Avid Xpress® - Release 4.5 Release Notes
97
1 a Important Information Avid recommends that you read all the information in these release notes thoroughly before installing or using any new software release. The documentation describes the features and hardware of all models. Therefore, your system might not contain certain features and hardware that are covered in this documentation. If you are an Avid Unity ™ MediaNet customer running Release 1.2, you cannot install this software until you upgrade to Avid Unity MediaNet Release 2.0. c Mac ® OS 9.1 is supported for this release. Verify the version of the Mac OS before installing Avid Xpress. For more information, see “Using the Macintosh Operating System” on page 20. c Avid Xpress application requires 256 MB of built-in RAM (random-access memory). Your system must have the required amount of RAM before you install Avid Xpress. New memory kits are available from Avid for updating your existing RAM configuration. For details, contact your Avid sales representative. Avid Xpress ® Release 4.5 Release Notes for the Macintosh ® Operating System
-
Upload
khangminh22 -
Category
Documents
-
view
0 -
download
0
Transcript of Avid Xpress® - Release 4.5 Release Notes

1
a
Important Information
Avid recommends that you read all the information in these release notes thoroughly before installing or using any new software release.
The documentation describes the features and hardware of all models. Therefore, your system might not contain certain features and hardware that are covered in this documentation.
If you are an Avid Unity™ MediaNet customer running Release 1.2, you cannot install this software until you upgrade to Avid Unity MediaNet Release 2.0.
c Mac® OS 9.1 is supported for this release. Verify the version of the Mac OS before installing Avid Xpress. For more information, see “Using the Macintosh Operating System” on page 20.
c Avid Xpress application requires 256 MB of built-in RAM (random-access memory). Your system must have the required amount of RAM before you install Avid Xpress. New memory kits are available from Avid for updating your existing RAM configuration. For details, contact your Avid sales representative.
Avid Xpress®
Release 4.5 Release Notesfor the Macintosh® Operating System

2
Contents
Symbols and Conventions . . . . . . . . . . . . . . . . . . . . . . . . . . . . . . . . . . . . 4New Features in Release 4.5 . . . . . . . . . . . . . . . . . . . . . . . . . . . . . . . . . . . 5Installation Check List . . . . . . . . . . . . . . . . . . . . . . . . . . . . . . . . . . . . . . . 5Accessing the Knowledge Center for Information . . . . . . . . . . . . . . . 7Hardware and Software Requirements . . . . . . . . . . . . . . . . . . . . . . . . . 9
Qualified Platforms for Release 4.5 . . . . . . . . . . . . . . . . . . . . . . . . . 9Built-in RAM . . . . . . . . . . . . . . . . . . . . . . . . . . . . . . . . . . . . . . . . . . . 10Changing the Memory Allocated to the Application. . . . . . . . . 13Troubleshooting Memory Allocation Problems . . . . . . . . . . . . . 14Required Extensions. . . . . . . . . . . . . . . . . . . . . . . . . . . . . . . . . . . . . 15PCI Board Revision History . . . . . . . . . . . . . . . . . . . . . . . . . . . . . . 17Using Avid System Test Pro . . . . . . . . . . . . . . . . . . . . . . . . . . . . . . 19
Using the Macintosh Operating System . . . . . . . . . . . . . . . . . . . . . . . 20Verifying the Macintosh Operating System Version . . . . . . . . . 20Obtaining the Macintosh Operating System. . . . . . . . . . . . . . . . 21Guidelines for Installing the Macintosh Operating System . . 21Guidelines for Using Mac OS 9.x . . . . . . . . . . . . . . . . . . . . . . . . . 22Choosing the Avid Drive and Restarting . . . . . . . . . . . . . . . . . . . 25
Installing Software Drivers . . . . . . . . . . . . . . . . . . . . . . . . . . . . . . . . . . 25USB-to-MIDI Software Installation . . . . . . . . . . . . . . . . . . . . . . . 27
Installing or Upgrading the Software . . . . . . . . . . . . . . . . . . . . . . . . . 31Checking Virtual Memory and Cache Size . . . . . . . . . . . . . . . . . 31Disabling Hard Disk Sleep Mode . . . . . . . . . . . . . . . . . . . . . . . . . 31Preliminary Information . . . . . . . . . . . . . . . . . . . . . . . . . . . . . . . . . 32Installation Procedure . . . . . . . . . . . . . . . . . . . . . . . . . . . . . . . . . . . 32Custom Installations. . . . . . . . . . . . . . . . . . . . . . . . . . . . . . . . . . . . . 36Installing Additional Avid Applications . . . . . . . . . . . . . . . . . . . 38Updating Your Avid Display Controller. . . . . . . . . . . . . . . . . . . . 39Running the Updater for the SCSI Board . . . . . . . . . . . . . . . . . . 40

3
Updating the Video I/O Firmware . . . . . . . . . . . . . . . . . . . . . . . . . 42Updating Your Application Key (Dongle) . . . . . . . . . . . . . . . . . . 44Test Patterns . . . . . . . . . . . . . . . . . . . . . . . . . . . . . . . . . . . . . . . . . . . . 44
Software Utilities . . . . . . . . . . . . . . . . . . . . . . . . . . . . . . . . . . . . . . . . . . . 45Special Notes . . . . . . . . . . . . . . . . . . . . . . . . . . . . . . . . . . . . . . . . . . . . . . . 47
Warning Regarding Your Application Key . . . . . . . . . . . . . . . . . 47About the Two-Button Mouse . . . . . . . . . . . . . . . . . . . . . . . . . . . . 47
USB Mouse Not Responding . . . . . . . . . . . . . . . . . . . . . . . . . . . . . 47MediaDock LVD . . . . . . . . . . . . . . . . . . . . . . . . . . . . . . . . . . . . . . . . 48Optimize for Batch Speed Option . . . . . . . . . . . . . . . . . . . . . . . . . 48Using Help . . . . . . . . . . . . . . . . . . . . . . . . . . . . . . . . . . . . . . . . . . . . . 49AVX Plug-ins and Memory . . . . . . . . . . . . . . . . . . . . . . . . . . . . . . . 49Importing QuickTime Files Created with an Avid Codec . . . . 50Recording with a TAO Media Systems Device . . . . . . . . . . . . . . 50Fibre Channel Configurations . . . . . . . . . . . . . . . . . . . . . . . . . . . . 51Using FilmScribe or EDL Manager . . . . . . . . . . . . . . . . . . . . . . . . 52Media Cleaner EZ, Media Cleaner Pro, and Cleaner 5.0 . . . . . . 52New File Name Extension for PICT Files. . . . . . . . . . . . . . . . . . . 52Setting Up the Edit Monitor . . . . . . . . . . . . . . . . . . . . . . . . . . . . . . 52Single Monitor Configuration . . . . . . . . . . . . . . . . . . . . . . . . . . . . 53
Documentation Changes. . . . . . . . . . . . . . . . . . . . . . . . . . . . . . . . . . . . . 53Preserving Vertical Blanking Information on Systems
with 3D Hardware . . . . . . . . . . . . . . . . . . . . . . . . . . . . . . . . . . . . . 53Filtering Based on Resolution . . . . . . . . . . . . . . . . . . . . . . . . . . . . 54Importing Audio from an Audio CD . . . . . . . . . . . . . . . . . . . . . . 54
G4 Slot Allocation . . . . . . . . . . . . . . . . . . . . . . . . . . . . . . . . . . . . . . . . . . 55Documentation Changes for Release 4.0 . . . . . . . . . . . . . . . . . . . . . . . 56
Changing the Sample Rate . . . . . . . . . . . . . . . . . . . . . . . . . . . . . . . 56Monitoring Previously Recorded Tracks While Recording
a Voice-Over Narration . . . . . . . . . . . . . . . . . . . . . . . . . . . . . . . . . 57Digitize Settings . . . . . . . . . . . . . . . . . . . . . . . . . . . . . . . . . . . . . . . . 57
4
Hardware and Software Limitations . . . . . . . . . . . . . . . . . . . . . . . . . . 59Limitation When Using Consumer Decks or Decks
Without Time-Base Correctors . . . . . . . . . . . . . . . . . . . . . . . . . . 59Avid/Mezzo Archiver . . . . . . . . . . . . . . . . . . . . . . . . . . . . . . . . . . . . 60Unrendered 3D Effects with Drop Shadow . . . . . . . . . . . . . . . . . 60
Known Bugs . . . . . . . . . . . . . . . . . . . . . . . . . . . . . . . . . . . . . . . . . . . . . . . 61Technical Support Information . . . . . . . . . . . . . . . . . . . . . . . . . . . . . . . 94
Symbols and Conventions
These release notes use the following special symbols and conventions:
In this document, Avid drive refers to the Macintosh system’s internal hard drive. Apple® Computer, Inc. names the internal hard drive Macintosh HD. Depending on your system’s setup, the internal hard drive might have a different name.
n A note provides important related information, reminders, recommendations, and strong suggestions.
c A caution means that a specific action you take could cause harm to your computer or cause you to lose data.

5
New Features in Release 4.5
For a description of the new features for Release 4.5, see the document Avid Xpress What’s New for Release 4.5.
Installation Check List
This check list covers the major steps required to install the Avid Xpress application.
1. Read these release notes completely.
2. Check the configuration of the Universal Serial Bus (USB) devices; see the Avid Composer Products Setup Guide for the Macintosh Operating System, which shipped with your Avid system.
3. Turn on the system components as described in the Avid Composer Products Setup Guide for the Macintosh Operating System.
4. Ensure the USB hub is turned on, if available.
5. Update the Avid application key, if necessary; see “Updating Your Application Key (Dongle)” on page 44.
6. Verify the version of the Macintosh operating system; see “Verifying the Macintosh Operating System Version” on page 20.
7. Check with your Avid Reseller to see if the Avid Xpress software is preinstalled.
8. For deck control and other peripheral devices, install any software drivers for the USB devices connected to the Avid system; see “Installing Software Drivers” on page 25.
9. Check the size of virtual memory and cache; see “Checking Virtual Memory and Cache Size” on page 31.
10. Disable hard disk Sleep mode; see “Disabling Hard Disk Sleep Mode” on page 31.

6
11. Remove any previous release of Avid Xpress; see “Preliminary Information” on page 32.
12. Install Avid Xpress; see “Installation Procedure” on page 32.
13. Update the code on the SCSI board; see “Running the Updater for the SCSI Board” on page 40.
14. If you are upgrading an existing system to the new release, you must update the video I/O firmware; see “Updating the Video I/O Firmware” on page 42.
15. If you are upgrading from a release earlier than Avid Xpress Release 4.0, the audio calibration level of your hardware might not match the default value in Avid Xpress Release 4.5. For information on changing the Avid application’s default audio hardware calibration for analog 0 Volume Unit (VU), see the Help for your Avid application.
For more information about the application key, see “Updating Your Application Key (Dongle)” on page 44 and “Warning Regarding Your Application Key” on page 47.

7
Accessing the Knowledge Center for Information
The Avid Customer Support Knowledge Center provides additional information that is frequently updated.
n Some locations on the Knowledge Center require you to log in as a registered user, but you can access most of the information on the Knowledge Center without registering and logging in.
To access the Knowledge Center:
1. Go to www.avid.com.
2. Click Support.
3. Click Knowledge Center.
4. Choose your product from the pop-up menu at the upper right of the Web page.
You can access the following information from the Knowledge Center:
• Latest Supported Decks List
For a list of supported decks, search for “Supported Decks” in the Avid Customer Support Knowledge Center.
• Latest Drive Striping Configurations
When drive configurations are tested and when drives and software are released, the most up-to-date drive striping configurations are available in the Documentation tab of the Avid Customer Support Knowledge Center.
• List of Effects Available per Avid Product
For a list of the effects available with Avid products, click the Documentation tab for your Avid product and click Effects Tables. The Avid Xpress model and exact options you purchased determine which effects are available.

8
• Downloading Avid Codecs for QuickTime™
The Avid Codecs for your Avid system are included on the installation CD-ROM as part of the standard installation. If you need a codec for a different platform (Windows® or Macintosh), you can download it from the Downloads tab of the Avid Customer Support Knowledge Center. For more information, see the Avid Xpress User’s Guide or the Help.
• Compatibility with Avid Video-Based Editing Products
For a complete description of moving projects, media files, and graphics to and from Avid products, see the Avid Products Collaboration Guide, which is available on the Avid Xpress Online Publications CD-ROM. The most recent update of the Avid Products Collaboration Guide is available in the Documentation tab of the Avid Customer Support Knowledge Center.
• White Papers
To access white papers, click the Documentation tab for your Avid product and click White Papers.

9
Hardware and Software Requirements
The following sections provide information about hardware and software requirements for your Avid system.
Qualified Platforms for Release 4.5
Table 1 lists the supported Apple platforms along with the versions of Meridien™ hardware that each system supports.
c Other versions have not been tested and might cause problems.
Release 4.5 requires Mac OS 9.1. For more information, see “Verifying the Macintosh Operating System Version” on page 20.
Table 1 Qualified Platforms for Release 4.5
Power Macintosh® Processor Speed Meridien Support
G4 (Digital Audio)a 533 MHz Meridien II, III
G4 (AGP) 400 MHz, 450 MHz, 500 MHz
Meridien I, II, III
G4 (PCI) 350 MHz, 400 MHz Meridien I, II, III
a. The G4 (Digital Audio) system has four PCI slots and one AGP slot.

10
Built-in RAM
Built-in RAM refers to the physical random-access memory installed in your Macintosh system. Avid Xpress Release 4.5 systems require 256 MB of built-in RAM.
Memory requirements vary, depending on your workflow and what applications you are running. Table 2 shows the minimum preferred memory for Avid Xpress along with other applications. Use this information as a guideline when determining your memory requirements.
When adding memory to your system, make sure the memory meets Apple’s specifications. For a detailed description of the RAM requirements for a particular Macintosh computer, see Apple’s specification database Web page:
http://www.info.apple.com/applespec/applespec.taf
n Apple 4.1.7 and 4.1.8 firmware updates verify whether the installed memory is compatible with Apple’s specifications. The memory test disables memory DIMMs that don’t comply with the specifications and DIMMs that cannot be determined to be compatible. As a result, some third-party memory that was recognized by previous versions of firmware might not be recognized after applying Apple 4.1.7 and 4.1.8 firmware updates.
Memory kits are available from Avid for updating your existing RAM configurations. For details, contact your Avid sales representative.

11
For information about supported RAM configurations, see “Supported RAM Configurations” on page 12.
Table 2 Minimum Preferred RAM Requirements
Installed Application Preferred Size
Mac OS 9.1a 66 MB
Avid Xpress 176 MB
Internet Explorer (Help System) 8 MB
Digidesign® Audio Engine (DAE ™)(for AudioSuite™ plug-ins)b
30 MB
AVX™ plug-ins 20 MB
EDL Manager 15 MB
FilmScribe™ 43 MB
Media Cleaner® EZ 4.0 31 MB
Media Cleaner Pro 4.0 31 MB
Cleaner 5.0 43 MB
a. Operating system memory allocation varies, depending on the applications you are running.
b. Your system is installed with DAE. If you do not plan to use AudioSuite plug-ins, you can disable DAE and use its memory allotment for another application.

12
Supported RAM Configurations
Avid recommends installing the same size and speed RAM from the same manufacturer in paired slots in all Power Macintosh CPUs.
For a detailed description of the RAM requirements for a particular Macintosh computer, see Apple’s specification database Web page:
http://www.info.apple.com/applespec/applespec.taf
Table 3 list the supported RAM configurations.
Table 3 Supported Macintosh G4 RAM Configurations
Power Macintosh CPU G4 (Digital Audio)
Power Macintosh CPU G4 (PCI and AGP)
Type PC133 SDRAM DIMM 168-pin, 8-ns PC-100 SDRAM
Banks 4 4
Modules/Bank 1 1
Built-in RAM 0 0
Standard 256 MB 256 MB
Largest DIMM Size 512 MB 512 MB (AGP), 256 MB (PCI)
FPM NAa NAa
EDO No No
Mix FPM and EDO No No
Parity Nonparity NAa
Interleaving No No
a. NA = Not applicable

13
Changing the Memory Allocated to the Application
When you install Avid Xpress, the “Minimum” default memory setting for the application is 76,171 KB. The “Preferred” default memory setting for the application is 176,171 KB.
You might need to increase the preferred size if you are working on large projects.
If you increase the amount of memory allocated to the application, leave enough memory to run the Macintosh operating system and other applications, such as Help (through Internet Explorer) and EDL Manager. The operating system’s need for memory is dynamic; therefore, the operating system might require more memory when running certain processes.
To change the amount of memory allocated to the application:
1. Click the application icon to highlight it.
2. Choose Get Info from the File menu.
The Avid Xpress Info window opens.
Preferred size
Minimum size
Close box
Show pop-up menu

14
3. Choose Memory from the Show pop-up menu.
The memory requirements appear.
4. Click the number in the Preferred Size text box.
5. Type the amount of memory you want to allocate to the Avid application.
n Do not set the preferred size to less than the minimum size.
6. Click the close box in the upper left corner to close the Avid Xpress Info window.
Troubleshooting Memory Allocation Problems
If you have problems starting or running the Avid application after adjusting the memory allocation, click the desktop and choose About This Computer from the Apple menu. About This Computer shows the total built-in memory installed in your system, how much memory the operating system currently is occupying, and the largest unused block. The following illustration shows an example on a Mac OS 9.1 system.
15
Depending upon the amount of free memory you have allocated to the Avid application, one of the following problems might occur when you start the application:
• A screen message warns you to close other applications to make more memory available. For more information on allocating memory to the application, see your Macintosh documentation.
• The application might not start and you might see an error message stating that the system was unable to load one of the required libraries. The error message indicates that not enough free memory is available to run the Avid application or that the required libraries are not installed in the system. For more information on allocating memory to the application, see your Macintosh documentation. The required libraries are installed when you install the Avid software, see “Installing or Upgrading the Software” on page 31.
Required Extensions
The extensions in this section must be installed on your Macintosh system for the Avid Xpress application to start.
The following files are installed automatically in the Extensions folder during the Full Install procedure:
• Pinnacle libraries (You need the Pinnacle libraries even if you do not have the 3D Effects option.)
- PGENIE.NDR
- SVI.CF
• PIM3.slib
• TrilliumUtilities
• Avid Codec
• AvidDriverInit
• DigiSystem_INIT
16
• ExpressRAID
• E3ITF
• USB Sentinel®
• Digidesign_DSP_Manager
• AVID_EDC2
• AVID_EDC4
• Avid Uncompressed G4
• Avid Compressed G4
If an extension is missing and you attempt to start the Avid application, an error message appears, stating that the required item is missing.
DigiSystem_INIT
The Avid system uses an extension called DigiSystem_INIT to process audio files. The installation software automatically installs the file in the Extensions folder inside the System folder. The installation software also installs a backup copy in the Backup System Files folder in the Utilities folder.
The Avid system requires a specific version of DigiSystem_INIT. The Avid system checks whether the correct version is present at startup. If the correct version is not present, the system displays a dialog box requesting that you locate and install the correct version.
The version for this release is 5.0.3.x13.
To check the version:
1. Select the file.
2. Choose Get Info from the File menu.

17
To install the correct version of the DigiSystem_INIT file:
1. Locate the System folder on your Avid drive.
2. Open the System folder.
3. Open the Extensions folder.
4. Locate the DigiSystem_INIT file.
5. Check the version:
a. Select the file.
b. Choose Get Info from the File menu.
The correct version for this release is 5.0.3.x13:
t If you do not have the correct version, delete or move the file to another folder.
t If there are multiple versions of the file, delete or move the extra versions.
6. Locate the Utilities folder on your Avid drive.
n On Mac OS 9.1, the Utilities folder is in the Applications (Mac OS 9) folder.
7. Open the Utilities folder, and open the Backup System Files folder.
8. Copy the DigiSystem_INIT file from the Backup System Files folder to your Extensions folder.
9. Restart the computer.
The system will use the new version of the DigiSystem_INIT file.
PCI Board Revision History
Table 4 lists the minimum revision levels of PCI boards required to run your Avid Xpress system on the Macintosh system. To determine board revision levels, use Avid System Test Pro. For more information, see the Avid System Test Pro Setup and User’s Guide or the Avid System Test Pro Help.

18
Table 4 PCI Board Minimum Revision Levels
PCI Board on a Power Macintosh G4 SystemMinimum Level for Release 4.5
Dual-channel SCSI LVD board (G4) D
UL3D board A
Keyspan SX Pro four-port serial board —
Meridien video I/O board E
Meridien serial digital video I/O board B
Meridien eight-channel audio interface board C
Meridien Genie 3D effects board A
Meridien 3D effects interface board C1
Meridien II 3D effects interface board (G4) A
Meridien III 3D effects interface board (G4) A
Meridien II 3D connector board (G4) A
Meridien 3D effects signal board A
Meridien 3D effects power board A
Meridien I digital media board C
Meridien II digital media board (G4) B
Fibre Channel FCE3210C controller board (standalone) A4
D
Fibre Channel FCE3210N controller board (standalone) A4
D

19
Using Avid System Test Pro
Avid System Test Pro, located in the Utilities folder, allows you to view a profile of the Avid system configuration and to test system boards. Avid System Test Pro displays information about the operating system, mounted volumes, system extensions, control panels, and peripheral boards. For information on using this test, see the Avid System Test Pro Setup and User’s Guide or the Avid System Test Pro Help.
You can see a visual representation of drive space in the Hardware tool (choose Hardware from the Tools menu). Use Avid System Test Pro to view all other system information.
n The Avid System Utility is no longer part of the utilities applications. Board functions that it performed are now performed by Avid System Test Pro.
Fibre Channel controller board (standalone) A2 E
Meridien I display controller board (single) B
Meridien II display controller board (single) A
Meridien III display controller board (single) A
Table 4 PCI Board Minimum Revision Levels (Continued)
PCI Board on a Power Macintosh G4 SystemMinimum Level for Release 4.5

20
Using the Macintosh Operating System
Release 4.5 of Avid Xpress requires Version 9.1 of the Macintosh operating system.
This section explains how to verify, obtain, and install the Macintosh operating system. It also provides information on how the Avid Xpress application interacts with the Macintosh operating system.
Verifying the Macintosh Operating System Version
To find out if you have the correct version of the Macintosh operating system:
t Choose About This Computer from the Apple menu.
Mac OS 9.1 should appear in the Version field as shown in Figure 1.
Figure 1 Mac OS 9.1 About This Computer Window

21
Obtaining the Macintosh Operating System
If you purchased a new Avid Xpress Release 4.5 system, you also received a separate Macintosh CD-ROM that contains the Macintosh operating system. If necessary, use the CD-ROM to load the Mac OS.
If you are upgrading to Release 4.5 of Avid Xpress, from a release earlier than Release 4.1, and the Macintosh system does not have Mac OS 9.1, purchase a Mac OS 9.1 CD-ROM from an Apple dealer.
c If you update the Mac OS, reinstall Release 4.5 of Avid Xpress after you finish the Mac OS update.
Guidelines for Installing the Macintosh Operating System
Use the following guidelines for installing a new Macintosh operating system:
• Check the internal hard drive and repair any problems by using DiskWarrior® Version 2.0 or Apple Disk First Aid™. To use DiskWarrior Version 2.0 on your internal hard drive, you must first start your system from the Macintosh CD-ROM. DiskWarrior will not check the internal hard drive if you are booting from it.
c Failure to repair any problems found on the internal hard drive could result in a corrupt installation.
• Start the Macintosh system from the Macintosh CD-ROM and perform a clean system software installation by following the instructions provided in the user guide supplied with the Macintosh system.
• Make sure the Destination Disk is the internal hard drive (usually named Avid).
n The internal hard drive might be named Macintosh HD.
22
• Run the AST Flasher Pro application. See “Updating Your Avid Display Controller” on page 39.
n The Avid system does not support Norton Utilities®.
n After you update your Macintosh OS software, you need to update the firmware on the Meridien display controller board. See “Updating Your Avid Display Controller” on page 39.
Guidelines for Using Mac OS 9.x
Several Mac OS 9.x features might interfere with your use of the Avid Xpress system. Avid recommends that you disable or customize the Mac OS 9.x features described in the following sections.
c Make sure your drive has sufficient space. Otherwise, the Macintosh system might crash if you export files.
Index Volumes
The Index Volumes feature lets you search for files on your hard drive by content. To do this, Sherlock2 indexes the contents of your drive. The indexing feature can interfere with Avid Xpress operations such as digitizing. Avid recommends you either disable indexing or schedule it for times when the Avid system will not be in use.
To adjust the indexing schedule:
1. Choose Sherlock2 from the Apple menu.
2. Choose Index Volumes from the Find menu.
The Index Volumes dialog box appears.

23
3. Do one of the following:
t Deselect the Use Schedule check box to disable indexing.
t Click Schedule and set a time for indexing when your Avid application is not being used.
4. Click the Close box to close the Index Volumes dialog box.
Software Update
Mac OS 9.x introduced a feature that enables you to update portions of your Macintosh operating system automatically over the Internet. Avid recommends disabling this feature because it might install software that has not yet been tested with your Avid software.
To disable Update Software Automatically feature:
1. Open the Software Update control panel in the Control Panels folder.
2. Deselect the Update Software Automatically check box.
3. Click the Close box to close the Software Update dialog box.
Customized Function Keys
Mac OS 9.x introduced a feature that lets you customize the keyboard function keys. However, if this feature is enabled, the function keys will not work properly in Avid Xpress if you have assigned Avid application commands to them. If you use the function keys to control Avid features, you should disable this feature.
To disable function keys:
1. Open the Keyboard control panel in your Control Panels folder.
2. Click the Function Keys button.
3. Deselect the “Use F1 through F15 as function keys” check box.
4. Click OK.

24
Multiple-Users Feature
If your Macintosh system is set up for multiple users, each user has an individual Startup Items folder. If you install the Avid application through the owner account, only the owner’s Startup folder will contain AVIDstartup. If a user logs in through a different account, the AVIDstartup application will not be started.
To solve this problem, copy the AVIDstartup application (or make an alias) to the user’s Startup Items folder. For example, if your user account is Smith:
1. Log in as owner.
2. Open the Users folder on your startup drive.
3. Open the Smith folder.
4. Copy the AVIDstartup application (or an alias) from the Startup Items folder in the System folder to the Startup Items folder in the Smith folder.
5. Log out and log in again as Smith.
The AVIDstartup application starts.
Keyspan SX Conflict
Avid supplies a USB-to-serial adapter with this release. If your Avid system contains a Keyspan SX Pro four-port serial board, you might receive the following error message when starting the Avid application:
SX Pro printer port is in use by another application and cannot be used by deck control
The error is caused by a conflict between the Keyspan SX Pro four-port serial board and the default setting in the Keyspan SX control panel.

25
To resolve the conflict:
1. Open the Keyspan SX Pro Manager in the Control Panels folder.
2. Click OK if you receive error messages.
3. Deselect the Emulate Printer Port check box for Port 1 (default setting).
4. Reboot your system.
Choosing the Avid Drive and Restarting
If you changed your startup disk to install the operating system, restart the Macintosh from the internal hard drive, using the following steps:
1. Choose Startup Disk from the Control Panels in the Apple menu.
2. Select the internal hard drive (usually the Avid drive).
n The internal hard drive might be named Macintosh HD.
3. Click Restart.
The system starts up from the Avid drive.
Installing Software Drivers
The software drivers for the serial board and USB devices ship separately from the Avid CD-ROM installer. If needed, you must install the serial board driver and USB device drivers before you install the Avid Xpress application.
n Starting with the G4 (Digital Audio) system, Macintosh systems have a USB serial adapter rather than a serial board. For instructions on installing the USB serial adapter, see the Avid Composer Products Setup Guide for the Macintosh Operating System.

26
Install the software drivers for the serial board and USB devices in the following order:
1. Serial board (Drivers are preinstalled by Avid or the Avid Reseller; reinstall only if you are rebuilding a system.)
2. USB-to-MIDI connector (if needed)
The MIDISPORT connector is necessary if you will be using one of the following devices to control audio gain automation on your Avid system:
• JL Cooper FaderMaster Pro™ MIDI automation controller
• JL Cooper MCS-3000X MIDI automation controller
• Yamaha® 01V digital mixing console
If you plan to use any of these devices on a system that is running Mac OS 9.1, you must install and configure the Open Music System (OMS®) Version 2.3.8 software. For installation instructions, see “USB-to-MIDI Software Installation” on page 27.
3. USB floppy drive
n The Avid Composer Products Setup Guide for the Macintosh Operating System indicates that you should connect the USB devices before installing the device drivers. When you turn on the Avid system, you might receive an informational message stating that the software is not loaded for a specific USB device. To eliminate these messages, install the required USB software drivers and restart the Avid system.
n If you want to install the Macally mouse software drivers, you must install Version 3.0 or higher to shuttle or scrub with the mouse.

27
USB-to-MIDI Software Installation
The Avid Composer Products Setup Guide for the Macintosh Operating System describes how to connect a fader controller to your Avid system. This section describes how to complete the connection by installing USB-to-MIDI software and configuring the software to recognize your fader controller.
n The term fader controller applies to the following controllers:
• JL Cooper FaderMaster Pro MIDI automation controller
• JL Cooper MCS-3000X MIDI automation controller
• Yamaha 01V digital mixing console
Avid supports the MIDIMAN MIDISport USB-to-MIDI converter. The Goodies folder on the Avid Xpress application CD-ROM includes installers for several OMS-related files. The following table shows the files and the installed location.
File Location
OMS (Open Music Software)
Avid:Opcode:OMS Applications
MIDISport OMS Driver Avid:System Folder:OMS Folder
n For Avid Xpress Release 4.5, the file name is “OMS MIDISport OMS Driver 106.” For later releases, see the release notes for your Avid product for the correct MIDISport OMS Driver file.
MIDISport extensions Avid:System Folder:Extensions
28
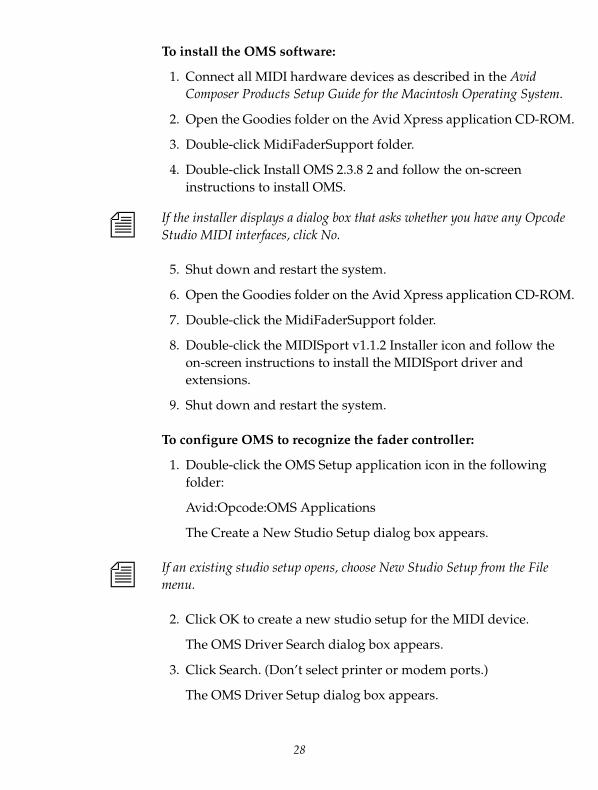
To install the OMS software:
1. Connect all MIDI hardware devices as described in the Avid Composer Products Setup Guide for the Macintosh Operating System.
2. Open the Goodies folder on the Avid Xpress application CD-ROM.
3. Double-click MidiFaderSupport folder.
4. Double-click Install OMS 2.3.8 2 and follow the on-screen instructions to install OMS.
n If the installer displays a dialog box that asks whether you have any Opcode Studio MIDI interfaces, click No.
5. Shut down and restart the system.
6. Open the Goodies folder on the Avid Xpress application CD-ROM.
7. Double-click the MidiFaderSupport folder.
8. Double-click the MIDISport v1.1.2 Installer icon and follow the on-screen instructions to install the MIDISport driver and extensions.
9. Shut down and restart the system.
To configure OMS to recognize the fader controller:
1. Double-click the OMS Setup application icon in the following folder:
Avid:Opcode:OMS Applications
The Create a New Studio Setup dialog box appears.
n If an existing studio setup opens, choose New Studio Setup from the File menu.
2. Click OK to create a new studio setup for the MIDI device.
The OMS Driver Search dialog box appears.
3. Click Search. (Don’t select printer or modem ports.)
The OMS Driver Setup dialog box appears.

29
4. Confirm that MIDISport appears in the list of devices.
If the MIDISport device does not appear in the list, check the cable connections for the USB-to-MIDI converter as described in the Avid Composer Products Setup Guide for the Macintosh Operating System.
5. Click OK to close the dialog box.
The OMS MIDI Device Setup dialog box appears.
6. Click OK to accept the new studio setup.
7. Save the studio setup with an appropriate file name in the OMS Applications folder.
Your newly named studio setup dialog box appears after you save the setup.
8. Select the MIDISport device in your studio setup (click the circle that looks like a MIDI connector).
9. Choose New Device from the Studio menu.
10. Choose the appropriate manufacturer (either Cooper or Yamaha) from the Manuf pop-up menu.
11. Choose either FaderMaster (for Cooper) or 01V (for Yamaha) from the Model pop-up menu.
n Use FaderMaster for either JL Cooper fader controller.
The system automatically selects the other settings in the dialog box.
12. Click OK to save your setup and close the dialog box.
13. To confirm that this studio setup is current, click the File menu. The menu item Save and Make Current should appear dimmed.
If it does not appear dimmed, then select it and save the studio setup with an appropriate file name in the OMS Applications folder.

30
14. Move the sliders on the fader controller and confirm that the MIDI IN LED indicator on the USB-to-MIDI converter turns on and off appropriately.
The USB LED indicator pulses — this is expected behavior.
15. Choose Preferences from the Edit menu and confirm that the following three options are deselected:
• When AppleTalk is on, ask about turning it off
• Turn AppleTalk back on when last OMS application quits
• Use Apple SerialDMA driver when available
16. Click OK.
17. Choose Save from the File menu.
18. Choose Quit from the File menu.
Now you are ready to use the fader controller with the Avid application software.
c To reduce traffic on the USB bus, connect the USB-to-MIDI converter only if you need to use the JL Cooper FaderMaster Pro, JL Cooper MCS-3000X, or Yamaha 01V fader box.

31
Installing or Upgrading the Software
You can install Avid Xpress Release 4.5 and EDL Manager Release 10.5 software on a Power Macintosh G4 system that has Meridien hardware, or you can upgrade from a system running Avid Xpress Release 3.1.3 or later. For a list of supported systems, see “Qualified Platforms for Release 4.5” on page 9.
Checking Virtual Memory and Cache Size
Before you install the Avid application, check virtual memory and cache size. You must turn off virtual memory and set the cache size to run the Avid application.
To turn off virtual memory and to set the cache size:
1. Choose the Memory Control Panels from the Apple menu.
2. Set the Cache Size to 128K.
3. Select Off for virtual memory.
4. Close the window.
5. Restart your Macintosh.
Disabling Hard Disk Sleep Mode
Before you install the Avid application, disable hard disk Sleep mode. The Macintosh operating system has an Energy Saver control panel that can put your system, display, or hard drives into Sleep mode when you don’t use them for a designated period of time. If the internal hard drive goes into Sleep mode while your Avid system is running, the system might hang or crash.
To disable the hard disk Sleep mode on your Avid system:
t Choose Energy Saver from the Control Panels list, and set the option “Put the system to sleep when it’s inactive for” to Never.
32
Preliminary Information
Verify that the version of the Macintosh operating system is a supported version; see “Verifying the Macintosh Operating System Version” on page 20. New systems ship with the current version of the Macintosh operating system installed, but you should still verify that you have the current version.
c These installation instructions require you to remove any earlier release of Avid Xpress software. You can save the old release of the software by renaming the folder on the Avid drive that contains the application. This also saves the old Settings and SupportingFiles folders.
n If you have problems installing the software when using these instructions, try turning off any virus-checking extensions or other system-monitoring software running on your Avid system. Use the Extensions Manager to turn off these applications, and then repeat the installation process.
After installing the software, use the Extensions Manager to turn on any virus-checking extension or other system-monitoring software that runs on your Avid system, and restart the system.
Installation Procedure
Before you install Avid Xpress and EDL Manager, make sure the software for the USB devices and serial board is installed. See “Installing Software Drivers” on page 25.
To install Avid Xpress:
1. Restart your Macintosh system.
2. Quit any applications that open automatically at startup.
3. Insert the Avid Xpress Release 4.5 application CD-ROM.

33
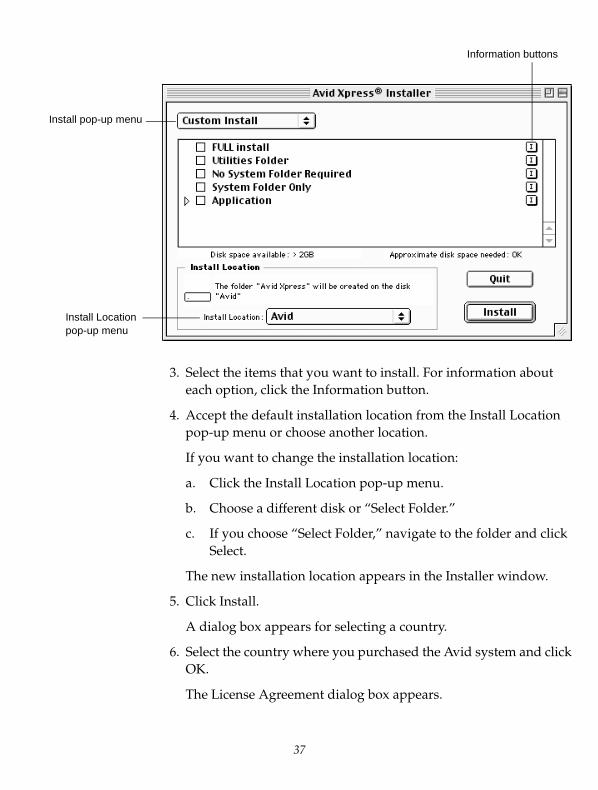
4. Double-click the Avid Xpress Installer icon.
n If you want to install other applications, open the Other Installers folder and double-click the installer icon for the application you want to install.
A splash screen introduces the Installer.
5. Click Continue.
The Avid Xpress Installer window opens.
The Install pop-up menu contains the following choices:
• Full Install
• Custom Install
• Uninstall
If you want to perform a custom installation, see “Custom Installations” on page 36.
Install pop-up menu
Install Location pop-up menu

34
6. If your system has an earlier version of Avid Xpress, do the following:
a. Choose Uninstall from the Install pop-up menu.
The Install button changes to the Uninstall button.
b. Click the Uninstall button.
A message appears, warning you that other applications can not be running during this operation.
c. Click Continue to automatically quit open applications.
The removal process begins. At the end of the process a message box appears, telling you that the application was uninstalled, but that some files or folders could not be deleted.
d. Click OK.
e. Open the Avid drive, and navigate to the Avid Xpress folder (usually located at the top level of the Avid drive).
f. Open the Avid Xpress folder and delete any remaining application files, except any personally created data files, such as those in the Avid Projects folder or the Avid Users folder.
g. Return to the Avid Xpress Installer window.
7. Choose Full Install from the Install pop-up menu.
The Installer window shows the components that will be installed.
8. Accept the default installation location from the Install Location pop-up menu or choose another location.
If you want to change the installation location:
a. Click the Install Location pop-up menu.
b. Choose a different disk drive or “Select Folder.”
c. If you choose “Select Folder,” navigate to the folder and click Select.
The new installation location appears in the Installer window.

35
9. Click Install.
A dialog box appears for selecting a country.
10. Select the country where you purchased the Avid system and click OK.
The License Agreement dialog box appears.
11. Click Yes after you read the Software License Agreement. You must scroll to the bottom of the Software License Agreement to activate the Yes button.
The installation begins.
A message appears, asking if you will be installing the Avid Unity™ TransferManager client.
12. Click Install, if you will be installing the TransferManager client.
n If you choose to install, you might notice a slight pause when starting your application. This is expected behavior.
The installation program runs several installers, including a QuickTime 4.0 installer. If the QuickTime installer encounters a newer version of QuickTime on the system it displays the following message:
A newer version of QuickTime is installed. To run this installer first you must uninstall, then rerun this installer.
This release of Avid Xpress supports QuickTime 4.0 and QuickTime 5.0.
13. Click Continue, if the system displays the previous message.
The installer will leave the newer version of QuickTime intact and the Avid installation will continue.
When the installation is complete, a message appears, asking if you want to restart the system or to perform additional installations.
14. Click Restart.

36
n If the Avid system contains a DAE folder before you begin the installation, the installer renames the folder to DAE Folder_saved. After the installation is complete, you can move the plug-ins from the DAE Folder_saved to the new DAE folder. Make sure the version of the plug-in meets the requirements for this release of Avid Xpress.
Custom Installations
You can perform a custom installation to install particular files from the installation CD-ROM. Use the Custom Install option primarily to replace lost or corrupted files.
c If you install “Utilities Folder” or “System Folder Only,” some parts of the application might not work properly because they need libraries that are included as part of the complete installation.
To perform a custom installation:
1. Open the Avid Xpress Installer window by following the steps in “Installation Procedure” on page 32.
2. Choose Custom Install from the Install pop-up menu.
The window displays items that can be installed individually.
37
3. Select the items that you want to install. For information about each option, click the Information button.
4. Accept the default installation location from the Install Location pop-up menu or choose another location.
If you want to change the installation location:
a. Click the Install Location pop-up menu.
b. Choose a different disk or “Select Folder.”
c. If you choose “Select Folder,” navigate to the folder and click Select.
The new installation location appears in the Installer window.
5. Click Install.
A dialog box appears for selecting a country.
6. Select the country where you purchased the Avid system and click OK.
The License Agreement dialog box appears.
Install pop-up menu
Information buttons
Install Location pop-up menu

38
7. Click Yes after you read the Software License Agreement. You must scroll to the bottom of the Software License Agreement to activate the Yes button.
A message appears, warning you that other applications cannot be running during the installation.
8. Click Continue to automatically quit open applications.
When the installation is complete, a message appears, asking you if you want to restart the system or to perform additional installations.
9. Click Restart.
Installing Additional Avid Applications
You can install additional Avid applications that are located in the Other Installers folder on the Avid Xpress application CD-ROM.
The applications available are:
• Avid Log Exchange
• FilmScribe
• MediaLog™
• EDL Manager
To install any of these applications:
1. Restart your Macintosh system.
2. Quit any applications that open automatically at startup.
3. Insert the Avid Xpress Release 4.5 application CD-ROM.
4. Double-click the Other Installers folder.
5. Double-click the application’s Installer icon.
A splash screen introduces the Installer.

39
6. Continue the installation procedure as described in “Installation Procedure” on page 32.
Updating Your Avid Display Controller
If you are updating your Macintosh system to Macintosh OS 9.1, you need to run ASTFlasher Pro to update the firmware on the Meridien display controller board.
To run ASTFlasher Pro:
1. Navigate to the AvidSystemTest folder in the Utilities folder on your Avid drive. The location differs depending on your version of the Mac OS as follows:
• For Mac OS 9.0.4:
Avid:Utilities:AvidSystemTest
• For Mac OS 9.1:
Avid:Applications (Mac OS 9):Utilities:AvidSystemTest
2. Double-click ASTFlasher Pro to run the updater.
n ASTFlasher Pro will update any Avid display controller. Earlier versions of this updater only updated the Meridien I display controller board.
n There is one problem with the ASTFlasher Pro application. If it detects that the controller is already up to date, the tool still displays an update message. If you click update at this point, the tool will do nothing. If this happens, click Cancel to quit the application.

40
Running the Updater for the SCSI Board
In most cases, after you load the Avid application software, you must update the code in the SCSI board. The Avid installers load the new code on the system but cannot run the software to load the code into the board.
n The software to load the code is specific to the type of SCSI board, so the following procedure shows how to determine the type of SCSI board in the system.
To run the updater for the SCSI board:
1. Open the Utilities folder in the system drive (usually named Avid).
n On Mac OS 9.1, the Utilities folder is in the Applications (Mac OS 9) folder.
2. Open the StorEx folder.
3. Determine the type of SCSI board you have in the system by running the StorEx program to scan the SCSI bus:
a. Double-click the StorEx icon.
b. Click OK in the first two dialog boxes.
The Main window opens and the program scans the SCSI bus.
4. Determine if you have a UL2D SCSI board or a UL3D SCSI board by looking at the data returned by the scan.

41
c If your board is UL2D and your system is a beige G3, do not upgrade the UL2D firmware or system hangs will result. Code revision 1.45 is the latest supported version for UL2D on the beige G3.
5. Close the Main window.
6. Navigate up one level to the Utilities folder, and double-click the updater that matches the SCSI board in your system:
• ExpressPCI_UL2D_Updater
• ExpressPCI_UL3D_Updater
The ExpressPCI_ULxD_Updater.out window opens for the selected updater.
7. Make sure the default option of (1) is selected, and press Return.
The code will be updated. The updating might take a minute.
8. When the update is complete, press Command+Q.
9. Restart the system so that the code becomes functional.
c When you restart the system, AVIDstartup runs and might cause the system to automatically restart a second time. This is expected behavior, and the system will be fine after the second restart.
Close box
Board type UL2D or UL3D

42
Updating the Video I/O Firmware
The information in this section only applies to customers that are upgrading their existing systems to this new software release.
After you install the new Avid software as described in these release notes, you need to run the VideoIOUtil program to update the Video I/O firmware.
n Even if you don’t have an SDI board, you should still update the rest of the Video I/O firmware.
Correcting SDI Firmware Revision 22 Problems
Media Composer® and Film Composer® Release 10.0, and Avid Xpress Release 4.0 contained Revision 22 of the SDI firmware. Revision 22 caused the system to hang or crash if you selected the SDI input as a sync in the software application and there was no actual sync attached to the input of the SDI board. Installing Revision 23 of the firmware fixes this problem. You must connect a cable to perform the update as described in step 3 of the following procedure.
n The installation of the new SDI revision takes approximately 20 minutes. Make sure you have that amount of time available before you start the installation.
To update the Video I/O firmware:
1. Install the new Avid software as described in “Installing or Upgrading the Software” on page 31.
2. Quit the Avid software application if it is running.
3. Connect a cable between the input of the SDI board and the output of the SDI board.
c If you don’t perform this step, the system will crash or hang due to the problem with Revision 22 of the firmware.

43
4. On the Avid drive, open the Utilities folder, open the AvidSystemTest folder, and double-click VideoIOUtil.
The Avid Video I/O Utility window opens.
5. Click the Video I/O Hardware Updater button.
The Video I/O Hardware Update window opens.
The Available Download Rev text boxes display the versions of the firmware that were installed with the new Avid software. The following revisions should be displayed:
• uCode = be
• FPGA = H2 (F8 for Falcon 1 boards)
• SDI-ISP = 23
6. If the firmware needs updating, select all of the available Update Indicator check boxes under the columns labeled uCode, FPGA, and SDI-ISP.
7. Click Update.
The system updates the code. If you update the SDI-ISP code, the updating takes approximately 20 minutes.
8. In the Avid Video I/O Utility window, click Quit.
9. Turn the Meridien I/O box off, then on, to enable the new code.
For more information, see the Avid Video I/O Utility Help.
c Do not interrupt the update process. If the process is interrupted, your system might not operate properly.

44
Updating Your Application Key (Dongle)
c Protect your application key from loss or theft; your Avid software does not function without it, and acquiring a new key from Avid involves a fee.
There are two different programs to update dongles:
• Dongle versioner: A software program created to update many Avid systems; normally included in a software Maintenance Kit
• Dongle updater: A software program created to update a specific Avid system
The following describes what you should do to update your dongle for this release:
• If you received a dongle versioner floppy disk with a Version Protection Kit or Maintenance Kit, then you will need to use this floppy disk to update the dongle before installing the new software.
• If you purchased this version as an upgrade, you have received a unique dongle updater floppy disk that reflects a specific System ID. You will need to use this floppy disk to update the dongle before installing the new software.
The floppy disk includes instructions for running the dongle versioner or updater.
For more information about the application key, see “Warning Regarding Your Application Key” on page 47.
Test Patterns
Test patterns are no longer located in the Goodies folder. They are now located in the SupportingFiles folder and should be imported with 601 video levels.

45
Software Utilities
Table 5 lists software utilities, current revision levels, and the folders where the utilities are located.
n On Mac OS 9.1, the Utilities folder is in the Applications (Mac OS 9) folder.
Table 5 Software Utilities Revisions
Software Version Installed Folder Location
ASTFlasher Pro 3.1.1 Utilities:AvidSystemTest
AVIDdrive™ Utility 2 2.6 Utilities
Avid Log Exchange 3.3 Utilities:ALE
AVIDstartup 3.4 Utilities:Backup System Files
System Folder:Startup Items
Avid System Test Pro 3.1.1 Utilities:AvidSystemTest
Avid Codec (extension) 9.3 Utilities:Backup System Files
System Folder:Extensions
Avid Compressed G4 9.4.1 (G4) Utilities:Backup System Files
System Folder:Extensions
Avid Uncompressed G4 9.4 (G4) Utilities:Backup System Files
System Folder:Extensions
AvidDriverInit 1.0.2 Utilities:Backup System Files
System Folder:Extensions
Avid Fibre Driver 3.0.1 Utilities:JNI
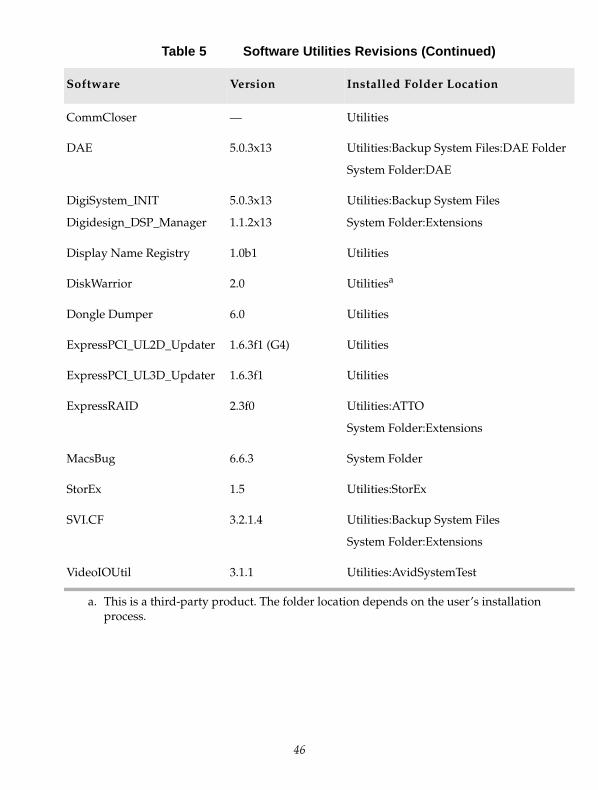
46
CommCloser — Utilities
DAE 5.0.3x13 Utilities:Backup System Files:DAE Folder
System Folder:DAE
DigiSystem_INIT
Digidesign_DSP_Manager
5.0.3x13
1.1.2x13
Utilities:Backup System Files
System Folder:Extensions
Display Name Registry 1.0b1 Utilities
DiskWarrior 2.0 Utilitiesa
Dongle Dumper 6.0 Utilities
ExpressPCI_UL2D_Updater 1.6.3f1 (G4) Utilities
ExpressPCI_UL3D_Updater 1.6.3f1 Utilities
ExpressRAID 2.3f0 Utilities:ATTO
System Folder:Extensions
MacsBug 6.6.3 System Folder
StorEx 1.5 Utilities:StorEx
SVI.CF 3.2.1.4 Utilities:Backup System Files
System Folder:Extensions
VideoIOUtil 3.1.1 Utilities:AvidSystemTest
a. This is a third-party product. The folder location depends on the user’s installation process.
Table 5 Software Utilities Revisions (Continued)
Software Version Installed Folder Location

47
Special Notes
This section contains important information about system-level changes that affect the way your Avid software and hardware operate.
Warning Regarding Your Application Key
The application key, commonly referred to as a dongle, allows your Avid application to operate. Protect your application key from loss or theft; your Avid system cannot function without it, and acquiring a new key from Avid involves a fee.
For information about installing the application key, see the Avid Composer Products Setup Guide for the Macintosh Operating System.
About the Two-Button Mouse
Your Avid system ships with a two-button USB mouse. This release does not support the right mouse button.
n Only Macally software drivers Version 3.0 or later support shuttling and scrubbing with the mouse.
USB Mouse Not Responding
If your Avid system is not used for a period of time (approximately 1 hour), the mouse might not respond when you move it. If this happens, disconnect the mouse cable from the keyboard and then reconnect it.
n You can perform this procedure with the Avid application open and the Macintosh system turned on.

48
MediaDock LVD
In its default configuration, the MediaDock™ LVD with MediaDock 160/LVD shuttle packs must run alone on the Ultra 160 LVD SCSI controller board SCSI bus. If you connect a standard MediaDock LVD to an Ultra 160 LVD SCSI controller board and populate the chassis with any MediaDock 160/LVD shuttle packs, do not daisy chain the MediaDock LVD with any other SCSI devices. If your configuration requires daisy chaining under these conditions, you must order and install the Avid MediaDock SCSI Repeater Module (PN 0010-04633-01). This limitation does not exist if you are using the UL2D LVD SCSI controller board.
Optimize for Batch Speed Option
When you select the Optimize for Batch Speed option in the Batch tab of the Digitize Settings dialog box, the system speeds up batch digitizing by allowing the deck to continue to roll forward between adjoining clips. For more information, see the Avid Xpress User’s Guide or the Help.
For this release, this option digitizes without preroll only if the tracks to be digitized for each clip are the same. For example, if one clip has a video track only, and the other has a video track and two audio tracks, and the system is set up to digitize both audio and video tracks, the system must preroll between them. However, if the system is set up to digitize only video (that is, only the track selector for video is on, the selectors for audio are off, and the “digitize tracks selected” setting is on), the system can digitize without prerolling for the second clip.

49
Using Help
The Help system for this release requires Internet Explorer Version 4.5 or later. Avid recommends using Internet Explorer Version 5.0.
The Help system automatically starts through Internet Explorer. If Internet Explorer is not on your system, a message warns you that using a different browser might cause system problems.
n If there is not enough free memory on your Macintosh system, the search function of Help might not work. See “Built-in RAM” on page 10 and “Changing the Memory Allocated to the Application” on page 13.
For information on using Help, click the Using Help button in the Help browser window.
AVX Plug-ins and Memory
Multiple AVX plug-ins that you have applied to a sequence are now kept resident in memory at the same time. When you close a bin containing the sequence, the plug-ins are also closed, freeing the memory. If you find your Avid system running out of memory and you are using many plug-ins:
1. Choose Console from the Tools menu.
2. Type the command closeallavxplugins in the Console window.
3. Press Return.
This command closes all currently opened plug-ins. They will automatically open again when needed.
50
Importing QuickTime Files Created with an Avid Codec
If you are importing a QuickTime file created with an Avid codec, and the file’s resolution does not match the current import setting, a dialog box appears by default. This dialog box asks which resolution you want to choose, and to which files you want to apply your choice. Make your choices, and click OK to continue with the import.
You can choose how to import these files in the OMFI tab of the Import Settings dialog box. The default choice is “Ask me to set the resolution for each file that is different from the current import resolution setting.”
Recording with a TAO Media Systems Device
Avid Xpress allows you to load a new machine template and use the LPort422™ to control devices that use the Control-L protocol, including many DV and Hi8™ camcorders and VCRs.
The machine template for use with the LPort442 has not been fully tested at this time and is not supported by Avid.
For more information on the LPort422, see the TAO Media Systems Web site:
http://www.taosys.com
To acquire the latest machine template for use with the device, contact Avid Customer Support.

51
Fibre Channel Configurations
If your Avid system is configured with a Fibre Channel board and the Avid Fibre Channel driver is enabled, make sure:
• There are drives connected to the Fibre Channel board and they are turned on.
• The connection is on for Avid Unity MediaNet configurations.
The Fibre Channel driver searches for drives. If none are connected to the Fibre Channel board or if the Avid Unity MediaNet connection is off, the performance of Avid Xpress is affected.
Disable the Fibre Channel driver if no drives are connected to the Fibre Channel board or if the Avid Unity MediaNet connection is off:
1. Quit Avid Xpress.
2. Choose Extensions Manager from the Control Panels in the Apple menu.
The Extensions Manager window opens.
3. Click Duplicate Set to Duplicate the current set of extensions.
4. Type a name in the “Name duplicate set” text box.
5. Deselect Avid Fibre Channel Driver on the duplicated set of extensions.
6. Restart the Macintosh.
n For information on striping Fibre Channel drives, see “Accessing the Knowledge Center for Information” on page 7.

52
Using FilmScribe or EDL Manager
If your Avid system includes FilmScribe or EDL Manager, and your projects contain complex sequences or large bins, you might need to increase the minimum memory size for FilmScribe or EDL Manager. For information about changing the memory size, see “Changing the Memory Allocated to the Application” on page 13.
Media Cleaner EZ, Media Cleaner Pro, and Cleaner 5.0
Your Avid system ships with Terran’s Media Cleaner EZ. This release supports the following versions of Terran products:
• Media Cleaner EZ 4.0
• Media Cleaner Pro 4.0
• Cleaner 5.0
New File Name Extension for PICT Files
The default file name extension for PICT files has changed from .pic to .pct for exporting PICT files to third-party applications that require the .pct file name extension.
Setting Up the Edit Monitor
Make sure the color depth for the Edit monitor is set to Millions. For a procedure on setting up the Edit monitor, see the Avid Composer Products Setup Guide for the Macintosh Operating System.

53
Single Monitor Configuration
When the Avid system is configured with a single monitor, you must remove the unused AGP graphics board from the Apple G4 (533 MHz) system. Otherwise, the Apple G4 system mistakenly identifies the system as a two-monitor system.
Documentation Changes
The information in this section is not included in the Avid Xpress documentation.
Preserving Vertical Blanking Information on Systems with 3D Hardware
The information in the Avid Xpress What’s New for Release 4.5 is incomplete regarding preserving vertical blanking information on systems with 3D hardware. The following paragraph describes the problem.
When 3D effects are enabled, the system automatically blanks the vertical blanking information on a sequence regardless of whether 3D effects are present. To work around this problem, you can render your 3D effects and wipe in the vertical blanking information from the original clip as described in the “Using a Partial Wipe Operation to Insert or Delete Vertical Blanking Information” section. In this case, you need to disable the 3D effects hardware before creating your final digital cut.

54
Filtering Based on Resolution
The Filter Based on Resolution option has moved from the General Settings dialog box to the Drive Filtering tab of the Media Creation dialog box.
This option prevents digitizing media to drives that do not have sufficient speed to play the media. If you select this option, the drives affected by drive filtering are unavailable when you try to access them with the Digitize tool.
If you are digitizing and cannot access your drives, ensure this option is deselected.
Drive filtering does not verify the drive speed when you select a drive while rendering effects. Use care when selecting your target drive for rendering to be sure it is fast enough to play the media.
Importing Audio from an Audio CD
If you import audio files directly from an audio CD on a Macintosh system, the quality of the audio clips is limited. You might hear pops in the imported audio track.
Avid recommends that you convert the audio CD (.cda) files to another format (such as AIFF) using an external conversion utility and then import the converted file using the standard procedures for importing files described in the chapter “Importing Files” in the Avid Xpress User’s Guide or the Help.
Adaptec™ Toast ships with a conversion utility that you can use for this purpose. The utility is called Toast Audio Extractor 1.0 and is located in:
Toast Folder:Goodies:Toast Audio Extractor
For more information on using Toast Audio Extractor, see the Toast Audio Extractor Manual PDF document located in the same folder.

55
G4 Slot Allocation
The Avid Composer Products Setup Guide for the Macintosh Operating System, Part Number 0130-04858-01 Rev A, incorrectly states that a Fibre Channel (F/C) board can be placed into a 5-slot G4 platform.
The Avid PCI Extender is still necessary for all systems configured with a F/C board.
Correct Slot Allocations in a 5-slot G4 Platform
The Avid system uses the G4 platform that contains an AGP slot (slot 1) and four PCI slots (see Figure 2). The following list shows the slot locations for the Avid board set in a 5-slot G4 platform when you order specific Media Composer, Film Composer, or Avid Xpress systems.
• Slot 1 — Can only contain an Apple graphics board.
• Slot 2 — Location for SCSI UL3D
• Slot 3 — Location for Meridien III digital media board set
• Slot 4 — Location for Meridien 3D effects board
• Slot 5 — Contains the Meridien display controller board
n The F/C board cannot be used internally to the 5-slot G4 platform. If you need to use the F/C board, the Avid board set must be placed in the Avid PCI Extender. For slot locations, see the Avid Composer Products Setup Guide for the Macintosh Operating System.

56
Figure 2 G4 Slot Locations
Documentation Changes for Release 4.0
The information in this section is not included in the Avid Xpress Release 4.0 hardcopy or online documentation, but the information does appear in the Help.
Changing the Sample Rate
You can use the Change Sample Rate dialog box to change the sample rate of a clip or sequence. Since you can combine clips of different sample rates in the same sequence, this feature is useful when you need to ensure that the entire sequence has the same sample rate for a digital cut or export.
1 2
1
2
Slot 1 (AGP)Slot 2 (PCI)Slot 3 (PCI)Slot 4 (PCI)Slot 5 (PCI)
57
Monitoring Previously Recorded Tracks While Recording a Voice-Over Narration
You can now monitor previously recorded audio tracks while you record a voice-over narration with the Audio Punch-In tool.
To monitor other audio tracks:
1. Choose Audio Tool from the Tools menu.
The Audio tool opens.
n For two-channel audio systems, omit step 2. You can monitor one previously recorded audio track.
2. Choose Direct Out from the Output Options pop-up menu.
3. Choose Audio Punch-In from the Tools menu.
The Audio Punch-In tool opens.
4. Follow the procedure in “Recording a Voice-Over Narration” in the Help or in the “Working with Audio” chapter of the Avid Xpress User’s Guide.
5. As you record, monitor the previously recorded audio tracks along with your current recording from the meters in the Audio tool and from the sound on the speakers.
Digitize Settings
Table 6 and Table 7 are more complete descriptions of some of the Digitize settings, which are described in the Avid Xpress User’s Guide.

58
Table 6 Digitize Settings Options (General Tab)
Option Description
Prepare multiple files for (minutes)
When this option is selected, the system preallocates space on the drive partitions to accommodate the specified number of minutes. (The preallocation can take a long time.)
The system digitizes for only the specified number of minutes; be careful not to underestimate. The default is 30 minutes.
Space bar stops digitize Select this option if you want to use the space bar to create clip names during the digitizing process. When you press the space bar during a digitize operation, the system stops digitizing, creates a clip from the digitized material, and places the clip in the active bin.
Table 7 Digitize Settings Options (Batch Tab)
Option Description
Optimize for Batch Speed When this option is selected, the system speeds up batch digitizing by allowing the deck to continue to roll forward between adjoining clips. To qualify for this operation, the two adjoining clips must meet the following criteria:
• There must be 5 seconds or less between the OUT point of the first clip and the IN point of the second clip.
• The two clips must have the same video resolution and the same audio rate.
n If you select this option, the system might occasionally digitize more than is required.

59
Hardware and Software Limitations
This section describes hardware and software limitations for your Avid system.
Limitation When Using Consumer Decks or Decks Without Time-Base Correctors
This section describes some difficulties you might encounter when working with consumer video decks and tapes (such as VHS) or decks that do not provide time-base correction or stabilized timing on their outputs. Workarounds are described when available.
Digitizing from Unstable Time-Base Sources
The Meridien subsystem used in Avid Xpress is optimized for use with modern, broadcast-quality VTRs that contain time-base correctors (TBCs). When presented with a stable input, the Meridien subsystem will digitize that video by using a high-quality, very-low-jitter clock reference. However, some sources do not include an internal TBC (including various S-Video decks or composite VHS, ¾-inch, or Hi8 decks). In some cases, due either to the deck performance or the deck performance in conjunction with a particular videotape, the Meridien subsystem will not lock to non-TBC sources. As a result, the image might be unstable or might have reduced or missing color, or syncing might not be possible at all.
If you select the Consumer Source option in the Video Input tool, a wider bandwidth, more closely tracking time-base will improve the range of syncing capability. In this mode, the video input levels will be set by automatic gain control. Not all of the Video Input tool’s adjustment sliders will operate, and the video might be slightly softened, but the syncing in most cases will be more reliable and more stable. The overall image quality will not be as high as with normal operation.

60
n The availability of the Consumer Source option depends on the model of your Avid system.
If you continue to experience difficulty with a source that does not include an internal TBC, Avid recommends the video signal be processed through an external TBC for maximum image quality. For more information on time-base correctors, contact your Avid Reseller.
Green Line in VHS Video
Some VHS tape decks do not output the full 240 lines of video normally included in the VHS format. As a result, after you digitize from a device such as a VCR, a green line might appear at the bottom of the monitors in the Avid application.
This line is at the bottom of the visible area of the picture, and is not seen in a standard consumer monitor in most cases. If you use the video in a circumstance in which the line is visible, you can remove it by cropping the bottom edge of the picture.
n For more information on cropping, see the effects guide or Help for your Avid system.
Avid/Mezzo Archiver
Avid/Mezzo Archiver Release 3.1.9 or earlier is not supported with Avid Xpress Release 4.1. Contact your Avid Reseller for availability of updated versions of Avid/Mezzo Archiver.
Unrendered 3D Effects with Drop Shadow
At the start of an unrendered 3D effect with a drop shadow, there is a one-field delay before the shadow appears. This is a hardware design limitation and cannot be fixed for real-time play of an unrendered effect.
Workaround: Render the effect.

61
Known Bugs
Audio
➤ For a sequence containing rendered audio effects, if you consolidate the sequence by using the “Do Audio Sample Rate Conversion” option in the Consolidate dialog box and then export the sequence to OMFI Version 1 or OMFI Version 2, an error message informs you that the composition contains mixed audio sample rates.
This message is incorrect; all the material in the sequence is at the same audio sample rate. If you have problems exporting this sequence, rerender it and then export it again.
➤ When you autoconfigure an audio-only deck, the audio tracks might not appear in the Digital Cut tool.
Workaround: Configure the deck manually by using the Deck Configuration dialog box, or close and reopen the project. The audio tracks reappear.
➤ Audio might export at a rate different from the rate reported in the Audio Project Settings dialog box.
If you export audio while a digital input sync mode (AES/EBU or S/PDIF) is set in the Audio Project Settings dialog box, the resulting export file might be created at a sample rate other than the one currently displayed in the Audio Project Settings dialog box.
The following scenario demonstrates how this problem can occur.

62
In the Audio Project Settings dialog box, with an AES/EBU or S/PDIF audio source connected to your system:
1. Choose Video Sync from the Sync Mode pop-up menu.
2. Choose an audio sample rate that is different from the digital rate for the source.
For example, choose a sample rate of 44.1 kHz when the digital rate for the source is 48 kHz.
3. Choose the appropriate digital option (AES/EBU or S/PDIF) from the Sync Mode pop-up menu.
The sample rate is forced to the digital rate of the source (for example, it reverts from 44.1 kHz to 48 kHz). This is normal behavior for the Audio Project Settings dialog box.
4. Export audio with an export setting that uses the project rate as the export sample rate.
For example, choose Project Rate as the sample rate in the Audio Format tab for an AVI export.
The audio exports at the sample rate you chose before forcing to the digital rate (that is, the sample rate you chose in step 2).
n If you switch back to Video Sync in the Sync Mode pop-up menu of the Audio Project Settings dialog box, the sample rate displayed stays at the forced digital selection but the export still uses the sample rate you chose before forcing the digital rate.
➤ In a mixed Macintosh and Windows environment, you might encounter the following error message during OMFI Version 2.0 export of a clip containing Sound Designer II™ audio: “Exception: CANT_EXPORT_MEDIA_AS_SD2 An error occurred during export.”
Workaround: In mixed Macintosh and Windows environments, use AIFF-C audio format.

63
➤ If you plan to use Pro Tools® on the same system as Media Composer, Film Composer, or Avid Xpress, note that Pro Tools uses different versions of the following files:
• DigiSystem_INIT — Stored in the Extensions folder
• Default AudioSuite plug-ins — Stored in the DAE folder in the System folder
If you plan to use Pro Tools on your Media Composer, Film Composer, or Avid Xpress system, you will need to keep separate copies of these files and copy them to the correct location before you start the application. For the default AudioSuite plug-ins, you should keep separate copies of the entire DAE folder (located in the System folder).
After you replace the files, you must restart the system for DigiSystem_INIT to take effect.
➤ Clip gain information is not carried forward from previous releases on segments that include automation gain. If you transfer a sequence from Avid Xpress Release 4.0 or later to an earlier release, save the sequence, and transfer it back again, the original additive clip gain on segments with automation gain will be lost.
➤ Audio fades are not extracted from the OMFI file when pan/vol is on the clip. When you import this OMFI file into another system, the dissolve will be unrendered. You might want to perform an audio mixdown of the clip before exporting.

64
Compatibility with Other Products and Releases
➤ If you open a project from a previous release, you might see windows that are inappropriately sized and you cannot resize them. The size of the windows is specified by the project’s workspace settings, and some windows might not allow you to resize them.
Workaround: Create new workspace settings for the current release.
➤ You might have problems running Apple System Profiler before running Avid Xpress.
Workaround: Start Apple System Profiler after loading Avid Xpress.
➤ If you eject a local drive from a system that has Avid Unity MediaNet volumes mounted, when you select Mount All from the File menu, the following error message appears: “Mac Error -65 (r/w requested for an off-line drive).”
Consolidating
➤ Consolidating a sequence with a group could result in the sequence referencing two different groups.
When you consolidate a sequence that contains a group clip that has the default clip selected for all tracks and you deselect the option “consolidate all clips in a group edit,” the Avid system creates a master clip (.new) and a group clip (.new). The sequence references the .new group clip for the default clip and the original group clip for any other clips in the group.

65
➤ You might receive an inaccurate warning message after consolidating and performing a sample rate conversion.
If you consolidate a mixed sample rate sequence while performing a sample rate conversion, and then export the sequence, you might see a message warning that the sequence still contains mixed audio sample rates. If you click Continue and complete the export, all the clips are correctly exported at the sample rate you selected for the conversion, and the sequence works correctly in other applications. However, the sequence retains inaccurate mixed sample rate labels on the clips.
➤ Consolidate ignores the “Lock Bin Selection” setting for a consolidated clip.
If you select the “Delete original media files when done” option in the Consolidate dialog box, the system ignores the “Lock Bin Selection” setting for a consolidated clip and deletes the media.
➤ Consolidated master clips have inaccurate locators.
Controllers
➤ Avid Xpress hangs if you choose another controller in the Controller Settings dialog box when the JL Cooper MCS3 controller is connected to the system.
When the JL Cooper MCS3 controller is connected to the COM 1 port, if you select COM 1 as the port and Avid Controller as the device in the Controller Settings dialog box, the Avid Xpress application cannot find the specified device and hangs. If this happens, you must quit Avid Xpress by using the Task Manager and then restart Avid Xpress.
Workaround: Make sure that the device you select in the Controller Settings dialog box is the device that is connected to the system.

66
Digitizing
➤ You might see digital input/output conflicts when you output a test pattern from the Video Output tool and then click the V (video) Channel Selection button in the Digitize tool.
This problem might occur if you do the following:
1. Open both the Video Output tool and the Digitize tool (with a video source connected).
2. Output a test pattern from the Video Output tool.
3. Click the V Channel Selection button in the Digitize tool.
A subsequent attempt to output a test pattern results in the following error message, “Exception:Meridien Processor Board Resource is already committed.”
A subsequent attempt to play a clip in the Source pop-up monitor and then output a test pattern results in the following error message, “Exception:VideoOutputWindow:Add Test Pattern CANT_ACCESS_VDM.”
Once either of these errors occurs, you must restart the application.
Workaround: Click in the Timeline after you output a test pattern from the Video Output tool and before you click the V Channel Selection button in the Digitize tool.
➤ Digitizing across timecode breaks does not always capture the frames around the timecode break. This happens on products that use RS-422 for deck control. When you select “Use control track for preroll,” sometimes the system misses as many as 9 frames before the timecode break and 12 frames after the timecode break.
Workaround: Manually set mark IN to the first frame of the clip after the timecode break, or record on-the-fly with the timecode track turned off.

67
➤ When you digitize using external timecode (also known as linear timecode, or LTC), the digitized media might be one frame off. This can happen when you use External Timecode mode while digitizing in Avid Xpress.
Workaround: If the digitized media is consistently one or two frames off, you can select the Latency for External Timecode Mode option in the Digitize Settings dialog box to compensate for the latency. This option ensures that digitizing starts on the correct frame. Note that the option is deselected by default.
➤ Due to a limitation with the Macintosh system, when “Optimize for batch speed” is selected in the Digitize Settings dialog box, the maximum number of clips that you can continuously digitize before a preroll occurs is 10.
➤ You cannot preserve vertical blanking information for S-Video passthrough and capture.
Workaround: If you need to preserve vertical blanking information when you digitize, use SDI, composite, or component. For more information, see “Preserving Information in the Vertical Blanking Interval” in the Avid Xpress What’s New for Release 4.5 or the Help.
➤ The Eject Tape button does not work if it is mapped to certain buttons.
The Eject Tape button does not work if you map it to the Tab key or to any of the buttons under the Source pop-up monitor or the Composer monitor.
Workaround: You can map the Eject Tape button to other keys in the Keyboard palette or to any button in the Tool palette.

68
➤ Autoconfigure chooses the JVC® BR-D85U deck instead of the JVC BR-D750U deck.
If you autoconfigure decks when the JVC BR-D750U Digital S deck is connected, the system incorrectly chooses the JVC BR-D85U deck. If you double-click the deck in the Deck Configuration dialog box, the system displays a message warning that the deck configuration does not match the deck attached to the system. You can close the message box and then select the JVC BR-D750U deck in the Deck Settings dialog box. The system then functions correctly with the deck. However, the message warning that the deck configuration does not match the attached deck will reappear whenever you create a new project.
➤ The Avid application does not report a missing video signal when you digitize from a DAT deck and select the Video Track button in the Digitize tool.
If you are digitizing audio from a DAT deck by dropping a logged clip in the Digitize tool, and you then select the Video Track button in the Digitize tool, the application does not produce an error message stating that there is no video signal.
Workaround: Do not select the Video Track button when you are digitizing audio from a DAT deck.
➤ You might experience sync problems while digitizing or making a digital cut.
Workaround: Increase the preroll time in the Deck Settings dialog box.
➤ Not all frames in the Timeline are updated after redigitizing a sequence and the clips.

69
➤ Switching input sources prevents the Waveform and Vectorscope monitors from adjusting properly. If you have a bad signal coming in through a Serial Digital Input (SDI) format and you switch the input settings to a different format (Composite or Component), the Waveform and Vectorscope monitors do not adjust properly to the new signal.
➤ Digitizing with Macrovision® copy-protected tapes causes sync problems.
➤ If the video input signal is interrupted, it is possible for the internal Vectorscope monitor to display incorrect data once the signal is restored. This does not affect the signal being digitized. The signal could be interrupted when cables are disconnected, or when signal generators or decks are turned off.
Workaround: Click the V button in the Digitize tool off and then back on, and the Vectorscope monitor should correct itself.
Editing
➤ The Final frame of a consolidated clip using multiple media files might be displayed incorrectly. If you create a consolidated clip that is made up of material from multiple media files, the bottom half of the final frame of the clip might appear as black or gray.
➤ Choosing Undo after editing video into an audio-only sequence causes audio track monitoring to become deselected. If you edit video into a sequence that has only audio tracks, and then choose Undo to undo the edit, the audio tracks and track monitoring become deselected.
Workaround: Select the audio tracks and track monitoring.
70
➤ Site and Project settings cannot be linked by workspace name. The following User settings also cannot be linked by workspace name: Bin View, Deck Preferences, Digital Cut, Export, Import, Script, and Title Style.
➤ You cannot move a bin out of the Trash when no other bins exist in the project.
Workaround: Create another bin in the project, and then move the bin out of the Trash.
➤ When copying information from the Info window, you must close the Info window after each copy. If you leave the Info window open, each time you use the Paste command it will paste the first information you copied.
➤ You need to close the MCS3 Controller Settings window before changes take effect.
You can select other windows when the MCS3 Controller Settings window is open. This can make it a little confusing to realize that the MCS3 Controller Settings window needs to be closed before any changes take effect.
Workaround: Close the MCS3 Controller Settings window before you try to use updated settings.
➤ If you set the desktop to display custom patterns, the bins might become transparent and reveal the patterns on the desktop.
Workaround: Turn off custom desktop patterns or force a redraw of bins as needed.

71
➤ Comments created during logging disappear when the bin view changes.
In each new view in which you would like to see the Comments column, you can type Comments in the column heading area of the bin and the comments will appear. The Comments column also appears in the Headings dialog box at the bottom with the custom columns. To type in the column heading area, you must find or make some room between columns or after the last column; you’ll see the text insert a cursor at locations where you can type.
➤ Partially covering the Source pop-up monitor with a group clip causes the Source pop-up monitor and the Client monitor to display a single frame instead of the grouped frames.
Remove the window that is covering the Source pop-up monitor and click the Source pop-up monitor. Both the Source pop-up monitor and the Client monitor display the grouped frames.
➤ The display of accent characters (set from the Apple Key Caps window) in the bin is different from the display in the Timeline.
➤ The Reverse Match Frame function is not working correctly with motion effects.
➤ There might be a hue shift noticed in certain colors when Avid graphics are being drawn on video. Since the graphics are not displayed during play, it will not affect the output of your digital cut and will be noticeable only when parked on a frame. Examples of Avid graphics include mark IN, mark OUT, and sawtooth marks denoting the beginning or end of a clip.

72
Effects
➤ If you select “Filter Based on Resolution” in the Media Creation dialog box and select a drive on which to store audio, you cannot select the audio drive in the Render dialog box as a location for saving precomputes.
Workaround: Deselect “Filter Based on Resolution.”
➤ Pixel artifacts might appear in dissolves and rolling titles during PAL to NTSC multiformat output on systems using the Meridien III digital media board set with the Genie 3D effects card.
If you output an NTSC version of a PAL sequence that contains dissolves or rolling titles, and if your Client monitor is in underscan mode, you might notice bad pixels flicker across the bottom left corner of the image during the effects. The problem occurs only in multiformat output going from PAL to NTSC, and only on systems that use the Meridien III digital media board set (Meridien II digital media board with Meridien III daughter card) and the Genie 3D effects board.
Workaround: Render the effect before you output the multiformat version of the sequence.
➤ The highest useful value for Border softness on 2D peels is 12. Promoting to 3D does not increase the effective range.
Workaround: Limit peel softness to 12.
➤ Motion effects keep their old clip names in the Timeline after relinking.
If you relink a sequence that contains motion effect clips to new master clips, the motion effect clips appear in the Timeline with their old clip names even though they have relinked successfully to the new media.

73
➤ The ExpertRender at Position command does not always recognize a partially completed render. If you attempt to use the ExpertRender at Position command on a partially rendered effect, you might receive the message, No Effects to Render.
Workaround: Use the following procedure:
1. Click the Timeline Fast Menu button, choose Render Ranges, and choose Partial Only or All.
2. Move the position indicator on top of the red line that indicates the unrendered part of the effect.
Now, when you choose ExpertRender at Position, the ExpertRender dialog box displays one effect to render.
➤ When the Marquee® plug-in window goes behind the Avid Xpress window, the Timeline continually refreshes.
Workaround: Bring the Marquee plug-in window to the foreground, or close Marquee.
➤ Rendering a large sequence with many effects might result in the system canceling the render.
If you begin to render all effects in a sequence that includes a large number of complex effects, the Avid system might not have enough memory to render all the effects. A message box appears, warning you that there is insufficient memory to complete the render; the render is then canceled.
Workaround: Simplify the render by first rendering nested effects.
You can also break up long effects by using the Add Edit function. However, using Add Edit might affect the appearance of effects that use Spline or Acceleration, so you should use this workaround with caution.
74
➤ 3D borders appear uneven at small sizes. In 3D effects, setting the border width to a small value might produce borders with uneven edges.
➤ A long video mixdown with unrendered effects causes an Insufficient Memory error. A video mixdown with many unrendered effects (such as a 15-minute sequence with 176 effects) will abort with a message that states “Insufficient Memory error. Keep or discard?” If you choose Keep, the mixdown up until that point is good. This problem does not occur with Render In/Out or when rendering a long effect.
Workaround: Render the effects before creating the mixdown, break up the video mixdown into smaller segments, or upgrade the system memory.
➤ You might experience problems when rendering effects-intensive sequences with collapsed tracks. Your system might continuously render the sequence.
Workaround: Increase the memory allocated to the Avid Xpress application.
➤ At the start of an unrendered 3D effect with a drop shadow, there is a one-field delay before the shadow appears.
Workaround: Render the effect.
➤ The Matte Key effect might cause a slight luminance level drop to the background media under the matte key.
➤ The luminance level will drop slightly in non-real-time keys when Crop or Position parameters are adjusted.

75
➤ The 3D Drop shadows that travel independently of their object do not play smoothly.
➤ The Stamp effect will not work on the first keyframe of an effect.
➤ Certain 3D effects display highlights and shadows as black-and-white lines.
FilmScribe and EDL Manager
➤ When you change options in EDL Manager, save as a template, and reopen the template, the options might appear to be selected incorrectly. The options are, in fact, set to your selection, but the user interface does not reflect them accurately.
Workaround: Close the Options window and reopen it.
➤ On the Windows ME operating system, the scroll box that allows you to scroll up and down does not appear in the FilmScribe Cut List tool or in EDL Manager. This appears to be a user interface display problem only.
Workaround: To scroll, click the bar where the scroll box should appear and drag the mouse.
➤ Error in FilmScribe Help. In the Avid FilmScribe Help and in the Avid FilmScribe User’s Guide, there is an error in the description of how to access a pop-up menu in a bin. The Help says that you must Ctrl+click the sequence in a bin on a Macintosh system. The correct key sequence is Ctrl+Shift+click.

76
You can access the Help topic by clicking the following topics in the Avid FilmScribe Help: Working with FilmScribe>Working with the Cut List and Change List Tools>Getting Sequences>Using the Sequences Menu. The note at the bottom of the page should read:
You can also open the Sequence menu as a pop-up menu in a bin. To do this, use the right mouse button to click the sequence (Windows) or Ctrl+Shift+click the sequence (Macintosh).
Hardware
➤ The 888 I/O™ audio meters do not always display accurately. The meters could show a signal that is not present.
Help
➤ Some toolbar buttons in the Script window do not have context-sensitive Help.
Context-sensitive Help is not fully implemented for the toolbar buttons for the Script window. Information on the functions of all of the toolbar buttons is available in the “Using Script Integration” chapter in the Help system or in the user’s guide for your Avid system.

77
Import and Export
➤ OMF cross-platform export of crawling titles causes blue background to appear. If you export an unrendered crawling title from an Avid for Macintosh system to an Avid for Windows system (or vice versa), the color of the title text is changed and the title background is blue.
Workaround: Render the title before export, or re-create title media after import.
➤ There is a limit on the length of a sequence that can be exported as MPEG-2. This limit applies to exporting an MPEG-2 file as well as using the Create DVD command. For Macintosh, the limit is 30 minutes. For Windows 2000, the limit is 7.5 minutes.
Workaround: Export the sequence as a QuickTime movie using either the Same As Source or QuickTime Reference movie format, and create the MPEG-2 file in Media Cleaner EZ.
➤ When you perform a Batch Import with QuickTime files, the Current Settings button in the Batch Import dialog box shows the OMFI tab instead of the Image tab.
Workaround: Use the Import Settings dialog box in the Settings scroll list to set up the batch import. Then perform the batch import as usual.
➤ When you select “NTSC Has Setup” and “Use Windows Compatible Filenames” in the General Settings dialog box and then change the sample rate and import audio, the Avid system creates a duplicate bin. It is empty and has a size of 1K.
Delete the duplicate bin. If you try to use it, an error message appears. If you rename it and try to use it, it remains a copy and you cannot have it open at the same time as the bin of which it is a duplicate.

78
➤ You cannot change the frame size or other settings when using an Avid codec to export a QuickTime movie.
Avid codecs are designed to provide a fast export or import at the native frame size. (If necessary, you can change the resolution, but the export will take longer.) If you change the frame size or other setting and then use an Avid codec to export a QuickTime movie, you cannot do a fast export or import and the codec might issue the following error message, “Unable to export bin.”
Workaround: Use a different codec. Alternatively, export the file by selecting the Same as Source option and change the setting in another application, such as Cleaner 5.
➤ Several export options do not appear if QuickTime 5.0 Minimum installation was used on the Avid system. The options that do not appear include those for exporting DV Stream, MPEG-1, MPEG-2, QuickTime, and QuickTime reference. This problem happens only if you install QuickTime 5.0 on your system and select the Minimum installation option.
Note that the Avid software installer automatically installs QuickTime 4.0 unless it detects a later version. If it detects a later version, it leaves the newer version intact and proceeds with the rest of the installation. QuickTime 5.0 is supported by this release but is not shipped with the release.
Workaround: If you have QuickTime 5.0 installed on your system and you notice that the export options are missing, reinstall QuickTime 5.0 and choose the Recommended installation.
➤ When you import material, your file might be larger than the 2-GB limit for file size.
Workaround: If the imported file is a sequence of files (such as a TARGA® sequence), you can break the files into groups and import the groups. Once the groups are imported, you can make the imported

79
clips a sequence or subsequence, which you can then edit into other sequences.
➤ You cannot create a DVD from a sequence with no audio tracks.
If you select a sequence with no audio tracks and choose Create DVD from the File menu, a message box appears telling you that your sequence needs at least one audio track. You cannot create a DVD from a sequence with no audio tracks.
Workaround: Add an audio track to your sequence. The track does not need to contain any information but must be present for you to create a DVD.
➤ The Cleaner EZ software installer installs a DV codec that causes video tearing during export and import.
The Cleaner EZ software included with your Avid application installs a DV codec named RadDVCodec. If you export a file as a DV Stream and then reimport the file into the Avid system, the video will display tearing.
Workaround: Remove the RadDVCodec file. Removing this file does not have any adverse effects on the Cleaner EZ application. Both Cleaner EZ and the Avid application will use the QuickTime DV codec.
To remove the RadDVCodec file:
1. Navigate to Macintosh HD:System Folder:Extensions.
2. Delete the file RadDVCodec.
3. Restart the system.

80
➤ You cannot change the frame size when using an Avid codec to export a QuickTime movie.
Avid codecs are designed to provide a fast export or import at the native frame size. If you change the frame size and then use an Avid codec to export a QuickTime movie, you cannot do a fast export or import and the codec issues the following error message: “Unable to export bin. Exception: Parameter Error! This export format may require audio or video tracks.”
Workaround: Use a different codec. Alternatively, export the file by selecting the Same as Source option and change the size in another application, such as Cleaner 5.
➤ Cleaner 5 displays error messages when using the Send To command with items already in the Batch window.
If Cleaner 5 already has a clip in its Batch window, and you use the Send to Cleaner command from the Avid application to add another clip, Cleaner displays the following error messages:
• “Unable to open file; image format not recognized.”
• “Unable to make an alias to movie.”
This problem does not occur when you use Media Cleaner Pro Version 4.0.2
Workaround: Click OK to these error messages. The clip is added to the batch and can be processed successfully.
➤ The sequence loses audio sync when creating DVD files with an AudioSuite effect and sample rate conversion.
If you want to create DVD files from a sequence that includes a rendered AudioSuite effect, and the audio sample rate of a sequence is different from the audio project setting, the automatic sample rate

81
conversion does not work correctly. The processed file has a doubled audio track, one of which is delayed and creates an echo.
Workaround: Do the sample rate conversion before you create the DVD files.
➤ You cannot export a PAL film sequence that uses synced subclips as a QuickTime reference movie.
If you digitize video and audio separately into a PAL film (Method 2) project, create subclips with video and audio using autosync, and then create a sequence using the subclips, you might not be able to export the sequence as a QuickTime reference movie. In addition, you might not be able to export an individual synced subclip as a QuickTime reference movie.
Workaround: You can export successfully if you do one of the following:
t Export video only or audio only.
t Disable the audio tracks before export.
t Mix down the audio tracks before export.
t Select Premix Audio Tracks in the Export Settings dialog box before export.
➤ The Send to Cleaner command doesn’t appear in the Send To submenu of the File menu.
The Send to Cleaner command does not appear in the Send To submenu of the File menu when you are logged in to your system with a user name other than the user name used when you installed Cleaner 5. The command appears correctly when you are logged in to your system using the same user name used when you installed Cleaner 5.

82
➤ Moving the target folder used when creating DVD volumes prevents further DVD export.
Under certain circumstances, moving the folder that is the target for a DVD export prevents any further export from taking place. This happens when you create a new folder as the target for your DVD export by browsing to a new location during the Create DVD process and then use the Macintosh Finder™ to move that folder to another location. The system displays an error message when you attempt to save to the folder again. You cannot save to that folder or to any other folder.
Workaround: Create the target folder for your DVD exports outside of the Avid Xpress application before you begin the Create DVD process, and do not move the folder to another location until you have finished all DVD exports for the current Avid Xpress session.
➤ Clip names longer than 32 characters are truncated when imported in a log file.
If you export a log file with clip names longer than 32 characters, and then reimport the log file, the system changes the clip names. Each reimported clip name consists of the first 32 characters of the original clip name followed by the tape name.
➤ Insufficient memory errors might occur if you attempt to play media after importing a QuickTime movie with a resolution different from the native file.
Workaround: Exit and restart the application.
➤ Avid ABVB NuVista Codec for QuickTime configuration doesn’t hold settings.
Do not use the Avid ABVB NuVista codec unless you are exporting to a system that uses AVR resolutions. If you need it, click anywhere in the Quality slider and then set things up as you want them in the

83
resulting dialog box. When you save and export, the selections you made are remembered.
➤ Some unsupported file types might stall the system during import. If you try to import an unsupported file type, such as an .aud file (MPEG-2 audio file), QuickTime might take several minutes to analyze the file type. During this period, the system appears to be frozen. After several minutes a message appears, saying the file is not a supported format.
➤ An exported graphic at 1:1 resolution is creating corrupt media. In an NTSC project, load a 2:1 clip. Mark a one-frame duration, and export the frame at 1:1 resolution. Reimport the same graphic at any resolution, and you see either green and magenta artifacts or a black screen with an SFCONS_VIDEO_TIMEOUT error.
➤ The padding for sequential PICT files is wrong.
➤ When you export an OMFI graphic to a drive with insufficient disk space, the system freezes.
Workaround: Export to a drive with adequate storage space.
➤ Batch importing a duplicate of a master clip causes the original master clip to be offline.
Workaround: Unlink the duplicate before batch importing it.
➤ When you export a file larger than 2 GB, a system error occurs.
Workaround: Ensure that the file you are exporting does not exceed the 2-GB limit. If the error occurs during a video mixdown, try to mix down in smaller segments.

84
➤ Audio fades are not extracted from OMFI when pan/vol is on the clip. When you import this OMFI file into another system, the dissolve will be unrendered.
Workaround: You might want to perform an audio mixdown of the clip before exporting.
➤ The position indicator will not be used if you export by pressing the Option key and using the drag-and-drop method. Option+drag does not use the position indicator and will always use mark IN and mark OUT, even if Use Marks is disabled.
➤ Avid Xpress does not support QDesign Music audio. If you try to import audio formatted with the QDesign Music codec, QuickTime crashes.
Workaround: Choose Import Video Only, or cancel the import.
➤ If you import an OMFI composition with video media and change the resolution on import, you might encounter problems if you delete the media clip and then attempt to reimport the file to the same bin. If you attempt to reimport the same file to the same bin (or to a different bin while the first bin is open), the system imports the composition but not the media.
Workaround: Close the bin, open another bin, and import the file to the new bin. You can also try quitting and restarting the Avid application and then reimporting the file.
➤ If you set Autodetect Sequential Files to ON in the Import Settings dialog box, folders ending in digits larger than 1 will not appear in the Select Files to Import dialog box.
Workaround: Set Autodetect Sequential Files to OFF in the Import Settings dialog box, or rename folders so they do not end in digits larger than 1.

85
Installation
➤ Some installer log files (such as MC.app.log) are too large to be opened by the SimpleText editing application. SimpleText cannot open a file larger than 32K.
Workaround: Open the file in another text editor, such as the BBEdit Lite or TexEdit.
MediaLog
➤ On the Windows ME operating system, the Shuttle Control box that allows you to shuttle the deck does not appear in the Logging Tool window. This appears to be a user interface display problem only.
Workaround: To shuttle the deck, click the bar where the Shuttle Control box should appear and drag the mouse.
Monitors
➤ If you are using dual monitors and you use Internet Explorer, you might have serious display problems. The display problems are a result of conflicts between Internet Explorer and Windows 2000. Avid recommends Internet Explorer 5.01 SP2 when you use a dual-monitor system. When later versions (for example, Version 5.5) are used on dual-monitor systems, there might be serious display problems. If you are using a version of Internet Explorer that experiences the problem, you might clear the problem with the following steps. The problem will return when you reboot your system.
86
Workaround: To temporarily disable and then enable the second monitor, do the following:
1. Right-click on the desktop, and then choose Properties.
The Display Properties dialog box appears.
2. Click the Settings tab.
3. Click the #2 monitor icon.
4. Deselect “Extend my Windows desktop onto this monitor.”
5. Click Apply.
The second monitor will appear black.
6. Click the #2 monitor icon again.
7. Click “Extend my Windows desktop onto this monitor.”
8. Click Apply.
The second monitor is displayed again.
9. Click OK.
➤ You cannot change the monitor resolution while Avid Xpress is running.
Workaround: Quit the Avid Xpress application before changing the monitor resolutions.
Output
➤ Audio tracks do not appear in the Digital Cut tool after you use the Autoconfigure command to configure an audio only deck.
Workaround: Manually configure the deck using the Deck Configuration settings, or close and reopen the project. Either of these actions will cause the audio tracks to appear in the Digital Cut tool.

87
➤ Preset buttons for video control sliders in the Video Input or Video Output tool might not be highlighted (green) when you open the Video Input or Video Output tool for the first time.
When you open the Video Input or Video Output tool for the first time, or open the Video Input or Video Output tool after creating a new project and new user, the Preset buttons for the video control sliders might not be highlighted as they should be.
Workaround: Click an individual Preset button to highlight it.
➤ Timecode drifts slightly when outputting simultaneous timecode.
A limitation in the way the system calculates timecode rates results in a slight drifting of timecode values when you output drop-frame and non-drop-frame timecode simultaneously. For a sequence 1 hour long, the two sets of timecode drift apart by approximately one-quarter of one frame. The problem is relatively more noticeable in 24-fps output than in 29.97-fps or 23.976-fps output.
➤ The Digital Cut tool does not remember window position.
When you perform an archive to tape, the Digital Cut tool automatically moves to the upper left corner so that it can’t overlap the Record monitor in the Composer window.
Workaround: When the archive to tape is complete, move the Digital Cut tool back to the position where you want it.

88
Play
➤ Playing media with an Avid Unity Fibre Channel controller installed but not connected causes errors.
Workaround: Choose one of the following:
t Connect the controller to an Avid Unity system.
t Install a fiber-optic cable connecting one port of the controller card to the other (a loopback cable) until the controller can be connected.
t Remove the controller until it can be connected.
➤ When you play a clip in a bin, the clip flickers to black before starting to play. If you set a bin to Frame view or Script view, select a clip, and click Play, the clip displays black briefly before it starts to play.
➤ Playback from a bin is not smooth when the bin is displayed in the Bin monitor. If a bin is displayed in the Bin monitor, and you set a bin to Frame view or Script view and play a clip, the clip does not play smoothly.
➤ Video and audio underrun errors might occur when playing a sequence with the Scroll While Playing option set. The more information that the system has to scroll (larger Timelines) increases the chances that the system will not respond to a video or audio request.
Workaround: Deselect the Scroll While Playing option in the Timeline Settings dialog box. This option is deselected by default.
➤ The monitor displaying the Composer monitor and Timeline might not refresh quickly.

89
StorEx
➤ StorEx might hang if you open it after starting and quitting Avid Xpress.
Workaround: Reboot your system and open StorEx before starting Avid Xpress.
System
➤ When you restart Avid Xpress after previous use with a MIDI controller and a USB floppy drive, an “already enabled” OMS message appears.
Workaround: When you use a MIDI controller and a USB floppy drive, and then you exit Avid Xpress, restart the Macintosh system before restarting Avid Xpress.
➤ If you receive the following message when starting the Avid system, the Avid application will not start: “Exception occurred while initializing Media Stream Manager, exception: MSM no directory specified.”
Workaround: You need to delete two files as follows.
1. Locate the Avid application folder and open it.
2. Double-click the SupportingFiles folder
3. Double-click the Avid_MediaFiles folder.
4. Select the msmFMID.pmr and the msmMMOB.mdb files, and then press the Delete key.
5. Restart the Avid application.

90
➤ The 3D diagnostic tests fail on Macintosh systems with the Meridien I board set.
The 3D diagnostic tests fail on Macintosh 9600, G3, and G4 systems that use the Meridien I board set with 3D. Although video looks correct, the diagnostic tests report checksum errors. This does not mean that there is a problem with the 3D hardware, only that the diagnostic tests do not function correctly.
Timeline
➤ When you start to play on a stamped keyframe, a purple flash appears on the odd field. If the position indicator is on a stamped keyframe, when you click the Play button, the odd field plays as purple. If you move the position indicator off the stamped keyframe and play, no purple appears.
Titles
➤ If you move an existing project and title from an earlier version of Avid Xpress (Release 3.1.1) to this version, a VDM error occurs when you open the title.
Workaround: In the Composer monitor, open the sequence with the title in it. Place IN and OUT points at the beginning and end of the title clip, and then choose Re-create Title Media from the Clip menu.
➤ If you start to play from a point within a rolling title that contains keyframes, you might receive a Rolling Title Underrun error message.
Workaround: Start play before the rolling title or remove the keyframes in the title.

91
➤ When you import a Photoshop® .psd title file, you receive an Exception: No Error message. The file does not import.
Workaround: Save the Photoshop file as a PICT file when saving and exporting from the Photoshop application.
➤ Editing or saving a large, multipage file can take a few minutes.
➤ Playing a long, complicated, rolling title can cause an exception error.
Workaround: Try reducing the complexity of the rolling title.
➤ You cannot revise a title after exporting it as OMFI Version 1 or 2.
➤ In the Effect Editor, if the Acceleration parameter is set to 100 (fast), dragging the scroll bar through the Timeline over a keyframe might cause an error message.
Workaround: Avid does not recommend acceleration for rolling titles or other DSK titles with vertical motion, due to anti-aliasing effects that cause flicker.
➤ When you import an OMFI Version 2.0 file with rolling titles, the icons for the rolling titles are blank.
➤ Some italic text in titles can become truncated.
Workaround: Click the Right, Left, or Center Justification buttons to eliminate truncation of text. You might have to create several text blocks to resolve this problem with multiple lines of text in your titles.

92
➤ Some 3D titles might not crop properly. The first letter of the title might be clipped.
Workaround: Open the left crop bar and adjust until the first letter is no longer clipped.
➤ Mixing different fonts, different sizes, and different styles might realign the vertical placement of a title.
➤ When you play a sequence with several rolling titles close together, you might see an error message.
Workaround: Render the rolling titles, or try moving the titles further away from each other.
Utilities
➤ Avid Xpress does not support MSM media when you use OMF utilities from Media Composer or Film Composer Release 7.1.
Workgroups
➤ A Macintosh client on an Avid Unity MediaNet system might not recognize an ALE file that was created on a Windows NT® or Windows 2000 client. For example, if you export a group of clips in a bin as an ALE file from a Windows NT client onto an Avid Unity MediaNet workspace and then try to import the same file into a Macintosh client, the system might display the following error message, “the file format of 'filename.ale' is not supported for import.”

93
Workaround: This happens because the Avid Unity file system does not save the resource fork information associated with the file. To fix the problem with the file:
1. Copy the file from the Windows NT client to a network drive not connected to Avid Unity.
2. Copy the file to the Macintosh client and perform the import as usual.
➤ QuickTime reference movies with added filler might not be shared correctly on an Avid Unity MediaNet. This can happen if you use the Add Filler or Load Filler commands to add filler to a sequence and then export the sequence as a QuickTime reference movie. The QuickTime reference movie points to the filler data on the local drive, which prevents the movie from being encoded with Avid ProEncode™.
Workaround: On Windows 2000 systems, enable sharing for the folder that contains the filler.
Workaround: On Macintosh and Windows NT systems, create a filler file (using Adobe® Photoshop or another application), copy it to an Avid Unity workspace, import it as a clip, and use it for filler. In this case, you cannot use the Add Filler or Load Filler features.
➤ When you use a Macintosh system on Avid Unity MediaNet, the name of a bin cannot exceed 27 characters. If you enter a name longer than 27 characters, the system displays the following error message, “Mac Error -37 (there may be no bad names in the final system!)”.
➤ A system that is not a workgroup client might see media on a workspace drive that was not created by that system.
If you mount a workspace drive on a system that is not a workgroup client, you can then create media on the system and store it on the workspace drive. In this circumstance, the Media tool might display media on the workspace drive that was created by the workgroup clients as well as media created by the current system.

94
For more information on limitations when mixing workgroup and non-workgroup systems and storage, see the Avid Unity MediaManager Release Notes.
➤ Invisible Macintosh directories appear as folders in the Project window.
When you share a folder using Macintosh file sharing, the Macintosh system creates invisible directories called “Network Trash Folder” and “NetworkInfoSettings.” If you use file sharing to share one of your Avid project folders, and then open that project in your Avid application, the invisible directories appear as folders in the Select User and Project dialog box and in the Project window. You should not use these folders to store any Avid files since you will be unable to access them from the Macintosh Finder. Do not rename the folders or place Avid bins inside them.
➤ Projects might not close correctly if a bin has been opened over the network and a network error occurs.
If you open a bin on another system and modify its contents, and then a network error occurs where you can no longer access that bin file on the networked system, the application might not exit because it cannot save the bin. You might have to force quit to exit the program.
Technical Support Information
For Broadcast Sites
Avid Customer Support has a variety of technical support options available. Avid Assurance includes annual telephone support, maintenance releases, and advanced hardware exchange. In North America, Assurance customers with broadcast products may contact our Broadcast Customer Support Center at 800-NEWS-DNG (639-7364). To purchase Avid Assurance, to renew your contract, or for
95
more information on Assurance offerings, in North America, contact Avid Inside Sales at 800-949-AVID (2843) or call your Avid Reseller. For international inquiries and support services, contact your local Avid Reseller. Support offerings may vary per location. For the latest information, consult your reseller or www.avid.com.
As an Avid customer, you are entitled to access technical support information and product information, as well as the latest news from our Web-based Knowledge Center. Simply navigate to www.avid.com/support/index.html, click the Knowledge Center link, and log in.
If you need help locating the reseller or Avid office nearest you, please visit our Web site at www.avid.com/cgi/locator/index.html or call 800-949-AVID (2843).
For Postproduction Sites
Avid Customer Support has a variety of technical support options available. Avid Assurance includes annual telephone support, maintenance releases, and advanced hardware exchange (7x24 option available). Assurance customers in North America may contact our Customer Support Center at 800-800-AVID (2843). To purchase Avid Assurance, to renew your contract, or for more information on Assurance offerings, in North America, contact Avid Inside Sales at 800-949-AVID (2843) or call your Avid Reseller. For international inquiries and support services, contact your local Avid Reseller. Support offerings may vary per location. For the latest information, consult your reseller or www.avid.com.
In North America, Avid FlexSupport options are also available. Avid On-Call per-event support is available by calling 800-800-AVID (2843) or 900-555-AVID (2843) (United States only). Avid CallPaks (available in the United States and Canada) allow customers to bundle Avid On-Call per-event support in 5-call or 10-call packages for added value. To purchase Avid CallPaks in North America, please contact Avid Inside Sales at 800-949-AVID (2843).

96
As an Avid customer, you are entitled to access technical support information and product information, as well as the latest news from our Web-based Knowledge Center. Simply navigate to www.avid.com/support/index.html, click the Knowledge Center link, and log in.
If you need help locating the reseller or Avid office nearest you, please visit our Web site at www.avid.com/cgi/locator/index.html or call 800-949-AVID (2843).
Copyright and DisclaimerProduct specifications are subject to change without notice and do not represent a commitment on the part of Avid Technology, Inc. The software described in this document is furnished under a license agreement. You can obtain a copy of that license by visiting Avid’s Web site at www.avid.com. The terms of that license are also available in the product in the same directory as the software. The software may not be reverse assembled and may be used or copied only in accordance with the terms of the license agreement. It is against the law to copy the software on any medium except as specifically allowed in the license agreement. Avid products or portions thereof are protected by one or more of the following United States patents: 4,746,994; 4,970,663; 5,045,940; 5,063,448; 5,077,604; 5,245,432; 5,267,351; 5,309,528; 5,325,200; 5,355,450; 5,396,594; 5,440,348; 5,452,378; 5,467,288; 5,513,375; 5,528,310; 5,557,423; 5,568,275; 5,577,190; 5,583,496; 5,584,006; 5,627,765; 5,634,020; 5,640,601; 5,644,364; 5,654,737; 5,701,404; 5,715,018; 5,719,570; 5,724,605; 5,726,717; 5,729,673; 5,731,819; 5,745,637; 5,752,029; 5,754,180; 5,754,851; 5,781,188; 5,799,150; 5,812,216; 5,828,678; 5,842,014; 5,852,435; 5,883,670; 5,889,532; 5,892,507; 5,905,841; 5,912,675; 5,929,836; 5,929,942; 5,930,445; 5,930,797; 5,946,445; 5,966,134; 5,977,982; 5,986,584; 5,987,501; 5,995,079; 5,995,115; 5,999,190; 5,999,406; 6,009,507; 6,011,562; 6,014,150; 6,016,152; 6,016,380; 6,018,337; 6,023,531; 6,023,703; 6,031,529; 6,035,367; 6,038,573; 6,052,508; 6,058,236; 6,061,758; 6,072,796; 6,084,569; 6,091,422; 6,091,778; 6,105,083; 6,118,444; 6,128,001; 6,128,681; 6,130,676; 6,134,379; 6,134,607; 6,137,919; 6,141,007; 6,141,691; 6,154,221; 6,157,929; 6,160,548; 6,161,115; 6,167,404; 6,174,206; 6,192,388; 6,198,477; 6,208,357; 6,211,869; 6,212,197; 6,215,485; 6,223,211; D352,278; D372,478; D373,778; D392,267; D392,268; D392,269; D395,291; D396,853; D398,912. Additional U.S. and foreign patents pending. No part of this document may be reproduced or transmitted in any form or by any means, electronic or mechanical, including photocopying and recording, for any purpose without the express written permission of Avid Technology, Inc.
© 2001 Avid Technology, Inc. All rights reserved.
Attn. Government User(s). Restricted Rights LegendU.S. GOVERNMENT RESTRICTED RIGHTS. This Software and its documentation are “commercial computer software” or “commercial computer software documentation.” In the event that such Software or documentation is acquired by or on behalf of a unit or agency of the U.S. Government, all rights with respect to this Software and documentation are subject to the terms of the License Agreement, pursuant to FAR §12.212(a) and/or DFARS §227.7202-1(a), as applicable.

97
TrademarksAirPlay, AudioVision, Avid, Avid Xpress, CamCutter, Digidesign, FieldPak, Film Composer, HIIP, Image Independence, Marquee, Media Composer, Media Recorder, NewsCutter, OMF, OMF Interchange, Open Media Framework, Pro Tools, and Softimage are registered trademarks and 888 I/O, AirSPACE, AirSPACE HD, AniMatte, AudioSuite, AutoSync, AVIDdrive, AVIDdrive Towers, AvidNet, Avid Production Network, AvidProNet, AVIDstripe, Avid Unity, AVX, DAE, D-Fi, D-fx, D-Verb, ExpertRender, FilmScribe, HyperSPACE, HyperSPACE HDCAM, Intraframe, iS9, iS18, iS23, iS36, Lo-Fi, Magic Mask, make manage move | media, Matador, Maxim, MCXpress, MEDIArray, MediaDock, MediaDock Shuttle, Media Fusion, Media Illusion, MediaLog, Media Reader, MediaShare, Meridien, NaturalMatch, OMM, Open Media Management, ProEncode, QuietDrive, Recti-Fi, rS9, rS18, Sci-Fi, Sound Designer II, SPACE, SPACEnet, SPACEShift, Symphony, Vari-Fi, Video Slave Driver, and VideoSPACE are trademarks of Avid Technology, Inc.
Adaptec is a trademark of Adaptec, Inc., which may be registered in some jurisdictions. After Effects and Photoshop are either a registered trademarks or trademarks of Adobe Systems Incorporated in the United States and/or other countries. Apple, AppleTalk, Disk First Aid, Finder, Mac, Macintosh, and Power Macintosh are trademarks of Apple Computer, Inc., registered in the U.S. and other countries. DiskWarrior is a registered trademark of Alsoft, Inc. FaderMaster Pro is a trademark of JL Cooper, a Division of Sound Technology. Hi8 is a trademark of Sony Corporation. JNI is a trademark or registered trademark of JNI Corp. JVC is a registered trademark of JVC Corporation in the United States and/or other countries. LPort422 is a trademark of TAO Media Systems. MacDrive 2000 is a trademark of Mediafour Corporation. Macrovision is a registered trademark of Macrovision Corporation. Media Cleaner is a registered trademark of Media 100, Inc. OMS is a registered trademark of Opcode Systems, Inc. Norton Utilities is a registered trademark of Symantec Corporation. NuVista+ is a registered trademark of Truevision, Inc. QuickTime and the QuickTime logo are trademarks used under license from Apple Computer, Inc. Sentinel is a registered trademark of Rainbow Technologies. TARGA is a trademark of Pinnacle Systems, Inc., in the United States and other countries. Windows and Windows NT are either registered trademarks or trademarks of Microsoft Corporation in the United States and/or other countries. Yamaha is a registered trademark of Yamaha Corporation of America. All other trademarks contained herein are the property of their respective owners.
Avid Xpress Release 4.5 Release Notes for the Macintosh Operating System • Part 0130-04904-01 Rev. A • July 2001