Arcserve® Unified Data Protection Agent for Windows User ...
780
Arcserve® Unified Data Protection Agent for Windows User Guide Version 7.0
-
Upload
khangminh22 -
Category
Documents
-
view
0 -
download
0
Transcript of Arcserve® Unified Data Protection Agent for Windows User ...

Arcserve® Unified Data Protection Agent for
Windows User Guide
Version 7.0

Legal NoticeThis Documentation, which includes embedded help systems and electronically distributed materials, (here-inafter referred to as the “Documentation”) is for your informational purposes only and is subject to change orwithdrawal by Arcserve at any time. This Documentation is proprietary information of Arcserve and may not becopied, transferred, reproduced, disclosed, modified or duplicated, in whole or in part, without the prior writ-ten consent of Arcserve.
If you are a licensed user of the software product(s) addressed in the Documentation, you may print or oth-erwise make available a reasonable number of copies of the Documentation for internal use by you and youremployees in connection with that software, provided that all Arcserve copyright notices and legends areaffixed to each reproduced copy.
The right to print or otherwise make available copies of the Documentation is limited to the period duringwhich the applicable license for such software remains in full force and effect. Should the license terminatefor any reason, it is your responsibility to certify in writing to Arcserve that all copies and partial copies of theDocumentation have been returned to Arcserve or destroyed.
TO THE EXTENT PERMITTED BY APPLICABLE LAW, ARCSERVE PROVIDES THIS DOCUMENTATION “AS IS”WITHOUT WARRANTY OF ANY KIND, INCLUDING WITHOUT LIMITATION, ANY IMPLIED WARRANTIES OFMERCHANTABILITY, FITNESS FOR A PARTICULAR PURPOSE, OR NONINFRINGEMENT. IN NO EVENT WILLARCSERVE BE LIABLE TO YOU OR ANY THIRD PARTY FOR ANY LOSS OR DAMAGE, DIRECT OR INDIRECT, FROMTHE USE OF THIS DOCUMENTATION, INCLUDING WITHOUT LIMITATION, LOST PROFITS, LOST INVESTMENT,BUSINESS INTERRUPTION, GOODWILL, OR LOST DATA, EVEN IF ARCSERVE IS EXPRESSLY ADVISED INADVANCE OF THE POSSIBILITY OF SUCH LOSS OR DAMAGE.
The use of any software product referenced in the Documentation is governed by the applicable license agree-ment and such license agreement is not modified in any way by the terms of this notice.
The manufacturer of this Documentation is Arcserve.
Provided with “Restricted Rights.” Use, duplication or disclosure by the United States Government is subject tothe restrictions set forth in FAR Sections 12.212, 52.227-14, and 52.227-19(c)(1) - (2) and DFARS Section252.227-7014(b)(3), as applicable, or their successors.
© 2019 Arcserve, including its affiliates and subsidiaries. All rights reserved. Any third party trademarks orcopyrights are the property of their respective owners.

Arcserve Product ReferencesThis document references the following Arcserve products:
Arcserve® Unified Data Protection
Arcserve® Unified Data Protection Agent for Windows
Arcserve® Unified Data Protection Agent for Linux
Arcserve® Backup
Arcserve® High Availability
Contents
Chapter 1: Understanding Arcserve UDP Agent (Windows) 13Introduction 14
Arcserve UDP Agent (Windows) Documentation 15
About this Document 16
Features 17
Arcserve UDP Agent (Windows) Videos 26
HowArcserve UDP Agent (Windows)Works 27
How the Backup Process Works 28
How Block-Level Incremental Backups Work 30
How Infinite Incremental Backups Work 31
How File Level Restores Work 32
How Verify Backups Work 33
How Recovery Sets Work 34
How Bare Metal Recovery Works 37
How Arcserve UDP Agent (Windows) Update Works 39
Chapter 2: Installing/Uninstalling Arcserve UDP Agent (Win-dows) 43How to Install Arcserve UDP Agent (Windows) 44
Review the Installation Considerations 46
Install Arcserve UDP Agent (Windows) Using the Installation Wizard 47
Install Arcserve UDP Agent (Windows) Silently 50
Verify that the Arcserve UDP Agent (Windows) Installation was Successful 54
How the Installation Process Affects Operating Systems 56
Arcserve UDP Agent (Windows) Installer Error Codes 70
How to Install Arcserve UDP Agent (Windows) Updates 75
Review the Considerations for Installing Updates 78
Specify Updates Preferences 83
Check for Updates and Download 88
Install the Arcserve UDP Agent (Windows) Updates 90
Verify that the Updates are Successfully Installed 92
(Optional) Install Arcserve UDP Agent (Windows) Updates Silently 93
4 Arcserve UDP Agent for Windows User Guide

Troubleshooting Update Issues 94
How to Uninstall Arcserve UDP Agent (Windows) 98
Review the Uninstallation Considerations 100
Uninstall Arcserve UDP Agent (Windows) Using Add or Remove Programs 101
Uninstall Arcserve UDP Agent (Windows) Using the Command Line 102
Remove Components Left Behind by the Uninstaller 103
Verify that the Arcserve UDP Agent (Windows) Uninstallation was Successful 104
Files Not Removed During Uninstallation 105
Troubleshooting Uninstall Issues 112
UDP Workstation Free 115
Chapter 3: Getting Started with Arcserve UDP Agent (Windows) 117How to Navigate the Arcserve UDP Agent (Windows) User Interface 118
Accessing Arcserve UDP Agent (Windows) 121
Introducing the User Interface 122
Understanding the User Interface 124
Troubleshooting User Interface Issues 144
Chapter 4: Settings 147Configure or Modify Backup Settings 148
Specify Protection Settings 149
Specify Schedule Settings 167
Specify Advanced Settings 193
Specify Pre/Post Backup Settings 197
Manage File Copy Settings 199
Specify the File Copy Source 200
Specify the File Copy Destination 207
Configure File Copy Settings to Optimize Performance 216
Specify the File Copy Schedule 219
Manage File Archive Settings 220
Specify the File Archive Source 221
Specify the File Archive Destination 228
Configure File Archive Settings to Optimize Performance 235
Specify the File Archive Schedule 238
5
Configure the Copy Recovery Point Settings 239
Copy Recovery Points - Example Scenarios 243
Specify Preferences 245
Specify General Preferences 246
Specify Email Preferences 247
Specify Updates Preferences 254
Chapter 5: Using Arcserve UDP Agent (Windows) 261How to Perform a Backup 262
Review the Backup Prerequisites and Considerations 265
Configure or Modify Backup Settings 283
Perform a Backup 325
Verify that the Backup was Successful 329
How Arcserve UDP Agent (Windows) Works 330
Troubleshooting Backup Issues 339
Perform File Copy to Disk/Cloud 346
Perform a Restore 347
Restore Considerations 348
Restore Methods 350
How to Restore From a Recovery Point 353
How to Restore From a File Copy 375
How to Restore From a File Archive 391
How to Restore Files/Folders 406
How to Restore a Virtual Machine 434
How to Use Exchange Granular Restore (GRT) 454
How to Restore Microsoft Exchange Data 462
How to Restore aMicrosoft Exchange Application 463
How to Restore aMicrosoft SQL Server Application 475
How to Restore an Oracle Database 487
How to Restore an Active Directory 504
How to Perform an Authoritative Restore of an Active Directory after a BMR 511
How to Restore Microsoft Clustered Nodes and Shared Disks 519
Restore from Windows Explorer Using Arcserve UDP Recovery Point View 525
6 Arcserve UDP Agent for Windows User Guide

How to Copy a Recovery Point 528
Review the Prerequisites 529
Configure the Copy Recovery Point Settings 530
Copy a Recovery Point 536
Verify the Copied Recovery Point 544
Mount a Recovery Point 545
Create a VHD File from an Arcserve UDP Agent (Windows) Backup 549
View Logs 553
How to Download File/Folders without Restore 555
How to Create a Boot Kit 557
Launch the Create Boot Kit Utility 558
Determine the Method to Generate a BMR ISO Image 562
Create an Arcserve UDP Agent (Windows) BMR ISO Image for a CD/DVD 564
Create an Arcserve UDP Agent (Windows) BMR ISO Image for a USB Stick 568
Verify the Boot Kit is Created 573
How to Perform a BareMetal Recovery Using a Backup 574
Review the BMR Prerequisites and Considerations 577
Define BMR Options 579
Verify that the BMR was Successful 595
BMR Reference Information 596
Troubleshooting BMR Issues 604
How to Perform a BareMetal Recovery Using a Virtual Standby VM or Instant VM 611
Review the BMR Prerequisites and Considerations 612
Define BMR Options 614
Verify that the BMR was Successful 635
BMR Reference Information 636
Troubleshooting BMR Issues 644
Using the PowerShell Interface 651
How to use the PowerShell Interface 652
Add Arcserve UDP Agent (Windows) Licensing 672
Change Server Communication Protocol 674
Use Scripts to Backup and RestoreMySQL Database 674
7

Restore MySQL Database 676
Modify Arcserve-MySQl-pre-post-snapshot-conf.bat 676
Use Scripts to Backup and Restore PostgreSQL Database 676
Prerequisites 676
Apply Scripts 677
Restore PostgreSQL Database 678
Chapter 6: Troubleshooting Arcserve UDP Agent (Windows) 681Troubleshooting Overview 682
Arcserve UDP Agent Service could not be started because of port conflict 683
Reboot Not Required After Agent Deployment 686
Unable to Connect to Cloud 687
Unable to Change Destination to Removable Device 688
Unable to display Arcserve UDP Agent (Windows) UI in Firefox 690
Settings Disabled when Opening Agent UI 691
Unable to Open the SQL database in SQLManagement Studio from MountedVolume 692
Recovery of SQL Server Databases to Original Location fails 693
Login Link Does not Work at Arcserve UDP Agent Home 694
Troubleshooting Installation Issues 695
Unable to install/uninstall Arcserve UDP Agent (Windows) if a previous attempt wasinterrupted 696
Windows failed to start after Arcserve UDP Agent (Windows) is installed 698
Troubleshooting Update Issues 702
Unable to Access Arcserve UDP Agent (Windows) After Reboot 703
Unable to Connect to the Arcserve Download Server to Download Updates 704
Failed to Download Arcserve UDP Agent (Windows) Updates 705
Troubleshooting Uninstall Issues 706
Unable to install/uninstall Arcserve UDP Agent (Windows) if a previous attempt wasinterrupted 707
Troubleshooting User Interface Issues 709
Unable to display Arcserve UDP Agent (Windows) home page in IE 710
Job Monitor data speed displays a 0 or some other abnormal value 711
Troubleshooting Backup Issues 712
8 Arcserve UDP Agent for Windows User Guide

SQL Server backup failed due to "out of memory" error 713
Backup sessions do not include Microsoft SQL database information 714
Catalog Job fails Due to Less Space when Backing up Large Number of Files 715
Failed to create snapshot for selected volumes 716
Unable to change backup destination folder to Arcserve UDP Recovery Point View 717
Troubleshooting BMR Issues 719
Slow throughput performance during BMR 720
After BMR, dynamic volumes are not recognized by the operating system 721
Unable to Reboot Hyper-V VM After BMR 722
Unable to Reboot VMware VM After BMR 723
Unable to boot the server after performing a BMR 724
Failed to submit BMR job to Recovery Point Server 725
Troubleshooting Merge Issues 726
Merge Session is Skipped 727
Merge Job Failed when Configured to Retain Recovery Sets 728
Merge Job Fails After Being Paused by a Restore Job 729
Troubleshooting Exchange Issues 730
Fail to Restore Exchange Database in DAG Node to Original Location 731
Restore Job Fails During Dump Exchange Database 732
Unable to Connect across the Domain Live Mailbox from Exchange GRT utilty 733
APPENDIX: Frequently Asked Questions (FAQ) 735File Copy Related FAQ 736
Can I restore data if I lose the encryption password? 737
What is the maximum file size that can be backed up/restored? 738
What is not deleted during a File Copy – Delete Source job? 739
Does a File Copy job copy data directly from the local source disks? 740
What is the maximum file size that can be stored on Amazon S3 cloud? 741
For any file size less than 64K, will Arcserve UDP Agent (Windows) copy the entire file? 742
Can a File Copy job and a Backup run simultaneously? 743
During a File Copy job, will the stub files be copied again? 744
Does every File Copy job initiate a VSS snapshot like a regular Arcserve UDP Agent (Win-dows) Backup job? 745
9

Will a File Copy stored on an Amazon S3 cloud location be open source archive format? 746
If a File Copy – Delete Source job deletes files, will I be able to perform a BMR from thefile copy destination? 747
For a File Copy job, is the Delete Source option enabled by default? 748
Encryption Related FAQ 749
If I change the encryption type or the encryption password and the maximum numberof recovery points are then reached, what happens? 750
If I enter a new encryption password, will the old encryption password be asked forfirst? 751
What happens to data encrypted either using Windows or a third-party encryption sys-tem? 752
Exchange Granular Restore FAQ 753
Can Exchange search attachments in email? 754
Can I restore a mailbox without overwriting the existing data? 755
Service Related FAQ 756
How do I use a different account to start the Arcserve UDP Agent Service? 757
Updates Related FAQ 758
Can I use scripted information for specifying Updates proxy settings? 759
Can I use a workstation node as an Updates staging server? 760
Can I manage/operate Updates together or do I need to configure each node separately(one by one)? 761
Does an Updates staging server need a separate Arcserve UDP Agent (Windows) licenseif I am not using any Arcserve UDP Agent (Windows) functions on same staging server? 762
Can I continue to replicate my recovery points backed up in my local RPS server to theremote managed RPS server, after Upgrade? 763
Can I continue to replicate backups from my production systems running Update 2 to aremotely managed RPS server running Update 1, after upgrade? 764
APPENDIX: Using the RDX Cleaner Utilities 765What are the RDX Cleaner Utilities? 766
How to Execute the RDX Cleaner Utility 767
Post Cleaning Verification (RDX Cleaner) 769
How to Execute the RDX Force Cleaner Utility 771
Post Cleaning Verification (RDX Force Cleaner) 773
APPENDIX: Arcserve UDP Terms and Definitions 775Agent-Based Backup 775
10 Arcserve UDP Agent for Windows User Guide

Compression 775
configuration 776
Dashboard 776
Destination 776
Data Store 776
Discovered Nodes 776
Encryption 776
Host-Based Agentless Backup 777
HOTADD Transport Mode 778
Job 778
NBD Transport Mode 778
NBDSSL Transport Mode 778
Nodes 778
Plan 778
Protected Nodes 778
Recent Event 779
Recovery Point 779
Recovery Point Server 779
Replicate 779
Resources 779
SAN Transport Mode 779
Systems 779
Tasks 779
Unprotected nodes 780
11

Contact Arcserve SupportThe Arcserve Support team offers a rich set of resources for resolving your tech-nical issues and provides easy access to important product information.
Contact Support
With Arcserve Support:
You can get in direct touch with the same library of information that is sharedinternally by our Arcserve Support experts. This site provides you with access toour knowledge-base (KB) documents. From here you easily search for and findthe product-related KB articles which contain field-tested solutions for manytop issues and common problems.
You can use our Live Chat link to instantly launch a real-time conversationbetween you and the Arcserve Support team. With Live Chat, you can get imme-diate answers to your concerns and questions, while still maintaining access tothe product.
You can participate in the Arcserve Global User Community to ask and answerquestions, share tips and tricks, discuss best practices and participate in con-versations with your peers.
You can open a support ticket. By opening a support ticket online, you canexpect a callback from one of our experts in the product area you are inquiringabout.
You can access other helpful resources appropriate for your Arcserve product.

Chapter 1: Understanding Arcserve UDP Agent (Win-dows)This section contains the following topics:
Introduction 14
Arcserve UDP Agent (Windows) Documentation 15
About this Document 16
Features 17
Arcserve UDP Agent (Windows) Videos 26
How Arcserve UDP Agent (Windows) Works 27
Chapter 1: Understanding Arcserve UDP Agent (Windows) 13

Introduction
Introduction
Arcserve UDP Agent (Windows) is a disk-based backup product designed to providea fast, simple, and reliable way to protect and recover critical business information.Arcserve UDP Agent (Windows) is a light-weight solution for tracking changes on amachine at the block level and then backing up only those changed blocks in anincremental fashion. As a result, Arcserve UDP Agent (Windows) lets you performfrequent backups (as frequently as every 15 minutes), reducing the size of eachincremental backup (as well as the backup window) and providing a more up-to-date backup. Arcserve UDP Agent (Windows) also provides the capability to restorefiles/folders, volumes, and applications, and perform bare metal recovery from asingle backup. In addition, Arcserve UDP Agent (Windows) also lets you copy andrestore backed-up data from your specified cloud storage location.
14 Arcserve UDP Agent for Windows User Guide

Arcserve UDP Agent (Windows) Documentation
Arcserve UDP Agent (Windows) Documentation
The latest Arcserve UDP Agent (Windows) documentation are:
Arcserve Unified Data Protection Agent for Windows User Guide
Arcserve Unified Data Protection Release Notes
The Arcserve UDP Release Notes contains information relating to system require-ments, operating system support, application recovery support, and other inform-ation you may need to know before installation of this product. In addition, thisdocument also contains a list of known issues that you should be aware of beforeusing this product.
Chapter 1: Understanding Arcserve UDP Agent (Windows) 15

About this Document
About this Document
This document provides the information to understand, install, use, and maintainArcserve UDP Agent (Windows) in the most practical and efficient manner. This doc-ument is divided into multiple categories to help you easily identify and locate thespecific information you are seeking.
The online help version of this document provides a link at the bottom of each topicto let you submit feedback to us about this document. We continually strive tomake our documentation as complete, error free, and easy-to-read as possible. Youcan help by giving us feedback. Thank you in advance!
UnderstandingArcserve UDP Agent(Windows)
This section contains an overview of the features of Arcserve UDPAgent (Windows), with process-flow descriptions of how somekey features work. By understanding how the features work, itshould be easier to understand and perform the related tasks.
Installing/UninstallingArcserve UDP Agent(Windows)
This section contains information about installing Arcserve UDPAgent (Windows), including any pre-installation considerationsyou should be familiar with, the installation procedure to be per-formed, and instructions if you want to perform a silent install-ation.
Getting Started withArcserve UDP Agent(Windows)
This section contains an overview of the Arcserve UDP Agent(Windows) user interface, and detailed information about eachindividual area of this interface. Before you use Arcserve UDPAgent (Windows), it is important that you become familiar withthe details of this interface.
SettingsThis section contains information to understand and manage thevarious Arcserve UDP Agent (Windows) configuration settings.
Using Arcserve UDPAgent (Windows)
This section contains the step-by-step procedures for such tasksas performing ad-hoc backups, restoring from backups, copyingrecovery points, viewing logs, file copying, performing BMR, andinstalling any Arcserve UDP Agent (Windows) self-updates.
TroubleshootingArcserve UDP Agent(Windows)
This section contains some fault-isolation information necessaryto quickly identify and locate the source of a problem so that itcan be remedied and allow Arcserve UDP Agent (Windows) tobecome fully operational again.
Arcserve UDP Agent(Windows) FAQ
This section provides answers to some of the more commonlyasked questions.
Appendix
The appendix section at the end of this document contains a col-lection of useful and supplementary information which is notnecessary for proper usage of Arcserve UDP Agent (Windows),but still may be of interest or use to you.
16 Arcserve UDP Agent for Windows User Guide

Features
Features
The following features are provided with Arcserve UDP Agent (Windows):
BACKUP
The following backup features are provided with Arcserve UDP Agent (Windows):
Lets you perform different types of backup jobs, such as full, incremental, orverify.
Provides volume filtering capability to let you specify to back up only theselected volumes.
If the specified backup destination is on the local volume, a warningmessage displays notifying you this volume is not being backed up.
If system/boot volume is not selected for backup, a warning messagedisplays notifying you the backup is unusable for Bare Metal Recovery(BMR).
If a data store is configured on the volume, then the volume cannot beselected as the backup source.
Protects all specified volumes of your computer (except if the volume con-tains the backup destination).
Lets you encrypt and protect (with encryption passwords) your sensitive data.
Lets you set/change backup schedules (or immediately initiate a customizedbackup).
Lets you set advanced scheduling features. To use advanced schedul-ing, set your Backup Data Format to Advanced. Then, you can accessthe advanced schedule view, set the advanced schedule for the backupjob, backup throttle, merge and daily/weekly/monthly retention.
Provides a system tray monitor to display status/notification information andperform quick actions.
The Arcserve UDP solution provides the capability to utilize a complimentary,limited version of Arcserve Backup to perform backups (agent-based andagentless-based) to tape.
Block Level Incremental Backups
Only backs up the blocks on the source volumes that have changed after thelast successful backup.
Significantly reduces the amount of backup data.
Chapter 1: Understanding Arcserve UDP Agent (Windows) 17

Features
If you have a large file and you only change a small portion of this file, Arc-serve UDP Agent (Windows) backs up only the changed portion to the incre-mental backup. It does not back up the whole file.
Consumes less disk space and less time.
Lets you perform more frequent backups, making the backup images moreup-to-date (as often as every 15 minutes) for recovery.
Infinite Incremental (I2) Snapshots
Initially creates one full backup and then intelligently creates incrementalsnapshot backups forever (after the initial full backup).
Uses less storage space, performs backups faster, and puts less load on yourproduction servers.
Can automatically collapse (merge) incremental changes optimizing the useof disk storage.
Application Consistent Backups
Takes advantage of Windows Volume Shadow Copy Service (VSS) to ensuredata consistency for any VSS-aware application.
Provides recovery of both Microsoft SQL Server and Microsoft ExchangeServer (without performing a full disaster recovery).
Ad-hoc Backups
An ad-hoc backup is one that is created when the situation makes it necessary,rather than being arranged in advance or being part of a plan.
Provides you with the flexibility to perform "ad-hoc" backups outside of thescheduled backups.
For example, you have a repeat schedule for Full, Incremental, and Verifybackups and you want to make major changes to your computer. You can per-form an immediate backup without waiting for the next scheduled backup tooccur.
Provides you with the capability to add a customized (unscheduled) recoverypoint so that you can roll back to this previous point in time if necessary.
For example, you install a patch or service pack and then discover itadversely affects the performance of your computer. You can roll back to thead-hoc backup session that does not include it.
Change Backup Destination
18 Arcserve UDP Agent for Windows User Guide
Features
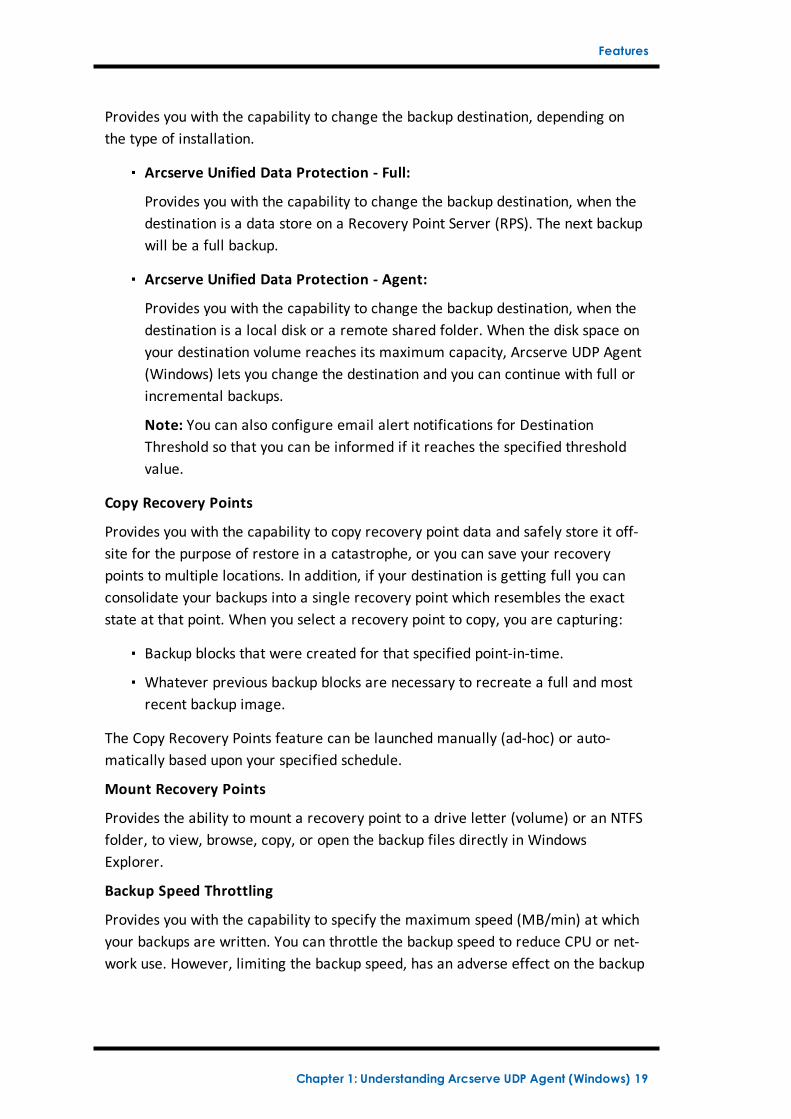
Provides you with the capability to change the backup destination, depending onthe type of installation.
Arcserve Unified Data Protection - Full:
Provides you with the capability to change the backup destination, when thedestination is a data store on a Recovery Point Server (RPS). The next backupwill be a full backup.
Arcserve Unified Data Protection - Agent:
Provides you with the capability to change the backup destination, when thedestination is a local disk or a remote shared folder. When the disk space onyour destination volume reaches its maximum capacity, Arcserve UDP Agent(Windows) lets you change the destination and you can continue with full orincremental backups.
Note: You can also configure email alert notifications for DestinationThreshold so that you can be informed if it reaches the specified thresholdvalue.
Copy Recovery Points
Provides you with the capability to copy recovery point data and safely store it off-site for the purpose of restore in a catastrophe, or you can save your recoverypoints to multiple locations. In addition, if your destination is getting full you canconsolidate your backups into a single recovery point which resembles the exactstate at that point. When you select a recovery point to copy, you are capturing:
Backup blocks that were created for that specified point-in-time.
Whatever previous backup blocks are necessary to recreate a full and mostrecent backup image.
The Copy Recovery Points feature can be launched manually (ad-hoc) or auto-matically based upon your specified schedule.
Mount Recovery Points
Provides the ability to mount a recovery point to a drive letter (volume) or an NTFSfolder, to view, browse, copy, or open the backup files directly in WindowsExplorer.
Backup Speed Throttling
Provides you with the capability to specify the maximum speed (MB/min) at whichyour backups are written. You can throttle the backup speed to reduce CPU or net-work use. However, limiting the backup speed, has an adverse effect on the backup
Chapter 1: Understanding Arcserve UDP Agent (Windows) 19

Features
window. As you lower the maximum backup speed, it increases the amount of timeof perform the backup.
Note: By default, the Throttle Backup option is not enabled and backup speed is notbeing controlled. Backup Speed Throttling only applies when the Backup DataFormat is Standard. When the Backup Data Format is Advanced, a Backup ThrottleSchedule is available.
Reserve Space on Destination
Provides you with the capability to specify a percentage of the calculated spacethat is necessary to perform a backup. This amount of continuous space is thenreserved on the destination before the backup starts writing data and helpsimprove backup speed.
Note: Reserve Space on Destination only applies when the Backup Data Format isStandard. When the Backup Data Format is Advanced, this option does not exist.
Backup Status Monitoring
Arcserve UDP Agent (Windows) provides the capability to monitor:
Last backup status
Recovery Points
Destination capacity
Protection summary
Most recent events
License notifications
Job Status Monitoring
Arcserve UDP Agent (Windows) provides the capability to monitor:
Details about the next scheduled job
Details about the next scheduled job
RESTORE
Arcserve UDP Agent (Windows) provides the following restore features:
Restore data from specific recovery points.
Search/browse to a specific file/folder to restore.
Restore from File Copy.
Restore a virtual machine (VM) that you previously backed up.
Set the restore destination to an alternate location or server.
20 Arcserve UDP Agent for Windows User Guide

Features
Restore encrypted backup data.
Granular-level restore of Exchange objects.
On Demand Catalog job for any catalog-less backup recovery point using theFind Files/Folders to Restore option.
Restore Active Directory to recover Active Directory objects and attributes.
Types of Restores
Arcserve UDP Agent (Windows) provides the following types of restores:
File-Level Restore
Restores any backed up files/folders.
Recovery Point Restore
Restores backed up data based from a specified point in time (recoverypoint).
File Copy Restore
Restores File Copy data from a disk or cloud.
Exchange Granular-Level Restore
Restores individual Exchange objects (mailboxes, mailbox folders, or mail).
Virtual Machine (VM) Recovery
Restores a VM that you previously backed up.
Application Restore
Restores backed up Microsoft SQL Server/Microsoft Exchange data at thedatabase level.
Explorer Integration Restore
Arcserve UDP Agent (Windows) provides the capability to browse directly andrestore files/folder and Exchange objects (mailboxes, mail folders, mail)from Windows Explorer by using the "Change to Arcserve UDP Agent (Win-dows) View" option.
Change Restore Location
Arcserve Unified Data Protection - Full:
Provides you with the ability to restore from a local disk, remoteshared folder, and from a Recovery Point Server (RPS).
Arcserve Unified Data Protection - Agent:
Chapter 1: Understanding Arcserve UDP Agent (Windows) 21

Features
Provides you with the ability to restore from a local disk or a remoteshared folder.
Bare Metal Recovery (BMR)
Recovers a computer system from "bare metal", and includes the operatingsystem, applications, and data components necessary to rebuild or restorethe entire backed-up system. BMR is used for disaster recovery or for migra-tion from one server to another.
Restores to dissimilar hardware and resolves any hardware differences.
Expands and restores to bigger disks if necessary.
Provides the capability to perform the following types of V2P (Virtual to Phys-ical) Bare Metal Recovery. This feature lets you perform V2P recovery fromthe latest state of a standby virtual machine and from any recovery point thathas been previously converted from an Arcserve UDP Agent (Windows)backup session. This feature also helps you reduce the loss of your productioncomputer.
BMR from a Hyper-V server
BMR from a VMware ESX or vCenter
Disk Resizing
During a Bare Metal Recovery, you can restore the image to another diskand can resize the disk partitions if necessary (without losing any data that isstored on the drive).
When restoring to another disk, the capacity of new disk must be the samesize or larger than the original disk.
Note: Disk resizing if necessary is for basic disks only, and not for dynamicdisks.
ALERT NOTIFICATIONS
Arcserve UDP Agent (Windows) provides the following email alert notifications:
Missed jobs - Sends an alert notification for any scheduled job that did notrun at the scheduled time.
Backup, Catalog, File Copy, Restore, or Copy Recovery Point job failure/crash- Sends an alert notification for all unsuccessful job attempts. This categoryincludes all failed, incomplete, and canceled jobs, and crashed attempts.
22 Arcserve UDP Agent for Windows User Guide
Features
Note: These email alerts are sent with a high importance. The email alertsthat have a high importance level setting display a visual indicator of anexclamation point in their Inbox.
Backup, Catalog, File Copy, Restore, or Copy Recovery Point job success -Sends an alert notification for all successful job attempts.
Merge job stopped, skipped, failed, or crashed - Sends an alert notificationfor all stopped, skipped, failed, or crashed merge jobs.
Merge job success - Sends an alert notification for all successful merge jobs.
Backup destination free space is less than - Sends an email notification whenthe amount of unused space at the backup destination is less than a specifiedvalue.
New Updates Available - Sends an email notification when a new update forArcserve UDP Agent (Windows) is available. Email notifications are also sentif a failure occurs during the check for updates or during the download.
Resource threshold alerts - Sends an alert notification when any specifiedresource performance threshold is reached. The monitored resource levelsare CPU Usage (percentage), Memory Usage (percentage), Disk Throughput(MB/second) and Network I/O (percentage of NIC bandwidth currently using).
ENCRYPTION/DECRYPTION SUPPORT
Arcserve UDP Agent (Windows) provides the capability to encrypt and protect (withencryption passwords) your sensitive data and also decrypt the encrypted data afterrecovery.
Encryption support is provided for both uncompressed backup format andcompressed backup format. (Uncompressed backup is no longer VHD formatif encrypted).
Windows built-in encryption libraries are used for data encryption and decryp-tion.
For Windows 2003/Vista/2008: CAPI (CryptoAPI) is used for data encryption.
For Windows 7/2008 R2/Windows 2012: CNG (Cryptography API Next Gen-eration) is used for data encryption.
Note: Data interoperability is supported both ways between CAPI and CNG,meaning that data that is encrypted on Windows 2003/Vista/2008 can bedecrypted on Windows 7/2008 R2 (and vice versa). This data interoperabilityenables moving backups of any computer to a different computer, and torestore data from there.
Chapter 1: Understanding Arcserve UDP Agent (Windows) 23

Features
Encryption password management provides a memory feature so that you donot need to remember encryption passwords when attempting to restoreencrypted data. For every encrypted backup, the encryption password issaved in a password list file.
As long as you can log in to Arcserve UDP Agent (Windows), there is no needto remember encryption passwords to restore data from current backups.(Current backups are defined as backups that were created from the samecomputer that you are logged in to). If you attempt to restore data fromencrypted backups belonging to a different computer, you are always askedto provide the encryption password.
FILE COPY
File Copy can be used for copying critical data to secondary locations and can alsobe used as an archiving solution. File Copy allows you to safely and securely deletethe source data after it has been copied to an off-site or secondary storage repos-itory.
Arcserve UDP Agent (Windows) provides the following capabilities to copy or movefiles and help you reduce storage cost, meet compliance, and improve data pro-tection.
Note:When you use the option File Copy - Delete Source, the data is moved fromthe source to the destination (deleted from source location). When you perform afile copy, the data is copied from the source to the destination (files remain intacton the original location).
Copy files to disk or to cloud based upon your specified policies.
Block-level file copying lets you save and store only the blocks of the sourcethat have changed as of the last file copying. (Significantly reduces theamount of file copied data).
Select the source to copy, which can be a specific volume, volumes, folder, orfolders.
Use filters to include or exclude files that are based upon your specific cri-teria or patterns.
Specify a schedule for file copying that is based upon completion of a spe-cified number of successful backups.
File copy versions of the same source at the specified destination.
Encrypt file copied data for security.
Compress data before performing file copying process.
24 Arcserve UDP Agent for Windows User Guide

Features
Specify how long to retain file copy data.
Specify how many versions of the data you can have on the destination.
Note: Arcserve UDP Agent (Windows) does not copy application files, fileswith system attributes, and files with temporary attributes. Only a currentbacked-up source is eligible for file copying.
Arcserve UDP Agent (Windows) UPDATES
Provides the following capabilities for downloading and installing self- updates toArcserve UDP Agent (Windows):
Check for new available updates to Arcserve UDP Agent (Windows) (manuallyinitiated from the UI or system tray monitor or automatically as scheduled).
Trigger automatic or manual downloading of updates.
Specify a custom schedule to perform automatically periodic checks forupdates.
Trigger installation of updates either from the UI, the system tray monitor, orsilently from the command line.
Specify to send automatic email notifications when new updates becomeavailable (or when problems occur).
Configure the client and or a staging server to connect to Arcserve Support(directly or by way of a proxy server) to download available updates. (A sta-ging server is an Arcserve UDP Agent (Windows) installed computer which isused as a temporary storage location for downloading an update before it isinstalled into an Arcserve UDP client computer from that staging server).
Use staging servers for clients that have limited access to the Internet.
Configure multiple staging servers for downloading the updates. If theprimary staging server is unavailable, the download function automaticallytransfers to the next specified staging server.
Remote deploy from one computer to another and let you move all updatesconfiguration and email settings from that first computer to the deployedcomputer.
Note: All updates that are released for Arcserve UDP Agent (Windows) are cumu-lative. As a result, each update also includes all previously released updates toensure that your computer is always up-to-date.
Chapter 1: Understanding Arcserve UDP Agent (Windows) 25

Arcserve UDP Agent (Windows) Videos
Arcserve UDP Agent (Windows) Videos
For those of you who believe that "a picture is worth a thousand words" ArcserveUDP Agent (Windows) provides various how-to videos that are designed to simplifyyour understanding and performance of specific tasks. Watching step-by-stepvideos is a great way to help you learn how to use Arcserve UDP Agent (Windows)features to perform essential system protection procedures.
Note: These videos are meant to supplement (and not replace) the written pro-cedures that they are related to. Refer to the actual procedures for all detailedinformation (precautions, notes, examples, and so on) associated with each task.
You can access these instructional videos from the Arcserve UDP Agent (Windows)user interface or from within the product documentation.
We provide a library of how-to videos that are designed to simplify your under-standing and performance of specific tasks. You can access these instructionalvideos from either the arcserve.com website or from YouTube. The versions of thevideos from arcserve.com and YouTube are identical, and only the viewing sourceis different:
To view Arcserve UDP Agent (Windows) videos on arcserve.com
To view Arcserve UDP Agent (Windows) videos on YouTube
The videos that are supplied are only a start, and we expect to have more createdin the future. If you have any ideas for new videos, let us know. You can click theuser interface link to Provide Feedback. You can even send Arcserve an email usingthe link at the bottom of all Online Help topics.
26 Arcserve UDP Agent for Windows User Guide

How Arcserve UDP Agent (Windows) Works
How Arcserve UDP Agent (Windows) Works
Arcserve UDP Agent (Windows) lets you perform frequent and periodic block levelbackups of your full machine. These backups can be stored on either an internaldrive, an external drive, on a remote network share, or a data store on a RecoveryPoint Server (RPS), depending on the type of installation (Arcserve Unified Data Pro-tection - Full or Arcserve Unified Data Protection - Agent). If the backup destinationvolume is also selected as the backup source volume, a never ending backup is notexecuted. During the backup, the backup destination volume is excluded and anentry is added to the Activity log. The Arcserve UDP Agent (Windows) provides thecapability to perform Full, Incremental, or Verify type backups.
Arcserve Unified Data Protection - Full:
Available backup destinations include: internal drive, external drive, remote net-work share, or a data store on a Recovery Point Server (RPS). When you create aPlan from the Arcserve UDP server, you can select Data Store on Recovery PointServer as the destination and then deploy the plan to the agent node.
Arcserve Unified Data Protection - Agent:
Available backup destinations include: internal drive, external drive, or a remotenetwork share.
Arcserve UDP Agent (Windows) also provides various methods to identify and loc-ate the backed up data and allow you to restore it if necessary. Regardless of whichrestore method you select, Arcserve UDP Agent (Windows) lets you quickly identifythe data you need and retrieve it from the appropriate backup location.
Chapter 1: Understanding Arcserve UDP Agent (Windows) 27

How Arcserve UDP Agent (Windows) Works
How the Backup Process Works
Arcserve UDP Agent (Windows) lets you perform frequent and periodic block levelbackups of your entire machine. These backups can be stored on either an internaldrive, an external drive, on a remote network share, or a data store on a RecoveryPoint Server (RPS), depending on the type of installation (Arcserve Unified Data Pro-tection - Full or Arcserve Unified Data Protection - Agent). The Arcserve UDP Agent(Windows) provides the capability to perform Full, Incremental, or Verify typebackups.
The basic process for how Arcserve UDP Agent (Windows) performs a backup issimple. When you initiate a backup (either as scheduled or manually launched), Arc-serve UDP Agent (Windows) captures a full VSS snapshot, and then backs up onlythose blocks that have been changed since the previous successful backup. (If it is aFull backup, all blocks are backed up). This block-level incremental backup processsignificantly reduces the amount of backup data. For example, if you have a largefile and only change a small portion of this file, Arcserve UDP Agent (Windows)backs up only the changed portion to the incremental backup and not back up theentire file.
During this block-level incremental backup process, Arcserve UDP Agent (Windows)not only captures the data, but also creates a catalog containing all informationrelated to the operating system, installed applications (Microsoft SQL andMicrosoft Exchange only), configuration settings, necessary drivers, and so on. Ifnecessary, you can then restore this backed-up image to recover your data or yourentire machine. If the backup destination volume is also selected as the backupsource volume, a never ending backup is not executed. During the backup, thebackup destination volume is excluded and an entry is added to the Activity log.
Note: You can submit a faster backup job (catalog-less backup), since a catalog isnot required after a backup job is complete. The backup settings option "GenerateFile System catalog for faster search after each backup" by default is unchecked,indicating it will perform a faster backup.
The details of what is being backed up, how it is being backed up, when it is beingbacked up, and so on, are controlled by the various backup configuration settingsthat you specify. These settings are applied to each backup job, regardless of howyou initiate the backup (automatically or manually).
Arcserve Unified Data Protection - Full:
With this type of installation, configure your backup by creating a plan. Availablebackup destinations include: internal drive, external drive, remote network share,or a data store on a Recovery Point Server (RPS). When you create a Plan from the
28 Arcserve UDP Agent for Windows User Guide

How Arcserve UDP Agent (Windows) Works
Arcserve UDP server, you can select Data Store on Recovery Point Server as the des-tination and then deploy the plan to the agent node.
Arcserve Unified Data Protection - Agent:
With this type of installation, configure your backup by specifying the backup set-tings. Available backup destinations include: internal drive, external drive, or aremote network share.
Chapter 1: Understanding Arcserve UDP Agent (Windows) 29

How Arcserve UDP Agent (Windows) Works
How Block-Level Incremental Backups Work
When you start a backup, the specified volume is divided into a number of sub-ordinate data blocks that are then backed up. The initial backup is considered the"parent backup" and will be a Full Backup of the entire volume to establish thebaseline blocks to be monitored. Before performing the backup, a VSS snapshot iscreated, then an internal monitoring driver checks each block to detect anychanges. As scheduled, Arcserve UDP Agent (Windows) will then incrementally backup only those blocks that have changed since the previous backup. You can schedulethe subsequent block-level incremental backups ("child backups") as frequently asevery 15 minutes to always provide accurate, up-to-date backup images.
If you need to restore the volume information, the most recent backed up versionof each block is located and the entire volume is rebuilt using these current blocks.
Arcserve Unified Data Protection - Full:
Available backup destinations include: internal drive, external drive, remote net-work share, or a data store on a Recovery Point Server (RPS). When you create aPlan from the Arcserve UDP server, you can select Data Store on Recovery PointServer as the destination and then deploy the plan to the agent node.
Arcserve Unified Data Protection - Agent:
Available backup destinations include: internal drive, external drive, or a remotenetwork share.
30 Arcserve UDP Agent for Windows User Guide

How Arcserve UDP Agent (Windows) Works
How Infinite Incremental Backups Work
If left alone, the incremental snapshots (backups) would continue, as often as 96times each day (every 15 minutes). These periodic snapshots will accumulate alarge chain of backed up blocks to be monitored each time a new backup is per-formed, and require added space to store these ever-growing backup images. Tominimize this potential problem, Arcserve UDP Agent (Windows) utilizes the InfiniteIncremental Backup process, which intelligently creates incremental snapshotbackups forever (after the initial full backup) and uses less storage space, performsfaster backups, and puts less load on your production servers. Infinite IncrementalBackups allow you to set a limit for the number of incremental child backups to bestored. When the Backup Data Format is Standard, configure the Recovery Pointsoption from the Protection Settings tab on the Backup Settings dialog. When theBackup Data Format is Advanced (default), configure the Recovery Points optionfrom the Schedule tab on the Backup Settings dialog.
When the specified limit is exceeded, the earliest (oldest) incremental child backupis merged into the parent backup to create a new baseline image consisting of the"parent plus oldest child" blocks (unchanged blocks will remain the same). Thiscycle of merging the oldest child backup into the parent backup repeats for eachsubsequent backup, allowing you to perform Infinite Incremental (I2) snapshotbackups while maintaining the same number of stored (and monitored) backupimages.
Chapter 1: Understanding Arcserve UDP Agent (Windows) 31

How Arcserve UDP Agent (Windows) Works
How File Level Restores Work
During a block-level backup, each backed up file is made up of a collection ofblocks that define that particular file. A catalog file is created containing a list ofthe backed up files, along with the individual blocks that were used for each fileand the available recovery points for these files. When you need to restore a par-ticular file, you can search your backup and select the file you want to restore andthe recovery point you want to restore from. Then Arcserve UDP collects the ver-sion of the blocks that were used for the recovery point of the specified file, andreassembles and restores the file.
Note: You can also perform a restore without a catalog file from a catalog-lessbackup recovery point.
The following flow diagram shows the process of how Arcserve UDP restores a spe-cific file:
32 Arcserve UDP Agent for Windows User Guide

How Arcserve UDP Agent (Windows) Works
How Verify Backups Work
Every so often (as scheduled or when manually initiated), Arcserve UDP Agent (Win-dows) can perform a Verify (resynchronization) type backup to provide a con-fidence check of the stored backup image and resynchronize that image ifnecessary. A Verify type backup looks at the most recent backup of each individualblock and compares the content and information to the source. This comparisonverifies that the latest backed up blocks represent the corresponding information atthe source. If the backup image for any block does not match the source (possiblybecause of changes in the system since the last backup), Arcserve UDP Agent (Win-dows) refreshes (resynchronizes) the backup of the block that does not match.
A Verify backup can also be used to get the same guarantee as a full backupwithout taking the space of full backup. The advantage of a Verify backup is that itis small when compared to full backup because only the changed blocks (blocks thatdo not match the last backup) are backed up. However, a Verify backup is alsoslower than an Incremental backup because Arcserve UDP Agent (Windows) has tocompare all of source disk blocks with the blocks of the last backup.
Chapter 1: Understanding Arcserve UDP Agent (Windows) 33

How Arcserve UDP Agent (Windows) Works
How Recovery Sets Work
A Recovery Set is a storage setting where a group of recovery points (backup ses-sions) are backed-up over a specified period and then stored together as one com-piled set. A Recovery Set includes a series of backups, always starting with a FullBackup, and then followed by a number of subsequent Incremental, Verify, or FullBackups. By using Recovery Sets (instead of Recovery Points), you disable infiniteincremental backups and discontinue merging of backup sessions, thereby com-pletely eliminating the time-consuming merge process.
Recovery Sets are generally used for large storage environments and helps you tomanage your backup window time more efficiently when protecting large amountsof data. Recovery Sets are used when the backup time is more important than stor-age space constraints.
A Full Backup is required to start a Recovery Set. Therefore, the backup session thatstarts a Recovery Set will be automatically converted to a Full Backup, even if thereis no Full Backup configured or scheduled to be performed at that time. After theinitial Full Backup is completed, all subsequent backups (regardless if which type ofbackup is performed) will be saved within the Recovery Set until the next newRecovery Set is launched (manually or automatically as scheduled).
You can configure the number of Recovery Sets to retain. When the number ofRecovery Sets retained exceeds the specified retention count, the oldest RecoverySet will be deleted (instead of being merged). A recovery set is considered com-plete only when the starting Full Backup for the next Recovery Set is completed. Forexample, if you specified to retain two Recovery Sets, Arcserve UDP Agent (Win-dows) will delete the first Recovery Set only after the Full Backup for the thirdRecovery Set is completed. This ensures that when the first backup is deleted, youalready have two Recovery Sets (Recovery Set 2 and Recovery Set 3) retained ondisk.
Note: If you want to delete a recovery set to save backup storage space, reduce thenumber of retained sets and Arcserve UDP Agent (Windows) automatically deletesthe oldest recovery set. Do not attempt to delete the recovery set manually.
A flag in the status column on the Arcserve UDP Agent (Windows) home page MostRecent Events section indicates that a full backup is the starting backup of a recov-ery set. After the recovery set setting is changed (for example, changing the recov-ery set starting point from the first backup of Monday to the first backup ofThursday), the starting point of existing recovery sets will not be changed.
Note: Recovery sets are only available when using Arcserve UDP Agent (Windows)and you set the Backup Data Format to Standard. Recovery sets are not available
34 Arcserve UDP Agent for Windows User Guide

How Arcserve UDP Agent (Windows) Works
if you set the Backup Data Format to Advanced. This is because merge jobs arevery fast and efficient when using the Advanced Backup Data Format, thereforeeliminating the need for recovery sets.
Default: 2
Minimum: 1
Maximum: 100
Example 1 - Retain 1 Recovery Set:
Specify the number of recovery sets to retain as 1.
Arcserve UDP Agent (Windows) always keeps two sets in order to keep one com-plete set before starting the next recovery set.
Example 2 - Retain 2 Recovery Sets:
Specify the number of recovery sets to retain as 2.
Arcserve UDP Agent (Windows) will delete the first recovery set when the fourthrecovery set is about to start. This ensures that when the first backup is deleted andthe fourth is starting, you still have two recovery sets (recovery set 2 and recoveryset 3) available on disk.
Note: Even if you choose to retain only one recovery set, you will need space for atleast two full backups.
Example 3 - Retain 3 Recovery Sets:
The backup start time is 6:00 AM, August 20, 2012.
An incremental backup runs every 12 hours.
A new recovery set starts at the last backup on Friday.
You want to retain 3 recovery sets.
With the above configuration, an incremental backup will run at 6:00 AM and 6:00PM every day. The first recovery set is created when the first backup (must be a fullbackup) is taken. Then the first full backup is marked as the starting backup of therecovery set. When the backup scheduled at 6:00 PM on Friday is run, it will be con-verted to a full backup and marked as the starting backup of the recovery set.
Chapter 1: Understanding Arcserve UDP Agent (Windows) 35

How Arcserve UDP Agent (Windows) Works
36 Arcserve UDP Agent for Windows User Guide

How Arcserve UDP Agent (Windows) Works
How Bare Metal Recovery Works
Bare Metal Recovery is the process of restoring a computer system from "baremetal" by reinstalling the operating system and software applications, and thenrestoring the data and settings. The most common reasons for performing a baremetal recovery are because your hard drive either fails or becomes full and youwant to upgrade (migrate) to a larger drive or migrate to newer hardware. Baremetal recovery is possible because during the block-level backup process, ArcserveUDP Agent (Windows) captures not only the data, but also all information related tothe operating system, installed applications, configuration settings, necessarydrivers, and so on. All relevant information that is necessary to perform a completerebuild of the computer system from "bare metal" is backed up into a series ofblocks and stored on the backup location.
Note: Dynamic disks are restored at disk level only. If your data is backed up to avolume on a dynamic disk, you will not be able to restore this dynamic disk (includ-ing all its volumes) during BMR.
When you perform a bare metal recovery, the Arcserve UDP Agent (Windows) bootdisk is used to initialize the new computer system and allow the bare metal recov-ery process to begin. When the bare metal recovery is started, Arcserve UDP Agent(Windows) will prompt you to select or provide a valid location to retrieve thesebacked up blocks from, as well as the recovery point to be restored. You may alsobe prompted to provide valid drivers for the new computer system if needed. Whenthis connection and configuration information is provided, Arcserve UDP Agent(Windows) begins to pull the specified backup image from the backup location andrestore all backed up blocks to the new computer system (empty blocks will not be
Chapter 1: Understanding Arcserve UDP Agent (Windows) 37

How Arcserve UDP Agent (Windows) Works
restored). After the bare metal recovery image is fully restored to the new com-puter system, the machine will be back to the state that it was in when the lastbackup was performed, and Arcserve UDP Agent (Windows) backups will be able tocontinue as scheduled. (After completion of the BMR, the first backup will be aVerify Backup).
38 Arcserve UDP Agent for Windows User Guide

How Arcserve UDP Agent (Windows) Works
How Arcserve UDP Agent (Windows) Update Works
A product update lets Arcserve deliver product improvements to users. Updates areused to deliver bug fixes, new hardware support, and performance and securityenhancements. Within Arcserve UDP Agent (Windows), the Updates function sim-plifies this process and provides a fast, easy, and reliable solution to keep your Arc-serve UDP Agent (Windows) installation up-to-date with the latest availableupdates. The Updates function is your link between Arcserve and your ArcserveUDP Agent (Windows) installation.
Arcserve UDP Agent (Windows) Updates provide the following functions:
Check for available updates (manual or scheduled)
Download available updates from Arcserve (either directly to a client machineor to a staging server first and then to a client machine)
Install successfully downloaded updates (to be initiated manually)
Send email notifications when a new update is available
Note:When Arcserve UDP Agent (Windows) is managed by the Arcserve UDP Con-sole, checking for updates is disabled from Arcserve UDP Agent (Windows). Youneed to check and deploy the update from the Arcserve UDP Console UI.
Check for Updates
When Arcserve Server is selected as download server, Arcserve UDP Agent (Win-dows) Updates provides the capability to connect to the Arcserve server either
Chapter 1: Understanding Arcserve UDP Agent (Windows) 39

How Arcserve UDP Agent (Windows) Works
directly or using a proxy server (as configured manually) to check for new and avail-able Arcserve UDP Agent (Windows) updates. The Arcserve UDP Agent (Windows)will directly connect to Arcserve server using the proxy settings configured bybrowser (only applicable for IE and Chrome). This check for updates function can betriggered either manually from the user interface/tray monitor or automatically asspecified by the Scheduler. (The internal Scheduler is responsible for starting at ascheduled day and time and triggering an automatic check and download of avail-able updates).
When triggered, the update manager contacts the Arcserve server to check thedate /time stamp of a file that contains the available update information. If thisavailable update information file has been modified since the last check, it will bedownloaded from the server for comparison. The available update information isthen compared to another file containing the already downloaded update inform-ation to determine if the available update is new and has not been previously down-loaded. If the latest available update is not installed on your machine, ArcserveUDP Agent (Windows) displays an icon on the home page to inform you that a newupdate is available. In addition, an email notification can also be sent to inform youwhen a new Arcserve UDP Agent (Windows) update is available for downloading.
When Staging Server is selected as download server, Arcserve UDP Agent (Win-dows) downloads the available update information file from the staging server, andperform the same comparison check with the already available update informationfile. If the latest available update is not installed on your machine, Arcserve UDPAgent (Windows) will display an icon on the home page to inform you that a newupdate is available.
Note: All updates released for Arcserve UDP Agent (Windows) are cumulative. As aresult, each update also includes all previously released updates to help ensure thatyour machine is always up-to-date. (The Help About dialog displays the updatelevel installed on a machine. If necessary, you can use this information for buildinganother server with the same configuration/patch level).
Download Updates
Arcserve UDP Agent (Windows) Updates provide the capability to download avail-able Arcserve UDP Agent (Windows) updates either directly from the Arcserveserver or from a staging server which in turn connects to the Arcserve server. Thisdownload process is triggered automatically when the check for updates processdetermines that a new update is available (unless this auto-download function is dis-abled). You can configure Arcserve UDP Agent (Windows) to download an updatedirectly (or using a proxy server) to your client machine or to a staging server. A sta-ging server can be used as a temporary storage location for downloading an updatebefore it is downloaded and installed into an Arcserve UDP Agent (Windows) client
40 Arcserve UDP Agent for Windows User Guide

How Arcserve UDP Agent (Windows) Works
machine. You may not want to expose your client machine to the internet to down-load updates from the Arcserve server. In this case, you can first download theupdate to a staging server and then allow other client machines to download theupdate from that staging server. The Arcserve UDP Agent (Windows) provides thecapability to configure multiple staging servers for downloading the updates. If forsome reason the primary staging server is unavailable, the download function willautomatically transfer to the next specified staging server.
Note: If you are using a staging server for your Updates downloads, Arcserve UDPAgent (Windows) must be installed on that staging server, but does not need to belicensed unless you are using Arcserve UDP Agent (Windows) to protect that stagingserver.
When triggered, the Updates function contacts the Arcserve server and downloadsthe available update and places it in a holding directory (on either the stagingserver or the client machine) until directed to proceed with the subsequent install-ation process.
The default location for the download folder is: <Product Home>\Update Man-ager\EngineUpdates\7.0\
If for some reason, the download cannot be started, a popup message is displayedand Arcserve UDP Agent (Windows) waits a specified number of minutes and thenattempt to download again. If after a specified number of retry attempts, the down-load still cannot continue, an error message will be displayed in the activity logindicating the most likely reason for the failure.
Install Updates
Arcserve UDP Agent (Windows) Updates provide the capability to install the avail-able and successfully downloaded updates. This install process can only betriggered manually from the user interface/tray monitor (not automatically). Whentriggered, the update is installed from the holding directory to the applicable Arc-serve UDP Agent (Windows) component directory of the client machine or the sta-ging server. You cannot trigger the installation of the update directly from astaging server to a client machine. When you click install, the update is downloadedfrom the staging server to the client machine (if it has not been downloadedalready), and then the installation process is triggered from the client machine.
Note: The installation only continues if no other active Arcserve UDP Agent (Win-dows) jobs are running. If another job is running, a message is displayed informingyou of this condition and requesting that you try again at a later time.
If the installation is successful, the file containing the status information is updatedfor future use.
Chapter 1: Understanding Arcserve UDP Agent (Windows) 41

How Arcserve UDP Agent (Windows) Works
If the installation fails, an error message is displayed indicating the most likelyreason for the failure.
Note: During the update installation Arcserve UDP Agent (Windows) will stop theArcserve UDP Agent (Windows) Web service and will restart this web service aftersuccessful installation of update.
Email Notifications
Arcserve UDP Agent (Windows) Updates provide the capability to send automaticemail notifications when a new update is available. The Arcserve UDP Agent (Win-dows) connects to an SMTP server (with appropriate credentials) to enable sendingthese email notifications over the Internet from Arcserve to your server. (The emailrecipients are specified from the Preferences dialog).
In addition, email notifications are also sent if a failure occurs during the check forupdates or during the download.
42 Arcserve UDP Agent for Windows User Guide

Chapter 2: Installing/Uninstalling Arcserve UDP Agent(Windows)This section contains the following topics:
How to Install Arcserve UDP Agent (Windows) 44
How to Install Arcserve UDP Agent (Windows) Updates 75
How to Uninstall Arcserve UDP Agent (Windows) 98
UDP Workstation Free 115
Chapter 2: Installing/Uninstalling Arcserve UDP Agent (Windows) 43

How to Install Arcserve UDP Agent (Windows)
How to Install Arcserve UDP Agent (Windows)
Installing Arcserve UDP Agent (Windows), a disk-based backup, allows you to pro-tect and recover critical business information in a fast, simple, and reliable way.The Arcserve UDP Agent (Windows) is a light-weight solution for tracking changeson a machine at the block level and then backing up only those changed blocks inan incremental method. As a result, Arcserve UDP Agent (Windows) lets you per-form frequent backups as frequently as every 15 minutes, reducing the size of eachincremental backup as well as the backup window and provides a more up-to-datebackup. The Arcserve UDP Agent (Windows) also provides the capability to restorefiles, folders, volumes, and applications, and perform bare metal recovery from asingle backup. In addition, Arcserve UDP Agent (Windows) also lets you copy andrestore backed-up data from your specified cloud storage location.
Note: You can use Arcserve UDP for a trial period. At the end of the trial period, ifyou have not obtained a license, Arcserve UDP will automatically revert to a Work-station Free Edition with limited capabilities.
The following diagram illustrates the process to install Arcserve UDP Agent (Win-dows):
44 Arcserve UDP Agent for Windows User Guide

How to Install Arcserve UDP Agent (Windows)
Perform the following tasks to install Arcserve UDP Agent (Windows):
1. Review the Installation Considerations
2. Install Arcserve UDP Agent (Windows) Using the Installation Wizard
3. Install Arcserve UDP Agent (Windows) Silently
4. Verify that the Arcserve UDP Agent (Windows) Installation was Successful
5. (Optional) How the Installation Process Affects Operating Systems
Chapter 2: Installing/Uninstalling Arcserve UDP Agent (Windows) 45
How to Install Arcserve UDP Agent (Windows)
Review the Installation Considerations
Review the following installation considerations before installing Arcserve UDPAgent (Windows):
The Arcserve UDP Agent (Windows) installation package is available through aweb download and from the product installation CD.
Note: You can use Arcserve UDP for a trial period. At the end of the trialperiod, if you have not obtained a license, Arcserve UDP will automaticallyrevert to a Workstation Free Edition with limited capabilities.
Verify that you have administrator privileges or the proper permissions toinstall software on the servers where you are installing Arcserve UDP Agent(Windows).
If you uninstall and install a new Arcserve UDP Agent (Windows) build and spe-cify the same backup destination as the previous build, the first backup afterthe installation runs as a Verify backup.
Note: After deploying the agent, you do not need to reboot to start backup. Fordetails, refer to Reboot Not Required After Agent Deployment.
After installation, you can configure your antivirus software to exclude specificprocesses, folders, and files so that the antivirus software does not interferewith the proper operation of Arcserve UDP Agent (Windows). For a completelist of processes, folders, and files that should be excluded, see Antivirus Con-figuration.
If Arcserve UDP Agent (Windows) is being installed on a x64 Windows CoreOperating System, you should also install Windows-on-Windows 64-bit(WOW64) on the Server Core for the Arcserve UDP Agent (Windows) setup towork.
For a list of the possible error codes that the Arcserve UDP Agent (Windows)installer could return, see Arcserve UDP Agent (Windows) Installer Error Codes.
Review the Compatibility Matrix which provides the supported operating sys-tems, databases, and browsers.
46 Arcserve UDP Agent for Windows User Guide

How to Install Arcserve UDP Agent (Windows)
Install Arcserve UDP Agent (Windows) Using theInstallation Wizard
This section describes how you can install Arcserve UDP Agent (Windows) on yourlocal system using the Installation wizard. The Installation wizard is an interactiveapplication that guides you through the installation process.
Follow these steps:
1. Access the Arcserve UDP Agent (Windows) installation package (arcserve_Unified_Data_Protection_Agent_Windows.exe) from either the Arcserve website or theproduct CD.
Notes:
If the installation is performed using the web downloaded installation package, thecontents of the package are extracted to your local system.
If one of the supported non-English operating systems is detected, you will berequired to select the language for the product installation.
The License Agreement dialog opens.
2. Read and accept the terms of the Licensing Agreement on the License Agreementdialog and click Next.
The Installation Type dialog opens.
3. Select Arcserve Unified Data Protection - Agent from the available componentsto install.
The Arcserve Unified Data Protection - Agent installs only the Arcserve UDPAgent.
For instructions on how to install Arcserve Unified Data Protection - Full, seeInstall Arcserve UDP Using the Setup Wizard in the Solutions Guide.
The Arcserve Unified Data Protection - Full installs Arcserve UDP Console, Recov-ery Point Server, and Agent.
4. Specify if you want to install the Arcserve UDP Agent (Windows) change trackingdriver and click Next.
By default, this option is selected.
Without this driver installed, Arcserve UDP Agent (Windows) cannot performa verify / incremental backup.
With this driver installed, you would still need to have a valid Arcserve UDPAgent (Windows) license to perform a local backup.
Chapter 2: Installing/Uninstalling Arcserve UDP Agent (Windows) 47

How to Install Arcserve UDP Agent (Windows)
This driver is not required if this agent is used as Virtual Standby monitor orhost-based VM backup proxy server.
Note: You can install this driver at any time after the installation is complete by run-ning the InstallDriver.bat utility from the following location: <Arcserve Agent installfolder>\Engine\BIN\DRIVER
The Destination Folder dialog opens.
5. Specify or browse to the location where you want to install Arcserve UDP Agent(Windows) and click Next.
Default location: C:\Program Files\Arcserve\Unified Data Protection\
Note: During Arcserve UDP Agent (Windows) installation, some files will not beinstalled at the default location. For a complete listing of these files, see Installationof Files Outside the Default Location.
The Configuration dialog opens.
6. Enter the following information in the Configuration dialog:
a. Specify if you want to use HTTP or HTTPS for web communication.
Note: You can change the communication protocol at any time after install-ation. If you are concerned about the security of information that is com-municated between these components including passwords, you can selectthis option to change the protocol being used to Hypertext Transfer ProtocolSecure (HTTPS). To use the SSL protocol for a hostname that contains anunderscore (_) character, you must manually run the following batch filebefore using Arcserve UDP Agent or Console:
Arcserve UDP Agent: INSTALLDIR \Management\BIN\changeToHttps.bat
Arcserve UDP Console: INSTALLDIR \Management\BIN\changeToHttps.bat
b. Specify the Agent port number. This port number is used to connect to theweb-based UI.
Default Value: 8014.
Note: The available port numbers for Arcserve UDP Agent (Windows) install-ation are between 1024 and 65535. You should verify that the specified portnumber is free and available for use. Setup will not let you install ArcserveUDP Agent (Windows) for a port that is not available for use.
c. Type the Windows Administrator Name and Password.
d. Specify if you want to display the Arcserve UDP Agent monitor for all users oronly the current user.
48 Arcserve UDP Agent for Windows User Guide

How to Install Arcserve UDP Agent (Windows)
7. Click Next.
The Firewall Exceptions dialog opens. It lists the services and programs to beregistered to Windows Firewall as exceptions for Arcserve UDP Agent (Windows).
Note: Firewall exceptions are required if you want to configure and manage Arc-serve UDP Agent (Windows) from remote machines.
8. Click Install to launch the installation process.
The Installation Progress dialog is displayed indicating the status of the install-ation. When the installation is complete, the Installation Report summary dialog isdisplayed and automatically performs the product configuration.
9. (Optional) Select the Check for an update immediately checkbox, to check if thereare any product updates since the last release.
This option is checked by default.
10. (Optional) You can also install the Arcserve UDP Agent for Linux by clicking on thelink provided and following the download instructions.
11. Click Finish.
When checking for updates, the Check for Updates dialog opens where you candownload the updates from the Arcserve server or the staging server.
12. Click Download and Install Updates.
13. Click Finish.
An alert message is displayed, informing you that a system restart is required andasking if you want to reboot now or at a later time.
When the reboot is finished, Arcserve UDP Agent (Windows) is installed on yourlocal system.
Note: You can access Arcserve UDP Agent (Windows) from either the Start menu orfrom the Arcserve UDP Agent (Windows) Monitor.
After the installation is complete, as a best practice, create a BMR ISO image usingthe Create Boot Kit utility. For more information about the BMR ISO image, seeHow to Create a Boot Kit.
Chapter 2: Installing/Uninstalling Arcserve UDP Agent (Windows) 49
How to Install Arcserve UDP Agent (Windows)
Install Arcserve UDP Agent (Windows) Silently
You can install Arcserve UDP Agent (Windows) silently. Silent installation allows youto perform an unattended installation and does not prompt you for any input, elim-inating the need for user interaction. Silent installations are used when performingsimilar installations on more than one computer.
You can install the application silently using the Windows Command Line.
Follow these steps:
1. Open the Windows Command Line on the computer where you want to start thesilent installation process.
2. Download the self-extracting installation package to your computer and start thesilent installation process, using the following command:
"arcserve_Unified_Data_Protection_Agent_Windows.exe" -s -a -q -Products:Agent -Path:<INSTALLDIR> -User:<UserName> -Password:<Password> -Https:<HTTPS> -AgentPort:<Port Number> -Driver:<DRIVER> -MonitorFlag:<MONITORFLAG> -StopUA:<STOPUA> -SummaryPath:<SUMMARYPATH> -AutoReboot:<AUTOREBOOT>
Example:
"arcserve_Unified_Data_Protection_Agent_Windows.exe" -s -a -q -Products:Agent -User:administrator -Password:Password01
3. Configure the silent installation using the following syntax and arguments:
Important: If the parameters include any of the following special characters,enclose the parameters in quotes:
<space>
&()[]^=;!'+,`~
For example: If the password is abc^*123, the input should be -Pass-word:"abc^*123".
-s
Specifies you to run the executable file package using the silent mode.
-a
Specifies any additional command line options.
-q
Specifies you to install the application in the silent mode.
-Products:<ProductList>
50 Arcserve UDP Agent for Windows User Guide

How to Install Arcserve UDP Agent (Windows)
Specifies the components to install silently. You can specify the following com-ponents:
Agent: Installs the Arcserve UDP Agent component.
Example:
Install Arcserve UDP Agent
-Products:Agent
-User:<UserName>
Specifies the user name that you want to use to install and run the applic-ation.
Note: The user name must be administrator or an account with admin-istrative privileges.
-Password:<Password>
Specifies the password of the user name.
-Https:<HTTPS>
(Optional) Specifies the communication protocol. The options are 0 and 1.Use 0 for http and 1 for https.
Default: 0
Example:
-https:1
-Path:<INSTALLDIR>
(Optional) Specifies the target installation path of the Arcserve UDP Agent.
Example:
-Path:"C:\Program Files\Arcserve\Unified Data Protection"
Note: If the value for INSTALLDIR contains a space, enclose the path with quo-tation marks. Additionally, the path cannot end with a backslash character.
-AgentPort:<Port Number>
(Optional) Specifies the communication port number for the Arcserve UDPAgent.
Default: 8014
Example:
-AgentPort:8014
Note: Use this option when you want to install the Arcserve UDP Agent.
-Driver:<DRIVER>
Chapter 2: Installing/Uninstalling Arcserve UDP Agent (Windows) 51

How to Install Arcserve UDP Agent (Windows)
(Optional) Specifies whether to install the Arcserve UDP Agent change track-ing driver. The options are 0 and 1.
0: Does not install the driver.
1: Installs the driver.
Default:1
Example:
-driver:1
-MonitorFlag:<MONITORFLAG>
(Optional) Specifies the Arcserve UDP Agent monitor display to users. Theoptions are 0 and 1.
0: Displays the agent monitor to all users.
1: Displays the agent monitor only to the current user.
Default: 0
Example:
-MonitorFlag:0
-StopUA:< STOPUA >
(Optional) Specifies to stop the Arcserve Universal Agent service.
0: Does not stop the Arcserve Universal Agent service if it is running duringthe installation process.
1: Stops the Arcserve Universal Agent service if it is running during the install-ation process.
Default: 0
Example:
-StopUA:1
Note: Use this option while upgrading to a new version. Verify that you setthe value to 1 or stop the service before starting the upgrade process. Thishelps ensure that the installation does not fail.
-SummaryPath:<SUMMARYPATH>
(Optional) Specifies the target path to generate the summary file of theinstallation.
Example:
-SummaryPath:"C:\Result"
52 Arcserve UDP Agent for Windows User Guide

How to Install Arcserve UDP Agent (Windows)
Note: If the value for SUMMARYPATH contains a space, enclose the pathwith quotation marks. Additionally, the path cannot end with a backslash char-acter.
-AutoReboot:<AUTOREBOOT>
(Optional) Let Setup reboot the machine after installation if the installationrequires a reboot. The options are 0 and 1.
0: Does not reboot the machine.
1: Reboots the machine if the installation requires a reboot.
Default:0
Example:
-AutoReboot:1
Note: If the installation does not require a reboot, Setup will not reboot themachine even if this parameter is set to 1.
4. Restart the target computer after you complete the silent installation.
Chapter 2: Installing/Uninstalling Arcserve UDP Agent (Windows) 53

How to Install Arcserve UDP Agent (Windows)
Verify that the Arcserve UDP Agent (Windows) Install-ation was Successful
Follow these steps:
1. Verify that the Agent icon appears in the system tray.
2. Navigate to services.msc from the command prompt tab and click OK.
3. Verify that the Agent services is up and running from the Services Manager.
4. Open the command prompt window and type the following driver name to verifythat the state is running:
54 Arcserve UDP Agent for Windows User Guide

How to Install Arcserve UDP Agent (Windows)
sc query afflt
The Arcserve UDP Agent (Windows) was installed successfully.
Chapter 2: Installing/Uninstalling Arcserve UDP Agent (Windows) 55

How to Install Arcserve UDP Agent (Windows)
How the Installation Process Affects Operating Sys-tems
The Arcserve UDP Agent (Windows) installation process updates various Windowsoperating system components using an installation engine named the MicrosoftInstaller Package (MSI). The components included in MSI let Arcserve UDP Agent(Windows) perform custom actions that let you install, upgrade, or uninstall Arc-serve UDP Agent (Windows).
The following components describe these custom actions that can be performed:
Note: All Arcserve UDP Agent (Windows) MSI packages call the components listedin the following description when you install and uninstall Arcserve UDP Agent (Win-dows).
CallAllowInstall
Lets the installation process check for conditions relating to the current Arc-serve UDP Agent (Windows) installation.
CallPreInstall
Lets the installation process read and write MSI properties. For example, readthe Arcserve UDP Agent (Windows) installation path from the MSI.
CallPostInstall
Lets the installation process perform various tasks relating to installation. Forexample, registering Arcserve UDP Agent (Windows) into the WindowsRegistry.
CallAllowUninstall
Lets the uninstallation process check for conditions relating the current Arc-serve UDP Agent (Windows) installation.
CallPreUninstall
Lets the uninstallation process perform various tasks relating to uninstallation.For example, un-registering Arcserve UDP Agent (Windows) from the WindowsRegistry.
CallPostUninstall
Lets the uninstallation process perform various tasks after the installed files areuninstalled. For example, removing the remaining files.
ShowMsiLog
Displays the Windows Installer log file in Notepad if the end user selects theShow the Windows Installer log check box in the SetupCompleteSuccess,
56 Arcserve UDP Agent for Windows User Guide

How to Install Arcserve UDP Agent (Windows)
SetupCompleteError, or SetupInterrupted dialogs and then clicks Finish. Thisworks only with Windows Installer 4.0.
ISPrint
Prints the contents of a ScrollableText control on a dialog.
This is a Windows Installer .dll custom action. The name of the .dll file isSetAllUsers.dll, and its entry point is PrintScrollableText.
CheckForProductUpdates
Uses FLEXnet Connect to check for product updates.
This custom action launches an executable file named Agent.exe, and it passesthe following:
/au[ProductCode] /EndOfInstall
CheckForProductUpdatesOnReboot
Uses FLEXnet Connect to check for product updates on reboot.
This custom action launches an executable file named Agent.exe, and it passesthe following:
/au[ProductCode] /EndOfInstall /Reboot
Directories Updated
The installation process installs and updates Arcserve UDP Agent (Windows) files inthe following directories by default (x86 and x64 operating systems):
C:\Program Files\Arcserve\Unified Data Protection\Engine
You can install Arcserve UDP Agent (Windows) into the default installation directoryor into an alternate directory. The installation process copies various system files tothe following directory:
C:\WINDOWS\SYSTEM32
Windows Registry Keys Updated
The installation process updates the following Windows registry keys:
Default registry keys:
HKEY_LOCAL_MACHINE\SOFTWARE\Arcserve\Unified Data Protection\Engine
The installation process creates new registry keys and modifies various otherregistry keys, based on the current configuration of your system.
Applications Installed
The installation process installs the following applications into your computer:
Chapter 2: Installing/Uninstalling Arcserve UDP Agent (Windows) 57

How to Install Arcserve UDP Agent (Windows)
Arcserve Licensing
Microsoft Visual C++ 2013
Java Runtime Environment (JRE) 1.8.0_65
Tomcat 9
The following installation processes update various Windows Operating Systems:
1. Antivirus Configuration
2. Installation of Files Outside the Default Location
3. Installation of Unsigned Binary Files
4. Installation of Binary Files Containing Incorrect File Version Information
5. Installation of Binary Files that Do Not Contain an Embedded Manifest
6. Installation of Binary Files That Require a Privilege Level of Administrator in Mani-fest
7. Installation of Driver API for Non-WDM Driver
8. User Mode Driver Framework
58 Arcserve UDP Agent for Windows User Guide

How to Install Arcserve UDP Agent (Windows)
Antivirus Configuration
Antivirus software can interfere with the smooth running of Arcserve UDP Agent(Windows) by either temporarily blocking access to files or by quarantining or delet-ing files that are incorrectly classified as suspicious or dangerous. You can con-figure an antivirus software to exclude files, or folders and avoid spending time onscanning data that does not need to be protected.
Configuring your antivirus software properly is required to exclude backup des-tination. Proper configuration lets you prevent interference with backup andrestore operations, or any other processes like merge and catalog generation.
Paths to be excluded for antivirus scanning:
Antivirus scanning forPaths toexclude
RPS
Data StoreFolder
Data Destin-ation Path
Index Destin-ation Path
Hash Destin-ation Path
Windows Agent not managed by ConsoleBackup Destin-ation
Chapter 2: Installing/Uninstalling Arcserve UDP Agent (Windows) 59
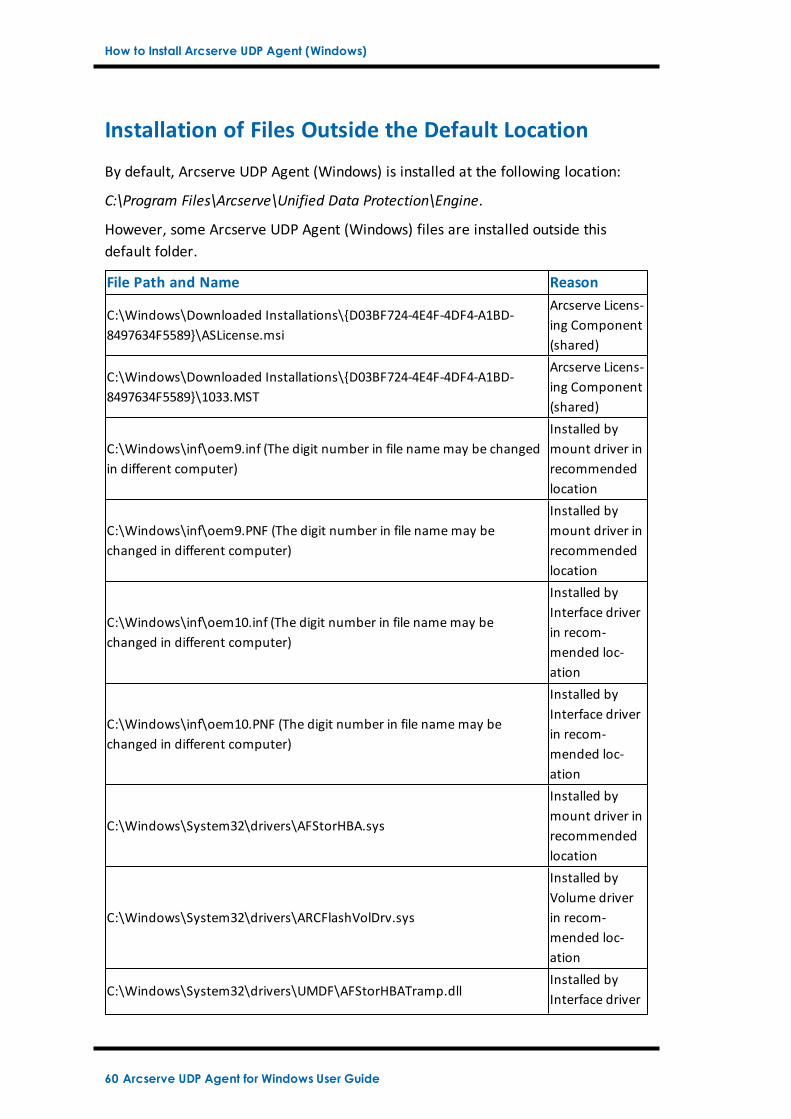
How to Install Arcserve UDP Agent (Windows)
Installation of Files Outside the Default Location
By default, Arcserve UDP Agent (Windows) is installed at the following location:
C:\Program Files\Arcserve\Unified Data Protection\Engine.
However, some Arcserve UDP Agent (Windows) files are installed outside thisdefault folder.
File Path and Name Reason
C:\Windows\Downloaded Installations\D03BF724-4E4F-4DF4-A1BD-8497634F5589\ASLicense.msi
Arcserve Licens-ing Component(shared)
C:\Windows\Downloaded Installations\D03BF724-4E4F-4DF4-A1BD-8497634F5589\1033.MST
Arcserve Licens-ing Component(shared)
C:\Windows\inf\oem9.inf (The digit number in file namemay be changedin different computer)
Installed bymount driver inrecommendedlocation
C:\Windows\inf\oem9.PNF (The digit number in file namemay bechanged in different computer)
Installed bymount driver inrecommendedlocation
C:\Windows\inf\oem10.inf (The digit number in file namemay bechanged in different computer)
Installed byInterface driverin recom-mended loc-ation
C:\Windows\inf\oem10.PNF (The digit number in file namemay bechanged in different computer)
Installed byInterface driverin recom-mended loc-ation
C:\Windows\System32\drivers\AFStorHBA.sys
Installed bymount driver inrecommendedlocation
C:\Windows\System32\drivers\ARCFlashVolDrv.sys
Installed byVolume driverin recom-mended loc-ation
C:\Windows\System32\drivers\UMDF\AFStorHBATramp.dllInstalled byInterface driver
60 Arcserve UDP Agent for Windows User Guide

How to Install Arcserve UDP Agent (Windows)
in recom-mended loc-ation
C:\Windows\System32\DriverStore\FileRepository\afstorhba.inf_amd64_neutral_23f49884ad235baf\AFStorHBA.cat
Installed bymount driver inrecommendedlocation
C:\Windows\System32\DriverStore\FileRepository\afstorhba.inf_amd64_neutral_23f49884ad235baf\afstorhba.inf
Installed bymount driver inrecommendedlocation
C:\Windows\System32\DriverStore\FileRepository\afstorhba.inf_amd64_neutral_23f49884ad235baf\afstorhba.PNF
Installed bymount driver inrecommendedlocation
C:\Windows\System32\DriverStore\FileRepository\afstorhba.inf_amd64_neutral_23f49884ad235baf\AFStorHBA.sys
Installed bymount driver inrecommendedlocation
C:\Windows\System32\DriverStore\FileRepository\afstorhba.inf_amd64_neutral_23f49884ad235baf\WdfCoinstaller01009.dll
Installed bymount driver inrecommendedlocation
C:\Windows\System32\DriverStore\FileRepository\afstorhbatramp.inf_amd64_neutral_c8c319207a86e457\AFStorHBATramp.cat
Installed byInterface driverin recom-mended loc-ation
C:\Windows\System32\DriverStore\FileRepository\afstorhbatramp.inf_amd64_neutral_c8c319207a86e457\AFStorHBATramp.dll
Installed byInterface driverin recom-mended loc-ation
C:\Windows\System32\DriverStore\FileRepository\afstorhbatramp.inf_amd64_neutral_c8c319207a86e457\afstorhbatramp.inf
Installed byInterface driverin recom-mended loc-ation
C:\Windows\System32\DriverStore\FileRepository\afstorhbatramp.inf_amd64_neutral_c8c319207a86e457\afstorhbatramp.PNF
Installed byInterface driverin recom-mended loc-ation
C:\Windows\System32\DriverStore\FileRepository\afstorhbatramp.inf_ Installed by
Chapter 2: Installing/Uninstalling Arcserve UDP Agent (Windows) 61

How to Install Arcserve UDP Agent (Windows)
amd64_neutral_c8c319207a86e457\WudfUpdate_01009.dll
Interface driverin recom-mended loc-ation
C:\Windows\System32\WdfCoinstaller01009.dll
Installed byBMR in recom-mended loc-ation
C:\Windows\System32\WudfUpdate_01009.dll
Installed byBMR in recom-mended loc-ation
C:\Windows\System32\atl100.dllMicrosoft VisualC++ component
C:\Windows\System32\mfc100.dllMicrosoft VisualC++ component
C:\Windows\System32\mfc100chs.dllMicrosoft VisualC++ component
C:\Windows\System32\mfc100cht.dllMicrosoft VisualC++ component
C:\Windows\System32\mfc100deu.dllMicrosoft VisualC++ component
C:\Windows\System32\mfc100enu.dllMicrosoft VisualC++ component
C:\Windows\System32\mfc100esn.dllMicrosoft VisualC++ component
C:\Windows\System32\mfc100fra.dllMicrosoft VisualC++ component
C:\Windows\System32\mfc100ita.dllMicrosoft VisualC++ component
C:\Windows\System32\mfc100jpn.dllMicrosoft VisualC++ component
C:\Windows\System32\mfc100kor.dllMicrosoft VisualC++ component
C:\Windows\System32\mfc100rus.dllMicrosoft VisualC++ component
C:\Windows\System32\mfc100u.dllMicrosoft VisualC++ component
C:\Windows\System32\mfcm100.dllMicrosoft VisualC++ component
C:\Windows\System32\mfcm100u.dllMicrosoft VisualC++ component
C:\Windows\System32\msvcp100.dllMicrosoft VisualC++ component
62 Arcserve UDP Agent for Windows User Guide

How to Install Arcserve UDP Agent (Windows)
C:\Windows\System32\msvcr100.dllMicrosoft VisualC++ component
C:\Windows\System32\vcomp100.dllMicrosoft VisualC++ component
Chapter 2: Installing/Uninstalling Arcserve UDP Agent (Windows) 63

How to Install Arcserve UDP Agent (Windows)
Installation of Unsigned Binary Files
Arcserve UDP Agent (Windows) installs binary files that are developed by thirdparties, other Arcserve products, and Arcserve UDP Agent (Windows) that are notsigned. The following table describes these binary files.
Binary Name Sourcelibbind9.dll Arcserve Replication and High Availabilitylibdns.dll Arcserve Replication and High Availabilitylibisc.dll Arcserve Replication and High Availabilitylibisccfg.dll Arcserve Replication and High Availabilityliblwres.dll Arcserve Replication and High Availabilitywin_nsupdate.exe Arcserve Replication and High Availabilitylibeay32.dll OpenSSLmsvcm90.dll Microsoftmsvcp90.dll Microsoftmsvcr90.dll Microsoftssleay32.dll OpenSSLzlib10.dll Zlib Compression Librarytcnative-1.dll Tomcattomcat9.exe TomcatUpdateData.exe Arcserve License
64 Arcserve UDP Agent for Windows User Guide

How to Install Arcserve UDP Agent (Windows)
Installation of Binary Files Containing Incorrect FileVersion Information
Arcserve UDP Agent (Windows) installs binary files that are developed by thirdparties, other Arcserve products, and Arcserve UDP Agent (Windows) that containincorrect file version information. The following table describes these binary files.
Binary Name Sourcelibbind9.dll Arcserve Replication and High Availabilitylibdns.dll Arcserve Replication and High Availabilitylibisc.dll Arcserve Replication and High Availabilitylibisccfg.dll Arcserve Replication and High Availabilityliblwres.dll Arcserve Replication and High Availabilitywin_nsupdate.exe Arcserve Replication and High Availabilitydecora-d3d.dll Java Runtime Environmentdecora-sse.dll Java Runtime Environmentfxplugins.dll Java Runtime Environmentglass.dll Java Runtime Environmentglib-lite.dll Java Runtime Environmentgstreamer-lite.dll Java Runtime Environmentjavafx-font.dll Java Runtime Environmentjavafx-iio.dll Java Runtime Environmentjfxmedia.dll Java Runtime Environmentjfxwebkit.dll Java Runtime Environmentlibxml2.dll Java Runtime Environmentlibxslt.dll Java Runtime Environmentprism-d3d.dll Java Runtime Environmentgvmomi.dll VMwarelibcurl.dll VMwareliblber.dll VMwarelibldap.dll VMwarelibldap_r.dll VMwarelibxml2.dll VMwarezlib1.dll Zlib Compression Libraryzlib10.dll Zlib Compression LibraryUpdateData.exe Arcserve License
Chapter 2: Installing/Uninstalling Arcserve UDP Agent (Windows) 65

How to Install Arcserve UDP Agent (Windows)
Installation of Binary Files that Do Not Contain anEmbedded Manifest
Arcserve UDP Agent (Windows) installs binary files that are developed by thirdparties, other Arcserve products, and Arcserve UDP Agent (Windows) that do notcontain an embedded manifest and do not contain a text manifest. The followingtable describes these binary files:
Binary Name Sourcearcserve_Unified_Data_Protection_Agent_Win-dows.exe
Arcserve UDP Agent (Win-dows)
ARCFlashVolDrvINSTALL.exeArcserve UDP Agent (Win-dows)
BaseLicInst.exe Arcserve LicenseUpdateData.exe Arcserve Licensevcredist_x64.exe Microsoftvcredist_x86.exe Microsofttomcat9.exe Tomcat
66 Arcserve UDP Agent for Windows User Guide

How to Install Arcserve UDP Agent (Windows)
Installation of Binary Files That Require a PrivilegeLevel of Administrator in Manifest
Arcserve UDP Agent (Windows) installs binary files developed by third parties,other Arcserve products, and Arcserve UDP Agent (Windows) that have a privilegelevel of Administrator or Highest Available. Log in using an administrative accountor an account with the highest available permissions to run various Arcserve UDPAgent (Windows) services, components, and applications. The binaries cor-responding to these services, components, and applications contain Arcserve UDPAgent (Windows) specific functionality that is not available to a basic user account.As a result, Windows prompts you to confirm an operation by specifying your pass-word or by using an account with administrative privileges to complete the oper-ation.
Administrative Privileges
Specifies that the administrative profile or an account with administrative priv-ileges has read, write, and execute permissions to all Windows and systemresources. If you do not have Administrative privileges, you are prompted toenter the user name / password of an administrator user to continue.
Highest Available Privileges
Specifies that an account with the highest-available privileges is a basic useraccount and a power user account with run-as administrative privileges.
The following table describes these binary files:
Binaries Sourceafbkw.exe Arcserve UDP Agent (Windows)AFBackend.exe Arcserve UDP Agent (Windows)Asremsvc.exe Arcserve UDP Agent (Windows)DeleteMe.exe Arcserve UDP Agent (Windows)MasterSetup.exe Arcserve UDP Agent (Windows)SetupFW.exe Arcserve UDP Agent (Windows)setup.exe Arcserve UDP Agent (Windows)silent.exe Arcserve Licensejbroker.exe Java Runtime Environmentjucheck.exe Java Runtime Environment
Chapter 2: Installing/Uninstalling Arcserve UDP Agent (Windows) 67

How to Install Arcserve UDP Agent (Windows)
Installation of Driver API for Non-WDM Driver
Arcserve UDP Agent (Windows) implements"SetupInstallServicesFromInfSection" API to install the non-WDM driver.
68 Arcserve UDP Agent for Windows User Guide
How to Install Arcserve UDP Agent (Windows)
User Mode Driver Framework
Arcserve UDP Agent (Windows) uses the "WUDFRd.sys" driver published byMicrosoft and part of UMDF (User Mode Driver Framework). This driver is notWHQL (Windows Hardware Quality Labs) signed.
Chapter 2: Installing/Uninstalling Arcserve UDP Agent (Windows) 69

How to Install Arcserve UDP Agent (Windows)
Arcserve UDP Agent (Windows) Installer Error Codes
The following table displays a list of the possible error codes that the Arcserve UDPAgent (Windows) installer could return:
ErrorCode
Description Action
0 Install Successfully. No action is required.3010 A restart is required to complete the install. Restart your system.
80000Setup could not run. Another instance ofSetup is running.
Quit and wait for the previousSetup to finish.
80009The resource DLL is not found in current dir-ectory.
Download the package again andrun Setup with the new down-loaded package.
80015 Setup could not find setup.icf. Quit and run Setup again.
80016You must have administrative privileges toinstall this product.
Run Setup with an administratoraccount.
80018Setup package cannot support the operatingsystem on the target host.
Check the supported OS mat-rixes and use the full package torun Setup.
80031
Setup cannot continue. Setup detected anewer version of Arcserve UDP Agent (Win-dows) installed on this computer that can-not be upgraded.
Before you can install the currentversion of this product, youmust uninstall the previous ver-sion from the target computer.
80032Setup detected that the same version of Arc-serve UDP Agent (Windows) is installed onthis computer.
Quit Setup and use the installedproduct.
80043The same version, a newer version, or a ver-sion of this product that is not supported isinstalled on the target computer.
Before you can install the currentversion of this product, youmust uninstall the previous ver-sion from the target computer.
80044Setup upgraded critical system files and arestart is required to continue.
Restart the computer and runSetup again.
80046 Internal error. Failed to launch process.Reboot the machine and runSetup again.
80049Setup requires Windows XP SP3 or later ver-sions.
Check current OS and the sup-ported OS matrixes.
80050Arcserve UDP Agent (Windows) cannot beinstalled on Itanium-based systemmachines.
Check the supported OS mat-rixes and run Setup on anothermachine.
80051Setup cannot continue. Setup detected jobsrunning on the target computer.
You must stop all jobs that arerunning on the target computerand then restart the installation.
70 Arcserve UDP Agent for Windows User Guide
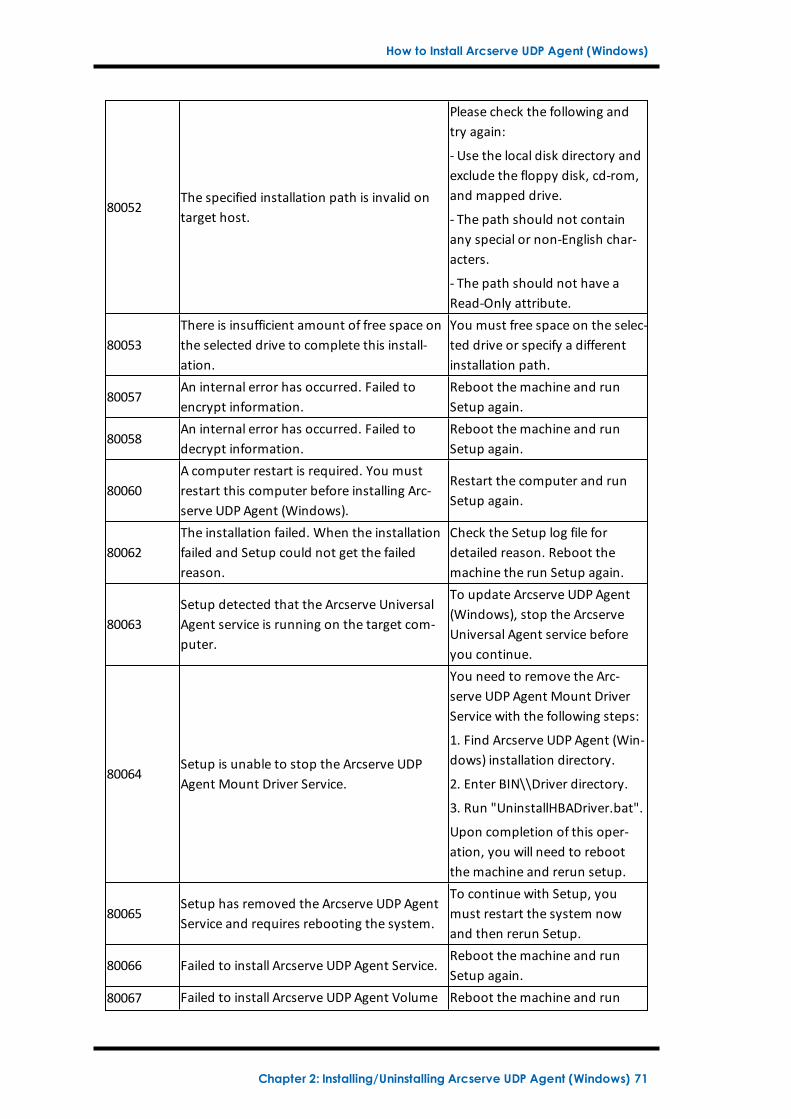
How to Install Arcserve UDP Agent (Windows)
80052The specified installation path is invalid ontarget host.
Please check the following andtry again:
- Use the local disk directory andexclude the floppy disk, cd-rom,and mapped drive.
- The path should not containany special or non-English char-acters.
- The path should not have aRead-Only attribute.
80053There is insufficient amount of free space onthe selected drive to complete this install-ation.
You must free space on the selec-ted drive or specify a differentinstallation path.
80057An internal error has occurred. Failed toencrypt information.
Reboot the machine and runSetup again.
80058An internal error has occurred. Failed todecrypt information.
Reboot the machine and runSetup again.
80060A computer restart is required. You mustrestart this computer before installing Arc-serve UDP Agent (Windows).
Restart the computer and runSetup again.
80062The installation failed. When the installationfailed and Setup could not get the failedreason.
Check the Setup log file fordetailed reason. Reboot themachine the run Setup again.
80063Setup detected that the Arcserve UniversalAgent service is running on the target com-puter.
To update Arcserve UDP Agent(Windows), stop the ArcserveUniversal Agent service beforeyou continue.
80064Setup is unable to stop the Arcserve UDPAgent Mount Driver Service.
You need to remove the Arc-serve UDP Agent Mount DriverService with the following steps:
1. Find Arcserve UDP Agent (Win-dows) installation directory.
2. Enter BIN\\Driver directory.
3. Run "UninstallHBADriver.bat".
Upon completion of this oper-ation, you will need to rebootthe machine and rerun setup.
80065Setup has removed the Arcserve UDP AgentService and requires rebooting the system.
To continue with Setup, youmust restart the system nowand then rerun Setup.
80066 Failed to install Arcserve UDP Agent Service.Reboot the machine and runSetup again.
80067 Failed to install Arcserve UDP Agent Volume Reboot the machine and run
Chapter 2: Installing/Uninstalling Arcserve UDP Agent (Windows) 71
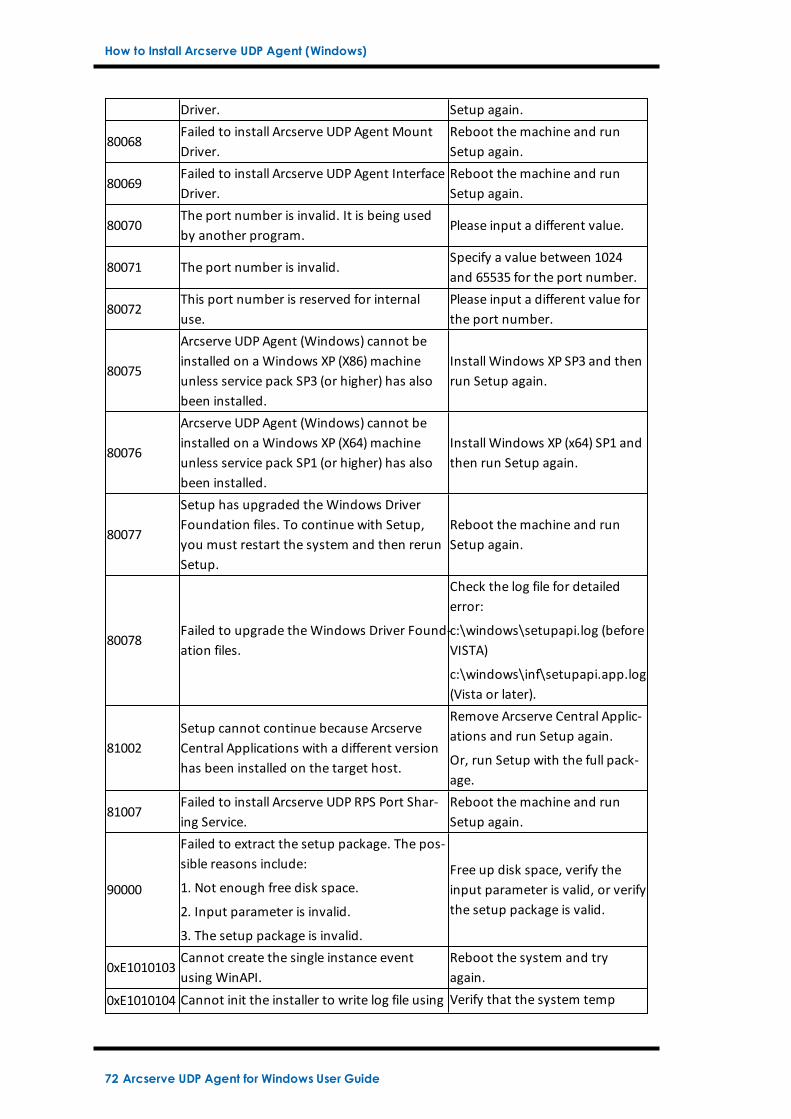
How to Install Arcserve UDP Agent (Windows)
Driver. Setup again.
80068Failed to install Arcserve UDP Agent MountDriver.
Reboot the machine and runSetup again.
80069Failed to install Arcserve UDP Agent InterfaceDriver.
Reboot the machine and runSetup again.
80070The port number is invalid. It is being usedby another program.
Please input a different value.
80071 The port number is invalid.Specify a value between 1024and 65535 for the port number.
80072This port number is reserved for internaluse.
Please input a different value forthe port number.
80075
Arcserve UDP Agent (Windows) cannot beinstalled on a Windows XP (X86) machineunless service pack SP3 (or higher) has alsobeen installed.
Install Windows XP SP3 and thenrun Setup again.
80076
Arcserve UDP Agent (Windows) cannot beinstalled on a Windows XP (X64) machineunless service pack SP1 (or higher) has alsobeen installed.
Install Windows XP (x64) SP1 andthen run Setup again.
80077
Setup has upgraded theWindows DriverFoundation files. To continue with Setup,you must restart the system and then rerunSetup.
Reboot the machine and runSetup again.
80078Failed to upgrade theWindows Driver Found-ation files.
Check the log file for detailederror:
c:\windows\setupapi.log (beforeVISTA)
c:\windows\inf\setupapi.app.log(Vista or later).
81002Setup cannot continue because ArcserveCentral Applications with a different versionhas been installed on the target host.
Remove Arcserve Central Applic-ations and run Setup again.
Or, run Setup with the full pack-age.
81007Failed to install Arcserve UDP RPS Port Shar-ing Service.
Reboot the machine and runSetup again.
90000
Failed to extract the setup package. The pos-sible reasons include:
1. Not enough free disk space.
2. Input parameter is invalid.
3. The setup package is invalid.
Free up disk space, verify theinput parameter is valid, or verifythe setup package is valid.
0xE1010103Cannot create the single instance eventusing WinAPI.
Reboot the system and tryagain.
0xE1010104 Cannot init the installer to write log file using Verify that the system temp
72 Arcserve UDP Agent for Windows User Guide

How to Install Arcserve UDP Agent (Windows)
WinAPI.folder exists (for example, C:\Win-dows\temp)
0xE1010105Another installer is already running and twoor more instances cannot run at the sametime.
Wait for the other installer tocomplete and try again.
0xE1010107Cannot find the resource file. The package isinvalid.
Verify that your update packageexecutable file is the same as thefile on the Arcserve server.
0xE1010108Cannot find the configuration inf file. Thepackage is invalid.
Verify that your update packageexecutable file is the same as thefile on the Arcserve server.
0xE1010109Cannot find the configuration XML file. Thepackage is invalid.
Verify that your update packageexecutable file is the same as thefile on the Arcserve server.
0xE101010BCannot load the resource file. The package isinvalid.
Verify that your update packageexecutable file is the same as thefile on the Arcserve server.
0xE101010C The input parameter is invalid.Verify that the input parameteris valid.
0xE101010DThe current user does not have admin-istrator privileges. Setup cannot continue.
Verify the current user hasadministrative privileges.
0xE101020ACannot parse the configuration XML file. Thepackage is invalid.
Verify the package is valid.
0xE1010501
Setup has detected that this machine doesnot meet the necessary requirements toinstall this update. A compatible version ofArcserve UDP Agent (Windows) is not detec-ted.
Note: Arcserve UDP Agent (Windows) is notinstalled on this machine.
Install a compatible version ofArcserve UDP Agent (Windows).
0xE1010503
Setup has detected that this machine doesnot meet the necessary requirements toinstall this update. The update does notapply to the installed version of ArcserveUDP Agent (Windows).
Note: Arcserve UDP Agent (Windows) isinstalled on this machine, but the currentupdate package does not match theinstalled version of Arcserve UDP Agent (Win-dows). For example, if the beta build isinstalled on this machine, and you try toapply the GM update, setup will fail becausethe GM update build can only be applied tothe GM build not for the beta build.
Verify the current update pack-age is compatible with theinstalled version of Arcserve UDPAgent (Windows).
Chapter 2: Installing/Uninstalling Arcserve UDP Agent (Windows) 73

How to Install Arcserve UDP Agent (Windows)
0xE1010504Failed to install update because ArcserveUDP Agent (Windows) has detected that theupdate is already installed on this machine.
No action is required.
0xE1010505
Setup has detected that this machine doesnot meet the necessary requirements toinstall this update. A newer version of theupdate has already been applied.
No action is required.
0xE1010506Setup has detected that at least one activejob is running on the machine. Setup cannotcontinue.
Stop all running jobs and trysetup again.
0xE1010507
Setup has detected that this machine doesnot meet the necessary requirements toinstall this update. Not enough free diskspace to install this update.
Free up disk space and try setupagain.
0xE1010508Setup has detected that this machine is cur-rently deploying Arcserve UDP Agent (Win-dows) to another remote machine.
Finish the deployment and tryagain to launch this update.
0xE1010509Setup has detected that this machine is cur-rently creating a boot kit.
Finish the boot kit process andtry to launch the update again.
0xE1010512Setup detected that a reboot is required in aprevious installation.
Reboot the system and try tolaunch the update again.
0xE101050ASetup detected that Arcserve UniversalAgent service is running on the targetmachine.
Stop the Arcserve UniversalAgent service first and then tryto launch the update again.
0xE101050BSetup cannot stop the Arcserve UniversalAgent service.
Wait for the active job to com-plete and then try to launch theupdate again.
74 Arcserve UDP Agent for Windows User Guide

How to Install Arcserve UDP Agent (Windows) Updates
How to Install Arcserve UDP Agent (Windows)Updates
The process of getting and installing Arcserve UDP Agent (Windows) updates is athree-part process: checking for a new update, downloading the update, and theninstalling the update.
Note: All updates that are released for Arcserve UDP Agent (Windows) are cumu-lative. As a result, each update also includes all previously released updates toensure that your computer is always up-to-date. The Help About dialog displaysthe update level that is installed on a computer. If necessary, you can use thisinformation for building another server with the same configuration/patch level.
The following diagram illustrates the process to install Arcserve UDP Agent (Win-dows) updates:
Chapter 2: Installing/Uninstalling Arcserve UDP Agent (Windows) 75

How to Install Arcserve UDP Agent (Windows) Updates
Perform the following tasks to install Arcserve UDP Agent (Windows) updates:
1. Review the Considerations for Installing Updates
2. Specify Updates Preferences
3. Check for Updates and Download
4. Install the Arcserve UDP Agent (Windows) Updates
5. Verify that the Updates are Successfully Installed
76 Arcserve UDP Agent for Windows User Guide
How to Install Arcserve UDP Agent (Windows) Updates
6. (Optional) Install Arcserve UDP Agent (Windows) Updates Silently
7. (Optional) Troubleshooting Update Issues
Chapter 2: Installing/Uninstalling Arcserve UDP Agent (Windows) 77

How to Install Arcserve UDP Agent (Windows) Updates
Review the Considerations for Installing Updates
Review the following considerations before installing Arcserve UDP Agent (Win-dows) updates:
If necessary, you can download available updates from Arcserve either directlyto a client machine or to a staging server first and then to a client machine.
If necessary, you can use your workstation node as a staging server for down-loading Arcserve UDP Agent (Windows) updates.
If you are not using Arcserve UDP Agent (Windows) for any function other thanjust as an Updates staging server, you do not need to have a separate ArcserveUDP Agent (Windows) license for the staging server.
Verify that the Update preference settings are properly configured for eachnode.
Updates can be installed either through the user interface or silently using thecommand line. For more information about installing Arcserve UDP Agent (Win-dows) updates silently, see (Optional) Install Arcserve UDP Agent (Windows)Updates Silently.
(Optional) Review the topic How Arcserve UDP Agent (Windows) UpdatesWorks.
Review the Compatibility Matrix that provides the supported operating sys-tems, databases, and browsers.
78 Arcserve UDP Agent for Windows User Guide

How to Install Arcserve UDP Agent (Windows) Updates
How Arcserve UDP Agent (Windows) Update Works
A product update lets Arcserve deliver product improvements to users. Updates areused to deliver bug fixes, new hardware support, and performance and securityenhancements. Within Arcserve UDP Agent (Windows), the Updates function sim-plifies this process and provides a fast, easy, and reliable solution to keep your Arc-serve UDP Agent (Windows) installation up-to-date with the latest availableupdates. The Updates function is your link between Arcserve and your ArcserveUDP Agent (Windows) installation.
Arcserve UDP Agent (Windows) Updates provide the following functions:
Check for available updates (manual or scheduled)
Download available updates from Arcserve (either directly to a client machineor to a staging server first and then to a client machine)
Install successfully downloaded updates (to be initiated manually)
Send email notifications when a new update is available
Note:When Arcserve UDP Agent (Windows) is managed by the Arcserve UDP Con-sole, checking for updates is disabled from Arcserve UDP Agent (Windows). Youneed to check and deploy the update from the Arcserve UDP Console UI.
Check for Updates
When Arcserve Server is selected as download server, Arcserve UDP Agent (Win-dows) Updates provides the capability to connect to the Arcserve server either
Chapter 2: Installing/Uninstalling Arcserve UDP Agent (Windows) 79

How to Install Arcserve UDP Agent (Windows) Updates
directly or using a proxy server (as configured manually) to check for new and avail-able Arcserve UDP Agent (Windows) updates. The Arcserve UDP Agent (Windows)will directly connect to Arcserve server using the proxy settings configured bybrowser (only applicable for IE and Chrome). This check for updates function can betriggered either manually from the user interface/tray monitor or automatically asspecified by the Scheduler. (The internal Scheduler is responsible for starting at ascheduled day and time and triggering an automatic check and download of avail-able updates).
When triggered, the update manager contacts the Arcserve server to check thedate /time stamp of a file that contains the available update information. If thisavailable update information file has been modified since the last check, it will bedownloaded from the server for comparison. The available update information isthen compared to another file containing the already downloaded update inform-ation to determine if the available update is new and has not been previously down-loaded. If the latest available update is not installed on your machine, ArcserveUDP Agent (Windows) displays an icon on the home page to inform you that a newupdate is available. In addition, an email notification can also be sent to inform youwhen a new Arcserve UDP Agent (Windows) update is available for downloading.
When Staging Server is selected as download server, Arcserve UDP Agent (Win-dows) downloads the available update information file from the staging server, andperform the same comparison check with the already available update informationfile. If the latest available update is not installed on your machine, Arcserve UDPAgent (Windows) will display an icon on the home page to inform you that a newupdate is available.
Note: All updates released for Arcserve UDP Agent (Windows) are cumulative. As aresult, each update also includes all previously released updates to help ensure thatyour machine is always up-to-date. (The Help About dialog displays the updatelevel installed on a machine. If necessary, you can use this information for buildinganother server with the same configuration/patch level).
Download Updates
Arcserve UDP Agent (Windows) Updates provide the capability to download avail-able Arcserve UDP Agent (Windows) updates either directly from the Arcserveserver or from a staging server which in turn connects to the Arcserve server. Thisdownload process is triggered automatically when the check for updates processdetermines that a new update is available (unless this auto-download function is dis-abled). You can configure Arcserve UDP Agent (Windows) to download an updatedirectly (or using a proxy server) to your client machine or to a staging server. A sta-ging server can be used as a temporary storage location for downloading an updatebefore it is downloaded and installed into an Arcserve UDP Agent (Windows) client
80 Arcserve UDP Agent for Windows User Guide

How to Install Arcserve UDP Agent (Windows) Updates
machine. You may not want to expose your client machine to the internet to down-load updates from the Arcserve server. In this case, you can first download theupdate to a staging server and then allow other client machines to download theupdate from that staging server. The Arcserve UDP Agent (Windows) provides thecapability to configure multiple staging servers for downloading the updates. If forsome reason the primary staging server is unavailable, the download function willautomatically transfer to the next specified staging server.
Note: If you are using a staging server for your Updates downloads, Arcserve UDPAgent (Windows) must be installed on that staging server, but does not need to belicensed unless you are using Arcserve UDP Agent (Windows) to protect that stagingserver.
When triggered, the Updates function contacts the Arcserve server and downloadsthe available update and places it in a holding directory (on either the stagingserver or the client machine) until directed to proceed with the subsequent install-ation process.
The default location for the download folder is: <Product Home>\Update Man-ager\EngineUpdates\7.0\
If for some reason, the download cannot be started, a popup message is displayedand Arcserve UDP Agent (Windows) waits a specified number of minutes and thenattempt to download again. If after a specified number of retry attempts, the down-load still cannot continue, an error message will be displayed in the activity logindicating the most likely reason for the failure.
Install Updates
Arcserve UDP Agent (Windows) Updates provide the capability to install the avail-able and successfully downloaded updates. This install process can only betriggered manually from the user interface/tray monitor (not automatically). Whentriggered, the update is installed from the holding directory to the applicable Arc-serve UDP Agent (Windows) component directory of the client machine or the sta-ging server. You cannot trigger the installation of the update directly from astaging server to a client machine. When you click install, the update is downloadedfrom the staging server to the client machine (if it has not been downloadedalready), and then the installation process is triggered from the client machine.
Note: The installation only continues if no other active Arcserve UDP Agent (Win-dows) jobs are running. If another job is running, a message is displayed informingyou of this condition and requesting that you try again at a later time.
If the installation is successful, the file containing the status information is updatedfor future use.
Chapter 2: Installing/Uninstalling Arcserve UDP Agent (Windows) 81
How to Install Arcserve UDP Agent (Windows) Updates
If the installation fails, an error message is displayed indicating the most likelyreason for the failure.
Note: During the update installation Arcserve UDP Agent (Windows) will stop theArcserve UDP Agent (Windows) Web service and will restart this web service aftersuccessful installation of update.
Email Notifications
Arcserve UDP Agent (Windows) Updates provide the capability to send automaticemail notifications when a new update is available. The Arcserve UDP Agent (Win-dows) connects to an SMTP server (with appropriate credentials) to enable sendingthese email notifications over the Internet from Arcserve to your server. (The emailrecipients are specified from the Preferences dialog).
In addition, email notifications are also sent if a failure occurs during the check forupdates or during the download.
82 Arcserve UDP Agent for Windows User Guide

How to Install Arcserve UDP Agent (Windows) Updates
Specify Updates Preferences
Arcserve UDP Agent (Windows) lets you specify the following Updates preferences:
Follow these steps:
1. From the Arcserve UDP Agent (Windows) home page (or Arcserve UDP Agent (Win-dows) Monitor), select Settings from the taskbar and then select the Preferencestab. When the Preferences dialog opens, select Updates.
The Updates preferences dialog opens.
2. Specify your Updates preference settings.
Download Server
Specifies the source server from where your Arcserve UDP Agent (Windows)server will connect to and download available updates.
Arcserve Server
You can use this option to specify that Arcserve UDP Agent (Windows) updatesare downloaded from the Arcserve server directly to your local server.
This is the default setting.
Staging Server
You can use this option to specify the server that is used as a staging server.
Chapter 2: Installing/Uninstalling Arcserve UDP Agent (Windows) 83
How to Install Arcserve UDP Agent (Windows) Updates
Note: If required, you can create a staging server. For more information, seeHow to Create a Staging Server.
If you specify more than one staging server, the first listed server is designatedas the primary staging server. Arcserve UDP Agent (Windows) initially attemptsto connect to the primary staging server. If for any reason the first listed serveris not available, then the next listed server becomes the primary staging server.The same sequence is continued until the last listed server becomes the primarystaging server. (The Staging Server list is limited to the maximum of 5 servers).
You can use the Move Up andMove Down buttons to change the stagingserver sequence.
You can use the Delete button to remove a server from this list.
You can use the Add Server button to add a new server to this list. Whenyou click the Add Server button, the Staging Server dialog opens, allow-ing you to specify the name of the added staging server.
You can use the Edit Server button to modify the existing server in the list.When you click the Edit Server button, the Staging Server dialog opens,allowing you to modify the name or port of the staging server.
Arcserve UDP Agent (Windows) updates are downloaded from the Arcserveserver directly to the specified staging server location. After the updates aredownloaded to this staging server, you can then further download the updatesfrom the staging server to a client server. If you select the Staging Server loc-ation, you must also specify the host name or IP address for the staging server,along with the corresponding port number.
You cannot specify your same local client server as this staging server. This is aninvalid configuration because the staging server cannot connect to itself to getand download the available updates from. If you attempt to use your local clientserver as the staging server, an error message is displayed.
Proxy Settings
Note: This Proxy Server option is only available when you select ArcserveServer as the download server.
Select Proxy Settings to specify if you want the Arcserve UDP Agent (Windows)updates to be downloaded via a proxy server. A proxy server acts as an inter-mediary between your download server (staging or client) and the Arcserveserver to ensure security, increased performance, and administrative control.This is the connection to the Arcserve server from which your download servergets the updates.
84 Arcserve UDP Agent for Windows User Guide

How to Install Arcserve UDP Agent (Windows) Updates
When you select this option the Proxy Settings dialog opens.
Use browser proxy settings
This selection is only applicable to Windows Internet Explorer (IE) andGoogle Chrome.
When selected, directs Arcserve UDP Agent (Windows) to automaticallydetect and use the same proxy settings that are applied to the browser toconnect to the Arcserve server for Arcserve UDP Agent (Windows) updateinformation.
Configure proxy settings
When selected enables the specified proxy server to connect to the Arc-serve server for Arcserve UDP Agent (Windows) update information. If youselect this option, you must also include the IP address (or machine name)of the proxy server and the corresponding port number that is used by theproxy server for internet connections.
In addition, you can also specify if your proxy server requires authen-tication. When selected, specifies that authentication information (User IDand Password) are required to use the proxy server.
Note: The format for user name should be a fully qualified domain username in the form of "<domain name>\<user name>".
Test Connection
Chapter 2: Installing/Uninstalling Arcserve UDP Agent (Windows) 85

How to Install Arcserve UDP Agent (Windows) Updates
Lets you test the following connections and display a status message when com-pleted:
If you selected "Arcserve Server" as the download server, tests the con-nection between the machine and the Arcserve server through the specifiedproxy server.
If you selected "Staging Server" as the download server, tests the connectionbetween the machine and the specified staging server. The test connectionbutton is used to test the availability of each listed staging server, and a cor-responding status is displayed in the Connection Status field. If none of theconfigured staging servers are available, a red icon is displayed on the statusSummary section home page to provide a visual alert of this condition.
Note: The test connection is automatically performed when you launch thePreferences Updates dialog from the home page. When this auto test is per-formed it will check the latest connection status of the previously configureddownload server (either Arcserve Server or Staging Server(s), whichever isselected). If you previously configured more than one staging server, thenthis auto test is performed on all staging servers to get the latest connectionstatus.
Update Schedule
Specifies when to check for (and download) new Arcserve UDP Agent (Win-dows) updates.
With this option selected, specifies to automatically check for new and avail-able Arcserve UDP Agent (Windows) updates. When you select this option,you then have drop-down menu capabilities to specify when to perform thisfunction (every day or weekly on a specified day) and the time of the day thatit is performed.
Note: The default setting for the day or hour that these checks are auto-matically performed is randomly assigned by Arcserve UDP Agent (Windows)at the time of installation. After installation, you can use this Update Sched-ule setting to change the day and time for these checks.
By default, if this check determines that a new update is available, ArcserveUDP Agent (Windows) also automatically downloads the update.
With this option not selected, specifies to disable all automatic check anddownload functions (and its status is displayed under status Summary sectionof the home page). With this option not selected, these update functions canonly be triggered manually.
Notes:
86 Arcserve UDP Agent for Windows User Guide

How to Install Arcserve UDP Agent (Windows) Updates
If configured you get an email notification if the scheduled check for updatesdiscovers that a new update is available. In addition, email notifications aresent if a failure occurs during the check for updates or during the download.
If the Arcserve UDP Agent (Windows) is managed by the Arcserve UDP Con-sole, the Automatically check for updates option is disabled. Instead youcan check updates from the Arcserve UDP Console and remote deployupdates to Arcserve UDP Agent (Windows).
3. Click Save Settings.
Your Updates preference settings are saved.
Chapter 2: Installing/Uninstalling Arcserve UDP Agent (Windows) 87

How to Install Arcserve UDP Agent (Windows) Updates
Check for Updates and Download
From the Arcserve UDP Agent (Windows) home page, you can select the Check forUpdates option from the Help tab. Check for updates allows you to determine ifany new updates are available.
Follow these steps:
1. Launch a check for updates to contact the Arcserve server or staging server. Thecheck for updates can be launched automatically or manually from the ArcserveUDP Agent (Windows) Help menu or from the Arcserve UDP Agent (Windows) Mon-itor.
2. If a new update is available, it is automatically downloaded from Arcserve to thespecified server staging or client.
A yellow Updates icon is displayed on the home page to provide a visual indicationthat a new update is ready to install.
Note: Update status balloon messages are also displayed from the Arcserve UDP
88 Arcserve UDP Agent for Windows User Guide

How to Install Arcserve UDP Agent (Windows) Updates
Agent (Windows) Monitor.
Chapter 2: Installing/Uninstalling Arcserve UDP Agent (Windows) 89

How to Install Arcserve UDP Agent (Windows) Updates
Install the Arcserve UDP Agent (Windows) Updates
After you check for a new update and download the update, you can start installingthe update.
Note: All updates that are released for Arcserve UDP Agent (Windows) are cumu-lative. As a result, each update also includes all previously released updates toensure that your computer is always up-to-date. The Help About dialog displaysthe update level that is installed on a computer. If necessary, you can use thisinformation for building another server with the same configuration/patch level.
Follow these steps:
1. Click the Updates icon.
The Install Updates dialog opens to display information that is related to the avail-able update. The dialog includes information such as description, download status,size, reboot requirement, and a link to the Arcserve server for additional updatedetails.
2. Review the update details, select OK to reboot machine, and click Install to trig-ger the installation of the Arcserve UDP Agent (Windows) update.
The new update is installed in your local computer. If the update requires a rebootand you selected the OK to reboot machine option, the computer reboots auto-matically as part of the install process. Depending on the update status of each com-puter, you could have different reboot requirements for each computer.
90 Arcserve UDP Agent for Windows User Guide

How to Install Arcserve UDP Agent (Windows) Updates
Notes:
If the update requires a computer reboot and you do not select the OK toreboot machine option, the Install button is disabled. You can then install theupdate at a more convenient time.
During installation of the update, Arcserve UDP Agent (Windows) stops the Arc-serve UDP Web Service and connection to UI is lost.
When the update is successfully installed, the Updates icon changes to a greenstatus icon. The green status icon indicates that your computer has been updatedand the updates function is enabled.
Updates can also be installed from the tray icon by clicking the New Update is avail-able balloon message.
Installation of Arcserve UDP Agent (Windows) updates is complete.
Chapter 2: Installing/Uninstalling Arcserve UDP Agent (Windows) 91

How to Install Arcserve UDP Agent (Windows) Updates
Verify that the Updates are Successfully Installed
Perform one of the following options to verify that the updates are successfullyinstalled:
From the Arcserve UDP Agent (Windows) home page UI, click View Logs, andthen verify that the installed updates are listed in the Activity Log.
From the Arcserve UDP Agent (Windows) home page, select Help, click AboutArcserve UDP Agent (Windows), and then verify that the about Arcserve UDPAgent (Windows) dialog displays the latest version updated.
92 Arcserve UDP Agent for Windows User Guide

How to Install Arcserve UDP Agent (Windows) Updates
(Optional) Install Arcserve UDP Agent (Windows)Updates Silently
Silent update installation allows you to perform an unattended update installationand does not prompt you for any input.
The downloaded update installation file is under “<Product Home>\Update Man-ager\EngineUpdates\7.0”.
Follow these steps:
1. Launch the Arcserve UDP Agent (Windows) Update silent installation.
"<UpdateExeFile>" /s /v"<Additional Arguments>"
2. Configure the silent installation using the following syntax and arguments:
UpdateExeFile
Specifies to run the self-extracting executable file.
s
Specifies to run the self-extracting executable file using the silent mode.
v
Specifies any additional arguments for update installation.
Additional Arguments
/s
Specifies to run the update installation using the silent mode.
The update is configured and installed.
Chapter 2: Installing/Uninstalling Arcserve UDP Agent (Windows) 93

How to Install Arcserve UDP Agent (Windows) Updates
Troubleshooting Update Issues
When a problem is detected, Arcserve UDP Agent (Windows) generates a messageto help you identify and resolve the problem. These messages are contained in theArcserve UDP Agent (Windows) Activity Log, which is accessed from the View Logsoption on the home page UI. In addition, when an incorrect action is attempted, Arc-serve UDP Agent (Windows) generally displays a pop-up message to help youidentify and quickly resolve the problem.
Unable to Access Arcserve UDP Agent (Windows) After Reboot
Unable to Connect to the Arcserve Download Server to Download Updates
Failed to Download Arcserve UDP Agent (Windows) Updates
94 Arcserve UDP Agent for Windows User Guide

How to Install Arcserve UDP Agent (Windows) Updates
Unable to Access Arcserve UDP Agent (Windows)After Reboot
If you are not able to access the Arcserve UDP Agent (Windows) UI, perform the fol-lowing troubleshooting procedure:
1. From the Add or Remove Programs dialog, click the Add/Remove Windows Com-ponents option to access the Windows Components Wizard screen and removethe Internet Explorer Enhanced Security Configuration component.
2. Add the host name URL to the Trusted Sites in Internet Explorer.
3. Adjust the security level in Internet Explorer.
If the problem persists, use Live Chat to contact Arcserve support. Live Chat lets youoptimize intelligent conversation between you and the Technical Support team,allowing you to address your concerns and questions immediately, while still main-taining access to the product.
Chapter 2: Installing/Uninstalling Arcserve UDP Agent (Windows) 95

How to Install Arcserve UDP Agent (Windows) Updates
Unable to Connect to the Arcserve Download Serverto Download Updates
If you are not able to connect to the Arcserve download server to download Arc-serve UDP Agent (Windows) updates, follow these steps:
1. From the Arcserve UDP Agent (Windows) home page, click View Logs, and verifythe error message.
2. Verify that you have a good network connection.
3. Open command line and ping the downloads.arcserve.com server.
Perform one of the following to establish connection with the download server:
From the Arcserve UDP Agent (Windows) home page, select Settings, thenPreferences, and click Updates and Download Server. Click on the proxy set-tings and verify that the default option Use browser proxy settings (for IE andChrome only) is selected.
From the Arcserve UDP Agent (Windows) home page, select Settings, thenPreferences, and click Updates and Download Server. Click on the proxy set-tings and select Configure Proxy Settings and enter the valid proxy servername, port number and credentials and click OK.
4. Click Test Connection to verify that the connection is established.
If the problem persists, use Live Chat to contact Arcserve support. Live Chat lets youoptimize intelligent conversation between you and the Technical Support team,allowing you to address your concerns and questions immediately, while still main-taining access to the product.
96 Arcserve UDP Agent for Windows User Guide
How to Install Arcserve UDP Agent (Windows) Updates
Failed to Download Arcserve UDP Agent (Windows)Updates
If you are not able to download Arcserve UDP Agent (Windows) updates, followthese steps:
1. From the Arcserve UDP Agent (Windows) home page, click View Logs and read theerror message.
2. Verify that you have a good network connection.
3. Verify that there is enough disk space.
4. From the Arcserve UDP (Windows) installation home path, access the update Logfile ( “<Product Home>\Update Manager\logs\ARCUpdate.log” ).
5. Check the log entries for detailed error messages.
If the problem persists, use Live Chat to contact Arcserve support. Live Chat lets youoptimize intelligent conversation between you and the Technical Support team,allowing you to address your concerns and questions immediately, while still main-taining access to the product.
Chapter 2: Installing/Uninstalling Arcserve UDP Agent (Windows) 97

How to Uninstall Arcserve UDP Agent (Windows)
How to Uninstall Arcserve UDP Agent (Windows)
You can uninstall Arcserve UDP Agent (Windows) using the standard Add orRemove Programs application located in the Windows Control Panel and also byusing the command line.
The uninstallation routine removes all Arcserve UDP Agent (Windows) directoriesand files from your computer, except for the following directories and all of theircontents:
Arcserve Licensing:
(x86 systems) C:\Program Files\Arcserve\SharedComponents\CA_LIC(x64 systems) C:\Program Files(X86)\Arcserve\SharedComponents\CA_LIC
The following diagram illustrates the process to uninstall Arcserve UDP Agent (Win-dows):
98 Arcserve UDP Agent for Windows User Guide

How to Uninstall Arcserve UDP Agent (Windows)
Perform the following tasks to uninstall Arcserve UDP Agent (Windows):
1. Review the Uninstallation Considerations
2. Uninstall Arcserve UDP Agent (Windows) Using Add or Remove Programs
3. Uninstall Arcserve UDP Agent (Windows) Using the Command Line
4. (Optional) Remove Components Left Behind by the Uninstaller
5. Verify that the Arcserve UDP Agent (Windows) Uninstallation was Successful
6. (Optional) Files Not Removed During Uninstallation
7. (Optional) Troubleshooting Uninstall Issues
Chapter 2: Installing/Uninstalling Arcserve UDP Agent (Windows) 99
How to Uninstall Arcserve UDP Agent (Windows)
Review the Uninstallation Considerations
Review the following uninstallation considerations:
When you upgrade Arcserve UDP Agent (Windows) to the next release, it is notnecessary for you to uninstall Arcserve UDP Agent (Windows).
A nodeID is kept after uninstallation to identify the server so that it does notchange when you install Arcserve UDP agent (Windows) again. To get a dif-ferent nodeID, you can delete the following file (if it exists) before the nextinstallation:
%windir%\Temp\Arcserve\Setup\UDP\Uninstall\Settings.ini
Review the Compatibility Matrix that provides the supported operating sys-tems, databases, and browsers.
100 Arcserve UDP Agent for Windows User Guide

How to Uninstall Arcserve UDP Agent (Windows)
Uninstall Arcserve UDP Agent (Windows) Using Addor Remove Programs
You can uninstall Arcserve UDP Agent (Windows) using the standard Add orRemove Programs application located in the Windows Control Panel.
Follow these steps:
1. Click Start, Settings, Control Panel, Add/Remove Programs.
The Add or Remove Programs dialog opens. The list of installed programs is dis-played.
2. Select Arcserve Unified Data Protection, and click Remove.
The Components dialog opens.
3. Select Arcserve UDP Agent and click Remove.
4. Click Finish to complete the uninstall process.
The application is uninstalled.
Chapter 2: Installing/Uninstalling Arcserve UDP Agent (Windows) 101

How to Uninstall Arcserve UDP Agent (Windows)
Uninstall Arcserve UDP Agent (Windows) Using theCommand Line
A silent uninstallation eliminates the need for user interaction. The following stepsdescribe how to uninstall the application using the Windows Command Line.
Follow these steps:
1. Log in to the computer where you want to uninstall Arcserve UDP components.
Note: You must log in to the computer using an administrative account.
2. Open the Windows Command Line.
3. Execute the syntax that corresponds with the architecture of the computer's oper-ating system:
x86 operating system:
"%ProgramFiles%\Arcserve\SharedComponents\Arcserve Unified Data Pro-tection\Setup\uninstall.exe" /q /p CAAD8AEA-A455-4A9F-9B48-C3838976646A
x64 operating system:
"%ProgramFiles(x86)%\Arcserve\SharedComponents\Arcserve Unified DataProtection\Setup\uninstall.exe" /q /p CAAD1E08-FC33-462F-B5F8-DE9B765F2C1E
Return Code:
0 = Uninstall was successful.
3010 = Uninstall was successful, however a reboot is required.
Other = Uninstall failed.
The uninstallation is complete. A reboot is required if the Arcserve UDP Agent (Win-dows) driver is installed.
102 Arcserve UDP Agent for Windows User Guide

How to Uninstall Arcserve UDP Agent (Windows)
Remove Components Left Behind by the Uninstaller
Uninstallation of Arcserve UDP Agent (Windows) may affect certain third party andproprietary components, some of which are installed and removed with the cor-responding component, and others which may remain because they are sharedcomponents with other Arcserve products and numerous components. Note that ifyou remove the "shared" components, it may adversely affect your use and licens-ing of other Arcserve products, including but not limited to, losing the licensing forother Arcserve products installed on that machine. Further, if the "shared" com-ponents are removed, any programs that are installed after Arcserve UDP Agent(Windows) and depend on these components may not function properly.
Note: For a complete listing of all files (path and name) that are left behind by Arc-serve UDP Agent (Windows) uninstallation, see Files Not Removed During Unin-stallation.
If you want to manually remove these components, perform the following steps:
Remove Arcserve Licensing Component manually
1. Go to C:\Program Files (x86)\Arcserve\SharedComponents\CA_LIC directory.
2. Find the zip file named lic98_uninstaller.zip and unzip that file to some other loc-ation (for example: C:\temp).
3. Go to the location where the files were extracted and locate two script files thatare named rmlic.exe and rmlicense.bat.
4. Click on rmlicense.bat to execute the script which uninstalls the components.
5. Manually delete the following folders:
C:\Program Files (x86)\Arcserve
C:\Program Files\Arcserve
Folder where you extracted the zip file.
Remove Microsoft Visual C++ manually
1. Access the standard Add or Remove Programs application located in the WindowsControl Panel (Control Panel -> Programs and Features -> Remove Programs).
2. SelectMicrosoft Visual C++ 2013 x86 Redistributable - 12.0.30501 and then click onuninstall.
3. SelectMicrosoft Visual C++ 2013 x64 Redistributable - 12.0.30501 and then click onuninstall.
Chapter 2: Installing/Uninstalling Arcserve UDP Agent (Windows) 103

How to Uninstall Arcserve UDP Agent (Windows)
Verify that the Arcserve UDP Agent (Windows) Unin-stallation was Successful
Follow these steps:
1. Verify that the Agent icon is deleted from the system tray.
2. Navigate to services.msc from the command prompt tab and click OK.
3. Verify that the Arcserve UDP Agent service is deleted from the Services Manager.
4. Open the Control Panel and verify if Arcserve UDP Agent (Windows) removed.
5. Go to Start, Programs, and verify if Arcserve UDP Agent (Windows) is deleted.
The Arcserve UDP Agent (Windows) was uninstalled successfully.
104 Arcserve UDP Agent for Windows User Guide

How to Uninstall Arcserve UDP Agent (Windows)
Files Not Removed During Uninstallation
Arcserve UDP Agent (Windows) is uninstalled using the standard Add or RemovePrograms application located in the Windows Control Panel or using the Com-mand Line. During the Arcserve UDP Agent (Windows) uninstallation process, somefiles may not be uninstalled or removed as expected.
Here is a list of the Arcserve UDP Agent (Windows) file names and correspondingpaths that are not removed by the uninstaller after the uninstallation process iscompleted:
C:\Program Files (x86)\Arcserve\SharedComponents\CA_LIC\CA Licensing UserHelp.chmC:\Program Files (x86)\CA\SharedComponents\CA_LIC\CALicnse.exeC:\Program Files (x86)\CA\SharedComponents\CA_LIC\CAminfo.exeC:\Program Files (x86)\CA\SharedComponents\CA_LIC\CAregit.exeC:\Program Files (x86)\CA\SharedComponents\CA_LIC\countries.txtC:\Program Files (x86)\CA\SharedComponents\CA_LIC\countriesTrial.txtC:\Program Files (x86)\CA\SharedComponents\CA_LIC\ErrBox.exeC:\Program Files (x86)\CA\SharedComponents\CA_LIC\lic_comp_codes.datC:\Program Files (x86)\CA\SharedComponents\CA_LIC\lic98.capC:\Program Files (x86)\CA\SharedComponents\CA_LIC\lic98.datC:\Program Files (x86)\CA\SharedComponents\CA_LIC\lic98.dllC:\Program Files (x86)\CA\SharedComponents\CA_LIC\lic98.errC:\Program Files (x86)\CA\SharedComponents\CA_LIC\lic98_64.dllC:\Program Files (x86)\CA\SharedComponents\CA_LIC\lic98_64_amd.dllC:\Program Files (x86)\CA\SharedComponents\CA_LIC\lic98_uninstaller.zipC:\Program Files (x86)\CA\SharedComponents\CA_LIC\lic98FileSockLib.dllC:\Program Files (x86)\CA\SharedComponents\CA_LIC\lic98FileSockLib_amd64.dllC:\Program Files (x86)\CA\SharedComponents\CA_LIC\lic98FileSockLib_ia64.dllC:\Program Files (x86)\CA\SharedComponents\CA_LIC\lic98log.exeC:\Program Files (x86)\CA\SharedComponents\CA_LIC\Lic98Msg.dllC:\Program Files (x86)\CA\SharedComponents\CA_LIC\lic98-portC:\Program Files (x86)\CA\SharedComponents\CA_LIC\lic98Service.exeC:\Program Files (x86)\CA\SharedComponents\CA_LIC\lic98version.exeC:\Program Files (x86)\CA\SharedComponents\CA_LIC\LicDebug.exeC:\Program Files (x86)\CA\SharedComponents\CA_LIC\licinfo_win.zipC:\Program Files (x86)\CA\SharedComponents\CA_LIC\LicRCmd.exeC:\Program Files (x86)\CA\SharedComponents\CA_LIC\licreg.dllC:\Program Files (x86)\CA\SharedComponents\CA_LIC\licreg_64.dllC:\Program Files (x86)\CA\SharedComponents\CA_LIC\licreg_64_amd.dllC:\Program Files (x86)\CA\SharedComponents\CA_LIC\licregres.dllC:\Program Files (x86)\CA\SharedComponents\CA_LIC\licregres_64.dllC:\Program Files (x86)\CA\SharedComponents\CA_LIC\licregres_64_amd.dllC:\Program Files (x86)\CA\SharedComponents\CA_LIC\LogWatNT.exeC:\Program Files (x86)\CA\SharedComponents\CA_LIC\mergecalic.exeC:\Program Files (x86)\CA\SharedComponents\CA_LIC\mergeolf.exe
Chapter 2: Installing/Uninstalling Arcserve UDP Agent (Windows) 105

How to Uninstall Arcserve UDP Agent (Windows)
C:\Program Files (x86)\CA\SharedComponents\CA_LIC\prod_codes.txtC:\Program Files (x86)\CA\SharedComponents\CA_LIC\silntreg.tmpC:\Program Files (x86)\CA\SharedComponents\CA_LIC\states.txtC:\Program Files (x86)\CA\SharedComponents\CA_LIC\statesTrial.txtC:\Program Files (x86)\Arcserve\SharedComponents\CA_LIC\vendor.datC:\Program Files (x86)\Common Files\microsoft shared\VC\amd64\msdia80.dllC:\Program Files (x86)\Common Files\microsoft shared\VC\msdia80.dllC:\Users\Administrator.RIGONE\AppData\Local\IconCache.dbC:\User-s\Ad-min-istrat-or\Ap-pData\LocalLow\Mi-crosoft\CryptnetUrlCache\Content\696F3DE637E6DE85B458996D49D759ADC:\User-s\Ad-min-istrat-or\Ap-pData\LocalLow\Mi-crosoft\CryptnetUrlCache\Content\B8CC409ACDBF2A2FE04C56F2875B1FD6C:\User-s\Ad-min-istrat-or\Ap-pData\LocalLow\Mi-crosoft\CryptnetUrlCache\MetaData\696F3DE637E6DE85B458996D49D759ADC:\User-s\Ad-min-istrat-or\Ap-pData\LocalLow\Mi-crosoft\CryptnetUrlCache\MetaData\B8CC409ACDBF2A2FE04C56F2875B1FD6C:\Users\Administrator\ arcserve Unified Data Protection Agent\TrayI-con\ARCFlashTrayIcon.logC:\Users\Administrator\arcserve Unified Data Protection Agent\TrayIcon\ARCFlashTrayIcon_java.logC:\Windows\Downloaded Installations\D03BF724-4E4F-4DF4-A1BD-8497634F5589\1033.MSTC:\Windows\Downloaded Installations\D03BF724-4E4F-4DF4-A1BD-8497634F5589\ASLicense.msiC:\Windows\inf\WmiApRpl\0009\WmiApRpl.iniC:\Windows\inf\WmiApRpl\WmiApRpl.h
106 Arcserve UDP Agent for Windows User Guide
How to Uninstall Arcserve UDP Agent (Windows)
C:\Windows\System32\config\COMPONENTS016888b8-6c6f-11de-8d1d-001e0b-cde3ec.TxR.0.regtrans-msC:\Windows\System32\config\COMPONENTS016888b8-6c6f-11de-8d1d-001e0b-cde3ec.TxR.1.regtrans-msC:\Windows\System32\config\COMPONENTS016888b8-6c6f-11de-8d1d-001e0b-cde3ec.TxR.2.regtrans-msC:\Windows\System32\config\COMPONENTS016888b8-6c6f-11de-8d1d-001e0b-cde3ec.TxR.blfC:\Windows\System32\drivers\Msft_Kernel_AFStorHBA_01009.WdfC:\Windows\System32\drivers\Msft_Kernel_ARCFlashVolDrv_01009.WdfC:\Windows\System32\drivers\Msft_User_AFStorHBATramp_01_09_00.WdfC:\Windows\System32\LogFiles\WUDF\WUDFTrace.etlC:\Windows\System32\winevt\Logs\Microsoft-Windows-DriverFrameworks-User-Mode%4Operational.evtxC:\$MftC:\Program Files (x86)\CA\SharedComponents\CA_LIC\CALicnse.exeC:\Program Files (x86)\CA\SharedComponents\CA_LIC\CALicnse.exeC:\Program Files (x86)\CA\SharedComponents\CA_LIC\CAminfo.exeC:\Program Files (x86)\CA\SharedComponents\CA_LIC\CAminfo.exeC:\Program Files (x86)\CA\SharedComponents\CA_LIC\CAregit.exeC:\Program Files (x86)\CA\SharedComponents\CA_LIC\CAregit.exeC:\Program Files (x86)\CA\SharedComponents\CA_LIC\ErrBox.exeC:\Program Files (x86)\CA\SharedComponents\CA_LIC\ErrBox.exeC:\Program Files (x86)\CA\SharedComponents\CA_LIC\lic98.dllC:\Program Files (x86)\CA\SharedComponents\CA_LIC\lic98.dllC:\Program Files (x86)\CA\SharedComponents\CA_LIC\lic98_64.dllC:\Program Files (x86)\CA\SharedComponents\CA_LIC\lic98_64.dllC:\Program Files (x86)\CA\SharedComponents\CA_LIC\lic98_64_amd.dllC:\Program Files (x86)\CA\SharedComponents\CA_LIC\lic98_64_amd.dllC:\Program Files (x86)\CA\SharedComponents\CA_LIC\lic98FileSockLib.dllC:\Program Files (x86)\CA\SharedComponents\CA_LIC\lic98FileSockLib.dllC:\Program Files (x86)\CA\SharedComponents\CA_LIC\lic98FileSockLib_amd64.dllC:\Program Files (x86)\CA\SharedComponents\CA_LIC\lic98FileSockLib_amd64.dllC:\Program Files (x86)\CA\SharedComponents\CA_LIC\lic98FileSockLib_ia64.dllC:\Program Files (x86)\CA\SharedComponents\CA_LIC\lic98FileSockLib_ia64.dllC:\Program Files (x86)\CA\SharedComponents\CA_LIC\lic98log.exeC:\Program Files (x86)\CA\SharedComponents\CA_LIC\lic98log.exeC:\Program Files (x86)\CA\SharedComponents\CA_LIC\Lic98Msg.dllC:\Program Files (x86)\CA\SharedComponents\CA_LIC\Lic98Msg.dllC:\Program Files (x86)\CA\SharedComponents\CA_LIC\lic98Service.exeC:\Program Files (x86)\CA\SharedComponents\CA_LIC\lic98Service.exeC:\Program Files (x86)\CA\SharedComponents\CA_LIC\lic98version.exeC:\Program Files (x86)\CA\SharedComponents\CA_LIC\lic98version.exeC:\Program Files (x86)\CA\SharedComponents\CA_LIC\LicDebug.exeC:\Program Files (x86)\CA\SharedComponents\CA_LIC\LicDebug.exeC:\Program Files (x86)\CA\SharedComponents\CA_LIC\LicRCmd.exeC:\Program Files (x86)\CA\SharedComponents\CA_LIC\LicRCmd.exeC:\Program Files (x86)\CA\SharedComponents\CA_LIC\licreg.dll
Chapter 2: Installing/Uninstalling Arcserve UDP Agent (Windows) 107

How to Uninstall Arcserve UDP Agent (Windows)
C:\Program Files (x86)\CA\SharedComponents\CA_LIC\licreg.dllC:\Program Files (x86)\CA\SharedComponents\CA_LIC\licreg_64.dllC:\Program Files (x86)\CA\SharedComponents\CA_LIC\licreg_64.dllC:\Program Files (x86)\CA\SharedComponents\CA_LIC\licreg_64_amd.dllC:\Program Files (x86)\CA\SharedComponents\CA_LIC\licreg_64_amd.dllC:\Program Files (x86)\CA\SharedComponents\CA_LIC\licregres.dllC:\Program Files (x86)\CA\SharedComponents\CA_LIC\licregres.dllC:\Program Files (x86)\CA\SharedComponents\CA_LIC\licregres_64.dllC:\Program Files (x86)\CA\SharedComponents\CA_LIC\licregres_64.dllC:\Program Files (x86)\CA\SharedComponents\CA_LIC\licregres_64_amd.dllC:\Program Files (x86)\CA\SharedComponents\CA_LIC\licregres_64_amd.dllC:\Program Files (x86)\CA\SharedComponents\CA_LIC\LogWatNT.exeC:\Program Files (x86)\CA\SharedComponents\CA_LIC\LogWatNT.exeC:\Program Files (x86)\CA\SharedComponents\CA_LIC\LogWatNT.exeC:\Program Files (x86)\CA\SharedComponents\CA_LIC\mergecalic.exeC:\Program Files (x86)\CA\SharedComponents\CA_LIC\mergecalic.exeC:\Program Files (x86)\CA\SharedComponents\CA_LIC\mergeolf.exeC:\Program Files (x86)\CA\SharedComponents\CA_LIC\mergeolf.exeC:\Program Files (x86)\Common Files\microsoft shared\VC\msdia100.dllC:\Users\Administrator.RIGONE\AppData\Local\Microsoft\Windows\UsrClass.datC:\User-s\Administrator.RIGONE\AppData\Local\Microsoft\Windows\UsrClass.dat.LOG1C:\Users\Administrator.RIGONE\NTUSER.DATC:\Users\Administrator.RIGONE\ntuser.dat.LOG1C:\User-s\Ad-min-istrat-or\Ap-pData\LocalLow\Mi-crosoft\CryptnetUrlCache\Content\94308059B57B3142E455B38A6EB92015C:\User-s\Ad-min-istrat-or\Ap-pData\LocalLow\Mi-crosoft\CryptnetUrlCache\MetaData\94308059B57B3142E455B38A6EB92015C:\Users\Administrator\NTUSER.DATC:\Users\Administrator\ntuser.dat.LOG1C:\Windows\AppCompat\Programs\RecentFileCache.bcfC:\Windows\inf\setupapi.dev.logC:\Win-dows\Ser-vicePro-files\Net-
108 Arcserve UDP Agent for Windows User Guide

How to Uninstall Arcserve UDP Agent (Windows)
workSer-vice\AppData\Roaming\Microsoft\SoftwareProtectionPlatform\Cache\cache.datC:\Windows\setupact.logC:\Windows\SoftwareDistribution\DataStore\DataStore.edbC:\Windows\SoftwareDistribution\DataStore\Logs\edb.chkC:\Windows\SoftwareDistribution\DataStore\Logs\edb.logC:\Windows\System32\7B296FB0-376B-497e-B012-9C450E1B7327-5P-0.C7483456-A289-439d-8115-601632D005A0C:\Windows\System32\7B296FB0-376B-497e-B012-9C450E1B7327-5P-1.C7483456-A289-439d-8115-601632D005A0C:\Windows\System32\catroot2\127D0A1D-4EF2-11D1-8608-00C04FC295EE\c-atdbC:\Windows\System32\catroot2\F750E6C3-38EE-11D1-85E5-00C04FC295EE\c-atdbC:\Windows\System32\catroot2\dberr.txtC:\Windows\System32\catroot2\edb.chkC:\Windows\System32\catroot2\edb.logC:\Windows\System32\config\COMPONENTSC:\Windows\System32\config\COMPONENTS.LOG1C:\Windows\System32\config\COMPONENTS016888b8-6c6f-11de-8d1d-001e0b-cde3ec.TxR.0.regtrans-msC:\Windows\System32\config\COMPONENTS016888b8-6c6f-11de-8d1d-001e0b-cde3ec.TxR.blfC:\Windows\System32\config\COMPONENTS016888b9-6c6f-11de-8d1d-001e0b-cde3ec.TMContainer00000000000000000001.regtrans-msC:\Windows\System32\config\DEFAULTC:\Windows\System32\config\DEFAULT.LOG1C:\Windows\System32\config\SAMC:\Windows\System32\config\SAM.LOG1C:\Windows\System32\config\SOFTWAREC:\Windows\System32\config\SOFTWARE.LOG1C:\Windows\System32\config\SYSTEMC:\Windows\System32\config\SYSTEM.LOG1C:\Windows\System32\config\TxR\016888cc-6c6f-11de-8d1d-001e0b-cde3ec.TxR.0.regtrans-msC:\Windows\System32\config\TxR\016888cc-6c6f-11de-8d1d-001e0b-cde3ec.TxR.blfC:\Windows\System32\config\TxR\016888cd-6c6f-11de-8d1d-001e0b-cde3ec.TMContainer00000000000000000001.regtrans-msC:\Windows\System32\DriverStore\INFCACHE.1C:\Windows\System32\DriverStore\infpub.datC:\Windows\System32\DriverStore\infstor.datC:\Windows\System32\DriverStore\infstrng.datC:\Windows\System32\LogFiles\Scm\3cdb3c57-5945-4fa9-8e4d-f8bd141f0f8fC:\Windows\System32\LogFiles\Scm\63ee8552-a444-4ba2-8e1e-c8350d6d412aC:\Windows\System32\LogFiles\Scm\c7847981-48e6-476f-9581-4bbd8e73f7c5C:\Windows\System32\LogFiles\Scm\cd264f70-fd14-48ea-9d74-f52f1d1d3f89
Chapter 2: Installing/Uninstalling Arcserve UDP Agent (Windows) 109

How to Uninstall Arcserve UDP Agent (Windows)
C:\Windows\System32\perfc009.datC:\Windows\System32\perfh009.datC:\Windows\System32\PerfStringBackup.INIC:\Windows\System32\SMI\Store\Machine\SCHEMA.DATC:\Windows\System32\SMI\Store\Machine\SCHEMA.DAT.LOG1C:\Windows\System32\wbem\Performance\WmiApRpl.hC:\Windows\System32\wbem\Performance\WmiApRpl.iniC:\Windows\System32\wbem\Repository\INDEX.BTRC:\Windows\System32\wbem\Repository\MAPPING1.MAPC:\Windows\System32\wbem\Repository\OBJECTS.DATAC:\Windows\System32\WdfCoinstaller01009.dllC:\Windows\System32\winevt\Logs\Application.evtxC:\Windows\System32\winevt\Logs\Microsoft-Windows-Bits-Client%4Operational.evtxC:\Windows\System32\winevt\Logs\Microsoft-Windows-Diagnosis-DPS%4Oper-ational.evtxC:\Windows\System32\winevt\Logs\Microsoft-Windows-GroupPoli-cy%4Operational.evtxC:\Windows\System32\winevt\Logs\Microsoft-Windows-Kernel-WHEA%4Oper-ational.evtxC:\Windows\System32\winevt\Logs\Microsoft-Windows-Known Folders API Ser-vice.evtxC:\Windows\System32\winevt\Logs\Microsoft-Windows-Net-workProfile%4Operational.evtxC:\Windows\System32\winevt\Logs\Microsoft-Windows-NlaSvc%4Operational.evtxC:\Windows\System32\winevt\Logs\Microsoft-Windows-PrintService%4Admin.evtxC:\Windows\System32\winevt\Logs\Microsoft-Windows-Resource-Exhaustion-Detect-or%4Operational.evtxC:\Windows\System32\winevt\Logs\Microsoft-Windows-TaskSched-uler%4Operational.evtxC:\Windows\System32\winevt\Logs\Microsoft-Windows-TerminalServices-LocalSes-sionManager%4Operational.evtxC:\Windows\System32\winevt\Logs\Microsoft-Windows-TerminalServices-RemoteCon-nectionManager%4Operational.evtxC:\Windows\System32\winevt\Logs\Microsoft-Windows-User Profile Ser-vice%4Operational.evtxC:\Windows\System32\winevt\Logs\Microsoft-Windows-Windows Firewall WithAdvanced Security%4Firewall.evtxC:\Windows\System32\winevt\Logs\Microsoft-Windows-Win-dowsUpdateClient%4Operational.evtxC:\Windows\System32\winevt\Logs\Microsoft-Windows-WinRM%4Operational.evtxC:\Windows\System32\winevt\Logs\Security.evtxC:\Windows\System32\winevt\Logs\Setup.evtxC:\Windows\System32\winevt\Logs\System.evtxC:\Windows\System32\winevt\Logs\Works with Tool.evtxC:\Windows\System32\WudfUpdate_01009.dllC:\Windows\WindowsUpdate.logC:\Windows\System32\atl100.dll
110 Arcserve UDP Agent for Windows User Guide

How to Uninstall Arcserve UDP Agent (Windows)
C:\Windows\System32\mfc100.dllC:\Windows\System32\mfc100chs.dllC:\Windows\System32\mfc100cht.dllC:\Windows\System32\mfc100deu.dllC:\Windows\System32\mfc100enu.dllC:\Windows\System32\mfc100esn.dllC:\Windows\System32\mfc100fra.dllC:\Windows\System32\mfc100ita.dllC:\Windows\System32\mfc100jpn.dllC:\Windows\System32\mfc100kor.dllC:\Windows\System32\mfc100rus.dllC:\Windows\System32\mfc100u.dllC:\Windows\System32\mfc100u.dllC:\Windows\System32\mfcm100.dllC:\Windows\System32\mfcm100u.dllC:\Windows\System32\msvcp100.dllC:\Windows\System32\msvcr100.dllC:\Windows\System32\vcomp100.dll
Chapter 2: Installing/Uninstalling Arcserve UDP Agent (Windows) 111

How to Uninstall Arcserve UDP Agent (Windows)
Troubleshooting Uninstall Issues
When a problem is detected, Arcserve UDP Agent (Windows) generates a messageto help you identify and resolve the problem. These messages are contained in theArcserve UDP Agent (Windows) Activity Log, which is accessed from the View Logsoption on the home page UI. In addition, when an incorrect action is attempted, Arc-serve UDP Agent (Windows) generally displays a pop-up message to help youidentify and quickly resolve the problem.
112 Arcserve UDP Agent for Windows User Guide

How to Uninstall Arcserve UDP Agent (Windows)
Unable to install/uninstall Arcserve UDP Agent (Win-dows) if a previous attempt was interrupted
If during an attempt to install or uninstall Arcserve UDP Agent (Windows), theinstall/uninstall process was interrupted, you may not be able to successfully con-tinue and complete the process.
For example, any of the following conditions could cause a partial install/uninstallstate:
Your computer is shut down in middle of install/uninstall process.
You encounter a power outage during install/uninstall and there is no Unin-terruptible Power Supply (UPS).
To resolve this problem, perform the following steps:
1. Enter "regedit" in the Run dialog and click OK to open Registry Editor.
2. Locate and delete the following entry:
"HKEY_LOCAL_MACHINE\SOFTWARE\Arcserve\Unified Data Protection\Engine"
3. Use the search option in the Registry Editor to locate and delete all occurrences ofthe following string:
[Arcserve UDP Agent (Windows) for x86]: CAAD8AEA-A455-4A9F-9B48-C3838976646A
[Arcserve UDP Agent (Windows) for x64]: CAAD1E08-FC33-462F-B5F8-DE9B765F2C1E
4. Use the search option in the Registry Editor to locate and delete all occurrences ofthe string “Arcserve UDP Agent ”under the following key:
HKEY_CLASSES_ROOT\Installer\ProductsHKEY_LOCAL_MACHINE\SOFTWARE\Classes\Installer\ProductsHKEY_LOCAL_MACHINE\SOFTWARE\Mi-crosoft\Windows\CurrentVersion\Installer\UserData\S-1-5-18\ProductsHKEY_LOCAL_MACHINE\SOFTWARE\Microsoft\Windows\CurrentVersion\Uninstall
5. From the command line, delete the service by entering the following commands:
sc delete ShProvd
sc delete CASAD2DWebSvc
6. Run the command line to remove additional setup files.
x86 operating system:
Chapter 2: Installing/Uninstalling Arcserve UDP Agent (Windows) 113

How to Uninstall Arcserve UDP Agent (Windows)
"%ProgramFiles%\Arcserve\SharedComponents\Arcserve Unified Data Pro-tection\Setup\uninstall.exe" /q
x64 operating system:
"%ProgramFiles(x86)%\Arcserve\SharedComponents\Arcserve Unified Data Pro-tection\Setup\uninstall.exe" /q
If the problem persists, use Live Chat to contact Arcserve support. Live Chat lets youoptimize intelligent conversation between you and the Technical Support team,allowing you to address your concerns and questions immediately, while still main-taining access to the product.
114 Arcserve UDP Agent for Windows User Guide

UDP Workstation Free
UDP Workstation Free
Starting with Arcserve UDP Version 5.0 Update 2, at the end of the trial period, afree and fully functional Workstation Free Edition is provided to any user who hasnot yet obtained a proper license. This Workstation Free Edition is for use on work-station-class hardware (Laptops or Desktops running Microsoft Client Operating Sys-tems) and continues to provide full and complete access to all functions andfeatures that were available during the trial period, with some limited capabilities.
Highlights:
After the trial period expires, the Workstation Edition (trial period edition) auto-matically reverts to the Workstation Free Edition.
Your Workstation Free Edition nodes can still be managed from the ArcserveUDP Console.
Provides a very simple key-based upgrade path to the full Arcserve UDP "Work-station Edition."
You can perform backup to a local disk, or to a shared folder, or to any othersupported destination that is not an RPS without requiring a license key.
Using Workstation Free Edition, you cannot select an RPS as the backup des-tination. As a result, you will lose the ability to leverage the Global Dedu-plication feature, which dramatically reduces the amount of data actuallytransferred during backup cycles. This feature is available after upgrading tothe full Workstation Edition.
Live Chat capabilities are unavailable, but you can use Online community basedsupport for questions or to resolve issues.
Frequently Asked Questions:
Q. Can I use the trial version to test all features of Arcserve UDP?
A. Yes, you can use the trial version to leverage all the great features of Arc-serve UDP until trial period expires. When the trial period expires, the Work-station Edition of Arcserve UDP will automatically revert to the WorkstationFree Edition.
Q. What will happen if a Recovery Point Server (RPS) is selected as the des-tination for a Workstation Free Edition node?
A. You can still select an RPS as your backup destination under certain con-ditions. If your Arcserve UDP environment has license counts available, theywill be consumed on a need-basis.
Q. Does Arcserve UDP know when to consume a license?
Chapter 2: Installing/Uninstalling Arcserve UDP Agent (Windows) 115

UDP Workstation Free
A. Arcserve UDP is intelligent enough to determine which nodes need alicense, and will only use (consume) a license when required. As a result, ifyou are performing a backup to a shared folder you will not consume alicense. However, if you select an RPS as your destination it will consume alicense (if a license is available). You could then leverage (select) an RPS asyour backup destination from your Workstation Free Edition node and itwould consume one of the available licenses (but no longer be a WorkstationFree Edition node).
Q. Does Workstation Free Edition work for server-class operating systemssuch as Windows 2012?
A. No, Workstation Free Edition is only for use on desktops and laptops run-ning on any of the supported Windows client operating system (such as Win-dows 7, 8, or 8.1). You should check the Compatibility Matrix to view a list ofall supported operating systems.
Q. What about product support for Workstation Free Edition?
A. You can leverage support for Workstation Free Edition by connecting tothe online community based support, directly from within the product. Withthe full Workstation Edition, you can leverage some of the more enhancedand speedy support offerings such as the "Live Chat" capability, which isunavailable for the Workstation Free Edition.
116 Arcserve UDP Agent for Windows User Guide

Chapter 3: Getting Started with Arcserve UDP Agent(Windows)This section contains the following topics:
How to Navigate the Arcserve UDP Agent (Windows) User Interface 118
Chapter 3: Getting Started with Arcserve UDP Agent (Windows) 117
How to Navigate the Arcserve UDP Agent (Windows) User Interface
How to Navigate the Arcserve UDP Agent (Windows)User Interface
Before you use Arcserve UDP Agent (Windows), you should learn how to navigatethe related home page interface and become familiar with the tasks and mon-itoring functions that are performed from this single, easy-to-read home page. Thehome page interface can be accessed from either the Start menu or from the Arc-serve UDP Agent (Windows) Monitor.
The following diagram illustrates the process for how to navigate the Arcserve UDPAgent (Windows) user interface:
118 Arcserve UDP Agent for Windows User Guide

How to Navigate the Arcserve UDP Agent (Windows) User Interface
Complete the following tasks to navigate the Arcserve UDP Agent (Windows) userinterface:
Chapter 3: Getting Started with Arcserve UDP Agent (Windows) 119

How to Navigate the Arcserve UDP Agent (Windows) User Interface
1. Accessing Arcserve UDP Agent (Windows)
2. Introducing the User Interface
3. Understanding the User Interface
Job Monitor Panel
Status Summary
Data Protection Summary
Most Recent Events Summary
Functionality Taskbar
Support and Community Access Taskbar
Miscellaneous User Interface Components
4. (Optional) Troubleshooting User Interface Issues
SUPPLEMENTAL VIDEO
This procedure contains a supplemental instructional video. Select either arc-serve.com or YouTube as the source for viewing this video. The versions of thevideo are identical, and only the viewing source is different.
arcserve.com:Getting Started with Arcserve UDP Agent (Win-dows)
YouTube:Getting Started with Arcserve UDP Agent (Win-dows)
120 Arcserve UDP Agent for Windows User Guide

How to Navigate the Arcserve UDP Agent (Windows) User Interface
Accessing Arcserve UDP Agent (Windows)
When you first access Arcserve UDP Agent (Windows), the Getting Started dialogis displayed. From this dialog, you can access videos and the online help to learnmore about Arcserve UDP Agent (Windows). In addition, you can also access thevarious dialogs to specify such configuration settings as your backup source and des-tination, parameters, schedule, alert notifications, file copy settings, copy recoverypoint settings, preferences, and other related tasks. You can also select the optionto not show this Getting Started dialog again.
Chapter 3: Getting Started with Arcserve UDP Agent (Windows) 121

How to Navigate the Arcserve UDP Agent (Windows) User Interface
Introducing the User Interface
Before you use Arcserve UDP Agent (Windows), become familiar with the relatedhome page interface. The Arcserve UDP Agent (Windows) interface lets you per-form the following tasks all from a single, easy-to-read home page:
Manage backup servers and workstations.
Monitor job performance.
Obtain backup statistics.
Initiate data protection tasks.
Socialize with the user community.
Get help.
The Arcserve UDP Agent (Windows) home page displays various icon symbols toprovide a quick visual indication of the recent status and indicates the urgency ofany actions you must take.
The Arcserve UDP Agent (Windows) home page consists of the following sub-sections:
Job Monitor Panel
Status Summary
Data Protection Summary
Most Recent Events Summary
Functionality Taskbar
Support and Community Access Taskbar
Help Menu Link
122 Arcserve UDP Agent for Windows User Guide

How to Navigate the Arcserve UDP Agent (Windows) User Interface
Chapter 3: Getting Started with Arcserve UDP Agent (Windows) 123

How to Navigate the Arcserve UDP Agent (Windows) User Interface
Understanding the User Interface
Job Monitor Panel
Status Summary
Data Protection Summary
Most Recent Events Summary
Functionality Taskbar
Support and Community Access Taskbar
Miscellaneous User Interface Components
124 Arcserve UDP Agent for Windows User Guide

How to Navigate the Arcserve UDP Agent (Windows) User Interface
Job Monitor Panel
When no jobs are currently running, the Job Monitor panel displays the date andtime of the next scheduled event, with the type of event to be performed.
When a job is running, this panel expands to display information about the ongoingevent such as the estimated time remaining to complete the job, the percentageand size of the job already completed, and the total size of the job when completed.
Note:When the Windows Performance Counter is disabled, the data speed of someArcserve UDP Agent (Windows) jobs displayed in the job monitor may be 0 or someother abnormal value. If this occurs, see the troubleshooting section for moreinformation.
When a job is running, you can click the Detail button to open the Backup StatusMonitor and display more detailed information about the current job running. Youcan also click the Cancel button to stop the current job.
Note: If you want to stop the current job, click the Detail button first, to gain accessto the Cancel button.
Chapter 3: Getting Started with Arcserve UDP Agent (Windows) 125

How to Navigate the Arcserve UDP Agent (Windows) User Interface
In addition to displaying more detailed information about the current job, theBackup Status Monitor also displays the throughput information for the job andthe configured throttle limit.
If the throughput is too fast, you could enable the Throttle Backup option toadjust and limit the job throughput. For more information about adjusting theThrottle Backup speed, see Specify the Protection Settings in the online help.
Note: Any changes made to the throttle settings take effect immediately whenyou save the settings.
If the throughput is too slow, there could be various reasons for this reducedspeed such as antivirus software may be scanning the machine, or some file isbeing copied, or the machine is being accessed by many users.
126 Arcserve UDP Agent for Windows User Guide

How to Navigate the Arcserve UDP Agent (Windows) User Interface
When a merge job is running, you can manually pause it from the Arcserve UDPAgent (Windows) home page Job Monitor.
If you manually pause a merge job, you must manually click Resume for the mergejob to continue. For more information, see Merge Job Guidelines in the online help.
Chapter 3: Getting Started with Arcserve UDP Agent (Windows) 127

How to Navigate the Arcserve UDP Agent (Windows) User Interface
Status Summary
The Status Summary section of the home page provides a quick and easy, high-level status of your backup health.
Last Backup
Displays the date and time of the last backup, with the status of that backup.
Green icon - Indicates that the last backup was successful and your computer issafely protected.
Red icon - Indicates that the last backup was not successful, your most recentbackup failed, and the computer cannot be restored with that recovery point.
Yellow icon - Indicates that backups have not been performed for your computerand your computer is not protected.
Recovery Points/Recovery Sets
Displays the number of Recovery Points or Recovery Sets for your monitoredserver based on your specified retention settings.
Green icon - Indicates that you have reached the specified number of recoverypoints or recovery sets.
Red icon - Indicates that there are no saved recovery points or recovery sets andyou have a potentially dangerous backup environment.
128 Arcserve UDP Agent for Windows User Guide

How to Navigate the Arcserve UDP Agent (Windows) User Interface
Yellow icon - Indicates that you have at least one recovery point or one recoveryset, but have not reached your specified number of recovery points or recoverysets.
If you specified your retention settings based on recovery sets, the status summarydisplays the number of recovery sets already retained and the number of recoverysets in progress. In addition, click the link under Recovery Sets to display the Recov-ery Sets Details dialog. This dialog contains detailed information about the con-tents of the recovery set.
Note: The Recovery Sets option is available if you select Standard as your BackupData Format. However, the Recovery Sets option is not available if you selectAdvanced as your Backup Data Format. For more information about recoverysets, see Specify Retention Settings in the online help.
First Recovery Point
The date/time of the first backup in the recovery set.
Last Recovery Point
The date/time of the last backup in the recovery set. With the first/last recov-ery point time listed, you are able to determine the complete time range ofthe recovery set.
Space Occupied
The total size of the recovery set. This number can be used to calculate howmuch disk space is used by the recovery set.
Count
The number of recovery points that belong to the recovery set.
Destination Capacity
Displays the amount of free space available at your backup destination. TheDestination Capacity display provides an additional indication of the amount of
Chapter 3: Getting Started with Arcserve UDP Agent (Windows) 129
How to Navigate the Arcserve UDP Agent (Windows) User Interface
space that is used for the backups, the amount of space that others use, and theamount of available free space.
Green icon - Indicates that the amount of available free space is above the safelevel.
Yellow icon - Indicates that the amount of available free space is reduced to 3%of your destination capacity. It can be configured from the Windows registry.
Red icon - Indicates either of the following conditions:
The specified destination is not accessible.
The amount of available free space is reduced to 100 MB of your des-tination capacity. It can be configured from the Windows registry.
Immediately increase the free space capacity of the backup destination orchange the destination to another location which has adequate space.
Note: You can set up an email alert notification when the amount of unused spaceat the backup destination is less than a specified value. For more information aboutsetting up this email alert notification, see Specify Email Alert Preferences in theonline help.
License Failure
If a backup fails because of a license validation failure, the License Failurestatus is displayed indicating which license was the cause of the failure.
Updates
Displays the status of Arcserve UDP Agent (Windows) updates for your com-puter.
Green icon - Indicates the Arcserve UDP Agent (Windows) Updates function isenabled. Your computer is able to connect to the download server, your UpdateSchedule is configured, and no new updates are available.
Yellow icon - Indicates either of the following conditions:
The latest available update is not installed on your computer.
You can then click Click here to install updates to trigger the installationof the update.
Your Update Schedule has not been configured.
For more information about configuring the Update Schedule, see SpecifyUpdates Preferences in the online help.
130 Arcserve UDP Agent for Windows User Guide

How to Navigate the Arcserve UDP Agent (Windows) User Interface
Note: All updates that are released for Arcserve UDP Agent (Windows)are cumulative. As a result, each update also includes all previouslyreleased updates to help ensure that your computer is always up-to-date.
Red icon - Indicates Arcserve UDP Agent (Windows) is not able to connect to thedownload server. When this red icon is displayed, it means that you mustprovide valid download server details on the Updates tab of the Preferences dia-log.
Last File Copy
Displays the date and time of the last File Copy job, with the status of the FileCopy job that was performed.
Green icon - Indicates that the last File Copy job was successful.
Red icon - Indicates that the last File Copy job was not successful.
Yellow icon - Indicates that the last File Copy job was incomplete or canceled.
In addition, the Last File Copy status indicator also displays the actual amount ofspace that is freed on the disk by the File Copy job. This space saved calculation isonly displayed if you select to move the File Copy to a different location instead ofcopying the File Copy to as different location. This value is based upon the actualsize of the backup that was moved from the computer to the specified destination.A File Copy job that does not move the copy to a different location, does not saveany space.
Destination Space Usage Status Bar
Backup - Total amount of space used for all backup sessions on the destination.
Note: For Windows Server 2012 NTFS, the Backup size displayed is the data dedu-plication un-optimized size. If the Arcserve UDP Agent (Windows) backup des-tination is configured with Windows NTFS data deduplication enabled, theBackup size may be larger than the actual data size on the disk.
Others - Non-Arcserve UDP Agent (Windows) data size on the destination.
Free - Amount of available space on the destination.
Note: If the backup destination is set to data store, this status bar does not display.
Chapter 3: Getting Started with Arcserve UDP Agent (Windows) 131

How to Navigate the Arcserve UDP Agent (Windows) User Interface
Data Protection Summary
The Data Protection Summary section of the home page displays status inform-ation for the available events (backups/file copy).
For each type of backup job (Full, Incremental, and Verify) and each File Copy job,this summary displays the following:
Count
For each type of event, indicates the number of successful backup/File Copyjobs that were performed (scheduled or non-scheduled).
Data Protected
The amount of data protected from the source. This is the size of data that wasbacked up from the source volume during a backup job (without deduplicationand compression).
Space Occupied
The amount of space occupied (saved) at the destination.
Note: For a deduplication data store, "N/A" will be displayed for the Space Occu-pied field. For a non-deduplication data store/share folder, the actual data size willbe displayed.
Last Successful Event
For each type of event, indicates the date and time that the last successfulevent was performed.
Next Event
For each type of event, indicates the next scheduled event. If this column isblank, it indicates that you do not have a schedule for this type of event or thenon-recurring schedule has been satisfied.
132 Arcserve UDP Agent for Windows User Guide

How to Navigate the Arcserve UDP Agent (Windows) User Interface
Most Recent Events Summary
The Most Recent Events section of the home page displays the most recent events(backup jobs), with the corresponding status, the type of event performed, the dateand time of the event, the size of the data protected (backed up) from the source,the amount of space occupied (saved) at the destination, and the status of the cor-responding File Copy job. It also includes the name of the event (if specified by theuser). You can click on a specific date to display the corresponding events for thatselected date.
A flag in the status column indicates that a full backup is the starting backup of arecovery set.
The calendar displays the dates of the most recent events, highlighted in cor-responding status colors.
Green - All backup attempts for that day were successful.
Red - All backup attempts for that day were unsuccessful (failed or canceled).
Yellow - Backup attempts for that day were not all successful or not all unsuc-cessful (mix of successful and unsuccessful backup attempts).
Note: A diagonal marker in the top left corner of a date indicates that the day
Chapter 3: Getting Started with Arcserve UDP Agent (Windows) 133

How to Navigate the Arcserve UDP Agent (Windows) User Interface
contains the start of a recovery set.
134 Arcserve UDP Agent for Windows User Guide

How to Navigate the Arcserve UDP Agent (Windows) User Interface
Functionality Taskbar
The Functionality taskbar section of the home page provides a means to initiate thevarious Arcserve UDP Agent (Windows) functions.
Backup Now
Lets you run a Full, Incremental, or Verify ad-hoc backup immediately, basedon current backup settings. The backup settings are configured and definedthrough the Backup Settings. For more information, see Perform Backup Manu-ally (Backup Now) in the online help.
Restore
Lets you perform a file level or application-level restores to the original loc-ation or to an alternate location. When you select this function, you then spe-cify to which restore option you want to use to locate the backup image to berestored. For more information, see Restore Methods in the online help.
Settings
Lets you configure/modify the following settings:
Backup Settings (backup destination, schedule, retention count, and so on).For more information, see Configure or Modify Backup Settings in the onlinehelp.
File Copy Settings (source, destination, schedule, retention count, filters, andso on). For more information, see Manage File Copy Settings in the onlinehelp.
Chapter 3: Getting Started with Arcserve UDP Agent (Windows) 135

How to Navigate the Arcserve UDP Agent (Windows) User Interface
Copy-Recovery Points (scheduled export of recovery points). For moreinformation, see Configure the Copy Recovery Point Settings in the onlinehelp.
Preferences (enable Email Alerts and Updates). For more information, seeSpecify Preferences in the online help.
Copy Recovery Point
Lets you view a list of available recovery points (successful backups) and selectwhich recovery point you want to use to create a consolidated copy. This con-solidated copy combines the blocks from the previous full and all incrementalbackups leading to the selected recovery point. In addition, the consolidatedcopy also removes any unused blocks (reducing the image size) to lets you gainmore efficient use of your backup resources.
Each recovery point represents a point in time when a VSS snapshot image wascaptured and contains not only the data, but also all information relating to theoperating system, installed applications, configuration settings, necessarydrivers, and so on. For more information, see How to Copy a Recovery Point inthe online help.
Mount Recovery Point
Provides the ability to mount a recovery point to a drive letter (volume) or anNTFS folder, to view, browse, copy, or open the backup files directly in WindowsExplorer.
View Logs
Lets you view logs of activities that are performed during operations such asbackup, restore, and copy. The Activity Log displays the status of the job, includ-ing such details as the throughput, compression size, elapsed time, encryptionstatus, and so on. For more information, see View Logs in the online help.
136 Arcserve UDP Agent for Windows User Guide

How to Navigate the Arcserve UDP Agent (Windows) User Interface
Support and Community Access Taskbar
The Support and Community Access taskbar section of the home page provides ameans to initiate the various support-related functions.
To avoid any delays in response and help ensure that your communication is routedto the proper destination, it is important to know and understand which of thesesites are used for which functions.
For example:
If you discover a bug in the product, you should select the Online Support linkand post the problem there. By doing this, the Arcserve Support team can dir-ectly assist you in resolving your problem in a productive and efficient manner.
If you have a suggestion or idea for improving the product for the next release,you should select the Provide Feedback link. By doing this, you can interact dir-ectly with the Arcserve team to work together to improve the product and helpmake it better for you.
Knowledge Center
Provides a complete "One Stop Knowledge Center" for all product relatedinformation. It can be accessed directly from the product and Arcserve Support.
Videos
Provides access to view various Arcserve UDP Agent (Windows)-related videos.These videos are for basic Arcserve UDP Agent (Windows) features and pro-cedures.
Online Support
Provides access to "One Stop Support" from where you can resolve issues andget important product information.
Chapter 3: Getting Started with Arcserve UDP Agent (Windows) 137

How to Navigate the Arcserve UDP Agent (Windows) User Interface
Provide Feedback
Provides access to the Arcserve team from where you can view FrequentlyAsked Questions, ask your own questions, share ideas, and report any problems.
Note: Available in English only.
Live Chat
Provides real-time monitoring and live help/support. Lets you optimize intel-ligent conversation between you and the Arcserve UDP Agent (Windows) Tech-nical Support team, allowing you to address your concerns and questionsimmediately, while still maintaining access to the product. Upon completion ofthe chat session, you can send a transcript of the chat to your email address.
Note: You may need to add the Live Chat link to your Trusted sites.
138 Arcserve UDP Agent for Windows User Guide

How to Navigate the Arcserve UDP Agent (Windows) User Interface
Miscellaneous User Interface Components
Managing Console
Help Menu
Arcserve UDP Agent for Windows Monitor
Chapter 3: Getting Started with Arcserve UDP Agent (Windows) 139

How to Navigate the Arcserve UDP Agent (Windows) User Interface
Managing Console
Managing Console refers to the Managed By field on the Arcserve UDP Agent (Win-dows) home page UI. If the agent is being centrally managed by an Arcserve UDPConsole, this link allows you to open the Arcserve UDP Console. If it is not centrallymanaged, this field is not displayed.
140 Arcserve UDP Agent for Windows User Guide

How to Navigate the Arcserve UDP Agent (Windows) User Interface
Help Menu
The Help menu on the home page provides a quick and easy access to the ArcserveUDP Knowledge Center, Arcserve UDP Agent (Windows) Help, User Guide, and theAbout Arcserve UDP Agent (Windows) page. In addition, you can launch a manualCheck for Updates from this menu.
Chapter 3: Getting Started with Arcserve UDP Agent (Windows) 141

How to Navigate the Arcserve UDP Agent (Windows) User Interface
Arcserve UDP Agent (Windows) Monitor
From the Arcserve UDP Agent (Windows) Monitor, you can access many of thesame task functions that you can access from the Arcserve UDP Agent (Windows)home page. You can launch the following tasks from the tray monitor: Open the Arc-serve UDP Agent (Windows) home page, Backup Now, Settings, Restore, CopyRecovery Point, Mount Recovery Point, Check for Updates, and Advanced. Fromthe Advanced option, you can access additional subordinate options such as CreateBoot Kit, Licensing, Start/Stop Service, and configure alert Notifications (None,Errors and Warnings, or All).
When the Arcserve UDP Agent (Windows) is being managed by Console:
When the Arcserve UDP Agent (Windows) is managed by console and not protectedin a plan:
In addition, when you hover your cursor over the Arcserve UDP Agent (Windows)Monitor icon, a backup status overview message is displayed. An animated iconindicates when any job is running and includes the progress completed. You can eas-ily determine if a job (backup, restore, file copy, copy recovery point, catalog, orgranular restore catalog) is running without logging in to Arcserve UDP Agent (Win-dows).
142 Arcserve UDP Agent for Windows User Guide

How to Navigate the Arcserve UDP Agent (Windows) User Interface
Chapter 3: Getting Started with Arcserve UDP Agent (Windows) 143

How to Navigate the Arcserve UDP Agent (Windows) User Interface
Troubleshooting User Interface Issues
When a problem is detected, Arcserve UDP Agent (Windows) generates a messageto help you identify and resolve the problem. These messages are contained in theArcserve UDP Agent (Windows) Activity Log, which is accessed from the View Logsoption on the home page. In addition, when an incorrect action is attempted, Arc-serve UDP Agent (Windows) generally displays a pop-up message to help youidentify and quickly resolve the problem.
Unable to display Arcserve UDP Agent (Windows) home page in IE webbrowser
Job Monitor data speed displays a 0 or some other abnormal value
144 Arcserve UDP Agent for Windows User Guide

How to Navigate the Arcserve UDP Agent (Windows) User Interface
Unable to display Arcserve UDP Agent (Windows)home page in IE
If you are using an Internet Explorer (IE) web browser to access the Arcserve UDPAgent (Windows) home page and it does not display, it may be that the ArcserveUDP Agent (Windows) website is not included as a "Trusted Site" in your IE browser.
If this condition occurs, add this website as a Trusted Site in your IE browser. Formore information about adding a website as a Trusted Site, see Security zones:adding or removing websites.
If the problem persists, use Live Chat to contact Arcserve support. Live Chat lets youoptimize intelligent conversation between you and the Technical Support team,allowing you to address your concerns and questions immediately, while still main-taining access to the product.
Chapter 3: Getting Started with Arcserve UDP Agent (Windows) 145

How to Navigate the Arcserve UDP Agent (Windows) User Interface
Job Monitor data speed displays a 0 or some otherabnormal value
Symptom
Windows Performance Counters are disabled.
Solution
From the Registry Editor, delete or enable the following registry keys on all Win-dows versions:
Perflib
Path: HKLM\SOFTWARE\Microsoft\Windows NT\CurrentVersion\Perflib
Name: “Disable Performance Counters”
Type: DWORD
Value: Set to 0 to enable performance counter.
Performance
Path: HKLM\SYSTEM\CurrentControlSet\Services\PerfProc\Performance
Name: “Disable Performance Counters”
Type: DWORD
Value: Set to 0 to enable performance counter.
If the problem persists, use Live Chat to contact Arcserve support. Live Chat lets youoptimize intelligent conversation between you and the Technical Support team,allowing you to address your concerns and questions immediately, while still main-taining access to the product.
146 Arcserve UDP Agent for Windows User Guide

Chapter 4: SettingsThis section contains the following topics:
Configure or Modify Backup Settings 148
Manage File Copy Settings 199
Manage File Archive Settings 220
Configure the Copy Recovery Point Settings 239
Specify Preferences 245
Chapter 4: Settings 147

Configure or Modify Backup Settings
Configure or Modify Backup Settings
Before you perform your first backup, you must configure the backup settingswhich are applied to each backup job. These settings can be retained for futurebackup or they can be modified at any time from the Arcserve UDP Agent (Win-dows) home page.
The settings let you specify behaviors such as:
Backup source and destination.
Schedule standard or advanced settings for each type of backup.
Advanced settings for your backup jobs.
Any pre or post backup operations.
Note: To view a video that is related to these Backup Settings, see How to Performa Backup.
To manage the backup settings, click the Settings link on the Arcserve UDP Agent(Windows) home page to display the Backup Settings dialogs and these sub-ordinate tab options:
Protection Settings
Schedule Settings
Advanced Settings
Pre/Post Backup Settings
148 Arcserve UDP Agent for Windows User Guide

Configure or Modify Backup Settings
Specify Protection Settings
Protection settings for the information that is going to be backed up ensures thatthe backup data is reliably protected (copied and saved) against any form of dataloss.
Specify the protection settings
1. From the Arcserve UDP Agent (Windows) home page (or Arcserve UDP Agent (Win-dows) Monitor), select Settings from the taskbar and then select the Backup Set-tings tab. When the Backup Settings dialog opens, select Protection Settings.
The Protection Settings dialog opens.
Notes:
If the Arcserve UDP Agent (Windows) is being managed by Console, not allsettings are available and will be displayed as read-only information.
When agent is managed by console and not protected in a plan, all the set-ings are still available except the Preference > Updates panel.
2. Specify the Backup Destination.
Use local disk or shared folder
You can specify a local path (volume or folder), or remote shared folder (ormapped drive) for the backup location, or you can browse to a backup loc-ation.
Chapter 4: Settings 149

Configure or Modify Backup Settings
Click the green arrow icon button to verify the connection to the specified loc-ation.
If you entered a local path for the destination, this button is disabled.
If you enter a network path and click this button, you are prompted toprovide the username and password.
If you are already connected to this path successfully, and click thearrow button you can change the username and password you used toconnect.
If you do not click the arrow button, the destination path is verified. Ifneeded, you are prompted for the username and password.
a. If you want to back up to your local path (volume or folder), the spe-cified backup destination cannot be the same location as your backupsource. If you inadvertently include the source in your destination, thebackup job ignores this portion of the source and it is not included inthe backup.
Example: You attempt to back up your entire local machine consistingof Volumes C, D, and E and also specify Volume E as your destination.The Arcserve UDP Agent (Windows) only backs up Volumes C and D toVolume E. Data from Volume E is not included in the backup. If youwant to back up all local volumes, specify a remote location for yourdestination.
Important! Verify that your specified destination volume does not con-tain system information. Or else it will not be protected (backed up)and your system will fail to recover after Bare Metal Recovery (BMR)if necessary.
Note: Dynamic disks are restored at disk-level only. If your data isbacked up to a volume on a dynamic disk, you are not able to restorethis dynamic disk during BMR.
b. If you want to back up to a remote shared location, specify a locationpath or browse to the location. You also have to provide user cre-dentials (Username and Password) to access the remote machine.
c. If the backup destination has changed after the last backup was per-formed, select the backup type: Full Backup or Incremental Backup.These options are only enabled when you change your backup des-tination.
Default: Full Backup
150 Arcserve UDP Agent for Windows User Guide

Configure or Modify Backup Settings
Note: If the backup destination has changed and catalog jobs arepending, the catalog job first runs and completes on the old locationbefore running on the new location.
Full Backup
The next backup that is performed is going to be a Full Backup. Thenew backup destination does not have any dependency on the oldbackup destination. If you continue with a full backup, the previous loc-ation is no longer needed for backups to continue. You can select tokeep the old backup for any restores or if you do not want to performany restores from there you can delete it. The old backup will notaffect future backups.
Incremental Backup
The next backup that is performed is going to be an IncrementalBackup. The next incremental backup to the new destination is per-formed without copying all the backups from the previous destination.However, for this option, the new location is dependent on the previouslocation because the changes include only the incremental data (notthe full backup data). Do not delete the data from the previous loc-ation. If you change the backup destination to another folder andattempt to perform an incremental backup, and the former backup des-tination does not exist, the backup fails.
Note:With the Full installation of Arcserve UDP, you can specify to use an ArcserveUDP Recovery Point Server as the backup location. If you do, the Protection SettingsBackup Destination displays the Arcserve UDP Recovery Point Server Settings,including the Hostname, Username, Password, Port, Protocol, and the Plan Sum-mary.
3. Specify the Backup Source.
You can back up the entire machine or selected volumes.
Back up the entire machine
Lets you back up the entire machine. All volumes on the machine are backedup.
Note: If you select the full machine backup option, Arcserve UDP Agent (Win-dows) automatically discovers all disks or volumes attached to the currentmachine and Arcserve UDP Agent (Windows) includes them in the backup.
Example: If a new disk is attached to the machine after the backup setting isconfigured, you do not need to change the backup settings and the data on thenew disk will be protected automatically.
Chapter 4: Settings 151

Configure or Modify Backup Settings
Select individual volumes to back up
This volume filtering capability lets you specify to back up only the selectedvolumes. You also have the option to Select or clear selection of all listedvolumes.
Note: If some volumes are selected explicitly for backup, only the selectedvolumes are backed up. If a new disk or volume is attached to the machine,manually change the volume selection list to protect the data on the new diskor volume.
When you select this option, a listing of all available volumes display, with thecorresponding volume information and notification messages.
Note: Computers that adhere to the Extensible Firmware Interface (EFI) use theEFI System Partition, which is a partition on a data storage device. The EFI Sys-tem partition is critical for Bare Metal Recovery (BMR). Therefore, when youselect boot volume "C" on a UEFI system, the EFI System Partition is selectedautomatically for the backup source for BMR and an information message is dis-played.
Name
Specifies the name of the volume drive letter, mount point, volume GUID(Globally Unique Identifier) name.
Layout
Indicates the simple, spanned, mirror, stripped, RAID5 (backup of a RAID 5volume on Microsoft Dynamic Disks is not supported; but backup of hardwareRAID is supported).
Type
Indicates the type, basic or dynamic.
File system
Lists the following file systems: NTFS, ReFS, FAT, FAT32 (backup of FAT,FAT32, and exFAT is not supported).
152 Arcserve UDP Agent for Windows User Guide

Configure or Modify Backup Settings
Contents
Indicates whether the application is (SQL/Exchange), System, Boot, Page file,Removable Device, VHD, 2-TB Disk.
Total size
Specifies the size or the capacity of the volume.
Used Space
Indicates the space, files or folders and volume data occupies.
The notification messages display for any of the following conditions:
Local volume related
If the specified backup destination is on the local volume, a warningmessage displays notifying you that this volume is not backed up.
BMR related
If system/boot volume is not selected for backup, a warning messagedisplays notifying you that the backup is not usable for BMR.
If you select boot volume "C" on a UEFI system, the EFI system partitionis selected automatically for the backup source for BMR and an inform-ation message is displayed.
Application related
If the application data files are on a volume that is not selected forbackup, the application name and database name display for ref-erence.
4. Specify the Backup Data Format.
Standard
Standard Backup Data Format allows you to set the number of recovery pointsto retain or the number of recovery sets to retain and includes a basic repeatbackup schedule. The Standard format is the legacy format used in releases ofArcserve D2D and Arcserve Central Applications.
Advanced
Advanced Backup Data Format allows you to set the number of recovery pointsto retain and includes advanced scheduling. The Advanced format is a new datastorage format, dividing source disks into multiple logical segments. Comparedto the Standard format, backup, restore, and merge job throughputs are greatlyimproved.
Chapter 4: Settings 153
Configure or Modify Backup Settings
If the Advanced Backup Data Format is selected, advanced scheduling will beenabled. Advanced scheduling consists of the following:
Week-based repeat backup schedule
Week-based backup throttling schedule
Week-based merge schedule
Daily backup schedule
Weekly backup schedule
Monthly backup schedule
5. Specify the Retention Setting if you selected Standard as the Backup DataFormat.
Note: If you selected Advanced as the Backup Data Format, the retention settingis specified on the Advanced Schedule Settings dialog.
You can set the retention setting based on the number of recovery points to retain(merges sessions) or based on the number of recovery sets to retain (deletes recov-ery sets and disables infinite incremental backups).
Default: Retain Recovery Points
Recovery Point
This is the recommended option. With this option selected, you can fully lever-age the infinite incremental backup capabilities and save storage space.
Note: If you selected Advanced as the Backup Data Format, then you can onlyspecify the number of recovery points to retain.
Recovery Set
This option is generally used for large storage environments. With this optionselected, you can create and manage backup sets that help you manage yourbackup window time more efficiently when you are protecting a large amountof data. You can use this option when backup time is a priority over space con-straints.
Note: Recovery sets are only available if you are backing up to a location thatis not a data store. Recovery sets are not supported with RPS deduplication.They are also not available for Advanced format backup to non-RPS locations.
For more information about setting the Recovery Point and Recovery Set options,see Specify Retention Settings.
6. Specify the type of Compression.
Specifies the type of compression that is used for backups.
154 Arcserve UDP Agent for Windows User Guide

Configure or Modify Backup Settings
Compression is often selected to decrease disk space usage, but also has an inverseimpact on your backup speed due to the increased CPU usage.
The available options are:
No Compression
No compression is performed. This option has the lowest CPU usage (fastestspeed), but also has the highest disk space usage for your backup image.
Standard Compression
Some compression is performed. This option provides a good balancebetween CPU usage and disk space usage. Standard compression is thedefault setting.
Maximum Compression
Maximum compression is performed. This option provides the highest CPUusage (lowest speed), but also has the lowest disk space usage for yourbackup image.
Notes:
If your backup image contains uncompressible data (such as JPG images orZIP files), you can allocate additional storage space to handle such data. As aresult, if you select any compression option and you have uncompressibledata in your backup, it can result in an increase in disk space usage.
If you change the compression level from No Compression to either StandardCompression or Maximum Compression, or if you change from either Stand-ard Compression or Maximum Compression to No Compression, the firstbackup that is performed after this compression level change is auto-matically a Full Backup. After the Full Backup is performed, all futurebackups (Full, Incremental, or Verify) will be performed as scheduled.
If your destination does not have sufficient free space, you can considerincreasing the Compression setting of the backup.
7. Specify the Encryption settings.
a. Select the type of encryption algorithm that is used for backups.
Data encryption is the translation of data into a form that is unintelligiblewithout a deciphering mechanism. The Arcserve UDP Agent (Windows) dataprotection uses secure, AES (Advanced Encryption Standard) encryptionalgorithms to achieve maximum security and privacy of your specified data.
Chapter 4: Settings 155
Configure or Modify Backup Settings
The available format options are No Encryption, AES-128, AES-192, and AES-256. (To disable encryption, select No Encryption).
A full backup and all its related incremental and verify backups mustuse the same encryption algorithm.
If the encryption algorithm for an incremental or verify backup ischanged, a full backup must be performed. This means after changingencryption algorithm, the first backup will be full, despite the originalbackup type.
For example, if you change the algorithm format and you submit a cus-tomized incremental or verify backup manually, it is automatically convertedto a full backup.
b. When an encryption algorithm is selected, provide (and confirm) an encryp-tion password.
The encryption password is limited to a maximum of 23 characters.
A full backup and all its related incremental and verify backups must usethe same password to encrypt data.
If the encryption password for an incremental or verify backup is changed,a full backup must be performed. This means after changing encryptionpassword, the first backup will be full, despite the original backup type.
For example, if you change the encryption password and you submit a cus-tomized incremental or verify backup manually, it is automatically con-verted to a full backup.
c. Arcserve UDP Agent (Windows) provides encryption password managementso that you do not need to remember encryption passwords.
Password is also encrypted.
Password is remembered and not required (if you restore to the samemachine).
Password is required if you restore to a different machine.
Password is not required if you are attempting to export a recovery pointthat contains encrypted data and the recovery point belongs to backupsperformed on the current machine.
Password is always required if you are attempting to recover encrypteddata from an exported recovery point.
Password is not required to browse to an encrypted recovery point.
Password is required to perform a BMR.
156 Arcserve UDP Agent for Windows User Guide

Configure or Modify Backup Settings
d. When encryption is enabled, the activity log is updated.
A message is recorded in the activity log to describe the selected encryp-tion algorithm for every backup.
A message is recorded in the activity log to indicate why an incrementalor verify backup was converted to a full backup (password change oralgorithm change).
Note: Encryption settings do not have to remain the same for your backups. Youcan change these settings at any time, including after several backups of the samedata.
8. Specify the Throttle Backup.
You can specify the maximum speed (MB/min) at which backups are written. Youcan throttle the backup speed to reduce CPU or network use. However, limiting thebackup speed, has an adverse effect on the backup window. As you lower the max-imum backup speed, it increases the amount of time of perform the backup. For abackup job, the Job Monitor on the Arcserve UDP Agent (Windows) home page dis-plays the average Read and Write speed of the job in progress and the configuredthrottle speed limit.
Note: By default, the Throttle Backup option is not enabled and backup speed isnot being controlled.
9. Calculate the Estimated Backup Size.
Displays the estimated usage of the destination volume.
Note: For more information about using these estimated backup calculations, seeEstimate Future Backup Space Requirements.
10. Click Save Settings.
Your backup protection settings are saved.
Chapter 4: Settings 157

Configure or Modify Backup Settings
Specify Retention Settings
The retention setting for the Standard Backup Data Format can be based on thenumber of recovery points to retain (merges sessions) or based on the number ofrecovery sets to retain (deletes recovery sets and disables infinite incrementalbackups).
Retain Recovery Points
Select this option to set your retention setting based on the number of recov-ery points to retain instead of on the number of recovery sets to retain.
Note: The recovery points to retain is set in the Protection Backup Settingsif you select Standard as the Backup Data Format. The recovery points toretain is set in the Advanced Schedule Settings if you select Advanced asthe Backup Data Format.
Specify the number of recovery points to retain
Specifies the number of recovery points (full, incremental, and verifybackup images) retained. When the number of recovery points presenton the destination exceeds the specified limit, the earliest (oldest)incremental backups beyond the retention count are merged into theparent backup to generate a new baseline image consisting of the "par-ent plus oldest childs" blocks. If there are multiple sessions availablefor merge, the oldest child backups will be merged into the parent
158 Arcserve UDP Agent for Windows User Guide

Configure or Modify Backup Settings
backup in a single pass, if the backups are compressed. If the backupsare not compressed, then only the oldest child backup will be mergedinto the parent backup and this cycle repeats for each subsequent childbackup to be merged.
Specifying the number of recovery points to retain allows you to per-form infinite incremental backups, while maintaining the same reten-tion count. For more information, see Merge Job Guidelines.
Note: If your destination does not have sufficient free space, you canconsider reducing the number of saved recovery points.
Default Value: 31
Minimum Value: 1
Maximum Value: 1344
Note: The Arcserve UDP Agent (Windows) home page Summary sec-tion indicates how many recovery points are retained out of the num-ber specified. For more information, see Status Summary in the onlinehelp.
Run the merge job:
As soon as possible
Select this option to run the merge job at any time.
Each day during the following time range
Select this option to run the merge job each day only within the spe-cified time range. Setting a time range helps to avoid the mergejob introducing too many I/O operations to the production server ifthe merge job runs for a long time.
Note:When setting the time range to run the merge job, ensurethat you specify a time range that will allow the related backupjobs to complete prior to the start of the merge.
Retain Recovery Sets
Select this option to set your retention setting based on the number ofrecovery sets to retain instead of on the number of recovery points toretain. With this setting you can disable infinite incremental backups,without merging any sessions. Using recovery sets helps reduce theamount of time it takes to complete merge jobs.
Note: The Recovery Sets option is available if you select Standard asyour Backup Data Format. However, the Recovery Sets option is not
Chapter 4: Settings 159

Configure or Modify Backup Settings
available if you select Advanced as your Backup Data Format.
Specify the number of recovery sets to retain
Specifies the number of recovery sets retained. A recovery set is a seriesof backups, starting with a full backup, and then followed by a number ofincremental, verify, or full backups.
Example Set 1:
Full
Incremental
Incremental
Verify
Incremental
Example Set 2:
Full
Incremental
Full
Incremental
A full backup is required to start a new recovery set. The backup thatstarts the set will be automatically converted to a full backup, even ifthere is no full backup configured or scheduled to be performed at that
160 Arcserve UDP Agent for Windows User Guide

Configure or Modify Backup Settings
time. A flag in the status column on the Arcserve UDP Agent (Windows)home page Most Recent Events section indicates that a full backup isthe starting backup of a recovery set. After the recovery set setting ischanged (for example, changing the recovery set starting point from thefirst backup of Monday to the first backup of Thursday), the starting pointof existing recovery sets will not be changed.
Note: An incomplete recovery set is not counted when calculating anexisting recovery set. A recovery set is considered complete only whenthe starting backup of the next recovery set is created.
When the specified limit is exceeded, the oldest recovery set is deleted(instead of merged).
Default Value: 2
Minimum Value: 1
Maximum Value: 100
Note: If you want to delete a recovery set to save backup storage space,reduce the number of retained sets and Arcserve UDP Agent (Windows)automatically deletes the oldest recovery set. Do not attempt to deletethe recovery set manually.
Example 1 - Retain 1 Recovery Set:
Specify the number of recovery sets to retain as 1.
Arcserve UDP Agent (Windows) always keeps two sets in order to keepone complete set before starting the next recovery set
Example 2 - Retain 2 Recovery Sets:
Specify the number of recovery sets to retain as 2.
Arcserve UDP Agent (Windows) will delete the first recovery set when thefourth recovery set is about to start. This ensures that when the firstbackup is deleted and the fourth is starting, you still have two recoverysets (recovery set 2 and recovery set 3) available on disk.
Note: Even if you choose to retain only one recovery set, you will needspace for at least two full backups.
Example 3 - Retain 3 Recovery Sets:
The backup start time is 6:00 AM, August 20, 2012.
An incremental backup runs every 12 hours.
Chapter 4: Settings 161

Configure or Modify Backup Settings
A new recovery set starts at the last backup on Friday.
You want to retain 3 recovery sets.
With the above configuration, an incremental backup will run at 6:00 AMand 6:00 PM every day. The first recovery set is created when the firstbackup (must be a full backup) is taken. Then the first full backup ismarked as the starting backup of the recovery set. When the backupscheduled at 6:00 PM on Friday is run, it will be converted to a fullbackup and marked as the starting backup of the recovery set.
Start a new recovery set on every:
Selected day of the week
Specifies the day of the week selected to start a new recovery set.
Selected day of the month
Specifies the day of the month selected to start a new recovery set. Spe-cify 1 through 30. Or, since a given month may have 28, 29, 30, or 31days, you can specify the last day of the month as the day to create therecovery set.
Start a new recovery set with:
First backup on the selected day
Indicates you want to start a new recovery set with the first scheduledbackup on the specified day.
Last backup on the selected day
Indicates you want to start a new recovery set with the last scheduledbackup on the specified day. If the last backup is selected to start theset and for any reason the last backup did not run, then the next sched-uled backup will start the set by converting it to a full backup. If thenext backup is run ad-hoc (for example an emergency situationrequires a quick incremental backup), you can decide if you want torun a full backup to start the recovery set or run an incrementalbackup so that the next backup starts the recovery set.
Note: The last backup may not be the last backup of the day if you runan ad-hoc backup.
The Arcserve UDP Agent (Windows) home page Summary section indicates howmany recovery sets are retained (or in progress) out of the number specified. Clickthe link under Recovery Sets to display the Recovery Sets Details dialog. This dia-
162 Arcserve UDP Agent for Windows User Guide

Configure or Modify Backup Settings
log contains detailed information about the contents of the recovery set. For moreinformation about this dialog, see Status Summary in the online help.
Chapter 4: Settings 163

Configure or Modify Backup Settings
Estimate Future Backup Space Requirements
Arcserve UDP Agent (Windows) provides you with this tool to calculate the estim-ated amount of available free space that you will need for backups. The cal-culations are based on your estimate of future data change and on the space that isoccupied from previous backups.
To use this estimating tool
1. Select the backup source. This can be your entire machine or selected volumeswithin your machine.
The actual size of the selected backup source is displayed in the Total Source Sizefield.
2. Estimate the anticipated Change Rate for future backups.
Base this estimate upon past performance of how much your total backup size haschanged for each subsequent incremental backup.
With the Estimated Values defined, Arcserve UDP Agent (Windows) calculates anddisplays the estimated backup size required based on the configuration of thebackup destination and the recovery points. The pie chart also displays the amountof used space and free space.
3. Estimate the Space Saved After Compression percentage value.
Estimated Values
164 Arcserve UDP Agent for Windows User Guide

Configure or Modify Backup Settings
You can use estimated values to calculate the approximate overall backup sizethat is based on the number of recovery points. Base this estimate upon pastperformance of your backups with different Compression settings applied. Asyou change this value, you will see the corresponding size impact for yourbackup sizes.
Note: If necessary, you can perform some Full Backups, each with a different Com-pression setting (No Compression, Standard Compression, and Maximum Com-pression) to establish past performance values and help you to better calculate thepercent of space saving that each setting produces for your backup
Space Saved After Compression
This value indicates how much disk space is saved after compression.
Example: If the data size of a volume is 1000 MB and after backup the com-pressed data size is 800 MB, then the Space Saved After Compression isestimated to be 200 MB (20%).
Change Rate
This value indicates the typical data size of an incremental backup.
Example: If an incremental backup data size is 100 MB and the full backupdata size is 1000 MB, the change rate is estimated to be 10%.
Space Saved After Windows Deduplication
This value indicates how much disk space is saved after Windows dedu-plication.
If the backup destination directory is located on a volume where Windowsdeduplication is enabled, the estimated backup size may exceed the totalcapacity of the volume. The reason is that with deduplication enabled, onlyone copy of multiple same size data blocks is kept. This value helps to estim-ate the size while taking deduplication into consideration.
Example: If the total size of the source backed up is 100 GB and it has 20 GBof data that is redundant, then the space saved after deduplication will be 20GB.
Estimated Backup Size
Displays the estimated values for Total Source Size, Compressed Full BackupSize, Compressed Incremental Backup Size, and Estimated Total Backup Size.
The Compressed Full Backup Size field displays a calculated value that isbased upon:
Chapter 4: Settings 165

Configure or Modify Backup Settings
Size of the backup source
Specified compression percentage.
The Compressed Incremental Backup Size field displays a calculated valuethat is based upon:
Estimated Change Rate
Number of recovery points to be saved
Specified compression percentage
The Estimated Total Backup Size field will display the anticipated space thatyou will need for future backups and is based upon:
Amount of space that is required for one Full Backup plus
Amount of space that is required for the number of IncrementalBackups needed to satisfy the specified number of saved recoverypoints.
4. From this Estimated Total Backup Size value, you should be able to determine ifyour backup destination has sufficient space to fit your backup.
If your destination does not have sufficient free space, you can consider the fol-lowing corrective actions:
Reduce the number of saved recovery points.
Increase the available free space at the backup destination.
Change the backup destination to a larger capacity.
Reduce the size of the backup source (maybe eliminate unnecessary volumesfrom the backup).
Increase the Compression setting of the backup.
166 Arcserve UDP Agent for Windows User Guide

Configure or Modify Backup Settings
Specify Schedule Settings
Arcserve UDP Agent (Windows) lets you specify the schedule for your backups. Ifyou set the Protection Settings Backup Data Format to Standard, the StandardSchedule dialog opens, where you can specify the standard schedule settings. If youset the Protection Settings Backup Data Format to Advanced, the AdvancedBackup Schedule dialog opens, where you can specify the advanced schedule set-tings.
Specify Standard Schedule Settings
Specify Advanced Schedule Settings
Chapter 4: Settings 167

Configure or Modify Backup Settings
Specify Standard Schedule Settings
Arcserve UDP Agent (Windows) lets you specify the schedule for your backups. Ifyou set the Backup Data Format option to Standard in Protection Settings, theStandard Schedule dialog opens, where you can specify the standard schedule set-tings.
Follow these steps:
1. From the Arcserve UDP Agent (Windows) home page (or Arcserve UDP Agent (Win-dows) Monitor), select Settings from the taskbar and then select the Backup Set-tings tab. When the Backup Settings dialog opens, select Schedule.
The Backup Settings StandardSchedule dialog opens.
Notes:
If the Arcserve UDP Agent (Windows) is being managed by Console, not allsettings are available and will be displayed as read-only information.
When agent is managed by console and not protected in a plan, all the set-tings are still available except the Preference > Updates panel.
2. Specify your backup schedule options.
Set start date and time
The start date and start time for your scheduled backups.
168 Arcserve UDP Agent for Windows User Guide

Configure or Modify Backup Settings
Note:When setting the interval between repeat backup jobs, ensure that youleave enough time to allow the previous job and any related merge jobs to com-plete before the next backup job starts. This amount of time can be estimatedbased on your own specific backup environment and history.
Incremental Backup
Determines the backup schedule for Incremental Backups.
As scheduled, Arcserve UDP Agent (Windows) incrementally backs up onlythose blocks that have changed since the last successful backup. The advant-ages of Incremental Backups are that it is a fast backup and it produces asmall backup image. This is the most optimal way to perform backups andyou should use this by default.
The available options are Repeat and Never. If you select the Repeat option,you must also specify the elapsed time period (in minutes, hours, or days)between backup attempts. The minimum setting for Incremental backups isevery 15 minutes.
By default the schedule for Incremental backups is to repeat every 1 day.
Full Backup
Determines the backup schedule for Full Backups.
As scheduled, Arcserve UDP Agent (Windows) performs a Full backup of allused blocks from the source machine. The available options are Repeat andNever. If you select the Repeat option, you must also specify the elapsedtime period (in minutes, hours, or days) between backup attempts. The min-imum setting for Full backups is every 15 minutes.
By default the schedule for Full backups is Never (no scheduled repeat).
Verify Backup
Determines the backup schedule for Verify Backups.
As scheduled, Arcserve UDP Agent (Windows) verifies that the protected datais valid and complete by performing a confidence check of the stored backupimage to the original backup source. If necessary, the image is resyn-chronized. A Verify Backup looks at the most recent backup of each individualblock and compares the content and information to the source. This com-parison verifies that the latest backed up blocks represent the correspondinginformation at the source. If the backup image for any block does not matchthe source (possibly because of changes in the system since the last backup),Arcserve UDP Agent (Windows) refreshes (resynchronizes) the backup of theblock that does not match. You can also use a Verify Backup (very infre-
Chapter 4: Settings 169
Configure or Modify Backup Settings
quently) to get the guarantee of full backup without using the space requiredfor a full backup.
Advantages: Produces a small backup image when compared to full backupbecause only the changed blocks (blocks that do not match the last backup)are backed up.
Disadvantages: Backup time is long because all source blocks are comparedwith the blocks of the last backup.
The available options are Repeat and Never. If you select the Repeat option,you must also specify the elapsed time period (in minutes, hours, or days)between backup attempts. The minimum setting for Verify backups is every15 minutes.
By default the schedule for Verify backups is Never (no scheduled repeat).
Catalogs
File System Catalog
When this option is selected, enables generation of the file system catalog. Ifyour browse time is too slow (especially if the Arcserve UDP Agent (Win-dows) destination is over a WAN) or if your restore by search time is tooslow, this option helps reduce your wait time. This catalog job will run foreach scheduled backup job after this option is selected.
If this option is not selected, the restores can be performed immediatelyafter backup without having to wait for the catalog job to finish. By default,this option is not enabled.
Note:When you generate a File System catalog for each backup job, it res-ults in an increased amount of disk storage needed to store the metadatafiles and catalog files and an increase in CPU usage. In addition, if the backupsource contains a large amount of files, the process of generating a catalogcould be a time consuming task.
Note: If you selected an ReFS volume as the backup source, you will not beable to generate a catalog and a warning message will be displayed toinform you of this condition.
3. Click Save Settings.
Your settings are saved.
Note: If at a given time there are more than one type of backup scheduled to beperformed simultaneously, the type of backup that will be performed is based uponthe following priorities:
170 Arcserve UDP Agent for Windows User Guide

Configure or Modify Backup Settings
Priority 1 - Full backup
Priority 2 - Verify backup
Priority 3 - Incremental backup
For example, if you schedule all three types of backups to be performed at thesame time, Arcserve UDP Agent (Windows) will perform the Full Backup. If there isno Full Backup scheduled, but you scheduled a Verify Backup and IncrementalBackup to be performed at the same time, Arcserve UDP Agent (Windows) will per-form the Verify Backup. A scheduled Incremental Backup is performed only if thereis no conflict with any other type of backup.
Chapter 4: Settings 171

Configure or Modify Backup Settings
Specify Advanced Schedule Settings
Arcserve UDP Agent (Windows) lets you specify the schedule for your backups. Ifyou set the Backup Data Format option in Protection Settings to Advanced, theAdvanced Backup Schedule dialog opens, where you can view your Repeat Sched-ule and Daily/Weekly/Monthly Settings.
Advanced Scheduling allows you to set the Repeat Schedule and the Daily WeeklyMonthly Schedule. Advanced scheduling consists of the following:
Week-based repeat backup schedule
Week-based backup throttling schedule
Week-based merge schedule
Daily backup schedule
Weekly backup schedule
Monthly backup schedule
Follow these steps:
1. From the Arcserve UDP Agent (Windows) home page (or Arcserve UDP Agent (Win-dows) Monitor), select Settings from the taskbar and then select the Backup Set-tings tab. When the Backup Settings dialog opens, select Schedule.
The Backup Settings Advanced Schedule dialog opens.
Notes:
If the Arcserve UDP Agent (Windows) is being managed by Console, not allsettings are available and will be displayed as read-only information.
If the Arcserve UDP Agent (Windows) is managed by console and not pro-tected in a plan, all the settings are still available except the Preference >
172 Arcserve UDP Agent for Windows User Guide

Configure or Modify Backup Settings
Updates panel.
2. (Optional) Click Add to add a backup schedule, backup throttle schedule, or amerge schedule.
For more information, see the following topics:
Add Backup Job Schedule.
Add Backup Throttle Schedule.
Add Merge Schedule.
3. Specify the Start Date and Time.
The start date and start time for your scheduled backups.
Note:When setting the interval between repeat backup jobs, ensure that you leaveenough time to allow the previous job and any related merge jobs to completebefore the next backup job starts. This amount of time can be estimated based onyour own specific backup environment and history.
Chapter 4: Settings 173
Configure or Modify Backup Settings
4. Specify the Number of recovery points to retain.
The number of recovery points to retain can be set for Daily, Weekly, Monthly, andCustom/Manual.
Note: The total retention count (Daily + Weekly + Monthly + Custom/Manual), themaximum limitation is 1440.
5. Specify File System Catalog and Exchange Catalog generation.
File System Catalog
When this option is selected, enables generation of the file system catalog. Ifyour browse time is too slow (especially if the Arcserve UDP Agent (Windows)destination is over a WAN) or if your restore by search time is too slow, thisoption helps reduce your wait time. This catalog job will run for each scheduledbackup job after this option is selected.
If this option is not selected, the restores can be performed immediately afterbackup without having to wait for the catalog job to finish. By default, thisoption is not enabled.
Note:When you generate a File System catalog for each backup job, it resultsin an increased amount of disk storage needed to store the metadata files andcatalog files and an increase in CPU usage. In addition, if the backup source con-tains a large amount of files, the process of generating a catalog could be atime consuming task.
Note: If you selected an ReFS volume as the backup source, you will not be ableto generate a catalog and a warning message will be displayed to inform you ofthis condition.
6. Click Save Settings.
Your settings are saved.
174 Arcserve UDP Agent for Windows User Guide

Configure or Modify Backup Settings
Add Backup Job Schedule
Follow these steps:
1. From the Arcserve UDP Agent (Windows) home page (or Arcserve UDP Agent (Win-dows) Monitor), select Settings from the taskbar and then select the Backup Set-tings tab. When the Backup Settings dialog opens, select Schedule.
The Backup Settings Advanced Schedule dialog opens.
2. From the Backup Settings Advanced Schedule dialog, click Add and then clickAdd Backup Schedule.
The New Backup Schedule dialog opens.
3. From the drop-down list, select Daily, Weekly, Monthly, or Custom.
4. Enter the appropriate fields based on the schedule you selected:
To add a Daily Backup Schedule, see Add Daily Backup Schedule.
To add a Weekly Backup Schedule, see Add Weekly Backup Schedule.
To add a Monthly Backup Schedule, see Add Monthly Backup Schedule.
To add a Custom/Manual Backup Schedule, see Add Custom Backup Schedule.
5. Click Save.
Chapter 4: Settings 175

Configure or Modify Backup Settings
Your settings are saved.
Notes:
You can add up to 4 time windows for any week day.
The time window cannot be set across multiple days. You can only configurethe time window from 12:00 AM to 11:59 PM.
For each time window, you can specify the time window and the repeat fre-quency.
The default backup schedule is 1 daily backup at 10:00pm.
176 Arcserve UDP Agent for Windows User Guide

Configure or Modify Backup Settings
Add Custom Backup Schedule
Follow these steps:
1. From the Arcserve UDP Agent (Windows) home page (or Arcserve UDP Agent (Win-dows) Monitor), select Settings from the taskbar and then select the Backup Set-tings tab. When the Backup Settings dialog opens, select Schedule.
The Backup Settings Advanced Schedule dialog opens.
2. From the Backup Settings Advanced Schedule dialog, click Add and then clickAdd Backup Schedule.
The New Backup Schedule dialog opens.
3. From the dropdown, Custom is selected as the default.
4. Enter the following fields:
Backup Type
Select the type of scheduled backup (Full, Verify, or Incremental) from a drop-down menu.
Start Time
Chapter 4: Settings 177
Configure or Modify Backup Settings
Specify the time of the day and which days to start applying the configuredschedule settings.
Repeat Every
Specify the time interval (hours/minutes) for how often to repeat this backupschedule.
Until
Specify the time of the day to stop applying the configured schedule settings.
How many backups do you want to retain?
Specifies the number of recovery points (full, incremental, and verify backupimages) retained. When the number of recovery points present on the des-tination exceeds the specified limit, the earliest (oldest) incremental backupsbeyond the retention count are merged into the parent backup to generate anew baseline image consisting of the "parent plus oldest childs" blocks. If thereare multiple sessions available for merge, the oldest child backups will bemerged into the parent backup in a single pass, if the backups are compressed.If the backups are not compressed, then only the oldest child backup will bemerged into the parent backup and this cycle repeats for each subsequent childbackup to be merged.
Specifying the number of recovery points to retain allows you to perform infin-ite incremental backups, while maintaining the same retention count. For moreinformation, see Merge Job Guidelines.
Note: If your destination does not have sufficient free space, you can considerreducing the number of saved recovery points.
Default Value: 31
Minimum Value: 1
Maximum Value: 1440
Note: The Arcserve UDP Agent (Windows) home page Summary section indic-ates how many recovery points are retained out of the number specified. Formore information, see Status Summary in the online help.
5. Click Save.
Your settings are saved.
Notes:
The time window cannot be set across multiple days. You can only configurethe time window from 12:00 AM to 11:59 PM.
178 Arcserve UDP Agent for Windows User Guide

Configure or Modify Backup Settings
For each time window, you can specify the time window and the repeat fre-quency.
Chapter 4: Settings 179

Configure or Modify Backup Settings
Add Daily Backup Schedule
Follow these steps:
1. From the Arcserve UDP Agent (Windows) home page (or Arcserve UDP Agent (Win-dows) Monitor), select Settings from the taskbar and then select the Backup Set-tings tab. When the Backup Settings dialog opens, select Schedule.
The Backup Settings Advanced Schedule dialog opens.
2. From the Backup Settings Advanced Schedule dialog, click Add and then clickAdd Backup Schedule.
The New Backup Schedule dialog opens.
3. From the drop-down list, select Daily.
4. Enter the following fields:
Backup Type
Select the type of scheduled backup (Full, Verify, or Incremental) from a drop-down menu.
Start Time
180 Arcserve UDP Agent for Windows User Guide

Configure or Modify Backup Settings
Specify the time of the day and which days to start applying the configuredschedule settings.
How many backups do you want to retain?
Specifies the number of recovery points (full, incremental, and verify backupimages) retained. When the number of recovery points present on the des-tination exceeds the specified limit, the earliest (oldest) incremental backupsbeyond the retention count are merged into the parent backup to generate anew baseline image consisting of the "parent plus oldest childs" blocks. If thereare multiple sessions available for merge, the oldest child backups will bemerged into the parent backup in a single pass, if the backups are compressed.If the backups are not compressed, then only the oldest child backup will bemerged into the parent backup and this cycle repeats for each subsequent childbackup to be merged.
Specifying the number of recovery points to retain allows you to perform infin-ite incremental backups, while maintaining the same retention count. For moreinformation, see Merge Job Guidelines.
Note: If your destination does not have sufficient free space, you can considerreducing the number of saved recovery points.
Default Value: 7
Minimum Value: 1
Maximum Value: 1440
Note: The Arcserve UDP Agent (Windows) home page Summary section indic-ates how many recovery points are retained out of the number specified. Formore information, see Status Summary in the online help.
5. Click Save.
Your settings are saved.
Notes:
The time window cannot be set across multiple days. You can only configurethe time window from 12:00 AM to 11:59 PM.
For each time window, you can specify the time window and the repeat fre-quency.
The default backup schedule is 1 daily backup at 10:00pm.
Chapter 4: Settings 181

Configure or Modify Backup Settings
Add Weekly Backup Schedule
Follow these steps:
1. From the Arcserve UDP Agent (Windows) home page (or Arcserve UDP Agent (Win-dows) Monitor), select Settings from the taskbar and then select the Backup Set-tings tab. When the Backup Settings dialog opens, select Schedule.
The Backup Settings Advanced Schedule dialog opens.
2. From the Backup Settings Advanced Schedule dialog, click Add and then clickAdd Backup Schedule.
The New Backup Schedule dialog opens.
3. From the drop-down list, selectWeekly.
4. Enter the following fields:
Backup Type
Select the type of scheduled backup (Full, Verify, or Incremental) from a drop-down menu.
Start Time
182 Arcserve UDP Agent for Windows User Guide

Configure or Modify Backup Settings
Specify the time of the day and which days to start applying the configuredschedule settings.
How many backups do you want to retain?
Specifies the number of recovery points (full, incremental, and verify backupimages) retained. When the number of recovery points present on the des-tination exceeds the specified limit, the earliest (oldest) incremental backupsbeyond the retention count are merged into the parent backup to generate anew baseline image consisting of the "parent plus oldest childs" blocks. If thereare multiple sessions available for merge, the oldest child backups will bemerged into the parent backup in a single pass, if the backups are compressed.If the backups are not compressed, then only the oldest child backup will bemerged into the parent backup and this cycle repeats for each subsequent childbackup to be merged.
Specifying the number of recovery points to retain allows you to perform infin-ite incremental backups, while maintaining the same retention count. For moreinformation, see Merge Job Guidelines.
Note: If your destination does not have sufficient free space, you can considerreducing the number of saved recovery points.
Default Value: 5
Minimum Value: 1
Maximum Value: 1440
Note: The Arcserve UDP Agent (Windows) home page Summary section indic-ates how many recovery points are retained out of the number specified. Formore information, see Status Summary in the online help.
5. Click Save.
Your settings are saved.
Notes:
The time window cannot be set across multiple days. You can only configurethe time window from 12:00 AM to 11:59 PM.
For each time window, you can specify the time window and the repeat fre-quency.
Chapter 4: Settings 183

Configure or Modify Backup Settings
Add Monthly Backup Schedule
Follow these steps:
1. From the Arcserve UDP Agent (Windows) home page (or Arcserve UDP Agent (Win-dows) Monitor), select Settings from the taskbar and then select the Backup Set-tings tab. When the Backup Settings dialog opens, select Schedule.
The Backup Settings Advanced Schedule dialog opens.
2. From the Backup Settings Advanced Schedule dialog, click Add and then clickAdd Backup Schedule.
The New Backup Schedule dialog opens.
3. From the drop-down list, selectMonthly.
4. Enter the following fields:
Backup Type
Select the type of scheduled backup (Full, Verify, or Incremental) from a drop-down menu.
Start Time
184 Arcserve UDP Agent for Windows User Guide

Configure or Modify Backup Settings
Specify the time of the day and which days to start applying the configuredschedule settings.
How many backups do you want to retain?
Specifies the number of recovery points (full, incremental, and verify backupimages) retained. When the number of recovery points present on the des-tination exceeds the specified limit, the earliest (oldest) incremental backupsbeyond the retention count are merged into the parent backup to generate anew baseline image consisting of the "parent plus oldest childs" blocks. If thereare multiple sessions available for merge, the oldest child backups will bemerged into the parent backup in a single pass, if the backups are compressed.If the backups are not compressed, then only the oldest child backup will bemerged into the parent backup and this cycle repeats for each subsequent childbackup to be merged.
Specifying the number of recovery points to retain allows you to perform infin-ite incremental backups, while maintaining the same retention count. For moreinformation, see Merge Job Guidelines.
Note: If your destination does not have sufficient free space, you can considerreducing the number of saved recovery points.
Default Value: 12
Minimum Value: 1
Maximum Value: 1440
Note: The Arcserve UDP Agent (Windows) home page Summary section indic-ates how many recovery points are retained out of the number specified. Formore information, see Status Summary in the online help.
5. Click Save.
Your settings are saved.
Notes:
The time window cannot be set across multiple days. You can only configurethe time window from 12:00 AM to 11:59 PM.
For each time window, you can specify the time window and the repeat fre-quency.
Chapter 4: Settings 185

Configure or Modify Backup Settings
Add Backup Throttle Schedule
Follow these steps:
1. From the Arcserve UDP Agent (Windows) home page (or Arcserve UDP Agent (Win-dows) Monitor), select Settings from the taskbar and then select the Backup Set-tings tab. When the Backup Settings dialog opens, select Schedule.
The Backup Settings Advanced Schedule dialog opens.
2. From the Backup Settings Advanced Schedule dialog, click Add and then clickAdd Throttle Schedule.
The Add New Throttle Schedule dialog opens.
3. Enter the following fields:
Throughput Limit
Specify the maximum speed (MB/min) at which the backup will be written.
You can throttle the backup speed to reduce CPU or network utilization.However, by limiting the backup speed, it has an adverse effect on the backupwindow. As you lower the maximum backup speed it increases the amount oftime to perform the backup. For a backup job, the Job Monitor on the homepage will display the average Read and Write speed of the job in progress andthe configured throttle speed limit.
Note: By default, the throttle backup speed option is not enabled and backupspeed is not being controlled.
Start Time
186 Arcserve UDP Agent for Windows User Guide

Configure or Modify Backup Settings
Specify the time of the day to start applying the configured backup throttle set-tings.
Until
Specify the time of the day to stop applying the configured backup throttle set-tings.
4. Click Save
Your settings are saved.
Notes:
You can add up to 4 time windows for any week day.
The throttling value control the backup speed. For example, if you set 2 timewindows, 1 from 8:00 AM to 6:00 PM, backup throughput limit is 1500MB/minute, and 1 from 6:00 PM to 8:00 PM, backup throughput limit is 3000MB/minute. If a backup job runs from 5:00 PM to 7:00 PM, the throughput willbe 1500 MB/minute from 5:00 PM to 6:00 PM, and change to 3000 MB/minutefrom 6:00 PM to 7:00 PM.
The time window cannot be set across multiple days. You can only configurethe time window from 12:00 AM to 11:45 PM. If the throttle schedule ends at11:45 PM, the schedule takes effect until the next day.
Backup throttle schedule applies to repeat backup, as well as daily / weekly /monthly backups.
Chapter 4: Settings 187

Configure or Modify Backup Settings
Add Merge Schedule
Follow these steps:
1. From the Arcserve UDP Agent (Windows) home page (or Arcserve UDP Agent (Win-dows) Monitor), select Settings from the taskbar and then select the Backup Set-tings tab. When the Backup Settings dialog opens, select Schedule.
The Backup Settings Advanced Schedule dialog opens.
2. From the Backup Settings Advanced Schedule dialog, click Add and then clickAdd Merge Schedule.
The Add New Merge Schedule dialog opens.
3. Enter the following fields:
Start Time
Specify the time of the day to start applying the configured backup throttle set-tings.
Until
Specify the time of the day to stop applying the configured backup throttle set-tings.
4. Click Save.
Your settings are saved.
Notes:
You can add up to 2 time windows for any week day.
If there is no merge schedule configured for any day, the merge job will belaunched as soon as it is ready. If you configured any time window for the
188 Arcserve UDP Agent for Windows User Guide

Configure or Modify Backup Settings
merge schedule, the merge job will only be launched within the time windows.For example, if the merge schedule is 8:00 AM to 6:00 PM on Sunday, themerge job will only be launched during this time window.
If the merge job launches within the configured time windows, and it runs tocompletion, despite the end time of the time windows. For example, if themerge time window is 8:00 AM to 6:00 PM on Sunday, a merge job started at5:55 PM. It will continue to run after 6:00 PM to complete, even though thetime is moving out of the defined time window.
Merge schedule applies to repeat backup, as well as daily / weekly / monthlybackups.
When you configure a merge job schedule, the merge will only be triggeredwhen the time is within the configured time window. If the merge is not withinthe configured time window, the merge will not run when you click the Run amerge job manually now link in the summary panel of the Arcserve UDPAgent (Windows) home page.
Chapter 4: Settings 189

Configure or Modify Backup Settings
Schedule Considerations
The Arcserve UDP Agent (Windows) provides flexible settings to let you specifyschedules for your backup. It consists of the following:
Week-based repeat backup schedule
Week-based backup throttling schedule
Week-based merge schedule
Daily backup schedule
Weekly backup schedule
Monthly backup schedule
However each backup, merge, or catalog job will consume system resources (CPUUsage, Memory Usage, IO Usage), occupy network bandwidth, and occupy diskspace. Therefore, to help protect your system, consider the following:
What is the business processing time range of your server?
To avoid affecting your business processing, configure your system to run lessjobs when the server is busy. For example, only configure to run backup jobswhen the server is busy and leave merge jobs to run when the server is idle.
How about the data change frequency of your server?
Normally more frequent data change means more frequent backup is required.This is to reduce data lost to the minimum. When needed, you can recover theserver to the last good known status.
How about your network bandwidth?
If your backup destination is configured to a network shared path, obviously thejob occupies some of your network bandwidth when it is running. This mightaffect your business processing of this server. In case of this, specify a throttleschedule to limit the Arcserve UDP Agent (Windows) occupying network band-width.
How much disk storage is allocated for your backup destination?
More Full backups and more backups to retain means more disk storage isrequired. So when you configure how frequently to run a Full backup and howmany backups to retain, consider the disk storage allocated for the backup des-tination.
How do you expect to use your backed up data?
Enable “File System Catalog” can shorten the browse time when you want torestore a file or a mailbox. But to generate catalogs, it also results in an
190 Arcserve UDP Agent for Windows User Guide

Configure or Modify Backup Settings
increased amount of disk storage needed to store the metadata files and cata-log files and an increase in CPU usage. In addition, if the backup source con-tains a large amount of files, the process of generating a catalog could be atime consuming task. So whether to enable or disable catalogs is depending onhow you would like to use the backed up data.
Based on the above considerations, the following is an example of using advancedscheduling to protect a build server, showing the situation and corresponding sched-ule settings:
The build server is used to provide source code pre-compile service every work-ing day. It’s business process time slot is 9:00 AM – 7:00 PM of every work day(from Monday to Friday). During other times, it is idle.
Schedule Settings:
Configure to run custom incremental backup from 9:00 AM to 7:00 PM,run merge job at night – 7:00 PM to 9:00 AM of next day.
The pre-compile service is launched every 2 hours, and there are lots of datachanges at that time.
Schedule Settings:
Configure to run custom incremental backup every 2 hours.
Every time to run pre-compile, the build server need to fetch source code froma remote source code repository server.
Schedule Settings:
Limit backup throttle to 500 MB/Minute during 9:00 AM to 7:00 PM andno limitation during other time slots.
Due to the poor disk storage, there is no requirement to retain a lot of recoverypoints. Only need to keep recovery points in one release cycle; 6 months isenough. But there is a requirement to keep the recovery point in the last 24hours, so that once needed you can recover to the last good known status.
Schedule Settings:
Specify to retain last 12 manual backups (the backups of the last 24hours).
Configure to run Daily Incremental backup at 9:00 PM of every day. Andkeep the last 7 Daily backups.
Configure to run Weekly Full Backup at 11:00 PM of every Friday. Andkeep the last 4 Weekly backups.
Chapter 4: Settings 191

Configure or Modify Backup Settings
Configure to run Monthly Full Backup at 12:00 PM on last Saturday ofmonth. And keep the last 6 monthly backups.
Finally, there are 6 monthly backups, 4 weekly backups, 7 daily backups and 12most recent backups. There are enough choices to recover the build server to agood known status.
For the build server, there is no requirement to quickly browse and restore files.Once needed, perform a BMR to restore the build server to the last good knownstatus. That is enough.
Schedule Settings:
Disable options to generate "File System Catalog".
192 Arcserve UDP Agent for Windows User Guide

Configure or Modify Backup Settings
Specify Advanced Settings
Arcserve UDP Agent (Windows) lets you specify the Advanced Settings for yourbackups.
Follow these steps:
1. From the Arcserve UDP Agent (Windows) home page (or Arcserve UDP Agent (Win-dows) Monitor), select Settings from the taskbar and then select the Backup Set-tings tab. When the Backup Settings dialog opens, select Advanced.
The Advanced dialog opens.
Notes:
If the Arcserve UDP Agent (Windows) is being managed by Console, not allsettings are available and will be displayed as read-only information.
If the Arcserve UDP Agent (Windows) is managed by console and not pro-tected in a plan, all the settings are still available except the Preference >Updates panel.
2. Specify your advanced backup settings options.
Truncate Log
Truncates the accumulated transaction log files for the selected applicationsafter the next successful backup.
Chapter 4: Settings 193
Configure or Modify Backup Settings
Arcserve UDP Agent (Windows) backups consist of a snapshot image and thetransaction log files that were created for it. At some point in time, the older(committed) transaction log files are no longer needed and can be purged tomake space for new log files. The process of purging these log files is trun-cating the log. This option enables truncating of committed transaction logfiles, which conserves disk space.
The available options are SQL Server and Exchange Server. You can selecteither, both, or none of these applications. If you select any of these applic-ations, you can also specify a scheduled time period (Daily, Weekly, orMonthly) for automatic log truncation:
Note: The transaction log files cannot be truncated without performing a suc-cessful backup.
Daily - Specifies that each day after the backup completes successfully, thecommitted transaction logs will be purged immediately.
Weekly - Specifies that after seven days, the committed transaction logs willbe purged immediately after the backup completes successfully.
Monthly - Specifies that after 30 days, the committed transaction logs willbe purged immediately after the backup completes successfully.
If a backup job is already running at the same time the purging is scheduledto be performed, the purging operation is moved to the next scheduled job.
Example:
You scheduled an Incremental Backup to run automatically every day at 5:00pm, and then started a Full Backup manually at 4:55 pm. You assume that thebackup successfully finishes at 5:10 pm.
In this case, the Incremental Backup that is scheduled for 5:00 pm is skippedbecause the ad-hoc Full Backup is still in progress. Now the committed trans-action log files are purged after the next successful backup job and be per-formed on the next day after the scheduled Incremental Backup completessuccessfully at 5:00 pm.
Snapshot Type for Backup
You can select the required option from software snapshot or hardware snap-shot.
Use software snapshot only
Specifies that the backup type uses only the software snapshot. Arc-serve UDP will not check for hardware snapshot. The software snapshot
194 Arcserve UDP Agent for Windows User Guide

Configure or Modify Backup Settings
utilizes less resources on the virtual machines. You can use this option ifthe server has lower configurations and processing speed.
Use hardware snapshot wherever possible
Specifies that the backup type first checks for a hardware snapshot. Ifall the criteria are met, the backup type uses hardware snapshot.
Note: For more information on the hardware snapshot criteria, see theprerequisite.
Administrator Account
Specifies the User Name and Password with access rights to perform thebackup. The Arcserve UDP Agent (Windows) verifies that the name and pass-word are valid and the user belongs to an administrator group.
Important! If the Administrator Account credential information for the ArcserveUDP Agent (Windows) server is changed (User Name/Password), you must alsoreconfigure/update the Administrator Account information in this dialog.
Note: To specify a domain account, the format for the user name is a fullyqualified domain user name in the form of "<domain name>\<user name>".
Recover Backup Destination Connection
Lets you update (resynchronize) the connection information to your backupdestination.
You can use this option if you are performing periodic backups to a remoteshare computer and then you can change the access credentials (user name/-password) for that remote computer. In this case, typically your next backupwould fail because the access credentials configured at your local computerdo not match the new credentials at the remote computer.
Note:When you click the Update Connection button and the resynchronizeprocess begins, you cannot cancel it.
Before you click this Update button, perform the following tasks:
a. Log in to the remote destination computer and use the following net sessioncommand to disconnect the connection between the local Arcserve UDPAgent (Windows) computer and the remote computer:
net session \\<computer name or IP address> /d
b. Return to the Arcserve UDP Agent (Windows) computer, and click the UpdateConnection button.
c. Enter new password for destination.
Chapter 4: Settings 195

Configure or Modify Backup Settings
Arcserve UDP Agent (Windows) updates your configured credentials to matchthe new credential information at the remote share destination. A pop-upconfirmation screen appears informing you that the credentials have beenupdated.
3. Click Save Settings.
Your advanced backup settings are saved.
196 Arcserve UDP Agent for Windows User Guide

Configure or Modify Backup Settings
Specify Pre/Post Backup Settings
Arcserve UDP Agent (Windows) lets you specify the Pre/Post Backup Settings.
Specify the Pre/Post Backup Settings
1. From the Arcserve UDP Agent (Windows) home page (or Arcserve UDP Agent (Win-dows) Monitor), select Settings from the taskbar and then select the Backup Set-tings tab. When the Backup Settings dialog opens, select Pre/Post Backup.
The Pre/Post Backup Settings dialog opens.
Notes:
If the Arcserve UDP Agent (Windows) is being managed by Console, not allsettings are available and will be displayed as read-only information.
When agent is managed by console and not protected in a plan, all the set-tings are still available except the Preference > Updates panel.
2. Specify your pre/post backup setting options.
Actions
Runs script commands for actions to take before the start of the backup, afterthe snapshot image is captured, and/or upon the completion of the backup. Youcan also trigger the script command based upon specific exit codes and selectthe action to be taken (run job or fail job) when that exit code is returned.
Chapter 4: Settings 197

Configure or Modify Backup Settings
A "run job" action directs Arcserve UDP Agent (Windows) to continue torun the job if the specified exit code is returned.
A "fail job" action directs Arcserve UDP Agent (Windows) to cancel thejob if the specified exit code is returned.
3. Click Save Settings.
Your pre/post backup settings are saved.
198 Arcserve UDP Agent for Windows User Guide

Manage File Copy Settings
Manage File Copy Settings
Arcserve UDP Agent (Windows) lets you copy selected source files from a backupsession to a destination (disk or cloud) based upon your specified file copy andretention criteria. File Copy can be used for copying critical data to secondary loc-ations.
The advantages of copying files are:
Improve Efficiency - Helps you to speed backup and recovery processes bycopying and moving unchanged data and reduce the amount of real data beingbacked up and stored to tape or disk.
Meet Regulatory Compliance - Helps you to preserve important documents,emails, and other critical data, as necessary to comply with internal rules andexternal regulations.
Reduce Storage Cost - Helps you to reclaim storage capacity by migratingolder or infrequently accessed data from your primary systems to more cost-effective storage locations.
Maintain Multiple File Versions - Helps you to roll back to previous versions ofbacked-up files (if necessary) or maintain multiple versions of the same files atdifferent destinations.
Before you perform your first File Copy job, specify the File Copy settings and plans.These configurations allow you to specify behaviors such as the source of your filecopy data, destination for your copied files, the schedule for each file copy job, andthe settings and filters applied to your file copy jobs. These settings can be modifiedat any time from the Arcserve UDP Agent (Windows) home page.
Note: To improve the performance (upload speed and server load), File Copy canupload the data to the specified destination in parallel chunks. To configure thenumber of chunks that are simultaneously sent to the destination, see ConfigureFile Copy Chunk Value.
To manage the File Copy settings, click the Settings link on the Arcserve UDP Agent(Windows) home page and select the File Copy Settings tab. The File Copy Settingsdialogs consist of the following subordinate tab options:
Source
Destination
Schedule
Chapter 4: Settings 199

Manage File Copy Settings
Specify the File Copy Source
Arcserve UDP Agent (Windows) lets you specify the source settings for your inform-ation to be file copied.
Note: To view a video that is related to the File Copy Settings, see Manage FileCopy Settings.
Follow these steps:
1. From the Arcserve UDP Agent (Windows) home page (or Arcserve UDP Agent (Win-dows) Monitor), select Settings from the taskbar and then select the File Copy Set-tings tab. When the File Copy Settings dialog opens, select Source.
The File Copy Sources dialog opens.
Notes:
If the Arcserve UDP Agent (Windows) is being managed by Console, not allsettings are available and will be displayed as read-only information.
When agent is managed by console and not protected in a plan, all the set-tings are still available except the Preference > Updates panel.
2. Specify your file copy source settings.
Enable File Copy
Enables the scheduled copying of files after the specified number of backups. Ifthis option is not selected (File Copy disabled), no scheduled file copying is per-formed and any changes to the File Copy settings are not validated and saved.
Note: ReFS and deduplicated NTFS volumes will not be listed as selectablebackup sources to be file copied. As a result, if all the volumes for a specifiedbackup source are only ReFS or deduplicated NTFS volumes, the file copy optionwill be disabled.
Recovery Points to Copy From
Specifies the recovery point that you want to copy. You have two options to spe-cify the recovery points. You can copy the recovery points from a specificbackup number. For example, you can specify that the recovery points must becopied from every fifth backup. Another option is, you can specify to copy recov-ery points from a daily, weekly, or monthly backup.
File Copy Sources
Displays a selectable listing of all sources, with the corresponding policy (fil-ters) and type of file copy (copy and retain or copy and move) to be performed
200 Arcserve UDP Agent for Windows User Guide

Manage File Copy Settings
after each successful Arcserve UDP Agent (Windows) backup. These File CopySources can be added, removed, or modified.
Note: Arcserve UDP Agent (Windows) does not copy application files, files withsystem attributes, and files with temporary attributes.
Note: File copy does not support mounted volumes as the source. If youattempt to select a mounted volume as the source, then no files will be copied.
Note: If a symbolic link is selected when specifying the File Copy source folder,it is replaced with the actual path it points to when saving the settings. Fromthe File Copy Restore user interface, the actual path will be displayed instead ofthe symbolic link.
n Add
When clicked, the Plan type dialog opens to let you initially select thetype of file copy job to perform (copy and retain or copy and move).After you select the plan type, the corresponding File Copy Plan dialogopens to let you add a source to copy and specify the correspondingplans for that source. For more information, see Specify File CopyPlans.
Note: The File Copy source can only be selected from a volume that iscurrently selected in Backup Settings. If the source contains ReFS ordeduplicated NTFS volumes, these volumes will not be available forselection.
n Remove
When clicked removes the selected source from this displayed list.
n Modify
When clicked, the File Copy Plans dialog opens to let you change theplan settings for the selected source. For more information, see SpecifyFile Copy Plans.
3. Click Save Settings.
Your File Copy settings are saved.
Chapter 4: Settings 201

Manage File Copy Settings
Specify File Copy Plans
When you click the Add Source option for File Copy, the Plan type dialog opens tolet you initially select the type of File Copy job to be performed.
The available type is File Copy. In File copy plan, data is copied from the source tothe destination (remains on source location) and provides multiple stored versionson the destination.
If you want to Add a new File Copy source or you want to Modify an existing FileCopy source, the File Copy Plans dialog lets you specify the details.
Depending upon the plan type that is selected, a different File Copy Plans dialogopens; however, the selections are similar.
File Copy Selected:
File Copy - Source Selection
Lets you specify the file copy source. You can specify or browse to a sourcevolume or folder.
Source Filters
Filters let you limit the objects to be file copied by certain specified types andvalues.
202 Arcserve UDP Agent for Windows User Guide

Manage File Copy Settings
For more information about these filters, see How File Copy Source FiltersWork.
Filter Type
There are two types of filters: Include and Exclude.
An Include filter copies only those objects from the file copy source thatmatch the specified value.
An Exclude filter copies all objects from the file copy source except thosethat match the specified value.
You can specify multiple filters within the same file copy request by sep-arating each filter value with a comma.
If you specify multiple Include filters, the data is included in the file copy ifany one of those Include filters matches.
If you specify multiple Exclude filters, the data is excluded from the file copyif any one of those Exclude filters matches.
You can mix both Include and Exclude filters in the same file copy request.
Note:When the specified parameters of Exclude and Include filters conflict,the Exclude filter is always a higher priority and is enforced. An Include filtercan never file copy an object that was also Excluded.
Chapter 4: Settings 203

Manage File Copy Settings
Filter Variable (Pattern)
There are two types of variable pattern filters: File Pattern and Folder Pat-tern.
You can use a File Pattern filter or Folder Pattern filter to include or excludecertain objects from the file copy.
Filter Value
The filter value lets you limit the information that is file copied by selectingonly the parameter information that you specify, such as .txt files.
Arcserve UDP Agent (Windows) supports the use of wildcard characters tohelp select multiple objects to file copy with a single request. A wildcard char-acter is a special character that can be used as a substitute to representeither a single character or a string of text.
The wildcard characters asterisk and question mark are supported in theValue field. If you do not know the complete file/folder pattern value, youcan simplify the results of the filter by specifying a wildcard character.
"*" - Use the asterisk to substitute zero or more characters in the value.
"?" - Use the question mark to substitute a single character in the value.
For example, you can enter *.txt to exclude all files with a .txt extension ifyou do not know the specific file name. You can provide as much of the filename as you know, then use wildcards to fill in the blanks.
Note:When you select File Pattern as the filter type, a drop-down list of pre-defined filters for many commonly used files is available (MS-Office files,Image files, Executable files, Temp files, etc.). After choosing any of the pre-defined filters, you can still append or modify the corresponding values.
204 Arcserve UDP Agent for Windows User Guide

Manage File Copy Settings
How File Copy Filters Work
The File Copy source filters for files and folders work as follows:
File with "d2darc" and "ASBUARC" extensions are always skipped.
Files with system and temporary attributes are always skipped.
Windows, Program Files, and Arcserve UDP Agent (Windows) installationfolders (for both File Copy and File Copy - delete source policies) are alwaysskipped.
The following precedence order is used for filtering (with the highest pre-cedence listed first):
Exclude directory filters
Exclude file filters
Include directory filters
Include file filters
Include Criteria
Exclude system and application files (Exchange and SQL only) present inany location. (This filter is only applicable for File Copy - Delete Sourcepolicies).
A file is copied only if the Include Folder or the Include File filter matches, itdoes not need to satisfy both filter requirements.
The File filter works only on the file name, and does not depend on the path.
For example, if you have the three files "Test.txt", "Hellotest.txt", and"TestHello.txt" these filters produce the following results:
Test*.txt filter matches only Test.txt and TestHello.txt
Test* filter matches Test.txt and TestHello.txt
Test filter does not match anything
*.txt filter matches all of them
*test filter does not match anything
A Folder filter works on the policy source level.
For example, if you have the following directory structure:
C:->Z99-> ->A00-> -> ->B01
Chapter 4: Settings 205

Manage File Copy Settings
-> -> ->C01-> -> ->D01
If you configure your File Copy Source as "C:\Z99\A00" and you apply anInclude Folder b* filter, then all files under c:\Z99\A00\B01 are copied.
In this example, the Source includes the parent folder and the asterisk islocated after the "b". As a result all files in any folder subordinate to"A00" that starts with "b" are copied.
If you configure your File Copy Source as "C:\Z99 and you apply anInclude Folder b* filter, then this filter does not match any folder and nofiles are copied.
In this example, the Source does includes the"Z99" grandparent folder,but not the "A00" parent folder. As a result, there are no "b" folders dir-ectly subordinate to "Z99" and no files are copied.
However if you specify a *b* filter, it now matches any subordinatefolder that starts with "b" and all files within these "b" folders are thencopied.
In this example, the asterisk is now located before the "b". As a result, allfiles in any folder subordinate to "C:\Z99" (regardless of the root level)that starts with "b" are copied.
If you configure your File Copy Source as "C:\Z99" and you apply anInclude Folder *01 filter, then all subordinate folders containing "01"(B01, C01, and D01) are copied.
In this example, the asterisk is located before the "01". As a result, allfiles in any subordinate folders (regardless of the root level) that contains"01" are copied.
Note: Folder filters are always relative to the source folder path spe-cified in the policy.
206 Arcserve UDP Agent for Windows User Guide

Manage File Copy Settings
Specify the File Copy Destination
Arcserve UDP Agent (Windows) lets you specify the destination settings for yourinformation to be file copied.
Note: To view a video that is related to File Copy Settings, see Manage File CopySettings.
Specify the file copy destination
1. From the Arcserve UDP Agent (Windows) home page (or Arcserve UDP Agent (Win-dows) Monitor), select Settings from the taskbar and then select the File Copy Set-tings tab. When the File Copy Settings dialog opens, select Destination.
The File Copy Settings Destination dialog opens.
Note: If the Arcserve UDP Agent (Windows) is being managed by Console, not allsettings are available and will be displayed as read-only information.
2. Specify your File Copy destination settings.
Destination
Specifies the destination location for the file copy job. You can only select onedestination.
Arcserve UDP Agent (Windows) lets you specify the settings for file copyingyour backed-up files to a disk or to the cloud. For file copying, you can specifyto perform a copy and retain or a copy and move of your backed-up data. Thetwo processes are similar, with the exception that when you perform a copyand move, the data is moved from the source to the destination (deleted fromsource location) and provides more available free space at your source. Whenyou perform a copy and retain, the data is copied from the source to the des-tination (remains on source destination) and provides multiple stored versions.
File Copy to a local or network drive
When selected, lets you specify the full path of the location where you want tomove or copy the source files/folders. The destination can be any local volumeor folder or a file share accessible by any uniform naming convention (UNC)path. You can browse to this destination location. Clicking the green arrow iconlets you validate the connection to the specified destination.
File Copy to Cloud
When selected, lets you specify the cloud location where you want to move orcopy the source files/folders. The Arcserve UDP Agent (Windows) currently sup-ports file copying to multiple cloud vendors, such as Amazon S3 (Simple Storage
Chapter 4: Settings 207
Manage File Copy Settings
Service), Windows Azure, Fujitsu Cloud (Windows Azure), and Eucalyptus-Walrus.These cloud vendors are publicly available web services which let you safely andsecurely store and retrieve any amount of data, at any time, from anywhere onthe Web.
You can click the Configure button to display the Cloud Configuration dialog. Formore information, see Specify Cloud Configuration for File Copy.
Note: To eliminate any potential clock skew error when attempting to connectto the cloud, verify that your machine has the correct time zone set and theclock is in sync with the global time. You should always check the time of yourmachine against the GMT time. If the time of your machine is not synchronizedwith the correct global clock time (within 5 to 10 minutes), your cloud con-nection may not work. If necessary, reset the correct time for your machine andrerun your file copy job.
For either destination option, if the connection to the specified destination is lostor broken, Arcserve UDP Agent (Windows) makes several attempts to continuethe file copy job. If these reattempts are not successful, a makeup job is then per-formed from the point where the failure occurred. In addition, the activity log isupdated with a corresponding error message and an email notification is sent (ifconfigured).
Compression
Specifies the type of compression that is used for File Copy jobs.
Compression is performed to decrease your storage space at the File Copy des-tination, but also has an inverse impact on your file copy speed due to theincreased CPU usage.
Note: For a compressed File Copy job, the Activity log displays only the uncom-pressed size.
The available options are:
No Compression
No compression is performed. This option has the lowest CPU usage (fastestspeed), but also has the largest storage space requirement for your file copy.
Standard Compression
Some compression is performed. This option provides a good balancebetween CPU usage and storage space requirement. This is the default set-ting.
Maximum Compression
208 Arcserve UDP Agent for Windows User Guide

Manage File Copy Settings
Maximum compression is performed. This option provides the highest CPUusage (lowest speed), but also has the lowest storage space requirement foryour file copy.
Encryption
Specifies to use encryption for file copying.
Data encryption is the translation of data into a form that is unintelligiblewithout a deciphering mechanism. The Arcserve UDP Agent (Windows) dataprotection uses secure, AES-256 (Advanced Encryption Standard) encryptionalgorithms to achieve maximum security and privacy of your specified data.
When an encryption is selected, you must provide (and confirm) an encryptionpassword.
Files Retention
Retains the files in the file copy destination if the specified criteria is met.
File created within the last
Specifies the amount of time (years, months, days) that the stored data isretained at the destination location. At the end of the specified retentiontime period, the stored data is purged from the destination.
Important! At the end of the specified retention time when the data ispurged from the destination, all of this purged data is no longer stored orsaved.
Note: The Retention Time purge process is only triggered if the File CopySchedule option is enabled.
File version less than
Specifies the number of copies retained and stored at the destination loc-ation. After this number is exceeded, the earliest (oldest) version will be dis-carded. This cycle of discarding the oldest stored version repeats as newerversions are added to the destination, allowing you to always maintain thespecified number of stored versions.
For example, if your specified File Versions retention count is set to 5 and youperform five file copies at times t1, t2, t3, t4, and t5, these file copiesbecome the five file copy versions retained and available to recover. Afterthe sixth file copy is performed (new version is saved), Arcserve UDP Agent(Windows) will remove the t1 copy and the five available versions to recoverare now t2, t3, t4, t5, and t6.
By default, the number of copies retained at the destination location beforediscarding is 15.
Chapter 4: Settings 209

Manage File Copy Settings
3. Click Save Settings.
Your File Copy settings are saved.
210 Arcserve UDP Agent for Windows User Guide

Manage File Copy Settings
Specify Cloud Configuration for File Copy
From the File Copy Settings Destination dialog, you can click the Configure buttonto display the Cloud Configuration dialog.
From this dialog you can use the drop-down menu to select a cloud vendor typethat you want to use for the storage of your file copies. The available options areAmazon S3, Windows Azure, Fujitsu Cloud (Windows Azure), and Eucalyptus-Walrus.(Amazon S3 is the default vendor). For more information about Fujitsu Cloud (Win-dows Azure), see the Overview and Registration.
Note: If you are using Eucalyptus-Walrus as your file copy cloud vendor, you cannotcopy files whose entire path length is greater than 170 characters.
Chapter 4: Settings 211

Manage File Copy Settings
The configuration options for each cloud vendor are similar (with some differentterminology), and any differences are described.
Follow these steps:
1. Specify the Connection Settings:
Vendor URL
Identifies the URL address of the cloud provider.
(For Amazon S3, Windows Azure, and Fujitsu Cloud (Windows Azure), theVendor URL is automatically pre-populated. For Eucalyptus-Walrus, you mustenter manually the Vendor URL using the specified format).
Access Key ID/Account Name/Query ID
Identifies the user who is requesting access this location.
(For this field, Amazon S3 uses Access Key ID, Windows Azure and Fujitsu Cloud(Windows Azure) use Account Name, and Eucalyptus-Walrus uses Query ID).
Secret Access Key/Secret Key
Because your Access Key is not encrypted, this Secret Access Key is a passwordthat is used to verify the authenticity of the request to access this location.
Important! This Secret Access Key is crucial for maintaining the security of youraccounts. You should keep your keys and your account credentials in a secure loc-ation. Do not embed your Secret Access Key in a web page or other publicly access-ible source code and do not transmit it over insecure channels.
(For this field, Amazon S3 uses Secret Access Key. Windows Azure, Fujitsu Cloud(Windows Azure), and Eucalyptus-Walrus use Secret Key).
Enable Proxy
If you select this option, you must also include the IP address (or machinename) of the proxy server and the corresponding port number that is used bythe proxy server for internet connections. You can also select this option if yourproxy server requires authentication. You then must provide the correspondingauthentication information (Domain Name\Username and Password) that isrequired to use the proxy server.
(Proxy capability is not available for Eucalyptus-Walrus).
2. Specify the Advanced Settings:
Bucket Name/Container
All files and folders moved or copied to the cloud vendor are stored and organ-ized in your buckets (or containers). Buckets are like a container for your files
212 Arcserve UDP Agent for Windows User Guide
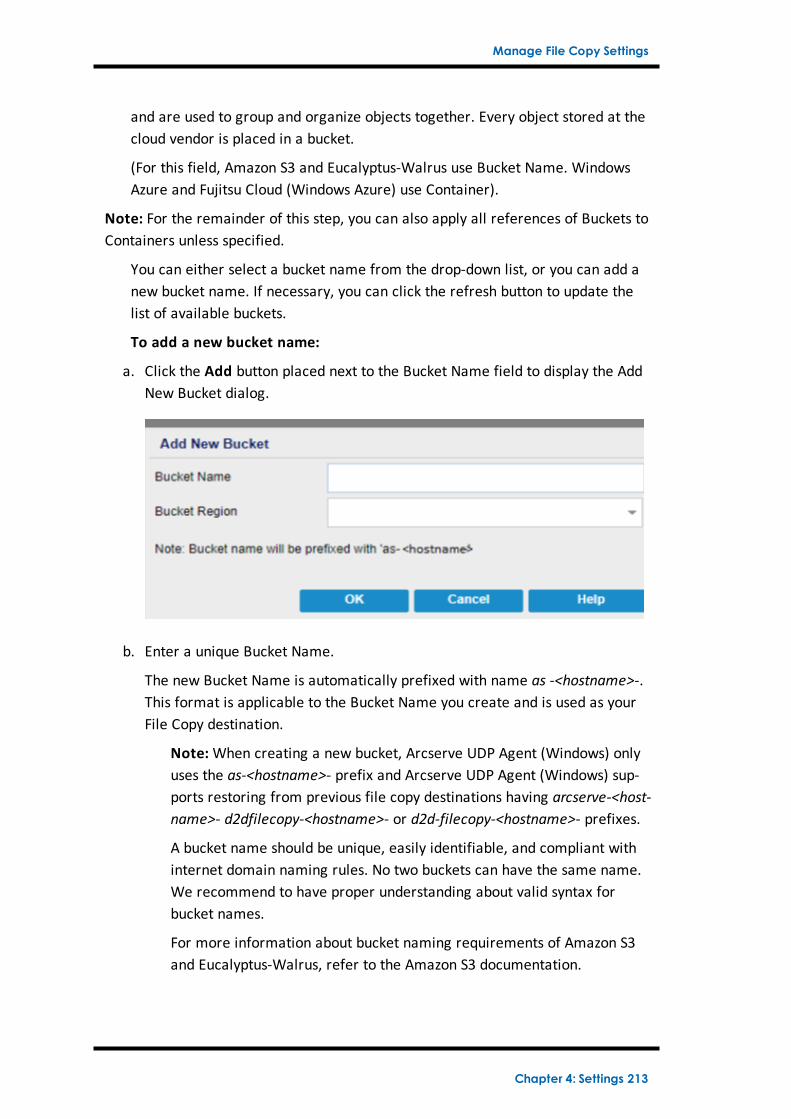
Manage File Copy Settings
and are used to group and organize objects together. Every object stored at thecloud vendor is placed in a bucket.
(For this field, Amazon S3 and Eucalyptus-Walrus use Bucket Name. WindowsAzure and Fujitsu Cloud (Windows Azure) use Container).
Note: For the remainder of this step, you can also apply all references of Buckets toContainers unless specified.
You can either select a bucket name from the drop-down list, or you can add anew bucket name. If necessary, you can click the refresh button to update thelist of available buckets.
To add a new bucket name:
a. Click the Add button placed next to the Bucket Name field to display the AddNew Bucket dialog.
b. Enter a unique Bucket Name.
The new Bucket Name is automatically prefixed with name as -<hostname>-.This format is applicable to the Bucket Name you create and is used as yourFile Copy destination.
Note:When creating a new bucket, Arcserve UDP Agent (Windows) onlyuses the as-<hostname>- prefix and Arcserve UDP Agent (Windows) sup-ports restoring from previous file copy destinations having arcserve-<host-name>- d2dfilecopy-<hostname>- or d2d-filecopy-<hostname>- prefixes.
A bucket name should be unique, easily identifiable, and compliant withinternet domain naming rules. No two buckets can have the same name.We recommend to have proper understanding about valid syntax forbucket names.
For more information about bucket naming requirements of Amazon S3and Eucalyptus-Walrus, refer to the Amazon S3 documentation.
Chapter 4: Settings 213

Manage File Copy Settings
For more information about container naming requirements of WindowsAzure and Fujitsu Cloud (Windows Azure), refer to the Microsoft doc-umentation.
c. For Amazon S3 only, select an available region from the drop-down menu. Bydefault, all available regions are included in the drop-down menu and youcan select the region where you want the new bucket to be created.
Regions allow you to select the geographical region where Amazon S3stores the buckets that you create. You should select a Region thatprovides you with fast access to your data and allows you to optimizelatency, minimize costs, or address regulatory requirements.
(For Windows Azure, Fujitsu Cloud (Windows Azure), and Eucalyptus-Wal-rus, the region is not selectable).
d. After you have specified your values, click OK.
The Bucket name is validated and created at the cloud.
After you successfully create the new bucket, the main Cloud Configurationdialog is displayed again, with the new bucket information (name and region)included in the Advanced Settings fields.
Enable Reduced Redundancy Storage
For Amazon S3 only, this option lets you select to enable Reduced RedundancyStorage (RRS). RRS is a storage option within Amazon S3 that helps you reducecost by storing non-critical, reproducible data at lower levels of redundancythan Amazon S3s standard storage. Both the standard and reduced redundancystorage options store data in multiple facilities and on multiple devices, butwith RRS the data is replicated fewer times, so the cost is less. You shouldexpect the same latency and throughput using either the Amazon S3 standardstorage or RRS. By default this option is not selected (Amazon S3 uses the stand-ard storage option).
214 Arcserve UDP Agent for Windows User Guide

Manage File Copy Settings
3. Click Test Connection to verify the connection to the specified cloud location.
4. Click OK to exit the Cloud Configuration dialog.
Chapter 4: Settings 215

Manage File Copy Settings
Configure File Copy Settings to Optimize Performance
To improve the performance (upload speed and server load), File Copy can uploaddata to the specified destination in parallel chunks and or parallel threads.
Chunk Value
You can set the number of 1-MB chunks that will be simultaneously sent to thedestination. By increasing the number of parallel chunks, you will decrease thetime to complete the job, but will also have an adverse affect on server per-formance. Configure this value as necessary to obtain optimal performance.
For example, if you are performing File Copy for a 10-MB file and set the num-ber of 1-MB chunks to 2, then File Copy will write 10 chunks, two at a time. Ifyou see that this is taking too long to complete the job, change this value to 4.The time to complete the job will then decrease because File Copy will now bewriting 10 chunks, four at a time, but the load on your server will increase.
Threads for Archive Value
File Copy lets you copy more than one file at a time. By default, File Copy trans-fers 8 files in parallel when the destination is configured to File Systems andtransfers 32 files in parallel when the destination is configured to Cloud. If yousee that File Copy is taking too long to transfer the data, increase the numberof threads up to 32, to optimize performance. However, if you experience aproblem on a machine with less memory, decrease the number of threads.
Chunk Value and Threads for Archive Value can be used together to control thespeed of the File Copy. If you increase Chunk Value and Threads for ArchiveValue, you see File Copy is performed faster.
For example, if you are transferring 8 files with 10 MB each and set the num-ber of 1-MB chunks to 2, then File Copy will write 16 at a time (8 files X 2-MBchunks), but the load on your server will increase. When you see the load onthe server has increased to a point where it becomes a problem, decrease thenumber of threads. If the destination is a Cloud location, it is recommendedthat you configure these settings in such a way that produces at least 20 writes,to optimize performance.
Threads for Restore Value
Restore from a File Copy lets you download more than one file at a time. Bydefault, restores from file copies downloads 8 files when the File Copy locationis configured to File Systems and downloads 32 files in parallel when the filecopy location is configured to Cloud. If you see that the restore from a File Copyis taking too long to transfer the data, increase the number of threads up to 32.
216 Arcserve UDP Agent for Windows User Guide

Manage File Copy Settings
Note: Chunk Value does not apply to restore jobs.
Threads for Catalog Synchronization Value
Catalog Synchronization jobs lets you use multiple threads to optimize per-formance.
If you see that the catalog synchronization job is taking too long to transfer thedata, increase the number of threads up to 10. You will see that the job is per-formed faster and the load on the server increases. When you see the load onthe server has increased to a point where it becomes a problem, decrease thenumber of threads.
To configure the file copy settings to optimize performance, set the correspondingDWORD values as follows:
1. Start edit registry.
2. Locate key:
"HKEY_LOCAL_MACHINE\SOFTWARE\Arcserve\Unified Data Pro-tection\Engine\AfArchiveDll"
Note: The same registry key is used when your File Copy destination is either FileSystems or a Cloud location.
3. To modify the value for the number of 1-MB chunks that will be simultaneouslysent to the destination, follow these steps:
a. Manually create a DWORD value for "ArchMultChunkIO".
b. Assign a DWORD value:
The available range for the number of chunks is 1 - 4 chunks.
Default: 4 chunks
Maximum: 4 chunks
4. To modify the value for the number of threads (files) that will be transferred in par-allel to the copy destination, follow these steps:
a. Manually create a DWORD value for "ThreadsForArchive".
b. Assign a DWORD value:
The available range for the number of files is 1 - 32 files.
Default: 8 files when the destination is configured to File Systems and 32 fileswhen the destination is configured to a Cloud location.
Maximum: 32
5. To modify the value for the number of file copies that can be downloaded in par-allel from the copy destination, follow these steps:
Chapter 4: Settings 217

Manage File Copy Settings
a. Manually create a DWORD value for "ThreadsForRestore".
b. Assign a DWORD value:
The available range for the number of files is 1 - 32 files.
Default: 8 files when the copy destination is File Systems and 32 files whenthe copy destination is a Cloud location.
Maximum: 32
6. To modify the value for the number of threads (streams) that can be used in par-allel to perform catalog synchronization, follow these steps:
a. Manually create a DWORD value for "ThreadForCatalogSync".
b. Assign a DWORD value:
The available range for the number of files is 1 - 10 threads.
Default: 8 threads
Maximum: 10
218 Arcserve UDP Agent for Windows User Guide

Manage File Copy Settings
Specify the File Copy Schedule
Arcserve UDP Agent (Windows) lets you specify the schedule settings for yourinformation to be file copied.
Note: To view a video that is related to the File Copy Settings, see Manage FileCopy Settings.
Follow these steps:
1. From the Arcserve UDP Agent (Windows) home page (or Arcserve UDP Agent (Win-dows) Monitor), select Settings from the taskbar and then select the File Copy Set-tings tab. When the File Copy Settings dialog opens, select Schedule.
The File Copy Settings Schedule dialog opens.
Note: If the Arcserve UDP Agent (Windows) is being managed by Console, not allsettings are available and will be displayed as read-only information.
2. Specify your File Copy schedule settings.
Schedule
Enables the file copying of data after the specified number of backups.
The file copy process will be launched automatically after the specified numberof successful backups (Full, Incremental, and Verify) and will be based on yourselected File Copy policies.
You can use this setting to control how many times a File Copy job is triggeredeach day. For example, if you specify to run a backup job every 15 minutes,then if you specify to run a File Copy job after every 4 backups, there will be 24File Copy jobs performed each day (1 each hour).
The number of backups that can be specified before the File Copy job runs mustbe in the range 1 - 700. By default, the schedule for file copying is after everyfive successful backups are completed.
3. Click Save Settings.
Your File Copy settings are saved.
Chapter 4: Settings 219

Manage File Archive Settings
Manage File Archive Settings
Arcserve UDP Agent (Windows) lets you copy selected source files from a backupsession to a destination (disk or cloud) based upon your specified file copy andretention criteria. File Copy can be used for copying critical data to secondary loc-ations.
The advantages of copying files are:
Improve Efficiency - Helps you to speed backup and recovery processes bycopying and moving unchanged data and reduce the amount of real data beingbacked up and stored to tape or disk.
Meet Regulatory Compliance - Helps you to preserve important documents,emails, and other critical data, as necessary to comply with internal rules andexternal regulations.
Reduce Storage Cost - Helps you to reclaim storage capacity by migratingolder or infrequently accessed data from your primary systems to more cost-effective storage locations.
Maintain Multiple File Versions - Helps you to roll back to previous versions ofbacked-up files (if necessary) or maintain multiple versions of the same files atdifferent destinations.
Before you perform your first File Copy job, specify the File Copy settings and plans.These configurations allow you to specify behaviors such as the source of your filecopy data, destination for your copied files, the schedule for each file copy job, andthe settings and filters applied to your file copy jobs. These settings can be modifiedat any time from the Arcserve UDP Agent (Windows) home page.
Note: To improve the performance (upload speed and server load), File Copy canupload the data to the specified destination in parallel chunks. To configure thenumber of chunks that are simultaneously sent to the destination, see ConfigureFile Copy Chunk Value.
To manage the File Copy settings, click the Settings link on the Arcserve UDP Agent(Windows) home page and select the File Copy Settings tab. The File Copy Settingsdialogs consist of the following subordinate tab options:
Source
Destination
Schedule
220 Arcserve UDP Agent for Windows User Guide

Manage File Archive Settings
Specify the File Archive Source
Arcserve UDP Agent (Windows) lets you specify the source settings for your inform-ation to be file copied.
Note: To view a video that is related to the File Copy Settings, see Manage FileCopy Settings.
Follow these steps:
1. From the Arcserve UDP Agent (Windows) home page (or Arcserve UDP Agent (Win-dows) Monitor), select Settings from the taskbar and then select the File Copy Set-tings tab. When the File Copy Settings dialog opens, select Source.
The File Copy Sources dialog opens.
Note: If the Arcserve UDP Agent (Windows) is being managed by Console, not allsettings are available and will be displayed as read-only information.
2. Specify your file copy source settings.
Enable File Copy
Enables the scheduled copying of files after the specified number of backups.If this option is not selected (File Copy disabled), no scheduled file copying isperformed and any changes to the File Copy settings are not validated andsaved.
Note: ReFS and deduplicated NTFS volumes will not be listed as selectablebackup sources to be file copied. As a result, if all the volumes for a specifiedbackup source are only ReFS or deduplicated NTFS volumes, the file copyoption will be disabled.
Recovery Points to Copy From
Specifies the recovery point that you want to copy. You have two options tospecify the recovery points. You can copy the recovery points from a specificbackup number. For example, you can specify that the recovery points mustbe copied from every fifth backup. Another option is, you can specify to copyrecovery points from a daily, weekly, or monthly backup.
File Copy Sources
Displays a selectable listing of all sources, with the corresponding policy (fil-ters) and type of file copy (copy and retain or copy and move) to be per-formed after each successful Arcserve UDP Agent (Windows) backup. TheseFile Copy Sources can be added, removed, or modified.
Note: Arcserve UDP Agent (Windows) does not copy application files, fileswith system attributes, and files with temporary attributes.
Chapter 4: Settings 221

Manage File Archive Settings
Note: File copy does not support mounted volumes as the source. If youattempt to select a mounted volume as the source, then no files will becopied.
Note: If a symbolic link is selected when specifying the File Copy sourcefolder, it is replaced with the actual path it points to when saving the set-tings. From the File Copy Restore user interface, the actual path will be dis-played instead of the symbolic link.
n Add
When clicked, the Plan type dialog opens to let you initially select the type offile copy job to perform (copy and retain or copy and move). After you selectthe plan type, the corresponding File Copy Plan dialog opens to let you add asource to copy and specify the corresponding plans for that source. For moreinformation, see Specify File Copy Plans.
Note: The File Copy source can only be selected from a volume that is cur-rently selected in Backup Settings. If the source contains ReFS or dedu-plicated NTFS volumes, these volumes will not be available for selection.
n Remove
When clicked removes the selected source from this displayed list.
n Modify
When clicked, the File Copy Plans dialog opens to let you change the plan set-tings for the selected source. For more information, see Specify File CopyPlans.
3. Click Save Settings.
Your File Copy settings are saved.
222 Arcserve UDP Agent for Windows User Guide

Manage File Archive Settings
Specify File Archive Plans
When you click the Add Source option for File Copy, the Plan type dialog opens tolet you initially select the type of File Copy job to be performed.
The available type is File Copy. In File copy plan, data is copied from the source tothe destination (remains on source location) and provides multiple stored versionson the destination.
If you want to Add a new File Copy source or you want to Modify an existing FileCopy source, the File Copy Plans dialog lets you specify the details.
Depending upon the plan type that is selected, a different File Copy Plans dialogopens; however, the selections are similar.
File Copy Selected:
Lets you specify the file copy source. You can specify or browse to a sourcevolume or folder.
Source Filters
Chapter 4: Settings 223

Manage File Archive Settings
Filters let you limit the objects to be file copied by certain specified types andvalues.
For more information about these filters, see How File Copy Source FiltersWork.
Filter Type
There are two types of filters: Include and Exclude.
An Include filter copies only those objects from the file copy source thatmatch the specified value.
An Exclude filter copies all objects from the file copy source except thosethat match the specified value.
You can specify multiple filters within the same file copy request by sep-arating each filter value with a comma.
If you specify multiple Include filters, the data is included in the file copy if any oneof those Include filters matches.
If you specify multiple Exclude filters, the data is excluded from the file copy if anyone of those Exclude filters matches.
You can mix both Include and Exclude filters in the same file copy request.
224 Arcserve UDP Agent for Windows User Guide

Manage File Archive Settings
Note:When the specified parameters of Exclude and Include filters conflict, theExclude filter is always a higher priority and is enforced. An Include filter can neverfile copy an object that was also Excluded.
Filter Variable (Pattern)
There are two types of variable pattern filters: File Pattern and Folder Pat-tern.
You can use a File Pattern filter or Folder Pattern filter to include or excludecertain objects from the file copy.
Filter Value
The filter value lets you limit the information that is file copied by selectingonly the parameter information that you specify, such as .txt files.
Arcserve UDP Agent (Windows) supports the use of wildcard characters tohelp select multiple objects to file copy with a single request. A wildcard char-acter is a special character that can be used as a substitute to representeither a single character or a string of text.
The wildcard characters asterisk and question mark are supported in theValue field. If you do not know the complete file/folder pattern value, youcan simplify the results of the filter by specifying a wildcard character.
"*" - Use the asterisk to substitute zero or more characters in the value.
"?" - Use the question mark to substitute a single character in the value.
For example, you can enter *.txt to exclude all files with a .txt extension ifyou do not know the specific file name. You can provide as much of the filename as you know, then use wildcards to fill in the blanks.
Note:When you select File Pattern as the filter type, a drop-down list of pre-defined filters for many commonly used files is available (MS-Office files,Image files, Executable files, Temp files, etc.). After choosing any of the pre-defined filters, you can still append or modify the corresponding values.
Chapter 4: Settings 225

Manage File Archive Settings
How File Archive Filters Work
The File Copy source filters for files and folders work as follows:
File with "d2darc" and "ASBUARC" extensions are always skipped.
Files with system and temporary attributes are always skipped.
Windows, Program Files, and Arcserve UDP Agent (Windows) installationfolders (for both File Copy and File Copy - delete source policies) are alwaysskipped.
The following precedence order is used for filtering (with the highest pre-cedence listed first):
Exclude directory filters
Exclude file filters
Include directory filters
Include file filters
Include Criteria
Exclude system and application files (Exchange and SQL only) present in any loc-ation. (This filter is only applicable for File Copy - Delete Source policies).
A file is copied only if the Include Folder or the Include File filter matches, itdoes not need to satisfy both filter requirements.
The File filter works only on the file name, and does not depend on the path.
For example, if you have the three files "Test.txt", "Hellotest.txt", and"TestHello.txt" these filters produce the following results:
Test*.txt filter matches only Test.txt and TestHello.txt
Test* filter matches Test.txt and TestHello.txt
Test filter does not match anything
*.txt filter matches all of them
*test filter does not match anything
A Folder filter works on the policy source level.
For example, if you have the following directory structure:
C:->Z99-> ->A00-> -> ->B01
226 Arcserve UDP Agent for Windows User Guide

Manage File Archive Settings
-> -> ->C01-> -> ->D01
If you configure your File Copy Source as "C:\Z99\A00" and you apply an IncludeFolder b* filter, then all files under c:\Z99\A00\B01 are copied.
In this example, the Source includes the parent folder and the asterisk is loc-ated after the "b". As a result all files in any folder subordinate to "A00" thatstarts with "b" are copied.
If you configure your File Copy Source as "C:\Z99 and you apply an IncludeFolder b* filter, then this filter does not match any folder and no files arecopied.
In this example, the Source does includes the"Z99" grandparent folder, but notthe "A00" parent folder. As a result, there are no "b" folders directly sub-ordinate to "Z99" and no files are copied.
However if you specify a *b* filter, it now matches any subordinate folder thatstarts with "b" and all files within these "b" folders are then copied.
In this example, the asterisk is now located before the "b". As a result, all filesin any folder subordinate to "C:\Z99" (regardless of the root level) that startswith "b" are copied.
If you configure your File Copy Source as "C:\Z99" and you apply an IncludeFolder *01 filter, then all subordinate folders containing "01" (B01, C01, andD01) are copied.
In this example, the asterisk is located before the "01". As a result, all files inany subordinate folders (regardless of the root level) that contains "01" arecopied.
Note: Folder filters are always relative to the source folder path specified inthe policy.
Chapter 4: Settings 227

Manage File Archive Settings
Specify the File Archive Destination
Arcserve UDP Agent (Windows) lets you specify the destination settings for yourinformation to be file copied.
Note: To view a video that is related to File Copy Settings, see Manage File CopySettings.
Specify the file copy destination
1. From the Arcserve UDP Agent (Windows) home page (or Arcserve UDP Agent (Win-dows) Monitor), select Settings from the taskbar and then select the File Copy Set-tings tab. When the File Copy Settings dialog opens, select Destination.
The File Copy Settings Destination dialog opens.
Notes:
If the Arcserve UDP Agent (Windows) is being managed by Console, not allsettings are available and will be displayed as read-only information.
When agent is managed by console and not protected in a plan, all the set-tings are still available except the Preference > Updates panel.
2. Specify your File Copy destination settings.
Destination
Specifies the destination location for the file copy job. You can only select onedestination.
Arcserve UDP Agent (Windows) lets you specify the settings for file copyingyour backed-up files to a disk or to the cloud. For file copying, you can specifyto perform a copy and retain or a copy and move of your backed-up data. Thetwo processes are similar, with the exception that when you perform a copyand move, the data is moved from the source to the destination (deleted fromsource location) and provides more available free space at your source. Whenyou perform a copy and retain, the data is copied from the source to the des-tination (remains on source destination) and provides multiple stored versions.
File Copy to a local or network drive
When selected, lets you specify the full path of the location where you wantto move or copy the source files/folders. The destination can be any localvolume or folder or a file share accessible by any uniform naming convention(UNC) path. You can browse to this destination location. Clicking the greenarrow icon lets you validate the connection to the specified destination.
File Copy to Cloud
228 Arcserve UDP Agent for Windows User Guide
Manage File Archive Settings
When selected, lets you specify the cloud location where you want to moveor copy the source files/folders. The Arcserve UDP Agent (Windows) cur-rently supports file copying to multiple cloud vendors, such as Amazon S3(Simple Storage Service), Windows Azure, Fujitsu Cloud (Windows Azure), andEucalyptus-Walrus. These cloud vendors are publicly available web serviceswhich let you safely and securely store and retrieve any amount of data, atany time, from anywhere on the Web.
You can click the Configure button to display the Cloud Configuration dialog.For more information, see Specify Cloud Configuration for File Copy.
Note: To eliminate any potential clock skew error when attempting to con-nect to the cloud, verify that your machine has the correct time zone set andthe clock is in sync with the global time. You should always check the time ofyour machine against the GMT time. If the time of your machine is not syn-chronized with the correct global clock time (within 5 to 10 minutes), yourcloud connection may not work. If necessary, reset the correct time for yourmachine and rerun your file copy job.
For either destination option, if the connection to the specified destination islost or broken, Arcserve UDP Agent (Windows) makes several attempts to con-tinue the file copy job. If these reattempts are not successful, a makeup job isthen performed from the point where the failure occurred. In addition, theactivity log is updated with a corresponding error message and an email noti-fication is sent (if configured).
Compression
Specifies the type of compression that is used for File Copy jobs.
Compression is performed to decrease your storage space at the File Copy des-tination, but also has an inverse impact on your file copy speed due to theincreased CPU usage.
Note: For a compressed File Copy job, the Activity log displays only the uncom-pressed size.
The available options are:
n No Compression
No compression is performed. This option has the lowest CPU usage (fastestspeed), but also has the largest storage space requirement for your file copy.
n Standard Compression
Some compression is performed. This option provides a good balance betweenCPU usage and storage space requirement. This is the default setting.
Chapter 4: Settings 229

Manage File Archive Settings
n Maximum Compression
Maximum compression is performed. This option provides the highest CPUusage (lowest speed), but also has the lowest storage space requirement foryour file copy.
Encryption
Specifies to use encryption for file copying.
Data encryption is the translation of data into a form that is unintelligiblewithout a deciphering mechanism. The Arcserve UDP Agent (Windows) dataprotection uses secure, AES-256 (Advanced Encryption Standard) encryptionalgorithms to achieve maximum security and privacy of your specified data.
When an encryption is selected, you must provide (and confirm) an encryptionpassword.
Files Retention
Retains the files in the file copy destination if the specified criteria is met.
File created within the last
Specifies the amount of time (years, months, days) that the stored data isretained at the destination location. At the end of the specified retentiontime period, the stored data is purged from the destination.
Important! At the end of the specified retention time when the data is purged fromthe destination, all of this purged data is no longer stored or saved.
Note: The Retention Time purge process is only triggered if the File Copy Scheduleoption is enabled.
3. Click Save Settings.
Your File Copy settings are saved.
230 Arcserve UDP Agent for Windows User Guide

Manage File Archive Settings
Specify Cloud Configuration for File Archive
From the File Copy Settings Destination dialog, you can click the Configure buttonto display the Cloud Configuration dialog.
From this dialog you can use the drop-down menu to select which cloud vendortype you want to use for storage of your file copies. The available options areAmazon S3, Windows Azure, Fujitsu Cloud (Windows Azure), and Eucalyptus-Walrus.(Amazon S3 is the default vendor). For more information about Fujitsu Cloud (Win-dows Azure), see the Overview and Registration.
Note: If you are using Eucalyptus-Walrus as your file copy cloud vendor, you cannotcopy files whose entire path length is greater than 170 characters.
The configuration options for each cloud vendor are similar (with some differentterminology), and any differences are described.
Follow these steps:
1. Specify the Connection Settings:
Vendor URL
Identifies the URL address of the cloud provider.
(For Amazon S3, Windows Azure, and Fujitsu Cloud (Windows Azure), the VendorURL is automatically pre-populated. For Eucalyptus-Walrus, the Vendor URL mustbe manually entered using the specified format).
Access Key ID/Account Name/Query ID
Chapter 4: Settings 231

Manage File Archive Settings
Identifies the user who is requesting access this location.
(For this field, Amazon S3 uses Access Key ID, Windows Azure and Fujitsu Cloud(Windows Azure) use Account Name, and Eucalyptus-Walrus uses Query ID).
Secret Access Key/Secret Key
Because your Access Key is not encrypted, this Secret Access Key is a password thatis used to verify the authenticity of the request to access this location.
Important! This Secret Access Key is crucial for maintaining the security of youraccounts. You should keep your keys and your account credentials in a secure loc-ation. Do not embed your Secret Access Key in a web page or other publicly access-ible source code and do not transmit it over insecure channels.
(For this field, Amazon S3 uses Secret Access Key. Windows Azure, Fujitsu Cloud(Windows Azure), and Eucalyptus-Walrus use Secret Key).
Enable Proxy
If you select this option, you must also include the IP address (or machine name) ofthe proxy server and the corresponding port number that is used by the proxyserver for internet connections. You can also select this option if your proxy serverrequires authentication. You then must provide the corresponding authenticationinformation (Domain Name\Username and Password) that is required to use theproxy server.
(Proxy capability is not available for Eucalyptus-Walrus).
2. Specify the Advanced Settings:
Bucket Name/Container
All files and folders moved or copied to the cloud vendor are stored and organizedin your buckets (or containers). Buckets are like a container for your files and areused to group and organize objects together. Every object stored at the cloudvendor is placed in a bucket.
(For this field, Amazon S3 and Eucalyptus-Walrus use Bucket Name. Windows Azureand Fujitsu Cloud (Windows Azure) use Container).
Note: For the remainder of this step, all references to Buckets can also be appliedto Containers unless specified.
You can either select a bucket name from the drop-down list, or you can add a newbucket name. If necessary, you can click the refresh button to update the list ofavailable buckets.
To add a new bucket name:
232 Arcserve UDP Agent for Windows User Guide

Manage File Archive Settings
a. Click the Add button placed next to the Bucket Name field to display the AddNew Bucket dialog.
b. Enter a unique Bucket Name.
The new Bucket Name is automatically prefixed with name as-<hostname>-.This format is applicable to the Bucket Name you create and is used as yourFile Copy destination.
Note:When creating a new bucket, Arcserve UDP Agent (Windows) only usesthe as-<hostname>- prefix and Arcserve UDP Agent (Windows) supportsrestoring from previous file copy destinations having arcserve-<hostname>-d2dfilecopy-<hostname>- or d2d-filecopy-<hostname>- prefixes.
A bucket name should be unique, easily identifiable, and compliant with inter-net domain naming rules. No two buckets can have the same name. Werecommend to understand valid syntax for bucket names.
For more information about bucket naming requirements of Amazon S3 andEucalyptus-Walrus, refer to the Amazon S3 documentation.
For more information about container naming requirements of WindowsAzure and Fujitsu Cloud (Windows Azure), refer to the Microsoft doc-umentation.
c. For Amazon S3 only, select an available region from the drop-down menu. Bydefault, all available regions are included in the drop-down menu and youcan select the region where you want the new bucket to be created.
Regions allow you to select the geographical region where Amazon S3 storesthe buckets that you create. You should select a Region that provides youwith fast access to your data and allows you to optimize latency, minimizecosts, or address regulatory requirements.
(For Windows Azure, Fujitsu Cloud (Windows Azure), and Eucalyptus-Walrus,the region is not selectable).
Chapter 4: Settings 233
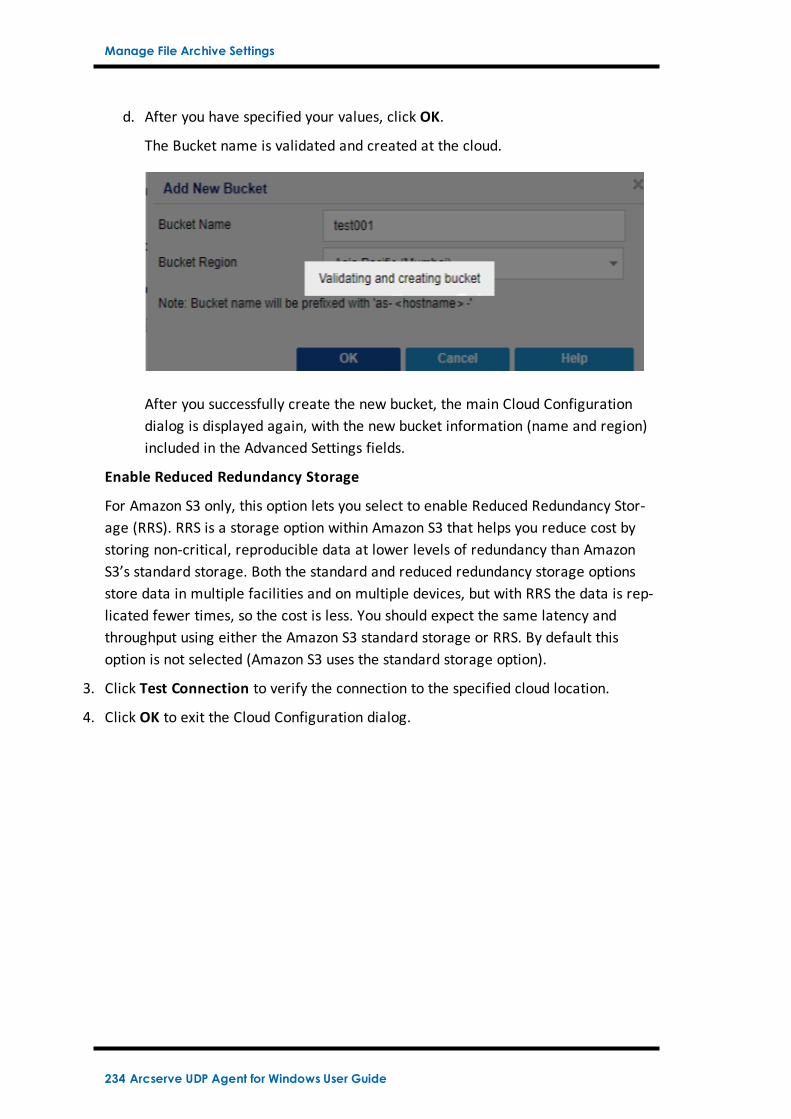
Manage File Archive Settings
d. After you have specified your values, click OK.
The Bucket name is validated and created at the cloud.
After you successfully create the new bucket, the main Cloud Configurationdialog is displayed again, with the new bucket information (name and region)included in the Advanced Settings fields.
Enable Reduced Redundancy Storage
For Amazon S3 only, this option lets you select to enable Reduced Redundancy Stor-age (RRS). RRS is a storage option within Amazon S3 that helps you reduce cost bystoring non-critical, reproducible data at lower levels of redundancy than AmazonS3’s standard storage. Both the standard and reduced redundancy storage optionsstore data in multiple facilities and on multiple devices, but with RRS the data is rep-licated fewer times, so the cost is less. You should expect the same latency andthroughput using either the Amazon S3 standard storage or RRS. By default thisoption is not selected (Amazon S3 uses the standard storage option).
3. Click Test Connection to verify the connection to the specified cloud location.
4. Click OK to exit the Cloud Configuration dialog.
234 Arcserve UDP Agent for Windows User Guide
Manage File Archive Settings
Configure File Archive Settings to Optimize Per-formance
To improve the performance (upload speed and server load), File Copy can uploaddata to the specified destination in parallel chunks and or parallel threads.
Chunk Value
You can set the number of 1-MB chunks that will be simultaneously sent to thedestination. By increasing the number of parallel chunks, you will decrease thetime to complete the job, but will also have an adverse affect on server per-formance. Configure this value as necessary to obtain optimal performance.
For example, if you are performing File Copy for a 10-MB file and set the num-ber of 1-MB chunks to 2, then File Copy will write 10 chunks, two at a time. Ifyou see that this is taking too long to complete the job, change this value to 4.The time to complete the job will then decrease because File Copy will now bewriting 10 chunks, four at a time, but the load on your server will increase.
Threads for Archive Value
File Copy lets you copy more than one file at a time. By default, File Copy trans-fers 8 files in parallel when the destination is configured to File Systems andtransfers 32 files in parallel when the destination is configured to Cloud. If yousee that File Copy is taking too long to transfer the data, increase the numberof threads up to 32, to optimize performance. However, if you experience aproblem on a machine with less memory, decrease the number of threads.
Chunk Value and Threads for Archive Value can be used together to control thespeed of the File Copy. If you increase Chunk Value and Threads for ArchiveValue, you see File Copy is performed faster.
For example, if you are transferring 8 files with 10 MB each and set the num-ber of 1-MB chunks to 2, then File Copy will write 16 at a time (8 files X 2-MBchunks), but the load on your server will increase. When you see the load onthe server has increased to a point where it becomes a problem, decrease thenumber of threads. If the destination is a Cloud location, it is recommendedthat you configure these settings in such a way that produces at least 20 writes,to optimize performance.
Threads for Restore Value
Restore from a File Copy lets you download more than one file at a time. Bydefault, restores from file copies downloads 8 files when the File Copy locationis configured to File Systems and downloads 32 files in parallel when the file
Chapter 4: Settings 235

Manage File Archive Settings
copy location is configured to Cloud. If you see that the restore from a File Copyis taking too long to transfer the data, increase the number of threads up to 32.
Note: Chunk Value does not apply to restore jobs.
Threads for Catalog Synchronization Value
Catalog Synchronization jobs lets you use multiple threads to optimize per-formance.
If you see that the catalog synchronization job is taking too long to transfer thedata, increase the number of threads up to 10. You will see that the job is per-formed faster and the load on the server increases. When you see the load onthe server has increased to a point where it becomes a problem, decrease thenumber of threads.
To configure the file copy settings to optimize performance, set the correspondingDWORD values as follows:
1. Start edit registry.
2. Locate key:
"HKEY_LOCAL_MACHINE\SOFTWARE\Arcserve\Unified Data Pro-tection\Engine\AfArchiveDll"
Note: The same registry key is used when your File Copy destination is either FileSystems or a Cloud location.
3. To modify the value for the number of 1-MB chunks that will be simultaneouslysent to the destination, follow these steps:
a. Manually create a DWORD value for "ArchMultChunkIO".
b. Assign a DWORD value:
The available range for the number of chunks is 1 - 4 chunks.
Default: 4 chunks
Maximum: 4 chunks
4. To modify the value for the number of threads (files) that will be transferred in par-allel to the copy destination, follow these steps:
a. Manually create a DWORD value for "ThreadsForArchive".
b. Assign a DWORD value:
The available range for the number of files is 1 - 32 files.
Default: 8 files when the destination is configured to File Systems and 32 files whenthe destination is configured to a Cloud location.
Maximum: 32
236 Arcserve UDP Agent for Windows User Guide

Manage File Archive Settings
5. To modify the value for the number of file copies that can be downloaded in par-allel from the copy destination, follow these steps:
a. Manually create a DWORD value for "ThreadsForRestore".
b. Assign a DWORD value:
The available range for the number of files is 1 - 32 files.
Default: 8 files when the copy destination is File Systems and 32 files when the copydestination is a Cloud location.
Maximum: 32
6. To modify the value for the number of threads (streams) that can be used in par-allel to perform catalog synchronization, follow these steps:
a. Manually create a DWORD value for "ThreadForCatalogSync".
b. Assign a DWORD value:
The available range for the number of files is 1 - 10 threads.
Default: 8 threads
Maximum: 10
Chapter 4: Settings 237

Manage File Archive Settings
Specify the File Archive Schedule
Arcserve UDP Agent (Windows) lets you specify the schedule settings for yourinformation to be file copied.
Note: To view a video that is related to the File Copy Settings, see Manage FileCopy Settings.
Follow these steps:
1. From the Arcserve UDP Agent (Windows) home page (or Arcserve UDP Agent (Win-dows) Monitor), select Settings from the taskbar and then select the File Copy Set-tings tab. When the File Copy Settings dialog opens, select Schedule.
The File Copy Settings Schedule dialog opens.
Notes:
If the Arcserve UDP Agent (Windows) is being managed by Console, not allsettings are available and will be displayed as read-only information.
When agent is managed by console and not protected in a plan, all the set-tings are still available except the Preference > Updates panel.
2. Specify your File Copy schedule settings.
Schedule
Enables the file copying of data after the specified number of backups.
The file copy process will be launched automatically after the specified numberof successful backups (Full, Incremental, and Verify) and will be based on yourselected File Copy policies.
You can use this setting to control how many times a File Copy job is triggeredeach day. For example, if you specify to run a backup job every 15 minutes,then if you specify to run a File Copy job after every 4 backups, there will be 24File Copy jobs performed each day (1 each hour).
The number of backups that can be specified before the File Copy job runs mustbe in the range 1 - 700. By default, the schedule for file copying is after everyfive successful backups are completed.
3. Click Save Settings.
Your File Copy settings are saved.
238 Arcserve UDP Agent for Windows User Guide

Configure the Copy Recovery Point Settings
Configure the Copy Recovery Point Settings
Arcserve UDP Agent (Windows) lets you specify the recovery point copy settings.Before you copy a recovery point, configure the copy recovery point settings. For abetter understanding about how the options on this dialog can be used to configureyour recovery point copy schedule, see Copy Recovery Points - Example Scenarios
Note: The recovery point copy process is a copy and paste operation only and not acut and paste operation. As a result, whenever a scheduled copy recovery point jobis performed Arcserve UDP Agent (Windows) creates an additional copy of therecovery point to the specified copy destination, while still retaining the originalcopy of the recovery point at the backup destination that was specified in BackupSettings.
Follow these steps:
1. From the Arcserve UDP Agent (Windows) home page (or Arcserve UDP Agent (Win-dows) Monitor), select Settings from the taskbar and then select the Copy Recov-ery Points tab. When the Copy Recovery Points dialog opens, select CopySettings.
The Copy Recovery Points dialog opens.
Notes:
If the Arcserve UDP Agent (Windows) is being managed by Console, not allsettings are available and will be displayed as read-only information.
Chapter 4: Settings 239

Configure the Copy Recovery Point Settings
When agent is managed by console and not protected in a plan, all the set-tings are still available except the Preference > Updates panel.
2. Select Enable Copy Recovery Points.
When selected, enables the copying of recovery points.
Note: If you do not select this option, no scheduled copying of recovery points is per-formed.
3. Specify the following recovery point copy schedule settings:
Destination
Specifies the storage location for the copy of the selected recovery point.(Optional) You can click the green arrow button to verify the connection tothe specified location.
Note: The maximum length for the specified destination path is 158 char-acters.
Copy Recovery Points job will run after the specified number of backupsare performed
Specifies when the scheduled recovery point copy process is automaticallylaunched. This process is launched based on your selected copy policies andspecified number of successful backups (Full, Incremental, and Verify).
Note: Number of successful backup is counted for any custom, daily, weeklymonthly backups that are configured.
240 Arcserve UDP Agent for Windows User Guide

Configure the Copy Recovery Point Settings
You can use this setting to control how many times a recovery point copy pro-cess is triggered each day. For example, if you schedule to run a backup jobevery 15 minutes, and copy job after every 4 backups, then it performs 24recovery point copy jobs each day (1 each hour).
Default: 8
Minimum: 1
Maximum: 1440
Important! If you schedule backup and copy jobs to run at regular intervalsand if the copy job is currently running (in active state) when the scheduledtime for the backup job time arrives, the backup job fails. (The next backupjob will run as scheduled and should be successful if it does not conflict withanother copy job). Because the copy operation takes almost same amount oftime as performing a full backup, the best practice is not to set a frequentschedule for your recovery point copy jobs.
Specify the number of recovery points to keep
Specifies the number of recovery points that are retained and stored at thespecified copy destination. Discards the oldest recovery point, when this num-ber is exceeded.
Note: If you do not have sufficient free space at the target destination,reduce the number of saved recovery points.
Default: 1
Maximum: 1440
4. Select the Compression level.
Compression is typically performed to decrease your disk space usage, but alsohas an inverse impact on your backup speed due to the increased CPU usage.
The available options are:
No Compression - Compression is not performed. Files are pure VHD. Thisoption has the lowest CPU usage (fastest speed), but also has the highest diskspace usage for your backup image.
No Compression - VHD - Compression is not performed. Files are converted to.vhd format directly, without the need for manual operations. This option hasthe lowest CPU usage (fastest speed), but also has the highest disk space usagefor your backup image.
Standard Compression - Some compression is performed. This option providesa good balance between CPU usage and disk space usage. This setting is thedefault setting.
Chapter 4: Settings 241

Configure the Copy Recovery Point Settings
Maximum Compression - Maximum compression is performed. This optionprovides the highest CPU usage (lowest speed), but also has the lowest diskspace usage for your backup image.
Note: If your backup image contains uncompressible data (such as JPG imagesor ZIP files), additional storage space can be allocated to handle such data. As aresult, if you select any compression option and you have uncompressible datain your backup, it can actually result in an increase in your disk space usage.
5. If you also want the copied recovery point to be encrypted, specify the followinginformation:
Encryption Algorithm
Specifies the type of encryption algorithm that is used for the recovery pointcopies.
The available format options are No Encryption, AES-128, AES-192, and AES-256.
Encryption Password
Lets you specify and confirm the encryption password being used to encryptthe destination session.
6. Click Save Settings.
Your recovery point copy settings are saved.
The copy recovery point settings are successfully configured.
242 Arcserve UDP Agent for Windows User Guide

Configure the Copy Recovery Point Settings
Copy Recovery Points - Example Scenarios
The following example scenarios are provided to give you a better understanding ofhow the various options can affect your scheduled copying of recovery points.
For this example, assume that you configured your Arcserve UDP Agent (Windows)backup schedule as follows:
Full Backup - Every 7 days
Incremental Backup - Every 1 hour
Verify Backup - Every 3 days
and assume:
First backup is on Day #1 at 5:00PM (by default, the first backup is always a FullBackup)
First Incremental Backup will be on Day #1 at 6:00PM (and every hour after)
Recovery Points retention count is set to 31 (default number)
Location "D" is configured as the copy destination.
Scenario #1
For this scenario, the Copy Recovery Point settings are as follows:
Copy after 4 backups
Retain 1 recovery point
Result:
At 8:00PM (after the 4th backup), the scheduled copy job will run and con-solidate all 4 recovery points into a single recovery point and store it at des-tination D.At 12:00 midnight (after the 8th backup), the next scheduled copy job will runand consolidate all 8 recovery points into a single recovery point and store it atdestination D.
The previous recovery point is removed from destination D because the settingis to retain only 1 recovery point at the destination.
Scenario #2
For this scenario, the Copy Recovery Point settings are as follows:
Copy after 4 backups
Retain 4 recovery points
Result:
Chapter 4: Settings 243
Configure the Copy Recovery Point Settings
At 8:00PM (after the 4th backup), the scheduled copy job will run and con-solidate all 4 recovery points into a single recovery point (Recovery Point #1)and store it at destination D.At 12:00 midnight (after the 8th backup), the next scheduled copy job will runto create Recovery Point #2 and store it at destination D.At 4:00AM on Day #2 (after the 12th backup), the next scheduled copy job willrun to create Recovery Point #3 and store it at destination D.At 8:00AM on Day #2 (after the 16th backup), the next scheduled copy job willrun to create Recovery Point #4 and store it at destination D.At 12:00 noon on Day #2 (after the 20th backup), the next scheduled copy jobwill run. A new recovery point will be created and the first recovery point (cre-ated after the 8:00PM backup on previous day) is removed from destination D,because the setting is to retain only 4 recovery points at the destination.
Scenario #3
For this scenario, the Copy Recovery Point settings are as follows:
Copy after 1 backup
Retain 4 recovery points
Result:
At 5:00PM (after the 1st backup), the scheduled copy job will run to create asingle recovery point (Recovery Point #1) and store it at destination D.At 6:00PM (after the 2nd backup), the next scheduled copy job will run to cre-ate Recovery Point #2 and store it at destination D.At 7:00PM (after the 3rd backup), the next scheduled copy job will run to createRecovery Point #3 and store it at destination D.At 8:00PM (after the 4th backup), the next scheduled copy job will run to createRecovery Point #4 and store it at destination D.At 9:00PM (after the 5th backup), the next scheduled copy job will run. A newrecovery point will be created and the first recovery point (created after the5:00PM backup) is removed from destination D, because the setting is to retainonly 4 recovery points at the destination.
244 Arcserve UDP Agent for Windows User Guide

Specify Preferences
Specify Preferences
The Preferences dialog page provides a quick and easy way to specify variousoptions for the behavior of your Arcserve UDP Agent (Windows). When clicked, thePreferences dialog opens with the following subordinate tabs:
General
Email Alerts
Updates
Chapter 4: Settings 245

Specify Preferences
Specify General Preferences
Arcserve UDP Agent (Windows) lets you specify your General preferences:
Specify the General Preferences
1. From the Arcserve UDP Agent (Windows) home page (or Arcserve UDP Agent (Win-dows) Monitor), select Settings from the taskbar and then select the Preferencestab. When the Preferences dialog opens, select General.
The General preferences dialog opens.
Notes:
If the Arcserve UDP Agent (Windows) is being managed by Console, not allsettings are available and will be displayed as read-only information.
When agent is managed by console and not protected in a plan, all the set-tings are still available except the Preference > Updates panel.
2. Specify your General preference settings.
Tray Monitor Notifications
Select the type of Alert notifications you want to display. The availableoptions are All, Errors and Warnings, and None.
3. Click Save Settings.
Your General preference settings are saved.
246 Arcserve UDP Agent for Windows User Guide

Specify Preferences
Specify Email Preferences
Arcserve UDP Agent (Windows) lets you specify the following Email Alert pref-erences:
Specify the Email Alerts Preferences
1. From the Arcserve UDP Agent (Windows) home page (or Arcserve UDP Agent (Win-dows) Monitor), select Settings from the taskbar and then select the Preferencestab. When the Preferences dialog opens, select Email Alerts.
The Email Alerts preferences dialog opens.
Notes:
If the Arcserve UDP Agent (Windows) is being managed by Console, not allsettings are available and will be displayed as read-only information.
When agent is managed by console and not protected in a plan, all the set-tings are still available except the Preference > Updates panel.
2. Select the Enable Email Alerts checkbox to send an email notification for JobAlerts, Disk Space Alerts, Updates Alerts, and Resource Alerts.
3. Specify your Email Alerts notification settings.
Automatic email alert notifications are sent upon the completion of selectedevents. You can select any or all of the available options.
Chapter 4: Settings 247

Specify Preferences
Note: If you do not need specific notifications for successful jobs, you can configureArcserve UDP Agent (Windows) to only send email alerts for failed and missed jobs.This configuration could help you reduce the amount of email notifications and alsomonitor any failures.
The available options are to send an alert notification for the following events:
Missed jobs
Sends an email alert notification for all missed jobs. A missed job is any sched-uled job that did not run at the scheduled time. A missed job could happenwhen some other job of the same type is running or previous job that startedearlier did not finish yet.
Arcserve UDP Agent (Windows) allows different types of jobs to be run in par-allel; however, only one job of each type can be run at the same time. Forexample, if a copy job is still running at the scheduled time for another copy jobthen the scheduled copy job is missed, but another backup job can still run.
Backup, Catalog, File Copy, Restore, or Copy Recovery Point jobfailed/crashed/canceled
Sends an alert notification for all unsuccessful backup, catalog, file copy,restore, or copy recovery point job attempts. This category includes all failed,incomplete, and canceled jobs, and crashed attempts.
Note: These email alerts are sent with a high importance. The email alerts thathave a high importance level setting display a visual indicator of an exclam-ation point in their Inbox.
Backup, Catalog, File Copy, Restore, or Copy Recovery Point job successfullycompleted
Sends an alert notification for all successful backup, catalog, file copy, restore,or copy recovery point job attempts.
Merge job stopped, skipped, failed, or crashed
Sends an alert notification for all stopped, skipped, failed, or crashed mergejobs. If you enable this alert, you are informed once a merge job is unsuc-cessful.
A merge failure can occur for the following reasons:
o The session is mounted.
To solve the problem, you can dismount the session.
o The session is locked by a catalog job.
The next backup job automatically merges this session.
248 Arcserve UDP Agent for Windows User Guide

Specify Preferences
o The session is locked due to other reasons.
If you disable this alert, you only know when a merge was unsuccessful fromthe balloon message in the tray monitor or the Recovery Points Summary onthe Arcserve UDP Agent (Windows) Home Page.
Merge job success
Sends an alert notification for all successful merge jobs.
Backup Destination free space is less than
Sends an email alert notification when the amount of unused space at thebackup destination is less than a specified value. For this option, you can furtherselect either a percentage of the total capacity or a specific value (in MB) forthe threshold level of when the alert notification is sent.
New Updates Available
Sends an email notification when a new update for Arcserve UDP Agent (Win-dows) is available. Email notifications are also sent if a failure occurs duringthe check for updates or during the download.
Enable Resource Alerts
Sends an email notification when any specified resource threshold level isreached. To ensure that your server is efficient and reliable, continually beaware of the performance to identify possible problems and quickly address bot-tleneck situations.
Defining threshold levels for these resource indicators is strictly up to you andyour knowledge of your server. You cannot specify right or wrong settings andcould base these alert notifications upon "normal" and acceptable per-formance. For example, if your system typically runs at an 80 percent CPU load,then setting a CPU Usage threshold at 75 percent would not be useful or effi-cient.
Each of these resource parameters can be separately configured to send analert notification when the corresponding threshold level is reached. The max-imum number that each resource alert email is sent is 5 per day.
CPU Usage
The specified CPU Usage alert threshold indicates the percentage of CPUusage for your Arcserve UDP Agent (Windows) protected server. You can usethis alert notification to ensure that your server does not become overloadedtoo often.
If your CPU usage is too high, your server response time can become slow orunresponsive. Therefore, consider spreading out (balancing) your load.
Chapter 4: Settings 249
Specify Preferences
Disk Throughput
The specified Disk Throughput alert threshold indicates the disk throughput(MB/second) for your Arcserve UDP Agent (Windows) protected server. Youcan use this alert notification to ensure that you are maximizing the cap-ability of your disk.
If your disk throughput is close to the maximum value your disk can handle,consider upgrading to a disk that better matches your needs. Generally afaster disk leads to better performance.
Memory Usage
The specified Memory Usage alert threshold indicates the percentage ofmemory in use on your Arcserve UDP Agent (Windows) protected server. Util-ization is how much of your memory capacity you are using. The higher the per-centage the worse your server performance is going to be.
If your memory use continually becomes too high, determine the process caus-ing this high usage. You can use this indicator setting to alert you of when anapplication or server upgrade can be necessary.
Network I/O
The specified Network I/O alert threshold indicates the percentage of NIC band-width you are currently using on your Arcserve UDP Agent (Windows) protectedserver. Utilization is how much of your network interface card (or NIC) capacityyou are using. The higher the percentage the worse your network performanceis going to be.
If your network use continually becomes too high, determine the process caus-ing this high usage and remedy the problem. In addition, if based on your spe-cific network capacity the percentage of your network use is too high duringbackup time, you can upgrade your NIC card to handle the higher throughputrequirements.
4. Click Save Settings.
Your Email Alerts preference settings are saved.
5. After you select to send an email notification, you can then click Email Settings todisplay the related dialog.
250 Arcserve UDP Agent for Windows User Guide

Specify Preferences
Specify Email Settings
From the Email Settings dialog, you can specify email settings such as the:
Mail server
Subject title
Who the email is coming from
Email recipients
You can also enable and define your proxy settings. These settings apply to allemail alert notifications and can be modified at any time.
After you establish your email settings, you can test the settings using the TestEmail button. After a job runs successfully or fails, it is too late to receive an emailalert for having the wrong settings. Therefore, testing the email information that isprovided validates the settings and tries to send an email using the specified set-tings. If the email settings are valid, you receive an email indicating so. If the emailsettings are invalid, you receive a failure message.
Service
The email provider service to use for sending the alert notifications. The avail-able options are Google Mail, Yahoo Mail, Live Mail, and Other.
If you select Other, identify the mail server and corresponding port numberused.
Chapter 4: Settings 251
Specify Preferences
If you select Google Mail, Yahoo Mail, or Live Mail the mail server and port num-ber fields are automatically populated.
Default: Other
Mail Server
The host name of the SMTP mail server that Arcserve UDP Agent (Windows)can use to send the email alerts.
Port
The output port number for the mail server.
Requires Authentication
Specifies if this mail server requires authentication when attempting to send anemail by way of the Internet. When this option is selected, provide the cor-responding user Account Name and Password.
Subject
Subject description for the email alert notifications that Arcserve UDP Agent(Windows) sends.
Default: "Arcserve UDP Agent Alert"
From
The email address that Arcserve UDP Agent (Windows) uses to send the emailalert notifications.
Recipients
Email address for the recipients of the email alert notifications sent.
Note: To enter multiple email addresses, separate each address with a semi-colon character.
Use SSL
Email server requires an SSL (Secure Sockets Layer) connection to transmit datasecurely by way of the Internet.
Send STARTTLS
Email server requires a STARTTLS (Start TLS extension) command that is issuedto initiate a secure SMTP connection between servers.
Use HTML format
Email alert notifications are sent as HTML. If this option is not selected, thealerts are sent as plain text. By default, this option is selected.
Enable Proxy Settings
252 Arcserve UDP Agent for Windows User Guide

Specify Preferences
Specifies if you want to connect to a proxy server for sending your email alertnotifications. When this option is selected, provide the corresponding name ofthe proxy server and port number.
Chapter 4: Settings 253

Specify Preferences
Specify Updates Preferences
Arcserve UDP Agent (Windows) lets you specify the following Updates preferences:
Follow these steps:
1. From the Arcserve UDP Agent (Windows) home page (or Arcserve UDP Agent (Win-dows) Monitor), select Settings from the taskbar and then select the Preferencestab. When the Preferences dialog opens, select Updates.
The Updates preferences dialog opens.
2. Specify your Updates preference settings.
Download Server
Specifies the source server from where your Arcserve UDP Agent (Windows)server will connect to and download available updates.
Arcserve Server
You can use this option to specify that Arcserve UDP Agent (Windows) updatesare downloaded from the Arcserve server directly to your local server.
This is the default setting.
Staging Server
You can use this option to specify the server that is used as a staging server.
254 Arcserve UDP Agent for Windows User Guide

Specify Preferences
Note: If required, you can create a staging server. For more information, seeHow to Create a Staging Server.
If you specify more than one staging server, the first listed server is designatedas the primary staging server. Arcserve UDP Agent (Windows) initially attemptsto connect to the primary staging server. If for any reason the first listed serveris not available, then the next listed server becomes the primary staging server.The same sequence is continued until the last listed server becomes the primarystaging server. (The Staging Server list is limited to the maximum of 5 servers).
You can use the Move Up andMove Down buttons to change the stagingserver sequence.
You can use the Delete button to remove a server from this list.
You can use the Add Server button to add a new server to this list. Whenyou click the Add Server button, the Staging Server dialog opens, allow-ing you to specify the name of the added staging server.
You can use the Edit Server button to modify the existing server in the list.When you click the Edit Server button, the Staging Server dialog opens,allowing you to modify the name or port of the staging server.
Arcserve UDP Agent (Windows) updates are downloaded from the Arcserveserver directly to the specified staging server location. After the updates aredownloaded to this staging server, you can then further download the updatesfrom the staging server to a client server. If you select the Staging Server loc-ation, you must also specify the host name or IP address for the staging server,along with the corresponding port number.
You cannot specify your same local client server as this staging server. This is aninvalid configuration because the staging server cannot connect to itself to getand download the available updates from. If you attempt to use your local clientserver as the staging server, an error message is displayed.
Proxy Settings
Note: This Proxy Server option is only available when you select ArcserveServer as the download server.
Select Proxy Settings to specify if you want the Arcserve UDP Agent (Windows)updates to be downloaded via a proxy server. A proxy server acts as an inter-mediary between your download server (staging or client) and the Arcserveserver to ensure security, increased performance, and administrative control.This is the connection to the Arcserve server from which your download servergets the updates.
Chapter 4: Settings 255

Specify Preferences
When you select this option the Proxy Settings dialog opens.
Use browser proxy settings
This selection is only applicable to Windows Internet Explorer (IE) andGoogle Chrome.
When selected, directs Arcserve UDP Agent (Windows) to automaticallydetect and use the same proxy settings that are applied to the browser toconnect to the Arcserve server for Arcserve UDP Agent (Windows) updateinformation.
Configure proxy settings
When selected enables the specified proxy server to connect to the Arc-serve server for Arcserve UDP Agent (Windows) update information. If youselect this option, you must also include the IP address (or machine name)of the proxy server and the corresponding port number that is used by theproxy server for internet connections.
In addition, you can also specify if your proxy server requires authen-tication. When selected, specifies that authentication information (User IDand Password) are required to use the proxy server.
Note: The format for user name should be a fully qualified domain username in the form of "<domain name>\<user name>".
Test Connection
256 Arcserve UDP Agent for Windows User Guide

Specify Preferences
Lets you test the following connections and display a status message when com-pleted:
If you selected "Arcserve Server" as the download server, tests the con-nection between the machine and the Arcserve server through the specifiedproxy server.
If you selected "Staging Server" as the download server, tests the connectionbetween the machine and the specified staging server. The test connectionbutton is used to test the availability of each listed staging server, and a cor-responding status is displayed in the Connection Status field. If none of theconfigured staging servers are available, a red icon is displayed on the statusSummary section home page to provide a visual alert of this condition.
Note: The test connection is automatically performed when you launch thePreferences Updates dialog from the home page. When this auto test is per-formed it will check the latest connection status of the previously configureddownload server (either Arcserve Server or Staging Server(s), whichever isselected). If you previously configured more than one staging server, thenthis auto test is performed on all staging servers to get the latest connectionstatus.
Update Schedule
Specifies when to check for (and download) new Arcserve UDP Agent (Win-dows) updates.
With this option selected, specifies to automatically check for new and avail-able Arcserve UDP Agent (Windows) updates. When you select this option,you then have drop-down menu capabilities to specify when to perform thisfunction (every day or weekly on a specified day) and the time of the day thatit is performed.
Note: The default setting for the day or hour that these checks are auto-matically performed is randomly assigned by Arcserve UDP Agent (Windows)at the time of installation. After installation, you can use this Update Sched-ule setting to change the day and time for these checks.
By default, if this check determines that a new update is available, ArcserveUDP Agent (Windows) also automatically downloads the update.
With this option not selected, specifies to disable all automatic check anddownload functions (and its status is displayed under status Summary sectionof the home page). With this option not selected, these update functions canonly be triggered manually.
Notes:
Chapter 4: Settings 257

Specify Preferences
If configured you get an email notification if the scheduled check for updatesdiscovers that a new update is available. In addition, email notifications aresent if a failure occurs during the check for updates or during the download.
If the Arcserve UDP Agent (Windows) is managed by the Arcserve UDP Con-sole, the Automatically check for updates option is disabled. Instead youcan check updates from the Arcserve UDP Console and remote deployupdates to Arcserve UDP Agent (Windows).
3. Click Save Settings.
Your Updates preference settings are saved.
258 Arcserve UDP Agent for Windows User Guide

Specify Preferences
How to create a Staging Server
Staging server is a node on which the Arcserve UDP Agent or Console is installed.Once this node finishes downloading updates from arcserve download server, it canwork as a staging server to provide updates for others.
Adding a Staging Server:
You can add a staging server manually, consider the following notes:
For other nodes, to download updates from staging server you need to specifythe server name. By default, console is 8015 and agent is 8014.
To work as a staging server, the node can use 'http' or 'https' protocol.
Arcserve UDP console can only download updates from console staging server.
Arcserve UDP agent can download updates from the console or agent stagingserver.
Chapter 4: Settings 259


Chapter 5: Using Arcserve UDP Agent (Windows)This section contains the following topics:
How to Perform a Backup 262
Perform File Copy to Disk/Cloud 346
Perform a Restore 347
How to Copy a Recovery Point 528
Mount a Recovery Point 545
Create a VHD File from an Arcserve UDP Agent (Windows) Backup 549
View Logs 553
How to Download File/Folders without Restore 555
How to Create a Boot Kit 557
How to Perform a Bare Metal Recovery Using a Backup 574
How to Perform a Bare Metal Recovery Using a Virtual Standby VM or Instant VM611
Using the PowerShell Interface 651
Add Arcserve UDP Agent (Windows) Licensing 672
Change Server Communication Protocol 674
Use Scripts to Backup and Restore MySQL Database 674
Use Scripts to Backup and Restore PostgreSQL Database 676
Chapter 5: Using Arcserve UDP Agent (Windows) 261

How to Perform a Backup
How to Perform a Backup
Arcserve UDP Agent (Windows) lets you perform frequent backups (as frequently asevery 15 minutes), reducing the size of each incremental backup (as well as thebackup window) and providing a more up-to-date backup.
Before you perform your first backup, review the backup prerequisites and con-siderations and then configure or modify the backup settings which are applied toeach backup job. A backup job can be initiated either automatically based uponyour schedule settings (Scheduled), or manually as an immediate or ad-hoc backup(Backup Now).
The following diagram illustrates the process for how to perform a backup:
262 Arcserve UDP Agent for Windows User Guide

How to Perform a Backup
Chapter 5: Using Arcserve UDP Agent (Windows) 263

How to Perform a Backup
Complete the following tasks to perform a backup:
1. Review the Backup Prerequisites and Considerations
2. Configure or Modify Backup Settings
Specify Protection Settings
Specify Schedule Settings
Specify Advanced Settings
Specify Pre/Post Backup Settings
3. Perform a Backup
Perform Backup Automatically (Scheduled)
Perform Backup Manually (Backup Now)
4. Verify that the Backup was Successful
5. (Optional) How Arcserve UDP Agent (Windows) Works
6. (Optional) Troubleshooting Backup Issues
264 Arcserve UDP Agent for Windows User Guide
How to Perform a Backup
Review the Backup Prerequisites and Considerations
Review the following backup considerations before you perform an Arcserve UDPAgent (Windows) backup:
Destination available free space
If your destination does not have sufficient free space, you can consider the fol-lowing corrective actions:
Reduce the number of saved recovery points.
Increase the available free space at the backup destination.
Change the backup destination to a larger capacity.
Reduce the size of the backup source (maybe eliminate unnecessary volumesfrom the backup).Increase the Compression setting of the backup.
Verify that you have proper licensing
When using Arcserve UDP Agent (Windows) to perform backups (especially forMicrosoft SQL Server and Microsoft Exchange Server), it is important to verifythat you have the proper licenses.
Arcserve UDP Agent (Windows) uses all the VSS writers during backup to ensureconsistent backups. The only exceptions are Microsoft SQL Server, MicrosoftExchange, and Hyper-V writers which are only included when they are properlylicensed.
Backup disk size
A volume is skipped from a backup if it is on a disk larger than 2 TB and thecompression option is disabled. However, there is no size limitation if com-pression is enabled (which is the default setting). As a result, if you want toback up source volumes larger than 2 TB, you must keep the compressionoption enabled.
Note: The 2 TB limitation only remains with the VHD format backup.
The minimum size for a block-level incremental (BLI) backup is 64K. For any filesize less than 64K, Arcserve UDP Agent (Windows) will copy the entire file.
Verify that you are using a supported disk
Different types of disks are supported as Arcserve UDP Agent (Windows)backup source disks and destination disks.
For more information, see Disks Supported by Arcserve UDP Agent (Windows).
Chapter 5: Using Arcserve UDP Agent (Windows) 265

How to Perform a Backup
Selecting your backup frequency and retention count
If your scheduled backups are occurring more frequently than the amount oftime it takes to generate a file system catalog for previous backup jobs, yourrecovery point retention count may be exceeded before the file system catalogbeing generated for the oldest session is completed. If this happens there maybe a delay in the catalog generation for all pending recovery points. As a result,the retained recovery points could accumulate (beyond the specified maximumretention number), and you could see a lack of disk space at the destination, onthe Status Summary. To avoid this problem, you can increase the schedule inter-val time for your incremental backups.
Backup destination folder manual operations
Manual operations (such as copy, cut, paste, or drag-and-drop) for the backupdestination folder are not successful if a job is active or a user is browsingrecovery points using the Arcserve UDP Recovery Point View. Verify that no act-ive jobs are running or browsing of recovery points (using Arcserve UDP Recov-ery Point View) is being performed before attempting any of these manualoperations.
Proper drivers installed
Verify that you have latest drivers or firmware installed for all the devices.
Verify that your machine is properly shutdown
Even when backup jobs are not running, Arcserve UDP Agent (Windows) is con-stantly monitoring changes that are related to the operating system and data.Any detected changes are then compiled and saved in a list to include as anIncremental Backup after the next machine start-up. If your machine was notproperly shut down and all of the changed information was not saved, ArcserveUDP Agent (Windows) may perform a more lengthy Verify Backup for the nextbackup, even if a Verify Backup was not scheduled.
Arcserve UDP Agent (Windows) in a Microsoft Hyper-V Environment
Arcserve UDP Agent (Windows) provides both host-level and virtual machine(VM) level protection for Microsoft Hyper-V environments. For more inform-ation about situations that you can encounter and offer protection solutionsusing Arcserve UDP Agent (Windows), see Arcserve UDP Agent (Windows) in aMicrosoft Hyper-V Environment.
How running backup jobs on a Hyper-V server affects the tasks that can beperformed
266 Arcserve UDP Agent for Windows User Guide

How to Perform a Backup
When the Arcserve UDP Agent (Windows) backup job runs on a Hyper-V server,the status of the VMs is "Backing up" and the following tasks cannot be per-formed:
Power onPower offSavePauseResetSnapshotMoveRenameEnable replication
How changing the machine host name can affect saving your settings
When you enter a backup path, Arcserve UDP Agent (Windows) appends thehost name to that path to use as the destination and this host name is also dis-played in the settings dialog. When the name of the machine is changed, youmust also change the destination path (backup, file copy, copy recovery point)by removing the old host name from the path before you attempt to save thesettings.
For example: If your host name is "Host_A" and your backup destination is X:\and you change your host name to "Host_B", any changes that are made toyour backup settings are not saved unless you first change the backup des-tination from x:\Host_A to x:\ again.
If you do not change the backup destination host name and attempt to save thesettings, Arcserve UDP Agent (Windows) thinks the backup destination "x:\Host_A" is already in use by Host_A and that Host_A is another machine and does notaccept any changes to the settings.
How changing your backup destination can affect saved recovery points
When you continue performing Incremental Backups to the changed des-tination and the specified number of saved recovery points is reached, ArcserveUDP Agent (Windows) merges the earliest backup sessions to the first des-tination to maintain the specified number of recovery points. As this mergingprocess repeats, the number of recovery points that are saved to the first des-tination decreases, and at the same time the number of recovery points for thechanged destination increases. Eventually, there are no recovery points for thefirst destination and all of the sessions are merged to the changed destination.
Chapter 5: Using Arcserve UDP Agent (Windows) 267

How to Perform a Backup
How changing backup destinations can affect continued backups
If you configure and perform a Full Backup (and maybe some IncrementalBackups) to a destination and then you decide to change your backups to a dif-ferent destination, you can reconfigure your backup settings and continue per-forming Incremental Backups to the new destination without any problems.
If you later decide to change your backup destination again, you can simplyreconfigure your backup settings again and continue performing IncrementalBackups to the new destination without any problems.
For example:
If you have a machine and it is configured to back up to Folder A on your localor remote volume, and after you perform a Full Backup and some Incrementalbackups, your destination is getting full and you want to change to a differentdestination (Folder B). You can reconfigure the backup settings to the Folder Bdestination and Arcserve UDP Agent (Windows) continues performing Incre-mental backups to that new destination. As a result, you have your Full Backupand some Incremental Backups on the original Folder A destination, and youhave some Incremental Backups on the new Folder B destination.If after performing some Incremental Backups to Folder B, you decide to recon-figure to another new destination (Folder C), Arcserve UDP Agent (Windows)will continue performing Incremental Backups to the Folder C destinationbecause the link to the original Full Backup location (Folder A) has been main-tained.
If you configure and perform a Full Backup (and maybe some IncrementalBackups) to a destination and then you decide to change your backups to a dif-ferent destination, you can copy or move the contents from the original des-tination to the new destination, and then reconfigure your backup settings andcontinue performing Incremental Backups to the new destination without anyproblems.
However, if you have Full Backups in one location and Incremental Backups in asecond location and then move the contents from the second location to a thirdlocation and attempt to continue performing Incremental Backups, then thesebackups fail because the link to the first location has been lost.
For example:
If you have a machine and it is configured to back up to Folder A on your localor remote volume, and after you perform a Full Backup and some IncrementalBackups, your destination is getting full and you want to change to a differentdestination (Folder B). You can move the contents of Folder A to Folder B andreconfigure the backup settings to the new Folder B destination. The ArcserveUDP Agent (Windows) continues performing Incremental Backups to that new
268 Arcserve UDP Agent for Windows User Guide

How to Perform a Backup
Folder B destination. As a result, you have your Full Backup and IncrementalBackups all on the new Folder B destination.However, if your first destination is in Folder A (which now contains a FullBackup and some Incremental Backups) and you change the destination toFolder B using Arcserve UDP Agent (Windows) backup settings and continue toperform Incremental Backups, in this scenario, Folder B now only contains Incre-mental Backups. Then, if you move the contents from Folder B to another newdestination in Folder C (moving only the Incremental Backups from Folder Bwithout a Full Backup included), in this scenario, if you continue to performIncremental Backups to Folder C, these Incremental Backups fails because thelink to the original Full Backup location (Folder A) has been lost.
How your Retention Settings can affect your merge performance
If you configure the backup format to Advanced, the merge performance isimproved significantly.
How volume defragmentation can affect continued backups
Volume defragmentation by Windows native tool affects the size of the block-level backups because Arcserve UDP Agent (Windows) will continue to incre-mentally back up all changed blocks. This means that blocks that shifted duringdefragmentation will also be included in the backup, even if no data haschanged in the files. As a result, the backup size may increase. This is expectedbehavior. If you do not want the increased backup size and the added backuptime is a problem, you can exclude volumes from defragmentation or stop anyschedules for defragmentation.
How to configure backups of replicated volumes
If you are backing up volumes that were replicated using Arcserve Replicationand High Availability, you should verify that the spool has been created on a sep-arate volume and configure your backup settings to exclude the spool volume.This helps to avoid the backing up of unnecessary temp spool data.
Restrictions for a Microsoft SQL Server Backup
Due to Microsoft SQL Server VSS writer restrictions, some Microsoft SQL Serverdatabases with a special status are automatically skipped and not backed up.
The Microsoft SQL server database includes:
Database with 'Restoring' status. This status indicates that the database may bethe log shipping secondary database, the mirror database, or the database wait-ing for more backed-up data to be restored.Database with 'Offline' status. This status indicates that the database is notavailable for general use.
Chapter 5: Using Arcserve UDP Agent (Windows) 269

How to Perform a Backup
If your database is configured in one volume and the logs are configured inanother volume and you select only one volume to back up, the Microsoft SQLapplication backup is skipped for that particular database.If you install Microsoft SQL Server after Arcserve UDP Agent (Windows) hasbeen installed, and no backup has been performed yet, the Microsoft SQLServer may not be detected. As a result if you unselect a volume that has thatapplication installed you may not get a warning notification that you are miss-ing that application from the backup. This condition will be automaticallyremedied after you stop and start the Arcserve UDP Agent Services or performthe next backup.
Restrictions for a Microsoft Exchange Server Backup
If your database is configured in one volume and the logs are configured inanother volume and you select only one volume to back up, the MicrosoftExchange application backup is skipped for that particular database.Any database in a dismounted state is skipped from Microsoft Exchange applic-ation backup.If you install Microsoft Exchange after Arcserve UDP Agent (Windows) has beeninstalled, and no backup has been performed yet, the Microsoft Exchangeserver may not be detected. As a result if you unselect a volume that has thatapplication installed you may not get a warning notification that you are miss-ing that application from the backup. This condition will be automaticallyremedied after you stop and start the D2D services or perform the next backup.
Restrictions for VSS Writers
Arcserve UDP Agent (Windows) uses all the VSS writers during backup to ensureconsistent backups. The only exceptions are Microsoft SQL Server, MicrosoftExchange, and Hyper-V writers which are only included when they are properlylicensed.
VHD Restrictions for Compression and Encryption
If both compression and encryption are disabled, then Arcserve UDP Agent(Windows) can only back up the files in .VHD format. The Arcserve UDP Agent(Windows) cannot back up the files to .VHDX format.
Active Directory Backup Prerequisites
An Active Directory restore requires an agent-based backup.
Oracle Backup Prerequisites
For more information, see the following topic:
Review the prerequisites to back up an Oracle database.
Microsoft Clustered Nodes and Shared Disks Backup Prerequisites
For more information, see the following topic:
270 Arcserve UDP Agent for Windows User Guide

How to Perform a Backup
Review the Prerequisites to Back Up Microsoft Clustered Nodes and SharedDisks.
How Arcserve UDP Agent (Windows) and the Backup Process Works
(Optional) Understand how the restore process works. For more information,see the following topics:
How Arcserve UDP Agent (Windows) WorksHow the Backup Process WorksHow Block-Level Incremental Backups WorkHow Infinite Incremental Backups WorkHow Verify Backups Work
Review the Compatibility Matrix that provides the supported operating sys-tems, databases, and browsers.
Chapter 5: Using Arcserve UDP Agent (Windows) 271
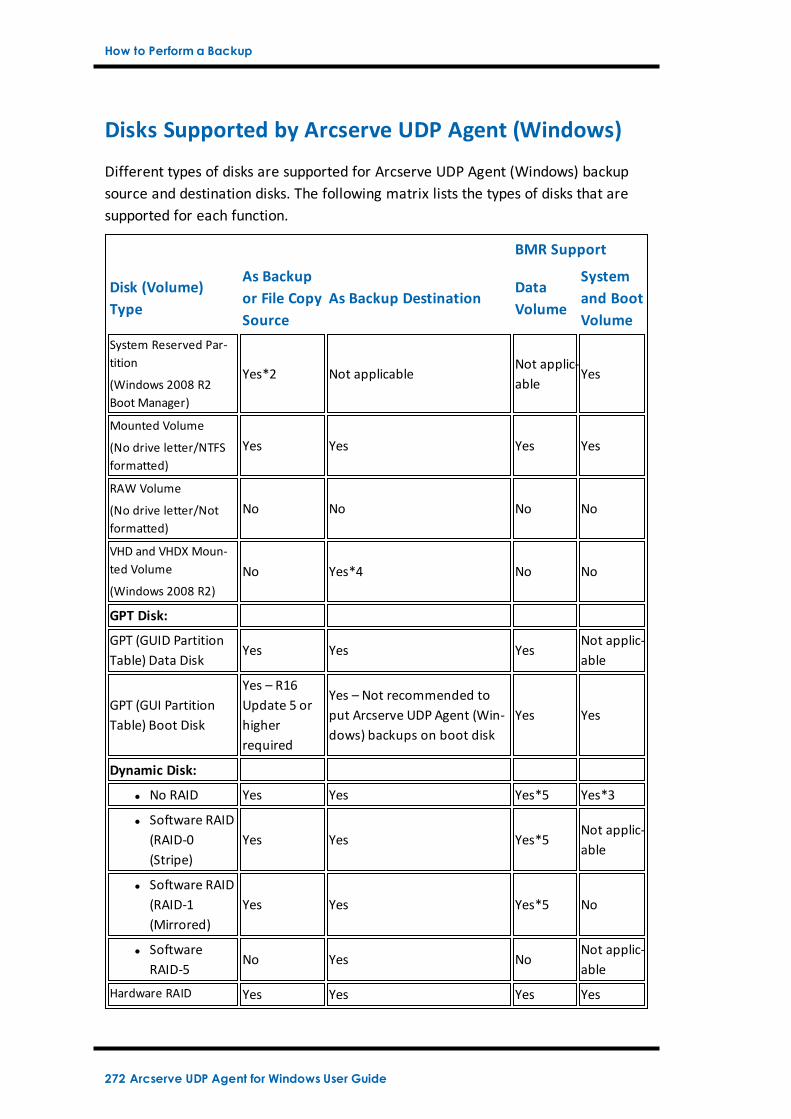
How to Perform a Backup
Disks Supported by Arcserve UDP Agent (Windows)
Different types of disks are supported for Arcserve UDP Agent (Windows) backupsource and destination disks. The following matrix lists the types of disks that aresupported for each function.
BMR Support
Disk (Volume)Type
As Backupor File CopySource
As Backup DestinationDataVolume
Systemand BootVolume
System Reserved Par-tition
(Windows 2008 R2Boot Manager)
Yes*2 Not applicableNot applic-able
Yes
Mounted Volume
(No drive letter/NTFSformatted)
Yes Yes Yes Yes
RAW Volume
(No drive letter/Notformatted)
No No No No
VHD and VHDX Moun-ted Volume
(Windows 2008 R2)No Yes*4 No No
GPT Disk:
GPT (GUID PartitionTable) Data Disk
Yes Yes YesNot applic-able
GPT (GUI PartitionTable) Boot Disk
Yes – R16Update 5 orhigherrequired
Yes – Not recommended toput Arcserve UDP Agent (Win-dows) backups on boot disk
Yes Yes
Dynamic Disk:
l No RAID Yes Yes Yes*5 Yes*3
l Software RAID(RAID-0(Stripe)
Yes Yes Yes*5Not applic-able
l Software RAID(RAID-1(Mirrored)
Yes Yes Yes*5 No
l SoftwareRAID-5
No Yes NoNot applic-able
Hardware RAID Yes Yes Yes Yes
272 Arcserve UDP Agent for Windows User Guide

How to Perform a Backup
(include EmbeddedRAID)
File System:
l FAT/FAT32 No Yes*1 No No
l NTFS Yes Yes Yes Yes
l REFSBackup: Yes
File Copy: NoYes Yes
Not applic-able
l Deduplication-enabled NTFS
Backup: Yes
File Copy: NoYes Yes
Not applic-able
Shared Volume:
Windows SharedVolume
No Yes No No
Linux Shared Volume(samba shared)
No Yes No No
Device Type:
l RemovableDisk (Ex.Memory Stick,RDX)
No Yes No No
Notes:
n Any non-removable disk that appears as a local drive to a server protected byArcserve UDP Agent (Windows) will also be protected. This includes any FibreChannel (FC) attached Storage Area Network (SAN) disks, or iSCSI disks. ForiSCSI disks, Arcserve UDP Agent (Windows) can protect system and data disks;however, iSCSI system disks are not supported for BMR. Therefore, you shouldonly use iSCSI for data disks.
n Supported file copy destinations include Amazon S3, Fujitsu Cloud (WindowsAzure), Eucalyptus-Walrus, and NTFS local or network volumes (could be oniSCSI).
n MSCS Shared Volume and CSV are not supported.
*1 FAT/FAT32 cannot hold a single file larger than 4 GB. If after compression theArcserve UDP Agent (Windows) file is larger than 4 GB (because the source is verylarge), the backup will fail.
* 2 For Agent-based backup job, Arcserve UDP supports backing up UEFI systemboot partition (FAT32 volume), but does not support backing up other FAT32 datavolume.
*3 Arcserve UDP Agent (Windows) supports BIOS and UEFI systems.
*4 A spanned volume cannot be used as a boot volume.
Chapter 5: Using Arcserve UDP Agent (Windows) 273

How to Perform a Backup
*5 The VHD mounted volume used as the backup destination should not reside on avolume which is selected as the backup source.
*6 When your system has multiple dynamic disks, BMR can fail. But, as long as thesystem volume is on a basic disk, the system should be able to boot. You can per-form a restore of dynamic disks after the system has booted, by using the How toRestore Files/Folders procedure.
274 Arcserve UDP Agent for Windows User Guide

How to Perform a Backup
Arcserve UDP Agent (Windows) in a Microsoft Hyper-V Environment
Arcserve UDP Agent (Windows) provides both host-level and virtual machine (VM)level protection for Microsoft Hyper-V environments. The following scenariosdescribe situations that you can encounter and offer protection solutions using Arc-serve UDP Agent (Windows).
Note: Verify that you apply the appropriate license for each of these scenarios.
Scenario 1 - You want to protect your Hyper-V host server:
1. Install Arcserve UDP Agent (Windows) on the Hyper-V Host server.
2. Verify that you back up the system and boot volume (if you are choosing volume fil-tering).
3. If the Hyper-V host server goes down, follow the standard Bare Metal Recovery pro-cedure in Arcserve UDP Agent (Windows) to recover your Hyper-V host server.
4. If you want to restore selected files, use the standard Arcserve UDP Agent (Win-dows) restore procedure.
Scenario 2 - You want to protect your Hyper-V host server and the Virtual Machineswhich are hosted on that server:
1. Install Arcserve UDP Agent (Windows) on the Hyper-V host server.
2. Verify that you back up the entire machine to provide complete protection of boththe host server and VMs.
3. Submit the backup jobs.
4. To restore a VM from an Arcserve UDP Agent (Windows) backup, there are two pos-sible solutions:
a. Restore the VM to original location:
From the restore window in Arcserve UDP Agent (Windows), select the VMfiles (.vhd, .avhd, configuration files, and so on).
Select Restore to original location as the destination and select the Over-write existing files option for resolving conflicts.
Submit the restore job.
Note: The recommendation is to turn off the VM before submitting therestore job because if the older file is active, it will be overwritten by Arc-serve UDP Agent (Windows) only after you reboot the Hyper-V host server tocomplete the restore process.
Chapter 5: Using Arcserve UDP Agent (Windows) 275

How to Perform a Backup
When the restore job has finished, open the Hyper-V Manager and start theVM.
If the VM is not yet registered in the Hyper-V Manager, create a VM. Duringthe VM creation process, point the path of VM’s configuration and .vhd file tothe same path of destination location where the restore was performed.
b. Restore the VM to alternate location on the same Hyper-V Host server:
From the restore window in Arcserve UDP Agent (Windows), select the VMfiles (.vhd, .avhd, configuration files, and so on).
Select Restore to alternate location as the destination and provide a des-tination path.
Submit the restore job.
Open the Hyper-V Manager and create a VM when the restore job has fin-ished. During VM creation process, point the path of VM’s configuration andvhd file to the same path of destination location where the restore was per-formed.
Start the VM, when the VM is created.
Note: For more detailed information about restoring Hyper-V VirtualMachines, see the Microsoft Hyper-V documentation.
Scenario 3 - You want to protect your Hyper-V Virtual Machines:
To protect your Hyper-V Virtual Machines (VM) using Arcserve UDP Agent (Win-dows), there are two possible solutions:
a. Install Arcserve UDP Agent (Windows) on the Hyper-V host server
Using the Arcserve UDP Agent (Windows) Backup Settings, select the volumewhere the VM files (.vhd, .avhd, configuration files, and so on) are located.
Submit a backup job.
To restore a Hyper-V Virtual Machine from an Arcserve UDP Agent (Win-dows) backup, follow the steps for either of the restore solutions provided inScenario 2.
b. Install Arcserve UDP Agent (Windows) inside the Windows VirtualMachine
Follow the standard backup and restore procedure to protect the VM, thesame as a physical machine.
Note: For scenarios 2 and 3a, if you attached/mounted an iSCSI LUN directly insidethe VM, the data inside the LUN is not backed up using Arcserve UDP Agent
276 Arcserve UDP Agent for Windows User Guide

How to Perform a Backup
(Windows) Hyper-V host level backups. You can overcome this limitation by usingthe same approach as the Install Arcserve UDP Agent (Windows) inside the Win-dows Virtual Machine solution in scenario 3b.
Chapter 5: Using Arcserve UDP Agent (Windows) 277

How to Perform a Backup
Merge Job Guidelines
Review the following merge job guidelines:
A merge job has the lowest priority. When a merge job is running, if any otherjob comes in, the merge job will be stopped. After that job completes, themerge will be resumed or restarted.
You can manually stop or pause the merge job when it is running. If the mergejob is manually stopped/paused, you must manually start or resume it from theArcserve UDP Agent (Windows) home page. It will not be resumed/restartedautomatically. As a result, the launching of all scheduled merge jobs will be sus-pended until you manually resume them.
If the merge job is automatically stopped it will be automatically started whenno other job is running.
When a merge job is resumed, Arcserve UDP Agent (Windows) will knowexactly where to start the process. If the merge job crashed or the machinewas abruptly shut down, the job is resumed from the previous merge state.
Example 1:When a merge job is started and crashed at 20%, the next timewhen the job is restarted, it will start to merge sessions again from 0%.
Example 2:When a merge job is started and paused at 10%, the next timewhen the job is restarted, it will start to merge sessions from the 10% point. If itcrashes at 20%, then the merge job will be restarted from the 10% point.
When a merge job is resumed or restarted, if the list of sessions being mergedis not changed since the time it was paused, the merge is resumed. This meansit resumes and continues the merge from the point where it was paused.
When a merge job is resumed or restarted, if the list of sessions being mergedis changed since the time it was paused, the original merge is resumed withoutany added or modified sessions. This means the original merge resumes andcontinues the merge from the point where it was paused. When the originalmerge is completed, a new merge of the added or modified sessions will thenbe performed.
Example: The original merge job contains 4 backup sessions and is pausedwhen it completes 90% of the merge. When the merge is resumed, ArcserveUDP Agent (Windows) will complete the remaining 10% of the original mergeand then a new merge will be performed for the added or modified sessions.
The Arcserve UDP Agent (Windows) home page Job Monitor indicates themerge job status. It shows the percentage complete and displays more details ifneeded. For more information, see Job Monitor Panel in the online help.
278 Arcserve UDP Agent for Windows User Guide

How to Perform a Backup
The merge process must be able to keep the recovery point in a consistentstate. You can restore a file from any visible session even if the session is par-tially merged. If there is a session merge not completed, the merge job will runin the background to merge the session.
Chapter 5: Using Arcserve UDP Agent (Windows) 279

How to Perform a Backup
Review the Prerequisites for Oracle Database
To back up an Oracle database with consistent data, ensure that the ARCHIVELOGmode is enabled to archive the Redo logs.
Follow these steps to verify if the ARCHIVELOG mode is enabled:
a. Log into the Oracle server as an Oracle user with SYSDBA privileges.
b. Enter the following command at the SQL*Plus prompt:
ARCHIVE LOG LIST;
Archive log settings for the current instance is displayed.
c. Configure the following settings:
Database log mode: Archive Mode
Automatic archival: Enabled
d. Start the ARCHIVELOG mode.
Note: If the ARCHIVELOG mode is not enabled, you must start the ARCHIVELOGmode to backup the database.
Follow these steps to start the ARCHIVELOG mode:
a. Shut down the Oracle server.
b. Run the following statements in Oracle:
CONNECT SYS/SYS_PASSWORD AS SYSDBA
STARTUP MOUNT;
ALTER DATABASE ARCHIVELOG;
ALTER DATABASE OPEN;
By default, archive logs is written to the flash recovery area. If you do not want towrite archive logs to the flash recovery area, you can set the LOG_ARCHIVE_DEST_n parameter to the location where you want to write archive logs.
SQL>ALTER SYSTEM SET LOG_ARCHIVE_DEST_1='LOCATION=e:\app\administrator\oradata\<oracle_database_name>\arch'SCOPE= BOTH;
System altered.
SQL> ARCHIVE LOG LIST;
Archive log settings for the current instance is displayed.
c. Configure the following settings:
Database log mode: Archive Mode
280 Arcserve UDP Agent for Windows User Guide

How to Perform a Backup
Automatic archival: Enabled
Archive destination: E:\app\oracle\oradata\<oracle_database_name>\arch
Oldest online log sequence: 21
Current log sequence: 23
d. Oracle VSS Writer Service is started and functioning properly.
Note: If Oracle VSS Writer Service is not running, Arcserve UDP Agent (Windows)will automatically start it before taking the snapshot.
e. Arcserve UDP Agent (Windows) is installed and a plan is scheduled.
Ensure that you have selected the volumes that include all the Oracle data files,server parameter file, control files, archived redo logs, and online redo logs for thebackup.
f. Review the Compatibility Matrix which provides the supported operating systems,databases, and browsers.
If you want to perform a BMR for a disaster recovery, ensure that you have selec-ted the system volumes and the volumes which includes all the oracle installationfiles.
Chapter 5: Using Arcserve UDP Agent (Windows) 281

How to Perform a Backup
Review the Prerequisites to Back Up MicrosoftClustered Nodes and Shared Disks
Review the following prerequisite steps when backing up Microsoft ClusteredNodes and Shared Disks:
Install the Arcserve UDP Agent on all the clustered nodes.
Add all agents or nodes into the same backup plan.
Review the Compatibility Matrix that provides the supported operating sys-tems, databases, and browsers.
Note: The shared disks will be backed up along with the agent which owns theshares disks. If the shared disk is moved from Node A to Node B during a failover,then for the next backup job on Node B, the disk will be backed up as a full diskeven though the job itself appears as an incremental. After another failover if theshared disk moves back to Node A, even then the disk will be backed up as a fulldisk even though the job itself appears as an incremental.
282 Arcserve UDP Agent for Windows User Guide

How to Perform a Backup
Configure or Modify Backup Settings
Before you perform your first backup, you must configure the backup settingswhich are applied to each backup job. These settings can be retained for futurebackup or they can be modified at any time from the Arcserve UDP Agent (Win-dows) home page.
The settings let you specify behaviors such as:
Backup source and destination.
Schedule standard or advanced settings for each type of backup.
Advanced settings for your backup jobs.
Any pre or post backup operations.
Note: To view a video that is related to these Backup Settings, see How to Performa Backup.
To manage the backup settings, click the Settings link on the Arcserve UDP Agent(Windows) home page to display the Backup Settings dialogs and these sub-ordinate tab options:
Protection Settings
Schedule Settings
Advanced Settings
Pre/Post Backup Settings
Chapter 5: Using Arcserve UDP Agent (Windows) 283

How to Perform a Backup
Specify Protection Settings
Protection settings for the information that is going to be backed up ensures thatthe backup data is reliably protected (copied and saved) against any form of dataloss.
Specify the protection settings
1. From the Arcserve UDP Agent (Windows) home page (or Arcserve UDP Agent (Win-dows) Monitor), select Settings from the taskbar and then select the Backup Set-tings tab. When the Backup Settings dialog opens, select Protection Settings.
The Protection Settings dialog opens.
Notes:
If the Arcserve UDP Agent (Windows) is being managed by Console, not allsettings are available and will be displayed as read-only information.
When agent is managed by console and not protected in a plan, all the set-ings are still available except the Preference > Updates panel.
2. Specify the Backup Destination.
Use local disk or shared folder
You can specify a local path (volume or folder), or remote shared folder (ormapped drive) for the backup location, or you can browse to a backup loc-ation.
284 Arcserve UDP Agent for Windows User Guide

How to Perform a Backup
Click the green arrow icon button to verify the connection to the specified loc-ation.
If you entered a local path for the destination, this button is disabled.
If you enter a network path and click this button, you are prompted toprovide the username and password.
If you are already connected to this path successfully, and click thearrow button you can change the username and password you used toconnect.
If you do not click the arrow button, the destination path is verified. Ifneeded, you are prompted for the username and password.
a. If you want to back up to your local path (volume or folder), the spe-cified backup destination cannot be the same location as your backupsource. If you inadvertently include the source in your destination, thebackup job ignores this portion of the source and it is not included inthe backup.
Example: You attempt to back up your entire local machine consistingof Volumes C, D, and E and also specify Volume E as your destination.The Arcserve UDP Agent (Windows) only backs up Volumes C and D toVolume E. Data from Volume E is not included in the backup. If youwant to back up all local volumes, specify a remote location for yourdestination.
Important! Verify that your specified destination volume does not con-tain system information. Or else it will not be protected (backed up)and your system will fail to recover after Bare Metal Recovery (BMR)if necessary.
Note: Dynamic disks are restored at disk-level only. If your data isbacked up to a volume on a dynamic disk, you are not able to restorethis dynamic disk during BMR.
b. If you want to back up to a remote shared location, specify a locationpath or browse to the location. You also have to provide user cre-dentials (Username and Password) to access the remote machine.
c. If the backup destination has changed after the last backup was per-formed, select the backup type: Full Backup or Incremental Backup.These options are only enabled when you change your backup des-tination.
Default: Full Backup
Chapter 5: Using Arcserve UDP Agent (Windows) 285

How to Perform a Backup
Note: If the backup destination has changed and catalog jobs arepending, the catalog job first runs and completes on the old locationbefore running on the new location.
Full Backup
The next backup that is performed is going to be a Full Backup. Thenew backup destination does not have any dependency on the oldbackup destination. If you continue with a full backup, the previous loc-ation is no longer needed for backups to continue. You can select tokeep the old backup for any restores or if you do not want to performany restores from there you can delete it. The old backup will notaffect future backups.
Incremental Backup
The next backup that is performed is going to be an IncrementalBackup. The next incremental backup to the new destination is per-formed without copying all the backups from the previous destination.However, for this option, the new location is dependent on the previouslocation because the changes include only the incremental data (notthe full backup data). Do not delete the data from the previous loc-ation. If you change the backup destination to another folder andattempt to perform an incremental backup, and the former backup des-tination does not exist, the backup fails.
Note:With the Full installation of Arcserve UDP, you can specify to use an ArcserveUDP Recovery Point Server as the backup location. If you do, the Protection SettingsBackup Destination displays the Arcserve UDP Recovery Point Server Settings,including the Hostname, Username, Password, Port, Protocol, and the Plan Sum-mary.
3. Specify the Backup Source.
You can back up the entire machine or selected volumes.
Back up the entire machine
Lets you back up the entire machine. All volumes on the machine are backedup.
Note: If you select the full machine backup option, Arcserve UDP Agent (Win-dows) automatically discovers all disks or volumes attached to the currentmachine and Arcserve UDP Agent (Windows) includes them in the backup.
Example: If a new disk is attached to the machine after the backup setting isconfigured, you do not need to change the backup settings and the data on thenew disk will be protected automatically.
286 Arcserve UDP Agent for Windows User Guide

How to Perform a Backup
Select individual volumes to back up
This volume filtering capability lets you specify to back up only the selectedvolumes. You also have the option to Select or clear selection of all listedvolumes.
Note: If some volumes are selected explicitly for backup, only the selectedvolumes are backed up. If a new disk or volume is attached to the machine,manually change the volume selection list to protect the data on the new diskor volume.
When you select this option, a listing of all available volumes display, with thecorresponding volume information and notification messages.
Note: Computers that adhere to the Extensible Firmware Interface (EFI) use theEFI System Partition, which is a partition on a data storage device. The EFI Sys-tem partition is critical for Bare Metal Recovery (BMR). Therefore, when youselect boot volume "C" on a UEFI system, the EFI System Partition is selectedautomatically for the backup source for BMR and an information message is dis-played.
Name
Specifies the name of the volume drive letter, mount point, volume GUID(Globally Unique Identifier) name.
Layout
Indicates the simple, spanned, mirror, stripped, RAID5 (backup of a RAID 5volume on Microsoft Dynamic Disks is not supported; but backup of hardwareRAID is supported).
Type
Indicates the type, basic or dynamic.
File system
Lists the following file systems: NTFS, ReFS, FAT, FAT32 (backup of FAT,FAT32, and exFAT is not supported).
Chapter 5: Using Arcserve UDP Agent (Windows) 287

How to Perform a Backup
Contents
Indicates whether the application is (SQL/Exchange), System, Boot, Page file,Removable Device, VHD, 2-TB Disk.
Total size
Specifies the size or the capacity of the volume.
Used Space
Indicates the space, files or folders and volume data occupies.
The notification messages display for any of the following conditions:
Local volume related
If the specified backup destination is on the local volume, a warningmessage displays notifying you that this volume is not backed up.
BMR related
If system/boot volume is not selected for backup, a warning messagedisplays notifying you that the backup is not usable for BMR.
If you select boot volume "C" on a UEFI system, the EFI system partitionis selected automatically for the backup source for BMR and an inform-ation message is displayed.
Application related
If the application data files are on a volume that is not selected forbackup, the application name and database name display for ref-erence.
4. Specify the Backup Data Format.
Standard
Standard Backup Data Format allows you to set the number of recovery pointsto retain or the number of recovery sets to retain and includes a basic repeatbackup schedule. The Standard format is the legacy format used in releases ofArcserve D2D and Arcserve Central Applications.
Advanced
Advanced Backup Data Format allows you to set the number of recovery pointsto retain and includes advanced scheduling. The Advanced format is a new datastorage format, dividing source disks into multiple logical segments. Comparedto the Standard format, backup, restore, and merge job throughputs are greatlyimproved.
288 Arcserve UDP Agent for Windows User Guide

How to Perform a Backup
If the Advanced Backup Data Format is selected, advanced scheduling will beenabled. Advanced scheduling consists of the following:
Week-based repeat backup schedule
Week-based backup throttling schedule
Week-based merge schedule
Daily backup schedule
Weekly backup schedule
Monthly backup schedule
5. Specify the Retention Setting if you selected Standard as the Backup DataFormat.
Note: If you selected Advanced as the Backup Data Format, the retention settingis specified on the Advanced Schedule Settings dialog.
You can set the retention setting based on the number of recovery points to retain(merges sessions) or based on the number of recovery sets to retain (deletes recov-ery sets and disables infinite incremental backups).
Default: Retain Recovery Points
Recovery Point
This is the recommended option. With this option selected, you can fully lever-age the infinite incremental backup capabilities and save storage space.
Note: If you selected Advanced as the Backup Data Format, then you can onlyspecify the number of recovery points to retain.
Recovery Set
This option is generally used for large storage environments. With this optionselected, you can create and manage backup sets that help you manage yourbackup window time more efficiently when you are protecting a large amountof data. You can use this option when backup time is a priority over space con-straints.
Note: Recovery sets are only available if you are backing up to a location thatis not a data store. Recovery sets are not supported with RPS deduplication.They are also not available for Advanced format backup to non-RPS locations.
For more information about setting the Recovery Point and Recovery Set options,see Specify Retention Settings.
6. Specify the type of Compression.
Specifies the type of compression that is used for backups.
Chapter 5: Using Arcserve UDP Agent (Windows) 289

How to Perform a Backup
Compression is often selected to decrease disk space usage, but also has an inverseimpact on your backup speed due to the increased CPU usage.
The available options are:
No Compression
No compression is performed. This option has the lowest CPU usage (fastestspeed), but also has the highest disk space usage for your backup image.
Standard Compression
Some compression is performed. This option provides a good balancebetween CPU usage and disk space usage. Standard compression is thedefault setting.
Maximum Compression
Maximum compression is performed. This option provides the highest CPUusage (lowest speed), but also has the lowest disk space usage for yourbackup image.
Notes:
If your backup image contains uncompressible data (such as JPG images orZIP files), you can allocate additional storage space to handle such data. As aresult, if you select any compression option and you have uncompressibledata in your backup, it can result in an increase in disk space usage.
If you change the compression level from No Compression to either StandardCompression or Maximum Compression, or if you change from either Stand-ard Compression or Maximum Compression to No Compression, the firstbackup that is performed after this compression level change is auto-matically a Full Backup. After the Full Backup is performed, all futurebackups (Full, Incremental, or Verify) will be performed as scheduled.
If your destination does not have sufficient free space, you can considerincreasing the Compression setting of the backup.
7. Specify the Encryption settings.
a. Select the type of encryption algorithm that is used for backups.
Data encryption is the translation of data into a form that is unintelligiblewithout a deciphering mechanism. The Arcserve UDP Agent (Windows) dataprotection uses secure, AES (Advanced Encryption Standard) encryptionalgorithms to achieve maximum security and privacy of your specified data.
290 Arcserve UDP Agent for Windows User Guide

How to Perform a Backup
The available format options are No Encryption, AES-128, AES-192, and AES-256. (To disable encryption, select No Encryption).
A full backup and all its related incremental and verify backups mustuse the same encryption algorithm.
If the encryption algorithm for an incremental or verify backup ischanged, a full backup must be performed. This means after changingencryption algorithm, the first backup will be full, despite the originalbackup type.
For example, if you change the algorithm format and you submit a cus-tomized incremental or verify backup manually, it is automatically convertedto a full backup.
b. When an encryption algorithm is selected, provide (and confirm) an encryp-tion password.
The encryption password is limited to a maximum of 23 characters.
A full backup and all its related incremental and verify backups must usethe same password to encrypt data.
If the encryption password for an incremental or verify backup is changed,a full backup must be performed. This means after changing encryptionpassword, the first backup will be full, despite the original backup type.
For example, if you change the encryption password and you submit a cus-tomized incremental or verify backup manually, it is automatically con-verted to a full backup.
c. Arcserve UDP Agent (Windows) provides encryption password managementso that you do not need to remember encryption passwords.
Password is also encrypted.
Password is remembered and not required (if you restore to the samemachine).
Password is required if you restore to a different machine.
Password is not required if you are attempting to export a recovery pointthat contains encrypted data and the recovery point belongs to backupsperformed on the current machine.
Password is always required if you are attempting to recover encrypteddata from an exported recovery point.
Password is not required to browse to an encrypted recovery point.
Password is required to perform a BMR.
Chapter 5: Using Arcserve UDP Agent (Windows) 291

How to Perform a Backup
d. When encryption is enabled, the activity log is updated.
A message is recorded in the activity log to describe the selected encryp-tion algorithm for every backup.
A message is recorded in the activity log to indicate why an incrementalor verify backup was converted to a full backup (password change oralgorithm change).
Note: Encryption settings do not have to remain the same for your backups. Youcan change these settings at any time, including after several backups of the samedata.
8. Specify the Throttle Backup.
You can specify the maximum speed (MB/min) at which backups are written. Youcan throttle the backup speed to reduce CPU or network use. However, limiting thebackup speed, has an adverse effect on the backup window. As you lower the max-imum backup speed, it increases the amount of time of perform the backup. For abackup job, the Job Monitor on the Arcserve UDP Agent (Windows) home page dis-plays the average Read and Write speed of the job in progress and the configuredthrottle speed limit.
Note: By default, the Throttle Backup option is not enabled and backup speed isnot being controlled.
9. Calculate the Estimated Backup Size.
Displays the estimated usage of the destination volume.
Note: For more information about using these estimated backup calculations, seeEstimate Future Backup Space Requirements.
10. Click Save Settings.
Your backup protection settings are saved.
292 Arcserve UDP Agent for Windows User Guide

How to Perform a Backup
Specify Retention Settings
The retention setting for the Standard Backup Data Format can be based on thenumber of recovery points to retain (merges sessions) or based on the number ofrecovery sets to retain (deletes recovery sets and disables infinite incrementalbackups).
Retain Recovery Points
Select this option to set your retention setting based on the number of recov-ery points to retain instead of on the number of recovery sets to retain.
Note: The recovery points to retain is set in the Protection Backup Settingsif you select Standard as the Backup Data Format. The recovery points toretain is set in the Advanced Schedule Settings if you select Advanced asthe Backup Data Format.
Specify the number of recovery points to retain
Specifies the number of recovery points (full, incremental, and verifybackup images) retained. When the number of recovery points presenton the destination exceeds the specified limit, the earliest (oldest)incremental backups beyond the retention count are merged into theparent backup to generate a new baseline image consisting of the "par-ent plus oldest childs" blocks. If there are multiple sessions availablefor merge, the oldest child backups will be merged into the parent
Chapter 5: Using Arcserve UDP Agent (Windows) 293

How to Perform a Backup
backup in a single pass, if the backups are compressed. If the backupsare not compressed, then only the oldest child backup will be mergedinto the parent backup and this cycle repeats for each subsequent childbackup to be merged.
Specifying the number of recovery points to retain allows you to per-form infinite incremental backups, while maintaining the same reten-tion count. For more information, see Merge Job Guidelines.
Note: If your destination does not have sufficient free space, you canconsider reducing the number of saved recovery points.
Default Value: 31
Minimum Value: 1
Maximum Value: 1344
Note: The Arcserve UDP Agent (Windows) home page Summary sec-tion indicates how many recovery points are retained out of the num-ber specified. For more information, see Status Summary in the onlinehelp.
Run the merge job:
As soon as possible
Select this option to run the merge job at any time.
Each day during the following time range
Select this option to run the merge job each day only within the spe-cified time range. Setting a time range helps to avoid the mergejob introducing too many I/O operations to the production server ifthe merge job runs for a long time.
Note:When setting the time range to run the merge job, ensurethat you specify a time range that will allow the related backupjobs to complete prior to the start of the merge.
Retain Recovery Sets
Select this option to set your retention setting based on the number ofrecovery sets to retain instead of on the number of recovery points toretain. With this setting you can disable infinite incremental backups,without merging any sessions. Using recovery sets helps reduce theamount of time it takes to complete merge jobs.
Note: The Recovery Sets option is available if you select Standard asyour Backup Data Format. However, the Recovery Sets option is not
294 Arcserve UDP Agent for Windows User Guide

How to Perform a Backup
available if you select Advanced as your Backup Data Format.
Specify the number of recovery sets to retain
Specifies the number of recovery sets retained. A recovery set is a seriesof backups, starting with a full backup, and then followed by a number ofincremental, verify, or full backups.
Example Set 1:
Full
Incremental
Incremental
Verify
Incremental
Example Set 2:
Full
Incremental
Full
Incremental
A full backup is required to start a new recovery set. The backup thatstarts the set will be automatically converted to a full backup, even ifthere is no full backup configured or scheduled to be performed at that
Chapter 5: Using Arcserve UDP Agent (Windows) 295

How to Perform a Backup
time. A flag in the status column on the Arcserve UDP Agent (Windows)home page Most Recent Events section indicates that a full backup isthe starting backup of a recovery set. After the recovery set setting ischanged (for example, changing the recovery set starting point from thefirst backup of Monday to the first backup of Thursday), the starting pointof existing recovery sets will not be changed.
Note: An incomplete recovery set is not counted when calculating anexisting recovery set. A recovery set is considered complete only whenthe starting backup of the next recovery set is created.
When the specified limit is exceeded, the oldest recovery set is deleted(instead of merged).
Default Value: 2
Minimum Value: 1
Maximum Value: 100
Note: If you want to delete a recovery set to save backup storage space,reduce the number of retained sets and Arcserve UDP Agent (Windows)automatically deletes the oldest recovery set. Do not attempt to deletethe recovery set manually.
Example 1 - Retain 1 Recovery Set:
Specify the number of recovery sets to retain as 1.
Arcserve UDP Agent (Windows) always keeps two sets in order to keepone complete set before starting the next recovery set
Example 2 - Retain 2 Recovery Sets:
Specify the number of recovery sets to retain as 2.
Arcserve UDP Agent (Windows) will delete the first recovery set when thefourth recovery set is about to start. This ensures that when the firstbackup is deleted and the fourth is starting, you still have two recoverysets (recovery set 2 and recovery set 3) available on disk.
Note: Even if you choose to retain only one recovery set, you will needspace for at least two full backups.
Example 3 - Retain 3 Recovery Sets:
The backup start time is 6:00 AM, August 20, 2012.
An incremental backup runs every 12 hours.
296 Arcserve UDP Agent for Windows User Guide

How to Perform a Backup
A new recovery set starts at the last backup on Friday.
You want to retain 3 recovery sets.
With the above configuration, an incremental backup will run at 6:00 AMand 6:00 PM every day. The first recovery set is created when the firstbackup (must be a full backup) is taken. Then the first full backup ismarked as the starting backup of the recovery set. When the backupscheduled at 6:00 PM on Friday is run, it will be converted to a fullbackup and marked as the starting backup of the recovery set.
Start a new recovery set on every:
Selected day of the week
Specifies the day of the week selected to start a new recovery set.
Selected day of the month
Specifies the day of the month selected to start a new recovery set. Spe-cify 1 through 30. Or, since a given month may have 28, 29, 30, or 31days, you can specify the last day of the month as the day to create therecovery set.
Start a new recovery set with:
First backup on the selected day
Indicates you want to start a new recovery set with the first scheduledbackup on the specified day.
Last backup on the selected day
Indicates you want to start a new recovery set with the last scheduledbackup on the specified day. If the last backup is selected to start theset and for any reason the last backup did not run, then the next sched-uled backup will start the set by converting it to a full backup. If thenext backup is run ad-hoc (for example an emergency situationrequires a quick incremental backup), you can decide if you want torun a full backup to start the recovery set or run an incrementalbackup so that the next backup starts the recovery set.
Note: The last backup may not be the last backup of the day if you runan ad-hoc backup.
The Arcserve UDP Agent (Windows) home page Summary section indicates howmany recovery sets are retained (or in progress) out of the number specified. Clickthe link under Recovery Sets to display the Recovery Sets Details dialog. This dia-
Chapter 5: Using Arcserve UDP Agent (Windows) 297

How to Perform a Backup
log contains detailed information about the contents of the recovery set. For moreinformation about this dialog, see Status Summary in the online help.
298 Arcserve UDP Agent for Windows User Guide

How to Perform a Backup
Estimate Future Backup Space Requirements
Arcserve UDP Agent (Windows) provides you with this tool to calculate the estim-ated amount of available free space that you will need for backups. The cal-culations are based on your estimate of future data change and on the space that isoccupied from previous backups.
To use this estimating tool
1. Select the backup source. This can be your entire machine or selected volumeswithin your machine.
The actual size of the selected backup source is displayed in the Total Source Sizefield.
2. Estimate the anticipated Change Rate for future backups.
Base this estimate upon past performance of how much your total backup size haschanged for each subsequent incremental backup.
With the Estimated Values defined, Arcserve UDP Agent (Windows) calculates anddisplays the estimated backup size required based on the configuration of thebackup destination and the recovery points. The pie chart also displays the amountof used space and free space.
3. Estimate the Space Saved After Compression percentage value.
Estimated Values
Chapter 5: Using Arcserve UDP Agent (Windows) 299

How to Perform a Backup
You can use estimated values to calculate the approximate overall backup sizethat is based on the number of recovery points. Base this estimate upon pastperformance of your backups with different Compression settings applied. Asyou change this value, you will see the corresponding size impact for yourbackup sizes.
Note: If necessary, you can perform some Full Backups, each with a different Com-pression setting (No Compression, Standard Compression, and Maximum Com-pression) to establish past performance values and help you to better calculate thepercent of space saving that each setting produces for your backup
Space Saved After Compression
This value indicates how much disk space is saved after compression.
Example: If the data size of a volume is 1000 MB and after backup the com-pressed data size is 800 MB, then the Space Saved After Compression isestimated to be 200 MB (20%).
Change Rate
This value indicates the typical data size of an incremental backup.
Example: If an incremental backup data size is 100 MB and the full backupdata size is 1000 MB, the change rate is estimated to be 10%.
Space Saved After Windows Deduplication
This value indicates how much disk space is saved after Windows dedu-plication.
If the backup destination directory is located on a volume where Windowsdeduplication is enabled, the estimated backup size may exceed the totalcapacity of the volume. The reason is that with deduplication enabled, onlyone copy of multiple same size data blocks is kept. This value helps to estim-ate the size while taking deduplication into consideration.
Example: If the total size of the source backed up is 100 GB and it has 20 GBof data that is redundant, then the space saved after deduplication will be 20GB.
Estimated Backup Size
Displays the estimated values for Total Source Size, Compressed Full BackupSize, Compressed Incremental Backup Size, and Estimated Total Backup Size.
The Compressed Full Backup Size field displays a calculated value that isbased upon:
300 Arcserve UDP Agent for Windows User Guide

How to Perform a Backup
Size of the backup source
Specified compression percentage.
The Compressed Incremental Backup Size field displays a calculated valuethat is based upon:
Estimated Change Rate
Number of recovery points to be saved
Specified compression percentage
The Estimated Total Backup Size field will display the anticipated space thatyou will need for future backups and is based upon:
Amount of space that is required for one Full Backup plus
Amount of space that is required for the number of IncrementalBackups needed to satisfy the specified number of saved recoverypoints.
4. From this Estimated Total Backup Size value, you should be able to determine ifyour backup destination has sufficient space to fit your backup.
If your destination does not have sufficient free space, you can consider the fol-lowing corrective actions:
Reduce the number of saved recovery points.
Increase the available free space at the backup destination.
Change the backup destination to a larger capacity.
Reduce the size of the backup source (maybe eliminate unnecessary volumesfrom the backup).
Increase the Compression setting of the backup.
Chapter 5: Using Arcserve UDP Agent (Windows) 301

How to Perform a Backup
Specify Schedule Settings
Arcserve UDP Agent (Windows) lets you specify the schedule for your backups. Ifyou set the Protection Settings Backup Data Format to Standard, the StandardSchedule dialog opens, where you can specify the standard schedule settings. If youset the Protection Settings Backup Data Format to Advanced, the AdvancedBackup Schedule dialog opens, where you can specify the advanced schedule set-tings.
Specify Standard Schedule Settings
Specify Advanced Schedule Settings
302 Arcserve UDP Agent for Windows User Guide

How to Perform a Backup
Specify Standard Schedule Settings
Arcserve UDP Agent (Windows) lets you specify the schedule for your backups. Ifyou set the Backup Data Format option to Standard in Protection Settings, theStandard Schedule dialog opens, where you can specify the standard schedule set-tings.
Follow these steps:
1. From the Arcserve UDP Agent (Windows) home page (or Arcserve UDP Agent (Win-dows) Monitor), select Settings from the taskbar and then select the Backup Set-tings tab. When the Backup Settings dialog opens, select Schedule.
The Backup Settings StandardSchedule dialog opens.
Notes:
If the Arcserve UDP Agent (Windows) is being managed by Console, not allsettings are available and will be displayed as read-only information.
When agent is managed by console and not protected in a plan, all the set-tings are still available except the Preference > Updates panel.
2. Specify your backup schedule options.
Set start date and time
The start date and start time for your scheduled backups.
Chapter 5: Using Arcserve UDP Agent (Windows) 303

How to Perform a Backup
Note:When setting the interval between repeat backup jobs, ensure that youleave enough time to allow the previous job and any related merge jobs to com-plete before the next backup job starts. This amount of time can be estimatedbased on your own specific backup environment and history.
Incremental Backup
Determines the backup schedule for Incremental Backups.
As scheduled, Arcserve UDP Agent (Windows) incrementally backs up onlythose blocks that have changed since the last successful backup. The advant-ages of Incremental Backups are that it is a fast backup and it produces asmall backup image. This is the most optimal way to perform backups andyou should use this by default.
The available options are Repeat and Never. If you select the Repeat option,you must also specify the elapsed time period (in minutes, hours, or days)between backup attempts. The minimum setting for Incremental backups isevery 15 minutes.
By default the schedule for Incremental backups is to repeat every 1 day.
Full Backup
Determines the backup schedule for Full Backups.
As scheduled, Arcserve UDP Agent (Windows) performs a Full backup of allused blocks from the source machine. The available options are Repeat andNever. If you select the Repeat option, you must also specify the elapsedtime period (in minutes, hours, or days) between backup attempts. The min-imum setting for Full backups is every 15 minutes.
By default the schedule for Full backups is Never (no scheduled repeat).
Verify Backup
Determines the backup schedule for Verify Backups.
As scheduled, Arcserve UDP Agent (Windows) verifies that the protected datais valid and complete by performing a confidence check of the stored backupimage to the original backup source. If necessary, the image is resyn-chronized. A Verify Backup looks at the most recent backup of each individualblock and compares the content and information to the source. This com-parison verifies that the latest backed up blocks represent the correspondinginformation at the source. If the backup image for any block does not matchthe source (possibly because of changes in the system since the last backup),Arcserve UDP Agent (Windows) refreshes (resynchronizes) the backup of theblock that does not match. You can also use a Verify Backup (very infre-
304 Arcserve UDP Agent for Windows User Guide

How to Perform a Backup
quently) to get the guarantee of full backup without using the space requiredfor a full backup.
Advantages: Produces a small backup image when compared to full backupbecause only the changed blocks (blocks that do not match the last backup)are backed up.
Disadvantages: Backup time is long because all source blocks are comparedwith the blocks of the last backup.
The available options are Repeat and Never. If you select the Repeat option,you must also specify the elapsed time period (in minutes, hours, or days)between backup attempts. The minimum setting for Verify backups is every15 minutes.
By default the schedule for Verify backups is Never (no scheduled repeat).
Catalogs
File System Catalog
When this option is selected, enables generation of the file system catalog. Ifyour browse time is too slow (especially if the Arcserve UDP Agent (Win-dows) destination is over a WAN) or if your restore by search time is tooslow, this option helps reduce your wait time. This catalog job will run foreach scheduled backup job after this option is selected.
If this option is not selected, the restores can be performed immediatelyafter backup without having to wait for the catalog job to finish. By default,this option is not enabled.
Note:When you generate a File System catalog for each backup job, it res-ults in an increased amount of disk storage needed to store the metadatafiles and catalog files and an increase in CPU usage. In addition, if the backupsource contains a large amount of files, the process of generating a catalogcould be a time consuming task.
Note: If you selected an ReFS volume as the backup source, you will not beable to generate a catalog and a warning message will be displayed toinform you of this condition.
3. Click Save Settings.
Your settings are saved.
Note: If at a given time there are more than one type of backup scheduled to beperformed simultaneously, the type of backup that will be performed is based uponthe following priorities:
Chapter 5: Using Arcserve UDP Agent (Windows) 305

How to Perform a Backup
Priority 1 - Full backup
Priority 2 - Verify backup
Priority 3 - Incremental backup
For example, if you schedule all three types of backups to be performed at thesame time, Arcserve UDP Agent (Windows) will perform the Full Backup. If there isno Full Backup scheduled, but you scheduled a Verify Backup and IncrementalBackup to be performed at the same time, Arcserve UDP Agent (Windows) will per-form the Verify Backup. A scheduled Incremental Backup is performed only if thereis no conflict with any other type of backup.
306 Arcserve UDP Agent for Windows User Guide
How to Perform a Backup
Specify Advanced Schedule Settings
Arcserve UDP Agent (Windows) lets you specify the schedule for your backups. Ifyou set the Backup Data Format option in Protection Settings to Advanced, theAdvanced Backup Schedule dialog opens, where you can view your Repeat Sched-ule and Daily/Weekly/Monthly Settings.
Advanced Scheduling allows you to set the Repeat Schedule and the Daily WeeklyMonthly Schedule. Advanced scheduling consists of the following:
Week-based repeat backup schedule
Week-based backup throttling schedule
Week-based merge schedule
Daily backup schedule
Weekly backup schedule
Monthly backup schedule
Follow these steps:
1. From the Arcserve UDP Agent (Windows) home page (or Arcserve UDP Agent (Win-dows) Monitor), select Settings from the taskbar and then select the Backup Set-tings tab. When the Backup Settings dialog opens, select Schedule.
The Backup Settings Advanced Schedule dialog opens.
Notes:
If the Arcserve UDP Agent (Windows) is being managed by Console, not allsettings are available and will be displayed as read-only information.
If the Arcserve UDP Agent (Windows) is managed by console and not pro-tected in a plan, all the settings are still available except the Preference >
Chapter 5: Using Arcserve UDP Agent (Windows) 307

How to Perform a Backup
Updates panel.
2. (Optional) Click Add to add a backup schedule, backup throttle schedule, or amerge schedule.
For more information, see the following topics:
Add Backup Job Schedule.
Add Backup Throttle Schedule.
Add Merge Schedule.
3. Specify the Start Date and Time.
The start date and start time for your scheduled backups.
Note:When setting the interval between repeat backup jobs, ensure that you leaveenough time to allow the previous job and any related merge jobs to completebefore the next backup job starts. This amount of time can be estimated based onyour own specific backup environment and history.
308 Arcserve UDP Agent for Windows User Guide

How to Perform a Backup
4. Specify the Number of recovery points to retain.
The number of recovery points to retain can be set for Daily, Weekly, Monthly, andCustom/Manual.
Note: The total retention count (Daily + Weekly + Monthly + Custom/Manual), themaximum limitation is 1440.
5. Specify File System Catalog and Exchange Catalog generation.
File System Catalog
When this option is selected, enables generation of the file system catalog. Ifyour browse time is too slow (especially if the Arcserve UDP Agent (Windows)destination is over a WAN) or if your restore by search time is too slow, thisoption helps reduce your wait time. This catalog job will run for each scheduledbackup job after this option is selected.
If this option is not selected, the restores can be performed immediately afterbackup without having to wait for the catalog job to finish. By default, thisoption is not enabled.
Note:When you generate a File System catalog for each backup job, it resultsin an increased amount of disk storage needed to store the metadata files andcatalog files and an increase in CPU usage. In addition, if the backup source con-tains a large amount of files, the process of generating a catalog could be atime consuming task.
Note: If you selected an ReFS volume as the backup source, you will not be ableto generate a catalog and a warning message will be displayed to inform you ofthis condition.
6. Click Save Settings.
Your settings are saved.
Chapter 5: Using Arcserve UDP Agent (Windows) 309

How to Perform a Backup
Add Backup Job Schedule
Follow these steps:
1. From the Arcserve UDP Agent (Windows) home page (or Arcserve UDP Agent (Win-dows) Monitor), select Settings from the taskbar and then select the Backup Set-tings tab. When the Backup Settings dialog opens, select Schedule.
The Backup Settings Advanced Schedule dialog opens.
2. From the Backup Settings Advanced Schedule dialog, click Add and then clickAdd Backup Schedule.
The New Backup Schedule dialog opens.
3. From the drop-down list, select Daily, Weekly, Monthly, or Custom.
4. Enter the appropriate fields based on the schedule you selected:
To add a Daily Backup Schedule, see Add Daily Backup Schedule.
To add a Weekly Backup Schedule, see Add Weekly Backup Schedule.
To add a Monthly Backup Schedule, see Add Monthly Backup Schedule.
To add a Custom/Manual Backup Schedule, see Add Custom Backup Schedule.
5. Click Save.
310 Arcserve UDP Agent for Windows User Guide

How to Perform a Backup
Your settings are saved.
Notes:
You can add up to 4 time windows for any week day.
The time window cannot be set across multiple days. You can only configurethe time window from 12:00 AM to 11:59 PM.
For each time window, you can specify the time window and the repeat fre-quency.
The default backup schedule is 1 daily backup at 10:00pm.
Chapter 5: Using Arcserve UDP Agent (Windows) 311

How to Perform a Backup
Add Backup Throttle Schedule
Follow these steps:
1. From the Arcserve UDP Agent (Windows) home page (or Arcserve UDP Agent (Win-dows) Monitor), select Settings from the taskbar and then select the Backup Set-tings tab. When the Backup Settings dialog opens, select Schedule.
The Backup Settings Advanced Schedule dialog opens.
2. From the Backup Settings Advanced Schedule dialog, click Add and then clickAdd Throttle Schedule.
The Add New Throttle Schedule dialog opens.
3. Enter the following fields:
Throughput Limit
Specify the maximum speed (MB/min) at which the backup will be written.
You can throttle the backup speed to reduce CPU or network utilization.However, by limiting the backup speed, it has an adverse effect on the backupwindow. As you lower the maximum backup speed it increases the amount oftime to perform the backup. For a backup job, the Job Monitor on the homepage will display the average Read and Write speed of the job in progress andthe configured throttle speed limit.
Note: By default, the throttle backup speed option is not enabled and backupspeed is not being controlled.
Start Time
312 Arcserve UDP Agent for Windows User Guide
How to Perform a Backup
Specify the time of the day to start applying the configured backup throttle set-tings.
Until
Specify the time of the day to stop applying the configured backup throttle set-tings.
4. Click Save
Your settings are saved.
Notes:
You can add up to 4 time windows for any week day.
The throttling value control the backup speed. For example, if you set 2 timewindows, 1 from 8:00 AM to 6:00 PM, backup throughput limit is 1500MB/minute, and 1 from 6:00 PM to 8:00 PM, backup throughput limit is 3000MB/minute. If a backup job runs from 5:00 PM to 7:00 PM, the throughput willbe 1500 MB/minute from 5:00 PM to 6:00 PM, and change to 3000 MB/minutefrom 6:00 PM to 7:00 PM.
The time window cannot be set across multiple days. You can only configurethe time window from 12:00 AM to 11:45 PM. If the throttle schedule ends at11:45 PM, the schedule takes effect until the next day.
Backup throttle schedule applies to repeat backup, as well as daily / weekly /monthly backups.
Chapter 5: Using Arcserve UDP Agent (Windows) 313
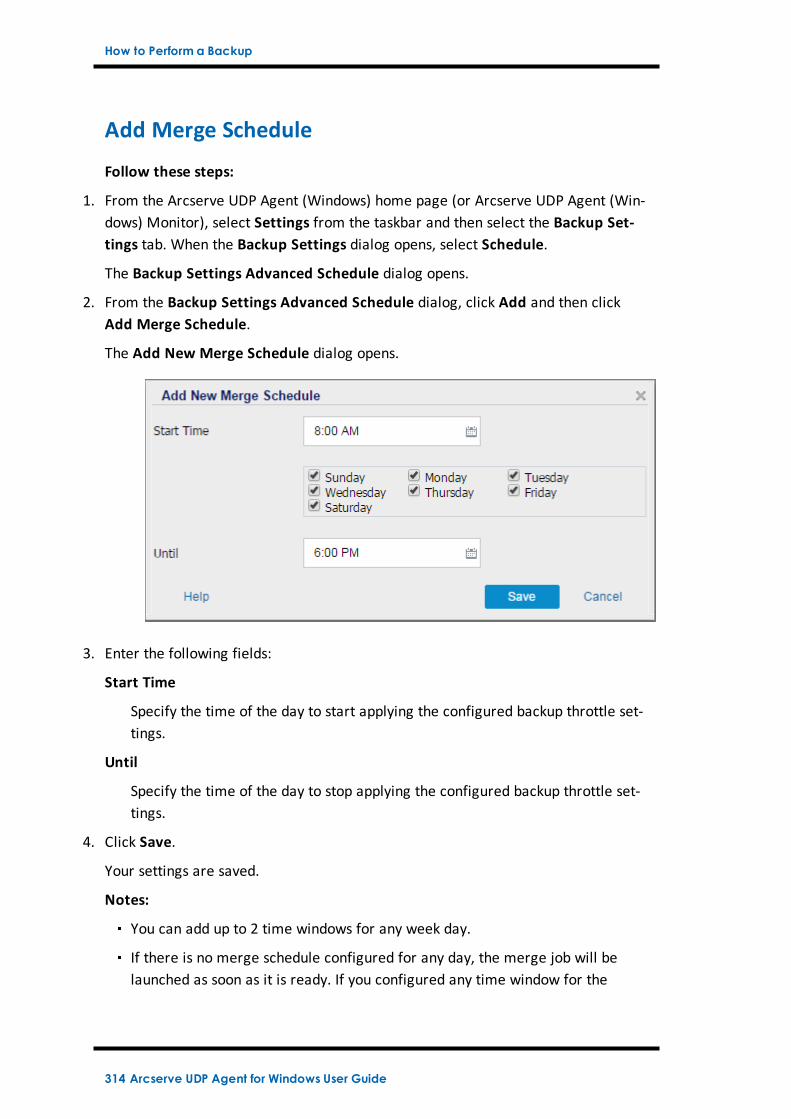
How to Perform a Backup
Add Merge Schedule
Follow these steps:
1. From the Arcserve UDP Agent (Windows) home page (or Arcserve UDP Agent (Win-dows) Monitor), select Settings from the taskbar and then select the Backup Set-tings tab. When the Backup Settings dialog opens, select Schedule.
The Backup Settings Advanced Schedule dialog opens.
2. From the Backup Settings Advanced Schedule dialog, click Add and then clickAdd Merge Schedule.
The Add New Merge Schedule dialog opens.
3. Enter the following fields:
Start Time
Specify the time of the day to start applying the configured backup throttle set-tings.
Until
Specify the time of the day to stop applying the configured backup throttle set-tings.
4. Click Save.
Your settings are saved.
Notes:
You can add up to 2 time windows for any week day.
If there is no merge schedule configured for any day, the merge job will belaunched as soon as it is ready. If you configured any time window for the
314 Arcserve UDP Agent for Windows User Guide

How to Perform a Backup
merge schedule, the merge job will only be launched within the time windows.For example, if the merge schedule is 8:00 AM to 6:00 PM on Sunday, themerge job will only be launched during this time window.
If the merge job launches within the configured time windows, and it runs tocompletion, despite the end time of the time windows. For example, if themerge time window is 8:00 AM to 6:00 PM on Sunday, a merge job started at5:55 PM. It will continue to run after 6:00 PM to complete, even though thetime is moving out of the defined time window.
Merge schedule applies to repeat backup, as well as daily / weekly / monthlybackups.
When you configure a merge job schedule, the merge will only be triggeredwhen the time is within the configured time window. If the merge is not withinthe configured time window, the merge will not run when you click the Run amerge job manually now link in the summary panel of the Arcserve UDPAgent (Windows) home page.
Chapter 5: Using Arcserve UDP Agent (Windows) 315

How to Perform a Backup
Schedule Considerations
The Arcserve UDP Agent (Windows) provides flexible settings to let you specifyschedules for your backup. It consists of the following:
Week-based repeat backup schedule
Week-based backup throttling schedule
Week-based merge schedule
Daily backup schedule
Weekly backup schedule
Monthly backup schedule
However each backup, merge, or catalog job will consume system resources (CPUUsage, Memory Usage, IO Usage), occupy network bandwidth, and occupy diskspace. Therefore, to help protect your system, consider the following:
What is the business processing time range of your server?
To avoid affecting your business processing, configure your system to run lessjobs when the server is busy. For example, only configure to run backup jobswhen the server is busy and leave merge jobs to run when the server is idle.
How about the data change frequency of your server?
Normally more frequent data change means more frequent backup is required.This is to reduce data lost to the minimum. When needed, you can recover theserver to the last good known status.
How about your network bandwidth?
If your backup destination is configured to a network shared path, obviously thejob occupies some of your network bandwidth when it is running. This mightaffect your business processing of this server. In case of this, specify a throttleschedule to limit the Arcserve UDP Agent (Windows) occupying network band-width.
How much disk storage is allocated for your backup destination?
More Full backups and more backups to retain means more disk storage isrequired. So when you configure how frequently to run a Full backup and howmany backups to retain, consider the disk storage allocated for the backup des-tination.
How do you expect to use your backed up data?
Enable “File System Catalog” can shorten the browse time when you want torestore a file or a mailbox. But to generate catalogs, it also results in an
316 Arcserve UDP Agent for Windows User Guide

How to Perform a Backup
increased amount of disk storage needed to store the metadata files and cata-log files and an increase in CPU usage. In addition, if the backup source con-tains a large amount of files, the process of generating a catalog could be atime consuming task. So whether to enable or disable catalogs is depending onhow you would like to use the backed up data.
Based on the above considerations, the following is an example of using advancedscheduling to protect a build server, showing the situation and corresponding sched-ule settings:
The build server is used to provide source code pre-compile service every work-ing day. It’s business process time slot is 9:00 AM – 7:00 PM of every work day(from Monday to Friday). During other times, it is idle.
Schedule Settings:
Configure to run custom incremental backup from 9:00 AM to 7:00 PM,run merge job at night – 7:00 PM to 9:00 AM of next day.
The pre-compile service is launched every 2 hours, and there are lots of datachanges at that time.
Schedule Settings:
Configure to run custom incremental backup every 2 hours.
Every time to run pre-compile, the build server need to fetch source code froma remote source code repository server.
Schedule Settings:
Limit backup throttle to 500 MB/Minute during 9:00 AM to 7:00 PM andno limitation during other time slots.
Due to the poor disk storage, there is no requirement to retain a lot of recoverypoints. Only need to keep recovery points in one release cycle; 6 months isenough. But there is a requirement to keep the recovery point in the last 24hours, so that once needed you can recover to the last good known status.
Schedule Settings:
Specify to retain last 12 manual backups (the backups of the last 24hours).
Configure to run Daily Incremental backup at 9:00 PM of every day. Andkeep the last 7 Daily backups.
Configure to run Weekly Full Backup at 11:00 PM of every Friday. Andkeep the last 4 Weekly backups.
Chapter 5: Using Arcserve UDP Agent (Windows) 317

How to Perform a Backup
Configure to run Monthly Full Backup at 12:00 PM on last Saturday ofmonth. And keep the last 6 monthly backups.
Finally, there are 6 monthly backups, 4 weekly backups, 7 daily backups and 12most recent backups. There are enough choices to recover the build server to agood known status.
For the build server, there is no requirement to quickly browse and restore files.Once needed, perform a BMR to restore the build server to the last good knownstatus. That is enough.
Schedule Settings:
Disable options to generate "File System Catalog".
318 Arcserve UDP Agent for Windows User Guide

How to Perform a Backup
Specify Advanced Settings
Arcserve UDP Agent (Windows) lets you specify the Advanced Settings for yourbackups.
Follow these steps:
1. From the Arcserve UDP Agent (Windows) home page (or Arcserve UDP Agent (Win-dows) Monitor), select Settings from the taskbar and then select the Backup Set-tings tab. When the Backup Settings dialog opens, select Advanced.
The Advanced dialog opens.
Notes:
If the Arcserve UDP Agent (Windows) is being managed by Console, not allsettings are available and will be displayed as read-only information.
If the Arcserve UDP Agent (Windows) is managed by console and not pro-tected in a plan, all the settings are still available except the Preference >Updates panel.
2. Specify your advanced backup settings options.
Truncate Log
Truncates the accumulated transaction log files for the selected applicationsafter the next successful backup.
Chapter 5: Using Arcserve UDP Agent (Windows) 319

How to Perform a Backup
Arcserve UDP Agent (Windows) backups consist of a snapshot image and thetransaction log files that were created for it. At some point in time, the older(committed) transaction log files are no longer needed and can be purged tomake space for new log files. The process of purging these log files is trun-cating the log. This option enables truncating of committed transaction logfiles, which conserves disk space.
The available options are SQL Server and Exchange Server. You can selecteither, both, or none of these applications. If you select any of these applic-ations, you can also specify a scheduled time period (Daily, Weekly, orMonthly) for automatic log truncation:
Note: The transaction log files cannot be truncated without performing a suc-cessful backup.
Daily - Specifies that each day after the backup completes successfully, thecommitted transaction logs will be purged immediately.
Weekly - Specifies that after seven days, the committed transaction logs willbe purged immediately after the backup completes successfully.
Monthly - Specifies that after 30 days, the committed transaction logs willbe purged immediately after the backup completes successfully.
If a backup job is already running at the same time the purging is scheduledto be performed, the purging operation is moved to the next scheduled job.
Example:
You scheduled an Incremental Backup to run automatically every day at 5:00pm, and then started a Full Backup manually at 4:55 pm. You assume that thebackup successfully finishes at 5:10 pm.
In this case, the Incremental Backup that is scheduled for 5:00 pm is skippedbecause the ad-hoc Full Backup is still in progress. Now the committed trans-action log files are purged after the next successful backup job and be per-formed on the next day after the scheduled Incremental Backup completessuccessfully at 5:00 pm.
Snapshot Type for Backup
You can select the required option from software snapshot or hardware snap-shot.
Use software snapshot only
Specifies that the backup type uses only the software snapshot. Arc-serve UDP will not check for hardware snapshot. The software snapshot
320 Arcserve UDP Agent for Windows User Guide

How to Perform a Backup
utilizes less resources on the virtual machines. You can use this option ifthe server has lower configurations and processing speed.
Use hardware snapshot wherever possible
Specifies that the backup type first checks for a hardware snapshot. Ifall the criteria are met, the backup type uses hardware snapshot.
Note: For more information on the hardware snapshot criteria, see theprerequisite.
Administrator Account
Specifies the User Name and Password with access rights to perform thebackup. The Arcserve UDP Agent (Windows) verifies that the name and pass-word are valid and the user belongs to an administrator group.
Important! If the Administrator Account credential information for the ArcserveUDP Agent (Windows) server is changed (User Name/Password), you must alsoreconfigure/update the Administrator Account information in this dialog.
Note: To specify a domain account, the format for the user name is a fullyqualified domain user name in the form of "<domain name>\<user name>".
Recover Backup Destination Connection
Lets you update (resynchronize) the connection information to your backupdestination.
You can use this option if you are performing periodic backups to a remoteshare computer and then you can change the access credentials (user name/-password) for that remote computer. In this case, typically your next backupwould fail because the access credentials configured at your local computerdo not match the new credentials at the remote computer.
Note:When you click the Update Connection button and the resynchronizeprocess begins, you cannot cancel it.
Before you click this Update button, perform the following tasks:
a. Log in to the remote destination computer and use the following net sessioncommand to disconnect the connection between the local Arcserve UDPAgent (Windows) computer and the remote computer:
net session \\<computer name or IP address> /d
b. Return to the Arcserve UDP Agent (Windows) computer, and click the UpdateConnection button.
c. Enter new password for destination.
Chapter 5: Using Arcserve UDP Agent (Windows) 321

How to Perform a Backup
Arcserve UDP Agent (Windows) updates your configured credentials to matchthe new credential information at the remote share destination. A pop-upconfirmation screen appears informing you that the credentials have beenupdated.
3. Click Save Settings.
Your advanced backup settings are saved.
322 Arcserve UDP Agent for Windows User Guide

How to Perform a Backup
Specify Pre/Post Backup Settings
Arcserve UDP Agent (Windows) lets you specify the Pre/Post Backup Settings.
Specify the Pre/Post Backup Settings
1. From the Arcserve UDP Agent (Windows) home page (or Arcserve UDP Agent (Win-dows) Monitor), select Settings from the taskbar and then select the Backup Set-tings tab. When the Backup Settings dialog opens, select Pre/Post Backup.
The Pre/Post Backup Settings dialog opens.
Notes:
If the Arcserve UDP Agent (Windows) is being managed by Console, not allsettings are available and will be displayed as read-only information.
When agent is managed by console and not protected in a plan, all the set-tings are still available except the Preference > Updates panel.
2. Specify your pre/post backup setting options.
Actions
Runs script commands for actions to take before the start of the backup, afterthe snapshot image is captured, and/or upon the completion of the backup. Youcan also trigger the script command based upon specific exit codes and selectthe action to be taken (run job or fail job) when that exit code is returned.
Chapter 5: Using Arcserve UDP Agent (Windows) 323

How to Perform a Backup
A "run job" action directs Arcserve UDP Agent (Windows) to continue torun the job if the specified exit code is returned.
A "fail job" action directs Arcserve UDP Agent (Windows) to cancel thejob if the specified exit code is returned.
3. Click Save Settings.
Your pre/post backup settings are saved.
324 Arcserve UDP Agent for Windows User Guide

How to Perform a Backup
Perform a Backup
Before you perform your first backup, specify the backup settings to be applied toand control all subsequent backup jobs. These settings are applied to each backupjob, regardless of how you initiate the backup. For more information, see Configureor Modify Backup Settings.
A backup job can be initiated either automatically (based upon your schedule set-tings) or manually (immediate ad-hoc backup).
Run a Scheduled Backup
Run a Backup Now
Chapter 5: Using Arcserve UDP Agent (Windows) 325

How to Perform a Backup
Perform Backup Automatically (Scheduled)
Automatic backup jobs are the same as manual backup jobs, except they aretriggered at pre-configured days and times. You can configure automatic backupjobs using the Backup Schedule dialog. For more information, see Specify ScheduleSettings.
The process for scheduling an automatic backup is as follows:
1. Based upon the configured time settings, Arcserve UDP Agent (Windows) triggersthe launching of each type of scheduled backup job (Full, Incremental, and Verify).
2. Configuration settings specified in the Backup Settings dialogs are applied to thejob.
3. If configured, an email notification is sent to the recipients informing them whenthe backup job is completed (or if a problem occurred that prevented the scheduledbackup job from being completed).
326 Arcserve UDP Agent for Windows User Guide

How to Perform a Backup
Perform Backup Manually (Backup Now)
Backups are performed automatically and are controlled by the schedule settings.However, there can be times when you have to perform an ad-hoc backup (Full,Incremental, or Verify) immediately.
An ad-hoc backup is need-based, rather than being scheduled in advance as part ofa backup plan. For example, if you have a repeat schedule for Full, Incremental,and Verify backups and you want to make major changes to your machine, youshould perform an immediate ad-hoc backup without waiting for the next sched-uled backup to occur.
An ad-hoc backup also allows you to add a customized (unscheduled) recovery pointso that you can roll back to this previous point in time if necessary. For example, ifyou install a patch or service pack and then discover that it adversely affects theperformance of your machine, you may want to roll back to the ad-hoc backup ses-sion that does not include the patch or service pack.
Follow these steps:
1. From the Arcserve UDP Agent (Windows) home page (or Arcserve UDP Agent (Win-dows) Monitor), click Backup Now.
The Run a backup now dialog opens.
2. Select the type of backup you want to perform.
The available options are Full, Incremental, or Verify.
Full Backup
Initiates a Full Backup of your entire machine or the selected volumes.
Incremental Backup
Chapter 5: Using Arcserve UDP Agent (Windows) 327

How to Perform a Backup
Initiates an Incremental Backup of your machine. An Incremental Backupbacks up only those blocks that have changed after the previous backup.
The advantages of Incremental Backups are that it is a fast backup and it pro-duces a small backup image. This is the most optimal way to performbackups.
Verify Backup
Initiates a Verify Backup of your machine by examining the most recentbackup of each individual block and comparing the content and informationto the original source. This comparison verifies that the latest backed upblocks represent the corresponding information at the source. If the backupimage for any block does not match the source, Arcserve UDP Agent (Win-dows) refreshes (resynchronizes) the backup of the block that does notmatch.
Advantages: A very small backup image is produced when compared to aFull Backup because only the changed blocks (blocks that do not match thelast backup) are backed up.
Disadvantages: The backup time is slow because all of source disk blocks arecompared with the blocks of the last backup.
Note: If you add a new volume to the backup source, the newly added volume isfully backed up regardless of the overall backup method selected.
3. If necessary, specify a backup name and click OK. If no backup name is specified, itis automatically named Customized Full/Incremental/Verify Backup by default.
A confirmation screen appears, and the selected type of backup is launched imme-diately.
All configuration settings specified in the Backup Settings dialogs are applied tothe job.
Note: Only one job can be run at a time. If you manually attempt to launch abackup job now and another job is currently running, an alert message informs youthat another job is running and request that you try again at a later time.
Note: If a custom (ad-hoc) backup job fails, no makeup job is created. A makeupjob is only created for a failed scheduled job.
328 Arcserve UDP Agent for Windows User Guide

How to Perform a Backup
Verify that the Backup was Successful
To verify that the backup process of the data to the specified destination was suc-cessful, perform one of the following procedures:
Follow these steps:
1. Navigate to the Arcserve UDP Agent (Windows) backup destination you specified.
A list of folders appears.
2. Verify that the size of the folder matches the size as displayed in the protectionSummary list.
Note: The size of the folder should be equal to the sum of the Full backup, Incre-mental backups, and any Verify backups.
The Arcserve UDP Agent (Windows) backup process is successful.
Follow these steps:
1. From the Arcserve UDP Agent (Windows) home page UI, click Restore wizard.
The Restore dialog opens.
2. Click the Browse Recovery Points and verify the data that you have backed up is lis-ted correctly.
The Arcserve UDP Agent (Windows) backup process is successful.
Follow these steps:
3. From the Arcserve UDP Agent (Windows) home page UI, clickMount RecoveryPoint wizard.
The Mount Recovery Point dialog opens.
4. Verify that the data in the mount backup volume is mounted correctly.
The Arcserve UDP Agent (Windows) backup process is successful.
Chapter 5: Using Arcserve UDP Agent (Windows) 329

How to Perform a Backup
How Arcserve UDP Agent (Windows) Works
Arcserve UDP Agent (Windows) lets you perform frequent and periodic block levelbackups of your full machine. These backups can be stored on either an internaldrive, an external drive, on a remote network share, or a data store on a RecoveryPoint Server (RPS), depending on the type of installation (Arcserve Unified Data Pro-tection - Full or Arcserve Unified Data Protection - Agent). If the backup destinationvolume is also selected as the backup source volume, a never ending backup is notexecuted. During the backup, the backup destination volume is excluded and anentry is added to the Activity log. The Arcserve UDP Agent (Windows) provides thecapability to perform Full, Incremental, or Verify type backups.
Arcserve Unified Data Protection - Full:
Available backup destinations include: internal drive, external drive, remote net-work share, or a data store on a Recovery Point Server (RPS). When you create aPlan from the Arcserve UDP server, you can select Data Store on Recovery PointServer as the destination and then deploy the plan to the agent node.
Arcserve Unified Data Protection - Agent:
Available backup destinations include: internal drive, external drive, or a remotenetwork share.
Arcserve UDP Agent (Windows) also provides various methods to identify and loc-ate the backed up data and allow you to restore it if necessary. Regardless of whichrestore method you select, Arcserve UDP Agent (Windows) lets you quickly identifythe data you need and retrieve it from the appropriate backup location.
330 Arcserve UDP Agent for Windows User Guide

How to Perform a Backup
How the Backup Process Works
Arcserve UDP Agent (Windows) lets you perform frequent and periodic block levelbackups of your entire machine. These backups can be stored on either an internaldrive, an external drive, on a remote network share, or a data store on a RecoveryPoint Server (RPS), depending on the type of installation (Arcserve Unified Data Pro-tection - Full or Arcserve Unified Data Protection - Agent). The Arcserve UDP Agent(Windows) provides the capability to perform Full, Incremental, or Verify typebackups.
The basic process for how Arcserve UDP Agent (Windows) performs a backup issimple. When you initiate a backup (either as scheduled or manually launched), Arc-serve UDP Agent (Windows) captures a full VSS snapshot, and then backs up onlythose blocks that have been changed since the previous successful backup. (If it is aFull backup, all blocks are backed up). This block-level incremental backup processsignificantly reduces the amount of backup data. For example, if you have a largefile and only change a small portion of this file, Arcserve UDP Agent (Windows)backs up only the changed portion to the incremental backup and not back up theentire file.
During this block-level incremental backup process, Arcserve UDP Agent (Windows)not only captures the data, but also creates a catalog containing all informationrelated to the operating system, installed applications (Microsoft SQL andMicrosoft Exchange only), configuration settings, necessary drivers, and so on. Ifnecessary, you can then restore this backed-up image to recover your data or yourentire machine. If the backup destination volume is also selected as the backupsource volume, a never ending backup is not executed. During the backup, thebackup destination volume is excluded and an entry is added to the Activity log.
Note: You can submit a faster backup job (catalog-less backup), since a catalog isnot required after a backup job is complete. The backup settings option "GenerateFile System catalog for faster search after each backup" by default is unchecked,indicating it will perform a faster backup.
The details of what is being backed up, how it is being backed up, when it is beingbacked up, and so on, are controlled by the various backup configuration settingsthat you specify. These settings are applied to each backup job, regardless of howyou initiate the backup (automatically or manually).
Arcserve Unified Data Protection - Full:
With this type of installation, configure your backup by creating a plan. Availablebackup destinations include: internal drive, external drive, remote network share,or a data store on a Recovery Point Server (RPS). When you create a Plan from the
Chapter 5: Using Arcserve UDP Agent (Windows) 331

How to Perform a Backup
Arcserve UDP server, you can select Data Store on Recovery Point Server as the des-tination and then deploy the plan to the agent node.
Arcserve Unified Data Protection - Agent:
With this type of installation, configure your backup by specifying the backup set-tings. Available backup destinations include: internal drive, external drive, or aremote network share.
332 Arcserve UDP Agent for Windows User Guide

How to Perform a Backup
How Block-Level Incremental Backups Work
When you start a backup, the specified volume is divided into a number of sub-ordinate data blocks that are then backed up. The initial backup is considered the"parent backup" and will be a Full Backup of the entire volume to establish thebaseline blocks to be monitored. Before performing the backup, a VSS snapshot iscreated, then an internal monitoring driver checks each block to detect anychanges. As scheduled, Arcserve UDP Agent (Windows) will then incrementally backup only those blocks that have changed since the previous backup. You can schedulethe subsequent block-level incremental backups ("child backups") as frequently asevery 15 minutes to always provide accurate, up-to-date backup images.
If you need to restore the volume information, the most recent backed up versionof each block is located and the entire volume is rebuilt using these current blocks.
Arcserve Unified Data Protection - Full:
Available backup destinations include: internal drive, external drive, remote net-work share, or a data store on a Recovery Point Server (RPS). When you create aPlan from the Arcserve UDP server, you can select Data Store on Recovery PointServer as the destination and then deploy the plan to the agent node.
Arcserve Unified Data Protection - Agent:
Available backup destinations include: internal drive, external drive, or a remotenetwork share.
Chapter 5: Using Arcserve UDP Agent (Windows) 333

How to Perform a Backup
How Infinite Incremental Backups Work
If left alone, the incremental snapshots (backups) would continue, as often as 96times each day (every 15 minutes). These periodic snapshots will accumulate alarge chain of backed up blocks to be monitored each time a new backup is per-formed, and require added space to store these ever-growing backup images. Tominimize this potential problem, Arcserve UDP Agent (Windows) utilizes the InfiniteIncremental Backup process, which intelligently creates incremental snapshotbackups forever (after the initial full backup) and uses less storage space, performsfaster backups, and puts less load on your production servers. Infinite IncrementalBackups allow you to set a limit for the number of incremental child backups to bestored. When the Backup Data Format is Standard, configure the Recovery Pointsoption from the Protection Settings tab on the Backup Settings dialog. When theBackup Data Format is Advanced (default), configure the Recovery Points optionfrom the Schedule tab on the Backup Settings dialog.
When the specified limit is exceeded, the earliest (oldest) incremental child backupis merged into the parent backup to create a new baseline image consisting of the"parent plus oldest child" blocks (unchanged blocks will remain the same). Thiscycle of merging the oldest child backup into the parent backup repeats for eachsubsequent backup, allowing you to perform Infinite Incremental (I2) snapshotbackups while maintaining the same number of stored (and monitored) backupimages.
334 Arcserve UDP Agent for Windows User Guide

How to Perform a Backup
How Verify Backups Work
Every so often (as scheduled or when manually initiated), Arcserve UDP Agent (Win-dows) can perform a Verify (resynchronization) type backup to provide a con-fidence check of the stored backup image and resynchronize that image ifnecessary. A Verify type backup looks at the most recent backup of each individualblock and compares the content and information to the source. This comparisonverifies that the latest backed up blocks represent the corresponding information atthe source. If the backup image for any block does not match the source (possiblybecause of changes in the system since the last backup), Arcserve UDP Agent (Win-dows) refreshes (resynchronizes) the backup of the block that does not match.
A Verify backup can also be used to get the same guarantee as a full backupwithout taking the space of full backup. The advantage of a Verify backup is that itis small when compared to full backup because only the changed blocks (blocks thatdo not match the last backup) are backed up. However, a Verify backup is alsoslower than an Incremental backup because Arcserve UDP Agent (Windows) has tocompare all of source disk blocks with the blocks of the last backup.
Chapter 5: Using Arcserve UDP Agent (Windows) 335
How to Perform a Backup
How Recovery Sets Work
A Recovery Set is a storage setting where a group of recovery points (backup ses-sions) are backed-up over a specified period and then stored together as one com-piled set. A Recovery Set includes a series of backups, always starting with a FullBackup, and then followed by a number of subsequent Incremental, Verify, or FullBackups. By using Recovery Sets (instead of Recovery Points), you disable infiniteincremental backups and discontinue merging of backup sessions, thereby com-pletely eliminating the time-consuming merge process.
Recovery Sets are generally used for large storage environments and helps you tomanage your backup window time more efficiently when protecting large amountsof data. Recovery Sets are used when the backup time is more important than stor-age space constraints.
A Full Backup is required to start a Recovery Set. Therefore, the backup session thatstarts a Recovery Set will be automatically converted to a Full Backup, even if thereis no Full Backup configured or scheduled to be performed at that time. After theinitial Full Backup is completed, all subsequent backups (regardless if which type ofbackup is performed) will be saved within the Recovery Set until the next newRecovery Set is launched (manually or automatically as scheduled).
You can configure the number of Recovery Sets to retain. When the number ofRecovery Sets retained exceeds the specified retention count, the oldest RecoverySet will be deleted (instead of being merged). A recovery set is considered com-plete only when the starting Full Backup for the next Recovery Set is completed. Forexample, if you specified to retain two Recovery Sets, Arcserve UDP Agent (Win-dows) will delete the first Recovery Set only after the Full Backup for the thirdRecovery Set is completed. This ensures that when the first backup is deleted, youalready have two Recovery Sets (Recovery Set 2 and Recovery Set 3) retained ondisk.
Note: If you want to delete a recovery set to save backup storage space, reduce thenumber of retained sets and Arcserve UDP Agent (Windows) automatically deletesthe oldest recovery set. Do not attempt to delete the recovery set manually.
A flag in the status column on the Arcserve UDP Agent (Windows) home page MostRecent Events section indicates that a full backup is the starting backup of a recov-ery set. After the recovery set setting is changed (for example, changing the recov-ery set starting point from the first backup of Monday to the first backup ofThursday), the starting point of existing recovery sets will not be changed.
Note: Recovery sets are only available when using Arcserve UDP Agent (Windows)and you set the Backup Data Format to Standard. Recovery sets are not available
336 Arcserve UDP Agent for Windows User Guide
How to Perform a Backup
if you set the Backup Data Format to Advanced. This is because merge jobs arevery fast and efficient when using the Advanced Backup Data Format, thereforeeliminating the need for recovery sets.
Default: 2
Minimum: 1
Maximum: 100
Example 1 - Retain 1 Recovery Set:
Specify the number of recovery sets to retain as 1.
Arcserve UDP Agent (Windows) always keeps two sets in order to keep one com-plete set before starting the next recovery set.
Example 2 - Retain 2 Recovery Sets:
Specify the number of recovery sets to retain as 2.
Arcserve UDP Agent (Windows) will delete the first recovery set when the fourthrecovery set is about to start. This ensures that when the first backup is deleted andthe fourth is starting, you still have two recovery sets (recovery set 2 and recoveryset 3) available on disk.
Note: Even if you choose to retain only one recovery set, you will need space for atleast two full backups.
Example 3 - Retain 3 Recovery Sets:
The backup start time is 6:00 AM, August 20, 2012.
An incremental backup runs every 12 hours.
A new recovery set starts at the last backup on Friday.
You want to retain 3 recovery sets.
With the above configuration, an incremental backup will run at 6:00 AM and 6:00PM every day. The first recovery set is created when the first backup (must be a fullbackup) is taken. Then the first full backup is marked as the starting backup of therecovery set. When the backup scheduled at 6:00 PM on Friday is run, it will be con-verted to a full backup and marked as the starting backup of the recovery set.
Chapter 5: Using Arcserve UDP Agent (Windows) 337

How to Perform a Backup
338 Arcserve UDP Agent for Windows User Guide

How to Perform a Backup
Troubleshooting Backup Issues
When a problem is detected, Arcserve UDP Agent (Windows) generates a messageto help you identify and resolve the problem. These messages are contained in theArcserve UDP Agent (Windows) Activity Log, which is accessed from the View Logsoption on the home page UI. In addition, when an incorrect action is attempted, Arc-serve UDP Agent (Windows) generally displays a pop-up message to help youidentify and quickly resolve the problem.
Note: If you convert a basic disk to a dynamic disk, and then you restart the server.When you perform an Incremental backup, the backup will be as large as a fullbackup for that disk. The reason is, when you change the disk from basic todynamic, Arcserve UDP considers the dynamic disks as a new disk and performs afull backup for the first time. From the next backup, the backup job will be an Incre-mental backup.
SQL Server backup failed due to Out of memory error
Backup sessions for Arcserve UDP Agent (Windows) do not include anyMicrosoft SQL database information
Catalog Job fails when backing up a large number of files because of lessspace
Catalog Job fails when backing up a large number of files on Windows 2003x86 machine
Failed to create snapshot for selected volumes
Unable to change backup destination folder to Arcserve UDP Recovery PointView
Chapter 5: Using Arcserve UDP Agent (Windows) 339

How to Perform a Backup
SQL Server backup failed due to "out of memory"error
This is caused by a Microsoft known issue: Volume Shadow Copy Service (VSS) can-not create a volume snapshot even when VSS has sufficient memory space.
To resolve this problem, apply the Microsoft patch.
If the problem persists, use Live Chat to contact Arcserve support. Live Chat lets youoptimize intelligent conversation between you and the Technical Support team,allowing you to address your concerns and questions immediately, while still main-taining access to the product.
340 Arcserve UDP Agent for Windows User Guide

How to Perform a Backup
Backup sessions do not include Microsoft SQL data-base information
After upgrading from a previous release, the backup sessions of Arcserve UDPAgent (Windows) do not include any Microsoft SQL database information. This maybe caused by the SQL server not starting automatically in a virtual environment. Ifthis occurs, verify that the SQL database is in a good state and retry the backup.
If the problem persists, you can change the startup type of the SQL server to "Auto-matic (Delayed Start)".
If the problem persists, use Live Chat to contact Arcserve support. Live Chat lets youoptimize intelligent conversation between you and the Technical Support team,allowing you to address your concerns and questions immediately, while still main-taining access to the product.
Chapter 5: Using Arcserve UDP Agent (Windows) 341

How to Perform a Backup
Catalog Job fails Due to Less Space when Backing upLarge Number of Files
If you are attempting to back up a large number of files and the catalog generationjob fails because there is not enough available space in the Arcserve UDP Agent(Windows) home folder, perform the following task to create a new temp location:
Important! Verify that this new location contains enough free space to hold all ofyour catalog temporary data.
1. Within the Arcserve UDP Agent (Windows) home folder, access the Configurationfolder. (The Arcserve UDP Agent (Windows) home folder is located on the ArcserveUDP Agent (Windows) install path).
Program Files\Arcserve\Unified Data Protection\Engine\Configuration
2. Within the Configuration folder, create a switch.ini file. (File name is case sens-itive).
3. Within the new switch.ini file, add the following content:
[CatalogMgrDll.DLL]
Common.TmpPath4Catalog="I:\catalogtemp"
4. Run the backup job again.
The catalog generation part of the job will now go to the newly created tempfolder.
If the problem persists, use Live Chat to contact Arcserve support. Live Chat lets youoptimize intelligent conversation between you and the Technical Support team,allowing you to address your concerns and questions immediately, while still main-taining access to the product.
342 Arcserve UDP Agent for Windows User Guide

How to Perform a Backup
Failed to create snapshot for selected volumes
If a volume does not have enough disk space, the backup job can fail with the errormessage "Failed to create snapshot for selected volumes". If the backup job fails,you can perform either task:
Free up some disk space on the volumes being backed up.
Reconfigure the Volume Shadow Copy settings to save shadow copy to avolume with sufficient free disk space.
If the problem persists, use Live Chat to contact Arcserve support. Live Chat lets youoptimize intelligent conversation between you and the Technical Support team,allowing you to address your concerns and questions immediately, while still main-taining access to the product.
Chapter 5: Using Arcserve UDP Agent (Windows) 343

How to Perform a Backup
Unable to change backup destination folder to Arc-serve UDP Recovery Point View
On Windows Vista and later operating systems, if you create an account whichbelongs to a local administrator group, and from this new account you attempt tochange the Arcserve UDP Agent (Windows) backup destination folder to ArcserveUDP Recovery Point View, the folder view cannot be changed and no error messageis displayed. This can happen when the User Account Control is enabled.
If this condition occurs, you can either disable the User Account Control or you cangrant Modify privileges to the created Windows account.
To disable the User Account Control, perform the following task:
1. From the Windows Control Panel, select User Accounts, User Accounts, and thenChange User Account Control Settings.
The User Account Control Settings dialog displays.
2. For the Choose when to be notified about changes to your computer option,drag the slide bar to the bottom (Never notify).
3. When you disable the User Account Control, reboot your computer.
To grant Modify privileges to the created Windows account, perform the fol-lowing task:
344 Arcserve UDP Agent for Windows User Guide

How to Perform a Backup
1. From the Windows Explorer view, navigate to the specified backup destination.
2. Right-click on the backup destination folder, select Properties, and click the Secur-ity tab.
3. Click Edit and Add a user for this destination folder.
The Permissions dialog is displayed.
4. For this user, check the Modify permissions option to allow control specifically tothis user and add it to the folder security list.
If the problem persists, use Live Chat to contact Arcserve support. Live Chat lets youoptimize intelligent conversation between you and the Technical Support team,allowing you to address your concerns and questions immediately, while still main-taining access to the product.
Chapter 5: Using Arcserve UDP Agent (Windows) 345
Perform File Copy to Disk/Cloud
Perform File Copy to Disk/Cloud
Arcserve UDP Agent (Windows) provides the capability to copy/move files to andfrom the cloud or disk, which is based on your specified File Copy and retentionpolicies. File Copy can be used for copying critical data to secondary locations andcan also be used as an archiving solution. File Copy allows you to safely andsecurely delete the source data after it has been copied to an off-site or secondarystorage repository.
The process of file copying Arcserve UDP Agent (Windows) backup information letsyou specify the file copy source, destination, and corresponding policies for the typeof File Copy job performed. The available types are File Copy and File Copy - DeleteSource. The two processes are similar, with the exception that when you perform aFile Copy - Delete Source job, the data is moved from the source to the destination(deleted from source location) and provides more available free space at yoursource. When you perform a File Copy job, the data is copied from the source tothe destination (remains on source destination) and provides multiple stored ver-sions. For more information about configuring the File Copy settings and policies,see Manage File Copy Settings.
The File Copy process can only be launched automatically as scheduled. For moreinformation about configuring the schedule settings, see Specify the File CopySchedule.
Note: For a compressed File Copy job, the activity log displays only the uncom-pressed size.
346 Arcserve UDP Agent for Windows User Guide

Perform a Restore
Perform a RestoreArcserve UDP provides you with various tools and options that you can use torestore data. The aim of running a successful restore job is to quickly identify thedata you need and to retrieve it from the appropriate backup media. Each restorejob requires a source and destination.
Chapter 5: Using Arcserve UDP Agent (Windows) 347

Perform a Restore
Restore Considerations
Before you perform an Arcserve UDP Agent (Windows) restore, review the fol-lowing restore considerations:
Restore Considerations for a remote destination
If all the drive letters (A - Z) are occupied, the restore to a remote path will notsucceed because Arcserve UDP Agent (Windows) needs to use one drive letterto mount the remote destination path.
Restore Considerations for Hyper-V servers
On a Hyper-V server (even if you have the proper VM license), you must manu-ally restore VHD files of VM and then re-register them with Hyper-V Manager.
Note: After the VHDs are restored they are not directly registered with Hyper-V Manager. You can either attach them to existing VM or create a new VM andattach those to them.
Restore Considerations for a Microsoft SQL Server 2008 database withFILESTREAM data
Both the database and its related FILESTREAM BLOB data can be automaticallybacked-up by Arcserve UDP Agent (Windows), but the FILESTREAM BLOB datacannot be restored automatically with the database. This is becauseFILESTREAM feature is not supported by the latest SQL Server Writer. As a res-ult, when one database with FILESTREAM BLOB data is restored, just restoringthe database is no longer enough, and the folder of FILESTREAM BLOB dataalso needs to be restored.
Note: FILESTREAM is a feature introduced by Microsoft SQL Server 2008, whichprovides the capability of storing binary large object (BLOB) data (MP3, Word,Excel, PDF, etc.) in the NTFS file system, rather than in a database file.
Restore Considerations for session dismount time
When you browse the volume of one recovery point which does not have a cata-log, the volume will be mounted. After the volume is mounted, the volumestatus is queried every 10 minutes to check if it is used. If it is not used, it willbe dismounted.
To change the default session dismount time of 10 minutes, modify the RegistryKey, using the following information:
n Registry key path: Arcserve UDP Agent (Windows) Installation path
n Registry key name: SessionDismountTime
348 Arcserve UDP Agent for Windows User Guide
Perform a Restore
n Registry key type: String
n Registry key value unit: second
For example: If you set the registry value to 60, the mounted volume status isqueried every 60 seconds and if it is not used for the last 60 seconds, it will bedismounted.
Chapter 5: Using Arcserve UDP Agent (Windows) 349

Perform a Restore
Restore Methods
The goal of running a successful restore job is to identify quickly the data you needand to retrieve it from the appropriate backup location. The Arcserve UDP Agent(Windows) provides various methods to identify and locate the backed up data andallow you to restore it. Regardless of the restore method you select, Arcserve UDPAgent (Windows) uses visual indicators (restore markers) of the objects that are orare not selected for restore. For more information, see Restore Markers.
Restore data
1. From the Arcserve UDP Agent (Windows) home page (or Arcserve UDP Agent (Win-dows) Monitor), select Restore.
The restore methods selection dialog opens.
2. Select the type of restore you want to perform.
The available options are Browse Recovery Points, Browse File Copies, FindFiles/Folders to Restore, Recover VM, and Restore Exchange Mails.
Note: Use the Browse Recovery Points if you want to restore any applications.
Browse Recovery Points
Lets you browse the available recovery points (successful backups) from a cal-endar view. The calendar dates that contain valid recovery points are high-lighted in green. When you select a recovery date, all the associated
350 Arcserve UDP Agent for Windows User Guide

Perform a Restore
recovery points for that date are displayed. You can then browse and selectthe backup content (including applications) to be restored.
Browse File Copies
Lets you browse the available File Copy locations (local disk/network drive orcloud) to locate the specific file or folder that is going to be restored.
Note: This option is not available for VM backup proxy.
Find Files/Folders to Restore
Lets you search for a file name pattern in a specific location and or the fileversion that is going to be restored.
Recover VM
Lets you browse the available virtual machine recovery points from a cal-endar view. The calendar dates that contain valid recovery points are high-lighted in green. When you select a recovery date, all the associated virtualmachine recovery points for that date are displayed. You can then browseand select the virtual machine content that is going to be restored.
Restore Microsoft Exchange Data
Lets you restore exchange data that includes appointments, contacts, emailmessages, and so on.
Restore Active Directory
Lets you recover Active Directory objects and attributes.
Chapter 5: Using Arcserve UDP Agent (Windows) 351

Perform a Restore
Restore Markers
Regardless of which restore method you select, when you navigate to a specificvolume, folder, or file to restore, each object displayed in the restore window has agreen or gray box to its left called a marker. These markers are visual indicators ofthe objects that are or are not selected for restore.
Green marker
Lets you control the extent of the restore for an object directly. Click a markerto exclude an object from a restore or to indicate that you want the restore forthe object to be full or partial. As you click the marker, you fill or empty themarker of color, indicating the extent of the restore.
Gray marker
These markers are associated with objects that are not real and that you can-not restore. Typically, these items serve as placeholders under which otherobjects are grouped and displayed. As you click the green markers under a graymarker item, the fill proportion of the gray marker changes automatically fromempty to partial to full depending on the proportion of files you have chosen torestore.
The following table describes the different marker configurations and cor-responding restore levels:
Marker Configuration Description
Completely filled center. Full restore.
Partially filled center. Partial restore.
Empty center. Do not restore.
Note: Gray marker configurations follow the same pattern as green marker con-figurations, but reflect the proportion of files under them that are selected forrestore.
The fill proportion of a marker at a higher level of the directory tree depends onthe fill proportions of the markers of the objects at the lower levels.
If all the markers at the lower levels are completely filled, then the marker atthe higher level is also automatically completely filled.
If the markers at the lower levels are a mix of completely filled and partiallyfilled, then the marker at the higher level is automatically partially filled.
If you click a marker at a higher level so that it is completely filled, then all themarkers at the lower levels are automatically filled completely.
352 Arcserve UDP Agent for Windows User Guide

Perform a Restore
How to Restore From a Recovery Point
Each time Arcserve UDP performs a successful backup, a point-in-time snapshotimage of your backup is created (recovery point). This collection of recovery pointsallows you to locate and specify exactly which backup image you want to restore. Ifat some later time, you suspect any of the backed up information is missing, cor-rupted, or not reliable, you can then locate and restore from a previous knowngood version.
The following diagram illustrates the process to restore from a recovery point:
Perform the following tasks to restore from a recovery point:
1. Review the Restore Prerequisites and Considerations
2. Specify the Recovery Point Information to Restore
a. Specify the Recovery Point and Content to Restore
b. Define the Restore Options
Chapter 5: Using Arcserve UDP Agent (Windows) 353

Perform a Restore
3. Restore the Recovery Point Content
4. Verify that Content was Restored
354 Arcserve UDP Agent for Windows User Guide

Perform a Restore
Review the Restore Prerequisites and Considerations
Verify that the following prerequisites exist before performing a restore:
You have at least one recovery point available to restore.
You have a valid and accessible recovery point destination to restore the recov-ery point content from.
You have a valid and accessible target location to restore the recovery pointcontent to.
Review the Compatibility Matrix that provides the supported operating sys-tems, databases, and browsers.
Review the following restore considerations:
If the restore is to a remote destination and if all the drive letters (A - Z) areoccupied, the restore to a remote path will not succeed. Arcserve UDP Agent(Windows) needs to use one drive letter to mount the remote destination path.
(Optional) Understand how the restore process works. For more information,see How File Level Restores Work.
(Optional) Review the files skipped during restore. For more information, seeFiles Skipped During Restore.
When you attempt to restore an optimized backup session to a non-emptyvolume (unoptimized restore), the restore job may take more time than theestimated time displayed in the job monitor. The amount of data that is pro-cessed and the elapsed time may increase based on the data that is optimizedon the volume.
Example:
The backup volume size is 100 GB and after optimization the volume size is reducedto 50 GB.
When you perform an unoptimized restore of this volume the restore job monitordisplays 100% after restoring 50 GB, but it will take more time to restore the entire100 GB.
The following Activity log message will be displayed when restoring the systemfiles:
"System files were skipped. If necessary, you can use the Bare Metal Recovery(BMR) option to restore them."
Chapter 5: Using Arcserve UDP Agent (Windows) 355

Perform a Restore
How File Level Restores Work
During a block-level backup, each backed up file is made up of a collection ofblocks that define that particular file. A catalog file is created containing a list ofthe backed up files, along with the individual blocks that were used for each fileand the available recovery points for these files. When you need to restore a par-ticular file, you can search your backup and select the file you want to restore andthe recovery point you want to restore from. Then Arcserve UDP collects the ver-sion of the blocks that were used for the recovery point of the specified file, andreassembles and restores the file.
Note: You can also perform a restore without a catalog file from a catalog-lessbackup recovery point.
The following flow diagram shows the process of how Arcserve UDP restores a spe-cific file:
356 Arcserve UDP Agent for Windows User Guide

Perform a Restore
Files Skipped During Restore
During restore by Arcserve D2D some files may be skipped intentionally.
The files and folders in the tables below are skipped during a restore if the fol-lowing two conditions exist:
Files are skipped when such files exist before the restore and the conflict optionis "skip existing files".
Files and folders are skipped when being an important component for Windowsor Arcserve D2D.
O-S
Folder orLocation
File or Folder Name Remark
All
Rootfolder ofeachvolume
CAVolTrc.datUsed by the tracking Driver.
cavoltrcsnapshot.datSystem VolumeInformation\*
Used to save files/folders by a Windows sys-tem. For example, volume shadow copy files.
RECYCLER\*
Used only on NTFS partitions. It contains aRecycle Bin for each user who logs on to thecomputer, sorted by their security identifier(SID).
$Recycle.Bin\*
When you delete a file in Windows NT Exploreror My Computer, the file is stored in theRecycle Bin until you empty the Recycle Bin orrestore the file.
Any foldercontainspicturefiles
Thumbs.dbStores thumbnail images for Windows Explorerthumbnail view.
Rootfolder ofvolume
PageFile.Sys Windows virtual memory swap file.
Hiberfil.sysHibernate file, used to save the system datawhen a computer goes into hibernate mode.
The following files and folders are skipped when you restore to the original oralternate location:
OS Folder or LocationFile or
Folder NameRemark
AllFolder specified in value record under:
HKLM\Software\Microsoft\Windows NT\Cur-rentVersion\WinLogon\SfcDllCache
All files/folders(recursively)
Folder con-tains acached dll file
Chapter 5: Using Arcserve UDP Agent (Windows) 357

Perform a Restore
which is usedfor SystemFile Checker(SFC) andcontents ofthe systemdll cache dir-ectory arerebuilt byusing SFC.
358 Arcserve UDP Agent for Windows User Guide

Perform a Restore
%SystemRoot%\SYSTEM32\dllCache
Root folder of quorum_device MSCS\*
Used forMicrosoftClusterServer.
%SystemRoot%\SYSTEM32\
perf?00?.dat Performancedata used bytheWindowsperformancecounter.
perf?00?.bak
CATROOT\*
Used forWindowsFile Pro-tection(WFP)recordsdigital sig-natures ofthe oper-ating sys-teminstalls(such asDLL, EXE,SYS, OCX,and so on)to protectthem fromdeletionor fromreplace-ment byolder ver-sions.
%SystemRoot%\inetsrv\ metabase.bin
Metabasebinary fileof earlierIIS ver-sionsbefore6.0.
File or folder specified in value except "SIS CommonStore" under HKLM\SYSTEM\Cur-rentCon-trolSet\Control\BackupRestore\FilesNotToBackup
All files/folders(recursively)
Do notback upandrestoreFiles andfolders .For moreinform-
Chapter 5: Using Arcserve UDP Agent (Windows) 359

Perform a Restore
ation, seethe link.
XPW20-03
System volume
NTLDRThe mainbootloader.
BOOT.INI
Containsboot con-figuration(if missing,NTLDR willdefaultto \Windo-ws on thefirst par-tition ofthe firstharddrive).
NTDETECT.COM
Requiredfor boot-ing an NT-based OS.Detectsbasic hard-wareinform-ationneededfor a suc-cessfulboot.
Vistaandlater
Root folder of system volume
boot\*Bootfolder forWindows.
bootmgrWindowsboot man-ager file.
EFI\Mi-crosoft\Boot\*
Used forEFI boot.
%SystemRoot%\SYSTEM32\LogFiles\WMI\RTB-ackup\*
StoresETW tracefiles(extension.etl) forreal timeeventtrace ses-
360 Arcserve UDP Agent for Windows User Guide

Perform a Restore
sions.
config\RegBack\*
Backup ofcurrentregistrytable.
Win-8andlater
System volume
swapfile.sys
Systemcontrollerfile, nor-mallyaround256 MB. Itis used byMetrostyleapplic-ations thatdo not fitthe tra-ditionalpagingchar-acteristics(such asusage pat-tern,growth,spacereser-vation) ofpage-file.sys.
BOOTNXT
Used toboot fromOS, otherthan Win-dows 8.Createdwhenenablingthe startupoptions,andupdatedby Win-dows.
The Activity log provides the following information:
Chapter 5: Using Arcserve UDP Agent (Windows) 361

Perform a Restore
Date Time Information: jobxxxx System Files skipped. You can use Bare-MetalRecovery Option (BMR) to restore them.
Date Time Information: jobxxxx Files or Directories skipped. Which files or dir-ectories were skipped can be found in: C:\Program Files\Arcserve\Unified DataProtection\Engine\Logs\Restore-<YYYYMMDD>-<hhmmss>-<Process ID>-<JobID>.log.
362 Arcserve UDP Agent for Windows User Guide
Perform a Restore
Specify the Recovery Point Information to Restore
Arcserve UDP provides you with an option to restore data from a recovery point.The goal of running a successful restore job is to identify quickly the data you needand to retrieve it from the appropriate backup location. Each restore job requires asource and destination.
The process involved in restoring from a recovery point is as follows:
1. Specify the Recovery Point and Content to Restore
2. Define the Restore Options
Chapter 5: Using Arcserve UDP Agent (Windows) 363

Perform a Restore
Specify the Recovery Point and Content to Restore
Use the Browse Recovery Points option to restore from a recovery point. Whenyou select a recovery date, and then specify the time, all the associated recoverypoints for that duration are displayed. You can then browse and select the backupcontent (including applications) to be restored.
Follow these steps:
1. Access the restore method selection dialog in one of the following ways:
From Arcserve UDP:
a. Log into Arcserve UDP.
b. Click the resources tab.
c. Select All Nodes in the left pane.
All the added nodes are displayed in the center pane.
d. In the center pane, select the node and click Actions.
e. Click Restore from the Actions drop-down menu.
The restore method selection dialog opens.
Note: You are automatically logged in to the agent node and the restoremethod selection dialog is opened from the agent node.
From Arcserve UDP Agent (Windows):
a. Log into Arcserve UDP Agent (Windows).
b. From the home page, select Restore.
The restore method selection dialog opens.
2. Click the Browse Recovery Points option.
The Browse Recovery Points dialog opens. You can see the Recovery Point Serverdetails in the Backup Location.
364 Arcserve UDP Agent for Windows User Guide

Perform a Restore
AR indicates the run result if Assured Recovery ran for the session.
3. Click Change to update the backup location.
The Source dialog opens where you can select the backup location.
4. Select one of the following sources:
Select local disk or shared folder
Chapter 5: Using Arcserve UDP Agent (Windows) 365

Perform a Restore
a. Specify or browse to the location where your backup images are stored andselect the appropriate backup source.
You can click the green arrow button to verify the connection to the specifiedlocation. If necessary, enter the Username and Password credentials to gainaccess to that source location.
The Select backup location dialog opens.
b. Select the folder where the recovery points are stored and click OK.
The Select backup location dialog closes and you can see the backup loc-ation in the Source dialog.
c. Click OK.
The recovery points are listed in the Browse Recovery Points dialog.
Select Recovery Point Server
a. Specify the Recovery Point Server setting details and click Refresh.
All the agents are listed in the Data Protection Agent column in the Sourcedialog.
b. Select the agent from the displayed list and click OK.
The recovery points are listed in the Browse Recovery Points dialog.
5. Select the calendar date for the backup image to restore.
All the dates containing recovery points for the specified backup source are high-lighted in green.
The corresponding recovery points for that date are displayed, with the time of thebackup, the type of backup that was performed (Full, Incremental, or Verify), andthe name of the backup.
6. Select a recovery point to restore.
The backup content (including any applications) for the selected recovery point dis-plays.
Note: A clock icon with a lock symbol indicates the recovery point contains encryp-ted information and may require a password for restore.
7. Select the content to restore.
For a volume-level restore, you can specify to restore the entire volume orselected files/folders within the volume.
For an application-level restore, you can specify to restore the entire applic-ation or selected components, databases, instances, and so on, within theapplication.
366 Arcserve UDP Agent for Windows User Guide

Perform a Restore
8. Click Next.
The Restore Options dialog Opens.
The recovery point and content to restore is specified.
Chapter 5: Using Arcserve UDP Agent (Windows) 367
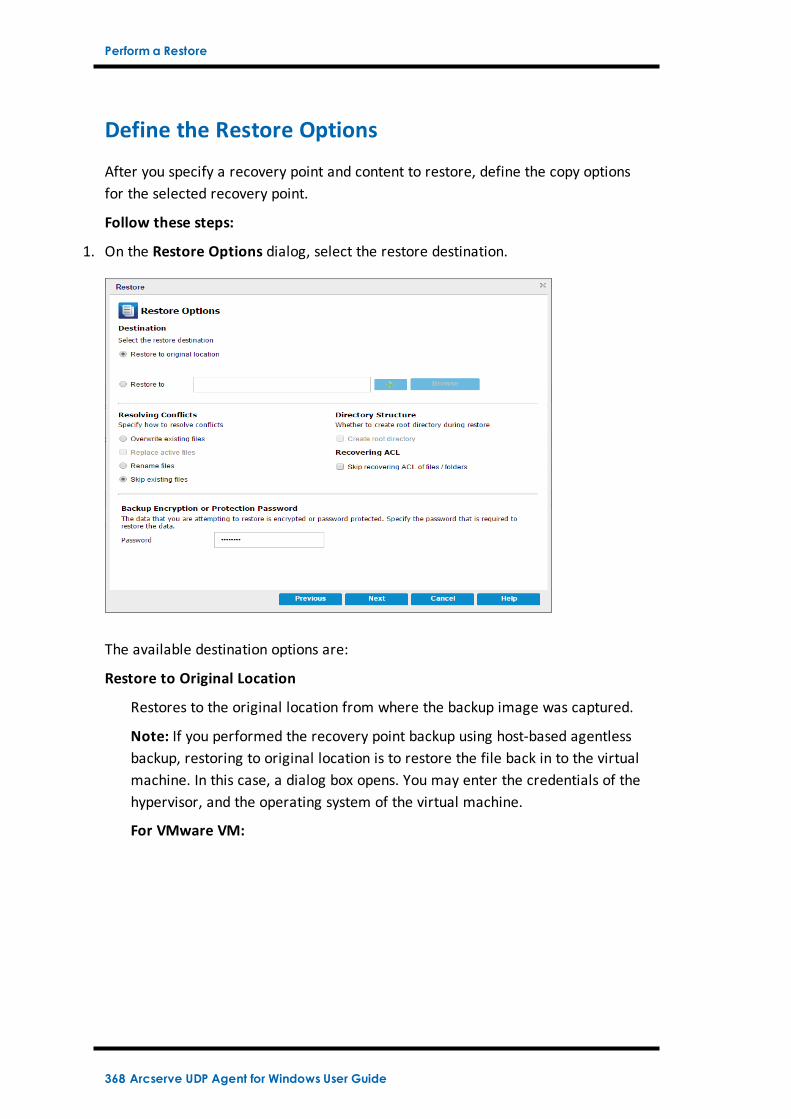
Perform a Restore
Define the Restore Options
After you specify a recovery point and content to restore, define the copy optionsfor the selected recovery point.
Follow these steps:
1. On the Restore Options dialog, select the restore destination.
The available destination options are:
Restore to Original Location
Restores to the original location from where the backup image was captured.
Note: If you performed the recovery point backup using host-based agentlessbackup, restoring to original location is to restore the file back in to the virtualmachine. In this case, a dialog box opens. You may enter the credentials of thehypervisor, and the operating system of the virtual machine.
For VMware VM:
368 Arcserve UDP Agent for Windows User Guide

Perform a Restore
Note: To be able to create or write files inside the VM, consider the fol-lowing requirements for the settings and account permission of virtualmachine:
VMware Tools is installed and running.
Firewall must allow File and Printer Sharing.
The account is built-in local administrator, built-in domain administrator, ordomain account that is member of the local Administrators group. If otheraccounts are used:
Disable the UAC remote access. To disable UAC remote access, seeImport Virtual Machine Using Additional Administrative Account.
Disable UAC in the Local Security Policy by disabling the setting Run alladministrator in Admin Approval Mode at secpol.msc -> Local Policies -> Security Options. (Secpol.msc is Microsoft's security policy editor).
Important: Do not attempt to disable the UAC in the User Account Con-trol Settings dialog box that opens from the control panel.
For VMware VM:
Chapter 5: Using Arcserve UDP Agent (Windows) 369

Perform a Restore
Note: To be able to create or write files inside the VM, consider the followingrequirements for the settings and account permission of virtual machine:
Hyper-V integration services are installed and running.
Firewall must allow File and Printer Sharing.
The account is built-in local administrator, built-in domain administrator,or domain account that is member of the local Administrators group. Ifother accounts are used:
Disable the UAC remote access. To disable UAC remote access, seeImport Virtual Machine Using Additional Administrative Account.
If virtual machine guest OS is Client version Windows (such as Windows10), you need to manually configure firewall to allow Windows Man-agement Instrumentation (WMI).
Restore to
Restores to the specified location. You can click the green arrow button toverify the connection to the specified location. If necessary, enter the User-name and Password credentials to gain access to that location.
2. Specify the Resolving Conflicts option that Arcserve UDP performs if conflicts areencountered during the restore process.
370 Arcserve UDP Agent for Windows User Guide

Perform a Restore
The available options are:
Overwrite existing files
Overwrites (replaces) any existing files, which are at the restore destination. Allobjects are restored from the backup files regardless of their current presenceon your computer.
Replace active files
Replaces any active files upon reboot. If during the restore attempt ArcserveUDP Agent (Windows) discovers that the existing file is currently in use or beingaccessed, it will not immediately replace that file, but instead to avoid any prob-lems will delay the replacement of the active files until the next time themachine is rebooted. (The restore occurs immediately, but the replacement ofany active files is done during the next reboot).
This option is only available if you select the Overwrite existing files option.
Note: If you do not select this option, any active file is skipped from the restore.
Rename files
Creates a new file if the file name already exists. Selecting this option copiesthe source file to the destination with the same file name but a different exten-sion. Data is then restored to the new file.
Skip existing files
Skips over and not overwrite (replace) any existing files that are located at therestore destination. Only objects that are not currently existing on yourmachine are restored from the backup files.
Default: Skip existing files.
3. Specify the Directory Structure to create a root directory during restore.
Create root directory
Specifies that if a root directory structure exists in the captured backup image,Arcserve UDP recreates that same root directory structure on the restore des-tination path.
With this option not selected, the file or folder is restored directly to the des-tination folder.
For example, if during the backup you captured the files "C:\Folder-1\SubFolder2\A.txt" and "C:\Folder1\SubFolder2\B.txt" and during the restoreyou specified to the restore destination as "D:\Restore".
If you select to restore the "A.txt" and "B.txt" files individually, the destinationfor the restored files will be "D:\Restore\A.txt" and "D:\Restore\B.txt" (the
Chapter 5: Using Arcserve UDP Agent (Windows) 371

Perform a Restore
root directory above the specified file level will not be recreated).
If you select to restore from the "SubFolder2" level, the destination for therestored files will be "D:\Restore\SubFolder2\A.txt" and"D:\Restore\SubFolder2\B.txt" (the root directory above the specified folderlevel will not be recreated).
With this option selected, the entire root directory path for the files/folders(including the volume name) is recreated to the destination folder. If the files/-folders to be restored are from the same volume name, then the destinationroot directory path does not include that volume name. However, if the files/-folders to be restored are from different volume names, then the destinationroot directory path does include the volume name.
For example, if during the backup you captured the files "C:\Folder-1\SubFolder2\A.txt", "C:\Folder1\SubFolder2\B.txt", and also E:\Folder-3\SubFolder4\C.txt" and during the restore you specified to the restoredestination as "D:\Restore".
If you select to restore just the "A.txt" file, the destination for the restoredfile will be "D:\Restore\ Folder1\SubFolder2\A.txt" (the entire root directorywithout the volume name will be recreated).
If you select to restore both the "A.txt" and "C.txt" files, the destination forthe restored files will be "D:\Restore\C\Folder1\SubFolder2\A.txt" and"D:\Restore\E\Folder3\SubFolder4\C.txt" (the entire root directory with thevolume name will be recreated).
4. From Recovering ACL, select the skip recovering ACL of files / folders option toskip the original permission for the restored files/folders. Selecting the option letsyou inherit the permissions of target folder instead. If you do not select the option,the original permissions are kept.
5. If necessary, specify the Backup Encryption Password, when the data you are try-ing to restore is encrypted.
A password is not required if you are attempting to restore from the same ArcserveUDP Agent (Windows) computer from where the encrypted backup was performed.However, if you are attempting to restore from a different Arcserve UDP Agent(Windows) computer, a password is required.
Note: A clock icon with a lock symbol indicates the recovery point contains encryp-ted information and may require a password for restore.
6. Click Next.
The Restore Summary dialog opens.
The restore options are defined to restore from a recovery point.
372 Arcserve UDP Agent for Windows User Guide

Perform a Restore
Restore the Recovery Point Content
After you define the restore options, verify that your settings are correct and con-firm the restore process. Restore Summary helps you to review all the restoreoptions that you defined and modify them if necessary.
Follow these steps:
1. On the Restore Summary dialog, review the displayed information to verify that allthe restore options and settings are correct.
2. Perform one of the following options:
If the summary information is incorrect, click Previous and go back to the applic-able dialog to change the incorrect setting.
If the summary information is correct, click Finish to launch the restore process.
The recovery point content is restored.
Chapter 5: Using Arcserve UDP Agent (Windows) 373

Perform a Restore
Verify that Content was Restored
After the completion of the restore process, verify that content was restored to thespecified destination.
Follow these steps:
1. Navigate to the restore destination you specified.
A list of folders appears.
2. Locate the file to which you have restored the content.
For example, If you select to restore the A.txt file to the restore destination as"D:\Restore, then navigate to the following location:
D:\Restore\A.txt.
3. Verify the content to confirm the restore job.
The restored content is successfully verified.
374 Arcserve UDP Agent for Windows User Guide

Perform a Restore
How to Restore From a File Copy
Each time Arcserve UDP performs a successful file copy job, it backs up all files thathave changed since the last successful file copy job. This restore method allows youto browse the file copied data and specify exactly which file you want to restore.
The following diagram illustrates the process to restore from a file copy:
Perform the following tasks to restore from a File Copy:
1. Review the Restore Prerequisites and Considerations
Chapter 5: Using Arcserve UDP Agent (Windows) 375

Perform a Restore
2. Specify the File Copy Information to Restore
a. Specify the File Copy and Content to Restore
n Specify Cloud Configuration for Restore
b. Define the Restore Options
3. Restore the Recovery Point Content
4. Verify that Content was Restored
376 Arcserve UDP Agent for Windows User Guide

Perform a Restore
Review the Restore Prerequisites and Considerations
Verify that the following prerequisites exist before performing a restore:
You have at least one file copy available to restore.
You have a valid and accessible file copy destination to restore the file copy con-tent from.
You have a valid and accessible target location to restore the file copy contentto.
Review the Compatibility Matrix that provides the supported operating sys-tems, databases, and browsers.
Review the following restore considerations:
Arcserve UDP only allows one restore job to run at the same time. If youattempt to launch a restore job manually, while another restore job is running,an alert message opens informing you another job is running and requests youto try again later.
If the restore is to a remote destination and if all the drive letters (A - Z) areoccupied, the restore to a remote path will not succeed. Arcserve UDP Agent(Windows) needs to use one drive letter to mount the remote destination path.
Enhance file copy to optimize performance:
File Copy can send multiple chunks simultaneously to the destination(ArchMultChunkIO)File Copy can copy more than one file at a time from the destination (Thread-sForArchive).Restore from a File Copy can download more than one file at a time (Thread-sForRestore).Catalog Synchronization uses multiple threads (ThreadForCatalogSync).
You can change the default File Copy Registry values by modifying the appropriateDWORD value. For more information, see Configure File Copy Settings to OptimizePerformance in the online help.
(Optional) Understand how the restore process works. For more information,see How File Level Restores Work.
Chapter 5: Using Arcserve UDP Agent (Windows) 377

Perform a Restore
How File Level Restores Work
During a File Copy, each backed up file is made up of a collection of blocks thatdefine the particular file. A catalog file is created for every version of the backedup file, along with the individual blocks that were used for these files. When youneed to restore a particular file, you can browse and select the file you want torestore and the file copy versions you want to restore from. Then Arcserve UDP col-lects the version of the blocks that were used for the file copy of the specified file,which reassembles and restores the file.
The following flow diagram shows the process of how Arcserve UDP restores a spe-cific file.
378 Arcserve UDP Agent for Windows User Guide

Perform a Restore
Specify the File Copy Information to Restore
Arcserve UDP provides you with an option to restore data from a file copy. The goalof running a successful restore job is to identify quickly the data you need and toretrieve it from the appropriate backup location. Each restore job requires a sourceand destination.
The process involved in restoring from a file copy is as follows:
1. Specify the File Copy and Content to Restore
2. Define the Restore Options
Chapter 5: Using Arcserve UDP Agent (Windows) 379
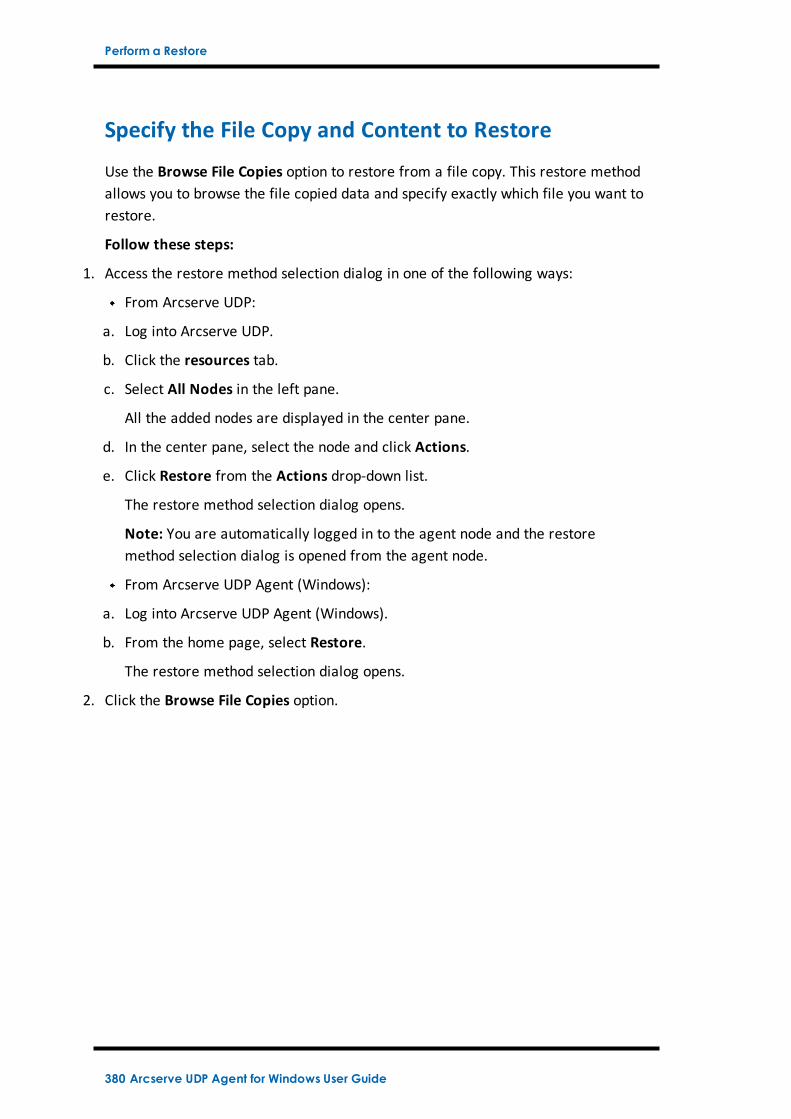
Perform a Restore
Specify the File Copy and Content to Restore
Use the Browse File Copies option to restore from a file copy. This restore methodallows you to browse the file copied data and specify exactly which file you want torestore.
Follow these steps:
1. Access the restore method selection dialog in one of the following ways:
From Arcserve UDP:
a. Log into Arcserve UDP.
b. Click the resources tab.
c. Select All Nodes in the left pane.
All the added nodes are displayed in the center pane.
d. In the center pane, select the node and click Actions.
e. Click Restore from the Actions drop-down list.
The restore method selection dialog opens.
Note: You are automatically logged in to the agent node and the restoremethod selection dialog is opened from the agent node.
From Arcserve UDP Agent (Windows):
a. Log into Arcserve UDP Agent (Windows).
b. From the home page, select Restore.
The restore method selection dialog opens.
2. Click the Browse File Copies option.
380 Arcserve UDP Agent for Windows User Guide

Perform a Restore
The Restore dialog opens. The destination that is currently showing in the RestoreFrom field is the configured default File Copy destination.
3. If necessary, you can click Add to browse to an alternate location where your filecopy images are stored.
The Destination dialog opens displaying the available alternate destination options.
Local or network drive
The Select a Backup Location dialog opens, allowing you to browse to andselect an alternate local or network drive location.
Cloud
The Cloud Configuration dialog opens, allowing you to access and select analternate cloud location. For more information about this dialog, see SpecifyCloud Configuration for Restore.
Regardless of whether you selected to restore from Local or network drive orfrom Cloud, when you change the destination to an alternate location a pop-up dia-
Chapter 5: Using Arcserve UDP Agent (Windows) 381

Perform a Restore
log will appear, asking if you want to perform a new catalog synchronization orread from the existing catalog.
If it is the first time you are performing a catalog synchronization, the Browse Exist-ing button will be disabled because there is no existing file copy catalog locally.
If a catalog synchronization has been previously performed, this dialog will displaydetails about the last time the catalog was synchronized from this destination. Ifthere were more file copy jobs run since that displayed time, your catalog may notbe currently synchronized and you can select the Sync option to ensure your filecopy catalog is up-to-date.
1. Click Sync to download the file copy catalog from the specified file copy des-tination to your local machine to provide faster browsing.
2. Click Browse Existing to use the file copy catalog that is available locally and notdownload/sync it again.
4. On the left pane, specify the file copy data to be restored. You can select file copiedfolders or files to be restored.
When you select an individual file to be restored, all file copied versions of that fileare displayed in the right pane. If multiple versions are available, you must selectwhich file copied version you want to restore.
5. After selecting the file copied folder or file version to restore, click Next.
The Restore Options dialog opens.
The File Copy and Content to restore is specified.
382 Arcserve UDP Agent for Windows User Guide

Perform a Restore
Specify Cloud Configuration for Restore
Note: The following procedure only applies if you are restoring a file/folder from afile copy or file archive cloud location.
The available options are Amazon S3, Amazon S3-compatible, Windows Azure, Win-dows Azure-compatible, Fujitsu Cloud (Windows Azure), and Eucalyptus-Walrus.(Amazon S3 is the default vendor).
Note: If you are using Eucalyptus-Walrus as your file copy cloud vendor, you willnot be able to copy files whose entire path length is greater than 170 characters.
The configuration options for each cloud vendor are similar (with some differentterminology), and any differences are described.
1. From the Browse File Copies option or the Find Files/Folders to Restore option,click Add.
The Destination dialog opens.
2. Select Cloud and click Browse.
The Cloud Configuration dialog opens.
Chapter 5: Using Arcserve UDP Agent (Windows) 383

Perform a Restore
3. Enter the following details:
Storage Name
Specifies the name of the cloud storage. This name will be added to Console foridentifying the cloud account. Each cloud account must have a unique storagename.
Storage Service
Select of the service from the drop-down list. The configuration option variesdepending on the storage service that is selected.
Access Key ID/Account Name/Query ID
Identifies the user who is requesting access this location.
(For this field, Amazon S3 uses Access Key ID, Windows Azure and Fujitsu Cloud(Windows Azure) use Account Name, and Eucalyptus-Walrus uses Query ID).
Secret Access Key/Secret Key
Because your Access Key is not encrypted, this Secret Access Key is a passwordthat is used to verify the authenticity of the request to access this location.
Important! This Secret Access Key is crucial for maintaining the security ofyour accounts. You should keep your keys and your account credentials in asecure location. Do not embed your Secret Access Key in a web page or otherpublicly accessible source code and do not transmit it over insecure channels.
(For this field, Amazon S3 uses Secret Access Key. Windows Azure, Fujitsu Cloud(Windows Azure), and Eucalyptus-Walrus use Secret Key).
Proxy Settings
Specifies the proxy server settings. Select Connect using a proxy server toenable this option. If you select this option, you must also include the IP address(or machine name) of the proxy server and the corresponding port number thatis used by the proxy server for internet connections. You can also select thisoption if your proxy server requires authentication. You then must provide thecorresponding authentication information (Domain Name\Username and Pass-word) that is required to use the proxy server.
(Proxy capability is not available for Eucalyptus-Walrus).
Bucket Name
All files and folders moved or copied to the cloud vendor are stored and organ-ized in your buckets (or containers). Buckets are like a container for your filesand are used to group and organize objects together. Every object stored at thecloud vendor is placed in a bucket.
384 Arcserve UDP Agent for Windows User Guide

Perform a Restore
(For this field, Amazon S3 and Eucalyptus-Walrus use Bucket Name. WindowsAzure and Fujitsu Cloud (Windows Azure) use Container).
Note: For the remainder of this step, all references to Buckets can also beapplied to Containers unless specified.
Enable Reduced Redundancy Storage
For Amazon S3 only, this option lets you select to enable Reduced RedundancyStorage (RRS). RRS is a storage option within Amazon S3 that helps you reducecost by storing non-critical, reproducible data at lower levels of redundancythan Amazon S3’s standard storage. Both the standard and reduced redundancystorage options store data in multiple facilities and on multiple devices, butwith RRS the data is replicated fewer times, so the cost is less. You shouldexpect the same latency and throughput using either the Amazon S3 standardstorage or RRS. By default this option is not selected (Amazon S3 uses the stand-ard storage option).
4. Click Test Connection to verify the connection to the specified cloud location.
5. Click OK.
The cloud account is added to the Console.
Chapter 5: Using Arcserve UDP Agent (Windows) 385

Perform a Restore
Define the Restore Options
After you specify the file copy information to restore, define the copy options forthe selected file copy and content.
Follow these steps:
1. On the Restore Options dialog, select the restore destination.
The available destination options are:
Restore to Original Location
Restores to the original location from where the backup image was captured.
Restore to
Restores to the specified location. You can click the green arrow button toverify the connection to the specified location. If necessary, enter the User-name and Password credentials to gain access to that location.
2. Specify the Resolving Conflicts option that Arcserve UDP performs if conflicts areencountered during the restore process.
The available options are:
Overwrite existing files
Overwrites (replaces) any existing files, which are at the restore destination. Allobjects are restored from the backup files regardless of their current presenceon your computer.
386 Arcserve UDP Agent for Windows User Guide

Perform a Restore
Replace active files
Replaces any active files upon reboot. If during the restore attempt ArcserveUDP Agent (Windows) discovers that the existing file is currently in use or beingaccessed, it will not immediately replace that file, but instead to avoid any prob-lems will delay the replacement of the active files until the next time themachine is rebooted. (The restore occurs immediately, but the replacement ofany active files is done during the next reboot).
This option is only available if you select the Overwrite existing files option.
Note: If you do not select this option, any active file is skipped from the restore.
Rename files
Creates a new file if the file name already exists. Selecting this option copiesthe source file to the destination with the same filename but a different exten-sion. Data is then restored to the new file.
Skip existing files
Skips over and not overwrite (replace) any existing files that are located at therestore destination. Only objects that are not currently existing on yourmachine are restored from the backup files.
Default: Skip existing files.
3. Specify the Directory Structure to create a root directory during restore.
Create root directory
Specifies that if a root directory structure exists in the captured backup image,Arcserve UDP recreates that same root directory structure on the restore des-tination path.
With this option not selected, the file or folder is restored directly to the des-tination folder.
For example, if during the backup you captured the files "C:\Folder-1\SubFolder2\A.txt" and "C:\Folder1\SubFolder2\B.txt" and during the restoreyou specified to the restore destination as "D:\Restore".
If you select to restore the "A.txt" and "B.txt" files individually, the destinationfor the restored files will be "D:\Restore\A.txt" and "D:\Restore\B.txt" (theroot directory above the specified file level will not be recreated).
If you select to restore from the "SubFolder2" level, the destination for therestored files will be "D:\Restore\SubFolder2\A.txt" and"D:\Restore\SubFolder2\B.txt" (the root directory above the specified folderlevel will not be recreated).
Chapter 5: Using Arcserve UDP Agent (Windows) 387

Perform a Restore
With this option selected, the entire root directory path for the files/folders(including the volume name) is recreated to the destination folder. If the files/-folders to be restored are from the same volume name, then the destinationroot directory path does not include that volume name. However, if the files/-folders to be restored are from different volume names, then the destinationroot directory path does include the volume name.
For example, if during the backup you captured the files "C:\Folder-1\SubFolder2\A.txt", "C:\Folder1\SubFolder2\B.txt", and also E:\Folder-3\SubFolder4\C.txt" and during the restore you specified to the restoredestination as "D:\Restore".
If you select to restore just the "A.txt" file, the destination for the restoredfile will be "D:\Restore\ Folder1\SubFolder2\A.txt" (the entire root directorywithout the volume name will be recreated).
If you select to restore both the "A.txt" and "C.txt" files, the destination forthe restored files will be "D:\Restore\C\Folder1\SubFolder2\A.txt" and"D:\Restore\E\Folder3\SubFolder4\C.txt" (the entire root directory with thevolume name will be recreated).
4. Specify the encryption password in File Copy Encryption Password.
5. Click Next.
The Restore Summary dialog opens.
The restore options are defined to restore from a file copy.
388 Arcserve UDP Agent for Windows User Guide

Perform a Restore
Restore the File Copy Content
After you define the restore options, verify that your settings are correct and con-firm the restore process. Restore Summary helps you to review all the restoreoptions that you defined and modify them if necessary.
Follow these steps:
1. On the Restore Summary dialog, review the displayed information to verify that allthe restore options and settings are correct.
If the summary information is incorrect, click Previous and go back to the applic-able dialog to change the incorrect setting.
If the summary information is correct, click Finish to launch the restore process.
The file copy content is restored.
Chapter 5: Using Arcserve UDP Agent (Windows) 389

Perform a Restore
Verify that Content was Restored
After the completion of the restore process, verify that content was restored to thespecified destination.
Follow these steps:
1. Navigate to the restore destination you specified.
A list of folders appears.
2. Locate the file to which you have restored the content.
For example, If you select to restore the A.txt file to the restore destination as"D:\Restore, then navigate to the following location:
D:\Restore\A.txt.
3. Verify the content to confirm the restore job.
The restored content is successfully verified.
390 Arcserve UDP Agent for Windows User Guide

Perform a Restore
How to Restore From a File Archive
Each time Arcserve UDP performs a successful file archive copy job, it archives allfiles that have changed since the last successful file archive job. This restoremethod allows you to browse the archived files and specify exactly which file youwant to restore.
The file archive restore process is identical to file copy restore.
Perform the following tasks to restore from a File Archive:
1. Review the Restore Prerequisites and Considerations
2. Specify the File Copy Information to Restore
a. Specify the File Copy and Content to Restore
Specify Cloud Configuration for Restore
b. Define the Restore Options
3. Restore the Recovery Point Content
4. Verify that Content was Restored
Chapter 5: Using Arcserve UDP Agent (Windows) 391

Perform a Restore
Review the Restore Prerequisites and Considerations
Verify that the following prerequisites exist before performing a restore:
You have at least one file copy available to restore.
You have a valid and accessible file copy destination to restore the file copy con-tent from.
You have a valid and accessible target location to restore the file copy contentto.
Review the Compatibility Matrix that provides the supported operating sys-tems, databases, and browsers.
Review the following restore considerations:
Arcserve UDP only allows one restore job to run at the same time. If youattempt to launch a restore job manually, while another restore job is running,an alert message opens informing you another job is running and requests youto try again later.
If the restore is to a remote destination and if all the drive letters (A - Z) areoccupied, the restore to a remote path will not succeed. Arcserve UDP Agent(Windows) needs to use one drive letter to mount the remote destination path.
Enhance file copy to optimize performance:
File Copy can send multiple chunks simultaneously to the destination(ArchMultChunkIO)File Copy can copy more than one file at a time from the destination (Thread-sForArchive).Restore from a File Copy can download more than one file at a time (Thread-sForRestore).Catalog Synchronization uses multiple threads (ThreadForCatalogSync).
You can change the default File Copy Registry values by modifying the appropriateDWORD value. For more information, see Configure File Copy Settings to OptimizePerformance in the online help.
(Optional) Understand how the restore process works. For more information,see How File Level Restores Work.
392 Arcserve UDP Agent for Windows User Guide

Perform a Restore
How File Level Restores Work
During a File Copy, each backed up file is made up of a collection of blocks thatdefine the particular file. A catalog file is created for every version of the backedup file, along with the individual blocks that were used for these files. When youneed to restore a particular file, you can browse and select the file you want torestore and the file copy versions you want to restore from. Then Arcserve UDP col-lects the version of the blocks that were used for the file copy of the specified file,which reassembles and restores the file.
The following flow diagram shows the process of how Arcserve UDP restores a spe-cific file.
Chapter 5: Using Arcserve UDP Agent (Windows) 393
Perform a Restore
Specify the File Copy Information to Restore
Arcserve UDP provides you with an option to restore data from a file copy. The goalof running a successful restore job is to identify quickly the data you need and toretrieve it from the appropriate backup location. Each restore job requires a sourceand destination.
The process involved in restoring from a file copy is as follows:
1. Specify the File Copy and Content to Restore
2. Define the Restore Options
394 Arcserve UDP Agent for Windows User Guide

Perform a Restore
Specify the File Copy and Content to Restore
Use the Browse File Copies option to restore from a file copy. This restore methodallows you to browse the file copied data and specify exactly which file you want torestore.
Follow these steps:
1. Access the restore method selection dialog in one of the following ways:
From Arcserve UDP:
a. Log into Arcserve UDP.
b. Click the resources tab.
c. Select All Nodes in the left pane.
All the added nodes are displayed in the center pane.
d. In the center pane, select the node and click Actions.
e. Click Restore from the Actions drop-down list.
The restore method selection dialog opens.
Note: You are automatically logged in to the agent node and the restoremethod selection dialog is opened from the agent node.
From Arcserve UDP Agent (Windows):
a. Log into Arcserve UDP Agent (Windows).
b. From the home page, select Restore.
The restore method selection dialog opens.
2. Click the Browse File Copies option.
Chapter 5: Using Arcserve UDP Agent (Windows) 395

Perform a Restore
The Restore dialog opens. The destination that is currently showing in the RestoreFrom field is the configured default File Copy destination.
3. If necessary, you can click Add to browse to an alternate location where your filecopy images are stored.
The Destination dialog opens displaying the available alternate destination options.
Local or network drive
The Select a Backup Location dialog opens, allowing you to browse to andselect an alternate local or network drive location.
Cloud
The Cloud Configuration dialog opens, allowing you to access and select analternate cloud location. For more information about this dialog, see SpecifyCloud Configuration for Restore.
Regardless of whether you selected to restore from Local or network drive orfrom Cloud, when you change the destination to an alternate location a pop-up dia-
396 Arcserve UDP Agent for Windows User Guide
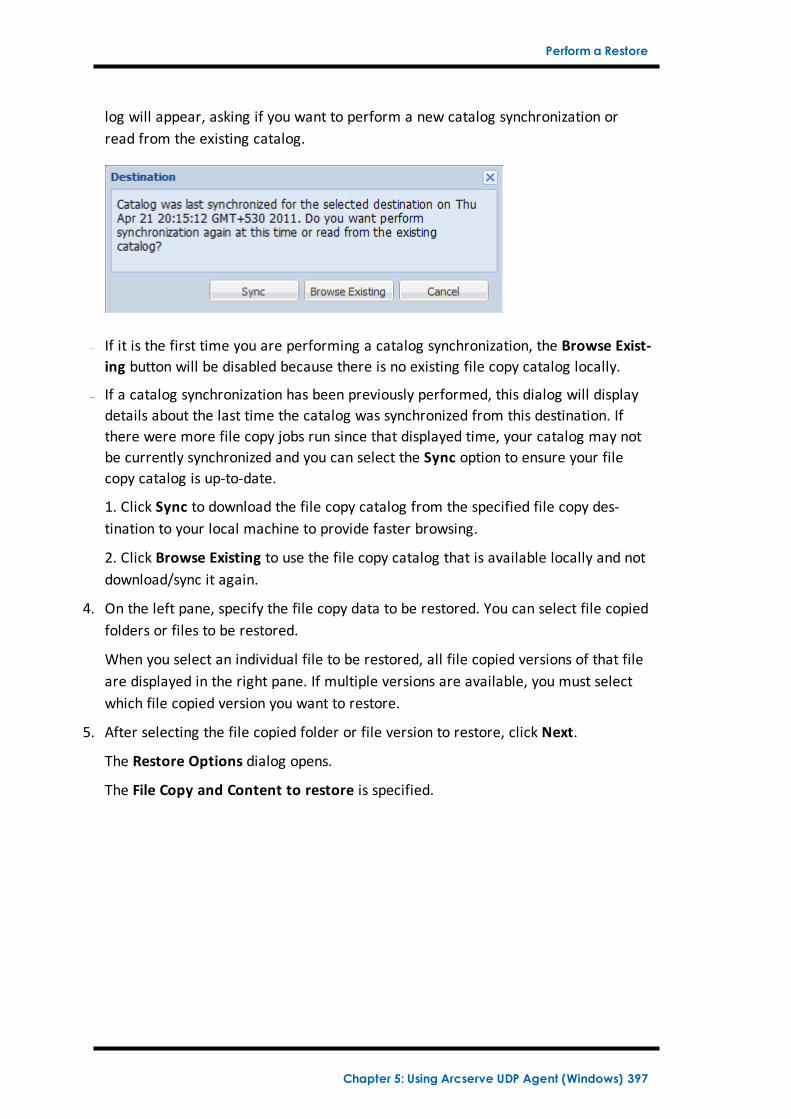
Perform a Restore
log will appear, asking if you want to perform a new catalog synchronization orread from the existing catalog.
If it is the first time you are performing a catalog synchronization, the Browse Exist-ing button will be disabled because there is no existing file copy catalog locally.
If a catalog synchronization has been previously performed, this dialog will displaydetails about the last time the catalog was synchronized from this destination. Ifthere were more file copy jobs run since that displayed time, your catalog may notbe currently synchronized and you can select the Sync option to ensure your filecopy catalog is up-to-date.
1. Click Sync to download the file copy catalog from the specified file copy des-tination to your local machine to provide faster browsing.
2. Click Browse Existing to use the file copy catalog that is available locally and notdownload/sync it again.
4. On the left pane, specify the file copy data to be restored. You can select file copiedfolders or files to be restored.
When you select an individual file to be restored, all file copied versions of that fileare displayed in the right pane. If multiple versions are available, you must selectwhich file copied version you want to restore.
5. After selecting the file copied folder or file version to restore, click Next.
The Restore Options dialog opens.
The File Copy and Content to restore is specified.
Chapter 5: Using Arcserve UDP Agent (Windows) 397
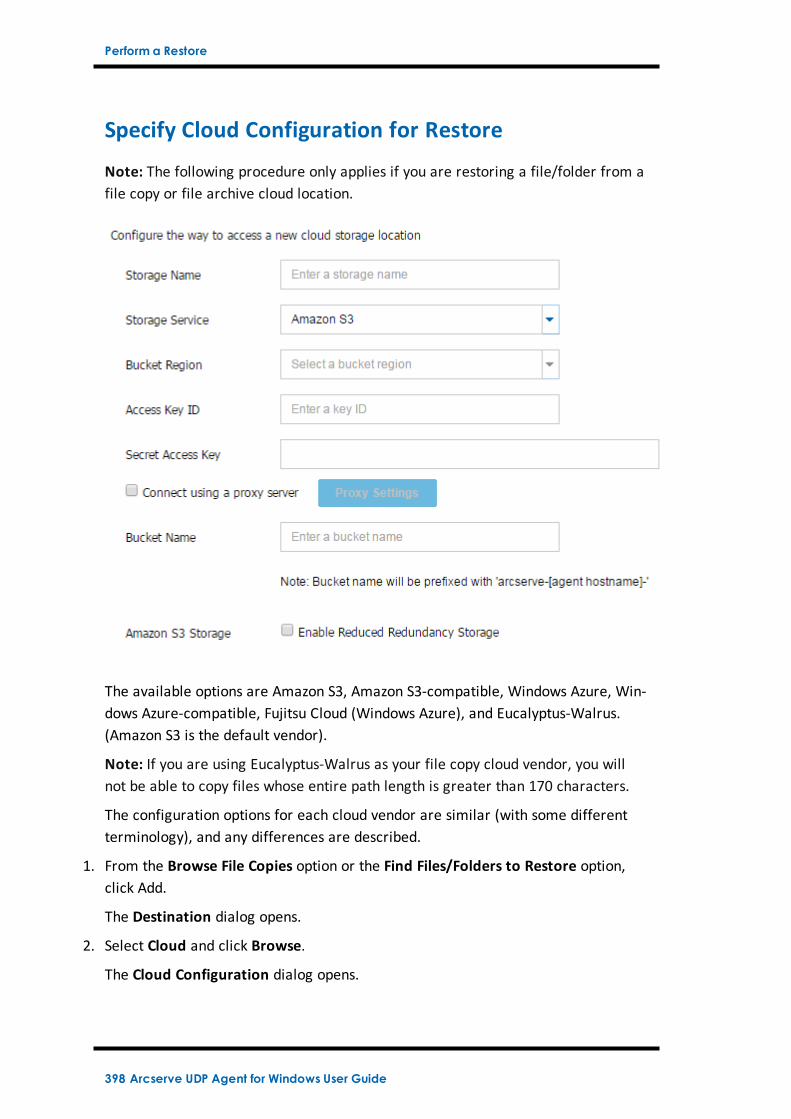
Perform a Restore
Specify Cloud Configuration for Restore
Note: The following procedure only applies if you are restoring a file/folder from afile copy or file archive cloud location.
The available options are Amazon S3, Amazon S3-compatible, Windows Azure, Win-dows Azure-compatible, Fujitsu Cloud (Windows Azure), and Eucalyptus-Walrus.(Amazon S3 is the default vendor).
Note: If you are using Eucalyptus-Walrus as your file copy cloud vendor, you willnot be able to copy files whose entire path length is greater than 170 characters.
The configuration options for each cloud vendor are similar (with some differentterminology), and any differences are described.
1. From the Browse File Copies option or the Find Files/Folders to Restore option,click Add.
The Destination dialog opens.
2. Select Cloud and click Browse.
The Cloud Configuration dialog opens.
398 Arcserve UDP Agent for Windows User Guide
Perform a Restore
3. Enter the following details:
Storage Name
Specifies the name of the cloud storage. This name will be added to Console foridentifying the cloud account. Each cloud account must have a unique storagename.
Storage Service
Select of the service from the drop-down list. The configuration option variesdepending on the storage service that is selected.
Access Key ID/Account Name/Query ID
Identifies the user who is requesting access this location.
(For this field, Amazon S3 uses Access Key ID, Windows Azure and Fujitsu Cloud(Windows Azure) use Account Name, and Eucalyptus-Walrus uses Query ID).
Secret Access Key/Secret Key
Because your Access Key is not encrypted, this Secret Access Key is a passwordthat is used to verify the authenticity of the request to access this location.
Important! This Secret Access Key is crucial for maintaining the security ofyour accounts. You should keep your keys and your account credentials in asecure location. Do not embed your Secret Access Key in a web page or otherpublicly accessible source code and do not transmit it over insecure channels.
(For this field, Amazon S3 uses Secret Access Key. Windows Azure, Fujitsu Cloud(Windows Azure), and Eucalyptus-Walrus use Secret Key).
Proxy Settings
Specifies the proxy server settings. Select Connect using a proxy server toenable this option. If you select this option, you must also include the IP address(or machine name) of the proxy server and the corresponding port number thatis used by the proxy server for internet connections. You can also select thisoption if your proxy server requires authentication. You then must provide thecorresponding authentication information (Domain Name\Username and Pass-word) that is required to use the proxy server.
(Proxy capability is not available for Eucalyptus-Walrus).
Bucket Name
All files and folders moved or copied to the cloud vendor are stored and organ-ized in your buckets (or containers). Buckets are like a container for your filesand are used to group and organize objects together. Every object stored at thecloud vendor is placed in a bucket.
Chapter 5: Using Arcserve UDP Agent (Windows) 399

Perform a Restore
(For this field, Amazon S3 and Eucalyptus-Walrus use Bucket Name. WindowsAzure and Fujitsu Cloud (Windows Azure) use Container).
Note: For the remainder of this step, all references to Buckets can also beapplied to Containers unless specified.
Enable Reduced Redundancy Storage
For Amazon S3 only, this option lets you select to enable Reduced RedundancyStorage (RRS). RRS is a storage option within Amazon S3 that helps you reducecost by storing non-critical, reproducible data at lower levels of redundancythan Amazon S3’s standard storage. Both the standard and reduced redundancystorage options store data in multiple facilities and on multiple devices, butwith RRS the data is replicated fewer times, so the cost is less. You shouldexpect the same latency and throughput using either the Amazon S3 standardstorage or RRS. By default this option is not selected (Amazon S3 uses the stand-ard storage option).
4. Click Test Connection to verify the connection to the specified cloud location.
5. Click OK.
The cloud account is added to the Console.
400 Arcserve UDP Agent for Windows User Guide

Perform a Restore
Define the Restore Options
After you specify the file copy information to restore, define the copy options forthe selected file copy and content.
Follow these steps:
1. On the Restore Options dialog, select the restore destination.
The available destination options are:
Restore to Original Location
Restores to the original location from where the backup image was captured.
Restore to
Restores to the specified location. You can click the green arrow button toverify the connection to the specified location. If necessary, enter the User-name and Password credentials to gain access to that location.
2. Specify the Resolving Conflicts option that Arcserve UDP performs if conflicts areencountered during the restore process.
The available options are:
Overwrite existing files
Overwrites (replaces) any existing files, which are at the restore destination. Allobjects are restored from the backup files regardless of their current presenceon your computer.
Chapter 5: Using Arcserve UDP Agent (Windows) 401

Perform a Restore
Replace active files
Replaces any active files upon reboot. If during the restore attempt ArcserveUDP Agent (Windows) discovers that the existing file is currently in use or beingaccessed, it will not immediately replace that file, but instead to avoid any prob-lems will delay the replacement of the active files until the next time themachine is rebooted. (The restore occurs immediately, but the replacement ofany active files is done during the next reboot).
This option is only available if you select the Overwrite existing files option.
Note: If you do not select this option, any active file is skipped from the restore.
Rename files
Creates a new file if the file name already exists. Selecting this option copiesthe source file to the destination with the same filename but a different exten-sion. Data is then restored to the new file.
Skip existing files
Skips over and not overwrite (replace) any existing files that are located at therestore destination. Only objects that are not currently existing on yourmachine are restored from the backup files.
Default: Skip existing files.
3. Specify the Directory Structure to create a root directory during restore.
Create root directory
Specifies that if a root directory structure exists in the captured backup image,Arcserve UDP recreates that same root directory structure on the restore des-tination path.
With this option not selected, the file or folder is restored directly to the des-tination folder.
For example, if during the backup you captured the files "C:\Folder-1\SubFolder2\A.txt" and "C:\Folder1\SubFolder2\B.txt" and during the restoreyou specified to the restore destination as "D:\Restore".
If you select to restore the "A.txt" and "B.txt" files individually, the destinationfor the restored files will be "D:\Restore\A.txt" and "D:\Restore\B.txt" (theroot directory above the specified file level will not be recreated).
If you select to restore from the "SubFolder2" level, the destination for therestored files will be "D:\Restore\SubFolder2\A.txt" and"D:\Restore\SubFolder2\B.txt" (the root directory above the specified folderlevel will not be recreated).
402 Arcserve UDP Agent for Windows User Guide

Perform a Restore
With this option selected, the entire root directory path for the files/folders(including the volume name) is recreated to the destination folder. If the files/-folders to be restored are from the same volume name, then the destinationroot directory path does not include that volume name. However, if the files/-folders to be restored are from different volume names, then the destinationroot directory path does include the volume name.
For example, if during the backup you captured the files "C:\Folder-1\SubFolder2\A.txt", "C:\Folder1\SubFolder2\B.txt", and also E:\Folder-3\SubFolder4\C.txt" and during the restore you specified to the restoredestination as "D:\Restore".
If you select to restore just the "A.txt" file, the destination for the restoredfile will be "D:\Restore\ Folder1\SubFolder2\A.txt" (the entire root directorywithout the volume name will be recreated).
If you select to restore both the "A.txt" and "C.txt" files, the destination forthe restored files will be "D:\Restore\C\Folder1\SubFolder2\A.txt" and"D:\Restore\E\Folder3\SubFolder4\C.txt" (the entire root directory with thevolume name will be recreated).
4. Specify the encryption password in File Copy Encryption Password.
5. Click Next.
The Restore Summary dialog opens.
The restore options are defined to restore from a file copy.
Chapter 5: Using Arcserve UDP Agent (Windows) 403

Perform a Restore
Restore the File Copy Content
After you define the restore options, verify that your settings are correct and con-firm the restore process. Restore Summary helps you to review all the restoreoptions that you defined and modify them if necessary.
Follow these steps:
1. On the Restore Summary dialog, review the displayed information to verify that allthe restore options and settings are correct.
If the summary information is incorrect, click Previous and go back to the applic-able dialog to change the incorrect setting.
If the summary information is correct, click Finish to launch the restore process.
The file copy content is restored.
404 Arcserve UDP Agent for Windows User Guide

Perform a Restore
Verify that Content was Restored
After the completion of the restore process, verify that content was restored to thespecified destination.
Follow these steps:
1. Navigate to the restore destination you specified.
A list of folders appears.
2. Locate the file to which you have restored the content.
For example, If you select to restore the A.txt file to the restore destination as"D:\Restore, then navigate to the following location:
D:\Restore\A.txt.
3. Verify the content to confirm the restore job.
The restored content is successfully verified.
Chapter 5: Using Arcserve UDP Agent (Windows) 405

Perform a Restore
How to Restore Files/Folders
Each time Arcserve UDP performs a successful backup, all backed up files/foldersare included in the snapshot image of your backup. This restore method allows youto specify exactly which file/folder you want to restore.
The following diagram illustrates the process to restore specific files/folders:
406 Arcserve UDP Agent for Windows User Guide

Perform a Restore
Perform the following tasks to restore files/folders:
1. Review the Restore Prerequisites and Considerations
2. Specify the File/Folder Information to Restore
Chapter 5: Using Arcserve UDP Agent (Windows) 407

Perform a Restore
a. Specify the File/Folder Location
Specify Cloud Configuration for Restore
b. Specify the File/Folder to Restore
c. Define the Restore Options
3. Restore the File/Folder
4. Verify that the File/Folder was Restored
408 Arcserve UDP Agent for Windows User Guide

Perform a Restore
Review the Restore Prerequisites and Considerations
Verify that the following prerequisites exist before performing a restore:
You have at least one backup or file copy version available to restore.
You have a valid and accessible backup or file copy destination to restore thebackup or file copy content from.
You have a valid and accessible target location to restore the backup or filecopy content to.
Review the Compatibility Matrix that provides the supported operating sys-tems, databases, and browsers.
Review the following restore considerations:
For a recovery point without a file system catalog created, to ensure you canbrowse and select files/folders to restore from the UI, the account/groupshould be granted access to all the folders/files on all volumes with read/listaccess before the backup is taken.
The local system (SYSTEM) or built-in administrators group (BUILTIN\Ad-ministrators) needs to be added to the ACL of the folders for Arcserve UDPAgent (Windows) to be able to browse a backup without a file system catalogcreated. Otherwise, Arcserve UDP Agent (Windows) will not be able to browsethe folders from the restore UI.
(Optional) Understand how the restore process works. For more information,see How File Level Restores Work.
Note: The process for restoring from a file copy location is similar to restoringfrom a backup location.
(Optional) Review the files skipped during restore. For more information, seeFiles Skipped During Restore.
Chapter 5: Using Arcserve UDP Agent (Windows) 409

Perform a Restore
How File Level Restores Work
During a block-level backup, each backed up file is made up of a collection ofblocks that define that particular file. When you need to restore a particular file,you can search your backup and select the file you want to restore and the recoverypoint you want to restore from. The Arcserve UDP Agent (Windows) then collectsthe version of the blocks that were used for the recovery point of the specified file,and reassembles and restores the file.
Note:When you specify your backup settings, you have an option to create a filecatalog during backup. This file catalog lets you browse the backup sessions fasterduring restore. If you choose not to create the catalog during backup, it can still becreated at a later time.
The following flow diagram shows the process of how Arcserve UDP restores a spe-cific file.
410 Arcserve UDP Agent for Windows User Guide

Perform a Restore
Files Skipped During Restore
During restore by Arcserve D2D some files may be skipped intentionally.
The files and folders in the tables below are skipped during a restore if the fol-lowing two conditions exist:
Files are skipped when such files exist before the restore and the conflict optionis "skip existing files".
Files and folders are skipped when being an important component for Windowsor Arcserve D2D.
O-S
Folder orLocation
File or Folder Name Remark
All
Rootfolder ofeachvolume
CAVolTrc.datUsed by the tracking Driver.
cavoltrcsnapshot.datSystem VolumeInformation\*
Used to save files/folders by a Windows sys-tem. For example, volume shadow copy files.
RECYCLER\*
Used only on NTFS partitions. It contains aRecycle Bin for each user who logs on to thecomputer, sorted by their security identifier(SID).
$Recycle.Bin\*
When you delete a file in Windows NT Exploreror My Computer, the file is stored in theRecycle Bin until you empty the Recycle Bin orrestore the file.
Any foldercontainspicturefiles
Thumbs.dbStores thumbnail images for Windows Explorerthumbnail view.
Rootfolder ofvolume
PageFile.Sys Windows virtual memory swap file.
Hiberfil.sysHibernate file, used to save the system datawhen a computer goes into hibernate mode.
The following files and folders are skipped when you restore to the original oralternate location:
OS Folder or LocationFile or
Folder NameRemark
AllFolder specified in value record under:
HKLM\Software\Microsoft\Windows NT\Cur-rentVersion\WinLogon\SfcDllCache
All files/folders(recursively)
Folder con-tains acached dll file
Chapter 5: Using Arcserve UDP Agent (Windows) 411

Perform a Restore
which is usedfor SystemFile Checker(SFC) andcontents ofthe systemdll cache dir-ectory arerebuilt byusing SFC.
412 Arcserve UDP Agent for Windows User Guide

Perform a Restore
%SystemRoot%\SYSTEM32\dllCache
Root folder of quorum_device MSCS\*
Used forMicrosoftClusterServer.
%SystemRoot%\SYSTEM32\
perf?00?.dat Performancedata used bytheWindowsperformancecounter.
perf?00?.bak
CATROOT\*
Used forWindowsFile Pro-tection(WFP)recordsdigital sig-natures ofthe oper-ating sys-teminstalls(such asDLL, EXE,SYS, OCX,and so on)to protectthem fromdeletionor fromreplace-ment byolder ver-sions.
%SystemRoot%\inetsrv\ metabase.bin
Metabasebinary fileof earlierIIS ver-sionsbefore6.0.
File or folder specified in value except "SIS CommonStore" under HKLM\SYSTEM\Cur-rentCon-trolSet\Control\BackupRestore\FilesNotToBackup
All files/folders(recursively)
Do notback upandrestoreFiles andfolders .For moreinform-
Chapter 5: Using Arcserve UDP Agent (Windows) 413

Perform a Restore
ation, seethe link.
XPW20-03
System volume
NTLDRThe mainbootloader.
BOOT.INI
Containsboot con-figuration(if missing,NTLDR willdefaultto \Windo-ws on thefirst par-tition ofthe firstharddrive).
NTDETECT.COM
Requiredfor boot-ing an NT-based OS.Detectsbasic hard-wareinform-ationneededfor a suc-cessfulboot.
Vistaandlater
Root folder of system volume
boot\*Bootfolder forWindows.
bootmgrWindowsboot man-ager file.
EFI\Mi-crosoft\Boot\*
Used forEFI boot.
%SystemRoot%\SYSTEM32\LogFiles\WMI\RTB-ackup\*
StoresETW tracefiles(extension.etl) forreal timeeventtrace ses-
414 Arcserve UDP Agent for Windows User Guide
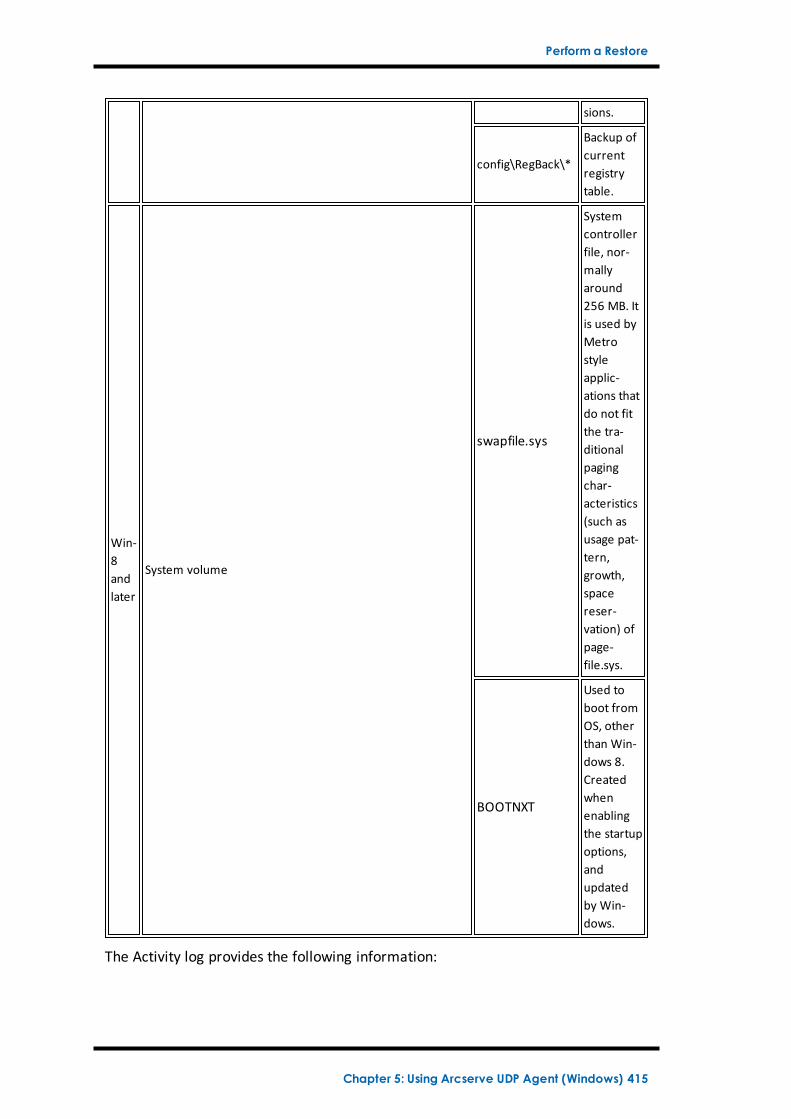
Perform a Restore
sions.
config\RegBack\*
Backup ofcurrentregistrytable.
Win-8andlater
System volume
swapfile.sys
Systemcontrollerfile, nor-mallyaround256 MB. Itis used byMetrostyleapplic-ations thatdo not fitthe tra-ditionalpagingchar-acteristics(such asusage pat-tern,growth,spacereser-vation) ofpage-file.sys.
BOOTNXT
Used toboot fromOS, otherthan Win-dows 8.Createdwhenenablingthe startupoptions,andupdatedby Win-dows.
The Activity log provides the following information:
Chapter 5: Using Arcserve UDP Agent (Windows) 415

Perform a Restore
Date Time Information: jobxxxx System Files skipped. You can use Bare-MetalRecovery Option (BMR) to restore them.
Date Time Information: jobxxxx Files or Directories skipped. Which files or dir-ectories were skipped can be found in: C:\Program Files\Arcserve\Unified DataProtection\Engine\Logs\Restore-<YYYYMMDD>-<hhmmss>-<Process ID>-<JobID>.log.
416 Arcserve UDP Agent for Windows User Guide

Perform a Restore
Specify the File/Folder Information to Restore
Arcserve UDP provides you with an option to find and restore a specific file orfolder. The goal of running a successful restore job is to identify quickly the datayou need and to retrieve it from the appropriate backup location. Each restore jobrequires a source and destination.
The process involved in restoring by find files/folders is as follows:
1. Specify the File/Folder Location
Specify Cloud Configuration for Restore
2. Specify the File/Folder to Restore
3. Define the Restore Options
Chapter 5: Using Arcserve UDP Agent (Windows) 417
Perform a Restore
Specify the File/Folder Location
Use the Find Files/Folders option to restore files and folders. This restore methodallows you to specify exactly which file or folder you want to restore.
Follow these steps:
1. Access the restore method selection dialog in one of the following ways:
From Arcserve UDP:
a. Log into Arcserve UDP.
b. Click the resources tab.
c. Select All Nodes in the left pane.
All the added nodes are displayed in the center pane.
d. In the center pane, select the node and click Actions.
e. Click Restore from the Actions drop-down list.
The restore method selection dialog opens.
Note: You are automatically logged in to the agent node and the restore methodselection dialog is opened from the agent node.
From Arcserve UDP Agent (Windows):
a. Log into Arcserve UDP Agent (Windows).
b. From the home page, select Restore.
The restore method selection dialog opens.
2. Click the Find Files/Folders to Restore option.
The Find Files/Folders to Restore dialog opens.
418 Arcserve UDP Agent for Windows User Guide

Perform a Restore
3. Select File Copy Location checkbox and click Change to change the location to thedestination where your file copy images are stored.
The Destination dialog opens and you can select Local or network drive or Cloud.
Note: By default, the Backup Location and File Copy Location fields display thecorresponding path used for the most recent backup/file copy destinations.
If you select Local or network drive, you can either specify a location or browseto the location where your file copy images are stored.
You can click green arrow validate icon to verify proper access to the source loc-ation.
If you select Cloud, you can either specify a cloud location or click the Configurebutton to display the Cloud Configuration dialog. For more information, see Spe-cify Cloud Configuration for Restore.
Regardless of whether you selected to restore from Local or network drive orfrom Cloud, when you change the destination to an alternate location a pop-updialog will appear, asking if you want to perform a new catalog synchronizationor read from the existing catalog.
Chapter 5: Using Arcserve UDP Agent (Windows) 419

Perform a Restore
If it is the first time you are performing a catalog synchronization, the BrowseExisting button will be disabled because there is no existing file copy catalog loc-ally.
If a catalog synchronization has been previously performed, this dialog will dis-play details about the last time the catalog was synchronized from this des-tination. If there were more file copy jobs run since that displayed time, yourcatalog may not be currently synchronized and you can select the Sync option toensure your file copy catalog is up-to-date.
1. Click Sync to download the file copy catalog from the specified file copy des-tination to your local machine to provide faster browsing.
2. Click Browse Existing to use the file copy catalog that is available locally andnot download/sync it again.
4. Select the Backup Location checkbox and click Change to change the Backup Loca-tion.
420 Arcserve UDP Agent for Windows User Guide

Perform a Restore
The Source dialog opens where you can select the backup location.
5. Select one of the following options on the Source dialog:
Select local disk or shared folder
a. Specify or browse to the location where your backup images are stored and selectthe appropriate backup source.
You can click the green arrow button to verify the connection to the specifiedlocation. If necessary, enter the Username and Password credentials to gainaccess to that source location.
The Select backup location dialog opens.
b. Select the folder where the recovery points are stored and click OK.
The Select backup location dialog closes and you can see the backup loc-ation in the Source dialog.
c. Click OK.
The recovery points are listed in the Find Files/Folders to Restore dialog.
Select Recovery Point Server
a. Specify the Recovery Point Server setting details and click Refresh.
All the agents are listed in the Data Protection Agent column in the Source dialog.
b. Select the agent from the displayed list and click OK.
The recovery points are listed in the Find Files/Folders to Restore dialog.
Chapter 5: Using Arcserve UDP Agent (Windows) 421

Perform a Restore
Note: If you select a different agent and if the recovery points are encrypted, thenyou have to provide the encryption password when prompted.
6. Select one of the following options to search recovery points:
Search all recovery points
Searches the file or folder in all the recovery points stored in the provided loc-ation. You have to specify the file or folder that you want to search on theFind Files/Folders to Restore dialog.
Select recovery points to search
Displays the recovery points between the specified time period. You can spe-cify the start time and end time and then select the recovery point from thespecified time period.
7. Select the recovery point and click Next.
Note: If you have selected a different agent in the Source dialog and if the recov-ery points are encrypted, then the encryption dialog opens. Provide the passwordand click OK.
The Find Files/Folders to Restore dialog opens.
The Backup or File Copy location is specified.
422 Arcserve UDP Agent for Windows User Guide

Perform a Restore
Specify Cloud Configuration for Restore
Note: The following procedure only applies if you are restoring a file/folder from afile copy cloud location.
From the Browse File Copies option or the Find Files/Folders to Restore option,click the Configure button to display the Cloud Configuration dialog.
Follow these steps:
Chapter 5: Using Arcserve UDP Agent (Windows) 423

Perform a Restore
1. From the Cloud Configuration dialog, use the drop-down menu to select whichcloud vendor type you want to restore from. The available options are Amazon S3,Windows Azure, Fujitsu Cloud (Windows Azure), and Eucalyptus-Walrus.(Amazon S3 is the default vendor). For more information about Fujitsu Cloud (Win-dows Azure), see the Overview and Registration.
Note: After encoding the bucket name, if the path length is greater than 170 char-acters, Eucalyptus-Walrus will not be able to copy files.
2. Specify the Configuration Options.
The configuration options for each cloud vendor are similar (with some differentterminology), and any differences are described.
a. Specify the Connection Settings:
Vendor URL
Identifies the URL address of the cloud provider.
(For Amazon S3, Windows Azure, and Fujitsu Cloud (Windows Azure), theVendor URL is automatically pre-populated. For Eucalyptus-Walrus, theVendor URL must be manually entered using the specified format).
Access Key ID/Account Name/Query ID
Identifies the user who is requesting access this location.
(For this field, Amazon S3 uses Access Key ID, Windows Azure and FujitsuCloud (Windows Azure) use Account Name, and Eucalyptus-Walrus usesQuery ID).
Secret Access Key/Secret Key
Because your Access Key is not encrypted, this Secret Access Key is a pass-word that is used to verify the authenticity of the request to access this loc-ation.
Important! This Secret Access Key is crucial for maintaining the security ofyour accounts. You should keep your keys and your account credentials in asecure location. Do not embed your Secret Access Key in a web page or otherpublicly accessible source code and do not transmit it over insecure channels.
(For this field, Amazon S3 uses Secret Access Key. Windows Azure, FujitsuCloud (Windows Azure), and Eucalyptus-Walrus use Secret Key).
Enable Proxy
If you select this option, you must also include the IP address (or machinename) of the proxy server and the corresponding port number that is used bythe proxy server for internet connections. You can also select this option ifyour proxy server requires authentication. You then must provide the
424 Arcserve UDP Agent for Windows User Guide

Perform a Restore
corresponding authentication information (Username and Password) that isrequired to use the proxy server.
(Proxy capability is not available for Eucalyptus-Walrus).
b. Specify the Advanced Settings:
Bucket Name/Container
All files and folders moved or copied to the cloud vendor are stored andorganized in your buckets (or containers). Buckets are like a container foryour files and are used to group and organize objects together. Every objectstored at the cloud vendor is placed in a bucket.
Select a bucket name from the drop-down list. If necessary, you can click theRefresh button to update the list of available buckets.
(For this field, Amazon S3 and Eucalyptus-Walrus use Bucket Name. WindowsAzure and Fujitsu Cloud (Windows Azure) use Container).
Bucket Region
For Amazon S3 only, the available region for the specified bucket is displayedin this field.
(For Windows Azure, Fujitsu Cloud (Windows Azure), and Eucalyptus-Walrus,the region is not displayed).
Enable Reduced Redundancy Storage
For Amazon S3 only, this option lets you select to enable Reduced Redund-ancy Storage (RRS). RRS is a storage option within Amazon S3 that helps youreduce cost by storing non-critical, reproducible data at lower levels ofredundancy than Amazon S3’s standard storage. Both the standard andreduced redundancy storage options store data in multiple facilities and onmultiple devices, but with RRS the data is replicated fewer times, so the costis less. You should expect the same latency and throughput using either theAmazon S3 standard storage or RRS. By default this option is not selected(Amazon S3 uses the standard storage option).
3. Click Test Connection to verify the connection to the specified cloud location.
4. Click OK to exit the Cloud Configuration dialog.
Chapter 5: Using Arcserve UDP Agent (Windows) 425
Perform a Restore
Specify the File/Folder to Restore
After you specify the backup or file copy location, search for the file or folder nameto restore. If a file has multiple file copy versions, all versions are listed and sortedby date (with the most recent listed first).
Follow these steps:
1. From the Find Files/Folders to Restore dialog, specify what to search for (file orfolder name to restore).
Note: The File Name field supports full name searching and wildcard searching. Ifyou do not know the complete file name, you can simplify the results of the searchby specifying the wildcard characters "*" and "?" in the File Name field.
The wildcard characters supported for the file or folder name are as follows:
Use the asterisk to substitute zero or more characters in a file or folder name.
Use the question mark to substitute a single character in a file or folder name.
For example, if you specify *.txt, all files with a .txt file extension appear in thesearch results.
2. (Optional) Specify a path to further filter your search and select whether to includeor not include any subdirectories.
3. Click Find to launch search results.
The search results are displayed. If the searched file has multiple file copy versions,all versions will be listed, sorted by date (with the most recent listed first). It alsoindicates if the searched file was backed up or file copied.
4. Select the version (occurrence) of the file/folder that you want to restore and clickNext.
The Restore Options dialog opens.
The file/folder name to be restored is specified.
426 Arcserve UDP Agent for Windows User Guide

Perform a Restore
Define the Restore Options
After you specify the file or folder to restore, define the restore options for theselected file or folder.
Follow these steps:
1. From the Restore Options dialog, select the restore destination.
The available destination options are:
Restore to Original Location
Restores to the original location from where the backup image was captured.
Note: If you performed the recovery point backup using host-based agentlessbackup, restoring to original location is to restore the file back in to the virtualmachine. In this case, a dialog box opens. You may enter the credentials of thehypervisor, and the operating system of the virtual machine.
For VMware VM:
Chapter 5: Using Arcserve UDP Agent (Windows) 427

Perform a Restore
Note: To be able to create or write files inside the VM, consider the fol-lowing requirements for the settings and account permission of virtualmachine:
VMware Tools is installed and running.
Firewall must allow File and Printer Sharing.
The account is built-in local administrator, built-in domain admin-istrator, or domain account that is member of the local Administratorsgroup. If other accounts are used:
Disable the UAC remote access. To disable UAC remote access,see Import Virtual Machine Using Additional AdministrativeAccount.
Disable UAC in the Local Security Policy by disabling the settingRun all administrator in Admin Approval Mode at secpol.msc ->Local Policies -> Security Options. (Secpol.msc is Microsoft'ssecurity policy editor).
428 Arcserve UDP Agent for Windows User Guide

Perform a Restore
Important:Do not attempt to disable the UAC in the UserAccount Control Settings dialog box that opens from the controlpanel.
For VMware VM:
Note: To be able to create or write files inside the VM, consider the followingrequirements for the settings and account permission of virtual machine:
Hyper-V integration services are installed and running.
Firewall must allow File and Printer Sharing.
The account is built-in local administrator, built-in domain administrator,or domain account that is member of the local Administrators group. Ifother accounts are used:
Disable the UAC remote access. To disable UAC remote access, seeImport Virtual Machine Using Additional Administrative Account.
If virtual machine guest OS is Client version Windows (such as Windows10), you need to manually configure firewall to allow Windows Man-agement Instrumentation (WMI).
Restore to
Chapter 5: Using Arcserve UDP Agent (Windows) 429

Perform a Restore
Restores to the specified location. You can click the green arrow button toverify the connection to the specified location. If necessary, enter the User-name and Password credentials to gain access to that location.
2. Specify the Resolving Conflicts option that Arcserve UDP performs if conflicts areencountered during the restore process.
The available options are:
Overwrite existing files
Overwrites (replaces) any existing files, which are at the restore destination.All objects are restored from the backup files regardless of their current pres-ence on your computer.
Replace active files
Replaces any active files upon reboot. If during the restore attempt ArcserveUDP Agent (Windows) discovers that the existing file is currently in use orbeing accessed, it will not immediately replace that file, but instead to avoidany problems will delay the replacement of the active files until the nexttime the machine is rebooted. (The restore occurs immediately, but thereplacement of any active files is done during the next reboot).
This option is only available if you select the Overwrite existing files option.
Note: If you do not select this option, any active file is skipped from therestore.
Rename files
Creates a new file if the file name already exists. Selecting this option copiesthe source file to the destination with the same file name but a differentextension. Data is then restored to the new file.
Skip existing files
Skips over and not overwrite (replace) any existing files that are located atthe restore destination. Only objects that are not currently existing on yourmachine are restored from the backup files.
Default: Skip existing files
3. Specify the Directory Structure to create a root directory during restore.
Create root directory
Specifies that if a root directory structure exists in the captured backup image,Arcserve UDP recreates that same root directory structure on the restore des-tination path.
430 Arcserve UDP Agent for Windows User Guide

Perform a Restore
With this option not selected, the file or folder is restored directly to the des-tination folder.
For example, if during the backup you captured the files "C:\Folder-1\SubFolder2\A.txt" and "C:\Folder1\SubFolder2\B.txt" and during the restoreyou specified to the restore destination as "D:\Restore".
If you select to restore the "A.txt" and "B.txt" files individually, the destinationfor the restored files will be "D:\Restore\A.txt" and "D:\Restore\B.txt" (theroot directory above the specified file level will not be recreated).
If you select to restore from the "SubFolder2" level, the destination for therestored files will be "D:\Restore\SubFolder2\A.txt" and"D:\Restore\SubFolder2\B.txt" (the root directory above the specified folderlevel will not be recreated).
With this option selected, the entire root directory path for the files/folders(including the volume name) is recreated to the destination folder. If the files/-folders to be restored are from the same volume name, then the destinationroot directory path does not include that volume name. However, if the files/-folders to be restored are from different volume names, then the destinationroot directory path does include the volume name.
For example, if during the backup you captured the files "C:\Folder-1\SubFolder2\A.txt", "C:\Folder1\SubFolder2\B.txt", and also E:\Folder-3\SubFolder4\C.txt" and during the restore you specified to the restoredestination as "D:\Restore".
If you select to restore just the "A.txt" file, the destination for the restoredfile will be "D:\Restore\ Folder1\SubFolder2\A.txt" (the entire root directorywithout the volume name will be recreated).
If you select to restore both the "A.txt" and "C.txt" files, the destination forthe restored files will be "D:\Restore\C\Folder1\SubFolder2\A.txt" and"D:\Restore\E\Folder3\SubFolder4\C.txt" (the entire root directory with thevolume name will be recreated).
4. The Encryption Password for file copy destination is loaded automatically. If youselect an alternate destination for the restore, you will need to enter the passwordmanually.
5. Click Next.
The Restore Summary dialog opens.
The restore options are defined to restore the specified file/folder.
Chapter 5: Using Arcserve UDP Agent (Windows) 431

Perform a Restore
Restore the File/Folder
The Restore Summary dialog helps you to review all the restore options that youpreviously defined and lets you modify them if necessary.
Follow these steps:
1. From the Restore Summary dialog, review the displayed information to verify thatall the restore options and settings are correct.
If the summary information is incorrect, click Previous and go back to theapplicable dialog to change the incorrect setting.
If the summary information is correct, click Finish to launch the restore pro-cess.
The specified file/folder is restored.
432 Arcserve UDP Agent for Windows User Guide

Perform a Restore
Verify that the File/Folder was Restored
After the completion of the restore process, verify that the file/folder was restoredto the specified destination.
Follow these steps:
1. Navigate to the restore destination you specified.
A list of folders appears.
2. Locate the file to which you have restored the content.
For example, If you select to restore the "A.txt'' file to the restore destination as"D:\Restore, then navigate to the following location:
D:\Restore\A.txt.
3. Verify the content of the restored file/folder.
The restored content is successfully verified.
Chapter 5: Using Arcserve UDP Agent (Windows) 433
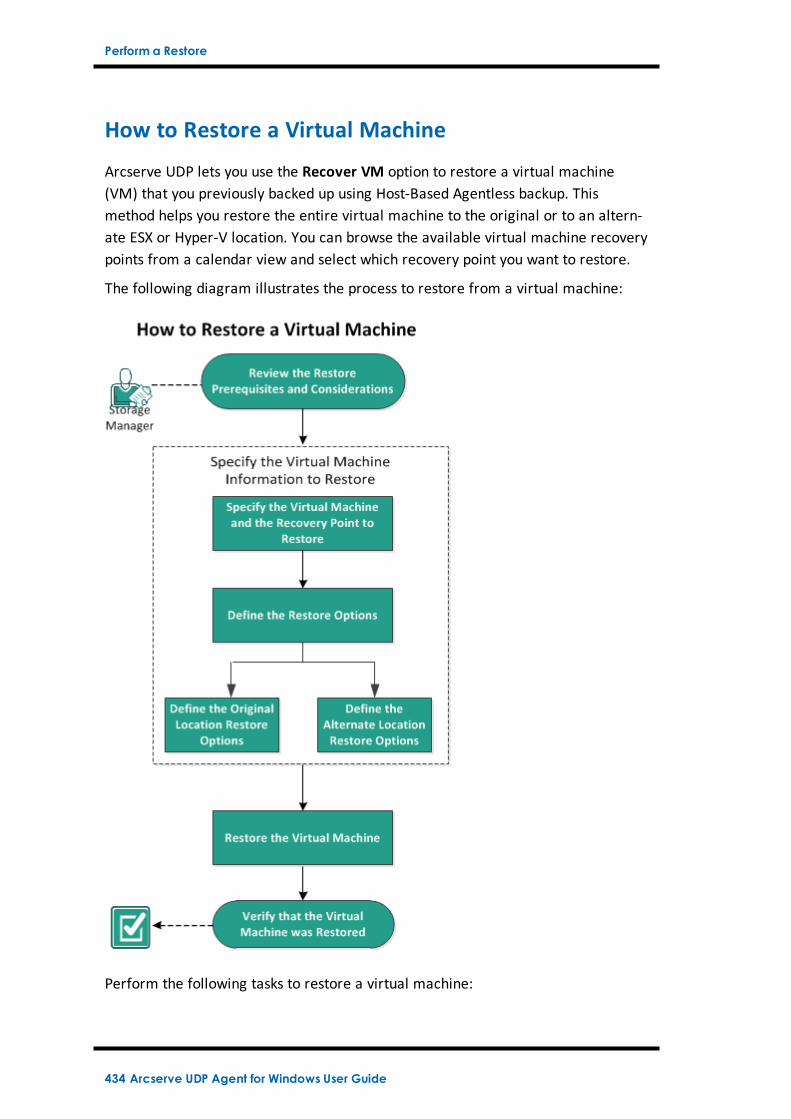
Perform a Restore
How to Restore a Virtual Machine
Arcserve UDP lets you use the Recover VM option to restore a virtual machine(VM) that you previously backed up using Host-Based Agentless backup. Thismethod helps you restore the entire virtual machine to the original or to an altern-ate ESX or Hyper-V location. You can browse the available virtual machine recoverypoints from a calendar view and select which recovery point you want to restore.
The following diagram illustrates the process to restore from a virtual machine:
Perform the following tasks to restore a virtual machine:
434 Arcserve UDP Agent for Windows User Guide

Perform a Restore
1. Review the Restore Prerequisites and Considerations
2. Specify the Virtual Machine Information to Restore
a. Specify the Virtual Machine and the Recovery Point to Restore
b. Define the Restore Options
Define the Original Location Restore Options
Define the Alternate Location Restore Options
3. Restore the Virtual Machine
4. Verify that the Virtual Machine was Restored
Chapter 5: Using Arcserve UDP Agent (Windows) 435
Perform a Restore
Review the Restore Prerequisites and Considerations
Verify that the following prerequisites exist before performing a restore:
You have a valid recovery point available to restore from.
You have a valid and accessible target Virtual Center/ESX or Hyper-V server torecover the virtual machine.
Review the Compatibility Matrix that provides the supported operating sys-tems, databases, and browsers.
Review the following restore considerations:
Arcserve UDP allows multiple restore jobs to run at the same time if the jobsare not for the same VM. If you attempt to launch a restore job, while anotherrestore job is running for the same VM, an alert message informs you thatanother job is running and requests you to try again later.
If the Recover VM destination is Windows Server 2008 R2 then the sourcebackup VM should not contain VHDx disks, which are not supported on theHyper-V server (Windows Server 2008 R2).
If the Recover VM destination is Windows Server 2008 R2 or Win2012 then thesource backup VM's sub-system type should not be generation 2 (which wasintroduced in Windows Server 2012 R2), and is not supported on the Hyper-Vserver (Windows Server 2012/2008 R2).
436 Arcserve UDP Agent for Windows User Guide
Perform a Restore
Specify the Virtual Machine Information to Restore
You can recover an entire virtual machine from a recovery point.
The process involved in restoring virtual machine is as follows:
1. Specify the Virtual Machine and the Recovery Point to Restore
2. Define the Restore Options
Define the Original Location Restore Options
Define the Alternate Location Restore Options
Chapter 5: Using Arcserve UDP Agent (Windows) 437

Perform a Restore
Specify the Virtual Machine and the Recovery Point toRestore
Use the Recover VM option to restore a virtual machine that you previously backedup. This method quickly and consistently creates a virtual machine from an Arc-serve UDP recovery point on an ESX or Hyper-V server. The recovered virtualmachine can then simply be started to complete the recovery process.
Follow these steps:
1. Access the restore method selection dialog in one of the following ways:
From Arcserve UDP:
a. Log into Arcserve UDP.
b. Click the resources tab.
c. Select All Nodes in the left pane.
All the added nodes are displayed in the center pane.
d. In the center pane, select the node and click Actions.
e. Click Restore from the Actions dropdown menu.
The restore method selection dialog opens.
Note: You are automatically logged in to the agent node and the restoremethod selection dialog is opened from the agent node.
From Arcserve UDP Agent (Windows):
a. Log into Arcserve UDP Agent (Windows).
b. From the home page, select Restore.
The restore method selection dialog opens.
2. Click the Recover VM option.
The Recover VM dialog opens.
438 Arcserve UDP Agent for Windows User Guide

Perform a Restore
3. Click Change to change the Backup Location.
The Source dialog opens. You can select the backup location in this dialog.
4. Select one of the following options:
Select local disk or shared folder
Chapter 5: Using Arcserve UDP Agent (Windows) 439

Perform a Restore
a. Specify or browse to the location where your backup images are stored andselect the appropriate backup source.
You can click the green arrow button to verify the connection to the specifiedlocation. If necessary, enter the Username and Password credentials to gainaccess to that source location.
The Select backup location dialog opens.
b. Select the folder where the recovery points are stored and click OK.
The Select backup location dialog closes and you can see the backup loc-ation in the Source dialog.
c. Click OK.
The recovery points are listed in the Recover VM dialog.
Select Recovery Point Server
a. Specify the Recovery Point Server setting details and click Refresh.
b. All the nodes (agents/virtual machines) are listed in the Node column in theSource dialog.
c. Select the node (agent/virtual machine) from the displayed list and click OK.
The recovery points are listed in the Recover VM dialog.
5. From the Virtual Machine drop-down list, select the virtual machine to recover.
The calendar view appears and all the dates containing recovery points for the spe-cified backup source are highlighted in green.
6. Select the calendar date for the virtual machine image to restore.
The corresponding recovery points for that date are displayed, with the time of thebackup, the type of backup that was performed, and the name of the backup.
7. Select a recovery point to restore.
The backup content (including any applications) for the selected recovery point isdisplayed. When restoring a virtual machine, the entire system is restored. As a res-ult, you can view, but not select individual volumes, folders, or files from within theselected virtual machine.
Note: A clock icon with a lock symbol indicates that the recovery point containsencrypted information and can require a password for restore.
8. Click Next.
The Restore Options dialog opens.
The virtual machine and the recovery point to restore are specified.
440 Arcserve UDP Agent for Windows User Guide
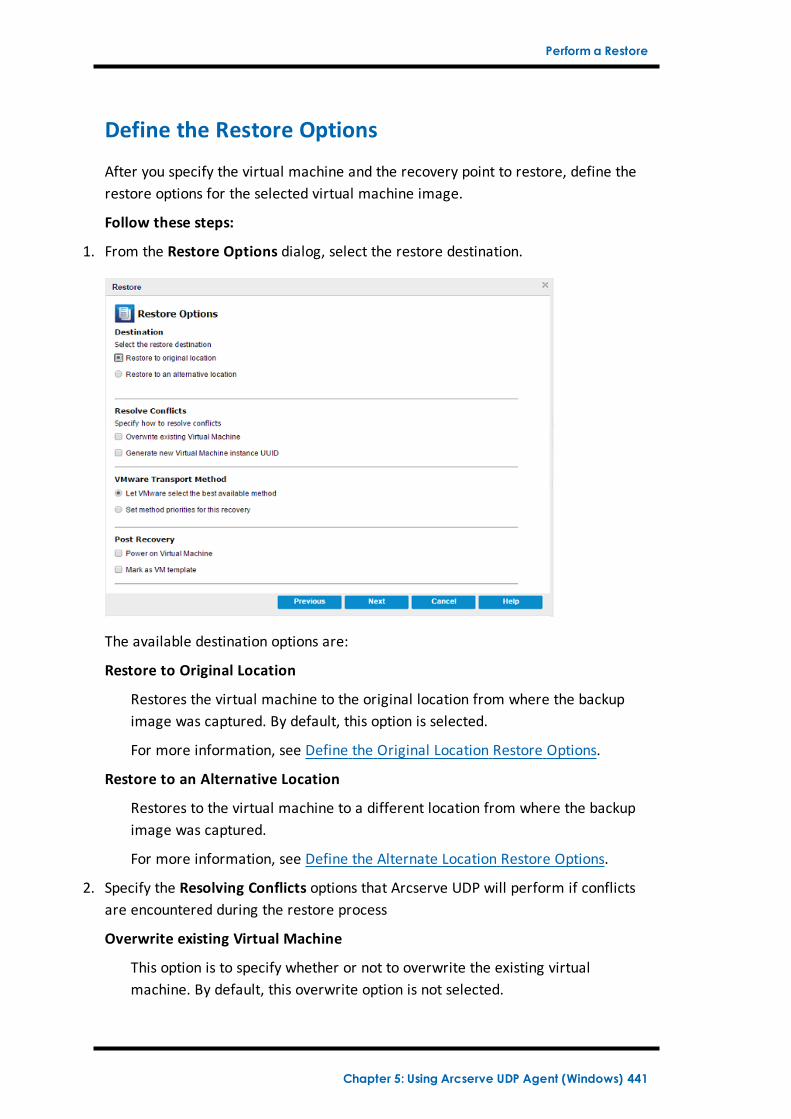
Perform a Restore
Define the Restore Options
After you specify the virtual machine and the recovery point to restore, define therestore options for the selected virtual machine image.
Follow these steps:
1. From the Restore Options dialog, select the restore destination.
The available destination options are:
Restore to Original Location
Restores the virtual machine to the original location from where the backupimage was captured. By default, this option is selected.
For more information, see Define the Original Location Restore Options.
Restore to an Alternative Location
Restores to the virtual machine to a different location from where the backupimage was captured.
For more information, see Define the Alternate Location Restore Options.
2. Specify the Resolving Conflicts options that Arcserve UDP will perform if conflictsare encountered during the restore process
Overwrite existing Virtual Machine
This option is to specify whether or not to overwrite the existing virtualmachine. By default, this overwrite option is not selected.
Chapter 5: Using Arcserve UDP Agent (Windows) 441

Perform a Restore
Note: For the Overwrite existing Virtual Machine option, an "existing virtualmachine" is defined as a VM which has the same VM name and resides in thesame ESXi host. If there is a VM which has the same VM name but resides in adifferent ESXi host (which is under the same vCenter), this overwrite option willnot work. In this case, a VM recovery will fail because a VM with the samename (including the ESXi host) does not exist, and therefore cannot be over-written. This failure is to avoid mistakenly overwrite a VM. To work around this,you need to either rename the existing VM or use the "Restore to alternativelocation" option and specify a different VM name.
If you select this option, the restore process overwrites (replaces) anyexisting images of this virtual machine that are at the specified restoredestination. The virtual machine image is restored from the backup filesregardless of its current presence on your restore destination.
If you do not select this option, and if you restore to the original location,the VM recovery job will fail if the VM still exists on the original location;and if you restore to alternative location, the restore process creates aseparate image of this virtual machine and the restore process does notoverwrite any existing images that are at the specified restore des-tination.
Generate new Virtual Machine instance UUID
This option is to specify whether to generate a new instance UUID for therestored VM or keep the original instance UUID. For Hyper-V VM, this option isselected and grayed out because Arcserve UDP always uses new instance UUIDfor restored Hyper-V VM.
Note: If you do not select this option, then the original instance UUID will be set tothe restored VM. However, in case the destination vCenter/ESXi already has a VMwith the same instance UUID, new UUID will be used instead and a warning mes-sage is displayed in the activity log of VM recovery job.
3. Specify the Post Recovery option.
Select whether power is applied to the virtual machine at the end of the restore pro-cess. By default, this option is not selected.
Mark as VM Template (available only for VMware VM)
Select whether to convert restored VM to template. If source node is VM whenbacked up, this option is not selected by default. If source node is templatewhen backed up, this option is selected by default.
The restore options are defined to restore a virtual machine.
442 Arcserve UDP Agent for Windows User Guide

Perform a Restore
Define the Original Location Restore Options
During the Recover VM configuration process, you are required to select the optionof where you want to restore the virtual machine to. The available selections areRestore to the Original Location and Restore to an Alternative Location.
This procedure explains how to restore a virtual machine to the original location.
Follow these steps:
1. From the Restore Options dialog, after specifying the Resolve Conflicts and PostRecovery options, select Restore to Original Location and click Next.
The appropriate dialog for VMware or Hyper-V is displayed.
For VMware the Set Credential for Source vCenter/ESX Server dialog is dis-played.
For Hyper-V the Set the credentials for the source Hyper-V Server dialog is
Chapter 5: Using Arcserve UDP Agent (Windows) 443

Perform a Restore
displayed.
2. Specify the credentials for accessing the virtual machine.
For VMware, complete the following fields.
vCenter/ESX Server
Displays the host name or IP address for the destination vCenter Server orESX Server system.
Note: You cannot edit this field. You can only view the details.
VM Name
Displays the virtual machine name that you are restoring.
Note: You cannot edit this field. You can only view the details.
Protocol
Specifies the protocol that you want to use for communication with the des-tination server. The available selections are HTTP and HTTPS.
Port Number
Specifies the port that you want to use for data transfer between the sourceserver and the destination.
Default: 443.
Username
Specifies the user name that has access rights to log in to the vCenter/ESXserver where you plan to restore the virtual machine.
Password
Specifies the corresponding password for the User Name.
For Hyper-V, complete the following fields.
444 Arcserve UDP Agent for Windows User Guide

Perform a Restore
Hyper-V/Hyper-V Cluster Server
Displays the host name or IP address for the destination Hyper-V Server orHyper-V cluster server system.
Note: You cannot edit this field. You can only view the details.
VM Name
Displays the virtual machine name that you are restoring.
Note: You cannot edit this field. You can only view the details.
Username
Specifies the user name that has access rights to log in to the Hyper-V serverwhere you plan to restore the virtual machine. For Hyper-V cluster VM, spe-cify the domain account which has administrative privilege of the cluster.
Password
Specifies the corresponding password for the User Name.
3. Click OK.
The Restore Summary dialog opens.
The restore options for original location are defined.
Chapter 5: Using Arcserve UDP Agent (Windows) 445

Perform a Restore
Define the Alternate Location Restore Options
During the Restore VM configuration process, specify where the recovered virtualmachine is stored. The available selections are Restore to the Original Locationand Restore to an Alternative Location.
This procedure explains how to restore a virtual machine to alternate location ordifferent data store.
Follow these steps:
1. From the Restore Options dialog, after specifying the Resolve Conflicts and PostRecovery options, select Restore to an Alternative Location.
For VMware, the Restore Options dialog expands to display additionalrestore to alternative options.
For Hyper-V, the Restore Options dialog expands to display additionalrestore to alternative options.
If you select the Specify a virtual disk path for each virtual disk option, the fol-lowing dialog appears:
2. Specify the appropriate server Information.
For VMware, enter the following fields:
vCenter/ESX Server
446 Arcserve UDP Agent for Windows User Guide

Perform a Restore
Specifies the host name or IP address for the destination vCenter or ESXserver system.
Username
Specifies the user name that has access rights to log into the vCenter/ESXserver where you plan to restore the virtual machine. For Hyper-V clusterVM, specify the domain account which has administrative privilege of thecluster.
Password
Specifies the corresponding password for the User Name.
Protocol
Specifies the protocol that you want to use for communication with the des-tination server. The available selections are HTTP and HTTPS.
Default: HTTPS.
Note: VMware Virtual Disk Development Kit (VDDK) 6.x.x is in-built with Arc-serve UDP 7.0 but VDDK 6.x.x does not support HTTP. Make sure to selectHTTPS, unless you manually replace the built-in VDDK 6.x.x with another ver-sion of VDDK.
Port Number
Specifies the port that you want to use for data transfer between the sourceserver and the destination.
Default: 443.
For Hyper-V, enter the following fields:
Hyper-V Server
Displays the host name or IP address for the destination Hyper-V Server sys-tem.
Username
Specifies the user name that has access rights to log into the Hyper-V serverwhere you plan to restore the virtual machine. For Hyper-V cluster VM, spe-cify the domain account that has administrative privilege of the cluster.
Password
Specifies the corresponding password for the User Name.
Add virtual machine to the cluster
Select the option if you want to add the virtual machine that Arcserve UDPrestores, into the cluster. Consider the following options:
Chapter 5: Using Arcserve UDP Agent (Windows) 447

Perform a Restore
n If you provide the cluster node name as the Hyper-V server name, thecheck box is disabled and checked by default. As a result, the virtualmachine is automatically added into the cluster.
n If you provide the host name of a Hyper-V server that is part of thecluster the check box is enabled and you can select to add the virtualmachine into the cluster.
n If you provide the host name of a standalone Hyper-V server that is notpart of the cluster the check box is disabled and unchecked
3. When the vCenter/ESX Server Information or Hyper-V Server Information is spe-cified, click the Connect to this vCenter/ESX Server button or click the Connect tothis Hyper-V Server button.
If the alternative server access credential information is correct, the VM Settingsfields become enabled.
4. Specify the VM Settings.
For VMware, enter the following fields.
VM Name
Specifies the virtual machine name that you are restoring.
ESX Server
Specifies the destination ESX server. The drop-down list contains a listing ofall ESX servers that are associated with a vCenter server.
Resource Pool
Selects the Resource Pool or vApp Pool that you want to use for the virtualmachine recovery.
Note: A Resource Pool is a configured collection of CPU and memoryresources. A vApp Pool is a collection of one or more virtual machines thatcan be managed as a single object.
Default: empty.
Click the Browse Resource Pool button to display the Select a ResourcePool dialog. This dialog contains a listing of all Resource Pools and vAppPools available for the destination ESX server. Select the pool to use for thevirtual machine recovery. You can leave this field blank when you do not
448 Arcserve UDP Agent for Windows User Guide

Perform a Restore
want to assign a Resource Pool or vApp Pool to this virtual machine recovery.
Storage Policy
Specify the VM storage policy that is applied to VM home of restored VM.Select Datastore Default if you do not want to apply the VM storage policy.
Note: If you can see only Datastore Default but actually vCenter has otherstorage policies defined, then the account used to connect vCenter does nothave enough permission to get the storage policy from vCenter. Verify if theaccount has the privilege Profile-driven storage view at the vCenter level.
VM DataStore
Specify the destination datastore for VM home of restored VM.
Note: By default, only those datastores that are compatible with selectedstorage policy are listed. If you want to see all datastores, clear selection ofthe checkbox Show only compatible datastores for selected storage policythat in under the Disk Datastore table.
Disk Datastore
Specify Virtual Disk Type, Storage Polic,y and Target Datastore for each ofthe virtual disk of the VM, respectively.
Virtual Disk Type: Select one of the following options: Thin, Thick Lazy Zer-oed, or Thick Eager Zeroed.
Chapter 5: Using Arcserve UDP Agent (Windows) 449
Perform a Restore
Storage Policy: Select the VM storage policy that is applied to this virtualdisk. Select Datastore Default if you do not want to apply the VM storagepolicy.
Target Datastore: Select the datastore where the virtual disk is restored.
Note: By default only the datastores that are compatible with selected stor-age policy are listed. If you want to see all datastores, clear selection of thecheckbox Show only compatible datastores for selected storage policythat in under the Disk Datastore table.
Network
Specifies the vSphere Standard Switch/vSphere Distributed Switch con-figuration details.
For Hyper-V, enter the following fields.
VM Name
Specifies the virtual machine name that you are restoring.
VM Path
Specifies the destination path (on Hyper-V server) where to save the Hyper-VVM configuration file. The default folder of the VM configuration file for theHyper-V server is shown by default. You can modify the path directly in thefield or click Browse to select one.
Note: If you are restoring the virtual machine into Hyper-V cluster and youwant the virtual machine to migrate among the cluster nodes, specify thecluster shared volume (CSV) for both- the VM path and the virtual disk path.
Specify the same virtual disk path for all virtual disks
Specify one path (on Hyper-V server) where to save all virtual disks of the VMtogether. The default folder of the VM disk file for the Hyper-V server isshown by default. You can modify the path directly in the field or clickBrowse to select one.
Note: If you are restoring the virtual machine into Hyper-V cluster and youwant the virtual machine to migrate among the cluster nodes, specify thecluster shared volume (CSV) for both- the VM path and the virtual disk path.
Specify a virtual disk path for each virtual disks
Specify the path (on Hyper-V server) for each of the virtual disks of the VMrespectively. The default folder of the VM disk file for the Hyper-V server isshown by default. You can modify the path directly in the field or clickBrowse to select one. To assign the virtual disk type, select one of the fol-
450 Arcserve UDP Agent for Windows User Guide

Perform a Restore
lowing options: Fixed Size, Fixed Size (Quick), Dynamically Expanding, andKeep same as Source disk.
Notes:
o If you are restoring the virtual machine into Hyper-V cluster and youwant the virtual machine to migrate among the cluster nodes, specifythe cluster shared volume (CSV) for both- the VM path and the virtualdisk path.
o Do not use Fixed Size (Quick) option unless you are sure that earlieryou have not saved sensitive information on the storage device wherethe virtual disk file resides.
Fixed Size (Quick)
Using this option, you can restore Fixed Size disk in a quicker way. You do notneed to clear unused disk blocks to zero while restoring the disk. However,because of this, some fragments of original data remained on underlying stor-age. That situation creates risks of information leaks. After the disk is moun-ted into the virtual machine, the user of the virtual machine may use somedisk tools to analyze the raw data in the disk and get the original data onHyper-V server storage device where the file of virtual disk resides.
Network
Specifies the network configuration details for the VM.
5. Click OK.
The Restore Summary dialog opens.
The restore options for alternate location are defined.
Chapter 5: Using Arcserve UDP Agent (Windows) 451

Perform a Restore
Restore the Virtual Machine
The Restore Summary helps you to review all the restore options that you definedand modify them if necessary.
Follow these steps:
On the Restore Summary dialog, review the displayed information to verify that allthe restore options and settings are correct.
If the summary information is incorrect, click Previous and go back to the applic-able dialog to change the incorrect setting.
If the summary information is correct, click Finish to launch the restore process.
The virtual machine is restored.
452 Arcserve UDP Agent for Windows User Guide

Perform a Restore
Verify that the Virtual Machine was Restored
After the completion of the restore process, verify that the virtual machine wasrestored to the specified destination.
Follow these steps:
1. Navigate to the restore destination you specified.
For example, if you select to restore the virtual machine to the restore destinationas original location, then log in to the original vCenter/ESX or Hyper-V Server andcheck if the virtual machine exists.
If you select to restore the virtual machine to the Alternate location, then log in tothe alternate vCenter/ESX or Hyper-V Server provided in the restore options andcheck if the virtual machine exists.
2. Verify the virtual machine was restored.
The virtual machine is restored successfully.
Chapter 5: Using Arcserve UDP Agent (Windows) 453
Perform a Restore
How to Use Exchange Granular Restore (GRT)
Introduction
Review the Prerequisites and Considerations
How to Restore Microsoft Exchange Data Using Exchange Granular Restore(GRT) Utility
454 Arcserve UDP Agent for Windows User Guide

Perform a Restore
Introduction
The Exchange Granular Restore utility is used to restore Microsoft Exchange emailand non-email objects. The utility includes the injection capability for items, such asemails, from offline databases (*.EDB) and log files to the original live Exchangedatabases, as well as granular data extraction to Personal Storage File (.pst) files.
This utility includes the following key benefits:
Supports non-email items (for example, Calendar, Contacts, Tasks) and publicfolders.
Can work with just a database file as well. Logs are not mandatory, but havingthem will ensure more recent data available for restore.
It does not need to generate a catalog and directly restores the mail from themounted recovery point.
Takes a minimum amount of time to restore a mailbox level item from a data-base or user mailbox of any size.
Supports the command line options to process several databases.
Note: For more details on the supported specifications, functions, and other fea-tures, see the Exchange Granular Restore user guide.
Chapter 5: Using Arcserve UDP Agent (Windows) 455

Perform a Restore
Review the Prerequisites and Considerations
Verify that the following prerequisites exist before performing a restore:
The Exchange Granular Restore utility is available at the following location:
The tool is installed with the Arcserve UDP Agent under the following directory:
X:\Program Files\Arcserve\Unified Data Protection\Engine\Exchange GRT
Note: The tool is installed with the Arcserve UDP Agent.
The Restore job is set to run from the Exchange machine or HBBU proxymachine.
Note: If you want to run the restore job on any other machine, search the recov-ery point from the backup destination.
The database name, Server name, path to database (.edb), and the log files ofthe user are identified to perform the restore job.
To identify, use the Exchange Management Console (EMC), Exchange ControlPanel (ECP), or Exchange Management Shell.
For example:
Get-Mailbox -identity "username" | fl Database
Get-MailboxDatabase -identity "Databasename" | fl Name, Server,EdbFilePath,LogFolderPath
More information:
How to Restore Microsoft Exchange Data Using Exchange Granular Restore (GRT)Utility
456 Arcserve UDP Agent for Windows User Guide

Perform a Restore
Restoring Microsoft Exchange Data Using ExchangeGranular Restore (GRT) Utility
Before you begin, review the prerequisites and considerations.
Perform the following tasks to restore Microsoft Exchange mailbox items, usingthe Exchange Granular Restore utility:
1. From the Arcserve UDP Agent console, select the Mount Recovery Point task(recommended) or restore the Exchange database to the local drive. The MountRecovery Point dialog opens.
Chapter 5: Using Arcserve UDP Agent (Windows) 457

Perform a Restore
2. Select the recovery point date and clickMount for the volume(s) that containExchange Database and logs.
Note: If the server that is running the restore job is not the Exchange or HBBUproxy, click Change to select the appropriate Recovery Point Server, Data Store,and Exchange Server.
3. Select the drive letter to mount the volume and click OK.
458 Arcserve UDP Agent for Windows User Guide

Perform a Restore
4. Launch the Exchange Granular Restore utility from one of the following locations:
Start > All Programs > Arcserve > Unified Data Protection > Arcserve UDP ExchangeGranular Restore
or
X:\Program Files\Arcserve\Unified Data Protection\Engine\Exchange GRT\esr.exe
A dialog appears to specify the path for the database and log files.
5. Specify the path to the mounted volume and click Open.
The Arcserve UDP Exchange Granular Restore utility opens.
6. Select the user data to restore and click Export into original mailbox or Exportinto .PST.
Chapter 5: Using Arcserve UDP Agent (Windows) 459

Perform a Restore
Notes:
For more details on the supported specifications, features, user options andlimitations, see the Exchange Granular Restore user guide (esr.pdf), locatedat:
%ProgramFiles%\Arcserve\Unified Data Protection\Engine\Exchange GRTor Exchange Granular Guide
By default, the utility uses the current user who is logged in to Windows toestablish the connection. If the current user does not have permissions toimpersonate the selected user, an error message appears in the Detailspane.
If an error is reported, the recommended action to take is to log in to themachine with an account that has impersonation rights for the selected useror the account of the selected user.
7. When the restore job completes, dismount the volume that was used for the recov-ery.
460 Arcserve UDP Agent for Windows User Guide

Perform a Restore
To dismount the volume, from the Arcserve UDP Agent console, clickMount Recov-ery Point and then click Dismount.
Chapter 5: Using Arcserve UDP Agent (Windows) 461

Perform a Restore
How to Restore Microsoft Exchange Data
Important! To restore Microsoft Exchange data, it is suggested to use theExchange Granular Restore utility.
462 Arcserve UDP Agent for Windows User Guide

Perform a Restore
How to Restore a Microsoft Exchange Application
Arcserve UDP Agent (Windows) allows you to not only protect and recover yourdata, but also helps you to get the applications that will use that data back up andrunning. All application recoveries can only be made using the Restore by RecoveryPoint method. During an application recovery, Arcserve UDP Agent (Windows)takes advantage of Windows Volume Shadow Copy Service (VSS) to help ensuredata consistency for any VSS-aware application. With Arcserve UDP Agent (Win-dows), you can recover the Microsoft Exchange Server application without per-forming a full disaster recovery.
The following diagram illustrates the process to restore a Microsoft ExchangeApplication:
Perform the following tasks to restore a Microsoft Exchange Application:
Chapter 5: Using Arcserve UDP Agent (Windows) 463

Perform a Restore
1. Review the Restore Prerequisites and Considerations
2. Specify the Microsoft Exchange Information to Restore
a. Specify the Recovery Point and Microsoft Exchange Database
b. Define the Restore Options
3. Restore the Microsoft Exchange Application
4. Verify that the Microsoft Exchange Application was Restored
464 Arcserve UDP Agent for Windows User Guide

Perform a Restore
Review the Restore Prerequisites and Considerations
Arcserve UDP Agent (Windows) supports the following versions of MicrosoftExchange Server:
Microsoft Exchange 2010 - Single Server Environment and Database AvailabilityGroup (DAG) environment.
Microsoft Exchange 2013 and 2016 - Single Server Environment and DatabaseAvailability Group (DAG) environment.
For Microsoft Exchange Server 2010, 2013, and 2016 DAG environment, Arc-serve UDP Agent (Windows) must be installed on all member servers in theDAG group. A backup job can also be performed from any member server forboth active and passive database copies, but restore can only be performed toan active database copy.
Microsoft Exchange Server can be restored at the following levels:
Microsoft Exchange Writer Level
Defines if you want to restore all the Microsoft Exchange Server data, you canperform a restore at Microsoft Exchange Writer level.
Storage Group Level
Defines if you want to restore a specific Storage Group, you can perform arestore at this level.
Note: The Storage Group Level does not apply for Microsoft Exchange Server 2010,2013, and 2016.
Mailbox Database Level (Microsoft Exchange 2010, 2013, and 2016)
Specifies if you want to restore a specific Mailbox Database, you can perform arestore at this level.
Mailbox Level (Microsoft Exchange 2010, 2013, and 2016)
Defines if you want to restore a specific Mailbox or mail object.
Verify that the following prerequisites exist before performing a MicrosoftExchange restore:
Database-level restore
The target machine has the same name and the same version of MicrosoftExchange installed.
The target database has the same database name and the same storage groupname (Microsoft Exchange 200X) and be a part of the same MicrosoftExchange organization.
Chapter 5: Using Arcserve UDP Agent (Windows) 465
Perform a Restore
Granular-level restore
To restore Microsoft Exchange data, use the Exchange Granular Restore utility.
466 Arcserve UDP Agent for Windows User Guide

Perform a Restore
Specify the Microsoft Exchange Information toRestore
Arcserve UDP Agent (Windows) allows you to not only protect and recover yourdata, but also helps you to get the Microsoft Exchange Server application that usesthat data back up and running. The Microsoft Exchange Server recovery can only bemade using the Restore by Recovery Point method.
The process involved in restoring a Microsoft Exchange Application is as follows:
1. Specify the Recovery Point and Microsoft Exchange Database
2. Define the Restore Options
Chapter 5: Using Arcserve UDP Agent (Windows) 467

Perform a Restore
Specify the Recovery Point and Microsoft ExchangeDatabase
Use the Browse Recovery Points option to restore from a recovery point. Whenyou select a recovery date, all the associated recovery points for that date are dis-played. You can then browse and select the Microsoft Exchange database to berestored.
Follow these steps:
1. Access the restore method selection dialog in one of the following ways:
From Arcserve UDP:
a. Log into Arcserve UDP.
b. Click the resources tab.
c. Select All Nodes in the left pane.
All the added nodes are displayed in the center pane.
d. In the center pane, select the node and click Actions.
e. Click Restore from the Actions dropdown menu.
The restore method selection dialog opens.
Note: You are automatically logged in to the agent node and the restore methodselection dialog is opened from the agent node.
From Arcserve UDP Agent (Windows):
a. Log into Arcserve UDP Agent (Windows).
b. From the home page, select Restore.
The restore method selection dialog opens.
2. Click the Browse Recovery Points option.
The Browse Recovery Points dialog opens.
3. Select the recovery point (date and time) and then select the Microsoft Exchangedatabase to be restored.
The corresponding marker box becomes filled (green) to indicate that the databasehas been selected for the restore.
Note: If you do not want the transaction log files to be applied after the restore,you must manually delete it before the restore is performed. For more informationabout manually deleting transaction log files, refer to the Microsoft Exchange
468 Arcserve UDP Agent for Windows User Guide

Perform a Restore
Server documentation.
4. Click Next.
The Restore Options dialog opens.
Chapter 5: Using Arcserve UDP Agent (Windows) 469

Perform a Restore
Define the Restore Options
After you specify a recovery point and content to restore, define the copy optionsfor the selected recovery point.
Follow these steps:
1. From the Restore Options dialog, select the restore destination.
2. Select the destination for the restore.
The available options are to restore to the original location of the backup, restorethe dump file only, or restore to a Recovery Storage Group/Recovery Mailbox Data-base.
Restore to original location
Restores to the original location from where the backup image was captured.
Dump file only
Restores the dump files only.
For this option, Arcserve UDP Agent (Windows) will restore the MicrosoftExchange database file to a specified folder, and will not bring it online afterrecovery. You can then use it to mount on Microsoft Exchange Server manually.
Note:When a Recovery Mailbox Database exists, restore with Dump file onlyoption will fail.
Replay log on database
470 Arcserve UDP Agent for Windows User Guide

Perform a Restore
Specifies that when the database files are dumped to the destination folder,you can replay Microsoft Exchange transaction log files and commit them tothe database.
Dismount the database before restore and mount the database after restore
Typically before a restore, Microsoft Exchange will perform some checks tohelp ensure the following:
The database to be restored is in "Dismounted" status.
The database is not restored unexpectedly.
To protect a Microsoft Exchange production database from beingrestored unexpectedly, a switch is added to allow the database to be over-written during the restore process. Microsoft Exchange will refuse torestore a database if this switch is not set.
For Arcserve UDP Agent (Windows), these two options are controlled by this"Dismount the database before restore and mount the database after restore"option. With this option, Arcserve UDP Agent (Windows) lets you launch therestore process automatically without any manual operations. (You can also spe-cify to dismount/mount database manually).
If checked, specifies that the recovery process will automatically dismountthe Microsoft Exchange database before the restore process and then mountthe database after the restore process is completed. In addition, if checked,this option will also allow the Microsoft Exchange database to be overwrittenduring the restore.
If unchecked, specifies that the recovery process will not automatically dis-mount the Microsoft Exchange database before recovery and mount the data-base after recovery.
The Microsoft Exchange administrator would have to perform some manualoperations such as dismount the Microsoft Exchange database, set the AllowOverwrite flag on the database, and mount the Microsoft Exchange data-base. (The recovery procedure is performed by Exchange during the mount-ing of the database).
In addition, if unchecked, this option does not allow the Microsoft Exchangedatabase to be overwritten during restore.
Restore to Recovery Database (Microsoft Exchange 2010 and 2013)
Restores the database to a Recovery Database. A Recovery Database is adatabase that can be used for recovery purposes. You can restore aMicrosoft Exchange Mailbox Database from a backup to a Recovery Data-
Chapter 5: Using Arcserve UDP Agent (Windows) 471

Perform a Restore
base and then recover and extract data from it, without affecting the pro-duction database that is being accessed by end users.
Before restoring a Microsoft Exchange 2010 or Exchange 2013 database to a Recov-ery Database, you must first create a Recovery Database.
3. Click Next.
The Restore Summary dialog opens.
472 Arcserve UDP Agent for Windows User Guide

Perform a Restore
Restore the Microsoft Exchange Application
After you define the restore options, verify that your settings are correct and con-firm the restore process. Restore Summary helps you to review all the restoreoptions that you defined and modify them if necessary.
Follow these steps:
1. From the Restore Summary dialog, review the displayed information to verify thatall the restore options and settings are correct.
If the summary information is not correct, click Previous and go back to theapplicable dialog to change the incorrect setting.
If the summary information is correct, click Next and then Finish to launch therestore process.
The Microsoft Exchange Application is restored.
Chapter 5: Using Arcserve UDP Agent (Windows) 473

Perform a Restore
Verify that the Microsoft Exchange Application wasRestored
Follow these steps:
1. Navigate to the Arcserve UDP Agent (Windows) restore destination you specified.
For example, if you select to restore the Microsoft Exchange database to the ori-ginal location, after the restore is complete, then browse to the physical location tocheck if the Microsoft Exchange database and logs are restored.
If you select to restore the Microsoft Exchange database to Dump File only locationthen Arcserve UDP Agent (Windows) will restore the Microsoft Exchange databaseand logs to a specified location.
2. Verify if the Microsoft Exchange Application was restored and check if the databaseis mounted and is accessible.
The Microsoft Exchange Application is restored successfully.
474 Arcserve UDP Agent for Windows User Guide

Perform a Restore
How to Restore a Microsoft SQL Server Application
The Arcserve UDP Agent (Windows) allows you to not only protect and recover yourdata, but also helps you to get the applications that will use that data back up andrunning. All application recoveries can only be made using the Restore by RecoveryPoint method. During an application recovery, Arcserve UDP Agent (Windows)takes advantage of Windows Volume Shadow Copy Service (VSS) to help ensuredata consistency for any VSS-aware application. With Arcserve UDP Agent (Win-dows), you can recover the Microsoft SQL Server application without performing afull disaster recovery.
The following diagram illustrates the process to restore a Microsoft SQL ServerApplication:
Perform the following tasks to restore a Microsoft SQL Server Application:
Chapter 5: Using Arcserve UDP Agent (Windows) 475

Perform a Restore
1. Review the Restore Prerequisites and Considerations
2. Specify the Microsoft SQL Server Information to Restore
a. Specify the Recovery Point and Microsoft SQL Server Database
b. Define the Restore Options
3. Restore the Microsoft SQL Server Application
4. Verify that the Microsoft SQL Server Application was Restored
476 Arcserve UDP Agent for Windows User Guide

Perform a Restore
Review the Restore Prerequisites and Considerations
Verify that the following prerequisites exist before performing a restore:
You need Microsoft SQL Server instance before performing a SQL Applicationrestore.
Review the Compatibility Matrix that provides the supported operating sys-tems, databases, and browsers.
Review the following restore considerations:
We cannot restore database across an instance. Restore to alternate location inArcserve UDP Agent (Windows) means we can restore database and change itsdatabase name and file location. For more information, see Microsoft SQLServer Restore to Alternate Location Considerations.
If the jobs are not for the same VM, Arcserve UDP allows multiple restore jobsto run at the same time. If you attempt to launch a restore job, while anotherrestore job is running for the same VM, an alert message informs you thatanother job is running and requests you to try again later.
Arcserve UDP Agent (Windows) only allows one restore job to run at the sametime. If you attempt to launch a restore job manually, while another restore jobis running, an alert message opens informing you that another job is runningand requests you to try again later.
Microsoft SQL Server Restore to Alternate Location Considerations
When you specify to restore a Microsoft SQL Server application to an alternate loc-ation, you can either restore it to an alternate location on the same machine or ona different machine.
Prior to performing an Arcserve UDP Agent (Windows) restore of a Microsoft SQLServer application to an alternate location, you should consider the following:
If alternate location is on the same machine
For this option, you can either restore a database to a new location (with thesame name) or restore with a new name (to the same location):
Same Name - New Location
For example, if Database A is installed in the current SQL Server at "C:\DB_A"and has been backed up. You can use this option and specify "Alternate File Loca-tion" to restore Database A to an alternate location such as "D:\Alternate_A.
After the database has been restored, the database file located at the new loc-ation "D:\Alternate_A" will then be used.
Chapter 5: Using Arcserve UDP Agent (Windows) 477
Perform a Restore
Important! During restore, if you change the database location but retain thedatabase name, then the previous database will be deleted after the restore iscomplete. The restored database file will be pointed to the new location.
When you restore to an alternate location, the Instance Name section is unavail-able because the Instance Name should always be the same and cannot bechanged. As a result, you cannot restore a database to an alternate instance thatis currently located on the same MS SQL Server.
Same Location - New Name
For example, if you have two databases (Database A and Database B) installedin the current SQL Server and both have been backed up. You can use this optionand specify "New database Name" to restore Database A to same location asDatabase A_New.
After the databases have been restored, this location will now have three data-bases (Database A, Database B, and Database A_New).
If alternate location is on the different machine
The SQL Server installation path must be the same as the path that existed whenthe backup was performed.
For example, if the backup of the SQL Server is installed at "C:\SQLServer", thenthe SQL Server on the new Arcserve UDP Agent (Windows) server must also beinstalled at C:\SQLServer.
The same instance name for the database that existed when the backup was per-formed must be installed on Arcserve UDP Agent (Windows) server, otherwisethe database associated with that instance will be skipped from the restore.
For example, if the backup of the SQL Server contained "Instance_1" with Data-base A and Database B and "Instance_2" with Database C, but the Arcserve UDPAgent (Windows) server only has "Instance_1". After the restore is complete,Database A and Database B will be restored, but Database C will not berestored.
The SQL Server version on the Arcserve UDP Agent (Windows) server must bebackwards compatible to the version of the SQL Server used during the backupsession.
For example, you can restore an SQL Server 2008 machine to an SQL Server2010 machine; however, you cannot restore a SQL Server 2010 machine to anSQL Server 2008 machine.
Restoring a database of 64-bit instance to 32-bit instance is not supported.
Microsoft SQL Server 2012/2014 AAG Restore Considerations
478 Arcserve UDP Agent for Windows User Guide

Perform a Restore
When restoring a Microsoft SQL Server 2012/2014 database that is part of anAlwaysOn Availability Group (AAG), there are some considerations that you shouldbe aware of.
If the MS SQL database is part of the MS SQL 2012/2014 AlwaysOn AvailabilityGroup (AAG), and restoring to the original location fails, perform the followingtasks:
1. Remove the database to be restored away from the Availability Group. Formore information, see link.
2. Share the backup session to Arcserve UDP Agent (Windows)on every Avail-ability Group node and then restore the session by Arcserve UDP Agent (Win-dows) on every Availability Group node.
3. Add the database back to an Availability Group. For more information, seelink.
Chapter 5: Using Arcserve UDP Agent (Windows) 479
Perform a Restore
Specify the Microsoft SQL Server Information toRestore
Arcserve UDP Agent (Windows) allows you to not only protect and recover yourdata, but also helps you to get the Microsoft SQL Server application that uses thatdata back up and running. The Microsoft SQL Server recovery can only be madeusing the Restore by Recovery Point method.
The process involved in restoring a Microsoft SQL Server Application is as follows:
1. Specify the Recovery Point and Microsoft SQL Server Database
2. Define the Restore Options
480 Arcserve UDP Agent for Windows User Guide

Perform a Restore
Specify the Recovery Point and Microsoft SQL ServerDatabase
Use the Browse Recovery Points option to restore from a recovery point. Whenyou select a recovery date, all the associated recovery points for that date are dis-played. You can then browse and select the Microsoft SQL Server database to berestored.
Follow these steps:
1. Access the restore method selection dialog in one of the following ways:
From Arcserve UDP:
a. Log into Arcserve UDP.
b. Click the resources tab.
c. Select All Nodes in the left pane.
All the added nodes are displayed in the center pane.
d. In the center pane, select the node and click Actions.
e. Click Restore from the server name drop-down menu.
The restore method selection dialog opens.
Note: You are automatically logged in to the agent node and the restoremethod selection dialog is opened from the agent node.
From Arcserve UDP Agent (Windows):
a. Log into Arcserve UDP Agent (Windows).
b. From the home page, select Restore.
The restore method selection dialog opens.
2. Click the Browse Recovery Points option.
The Browse Recovery Points dialog opens.
3. Select the recovery point (date and time) and then select the Microsoft SQL Serverdatabase to be restored.
4. The corresponding marker box becomes filled (green) to indicate that the databasehas been selected for the restore.
Note: If you do not want the transaction log files to be applied after the restore,you must manually delete it before the restore is performed. For more informationabout manually deleting transaction log files, refer to the Microsoft SQL Server doc-
Chapter 5: Using Arcserve UDP Agent (Windows) 481

Perform a Restore
umentation.
5. Click Next.
The Restore Options dialog opens.
482 Arcserve UDP Agent for Windows User Guide

Perform a Restore
Define the Restore Options
After you specify a recovery point and content to restore, define the copy optionsfor the selected recovery point.
Follow these steps:
1. From the Restore Options dialog, select the restore destination.
2. Select the destination for the restore.
The available options are to restore to the original location of the backup, restorethe dump file only, or restore to alternative location.
Restore to original location
Restores to the original location from where the backup image was captured.
Dump file only
For this option, Arcserve UDP Agent (Windows) dumps the selected MicrosoftSQL database files to the specified folder. When you select this option, youcan then specify or browse to the folder location where the dump file will berestored to.
Chapter 5: Using Arcserve UDP Agent (Windows) 483

Perform a Restore
Restore to alternate location
Restores to an alternate location (not the original location).
Backups can be copied to network locations and they can be used by multipleSQL Server instances. You can perform a multiple database restore (sim-ultaneously) from the instance level. From this listing, you can select the data-base instance and specify a new database name and alternate location torestore the database to. In addition, you can also browse to the alternate loc-ation where the database will be restored to.
When restoring a Microsoft SQL Server application to an alternate location,there are some considerations that you should be aware of. For more inform-ation, see the Microsoft SQL Server Restore to Alternate Location Con-siderations section in the topic Review the Restore Prerequisites andConsiderations.
3. Click Next.
The Restore Summary dialog opens.
484 Arcserve UDP Agent for Windows User Guide

Perform a Restore
Restore the Microsoft SQL Server Application
After you define the restore options, verify that your settings are correct and con-firm the restore process. Restore Summary helps you to review all the restoreoptions that you defined and modify them if necessary.
Follow these steps:
1. From the Restore Summary dialog, review the displayed information to verify thatall the restore options and settings are correct.
If the summary information is not correct, click Previous and go back to theapplicable dialog to change the incorrect setting.
If the summary information is correct, click Finish to launch the restore process.
The Microsoft SQL Server Application is restored.
Chapter 5: Using Arcserve UDP Agent (Windows) 485

Perform a Restore
Verify that the Microsoft SQL Server Application wasRestored
Follow these steps:
1. Navigate to the Arcserve UDP Agent (Windows) restore destination you specified.
For example, if you select to restore the Microsoft SQL Server database to the ori-ginal location, after the restore is complete, then browse to the physical location tocheck if the Microsoft SQL Server database and logs are restored.
If you select to restore the Microsoft SQL Server database to Dump File only loc-ation then Arcserve UDP Agent (Windows) will restore the Microsoft SQL Serverdatabase and logs to a specified location.
2. Verify if the Microsoft SQL Server Application was restored and check if the data-base is mounted and is accessible.
The Microsoft SQL Server Application is restored successfully.
486 Arcserve UDP Agent for Windows User Guide

Perform a Restore
How to Restore an Oracle Database
You can restore either certain files and tablespaces or the entire Oracle databaseusing the restore wizard. To restore an Oracle database, locate the files ortablespace on the destination node. Then, you restore the files or tablespace usingthe restore wizard.
The following diagram illustrates the process to restore an Oracle database:
Perform the following tasks to restore an Oracle database:
Chapter 5: Using Arcserve UDP Agent (Windows) 487

Perform a Restore
Review the Prerequisites
Restore the Server Parameter File
Restore the Parameter File
Restore the Archived Redo Logs
Restore the Tablespaces or Data Files
Restore System, Undo Tablespaces, Data Files
Restore All Tablespaces and Data Files
Restore Control Files
Restore the Entire Database (Tablespaces and Control Files)
Recover the Oracle Database Using Bare Metal Recovery
488 Arcserve UDP Agent for Windows User Guide

Perform a Restore
Review the Prerequisites and Considerations
Review the following prerequisites before you restore the Oracle database:
The Oracle VSS writer on the backup node is functioning properly. If the OracleVSS writer does not function properly, you get a warning message in the Activ-ity Log associated with the backup job.
You have a valid recovery point.
To avoid any restore failure problem, you have saved a duplicate copy of yoursystem files before you overwrite the original files.
Review the Compatibility Matrix that provides the supported operating sys-tems, databases, and browsers.
Chapter 5: Using Arcserve UDP Agent (Windows) 489

Perform a Restore
Restore the Server Parameter File
The server parameter file is a repository for initialization parameters. Before yourestore, you must locate the file. When you locate the files, ensure that the data-base is in the Open state.
Follow these steps:
1. Log into the computer where you want to restore the files.
2. Locate the server parameter file using the following command:
SQL> SHOW PARAMETER SPFILE;
3. Shut down the database or the Oracle instance before you begin the restore pro-cess:
SQL> SHUTDOWN IMMEDIATE;
4. Log into the Arcserve UDP Console.
5. Restore the server parameter file using the Restore Wizard. For more informationon the restore process, see How to Restore From a Recovery Point.
6. Log into the destination computer.
7. Navigate to the specific folders and verify that the files are restored.
8. Connect to SQL*Plus to restart the Oracle instance with the restored server para-meter file.
The server parameter file is restored.
490 Arcserve UDP Agent for Windows User Guide
Perform a Restore
Restore the Parameter File
The parameter file includes a list of initialization parameters and values for eachparameter. Before you restore, you must locate the file. When you locate the files,ensure that the database is in the Open state.
Follow these steps:
1. Log into the computer where you want to restore the files.
2. Locate the parameter file (pfile).
Typically, the pfile (INIT<SID>.ORA) is located in the %ORACLE_HOME/database dir-ectory. You can type "INIT<SID>.ORA" to locate the pfile.
3. Shut down the database or the Oracle instance before you begin the restore pro-cess:
SQL> SHUTDOWN IMMEDIATE;
4. Log into the Arcserve UDP Console.
5. Restore the parameter file using the Restore Wizard. For more information on therestore process, see How to Restore From a Recovery Point.
6. Log into the destination computer.
7. Navigate to the specific folders and verify that the files are restored.
8. Connect to SQL*Plus to restart the Oracle instance with the restored parameterfile.
The parameter file is restored.
Chapter 5: Using Arcserve UDP Agent (Windows) 491

Perform a Restore
Restore the Archived Redo Logs
Archived redo logs are used to recover a database or update a standby database.Before you restore, you must locate the file. When you locate the files, ensure thatthe database is in the Open state.
Follow these steps:
1. Log into the computer where you want to restore the files.
2. Locate the archived redo logs using the following command.
SQL> ARCHIVE LOG LIST;
SQL> SHOW PARAMETER DB_RECOVERY_FILE_DEST;
3. Log into the Arcserve UDP Console.
4. Restore the archived redo logs using the Restore Wizard. For more information onthe restore process, see How to Restore From a Recovery Point.
5. Log into the destination computer.
6. Navigate to the specific folders and verify that the archived redo logs are restored.
The archived redo logs are restored.
492 Arcserve UDP Agent for Windows User Guide

Perform a Restore
Restore the Tablespaces or Data Files
You can restore the tablespace or data files. Before you restore, you must locatethe file. When you locate the files, ensure that the database is in the Open state. Ifthe database is open, use the ALTER TABLESPACE. OFFLINE statement to take thetablespaces or datafiles offline before you begin the restore process.
Follow these steps:
1. Log into the computer where you want to restore the tablespaces or datafiles.
2. Locate the user tablespaces or datafiles using the following command:
SQL> SELECT FILE_NAME, TABLESPACE_NAME FROM DBA_DATA_FILES;
3. Change the state of the database to mount, or nomount, or shutdown before yourestore the tablespaces or datafiles.
SQL> STARTUP MOUNT;
SQL> STARTUP NOMOUNT;
SQL> SHUTDOWN IMMEDIATE;
4. Log in to the Arcserve UDP Console.
5. Restore the tablespaces or datafiles using the Restore Wizard. For more inform-ation on the restore process, see How to Restore From a Recovery Point.
6. Log into the destination computer.
7. Navigate to the specific folders and verify that the tablespaces or datafiles arerestored.
8. Recover the tablespace or data files.
To recover a tablespace, enter the following command at the SQL*Plusprompt screen:
SQL> RECOVER TABLESPACE "tablespace_name";
To recover a data file, enter the following command at the SQL*Plus promptscreen:
SQL> RECOVER DATAFILE 'path';
Oracle checks for the archive redo log files that it needs to apply and displaysthe names of the files in a sequence.
9. Enter AUTO in the SQL*Plus prompt screen to apply the files.
Oracle applies the log files to restore the data files. After Oracle finishes applyingthe redo log file, it displays the following messages:
Applying suggested logfile
Chapter 5: Using Arcserve UDP Agent (Windows) 493

Perform a Restore
Log applied
After each log is applied, Oracle continues to apply the next redo log file until therecovery is complete.
10. Enter the following command to bring the tablespace online:
SQL> ALTER TABLESPACE "tablespace_name" ONLINE;
The tablespace is now recovered to the last available log file.
494 Arcserve UDP Agent for Windows User Guide

Perform a Restore
Restore System, or Undo Tablespaces or Data Files
You can restore system, or undo tablespaces or data files. Before you restore, youmust locate the file. When you locate the files, ensure that the database is in theOpen state.
Follow these steps:
1. Log into the computer where you want to restore system or undo tablespaces ordatafiles.
2. Locate the user tablespaces or datafiles using the following command:
SQL> SELECT TABLESPACE_NAME, FILE_NAME FROM DBA_DATA_FILES;
3. Change the state of the database to mount, or nomount, or shutdown before yourestore the tablespaces or datafiles.
SQL> STARTUP MOUNT;
SQL> STARTUP NOMOUNT;
SQL> SHUTDOWN IMMEDIATE;
4. Log into the Arcserve UDP Console.
5. Restore the tablespaces or datafiles using the Restore Wizard. For more inform-ation on the restore process, see How to Restore From a Recovery Point.
6. Log into the destination computer.
7. Navigate to the specific folders and verify that the system, or undo tablespaces ordatafiles are restored.
8. Recover the tablespace or data files.
To recover a tablespace, enter the following command at the SQL*Plusprompt screen:
SQL> RECOVER TABLESPACE "tablespace_name";
To recover a data file, enter the following command at the SQL*Plus promptscreen:
SQL> RECOVER DATAFILE 'path';
Oracle checks for the archive redo log files that it needs to apply and displaysthe names of the files in a sequence.
9. Enter AUTO in the SQL*Plus prompt screen to apply the files.
Oracle applies the log files to restore the data files. After Oracle finishes applyingthe redo log file, it displays the following messages:
Applying suggested logfile
Chapter 5: Using Arcserve UDP Agent (Windows) 495

Perform a Restore
Log applied
After each log is applied, Oracle continues to apply the next redo log file until therecovery is complete.
10. Enter the following command to bring the tablespace online:
SQL> ALTER TABLESPACE "tablespace_name" ONLINE;
The tablespace is now recovered to the last available log file.
496 Arcserve UDP Agent for Windows User Guide

Perform a Restore
Restore All Tablespaces and Data Files
You can restore all the tablespaces and data files. Before you restore, you must loc-ate the file. When you locate the files, ensure that the database is in the Openstate. If the database is open, use the ALTER TABLESPACE. OFFLINE statement totake the tablespaces or datafiles offline before you begin the restore process.
Follow these steps:
1. Log into the computer where you want to restore the tablespaces or datafiles.
2. Locate the user tablespaces or datafiles using the following command:
SQL> SELECT FILE_NAME, TABLESPACE_NAME FROM DBA_DATA_FILES;
3. Change the state of the database to mount, or nomount, or shutdown before yourestore the tablespaces or datafiles.
SQL> STARTUP MOUNT;
SQL> STARTUP NOMOUNT;
SQL> SHUTDOWN IMMEDIATE;
4. Log into the Arcserve UDP Console.
5. Restore the tablespaces or datafiles using the Restore Wizard. For more inform-ation on the restore process, see How to Restore From a Recovery Point.
6. Log into the destination computer.
7. Navigate to the specific folders and verify that the tablespaces or datafiles arerestored.
8. Recover the database.
SQL> RECOVER DATABASE;
Oracle checks for the archive redo log files that it needs to apply and displays thenames of the files in a sequence.
9. Enter AUTO in the SQL*Plus prompt screen to apply the files.
Oracle applies the log files to restore the data files. After Oracle finishes applyingthe redo log file, it displays the following messages:
Applying suggested logfile
Log applied
After each log is applied, Oracle continues to apply the next redo log file until therecovery is complete.
Note: If Oracle displays an error indicating that the log file cannot be opened, thelog file may not be available. In such cases, perform the incomplete media
Chapter 5: Using Arcserve UDP Agent (Windows) 497

Perform a Restore
recovery to recover the database again. After all the log files are applied, the data-base recovery is complete. For more information about incomplete media recov-ery, see the Oracle documentation.
10. Enter the following command to bring the database online:
SQL> ALTER DATABASE OPEN;
The database is now recovered to the last available log file.
Note: If you perform an incomplete media recovery, enter the following commandto change the database to the open state:
SQL> ALTER DATABASE OPEN RESETLOGS;
498 Arcserve UDP Agent for Windows User Guide

Perform a Restore
Restore Control Files
You can restore the control files that stores the physical structure of the database.Before you restore, you must locate the file. When you locate the files, ensure thatthe database is in the Open state.
Follow these steps:
1. Log into the computer where you want to restore the control files.
2. Locate the control files using the following command:
SQL> SHOW PARAMETER CONTROL FILES;
3. Change the state of the database to nomount or shutdown before you restore thecontrol files.
SQL> STARTUP NOMOUNT;
SQL> SHUTDOWN IMMEDIATE;
4. Log into the Arcserve UDP Console.
5. Restore the tablespaces or datafiles using the Restore Wizard. For more inform-ation on the restore process, see How to Restore From a Recovery Point.
6. Log into the destination computer.
7. Navigate to the specific folders and verify that the control files are restored.
8. Mount the database to begin the database recovery:
SQL> START MOUNT
9. Enter the RECOVER command with the USING BACKUP CONTROLFILE clause.
SQL> RECOVER DATABASE USING BACKUP CONTROLFILE
The database recovery process begins.
10. (Optional) Specify the UNTIL CANCEL clause to perform an incomplete recovery.
SQL> RECOVER DATABASE USING BACKUP CONTROLFILE UNTIL CANCEL
11. Apply the prompted archived logs.
Note: If the required archived log is missing, then it implies that a necessary redorecord is located in the online redo logs. It occurs because unarchived changes arelocated in the online logs when the instance failed. You can specify the full path ofan online redo log file and press Enter (you may have to try this a few times untilyou find the correct log).
12. Enter the following command to return the control file information about the redolog of a database:
Chapter 5: Using Arcserve UDP Agent (Windows) 499

Perform a Restore
SQL>SELECT * FROM V$LOG;
13. (Optional) Enter the following command to see the names of all of the member ofa group:
SQL>SELECT * FROM V$LOGFILE;
Example: After applying the prompted archived logs, you may see the followingmessages:
ORA-00279: change 55636 generated at 24/06/2014 16:59:47 needed for thread 1
ORA-00289: suggestion e:\app\Administrator\flash_recovery_area\orcl\ARCHIVELOG\2014_06_24\ O1_MF_1_2_9TKXGGG2_.ARC
ORA-00280: change 55636 for thread 1 is in sequence #24
Specify log: <RET>=suggested | filename | AUTO | CANCEL
14. Specify the full path of the online redo log file and press Enter.
Example: E:\app\Administrator\oradata\orcl\redo01.log
Note: You have to specify the full path multiple times until you get the correct log.
The following messages are displayed:
Log applied
Media recovery complete
15. Open the database with the RESETLOGS clause after completing the recovery pro-cess.
SQL> ALTER DATABASE OPEN RESETLOGS;
The lost control files are recovered.
500 Arcserve UDP Agent for Windows User Guide

Perform a Restore
Restore the Entire Database (Tablespaces and ControlFiles)
You can restore all the entire database (all tablespaces and control files). Beforeyou restore, you must locate the file. When you locate the files, ensure that thedatabase is in the Open state. If the database is open, use the ALTER TABLESPACE.OFFLINE statement to take the tablespaces or datafiles offline before you begin therestore process.
Follow these steps:
1. Log into the computer where you want to restore the tablespaces or datafiles.
2. Locate the user tablespaces or datafiles using the following command:
SQL> SELECT TABLESPACE_NAME, FILE_NAME from DBA_DATA_FILES;
SQL> SHOW PARAMETER CONTROL FILES;
3. Change the state of the database to nomount, or shutdown before you restore thetablespaces or datafiles.
SQL> STARTUP NOMOUNT;
SQL> SHUTDOWN IMMEDIATE;
4. Log into the Arcserve UDP Console.
5. Restore the tablespaces or datafiles using the Restore Wizard. For more inform-ation on the restore process, see How to Restore From a Recovery Point.
6. Log into the destination computer.
7. Navigate to the specific folders and verify that the tablespaces or datafiles arerestored.
8. Recover the database.
SQL> RECOVER DATABASE USING BACKUP CONTROLFILE UNTIL CANCEL;
9. Apply the prompted archived logs.
Note: If the required archived log is missing, then it implies that a necessary redorecord is located in the online redo logs. It occurs because unarchived changes arelocated in the online logs when the instance failed. You can specify the full path ofan online redo log file and press Enter (you may have to try this a few times untilyou find the correct log).
10. Enter the following command to return the control file information about the redolog of a database:
SQL>SELECT * FROM V$LOG;
Chapter 5: Using Arcserve UDP Agent (Windows) 501

Perform a Restore
11. (Optional) Enter the following command to see the names of all of the member ofa group:
SQL>SELECT * FROM V$LOGFILE;
Example: After applying the prompted archived logs, you may see the followingmessages:
ORA-00279: change 55636 generated at 24/06/2014 16:59:47 needed for thread 1
ORA-00289: suggestion e:\app\Administrator\flash_recovery_area\orcl\ARCHIVELOG\2014_06_24\ O1_MF_1_2_9TKXGGG2_.ARC
ORA-00280: change 55636 for thread 1 is in sequence #24
Specify log: <RET>=suggested | filename | AUTO | CANCEL
12. Specify the full path of the online redo log file and press Enter.
Example: E:\app\Administrator\oradata\orcl\redo01.log
Note: You have to specify the full path multiple times until you get the correct log.
The following messages are displayed:
Log applied
Media recovery complete
13. Open the database with the RESETLOGS clause after completing the recovery pro-cess.
SQL> ALTER DATABASE OPEN RESETLOGS;
The entire database is restored.
502 Arcserve UDP Agent for Windows User Guide

Perform a Restore
Recover the Oracle Database Using Bare Metal Recov-ery
Bare metal recovery lets you recover and rebuild the entire computer system dur-ing a disaster. You can restore the original computer or you can restore anothercomputer.
Follow these steps:
1. Restore the computer using one of the following methods:
If the recovery points are from an agent-based backup, perform a BMR torestore the computer.
If the recovery points are from a host-based agentless backup, then use RecoverVM to restore the computer.
2. Log into the restored computer.
3. Open the command prompt and connect to the Oracle instance (for example ORCL)as sysdba.
4. Verify the status of the Oracle instance.
SQL> SELECT STATUS FROM V$INSTANCE;
5. Perform one of the following steps depending on the status of the Oracle instance:
If the status is Shutdown, then start and open the instance.
SQL> STARTUP;
SQL> ALTER DATABASE OPEN;
If the status is Nomount, then mount and open the instance.
SQL> ALTER DATABASE MOUNT;
SQL> ALTER DATABASE OPEN;
If the status is Mount, then open the Oracle instance.
SQL> ALTER DATABASE OPEN;
6. Recovery by executing the RECOVER command if database need media recovery
SQL> RECOVER DATABASE;
7. Open the Oracle instance after the media recovery is complete.
SQL> ALTER DATABASE OPEN;
The Oracle database is recovered using the bare metal recovery.
Chapter 5: Using Arcserve UDP Agent (Windows) 503

Perform a Restore
How to Restore an Active Directory
You need to restore a backed up Active Directory session if you have any of the fol-lowing scenarios:
You want to recover an attribute of the Active Directory object from any avail-able backed up Active Directory session (not only the last backed up session).
You want to recover the Active Directory object from any available backed upActive Directory session (not only the last backed up session).
You want to recover multiple Active Directory attributes or objects from anyavailable backed up Active Directory session (not only the last backed up ses-sion).
Important! To perform a granular recovery of an Active Directory, an agent-basedbackup needs to be performed.
The scenario describes how you can restore an Active Directory.
Perform the following tasks to restore an Active Directory:
1. Review the Restore Prerequisites and Considerations
2. Restore an Active Directory
3. Verify that the Active Directory was Restored
504 Arcserve UDP Agent for Windows User Guide

Perform a Restore
Review the Restore Prerequisites and Considerations
Verify that the following prerequisites exist before performing a restore:
You have already backed up the volumes that include the Active Directory data-base folder and Log files folder.
You have the Arcserve UDP Agent (Windows) installed on Domain Controller.
You have performed an agent-based backup.
Review the Compatibility Matrix that provides the supported operating sys-tems, databases, and browsers.
Review the following restore considerations:
For a recovery point without a file system catalog created, to ensure you canbrowse and select files/folders to restore, the account/group should be grantedaccess permission to all the folders/files on all volumes with read/list accessbefore the backup is taken.
You can perform an Active Directory restore only on the Arcserve UDP Agent(Windows).
Chapter 5: Using Arcserve UDP Agent (Windows) 505

Perform a Restore
Restore an Active Directory
After you have installed the Active Directory in different volumes and have per-formed a backup for both volumes, you may want to restore the volumes with theActive Directory. This scenario describes how you can restore the backed up ActiveDirectory volumes.
Note: Verify that you have completed the prerequisites and backed up Active Dir-ectory volumes.
Follow these steps:
1. Access the restore method selection dialog in one of the following ways:
From Arcserve UDP:
a. Log into Arcserve UDP.
b. Click the resources tab.
c. Select All Nodes in the left pane.
All the added nodes are displayed in the center pane.
d. In the center pane, select the node and click Actions.
e. Click Restore from the Actions dropdown menu.
The restore method selection dialog opens.
Note: You are automatically logged in to the agent node and the restoremethod selection dialog is opened from the agent node.
From Arcserve UDP Agent (Windows):
a. Log into Arcserve UDP Agent (Windows).
b. From the home page, select Restore.
The restore method selection dialog opens.
2. From the Restore screen, click Restore Active Directory.
The Restore Active Directory dialog opens.
506 Arcserve UDP Agent for Windows User Guide

Perform a Restore
3. From the Restore Active Directory screen, perform the following steps:
a. From the calendar, select Backup date for the Active Directory that you wantto restore.
b. From the Time range, select Backup time.
c. From the Restore Active Directory screen, select Backup Job Type and BackupJob Name.
d. From the Name section, select an Active Directory backup session to restore.
4. Click Next.
5. Select the following options to further define the objects, path, and attributes torestore:
Chapter 5: Using Arcserve UDP Agent (Windows) 507

Perform a Restore
a. From the Object column, select the name of an object. The paths related tothe selected object are displayed.
b. From the Path column, select a path. The attributes related to the selectedpath are displayed.
Note: You can use the search icon to browse for the path.
c. From the Attribute column, select one or more attributes.
6. Click Next.
The Restore Options screen is displayed.
7. From the Restore Options, select the following objects according to your require-ment:
a. If the selected object was renamed after backup, click the "Restore with ori-ginal name of Renamed Objects" option to restore the renamed object.
Note: If you do not select this option, the object will not be restored.
b. If the selected object was moved to another container after backup, click the"Restore to original location of Moved Objects" option to restore the movedobject.
Note: If you do not select this option, the object will not be restored.
508 Arcserve UDP Agent for Windows User Guide

Perform a Restore
c. If the selected object was deleted permanently after backup, click the"Restore with the new object ID of Deleted Objects" option to restore the per-manently deleted object.
Note: Using this option helps you keep the restored object with the newobject ID.
8. Click Next.
The Restore Summary screen is displayed
9. Review the details and perform one of the following action:
Click Previous, if you want to modify the details.
Click Finish to run restore.
A status message is displayed to inform you when the Restore job is completed. Ifthe restore is unsuccessful, view the logs and try again.
Chapter 5: Using Arcserve UDP Agent (Windows) 509

Perform a Restore
Verify that the Active Directory was Restored
After the completion of the restore process, you can use the Active Directory Usersand Computers utility to verify that the Active Directory (object and/or attribute)was restored to the specified destination.
Note: The Active Directory utility is installed automatically with the Active Dir-ectory.
510 Arcserve UDP Agent for Windows User Guide

Perform a Restore
How to Perform an Authoritative Restore of an ActiveDirectory after a BMR
When a domain contains more than one domain controller, Active Directory rep-licates directory objects to all the domain controllers in that domain. The objectscontained within a domain can be grouped into Organizational Units (OUs). TheseOUs can provide a hierarchy structure to a domain and can resemble the organ-ization's structure in managerial or geographical terms. If you inadvertently deletea Active Directory object from a domain controller and want to recover it, you mustperform an authoritative restore to return the specified Active Directory object (orcontainer of objects) to its pre-deletion state at the time when it was backed up.For example, you might have to perform an authoritative restore if you inad-vertently delete an OU that contains a large number of users.
There are two parts to the authoritative restore process: a non-authoritativerestore is performed first by running a BMR, and then an authoritative restore ofthe deleted Active Directory objects is performed. If you perform only the BMR, thedeleted object will not be truly recovered because after the restored Active Dir-ectory is updated it will then get replicated back to the pre-restored status by itsreplication partners, which are also missing the object you wanted to recover.
Chapter 5: Using Arcserve UDP Agent (Windows) 511

Perform a Restore
Complete the following tasks to perform an authoritative restore of an active dir-ectory after a BMR:
1. Review the Restore Prerequisites and Considerations
2. Perform a BMR and Access the Directory Services Repair Mode
3. Perform an Authoritative Restore of an Active Directory
4. Verify that the Active Directory was Restored
512 Arcserve UDP Agent for Windows User Guide
Perform a Restore
Review the Restore Prerequisites and Considerations
Review the following prerequisites and considerations:
The <"distinguished name"> is the name of the subtree or individual object(s)that is to be marked authoritative. To complete this procedure, you must knowthe full distinguished name of the object or objects that you want to restore.
Review the Compatibility Matrix that provides the supported operating sys-tems, databases, and browsers.
Chapter 5: Using Arcserve UDP Agent (Windows) 513

Perform a Restore
Perform a BMR and Access the Directory ServicesRepair Mode
There are two parts to the authoritative restore process: a non-authoritativerestore is performed first by running a BMR, and then an authoritative restore ofthe deleted Active Directory objects is performed. As a result, you must make surethat the domain controller that is recovered by the BMR does not automaticallyreboot before you can access the Directory Services Repair Mode to perform thesecond part of the process (authoritative restore).
Follow these steps:
1. Perform a BMR for the domain controller that you want to recover, and when theBare Metal Recovery Summary of Restore Settings dialog is displayed, uncheckAutomatically reboot your system after recovery option.
For more information, see How to Perform a BMR Using a Backup or How to Per-form a BMR Using a Virtual Standby VM.
Important: Do not reboot the domain controller normally after BMR, or else youwill lose the opportunity to perform the authoritative restore. The authoritativerestore must be performed after you complete the BMR process, but before youfully reboot the recovered domain controller.
2. When the BMR process is completed, initiate a reboot and during the reboot pro-cess press F8 to display the Advanced Boot Options screen.
Note: For Windows 8 / Server 2012 and later Operating Systems, accessingAdvance Boot Option by pressing F8 at the boot up of machine is disabled bydefault. To perform BMR and Active Directory server recovery, we provide anoption on BMR user interface to help you boot into Advance Boot Option directlywithout pressing F8. Using this option, you can boot into DSRM mode and perform
514 Arcserve UDP Agent for Windows User Guide

Perform a Restore
Active Directory Authoritative recovery.
3. From the Advanced Boot Options screen, select the Directory Services RepairMode and wait for the system to boot up into Directory Services Repair Mode.
Chapter 5: Using Arcserve UDP Agent (Windows) 515
Perform a Restore
Perform an Authoritative Restore of an Active Dir-ectory
There are two parts to the authoritative restore process: a non-authoritativerestore is performed first by running a BMR, and then an authoritative restore ofthe deleted Active Directory objects is performed.
Follow these steps:
1. Execute cmd.exe as an administrator.
2. Run ntdsutil.exe to access the Active Directory diagnostic utility.
Note: The ntdsutil.exe is a command-line utility for accessing and managing an Act-ive Directory database.
3. Activate the instance by running the activate instance <instancename> commandand press Enter. You need to activate the correct instance of ntds to perform main-tenance tasks.
The instance name can be retrieved from the ntdsutil.exe by running the "listinstances" command. The standard instance of Active Directory is “ntds”.
4. Access authoritative restore by running au r or authoritative restore and pressEnter.
5. To restore a subtree or an individual object of an Active Directory, type one of thefollowing commands, and then press Enter.
Note: The <"distinguished name"> is the name of the subtree or object that is to bemarked authoritative. To complete this procedure, you must know the full dis-tinguished name of the object or objects that you want to restore.
To restore a subtree, such as an organizational unit (OU) and all child objects, type:restore subtree <"distinguished name">
For example: restore subtree “OU=<Organizational Unit>,DC=corp,DC=<CorporateName>,DC=com”
To restore a single object or common name (CN), type: restore object <"dis-tinguished name">
For example: restore object “CN=<Object Name>,OU=<Organizational Unit>,DC-C=corp,DC=<Corporate Name>,DC=com”
Note: Always enclose the distinguished name in quotes when there is a space orother special characters within the distinguished name. The most common cause offailure is an incorrectly specified distinguished name or a backup for which the dis-tinguished name does not exist (which occurs if you try to restore a deleted object
516 Arcserve UDP Agent for Windows User Guide

Perform a Restore
that was created after the backup).
6. From the Authoritative Restore Confirmation dialog, select Yes from the pop-upmessage asking if you are sure you want to perform this Authoritative Restore.
7. Wait for the restore job to complete.
8. At the authoritative restore and ntdsutil prompts, type quit, and then press Enter.
9. Restart the recovered domain controller in normal operating mode,
10. After the recovered domain controller is started, configure the network settings asnecessary (static IP, DNS server etc).
11. From a partner domain controller, access the "Windows Administrative Tools"menu and open Active Directory Sites and Services.
12. Run a Replicate job from recovered domain controller. The deleted user is nowrestored and available from the recovered domain controller and all associatedpartner domain controllers.
Chapter 5: Using Arcserve UDP Agent (Windows) 517
Perform a Restore
Verify that the Active Directory was Restored
After the completion of the authoritative restore process, verify that the deletedobject(s) from the Active Directory were restored to the specified destination.
Follow these steps:
1. For the recovered domain controller, navigate to the Active Directory and verifythat the object(s) that were previously deleted are now included.
2. For each domain controller that is associated with the recovered domain controller,navigate to the Active Directory and verify that the object(s) that were previouslydeleted are now included.
The restored Active Directory is successfully verified.
518 Arcserve UDP Agent for Windows User Guide

Perform a Restore
How to Restore Microsoft Clustered Nodes andShared Disks
If you have a clustered environment and the clustered nodes and shared disk arenot functioning properly, you can easily recover the nodes and disks. You canrestore the following items:
Individual files and folders in a shared disks
Specific nodes in a cluster
Entire shared disk
Entire cluster setup (all clustered nodes and shared disk)
The following diagram illustrates the process to restore clustered nodes and shareddisks:
Follow these steps to restore Microsoft clustered nodes and shared disks:
Review the Prerequisites
Restore Files of a Cluster Shared Disk
Restore a Specific Node in a Cluster
Restore a Corrupted Cluster Shared Disk
Restore the Entire Clustered Nodes and Shared Disk
Chapter 5: Using Arcserve UDP Agent (Windows) 519
Perform a Restore
Review the Prerequisites
Verify that you have completed the following prerequisites:
You have a valid recovery point for restore.
You have a valid ISO image for a BMR.
Review the Compatibility Matrix that provides the supported operating sys-tems, databases, and browsers.
520 Arcserve UDP Agent for Windows User Guide

Perform a Restore
Restore Files of a Cluster Shared Disk
The shared disk belongs to one of the nodes from the cluster. When you recoverany files from the shared disk (not the cluster quorum disk), you need to find theparent node of the shared disk. After you identify the parent node, you can recoverfiles to the parent node from the shared disk.
Note: After a failover happens, you have to browse the recovery point of a dif-ferent agent to find out the desired recovery point.
Follow these steps:
1. Log into the agent that owns the shared disk.
2. Open the Restore Wizard and select Find Files/Folders to Restore.
Note: For more information on restoring the files and folders, see How to RestoreFiles/Folders.
3. Select all the files from the Restore Wizard that you want to restore to the originallocation.
4. Complete the Restore Wizard configurations and submit the job.
The files are recovered.
5. Log into the parent node of the shared disk and verify the files are recovered.
The files of the shared disk are recovered.
Chapter 5: Using Arcserve UDP Agent (Windows) 521

Perform a Restore
Restore a Specific Node in a Cluster
If a specific node in a cluster is down, you can perform a BMR for only that node.Typically, in this scenario the shared disk is in a good state and does not need arecovery.
Follow these steps:
1. Prepare the BMR image (CD / DVD or USB stick).
2. Remove all the connections between the node that you want to recover and theshared disks.
Example: Disconnect the fibre channel connection.
3. Perform a BMR for the cluster node.
Note: For more information on performing a bare metal recovery, see How to Per-form a BMR Using a Backup.
The specific node in a cluster is recovered.
4. Check the status of the recovered node in the cluster management console andensure that it acts as part of the cluster.
The specific node in a cluster is recovered.
522 Arcserve UDP Agent for Windows User Guide

Perform a Restore
Restore a Corrupted Cluster Shared Disk
The shared disk belongs to one of the nodes from the cluster. If the shared disk iscorrupted or broken, you can restore the specific files or folders of the shared disk,without recovering the clustered nodes. Typically, in this scenario the quorum diskand all the cluster nodes are in a good state.
Follow these steps:
1. Replace the corrupted disk manually and reconfigure the cluster shared disk.
2. Identify the agent that owns the shared disk and log in to that agent.
3. Open the Restore Wizard and select Find Files/Folders to Restore.
Note: For more information on restoring the files and folders, see How to RestoreFiles/Folders.
4. Select all the files from the Restore Wizard that you want to restore to the originallocation.
5. Complete the Restore Wizard configurations and submit the job.
The shared disk is recovered.
6. Check the status of the shared disk in the cluster management console and ensurethat it acts as a part of the cluster.
The shared disk is recovered.
Chapter 5: Using Arcserve UDP Agent (Windows) 523

Perform a Restore
Restore the Entire Clustered Nodes and Shared Disk
If the entire clustered setup is corrupted or not functioning, you can recover theentire cluster. Recovering the entire cluster is a two-part process. First you recoverindividual clustered nodes using BMR. Then you recover the files and folders of theshared disk.
Note: For quorum disks, rebuild the disk using the cluster management consoleinstead of recovering it using the Restore Wizard in Arcserve UDP Agent (Win-dows).
Follow these steps:
1. Prepare the BMR image (CD / DVD or USB stick).
2. Remove all the connections between the node that you want to recover and theshared disks.
Example: Disconnect the fibre channel connection.
3. Perform a BMR for the cluster node.
Note: For more information on performing a bare metal recovery, see How to Per-form a BMR Using a Backup.
The specific node in a cluster is recovered.
4. Check the status of the recovered node in the cluster management console andensure that it acts as part of the cluster.
The specific node in a cluster is recovered.
5. Repeat the steps to recover all the clustered nodes.
All the clustered nodes are recovered. Now recover the shared disk.
6. Replace the corrupted disk manually and reconfigure the cluster shared disk.
7. Identify the agent that owns the shared disk and log in to that agent.
8. Open the Restore Wizard and select Find Files/Folders to Restore.
Note: For more information on restoring the files and folders, see How to RestoreFiles/Folders.
9. Select all the files from the Restore Wizard that you want to restore to the originallocation.
10. Complete the Restore Wizard configurations and submit the job.
The shared disk is recovered.
11. Verify the files of the shared disk and ensure the files are recovered.
The entire cluster is recovered.
524 Arcserve UDP Agent for Windows User Guide

Perform a Restore
Restore from Windows Explorer Using Arcserve UDPRecovery Point View
You can use the Arcserve UDP Recovery Point View from Windows Explorer as analternate method to restore objects that were backed up. The Arcserve UDP Recov-ery Point View lets you perform such functions as recover, copy, and paste toquickly and easily restore objects.
From the Arcserve UDP Recovery Point View, you can perform the followingrestore:
Restore a file/folder
Chapter 5: Using Arcserve UDP Agent (Windows) 525

Perform a Restore
Restore a File/Folder Using Arcserve UDP RecoveryPoint View
For a file/folder restore, you can use the copy and paste function to restore backedup objects (files or folders) from the backup destination to your specific restore des-tination. (The drag-and-drop method is not supported for a file/folder restore fromthe Arcserve UDP Recovery Point View).
Note: The path addresses cannot be restored if the length of path is more than 514characters.
Follow these steps:
1. Access Windows Explorer and from the folders in the left pane, navigate to andselect the backup destination.
2. From the right pane, right-click on the backup destination.
A pop-up menu is displayed listing the available options.
3. Select the Change to Arcserve UDP Recovery Point View option.
The Windows Explorer View changes to the Arcserve UDP Recovery Point View.When you enter into that directory, all views are logic views from an Arcserve UDPAgent (Windows) user perspective and displays the recovery points stored at thatlocation.
Note:When using the Arcserve UDP Recovery Point View, if you attempt to browseto or locate a recovery point and all recovery points are not displayed, it may bebecause your backup destinations were split between your local machine and aremote share machine. For the Arcserve UDP Recovery Point View to display allrecovery points, the backup locations (for full and corresponding incrementalbackups) should all be at the same location (either local or remote). If this occurs, itis a limitation only when using the Arcserve UDP Recovery Point View. To remedythis problem, you can use the Arcserve UDP Agent (Windows) restore UI instead toproperly display all recovery points, regardless of being at the same or different loc-ations.
4. Select the recovery point that you want to restore from and expand that directoryuntil you can gain access to the file or folder that you want to restore.
Note: From the Arcserve UDP Recovery Point View, the Copy option is only avail-able for file and folder level objects. You cannot use this option to copy volume ormachine level objects.
5. Right-click on the file or folder to be restored and select Copy. Navigate to therestore location, right-click on the location, and select Paste.
526 Arcserve UDP Agent for Windows User Guide

Perform a Restore
Note:Manual operations (such as copy, cut, or paste) for the backup destinationfolder are not successful if a job is active or a user is browsing recovery pointsusing the Arcserve UDP Recovery Point View.
Note:When restoring backed-up files (with long file names) from the Arcserve UDPRecovery Point View using the copy-and-paste method, the job can fail without anycorresponding error or warning. (Windows Explorer has a limitation on the max-imum file path length, which can lead to a file copy failure). If this occurs, you canuse the installed Arcserve UDP Agent (Windows) UI to perform the restore.
6. When the restore is successfully completed, right-click on the backup destinationand select the Change to Windows Normal View option.
The Arcserve UDP Recovery Point View changes back to the Windows ExplorerView.
Note: During the time that you are in the Arcserve UDP Recovery Point View mode,the merge/purge process for retaining the maximum number of recovery pointswill be disabled. As a result, Arcserve UDP Agent (Windows) will continue to saverecovery points beyond the specified number of recovery points until you exit theArcserve UDP Recovery Point View and return to the Windows Normal View. Whenyou exit the Arcserve UDP Recovery Point View, all retained recovery points beyondthe specified number will then be merged/purged.
Chapter 5: Using Arcserve UDP Agent (Windows) 527

How to Copy a Recovery Point
How to Copy a Recovery Point
Each time Arcserve UDP Agent (Windows) performs a successful backup, a point-in-time snapshot image of the backup is created. This collection of recovery points letsyou locate and specify the exact backup image to copy.
The following diagram illustrates the process to copy a recovery point:
Perform the following tasks to copy a recovery point:
1. Review the Prerequisites
2. Configure the Copy Recovery Point Settings
3. Copy a Recovery Point
a. Select the Recovery Point to Copy
b. Define the Copy Options and Copy the Recovery Point
4. Verify the Copied Recovery Point
528 Arcserve UDP Agent for Windows User Guide

How to Copy a Recovery Point
Review the Prerequisites
Review the following prerequisites before copying a recovery point:
You have at least one full backup available to copy.
You need a valid destination to copy the recovery point.
Review the Compatibility Matrix that provides the supported operating sys-tems, databases, and browsers.
Chapter 5: Using Arcserve UDP Agent (Windows) 529

How to Copy a Recovery Point
Configure the Copy Recovery Point Settings
Arcserve UDP Agent (Windows) lets you specify the recovery point copy settings.Before you copy a recovery point, configure the copy recovery point settings. For abetter understanding about how the options on this dialog can be used to configureyour recovery point copy schedule, see Copy Recovery Points - Example Scenarios
Note: The recovery point copy process is a copy and paste operation only and not acut and paste operation. As a result, whenever a scheduled copy recovery point jobis performed Arcserve UDP Agent (Windows) creates an additional copy of therecovery point to the specified copy destination, while still retaining the originalcopy of the recovery point at the backup destination that was specified in BackupSettings.
Follow these steps:
1. From the Arcserve UDP Agent (Windows) home page (or Arcserve UDP Agent (Win-dows) Monitor), select Settings from the taskbar and then select the Copy Recov-ery Points tab. When the Copy Recovery Points dialog opens, select CopySettings.
The Copy Recovery Points dialog opens.
Notes:
If the Arcserve UDP Agent (Windows) is being managed by Console, not allsettings are available and will be displayed as read-only information.
530 Arcserve UDP Agent for Windows User Guide

How to Copy a Recovery Point
When agent is managed by console and not protected in a plan, all the set-tings are still available except the Preference > Updates panel.
2. Select Enable Copy Recovery Points.
When selected, enables the copying of recovery points.
Note: If you do not select this option, no scheduled copying of recovery points is per-formed.
3. Specify the following recovery point copy schedule settings:
Destination
Specifies the storage location for the copy of the selected recovery point.(Optional) You can click the green arrow button to verify the connection tothe specified location.
Note: The maximum length for the specified destination path is 158 char-acters.
Copy Recovery Points job will run after the specified number of backupsare performed
Specifies when the scheduled recovery point copy process is automaticallylaunched. This process is launched based on your selected copy policies andspecified number of successful backups (Full, Incremental, and Verify).
Note: Number of successful backup is counted for any custom, daily, weeklymonthly backups that are configured.
Chapter 5: Using Arcserve UDP Agent (Windows) 531

How to Copy a Recovery Point
You can use this setting to control how many times a recovery point copy pro-cess is triggered each day. For example, if you schedule to run a backup jobevery 15 minutes, and copy job after every 4 backups, then it performs 24recovery point copy jobs each day (1 each hour).
Default: 8
Minimum: 1
Maximum: 1440
Important! If you schedule backup and copy jobs to run at regular intervalsand if the copy job is currently running (in active state) when the scheduledtime for the backup job time arrives, the backup job fails. (The next backupjob will run as scheduled and should be successful if it does not conflict withanother copy job). Because the copy operation takes almost same amount oftime as performing a full backup, the best practice is not to set a frequentschedule for your recovery point copy jobs.
Specify the number of recovery points to keep
Specifies the number of recovery points that are retained and stored at thespecified copy destination. Discards the oldest recovery point, when this num-ber is exceeded.
Note: If you do not have sufficient free space at the target destination,reduce the number of saved recovery points.
Default: 1
Maximum: 1440
4. Select the Compression level.
Compression is typically performed to decrease your disk space usage, but alsohas an inverse impact on your backup speed due to the increased CPU usage.
The available options are:
No Compression - Compression is not performed. Files are pure VHD. Thisoption has the lowest CPU usage (fastest speed), but also has the highest diskspace usage for your backup image.
No Compression - VHD - Compression is not performed. Files are converted to.vhd format directly, without the need for manual operations. This option hasthe lowest CPU usage (fastest speed), but also has the highest disk space usagefor your backup image.
Standard Compression - Some compression is performed. This option providesa good balance between CPU usage and disk space usage. This setting is thedefault setting.
532 Arcserve UDP Agent for Windows User Guide

How to Copy a Recovery Point
Maximum Compression - Maximum compression is performed. This optionprovides the highest CPU usage (lowest speed), but also has the lowest diskspace usage for your backup image.
Note: If your backup image contains uncompressible data (such as JPG imagesor ZIP files), additional storage space can be allocated to handle such data. As aresult, if you select any compression option and you have uncompressible datain your backup, it can actually result in an increase in your disk space usage.
5. If you also want the copied recovery point to be encrypted, specify the followinginformation:
Encryption Algorithm
Specifies the type of encryption algorithm that is used for the recovery pointcopies.
The available format options are No Encryption, AES-128, AES-192, and AES-256.
Encryption Password
Lets you specify and confirm the encryption password being used to encryptthe destination session.
6. Click Save Settings.
Your recovery point copy settings are saved.
The copy recovery point settings are successfully configured.
Chapter 5: Using Arcserve UDP Agent (Windows) 533

How to Copy a Recovery Point
Copy Recovery Points - Example Scenarios
The following example scenarios are provided to give you a better understanding ofhow the various options can affect your scheduled copying of recovery points.
For this example, assume that you configured your Arcserve UDP Agent (Windows)backup schedule as follows:
Full Backup - Every 7 days
Incremental Backup - Every 1 hour
Verify Backup - Every 3 days
and assume:
First backup is on Day #1 at 5:00PM (by default, the first backup is always a FullBackup)
First Incremental Backup will be on Day #1 at 6:00PM (and every hour after)
Recovery Points retention count is set to 31 (default number)
Location "D" is configured as the copy destination.
Scenario #1
For this scenario, the Copy Recovery Point settings are as follows:
Copy after 4 backups
Retain 1 recovery point
Result:
At 8:00PM (after the 4th backup), the scheduled copy job will run and con-solidate all 4 recovery points into a single recovery point and store it at des-tination D.At 12:00 midnight (after the 8th backup), the next scheduled copy job will runand consolidate all 8 recovery points into a single recovery point and store it atdestination D.
The previous recovery point is removed from destination D because the settingis to retain only 1 recovery point at the destination.
Scenario #2
For this scenario, the Copy Recovery Point settings are as follows:
Copy after 4 backups
Retain 4 recovery points
Result:
534 Arcserve UDP Agent for Windows User Guide

How to Copy a Recovery Point
At 8:00PM (after the 4th backup), the scheduled copy job will run and con-solidate all 4 recovery points into a single recovery point (Recovery Point #1)and store it at destination D.At 12:00 midnight (after the 8th backup), the next scheduled copy job will runto create Recovery Point #2 and store it at destination D.At 4:00AM on Day #2 (after the 12th backup), the next scheduled copy job willrun to create Recovery Point #3 and store it at destination D.At 8:00AM on Day #2 (after the 16th backup), the next scheduled copy job willrun to create Recovery Point #4 and store it at destination D.At 12:00 noon on Day #2 (after the 20th backup), the next scheduled copy jobwill run. A new recovery point will be created and the first recovery point (cre-ated after the 8:00PM backup on previous day) is removed from destination D,because the setting is to retain only 4 recovery points at the destination.
Scenario #3
For this scenario, the Copy Recovery Point settings are as follows:
Copy after 1 backup
Retain 4 recovery points
Result:
At 5:00PM (after the 1st backup), the scheduled copy job will run to create asingle recovery point (Recovery Point #1) and store it at destination D.At 6:00PM (after the 2nd backup), the next scheduled copy job will run to cre-ate Recovery Point #2 and store it at destination D.At 7:00PM (after the 3rd backup), the next scheduled copy job will run to createRecovery Point #3 and store it at destination D.At 8:00PM (after the 4th backup), the next scheduled copy job will run to createRecovery Point #4 and store it at destination D.At 9:00PM (after the 5th backup), the next scheduled copy job will run. A newrecovery point will be created and the first recovery point (created after the5:00PM backup) is removed from destination D, because the setting is to retainonly 4 recovery points at the destination.
Chapter 5: Using Arcserve UDP Agent (Windows) 535

How to Copy a Recovery Point
Copy a Recovery Point
When you select a recovery point to copy, all previous backup blocks (full and incre-mental) are consolidated and captured to recreate a full and most recent backupimage.
You can perform the following tasks to protect your backups:
Copy/export recovery point information to store it safely off-site in the event ofa catastrophe.
Save your recovery points to multiple locations.
Consolidate your backups to preserve all your recovery points.
The process involved in copying a recovery point is as follows:
1. Select the Recovery Point to Copy
2. Define the Copy Options and Copy the Recovery Point
536 Arcserve UDP Agent for Windows User Guide

How to Copy a Recovery Point
Select the Recovery Point to Copy
Arcserve UDP Agent (Windows) provides a list of available recovery points and letsyou select the recovery point to create a copy. You can specify the destination,recovery point date, and time range to copy a recovery point.
Follow these steps:
1. On the Arcserve UDP Agent (Windows) home page, select Copy Recovery Point.
The Copy Recovery Point dialog opens.
Chapter 5: Using Arcserve UDP Agent (Windows) 537

How to Copy a Recovery Point
2. Click Change to change the backup location.
The Source dialog opens where you can select the backup location.
3. Select one of the following sources:
Select local disk or shared folder
a. Specify or browse to the location where your backup images are stored andselect the appropriate backup source.
You can click the green arrow button to verify the connection to the specifiedlocation. If necessary, enter the Username and Password credentials to gainaccess to that source location.
The Select backup location dialog opens.
b. Select the folder where the recovery points are stored and click OK.
The Select backup location dialog closes and you can see the backup loc-ation in the Source dialog.
c. Click OK.
The recovery points are listed in the Browse Recovery Points dialog.
Select Recovery Point Server
a. Specify the Recovery Point Server setting details and click Refresh.
All the agents are listed in the Data Protection Agent column in the Sourcedialog.
538 Arcserve UDP Agent for Windows User Guide

How to Copy a Recovery Point
b. Select the agent from the displayed list and click OK.
The recovery points are listed in the Browse Recovery Points dialog.
Note: All the dates containing recovery points for the specified location arehighlighted in green.
4. Select the calendar date for the backup image to copy.
The corresponding recovery points for that date are displayed, with the time of thebackup, the type of backup that was performed, and the name of the backup.
Note: A clock icon with a lock symbol indicates that the recovery point containsencrypted information and can require a password for the restore.
5. Select a Recovery Point to copy.
The backup content (including any applications) for the selected recovery point dis-plays.
6. Click Next.
The Copy Options dialog opens.
The recovery point to copy is specified.
Chapter 5: Using Arcserve UDP Agent (Windows) 539

How to Copy a Recovery Point
Define the Copy Options and Copy the Recovery Point
After you specify a recovery point to copy, define the copy options to create a copythat combines the previous full and incremental backups for the selected recoverypoint.
When the backup destination is on a data store of a Recovery Point Server, youhave the option to copy a recovery point without providing the password of therecovery point. If the password is not provided, you can still copy the recoverypoint, but the password, compression, and encryption settings are kept as thesource recovery point. If the password is provided, you can change the com-pression, encryption, and password.
When the backup destination is on a shared or local folder, you must provide thepassword to copy the recovery point.
Follow these steps:
1. From the Copy Options dialog, specify the type of Copy Options.
Retain original compression and encryption settings
This option is available when you back up to a data store.
Note:When you back up to a shared or local folder, this option is not available.
Use different compression and encryption settings
540 Arcserve UDP Agent for Windows User Guide

How to Copy a Recovery Point
This option is available when you back up to a data store or a shared or localfolder.
Note:When you back up to a shared or local folder, you can only submit a copyrecovery point job using this option.
2. Specify the Copy Options.
Password
Specify the encrypted password for backup.
Note: This dialog includes two password fields. The upper field is for the passwordto decrypt the source session, and the lower field is used to encrypt the destinationsession.
If the recovery point you select to copy was previously encrypted, provide thepassword.
If the recovery point to be copied is a backup session of the same computerthat is running the copy recovery point job, the encryption password isremembered and this field is automatically populated.
If the recovery point to be copied is a backup session of another computer,enter the encryption password.
Destination
Specify (or browse to) the storage location of the selected recovery point.(Optional) You can click the green arrow button to verify the connection to thespecified location.
If necessary, enter the Username and Password.
3. If you selected Use different compression and encryption settings, select theCompression level.
Note: The specified backup compression level has no relation with the copy com-pression level. For example, in backup destination the compression level can be setto Standard; however, when you submit the copy job, the compression can bechanged to No Compression or Maximum Compression.
Compression is typically performed to decrease your disk space usage, but also hasan inverse impact on your backup speed due to the increased CPU usage.
The available options are:
No Compression - Compression is not performed. Files are pure VHD. Thisoption has the lowest CPU usage (fastest speed), but also has the highest diskspace usage for your backup image.
Chapter 5: Using Arcserve UDP Agent (Windows) 541

How to Copy a Recovery Point
No Compression - VHD - Compression is not performed. Files are convertedto .vhd format directly, without the need for manual operations. This optionhas the lowest CPU usage (fastest speed), but also has the highest disk spaceusage for your backup image.
Standard Compression - Some compression is performed. This optionprovides a good balance between CPU usage and disk space usage. This set-ting is the default setting.
Maximum Compression - Maximum compression is performed. This optionprovides the highest CPU usage (lowest speed), but also has the lowest diskspace usage for your backup image.
Note: If your backup image contains uncompressible data (such as JPG images orZIP files), additional storage space can be allocated to handle such data. As a result,if you select any compression option and you have uncompressible data in yourbackup, it can actually result in an increase in your disk space usage.
Note: If you change the compression level from No Compression to either Stand-ard Compression or Maximum Compression, or if you change from either Stand-ard Compression or Maximum Compression to No Compression, the first backupthat is performed after this compression level change is automatically a FullBackup. After performing the Full Backup, performs all future backups (Full, Incre-mental, or Verify) as scheduled.
4. If you also want the copied recovery point to be encrypted, specify the followinginformation:
Encryption Algorithm
Specifies the type of encryption algorithm that is used for the recovery pointcopies.
The available format options are No Encryption, AES-128, AES-192, and AES-256.
Encryption Password
Lets you specify and confirm the encryption password being used to encrypt thedestination session.
Note:When you enable the encryption, specify a new password. You need this pass-word to restore the copied recovery point.
5. Click Create a Copy.
A status notification window appears and the copy process for the selected recov-ery point type is launched immediately.
542 Arcserve UDP Agent for Windows User Guide

How to Copy a Recovery Point
Note: Arcserve UDP Agent (Windows) allows only one recovery point copy job torun at the same time. If you attempt to launch a recovery point copy job manuallywhile running another scheduled copy job, an alert message opens. The messageinforms you that another job is running and requests you to try again at a latertime.
The recovery point is copied from the backup source to the copy target destination.
Chapter 5: Using Arcserve UDP Agent (Windows) 543

How to Copy a Recovery Point
Verify the Copied Recovery Point
After you copy a recovery point, verify that the copied recovery point is available atthe specified destination.
Follow these steps:
1. Navigate to the Arcserve UDP Agent (Windows) destination you specified.
A list of folders appears.
2. Open the hostname folder, and navigate to the following subordinate folder:
hostname\VStore
3. Open the VStore folder, and navigate to the following session folder:
VStore\S0000000001
4. Locate all files with a D2D extension to verify your copied recovery point at the spe-cified location.
For example, if your computer name is "Department_A" and you copied the recov-ery point (backup) to "E:\copied_vhd\", navigate to the following location:
E:\copied_vhd\Department_A\VStore\S0000000001.
The copy of your recovery point is successfully verified.
544 Arcserve UDP Agent for Windows User Guide

Mount a Recovery Point
Mount a Recovery Point
Mount Recovery Point provides the ability to mount a recovery point to a drive let-ter (volume) or an NTFS folder, to view, browse, copy, or open the backup files dir-ectly in Windows Explorer.
Note: For Arcserve UDP host-based VM backup, the recovery points are mountedon the backup proxy system.
Instead of using the Arcserve UDP Agent (Windows) web interface to find orrecover files and folders, you can mount the volumes from a given Arcserve UDPAgent (Windows) backup recovery point to a drive letter, so that you can use Win-dows Explorer to find or recover any files and folders. The benefit is that WindowsExplorer can be more familiar and convenient to use.
Note: The cache file, which is used to record the data change when mounting awritable volume from the backup session, must be on a non-4k sector size disk.
Follow these steps:
1. From the Arcserve UDP Agent (Windows) home page (or Arcserve UDP Agent (Win-dows) Monitor), selectMount Recovery Point.
The Mount Recovery Point dialog opens.
2. Click Change to change the backup location.
The Source dialog opens where you can select the backup location.
Chapter 5: Using Arcserve UDP Agent (Windows) 545

Mount a Recovery Point
3. Select one of the following sources:
Select local disk or shared folder
a. Specify or browse to the location where your backup images are stored andselect the appropriate backup source.
You can click the green arrow button to verify the connection to the specifiedlocation. If necessary, enter the Username and Password credentials to gainaccess to that source location.
The Select backup location dialog opens.
b. Select the folder where the recovery points are stored and click OK.
The Select backup location dialog closes and you can see the backup locationin the Source dialog.
c. Click OK.
The recovery points are listed in the Browse Recovery Points dialog.
Select Recovery Point Server
a. Specify the Recovery Point Server setting details and click Refresh.
All the agents are listed in the Data Protection Agent column in the Sourcedialog.
b. Select the agent from the displayed list and click OK.
The recovery points are listed in the Browse Recovery Points dialog.
546 Arcserve UDP Agent for Windows User Guide

Mount a Recovery Point
Note: All the dates containing recovery points for the specified location arehighlighted in green.
4. Specify the recovery point to mount.
a. Select the calendar date for the backup image you want to mount.
The corresponding recovery points for that date are displayed, with the timeof the backup, the type of backup that was performed, and the name of thebackup.
Note: A clock icon with a lock symbol indicates that the recovery point con-tains encrypted information and can require a password to mount the recov-ery point.
b. Select a recovery point that you want to mount.
The corresponding backup content (including any applications) for that recov-ery point is displayed.
c. Locate the Volume that you want to mount and clickMount.
You can mount the recovery point to a drive letter (volume) or an emptyNTFS folder.
Note: If a volume is mounted already, you cannot mount it again from thesame recovery point.
The Mount Recovery Point dialog opens.
Chapter 5: Using Arcserve UDP Agent (Windows) 547

Mount a Recovery Point
5. Select whether you want to mount to a volume or path.
If you mount to a volume, select the volume from the drop-down list.
If you mount to a path, enter or browse for the location.
Important! The path must be to an empty NTFS or ReFS folder.
6. If the selected recovery point was encrypted, provide the encryption password andclick OK.
The selected backed up volume is mounted and displayed in the List of MountedVolumes on the Mount Recovery Point dialog. You can now use Windows Explorerto view, browse, copy, or open the backup files.
Note: You cannot delete any backup files from Windows Explorer.
7. When the mounted recovery point is no longer needed, the best practice is to dis-mount it. Otherwise, the mounted recovery point prevents the Arcserve UDP Agent(Windows) backup from performing a session merge/purge operation.
If Arcserve UDP Agent (Windows) attempts to merge a mounted recovery point, astatus alert also displays on the Home Page to inform you the selected recoverypoint cannot be merged.
Note: If the merge fails and you want to be notified, you can configure Email Alertsin the Preferences Settings to receive an email alert. For more information, see Spe-cify Email Alert Preferences.
a. To dismount the mount points, select the mount point that you want to dis-mount and click Dismount.
The selected mount point is dismounted and no longer displays in the List ofMounted Volumes on the Mount Recovery Point dialog.
b. To refresh the list of mount points, click Refresh.
The updated list of mount points displays.
548 Arcserve UDP Agent for Windows User Guide

Create a VHD File from an Arcserve UDP Agent (Windows) Backup
Create a VHD File from an Arcserve UDP Agent (Win-dows) Backup
Each time Arcserve UDP Agent (Windows) performs a successful backup, a point-in-time snapshot image of your backup is also created. Before creating a Virtual HardDisk (VHD) file from an Arcserve UDP Agent (Windows) backup, you must have atleast one Arcserve UDP Agent (Windows) recovery point available.
Follow these steps:
1. From the Arcserve UDP Agent (Windows) home page, select Copy Recovery Point.
The Copy Recovery Point dialog opens.
2. Click Change to change the backup location.
The Source dialog opens where you can select the backup location.
Chapter 5: Using Arcserve UDP Agent (Windows) 549

Create a VHD File from an Arcserve UDP Agent (Windows) Backup
3. Select one of the following sources:
Select local disk or shared folder
a. Specify or browse to the location where your backup images are stored andselect the appropriate backup source.
You can click the green arrow button to verify the connection to the specifiedlocation. If necessary, enter the Username and Password credentials to gainaccess to that source location.
The Select backup location dialog opens.
b. Select the folder where the recovery points are stored and click OK.
The Select backup location dialog closes and you can see the backup locationin the Source dialog.
c. Click OK.
The recovery points are listed in the Browse Recovery Points dialog.
Select Recovery Point Server
a. Specify the Recovery Point Server setting details and click Refresh.
All the agents are listed in the Data Protection Agent column in the Sourcedialog.
b. Select the agent from the displayed list and click OK.
The recovery points are listed in the Browse Recovery Points dialog.
550 Arcserve UDP Agent for Windows User Guide
Create a VHD File from an Arcserve UDP Agent (Windows) Backup
Note: All the dates containing recovery points for the specified location arehighlighted in green.
4. Specify the recovery point to copy.
a. Select the calendar date for the backup image you want to copy.
The corresponding recovery points for that date are displayed, with the timeof the backup, the type of backup that was performed, and the name of thebackup.
b. Select a recovery point that you want to copy.
The corresponding backup content (including any applications) for that recov-ery point is displayed.
5. Specify the copy options.
a. Select Use different compression and encryption settings and enter thePassword.
b. Select the destination.
You can either specify a location or browse to the location where the copy ofyour selected recovery point is going to be stored. If necessary, enter theUsername and Password.
Note: Verify that you select a location that has sufficient free space availableto hold the entire VHD.
c. Set the level of compression to No Compression - VHD.
Compression is not performed. Files are converted to .vhd format directly,without the need for manual operations. This option has the lowest CPUusage (fastest speed), but also has the highest disk space usage for yourbackup image.
6. Click Create a Copy.
A status notification window appears and the copy process for the selected recov-ery point type is launched immediately.
The recovery point image is copied from the backup source to the destination.
7. When the copy process is finished, browse to the destination and navigate to thesubordinate folder corresponding to the hostname of the Arcserve UDP Agent (Win-dows) computer.
8. Open the hostname folder and navigate to the following subordinate folder:
"VStore\S0000000001"
Chapter 5: Using Arcserve UDP Agent (Windows) 551

Create a VHD File from an Arcserve UDP Agent (Windows) Backup
For example, if your computer name is "Department_A" and you copied the recov-ery point (backup) to "E:\export_vhd\" you would navigate to:
E:\export_vhd\Department_A\VStore\S0000000001
9. Open the "S0000000001" folder to locate all files with a ".vhd" extension.
Each of these files corresponds to an actual physical disk on the source computerwhich can be used as regular VHD files.
Important! The VHD created by Arcserve UDP Agent (Windows) during the copyprocess may not boot in the hypervisor because the VHD files may not contain thecorrect drivers for the VM.
552 Arcserve UDP Agent for Windows User Guide

View Logs
View Logs
The Activity Log contains comprehensive information about all the operations per-formed by Arcserve UDP Agent (Windows). The log provides an audit trail of everyjob that is run (with the most recent activities listed first) and can be helpful introubleshooting any problems that occur.
Note: This task is only available from the Arcserve UDP Agent (Windows) UI andnot from the Arcserve UDP Agent (Windows) Monitor.
View Logs
1. From the Arcserve UDP Agent (Windows) home page, select View Logs.
The Arcserve UDP Agent (Windows) Activity Log opens, displaying the followinginformation:
Type of Message (Error, Warning, Information)
Job ID
Note: The Job ID can be used to easily locate log entries that are related to aspecific job and can be helpful when troubleshooting job-related problems.
Time that the message was recorded
Message indicating the activity performed or the problem encountered.
2. If necessary, you can click the Delete button to purge some or all of the log entries.
The Delete Activity Log dialog opens.
Chapter 5: Using Arcserve UDP Agent (Windows) 553

View Logs
You can then specify to Delete all log records or Delete log records older than a spe-cific date. If you select the "Delete log records older than" option, you can then spe-cify from the calendar which date will be used as the older than date.
554 Arcserve UDP Agent for Windows User Guide

How to Download File/Folders without Restore
How to Download File/Folders without Restore
Arcserve UDP lets you download a file or complete folder without submitting forrestore. From the Restore wizard, the Browse Recovery Points screen lets you dir-ectly download any file or a complete folder with all the files. Downloading beforerestore may help perform a quick check of files to avoid undesired files gettingrestored.
A single file is downloaded directly in the same format, while a folder is down-loaded as a zip file. The zip file has the following name format:
[nodename]_[sessionid]_[timestamp].zip
To download, you simply need to reach the Browse Recovery point screen in theRestore wizard. The below screenshot displays how to perform download of a fileor folder:
Considerations for download:
Chapter 5: Using Arcserve UDP Agent (Windows) 555

How to Download File/Folders without Restore
Downloading or packaging as zip file is not possible for some system file. Theagent tomcat service does not have enough privileges to access system file oruser files of other protected node.
To avoid excess consumption of Tomcat memory and CPU usage, we recom-mend submitting a restore job to alternative path while downloading a hugefile or folder.
Using Windows Compressed Folder Tools to browse the downloaded zip filesmay fail as the tool finds some of the zip entry names too long to browse. Werecommend using other zip tools to open the file. For example, WinZip,WinRAR,7-Zip.
IE9 user using https in IE9 and agent web service to provide service may notbe able to download the files. A known issue from IE9 in downloadingresource from a dynamic page through https prevents such download. Formore information and solution, click link for Microsoft article.
556 Arcserve UDP Agent for Windows User Guide

How to Create a Boot Kit
How to Create a Boot Kit
The Arcserve UDP Agent (Windows) utilizes a Boot Kit Utility to combine a WinPE(Windows Preinstallation Environment) image and Arcserve UDP Agent (Windows)image to create a BMR ISO image. This ISO image is then burned onto a bootablemedia. When you perform a bare metal recovery, the Arcserve UDP Agent (Win-dows) bootable media (CD/DVD or USB stick) is used to initialize the new computersystem and allow the bare metal recovery process to begin.
The following diagram illustrates the process to create a boot kit:
Perform the following tasks to create a boot kit:
1. Launch the Create Boot Kit Utility
2. Determine the Method to Generate a BMR ISO Image
3. Create an Arcserve UDP Agent (Windows) BMR ISO Image for a CD/DVD
a. Create Bootable BMR ISO Image
b. (optional) Create a BMR CD/DVD
4. Create an Arcserve UDP Agent (Windows) BMR ISO Image for a USB Stick
a. Prepare the USB Stick
b. Create Bootable BMR USB Stick
5. Verify the Boot Kit is Created
Chapter 5: Using Arcserve UDP Agent (Windows) 557

How to Create a Boot Kit
Launch the Create Boot Kit Utility
Arcserve UDP Agent (Windows) provides a Create Boot Kit for Bare Metal Recoveryutility to help you generate a WinPE-based ISO image. This ISO image contains allthe information needed to perform a bare metal recovery (BMR) if necessary.
Important! If you upgrade to a newer version or update of Arcserve UDP, you mustre-create the BMR ISO using the proper Windows AIK or ADK level to include sup-port for latest features and bug fixes. If you want to perform BMR from an olderversion of RPS and deduplication data store, you have to use the older version ofthe BMR ISO.
Follow these steps:
1. You can launch the Create Boot Kit utility from the Advanced options of the Sys-tem Tray Monitor or from the Start menu.
2. Specify the type of BMR ISO image to be created (Windows 10, Windows 8/8.1, orWindows 7) and click Next.
Once a BMR ISO is created, the ISO file can be used for the same OS level. The fol-lowing OS levels can use the same ISO:
ISO created using Windows 7 WAIK – works for Windows 2008, 2008 R2
ISO create using Windows 8/8.1 ADK – works for Windows 8, 8.1, Server2012, Server 2012 R2
558 Arcserve UDP Agent for Windows User Guide
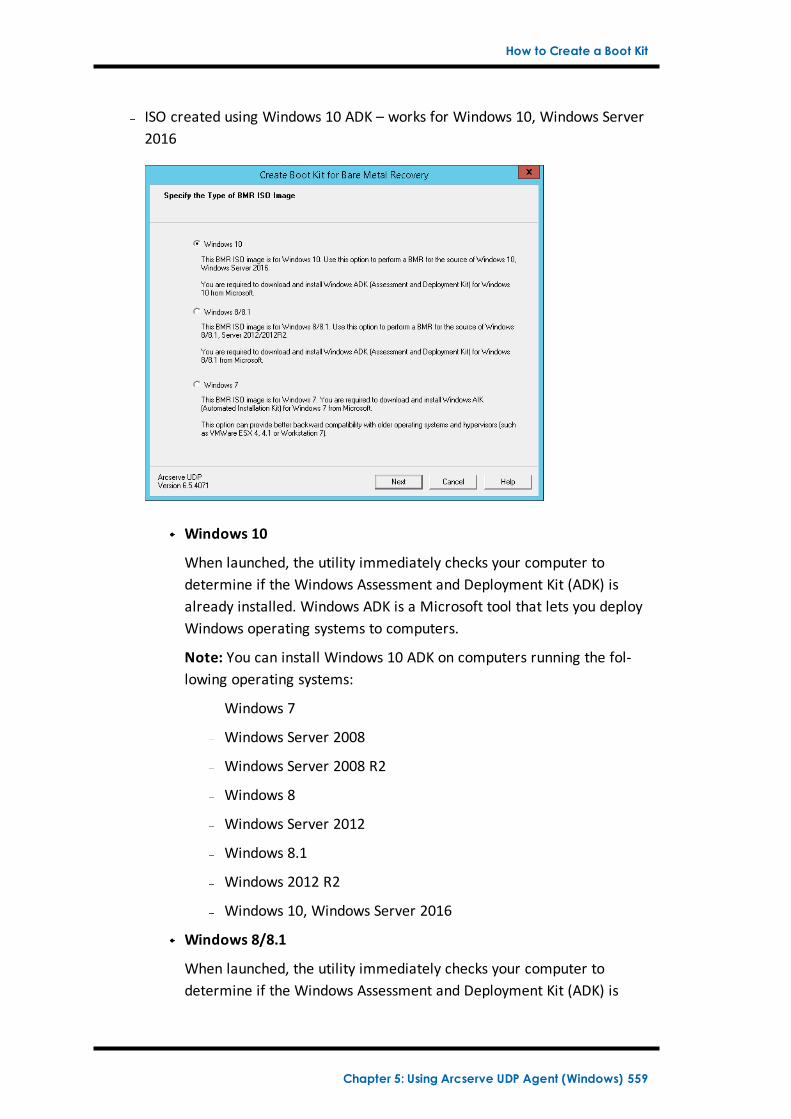
How to Create a Boot Kit
ISO created using Windows 10 ADK – works for Windows 10, Windows Server2016
Windows 10
When launched, the utility immediately checks your computer todetermine if the Windows Assessment and Deployment Kit (ADK) isalready installed. Windows ADK is a Microsoft tool that lets you deployWindows operating systems to computers.
Note: You can install Windows 10 ADK on computers running the fol-lowing operating systems:
Windows 7
Windows Server 2008
Windows Server 2008 R2
Windows 8
Windows Server 2012
Windows 8.1
Windows 2012 R2
Windows 10, Windows Server 2016
Windows 8/8.1
When launched, the utility immediately checks your computer todetermine if the Windows Assessment and Deployment Kit (ADK) is
Chapter 5: Using Arcserve UDP Agent (Windows) 559
How to Create a Boot Kit
already installed. Windows ADK is a Microsoft tool that lets you deployWindows operating systems to computers.
Note: You can install Windows 8.1 ADK on computers running the fol-lowing operating systems:
Windows 7
Windows Server 2008
Windows Server 2008 R2
Windows 8
Windows Server 2012
Windows 8.1
Windows 2012 R2
Windows 10, Windows Server 2016
Windows 7
When launched, the utility immediately checks your computer todetermine if the Windows Automated Installation Kit (AIK) is alreadyinstalled. Windows AIK is a Microsoft tool that lets you deploy Windowsoperating systems to computers.
Note: You can install Windows AIK for Windows 7 on computers run-ning the following operating systems:
Windows 7
Windows Server 2008
Windows Server 2008 R2
3. To create the bootable ISO image, Windows ADK or Windows AIK (as applicable)must be installed on the computer.
a. If Windows ADK (or AIK) is installed, the utility will advance to the Select theBoot Kit Method screen to let you continue creating the boot kit.
b. If Windows ADK (or AIK) is not installed, the corresponding Windows Inform-ation screen opens. You need to download and install Windows ADK (or AIK)from the Microsoft Download Center.
Note: For more information on installing Windows ADK (or AIK), see the fol-lowing websites:
Installing Windows ADK
Installing Windows AIK for Windows 7
560 Arcserve UDP Agent for Windows User Guide

How to Create a Boot Kit
You can install Windows ADK (or AIK) using either of the following methods:
Download the installation media directly from the Microsoft websiteand install Windows ADK (or AIK) on your computer.
Click the links on the information screen to open the Microsoft websiteso that you can download Windows ADK (or AIK) and install it on yourcomputer.
After you install Windows ADK (or AIK), click Next and the utility willadvance to the Select the Boot Kit Method screen to let you continuecreating the boot kit.
Note: For Windows ADK installation, the following features are required tosupport creating the boot kit:
Deployment Tools
Windows Preinstallation Environment (Windows PE)
Note: For Windows AIK installation, select Windows AIK Setup.
Chapter 5: Using Arcserve UDP Agent (Windows) 561

How to Create a Boot Kit
Determine the Method to Generate a BMR ISO Image
The Create Boot Kit utility provides two options for generating an ISO image:
Create Bootable BMR ISO Image
This method creates an ISO image that you can then burn onto a CD/DVD forstorage. This is the default option. For more information, see Create an Arc-serve UDP Agent (Windows) BMR ISO Image for a CD/DVD.
Create Bootable BMR USB Stick
This method creates an ISO image and burns it directly onto a portable USBstick for storage. For more information, see Create an Arcserve UDP Agent(Windows) BMR ISO Image for a USB Stick.
You can then use either of these bootable media to initialize the new computer sys-tem and allow the bare metal recovery process to begin. To ensure your saved
562 Arcserve UDP Agent for Windows User Guide

How to Create a Boot Kit
image is always the most up-to-date version, it is good practice to create a new ISOimage every time you update Arcserve UDP Agent (Windows).
Note: If you are performing a BMR on a virtual machine (VM), then you can alsodirectly attach the ISO image to the VM to start the BMR process without having tofirst burn it onto a CD/DVD.
Chapter 5: Using Arcserve UDP Agent (Windows) 563

How to Create a Boot Kit
Create an Arcserve UDP Agent (Windows) BMR ISOImage for a CD/DVD
The process to create an Arcserve UDP Agent (Windows) BMR ISO image consistsof:
Create Bootable BMR ISO Image
Create a BMR CD/DVD
564 Arcserve UDP Agent for Windows User Guide

How to Create a Boot Kit
Create Bootable BMR ISO Image
If you select to create a BMR ISO image, you can then burn this image onto a boot-able media (CD or DVD) to initialize the new computer system and allow the baremetal recovery process to begin.
Follow these steps:
1. From the Select the Boot Kit Method screen, select Create Bootable BMR ISOImage and click Next.
The Select Platform and Destination dialog opens.
2. Select the applicable platform for the ISO image.
You can select either of the two available options, or both. If you select both plat-forms, it will result in added time to create the image,
Note: An ISO image that is created from a 32-bit platform should be used torestore a 32-bit server. An ISO image that is created from a 64-bit platform shouldbe used to restore a 64-bit server. If you want to boot a UEFI firmware system,make sure the x64 platform option is selected.
The available options are:
BMR ISO image for x86 platform (only).
BMR ISO image for x64 platform (only).
BMR ISO image for both x86 and x64 platforms.
3. Specify the Destination.
Specify or browse to the location where the BMR ISO image file will be created andstored.
4. Specify the name of the generated BMR ISO image file.
5. After you specify the platform and destination, click Next.
The Select Languages dialog opens.
6. Select the language for the BMR ISO image. During the BMR procedure, the userinterface and keyboard will be integrated with the selected language.
You can select one or more different languages for the BMR ISO image. However,each language selected will result in added time to create the image. The more lan-guages you select, the longer it will take to complete. As a result, you should onlyselect the languages that you actually need.
7. Click Next.
The Specify Drivers dialog opens.
Chapter 5: Using Arcserve UDP Agent (Windows) 565

How to Create a Boot Kit
8. Specify the drivers to populate the driver list with drivers to be integrated into theBMR ISO image.
The driver pane is enabled and you can specify any additional drivers that you wantto add (or delete) from the BMR ISO image.
Note:When integrating the VirtualBox Host-Only Ethernet Adapter driver into theBMR ISO image, a possible conflict with the Windows ADK components exists. Toavoid any conflict, the best practice is not to integrate this driver into the BMR ISOimage.
a. Include Local Drivers: Load the local critical device drivers (only oem driversfor NIC, FC, or SCSI) to the driver list. When clicked, the utility checks yourcomputer to determine if there are any critical device drivers that need to beadded to the BMR ISO image for this computer. If any critical device driversare found, they are automatically added to the list.
b. Add Driver: Browse to the drivers you want to be added to the driver list.
c. Delete Driver: Remove any drivers selected from the list that you do notwant added to the BMR ISO image.
9. Click Create to launch the process and create a bootable BMR ISO image.
During the process, the status is displayed.
10. When the process is complete a confirmation screen opens to indicate that theBMR ISO image was successfully generated. This screen also displays the locationand platform for the image, along with a clickable link to browse to that location.
566 Arcserve UDP Agent for Windows User Guide

How to Create a Boot Kit
Create a BMR CD/DVD
After the ISO image is created and saved to the specified destination, you thenneed to burn this image onto a bootable CD or DVD. You can use this bootablemedia to initialize the new computer system and allow the bare metal recovery(BMR) process to begin.
To ensure your saved ISO image is always the most recent version:
You should create a new ISO image every time you update Arcserve UDP Agent(Windows).
If you saved the ISO image to a remote location, you should burn the CD/DVDonly if you need to perform a BMR.
If you have Arcserve UDP Agent (Windows) installed on multiple computers,you should create a new ISO image (and corresponding CD/DVD) from aknown-good computer just prior to performing a BMR so that the imageincludes all latest Arcserve UDP Agent (Windows) updates.
Chapter 5: Using Arcserve UDP Agent (Windows) 567

How to Create a Boot Kit
Create an Arcserve UDP Agent (Windows) BMR ISOImage for a USB Stick
The process to create an Arcserve UDP Agent (Windows) BMR USB stick consists of:
Prepare the USB Stick
Create Bootable BMR USB Stick
568 Arcserve UDP Agent for Windows User Guide

How to Create a Boot Kit
Prepare the USB Stick
Prior to burning the BMR ISO image onto a USB stick, you must prepare the stick.To create a bootable USB BMR stick, the stick must be made active to enable it toboot a system. You can use the DiskPart command to make the stick active.
Important! If the USB stick needs to be formatted, this process will erase all datacurrently stored on your USB stick. Verify that there is nothing important on thisstick prior to performing this process. If the USB stick was previously formatted, thisprocess will overwrite any files with the same name.
Follow these steps:
1. Open a command prompt (with administrative rights if required by your OS).
2. Type Diskpart and press Enter.
3. Type List Disk and press Enter.
A listing of all detected disks is displayed. Determine which of the displayed disks isyour USB disk.
4. Select the USB disk by typing Select Disk <n> ("n" is the disk number for the USBdisk), and press Enter.
5. Type Clean and press Enter.
The system will display "DiskPart succeeded in cleaning the disk."
6. Type create partition primary and press Enter.
The system will display "succeeded in creating the specified partition".
7. Type select partition 1 and press Enter.
The system will display "Partition 1 is now the selected partition."
8. Type active and press Enter.
The system will display "DiskPart marked the current partition as active."
9. If necessary, format the USB stick with FAT32 or NTFS file system.
Type format fs=fat32 quick or format fs=ntfs quick
Chapter 5: Using Arcserve UDP Agent (Windows) 569

How to Create a Boot Kit
The USB stick is now prepared and ready for use.
570 Arcserve UDP Agent for Windows User Guide

How to Create a Boot Kit
Create Bootable BMR USB Stick
If you select to create a bootable BMR (Bare Metal Recovery) USB stick, you canthen burn this ISO image directly onto a USB stick to initialize the new computer sys-tem and allow the bare metal recovery process to begin.
Follow these steps:
1. If necessary, prepare the USB stick. For more information, see Prepare the USBStick.
2. From the Select the Boot Kit Method screen, select Create Bootable BMR USBStick and click Next.
The Select Platform and Destination dialog opens.
3. Select the applicable platform for the ISO image.
You can select either of the two available options, or both. If you select both plat-forms, it will result in added time to create the image,
Note: An ISO image that is created from a 32-bit platform should be used torestore a 32-bit server. An ISO image that is created from a 64-bit platform shouldbe used to restore a 64-bit server. If you want to boot a UEFI firmware system,make sure the x64 platform option is selected.
The available options are:
BMR ISO image for x86 platform (only).
BMR ISO image for x64 platform (only).
BMR ISO image for both x86 and x64 platforms.
4. Specify the USB Drive.
Specify or browse to the drive location where the BMR ISO image file will be cre-ated and burned onto the USB stick.
Note: For a USB drive, if you want to boot the UEFI firmware system, you shouldformat the USB drive as a FAT32 file system.
5. Verify that a prepared USB stick is inserted in the specified drive.
6. After you specify the platform and location, click Next,
The Select Languages dialog opens.
7. Select the language for the generated BMR ISO image. During the BMR procedure,the user interface and keyboard will be integrated with the selected language.
You can select one or more different languages for the BMR ISO image. However,each language selected will result in added time to create the image. The more
Chapter 5: Using Arcserve UDP Agent (Windows) 571

How to Create a Boot Kit
languages you select, the longer it will take to complete. As a result, you shouldonly select the languages that you actually need.
8. Click Next.
The Specify Drivers dialog opens.
9. If necessary, select the Integrate additional drivers option.
The driver pane is enabled and you can specify any additional drivers that you wantto add (or delete) from the BMR ISO image.
10. Click Create to launch the process and create a bootable BMR ISO image.
During the process, the status is displayed.
11. When the process is complete a confirmation screen opens to indicate that theBMR ISO image was successfully generated and burned onto your USB stick. Thisscreen also displays the location and platform for the image, along with a clickablelink to browse to that location.
572 Arcserve UDP Agent for Windows User Guide

How to Create a Boot Kit
Verify the Boot Kit is Created
After the BMR ISO image has been successfully created, the Create Boot Kit utilitydisplays a link to connect to the location where the image is saved. Verify the BMRISO image is saved at that location. By default, the image is saved to the User-Profile folder, with a default image name format consisting of:
BMR_<Platform>_<OS Kernel>_<version>(Build xxx).ISO
Example:
BMR_x86x64_w8.1_Version 5.0 (Build 5.0.1717).ISO
Chapter 5: Using Arcserve UDP Agent (Windows) 573

How to Perform a Bare Metal Recovery Using a Backup
How to Perform a Bare Metal Recovery Using aBackup
Bare Metal Recovery (BMR) is the process of restoring a computer system from"bare metal" including reinstalling the operating system and software applications,and then restoring the data and settings. The BMR process lets you restore a fullcomputer with minimal effort, even to different hardware. BMR is possible becauseduring the block-level backup process, Arcserve UDP Agent (Windows) not only cap-tures the data, but also all information that is related to the following applications:
Operating system
Installed applications
Configuration settings
Necessary drivers
All relevant information that is necessary to perform a complete rebuild of the com-puter system from "bare metal" is backed up into a series of blocks and stored onthe backup location.
The following diagram illustrates the process for how to perform a BMR using abackup:
574 Arcserve UDP Agent for Windows User Guide

How to Perform a Bare Metal Recovery Using a Backup
Complete the following tasks to perform a BMR using a backup:
1. Review the BMR Prerequisites and Considerations
2. Define BMR Options
Perform BMR in Express Mode
Perform BMR in Advanced Mode
3. Verify that the BMR was Successful
4. BMR Reference Information
Chapter 5: Using Arcserve UDP Agent (Windows) 575

How to Perform a Bare Metal Recovery Using a Backup
5. Troubleshooting BMR Issues
576 Arcserve UDP Agent for Windows User Guide
How to Perform a Bare Metal Recovery Using a Backup
Review the BMR Prerequisites and Considerations
Verify that the following prerequisites exist before performing a BMR:
You must have one of the following images:
A created BMR ISO image burned onto a CD/DVDA created BMR ISO image burned onto a portable USB stick
Note: Using Arcserve UDP Agent (Windows), you can utilize a Boot Kit Utility tocombine a WinPE image and Arcserve UDP Agent (Windows) image to create aBMR ISO image. This ISO image is then burned onto a bootable media. You canthen use either of these bootable media (CD/DVD or USB stick) to initialize thenew computer system and allow the bare metal recovery process to begin. Toensure your saved image is always the most up-to-date version, create a newISO image every time you update Arcserve UDP Agent (Windows).
At least one full backup available.
At least 2-GB RAM installed on the virtual machine and the source server thatyou are recovering.
To recover VMware virtual machines to VMware virtual machines that are con-figured to behave as physical servers, verify the VMware Tools application isinstalled on the destination virtual machine.
Review the Compatibility Matrix that provides the supported operating sys-tems, databases, and browsers.
Review the following restore considerations:
Regardless of which method you used to create the Boot Kit image, the BMRprocess is basically the same.
Note: The BMR process cannot create storage spaces. If the source machinehad storage spaces, during BMR you cannot create storage spaces at the des-tination machine. You can either restore those volumes to regular disks/-volumes or manually create storage spaces before performing the BMR, andthen restore the data into those created storage spaces.
Dynamic disks are restored at the disk level only. If your data is backed up to alocal volume on a dynamic disk, you cannot to restore this dynamic disk duringBMR. In this scenario, to restore during BMR you must perform one of the fol-lowing tasks and then perform BMR from the copied Recovery Point:
Back up to a volume on another drive.
Back up to a remote share.
Copy a recovery point to another location.
Chapter 5: Using Arcserve UDP Agent (Windows) 577

How to Perform a Bare Metal Recovery Using a Backup
Note: If you perform BMR with multiple dynamic disks, the BMR may failbecause of some unexpected errors (such as fail to boot, unrecognized dynamicvolumes, and so on). If this occurs, you should restore only the system disk usingBMR, and then after the machine reboot you can restore the other dynamicvolumes on a normal environment.
(Optional) Review the BMR Reference Information. For more information, seethe following topics:
How Bare Metal Recovery WorksOperating Systems that Support UEFI/BIOS ConversionManaging the BMR Operations Menu
Review the following considerations:
If you upgrade to a newer version or update of Arcserve UDP, you must re-cre-ate the BMR ISO using the proper Windows AIK or ADK level to include supportfor latest features and bug fixes. However, once a BMR ISO is created, the ISOfile can be used for the same OS level. The following OS levels can use thesame ISO:
ISO created using Windows 7 WAIK – works for Windows 2008, 2008 R2
ISO create using Windows 8/8.1 ADK – works for Windows 8, 8.1, Server 2012,Server 2012 R2
ISO created using Windows 10 ADK – works for Windows 10, Windows Server2016
578 Arcserve UDP Agent for Windows User Guide

How to Perform a Bare Metal Recovery Using a Backup
Define BMR Options
Prior to initiating the BMR process, you must specify some preliminary BMRoptions.
Follow these steps:
1. Insert the saved Boot Kit image media and boot the computer.
If you are using a BMR ISO image burned onto a CD/DVD, insert the savedCD/DVD.
If you are using a BMR ISO image burned onto a USB stick, insert the saved USBstick.
The BIOS Setup Utility screen is displayed.
2. From the BIOS Setup Utility screen, select the CD-ROM Drive option or the USBoption to launch the boot process. Select an architecture (x86/x64) and press Enterto continue.
3. The Arcserve UDP Agent (Windows) language select screen is displayed. Select alanguage and click Next to continue.
Chapter 5: Using Arcserve UDP Agent (Windows) 579

How to Perform a Bare Metal Recovery Using a Backup
The Bare Metal Recovery process is initiated and the initial BMR wizard screen isdisplayed.
The BMR wizard screen allows you to select the type of BMR you want to perform:
Restore from an Arcserve Unified Data Protection backup
Use this option to perform a restore from either a backup destination folderor a data store.
This option lets you recover data that was backed up using Arcserve UDPAgent (Windows). This option is used in connection with backup sessions per-formed with Arcserve UDP Agent (Windows) or with the Arcserve UDP host-based VM backup application.
If you select this option, continue this procedure from here.
Recover from a virtual machine
Use this option to perform a virtual-to-physical (V2P) restore from a virtualstandby VM. Virtual-to-physical (V2P) is a term that refers to the migration ofan operating system (OS), application programs and data from a virtualmachine or disk partition to a computer's main hard disk. The target can be asingle computer or multiple computers.
Source is on a VMware machine
580 Arcserve UDP Agent for Windows User Guide

How to Perform a Bare Metal Recovery Using a Backup
Lets you recover data for a machine for which virtual conversion isdone to a VMware virtual machine. This option is used in connectionwith the Arcserve Central Virtual Standby application.
Note: For this option, you can only recover data if the virtual con-version to a VMDK file (for VMware) was performed using ArcserveCentral Virtual Standby.
If you select this option, see Recover using a VMware Virtual StandbyVM to continue this procedure.
For more information, see Recover using a VMware Virtual StandbyVM in the online help.
Source is on a Hyper-V machine
Lets you recover data for a machine for which virtual conversion is per-formed to a Hyper-V virtual machine. This option is used in connectionwith the Arcserve Central Virtual Standby application.
Note: For this option, you can only recover data if the virtual con-version to a VHD file (for Hyper-V) was performed using Arcserve Cen-tral Virtual Standby.
If you select this option, see Recover using a Hyper-V Virtual StandbyVM to continue this procedure.
For more information, see Recover using a Hyper-V Virtual Standby VMin the online help.
4. Select Restore from an Arcserve Unified Data Protection backup and click Next.
The Select a Recovery Point wizard screen is displayed.
Chapter 5: Using Arcserve UDP Agent (Windows) 581

How to Perform a Bare Metal Recovery Using a Backup
5. From the Select a Recovery Point wizard screen, click Browse and select eitherBrowse from network/local path or select Browse from Recovery Point Server.
a. If you select Browse from network/local path, select the machine (orvolume) which contains recovery points for your backup image.
Arcserve UDP Agent (Windows) lets you recover from any local drive or froma network share.
If you recover from a local backup, the BMR wizard automaticallydetects and displays all volumes containing recovery points.
If you recover from a remote share, browse to the remote locationwhere the recovery points are stored. If there are multiple machinescontaining recovery points, all machines are displayed.
You may also need access information (User Name and Password) forthe remote machine.
Note: The network must be up and running to browse to remote recov-ery points. If necessary, you can check/refresh your network con-figuration information or you can load any missing drivers from theUtilities menu.
If the BMR module cannot detect any local destination volume, theSelect a Folder dialog automatically displays. Provide the remoteshare where the backups are residing.
582 Arcserve UDP Agent for Windows User Guide

How to Perform a Bare Metal Recovery Using a Backup
If you are restoring from an iSCSI destination, the BMR module maynot detect this destination and you need to perform the following:
1. Click Utilities, select Run from the pop-up menu, type cmd, and thenclick OK.
2. In the command prompt window, use the following Windows iSCSIcommands to set up iSCSI connections:
> net start msiscsi
> iSCSICLI QAddTargetPortal <TargetPortalAddress>
> iSCSICLI QLoginTarget <TargetName > [CHAP username] [CHAP pass-word]
Note: CHAP = Challenge-Handshake Authentication Protocol
For more information about Windows iSCSI command line options, seelink.
Note: Extra steps may be needed depending on the iSCSI target soft-ware being used. For more information, see the manual of the iSCSI tar-get software.
3. From the BMR screen the disks/volumes connected through the iSCSIdisk should be displayed. The iSCSI disk can now be used as the sourcevolume or the backup destination volume.
Note: BMR does not support the case where the OS is installed on aniSCSI disk. Only data disks are supported.
b. If you select Browse the Recovery Point Server, the Select Agent dialog dis-plays. Provide the Recovery Point Server Host Name, User Name,Password, Port, and Protocol. Click Connect.
Chapter 5: Using Arcserve UDP Agent (Windows) 583

How to Perform a Bare Metal Recovery Using a Backup
6. Select the folder or Agent Name under Data Store where the recovery points foryour backup are stored and click OK.
The BMR wizard screen now displays the following information:
Machine name (in the upper left pane).
Related backup information (in the upper right pane).
All the corresponding recovery points (in the lower left pane).
Note: For supported operating systems, you can perform a BMR from a backupperformed on a UEFI machine to a BIOS-compatible machine and from a BIOSmachine to a UEFI-compatible machine. See Operating Systems that SupportUEFI/BIOS Conversion for a complete listing of firmware conversion supportedsystems.
For operating systems that do not support firmware conversion, to perform BMRfor a UEFI system, you must boot the computer in UEFI mode. BMR does not sup-port restoring a computer with different firmware. To verify that the boot firm-ware is UEFI and not BIOS, click Utilities, About.
For operating systems that do support firmware conversion, after you select arecovery point, if it is detected that the source machine is not the same firm-ware as your system, you will be asked if you want to convert UEFI to a BIOS-
584 Arcserve UDP Agent for Windows User Guide
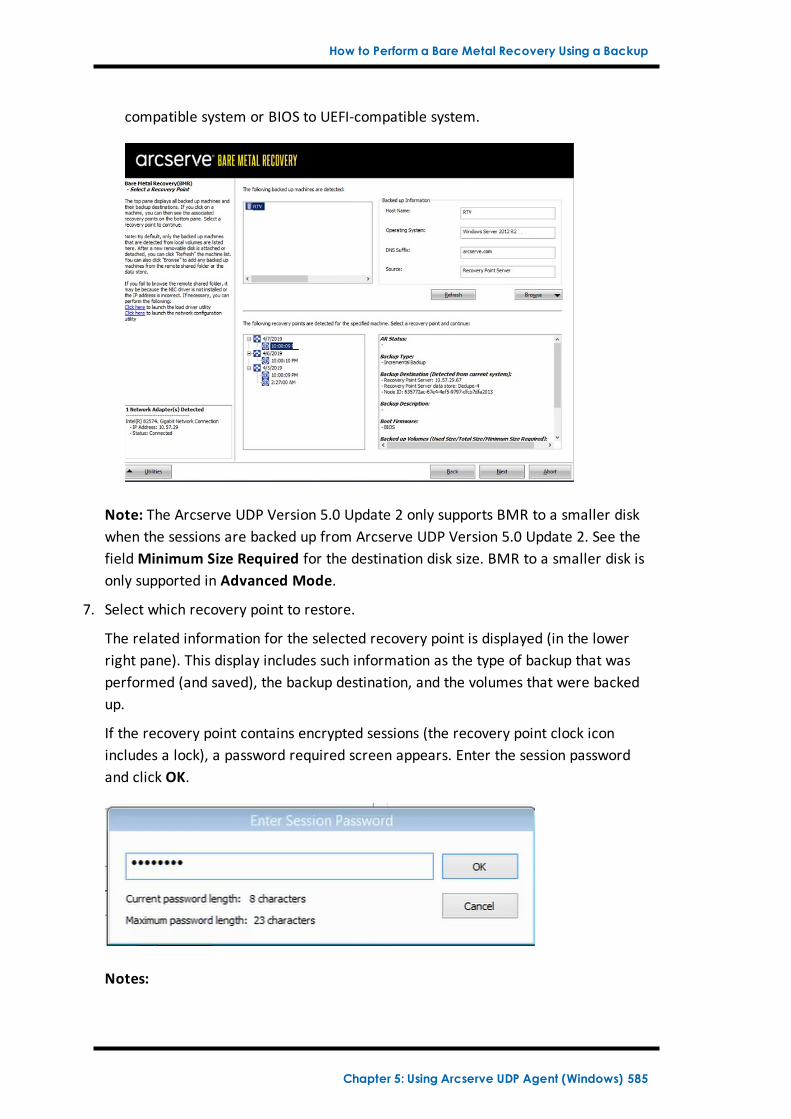
How to Perform a Bare Metal Recovery Using a Backup
compatible system or BIOS to UEFI-compatible system.
Note: The Arcserve UDP Version 5.0 Update 2 only supports BMR to a smaller diskwhen the sessions are backed up from Arcserve UDP Version 5.0 Update 2. See thefieldMinimum Size Required for the destination disk size. BMR to a smaller disk isonly supported in Advanced Mode.
7. Select which recovery point to restore.
The related information for the selected recovery point is displayed (in the lowerright pane). This display includes such information as the type of backup that wasperformed (and saved), the backup destination, and the volumes that were backedup.
If the recovery point contains encrypted sessions (the recovery point clock iconincludes a lock), a password required screen appears. Enter the session passwordand click OK.
Notes:
Chapter 5: Using Arcserve UDP Agent (Windows) 585

How to Perform a Bare Metal Recovery Using a Backup
If you are restoring from a Arcserve UDP Recovery Point Server, you are asked toprovide a session password.
If your machine is a Domain Controller, Arcserve UDP Agent (Windows) supports anonauthoritative restore of the active directory (AD) database file during BMR. (Itdoes not support restoring MSCS clusters).
8. Verify the recovery point that you want to restore and click Next.
A BMR wizard screen is displayed with the available recovery mode options.
The available options are Advanced Mode and Express Mode.
Select Express Mode if you want minimal interaction during the recovery pro-cess.
Select Advanced Mode if you want to customize the recovery process.
Default: Express Mode.
586 Arcserve UDP Agent for Windows User Guide

How to Perform a Bare Metal Recovery Using a Backup
Perform BMR in Express Mode
The Express Mode requires minimal interaction during the recovery process.
Follow these steps:
1. From the Choose a Recovery Mode dialog, select Express Mode and click Next.
A confirmation dialog appears.
2. Click Yes.
The Summary of Disk Restore Settings screen opens, displaying a summary of thevolumes that are going to be restored.
Note: On the bottom of restore summary window, the drive letters listed in Destin-ation Volume column are automatically generated from the Windows Pre-installation Environment (WinPE). They can be different from the drive letters listedin Source Volume column. However, the data is still restored to proper volumeeven if drive letters are different.
3. After you have verified that the summary information is correct, click OK.
The restore process starts. The BMR wizard screen displays the restore status foreach volume.
Depending upon the size of the volume being restored, this operation can takesome time.
Chapter 5: Using Arcserve UDP Agent (Windows) 587

How to Perform a Bare Metal Recovery Using a Backup
During this process you are restoring, block-by-block whatever you had backedup for that recovery point and creating a replica of the source machine on thetarget machine.
By default, the option to reboot your system automatically after recovery isselected. If necessary, you can clear this option and you can reboot manually ata later time.
Important: If you are performing an authoritative restore of an active directoryafter a BMR, you must uncheck the option Automatically reboot your systemafter recovery and for more information, see How to Perform an AuthoritativeRestore of an Active Directory after a BMR.
By default, Do not start Agent service automatically after reboot is enabled.
If necessary, you can cancel or abort the operation at any time.
Note: Selecting the check box of Boot system to Advanced Boot Options..helps when you restore one machine with Active Directory.
4. From the Utilitiesmenu, you can access the BMR Activity Log and you can use theSave option to save the Activity Log.
By default, the Activity Log is saved to the following location:
X:\windows\system32\dr\log.
588 Arcserve UDP Agent for Windows User Guide

How to Perform a Bare Metal Recovery Using a Backup
Note: To avoid getting a Windows-generated error, do not save the Activity Log onyour desktop or create a folder on your desktop using the Save As option from theBMR Activity Log window.
5. If you are restoring to dissimilar hardware (the SCSI/FC adapter which used to con-nect hard drives could have been changed) and no compatible driver is detected inyour original system, a "driver injection" page is displayed to allow you to providedrivers for these devices.
You can browse and select drivers to inject to the recovered system so that even ifyou are recovering to a machine with dissimilar hardware, you can still bring backthe machine after BMR.
6. When the BMR process is completed, a confirmation notification is displayed.
Chapter 5: Using Arcserve UDP Agent (Windows) 589

How to Perform a Bare Metal Recovery Using a Backup
Perform BMR in Advanced Mode
The Advanced Mode option lets you customize the recovery process.
Follow these steps:
1. From the Choose a Recovery Mode dialog, select Advanced Mode and click Next.
A confirmation dialog appears.
2. Click Yes.
The BMR utility starts locating the machine that is going to be recovered and dis-plays the corresponding disk partition information.
The upper pane shows the disk configuration that you have on the current (target)machine and the lower pane shows the disk partition information that you had onthe original (source) machine.
Important! A red X icon displaying for a source volume in the lower pane indicatesthat this volume contains system information and has not been assigned (mapped)to the target volume. This system information volume from the source disk must beassigned to the target disk and restored during BMR or the reboot fails.
You can create volumes to a smaller disk based on the suggestedMinimum diskspace required. In the example, the original size of the volume is 81568 MB. Whenyou create the volume on the target disk, the suggested minimum size is 22752MB. In this case, you can create the original volume with a size of 22752 MB.
590 Arcserve UDP Agent for Windows User Guide

How to Perform a Bare Metal Recovery Using a Backup
Note: If you perform BMR and you restore the system volume to a disk which is notconfigured as the boot disk, it will fail to boot the machine after BMR is completed.Ensure that you are restoring the system volume to a properly configured boot disk.
Note:When restoring to another disk/volume, the capacity of new disk/volume canbe the same size, larger than original disk/volume, or smaller than the originaldisk/volume. In addition, volume resizing is not for dynamic disks.
3. If the current disk information you are seeing does not appear correct, you canaccess the Utilitiesmenu and check for missing drivers.
4. If necessary, on the target disk/volume pane you can click the Operations drop-down menu to display the available options. For more information about theseoptions, see Managing the BMR Operations Menu.
5. Click on each target volume and from the pop-up menu, select the Map VolumeFrom option to assign a source volume to this target volume.
The Select a Basic Source Volume dialog opens.
Chapter 5: Using Arcserve UDP Agent (Windows) 591
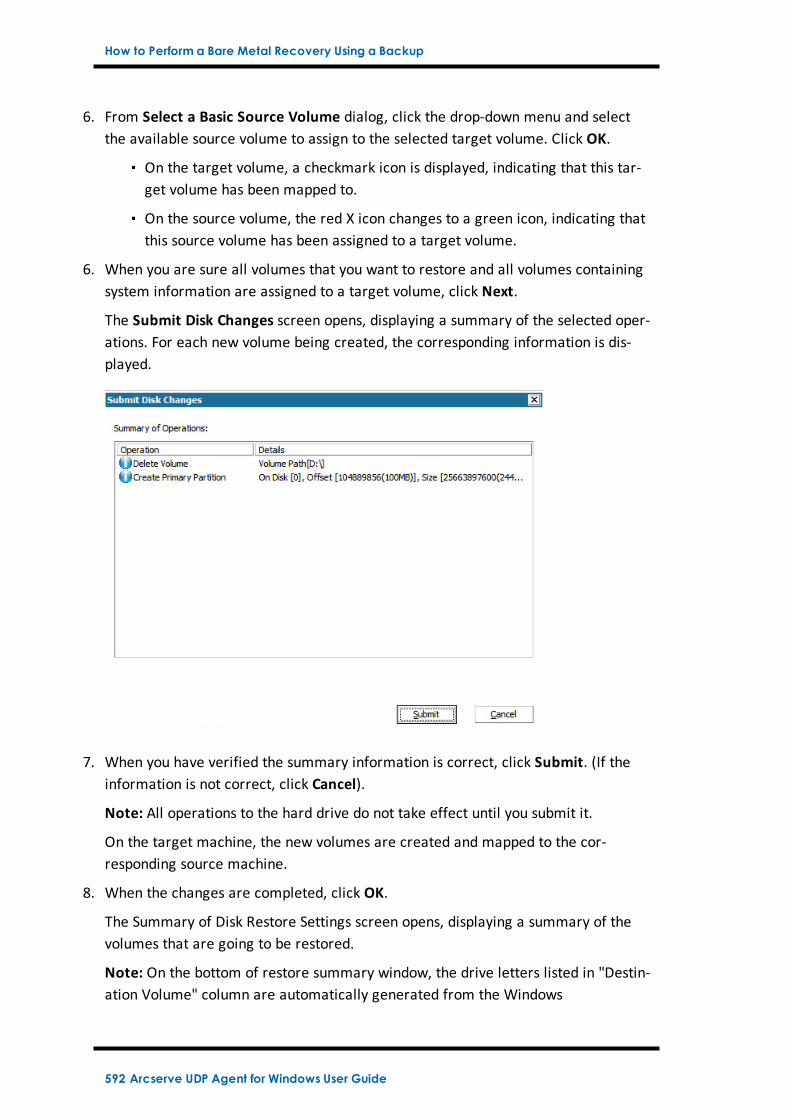
How to Perform a Bare Metal Recovery Using a Backup
6. From Select a Basic Source Volume dialog, click the drop-down menu and selectthe available source volume to assign to the selected target volume. Click OK.
On the target volume, a checkmark icon is displayed, indicating that this tar-get volume has been mapped to.
On the source volume, the red X icon changes to a green icon, indicating thatthis source volume has been assigned to a target volume.
6. When you are sure all volumes that you want to restore and all volumes containingsystem information are assigned to a target volume, click Next.
The Submit Disk Changes screen opens, displaying a summary of the selected oper-ations. For each new volume being created, the corresponding information is dis-played.
7. When you have verified the summary information is correct, click Submit. (If theinformation is not correct, click Cancel).
Note: All operations to the hard drive do not take effect until you submit it.
On the target machine, the new volumes are created and mapped to the cor-responding source machine.
8. When the changes are completed, click OK.
The Summary of Disk Restore Settings screen opens, displaying a summary of thevolumes that are going to be restored.
Note: On the bottom of restore summary window, the drive letters listed in "Destin-ation Volume" column are automatically generated from the Windows
592 Arcserve UDP Agent for Windows User Guide

How to Perform a Bare Metal Recovery Using a Backup
Preinstallation Environment (WinPE). They can be different from the drive letterslisted in "Source Volume" column. However, the data is still restored to propervolume even if drive letters are different.
9. After you have verified that the summary information is correct, click OK.
The restore process starts. The BMR wizard screen displays the restore status foreach volume.
Depending upon the size of the volume being restored, this operation cantake some time.
During this process you are restoring, block-by-block whatever you hadbacked up for that recovery point and creating a replica of the sourcemachine on the target machine.
By default, the option to reboot your system automatically after recovery isselected. If necessary, you can clear this option and you can reboot manuallyat a later time.
Important: If you are performing an authoritative restore of an active dir-ectory after a BMR, you must uncheck the option Automatically rebootyour system after recovery and for more information, see How to Performan Authoritative Restore of an Active Directory after a BMR.
If necessary, you can select Do not start Agent service automatically afterreboot.
Chapter 5: Using Arcserve UDP Agent (Windows) 593

How to Perform a Bare Metal Recovery Using a Backup
If necessary, you can cancel or abort the operation at any time.
Note: Selecting the check box of "Boot the system to Advanced boot options ..helps when you restore one machine with Active Directory.
10. From the Utilitiesmenu, you can access the BMR Activity Log and you can use theSave option to save the Activity Log.
By default, the Activity Log is saved to the following location:
X:\windows\system32\dr\log.
Note: To avoid getting a Windows-generated error, do not save the Activity Log onyour desktop or create a folder on your desktop using the Save As option from theBMR Activity Log window.
11. If you are restoring to dissimilar hardware (the SCSI/FC adapter which used to con-nect hard drives could have been changed) and no compatible driver is detected inyour original system, a "driver injection" page is displayed to allow you to providedrivers for these devices.
You can browse and select drivers to inject to the recovered system so that even ifyou are recovering to a machine with dissimilar hardware, you can still bring backthe machine after BMR.
12. When the BMR process is completed, a confirmation notification is displayed.
594 Arcserve UDP Agent for Windows User Guide

How to Perform a Bare Metal Recovery Using a Backup
Verify that the BMR was Successful
To verify that the BMR was successful, perform the following tasks:
Reboot the operating system.
Verify all systems and applications function correctly.
Verify all network settings are properly configured.
Verify the BIOS is configured to boot from the disk on which the boot volumewas restored to.
When the BMR is completed, be aware of the following conditions:
The first backup that is performed after the BMR is a Verify Backup.
When the machine has been rebooted, you may need to configure the networkadapters manually if you restored to dissimilar hardware.
Note:When the machine is rebooting, a Windows Error Recovery screen maybe displayed indicating that Windows did not shut down successfully. If thisoccurs, you can safely ignore this warning and continue to start Windows nor-mally.
For dynamic disks, if the status of the disk is offline, you can manually change itto online from the disk management UI (accessed by running the Diskmg-mt.msc control utility).For dynamic disks, if the dynamic volumes are in a failed redundancy status,you can manually resynchronize the volumes from the disk management UI(accessed by running the Diskmgmt.msc control utility).
Chapter 5: Using Arcserve UDP Agent (Windows) 595

How to Perform a Bare Metal Recovery Using a Backup
BMR Reference Information
How Bare Metal Recovery Works
Operating Systems that Support UEFI or BIOS Conversion
Managing the BMR Operations Menu
596 Arcserve UDP Agent for Windows User Guide

How to Perform a Bare Metal Recovery Using a Backup
How Bare Metal Recovery Works
Bare Metal Recovery is the process of restoring a computer system from "baremetal" by reinstalling the operating system and software applications, and thenrestoring the data and settings. The most common reasons for performing a baremetal recovery are because your hard drive either fails or becomes full and youwant to upgrade (migrate) to a larger drive or migrate to newer hardware. Baremetal recovery is possible because during the block-level backup process, ArcserveUDP Agent (Windows) captures not only the data, but also all information related tothe operating system, installed applications, configuration settings, necessarydrivers, and so on. All relevant information that is necessary to perform a completerebuild of the computer system from "bare metal" is backed up into a series ofblocks and stored on the backup location.
Note: Dynamic disks are restored at disk level only. If your data is backed up to avolume on a dynamic disk, you will not be able to restore this dynamic disk (includ-ing all its volumes) during BMR.
When you perform a bare metal recovery, the Arcserve UDP Agent (Windows) bootdisk is used to initialize the new computer system and allow the bare metal recov-ery process to begin. When the bare metal recovery is started, Arcserve UDP Agent(Windows) will prompt you to select or provide a valid location to retrieve thesebacked up blocks from, as well as the recovery point to be restored. You may alsobe prompted to provide valid drivers for the new computer system if needed. Whenthis connection and configuration information is provided, Arcserve UDP Agent(Windows) begins to pull the specified backup image from the backup location andrestore all backed up blocks to the new computer system (empty blocks will not be
Chapter 5: Using Arcserve UDP Agent (Windows) 597

How to Perform a Bare Metal Recovery Using a Backup
restored). After the bare metal recovery image is fully restored to the new com-puter system, the machine will be back to the state that it was in when the lastbackup was performed, and Arcserve UDP Agent (Windows) backups will be able tocontinue as scheduled. (After completion of the BMR, the first backup will be aVerify Backup).
598 Arcserve UDP Agent for Windows User Guide

How to Perform a Bare Metal Recovery Using a Backup
Operating Systems that Support UEFI/BIOS Con-version
If it is detected that the operating system of your source machine is not the samefirmware as your system, you will be asked if you want to convert UEFI to a BIOS-compatible system or BIOS to UEFI-compatible system. The following table listseach operating system and the type of conversion supported.
Operating System (OS) CPU uEFI to BIOS BIOS to uEFIWindows Server 2008 x86 No NoWindows Server 2008 x64 Yes YesWindows Server 2008 R2 x64 Yes YesWindows 7 x86 No NoWindows 7 x64 Yes YesWindows 8 x86 No NoWindows 8 x64 Yes YesWindows Server 2012 x64 Yes YesWindows 8.1 x86 No NoWindows 8.1 x64 Yes YesWindows 10 x86 No NoWindows 10 x64 Yes YesWindows Server 2012 R2 x64 Yes YesWindows Server 2016 x64 Yes YesWindows Server 2019 x64 Yes Yes
Chapter 5: Using Arcserve UDP Agent (Windows) 599

How to Perform a Bare Metal Recovery Using a Backup
Managing the BMR Operations Menu
The BMR Operations menu consists of the following three types of operations:
Disk Specific Operations
Volume/Partition Specific Operations
BMR Specific Operations
Disk Specific Operations:
To perform disk specific operations, select the disk header and click Oper-ations.
Clean Disk
This operation is used to clean all partitions of a disk and is:
An alternate method to delete all volumes of a disk. With the Clean Disk oper-ation, you do not have to delete each volume one by one.
Used to delete the non-Windows partitions. Due to a VDS limitation, the non-Windows partition cannot be deleted from the UI, but you can use this oper-ation to clean them all.
Note: During BMR, when the destination disk has non-Windows partitions orOEM partitions, you cannot select this partition and delete it from the BMRUI. Usually this would occur if you ever installed Linux/Unix on the destinationdisk. To resolve this issue, perform one of the following tasks:
Select the disk header on the BMR UI, click Operations, and use the CleanDisk operation to erase all partitions on the disk.
Select the disk header on the BMR UI, click Operations, and use the CleanDisk operation to erase all partitions on the disk.
Convert to MBR
This operation is used to convert a disk to MBR (Master Boot Record). It isavailable only when the selected disk is a GPT (GUID Partition Table) disk andthere are no volumes on this disk.
Convert to GPT
This operation is used to convert a disk to GPT. It is available only when theselected disk is an MBR disk and there are no volumes on this disk.
Convert to Basic
This operation is used to convert a disk to Basic. It is available only when theselected disk is a Dynamic disk and there are no volumes on this disk.
600 Arcserve UDP Agent for Windows User Guide

How to Perform a Bare Metal Recovery Using a Backup
Convert to Dynamic
This operation is used to convert a disk to Dynamic Disk. It is available onlywhen the selected disk is a Basic disk.
Online Disk
This operation is used to bring a disk online. It is available only when theselected disk is in the offline status.
Disk Properties
This operation is used to view detailed disk properties. It is always availableand when you select this operation, a Disk Properties dialog appears.
Volume/Partition Specific Operations:
To perform volume/partition operations, select the disk body area and click Oper-ations. From this menu, you can create new partitions to correspond to the disk par-titions on the source volume.
Create Primary Partition
This operation is used to create a partition on a basic disk. It is available onlywhen the selected area is an unallocated disk space.
Create Logical Partition
This operation is used to create a logical partition on a basic MBR disk. It isavailable only when the selected area is an extended partition.
Create Extended Partition
This operation is used to create an extended partition on a basic MBR disk. Itis available only when the disk is an MBR disk and the selected area is anunallocated disk space.
Create System Reserved Partition
This operation is used to create the System Reserved Partition on a BIOS firm-ware system and builds a mapping relationship with the source EFI SystemPartition. It is only available when you restore a UEFI system to a BIOS sys-tem.
Note: If you previously converted from UEFI to a BIOS-compatible system,use the Create System Reserved Partition operation for destination disk res-izing.
Create EFI System Partition
This operation is used to create the EFI System Partition on a basic GPT disk.It is available only when the target machine firmware is UEFI and the selec-ted disk is a basic GPT disk.
Chapter 5: Using Arcserve UDP Agent (Windows) 601

How to Perform a Bare Metal Recovery Using a Backup
Note: If you previously converted from BIOS to a UEFI-compatible system,use the Create EFI System Partition operation for destination disk resizing.
Note: Systems that support UEFI also require that the boot partition reside ona GPT (GUID Partition Table) disk. If you are using a MBR (Master BootRecord) disk, you must convert this disk to a GPT disk, and then use theCreate EFI System Partition operation for disk resizing.
Resize Volume
This operation is used to resize a volume. It is an alternate method of Win-dows "Extend Volume/Shrink Volume". It is available only when the selectedarea is a valid disk partition.
Delete Volume
This operation is used to delete a volume. It is available only when the selec-ted area is a valid volume.
Delete Extended Partition
This operation is used to delete the extended partition. It is available onlywhen the selected area is the extended partition.
Volume Properties
This operation is used to view detailed volume properties. When you selectthis operation, a Volume Properties dialog appears.
BMR Specific Operations:
These operations are specific to BMR. To perform BMR operations, select thedisk header or the disk body area and click Operations.
Map Disk From
This operation is used to build a mapping relationship between the sourceand target dynamic disks. It is available only when the selected disk is aDynamic disk.
Note:When mapping to another disk, the capacity of each mapped targetvolume must be the same size or larger than the corresponding sourcevolume.
Map Volume From
This operation is used to build a mapping relationship between the sourceand target basic volume. It is available only when the selected volume is aBasic volume.
Note:When mapping to another disk, the capacity of each mapped targetvolume must be the same size or larger than the corresponding sourcevolume.
602 Arcserve UDP Agent for Windows User Guide

How to Perform a Bare Metal Recovery Using a Backup
Commit
This operation is always available. All of the operations are cached inmemory and they do not modify the target disks until you select the Commitoperation.
Reset
This operation is always available. The Reset operation is used to relinquishyour operations and restore the disk layout to the default status. This oper-ation cleans all of the cached operations. Reset means to reload the sourceand target disk layout information from the configure file and current OS,and discard any user changed disk layout information.
Chapter 5: Using Arcserve UDP Agent (Windows) 603

How to Perform a Bare Metal Recovery Using a Backup
Troubleshooting BMR Issues
When a problem is detected, Arcserve UDP Agent (Windows) generates a messageto help you identify and resolve the problem. These messages are contained in theArcserve UDP Agent (Windows) Activity Log, which is accessed from the View Logsoption on the home page UI. In addition, when an incorrect action is attempted, Arc-serve UDP Agent (Windows) generally displays a pop-up message to help youidentify and quickly resolve the problem.
604 Arcserve UDP Agent for Windows User Guide

How to Perform a Bare Metal Recovery Using a Backup
Slow throughput performance during BMR
This problem can be caused by SATA controllers with "AHCI" enabled.
During BMR, Arcserve UDP Agent (Windows) will install drivers for critical unknowndevices. If the device already has a driver installed, Arcserve UDP Agent (Windows)will not update that driver again. For some devices, Windows 7PE may have thedrivers for them, but these drivers may not be the best ones and this can cause theBMR to run too slow.
To remedy this problem, perform one of the following tasks:
Check if the driver pool folder contains the newest disk drivers. If it does, andyou are restoring to the original machine, please install the new driver fromthe driver pool folder. If you are restoring to alternate machine, download thelatest disk drivers from the Internet, and load it before you start data recovery.To load the driver, you can use the "drvload.exe" utility, which is included inWindows PE
Change the device operating mode from "AHCI" (Advanced Host ControllerInterface) to Compatibility mode. (Compatibility mode provides a betterthroughput).
If the problem persists, use Live Chat to contact Arcserve support. Live Chat lets youoptimize intelligent conversation between you and the Technical Support team,allowing you to address your concerns and questions immediately, while still main-taining access to the product.
Chapter 5: Using Arcserve UDP Agent (Windows) 605

How to Perform a Bare Metal Recovery Using a Backup
After BMR, dynamic volumes are not recognized bythe operating system
To keep dynamic disks in a consistent state, the Windows operating system auto-matically synchronizes the Logical Disk Manager (LDM) metadata on each dynamicdisk. So when BMR restores one dynamic disk and brings it online, the LDMmetadata on this disk is automatically updated by the operating system. This mayresult in a dynamic volume not being recognized by the operating system and miss-ing after the reboot.
To remedy this problem, when you perform BMR with multiple dynamic disks, donot perform any pre-BMR disk operations such as cleaning, deleting volume, and soon.
If the problem persists, use Live Chat to contact Arcserve support. Live Chat lets youoptimize intelligent conversation between you and the Technical Support team,allowing you to address your concerns and questions immediately, while still main-taining access to the product.
606 Arcserve UDP Agent for Windows User Guide

How to Perform a Bare Metal Recovery Using a Backup
Unable to Reboot Hyper-V VM After BMR
If you performed BMR to a Hyper-V machine consisting of more than one disk con-nected to an Integrated Drive Electronics (IDE) controller and if the server does notreboot, perform the following troubleshooting procedure:
1. Verify that the disk that contains the system volume is the master disk.
The Hyper-V BIOS searches for the system volume on the master disk (disk 1) whichis connected to the master channel. If the system volume is not located on the mas-ter disk, the VM will not reboot.
Note: Verify that the disk that contains the system volume is connected to an IDEcontroller. Hyper-V cannot boot from a SCSI disk.
2. If necessary, modify the Hyper-V settings, to connect the disk that contains the sys-tem volume to the IDE master channel and reboot the VM again.
If the problem persists, use Live Chat to contact Arcserve support. Live Chat lets youoptimize intelligent conversation between you and the Technical Support team,allowing you to address your concerns and questions immediately, while still main-taining access to the product.
Chapter 5: Using Arcserve UDP Agent (Windows) 607

How to Perform a Bare Metal Recovery Using a Backup
Unable to Reboot VMware VM After BMR
If you performed BMR to a VMware machine consisting of more than one disk con-nected to an Integrated Drive Electronics (IDE) controller or a SCSI adapter and theserver does not reboot, perform the following troubleshooting procedure:
1. Verify that the disk that contains the system volume is the master disk.
The VMware BIOS searches for the system volume on the Master disk (disk 0)which is connected the master channel. If the system volume is not on the Masterdisk, the VM does not reboot.
2. If necessary, modify the VMware settings, to connect the disk that contains the sys-tem volume to the IDE master channel and reboot the VM again.
3. If the disk is a SCSI disk, verify the disk which contains boot volume is the first diskwhich connects to the SCSI adapter. If not, assign the boot disk from the VMwareBIOS.
4. Verify the disk which contains boot volume is in the previous eight disks, becausethe VMware BIOS only detect eight disks during the boot. If there are more thanseven disks ahead the disk which contains system volumes connected to the SCSIadapter, the VM cannot boot.
If the problem persists, use Live Chat to contact Arcserve support. Live Chat lets youoptimize intelligent conversation between you and the Technical Support team,allowing you to address your concerns and questions immediately, while still main-taining access to the product.
608 Arcserve UDP Agent for Windows User Guide

How to Perform a Bare Metal Recovery Using a Backup
Unable to boot the server after performing a BMR
Symptom
When the source machine is an Active Directory server performing a BMR to aphysical machine with different hardware or to a virtual machine on a hyper-vserver, the server does not boot and a blue screen displays with the following mes-sage:
STOP: c00002e2 Directory Services could not start because of the following error: adevice attached to the system is not functioning. Error status: 0xc0000001.
Solution
Reboot the system to the BMR PE environment, rename all *.log files in the C:\Win-dows\NTDS folder, and restart the system. For example, rename the file edb.log toedb.log.old and restart the system.
If the problem persists, use Live Chat to contact Arcserve support. Live Chat lets youoptimize intelligent conversation between you and the Technical Support team,allowing you to address your concerns and questions immediately, while still main-taining access to the product.
Chapter 5: Using Arcserve UDP Agent (Windows) 609

How to Perform a Bare Metal Recovery Using a Backup
Failed to submit BMR job to Recovery Point Server
Only one BMR job is supported when restoring from same RPS server for the samenode (Agent backup or Host-Based Backup). This is controlled by the job monitor onthe RPS server.
If the machine where the BMR job is running is shut down or rebooted unex-pectedly, the job monitor at the RPS server side will wait 10 minutes and then timeout. During this time you cannot start another BMR for the same node from thesame RPS server.
If you abort the BMR from the BMR UI, this problem does not exist.
If the problem persists, use Live Chat to contact Arcserve support. Live Chat lets youoptimize intelligent conversation between you and the Technical Support team,allowing you to address your concerns and questions immediately, while still main-taining access to the product.
610 Arcserve UDP Agent for Windows User Guide

How to Perform a Bare Metal Recovery Using a Virtual Standby VM or Instant VM
How to Perform a Bare Metal Recovery Using a Vir-tual Standby VM or Instant VM
Bare Metal Recovery (BMR) is the process of restoring a computer system from"bare metal" including reinstalling the operating system and software applications,and then restoring the data and settings. The BMR process lets you restore a fullcomputer with minimal effort, even to different hardware. BMR is possible becauseduring the block-level backup process, Arcserve UDP Agent (Windows) not only cap-tures the data, but also all information that is related to the following applications:
Operating system
Installed applications
Configuration settings
Necessary drivers
All relevant information that is necessary to perform a complete rebuild of the com-puter system from "bare metal" is backed up into a series of blocks and stored onthe backup location.
To perform a BMR from a virtual machine, use one of the following ways:
Connect to the ESX server directly using the IP address
Add the correct DNS setting in your BMR machine and resolve the hostname tothe IP address
Complete the following tasks to perform a BMR using a virtual standby VM orInstant VM:
1. Review the BMR Prerequisites and Considerations
2. Define BMR Options
Recover Using a Hyper-V Virtual Standby VM or Instant VM
Recover Using a VMware Virtual Standby VM or Instant VM
Perform BMR in Express Mode
Perform BMR in Advanced Mode
3. Verify that the BMR was Successful
4. BMR Reference Information
5. Troubleshooting BMR Issues
Chapter 5: Using Arcserve UDP Agent (Windows) 611

How to Perform a Bare Metal Recovery Using a Virtual Standby VM or Instant VM
Review the BMR Prerequisites and Considerations
Verify that the following prerequisites exist before performing a BMR:
You must have one of the following images:
A created BMR ISO image burned onto a CD/DVDA created BMR ISO image burned onto a portable USB stick
Note: Arcserve UDP Agent (Windows) utilizes a Boot Kit Utility to combine aWinPE image and Arcserve UDP Agent (Windows) image to create a BMR ISOimage. This ISO image is then burned onto a bootable media. You can then useeither of these bootable media (CD/DVD or USB stick) to initialize the new com-puter system and allow the bare metal recovery process to begin. To ensureyour saved image is always the most up-to-date version, create a new ISOimage every time you update Arcserve UDP Agent (Windows).
At least one full backup available.
At least 1-GB RAM installed on the virtual machine and the source server thatyou are recovering.
To recover VMware virtual machines to VMware virtual machines that are con-figured to behave as physical servers, verify the VMware Tools application isinstalled on the destination virtual machine.
Review the Compatibility Matrix that provides the supported operating sys-tems, databases, and browsers.
Review the following restore considerations:
Regardless of which method you used to create the Boot Kit image, the BMRprocess is basically the same.
Note: The BMR process cannot create storage spaces. If the source machinehad storage spaces, during BMR you cannot create storage spaces at the des-tination machine. You can either restore those volumes to regular disks/-volumes or manually create storage spaces before performing the BMR, andthen restore the data into those created storage spaces.
Dynamic disks are restored at the disk level only. If your data is backed up to alocal volume on a dynamic disk, you cannot to restore this dynamic disk duringBMR. In this scenario, to restore during BMR you must perform one of the fol-lowing tasks and then perform BMR from the copied Recovery Point:
Back up to a volume on another drive.Back up to a remote share.Copy a recovery point to another location.
612 Arcserve UDP Agent for Windows User Guide

How to Perform a Bare Metal Recovery Using a Virtual Standby VM or Instant VM
Note: If you perform BMR with multiple dynamic disks, the BMR may failbecause of some unexpected errors (such as fail to boot, unrecognized dynamicvolumes, and so on). If this occurs, you should restore only the system disk usingBMR, and then after the machine reboot you can restore the other dynamicvolumes on a normal environment.
If you attempt to perform a BMR on a Hyper-V VM with a 4 KB disk, add this 4KB disk to the SCSI controller. If you add it to the IDE controller, the disk will notbe detected in the Windows PE system.
(Optional) Review the BMR Reference Information. For more information, seethe following topics:
How Bare Metal Recovery WorksOperating Systems that Support UEFI/BIOS ConversionManaging the BMR Operations Menu
Review the following considerations:
If you upgrade to a newer version or update of Arcserve UDP, you must re-cre-ate the BMR ISO using the proper Windows AIK or ADK level to include supportfor latest features and bug fixes. However, once a BMR ISO is created, the ISOfile can be used for the same OS level. The following OS levels can use thesame ISO:
ISO created using Windows 7 WAIK – works for Windows 2008, 2008 R2ISO create using Windows 8/8.1 ADK – works for Windows 8, 8.1, Server 2012,Server 2012 R2ISO created using Windows 10 ADK – works for Windows 10
Chapter 5: Using Arcserve UDP Agent (Windows) 613

How to Perform a Bare Metal Recovery Using a Virtual Standby VM or Instant VM
Define BMR Options
Prior to initiating the BMR process, you must specify some preliminary BMRoptions.
Follow these steps:
1. Insert the saved Boot Kit image media and boot the computer.
If you are using a BMR ISO image burned onto a CD/DVD, insert the savedCD/DVD.
If you are using a BMR ISO image burned onto a USB stick, insert the saved USBstick.
The BIOS Setup Utility screen is displayed.
2. From the BIOS Setup Utility screen, select the CD-ROM Drive option or the USBoption to launch the boot process. Select an architecture (x86/x64) and press Enterto continue.
3. The Arcserve UDP Agent (Windows) language select screen is displayed. Select alanguage and click Next to continue.
614 Arcserve UDP Agent for Windows User Guide

How to Perform a Bare Metal Recovery Using a Virtual Standby VM or Instant VM
The Bare Metal Recovery process is initiated and the initial BMR wizard screen isdisplayed.
The BMR wizard screen allows you to select the type of BMR you want to perform:
Restore from an Arcserve Unified Data Protection backup
Use this option to perform a restore from either a backup destination folder or adata store.
This option lets you recover data that was backed up using Arcserve UDP Agent(Windows). This option is used in connection with backup sessions performedwith Arcserve UDP Agent (Windows) or with the Arcserve UDP host-based VMbackup application.
For more information, see How to Perform a Bare Metal Recovery Using aBackup in the online help.
Recover from a Virtual Standby VM
Use this option to perform a virtual-to-physical (V2P) restore from a virtualstandby VM or Instant VM. Virtual-to-physical (V2P) is a term that refers to themigration of an operating system (OS), application programs and data from avirtual machine or disk partition to a computer's main hard disk. The target canbe a single computer or multiple computers.
Chapter 5: Using Arcserve UDP Agent (Windows) 615

How to Perform a Bare Metal Recovery Using a Virtual Standby VM or Instant VM
Source is on a VMware machine
Lets you recover data for a machine for which virtual conversion is doneto a VMware virtual machine. This option is used in connection with theArcserve Central Virtual Standby or Instant VM application.
Note: For this option, you can only recover data if the virtual conversionto a VMDK file (for VMware) was performed using Arcserve Central Vir-tual Standby or Instant VM.
If you select this option, see Recover using a VMware Virtual Standby VMor Instant VM to continue this procedure.
Source is on a Hyper-V machine
Lets you recover data for a machine for which virtual conversion is per-formed to a Hyper-V virtual machine. This option is used in connectionwith the Arcserve Central Virtual Standby or Instant VM application.
Note: For this option, you can only recover data if the virtual conversionto a VHD file (for Hyper-V) was performed using Arcserve Central VirtualStandby or Instant VM.
If you select this option, see Recover using a Hyper-V Virtual Standby VMor Instant VM to continue this procedure.
4. Select Recover from a Virtual Standby VM. Then select one of the sources.
If you select the Source is on a VMware machine option, see Recover usinga VMware Virtual Standby VM or Instant VM to continue this procedure.
If you select the Source is on a Hyper-V machine option, see Recover using aHyper-V Virtual Standby VM or Instant VM to continue this procedure.
616 Arcserve UDP Agent for Windows User Guide

How to Perform a Bare Metal Recovery Using a Virtual Standby VM or Instant VM
Recover using a Hyper-V Virtual Standby VM orInstant VM
Arcserve UDP Agent (Windows) provides the capability to perform Bare MetalRecovery for virtual-to-physical (V2P) machines. This feature lets you perform vir-tual-to-physical recovery from the latest state of a standby or instant virtualmachine and helps you reduce the loss of your production machine.
Follow these steps:
1. From the select the Type of Bare Metal Recovery (BMR) wizard screen, select theRecover from a Virtual Standby VM and select Source is on a Hyper-V machineoption.
Use this option to perform a virtual-to-physical restore from a virtual standby VMor Instant VM. The term virtual-to-physical refers to the migration of an operatingsystem (OS), application programs and data from a virtual machine or disk par-tition to a computer's main hard disk. The target can be a single computer or mul-tiple computers.
2. Click Next.
Chapter 5: Using Arcserve UDP Agent (Windows) 617

How to Perform a Bare Metal Recovery Using a Virtual Standby VM or Instant VM
The Select a virtual machine snapshot screen is displayed, with the Hyper-VAuthentication dialog, prompting you for Hyper-V server details.
3. Enter the authentication information and click OK.
Arcserve UDP Agent (Windows) detects and displays the Hyper-V Server with a list-ing of all the virtual machines that are converted to the specified Hyper-V serverusing Arcserve Central Virtual Standby or Instant VM.
618 Arcserve UDP Agent for Windows User Guide

How to Perform a Bare Metal Recovery Using a Virtual Standby VM or Instant VM
4. Select the virtual machine that contains the recovery point snapshots for yourbackup image.
The backup sessions (recovery point snapshots) for the selected virtual machine aredisplayed.
5. Select the virtual machine backup session (recovery point snapshot) that you wantto recover.
The corresponding details for the selected recovery point snapshot (virtual machinename, backup session name, backed up volumes) are displayed in the right pane.
In addition to selecting one of the listed recovery points, you also have the option toselect the Current State or the Latest State recovery point.
If the virtual machine that you are recovering from is powered on, the CurrentState recovery point is displayed.
Note: If the virtual machine is powered on, then any data changes in the virtualmachine after the BMR process started will not be recovered.
If the virtual machine that you are recovering from is powered off, the Latest Staterecovery point is displayed.
Chapter 5: Using Arcserve UDP Agent (Windows) 619

How to Perform a Bare Metal Recovery Using a Virtual Standby VM or Instant VM
6. Verify this is the recovery point that you want to restore and click Next.
A BMR wizard screen is displayed with the available recovery mode options.
The available options are Advanced Mode and Express Mode.
Select Express Mode if you want minimal interaction during the recovery pro-cess. For more information see, Perform BMR in Express Mode.
Select Advanced Mode if you want to customize the recovery process. Formore information, see Perform BMR in Advanced Mode.
Default: Express Mode.
620 Arcserve UDP Agent for Windows User Guide

How to Perform a Bare Metal Recovery Using a Virtual Standby VM or Instant VM
Recover using a VMware Virtual Standby VM orInstant VM
The Arcserve UDP Agent (Windows) provides the capability to perform Bare MetalRecovery for virtual-to-physical (V2P) machines. This feature lets you perform vir-tual-to-physical recovery from the latest state of a standby virtual machine andhelps you reduce the loss of your production machine.
Follow these steps:
1. From the select the Type of Bare Metal Recovery (BMR) wizard screen, select theRecover from a virtual machine and select the Source is on a VMware machineoption.
Use this option to perform a virtual-to-physical restore from a virtual standby VMor Instant VM. The term virtual-to-physical refers to the migration of an operatingsystem (OS), application programs and data from a virtual machine or disk par-tition to a computer's main hard disk. The target can be a single computer or mul-tiple computers.
2. Click Next.
Chapter 5: Using Arcserve UDP Agent (Windows) 621

How to Perform a Bare Metal Recovery Using a Virtual Standby VM or Instant VM
The Select a Recovery Point screen is displayed with the ESX/VC Credentials dia-log.
3. Enter the credential information and click OK.
Note: If you are connecting to a vCenter, you do not need an Administrator per-mission at the vCenter Server level but you must have an Administrator permissionat the Datacenter level. In addition, you must have the following permissions at thevCenter Server level:
Global, DisableMethods and EnableMethods
Global, License
The Select a Recovery Point screen is displayed.
The Arcserve UDP Agent (Windows) then retrieves all the recovery point snapshotsfor the selected VMware server and displays the VMware Server in the left pane,with a listing of all the virtual machines that are hosted on the selected VMware
622 Arcserve UDP Agent for Windows User Guide

How to Perform a Bare Metal Recovery Using a Virtual Standby VM or Instant VM
server.
4. Select the virtual machine which contains recovery points for your backup image.
The backup sessions (recovery point snapshots) for the selected virtual machine aredisplayed.
Chapter 5: Using Arcserve UDP Agent (Windows) 623

How to Perform a Bare Metal Recovery Using a Virtual Standby VM or Instant VM
5. Select the virtual machine backup session (recovery point snapshots) that you wantto recover.
The corresponding details for the selected recovery point snapshot (virtual machinename, backup session name, backed up volumes, backed up dynamic disks) are dis-played in the right pane.
In addition to selecting one of the listed recovery points, you also have the option toselect the Current State or the Latest State recovery point.
If the virtual machine that you are recovering from is powered on, the CurrentState recovery point is displayed.
Note: If the virtual machine is powered on, then any data changes in the virtualmachine after the BMR process started will not be recovered.
If the virtual machine that you are recovering from is powered off, the Latest Staterecovery point is displayed.
6. Verify this is the recovery point that you want to restore and click Next.
A BMR wizard screen is displayed with the available recovery mode options.
The available options are Advanced Mode and Express Mode.
Select Express Mode if you want minimal interaction during the recovery pro-cess. For more information see, Perform BMR in Express Mode.
Select Advanced Mode if you want to customize the recovery process. Formore information, see Perform BMR in Advanced Mode.
624 Arcserve UDP Agent for Windows User Guide

How to Perform a Bare Metal Recovery Using a Virtual Standby VM or Instant VM
Default: Express Mode.
Note:When the virtual machine is located on the VMware ESX(i) server whose edi-tion is 5.0 or 5.1.x, you need to create registry key in the BMR machine. For details,view link.
Chapter 5: Using Arcserve UDP Agent (Windows) 625

How to Perform a Bare Metal Recovery Using a Virtual Standby VM or Instant VM
Create Registry Key in the BMR machine
You can create registry key in the BMR machine. The key is required when the vir-tual machine is located on the VMware ESX(i) server whose edition is 5.0 or 5.1.x.
Follow these steps:
1. Open the command line console, type regedit, and press Enter.
The Windows Registry Editor opens.
2. Locate and click the following registry key:
HKEY_LOCAL_MACHINE\SOFTWARE\Arcserve\Unified Data Protection\Engine
3. From the Edit menu, click New, and then click String Value.
4. Specify ESXVersion as the name for the new entry and then press Enter.
5. Right-click ESXVersion and then clickModify.
6. Specify 5.1 in the Value data field and then click OK.
7. Exit the Registry Editor.
626 Arcserve UDP Agent for Windows User Guide

How to Perform a Bare Metal Recovery Using a Virtual Standby VM or Instant VM
Perform BMR in Express Mode
The Express Mode requires minimal interaction during the recovery process.
Follow these steps:
1. From the Choose a Recovery Mode dialog, select Express Mode and click Next.
The Summary of Disk Restore Settings screen opens, displaying a summary of thevolumes that are going to be restored.
Note: On the bottom of restore summary window, the drive letters listed in Destin-ation Volume column are automatically generated from the Windows Pre-installation Environment (WinPE). They can be different from the drive letters listedin Source Volume column. However, the data is still restored to proper volumeeven if drive letters are different.
2. After you have verified that the summary information is correct, click OK.
The restore process starts. The BMR wizard screen displays the restore status foreach volume.
Depending upon the size of the volume being restored, this operation cantake some time.
During this process you are restoring, block-by-block whatever you hadbacked up for that recovery point and creating a replica of the sourcemachine on the target machine.
Chapter 5: Using Arcserve UDP Agent (Windows) 627

How to Perform a Bare Metal Recovery Using a Virtual Standby VM or Instant VM
By default, the option to reboot your system automatically after recovery isselected. If necessary, you can clear this option and you can reboot manuallyat a later time.
Important: If you are performing an authoritative restore of an active dir-ectory after a BMR, you must uncheck the option Automatically rebootyour system after recovery and for more information, see How to Performan Authoritative Restore of an Active Directory after a BMR.
If necessary, you can select Do not start Agent service automatically afterreboot.
If necessary, you can cancel or abort the operation at any time.
3. From the Utilitiesmenu, you can access the BMR Activity Log and you can use theSave option to save the Activity Log.
By default, the Activity Log is saved to the following location:
X:\windows\system32\dr\log.
Note: To avoid getting a Windows-generated error, do not save the Activity Log onyour desktop or create a folder on your desktop using the Save As option from theBMR Activity Log window.
4. If you are restoring to dissimilar hardware (the SCSI/FC adapter which used to con-nect hard drives could have been changed) and no compatible driver is detected inyour original system, a "driver injection" page is displayed to allow you to providedrivers for these devices.
628 Arcserve UDP Agent for Windows User Guide

How to Perform a Bare Metal Recovery Using a Virtual Standby VM or Instant VM
You can browse and select drivers to inject to the recovered system so that even ifyou are recovering to a machine with dissimilar hardware, you can still bring backthe machine after BMR.
5. When the BMR process is completed, a confirmation notification is displayed.
Chapter 5: Using Arcserve UDP Agent (Windows) 629

How to Perform a Bare Metal Recovery Using a Virtual Standby VM or Instant VM
Perform BMR in Advanced Mode
The Advanced Mode lets you customize the recovery process.
Follow these steps:
1. From the Choose a Recovery Mode dialog, select Advanced Mode and click Next.
The BMR utility starts locating the machine that is going to be recovered and dis-plays the corresponding disk partition information.
The upper pane shows the disk configuration that you have on the current (target)machine and the lower pane shows the disk partition information that you had onthe original (source) machine.
Important! A red X icon displaying for a source volume in the lower pane indicatesthat this volume contains system information and has not been assigned (mapped)to the target volume. This system information volume from the source disk must beassigned to the target disk and restored during BMR or the reboot fails.
Note: If you perform BMR and you restore the system volume to a disk which is notconfigured as the boot disk, it will fail to boot the machine after BMR is completed.Ensure that you are restoring the system volume to a properly configured boot disk.
Note:When restoring to another disk/volume, the capacity of new disk/volumemust be the same size or larger than original disk/volume. In addition, disk resizingis for basic disks only, and not for dynamic disks.
630 Arcserve UDP Agent for Windows User Guide

How to Perform a Bare Metal Recovery Using a Virtual Standby VM or Instant VM
2. If the current disk information you are seeing does not appear correct, you canaccess the Utilitiesmenu and check for missing drivers.
3. If necessary, on the target disk/volume pane you can click the Operations drop-down menu to display the available options. For more information about theseoptions, see Managing the BMR Operations Menu.
4. Click on each target volume and from the pop-up menu, select the Map VolumeFrom option to assign a source volume to this target volume.
The Select a Basic Source Volume dialog opens.
5. From Select a Basic Source Volume dialog, click the drop-down menu and selectthe available source volume to assign to the selected target volume. Click OK.
On the target volume, a checkmark icon is displayed, indicating that this targetvolume has been mapped to.
On the source volume, the red X icon changes to a green icon, indicating thatthis source volume has been assigned to a target volume.
6. When you are sure all volumes that you want to restore and all volumes containingsystem information are assigned to a target volume, click Next.
The Submit Disk Changes screen opens, displaying a summary of the selected oper-ations. For each new volume being created, the corresponding information is dis-
Chapter 5: Using Arcserve UDP Agent (Windows) 631

How to Perform a Bare Metal Recovery Using a Virtual Standby VM or Instant VM
played.
7. When you have verified the summary information is correct, click Submit. (If theinformation is not correct, click Cancel).
Note: All operations to the hard drive do not take effect until you submit it.
On the target machine, the new volumes are created and mapped to the cor-responding source machine.
8. When the changes are completed, click OK.
The Summary of Disk Restore Settings screen opens, displaying a summary of thevolumes that are going to be restored.
Note: On the bottom of restore summary window, the drive letters listed in "Destin-ation Volume" column are automatically generated from the Windows Pre-installation Environment (WinPE). They can be different from the drive letters listedin "Source Volume" column. However, the data is still restored to proper volume
632 Arcserve UDP Agent for Windows User Guide
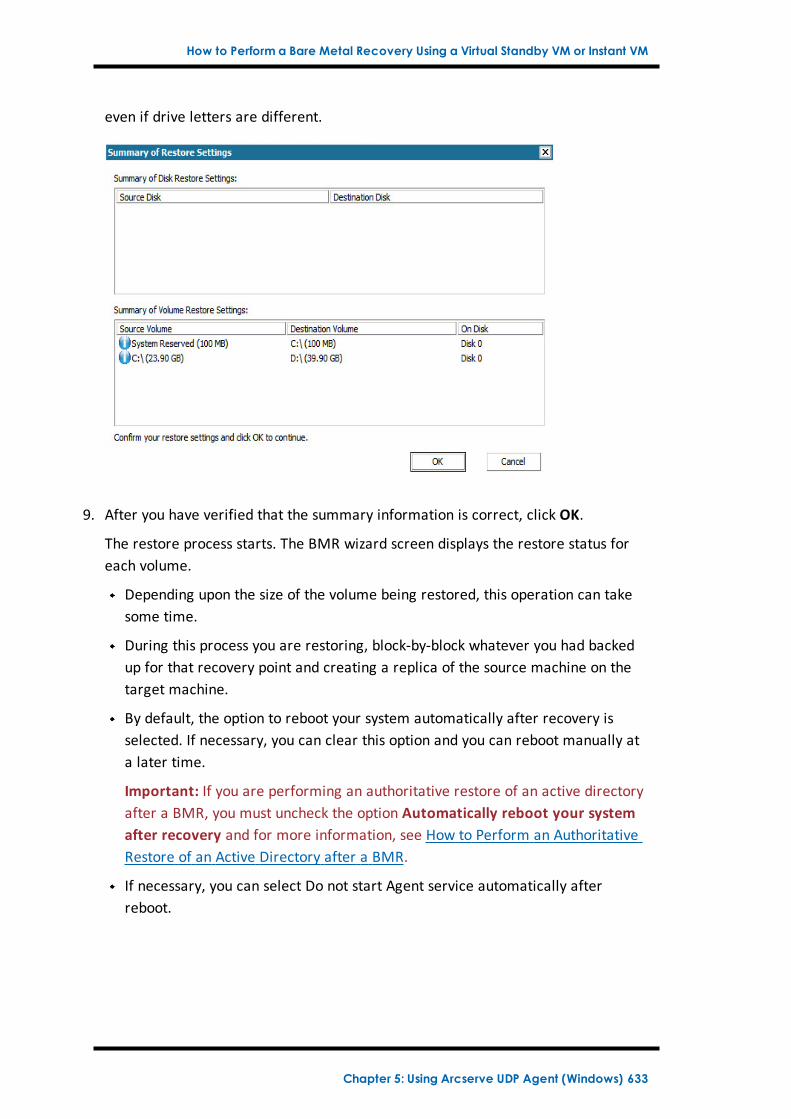
How to Perform a Bare Metal Recovery Using a Virtual Standby VM or Instant VM
even if drive letters are different.
9. After you have verified that the summary information is correct, click OK.
The restore process starts. The BMR wizard screen displays the restore status foreach volume.
Depending upon the size of the volume being restored, this operation can takesome time.
During this process you are restoring, block-by-block whatever you had backedup for that recovery point and creating a replica of the source machine on thetarget machine.
By default, the option to reboot your system automatically after recovery isselected. If necessary, you can clear this option and you can reboot manually ata later time.
Important: If you are performing an authoritative restore of an active directoryafter a BMR, you must uncheck the option Automatically reboot your systemafter recovery and for more information, see How to Perform an AuthoritativeRestore of an Active Directory after a BMR.
If necessary, you can select Do not start Agent service automatically afterreboot.
Chapter 5: Using Arcserve UDP Agent (Windows) 633

How to Perform a Bare Metal Recovery Using a Virtual Standby VM or Instant VM
If necessary, you can cancel or abort the operation at any time.
10. From the Utilitiesmenu, you can access the BMR Activity Log and you can use theSave option to save the Activity Log.
By default, the Activity Log is saved to the following location:
X:\windows\system32\dr\log.
Note: To avoid getting a Windows-generated error, do not save the Activity Log onyour desktop or create a folder on your desktop using the Save As option from theBMR Activity Log window.
11. If you are restoring to dissimilar hardware (the SCSI/FC adapter which used to con-nect hard drives could have been changed) and no compatible driver is detected inyour original system, a "driver injection" page is displayed to allow you to providedrivers for these devices.
You can browse and select drivers to inject to the recovered system so that even ifyou are recovering to a machine with dissimilar hardware, you can still bring backthe machine after BMR.
12. When the BMR process is completed, a confirmation notification is displayed.
634 Arcserve UDP Agent for Windows User Guide

How to Perform a Bare Metal Recovery Using a Virtual Standby VM or Instant VM
Verify that the BMR was Successful
To verify that the BMR was successful, perform the following tasks:
Reboot the operating system.
Verify all systems and applications function correctly.
Verify all network settings are properly configured.
Verify the BIOS is configured to boot from the disk on which the boot volumewas restored to.
When the BMR is completed, be aware of the following conditions:
The first backup that is performed after the BMR is a Verify Backup.When the machine has been rebooted, you may need to configure the networkadapters manually if you restored to dissimilar hardware.
Note:When the machine is rebooting, a Windows Error Recovery screen maybe displayed indicating that Windows did not shut down successfully. If thisoccurs, you can safely ignore this warning and continue to start Windows nor-mally.
For dynamic disks, if the status of the disk is offline, you can manually change itto online from the disk management UI (accessed by running the Diskmg-mt.msc control utility).For dynamic disks, if the dynamic volumes are in a failed redundancy status,you can manually resynchronize the volumes from the disk management UI(accessed by running the Diskmgmt.msc control utility).
Chapter 5: Using Arcserve UDP Agent (Windows) 635

How to Perform a Bare Metal Recovery Using a Virtual Standby VM or Instant VM
BMR Reference Information
How Bare Metal Recovery Works
Operating Systems that Support UEFI or BIOS Conversion
Managing the BMR Operations Menu
636 Arcserve UDP Agent for Windows User Guide

How to Perform a Bare Metal Recovery Using a Virtual Standby VM or Instant VM
How Bare Metal Recovery Works
Bare Metal Recovery is the process of restoring a computer system from "baremetal" by reinstalling the operating system and software applications, and thenrestoring the data and settings. The most common reasons for performing a baremetal recovery are because your hard drive either fails or becomes full and youwant to upgrade (migrate) to a larger drive or migrate to newer hardware. Baremetal recovery is possible because during the block-level backup process, ArcserveUDP Agent (Windows) captures not only the data, but also all information related tothe operating system, installed applications, configuration settings, necessarydrivers, and so on. All relevant information that is necessary to perform a completerebuild of the computer system from "bare metal" is backed up into a series ofblocks and stored on the backup location.
Note: Dynamic disks are restored at disk level only. If your data is backed up to avolume on a dynamic disk, you will not be able to restore this dynamic disk (includ-ing all its volumes) during BMR.
When you perform a bare metal recovery, the Arcserve UDP Agent (Windows) bootdisk is used to initialize the new computer system and allow the bare metal recov-ery process to begin. When the bare metal recovery is started, Arcserve UDP Agent(Windows) will prompt you to select or provide a valid location to retrieve thesebacked up blocks from, as well as the recovery point to be restored. You may alsobe prompted to provide valid drivers for the new computer system if needed. Whenthis connection and configuration information is provided, Arcserve UDP Agent(Windows) begins to pull the specified backup image from the backup location andrestore all backed up blocks to the new computer system (empty blocks will not be
Chapter 5: Using Arcserve UDP Agent (Windows) 637

How to Perform a Bare Metal Recovery Using a Virtual Standby VM or Instant VM
restored). After the bare metal recovery image is fully restored to the new com-puter system, the machine will be back to the state that it was in when the lastbackup was performed, and Arcserve UDP Agent (Windows) backups will be able tocontinue as scheduled. (After completion of the BMR, the first backup will be aVerify Backup).
638 Arcserve UDP Agent for Windows User Guide
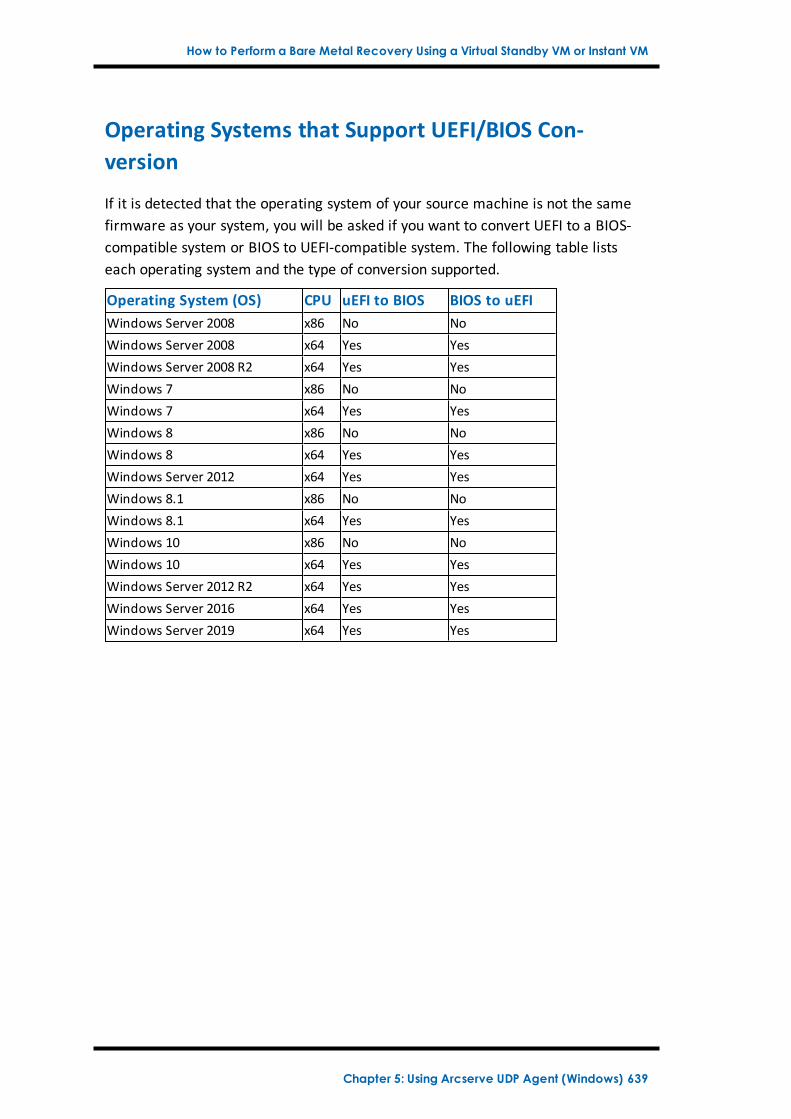
How to Perform a Bare Metal Recovery Using a Virtual Standby VM or Instant VM
Operating Systems that Support UEFI/BIOS Con-version
If it is detected that the operating system of your source machine is not the samefirmware as your system, you will be asked if you want to convert UEFI to a BIOS-compatible system or BIOS to UEFI-compatible system. The following table listseach operating system and the type of conversion supported.
Operating System (OS) CPU uEFI to BIOS BIOS to uEFIWindows Server 2008 x86 No NoWindows Server 2008 x64 Yes YesWindows Server 2008 R2 x64 Yes YesWindows 7 x86 No NoWindows 7 x64 Yes YesWindows 8 x86 No NoWindows 8 x64 Yes YesWindows Server 2012 x64 Yes YesWindows 8.1 x86 No NoWindows 8.1 x64 Yes YesWindows 10 x86 No NoWindows 10 x64 Yes YesWindows Server 2012 R2 x64 Yes YesWindows Server 2016 x64 Yes YesWindows Server 2019 x64 Yes Yes
Chapter 5: Using Arcserve UDP Agent (Windows) 639

How to Perform a Bare Metal Recovery Using a Virtual Standby VM or Instant VM
Managing the BMR Operations Menu
The BMR Operations menu consists of the following three types of operations:
Disk Specific Operations
Volume/Partition Specific Operations
BMR Specific Operations
Disk Specific Operations:
To perform disk specific operations, select the disk header and click Oper-ations.
Clean Disk
This operation is used to clean all partitions of a disk and is:
An alternate method to delete all volumes of a disk. With the Clean Disk oper-ation, you do not have to delete each volume one by one.
Used to delete the non-Windows partitions. Due to a VDS limitation, the non-Windows partition cannot be deleted from the UI, but you can use this oper-ation to clean them all.
Note: During BMR, when the destination disk has non-Windows partitions orOEM partitions, you cannot select this partition and delete it from the BMRUI. Usually this would occur if you ever installed Linux/Unix on the destinationdisk. To resolve this issue, perform one of the following tasks:
Select the disk header on the BMR UI, click Operations, and use the CleanDisk operation to erase all partitions on the disk.
Select the disk header on the BMR UI, click Operations, and use the CleanDisk operation to erase all partitions on the disk.
Convert to MBR
This operation is used to convert a disk to MBR (Master Boot Record). It isavailable only when the selected disk is a GPT (GUID Partition Table) disk andthere are no volumes on this disk.
Convert to GPT
This operation is used to convert a disk to GPT. It is available only when theselected disk is an MBR disk and there are no volumes on this disk.
Convert to Basic
This operation is used to convert a disk to Basic. It is available only when theselected disk is a Dynamic disk and there are no volumes on this disk.
640 Arcserve UDP Agent for Windows User Guide

How to Perform a Bare Metal Recovery Using a Virtual Standby VM or Instant VM
Convert to Dynamic
This operation is used to convert a disk to Dynamic Disk. It is available onlywhen the selected disk is a Basic disk.
Online Disk
This operation is used to bring a disk online. It is available only when theselected disk is in the offline status.
Disk Properties
This operation is used to view detailed disk properties. It is always availableand when you select this operation, a Disk Properties dialog appears.
Volume/Partition Specific Operations:
To perform volume/partition operations, select the disk body area and click Oper-ations. From this menu, you can create new partitions to correspond to the disk par-titions on the source volume.
Create Primary Partition
This operation is used to create a partition on a basic disk. It is available onlywhen the selected area is an unallocated disk space.
Create Logical Partition
This operation is used to create a logical partition on a basic MBR disk. It isavailable only when the selected area is an extended partition.
Create Extended Partition
This operation is used to create an extended partition on a basic MBR disk. Itis available only when the disk is an MBR disk and the selected area is anunallocated disk space.
Create System Reserved Partition
This operation is used to create the System Reserved Partition on a BIOS firm-ware system and builds a mapping relationship with the source EFI SystemPartition. It is only available when you restore a UEFI system to a BIOS sys-tem.
Note: If you previously converted from UEFI to a BIOS-compatible system,use the Create System Reserved Partition operation for destination disk res-izing.
Create EFI System Partition
This operation is used to create the EFI System Partition on a basic GPT disk.It is available only when the target machine firmware is UEFI and the selec-ted disk is a basic GPT disk.
Chapter 5: Using Arcserve UDP Agent (Windows) 641

How to Perform a Bare Metal Recovery Using a Virtual Standby VM or Instant VM
Note: If you previously converted from BIOS to a UEFI-compatible system,use the Create EFI System Partition operation for destination disk resizing.
Note: Systems that support UEFI also require that the boot partition reside ona GPT (GUID Partition Table) disk. If you are using a MBR (Master BootRecord) disk, you must convert this disk to a GPT disk, and then use theCreate EFI System Partition operation for disk resizing.
Resize Volume
This operation is used to resize a volume. It is an alternate method of Win-dows "Extend Volume/Shrink Volume". It is available only when the selectedarea is a valid disk partition.
Delete Volume
This operation is used to delete a volume. It is available only when the selec-ted area is a valid volume.
Delete Extended Partition
This operation is used to delete the extended partition. It is available onlywhen the selected area is the extended partition.
Volume Properties
This operation is used to view detailed volume properties. When you selectthis operation, a Volume Properties dialog appears.
BMR Specific Operations:
These operations are specific to BMR. To perform BMR operations, select thedisk header or the disk body area and click Operations.
Map Disk From
This operation is used to build a mapping relationship between the sourceand target dynamic disks. It is available only when the selected disk is aDynamic disk.
Note:When mapping to another disk, the capacity of each mapped targetvolume must be the same size or larger than the corresponding sourcevolume.
Map Volume From
This operation is used to build a mapping relationship between the sourceand target basic volume. It is available only when the selected volume is aBasic volume.
Note:When mapping to another disk, the capacity of each mapped targetvolume must be the same size or larger than the corresponding sourcevolume.
642 Arcserve UDP Agent for Windows User Guide

How to Perform a Bare Metal Recovery Using a Virtual Standby VM or Instant VM
Commit
This operation is always available. All of the operations are cached inmemory and they do not modify the target disks until you select the Commitoperation.
Reset
This operation is always available. The Reset operation is used to relinquishyour operations and restore the disk layout to the default status. This oper-ation cleans all of the cached operations. Reset means to reload the sourceand target disk layout information from the configure file and current OS,and discard any user changed disk layout information.
Chapter 5: Using Arcserve UDP Agent (Windows) 643

How to Perform a Bare Metal Recovery Using a Virtual Standby VM or Instant VM
Troubleshooting BMR Issues
When a problem is detected, Arcserve UDP Agent (Windows) generates a messageto help you identify and resolve the problem. These messages are contained in theArcserve UDP Agent (Windows) Activity Log, which is accessed from the View Logsoption on the home page UI. In addition, when an incorrect action is attempted, Arc-serve UDP Agent (Windows) generally displays a pop-up message to help youidentify and quickly resolve the problem.
644 Arcserve UDP Agent for Windows User Guide

How to Perform a Bare Metal Recovery Using a Virtual Standby VM or Instant VM
Slow throughput performance during BMR
This problem can be caused by SATA controllers with "AHCI" enabled.
During BMR, Arcserve UDP Agent (Windows) will install drivers for critical unknowndevices. If the device already has a driver installed, Arcserve UDP Agent (Windows)will not update that driver again. For some devices, Windows 7PE may have thedrivers for them, but these drivers may not be the best ones and this can cause theBMR to run too slow.
To remedy this problem, perform one of the following tasks:
Check if the driver pool folder contains the newest disk drivers. If it does, andyou are restoring to the original machine, please install the new driver fromthe driver pool folder. If you are restoring to alternate machine, download thelatest disk drivers from the Internet, and load it before you start data recovery.To load the driver, you can use the "drvload.exe" utility, which is included inWindows PE
Change the device operating mode from "AHCI" (Advanced Host ControllerInterface) to Compatibility mode. (Compatibility mode provides a betterthroughput).
If the problem persists, use Live Chat to contact Arcserve support. Live Chat lets youoptimize intelligent conversation between you and the Technical Support team,allowing you to address your concerns and questions immediately, while still main-taining access to the product.
Chapter 5: Using Arcserve UDP Agent (Windows) 645

How to Perform a Bare Metal Recovery Using a Virtual Standby VM or Instant VM
After BMR, dynamic volumes are not recognized bythe operating system
To keep dynamic disks in a consistent state, the Windows operating system auto-matically synchronizes the Logical Disk Manager (LDM) metadata on each dynamicdisk. So when BMR restores one dynamic disk and brings it online, the LDMmetadata on this disk is automatically updated by the operating system. This mayresult in a dynamic volume not being recognized by the operating system and miss-ing after the reboot.
To remedy this problem, when you perform BMR with multiple dynamic disks, donot perform any pre-BMR disk operations such as cleaning, deleting volume, and soon.
If the problem persists, use Live Chat to contact Arcserve support. Live Chat lets youoptimize intelligent conversation between you and the Technical Support team,allowing you to address your concerns and questions immediately, while still main-taining access to the product.
646 Arcserve UDP Agent for Windows User Guide

How to Perform a Bare Metal Recovery Using a Virtual Standby VM or Instant VM
Unable to Reboot Hyper-V VM After BMR
If you performed BMR to a Hyper-V machine consisting of more than one disk con-nected to an Integrated Drive Electronics (IDE) controller and if the server does notreboot, perform the following troubleshooting procedure:
1. Verify that the disk that contains the system volume is the master disk.
The Hyper-V BIOS searches for the system volume on the master disk (disk 1) whichis connected to the master channel. If the system volume is not located on the mas-ter disk, the VM will not reboot.
Note: Verify that the disk that contains the system volume is connected to an IDEcontroller. Hyper-V cannot boot from a SCSI disk.
2. If necessary, modify the Hyper-V settings, to connect the disk that contains the sys-tem volume to the IDE master channel and reboot the VM again.
If the problem persists, use Live Chat to contact Arcserve support. Live Chat lets youoptimize intelligent conversation between you and the Technical Support team,allowing you to address your concerns and questions immediately, while still main-taining access to the product.
Chapter 5: Using Arcserve UDP Agent (Windows) 647

How to Perform a Bare Metal Recovery Using a Virtual Standby VM or Instant VM
Unable to Reboot VMware VM After BMR
If you performed BMR to a VMware machine consisting of more than one disk con-nected to an Integrated Drive Electronics (IDE) controller or a SCSI adapter and theserver does not reboot, perform the following troubleshooting procedure:
1. Verify that the disk that contains the system volume is the master disk.
The VMware BIOS searches for the system volume on the Master disk (disk 0)which is connected the master channel. If the system volume is not on the Masterdisk, the VM does not reboot.
2. If necessary, modify the VMware settings, to connect the disk that contains the sys-tem volume to the IDE master channel and reboot the VM again.
3. If the disk is a SCSI disk, verify the disk which contains boot volume is the first diskwhich connects to the SCSI adapter. If not, assign the boot disk from the VMwareBIOS.
4. Verify the disk which contains boot volume is in the previous eight disks, becausethe VMware BIOS only detect eight disks during the boot. If there are more thanseven disks ahead the disk which contains system volumes connected to the SCSIadapter, the VM cannot boot.
If the problem persists, use Live Chat to contact Arcserve support. Live Chat lets youoptimize intelligent conversation between you and the Technical Support team,allowing you to address your concerns and questions immediately, while still main-taining access to the product.
648 Arcserve UDP Agent for Windows User Guide

How to Perform a Bare Metal Recovery Using a Virtual Standby VM or Instant VM
Unable to boot the server after performing a BMR
Symptom
When the source machine is an Active Directory server performing a BMR to aphysical machine with different hardware or to a virtual machine on a hyper-vserver, the server does not boot and a blue screen displays with the following mes-sage:
STOP: c00002e2 Directory Services could not start because of the following error: adevice attached to the system is not functioning. Error status: 0xc0000001.
Solution
Reboot the system to the BMR PE environment, rename all *.log files in the C:\Win-dows\NTDS folder, and restart the system. For example, rename the file edb.log toedb.log.old and restart the system.
If the problem persists, use Live Chat to contact Arcserve support. Live Chat lets youoptimize intelligent conversation between you and the Technical Support team,allowing you to address your concerns and questions immediately, while still main-taining access to the product.
Chapter 5: Using Arcserve UDP Agent (Windows) 649

How to Perform a Bare Metal Recovery Using a Virtual Standby VM or Instant VM
Failed to submit BMR job to Recovery Point Server
Only one BMR job is supported when restoring from same RPS server for the samenode (Agent backup or Host-Based Backup). This is controlled by the job monitor onthe RPS server.
If the machine where the BMR job is running is shut down or rebooted unex-pectedly, the job monitor at the RPS server side will wait 10 minutes and then timeout. During this time you cannot start another BMR for the same node from thesame RPS server.
If you abort the BMR from the BMR UI, this problem does not exist.
If the problem persists, use Live Chat to contact Arcserve support. Live Chat lets youoptimize intelligent conversation between you and the Technical Support team,allowing you to address your concerns and questions immediately, while still main-taining access to the product.
650 Arcserve UDP Agent for Windows User Guide
Using the PowerShell Interface
Using the PowerShell Interface
This section contains the following topics:
How to use the PowerShell Interface
Review the Prerequisite
Using the PowerShell Interface for Arcserve UDP
PowerShell Syntax and Parameters
PowerShell Examples
Chapter 5: Using Arcserve UDP Agent (Windows) 651

Using the PowerShell Interface
How to use the PowerShell Interface
Arcserve UDP provides PowerShell capabilities that allows you to submit a backupjob, perform a restore, and recover VM from the command line. The PowerShellinterface is named as UDPPowerCLI.ps1.
Review the Prerequisite
Using the PowerShell Interface for Arcserve UDP
PowerShell Syntax and Parameters
PowerShell Examples
652 Arcserve UDP Agent for Windows User Guide
Using the PowerShell Interface
Review the Prerequisite
Review the following prerequisites before using the PowerShell interface:
You must have Windows 2008 R2 Server or higher versions.
You must have PowerShell 3 or higher version installed on your server.
Chapter 5: Using Arcserve UDP Agent (Windows) 653

Using the PowerShell Interface
Using the PowerShell Interface for Arcserve UDP
The PowerShell utility is bundled with the Arcserve UDP installation file. When youinstall Arcserve UDP, typically the file gets installed at the following location:
C:\Program Files\Arcserve\Unified Data Protection
In such cases, on Console, UDPPowerCLI.ps1 gets installed at the following location:
C:\Program Files\Arcserve\Unified Data Protection\Management\PowerCLI
On RPS or Agent, UDPPowerCLI.ps1 gets installed at the following location:
C:\Program Files\Arcserve\Unified Data Protection\Engine\PowerCLI
Refer the following items to help you use the PowerShell interface:
Update the PowerShell execution policy to allow the scripts to run. Forexample, update the execution policy to Set-ExecutionPolicyRemoteSigned.
Note: For more information about changing the execution policy, see theMicrosoft website.
Run the following PowerShell command to get the detailed help messagesand examples for the scripts:
On Console:
Get-Help 'C:\Program Files\Arcserve\Unified Data Pro-tection\Management\PowerCLI\UDPPowerCLI.ps1' -full
On RPS or Agent:
Get-Help 'C:\Program Files\Arcserve\Unified Data Pro-tection\Engine\PowerCLI\UDPPowerCLI.ps1' -full
654 Arcserve UDP Agent for Windows User Guide

Using the PowerShell Interface
PowerShell Syntax and ParametersSYNTAX 1
UDPPowerCLI.ps1 -Command <CreatePswFile> -Password <String> -PasswordFile<string> [<CommonParameters>]
SYNTAX 2
UDPPowerCLI.ps1 -Command <Backup> [-UDPConsoleServerName <String>] [-UDPConsoleProtocol <http|https>] [-UDPConsolePort <int>] [-UDPCon-soleUserName [<String>]] [-UDPConsolePassword <String>] [-UDPCon-solePasswordFile <String>] [-UDPConsoleDomainName <String>] -planName<String> -nodeName <String> [-backupJobType <String>] [-jobDescription<String>] [-waitJobFinish <String String>] [-timeOut <int>] [-agentBasedJob <true|-false String>] [-backupScheduleType <String>] [<CommonParameters>]
SYNTAX 3
UDPPowerCLI.ps1 -Command <Restore> [-UDPConsoleServerName <String>] [-UDPConsoleProtocol <String>] [-UDPConsolePort <int>] [-UDPConsoleUserName<String>] [-UDPConsolePassword <String>] [-UDPConsolePasswordFile <String>][-UDPConsoleDomainName <String>] [-UDPAgentServerName <String>] [-UDPA-gentProtocol <String>] [-UDPAgentPort <int>] [-UDPAgentUserName <String>] [-UDPAgentPassword <String>] [-UDPAgentPasswordFile <String>] [-UDPA-gentDomainName <String>] [-RestoreDirectoryPath <String>] [-RestoreFilePath<String>] [-BackupSessionNumber <int>] [-VmName <String>] -RestoreDestination<String> [-RestoreDestinationUserName <String>] [-RestoreDestinationPassword<String>] [-CreateRootFolder <String>] [-ChangeFileName <String>] [-ReplaceAct-iveFilesFlag <String>] [-OverwriteExistFiles <String>] [<CommonParameters>]
SYNTAX 4
UDPPowerCLI.ps1 -command <RecoverVM> [-UDPConsoleServerName <String>][-UDPConsoleProtocol <String>] [-UDPConsolePort <int>] [-UDPCon-soleUserName <String>] [-UDPConsolePassword <String>] [-UDPCon-solePasswordFile <String>] [-UDPConsoleDomainName <String>] [-UDPAgentServerName <String>] [-UDPAgentProtocol <String>] [-UDPAgentPort<int>] [-UDPAgentUserName <String>] [-UDPAgentPassword <String>] [-UDPA-gentDomainName <String>] [-UDPAgentPasswordFile <String>] [-BackupSes-sionNumber <int>] -RecoverVmName <String> [-OverwriteExistingVM <String>] [-PoweronVM <String>] [<CommonParameters>]
DESCRIPTION
A utility to connect to the Arcserve UDP Console service, and submit backup andrestore jobs.
PARAMETERS
Chapter 5: Using Arcserve UDP Agent (Windows) 655

Using the PowerShell Interface
-Command <String>
Specifies the command that is used. Currently, the following strings are sup-ported:
CreatePswFile
Backup
Restore
RecoverVM
Required? true
Position? named
Default value
Accept pipeline input? false
Accept wildcard characters? false
-UDPConsoleServerName <String>
Specifies the DNS name of the UDP server (the server where you have installedthe Console) to which you want to connect. If this value is not specified, thenthe cmdlet uses the default value, the DNS name of the local machine.
Required? false
Position? named
Default value $env:COMPUTERNAME
Accept pipeline input? false
Accept wildcard characters? false
-UDPConsolePort <int>
Specifies the port number you want to use for the connection. If this value is notspecified, then the cmdlet uses the default value, 8015.
Required? false
Position? named
Default value 8015
Accept pipeline input? false
Accept wildcard characters? false
-UDPConsoleProtocol <String>
656 Arcserve UDP Agent for Windows User Guide
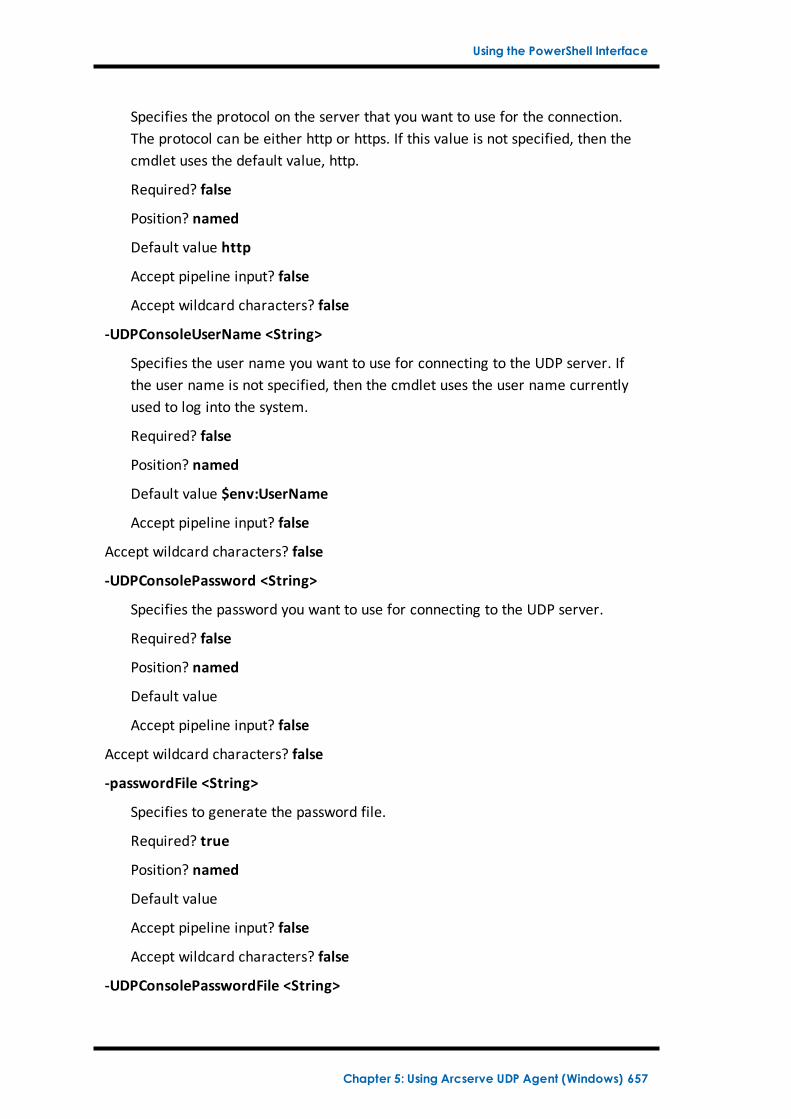
Using the PowerShell Interface
Specifies the protocol on the server that you want to use for the connection.The protocol can be either http or https. If this value is not specified, then thecmdlet uses the default value, http.
Required? false
Position? named
Default value http
Accept pipeline input? false
Accept wildcard characters? false
-UDPConsoleUserName <String>
Specifies the user name you want to use for connecting to the UDP server. Ifthe user name is not specified, then the cmdlet uses the user name currentlyused to log into the system.
Required? false
Position? named
Default value $env:UserName
Accept pipeline input? false
Accept wildcard characters? false
-UDPConsolePassword <String>
Specifies the password you want to use for connecting to the UDP server.
Required? false
Position? named
Default value
Accept pipeline input? false
Accept wildcard characters? false
-passwordFile <String>
Specifies to generate the password file.
Required? true
Position? named
Default value
Accept pipeline input? false
Accept wildcard characters? false
-UDPConsolePasswordFile <String>
Chapter 5: Using Arcserve UDP Agent (Windows) 657

Using the PowerShell Interface
Specifies the UDP password file you want to use for connecting to the UDPserver.
Required? false
Position? named
Default value
Accept pipeline input? false
Accept wildcard characters? false
-UDPAgentServerName <String>
Specifies the DNS name of the UDP agent server to which you want to connectfor restore.
Required? false
Position? named
Default value $env:COMPUTERNAME
Accept pipeline input? false
Accept wildcard characters? false
-UDPAgentProtocol <String>
Specifies the internet protocol that you want to use to connect to the UDP agentserver. It can be either http or https. If this value is not specified, then the cmd-let uses the default value, http.
Required? false
Position? named
Default value http
Accept pipeline input? false
Accept wildcard characters? false
-UDPAgentPort <int>
Specifies the port number that you want to use to connect to the UDP agentserver. If this value is not specified, then the cmdlet uses the default value,8014.
Required? false
Position? named
Default value 8014
Accept pipeline input? false
Accept wildcard characters? false
658 Arcserve UDP Agent for Windows User Guide

Using the PowerShell Interface
-UDPAgentUserName <String>
Specifies the user name that you want to use to connect to the UDP agentserver. If the user name is not specified, then the cmdlet uses the user namecurrently used to log into the system.
Required? false
Position? named
Default value $env:UserName
Accept pipeline input? false
Accept wildcard characters? false
-UDPAgentPassword <String>
Specifies the password that you want to use to connect to the UDP agent server.
Required? false
Position? named
Default value
Accept pipeline input? false
Accept wildcard characters? false
-UDPAgentPasswordFile <String>
Specifies the UDP agent password file that you want to use to connect to theUDP agent server.
Required? false
Position? named
Default value
Accept pipeline input? false
Accept wildcard characters? false
-UDPAgentDomainName <String>
Specifies the domain name where the specified UDP agent user is located.
Required? false
Position? named
Default value
Accept pipeline input? false
Accept wildcard characters? false
-NodeName <String>
Chapter 5: Using Arcserve UDP Agent (Windows) 659

Using the PowerShell Interface
Specifies the name of node that you want to back up.
Required? true
Position? named
Default value
Accept pipeline input? false
Accept wildcard characters? false
-RestoreFilePath <String>
Specifies the file that you want to restore.
Required? false
Position? named
Default value
Accept pipeline input? false
Accept wildcard characters? false
-RestoreDirectoryPath <String>
Specifies the directory that you want to restore.
Required? false
Position? named
Default value
Accept pipeline input? false
Accept wildcard characters? false
-BackupSessionNumber <int>
Specifies the session number to use for the restore job.
Required? false
Position? named
Default value
Accept pipeline input? false
Accept wildcard characters? false
-VmName <String>
Specifies the host name of a virtual machine for restoring file or directory fromits backup session.
Required? false
Position? named
660 Arcserve UDP Agent for Windows User Guide
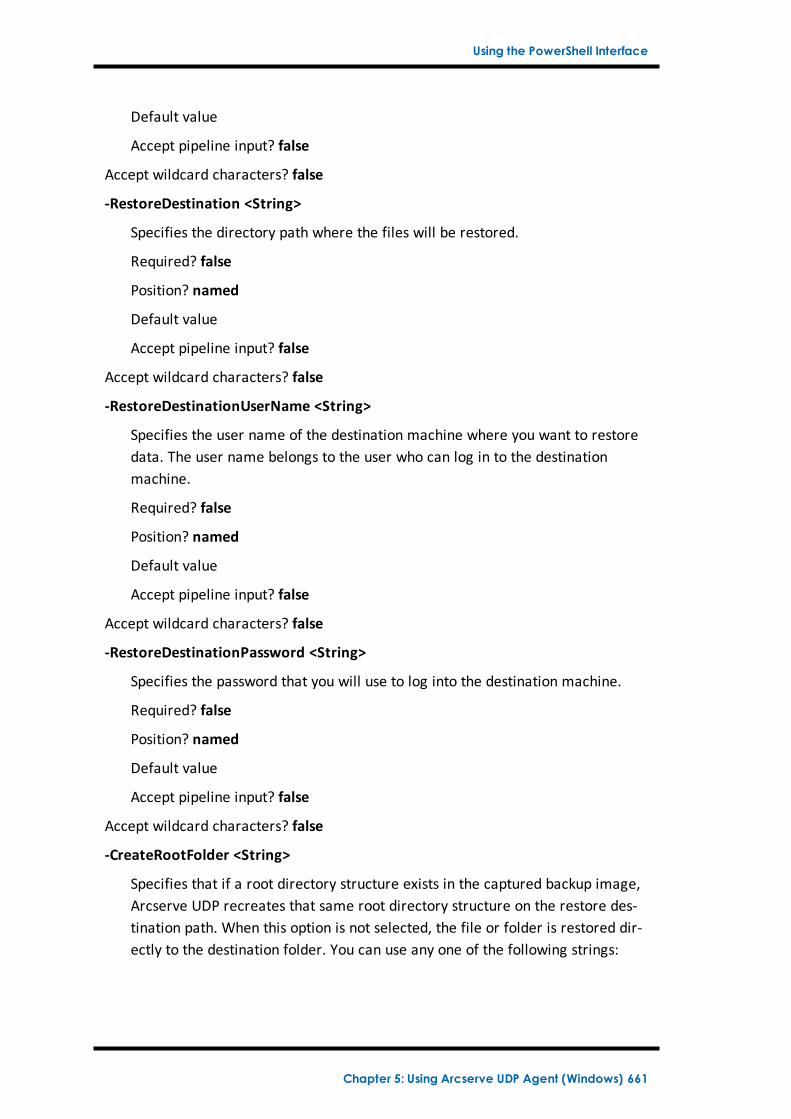
Using the PowerShell Interface
Default value
Accept pipeline input? false
Accept wildcard characters? false
-RestoreDestination <String>
Specifies the directory path where the files will be restored.
Required? false
Position? named
Default value
Accept pipeline input? false
Accept wildcard characters? false
-RestoreDestinationUserName <String>
Specifies the user name of the destination machine where you want to restoredata. The user name belongs to the user who can log in to the destinationmachine.
Required? false
Position? named
Default value
Accept pipeline input? false
Accept wildcard characters? false
-RestoreDestinationPassword <String>
Specifies the password that you will use to log into the destination machine.
Required? false
Position? named
Default value
Accept pipeline input? false
Accept wildcard characters? false
-CreateRootFolder <String>
Specifies that if a root directory structure exists in the captured backup image,Arcserve UDP recreates that same root directory structure on the restore des-tination path. When this option is not selected, the file or folder is restored dir-ectly to the destination folder. You can use any one of the following strings:
Chapter 5: Using Arcserve UDP Agent (Windows) 661

Using the PowerShell Interface
True
False
Required? false
Position? named
Default value False
Accept pipeline input? false
Accept wildcard characters? false
-ChangeFileName <String>
Creates a new file if the file name already exists. Selecting this option copiesthe source file to the destination with the same filename but a different exten-sion. Data is then restored to the new file. You can use any one of the followingstrings:
True
False
Required? false
Position? named
Default value False
Accept pipeline input? false
Accept wildcard characters? false
-ReplaceActiveFilesFlag <String>
Replaces any active files after reboot. If during the restore attempt ArcserveUDP Agent (Windows) discovers that the existing file is currently in use or beingaccessed, it will not immediately replace that file, but instead, to avoid anyproblems, will delay the replacement of the active files until the next time themachine is rebooted. (The restore occurs immediately, but the replacement ofany active files is done during the next reboot). This option is only availablewhen the OverwriteExistingFiles parameter is True. You can use any one of thefollowing strings:
True
False
Required? false
Position? named
Default value False
662 Arcserve UDP Agent for Windows User Guide

Using the PowerShell Interface
Accept pipeline input? false
Accept wildcard characters? false
-OverwriteExistingFiles <String>
Overwrites (replaces) any existing files, which are at the restore destination. Allobjects are restored from the backup files regardless of their current presenceon your computer. You can use any one of the following strings:
True
False
Required? false
Position? named
Default value False
Accept pipeline input? false
Accept wildcard characters? false
-UDPConsoleDomainName <String>
Specifies name of domain where the specified user is located. If this value isnot specified, then the cmdlet uses the domain name of local machine; or theDNS name of local machine if it is not in a domain.
Required? false
Position? named
Default value
Accept pipeline input? false
Accept wildcard characters? false
-PlanName <String>
Specifies the plan name that defines the backup job setting.
Required? true
Position? named
Default value
Accept pipeline input? false
Accept wildcard characters? false
-BackupJobType <String>
Specifies the type of the backup job. One of the following values can be used:Full (indicates a Full backup), Incr (indicates an Incremental backup), or Rsyn
Chapter 5: Using Arcserve UDP Agent (Windows) 663

Using the PowerShell Interface
(indicates a Resync backup). If you do not provide any value, then the cmdletuses the default value, Incr. The following strings are supported:
Full
Incr
Rsyn
Required? false
Position? named
Default value Incr
Accept pipeline input? false
Accept wildcard characters? false
-JobDescription <String>
Specifies the description for the backup job.
Required? true
Position? named
Default value PowerCLIJo
Accept pipeline input? false
Accept wildcard characters? false
-RecoverVmName <String>
Specifies the host name of the virtual machine that you want to recover.
Required? true
Position? named
Default value
Accept pipeline input? false
Accept wildcard characters? false
-OverwriteExistingVM <String>
Specifies that if the value is true, the restore job overwrites the existing virtualmachine. The default value is false. You can use any one of the followingstrings:
True
False
Required? false
664 Arcserve UDP Agent for Windows User Guide

Using the PowerShell Interface
Position? named
Default value False
Accept pipeline input? false
Accept wildcard characters? false
-PoweronVM <String>
Specifies that if the value is true, the virtual machine is powered on after it isrecovered. The default value is false. You can use any one of the followingstrings:
True
False
Required? false
Position? named
Default value False
Accept pipeline input? false
Accept wildcard characters? false
-waitJobFinish <true|false String>
Specifies that if the value is true, the command waits for further instructionsuntil the backup job is complete. The default value is false. You can use any oneof the following strings:
True
False
Required? false
Position? named
Default value False
Accept pipeline input? false
Accept wildcard characters? false
-timeOut <int>
Specifies the maximum waiting time (in seconds) for the backup job to com-plete.
Required? false
Position? named
Default value 600
Chapter 5: Using Arcserve UDP Agent (Windows) 665

Using the PowerShell Interface
Accept pipeline input? false
Accept wildcard characters? false
-agentBasedJob <String String>
Specifies that if true then for two nodes with the same node name, the cmdletlets the node that has the agent-based task to submit the backup job. Thedefault value is False. You can use any one of the following strings:
True
False
Required? false
Position? named
Default value False
Accept pipeline input? false
Accept wildcard characters? false
-backupScheduleType <String>
Specifies schedule backup job, submits the specified schedule backup job imme-diately, and runs only once. The following strings are supported:
Daily
Weekly
Monthly
Required? false
Position? named
Default value
Accept pipeline input? false
Accept wildcard characters? false
<CommonParameters>
This cmdlet supports the common parameters such as Verbose, Debug,ErrorAction, ErrorVariable, WarningAction, WarningVariable, OutBuffer,and OutVariable. For more information, see about_CommonParameters.
INPUTS
OUTPUTS
0 or 1
666 Arcserve UDP Agent for Windows User Guide

Using the PowerShell Interface
If job is successfully submitted successfully, the command returns 0; otherwisereturns 1.
Chapter 5: Using Arcserve UDP Agent (Windows) 667

Using the PowerShell Interface
PowerShell ExamplesExample 1
C:\PS>UDPPowerCLI.ps1 -Command CreatePswFile -password myPlainPassword -passwordFile myPasswordFile
Description
The command encrypts plain passwords that are present in the password file.
Example 2
C:\PS>UDPPowerCLI.ps1 -Command Backup -UDPConsoleUserName myUsr -UDPConsolePassword myPsw -PlanName myPlan
Description
On the local server, the command connects to the UDP Console service withHTTP protocol over port 8015, and then submits an Incremental backup jobfor the plan namedmyplan.
Example 3
C:\PS>UDPPowerCLI.ps1 -Command Backup -UDPConsoleUserName myUsr -UDPConsolePasswordFile myUDPPasswordFile -NodeName myNodeName
Description
On the local server, the command connects to the UDP Console service withHTTP protocol over port 8015, and then submits an Incremental backup jobfor the node namedmyNodeName.
Example 4
C:\PS>UDPPowerCLI.ps1 -Command Backup -UDPConsoleServerName myServer-UDPConsoleProtocol https -UDPConsolePort 8018 -UDPConsoleUserName myUsr-UDPConsolePassword myPsw -UDPConsoleDomainName myDomain -PlanNamemyPlan -BackupJobType Full -JobDescription myJob
Description
The command connects to the UDP Console service on the server namedmyServer with HTTPS protocol over port 8018, and then submits a Full backupjob for the plan namedmyPlan, and set the job description asmyJob.
Example 5
C:\PS>UDPPowerCLI.ps1 -Command Backup -UDPAgentServerName yourUDPA-gentServer -UDPAgentPasswordFile myUDPAgentPasswordFile -jobType Incr
Description
668 Arcserve UDP Agent for Windows User Guide

Using the PowerShell Interface
The command connects to the UDP agent service on the server namedyourUDPAgentServer with HTTP protocol over port 8014, and then submits anIncremental backup job for yourUDPAgentServer.
Example 6
C:\PS>UDPPowerCLI.ps1 -Cmd Backup -Svr myServer -Ptc https -Prt 8018 -UsrmyUsr -Psw myPsw -Dmn myDomain -Pln myPlan -Jbt Full -Jbd myJob
Description
The command shortens the Parameter name.
Example 7
C:\PS>UDPPowerCLI.ps1 -Command restore -UDPAgentServerName yourUDPA-gentServer -UDPAgentPasswordFile myUDPAgentPasswordFile -RestoreDir-ectoryPath 'c:\Test' -BackupSessionNumber 1
Description
The command connects to the server named yourUDPAgentServer using theuser name of the environment, the default HTTP protocol, and port 8014. Itverifies the backup session number is 1 from the yourUDPAgentServer backupconfiguration and then restores the directory to the original location, withthe restore option selected as Overwrite existing files.
Example 8
C:\PS>UDPPowerCLI.ps1 -Command restore -UDPAgentServerName yourUDPA-gentServer -UDPAgentUserName UDPAgentUsername -UDPAgentPasswordFilemyUDPAgentPasswordFile -UDPAgentProtocol 'https' -UDPAgentPort 8018 -UDPAgentDomainName UDPAgentdomainName -BackupSessionNumber 1 -RestoreFilePath 'C:\1.txt' -RestoreDestination 'C:\restore' -RestoreDestin-ationUserName remoteAccessUser -RestoreDestinationPassword remoteAccessPsw -CreateBaseFolder 'true'
Description
The command connects to the server named yourUDPAgentServer using theHTTPS protocol and port 8018. It verifies the backup session number is 1from the yourUDPAgentServer backup configuration and then restores the1.txt file to an alternate location, with the restore option selected as Over-write existing file and create root directory.
Example 9
C:\PS>UDPPowerCLI.ps1 -Command restore -UDPAgentServerName yourUDPA-gentServer -UDPAgentPasswordFile myUDPAgentPasswordFile -RestoreDir-ectoryPath 'c:\Test' -BackupSessionNumber 1 -RestoreDestination 'C:\restore' -RestoreDestinationUserName remoteAccessUser -RestoreDestinationPassword
Chapter 5: Using Arcserve UDP Agent (Windows) 669

Using the PowerShell Interface
remoteAccessPsw -servername yourUDPServer -vmname sourceVMName -UDPCon-solePasswordFile myUDPPasswordFile -domainname yourUDPDomainName -Over-writeExistFiles 'true' -CreateRootFolder 'true'
Description
The command connects to the server named yourUDPAgentServer using theuser name of the environment, the default HTTP protocol, and port 8014.Then, it connects to the UDP server using the default port 8015 and protocolHTTP to check the backup session number is 1. Lastly, it restores the dir-ectory to an alternate location, with the restore option selected as Overwriteexisting file and create root directory.
Example 10
C:\PS>UDPPowerCLI.ps1 -Command RecoverVM -UDPAgentServerNameyourUDPAgentServer -UDPAgentPasswordFile myUDPAgentPasswordFile -BackupSessionNumber 1 -UDPConsoleServerName yourUDPServer -recov-ervmname sourceVMName -UDPConsolePasswordFile myUDPPasswordFile -UDPConsoleDomainName yourUDPDomainName -OverwriteExistingVM 'true' -PoweronVM 'true'
Description
The command connects to the server named yourUDPAgentServer using theuser name of the environment, the default HTTP protocol, and port 8014.Then, it connects to the UDP server using the default port 8015 and protocolHTTP to check the backup session number is 1. Lastly, it recovers the VM tothe original location, with the recover VM option selected as Overwrite exist-ing vm and power on vm after recovered.
Example 11
C:\PS>UDPPowerCLI.ps1 -Command Backup -UDPAgentServerName myServer -UDPAgentPassword myPassword -UDPAgentDomainName myDomainName -UDPAgentUserName myPassword -backupJobType 'incremental' -backupSched-uleType 'weekly' -jobDescription 'PowerCLIJob'
Description
The command submits weekly backup job on the UDP Agent immediately andruns only one time.
Example 12
C:\PS>UDPPowerCLI.ps1 -Command Backup -UDPConsoleServerName myServer-UDPConsolePasswordFile myPasswordFile -UDPConsoleDomainName myDo-mainName -nodeName myNodeName -UDPConsoleUserName myAdmin -backupJobType 'incremental' -jobDescription 'PowerCLIJob' –waitJobFinish 'true' -timeout 600 -agentBasedJob 'true'
670 Arcserve UDP Agent for Windows User Guide

Using the PowerShell Interface
Description
The command submits the backup job and sets the timeout in seconds to waitfor the job to complete.
Chapter 5: Using Arcserve UDP Agent (Windows) 671
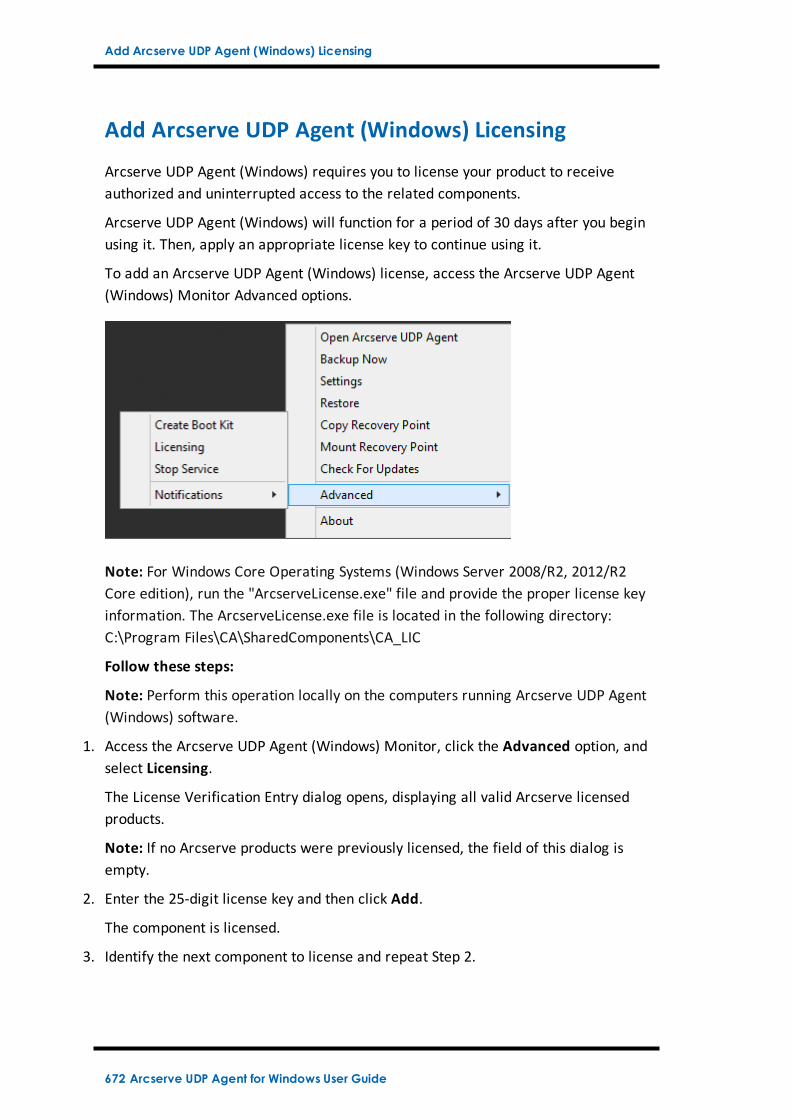
Add Arcserve UDP Agent (Windows) Licensing
Add Arcserve UDP Agent (Windows) Licensing
Arcserve UDP Agent (Windows) requires you to license your product to receiveauthorized and uninterrupted access to the related components.
Arcserve UDP Agent (Windows) will function for a period of 30 days after you beginusing it. Then, apply an appropriate license key to continue using it.
To add an Arcserve UDP Agent (Windows) license, access the Arcserve UDP Agent(Windows) Monitor Advanced options.
Note: For Windows Core Operating Systems (Windows Server 2008/R2, 2012/R2Core edition), run the "ArcserveLicense.exe" file and provide the proper license keyinformation. The ArcserveLicense.exe file is located in the following directory:C:\Program Files\CA\SharedComponents\CA_LIC
Follow these steps:
Note: Perform this operation locally on the computers running Arcserve UDP Agent(Windows) software.
1. Access the Arcserve UDP Agent (Windows) Monitor, click the Advanced option, andselect Licensing.
The License Verification Entry dialog opens, displaying all valid Arcserve licensedproducts.
Note: If no Arcserve products were previously licensed, the field of this dialog isempty.
2. Enter the 25-digit license key and then click Add.
The component is licensed.
3. Identify the next component to license and repeat Step 2.
672 Arcserve UDP Agent for Windows User Guide

Add Arcserve UDP Agent (Windows) Licensing
4. Click OK to accept the key after all components are defined as a licensed product.
All components you specified are licensed.
The license key information is stored in the Arcserve.olf file on each of the com-puters that are running your Arcserve software.
Chapter 5: Using Arcserve UDP Agent (Windows) 673

Change Server Communication Protocol
Change Server Communication Protocol
By default, Arcserve UDP Agent (Windows) uses the Hypertext Transfer ProtocolSecure (HTTPS) for communication among all of its components. In addition, if youdo not need this extra level of security, you can easily change the protocol beingused back to HTTP.
Note: After you change the protocol from HTTP to HTTPS or from HTTPS to HTTP,restart the browser and reconnect to Arcserve UDP Agent (Windows).
Follow these steps:
1. To change the protocol from HTTP to HTTPS, launch the changeToHttps.bat utilitytool from the following default location:
C:\Program Files\Arcserve\Unified Data Protection\Engine\BIN
Note: The location of the BIN folder can vary depending upon your Arcserve UDPAgent (Windows) installation path.
When the protocol has been successfully changed, the following message displays:
"Protocol has been changed to HTTPS. Use https://localhost:8014 to access ArcserveUDP Agent (Windows) system."
Note:When the protocol is changed to HTTPS, a warning displays in the webbrowser due to a self-signed security certificate. The message asks you to either:
Ignore the warning and proceed. or
Add that certificate to the browser to prevent that warning from coming back inthe future.
2. To change the protocol from HTTPS to HTTP, launch the changeToHttp.bat utilitytool from the following default location:
C:\Program Files\Arcserve\Unified Data Protection\Engine\BIN
Note: The location of the BIN folder can vary depending upon your Arcserve UDPAgent (Windows) installation path.
When the protocol has been successfully changed, the following message displays:
"Protocol has been changed to HTTP. Use http://localhost:8014 to access ArcserveUDP Agent (Windows) system."
Use Scripts to Backup and Restore MySQL Database
The following scripts are available to perform backup of the MySQL database.When running the scripts, you do not have to stop your database to perform abackup.
674 Arcserve UDP Agent for Windows User Guide

Use Scripts to Backup and Restore MySQL Database
Arcserve_MySql_PreBackup_script.bat: This script closes all open tables,and it locks all the tables for all the databases with a global read lock.
Arcserve_MySql_PostSnapshot_script.bat: This script releases all the locks.
Arcserve-MySQl-pre-post-snapshot-conf.bat: This script helps to capturedatabase details -hostname, DB username, DB password, Port.
To use the scripts, follow these steps:
1. Extract UDP-MySQL-Windows-scripts.zip provides seven files.
2. Place all the files in BIN folder of the agent installation folder. The defaultagent installation location is C:\Program Files\Arcserve\Unified Data Pro-tection\Engine\.
3. Provide MySQL database details (hostname, DB username, DB password,Port) under Arcserve-MySQl-pre-post-snapshot-conf.bat
4. Configure agent-based plan from UDP Console and select the MySQL node assource.
5. Check the Activity log for pre and post script execution status. The Arc-serveMySQLPrepost.log and ArcserveMySQLReadLock.log files are availablein C:\Program Files\Arcserve\Unified Data Protection\Engine\Logs.
Chapter 5: Using Arcserve UDP Agent (Windows) 675
Use Scripts to Backup and Restore PostgreSQL Database
Restore MySQL Database
1. Stop MySQL Service.
2. To restore to the original location, do the following:
c. Delete files and directories from the current MySQL\data\ folder.
d. Restore database folder from recovery point to MySQL\data\ folder.
5. Start MySQL Service.
Note: The steps provided here help to restore the entire MySQL server data,not just the single database.
Modify Arcserve-MySQl-pre-post-snapshot-conf.bat
Edit the following two configurable parameters, which are available in the Arc-serve-MySQl-pre-post-snapshot-conf.bat file.
set AMSQLREADLOCKTIMEOUT=25 // time-out parameter in minute foracquiring the read lock on MySQL database server
set AMSQLREADLOCKRETRY=3 // Retry count to acquire Read Lock <in pre-script> and Remove the Read lock <in pos-script>
Note: If read-lock is not successful in “AMSQLREADLOCKTIMEOUT” minutes, thebackup fails.
Use Scripts to Backup and Restore PostgreSQL Data-base
The following scripts are available to perform backup of the PostgreSQL database.When running the scripts, you do not have to stop your database to perform abackup.
postgresql_pre_script.bat: This script puts the database into backup mode.
postgresql_post_snapshot_script.bat: This script removes the database frombackup mode.
postgresql_pre_post_conf.bat: This is a configuration file where PostgreSQLvariables might need to be updated.
Prerequisites
Before you begin the backup, make sure to do the following:
676 Arcserve UDP Agent for Windows User Guide

Use Scripts to Backup and Restore PostgreSQL Database
WAL level is set to archive (or hot_standby)
archive_mode is set to on
archive_command has to be set to specify the archive location
Note: To apply the settings, reboot the server after configuring these settings in thepostgresql.conf file.
The following commands help to check the status of the archive mode after reboot:
show archive_mode
show archive_command
showWAL level
Apply Scripts
Follow these steps:
1. Extract the PostgreSQL_UDP_Windows_Scripts.zip, which contains the fol-lowing three files: postgresql_pre_script.bat, postgresql_post_snapshot_script.bat, postgresql_pre_post_conf.bat.
2. Create a folder on a node where PostgreSQL database is running, forexample: C:\PostgresBKP, and then copy all three files.
3. Make sure to check the postgresql_pre_post_conf.bat for all values setagainst the variables and make modifications for any required changes asper your environment.
4. Configure the plan from UDP Console and select the PostgreSQL node assource.
5. Confirm the backup status. To know the status of PostgreSQL backup, checkfor the postgresql_pre_post_backup.txt file, which gets created under the dir-ectory ‘C:\Program Files\Arcserve\Unified Data Protection\Engine\Logs’.
Chapter 5: Using Arcserve UDP Agent (Windows) 677

Use Scripts to Backup and Restore PostgreSQL Database
Restore PostgreSQL Database
1. Stop the database server.
2. To restore to the original location, do the following:
a. Delete files and directories from the current /data folder.
b. Perform a restore of entire /data folder.
3. Delete the files from the following folders after completion of restore from/data folder:
pg_dynshmem/
pg_notify/
pg_serial/
pg_snapshots/
pg_stat_tmp/
pg_subtrans/
pg_internal.init
4. Go to the folder, which is configured for WAL Archiving, and do the following:
a. Delete the files present in the restored pg_wal directory which con-tains the information related to transactions performed during thebackup.
b. Now, copy files from the user defined archived location to the pg_walfolder, for data consistency and point-intime recovery.
5. Start the Database server.
Restore to Alternate location on the Same Server:
Follow these steps:
1. Stop the database server.
2. Run PGDATA configuring it to the” new_data_directory_path”.
3. Initialize the newly created DB using `Initdb` cmd.
4. Delete files and directories from the current /data folder.
5. Perform a restore of entire /data folder.
6. Delete the files from the following folders after completion of restore from/data folder:
678 Arcserve UDP Agent for Windows User Guide

Use Scripts to Backup and Restore PostgreSQL Database
pg_dynshmem/
pg_notify/
pg_serial/
pg_snapshots/
pg_stat_tmp/
pg_subtrans/
pg_internal.init
7. Go to the folder, which is configured for WAL Archiving, and do the following:
a. Delete the files present in the restored pg_wal directory, which con-tains the information related to transactions performed during thebackup.
b. Now, copy files from the user defined archived location to the pg_walfolder, for data consistency and point-intime recovery.
8. Start the Database server.
Note:Make sure that the database startup is performed in the session wherethe PGDATA gets updated.
Sample postgresql_pre_post_conf.batPG_BIN_PATH=C:\"Program Files"\PostgreSQL\12\bin\PG_DATA_DIR=C:\"Program Files"\PostgreSQL\12\data\PG_USERNAME=postgresPGPASSWORD=postgresSet PG_PORT=5432
Chapter 5: Using Arcserve UDP Agent (Windows) 679


Chapter 6: Troubleshooting Arcserve UDP Agent (Win-dows)This section contains the following topics:
Troubleshooting Overview 682
Arcserve UDP Agent Service could not be started because of port conflict 683
Reboot Not Required After Agent Deployment 686
Unable to Connect to Cloud 687
Unable to Change Destination to Removable Device 688
Unable to display Arcserve UDP Agent (Windows) UI in Firefox 690
Settings Disabled when Opening Agent UI 691
Unable to Open the SQL database in SQL Management Studio from MountedVolume 692
Recovery of SQL Server Databases to Original Location fails 693
Login Link Does not Work at Arcserve UDP Agent Home 694
Troubleshooting Installation Issues 695
Troubleshooting Update Issues 702
Troubleshooting Uninstall Issues 706
Troubleshooting User Interface Issues 709
Troubleshooting Backup Issues 712
Troubleshooting BMR Issues 719
Troubleshooting Merge Issues 726
Troubleshooting Exchange Issues 730
Chapter 6: Troubleshooting Arcserve UDP Agent (Windows) 681

Troubleshooting Overview
Troubleshooting Overview
When a problem is detected, Arcserve UDP Agent (Windows) generates a messageto help you identify and resolve the problem. These messages are contained in theArcserve UDP Agent (Windows) Activity Log, which is accessed from the View Logsoption on the home page UI. In addition, when an incorrect action is attempted, Arc-serve UDP Agent (Windows) generally displays a pop-up message to help youidentify and quickly resolve the problem.
682 Arcserve UDP Agent for Windows User Guide

Arcserve UDP Agent Service could not be started because of port conflict
Arcserve UDP Agent Service could not be startedbecause of port conflict
The port that Arcserve UDP Agent (Windows) uses can conflict with the default portthat Tomcat uses. This conflict causes Tomcat to fail when Arcserve UDP Agent(Windows) is started before it. To remedy this problem, you can change the Tomcatdefault port as follows:
1. Access the Arcserve UDP Agent (Windows) Monitor, click the Advanced option, andselect Stop Service.
The Arcserve UDP Agent Service is stopped.
2. Access the Tomcat server.xml file to edit/configure the behavior of Tomcat.
The Tomcat server.xml file is located in the following folder structure:
C:\Program Files\Arcserve\Unified Data Protection\Engine\TOMCAT\con
Chapter 6: Troubleshooting Arcserve UDP Agent (Windows) 683

Arcserve UDP Agent Service could not be started because of port conflict
3. Locate the <Server> tag inside the server.xml file.
4. Edit the <Server> tag as follows:
From:
<Server port="18005" shutdown="SHUTDOWN">
To:
<Server port="18006" shutdown="SHUTDOWN">
684 Arcserve UDP Agent for Windows User Guide

Arcserve UDP Agent Service could not be started because of port conflict
5. Save and close the server.xml file.
The command to shut down Tomcat has now been configured so that it must bereceived by the server on the named port (8015).
6. Access the Arcserve UDP Agent (Windows) Monitor, click the Advanced option, andselect Start Service.
The Arcserve UDP Agent Service is started.
If the problem persists, use Live Chat to contact Arcserve support. Live Chat lets youoptimize intelligent conversation between you and the Technical Support team,allowing you to address your concerns and questions immediately, while still main-taining access to the product.
Chapter 6: Troubleshooting Arcserve UDP Agent (Windows) 685

Reboot Not Required After Agent Deployment
Reboot Not Required After Agent Deployment
Symptom
After deployment, the deploy Agent on Windows 2008 x86 platform displays the fol-lowing message:
Deployment completed successfully but requires a reboot.
Solution
You do not need to reboot. You need to manually start agent web services forbackup to work. Reboot is required only to restore data directly into the system.Without reboot, you can use alternative system to restore data.
Note: Valid only for systems that have “UMDF/KMDF” versions lower than 1.9. Forexample, Server 2008 and lower.
686 Arcserve UDP Agent for Windows User Guide

Unable to Connect to Cloud
Unable to Connect to Cloud
If you are attempting to file copy to cloud, but cannot connect your machine to thecloud server, perform the following troubleshooting procedure:
1. From the File Copy Settings Destination dialog, click the Configure button to displaythe Cloud Configuration dialog and verify the following are correct:
Proxy credentials (Username and password)
Proxy Server IP address and corresponding port number
Access key and Secret key for access to the specified proxy server
Vendor URL address for the specified cloud provider
2. To eliminate any potential clock skew error, verify that your machine has the cor-rect time zone set and the clock is in sync with the global time.
3. Resubmit the file copy job.
If the problem persists, use Live Chat to contact Arcserve support. Live Chat lets youoptimize intelligent conversation between you and the Technical Support team,allowing you to address your concerns and questions immediately, while still main-taining access to the product.
Chapter 6: Troubleshooting Arcserve UDP Agent (Windows) 687
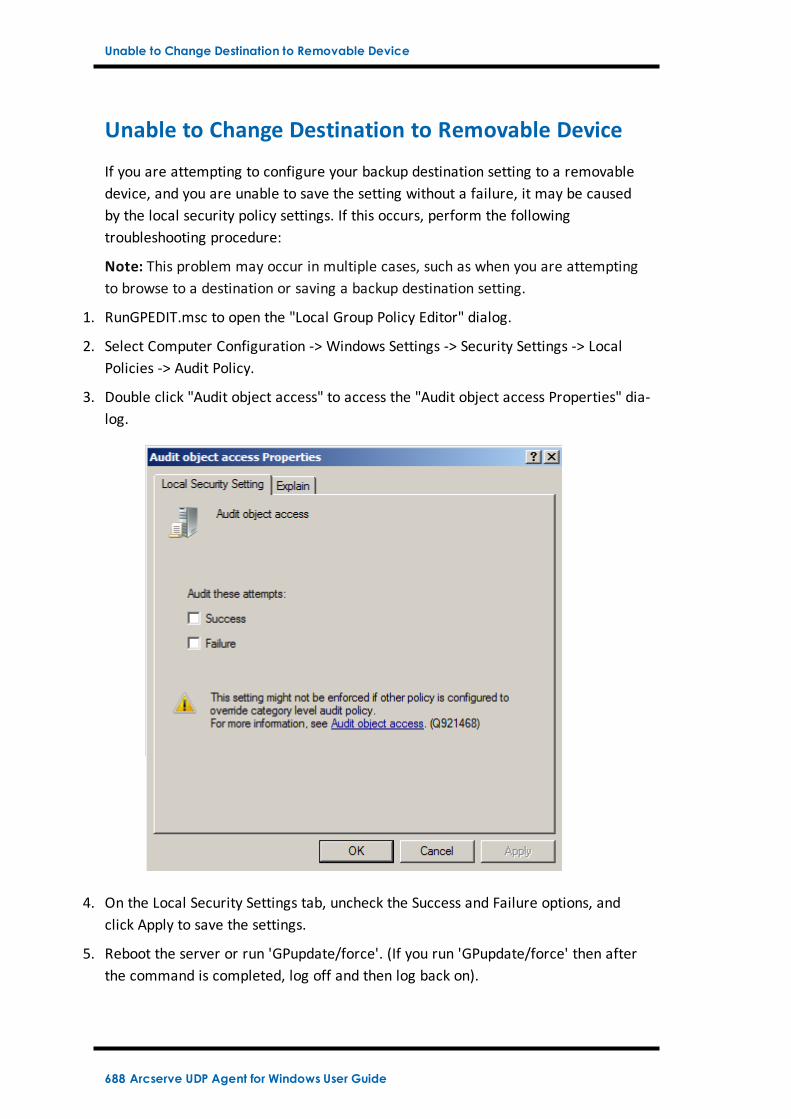
Unable to Change Destination to Removable Device
Unable to Change Destination to Removable Device
If you are attempting to configure your backup destination setting to a removabledevice, and you are unable to save the setting without a failure, it may be causedby the local security policy settings. If this occurs, perform the followingtroubleshooting procedure:
Note: This problem may occur in multiple cases, such as when you are attemptingto browse to a destination or saving a backup destination setting.
1. RunGPEDIT.msc to open the "Local Group Policy Editor" dialog.
2. Select Computer Configuration -> Windows Settings -> Security Settings -> LocalPolicies -> Audit Policy.
3. Double click "Audit object access" to access the "Audit object access Properties" dia-log.
4. On the Local Security Settings tab, uncheck the Success and Failure options, andclick Apply to save the settings.
5. Reboot the server or run 'GPupdate/force'. (If you run 'GPupdate/force' then afterthe command is completed, log off and then log back on).
688 Arcserve UDP Agent for Windows User Guide
Unable to Change Destination to Removable Device
6. If the trouble continues, the computer is most likely a part of a domain. You willneed to find out which group policy has the setting enabled by running the fol-lowing in an administrative command-prompt:
gpresult /H C:\gpresult.html
7. Open the file C:\gpresult.html and navigate to the following section:
Computer Details -> Settings -> Policies -> Windows Settings -> Security Settings ->Local Policies\Audit Policy -> Audit Object Access.
Note: For Windows 7 operating systems, the location of Audit object access in thefile C:\gpresult.html varies slightly by replacing "Computer Details -> Settings" with"Computer Configuration" in the navigation path.
8. The group policy is located under the "Winning GPO" column. Edit that grouppolicy, and then reboot the server.
If the problem persists, use Live Chat to contact Arcserve support. Live Chat lets youoptimize intelligent conversation between you and the Technical Support team,allowing you to address your concerns and questions immediately, while still main-taining access to the product.
Chapter 6: Troubleshooting Arcserve UDP Agent (Windows) 689

Unable to display Arcserve UDP Agent (Windows) UI in Firefox
Unable to display Arcserve UDP Agent (Windows) UIin Firefox
If you are using Firefox to connect to the local Arcserve UDP Agent (Windows)server, where the browser and Arcserve UDP Agent (Windows) are both on thesame machine, certain proxy settings may cause the Arcserve UDP Agent (Win-dows) UI not to be displayed.
If this condition occurs, connect to the loopback address 127.0.0.1 or use the host-name in Firefox instead of using localhost.
If the problem persists, use Live Chat to contact Arcserve support. Live Chat lets youoptimize intelligent conversation between you and the Technical Support team,allowing you to address your concerns and questions immediately, while still main-taining access to the product.
690 Arcserve UDP Agent for Windows User Guide

Settings Disabled when Opening Agent UI
Settings Disabled when Opening Agent UI
If Arcserve UDP Agent (Windows) nodes are not removed from the Arcserve UDP UIbefore uninstalling the Arcserve UDP console, the settings will be disabled whenopening the agent UI on those Arcserve UDP Agent (Windows) nodes.
Symptom
The Arcserve UDP Agent (Windows) node is not notified that the Arcserve UDP Con-sole is uninstalled. It assumes it is managed.
Solution
Remove the files "RegConfigPM.xml" and "BackupConfiguration.xml" under"<UDP_ENGINE_HOME>\Configuration" directory on the Arcserve UDP Agent (Win-dows) node, and then restart the Windows service "Arcserve UDP Agent Service".
If the problem persists, use Live Chat to contact Arcserve support. Live Chat lets youoptimize intelligent conversation between you and the Technical Support team,allowing you to address your concerns and questions immediately, while still main-taining access to the product.
Chapter 6: Troubleshooting Arcserve UDP Agent (Windows) 691

Unable to Open the SQL database in SQL Management Studio fromMounted Volume
Unable to Open the SQL database in SQL Man-agement Studio from Mounted Volume
Symptom
Unable to Open the SQL database in SQL Management Studio from mountedvolume.
Solution
If the database could not be attached in SQL Management Studio, use the followingregistry to make the mounted volume writable, then dismount and mount thevolume, and attach the database again.
Registry:
Forcewritable "=dword:00000001
under
[…\Engine\AFStorHBAmgmt]
692 Arcserve UDP Agent for Windows User Guide

Recovery of SQL Server Databases to Original Location fails
Recovery of SQL Server Databases to Original Locationfails
Symptom
Recovery of SQL Server databases to original location fails with error "sqlwriter isin bad status".
When recovering database to original location it is expected to have the originalSQL Server instance service up and running.
Solution
Start the SQL Server instance service and try the restore job again.
Chapter 6: Troubleshooting Arcserve UDP Agent (Windows) 693
Login Link Does not Work at Arcserve UDP Agent Home
Login Link Does not Work at Arcserve UDP AgentHome
Agent login fails while using the Microsoft Edge browser.
Symptom
When logging in from the Arcserve UDP Agent home page, the link Loginwith current Windows Credentials does not work.
Solution
The feature is not supported at Microsoft Edge. Switch to other browser. Onother browsers, when you face the problem, use the following workaround:
For Internet Explorer or Chrome, verify if the URL is added into theLocal Intranet list. To add URL, navigate to "Internet Options > Security> Local Intranet > Sites > Advanced settings.
For Firefox, modify configuration to enable IWA.
For details, click the link.
Agent login fails with Http error code 500.
Symptom
When logging in from the Arcserve UDP Agent home page, the link Loginwith current Windows Credentials does not work.
Solution
Follow these steps:
1. Open the file from the location: C:\Program Files\Arcserve\Unified Data Pro-tection\Common\JRE\lib\net.properties.
2. Replace the folder C:\Program Files\ to your installation location.
3. Modify the entry to the following one:
jdk.http.ntlm.transparentAuth=allHosts
4. Restart the Arcserve UDP Agent service to login again.
694 Arcserve UDP Agent for Windows User Guide

Troubleshooting Installation Issues
Troubleshooting Installation Issues
When a problem is detected, Arcserve UDP Agent (Windows) generates a messageto help you identify and resolve the problem. These messages are contained in theArcserve UDP Agent (Windows) Activity Log, which is accessed from the View Logsoption on the home page UI. In addition, when an incorrect action is attempted, Arc-serve UDP Agent (Windows) generally displays a pop-up message to help youidentify and quickly resolve the problem.
Chapter 6: Troubleshooting Arcserve UDP Agent (Windows) 695

Troubleshooting Installation Issues
Unable to install/uninstall Arcserve UDP Agent (Win-dows) if a previous attempt was interrupted
If during an attempt to install or uninstall Arcserve UDP Agent (Windows), theinstall/uninstall process was interrupted, you may not be able to successfully con-tinue and complete the process.
For example, any of the following conditions could cause a partial install/uninstallstate:
Your computer is shut down in middle of install/uninstall process.
You encounter a power outage during install/uninstall and there is no Unin-terruptible Power Supply (UPS).
To resolve this problem, perform the following steps:
1. Enter "regedit" in the Run dialog and click OK to open Registry Editor.
2. Locate and delete the following entry:
"HKEY_LOCAL_MACHINE\SOFTWARE\Arcserve\Unified Data Protection\Engine"
3. Use the search option in the Registry Editor to locate and delete all occurrences ofthe following string:
[Arcserve UDP Agent (Windows) for x86]: CAAD8AEA-A455-4A9F-9B48-C3838976646A
[Arcserve UDP Agent (Windows) for x64]: CAAD1E08-FC33-462F-B5F8-DE9B765F2C1E
4. Use the search option in the Registry Editor to locate and delete all occurrences ofthe string “Arcserve UDP Agent ”under the following key:
HKEY_CLASSES_ROOT\Installer\ProductsHKEY_LOCAL_MACHINE\SOFTWARE\Classes\Installer\ProductsHKEY_LOCAL_MACHINE\SOFTWARE\Mi-crosoft\Windows\CurrentVersion\Installer\UserData\S-1-5-18\ProductsHKEY_LOCAL_MACHINE\SOFTWARE\Microsoft\Windows\CurrentVersion\Uninstall
5. From the command line, delete the service by entering the following commands:
sc delete ShProvd
sc delete CASAD2DWebSvc
6. Run the command line to remove additional setup files.
x86 operating system:
696 Arcserve UDP Agent for Windows User Guide

Troubleshooting Installation Issues
"%ProgramFiles%\Arcserve\SharedComponents\Arcserve Unified Data Pro-tection\Setup\uninstall.exe" /q
x64 operating system:
"%ProgramFiles(x86)%\Arcserve\SharedComponents\Arcserve Unified Data Pro-tection\Setup\uninstall.exe" /q
If the problem persists, use Live Chat to contact Arcserve support. Live Chat lets youoptimize intelligent conversation between you and the Technical Support team,allowing you to address your concerns and questions immediately, while still main-taining access to the product.
Chapter 6: Troubleshooting Arcserve UDP Agent (Windows) 697

Troubleshooting Installation Issues
Windows failed to start after Arcserve UDP Agent(Windows) is installed
If Windows failed to start with the following error after Arcserve UDP Agent (Win-dows) has recently been installed, it can be caused by a Windows internal failure.
File: ARCFlashVolDrv.sys
Status: 0xc0000098
Info: Windows failed to load because a required file is missing, or corrupt.
The probable causes for this problem are:
User temporary folder is not writable
Insufficient privilege
Windows update database corrupted
Important! This procedure contains information about modifying the registry.Before you modify the registry, make sure to create a backup of the registry andensure that you understand how to restore the registry if a problem occurs. Formore information about how to back up, restore, and edit the registry, see the rel-evant Microsoft Knowledge Base articles.
To resolve this problem, perform the following steps to uninstall the driver:
1. Use the Create Boot Kit for Bare Metal Recovery utility to create the BMR ISOimage if you do not already have it. For more information, see How to Create aBoot Kit in the online help.
2. Click Run from the Utilities menu.
3. Enter "regedit" in the Run dialog and click OK to open Registry Editor.
4. Select HKEY_LOCAL_MACHINE and click "Load Hive..." from the File menu in theRegistry Editor.
5. Locate SYSTEM file under the %systemroot%\system32\config directory on your sys-tem and click open.
6. Enter a name for the hive to be loaded.
7. From the Registry Editor, check the "Current" entry under "HKEY_LOCAL_MACHINE\SYSTEM\Select".
698 Arcserve UDP Agent for Windows User Guide
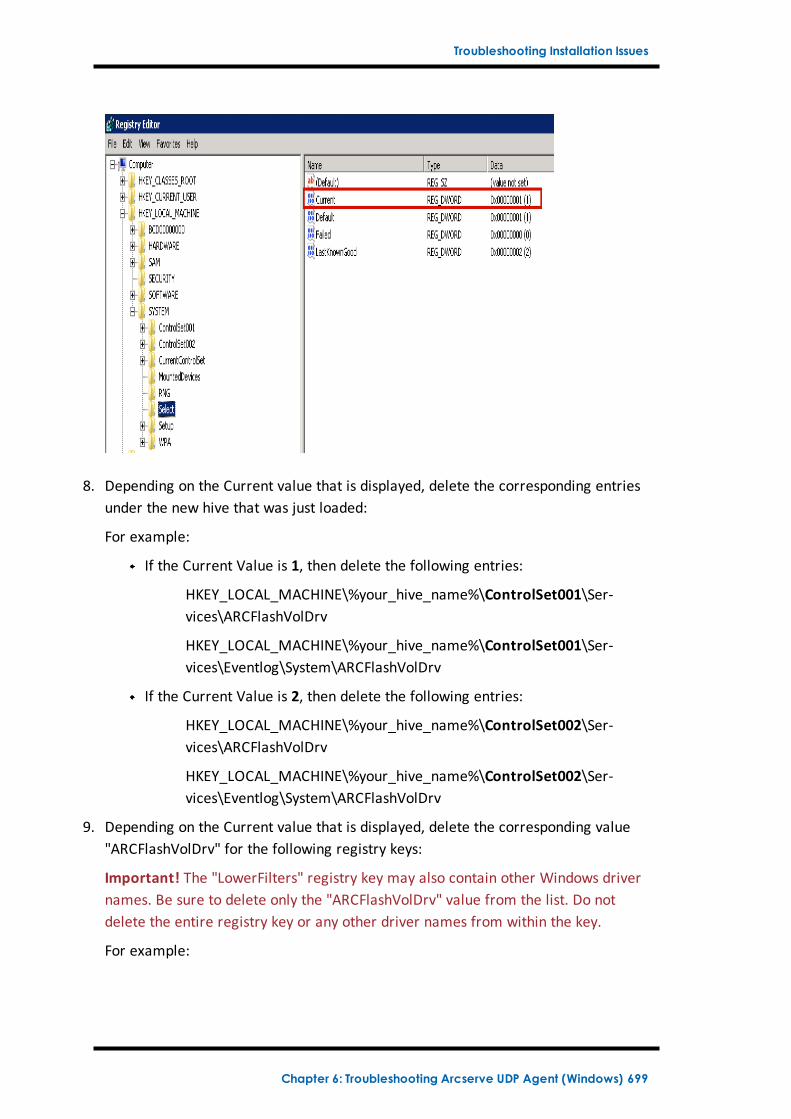
Troubleshooting Installation Issues
8. Depending on the Current value that is displayed, delete the corresponding entriesunder the new hive that was just loaded:
For example:
If the Current Value is 1, then delete the following entries:
HKEY_LOCAL_MACHINE\%your_hive_name%\ControlSet001\Ser-vices\ARCFlashVolDrv
HKEY_LOCAL_MACHINE\%your_hive_name%\ControlSet001\Ser-vices\Eventlog\System\ARCFlashVolDrv
If the Current Value is 2, then delete the following entries:
HKEY_LOCAL_MACHINE\%your_hive_name%\ControlSet002\Ser-vices\ARCFlashVolDrv
HKEY_LOCAL_MACHINE\%your_hive_name%\ControlSet002\Ser-vices\Eventlog\System\ARCFlashVolDrv
9. Depending on the Current value that is displayed, delete the corresponding value"ARCFlashVolDrv" for the following registry keys:
Important! The "LowerFilters" registry key may also contain other Windows drivernames. Be sure to delete only the "ARCFlashVolDrv" value from the list. Do notdelete the entire registry key or any other driver names from within the key.
For example:
Chapter 6: Troubleshooting Arcserve UDP Agent (Windows) 699

Troubleshooting Installation Issues
If the Current Value is 1, then delete the following entries:
HKEY_LOCAL_MACHINE\%your_hive_name%\ControlSet001\Con-trol\Class\533C5B84-EC70-11D2-9505-00C04F79DEAF\LowerFilters
HKEY_LOCAL_MACHINE\%your_hive_name%\ControlSet001\Con-trol\Class\71A27CDD-812A-11D0-BEC7-08002BE2092F\LowerFilters
If the Current Value is 2, then delete the following entries:
HKEY_LOCAL_MACHINE\%your_hive_name%\ControlSet002\Con-trol\Class\533C5B84-EC70-11D2-9505-00C04F79DEAF\LowerFilters
HKEY_LOCAL_MACHINE\%your_hive_name%\ControlSet002\Con-trol\Class\71A27CDD-812A-11D0-BEC7-08002BE2092F\LowerFilters
10. Click "Unload Hive..." from the File menu in the Registry Editor.
11. Perform the following troubleshooting steps:
a. Verify that the user account has administrator privileges on this machine.
b. Verify that the user account has write permissions on the following temp folders:
%windir%/temp
%temp%
c. For Microsoft Windows Vista and Microsoft Windows 2008 and later, download andrun the Microsoft System Update Readiness Tool. This tool helps to fix any incon-sistencies or corruption in the installed updates and system files.
d. Determine if there are any pending Windows updates or reboots and take thenecessary action. Perform one of the following tasks to showWindows Updaterelated information for the computer:
Click Start, All Programs, Windows Update.
Access Update.
e. If there are problems installing several Windows Updates, then examine why theupdates cannot be installed on this computer before proceeding to the next step.
12. Reinstall the ARCFlashVolDrv driver by running "ARCFlashVolDrvINSTALL.exe –i –output=c:\install.log" after the machine reboot.
ARCFlashVolDrvINSTALL.exe is located on Arcserve UDP Agent_Home\bin\Driver.
Arcserve UDP Agent_Home is located on the Arcserve UDP Agent (Windows)install path.
If the problem persists, use Live Chat to contact Arcserve support. Live Chat lets youoptimize intelligent conversation between you and the Technical Support team,
700 Arcserve UDP Agent for Windows User Guide

Troubleshooting Installation Issues
allowing you to address your concerns and questions immediately, while still main-taining access to the product.
Chapter 6: Troubleshooting Arcserve UDP Agent (Windows) 701
Troubleshooting Update Issues
Troubleshooting Update Issues
When a problem is detected, Arcserve UDP Agent (Windows) generates a messageto help you identify and resolve the problem. These messages are contained in theArcserve UDP Agent (Windows) Activity Log, which is accessed from the View Logsoption on the home page UI. In addition, when an incorrect action is attempted, Arc-serve UDP Agent (Windows) generally displays a pop-up message to help youidentify and quickly resolve the problem.
Unable to Access Arcserve UDP Agent (Windows) After Reboot
Unable to Connect to the Arcserve Download Server to Download Updates
Failed to Download Arcserve UDP Agent (Windows) Updates
702 Arcserve UDP Agent for Windows User Guide

Troubleshooting Update Issues
Unable to Access Arcserve UDP Agent (Windows)After Reboot
If you are not able to access the Arcserve UDP Agent (Windows) UI, perform the fol-lowing troubleshooting procedure:
1. From the Add or Remove Programs dialog, click the Add/Remove Windows Com-ponents option to access the Windows Components Wizard screen and removethe Internet Explorer Enhanced Security Configuration component.
2. Add the host name URL to the Trusted Sites in Internet Explorer.
3. Adjust the security level in Internet Explorer.
If the problem persists, use Live Chat to contact Arcserve support. Live Chat lets youoptimize intelligent conversation between you and the Technical Support team,allowing you to address your concerns and questions immediately, while still main-taining access to the product.
Chapter 6: Troubleshooting Arcserve UDP Agent (Windows) 703

Troubleshooting Update Issues
Unable to Connect to the Arcserve Download Serverto Download Updates
If you are not able to connect to the Arcserve download server to download Arc-serve UDP Agent (Windows) updates, follow these steps:
1. From the Arcserve UDP Agent (Windows) home page, click View Logs, and verifythe error message.
2. Verify that you have a good network connection.
3. Open command line and ping the downloads.arcserve.com server.
Perform one of the following to establish connection with the download server:
From the Arcserve UDP Agent (Windows) home page, select Settings, thenPreferences, and click Updates and Download Server. Click on the proxy set-tings and verify that the default option Use browser proxy settings (for IE andChrome only) is selected.
From the Arcserve UDP Agent (Windows) home page, select Settings, thenPreferences, and click Updates and Download Server. Click on the proxy set-tings and select Configure Proxy Settings and enter the valid proxy servername, port number and credentials and click OK.
4. Click Test Connection to verify that the connection is established.
If the problem persists, use Live Chat to contact Arcserve support. Live Chat lets youoptimize intelligent conversation between you and the Technical Support team,allowing you to address your concerns and questions immediately, while still main-taining access to the product.
704 Arcserve UDP Agent for Windows User Guide

Troubleshooting Update Issues
Failed to Download Arcserve UDP Agent (Windows)Updates
If you are not able to download Arcserve UDP Agent (Windows) updates, followthese steps:
1. From the Arcserve UDP Agent (Windows) home page, click View Logs and read theerror message.
2. Verify that you have a good network connection.
3. Verify that there is enough disk space.
4. From the Arcserve UDP (Windows) installation home path, access the update Logfile ( “<Product Home>\Update Manager\logs\ARCUpdate.log” ).
5. Check the log entries for detailed error messages.
If the problem persists, use Live Chat to contact Arcserve support. Live Chat lets youoptimize intelligent conversation between you and the Technical Support team,allowing you to address your concerns and questions immediately, while still main-taining access to the product.
Chapter 6: Troubleshooting Arcserve UDP Agent (Windows) 705

Troubleshooting Uninstall Issues
Troubleshooting Uninstall Issues
When a problem is detected, Arcserve UDP Agent (Windows) generates a messageto help you identify and resolve the problem. These messages are contained in theArcserve UDP Agent (Windows) Activity Log, which is accessed from the View Logsoption on the home page UI. In addition, when an incorrect action is attempted, Arc-serve UDP Agent (Windows) generally displays a pop-up message to help youidentify and quickly resolve the problem.
706 Arcserve UDP Agent for Windows User Guide
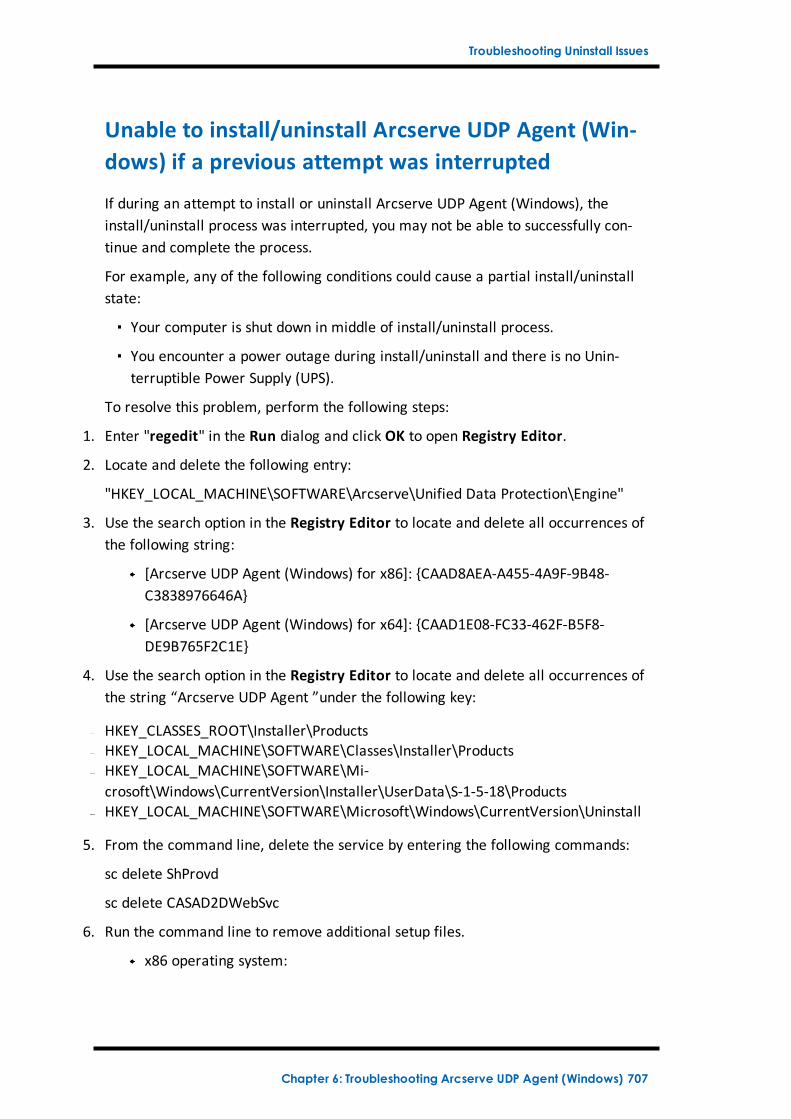
Troubleshooting Uninstall Issues
Unable to install/uninstall Arcserve UDP Agent (Win-dows) if a previous attempt was interrupted
If during an attempt to install or uninstall Arcserve UDP Agent (Windows), theinstall/uninstall process was interrupted, you may not be able to successfully con-tinue and complete the process.
For example, any of the following conditions could cause a partial install/uninstallstate:
Your computer is shut down in middle of install/uninstall process.
You encounter a power outage during install/uninstall and there is no Unin-terruptible Power Supply (UPS).
To resolve this problem, perform the following steps:
1. Enter "regedit" in the Run dialog and click OK to open Registry Editor.
2. Locate and delete the following entry:
"HKEY_LOCAL_MACHINE\SOFTWARE\Arcserve\Unified Data Protection\Engine"
3. Use the search option in the Registry Editor to locate and delete all occurrences ofthe following string:
[Arcserve UDP Agent (Windows) for x86]: CAAD8AEA-A455-4A9F-9B48-C3838976646A
[Arcserve UDP Agent (Windows) for x64]: CAAD1E08-FC33-462F-B5F8-DE9B765F2C1E
4. Use the search option in the Registry Editor to locate and delete all occurrences ofthe string “Arcserve UDP Agent ”under the following key:
HKEY_CLASSES_ROOT\Installer\ProductsHKEY_LOCAL_MACHINE\SOFTWARE\Classes\Installer\ProductsHKEY_LOCAL_MACHINE\SOFTWARE\Mi-crosoft\Windows\CurrentVersion\Installer\UserData\S-1-5-18\ProductsHKEY_LOCAL_MACHINE\SOFTWARE\Microsoft\Windows\CurrentVersion\Uninstall
5. From the command line, delete the service by entering the following commands:
sc delete ShProvd
sc delete CASAD2DWebSvc
6. Run the command line to remove additional setup files.
x86 operating system:
Chapter 6: Troubleshooting Arcserve UDP Agent (Windows) 707

Troubleshooting Uninstall Issues
"%ProgramFiles%\Arcserve\SharedComponents\Arcserve Unified Data Pro-tection\Setup\uninstall.exe" /q
x64 operating system:
"%ProgramFiles(x86)%\Arcserve\SharedComponents\Arcserve Unified Data Pro-tection\Setup\uninstall.exe" /q
If the problem persists, use Live Chat to contact Arcserve support. Live Chat lets youoptimize intelligent conversation between you and the Technical Support team,allowing you to address your concerns and questions immediately, while still main-taining access to the product.
708 Arcserve UDP Agent for Windows User Guide

Troubleshooting User Interface Issues
Troubleshooting User Interface Issues
When a problem is detected, Arcserve UDP Agent (Windows) generates a messageto help you identify and resolve the problem. These messages are contained in theArcserve UDP Agent (Windows) Activity Log, which is accessed from the View Logsoption on the home page. In addition, when an incorrect action is attempted, Arc-serve UDP Agent (Windows) generally displays a pop-up message to help youidentify and quickly resolve the problem.
Unable to display Arcserve UDP Agent (Windows) home page in IE webbrowser
Job Monitor data speed displays a 0 or some other abnormal value
Chapter 6: Troubleshooting Arcserve UDP Agent (Windows) 709

Troubleshooting User Interface Issues
Unable to display Arcserve UDP Agent (Windows)home page in IE
If you are using an Internet Explorer (IE) web browser to access the Arcserve UDPAgent (Windows) home page and it does not display, it may be that the ArcserveUDP Agent (Windows) website is not included as a "Trusted Site" in your IE browser.
If this condition occurs, add this website as a Trusted Site in your IE browser. Formore information about adding a website as a Trusted Site, see Security zones:adding or removing websites.
If the problem persists, use Live Chat to contact Arcserve support. Live Chat lets youoptimize intelligent conversation between you and the Technical Support team,allowing you to address your concerns and questions immediately, while still main-taining access to the product.
710 Arcserve UDP Agent for Windows User Guide

Troubleshooting User Interface Issues
Job Monitor data speed displays a 0 or some otherabnormal value
Symptom
Windows Performance Counters are disabled.
Solution
From the Registry Editor, delete or enable the following registry keys on all Win-dows versions:
Perflib
Path: HKLM\SOFTWARE\Microsoft\Windows NT\CurrentVersion\Perflib
Name: “Disable Performance Counters”
Type: DWORD
Value: Set to 0 to enable performance counter.
Performance
Path: HKLM\SYSTEM\CurrentControlSet\Services\PerfProc\Performance
Name: “Disable Performance Counters”
Type: DWORD
Value: Set to 0 to enable performance counter.
If the problem persists, use Live Chat to contact Arcserve support. Live Chat lets youoptimize intelligent conversation between you and the Technical Support team,allowing you to address your concerns and questions immediately, while still main-taining access to the product.
Chapter 6: Troubleshooting Arcserve UDP Agent (Windows) 711

Troubleshooting Backup Issues
Troubleshooting Backup Issues
When a problem is detected, Arcserve UDP Agent (Windows) generates a messageto help you identify and resolve the problem. These messages are contained in theArcserve UDP Agent (Windows) Activity Log, which is accessed from the View Logsoption on the home page UI. In addition, when an incorrect action is attempted, Arc-serve UDP Agent (Windows) generally displays a pop-up message to help youidentify and quickly resolve the problem.
Note: If you convert a basic disk to a dynamic disk, and then you restart the server.When you perform an Incremental backup, the backup will be as large as a fullbackup for that disk. The reason is, when you change the disk from basic todynamic, Arcserve UDP considers the dynamic disks as a new disk and performs afull backup for the first time. From the next backup, the backup job will be an Incre-mental backup.
SQL Server backup failed due to Out of memory error
Backup sessions for Arcserve UDP Agent (Windows) do not include anyMicrosoft SQL database information
Catalog Job fails when backing up a large number of files because of lessspace
Catalog Job fails when backing up a large number of files on Windows 2003x86 machine
Failed to create snapshot for selected volumes
Unable to change backup destination folder to Arcserve UDP Recovery PointView
712 Arcserve UDP Agent for Windows User Guide
Troubleshooting Backup Issues
SQL Server backup failed due to "out of memory"error
This is caused by a Microsoft known issue: Volume Shadow Copy Service (VSS) can-not create a volume snapshot even when VSS has sufficient memory space.
To resolve this problem, apply the Microsoft patch.
If the problem persists, use Live Chat to contact Arcserve support. Live Chat lets youoptimize intelligent conversation between you and the Technical Support team,allowing you to address your concerns and questions immediately, while still main-taining access to the product.
Chapter 6: Troubleshooting Arcserve UDP Agent (Windows) 713
Troubleshooting Backup Issues
Backup sessions do not include Microsoft SQL data-base information
After upgrading from a previous release, the backup sessions of Arcserve UDPAgent (Windows) do not include any Microsoft SQL database information. This maybe caused by the SQL server not starting automatically in a virtual environment. Ifthis occurs, verify that the SQL database is in a good state and retry the backup.
If the problem persists, you can change the startup type of the SQL server to "Auto-matic (Delayed Start)".
If the problem persists, use Live Chat to contact Arcserve support. Live Chat lets youoptimize intelligent conversation between you and the Technical Support team,allowing you to address your concerns and questions immediately, while still main-taining access to the product.
714 Arcserve UDP Agent for Windows User Guide

Troubleshooting Backup Issues
Catalog Job fails Due to Less Space when Backing upLarge Number of Files
If you are attempting to back up a large number of files and the catalog generationjob fails because there is not enough available space in the Arcserve UDP Agent(Windows) home folder, perform the following task to create a new temp location:
Important! Verify that this new location contains enough free space to hold all ofyour catalog temporary data.
1. Within the Arcserve UDP Agent (Windows) home folder, access the Configurationfolder. (The Arcserve UDP Agent (Windows) home folder is located on the ArcserveUDP Agent (Windows) install path).
Program Files\Arcserve\Unified Data Protection\Engine\Configuration
2. Within the Configuration folder, create a switch.ini file. (File name is case sens-itive).
3. Within the new switch.ini file, add the following content:
[CatalogMgrDll.DLL]
Common.TmpPath4Catalog="I:\catalogtemp"
4. Run the backup job again.
The catalog generation part of the job will now go to the newly created tempfolder.
If the problem persists, use Live Chat to contact Arcserve support. Live Chat lets youoptimize intelligent conversation between you and the Technical Support team,allowing you to address your concerns and questions immediately, while still main-taining access to the product.
Chapter 6: Troubleshooting Arcserve UDP Agent (Windows) 715

Troubleshooting Backup Issues
Failed to create snapshot for selected volumes
If a volume does not have enough disk space, the backup job can fail with the errormessage "Failed to create snapshot for selected volumes". If the backup job fails,you can perform either task:
Free up some disk space on the volumes being backed up.
Reconfigure the Volume Shadow Copy settings to save shadow copy to avolume with sufficient free disk space.
If the problem persists, use Live Chat to contact Arcserve support. Live Chat lets youoptimize intelligent conversation between you and the Technical Support team,allowing you to address your concerns and questions immediately, while still main-taining access to the product.
716 Arcserve UDP Agent for Windows User Guide

Troubleshooting Backup Issues
Unable to change backup destination folder to Arc-serve UDP Recovery Point View
On Windows Vista and later operating systems, if you create an account whichbelongs to a local administrator group, and from this new account you attempt tochange the Arcserve UDP Agent (Windows) backup destination folder to ArcserveUDP Recovery Point View, the folder view cannot be changed and no error messageis displayed. This can happen when the User Account Control is enabled.
If this condition occurs, you can either disable the User Account Control or you cangrant Modify privileges to the created Windows account.
To disable the User Account Control, perform the following task:
1. From the Windows Control Panel, select User Accounts, User Accounts, and thenChange User Account Control Settings.
The User Account Control Settings dialog displays.
2. For the Choose when to be notified about changes to your computer option,drag the slide bar to the bottom (Never notify).
3. When you disable the User Account Control, reboot your computer.
To grant Modify privileges to the created Windows account, perform the fol-lowing task:
Chapter 6: Troubleshooting Arcserve UDP Agent (Windows) 717

Troubleshooting Backup Issues
1. From the Windows Explorer view, navigate to the specified backup destination.
2. Right-click on the backup destination folder, select Properties, and click the Secur-ity tab.
3. Click Edit and Add a user for this destination folder.
The Permissions dialog is displayed.
4. For this user, check the Modify permissions option to allow control specifically tothis user and add it to the folder security list.
If the problem persists, use Live Chat to contact Arcserve support. Live Chat lets youoptimize intelligent conversation between you and the Technical Support team,allowing you to address your concerns and questions immediately, while still main-taining access to the product.
718 Arcserve UDP Agent for Windows User Guide

Troubleshooting BMR Issues
Troubleshooting BMR Issues
When a problem is detected, Arcserve UDP Agent (Windows) generates a messageto help you identify and resolve the problem. These messages are contained in theArcserve UDP Agent (Windows) Activity Log, which is accessed from the View Logsoption on the home page UI. In addition, when an incorrect action is attempted, Arc-serve UDP Agent (Windows) generally displays a pop-up message to help youidentify and quickly resolve the problem.
Chapter 6: Troubleshooting Arcserve UDP Agent (Windows) 719

Troubleshooting BMR Issues
Slow throughput performance during BMR
This problem can be caused by SATA controllers with "AHCI" enabled.
During BMR, Arcserve UDP Agent (Windows) will install drivers for critical unknowndevices. If the device already has a driver installed, Arcserve UDP Agent (Windows)will not update that driver again. For some devices, Windows 7PE may have thedrivers for them, but these drivers may not be the best ones and this can cause theBMR to run too slow.
To remedy this problem, perform one of the following tasks:
Check if the driver pool folder contains the newest disk drivers. If it does, andyou are restoring to the original machine, please install the new driver fromthe driver pool folder. If you are restoring to alternate machine, download thelatest disk drivers from the Internet, and load it before you start data recovery.To load the driver, you can use the "drvload.exe" utility, which is included inWindows PE
Change the device operating mode from "AHCI" (Advanced Host ControllerInterface) to Compatibility mode. (Compatibility mode provides a betterthroughput).
If the problem persists, use Live Chat to contact Arcserve support. Live Chat lets youoptimize intelligent conversation between you and the Technical Support team,allowing you to address your concerns and questions immediately, while still main-taining access to the product.
720 Arcserve UDP Agent for Windows User Guide

Troubleshooting BMR Issues
After BMR, dynamic volumes are not recognized bythe operating system
To keep dynamic disks in a consistent state, the Windows operating system auto-matically synchronizes the Logical Disk Manager (LDM) metadata on each dynamicdisk. So when BMR restores one dynamic disk and brings it online, the LDMmetadata on this disk is automatically updated by the operating system. This mayresult in a dynamic volume not being recognized by the operating system and miss-ing after the reboot.
To remedy this problem, when you perform BMR with multiple dynamic disks, donot perform any pre-BMR disk operations such as cleaning, deleting volume, and soon.
If the problem persists, use Live Chat to contact Arcserve support. Live Chat lets youoptimize intelligent conversation between you and the Technical Support team,allowing you to address your concerns and questions immediately, while still main-taining access to the product.
Chapter 6: Troubleshooting Arcserve UDP Agent (Windows) 721

Troubleshooting BMR Issues
Unable to Reboot Hyper-V VM After BMR
If you performed BMR to a Hyper-V machine consisting of more than one disk con-nected to an Integrated Drive Electronics (IDE) controller and if the server does notreboot, perform the following troubleshooting procedure:
1. Verify that the disk that contains the system volume is the master disk.
The Hyper-V BIOS searches for the system volume on the master disk (disk 1) whichis connected to the master channel. If the system volume is not located on the mas-ter disk, the VM will not reboot.
Note: Verify that the disk that contains the system volume is connected to an IDEcontroller. Hyper-V cannot boot from a SCSI disk.
2. If necessary, modify the Hyper-V settings, to connect the disk that contains the sys-tem volume to the IDE master channel and reboot the VM again.
If the problem persists, use Live Chat to contact Arcserve support. Live Chat lets youoptimize intelligent conversation between you and the Technical Support team,allowing you to address your concerns and questions immediately, while still main-taining access to the product.
722 Arcserve UDP Agent for Windows User Guide

Troubleshooting BMR Issues
Unable to Reboot VMware VM After BMR
If you performed BMR to a VMware machine consisting of more than one disk con-nected to an Integrated Drive Electronics (IDE) controller or a SCSI adapter and theserver does not reboot, perform the following troubleshooting procedure:
1. Verify that the disk that contains the system volume is the master disk.
The VMware BIOS searches for the system volume on the Master disk (disk 0)which is connected the master channel. If the system volume is not on the Masterdisk, the VM does not reboot.
2. If necessary, modify the VMware settings, to connect the disk that contains the sys-tem volume to the IDE master channel and reboot the VM again.
3. If the disk is a SCSI disk, verify the disk which contains boot volume is the first diskwhich connects to the SCSI adapter. If not, assign the boot disk from the VMwareBIOS.
4. Verify the disk which contains boot volume is in the previous eight disks, becausethe VMware BIOS only detect eight disks during the boot. If there are more thanseven disks ahead the disk which contains system volumes connected to the SCSIadapter, the VM cannot boot.
If the problem persists, use Live Chat to contact Arcserve support. Live Chat lets youoptimize intelligent conversation between you and the Technical Support team,allowing you to address your concerns and questions immediately, while still main-taining access to the product.
Chapter 6: Troubleshooting Arcserve UDP Agent (Windows) 723

Troubleshooting BMR Issues
Unable to boot the server after performing a BMR
Symptom
When the source machine is an Active Directory server performing a BMR to aphysical machine with different hardware or to a virtual machine on a hyper-vserver, the server does not boot and a blue screen displays with the following mes-sage:
STOP: c00002e2 Directory Services could not start because of the following error: adevice attached to the system is not functioning. Error status: 0xc0000001.
Solution
Reboot the system to the BMR PE environment, rename all *.log files in the C:\Win-dows\NTDS folder, and restart the system. For example, rename the file edb.log toedb.log.old and restart the system.
If the problem persists, use Live Chat to contact Arcserve support. Live Chat lets youoptimize intelligent conversation between you and the Technical Support team,allowing you to address your concerns and questions immediately, while still main-taining access to the product.
724 Arcserve UDP Agent for Windows User Guide

Troubleshooting BMR Issues
Failed to submit BMR job to Recovery Point Server
Only one BMR job is supported when restoring from same RPS server for the samenode (Agent backup or Host-Based Backup). This is controlled by the job monitor onthe RPS server.
If the machine where the BMR job is running is shut down or rebooted unex-pectedly, the job monitor at the RPS server side will wait 10 minutes and then timeout. During this time you cannot start another BMR for the same node from thesame RPS server.
If you abort the BMR from the BMR UI, this problem does not exist.
If the problem persists, use Live Chat to contact Arcserve support. Live Chat lets youoptimize intelligent conversation between you and the Technical Support team,allowing you to address your concerns and questions immediately, while still main-taining access to the product.
Chapter 6: Troubleshooting Arcserve UDP Agent (Windows) 725
Troubleshooting Merge Issues
Troubleshooting Merge Issues
When a problem is detected, Arcserve UDP Agent (Windows) generates a messageto help you identify and resolve the problem. These messages are contained in theArcserve UDP Agent (Windows) Activity Log, which is accessed from the View Logsoption on the home page UI. In addition, when an incorrect action is attempted, Arc-serve UDP Agent (Windows) generally displays a pop-up message to help youidentify and quickly resolve the problem.
726 Arcserve UDP Agent for Windows User Guide

Troubleshooting Merge Issues
Merge Session is Skipped
If the oldest recovery point is skipped in the merge operation, perform the fol-lowing troubleshooting procedure after you submit a new backup when the spe-cified recovery point count limit is exceeded:
1. Open the Mount Recovery Point dialog to see if you have any recovery points moun-ted. If any recovery points are mounted, dismount them.
2. Open Windows Explorer and switch to the backup destination to see if the session isunder the Arcserve UDP Recovery Point View. If it is, change to the WindowsExplorer View.
3. Verify if any file copy jobs are running.
If the problem persists, use Live Chat to contact Arcserve support. Live Chat lets youoptimize intelligent conversation between you and the Technical Support team,allowing you to address your concerns and questions immediately, while still main-taining access to the product.
Chapter 6: Troubleshooting Arcserve UDP Agent (Windows) 727

Troubleshooting Merge Issues
Merge Job Failed when Configured to Retain Recov-ery Sets
Symptom
Possible network failure or busy network.
Solution
Perform any of the following to fix this problem:
Run a new backup job which will trigger a merge job after the backup is com-pleted.
Access the Backup Settings dialog and save the Retention Setting again.
Restart the Arcserve UDP Agent Service.
If the problem persists, use Live Chat to contact Arcserve support. Live Chat lets youoptimize intelligent conversation between you and the Technical Support team,allowing you to address your concerns and questions immediately, while still main-taining access to the product.
728 Arcserve UDP Agent for Windows User Guide

Troubleshooting Merge Issues
Merge Job Fails After Being Paused by a Restore Job
If a merge job is running and you perform another job at the same time, the mergejob will automatically pause. After the other job is finished, if you attempt toresume the merge job, then the merge job will fail. This may be caused by the ses-sion not being released after the other job is finished, and the unreleased sessioncould not be merged. If a mounted session was not cleanly dismounted, the sessionlock may not disappear and as a result the session will not be released after the jobis finished. If this occurs, run the following command to force a clean session dis-mount:
"%caarcflash_home%\bin\driver\AFMntDrvInstall.exe" -stop
If the problem persists, use Live Chat to contact Arcserve support. Live Chat lets youoptimize intelligent conversation between you and the Technical Support team,allowing you to address your concerns and questions immediately, while still main-taining access to the product.
Chapter 6: Troubleshooting Arcserve UDP Agent (Windows) 729

Troubleshooting Exchange Issues
Troubleshooting Exchange Issues
When a problem is detected, Arcserve UDP Agent (Windows) generates a messageto help you identify and resolve the problem. These messages are contained in theArcserve UDP Agent (Windows) Activity Log, which is accessed from the View Logsoption on the home page UI. In addition, when an incorrect action is attempted, Arc-serve UDP Agent (Windows) generally displays a pop-up message to help youidentify and quickly resolve the problem.
730 Arcserve UDP Agent for Windows User Guide

Troubleshooting Exchange Issues
Fail to Restore Exchange Database in DAG Node toOriginal Location
If you want to restore the Exchange database (DB), including DAG DB or local DB inthe node, in an Exchange DAG environment, ensure that the status of exchange ser-vices with Startup Type as Automatic are running for all the nodes for DAG.
If the problem persists, use Live Chat to contact Arcserve support. Live Chat lets youoptimize intelligent conversation between you and the Technical Support team,allowing you to address your concerns and questions immediately, while still main-taining access to the product.
Chapter 6: Troubleshooting Arcserve UDP Agent (Windows) 731

Troubleshooting Exchange Issues
Restore Job Fails During Dump Exchange Database
Valid on Windows operating system
Symptom
The restore job fails for the following two scenarios:
When you dump Exchange database to file only and the Replay log on data-base option is selected in host-based agentless backup session. Also, theExchange writer is not installed on the proxy server.
You use an agent (Agent A), which does not have the Exchange writer installed,to browse recovery points backed up by another agent (Agent B). You want todump Exchange database to file only and you have selected the Replay log ondatabase option from Agent A.
Solution
To resolve this issue, do not select the Replay log on database option.
732 Arcserve UDP Agent for Windows User Guide
Troubleshooting Exchange Issues
Unable to Connect across the Domain Live Mailboxfrom Exchange GRT utilty
Symptom
In two scenarios, the proxy cannot connect live mailbox in Exchange server and thefollowing error message is displayed:
Could not resolve domain name . Try using server's IP address instead.
When proxy is in Workgoup or does not share the same domain with Exchangeserver then performing HBBU backup and open Exchange GRT utility in proxycannot connect live mailbox in Exchange server even after using the IP address.
Connect live mailbox failed across domain in Exchange GRT utility even afterusing the IP address. The two domains do not have the same windows version.For example, the first one is Windows 2008 and the other one is Windows 2012.
Solution
Add one item in hosts file and save at the following location:
C:\Windows\System32\drivers\etc
For example:
102.54.94.97 DesExchangeServer.domain.com
Chapter 6: Troubleshooting Arcserve UDP Agent (Windows) 733

APPENDIX: Frequently Asked Questions (FAQ)
This section contains the following topics:
File Copy Related FAQ 736
Encryption Related FAQ 749
Exchange Granular Restore FAQ 753
Service Related FAQ 756
Updates Related FAQ 758
APPENDIX: Frequently Asked Questions (FAQ) 735

File Copy Related FAQ
File Copy Related FAQ
The following Frequently Asked Questions are related to the File Copy feature.
736 Arcserve UDP Agent for Windows User Guide

File Copy Related FAQ
Can I restore data if I lose the encryption password?
No. To restore encrypted data that was backed up, you must provide the properencryption password.
APPENDIX: Frequently Asked Questions (FAQ) 737

File Copy Related FAQ
What is the maximum file size that can be backedup/restored?
You do not face any restriction on the file size that can be backed up or restoredusing Arcserve UDP Agent (Windows) (for example large Outlook PST files, CADfiles, video broadcast files).
738 Arcserve UDP Agent for Windows User Guide
File Copy Related FAQ
What is not deleted during a File Copy – DeleteSource job?
Yes. The Arcserve UDP Agent (Windows) will exclude deletion of all system statefiles and application files and folders during a File Copy – Delete Source job. TheArcserve UDP Agent (Windows) only supports Microsoft Exchange and SQL Serverand the list of application files is obtained by querying the VSS writers.
APPENDIX: Frequently Asked Questions (FAQ) 739

File Copy Related FAQ
Does a File Copy job copy data directly from the localsource disks?
A File Copy job will mount the Arcserve UDP Agent (Windows) backup disks and itwill then copy the data. It does not actually read from the local source disks.
740 Arcserve UDP Agent for Windows User Guide

File Copy Related FAQ
What is the maximum file size that can be stored onAmazon S3 cloud?
There is no maximum file size that can be stored on an Amazon S3 cloud location.
APPENDIX: Frequently Asked Questions (FAQ) 741

File Copy Related FAQ
For any file size less than 64K, will Arcserve UDPAgent (Windows) copy the entire file?
Yes, the granularity limit for block-level incremental backups is set for 64K. Theminimum size for a block-level incremental (BLI) backup is 64K.
742 Arcserve UDP Agent for Windows User Guide

File Copy Related FAQ
Can a File Copy job and a Backup run simultaneously?
Yes. The Arcserve UDP Agent (Windows) allows both jobs to run at the same time.
APPENDIX: Frequently Asked Questions (FAQ) 743

File Copy Related FAQ
During a File Copy job, will the stub files be copiedagain?
No. During a File Copy job, Arcserve UDP Agent (Windows) will ignore the stub filesand not copy them again.
744 Arcserve UDP Agent for Windows User Guide

File Copy Related FAQ
Does every File Copy job initiate a VSS snapshot like aregular Arcserve UDP Agent (Windows) Backup job?
No. The VSS snapshot is performed only during a Backup job and not during a FileCopy job.
APPENDIX: Frequently Asked Questions (FAQ) 745

File Copy Related FAQ
Will a File Copy stored on an Amazon S3 cloud loc-ation be open source archive format?
No. A File Copy that is stored on an Amazon S3 cloud location will be proprietaryonly format.
746 Arcserve UDP Agent for Windows User Guide

File Copy Related FAQ
If a File Copy – Delete Source job deletes files, will Ibe able to perform a BMR from the file copy des-tination?
No. You just need to perform a restore from the file copy destination. The files thatare deleted are only deleted from the source, and not from the recovery point. Therecovery points contain the full volume information necessary to perform a com-plete BMR.
APPENDIX: Frequently Asked Questions (FAQ) 747

File Copy Related FAQ
For a File Copy job, is the Delete Source optionenabled by default?
No. This option is selected by you when you add a task or set backup settings.
748 Arcserve UDP Agent for Windows User Guide

Encryption Related FAQ
Encryption Related FAQ
The following Frequently Asked Questions are related to the Encryption feature.
APPENDIX: Frequently Asked Questions (FAQ) 749

Encryption Related FAQ
If I change the encryption type or the encryption pass-word and the maximum number of recovery pointsare then reached, what happens?
The image consolidation during backups will continue as usual for images with theolder password. When the remaining oldest image is the last Full Backup with theold password, that Full Backup will be deleted.
750 Arcserve UDP Agent for Windows User Guide

Encryption Related FAQ
If I enter a new encryption password, will the oldencryption password be asked for first?
No. The Arcserve UDP Agent (Windows) will immediately apply the new passwordand no longer request the old password.
APPENDIX: Frequently Asked Questions (FAQ) 751

Encryption Related FAQ
What happens to data encrypted either using Win-dows or a third-party encryption system?
For Windows Encryption File System (EFS) encryption, Arcserve UDP Agent (Win-dows) will write in encrypted format used in the EFS format.
For third-party-encryption, it depends on the technology. If volume encryptionis enabled or locked, Arcserve UDP Agent (Windows) will not be able to read itand will generate an error.
752 Arcserve UDP Agent for Windows User Guide

Exchange Granular Restore FAQ
Exchange Granular Restore FAQ
The following Frequently Asked Questions are related to the Exchange Granular-Level Restore feature.
APPENDIX: Frequently Asked Questions (FAQ) 753
Exchange Granular Restore FAQ
Can Exchange search attachments in email?
Yes, you can search using keywords of subject, from, to, within date range of send /received time, and find the email attachment as well as the content in the attach-ments.
754 Arcserve UDP Agent for Windows User Guide

Exchange Granular Restore FAQ
Can I restore a mailbox without overwriting the exist-ing data?
Yes, you can restore an entire mailbox and it will not overwrite the existing data inthe mailbox store.
APPENDIX: Frequently Asked Questions (FAQ) 755

Service Related FAQ
Service Related FAQ
The following Frequently Asked Questions are related to the services:
756 Arcserve UDP Agent for Windows User Guide

Service Related FAQ
How do I use a different account to start the ArcserveUDP Agent Service?
If you want to change the account used to start the Arcserve UDP Agent Service,you must create an account belonging to the local administrators group, andensure the Replace a process level token user right is assigned to this account. Formore information, see the Microsoft documentation on how to assign this userright to an account.
APPENDIX: Frequently Asked Questions (FAQ) 757

Updates Related FAQ
Updates Related FAQ
The following Frequently Asked Questions are related to the Updates feature:
758 Arcserve UDP Agent for Windows User Guide

Updates Related FAQ
Can I use scripted information for specifying Updatesproxy settings?
Yes. You can select the "Use Browser Settings" option on the Proxy Settings dialogto inherit the browser proxy settings (accessed from the Updates Preferences).
APPENDIX: Frequently Asked Questions (FAQ) 759
Updates Related FAQ
Can I use a workstation node as an Updates stagingserver?
Yes. Your workstation node can be used as a staging server for downloading Arc-serve UDP Agent (Windows) updates.
760 Arcserve UDP Agent for Windows User Guide

Updates Related FAQ
Can I manage/operate Updates together or do I needto configure each node separately (one by one)?
No. You must configure each node individually for Updates.
APPENDIX: Frequently Asked Questions (FAQ) 761

Updates Related FAQ
Does an Updates staging server need a separate Arc-serve UDP Agent (Windows) license if I am not usingany Arcserve UDP Agent (Windows) functions onsame staging server?
No. If you are not using Arcserve UDP Agent (Windows) for any function other thanjust as an Updates staging server, you do not need to have a separate Arcserve UDPAgent (Windows) license for the staging server.
762 Arcserve UDP Agent for Windows User Guide

Updates Related FAQ
Can I continue to replicate my recovery points backedup in my local RPS server to the remote managed RPSserver, after Upgrade?
Question:
Due to production issues, I have not yet upgraded my Arcserve UDP Console, Recov-ery Point Server installations and Arcserve UDP agents. They are still running Arc-serve UDP Version 5.0 Update 1.
However, I upgraded my remote Recovery Point Server to Update 2 as I could man-age some downtime for this server. Can I continue to replicate my recovery pointsbacked up in my local RPS server to the remote managed RPS server?
Answer:
No. It has been observed with some basic testing that such configurations shouldnot have a problem and you should be able to continue replicating data to theremote managed RPS server running Update 2. However, it is strongly recom-mended that you upgrade all your source nodes running Update 1 to Update 2.
APPENDIX: Frequently Asked Questions (FAQ) 763

Updates Related FAQ
Can I continue to replicate backups from my pro-duction systems running Update 2 to a remotely man-aged RPS server running Update 1, after upgrade?
Question:
I have upgraded all of my source nodes including Arcserve UDP Console, RPS serv-ers and Arcserve UDP agent nodes to Update 2 but my destination RPS node is stillrunning Update 1.
Can I continue to replicate backups from my production systems running Update 2to a remotely managed RPS server running Update 1?
Answer:
No. This configuration is an unsupported one. Update 2 contains several newupdates and enhancements. Given that the destination is still at Update 1, you can-not run replication of recovery points backed up using Update 2 to a server that hasan older update. The Replication will try to connect for 10 minutes and show the“Preparing” status. After 10 minutes the replication will stop, and the cor-responding job log will have an error entry with the following text:
“The specified timeout period expired while communicating with the web serviceon the destination server.”
This is not a network related issue, but an indication of a destination RPS that is notupgraded to Update 2 yet. It is strongly recommended to upgrade the destination toUpdate 2 as well to ensure seamless functioning of the system as all units will nowbe at Update 2 level.
764 Arcserve UDP Agent for Windows User Guide

APPENDIX: Using the RDX Cleaner Utilities
This section contains the following topics:
What are the RDX Cleaner Utilities? 766
How to Execute the RDX Cleaner Utility 767
How to Execute the RDX Force Cleaner Utility 771
APPENDIX: Using the RDX Cleaner Utilities 765

What are the RDX Cleaner Utilities?
What are the RDX Cleaner Utilities?
RDX is a removable hard disk drive storage system, containing a docking station(RDX dock) and storage media (removable disk cartridge). RDX disk technology com-bines the strengths of hard disk drive and tape cartridge data storage, allowing youto back up data like a tape drive, with the instant access of a hard drive. It allowsfor shorter backup windows and quicker restorations. Indirectly, these utilities helpto rotate the RDX media based on the backup schedule, in order to maximize theuse of the RDX media.
The RDX Cleaner utility is a tool that helps to purge or clear the current backupRDX media destination, if it does not contain the latest Full Backup. It reliesupon a verification process which ensures no full backup exists before it clearsthe content.
How to Execute the RDX Cleaner Utility
The RDX Force Cleaner utility is a similar tool that helps purge the currentbackup RDX media destination, but does not rely on any verification processbefore it forcefully clears the content. You should only use the RDX ForceCleaner utility when you need to clean all backup sessions at the destination.This utility will perform a complete cleanup of the destination without checkingfor any existing condition or criteria.
How to Execute the RDX Force Cleaner Utility
Notes: If the RDX Storage device is configured as Backup destination for incre-mental backups, then consider the following points:
If planning to change the RDX cartridges every week, then configure theBackup Settings - >Schedule->Recovery point Retentions as 7.
If planning to change the RDX cartridges every 5 days (excluding Saturdayand Sunday), then configure Backup Settings - >Schedule->Recovery pointRetentions as 5.
If planning to change the RDX cartridge daily, then configure Backup Settings- >Schedule->Recovery point Retentions as 1.
Always keep the Recover Point Retention number more than the cartridgesavailable in the RDX Storage device.
766 Arcserve UDP Agent for Windows User Guide

How to Execute the RDX Cleaner Utility
How to Execute the RDX Cleaner Utility
Before you can use the RDX Cleaner utility, you must download a copy of the utilityfrom the file transfer site.
Follow these steps:
1. Download the appropriate RDX Cleaner utility from the file transfer site:
X64 Platform - RDXCleanerX64.exe
X86 Platform - RDXCleanerX86.exe
2. Copy the appropriate version of the RDX Cleaner utility to your local machine (forexample C:\) or to any location you specify.
3. From the Arcserve UDP Agent (Windows) home page (or Arcserve UDP Agent (Win-dows) Monitor), select Settings from the taskbar and then select the Backup Set-tings tab. When the Backup Settings dialog opens, select Pre/Post Backup.
The Pre/Post Backup Settings dialog opens.
4. In the Actions section, specify your pre/post backup setting options:
a. Select the Run a command before backup is started check box.
b. Enter the path to the location where you downloaded the RDX Cleaner utility in thecommand field. For example:
C:\RDXCleanerX64.exe
C:\RDXCleanerX86.exe
c. Select the On exitcode check box and enter a zero in the On exit code field.
Note: The exit code corresponds to the completion status of the RDX Cleaner com-mand. A zero (0) exit code specifies to run the backup job only when the RDXCleaner utility successfully completes the deletion of the backup destination con-tent.
APPENDIX: Using the RDX Cleaner Utilities 767

How to Execute the RDX Cleaner Utility
d. Select Run Job.
5. Click Save Settings.
Your pre/post backup settings are saved.
Note: For information about running this utility, see Post Cleaning Verification (RDXCleaner).
768 Arcserve UDP Agent for Windows User Guide

How to Execute the RDX Cleaner Utility
Post Cleaning Verification (RDX Cleaner)
When the RDX Cleaner utility runs, verify the following:
It creates a new log folder ClearRDXMediaLogs in the following location:
C:\Program Files\Arcserve\Unified Data Protection\Engine\Logs
Each time the utility runs, a log file is created with the current time stamp, usingthe format: YYYY-MM-DD_HH-MM-SS.txt
It clears all the contents of the backup destination folder, except the followingfiles:
BackupDestination.icoNodeInfoBackupDev.sigdesktop.ini
Before clearing the content of the destination folder, the utility will temporarilymove these files to the following folder:
C:\Program Files\Arcserve\Unified Data Pro-tection\Engine\Logs\ClearRDXMediaLogs
After the backup destination has been cleared, the RDX Cleaner utility thenmoves these files back to the destination folder.
After the RDX Cleaner utility runs, one of the following codes will be returned:
0 - If one of the following occurs:
o If the backup destination has the latest Full Backup, then its con-tents will not be cleared and the backup will be run as submitted.
o If the backup destination does not have the latest Full Backup, thenthe content of this destination will be cleared and if the content isdeleted successfully a "0" is returned. Because all the content inthis destination has been deleted, this backup job will automaticallybe converted to a Full Backup, regardless of which type was sub-mitted.
-1 - Deletion of the backup destination content failed.-2 - Cannot preserve some important files of the backup destination beforeclearing it.-3 - Current backup destination is not accessible.
Note: The exit code corresponds to the completion status of the RDX Cleanercommand. If the exit code is not zero (0), you should check the correspondinglog files in the following folder for more detailed information about the reason
APPENDIX: Using the RDX Cleaner Utilities 769

How to Execute the RDX Cleaner Utility
for the failure of this cleanup attempt:
C:\Program Files\Arcserve\Unified Data Protection\Engine\Logs\ClearRDXMediaLogs
770 Arcserve UDP Agent for Windows User Guide
How to Execute the RDX Force Cleaner Utility
How to Execute the RDX Force Cleaner Utility
Before you can use the RDX Force Cleaner utility, you must download a copy of theutility from the file transfer site.
Follow these steps:
1. Download the appropriate RDX Force Cleaner utility from the file transfer site:
X64 Platform - RDXForceCleanX64.exe
X86 Platform - RDXForceCleanX86.exe
2. Copy the appropriate version of the RDX Force Cleaner utility to your local machine(for example C:\) or to any location you specify.
3. From the Arcserve UDP Agent (Windows) home page (or Arcserve UDP Agent (Win-dows) Monitor), select Settings from the taskbar and then select the Backup Set-tings tab. When the Backup Settings dialog opens, select Pre/Post Backup.
The Pre/Post Backup Settings dialog opens.
4. In the Actions section, specify your pre/post backup setting options:
a. Select the Run a command before backup is started check box.
b. Enter the path to the location where you downloaded the RDX Force Cleaner utilityin the command field. For example:
C:\RDXForceCleanX64.exe
C:\RDXForceCleanX86.exe
c. Select the On exitcode check box and enter a zero in the On exit code field.
Note: The exit code corresponds to the completion status of the RDX Force Cleanercommand. A zero (0) exit code specifies to run the backup job only when the RDXForce Cleaner utility successfully completes the deletion of the backup destinationcontent.
APPENDIX: Using the RDX Cleaner Utilities 771
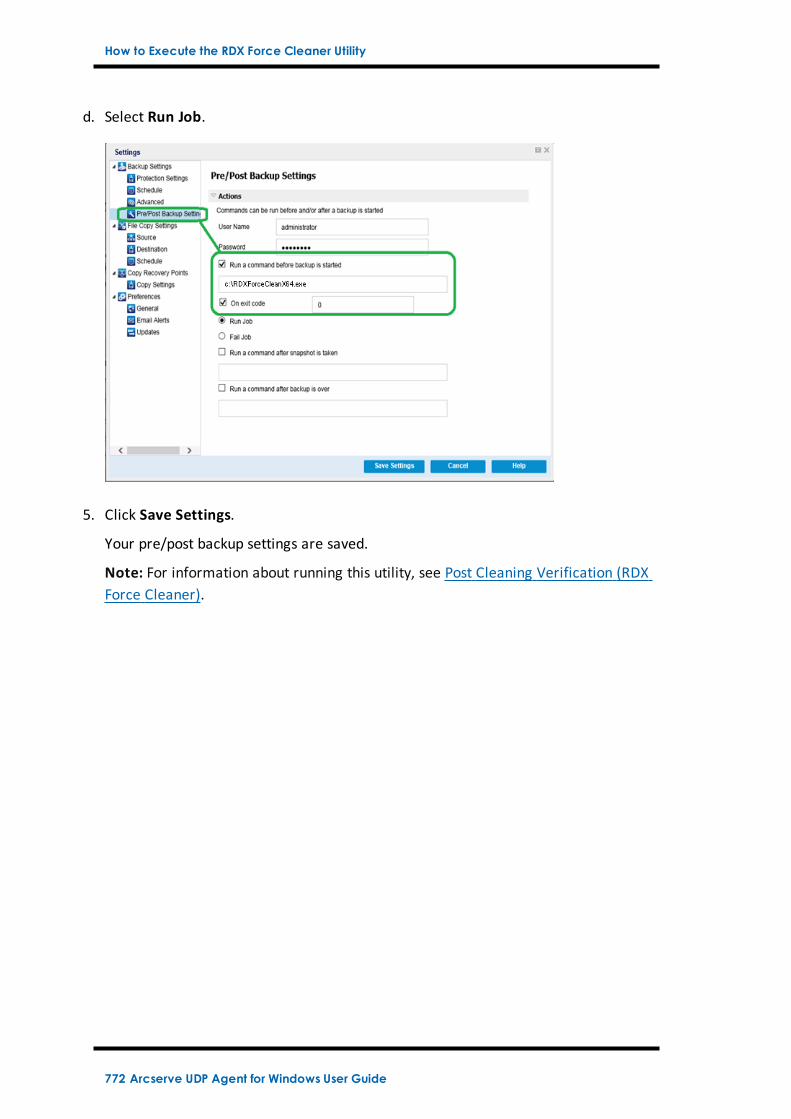
How to Execute the RDX Force Cleaner Utility
d. Select Run Job.
5. Click Save Settings.
Your pre/post backup settings are saved.
Note: For information about running this utility, see Post Cleaning Verification (RDXForce Cleaner).
772 Arcserve UDP Agent for Windows User Guide

How to Execute the RDX Force Cleaner Utility
Post Cleaning Verification (RDX Force Cleaner)
When the RDX Force Cleaner utility runs, verify the following:
It creates a new log folder ClearRDXMediaLogs in the following location:
C:\ProgramFiles\Arcserve\Unified Data Protection\Engine\Logs
Each time the utility runs, a log file is created with the current time stamp, usingthe format: YYYY-MM-DD_HH-MM-SS.txt
It clears all the contents of the backup destination folder, except the followingfiles:
BackupDestination.icoNodeInfoBackupDev.sigdesktop.ini
Before clearing the content of the destination folder, the utility will temporarilymove these files to the following folder:
C:\Program Files\Arcserve\Unified Data Pro-tection\Engine\Logs\ClearRDXMediaLogs
After the backup destination has been cleared, the RDX Force Cleaner utility thenmoves these files back to the destination folder.
After the RDX Force Cleaner utility runs, one of the following codes will bereturned:
0 - Deletion of all backup contents was successful.
-1 - Deletion of the backup destination content failed.
-2 - Cannot preserve some important files of the backup destination beforeclearing it.
-3 - Current backup destination is not accessible.
Note: The exit code corresponds to the completion status of the RDX Force Cleanercommand. If the exit code is not zero (0), you should check the corresponding logfiles in the following folder for more detailed information about the reason for thefailure of this cleanup attempt:
C:\Program Files\Arcserve\Unified Data Protection\Engine\Logs\ClearRDXMediaLogs
APPENDIX: Using the RDX Cleaner Utilities 773


Agent-Based Backup
APPENDIX: Arcserve UDP Terms and Definitions
Agent-Based Backup
An Agent-Based backup is a method to back up data using an agent component. Theagent is installed on the source node.
Compression
Compression is used for backups. Compression is often selected to decrease diskspace usage, but also has an inverse impact on your backup speed due to theincreased CPU usage.
The available options are:
No Compression
This option has the lowest CPU usage (fastest speed), but also has the highestdisk space usage for your backup image.
Standard Compression
Some compression is performed. This option provides a good balance betweenCPU usage and disk space usage. This is the default setting.
Maximum Compression
Maximum compression is performed. This option provides the highest CPUusage (lowest speed), but also has the lowest disk space usage for your backupimage.
Notes:
If your backup image contains uncompressible data (such as JPG images, ZIPfiles, and so on), you may need to allocate additional storage space to handlesuch data. As a result, if you select any compression option and have uncom-pressible data in your backup, it could result in an increase in disk space usage.
If you change the compression level from No Compression to either StandardCompression or Maximum Compression, or if you change from either StandardCompression or Maximum Compression to No Compression, the first backupperformed after this compression level change is automatically a Full Backup.After the Full Backup is performed, all future backups (Full, Incremental, orVerify) are performed as scheduled.
This option is available only for the local or remote share destinations. You can-not change the compression setting if the Arcserve Unified Data Protectionagent is backed up to data store.
775 Arcserve UDP Agent for Windows User Guide

configuration
If your destination does not have sufficient free space, you may considerincreasing the Compression setting of the backup. This option is available onlyfor the local or remote share destinations. You cannot change the compressionsetting if the Arcserve Unified Data Protection agent is backed up to data store.
configuration
A tab on the Arcserve UDP Console to define configuration parameters such asemail alerts, database settings, and installation preferences.
Dashboard
A tab on the Arcserve UDP Console that lets you monitor the status of all jobs suchas backup, replication, and restore. The details include jobs, task types, node IDs,recovery points, and plan names.
Destination
Destination is a computer or server where you store backup data. A destination canbe a local folder on the protected node, a remote shared folder, or a RecoveryPoint Server (RPS).
Data Store
A data store is a physical storage area on a disk. You can create a data store on anyWindows system where the recovery point server is installed. Data stores can belocal or on a remote share that the Windows system can access.
Discovered Nodes
Discovered nodes are physical or virtual systems that are added to the ArcserveUDP Console by discovering them from active directory or vCenter/ESX server,importing from a file, or manually adding them using its IP address.
Encryption
The Arcserve Unified Data Protection solution provides encryption feature for data.
When the backup destination is a recovery point server, the available encryptionsare No Encryption and Encrypt data with AES-256. You can set this to create a datastore. When the backup destination is the local or remote share, the availableencrypt format options are No Encryption, AES-128, AES-192, and AES-256. You can
APPENDIX: Arcserve UDP Terms and Definitions 776
Host-Based Agentless Backup
set the option while creating a plan to backup to local or share folder, or set thisfrom backup setting for standalone Arcserve Unified Data Protection Agent.
Encryption settings
a. Select the type of encryption algorithm that you want to use for backups.
Data encryption is the translation of data into a form that is unintelligible without adeciphering mechanism. The Arcserve Unified Data Protection solution uses secure,AES (Advanced Encryption Standard) encryption algorithms to achieve maximumsecurity and privacy of your specified data.
b. When an encryption algorithm is selected, provide (and confirm) an encryptionpassword.
The encryption password is limited to a maximum of 23 characters.
A full backup and all its related incremental and verify backups must usesame password to encrypt data.
If the encryption password for an incremental or verify backup is changed, afull backup must be performed. This means after changing encryption pass-word, the first backup will be full, despite the original backup type.
For example, if you change the encryption password and submit a customized incre-mental or verify backup manually, it automatically converts to a full backup.
Note: This option is available only for the local or remote share destinations. Youcannot disable the encryption setting if the Arcserve Unified Data Protection agentis backed up to data store.
c. The Arcserve Unified Data Protection solution has encryption password and sessionpassword.
The encryption password is required for data store.
The session password is required for node.
If the data store is encrypted, then session password is mandatory. If the datastore is not encrypted, the session password is optional.
A password is not required when you are attempting to restore to the computerfrom which the backup was performed. However, when you attempt to restore to adifferent computer, a password is required.
Host-Based Agentless Backup
A Host-Based Agentless backup is a method to back up data without using an agentcomponent on the source machine.
777 Arcserve UDP Agent for Windows User Guide
HOTADD Transport Mode
HOTADD Transport Mode
The HOTADD transport mode is a data transport method that lets you back up vir-tual machines configured with SCSI disks. For more information, see the VirtualDisk API Programming Guide on the VMware website.
Job
A job is an Arcserve UDP action to back up, restore, create virtual standby, or rep-licate nodes.
NBD Transport Mode
Network Block Device (NBD) transport mode, also referred to as LAN transportmode, uses the Network File Copy (NFC) protocol to communicate. Various VDDKand VCB operations use one connection for each virtual disk that it accesses oneach ESX/ESXi Server host when using NBD.
NBDSSL Transport Mode
Network Block Device Secure Sockets Layer (NBDSSL) transport mode uses the Net-work File Copy (NFC) protocol to communicate. NBDSSL transfers encrypted datausing TCP/IP communication networks.
Nodes
A node is a physical or virtual system that Arcserve UDP protects. Arcserve UDP canprotect physical nodes and virtual machines in a vCenter/ESX or Microsoft Hyper-Vserver.
Plan
A plan is a group of tasks to manage backup, replication, and creation of virtualstandby machines. A plan consists of a single or multiple tasks. Tasks are a set ofactivities to define the source, destination, schedule, and advanced parameters.
Protected Nodes
Protected nodes are the nodes that have scheduled backup plans to back up data onregular intervals.
APPENDIX: Arcserve UDP Terms and Definitions 778

Recent Event
Recent Event
Recent Events are the jobs that are still running or jobs that were recently com-pleted.
Recovery Point
A recovery point is a point in time backup snapshot of a node. A recovery point iscreated when you back up a node. Recovery points are stored on the backup des-tination.
Recovery Point Server
A recovery point server is a destination node where you install the server. You cancreate data stores in a recovery point server.
Replicate
Replicate is a task that duplicates the recovery points from one server to anotherserver.
Resources
resources is a tab on the Arcserve UDP Console. From the resources tab, you canmanage source nodes, destinations, and plans.
SAN Transport Mode
The SAN (Storage Area Network) transport mode lets you transfer backup datafrom proxy systems connected to the SAN to storage devices.
Systems
Systems are all type of nodes, devices, and virtual machines that can be managedby Arcserve Unified Data Protection. This includes physical, virtual, Linux, andstandby virtual machines.
Tasks
A task is a set of activities to define various parameters to back up, replicate, andcreate virtual standby machines. These parameters include source, destination,
779 Arcserve UDP Agent for Windows User Guide

Unprotected nodes
schedule, and some advanced parameters. Each task is associated with a plan. Youcan have more than one task in a plan.
Unprotected nodes
Unprotected nodes are the nodes that are added to Arcserve Unified Data Pro-tection but a plan is not assigned. When a plan is not assigned, you cannot back updata and the node remains unprotected.
APPENDIX: Arcserve UDP Terms and Definitions 780