Amiga Hard Drive - Retro
93
User’s Guide Amiga Hard Drive AMIGA C= Commodore
-
Upload
khangminh22 -
Category
Documents
-
view
3 -
download
0
Transcript of Amiga Hard Drive - Retro

User’s Guide
Amiga Hard Drive
AMIGA
C= Commodore

User’s Guide
Amiga Hard Drive
AMIGA
C1 Commodore
WARNING
Installation information in this document is for reference only. All installation of internal optional devices or equipment including third-party optional devices or equipment, should be performed by an experienced and knowledgeable technician. All servicing or upgrading of original or optional devices or equipment should also be performed by an experienced and knowledgeable technician. UNAUTHORIZED INSTALLATION, SERVICING OR UPGRADING MAY VOID YOUR WARRANTIES.
This manual provides a general description of various product configurations and
features currently planned for inclusion in Commodore’s product line. The
configurations and features described may not be available or otherwise apply to
your particular system. Please consult your Commodore dealer with any questions.
COPYRIGHT
Copyright © 1992 by Commodore Electronics Limited. All rights Reserved. This document may not, in whole or in part, be copied, photocopied, reproduced, translated or reduced to any electronic medium or machine readable form without prior consent, in writing, from Commodore Electronics Limited.
If this product is being acquired for on behalf of the United States of America, its agencies and/or instrumentalities, it is provided with RESTRICTED RIGHTS, and all use, duplication, or disclosure with respect to the included software and documentation is subject to the restrictions set forth in subdivision (b) (3) (ii) of The Rights in Technical Data and Computer Software clause at 252.227-7013 of the DOD FAR. Unless otherwise indicated, the manufacturer/integrator is Commodore Business Machines, Inc., 1200 Wilson Drive, West Chester, PA 19380.
DISCLAIMER
With this document Commodore makes no warranties or representations, either expressed or implied, with respect to the products described herein. The information presented herein is being supplied on an NAS IS" basis and is expressly subject to change without notice. The entire risk as to the use of this information is assumed by the user. IN NO EVENT WILL COMM ODORE BE LIABLE FOR DIRECT, INDIRECT, INCIDENTAL, OR CONSEQUENTIAL DAMAGES RESULTING FROM ANY CLAIM ARISING OUT OF THE INFORMATION PRESENTED HEREIN, EVEN IF IT HAS BEEN ADVISED OF THE POSSIBILITIES OF SUCH DAMAGES. SOME STATES DO NOT ALLOW THE LIMITATION OF IMPLIED WARRANTIES OR DAMAGES, SO THE ABOVE LIMITATIONS MAY NOT APPLY.
TRADEMARKS
Commodore, the Commodore logo, CBM, and AUTOCONFIG are trademarks of Commodore Electronics Limited in the United States and other countries. Amiga, AmigaDOS, Kickstart, Workbench and Bridgeboard are trademarks of Commodore-Amiga, Inc. in the United States and other countries.
MS-DOS is a registered trademark of Microsoft Corporation. PC/XT is a registered trademark of International Business Machines, Inc. UNIX is a registered trademark of Unix Systems Laboratories Inc.
Printed in Germany, Hong Kong, the Philippines, Singapore, Taiwan and the United Kingdom.
This book was produced using a variety of Commodore systems by Ross Hippely.
P/N: 371 001-01

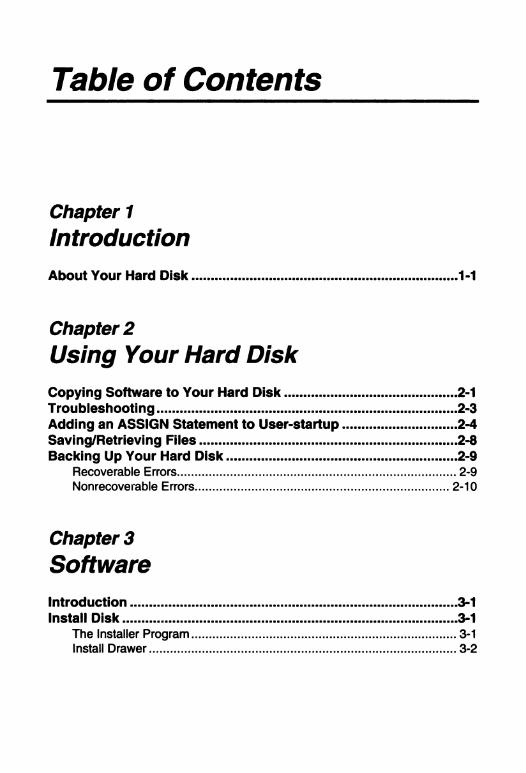
Table of Contents
Chapter 1IntroductionA b o u t Y o u r H ard D is k ...........................................................................................1-1
Chapter 2Using Your Hard DiskC o p y in g S o ftw a re to Y o u r H ard D is k ...........................................................2-1T ro u b le s h o o tin g ...................................................................................................... 2 -3A d d in g an A S S IG N S ta te m e n t to U s e r -s ta r tu p .......................................2 -4S a v in g /R e trie v in g F ile s ........................................................................................2 -8B ack in g U p Y o u r H ard D is k ...............................................................................2 -9
Recoverable Errors................................................................................................2-9Nonrecoverable Errors........................................................................................2-10
Chapter 3SoftwareIn tro d u c tio n ................................................................................................................3-1In s ta ll D is k .................................................................................................................. 3-1
The Installer Program........................................................................................... 3-1Install Drawer..........................................................................................................3-2
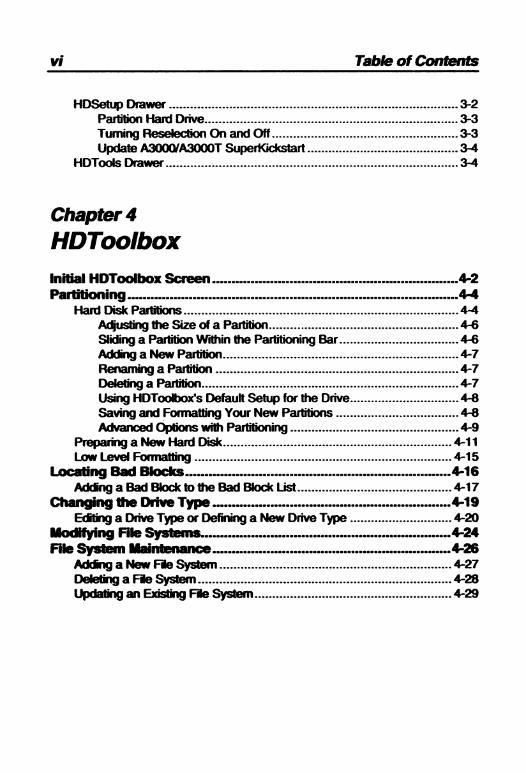
w Table o f Contents
HDSetup Drawer...................................................................................................3-2Partition Hard Drive.......................................................................................3-3Turning Reselection On and O ff................................................................3-3Update A300G/A3000T SuperKickstart....................................................3-4
HDTools Drawer.................................................................................................... 3-4
Chapter 4HDToolboxIn itia l H D T o o lb o x S c re e n __________________________________________4 -2P a rtit io n in g ________________________________________________________ 4 -4
Hard Disk Partitions.............................................................................................. 4-4Adjusting the Size of a Partition.................................................................4-6Sliding a Partition Within the Partitioning Bar.........................................4-6Adding a New Partition.................................................................................4-7Renaming a Partition................................................................................... 4-7Deleting a Partition........................................................................................ 4-7Using HDToolbox's Default Setup for the Drive..................................... 4-8Saving and Formatting Your New Partitions.......................................... 4-8Advanced Options with Partitioning..........................................................4-9
Preparing a New Hard Disk.............................................................................. 4-11Low Level Formatting........................................................................................ 4-15
L o c a tin g B a d B lo c k s _____________________________________________ 4 -1 6Addmg a Bad Block to the Bad Block List.....................................................4-17
C h a n g in g th e D riv e T y p e ________________________________________ 4 -1 9Edfflng a Drive Type or Defining a New Drive T yp e .................................. 4-20
M o d ify in g H ie S y s te m s .__________________________________________4 -2 4H ie S y s te m M a in te n a n c e ________________________________________ 4 -2 6
Adrfng a New F ie System................................................................................4-27Deleting a F ie System....................................................................................... 4-28Updating an Brisling F ie System....................................................................4-29
Table of Contents vir
ChaptersBacking Up Your Hard Disk with HDBackupU s in g H D B a c k u p fo r th e F irs t T im e _______________________________.5-1C re a tin g a Fu ll B a c k u p ____________________________________________.5 -2C re a tin g an In c rem en ta l B a c k u p _________________________________ .5 -7
Selected Files and Selected Size Display........................................................5-7Include and Exclude Gadgets.............................................................................5-8File Selection Gadgets..........................................................................................5-8
Selecting Files by Archive Bit Status........................................................5-9Selecting Files by Pattern........................................................................... 5-9Selecting Files by D a te ..............................................................................5-10Selecting Files by S ize............................................................................... 5-11
Smaller Log File Option..................................................................................... 5-12H ie C o m p re s s io n O p tio n ________________________________________ 5 -1 3C h e c k in g D iffe re n c e s ____________________________________________ 5 -1 4In s p e c tin g a B a c k u p ______________________________________________5 -1 5R e s to rin g H ie s ___________________________________________________ 5 -1 6T o o l T y p e s -------------------------------------------------------------------------------------------- 5 -1 8
Appendix ATroubleshooting
Index

Welcome
This book introduces you to your Amiga® hard disk. It describes the features of the included software, and tells you how to use it.Before you begin using your Amiga hard disk drive, you should be familiar with the operation of your Amiga. In particular, you should know how to:• save and retrieve files• transfer files from one device to another• use the Shell• use a text editorRefer to your Amiga documentation for information on each of the above operations.As you use the hard drive, you may find that you need or want additional information on its general operation and specific features. The first chapter of this book contains general hardware information. Detailed software information is found in the following four chapters. Troubleshooting information is listed in the Appendix.Most applications like word processors, spreadsheets, etc. have special hard disk installation procedures. Refer to the documentation provided with your application before installing it on your hard drive.

Chapter 1
Introduction
About Your Hard DiskYour hard disk allows you to store, use and retrieve large amounts of data quickly and conveniently. Information is stored on spinning disks or "platters” located within the hard drive. Unlike floppy disks, these platters cannot be removed and are protected from the wear and tear of being handled.Hard disk platters, like floppy disks, are usually either 3.5 or 5.25 inches in diameter, and are coated with a magnetic recording surface that records information on both sides. A hard disk usually contains from one to eight platters. The platters spin continuously while the computer is powered on.In order for the computer to locate information quickly on the hard disk, the platters are divided into smaller sections. Each hard disk platter is organized into cylinders, tracks, and sectors.Sectors are the smallest unit of storage on the hard disk platter, usually 512 bytes.Tracks are similar to the tracks on a record album. They divide the hard disk platter into concentric circles. A track is made up of several sectors.A cylinder on a single hard disk platter is the recording space on both the top and bottom of one track. A cylinder on a multiple- platter hard disk is the recording space (top and bottom) on all of the platters of the tracks with the same track number.
1-2 About Your Hard Disk
The hard disk finds information by using the combination of three numbers—cylinder, track and sector—to find the desired block. It is similar to the city, street, and box number on a mailing address.Information stored on the hard disk platter is read and written by read/write heads. A read/write head is like the head of a cassette tape deck, but moves across the surface on an arm similar to the tone arm of a record player. To read or write data, the head senses and discharges magnetic impulses at the appropriate cylinder as the rotating platter passes beneath it. There is a separate head for each surface (top and bottom) of each hard disk platter.There are many types of hard drives, with varying storage sizes from 20MB (20 megabytes, or over 20 million characters) to more than 1000MB of information. A 20 MB hard drive has about as much storage space as 26 standard Amiga 3.5-inch floppy disks.This ie *he equivalent of nearly 5,700 typed pages.Commodore-supplied hard disks come with at least one partition— the Workbench (or System). Depending on which computer you own, you may have received additional partitions, such as a Work partition provided as general storage space.With the HDToolbox program, you can re-partition your hard disk in any way you like, giving each partition any name otherwise unused.The best time to partition a hard disk is before you begin using it.All information on affected partitions (for example, a large partition you may have separated into two smaller ones) is erased in the process. If you already have important information stored on affected partitions, you must back up the information and restore it after you partition.
Chapter 2
Using Your Hard Disk
Hard disks provided by Commodore with your Amiga or as a hardware accessory are partitioned and preformatted so that you can start using your equipment right away. The necessary Amiga system software is already on the disk. Floppy disks with the system software are also provided should you need to re-install it. There is also an Install disk, which contains various hard disk specific utilities.The examples in this book will assume that you have a hard disk with a boot partition named System: (containing Workbench and other Amiga software) and a partition called Work:, on which you keep your applications and their data.
Copying Software to Your Hard DiskIn addition to working with the utilities provided with your Amiga, you will want to transfer applications from floppy disks to your hard disk. Running applications from the hard disk is much faster and more convenient than using floppy disks. Rather than inserting floppy disks each time you want to use a program, you can call up programs from the hard disk.Most software can be installed on your hard disk, although some, particularly entertainment titles, cannot. Many applications provide an easy-to-use installation process. Read the manual that is supplied with a program carefully, as well as any ReadMe files on the disk. If a program includes installation directions, you should always follow them precisely.In case you have a program without installation directions, this section demonstrates how to copy a generic program to your hard
2-2 Copying Software to Your Hard Disk
drive. In this example, we assume you are installing a program to the Work: partition. We recommend that you not create application drawers on the System: partition, but on Work: or some other partition. Keeping application software separate from AmigaOS storage will make upgrading the system software easier.You should create a new drawer for each application you install and name it accordingly:1. Open the hard disk's window by double-clicking on its icon.2. Choose New Drawer from the Window menu.
A new drawer icon called "Unnamedl" will appear in the window.A requester will appear telling you to enter a new name for "Unnamedl" in a text gadget.You can give a drawer any name you would like, but you should use a name that reminds you of its contents, such as the name of the program.
3. Using the Backspace key, delete the contents of the text gadget (or use the right Amiga+X key combination) and enter the correct name.Be sure to delete any spaces before or after the new name.
4. Press Return or select the OK gadget.The requester will go away, and the new name will appear under the icon.You can now copy the software into the new drawer. This can be done by simply pointing and dragging.
5. Put the software disk into the disk drive.Make sure the software disk is write-protected. This is a precautionary measure to ensure that you don't alter your original software disk.
6. Double-click on the disk's icon.Look at the contents of the disk on your screen. Often software disks contain duplicates of files that are already on your system.
Troubleshooting 2-3
You next need to copy only those files that are not already on your system to the new drawer you created.
7. Holding down the Shift key, click on each icon on the software disk that is not already on your system. Keeping the Shift key held down, drag the icons until the pointer is over the new drawer and release the selection button.You will notice that both your hard and your floppy disk drive lights will begin flashing. This shows that Workbench is reading from your program disk and writing to your hard disk. Be sure not to eject the floppy disk until the transfer is complete.When the lights have stopped flashing, the information transfer is complete. Your software should now be in the drawer you created.
8. Remove the original software disk from the floppy disk drive, and try to run the program from your hard disk.If the program runs properly from the hard disk, you have installed it correctly. If you have any problems running the software or if requesters appear asking for the original software disk, read the following section.
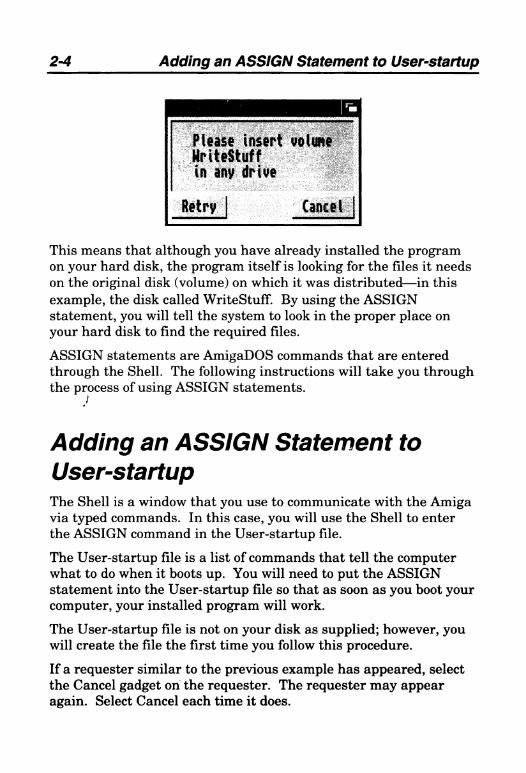
TroubleshootingIf you are having trouble running a program from the hard disk, you may have to set up an ASSIGN statement for the software to run properly.Usually, the indication that you need an ASSIGN statement comes in the form of a requester. For example, suppose you copied a program called WriteStuff from a disk of the same name into a drawer called WS in the Work: partition. When you try to run the software, a requester appears saying:
2-4 Adding an ASSIGN Statement to User-startup
f least insert volwr HriteStuff in any drive
Retry Cancel
This means that although you have already installed the program on your hard disk, the program itself is looking for the files it needs on the original disk (volume) on which it was distributed—in this example, the disk called WriteStuff. By using the ASSIGN statement, you will tell the system to look in the proper place on your hard disk to find the required files.ASSIGN statements are AmigaDOS commands that are entered through the Shell. The following instructions will take you through the process of using ASSIGN statements.
J
Adding an ASSIGN Statement to User-startupThe Shell is a window that you use to communicate with the Amiga via typed commands. In this case, you will use the Shell to enter the ASSIGN command in the User-startup file.The User-startup file is a list of commands that tell the computer what to do when it boots up. You will need to put the ASSIGN statement into the User-startup file so that as soon as you boot your computer, your installed program will work.The User-startup file is not on your disk as supplied; however, you will create the file the first time you follow this procedure.If a requester similar to the previous example has appeared, select the Cancel gadget on the requester. The requester may appear again. Select Cancel each time it does.
Adding an ASSIGN Statement to User-startup 2-5
This section demonstrates how to create an ASSIGN statement for a generic program on your hard drive. Refer to your Amiga manual for information on using the Shell.
Note In the examples of AmigaDOS commands in thismanual, commands and their keywords are shown in all capital letters, with file and directory names having the first letter capitalized. However, the Amiga Shell is not case sensitive, so you never need to use capitals.
To add an ASSIGN statement to your User-startup:1. Double-click on the Shell icon, which is normally located in the
System drawer.The Shell gives you a text "prompt" which ends in a ">". This is where you will type in an AmigaDOS command followed by a Return.
2. Type the following words into the Shell after the prompt:ED S:User-startupthen press Return.This command tells the Amiga that you want to edit (create or make changes to) the User-startup file which is located in the directory called S:. ED tells the computer you will be using the text editor that is called ED. A text editor is a program that makes it possible to create and make changes in a text file.You will notice that a new window will open. You are now using ED, and on the screen is the User-startup file. The first time you use it, it will be empty. This is where you will always enter your ASSIGN statements. If it is not empty, move the cursor so it is at the beginning of a blank line.
2-6 Adding an ASSIGN Statement to User-startup
ASSIGN statements are set up as follows:ASSIGN diskname: partition:drawer
where:
ASSIGN Is the first word you type in to tell the computer you are entering an ASSIGN statement.
Is the name of the disk which contained the software program. This must be entered in the exact form that was stated in the requester.
diskname
partition Is the name of the hard disk partition which contains the drawer where you will keep your program.
drawer Is the name of the drawer (directory) you made for the software.
In the previous example, you copied a program called WriteStuff to a drawer called WS in your Work partition.You received a requester which said "Please insert volume WriteStuff into any drive." It is looking for the WriteStuff disk. In this case, your ASSIGN statement should read as follows:
ASSIGN WriteStuff: WorkiWSNow that you have seen how to form an ASSIGN statement, you should have a better idea of what it does. You are "assigning" the name of the original software disk to the name of the drawer that now contains the program. Using the previous example, when you double-click on the program's icon, instead of the program looking for the volume WriteStuff (which is the original software disk), it will look in Work:WS (where Work: is the partition and WS is the name of the drawer).The following example illustrates an ASSIGN statement if the software drawer is within another drawer. If you copied the same program into the WS drawer which is within a drawer called Projects, your ASSIGN statement would read:
ASSIGN WriteStuff: Work:Projects/WS
Adding an ASSIGN Statement to User-startup 2-7
Note In order for the ASSIGN statement to work, you must make sure it is written properly.
• Make sure that the disk name in the ASSIGN statement is the exact name of the software disk. This is usually the same as the name of the program, but not always. The best way to check is to insert the software disk and look for the disk's name under its icon.
• If the original disk name contains spaces, then that name (including the colon) must be enclosed in double quote marks.
• Put one space after ASSIGN and one space after the disk name.
• Use a colon between the partition name and the drawer name (and slashes between any drawers after that).
3. Following the directions above, enter your ASSIGN statement inthe blank line. Press Return.
4. Press Esc (in the upper left corner of your keyboard).Your cursor is taken to an asterisk at the bottom of the screen.
The following step tells you how to save the changes you have made to the User-startup file. (If you have made a mistake and want to exit the User-startup file without saving your changes: Type a Q and press Return. If a requester appears saying edits will be lost, type a Y. The ED window will close. Return to Step 2.)5. To save your changes in the User-startup file, type an X and
press Return.You are returned to the Shell window.
To see if your ASSIGN statement worked, reboot your system (by pressing the Ctrl key simultaneously with both Amiga keys). Try opening the program from its icon on your hard disk. If you can use your software, you have created the ASSIGN properly.If you created the ASSIGN improperly (such as typing in the wrong name of the software, partition or drawer) one or more of the following may happen:
2-8 Saving/Retrieving Files
\
• Your Workbench icons do not appear, and a message is presented saying that it cannot find the software and the "assign failed." Use Ctrl+C to get to the Workbench screen. Open a Shell, and repeat the steps above to edit User-startup. Look for what you may have entered improperly, correct it, and reboot.
• When you try to call up the program, you receive another requester telling you to "Please insert volume <program name> into any drive." Open a Shell, and repeat the steps above to edit User-startup. Look for what you may have entered improperly, correct it, and reboot.
• If the program is not functioning properly, examine the new drawer (open the drawer and choose the Show All Files menu item in the Window menu) to see if it includes any of the following drawers:• Fonts. L. C• Libs• S
If one (or more) of the drawers in the list exists in the new drawer, you must assign each to the corresponding device on your hard drive. The drawer most likely to be found in your new drawer is Fonts. Using the previous example, the following demonstrates ASSIGNing Fonts using the extended assign feature:
ASSIGN FONTS: Work:WS/Fonts ADD
Saving/Retrieving FilesYou can save files to and retrieve files from the hard drive just as you would a floppy disk. For instance, if you want to save a file created with your graphics program to the Pics drawer on Work:, you would enter:
Work:Pics/filename
Backing Up Your Hard Disk 2-9
in the program's Save requester. The generic path for accessing files on the hard disk is:
<partition>:<drawername>/<filename><Partition>: is the name assigned to the particular area of the hard disk, for example Work:. <Drawername> represents a directory on the partition, and <filename> is the name of the file you are creating or retrieving.You can also save and retrieve files and directories on your hard disk by the normal Workbench methods.
Backing Up Your Hard DiskBefore adding new data to your hard drive, it is strongly suggested that you choose a hard disk backup program for copying the information stored on the hard disk to floppy disks. Commodore provides the hard disk backup program HDBackup. See the HDBackup chapter for more information. (Please see your local software dealer for information on the available commercial programs.)You should back up the hard disk frequently—daily or weekly, depending on hew often it is used. Without a backup, it will be impossible for you to replace any files that may be lost due to accidental deletion or disk failure.Each time you back up your hard disk you should also run Verify Data on Drive from the HDToolbox program. This can locate blocks on the disk that may later develop problems.
Recoverable ErrorsWhen the verify function locates a block that may eventually become unreadable, it copies the information from that block onto a new block. This will be reported as a recoverable error. By marking a questionable block as bad and storing the information from that block to another location, you will avoid losing that information when the block becomes unreadable. In this case there
2-10 Backing Up Your Hard Disk
is no need to reformat the hard disk and restore the file from the backup copy.
Nonrecoverable ErrorsWhen the verify function locates a block that cannot be read, the system reports it as bad block found. This is known as a nonrecoverable error. The information stored on that block has been lost.When either a recoverable or nonrecoverable error is found, the system will display the location of the block. You must then choose one of three options:1. Have the system add the block to the Bad Block List and then
continue.2. Ignore the block and continue verifying the data on the disk.3. Stop the verification.You should normally add the block to the Bad Block List. After the verify is finished, click on Save Changes to Drive and then Exit. You will then reboot the system.If the system reports a nonrecoverable error, you should use the Workbench Format Disk function or the Shell FORMAT command to format the partition. Then restore your files from your backup disks.
Chapter 3
Software
IntroductionThe Commodore Install disk contains utility programs that allow you to set up your hard disk, modify your hard disk partitions, perform hard disk maintenance, reinstall your original system files, and back up your hard disk. Each of the utilities on the Install disk has its own icon.Files on the Install disk without icons are used by the installation program to set up systems with certain hardware configurations. There is no need for most users to work with these files directly.
Install DiskThe Install disk contains the drawers Install, HDSetup, and HDTools. (The Install 2.1 disk also contains Install Printers and Install Languages drawers.) The Install drawer contains the AmigaOS hard disk installation program. The HDSetup drawer contains a similar program for configuring a hard disk. The HDTools drawer contains hard disk backup and maintenance utilities.
The Installer ProgramBoth the Install and HDSetup utilities use the Amiga Installer, a standardized software installation and setup program. Commodore

3-2 Install Disk
as well as some third-party software developers use Installer for hard disk installation of their applications.On Commodore software disks, for a given Installer utility there are icons for each language available, grouped in a drawer. For example, the HDSetup drawer on the Install disk contains the icons English, Deutsch, Français, and so on, for each language in which you can run the HDSetup utility.
Install DrawerThe Install drawer contains the Install utility for system software installation. (On the 2.1 disk, this drawer is called Install 2.1.) The Install utility allows you to install all or part of the system software onto a hard disk. You may need to do this if:• There is a severe nonrecoverable disk error on your boot
partition.• Important system files have been accidentally deleted.• You need to install additional languages on your hard disk.• You have acquired a new hard drive and wish to use it as your
boot device.Chapter 1 of Using the Amiga Workbench gives directions for using the Install utility for system software installation.
HDSetup DrawerThe HDSetup utility allows you to perform several basic hard disk configuration tasks very easily. You must, however, have one of several Amiga systems or Commodore SCSI (Small Computer Systems Interface) hard drive controllers. With HDSetup, owners of this equipment can:• Partition a hard disk to the standard configuration.• Enable or disable reselection for SCSI hard drives.• Update an A3000/A3000T SuperKickstart file.To perform one of these tasks, open the HDSetup drawer and double-click on the icon for your preferred language.
Install Disk 3-3
The first HDSetup window lists the Amiga systems and hard drive controllers with which you can use HDSetup. (The 3.0 HDSetup does not have this window.) Select Proceed if your system matches one of these or is 100% compatible; select Abort otherwise.The next window asks you to choose the operation to perform.Select the Help gadget for a brief description of each choice and the operation of the window buttons. Select the Help gadget in subsequent windows for additional details about the operation.
Partition Hard DriveThis option lets you partition a hard drive to the standard configuration. The standard configuration is a system partition for AmigaOS files and second partition for your applications and data which fills the remaining space on the drive. Use the HDToolbox utility, described in Chapter 4, instead of this HDSetup option if you require a custom hard drive configuration.HDSetup will prompt you to give the unit number of the drive you wish to partition. If you do not know the unit number of your hard drive, you can use HDToolbox to determine it. Amiga systems with SCSI hard drives normally use unit 6; Amiga systems with IDE hard drives normally use unit 0.
C au tio n R e p artitio n in g in vo lves fo rm a ttin g th e e n tire d rive .T h is p e rm a n e n tly d e s tro y s a ll in fo rm a tio n s to red on th e d rive . B ack up an y im p o rta n t f ile s on th e d riv e to so m e o th e r m ed iu m b e fo re u s in g th is o p tio n .
Enter the unit number of the drive to partition and select Proceed. Another window requests your confirmation. Selecting Cancel or Abort will prevent the partitioning from taking place.After being partitioned, the drive must be formatted, and then the AmigaOS software must be installed on the system partition using the Install utility. The 3.0 HDSetup automatically does the formatting.
3-4 Install Disk
Turning Deselection On and OffReselection is a feature that SCSI devices such as hard drives, tape drives, and CD-ROM drives may use to improve performance when more than one device a t a time is active. For example, if you have a SCSI hard drive and a SCSI CD-ROM drive, copying data from the CD-ROM to the hard drive will be faster with reselection enabled for both drives.You should enable reselection if you use more than one SCSI device a t a time. Reselection is automatically disabled if you have only a single SCSI device.
Note Some earlier SCSI controller ROM revisions did not work properly with reselection enabled. If you experience problems when moving data between two devices, try turning reselection off. If you continue to have problems, see your Commodore dealer/service center about obtaining a ROM update.
Selecting Turn Reselection On or Turn Reselection Off affects all attached SCSI units. Changing reselection settings does not affect the data on the drive in any way.
Update A3000/A3000T SuperKickstartAmiga 3000 and 3000T computers can boot using an image of the Amiga's ROM read into memory from disk. This provides higher performance, and allows the use of the latest Kicks tart software. The ROM image is distributed on a special SuperKickstart floppy disk. The Update A3000/A3000T SuperKickstart option reads the ROM image from a SuperKickstart disk onto the hard disk so the Amiga can boot using the new Kickstart.If you select this option, insert the SuperKickstart disk into drive DFO: when prompted. (In the 2.1 HDSetup, a new window opens requesting insertion of the disk. If there is a problem with the SuperKickstart disk a t this point, press Ctrl+C and then Return to exit the window.) After the new Kickstart information has been read from the disk, the Amiga must be rebooted.
Install Disk 3S
HDTools DrawerThe HDTools drawer contains the programs HDToolbox and HDBackup. These programs are explained in the following two chapters.

Chapter 4
HDToolbox
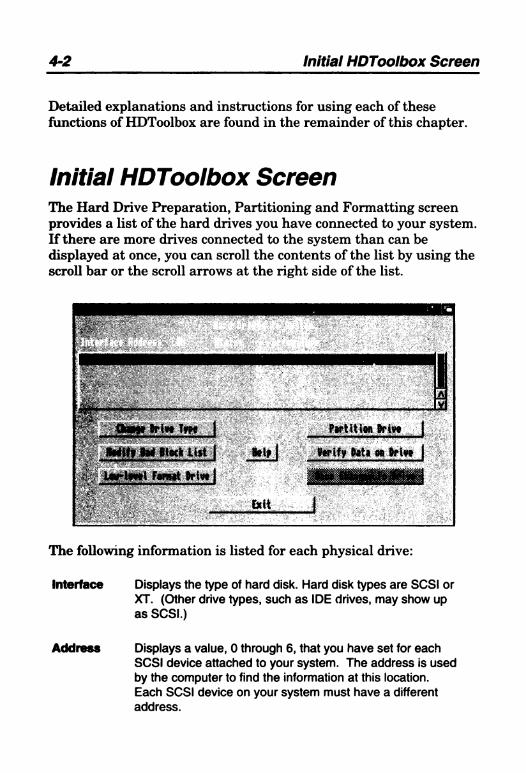
HDToolbox provides a variety of tools for controlling hard disk operations.To run HDToolbox from your hard disk:1. Open the System or Workbench partition.2. Open the Tools drawer.3. Double-click on the HDToolbox icon.If your hard disk has not been set up yet:1. Boot your system with the Install disk.2. Open the Install disk icon.3. Open the HDTools drawer.4. Double-click on the HDToolbox icon when it appears.The first screen which appears is the Hard Drive Preparation, Partitioning and Formatting screen. You will learn more about this screen in the next section.You will use this opening screen to get to the functions of HDToolbox. The functions you can select with HDToolbox include:• Partitioning• Preparing a New Hard Disk• Configuring the Drive Type of the Hard Disk• Low-Level Formatting a Hard Disk• Locating Bad Blocks on a Hard Disk• Defining File System Characteristics• Adding, Deleting or Modifying File Systems
4-2 Initial HDToolbox Screen
Detailed explanations and instructions for using each of these functions of HDToolbox are found in the remainder of this chapter.
Initial HDToolbox ScreenThe Hard Drive Preparation, Partitioning and Formatting screen provides a list of the hard drives you have connected to your system. If there are more drives connected to the system than can be displayed at once, you can scroll the contents of the list by using the scroll bar or the scroll arrows at the right side of the list.
The following information is listed for each physical drive:
Interface Displays the type of hard disk. Hard disk types are SCSI or XT. (Other drive types, such as IDE drives, may show up as SCSI.)
Address Displays a value, 0 through 6, that you have set for eachSCSI device attached to your system. The address is used by the computer to find the information at this location.Each SCSI device on your system must have a different address.
Initial HDToolbox Screen 4-3
LUN
Status
Drive Type
The SCSI controller is set as device 7. If the supplied hard disk is a SCSI unit, it is jumpered as unit 6. Most hard drives come pre-configured as device 0, so the first additional SCSI hard disk can be connected without change. If you add additional drives, you will need to reset them to different (unused) addresses. If two or more devices are jumpered to the same address, the system will not function properly. See the hard disk's documentation for more information, including jumper location.
Shows the Logical Unit Number (LUN) of the drive, a value from 0 to 7. The LUN is a secondary address. It is used when a device controls multiple devices. For example, a controller card may be capable of controlling more than one hard disk. Just as each attached SCSI device must have a different address, each device attached to the controller card needs a different LUN.
The LUN of a SCSI hard drive will usually be 0. See the controller card's documentation for more information on whether your controller supports multiple LUNS, and/or how to change them.
Shows whether or not you have made any changes to a drive that have not been saved. To save changes after any HDToolbox operation, you must select the Save Changes to Drive gadget on the Hard Disk Preparation, Partitioning and Formatting screen.
Shows the drive's manufacturer, name, and revision.
NOTE: This information may not correspond exactly to the name and number listed in the drive's documentation. This was the name reported by the drive to HDToolbox.
If the drive is listed in this window as Unknown, it is not partitioned and the drive type will have to be selected using the Change Drive Type option.
SCSI tape drives are always listed in Drive Type as Unknown.
4-4 Partitioning
The remaining gadgets are used to perform the functions of HDToolbox, described throughout the remainder of this chapter.
C au tio n B e cau se m a n y fu n c tio n s o f H D T o o lb o x in v o lv ee ra s in g a ll th e in fo rm atio n s to re d o n y o u r h ard d isk , th e e n tire c o n te n ts o f y o u r hard d is k s h o u ld be b acked up b e fo re u s ing th e p ro g ra m . T h is m ay be d o n e th ro u g h th e H D B a c k u p p ro g ram .
You may abort any changes made to HDToolbox screens or requesters by selecting the Cancel gadget. This gadget is present on each screen and will return you to the previous screen without saving any changes.
PartitioningA partition is a subdivision of the space on your hard disk. Each partition on your system appears as an icon on the opening Workbench screen.
Hard Disk PartitionsBecause the storage capacity of hard disks is large, your hard disk can be divided into partitions which are simply subdivisions of the hard disk's storage space. Partitions can be used to better organize your work. For instance, you may want to separate the system software and other files your computer uses from your own application programs and files. If you add an additional operating system to your Amiga (such as MS-DOS or UNIX), you must provide it with its own partition to keep it separate from AmigaDOS.HDToolbox provides a screen where you can easily partition your hard disk. You may have just installed a new hard disk and need to partition it. Or you may decide to repartition your existing hard drive.Reasons for partitioning include:
Partitioning 4-5
• Organizing your work. You may want to keep certain files in their own partition so you can find them more easily.
• Keeping AmigaDOS separate from a new operating system you've added (such as UNIX).
• Reducing fragmentation of partitions for a more efficient system.
C au tio n T h e b e s t tim e to p a rtitio n th e hard d is k is b e fo re you b eg in u s in g it. W h e n e v e r you re -p a rtit io n y o u r hard d isk , a ll in fo rm a tio n s to red on th e a lte re d p artitio n s is e ra s e d . B e fo re yo u beg in , b ack up y o u r e n tire h ard d is k w ith th e H D B acku p p ro g ram o r w ith a c o m m e rc ia l b acku p p ro g ram . Y o u r d a ta can th en be e a s ily res to red w h en y o u 're fin is h e d .
Advanced users can use HDToolbox's Advanced Options to modify the number of sector cache buffers, change file systems on the partitions and set boot priorities on bootable partitions. The Advanced Options are described later in this section.To partition, begin in the Hard Drive Preparation, Partitioning and Formatting screen:1. Select the hard disk that you want to partition by clicking on its
name in the list.The selected drive will be highlighted.
2. Select the Partition Drive gadget.You will be taken to the Partitioning screen.
As you see, the space on your hard drive is displayed as a horizontal bar (the partitioning bar) with the number of the last cylinder shown in the upper right corner of the screen. With the default Workbench colors, the current (or selected) partition is displayed in black, with the size of the partition listed below it. Other partitions are shaded, with white lines as divisions. Unused areas are displayed in solid gray. You will use the partitioning bar and your mouse to form your new partitions.Before you begin to partition, note the following on the Partitioning screen:
4-6 Partitioning
Partition Device Name Displays the name of the selected partition.To select a partition, click on it within the partitioning bar.
File System: Displays the file system of the selectedpartition.
Bootable Displays whether or not the selected partitioncan be used to boot the system. The default is bootable for the first partition and not bootable for all other partitions.
Because partitioning is based on your personal choice of how you want your system, read the information below and form your partitions in any way you'd like.
Adjusting the Size of a Partition1. Click and hold the left mouse button on the blue triangle under
the partition bar.2. Slide the triangle to the new position and release the button.
You cannot expand the size of a partition over a partition which already exists.The new size of the current partition will be displayed under the triangle.
Sliding a Partition Within the Partitioning BarYou will need to slide partitions to make room for a new partition or to consolidate portions of unused space. Partitions will only slide on unused space in the partitioning bar. They will not slide over existing partitions.1. Click and hold the selection button on the partition you wish to
move.2. Still holding the button, slide the partition to where you want it
and release the mouse button.
Partitioning 4-7
If a partition is too small to click on conveniently, you can also move left and right through the partitions by using the left and right arrow keys, respectively.
Adding a New PartitionYou cannot make a new partition over a partition which already exists. If all of the space on your hard disk is in use (i.e., no unused space in the partitioning bar), you will first need to make space for a new partition by making existing partitions smaller (see ”Adjusting the Size of a Partition"). Unused space is shown as a gray block.1. Slide existing partitions so you have a solid block of unused
space within the bar for your new partition.2. Select the New Partition gadget.
The New Partition gadget will be highlighted.3. Click on the unused portion of the partitioning bar where you
want your partition.A new partition will fill the previously unused space. The Partition Device Name text gadget will display CHANGE_ME.
Renaming a Partition1. In the partitioning bar, click on the partition you wish to
rename (making it the current partition).2. Click in the Partition Device Name text gadget that displays the
name of the current partition.3. Delete the existing name, type in the new name and press
Return. (It is best to avoid using spaces in a partition name.)
Deleting a Partition1. In the partitioning bar, click on the partition you wish to delete
(making it the current partition).2. Select the Delete Partition gadget.
Partitioning4-8
The selected partition will be deleted, and the leftmost partition in the partitioning bar will now become the selected partition.
Using HDToolbox's Default Setup for the DriveHDToolbox contains a default setup if you decide not to form your partitions manually: a single partition on 20 MB or smaller drives, and two partitions of equal size on larger drives.1. Select the Default Setup gadget.
The partitioning bar will form the appropriate default. The first partition will be named QDHO: and the second partition will be named QDH1:, where Q is the first letter of the name of the drive manufacturer. You may rename the partitions using the method described in "Renaming Partitions."
Saving and Formatting Your New PartitionsWhen you are satisfied with your new partitions, you must save them.1. Select the Ok gadget.
You will be returned to the Hard Drive Preparation, Partitioning and Formatting screen.
2. Select the Save Changes to Drive gadget.Your new partition information will be written to the hard disk.
3. Wait ten seconds and reboot your system.An icon will appear for each partition on the hard disk. You must now format each partition to make it ready for use.
4. Format the first new partition by clicking on the icon and selecting the Format Disk item from the Icons menu.
Partitioning 4-9
Note If this is the only hard disk in the system, you willneed to install Workbench and Extras on one of the partitions. See the section on installation in Chapter 1 of Using the Amiga Workbench for complete instructions.
5. Click on the first new partition. Select Rename from the Icons menu and change the name of the partition as desired.
Repeat steps 4 and 5 for each new partition.
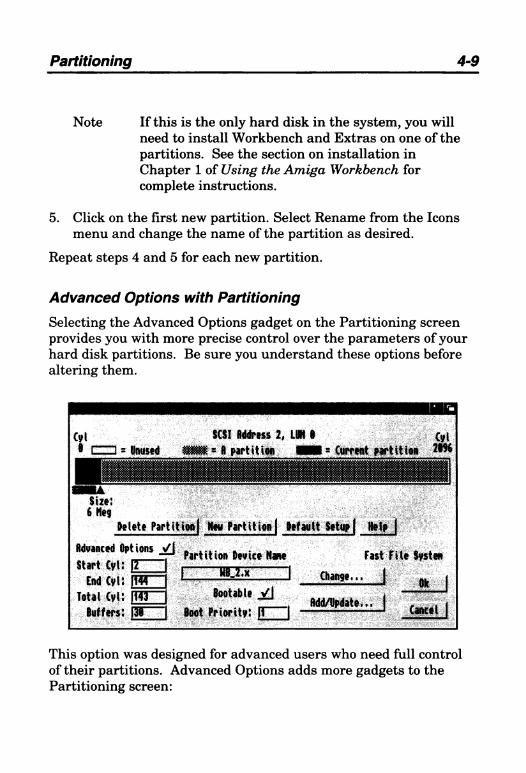
Advanced Options with PartitioningSelecting the Advanced Options gadget on the Partitioning screen provides you with more precise control over the parameters of your hard disk partitions. Be sure you understand these options before altering them.
Cyl___8 CH] = Unused
SCSI Address 2, LUN I Cyl■« 8 partition ■ ■ * Current partition
Delete Partition! Mow Partition! hfantt le t» ! Help 1
Advanced Options _✓ ! . . . . . . . u, — 1 Partition Device KaneStart Cyl: |2 t r
End Cyl: [TO 1 LTotal Cyl: |TO
Buffers: |38
TEXTFast Fite festen
...............Bootable _✓ ! (
..................... ...... . Bdd/Bpdate... fhot Priority: |1 | .......... ........... 1
Ok
This option was designed for advanced users who need full control of their partitions. Advanced Options adds more gadgets to the Partitioning screen:
4-10 Partitioning
(To change the following text gadgets, click in the gadget, delete the existing number and type in the new value. Press Return after each entry.)
Start Cyl: Displays the number of the first cylinder of the selected partition. This number can be any cylinder in the current partition except for the last cylinder, or any cylinder in the unused area before the partition. TheTotal Cyl number will be adjusted accordingly.
End Cyl: Displays the number of the last cylinder of the selected partition. This number can be any cylinder in the partition except for the first cylinder, or any cylinder in the unused area after the partition. TheTotal Cyl number will be adjusted accordingly.
Total Cyl: Displays the total number of cylinders of the selected partition. The End Cyl number will be adjusted accordingly.
Buffers: Displays the number of sector cache buffers being used in the selected partition. Buffers improve disk access time but use 512 bytes of memory per buffer.You can use as many buffers as you wish, provided you have enough free memory As a general rule, use 30 to 50 buffers per partition.
Bootable Displays whether or not the selected partition can be used to boot the system. The default is bootable for the first partition and not bootable for all other partitions. Simply click in the gadget to toggle between bootable and not bootable.
To use a partition as the boot partition, you will first need to prepare it by performing the following steps: Format the partition; install your AmigaOS files on the partition; and then reboot your system. You can then run HDToolbox, return to the Partitioning screen, and select the Bootable gadget.
Partitioning 4-11
Boot Priority: Allows you to determine which drive or partition willboot your system. This will only apply to bootable partitions. If you use a hard drive partition to boot, you should copy your AmigaOS files into that partition.
The value of Boot Priority can range from 127 to -128. A large value has higher priority than a lower value. The Amiga's floppy disk drive (DFO:) has a Boot Priority of 5.
Never set a partition's boot priority above 5. It is suggested that you set your boot partition's priority to 1 and any other bootable partition to a priority of 0.
Change... Takes you to the File System Characteristics screen.This screen will allow you to change the file system on the selected partition.
Add/Update... Takes you to the File System Maintenance screen.This screen will allow you to add, delete, and modify file systems.
Preparing a New Hard DiskWhen you feel you need an additional large amount of storage space, you may purchase a new hard disk to mount to your existing system. Once you have physically installed your new hard disk according to the manufacturer's directions, HDToolbox is used to configure your system with all of the new hard disk's specifications.Whenever you add a hard disk to your system, you must tell your system what type of drive you added. HDToolbox provides a list of possible drive types, from which you can select. Occasionally, you may add a drive type that is not on the list. In this case, HDToolbox provides a separate screen for you to enter the specifications for that particular drive. These specifications may come with the drive you purchased and include information on the manufacturer, size, and set up of that particular drive. If the manufacturer did not supply the information, HDToolbox can usually read it from the drive.
4-12 Partitioning
Note Consult your drive's installation manual for moreinformation on installing and using your new storage device. The following is a description of using the HDToolbox software and is not a complete installation guide.
If you are replacing the main drive (the one that contains Workbench), you will need to boot your system with your Install disk. Do not boot from the hard disk. Then double-click on the Install disk icon and follow the steps below.To prepare your new hard drive:1. Double-click on the HDToolbox icon.
You will see the Hard Drive Preparation, Partitioning and Formatting screen. In the scroll gadget, the new hard disk you installed is called Unknown.
2. Select the drive called Unknown.This will highlight it.
3. Select the Change Drive Type gadget.You are now in the Set Drive Type screen. This is where you will tell HDToolbox which type of hard disk you just added. This screen provides you with a scroll list containing a few different types of hard disks available on the market.
4. Select the cycle gadget so it displays SCSI or XT , depending on which type of hard disk you installed.
Note Select SCSI for an IDE drive. (If you select the XT gadget, a new list of XT-type drives will appear.)
5. Click on the drive type you installed if it is shoWn in the list.
6. If the appropriate drive type is not listed, select the Define New... gadget.You can now type in the drive's specifications or you can have the system try to read the drive's specifications directly off the disk by selecting the Read Configuration from Drive gadget.
Partitioning 4-13
Remember to dick on the drive type you just created. When the correct drive specifications have been read in, select the OK gadget. You will be returned to the Set Drive Type screen. The newly-defined drive type will appear on the list. Click on it before proceeding.
Note You may decide to set the configuration of the drivemanually, rather than having the computer read it off the drive. To do this, consult the section entitled "Changing the Drive Type," and then return to this section to complete the preparation.
7. Select the OK gadget on the Set Drive Type screen.A warning requester will appear.
8. Select Continue on the requester to save your changes.You are returned to the Hard Drive Preparation, Partitioning and Formatting screen.The next step in hard disk preparation is low-level formatting.Make sure that the correct drive (the one labeled "Unknown") is selected (and thus highlighted) in the scroll gadget.
9. Select the Low-level Format Drive gadget.A warning requester will appear.If you are installing a new drive, you don't need to worry about losing any information. Ju st make sure the correct drive is highlighted in the list.
10. Select the Low Level Format Disk gadget in the requester.You will receive a warning requester telling you th a t all information on that drive will be erased.
11. Select the Continue gadget in the requester.The next step in preparing a new hard disk for use is verifying the disk for bad blocks.
12. Select the Verify Data on Drive gadget.A requester will appear.

4-14 Partitioning
13. Select Continue on the requester.If HDToolbox reports bad blocks they will automatically be recorded in the Bad Block List—a separate screen on HDToolbox. If you have received a list of bad blocks from the hard disk manufacturer, you will need to record them in a different screen on HDToolbox when you complete these preparation steps.
14. Select the OK gadget.You will be returned to the Hard Drive Preparation, Partitioning and Formatting screen.
15. Select the Partition Drive gadget.You will be taken to the Partitioning screen, where you should partition the new hard disk however you would like. For complete instructions on partitioning, see "Partitioning." Then return to step 16, to complete hard drive installation.
16. In the Hard Drive Preparation, Partitioning and Formatting screen, select the Save Changes to Drive gadget.This gadget saves all changes made to the hard disk configuration and overwrites the previous configuration. You will receive a warning requester.
17. Select Continue on the requester to save your changes.
C au tio n A fte r sa v in g a c h a n g e o r w ritin g to th e d isk , w a it at leas t ten s e c o n d s b e fo re tu rn in g o ff th e p o w er to th e c o m p u te r o r reb o o tin g .
18. Wait ten seconds and reboot your system.An icon will appear for each partition on the hard disk.
19. Format the first partition by clicking on its icon and selecting the Format Disk item from the Icons menu.
Partitioning 4-15
Note If this is the only hard disk in the system, you willlater need to install the AmigaOS software provided with your system.
The next step renames the partitions.20. Click on the first partition. Select Rename from the Icons menu
and change the name of the partition as desired.Repeat steps 19 and 20 for each partition.
Low Level FormattingAfter you’ve added a new drive, you may need to low-level format it to prepare it for operation. A low-level format is commonly done by the drive manufacturer, and ordinarily need not be done by you. (This is not the same as the FORMAT command, which must also be performed on each partition.)If the drive will not respond to the FORMAT command or does not save changes properly, you can attempt a low-level format.With HDToolbox, low-level formatting is an easy one-step procedure that is done within the Hard Drive Preparation, Partitioning and Formatting screen.To low level format a hard disk:1. Select the drive you wish to low-level format by clicking on it in
the scroll area.The selected drive will be highlighted.
2. Select the Low-level Format Drive gadget.A requester will appear.Select the Low-Level Format Disk gadget in the requester.At this point, you will receive a warning requester telling you that all information on that drive will be erased.
3. Select the Continue gadget on the requester.
4-16 Locating Bad Blocks
This step may take as little as a few seconds or as much as several minutes, depending on the type of hard drive you areu sin g
4. Select the Save Changes to Drive gadget.The low-level format is complete.
Locating Bad BlocksA bad block is a portion of the hard disk which can no longer be read. Just as floppy disks can develop errors and corruption from being used over and over again, hard disks can also develop errors. Hard disk errors, however, occur much less frequently.If you consistently find read/write errors on backups, it may be because of bad blocks. Other symptoms of bad blocks include frequent hardware and software failures and requesters. If you've added a new hard disk and low level formatted it, you should use HDToolbox to locate bad blocks before you begin to enter data.With HDToolbox you can easily check your hard disk(s) for errors. The program will search your hard disk(s) and report a list of blocks which have developed errors. These locations are then recorded on a separate screen known as the Bad Block screen.The computer will use the recorded blocks on the Bad Block Lost (located on a separate screen) during initialization to avoid using these areas. If HDToolbox finds errors in areas which contain data, it will re-write the data to a different area on the hard disk, if possible.It is not unusual for a new hard disk to have a few bad blocks before it is even used. Often, the company which made the hard disk will provide you with a list of bad blocks. You must enter these locations in the Bad Block list. The drive may even handle bad-block mapping automatically.Ju st as regular backups are necessary for proper hard disk maintenance, occasional data verification is also necessary. Depending on how often you use your hard disk, you may want to

Locating Bad Blocks 4-17
check the integrity of your hard disk from as often as once a week to once a month.To check a hard disk for bad blocks, start from the Hard Disk Preparation, Partitioning and Formatting screen:1. Select the hard disk you wish to verify by clicking on its name in
the scrolling list.The selected drive will be highlighted.
2. Select the Verify Data on Drive gadget.You will receive a warning requester.Verifying the data on a typical 40MB hard disk can take as little as a few seconds or as much as several minutes, depending on the type of hard drive you are using.
3. Select Continue to begin the process.If HDToolbox finds no errors, you will receive a requester.
4. Select Continue and the verify is complete.If HDToolbox finds errors, you will receive a requester listing the bad blocks with their locations on the hard disk. These bad blocks will be recorded on the Bad Block List. To view this fist, or to add bad blocks supplied to you by the manufacturer, read the section entitled, "Adding a Bad Block to the Bad Block List."
Adding a Bad Block to the Bad Block ListIf the hard disk manufacturer has provided you with a list of bad blocks, you should enter them into HDToolbox on the Bad Blocks screen. Many hard disk manufacturers use tests that locate blocks that are not currently bad, but might degrade over time. It is advisable to enter these blocks into the list even if HDToolbox does not identify them as bad.The Bad Blocks screen keeps a list of any blocks on the hard disk that might develop read/write errors. The computer uses this list to avoid using these areas.To see the Bad Blocks List, start from the Hard Drive Preparation, Partitioning and Formatting screen. To add a bad block to the list:
4-18 Locating Bad Blocks
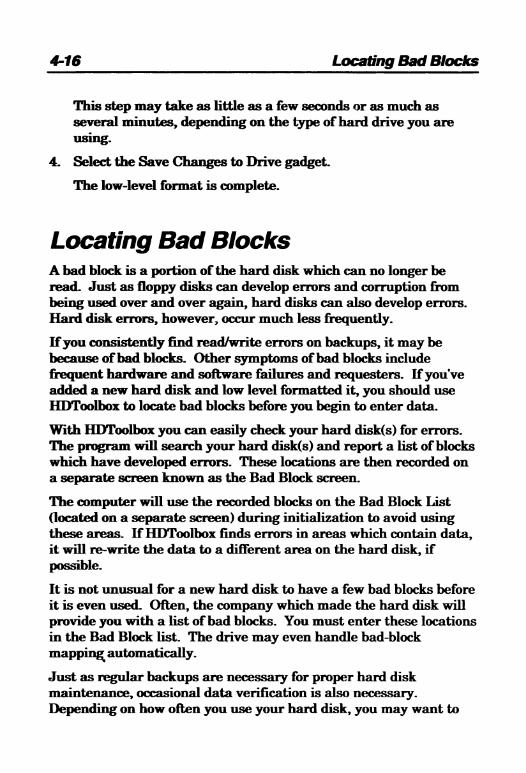
1. Select the Modify Bad Block List gadget. You will be taken to the Bad Blocks screen.
M flocks ft awed «stl ly driw: 8 taacel |
Notice the scroll gadget in the center of the screen. If you have not previously located any bad areas on your hard disk, the gadget will be empty. If bad blocks were found, they will be listed here.The list shows the location of the bad blocks by cylinder, head, bytes from index and sector. Note that the system will list a range for the approximate number of Bytes from Index, and you will only be able to list one error per sector. Once a sector has an error, the entire sector will be marked as bad.Most SCSI hard disks handle bad block errors internally—they locate bad blocks themselves and avoid using these areas without any user intervention. When you use the Verify Data on Drive function, it locates bad blocks which the hard disk itself did not find. At the bottom of the screen is an informational message called Bad Blocks mapped out by drive: which displays the number of bad blocks the hard disk located internally.
2. Select the Add Bad Block... gadget.A requester will open.
Changing the Drive Type 4-19
In this requester, enter the Cylinder, Head, Bytes from Index or Sector of the block. To enter this information, click on each text gadget and enter the proper number. Press Return after each entry. Select OK to add this block to the list or Cancel. You will be returned to the Bad Blocks screen.To delete a bad block from the list, click on it and select the Delete Bad Block gadget.
3. Select OK on the Bad Blocks screen to save your changes.You will be returned to the Hard Disk Preparation, Partitioning and Formatting screen.
4. Select the Save Changes to Drive gadget.
Changing the Drive TypeIn order for your system to function properly with a hard disk, it must be told which type of hard disk it is using. The configuration of the hard disk that came with your computer is already set. You will not need to change anything.When you add a new hard disk, you supply your system with the hard disk’s specifications through HDToolbox. HDToolbox can read the specifications directly from the new hard disk.You may, however, decide to type them in manually from the documentation that came with the hard disk. These specifications include the manufacturer's name, the model number, the storage size, and many other technical specifications. The use of Read Configuration is recommended.HDToolbox can also be used to change the drive type if you've replaced a drive, or to change specifications if you need to edit any specifications of an existing hard drive type.To change or add a new drive type, start from the Hard Drive Preparation, Partitioning and Formatting screen:1. Select the Change Drive Type gadget.
This gadget takes you to the Set Drive Type screen.
4-20 Changing the Drive Type
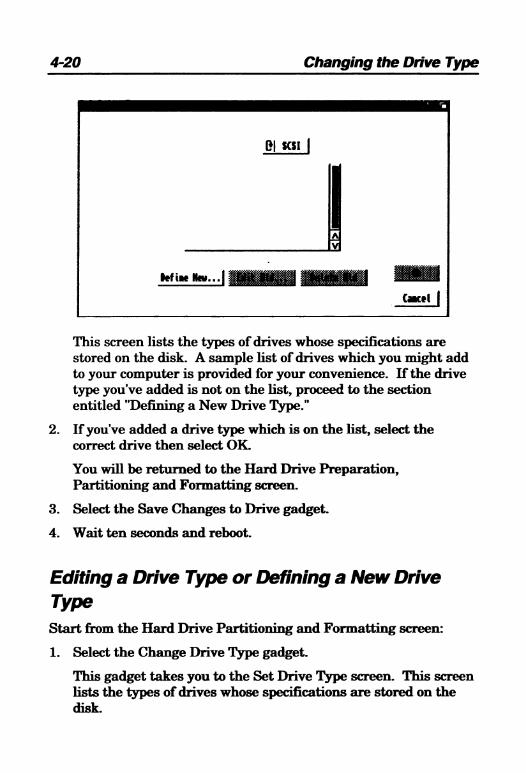
This screen lists the types of drives whose specifications are stored on the disk. A sample list of drives which you might add to your computer is provided for your convenience. If the drive type you've added is not on the list, proceed to the section entitled "Defining a New Drive Type."
2. If you've added a drive type which is on the list, select the correct drive then select OK.You will be returned to the Hard Drive Preparation, Partitioning and Formatting screen.
3. Select the Save Changes to Drive gadget.4. Wait ten seconds and reboot.
Editing a Drive Type or Defining a New Drive TypeStart from the Hard Drive Partitioning and Formatting screen:1. Select the Change Drive Type gadget.
This gadget takes you to the Set Drive Type screen. This screen lists the types of drives whose specifications are stored on the disk.
Changing the Drive Type 4-21
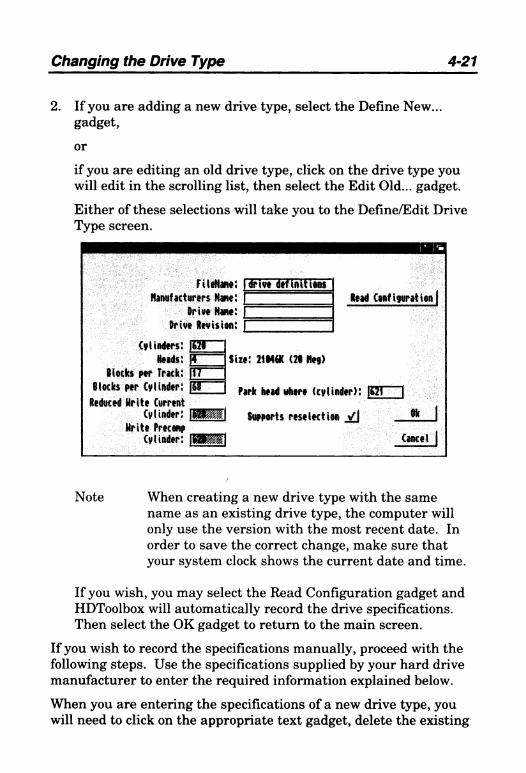
2. If you are adding a new drive type, select the Define New... gadget,orif you are editing an old drive type, click on the drive type you will edit in the scrolling list, then select the Edit Old... gadget.Either of these selections will take you to the Define/Edit Drive Type screen.
FileNm: Manufacturers Kane:
Drive Hane: Drive Revision:
drive definitionsRead Confiyurationj
Cylinders: |S2B
EEHuds: g
Blocks rer Track: Blocks per Cylinder: j§7
Reduced Hrite Current Cylinder:
Mrite Preconp Cylinder:
Size: 21M6K (2B Nee)
Park head where (cylinder): [SZT
Supports reselection j / j
Cancel
Note When creating a new drive type with the samename as an existing drive type, the computer will only use the version with the most recent date. In order to save the correct change, make sure that your system clock shows the current date and time.
If you wish, you may select the Read Configuration gadget andHDToolbox will automatically record the drive specifications.Then select the OK gadget to return to the main screen.
If you wish to record the specifications manually, proceed with the following steps. Use the specifications supplied by your hard drive manufacturer to enter the required information explained below.When you are entering the specifications of a new drive type, you will need to click on the appropriate text gadget, delete the existing

4-22 Changing the Drive Type
information, type the correct information, and press Return. Always press Return after entering new information.The specifications on the Define/Edit Drive Type screen are as follows:
Filename: The file called drive definitions is located on your hard disk and contains all of the drive specifications you have saved. This is the list of sample drives you saw on the Change DriveType screen. Since you can save multiple drive types and their specifications in this file, you do not need to change this filename.
Manufacturer's name: Displays the name of the drive manufacturer, using up to eight characters.
Drive Name: Displays the name of the drive, using up to sixteen characters.
Drive Revision: Displays the number of the drive revision, using up to four characters.
Cylinders: Displays the number of drive cylinders.
Heads: Displays the number of drive heads.
Blocks per Track: Displays the number of blocks (512 bytes per block) on each track. Some manufacturers may list this as "sectors".
Blocks per Cylinder: Displays the number of blocks in each cylinder.This will normally be the number of heads multiplied by the number of blocks per track.
Size: Displays the amount of memory space on the drive in kilobytes (K) or megabytes (MB).
Changing the Drive Type 4-23
After you have entered information into the Cylinders:, Heads:, and Blocks per Track: text gadgets and pressed Return, the value listed after Size will change. When you are finished, compare the listed size to the drive specification, to ensure that it is close to the value given by the drive manufacturer.
Reduced WriteCurrent Cylinder:
Not used with SCSI, IDE, or XT devices.
Write Precomp Cylinder:
Not used with SCSI, IDE, or XT devices.
Supports reselection Refer to the manufacturer’s documentation to determine whether or not a SCSI device supports reselection. Click on this gadget to change it.
Park head where (cylinder):
Displays the number of the cylinder recommended by the manufacturer. This function is not needed with drives that automatically park the drive head. Refer to the manufacturer’s documentation. If no value is given by the manufacturer, use the number of the last cylinder.
Ok Saves the changes on this screen to the drive definitions file in the current directory immediately, and returns you to the ChangeDrive Type screen.
Cancel Returns you to the Change Drive Type screenwithout saving your changes
When you have finished entering the specifications:1. Select the Ok gadget on the Define/Edit Drive Type screen.
You will be returned to the Set Drive Type screen.2. Click on the newly defined drive in the drive type list.
4-24 Modifying File Systems
3. Select the Ok gadget on the Set Drive Type screen.This saves your changes and returns you to the Hard Drive Preparation, Partitioning and Formatting screen.
4. Select the Save Changes to Drive gadget.5. Wait ten seconds and reboot.
Modifying File Systems
Note This function is intended for advanced users.
A file system is software that controls how data is organized on a disk. Amiga systems use the FastFileSystem (FFS), which is an efficient file system saving time and hard disk space.You may decide to switch to a different file system—perhaps to an upgrade in AmigaDOS or to a file system you've produced yourself. HDToolbox allows you to modify the list of available file systems by adding new file systems, deleting file systems, and modifying existing file systems.
C autio n C h an g in g th e file sys tem o f a p a rtitio n th a t co n ta in s d ata m igh t m ake th e d a ta in a ccess ib le .
Advanced users may choose to use the File System Characteristics screen to modify a partition's file system. Most users can safely ignore this screen.To modify a partition's file system, start from the Hard Disk Preparation, Partitioning and Formatting screen:1. Select the Partition Drive gadget.
The Partitioning screen will be displayed.2. Select the Advanced Options gadget.
The Advanced Options screen will be displayed. You must next make the partition whose file system you wish to modify the
Modifying File Systems 4-25
current partition. To do this, click on that partition in the partitioning bar.
3. Select the Change... gadget.The File System Characteristics screen will be displayed. At the top of the screen, it shows the name of the selected partition.
You must next choose the file system for the selected partition by clicking on one of the following gadgets:
Fast File System This is the default file system.
Old File System This is the original Amiga file system. It may be necessary to choose this file system to read old Amiga hard disks.
Custom File System This allows you to install your own file system.
Reserved Partition This will allow you to reserve an area on the disk without a partition. This area can be set aside for some special use, such as for a UNIX operating system.
After you have chosen a file system you must set its values. To change any of the following values, click on the box, delete the existing information, type the new number and press Return. (Hex numbers must begin with Ox.):
Identifier = Displays the hex number (code) that tells AmigaDOS what file system is being used. The Identifier can only be modified when using a Custom File System.
Mask = Displays the hex number that defines which areas of memory can be used with DirectMemory Access (DMA). Mask is available when using Fast File System and Custom File System.
4-26 File System Maintenance
MaxTransfer = Displays the hex number that determines the maximum number of bytes to be moved during each DMA transfer. MaxTransfer is only available when using Fast File System and Custom File System.
Reserved blocks at beginning:
Displays the number of blocks reserved at the beginning of the selected partition for DOS usage. This value defaults to 2, and normally should not be set to less than 2.
Reserved blocks at end:
Displays the number of blocks reserved at the end of the selected partition, for DOS usage. This value defaults to 0.
To return to the Partitioning screen without saving your changes, select the Cancel gadget.To save your new file system characteristics:1. Select the Ok gadget.
You will be returned to the Partitioning screen.2. Select the Ok gadget in the Partitioning screen.
You will be returned to the Hard Drive Preparation, Partitioning and Formatting screen.
3. Select the Save Changes to Drive gadget.
File System MaintenanceThe File System Maintenance screen allows you to modify the list of available file systems. This section tells you how to:• Add a new file system• Delete a file system• Modify an existing file systemTo use this screen to perform any of the above, you must start from the Hard Disk Preparation, Partitioning and Formatting screen:
File System Maintenance 4-27
1. Select the Partitioning gadget.The Partitioning screen will be displayed.
2. Select the Advanced Options gadget.The Advanced Options will be displayed. You must next make the partition whose file system you wish to modify the current partition. Click on that partition in the partitioning bar.
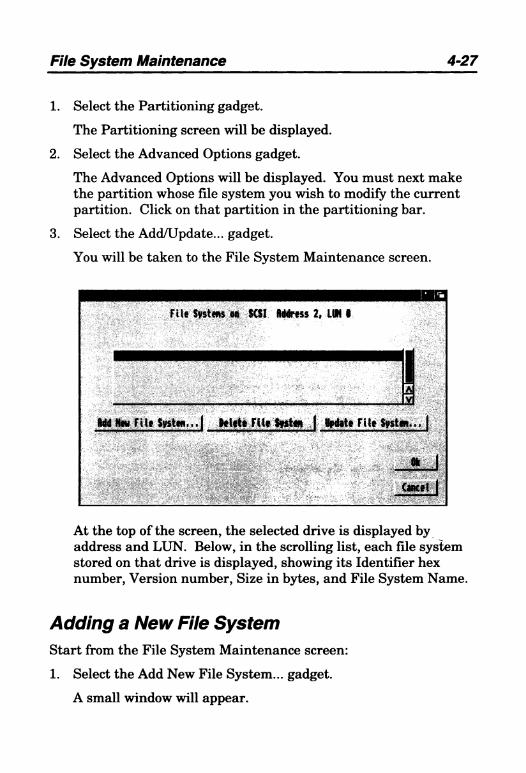
3. Select the Add/Update... gadget.You will be taken to the File System Maintenance screen.
HU Systems m SCSI flttms 2, LIM I
m Hw Rig Systw.,,1 PtUtt Fût $nt«* | Mat* H it Syst«.
At the top of the screen, the selected drive is displayed by address and LUN. Below, in the scrolling list, each file system stored on that drive is displayed, showing its Identifier hex number, Version number, Size in bytes, and File System Name.
Adding a New File SystemStart from the File System Maintenance screen:1. Select the Add New File System... gadget.
A small window will appear.
4-28 File System Maintenance
2. Delete the contents of the first text gadget and enter the full pathname to the location of the new file system. Press Return.
3. Click on the second text gadget, delete the existing hex number and type the hex number of the DosType of the new file system.The system defaults to FastFileSystem with DosType 0x444f5301.
4. Click on the third text gadget and enter the version number of the new file system.
5. Select the Ok gadget to retain your changes.You will be returned to the File System Maintenance screen.
6. Select the Ok gadget in the File System Maintenance screen. You will be returned to the Partitioning screen.
7. Select the Ok gadget in the Partitioning screen.You will be returned to the Hard Drive Preparation, Partitioning and Formatting screen.
8. Select the Save Changes to Drive gadget.
Deleting a File SystemStart from the File System Maintenance screen:1. Select the file system you wish to delete.
The selected file system is highlighted. To select a different file system, click on the desired file system.
2. Select the Delete File System gadget.The selected file system will disappear.
3. Select the Ok gadget in the File System Maintenance screen. You will be returned to the Partitioning screen.
4. Select the Ok gadget in the Partitioning screen.You will be returned to the Hard Drive Preparation, Partitioning and Formatting screen.
File System Maintenance 4-29
5. Select the Save Changes to Drive gadget.
Updating an Existing File SystemStart from the File System Maintenance screen:1. Select the Update File System... gadget.
A small window will appear.2. Delete the contents of the boxes which must change and type
the new information. Press Return.3. Select the Ok gadget to retain your changes.
You will be returned to the File System Maintenance screen.4. Select the Ok gadget in the File System Maintenance screen.
You will be returned to the Partitioning screen.5. Select the Ok gadget in the Partitioning screen.
You will be returned to the Hard Drive Preparation, Partitioning and Formatting screen.
6. Select the Save Changes to Drive gadget.


Chapter 5
Backing Up Your Hard Disk with HDBackup
HDBackup is a backup and restore utility included with your system software. On hard disk systems, you will find its icon in the Tools drawer.HDBackup provides an easy way to back up your hard disk to floppy disks or tape, and then, if necessary, restore them to your hard disk.You have many options with HDBackup. You can back up every file on your system or you can limit backups to a given directory. You can set HDBackup to back up only those files which have changed since the last time you've backed up. Also, HDBackup can compress files to a smaller size so you can save space on your backup disks.HDBackup has a complete built-in Help facility, available by choosing Help in the Project menu or pressing Right Amiga+H at any time. Simply click on any text displayed in white on the following screens for information.
Using HDBackup for the First TimeWhen you create a backup, you must first decide whether you want to back up an entire volume (a full backup) or just a portion of a volume (an incremental backup).The following section will take you through the step-by-step procedure of creating a backup of an entire volume.
5-2 Creating a Full Backup
Creating a Full Backup1. Open the Tools drawer.2. Double-click on the HDBackup icon.
The HDBackup screen will appear.3. Choose Backup from the Project menu.
The Volume requester will appear with gadgets listing each of your devices and partitions, such as RAM:, DFO: and Work:.You now decide which of these volumes you would like to back up.
4. Choose a volume by either clicking on a gadget, or by typing the volume name in the text gadget. 'iOnce you have selected a volume, the scroll gadget on youjr screen will contain your File Selection list—a list of all the directories and files within the volume you've selected.Directories and empty directories are indicated as such to the right of their names. Double-click on a directory to see what subdirectories and files it contains. To return to the previous directory, select the Parent gadget above the list. If you have descended into a subdirectory and wish to return to the original list of files, select the Root gadget.Files in the File Selection list include information on their size (in bytes), their last modification date (the last date you changed the file), and their archive bit status.An archive bit tells you whether the file has been archived (backed up) already. If a file list item has an "A" at the end, it means the archive bit is set. If there is no "A", the file has never been archived or has been changed since its last archive.HDBackup has a File Data requester to provide you with even more information about a file in the File Selection list. To see the File Data requester:
5. Double-click on any file (not a directory) in the File Selection list.A typical File Data requester appears.
Creating a Full Backup 5-3
This information tells you:
Name
Size
Date
Status
File Note
The name of the file.
The size of the file in bytes, and the number of archive blocks. A block is equivalent to a sector on the hard disk.
The last modification date and time.
A list of current attributes that have been set for the file. For more information on attributes (protection bits), refer to your AmigaDOS documentation.
Displays any comments attached to the file. (For more information on comments and File notes, refer to your AmigaDOS documentation.)
You will also notice four lines of letters and numbers on the bottom of the File Data requester. These are the first 64 characters of the file in binary form which is how your computer reads the information. On the right of these lines is a column containing the first 64 characters of the file in text form. This can be used to take a quick look at the file's contents.
6. To exit the File Data requester, choose the OK gadget or type any letter.Now you must decide if you want to set archive bits on the volume. If you wish to use archive bits to mark files as archived, you must choose a menu item. It is a good idea to set archive bits; in the future, you can create backups of only those files which have changed by using their archive bit status.If you wish to set archive bits:
7. Choose Set Archive Bits from the Options menu.A check mark next to the Set Archive Bits item indicates it is selected.The File Selection list can be sorted in a number of ways. Your choices are shown in the Display Sorting menu.A check mark indicates which method is selected.With these features you can:
5-4 Creating a Full Backup
List Directories First Lists all directories before files. If this is not chosen, directories are listed with files according to the sorting method you selected.
You have the choice of one of the following sorting methods:
Sort by Name Lists files in alphabetical order. Files with numerical names are listed first.
Sort by Date Lists files chronologically according to the last modification date. In other words, the files that you've changed (or created) most recently will be at the bottom of the list.
Sort by Size
Sort by Archive Bit
Lists files in order of number of bytes, from smallest to largest.
Lists files with a dear archive bit first.
If you wish to change the sorting method:8. Choose a sorting method for the File Selection list from the
Display Sorting menu.Your next step before you begin backing up the volume is telling HDBackup which device(s) will hold your backup. For example, drive DFO: is your archive device if you plan to archive with floppy disks to drive DFO:. More than one device may be selected.
9. Set the device(s) you will use by choosing it in the Devices menu.To add a device (such as a tape drive) to the menu, see the "Tool Types' section.To see how many disks the backup will require, you can refer to the Archive Size display in the lower left comer of the screen. The Archive Size display shows the total archive size in kilobytes. This is the size the backup will take up on disks or
Creating a Full Backup 5-5
tapes and includes extra space for archive overhead (all the information the backup itself needs).The Archive Size display also estimates how many 880 KB floppy disks you will need to archive the files you've selected. (It refers to disks as volumes.) This way you can have the proper amount of disks on hand. Disks do not need to be formatted before using them with HDBackup.
Note When the device is set to tape, HDBackup does not know the size of tape you are using. Therefore the Archive Size display cannot report how many volumes you will need. Instead, it reports "???" in that field.
By default, HDBackup backs up the directory structure for each file. This means HDBackup will restore files to the same directory they were in when you created the backup. The check mark next to the Backup Dir Structure item in the Options menu shows this is set. Although you will normally leave it as such, to deselect this option, simply choose the item again.Once all the options have been selected, to tell HDBackup to begin creating the backup:
10. Load the first volume (disk or tape) your backup will be stored on.
11. Select the Start gadget.HDBackup will provide a requester warning you that all information on the specified volume will be erased.At this point, HDBackup waits for confirmation to proceed.
12. If you wish to start backing up, select the Continue gadget. (To quit, select the Quit gadget, and the backup will be aborted.)HDBackup will prompt you to load disks to continue the backup. The names of the files being backed up appear at the top of the HDBackup screen. A requester displays the percentage of the backup completed, and gives you the option to cancel the backup.
5-6 Creating a Full Backup
13. As you fill up each volume, you should label each disk with three pieces of information:• The date of the backup.• The volume you backed up.• The backup disk's volume number.It is essential to have an accurately labeled disk. When you restore files, you will need to know which disks to use, in their proper sequence.When the backup is complete, you will receive a Log File requester.HDBackup automatically creates a log file for each backup.A log file is a report—or log—of what was included in your backup. While the actual backup is located on your backup disks or tapes, the table of contents of each backup is found on its log file.By default, log files are stored on Work:, though you may change this with the LOGDIR Tool Type. The log file ideally is not stored on your hard disk to ensure that it is not destroyed if anything happens to data on your hard disk. When you restore files, HDBackup uses the log file to provide you with the File Selection list for that particular backup. When you've found the log file with the file(s) you want to restore, you can then locate the corresponding disks.Log files are automatically named according to the date that you've done your backup. For instance, a backup created on May 20, 1990, would have a log file called 20May90. (If you create a second backup of the same volume on May 20, 1990, it will be called 20May90.1.)
14. Select the OK gadget to store the log file in Work:.Your backup is now complete.Make sure to store your backup disks or tapes in a safe place.
Creating an Incremental Backup 5-7
Creating an Incremental BackupYou may decide to exclude certain files from your backups because, for example, you have them on another disk, they might take up too much room on your disks, and so on. Now that you have seen how to back up a full volume, the following sections will explain the various ways to create incremental backups.HDBackup is designed to make incremental backups very easy. Many of the gadgets you see in the HDBackup screen are used to select and exclude files from the backup, quickly and conveniently. The most basic way to exclude files is to point and click on the items that have been read into the File Selection list.When you click on a file or directory in the list, it becomes shadowed. This indicates that file has been excluded from the list and will not be included in your backup.If you shadow a directory, the entire contents of that directory (including all of its subdirectories) will be excluded from the archive.To exclude only certain files within a directory, you must descend into a directory (by double-clicking on it) and shadow files within it that you wish to exclude. (To get back to the previous list, select the Parent gadget.) The directory will no longer be shadowed, but all shadowed files within the directory will remain shadowed and excluded from the backup.To desel zt a file or directory which has been shadowed (and thus have it included on the backup), click on it again.
Selected Files and Selected Size DisplayThere is a running tally of selected files and selected size on the bottom left corner of your screen.This lists the number of files you have selected from the list and the total size of the all these files in bytes. The number of selected files and the selected size decreases as you shadow files in the list.
5-8 Creating an Incremental Backup
Include and Exclude GadgetsAt times, you may want to back up only a few files of a very large volume. You could scroll through the list and shadow each file or directory to exclude, or you could use the Exclude gadget.The Include and Exclude gadgets are at the top left comer of the screen.The Include gadget tells HDBackup that all files in the File Selection list should be included in the backup. By default, HDBackup assumes that the Include gadget is selected. That is why all files which are read into the File Selection list are already included in the backup.When you select the Exclude gadget, all files in the File Selection list are shadowed and excluded. All of the contents of directories are shadowed. You can then include some of the files by single clicking on them. To include files from a shadowed directory, you must descend into the directory and click on them. Try this and note the Selected Files display.To return to the Include mode (and thus include all of the files again), select the Root gadget, then select the Include gadget.
File Selection GadgetsYou do not always need to point and click to exclude files. All of the gadgets on the left side of the HDBackup screen are used to include and exclude files from a backup (and later from a restore). These gadgets allow you to include or exclude files by their archive bit status, by a specified pattern that they may contain, by a specified modification date and/or by a specified size.Here's how they work: File Selection gadgets are set after you have selected a volume and its contents are read into the File Selection list. You must activate the gadgets and provide them with specific information in their text gadgets. You must then select the Exclude gadget. All files that meet these criteria are shadowed and thus excluded from the backup.All of the File Selection gadgets act in conjunction with one another. For instance, if you have activated both the Date Selection gadget
Creating an Incremental Backup 5-9
and the Size Selection gadget, a file must meet the criteria of both to be included in (or excluded from) your backup.The following four sections explain in detail how to use each of HDBackup's File Selection gadgets.
Selecting Files by Archive Bit StatusHDBackup can select files by the status of their archive bit. With this gadget, you can select a file list of only files with either a clear archive bit or a set archive bit.After a volume is selected and its contents have been read into the File Selection list:1. Select the gadget marked Archive Bit.
This will highlight the gadget, indicating this feature has been selected.
2. Select either Set or Clear.The Set gadget is a cycle gadget. With it, you can choose:Set Select files with archive bits set.Clear Select files with archive bits clear.
3. Select the Exclude gadget.If you have chosen Set, all files with set archive bits will be shadowed (and thus excluded). If you have chosen Clear, all files with clear archive bits will be shadowed.
Selecting Files by PatternA pattern is simply a group of characters. HDBackup allows you to type in a pattern, and only files which contain that pattern (or only files which don't contain that pattern), will be included in your File Selection list.For example, you may want to archive every file in your DHO: partition, except for .info files. In this case, ".info" is the pattern you want HDBackup to exclude from your File Selection list.
5-10 Creating an Incremental Backup
The characters #? are used as a wildcard. The wildcard means "any text." For example, entering #?.info means any filename which ends in ".info" will be included on the list. If you want to archive only files which begin with the letter "s", you would enter s#? in the text gadget. The wildcard must be used in the pattern unless you are selecting a pattern which would be matched exactly.After a volume is selected and its contents have been read into the File Selection list:1. Select the gadget marked Files Pattern:.
This will highlight the gadget, indicating it is activated.Below this gadget is a cycle gadget that says Match. It has two functions:Match Select files that contain that pattern.* Select files that do not contain that pattern.
2. Select either Match or *.
3. Click in text gadget, delete its contents and type in the pattern you wish to use.
4. Select the Exclude gadget.Files which meet these criteria will be shadowed.
Selecting Files by DateYou can tell HDBackup to select files by date. It will then include on your backup only those files with modification dates before, after or exactly on the date you specify, whichever you choose.An example of this feature is performing a daily backup. As mentioned earlier, each file contains a modification date—this is the date and time a file was last used. In this case you want an archive of only those files which have changed today. In this case you would tell HDBackup to exclude files dated before today.After a volume is selected and its contents have been read into the File Selection list:1. Select the gadget marked Files Dated:.
Creating an Incremental Backup 5-11
This will highlight the gadget, indicating this feature has been activated.The gadget marked Before is a cycle gadget. With this gadget, you can select:
Before Select files with modification dates before thespecified date.
After Select files with modification dates after the specifieddate.
On Select files with that exact modification date.
2. Use the cycle gadget to choose Before, After or On.Next you must set the date.
3. Click in the text gadget, delete its contents and type in the date you choose.The date should be in this form:DD-MMM-YYwhere:
DD Is the day of the month.
MMM Is the name of the month, abbreviated to its firstthree characters (such as SEP for September).
YY Is the last two digits of the year.
It is not necessary to use a leading 0 for single digits.4. Select the Exclude gadget.
Files which meet the criteria you've set will be shadowed.
Selecting Files by SizeYou may choose to back up files by a specific size. For example, you may want to back up only your very large files (such as database files) that took you a long time to create.After a volume is selected and its contents have been read into the File Selection list:
5-12 Creating an Incremental Backup
1. Select the gadget marked Files Size:.This will highlight the gadget, indicating this feature has been selected.Next you must specify a size.
2. Click in the text gadget, delete its contents and enter the size. Size is specified in bytes.The gadget that says Smaller is a cycle gadget. With this gadget, you can select:
Smaller Select files smaller than the specified size.
Larger Select files larger than the specified size.
Equal Select files equal to the specified size.
3. Using the cycle gadget, select either Smaller, Larger or Equal.4. Select the Exclude gadget.
Files which meet these criteria will be shadowed.
Smaller Log File OptionNormally the log file contains the complete File Selection list for that particular archive. This includes files which were included in the archive as well as files which were excluded by shadowing them. When you go to restore files, you will notice that Excluded files are represented in a different color.By choosing Smaller Log files from the Options menu, HDBackup will eliminate the excluded files from your log file. This way, when you go to restore files, only files which were included in the archive will appear in the File Selection list. This option is useful for saving disk space if you have many log files saved on your HDBackupLogs disk.
File Compression Option 5-13
File Compression OptionThe File Compression option was designed to save space on your backup disks. Files are compressed—made smaller—so more files will fit on each disk.The smaller size of the archive is the advantage of compressing files. You should weigh this advantage with File Compression option's two disadvantages. The first is that it takes longer to perform the backup—sometimes two to three times longer—because for each file, HDBackup must first compress it and then save it to your backup disk. The second disadvantage is that HDBackup cannot provide you with an estimate in the Archive Size display area. Instead it reports "???' in that field. HDBackup would actually have to go through and compress each file just to give you an estimate.To save backup disk space, you may be willing to overlook these disadvantages.The Compression menu item gives you three choices:
None By default, the File Compression option is set atNone where no files will be compressed.
All Every selected file on your File Selection list willbe compressed.
Larger Than Only files larger than the specified size (in bytes) will be compressed. This option compresses files which are very space consuming, but cuts down the archive time by not compressing all of the files.
When you choose the Compress Larger Than menu item, a requester will appear asking for the size (in bytes). A default size of 100 (K) will appear in the text gadget. If you wish to use this size, select the OK gadget. If you want to change the size, click in the text gadget and delete its contents. Enter the new size in the text gadget and select OK.
Files which have been compressed can be restored in the same way as regular files. HDBackup will automatically decompress files before it restores them.
Compress
Compress
Compress
5-14 Checking Differences
File compression on a backup does not affect your original file in any way.
Checking DifferencesAfter you've created a backup you may want some assurance that it is complete and error-free so it can be used in the future. The Differences mode checks a backup for errors and any differences between the files on your backup and the files with the same name on your hard disk.The Differences mode can be used immediately after you've created a backup to make sure that the backup is complete—you should not see any differences between your backup and your hard disk files of the same name. You can also run Differences on a backup at a later time to see which files have changed since the archive was created.To run the Differences mode:1. Choose Differences from the Project menu.
The Log File requester will appear and show a list of volumes you have backed up.
2. Click on the directory for the proper volume. From the log file list, click on the log file you will check for differences. Then select the OK gadget.The File Selection list on the HDBackup screen will display the list of files that you backed up.
3. Check that the Devices menu is set properly to reflect which device(s) will contain your backup.
4. Insert the first backup disk.5. Select the Start gadget.
The volume requester will appear asking you to select the volume to which you will be comparing the backup.
6. Select the volume and then select the OK gadget.HDBackup will scan the list of files and report any errors and differences in files. These differences may include variations in
Inspecting a Backup 5-75
file size, modification dates, contents, protection bit settings and file names.
If you have checked differences in the file immediately after creating it and HDBackup reports nothing, you know that there are no errors and none of the files have been changed since you archived. In this case you know your backup was complete and error-free.If files you backed up produce error warnings (such as a warning telling you a file may be corrupted), you must decide if the file is critical. If so, you may decide to investigate the problem and try to archive that file again on a separate disk.
Inspecting a BackupIn one sense, HDBackup's Inspect mode works similarly to the Differences mode—it reports errors. The Inspect mode does not compare a backup to files on your hard disk so it is useful if you want to check an older backup for errors.To use the Inspect mode:1. Choose Inspect from Project menu.
The Log File requester will appear and show a list of volumes you have backed up.
2. Click on the directory for the proper volume. From the log file list, click on the log file you will inspect. Then select the OK gadget.The File Selection list on the HDBackup screen will display the list of files that you backed up.
3. Check that the Devices menu is set properly to reflect which device(s) will contain your backup disks.
4. Insert the first backup disk.5. Select the Start gadget.
The volume requester will appear asking you to select the volume or directory to inspect.
5-16 Restoring Files
6. Select the volume and then select the OK gadget.HDBackup will start reading the backup and inspecting it. File names will appear in the screen's display area as it scans.
As in the Differences mode, HDBackup will display any errors it has found in the files.If no error messages appear, your backup is error-free. If error messages do appear, you may want to investigate the problem and decide if you want to try to back up the files again.
Restoring FilesAny time a volume, directory, or file is lost, you can use the log files in HDBackupLogs to see exactly which backup contains the files that you want to restore.If you do not have a log file you may select No-log Restore. The entire backup will then be read.To restore files to your hard disk:1. Choose the Restore item from the Project menu.
The Log File requester will appear, listing the contents of your LOGDIR directory.Look for the drawer with the name of the volume you want to restore. If you made a backup of a directory within that volume, it will appear with all of the log files for that volume.
2. Click on the volume name you wish to restore. From the log file list, click on the log file which contains the file(s) to restore. Then select the OK gadget.The File Selection list on the HDBackup screen will display the list of files that you backed up. Remember, files in light blue were excluded from the backup when you created it. If the file(s) you wish to restore are not on the current log file, choose Restore from the Project menu. The Log File requester will appear, and you can search through another log file.
Restoring Files 5-17
You may not wish to restore all of the directories and files that now appear in the File Selection list. You can now exclude files you don't want restored by shadowing them or by using the File Selection gadgets with the Include and Exclude gadgets as you did when creating a backup, explained earlier in this chapter.
3. Exclude any files you do not wish to restore.4. Check that the Devices menu is set properly to reflect which
device(s) contains your backup files.5. Insert the first backup disk (or tape).6. Select the Start gadget.
The volume requester will appear. This requester is similar to the requester which appears when you create a backup. You must tell it where you want the files restored.Notice that the text gadget in the requester already contains a default—the volume that originally contained the files. If you want them restored to the same place you can simply select the OK gadget.If you want files to be placed in another partition, click on the gadget which contains the name of that partition. If the files should be placed in a directory within a partition, you must type the partition name and the directory in the requester's text gadget. (For example, if you want to restore the file(s) to a directory named Junk in the Work: partition, you would enter Work:Junk in the text gadget.)
7. Select the volume you will restore to by clicking on a gadget or typing the name in the text gadget. Select the OK gadget.
Note Sometimes you may restore files from a backupwhich is already on your hard disk. HDBackup will not overwrite a newer hard disk file with an older version of the file from the backup.
You will see in the display area on the screen that HDBackup is scanning the backup and restoring the files. The flashing lights between your hard disk and your disk drive show that the
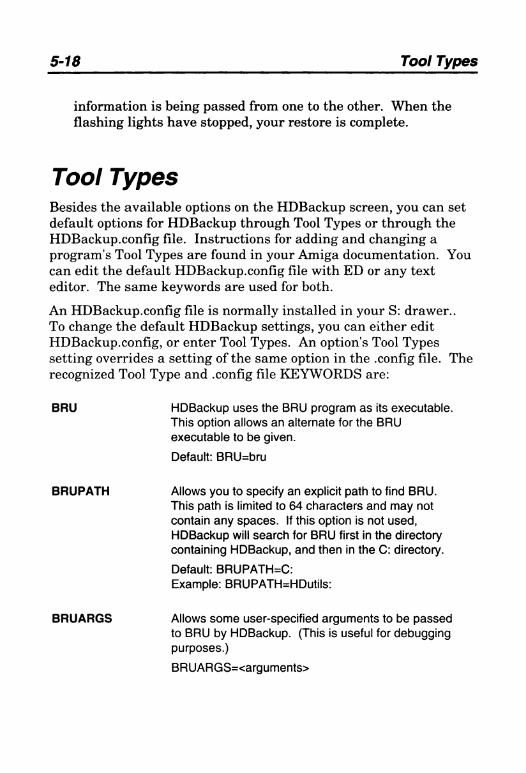
5-18 Tool Types
information is being passed from one to the other. When the flashing lights have stopped, your restore is complete.
Tool TypesBesides the available options on the HDBackup screen, you can set default options for HDBackup through Tool Types or through the HDBackup.config file. Instructions for adding and changing a program’s Tool Types are found in your Amiga documentation. You can edit the default HDBackup.config file with ED or any text editor. The same keywords are used for both.An HDBackup.config file is normally installed in your S: drawer..To change the default HDBackup settings, you can either edit HDBackup.config, or enter Tool Types. An option's Tool Types setting overrides a setting of the same option in the .config file. The recognized Tool Type and .config file KEYWORDS are:
BRU HDBackup uses the BRU program as its executable.This option allows an alternate for the BRU executable to be given.
Default: BRU=bru
BRUPATH Allows you to specify an explicit path to find BRU.This path is limited to 64 characters and may not contain any spaces. If this option is not used, HDBackup will search for BRU first in the directory containing HDBackup, and then in the C: directory.
Default: BRUPATH=C:Example: BRUPATH=HDutils:
BRUARGS Allows some user-specified arguments to be passedto BRU by HDBackup. (This is useful for debugging purposes.)
BRUARGS=<arguments>
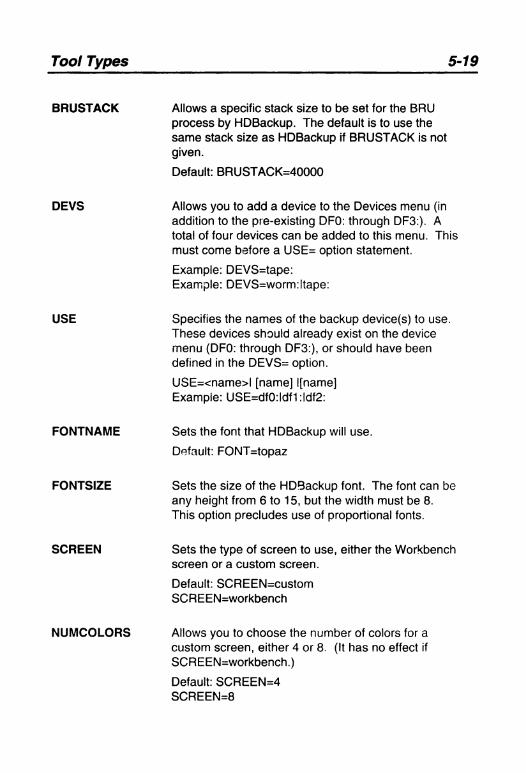
Tool Types 5-19
BRUSTACK Allows a specific stack size to be set for the BRU process by HDBackup. The default is to use the same stack size as HDBackup if BRUSTACK is not given.
Default: BRUSTACK=40000
DEVS Allows you to add a device to the Devices menu (in addition to the pre-existing DFO: through DF3:). A total of four devices can be added to this menu. This must come before a USE= option statement.
Example: DEVS=tape:Example: DEVS=worm:ltape:
USE Specifies the names of the backup device(s) to use. These devices should already exist on the device menu (DFO: through DF3:), or should have been defined in the DEVS= option.
USE=<name>l [name] l[name]Example: USE=dfO:ldf1:ldf2:
FONTNAME Sets the font that HDBackup will use.
Default: FONT=topaz
FONTSIZE Sets the size of the HDBackup font. The font can be any height from 6 to 15, but the width must be 8.This option precludes use of proportional fonts.
SCREEN Sets the type of screen to use, either the Workbench screen or a custom screen.
Default: SCREEN=customSCREEN=workbench
NUMCOLORS Allows you to choose the number of colors for a custom screen, either 4 or 8. (It has no effect if SCREEN=workbench.)
Default: SCREEN=4SCREEN=8
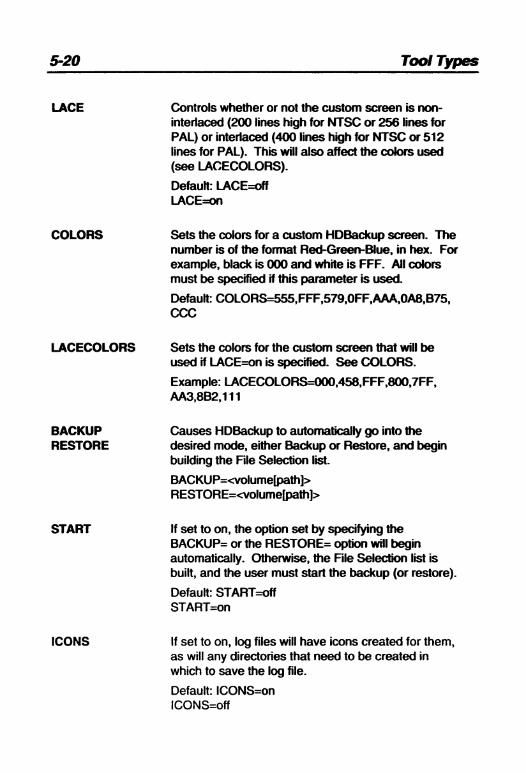
5-20 Tool Types
LACE Controls whether or not the custom screen is noninterlaced (200 lines high for NTSC or 256 lines for PAL) or interlaced (400 lines high for NTSC or 512 lines for PAL). This will also affect the colors used (see LACECOLORS).
Default: LACE=offLACE=on
COLORS Sets the colors for a custom HDBackup screen. The number is of the format Red-Green-Blue, in hex. For example, black is 000 and white is FFF. All colors must be specified if this parameter is used.
Default: COLORS=555,FFF,579,OFF,AAA,OA8,B75, CCC
LACECOLORS Sets the colors for the custom screen that will be used if LACE=on is specified. See COLORS.
Example: LACECOLORS=000,458,FFF,800,7FF, AA3,8B2,111
BACKUPRESTORE
Causes HDBackup to automatically go into the desired mode, either Backup or Restore, and begin building the File Selection list.
BACKUP=<volume[path]>RESTORE=<volume[path]>
START If set to on, the option set by specifying theBACKUP= or the RESTORE= option will begin automatically. Otherwise, the File Selection list is built, and the user must start the backup (or restore).
Default: START=offSTART=on
ICONS If set to on, log files will have icons created for them, as will any directories that need to be created in which to save the log file.
Default: ICONS=onICONS=off
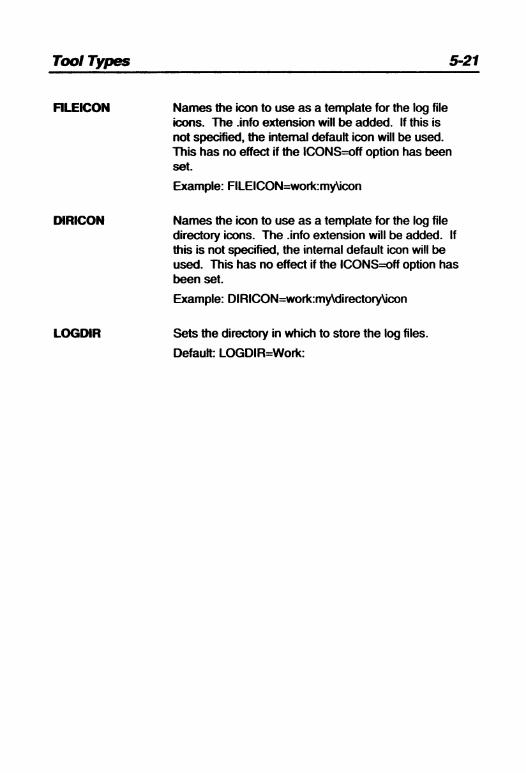
Tool Types 5-21
FILEICON Names the icon to use as a template for the log file icons. The .info extension will be added. If this is not specified, the internal default icon will be used. This has no effect if the ICONS=off option has been set.
Example: FILEICON=work:my\icon
DIRICON Names the icon to use as a template for the log file directory icons. The .info extension will be added. If this is not specified, the internal default icon will be used. This has no effect if the ICONS=off option has been set.
Example: DIRICON=work:my\directory\icon
LOGDIR Sets the directory in which to store the log files.
Default: LOGDIR=Work:

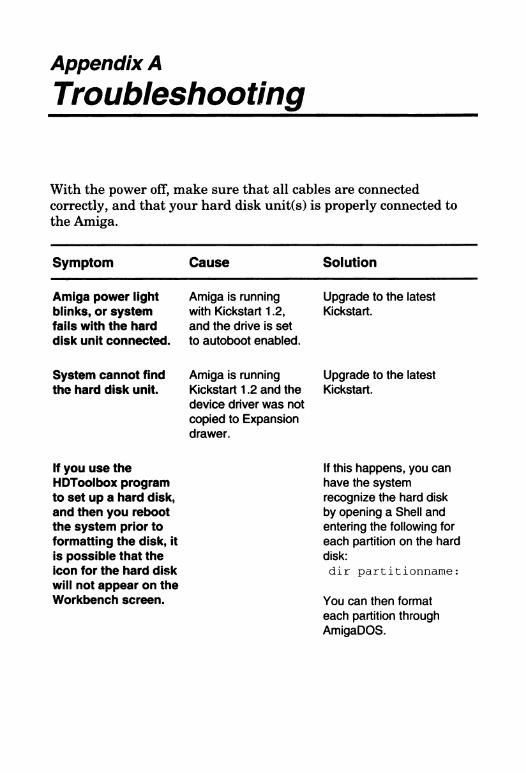
Appendix A
Troubleshooting
With the power off, make sure that all cables are connected correctly, and that your hard disk unit(s) is properly connected to the Amiga.
S ym p to m C a u s e S o lu tio n
Amiga power light blinks, or system fails with the hard disk unit connected,
System cannot find the hard disk unit.
If you use the HDToolbox program to set up a hard disk, and then you reboot the system prior to formatting the disk, it is possible that the icon for the hard disk will not appear on the Workbench screen.
Amiga is running with Kickstart 1.2, and the drive is set to autoboot enabled.
Amiga is running Kickstart 1.2 and the device driver was not copied to Expansion drawer.
Upgrade to the latest Kickstart.
Upgrade to the latest Kickstart.
If this happens, you can have the system recognize the hard disk by opening a Shell and entering the following for each partition on the hard disk:dir partitionname:
You can then format each partition through AmigaDOS.
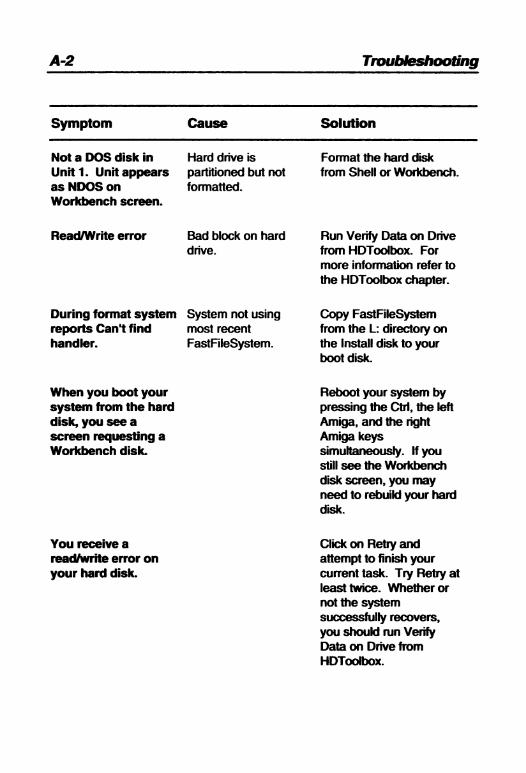
A-2 Troubleshooting
S ym p to m C a u s e S o lu tio n
Not a DOS disk in U n it l . Unit appears as NDOS on Workbench screen.
Hard drive is partitioned but not formatted.
Format the hard disk from Shell or Workbench.
Read/Write error Bad block on hard drive.
Run Verify Data on Drive from HDToolbox. For more information refer to the HDToolbox chapter.
During format system reports Can't find handler.
System not using most recent FastFileSystem.
Copy FastFileSystem from the L: directory on the Install disk to your boot disk.
When you boot your system from the hard disk, you see a screen requesting a Workbench disk.
Reboot your system by pressing the Ctrl, the left Amiga, and the right Amiga keys simultaneously. If you still see the Workbench disk screen, you may need to rebuild your hard disk.
You receive a read/write error on your hard disk.
Click on Retry and attempt to finish your current task. Try Retry at least twice. Whether or not the system successfully recovers, you should run VerifyData on Drive from HDToolbox.
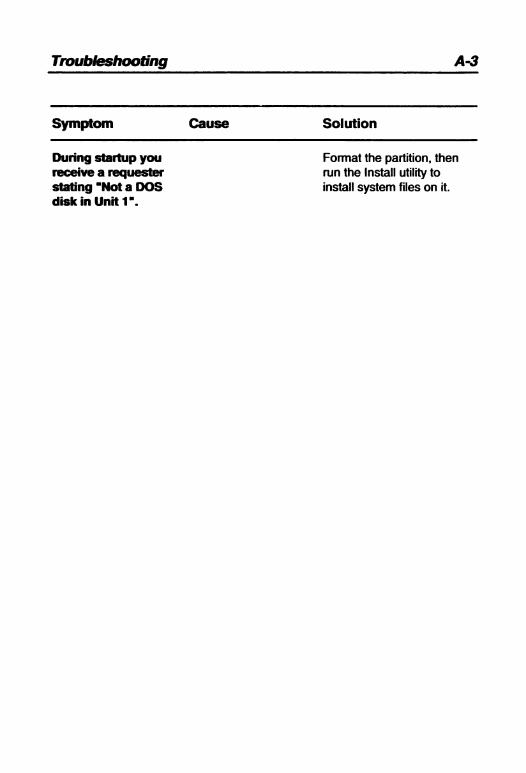
Troubleshooting A-3
S y m p to m C a u s e S o lu tio n
During startup you receive a requester stating "Not a DOS disk in Unit 1".
Format the partition, then run the Install utility to install system files on it.

Index
AA3000/A3000T, 3-4 address, SCSI, 4-2 address, secondary, 4-3 Advanced Options, 4-9, 4-24, 4-27 AmigaDOS, 2-4, 4-4, 4-24, 5-3,A-1applications, 2-1, 3-2, 3-3, 4-4 archive bits, 5-2, 5-3, 5 -4 ,5 -9 archive size, 5-4 ASSIGN statement, 2-3
Bbacking up your hard disk, 1 -2,2-9, 3-3, 4-4, 4-5, 5-1Bad Block List, 4-16bad blocks, 2-10, 4-13,4-16, A-2block, 1-2, 2-9, 5-3blocks per cylinder, 4-22blocks per track, 4-22boot priority, 4-11Bootable gadget, 4 -6 ,4 -10booting, 3-4, 4-12BRU, 5-18buffers, 4-10
cCD-ROM drives, 3-3 configuration
standard, 3-3configuration;hardware, 3-1 controller (SCSI), 3-2, 3-4, 4-3 cylinders, 1-1 ,4-5, 4-10, 4-22
Ddefault setup, 4-8 device name, 4-6, 4-7 device number, 4-3 DFO:, 3-4, 4-11 differences mode, 5-14 Direct Memory Access (DMA), 4-25DosType, 4-28drive definitions (file), 4-22drive specifications, 4-21
EED, 2-5, 5-18 error warning, 5-15 errors
nonrecoverable, 2-10, 3-2
Index-2
read/write, 4-16, A-2 recoverable, 2-9
FFastFileSystem (FFS), 4 -24,4-28, A-2file compression, 5-13 File Data requester, 5-2 file notes, 5-3 file size, 5-2 file systems, 4-11
custom, 4-25 display, 4-6 maintenance, 4-26 Old, 4-25version number, 4-28
file systems;Fast, 4-24 font, HDBackup, 5-19 Fonts drawer, 2-8 FORMAT command, 2 -10,4-15 formatting, A-2 formatting drive, 3 -3 ,4 -8 fragmentation, 4-5
Hhard drive
configuration, 4-14 heads, 4-22 size, 4-22 size(s), 1-2types, 4-2, 4-3, 4 -11 ,4 -19 Unknown, 4 -3 ,4 -12
HDBackup, 2-9, 4-4, 5-1 HDBackupLogs, 5-16 HDBackupLogs disk, 5-12 HDSetup drawer, 3-1 HDSetup utility, 3-2
HDToolbox, 1-2, 3-3, 4-1, A-1 HDTools drawer, 3-1 Help
HDBackup, 5-1 HDSetup, 3-2
Iicons, 2-2, 2-6, 2-8, 3 -1 ,5 -1 , 5-20, A-1icons, language, 3-2 IDE, 4-2, 4-12, 4-23 Identifier, file system, 4-25 incremental backup, 5-7 inspect mode, 5-15 Install disk, 2 -1 ,3 -1 ,4 -1 ,4 -1 2 Install drawer, 3-1 Install utility, 3-2, 3-3 installation
applications, 2 -1 ,3 -2 languages, 3-2 system software, 3-2
Installer program, 3-1 installing system software, 4-10, 4-15
KKickstart, 3-4, A-1
Llabeling backups, 5-6 log file, 5-6, 5-12, 5-14, 5-15, 5-20 LOGDIR, 5-6, 5-16, 5-21 Logical Unit Number (LUN), 4-3 low-level formatting, 4 -13 ,4-15
Index-3
MMask, 4-25 MaxTransfer, 4-26 modification date, 5-2, 5-10
Pparking, drive head, 4-23 partition, 1-2, 2-1
size, 4-6partitioning, 1-2, 3-3, 4-4 partitioning bar, 4-5 Partitioning screen, 4-5 partitions, standard, 3-3 pattern, 5-8, 5-9 platters, 1-1
Rread/write heads, 1-2 reading configuration, 4-12, 4-21 rebooting, 2-7, 2-10, 4-8, 4-10, 4-14, 4-24, A-2 reselection, 3-3, 4-23 reserved blocks, 4-26 reserved partition, 4-25 restoring, 1-2, 2-10, 5-16 ROM update, 3-4
SS: directory, 2-5 S: drawer, 2-8, 5-18 SCSI, 3-3, 4-2, 4-12, 4-18, 4-23 sector, 1-1 ,4-18, 4-22
shadowing, 5-7, 5-12, 5-17 Shell, 2-4, A-1 sorting, 5-3 stack, 5-19 status, 4-3SuperKickstart disk, 3-4 system clock, 4-21 System partition, 4-1
Ttape drives, 3-3, 4-3, 5-4 Tool Types, 5-4, 5-6, 5-18 Tools drawer, 4-1,5-1 track, 1-1
uunit number, 3-3, 4-3User-startup, 2-4Using the Amiga Workbench, 3-2,4-9
Vverifying data on drive, 2-9, 4-13, 4-17volumes, 2-4, 2-6, 5-2
Wwildcards (#,?,*), 5-10 Workbench, 4 -9 ,4 -12 Workbench screen, 2 -8 ,4 -4 ,5 -19 , A-1

Index-4
XXT, 4-2, 4-12, 4-23

AMIGA
C* Commodore
371001-01

This was brought to you
from the archives of
http://retro-commodore.eu