AMBASSADOR+ - 60 - 80 - 100 - Cooke Industries
124
AMBASSADOR + 60 - 80 - 100 - 120 - 150 - 180 Wall hung high efficiency boiler with energy saving pump Mounting, user and service instructions BASE VERSION E93.0802EN.C Cooke Industries - Phone: +64 9 579 2185 Fax: +64 9 579 2181 Email: [email protected] Web: www.cookeindustries.co.nz
-
Upload
khangminh22 -
Category
Documents
-
view
2 -
download
0
Transcript of AMBASSADOR+ - 60 - 80 - 100 - Cooke Industries

AMBASSADOR+ 60 - 80 - 100 - 120 - 150 - 180 Wall hung high efficiency boiler
with energy saving pump Mounting, user and service instructions
BASE VERSION E93.0802EN.C
Cooke Industries - Phone: +64 9 579 2185 Fax: +64 9 579 2181 Email: [email protected] Web: www.cookeindustries.co.nz

Cooke Industries - Phone: +64 9 579 2185 Fax: +64 9 579 2181 Email: [email protected] Web: www.cookeindustries.co.nz

E93.0802EN.C Ambassador+ manual 3
TABLE OF CONTENTS
INTRODUCTION…………………………………………………………………………………………….……..6
1 SAFETY GUIDELINES ................................................................................................................................ 6
2 TECHNICAL DATA AMBASSADOR+ BOILERS ........................................................................................ 7 2.1 FUNCTIONAL INTRODUCTION ............................................................................................................. 7 2.2 TECHNICAL SPECIFICATIONS DATASHEET........................................................................................... 8 2.3 GAS TYPE I2EK ................................................................................................................................. 9 2.4 ERP SPECIFICATIONS DATASHEET .................................................................................................. 10
3 DIMENSIONS .............................................................................................................................................11 3.1 AMBASSADOR+ 60-120 .................................................................................................................. 11 3.2 AMBASSADOR+ 150-180 ................................................................................................................ 12
4 ACCESSORIES AND UNPACKING ..........................................................................................................13 4.1 ACCESSORIES ............................................................................................................................... 13 4.2 FLUE GAS AND AIR SUPPLY PARTS - TWIN PIPE: ............................................................................ 13 4.3 FLUEGAS AND AIR SUPPLY PARTS - CONCENTRIC: ....................................................................... 14 4.4 UNPACKING ................................................................................................................................... 14
5 INSTALLATION OF THE AMBASSADOR+ ..............................................................................................15 5.1 GENERAL NOTES ........................................................................................................................... 15 5.2 MOUNTING THE BOILER .................................................................................................................. 16
6 CONNECTIONS WATER SIDE .................................................................................................................17 6.1 BOILER CONNECTIONS ................................................................................................................... 17 6.2 CONDENSATE DRAIN CONNECTION .................................................................................................. 17 6.3 FLOW AND RETURN CONNECTIONS .................................................................................................. 18 6.4 THE EXPANSION VESSEL................................................................................................................. 18 6.5 PRESSURE RELIEF VALVE ............................................................................................................... 18 6.6 BYPASS ........................................................................................................................................ 18 6.7 PUMP FUNCTIONALITY .................................................................................................................... 18 6.8 FROST PROTECTION ...................................................................................................................... 19 6.9 INSTALLING A STRAINER AND/OR DIRT SEPARATOR ........................................................................... 19 6.10 WATER QUALITY ............................................................................................................................ 19 6.11 PLASTIC PIPING IN THE HEATING SYSTEM ......................................................................................... 20 6.12 AUTOMATIC AIR VENT ..................................................................................................................... 20 6.13 AUTOMATIC WATER FILLING SYSTEMS ............................................................................................. 20 6.14 WATER PRESSURE ......................................................................................................................... 20 6.15 CHEMICAL WATER TREATMENT ....................................................................................................... 21 6.16 UNDER FLOOR HEATING ................................................................................................................. 21 6.17 FLUSH THE SYSTEM WITH FRESH WATER ......................................................................................... 21 6.18 INSTALLATION EXAMPLES ............................................................................................................... 21
6.18.1 Example of a low-resistance heating circuit ...................................................................... 21 6.18.2 Example of a normal single boiler heating circuit with low loss header (preferable) ........ 22 6.18.3 Example of a multiple boiler heating circuit with low loss header ..................................... 22
7 PUMP CHARACTERISTICS ......................................................................................................................23 7.1 HYDRAULIC GRAPHS ...................................................................................................................... 23 7.2 PUMPS: MAXIMUM ELECTRICAL POWER............................................................................................ 26
8 FLUE GAS AND AIR SUPPLY SYSTEM ..................................................................................................26 8.1 GENERAL ...................................................................................................................................... 26 8.2 BOILER CATEGORIES - TYPES OF FLUEGAS SYSTEMS. ...................................................................... 27 8.3 C63 CERTIFIED .............................................................................................................................. 28 8.4 AIR SUPPLY ................................................................................................................................... 29
8.4.1 Combustion air quality ...................................................................................................... 29 8.4.2 Air supply through humid areas ........................................................................................ 29
8.5 A+60 TWIN PIPE VERSION ............................................................................................................... 30 8.6 PIPE HEIGHTS AND MUTUAL DISTANCES ON A FLAT ROOF .................................................................. 30 8.7 FLUE GAS AND AIR SUPPLY RESISTANCE TABLE ................................................................................ 31
Cooke Industries - Phone: +64 9 579 2185 Fax: +64 9 579 2181 Email: [email protected] Web: www.cookeindustries.co.nz

E93.0802EN.C Ambassador+ manual 4
8.8 SIX TYPICAL EXAMPLES .................................................................................................................. 32
8.8.1 Example A: Twin pipe system (C63) ................................................................................. 32 8.8.2 Example B: Twin pipe system with concentric roof terminal (C33) ................................... 32 8.8.3 Example C: Single flue gas outlet. Air supply from boiler room ........................................ 34 8.8.4 Example D: Concentric flue gas/air supply pipe (roof-mounted) ...................................... 35 8.8.5 Example E: Concentric system Wall outlet C13(wall-mounted) ....................................... 35 8.8.6 Example F: Separate air supply duct & flue duct in different pressure zone (C53) .......... 37
9 ELECTRICAL INSTALLATION .................................................................................................................38 9.1 GENERAL ...................................................................................................................................... 38 9.2 ELECTRICAL CONNECTIONS ............................................................................................................ 38 9.3 EXPLANATION OF THE CONNECTIONS .............................................................................................. 38 9.4 ELECTRICAL SCHEMATICS .............................................................................................................. 40 9.5 SENSOR VALUES ............................................................................................................................ 42
10 USER INTERFACE ....................................................................................................................................43 10.1 CONTROL PANEL / DISPLAY UNIT ..................................................................................................... 43 10.2 CONTROL PANEL MENU STRUCTURE................................................................................................ 44 10.3 DISPLAY DURING OPERATION .......................................................................................................... 46 10.4 MONITOR SCREENS ....................................................................................................................... 47 10.5 SERVICE FUNCTION ........................................................................................................................ 49 10.6 SCHORNSTEINFEGER FUNCTION ..................................................................................................... 50 10.7 PROGRAMMING IN STANDBY MODE .................................................................................................. 51 10.8 SETTING THE TIME & DATE ............................................................................................................. 51 10.9 SETTINGS ...................................................................................................................................... 52 10.10 SETTING THE TIMER PROGRAMS ..................................................................................................... 53 10.11 SETTING THE OUTDOOR SPECIFICATIONS ........................................................................................ 56 10.12 CHECKING THE OPERATING HISTORY ............................................................................................... 60 10.13 CHECKING THE FAULT HISTORY ...................................................................................................... 61 10.14 SETTING THE MAINTENANCE SPECIFICATIONS .................................................................................. 62 10.15 SETTING THE USER LOCK ............................................................................................................... 65 10.16 SETTING THE PARAMETERS AT THE CONTROL PANEL ........................................................................ 66 10.17 FAULT CODES DISPLAY ................................................................................................................... 73
10.17.1 Lock-out codes .................................................................................................................. 73 10.17.2 Blocking codes .................................................................................................................. 74 10.17.3 Maintenance attention messages ..................................................................................... 75
11 CONTROLLING OPTIONS AND SETTINGS ............................................................................................76 11.1 GENERAL ...................................................................................................................................... 76
11.1.1 Extra boiler control ............................................................................................................ 76 11.1.2 Max cooling time ............................................................................................................... 76 11.1.3 Temperature display on/off ............................................................................................... 76 11.1.4 Water pressure ................................................................................................................. 76 11.1.5 Gas type selection ............................................................................................................ 76 11.1.6 Soft start option ................................................................................................................. 77 11.1.7 Pump mode (EC technology) ............................................................................................ 77
11.2 HEATING ....................................................................................................................................... 78 11.2.1 Controlling behaviour settings........................................................................................... 78 11.2.2 Room thermostat on/off .................................................................................................... 79 11.2.3 Room thermostat OPEN-THERM ..................................................................................... 79 11.2.4 Outdoor temperature related flow control ......................................................................... 79 11.2.5 0-10 Vdc remote flow temperature set point ..................................................................... 79 11.2.6 0-10 Vdc Remote burner input control .............................................................................. 80 11.2.7 Timer contact function ....................................................................................................... 80
11.3 INDIRECT HOT WATER/CALORIFIER .................................................................................................. 81 11.3.1 Pump and 3-way valve control .......................................................................................... 81 11.3.2 Tank thermostat ................................................................................................................ 81 11.3.3 Tank sensor ...................................................................................................................... 81 11.3.4 Low/high flow temperature to tank coil ............................................................................. 82 11.3.5 Heating and hot water switching time ............................................................................... 83 11.3.6 Heating and hot water switching at sudden temperature drop ......................................... 83 11.3.7 Anti-Legionnaires’ disease function (pasteurisation) ........................................................ 84
Cooke Industries - Phone: +64 9 579 2185 Fax: +64 9 579 2181 Email: [email protected] Web: www.cookeindustries.co.nz

E93.0802EN.C Ambassador+ manual 5
11.4 CASCADE CONTROL ....................................................................................................................... 85
11.4.1 Parameter settings for cascaded boilers .......................................................................... 85 11.4.2 Monitor screens ................................................................................................................ 87 11.4.3 Output control and boiler sequence .................................................................................. 87
12 COMMISSIONING THE BOILER ...............................................................................................................88 12.1 FIRST: FLUSHING THE BOILER WITH WATER ...................................................................................... 88 12.2 SECOND: FILLING & VENTING THE BOILER AND THE SYSTEM .............................................................. 88 12.3 THIRD: CHECK THE WATER FLOW .................................................................................................... 88
13 STARTING THE BOILER ..........................................................................................................................90 13.1 GENERAL ...................................................................................................................................... 90 13.2 FIRING FOR THE FIRST TIME ............................................................................................................ 90
14 ADJUSTING AND SETTING THE BURNER ............................................................................................91 14.1 INTRODUCTION .............................................................................................................................. 91
14.1.1 Adjustment tables ............................................................................................................. 91 14.1.2 Adjustment values ............................................................................................................. 92 14.1.3 Setting screws gas valve(s): drawings .............................................................................. 96 14.1.4 Gas valve classes A+C and B+J (B+J only for Poland) .................................................... 96 14.1.5 Adjustment actions: general scheme ................................................................................ 97
14.2 ADJUSTING IN CASE OF A NEW BOILER, OR AFTER MAINTENANCE (CASE A) ........................................ 98 14.2.1 General remark ................................................................................................................. 98 14.2.2 Checking and adjusting at maximum load ........................................................................ 98 14.2.3 Checking and adjusting at minimum load ......................................................................... 98
14.3 ADJUSTING IN CASE OF VALVE REPLACEMENT OR GAS CONVERSION (CASE B) ................................... 98 14.3.1 General remarks ............................................................................................................... 98 14.3.2 Checking and adjusting at minimum load A+60 / A+80 / A+100......................................... 98 14.3.3 Checking and adjusting at maximum load A+120 / A+150 / A+180 ................................... 99 14.3.4 Checking and adjusting at minimum load A+120 / A+150 / A+180 .................................... 99
14.4 ADJUSTING PROCEDURES ............................................................................................................ 100 15 PUTTING THE BOILER OUT OF OPERATION ......................................................................................101
15.1 OUT OF OPERATION: ON/OFF FUNCTION ........................................................................................ 101 15.2 OUT OF OPERATION: POWER OFF .................................................................................................. 101
16 FAULT CODES. .......................................................................................................................................102 16.1 LOCK-OUT CODES ........................................................................................................................ 102 16.2 BLOCKING CODES: ....................................................................................................................... 108 16.3 MAINTENANCE ATTENTION FUNCTION ............................................................................................ 111
17 MAINTENANCE .......................................................................................................................................112 17.1 GENERAL .................................................................................................................................... 112 17.2 INSPECTION & MAINTENANCE........................................................................................................ 112
18 USER INSTRUCTIONS ...........................................................................................................................115 19 INSTALLATION EXAMPLES ..................................................................................................................116
21 INDEX .......................................................................................................................................................121
Cooke Industries - Phone: +64 9 579 2185 Fax: +64 9 579 2181 Email: [email protected] Web: www.cookeindustries.co.nz

E93.0802EN.C Ambassador+ manual 6
INTRODUCTION This manual is written for: The installer System design engineer The service engineer The user abbreviations EHS
NB
Eco Heating Systems Groningen B.V.
NOTICE
symbols
Warning: important information related to the safety of persons and/or the appliance
terminology
Flow Return
Water heater hot water out Water heater cold water in
Eco HS is not accountable for any damage caused by incorrect following the mounting instructions. For service and repair purposes use only original EHS spare parts. All documentation produced by the manufacturer is subject to copyright law.
1 SAFETY GUIDELINES Carefully read all the instructions before commencing installation. Keep these instructions near the boiler for quick reference. The appliance should be installed by a skilled installer according to all applicable standards. Failure to comply with these regulations could deem the warranty invalid. Without written approval of the manufacturer the internals of the boiler may not be changed. When changes are executed without approval, the boiler certification becomes invalid. Commissioning, maintenance and repair must be done by a skilled installer/engineer, according to all applicable standards and regulations.
What to do if you smel gas: Don't use any electrical equipment. Don't press any switches. Close the gas supply. Ventilate the room (open the windows and/or outdoor boiler room doors). Immediately warn the installer.
The manufacturer/supplier is not liable for any damage caused by inaccurately following these mounting instructions. Only original parts may be used when carrying out any repair or service work.
This appliance is not intended for use by persons (including children) with reduced physical, sensory or mental capabilities, or lack of experience and knowledge, unless they have been given supervision or in-struction concerning use of the appliance by a person responsible for their safety. Children should be su-pervised to ensure that they do not play with the appliance.
Cooke Industries - Phone: +64 9 579 2185 Fax: +64 9 579 2181 Email: [email protected] Web: www.cookeindustries.co.nz

E93.0802EN.C Ambassador+ manual 7
2 TECHNICAL DATA AMBASSADOR+ BOILERS
2.1 Functional introduction The Ambassador+ boilers are central heating boilers with a maximum high efficiency. Such a performance can be reached by, amongst other things, using a special heat exchanger made of stainless steel. This allows the flue gases to cool down below the condensation point, and so release extra heat. This has an immediate positive impact on the efficiency, exceeding the 100%.
The Ambassador+ boiler is standard set for Natural gas G20 / G25.3 Gases used must meet the European standard EN 437. Fuel used should have sulphur rates according to the European standard, a maximum annual peak over a short period of time of 150 mg/m3 and an annual average of 30 mg/m3. Boiler control includes: Cascade control for up to twelve boilers Remote operation and heat demand indication from each boiler Weather compensation control Calorifier control Connections for: 0-10 VDC remote flow temperature (set point) control 0-10 VDC remote burner input control Outdoor temperature sensor External calorifier pump or diverter valve Cascade control When using the integrated cascade control, a maximum of twelve boilers can be controlled in a cascade configura-tion. By the use of an appropriate external control, this number may be increased at will. 0-10 VDC connection available The boiler flow temperature or power input can be controlled by an external 0-10 VDC signal. When a number of boilers are cascaded, and controlled by the integrated cascade control, the signal should be directed to the master boiler only. If an alternative control is used, more than one boiler may be controlled by a 0-10 VDC signal. A signal of 1,48 Volt will switch on the boiler(s), less than 1,4 Volt will switch off the boiler(s). Time program For both central heating and hot water function of the boiler, time programs with three programmable periods per day are available. These time programs are set and activated by entering the desired settings directly at the boiler control panel.
Cooke Industries - Phone: +64 9 579 2185 Fax: +64 9 579 2181 Email: [email protected] Web: www.cookeindustries.co.nz

E93.0802EN.C Ambassador+ manual 8
2.2 Technical specifications datasheet
GENERAL
Product Identification Number - CE 0063 BP3254 Classification - II2EK3B/P (Country depending) Gas Appliance Type - B23, B23P, C13, C33, C43, C53, C63, C83 Type boiler A+60 A+80 A+100 A+120 A+150 A+180 Dimensions (h x w x d) mm 842 x 476 x 486 898 x 476 x 677 Water content estimated litre 3,9 5,0 6,5 8,3 10,4 12,9 Weight (empty) kg 46 73 78 83 92 101 Flow/return connection (boiler) inch R 1” R 1” R 1” R 1” R 1¼” R 1¼” Flow/return connection (T-piece) inch Rp 1¼” Rp1¼” Rp 1¼” Rp 1¼” Rp 1½” Rp 1½” Gas connection inch R ¾” R ¾” R ¾” R ¾” R 1” R 1” Flue duct flue/air inlet mm 80/125 80/125 100/150 100/150 100/150 100/150 Parallel connection mm 80-80 80-80 100-100 100-100 130-130 130-130
HEATING Values min-max:
Nominal input (Net) kW 12,5 - 55,6 14,6 - 74,3 17,2 - 92,2 26,0 - 111 34,0 - 138 45,0 - 166 Nominal input (gross) (G20, G25.3) kW 13,9 - 61,8 16,2 - 82,5 19,1 - 102 28,9 - 123 37,8 - 153 50,0 - 184 Nominal input (gross) (G31) kW 13,6 - 60,4 15,9 - 80,8 18,7 - 100 28,3 - 121 37,0 - 150 48,9 - 180 Nominal input (gross) (G30/G31) kW 13,5 - 60,3 15,8 - 80,2 18,6 - 99,7 34,7 - 120 36,8 - 150 48,8 - 180 Nom. output 80/60°C kW 12,0 - 53,5 14,0 - 71,2 16,5 - 88,4 24,7 - 106 32,6 - 132 43,3 - 160 Nom. output 50/30°C kW 12,9 - 57,4 15,2 - 77,5 18,0 - 96,2 27,2 - 116 35,5 - 144 47,3 - 175 Nom. output 37/30°C kW 13,5 - 59,8 15,7 - 80,1 18,6 - 99,5 28,1 - 120 36,7 - 149 48,5 - 179 Efficiency 40/30°C DIN 4702-8 % up to 110,6 % within the Ambassador+ range
GAS CONSUMPTION [EN437] Values min-max:
Natural gas G25.3 m³st/h 1,50 - 6,69 1,76 - 8,94 2,07 - 11,1 3,13 - 13,4 4,09 - 16,6 5,41 – 20,0 Natural gas G20 m³st/h 1,32 - 5,88 1,54 - 7,86 1,82 - 9,76 2,75 - 11,8 3,60 - 14,6 4,76 - 17,6 Propane gas G31 1 m³st/h 0,51 - 2,27 0,60 - 3,04 0,70 - 3,77 1,06 - 4,54 1,39 - 5,65 1,84 - 6,79 Butane/Propane (B/P) G30/G31 1 m³st/h 0,39 - 1,72 0,45 - 2,29 0,53 - 2,85 0,99 - 3,44 1,05 - 4,28 1,40 - 5,15
Gas supply pressure nom. 2
G25.3 mbar 25 G20 mbar 20 G31 1 mbar 30/37 G30/G31 1 mbar 50
NOTES 1 Using propane or butane/propane mixtures (B/P), maximum fan speed needs to be reduced (parameter P4BD) 2 Min. and max. gas supply pressures according to EN437:
p nominal [mbar] p min [mbar] p max [mbar]
G25.3 25 20 30 G20 20 17 25
G31 30 25 35 37 25 45
G30/G31 50 43 57
Cooke Industries - Phone: +64 9 579 2185 Fax: +64 9 579 2181 Email: [email protected] Web: www.cookeindustries.co.nz

E93.0802EN.C Ambassador+ manual 9
Type boiler A+60 A+80 A+100 A+120 A+150 A+180
EMISSION [EN437] Nominal values at min-max load:
CO2 flue gas 3 G25.3/G20 % 8,7 - 9,0 8,7 - 9,0 8,7 - 9,0 8,7 - 9,0 8,7 - 9,0 8.7 - 9.0 G31 % 9,3 - 10,3 9,3 - 10,3 9,3 - 10,3 9,3 - 10,3 9,3 - 10,4 9.3 - 10.5 G30/ G31 (B/P) % 9,3 - 10,4 9,3 - 10,4 9,3 - 10,4 9,3 - 10,4 9,3 - 10,5 9.3 - 10.6
NOx class (EN15502-1) - 5 Flue gas temperature at combustion air temperature = 20°C °C ~ 85-95
Mass flow flue gas [min-max] Qfluegas condensing g/s 5,59-28,9 6,52-38,6 7,69-47,9 11,6-57,7 15,2-71,7 20,1-86,2
Available pressure for the flue sys-tem 4 Pa 200
INSTALLATION
Available pressure for the installation at
∆T = 20 K mWC 5,9 3,1 2,3 1,5 6,0 4,8 ∆T = 25 K mWC 7,0 5,5 5,0 4,4 9,0 7,9
Pressure boiler min-max. bar 1,0 - 4,0 5 Max. flow temperature °C 90
ELECTRIC
Maximum power consumption W 240 265 270 280 505 520 Power supply V/Hz 230/50 Protection class - IPX4D
NOTES 3 CO2 of the unit measured/set without the boiler
front panel in place 4 Maximum allowed combined resistance of flue
gas and air supply piping at high fire
5 When the built-in water pressure sensor is replaced by a water pressure switch, water pressure may go up to 6,0 bar
2.3 Gas type I2EK Only applicable to the Dutch manual
Cooke Industries - Phone: +64 9 579 2185 Fax: +64 9 579 2181 Email: [email protected] Web: www.cookeindustries.co.nz

E93.0802EN.C Ambassador+ manual 10
2.4 ERP specifications datasheet Technical parameters according the European ERP (Energy Related Products) legislation:
Type Boiler: A+60 A+80 A+100 A+120 A+150 A+180 Condensing boiler: Yes Yes Yes Yes Yes Yes low temperature boiler: Yes Yes Yes Yes Yes Yes B11 boiler: No No No No No No Cogeneration space heater: No No No No No No Combination heater: No No No No No No
Unit: Value Value Value Value Value Value Rated heat output kW 53,5 72,1 89,4 107,7 132,9 159,9 P-rated (P4) at 60-80⁰C kW 53,5 72,1 89,4 107,7 132,9 159,9
Heat output (p1) 30% at 30-37⁰C kW 17,9 24,1 29,8 36,0 44,7 53,7 Seasonal space heating energy effi-ciency (ɳs). % 91,9 92,3 92,4 92,6 92,3 92,3
energy efficiency (ɳ4) at 60-80⁰C % 86,8 87,4 87,4 87,4 86,8 86,8
energy efficiency (ɳ1) at 30-37⁰C % 96,9 97,2 97,2 97,5 97,2 97,1 Auxiliary electricity consumption At full load (elmax). kW 0,111 0,136 0,142 0,151 0,214 0,229 At part load (elmin) kW 0,024 0,025 0,025 0,032 0,041 0,041 In standby mode (Psb) kW 0,004 0,004 0,004 0,004 0,004 0,004 Other Standby heat loss (Pstby) kW 0,063 0,067 0,071 0,076 0,084 0,094 Ignition burner power consumption (Pign) kW 0,000 0,000 0,000 0,000 0,000 0,000 Annual Energy consumption (QHE) Gj 112 x x x x x Emissions (Nox) of nitrogen oxides (EN15502-1:2012+A1:2015) mg/kWh 38 46 40 45 41 44
Sound power level, indoors (EN 15036-1:2006) dB 65 67 65 62 66 69
Cooke Industries - Phone: +64 9 579 2185 Fax: +64 9 579 2181 Email: [email protected] Web: www.cookeindustries.co.nz

E93.0802EN.C Ambassador+ manual 11
3 DIMENSIONS
3.1 Ambassador+ 60-120 TWIN PIPE CONCENTRIC
Connections twin pipe concentric
A+60 A+80 A+100 A+120 A+60 A+80 A+100 A+120
FG AI
flue gas air inlet
80-80 100-100 80/125 100/150
size "A" 112 155 112 size "B" 135 150 135 size "C" 308 N.A.
F C R G
flow condensate return gas
R 1¼" (male) flexible hose Ø25/21 x 750 mm R 1¼" (male) R ¾" (male)
Cooke Industries - Phone: +64 9 579 2185 Fax: +64 9 579 2181 Email: [email protected] Web: www.cookeindustries.co.nz

E93.0802EN.C Ambassador+ manual 12
3.2 Ambassador+ 150-180 TWIN PIPE CONCENTRIC
Connections twin pipe concentric
FG AI
flue gas air inlet
130-130 100/150
F C R G
flow condensate return gas
R 1½" (male) flexible hose Ø25/21 x 750 mm R 1½" (male) R 1” (male)
Cooke Industries - Phone: +64 9 579 2185 Fax: +64 9 579 2181 Email: [email protected] Web: www.cookeindustries.co.nz

E93.0802EN.C Ambassador+ manual 13
4 ACCESSORIES AND UNPACKING 4.1 Accessories Depending on the selected controlling behaviour for the central heating system and/or the optional use of a calorifier, the following items can be supplied with the boiler. Ask your supplier for the specifications. Item Part Nº. Outdoor (air) temperature sensor: 12kOhm@25°C (Connect to 1/2 of the boiler connections) E04.016.585 External flow temperature sensor for behind the low loss header: 10kOhm@25°C (Connect to 3/4 of the boiler connections) E04.016.304
Calorifier temperature sensor: 10kOhm@25°C (to be mounted to the boiler connections) S04.016.303 Room Controller “OpenTherm” RC (Modulating) with room sensor S04.016.355 Room Controller “OpenTherm” RC (Modulating) no room sensor/to be used with E04.016.359 S04.016.358 External room sensor for the RC and RCH controller: 5kOhm@25°C E04.016.359 External flow sensor for one heating zone: 5 kOhm@25°C E04.016.363 Software + interface cable for programming the boiler with a computer/laptop S04.016.586
4.2 Flue gas and air supply parts - TWIN PIPE: Boiler type: A60 A80 A100 + A120 A150 + A180 Twin pipe air and flue diameters: Ø80 Ø80 Ø100 Ø130 Conversion kit concentric to twin pipe E61.001.162 E61.001.163 E61.001.164 E61.001.165 Flue gas pipe stainless steel L=1000mm E04.018.055 E04.018.055 E04.018.061 E04.018.036 Flue gas pipe stainless steel L=500mm E04.018.054 E04.018.054 E04.018.060 E04.018.037 Flue gas pipe stainless steel L=250mm E04.018.053 E04.018.053 E04.018.059 E04.018.038 Flue gas pipe PP L=1000mm 410085502 410085502 410085482 410070242 Flue gas pipe PP L=500mm 410085501 410085501 410085481 410070241 Flue gas pipe PP L=250mm 410085500 410085500 410085480 410070240 Adjustable pipe PP 410085027 410085027 410085127 410070250 All-purpose lead tile roof terminal E04.018.031 E04.018.031 E04.018.013 E04.018.092 Concentric roof terminal SS. E04.018.015 E04.018.015 E04.018.001 E04.018.074
Single pipe roof terminal PP 410086883 410086883 410084853 410070279
Tile roof terminal E04.018.032 E04.018.032 E04.018.014 E04.018.079 Condensate drain stainless steel E04.018.058 E04.018.058 E04.018.064 E04.018.065 Condensate drain PP 410085048 410085048 410085130 410070247 Wall pipe clamps E04.018.083 E04.018.083 E04.018.084 E04.018.086 Roof deck pipe clamps (included in roof term.) Incl. in terminal Incl. in terminal Incl. in terminal Incl. in terminal Seal ring rubber S07.004.023 S07.004.023 S07.004.024 S07.004.025 Bend stainless steel 43-45° E04.018.057 E04.018.057 E04.018.063 E04.018.041 Bend stainless steel 87-90° E04.018.056 E04.018.056 E04.018.062 E04.018.042 Bend PP 43-45° 410085042 410085042 410085142 410070252 Bend PP 87-90° 410085041 410085041 410085141 410070251 Concentric wall terminal E04.018.019 E04.018.019 E04.018.002 410072131 Air supply wall terminal 410082856 410082856 410087931 410087550
Manifold Air-Flue gas E04.010.161 E04.010.161 E04.018.033 Included in roof terminal
Cooke Industries - Phone: +64 9 579 2185 Fax: +64 9 579 2181 Email: [email protected] Web: www.cookeindustries.co.nz

E93.0802EN.C Ambassador+ manual 14
4.3 Fluegas and air supply parts - CONCENTRIC:
Boiler type: A60 A80 A100, A120 A150, A180 Concentric pipe diameters air and flue: Ø80/125 Ø80/125 Ø100/150 Ø100/150 Conversion kit twin pipe to concentric E61.001.187 E61.001.170 E61.001.171 E61.001.172 Flue gas pipe SS L=1000mm E04.018.016 E04.018.016 E04.018.005 E04.018.005 Flue gas pipe SS L=500mm E04.018.067 E04.018.067 E04.018.004 E04.018.004 Flue gas pipe SS L=250mm E04.018.066 E04.018.066 E04.018.003 E04.018.003 Adjustable pipe SS at request at request 410031724 410031724 Flue gas pipe PP L=1000mm E04.018.020 E04.018.020 410084302 410084302 Flue gas pipe PP L=500mm E04.018.025 E04.018.025 410084301 410084301 Flue gas pipe PP L=250mm E04.018.024 E04.018.024 410084300 410084300 Adjustable pipe PP 410084457 410084457 410084307 410084307 All-purpose lead tile roof terminal E04.018.031 E04.018.031 E04.018.013 E04.018.013 Concentric roof terminal SS E04.018.015 E04.018.015 E04.018.001 E04.018.001 Roof pipe flashing E04.018.032 E04.018.032 E04.018.014 E04.018.014 Concentric roof terminal PP E04.018.018 E04.018.018 410084863 410084863 Air sealring concentric roof terminal 08 1078 00 08 1078 00 08 1078 00 410075439 Concentric condensate drain SS E04.018.069 E04.018.069 E04.018.009 E04.018.009 Concentric condensate drain PP E04.018.028 E04.018.028 410084318 410084318 Wall pipe clamps E04.018.085 E04.018.085 E04.018.087 E04.018.087 Roof deck pipe clamps E04.018.030 E04.018.030 E04.018.012 E04.018.012
Seal ring gummi Inner flue gas pipe E07.004.023 E07.004.023 E07.004.024 E07.004.024 Outer air pipe E07.004.026 E07.004.026 E07.004.027 E07.004.027
Conc. bend SS 43-45° E04.018.068 E04.018.068 E04.018.007 E04.018.007 Conc. bend SS 87-90° E04.018.017 E04.018.017 E04.018.006 E04.018.006 Conc. bend PP 43-45° E04.018.027 E04.018.027 410084313 410084313 Conc. bend PP 87-90° E04.018.021 E04.018.021 410084312 410084312 Concentric wall terminal stainless steel E04.018.019 E04.018.019 E04.018.002 E04.018.002
4.4 Unpacking The Ambassador+ boiler will be supplied with the following documents and accessories: • One “Mounting Instructions” manual for the installer • One suspension bracket with locking plate and bolts • Three spare nuts for mounting the burner plate, two spare fuses for the boiler control and a gas conversion sticker
(all in a bag attached to the front of the gas valve) • Bottom part of the siphon • Two T-pieces for the flow and return connections of the boiler After delivery, always check the boiler package to see if it is complete and without any defects. Report any imperfec-tions immediately to your supplier.
Cooke Industries - Phone: +64 9 579 2185 Fax: +64 9 579 2181 Email: [email protected] Web: www.cookeindustries.co.nz

E93.0802EN.C Ambassador+ manual 15
5 INSTALLATION OF THE AMBASSADOR+
5.1 General notes At every side of the boiler at least 50 mm of clearance should be applied to walls or wall units, 350 mm above the top side of the boiler and 250 mm from the bottom of the boiler. The installation area/room must have the following provisions: • 230 V - 50 Hz power source socket with earth connection. • Open connection to the sewer system for draining condensing water. • A sound-deadening wall. Note: The wall used for mounting the boiler must be able to hold the weight of the boiler. If not, it is recommended to mount the boiler by means of a (cascade) frame. Other considerations related to the boiler location.
• The ventilation of the boiler room must meet local and national standards and regulations, regardless of the selected supply of fresh air to the boiler.
• Both the air supply and the flue gas pipes must be connected to the outside wall and/or the outside roof. • The installation area must be dry and frost-free. • The boiler has a built-in fan that will generate noise, depending on the total heat demand. The boiler location
should minimise any disturbance this might cause. Preferably mount the boiler on a brick wall. • There must be sufficient lighting available in the boiler room to work safely on the boiler. • When a boiler is positioned at the highest point of the installation, the supply and return pipes must first
protrude 0,5 m above the top of the boiler, before these pipes go to the installation side. In other words, the water level must always be 0,5 meter above the top of the boiler and an automatic air vent must be installed in the supply or return pipe. A low-water level protection should also be installed at the installation side.
• Remind the positioning of electrical components in relation to the temperature sensitivity. • Make sure there is an open connection with the sewer to drain the condensate. This connection should be
lower than the condensate drain level of the boiler. The boiler must be positioned and installed by a skilled installer in accordance with all applicable standards and regulations. Commissioning of the boiler must be done by a skilled service/commissioning engineer, who is trained for this type of boiler.
Cooke Industries - Phone: +64 9 579 2185 Fax: +64 9 579 2181 Email: [email protected] Web: www.cookeindustries.co.nz

E93.0802EN.C Ambassador+ manual 16
5.2 Mounting the boiler Before mounting and installing the boiler the following connections should be considered:
• Flue gas system and the flue gas pipe connections • Air supply system and connections • Flow and return pipe connection • Condensate and pressure relief valve drainage • Power supply (preferably the power connection positioned above the boiler) • Gaspipe.
All lines/piping must be mounted free of tension. The weight of the installation components should be sup-ported separately from the boiler so there will be no standing forces on the connections. This might influence the mounting position of the boiler.
Determine the position of the flow and return pipes by using the included suspension bracket or a suspension frame (when supplied). While marking the holes, ensure that the suspension bracket or frame is perpendicular and the boiler does not lean forward. If necessary adjust the position with the adjusting bolts at the lower rear side of the back panel (see draw-ing). When the adjusting bolts aren’t sufficient, fill the gap behind the bolts to get the boiler in position. The exact boiler position lies between the boiler hanging level and hanging slightly backwards. The boiler should not lean forward in the mounted position. Lock the suspension bracket with the security cover before making any other connections to the boiler. This security cover will prevent the boiler from falling off the bracket. Don't use excessive force during the mounting of the boiler connections.
suspension detail
1. Attach mounting bracket to wall with inclined side facing upwards
3. Lock boiler with locking plate and two bolts
2. Suspend boiler with suspension bracket on mounting bracket
4. Level boiler using adjusting bolts
Cooke Industries - Phone: +64 9 579 2185 Fax: +64 9 579 2181 Email: [email protected] Web: www.cookeindustries.co.nz

E93.0802EN.C Ambassador+ manual 17
6 CONNECTIONS WATER SIDE
FRONT VIEW
6.1 Boiler connections
1 – Flow CH 2 – Condensate drain 3 – Siphon cleaning point 4 – Return CH 5 – Gas
Open connection to the sewer.
6.2 Condensate drain connection The condensate drain is placed at the centre and at the bottom of the boiler and has a ¾ inch hose discharge. Connect this flexible hose to the sewer system.
Use only plastic parts with the condensate drain. Metal lines are not allowed.
Blockage of this drain might damage the boiler. The drain connection is correct when the condensate can be seen flowing away, e.g. using a funnel. Any damage that might occur, when the drain is not installed correctly, is not covered by the warranty of the boiler.
There should be an open connection of the condensate hose into the sewage system. A possible vacuum in the sewage system must never give the opportunity to suck on the boiler’s condensate drain hose.
When mounting the bottom part of the siphon, before commissioning the boiler and/or after maintenance, the siphon must ALWAYS be completely filled with water.
This is a safety measure: the water in the siphon keeps the flue gases from leaking out of the heat exchanger via the condensate drain.
1 2 3 4 5
The siphon must always be filled to the edge with water, before replacing to the unit.
Cooke Industries - Phone: +64 9 579 2185 Fax: +64 9 579 2181 Email: [email protected] Web: www.cookeindustries.co.nz

E93.0802EN.C Ambassador+ manual 18
6.3 Flow and return connections Two separate T-pieces are shipped with the boiler. These are applied for externally mounting the pressure relief valve and the boiler bleed valve for servicing the boiler. We advise to install two service valves in the flow and return pipes underneath the boiler, so the boiler can be isolated from the heating system and eventually disconnected, when needed.
When using a system pump, this pump should always be mounted in the return pipe of the heating system. Do not use chloride-based fluxes for soldering any pipes of the water system.
6.4 The expansion vessel The capacity of the expansion vessel must be selected and based on the capacity of the central heating sys-tem and the static pressure. Suggested is to fit the ex-pansion vessel in the return pipe of the central heating system. It can be combined with the drain valve for service. See the above drawing.
6.5 Pressure relief valve The boiler has no internal pressure relief valve. This should be installed close to the boiler in the flow pipe of the heating system. When having cascaded boilers, each boiler should have its own pressure relief valve. It is advised to use the T-piece that is supplied with the boiler, for this.
Advice is always to install service valves, so the boiler can be isolated from the heating system, when needed. Make sure that the pressure relief valve is mounted between the boiler and the service valves. The specifications and size of the relief valve should be determined by the installer and must comply with all appli-cable regulations and boiler capacity.
6.6 Bypass The boiler has no internal bypass. When many thermostatic valves are being used, the system should have a by-pass to allow an adequate flow when all thermostatic valves are closed. Instead of a bypass also a low-loss header can be used for this function.
The boiler flow will also be influenced when a pipe of the heating system is frozen / blocked. Make sure all heating pipes are free from the risk of frost. If there is the risk of freezing of the heating system, all the pipe section must be insulated and/or protected with the help of a tracing.
6.7 Pump functionality Controlling the pump: The pump speed is controlled by a PWM signal provided by the burner controller at a value causing a Delta T across the heat exchanger of 20°C at the whole burner modulation range. When the boiler modulates down or up, also the pump speed decreases or increases, keeping delta T at 20°C until it reaches the end of its modulation range. Delta T monitoring: The delta T monitoring parameters are active. A to high Delta T (caused by a defective pump, or a high resistance in the hydraulic system e.g.) will therefore be detected by the burner controller. The display shows “dT Block” or “FlowReturn dTfault”.
Cooke Industries - Phone: +64 9 579 2185 Fax: +64 9 579 2181 Email: [email protected] Web: www.cookeindustries.co.nz

E93.0802EN.C Ambassador+ manual 19
6.8 Frost protection The boiler has a built-in frost protection that is automatically activating the central heating pump when the boiler return (water) temperature drops below the 5°C (programmable). When the boiler return temperature drops below the 3°C (programmable), the burner is also ignited. The pump and/or burner will shut down as soon as the return temperature has reached the 10°C (programmable). The mentioned temperatures are related to the temperatures measured by the RETURN sensor of the boiler. This frost protection function will not fire up the boiler in case of a “general blocking” of the burner demand.
NOTICE: This “Frost Protection” function is only useable for the boiler and not for the whole central heating system. Because it concerns a programmable setting, a boiler damaged by frost is not covered under warranty.
6.9 Installing a strainer and/or dirt separator
Always install a strainer (water filter) and/or a dirt separator in the return pipe of the boiler; in such a way that the water going to the boiler is free of any de-bris/particles. When using a water filter always check a week after installation to determine the strainer cleaning interval. Advice is to mount valves before and af-ter the strainer, including an air bleed valve, so the strainer can be isolated from the heating circuit for service operations. Clean water is very important, blocked and/or polluted heat exchangers, includ-ing failures and/or damages caused by this blockage are not covered by the war-ranty.
6.10 Water quality The pH value of the water must be within the following limits: 7,5 < pH < 9,5. This pH value is reached with the steady conditions. These steady conditions will occur, when after filling the heating system (pH around 7) with fresh water, the water will lose its air because of the air bleeding operation and heating up (dead water conditions).
Water hardness must be within the following limits: 3,5° Clark (50 ppm CaCO3) < total hardness < 10,5° Clark (150 ppm CaCO3)
When the water might contain aluminium particles, this should be of a maximum of 0.2 mg/litre. If there is the risk of contamination of the water by any kind of debris/chemicals in the period after installing, a plate heat exchanger should be used to separate the boiler circuit from the heating circuit (see drawing below).
It is advised to prevent the possible air intake and water leakage of the central heating system. Fresh oxygenated water might damage the heat exchanger of the boiler and should therefore be prevented! Usual spots where air is most likely to seep in are: suction gaskets, pumps, air valve working as a venting pipe, O-rings / gaskets in stuffing box, under floor heating pipes.
Cooke Industries - Phone: +64 9 579 2185 Fax: +64 9 579 2181 Email: [email protected] Web: www.cookeindustries.co.nz

E93.0802EN.C Ambassador+ manual 20
6.11 Plastic piping in the heating system When plastic pipes are used in the central heating system, these should be separated from the boiler system by using a plate heat exchanger. Diffusion (through the plastic) can cause air to enter the heating system. This could damage the boiler, pumps and other components in the system. Be aware that plastic piping is often used in under floor heating systems. When no measures have been taken to prevent the entrance of air into the boiler system, the warranty of the boiler and any boiler part may be deemed invalid.
6.12 Automatic air vent An automatic air vent is mounted on the boiler to remove the air from the water circuit. NOTICE: This automatic air vent is only used for bleeding the air in the heat exchanger of the boiler. One or more external automatic air vent(s) and/or air separators must always be mounted in the heating system to take out the air trapped in the heating circuit. DE-AERATION PROGRAM. When the unit is fired for the first time the unit starts a de-aeration program. One cycle means 5 seconds pump running and 5 seconds pump off. A complete de-aeration program consists out of three cycles. The de-aeration program can be interrupted/stopped by briefly pressing the service button.
6.13 Automatic water filling systems When using an automatic water refill system some precautions should be taken (fresh water is bringing fresh oxygen into the system), like installing a water meter to measure and evaluate the total water volume that is added to the system. This to detect and eliminate any water leakage as soon as possible. When an automatic water refill system is used, some form of logging should take place to prevent continuously filling of the system with large amounts of oxygenated fresh water. This can happen when a leak in the system is not detected and the total added water amount is not being logged.
6.14 Water pressure First and for all, the installation should be designed and built conform all applicable regulations and standards, in-cluding the right safety valves. IMPORTANT: Always keep the pressure in the boiler lower than the value at which its safety valve opens.
Sensor A water pressure sensor has been built into the boiler. With this sensor, the minimum water pressure in the boiler is 0,8 bar and the maximum pressure is 4,0 bar (sensor values). The normal water pressure is supposed to be between 1,5 and 2,0 bar. The pressure sensor will stop the boiler from firing when the water pressure drops below 0,8 bar, and start the boiler firing again when the water pressure reaches above the 1,0 bar. These values can be changed in the boiler control settings.
BOILER BOILER BOILER BOILER HEATING
ZONE
HEATING ZONE
PLATE HEAT EX-CHANGER
PLATE HEAT EXCHANGER
Cooke Industries - Phone: +64 9 579 2185 Fax: +64 9 579 2181 Email: [email protected] Web: www.cookeindustries.co.nz

E93.0802EN.C Ambassador+ manual 21
Higher pressure systems (e.g. in high buildings) If pressures higher than 4,0 bar occur in the heating system, the best solution is to separate the system from the boiler by means of a plate heat exchanger. Now the boiler pressure can still be under 4,0 bar and the boiler control remains as described above. Without plate heat exchanger, above 4,0 bar, a water pressure switch has to be built into the boiler instead of the water pressure sensor - the maximum allowed value in the boiler now is 6,0 bar and the boiler control needs to be adjusted.
6.15 Chemical water treatment The chemical compatibility of several products for treatment of the central heating equipment has been tested on the heat exchangers and the boilers. A list with the corrosion inhibitors in preventative and curative treatment for gas fired central heating boilers can be supplied by ECO HSG.
6.16 Under floor heating When using an under floor heating system, the boiler circuit must be separated from the heating circuit with a plate heat exchanger.
6.17 Flush the system with fresh water The water of the boiler and heating circuit should be free of any particles, debris and pollution. Therefore the complete installation must always be thoroughly flushed with clean water before installing and using the boiler(s).
6.18 Installation examples
6.18.1 EXAMPLE OF A LOW-RESISTANCE HEATING CIRCUIT
valve
air separator
dirt separator
strainer (water filter)
pressure relief valve
siphon
pump
automatic air vent
expansion vessel
P1
BOILER
HEATING ZONE
Cooke Industries - Phone: +64 9 579 2185 Fax: +64 9 579 2181 Email: [email protected] Web: www.cookeindustries.co.nz

E93.0802EN.C Ambassador+ manual 22
6.18.2 EXAMPLE OF A NORMAL SINGLE BOILER HEATING CIRCUIT WITH LOW LOSS HEADER (PREFERABLE)
valve
air separator
dirt separator
strainer (water filter)
pressure relief valve
siphon
pump
automatic air vent
expansion vessel
low loss header
6.18.3 EXAMPLE OF A MULTIPLE BOILER HEATING CIRCUIT WITH LOW LOSS HEADER
P1
P3S3
BOILER BOILER
HEATING ZONE
NON RETURNVALVE(low resistance type)NOT SPRINGLOADED
P3
S3
P1 P1
BOILER
HEATING ZONE
Cooke Industries - Phone: +64 9 579 2185 Fax: +64 9 579 2181 Email: [email protected] Web: www.cookeindustries.co.nz

E93.0802EN.C Ambassador+ manual 23
7 PUMP CHARACTERISTICS
7.1 Hydraulic graphs Boiler and pump graph A60. UPML 25-105PWM:
Boiler and pump graph A80. UPML 25-105PWM:
ΔT=20KΔT=25K
0,01,02,03,04,05,06,07,08,09,0
10,0
0,0 0,5 1,0 1,5 2,0 2,5 3,0
Hea
d (m
eter
WC
)
Water flow (m³/h) →Resistance Boiler Max. Head PumpHead for Installation Min. Head Pump
ΔT=20KΔT=25K
0,01,02,03,04,05,06,07,08,09,0
10,0
0,0 0,5 1,0 1,5 2,0 2,5 3,0 3,5
Hea
d (m
eter
WC
)
Water flow (m³/h) →Resistance Boiler Max. Pump HeadHead for Installation Min. Pump Head
Cooke Industries - Phone: +64 9 579 2185 Fax: +64 9 579 2181 Email: [email protected] Web: www.cookeindustries.co.nz

E93.0802EN.C Ambassador+ manual 24
Boiler and pump graph A100. UPML 25-105PWM:
Boiler and pump graph A120. UPML25-105 PWM:
ΔT=20KΔT=25K
0,01,02,03,04,05,06,07,08,09,0
10,0
0,0 1,0 2,0 3,0 4,0
Hea
d (m
eter
WC
)
Water flow (m³/h) →Resistance Boiler Max. Pump HeadHead for Installation Min. Pump Head
ΔT=20KΔT=25K
0,01,02,03,04,05,06,07,08,09,0
10,0
0,0 1,0 2,0 3,0 4,0 5,0
Hea
d (m
eter
WC
)
Water flow (m³/h) →Resistance Boiler Max. Head PumpHead for Installation Min Head Pump
Cooke Industries - Phone: +64 9 579 2185 Fax: +64 9 579 2181 Email: [email protected] Web: www.cookeindustries.co.nz

E93.0802EN.C Ambassador+ manual 25
Boiler and pump graph A150. Wilo Stratos Para 30/1-12 PWM:
Boiler and pump graph A180. Wilo Stratos Para 30/1-12 PWM:
Explanation pump graph: The Ambassador+ range is equipped with high efficiency pumps, in the hydraulic graph there is a minimum and maximum head for the pump. This is the range in which the pump will modulate. The pump speed is controlled by a PWM signal provided by the burner controller at a value causing a Delta T across the heat exchanger of 20°C at the whole burner modulation range.
ΔT=20KΔT=25K
0,0
2,0
4,0
6,0
8,0
10,0
12,0
3,0 3,5 4,0 4,5 5,0 5,5 6,0 6,5
Hea
d (m
eter
WC
)
Water flow (m³/h) →Resistance Boiler Max. Head Pump
Head for Installation Min. Head Pump
ΔT=20KΔT=25K
0,0
2,0
4,0
6,0
8,0
10,0
12,0
5,0 5,5 6,0 6,5 7,0 7,5
Hea
d (m
eter
WC
)
Water flow (m³/h) →Resistance Boiler max. head pump
Head for Instalation Min. Head Pump
Cooke Industries - Phone: +64 9 579 2185 Fax: +64 9 579 2181 Email: [email protected] Web: www.cookeindustries.co.nz

E93.0802EN.C Ambassador+ manual 26
7.2 Pumps: maximum electrical power General - The inrush current of a conventional pump is approximately 2½ x its nominal current. - The maximum switch current of the PCB is 5 A.
Combining both above statements: the current of pumps, controlled by the PCB, may not exceed 2 A.
Pump P1 - boiler pump. This modulating pump is part of the appliance. The speed and power consumption depends on the Delta T accros the heatexchanger and is controlled by the burner controller.
Pump P2 - calorifier pump. Pump P2 is a DHWi pump and is used when P4AA = 1, meaning the appliance is an indirect calorifier. Pumps P1 and P2 are connected to one fuse of 5 A, so their total nominal current may not exceed 5 A. To limit the inrush current, the switching sequence has been modified so pump P2 always switches 100 ms later than pump P1. The maximum nominal current of pump P2 must also be 2 A, again due to the inrush current.
3 way valve. The combined nominal current of pump P1 and the 3 way valve must be smaller than 5 A. So, the inrush current of the 3 way valve must be lower than 3 A.
Pump P3 - system pump. The nominal current of pump P3 must be equal to or lower than 2 A.
Warning (EC pumps): In case of using an electronic commutating pump, the relays 1, 2 or 3 may not be used for the power connection, because of the inrush current of the electronics of the pump. Directly connect the pump to an external power supply. Control connections of an EC pump can be established in several ways, set by parameter P5BN. See § 11.1.7 on page 77.
8 FLUE GAS AND AIR SUPPLY SYSTEM 8.1 General The boiler has a positive pressure flue system. The available combined pressure drop for the inlet and outlet system is 200 Pa for the complete boiler range.
Notice: • Install the horizontal flue components with an angle of 3° downwards in the direction of the boiler (roughly equal
to five centimetres for every linear meter). When not installed accordingly, it may result in condensate building-up in the flue gas tube, eventually causing component failure.
• Wall flue terminals are generally used up to 60-80 kW. Using these terminals with larger capacities will give unpleasant large condensate clouds.
• When using a wall terminal, there is the possible risk of ice building-up on surrounding parts/structures, because the condensate will freeze. This risk should be taken into account during the design phase of the heating instal-lation.
Note Because the flue gases can have a low temperature, the boiler needs to have a high efficiency approved stainless steel or plastic flue system. These materials, including the gaskets, should be usable for positive pressure flue gas systems and have a temperature class of T120.
Before installing, read the installation manual(s) of the supplier of the flue gas and air supply parts in-cluded with the parts. Manuals for parts supplied by ECO can be found at: http://burgerhout.nl/documenten/handleidingen/ (Only Dutch language available).
Undermentioned manuals for parts supplied by ECO HS are applicable:
- Regulations regarding fluegas systems PP(s) - Installation instructions clamps: Checklist - Installation instructions Skyline 3000
Cooke Industries - Phone: +64 9 579 2185 Fax: +64 9 579 2181 Email: [email protected] Web: www.cookeindustries.co.nz

E93.0802EN.C Ambassador+ manual 27
8.2 Boiler categories - types of fluegas systems. For C43 and C83 see cascade manual: http://www.ecohs.nl/products/ambassador-/documentation/
Type according EN 15502-2-1: 2012 Perfor-mance
Description
B23(P) Open Air supply from room
* Roofterminal * Without draught diverter * Boiler room air supply. * P = overpressure systems See chapter: Accessoires – Fluegas and airsupply parts - TWIN PIPE See: Six typical examples - example C Be aware: The installation room has to have
sufficient air supply vents. These vents must be open and may not be closed or blocked.
Requirements at NEN 3028 paragraph 6.5 C13
Closed Air supply from outside
*Wall outlet. *Air supply inlet and flue gas outlet at the
same air pressure zone. (a combined wall outlet e.g.).
When used with seperated air supply inlet and flue gas outlet the outlets have to be within a square of : - 50 cm for boilers up to 70 kW - 100 cm for boilers between 70 to 1000 kW See chapter: Accessoires – Fluegas and airsupply parts - CONCENTRIC See: Six typical examples - example E
C33 Closed Air supply from outside
* Flue terminal at the roof. * Air supply inlet and flue gas outlet located
at the same air pressure zone (a combined roof terminal e.g.).
When used with seperated air supply and flue gas outlet the outlets have to be within a square of : - 50 cm for boilersup to 70 kW - 100 cm for boilers between 70 to 1000 kW And the distance between the planes of the two transits must be smaller as: - 50 cm for boilers up to 70 kW - 100 cm for boilers over 70kW See chapter: Accessoires – Fluegas and airsupply parts - TWIN PIPE See: Six typical examples - example B
Vented area
Air inlet
Flue outlet
Concentric roof terminal concentric/ parallel adaptor
Concentric wall outlet
Cooke Industries - Phone: +64 9 579 2185 Fax: +64 9 579 2181 Email: [email protected] Web: www.cookeindustries.co.nz

E93.0802EN.C Ambassador+ manual 28
8.3 C63 certified In general, boilers are certified with their own flue gas material. For type B23, C13, C33, C43, C53, C83 systems, only use flue gas and air supply parts approved according §4.2 en §4.3.
If a boiler is C63 certified, no specific type flue gas material has been certified in combination with the boiler. In this case the flue gas and air supply parts should comply with the applicable European standards (EN14989). So, for type C63 systems flue gas and air supply parts from other suppliers can be used. It must be able to handle the condensate forming (W) and transport, overpressure (P1) and must have a minimum temperature class of T120. Also it has to meet the requirements in the following chapters "air supply" and "flue terminal".
CE string flue gas
material
Eur
opea
n
stan
dard
Tem
pera
-ture
cl
ass
Pre
ssur
e cl
ass
Res
ista
nce
to
cond
ensa
te
Cor
rosi
on re
-si
stan
ce c
lass
Met
al: l
iner
sp
ecifi
catio
ns
Soo
t fire
resi
s-ta
nce
clas
s
Dis
tanc
e to
co
mbu
stib
le m
a-te
rial
P
last
ics:
lo
catio
n
Pla
stic
s: fi
re b
e-ha
viou
r
P
last
ics:
en
clos
ure
min. eis PP EN 14471 T120 P1 W 1 O 30 I of E C/E L min. eis RVS EN 1856-1 T120 P1 W 1 L20040 O 40
C53
Closed Air supply from outside
*Separate air supply duct *Separate flue gas discharge duct. * Air supply inlet and flue gas outlet at differ-ent air pressure zones.But not at opposite walls.
See chapter: Accessoires – Fluegas and airsupply parts - TWIN PIPE See: Six typical examples - example F
C63 - example
Closed Air supply from outside
* Appliance sold without flue/air-inlet ducts * The flue gas parts are not part of the boiler. The boiler is intended to be con-nected to a separately approved and mar-keted system for the supply of combustion air and discharge of combustion products. Condensate is allowed to go to the boiler. * Air supply inlet and flue gas outlet not at
opposite walls * Technical data:
nominal Tflue gas 85°C nominal Qfluegas see 2.21)
maximum Tfluegas 95°C min. load Tfluegas 35°C min. load Qfluegas zie 2.21) nominal % CO2 see 2.21) max. allowed draft 70Pa max. pressure drop in-
let-outlet 200Pa
max Tair supply 40°C max recirculation 10%
1) tabel technical specifications See chapter: Accessoires - Fluegas and airsupply parts - TWIN PIPE See: Six typical examples - example A
roof terminal
roof terminal
Flue outlet
Air inlet
Air inlet
Flue outlet
Cooke Industries - Phone: +64 9 579 2185 Fax: +64 9 579 2181 Email: [email protected] Web: www.cookeindustries.co.nz

E93.0802EN.C Ambassador+ manual 29
A few examples of flue gas material suitable for ECO boilers: CE String for Plastic PPs: EN14471 T120 P1 W 2 O(30) I C/E L CE String for Stainless Steel: EN1856-1 T250 P1 W V2-L50040 O (50) When selecting flue gas systems, be aware that the minimum requirements are met. So only select flue gas materials having the same or better properties than this table.
Never use allumnium containing fluegas pipes in these boilers.
Connecting diameters and tolerances:
mat boiler dnom Doutside dinside Linsert SS A60, A80 80 80 +0,3/ -0,7 81 +0,3/ -0,3 50 +2/ -2 SS A100, A120 100 100 +0,3/ -0,7 101 +0,3/ -0,3 50 +2/ -2 SS A150, A180 130 130 +0,3/ -0,7 131 +0,5/ -0,5 50 +2/ -2
PP A60, A80 80 80 +0,6/ -0,6 50 +20/ -2 PP A100, A120 100 100 +0,6/ -0,6 50 +20/ -2 PP A150, A180 130 130 +0,9/ -0,9 50 +20/ -2
Multiple boilers can be connected to a common duct. These flue gas systems for multiple boiler installations must always be engineered as zero or negative pressure systems; this to prevent the risk of recirculation of the flue gases. Consult the flue gas supplier for detailed information and engineering. See also the cascade manual for these multiple boiler installations. More information about these common fluegas systems can be found at the cascade-installation manual. You can find the cascade manual at the website: http://www.ecohs.nl/products/ambassador-/documentation/
8.4 Air supply When an air supply duct is connected from the outside of the building to the boiler, the boiler will operate as a room-independent boiler (closed boiler).
The air supply duct can be made of: • PVC / PP • Thin-walled aluminium • Stainless steel
8.4.1 COMBUSTION AIR QUALITY
Combustion air must be free of contaminants. For example: chlorine, ammonia and/or alkali agents, dust, sand and pollen. Remind that installing a boiler near a swimming pool, a washing machine, laundry or chemical plants does expose combustion air to these contaminants.
8.4.2 AIR SUPPLY THROUGH HUMID AREAS
When the supply duct will be placed in a boiler room with moist air (for example: greenhouses), a double walled supply duct or an insulated duct must be used to prevent the possible condensation at the outside of the duct. It is not possible to insulate the internal air pipes of the boiler and therefore condensation at the internal air canals must be prevented.
When roof mounted, the air supply duct needs to be protected against rain, so no water will be entering the boiler.
Cooke Industries - Phone: +64 9 579 2185 Fax: +64 9 579 2181 Email: [email protected] Web: www.cookeindustries.co.nz

E93.0802EN.C Ambassador+ manual 30
8.5 A+60 Twin pipe version
The A+60 boiler as shown in the picture below, is a twin pipe boiler with separate air inlet and flue outlet pipes. Do NOT connect a concentric pipe to this boiler.
8.6 Pipe heights and mutual distances on a flat roof
Height A
This is the height of the air inlet. A rain hood should prevent rain-water entering the air supply system. When the inlet and outlet are mounted on a flat roof, the inlet should be at least 60 cm above the roof surface and at least 30 cm above the maximum snow level.
Example 1: When the maximum snow level on the roof surface is 45 cm then the air inlet should be at 45+30=75 cm. 75 cm is more than the minimum 60 so the height will be 75 cm.
Example 2: When the maximum snow level on the roof surface is 15 cm then the air inlet should be at 15+30=45 cm. 45 cm is less than the minimum 60 cm so the height will be 60 cm. Height difference B
This is the distance between the flue outlet and the air inlet. The flue gas outlet should be at least 70 cm above the air inlet. It is advised to be equipped with a conical outlet. When no air inlet connection is applied on the roof, the flue outlet should be situated at least 100 cm above the roof surface. Distance C
The horizontal mutual distance at roof level. This distance should be at least 70 cm.
BA
C
Note the sticker on the flue pipe, indicating that this is a twin pipe boiler.
The twin pipe version is recognized by the two pipes, one of which has a RED ring cap.
Cooke Industries - Phone: +64 9 579 2185 Fax: +64 9 579 2181 Email: [email protected] Web: www.cookeindustries.co.nz

E93.0802EN.C Ambassador+ manual 31
8.7 Flue gas and air supply resistance table In the next section, for six typical flue gas outlet & air inlet configurations the maximum lengths of the straight pipes will be calculated. First all component resistance values are given in the next table:
* Never reduce pipe diameters relative to boiler connections Values printed in grey applicable for larger pipe diameters than boiler connection
A+60 A+80 A+100 A+120 A+150 A+180 FLUE GAS PIPING Ø [mm] * RESISTANCE [Pa] straight tube/m 80 5,0 8,0 - - - -
100 2,0 3,5 4,0 6,5 - - 130 0,45 0,8 1,2 1,8 3,8 6,0 150 - - 0,5 0,8 1,7 3,0
45° bend 80 2,5 4,0 - - - - 100 1,0 1,7 2,0 3,2 - - 130 0,2 0,4 0,6 0,8 1,9 3,0 150 - - 0,2 0,4 0,8 1,5
90° bend 80 5,0 8,0 - - - - 100 2,0 3,5 4 6,5 - - 130 0,4 0,8 1,2 1,8 3,8 6,0 150 - - 0,5 0,7 1,7 3,0
Flue outlet zeta=0,05 80 0,7 1,2 - - - - 100 0,3 0,5 0,8 1,1 - - 130 0,1 0,18 0,3 0,4 0,6 0,9 150 - - 0,15 0,2 0,35 0,5
Flue outlet zeta=1 80 13,8 24,0 - - - - 100 5,6 9,8 15,2 22,1 - - 130 2,0 3,5 5,3 7,8 12,0 17,3 150 - - 3,0 4,4 6,8 9,8
Flue outlet zeta=1,5 80 20,6 36,0 - - - - 100 8,5 14,8 22,8 33,2 - - 130 3,0 5,2 8,0 11,6 18,0 26,0 150 - - 4,5 6,6 10,2 14,7
AIR SUPPLY PIPING Ø [mm] * RESISTANCE [Pa] straight tube/m 80 4,0 7,5 - - - -
100 1,2 3,0 3,5 4,0 - - 130 0,35 0,75 0,8 1,1 1,2 2,0 150 - - 0,3 0,4 0,6 1,2
45° bend 80 2,0 3,5 - - - - 100 0,6 1,5 1,7 2 - - 130 0,2 0,4 0,4 0,5 0,6 1,0 150 - - 0,15 0,2 0,3 0,6
90° bend 80 4,0 7,0 - - - - 100 1,2 3,0 3,5 4,0 - - 130 0,3 0,7 0,8 1,1 1,2 2,0 150 - - 0,3 0,4 0,6 1,2
Air inlet zeta =1 80 10,4 18,1 - - - - 100 4,2 7,4 11,4 16,7 - - 130 1,5 2,6 4,0 5,8 9,1 13,1 150 - - 2,3 3,3 5,1 7,4
CONCENTRIC PARTS Ø [mm] * RESISTANCE [Pa] roof terminal 80/125 34 61 - - - -
100/150 - - 39 45 69 86 130/200 - - - - 15 23
wall terminal 80/125 13 22 - - - - 100/150 - - 19 24 40 48
straight tube/m 80/125 9 12 - - - - 100/150 - - 8 10 14 16
45° bend concentric 80/125 5 7 - - - - 100/150 - - 8 9 14 16
90° bend concentric 80/125 8 13 - - - - 100/150 - - 11 13 22 28
conc./par. adaptor 80/125 10 14 - - - - 100/150 - - 16 22 40 56
NOTICE: This table may only be used for a single flue/air system for one boiler. Do NOT use this table for common flue systems with cascaded boilers.
CONCENTRIC FLUE GAS OUTLET
AIR INLET
ROOF
WALL
AIR INLET
H/D=1,0 zeta=1,0
FLUE GAS OUTLET
zeta=0 open outlet
zeta=0,05 conical outlet
H/D=1,0 zeta=1,0
H/D=0,5 zeta=1,5
Cooke Industries - Phone: +64 9 579 2185 Fax: +64 9 579 2181 Email: [email protected] Web: www.cookeindustries.co.nz

E93.0802EN.C Ambassador+ manual 32
8.8 Six typical examples A: Twin pipe system with separate pipes for flue gas and air supply C63 B: Twin pipe system with separate pipes and concentric roof terminal C33 C: Single pipe for flue gas outlet only (air supply from boiler room) B23 D: Concentric pipe for flue gas/air supply (roof-mounted) C33 E: Concentric pipe for flue gas/air supply (wall-mounted) C13 F: Separate air supply duct & flue duct in different pressure zone C53
8.8.1 EXAMPLE A: TWIN PIPE SYSTEM (C63)
Calculation example with given lengths: checking resistance
The total resistance is less than 200 Pa. This flue gas / air supply system is functional.
Be aware: Eco specific resistance values are used in this example. Flue and air pipes of other supplier can have other values
Boiler type: A+ 180
Flue
gas
Diameter: 130 mm Number Pa Pa total Straight tube m¹ total 9 6 54
Bend 90° 2 6 12 Flue outlet conical 1 0,9 0,9
Total resistance flue gas outlet: 66.9
Air
supp
ly Diameter: 130 mm Number Pa Pa total
Straight tube m¹ total 8 2 16 Bend 90° 2 2 4
Air inlet H/D = 1,0 1 13,1 13,1 Total resistance air supply: 33,1
Total resistance flue gas outlet and air supply: 100 Pa
8.8.2 EXAMPLE B: TWIN PIPE SYSTEM WITH CONCENTRIC ROOF TERMINAL (C33) Calculation example with given lengths: checking resistance
The total resistance is less than 200 Pa. This flue gas / air supply system is functional. Part number. roof terminal: E04.018.001 - Inox Part number. adaptor conc/twin: E04.018.033 - Inox/PP
Boiler type: A+ 120
Flue
gas
Diameter: 100 mm Number Pa Pa total Straight tube m¹ total 6 6,5 39
Bend 90° 2 6,5 13
Roof terminal concentric 150/100 1 45 45
Adaptor conc./par. 150/100 1 22 22 Total resistance flue gas outlet: 119
Air
supp
ly Diameter: 100 mm Number Pa Pa total
Straight tube m¹ total 6 4 24
Bend 90° 2 4 8
Total resistance air supply: 32 Total resistance flue gas outlet and air supply: 151 Pa
120
2m
2m
2m
2m
2m
2m
180
4m
2m
2m
2m
2m
5m
Cooke Industries - Phone: +64 9 579 2185 Fax: +64 9 579 2181 Email: [email protected] Web: www.cookeindustries.co.nz

E93.0802EN.C Ambassador+ manual 33
Examples A (C63) and B (C33) maximum pipe lengths
Example B (C33)
boiler type → A+ 60 A+ 80 A+ 100 A+ 120 A+ 150 A+ 180 Diameter air inlet [mm] 80 80 100 100 130 130 Diameter flue outlet [mm] 80 80 100 100 130 130 Concentric roof terminal [mm] 80/125 80/125 100/150 100/150 130/200 130/200 Maximum pipe length [m] (inlet + outlet together) 21,0 12,0 23,0 16,5 40,5 25,5
Part no. concentric roof terminal E04.018.015 E04.018.001 E04.018.074
Part no. adaptor conc/twin: E04.010.161 E04.018.033 - included in terminal
Example A (C63) boiler type → A+ 60 A+ 80 A+ 100 A+ 120 A+ 150 A+ 180
Diameter air inlet [mm] 80 80 100 100 130 130 Diameter flue outlet [mm] 80 80 100 100 130 130 Diam. roof terminals [mm] 80 80 100 100 130 130 Maximum pipe length [m] (inlet + outlet together) 27,5 18,0 31,5 24,0 44,5 30,0
Concentric roof terminal
Air inlet
Flue outlet
Example A C63
Example B C33
concentric/parallel adaptor
Cooke Industries - Phone: +64 9 579 2185 Fax: +64 9 579 2181 Email: [email protected] Web: www.cookeindustries.co.nz

E93.0802EN.C Ambassador+ manual 34
8.8.3 EXAMPLE C: SINGLE FLUE GAS OUTLET. AIR SUPPLY FROM BOILER ROOM
Calculation example with given lengths: checking resistance
The total resistance is less than 200 Pa. This flue gas / air supply system is functional. Part number. roof terminal: E04.018.001 - Inox, concentric Part number. roof terminal: 410084853 - PP, concentric
Example C (B23, B23P) boiler type → A+ 60 A+ 80 A+ 100 A+ 120 A+ 150 A+ 180
Diameter air inlet [mm] 80 80 100 100 130 130 Diameter flue outlet [mm] 80 80 100 100 130 130 Diam. roof terminal [mm] 80 80 100 100 130 130 Maximum pipe length [m] (total outlet length) 36,5 21,5 46,5 27,5 49,5 30,0
Part no. roof terminal: Inox, conc: (same as concentric) E04.018.015 E04.018.001 E04.018.074
Part no. roof terminal: PP, conc: 410086883 410084853 410070279
Boiler type: A+ 100
Flue
gas
Diameter: 100 mm Number Pa Pa total
Straight tube m¹ total 13 4 52
Bend 90° 2 4 8
Bend 45° 2 2 4
Flue outlet H/D = 1,0 1 15,2 15,2
Total resistance flue gas outlet: 79,2
100
4m
2m
3m
2m
2m
Example C B23
Vented area
Air inlet
Flue outlet
Air inlet
Cooke Industries - Phone: +64 9 579 2185 Fax: +64 9 579 2181 Email: [email protected] Web: www.cookeindustries.co.nz

E93.0802EN.C Ambassador+ manual 35
8.8.4 EXAMPLE D: CONCENTRIC FLUE GAS/AIR SUPPLY PIPE (ROOF-MOUNTED)
Calculation example with given lengths: checking resistance
Boiler type: A+ 60 (C33)
Con
cent
ric
Diameter: 80/125 mm. Number Pa Pa total
Straight tube m total 11 9 99
Bend 90° 3 8 24
Bend 45° 2 5 10
Concentric terminal roof 1 34 34 Total resistance flue gas outlet and air supply
(concentric): 167
The total resistance is less than 200 Pa. This flue gas / air supply system is functional. Part number concentric roof terminaL: E04.018.015 – Inox E04.018.018 - PP
8.8.5 EXAMPLE E: CONCENTRIC SYSTEM WALL OUTLET C13(WALL-MOUNTED)
Calculation example with given lengths: checking resistance
The total resistance is less than 200 Pa. This flue gas / air supply system is functional. Part number concentric wall terminal: E04.018.019 - Inox
Boiler type: A+ 60
Con
cent
ric
Diameter: 80/125 mm Number Pa Pa total
Straight tube m total 9 9 81
Bend 90° 1 8 8
Concentric terminal wall 1 13 13 Total resistance flue gas outlet and air supply
(concentric): 102
60
60
Cooke Industries - Phone: +64 9 579 2185 Fax: +64 9 579 2181 Email: [email protected] Web: www.cookeindustries.co.nz

E93.0802EN.C Ambassador+ manual 36
Examples D and E maximum pipe lengths
Example D (C33) boiler type → A+ 60 A+ 80 A+ 100 A+ 120 A+ 150 A+ 180
Diameter concentric pipe [mm] 80/125 80/125 100/150 100/150 NOT RECOMMENDED (choose B,C or E)
Concentric roof terminal [mm] 80/125 80/125 100/150 100/150
Maximum pipe length [m] 13,5 6,0 12,0 7,5
Part no. conc. roof terminal inox E04.018.015 E04.018.001
Part no. conc. roof terminal PP E04.018.018 410084863
Example E (C13) boiler type → A+ 60 A+ 80 A+ 100 A+ 120 A+ 150 A+ 180
Diameter concentric pipe [mm] 80/125 80/125 100/150 100/150 100/150 100/150 Concentric wall terminal [mm] 80/125 80/125 100/150 100/150 100/150 100/150
Maximum pipe length [m] 18,5 12,5 19,0 14,0 7,0 4,0
Part no. conc. wall terminal inox E04.018.019 E04.018.002
concentric roof terminal
concentric wall terminal
Example D Example E C33 C13
Cooke Industries - Phone: +64 9 579 2185 Fax: +64 9 579 2181 Email: [email protected] Web: www.cookeindustries.co.nz

E93.0802EN.C Ambassador+ manual 37
8.8.6 EXAMPLE F: SEPARATE AIR SUPPLY DUCT & FLUE DUCT IN DIFFERENT PRESSURE ZONE (C53)
Example F (C53)
boiler type → A+ 60 A+ 80 A+ 100 A+ 120 A+ 150 A+ 180 Diameter wall terminal [mm] 80 80 100 100 130 130 Diameter air inlet [mm] 80 80 100 100 130 130 Diameter air inlet/ flue outlet [mm] 80 80 100 100 130 130
Diameter roof terminal [mm] 80 80 100 100 130 130 Maximum pipe length [m] (inlet + outlet together) 30 14 38 19 42 23
Part no. roof terminal: Inox, conc: E04.018.015 E04.018.001 E04.018.074 PP, conc: 410086883 410084853 410070279
Part no. wall terminal: Inox, conc: E04.018.019 E04.018.002 410072131
PP: 410082856 410087931 410087550
Air inlet
Flue outlet
Example F C53
Cooke Industries - Phone: +64 9 579 2185 Fax: +64 9 579 2181 Email: [email protected] Web: www.cookeindustries.co.nz

E93.0802EN.C Ambassador+ manual 38
9 ELECTRICAL INSTALLATION
9.1 General All the wiring is connected to a separate connector that is fitted in a socket. The connector can be taken from the sockets without loosening the wiring. The connections are placed on top of the display panel and can be accessed by removing the boiler front door and the connector protection cover.
• For operation the boiler needs a power supply of 230 Vac 50Hz. • The boiler connections are not life/neutral sensitive (the boiler is not phase-sensitive). • The wiring for the connections can be entered at the bottom of the boiler through the cable glands. • NOTICE: Before starting to work on the boiler, it must be switched off and the power supply to the boiler
must be disconnected. • Electrical wiring should be installed according to all applicable standards and regulations. • Working on the boiler should only be done by a qualified service engineer that is skilled in working on elec-
trical installations and according to all applicable standards.
9.2 Electrical connections
9.3 Explanation of the connections 1-2 OUTDOOR SENSOR When an outdoor temperature sensor is connected, the boiler will control the flow water temperature by using a calculated setting, which is relative to the outdoor temperature. PARAMETER: No parameter settings needed. 3-4 EXTERNAL FLOW SENSOR When a low loss header is used, this sensor measures the flow temperature at the system side. The sensor must be mounted on the supply pipe at the system side, just behind the low loss header. NO-TICE: The sensor must be used when boilers are cascaded with the internal cascade manager. PARAMETER: No parameter settings needed. 5-6 CALORIFIER SENSOR or THERMOSTAT When an indirect hot water tank / calorifier is installed, a hot water sensor must be connected to these terminals. In case of a DHW heat demand, the set point will be shown in the display. An external on/off thermostat can also be connected to these terminals. When there is heat demand (terminals 5 and 6 are bridged) the flow temperature going to the heating coil(s) will be shown in the display.
OUTDOOR SENSOR
EXTERNAL FLOW
SENSOR
CALORIFIER SENSOR
or THERMOSTAT
GENERAL BLOCKING
EMPTY EXTERNAL WPS
On/Off Stat or Open
Therm Hea-ting Circuit
+ -
0 – 10 VDC
A B
CASCADE CONNECTION
LOCK-OUT
N.O.
BURNER BURNING
N.O.
HEAT DE-MAND N.O.
CH System Pump P3
Diverter Valve Calorifier
Calorifier Pump P2
Mains 230 VAC
CONNECTIONS
Cooke Industries - Phone: +64 9 579 2185 Fax: +64 9 579 2181 Email: [email protected] Web: www.cookeindustries.co.nz

E93.0802EN.C Ambassador+ manual 39
7-8 GENERAL BLOCKING A heat demand that will start the burner will be blocked when terminals 7 and 8 are not bridged. This connection is for the use of external safety devices (terminals must be bridged for allowing burner to fire). 9-10 EMPTY 11-12 EXTERNAL WATER PRESSURE SWITCH
A water pressure sensor is mounted in the boiler. As an option a water pressure switch can be installed. The sensor can be replaced by the water pressure switch, which can be wired to the terminals. When terminals 11-12 are not bridged, the boiler will lock-out. PARAMETER: A parameter change is needed.
13-14 ON/OFF STAT OR OPENTHERM HEATING CIRCUIT OPTION 1: An ON/OFF thermostat can be connected. The boiler will use the set/programmed flow tem-perature for the heating system when these terminals 13 and 14 are bridged. OPTION 2: An OpenTherm (OT) controller can be connected to the terminals 13 and 14. The boiler software will detect and use this OpenTherm signal automatically. 15-16 0-10 VDC CONTROL SIGNAL These terminals are used for an external 0-10 VDC control signal. PARAMETER: A parameter change is needed. NOTICE: Terminal 15 [+] (positive) and terminal 16 [-] (negative). 17-18 CASCADE CONNECTION These connections are used when boilers are cascaded with the internal cascade manager for control-ling the total cascade. NOTICE: Connect all terminals 17 and all terminals 18 together, do not switch between these terminals. 19-20 LOCK-OUT OR PUMP ON/OFF This contact is N.O. (normally open). When the unit is in lock-out this contact will close. This contact can also be used for the switching of a pump with a separate control input connection; then a parameter change is needed. 21-22 BURNER BURNING OR EXTRA BOILER OR PUMP ON/OFF
This contact is N.O. (normally open). When the unit starts the burner and detects the flame, this contact will be closed. This contact can also be used to control an external boiler or for the switching of a pump with a separate control input connection; in both latter cases a parameter change is needed.
23-24 HEAT DEMAND OR PUMP ON/OFF This contact is N.O. (normally open). When the unit receives any heat demand this contact will close. This contact can also be used for the switching of a pump with a separate control input connection; then a parameter change is needed. 25-26-27 CH SYSTEM PUMP P3 Connections for a central heating system pump (P3). Nominal pump current of P3 may not exceed 2 A, therefore its power may not exceed 460 W, see also § 7.2. 28-29-30-31 DIVERTER VALVE CALORIFIER When using a calorifier/hot water tank, a 3-way valve or a pump (P2) can be used to divert hot water to the heating coil of the calorifier/tank. This 3-way valve will open, when the hot water storage tank/calo-rifier has a heat demand. PARAMETER: A parameter change is needed. 28 = L1 wire (heating position); 29 = Neutral wire; 30 = Ground wire; 31 = L2 wire (hot water position). The inrush current of the 3-way valve may not exceed 3 A, see also § 7.2. 29-30-31 CALORIFIER PUMP P2 When using a calorifier/hot water tank, a 3-way valve or a pump (P2) can be used to divert hot water to the heating coil of the calorifier/tank. This pump will start when the hot water storage tank/calorifier cre-ates a hot water demand. PARAMETER: A parameter change is needed. Nominal pump current of P2 may not exceed 2 A, therefore its power may not exceed 460 W, see also § 7.2.
32-33-34 POWER SUPPLY The power supply connection of the unit. 32 = Phase wire; 33 = Ground wire; 34 = Neutral wire.
Cooke Industries - Phone: +64 9 579 2185 Fax: +64 9 579 2181 Email: [email protected] Web: www.cookeindustries.co.nz

E93.0802EN.C Ambassador+ manual 40
9.4 Electrical schematics
Cooke Industries - Phone: +64 9 579 2185 Fax: +64 9 579 2181 Email: [email protected] Web: www.cookeindustries.co.nz

E93.0802EN.C Ambassador+ manual 41
Cooke Industries - Phone: +64 9 579 2185 Fax: +64 9 579 2181 Email: [email protected] Web: www.cookeindustries.co.nz

E93.0802EN.C Ambassador+ manual 42
9.5 Sensor values
SENSOR SENSOR TYPE SENSOR VALUE S1 internal flow sensor NTC-10K-B3977 S2 internal return sensor NTC-10K-B3977 S3 external flow sensor NTC-10K-B3977 S4 calorifier/tank sensor NTC-10K-B3977 S5 outdoor sensor NTC-12K-B3740 S6 flue gas sensor NTC-10K-B3977
Conversion table temperature vs. resistance outdoor sensor NTC-12k B3740
Temperature (°C)
Resistance (Ω)
Temperature (°C)
Resistance (Ω)
-50 0 36130 -45 5 28600 -40 10 22800 -35 15 18300 -30 171800 20 14770 -25 129800 25 12000 -20 98930 30 9804 -15 76020 35 8054 -10 58880 40 6652 - 5 45950 45 5522
Conversion table temperature vs. resistance all sensors except outdoor sensor. NTC-10k B3977
Temperature (°C)
Resistance (Ω)
Temperature (°C)
Resistance (Ω)
Temperature (°C)
Resistance (Ω)
Temperature (°C)
Resistance (Ω)
-30 175203 20 12488 70 1753 120 387 -25 129289 25 10000 75 1481 125 339 -20 96360 30 8059 80 1256 130 298 -15 72502 35 6535 85 1070 135 262 -10 55047 40 5330 90 915 140 232 -5 42158 45 4372 95 786 145 206 0 32555 50 3605 100 677 150 183 5 25339 55 2989 105 586 155 163
10 19873 60 2490 110 508 160 145 15 15699 65 2084 115 443 165 130
Cooke Industries - Phone: +64 9 579 2185 Fax: +64 9 579 2181 Email: [email protected] Web: www.cookeindustries.co.nz

E93.0802EN.C Ambassador+ manual 43
10 USER INTERFACE
10.1 Control panel / display unit
COMM.PORT
SERVICE
ON/OFFRESETENTER
MENU
COMM.PORT
MENU
ON/OFFRESETENTER
SERVICE
CONTROL PANEL
DISPLAY 2 rows/ each 20 characters
Press and hold for three seconds for stand-by/progr. mode Press and hold for six seconds to switch boiler on/off. Used as RESET and ENTER button when programming.
Connector for connecting computer cable.
Button is pushed to open MENU.
Buttons to toggle through measured temperatures. Also used for navigating through the menus and for chang-ing values.
Button to activate service function (hold for three seconds).
Schornsteinfeger function (only for Germany).
Light: lights when controller detects good flame signal. Lights when burner is burning.
Cooke Industries - Phone: +64 9 579 2185 Fax: +64 9 579 2181 Email: [email protected] Web: www.cookeindustries.co.nz

E93.0802EN.C Ambassador+ manual 44
10.2 Control panel menu structure
BASE SCREEN : (appears during operation) HEATING : No demand / Standby / burning
> > > : 1 1 8 ° C ( 1 2 5 ° C )
1. view data
press: ◄►
"MONITOR" screens One can toggle through the measured val-ues and status of the heater. Pressing "ON/OFF, RESET, ENTER" briefly will cause the display to go back to the base menu. When no button has been pressed for three minutes the display will automatically go to the BASE DISPLAY. (This period can be set by a parameter)
Display shows 2x20 digit mes-sage for three seconds. Message can be set in parame-ters. example: Company name City, Country
press: ▲
Display shows for three seconds: - Heater type - Time, date and day example: Z-FG 550 13:51 US (or EU) 06 / 01 / 2010 Wed After this message the display shows for three seconds: - Software version and - Cascade designation example: Firmware : Mk 00197 Address : 0
press: ▼
These three messages will also show when: - Heater is connected to the power - When heater is turned ON - When heater is turned OFF sequence: The messages will show from TOP to BOTTOM each for three seconds.
press: MENU
1 2
2. press [ON/OFF] for ± three seconds to
program in standby mode
NOTICE: Pressing too long will switch off the boiler.
Cooke Industries - Phone: +64 9 579 2185 Fax: +64 9 579 2181 Email: [email protected] Web: www.cookeindustries.co.nz

E93.0802EN.C Ambassador+ manual 45
By pressing (◄ ►) one can toggle though the available menus.
"USER LOCK" menu In this menu one can lock the menu for users 0= UNLOCKED 1= LOCKED When un-locked the user can enter the "MENU" by pressing the menu button and all submenus will show. When locked the user has to push the : MENU and simultaneously press ▼ for six seconds to get ac-cess to all submenus. This is to prevent accidental changes! NOTE: The parameters sub menu can always be accessed.
"MAINTENANCE" menu By pressing (◄ ► ) one can set the following options: - Maintenance reset - Maintenance Mode - All - Date - Ignition cycles - Burning hours - Mainten Off
"SETPOINT" menu In this menu one can change temper-ature settings without the need for a password. - Heating set point Flow set point when controlling on/off on set flow temp. - Heating reduced The amount of degrees diff. relative to "Heating set point" during night re-duction. - Parallel shift +/- relative to out-door curve (also in outdoor menu possible) - Hot water set point Calorifier or Water heater (depends on heater type) - Hot water reduced The amount of degrees diff. relative to "Hot water set point" during night reduction.
"PROGRAM" menu In this menu one can set the CH, DHW and Anti Legionnella program.
"OUTDOOR" menu In this menu one can set all Outdoor relevant parameters.
"OPERATING HISTORY" menu Shows burning hours DHW, Heating, etc.
"FAULT HISTORY" menu press: ▼ Reading last fifteen faults (only reading!).
"TIME/DATE/DAY" menu In this menu one can set the time and the date.
"PARAMETERS" menu In this menu one can change param-eters. The possible access depends on the password that is used.
HOW TO CONFIRM CHANGES When changes have been made in one of the nine menus below, the user presses ENTER to confirm these changes. To prevent anyone from making changes by mistake, the following happens when changes are made: Step 1: The user presses [ENTER] to confirm the change made or [MENU] to exit the menu without changes. HINT: First pro-gramme all changes planned, then only after that, press [ENTER] Step 2: The display asks the user to be sure to make these changes. The user can cancel or confirm by using the left and right arrows. CANCEL = ◄ CONFIRM = ►
Enter password
Enter PW Level 1: three second message confirming access:
LEVEL 1
Enter PW Level 2: three second message confirming access:
LEVEL 2
parameter menu
Cooke Industries - Phone: +64 9 579 2185 Fax: +64 9 579 2181 Email: [email protected] Web: www.cookeindustries.co.nz

E93.0802EN.C Ambassador+ manual 46
10.3 Display during operation During normal operation the text in the display shows the status of the boiler. In the following graphs the several displays during normal operation are explained.
Display at HEATING DEMAND Heat demand type: Actual status: H E A T I N G : N o d e m a n d > > > : 1 2 3 . 4 ° C ( 1 2 3 . 4 ° C ) cascade communi-cation indi-cator
temp. set point control sensor showing the measured temperature. Can be turned off by P5 BJ
When heat is needed for the calorifier the text "HEATING" changes into "HOTWATR". When there is no heat demand it always shows heating.
Display at HOT WATER DEMAND Heat demand type: Actual status: H O T W A T R : N o d e m a n d > > > : 1 2 3 . 4 ° C ( 1 2 3 . 4 ° C ) cascade communi-cation indi-cator
temp. set point Thermostat > coil flow temp. Sensor > water temp.
control sensor showing the measured temperature Can be turned off by P5 BJ
Explanation "Actual status" screen Actual status: B o i l e r o f f When boiler is switched off (only text in the display during this status). N o d e m a n d No heat demand signal coming from the room thermostat and calorifier sensor (open). S t a n d - b y Room thermostat & calorifier sensor/thermostat detect heat demand but set point is reached. P r e - p u r g e The fan is purging before a burner start attempt. P r e - i g n i t i o n Ignition starts before opening of the gas valve. I g n i t i o n The ignitor is igniting. P o s t - p u r g e The fan is purging after burner is switched off. B u r n i n g 1 0 0 % When the burner is firing, also the actual rpm% is shown.
Explanation "Cascade communication indicator" NO CASCADE COMMUNICATION > > > no.1 Always showing the fixed ">>>" CORRECT CASCADE COMMUNICATION > > no.1
no.2 > Showing alternating no.1 & no.2 with one second interval.
Cooke Industries - Phone: +64 9 579 2185 Fax: +64 9 579 2181 Email: [email protected] Web: www.cookeindustries.co.nz

E93.0802EN.C Ambassador+ manual 47
10.4 Monitor screens During normal operation and stand-by, the [◄] and [►] buttons can be used to show some boiler information, includ-ing measured temperatures, settings and data. In the following graphs is explained which values can be shown in the display. When no button is activated for 2 minutes, the display will return to its status display.
Pressing [◄] or [►] while being at the "operating screen" toggles through the screens below. When pressing [ON/OFF], [RESET], [ENTER] or [MENU] at any time the display returns to the base menu.
SCREEN: 1 T 1 F l o w 1 2 3 , 9 ° C Measured value by the internal flow sensor. T 2 R e t u r n 1 2 3 , 9 ° C Measured value by the internal return sensor.
O p e n Shown when controller doesn’t detect this sensor. S h o r t e d Shown when sensor wires or sensor itself is shorted.
SCREEN: 2
T 3 E x t e r n a l 1 2 3 , 9 ° C Measured value by the external sensor. T 4 C a l o r i f i 1 2 3 , 9 ° C Measured value by the calorifier sensor.
O p e n Shown when controller doesn’t detect this sensor. S h o r t e d Shown when sensor wires or sensor itself is shorted.
SCREEN: 3
T 5 O u t d o o r 1 2 3 , 9 ° C Measured value by the outdoor sensor. T 6 F l u e 1 2 3 , 9 ° C Measured value by the flue gas sensor.
O p e n Shown when controller doesn’t detect this sensor. S h o r t e d Shown when the sensor wires or the sensor itself is
shorted.
SCREEN: 4
Temp. difference between internal flow & return sen-sor. d T F l o w R e t u r n 1 2 3 , 9 ° C
d T F l u e R e t u r n 1 2 3 , 9 ° C Temp. difference between flue gas & internal return sensor.
SCREEN: 5
Temp. difference between external & internal return (ΔT LLH). d T E x t R e t u r n 1 2 3 , 9 ° C
S i g n a l P o w e r External supplied 0-10 Volt dc signal. S e t p o i "Power" = power input control or "Setpoi" = set point
control.
SCREEN: 6
F a n s p e e d 9 9 9 9 r p m Actual fan speed in rpm.
F a n s p e e d 1 0 0 % Actual fan speed % of maximum allowable fan speed.
Fan maximum RPM:The maximum actual rpm may be lower than the maximum rpm set point. The fan may not be able to reach the maximum rpm set point, because of the unit’s resistance, which is still correct according to the design of that specific unit.
SCREEN: 7
F l a m e s i g n a l 1 0 0 μ A Flame signal given in μA.
W a t e r P r e s s u r 1 , 0 b a r Shows water pressure when sensor is connected.
SCREEN: 8
P u m p 1 H e a t e r O f f Pump 1 (HEATER PUMP) On or Off.
P u m p 1 S i g n a l 1 0 0 % Modulating signal Pump 1 in (%).
SCREEN: 9
P u m p 2 C a l o r i O f f Shows when the calorifier pump is "ON" or "OF".
3 - w a y V a l v e H e a t i n g Signal to the 3-way valve: "HEATING" or "HOTWA-TER".
SCREEN: 10
P u m p 3 S y s t e m O f f Shows when the system pump is "ON" or "OF".
h h : m m D D / M M / Y Y Y Y D a y hh=hour; mm=minutes; DD=day; MM=month; YYYY=yr; Day o/t week
Cooke Industries - Phone: +64 9 579 2185 Fax: +64 9 579 2181 Email: [email protected] Web: www.cookeindustries.co.nz

E93.0802EN.C Ambassador+ manual 48
SCREEN: 11
C a s c D e s i g n 0 0 = MASTER, 1 ..... 11 = SLAVES
C a s I n f 0 1 2 3 4 5 6 7 8 9 A B Displays number, priority and state of cascade boilers.
DESCRIPTION "CASCINFO" Screen 11
Shows the number of boilers connected with the cascade. The Master/Lead boiler is designated as 0. Slave/Lag boilers will be designated 1, 2, 3, 4, 5, 6, 7, 8, 9, A, B. When a “-“ is used instead of a number, then that boiler is either not connected, or in a lockout mode and not available for the cascade. When an “x“ is used instead of a number, then that boiler is connected, but in lockout mode. When a “d” is displayed instead of a number, then that boiler is handling a DHW demand. When the number is flashing, then that boiler is providing heat to the cascade. When the leading boiler is changed according to the set priority change time, then that boiler’s address will be shown first in the row of numbers.
Example 1: "3 4 5 - - - - - - 0 1 2" Six are boilers present and nr. 3 has priority.
Example 2: "3 4 x - - - - - - d 1 2" Six boilers are present and nr. 3 has priority. Boiler 0 is heating up an indirect DHW tank. Boiler 5 is present, but in a lock-out.
SCREEN: 12
C a s c P o w e r 9 9 9 % 9 9 9 % % heat demand of total (cascade) power available (%).
D u a l B u r n e r : N o Heat exchanger equipped with two burners: "Yes" or "No".
SCREEN: 13
M a x T h e r m O p e n Status of the maximum thermostat: "Open" or "Closed".
G e n B l o c k C l o s e d Status of the general blocking contact: "Open" or "Closed".
SCREEN: *14
S i p h o n p r e s s C l o s e d Status of the siphon pressure switch: "Open" or "Closed".
N R V C o n t a c t O p e n Status of the non-return valve contact: "Open" or "Closed".
* REMARK: at screen 14: No NRV used in this type of boiler.
Cooke Industries - Phone: +64 9 579 2185 Fax: +64 9 579 2181 Email: [email protected] Web: www.cookeindustries.co.nz

E93.0802EN.C Ambassador+ manual 49
10.5 Service function The following graphs describe how to use the service function.
Operating screen: H E A T I N G : N o d e m a n d > > > : 1 2 3 . 4 ° C ( 1 2 3 . 4 ° C )
Press [SERVICE] and hold for 3 seconds. The burner will start and show the display below.
Operating screen: H E A T I N G : S e r v i c e 2 6 % > > > 9 0 . 0 ° C ( 6 0 . 0 ° C )
"HEATING": It is a boiler for heating. "Service": It is operating in the service mode. "26%": The burner is firing at 26%. "90,0oC": Max. allowable water temp. during service. "60,0oC": Actual measured water temp. (when P5BJ active).
Press [SERVICE] to exit. The unit will go to the operating screen. Press 3 s. [ON/OFF] to exit. The unit will be switched off.
By using the [▲] & [▼] buttons the burner firing rate% can be changed.
Press [MENU] to access the main menu. Press [MENU] to return to the service menu.
Use [◄] & [►] buttons to browse through the monitor screens. Press [MENU] to go to the operation menu of the service mode.
Press [SERVICE] to exit the service mode. The unit will return to the standard operation display.
Cooke Industries - Phone: +64 9 579 2185 Fax: +64 9 579 2181 Email: [email protected] Web: www.cookeindustries.co.nz

E93.0802EN.C Ambassador+ manual 50
10.6 Schornsteinfeger function The following graphs describe how to use the Schornsteinfeger function. NOTICE: This function is required for Germany and can be activated by parameter (P5 BK). The standard factory setting for this function is “OFF”.
The purpose of this function is to have an easy interface for the "Schorn-steinfegers" in Germany, to be able to do their required testing on the boiler. This is a simplified function similar to the normal service function of the boiler.
When the "Schornsteinfeger" button is pressed for 3 seconds: the heater will fire at minimum firing rate (%) In this state the display shows: F l u e s e r v i c e m o d e P o w e r : M i n i m u m When the button is pressed (briefly) again: the heater will fire at 50% firing rate In this state the display shows:
F l u e s e r v i c e m o d e P o w e r : 5 0 % When the button is pressed (briefly) again: the heater will fire at maximum firing rate (%) In this state the display shows:
F l u e s e r v i c e m o d e P o w e r : M a x i m u m
When the button is pressed briefly again: the heater will return to the normal operation mode. The "Schornsteinfeger" function is switched off.
NOTES:
When the heater is burning during Schornsteinfeger function (when top display line shows "Flue service mode") and no button is pressed for 12 minutes, the boiler will return automatically to the normal operation mode. The "Schornsteinfeger" function will be switched off. The "Schornsteinfeger function" can be activated for the user by programming a parameter (P5 BK) All regular temperature safety controls remain active and the boiler/water heater pump and the system pump are running.
Cooke Industries - Phone: +64 9 579 2185 Fax: +64 9 579 2181 Email: [email protected] Web: www.cookeindustries.co.nz

E93.0802EN.C Ambassador+ manual 51
10.7 Programming in standby mode Standby Use the standby mode for modifying boiler settings without interaction with the boiler control. Changes are effectu-ated by leaving standby mode.
Properties of standby mode: • Keys are active and the menu is accessible. • Burner does NOT respond to an external heat demand. • All control functions are active: pumps, fans and cascade are operational, recirculation and frost protection
are working.
How to programme the boiler: • First disconnect or shut down the room thermostat and/or other external controllers from the boiler. The CH
pump and fan will stop after a short delay time. • Switch the boiler in standby mode by pressing [ON/OFF] for three seconds. • The next display screen should appear:
Display message H E A T I N G : b o i l e r o f f > > > : 1 2 3 . 4 ° C ( 1 2 3 . 4 ° C )
• Program the boiler at the control panel (see the following sections). • Terminate programming mode by pressing [MENU], or [ENTER] and NO ◄ or YES ►. • Reactivate the boiler by pressing [ON/OFF] for three seconds again.
10.8 Setting the time & date The following graphs describe how to programme the time and date of the unit.
Operating screen: H E A T I N G : b o i l e r o f f > > > : 1 2 3 . 4 ° C ( 1 2 3 . 4 ° C )
Press [MENU]
Main menu screen: M a i n M e n u C l o c k
The display shows "CLOCK" press [ENTER]
Setting Time and Date: S e t t i m e / d a t e 0 8 : 3 3 3 0 / 0 3 / 2 0 1 0 T u e
The day is now blinking/selected and can be changed. Use [▲]& [▼] to change the value. Use [◄] & [►] to select another value.
Press [ENTER] for the confirmation screen after all changes are done.
Confirmation screen: A r e y o u s u r e < C a n c e l ; > C o n f i r m Press [◄] to cancel the changes made (display goes back to operating screen). Press [►] to confirm the changes made. The time and day will start blinking for a few seconds. After this, the display returns to its operating screen.
Cooke Industries - Phone: +64 9 579 2185 Fax: +64 9 579 2181 Email: [email protected] Web: www.cookeindustries.co.nz

E93.0802EN.C Ambassador+ manual 52
10.9 Settings The following graphs describe how to program the heating and hot water set points. NOTICE: The hot water set points are only displayed, when the boiler is programmed as an indirect hot water boiler or direct hot water boiler. See parameter P4 AA for the exact boiler configuration.
Operating screen: H E A T I N G : b o i l e r o f f > > > : 1 2 3 . 4 ° C ( 1 2 3 . 4 ° C )
Press [MENU]
Main menu screen: M a i n M e n u S e t p o i n t s
Select "Set points" using [◄] & [►] and press [ENTER]
By pressing [◄] & [►] the following screens can be selected. By pressing [▲] & [▼] the blinking values in the selected screen can be changed. Press [MENU] to exit. The unit will reset and return to the operat-ing screen. Press [ENTER] for confirmation screen when all the changes are made.
Confirmation screen: A r e y o u s u r e < C a n c e l ; > C o n f i r m Press [◄] to cancel the changes made (unit will reset). Press [►] to confirm the changes. The value set in the screen when pressing enter will be shown for a few seconds. After this the display returns to the normal operating screen.
Heating set point normal/day time: H e a t i n g s e t p o i n t 8 0 ° C
The flow temperature set point that will be active during the programmed CH periods.
Heating night shift related to the normal/day time set point: C H N i g h t s h i f t - 1 0 ° C
The reduction of the normal/day time set point. This reduction is used outside the programmed CH periods. Parameter P6 BB.
Heating parallel shift: H e a t i n g P a r s h i f t 5 ° C
Setting the parallel shift of the heating curve related to the out-door temperature control (parameter P6 BC).
Cooke Industries - Phone: +64 9 579 2185 Fax: +64 9 579 2181 Email: [email protected] Web: www.cookeindustries.co.nz

E93.0802EN.C Ambassador+ manual 53
10.10 Setting the timer programs Three different programs can be set with the boiler, these are:
• CH program • DHW program • Anti-Legionnaires’ disease (pasteurisation) program
DHW set point normal/day time: (parameter P4 AA = 1/2) D H W s e t p o i n t 6 0 ° C
This is the water temperature set point that is active during the programmed DHW periods (parameter P4 AA = 1/2).
DHW set point reduction: (parameter P4 AA = 1/2) D H W R e d u c e 1 0 ° C
The reduction of the DHW set point related to normal/day time set point. This reduction is used outside the pro-grammed DHW periods (parameter P4 AA = 1/2).
NOTICE: The max. actual DHW tempera-ture will never exceed the value set at “Heating Setpoint” regard-less the set DHW setpoint. If higher DHW setpoints are needed the Heating Setpoint has to be set higher also.
Cooke Industries - Phone: +64 9 579 2185 Fax: +64 9 579 2181 Email: [email protected] Web: www.cookeindustries.co.nz

E93.0802EN.C Ambassador+ manual 54
HEATING PROGRAM Three programmed periods each day can be set (period 1, period 2 and period 3). During these periods the unit will use the normal CH and DHW set points. Outside the programmed period(s) the unit will use the reduced temperature as set point. When no time is programmed for a period, it will not be used. (Example: no time programmed in period 3 on Monday > "Mon 3 --:-- ---:--").
Operating screen:
H E A T I N G : b o i l e r o f f > > > : 1 2 3 . 4 ° C ( 1 2 3 . 4 ° C )
Press [MENU]
Select "Timer" using [◄] & [►] and press [ENTER]
Main menu screen: M a i n M e n u T i m e r
Press [ENTER]
Setting CH program times: P r o g r a m C H M o n 1 0 6 : 0 0 - 2 3 : 0 0
Press [►] to browse through the values that can be set at the bottom line. The blinking value can be changed.
Press [▲] & [▼] to change the selected (blinking) value.
Press [ENTER] for confirmation screen when all settings are done.
Confirmation screen: A r e y o u s u r e < C a n c e l ; > C o n f i r m Press [◄] to cancel the changes made (unit will reset). Press [►] to confirm the changes. The last alternation will be blinking for a few seconds and return to base menu.
Press [MENU] to exit. The boiler will reset and go to the operating screen.
Press [◄] for next SCREEN
Copy programmed day for CH: C o p y f r o m : C H M o n C o p y t o : C H T u e
Press [►] to switch between "Copy from" and "Copy to". The blinking day is selected and can be changed.
Press [▲] & [▼] to change the selected (blinking) value.
Press [ENTER] for confirmation screen when all settings are done.
Confirmation screen: A r e y o u s u r e < C a n c e l ; > C o n f i r m Press [◄] to cancel the changes made (unit will reset). Press [►] to confirm the changes. The two days will blink for a moment.
Press [MENU] to exit. The boiler will reset and go to the operating screen.
Press [◄] for next SCREEN
> > > Continue on next page HOT WATER program < < <
Cooke Industries - Phone: +64 9 579 2185 Fax: +64 9 579 2181 Email: [email protected] Web: www.cookeindustries.co.nz

E93.0802EN.C Ambassador+ manual 55
HOT WATER PROGRAM
> > > From previous page with HEATING part < < <
Setting DHW program times: P r o g r a m D H W M o n 1 0 6 : 0 0 - 2 3 : 0 0
Press [►] to browse through the values that can be set at the bottom line. The blinking value can be changed.
Press [▲] & [▼] to change the selected (blinking) value.
Press [ENTER] for confirmation screen when all settings are done.
Confirmation screen: A r e y o u s u r e < C a n c e l ; > C o n f i r m Press [◄] to cancel the changes made (unit will reset). Press [►] to confirm the changes. The last alternation will be blinking for a few seconds and return to base menu.
Press [MENU] to exit. The boiler will reset and go to the operating screen.
Press [◄] for next SCREEN
Copy programmed day for DHW: C o p y f r o m : D H W M o n C o p y t o : D H W T u e
Press [►] to switch between "Copy from" and "Copy to". The blinking day is selected and can be changed.
Press [▲] & [▼] to change the selected (blinking) value.
Press [ENTER] for confirmation screen when all settings are done.
Confirmation screen: A r e y o u s u r e < C a n c e l ; > C o n f i r m Press [◄] to cancel the changes made (unit will reset). Press [►] to confirm the changes. The two days will blink for a moment.
Press [MENU] to exit. The boiler will reset and go to the operating screen.
Press [◄] for next SCREEN
> > > Continue on next page LEGIONELLA program < < <
Cooke Industries - Phone: +64 9 579 2185 Fax: +64 9 579 2181 Email: [email protected] Web: www.cookeindustries.co.nz

E93.0802EN.C Ambassador+ manual 56
ANTI LEGIONNAIRES' DISEASE PROGRAM The anti-Legionnaires’ disease (pasteurisation) program of the boiler can only be used when the boiler is set as an “indirect” boiler configuration or a “direct” hot water boiler configuration. Only these configurations can activate the day and time program of the anti-Legionnaires’ disease function. See the following graphs. The standard factory setting for this function is “OFF”.
> > > From previous page with HOT WATER part < < <
Setting legionella program (day and time): P r o g r a m L e g i o n e l l a M o n 0 9 : 5 1
Press [►] to browse through the values that can be set at the bottom line. The blinking value can be changed.
Press [▲] & [▼] to change the selected (blinking) value.
Press [ENTER] for confirmation screen when all settings are done.
Confirmation screen: A r e y o u s u r e < C a n c e l ; > C o n f i r m Press [◄] to cancel the changes made (unit will reset). Press [►] to confirm the changes. The last alternation will be blinking for a few seconds and return to base menu.
Press [MENU] to exit. The boiler will reset and go to the op-erating screen.
Press [◄] for next SCREEN
10.11 Setting the outdoor specifications PARAMETERS FOR SETTING THE OUTDOOR GRAPH When using this function the flow temperature is calculated based on the measured outdoor temperature. The relation between the outdoor temperature and the flow temperature can be programmed with the following parameters. This setting creates the so called “heating curve”. The boiler will recognise an outdoor sensor when it is connected. When the sensor is detected the boiler controller will control the flow temperature based on the heating curve that is programmed. P5 AA OutsidPres. (1=On 0=Off) Outside sensor present. Setting this parameter to “On” a fault message will be displayed in case of a interrupted connection to the outdoor sensor or if the measured outdoor temperature exceeds 60°C (defective sensor). 0 => No fault message at interrupted outdoor sensor connection. Boiler keeps burning using the value of the external or internal flow sensor instead of the outdoor sensor. 1 => Interrupted sensor wiring causes a fault message to occur at the display Boiler keeps burning using the value of the external or internal flow sensor instead of the outdoor sensor.
Cooke Industries - Phone: +64 9 579 2185 Fax: +64 9 579 2181 Email: [email protected] Web: www.cookeindustries.co.nz
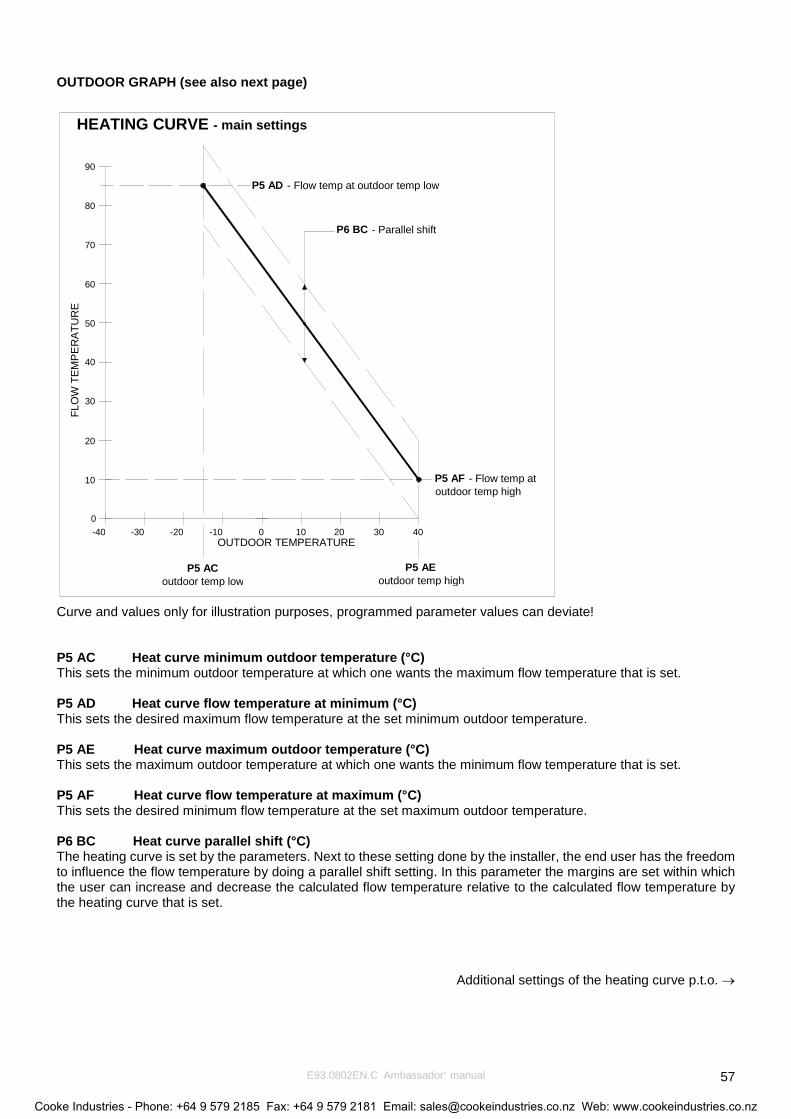
E93.0802EN.C Ambassador+ manual 57
OUTDOOR GRAPH (see also next page)
Curve and values only for illustration purposes, programmed parameter values can deviate! P5 AC Heat curve minimum outdoor temperature (°C) This sets the minimum outdoor temperature at which one wants the maximum flow temperature that is set. P5 AD Heat curve flow temperature at minimum (°C) This sets the desired maximum flow temperature at the set minimum outdoor temperature. P5 AE Heat curve maximum outdoor temperature (°C) This sets the maximum outdoor temperature at which one wants the minimum flow temperature that is set. P5 AF Heat curve flow temperature at maximum (°C) This sets the desired minimum flow temperature at the set maximum outdoor temperature. P6 BC Heat curve parallel shift (°C) The heating curve is set by the parameters. Next to these setting done by the installer, the end user has the freedom to influence the flow temperature by doing a parallel shift setting. In this parameter the margins are set within which the user can increase and decrease the calculated flow temperature relative to the calculated flow temperature by the heating curve that is set.
Additional settings of the heating curve p.t.o. →
OUTDOOR TEMPERATURE
FLO
W T
EM
PE
RA
TUR
E
40 30 20 10 -40 -30 -20 0 -10
30
0
90
80
70
60
50
40
20
10
P5 AE outdoor temp high
P5 AC outdoor temp low
P5 AF - Flow temp at outdoor temp high
P5 AD - Flow temp at outdoor temp low
P6 BC - Parallel shift
HEATING CURVE - main settings
Cooke Industries - Phone: +64 9 579 2185 Fax: +64 9 579 2181 Email: [email protected] Web: www.cookeindustries.co.nz

E93.0802EN.C Ambassador+ manual 58
Curve and values only for illustration purposes, programmed parameter values can deviate! P5 AG Heat curve minimum flow temperature (°C) The flow temperature will never be lower than the flow temperature set in parameter P5AG. The minimum tempera-ture is limited, even if the calculated set temperature, according to the heating curve, would be lower. P5 AH Summer outdoor temperature central heating (°C) If the outdoor temperature is higher than set in P5AH the heat demand for heating will be blocked. P5AR Outdoor sensor 10K or 12K resistance (1 or 0) Depending to the used type of sensor this parameter can be set. Set to ‘0’ when using a so called 12k NTC sensor (sensor resistance is 12 kohm at 25°C) Set to ‘1’ when using a so called 10k NTC sensor (sensor resistance is 10 kohm at 25°C) Default the parameter = 0, so the used sensor is assumed to be 12 kΩ. P2 HA Outdoor sensor hysteresis (°C) If the outdoor temperature reaches the temperature set in P5 AH (warm weather shutdown) the unit won’t start for heating. If the measured outdoor temperature drops P5 AH minus P2 HA the boiler can start up for heating again. P6 BA CH user setting (°C) The flow temperature will never be higher than the flow temperature set in parameter P6BA. The maximum temper-ature is limited, even if the calculated set temperature, according to the heating curve, would be higher. P6 BB Heat curve night shift (°C) The temperature reduction during the night, relative to the setting determined by the heat curve
FLO
W T
EM
PE
RA
TUR
E
OUTDOOR TEMPERATURE
P5 AG - min flow temp
P5 AH - Warm weather shutdown P2 HA - Outdoor sensor hysteresis
HEATING CURVE - additional settings
P6 BB - Heatcurve night shift
P6 BA - max flow temp
10
20
40
50
60
70
80
90
0
30
-10 0 -20 -30 -40 10 20 30 40
Cooke Industries - Phone: +64 9 579 2185 Fax: +64 9 579 2181 Email: [email protected] Web: www.cookeindustries.co.nz

E93.0802EN.C Ambassador+ manual 59
DISPLAY The following graphs describe how to program the outdoor graph settings.
Operating screen: H E A T I N G : b o i l e r o f f > > > : 1 2 3 . 4 ° C ( 1 2 3 . 4 ° C )
Press [MENU]
Select "Outdoor" using [◄] & [►] and press [ENTER]
Main menu screen: M a i n M e n u O u t d o o r
Press [◄] & [►] to browse through the screens that are shown below. Press [▲] [▼] to change the blinking value in the selected screen. Press [MENU] to exit. The unit will reset and go to the operating screen. Press [ENTER] for confirmation screen after all changes are made.
Confirmation screen: A r e y o u s u r e < C a n c e l ; > C o n f i r m Press [◄] to cancel the changes made (unit will reset). Press [►] to confirm the changes made. The time and day will start blinking for a few seconds. After this, the display returns to its operating screen.
0 1 O u t s i d P r e s P5 AA 0
0 2 H C m i n O u T m p P5 AC - 1 5 ° C
0 3 H C m i n F l T m p P5 AD 8 5 ° C
0 4 H C m a x O u T m p P5 AE 2 0 ° C
0 5 H C m a x F l T m p P5 AF 2 0 ° C
0 6 H C m i n F l L i m P5 AG 2 0 ° C
0 7 S u m S h D w n O u P5 AH 3 0 ° C
0 8 H C m a x F l L i m P6 BA 8 5 ° C
0 9 H C n g h t s h f t P6 BB - 1 0 ° C
0 A H C p a r a s h f t P6 BC 5 ° C
0 B O u t S 1 2 k 1 0 k P5 AR 0
Cooke Industries - Phone: +64 9 579 2185 Fax: +64 9 579 2181 Email: [email protected] Web: www.cookeindustries.co.nz

E93.0802EN.C Ambassador+ manual 60
10.12 Checking the operating history The following graphs describe how to check the operating history of the boiler.
Operating screen: H E A T I N G : b o i l e r o f f > > > : 1 2 3 . 4 ° C ( 1 2 3 . 4 ° C )
Press [MENU]
Select "Operate" using [◄] & [►] and press [ENTER]
Main menu screen: M a i n M e n u O p e r a t e
Press [◄] & [►] to browse through the 5 screens. Press [MENU] or [ENTER] to exit. The unit will return to the op-erating screen.
SCREEN: 1 O p e r a t i n g h i s t o r y P o w e r O n h r s 1 3 1 4 0 0 Top line: Shows the operating history menu is activated. Bottom line: Total hours the boiler is connected to power supply and switched on.
SCREEN: 2 h r s C h T o t 1 0 0 0 0 0 0 h r s D h w T o t 1 0 0 0 0 0 0 Top line: Total burning hours for heating. Bottom line: Total burning hours for domestic hot water.
SCREEN: 3 h r s C h < 5 0 % 1 0 0 0 0 0 0 h r s C h = > 5 0 % 1 0 0 0 0 0 0 Top line: Burning hours for heating while the burner was firing less than 50%. Bottom line: Burning hours for heating while the burner was fir-ing equal or higher than 50%.
SCREEN: 4 h r s D h w < 5 0 % : 1 0 0 0 0 0 0 h r s D h w = > 5 0 % : 1 0 0 0 0 0 0 Top line: Burning hours for hot water while the burner was firing less than 50%. Bottom line: Burning hours for hot water while the burner was firing equal or higher than 50%.
SCREEN: 5 T i a 1 0 0 0 0 0 F i a 1 0 0 0 0 0 S s l 1 0 0 0 0 0 S s t 1 0 0 0 0 6 Top line: Shows Total Ignition Attempts (Tia) & Failed Ignition Attempts (Fia) Bottom line: Shows Soft Starts last (Ssl) & Soft Starts Total (Sst)
Cooke Industries - Phone: +64 9 579 2185 Fax: +64 9 579 2181 Email: [email protected] Web: www.cookeindustries.co.nz

E93.0802EN.C Ambassador+ manual 61
10.13 Checking the fault history The following graphs describe how to check the fault history of the boiler.
Operating screen: H E A T I N G : b o i l e r o f f > > > : 1 2 3 . 4 ° C ( 1 2 3 . 4 ° C )
Press [MENU]
Select "Faulthist" using [◄] & [►] and press [ENTER] F a u l t h i s t N o . 0 1 2 1 / 0 4 / 2 0 1 0 W e d 2 2 : 2 3 A
▲ blinking alternately ▼ S i p h o n S w i t c h S v 9 9 9 / C U M 9 9 9 / R 9 9 9 9 , 5
Press [◄] & [►] to browse through the last ten faults. Press [MENU] or [ENTER] to exit. The unit will return to the op-erating screen.
The fault menu shows the last ten faults. For each fault the dis-play blinks between the two screens shown above. The top line of the top screen shows the fault number and the bottom line of the top screen shows the date, day and time the fault occurred. On the top line of the bottom screen the fault type is displayed. The bottom line shows the following:
SV: The total amount of this fault that has occurred after the last time that the service history was erased (after service was done).
CUM: The total amount of this fault. The total amount cannot be erased after service; this shows the fault history of the boiler (electronics) since the start of operation.
R: Shows the elapsed time in hrs. between the moment the fault occurred and the moment it was reset.
Cooke Industries - Phone: +64 9 579 2185 Fax: +64 9 579 2181 Email: [email protected] Web: www.cookeindustries.co.nz

E93.0802EN.C Ambassador+ manual 62
10.14 Setting the maintenance specifications The following graphs describe how to check and program the maintenance settings. The standard factory setting for this function is “OFF”.
MAINTENANCE SETTINGS The unit can be programmed in such a way that an automatic maintenance message is displayed. There are three options that can be selected. A maintenance message appears after: * A programmed date is reached. * An amount of burning hours is reached. * An amount of ignition cycles is reached. One single option can be activated or all three options.
Operating screen:
H E A T I N G : N o d e m a n d > > > : 1 2 3 . 4 ° C ( 1 2 3 . 4 ° C )
Press [MENU]
Select "Maintenan" using [◄] & [►] and press [ENTER]
Operating screen: M a i n t e n R e s e t
Press [▲] to reset the: Counter for the total amount of burning hours. Counter for the total amount of ignition cycles. (The text will blink once briefly after resetting).
Operating screen: M a i n t e n M o d e Blinking second line.
What is blinking at the second line (before a selection is made) is the active maintenance option.
Press [▲] or [▼] to change the selected blinking op-tion.
Screen: Selecting of all maintenance options. M a i n t e n M o d e A l l
Press [►] to set: The option that is blinking can be changed using by [▲] & [▼] * Date for the Maintenance message. * Total amount of burning hours for the Maintenance message. * Total amount of ignition cycles for the Maintenance message. After selecting one of these values the boiler returns to the maintenance operating screen.
Press [ENTER] to confirm the changes.
Confirmation screen: A r e y o u s u r e < C a n c e l ; > C o n f i r m Press [◄] to cancel the changes or [►] to confirm the changes. Hereafter the boiler returns to the operating screen.
Go to next page
Cooke Industries - Phone: +64 9 579 2185 Fax: +64 9 579 2181 Email: [email protected] Web: www.cookeindustries.co.nz

E93.0802EN.C Ambassador+ manual 63
From previous page
Screen: Selecting message at certain date. M a i n t e n M o d e D a t e
Press [►] to set: The date for the maintenance message.
Press [◄] to: Return to maintenance mode selection.
Press [►] to browse through the values that can be set at the bottom line. The blinking value can be changed with [▲] & [▼]
Press [ENTER] to confirm the changes.
Confirmation screen: A r e y o u s u r e < C a n c e l ; > C o n f i r m Press [◄] to cancel the changes or [►] to confirm the changes. Hereafter the boiler returns to the operating screen.
Screen: Message after total amount of ignition cycles. M a i n t e n M o d e I g n i t i o n c y c l e s
Press [►] to set: The total amount of ignition cycles for the Maintenance message.
Press [◄] to: Return to maintenance mode selection.
The blinking value can be changed with [▲] & [▼]
Press [ENTER] to confirm the changes.
Confirmation screen: A r e y o u s u r e < C a n c e l ; > C o n f i r m Press [◄] to cancel the changes or [►] to confirm the changes. Hereafter the boiler returns to the operating screen.
Go to next page
Cooke Industries - Phone: +64 9 579 2185 Fax: +64 9 579 2181 Email: [email protected] Web: www.cookeindustries.co.nz

E93.0802EN.C Ambassador+ manual 64
From previous page
Screen: Message after total amount of burning hours. M a i n t e n M o d e B u r n i n g h o u r s
Press [►] to set: The total amount of burning hours for the Maintenance message.
Press [◄] to: Return to maintenance mode selection.
The blinking value can be changed with [▲] & [▼]
Press [ENTER] to confirm the changes.
Confirmation screen: A r e y o u s u r e < C a n c e l ; > C o n f i r m Press [◄] to cancel the changes or [►] to confirm the changes. Hereafter the boiler returns to the operating screen.
Screen: No maintenance message will be displayed. M a i n t e n M o d e M a i n t e n O f f
Press [ENTER] to confirm the changes.
Confirmation screen: A r e y o u s u r e
< C a n c e l ; > C o n f i r m Press [◄] to cancel the changes or [►] to confirm the changes. Hereafter the boiler returns to the operating screen.
Note: The [MENU] button will return the display to the operating screen.
BE AWARE : This function is standard turned OFF. We offer this programmable function to the installer to use as a reminder. Because it concerns a free programmable function, the application of it cannot be used as an argu-ment in warranty cases. Our units must be maintained every twelve months whatever the settings/working of this function. It is and remains the responsibility of the end user to have the unit maintained every twelve months.
Cooke Industries - Phone: +64 9 579 2185 Fax: +64 9 579 2181 Email: [email protected] Web: www.cookeindustries.co.nz

E93.0802EN.C Ambassador+ manual 65
10.15 Setting the user lock The following graphs describe how to activate the user lock of the display. The standard factory setting for this func-tion is “OFF”.
The "USER LOCK" menu. In this menu the boiler can be locked for (end-)users. 0 = UNLOCKED 1 = LOCKED
When the boiler is unlocked, the user can enter the MENU by pressing the menu button and all screens will show up.
When the boiler is locked, the user has to push the [MENU] button together with the [▼] button for 5 s. to access all menu screens. This function is to prevent accidental changes! NOTICE: The PARAMETER screen always accessible.
Operating screen: H E A T I N G : N o d e m a n d > > > : 1 2 3 . 4 ° C ( 1 2 3 . 4 ° C )
Press [MENU]
Select "User lock" using [◄] & [►] and press [ENTER]
User lock screen: S e t U s e r l o c k = 0 0
The "0" is now blinking/selected and can be changed. Use [▲] & [▼] to change the value. 0 = User lock function OFF 1 = User lock function ON Press [ENTER] for the confirmation screen after the selection has been made.
Confirmation screen: A r e y o u s u r e < C a n c e l ; > C o n f i r m Press [◄] to cancel the changes (the unit will reset and the display returns to the operating screen). Press [►] to confirm the changes. The changed value will be blinking for a few seconds. After this, the display returns to the operating screen. NOTICE: Using the [MENU] button during the User lock display, will re-set the boiler and the boiler will return to the operating screen. Changes will be neglected in this case.
Cooke Industries - Phone: +64 9 579 2185 Fax: +64 9 579 2181 Email: [email protected] Web: www.cookeindustries.co.nz

E93.0802EN.C Ambassador+ manual 66
10.16 Setting the parameters at the control panel The functions of the controller are embedded in de electronics by means of parameters. The values and settings hereof can be programmed by a skilled and trained service engineer with the help of a computer (laptop), the correct software and an interface cable. A selection of these parameters can be programmed at the control panel of the unit itself, without the use of a computer.
The following table gives a list of these last mentioned parameters. NOTICE: Only the password for level 1 is is-sued in this manual. “More advanced” parameters need to be programmed by a skilled and trained service engi-neer with access to level 2.
When ‘Modify = no’, the parameter can only be programmed at level 2 PASSWORD: 1342
MENU PARA-METER DESCRIPTION UNITS TEXT DISPLAY
LEVEL 1 Modify
HEA
TIN
G
A
1 P5BE Step modulation (1=on 0=off) - S t e p m o d u l no 2 P5AO Blocking offset flow temperature control °C H E s O f f 1 3 yes 3 P5AP Proportional range temperature control °C H E s P r b 1 3 no 4 P5AL Hysteresis CH Flow temperature control °C H E s c D i f 1 3 yes 5 P2IC Integration time temperature control s H E s I n t 1 3 no 6 P2MI Blocking offset System CH temperature control °C H E c O f f 3 yes 7 P2MJ Proportional range System CH temperature control °C H E c P r b 3 no 8 P2MK Integration time CH temperature control s H E c I n t 3 no 9 P5AB Timer Contact (1=on) - T i m e r C o n t yes
DH
W
B
1 P4AB DHW Pump Config 0=Pump 1=TWV - D H i p m p / t w v yes 2 P5CB Flow temperature DHW tank low °C D H i f l o w L O yes 3 P5CK Flow temperature DHW tank hi °C D H i f l o w H I yes 4 P5CL Low Flow temperature time DHW min D H i L O t i m e yes 5 P5CD Legionella temperature °C L e g i o t e m p no 6 P5CI Legionella hyst DHW tank temperature °C L e g i o h y s t no 7 P5CJ Legionella hold time (0=off) min L e g i o h o l d no 8 P2KI CH interrupt by Legionella (0=yes)(1=no) - L e g i o i n t r no 9 P2LC Regulation temperature offset DHWd °C D H d s c O f f 2 yes A P2MN Proportional range DHWd modulation °C D H d s c P r b 2 3 no B P2LD Regulation temperature hysteresis DHWd °C D H d s c D i f 2 yes C P2MO integration time DHWd modulation s D H d s c I n t 2 3 no D P2ML Sys temp blocking offset DHW tank °C D H d s c O f f 3 yes E P2MM Sys temp blocking hysteresis DHW tank °C D H d s c D i f 3 yes F P5CA Hysteresis DHW tank temperature °C D H i s c D i f 4 yes G P2KH Gradient heat demand detect DHW tank temperature °C D H i d e t g r a d yes
CA
SCA
DE
C
1 P2MA Max number extra boilers - M a x C a s c U n t no 2 P5DA Bus address boiler - B u s a d r e s s no 3 P5DC Dhw on entire cascade(0) only master(1) - D H i c a s / m a s no 4 P5DE Extra Boiler output enable(1) - E x t r a u n i t yes 5 P5DF Cascade detection (0=standalone 1=Leader) - C a s S i / M a no 6 P5BL Power off total cascade (1) - P w r O f f T o C a no 7 P5DB Number of boilers with common flue 0=None - C o m F l u N u m no
GEN
ERA
L
D
1 P5BB Analogue input Config (0=off 1=temp 2=power) - A n I n p C o n yes 2 P5AI Minimum Temperature 0-10V input °C 0 - 1 0 M i n T m p yes 3 P5BI Altitude (in amounts of 100 ft.) 100 ft A l t * 1 0 0 f t yes 4 P2LK Max cooling time min M a x C o o l T i m yes 5 P5BJ Temperature display 1=on - T e m p O n D i s p yes 6 P4AA DHW 0=off 1=Indirect 2=Direct - D H W 1 = i 2 = d no 7 P4AD pressure 0=off 1=sensor and 2=switch - c o n f i g no 8 P4BD Gas type values 0-2 - g a s t y p e no 9 P4BE Soft start type values 0-2 - c o n f i g no A P5BN Pump modes 0-4 - c o n f i g no
For extensive explanation see Ch. 11: ‘Controlling options and settings’, page 76 ff.
IMPORTANT: Do not change the parameters P2LC, P2LD, P2ML, P2MM and P5BI; they are present in the controller for different purposes than CH control. Changing these parameters may affect boiler operation negatively.
Parameter screens + concise explanation see next pages →
Cooke Industries - Phone: +64 9 579 2185 Fax: +64 9 579 2181 Email: [email protected] Web: www.cookeindustries.co.nz

E93.0802EN.C Ambassador+ manual 67
Operating screen: H E A T I N G : N o d e m a n d > > > : 1 2 3 . 4 ° C ( 1 2 3 . 4 ° C )
Press [MENU]
Select "Parameter" using [◄] & [►] and press [ENTER]
Parameter menu: I n s t a l l e r c o d e 0 0 0 0
Enter the 4-digit code with the [◄] & [►] and the [▲] & [▼] buttons and select [ENTER] The code will blink a few seconds and when entered correctly, the following parameters will be displayed. NOTICE: These codes are user based and give access to a selected amount of parameters, which can be changed (In-staller level 1/2).
Menu A: Heating A 1 S t e p m o d u l 1
Function to activate the step modulation: 0 = Off 1 = On
Menu A: Heating A 2 H E s o f f 1 3 4 ° C
CH supply temperature setting. This parameter is the offset of the programmed CH temperature.
Menu A: Heating A 3 H E s P r b 1 3 2 5 ° C
Select the CH supply temperature control. This parameter is the proportional range of the selected CH supply temperature.
Menu A: Heating A 4 H E s c D i f 1 3 1 0 ° C
Select the CH supply temperature control. This parameter is the hysteresis of the selected CH supply temperature.
Menu A: Heating A 5 H E s l n t 1 3 6 0 S e c
Select the CH supply temperature control. This parameter is the integration time of the selected CH supply temperature.
Menu A: Heating A 6 H E c O f f 3 4 ° C
Select the cascaded boilers supply temperature control. This parameter is the offset of the selected CH supply temper-ature of EACH boiler of the total cascade.
The screen texts on these pages are standard part of the software and apply to CH systems (boilers) and/or DHW devices (wa-ter heaters).
Cooke Industries - Phone: +64 9 579 2185 Fax: +64 9 579 2181 Email: [email protected] Web: www.cookeindustries.co.nz

E93.0802EN.C Ambassador+ manual 68
Menu A: Heating A 7 H E c P r b 3 2 5 ° C
Select the cascaded boilers supply temperature control. This parameter is the proportional range of the selected CH supply temperature of EACH boiler of the total cascade and of the external (cascade) sensor.
Menu A: Heating A 8 H E c l n t 3 8 0 S e c
Select the cascaded boilers supply temperature control. This parameter is the integration time of the selected CH supply temperature of EACH boiler of the total cascade and of the ex-ternal (cascade) sensor.
Menu A: Heating A 9 T i m e r C o n t 0
Function to activate "external time controller": 0 = Off 1 = On Connect to 13-14. Contact closed = daytime setting, Contact open = night-time setting.
Menu B: Hot water B 1 D H i p m p / t w v 1
Hot water function of the boiler by: 0 = pump 1 = 3-way valve
Menu B: Hot water B 2 D H i f l o w L O 2 5 ° C
Hot water function of the boiler. This parameter is the CH sup-ply temperature LOW level with an indirect hot water demand.
Menu B: Hot water B 3 D H i f l o w H I 8 5 ° C
Hot water function of the boiler. This parameter is the CH sup-ply temperature HIGH level with an indirect hot water demand.
Menu B: Hot water B 4 D H i L O t i m e 1 M i n
Hot water function of the boiler. This parameter is the se-lectable time period after which the boiler switches from LOW to HIGH set point with an indirect hot water demand.
The screen texts on these pages are standard part of the software and apply to CH systems (boilers) and/or DHW devices (wa-ter heaters).
Cooke Industries - Phone: +64 9 579 2185 Fax: +64 9 579 2181 Email: [email protected] Web: www.cookeindustries.co.nz

E93.0802EN.C Ambassador+ manual 69
Menu B: Hot water B 5 L e g i o t e m p 8 5 ° C
Pasteurisation function of the boiler. This parameter is the se-lected hot water temperature during the pasteurisation func-tion of the boiler.
Menu B: Hot water B 6 L e g i o h y s t 2 ° C
Pasteurisation function of the boiler. This parameter is the se-lected hysteresis during the pasteurisation function of the boiler.
Menu B: Hot water B 7 L e g i o h o l d 2 M i n
Pasteurisation function of the boiler. This parameter is the se-lected time period for the pasteurisation function of the boiler.
Menu B: Hot water B 8 L e g i o i n t r 0
Pasteurisation function of the boiler. This parameter controls if the CH demand can be interrupted by the pasteurisation function of the boiler. 0 = Yes 1 = No
Menu B: Hot water B 9 D H d s c O f f 2 4 ° C
Function for the direct hot water boiler. This parameter is de off set of the selected HW temperature of the boiler.
Menu B: Hot water B A D H d s c P r b 2 3 2 0 ° C
Function for the direct hot water boiler. This parameter is the proportional range of the selected HW temperature of the boiler.
Menu B: Hot water B B D H d s c D i f 2 1 0 ° C
Function for the direct hot water boiler. This parameter is the hysteresis of the selected HW tempera-ture of the boiler.
The screen texts on these pages are standard part of the software and apply to CH systems (boilers) and/or DHW devices (wa-ter heaters).
Cooke Industries - Phone: +64 9 579 2185 Fax: +64 9 579 2181 Email: [email protected] Web: www.cookeindustries.co.nz

E93.0802EN.C Ambassador+ manual 70
Menu B: Hot water B C D H d s c l n t 2 3 2 0 0 S e c
Function for the direct hot water boiler. This parameter is the integration time of the selected HW tem-perature of the boiler.
Menu B: Hot water B D D H d s c O f f 3 4 ° C
Function for the cascaded direct hot water boilers. This parameter is the offset of the selected HW temperature of the cascaded boilers.
Menu B: Hot water B E D H d s c D i f 3 8 ° C
Function for the cascaded direct hot water boilers. This parameter is the hysteresis of the selected HW tempera-ture of the cascaded boilers.
Menu B: Hot water B F D H i s c D i f 4 5 ° C
Function for the indirect hot water supply of the boiler (tank). This parameter is the hysteresis of the selected HW tempera-ture of the calorifier/tank.
Menu B: Hot water B G D H i d e t g r a d 3 ° C
Function for the indirect hot water supply of the boiler (tank). This parameter detects an (an accelerated) hot water de-mand, when a larger (water) amount is being used.
Menu C: Cascade C 1 M a x C a s c U n t 1 1
Function for the cascading of the boiler(s). This parameter sets the total amount of cascaded boilers. (Max. 12 boilers).
Menu C: Cascade C 2 B u s a d d r e s s 0
Function for the cascading of the boiler(s). This parameter determines the address of the boiler for the total cascading control. Master = 0, Slave 1 = 1 etc.
Menu C: Cascade C 3 D H i c a s / m a s 0
Function for the cascading of the boiler(s). This parameter determines if only the Master boiler or all boil-ers of the cascade are used for indirect hot water. 0 = All 1 = Master
The screen texts on these pages are standard part of the software and apply to CH systems (boilers) and/or DHW devices (wa-ter heaters).
Cooke Industries - Phone: +64 9 579 2185 Fax: +64 9 579 2181 Email: [email protected] Web: www.cookeindustries.co.nz

E93.0802EN.C Ambassador+ manual 71
Menu C: Cascade C 4 E x t r a u n i t 0
Function for the cascading of the boiler(s). This parameter is activated when an external (extra) boiler is connected to the Master boiler. Connect to the Master connec-tions 21-22.
Menu C: Cascade C 5 C a s S i / M a 0
Function for the cascading of the boiler(s). This parameter sets the function of the boiler at a cascade alignment 0 = Single / Slave unit 1 = Master unit
Menu C: Cascade C 6 P w r O f f T o C a 0
Function for the cascading of the boiler(s). This parameter determines the function of the Slave boilers when the Master boiler is switched off. 0 = Slave boiler(s) continue operation 1 = Slave boiler(s) switch off
Menu C: Cascade C 7 C o m F l u N u m 0
Function for the cascading of the boiler(s). This parameter determines the number of cascaded boilers that are implemented with a common flue system.
Menu D: General D 1 0 - 1 0 V c o n t r 0
Function for the external control of the boiler by using a 0-10 Volt signal (Connections 15-16). 0 = No external control 1 = Control based on temperature setting 2 = Control based on power setting
Menu D: General D 2 0 - 1 0 M i n T m p 2 0 ° C
Function for the external control of the boiler by using a 0-10 Volt signal (Connections 15-16). Control based on temperature (setting 1). The minimum (desired) CH water temperature when supplying a 1,4 Volt signal.
Menu D: General D 3 A l t * 1 0 0 f 0
Function for setting the location height (above sea level) of the boiler. NOTICE: dimensions in English feet. One unit = 100 ft. Use this function only in consultation with the supplier / manu-facturer.
The screen texts on these pages are standard part of the software and apply to CH systems (boilers) and/or DHW devices (wa-ter heaters).
Cooke Industries - Phone: +64 9 579 2185 Fax: +64 9 579 2181 Email: [email protected] Web: www.cookeindustries.co.nz

E93.0802EN.C Ambassador+ manual 72
Menu D: General D 4 M a x C o o l T i m 2 M i n
Function for setting the maximum overrun time of the fan (maxi-mum 10 minutes). 0 = Switch off
Menu D: General D 5 T e m p O n D i s p 1
Function to show the (measured) temperature of the boiler at the display.
Menu D: General D 6 D H W 1 = i 2 = d 1
Function to set up the CH and HW boiler options. 0 = CH only (direct) 1 = CH/HW function (indirect) 2 = HW only (direct)
Menu D: General D 7 c o n f i g
Function for the setting of the water pressure. Up to 4 bar a sensor is used, up to 6 bar a switch. 0 = off 1 = sensor 2 = switch
Menu D: General D 8 g a s t y p e
Function to select the gas type* 0 = G20, G25.3 and for Poland G27, G2.350 1 = G31 2 = B/P
*According to EN437
Menu D: General D 9 c o n f i g
Function for setting the 'soft start' option 0 = normal start-up 1 = reduced fan ramp-up speed (I) 2 = reduced fan ramp-up speed (II)
Menu D: General D A c o n f i g
Function: Pump mode 0 = normal 1 = relay 1, connector 19 and 20 (lock-out) 2 = relay 2, connector 21 and 22 (burner burning) 3 = relay 3, connector 23 and 24 (heat demand) 4 = Do not use (reserved for future applications).
The screen texts on these pages are standard part of the software and apply to CH systems (boilers) and/or DHW devices (wa-ter heaters).
Cooke Industries - Phone: +64 9 579 2185 Fax: +64 9 579 2181 Email: [email protected] Web: www.cookeindustries.co.nz

E93.0802EN.C Ambassador+ manual 73
10.17 Fault codes display The following graphs describe the lock out codes of the boiler. A lock out code can only be removed by a manual resetting of the boiler. NOTICE: Before resetting the boiler always check the boiler, central heating system and all components corres-ponding to the related lock out description. Never just reset the boiler, before analysing the possible cause of failure.
10.17.1 LOCK-OUT CODES
Having a lockout means that the boiler needs a manual reset to start operating again. When the boiler is in lockout the backlight of the display is blinking on and off.
Explanation > 9 9 9 , 5 : h r s = time elapsed after fault & message.
Explanation > P u m p 1 o n = status of the pump during fault.
Display message F15
C l i x o n F a u l t p u m p o n 9 9 9 , 5 h r s
Reason Heat exchanger fuse or burner door clixon exceeded maximum allowed value.
Display message F10
F a l s e f l a m e s i g n a l p u m p o n 9 9 9 , 5 h r s
Reason Flame signal is detected while it cannot be expected.
Display message F8
F a i l e d b u r n e r s t a r t p u m p o n 9 9 9 , 5 h r s
Reason Boiler is not starting after the programmed starting attempts.
Display message F11
F a n s p e e d i n c o r r e c t p u m p o n 9 9 9 , 5 h r s
Reason The controller does not detect a correct fan speed.
Display message F9
F l a m e l o s t p u m p o n 9 9 9 , 5 h r s
Reason Flame detected during normal operation, but was lost while running.
Display message F1
F l o w h i g h T e m p p u m p o n 9 9 9 , 5 h r s
Reason Flow temperature exceeds the limit which has been set in the parameters.
Display message F16
F l o w R e t u r n d t f a u l t p u m p o n 9 9 9 , 5 h r s
Reason Temperature difference between flow and return exceeds limitation value, or 'dT block or delta direct block' has occurred three times.
Display message F0
F l o w s e n s o r e r r o r p u m p o n 9 9 9 , 5 h r s
Reason Flow sensor not detected by the boiler caused by faulty connection/sensor.
Display message F6
F l u e s e n s o r e r r o r p u m p o n 9 9 9 , 5 h r s
Reason Flue gas sensor not detected by the boiler caused by faulty connection/sensor.
Display message F7
F l u e t e m p t o o h i g h p u m p o n 9 9 9 , 5 h r s
Reason Flue gas temperature exceeds the limit more than 3 times within a certain time frame.
Cooke Industries - Phone: +64 9 579 2185 Fax: +64 9 579 2181 Email: [email protected] Web: www.cookeindustries.co.nz

E93.0802EN.C Ambassador+ manual 74
Display message F1
R e t u r n h i g h T e m p p u m p o n 9 9 9 , 5 h r s
Reason The maximum return temperature as set in the parameters is exceeded.
Display message F3
R e t u r n s e n s o r e r r o r p u m p o n 9 9 9 , 5 h r s
Reason Return sensor not detected by the boiler caused by faulty connection/sensor.
Display message F17
W a t e r h i g h l i m i t p u m p o n 9 9 9 , 5 h r s
Reason Maximum thermostat (clixon) measured a too high flow temperature.
10.17.2 BLOCKING CODES
The following graphs describe the blocking codes of the boiler. A blocking code is only a temporary blocking of the boiler, because of an extraordinary situation. The boiler will continue to operate after stabilisation of this situation. The display is not blinking, but is lightened up during the blocking period. The boiler is blocking an action because of an extraordinary situation. This action will be continued after elimination of the extraordinary situation.
Display message C a s c a d e B l o c k 9 9 9 , 5 h r s
Reason One of the cascaded boilers causes an error, because of a lock out.
Display message d T b l o c k 9 9 9 , 5 h r s
Reason Temperature difference between flow and return exceeds the blocking value but not the lock out value.
Display message F13
P a r a m / H a r d w f a u l t p u m p o n 9 9 9 , 5 h r s
Reason Fault during programming of the boiler software parameters.
Display message F12
p r o g r a m m i n g e n d p u m p o n 9 9 9 , 5 h r s
Reason Software parameters have been programmed.
Display message F19
S i p h o n s w i t c h p u m p o n 9 9 9 , 5 h r s
Reason The pressure switch detects a high pressure in the flue/siphon system.
Display message A n t i c y c l e t i m e 9 9 9 , 5 h r s
Reason The controller received a new heat demand too quick after the last ended de-mand.
Display message D e a i r a t i o n 9 9 9 , 5 h r s
Reason The boiler starts its deairation function and after will return to normal opera-tion. This function can be activated by parameter P4AJ.
Display message F l o w t e m p h i g h 9 9 9 , 5 h r s
Reason Flow temperature has exceeded the blocking temperature, but it has not ex-ceeded the lock-out value
Cooke Industries - Phone: +64 9 579 2185 Fax: +64 9 579 2181 Email: [email protected] Web: www.cookeindustries.co.nz

E93.0802EN.C Ambassador+ manual 75
Display message F l u e t e m p h i g h 9 9 9 , 5 h r s
Reason Flue gas temperature has exceeded the limit.
Display message G e n B l o c k 9 9 9 , 5 h r s
Reason The general blocking circuit is activated during operation = contact 7-8
Display message L i n e f a u l t 9 9 9 , 5 h r s
Reason Wrong electrical power supply is connected (not 50 or 60 Hz, 220-240 Volt).
Display message O u t d o o r s e n s o r f a i l 9 9 9 , 5 h r s
Reason Outdoor temperature has exceeded the blocking temperature.
Display message R e t u r n t e m p h i g h 9 9 9 , 5 h r s
Reason Return temperature has exceeded the blocking temperature, but the return temperature has not exceeded the lock-out value.
Display message T 2 - T 1 h i g h
9 9 9 , 5 h r s Reason Temperature difference T2-T1 has exceeded the blocking value.
Display message W a t e r p r e s s u r e f a u l t
9 9 9 , 5 h r s Reason Water pressure is too low or too high.
10.17.3 MAINTENANCE ATTENTION MESSAGES
The following graphs describe the messages at the boiler display. Depending on the selected and activated options for the boiler, it is possible that some messages will show up at the display. For example a maintenance message after a certain programmed date has been reached. The boiler will operate independently of these messages. The display shows alternating the base screen and this message, while the backlight is blinking. The boiler is operating, but will count the exceeding hours. A parameter must be changed, after service, to remove this message.
Display message N e e d s M a i n t e n a n 0 . 0 I g n i t i o n c y c l e s h r s
Reason Maintenance option of total amount of ignition cycles has been reached. Display message N e e d s M a i n t e n a n 0 . 0
D a t e h r s Reason Maintenance option of the date has been reached. Display message N e e d s M a i n t e n a n 0 . 0
B u r n i n g h o u r s h r s Reason Maintenance option of total amount of burning hours has been reached. Display message N e e d s M a i n t e n a n 0 . 0
A l l h r s Reason One of the abovementioned maintenance options has been reached.
Cooke Industries - Phone: +64 9 579 2185 Fax: +64 9 579 2181 Email: [email protected] Web: www.cookeindustries.co.nz

E93.0802EN.C Ambassador+ manual 76
11 CONTROLLING OPTIONS AND SETTINGS
11.1 General The following paragraphs describe some general functions of the boiler and their possible use.
11.1.1 EXTRA BOILER CONTROL
When all units (cascaded) are firing at their maximum it is possible to start an extra “external” heating source. This unit can be connected to the “Burner Burning” contacts (connection 21-22). P5DE Extra Boiler output enable (1) (display C4) When this parameter is set 1, the contact “Burner Burning” will close, but only when all units are firing at a certain (programmable) input percentage. The standard factory setting for this function is “OFF”.
11.1.2 MAX COOLING TIME
The fan will cool down the heat exchanger according to the temperature settings (parameters) of the software. With this cooling parameter the maximum run time of the fan can be programmed. P2LK Max cooling time (display D4) This function is not used for central heating boilers.
11.1.3 TEMPERATURE DISPLAY ON/OFF
Selection for showing the measured temperatures at the operation display of the boiler.
P5BJ Temperature display 1=on (display D5) The measured temperature at the operation display. 0 = not visible 1 = visible
11.1.4 WATER PRESSURE
P4AD pressure 0=off, 1=sensor, 2=switch. When the water pressure exceeds 4 bar a pressure switch must be used instead of the sensor (suitable till 4 bar). With the switch, pressure can go up to 6 bar. In this case, remove the pressure sensor and replace it by the pressure switch. Now set the parameter at the control panel by changing “D7 config” from 1 into 2.
11.1.5 GAS TYPE SELECTION
Settings for gas types: natural gas, propane or butane-propane mixture (B/P).
P4 BD Gas type (0=standard, 1=propane, 2=B/P) (display D8) This parameter is set 0 for the common used gas types such as natural gas G20 or G25.3. By setting this parameter 1 for propane, fan speed is reduced. Set this parameter 2 for B/P.
0 = standard gas (e.g.: natural gas), Lw, Ls (Lw and Ls only for Poland) 1 = propane 2 = B/P
By each setting, the relevant Soft start settings are automatically adjusted, depending on its main setting P4BE, see next section § 11.1.6.
Cooke Industries - Phone: +64 9 579 2185 Fax: +64 9 579 2181 Email: [email protected] Web: www.cookeindustries.co.nz

E93.0802EN.C Ambassador+ manual 77
In case of gas conversion, paste the corresponding sticker at the appropriate position in the boiler and mark the square for the used gas type. Also mark the square, indicating that the correct value has been set for parameter P4BD.
(In the example on the right, ‘propane’ and ‘P4BD = 1’ have been marked).
11.1.6 SOFT START OPTION
Start parameters can be modified to achieve better start behaviour, in case of noise or other difficulties. This is done by reducing the fan ramp-up speed. Two reduced settings are available (I and II).
P4 BE Soft start (0=normal, 1=reduced fan ramp-up speed (I), 2=reduced fan speed ramp-up (II)) (display D9).
0 = normal start-up 1 = reduced fan ramp-up speed (I) 2 = reduced fan ramp-up speed (II)
11.1.7 PUMP MODE (EC TECHNOLOGY)
When using a pump with Electronic Commutation technology and start-stop function, with a separate control con-nection, this parameter determines the relay for switching the pump on and off.
P5 BN Pump mode (0=modulating, 1=relay1, 2= relay2, 3= relay3) (display DA)
Do not use the 230 Vac relay for the main power supply of the pump, but directly connect the pump to an external power supply.
A modulating pump with PWM control: the power supply is directly connected to the mains, the PWM connection is connected to CN10, contacts 9 and 18. Pumps with an on/off control can be switched by one of the relay connections “lock-out”, “burner burning” or “heat demand”. Choose a connection which is not yet used. 0 = PWM 0-100% modulating pump, connection CN10, connectors 9 and 18 1 = Start-stop through relay 1, connectors 19 and 20 (lock-out) 2 = Start-stop through relay 2, connectors 21 and 22 (burner burning) 3 = Start-stop through relay 3, connectors 23 and 24 (heat demand) 4 = Do not use (reserved for future applications).
Cooke Industries - Phone: +64 9 579 2185 Fax: +64 9 579 2181 Email: [email protected] Web: www.cookeindustries.co.nz

E93.0802EN.C Ambassador+ manual 78
11.2 Heating The following paragraphs describe the different functions of the boiler and their related “controlling behaviour settings” as a central heating boiler.
11.2.1 CONTROLLING BEHAVIOUR SETTINGS
The factory settings for all heating applications are working fine and it is therefore advised not to change these settings. Always consult the manufacturer for advice if changes to parameter settings are needed. P5 AO Blocking offset flow temperature control (display A2) The amount of degrees the measured temperature exceeds the active flow temperature set point before the heat demand stops. Only active when the unit is controlled by the internal flow sensor (S1) and used for single unit control. P5 AL Hysteresis CH flow temperature control (display A4) The amount of degrees that the measured temperature must drop, relative to the active flow temperature set point + Offset (Parameter P5 AO), before the heat demand starts. This function is active when the unit is controlled by the internal flow sensor (S1) and used for single units. When controlling cascaded units with an external flow sensor (S3), this sensor will be used. P5 AP Proportional range single heating boiler (display A3) The proportional range for controlling the flow temperature of the boiler. This function is active when the unit is controlled by the internal flow sensor (S1) and used for single units. When controlling cascaded units with an external flow sensor (S3), this sensor will be used. P2 MI Blocking offset system CH temperature control (display A6) The amount of degrees the measured temperature exceeds the active flow temperature set point before heat demand stops. Only active when the unit is controlled by an external flow sensor (S3).
The following graph shows the relation between the several parameters.
WHEN CONTROLLING ON INTERNAL FLOW SENSOR Settings: P5 AO Offset = 5°C P5 AP Proportional band = 15°C P5 AL Hysteresis = 10°C Temp. set point = 50°C Burner starts at 45°C Set point + Offset - Hysteresis = 50+5-10= 45°C Burner stops at 55°C Set point + Offset = 50 + 5 = 55°C WHEN CONTROLLING ON EXTERNAL FLOW SENSOR Settings: P2 MI Offset = 5°C P5 AP Proportional band = 15°C P5 AL Hysteresis = 10°C Temp. set point = 70°C Burner starts at 65°C Set point + Offset - Hysteresis = 70+5-10= 65°C Burner stops at 75°C Set point + Offset = 70 + 5 = 75°C
Graph and values only for illustration purposes, programmed parameter values can deviate!
BOILER OFF
SETPOINT
ALLOWED TO MODULATE
OFF
SET
P
RO
PO
RTI
ON
AL
BAN
D
HY
STE
RES
IS
BOILER ON
SETPOINT + OFFSET
Cooke Industries - Phone: +64 9 579 2185 Fax: +64 9 579 2181 Email: [email protected] Web: www.cookeindustries.co.nz

E93.0802EN.C Ambassador+ manual 79
11.2.2 ROOM THERMOSTAT ON/OFF
A room thermostat with a fixed set point and using an ON/OFF control can be connected to the boiler (Connections 13-14). Changing the flow temperature set point and activation of a timer program can be done by this room thermo-stat or by programming the boiler settings. See chapter 10.10
11.2.3 ROOM THERMOSTAT OPEN-THERM
An RC Open Therm controller can be connected to the boiler for temperature reading(s) and remote programming (connections 13-14).
11.2.4 OUTDOOR TEMPERATURE RELATED FLOW CONTROL
The flow temperature can be calculated by using the measured outdoor temperature for controlling the boiler. See for detailed information § 10.11.
11.2.5 0-10 VDC REMOTE FLOW TEMPERATURE SET POINT
The flow temperature is controlled by connecting an external 0-10 Vdc signal to the boiler (connections 15-16). P5 BB Analogue input config (0=off 1=temperature 2=power) (display D1) This parameter must be set at "1" so the supplied 0-10 Vdc signal will control the temperature set point. Possible settings are: 0 = 0-10 V control off 1 = 0-10 V temperature set point control active 2 = 0-10 V burner input control active P5 AI Minimum temperature 0-10V input (display D2) The standard starting temperature of the heat demand, when the minimum voltage signal is sent to the boiler. The factory settings for all heating applications are working fine and it is therefore advised not to change these settings. Always consult the manufacturer for advice if parameter changes are needed. See also the following graph for the relation between the temperature and the control signal
Curve and values only for illustration purposes, programmed parameter values can deviate!
0-10 Vdc control signal
tem
pera
ture
set
ting
°C
P2GB off P2GA on P2GC max.
P6BA max. temperature set point e.g. 90°C
P5AI min. temperature set point e.g. 20°C (default)
0 °C
10
20
30
40
50
60
70
80
0 1 2 3 4 5 6 7 8 9 10 11 12
90
100
Cooke Industries - Phone: +64 9 579 2185 Fax: +64 9 579 2181 Email: [email protected] Web: www.cookeindustries.co.nz

E93.0802EN.C Ambassador+ manual 80
11.2.6 0-10 VDC REMOTE BURNER INPUT CONTROL
The burner input is controlled by connecting an external 0-10 Vdc signal to the boiler (connections 15-16). P5 BB Analogue input config (0=off 1=temperature 2=power) (display D1) This parameter must be set at "2" so the supplied 0-10V dc signal will control the burner input. The standard factory setting is “1”, temperature set point control. Possible settings are: 0 = 0-10V control off 1 = 0-10V temperature set point control active 2 = 0-10V burner input control active See also the following graph for the relation between the burner input and the control signal.
Curve and values only for illustration purposes, programmed parameter values can deviate!
11.2.7 TIMER CONTACT FUNCTION
This function can be activated when using an external night reduction timer for heating. This timer contact can be connected to the thermostat terminals (connections 13-14). P5 AB Timer contact (1=on) (display A9) When this parameter is activated and… - …the thermostat terminals are bridged (timer contact closed), the normal daytime temperature is used as set point. - …the thermostat terminals are not bridged (timer contact open), the night reduced temperature is used as set point.
0
10
20
30
40
50
60
70
80
90
100
0 1 2 3 4 5 6 7 8 9 10 11 120-10 Vdc control signal
burn
er in
put [
%]
P2GB off P2GA on P2GC max.
Min. burner input % fixed value, e.g. 25%
Max. burner input %
Cooke Industries - Phone: +64 9 579 2185 Fax: +64 9 579 2181 Email: [email protected] Web: www.cookeindustries.co.nz

E93.0802EN.C Ambassador+ manual 81
11.3 Indirect hot water/calorifier The following paragraphs describe the different functions of the boiler and their related “controlling behaviour settings” as a central heating boiler with an indirect hot water function.
11.3.1 PUMP AND 3-WAY VALVE CONTROL
See chapter 19 for several installation examples of the boiler and the preferred functions. When the boiler is used as an indirect boiler for both central heating and hot water function, this hot water function can be activated by u-sing a DHW pump (calorifier pump (pump 2)) or a 3-way valve. P4 AB DHW Pump config 0=Pump 1=TWV (display B1) With this parameter it is programmed if the flow to the indirect water tank (calorifier) is controlled by a pump (0 = pump) or a 3-way valve (1 = TWV).
11.3.2 TANK THERMOSTAT
An external thermostat can be connected to the boiler (connections 5-6). When there is a hot water demand and the tank thermostat closes, the boiler will start for the hot water demand. The calorifier/tank pump will be activated or in case of a 3-way valve, this valve will turn to the position to supply heat to the tank coil(s). In case of a heat demand and hot water demand, the (central) heating pump will switch off until the hot water demand ends. P4 AB DHW pump Config 0=Pump 1=TWV (display B1) With this parameter it is programmed if the flow to the indirect water tank (calorifier) is controlled by a pump (0 = pump) or a 3-way valve (1 = TWV).
11.3.3 TANK SENSOR
A tank sensor can be connected to the boiler. The tank (hot water) set point and related controlling parameters are set in the boiler controller. A hot water demand is detected by the boiler, when the sensor (water) temperature drops below the set point. The calorifier/tank pump will be activated or in case of a 3-way valve, this valve will turn to the position to supply heat to the tank coil(s). In case of a heat and hot water demand at the same time, the hea-ting pump will switch off until the hot water demand is stopped (water temperature is reached). P5 CA Hysteresis DHW tank temperature (display BF) The amount of degrees that the hot water temperature in the indirect water tank/calorifier needs to drop relative to the hot water set point, before the heat demand is send to the boiler.
Cooke Industries - Phone: +64 9 579 2185 Fax: +64 9 579 2181 Email: [email protected] Web: www.cookeindustries.co.nz

E93.0802EN.C Ambassador+ manual 82
11.3.4 LOW/HIGH FLOW TEMPERATURE TO TANK COIL
This function can only be used for an “indirect” programmed boiler (parameter P4 AA = 1). Normally for a regular calorifier a fixed flow temperature of 85°C is supplied to the calorifier heat exchanger in case of a heat demand. This hot water flow will indirectly heat up the water in the calorifier tank. The parameters for this function can be configured for both low and high calorifier operation. This function operates as follows: When there is a heat demand, the boiler supplies water to the heat exchanger of the calorifier, according to the flow temperature set in parameter P5 CB. When the heat demand remains for the period set in parameter P5 CL, the flow temperature set point will change to a higher temperature, which is set in parameter P5 CK. This situation continues until the heat demand ends.
The reason for this function is that the boiler by supplying a lower flow temperature to the heat exchanger of the calorifier, can stay in its condensing mode (if the temperature is low enough) and thus operate at a higher efficiency level. When it takes too long (> P5 CL) to heat up the tank with this low temperature mode, the flow temperature set point will change to a higher setting to make sure that the hot water set point is reached. P5 CB Flow temperature DHW tank low (display B2) The low level flow temperature to the tank coil(s) in case of a calorifier/indirect hot water demand. This “two staged” function is added to keep the boiler in the condensing mode as long as possible. P5 CK Flow temperature DHW tank high (display B3) The high level flow temperature to the tank coil(s) in case of a calorifier/indirect hot water demand. P5 CL Low flow temperature time DHW (display B4) The programmed period for changing the set point of the water flow temperature from low to high. The standard factory setting for this function is “OFF”.
P5CK
P5CL
P5CB
Start heat demand calorifier
Time
Wat
er te
mpe
ratu
re to
ca
lorif
ier h
eat e
xcha
nger
P5CB P5CK
P5CL
Cooke Industries - Phone: +64 9 579 2185 Fax: +64 9 579 2181 Email: [email protected] Web: www.cookeindustries.co.nz

E93.0802EN.C Ambassador+ manual 83
11.3.5 HEATING AND HOT WATER SWITCHING TIME
This function can only be used for an “indirect” programmed boiler (parameter P4 AA = 1). In case there is a heating demand and the unit is operating for this heating demand, also a hot water demand can be activated. A hot water demand always has priority, this means that the unit will switch to hot water operation. When the hot water demand remains for a longer period, there will be no heat supply for/to the central heating system during this period. Not supplying any heat for/to the central heating system might cause undesirable temperature fluctuations. The following parameters can be used to program the preferred settings. P5 CL Low flow temperature time DHW (display B4) The period during which the set point of the water flow temperature (to the heating coil(s) of the calorifier) will switch from “low” to “high”. P5 CF Max runtime DHW during CH demand The programmed period for the boiler to operate for DHW demand in case of a CH demand. After this period the boiler will switch to operate for CH demand, even when there is still a DHW demand. P5 CM Max runtime CH during DHW demand The programmed period for the boiler to operate for CH demand in case of a DHW demand. After this period the boiler will switch to operate for DHW demand, even when there is still a CH demand.
The standard factory setting for this function is that the hot water demand always has priority and that no switching between the heat and hot water demand happens, when both are active.
11.3.6 HEATING AND HOT WATER SWITCHING AT SUDDEN TEMPERATURE DROP
This function can be used to detect indirect water tank/calorifier heat demand in case of a sudden temperature drop within the range between the set point and the (minimum) value at which the boiler is normally switched on. For this parameter is chosen the value of the temperature drop detected within one second, at which an immediate indirect hot water demand is activated.
P2KH Gradient heat demand detect Dhw tank temperature (display BG) See the given explanation. The standard factory setting for this function is “OFF”.
The parameter acts in this temperature range
BOILER OFF
SET POINT
ALLOWED TO MODULATE
OFF
SET
PR
OPO
RTI
ON
AL B
AND
HYS
TER
ESIS
BOILER ON
SET POINT + OFFSET
Cooke Industries - Phone: +64 9 579 2185 Fax: +64 9 579 2181 Email: [email protected] Web: www.cookeindustries.co.nz

E93.0802EN.C Ambassador+ manual 84
11.3.7 ANTI-LEGIONNAIRES’ DISEASE FUNCTION (PASTEURISATION)
This function can only be used for an “indirect” programmed boiler (parameter P4 AA = 1), on which a DHW program is active. To prevent Legionnaires' disease the boiler (software) provides a function for heating up the hot water storage tank (once a week) to a higher water temperature then the normal active hot water set point. Also the period, that this “higher” water temperature function must be active, can be programmed. NOTICE: The standard factory setting for this Legionnaires' disease (pasteurisation) function is “OFF”. To activate this Legionnaires' disease function some parameters must be programmed by the manufacturer/supplier. The starting day and time of this Legionnaires' disease function can be programmed at the control panel of the boiler. There are several parameters being used for this function. Three of these parameters are shown in the following graph. With parameter P2 KI the heating (CH) demand can be interrupted to provide heat for the anti-Legionnaires’ disease demand. When no interruption is activated the boiler will wait for the end of the heat demand before the anti-Legion-naires’ disease function starts. The standard factory setting for this function is “OFF”.
Curve and values only for illustration purposes, programmed parameter values can deviate! The settings of these parameters P5 CI, P5 CJ and P5 CD must be programmed according to the national and/or local anti-Legionnaires’ disease preventing regulations. The setting of these parameters can only be done by the manufacturer/supplier of the boiler or by a technician with access to programming level 2, at the control panel of the unit without the use of a computer.
NOTICE: The use and activation of this function won’t guarantee a Legionnaires’ disease free installation. The responsibility for a Legionnaires' disease free installation remains at the end-user/owner.
P5CI = 5°C This is the bandwith within which the Legionnaires' temperature must stay during the programmed du-ration (P5CJ). In this example the temperature is al-lowed to fluctuate between 65°C and 70°C during the anti-Legionnaires' function.
P5CJ = 80 min. This is the duration within which the water tem-perature will be between the 65°C and 70°C.
P5CD = 70°C This is the maximum temperature during anti Legionnaires' disease function period.
Normal setting wa-ter temperature.
Start of the anti Legionnaires' disease program (start day and
time can be programmed).
Normal setting wa-ter temperature.
Time (10 min steps)
Wat
er te
mpe
ratu
re
Cooke Industries - Phone: +64 9 579 2185 Fax: +64 9 579 2181 Email: [email protected] Web: www.cookeindustries.co.nz

E93.0802EN.C Ambassador+ manual 85
11.4 Cascade control
→ The following information is also found in the specific cascade manual, supplied standardly with EHS cas-cade accessories or on request.
Before commissioning a cascade installation, a number of parameters have to be changed. These parameters can be programmed on the unit itself, without the use of a computer.
Changes in parameter may only be carried out by a skilled commissioning/service engineer, who has had specific training for setting up the Ambassador+ range boilers. He will be able to check whether the installa-tion functions correctly after the parameter change has been done.
For programming all parameters of the boilers one needs to have a laptop with the appropriate EHS software and an interface cable for connecting the laptop to the boiler control (one Part number.: S04.016.586). This software is used for programming but also shows all measured temperatures and cascade behaviour during operation and ser-vice/fault history.
11.4.1 PARAMETER SETTINGS FOR CASCADED BOILERS
Before programming the cascaded boilers, make sure that all boilers are connected (wire) with each other. Use connection 17 and 18 of each boiler. Remind: do not alternate these connections, so always connect 17 to 17 and 18 to 18. After connection every boiler must be programmed. This can be done at the control panel. Press the [MENU] but-ton and select the [PARAMETER] menu. See graphics below.
Operating screen: H E A T I N G : S T A N D - B Y > > > : 1 2 3 . 4 ° C ( 1 2 3 . 4 ° C )
Press [MENU] Main menu screen: M a i n M e n u S e t p o i n t s
Select "Parameter" using [◄] & [►] and press [ENTER]
After this, use the password for installer’s level 2.
Parameter menu: I n s t a l l e r c o d e 0 0 0 0
Enter the 4-digit code with the [◄] & [►] and the [▲] & [▼] buttons and select [ENTER] The code will blink a few seconds and when entered correctly, the following parameters will be displayed.
Cooke Industries - Phone: +64 9 579 2185 Fax: +64 9 579 2181 Email: [email protected] Web: www.cookeindustries.co.nz

E93.0802EN.C Ambassador+ manual 86
Now for every single boiler of the cascade the following two parameters must be selected and programmed accord-ing to the above drawing.
Master: C5 P5 DF 1 C2 P5 DA 0 Slave 1: C5 P5 DF 0 C2 P5 DA 1 Slave 2: C5 P5 DF 0 C2 P5 DA 2 And so on.
Menu C: Cascade C 5 C a s S i / M a 0
Function for the cascading of the boiler(s). This parameter sets the function of the boiler at a cascade alignment 0 = Single / Slave unit 1 = Master unit
Menu C: Cascade C 2 B u s a d d r e s s 0
Function for the cascading of the boiler(s). This parameter determines the address of the boiler for the total cascading control. Master = 0, Slave1 = 1, etc.
When the correct parameter is set, this must be confirmed at the confirmation screen. After activation, the value will blink for a few seconds while the parameter is programmed into the boiler.
Cooke Industries - Phone: +64 9 579 2185 Fax: +64 9 579 2181 Email: [email protected] Web: www.cookeindustries.co.nz

E93.0802EN.C Ambassador+ manual 87
When cascade connection is programmed correctly the boiler display will show the following.
Explanation "Cascade communication indicator" NO CASCADE COMMUNICATION > > > no.1 Always showing the fixed ">>>" CORRECT CASCADE COMMUNICATION > > no.1
no.2 >
Showing alternating no.1 & no.2 with 1 second interval.
11.4.2 MONITOR SCREENS
To obtain cascade information, see § 10.4 on page 47.
11.4.3 OUTPUT CONTROL AND BOILER SEQUENCE
The total cascade set-up will act as one single big boiler, switching on- and off boilers, depending on the total load necessary to adjust and keep the flow temperature at the calculated value. When the heat demand rises, more boilers are switched on, and when heat demand falls, one or more boilers will be switched off. The boiler that was switched on last, will be switched off first, see table below. To distribute operating hours equally over all boilers, the working sequence of the boilers will change every two hours.
Hour Switching ON sequence Switching OFF sequence
X Master – Slave 1 – Slave 2 – Slave 3 – Slave 4 – Slave 5 – Slave 6 – Slave 7
Slave 7 – Slave 6 – Slave 5 – Slave 4 – Slave 3 – Slave 2 – Slave 1 – Master
X+2 Slave 7 – Master – Slave 1 – Slave 2 – Slave 3 – Slave 4 – Slave 5 – Slave 6
Slave 6 – Slave 5 – Slave 4 – Slave 3 – Slave 2 – Slave 1 – Master – Slave 7
X+4 Slave 6 – Slave 7 – Master – Slave 1 – Slave 2 – Slave 3 – Slave 4 – Slave 5
Slave 5 – Slave 4 – Slave 3 – Slave 2 – Slave 1 – Master – Slave 7 – Slave 6
X+6 Slave 5 – Slave 6 – Slave 7 – Master – Slave 1 – Slave 2 – Slave 3 – Slave 4
Slave 4 – Slave 3 – Slave 2 – Slave 1 – Master – Slave 7 – Slave 6 – Slave 5
……….. ………………………………………………… …………………………………………………
Table: boiler sequence example of an eight boiler cascade.
In this table a total of eight boilers (one master, seven slaves) is mentioned as an example, in practice the maximum number in a cascade, without extra (external) control, is twelve boilers.
Cooke Industries - Phone: +64 9 579 2185 Fax: +64 9 579 2181 Email: [email protected] Web: www.cookeindustries.co.nz

E93.0802EN.C Ambassador+ manual 88
12 COMMISSIONING THE BOILER
12.1 First: flushing the boiler with water After installation of the boiler the first step, before commissioning, is to flush the boiler and the whole heating instal-lation with fresh water to remove pollution, debris and other materials that might cause a blocking. This must also be done with heating installations, where only the boiler is replaced.
12.2 Second: filling & venting the boiler and the system After flushing the boiler and the installation the system can be filled with fresh water. Fill the boiler and the heating system by using the appropriate filling valve. The water pressure of the system normally lies between 1,5 and 2,0 bar – see § 6.14 ‘Water pressure’ on page 20. NOTICE: Use the following aspects to prevent corrosion of the central heating system: • Filling water: Do not use any additives for the water of the central heating system. The pH value of the water
should be more than 5 (If this pH value is less, please contact the supplier). • Ensure that any used “plastic” pipes are oxygen diffusion-proof in accordance with DIN 4726/4729. If not, make
sure that the boiler circuit is separated from the heating circuit by a plate heat exchanger. This way no oxygen that entered the heating system through these pipes can reach the boiler.
• Check the total heating system for any leaks. This to prevent oxygen entering the system through these leaks. The boiler has an automatic air vent situated on top. This vent must be opened during the filling of the boiler and the heating system to make sure that no air/oxygen is trapped in the heat exchanger of the boiler. NOTICE: Check that the screw cap has been loosened at least one twist. Shortly after putting the boiler into operation, check the water pressure and add or lose some water to obtain the required pressure. During these proceedings, make sure that no water can enter the boiler and make contact with the electrical parts.
12.3 Third: check the water flow Before the boiler will be started it must be sure that the boiler pump is functioning and that there is a water flow over the heat exchanger. Check the electrical power supply of the boiler; if this is connected correctly, the display will show:
Display message B o i l e r o f f
Reason Boiler is not active. To activate the boiler press [ON/OFF] button for six seconds.
Display message H E A T I N G : b o i l e r o f f > > > : 1 2 3 . 4 ° C ( 1 2 3 . 4 ° C )
Reason Boiler is standby. To activate the boiler press [ON/OFF] button for three seconds.
Activate the boiler by pressing the [ON/OFF] button for six resp. three seconds. After this the following display will appear:
Display message H E A T I N G : N o d e m a n d > > > : 1 2 3 . 4 ° C ( 1 2 3 . 4 ° C )
Reason Boiler is active, but there is no heat demand. When no water is present in the boiler or the water pressure is too low or high, the boiler will go into lock-out and will show a corresponding message in the display. Display message W a t e r p r e s s u r e f a u l t
9 9 9 , 5 h r s Reason Water pressure is too low or high.
Cooke Industries - Phone: +64 9 579 2185 Fax: +64 9 579 2181 Email: [email protected] Web: www.cookeindustries.co.nz

E93.0802EN.C Ambassador+ manual 89
By pressing the [SERVICE] button of the boiler, the boiler can be started without a heating demand. The boiler will start to fire and also the pump will start to run. Firing of the boiler without water flow (but filled with water!) will cause the so called “boiling noises”. Check during this “service function” operation also the flow and return temperatures of the boiler by pressing the [◄] button once. The temperature difference of the flow and return must be between 13°C and 25°C at high fire. This temperature difference indicates that there is a sufficient water flow over the boiler; this water flow protects the heat exchanger against possible damage caused by a thermal overload. Another safety feature of the boiler, to make sure that there is enough water flow over the boiler, is the monitoring of the flow and return temperatures (T1 and T2). When the temperature difference (delta T) between the flow and return exceeds a certain (set) value, the following warning messages will be shown in the display.
Display message T 2 - T 1 h i g h 9 9 9 , 5 h r s
Reason Temperature difference T2-T1 has exceeded the blocking value, as set in the parameters.
Display message d T B l o c k 9 9 9 , 5 h r s
Reason Temperature difference T1-T2 has exceeded the blocking value.
When the T1-T2 value exceeds the lock-out setting, the boiler will switch off and the following lock out code will be shown at the display.
Display message F16
F l o w R e t u r n d t f a u l t p u m p o n 9 9 9 , 5 h r s
Reason Temperature difference between flow and return exceeds limitation value, or 'dT block or delta direct block' has occurred three times.
When these messages appear and/or the boiler will lock out, it means that there is not enough flow over the boiler. In this case check the functioning of the pump. The boiler has no built in water-flow switch. If there is the possible risk of a water-flow blockage of the (external) heating system, the following pre-cautions can be taken to ensure a water flow over the boiler:
• Separate the boiler circuit from the (external) heating circuit by using a low loss header or plate heat ex-changer.
During and after the commissioning of the boiler, the operation of the boiler pump must be checked, before leaving the installation room. NOTICE: Always check the running of the pump before firing the boiler.
Cooke Industries - Phone: +64 9 579 2185 Fax: +64 9 579 2181 Email: [email protected] Web: www.cookeindustries.co.nz

E93.0802EN.C Ambassador+ manual 90
13 STARTING THE BOILER
13.1 General Check the gas pressure available at the gas connection pipe of the boiler. Use the pressure nipple (3) of the gas safety valve for this measurement. The graphs on page 96 show the position of the pressure nipple (3) for the complete boiler range. The gas input pressure for the boiler to operate properly under the correct load must be more than 20 mbar at high fire.
For Ls gas G2.350, used in parts of Poland, a B+J gas valve must be installed in the A+80, A+100, A+150 and A+180 boilers. See also page 91 ff. and page 96.
13.2 Firing for the first time After the commissioning of the boiler and the described previous actions, the boiler display will show the following graph.
Display message H E A T I N G : N o d e m a n d > > > : 1 2 3 . 4 ° C ( 1 2 3 . 4 ° C )
Reason Boiler is active, but there is no heat demand. The display describes:
• The actual operation for heating or hot water • If there is a heat demand activated • The temperature setting • The temperature measured
When mounting the bottom part of the siphon, before commissioning the boiler and/or after maintenance, it must ALWAYS be completely filled with water.
This is a safety measure: the water in the siphon keeps the flue gases from leaking out of the heat exchanger via the condensate drain.
When the boiler receives a heat demand the electronics will start the operation of the boiler. Before the boiler is used, the boiler burner must be adjusted and set at the minimum and maximum load.
The siphon must always be filled with water to the edge before replacing to the unit
Cooke Industries - Phone: +64 9 579 2185 Fax: +64 9 579 2181 Email: [email protected] Web: www.cookeindustries.co.nz

E93.0802EN.C Ambassador+ manual 91
14 ADJUSTING AND SETTING THE BURNER
Before carrying out any adjusting of the burner, carefully read this complete chapter.
14.1 Introduction The burner must always be adjusted in the next situations:
A. - A new boiler is installed - As part of a service/maintenance check, in case the CO2 values turn out to be incorrect.
B. - The gas control safety valve has been (re)placed - Another type of gas is applied: gas conversion
Adjustment procedures for situation A are described in § 14.2 And for situation B § 14.3.
In either of the four cases described in A and B, always check the gas/air ratio of the combustion figure (CO2) at maximum and minimum input. First set the boiler at max. load and subsequently at min. load, and repeat if necessary.
Gas types and valves The right type of valve must be selected, depending on the gas type. Gas types G20, G25.3 and G31 are commonly used; the boilers are standard equipped with the A+C-class valves required for these types of gas. Poland Gas types G27 and G2.350 are Lw and Ls gases, used in some parts of Poland. For Ls gas G2.350, the boilers A+80, A+100, A+150 and A+180 must be equipped with B+J-class valves, see table 3 and see the pictures on page 96. Set-up of this chapter: First, all necessary values are given in three tables in § 14.1.1. A drawing of the gas valve(s) and setting screws is given in § 14.1.3. In § 14.1.5 a general scheme, conform which the adjustments must be carried out, is presented in table form. In §§ 14.2 and 14.3, a description is given of how to proceed in cases A and B respectively. In § 14.4, finally, two main procedures used in the previous sections are described in detail.
14.1.1 ADJUSTMENT TABLES
Table 1: CO2 values for maximum and minimum load. 2)
1 Cf. EN437. 2 All values measured without front door. The CO2 / O2 values should always be between the values set in this table. Nominal values can be found in Technical specifications datasheet page ... 3 Fan settings must be changed by altering parameter P4BD (display D8). (only by a skilled mechanic). 4 B/P: Propane/butane mixture.
Using propane or butane/propane mixtures (B/P), maximum fan speed needs to be reduced by changing parameter P4BD.
gas type 1) CO2 [%] O2 [%]
G20, G25.3 boiler type max load min load max load min load A+ 60-180 9,0 - 9,2 8,5 - 8,7 4,5 - 4,8 5,4 - 5,7
CO2 [%] O2 [%]
propane G313)
boiler type max load min load max load min load A+ 60-120 10,3 - 10,5
9,1 – 9,3 4,9 - 5,2
6,7 – 7,0 A+ 150 10,4 - 10,6 4,7 - 5,0 A+ 180 10,5 - 10,7 4,6 - 4,9
CO2 [%] O2 [%]
B/P 3) 4) G30/ G31
boiler type max load min load max load min load A+ 60-120 10,4 - 10,6
9,1 – 9,3 5,1 - 5,4
7,0 – 7,3 A+ 150 10,5 - 10,7 4,9 - 5,2 A+ 180 10,6 - 10,8 4,8 - 5,1
Cooke Industries - Phone: +64 9 579 2185 Fax: +64 9 579 2181 Email: [email protected] Web: www.cookeindustries.co.nz

E93.0802EN.C Ambassador+ manual 92
14.1.2 ADJUSTMENT VALUES
To make adjustments easier, values of table 1 are presented in the following figures. The CO2 / O2 values should always be between the values set in this figure. Nominal values can be found in the Technical specifications datasheet at the beginning of this manual. All values are measured without frontdoor. Gas type G20, G25.3 The CO2 level may never be in the hatched area. A60 - A180
____________________________________________________________________________ Propane G31: Fan settings must be changed by altering parameter P4BD (display D8). (only by a skilled mechanic). The CO2 level may never be in the hatched area. A60 - A120
adjust
adjust
adjust
adjust
max load
min load
4,5 %
4,8 %
5,4 %
5,7 %
O2
9,2 %
9,0 %
8,7 %
8,5 %
CO2
adjust
adjust
adjust
adjust
max load
min load
4,9 %
5,2 %
6,7 %
7,0 %
O2
10,5 %
10,3 %
9,3 %
9,1 %
CO2
O.K.
O.K.
O.K.
O.K.
Cooke Industries - Phone: +64 9 579 2185 Fax: +64 9 579 2181 Email: [email protected] Web: www.cookeindustries.co.nz

E93.0802EN.C Ambassador+ manual 93
>>> cont. Propane G31: The CO2 level may never be in the hatched area. A150 ____________________________________________________________________________ A180
adjust
adjust
adjust
adjust
max load
min load
4,7 %
5,0 %
6,7 %
7,0 %
O2
10,6 %
10,4 %
9,3 %
9,1 %
CO2
O.K.
O.K.
adjust
adjust
adjust
adjust
max load
min load
4,6 %
4,9 %
6,7 %
7,0 %
O2
10,7 %
10,5 %
9,3 %
9,1 %
CO2
O.K.
O.K.
Cooke Industries - Phone: +64 9 579 2185 Fax: +64 9 579 2181 Email: [email protected] Web: www.cookeindustries.co.nz

E93.0802EN.C Ambassador+ manual 94
B/P: propane/ butane mixture G30/ G31: Fan settings must be changed by altering parameter P4BD (display D8). (only by a skilled mechanic). The CO2 level may never be in the hatched area. A60-120 ____________________________________________________________________________ A150 ____________________________________________________________________________ A180
adjust
adjust
adjust
adjust
max load
min load
5,1 %
5,4 %
7,0 %
7,3 %
O2
10,6 %
10,4 %
9,3 %
9,1 %
CO2
O.K.
O.K.
adjust
adjust
adjust
adjust
max load
min load
4,9 %
5,2 %
7,0 %
7,3 %
O2
10,7 %
10,5 %
9,3 %
9,1 %
CO2
O.K.
O.K.
adjust
adjust
adjust
adjust
max load
min load
4,8 %
5,1 %
7,0 %
7,3 %
O2
10,8 %
10,6 %
9,3 %
9,1 %
CO2
O.K.
O.K.
Cooke Industries - Phone: +64 9 579 2185 Fax: +64 9 579 2181 Email: [email protected] Web: www.cookeindustries.co.nz

E93.0802EN.C Ambassador+ manual 95
Table 2 pre adjustment settings gas valves (G27 for Poland)
boiler type
number of turns open (counter clockwise)
nat. gas G20 / G25.3 / G27 propane G31 Butane/Propane B/P G30/G31
A+ 60 1 0,5 0,25
A+ 80 1,5 0,75 0,5
A+100 3,5 1,5 1,25
A+120 2,25 * 1 * 0,75 *
A+150 2,25 * 1 * 0,75 *
A+180 4,25 * 2,25 * 2 *
* Both gas valves must be opened this number of turns.
Table 3 Gas valve settings for Ls gas G2.350 (for Poland)
boiler type
number of turns open (counter clockwise)
natural gas Ls G2.350 gas valve class gas valve part no: A+ 60 1,25 A + C No replacement A+ 80 1,75 B + J S04.000.393 A+ 100 4 B + J S04.000.393
A+ 120 *2,5 A + C No replacement
A+ 150 *2,5 B + J S04.000.393
A+ 180 *4,5 B + J S04.000.393
* Both gas valves must be opened this number of turns.
Table 4 Pressure adjustment settings LEFT valve
Contact you boiler supplier for the right settings when converting to a not mentioned type of gas
boiler type
"p-out" pressure at gas valve
nat. gas G20 / G25.3 propane G31 Butane/Propane B/P G30/G31
A+ 120 -2 to 0 Pa -4 to -2 Pa -5 to -3 Pa
A+ 150 -2 to 0 Pa -7 to -5 Pa -8 to -6 Pa
A+ 180 -2 to 0 Pa -7 to -5 Pa -8 to -6 Pa
Maximum fan speed has to be reduced to convert the boiler into a propane or B/P appliance. Setting of parameter P4BD.
A sticker has to be pasted after converting the boiler into a propane or B/P appliance. Mark the used gas and the parameter setting on this sticker.
See § 14.3 on page 98.
Cooke Industries - Phone: +64 9 579 2185 Fax: +64 9 579 2181 Email: [email protected] Web: www.cookeindustries.co.nz

E93.0802EN.C Ambassador+ manual 96
14.1.3 SETTING SCREWS GAS VALVE(S): DRAWINGS
NOTICE: Do NOT mistake the screw marked ‘PILOT’ for screw 2. → Screw 2 is the SMALL screw immediately next to the pilot screw.
14.1.4 GAS VALVE CLASSES A+C AND B+J (B+J ONLY FOR POLAND)
These pictures show the difference between an A+C and a B+J valve. Notice the class being denoted on the ID plate of the valve.
Cooke Industries - Phone: +64 9 579 2185 Fax: +64 9 579 2181 Email: [email protected] Web: www.cookeindustries.co.nz

E93.0802EN.C Ambassador+ manual 97
14.1.5 ADJUSTMENT ACTIONS: GENERAL SCHEME
General scheme for adjustment of the gas valve(s). Check this scheme for an overview. To complete all necessary adjustments in right order, follow case A or B top-down through the scheme (B involves a few extra steps (grey text blocks)):
GENERAL SCHEME SETTING STEPS
case A new boiler or service check
case B valve replacement or gas conversion
continue ↓ first close (both*) screw(s) [2], then set them in accordance with table 2
SWITCH TO SERVICE MODE
continue ↓ If burner doesn’t start, open (RIGHT*) screw[2] ¼ turn extra
setting at maximum load
proc
edur
e 1
[▲] set burner at maximum load measure CO2 at flue gas outlet;
use (RIGHT*) screw [2] to adjust according table 1 or figures.
setting at minimum load
continue ↓ only → A+120, 150, 180
[▼] set burner at minimum load use LEFT screw [1] to match "p-out" with table 4
proc
edur
e 2
[▼] set burner at minimum load
measure CO2 at flue gas outlet; use (RIGHT*) screw [1] to
adjust according table 1 or figures.
repeat procedure 1 repeat procedure 2
keep repeating until values match table values best Boiler returns to NORMAL MODE after 40 min. OR by pressing [SERVICE] button
* in case of a double valve (A+120, A+150 and A+180) For an extensive description consult the next two sections (choose which is applicable, A or B):
CO2 [2]
CO2 [2]
CO2 [1]
CO2 [1]
Cooke Industries - Phone: +64 9 579 2185 Fax: +64 9 579 2181 Email: [email protected] Web: www.cookeindustries.co.nz

E93.0802EN.C Ambassador+ manual 98
14.2 Adjusting in case of a new boiler, or after maintenance (case A)
14.2.1 GENERAL REMARK
For all adjusting steps under A the measured CO2 values shall be according table 1 or figures
14.2.2 CHECKING AND ADJUSTING AT MAXIMUM LOAD
Adjust at maximum load by carrying out procedure 1 on p.100.
14.2.3 CHECKING AND ADJUSTING AT MINIMUM LOAD
Adjust at minimum load by carrying out procedure 2 on p.100.
14.3 Adjusting in case of valve replacement or gas conversion (case B)
Maximum fan speed has to be reduced to convert the boiler into a propane or B/P appliance. Setting parameter P4BD.
14.3.1 GENERAL REMARKS
In case B, a distinction is made between the setting of boilers containing a single valve (A+60-A+100) and boilers with a double valve (A+120-A+180). All adjustments must result in CO2 according table 1 or figures. Checking and adjusting at maximum load A+60 / A+80 / A+100 The boilers A60, A80 and A100 all have single gas valves, see the drawings on page 95.
• First, turn setting screw [2] of the gas valve clockwise until you feel resistance. This means that the valve is closed, do not try to tighten the screw any further.
• Now turn screw [2] counter clockwise (open), according to the number of turns in table 2 or 3 for the used boiler and gas type.
After this, adjust at maximum load by carrying out procedure 1 on page 100. If the burner doesn’t start up in service mode, turn screw [2] a quarter turn counter clockwise open, and try again.
14.3.2 CHECKING AND ADJUSTING AT MINIMUM LOAD A+60 / A+80 / A+100
Adjust at minimum load by carrying out procedure 2 on page 100.
IMPORTANT: Toggle between high fire and low fire to make fine-tuning adjustments (adjusting the minimum setting affects the maximum setting and contrariwise).
In case of gas conversion, paste the corres-ponding sticker at the appropriate position in the boiler and mark the square for the used gas type. Also mark the square, indicating that the correct value has been set for parameter P4BD.
(In the example on the right, ‘propane’ and ‘P4BD = 1’ have been marked).
For adjusting double gas valves A+120 / A+150 / A+180 see next page →
Cooke Industries - Phone: +64 9 579 2185 Fax: +64 9 579 2181 Email: [email protected] Web: www.cookeindustries.co.nz

E93.0802EN.C Ambassador+ manual 99
14.3.3 CHECKING AND ADJUSTING AT MAXIMUM LOAD A+120 / A+150 / A+180
The boilers A+120, A+150 and A+180 all have double gas valves, see the drawings on page 95.
First connect a manometer to "p-out" = measuring point [4] of the left gas valve (see drawing).
• Now, turn setting screws [2] of both gas valves clockwise until you feel resistance. This means that the valves are closed, do not try to tighten the screws any further in the closed position.
• After this, turn screws [2] of both left and right hand gas valve counter clockwise (open), according to the number of turns in table 2 or 3 for the used boiler and gas type.
From now on only use the right hand gas valve for adjustments on high fire.
Adjust the right valve at maximum load by carrying out procedure 1 on page 100. If the burner doesn’t start up in service mode, turn screw [2] a quarter turn counter clockwise further open, and try again.
14.3.4 CHECKING AND ADJUSTING AT MINIMUM LOAD A+120 / A+150 / A+180
Adjusting these boilers at minimum load in case B involves extra measurements, to get both valves balanced: Use the [▼] button to decrease the actual load of the service (percentage) to the minimum. The following screen will appear:
Display message H E A T I N G : S e r v i c e 2 6 % > > > 1 2 3 . 4 ° C ( 1 2 3 . 4 ° C )
Boiler is activated and operates at service mode at 26% (minimum). See table 4 for pressure settings "p-out" gas valve for the used boiler and gas type. Use screw [1] on the left hand gas valve to adjust the measured pressure at "p-out" to the right value according to table 4. Be sure the manometer has been zeroed out prior to making this setting. Below, the influence of turning screw [1] is described.
Turning counter clockwise Turning clockwise
→ →
less gas more gas
→ →
a drop in CO2 a rise in CO2
→ →
a drop in measured pressure at "p-out" a rise in measured pressure at "p-out"
After "p-out" has been set according table 4, the CO2 level at low fire has to be set again. Use values of table 1 and/or figures.
Adjust srew [1] of the RIGHT hand valve to set the CO2 at minimum load by carrying out procedure 2 on page 100. Again, toggle between high fire and low fire to make fine-tuning adjustments (adjusting the minimum setting affects the maximum setting and contrariwise). If the valves have been set correctly, "p-out" left should equal "p-out" right. As an additional test, one could check this by measuring "p-out" at the RIGHT valve, i.e. at measuring point 4 on the right valve (not denoted in the drawings on page 96). This pressure should be in the same range of pressure as the left valve, so in accordance with table 4 again. If, after all setting steps have been carried out properly, the values of left and right "p-out" are still very different, contact your supplier.
Cooke Industries - Phone: +64 9 579 2185 Fax: +64 9 579 2181 Email: [email protected] Web: www.cookeindustries.co.nz

E93.0802EN.C Ambassador+ manual 100
14.4 Adjusting procedures Procedures 1 and 2, referred to in the previous sections 14.2 and 14.3, are described here: Procedure 1: adjust at maximum load In case B (replacement of gas valve or gas conversion): consult § 14.3. before starting procedure 1 below. Carry out the next 4 steps:
1. Press [SERVICE] button for about 3 seconds.
Display message H E A T I N G : S e r v i c e 2 6 % > > > 1 2 3 . 4 ° C ( 1 2 3 . 4 ° C )
Boiler is activated and operates at service mode at 26% (minimum). (example)
2. Press [▲] button until maximum load is reached:
Display message H E A T I N G : S e r v i c e 1 0 0 % > > > 1 2 3 . 4 ° C ( 1 2 3 . 4 ° C )
Boiler is activated and operates at service mode at 100% (maximum). (example)
3. Measure the CO2 percentage at the flue gas outlet. 4. By setting screw [2], adjust the gas valve to obtain the CO2 value of table 1 or the figures.
NOTICE: For the A+120, 150 and 180 boilers use only the RIGHT side gas valve for adjusting.
Decrease CO2 percentage
Turn screw [2] right (clockwise)
Increase CO2 percentage
Turn screw [2] left (counter clockwise)
The service operation of the boiler will be active for 40 minutes. After this period the boiler will return to normal operation.
Procedure 2: adjust at minimum load In case B (gas conversion or replacement of gas valve): consult § 14.3. before starting procedure 2 below. Carry out the next three steps:
1. Press [▼] button until minimum load is reached.
Display message H E A T I N G : S e r v i c e 2 6 % > > > 1 2 3 . 4 ° C ( 1 2 3 . 4 ° C )
Boiler is activated and operates at service mode at 26% (minimum).
2. Measure the CO2 percentage at the flue gas outlet. 3. By setting screw [1], adjust the gas valve to obtain the CO2 value of table 1.
NOTICE: For the A+120, 150 and 180 boilers use only the RIGHT side gas valve for adjusting.
Decrease CO2 percentage
Turn screw [1] left (counter clockwise)
Increase CO2 percentage
Turn screw [1] right (clockwise)
The service operation of the boiler will be active for 40 minutes. After this period the boiler will return to normal operation.
CO2 [2]
CO2 [2]
CO2 [1]
CO2 [1]
Cooke Industries - Phone: +64 9 579 2185 Fax: +64 9 579 2181 Email: [email protected] Web: www.cookeindustries.co.nz

E93.0802EN.C Ambassador+ manual 101
15 PUTTING THE BOILER OUT OF OPERATION It is recommended to have the boiler operational all year round to prevent any frost damage during the winter and/or rotating parts getting jammed during other times of the year (built in boiler safety features).
15.1 Out of operation: on/off function To be used when the appliance must be put out of operation for a long period because of a defect or another safety risk.
Act as follows: • Disconnect or switch off the room thermostat and/or other external controllers from the boiler. The CH pump
and fan will stop after a short time. • Switch off the boiler by pressing the [ON/OFF] button for six seconds. • Make sure that the following display screen is visible.
Display message B o i l e r o f f
Properties of the ‘off’ function: • The keys do NOT respond and the menu is NOT accessible. • The burner does NOT respond to an external heat demand. • The boiler CAN, however, be switched on again by pressing the [ON/OFF] button. • Pumps, fans and cascade (if applicable) are operational, and so are both recirculation protection (if applic-
able) and frost protection. • NOTICE: Pump 3 (CH pump) is switched OFF, but this is NOT the case when the boiler is in a cascade. • To reactivate the boiler, switch on the burner by pressing [ON/OFF] for six seconds again.
The frost protection module can still activate the burner. To prevent this, switch off this protection or put the boiler in ‘power off’ mode.
15.2 Out of operation: power off To assure that the boiler cannot become active at all anymore, power should be cut off completely.
Act as follows: • Disconnect or switch off the room thermostat and/or other external controllers from the boiler. The CH pump
and fan will stop after a short time. • Switch off the boiler by pressing the [ON/OFF] button for six seconds. • Make sure that the following display screen is visible.
Display message B o i l e r o f f
• Switch off the electrical power supply of the boiler (remove connection from the wall socket, or switch off the main power).
• Close the gas valve / gas supply. • In case of possible frost damage: drain both the boiler and the heating system.
NOTICE: Before starting to drain the boiler, first start draining the heating system and subsequently open also the two drains of the boiler.
Cooke Industries - Phone: +64 9 579 2185 Fax: +64 9 579 2181 Email: [email protected] Web: www.cookeindustries.co.nz

E93.0802EN.C Ambassador+ manual 102
16 FAULT CODES.
16.1 Lock-out codes IMPORTANT: To avoid electric shocks, disconnect electrical supply before performing troubleshooting. To avoid burns, allow the unit to cool before performing troubleshooting. Be aware that a fault code is an indication that the unit or the system needs attention. When repeatedly having faults these should not be neglected. The first step is to check if the unit is installed according to the instructions. If not, first make sure the installation complies with the installation manual. Always check the fuses on the control board before replacing any major components. A blown fuse can prevent the controller or other components from operating. Most faults can also be caused by a bad wiring and/or connections, even if it is not spe-cifically mentioned. With every fault it is wise to check wiring and connections (at both ends) that connect to the safety device/component that generates the fault.
LOCK-OUT CODES: Having a lockout means that the boiler needs a manual reset to start operating again. When the boiler is in lockout the backlight of the display is blinking on and off.
Explanation > 9 9 9 , 5 : h r s = time elapsed after fault/mes-sage.
Explanation > P u m p 1 o n = status of the pump during fault.
Display message F15
C l i x o n F a u l t p u m p o n 9 9 9 , 5 h r s
Reason Heat exchanger fuse or burner door clixon exceeded maximum al-lowed value.
Cause: The thermal fuse of the heat exchanger has opened permanently. Corrective action: Switch off the electrical power and gas supply and contact supplier. Cause: The burner door clixon has opened. Corrective action: Remove the burner door of the heat exchanger and check the burner door gasket for leakage. Check the burner door for deformation; when it deforms it must be replaced. Check the heat exchanger for dirt and check that the flue is not blocked. If heat exchanger is clean, reset manually the clixon itself and reset the boiler.
Cooke Industries - Phone: +64 9 579 2185 Fax: +64 9 579 2181 Email: [email protected] Web: www.cookeindustries.co.nz

E93.0802EN.C Ambassador+ manual 103
Display message F8
F a i l e d b u r n e r s t a r t p u m p o n 9 9 9 , 5 h r s
Reason Boiler not operational after four starting attempts. Cause: No spark. Corrective action:
Check the ignitor/ignition electrode and replace/clean if necessary. Check the state of the ceramic insulator. A small crack can prevent the spark to form at the end of the electrode. Check the distance between the electrode pin, earth pin and burner. Check the state of the ignition cable and replace if necessary. Check the state of the earth wire/connection of the ignitor and replace if necessary. Check the state of the sparkplug cap and replace if necessary. Check power supply. Voltage must be 230 Vac nom. Check for proper electrical grounding of unit. Bad ignition transformer. Replace the burner control of the unit. Cause: Ignition spark is present, but no flame results. Corrective action:
Check if all gas valves in the supply line are completely open. Check if there is no air in the gas supply (start-up new systems). Check if the gas valve opens. When there is power supply to the gas valve, but the valve does not open, the gas valve must be replaced. Check if the gas valve opens. When there is no power supply to the gas valve check the gas valve wiring/connections. Check if the gas valve settings are correct and adjust if necessary. Check if the gas pressure is correct and sufficient. Check if the air supply is open/not blocked. Cause: Flame, but not enough ionisation to establish the flame. Corrective action:
Check the ignitor/ignition electrode and replace/clean if necessary. Check the state of the ceramic insulator. Check the distance between the electrode pin, earth pin and burner. Check the state of the ignition wire (also the ionisation wire) and replace if necessary. Check the state of the earth wire/connection of the ignitor and replace if necessary. Check for proper electrical grounding of unit. Check power supply. Voltage must be 230 Vac nom. Check the state of the sparkplug cap and replace if necessary.
Display message F10
F a l s e f l a m e s i g n a l p u m p o n 9 9 9 , 5 h r s
Reason Flame signal detected, while boiler should not fire for operation.
Cause: The flame detection circuit detects a flame which is not supposed to be present. Corrective action:
Check the ignition/ionisation electrode and make sure it is clean (or replace it). Check the power supply voltage for a correct polarity. Check the power supply for bad frequency or voltage peaks. Check external wiring for voltage feedback. Check the internal wiring for bad connections. Check if the gas valve is closing correctly. Replace the burner control.
Cooke Industries - Phone: +64 9 579 2185 Fax: +64 9 579 2181 Email: [email protected] Web: www.cookeindustries.co.nz

E93.0802EN.C Ambassador+ manual 104
Display message F11
F a n s p e e d i n c o r r e c t p u m p o n 9 9 9 , 5 h r s
Reason Actual fan speed differs from the unit rpm set point. Cause: An incorrect fan speed is detected. Corrective action: Check the 4 wired wiring and connections at the fan and at the main control board. Check the 3 wired power supply wiring and connections at both ends. Replace the fan. Replace the main control board.
Display message F9
F l a m e l o s t p u m p o n 9 9 9 , 5 h r s
Reason Flame signal lost during operation. Cause: Bad gas supply pressure. Corrective action:
Be aware that the specified gas pressure must be met during all operation conditions. Check if all gas valves in the supply line are completely open. Check if the dirt filters mesh in the gas valve inlet is clean. Check if the external dirt filter in the gas supply line is not blocked. Check if an external gas pressure regulator is selected/installed correctly. Check the gas pressure that is supplied to the building > call the supplier if necessary. Cause: Bad gas valve or gas valve settings. Corrective action: Check and set gas valve settings. Cause: Bad electrode, electrode wiring/connection (bad ionisation signal). Corrective action:
Check ionisation signal. Check the ignitor/ignition electrode and replace/clean if necessary. Check the state of the ceramic insulator. Check the distance between the electrode pin, earth pin and burner. Check the state of the ignition wire (is also ionisation wire), and replace if necessary Check the state of the ignitor earth wire/connection and replace if necessary. Check for proper electrical grounding of unit. Cause: Bad flue gas and/or air supply system. Corrective action:
Check if the design of the flue gas and air supply system complies with the max. com-bined resistance as specified. Check if the flue gas and air supply system is installed according a good installation prac-tice by a skilled installer. Check all seals in the flue gas and air supply system. Cause: External factors. Corrective action: Check if there were extreme weather/wind conditions when the fault occurred. Check if the boiler room pressure is equal to the pressure at the position of the flue gas outlet (when combustion air is drawn from the boiler room).
Cooke Industries - Phone: +64 9 579 2185 Fax: +64 9 579 2181 Email: [email protected] Web: www.cookeindustries.co.nz

E93.0802EN.C Ambassador+ manual 105
Display message F1
F l o w h i g h T e m p p u m p o n 9 9 9 , 5 h r s
Reason: Max. flow temperature exceeds limitation (lock-out) value. Cause: The water flow is restricted. Corrective action: Check functioning of the pump. Check/open all valves that might restrict the water flow through the unit. Check for an external system pump that influences flow through the unit. Check if the system resistance exceeds the spare capacity of the unit pump.
Display message F0
F l o w s e n s o r e r r o r p u m p o n 9 9 9 , 5 h r s
Reason: Flow sensor is not detected. Cause: Bad wiring/connection in the flow sensor circuit. Corrective action: Check for loose wiring/connections in the flow sensor circuit. Cause: Bad temperature sensor causing a fault signal. Corrective action: Replace flow sensor.
Display message F16
F l o w R e t u r n d t f a u l t p u m p o n 9 9 9 , 5 h r s
Reason:
Temperature difference between flow and return exceeds limita-tion value, or 'dT block or delta direct block' has occurred three times.
Cause: The water flow through the unit is too low. Corrective Action: Check functioning of the pump. Check/open all valves that might restrict the water flow through the unit. Check for an external system pump that influences the flow through the unit. Check if the system resistance exceeds the spare capacity of the unit pump. Make sure the heat exchanger is clean. Heat exchanger fouling (partly blockage) will in-crease the resistance causing the water flow to drop.
Display message F6
F l u e s e n s o r e r r o r p u m p o n 9 9 9 , 5 h r s
Reason Flue sensor is not detected by the boiler PCB. Cause: Bad wiring/connection in the flue gas sensor circuit. Corrective action: Check for loose wiring/connections in the flue gas sensor circuit. Cause: Bad temperature sensor causing a fault signal. Corrective action: Replace flue gas sensor.
Cooke Industries - Phone: +64 9 579 2185 Fax: +64 9 579 2181 Email: [email protected] Web: www.cookeindustries.co.nz

E93.0802EN.C Ambassador+ manual 106
Display message F7
F l u e t e m p t o o h i g h p u m p o n 9 9 9 , 5 h r s
Reason Flue gas temperature exceeded 3 times limitation value within a certain period.
Cause: Heat exchanger polluted and not able to transfer enough heat to system water. Corrective action: Check and clean heat exchanger. Cause: Bad flue gas sensor or sensor connection (partly shorted). Corrective action:
The sensor is of the type NTC. This means if the temperature rises, the resistance low-ers. A partly shorted sensor will drop its resistance and therefore 'measure' a raise in tem-perature when actually there is none. Check for moist in the sensor connections or replace sensor. Cause: There is no water in the unit while firing. Corrective action: This is an unlikely situation while all the safeties for checking the water presence didn't detect anything. Only a lot of air in the system/unit (under pressure) can cause the water pressure switch to switch while no water is present. Also the water leak detection did not react. Bleed all air from the unit so the heat from combustion can be transferred to the water and won't disappear through the flue system. Cause: Heat exchanger failure. Corrective action: This is an unlikely situation but when there is severe damage to the heat exchanger, the combustion product will not be able to transfer all heat to the system water. The heat that is not transferred will convert to an increased flue gas temperature.
Display message F12
p r o g r a m m i n g e n d p u m p o n 9 9 9 , 5 h r s
Reason Programming of the parameters completed successfully. Cause: Programming of the parameters completed successfully. Corrective action: This message occurs to confirm the end of programming. Pressing RESET will return the unit in normal operating status.
Display message F13
P a r a m / H a r d w f a u l t p u m p o n 9 9 9 , 5 h r s
Reason Failure during programming of the parameters. Cause: Programming of the parameters NOT successfully completed
Corrective action:
Unit is not in standby mode (fan must not run during programming). Check programming wire and connections and try again. Check if the software complies with the PCB. Replace the programming wire. Replace the display PCB.
Display message R e t u r n h i g h T e m p F1 p u m p o n 9 9 9 , 5 h r s Reason: Maximum return temperature exceeds limit value. Cause: Systems that pre-heats the boiler return temperature too much/high. Corrective Action: Reduce pre heat temperature of external heat source. Cause: The need for heat in the system suddenly drops causing hot return water to the boiler. Corrective Action: Dampen external heating system control to prevent sudden boiler temperature rise.
Cooke Industries - Phone: +64 9 579 2185 Fax: +64 9 579 2181 Email: [email protected] Web: www.cookeindustries.co.nz

E93.0802EN.C Ambassador+ manual 107
Display message F3
R e t u r n s e n s o r e r r o r p u m p o n 9 9 9 , 5 h r s
Reason Return sensor is not detected by the boiler PCB. Cause: Bad wiring/connection in the return sensor circuit. Corrective action: Check for loose wiring/connections in the return sensor circuit. Cause: Bad temperature sensor causing a fault signal. Corrective action: Replace return sensor.
Display message F19
S i p h o n s w i t c h p u m p o n 9 9 9 , 5 h r s
Reason Siphon pressure switch detects high pressure in the flue/siphon system.
Cause: There is too much resistance in the flue gas circuit causing high pressure in the heat ex-changer at the flue gas side. Corrective action:
Check if the flue gas system is blocked. Extreme failing of the heat exchanger also causes the resistance to rise. Check the state of the heat exchanger and clean if necessary. Check the flue gas system diameter & length (most likely in a new system). Cause: The condensate drain system is blocked. The condensate will build up above the measur-ing point of the pressure switch and creates a static pressure larger than the measuring point. Corrective action: Check if the condensate drain hose between the heat exchanger and the siphon is open, so the condensate can flow freely to the siphon. Check if the siphon is free of debris that might block the condensate flow and clean the siphon if necessary. Check the condensate drain hose between the siphon and the condensate drain point in the external installation. Condensate must be able to flow freely. Cause: The condensate drain hose must have an open connection to the external system. If not, pressure fluctuations in the building drainage system can have effect on the pressure in the heat exchanger of the boiler. Corrective action: Make sure that there is an open connection between the siphon hose and the drainage system of the building installation. The condensate should flow in the drainage system through a freely "breathing" connection, so pressure fluctuations of the external drainage system cannot affect the pressure in the heat exchanger of the boiler. Cause: Blockage of the pressure signal hose going to the pressure switch. Corrective action: Check the pressure signal hose and clean or replace if necessary. Cause: Bad pressure switch causing a fault signal. Corrective action: Replace the pressure switch. Cause: Bad wiring/connection in the pressure switch circuit. Corrective action: Check for loose wiring/connections in the pressure switch circuit.
Display message F17
W a t e r h i g h l i m i t p u m p o n 9 9 9 , 5 h r s
Reason Maximum thermostat exceeds limitation value. Cause: The water flow is restricted. Corrective action: Check functioning of the pump. Check/open all valves that might restrict the water flow through the unit. Check for an external system pump that influences the flow through the unit. Check if the system resistance exceeds the spare capacity of the unit pump.
Cooke Industries - Phone: +64 9 579 2185 Fax: +64 9 579 2181 Email: [email protected] Web: www.cookeindustries.co.nz

E93.0802EN.C Ambassador+ manual 108
16.2 Blocking codes: The display is not blinking, but is lightened up during the blocking period. The boiler is blocking an action, because of an extraordinary situation. This action will be continued after stabilisation of this situation.
Display message A n t i c y c l e t i m e 9 9 9 , 5 h r s
Reason The controller received a new heat demand too fast after the last ended demand.
Cause: Opening and immediately thereafter closing of the external thermostat. Corrective action: Controlled water flow cools down too quickly after loss of heat demand. Controlled water flow heats up too quickly after start of heat demand. Immediately opening and closing of the external thermostat. Check switching differential of the ON/OFF thermostat. Controller settings need to be changed. Be aware that the standard settings work fine for all common systems. When anti-cycling is active, because of immediate heating or cool-ing of the controlled water flow/temperature, it concerns an unconventional system.
Display message C a s c a d e B l o c k 9 9 9 , 5 h r s
Reason One of the boilers of the cascade is in a lock-out. Cause: The unit is programmed in such a way that none of the boilers in a cascade will fire, if one has a lockout. One unit has a lockout and therefore the whole cascade is blocked. Corrective action: Troubleshoot the fault of the unit in lock-out.
Display message d T b l o c k 9 9 9 , 5 h r s
Reason Temperature difference between flow and return has exceeded the blocking value, but not the lock out value.
Cause: The water flow through the unit is too low. Corrective action: Check functioning of the pump. Check/open all valves that might restrict the water flow through the unit. Check for an external system pump that influences the flow through the unit. Check if the system resistance exceeds the spare capacity of the unit pump. Make sure the heat exchanger is clean. Heat exchanger fouling (partly blockage) will in-crease the resistance causing the water flow to drop.
Display message F l o w t e m p h i g h 9 9 9 , 5 h r s
Reason: Flow temperature has exceeded the blocking temperature, but it has not exceeded the lock-out value.
Cause: The water flow is restricted. Corrective action: Check functioning of the pump. Check/open all valves that might restrict the water flow through the unit. Check for an external system pump that influences the flow through the unit. Check if the system resistance exceeds the spare capacity of the unit pump.
Cooke Industries - Phone: +64 9 579 2185 Fax: +64 9 579 2181 Email: [email protected] Web: www.cookeindustries.co.nz

E93.0802EN.C Ambassador+ manual 109
Display message F l u e t e m p h i g h 9 9 9 , 5 h r s
Reason Flue gas temperature has exceeded the limit. Cause: Heat exchanger polluted and not able to transfer enough heat to the system water. Corrective action: Check and clean heat exchanger. Cause: Bad flue gas sensor or sensor connection (partly shorted.) Corrective action:
The sensor is of the type NTC. This means when the temperature rises, its resistance de-creases. A partly shorted sensor will drop its resistance and therefore ‘measure’ a raise in temperature when actually there is none. Check for moist in the sensor connections or replace the sensor. Cause: There is no water in the unit while firing. Corrective action:
This is an unlikely situation while all the safeties for checking the water presence didn't detect anything. Only a lot of air in the system/unit (under pressure) can cause the water pressure switch to switch while no water is present. Also the water leak detection did not react. Bleed all air from the unit so the heat from combustion can be transferred to the water and won't leave through the flue system. Cause: Heat exchanger failure. Corrective action: This is an unlikely situation but when there is severe damage to the heat exchanger, the combustion product will not be able to transfer all heat to the system water. The heat that is not transferred will convert to an increased flue gas temperature.
Display message G e n B l o c k 9 9 9 , 5 h r s
Reason General blocking circuit is activated during operation (general blocking contacts 7-8).
Cause: The circuit connected to the general blocking terminals is not closed. Corrective action: Check all external components that are connected to the general blocking terminals and check why the contact is not closing during heat demand. Cause: if used in combination with flow switch: The water flow through the unit is too low. Corrective action: Check functioning of the pump and the flow switch. Check/open all valves that might restrict the water flow through the unit. Check for an external system pump that influences flow through the unit. Check if the system resistance exceeds the spare capacity of the unit pump. Make sure the heat exchanger is clean. Heat exchanger fouling (partly blockage) will in-crease the resistance causing the water flow to drop.
Cooke Industries - Phone: +64 9 579 2185 Fax: +64 9 579 2181 Email: [email protected] Web: www.cookeindustries.co.nz

E93.0802EN.C Ambassador+ manual 110
Display message L i n e f a u l t p u m p o n 9 9 9 , 5 h r s
Reason Bad power supply Cause: The supplied power does not comply with the specifications. Corrective action:
Check if the power supply is connected correctly to the unit. Check the voltage and frequency (should be Life Neutral, Gnd > 230 Vac / 50 Hz). Make sure there is no signal failing or voltage peaks in the power supply.
Display message O u t d o o r s e n s o r f a i l 9 9 9 , 5 h r s
Reason No outdoor sensor detected. Cause: The unit is programmed to check if an outdoor sensor is present and does not detect an outdoor sensor. Corrective action: Check for loose wiring/connections in the outdoor sensor circuit. Check the state of the outdoor sensor and replace if necessary.
Display message R e t u r n t e m p h i g h 9 9 9 , 5 h r s
Reason Return temperature has exceeded the blocking temperature, but it has not exceeded the lock-out value.
Cause: Systems that pre-heats the boiler return temperature too much/high. Corrective action: Reduce pre heat temperature of external heat source. Cause: The need for heat in the system suddenly drops causing hot return water to the boiler. Corrective action: Dampen external heating system control to prevent sudden boiler temperature rise.
Display message T 2 - T 1 h i g h 9 9 9 , 5 h r s
Reason Difference between T2 and T1 has exceeded the blocking value which has been set in the parameters.(return temp higher than flow)
Cause: The water flow through the unit is too low. Corrective action: Check functioning of the pump. Check/open all valves that might restrict the water flow throught the unit. Check for an external system pump that influences flow through the unit. Check if the system resistance exceeds the spare capacity of the unit pump. Make sure the heat exchanger is clean. Heat exchanger fouling (partly blockage) will in-crease the resistance causing the water flow to drop.
Cooke Industries - Phone: +64 9 579 2185 Fax: +64 9 579 2181 Email: [email protected] Web: www.cookeindustries.co.nz

E93.0802EN.C Ambassador+ manual 111
Display message W a t e r p r e s s u r e f a u l t 9 9 9 , 5 h r s
Reason Water pressure is too low or high. Cause: The water pressure in the system is too high. Corrective action: Check if the system pressure is too high after (re)filling. Make sure that there is a pressure relief valve and expansion vessel installed in the sys-tem, according to the applicable standards. Check if there is an open connection between the unit and the relief valve plus expansion vessel. Be aware that if the unit is installed in the basement of a tall building, only the static pres-sure of the water column above the units can raise above the maximum allowable limits. Make sure that this is not the case. Cause: The water pressure in the system is too low. Corrective action: Check if there is no leakage in the system that causes the pressure to drop. Fix any leak-age and fill the system. Check if there is an external system pump that sucks water through the boiler, causing an under pressure (bad installation design).
16.3 Maintenance attention function The display shows alternately the base screen and this message, while backlight is blink-ing. The boiler is operating, but will count the exceeding hours. A parameter must be changed, after service, to remove this message. Display message N e e d s M a i n t e n a n 0 . 0
I g n i t i o n c y c l e s h r s Reason Maintenance option of total amount of ignition cycles has been
reached.
Display message N e e d s M a i n t e n a n 0 . 0 D a t e h r s
Reason Maintenance option of the date has been reached.
Display message N e e d s M a i n t e n a n 0 . 0 B u r n i n g h o u r s h r s
Reason Maintenance option of total amount of burning hours has been reached.
Display message N e e d s M a i n t e n a n 0 . 0 A l l h r s
Reason One of the abovementioned maintenance options has been reached.
This function/message is standard not activated, but can be acti-vated/set by a trained engineer. This function does not overrule the need for annual maintenance. The end user is always responsible for arranging annual maintenance.
Cooke Industries - Phone: +64 9 579 2185 Fax: +64 9 579 2181 Email: [email protected] Web: www.cookeindustries.co.nz

E93.0802EN.C Ambassador+ manual 112
17 MAINTENANCE
17.1 General For a good, safe and long-time operation of the boiler it is advised to carry out maintenance and service on the boiler at least once a year. Maintenance and inspection of the boiler should be carried out at the following occasions: • When a number of similar error codes and/or lock-outs appear. • At least every twelve months maintenance must be done to ensure safe and efficient operation.
Damage caused by the lack of maintenance will not be covered under warranty MAINTENANCE REMINDER FUNCTION. ← See previous page. BE AWARE : This function is standard turned off. We offer this programmable function to the installer to use as a reminder. Because it concerns a free programmable function the use of it cannot be used as an argument in warranty cases. Our units must be maintained every twelve months whatever the settings/working of this function. It is and remains the responsibly of the end user to have the unit maintained every twelve months. For more information about this maintenance mode see section 10.14, ‘Setting the maintenance specifications’, page 62. Service intervals The normal service frequency for the boiler is once a year. Every year the boiler should be cleaned and checked, according to the maintenance procedures. If there is doubt whether the boiler is operating with the correct water and/or combustion air quality, it is advised that a first check is already executed after six months. This check serves to determine the frequency of the future services. The maximum interval between two services is a year.
INSPECTION AND MAINTENANCE MUST BE EXECUTED FOR A SAFE AND EFFICIENT OPERATION OF THE BOILER.
17.2 Inspection & maintenance Inspection, maintenance and the replacement of boiler parts should only be done by a skilled service engineer. Apart from the maintenance proceedings it is advised to have a log chart for every boiler that describes the following aspects:
• Serial number • Date and time of maintenance • Name of maintenance engineer • Which parts were exchanged during maintenance • Which settings (software) were changed during maintenance • Special remarks / findings • Future aspects that need extra attention • Additional aspects: measurement reports, complaints by the (end)-user, lock-out codes, etc.
During maintenance the following parts and aspects of the boiler should be checked and inspected. NOTICE: Before starting to work on the boiler:
• Switch off the electrical power to the boiler (service switch and/or unplug boiler) • Close the gas valve to block gas supply to the boiler
Customer comments Comments and remarks from the customer should be analysed and used to find possible causes for any occurring problems and complaints.
Cooke Industries - Phone: +64 9 579 2185 Fax: +64 9 579 2181 Email: [email protected] Web: www.cookeindustries.co.nz

E93.0802EN.C Ambassador+ manual 113
Service history The operational and fault history (total amount and since the last service) of the boiler can be retrieved with the help of a computer, correct software and an interface cable. This information can be used to specify the maintenance and service proceedings in relation to the boiler (parts). Water leakage The water pressure of the heating installation should be more than 1.0 bar and at a maximum of 2.0 bar in normal operation. When the water pressure drops below the minimum occasionally, there might be a water leak. Check the boiler and the complete heating installation for any water leakages and have these repaired. Flue gas & air supply The flue gas pipes and the air supply pipes must be checked for gas tightness. Also check if the mounting of these pipes is correct, safe and not damaged. Check the rooftop of the boiler housing for signs of water leakage and traces of water coming from the air supply pipe, the air vent or any condensate coming from the flue gas pipes. Gas supply & safeties The gas pipes must be checked for gas tightness. Also check if the mounting of these pipes is correct, safe and not damaged. Any built in safeties should be checked for a correct functioning. Remove complete burner unit The complete burner unit consists of the fan, the burner plate and the internal burner. To remove this part for an internal heat exchanger check: remove the six M6 nuts, the ignition cable and the thermal fuse cables. After this, take out the complete burner unit by moving it forward out of the boiler housing. NOTICE: Watch out not to damage the burner plate insulation during this operation. While removing the complete burner unplug both of the electrical and controlling cables of the fan. After all this dismantle the air gas mixing box on the suction side of the fan and check the blade wheel of the fan. Burner Check the burner surface to see if it has damages, signs of rust and/or cracks. When the burner surface is damaged the burner must be replaced. The burner can be cleaned by using a soft (non-metallic) brush. The dust can be removed with a vacuum cleaner or pressurized air. Ignition / ionisation electrode When the complete burner is removed, it is very easy to check the ignition electrode. First check if the distances between the electrodes and between the electrode and the burner are according to the graph below. When these are not correct, try to bend the electrodes in the right position. Notice: the electrodes undergo high temperatures, therefore the electrodes become hard and are difficult to bend. While bending used electrodes they might break or burst. Check the electrode, after bending, for any tear/crack and signs of rust. When they are burst/cracked or rusty, replace the electrode. Also replace the electrode when there is a crack in the ceramic insulation of the electrode. When the electrode is replaced, also the gasket should be renewed.
Burner door gaskets When these gaskets have changed colours at some parts, the rubber has cured and/or has damages, these gaskets must be replaced. Notice: only use the gaskets that are supplied by the boiler manufacturer.
D = 8 - 10 mmD = 0.315 - 0.393 inch
D
3.5 mm / 0.14 inch
Point of view in next picture →
Cooke Industries - Phone: +64 9 579 2185 Fax: +64 9 579 2181 Email: [email protected] Web: www.cookeindustries.co.nz

E93.0802EN.C Ambassador+ manual 114
Fan When the fan blades are polluted and dirty, carefully clean the blades with a soft brush. Notice: do not use too much force on the blades or else the fan might be out of balance and run irregularly, causing noises and fan failures. Check the fan also for any water damages. In doubt always replace the fan of the boiler. Insulation The insulation of the heat exchanger (located on the rear wall inside the heat exchanger and burner door) must be inspected. If this insulation disk shows any signs of (water) damage or degradation it should be exchanged. Also check if there are any indications in the burner room of a high condensate level (caused by a blocked siphon) that might have wetted the rear wall insulation. When this has happened the rear wall insulation should also be replaced. Only use the insulation disk that is supplied by the boiler manufacturer. The same procedure must be applied on the insulation and gaskets fitted on the burner door. Siphon Disassemble the siphon and clean every part of it. Check the siphon connection of the heat exchanger for any block-ing or pollution and clean it (if necessary). Check the functioning of the siphon by pouring clean tap water in the burner room (when burner door is removed). This water will exit the heat exchanger by the siphon. Notice: don’t wet the rear wall insulation.
When mounting the bottom part of the siphon, before commissioning the boiler and/or after maintenance, the siphon must ALWAYS be completely filled with water.
This is a safety measure: the water in the siphon keeps the flue gases from leaking out of the heat exchanger via the condensate drain.
Heat exchanger and burner room After the removal of the complete burner unit check if there is any debris and dirt in the heat exchanger. The coils of the heat exchanger can be cleaned by using a non-metallic brush. After this the dirt and dust can be removed with a vacuum cleaner and by flushing the burner room with water. Don’t forget afterwards to clean the siphon once again. Gas/air ratio With every service check and/or maintenance of the boiler always check the gas/air ratio by measuring the CO2 percentage (flue gas) at the maximum and minimum load of the boiler. If necessary adjust these values. See for information chapter 14 “Adjusting and setting the burner”. Pump Check the electrical parts and the motor of the pump for a correct functioning. The pump must generate a sufficient water flow over the (heat exchanger of) the boiler. When the pump produces noise, is operational for more than five years or has signs of water leakage it is recommended to replace the pump as a precaution.
When defects and abnormalities are found by the service engineer during service and maintenance and these are not repairable, this information should be reported to the owner/end-user of the installation. Also the owner/end-user should be advised how to fix these defects and these defects should be reported in the service report / log file of the boiler.
During service and maintenance the gas, supply air, flue gas and condensate connections are disconnected, checked and replaced. Make sure that all these components are mounted correctly before commissioning the boiler again.
The siphon must always be filled to the edge with water, before replacing to the unit.
Cooke Industries - Phone: +64 9 579 2185 Fax: +64 9 579 2181 Email: [email protected] Web: www.cookeindustries.co.nz

E93.0802EN.C Ambassador+ manual 115
Cleaning the burner room with acid or alkali products is prohibited.
Mounting the burner door correctly back onto the heat exchanger: IMPORTANT: Before mounting the burner door, make sure that its gas-kets and insulation are in excellent shape. If any signs of damage or ageing are present, these parts must be replaced. The burner door must be mounted back on the heat ex-changer as follows: - Place the burner door with its holes over the six thread-
ed studs. Careful! When handling too rough or misplacing the holes over the threaded studs, the burner door insulation and/or gaskets can be damaged. Assure yourself that the door is well positioned with res-pect to the threaded studs, before pushing it onto the ex-changer.
- Now keep the burner door firmly in place by pushing the gas/air nose with one hand at the middle at point A.
- Then turn-tighten the flange nuts with the other hand as far as possible onto the threaded studs.
Now the burner door is in place and the nuts can be tight-ened with a torque key.
- Tighten the nuts in the order given in the picture - The specified torque value for tightening the bur-
ner door flange nuts is 8 Nm
tighten in given order.
torque value = 8 Nm
18 USER INSTRUCTIONS After installing and commissioning of the boiler, demonstrate the operation of the entire central heating system to the end-user. The user should be made familiar with all safety precautions of the boiler and the installation. The user should be instructed that service and maintenance of the boiler is required every twelve months. Regular service and maintenance is essential for a safe and proper operation of the boiler. Hand over the documents supplied with the boiler.
Cooke Industries - Phone: +64 9 579 2185 Fax: +64 9 579 2181 Email: [email protected] Web: www.cookeindustries.co.nz

E93.0802EN.C Ambassador+ manual 116
19 INSTALLATION EXAMPLES The following schematics present several ways of mounting the heating installation:
All schematics are purely functional. Safety components must be added conform all applicable standards and regulations.
System Type 1
Code 1 Name Wire terminal Part nr.
P1 built-in boiler pump
P3 optional heating pump 25-26-27
RT modulating room unit with timer 13-14 S04.016.355
No parameter change needed
System Type 2
Code 2 Name Wire terminal Part nr.
P1 built-in boiler pump
P3 optional heating pump 25-26-27
place bridge 13-14
OS outdoor temperature sensor 1-2 E04.016.585
No parameter change required
System Type 3
Code 3 Name Wire terminal Part nr.
P1 built-in boiler pump
P3 optional heating pump 25-26-27
RT modulating room unit with timer 13-14 S04.016.355
OS outdoor temperature sen-sor 1-2 E04.016.585
No parameter change required
RT
P3P1
HEATING ZONE BOILER
P3P1
OS
HEATING ZONE BOILER
P3P1
OS RT
HEATING ZONE BOILER
Cooke Industries - Phone: +64 9 579 2185 Fax: +64 9 579 2181 Email: [email protected] Web: www.cookeindustries.co.nz

E93.0802EN.C Ambassador+ manual 117
System Type 4
Code 4 Name Wire terminal Part nr.
P1 built-in boiler pump
P3 optional heating pump 25-26-27
RT modulating room unit with timer 13-14 S04.016.355
T calorifier
ST calorifier thermostat or tank sensor 5-6 S04.016.303
OS outdoor temperature sensor 1-2 E04.016.585
DV diverter valve (3-way-valve) 28-29-30-31
Parameter change required
System Type 5
Code 5 Name Wire terminal Part nr.
P1 Built-in Boiler Pump
P3 Optional Heating Pump 25-26-27
RT Modulating Room unit with timer 13-14 S04.016.355
T Calorifier
ST Calorifier thermostat or tank sensor 5-6 S04.016.303
P2 HWS Primary Pump 29-30-31
OS Outdoor temperature sensor 1-2 E04.016.585
SNV Non Return Valve
Parameter change required
System Type 6
Code 6 Name Wire terminal Part nr.
P1 built-in boiler pump
P3 optional heating pump 25-26-27
RT modulating room unit with timer 13-14 S04.016.355
FS flow temperature sensor 3-4 E04.016.304
OH low loss header
OS outdoor temperature sen-sor 1-2 E04.016.585
No parameter change required
OS RT
P3P1
DV
ST
T
HEATING ZONE BOILER
OS RT
P3P1
ST
T
P2
SNV
SNV
HEATING ZONE BOILER
OS RT
P3
P1
FSOH
BOILER HEATING
ZONE
Cooke Industries - Phone: +64 9 579 2185 Fax: +64 9 579 2181 Email: [email protected] Web: www.cookeindustries.co.nz

E93.0802EN.C Ambassador+ manual 118
System Type 7
Code 7 Name Wire terminal Part nr.
P1 built-in boiler pump
P3 optional heating pump 25-26-27
RT modulating room unit with timer 13-14 S04.016.355
T calorifier
ST calorifier thermostat or tank sensor 5-6 S04.016.303
OH low loss header
FS flow temperature sensor 3-4 E04.016.304
DV diverter valve (3-way-valve) 28-29-30-31
OS outdoor temperature sensor 1-2 E04.016.585
Parameter change required
System Type 8
Code 8 Name Wire terminal Part nr.
P1 built-in boiler pump
P3 optional heating pump 25-26-27
RT modulating room unit with timer 13-14 S04.016.355
T calorifier
P2 HWS primary pump 29-30-31
ST calorifier thermostat or tank sensor 5-6 S04.016.303
OH low loss header
FS flow temperature sensor 3-4 E04.016.304
SNV non return valve (low resistance type)
OS outdoor temperature sen-sor 1-2 E04.016.585
Parameter change required
System Type 9
Code 9 Name Wire terminal Part nr.
P1 built-in boiler pump
P3 optional heating pump 25-26-27
RT modulating room unit with timer 13-14 S04.016.355
P2 HWS primary pump 29-30-31
T calorifier
ST calorifier thermostat or tank sensor 5-6 S04.016.303
OH low loss header
FS flow temperature sensor 3-4 E04.016.304
SNV non return valve (low resistance type)
OS outdoor temperature sensor 1-2 E04.016.585
Parameter change required.
OS RT
P3
P1
OH
ST
T DV FS
BOILER
HEATING ZONE
OS RT
P3
P1
OH
ST
T
FS
P2
SNV
BOILER HEATING
ZONE
OS RT
P3
P1
OH
ST
T
FS
P2
SNVSNV
BOILER HEATING
ZONE
Cooke Industries - Phone: +64 9 579 2185 Fax: +64 9 579 2181 Email: [email protected] Web: www.cookeindustries.co.nz

E93.0802EN.C Ambassador+ manual 119
For the cascade installations see the special Cascade Manual. System Type 10
Code 10 Name Wire terminal Part nr.
P1 built-in boiler pump
P3 optional heating pump 25-26-27
RT modulating room unit with timer 13-14 S04.016.355
SNV non return valve (low resistance type)
OH low loss header
FS flow temperature sensor 3-4 E04.016.304
OS outdoor temperature sensor 1-2 E04.016.585
Parameter change required
OS RT
P3
P1
OH
FS
SNV
P1 P1 P1
SNV SNV SNV
BOILER master
HEATING ZONE BOILER
slave 1 BOILER slave 2
BOILER slave 3
Cooke Industries - Phone: +64 9 579 2185 Fax: +64 9 579 2181 Email: [email protected] Web: www.cookeindustries.co.nz

E93.0802EN.C Ambassador+ manual 120
System Type 11
Code 11 Name Wire terminal Part nr.
P1 built-in boiler pump
P3 optional heating pump 25-26-27
RT modulating room unit with timer 13-14 S04.016.355
SNV non return valve (low resistance type)
P2 HWS primary pump 29-30-31
T calorifier
ST calorifier thermostat or sensor 5-6 S04.016.303
OH low loss header
FS flow temperature sensor 3-4 E04.016.304
OS outdoor temperature sensor 1-2 E04.016.585
Parameter change required.
P1 P1 P1
SNV SNV SNV
P2
ST
T
SNV
SNV
OS RT
P3
P1
OH
FS
SNV
HEATING ZONE BOILER
master BOILER slave 1
BOILER slave 2
BOILER slave 3
Cooke Industries - Phone: +64 9 579 2185 Fax: +64 9 579 2181 Email: [email protected] Web: www.cookeindustries.co.nz

E93.0802EN.C Ambassador+ manual 121
21 INDEX 0-10 vdc remote burner input control, 79 0-10 vdc remote flow temperature set point, 79 3-way valve (diverter valve), 7, 38, 81 accessories, 13 accessories and unpacking, 10 adjusting and setting the burner, 91 air separator, 21 ff. air supply, 15, 28 air venting, 19, 20 Ambassador+ 60-120, 11 Ambassador+ 150-180, 12 anti-Legionnaires’ disease (pasteurisa-tion) function, 83 article numbers, 13 automatic air vent, 20 automatic water filling systems, 20 B23P boilers, 30 blocking, 19, 38, 73, 78, 88, 102, 112 boiler connections, 17 boiler room, 15 by-pass, 18 C63 boilers, 30 checking the fault history, 61 checking the operating history, 60 cleaning of the burner, 112 closed boiler, 15, 28 combustion air quality, 29 commissioning the boiler, 85 connections electric, 38 ff. connections gases miscellaneous, 25 ff. connections water miscellaneous, 17 ff. control panel / display unit, 43 control panel menu structure, 44 controlling behaviour settings, 78 controlling options and settings, 76 dimensions, 10 dirt filter, 21 ff. dirt separator, 21 ff. display during operation, 46 diverter valve (3-way valve), 7, 38, 81 e-bus interface, 13 efficiency, 7 electrical connections, 38 electrical installation, 38 electrical schematics, 40 expansion vessel, 18 extra boiler control, 76 fan, 15, 49, 76, 101, 112 fault checking, 61, 73 fault codes display, 73 fault codes. blocking codes, 102
firing for the first time, 90 flue gas and air supply examples, 30 flue gas and air supply systems, 25 flue gas duct, 29 flushing with clean water, 21 frame, 16 frost protection, 19 gas conversion, 98 gas valve, 13, 91 ff, 101, 112 hanging level, 16 heat exchanger, 7, 82 ff, 112 heating, 76 ff. heating and hot water switching at sud-den temperature drop, 83 heating and hot water switching time, 83 hydraulic graphs, 23 hysteresis, 78 ignition, 112 indirect hot water / calorifier, 81 inspection & maintenance, 112 installation examples, 21, 116 ff. installation of the Ambassador+, 15 installing a strainer and/or dirt separator, 19 introduction, 7 legonnaires' disease, 53, 83 low loss header, 18, 21, 88 low/high flow temperature to tank coil, 82 low-water level protection, 15 Ls and Lw gases, 91 ff, 96 maintenance, 112 master, 7, 56 max cooling time, 76 modulation, 13, 116 ff. monitor screens, 47 night shift, 56, 80 non return valve, 116 ff. offset, 78 outdoor graph, 56 outdoor sensor (outdoor temperature), 13, 38, 39, 56 outdoor temperature control, 56 oxygen, 19 ff. oxygen diffusion proof, 88 oxygen tight, 88 password, 66 plastic piping in the heating system, 20 positioning the boiler, 16 power (supply), 7, 18, 38, 88
pressure relief valve, 18 pressure safety valve, 88 printed circuit board, 40 pump, 18 pump and 3-way valve control, 81 putting the boiler out of operation, 101 quality of combustion air, 29 quality of used water, 19 reset, 73 roof mounted duct, 29 room thermostat on/off, 78 room thermostat open therm, 79 safety guidelines, 6 schornsteinfeger function, 48 sensor, 13, 19, 20, 38, 56, 78, 81, 116 ff. sensor values, 39 service function, 49 set points, 52 setting at the maximum load, 91 ff. setting at the minimum load, 91 ff. setting the maintenance specifications, 62 setting the outdoor specifications, 56 setting the parameters with the display menu, 66 setting the time & date, 51 setting the timer programs, 53 starting the boiler, 90 stationing the boiler, 16 status, 46 tank sensor, 81 tank thermostat, 81 technical data Ambassador+ boilers, 7 temperature display on/off, 76 timer contact function, 80 under floor heating, 21 unpacking, 14 user instructions, 115 user manual, 7, 15 valve, 90 ff, 91 ff, 112 ventilate, 6, 15 venting, 6, 15, 19, 20, 112 wall mounted duct, 16, 21 water pressure, 20 water pressure switch, 38, 88 water quality, 19 water side connections, 17 water treatment, 21 weather dependent control, 56, 79
Cooke Industries - Phone: +64 9 579 2185 Fax: +64 9 579 2181 Email: [email protected] Web: www.cookeindustries.co.nz

Cooke Industries - Phone: +64 9 579 2185 Fax: +64 9 579 2181 Email: [email protected] Web: www.cookeindustries.co.nz

Cooke Industries - Phone: +64 9 579 2185 Fax: +64 9 579 2181 Email: [email protected] Web: www.cookeindustries.co.nz

Your distributor:
Eco Heating Systems Groningen B.V. P.O. Box 5145 9700 GC Groningen Rigaweg 10 9723 TH Groningen The Netherlands T +31 (0)50 5470470 F +31 (0)50 5470498 E [email protected] I www.ecohs.nl
Cooke Industries - Phone: +64 9 579 2185 Fax: +64 9 579 2181 Email: [email protected] Web: www.cookeindustries.co.nz