Albrecht AE 2990 AFS manual - CBMania
14
17 AE2990 AFS CB Handheld Radio for AM, FM and SSB User Manual
-
Upload
khangminh22 -
Category
Documents
-
view
7 -
download
0
Transcript of Albrecht AE 2990 AFS manual - CBMania

17
AE2990 AFS CB Handheld Radio for AM, FM and SSB
User Manual

18
General: Albrecht hand portable radio AE 2990 AFS is a Multi-Standard CB Radio , which can be switched to all CB standards used within Europe. The radio can be used as portable radio with rechargeable batteries, but as well as mobile radio with optional mobile adaptor or as CB base station in connection with an external antenna and an external power supply. Licensed ham radio operators may modify the radio easily to the 10 m and 12 m Band amateur radio frequency ranges. In such cases please download the modification notes from our download server www.hobbyradio.de in the section for “Amateur Radio”. The regulations require that with such a modified radio only amateur radio frequencies may be used, operation is only allowed according to the amateur radio regulations and only for the purpose of amateur radio, not for any other purpose. Vice versa, the use as CB radio is only allowed in the original factory default condition. To operate a CB radio legally, it is requested to use only the country code setting and the operation modes for the region where you wish to operate the radio. When crossing borders, switch the radio to the allowed country code of your guest country.
OPERATING CONTROL AND FEATURES Top Panel Features 1. Off/On, Volume: Turn this button clockwise to turn power on and set desired listening volume. 2. Clarifier: Allows variation of the received frequencies above and below the channel frequency, although this control is intended primarily to tune in SSB signals. 3. Antenna Connector: This radio uses a BNC type connector for use with the supplied custom flexible antenna this antenna provides good performance given its overall size. However, longer antennas will substantially increase the users distance with the radio. 4. Microphone and Speaker Jack : 2.5mm and 3.5mm jack for connection of optional speaker microphone accessory. Rubber Cover: When speaker/microphone is not being used, this prevents dirt and water from getting inside the CB.
4
2 13
CLAR VOL
OFF
SPK MIC

19
OPERATING CONTROL AND FEATURES Side and Back Panel Features 1. Function Button (Func): This button allows for activation of the secondary feature in each of the front panel of the radio. The features that are activated by the FUNC button are those that are printed on the radio in blue letters. These features are the following: MS, M/SCN, RPT, and LOCK . In addition, the "Hi/Low " power function is controlled by the "FUNC" button, and CH.FR toggles between Frequency display and Channel number display. Some other (not often used) functions can be reached by pressing a button longer. 2. Frequency Up/Down Buttons: When pressed, these buttons are used to select channels or frequencies (in amateur version). Press the "UP" arrow to move to a higher frequency than is currently shown on the display. Press the "DWN" arrow to move to a lower frequency than is currently shown on the display. In either the "UP" or "DWN" mode, when you press
and hold the frequency button for longer than one half of a second, the frequency will continuously move to the next until you release the button. 3. Push-To-Talk (PTT) switch: The receiver and transmitter are controlled by the push-to-talk switch. Press the switch and the transmitter is activated: you can now send a message. To receive, release the push-to-talk switch. When transmitting, hold the unit two inches from your mouth and speaker grill area. 4. Battery Pack Latch: Sliding this button up in its tracks allows the battery case to be removed once it is placed on the radio. 5. Belt Clip: Allows for ease of carrying while attached to user’s belt. 6. Flexible Wrist Strap: Place strap around the wrist to prevent the unit from failing to the ground in the event it falls out of user’s hand.

20
DESCRIPTION OF FEATURES (CONT) Front Panel Features

21
Button 1. MS (Memory Save) and ML (Memory Load) Fu nctions: This feature allows the user to save and recall specific frequency and operating mode. See Memory programming and Recall instructions.
Memory Programming Memory Save “M1 to M5”
• Using “UP/DOWN” buttons select the desired frequency and mode to be saved. • Press and release “FUNC” button and then press the “ML/MS” button, notice the
“M “icon blinking on the right side on the display. • Then press “SCAN/M/SCN” button to save in memory M1.
• Repeat procedures 1and 2 and save it to “MODE / H/L” button for memory M2, • “STEP / CH/FREQ” button for M3, “CH9/19 / LOCK ” button for M4 and “
SQ,MICG,RFG /RPT” for M5. Memory Recall “M1 to M5” Now You will use the Memory Load ML function: See Memory Save MS in last paragraph.
• Press ML/MS button and then SCAN / MSCN to recall memory M1 • Press ML/MS button and then MODE / H/L to recall memory M2 • Press ML/MS button and then STEP/ CH/FREQ. to recall memory M3 • Press ML/MS button and then CH9/19 / LOCK to recall memory M4. • Press ML/MS button and then SQ, MICG, RF-G/ RPT to recall memory M5.
Button 2: Scan Functions SCN (Scan) : Allows the radio to automatically scan through all frequency, stopping at any frequency that is busy with signals being communicated. It will remain on that frequency during the conversation, and will not reactivate scanning until roughly 5 seconds after the communication signal has ended. To activate, press the “SCN/M/SCAN” button. The word SCAN will appear on the display. To stop, press the “SCN/M/SCAN” button again. M/SCAN (Memory Scan) : This feature allows the user to scan all the 5 saved channels to the memory. To Turn it “on”, press the “FUNC” button first and then followed by the “SCN/M/SCAN” button. To Turn-Off: Performed same procedure as mentioned above. Shift-Offset Frequency: To access press the “SCN/M/SCAN" button for 3 seconds or more , the shift frequency will appear on the display, then use the “up ” and “down ” button to select the desired shift frequency from 0 to 990 KHz. This function can only be activated when the unit is in Ham Radio mode. In CB, this function is not possible (and not needed at all).
Button 3. Mode switch Allows selection between the four operational modes of the radio (AM/FM/USB/LSB ). To select your desired mode, press the "Mode " button until you see the mode in which you desired. The order of appearance is FM then AM, then USB, and then LSB. FM means Frequency modulation, this is the standard mode all over Europe, which is allowed in all countries. AM means Amplitude modulation, which is used by most truck drivers in continental Europe.

22
In SSB (Single Side Band) you will have the Upper Side Band USB and the Lower Side Band LSB. SSB is the mode for the longest possible communication distances. All commercial short waves services use this long range mode. However, it is necessary to make a fine adjustment of the clarifier knob for best voice reproduction, and most listeners need a certain training period until they can understand SSB communication clearly. But the result is the largest possible communication range among all other modes! Selectable Hi/Low Power: The unit has been designed with proprietary circuitry that gives superior transmitting performance and gives the user the ability, depending on the usage application they are in, to select between two power levels. Low power output mode will give the user significantly longer battery life estimated twice as long as when in the full power mode. It is recommended that when you only need a range of 1/2 mile or less, the "low" position would provide more than adequate output power. If you need distances greater than that, leave the radio in the "Full" power mode. To Change the Power Output Level:
• Press and release the "Func " button. • Then press and release the "MODE/H/L" button.
The word "Low " will appear on the display. The power out level is now 1 watt on the AM/FM mode. This is recommended when communicating in short range, such as around 1/2 mile or less.
• to return to full power, simply press the "Func " button again, followed by the "MODE/H/L" button.
This will return the radio to the full power position, which is 4 watts in FM and 1 Watt / 4 Watt in AM and 4 Watts PEP in SSB depending on country setting.
Button 4: Step Function This button is used for select one of the frequency step (1 KHz, 10 KHz and 100 KHz) and is only in operation if the unit is switched to Ham Radio mode. "+"and"-" Shift Function: This function allows the user to activate the shift offset frequency and transmit higher or lower than displayed or receive frequency. To activate, press the "FUNC" button first, followed immediately by the "STEP/CH.FR" button. The sign "+" will appear on the display, now the unit will transmit higher than receive frequency. To transmit lower than receive frequency, repeat the same procedure until the"-” sign appear on the display. To deactivate these operations repeat same procedure until "+" and "-" icons disappear. This function activate when the unit is in mode 1 (ham band) operation only, where it is used for Repeater operation. . Frequency display: This button allows the user to show up the channel frequency of the selected channel on the LCD display. To activate just press ”FUNC” button first and then followed immediately by “STEP/CH.FR”
Button 5 : CH 9/19 and LOCK switching The special channels 9 and 19 are used by CB community for emergency and calling channels (different from country to country). To activate this special frequency just press "CH9/19/LOCK " button, then the operating frequency automatically will jump to this frequency. Each time you press this button the blinking display change to 9 and 19 then back to previously selected frequency. This button can also be used for selecting band segment switching (not for legal use in EU states) when the unit is in Full Band mode of operation.

23
Calling Frequency in amateur radio mode: For Call monitoring on call frequency 29.300MHz, just press "CH9/19 LOCK" button. 29.300 flashes appear on the display, press the mentioned button again, the flashes appear on the display change to 29.600 and the transceiver stays on frequency 29.300MHz and 29.600 as what has been selected. To release Call monitoring, press “CH9/19 LOCK” button. The previously selected frequency appears on the display. This function is only activated when the unit is in mode 1 (ham band) operation. Lock: The LOCK feature allows the user to "LOCK " virtually all of the button features on the radio so that once they are set, they can not be activated. This will prevent the radio from having its operation modes changed once the user has them set the way they like.
• To activate, press the "FUNC" button, followed by the “CH9/19 LOCK " button.
• The key symbol will appear on the display. With this feature activated, the only buttons that will work are the Light (longer than 1 second the "FUNC" button) and the PTT (Transmit) button.
• To deactivate, simply press the "FUNC" button again, followed immediately by the “CH9/19 LOCK " button.
Button 6: Squelch , Mic Gain, RF Gain, Repeater con trol The squelch is used to eliminate background or “white” noise when monitoring strong signals. To activate the squelch control press “SQ, MICG, RFG/RPT” button and then use the “up ” and “down ” button to set the desired point where the background noise is just eliminated.
MIC-G (MIC-Gain) : When activated, the MIC-G feature actually adjusts the microphone gain in the transmit mode, On the unit activating the MIC-Gain feature would have its best application when the user has a very strong, "booming" voice tone that would create a distorted signal going into the microphone, because this situation will only occur in rare situation. Mic-Gain feature in maximum position give the user to its maximum sensitivity.
• To Turn-On, press “SQ, MICG, RFG/RPT " 2 times until the word 'MC-G" will appear on display. Then use the “up “and “down ” button to increase and decrease microphone amplifier gain.
RF-G (RF Gain): Allows optimizing the incoming signal gain.
• To activate, press “SQ, MICG, RFG/RPT” button 3 times until the word “RF-G” appear on the display. Use “up ” and “down ” button to increase and decrease the receiver sensitivity.
Activating the "RF-G" feature helps to attenuate very strong signals that are produced from another radio that is in very close proximity to the unit. Turning this feature to maximum position creates full receiver sensitivity. RPT: Repeater access tone on and off control Most USA repeaters require an 88.5 Hz CTCSS tone to access.
• To activate the 88.5Hz CTCSS tone press “FUNC” and then “SQ, MICG, RFG/RPT ".

24
RPT will appear on the LCD display indicating that the tone burst now automatically be transmitted whenever the PTT is pressed. To deactivate, repeat the same procedure. This function activated when the unit is in mode 1 (ham band) operation only. Position 7 : Speaker High quality, impact resistant output speaker for clear output reception. Position 8 : Electret Microphone Front mounted, electrostatic condenser microphone for clear high quality transmission power. You should hold the radio 2-4 inches from your mouth and speak in a normal voice. Position 9 : Battery Case Slide on battery case, which contain 9 "AA" batteries. (See "batteries" for installation instructions). We recommend only using AA Ni-MH rechargeable batteries only in this radio.
Country Switching for CB Radio Multi mode Channel : this feature allows the user to convert the radio to multi channels. Please observe the regulations in the different countries. You are only allowed to work on the channels and with the operating modes which are allowed in the Country’s regulations. Only radio amateurs with a valid amateur radio license are allowed to use all the available possible settings of this radio. Radio amateurs find the installation procedure hints on our download server under “Amateur Radio” In the factory default settings only selection between the possible CB radio modes is possible.
Codes and its Corresponding Mode Channel Code d: Germany (80 FM4W; 40 AM 1W and SSB 4W), Czechia and Slovak Republic. Code EU: Present Europe Standard (most countries) 40AM 1W, 40 FM/SSB 4W Code E: Spain, Italy and Future European Standard 40Ch. AM/FM/SSB 4W Code PL: Poland 40ch. AM/FM/SSB 4W “0” Raster Poland Frequencies with – 5 kHz
offset Code U: * UK; U1 CH 1 to 40; U2 Ch 1to 40, both in FM Code US: 40 ch. (AM/SSB 4W), restricted mode for USA without FM *Frequency display is not necessary for UK mode In Ireland it is allowed to use Code EU. In Austria it is (still) forbidden to use this radio at all, because Austria does not accept any CB radio which can be switched to any mode except FM and to any other channel than 1-40. In DK, N, S, LT, M, CY, L, SLO it is only allowed to use FM modulation in position Code EU The new common European Country setting E is expected to come into force around middle of 2011.
Channel Conversion option of Code: d, EU, E, PL, U and US only 1. Turn Off the unit (Volume switch off) 2. Press ML/MS button & hold 3. Turn ON the unit 4. Release ML/MS button 5. The display will show the current setting of code: d, EU, E, PL, U or US.
And then press the “UP/DOWN” buttons to select the desired code. 6. Turn OFF the unit to set the selected code 7. Turn ON the unit to operate on the selected code
25
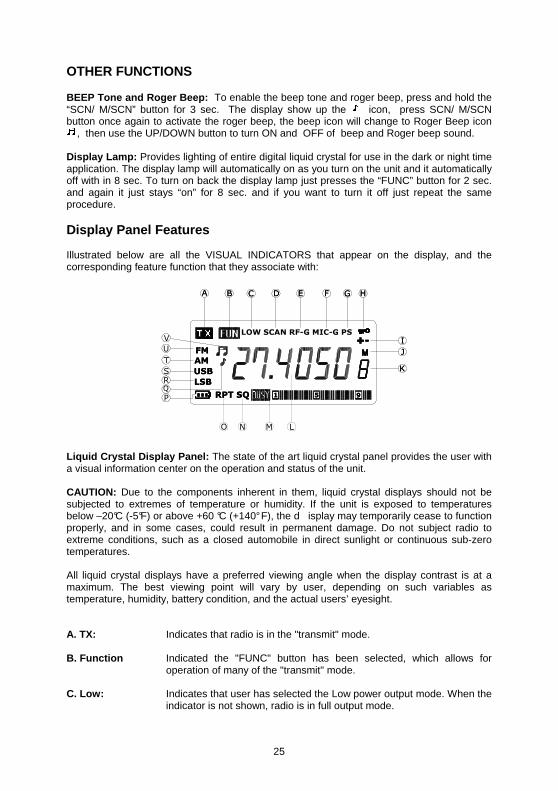
OTHER FUNCTIONS BEEP Tone and Roger Beep: To enable the beep tone and roger beep, press and hold the “SCN/ M/SCN” button for 3 sec. The display show up the icon, press SCN/ M/SCN button once again to activate the roger beep, the beep icon will change to Roger Beep icon
, then use the UP/DOWN button to turn ON and OFF of beep and Roger beep sound. Display Lamp: Provides lighting of entire digital liquid crystal for use in the dark or night time application. The display lamp will automatically on as you turn on the unit and it automatically off with in 8 sec. To turn on back the display lamp just presses the “FUNC” button for 2 sec. and again it just stays “on” for 8 sec. and if you want to turn it off just repeat the same procedure. Display Panel Features Illustrated below are all the VISUAL INDICATORS that appear on the display, and the corresponding feature function that they associate with: Liquid Crystal Display Panel: The state of the art liquid crystal panel provides the user with a visual information center on the operation and status of the unit. CAUTION: Due to the components inherent in them, liquid crystal displays should not be subjected to extremes of temperature or humidity. If the unit is exposed to temperatures below –20°C (-5°F) or above +60 °C (+140° F), the d isplay may temporarily cease to function properly, and in some cases, could result in permanent damage. Do not subject radio to extreme conditions, such as a closed automobile in direct sunlight or continuous sub-zero temperatures. All liquid crystal displays have a preferred viewing angle when the display contrast is at a maximum. The best viewing point will vary by user, depending on such variables as temperature, humidity, battery condition, and the actual users’ eyesight. A. TX: Indicates that radio is in the "transmit" mode. B. Function Indicated the "FUNC" button has been selected, which allows for
operation of many of the "transmit" mode. C. Low: Indicates that user has selected the Low power output mode. When the
indicator is not shown, radio is in full output mode.
995511RPT SQRPT SQ
LSBLSB
LOW SCAN RF-G MIC-G PS
USBUSB
AMAM
FMFM
S
AA BB CC DD EE FF GG HH
T
RQ
P
II
JJ
KK
LMNO
U
V

26
D. Scan: Indicates that the radio is in the Scan mode, which works in conjunction with all bands and country settings.
E. RF-G: Indicates that the RF-G feature has been activated. F. MIC-G: Indicates that the Mic-Gain feature has been activated. G. PS: Indicates that the Power save feature has been activated. H. The key symbol indicates the key lock feature has been activated. I. "+/-": Indicates + and – shift mode. J. "м": Indicates that the Memory feature has been activated. K. Memory Nr. : Indicates that a Memory location number has been activated. L. CH/FR. Frequency Indicator: Displays the corresponding channel / frequency,
in which the radio is operating on. M. Busy; Meter: Your unit shows an eighteen segment bar graph for incoming signal
and power output in the liquid crystal display panel.
When receiving a signal, the meter will indicate how strong the signal is. A weak signal will be indicated by five or seven segments, while a very strong signal will have 9 or more segments. When transmitting, the letter “TX” will appear on the display. If the radio is operating in the HIGH power position, 9 to 10 segments will be displayed, depending on the condition of your batteries. If the radio is operating in the LOW power position, only 3 to 5 segments will appear.
N. SQ: Indicates that the squelch feature has been activated. O. RPT: Indicates that the RPT feature has been activated. P. BATT Indicates batteries are getting low. Q. Beep Tone Indicates that the beep tone feature has been activated. R. LSB: Indicates lower side band mode operation. S. USB: Indicates upper side band mode operation. T. AM: Indicates AM mode operation. U. FM: Indicates FM mode operation. V. RGB Tone Indicates that the Roger beep tone feature has been activated.

27
BATTERY PACK INSTRUCTIONS For maximum power output and performance from the unit, we strongly recommend that you only use "AA" NiMH rechargeable batteries in your battery pack. Due to the voltage rating and power consumption of the radio, NiMH’s deliver superior performance and life than alkaline. These batteries are readily available from your radio dealer or other electronic stores. While the radio will work with alkaline batteries, you will definitely not achieve full transmit power or length of talk time on each set of batteries when compared to NiMH'. The battery pack supplied with the radio is a slide on battery case that requires 9 "AA" size batteries (preferably NiMH) To install the 9 batteries into the case, hold the pack in one hand, while at the same time using your other hand to press down on the center tab (see illustration). The pack will open into two distinct pieces, with polarity markings for batteries to install on each side. Please pay attention to the polarity markings, as incorrect battery installation can damage the radio. IMPORTANT: When the batteries voltage become low, in addition to the "Battery Low" indicator coming on the display, you will experience a BLANK DISPLAY when you press the PTT button. This is due to the needed voltage being greater than the power you have left in the battery pack. This "Blank Display" situation is a normal reaction to the batteries becoming low. Please replace or re-charge to batteries immediately when these situations occur.

28
Customer Support & Warranty matters Troubleshooting Check at first the power supply (batteries and their contact quality or the 12 V adapter/cable). A problem may be caused through power supply, when no light or display appears after switching on. If the unit works in a strange way, disconnect the power supply cable (or take off the battery case), wait some time (minimum 10 seconds), and then reconnect power again. Another method is to try a new country setting. Repeat the method to program your country’s setting. European 2 years warranty matters Distribtor’s warranty: the warranty does not limit the user’s statutory rights under applicable National laws relating to the sale of consumer products. The warranty period starts at the time of Product’s original purchase and lasts 24 months. Liable for warranty matters is the distributor, where you have bought the radio.
It is only valid and enforceable in the country where the user has purchased the product provided that the same product has been intended for sale in that country by the manufacturer. To make use of this warranty, it is necessary to return the defective product with its original package together with the original sales receipt to the authorized service centre. The warranty totally covers the device in all its parts and the workmanship necessary to repair it.
The warranty does not cover defects or damages caused to the Product by misuse with, or connection to, any accessory or software not produced or supplied by the manufacturer or by use of the product for any other use than for intended use of the product. The warranty is not enforceable if the product has been dismantled, modified or repaired by anyone other than the authorized service centre or if it is repaired using unauthorized spare parts.
Moreover, the warranty is not valid and no protest can be made if the product has been modified or altered respect to its original purpose. Nobody will be indemnified for the inactivity period of the device nor can expect refund or claim for direct or circumstantial damages due to an inappropriate use of the device. The warranty does not apply to damaged accessory parts like connecting or supply cables, batteries, or problems caused through not authorised or not recommended accessories like other than the supplied microphone, external antennas, external power supplies and over voltage caused through external power supplies, lightning or over voltage defects. The warranty does not cover broken or damaged acrylic glass windows, cabinet parts, belt clips or carrying strips. Please contact the dealer or person where you have purchased the CB radio. Additional manufacturer’s guarantee: Alan Electronics GmbH offers an additional manufacturer’s guarantee period of 2 years for CB radios under Albrecht brand which have been sold in Germany. During this period it is possible to contact our service partner(s) in Germany directly as well (instead of the distributor), or contact our repair service in Germany directly. Our recommendation: Before returning a radio, please call first your distributor (if available) or the service hotline. Our experience shows that many smaller problems can be cleared already by a simple phone call with our service hotline. If returning will be necessary, the hotline can also tell you the nearest service partner address and discuss with you the fastest way to get your radio repaired. Where to find service hints and service documentati on The complete technical documentation is updated regularly. You can download the latest versions of user manuals, technical documents and conformity declaration, as well as service

29
hints or FAQ’s any time from our server under
http://www.service.alan-electronics.de If you should have a problem, please have a look to the service hints or frequently asked questions (FAQ) before you send Your CB radio to the service centre. Please note that the acceptance of AM, SSB+FM in the different European countries has just started and may be subject to unpredictable changes. Our homepage will provide the latest information about using the radio. Service Hotline 01805 012204 (14 cents/ minute, mobile not
more than 42 cents/minute. Available only for customers who bought the radio in Germany)
Homepages: www.albrecht-online.de, www.alan-electronics.de e-mail: [email protected] Service-Download: www.hobbyradio.de If You have purchased your radio in another country, please contact the local distributor for all inquiries. For radios sold in the U.K. please contact: Alan UK Unit 2, Callenders, Paddington Drive, Churchward Park, Swindon, Wiltshire, SN5 7YW Tel: +44 1793 882 431 e-mail: [email protected] www.alan-uk.com Recycling of defective electronics items European laws request that electronics items shall not any more be disposed via the normal household trash. Since the industry has started to finance the recycling of electronics waste, local collecting stations everywhere are prepared to accept defective electronics items free of charge for the users.

30
Legal Information and Conformity Declaration The radio may be used in European Countries only according to following information, which we publish as “Radio Passport”. Because the number of countries allowing the current and future AM+SSB+FM standard is changing, the latest version of this radio passport is published on our Internet web server and may be downloaded any time. (http://www.service.alan-electronics.de or www.hobbyradio.de ) The version printed in this user manual has been issued in November 2010.
RADIO PASSPORT AE 2990 AFS
Country Country switch position Licence and operating conditions
Operation only with individual license Austria 40 FM Austria does not yet accept radios with country
switches or AM / SSB. Please do not use in Austria Italy and San Marino 40 Channels AM, FM, SSB Licence and regular charges for residents Switzerland and Liechtenstein
40 Channels AM, FM, SSB Licence and monthly charges for residents
Spain 40 Channels AM, FM, SSB Licence and regular charges for residents Operation without licence and charges allowed
Belgium 40 Channels AM, FM, SSB Free of licence and charges for all users
Czech Republic 80 CH FM with German switch position , but do not use AM/SSB
Free of licence and charges for all users, but AM channels are not allowed to be used
Denmark / Lithuania 40 FM do not use AM or SSB Free of licence and charges for all users Finland 40 Channels AM, FM, SSB Free of licence and charges for all users
(travellers with Circulation Card) France 40 Channels AM, FM, SSB Free of licence and charges for all users Germany Up to 80 CH FM, up to 40 CH
AM/SSB Free of licence and charges for all users except in some border regions for base stations using channels 41-80
Greece 40 Channels AM, FM, SSB Free of licence and charges for all users Hungary 40 FM, do not use AM / SSB Free of licence and charges for all users Cyprus 40 FM, do not use AM / SSB Free of licence and charges for all users Iceland 40 FM, do not use AM / SSB Free of licence and charges for all users Ireland 40 Channels AM, FM, SSB Free of licence and charges for all users Luxembourg, Malta 40 FM, do not use AM / SSB Free of licence and charges for all users Netherlands 40 Channels AM, FM, SSB Free of licence and charges for all users Norway 40 FM, do not use AM / SSB Free of licence and charges for all users Bulgaria,Estonia, Latvia, Poland, Portugal and Romania
40 Channels AM, FM, SSB Free of licence and charges for all users, in Poland the Poland switch position with – 5 kHz frequency offset may be used as well
Slovak Republic 40 FM + CH 70-80 FM German switch position
Free of license and charges for all users, German setting allowed – Use of AM forbidden
Spain 40 Channels AM, FM, SSB Free of licence and charges for travellers with Circulation Card
Slovenia, Sweden 40 FM, do not use AM / SSB Free of licence and charges for all users Switzerland and Liechtenstein
40 Channels AM, FM, SSB Free of licence and charges for travellers with Circulation Card
United Kingdom UK 40 FM UK switch position Free of licence and charges for all users Important Note: Please respect the licence conditions in the above listed countries and do not use the radio without licence, where necessary. For travelling with Your radio, we recommend to provide a copy of Your home country licence document and / or this Radio Passport together with the radio.
© 2010 Alan Electronics GmbH