Akeeba Backup User's Guide - strategie-joomla
183
Akeeba Backup User's Guide Nicholas K. Dionysopoulos
-
Upload
khangminh22 -
Category
Documents
-
view
1 -
download
0
Transcript of Akeeba Backup User's Guide - strategie-joomla
Akeeba Backup User's Guide
Nicholas K. Dionysopoulos
Akeeba Backup User's Guideby Nicholas K. Dionysopoulos
Publication date February 2013Copyright © 2014 Akeeba Ltd
Abstract
This book covers the use of the Akeeba Backup site backup component for Joomla!™ -powered web sites. It doesnot cover any other software of the Akeeba Backup suite, including Kickstart and the desktop applications whichhave documentation of their own. Both the free Akeeba Backup Core and the subscription-based Akeeba BackupProfessional editions are completely covered.
Permission is granted to copy, distribute and/or modify this document under the terms of the GNU Free Documentation License, Version 1.3 or anylater version published by the Free Software Foundation; with no Invariant Sections, no Front-Cover Texts, and no Back-Cover Texts. A copy ofthe license is included in the appendix entitled "The GNU Free Documentation License".
iii
Table of ContentsI. User's Guide to Akeeba Backup for Joomla!™ ..................................................................................... 1
1. Introduction ........................................................................................................................... 51. Introducing Akeeba Backup .............................................................................................. 52. Indicative uses ................................................................................................................ 53. A typical backup/restoration work flow ............................................................................... 64. Server environment requirements ....................................................................................... 7
2. Installation, updates and upgrades .............................................................................................. 91. Installing Akeeba Backup ................................................................................................. 9
1.1. Installing or manually updating the backup component and language files ....................... 91.1.1. Install from URL ....................................................................................... 91.1.2. Upload and install. ................................................................................... 101.1.3. Manual installation ................................................................................... 111.1.4. The installation / update broke my site! ........................................................ 12
2. Upgrading from Core to Professional ................................................................................ 123. Automatic updates ......................................................................................................... 124. Requesting support and reporting bugs .............................................................................. 14
3. Using the Akeeba Backup component ....................................................................................... 151. Pages outside the Control Panel panes .............................................................................. 15
1.1. Common navigation elements ............................................................................... 151.2. The Control Panel ............................................................................................... 15
1.2.1. Editing the component's Parameters ............................................................. 172. Basic Operations ........................................................................................................... 21
2.1. Profiles Management ........................................................................................... 222.2. Configuration Wizard .......................................................................................... 232.3. Configuration ..................................................................................................... 24
2.3.1. The main settings ..................................................................................... 262.3.1.1. Basic Configuration ........................................................................ 262.3.1.2. Advanced configuration .................................................................. 302.3.1.3. Site overrides ................................................................................ 312.3.1.4. Optional filters .............................................................................. 332.3.1.5. Quota management ......................................................................... 342.3.1.6. Fine tuning ................................................................................... 36
2.3.2. Database dump engines ............................................................................. 382.3.2.1. Native MySQL Backup Engine ........................................................ 382.3.2.2. Reverse Engineering Database Dump Engine ...................................... 40
2.3.3. File and directories scanner engines ............................................................. 422.3.3.1. Smart scanner ............................................................................... 422.3.3.2. Large site scanner .......................................................................... 43
2.3.4. Archiver engines ...................................................................................... 442.3.4.1. ZIP format .................................................................................... 442.3.4.2. JPA format ................................................................................... 462.3.4.3. Encrypted Archives (JPS format) ...................................................... 462.3.4.4. DirectFTP ..................................................................................... 482.3.4.5. DirectSFTP ................................................................................... 502.3.4.6. ZIP using ZIPArchive class ............................................................. 51
2.3.5. Data processing engines ............................................................................ 522.3.5.1. No post-processing ......................................................................... 522.3.5.2. Upload to CloudMe ........................................................................ 522.3.5.3. Upload to Microsoft Windows Azure BLOB Storage service .................. 522.3.5.4. Upload to RackSpace CloudFiles ...................................................... 542.3.5.5. Upload to DreamObjects ................................................................. 55
Akeeba Backup User's Guide
iv
2.3.5.6. Upload to Dropbox ........................................................................ 572.3.5.7. Send by email ............................................................................... 592.3.5.8. Upload to Remote FTP server .......................................................... 602.3.5.9. Upload to Google Storage ............................................................... 622.3.5.10. Upload to iDriveSybc ................................................................... 642.3.5.11. Upload to Amazon S3 ................................................................... 652.3.5.12. Upload to Remote SFTP server ....................................................... 682.3.5.13. Upload to SugarSync .................................................................... 702.3.5.14. Upload to WebDAV ..................................................................... 712.3.5.15. Upload to Box.net / Box.com ......................................................... 73
2.4. Backup now ....................................................................................................... 732.5. Manage Backups ................................................................................................ 77
2.5.1. Integrated restoration ................................................................................ 802.5.2. Manage remotely stored files ...................................................................... 832.5.3. Discover and import archives ..................................................................... 84
2.6. View Log .......................................................................................................... 862.7. Site Transfer Wizard ........................................................................................... 87
3. Include data to the backup .............................................................................................. 923.1. Multiple Databases Definitions .............................................................................. 923.2. Off-site Directories Inclusion ................................................................................ 95
4. Exclude data from the backup ......................................................................................... 964.1. Files and Directories Exclusion ............................................................................. 964.2. Database Tables Exclusion ................................................................................... 994.3. Extension Filters ............................................................................................... 101
4.3.1. Components ........................................................................................... 1014.3.2. Modules ................................................................................................ 1024.3.3. Plug-ins ................................................................................................ 1034.3.4. Languages ............................................................................................. 1044.3.5. Templates .............................................................................................. 104
4.4. RegEx Files and Directories Exclusion .................................................................. 1054.4.1. Regular Expressions recipes for files and directories ...................................... 107
4.5. RegEx Database Tables Exclusion ........................................................................ 1084.5.1. Regular Expressions recipes for database tables ............................................ 110
5. Automating your backup ............................................................................................... 1105.1. Taking backups automatically .............................................................................. 110
5.1.1. Front-end backup, for use with CRON ........................................................ 1105.1.2. Native CRON script ................................................................................ 1145.1.3. Alternative CRON script .......................................................................... 118
5.2. Checking for failed backups automatically ............................................................. 1205.2.1. Front-end backup failure check, for use with CRON ...................................... 1205.2.2. Native CRON script for failed backup checks .............................................. 1235.2.3. Alternative CRON script .......................................................................... 124
6. Miscellaneous features .................................................................................................. 1256.1. Lite mode for cell phones, PDAs, MIDs, etc. ......................................................... 1266.2. System Restore Points ........................................................................................ 126
4. Miscellaneous Extensions (Modules, Plugins) ........................................................................... 1301. Akeeba Backup Notification plugin ................................................................................. 1302. The CLI update notification and automatic update script ..................................................... 1303. JMonitoring integration ................................................................................................. 1324. Backup on Update ....................................................................................................... 132
5. Restoring backups ............................................................................................................... 1341. Restoration and troubleshooting instructions ..................................................................... 1342. Unorthodox: the emergency restoration procedure .............................................................. 1343. Automating the Akeeba Backup Installer ......................................................................... 137
Akeeba Backup User's Guide
v
6. Step by step guides .............................................................................................................. 1401. Backing up your site to a cloud storage service ................................................................. 140
1.1. Introduction ..................................................................................................... 1401.2. Basic configuration ............................................................................................ 1401.3. Using Amazon S3 ............................................................................................. 141
1.3.1. Making your backups accessible by other Amazon S3 accounts ....................... 1431.4. Using Dropbox ................................................................................................. 1461.5. Where to go from here? ..................................................................................... 1471.6. Alternatives to cloud storage ............................................................................... 147
II. Security information .................................................................................................................... 1497. Introduction ........................................................................................................................ 151
1. Foreword ................................................................................................................... 1512. Why you need to care about ownership and permissions? .................................................... 151
8. How your web server works .................................................................................................. 1521. Users and groups ......................................................................................................... 152
1.1. Users .............................................................................................................. 1521.2. Groups ............................................................................................................ 1521.3. How users and groups are understood by UNIX-derived systems ................................ 153
2. Ownership .................................................................................................................. 1532.1. Process ownership ............................................................................................. 1532.2. File ownership .................................................................................................. 154
3. Permissions ................................................................................................................ 1553.1. The three types of permissions ............................................................................ 1553.2. What permissions can control .............................................................................. 1553.3. Permissions notation .......................................................................................... 156
3.3.1. The textual notation ................................................................................ 1563.3.2. The octal notation ................................................................................... 156
9. Securing your Akeeba Backup installation ............................................................................... 1581. Access rights .............................................................................................................. 1582. Securing the output directory ......................................................................................... 1583. Securing file transfers ................................................................................................... 159
III. Appendices ............................................................................................................................... 160A. The JPA archive format, v.1.2 ............................................................................................... 162B. The JPS archive format, v.1.9 ............................................................................................... 166C. Things which will (most likely) not be implemented .................................................................. 170
1. Windows Live SkyDrive ............................................................................................... 1702. Google Drive .............................................................................................................. 1703. Automatic sync between sites ........................................................................................ 1704. Automatic backups without CRON ................................................................................. 1715. Automatic backups after saving/creating/whatever an article ................................................ 1716. Put Akeeba Backup in Joomla! ...................................................................................... 171
D. GNU Free Documentation License ......................................................................................... 173
Part I. User's Guide toAkeeba Backup for Joomla!™
2
Table of Contents1. Introduction ................................................................................................................................... 5
1. Introducing Akeeba Backup ...................................................................................................... 52. Indicative uses ........................................................................................................................ 53. A typical backup/restoration work flow ...................................................................................... 64. Server environment requirements ............................................................................................... 7
2. Installation, updates and upgrades ...................................................................................................... 91. Installing Akeeba Backup ......................................................................................................... 9
1.1. Installing or manually updating the backup component and language files ............................... 91.1.1. Install from URL ............................................................................................... 91.1.2. Upload and install. ........................................................................................... 101.1.3. Manual installation ........................................................................................... 111.1.4. The installation / update broke my site! ................................................................ 12
2. Upgrading from Core to Professional ........................................................................................ 123. Automatic updates ................................................................................................................. 124. Requesting support and reporting bugs ...................................................................................... 14
3. Using the Akeeba Backup component ............................................................................................... 151. Pages outside the Control Panel panes ...................................................................................... 15
1.1. Common navigation elements ....................................................................................... 151.2. The Control Panel ....................................................................................................... 15
1.2.1. Editing the component's Parameters ..................................................................... 172. Basic Operations ................................................................................................................... 21
2.1. Profiles Management ................................................................................................... 222.2. Configuration Wizard .................................................................................................. 232.3. Configuration ............................................................................................................. 24
2.3.1. The main settings ............................................................................................. 262.3.1.1. Basic Configuration ................................................................................ 262.3.1.2. Advanced configuration .......................................................................... 302.3.1.3. Site overrides ........................................................................................ 312.3.1.4. Optional filters ...................................................................................... 332.3.1.5. Quota management ................................................................................. 342.3.1.6. Fine tuning ........................................................................................... 36
2.3.2. Database dump engines ..................................................................................... 382.3.2.1. Native MySQL Backup Engine ................................................................ 382.3.2.2. Reverse Engineering Database Dump Engine .............................................. 40
2.3.3. File and directories scanner engines ..................................................................... 422.3.3.1. Smart scanner ....................................................................................... 422.3.3.2. Large site scanner .................................................................................. 43
2.3.4. Archiver engines .............................................................................................. 442.3.4.1. ZIP format ............................................................................................ 442.3.4.2. JPA format ........................................................................................... 462.3.4.3. Encrypted Archives (JPS format) .............................................................. 462.3.4.4. DirectFTP ............................................................................................. 482.3.4.5. DirectSFTP ........................................................................................... 502.3.4.6. ZIP using ZIPArchive class ..................................................................... 51
2.3.5. Data processing engines .................................................................................... 522.3.5.1. No post-processing ................................................................................. 522.3.5.2. Upload to CloudMe ................................................................................ 522.3.5.3. Upload to Microsoft Windows Azure BLOB Storage service .......................... 522.3.5.4. Upload to RackSpace CloudFiles .............................................................. 542.3.5.5. Upload to DreamObjects ......................................................................... 552.3.5.6. Upload to Dropbox ................................................................................ 57

User's Guide to Akee-ba Backup for Joomla!™
3
2.3.5.7. Send by email ....................................................................................... 592.3.5.8. Upload to Remote FTP server .................................................................. 602.3.5.9. Upload to Google Storage ....................................................................... 622.3.5.10. Upload to iDriveSybc ........................................................................... 642.3.5.11. Upload to Amazon S3 ........................................................................... 652.3.5.12. Upload to Remote SFTP server ............................................................... 682.3.5.13. Upload to SugarSync ............................................................................ 702.3.5.14. Upload to WebDAV ............................................................................. 712.3.5.15. Upload to Box.net / Box.com ................................................................. 73
2.4. Backup now ............................................................................................................... 732.5. Manage Backups ........................................................................................................ 77
2.5.1. Integrated restoration ........................................................................................ 802.5.2. Manage remotely stored files .............................................................................. 832.5.3. Discover and import archives ............................................................................. 84
2.6. View Log .................................................................................................................. 862.7. Site Transfer Wizard ................................................................................................... 87
3. Include data to the backup ...................................................................................................... 923.1. Multiple Databases Definitions ...................................................................................... 923.2. Off-site Directories Inclusion ........................................................................................ 95
4. Exclude data from the backup ................................................................................................. 964.1. Files and Directories Exclusion ..................................................................................... 964.2. Database Tables Exclusion ........................................................................................... 994.3. Extension Filters ....................................................................................................... 101
4.3.1. Components ................................................................................................... 1014.3.2. Modules ........................................................................................................ 1024.3.3. Plug-ins ........................................................................................................ 1034.3.4. Languages ..................................................................................................... 1044.3.5. Templates ...................................................................................................... 104
4.4. RegEx Files and Directories Exclusion .......................................................................... 1054.4.1. Regular Expressions recipes for files and directories .............................................. 107
4.5. RegEx Database Tables Exclusion ................................................................................ 1084.5.1. Regular Expressions recipes for database tables .................................................... 110
5. Automating your backup ....................................................................................................... 1105.1. Taking backups automatically ..................................................................................... 110
5.1.1. Front-end backup, for use with CRON ................................................................ 1105.1.2. Native CRON script ........................................................................................ 1145.1.3. Alternative CRON script .................................................................................. 118
5.2. Checking for failed backups automatically ..................................................................... 1205.2.1. Front-end backup failure check, for use with CRON .............................................. 1205.2.2. Native CRON script for failed backup checks ...................................................... 1235.2.3. Alternative CRON script .................................................................................. 124
6. Miscellaneous features .......................................................................................................... 1256.1. Lite mode for cell phones, PDAs, MIDs, etc. ................................................................. 1266.2. System Restore Points ............................................................................................... 126
4. Miscellaneous Extensions (Modules, Plugins) ................................................................................... 1301. Akeeba Backup Notification plugin ........................................................................................ 1302. The CLI update notification and automatic update script ............................................................. 1303. JMonitoring integration ......................................................................................................... 1324. Backup on Update ............................................................................................................... 132
5. Restoring backups ....................................................................................................................... 1341. Restoration and troubleshooting instructions ............................................................................. 1342. Unorthodox: the emergency restoration procedure ..................................................................... 1343. Automating the Akeeba Backup Installer ................................................................................. 137
6. Step by step guides ...................................................................................................................... 140
User's Guide to Akee-ba Backup for Joomla!™
4
1. Backing up your site to a cloud storage service ......................................................................... 1401.1. Introduction ............................................................................................................. 1401.2. Basic configuration .................................................................................................... 1401.3. Using Amazon S3 ..................................................................................................... 141
1.3.1. Making your backups accessible by other Amazon S3 accounts ............................... 1431.4. Using Dropbox ......................................................................................................... 1461.5. Where to go from here? ............................................................................................. 1471.6. Alternatives to cloud storage ....................................................................................... 147
5
Chapter 1. Introduction1. Introducing Akeeba BackupAkeeba Backup is a complete site backup solution for your Joomla!™ powered website. As the successor to theacclaimed JoomlaPack component, Akeeba Backup builds on its strong legacy to deliver an easy to use, yet powerful,solution to backing up, restoring and moving your site between servers of the same or different architecture.
Its mission is simple: backup your entire site - including all files and database contents - inside a standalone archive.You can then restore your entire site from the contents of this archive, without the need of installing Joomla!™ priorto the restoration. You can do so in a single click manner, without the tedious work required to set up and test externalutilities, without changing your server configuration and without having to dive into obscure configuration options.
If you want absolute power and flexibility, Akeeba Backup is right for you, too! It puts you in charge of fine-tuningyour backup, choosing which directories, files or database tables to exclude. It can even allow you to backup non-Joomla!™ content, as long as you specify which off-site directories and databases you want to add.
Akeeba Backup has won three J.O.S.C.A.R. awards at J and Beyond. The J.O.S.C.A.R. awards are the result of apeer voting process, where the high-end Joomla! developers and web designers participating in the J and Beyondconferences pick the top extensions for Joomla!.
2. Indicative usesAkeeba Backup can be used for much more than just backup. Some indicative uses are:
• Security backups. Taking a snapshot of your site should your server fail, or a hacker exploit some security holeto deface or compromise your site.
• Template sites. Web professionals have used Akeeba Backup in order to create "template sites". This means thatyou can build a site on a local server, install every component you usually do on most clients' sites and back it up.You now have a canned site that can serve as a great template for future clients. Using the same method you can havea snapshot of all the sites you have built for your clients, without the need to have them installed on your local server.
• Build a site off-line, upload the finished site easily. Web professionals can build a complete site off-line on a localserver and when done take a snapshot with Akeeba Backup, then restore it on the production site.
• Testing upgrades locally, without risking breaking the on-line site. Joomla!™ updates have the potential ofbreaking things, especially in complex or badly written components and modules. Web masters use Akeeba Backupto get a site snapshot, restore it on a local test server, perform the upgrade there and test for any problems withoutthe live site being at risk.
• Debugging locally. Almost the same as above, web professionals have used Akeeba Backup to take a snapshot ofa client's Joomla!™ site in order to perform bug hunting. Using Akeeba Backup again, they can upload the fixedsite back on the live server.
• Relocating a site to a new host. Web masters who want to take their site to a new host have found Akeeba Backupto be their saviour. Just backup the original site and restore on the new host; presto, your site is relocated withvirtually no effort at all.
Akeeba Backup has the potential to save you hours of hard labor, according to our users. It is licensed under the GNUGeneral Public License version 3 or, at your option, any later version of the license. As a result, you are free to modifyit to your liking and install it on as many sites as you like without having to pay for a pricey "developer's license".
Introduction
6
Akeeba Backup comes in two editions, Core and Professional. Akeeba Backup Core is provided free of charge andcontains all the features a typical webmaster would like to have in order to easily complete backup and restoration jobs.Even if this is not enough for you, we even give away our full documentation and the comprehensive troubleshooterguide without charging a single penny! If you find something missing, or spotted a bug, don't be afraid to contact us.We have an ongoing Bug Bounty: if you're the first to help us solve a substantial bug, you'll get a free subscription.
Akeeba Backup Professional is designed to take your experience to a whole new level. Featuring advanced options,like embedded restoration, inclusion of external directories and databases, powerful filters based on regular expres-sions, easy exclusion of Joomla!™ extensions and support for putting your backups on compatible cloud storage ser-vices (such as Amazon's S3), it is designed to give the professional user a strong efficiency leverage. Akeeba BackupProfessional is the ideal choice for professional web developers. Thanks to its liberal GNU GPL v3 license, AkeebaBackup Professional can be installed on an unlimited number of clients' websites, royalty-free! Amazing, isn't it?
3. A typical backup/restoration work flowAs stated, Akeeba Backup is designed to make your life easier. It does that by streamlining the work flow of backingup and restoring (or migrating) your site. From Akeeba Backup's perspective, restoring to the same host and location,copying your site in a subdirectory / subdomain of the same host or transferring your site to a completely new host isidentical. That's right, Akeeba Backup doesn't care if you are restoring, copying, cloning or migrating your site! Theprocess is always the same, so you only have to learn it once. The learning curve is very smooth, too!
Warning
DO NOT ATTEMPT TO RESTORE TO A DIFFERENT DATABASE TECHNOLOGY. IT WILLNOT WORK, IT IS NOT SUPPOSED TO WORK AND IT CANNOT BE MADE TO WORK. Forexample if you took a backup from a site using a MySQL database you CANNOT restore this database on aPostgreSQL, Microsoft SQL Server or Windows Azure SQL database.
For your information: the structure of tables is extremely different between different database server tech-nologies. There is no one-to-one correspondence between the structures among two different database servertechnologies. As a result the conversion process is a very manual and tedious job which involves a lot of trialand error and knowing the code which is going to be using this database. To give you an idea, converting thetiny and easy database structure of Akeeba Backup to MS SQL Server and PostgreSQL took about 20 hoursand involved making a lot of changes to our code to cater for the new databases. That was the preparatory BE-FORE we started working on the actual database backup code. This is something which cannot be automated.
The typical work flow involves using two utilities from the Akeeba Backup suite: the Akeeba Backup componentitself, and Akeeba Kickstart. Here is the overview:
1. Install Akeeba Backup and configure it to taste. Or use the automated Configuration Wizard to automatically con-figure it with the perfect settings for your server. Hit on the Backup Now button and let your site back up. When itfinishes up, click on the Manage Backups button. Click on the download links on the far-right of the only backupentry from the list - or, better yet, use FTP to do that - saving all parts of the backup archive somewhere on yourlocal PC.
2. Extract the kickstart- VERSION .zip file you downloaded from our Downloads repository. The only contained filesare kickstart.php and the translation INI files. Upload them to the server on which you want to restore yoursite to.
3. Upload all parts of the backup archive (do not extract it yet, just upload the files) to the server on which youwant to restore your site to (called here forth the target server ). Your server's directory should now contain thekickstart.php and the parts of the backup archive (.jpa, .j01, etc).
4. Fire up your browser and visit the Kickstart URL on your target server, for example http://www.example.com/kickstart.php .
Introduction
7
5. Change any option - if necessary - and hit the Start button. Sit back while Kickstart extracts the backup archivedirectly on the server! It's ultra-fast too (when compared to FTP uploading all those 4000+ files!). If it fails withan error, go back, select the Upload using FTP option and supply your FTP connection information, thenclick on Start again.
6. A new window pops up. It's the Akeeba Backup Installer (ABI), the site restoration script which was embeddedinside your archive. Do not close the Kickstart window yet!
7. Follow the prompts of the Akeeba Backup Installer, filling in the details of the new server (most importantly, thenew database connection and FTP connection information).
8. When the Akeeba Backup Installer is done, it prompts you to delete the installation directory. Ignore this promptand simply close the ABI window.
9. Back to the Kickstart window, click the button titled Clean Up. Kickstart removes the installation directory, restoresyour .htaccess file (if you had one in the first place), removes the backup archive and itself.
10.Believe it or not, you have a working site! Honestly! Click on the View the front-end button to visit your new site.
If you are restoring to a different subdirectory on the same server as the original site, or to a whole different host,you might need to edit your .htaccess file for your site to work properly. Also note that some third party extensionswhich store absolute filesystem paths, absolute URLs or contain host- or directory-specific settings may require manualreconfiguration after the restoration is complete. This is all described in the restoration section of this guide. If youneed help backing up your site, take a look in the Backup Now section of this guide.
4. Server environment requirementsIn order to work, Akeeba Backup requires the following server software environment:
• Joomla!™ and PHP version compatibilities are detailed in our Compatibility page [https://www.akeebabackup.com/compatibility.html].
• MySQL 5.0.42 or later. MySQL 5.1 or later recommended for optimal performance. MySQL 4.x is not supported.Alternatively you may use PostgreSQL 9.1+, Microsoft SQL Server 2008+ or Microsoft Windows Azure SQLdatabase. Akeeba Backup (since version 3.8.0) is able to backup and restore databases running on any of the aboveserver technologies.
• Minimum 24Mb of PHP memory_limit (sufficient only for smaller web sites, without many plug-ins and mod-ules running). More is better. 32Mb to 64Mb recommended for optimal performance on large sites. 128Mb is rec-ommended for sites containing deep-nested directories with thousands of files.
Even though Akeeba Backup may run on servers with a lesser memory limit, it is unlikely that it will ever finishthe backup process.
• The PHP function opendir must be available.
• Available free space or quota limit about 75%-80% of your site's size (excluding the cache, temporary and backupdirectories).
• The cURL PHP module must be installed for FTP and cloud backup to work.
As far as the browser is concerned, you can use:
• Internet Explorer 9, or greater (IE7 and IE6 are not supported, IE8 users may get random backup crashes on largersites).
Introduction
8
• Safari 4, or greater
• Opera 9, or greater. Experimental support due to lack of interest by users.
• Google Chrome 4 or greater. This is the best supported browser.
Some versions of Firefox are displaying erratic behaviour with Javascript. We cannot guarantee trouble-free operationunder Firefox. Most likely it will work just fine, but if you do spot an odd behaviour please try using one of the supportedbrowsers above before assuming there is a bug in our software. Most likely it's a bug in your version of Firefox.
In any case, you must make sure that Javascript is enabled on your browser for the backup to work. If you are usingAVG antivirus, please disable its Link Checker feature (and reboot your computer) as it is known to cause problemswith several Javascript-based web applications, including Akeeba Backup and its tools.
9
Chapter 2. Installation, updates andupgrades1. Installing Akeeba BackupInstalling Akeeba Backup is no different than installing any other Joomla!™ extension on your site. You can readthe complete instructions for installing Joomla!™ extensions on the official help page [http://help.joomla.org/con-tent/view/1476/235/]. Throughout this chapter we assume that you are familiar with these instructions and we willtry not to duplicate them.
Note
The language (translation) files are NOT installed automatically. You can download and install them from ourlanguage download page [http://cdn.akeebabackup.com/language/akeebabackup/index.html]. Do note thatyou will have to install both the component and the language packages for the component to work.
As noted on that page, Akeeba Ltd only produces the English and Greek language files. All other languagesare contributed by third parties. If you spot an error please do not contact Akeeba Ltd; we will be unable to helpyou. Instead, please go to the translation project page [https://www.transifex.com/projects/p/akeebabackup/]to find the contact information of the translator. Abandoned languages will show the maintainer being ourstaff member "nikosdion". In this case you're out of luck; if you want to fix the language package you willneed to volunteer to take over the translation project for that language.
1.1. Installing or manually updating the backup compo-nent and language filesJust like with most Joomla! extensions there are three ways to install or manually update Akeeba Backup on your site:
• Install from URL. This works only with the Professional release of our component. It is the easiest and fastest one,if your server supports it. Most servers do support this method.
• Upload and install. That's the typical extension installation method for Joomla! extensions. It rarely fails.
• Manual installation. This is the hardest, but virtually fail-safe, installation method.
Please note that installing and updating Akeeba Backup (and almost all Joomla! extensions) is actually the same thing.If you want to update Akeeba Backup please remember that you MUST NOT uninstall it before installing the newversion! When you uninstall Akeeba Backup you will lose all your backup settings and all backup archives storedinside Akeeba Backup's directories (including the default backup output directory). This is definitely something youdo not want to happen! Instead, simply install the new version on top of the old one. Joomla! will figure out that youare doing an update and will treat it as such, automatically.
Tip
If you find that after installing or updating Akeeba Backup it is missing some features or doesn't work, pleasetry installing the same version a second time, without uninstalling the component. The reason is that veryfew times the Joomla! extensions installer infrastructure gets confused and fails to copy some files or entirefolders. By repeating the installation you force it to copy the missing files and folders, solving the problem.
1.1.1. Install from URL
The easiest way to install Akeeba Backup Professional is using the Install from URL feature in Joomla!.
Installation, updates and upgrades
10
Important
This Joomla! feature requires that your server supports fopen() URL wrappers (allow_url_fopen isset to 1 in your server's php.ini file) or has the PHP cURL extension enabled. Moreover, if your serverhas a firewall, it has to allow TCP connections over ports 80 and 443 to www.akeebabackup.com andcdn.akeebabackup.com. If you don't see any updates or if they fail to download please ask your host tocheck that these conditions are met. If they are met but you still do not see the updates please file a bug reportin the official Joomla! forum [http://forum.joomla.org/]. In the meantime you can use the manual updatemethods discussed further below this page.
First, go to our site's download page for Akeeba Backup [https://www.akeebabackup.com/downloads/akee-ba-backup.html]. Make sure you are logged in. If not, log in now. These instructions won't work if you are not loggedin! Click on the Take me to the downloads for this version button of the version you want to install. Please note thatthe latest released version is always listed first on the page. On that page you will find both Akeeba Backup Core andProfessional. Next to the Professional edition's Download Now button you will see the DirectLink link. Right click onit and select Copy link address or whatever your browser calls this.
Now go to your site's administator page and click on Extensions, Extension Manager. If you have Joomla! 3.x clickon the Install from URL tab. Clear the contents of the Install URL field and paste the URL you copied from our site'sdownload page. Then click on the Install button. Joomla! will download and install the Akeeba Backup update.
If Joomla! cannot download the package, please use one of the methods described in this section of the documentation.If, however you get an error about copying files, folder not found or a cryptic "-1" error please follow our installationtroubleshooting instructions [https://www.akeebabackup.com/documentation/troubleshooter/abinstallation.html].
1.1.2. Upload and install.
You can download the latest installation packages our site's download page for Akeeba Backup [https://www.akeebabackup.com/downloads/akeeba-backup.html]. Please note that the latest version is always on top. If youhave an older version of Joomla! or PHP please consult our Compatibility page [https://www.akeebabackup.com/compatibility.html] to find the version of Akeeba Backup compatible with your Joomla! and PHP versions. In eithercase click on the version you want to download and install.
If you are not a subscriber, click on the Akeeba Backup Core to download the ZIP installation package of the freeof charge version.
If you are a subscriber to the Professional release, please make sure that you have loged in first. You should then seean item on this page reading Akeeba Backup Professional. If you do not see it, please log out and log back in. Clickon the Professional item to download the ZIP installation package.
All Akeeba Backup installation packages contain the component and all of its associated extensions. Installing it willinstall all of these items automatically. It can also be used to upgrade Akeeba Backup; just install it without uninstallingthe previous release.
In any case, do not extract the ZIP files yet!
Warning
Attention Mac OS X users! Safari, the default web server provided to you by Apple, is automatically extract-ing the ZIP file into a directory and removes the ZIP file. In order to install the extension through Joomla!'sextensions installer you must select that directory, right-click on it and select Compress to get a ZIP file of itscontents. This behaviour was changed in Mac OS X Mountain Lion, but people upgrading from older versionsof Mac OS X (Mac OS X Lion and earlier) will witness the old, automatic ZIP extraction, behaviour.
Log in to your site's administrator section. Click on Extensions, Manage link on the top menu. If you are on Joomla!3.x please click on the Upload Package File tab. Locate the Browse button next to the Package File (Joomla! 2.5, 3.0
Installation, updates and upgrades
11
and 3.1) or Extension package file (Joomla! 3.2 and later) field. Locate the installation ZIP file you had previouslydownloaded and select it. Back to the page, click on the Upload & Install button. After a short while, Joomla!™ willtell you that the component has been installed.
Warning
Akeeba Backup is a big extension (over 2Mb for the Professional release). Some servers do not allow youto upload files that big. If this is the case you can try the Manual installation or ask your host to followour installation troubleshooting instructions [https://www.akeebabackup.com/documentation/troubleshoot-er/abinstallation.html] under "You get an error about the package not being uploaded to the server".
If you have WAMPServer (or any other prepackaged local server), please note that its default configurationdoes not allow files over 2Mb to be uploaded. To work around that you will need to modify your php.ini andrestart the server. On WAMPserver left-click on the WAMP icon (the green W), click on PHP, php.ini. Findthe line beginning with upload_max_filesize. Change it so that it reads:
upload_max_filesize = 6M
Save this file. Now, left-click on the WAMP icon, click on Apache, Service, Restart Service and you can nowinstall the component. Editing the php.ini file should also work on all other servers, local and live alike.
If the installation did not work, please take a look at our installation troubleshooting instructions [https://www.akeebabackup.com/documentation/troubleshooter/abinstallation.html] or try the manual installation describedbelow.
1.1.3. Manual installation
Sometimes Joomla!™ is unable to properly extract ZIP archives due to technical limitations on your server. In thiscase, you can follow a manual installation procedure.
You can download the latest installation packages our site's download page for Akeeba Backup [https://www.akeebabackup.com/downloads/akeeba-backup.html]. Please note that the latest version is always on top. If youhave an older version of Joomla! or PHP please consult our Compatibility page [https://www.akeebabackup.com/compatibility.html] to find the version of Akeeba Backup compatible with your Joomla! and PHP versions. In eithercase click on the version you want to download and install.
If you are not a subscriber, click on the Akeeba Backup Core to download the ZIP installation package of the freeof charge version.
If you are a subscriber to the Professional release, please make sure that you have loged in first. You should then seean item on this page reading Akeeba Backup Professional. If you do not see it, please log out and log back in. Clickon the Professional item to download the ZIP installation package.
All Akeeba Backup installation packages contain the component and all of its associated extensions. Installing it willinstall all of these items automatically. It can also be used to upgrade Akeeba Backup; just install it without uninstallingthe previous release.
Before doing anything else, you have to extract the installation ZIP file in a subdirectory named akeeba on yourlocal PC. Then, upload the entire subdirectory inside your site's temporary directory. At this point, there should be asubdirectory named akeeba inside your site's temporary directory which contains all of the ZIP package's files.
If you are unsure where your site's temporary directory is located, you can look it up by going to the Global Configura-tion, click on the Server tab and take a look at the Path to Temp-folder setting. The default setting is the tmp directoryunder your site's root. Rarely, especially on automated installations using Fantastico, this might have been assigned thesystem-wide /tmp directory. In this case, please consult your host for instructions on how to upload files inside thisdirectory, or about changing your Joomla!™ temporary directory back to the default location and making it writable.

Installation, updates and upgrades
12
Assuming that you are past this uploading step, click on Extensions, Manage link on the top menu. If you are on Joomla!3.x please click on the Install from Directory tab. Locate the Install Directory edit box. It is already filled in with theabsolute path to your temporary directory, for example /var/www/joomla/tmp. Please append /akeeba to it. Inour example, it should look something like /var/www/joomla/tmp/akeeba. Then, click on the Install button.
If you still can't install Akeeba Backup and you are receiving messages regarding unwritable directories, inability tomove files or other similar file system related error messages, please consult our installation troubleshooting instruc-tions [https://www.akeebabackup.com/documentation/troubleshooter/abinstallation.html]. If these instructions do nothelp please do not request support from us; we are unlikely to be able to help you. These errors come from your siteset up and can best be resolved by asking your host for assistance or by asking other users in the official Joomla!™forums [http://forum.joomla.org].
1.1.4. The installation / update broke my site!
Some users have reported that after they have installed or updated Akeeba Backup, they were no longer able to accessparts of their site, especially the back-end. This is an indication of a failed or partial installation. Should this happen,use your FTP client to remove the following directories (some of them may not be present on your site; this is normal):
administrator/component/com_akeebaadministrator/modules/mod_akadmincomponent/com_akeebamedia/com_akeebaplugins/quickicon/akeebabackupplugins/system/akeebaupdatecheckplugins/system/backuponupdateplugins/system/oneclickactionplugins/system/srp
This will do the trick! You will now be able to access your site's administrator page again and retry installing Akee-ba Backup without uninstalling it first. Remember, uninstalling Akeeba Backup will remove your settings and yourbackups; you do not want that to happen!
2. Upgrading from Core to ProfessionalUpgrading from Akeeba Backup Core to Akeeba Backup Professional is by no means different than installing thecomponent. You do not have to uninstall the previous version; in fact, you MUST NOT do that. Simply follow theinstallation instructions to install Akeeba Backup Professional over the existing Akeeba Backup Core installation.That's all! All your settings are preserved.
Important
When upgrading from Core to Professional you usually have to install the Professional package twice, withoutuninstalling anything in between. Sometimes Joomla! does not copy some of the files and folders the first timeyou install it. However, if you install the package again (without uninstalling your existing copy of AkeebaBackup) Joomla! copies all of the necessary files and performs the upgrade correctly.
3. Automatic updates
Checking for the latest version and upgradingYou can easily check for the latest published version of the Akeeba Backup component by visiting http://www.akeebabackup.com/latest. The page lists the version and release date of the latest Akeeba Backup release. You
Installation, updates and upgrades
13
can check it against the data which appear on the right-hand pane of your Akeeba Backup Control Panel. If your releaseis out of date, simply click on the Download link to download the install package of the latest release to your PC.
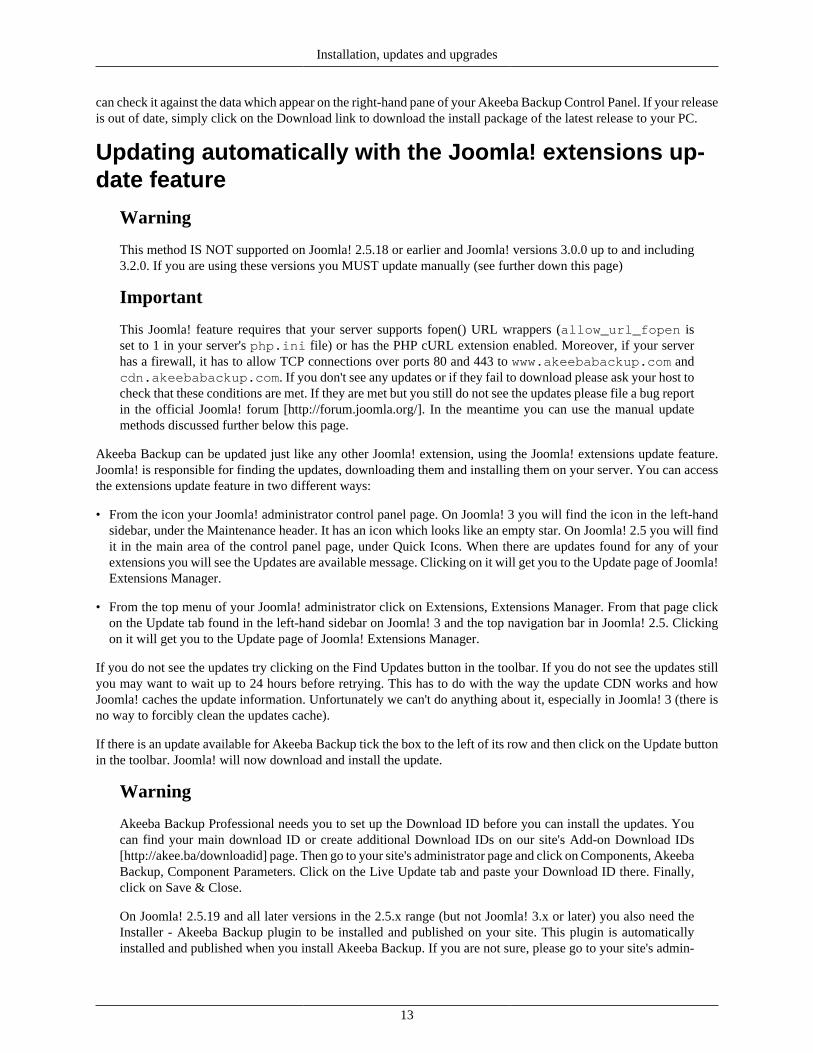
Updating automatically with the Joomla! extensions up-date feature
Warning
This method IS NOT supported on Joomla! 2.5.18 or earlier and Joomla! versions 3.0.0 up to and including3.2.0. If you are using these versions you MUST update manually (see further down this page)
Important
This Joomla! feature requires that your server supports fopen() URL wrappers (allow_url_fopen isset to 1 in your server's php.ini file) or has the PHP cURL extension enabled. Moreover, if your serverhas a firewall, it has to allow TCP connections over ports 80 and 443 to www.akeebabackup.com andcdn.akeebabackup.com. If you don't see any updates or if they fail to download please ask your host tocheck that these conditions are met. If they are met but you still do not see the updates please file a bug reportin the official Joomla! forum [http://forum.joomla.org/]. In the meantime you can use the manual updatemethods discussed further below this page.
Akeeba Backup can be updated just like any other Joomla! extension, using the Joomla! extensions update feature.Joomla! is responsible for finding the updates, downloading them and installing them on your server. You can accessthe extensions update feature in two different ways:
• From the icon your Joomla! administrator control panel page. On Joomla! 3 you will find the icon in the left-handsidebar, under the Maintenance header. It has an icon which looks like an empty star. On Joomla! 2.5 you will findit in the main area of the control panel page, under Quick Icons. When there are updates found for any of yourextensions you will see the Updates are available message. Clicking on it will get you to the Update page of Joomla!Extensions Manager.
• From the top menu of your Joomla! administrator click on Extensions, Extensions Manager. From that page clickon the Update tab found in the left-hand sidebar on Joomla! 3 and the top navigation bar in Joomla! 2.5. Clickingon it will get you to the Update page of Joomla! Extensions Manager.
If you do not see the updates try clicking on the Find Updates button in the toolbar. If you do not see the updates stillyou may want to wait up to 24 hours before retrying. This has to do with the way the update CDN works and howJoomla! caches the update information. Unfortunately we can't do anything about it, especially in Joomla! 3 (there isno way to forcibly clean the updates cache).
If there is an update available for Akeeba Backup tick the box to the left of its row and then click on the Update buttonin the toolbar. Joomla! will now download and install the update.
Warning
Akeeba Backup Professional needs you to set up the Download ID before you can install the updates. Youcan find your main download ID or create additional Download IDs on our site's Add-on Download IDs[http://akee.ba/downloadid] page. Then go to your site's administrator page and click on Components, AkeebaBackup, Component Parameters. Click on the Live Update tab and paste your Download ID there. Finally,click on Save & Close.
On Joomla! 2.5.19 and all later versions in the 2.5.x range (but not Joomla! 3.x or later) you also need theInstaller - Akeeba Backup plugin to be installed and published on your site. This plugin is automaticallyinstalled and published when you install Akeeba Backup. If you are not sure, please go to your site's admin-
Installation, updates and upgrades
14
istrator, click on Extensions, Plug-in Manager and verify that this plugin is installed and published. If thisplugin is not installed or not published you will see the updates but you will NOT be able to install them.Instead you will see an error message telling you about a 403 or 404 error message received. If you do notsee the plugin on your site please update manually, with the method described below.
If Joomla! cannot download the package, please use one of the manual update methods described below. If, howeveryou get an error about copying files, folder not found or a cryptic "-1" error please follow our installation troubleshoot-ing instructions [https://www.akeebabackup.com/documentation/troubleshooter/abinstallation.html].
Updating manuallyAs noted in the installation section, installing and updating Akeeba Backup is actually the same thing. If the automaticupdate using Joomla!'s extensions update feature does not work, please install the update manually following theinstructions in the installation section of this documentation.
Important
When installing an update manually you MUST NOT uninstall your existing version of Akeeba Backup.Uninstalling Akeeba Backup will always remove all your settings and any existing backup archives storedon your server. You definitely not want that to happen!
Live update (versions 3.0 up to and including 3.10.1)
Note
This method was removed in Akeeba Backup 3.10.2
On older versions of Akeeba Backup there is a different update method, if your server supports it. It is called the "LiveUpdate" feature. Whenever you visit the Akeeba Backup Control Panel, it will automatically check for the existenceof an updated version and it will notify you. Clicking on the notification allows you to perform a live update withoutfurther interaction. Do note that if your server is protected by a firewall you'll have to enable port 80 and 443 TCPtraffic to www.akeebabackup.com and cdn.akeebabackup.com for this feature to work properly.
4. Requesting support and reporting bugsSince July 7th, 2011, support is provided only to subscribers. If you already have an active subscription which givesyou access to the support for Akeeba Backup you can request support for it through our site. You will need to log in toour site and go to Support, Akeeba Backup 3.x and click on the New Ticket button. If you can't see the button pleaseuse the Contact Us page to let us know of the ticket system problem and remember to tell us your username.
If you want to report a bug, please use the Contact Us page of our site. You don't need to be a subscriber to reporta bug. Please note that unsolicited support requests sent through the Contact Us page will not be addressed. If youbelieve you are reporting a bug please indicate so in the contact form.
Important
Support cannot be provided over Twitter, Facebook, email, Skype, telephone, the official Joomla! forum,our Contact Us page or any other method except the Support section on our site. We also cannot take bugreports over any other medium except the Contact Us page and the Support section on our site. Support isnot provided to non-subscribers; if you are using the Core version you can request support from other usersin the official Joomla! forum or any other Joomla!-related forum in your country/region. We have to imposethose restrictions in support to ensure a high level of service and quality. Thank you for your understanding.
15
Chapter 3. Using the Akeeba BackupcomponentIn this chapter you are going to find detailed reference of all the pages, options and features of the Akeeba Backupcomponents. To get things organized in a logical manner, we chose to present the individual pages in the same mannerthey appear on the component's Control Panel page, i.e. the first page which is presented to you when you launch thecomponent's back-end. Some of the pages are not available as Control Panel icons, but from different areas of thecomponent. These are discussed first.
1. Pages outside the Control Panel panes1.1. Common navigation elementsAll pages have their title displayed above their contents. On the tool bar there is a Control Panel icon. Clicking it willbring you back to Akeeba Backup's Control Panel (the first page of the component, with all the buttons).
On pages where editing takes place (e.g. the Configuration page, the profiles editor, etc) instead of the Control Panelicon there is a Cancel icon which discards any changes made and returns you to the previous page. On those pages youwill also find a Save icon which saves settings and returns you to the previous page, as well as an Apply icon whichsaves settings and returns you to the same editing page.
On the bottom of each page, just above the Joomla!™ footer, there is the license information. On the Control Panelpage of the Akeeba Backup Core editions there is also a donation link appearing on the right sidebar; if you feel thatAkeeba Backup was useful for you do not hesitate to donate any amount you deem appropriate.
1.2. The Control PanelThe main page which loads when you click on Components, Akeeba Backup is called the Control Panel screen. Fromhere you can see if everything is in working order and access all of the component's functions and configuration options.
If Akeeba Backup detects a problem with loading the necessary Javascript files, it will issue a big warning messagenotifying you that it couldn't load the necessary Javascript files. Sometimes, depending on your server settings, thismessage will not be shown but the interface will behave erratically and appear different than the screen shots providedin here. In this case, you have to use your favorite FTP client and give the media/com_akeeba directory and all of itscontained subdirectories and files 0755 permissions (read/write/execute for the owner, read/execute for group and oth-ers). If this doesn't work, one of your system plugins is killing Akeeba Backup's jQuery integration. In this case, pleasecontact us. Even if you're not a subscriber, please drop us a line using the Contact Us [https://www.akeebabackup.com/contact-us.html] page so that we can figure out what happened and help you. That said, Akeeba Backup will try toautomatically do the necessary changes for you, as long as you have provided FTP connection information to yoursite's Global Configuration and enabled the FTP option in that page.
If you see a blank page instead of the Control Panel, you may have a very old version of PHP installed on your server.Akeeba Backup requires PHP 5.2.0 or later in order to work. You can check your PHP version by going to your site'sadministrator back-end and clicking on the Help, System Info menu item. Take a look at the PHP Version row. If thenumber in there is in the 4.x.y, 5.0.x or 5.1.x range, you can't use Akeeba Backup on your server before upgradingto PHP 5.2 or later.
Important
Even though the Control Panel may load in PHP 5.0.x or 5.1.x, the backup won't run on such old versions ofPHP. You can check your PHP version by going to your site's System Information menu item. We stronglysuggest that you use the latest PHP 5.3.x or 5.4.x version for optimal operation of the component.
Using the Akeeba Backup component
16
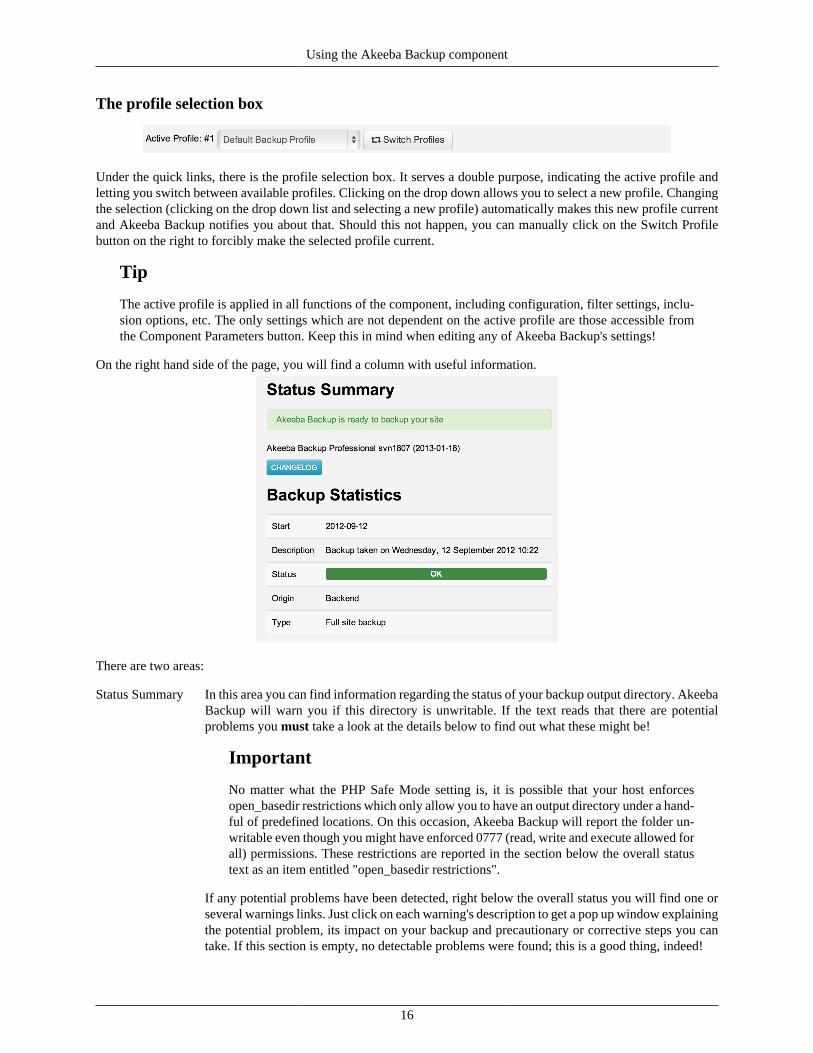
The profile selection box
Under the quick links, there is the profile selection box. It serves a double purpose, indicating the active profile andletting you switch between available profiles. Clicking on the drop down allows you to select a new profile. Changingthe selection (clicking on the drop down list and selecting a new profile) automatically makes this new profile currentand Akeeba Backup notifies you about that. Should this not happen, you can manually click on the Switch Profilebutton on the right to forcibly make the selected profile current.
Tip
The active profile is applied in all functions of the component, including configuration, filter settings, inclu-sion options, etc. The only settings which are not dependent on the active profile are those accessible fromthe Component Parameters button. Keep this in mind when editing any of Akeeba Backup's settings!
On the right hand side of the page, you will find a column with useful information.
There are two areas:
Status Summary In this area you can find information regarding the status of your backup output directory. AkeebaBackup will warn you if this directory is unwritable. If the text reads that there are potentialproblems you must take a look at the details below to find out what these might be!
Important
No matter what the PHP Safe Mode setting is, it is possible that your host enforcesopen_basedir restrictions which only allow you to have an output directory under a hand-ful of predefined locations. On this occasion, Akeeba Backup will report the folder un-writable even though you might have enforced 0777 (read, write and execute allowed forall) permissions. These restrictions are reported in the section below the overall statustext as an item entitled "open_basedir restrictions".
If any potential problems have been detected, right below the overall status you will find one orseveral warnings links. Just click on each warning's description to get a pop up window explainingthe potential problem, its impact on your backup and precautionary or corrective steps you cantake. If this section is empty, no detectable problems were found; this is a good thing, indeed!

Using the Akeeba Backup component
17
Important
You are supposed to read the full text of the warnings by clicking on each item. Quiteoften users post for support on our forum asking something which is already written inthe full text of the warnings. Please, DO NOT seek support unless you have read thedetailed descriptions of all of the potential problems appearing in this box.
Below of all this information you can find a donation link. If you feel that Akeeba Backup hassaved your day - and you do not wish or can't afford subscribing to the Professional edition - youcan donate a small amount of money to help us keep the free version going!
Backup Statistics This panel informs you about the status of your last backup attempt. The information shown is thedate and time of backup, the origin (e.g. remote, backend, frontend and so on), the profile usedand the backup status.
The left navigation panel set
The left navigation panel set allows access to the different functions of the component, by clicking on each icon.
There are two icons which need special mention, the updates icon and the Component Parameters icon.
The Component Parameters button allows you to edit component-wide parameters, i.e. settings which apply to allbackup profiles. These options are mentioned in the following section.
1.2.1. Editing the component's Parameters
The second-to-last icon in the Basic Operations set is titled Component Parameters. Clicking on it will open the editorpage in a modal dialog (lightbox) on your browser. These parameters take effect regardless of the active profile.
Using the Akeeba Backup component
18
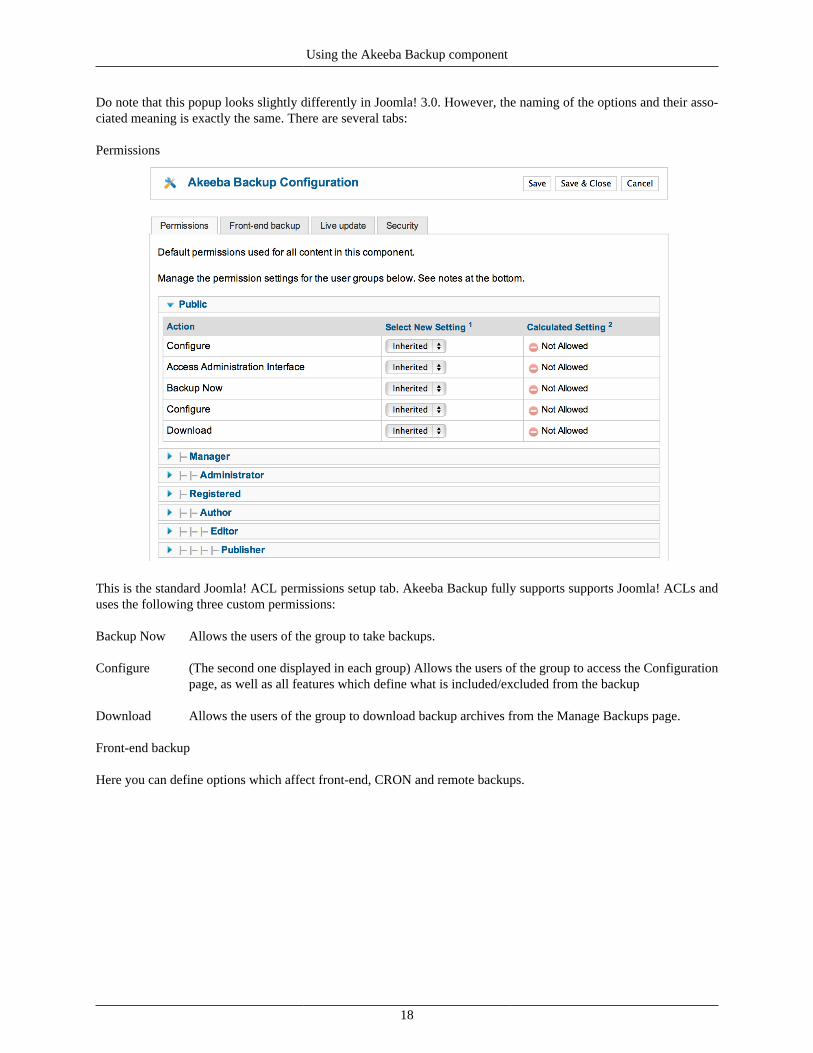
Do note that this popup looks slightly differently in Joomla! 3.0. However, the naming of the options and their asso-ciated meaning is exactly the same. There are several tabs:
Permissions
This is the standard Joomla! ACL permissions setup tab. Akeeba Backup fully supports supports Joomla! ACLs anduses the following three custom permissions:
Backup Now Allows the users of the group to take backups.
Configure (The second one displayed in each group) Allows the users of the group to access the Configurationpage, as well as all features which define what is included/excluded from the backup
Download Allows the users of the group to download backup archives from the Manage Backups page.
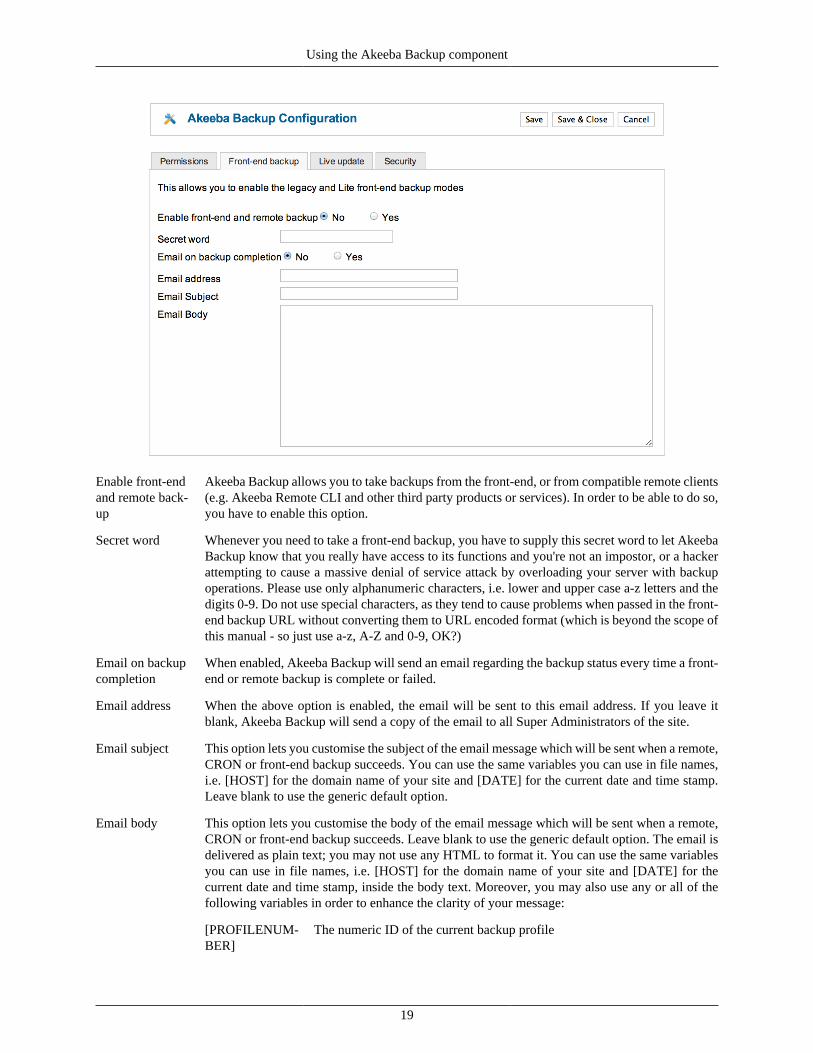
Front-end backup
Here you can define options which affect front-end, CRON and remote backups.
Using the Akeeba Backup component
19
Enable front-endand remote back-up
Akeeba Backup allows you to take backups from the front-end, or from compatible remote clients(e.g. Akeeba Remote CLI and other third party products or services). In order to be able to do so,you have to enable this option.
Secret word Whenever you need to take a front-end backup, you have to supply this secret word to let AkeebaBackup know that you really have access to its functions and you're not an impostor, or a hackerattempting to cause a massive denial of service attack by overloading your server with backupoperations. Please use only alphanumeric characters, i.e. lower and upper case a-z letters and thedigits 0-9. Do not use special characters, as they tend to cause problems when passed in the front-end backup URL without converting them to URL encoded format (which is beyond the scope ofthis manual - so just use a-z, A-Z and 0-9, OK?)
Email on backupcompletion
When enabled, Akeeba Backup will send an email regarding the backup status every time a front-end or remote backup is complete or failed.
Email address When the above option is enabled, the email will be sent to this email address. If you leave itblank, Akeeba Backup will send a copy of the email to all Super Administrators of the site.
Email subject This option lets you customise the subject of the email message which will be sent when a remote,CRON or front-end backup succeeds. You can use the same variables you can use in file names,i.e. [HOST] for the domain name of your site and [DATE] for the current date and time stamp.Leave blank to use the generic default option.
Email body This option lets you customise the body of the email message which will be sent when a remote,CRON or front-end backup succeeds. Leave blank to use the generic default option. The email isdelivered as plain text; you may not use any HTML to format it. You can use the same variablesyou can use in file names, i.e. [HOST] for the domain name of your site and [DATE] for thecurrent date and time stamp, inside the body text. Moreover, you may also use any or all of thefollowing variables in order to enhance the clarity of your message:
[PROFILENUM-BER]
The numeric ID of the current backup profile
Using the Akeeba Backup component
20
[PROFILE-NAME]
The description of the current backup profile
[PARTCOUNT] The number of archive parts of the backup archive which was just generated
[FILELIST] A list of filenames of the archive parts of the backup archive which was justgenerated
[REMOTESTA-TUS]
Available since Akeeba Backup 3.5.3. Shows the status of post-processing,e.g. uploading the file to remote storage like Amazon S3. If you are not usingpost-processing, this is always empty. If the transfer to the remote storagewas successful it will output "Post-processing (upload to remote storage) wassuccessful". If the transfer fails it will output "Post-processing (upload toremote storage) has FAILED".
The options under Check for failed backups are used with the feature for checking for failed backups automatically.
Stuck backuptimeout
A backup will be considered stuck (failed) after this many seconds of inactivity. Please note thatuploading backup archives to remote storage, such as Amazon S3, using the native CRON modemight take substantially longer than that. We advise you to leave this value as is and schedule thebackup failure checks to take place a substantial amount of time (e.g. 1 hour) after the expectedend time of your scheduled backups. If a backup failure check takes place before a backup hasfinished it is very possible that you will end up with a failed backup!
Email address The email address which will be notified for failed backups
Email subject Leave blank to use the default. You can use all of Akeeba Backup's variables you can use fornaming archive files, e.g. [HOST] and [DATE]
Email body Leave blank to use the default. You can use all of Akeeba Backup's variables you can use fornaming archive files, e.g. [HOST] and [DATE].
Live update
These options define how Akeeba Backup will notify you regarding available updates
Download ID If and only if you are using the Professional release you have to specify your DownloadID for the live update feature to work properly. You can get your Download ID by visitingAkeebaBackup.com and clicking My Subscriptions. Your Download ID is printed below the list ofsubscriptions. Filling in this field is required so that only users with a valid Professional subscrip-tion can download update packages, just as you'd expect from any commercial software.
Note
Users of Akeeba Backup Core do not need to supply this information. Akeeba BackupCore is provided free of charge to everybody, therefore there is no need to validate theupdate against a username and a password.
Security
These options define how Akeeba Backup will secure your settings
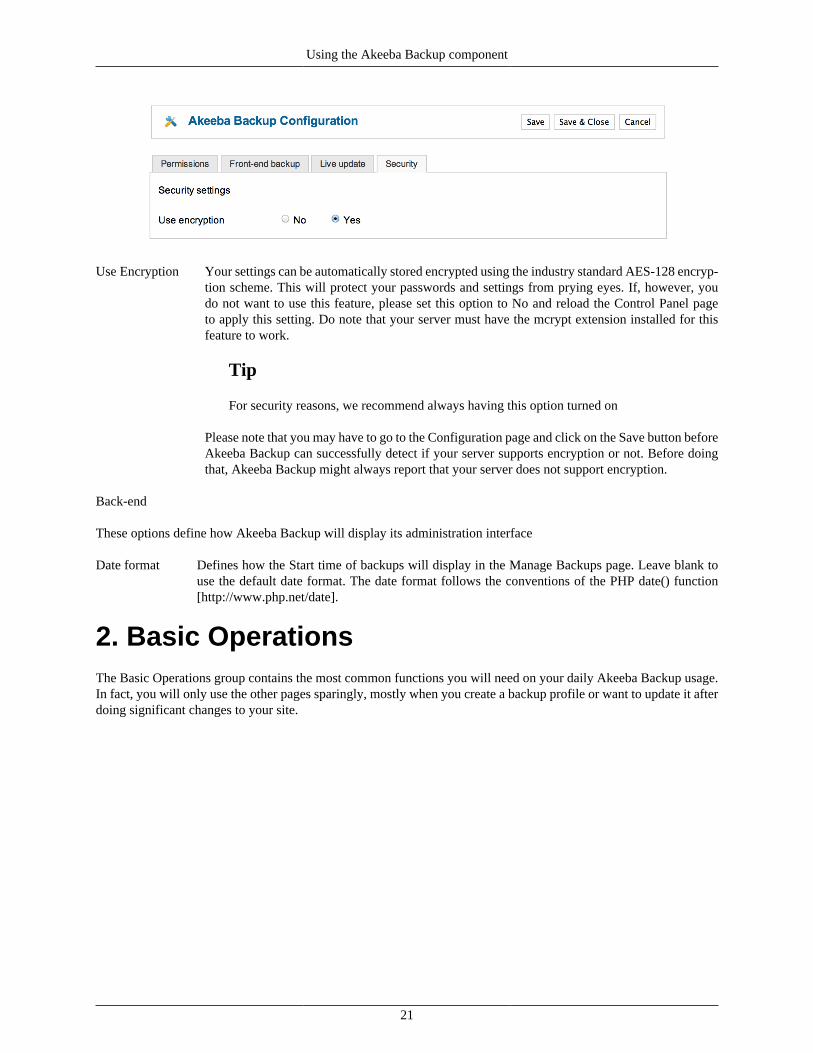
Using the Akeeba Backup component
21
Use Encryption Your settings can be automatically stored encrypted using the industry standard AES-128 encryp-tion scheme. This will protect your passwords and settings from prying eyes. If, however, youdo not want to use this feature, please set this option to No and reload the Control Panel pageto apply this setting. Do note that your server must have the mcrypt extension installed for thisfeature to work.
Tip
For security reasons, we recommend always having this option turned on
Please note that you may have to go to the Configuration page and click on the Save button beforeAkeeba Backup can successfully detect if your server supports encryption or not. Before doingthat, Akeeba Backup might always report that your server does not support encryption.
Back-end
These options define how Akeeba Backup will display its administration interface
Date format Defines how the Start time of backups will display in the Manage Backups page. Leave blank touse the default date format. The date format follows the conventions of the PHP date() function[http://www.php.net/date].
2. Basic OperationsThe Basic Operations group contains the most common functions you will need on your daily Akeeba Backup usage.In fact, you will only use the other pages sparingly, mostly when you create a backup profile or want to update it afterdoing significant changes to your site.
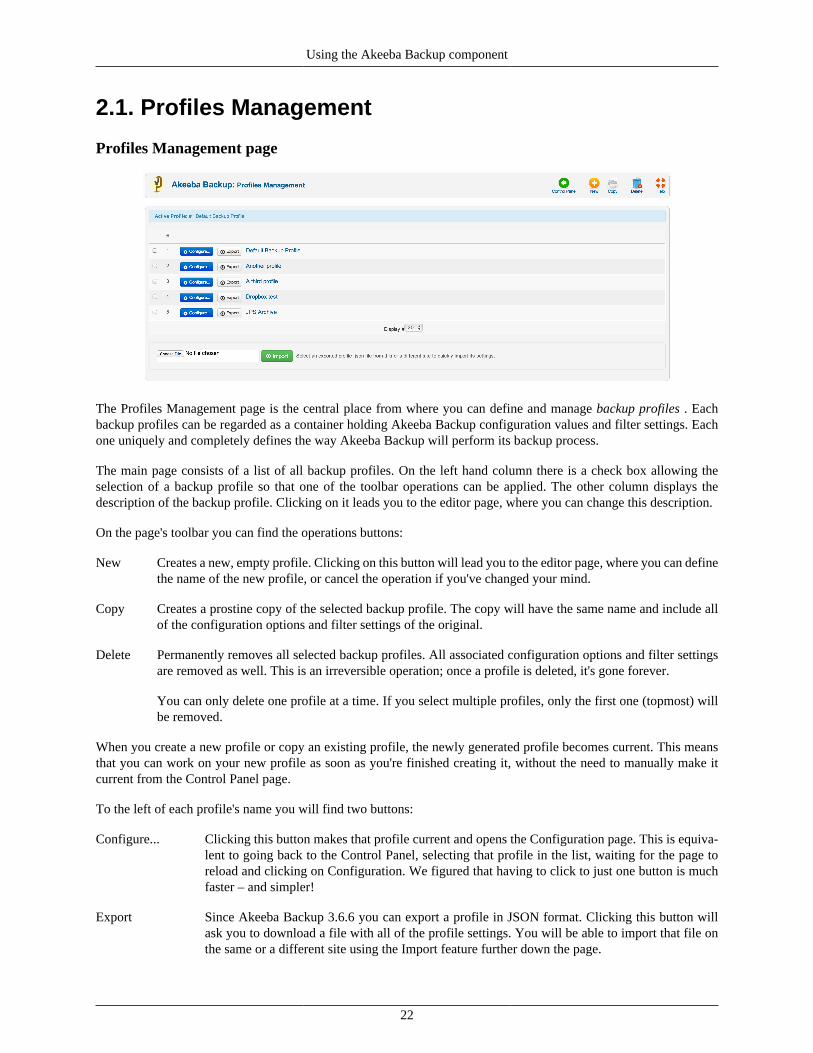
Using the Akeeba Backup component
22
2.1. Profiles Management
Profiles Management page
The Profiles Management page is the central place from where you can define and manage backup profiles . Eachbackup profiles can be regarded as a container holding Akeeba Backup configuration values and filter settings. Eachone uniquely and completely defines the way Akeeba Backup will perform its backup process.
The main page consists of a list of all backup profiles. On the left hand column there is a check box allowing theselection of a backup profile so that one of the toolbar operations can be applied. The other column displays thedescription of the backup profile. Clicking on it leads you to the editor page, where you can change this description.
On the page's toolbar you can find the operations buttons:
New Creates a new, empty profile. Clicking on this button will lead you to the editor page, where you can definethe name of the new profile, or cancel the operation if you've changed your mind.
Copy Creates a prostine copy of the selected backup profile. The copy will have the same name and include allof the configuration options and filter settings of the original.
Delete Permanently removes all selected backup profiles. All associated configuration options and filter settingsare removed as well. This is an irreversible operation; once a profile is deleted, it's gone forever.
You can only delete one profile at a time. If you select multiple profiles, only the first one (topmost) willbe removed.
When you create a new profile or copy an existing profile, the newly generated profile becomes current. This meansthat you can work on your new profile as soon as you're finished creating it, without the need to manually make itcurrent from the Control Panel page.
To the left of each profile's name you will find two buttons:
Configure... Clicking this button makes that profile current and opens the Configuration page. This is equiva-lent to going back to the Control Panel, selecting that profile in the list, waiting for the page toreload and clicking on Configuration. We figured that having to click to just one button is muchfaster – and simpler!
Export Since Akeeba Backup 3.6.6 you can export a profile in JSON format. Clicking this button willask you to download a file with all of the profile settings. You will be able to import that file onthe same or a different site using the Import feature further down the page.
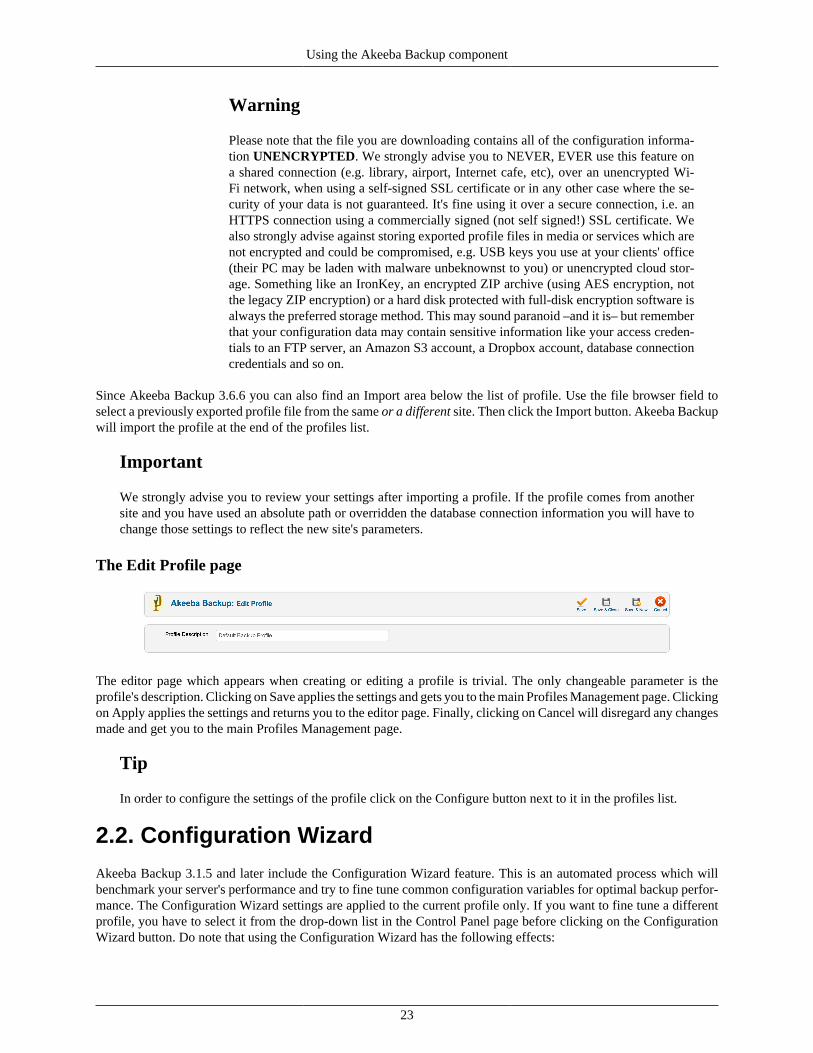
Using the Akeeba Backup component
23
Warning
Please note that the file you are downloading contains all of the configuration informa-tion UNENCRYPTED. We strongly advise you to NEVER, EVER use this feature ona shared connection (e.g. library, airport, Internet cafe, etc), over an unencrypted Wi-Fi network, when using a self-signed SSL certificate or in any other case where the se-curity of your data is not guaranteed. It's fine using it over a secure connection, i.e. anHTTPS connection using a commercially signed (not self signed!) SSL certificate. Wealso strongly advise against storing exported profile files in media or services which arenot encrypted and could be compromised, e.g. USB keys you use at your clients' office(their PC may be laden with malware unbeknownst to you) or unencrypted cloud stor-age. Something like an IronKey, an encrypted ZIP archive (using AES encryption, notthe legacy ZIP encryption) or a hard disk protected with full-disk encryption software isalways the preferred storage method. This may sound paranoid –and it is– but rememberthat your configuration data may contain sensitive information like your access creden-tials to an FTP server, an Amazon S3 account, a Dropbox account, database connectioncredentials and so on.
Since Akeeba Backup 3.6.6 you can also find an Import area below the list of profile. Use the file browser field toselect a previously exported profile file from the same or a different site. Then click the Import button. Akeeba Backupwill import the profile at the end of the profiles list.
Important
We strongly advise you to review your settings after importing a profile. If the profile comes from anothersite and you have used an absolute path or overridden the database connection information you will have tochange those settings to reflect the new site's parameters.
The Edit Profile page
The editor page which appears when creating or editing a profile is trivial. The only changeable parameter is theprofile's description. Clicking on Save applies the settings and gets you to the main Profiles Management page. Clickingon Apply applies the settings and returns you to the editor page. Finally, clicking on Cancel will disregard any changesmade and get you to the main Profiles Management page.
Tip
In order to configure the settings of the profile click on the Configure button next to it in the profiles list.
2.2. Configuration Wizard
Akeeba Backup 3.1.5 and later include the Configuration Wizard feature. This is an automated process which willbenchmark your server's performance and try to fine tune common configuration variables for optimal backup perfor-mance. The Configuration Wizard settings are applied to the current profile only. If you want to fine tune a differentprofile, you have to select it from the drop-down list in the Control Panel page before clicking on the ConfigurationWizard button. Do note that using the Configuration Wizard has the following effects:

Using the Akeeba Backup component
24
• Your backup type is switched to "Full site backup"
• The archiver engine is switched to "JPA (Recommended)"
If you want to use a different backup type and/or archive type, you can review the configuration changes after thewizard is finished.
The Configuration Wizard page
The Configuration Wizard will automatically fine tune the following configuration parameters:
• AJAX method (use AJAX or IFrames)
• Optimize the minimum execution time so as to make the backup as fast as possible without your server throwing403 Forbidden errors
• Adjust the location and/or permissions of the output directory. Useful if you just transferred your site to a newserver or location.
• Optimize the database dump engine settings to make database dump as fast as possible, while avoiding memoryoutage errors
• Optimize the maximum execution time so that as few steps as possible are performed during the backup, withoutcausing a timeout
• Automatically determines if your server needs archive splitting.
Important
The Configuration Wizard does not address the archive splitting required when you are using a post-pro-cessing engine (such as backup-to-email, S3, Dropbox, etc). If you are using post-processing you may haveto manually set the Part Size for Split Archives to a different value manually.
At the end of the wizard process, you can either try taking a backup immediately or review and possibly modify theconfiguration parameters.
2.3. Configuration
Note
Some options discussed below may be only available in the for-a-fee Professional edition!
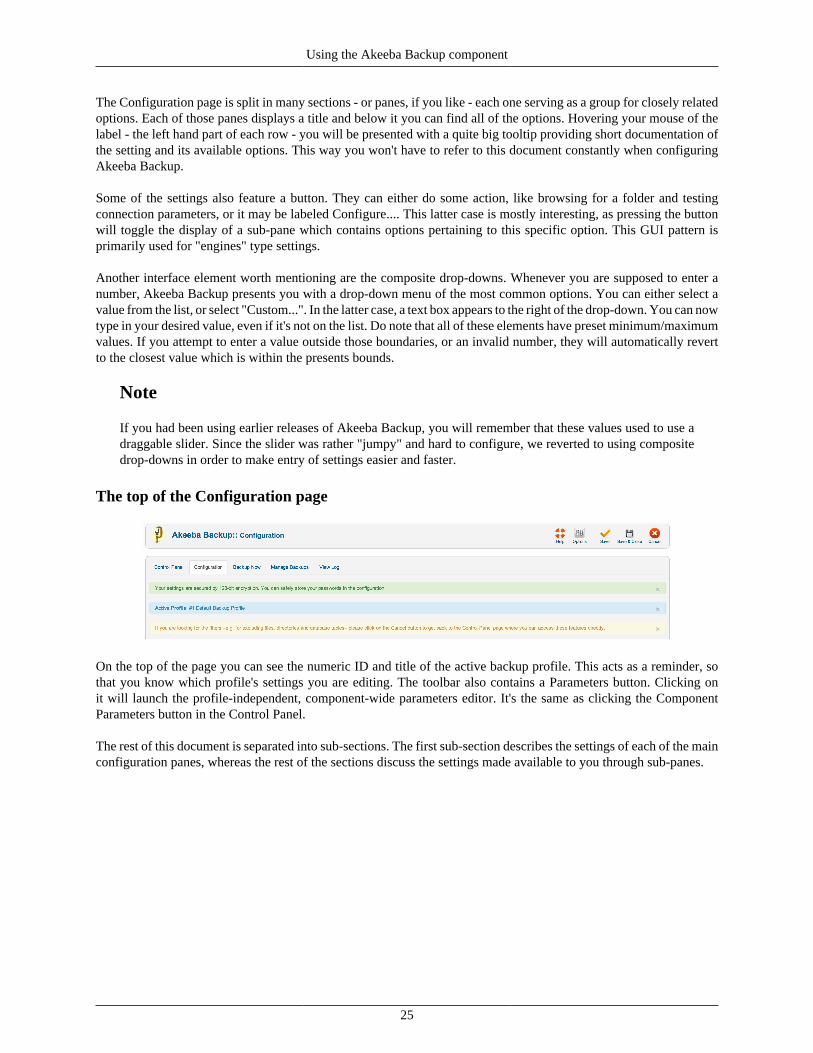
Using the Akeeba Backup component
25
The Configuration page is split in many sections - or panes, if you like - each one serving as a group for closely relatedoptions. Each of those panes displays a title and below it you can find all of the options. Hovering your mouse of thelabel - the left hand part of each row - you will be presented with a quite big tooltip providing short documentation ofthe setting and its available options. This way you won't have to refer to this document constantly when configuringAkeeba Backup.
Some of the settings also feature a button. They can either do some action, like browsing for a folder and testingconnection parameters, or it may be labeled Configure.... This latter case is mostly interesting, as pressing the buttonwill toggle the display of a sub-pane which contains options pertaining to this specific option. This GUI pattern isprimarily used for "engines" type settings.
Another interface element worth mentioning are the composite drop-downs. Whenever you are supposed to enter anumber, Akeeba Backup presents you with a drop-down menu of the most common options. You can either select avalue from the list, or select "Custom...". In the latter case, a text box appears to the right of the drop-down. You can nowtype in your desired value, even if it's not on the list. Do note that all of these elements have preset minimum/maximumvalues. If you attempt to enter a value outside those boundaries, or an invalid number, they will automatically revertto the closest value which is within the presents bounds.
Note
If you had been using earlier releases of Akeeba Backup, you will remember that these values used to use adraggable slider. Since the slider was rather "jumpy" and hard to configure, we reverted to using compositedrop-downs in order to make entry of settings easier and faster.
The top of the Configuration page
On the top of the page you can see the numeric ID and title of the active backup profile. This acts as a reminder, sothat you know which profile's settings you are editing. The toolbar also contains a Parameters button. Clicking onit will launch the profile-independent, component-wide parameters editor. It's the same as clicking the ComponentParameters button in the Control Panel.
The rest of this document is separated into sub-sections. The first sub-section describes the settings of each of the mainconfiguration panes, whereas the rest of the sections discuss the settings made available to you through sub-panes.
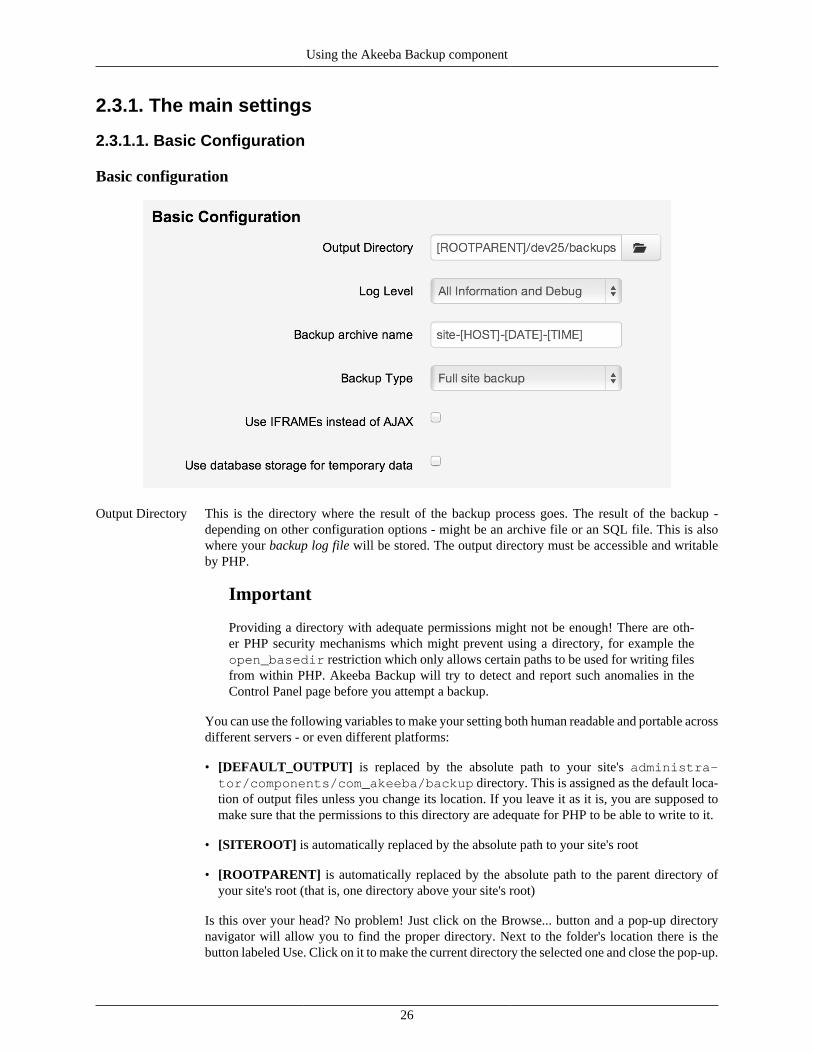
Using the Akeeba Backup component
26
2.3.1. The main settings
2.3.1.1. Basic Configuration
Basic configuration
Output Directory This is the directory where the result of the backup process goes. The result of the backup -depending on other configuration options - might be an archive file or an SQL file. This is alsowhere your backup log file will be stored. The output directory must be accessible and writableby PHP.
Important
Providing a directory with adequate permissions might not be enough! There are oth-er PHP security mechanisms which might prevent using a directory, for example theopen_basedir restriction which only allows certain paths to be used for writing filesfrom within PHP. Akeeba Backup will try to detect and report such anomalies in theControl Panel page before you attempt a backup.
You can use the following variables to make your setting both human readable and portable acrossdifferent servers - or even different platforms:
• [DEFAULT_OUTPUT] is replaced by the absolute path to your site's administra-tor/components/com_akeeba/backup directory. This is assigned as the default loca-tion of output files unless you change its location. If you leave it as it is, you are supposed tomake sure that the permissions to this directory are adequate for PHP to be able to write to it.
• [SITEROOT] is automatically replaced by the absolute path to your site's root
• [ROOTPARENT] is automatically replaced by the absolute path to the parent directory ofyour site's root (that is, one directory above your site's root)
Is this over your head? No problem! Just click on the Browse... button and a pop-up directorynavigator will allow you to find the proper directory. Next to the folder's location there is thebutton labeled Use. Click on it to make the current directory the selected one and close the pop-up.
Using the Akeeba Backup component
27
To make it even easier for you, Akeeba Backup displays a small icon next to the Use button. If it's agreen check mark the directory is writable and you can use it. If it's a red X sign, the directory is notreadable and you either have to select a different directory, or change this directory's permissions.
Warning
NEVER, EVER, UNDER ANY CIRCUMSTANCES SHOULD YOU USE YOURSITE'S ROOT AS YOUR OUTPUT DIRECTORY! This will usually lead to corruptbackup or backup failure. The reason is that the output directory and all of their contentsare automatically excluded from the backup set. However, even if your backup succeedsdue to a bug (remember, it's supposed to fail!), using your public, web accessible siteroot as your output directory is like a party invitation to hackers worldwide. If you cometo our forum with such a setup and a broken backup we can't help you.
Log Level This option determines the verbosity of Akeeba Backup's log file:
• Errors only. Only fatal errors are reported. Use this on production boxes where you havealready confirmed there are no unreadable files or directories.
• Errors and warnings. The minimum recommended setting, reports fatal errors as well as warn-ings. Akeeba Backup communicates unreadable files and directories which it wasn't able tobackup through warnings. Read the warnings to make sure you don't end up with incompletebackups! Warnings are also reported in the Backup Now page GUI irrespective of the log ver-bosity setting as a convenience.
• All information. As "Error and Warnings" but also includes some informative messages onAkeeba Backup's backup process.
• All Information and Debug. This is the recommended setting for reporting bugs. It is the mostverbose level, containing developer-friendly information on Akeeba Backup's operation. Thisis what we need to help you in case of a problem. This will also create a 2-5Mb log file on mostsites, so you should only use this until you have achieved consistently valid backup archivescreation.
• None. This log level is not recommended. You should only use this if you are paranoid andwant no log files written on the server. However, if you are truly concerned about security, youshould protect the backup output directory instead of using this log level!
Our servers usually run on Errors and Warnings or All Information levels. When we are testingnew releases or change our server setups, we switch to All Information and Debug until we aresure everything is flowing smoothly.
Backup archivename
Here you can define the naming template of backup files. There are a few available variables.Variables are special pieces of text which will be expanded to something else at backup time.They can be used to make the names of the files harder to guess for potential attackers, as wellas allow you to store multiple backup archives on the output directory at any given time. Theavailable variables and their expansion at backup time are:
[HOST] The configured host name of your site.
Note
This doesn't work in the native command-line CRON mode, i.e. us-ing akeeba-backup.php for producing automated backups. In such acase, it will be replaced with an empty string (no text).

Using the Akeeba Backup component
28
[DATE] The current server date, in the format YYYYMMDD (year as four digits,month as two digits, day as two digits), for example 20080818 for August18th 2008.
[YEAR] The year of the current server date, as four digits
[MONTH] The month of the current server date, as two digits (zero-padded)
[DAY] The day of the current server date, as two digits (zero-padded)
[WEEK] The current week number of the year. Week #1 is the first week with a Sundayin it.
[WEEKDAY] Day of the week, i.e. Sunday, Monday, etc. The full name is returned in yourcurrent Joomla! language. Front-end, remote and CRON backups may returnthis in English or your default Joomla! language. This is not a bug, it is howJoomla!'s translation system is supposed to work.
[RANDOM] A 64-character random string. Use sparingly, it can cause backup failure dueto the file name being too long for your server
[TIME] The current server time, in the format HHMMSS (hour as two digits, minutesas two digits and seconds as two digits), for example 221520 for 10:15:20 pm.
[VERSION] The version of Akeeba Backup. Useful if you want to know which versionof Akeeba Backup generated this archive file.
[PLATFORM_NAME]The name of the platform Akeeba Backup is currently running under. Thisalways returns "Joomla!".
[PLATFORM_VERSION]The version of the platform Akeeba Backup is currently running under. Thisalways returns the current Joomla! version, e.g. 2.5.4.
[SITENAME] The name of the site, lowercased and transformed into a format which guar-antees compatibility with all filesystem types commonly found in modernOperating Systems. Please note that the site name will be trimmed at 50 char-acters if it's longer.
Backup Type It defines the kind of backup you'd like to take. The backup types for Akeeba Backup are:
• Full site backup which backs up the Joomla! database, any extra databases you might havedefined and all of the site's files. This produces a backup archive with an embedded installerso that you can restore your site with ease. This is the option 90% of the users want; it is theonly option which creates a full backup of your site, capable of producing a working site ifeverything is wiped out of your server.
• Main site database only (SQL file) which backs up only the Joomla! database. It results in asingle SQL file which can be used with any database administration utility (e.g. phpMyAdminfor MySQL, pgAdmin3 for PostgreSQL etc) to restore only your database should disaster strike.This option is recommended for advanced users only.
• Site files only which backs up nothing but the site's files. It is complementary to the previousoption.
Using the Akeeba Backup component
29
Warning
Having one "main site database" backup and one "sites files only" backup is not equalto having a full site backup! The full site backup also includes an installation scriptwhich, just like Joomla!'s web installer, allows you to effortlessly recover your siteeven if everything is wiped out of your server. It acts as the glue between the twopieces (files and database).
• All configured databases (archive file) which creates an archive file containing SQL fileswith dumps of your main site's database and all of the defined multiple databases. The databasedumps can be restored by any database administration tool (for example phpMyAdmin forMySQL). The difference to the second option is that it produces an uncompressed SQL file anddoesn't include any extra databases which you might have defined.
Note
Extra - or "multiple" - database definitions are only available in the Professional edi-tion of the component.
• Incremental (files only). This is the same as the Site files only option, but instead of backingup all of your site's files, it only backs up the files which changed since the last time youperformed a backup. The only comparison made is between the file's modification time and thelast successful backup's time. The "last successful backup" refers to the last backup made usingthis backup Profile and which has a status of "OK", "Remote" or "Obsolete".
Restoring an incremental backup set is a manual process. You have to manually extract thefiles from your "base" backup (an archive made with a Full Site Backup profile), then extractall incremental archives on top of it. Finally, used this collection of extracted files to restoreyour site. This process should only be used if you really know what you are doing. Do not trustthat Akeeba Backup can sort out the collection of incremental backups and help you restorethem. It won't.
Client-side im-plementation ofminimum execu-tion time
Akeeba Backup splits the backup process into smaller chunks, called backup steps, to preventbackup failure due to server time-out or server protection reasons. Each backup step has a min-imum and maximum duration defined by the Minimum Execution Time, Maximum ExecutionTime and Execution Time Bias parameters in this Configuration page. If the step takes less timeto complete than the minimum duration Akeeba Backup will have to wait.
When this box is unchecked (default) Akeeba Backup will have the server wait until the mini-mum execution time is reached. This may cause some very restrictive servers to kill your back-up. Checking this box will implement the waiting period on the browser, working around thislimitation.
Important
This option only applies to back-end backups. Front-end, JSON API (remote) and Com-mand-Line (CLI) backups always implement the wait at the server side.
Use IFRAMEsinstead of AJAX
Normally, Akeeba Backup is using AJAX postbacks to perform the backup process without timingout. Its ability to do so depends on how well your server plays along with your browser's Javascriptengine. Sometimes, this is just not possible at all and you'll experience the backup stalling atrandom points through the backup process. If modifying the other options doesn't help, enablethis feature. When enabled, instead of using AJAX calls, Akeeba Backup will create a hiddenIFRAME in the page and perform all server communications through it. Since IFRAMEs load
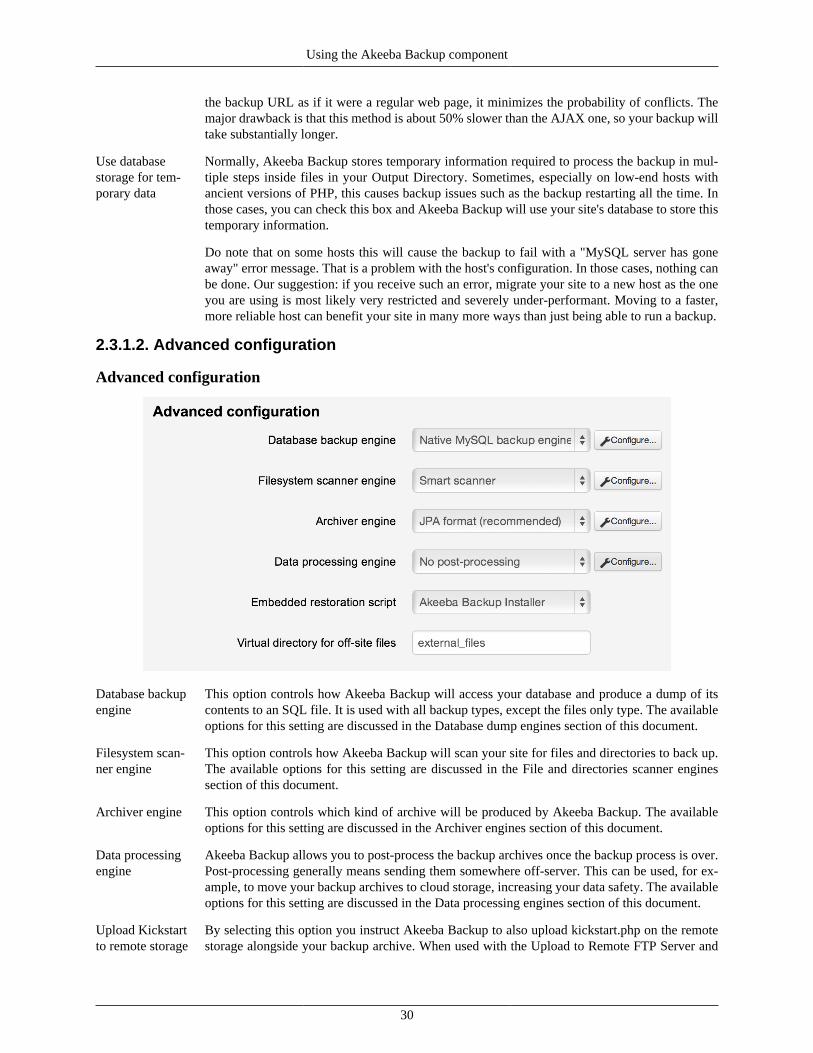
Using the Akeeba Backup component
30
the backup URL as if it were a regular web page, it minimizes the probability of conflicts. Themajor drawback is that this method is about 50% slower than the AJAX one, so your backup willtake substantially longer.
Use databasestorage for tem-porary data
Normally, Akeeba Backup stores temporary information required to process the backup in mul-tiple steps inside files in your Output Directory. Sometimes, especially on low-end hosts withancient versions of PHP, this causes backup issues such as the backup restarting all the time. Inthose cases, you can check this box and Akeeba Backup will use your site's database to store thistemporary information.
Do note that on some hosts this will cause the backup to fail with a "MySQL server has goneaway" error message. That is a problem with the host's configuration. In those cases, nothing canbe done. Our suggestion: if you receive such an error, migrate your site to a new host as the oneyou are using is most likely very restricted and severely under-performant. Moving to a faster,more reliable host can benefit your site in many more ways than just being able to run a backup.
2.3.1.2. Advanced configuration
Advanced configuration
Database backupengine
This option controls how Akeeba Backup will access your database and produce a dump of itscontents to an SQL file. It is used with all backup types, except the files only type. The availableoptions for this setting are discussed in the Database dump engines section of this document.
Filesystem scan-ner engine
This option controls how Akeeba Backup will scan your site for files and directories to back up.The available options for this setting are discussed in the File and directories scanner enginessection of this document.
Archiver engine This option controls which kind of archive will be produced by Akeeba Backup. The availableoptions for this setting are discussed in the Archiver engines section of this document.
Data processingengine
Akeeba Backup allows you to post-process the backup archives once the backup process is over.Post-processing generally means sending them somewhere off-server. This can be used, for ex-ample, to move your backup archives to cloud storage, increasing your data safety. The availableoptions for this setting are discussed in the Data processing engines section of this document.
Upload Kickstartto remote storage
By selecting this option you instruct Akeeba Backup to also upload kickstart.php on the remotestorage alongside your backup archive. When used with the Upload to Remote FTP Server and
Using the Akeeba Backup component
31
Upload to Remote SFTP Server you can perform easy site transfers without leaving the comfort ofyour browser. Just enter the new site's (S)FTP information in the Data Processing Engine config-uration and select the Upload Kickstart to Remote Storage option, then take a new backup. Whenthe backup is complete just open the new site's kickstart.php URL (e.g. http://www.example.com/kickstart.php) in your browser to begin the restoration on the new site's server. This even workswith mobile devices (we strongly recommend using a tablet or phablet with a display size of atleast 7"), allowing you to clone sites even you are on the go!
Embeddedrestoration script
Akeeba Backup will include a restoration script inside the backup archive in order to make restora-tion easy and the backup archive self-contained. You do not need anything else except the archivein order to restore a site. Restoration scripts honour the settings in your configuration.php, mod-ifying only those necessary (for example, the database connection information), allowing you tocreate pristine copies ("clones") of your site to any host. You can find more information aboutrestoration scripts in the next Chapter.
Virtual directoryfor off-site files
Using the off-site directories inclusion of Akeeba Backup Professional, the component will beinstructed to look for files in arbitrary locations, even if they are outside the site's root (hence thename of that feature). All the directories included with this feature will be placed in the archiveas subdirectories of another folder, in order to avoid directory name clashes. We call this folderthe "virtual directory", because it doesn't physically exist on the server, it only exists inside thebackup archive.
2.3.1.3. Site overrides
These settings are all optional and only available in Akeeba Backup Professional. They allow you to back up a differentsite than the one Akeeba Backup is currently installed. Essentially, you can install Akeeba Backup on one site andhave it back up all sites on the server.
Note
You do not need to set anything up in this section if you only intend to backup or transfer your site. This isonly required when you want Akeeba Backup to backup a different site than the one it is installed in.
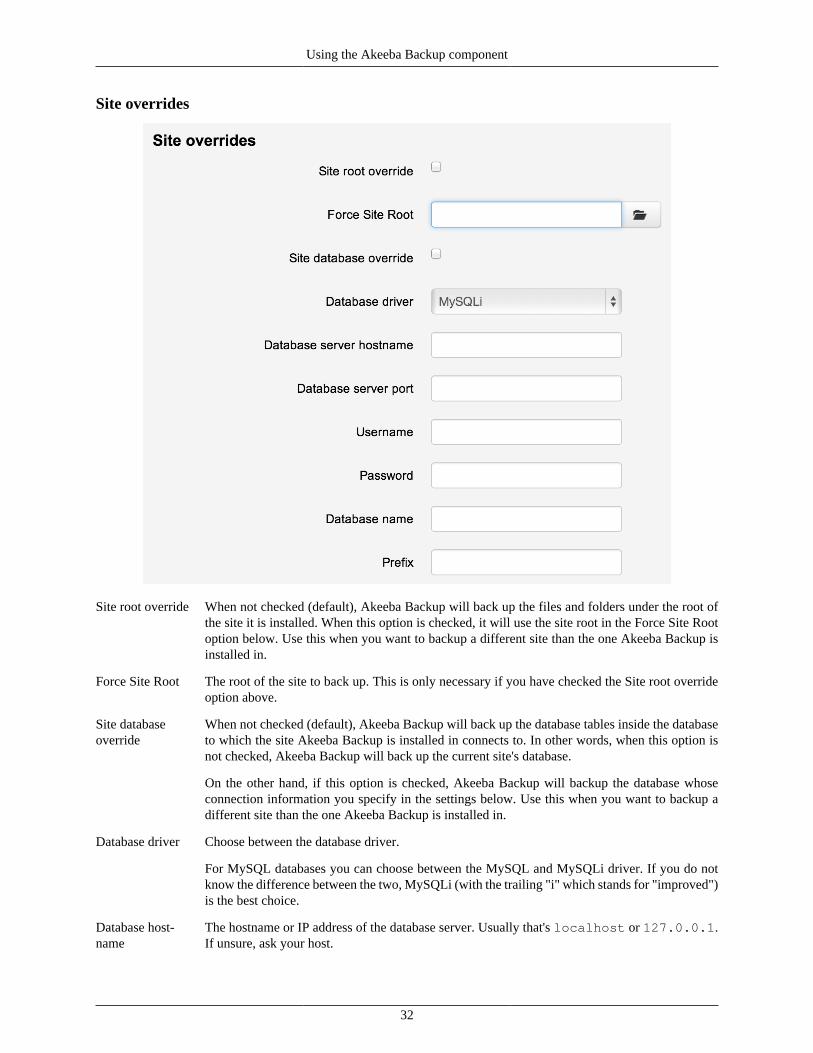
Using the Akeeba Backup component
32
Site overrides
Site root override When not checked (default), Akeeba Backup will back up the files and folders under the root ofthe site it is installed. When this option is checked, it will use the site root in the Force Site Rootoption below. Use this when you want to backup a different site than the one Akeeba Backup isinstalled in.
Force Site Root The root of the site to back up. This is only necessary if you have checked the Site root overrideoption above.
Site databaseoverride
When not checked (default), Akeeba Backup will back up the database tables inside the databaseto which the site Akeeba Backup is installed in connects to. In other words, when this option isnot checked, Akeeba Backup will back up the current site's database.
On the other hand, if this option is checked, Akeeba Backup will backup the database whoseconnection information you specify in the settings below. Use this when you want to backup adifferent site than the one Akeeba Backup is installed in.
Database driver Choose between the database driver.
For MySQL databases you can choose between the MySQL and MySQLi driver. If you do notknow the difference between the two, MySQLi (with the trailing "i" which stands for "improved")is the best choice.
Database host-name
The hostname or IP address of the database server. Usually that's localhost or 127.0.0.1.If unsure, ask your host.
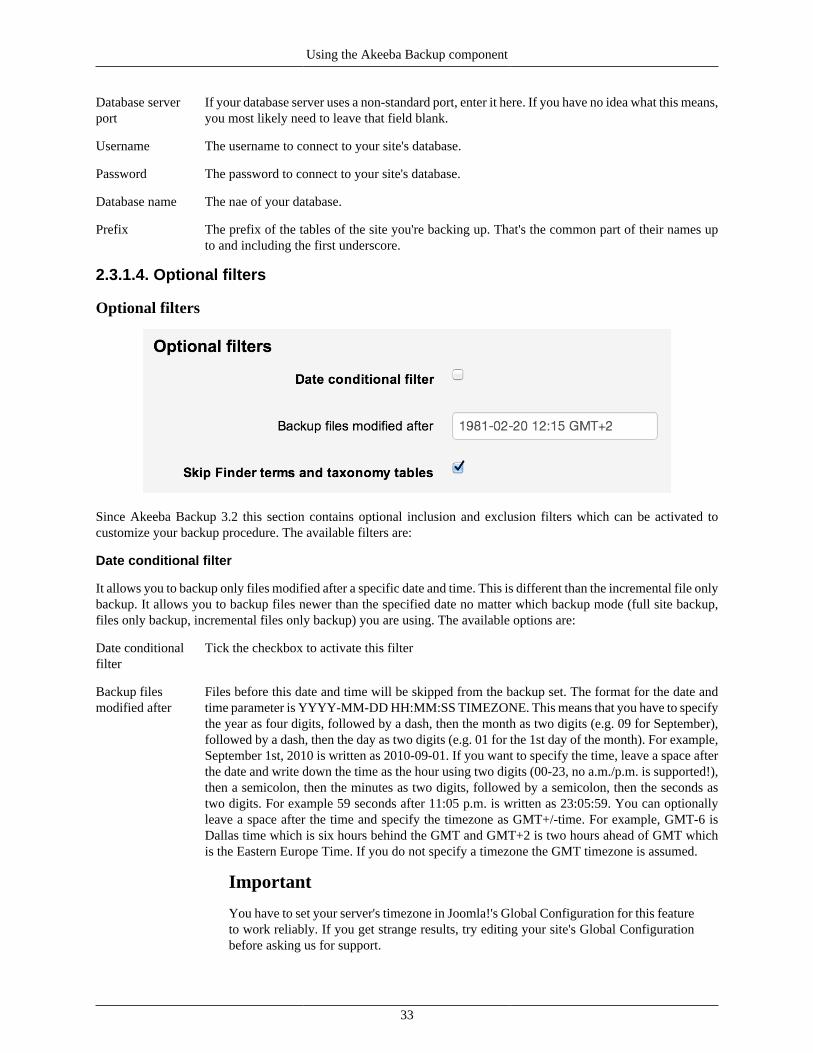
Using the Akeeba Backup component
33
Database serverport
If your database server uses a non-standard port, enter it here. If you have no idea what this means,you most likely need to leave that field blank.
Username The username to connect to your site's database.
Password The password to connect to your site's database.
Database name The nae of your database.
Prefix The prefix of the tables of the site you're backing up. That's the common part of their names upto and including the first underscore.
2.3.1.4. Optional filters
Optional filters
Since Akeeba Backup 3.2 this section contains optional inclusion and exclusion filters which can be activated tocustomize your backup procedure. The available filters are:
Date conditional filter
It allows you to backup only files modified after a specific date and time. This is different than the incremental file onlybackup. It allows you to backup files newer than the specified date no matter which backup mode (full site backup,files only backup, incremental files only backup) you are using. The available options are:
Date conditionalfilter
Tick the checkbox to activate this filter
Backup filesmodified after
Files before this date and time will be skipped from the backup set. The format for the date andtime parameter is YYYY-MM-DD HH:MM:SS TIMEZONE. This means that you have to specifythe year as four digits, followed by a dash, then the month as two digits (e.g. 09 for September),followed by a dash, then the day as two digits (e.g. 01 for the 1st day of the month). For example,September 1st, 2010 is written as 2010-09-01. If you want to specify the time, leave a space afterthe date and write down the time as the hour using two digits (00-23, no a.m./p.m. is supported!),then a semicolon, then the minutes as two digits, followed by a semicolon, then the seconds astwo digits. For example 59 seconds after 11:05 p.m. is written as 23:05:59. You can optionallyleave a space after the time and specify the timezone as GMT+/-time. For example, GMT-6 isDallas time which is six hours behind the GMT and GMT+2 is two hours ahead of GMT whichis the Eastern Europe Time. If you do not specify a timezone the GMT timezone is assumed.
Important
You have to set your server's timezone in Joomla!'s Global Configuration for this featureto work reliably. If you get strange results, try editing your site's Global Configurationbefore asking us for support.
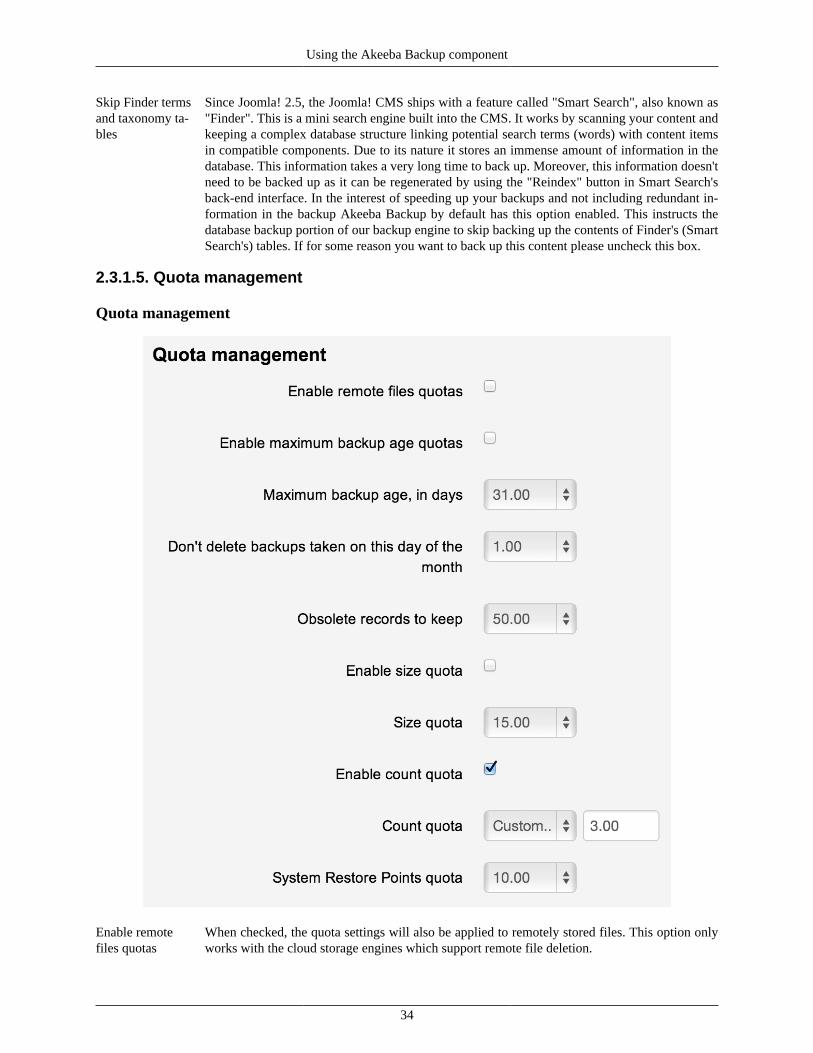
Using the Akeeba Backup component
34
Skip Finder termsand taxonomy ta-bles
Since Joomla! 2.5, the Joomla! CMS ships with a feature called "Smart Search", also known as"Finder". This is a mini search engine built into the CMS. It works by scanning your content andkeeping a complex database structure linking potential search terms (words) with content itemsin compatible components. Due to its nature it stores an immense amount of information in thedatabase. This information takes a very long time to back up. Moreover, this information doesn'tneed to be backed up as it can be regenerated by using the "Reindex" button in Smart Search'sback-end interface. In the interest of speeding up your backups and not including redundant in-formation in the backup Akeeba Backup by default has this option enabled. This instructs thedatabase backup portion of our backup engine to skip backing up the contents of Finder's (SmartSearch's) tables. If for some reason you want to back up this content please uncheck this box.
2.3.1.5. Quota management
Quota management
Enable remotefiles quotas
When checked, the quota settings will also be applied to remotely stored files. This option onlyworks with the cloud storage engines which support remote file deletion.

Using the Akeeba Backup component
35
Enable maximumbackup age quo-tas
When checked, Akeeba Backup will only apply quotas based on the date and time the backup wasstarted. This allows you to easily do something like "keep daily backups for the last 15 days andalways keep the backup taken on the first of each month".
Warning
Enabling this options DISABLES the size and count quotas.
Maximum backage, in days
Only applies when the Enable maximum backup age quotas option is enabled.
Backups older than this number of days will be deleted. Newer backups will not be deleted.
Don't deletebackups taken onthis day of themonth
Only applies when the Enable maximum backup age quotas option is enabled.
Even when a backup is older than the Maximum back age, in days setting, it won't be deleted ifit was taken on this day of the month. For example, if you set this to 1, backups taken on the firstday of each calendar month will not be deleted. Setting this option to 1, the backup age to 31 andenabling the maximum backup age quotas you end up keeping all backups taken the last monthand keeping the backups taken on the first of each month.
Obsolete recordsto keep
When the locally stored files of a backup record are deleted (either manually or automaticallyafter uploading it to a remote storage) the record is marked as Obsolete or Remote. Some usersprefer to limit the number of the backup entries showing in the Manage Backups (formerly "Ad-minister Backup Files") page. This option instructs Akeeba Backup to keep at most that manyobsolete/remote records and automatically delete older obsolete/remote entries. This is differentthan the rest of the quotas because it doesn't remove files from your server, it removes the backupentry from Akeeba Backup's interface.
Enable size quota When checked, old backup archives will be erased when the total size of archives stored underthis (and only this) profile exceed the Size quota setting.
Size quota Defines the maximum aggregated size of backup archives under the current profile to keep. Onlyhas an effect if the previous options is activated.
Enable countquota
When checked, old backup archives will be erased when there are more backups stored under this(and only this) profile exceed the Count quota setting.
Count quota Defines the maximum number of backups under the current profile to keep. Only has an effectif the previous options is activated.
System RestorePoints quota
Note
This feature is only available in Akeeba Backup Professional, the for-a-fee edition ofour software
Important
This option has effect ONLY when set in profile #1 (the default backup profile). In allother cases it is ignored.
This quota setting doesn't affect the regular backups; it only applies to System Restore Points.Moreover, System Restore Points are not subject to the other quota settings, but only to this one.
This setting defines the maximum total size System Restore Points can take on your server. Forexample, if it is set to 10Mb (the default value), only up to 10Mb of System Restore Point fileswill be kept on your server.

Using the Akeeba Backup component
36
2.3.1.6. Fine tuning
Fine tuning
Minimum execu-tion time
Some servers deploy anti-hacker measures (such as mod_evasive or mod_security) which willdeny connections to the server if the same URL is accessed multiple times in a limited amountof time. Akeeba Backup has to call its backup URL multiple times, so it runs the risk of beingtreated as a potential hacker and denied connection to your server, resulting to backup failure.
In order to work around this issue, Akeeba Backup can throttle the rate of server requests usingthis setting. A minimum execution time of 2 seconds means that calls to the backup URL willhappen at most once every two seconds. You are suggested to keep the default value.
Maximum execu-tion time
Akeeba Backup has to divide the backup process in individual small steps in order to avoid servertimeouts. However, it has to know how small they have to be; that's why this setting exists. Akee-ba Backup will try to avoid consuming more time per step than this setting. You have to use a
Using the Akeeba Backup component
37
number lower than the maximum_execution_time setting in your host's php.ini file. In fact,we suggest using 50% of that value here: if your host allows up to 30 seconds in the php.ini, youhave to enter no more than 15-17 seconds here. If unsure, 7 seconds is a very safe value undermost configurations.
Execution timebias
When Akeeba Backup calculates the available time left for performing operations within the cur-rent backup step a number of external settings may skew this result and lead to timeout errors. Thissetting defines how conservative the backup engine will be when performing those calculationsand is expressed as a percentage of the Maximum execution time parameter. The less this settingis, the more conservative Akeeba Backup gets. It is suggested not to use a value over 75%, unlessyou have a very fast server. If you experience timeouts, you may want to lower this setting to avalue around 50%.
Resume backupafter an AJAX er-ror has occurred
When this option is unchecked Akeeba Backup will completely stop the backup when the serverresponds with an error or the communication with the server is cut short. When this option isenabled (default), Akeeba Backup will try to resume the backup by repeating the last backupstep. This will not let you successfully resume all backups which result in an error: only backupattempts temporarily blocked by server CPU usage restrictions or network outage issues can beresumed. If the backup fails due to a timeout error, memory outage, incompatible server softwareetc the backup resumption will result in the same error until it leads to a permanent backup failure.
Important
This feature only applies to back-end backups. This feature will not be taken into accountwhen you have enabled the Process each part immediately option in the configuration ofthe Data processing engine since it's impossible to retry backing up to a backup archivewhich may have already been transferred to remote storage and removed from the server.
Wait period be-fore retrying thebackup step
How many seconds to wait before resuming the backup. It is advisable to set this to 30 secondsor more (120 seconds is recommended in most cases) to give your server / network the necessarytime to recover from the error condition which caused your backup to fail.
Maximum retriesof a backup stepafter an AJAX er-ror
How many consecutive times should we retry resuming the backup before finally giving up andthrowing a permanent error (backup failure). 3 to 5 retries work best on most servers.
Disable stepbreak beforelarge files
When the application detects a large file (see the filesystem scanner engine configuration) it willtry to break the execution of the current backup step and start backing up the large file in its ownbackup step. This is a conservative behaviour that increases the likelihood of being able to backuplarge files but makes the backup slower. If you check this box the backup will become faster, butit might fail backing up larger files.
Disable stepbreak after largefiles
When the application finishes backing up a large file (see the filesystem scanner engine configu-ration) it will try to break the execution of the current backup step and continue the backup pro-cess in a step. This is a conservative behaviour that decreases the likelihood of the backup enginetiming out after backing up a large file but makes the backup slower. If you check this box thebackup will become faster, but it might fail after backing up larger files.
Disable proactivestep breaking
The application tries to guess how much time it will take it to backup each file. If it believes thatbacking up the next file in its queue will take too long it will break the backup step and continue thebackup in a new step. This decreases the likelihood of server timeouts, at the expense of makingthe backup a little slower, especially if you have lots of tiny files. If you check this box the backupwill become faster, but it might fail in some cases.
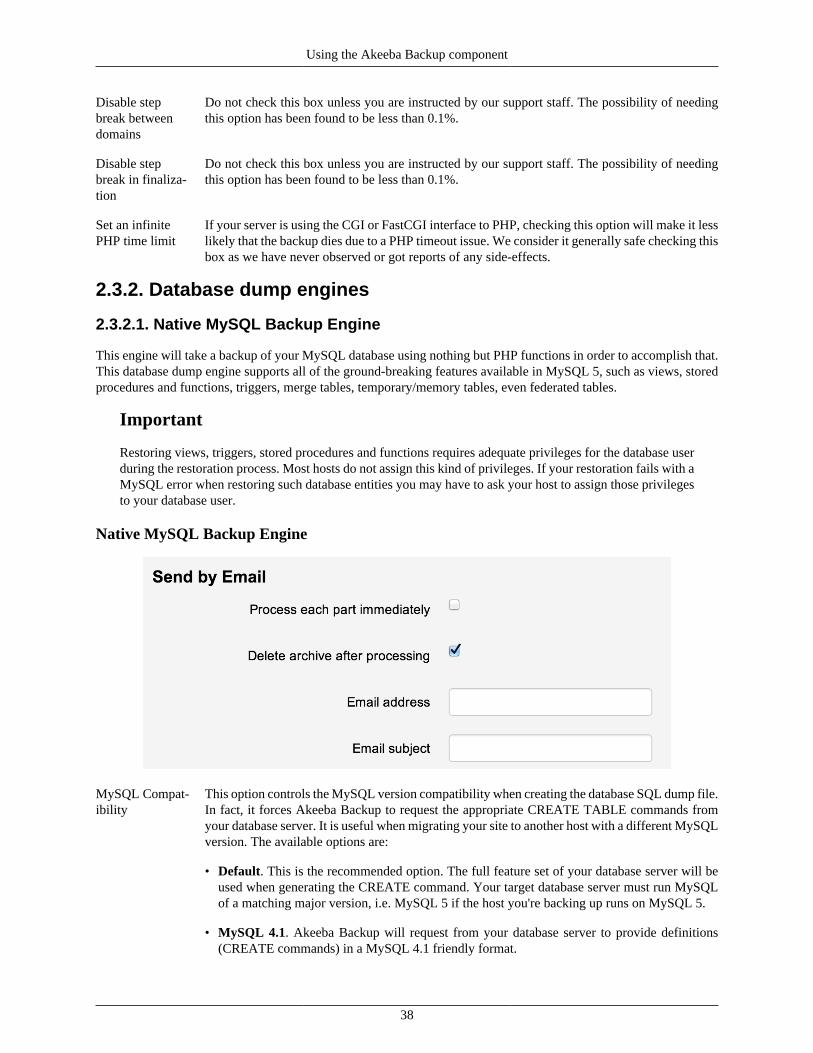
Using the Akeeba Backup component
38
Disable stepbreak betweendomains
Do not check this box unless you are instructed by our support staff. The possibility of needingthis option has been found to be less than 0.1%.
Disable stepbreak in finaliza-tion
Do not check this box unless you are instructed by our support staff. The possibility of needingthis option has been found to be less than 0.1%.
Set an infinitePHP time limit
If your server is using the CGI or FastCGI interface to PHP, checking this option will make it lesslikely that the backup dies due to a PHP timeout issue. We consider it generally safe checking thisbox as we have never observed or got reports of any side-effects.
2.3.2. Database dump engines
2.3.2.1. Native MySQL Backup Engine
This engine will take a backup of your MySQL database using nothing but PHP functions in order to accomplish that.This database dump engine supports all of the ground-breaking features available in MySQL 5, such as views, storedprocedures and functions, triggers, merge tables, temporary/memory tables, even federated tables.
Important
Restoring views, triggers, stored procedures and functions requires adequate privileges for the database userduring the restoration process. Most hosts do not assign this kind of privileges. If your restoration fails with aMySQL error when restoring such database entities you may have to ask your host to assign those privilegesto your database user.
Native MySQL Backup Engine
MySQL Compat-ibility
This option controls the MySQL version compatibility when creating the database SQL dump file.In fact, it forces Akeeba Backup to request the appropriate CREATE TABLE commands fromyour database server. It is useful when migrating your site to another host with a different MySQLversion. The available options are:
• Default. This is the recommended option. The full feature set of your database server will beused when generating the CREATE command. Your target database server must run MySQLof a matching major version, i.e. MySQL 5 if the host you're backing up runs on MySQL 5.
• MySQL 4.1. Akeeba Backup will request from your database server to provide definitions(CREATE commands) in a MySQL 4.1 friendly format.
Using the Akeeba Backup component
39
Important
This option will take effect in MySQL 4.1 or greater database hosts. If you use it onolder MySQL version the backup might fail!
Warning
Do not use this option if your site is already running on MySQL 4.x or if both yoursite and the target host run on MySQL 5.x. Otherwise, crucial information about thedatabase's encoding might be lost in the process, causing broken text on sites usingnon-ASCII character sets.
Blank out user-name/password
When enabled, Akeeba Backup will not include the username and password of database connec-tions in the backup. Please note that this option only removes the database username and passwordfrom the installation/sql/databases.ini file which is included in the backup. It does not remove thedatabase connection information from the configuration.php file of Joomla!. If you want to removethe database connection information for security reasons you should exclude configuration.phpfrom your backup using the Files and Directories Exclusion filter feature of Akeeba Backup.
Generate extend-ed INSERTs
When this is not checked, Akeeba Backup will create one INSERT statement for each data rowof each table. When you have lots of rows with insignificant amount of data, such as banner andclick tracking logs, the overhead of the INSERT statement is much higher than the actual data,causing a massively bloated database dump file. When this option is enabled, the dump engine willcreate a single INSERT statement for multiple rows of data, reducing the overhead and resultinginto significantly smaller backup archives. Moreover, this will lead to much less SQL commandsbeing run during restoration, which is of paramount importance on many restrictive shared hostingenvironments. It is suggested to turn this setting on, unless you are going to restore to a MySQL4.1 host.
Max packet sizefor extended IN-SERTs
If the previous setting is enabled, this setting defines the maximum length of a single INSERTstatement. Most MySQL servers have a configured limit of maximum statement length and willnot accept an INSERT statement over 1Mb. It is suggested to leave the default conservative setting(128Kb) unless you know what you're doing. If you get restoration failures indicating that youexceeded the maximum query length, please lower this setting.
Dump PRO-CEDUREs,FUNCTIONs andTRIGGERs
By default, Akeeba Backup will only back up database tables and VIEWs. If your host supportsthis, you can also back up and restore advanced aspects of your MySQL database: stored proce-dures, stored functions and triggers. If your site makes use of any of those features you will haveto tick the box. If the backup operation crashes or you the database tables filter page is blank youmust turn this option off for Akeeba Backup to work properly.
Warning
Using this feature requires that your host allows you to execute privileged SQL com-mands against the MySQL database:
• SHOW PROCEDURE STATUS
• SHOW FUNCTION STATUS
• SHOW TRIGGERS
Most shared hosting providers do not allow you to execute these commands. Trying todo so will usually cause the script execution to abruptly halt, most often without indicat-
Using the Akeeba Backup component
40
ing the source of error. If you are in doubt, disable this option and retry backup. Thisshouldn't be an issue with dedicated hosting, as long as you grant the SUPER privilegeto the database user you use to connect to your site's database.
Size for splitSQL dump files
Akeeba Backup is able to split your MySQL database dump to smaller files. This allows for animproved compression ratio and also helps avoid several problems with certain cheap hosts whichput a restriction on the maximum size a file generated by PHP code can have.
Ideally, you should specify a setting which is about half as much as your Big file threshold settingin the archiver engine's configuration options pane. The reason to do that is that the archiverengines will not compress files with sizes over the value this threshold. Since it's impossible tohave absolute control of the size of the database dump, using half the value of this setting allowsfor the expected size fluctuation.
If you want to disable this feature and create a single big SQL dump file instead, just set thisoption to 0 Mb.
Important
This setting has no effect on "Main site database only" backup profiles. This is becausethe nature of this backup type does not allow splitting the database archive dump. Ifyou want something equivalent, please use the "All configured databases" backup typeinstead, as it creates an archive file which contains your (split) database dump and takesup MUCH less space on your web server.
Number of rowsper batch
Dumping table data happens in "batches", i.e. a few rows at a time. This parameter defines howmany rows will be fetched from the table at any given time. If you are backing up tables with largechunks of binary data (e.g. files stored in BLOB fields) or if you have very large chunks of textstored in the database, the default value - 1000 rows - may cause a PHP memory or MySQL bufferexhaustion. If you get memory outage errors during the table backup, it is advisable to lower thissetting. This is especially true if your MySQL and PHP combination does not allow a cursor tobe effectively created and all data has to be transferred in PHP's memory. A value of 20 is a verysafe value, at the expense of making your backup process slower and run more queries againstyour database server. Most servers work fine with the default value of 1000 rows per batch.
No dependencytracking
When this option is enabled, Akeeba Backup's database dump engine will no longer try to figureout table and VIEW dependencies. This will speed up the database dump initialization step. This isrecommended if and only if you have too many tables (over 200) in your database, you get time-out errors during the database dump initialization step and you do not use foreign keys, VIEWs,FUNCTIONs, PROCEDUREs, TRIGGERs or any tables using the MERGE database engine. Ifyou do use any of those MySQL features in your tables there is a high probability that your SQLdump will be unable to be restored.
2.3.2.2. Reverse Engineering Database Dump Engine
Warning
Due to its nature we consider this method a beta feature.
This engine will take a backup of your database by reverse engineering its structure. This is the only possible method fornon-MySQL databases (PostgreSQL, SQL Server, Windows Azure SQL). This database dump engine only supports arudimentary feature set of your database server: tables and views only with their constraints and foreign key relations.It doesn't support advanced entities such as triggers, procedures and functions. The supported feature set should beadequate for backing up a Joomla! site.
Using the Akeeba Backup component
41
Important
Reverse engineering the database structure usually requires adequate privileges for the database user duringthe backup process. The same goes for restoration of VIEWs during the restoration process. Most hosts donot assign this kind of privileges. If your backup or restoration fails with a database error when backing upor restoring your site you may have to ask your host to assign those privileges to your database user.
Blank out user-name/password
When enabled, Akeeba Backup will not include the username and password of database connec-tions in the backup. Please note that this option only removes the database username and passwordfrom the installation/sql/databases.ini file which is included in the backup. It does not remove thedatabase connection information from the configuration.php file of Joomla!. If you want to removethe database connection information for security reasons you should exclude configuration.phpfrom your backup using the Files and Directories Exclusion filter feature of Akeeba Backup.
Generate extend-ed INSERTs
When this is not checked, Akeeba Backup will create one INSERT statement for each data rowof each table. When you have lots of rows with insignificant amount of data, such as banner andclick tracking logs, the overhead of the INSERT statement is much higher than the actual data,causing a massively bloated database dump file. When this option is enabled, the dump engine willcreate a single INSERT statement for multiple rows of data, reducing the overhead and resultinginto significantly smaller backup archives. Moreover, this will lead to much less SQL commandsbeing run during restoration, which is of paramount importance on many restrictive shared hostingenvironments. It is suggested to turn this setting on, unless you are going to restore to a MySQL4.1 host.
Max packet sizefor extended IN-SERTs
If the previous setting is enabled, this setting defines the maximum length of a single INSERTstatement. Most MySQL servers have a configured limit of maximum stement length and will notaccept an INSERT statement over 1Mb. It is suggested to leave the default conservative setting(128Kb) unless you know what you're doing. If you get restoration failures indicating that youexceeded the maximum query length, please lower this setting.
Size for splitSQL dump files
Akeeba Backup is able to split your MySQL database dump to smaller files. This allows for animproved compression ratio and also helps avoid several problems with certain cheap hosts whichput a restriction on the maximum size a file generated by PHP code can have.
Ideally, you should specify a setting which is about half as much as your Big file threshold settingin the archiver engine's configuration options pane. The reason to do that is that the archiverengines will not compress files with sizes over the value this threshold. Since it's impossible tohave absolute control of the size of the database dump, using half the value of this setting allowsfor the expected size fluctuation.
If you want to disable this feature and create a single big SQL dump file instead, just set thisoption to 0 Mb.
Important
This setting has no effect on "Main site database only" backup profiles. This is becausethe nature of this backup type does not allow splitting the database archive dump. Ifyou want something equivalent, please use the "All configured databases" backup typeinstead, as it creates an archive file which contains your (split) database dump and takesup MUCH less space on your web server.
Number of rowsper batch
Dumping table data happens in "batches", i.e. a few rows at a time. This parameter defines howmany rows will be fetched from the table at any given time. If you are backing up tables with largechunks of binary data (e.g. files stored in BLOB fields) or if you have very large chunks of text
Using the Akeeba Backup component
42
stored in the database, the default value - 1000 rows - may cause a PHP memory or MySQL bufferexhaustion. If you get memory outage errors during the table backup, it is advisable to lower thissetting. This is especially true if your MySQL and PHP combination does not allow a cursor tobe effectively created and all data has to be transferred in PHP's memory. A value of 20 is a verysafe value, at the expense of making your backup process slower and run more queries againstyour database server. Most servers work fine with the default value of 1000 rows per batch.
Dump PRO-CEDUREs,FUNCTIONs andTRIGGERs
By default, Akeeba Backup will only back up database tables and VIEWs. If your host supportsthis, you can also back up and restore advanced aspects of your database: stored procedures, storedfunctions and triggers. If your site makes use of any of those features you will have to tick thebox. If the backup operation crashes or you the database tables filter page is blank you must turnthis option off for Akeeba Backup to work properly.
Warning
THIS OPTION CURRENTLY HAS NO EFFECT! We are working on providing a so-lution in a future version.
No dependencytracking
When this option is enabled, Akeeba Backup's database dump engine will no longer try to figureout table and VIEW dependencies. This will speed up the database dump initialization step. Thisis recommended if and only if you have too many tables (over 200) in your database, you gettimeout errors during the database dump initialization step and you do not use foreign keys orVIEWs. If you do use any of those database features there is a high probability that your SQLdump will be unable to be restored.
2.3.3. File and directories scanner engines
2.3.3.1. Smart scanner
This engine is the culmination of years of research in optimizing file system scanning for PHP scripts. The SmartScanner will browse your file system tree for directories and files to include in the backup set, automatically breakingthe step upon detecting a very large directory which could lead to timeout errors.
Large directorythreshold
This option tells Akeeba Backup which directories to consider "large" so that it can break thebackup step. When it is encountered with a directory having at least this number of files andsubdirectories, it will break the step. The default value is quite conservative and suitable for mostsites. If you have a very fast server, e.g. a dedicated server, VPS or MVS, you may increase thisvalue. If you get timeout errors, try decreasing this setting.
Directory listingmethod
Akeeba Backup can use two different methods for asking your server to list the contents of adirectory. The Regular method is very fast and works on the vast majority of servers. However,some servers refuse to list files with permissions lower than 0755 (it's absurd, I know!) and requirethe slightly slower, Alternate method. If your backup archive is missing files and you do not get"Unreadable file" or "Unreadable directory" warnings during backup, please switch this option toAlternate (failsafe) and retry backing up.
Large file thresh-old
Normally, Akeeba Backup tries to backup multiple files in a single step in order to provide a fastbackup. However, doing that for larger files may result in a timeout or memory outage error. Filesbigger than the large file threshold will be backed up in a backup step of their own. If you set ittoo low you will have a big performance impact in your backup (it will be slower). If you set ittoo high you might end up with a timeout or memory outage. The default setting (10Mb) is finefor most sites. If you are not sure what you're doing you're better off not touching it at all. If youfind that your backup consistently fails while backing up a larger file (over 1Mb) you might wantto lower this setting, e.g. to 2Mb. If you have a rather big PHP memory limit (128Mb or more)
Using the Akeeba Backup component
43
and you can afford the increased memory usage set it to a higher value, e.g. 25Mb (values overthat tend to cause issues on all but the higher end dedicated servers).
2.3.3.2. Large site scanner
This engine is specifically optimised for large sites, containing folders with thousands of files. This is usually the casewhen you have a huge media collection such as news sites, professional blogers, companies with a large downloadablereference library or very active business sites storing hundreds of invoices daily on the server. In these cases the "Smartscanner" tends to consume unwieldy amounts of memory and CPU time to compile the list of files to backup, usuallyleading to timeout or memory outage issues. The "Large site scanner", on the other hand, works just fine by usinga specially designed chunked processing technique. The drawback is that it makes the backup approximately 11%slower than the "Smart scanner".
Important
If your backup fails while trying to backup a directory with over 100 files you MUST use the "Large sitescanner". It's very likely that this will solve your backup issues.
Warning
The developers of Akeeba Backup DO NOT recommend storing several thousands of files in a single direc-tory. Due to reasons that have to do with the way most filesystems work at the Operating System level, thetime required to produce a listing of files in a directory or access the files in a directory grows exponentiallywith the number of files. At about 5000 files the performance impact for accessing the directory, even ona moderately busy server, is big enough to both slow down your site noticeably (adversely impacting yoursearch engine rankings) and make the backup slower and more prone to timeout errors. We strongly recom-mend using a sane number of subdirectories to logically organise your files and reduce the number of filesper directory.
For the technically inclined (we really mean "serious geeks who aspire to do Linux server management asa living"), here is a nice discussion on the subject: http://stackoverflow.com/questions/466521/how-many-files-in-a-directory-is-too-many The problem is that readdir() which is also internally used by PHP only ev-er reads 32Kb of directory entries at a time. Further down the thread you can see that with 88,000 filesin a directory the access becomes ten times slower. Per image. Add that up and you have a dead slowfrontpage which is banished to the far end of search indexes. And if you wonder where the 5000 numberpopped up, it's from http://serverfault.com/questions/129953/maximum-number-of-files-in-one-ext3-direc-tory-while-still-getting-acceptable-per and applies to older Linux distributions without Ext3/4 directory in-dex support or using filesystems without directory index support (e.g. Ext2) which is, of course, the worstcase scenario.
Directory scan-ning batch size
The Large site scanner creates a listing of folders by scanning a small number of them at a time.This setting determines how much this small number is. The larger this number the faster thebackup is, but with the increased possibility of a backup failure on large sites. The smaller thisnumber gets, the slower the backup becomes but the less likely it is to fail. We recommend asetting of 50 for most sites.
If your backup fails on deep nested folders containing many subdirectories we recommend settingthis to a lower number, e.g. 20 or even 10. If you have a large PHP maximum memory limit andplenty of memory on your server to spare you may want to increase it to 100 or more. If you areunsure, don't touch this setting.
FIles scanningbatch size
The Large site scanner will create a listing of files by scanning a small number of them at a timeand then back them up. It will repeat this process until all files in the directory are backed up,then proceed to the next available directory. This setting determines how much this small number

Using the Akeeba Backup component
44
of files is. The larger this number the faster the backup is, but with the increased possibility of abackup failure on large sites. The smaller this number gets, the slower the backup becomes butthe less likely it is to fail. We recommend a setting of 100 for most sites.
If your backup fails on folders containing many files we recommend setting this to a lower number,e.g. 50 or even 20. If you have a large PHP maximum memory limit and plenty of memory onyour server to spare you may want to increase it to 500 or more. If you are unsure, don't touchthis setting.
Large file thresh-old
Normally, Akeeba Backup tries to backup multiple files in a single step in order to provide a fastbackup. However, doing that for larger files may result in a timeout or memory outage error. Filesbigger than the large file threshold will be backed up in a backup step of their own. If you set ittoo low you will have a big performance impact in your backup (it will be slower). If you set ittoo high you might end up with a timeout or memory outage. The default setting (10Mb) is finefor most sites. If you are not sure what you're doing you're better off not touching it at all. If youfind that your backup consistently fails while backing up a larger file (over 1Mb) you might wantto lower this setting, e.g. to 2Mb. If you have a rather big PHP memory limit (128Mb or more)and you can afford the increased memory usage set it to a higher value, e.g. 25Mb (values overthat tend to cause issues on all but the higher end dedicated servers).
2.3.4. Archiver engines
2.3.4.1. ZIP format
The ZIP format is the most well known archive format and is integrated in many operating systems and desktopenvironments, including Windows™, Mac OS X™, KDE and GNOME.
Warning
The ZIP format requires the calculation of CRC32 checksums for each file added in the archive. This is aresource intensive operation which will slow down your backup and may lead to timeouts when archivingbig files on slow hosts. If this happens, your only choice is not to use the ZIP format; use JPA instead.Unfortunately, we can't do anything about it: it is a combined limitation of the ZIP specification, how PHPworks and how your server is set up.
ZIP Format
Using the Akeeba Backup component
45
Dereference sym-links
This setting is only valid on Linux and compatible *NIX hosts. Normally, when Akeeba Back-up encounters symbolic links ("symlinks"), it follows them and treats them as regular files anddirectories, backing up their contents. Some site configurations may have symbolic links set upin such a way as to create an infinite loop, causing the backup to fail. When this option is set toNo, Akeeba Backup will not follow symbolic links, but store their name and their target in thearchive. Of course, if your symbolic links use absolute paths, restoring to a different server thanthe one you backed up from will result in broken symlinks.
Note
Even though Windows 7 supports symbolic links, it does so in a way that it's not possiblefor PHP to make use of this feature. As a result, this setting will only work on Linux,FreeBSD, Solaris and other compatible *NIX hosts.
Part size for splitarchives
Akeeba Backup supports the creation of Split Archives. In a nutshell, your backup archive isspanned among one or several files, so that each of these files ("part") is not bigger than the valueyou specify here. This is a useful feature for hosts which impose a maximum file size quota. Ifyou use a value of 0Mb, no archive splitting will take place and Akeeba Backup will produce asingle backup archive (default).
Warning
If you want to post-process your archive files it is suggested that you use small, non-zero values here. The time it takes the post-processing engine to transfer an archive fromyour server to the remote server equals part size divided by available bandwidth. Sincethe available execution time is finite and the available bandwidth is constant, the onlyway to avoid a timeout is creating small parts.
Important
Split ZIP archives can not be opened with 7-zip, Linux unzip and other GUI clients.Only WinZIP and PKZIP understand them. If you want to extract them, you must useWinZIP, PKZIP, Akeeba Kickstart or Akeeba eXtract Wizard. This is not an AkeebaBackup "bug", it's a problem with most free archiver extraction tools.
Chunk size forlarge files pro-cessing
Each file is read in small increments, we call chunks, while being copied in the archive. Largerchunks will result in faster backup, at the price of taking longer to process each one of themand risking a timeout. Smaller chunks lead to slower but safer backups. On very slow hosts, thisparameter should be set to a low value, for example 256Kb, or even lower - especially true if youconstantly get timeout errors when backing up large files. On fast hosts you may want to increasethis value in order to speed up your backup operation.
Big file threshold Files over this size will be stored in the archive file uncompressed. Do note that in order for a fileto be compressed, Akeeba Backup has to load it in its entirety to memory, compress it and thenwrite it to disk. As a rule of thumb, you need to have free memory equal to 1.8 times the size of thefile to compress, e.g. 18Mb for a 10Mb file. Joomla! with a lot of plug-ins might consume as muchas 16Mb and Akeeba Backup's engine might consume another 5Mb, so plan this value carefully,or you will run into memory exhaustion errors. Compression is also resource intensive and willincrease the time to produce a backup. If this value is too high, you might run into timeout errors.
Chunk size forCentral Directoryprocessing
At the end of the ZIP archive creation we have to attach a lookup table containing the names ofall included files to the end of the archive file. This table is called the Central Directory. We haveto do this in small chunks so as to avoid timeout or memory exhaustion errors. It is recommendedthat you leave the default value (1Mb) unless you know what you're doing.
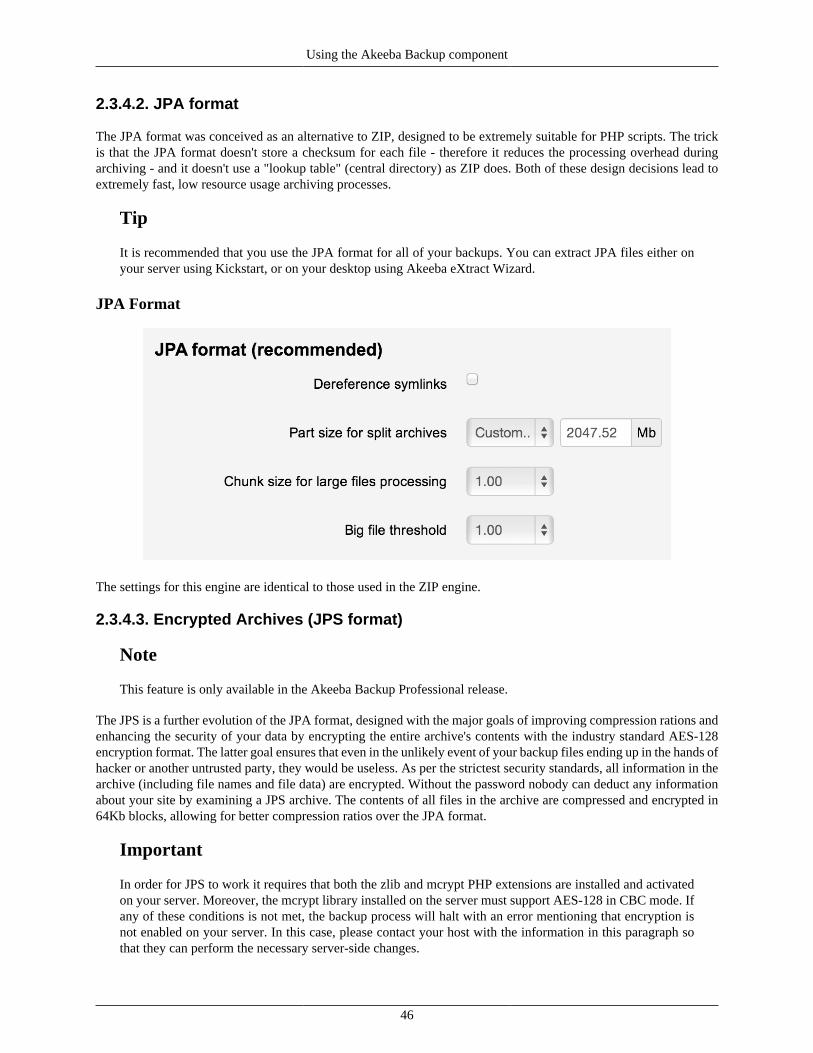
Using the Akeeba Backup component
46
2.3.4.2. JPA format
The JPA format was conceived as an alternative to ZIP, designed to be extremely suitable for PHP scripts. The trickis that the JPA format doesn't store a checksum for each file - therefore it reduces the processing overhead duringarchiving - and it doesn't use a "lookup table" (central directory) as ZIP does. Both of these design decisions lead toextremely fast, low resource usage archiving processes.
Tip
It is recommended that you use the JPA format for all of your backups. You can extract JPA files either onyour server using Kickstart, or on your desktop using Akeeba eXtract Wizard.
JPA Format
The settings for this engine are identical to those used in the ZIP engine.
2.3.4.3. Encrypted Archives (JPS format)
Note
This feature is only available in the Akeeba Backup Professional release.
The JPS is a further evolution of the JPA format, designed with the major goals of improving compression rations andenhancing the security of your data by encrypting the entire archive's contents with the industry standard AES-128encryption format. The latter goal ensures that even in the unlikely event of your backup files ending up in the hands ofhacker or another untrusted party, they would be useless. As per the strictest security standards, all information in thearchive (including file names and file data) are encrypted. Without the password nobody can deduct any informationabout your site by examining a JPS archive. The contents of all files in the archive are compressed and encrypted in64Kb blocks, allowing for better compression ratios over the JPA format.
Important
In order for JPS to work it requires that both the zlib and mcrypt PHP extensions are installed and activatedon your server. Moreover, the mcrypt library installed on the server must support AES-128 in CBC mode. Ifany of these conditions is not met, the backup process will halt with an error mentioning that encryption isnot enabled on your server. In this case, please contact your host with the information in this paragraph sothat they can perform the necessary server-side changes.
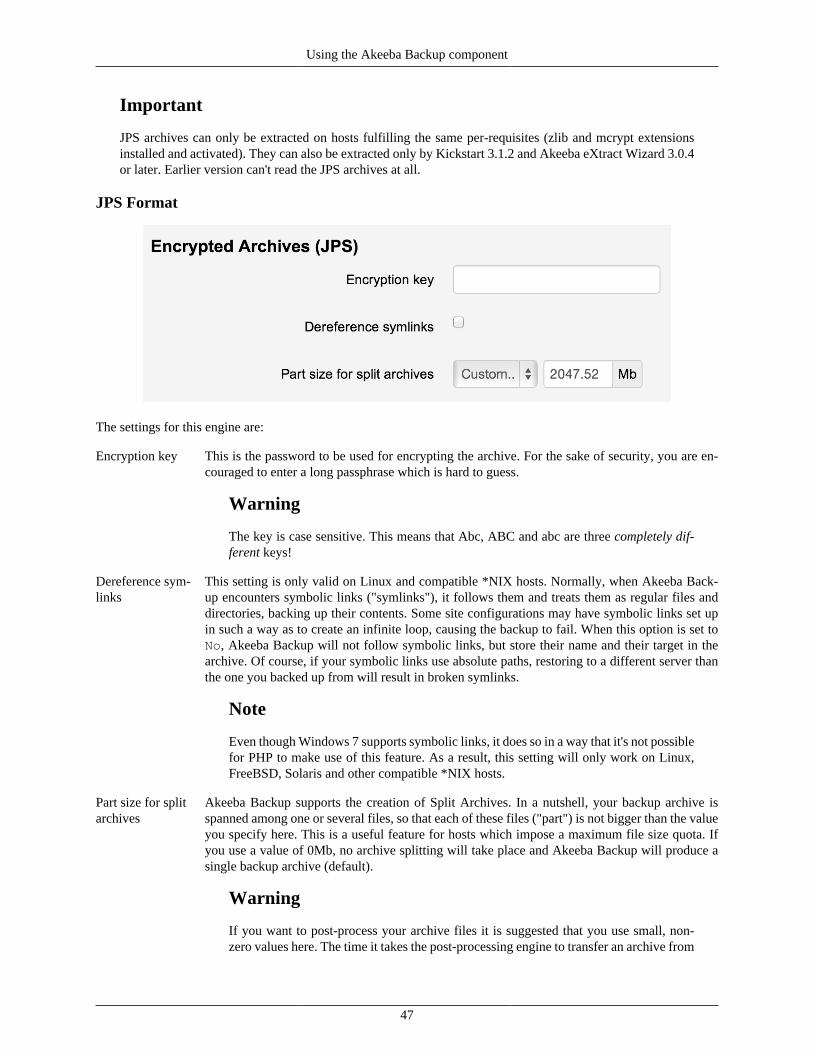
Using the Akeeba Backup component
47
Important
JPS archives can only be extracted on hosts fulfilling the same per-requisites (zlib and mcrypt extensionsinstalled and activated). They can also be extracted only by Kickstart 3.1.2 and Akeeba eXtract Wizard 3.0.4or later. Earlier version can't read the JPS archives at all.
JPS Format
The settings for this engine are:
Encryption key This is the password to be used for encrypting the archive. For the sake of security, you are en-couraged to enter a long passphrase which is hard to guess.
Warning
The key is case sensitive. This means that Abc, ABC and abc are three completely dif-ferent keys!
Dereference sym-links
This setting is only valid on Linux and compatible *NIX hosts. Normally, when Akeeba Back-up encounters symbolic links ("symlinks"), it follows them and treats them as regular files anddirectories, backing up their contents. Some site configurations may have symbolic links set upin such a way as to create an infinite loop, causing the backup to fail. When this option is set toNo, Akeeba Backup will not follow symbolic links, but store their name and their target in thearchive. Of course, if your symbolic links use absolute paths, restoring to a different server thanthe one you backed up from will result in broken symlinks.
Note
Even though Windows 7 supports symbolic links, it does so in a way that it's not possiblefor PHP to make use of this feature. As a result, this setting will only work on Linux,FreeBSD, Solaris and other compatible *NIX hosts.
Part size for splitarchives
Akeeba Backup supports the creation of Split Archives. In a nutshell, your backup archive isspanned among one or several files, so that each of these files ("part") is not bigger than the valueyou specify here. This is a useful feature for hosts which impose a maximum file size quota. Ifyou use a value of 0Mb, no archive splitting will take place and Akeeba Backup will produce asingle backup archive (default).
Warning
If you want to post-process your archive files it is suggested that you use small, non-zero values here. The time it takes the post-processing engine to transfer an archive from
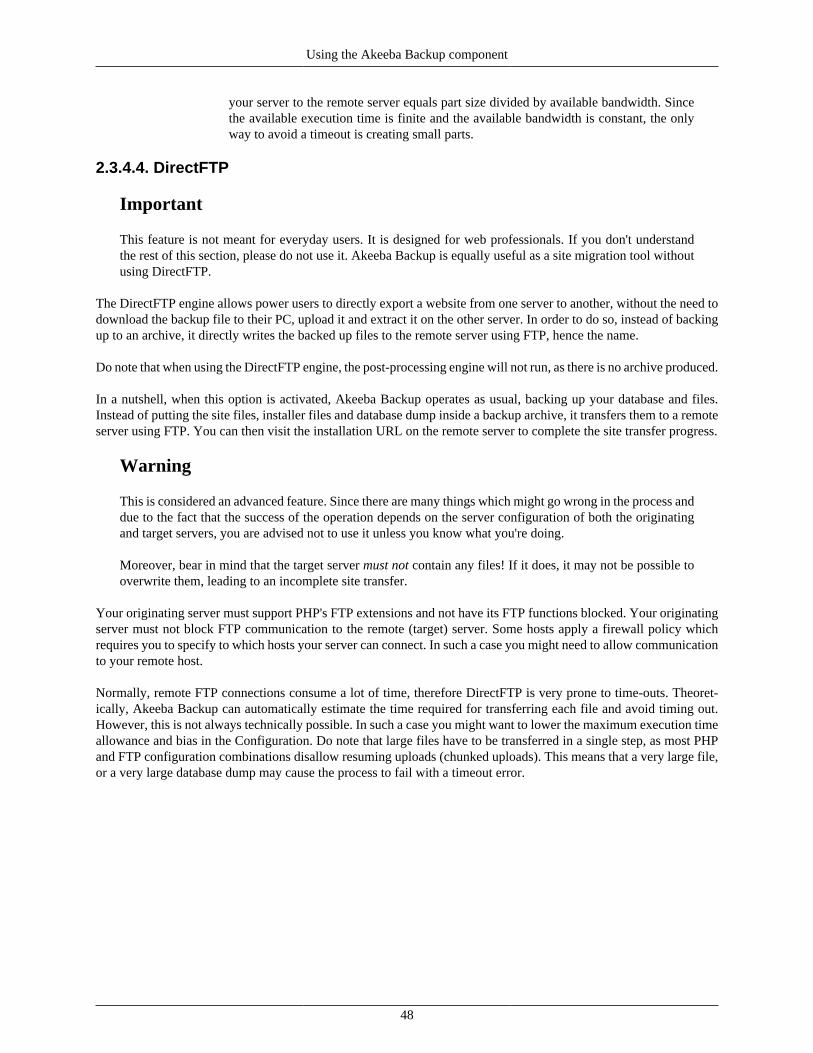
Using the Akeeba Backup component
48
your server to the remote server equals part size divided by available bandwidth. Sincethe available execution time is finite and the available bandwidth is constant, the onlyway to avoid a timeout is creating small parts.
2.3.4.4. DirectFTP
Important
This feature is not meant for everyday users. It is designed for web professionals. If you don't understandthe rest of this section, please do not use it. Akeeba Backup is equally useful as a site migration tool withoutusing DirectFTP.
The DirectFTP engine allows power users to directly export a website from one server to another, without the need todownload the backup file to their PC, upload it and extract it on the other server. In order to do so, instead of backingup to an archive, it directly writes the backed up files to the remote server using FTP, hence the name.
Do note that when using the DirectFTP engine, the post-processing engine will not run, as there is no archive produced.
In a nutshell, when this option is activated, Akeeba Backup operates as usual, backing up your database and files.Instead of putting the site files, installer files and database dump inside a backup archive, it transfers them to a remoteserver using FTP. You can then visit the installation URL on the remote server to complete the site transfer progress.
Warning
This is considered an advanced feature. Since there are many things which might go wrong in the process anddue to the fact that the success of the operation depends on the server configuration of both the originatingand target servers, you are advised not to use it unless you know what you're doing.
Moreover, bear in mind that the target server must not contain any files! If it does, it may not be possible tooverwrite them, leading to an incomplete site transfer.
Your originating server must support PHP's FTP extensions and not have its FTP functions blocked. Your originatingserver must not block FTP communication to the remote (target) server. Some hosts apply a firewall policy whichrequires you to specify to which hosts your server can connect. In such a case you might need to allow communicationto your remote host.
Normally, remote FTP connections consume a lot of time, therefore DirectFTP is very prone to time-outs. Theoret-ically, Akeeba Backup can automatically estimate the time required for transferring each file and avoid timing out.However, this is not always technically possible. In such a case you might want to lower the maximum execution timeallowance and bias in the Configuration. Do note that large files have to be transferred in a single step, as most PHPand FTP configuration combinations disallow resuming uploads (chunked uploads). This means that a very large file,or a very large database dump may cause the process to fail with a timeout error.
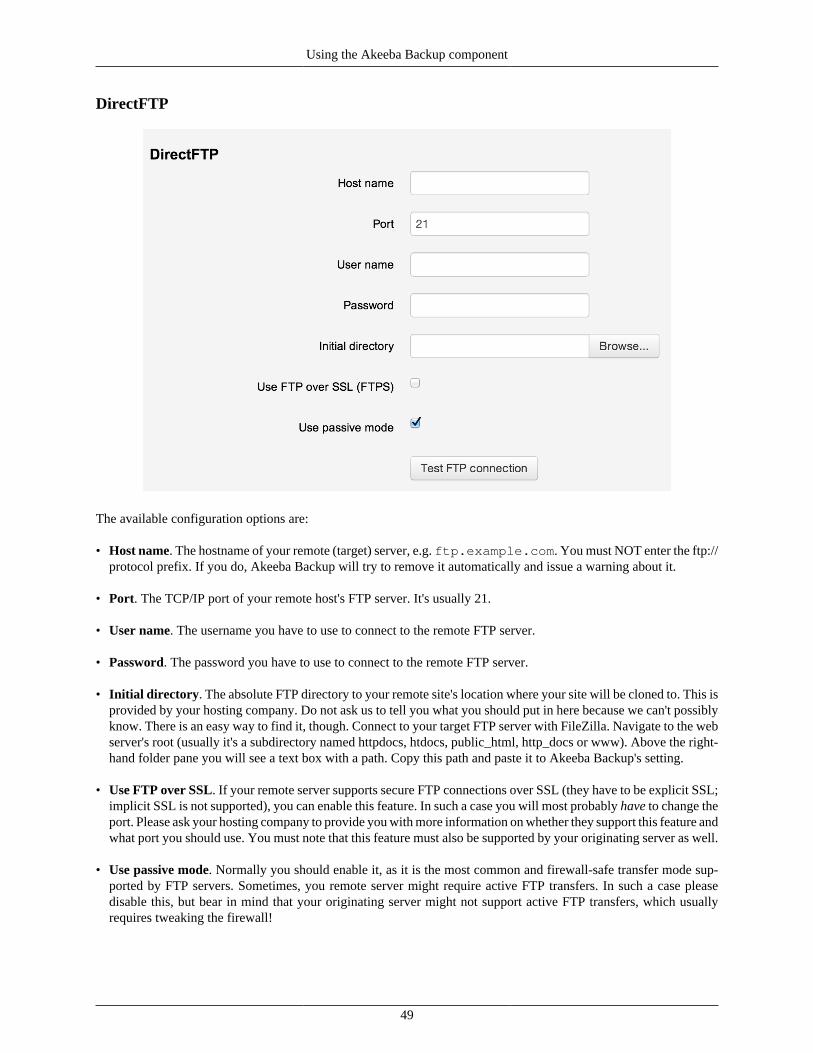
Using the Akeeba Backup component
49
DirectFTP
The available configuration options are:
• Host name. The hostname of your remote (target) server, e.g. ftp.example.com. You must NOT enter the ftp://protocol prefix. If you do, Akeeba Backup will try to remove it automatically and issue a warning about it.
• Port. The TCP/IP port of your remote host's FTP server. It's usually 21.
• User name. The username you have to use to connect to the remote FTP server.
• Password. The password you have to use to connect to the remote FTP server.
• Initial directory. The absolute FTP directory to your remote site's location where your site will be cloned to. This isprovided by your hosting company. Do not ask us to tell you what you should put in here because we can't possiblyknow. There is an easy way to find it, though. Connect to your target FTP server with FileZilla. Navigate to the webserver's root (usually it's a subdirectory named httpdocs, htdocs, public_html, http_docs or www). Above the right-hand folder pane you will see a text box with a path. Copy this path and paste it to Akeeba Backup's setting.
• Use FTP over SSL. If your remote server supports secure FTP connections over SSL (they have to be explicit SSL;implicit SSL is not supported), you can enable this feature. In such a case you will most probably have to change theport. Please ask your hosting company to provide you with more information on whether they support this feature andwhat port you should use. You must note that this feature must also be supported by your originating server as well.
• Use passive mode. Normally you should enable it, as it is the most common and firewall-safe transfer mode sup-ported by FTP servers. Sometimes, you remote server might require active FTP transfers. In such a case pleasedisable this, but bear in mind that your originating server might not support active FTP transfers, which usuallyrequires tweaking the firewall!

Using the Akeeba Backup component
50
2.3.4.5. DirectSFTP
Important
This feature is only available in the Akeeba Backup Professional edition.
Important
This feature is not meant for everyday users. It is designed for web professionals. If you don't understandthe rest of this section, please do not use it. Akeeba Backup is equally useful as a site migration tool withoutusing DirectSFTP.
The DirectSFTP engine allows power users to directly export a website from one server to another, without the need todownload the backup file to their PC, upload it and extract it on the other server. In order to do so, instead of backingup to an archive, it directly writes the backed up files to the remote server using SFTP (Secure File Transfer Protocolover SSH), hence the name.
Do note that when using the DirectSFTP engine, the post-processing engine will not run, as there is no archive pro-duced.
In a nutshell, when this option is activated, Akeeba Backup operates as usual, backing up your database and files.Instead of putting the site files, installer files and database dump inside a backup archive, it transfers them to a remoteserver using SFTP. You can then visit the installation URL on the remote server to complete the site transfer progress.
Warning
This is considered an advanced feature. Since there are many things which might go wrong in the process anddue to the fact that the success of the operation depends on the server configuration of both the originatingand target servers, you are advised not to use it unless you know what you're doing.
Moreover, bear in mind that the target server must not contain any files! If it does, it may not be possible tooverwrite them, leading to an incomplete site transfer.
Your originating server (where you are backing up from) must a. support PHP's SSH2 extensions, b. allow outboundTCP/IP connections to your target host's SSH port and c. not have the SFTP functions of the SSH2 extension blocked.Please note that some hosts apply a firewall policy which requires you to specify to which hosts your server can connect.In such a case you might need to allow communication to your remote host. Moreover, your target host must supportSFTP connections using a username and password for authentication. If your remote server only allows authenticationusing certificate files it won't work with Akeeba Backup's DirectSFTP feature.
Normally, remote SFTP connections consume a lot of time, therefore DirectSFTP is very prone to time-outs. Theoret-ically, Akeeba Backup can automatically estimate the time required for transferring each file and avoid timing out.However, this is not always technically possible. In such a case you might want to lower the maximum execution timeallowance and bias in the Configuration. Do note that large files have to be transferred in a single step, as most PHPand SFTP configuration combinations disallow resuming uploads (chunked uploads). This means that a very large file,or a very large database dump may cause the process to fail with a timeout error.

Using the Akeeba Backup component
51
DirectSFTP
The available configuration options are:
• Host name. The hostname of your remote (target) server, e.g. sftp.example.com. You must NOT enter thesftp:// or ssh:// protocol prefix. If you do, Akeeba Backup will try to remove it automatically and issue a warningabout it.
• Port. The TCP/IP port of your remote host's FTP server. It's usually 22.
• User name. The username you have to use to connect to the remote SFTP server.
• Password. The password you have to use to connect to the remote SFTP server.
• Initial directory. The absolute FTP directory to your remote site's location where your site will be cloned to. This isprovided by your hosting company. Do not ask us to tell you what you should put in here because we can't possiblyknow. There is an easy way to find it, though. Connect to your target FTP server with FileZilla. Navigate to the webserver's root (usually it's a subdirectory named httpdocs, htdocs, public_html, http_docs or www). Above the right-hand folder pane you will see a text box with a path. Copy this path and paste it to Akeeba Backup's setting.
2.3.4.6. ZIP using ZIPArchive class
This engine produces ZIP archive using PHP's built-in ZIP archive class. It is only recommended for extremely smallsites hosted on very slow hosts. If you have a larger site or quite big files you can expect that this engine will time out,crash the backup or throw a memory outage error. Also note that this engine has absolutely no options and is boundto fail on hosts which impose limitations on the maximum size per file.
Frankly, this is the worst archiver engine. It was added because some users argued that it is faster (it is not) and thisis why it is being used by competitive products. Well, try it out if you want. As soon as it causes backup errors do notask for support, just switch to the classic ZIP engine or, even better, the JPA engine.
Using the Akeeba Backup component
52
2.3.5. Data processing engines
2.3.5.1. No post-processing
This is the default setting and the only one one available to Akeeba Backup Core. It does no post-processing. It simplyleaves the backup archives on your server.
2.3.5.2. Upload to CloudMe
Note
This feature is available only to Akeeba Backup Professional 3.10.1 and later.
Using this engine, you can upload your backup archives to the European cloud storage service CloudMe.
The required settings for this engine are:
Process each partimmediately
If you enable this, each backup part will be uploaded as soon as it's ready. This is useful if youare low on disk space (disk quota) when used in conjunction with Delete archive after processing.When using this feature we suggest having 10Mb plus the size of your part for split archives freein your account. The drawback with enabling this option is that if the upload fails, the backup fails.If you don't enable this option, the upload process will take place after the backup is complete andfinalized. This ensures that if the upload process fails a valid backup will still be stored on yourserver. The drawback is that it requires more available disk space.
Delete archive af-ter processing
If enabled, the archive files will be removed from your server after they are uploaded to CloudMe.
Username Your CloudMe username
Password Your CloudMe password
Directory The directory inside your CloudMe Blue Folder™ where your files will be stored in. If you want touse subdirectories, you have to use a forward slash, e.g. directory/subdirectory/sub-subdirectory.
Tip
You can use Akeeba Backup's "variables" in the directory name in order to create itdynamically. These are the same variables as what you can use in the archive name, i.e.[DATE], [TIME], [HOST], [RANDOM].
2.3.5.3. Upload to Microsoft Windows Azure BLOB Storage service
Note
This feature is available only to Akeeba Backup Professional.
Using this engine, you can upload your backup archives to the Microsoft Windows Azure BLOB Storage [http://www.microsoft.com/windowsazure/windowsazure/] cloud storage service. This new cloud storage service from Mi-crosoft is reasonably priced (the cost is very close to CloudFiles) and quite fast, with lots of local endpoints aroundthe globe.
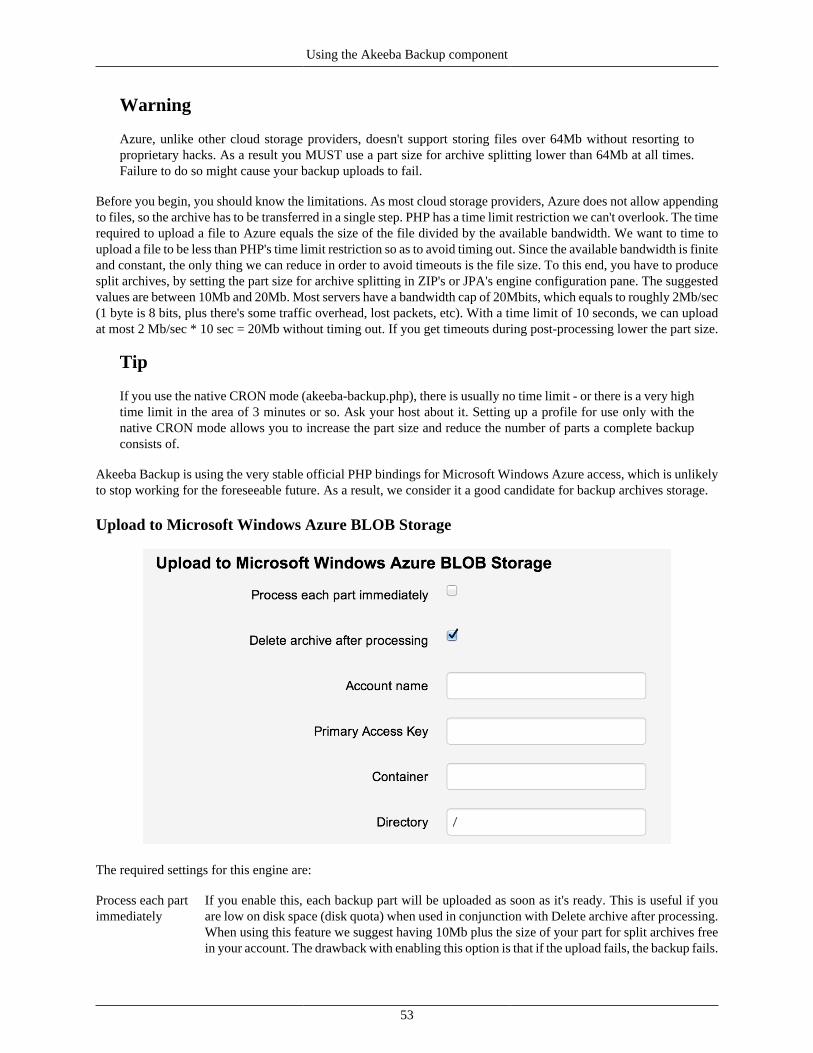
Using the Akeeba Backup component
53
Warning
Azure, unlike other cloud storage providers, doesn't support storing files over 64Mb without resorting toproprietary hacks. As a result you MUST use a part size for archive splitting lower than 64Mb at all times.Failure to do so might cause your backup uploads to fail.
Before you begin, you should know the limitations. As most cloud storage providers, Azure does not allow appendingto files, so the archive has to be transferred in a single step. PHP has a time limit restriction we can't overlook. The timerequired to upload a file to Azure equals the size of the file divided by the available bandwidth. We want to time toupload a file to be less than PHP's time limit restriction so as to avoid timing out. Since the available bandwidth is finiteand constant, the only thing we can reduce in order to avoid timeouts is the file size. To this end, you have to producesplit archives, by setting the part size for archive splitting in ZIP's or JPA's engine configuration pane. The suggestedvalues are between 10Mb and 20Mb. Most servers have a bandwidth cap of 20Mbits, which equals to roughly 2Mb/sec(1 byte is 8 bits, plus there's some traffic overhead, lost packets, etc). With a time limit of 10 seconds, we can uploadat most 2 Mb/sec * 10 sec = 20Mb without timing out. If you get timeouts during post-processing lower the part size.
Tip
If you use the native CRON mode (akeeba-backup.php), there is usually no time limit - or there is a very hightime limit in the area of 3 minutes or so. Ask your host about it. Setting up a profile for use only with thenative CRON mode allows you to increase the part size and reduce the number of parts a complete backupconsists of.
Akeeba Backup is using the very stable official PHP bindings for Microsoft Windows Azure access, which is unlikelyto stop working for the foreseeable future. As a result, we consider it a good candidate for backup archives storage.
Upload to Microsoft Windows Azure BLOB Storage
The required settings for this engine are:
Process each partimmediately
If you enable this, each backup part will be uploaded as soon as it's ready. This is useful if youare low on disk space (disk quota) when used in conjunction with Delete archive after processing.When using this feature we suggest having 10Mb plus the size of your part for split archives freein your account. The drawback with enabling this option is that if the upload fails, the backup fails.
Using the Akeeba Backup component
54
If you don't enable this option, the upload process will take place after the backup is complete andfinalized. This ensures that if the upload process fails a valid backup will still be stored on yourserver. The drawback is that it requires more available disk space.
Delete archive af-ter processing
If enabled, the archive files will be removed from your server after they are uploaded to Azure.
Account name The account name for your Microsoft Azure subscription. If your endpoint looks likefoobar.blobl.core.windows.net then your account name is foobar.
Primary AccessKey
You can find this Key in account page. It is lengthy and always ends in double equals marks.
Container The name of the Azure container where you want to store your archives in.
Directory The directory inside your Azure container where your files will be stored in. If you want to usesubdirectories, you have to use a forward slash, e.g. /directory/subdirectory/sub-subdirectory. Leave blank to store the files on the container's root.
2.3.5.4. Upload to RackSpace CloudFiles
Note
This feature is available only to Akeeba Backup Professional.
Using this engine, you can upload your backup archives to the RackSpace CloudFiles [www.rackspacecloud.com/cloud_hosting_products/files] cloud storage service. This service has been around for a long time, under the Mossobrand, and is considered one of the most dependable ones. Its cheap prices make it ideal for applications where storinglarge quantities of backup archives is more likely than downloading them.
Before you begin, you should know the limitations. As most cloud storage providers, CloudFiles does not allow ap-pending to files, so the archive has to be transferred in a single step. PHP has a time limit restriction we can't overlook.The time required to upload a file to CloudFiles equals the size of the file divided by the available bandwidth. Wewant to time to upload a file to be less than PHP's time limit restriction so as to avoid timing out. Since the availablebandwidth is finite and constant, the only thing we can reduce in order to avoid timeouts is the file size. To this end,you have to produce split archives, by setting the part size for archive splitting in ZIP's or JPA's engine configurationpane. The suggested values are between 10Mb and 20Mb. Most servers have a bandwidth cap of 20Mbits, whichequals to roughly 2Mb/sec (1 byte is 8 bits, plus there's some traffic overhead, lost packets, etc). With a time limit of10 seconds, we can upload at most 2 Mb/sec * 10 sec = 20Mb without timing out. If you get timeouts during post-processing lower the part size.
Tip
If you use the native CRON mode (akeeba-backup.php), there is usually no time limit - or there is a very hightime limit in the area of 3 minutes or so. Ask your host about it. Setting up a profile for use only with thenative CRON mode allows you to increase the part size and reduce the number of parts a complete backupconsists of.
Akeeba Backup is using an implementation of the version 2 API of CloudFiles access which is unlikely to stop workingfor the foreseeable future. As a result, we consider it a good candidate for cheap backup archives storage.

Using the Akeeba Backup component
55
Upload to RackSpace CloudFiles
The required settings for this engine are:
Process each partimmediately
If you enable this, each backup part will be uploaded as soon as it's ready. This is useful if youare low on disk space (disk quota) when used in conjunction with Delete archive after processing.When using this feature we suggest having 10Mb plus the size of your part for split archives freein your account. The drawback with enabling this option is that if the upload fails, the backup fails.If you don't enable this option, the upload process will take place after the backup is complete andfinalized. This ensures that if the upload process fails a valid backup will still be stored on yourserver. The drawback is that it requires more available disk space.
Delete archive af-ter processing
If enabled, the archive files will be removed from your server after they are uploaded to Cloud-Files.
Username The username assigned to you by the RackSpace CloudFiles service
API Key The API Key found in your CloudFiles account
Container The name of the CloudFiles container where you want to store your archives in.
Directory The directory inside your CloudFiles container where your files will be stored in. If you want touse subdirectories, you have to use a forward slash, e.g. /directory/subdirectory/sub-subdirectory. Leave blank to store the files on the container's root.
2.3.5.5. Upload to DreamObjects
Note
This feature is available only to Akeeba Backup Professional.
Using the Akeeba Backup component
56
Using this engine, you can upload your backup archives to the DreamObjects cloud storage service by DreamHost.
The required settings for this engine are:
Process each partimmediately
If you enable this, each backup part will be uploaded as soon as it's ready. This is useful if youare low on disk space (disk quota) when used in conjunction with Delete archive after processing.When using this feature we suggest having 10Mb plus the size of your part for split archives freein your account. The drawback with enabling this option is that if the upload fails, the backup fails.If you don't enable this option, the upload process will take place after the backup is complete andfinalized. This ensures that if the upload process fails a valid backup will still be stored on yourserver. The drawback is that it requires more available disk space.
Delete archive af-ter processing
If enabled, the archive files will be removed from your server after they are uploaded to DreamOb-jects.
Access Key Your DreamObjects Access Key
Secret Key Your DreamObjects Secret Key
Use SSL If enabled, an encrypted connection will be used to upload your archives to DreamObjects. Inthis case the upload will take slightly longer, as encryption - what SSL does - is more resourceintensive than uploading unencrypted files. You may have to lower your part size.
Warning
Do not enable this option if your bucket name contains dots.
Bucket The name of your DreamObjects bucket where your files will be stored in. The bucket must bealready created; Akeeba Backup can not create buckets.
Warning
DO NOT CREATE BUCKETS WITH NAMES CONTAINING UPPERCASELETTERS OR DOTS. If you use a bucket with uppercase letters in its name it is verypossible that Akeeba Backup will not be able to upload anything to it for reasons thathave to do with the S3 API implemented by DreamObjects. It is not something we can"fix" in Akeeba Backup. Moreover, if you use a dot in your bucket name you will not beable to enable the "Use SSL" option since DreamObject's SSL certificate will be invalidfor this bucket, making it impossible to upload backup archives. If this is the case withyour site, please don't ask for support; simply create a new bucket whose name onlyconsists of lowercase unaccented latin characters (a-z), numbers (0-9) and dashes.
Directory The directory inside your DreamObjects bucket where your files will be stored in. If you want touse subdirectories, you have to use a forward slash, e.g. directory/subdirectory/sub-subdirectory.
Tip
You can use Akeeba Backup's "variables" in the directory name in order to create itdynamically. These are the same variables as what you can use in the archive name, i.e.[DATE], [TIME], [HOST], [RANDOM].
Regarding the naming of buckets and directories, you have to be aware of the S3 API rules used by DreamObjects:
• Folder names can not contain backward slashes (\). They are invalid characters.

Using the Akeeba Backup component
57
• Bucket names can only contain lowercase letters, numbers, periods (.) and dashes (-). Accented characters, interna-tional characters, underscores and other punctuation marks are illegal characters.
Important
Even if you created a bucket using uppercase letters, you must type its name with lowercase letters. TheS3 API implemented by DreamObjects automatically converts the bucket name to all-lowercase. Also notethat, as stated above, you may NOT be able to use at all under some circumstances. Generally, your shouldavoid using uppercase letters.
• Bucket names must start with a number or a letter.
• Bucket names must be 3 to 63 characters long.
• Bucket names can't be in an IP format, e.g. 192.168.1.2
• Bucket names can't end with a dash.
• Bucket names can't have an adjacent dot and dash. For example, both my.-bucket and my-.bucket are invalid.It is preferable to NOT use a dot as it will cause issues.
If any - or all - of those rules are broken, you'll end up with error messages that Akeeba Backup couldn't connect toDreamObjects, that the calculated signature is wrong or that the bucket does not exist. This is normal and expectedbehaviour, as the S3 API of DreamObjects drops the connection when it encounters invalid bucket or directory names.
2.3.5.6. Upload to Dropbox
Note
This feature is available only to Akeeba Backup Professional. The implementation discussed applies to Akee-ba Backup 3.4 and later. Older versions used a different implementation of the Dropbox post-processing en-gine which works differently.
Using this engine, you can upload your backup archives to the low-cost Dropbox cloud storage service (http://www.dropbox.com). This is an ideal option for small websites with a low budget, as this service offers 2Gb of storagespace for free, all the while retaining all the pros of storing your files on the cloud. Even if your host's data center isannihilated by a natural disaster and your local PC and storage media are wiped out by an unlikely event, you will stillhave a copy of your site readily accessible and easy to restore.
Before you begin, you should know the limitations. Dropbox does not allow appending to files, so the archive has tobe transferred in a single step. PHP has a time limit restriction we can't overlook. The time required to upload a fileto Dropbox equals the size of the file divided by the available bandwidth. We want to time to upload a file to be lessthan PHP's time limit restriction so as to avoid timing out. Since the available bandwidth is finite and constant, theonly thing we can reduce in order to avoid timeouts is the file size. To this end, you have to produce split archives, bysetting the part size for archive splitting in ZIP's or JPA's engine configuration pane. The suggested values are between10Mb and 20Mb. Most servers have a bandwidth cap of 20Mbits, which equals to roughly 2Mb/sec (1 byte is 8 bits,plus there's some traffic overhead, lost packets, etc). With a time limit of 10 seconds, we can upload at most 2 Mb/sec* 10 sec = 20Mb without timing out. If you get timeouts during post-processing lower the part size.
Tip
If you use the native CRON mode (akeeba-backup.php), there is usually no time limit - or there is a very hightime limit in the area of 3 minutes or so. Ask your host about it. Setting up a profile for use only with thenative CRON mode allows you to increase the part size and reduce the number of parts a complete backupconsists of.
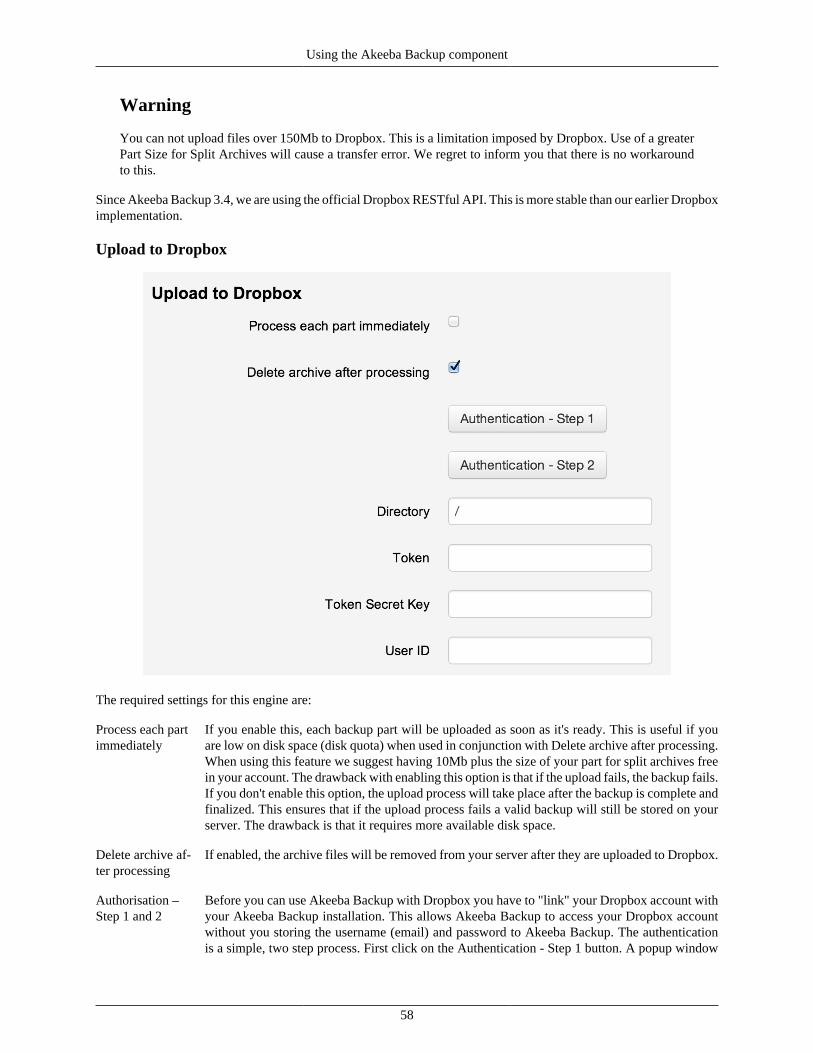
Using the Akeeba Backup component
58
Warning
You can not upload files over 150Mb to Dropbox. This is a limitation imposed by Dropbox. Use of a greaterPart Size for Split Archives will cause a transfer error. We regret to inform you that there is no workaroundto this.
Since Akeeba Backup 3.4, we are using the official Dropbox RESTful API. This is more stable than our earlier Dropboximplementation.
Upload to Dropbox
The required settings for this engine are:
Process each partimmediately
If you enable this, each backup part will be uploaded as soon as it's ready. This is useful if youare low on disk space (disk quota) when used in conjunction with Delete archive after processing.When using this feature we suggest having 10Mb plus the size of your part for split archives freein your account. The drawback with enabling this option is that if the upload fails, the backup fails.If you don't enable this option, the upload process will take place after the backup is complete andfinalized. This ensures that if the upload process fails a valid backup will still be stored on yourserver. The drawback is that it requires more available disk space.
Delete archive af-ter processing
If enabled, the archive files will be removed from your server after they are uploaded to Dropbox.
Authorisation –Step 1 and 2
Before you can use Akeeba Backup with Dropbox you have to "link" your Dropbox account withyour Akeeba Backup installation. This allows Akeeba Backup to access your Dropbox accountwithout you storing the username (email) and password to Akeeba Backup. The authenticationis a simple, two step process. First click on the Authentication - Step 1 button. A popup window
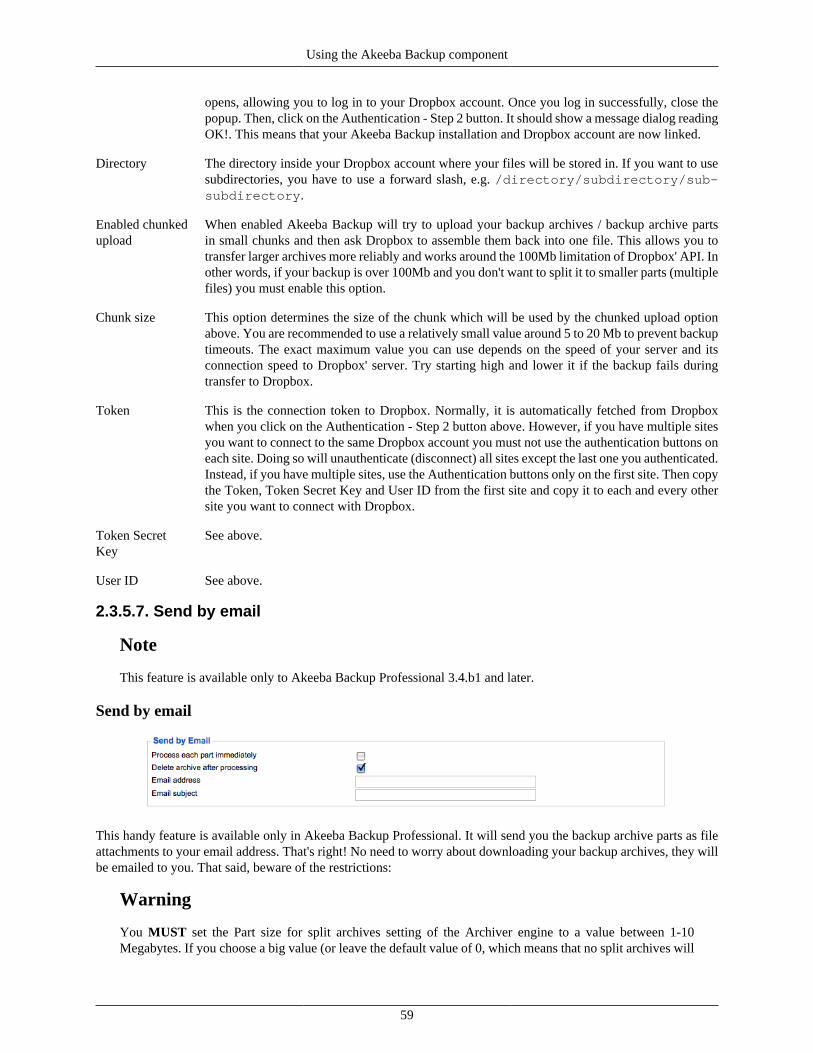
Using the Akeeba Backup component
59
opens, allowing you to log in to your Dropbox account. Once you log in successfully, close thepopup. Then, click on the Authentication - Step 2 button. It should show a message dialog readingOK!. This means that your Akeeba Backup installation and Dropbox account are now linked.
Directory The directory inside your Dropbox account where your files will be stored in. If you want to usesubdirectories, you have to use a forward slash, e.g. /directory/subdirectory/sub-subdirectory.
Enabled chunkedupload
When enabled Akeeba Backup will try to upload your backup archives / backup archive partsin small chunks and then ask Dropbox to assemble them back into one file. This allows you totransfer larger archives more reliably and works around the 100Mb limitation of Dropbox' API. Inother words, if your backup is over 100Mb and you don't want to split it to smaller parts (multiplefiles) you must enable this option.
Chunk size This option determines the size of the chunk which will be used by the chunked upload optionabove. You are recommended to use a relatively small value around 5 to 20 Mb to prevent backuptimeouts. The exact maximum value you can use depends on the speed of your server and itsconnection speed to Dropbox' server. Try starting high and lower it if the backup fails duringtransfer to Dropbox.
Token This is the connection token to Dropbox. Normally, it is automatically fetched from Dropboxwhen you click on the Authentication - Step 2 button above. However, if you have multiple sitesyou want to connect to the same Dropbox account you must not use the authentication buttons oneach site. Doing so will unauthenticate (disconnect) all sites except the last one you authenticated.Instead, if you have multiple sites, use the Authentication buttons only on the first site. Then copythe Token, Token Secret Key and User ID from the first site and copy it to each and every othersite you want to connect with Dropbox.
Token SecretKey
See above.
User ID See above.
2.3.5.7. Send by email
Note
This feature is available only to Akeeba Backup Professional 3.4.b1 and later.
Send by email
This handy feature is available only in Akeeba Backup Professional. It will send you the backup archive parts as fileattachments to your email address. That's right! No need to worry about downloading your backup archives, they willbe emailed to you. That said, beware of the restrictions:
Warning
You MUST set the Part size for split archives setting of the Archiver engine to a value between 1-10Megabytes. If you choose a big value (or leave the default value of 0, which means that no split archives will
Using the Akeeba Backup component
60
be generated) you run the risks of the process timing out, a memory outage error to occur or, finally, youremail servers not being able to cope with the attachment size, dropping the email.
The available configuration settings for this engine, accessed by pressing the Configure... button next to it, are:
Process each partimmediately
If you enable this, each backup part will be emailed to you as soon as it's ready. This is usefulif you are low on disk space (disk quota) when used in conjunction with Delete archive afterprocessing. When using this feature we suggest having 10Mb plus the size of your part for splitarchives free in your account. The drawback with enabling this option is that if the email fails,the backup fails. If you don't enable this option, the email process will take place after the backupis complete and finalized. This ensures that if the email process fails a valid backup will still bestored on your server. The drawback is that it requires more available disk space.
Delete archive af-ter processing
If enabled, the archive files will be removed from your server after they are emailed to you. Veryuseful to conserve disk space and practice the good security measure of not leaving your backupson your server.
Email address The email address where you want your backups sent to. When used with GMail or other webmailservices it can provide a cheap alternative to proper cloud storage.
Email subject A subject for the email you'll receive. You can leave it blank if you want to use the default.However, we suggest using something descriptive, i.e. your site's name and the description of thebackup profile.
2.3.5.8. Upload to Remote FTP server
Note
This feature is available only to Akeeba Backup Professional.
Using this engine, you can upload your backup archives to any FTP or FTPS (FTP over explicit SSL) server. There aresome "FTP" protocols and other file storage protocols which are not supported, such as SFTP, SCP, Secure FTP, FTPover implicit SSL and SSH variants. The difference of this engine to the DirectFTP archiver engine is that this engineuploads backup archives to the server, whereas DirectFTP uploads the uncompressed files of your site. DirectFTP isdesigned for rapid migration, this engine is designed for easy moving of your backup archives to an off-server location.
Your originating server must support PHP's FTP extensions and not have its FTP functions blocked. Your originatingserver must not block FTP communication to the remote (target) server. Some hosts apply a firewall policy whichrequires you to specify to which hosts your server can connect. In such a case you might need to allow communicationto your remote host.
Before you begin, you should know the limitations. Most servers do not allow resuming of uploads (or even if theydo, PHP doesn't quite support this feature), so the archive has to be transferred in a single step. PHP has a time limitrestriction we can't overlook. The time required to upload a file to FTP equals the size of the file divided by theavailable bandwidth. We want to time to upload a file to be less than PHP's time limit restriction so as to avoid timingout. Since the available bandwidth is finite and constant, the only thing we can reduce in order to avoid timeouts isthe file size. To this end, you have to produce split archives, by setting the part size for archive splitting in ZIP's orJPA's engine configuration pane. The suggested values are between 10Mb and 20Mb. Most servers have a bandwidthcap of 20Mbits, which equals to roughly 2Mb/sec (1 byte is 8 bits, plus there's some traffic overhead, lost packets,etc). With a time limit of 10 seconds, we can upload at most 2 Mb/sec * 10 sec = 20Mb without timing out. If youget timeouts during post-processing lower the part size.
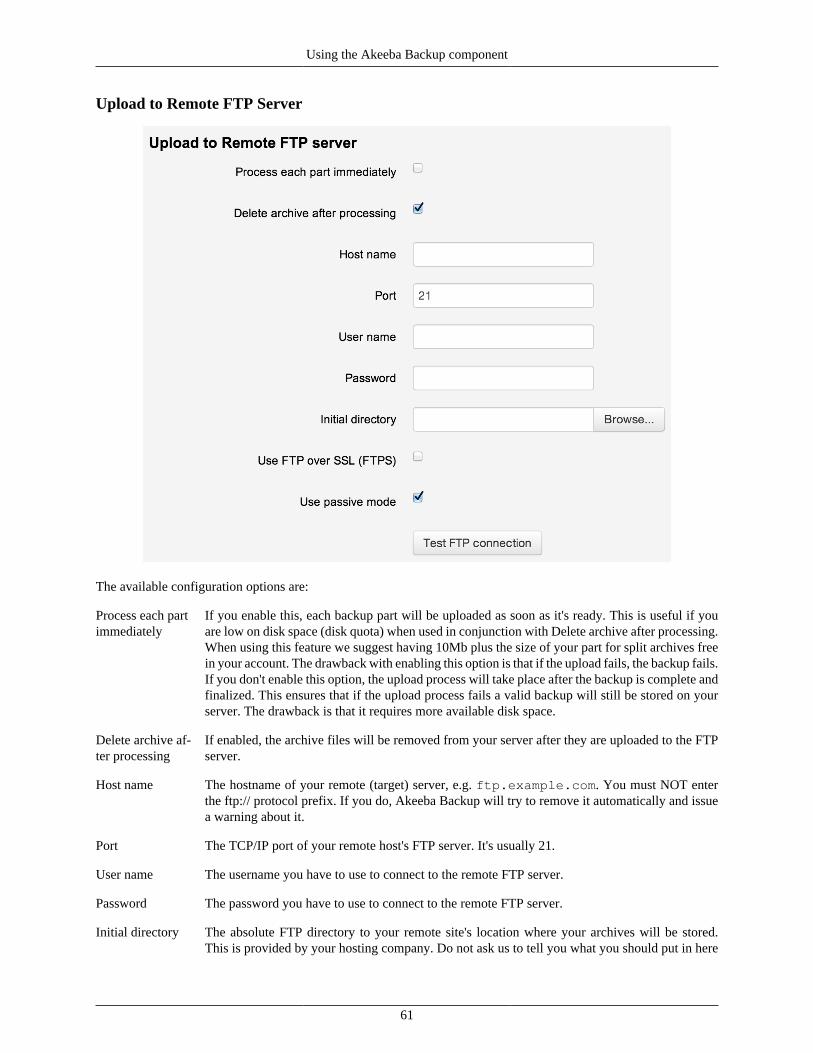
Using the Akeeba Backup component
61
Upload to Remote FTP Server
The available configuration options are:
Process each partimmediately
If you enable this, each backup part will be uploaded as soon as it's ready. This is useful if youare low on disk space (disk quota) when used in conjunction with Delete archive after processing.When using this feature we suggest having 10Mb plus the size of your part for split archives freein your account. The drawback with enabling this option is that if the upload fails, the backup fails.If you don't enable this option, the upload process will take place after the backup is complete andfinalized. This ensures that if the upload process fails a valid backup will still be stored on yourserver. The drawback is that it requires more available disk space.
Delete archive af-ter processing
If enabled, the archive files will be removed from your server after they are uploaded to the FTPserver.
Host name The hostname of your remote (target) server, e.g. ftp.example.com. You must NOT enterthe ftp:// protocol prefix. If you do, Akeeba Backup will try to remove it automatically and issuea warning about it.
Port The TCP/IP port of your remote host's FTP server. It's usually 21.
User name The username you have to use to connect to the remote FTP server.
Password The password you have to use to connect to the remote FTP server.
Initial directory The absolute FTP directory to your remote site's location where your archives will be stored.This is provided by your hosting company. Do not ask us to tell you what you should put in here
Using the Akeeba Backup component
62
because we can't possibly know. There is an easy way to find it, though. Connect to your targetFTP server with FileZilla. Navigate to the intended directory. Above the right-hand folder paneyou will see a text box with a path. Copy this path and paste it to Akeeba Backup's setting.
Alternatively, use the button next to the edit box to launch an interactive FTP folder browserwhich allows you to select the directory visually.
Use FTP overSSL
If your remote server supports secure FTP connections over SSL (they have to be explicit SSL;implicit SSL is not supported), you can enable this feature. In such a case you will most probablyhave to change the port. Please ask your hosting company to provide you with more informationon whether they support this feature and what port you should use. You must note that this featuremust also be supported by your originating server as well.
Use passivemode
Normally you should enable it, as it is the most common and firewall-safe transfer mode supportedby FTP servers. Sometimes, you remote server might require active FTP transfers. In such a caseplease disable this, but bear in mind that your originating server might not support active FTPtransfers, which usually requires tweaking the firewall!
2.3.5.9. Upload to Google Storage
Note
This feature is available only to Akeeba Backup Professional 3.5 and later.
Using this engine, you can upload your backup archives to the Google Storage cloud storage service using the inter-operable API (Google Storage simulates the API of Amazon S3)
Before you begin, go to your Google API Console, select your project and then select Google Cloud Storage from theleft-hand sidebar. Under "Interoperable Access" enable the "Make this my default project for interoperable storageaccess". Then, you need to create an Access and Secret key pair for use in Akeeba Backup. You can create keys byusing the Google Cloud Storage key management tool [https://code.google.com/apis/console#:storage:legacy]. Youcan create up to five sets of developer keys. After creating an access and secret key pair, copy the Access Key andSecret. You will paste them into Akeeba Backup's configuration page, into the Access Key and Secret Key areas.
You should also know the limitations. Google Storage's interoperable API does not allow appending to files, so thearchive has to be transferred in a single step. PHP has a time limit restriction we can't overlook. The time requiredto upload a file to Google Storage equals the size of the file divided by the available bandwidth. We want to time toupload a file to be less than PHP's time limit restriction so as to avoid timing out. Since the available bandwidth is finiteand constant, the only thing we can reduce in order to avoid timeouts is the file size. To this end, you have to producesplit archives, by setting the part size for archive splitting in ZIP's or JPA's engine configuration pane. The suggestedvalues are between 10Mb and 20Mb. Most servers have a bandwidth cap of 20Mbits, which equals to roughly 2Mb/sec(1 byte is 8 bits, plus there's some traffic overhead, lost packets, etc). With a time limit of 10 seconds, we can uploadat most 2 Mb/sec * 10 sec = 20Mb without timing out. If you get timeouts during post-processing lower the part size.
Tip
If you use the native CRON mode (akeeba-backup.php), there is usually no time limit - or there is a very hightime limit in the area of 3 minutes or so. Ask your host about it. Setting up a profile for use only with thenative CRON mode allows you to increase the part size and reduce the number of parts a complete backupconsists of.
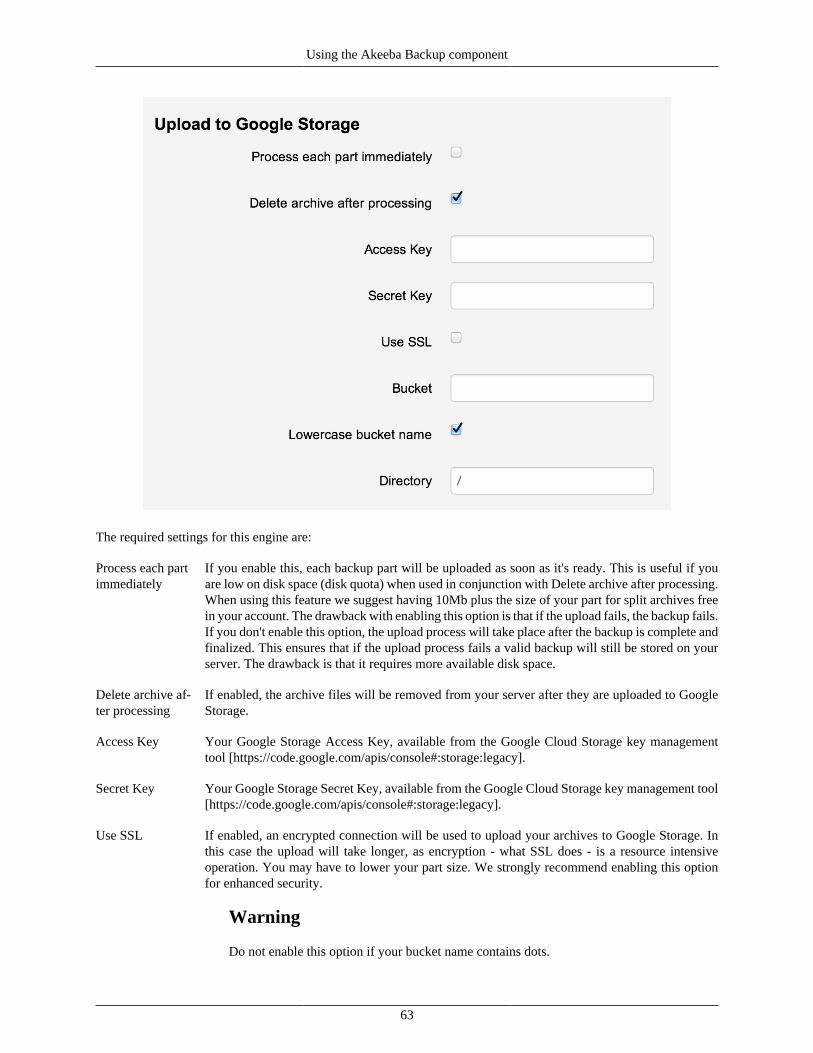
Using the Akeeba Backup component
63
The required settings for this engine are:
Process each partimmediately
If you enable this, each backup part will be uploaded as soon as it's ready. This is useful if youare low on disk space (disk quota) when used in conjunction with Delete archive after processing.When using this feature we suggest having 10Mb plus the size of your part for split archives freein your account. The drawback with enabling this option is that if the upload fails, the backup fails.If you don't enable this option, the upload process will take place after the backup is complete andfinalized. This ensures that if the upload process fails a valid backup will still be stored on yourserver. The drawback is that it requires more available disk space.
Delete archive af-ter processing
If enabled, the archive files will be removed from your server after they are uploaded to GoogleStorage.
Access Key Your Google Storage Access Key, available from the Google Cloud Storage key managementtool [https://code.google.com/apis/console#:storage:legacy].
Secret Key Your Google Storage Secret Key, available from the Google Cloud Storage key management tool[https://code.google.com/apis/console#:storage:legacy].
Use SSL If enabled, an encrypted connection will be used to upload your archives to Google Storage. Inthis case the upload will take longer, as encryption - what SSL does - is a resource intensiveoperation. You may have to lower your part size. We strongly recommend enabling this optionfor enhanced security.
Warning
Do not enable this option if your bucket name contains dots.
Using the Akeeba Backup component
64
Bucket The name of your Google Storage bucket where your files will be stored in. The bucket must bealready created; Akeeba Backup can not create buckets.
Warning
DO NOT CREATE BUCKETS WITH NAMES CONTAINING UPPERCASELETTERS. If you use a bucket with uppercase letters in its name it is very possible thatAkeeba Backup will not be able to upload anything to it. Moreover you should not usedots in your bucket names as they are incompatible with the Use SSL option due to anAmazon S3 limitation.
Please note that this is a limitation of the API. It is not something we can "fix" in AkeebaBackup. If this is the case with your site, please DO NOT ask for support; simply createa new bucket whose name only consists of lowercase unaccented latin characters (a-z),numbers (0-9) and dashes.
Directory The directory inside your Google Storage bucket where your files will be stored in. If you want touse subdirectories, you have to use a forward slash, e.g. directory/subdirectory/sub-subdirectory.
Tip
You can use Akeeba Backup's "variables" in the directory name in order to create itdynamically. These are the same variables as what you can use in the archive name, i.e.[DATE], [TIME], [HOST], [RANDOM].
Regarding the naming of buckets and directories, you have to be aware of the Google Storage rules:
• Folder names can not contain backward slashes (\). They are invalid characters.
• Bucket names can only contain lowercase letters, numbers, periods (.) and dashes (-). Accented characters, interna-tional characters, underscores and other punctuation marks are illegal characters.
• Bucket names must start with a number or a letter.
• Bucket names must be 3 to 63 characters long.
• Bucket names can't be in an IP format, e.g. 192.168.1.2
• Bucket names can't end with a dash.
• Bucket names can't have an adjacent dot and dash. For example, both my.-bucket and my-.bucket are invalid.It's best not to use dots at all as they are incompatible with the Use SSL option.
If any - or all - of those rules are broken, you'll end up with error messages that Akeeba Backup couldn't connect toGoogle Storage, that the calculated signature is wrong or that the bucket does not exist. This is normal and expectedbehaviour, as Google Storage drops the connection when it encounters invalid bucket or directory names.
2.3.5.10. Upload to iDriveSybc
Note
This feature is available only to Akeeba Backup Professional.
Using this engine, you can upload your backup archives to the iDriveSync low-cost, encrypted, cloud storage service.
The required settings for this engine are:
Using the Akeeba Backup component
65
Process each partimmediately
If you enable this, each backup part will be uploaded as soon as it's ready. This is useful if youare low on disk space (disk quota) when used in conjunction with Delete archive after processing.When using this feature we suggest having 10Mb plus the size of your part for split archives freein your account. The drawback with enabling this option is that if the upload fails, the backup fails.If you don't enable this option, the upload process will take place after the backup is complete andfinalized. This ensures that if the upload process fails a valid backup will still be stored on yourserver. The drawback is that it requires more available disk space.
Delete archive af-ter processing
If enabled, the archive files will be removed from your server after they are uploaded to iDriveSync
Username or e-email
Your iDriveSync username or email address
Password Your iDriveSync password
Private key (op-tional)
If you have locked your account with a private key (which means that all your data is storedencrypted in iDriveSync) please enter your Private Key here. If you are not making use of thisfeature please leave this field blank.
Directory The directory inside your iDriveSync where your files will be stored in. If you want to use sub-directories, you have to use a forward slash, e.g. directory/subdirectory/subsubdi-rectory.
Tip
You can use Akeeba Backup's "variables" in the directory name in order to create itdynamically. These are the same variables as what you can use in the archive name, i.e.[DATE], [TIME], [HOST], [RANDOM].
Use the new end-point
This is required for iDriveSync accounts created after 2014. If you have entered your username/e-mail and password correctly but Akeeba Backup can't connect to iDriveSync please try checkingthis box.
Lengthier explanation. Sometime after 2014 iDriveSync started signing up new users throughiDrive.com instead of iDriveSync.com. The new accounts need to access a new service endpoint(URL) to upload new files, delete existing files and so on. Meanwhile, accounts created beforethis change still need to access the old service endpoint (URL). The same service, two differentinterface implementations, making it impossible for us to automatically detect which method willwork with your iDriveSync account. Therefore the only thing we could do was add this confusingcheckbox. We're sorry about that.
2.3.5.11. Upload to Amazon S3
Note
This feature is available only to Akeeba Backup Professional. Older versions of Akeeba Backup may nothave all of the options discussed here.
Using this engine, you can upload your backup archives to the Amazon S3 cloud storage service. With dirt cheapprices per Gigabyte, it is an ideal option for securing your backups. Even if your host's data center is annihilated bya natural disaster and your local PC and storage media are wiped out by an unlikely event, you will still have a copyof your site readily accessible and easy to restore.
Since Akeeba Backup 3.2 we support multi-part uploads to Amazon S3. This means that, unlike the other post-process-ing engines, even if you do not use split archives, Akeeba Backup will still be able to upload your files to Amazon S3!This new feature allows Akeeba Backup to upload your backup archive in 5Mb chunks so that it doesn't time out when
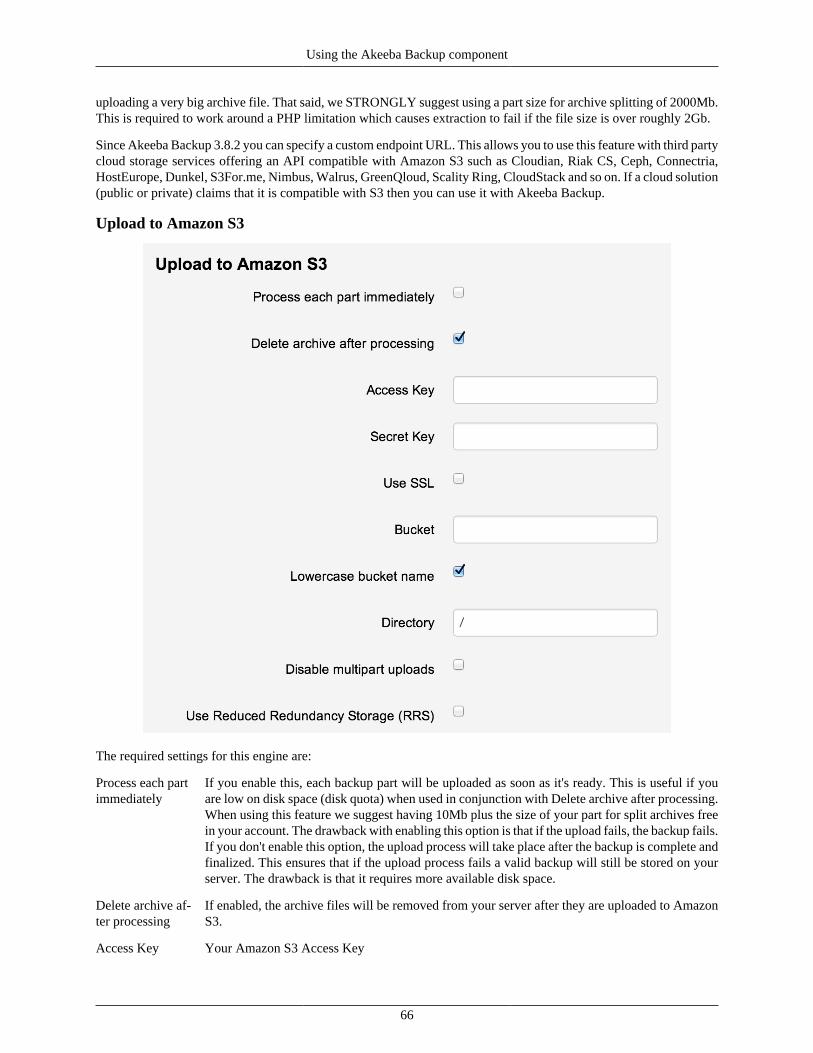
Using the Akeeba Backup component
66
uploading a very big archive file. That said, we STRONGLY suggest using a part size for archive splitting of 2000Mb.This is required to work around a PHP limitation which causes extraction to fail if the file size is over roughly 2Gb.
Since Akeeba Backup 3.8.2 you can specify a custom endpoint URL. This allows you to use this feature with third partycloud storage services offering an API compatible with Amazon S3 such as Cloudian, Riak CS, Ceph, Connectria,HostEurope, Dunkel, S3For.me, Nimbus, Walrus, GreenQloud, Scality Ring, CloudStack and so on. If a cloud solution(public or private) claims that it is compatible with S3 then you can use it with Akeeba Backup.
Upload to Amazon S3
The required settings for this engine are:
Process each partimmediately
If you enable this, each backup part will be uploaded as soon as it's ready. This is useful if youare low on disk space (disk quota) when used in conjunction with Delete archive after processing.When using this feature we suggest having 10Mb plus the size of your part for split archives freein your account. The drawback with enabling this option is that if the upload fails, the backup fails.If you don't enable this option, the upload process will take place after the backup is complete andfinalized. This ensures that if the upload process fails a valid backup will still be stored on yourserver. The drawback is that it requires more available disk space.
Delete archive af-ter processing
If enabled, the archive files will be removed from your server after they are uploaded to AmazonS3.
Access Key Your Amazon S3 Access Key
Using the Akeeba Backup component
67
Secret Key Your Amazon S3 Secret Key
Use SSL If enabled, an encrypted connection will be used to upload your archives to Amazon S3. In thiscase the upload will take longer, as encryption - what SSL does - is a resource intensive operation.You may have to lower your part size.
Warning
Do not use this option if your bucket name contains dots.
Bucket The name of your Amazon S3 bucket where your files will be stored in. The bucket must bealready created; Akeeba Backup can not create buckets.
Warning
DO NOT CREATE BUCKETS WITH NAMES CONTAINING UPPERCASELETTERS. AMAZON CLEARLY WARNS AGAINST DOING THAT. If you usea bucket with uppercase letters in its name it is very possible that Akeeba Backup willnot be able to upload anything to it. More specifically, it seems that if your web server islocated in Europe, you will be unable to use a bucket with uppercase letters in its name. Ifyour server is in the US, you will most likely be able to use such a bucket. Your mileagemay vary. The same applies if your bucket name contains dots and you try using the UseSSL option, for reasons that have to do with Amazon S3's setup.
Please note that this is a limitation imposed by Amazon itself. It is not something we can"fix" in Akeeba Backup (I did spent 5 hours on Christmas trying to find a workaround,with no success, because it's a limitation by Amazon). If this is the case with your site,please DO NOT ask for support; simply create a new bucket whose name only consistsof lowercase unaccented latin characters (a-z), numbers (0-9) and dashes.
Directory The directory inside your Amazon S3 bucket where your files will be stored in. If you want touse subdirectories, you have to use a forward slash, e.g. directory/subdirectory/sub-subdirectory.
Tip
You can use Akeeba Backup's "variables" in the directory name in order to create itdynamically. These are the same variables as what you can use in the archive name, i.e.[DATE], [TIME], [HOST], [RANDOM].
Disable multipartuploads
Since Akeeba Backup 3.2, uploads to Amazon S3 of parts over 5Mb use Amazon's new multi-partupload feature. This allows Akeeba Backup to upload the backup archive in 5Mb chunks andthen ask Amazon S3 to glue them together in one big file. However, some hosts time out whileuploading archives using this method. In that case it's preferable to use a relatively small PartSize for Split Archive setting (around 10-20Mb, your mileage may vary) and upload the entirearchive part in one go. Enabling this option ensures that, no matter how big or small your PartSize for Split Archives setting is, the upload of the backup archive happens in one go. You MUSTuse it if you get RequestTimeout warnings while Akeeba Backup is trying to upload the backuparchives to Amazon S3.
Custom endpoint Enter the custom endpoint (connection URL) of a third party service which supports an AmazonS3 compatible API.
Regarding the naming of buckets and directories, you have to be aware of the Amazon S3 rules (these rules are asimplified form of the list S3Fox presents you with when you try to create a new bucket):
Using the Akeeba Backup component
68
• Folder names can not contain backward slashes (\). They are invalid characters.
• Bucket names can only contain lowercase letters, numbers, periods (.) and dashes (-). Accented characters, interna-tional characters, underscores and other punctuation marks are illegal characters.
Important
Even if you created a bucket using uppercase letters, you must type its name with lowercase letters.Amazon S3 automatically converts the bucket name to all-lowercase. Also note that, as stated above, youmay NOT be able to use at all under some circumstances. Generally, your should avoid using uppercaseletters.
• Bucket names must start with a number or a letter.
• Bucket names must be 3 to 63 characters long.
• Bucket names can't be in an IP format, e.g. 192.168.1.2
• Bucket names can't end with a dash.
• Bucket names can't have an adjacent dot and dash. For example, both my.-bucket and my-.bucket are invalid.It's best to avoid dots at all as they are incompatible with the Use SSL option.
If any - or all - of those rules are broken, you'll end up with error messages that Akeeba Backup couldn't connect toS3, that the calculated signature is wrong or that the bucket does not exist. This is normal and expected behaviour, asAmazon S3 drops the connection when it encounters invalid bucket or directory names.
2.3.5.12. Upload to Remote SFTP server
Note
This feature is available only to Akeeba Backup Professional since version 3.9.0.
Using this engine, you can upload your backup archives to any SFTP (Secure File Transfer Protocol) server. Pleasenote that SFTP is the encrypted file transfer protocol provided by SSH servers. Even though the name is close, it hasnothing to do with plain old FTP or FTP over SSL. Not all servers support this but for those which do this is the mostsecure file transfer option.
The difference of this engine to the DirectSFTP archiver engine is that this engine uploads backup archives to theserver, whereas DirectSFTP uploads the uncompressed files of your site. DirectSFTP is designed for rapid migration,this engine is designed for easy moving of your backup archives to an off-server location. Moreover, this engine alsosupports connecting to your SFTP server using cryptographic key files instead of passwords, a much safer (and muchharder and geekier) user authentication method.
Your originating server must have PHP's SSH2 module installed and activated and its functions unblocked. Youroriginating server must also not block SFTP communication to the remote (target) server. Some hosts apply a firewallpolicy which requires you to specify to which hosts your server can connect. In such a case you might need to allowcommunication to your remote host over TCP port 22 (or whatever port you are using).
Before you begin, you should know the limitations. SFTP does not allow resuming of uploads so the archive has tobe transferred in a single step. PHP has a time limit restriction we can't overlook. The time required to upload a file toSFTP equals the size of the file divided by the available bandwidth. We want to time to upload a file to be less thanPHP's time limit restriction to avoid timing out. Since the available bandwidth is finite and constant, the only thingwe can reduce in order to avoid timeouts is the file size. To this end, you have to produce split archives, by settingthe part size for archive splitting in ZIP's or JPA's engine configuration pane. The suggested values are between 10Mband 20Mb. Most servers have a bandwidth cap of 20Mbits, which equals to roughly 2Mb/sec (1 byte is 8 bits, plus
Using the Akeeba Backup component
69
there's some traffic overhead, lost packets, etc). With a time limit of 10 seconds, we can upload at most 2 Mb/sec * 10sec = 20Mb without timing out. If you get timeouts during post-processing lower the part size.
The available configuration options are:
Process each partimmediately
If you enable this, each backup part will be uploaded as soon as it's ready. This is useful if youare low on disk space (disk quota) when used in conjunction with Delete archive after processing.When using this feature we suggest having 10Mb plus the size of your part for split archives freein your account. The drawback with enabling this option is that if the upload fails, the backup fails.If you don't enable this option, the upload process will take place after the backup is complete andfinalized. This ensures that if the upload process fails a valid backup will still be stored on yourserver. The drawback is that it requires more available disk space.
Delete archive af-ter processing
If enabled, the archive files will be removed from your server after they are uploaded to the SFTPserver.
Host name The hostname of your remote (target) server, e.g. secure.example.com. You must NOT en-ter the sftp:// or ssh:// protocol prefix. If you do, Akeeba Backup will try to remove it automati-cally and issue a warning about it.
Port The TCP/IP port of your remote host's SFTP (SSH) server. It's usually 22. If unsure, please askyour host.
User name The username you have to use to connect to the remote SFTP server. This must be always provided
Password The password you have to use to connect to the remote SFTP server.
Private key file(advanced)
Many (but not all) SSH/SFTP servers allow you to connect to them using cryptographic key filesfor user authentication. This method is far more secure than using a password. Passwords can beguessed within some degree of feasibility because of their relatively short length and complexity.Cryptographic keys are night impossible to guess with the current technology due to their com-plexity (on average, more than 100 times as complex as a typical password).
If you want to use this kind of authentication you will need to provide a set of two files, your publicand private key files. In this field you have to enter the full filesystem path to your private keyfile. The private key file must be in RSA or DSA format and has to be configured to be acceptedby your remote host. The exact configuration depends on your SSH/SFTP server and is beyondthe scope of this documentation. If you are a curious geek we strongly advise you to search for"ssh certificate authentication" in your favourite search engine for more information.
If you are using encrypted private key files enter the passphrase in the Password field above. If itis not encrypted, which is a bad security practice, leave the Password field blank.
Public Key File(advanced)
If you are using the key file authentication method described above you will also have to supplythe public key file. Enter here the full filesystem path to the public key file. The public key filemust be in RSA or DSA format and, of course, unencrypted (as it's a public key).
Initial directory The absolute filesystem path to your remote site's location where your archives will be stored.This is provided by your hosting company. Do not ask us to tell you what you should put in herebecause we can't possibly know. There is an easy way to find it, though. Connect to your targetSFTP server with FileZilla. Navigate to the intended directory. Above the right-hand folder paneyou will see a text box with a path. Copy this path and paste it to Akeeba Backup's setting.
Alternatively, use the button next to the edit box to launch an interactive SFTP folder browserwhich allows you to select the directory visually. However, due to limitations of PHP's SFTPhandling, you MUST give a valid pathname before clicking that button. We suggest asking yourhost. Really, they are the only ones which can provide you with this information.
Using the Akeeba Backup component
70
2.3.5.13. Upload to SugarSync
Note
This feature is available only to Akeeba Backup Professional 3.5.a1 and later.
Using this engine, you can upload your backup archives to the SugarSync [http://www.sugarsync.com] cloud storageservice. SugarSync has a free tier (with 5Gb of free space) and a paid tier. Akeeba Backup can work with either one.
Please note that Akeeba Backup can only upload files to Sync Folders, it can not upload files directly to a Workspace(a single device). You have to set up your Sync Folders in SugarSync before using Akeeba Backup. If you have notcreated or specified any Sync Folder, Akeeba Backup will upload the backup archives to your Magic Briefcase, thedefault Sync Folder which syncs between all of your devices, including your mobile devices (iPhone, iPad, Androidphones, ...).
Before you begin, you should know the limitations. As most cloud storage providers, SugarSync does not allow ap-pending to files, so the archive has to be transferred in a single step. PHP has a time limit restriction we can't overlook.The time required to upload a file to SugarSync equals the size of the file divided by the available bandwidth. Wewant to time to upload a file to be less than PHP's time limit restriction so as to avoid timing out. Since the availablebandwidth is finite and constant, the only thing we can reduce in order to avoid timeouts is the file size. To this end,you have to produce split archives, by setting the part size for archive splitting in ZIP's or JPA's engine configurationpane. The suggested values are between 10Mb and 20Mb. Most servers have a bandwidth cap of 20Mbits, whichequals to roughly 2Mb/sec (1 byte is 8 bits, plus there's some traffic overhead, lost packets, etc). With a time limit of10 seconds, we can upload at most 2 Mb/sec * 10 sec = 20Mb without timing out. If you get timeouts during post-processing lower the part size.
Tip
If you use the native CRON mode (akeeba-backup.php), there is usually no time limit - or there is a very hightime limit in the area of 3 minutes or so. Ask your host about it. Setting up a profile for use only with thenative CRON mode allows you to increase the part size and reduce the number of parts a complete backupconsists of.
The required settings for this engine are:
Process each partimmediately
If you enable this, each backup part will be uploaded as soon as it's ready. This is useful if youare low on disk space (disk quota) when used in conjunction with Delete archive after processing.When using this feature we suggest having 10Mb plus the size of your part for split archives free
Using the Akeeba Backup component
71
in your account. The drawback with enabling this option is that if the upload fails, the backup fails.If you don't enable this option, the upload process will take place after the backup is complete andfinalized. This ensures that if the upload process fails a valid backup will still be stored on yourserver. The drawback is that it requires more available disk space.
Delete archive af-ter processing
If enabled, the archive files will be removed from your server after they are uploaded to Sug-arSync.
Email The email used by your SugarSync account.
Password The password used by your SugarSync account.
Directory The directory inside SugarSync where your files will be stored in. If you want to use subdirecto-ries, you have to use a forward slash, e.g. /directory/subdirectory/subsubdirec-tory. You may use the same variables used in archive naming, e.g. [HOST] for the site's hostname or [DATE] for the current date.
Please note that the first part of your directory should be the name of your shared folder. Forexample, if you have a shared folder named backups and you want to create a subdirectoryinside it based on the site's name, you need to enter backups/[HOST] in the directory box. Ifa Sync Folder by the name "backups" is not found, a directory named "backups" will be createdinside your Magic Briefcase folder. Yes, it's more complicated than, say, DropBox – but that'salso why SugarSync is more powerful.
2.3.5.14. Upload to WebDAV
Note
This feature is available only to Akeeba Backup Professional 3.10.1 and later.
Using this engine, you can upload your backup archives to any server which supports the WebDAV (Web DistributedAuthoring and Versioning) protocol. Examples of storage services supporting WebDAV:
• OwnCloud [http://doc.owncloud.org/server/5.0/user_manual/files/files.html] is a software solution that you can in-stall on your own servers to provide a private cloud.
• CloudDAV [http://storagemadeeasy.com/CloudDav/] is a service which gives you WebDAV access to a plethoraof cloud storage providers: Amazon S3, GMail, RackSpace CloudFiles, Microsoft OneDrive (formerly: SkyDrive),Windows Azure BLOB Storage, iCloud, LiveMesh, Box.com, FTP servers, Email (which, unlike the Send by emailengine in Akeeba Backup, does support large files), Google Docs, Mezeo, Zimbra, FilesAnywhere, Dropbox, GoogleStorage, CloudMe, Microsoft SharePoint, Trend Micro, OpenStack Swift (supported by several providers), Googlesites, HP cloud, Alfresco cloud, Open S3, Eucalyptus Walrus, Microsoft Office 365, EMC Atmos, iKoula - iKeep-inCloud, PogoPlug, Ubuntu One, SugarSync, Hosting Solutions, BaseCamp, Huddle, IBM Files Cloud, Scality,Google Drive, Memset Memstore, DumpTruck, ThinkOn, Evernote, Cloudian, Copy.com, Salesforce. [TESTEDwith Amazon S3 as the storage provider]
• Apache web server (when the optional WebDAV support is enabled – recommended for advanced users only).
• 4Shared [http://www.4shared.com/].
• ADrive [http://www.adrive.com/].
• Amazon Cloud Drive [http://www.amazon.com/gp/feature.html/ref=cd_def?ie=UTF8&*Version*=1&*entries*=0&docId=1000828861].
• Box.com [https://www.box.com/].
• CloudSafe [https://secure.cloudsafe.com/login/].
Using the Akeeba Backup component
72
• DriveHQ [https://www.drivehq.com/].
• DumpTruck [http://www.goldenfrog.com/].
• FilesAnywhere [https://www.filesanywhere.com/].
• MyDrive [http://www.mydrive.net/].
• MyDisk.se. [https://mydisk.com/web/main.php?show=home]
• PowerFolder [https://www.powerfolder.com/].
• OVH.net [http://ovh.net/]
• Safecopy Backup [http://safecopybackup.com/].
• Strato HiDrive [https://www.free-hidrive.com/index.html].
• Telekom Mediencenter [http://mediencenter.telekom.de/].
• Pretty much every storage provider which claims to support WebDAV
Tip
You can find more information for WebDAV access of each of these providers in http://www.free-on-line-backup-services.com/features/webdav.html
Note
We have not thoroughly tested and do not guarantee that any of the above providers will work smoothly withAkeeba Backup unless you see the notive [TESTED] next to it.
Before you begin, you should know the limitations. As most remote storage technologies, WebDAV does not allowappending to files, so the archive has to be transferred in a single step. PHP has a time limit restriction we can'toverlook. The time required to upload a file to WebDAV equals the size of the file divided by the available bandwidth.We want to time to upload a file to be less than PHP's time limit restriction so as to avoid timing out. Since the availablebandwidth is finite and constant, the only thing we can reduce in order to avoid timeouts is the file size. To this end,you have to produce split archives, by setting the part size for archive splitting in ZIP's or JPA's engine configurationpane. The suggested values are between 10Mb and 20Mb. Most servers have a bandwidth cap of 20Mbits, whichequals to roughly 2Mb/sec (1 byte is 8 bits, plus there's some traffic overhead, lost packets, etc). With a time limit of10 seconds, we can upload at most 2 Mb/sec * 10 sec = 20Mb without timing out. If you get timeouts during post-processing lower the part size.
Tip
If you use the native CRON mode (akeeba-backup.php), there is usually no time limit - or there is a very hightime limit in the area of 3 minutes or so. Ask your host about it. Setting up a profile for use only with thenative CRON mode allows you to increase the part size and reduce the number of parts a complete backupconsists of.
The required settings for this engine are:
Process each partimmediately
If you enable this, each backup part will be uploaded as soon as it's ready. This is useful if youare low on disk space (disk quota) when used in conjunction with Delete archive after processing.When using this feature we suggest having 10Mb plus the size of your part for split archives freein your account. The drawback with enabling this option is that if the upload fails, the backup fails.If you don't enable this option, the upload process will take place after the backup is complete andfinalized. This ensures that if the upload process fails a valid backup will still be stored on yourserver. The drawback is that it requires more available disk space.

Using the Akeeba Backup component
73
Delete archive af-ter processing
If enabled, the archive files will be removed from your server after they are uploaded to Sug-arSync.
Username The username you use to connect to your WebDAV server
Password The password you use to connect to your WebDAV server
WebDAV baseURL
The base URL of your WebDAV server's endpoint. It might be a directory such ashttp://www.example.com/mydav/ or even a script endpoint such as http://www.example.com/webdav.php. If unsure please ask your WebDAV provider for moreinformation.
Warning
If the base URL of your WebDAV server's endpoint is a directory (almost always) youMUST use a trailing slash, e.g. http://www.example.com/mydav/ (correct) butnot http://www.example.com/mydav (WRONG!)
Directory The directory inside the WebDAV folder where your files will be stored in. If you want to usesubdirectories, you have to use a forward slash, e.g. /directory/subdirectory/sub-subdirectory. You may use the same variables used in archive naming, e.g. [HOST] for thesite's host name or [DATE] for the current date.
Warning
You MUST always use a directory. Most WebDAV servers, e.g. Box.com, allow you touse the root directory which is denoted by / (a single forward slash). Other WebDAVservers, such as CloudDAV, DO NOT allow you to use the root directory. In this caseyou MUST use a non-empty directory, e.g. /backups for the upload to WebDAV towork at all.
2.3.5.15. Upload to Box.net / Box.com
As of Akeeba Backup 3.10.1 you can use the Upload to WebDAV option to upload your backup archives to Box.com.You will need to use the following parameters:
Username Your box.com email address
Password Your box.com password
WebDAV baseURL
https://dav.box.com/dav
For more information please check the official Box.com page explaining the Box.com over WebDAV feature: https://support.box.com/hc/en-us/articles/200519748-Does-Box-support-WebDAV-
Important
Due to limitations in the Box.com implementation of WebDAV we strongly recommend using a Part Sizefor Split Archives smaller than 50Mb at all times.
2.4. Backup nowBefore we go on describing the Backup Now page, we have to discuss something important pertaining to the overallbackup and restoration process. In order for the restoration to work properly, the original site must have a readable and
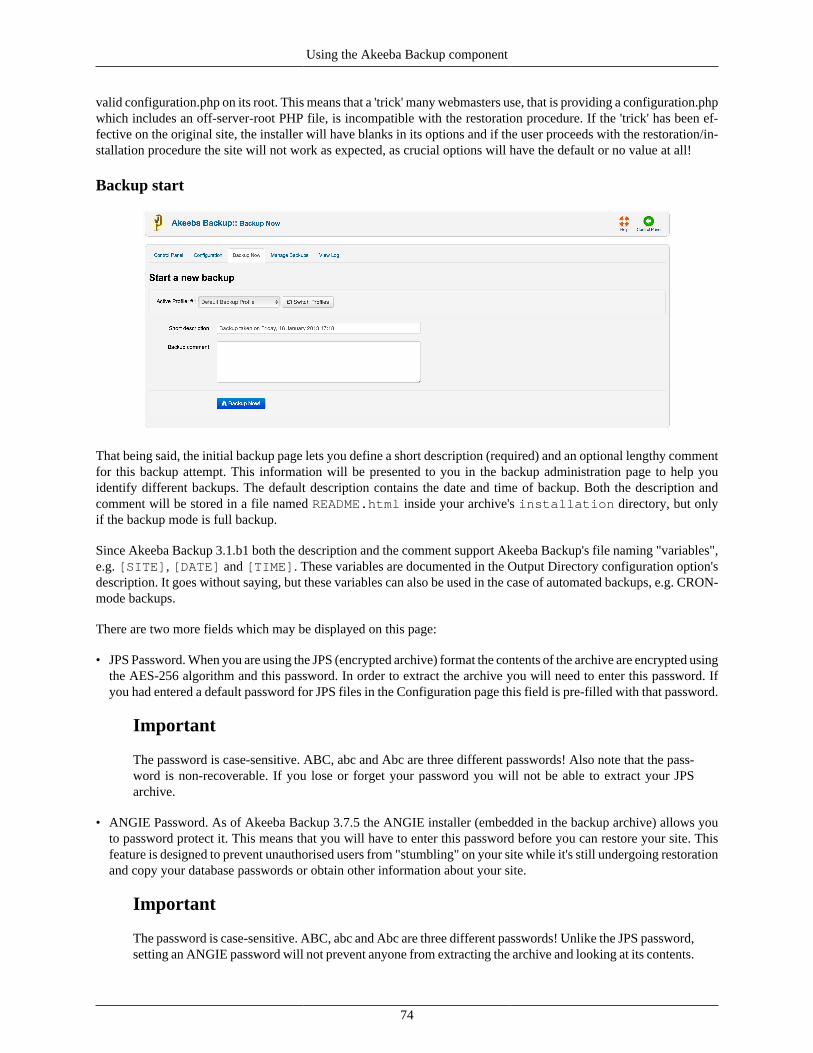
Using the Akeeba Backup component
74
valid configuration.php on its root. This means that a 'trick' many webmasters use, that is providing a configuration.phpwhich includes an off-server-root PHP file, is incompatible with the restoration procedure. If the 'trick' has been ef-fective on the original site, the installer will have blanks in its options and if the user proceeds with the restoration/in-stallation procedure the site will not work as expected, as crucial options will have the default or no value at all!
Backup start
That being said, the initial backup page lets you define a short description (required) and an optional lengthy commentfor this backup attempt. This information will be presented to you in the backup administration page to help youidentify different backups. The default description contains the date and time of backup. Both the description andcomment will be stored in a file named README.html inside your archive's installation directory, but onlyif the backup mode is full backup.
Since Akeeba Backup 3.1.b1 both the description and the comment support Akeeba Backup's file naming "variables",e.g. [SITE], [DATE] and [TIME]. These variables are documented in the Output Directory configuration option'sdescription. It goes without saying, but these variables can also be used in the case of automated backups, e.g. CRON-mode backups.
There are two more fields which may be displayed on this page:
• JPS Password. When you are using the JPS (encrypted archive) format the contents of the archive are encrypted usingthe AES-256 algorithm and this password. In order to extract the archive you will need to enter this password. Ifyou had entered a default password for JPS files in the Configuration page this field is pre-filled with that password.
Important
The password is case-sensitive. ABC, abc and Abc are three different passwords! Also note that the pass-word is non-recoverable. If you lose or forget your password you will not be able to extract your JPSarchive.
• ANGIE Password. As of Akeeba Backup 3.7.5 the ANGIE installer (embedded in the backup archive) allows youto password protect it. This means that you will have to enter this password before you can restore your site. Thisfeature is designed to prevent unauthorised users from "stumbling" on your site while it's still undergoing restorationand copy your database passwords or obtain other information about your site.
Important
The password is case-sensitive. ABC, abc and Abc are three different passwords! Unlike the JPS password,setting an ANGIE password will not prevent anyone from extracting the archive and looking at its contents.
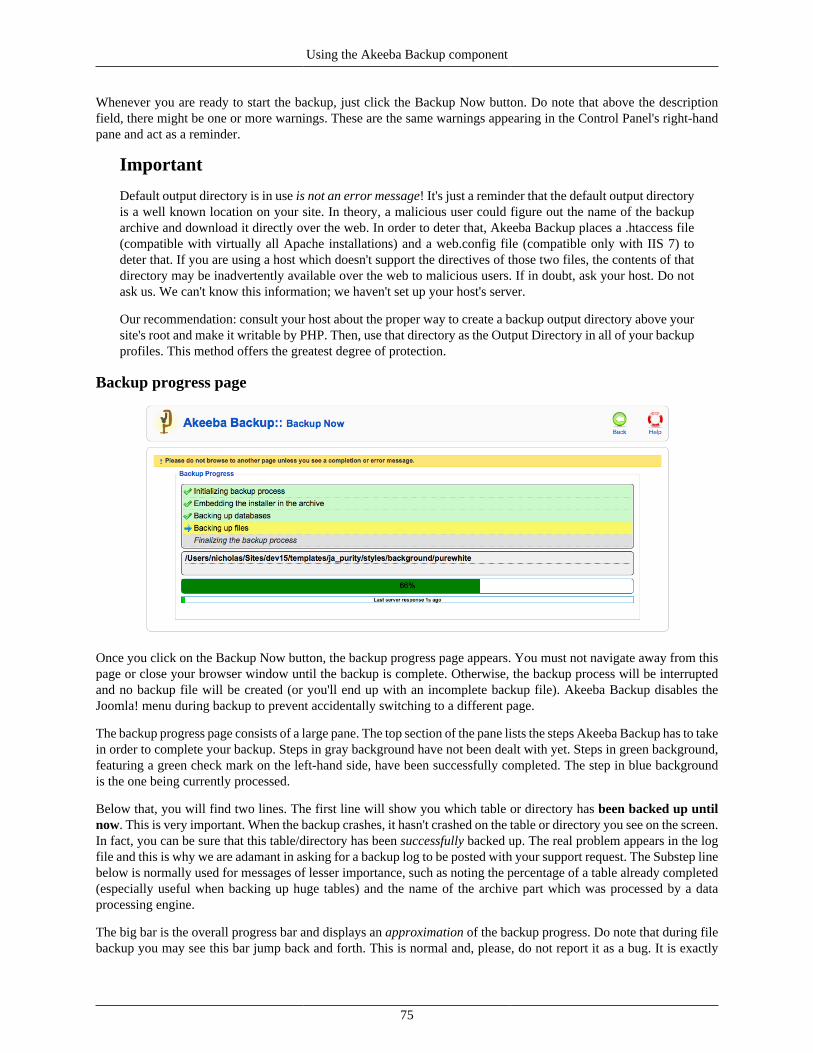
Using the Akeeba Backup component
75
Whenever you are ready to start the backup, just click the Backup Now button. Do note that above the descriptionfield, there might be one or more warnings. These are the same warnings appearing in the Control Panel's right-handpane and act as a reminder.
Important
Default output directory is in use is not an error message! It's just a reminder that the default output directoryis a well known location on your site. In theory, a malicious user could figure out the name of the backuparchive and download it directly over the web. In order to deter that, Akeeba Backup places a .htaccess file(compatible with virtually all Apache installations) and a web.config file (compatible only with IIS 7) todeter that. If you are using a host which doesn't support the directives of those two files, the contents of thatdirectory may be inadvertently available over the web to malicious users. If in doubt, ask your host. Do notask us. We can't know this information; we haven't set up your host's server.
Our recommendation: consult your host about the proper way to create a backup output directory above yoursite's root and make it writable by PHP. Then, use that directory as the Output Directory in all of your backupprofiles. This method offers the greatest degree of protection.
Backup progress page
Once you click on the Backup Now button, the backup progress page appears. You must not navigate away from thispage or close your browser window until the backup is complete. Otherwise, the backup process will be interruptedand no backup file will be created (or you'll end up with an incomplete backup file). Akeeba Backup disables theJoomla! menu during backup to prevent accidentally switching to a different page.
The backup progress page consists of a large pane. The top section of the pane lists the steps Akeeba Backup has to takein order to complete your backup. Steps in gray background have not been dealt with yet. Steps in green background,featuring a green check mark on the left-hand side, have been successfully completed. The step in blue backgroundis the one being currently processed.
Below that, you will find two lines. The first line will show you which table or directory has been backed up untilnow. This is very important. When the backup crashes, it hasn't crashed on the table or directory you see on the screen.In fact, you can be sure that this table/directory has been successfully backed up. The real problem appears in the logfile and this is why we are adamant in asking for a backup log to be posted with your support request. The Substep linebelow is normally used for messages of lesser importance, such as noting the percentage of a table already completed(especially useful when backing up huge tables) and the name of the archive part which was processed by a dataprocessing engine.
The big bar is the overall progress bar and displays an approximation of the backup progress. Do note that during filebackup you may see this bar jump back and forth. This is normal and, please, do not report it as a bug. It is exactly
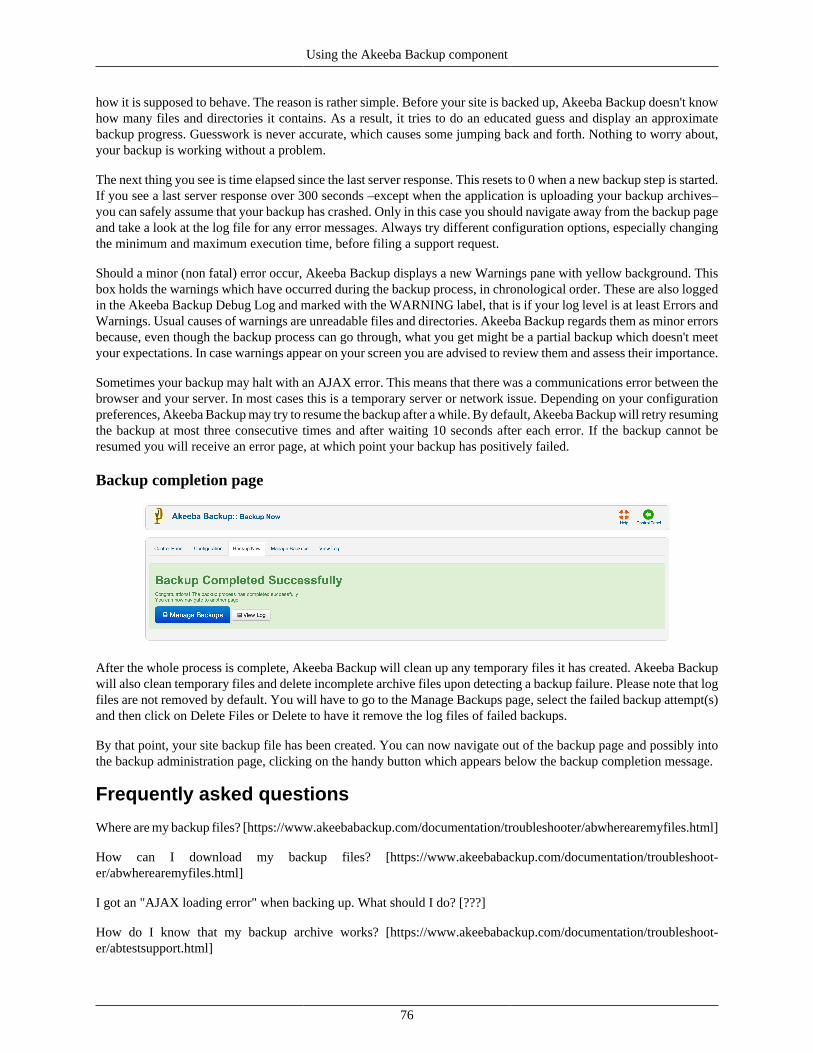
Using the Akeeba Backup component
76
how it is supposed to behave. The reason is rather simple. Before your site is backed up, Akeeba Backup doesn't knowhow many files and directories it contains. As a result, it tries to do an educated guess and display an approximatebackup progress. Guesswork is never accurate, which causes some jumping back and forth. Nothing to worry about,your backup is working without a problem.
The next thing you see is time elapsed since the last server response. This resets to 0 when a new backup step is started.If you see a last server response over 300 seconds –except when the application is uploading your backup archives–you can safely assume that your backup has crashed. Only in this case you should navigate away from the backup pageand take a look at the log file for any error messages. Always try different configuration options, especially changingthe minimum and maximum execution time, before filing a support request.
Should a minor (non fatal) error occur, Akeeba Backup displays a new Warnings pane with yellow background. Thisbox holds the warnings which have occurred during the backup process, in chronological order. These are also loggedin the Akeeba Backup Debug Log and marked with the WARNING label, that is if your log level is at least Errors andWarnings. Usual causes of warnings are unreadable files and directories. Akeeba Backup regards them as minor errorsbecause, even though the backup process can go through, what you get might be a partial backup which doesn't meetyour expectations. In case warnings appear on your screen you are advised to review them and assess their importance.
Sometimes your backup may halt with an AJAX error. This means that there was a communications error between thebrowser and your server. In most cases this is a temporary server or network issue. Depending on your configurationpreferences, Akeeba Backup may try to resume the backup after a while. By default, Akeeba Backup will retry resumingthe backup at most three consecutive times and after waiting 10 seconds after each error. If the backup cannot beresumed you will receive an error page, at which point your backup has positively failed.
Backup completion page
After the whole process is complete, Akeeba Backup will clean up any temporary files it has created. Akeeba Backupwill also clean temporary files and delete incomplete archive files upon detecting a backup failure. Please note that logfiles are not removed by default. You will have to go to the Manage Backups page, select the failed backup attempt(s)and then click on Delete Files or Delete to have it remove the log files of failed backups.
By that point, your site backup file has been created. You can now navigate out of the backup page and possibly intothe backup administration page, clicking on the handy button which appears below the backup completion message.
Frequently asked questions
Where are my backup files? [https://www.akeebabackup.com/documentation/troubleshooter/abwherearemyfiles.html]
How can I download my backup files? [https://www.akeebabackup.com/documentation/troubleshoot-er/abwherearemyfiles.html]
I got an "AJAX loading error" when backing up. What should I do? [???]
How do I know that my backup archive works? [https://www.akeebabackup.com/documentation/troubleshoot-er/abtestsupport.html]
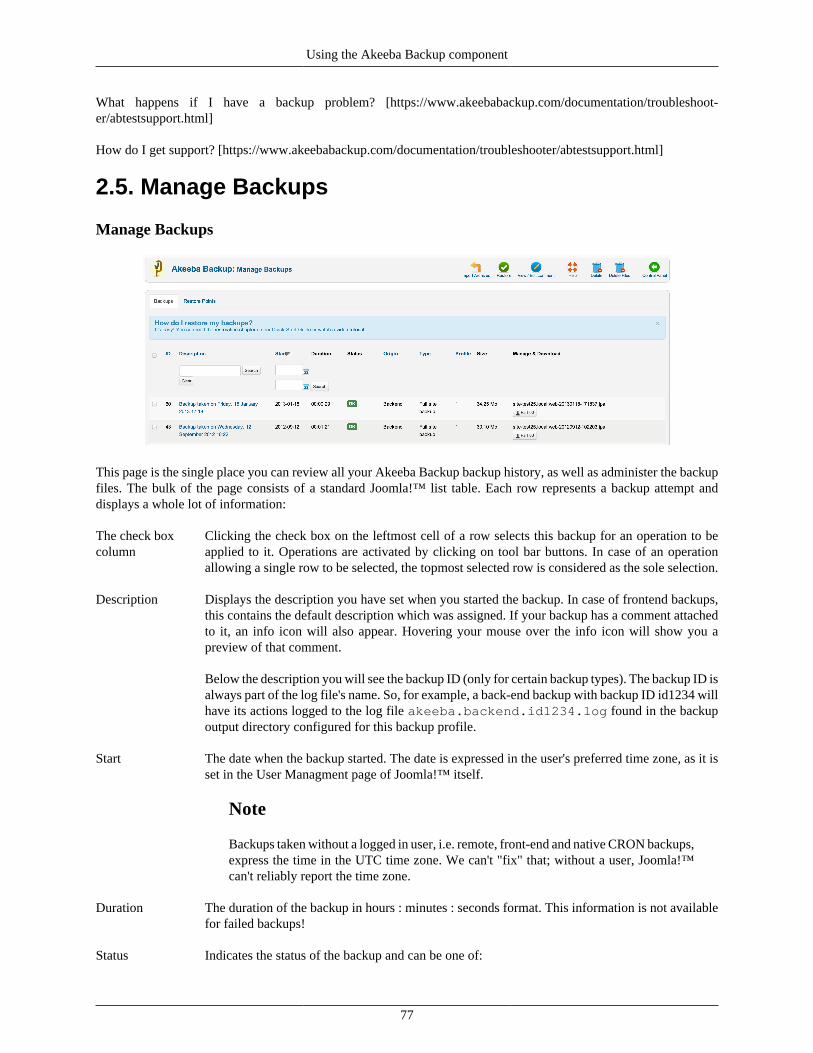
Using the Akeeba Backup component
77
What happens if I have a backup problem? [https://www.akeebabackup.com/documentation/troubleshoot-er/abtestsupport.html]
How do I get support? [https://www.akeebabackup.com/documentation/troubleshooter/abtestsupport.html]
2.5. Manage Backups
Manage Backups
This page is the single place you can review all your Akeeba Backup backup history, as well as administer the backupfiles. The bulk of the page consists of a standard Joomla!™ list table. Each row represents a backup attempt anddisplays a whole lot of information:
The check boxcolumn
Clicking the check box on the leftmost cell of a row selects this backup for an operation to beapplied to it. Operations are activated by clicking on tool bar buttons. In case of an operationallowing a single row to be selected, the topmost selected row is considered as the sole selection.
Description Displays the description you have set when you started the backup. In case of frontend backups,this contains the default description which was assigned. If your backup has a comment attachedto it, an info icon will also appear. Hovering your mouse over the info icon will show you apreview of that comment.
Below the description you will see the backup ID (only for certain backup types). The backup ID isalways part of the log file's name. So, for example, a back-end backup with backup ID id1234 willhave its actions logged to the log file akeeba.backend.id1234.log found in the backupoutput directory configured for this backup profile.
Start The date when the backup started. The date is expressed in the user's preferred time zone, as it isset in the User Managment page of Joomla!™ itself.
Note
Backups taken without a logged in user, i.e. remote, front-end and native CRON backups,express the time in the UTC time zone. We can't "fix" that; without a user, Joomla!™can't reliably report the time zone.
Duration The duration of the backup in hours : minutes : seconds format. This information is not availablefor failed backups!
Status Indicates the status of the backup and can be one of:
Using the Akeeba Backup component
78
OK A complete backup whose backup archive is available for download.
Obsolete A complete backup whose backup archive is either deleted, or was overwritten byanother backup attempt.
Note
If you move your backup output directory's location, all your previousbackups will appear as "Obsolete", even though you might have movedthese backup files as well. This is not a bug. Akeeba Backup internallystores the absolute path to the backup files. When you move the outputdirectory its absolute path changes, so Akeeba Backup is unable to locatethe old backup files.
Important
If your host uses MySQL 4.0 the status will always appear as Obsolete andyou will be unable to download the backup archive through your brows-er, as the result of limitations of this ancient, obsolete and unsupportedMySQL version. You can still use your favorite FTP client to downloadthe backup archives, though.
Remote Indicates a complete backup which has been uploaded to remote storage (e.g. Drop-box, Amazon S3, CloudFiles and so on), but it is no longer stored on your server.You can fetch the backup archive backup to your server any time (as long as youhaven't manually removed the file from the remote storage) in order to restore it,clicking the Manage Remote Files link on the right-hand column.
Note
Not all remote storage engines support fetching back backup archives.Currently, only FTP, Amazon S3, CloudFiles and Dropbox support thisfeature.
Pending A backup attempt which is still running. You should not see any such record, un-less a backup attempt started while you were loading this page. In this case, youshould not navigate to the Control Panel page! Doing so would invalidate the back-up and wreck havoc. You have been warned! Another reason to see such an entryis a backup attempt which failed with a PHP fatal error, or which was abruptly in-terrupted (by the user or a PHP error). In this case, you can safely delete the entryand get rid of the backup file as well.
Failed A backup attempt which failed with a catchable error condition.
Origin Indicates the origin of the backup and can be either frontend for backups originating from thefront-end - or remote interface - or backend for backups originating from the back-end (regularbackups).
Type Indicates the backup type and can be Full for full site backups (database and files), DB Only fordatabase only backups, Files only for files only backup or Multi DB for multiple databases backup(an archive containing SQL dumps of the main site's database and the defined multiple databases).
Profile Displays the numeric identifier of the backup profile used during the backup. It is possible thatsince then the profile may have been modified or even deleted!
Using the Akeeba Backup component
79
Size The total size of the backup archive in Mb. If the files are not available on your server, i.e. therecord is marked as "obsolete" or "remote", the size appears inside parentheses to let you knowthat the files are not available for download.
Archive Displays the name of the backup file, if it is available.
Moreover, it will show you the backup download links which allow you to download the backuparchive directly to your browser. These links show as "Part 00", "Part 01" and so on. Single-partarchives (the default setting on most hosts) will always have only one download link, titled "Part00". If you have a multi-part archive, you will see as many links as the number of parts generatedby Akeeba Backup.
Important
The only supported and guaranteed method of downloading your backup archives er-ror-free is using FTP/SFTP in BINARY transfer mode. Anything else has the potentialto CORRUPT your backup archives.
If the file is stored on a remote storage location, e.g. Amazon S3 or a remote FTP server, you willalso see a Manage remote stored files link if you are using Akeeba Backup 3.2 or later. Clickingon it will allow you to transfer the files back to your server, download them directly from theremote location or remove them from the remote storage.
If your backup archive has a backup ID you will also see the View Log button which takes youto the View Log page, with this backup attempt's log file open.
Clicking on the label of each column allows you to sort the backup entries by the contents of that column. By default,Akeeba Backup sorts the records by Start descending, so that the newest backup attempts will appear on top. Belowthe header there are three filter boxes. The first one allows you to filter by the backup description. The other two allowyou to select a date range so that only backups attempted within this date range will be displayed. You can leave eitherof these boxes empty to allow an open start or end date respectively.
On the top of the page you can find a tool bar with operations buttons. The Delete button will remove the selectedbackup attempt entries along with their backup archives (if applicable), whereas the Delete Files button will only re-move the files (if found on your server). The Restore button (Akeeba Backup Professional only) will run the integratedrestoration feature for the selected archive file. This feature can be used to restore your backup archive on the sameserver you backed up from or even a different server (live transfer of your site to another host!). The Discover andImport Archives (available since Akeeba Backup Professional 3.2) allows you to import any ZIP, JPA or JPS file,located anywhere in your server or Amazon S3, in the Manage Backups (formerly "Administer Backup Files") pagein order to restore it on this or any other site.
Note
If you are interested in restoring your backup archives and your site is inaccessible or you're using the freeAkeeba Backup Core edition, you can use Akeeba Kickstart or Akeeba eXtract Wizard to extract the archiveand restore it on their server. The procedure is detailed in our Quick Start Guide and our Video Tutorials(both found under the Documentation menu item on our site).
Important
Integrated restoration is only supported for Full Site and Files Only backup archives. Trying to use it with anyother type of backup files will ultimately result in an error. This feature is available only to Akeeba BackupProfessional - the paid version. Users of the Akeeba Backup Core version can follow our video tutorials orQuick Start Guide instructions to easily restore their backups using Kickstart or eXtract Wizard.

Using the Akeeba Backup component
80
Backup description / comment editor
The View / Edit Comment button will open a page showing the description and comment of the currently selectedbackup row. You can freely edit both the description and the comment on that page and save your changes using theSave button. The same page will open if you click on a backup record's description (appearing as a link).
2.5.1. Integrated restoration
Note
This feature is only available in the Akeeba Backup Professional edition; users of Akeeba Backup Core -and users of the Professional edition when their site is completely inaccessible- can use Akeeba Kickstart orAkeeba eXtract Wizard to extract the archive and restore it on their server. The procedure is detailed in ourQuick Start Guide and our Video Tutorials (both found under the Documentation menu item on our site).
Warning
THE INTEGRATED RESTORATION FEATURE MAY DESTROY YOUR SITE IF YOU ARE NOTCAREFUL.
Remember that you are OVERWRITING your site with the one contained in the backup archive. Do not dothat on a live site unless it is absolutely necessary, i.e. you have already destroyed something vital in yoursite and want to revert to a "last known good" state.
As with any backup restoration method, practise on a local testing server first. Don't push your luck by tryinga potentially dangerous procedure you are unfamiliar with on a live server. Many sites have been destroyedby human error, augmented by the "bliss of ignorance" effect. Never, ever, under any circumstances, attempta restoration on a live site unless you are familiar with the procedure and confident of all the steps you take.
That said, we trust our own software and use it on our sites. Do note that we are extremely familiar with theprocedure and extremely careful when doing restorations. This message tries to excessively - if that's ever

Using the Akeeba Backup component
81
possible - stress the point that you must be careful and that the best method to achieve that is practising ona local testing server first.
The integrated restoration feature allows you to easily restore a previous backup directly on your server, as long asyour backup archive still exists on your server of course. The whole idea behind this feature is that it is not necessary tomanually download Kickstart, place it in your site's root and move the backup archive from the output directory to thesite's root in order to perform the restoration. Instead, the integrated restoration feature takes care of extracting yourbackup archive directly from the backup output folder into your site's root and then allow you to run the embeddedinstaller (Akeeba Backup Installer) to complete the restoration procedure.
The communication between your browser and the archive extraction script is encrypted with the AES128 (Rijndael)encryption method, using a random key produced as soon as you initiate the restoration of a backup archive. Thisensures that a malicious user can't exploit the restoration script to mischievously extract your backup archive in yoursite's root with the intent to steal your database password. The encryption/decryption algorithm is implemented withstandard PHP and Javascript code, eliminating the need for third party cryptography libraries and ensuring that underno circumstances unencrypted data will be exchanged between the browser and the server.
In order to start an integrated restoration begin by going to the Manage Backups page of the component. In that pagecheck the checkbox next to the backup you want to restore and click the Restore button in the toolbar to will run theintegrated restoration feature for the selected archive file.
The integrated restoration setup page
When you first start the integrated restoration feature, you are presented with a few settings. The first setting, appearingabove the Start Restoration button, determines how the file extraction will be performed. The two available options are:
Write directly tofiles
All files will be extracted directly to their final location using direct PHP file writes. If yourpermissions settings do not allow some files or directories to be created/overwritten the processwill fail and your site will be left in a half-restored state.
Use FTP uploads Using this method, each file is first extracted to the temporary directory specified by the currentprofile and then moved to its final location using FTP. This is a "best effort" approach and canwork with most servers. Do note that only unencrypted FTP (plain FTP) is supported. If youchoose this option, you'll also have to specify the FTP connection settings.
Using the Akeeba Backup component
82
Tip
You can use this option to restore a backup on a different site. Just select this option andprovide the FTP connection details to the other site before clicking on Start Restoration.
Hybrid This mode combines the previous two in an intelligent manner. When selected, Akeeba Backupwill first attempt to write to the files directly. If this is not possible, i.e. due to permissions orownership of the file or folder being exracted, it will automatically make use of the FTP mode toovercome the permissions / ownership problem. It effectively works around a situation commonlycalled "permissions hell", where different files and folders are owned by different users, makingit extremely difficult to overwrite them. This is a situation which happens very commonly onshared hosting. Therefore we strongly advise clients on shared hosting environments to usethe Hybrid option.
Note
You MUST supply your FTP information for this mode to have any effect. If you do notdo that the Hybrid mode will function exactly as the "Write directly to files" mode.
The default mode is writing directly to files, unless your site's Global Configuration indicates that the FTP layer shouldbe used in which case the Hybrid mode is selected by default.
In the event that a partial restoration happens, your site will be left in a semi-restored state. Trying to access it will popup the restoration script (ANGIE or ABI). If you want to retry the restoration using different settings, please removethe installation directory from your site's root manually, for example using FTP, before trying to access yoursite's administrator back-end.
If you chose to use the FTP mode, there are some connection settings you have to take care of. Do note that they arefilled in with Joomla!'s FTP layer settings by default. Unless you chose not to store your FTP password in Joomla!'sconfiguration or if you have not configured the FTP layer yet, there is no need to change them. The settings are:
Host name The host name of your site's FTP server, without the protocol. For example, ftp.example.comis valid, ftp://ftp.example.com is invalid.
Port The TCP/IP port of your site's FTP server. The default and standard value is 21. Please only usea different setting if your host explicitly specifies a non-standard port.
User name The username used to connect to the FTP server.
Password The password used to connect to the FTP server.
Initial directory The FTP directory to your web site's root. This is not the same as the filesystem directory andcan't be determined automatically. The easiest way to determine it is to connect to your site usingyour favourite FTP client, such as FileZilla. Navigate inside your web site's root directory. You'llknow you are there when you see the file configuration.php and directories such as ad-ministrator, component, language, includes, cache and xmlrpc in that directory.Copy (in FileZilla it appears on the right hand column, above the directory tree) and paste thatpath in Akeeba Backup's setting.
Alternatively, click on the Browse button next to the text box to launch an interactive FTP direc-tory browser. Navigate into the directory where you want your files to be restored and click onthe OK button.
Test FTP connec-tion
Clicking on this button will tell you if the FTP connection could be established or not. If theconnection is not successful you should not proceed with a restoration in FTP mode as it will failimmediately.
Using the Akeeba Backup component
83
The whole process is fully automated, so there is not much to tell you about it. However, you must not that in orderfor the restoration procedure to work properly you must take care of the following:
1. This feature is directly calling the administrator/components/com_akeeba/restore.php script. Ifyou have a server-side protection, i.e. .htaccess rules, or permissions settings which prevent this file from beingcalled directly the process will fail.
Security note: The restore.php file is of no use to potential hackers. In order for it to work at all, it requires therestoration.php file (more on that on the next point of this list) to load. Even then, it expects encrypted datawith a key which is not predefined and is only known to the restore.php script and the integrated restorationpage of Akeeba Backup. As a result, it can't be used as a potential attack vector.
2. Before the restoration begins, Akeeba Backup needs to create the administrator/compo-nents/com_akeeba/restoration.php file with all the archive extraction setup parameters. It is intelli-gent enough to use Joomla!'s FTP mode if it is enabled so as to overcome any permission problems, but you areultimately responsible for ensuring that the permission settings are adequate for Akeeba Backup to create this file.
If you have disabled Joomla!'s FTP layer, the permissions of the administrator/compo-nents/com_akeeba directory should be 0777 for the integrated restoration to work, or 0755 on hosts whichuse suPHP.
If you are using Joomla!'s FTP layer and it was active when you were installing Akeeba Backup, you'll need to givethis directory at least 0744 permissions, but you may have to manually remove restoration.php (but NOTrestore.php!!!) after the site restoration is over.
3. When the extraction of the backup archive finishes, you will be automatically forwarded to the Akeeba BackupInstaller page on a new tab or window. DO NOT CLOSE THE INTEGRATED RESTORATION PAGE'S TAB/WINDOW! After you have competed the Akeeba Backup Installer process you are supposed to return to the Inte-grated Restoration page and click on the Finalize button to:
• remove the installation directory from your site's root, and
• remove the administrator/components/com_akeeba/restoration.php setup file to nullify the,already non-existent, potential risk of a malicious user abusing this script.
4. If you are restoring to a remote server, the previous step will result in a 404 page. Just point your browserto http://www.yoursite.com/installation/index.php (where www.yoursite.com is the domainname of the site you are restoring to) to access the restoration script. After finishing the restoration procedure, doNOT click the Finalize button. Instead, use your favorite FTP client to remove the installation directory fromthe site you were restoring to and rename any htaccess.bak file back to .htaccess.
2.5.2. Manage remotely stored files
Note
This feature is only available in the Akeeba Backup Professional edition
Since Akeeba Backup 3.2 you have the option to manage backup archives stored in a remote storage location, forexample Amazon S3 or a remote FTP server. You can do that by clicking on the Manage remotely stored files linkon the far right of supported backup records in the Manage Backups (formerly "Administer Backup Files") page. Donote that, if you have upgraded from Akeeba Backup 3.0.x or 3.1.x, backup records created by older versions of thesoftware do not support this feature. Clicking on that link opens a lightbox (modal dialog) with the options compatiblewith your backup archive.
Please note that not all of the following features may appear in the dialog. It depends on the remote storage engineused for the backup record. All options currently appear only for files stored on Amazon S3 and remote FTP.
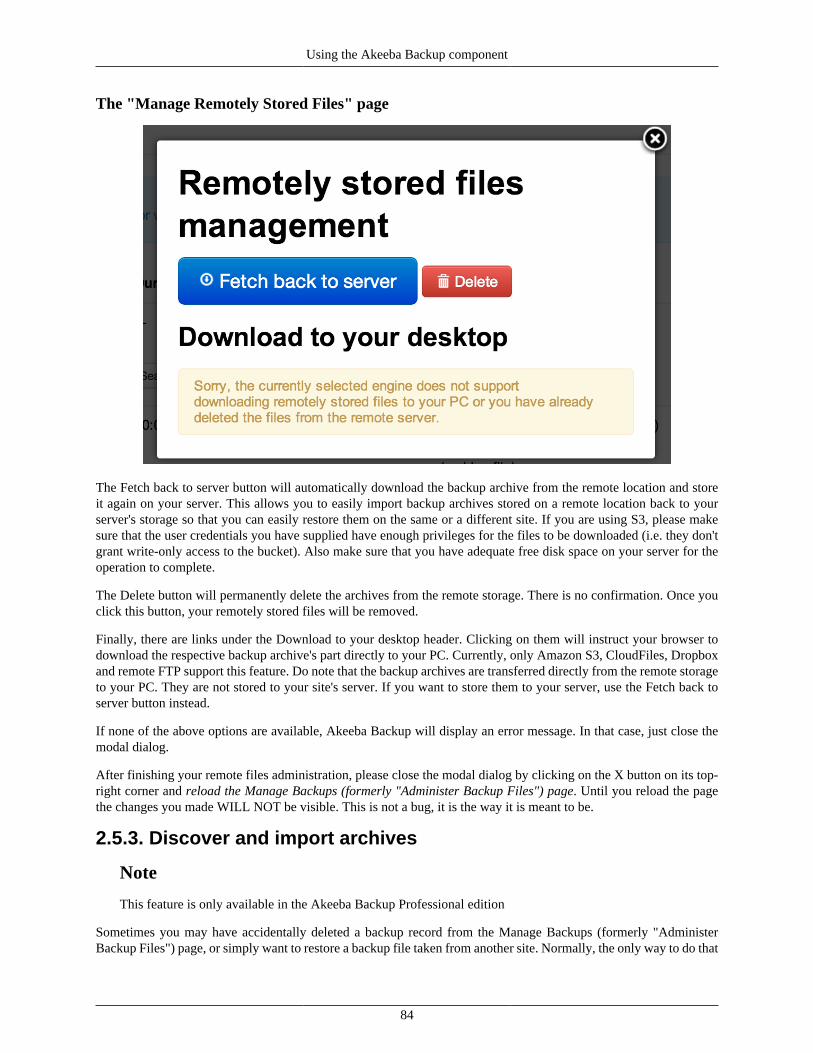
Using the Akeeba Backup component
84
The "Manage Remotely Stored Files" page
The Fetch back to server button will automatically download the backup archive from the remote location and storeit again on your server. This allows you to easily import backup archives stored on a remote location back to yourserver's storage so that you can easily restore them on the same or a different site. If you are using S3, please makesure that the user credentials you have supplied have enough privileges for the files to be downloaded (i.e. they don'tgrant write-only access to the bucket). Also make sure that you have adequate free disk space on your server for theoperation to complete.
The Delete button will permanently delete the archives from the remote storage. There is no confirmation. Once youclick this button, your remotely stored files will be removed.
Finally, there are links under the Download to your desktop header. Clicking on them will instruct your browser todownload the respective backup archive's part directly to your PC. Currently, only Amazon S3, CloudFiles, Dropboxand remote FTP support this feature. Do note that the backup archives are transferred directly from the remote storageto your PC. They are not stored to your site's server. If you want to store them to your server, use the Fetch back toserver button instead.
If none of the above options are available, Akeeba Backup will display an error message. In that case, just close themodal dialog.
After finishing your remote files administration, please close the modal dialog by clicking on the X button on its top-right corner and reload the Manage Backups (formerly "Administer Backup Files") page. Until you reload the pagethe changes you made WILL NOT be visible. This is not a bug, it is the way it is meant to be.
2.5.3. Discover and import archives
Note
This feature is only available in the Akeeba Backup Professional edition
Sometimes you may have accidentally deleted a backup record from the Manage Backups (formerly "AdministerBackup Files") page, or simply want to restore a backup file taken from another site. Normally, the only way to do that
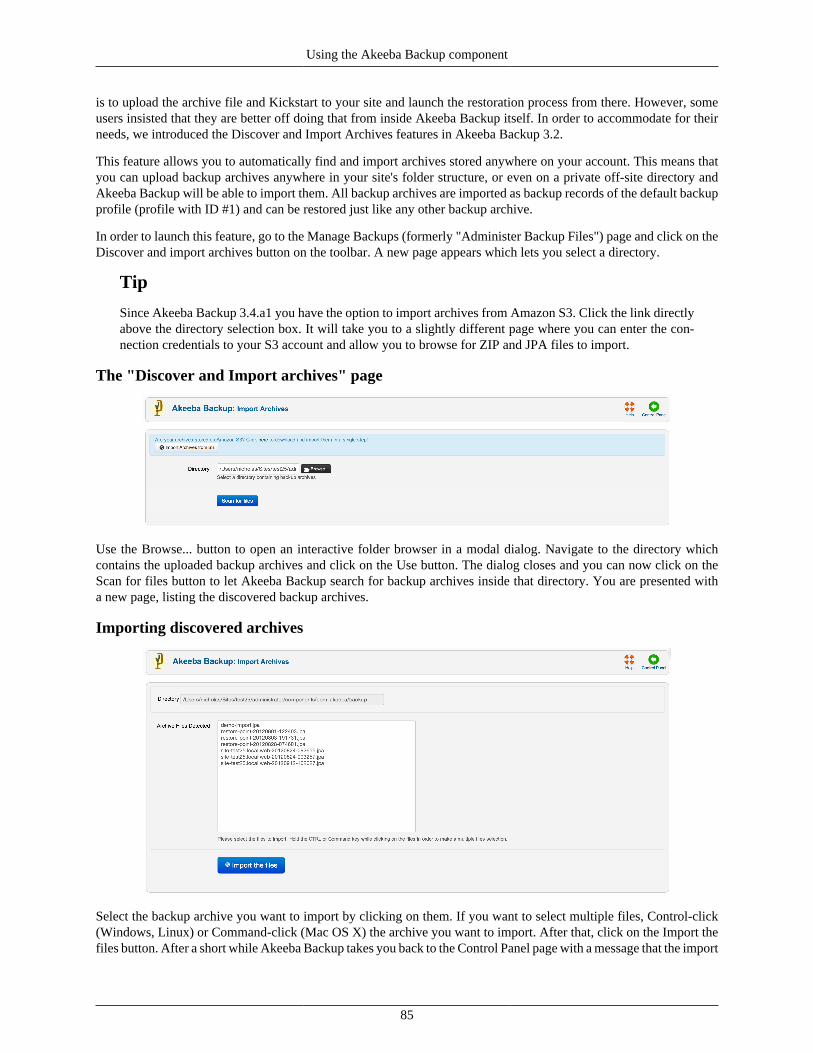
Using the Akeeba Backup component
85
is to upload the archive file and Kickstart to your site and launch the restoration process from there. However, someusers insisted that they are better off doing that from inside Akeeba Backup itself. In order to accommodate for theirneeds, we introduced the Discover and Import Archives features in Akeeba Backup 3.2.
This feature allows you to automatically find and import archives stored anywhere on your account. This means thatyou can upload backup archives anywhere in your site's folder structure, or even on a private off-site directory andAkeeba Backup will be able to import them. All backup archives are imported as backup records of the default backupprofile (profile with ID #1) and can be restored just like any other backup archive.
In order to launch this feature, go to the Manage Backups (formerly "Administer Backup Files") page and click on theDiscover and import archives button on the toolbar. A new page appears which lets you select a directory.
Tip
Since Akeeba Backup 3.4.a1 you have the option to import archives from Amazon S3. Click the link directlyabove the directory selection box. It will take you to a slightly different page where you can enter the con-nection credentials to your S3 account and allow you to browse for ZIP and JPA files to import.
The "Discover and Import archives" page
Use the Browse... button to open an interactive folder browser in a modal dialog. Navigate to the directory whichcontains the uploaded backup archives and click on the Use button. The dialog closes and you can now click on theScan for files button to let Akeeba Backup search for backup archives inside that directory. You are presented witha new page, listing the discovered backup archives.
Importing discovered archives
Select the backup archive you want to import by clicking on them. If you want to select multiple files, Control-click(Windows, Linux) or Command-click (Mac OS X) the archive you want to import. After that, click on the Import thefiles button. After a short while Akeeba Backup takes you back to the Control Panel page with a message that the import
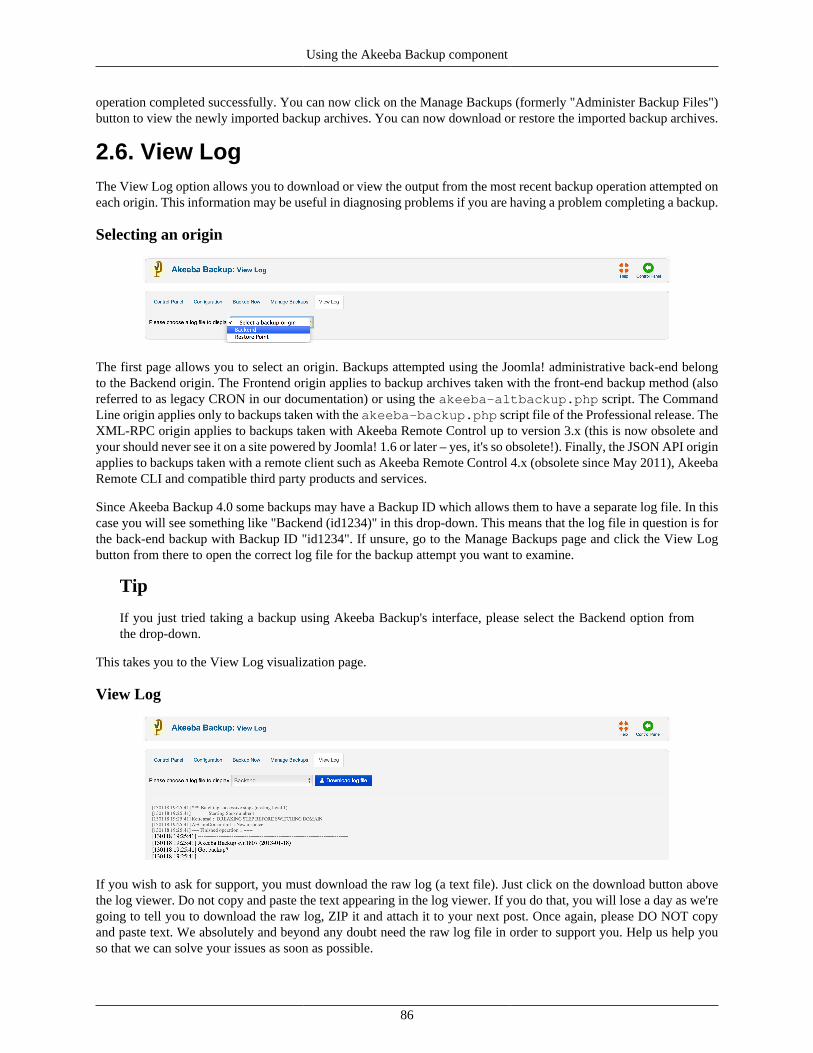
Using the Akeeba Backup component
86
operation completed successfully. You can now click on the Manage Backups (formerly "Administer Backup Files")button to view the newly imported backup archives. You can now download or restore the imported backup archives.
2.6. View LogThe View Log option allows you to download or view the output from the most recent backup operation attempted oneach origin. This information may be useful in diagnosing problems if you are having a problem completing a backup.
Selecting an origin
The first page allows you to select an origin. Backups attempted using the Joomla! administrative back-end belongto the Backend origin. The Frontend origin applies to backup archives taken with the front-end backup method (alsoreferred to as legacy CRON in our documentation) or using the akeeba-altbackup.php script. The CommandLine origin applies only to backups taken with the akeeba-backup.php script file of the Professional release. TheXML-RPC origin applies to backups taken with Akeeba Remote Control up to version 3.x (this is now obsolete andyour should never see it on a site powered by Joomla! 1.6 or later – yes, it's so obsolete!). Finally, the JSON API originapplies to backups taken with a remote client such as Akeeba Remote Control 4.x (obsolete since May 2011), AkeebaRemote CLI and compatible third party products and services.
Since Akeeba Backup 4.0 some backups may have a Backup ID which allows them to have a separate log file. In thiscase you will see something like "Backend (id1234)" in this drop-down. This means that the log file in question is forthe back-end backup with Backup ID "id1234". If unsure, go to the Manage Backups page and click the View Logbutton from there to open the correct log file for the backup attempt you want to examine.
Tip
If you just tried taking a backup using Akeeba Backup's interface, please select the Backend option fromthe drop-down.
This takes you to the View Log visualization page.
View Log
If you wish to ask for support, you must download the raw log (a text file). Just click on the download button abovethe log viewer. Do not copy and paste the text appearing in the log viewer. If you do that, you will lose a day as we'regoing to tell you to download the raw log, ZIP it and attach it to your next post. Once again, please DO NOT copyand paste text. We absolutely and beyond any doubt need the raw log file in order to support you. Help us help youso that we can solve your issues as soon as possible.

Using the Akeeba Backup component
87
Warning
When asking for support, make sure that the Log Level was set to "All Information and Debug" in the Basicsection of the Configuration page before backing up. Otherwise the log will be useless in supporting you.
The bulk of this page is the log visualization box. Each line is preceded by a time stamp, in the format YYMMDDhh:mm:ss (that's year, month, date with two digits, a space and time in 24-hour format). Each line is colour coded, foryour convenience. Debug information is in smaller, grey type. Normal information is in black type. Warnings appearin bold yellow letters. It is important to read them as they convey information about skipped directories or other thingsthat will be missing from the backup archive. If any errors occurred, these appear in bold red type.
Whenever you report bugs, all of this information is absolutely necessary. In order to reveal as little sensitive infor-mation as possible, whenever a file path has to be logged, your site's root folder is replaced with the string '<root>'.Keep this in mind when reading warnings and errors.
2.7. Site Transfer Wizard
Note
This feature is only available in the for-a-fee Professional edition since version 3.3.5
Important
While the Site Transfer Wizard may be useful in transferring a site to another server, it is neither the optimalnor the only way. In fact, you could just as well back your site up, move the backup archive to the new serverand use Kickstart to restore it. Yes, it's that easy. The wizard may make this process easier, but it's possiblethat it doesn't work under some server combinations. It's not a bug, it has to do with the way PHP works andhow different FTP servers are configured between hosts.
Many times you simply want to move your site between hosts, e.g. from a local or development server back to the liveserver or move your site from Host A to Host B. Traditionally, this was a multi-step process: take a backup, download itto your local PC, upload it to the live server, upload Kickstart, run Kickstart and finalize the restoration. Since version2.2 we offer a backup engine called DirectFTP which allows you to take a backup directly to a remote FTP serverinstead of an archive. This means that you no longer need to download/upload a backup archive or even use Kickstart.By the time the backup is finished, you are able to simply point your browser to the new host and start the restoration.The biggest drawback of this approach was that setting it up was a little difficult for novice users. Our Site TransferWizard feature is here to make using that feature dead simple!
The Site Transfer Wizard guides you through a series of steps which allow you to define the connection parametersto your remote server and automatically takes care of all the details necessary for moving your site to the new host.It consists of only three simple steps.
Step 1: Choose your profile
Using the Akeeba Backup component
88
The Site Transfer Wizard requires to create a dedicated backup profile for the site transfer backup job. This step allowsyou to select how this is going to happen.
Use the existingprofile
If you had already used the Site Transfer Wizard in the past, all of its settings are stored in itsdedicated backup profile. Selecting this option will recall them and allow you to modify them oruse the same settings to transfer your site again.
Copy settingsfrom
Select an existing backup profile to copy all settings from. This allows you to "clone" specialconfiguration options (such as the optimal settings defined by the Configuration Wizard) as wellas any filter options, e.g. directories, files and database tables to exclude from the backup. If it isthe first time you are running the wizard and you are not a very experienced user, it's suggestedto copy the settings from the Default Backup Profile.
Create a new pro-file, resetting itssettings to default
This will reset all the configuration and filter options of the Site Transfer Wizard backup profileto factory defaults. This should only be used by experienced users who know what they are doingor if you are willing to apply special configuration and/or filter settings manually.
Clicking on Next will take you to the next and most important step.
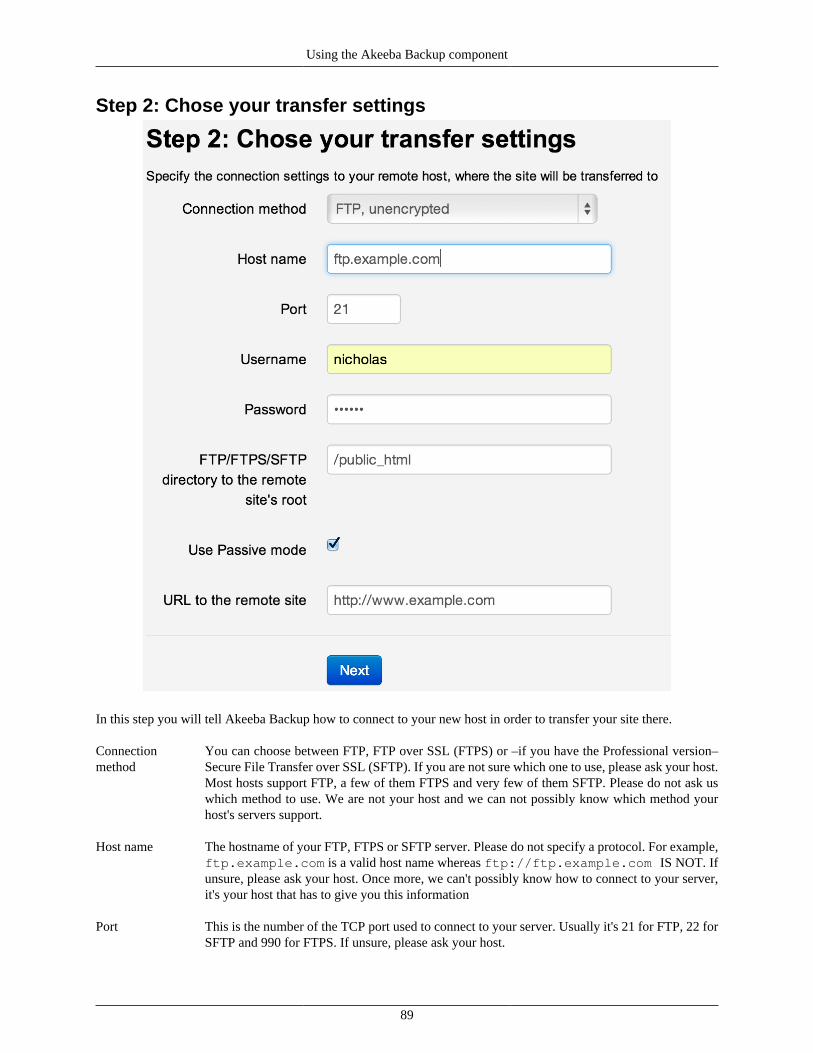
Using the Akeeba Backup component
89
Step 2: Chose your transfer settings
In this step you will tell Akeeba Backup how to connect to your new host in order to transfer your site there.
Connectionmethod
You can choose between FTP, FTP over SSL (FTPS) or –if you have the Professional version–Secure File Transfer over SSL (SFTP). If you are not sure which one to use, please ask your host.Most hosts support FTP, a few of them FTPS and very few of them SFTP. Please do not ask uswhich method to use. We are not your host and we can not possibly know which method yourhost's servers support.
Host name The hostname of your FTP, FTPS or SFTP server. Please do not specify a protocol. For example,ftp.example.com is a valid host name whereas ftp://ftp.example.com IS NOT. Ifunsure, please ask your host. Once more, we can't possibly know how to connect to your server,it's your host that has to give you this information
Port This is the number of the TCP port used to connect to your server. Usually it's 21 for FTP, 22 forSFTP and 990 for FTPS. If unsure, please ask your host.

Using the Akeeba Backup component
90
Username The username used to connect to your remote server. Do note that if your host requires an SSHcertificate to connect to their server through SFTP, you will not be able to use SFTP with AkeebaBackup to transfer your site. Our software only supports username/password authentication to theremote server.
Password The password used to connect to your remote server
FTP/FTPS/SFTPdirectory to theremote site's root
This is the full FTP, FTPS or SFTP directory to your remote site's web root. This may not alwaysbe obvious and most likely should not be left blank. You can always connect to your remote siteusing FileZilla, navigate to the web root directory of your new host and take a look above theright-hand directory pane. You will see a path. Copy it and paste it in this box of the Site TransferWizard.
Use Passivemode
For FTP/FTPS connections only. The default behaviour is to use FTP Passive Mode for all sitetransfers, as it is the only guaranteed way to pass through firewalls. If your remote site requiresFTP Active Mode (very rare) uncheck this box. If you are unsure if this is required, please askyour host.
URL to the re-mote site
Enter the full URL to the remote site, e.g. http://www.example.com/joomla. Please, donot include a trailing slash.
Clicking on Next, Akeeba Backup will try to establish an FTP/FTPS/SFTP connection to your remote host and uploada small file named akeeba_connection_test.png. If that fails, it will let you know about the error which occurred so thatyou can fix it. If you have entered an incorrect directory, i.e. it doesn't correspond to the location used to store the filesaccessible through the "URL to the remote site" address, you will also get an error telling you that you have to fix it.
Important
Not all hosts are able to initiate FTP/FTPS/SFTP connections to other servers. The most common limitingfactor is a server-side firewall which disallows outbound connections. If you are perfectly sure that your FTP/FTPS/SFTP connection settings are correct and you still can not connect to your remote site, do not ask usfor support. If you do, we'll tell you to read the documentation (this paragraph!). What you have to do insteadis to contact your current host and ask them to open their firewall so that you can connect to your new hostthrough FTP/FTPS/SFTP.
If you get an error about not being able to change to the requested directory, you have entered the "FTP/FTPS/SFTP directory to the remote site's root" wrong. Please refer to the section above about how to determineits correct setting.
If you get an error reading "Your FTP/FTPS/SFTP directory is not defined correctly. You will be redirectedback to the previous page to correct it. If in doubt about what this means, please read our documentation."then you have entered the "FTP/FTPS/SFTP directory to the remote site's root" wrong. Please refer to thesection above about how to determine its correct setting.
Do not ask for support if you have not read the above and followed all of these instructions. Such requestswill be deleted without a reply.
Step 3: Transfer your site
Using the Akeeba Backup component
91
In the final step, you are ready to transfer your site! Click on the button titled Begin the site transfer to start transferringyour site to the remote host.
If you get an error message about not being able to write to a remote file or directory, please check that this file ordirectory doesn't already exist on your remote site. If it does, try removing it or adjust its permissions so that it iswritable through FTP/FTPS/SFTP. If you are not sure how to do that, please ask your host for instructions, as thesolution is entirely host-specific.
When the transfer is complete, you will be forwarded to the restoration script which was uploaded together with yoursite's files and database dump to the remote server. Follow all of its steps to restore your site's database and configureyour site so that it can be used on the remote host.
If you end up back on your source site (the one you are transferring from), a blank page or an Internal Server Errorpage, please use your favourite FTP client (e.g. FileZilla) to rename or remove the .htaccess file from the remotesite and reload the page. Do not contact us for support unless you do that first. For your information, it is possible thatyour .htaccess file contains directives which either have a hardcoded site URL in them or are simply not compatiblewith your new host. Renaming the file "neutralizes" it and you can access the installation script normally. If yournew host is GoDaddy, do note that it may take anywhere from 10 to 30 minutes after you rename .htaccess beforethe changes take any effect at all!
After the restoration is over, click on the "remove the installation directory" link to remove the installation directoryfrom your new host and begin using your site. If that is not possible or throws an error, please use your favourite FTPclient (e.g. FileZilla) to manually remove the installation directory and all of its contents from your new host. Pleasedo not ask for support if trying to access your site is causing the installation script to appear again. The solution is toremove the installation directory manually.
If, after the restoration, you have any problems accessing the remote site, please refer to these troubleshooting instruc-tions [https://www.akeebabackup.com/documentation/troubleshooter/prbasicts.html] first. Unless you have followedall of them, please do not ask us for support. 99.9% of all post-restoration problems that have ever been reported toour forum are solved by following these simple instructions.
Why does Site Transfer Wizard consistently fails after a while, butalways when transferring the same file?
This is a limitation of how most FTP servers work and how PHP works.
• Problem 1: Blocked by FTP server. In order to avoid server timeouts, the site transfer (essentially: a backup) has tobe performed in multiple small steps. On each step we have to connect to the remote FTP server, log in, transfer afew files, log out. This roughly means that we have to do this log in, transfer, log out routine 3-4 times per minuteover several minutes (or hours). This tends to cause most FTP servers to consider this behaviour as an attack andblock logins from this IP for a while. The next time we try to connect to the FTP server we are blocked and thesite transfer fails.
• Problem 2: Large files. The definition of "large" mostly depends on the transfer speed between your original andyour target servers. If a file takes too long to transfer it is possible that the FTP server closes its connection. It isalso possible that, before that, PHP runs into a timeout and halts. In both cases it cases site transfer failure.
If this happens we recommend an easier, alternative method to transferring your site. Create a regular backup profileand use the "Upload to Remote FTP Server" or "Upload to Remote SFTP Server" to transfer the backup archive to thenew host. As a precaution, you are advised to set the Part size for split archives in the Archiver Engine configurationpane to 20Mb or smaller. After the backup is complete the backup file(s) will be transferred to the new server. Justupload Kickstart into it and run Kickstart. This method uses far fewer FTP connection requests than the Site TransferWizard, it's faster (usually: five to ten times faster!) and only requires you to upload 1 file manually.

Using the Akeeba Backup component
92
3. Include data to the backupNote
This feature is available only in Akeeba Backup Professional, the paid version of our component
By default, Akeeba Backup automatically includes the whole database of your Joomla!™ installation as well as allthe files under your site's root in the backup set. Sometimes you want to include a different database - for example,one used by your non-Joomla!™ newsletter software - or files you have placed above your site's root for increasedsecurity. Akeeba Backup Professional can cope with that need by providing you with handy data inclusion filters.
3.1. Multiple Databases Definitions
Note
This feature is available only in Akeeba Backup Professional, the paid version of our component
Sometimes your site grows beyond Joomla!. A forum, a torrent tracker, a custom script... Some of them get to beinstalled in a database of their own, not as tables in the same database as the one Joomla! is using. If you really want totake a full site backup, you really need these databases backed up as well. The solution to this is the Multiple databasesdefinitions option of Akeeba Backup. You can define an unlimited number of additional MySQL, PostgreSQL, SQLServer and Windows Azure SQL databases which will get to be backed up (and restored!) along with your regularJoomla! database.
Warning
Do not use this feature to add your site's database. It is automatically added anyway. Doing so will causeerrors during the restoration of your site! You have been warned. Do not seek support for this kind ofissues.
Warning
Do not confuse the term "database" with your Joomla!™ tables. It is possible that a single database containstables for the current Joomla!™ site, tables from a standalone photo gallery script, tables from another Joom-la!™ site on the same server (e.g. a subdomain), tables from a standalone PHPList installation and so forth.As far as Akeeba Backup is concerned, all of those tables exist in the same database. Unless you tell itotherwise, it will backup ALL tables of the database.
A common misconception is that if you want to also backup a subdomain running on Joomla!™ and havingits tables inside the same database as the main site, you should add its database a multiple database definition.DO NOT DO THAT, IT WILL MAKE THE RESTORATION FAIL! After all, Akeeba Backup alreadybacks up those tables. Why should you have to back them up a second time?
Warning
If you add an empty database (one which has no tables) it will result in backup errors!
Note
The settings on this page are defined per profile . Make sure you have selected the desired profile in theControl Panel page.
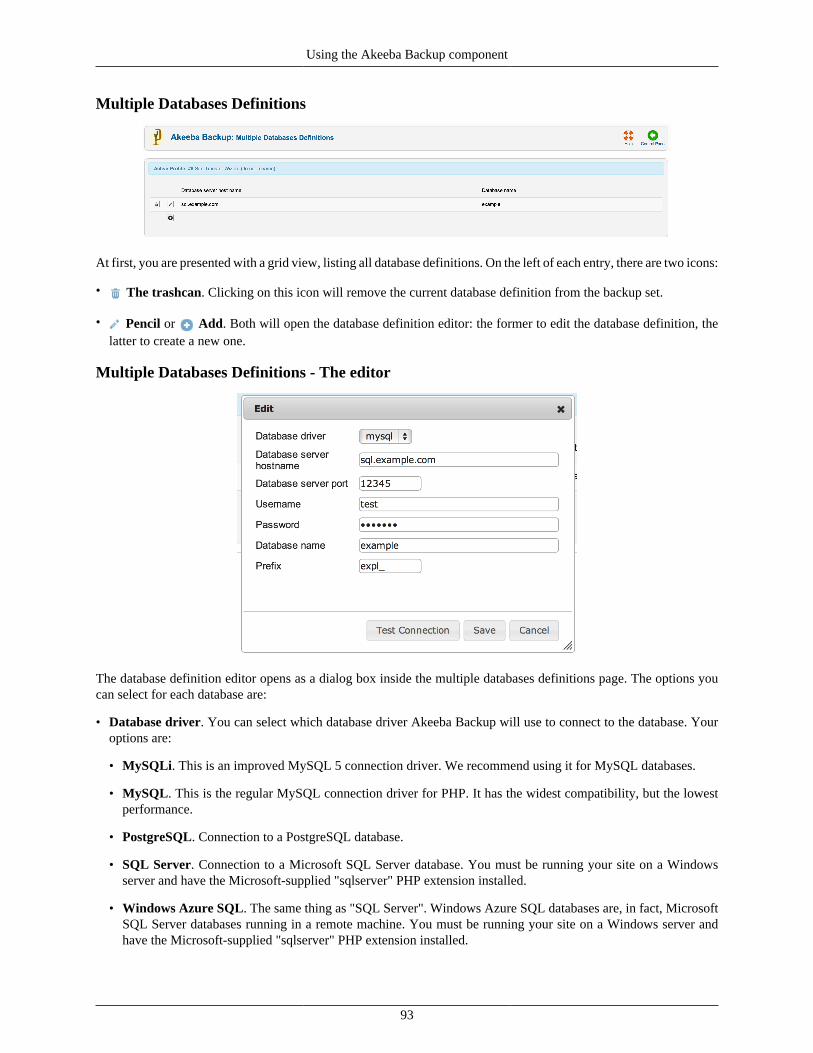
Using the Akeeba Backup component
93
Multiple Databases Definitions
At first, you are presented with a grid view, listing all database definitions. On the left of each entry, there are two icons:
• The trashcan. Clicking on this icon will remove the current database definition from the backup set.
• Pencil or Add. Both will open the database definition editor: the former to edit the database definition, thelatter to create a new one.
Multiple Databases Definitions - The editor
The database definition editor opens as a dialog box inside the multiple databases definitions page. The options youcan select for each database are:
• Database driver. You can select which database driver Akeeba Backup will use to connect to the database. Youroptions are:
• MySQLi. This is an improved MySQL 5 connection driver. We recommend using it for MySQL databases.
• MySQL. This is the regular MySQL connection driver for PHP. It has the widest compatibility, but the lowestperformance.
• PostgreSQL. Connection to a PostgreSQL database.
• SQL Server. Connection to a Microsoft SQL Server database. You must be running your site on a Windowsserver and have the Microsoft-supplied "sqlserver" PHP extension installed.
• Windows Azure SQL. The same thing as "SQL Server". Windows Azure SQL databases are, in fact, MicrosoftSQL Server databases running in a remote machine. You must be running your site on a Windows server andhave the Microsoft-supplied "sqlserver" PHP extension installed.
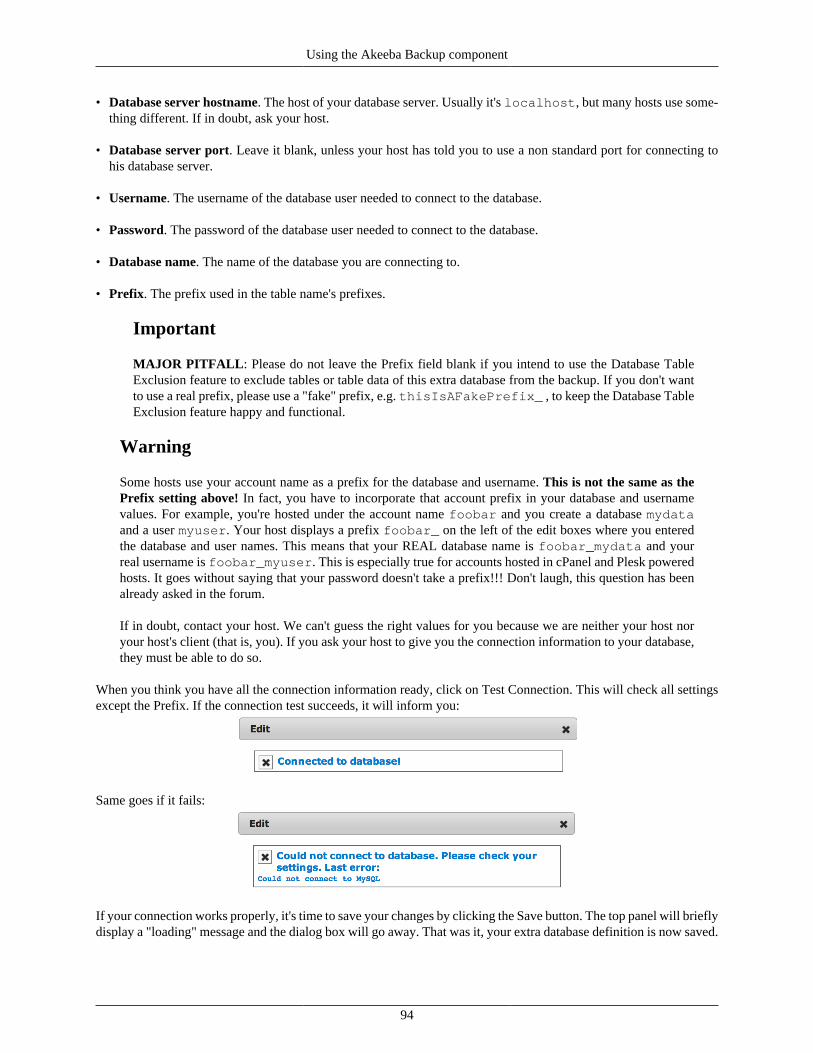
Using the Akeeba Backup component
94
• Database server hostname. The host of your database server. Usually it's localhost, but many hosts use some-thing different. If in doubt, ask your host.
• Database server port. Leave it blank, unless your host has told you to use a non standard port for connecting tohis database server.
• Username. The username of the database user needed to connect to the database.
• Password. The password of the database user needed to connect to the database.
• Database name. The name of the database you are connecting to.
• Prefix. The prefix used in the table name's prefixes.
Important
MAJOR PITFALL: Please do not leave the Prefix field blank if you intend to use the Database TableExclusion feature to exclude tables or table data of this extra database from the backup. If you don't wantto use a real prefix, please use a "fake" prefix, e.g. thisIsAFakePrefix_ , to keep the Database TableExclusion feature happy and functional.
Warning
Some hosts use your account name as a prefix for the database and username. This is not the same as thePrefix setting above! In fact, you have to incorporate that account prefix in your database and usernamevalues. For example, you're hosted under the account name foobar and you create a database mydataand a user myuser. Your host displays a prefix foobar_ on the left of the edit boxes where you enteredthe database and user names. This means that your REAL database name is foobar_mydata and yourreal username is foobar_myuser. This is especially true for accounts hosted in cPanel and Plesk poweredhosts. It goes without saying that your password doesn't take a prefix!!! Don't laugh, this question has beenalready asked in the forum.
If in doubt, contact your host. We can't guess the right values for you because we are neither your host noryour host's client (that is, you). If you ask your host to give you the connection information to your database,they must be able to do so.
When you think you have all the connection information ready, click on Test Connection. This will check all settingsexcept the Prefix. If the connection test succeeds, it will inform you:
Same goes if it fails:
If your connection works properly, it's time to save your changes by clicking the Save button. The top panel will brieflydisplay a "loading" message and the dialog box will go away. That was it, your extra database definition is now saved.
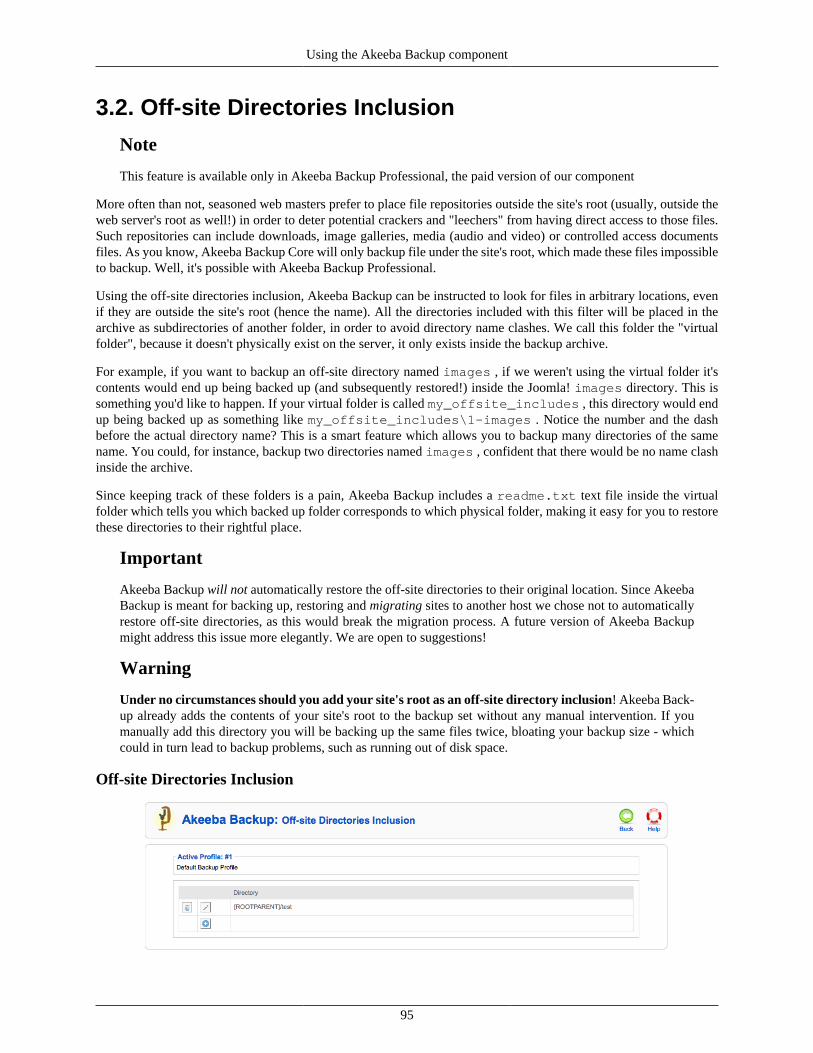
Using the Akeeba Backup component
95
3.2. Off-site Directories Inclusion
Note
This feature is available only in Akeeba Backup Professional, the paid version of our component
More often than not, seasoned web masters prefer to place file repositories outside the site's root (usually, outside theweb server's root as well!) in order to deter potential crackers and "leechers" from having direct access to those files.Such repositories can include downloads, image galleries, media (audio and video) or controlled access documentsfiles. As you know, Akeeba Backup Core will only backup file under the site's root, which made these files impossibleto backup. Well, it's possible with Akeeba Backup Professional.
Using the off-site directories inclusion, Akeeba Backup can be instructed to look for files in arbitrary locations, evenif they are outside the site's root (hence the name). All the directories included with this filter will be placed in thearchive as subdirectories of another folder, in order to avoid directory name clashes. We call this folder the "virtualfolder", because it doesn't physically exist on the server, it only exists inside the backup archive.
For example, if you want to backup an off-site directory named images , if we weren't using the virtual folder it'scontents would end up being backed up (and subsequently restored!) inside the Joomla! images directory. This issomething you'd like to happen. If your virtual folder is called my_offsite_includes , this directory would endup being backed up as something like my_offsite_includes\1-images . Notice the number and the dashbefore the actual directory name? This is a smart feature which allows you to backup many directories of the samename. You could, for instance, backup two directories named images , confident that there would be no name clashinside the archive.
Since keeping track of these folders is a pain, Akeeba Backup includes a readme.txt text file inside the virtualfolder which tells you which backed up folder corresponds to which physical folder, making it easy for you to restorethese directories to their rightful place.
Important
Akeeba Backup will not automatically restore the off-site directories to their original location. Since AkeebaBackup is meant for backing up, restoring and migrating sites to another host we chose not to automaticallyrestore off-site directories, as this would break the migration process. A future version of Akeeba Backupmight address this issue more elegantly. We are open to suggestions!
Warning
Under no circumstances should you add your site's root as an off-site directory inclusion! Akeeba Back-up already adds the contents of your site's root to the backup set without any manual intervention. If youmanually add this directory you will be backing up the same files twice, bloating your backup size - whichcould in turn lead to backup problems, such as running out of disk space.
Off-site Directories Inclusion
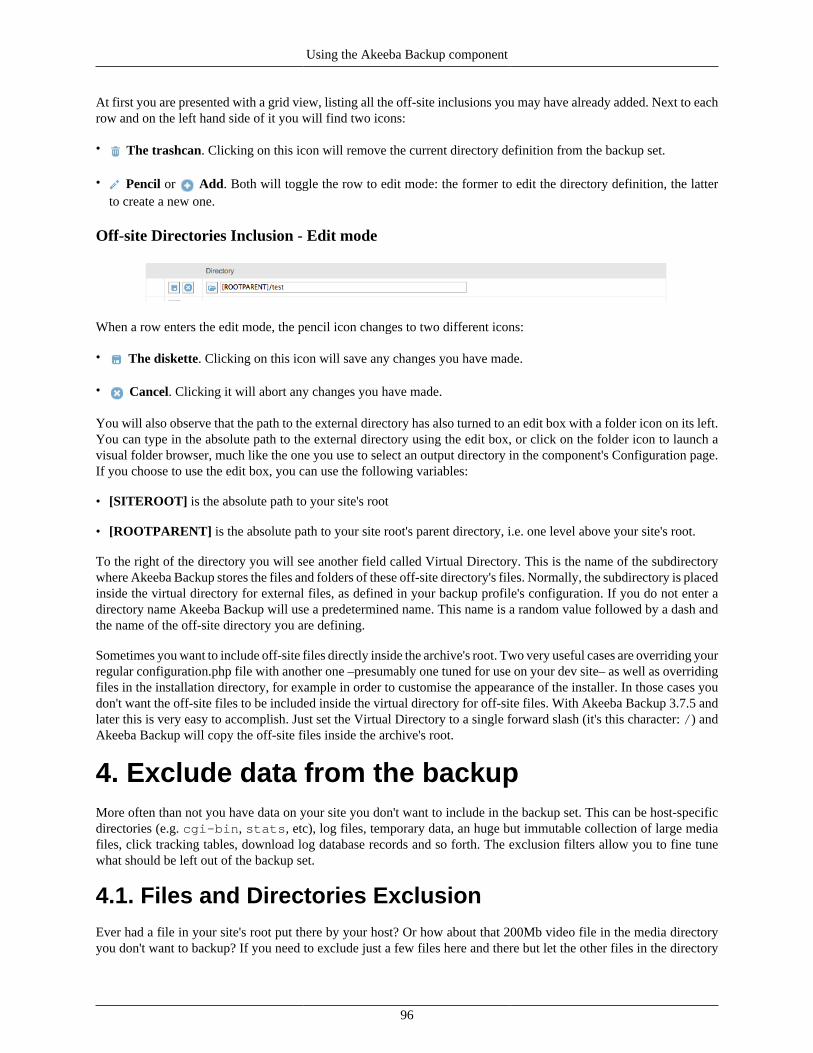
Using the Akeeba Backup component
96
At first you are presented with a grid view, listing all the off-site inclusions you may have already added. Next to eachrow and on the left hand side of it you will find two icons:
• The trashcan. Clicking on this icon will remove the current directory definition from the backup set.
• Pencil or Add. Both will toggle the row to edit mode: the former to edit the directory definition, the latterto create a new one.
Off-site Directories Inclusion - Edit mode
When a row enters the edit mode, the pencil icon changes to two different icons:
• The diskette. Clicking on this icon will save any changes you have made.
• Cancel. Clicking it will abort any changes you have made.
You will also observe that the path to the external directory has also turned to an edit box with a folder icon on its left.You can type in the absolute path to the external directory using the edit box, or click on the folder icon to launch avisual folder browser, much like the one you use to select an output directory in the component's Configuration page.If you choose to use the edit box, you can use the following variables:
• [SITEROOT] is the absolute path to your site's root
• [ROOTPARENT] is the absolute path to your site root's parent directory, i.e. one level above your site's root.
To the right of the directory you will see another field called Virtual Directory. This is the name of the subdirectorywhere Akeeba Backup stores the files and folders of these off-site directory's files. Normally, the subdirectory is placedinside the virtual directory for external files, as defined in your backup profile's configuration. If you do not enter adirectory name Akeeba Backup will use a predetermined name. This name is a random value followed by a dash andthe name of the off-site directory you are defining.
Sometimes you want to include off-site files directly inside the archive's root. Two very useful cases are overriding yourregular configuration.php file with another one –presumably one tuned for use on your dev site– as well as overridingfiles in the installation directory, for example in order to customise the appearance of the installer. In those cases youdon't want the off-site files to be included inside the virtual directory for off-site files. With Akeeba Backup 3.7.5 andlater this is very easy to accomplish. Just set the Virtual Directory to a single forward slash (it's this character: /) andAkeeba Backup will copy the off-site files inside the archive's root.
4. Exclude data from the backupMore often than not you have data on your site you don't want to include in the backup set. This can be host-specificdirectories (e.g. cgi-bin, stats, etc), log files, temporary data, an huge but immutable collection of large mediafiles, click tracking tables, download log database records and so forth. The exclusion filters allow you to fine tunewhat should be left out of the backup set.
4.1. Files and Directories ExclusionEver had a file in your site's root put there by your host? Or how about that 200Mb video file in the media directoryyou don't want to backup? If you need to exclude just a few files here and there but let the other files in the directory
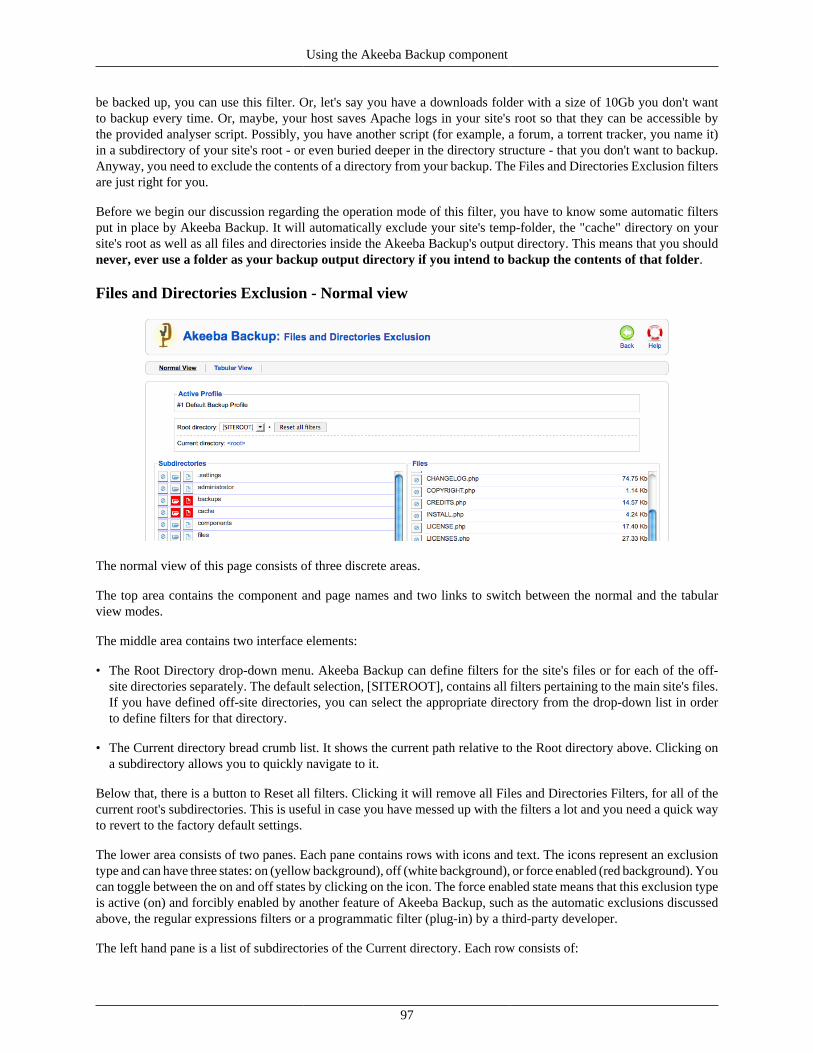
Using the Akeeba Backup component
97
be backed up, you can use this filter. Or, let's say you have a downloads folder with a size of 10Gb you don't wantto backup every time. Or, maybe, your host saves Apache logs in your site's root so that they can be accessible bythe provided analyser script. Possibly, you have another script (for example, a forum, a torrent tracker, you name it)in a subdirectory of your site's root - or even buried deeper in the directory structure - that you don't want to backup.Anyway, you need to exclude the contents of a directory from your backup. The Files and Directories Exclusion filtersare just right for you.
Before we begin our discussion regarding the operation mode of this filter, you have to know some automatic filtersput in place by Akeeba Backup. It will automatically exclude your site's temp-folder, the "cache" directory on yoursite's root as well as all files and directories inside the Akeeba Backup's output directory. This means that you shouldnever, ever use a folder as your backup output directory if you intend to backup the contents of that folder.
Files and Directories Exclusion - Normal view
The normal view of this page consists of three discrete areas.
The top area contains the component and page names and two links to switch between the normal and the tabularview modes.
The middle area contains two interface elements:
• The Root Directory drop-down menu. Akeeba Backup can define filters for the site's files or for each of the off-site directories separately. The default selection, [SITEROOT], contains all filters pertaining to the main site's files.If you have defined off-site directories, you can select the appropriate directory from the drop-down list in orderto define filters for that directory.
• The Current directory bread crumb list. It shows the current path relative to the Root directory above. Clicking ona subdirectory allows you to quickly navigate to it.
Below that, there is a button to Reset all filters. Clicking it will remove all Files and Directories Filters, for all of thecurrent root's subdirectories. This is useful in case you have messed up with the filters a lot and you need a quick wayto revert to the factory default settings.
The lower area consists of two panes. Each pane contains rows with icons and text. The icons represent an exclusiontype and can have three states: on (yellow background), off (white background), or force enabled (red background). Youcan toggle between the on and off states by clicking on the icon. The force enabled state means that this exclusion typeis active (on) and forcibly enabled by another feature of Akeeba Backup, such as the automatic exclusions discussedabove, the regular expressions filters or a programmatic filter (plug-in) by a third-party developer.
The left hand pane is a list of subdirectories of the Current directory. Each row consists of:
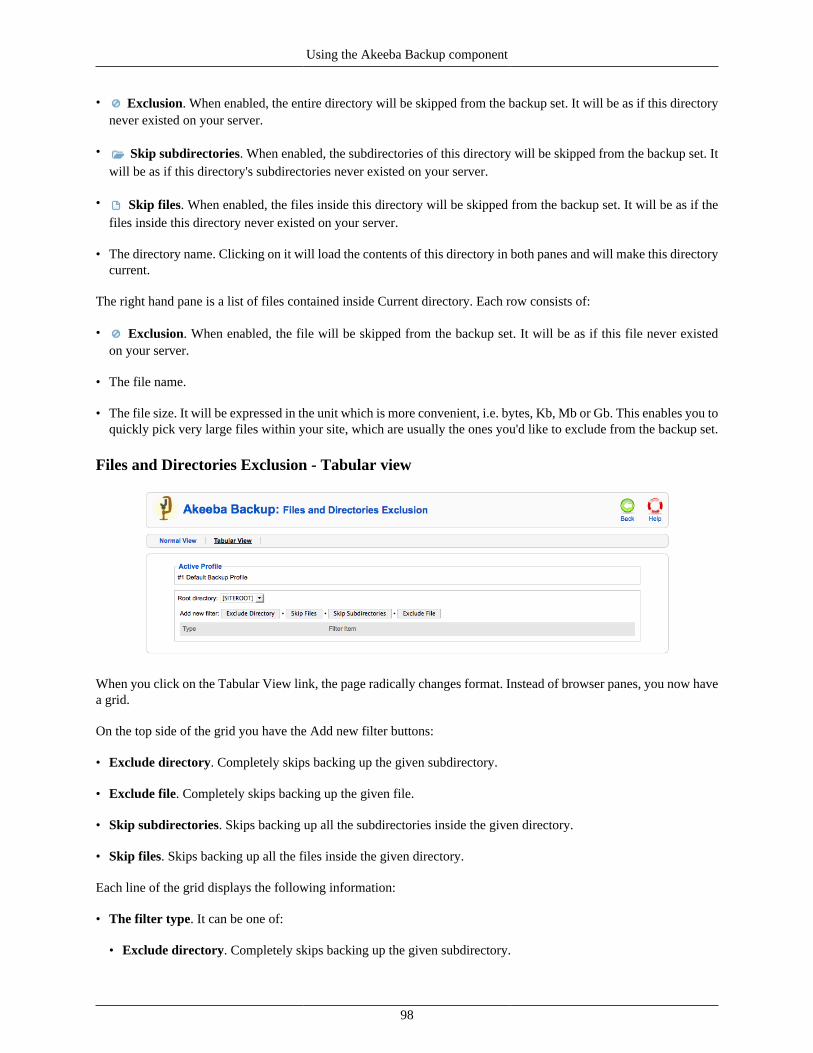
Using the Akeeba Backup component
98
• Exclusion. When enabled, the entire directory will be skipped from the backup set. It will be as if this directorynever existed on your server.
• Skip subdirectories. When enabled, the subdirectories of this directory will be skipped from the backup set. Itwill be as if this directory's subdirectories never existed on your server.
• Skip files. When enabled, the files inside this directory will be skipped from the backup set. It will be as if thefiles inside this directory never existed on your server.
• The directory name. Clicking on it will load the contents of this directory in both panes and will make this directorycurrent.
The right hand pane is a list of files contained inside Current directory. Each row consists of:
• Exclusion. When enabled, the file will be skipped from the backup set. It will be as if this file never existedon your server.
• The file name.
• The file size. It will be expressed in the unit which is more convenient, i.e. bytes, Kb, Mb or Gb. This enables you toquickly pick very large files within your site, which are usually the ones you'd like to exclude from the backup set.
Files and Directories Exclusion - Tabular view
When you click on the Tabular View link, the page radically changes format. Instead of browser panes, you now havea grid.
On the top side of the grid you have the Add new filter buttons:
• Exclude directory. Completely skips backing up the given subdirectory.
• Exclude file. Completely skips backing up the given file.
• Skip subdirectories. Skips backing up all the subdirectories inside the given directory.
• Skip files. Skips backing up all the files inside the given directory.
Each line of the grid displays the following information:
• The filter type. It can be one of:
• Exclude directory. Completely skips backing up the given subdirectory.
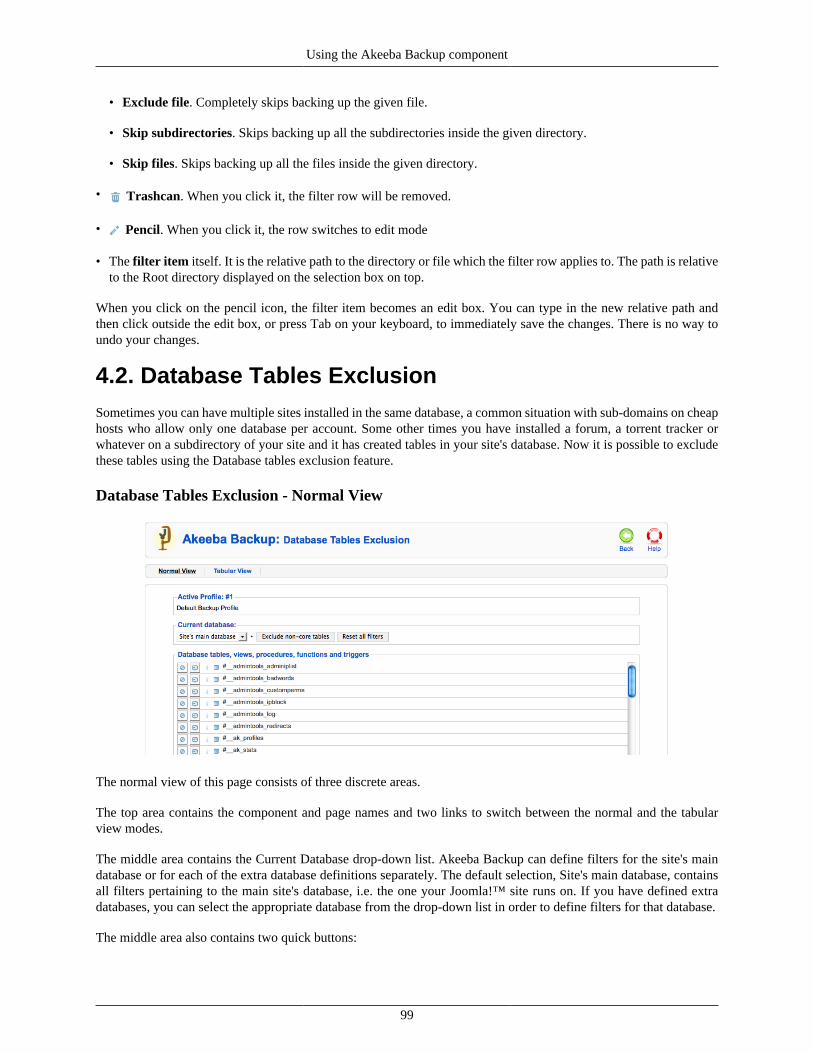
Using the Akeeba Backup component
99
• Exclude file. Completely skips backing up the given file.
• Skip subdirectories. Skips backing up all the subdirectories inside the given directory.
• Skip files. Skips backing up all the files inside the given directory.
• Trashcan. When you click it, the filter row will be removed.
• Pencil. When you click it, the row switches to edit mode
• The filter item itself. It is the relative path to the directory or file which the filter row applies to. The path is relativeto the Root directory displayed on the selection box on top.
When you click on the pencil icon, the filter item becomes an edit box. You can type in the new relative path andthen click outside the edit box, or press Tab on your keyboard, to immediately save the changes. There is no way toundo your changes.
4.2. Database Tables ExclusionSometimes you can have multiple sites installed in the same database, a common situation with sub-domains on cheaphosts who allow only one database per account. Some other times you have installed a forum, a torrent tracker orwhatever on a subdirectory of your site and it has created tables in your site's database. Now it is possible to excludethese tables using the Database tables exclusion feature.
Database Tables Exclusion - Normal View
The normal view of this page consists of three discrete areas.
The top area contains the component and page names and two links to switch between the normal and the tabularview modes.
The middle area contains the Current Database drop-down list. Akeeba Backup can define filters for the site's maindatabase or for each of the extra database definitions separately. The default selection, Site's main database, containsall filters pertaining to the main site's database, i.e. the one your Joomla!™ site runs on. If you have defined extradatabases, you can select the appropriate database from the drop-down list in order to define filters for that database.
The middle area also contains two quick buttons:
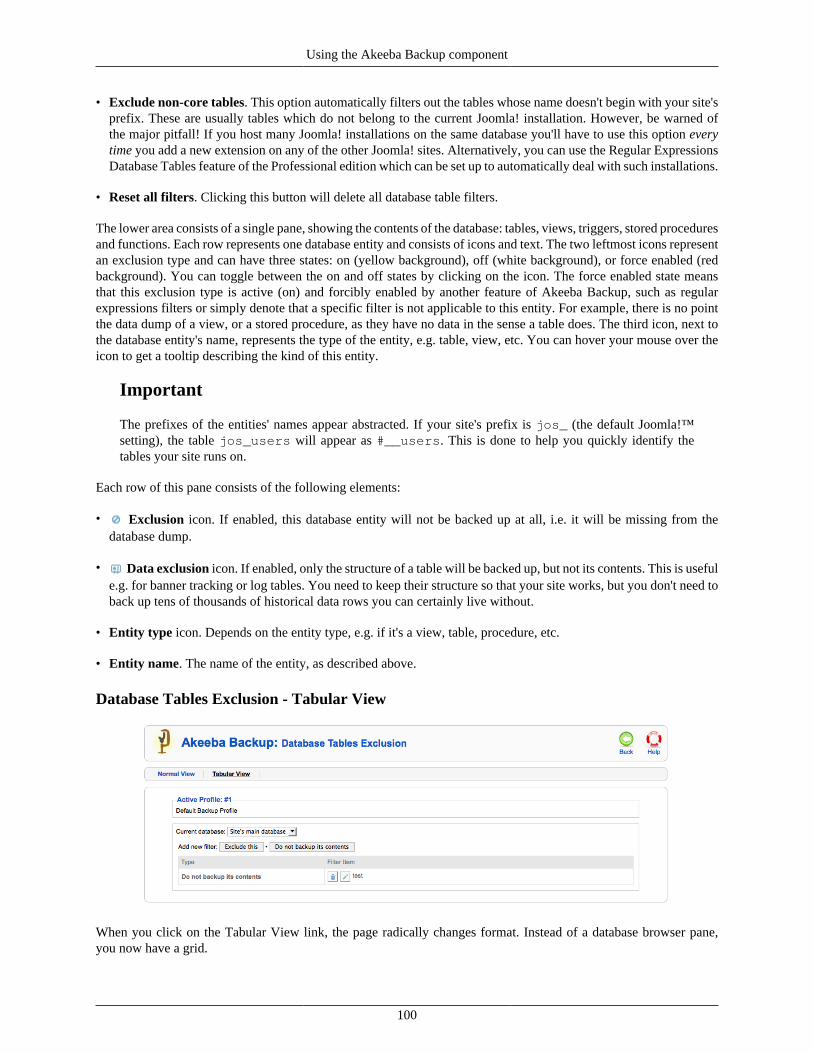
Using the Akeeba Backup component
100
• Exclude non-core tables. This option automatically filters out the tables whose name doesn't begin with your site'sprefix. These are usually tables which do not belong to the current Joomla! installation. However, be warned ofthe major pitfall! If you host many Joomla! installations on the same database you'll have to use this option everytime you add a new extension on any of the other Joomla! sites. Alternatively, you can use the Regular ExpressionsDatabase Tables feature of the Professional edition which can be set up to automatically deal with such installations.
• Reset all filters. Clicking this button will delete all database table filters.
The lower area consists of a single pane, showing the contents of the database: tables, views, triggers, stored proceduresand functions. Each row represents one database entity and consists of icons and text. The two leftmost icons representan exclusion type and can have three states: on (yellow background), off (white background), or force enabled (redbackground). You can toggle between the on and off states by clicking on the icon. The force enabled state meansthat this exclusion type is active (on) and forcibly enabled by another feature of Akeeba Backup, such as regularexpressions filters or simply denote that a specific filter is not applicable to this entity. For example, there is no pointthe data dump of a view, or a stored procedure, as they have no data in the sense a table does. The third icon, next tothe database entity's name, represents the type of the entity, e.g. table, view, etc. You can hover your mouse over theicon to get a tooltip describing the kind of this entity.
Important
The prefixes of the entities' names appear abstracted. If your site's prefix is jos_ (the default Joomla!™setting), the table jos_users will appear as #__users. This is done to help you quickly identify thetables your site runs on.
Each row of this pane consists of the following elements:
• Exclusion icon. If enabled, this database entity will not be backed up at all, i.e. it will be missing from thedatabase dump.
• Data exclusion icon. If enabled, only the structure of a table will be backed up, but not its contents. This is usefule.g. for banner tracking or log tables. You need to keep their structure so that your site works, but you don't need toback up tens of thousands of historical data rows you can certainly live without.
• Entity type icon. Depends on the entity type, e.g. if it's a view, table, procedure, etc.
• Entity name. The name of the entity, as described above.
Database Tables Exclusion - Tabular View
When you click on the Tabular View link, the page radically changes format. Instead of a database browser pane,you now have a grid.
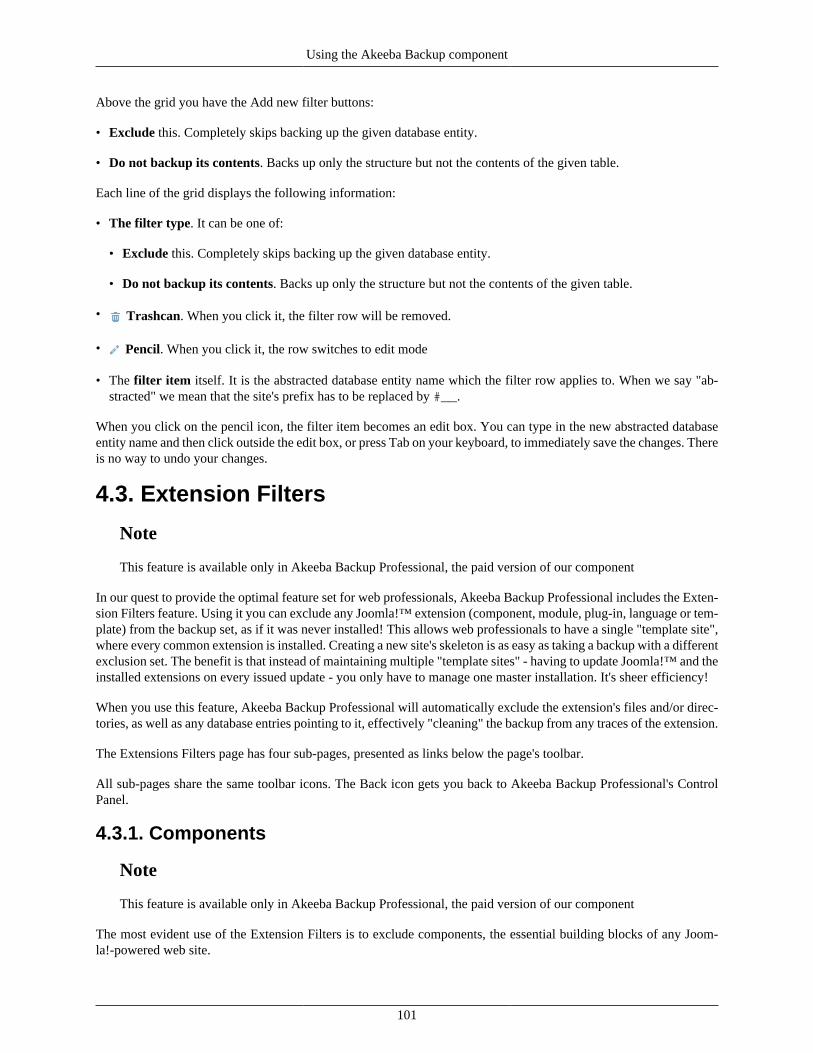
Using the Akeeba Backup component
101
Above the grid you have the Add new filter buttons:
• Exclude this. Completely skips backing up the given database entity.
• Do not backup its contents. Backs up only the structure but not the contents of the given table.
Each line of the grid displays the following information:
• The filter type. It can be one of:
• Exclude this. Completely skips backing up the given database entity.
• Do not backup its contents. Backs up only the structure but not the contents of the given table.
• Trashcan. When you click it, the filter row will be removed.
• Pencil. When you click it, the row switches to edit mode
• The filter item itself. It is the abstracted database entity name which the filter row applies to. When we say "ab-stracted" we mean that the site's prefix has to be replaced by #__.
When you click on the pencil icon, the filter item becomes an edit box. You can type in the new abstracted databaseentity name and then click outside the edit box, or press Tab on your keyboard, to immediately save the changes. Thereis no way to undo your changes.
4.3. Extension Filters
Note
This feature is available only in Akeeba Backup Professional, the paid version of our component
In our quest to provide the optimal feature set for web professionals, Akeeba Backup Professional includes the Exten-sion Filters feature. Using it you can exclude any Joomla!™ extension (component, module, plug-in, language or tem-plate) from the backup set, as if it was never installed! This allows web professionals to have a single "template site",where every common extension is installed. Creating a new site's skeleton is as easy as taking a backup with a differentexclusion set. The benefit is that instead of maintaining multiple "template sites" - having to update Joomla!™ and theinstalled extensions on every issued update - you only have to manage one master installation. It's sheer efficiency!
When you use this feature, Akeeba Backup Professional will automatically exclude the extension's files and/or direc-tories, as well as any database entries pointing to it, effectively "cleaning" the backup from any traces of the extension.
The Extensions Filters page has four sub-pages, presented as links below the page's toolbar.
All sub-pages share the same toolbar icons. The Back icon gets you back to Akeeba Backup Professional's ControlPanel.
4.3.1. Components
Note
This feature is available only in Akeeba Backup Professional, the paid version of our component
The most evident use of the Extension Filters is to exclude components, the essential building blocks of any Joom-la!-powered web site.
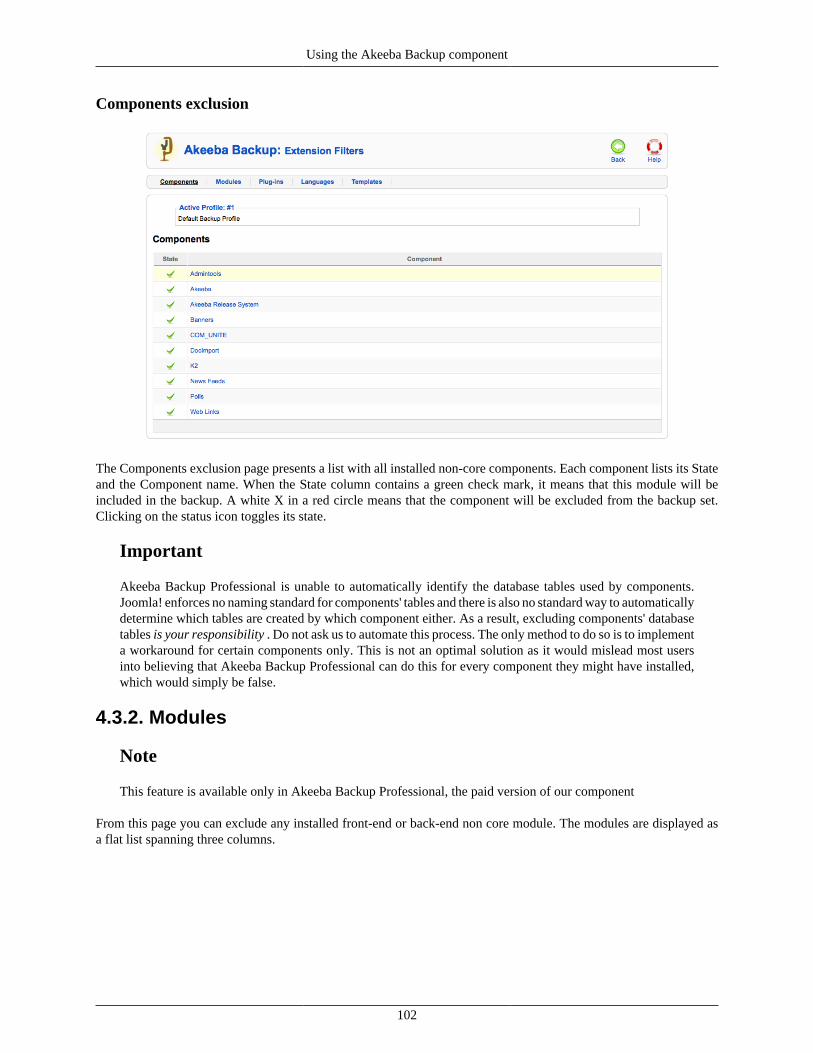
Using the Akeeba Backup component
102
Components exclusion
The Components exclusion page presents a list with all installed non-core components. Each component lists its Stateand the Component name. When the State column contains a green check mark, it means that this module will beincluded in the backup. A white X in a red circle means that the component will be excluded from the backup set.Clicking on the status icon toggles its state.
Important
Akeeba Backup Professional is unable to automatically identify the database tables used by components.Joomla! enforces no naming standard for components' tables and there is also no standard way to automaticallydetermine which tables are created by which component either. As a result, excluding components' databasetables is your responsibility . Do not ask us to automate this process. The only method to do so is to implementa workaround for certain components only. This is not an optimal solution as it would mislead most usersinto believing that Akeeba Backup Professional can do this for every component they might have installed,which would simply be false.
4.3.2. Modules
Note
This feature is available only in Akeeba Backup Professional, the paid version of our component
From this page you can exclude any installed front-end or back-end non core module. The modules are displayed asa flat list spanning three columns.
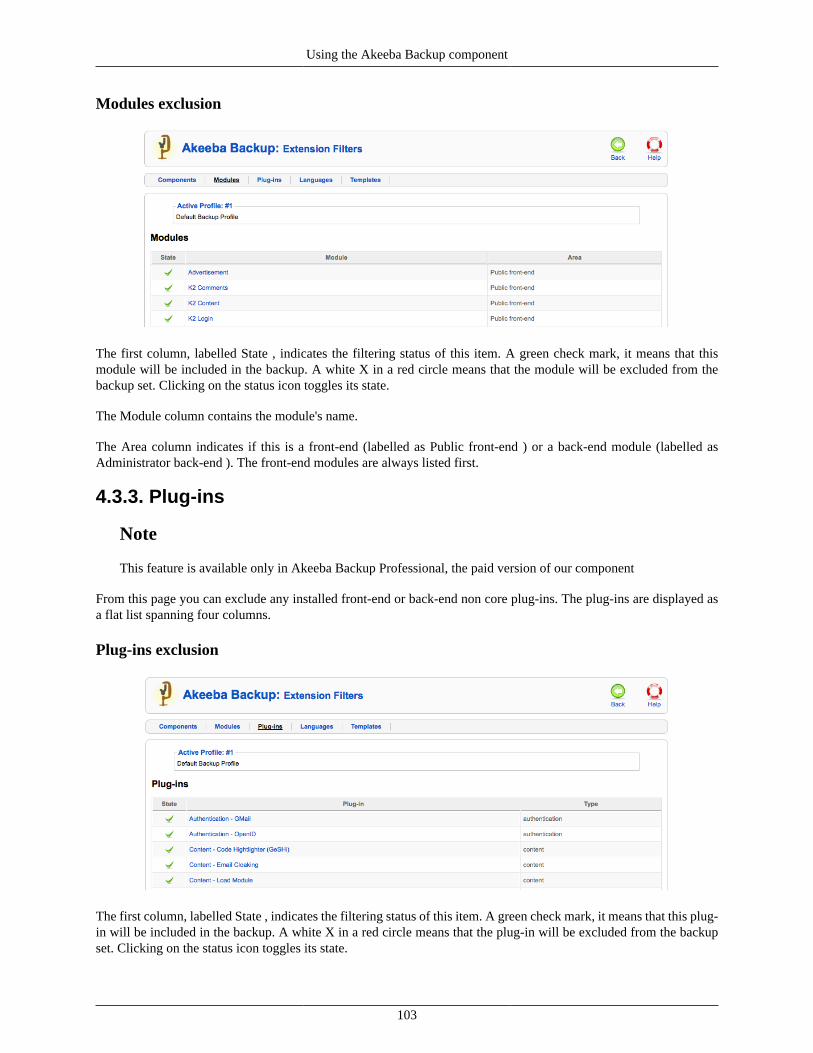
Using the Akeeba Backup component
103
Modules exclusion
The first column, labelled State , indicates the filtering status of this item. A green check mark, it means that thismodule will be included in the backup. A white X in a red circle means that the module will be excluded from thebackup set. Clicking on the status icon toggles its state.
The Module column contains the module's name.
The Area column indicates if this is a front-end (labelled as Public front-end ) or a back-end module (labelled asAdministrator back-end ). The front-end modules are always listed first.
4.3.3. Plug-ins
Note
This feature is available only in Akeeba Backup Professional, the paid version of our component
From this page you can exclude any installed front-end or back-end non core plug-ins. The plug-ins are displayed asa flat list spanning four columns.
Plug-ins exclusion
The first column, labelled State , indicates the filtering status of this item. A green check mark, it means that this plug-in will be included in the backup. A white X in a red circle means that the plug-in will be excluded from the backupset. Clicking on the status icon toggles its state.
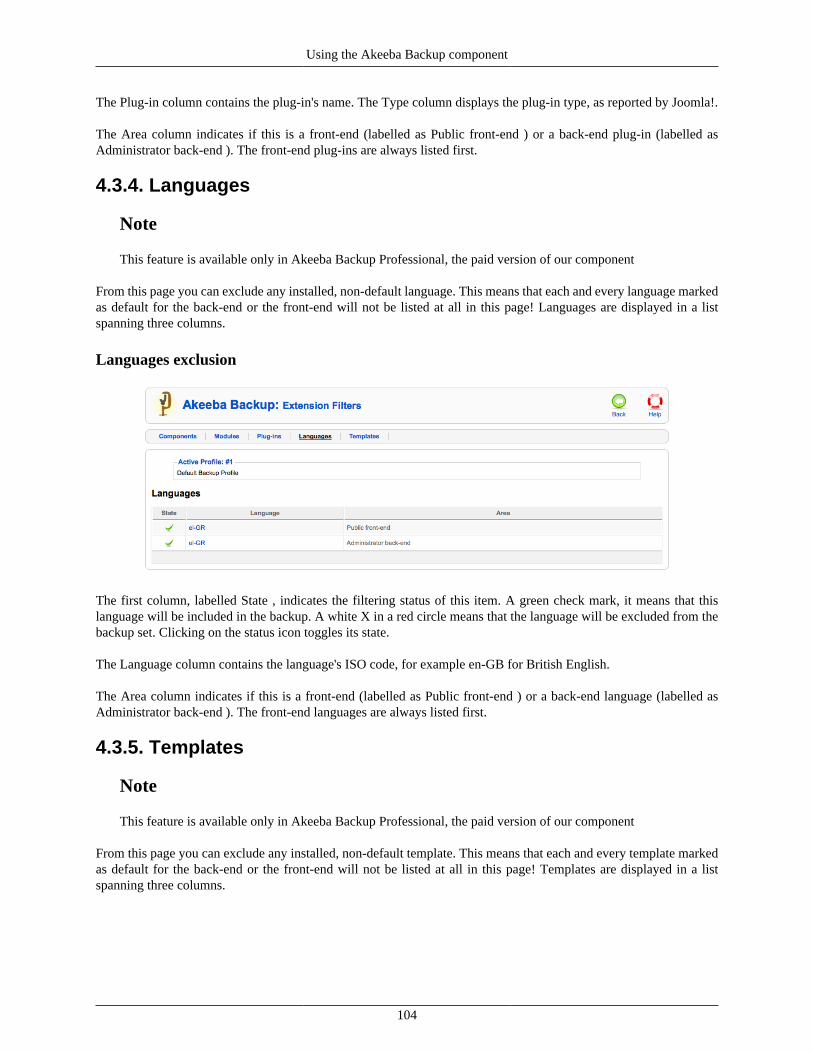
Using the Akeeba Backup component
104
The Plug-in column contains the plug-in's name. The Type column displays the plug-in type, as reported by Joomla!.
The Area column indicates if this is a front-end (labelled as Public front-end ) or a back-end plug-in (labelled asAdministrator back-end ). The front-end plug-ins are always listed first.
4.3.4. Languages
Note
This feature is available only in Akeeba Backup Professional, the paid version of our component
From this page you can exclude any installed, non-default language. This means that each and every language markedas default for the back-end or the front-end will not be listed at all in this page! Languages are displayed in a listspanning three columns.
Languages exclusion
The first column, labelled State , indicates the filtering status of this item. A green check mark, it means that thislanguage will be included in the backup. A white X in a red circle means that the language will be excluded from thebackup set. Clicking on the status icon toggles its state.
The Language column contains the language's ISO code, for example en-GB for British English.
The Area column indicates if this is a front-end (labelled as Public front-end ) or a back-end language (labelled asAdministrator back-end ). The front-end languages are always listed first.
4.3.5. Templates
Note
This feature is available only in Akeeba Backup Professional, the paid version of our component
From this page you can exclude any installed, non-default template. This means that each and every template markedas default for the back-end or the front-end will not be listed at all in this page! Templates are displayed in a listspanning three columns.

Using the Akeeba Backup component
105
Templates exclusion
The first column, labelled State , indicates the filtering status of this item. A green check mark, it means that thistemplate will be included in the backup. A white X in a red circle means that the template will be excluded from thebackup set. Clicking on the status icon toggles its state.
The Template column contains the template's name.
The Area column indicates if this is a front-end (labelled as Public front-end ) or a back-end template (labelled asAdministrator back-end ). The front-end languages are always listed first.
4.4. RegEx Files and Directories Exclusion
Note
This feature is available only in Akeeba Backup Professional, the paid version of our component
Sometimes you know that you have to exclude files or directories following a specific naming pattern, but they are somany that it's completely impractical going to the normal exclusion filters page and click them one by one. Or they arescattered around the file system tree, making it extremely complex to track them down and exclude them. Wouldn't itbe nice to have an automated way to say, for example, "exclude all SVN directories from the backup"? Enter regularexpressions. What are those regular expressions? Let's see what Wikipedia has to say on the subject:
In computing, regular expressions, also referred to as regex or regexp, provide a concise and flexiblemeans for matching strings of text, such as particular characters, words, or patterns of characters.A regular expression is written in a formal language that can be interpreted by a regular expressionprocessor, a program that either serves as a parser generator or examines text and identifies partsthat match the provided specification.—"Regular expression" article [http://en.wikipedia.org/wiki/Regular_expression] from Wikipedia
In a nutshell, regular expressions allow you to quickly define filters which span multiple subdirectories and matchfile or directory names based on a number of criteria. If you want a quick cheatsheet you can use, I suggest the Reg-ular Expressions Cheat Sheet (V2) [http://www.addedbytes.com/cheat-sheets/regular-expressions-cheat-sheet/] fromAddedBytes.com. Some practical examples will be presented at the end of this section.
There are some special considerations experienced regular expressions users must have in mind:
• You are supposed to specify a full regular expression, including its opening and ending separators. So "^foo" isinvalid, but "/^foo/" and "#^foo#" are valid.
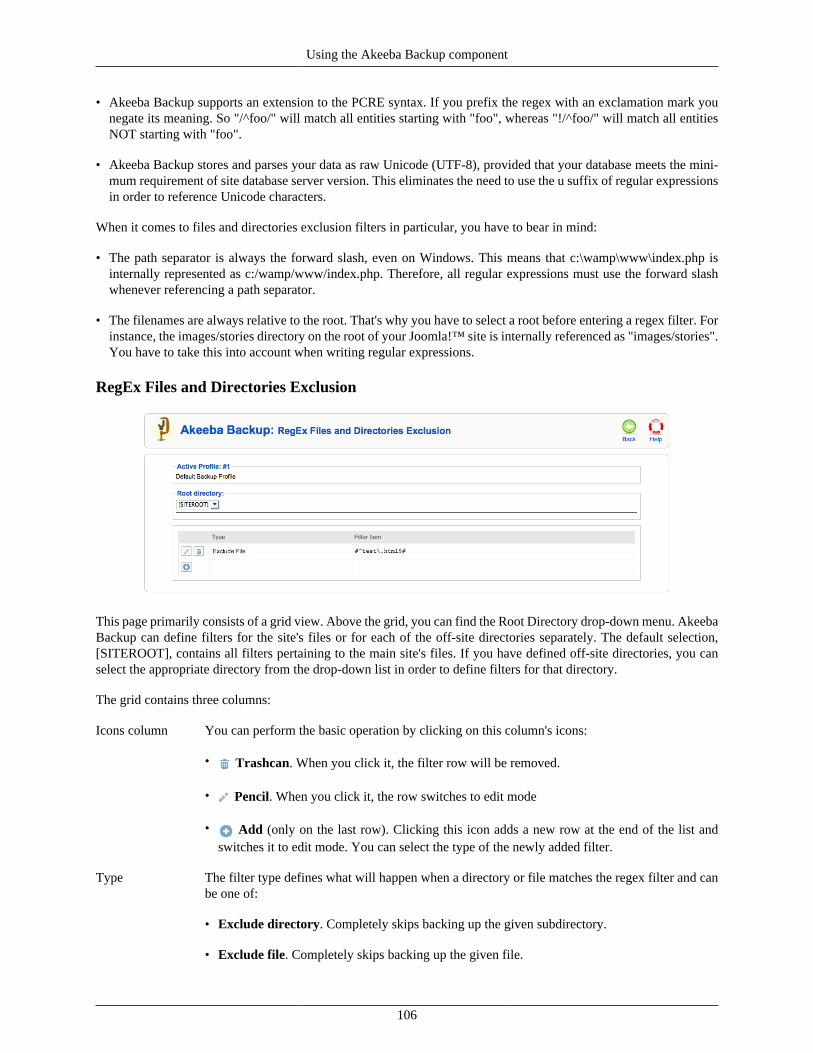
Using the Akeeba Backup component
106
• Akeeba Backup supports an extension to the PCRE syntax. If you prefix the regex with an exclamation mark younegate its meaning. So "/^foo/" will match all entities starting with "foo", whereas "!/^foo/" will match all entitiesNOT starting with "foo".
• Akeeba Backup stores and parses your data as raw Unicode (UTF-8), provided that your database meets the mini-mum requirement of site database server version. This eliminates the need to use the u suffix of regular expressionsin order to reference Unicode characters.
When it comes to files and directories exclusion filters in particular, you have to bear in mind:
• The path separator is always the forward slash, even on Windows. This means that c:\wamp\www\index.php isinternally represented as c:/wamp/www/index.php. Therefore, all regular expressions must use the forward slashwhenever referencing a path separator.
• The filenames are always relative to the root. That's why you have to select a root before entering a regex filter. Forinstance, the images/stories directory on the root of your Joomla!™ site is internally referenced as "images/stories".You have to take this into account when writing regular expressions.
RegEx Files and Directories Exclusion
This page primarily consists of a grid view. Above the grid, you can find the Root Directory drop-down menu. AkeebaBackup can define filters for the site's files or for each of the off-site directories separately. The default selection,[SITEROOT], contains all filters pertaining to the main site's files. If you have defined off-site directories, you canselect the appropriate directory from the drop-down list in order to define filters for that directory.
The grid contains three columns:
Icons column You can perform the basic operation by clicking on this column's icons:
• Trashcan. When you click it, the filter row will be removed.
• Pencil. When you click it, the row switches to edit mode
• Add (only on the last row). Clicking this icon adds a new row at the end of the list andswitches it to edit mode. You can select the type of the newly added filter.
Type The filter type defines what will happen when a directory or file matches the regex filter and canbe one of:
• Exclude directory. Completely skips backing up the given subdirectory.
• Exclude file. Completely skips backing up the given file.
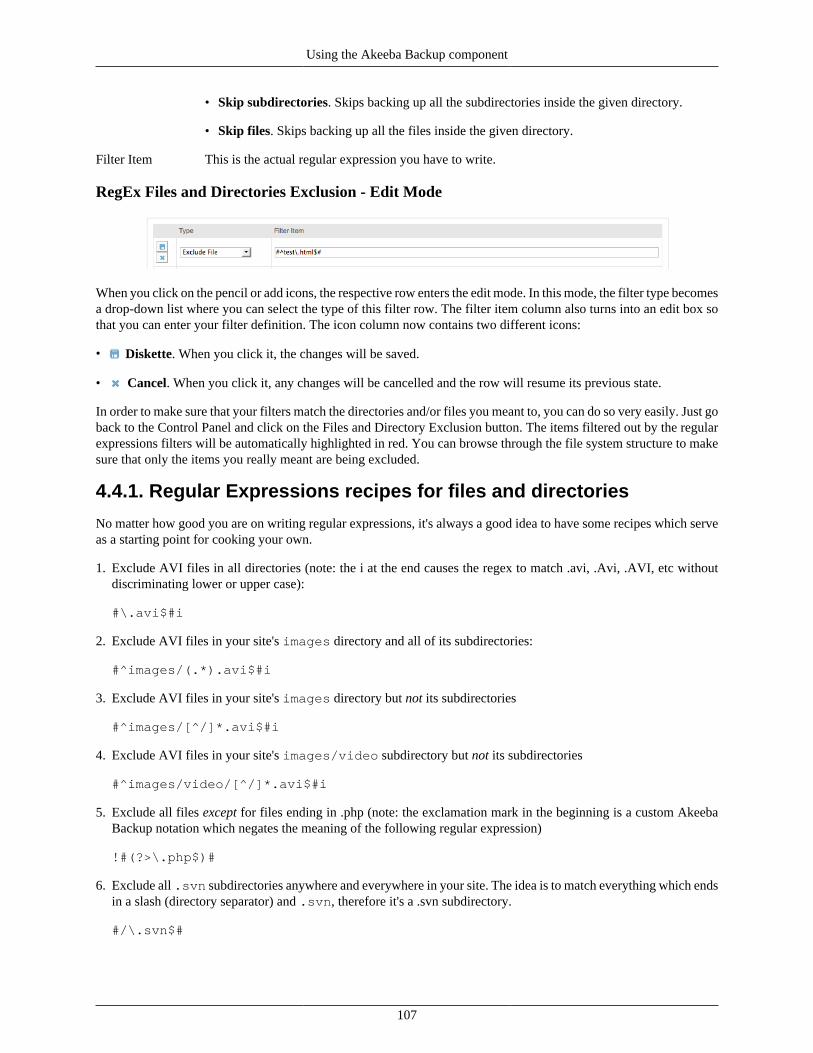
Using the Akeeba Backup component
107
• Skip subdirectories. Skips backing up all the subdirectories inside the given directory.
• Skip files. Skips backing up all the files inside the given directory.
Filter Item This is the actual regular expression you have to write.
RegEx Files and Directories Exclusion - Edit Mode
When you click on the pencil or add icons, the respective row enters the edit mode. In this mode, the filter type becomesa drop-down list where you can select the type of this filter row. The filter item column also turns into an edit box sothat you can enter your filter definition. The icon column now contains two different icons:
• Diskette. When you click it, the changes will be saved.
• Cancel. When you click it, any changes will be cancelled and the row will resume its previous state.
In order to make sure that your filters match the directories and/or files you meant to, you can do so very easily. Just goback to the Control Panel and click on the Files and Directory Exclusion button. The items filtered out by the regularexpressions filters will be automatically highlighted in red. You can browse through the file system structure to makesure that only the items you really meant are being excluded.
4.4.1. Regular Expressions recipes for files and directories
No matter how good you are on writing regular expressions, it's always a good idea to have some recipes which serveas a starting point for cooking your own.
1. Exclude AVI files in all directories (note: the i at the end causes the regex to match .avi, .Avi, .AVI, etc withoutdiscriminating lower or upper case):
#\.avi$#i
2. Exclude AVI files in your site's images directory and all of its subdirectories:
#^images/(.*).avi$#i
3. Exclude AVI files in your site's images directory but not its subdirectories
#^images/[^/]*.avi$#i
4. Exclude AVI files in your site's images/video subdirectory but not its subdirectories
#^images/video/[^/]*.avi$#i
5. Exclude all files except for files ending in .php (note: the exclamation mark in the beginning is a custom AkeebaBackup notation which negates the meaning of the following regular expression)
!#(?>\.php$)#
6. Exclude all .svn subdirectories anywhere and everywhere in your site. The idea is to match everything which endsin a slash (directory separator) and .svn, therefore it's a .svn subdirectory.
#/\.svn$#
Using the Akeeba Backup component
108
However, this won't match the .svn directory in your site's root, so you will have to add yet another filter:
#^\.svn$#
This second filter matches only the .svn directory in your site's root.
4.5. RegEx Database Tables Exclusion
Note
This feature is available only in Akeeba Backup Professional, the paid version of our component
Sometimes you know that you have to exclude database tables which follow a specific naming pattern, but they areso many that it's completely impractical going to the normal exclusion filters page and click them one by one. Oryou want to exclude everything which doesn't match a specific pattern (e.g. it's not part of the site's main database),but the matching set dynamically and constantly changes over time, making it impossible to create an accurate filterwithout lots of maintenance. Enter regular expressions. What are those regular expressions? Let's see what Wikipediahas to say on the subject:
In computing, regular expressions, also referred to as regex or regexp, provide a concise and flexiblemeans for matching strings of text, such as particular characters, words, or patterns of characters.A regular expression is written in a formal language that can be interpreted by a regular expressionprocessor, a program that either serves as a parser generator or examines text and identifies partsthat match the provided specification.—"Regular expression" article [http://en.wikipedia.org/wiki/Regular_expression] from Wikipedia
In a nutshell, regular expressions allow you to quickly define filters which match table names based on a numberof criteria. If you want a quick cheatsheet you can use, I suggest the Regular Expressions Cheat Sheet (V2) [http://www.addedbytes.com/cheat-sheets/regular-expressions-cheat-sheet/] from AddedBytes.com. Some practical exam-ples will be presented at the end of this section.
There are some special considerations experienced regular expressions users must have in mind:
• You are supposed to specify a full regular expression, including its opening and ending separators. So "^foo" isinvalid, but "/^foo/" and "#^foo#" are valid.
• Akeeba Backup supports an extension to the PCRE syntax. If you prefix the regex with an exclamation mark younegate its meaning. So "/^foo/" will match all entities starting with "foo", whereas "!/^foo/" will match all entitiesNOT starting with "foo".
• Akeeba Backup stores and parses your data as raw Unicode (UTF-8), provided that your database meets the min-imum requirement of site database version. This eliminates the need to use the u suffix of regular expressions inorder to reference Unicode characters.
When it comes to database table filters in particular, you have to bear in mind:
• All Joomla!™ tables have their prefix stripped and replaced by the standard #__ placeholder. So, if your databaseprefix is jos_, jos_users is internally referenced as #__users. You must take this into account when writingregex filters, as this is the name you will have to match!
• The prefix replacement is not made in Database Only backup modes (either main site database, or all databases).As a result, you have to reference the tables by their full, normal name, e.g. jos_users.
• The examples at the end of this section apply to a full site backup scenario, where the replacement does take place.
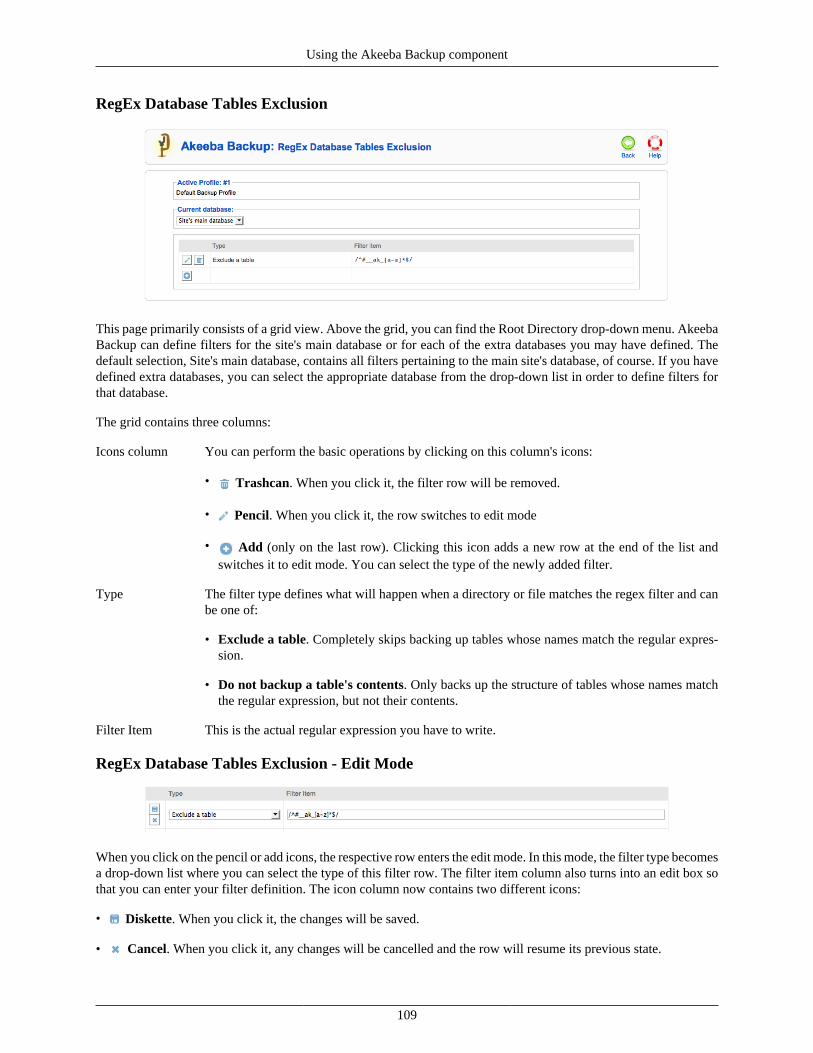
Using the Akeeba Backup component
109
RegEx Database Tables Exclusion
This page primarily consists of a grid view. Above the grid, you can find the Root Directory drop-down menu. AkeebaBackup can define filters for the site's main database or for each of the extra databases you may have defined. Thedefault selection, Site's main database, contains all filters pertaining to the main site's database, of course. If you havedefined extra databases, you can select the appropriate database from the drop-down list in order to define filters forthat database.
The grid contains three columns:
Icons column You can perform the basic operations by clicking on this column's icons:
• Trashcan. When you click it, the filter row will be removed.
• Pencil. When you click it, the row switches to edit mode
• Add (only on the last row). Clicking this icon adds a new row at the end of the list andswitches it to edit mode. You can select the type of the newly added filter.
Type The filter type defines what will happen when a directory or file matches the regex filter and canbe one of:
• Exclude a table. Completely skips backing up tables whose names match the regular expres-sion.
• Do not backup a table's contents. Only backs up the structure of tables whose names matchthe regular expression, but not their contents.
Filter Item This is the actual regular expression you have to write.
RegEx Database Tables Exclusion - Edit Mode
When you click on the pencil or add icons, the respective row enters the edit mode. In this mode, the filter type becomesa drop-down list where you can select the type of this filter row. The filter item column also turns into an edit box sothat you can enter your filter definition. The icon column now contains two different icons:
• Diskette. When you click it, the changes will be saved.
• Cancel. When you click it, any changes will be cancelled and the row will resume its previous state.
Using the Akeeba Backup component
110
In order to make sure that your filters match the directories and/or files you meant to, you can do so very easily. Justgo back to the Control Panel and click on the Database Tables Exclusion button. The items filtered out by the regularexpressions filters will be automatically highlighted in red. You can browse through the database structure to makesure that only the items you really meant are being excluded.
4.5.1. Regular Expressions recipes for database tables
No matter how good you are on writing regular expressions, it's always a good idea to have some recipes which serveas a starting point for cooking your own.
1. Exclude non-Joomla! database tables:
/^(?>[^#]{1}|##|#_[^_]{1})/
2. Since nobody understood the previous filter, I have rewritten it in Akeeba Backup's compact proprietary notationwhich uses the non-standard negation operator (exclamation mark):
!/^#__/
Much simpler, huh?
3. Exclude VirtueMart tables. We know that these tables have vm_ in their name after the table prefix, e.g.jos_vm_foobar becomes #__vm_foobar, so you only need to filter #__vm.
/^#__vm_/
5. Automating your backup
5.1. Taking backups automaticallyEven though Akeeba Backup makes it very easy to take a backup of your Joomla!™ site, it still requires you to login to the site's backend, click on the Backup Now button and wait for the backup to finish. If you do this daily, it is adrag. Our job is to automate your life, making repeated and time consuming procedures a breeze. To this end we offernot just one, but 3 (yes, THREE!) different backup automation possibilities for Akeeba Backup.
Important
Only one of those options is available in the free (as in "free beer") Akeeba Backup Core release
5.1.1. Front-end backup, for use with CRON
Tip
This option is available in both the Akeeba Backup Core and Akeeba Backup Professional releases. You don'tneed to subscribe to the Professional edition to use it.
The front-end backup feature is intended to provide the capability to perform an unattended, scheduled backup ofyour site.
The front-end backup URL performs a single backup step and sends a redirection (HTTP 302) header to force the clientto advance to the next page, which performs the next step and so forth. You will only see a message upon completion,should it be successful or not. There are a few limitations, though:
• It is not designed to be run from a normal web browser, but from an unattended cron script, utilizing wget orcron as a means of accessing the function.
Using the Akeeba Backup component
111
• The script is not capable of showing progress messages.
• Normal web browsers tend to be "impatient". If a web page returns a bunch of redirection headers, the web browserthinks that the web server has had some sort of malfunction and stop loading the page. It will also show some kindof "destination unreachable" message. Remember, these browsers are meant to be used on web pages which aresupposed to show some content to a human. This behaviour is normal. Most browsers will quit after they encounterthe twentieth page redirect response, which is bound to happen. Do not come to the Free Support Forum complainingthat Firefox, Internet Explorer, Chrome, Safari, Opera or another browser doesn't work with the front-end backupfeature. It was NOT meant to work by design.
• Command line utilities, by default, will also give up loading a page after it has been redirected a number of times.For example, wget gives up after 20 redirects, curl does so after 50 redirects. Since Akeeba Backup redirects oncefor every step, it is advisable to configure your command line utility with a large number of redirects; about 10000should be more than enough for virtually all sites.
Tip
Do you want to automate your backups despite your host not supporting CRON? Webcron.org [http://webcron.org/] fully supports Akeeba Backup's front-end backup feature and is dirt cheap - you need to spendabout 1 Euro for 1000 backup runs. Just make sure you set up your Webcron CRON job time limit to be atleast 10% more than the time it takes for Akeeba Backup to backup your site. Don't know how much is that?No problem! Just take a regular backup from your site's back-end, then go to Manage Backups (formerly"Administer Backup Files") page and take a look at the Duration column. That's what you're looking for!
Before beginning to use this feature, you must set up Akeeba Backup to support the front-end backup option. First,go to Akeeba Backup's main page and click on the Component Parameters button. Find the option titled Enable front-end and remote backup and set it to Yes. Below it, you will find the option named Secret key. In that box you haveto enter a password which will allow your CRON job to convince Akeeba Backup that it has the right to request abackup to be taken. Think of it as the password required to enter the VIP area of a night club. After you're done, clickthe Save button on top to save the settings and close the dialog.
Tip
Use only lower- and upper-case alphanumeric characters (0-9, a-z, A-Z) in your secret key. Other charactersmay need to be manually URL-encoded in the CRON job's command line. This is error prone and can causethe backup to never start even though you'll be quite sure that you have done everything correctly.
Most hosts offer a CPanel of some kind. There has to be a section for something like "CRON Jobs", "scheduled tasks"and the like. The help screen in there describes how to set up a scheduled job. One missing part for you would be thecommand to issue. Simply putting the URL in there is not going to work.
Warning
If your host only supports entering a URL in their "CRON" feature, this will most likely not work with AkeebaBackup. There is no workaround. It is a hard limitation imposed by your host. We would like to help you,but we can't. As always, the only barrier to the different ways we can help you is server configuration.
If you are on a UNIX-style OS host (usually, a Linux host) you most probably have access to a command line utilitycalled wget. It's almost trivial to use:
wget --max-redirect=10000 "http://www.yoursite.com/index.php?option=com_akeeba&
view=backup&key=YourSecretKey"
Of course, the line breaks are included for formatting clarity only. You should not have a line break in your commandline!
Using the Akeeba Backup component
112
Important
Do not miss the --max-redirect=10000 part of the wget command! If you fail to include it, the backup willnot work with wget complaining that the maximum number of redirections has been reached. This is normalbehavior, it is not a bug.
Warning
Do not forget to surround the URL in double quotes. If you don't the backup will fail and it will be your fault!The reason is that the ampersand is also used to separate multiple commands in a single command line. Ifyou don't use the double quotes at the start and end of the backup URL, your host will think that you tried torun multiple commands and load your site's homepage instead of the front-end backup URL.
If you're unsure, check with your host. Sometimes you have to get from them the full path to wget in order for CRONto work, thus turning the above command line to something like:
/usr/bin/wget --max-redirect=10000 "http://www.yoursite.com/index.php?option=com_akeeba&
view=backup&key=YourSecretKey"
Contact your host; they usually have a nifty help page for all this stuff. Read also the section on CRON jobs below.
Optionaly, you can also include an extra parameter to the above URL, &profile=profile_id, whereprofile_id is the numeric ID of the profile you want to use for the backup. If you don't specify this parameter, thedefault backup profile (ID=1) will be used. In this sense, the aforementioned URL becomes:
/usr/bin/wget --max-redirect=10000 "http://www.yoursite.com/index.php?option=com_akeeba&
view=backup&key=YourSecretKey&profile=profile_id"
wget is multi-platform command line utility program which is not included with all operating systems. If yoursystem does not include the wget command, it can be downloaded at this address: http://wget.addictivecode.org/FrequentlyAskedQuestions#download. The wget homepage is here: http://www.gnu.org/software/wget/wget.html.Please note that the option --max-redirect is available on wget version 1.11 and above.
Important
Using a web browser (Internet Explorer, Google Chrome, ...) or wget version 1.10 and earlier will mostprobably result into an error message concerning the maximum redirections limit being exceeded. This is nota bug. Most network software will stop dealing with a web site after it has redirected the request more than 20times. This is a safety feature to avoid consuming network resources on misconfigured web sites which haveentered an infinite redirection loop. Akeeba Backup uses redirections creatively, to force the continuation ofthe backup process without the need for client-side scripting. It is possible, depending on site size, AkeebaBackup configuration and server setup, that it will exceed the limit of 20 redirections while performing abackup operation.
Warning
The ampersands above should be written as a single ampersand, not as an HTML entity (&). Failureto do so will result in a 403: Forbidden error message and no backup will occur. This is not a bug, it's theway wget works.
Using webcron.org to automate your backups
Assuming that you have already bought some credits on webcron.org, here's how to automate your backup using theirservice.
Using the Akeeba Backup component
113
First, go to Akeeba Backup's main page (Control Panel) and click on the Component Parameters button. Find theoption titled Enable front-end and remote backup and set it to Yes. Below it, you will find the option named Secretkey. Type in a secret key. We strongly recommend using only alphanumeric characters, i.e. 0-9, a-z and A-Z. For thesake of this example, we will assume that you have entered ak33b4s3cRet in that field. We will also assume thatyour site is accessible through the URL http://www.example.com.
Log in to webcron.org. In the CRON area, click on the New Cron button. Here's what you have to enter at webcron.org'sinterface:
• Name of cronjob: anything you like, e.g. "Backup www.example.com"
• Timeout: 180sec; if the backup doesn't complete, increase it. Most sites will work with a setting of 180 or 600 here.If you have a very big site which takes more than 5 minutes to back itself up, you might consider using AkeebaBackup Professional and the native CRON script (akeeba-backup.php) instead, as it's much more cost-effective.
• Url you want to execute: http://www.example.com/index.php?option=com_akeeba&view=backup&key=ak33b4s3cRet
• Login and Password: Leave them blank
• Execution time (the grid below the other settings): Select when you want your CRON job to run
• Alerts: If you have already set up alert methods in webcron.org's interface, we recommend choosing an alert methodhere and not checking the "Only on error" so that you always get a notification when the backup CRON job runs.
Now click on Submit and you're all set up!
A PHP alternative to wget
As user DrChalta pointed out in a forum post, there is an alternative to wget, as long as your PHP installation hasthe cURL extension installed and enabled. For starters, you need to save the following PHP script as backup.phpsomewhere your host's cron feature can find it. Please note that this is a command-line script and needn't be locatedin your site's root; it should be preferably located above your site's root, in a non web-accessible directory.
The script below is a modification over DrChalta's original script, taking into account changes made in later versionsof our software. In order to configure it for your server, you only have to change the first three lines.
<?phpdefine('SITEURL', 'http://www.example.com'); // Base URL of your sitedefine('SECRETKEY', 'MySecretKey'); // Your secret keydefine('PROFILE',1); // The profile's ID
// ====================== DO NOT MODIFY BELOW THIS LINE ======================$curl_handle=curl_init();curl_setopt($curl_handle,CURLOPT_URL,SITEURL.'/index.php?option=com_akeeba&view=backup&key='.SECRETKEY.'&profile='.PROFILE);curl_setopt($curl_handle,CURLOPT_FOLLOWLOCATION,TRUE);curl_setopt($curl_handle,CURLOPT_MAXREDIRS,10000); # Fix by Nicholascurl_setopt($curl_handle,CURLOPT_RETURNTRANSFER,1);$buffer = curl_exec($curl_handle);curl_close($curl_handle);if (empty($buffer)) echo "Sorry, the backup didn't work.";else echo $buffer;
Using the Akeeba Backup component
114
?>
Where www.yoursite.com and YourSecretKey should be set up as discussed in the previous section.
Warning
The ampersands above should be written as a single ampersand, not as an HTML entity (&). Failureto do so will result in a 403: Forbidden error message and no backup will occur. This is not a bug, it's theway wget and PHP work.
In order to call this script with a schedule, you need to put something like this to your crontab (or use your host'sCRON feature to set it up):
0 3 * * 6 /usr/local/bin/php /home/USER/backups/backup.php
Where /usr/local/bin/php is the absolute path to your PHP command-line executable and /home/US-ER/backups/backup.php is the absolute path to the script above.
If you set up your cron schedule with a visual tool (for example, a web interface), the command to execute part is "/usr/local/bin/php /home/USER/backups/backup.php".
Thank you DrChalta for this wonderful tip!
Using the front-end backup in SiteGround and other hosts using cURL instead ofwget
As one of our users pointed out in the support forum, finding the correct command to issue for the CRON job is tricky.What he writes applies not only to his host, SiteGround, but many other commercial hosts as well. We'll simply quoteour user, bzcoder.
In the CPanel for SiteGround there is a cronjob option, you create a cronjob using that and use:
curl -b /tmp/cookies.txt -c /tmp/cookies.txt -L --max-redirs 1000 -v "<url>"
as your command.
Replace <url> with your backup URL. Make sure to use the initial url displayed on the backend NOT the final URLwhen you run the backup manually (been there, done that) - when you do that you end up with a url that doesn't workbecause of the extra parameter used in continuing the backup process.
5.1.2. Native CRON script
Tip
This option is only available in the Akeeba Backup Professional releases. You need to subscribe to the Pro-fessional edition to use it.
Tip
Our users report that they get no joy using this script on GoDaddy hosting, but our alternative script (detailedon the next chapter) works.
Note
This file was found in administrator/components/com_akeeba/backup.php in Akeeba Back-up 3.0.x up to and including 3.4.x. Since Akeeba Backup 3.5 this file is now present under cli/akee-ba-backup.php.
Using the Akeeba Backup component
115
If you have access to the command-line version of PHP, Akeeba Backup Professional includes an even better - andfaster - way of scheduling your backups. All Akeeba Backup Professional releases include the file cli/akee-ba-backup.php, which can be run from the command-line PHP interface (PHP CLI). In contrast with previousreleases, it doesn't require the front-end backup in order to work; it is self-contained, native backup for your Joomla!™site, even if your web server is down!
In order to schedule a backup, you will have to use the following command line to your host's CRON interface:
/usr/local/bin/php /home/USER/webroot/cli/akeeba-backup.php
where /usr/local/bin/php is the path to your PHP CLI executable and /home/USER/webroot is the abso-lute path to your web site's root. You can get this information from your host.
The backup script accepts three optional parameters:
• --profile profile_id allows you to select which backup profile you would like to use for the scheduled backup.The profile_id is the numeric profile ID you can see in your Control Panel page.
• --description "Your description" allows you set a backup description different than the default. Do notforget to enclose your description in double quotes, or this parameter will not work! Since Akeeba Backup 3.1the description supports Akeeba Backup's file naming "variables", e.g. [SITE], [DATE] and [TIME]. Thesevariables are documented in the Output Directory configuration option's description. This allows you to use themin conjunction with this parameter to provide flexible backup descriptions.
• --override "keyname=value" allows you to override profile configuration variables. This parameter can appear anunlimited number of times in the command line. It can be used, for example, to provide the username and passwordto your cloud storage service in the command line, without having to store it in the backup profile's configuration,therefore never storing it in database and hiding it from other administrators. Please take a look at the "Overridingconfiguration variables" subsection for more information.
• --quiet will suppress all output except warnings and error messages. If the backup runs successfully you get nooutput at all. Note: this option was added in Akeeba Backup Professional 3.3.4.
The akeeba-backup.php script will return a different exit code, depending on the backup status. When the backupis successful and without warnings, the exit code will be 0. When the backup completed but with warnings, the exitcode will be 1. Finally, if the backup fails, the exit code will be 2. This allows you to check the backup status, forexample inside a shell script, for automation purposes.
In order to give some examples, I will assume that your PHP CLI binary is located in /usr/local/bin/php - acommon setting among hosts - and that your web site's root is located at /home/johndoe/httpdocs.
1. Backup with the default profile (ID = 1) and default description:
usr/local/bin/php /home/johndoe/httpdocs/cli/akeeba-backup.php
2. Backup with profile number 2 and default description:
usr/local/bin/php /home/johndoe/httpdocs/cli/akeeba-backup.php --profile=2
3. Backup with the default profile (ID = 1) and a description reading "My automated backup":
usr/local/bin/php /home/johndoe/httpdocs/cli/akeeba-backup.php --description="My automated backup"
4. Backup with profile number 2 and a description reading "My automated backup":
usr/local/bin/php /home/johndoe/httpdocs/cli/akeeba-backup.php --profile=2 --description="My automated backup"
Using the Akeeba Backup component
116
It goes without saying that the line breaks are for readability only. You should not include line breaks in your commandline.
Special considerations:
• All parameters must start with a double dash. If you use a single dash, they will be ignored. This is a limitationof Joomla!'s JApplicationCli iterface –used by our script– which follows the UNIX conventions of command lineparameters.
• Most hosts do not impose a time limit on scripts running from the command-line. If your host does and the limitis less than the required time to backup your site, the backup will fail. We are working on a workaround to allowoperation even within such time constraints.
• This script is not meant to run from a web interface. If your host only provides access to the CGI or FastCGI PHPbinaries, backup.php will not work with them. The solution to this issue is tied to the time constraint above. Theworkaround we're planning will solve both issues.
• Some servers do not fully support this backup method. The usual symptoms will be a backup which starts butis intermittently or consistently aborted in mid-process without any further error messages and no indication ofsomething going wrong. In such a case, trying running the backup from the back-end of your site will work properly.If you witness similar symptoms please use the Alternative CRON Script, outlined in the next section.
Setting up a CRON job on cPanel
Go to your cPanel main page and choose the CRON Jobs icon from the Advanced pane. In the Add New CRON Jobbox on the page which loads, enter the following information:
Common Settings Choose the frequency of your backup, for example once per day.
Command Enter your backup command. Usually, you have to use something like:
/usr/bin/php5-cli /home/myusername/public_html/cli/akeeba-backup.php --profile=YourProfileID
where myusername is your account's user name (most probably the same you use to login tocPanel) and YourProfileID is the numeric profile number you want to use for your backupjob. Do note the path for the PHP command line executable: /usr/bin/php5-cli. This isthe default location of the correct executable file for cPanel 11 and later. Your host may use adifferent path to the executable. If the command never runs, ask them. We can't help you withthat; only those who have set up the server know the changes they have made to the default setup.
Finally, click the Add New Cron Job button to activate the CRON job.
Special considerations for HostGator
The location of the PHP CLI binary is /usr/bin/php-cli. This means that your CRON command line shouldlook like:
/opt/php53/bin/php /home/myusername/public_html/cli/akeeba-backup.php --profile=YourProfileID
Overriding configuration variables
Since Akeeba Backup 3.1 the Native CRON Script allows you to override or supply missing configuration variablesin the command line. This is especially useful for security reasons. One security issue with the cloud storage serviceintegration is that other administrators can peek at Akeeba Backup's configuration and read the username, passwordor API keys used to access the cloud storage service. You can, however, leave these fields blank in the configurationand supply their values in the command line.
Using the Akeeba Backup component
117
Overriding a configuration variable requires knowing its key name. The key names are represented in dot-format, i.e.engine.postproc.s3.accesskey for Amazon S3's access key. Determining the key name is quite easy, asthey are stored in INI files throughout the component's back-end. The first location you should look at is adminis-trator/components/com_akeeba/akeeba/core, where you will find four INI files with general settings.Inside the administrator/components/com_akeeba/akeeba/engines and administrator/com-ponents/com_akeeba/akeeba/plugins/engines directories and their subdirectories you will find one INIfile per engine.
In order to save you from trouble, here are the most useful key names for providing cloud storage engine credentials.The names are designed to be self-explanatory.
Amazon S3 • engine.postproc.s3.accesskey
• engine.postproc.s3.secretkey
RackSpaceCloudFiles
• engine.postproc.cloudfiles.username
• engine.postproc.cloudfiles.apikey
Dropbox • engine.postproc.dropbox.token
• engine.postproc.dropbox.token_secret
Microsoft Win-dows AzureBLOB Storage
• engine.postproc.azure.account
• engine.postproc.azure.key
Remote FTPserver
• engine.postproc.ftp.host
• engine.postproc.ftp.port
• engine.postproc.ftp.user
• engine.postproc.ftp.pass
Applying them on the command line is easy. Take this command line as an example:
usr/local/bin/php /home/johndoe/httpdocs/cli/akeeba-backup.php--profile=2 --description="My automated backup"--override="engine.postproc.s3.accesskey=ABCDEF"--override="engine.postproc.s3.secretkey=1234567890abcdefgh"
In this case, we are telling the backup script to use the backup Profile with ID=2, give the backup description of "Myautomated backup" and then supply the S3 access and secret keys.
Important
The values of the override parameters must be enclosed in double or single quotes (depends on your OperatingSystem), otherwise the operating system will not pass them back to the backup.php script.
Important
Your script MUST NOT include the line breaks in the previous example. The line breaks are there only fortypesetting purposes.
Finally, it should be noted that you can use the command-line override feature to do more tricky configuration over-rides, for example turning off the archive splitting or using a different backup output directory to enhance your se-
Using the Akeeba Backup component
118
curity. If it's something you can do in the Configuration page of the component, you can also do it using commandline overrides.
5.1.3. Alternative CRON script
Tip
This option is only available in the Akeeba Backup Professional releases. You need to subscribe to the Pro-fessional edition to use it.
Note
This file was found in administrator/components/com_akeeba/altbackup.php in AkeebaBackup 3.0.x up to and including 3.4.x. Since Akeeba Backup 3.5 this file is now present under cli/akee-ba-altbackup.php.
On some hosts it is impossible to use the native CRON script outlined in the previous section. On such hosts the CRONscript will get aborted if it is using too much CPU time, or if the system load exceeds a value predefined by yourhost company. In order to accomodate for these hosts, Akeeba Backup Professional includes an alternative CRONscript. The alternative CRON script performs the backup by using the front-end backup feature of Akeeba Backup. Thealternative CRON script is located in cli/akeeba-altbackup.php, and must be run from the command-linePHP interface (PHP CLI).
In order to schedule a backup, you will have to use the following command line to your host's CRON interface:
/usr/local/bin/php /home/USER/webroot/cli/akeeba-altbackup.php
where /usr/local/bin/php is the path to your PHP CLI executable and /home/USER/webroot is the abso-lute path to your web site's root. You can get this information from your host.
The backup script accepts only one optional parameters:
• -profile profile_id allows you to select which backup profile you would like to use for the scheduled backup.The profile_id is the numeric profile ID you can see in your Control Panel page.
In order to give some examples, we will assume that your PHP CLI binary is located in /usr/local/bin/php -a common setting among hosts - and that your web site's root is located at /home/johndoe/httpdocs.
1. Backup with the default profile (ID = 1)
usr/local/bin/php /home/johndoe/httpdocs/cli/akeeba-altbackup.php
2. Backup with profile number 2
usr/local/bin/php /home/johndoe/httpdocs/cli/akeeba-altbackup.php --profile=2
It goes without saying that the line breaks are for readability only. You should not include line breaks in your commandline.
Special considerations:
• Most hosts do not impose a time limit on scripts running from the command-line. If your host does and the limit isless than the required time to backup your site, the backup will fail.
• This script is not meant to run from a web interface. If your host only provides access to the CGI or FastCGI PHPbinaries, backup.php will not work with them. The solution to this issue is tied to the time constraint above. Theworkaround we're planning will solve both issues.

Using the Akeeba Backup component
119
• You must enable the front-end backup feature of your Akeeba Backup Professional instalaltion and assign a "secretkey" for it. This is possible by going to the Akeeba Backup Professional's Control Panel page and clicking on theParameters button on the top right corner of the toolbar. You will find the front-end backup options further downthe Parameters page.
• Before using the alternative CRON script for the first time, you must visit the Akeeba Backup's Control Panel pageat least once. Since the command-line version of PHP used to run the backup is oblivious to the domain name usedby your site, we have to cache this information. Caching of this information occurs as soon as you visit the ControlPanel page. The host name is absolutely required in order for the script to be able to access your Akeeba Backupinstallation's front-end backup feature.
• Your host must support one of the three methods used by the helper script to access your front-end backup URL:
1. The PHP cURL module.
2. The fsockopen() method
3. The fopen() URL wrappers
If none of these methods is available, the backup will fail.
• Your host may have a firewall setup which doesn't allow the CRON script to access the front-end backup URL.In such a case, the backup will consistently fail without a new log file being produced and without a backup entrybeing written to the database. You will have to contact your host so that they can allow the script to access the front-end backup URL. Do note that despite the alternative CRON script and your site running on the same server, thefirewall restriction might still be in place. This is counter-intuitive, but we've seen this happening on man hosts.
If you are seeking assistance in our forums regarding a failed CRON job, please indicate if and which of these stepsyou have already tried. Not doing so will hinder our ability to help you in a timely manner.
Setting up a CRON job on cPanel
Go to your cPanel main page and choose the CRON Jobs icon from the Advanced pane. In the Add New CRON Jobbox on the page which loads, enter the following information:
Common Settings Choose the frequency of your backup, for example once per day.
Command Enter your backup command. Usually, you have to use something like:
/usr/bin/php5-cli /home/myusername/public_html/cli/akeeba-altbackup.php --profile=YourProfileID
where myusername is your account's user name (most probably the same you use to login tocPanel) and YourProfileID is the numeric profile number you want to use for your backupjob. Do note the path for the PHP command line executable: /usr/bin/php5-cli. This isthe default location of the correct executable file for cPanel 11 and later. Your host may use adifferent path to the executable. If the command never runs, ask them. We can't help you withthat; only those who have set up the server know the changes they have made to the default setup.
Finally, click the Add New Cron Job button to activate the CRON job.
Special notes for GoDaddy
According to our users who have tried this, this laternative script does work with GoDaddy. The command line youhave to use is:
/usr/local/php5/bin/php "$HOME/html/cli/akeeba-altbackup.php" --profile=YourProfileID
where YourProfileID is the numeric profile number you want to use for your backup job.
Using the Akeeba Backup component
120
The PHP executable we are using is the CLI rather than the default CGI. This is important; if you use the CGI executablethen the script will not run. Don't forget to enable frontend backup and insert your secret word. To enable frontendbackup go to Akeeba Backup under components, select configuration, select options from the navigation, then selectthe front-end backup tab to enable the settings.
If the backup completes successfully but the backup appears as "Failed" in the Manage Backups (formerly "AdministerBackup Files") page, you'll have to apply a workaround. Go to Akeeba Backup and select your backup profile fromthe drop-down list. Then click on the Configuration button. In the configuration page check the Use database storagefor temporary data option.
5.2. Checking for failed backups automatically
Tip
This option is only available in the Akeeba Backup Professional releases. You need to subscribe to the Pro-fessional edition to use it.
While you can automate backups with any of the three methods above, there is a small drawback. It is impossibleto catch a failed backup if the backup failure was caused by a PHP error or the server killing the backup script forany reason (usually: time, file size and memory limits). This has the unwanted side effect of not knowing when yourbackup has failed unless you keep track of the backup records on your sites or the emails sent out by your CRON jobs(if any are sent at all – it depends on the server / service you are using).
Since Akeeba Backup 3.10.2 you can automate the check for failed backups and have it email you when it detectsthat the latest backup has failed.
Warning
This is an optional, advanced and DANGEROUS feature. If you check for failed backups while a backupis still running it is very possible that you will cause the backup to fail! We recommend scheduling backupchecks a substantial amount of time (e.g. 1 hour) after the expected end time of your backups.
5.2.1. Front-end backup failure check, for use with CRON
Tip
This option is only available in the Akeeba Backup Professional releases. You need to subscribe to the Pro-fessional edition to use it.
The front-end backup feature is intended to provide the capability to perform an unattended, scheduled failed backupcheck.
Before beginning to use this feature, you must set up Akeeba Backup to support the front-end backup option. First,go to Akeeba Backup's main page and click on the Component Parameters button. Find the option titled Enable front-end and remote backup and set it to Yes. Below it, you will find the option named Secret key. In that box you haveto enter a password which will allow your CRON job to convince Akeeba Backup that it has the right to request abackup to be taken. Think of it as the password required to enter the VIP area of a night club. After you're done, clickthe Save button on top to save the settings and close the dialog.
Tip
Use only lower- and upper-case alphanumeric characters (0-9, a-z, A-Z) in your secret key. Other charactersmay need to be manually URL-encoded in the CRON job's command line. This is error prone and can causethe backup to never start even though you'll be quite sure that you have done everything correctly.

Using the Akeeba Backup component
121
Most hosts offer a CPanel of some kind. There has to be a section for something like "CRON Jobs", "scheduled tasks"and the like. The help screen in there describes how to set up a scheduled job. One missing part for you would be thecommand to issue. Simply putting the URL in there is not going to work.
If you are on a UNIX-style OS host (usually, a Linux host) you most probably have access to a command line utilitycalled wget. It's almost trivial to use:
wget "http://www.yoursite.com/index.php?option=com_akeeba&view=check&key=YourSecretKey"
Warning
Do not forget to surround the URL in double quotes. If you don't, the check will fail to execute. The reasonis that the ampersand is also used to separate multiple commands in a single command line. If you don't usethe double quotes at the start and end of the backup URL, your host will think that you tried to run multiplecommands and load your site's homepage instead of the front-end backup URL.
If you're unsure, check with your host. Sometimes you have to get from them the full path to wget in order for CRONto work, thus turning the above command line to something like:
/usr/bin/wget "http://www.yoursite.com/index.php?option=com_akeeba&view=check&key=YourSecretKey"
Contact your host; they usually have a nifty help page for all this stuff. Read also the section on CRON jobs below.
wget is multi-platform command line utility program which is not included with all operating systems. If yoursystem does not include the wget command, it can be downloaded at this address: http://wget.addictivecode.org/FrequentlyAskedQuestions#download. The wget homepage is here: http://www.gnu.org/software/wget/wget.html.
Warning
The ampersands above should be written as a single ampersand, not as an HTML entity (&). Failureto do so will result in a 403: Forbidden error message and no backup will occur. This is not a bug, it's theway wget works.
Using webcron.org to automate your failed backup checks
Assuming that you have already bought some credits on webcron.org, here's how to automate your failed backupchecks using their service.
First, go to Akeeba Backup's main page (Control Panel) and click on the Component Parameters button. Find theoption titled Enable front-end and remote backup and set it to Yes. Below it, you will find the option named Secretkey. Type in a secret key. We strongly recommend using only alphanumeric characters, i.e. 0-9, a-z and A-Z. For thesake of this example, we will assume that you have entered ak33b4s3cRet in that field. We will also assume thatyour site is accessible through the URL http://www.example.com.
Log in to webcron.org. In the CRON area, click on the New Cron button. Here's what you have to enter at webcron.org'sinterface:
• Name of cronjob: anything you like, e.g. "Backup www.example.com"
• Timeout: 30sec; if the failed backup check doesn't complete, increase it. Most sites will work with a setting of 60or 90 here.
• Url you want to execute: http://www.example.com/index.php?option=com_akeeba&view=check&key=ak33b4s3cRet
Using the Akeeba Backup component
122
• Login and Password: Leave them blank
• Execution time (the grid below the other settings): Select when you want your CRON job to run
Now click on Submit and you're all set up!
A PHP alternative to wget
As user DrChalta pointed out in a forum post, there is an alternative to wget, as long as your PHP installation has thecURL extension installed and enabled. For starters, you need to save the following PHP script as check.php somewhereyour host's cron feature can find it. Please note that this is a command-line script and needn't be located in your site'sroot; it should be preferably located above your site's root, in a non web-accessible directory.
The script below is a modification over DrChalta's original script, taking into account changes made in later versionsof our software. In order to configure it for your server, you only have to change the first three lines.
<?phpdefine('SITEURL', 'http://www.example.com'); // Base URL of your sitedefine('SECRETKEY', 'MySecretKey'); // Your secret key
// ====================== DO NOT MODIFY BELOW THIS LINE ======================$curl_handle=curl_init();curl_setopt($curl_handle,CURLOPT_URL,SITEURL.'/index.php?option=com_akeeba&view=check&key='.SECRETKEY);curl_setopt($curl_handle,CURLOPT_FOLLOWLOCATION,TRUE);curl_setopt($curl_handle,CURLOPT_RETURNTRANSFER,1);$buffer = curl_exec($curl_handle);curl_close($curl_handle);if (empty($buffer)) echo "Sorry, the failed backup check didn't work.";else echo $buffer;?>
Where www.yoursite.com and YourSecretKey should be set up as discussed in the previous section.
Warning
The ampersands above should be written as a single ampersand, not as an HTML entity (&). Failureto do so will result in a 403: Forbidden error message and no backup will occur. This is not a bug, it's theway wget and PHP work.
In order to call this script with a schedule, you need to put something like this to your crontab (or use your host'sCRON feature to set it up):
0 3 * * 6 /usr/local/bin/php /home/USER/backups/check.php
Where /usr/local/bin/php is the absolute path to your PHP command-line executable and /home/US-ER/backups/backup.php is the absolute path to the script above.
If you set up your cron schedule with a visual tool (for example, a web interface), the command to execute part is "/usr/local/bin/php /home/USER/backups/check.php".
Thank you DrChalta for this wonderful tip!

Using the Akeeba Backup component
123
Using the front-end backup in SiteGround and other hosts using cURL instead ofwget
As one of our users pointed out in the support forum, finding the correct command to issue for the CRON job is tricky.What he writes applies not only to his host, SiteGround, but many other commercial hosts as well. We'll simply quoteour user, bzcoder.
In the CPanel for SiteGround there is a cronjob option, you create a cronjob using that and use:
curl -b /tmp/cookies.txt -c /tmp/cookies.txt -L -v "<url>"
as your command.
Replace <url> with your failed backup check URL.
5.2.2. Native CRON script for failed backup checks
Tip
This option is only available in the Akeeba Backup Professional releases. You need to subscribe to the Pro-fessional edition to use it.
Tip
Our users report that they get no joy using this script on GoDaddy hosting, but our alternative script (detailedon the next chapter) works.
If you have access to the command-line version of PHP, Akeeba Backup Professional includes an even better wayof scheduling your failed backup checks. All Akeeba Backup Professional releases include the file cli/akee-ba-check-failed.php, which can be run from the command-line PHP interface (PHP CLI). In contrast withprevious releases, it doesn't require the front-end backup in order to work; it is self-contained, native backup for yourJoomla!™ site, even if your web server is down!
In order to schedule a backup, you will have to use the following command line to your host's CRON interface:
/usr/local/bin/php /home/USER/webroot/cli/akeeba-check-failed.php
where /usr/local/bin/php is the path to your PHP CLI executable and /home/USER/webroot is the abso-lute path to your web site's root. You can get this information from your host.
In order to give an example, we will assume that your PHP CLI binary is located in /usr/local/bin/php - acommon setting among hosts - and that your web site's root is located at /home/johndoe/httpdocs.
usr/local/bin/php /home/johndoe/httpdocs/cli/akeeba-check-failed.php
Special considerations:
• This script is not meant to run from a web interface. If your host only provides access to the CGI or FastCGI PHPbinaries, backup.php will not work with them. The solution to this issue is tied to the time constraint above. Theworkaround we're planning will solve both issues.
Setting up a CRON job on cPanel
Go to your cPanel main page and choose the CRON Jobs icon from the Advanced pane. In the Add New CRON Jobbox on the page which loads, enter the following information:
Common Settings Choose the frequency of your backup, for example once per day.
Using the Akeeba Backup component
124
Command Enter your backup command. Usually, you have to use something like:
/usr/bin/php5-cli /home/myusername/public_html/cli/akeeba-check-failed.php
where myusername is your account's user name (most probably the same you use to login tocPanel). Do note the path for the PHP command line executable: /usr/bin/php5-cli. Thisis the default location of the correct executable file for cPanel 11 and later. Your host may usea different path to the executable. If the command never runs, ask them. We can't help you withthat; only those who have set up the server know the changes they have made to the default setup.
Finally, click the Add New Cron Job button to activate the CRON job.
Special considerations for HostGator
The location of the PHP CLI binary is /usr/bin/php-cli. This means that your CRON command line shouldlook like:
/opt/php53/bin/php /home/myusername/public_html/cli/akeeba-check-failed.php
5.2.3. Alternative CRON script
Tip
This option is only available in the Akeeba Backup Professional releases. You need to subscribe to the Pro-fessional edition to use it.
On some hosts it is impossible to use the native CRON script outlined in the previous section. In order to accomodate forthese hosts, Akeeba Backup Professional includes an alternative CRON script. The alternative CRON script performsthe failed backup check by using the front-end bacup check URL of Akeeba Backup. The alternative CRON script islocated in cli/akeeba-altcheck-failed.php, and must be run from the command-line PHP interface (PHPCLI).
In order to schedule a backup, you will have to use the following command line to your host's CRON interface:
/usr/local/bin/php /home/USER/webroot/cli/akeeba-altcheck-failed.php
where /usr/local/bin/php is the path to your PHP CLI executable and /home/USER/webroot is the abso-lute path to your web site's root. You can get this information from your host.
In order to give an example, we will assume that your PHP CLI binary is located in /usr/local/bin/php - acommon setting among hosts - and that your web site's root is located at /home/johndoe/httpdocs.
usr/local/bin/php /home/johndoe/httpdocs/cli/akeeba-altcheck-failed.php
Special considerations:
• This script is not meant to run from a web interface. If your host only provides access to the CGI or FastCGI PHPbinaries, akeeba-altcheck-failed.php will not work with them.
• You must enable the front-end backup feature of your Akeeba Backup Professional instalaltion and assign a "secretkey" for it. This is possible by going to the Akeeba Backup Professional's Control Panel page and clicking on theParameters button on the top right corner of the toolbar. You will find the front-end backup options further downthe Parameters page.
• Before using the alternative CRON script for the first time, you must visit the Akeeba Backup's Control Panel pageat least once. Since the command-line version of PHP used to run the backup is oblivious to the domain name used

Using the Akeeba Backup component
125
by your site, we have to cache this information. Caching of this information occurs as soon as you visit the ControlPanel page. The host name is absolutely required in order for the script to be able to access your Akeeba Backupinstallation's front-end backup feature.
• Your host must support one of the three methods used by the helper script to access your front-end backup URL:
1. The PHP cURL module.
2. The fsockopen() method
3. The fopen() URL wrappers
If none of these methods is available, the backup will fail.
• Your host may have a firewall setup which doesn't allow the CRON script to access the front-end backup checkURL. In such a case, the backup check will consistently fail. You will have to contact your host so that they canallow the script to access the front-end backup check URL. Do note that despite the alternative CRON script andyour site running on the same server, the firewall restriction might still be in place. This is counter-intuitive, butwe've seen this happening on many hosts.
Setting up a CRON job on cPanel
Go to your cPanel main page and choose the CRON Jobs icon from the Advanced pane. In the Add New CRON Jobbox on the page which loads, enter the following information:
Common Settings Choose the frequency of your backup, for example once per day.
Command Enter your backup command. Usually, you have to use something like:
/usr/bin/php5-cli /home/myusername/public_html/cli/akeeba-altcheck-failed.php
where myusername is your account's user name (most probably the same you use to login tocPanel). Do note the path for the PHP command line executable: /usr/bin/php5-cli. Thisis the default location of the correct executable file for cPanel 11 and later. Your host may usea different path to the executable. If the command never runs, ask them. We can't help you withthat; only those who have set up the server know the changes they have made to the default setup.
Finally, click the Add New Cron Job button to activate the CRON job.
Special notes for GoDaddy
According to our users who have tried this, this alternative script does work with GoDaddy. The command line youhave to use is:
/usr/local/php5/bin/php "$HOME/html/cli/akeeba-altcheck-failed.php"
The PHP executable we are using is the CLI rather than the default CGI. This is important; if you use the CGI executablethen the script will not run. Don't forget to enable frontend backup and insert your secret word. To enable frontendbackup go to Akeeba Backup under components, select configuration, select options from the navigation, then selectthe front-end backup tab to enable the settings.
6. Miscellaneous featuresSome features do not fall under any other category. We decided to reserve a place in our manual for these lesser-knownbut very useful features.
Using the Akeeba Backup component
126
6.1. Lite mode for cell phones, PDAs, MIDs, etc.In contrast to the classic front-end backup which is meant primarily for backup automation, the "Light Mode" is meantfor performing site backups from a browser, without even having to log in to the administrator backend. It goes furtherthan that, enabling you to backup your site from any web-capable device, including Pocket PC's, netbooks, your iPodor even your cell phone!
The "Light Mode" requires that your browser has at least rudimentary support for Javascript. Most recent web-capabledevices, including low end cellphones, fulfill this requirement. This feature has been tested on Pocket Internet Explorerrunning on a Mio P560 and a HTC Touch, as well as Sony Ericsson and Nokia featurephones. We have tested it withmobile WebKit-based browsers, such as those supplied with Android phones and iPhones. It also works on devicesrunning Opera Mobile.
Note
Modern smartphones and tablets are more than capable of using Joomla!'s back-end without issues. Therefore,you can use your tablet or smartphone to login ot your site's back-end and run a regular back-end backupinstead. The Lite Mode, however, may be more convenient when you're roaming, as it consumes tiny amountsof data compared to logging in and using Joomla!'s back-end.
The "light mode" performs user authentication using the front-end backup's secret word and allows you to select thebackup profile. It does not give you, however, the option to download your backup. If you want to do so, you'll eitherhave to log in to the administrator back-end of your site, or use other means - e.g. FTP client software.
In order to access the "Light Mode" you have to visit the URL:
http://www.example.com/index.php?option=com_akeeba&view=light
Just replace www.example.com with the actual domain name and path to your site!
Important
The front-end backup feature option must be enabled from the Parameters button in the Control Panel. If it'snot, you'll get an "Access Denied" message.
In the first page you get upon accessing this URL just select the backup profile from the drop down list and enter yoursecret word in the text box, then click on the Backup Now button. The backup process will proceed automatically,giving you a cut-down version of the backup progress information you would get from the backend backup mode.Akeeba Backup advances through the pages automatically, using Javascript.
6.2. System Restore Points
Note
This feature is only available in Akeeba Backup Professional, the for-a-fee edition of our software
Since Akeeba Backup 3.3.a1 we support an exciting new feature called System Restore Points. In order to let youunderstand what it is, let's start with a simple exercise.
Imagine that you have a site on which you've spent countless hours configuring, say, a web shop component. Oneday you see that there is an update available. It's a minor update, so you decide to not take a backup (it takes severalminutes, you're too impatient to wait for it) and go ahead with the update. Unfortunately, the update completely breaksyour site. You try to re-install the previous version of your web shop component but, due to database changes, it no
Using the Akeeba Backup component
127
longer works. Your latest backup is from several weeks ago. You're stuck. You have to spend countless hours, all overagain, losing sales in the meantime, to get your site working properly again.
Wouldn't it be very cool if Joomla! was able to backup the extension you're upgrading (all of its files and data) whenyou are upgrading it? Wouldn't it be very cool if you could just roll back to the previous state of the component, fromthat automatic backup, with a single click? It sounds like science fiction. No other CMS does that. It must be impossibleto do, right? Not really. We present you our System Restore Point feature which does that and is available only in thefor-a-fee Professional release. And it's fully compatible with Joomla! 2.5 and later versions, out of the box!
How does it work?
All you have to do is to enable the "System - System Restore Points" plugin which is installed with Akeeba BackupProfessional. By default, the plugin is automatically enabled when you install Akeeba Backup. This plugin allows usto intercept your interaction with Joomla!'s Extension Installer, providing our enhanced version without modifyingyour Joomla! core files.
All you have to do is install a component upgrade, just like you always did. Our enhanced extensions installer willsee that and before Joomla! installs it, Akeeba Backup will take a backup of the extension files and database contents.After that, the original Joomla! extensions installer will take care of the extension's installation. So simple!
What if you don't want to take a System Restore Point? That's very simple as well. Just click on the Back to regularinstaller link on the bottom of the page to deactivate the System Restore Point temporarily, or unpublish the pluginto deactivate System Restore Points permanently.
Which extension types are supported?
The following Joomla! extension types are supported:
• Components
• Modules
• Plugins
• Templates
• Packages (since version 3.10.0)
• Libraries (since version 3.10.0)
• Files (since version 3.10.0)
The System Restore Points feature will attempt to backup the extension core files, its media files and database tablesas long as the common Joomla! naming conventions are used. That said, many extensions break away from theserules and cannot be fully supported without their developer providing s System Restore Point definition in the XMLmanifest. Always perform a test upgrade of your extensions on a testing / development site and always check yourSystem Restore Points there to make sure all data is retained.
How do I restore a System Restore Point?
Just go to Akeeba Backup, Manage Backups (formerly "Administer Backup Files"). You will see two links below thetoolbar, Backups and Restore Points. Just click on Restore Points to see a list of all restore points. Select the one youwant and click on Roll Back. That's all! Please read the next few paragraphs to understand the pitfalls.
If you want to reclaim free space on your host, just select the restore points which are no longer relevant and clickon Delete.
Using the Akeeba Backup component
128
Where are restore points stored?
System Restore Point backup archives are always stored in the Output Directory of the default backup profile (profile#1). By default, that is administrator/components/com_akeeba/backup. You can change it by editingthe default profile's configuration. All restore points are named restore-point-*.jpa to make it easier for youto find them with, say, an FTP client.
How can I make my extension compatible with System RestorePoints?
All you have to do is to add a small snippet of XML inside your extension's XML manifest. We provide up-to-date doc-umentation for developers in a dedicated page on our site [https://www.akeebabackup.com/documentation/item/1127-system-restore-points.html]. If you get stuck, do not hesitate to contact us, as instructed on the end of that page.
The System Restore Points feature does not allow me to install anextension. Now what?
Not all extensions are compatible with the System Restore Points feature of Akeeba Backup. Some of them might failto install at all when you're using SRP. In this case, you have two options:
1. Temporarily disable SRP. In the extensions installer page, towards the top, you will see a link which reads "Back tothe standard installer". Click on it. The page reloads and the top section with the Akeeba Backup logo is no longerthere. Now retry installing your extension; it should work. If not, proceed to the next option.
2. Completely disable SRP. Go to Extensions, Plugin Manager and find the System - System Restore Points plugin.Disable it by clicking on the green hollow disk so that it turns red. This completely disables Akeeba Backup's SRPfeature until you enable back the plugin.
I restored a System Restore Point and my extension is still broken!
As you read above, not all extensions are fully compatible with Akeeba Backup's System Restore Point feature. Thefollowing problems, outside our control, may arise:
• Database tables not backed up. Akeeba Backup expects a specific naming convention for database table. Forexample, if you have com_foobar, it expects that its tables are named jos_foobar_something, where jos_ is your site'sprefix and something is the last part of the table's name. Some components, however, do not follow that convention.For example, VirtueMart is called com_virtumart and its tables follow the jos_vm_something convention. Unless theextension's developer or us (as in the case of VirtueMart!) have provided an SRP integration file, Akeeba Backup'sSRP feature will NOT back up the component's tables and restoring the SRP will pretty much make no difference,despite Akeeba Backup reporting that it was restored successfully. Unless Joomla! enforces a strict table namingstandard, you can pretty much be sure that this will happen. The solution is to ALWAYS have a tested backup ofyour site and ALWAYS try extension upgrades on a dev or local copy of your site.
• Related extensions not backed up. Many components rely on numerous plugins and modules to provide theirfunctionality. Unless its developer has provided an SRP integration file or ship all related extensions in a single"package" type extension, Akeeba Backup doesn't know about this necessary related extensions, doesn't back themup and -of course- does not restore them. Due to that, even after an SRP restoration your component may still bebroken! The solution is to ALWAYS have a tested backup of your site and ALWAYS try extension upgrades ona dev or local copy of your site.
• Added files are not removed. This may sound odd, but it can be a huge problem. If the newer version of thecomponent added some files which were not present in the previous, backed up, version it is very possible that theywill cause a problem. This depends on how the component works. Unfortunately, the only workaround is to uninstallthe newer version, reinstall the old one and then restore your SRP backup.
Using the Akeeba Backup component
129
Please note that SRP is a more or less experimental technology since Joomla! doesn't enforce any kind of namingconventions for its extensions. We are essentially trying to provide a feature that Joomla! wasn't designed to be capableof. As a result, this feature is prone to some random breakage. While we have tried our best to support the majorcomponents out of the box, we can't really support everything under the sun (not with several thousands Joomla!extensions listed in the JED and growing fast). Do not rely solely on SRPs for the good health of your site. Werecommend to ALWAYS take a full site backup prior to the installation / uninstallation / upgrade of any extension onyour site and to ALWAYS test your backups. An untested backup is not a backup! Our Quick Start Guide providesimportant information regarding the ways to test your backups.
I have Restore Points taken with Akeeba Backup Core 3.3.4 or earli-er. How do I restore them?
The System Restore Points feature was removed from the free of charge (Core) version of our software as of AkeebaBackup Core 3.3.5. However, restoring your System Restore Points is still possible, albeit manually.
• Download the SRP backup. It's a .jpa file whose name starts with restorepoint- and is located in the defaultoutput directory; for most users this is administrator/components/com_akeeba/backup
• Extract it locally using Akeeba eXtract Wizard
• Copy all folders EXCEPT the sql folder to your site's root, overwriting existing files.
• Open the files in the sql folder with a text editor. Search and replace #__ with your site's database table nameprefix (usually it's jos_).
• Restore those files to your site's database using phpMyAdmin
130
Chapter 4. Miscellaneous Extensions(Modules, Plugins)1. Akeeba Backup Notification pluginThis plugin is obsolete as of Akeeba Backup 3.11.0. Please use the Joomla! Extensions Manager to get informed forand install the updates of our components.
2. The CLI update notification and automaticupdate script
Note
This feature is only available in the Professional release.
Since March 2014 all of our software uses Joomla! Extensions Update to determine if there is an extension availableand to let you install it. None of our own code is involved in the update provisioning and installation process. However,this means that you need to either log in to your site often to see if there are updates available or subscribe to a third partyservice which will do that for you. The former is inconvenient when you have multiple sites, the latter is expensive.
This is where our CLI update script come into the big picture. This script will ask Joomla! to tell it if there is an updateavailable for our component. If there is, it can do either (or both) of these actions:
• Send an email notification to the email address you have specified.
• Ask Joomla! to install the available update automatically.
Warning
AUTOMATIC INSTALLATION OF UPDATES IS A VERY BAD IDEA AND CAN LEAD TO YOURSITE BECOMING INACCESSIBLE! Read below for more information. Akeeba Ltd does not accept anyresponsibility for any problems, data loss or other side effects which might arise directly or indirectly fromthe use, misuse or abuse of our software per the license of the software. Since the actual update code is partof Joomla! itself (it is not written by us) we cannot provide bug fixes, making the use of this script exemptfrom our support policy. IF YOU DECIDE TO USE THIS SCRIPT TO INSTALL UPDATES OF OURSOFTWARE AUTOMATICALLY YOU ARE DOING SO AT YOUR OWN RISK.
Joomla! currently does not provide a way to indicate the stability status (alpha, beta, RC, stable), Joomla! versioncompatibility and PHP version compatibility status of an available update. This means that in the future you mightend up having the automatic update CLI script install a version of our software which is unstable or incompatible withyour version of PHP or Joomla!. We strongly recommend you to check the Compatibility page on our site to determinewhich version is compatible with your site.
Furthermore, Joomla! does not provide a rollback feature for failed updates. If for any reason the update process (whichis handled by Joomla! itself, not our own code, therefore outside our control) fails while it is copying the component'sfiles you will end up with a partially upgrade component. This can lead to functional issues or even inability to accessyour site.
Finally, even if you have Akeeba Backup Professional, System Restore Points CAN NOT be taken when installing anupdate through the CLI update script. If the update fails you are really left with no backup.
Miscellaneous Exten-sions (Modules, Plugins)
131
Configuring the update scriptThe update script can be configured from the Options page of the component. Please go to the component's main(control panel) page and click on the Options button. On the new page, click on the Live Update tab. You have thefollowing options:
Download ID If you have the Professional version of our software please enter your Download ID to allowJoomla! to download subscriber-only updates. The Download ID may change over time: it changeswhenever the passwords' hashing ("encryption") on our site is enhanced to increase security, whenyou change/reset your password on our site or when you change your email address on our site. Ifyou cannot install updates to the Professional release please use the My Subscription page on oursite to find out your current Download ID and make sure that you have an active subscription.
Auto-update CLIsettings
What you want the update CLI to do when Joomla! reports that a new version is available.
• Notify and update. It will send you an email to notify you about the available update and im-mediately ask Joomla! to install it.
• Notify only. RECOMMENDED. It will only send you an email to notify you about the availableupdate.
• Update only. Not recommended! It will only ask Joomla! to install the available update, withoutany further notification.
Notification fre-quency
The maximum frequency you will be receiving update notification emails if you use the "Notifyand update" or "Notify only" options above. This field only contains a number, by default it's 1.Please look at the next option too.
Notification time The time period expressed by notification frequency. For example, if you set the notificationfrequency to 1 and the notification time to "days" you will receive update notification emails forthe new version at most once a day.
Important
These two options only define the maximum update notification frequency. You mayreceive update emails less frequently than what you have set up. It depends on how of-ten then CLI update script runs and how often Joomla! performs the update check. It isalways possible that you will not be notified about an update which has been released inthe last two days because Joomla! hasn't yet "seen" it.
Email for updatenotifications
The email address where update notification emails will be sent. If you do not specify an addressno update notification email will be sent. You can only specify a singe email address.
Creating a CRON job for the update scriptYou can only use this feature if you have access to the command-line version of PHP. In order to schedule an automaticupdate, you will have to use the following command line to your host's CRON interface:
/usr/local/bin/php /home/USER/webroot/cli/akeeba-update.php
where /usr/local/bin/php is the path to your PHP CLI executable and /home/USER/webroot is the abso-lute path to your web site's root. You can get this information from your host.
The update script does not accept any parameters.
Miscellaneous Exten-sions (Modules, Plugins)
132
In order to give you an example, we will assume that your PHP CLI binary is located in /usr/local/bin/php -a common setting among hosts - and that your web site's root is located at /home/johndoe/httpdocs :
usr/local/bin/php /home/johndoe/httpdocs/cli/akeeba-update.php
Special considerations:
• Most hosts do not impose a time limit on scripts running from the command-line. If your host does and the limit isless than the required time to send an update notification and/or install the update your site, the update will fail.
• This script is not meant to run from a web interface. If your host only provides access to the CGI or FastCGI PHPbinaries the script may not work with them. The reason is the time constraint explained above.
• Some servers do not fully support this update method. The usual symptoms will be an update which fails to completewithout any further error messages and no indication of something going wrong. In such a case, trying to ryn theupdate from the back-end of your site will work properly.
Setting up a CRON job on cPanelGo to your cPanel main page and choose the CRON Jobs icon from the Advanced pane. In the Add New CRON Jobbox on the page which loads, enter the following information:
Common Settings Choose the frequency of your backup, for example once per day.
Command Enter your backup command. Usually, you have to use something like:
/usr/bin/php5-cli /home/myusername/public_html/cli/akeeba-update.php
where myusername is your account's user name (most probably the same you use to login tocPanel). Do note the path for the PHP command line executable: /usr/bin/php5-cli. Thisis the default location of the correct executable file for cPanel 11 and later. Your host may usea different path to the executable. If the command never runs, ask them. We can't help you withthat; only those who have set up the server know the changes they have made to the default setup.
Finally, click the Add New Cron Job button to activate the CRON job.
Special considerations for HostGatorThe location of the PHP CLI binary is /usr/bin/php-cli. This means that your CRON command line shouldlook like:
/opt/php53/bin/php /home/myusername/public_html/cli/akeeba-update.php
3. JMonitoring integrationThis plugin is obsolete. JMonitoring has been removed from the Joomla! Extensions Directory as it was replaced bythe (for-a-fee) Watchful service. All Joomla!-specific monitoring services, Watchful.li, MyJoomla.com and Joomla!Commander, now offer direct integration with Akeeba Backup without the need for a special plugin.
4. Backup on UpdateNote
Displayed on the Plugin Manager as System - Backup on update
Miscellaneous Exten-sions (Modules, Plugins)
133
Joomla! 2.5 and later versions include the Joomla! Update component (originally developed as part of Admin Toolsby our company, later donated to Joomla! and now maintained by the Joomla! team) which allows you to updateJoomla! to its latest version. When you are updating between minor versions of Joomla! (e.g. 3.2 to 3.3) or betweenmajor versions of Joomla! (e.g. 2.5 to 3.x) some extensions on your site might experience problems or make your siteinaccessible. It's always a good idea to take a backup of your site before upgrading Joomla!, but how many times didyou forget to do it only to end up with an inaccessible site and a furious client? Fear no more, our plugin is here toautomate this process for you.
When this plugin is enabled it will "see" your attempt to update Joomla! and automatically launch Akeeba Backup totake a backup of your site. Once the backup is successfully complete it will take you back to Joomla! Update, allowingit to install the new Joomla! version. All this happens automatically. You and your clients can no longer forget to takea backup before updating Joomla!: the backup will be taken automatically.
Editing the plugin you will find the sole option, Backup Profile, which lets you define which Akeeba Backup profileto use for these automated backups. If you don't specify anything the default backup profile (the one with ID=1) willbe used.
Tip
We recommend using a backup profile which stores a copy of the backup archive in external storage (e.g.Amazon S3, Dropbox or Box.com) on top of leaving a copy of the backup archive on your server. This wayyou have maximum protection against any kind of accidents caused by a failed or problematic Joomla! update.
134
Chapter 5. Restoring backups1. Restoration and troubleshooting instruc-tions
How do I restore my backups?We have replaced this chapter with the corresponding chapter [https://www.akeebabackup.com/documentation/quick-start-guide/restoring-backups.html] in our Quick Start Guide. Alternatively, you can try watching our Video Tutorials[https://www.akeebabackup.com/documentation/video-tutorials.html] for a quick (less than 10 minutes) overview ofthe whole process, from installing Akeeba Backup to restoring your backup archives.
Troubleshooting non-functional restored sites
Please refer to our Troubleshooting Wizard's section on solving post-restoration issues [https://www.akeebabackup.com/documentation/troubleshooter/post-restoration.html]. Please note that all of them have noth-ing to do with Akeeba Backup, but can be attributed either to some server configuration mismatch or a pesky settingin some component, plugin, module or template.
2. Unorthodox: the emergency restoration pro-cedure
Warning
THIS IS NOT THE REGULAR RESTORATION PROCEDURE.
I will say it again.
THIS IS ****NOT**** HOW YOU ARE SUPPOSED TO RESTORE BACKUPS!!!!!
You must follow these instructions ONLY if the restoration script which is included inside the backup archive,under the installation directory (Akeeba Backup Installer) is not working on your host and you really, RE-ALLY are in a BIG hurry to get your site up and running.
And I will say it once more.
THIS IS NOT HOW YOU ARE SUPPOSED TO RESTORE BACKUP ARCHIVES UNDER NORMALCIRCUMSTANCES.
For normal restoration instructions, please take a look in our Quick Start Guide [https://www.akeebabackup.com/documentation/quick-start-guide/restoring-backups.html].
Note
These instructions are meant to be first read before disaster strikes. Therefore, a fair amount of humour hasbeen used throughout. If you try to read it after disaster struck you will naturally find the humorous partsinappropriate, or even offensive. Rest assured that this is because you are under a huge amount of stress. Assoon as you'll have finished following the instructions herein, you will be able to re-read this document witha light heart and enjoy the humorous puns as they were intended.
Restoring backups
135
Inevitably, some people will end up with a backup file, a ruined site and a problem in the restoration procedure theycan't work out. Almost always, the recipe includes a pressing deadline which requires that the site is on-line... yesterday.If you are in a situation like the one we just described, breathe. Do not panic. We've got you covered, with this concisemanual site restoration guide. So, here it goes... it's manual Joomla! Site restoration In 7 steps or even less.
Step 1. Making sure it won't get worse.
Assuming such a situation, it's only human to be in panic and despair. Panic is a bad counsellor. It will give you wrongadvice. Despair will only make you careless. So, people, get it together! Make a backup of the only thing separatingyou from complete disaster: the backup file. Burn it on a CD. Write it on your USB key. Put it on a couple of locationson your file server. Just make sure you'll have an extra copy in case you screw up.
This exercise has been proven to lower the probability of anything going wrong. Furthermore, it's good for yourpsychology. It gives you a sense of security you didn't have five minutes ago.
Step 2. Extracting the archive.
Now, we have to extract the archive somewhere on your local hard drive.
If the archive is of the JPA type, you'll have to use Akeeba eXtract Wizard, available without charge from our website.
If you have a ZIP package, there are a couple of gotchas. If you are working on a Linux machine, unzip will workjust fine. If you're on Windows and under certain configuration circumstances on the server you took the backup on,you might not be able to extract it with WinZIP, WinRAR, 7-Zip or other archiver software. So you'll have to useAkeeba eXtract Wizard available for free from our website. This is a GUI utility which allows direct extraction ofbackup archives on your Windows™ PC. It is possible to run it under other operating systems, such as Mac OS X™and Linux™, using DarWINE and WINE respectively. Please refer to the Akeeba eXtract Wizard documentation,available on-line on our site, for more information on using it.
Step 3. Editing your database backup.
Take a look at the directory where you extracted your backup archive. Inside it there is a directory named instal-lation. Inside this, there is a subdirectory named sql. Inside this there is a file, site.sql (older versions:joomla.sql), containing your database data. COPY THIS TO ANOTHER LOCATION NOW! We'll have to edit it,so please, don't tamper with the original, will you?
Open the copy of site.sql (older versions: joomla.sql). Use a text editor (we recommend gedit and Kate onLinux™, Notepad++ on Windows™; do not use Wordpad or Word!). If you were ever familiar with SQL, you'llrecognize that each line consists of a single SQL command. But they have a problem: table names are mangled. You'llsee that tables are in a form similar to #__banner instead of jos_banner. Ah, nice! We'll have to fix that.
Using your text editors Replace command, do the following changes:
• search for CREATE TABLE `#__ replace with CREATE TABLE `jos_
• search for DROP TABLE IF EXISTS `#__ replace with DROP TABLE IF EXISTS `jos_
• search for INSERT INTO `#__ replace with INSERT INTO `jos_
• search for CREATE VIEW `#__ replace with CREATE VIEW `jos_
• search for CREATE PROCEDURE `#__ replace with CREATE PROCEDURE `jos_
• search for CREATE FUNCTION `#__ replace with CREATE FUNCTION `jos_
• search for CREATE TRIGGER `#__ replace with CREATE TRIGGER `jos_
Restoring backups
136
The idea is to replace all instances of #__ (note that there are two underscores after the hash sign) with jos_ in the SQLcommand part (not the data part). DO NOT PERFORM A BLIND SEARCH AND REPLACE OF #__ WITH jos_ ASIT WILL CAUSE SEVERE PROBLEMS WITH SOME COMPONENTS. Easy, wasn't it? NOW SAVE THAT FILE!
Step 4. Restoring the database.
In order to restore the database on the server you'll have to use some appropriate tool. For small to moderately sizeddatabase dumps (up to 2Mb), we find that phpMyAdmin [http://www.phpmyadmin.net] does the trick pretty well, plusit's installed on virtually all PHP enabled commercial hosts. For larger dumps, we found that bigdump.php from AlexeyOzerov [http://www.ozerov.de/bigdump.php] works wonders. Another useful and very easy (or, should I say, easier)to use tool which also works with PostgreSQL and Microsoft SQL Server is Adminer [http://www.adminer.org/]. Useeither of those tools - or any other of your liking - to restore your database.
Step 5. Upload your site's files.
First of all, delete the installation subdirectory from the directory you extracted the backup archive to. We won't beneeding this any more. Then, using FTP - or any method you please - upload all of the files to the target server.
If you want to be thorough remember to set the directory and file permissions accordingly. If you just want to get thedamn thing on-line ASAP, just skip this permissions thing; it will remind you of itself as soon as you try to do somewebsite administration (like uploading a picture) after the site's back on-line.
Step 6. Edit configuration.php, if necessary.
If you were restoring to the same server location you took the backup on, nothing else is necessary. Your site shouldbe back on-line now. If not, you'll have to edit the configuration.php.
You have Joomla! 1.5.x. Good news! Joomla! 1.5.x doesn't require you to specify some of the hard-to-obtain param-eters. Your configuration.php consists of several lines. Each one is in the following form:
var $key = "value";
The key is the name of the configuration variable and value (inside double quotes!) is the value of the variable. Belowwe provide a list of the configuration variables which have to be modified to get up on-line.
dbtype is the database driver Joomla! will use. It can be mysql, mysqli (notice the extra i in the end), postgresql,sqlsrv or sqlazure. This depends on the kind of database you are using. If unsure, your best bet is mysqli.
host is the database host name, usually localhost
user is the database user name, assigned from your host company
password is - obviously - the database password, assigned from your host company
db is the database's name, assigned from your host company
dbprefix is the database prefix; if you followed our instructions, it is jos_
live_site Normally this is an empty string. If, however, your Joomla! site's front page looks as if all images andCSS files are not loading, you have to modify it and enter your site's base URL. For example, if thenew site is located in http://www.example.com/mysite/, you have to locate the line startingwith var $live_site and change it to become:
var $live_site = "http://www.example.com/mysite";
That's all! You're good to go.
Restoring backups
137
Step 7. Enjoy success.
Your mission is accomplished. You are exhausted. Go drink whatever is your favourite drink and enjoy sweet success!
3. Automating the Akeeba Backup InstallerSometimes you perform the same kind of restoration over and over again. For example, you might want to regularlytest the backup archives of your live site on a local environment. Having to type in the same kind of information allthe time is a waste of time. Our software suite supports one-click site restorations using the automation feature ofKickstart and the Akeeba Backup Installer.
Automating the restoration is very easy. All you have to do is create a file named abiautomation.ini and placeit in the same directory as kickstart.php. As soon as the extraction is over, Kickstart will automatically open theAkeeba Backup Installer. On its turn, ABI will try to locate abiautomation.ini in its parent directory, parse itand use its information to automatically perform all the restoration steps. When ABI is done it will close its windowand all you have to do is click on the Clean Up button in the Kickstart window to finalize the restoration procedure.
This section discusses the part of the abiautomation.ini file which pertains to the Akeeba Backup Installer automation.The part of this file which pertains to automating Kickstart can be found in Kickstart's documentation. Both sectionsmust be present for a fully automated restoration to take place.
The section named [abi] is where all parameters regarding your site (but not its database) are stored. Typically, itlooks like this:
[abi]ftp_enable=offftp_host=ftp.example.comftp_port=21ftp_user=myuserftp_pass=mypassftp_root=/public_htmlsitename=The Site [email protected]=Site Name Email Notification [email protected]_path="$SITEROOT/tmp"log_path="$SITEROOT/log"live_site="http://www.example.com"
All parameters are saved on the configuration.php file of the restored site, or directly stored in the database.
Tip
If PHP throws a warning about parsing abiautomation.ini and the ABI restoration process doesn't proceedautomatically, you will have to include all parameters' values in double quotes, like this:
myparameter="my_value"
The available parameters are:
• ftp_enable. Should the Joomla! FTP layer be enabled for the new site? It can be on or off. The other ftp_*parameters are only required if this is on. Otherwise, they can be left blank. However, the ftp_enable must be definedin the abiautomation.ini.
Restoring backups
138
• ftp_host. The FTP host name, without the ftp:// protocol prefix, e.g. ftp.example.com.
• ftp_port. The FTP port to connect to, normally it's 21.
• ftp_user. The username to use when connecting to the FTP server.
• ftp_pass. The password to use when connecting to the FTP server.
• ftp_root. The FTP directory where your site has been restored. You can find this out by launching a graphical FTPclient, for example FileZilla, finding where kickstart.php is stored and noting down the FTP path shown. This isthe path you have to use in this variable.
• sitename. The name of the restored Joomla! site. If you don't include it, the old site's parameter will be used.
• mailfrom. The email which will appear as the sender of all of the site's emails. If not included, the old site's parameterwill be used.
• fromname. The sender name for all of the site's emails. If not included, the old site's parameter will be used.
• sauser. The numerical Super Administrator user ID for who you want to change his password and/or email. If notdefined, no change to the Super Administrator credentials will occur (the old site's login credentials will be stillin effect). You can find the numerical ID of the Super Administrator user from Joomla!'s backend, in the UserManagement page.
• sapass1. The Super Administrator password for the new site. If not included, the old site's Super Administratorpassword will be used.
• saemail. The Super Administrator email for the new site. If not included, the old site's Super Administrator emailwill be used.
• tmp_path. The absolute path to the temporary files directory of the restored site. If not included, JPI4 will auto-matically determine the correct path. If the old site's temporary files path exists and is writable, it will be used inthe new site as well. If not, the tmp directory inside the restored site's root will be used.
You can start the path with $SITEROOT, just like in the example above. The $SITEROOT will be automaticallyreplaced with the absolute path to the restored site's root directory.
• log_path. The absolute path to the log files directory of the restored site. The same as above holds true, with theexception that the default value is the log directory inside the restored site's root.
• live_site. Optional. The URL to your live site, without the trailing slash, e.g. http://www.example.com. Youonly need to specify this if your host does not allow Joomla! to properly identify the site's URL automatically. Youcan safely skip this setting.
In order for the JPI4 restoration to work, only the ftp_host parameter has to exist. Everything else is optional.
The next few sections define how each and every database backed up with Akeeba Backup will be restored, one sectionper backed up database. The names of the sections must be the same as those listed in the installation/sql/databases.ini file inside the backup file. The section regarding the site's main database is always named [site.sql](on older versions it is [joomla.sql] instead). A database section looks like this:
[site.sql]dbtype=mysqldbhost=localhostdbuser=myuserdbpass=mypassdbname=joomladb

Restoring backups
139
prefix=jos_existing=backupsuppressfk=onmaxchunk=1048756maxqueries=1000
The available parameters are divided into two groups: Obligatory and optional. The obligatory ones must appear foreach database which is to be restored and are:
• dbtype. The database connection type, it can be mysql, mysqli, postgresql, sqlsrv or sqlazure. Ifunsure, please use mysqli.
• dbhost. The database server host name.
• dbuser. The database server user name.
• dbpass. The database server password.
• dbname. The name of the actual database to be used for restoration, for example joomla or myaccount_joomla, etc.
• prefix. The prefix of the restored database. This is required only for the [site.sql] (older versions: [joomla.sql])section and for databases for which you have defined a non-blank prefix in their configuration in the MultipleDatabases configuration page of Akeeba Backup.
The optional parameters are the fine-tuning options of ABI:
• existing. What to do with any tables already existing in the database. This can be drop to delete the old tables, orbackup to create backup copies of the existing tables.
• suppressfk. It can either be on or off. When set to on, ABI will suppress foreign key checks, so that databaseshaving tables with foreign keys can be restored. It is a good idea to always set to on.
• maxchunk. ABI will read at most this amount of data from the database dump in one go while restoring. This isuseful if the restoration times out. The default value, if this option is omitted, is 1048756 (this 1Mb expressed inbytes). Use a lower value if you get timeouts, or a higher value to speed things up.
• maxqueries. This is the maximum number of SQL queries ABI will execute in a single go while restoring yourdatabase. The default value is 1000. If the restoration times out, please lower this to 500 or even 100. Some incrediblyslow servers might require an even lower value, e.g. 100, but restoration will be extra slow then.

140
Chapter 6. Step by step guidesEven though the previous chapters provide a good reference, they assume that you know what you're doing. Manytimes, especially when you are a novice user, just the number of options can be intimidating. We are perfectly aware ofthat, hence this section. It is designed to get you up to speed with performing complex operations or creating advancedsetups for your backup operation needs. It is not meant to be a thorough reference; if you have questions about how eachof the individual settings work, you should refer to the appropriate section of the other chapters in this User's Guide.
1. Backing up your site to a cloud storage ser-vice
1.1. IntroductionFor most of us, our websites are a key element to our business. Either being the business itself, or acting as the storefrontto the Internet, they provide a significant added value. The last thing any web site owner want is to see their site defaced,damaged or even lost. Dangers lurk everywhere. From a simple human error in site administration to malicious activityand from hardware failure to natural disasters, no web server is the bulletproof vault we’d like it to be.
While nobody expects a catastrophe to hit his site, a good deal of precaution is required. It's pretty much the samerationale as in wearing a seatbelt while driving; you don't expect to crash, but if you do you most certainly want toevade the incident unharmed. The web site equivalent to a safety belt is none other than backup.
Web site backup comes with its own set of limitations and pitfalls. If you trust your web host for backup you mightfind your expectations fall short. Most hosts take daily backups – if any at all –on a secondary hard disk on the sameserver or, even worse, on a secondary partition of the same hard disk. If the server goes down due to a hardware fault,so does your backup. A few enlightened hosts also take backups on remote storage, for example NAS arrays. Eventhey do so on rather sparse intervals, for example twice per week. This means that on a complete catastrophe you willmost assuredly lose a fair amount of data.
The solution is simple in concept. Take your own backups and store them on a cloud storage service, like Amazon S3or even Dropbox. Taking your own backups means that you get to decide which data and how often has to be backedup, making sure that the crucial, regularly updated information routinely ends up in a backup archive. Using a cloudstorage device adds a strong data safety clause to your procedure, while keeping costs low. Cloud storage is designedto be redundant and reliable, boasting a negligible risk of data corruption or data loss. Combined with its incrediblylow cost (or even no cost for very low storage requirements!), it is reasonably attractive to businesses of all sizes: fromhobbyists and sole proprietorships up to large corporations and government agencies.
But how can you implement this seemingly Utopian data protection scheme on your Joomla!™ site today, with thelowest possible cost? Enter Akeeba Backup Professional. The Professional edition sports significant features addedon top of those offered to our free of charge Akeeba Backup Core edition (formerly known as JoomlaPack). One ofthose features we are going to use to accomplish our objective: transferring backup archives to cloud storage.
This section describes how to set up your site to store its backup archives to either Amazon S3 or Dropbox. Morecloud storage providers will be added in the future. The setup always follows the same principle, no matter whichcloud storage you want to use. Read along and you'll pick up the idea really fast.
1.2. Basic configurationThe most essential step is to download and install the Akeeba Backup Professional component to your site. In order todo that, you'll have to subscribe to the Professional download service first. After that, simply follow the step-by-step
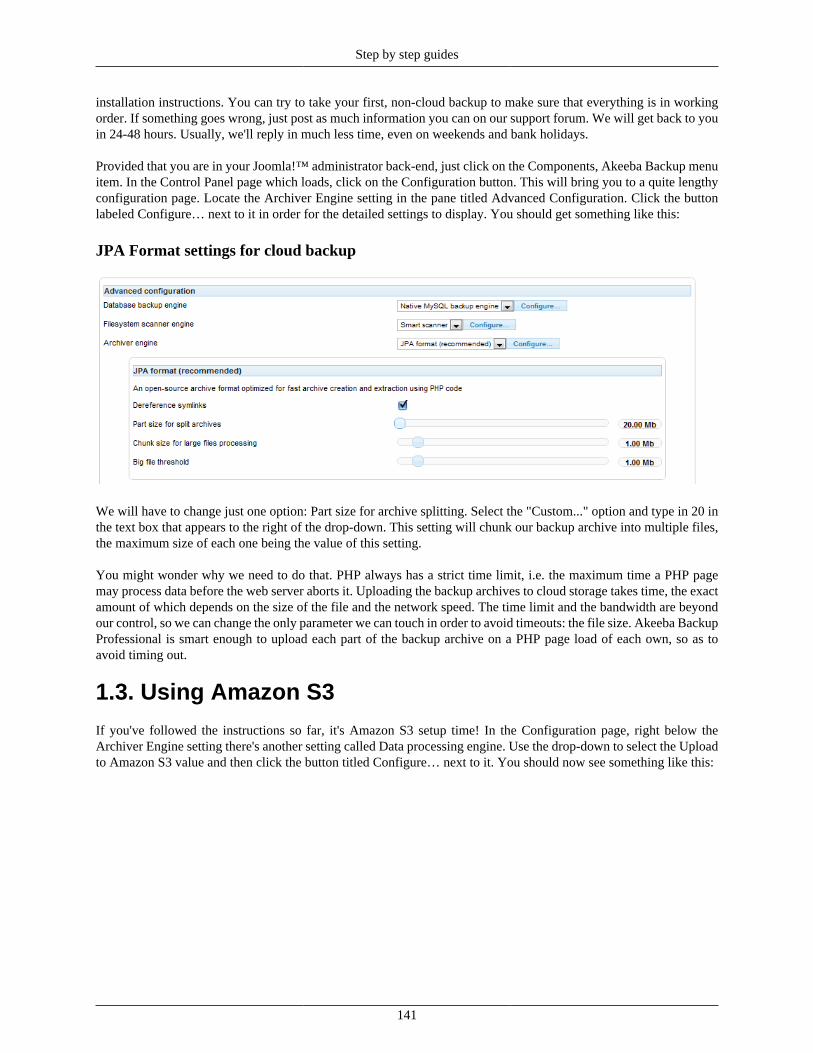
Step by step guides
141
installation instructions. You can try to take your first, non-cloud backup to make sure that everything is in workingorder. If something goes wrong, just post as much information you can on our support forum. We will get back to youin 24-48 hours. Usually, we'll reply in much less time, even on weekends and bank holidays.
Provided that you are in your Joomla!™ administrator back-end, just click on the Components, Akeeba Backup menuitem. In the Control Panel page which loads, click on the Configuration button. This will bring you to a quite lengthyconfiguration page. Locate the Archiver Engine setting in the pane titled Advanced Configuration. Click the buttonlabeled Configure… next to it in order for the detailed settings to display. You should get something like this:
JPA Format settings for cloud backup
We will have to change just one option: Part size for archive splitting. Select the "Custom..." option and type in 20 inthe text box that appears to the right of the drop-down. This setting will chunk our backup archive into multiple files,the maximum size of each one being the value of this setting.
You might wonder why we need to do that. PHP always has a strict time limit, i.e. the maximum time a PHP pagemay process data before the web server aborts it. Uploading the backup archives to cloud storage takes time, the exactamount of which depends on the size of the file and the network speed. The time limit and the bandwidth are beyondour control, so we can change the only parameter we can touch in order to avoid timeouts: the file size. Akeeba BackupProfessional is smart enough to upload each part of the backup archive on a PHP page load of each own, so as toavoid timing out.
1.3. Using Amazon S3
If you've followed the instructions so far, it's Amazon S3 setup time! In the Configuration page, right below theArchiver Engine setting there's another setting called Data processing engine. Use the drop-down to select the Uploadto Amazon S3 value and then click the button titled Configure… next to it. You should now see something like this:
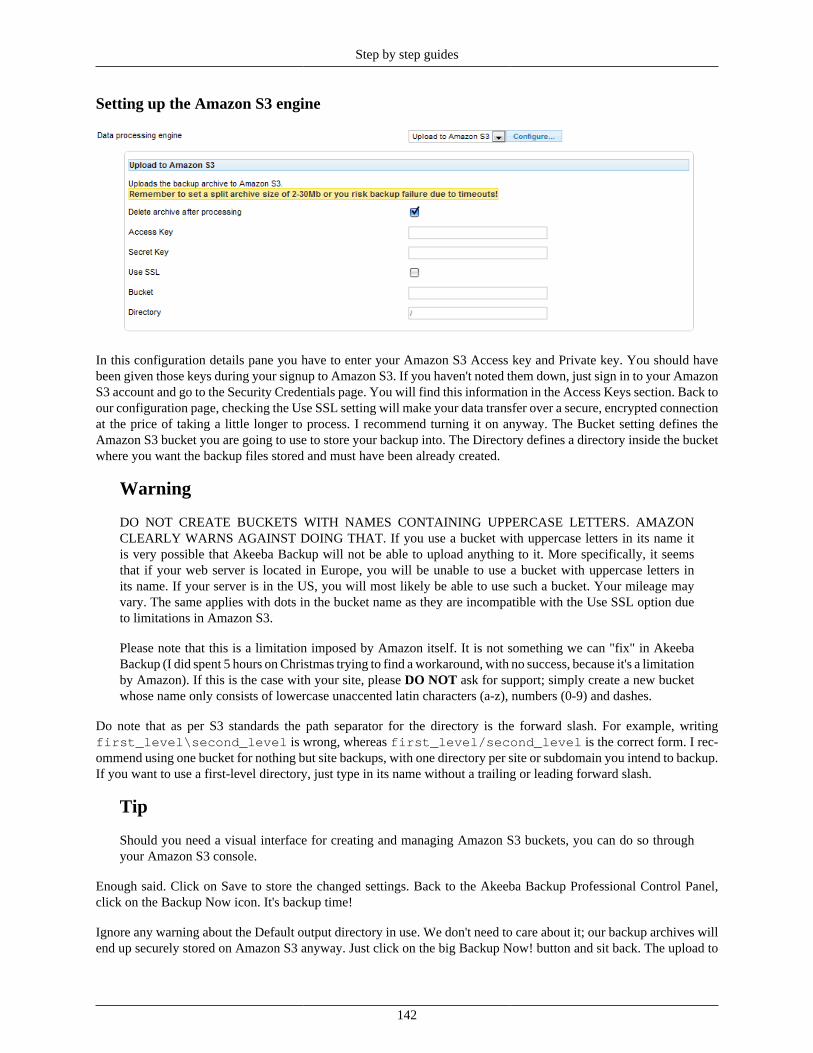
Step by step guides
142
Setting up the Amazon S3 engine
In this configuration details pane you have to enter your Amazon S3 Access key and Private key. You should havebeen given those keys during your signup to Amazon S3. If you haven't noted them down, just sign in to your AmazonS3 account and go to the Security Credentials page. You will find this information in the Access Keys section. Back toour configuration page, checking the Use SSL setting will make your data transfer over a secure, encrypted connectionat the price of taking a little longer to process. I recommend turning it on anyway. The Bucket setting defines theAmazon S3 bucket you are going to use to store your backup into. The Directory defines a directory inside the bucketwhere you want the backup files stored and must have been already created.
Warning
DO NOT CREATE BUCKETS WITH NAMES CONTAINING UPPERCASE LETTERS. AMAZONCLEARLY WARNS AGAINST DOING THAT. If you use a bucket with uppercase letters in its name itis very possible that Akeeba Backup will not be able to upload anything to it. More specifically, it seemsthat if your web server is located in Europe, you will be unable to use a bucket with uppercase letters inits name. If your server is in the US, you will most likely be able to use such a bucket. Your mileage mayvary. The same applies with dots in the bucket name as they are incompatible with the Use SSL option dueto limitations in Amazon S3.
Please note that this is a limitation imposed by Amazon itself. It is not something we can "fix" in AkeebaBackup (I did spent 5 hours on Christmas trying to find a workaround, with no success, because it's a limitationby Amazon). If this is the case with your site, please DO NOT ask for support; simply create a new bucketwhose name only consists of lowercase unaccented latin characters (a-z), numbers (0-9) and dashes.
Do note that as per S3 standards the path separator for the directory is the forward slash. For example, writingfirst_level\second_level is wrong, whereas first_level/second_level is the correct form. I rec-ommend using one bucket for nothing but site backups, with one directory per site or subdomain you intend to backup.If you want to use a first-level directory, just type in its name without a trailing or leading forward slash.
Tip
Should you need a visual interface for creating and managing Amazon S3 buckets, you can do so throughyour Amazon S3 console.
Enough said. Click on Save to store the changed settings. Back to the Akeeba Backup Professional Control Panel,click on the Backup Now icon. It's backup time!
Ignore any warning about the Default output directory in use. We don't need to care about it; our backup archives willend up securely stored on Amazon S3 anyway. Just click on the big Backup Now! button and sit back. The upload to
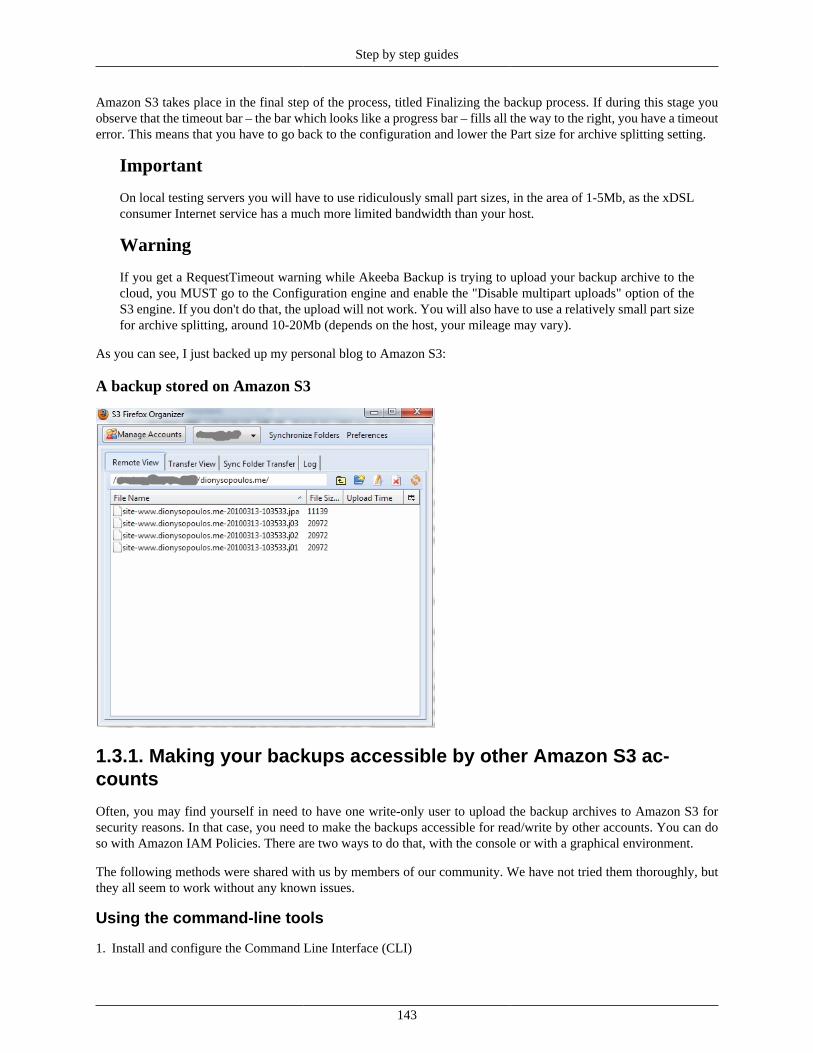
Step by step guides
143
Amazon S3 takes place in the final step of the process, titled Finalizing the backup process. If during this stage youobserve that the timeout bar – the bar which looks like a progress bar – fills all the way to the right, you have a timeouterror. This means that you have to go back to the configuration and lower the Part size for archive splitting setting.
Important
On local testing servers you will have to use ridiculously small part sizes, in the area of 1-5Mb, as the xDSLconsumer Internet service has a much more limited bandwidth than your host.
Warning
If you get a RequestTimeout warning while Akeeba Backup is trying to upload your backup archive to thecloud, you MUST go to the Configuration engine and enable the "Disable multipart uploads" option of theS3 engine. If you don't do that, the upload will not work. You will also have to use a relatively small part sizefor archive splitting, around 10-20Mb (depends on the host, your mileage may vary).
As you can see, I just backed up my personal blog to Amazon S3:
A backup stored on Amazon S3
1.3.1. Making your backups accessible by other Amazon S3 ac-counts
Often, you may find yourself in need to have one write-only user to upload the backup archives to Amazon S3 forsecurity reasons. In that case, you need to make the backups accessible for read/write by other accounts. You can doso with Amazon IAM Policies. There are two ways to do that, with the console or with a graphical environment.
The following methods were shared with us by members of our community. We have not tried them thoroughly, butthey all seem to work without any known issues.
Using the command-line tools
1. Install and configure the Command Line Interface (CLI)

Step by step guides
144
2. Create a Group
3. Give Group Access to S3 Bucket
4. Create User and Add to Group
5. Create Login Profile and Create Keys
6. Test Access
These steps are detailed here: http://newtech.about.com/od/cloudcomputing/a/How-To-Setup-Amazon-Identity-And-Access-Management-Iam-With-S3-And-Cloudfront.htm
Note
When you're following the "Install & configure the Command line" instructions in the above tutorial, makesure to also add this into your system path: %AWS_IAM_HOME%\bin It seems they left that step out.
Once the CLI is working, here are the commands to run (don't enter the lines with #Comments. Also enter them oneat a time).
# Create the groupiam-groupcreate -g MYSITE-backup
# Create the user & add to the groupiam-usercreate -u MYSITE-backup -g MYSITE-backup
# Attach the policy to the groupiam-groupuploadpolicy -g MYSITE-backup -p MYSITE-backup -f L:\IAMCli-1.2.0\policy\MYSITE-backup.txt
# Get the credentials iam-useraddkey -u MYSITE-backup
In this example, we have created a bucket for all site backups. Within that bucket we have folders for each site. Wecan create credentials for each site and they can only access their subfolder. Also the credentials can only add backups.Backups can not be deleted or even downloaded. The only access the credential has is "PutObject" to upload the backupfile. Here is the sample policy file (L:\IAMCli-1.2.0\policy\MYSITE-backup.txt):
{ "Statement":[{ "Sid":"XXXXXXXXXXXXXXX", "Action":["s3:PutObject" ], "Effect":"Allow", "Resource":"arn:aws:s3:::MYBUCKET/MYSITE/*" }]}
You can generate your own policy file here: http://awspolicygen.s3.amazonaws.com/policygen.html
Using Amazon's graphical interface
Kudos to our user leolll for the following instructions.
Since Amazon Web Services now includes a web based IAM management interface, this may be a nice alternative:
1. Create bucket to store backups in.
2. Log into the AWS Management Console.

Step by step guides
145
3. Click on the "IAM" tab.
4. Click Users under the Navigation section.
5. Click Create New Users.
6. Enter the name of the new user.
7. Copy & paste the credentials to a text editor.
8. Click on the newly created user.
9. Go to the user's Permissions tab.
10.Click Attach User Policy
11.Choose Custom Policy.
12.Enter the following Policy Document:
{ "Statement": [ { "Action": [ "s3:PutObject" ], "Effect": "Allow", "Resource": "arn:aws:s3:::YOURBUCKETNAMEHERE/*" } ]}
13.Click Apply Policy
That's it! Now you can use those S3 credentials in your Akeeba Backup profile.
Using a third party application
In this example, we will use Cloudberry S3 Explorer Pro which has an "Access Manager" function that make thisprocess very easy. There is a 15 day free trial you can use to set this all up. The full version costs about $39.
You can create as many groups as you want and easily create policies for each group. Just create a group and policyfor each subdirectory in your S3 bucket. Each subdirectory is supposed to contain backups of a single website. Thencreate a user to put in each group. Once that is done you can right click on the user and select "Manage Access Keys".That will give you the S3 Access keys you need to enter into your Akeeba Backup profile.
The only gotcha is that when you create the policy and are browsing for the bucket and directory to apply the "PutO-bject" rights to, it doesn't add the "/*" at the end that is needed to make this work. You have to specify the resourceand then go back and edit it so you can add the slash and star.
Further thoughts
Giving a user only the PutObject privilege allows the user to upload backups to the bucket, but any remote quotaswill fail, as the user is not allowed to delete any objects (files) in your S3 bucket. You can opt for a compromisebetween tight security and ease of use. If you give your user both the PutObject and DeleteObject privileges he will beable to upload backups (PutObject) and run quotas (DeleteObject) but not list or download backup archives. In other

Step by step guides
146
words, even in the unlikely event that an attacker gains complete access to your site's database and filesystem, recoversthe encrypted contents of Akeeba Backup's configuration table and encryption key file, writes a script to decode theconfiguration, gets access to your S3 credentials and tries to use them, he won't be able to download backup archivesor even use those S3 credentials with any graphical S3 tool.
1.4. Using DropboxUnder some circumstances using a for-a-fee cloud storage service may be beyond the budget of the client, as is usuallythe case with personal or very small business websites. Dropbox offers an inexpensive storage service, giving out thefirst 2 Gb of storage for free. Moreover, they offer a desktop client application which synchronizes the files storedin the cloud with those stored locally on a specified directory. Within the scope of backup, this is a very desirablefeature, as it allows for automatic redundant storage of the backup archives on the local PC (actually, on any numberof local PCs!), without any manual intervention.
To this end, we decided to include support for Dropbox storage. If you've followed the instructions so far, it's Dropboxsetup time! In the Configuration page, right below the Archiver Engine setting there's another setting called Data pro-cessing engine. Use the drop-down to select the Upload to DropBox value and then click the button titled Configure…next to it. You should now see a pane opening below this row.
In this configuration details pane you have to login to Dropbox. It is a two step authentication process. First clickon the Authorisation - Step 1 button. It will open a popup box which will ask you to log in to Dropbox. This popupexecutes a page in Dropbox's servers, so that Akeeba Backup never knows your email and password. After loggingin, close the popup and click on the Authorisation - Step 2 button. Wait a few seconds (usually 3-5 seconds). It shouldreply with a dialog box reading OK. This means that Akeeba Backup on your server is now granted access to yourDropbox account. Should you want to revoke this access, you can do that from your Dropbox account.
Warning
Follow the above procedure only if you want to connect ONE AND ONLY ONE site to that Dropbox account.If you have multiple sites you want to connect to the same Dropbox account, please follow this procedure:
1. On the first site you want to connect, follow the procedure with the two Authorisation buttons. This willfill in the two Token and Token Secret Key boxes. Copy their contents.
2. Go into the next site you want to authorise. Do not click on the Authorise buttons! Just paste the Tokenand Token Secret Key you copied from the first site into the respective boxes.
3. Repeat step 2 for every site.
Please note that if you slick the Authorise button on any site you will have to repeat the entire process forall sites, including the first one, all over again.
The Directory defines a directory inside your Dropbox account where you want the backup files stored and musthave been already created. Do note that as per Dropbox.com standards the path separator for the directory isthe forward slash. For example, writing first_level\second_level is wrong, whereas first_level/second_level is the correct form. I recommend using one directory for nothing but site backups, with one subdi-rectory per site or subdomain you intend to backup. If you want to use a first-level directory, just type in its namewithout a trailing or leading forward slash.
Tip
If you have installed Dropbox' desktop client application on your PC you can simply create the directory onyour local Dropbox directory (usually found under My Documents in Windows™ machines). The desktopclient application will automatically synchronize the folders to your on-line account.
Step by step guides
147
Enough said. Click on Save to store the changed settings. Back to the Akeeba Backup Professional Control Panel,click on the Backup Now icon. It's backup time!
Ignore any warning about the Default output directory in use. We don't need to care about it; our backup archiveswill end up securely stored on Dropbox anyway. Just click on the big Backup Now! button and sit back. The uploadto Dropbox takes place in the final step of the process, titled Finalizing the backup process. If during this stage youobserve that the timeout bar – the bar which looks like a progress bar – fills all the way to the right, you have a timeouterror. This means that you have to go back to the configuration and lower the Part size for archive splitting setting.
Important
On local testing servers you will have to use ridiculously small part sizes, in the area of 1-5Mb, as the xDSLconsumer Internet service has a much more limited bandwidth than your host.
1.5. Where to go from here?Backing up your site to the cloud is the first step to backup autonomy and data safety. However, you still have to loginto your site's back-end to take a cloud backup. This is suboptimal. What about when you are on the road for days,without reliable Internet connection? What about not wanting to go through this daily drill?
I am 100% behind you on this. I don't like routine either. You know, programmers are lazy and get bored easily.
With Akeeba Backup Professional you have three (that's not a typo, three) different options to automate your backup!Two of them are designed to utilize your host's CRON scheduling, i.e. your host's ability to run specific commandson his server, on a predefined schedule. This would mean that your backup is fully automated; you sleep at night,your site backs up itself.
You can read more about Akeeba Backup's scheduling options in the Automating your backup section of this User'sGuide.
Overall, the Amazon S3 upload was our first, successful experiment in adding affordable, enterprise-grade qualities tofull a site backup solution. Even though that's years ahead of the competition, we do not settle with it. Akeeba Backuphas always been in very active development. Our desire to push the envelope is a core ingredient of the philosophybehind the software. As a result, S3 - and Dropbox - was just the beginning. Our roadmap includes support for severaloptions of taking the backup off your server. We will try to integrate practically all major storage facilities, as long asthey have a publicized integration API. If you have a specific need not covered by our base software, just contact us.We listen carefully to the community feedback and we make the impossible happen. All that for a very low subscriptionfee to the Professional downloads service.
1.6. Alternatives to cloud storageMany people inquire us about the possibility of integrating with one of the myriads of free or low cost "cloud" storageproviders that have started popping up since mid-2012. In most cases this is impossible either because the storageprovider doesn't offer an API for developers or because most of them provide an API which only works for otherservices using this storage provider to store media files (images, audio, video) of their clients. In the latter case youcan't use them for storing backups either due to restrictions in their terms of service or their API. In fact, we considerinquiries for using these services rather misguided for two reasons: cost vs risk and technical deficiencies.
Cost vs risk. We have found that the lowest cost per Gb is actually offered by Amazon S3. Taking everything intoaccount (including failure rate of hard disks, data redundancy and availability, cost of electricity and so on) they dooffer a price nobody can beat. Not even other behemoths of the industry such as Microsoft. The only other companythat can compete with their prices is the one other company with vast storage services, Google. In either case, thecost of storing your backups (assuming daily backups kept for 30 days and one monthly backup stored forever) areapproximately 50% of your site hosting costs. When you have a mission critical site, e.g. an e-commerce site, backups
Step by step guides
148
is NOT where you want to cut costs. Backups are vital to your site's health, therefore the small cost of retaining themis disproportionately small to the cost of the risk of losing backup data when your site is in need of restoration. Theoperation of your site will compensate this amount extremely fast: in most cases the first day of the site's operation in ayear will have made enough money to offset all hosting and backup storage costs for the entire year ahead. Even betterfor cost management, you can move older backups (over 6 months old) to Amazon Glacier where it is still available,but with a 4 hour delay. It's equivalent of storing backup tapes in a fire-proof safe in an off-site location, i.e. howcorporations archive their older backups.
For personal and non-critical sites it's a different story. In this case the cost does matter and you do have two verylow cost solutions:
A. Using Dropbox. Use a free Dropbox account to store your backup archives. When it gets close to filling up moveyour old backups from Dropbox onto external media such as external hard disks, flash drives, DVDs etc.
B. Using a cheap NAS (network attached storage) with FTP or SFTP support installed in your office / home. You justneed a free DynDNS account to make it accessible over the Internet and use Akeeba Backup Professional's Uploadto Remote FTP / SFTP to store the backups directly to your NAS. If you are more technically inclined you can easilybuild your own NAS solution using an inexpensive Raspberry Pi and a cheap external hard drive for less than $80. Oryou could use that old PC that's collecting dust in your basement.
All and all, you have to weigh the risk factors involved in your choice. If you value data preservation you will needto use a proper cloud storage provider for a small fee. If you put cost and/or ownership of your data before datapreservation you can use a cheap NAS solution to store your backups right at home / office. In any case, backupsare best stored using one of these two solutions. Going for a cheap / free "cloud" storage is really only an option forconsumers who want to store their photos, music and home videos – and don't care if anyone else gets a peek at themfor marketing or more nefarious reasons.

Part II. Security information

150
Table of Contents7. Introduction ................................................................................................................................ 151
1. Foreword ........................................................................................................................... 1512. Why you need to care about ownership and permissions? ............................................................ 151
8. How your web server works .......................................................................................................... 1521. Users and groups ................................................................................................................. 152
1.1. Users ...................................................................................................................... 1521.2. Groups .................................................................................................................... 1521.3. How users and groups are understood by UNIX-derived systems ........................................ 153
2. Ownership .......................................................................................................................... 1532.1. Process ownership ..................................................................................................... 1532.2. File ownership .......................................................................................................... 154
3. Permissions ........................................................................................................................ 1553.1. The three types of permissions .................................................................................... 1553.2. What permissions can control ...................................................................................... 1553.3. Permissions notation .................................................................................................. 156
3.3.1. The textual notation ........................................................................................ 1563.3.2. The octal notation ........................................................................................... 156
9. Securing your Akeeba Backup installation ....................................................................................... 1581. Access rights ...................................................................................................................... 1582. Securing the output directory ................................................................................................. 1583. Securing file transfers .......................................................................................................... 159
151
Chapter 7. Introduction1. ForewordSince you have chosen Akeeba Backup for backing your site up, it is obvious that you are using Joomla!™ as yourweb-based Content Management System. By using Joomla!™ you have embarked to the joyful adventure of managinga PHP powered website. Usually, this last part is gone unnoticed. The fact that you are using a PHP application isoften taken for granted, but when it comes down to security and problem solving, this is the key concept of whichyou should have a strong grasp.
This part of the documentation deals with the basic concepts of PHP website management and their implications uponusing Akeeba Backup. In this part, we will see the intricacies of access permissions, web site users and the impactof various PHP settings on your site's operability and security. This is not meant to be a concise manual on websiteadministration. There are plenty of web and off-line resources with more in-depth information on the subject, but thisintroduction will quickly get you up to speed.
This document is no light reading; it is purposely sprinkled with a lot of tech-talk, albeit explained in layman's terms.Our objective was not to write a document which can be read and understood in a single reading. Some things youwill understand by the first time you'll have read it. Most of it you will only get it after reading it again. A few shadyareas will only become clear reading over again and referring to it every time you get stuck managing your site.
2. Why you need to care about ownership andpermissions?Most probably your server is running on Linux™, or another UNIX™-derivative operating system. You might haveread, or heard, how these operating systems are safer and more secure than others. This is just half the story. The realsecurity power of such operating systems stems from the way they manage files and directories, allowing or disablingaccess to them depending on who asks for it and what he's trying to do.
This management is pretty much like electricity in the Western world. It never gets in your way and you don't thinkabout it, but you must have some basic understanding of it so as not to run the risk of getting toasted by it. That'show it goes with ownership and permissions. You might not think about them a lot, but potentials crackers do. If youdon't manage permissions wisely, you might be creating a security hole on your server which can be exploited by amalicious cracker. Nobody wants his site cracked, right?
The following chapter will analyze how your web server works under the hood, so that you can grasp the third chapter,which analyzes all the ways you can secure your backup files so as not to fall prey on a cracker.
152
Chapter 8. How your web server works
1. Users and groupsThe concept of users is the fundamental block of ownership separation on multiuser operating systems. All Windows™versions based on the NT kernel are such; Windows™ NT, 2000, XP, Vista are all multiuser operating systems. OtherUNIX variants are also inherently multiuser, including Linux™ , BSD™ flavours, MacOSX™ , etc. Since most webservers capable of running Joomla!™ are based on Linux™ , we will talk about the Linux™ user system, which isin fact the same as the UNIX user system; after all, GNU/Linux is nothing but an open-source UNIX variant whichbecame very popular among geeks and recently among other people, too.
1.1. UsersAs we mentioned, the fundamental block of ownership separation is a user . Each user has an entry in the system'spassword database and consists of a user name and a numeric user ID . A user is not necessarily linked to a physicalperson; in fact, most utilities and services create and operate under a user of their own.
The numeric user ID is an unsigned integer, therefore it can take a value between 0 and 65534. The user name andthe numeric user ID are usually linked with an one to one relationship, meaning that if you know either one you canfind the other one. The exception to this is most ISPs. In this case, because there are more users than the availablenumber of user IDs, some numeric IDs will be reused, breaking the one to one relationship. However, on most - ifnot all - hosts, the one to one relationship exists.
Some user IDs are special. By convention, user IDs below 500 are reserved for system users. These are special userswhich are not assigned to some physical person. One of them, zero (0), has a very special meaning; it is assigned tothe super user , commonly called root . This user is the God of the system. He has unlimited powers. He can overrideall access restrictions and make any kind of modification. For this reason, no sane system administrator logs in underthat user. They will always log in under a normal user and only temporarily log in as root whenever they need tochange system-wide settings.
1.2. GroupsDefining permissions per user is tiresome on systems which have more than a few users. In order to combat this incon-venience, all UNIX systems have the notion of groups . A group is nothing but a collection of users. The relationshipto users is a many-to-many relationship, meaning that one user can belong to many groups and one group can containmany users. To keep things dead simple, groups have the same format as users. Each group has a group name and anumeric group ID . Again, not all groups are linked to a physical person; in fact there are a number of de facto groupnames used to control access to crucial system resources.
The numeric group ID is an unsigned integer, therefore it can take a value between 0 and 65534. The group name andgroup ID are linked with an one to one relationship, meaning that if you know either one you can find the other one.I am not aware of exceptions to this rule and I can't think a reason, either.
There are some special group ID's. By convention, zero (0), is assigned to the root's group. Its sole member should beroot, or other users with a user ID of 0. It empowers its members to do anything they please on the system, almost likethe user ID 0 does. Noticed the "almost" part? Belonging to the root group alone, without having a user ID of 0, doesnot give you infinite powers but it does grant you very broad access indeed!
Every user can belong to many different groups. To simplify things a little bit, every user has a so-called default group.This means that one of the groups he is a member of will be his effective group, unless otherwise specified, in alloperations.
How your web server works
153
1.3. How users and groups are understood by UNIX-de-rived systemsThis section is a bit ahead of the rest of this chapter, I know that. The information contained here, though, clarify a lotof what will follow, so it seemed only appropriate to include it here.
Every time the system has to store the owning user and group of a system item, it does so by storing the numeric userand group IDs, not the names! The names are only used as a convenience; you can't remember that John's user ID is637, but it's easy to remember that his user name is john. Likewise, remembering that group ID 22 controls access tothe CD-ROM drive is improbable, while remembering that the group named cdrom does that is self-understood.
Important
User IDs for a user with the same user name on different systems can be different. A user named exampleon system A and system B might have one user ID on system A and a completely different on system B.However, all UNIX-derived systems really know about are IDs, not names!
This is very (read: extremely) important when you transfer files from one system to another. All archive types whichstore owner information (for example GNU tar ) store nothing but the numeric ID's. Moving these to another systemand extracting them will screw up ownership and permissions. Just because you have the user ID 567 on Host A doesn'tmean that you won't end up with user ID 678 on Host B; extracting such an archive would make all your files ownedby someone else, effectively screwing up your site.
2. OwnershipThe term ownership implies that system items belong to someone. In the context of web site management the itemswe are interested in are files and processes . Everybody understands what files are, but the term processes is rarelyunderstood amongst webmasters. So, let's explain it.
2.1. Process ownershipEvery time you run a program, be it interactive or a system service, you create a process. A process is a piece ofcode being executed by the operating system. A process can spawn child processes which can spawn new threads .In layman's terms, a program can start other instances of itself or another program and they, in turn, can start smallpieces of executable code which can run in parallel with the main program.
Programs do not start spontaneously. Someone has either got to start them, or instruct the system to start them whensome criteria are met. This sentence is the acknowledgement of the simplicity behind a computer system; it can't thinkon its own, humans have to tell it what to do one way or the other. Based on how a program starts, it process willbe owned by some user.
In the first and simplest case, when you start a program, the ownership is almost self-understood. You are logged inas some user, so the process of the program you have executed is owned by your user. It's simple as that. This alsoimplies that the process has the same permissions as the owning user, that's why we say that the process runs underthis user; its access level is at most as much as the owning user, so the process is under the user.
The other case, instructing the system to start a process, is somewhat different. Usually, the utilities which are used tostart programs automatically are the system initialisation scripts, time-based execution programs (for example, cronand at ), etc. All of these programs are in most cases owned by root and are executed under root privileges. On top ofthat, most programs started this way are system services, running as long as the system is up and running. But do youremember what we said before? Root is the God of the system. Normally, these programs would get root's privileges,posing a huge security hole. If there is a bug in the program and some malicious user exploits it, he could wreck havocon the system; root is above all restrictions.
How your web server works
154
In order to combat this possibility, UNIX systems employ a feature which allows processes to drop privileges and rununder a different user than the one which started them. In fact, they change their ownership! To prevent abuse of thisfeature, a process must run under root privileges to be able to switch to another user. This feature is extensively usedby system services, including MySQL and Apache.
In the context of web site management, Apache is of special interest. Apache is the de facto web server for Linuxsystems and is being used by over 50% of Internet sites, according to NetCraft's August 2008 survey. Chances are youare using it on your site, too. Apache, like most UNIX services (affectionately called daemons) uses the feature to dropprivileges. The user and group under which it runs are defined in its configuration files. These configuration files areusually out of the reach of regular users (like you!) on commercial hosts, for security reasons.
There is a special case which acts as the exception to the Apache rule. Many commercial hosts run suPHP-enabledApache installations. This is an extension to the normal PHP's mode of operation which allows each PHP page to runin a process owned by the file's owner (more on file ownership in the next sub-section). This means that each of thePHP files under your account on such a host run as the user which has been assigned to your account. And, if this stillisn't apparent to you, such hosts nullify the burden of ownership and permissions (more on permissions in the nextsection). To put it clearly: with suPHP the file owner, your own user and the Apache user are one and the same. If youare looking for a decent host, find one which is using suPHP. It's better for security and removes a lot of administrativeburden from you. A win-win situation.
2.2. File ownershipEverybody knows what a file is, right? Well, we all know intuitively what a file might be, but we seldom know whatexactly it is. A file is actually consisted of at least two parts. The first part is the file data, what we intuitively understandas the file contents. The second part is the file system entry, which makes the file data an identifiable entity. Thisis where the operating system stores all kinds of information, such as how the file is named, where it is located inthe file system hierarchy, when it was modified, etc. It also contains information about who owns the files and whatare the file's permissions. You might be surprised reading this, but only this latter, informative, part is required fora file. Really!
It seems absurd to have a file without file data, but it is anything but that. There are some special "files" (more correctly:file system entries) in the UNIX world. You have devices, whose "files" actually point to a serial input/output providedby this device, for example the serial port of your computer. There are directories, which obviously don't have anydata contained; they are used for organising files only. There are soft links, which are pointers to other files in the filesystem, used to have standardised names and locations on files which might be moved around or have varying names.There are also these wired beasts called "hard links", some peculiar file system entries which point to the file data ofanother file, making virtually impossible to know which is the "original" file and which is its clone. Their usefulness isonly apparent to the UNIX gurus, therefore out of the scope of this document. For the purpose of website managementwe are only concerned about regular files (hereby called "files"), directories and soft links (hereby called "links").
All files, directories and links are owned by a user and a group, be they files or links. In fact, they are owned by a userID and a group ID. Normally, the ownership is inherited by the creating process's ownership. When you create a filedirectly from an interactive editor application the editor's process is owned by your user ID and your default group ID,therefore the file will be owned by your user ID and your default group ID.
Links are a special case on their own. They are not files, they are pointer to files. The ownership (and permissions)of links is irrelevant. Whenever a process tries to access a link, the underlying operating system "follows" the link,until it finds a regular file. Therefore, the ownership that matters is that of the file linked to, not the link itself. Thisfeature of the operating system prevents unauthorised access to arbitrary files, normally accessible to specific usersonly, from users who just happen to know the path to those files.
What is especially interesting is the correlation between FTP, web server and file ownership. Whenever you accessFTP, you log in as some user. This user is linked to a system user (often the same user assigned to you by host), sologging in FTP actually has the same effect as logging into the system as this user. Common sense implies that all fileoperations are performed under this user and all files created (read: uploaded) through FTP will be owned by this user.
How your web server works
155
Conversely, whenever you are using a web interface to perform file operations, you are using a web application - orany PHP script/application for that matter - running on the web server whose process is owned by a different user.Therefore, whenever you create files from a web application, they will be owned by the user the web server runs under.
The distinction of file ownership in these two cases is of paramount importance when you get stuck with files whichare accessible to FTP but inaccessible to the web server, or vice versa. This minute distinction is the cause of a lotof grief to many webmasters, so beware!
3. PermissionsSo far you have learned about users, groups and ownerships. But how do they all stick together? Why these arenecessary to have in the first place? The reason is simple: security. In multiuser operating systems you normallydon't like users snooping around other people's files, especially when those files contain sensitive information, suchas passwords. The most common method for overcoming this problem is to assign permissions on each system item,controlling who can do what. This simple concept works wonderfully; it's like putting doors on a building and givingpeople only the keys for the doors to areas they should have access to.
3.1. The three types of permissionsWe already learned that each system item is owned by a user ID and a group ID. Whenever a process tries to accessa system item, the operating system checks the permissions and decides if it will proceed with the operation or denyaccess. It seems reasonable to have control over what a process with the same owning user ID can do with it, what the aprocess with the same owning group ID can do with it and, finally, what the rest of the world can do with it. Indeed, thisis the rationale behind the three types of permissions we can define on UNIX systems. In order of precedence they are:
User permissions They are the access rights granted to the owning user of the item. Every process with the sameowning user ID as the item's owning user ID has these access rights. These access rights haveprecedence over all other permissions.
Group permis-sions
These are the access rights granted to the owning group of the item. Every process with the sameowning group ID as the item's owning group ID has these access rights. These access rights areapplied only if the owning user ID's of the process and the item do not match, but their owninggroup ID's match.
Other permis-sions
These are the access rights granted to the rest of the world. If the owning user ID's of the processand the item do not match and the same happens for the owning group ID's as well, these accessrights will be applied.
3.2. What permissions can controlWe will be focused on permissions on files and directories, the building blocks of a web site. Permissions can controlonly three different actions:
Read The ability to read a file, or get a directory listing.
Write The ability to write to a file, or the ability to create, rename and delete files and subdirectorieson a directory.
Execute (orBrowse, for di-rectories)
For files, it controls the ability to be directly executable from the command line. It is only mean-ingful for binary programs and executable scripts. For directories, it controls the ability to changeto that directory. Note that if this is disabled you can't usually obtain a directory listing and fileread operations might fail.
These three actions, combined with the three access request groups (owning user, owning group and the rest of theworld) give us a total of nine distinct operations which can be controlled. Each action is an on/off switch. If a permission
How your web server works
156
is set, it is turned on and the right to perform the action is granted. If the permission is not set, the switch is off andthe right to perform the action is not granted.
3.3. Permissions notationThe two most common notations for permissions is the textual notation and the octal notation. Each one has its ownvirtues.
3.3.1. The textual notation
The textual notation is traditionally used in UNIX long directory listing format and in most FTP clients listings as well.It consists of ten characters. The first one displays the file type. It can be one of dash (regular file), "d" (a directory) or"l" (a link). The following nine characters display the permissions, consisting of three groups of three letters each. Thegroups are in order of appearance: owning user, owning group and others. The permissions on each group are in orderof appearance: read (denoted with r), write (denoted with w) and execute/browse (denoted with x). If a permission isnot set, a dash appears instead of the letter.
For example, the string -rwxr-xr-x means that it is a regular file, the owning user has read/write/execute permis-sions, the owning group has read and execute permissions and so does the rest of the world. On the other hand, thestring dr-x------ indicates that we have a directory whose owning user has read and browse permissions andeverybody else (owning group and the rest of the world) have no right to access it.
3.3.2. The octal notation
This is the de facto standard geeks use to communicate permissions. The benefit of this approach is that you only needfour characters to fully define them and they're easier to read (to the trained eye, at least).
Permissions are in fact a bit field. Each permission is a bit which can be turned on or off. If you put bits together theyform bytes (by grouping eight bits together). Many bytes one next to the other form a computer-readable representationof a whole number (an integer). If you write this down in base 8, you've got the octal representation. If you didn'tunderstand this, it's OK. We'll explain it the easy way.
The octal notation consists of four numbers. In the context of web site management you can consider the first to bealways zero and sometimes omitted. The next three numbers describe each one the permissions. The second numberdescribes owning user permissions. The third number describes owning group's permissions. The fourth number de-scribes the permissions for the rest of the world. Each number is 0 to 7. The meaning of each number is simple:
0 No access
1 Execute/browse access only
2 Write access only
3 Write and execute/browse access
4 Read access only
5 Read and execute/browse access
6 Read and write access
7 Full access
It is almost apparent that "1" stands for execute only, "2" stands for write only and "4" stands for read only. Addingthese values together gives you the rest of the combinations. You can't add together the same value (1+1 is forbidden

How your web server works
157
as it is meaningless), so each of the composite values can be broken down to its components very easily. You don'teven have to memorise the whole table!
A permission of 0777 means that the owning user, owning group and the rest of the world can read, write and executethe file (full permissions for everyone). A 0764 permission means that the owning user has full access, the owninggroup has read and write access and the rest of the world have read only access.
158
Chapter 9. Securing your AkeebaBackup installation1. Access rightsAs with every software which can access your site as a whole, Akeeba Backup needs to control who's got access to itsbackup functionality. Due to the lack of a thorough ACL mechanism in Joomla! 1.0 and 1.5, we have decided to makethe administrator (back end) of this component available by default to the Super Administrators only. This group ofpeople already has infinite access to the access, making them the ideal candidate for backup operators. You can changethis default behavior from the component's Parameters button in the Control Panel page.
The front-end backup feature is a different story. Since it has to be available to unattended scripts which can't usecookies and interactive user authentication, a different approach was taken. Instead of requiring the user to have loggedin with Joomla! it uses a simple "secret word" authentication model. Because this "secret word" is transmitted in cleartext we strongly advise against using it over anything else than a local network (for example, an automated tool runningon the same host as the web server). If you have to use it over the Internet we strongly advise using a secure protocolconnection (HTTPS) with a valid commercially acquired certificate.
If you want to enhance the security of your site, we strongly advise you to use a commercial-grade ACL system,such as Dioscouri's JUGA or `CorePHP` Community ACL on top of Akeeba Backup's rudimentary access control andJoomla! 1.6's ACL system. Such ACL systems allow you to fine-tune the permission settings down to the user andcomponent view level, if so required. Using such an ACL scheme you can create, for example, a backup operator userwho has access to the Backup Now and configuration pages of Akeeba Backup, but not the Download function.
2. Securing the output directorySecuring the backup output directoryBy default the component uses a non secure location to store its backup files and temporary files, within your site's filesystem hierarchy, namely administrator/components/com_akeeba/backup. This location is well knownand can be - theoretically - accessed directly from a web browser. Since the backup output directory stores the resultsof your backup attempts, that is SQL files containing database backups and archive files containing all of your site, amalicious person with access to this location could steal sensitive information or compromise your site's integrity.
The first line of defense, is to use mangled, hard to guess, names for the SQL backup. However, in the era of mul-ti-MbPS xDSL Internet connections and scripting, it wouldn't take an attacker that long to figure out the filename.Remember: security through obscurity is no security at all!
As a second line of defense, we include a secure .htaccess on the default backup output directory to disable directweb access. However, this is only possible on Apache-powered web servers which allow the use of .htaccess files.You should check with your host to ensure that this kind of protection is possible on your site.
However, this is not enough. Security experts argue that storing backups within the potentially vulnerable system itselfmight be a security risk. It is possible that a malicious person could gain access via other means. Think of a simplescenario. You have an Administrator with a weak password a hacker eventually guesses. Now the hacker can log in toyour site, but doesn't have access to the component. Despite that, you have installed a file administration component,such as eXtplorer, which allows administrators to browse the site's file system and download files. How long wouldit take before your site got compromised? Right. Not very long indeed!
The best approach is to use a directory which is outside your web server's root. By definition, this is not directlyexposed to the web and is usually unavailable to file administration utilities.
Securing your Akee-ba Backup installation
159
3. Securing file transfersWhenever you download your backup files you can fall prey to a malicious user. Backup files are transferred unen-crypted (unless you access your site's administrator section through the HTTPS protocol). It is possible for a resource-ful hacker to launch a man-in-the-middle attack. In such a case, whatever you download from your site will be directedto the hacker's computer before reaching yours.
To avoid such insecure scenarios, we advise against using the Download button in the backup administration page. Wesuggest that you use Secure FTP (SFTP) instead. Avoid using the plain old FTP, because your password and data aretransmitted in clear text (unencrypted) over the Internet. Also avoid FTPS and FTPES (FTP over SSL) as they havesome security restrictions, like requiring your FTP server to have a commercially obtained SSL certificate in orderto be really effective. Sometimes, your host will allow secure access to a web based control panel which has a filedownload feature. You could use this, it's as safe as it gets.
There is also another reason why not to use the Download button in the backup administration page. Your host neitherdiscriminates the back end and front end pages of your Joomla! site, nor your IP from the rest of the world. As aresult, every time you use the Joomla!™ back end, the data transferred counts towards your monthly bandwidth quota.Backup archives are large, sometimes in the hundreds of megabytes. Transferring them through the Download featurewill incur a huge loss on your monthly bandwidth quota. Using Secure FTP or your host's control panel usually doesnot count through the bandwidth quota and should be used instead. It's better to ask your host, though; some include theFTP and SFTP traffic in your monthly bandwidth quota. Finally, the Download feature doesn't work with all possibleconfigurations and has objective problems with the handling of very large archives; this is a technical limitation whichcan not be overcome in the PHP level the component operates. Most notably, many servers which use the FastCGImode do not work at all with the Download button. They will simply throw an HTTP 500 error page, or a "file notfound" message. We've tried all the tricks in the book and then some more, but there's really absolutely nothing wecan do about it. Sorry.
Important
The preferred and suggested method for downloading your backup files - for several reasons - is using FTPin BINARY mode, preferably over an encrypted connection. Alternatively, you can use Remote CLI whichallows you to use this approach when downloading backup archives.

Part III. Appendices

161
Table of ContentsA. The JPA archive format, v.1.2 ...................................................................................................... 162B. The JPS archive format, v.1.9 ....................................................................................................... 166C. Things which will (most likely) not be implemented ......................................................................... 170
1. Windows Live SkyDrive ....................................................................................................... 1702. Google Drive ...................................................................................................................... 1703. Automatic sync between sites ................................................................................................ 1704. Automatic backups without CRON ......................................................................................... 1715. Automatic backups after saving/creating/whatever an article ........................................................ 1716. Put Akeeba Backup in Joomla! .............................................................................................. 171
D. GNU Free Documentation License ................................................................................................. 173
162
Appendix A. The JPA archive format,v.1.2Design goalsThe JPA format strives to be a compressed archive format designed specifically for efficiency of creation by a PHPscript. It is similar in design to the PKZIP format, with a few notable differences:
• CRC32 is not used; calculation of file checksums is time consuming and can lead to errors when attempted on largefiles from a script running under PHP4, or a script running on PHP5 without the hash extension.
• Only allowed compression methods are store and deflate.
• There is no Central Directory (simplifies management of the file).
• File permissions (UNIX style) are stored within the file.
Even though JPA is designed for use by PHP scripts, creating a command-line utility, a programming library or evena GUI program in any other language is still possible. JPA is not supposed to have high compression rations, or besecure and error-tolerant as other archive formats. It merely an attempt to provide the best compromise for creatingarchives of very large directory trees using nothing but PHP code to do it.
This is an open format. You may use it in any commercial or non-commercial application royalty-free. Even thoughthe PHP implementation is GPL-licensed, we can provide it under commercial-friendly licenses, e.g. LGPL v3. Pleaseask us if you want to use it on your own software.
Structure of an archiveAn archive consists of exactly one Standard Header and one or more Entity Blocks . Each Entity Block consists ofexactly one Entity Description Block and at most one File Data Block . All values are stored in little-endian byte order,unless otherwise specified.
All textual data, e.g. file names and symlink targets, must be written as little-endian UTF-8, non null terminated strings,for the widest compatibility possible.
Standard HeaderThe function of the Standard Header is to allow identification of the archive format and supply the client with generalinformation regarding the archive at hand. It is a binary block appearing at the beginning of the archive file and therealone. It consists of the following data (in order of appearance):
Signature, 3 bytes The bytes 0x4A 0x50 0x41 (uppercase ASCII string “JPA”) used for identification purposes.
Header length, 2bytes
Unsigned short integer represented as two bytes, holding the size of the header in bytes. This isnow fixed to 19 bytes, but this variable is here to allow for forward compatibility. When extraheader fields are present, this value will be 19 + the length of all extra fields.
Major version, 1byte
Unsigned integer represented as single byte, holding the archive format major version, e.g. 0X01for version 1.2.
Minor version, 1byte
Unsigned integer represented as single byte, holding the archive format minor version, e.g. 0X02for version 1.2.
The JPA archive format, v.1.2
163
File count, 4bytes
Unsigned long integer represented as four bytes, holding the number of files present in the archive.
Uncompressedsize, 4 bytes
Unsigned long integer represented as four bytes, holding the total size of the archive's files whenuncompressed.
Compressed size,4 bytes
Unsigned long integer represented as four bytes, holding the total size of the archive's files in theirstored (compressed) form
Extra Header Field - Spanned Archive MarkerThis is an optional field, written after the Standard Header but before the first Entity Block, denoting that the currentarchive spans multiple files. Its structure is:
Signature, 4 bytes The bytes 0x4A, 0x50, 0x01, 0x01
Extra FieldLength, 2 bytes
The length of the extra field, without counting the signature length. It's value is fixed and equals 4.
Number of parts,2 bytes
The total number of parts this archive consists of.
When creating spanned archives, the first file (part) of the archive set has an extension of .j01, the next part has anextension of .j02 and so on. The last file of the archive set has the extension .jpa.
When creating spanned archives you must ensure that the Entity Description Block is within the limits of a single part,i.e. the contents of the Entity Description Block must not cross part boundaries. The File Data Block data can crossone or multiple part blocks.
Entity BlockAn Entity Block is merely the aggregation of an Entity Description Block and at most one File Data Block. An Entitycan be at present either a File or a Directory. If the entity is a File of zero length or if it is a Directory the File DataBlock is omitted. In any other case, the File Data Block must exist.
Entity Description BlockThe function of the Entity Description Block is to provide the client information about an Entity included in the archive.The client can then use this information in order to reconstruct a copy of the Entity on the client's file system. It is abinary block consisting of the following data (in order of appearance):
Signature, 3 bytes The bytes 0x4A, 0x50, 0x46 (uppercase ASCII string “JPF”) used for identification purposes.
Block length, 2bytes
Unsigned short integer, represented as 2 bytes, holding the total size of this Entity DescriptionBlock.
Length of entitypath, 2 bytes.
Unsigned short integer, represented as 2 bytes, holding the size of the entity path data below.
Entity path data,variable length.
Holds the complete (relative) path of the Entity as a UTF16 encoded string, without trailing null.The path separator must be a forward slash (“/”), even on systems which use a different pathseparator, e.g. Windows.
Entity type, 1byte.
• 0x00 for directories (instructs the client to recursively create the directory specified in Entitypath data).
• 0x01 for files (instructs the client to reconstruct the file specified in Entity path data)
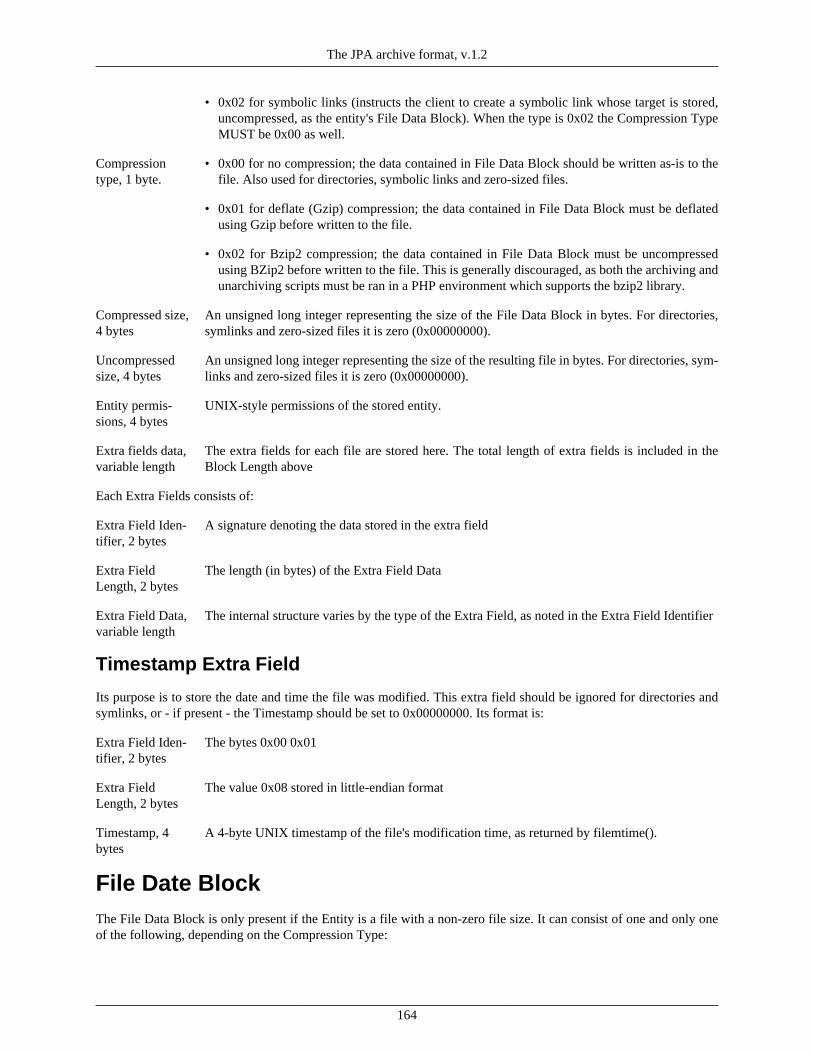
The JPA archive format, v.1.2
164
• 0x02 for symbolic links (instructs the client to create a symbolic link whose target is stored,uncompressed, as the entity's File Data Block). When the type is 0x02 the Compression TypeMUST be 0x00 as well.
Compressiontype, 1 byte.
• 0x00 for no compression; the data contained in File Data Block should be written as-is to thefile. Also used for directories, symbolic links and zero-sized files.
• 0x01 for deflate (Gzip) compression; the data contained in File Data Block must be deflatedusing Gzip before written to the file.
• 0x02 for Bzip2 compression; the data contained in File Data Block must be uncompressedusing BZip2 before written to the file. This is generally discouraged, as both the archiving andunarchiving scripts must be ran in a PHP environment which supports the bzip2 library.
Compressed size,4 bytes
An unsigned long integer representing the size of the File Data Block in bytes. For directories,symlinks and zero-sized files it is zero (0x00000000).
Uncompressedsize, 4 bytes
An unsigned long integer representing the size of the resulting file in bytes. For directories, sym-links and zero-sized files it is zero (0x00000000).
Entity permis-sions, 4 bytes
UNIX-style permissions of the stored entity.
Extra fields data,variable length
The extra fields for each file are stored here. The total length of extra fields is included in theBlock Length above
Each Extra Fields consists of:
Extra Field Iden-tifier, 2 bytes
A signature denoting the data stored in the extra field
Extra FieldLength, 2 bytes
The length (in bytes) of the Extra Field Data
Extra Field Data,variable length
The internal structure varies by the type of the Extra Field, as noted in the Extra Field Identifier
Timestamp Extra Field
Its purpose is to store the date and time the file was modified. This extra field should be ignored for directories andsymlinks, or - if present - the Timestamp should be set to 0x00000000. Its format is:
Extra Field Iden-tifier, 2 bytes
The bytes 0x00 0x01
Extra FieldLength, 2 bytes
The value 0x08 stored in little-endian format
Timestamp, 4bytes
A 4-byte UNIX timestamp of the file's modification time, as returned by filemtime().
File Date BlockThe File Data Block is only present if the Entity is a file with a non-zero file size. It can consist of one and only oneof the following, depending on the Compression Type:
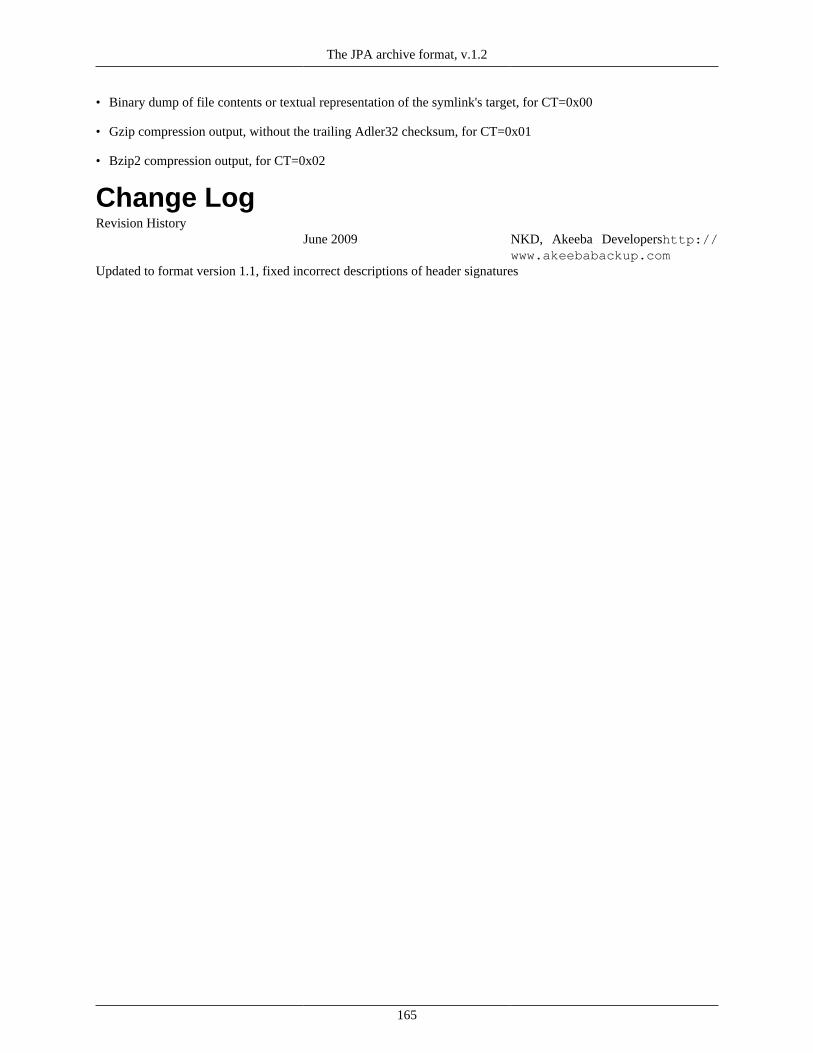
The JPA archive format, v.1.2
165
• Binary dump of file contents or textual representation of the symlink's target, for CT=0x00
• Gzip compression output, without the trailing Adler32 checksum, for CT=0x01
• Bzip2 compression output, for CT=0x02
Change LogRevision History
June 2009 NKD, Akeeba Developershttp://www.akeebabackup.com
Updated to format version 1.1, fixed incorrect descriptions of header signatures

166
Appendix B. The JPS archive format,v.1.9Design goalsThe JPS format strives to be a compressed archive format designed specifically for efficiency of creation by a PHPscript, while providing secure AES-128 encryption of the file descriptor and file contents. It is similar in design tothe JPA, with a few notable differences:
• Both the file descriptor and the file data are split to 64Kb blocks encrypted using AES-128 in CBC mode
• All files are compressed using Deflate (ZLib)
Even though JPS is designed for use by PHP scripts, creating a command-line utility, a programming library or evena GUI program in any other language is still possible. JPS is supposed to have low to medium compression rations,and be secure. However it is not as error-tolerant as other archive formats.
This is an open format. You may use it in any commercial or non-commercial application royalty-free. Even thoughthe PHP implementation is GPL-licensed, we can provide it under commercial-friendly licenses, e.g. LGPL v3. Pleaseask us if you want to use it on your own software.
Important
When the password is blank, no encryption takes place. Archivers should take this into account when creatingfiles. Unarchivers should also take this into account when the user passes an empty string as their password.
When a non-blank password is used, all files are encrypted using the same password. More specifically, alldata blocks are encrypted using the same password.
Structure of an archiveAn archive consists of exactly one Standard Header and one or more Entity Blocks . Each Entity Block consists ofexactly one Entity Description Block and at most one File Data Block. Each FIle Data Block consist of one or severalData Chunk Blocks. All values are stored in little-endian byte order, unless otherwise specified.
All textual data, e.g. file names and symlink targets, must be written as little-endian UTF-8, non null terminated strings,for the widest compatibility possible.
Standard HeaderThe function of the Standard Header is to allow identification of the archive format and supply the client with generalinformation regarding the archive at hand. It is a binary block appearing at the beginning of the archive file and therealone. It consists of the following data (in order of appearance):
Signature, 3 bytes The bytes 0x4A 0x50 0x54 (uppercase ASCII string “JPS”) used for identification purposes.
Major version, 1byte
Unsigned integer represented as single byte, holding the archive format major version, e.g. 0X01for version 1.9.
Minor version, 1byte
Unsigned integer represented as single byte, holding the archive format minor version, e.g. 0X09for version 1.9.
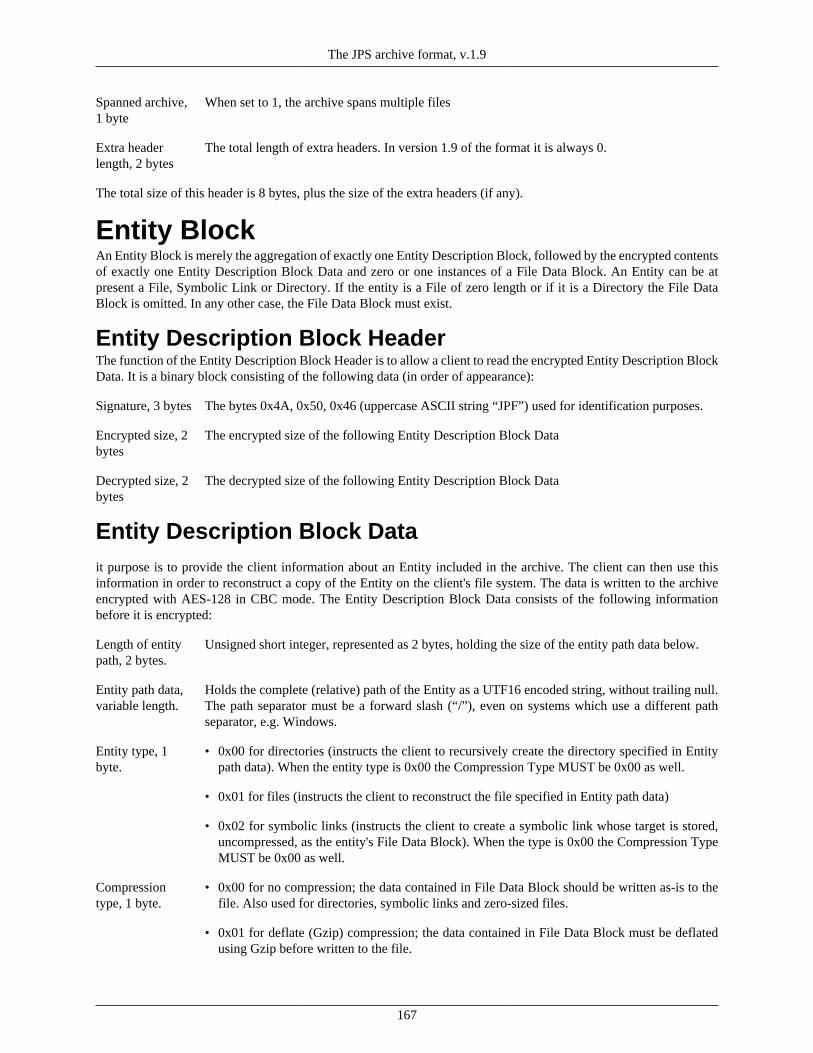
The JPS archive format, v.1.9
167
Spanned archive,1 byte
When set to 1, the archive spans multiple files
Extra headerlength, 2 bytes
The total length of extra headers. In version 1.9 of the format it is always 0.
The total size of this header is 8 bytes, plus the size of the extra headers (if any).
Entity BlockAn Entity Block is merely the aggregation of exactly one Entity Description Block, followed by the encrypted contentsof exactly one Entity Description Block Data and zero or one instances of a File Data Block. An Entity can be atpresent a File, Symbolic Link or Directory. If the entity is a File of zero length or if it is a Directory the File DataBlock is omitted. In any other case, the File Data Block must exist.
Entity Description Block HeaderThe function of the Entity Description Block Header is to allow a client to read the encrypted Entity Description BlockData. It is a binary block consisting of the following data (in order of appearance):
Signature, 3 bytes The bytes 0x4A, 0x50, 0x46 (uppercase ASCII string “JPF”) used for identification purposes.
Encrypted size, 2bytes
The encrypted size of the following Entity Description Block Data
Decrypted size, 2bytes
The decrypted size of the following Entity Description Block Data
Entity Description Block Datait purpose is to provide the client information about an Entity included in the archive. The client can then use thisinformation in order to reconstruct a copy of the Entity on the client's file system. The data is written to the archiveencrypted with AES-128 in CBC mode. The Entity Description Block Data consists of the following informationbefore it is encrypted:
Length of entitypath, 2 bytes.
Unsigned short integer, represented as 2 bytes, holding the size of the entity path data below.
Entity path data,variable length.
Holds the complete (relative) path of the Entity as a UTF16 encoded string, without trailing null.The path separator must be a forward slash (“/”), even on systems which use a different pathseparator, e.g. Windows.
Entity type, 1byte.
• 0x00 for directories (instructs the client to recursively create the directory specified in Entitypath data). When the entity type is 0x00 the Compression Type MUST be 0x00 as well.
• 0x01 for files (instructs the client to reconstruct the file specified in Entity path data)
• 0x02 for symbolic links (instructs the client to create a symbolic link whose target is stored,uncompressed, as the entity's File Data Block). When the type is 0x00 the Compression TypeMUST be 0x00 as well.
Compressiontype, 1 byte.
• 0x00 for no compression; the data contained in File Data Block should be written as-is to thefile. Also used for directories, symbolic links and zero-sized files.
• 0x01 for deflate (Gzip) compression; the data contained in File Data Block must be deflatedusing Gzip before written to the file.
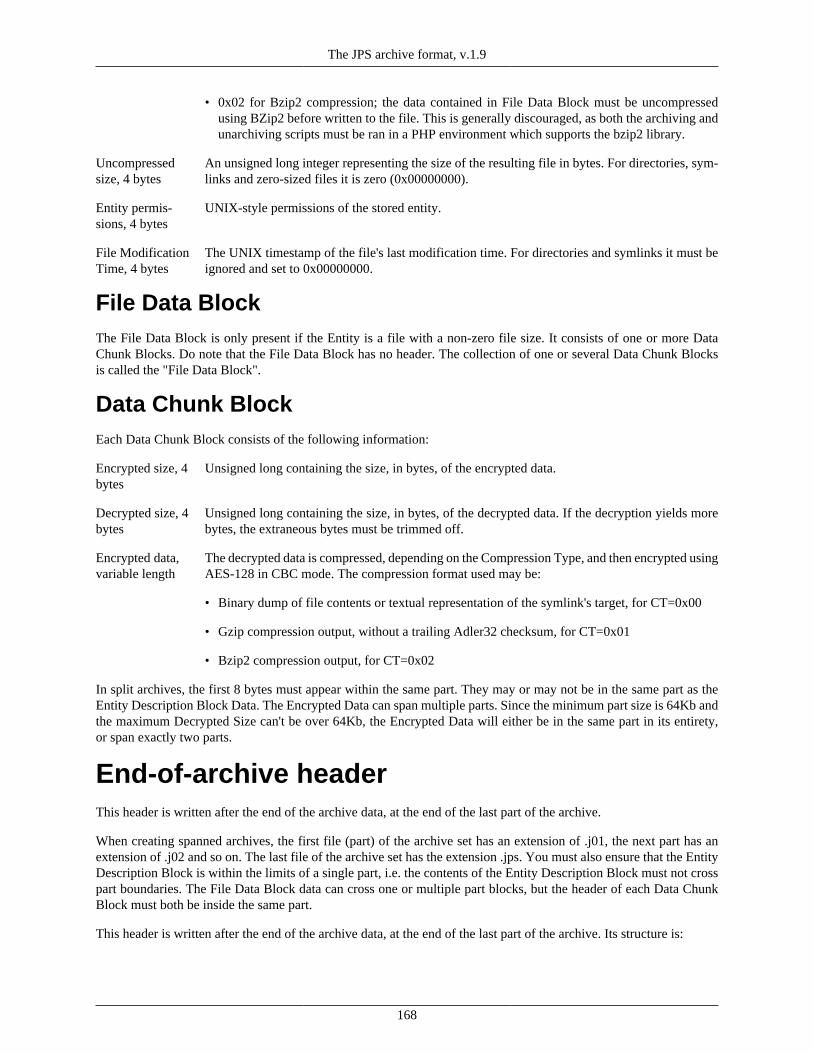
The JPS archive format, v.1.9
168
• 0x02 for Bzip2 compression; the data contained in File Data Block must be uncompressedusing BZip2 before written to the file. This is generally discouraged, as both the archiving andunarchiving scripts must be ran in a PHP environment which supports the bzip2 library.
Uncompressedsize, 4 bytes
An unsigned long integer representing the size of the resulting file in bytes. For directories, sym-links and zero-sized files it is zero (0x00000000).
Entity permis-sions, 4 bytes
UNIX-style permissions of the stored entity.
File ModificationTime, 4 bytes
The UNIX timestamp of the file's last modification time. For directories and symlinks it must beignored and set to 0x00000000.
File Data BlockThe File Data Block is only present if the Entity is a file with a non-zero file size. It consists of one or more DataChunk Blocks. Do note that the File Data Block has no header. The collection of one or several Data Chunk Blocksis called the "File Data Block".
Data Chunk BlockEach Data Chunk Block consists of the following information:
Encrypted size, 4bytes
Unsigned long containing the size, in bytes, of the encrypted data.
Decrypted size, 4bytes
Unsigned long containing the size, in bytes, of the decrypted data. If the decryption yields morebytes, the extraneous bytes must be trimmed off.
Encrypted data,variable length
The decrypted data is compressed, depending on the Compression Type, and then encrypted usingAES-128 in CBC mode. The compression format used may be:
• Binary dump of file contents or textual representation of the symlink's target, for CT=0x00
• Gzip compression output, without a trailing Adler32 checksum, for CT=0x01
• Bzip2 compression output, for CT=0x02
In split archives, the first 8 bytes must appear within the same part. They may or may not be in the same part as theEntity Description Block Data. The Encrypted Data can span multiple parts. Since the minimum part size is 64Kb andthe maximum Decrypted Size can't be over 64Kb, the Encrypted Data will either be in the same part in its entirety,or span exactly two parts.
End-of-archive headerThis header is written after the end of the archive data, at the end of the last part of the archive.
When creating spanned archives, the first file (part) of the archive set has an extension of .j01, the next part has anextension of .j02 and so on. The last file of the archive set has the extension .jps. You must also ensure that the EntityDescription Block is within the limits of a single part, i.e. the contents of the Entity Description Block must not crosspart boundaries. The File Data Block data can cross one or multiple part blocks, but the header of each Data ChunkBlock must both be inside the same part.
This header is written after the end of the archive data, at the end of the last part of the archive. Its structure is:
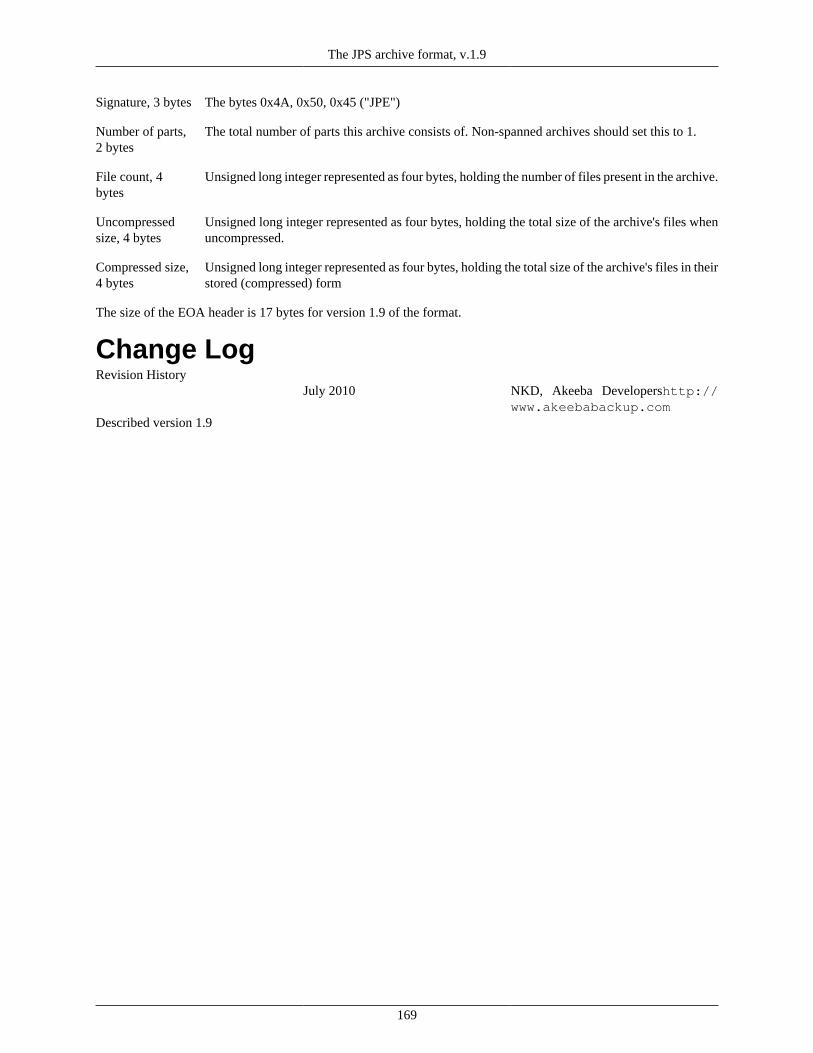
The JPS archive format, v.1.9
169
Signature, 3 bytes The bytes 0x4A, 0x50, 0x45 ("JPE")
Number of parts,2 bytes
The total number of parts this archive consists of. Non-spanned archives should set this to 1.
File count, 4bytes
Unsigned long integer represented as four bytes, holding the number of files present in the archive.
Uncompressedsize, 4 bytes
Unsigned long integer represented as four bytes, holding the total size of the archive's files whenuncompressed.
Compressed size,4 bytes
Unsigned long integer represented as four bytes, holding the total size of the archive's files in theirstored (compressed) form
The size of the EOA header is 17 bytes for version 1.9 of the format.
Change LogRevision History
July 2010 NKD, Akeeba Developershttp://www.akeebabackup.com
Described version 1.9

170
Appendix C. Things which will (mostlikely) not be implementedThe following often requested features are likely to never be implemented due to several technical limitations. In orderto save you and us some time, we are documenting what will not get implemented and why.
1. Windows Live SkyDriveYes, Windows Live SkyDrive does have a published RESTful API called Live Connect. However, they only allowphotos, videos, audio and proprietary Microsoft format files to be uploaded. For more information, take a look at theirdocumentation [http://msdn.microsoft.com/en-us/library/live/hh826545.aspx#fileformats]. As they say in there:
SkyDrive includes features both for high-quality document viewing and editing, and for creatingand sharing beautiful photo albums. If possible, have your apps take advantage of these features. Tosupport this principle, the Live Connect APIs limit the set of file formats that apps can upload toSkyDrive. In general, if your apps store file formats that are understood only by those apps,those file formats don’t belong on SkyDrive.
The emphasis is mine. This key phrase means that the official Microsoft stance is that they don't you to store yourbackups on SkyDrive. I have tried implementing SkyDrive in Akeeba Backup. Guess what? They really mean it.Unless your file has one of the "supported" file extensions, they reject the upload. So, there you have it, Microsoftdoesn't want you to store your backups on SkyDrive and we can not implement it.
2. Google DriveIt seems that you cannot use Google Drive for generic data storage. As mentioned in the Google Drive documen-tation:
Apps will not have any API access to files unless the app has been installed in Chrome Web Store.To test an app during development, you must first create a listing and install it.
In other words, the only way to have an application use Google Drive is to make installable in Google Chrome.Obviously this is impossible for Akeeba Backup.
Instead of Google Drive you can always use Google Storage.
3. Automatic sync between sitesSite synchronisation is a completely different concept to backups. In fact, it is impossible to have reliable site syncin Joomla! (and all major PHP CMS, actually). For more information read my blog post on the subject [http://www.dionysopoulos.me/blog/myths-and-facts-on-site-sync]. The closest you can get to that concept is performing theprocedure underlined in Advanced Site Transfers [https://www.akeebabackup.com/documentation/walkthroughs/ad-vanced-site-transfers.html].
While I am at it, since Joomla! 1.6 it has become even more difficult to perform site sync or even an advanced sitetransfer. Extensions, categories and articles all come with ACL records in the #__assets table. This means that if youonly want to copy articles between sites with, say, even one different extension, you can't. If you don't have the exactsame user groups and view levels (down to the numeric ID level) in both sites, you can't transfer anything betweenthem. In short, unless the sites are identical except the new articles, you can't merge them. Keep that in mind and beready for a lot of hair pulling if you decide to go through the dev-staging-live site work flow.

Things which will (mostlikely) not be implemented
171
4. Automatic backups without CRONA full site backup is something which takes a heck of a lot of time, CPU and RAM to perform. It can't happen in asingle page load. That's why you need Akeeba Backup, because it splits the process into smaller steps suitable forexecution on the server. Asking for an automatic backup without CRON means that the backup would have to be takenas a visitor tries to load a page on your site. That would lead to a blank page, or -in the best, unrealistic, case scenario-your visitor would have to wait for several minutes or hours before the page loads. Come on, get real. There is a reasonwhy there are CRON jobs. Long running operations, like backups, are one of them.
Before you argue that it is possible, please read our documentation regarding the known issues of the Lazy Schedulingplugin. That plugin was designed to solve that problem. Guess what? It turns out that the limitations on the serverswhere you can't use CRON are so big that even this solution can't work reliably. If you can't get a CRON job workingon your server, try webcron.org. It rocks.
5. Automatic backups after saving/creat-ing/whatever an articleIt's the same thing as automatic backups without CRON. It's exrtemely easy for me to create a plugin which waits foran article to be saved, then take you to the backup page. But, honestly, would you want a full site backup every timeyou hit Apply on the article editor? Hardly. What you really want is make a bunch of changes to a few articles, thentake a backup. Well, that's possible ever since JoomlaPack 1.0, released back in 2006 :)
6. Put Akeeba Backup in Joomla!First, it's the licensing issue. Akeeba Backup is licensed under GPL v3 or later, whereas Joomla! is licensed underGPL v2 or later. Including Akeeba Backup inside Joomla! would make Joomla! GPL v3 or later. This would makehundreds of extensions licensed as GPL v2 (without the "or later" part) to become illegal. I believe that's the primaryreason why Joomla! has not adopted GPL v3 yet.
Anyway, you really don't want that to happen. The reason that Akeeba Backup is successful is because of its support,rapid releases and feedback from its users. If it were included in Joomla! itself:
• Support would suffer. Obviously, I couldn't offer support for free because it doesn't scale (that's why support becamefor-a-fee). I simply don't make enough money to hire an army of support personnel to do free support on the Joomla!forum. Due to the nature of backups and the (mostly host-dependent) issues you might encounter generic supporton the Joomla! forum by volunteers doesn't really work. I mean, you can already witness that if you try to ask anAkeeba Backup question on the Joomla! forum today.
• Fixes would take too long to get published. Even if a major issue was discovered, we couldn't just fix it and releasea new Joomla! version. Joomla! is a huge cruiseship. It takes a lot of effort to get new releases packaged, testedand released. This would degrade the quality of your backup experience. Or it would lead us to not offer any newfeatures, ever, in fear of breaking what works. This is what happens with other core components.
• New features would suffer. Actually, no new features would be added mainly due to a. lack of feedback (by isolatingthe developer from the users there is no feedback, ergo no new ideas) and b. because no developer would assumethe responsibility of introducing something potentially buggy in a new Joomla! release. At best, new features wouldbe introduced once every 18 months. Put that in contrast with the current 3 month release cycle of Akeeba Backupand you'll understand how bad that would suck.
• I might have to abandon it altogether. Unfortunately, I need money for me and my family. Maintaining AkeebaBackup takes up the better part of my days, nights, weekends and vacation time. Having subscriptions is the onlyway for me to make enough money to justify living, breathing and not sleeping for or because of this software. If
Things which will (mostlikely) not be implemented
172
you take away the money from me, I would have to be a slave. Nope. I would just abandon the software and getanother job to pay my bills. And, since you might wonder, no, I couldn't have a paid version even if just AkeebaBackup Core was included in Joomla!. The first reason would be API compatibility. I have a successful for-a-feeversion because I am free to change the backup engine's API very often. Adding that to Joomla!, my hands would betied. Moreover, the free version acts as an advertisement for the for-a-fee version. If the free version is in Joomla!itself and no longer called Akeeba Backup I've lost my major source of new customers. No new customers = noincome = abandoned development.
So just watch what you wish for. Adding something to the core is not a positive thing. It is usually the end of the lifeof a component. In fact, I'd argue that the Joomla! core should be as lightweight as possible and now it's anything but.Having people outside of the Joomla! project maintain each extension is not a drawback, it's an asset. Organisationslike the Joomla! project are by definition slow-moving. Small teams of 1-3 people per component are infinitely moreflexible and can produce much better results in the long run.
173
Appendix D. GNU Free DocumentationLicenseCopyright (C) 2000, 2001, 2002 Free Software Foundation, Inc. 51 Franklin St , Fifth Floor, Boston, MA 02110-1301USA . Everyone is permitted to copy and distribute verbatim copies of this license document, but changing it is notallowed.
0. PREAMBLEThe purpose of this License is to make a manual, textbook, or other functional and useful document "free" in the senseof freedom: to assure everyone the effective freedom to copy and redistribute it, with or without modifying it, eithercommercially or noncommercially. Secondarily, this License preserves for the author and publisher a way to get creditfor their work, while not being considered responsible for modifications made by others.
This License is a kind of "copyleft", which means that derivative works of the document must themselves be free in thesame sense. It complements the GNU General Public License, which is a copyleft license designed for free software.
We have designed this License in order to use it for manuals for free software, because free software needs freedocumentation: a free program should come with manuals providing the same freedoms that the software does. But thisLicense is not limited to software manuals; it can be used for any textual work, regardless of subject matter or whetherit is published as a printed book. We recommend this License principally for works whose purpose is instruction orreference.
1. APPLICABILITY AND DEFINITIONSThis License applies to any manual or other work, in any medium, that contains a notice placed by the copyright holdersaying it can be distributed under the terms of this License. Such a notice grants a world-wide, royalty-free license,unlimited in duration, to use that work under the conditions stated herein. The "Document", below, refers to any suchmanual or work. Any member of the public is a licensee, and is addressed as "you". You accept the license if you copy,modify or distribute the work in a way requiring permission under copyright law.
A "Modified Version" of the Document means any work containing the Document or a portion of it, either copiedverbatim, or with modifications and/or translated into another language.
A "Secondary Section" is a named appendix or a front-matter section of the Document that deals exclusively with therelationship of the publishers or authors of the Document to the Document's overall subject (or to related matters) andcontains nothing that could fall directly within that overall subject. (Thus, if the Document is in part a textbook ofmathematics, a Secondary Section may not explain any mathematics.) The relationship could be a matter of historicalconnection with the subject or with related matters, or of legal, commercial, philosophical, ethical or political positionregarding them.
The "Invariant Sections" are certain Secondary Sections whose titles are designated, as being those of Invariant Sec-tions, in the notice that says that the Document is released under this License. If a section does not fit the above def-inition of Secondary then it is not allowed to be designated as Invariant. The Document may contain zero InvariantSections. If the Document does not identify any Invariant Sections then there are none.
The "Cover Texts" are certain short passages of text that are listed, as Front-Cover Texts or Back-Cover Texts, in thenotice that says that the Document is released under this License. A Front-Cover Text may be at most 5 words, anda Back-Cover Text may be at most 25 words.
A "Transparent" copy of the Document means a machine-readable copy, represented in a format whose specificationis available to the general public, that is suitable for revising the document straightforwardly with generic text editors
GNU Free Documentation License
174
or (for images composed of pixels) generic paint programs or (for drawings) some widely available drawing editor,and that is suitable for input to text formatters or for automatic translation to a variety of formats suitable for inputto text formatters. A copy made in an otherwise Transparent file format whose markup, or absence of markup, hasbeen arranged to thwart or discourage subsequent modification by readers is not Transparent. An image format is notTransparent if used for any substantial amount of text. A copy that is not "Transparent" is called "Opaque".
Examples of suitable formats for Transparent copies include plain ASCII without markup, Texinfo input format, La-TeX input format, SGML or XML using a publicly available DTD, and standard-conforming simple HTML, PostScriptor PDF designed for human modification. Examples of transparent image formats include PNG, XCF and JPG. Opaqueformats include proprietary formats that can be read and edited only by proprietary word processors, SGML or XMLfor which the DTD and/or processing tools are not generally available, and the machine-generated HTML, PostScriptor PDF produced by some word processors for output purposes only.
The "Title Page" means, for a printed book, the title page itself, plus such following pages as are needed to hold,legibly, the material this License requires to appear in the title page. For works in formats which do not have anytitle page as such, "Title Page" means the text near the most prominent appearance of the work's title, preceding thebeginning of the body of the text.
A section "Entitled XYZ" means a named subunit of the Document whose title either is precisely XYZ or containsXYZ in parentheses following text that translates XYZ in another language. (Here XYZ stands for a specific sectionname mentioned below, such as "Acknowledgements", "Dedications", "Endorsements", or "History".) To "Preservethe Title" of such a section when you modify the Document means that it remains a section "Entitled XYZ" accordingto this definition.
The Document may include Warranty Disclaimers next to the notice which states that this License applies to theDocument. These Warranty Disclaimers are considered to be included by reference in this License, but only as regardsdisclaiming warranties: any other implication that these Warranty Disclaimers may have is void and has no effect onthe meaning of this License.
2. VERBATIM COPYINGYou may copy and distribute the Document in any medium, either commercially or noncommercially, provided thatthis License, the copyright notices, and the license notice saying this License applies to the Document are reproducedin all copies, and that you add no other conditions whatsoever to those of this License. You may not use technicalmeasures to obstruct or control the reading or further copying of the copies you make or distribute. However, youmay accept compensation in exchange for copies. If you distribute a large enough number of copies you must alsofollow the conditions in section 3.
You may also lend copies, under the same conditions stated above, and you may publicly display copies.
3. COPYING IN QUANTITYIf you publish printed copies (or copies in media that commonly have printed covers) of the Document, numberingmore than 100, and the Document's license notice requires Cover Texts, you must enclose the copies in covers thatcarry, clearly and legibly, all these Cover Texts: Front-Cover Texts on the front cover, and Back-Cover Texts on theback cover. Both covers must also clearly and legibly identify you as the publisher of these copies. The front covermust present the full title with all words of the title equally prominent and visible. You may add other material on thecovers in addition. Copying with changes limited to the covers, as long as they preserve the title of the Document andsatisfy these conditions, can be treated as verbatim copying in other respects.
If the required texts for either cover are too voluminous to fit legibly, you should put the first ones listed (as many asfit reasonably) on the actual cover, and continue the rest onto adjacent pages.
If you publish or distribute Opaque copies of the Document numbering more than 100, you must either include a ma-chine-readable Transparent copy along with each Opaque copy, or state in or with each Opaque copy a computer-net-
GNU Free Documentation License
175
work location from which the general network-using public has access to download using public-standard networkprotocols a complete Transparent copy of the Document, free of added material. If you use the latter option, you musttake reasonably prudent steps, when you begin distribution of Opaque copies in quantity, to ensure that this Transpar-ent copy will remain thus accessible at the stated location until at least one year after the last time you distribute anOpaque copy (directly or through your agents or retailers) of that edition to the public.
It is requested, but not required, that you contact the authors of the Document well before redistributing any largenumber of copies, to give them a chance to provide you with an updated version of the Document.
4. MODIFICATIONSYou may copy and distribute a Modified Version of the Document under the conditions of sections 2 and 3 above,provided that you release the Modified Version under precisely this License, with the Modified Version filling the roleof the Document, thus licensing distribution and modification of the Modified Version to whoever possesses a copyof it. In addition, you must do these things in the Modified Version:
A. Use in the Title Page (and on the covers, if any) a title distinct from that of the Document, and from those of previousversions (which should, if there were any, be listed in the History section of the Document). You may use the sametitle as a previous version if the original publisher of that version gives permission.
B. List on the Title Page, as authors, one or more persons or entities responsible for authorship of the modificationsin the Modified Version, together with at least five of the principal authors of the Document (all of its principalauthors, if it has fewer than five), unless they release you from this requirement.
C. State on the Title page the name of the publisher of the Modified Version, as the publisher.
D. Preserve all the copyright notices of the Document.
E. Add an appropriate copyright notice for your modifications adjacent to the other copyright notices.
F. Include, immediately after the copyright notices, a license notice giving the public permission to use the ModifiedVersion under the terms of this License, in the form shown in the Addendum below.
G. Preserve in that license notice the full lists of Invariant Sections and required Cover Texts given in the Document'slicense notice.
H. Include an unaltered copy of this License.
I. Preserve the section Entitled "History", Preserve its Title, and add to it an item stating at least the title, year, newauthors, and publisher of the Modified Version as given on the Title Page. If there is no section Entitled "History"in the Document, create one stating the title, year, authors, and publisher of the Document as given on its Title Page,then add an item describing the Modified Version as stated in the previous sentence.
J. Preserve the network location, if any, given in the Document for public access to a Transparent copy of the Docu-ment, and likewise the network locations given in the Document for previous versions it was based on. These maybe placed in the "History" section. You may omit a network location for a work that was published at least fouryears before the Document itself, or if the original publisher of the version it refers to gives permission.
K. For any section Entitled "Acknowledgements" or "Dedications", Preserve the Title of the section, and preserve inthe section all the substance and tone of each of the contributor acknowledgements and/or dedications given therein.
L. Preserve all the Invariant Sections of the Document, unaltered in their text and in their titles. Section numbers orthe equivalent are not considered part of the section titles.
M.Delete any section Entitled "Endorsements". Such a section may not be included in the Modified Version.
N. Do not retitle any existing section to be Entitled "Endorsements" or to conflict in title with any Invariant Section.
GNU Free Documentation License
176
O. Preserve any Warranty Disclaimers.
If the Modified Version includes new front-matter sections or appendices that qualify as Secondary Sections andcontain no material copied from the Document, you may at your option designate some or all of these sections asinvariant. To do this, add their titles to the list of Invariant Sections in the Modified Version's license notice. Thesetitles must be distinct from any other section titles.
You may add a section Entitled "Endorsements", provided it contains nothing but endorsements of your ModifiedVersion by various parties--for example, statements of peer review or that the text has been approved by an organizationas the authoritative definition of a standard.
You may add a passage of up to five words as a Front-Cover Text, and a passage of up to 25 words as a Back-CoverText, to the end of the list of Cover Texts in the Modified Version. Only one passage of Front-Cover Text and oneof Back-Cover Text may be added by (or through arrangements made by) any one entity. If the Document alreadyincludes a cover text for the same cover, previously added by you or by arrangement made by the same entity youare acting on behalf of, you may not add another; but you may replace the old one, on explicit permission from theprevious publisher that added the old one.
The author(s) and publisher(s) of the Document do not by this License give permission to use their names for publicityfor or to assert or imply endorsement of any Modified Version.
5. COMBINING DOCUMENTSYou may combine the Document with other documents released under this License, under the terms defined in section4 above for modified versions, provided that you include in the combination all of the Invariant Sections of all of theoriginal documents, unmodified, and list them all as Invariant Sections of your combined work in its license notice,and that you preserve all their Warranty Disclaimers.
The combined work need only contain one copy of this License, and multiple identical Invariant Sections may bereplaced with a single copy. If there are multiple Invariant Sections with the same name but different contents, makethe title of each such section unique by adding at the end of it, in parentheses, the name of the original author orpublisher of that section if known, or else a unique number. Make the same adjustment to the section titles in the listof Invariant Sections in the license notice of the combined work.
In the combination, you must combine any sections Entitled "History" in the various original documents, forming onesection Entitled "History"; likewise combine any sections Entitled "Acknowledgements", and any sections Entitled"Dedications". You must delete all sections Entitled "Endorsements".
6. COLLECTIONS OF DOCUMENTSYou may make a collection consisting of the Document and other documents released under this License, and replacethe individual copies of this License in the various documents with a single copy that is included in the collection,provided that you follow the rules of this License for verbatim copying of each of the documents in all other respects.
You may extract a single document from such a collection, and distribute it individually under this License, providedyou insert a copy of this License into the extracted document, and follow this License in all other respects regardingverbatim copying of that document.
7. AGGREGATION WITH INDEPENDENTWORKSA compilation of the Document or its derivatives with other separate and independent documents or works, in or ona volume of a storage or distribution medium, is called an "aggregate" if the copyright resulting from the compilation
GNU Free Documentation License
177
is not used to limit the legal rights of the compilation's users beyond what the individual works permit. When theDocument is included in an aggregate, this License does not apply to the other works in the aggregate which are notthemselves derivative works of the Document.
If the Cover Text requirement of section 3 is applicable to these copies of the Document, then if the Document is lessthan one half of the entire aggregate, the Document's Cover Texts may be placed on covers that bracket the Documentwithin the aggregate, or the electronic equivalent of covers if the Document is in electronic form. Otherwise they mustappear on printed covers that bracket the whole aggregate.
8. TRANSLATIONTranslation is considered a kind of modification, so you may distribute translations of the Document under the termsof section 4. Replacing Invariant Sections with translations requires special permission from their copyright holders,but you may include translations of some or all Invariant Sections in addition to the original versions of these InvariantSections. You may include a translation of this License, and all the license notices in the Document, and any WarrantyDisclaimers, provided that you also include the original English version of this License and the original versions ofthose notices and disclaimers. In case of a disagreement between the translation and the original version of this Licenseor a notice or disclaimer, the original version will prevail.
If a section in the Document is Entitled "Acknowledgements", "Dedications", or "History", the requirement (section4) to Preserve its Title (section 1) will typically require changing the actual title.
9. TERMINATIONYou may not copy, modify, sublicense, or distribute the Document except as expressly provided for under this License.Any other attempt to copy, modify, sublicense or distribute the Document is void, and will automatically terminateyour rights under this License. However, parties who have received copies, or rights, from you under this License willnot have their licenses terminated so long as such parties remain in full compliance.
10. FUTURE REVISIONS OF THIS LICENSEThe Free Software Foundation may publish new, revised versions of the GNU Free Documentation License from timeto time. Such new versions will be similar in spirit to the present version, but may differ in detail to address newproblems or concerns. See http://www.gnu.org/copyleft/ [http://www.gnu.org/copyleft/] .
Each version of the License is given a distinguishing version number. If the Document specifies that a particularnumbered version of this License "or any later version" applies to it, you have the option of following the terms andconditions either of that specified version or of any later version that has been published (not as a draft) by the FreeSoftware Foundation. If the Document does not specify a version number of this License, you may choose any versionever published (not as a draft) by the Free Software Foundation.
ADDENDUM: How to use this License for yourdocumentsTo use this License in a document you have written, include a copy of the License in the document and put the followingcopyright and license notices just after the title page:
Copyright (C) YEAR YOUR NAME.
Permission is granted to copy, distribute and/or modify this document under the terms of the GNUFree Documentation License, Version 1.2 or any later version published by the Free Software Foun-
GNU Free Documentation License
178
dation; with no Invariant Sections, no Front-Cover Texts, and no Back-Cover Texts. A copy of thelicense is included in the section entitled "GNU Free Documentation License".
If you have Invariant Sections, Front-Cover Texts and Back-Cover Texts, replace the "with...Texts." line with this:
with the Invariant Sections being LIST THEIR TITLES, with the Front-Cover Texts being LIST,and with the Back-Cover Texts being LIST.
If you have Invariant Sections without Cover Texts, or some other combination of the three, merge those two alterna-tives to suit the situation.
If your document contains nontrivial examples of program code, we recommend releasing these examples in parallelunder your choice of free software license, such as the GNU General Public License, to permit their use in free software.