AirWave 8.2.14.0 Installation Guide - Aruba Networks
15
AirWave 8.2.14.0 Installation Guide This document is designed as a reference for installing AirWave 8.2.14.0 with the CentOS software bundled with the ISO disc image. For upgrade instructions, see the AirWave 8.2.14.0 Release Notes. Download Files The table below describes the different files that you might see on the Support site when you download AirWave. For more information, see the Upgrade Procedures in the Release Notes. File Type Description Install ISO Standalone installation media, including the CentOS operating system. This image can fit on a CD/DVD, or it can be mounted as a virtual disk for installation. Install OVA (Virtual appliance) VMware OVA template for AirWave deployment on VMware ESXi infrastructure. Optimized for deployments up to 100 devices. NOTE: Install the OVA package for only testing in lab environments. TAR package file Used for AirWave upgrades. The TAR package delivers updated security packages and kernel updates. NOTE: Contact Techical Support to help you upgrade the software if your software is more than two versions old. Table 1: Download Page File Types Minimum Supported Browsers AirWave supports the following browsers: n Internet Explorer 11.0.9 or later on Windows n Firefox 57.0 or later on Windows and macOS n Chrome 65.0.3299.0 (64-bit) or later on Windows and macOS n Safari 11.0.2 or later for macOS n Microsoft Edge version 91.0.864.37 on Windows Hardware Requirements AirWave supports any hardware that is Red Hat Enterprise Linux 7.6 or later. By default, all installations are based on a 64-bit operating system. If you're using the Central Ready HPE DL360 Gen10 appliance, the appliance ships with Unified Extensible Firmware Interface (UEFI) as the boot environment instead of Basic Input/Output System (BIOS). For the Pro HPE DL360 Gen9 and Enterprise HPE DL360 Gen9 appliances that use BIOS, the AirWave 8.2.14.0 install ISO includes a workaround that eliminates the need to replace BIOS in these appliances or boot in Legacy BIOS. AirWave hardware requirements vary by version. As additional features are added to AirWave, increased hardware resources become necessary. For the most recent hardware requirements, refer to the AirWave 8.2.11.0 Server Sizing Guide. AirWave 8.2.14.0 | Installation Guide Rev. 01 | December 2021
-
Upload
khangminh22 -
Category
Documents
-
view
0 -
download
0
Transcript of AirWave 8.2.14.0 Installation Guide - Aruba Networks

AirWave 8.2.14.0Installation Guide
This document is designed as a reference for installing AirWave 8.2.14.0 with the CentOS software bundledwith the ISO disc image. For upgrade instructions, see the AirWave 8.2.14.0 Release Notes.
Download FilesThe table below describes the different files that youmight see on the Support site when you downloadAirWave. Formore information, see theUpgrade Procedures in the Release Notes.
File Type Description
Install ISO Standalone installation media, including the CentOS operating system.This image can fit on a CD/DVD, or it can be mounted as a virtual disk forinstallation.
Install OVA (Virtualappliance)
VMware OVA template for AirWave deployment on VMware ESXiinfrastructure. Optimized for deployments up to 100 devices.
NOTE: Install the OVA package for only testing in lab environments.
TAR package file Used for AirWave upgrades. The TAR package delivers updated securitypackages and kernel updates.
NOTE: Contact Techical Support to help you upgrade the software ifyour software is more than two versions old.
Table 1: Download Page File Types
Minimum Supported BrowsersAirWave supports the following browsers:
n Internet Explorer 11.0.9 or later onWindows
n Firefox 57.0 or later onWindows andmacOS
n Chrome 65.0.3299.0 (64-bit) or later onWindows andmacOS
n Safari 11.0.2 or later formacOS
n Microsoft Edge version 91.0.864.37 onWindows
Hardware RequirementsAirWave supports any hardware that is Red Hat Enterprise Linux 7.6 or later. By default, all installations arebased on a 64-bit operating system.
If you're using the Central Ready HPEDL360 Gen10 appliance, the appliance ships with Unified ExtensibleFirmware Interface (UEFI) as the boot environment instead of Basic Input/Output System (BIOS). For the ProHPEDL360 Gen9 and Enterprise HPEDL360 Gen9 appliances that use BIOS, the AirWave 8.2.14.0 install ISOincludes aworkaround that eliminates the need to replace BIOS in these appliances or boot in Legacy BIOS.
AirWave hardware requirements vary by version. As additional features are added to AirWave, increasedhardware resources become necessary. For themost recent hardware requirements, refer to the AirWave8.2.11.0 Server Sizing Guide.
AirWave 8.2.14.0 | Installation Guide Rev. 01 | December 2021
AirWave does not support downgrading to older versions. In unusual circumstances requiring that youreturn to an earlier version of AirWave, we recommend you perform a fresh installation of the earlierAirWave version, and then restore data from a backup taken before the upgrade.
Pre-Installation ChecklistUse this check list to ensure installation goes smoothly.
Task Completed
Have available the AirWave license key sent to you in an email from Aruba.
Obtain dedicated server(s) meeting Aruba sizing specifications.
Determine the static IP address for each AirWave server.
Provision firewall and enable proper ports.
Determine WLAN infrastructure properties (type, quantity, and location).
Determine WLAN infrastructure access credentials (SNMP, telnet, SSH, etc.).
Determine WLAN security policy specifications.
Set router and switches to monitoring (optional).
Configure upstream NMS applications (optional).
Determine wireless client authentication servers (optional).
Determine AirWave administrative authentication servers like TACACS+, LDAP, orRADIUS (optional).
Contact Techical Support to help you upgrade the software if your software is morethan two versions old.
Table 2: Pre-Installation Checklist
Installation WorkflowThis section provides step-by-step instructions to install Linux CentOS 7.8, configure the AirWave server, andprepare your deployment.
Step 1: Install Linux CentOS 7.8Youmust install Linux before you install AirWave on the network management system. Installing the CentOSsoftware takes 10 to 20 minutes to complete.
This procedure erases the hard drive(s) on the server.
To install the Linux CentOS 7.8 operating system:
2 AirWave 8.2.14.0 | Installation Guide
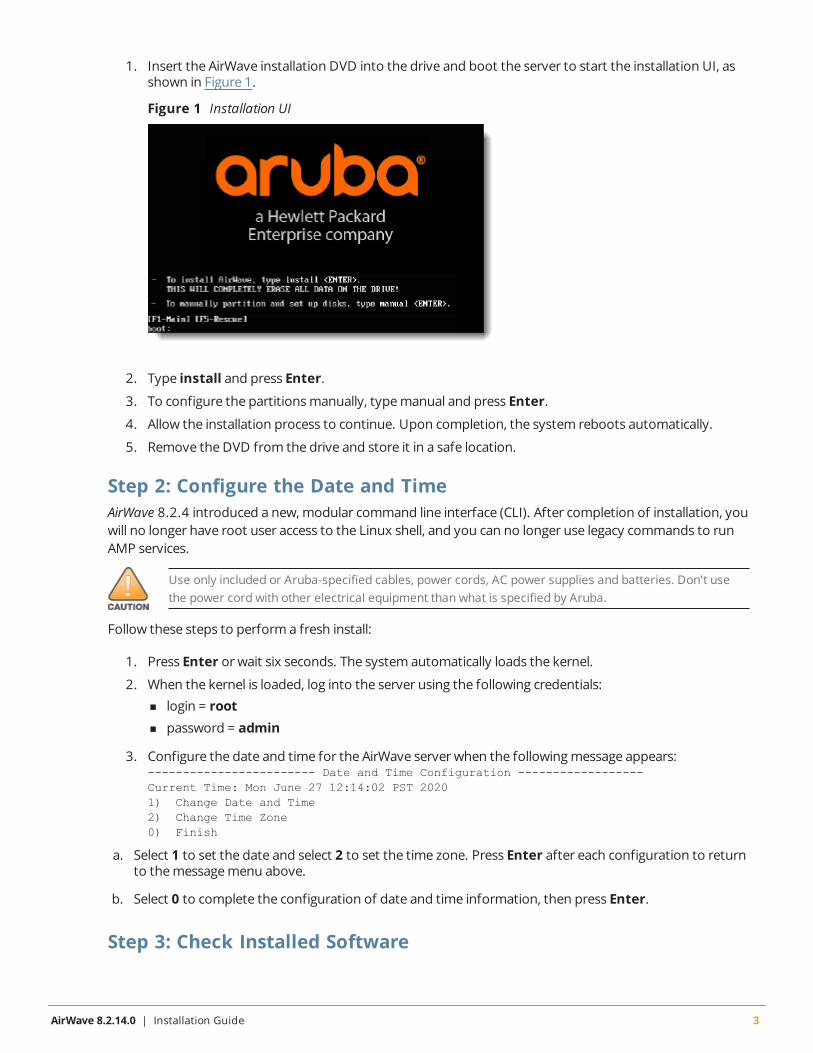
1. Insert the AirWave installation DVD into the drive and boot the server to start the installation UI, asshown in Figure 1.
Figure 1 Installation UI
2. Type install and press Enter.
3. To configure the partitionsmanually, typemanual and press Enter.
4. Allow the installation process to continue. Upon completion, the system reboots automatically.
5. Remove theDVD from the drive and store it in a safe location.
Step 2: Configure the Date and TimeAirWave 8.2.4 introduced a new,modular command line interface (CLI). After completion of installation, youwill no longer have root user access to the Linux shell, and you can no longer use legacy commands to runAMP services.
Use only included or Aruba-specified cables, power cords, AC power supplies and batteries. Don't usethe power cord with other electrical equipment than what is specified by Aruba.
Follow these steps to perform a fresh install:
1. Press Enter orwait six seconds. The system automatically loads the kernel.
2. When the kernel is loaded, log into the server using the following credentials:n login = rootn password = admin
3. Configure the date and time for the AirWave server when the followingmessage appears:------------------------ Date and Time Configuration ------------------Current Time: Mon June 27 12:14:02 PST 20201) Change Date and Time2) Change Time Zone0) Finish
a. Select 1 to set the date and select 2 to set the time zone. Press Enter after each configuration to returnto themessagemenu above.
b. Select 0 to complete the configuration of date and time information, then press Enter.
Step 3: Check Installed Software
AirWave 8.2.14.0 | Installation Guide 3

The installer automatically checks for an earlier version of AirWave. If your server has an earlier version ofAirWave installed, you'll see amessage that asks you to reinstall AirWave.
This action erases the current database, including all historical information. To ensure that the AMPdatabase is backed up prior to reinstallation, answer n at the prompt and contact your Value AddedReseller or Aruba support.
Wait for the installer to check that the database is up and running the current version.
Step 4: Create the Recovery UserDuring this step, AirWave configures the AMP CLI while creating the recover user account. At the prompt,enter a user name for the recovery user. If you don't enter a username, AirWave uses the default recoveryuser, called "amprecovery".
You can change the password later from the AMP CLI by selecting 5 to open the Users menu, then 2-2to change the CLI user password for the "amprecovery" user. For more information, refer to theAirWave 8.2.14.0 User Guide.
Step 5: Create the Admin UserAt the prompt, enter a user name and password for the admin CLI user account. If you don't enter a username, AirWave uses the default admin user, called "ampadmin".
n You can change the password later from the AMP CLI by selecting 5 to open the Users menu, then 2-1 to change the CLI user password for the "ampadmin" user. For more information, refer to theAirWave 8.2.14.0 User Guide.
n Save your user name and password somewhere safe because you'll need them to log in to the CLI.
Step 6: Configure the NetworkIf the installer only detects one interface, it will call that interface eth0. The following example shows how toconfigure the default eth0 interface. If you want to configure additional interfaces, repeat this step for eachinterface.
For networks using a Gen-10 Central On-Premises server, configuration on a 10G interface is notsupported if an external 10G NIC(PCIe) is present. Please ensure Ethernet configuration is done on 1Ginterface.
Connect the following cables to the correct ports based on the figure below:
n Connect an Ethernet cable to the iLO port and to the switch which has DHCP IP.
n Connect another Ethernet cable to the eno1 port which is the Ethernet port.
n Connect amonitor to the VGA port on the server to see the iLO IP Address.
n Connect a key board to the server to setup the server.
n Once the server is powered on and the cables connected to iLO and eno1, reboot the server using the power
4 AirWave 8.2.14.0 | Installation Guide

button or unplug and plug the power cable. Themonitor displays the iLO IP address assigned by theDHCPserver.
Following network interfaces are supported:
Enter the IPv4 static IP address, subnet mask, and gateway addresses when the followingmessage appears:AirWave must be configured with a static IP.Here are the ethernet interfaces with hardware present:
1. eth0 default 08:df:37:c4:57:b02. eth1 08:df:37:c4:57:b13. eth2 08:df:37:c4:57:b24. eth3 08:df:37:c4:57:b35. eth4 48:df:37:c4:57:b06. eth5 48:df:37:c4:57:b8q. Quit
Which interface shall we configure?
a. Select 1 and press Enter.------ Network Interface Configuration for eth0 -----
1) IPv4 Address : xxx.xxx.xxx.xxx2) IPv4 Netmask : xxx.xxx.xxx.xxx3) IPv4 Gateway : xxx.xxx.xxx.xxx4) IPv6 Address (optional) : xxx.xxx.xxx.xxx5) IPv6 Gateway (optional) : xxx.xxx.xxx.xxx6) Primary DNS : xxx.xxx.xxx.xxx7) Secondary DNS : xxx.xxx.xxx.xxx8) Set as default interface : y9) Commit Changes0) Exit (discard changes)
b. Select 1 to enter the network information, then press Enter.
c. Select 2 to enter the subnet mask, then press Enter.
d. Select 3 to enter the gateway, then press Enter.
e. Select 6 to enter the primary DNS address, then press Enter.
f. Select 8 to set the default interface, then press Enter.
g. To commit the changes, type 9 and then press Enter. To discard the changes, type 0 and then pressEnter.
h. To restart the network with the configured settings, type y.
Step 7: Generate an SSL CertificateTo generate the SSL certificate for the AirWave server:
n If AirWave does not have a valid host name on the network, typen.n If AirWave has a valid host name on the network, type y and enter the fully qualified domain name for the
AirWave server (for example,myserver.example.com)
AirWave 8.2.14.0 | Installation Guide 5
After installing AirWave, you can install a new SSL certificate, or generate a CSR to install a signedcertificate from the AMP CLI.
Step 8: Complete the InstallationUpon completion of all previous steps, the followingmessage appears.CONGRATULATIONS! AMP is configured properly.To access the AMP web console, browse to https://<IP Address>Login with the following credentials:Username: adminPassword: [User-provided password from above for 'ampadmin' user]
Once you log out, the root user will be disabled. Subsequently, youmust use the ampadmin usergenerated during the software installation to log in to the CLI.
n To view the Phase 1 installation log file, type cat /root/install.log.n To view the Phase 2 installation log file, type cat /root/amp-install.log.
Install AirWave on a Virtual MachineThe following sections provide information to help you installAirWave on VMware® ESX(i).
n VMware Requirements
n Creating a VMware Virtual Machine
VMware RequirementsAirWave supports VMware ESX(i) 6.5 and later. To be sure that enough resources are allocated to the virtualmachine, consult the AirWave 8.2.11.0 Server Sizing Guide.
If your VM host is hosting other instances, ensure that the AirWave instance has the highest priority. A virtualSCSI disk is recommended over IDE.
Creating a VMware Virtual MachineThe VMware Infrastructure Client provides awizard to create a new virtual machine. The resulting virtualmachine acts like physical host, in which you install the AirWave software.
The recommended OS is CentOS 7.6 or later (64-bit). Refer to the AirWave 8.2.11.0 Server Sizing Guide formemory and storage requirements.
To create a virtual machine:
1. From the VMware Infrastructure Client, select Create a new virtual machine.
2. Select Next, and then select Typical > Virtual Machine Configuration.
3. Name your virtual machine (for example, AirWave), and then click Next.
4. Select an available datastorewith sufficient space for the number of APs that your AirWavewillmanage, choosing the right server hardware to comply with the hardware requirements. Click Next.
5. Select the Linux radio button, and then select theOS. Click Next.
6. Select the appropriate number or processors, and then specify theminimum virtual RAM.
7. Accept the VMware default virtual network adapter, and click Next.
6 AirWave 8.2.14.0 | Installation Guide

8. Allocate a virtual disk large enough to contain the AirWave operating system, application, and datafiles.
9. Review the virtual machine settings, and then click Finish when you are done.
Install AirWave Using Hyper-VThe following sections provide information to help you install AirWave on a virtual machine running a Hyper-V:
n Hyper-V Requirements
n Adding theHyper-V Network Adapter
Hyper-V RequirementsAirWave supports using Hyper-V Manager on:
n Windows Server 2003 or later.
n Windows Server 2012 R2. Youmight experience boot issues usingWindows Server 2012 Standard (not R2).
AirWave does not support a Hyper-V Generation 2 VM
Adding the Hyper-V Network AdapterWhen you create the virtual machine in Hyper-V Manager, youmust configure a virtual network adapter inorder to install AirWave. Hyper-V provides two virtual network adapters: a default and a legacy adapter (forgeneration 1 virtual machines). If you use the legacy network adapter to establish networking, youmightexperience connectivity issues even though there are no resource constraints on the server.
To add theHyper-V network adapter:
1. Open Hyper-V Manager, then connect to theHyper-V host.
2. Right-click the virtual machine and select Settings.
AirWave 8.2.14.0 | Installation Guide 7

3. From the Add Hardwarewindow, select Network Adapter then click Add.
4. View the adapter properties, and click OK.
5. Click OK.
Install AirWave on a KVM Virtual MachineThe following sections provide information to help you install AirWave on a KVM:
n KVM Requirements
n Creating a KVM Virtual Machine
KVM RequirementsThe recommended OS is CentOS 7.6 or later (64-bit). Refer to the AirWave 8.2.11.0 Server Sizing Guide formemory and storage requirements.
Creating a KVM Virtual MachineTo create a KVM virtual machine:
1. On the local host, type virt manager to run theNew VMwizard.
2. Type a name for the virtual machine, select Local install media (ISO image or CDROM), and thenclick Forward.
3. Click Browse to find the ISO image. Select Linux and Red Hat Enterprise Linux 7 from the drop-downmenus, then click Forward.
8 AirWave 8.2.14.0 | Installation Guide

4. Assignmemory to the KVM and CPUs, then click Forward.
5. Assign disk storage, enable theAllocate entire disk now option, and then click Forward.
6. Before you start the installation, under the Advanced options, select theHost device and enter thefixedMAC address of the bridge (typically br0) into the text box.
7. Click Finish. The Virtual MachineManager creates the virtual machine and opens the AirWave console.
AirWave 8.2.14.0 | Installation Guide 9

Upgrade to Airwave 8.2.12.0 in Aruba Central (on-premises)ServerIf you are performing a fresh installation of AirWave 8.2.12.0 on Aruba Central (on-premises) servers,interfaces on the Aruba Central (on-premises) server will always be in the following order:
n eth0- eth3 – 1G interfaces
n eth4 and eth5 - 10G interfaces
If you are upgrading from a prior AirWave version to AirWave 8.2.12.0 on Aruba Central (on-premises)servers, the followingmessage is displayed.
Perform the following steps on Aruba Central (on-premises) server Gen10 server with both 1G and 10Ginterfaces only.
1. Run upgrade to AirWave 8.2.14.0 8.2.12.0.
2. Post upgrade, run intfinorder, reboot, and configure network setup by entering the following optionsin AMP CLI:
a. Enter option 8 - Advanced.
b. Enter option 1 - Custom Commands.
c. Enter option 2 - Enter Commands.
d. This will run the enter commands, execute $ intfinorder
e. Click y when prompted with Do you want to continue (y/N)? : message.
10 AirWave 8.2.14.0 | Installation Guide

3. Type exit and navigate to the CLI prompt and select option 4 – System and then, select option 4 -Reboot System to reboot the system.
4. If you lose connection to Aruba Central (on-premises) server post step 3, login to the ILO/console ofthe server and navigate to the CLI prompt, and select option 3 – configuration and option 1-Configure Network Settings.
5. Select the proper network interface and configure the IP address for your AMP and commit thechanges. The AMP should be reachable with the IP address configured.This will enable reliable ordering of interfaces in upgrade scenario that is, eth0 - eth3 mapped to1Ginterfaces and eth4 -eth5 mapped to 10G interfaces at the end. Once interfaces are set in properorder, future AMP upgrades will be smooth. The intfinorder script should be runmandatorily from theAMPCLI menu as described above for users using Aruba Central (on-premises) server after upgradingto 8.2.12 build.
Getting StartedWhen you start using AirWave for the first time, perform the following steps:
AirWave 8.2.14.0 | Installation Guide 11

n Log in to theWebUI
n Change the Language
n Install the License
n Change theDefault User
Refer to the AirWave 8.2.14.0 User Guide for complete details on configuring AirWave.
Log in to the WebUIAirWave comeswith a default user account with the user name "admin" and password "admin". In order tolog in to theWebUI for the first time, you have to log in as the default user.
To access the AirWaveWebUI:
1. Enter the AirWave IP address (IPv4 or IPv6) or hostname in the address bar of any browser.
2. Enter the default user name and password: admin and <ampadmin password>.
3. Click Log In.
Change the LanguageYou can change the language of the buttons, menus, and tabs in AirWave. You'll see the available languages atthe bottomof the Login window. Look for the language that you want and select it.
If you want to change a language again, youmust log out of AirWave and reopen the Login window.
Install the LicenseThe first page to appear after you initially log in is the Home > Overview page. If you havemore than onelicense to install, repeat this procedure for each license.
12 AirWave 8.2.14.0 | Installation Guide

AirWave pages are protected via SSL. Some browsers will display a confirmation dialog for your self-signed certificate. Signing your certificate will prevent this dialog from displaying.
To install the AirWave license:
1. On the License page, paste the AirWave license key you received into the license field on this page.
2. Cick Save.
3. In the AirWave licensing agreement, click I Accept to agree to the license terms and apply the licensekey.
Change the Default UserFor security reasons, it's a good idea to change the default user name and password. You can do this fromthe AMP Setup > Users page. Refer to the procedure Creating AirWaveUser Roles in the AirWave 8.2.14.0User Guide for additional information.
Appendix A: Communication Protocols and PortsThe following table itemizes the communication protocols and ports necessary for AirWave to communicatewith wireless LAN infrastructure devices, including access points (APs), controllers, routers, switches, andRADIUS servers. Assign or adjust port usage on the network administration system as required to supportthese components.
Port Type Protocol DescriptionDataFlowDirection
Device Type
21 TCP FTP Firmware distribution > APs or controllers
22 TCP SSH Configure devices > APs or controllers
22 TCP SSH Configure AirWave fromthe CLI
< Laptop or workstation
22 TCP VTUN Support connection(optional)
> Aruba supports home office
22 TCP SCP Transfer configurationfiles or FW
< APs or controllers
23 TCP Telnet Configure devices > APs or controllers
23 TCP VTUN Support connection(Optional)
> Aruba supports home office
25 TCP SMTP Support email (optional) > Aruba supports email server
49 UDP TACACS AirWave AdministrativeAuthentication
> Cisco TACACS+
53 UDP DNS DNS lookup from AirWave > DNS Server
Table 3: AirWave Protocol and Port Chart
AirWave 8.2.14.0 | Installation Guide 13

Port Type Protocol DescriptionDataFlowDirection
Device Type
69 UDP TFTP Transfer configurationfiles or FW
< APs or controllers
80 TCP HTTP Configure devices > Legacy APs
80 TCP VTUN Support connection(optional)
> Aruba supports home office
161 UDP SNMP Get and Set operations > APs or controllers
162 UDP SNMP Traps from devices < APs or controllers
162 UDP SNMP Traps from AirWave > NMS
443 TCP HTTPS Webmanagement < Laptop or workstation
443 TCP HTTPS WLSE polling > WLSE
443 TCP VTUN Support connection(optional)
> Aruba supports home office
1701 TCP HTTPS AP and rogue discovery > WLSE
1741 TCP HTTP WLSE polling > WLSE
1812 UDP RADIUSAuth
Authenticate & authorizeAirWave administrativeusers on a RADIUS server.
> RADIUS auth server
1813 UDP RADIUSaccounting
Retrieve user names forauthenticatedWLANclients from NAS (captiveportal, controller,autonomous AP). Onlyused when user namesare not available in theSNMPMIB of a controlleror autonomous AP.
< RADIUS accounting client
2002 TCP HTTPS Retrieve clientauthentication info
> ACS
5050 UDP RTLS Real Time Location Feed < Aruba thin APs
8211 UDP PAPI Real Time Feed (AMON) < > WLAN controllers
ICMP Ping Probe > APs or controllers
14 AirWave 8.2.14.0 | Installation Guide

Contacting Support
Main Site arubanetworks.com
Support Site asp.arubanetworks.com
Airheads Social Forums and KnowledgeBase
community.arubanetworks.com
North American Telephone 1-800-943-4526 (Toll Free)1-408-754-1200
International Telephone arubanetworks.com/support-services/contact-support/
Software Licensing Site lms.arubanetworks.com
End-of-life Information arubanetworks.com/support-services/end-of-life/
Security Incident Response Team (SIRT) Site: arubanetworks.com/support-services/security-bulletins/Email: [email protected]
15 AirWave 8.2.14.0 | Installation Guide
www.arubanetworks.com6280 America Center Drive
San Jose, CA 95002
© Copyright 2020 Hewlett Packard Enterprise Development LP Phone: 1-800-WIFI-LAN (+800-943-4526)Fax 408.752.0626