Adding Multimedia Content to Web Pages - Amazon S3
32
HTML 8 Objectives You will have mastered the material in this chapter when you can: Describe the benefits and limitations • of multimedia in Web sites Identify audio and video formats • Describe parameters for embedded • multimedia Add an audio clip to a Web page • Add a video clip to a Web page • Adding Multimedia Content to Web Pages Copyright 2010 Cengage Learning. All Rights Reserved. May not be copied, scanned, or duplicated, in whole or in part. Due to electronic rights, some third party content may be suppressed from the eBook and/or eChapter(s). Editorial review has deemed that any suppressed content does not materially affect the overall learning experience. Cengage Learning reserves the right to remove additional content at any time if subsequent rights restrictions require it.
-
Upload
khangminh22 -
Category
Documents
-
view
1 -
download
0
Transcript of Adding Multimedia Content to Web Pages - Amazon S3
HTML
8
ObjectivesYou will have mastered the material in this chapter when you can:
Describe the benefi ts and limitations • of multimedia in Web sites
Identify audio and video formats•
Describe parameters for embedded • multimedia
Add an audio clip to a Web page•
Add a video clip to a Web page•
Adding Multimedia Content to Web Pages
Copyright 2010 Cengage Learning. All Rights Reserved. May not be copied, scanned, or duplicated, in whole or in part. Due to electronic rights, some third party content may be suppressed from the eBook and/or eChapter(s).
Editorial review has deemed that any suppressed content does not materially affect the overall learning experience. Cengage Learning reserves the right to remove additional content at any time if subsequent rights restrictions require it.
HTML
HTML 362
IntroductionIn previous chapters, you used HTML tags and CSS code to change the way a Web page is displayed in a Web browser. You learned how to collect data from Web site visitors using Web page forms. You also learned advanced CSS techniques to create drop-down menus and pop-ups. In this chapter, you learn how to insert multimedia content in the form of audio and video clips.
Project — Adding Multimedia to a History Class Web Site In your U.S. History class, you are studying the Berlin Wall. Several U.S. Presidents made famous speeches at the Brandenburg Gate of the Berlin Wall. Your class created a Web site that describes the historical signifi cance of two of these speeches, one by President Kennedy, and one by President Reagan. Your instructor, Ms. Amy Sirko, would like you to enhance that Web site to make these speeches as “real” as possible.
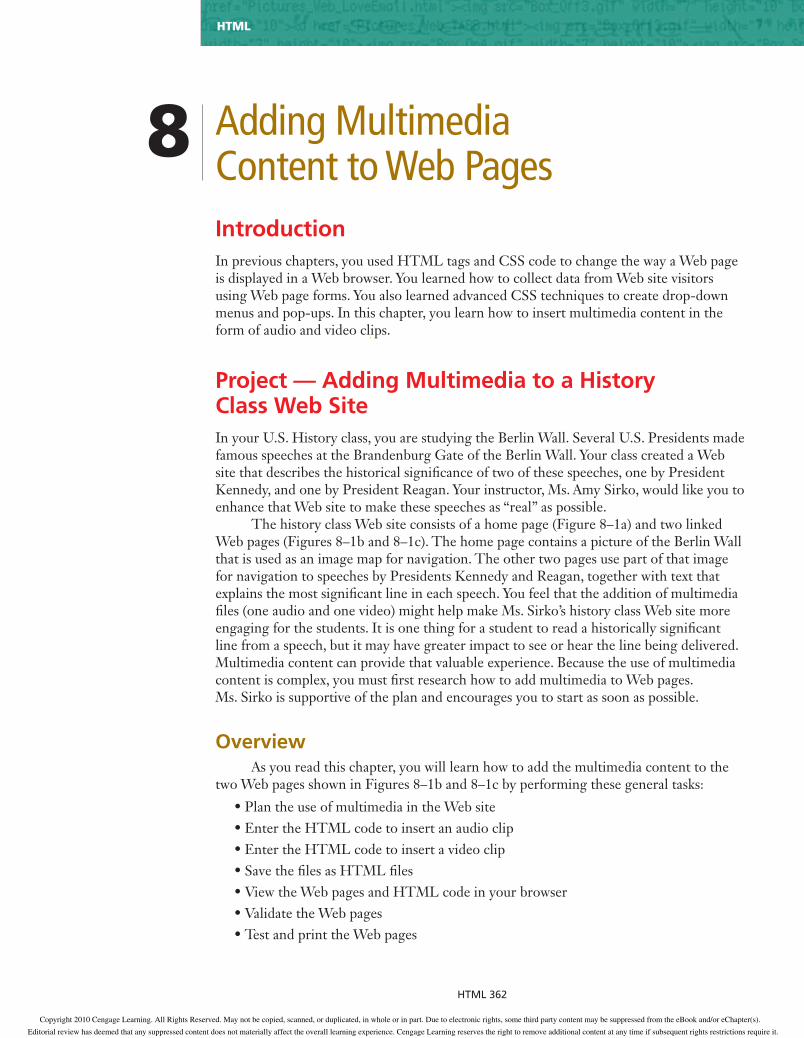
The history class Web site consists of a home page (Figure 8–1a) and two linked Web pages (Figures 8–1b and 8–1c). The home page contains a picture of the Berlin Wall that is used as an image map for navigation. The other two pages use part of that image for navigation to speeches by Presidents Kennedy and Reagan, together with text that explains the most signifi cant line in each speech. You feel that the addition of multimedia fi les (one audio and one video) might help make Ms. Sirko’s history class Web site more engaging for the students. It is one thing for a student to read a historically signifi cant line from a speech, but it may have greater impact to see or hear the line being delivered. Multimedia content can provide that valuable experience. Because the use of multimedia content is complex, you must fi rst research how to add multimedia to Web pages. Ms. Sirko is supportive of the plan and encourages you to start as soon as possible.
OverviewAs you read this chapter, you will learn how to add the multimedia content to the
two Web pages shown in Figures 8–1b and 8–1c by performing these general tasks:
Plan the use of multimedia in the Web site• Enter the HTML code to insert an audio clip• Enter the HTML code to insert a video clip• Save the fi les as HTML fi les• View the Web pages and HTML code in your browser• Validate the Web pages• Test and print the Web pages•
8 Adding Multimedia Content to Web Pages
Copyright 2010 Cengage Learning. All Rights Reserved. May not be copied, scanned, or duplicated, in whole or in part. Due to electronic rights, some third party content may be suppressed from the eBook and/or eChapter(s).
Editorial review has deemed that any suppressed content does not materially affect the overall learning experience. Cengage Learning reserves the right to remove additional content at any time if subsequent rights restrictions require it.
HTML
HTML 363
Figure 8–1
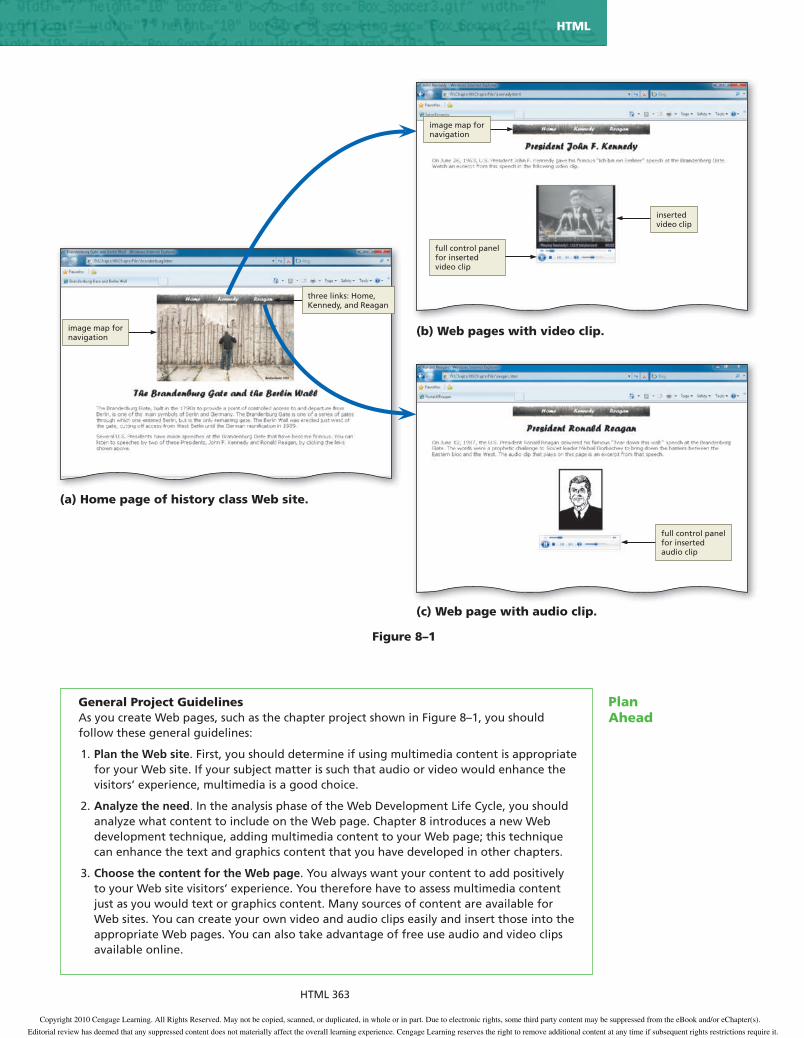
General Project GuidelinesAs you create Web pages, such as the chapter project shown in Figure 8–1, you should follow these general guidelines:
1. Plan the Web site. First, you should determine if using multimedia content is appropriate for your Web site. If your subject matter is such that audio or video would enhance the visitors’ experience, multimedia is a good choice.
2. Analyze the need. In the analysis phase of the Web Development Life Cycle, you should analyze what content to include on the Web page. Chapter 8 introduces a new Web development technique, adding multimedia content to your Web page; this technique can enhance the text and graphics content that you have developed in other chapters.
3. Choose the content for the Web page. You always want your content to add positively to your Web site visitors’ experience. You therefore have to assess multimedia content just as you would text or graphics content. Many sources of content are available for Web sites. You can create your own video and audio clips easily and insert those into the appropriate Web pages. You can also take advantage of free use audio and video clips available online.
Plan Ahead
(a) Home page of history class Web site.
(c) Web page with audio clip.
(b) Web pages with video clip.
three links: Home,Kennedy, and Reagan
image map fornavigation
image map fornavigation
inserted video clip
full control panel for inserted video clip
full control panel for inserted audio clip
Copyright 2010 Cengage Learning. All Rights Reserved. May not be copied, scanned, or duplicated, in whole or in part. Due to electronic rights, some third party content may be suppressed from the eBook and/or eChapter(s).
Editorial review has deemed that any suppressed content does not materially affect the overall learning experience. Cengage Learning reserves the right to remove additional content at any time if subsequent rights restrictions require it.

HTML 364 HTML Chapter 8 Adding Multimedia Content to Web Pages
Using MultimediaThe popularity of the World Wide Web (the Web) is due in part to the ability to view Web pages that include graphic images, audio, and video. These additions can be wonder-ful for a Web site and give the users more enhanced and effective browsing experiences. Sometimes, however, the addition of multimedia can distract from the Web site message. Always remember the purpose of the Web site. If the multimedia content enhances that purpose, it should be included. If the multimedia content distracts from the purpose of the Web site, then you should reconsider using it.
Multimedia is defi ned as the combination of text, sound, and video to express an idea or convey a message. In the past, it was somewhat prohibitive to use multimedia on the Web. Most people dialed up to connect to the Internet, so the bandwidth (i.e., the capacity for data transfer) was not there to accommodate the large fi les required for audio, video, and even some graphic images. The Web of yesterday was mostly text-based with a few background colors and small graphic images. Today, most people have broad-band Internet connections with a much greater capacity for data transfer. Multimedia Web pages that include large graphics, audio, and video are therefore common today.
Multimedia is used widely on Web pages. Many companies utilize videos to show potential customers new products or how to use their existing products. You may be able to review a medical procedure online before having the procedure done yourself. You can view clips of movies or hear segments of audio recordings from Web pages that pro-vide content in those formats. Podcasts, a series of audio or video clips that are released in a sequence, are becoming more prevalent in both academic and corporate settings. Additionally, some instructors rely on multimedia content to stress important aspects of a class. It is important to determine where multimedia content may enhance the learning or viewing experience. You do not want to divert your Web site visitors with distracting
(continued)
4. Determine the type of multimedia to incorporate into your Web pages. The type of multimedia that you select is based on the purpose of the content. If you want to provide background music, an audio clip is fi ne; there would be no need for a video clip in this instance. For more complex topics though, a video clip might be more effective. As an example, if you are explaining to someone where middle C is on the piano, a video clip is more appropriate. If you want to give someone the experience of hearing a speech that does not explain things in a “how to” approach, then an audio clip is acceptable.
5. Create or fi nd the multimedia content and insert it into the Web site. Once the analysis and design are complete, the Web developer creates or fi nds the appropriate multimedia content for the Web site. Again, consider free use content sources. Otherwise, developing multimedia content on your own might be a fun experience. Good Web development standard practices should be followed in the steps that you take to insert the multimedia.
6. Test all Web pages within the Web site. An important part of Web development is testing to assure that you are following XHTML standards. In this book, you use the World Wide Web Consortium (W3C) validator that allows you to test your Web page and clearly explains any errors you have. When testing, you should check all content for accuracy. Finally, all of the Web pages with multimedia content should be validated per the standard set throughout this book.
When necessary, more specifi c details concerning the above guidelines are presented at appropriate points in the chapter. The chapter also will identify the actions performed and decisions made regarding these guidelines during the creation of the Web page shown in Figure 8–1 on the previous page.
Plan Ahead
Copyright 2010 Cengage Learning. All Rights Reserved. May not be copied, scanned, or duplicated, in whole or in part. Due to electronic rights, some third party content may be suppressed from the eBook and/or eChapter(s).
Editorial review has deemed that any suppressed content does not materially affect the overall learning experience. Cengage Learning reserves the right to remove additional content at any time if subsequent rights restrictions require it.

Using Multimedia HTML 365
HTM
L C
hap
ter
8
multimedia. The Web site enhanced in this chapter is one based on historical information. To improve the user experience, you insert an audio clip and a video clip on two different Web pages. These clips enhance the content of each Web page nicely; they do not distract from the message.
This chapter provides an introduction to the use of multimedia in Web development. The chapter focuses on two different forms of multimedia: audio and video. Other multi-media formats exist, but are not covered in this chapter, including Java applets, Flash, and automated slideshows. The fi nished Web pages (Figure 8–2a and 8–2b) are more useful for the Web site visitors because they contain relevant audio and video clips that provide valuable multimedia content.
(a) Web page with video clip.
(b) Web page with audio clip.
Figure 8–2
video clip of president displays in full window mode
control panel provides access to all player functions
completed Web page contains Kennedy video clip
completed Web page contains Reagan audio clip
static picture of president used because this isaudio fi le only
playercontrols
Slideshows, Java, and FlashYou can easily create a slideshow from your pictures using most movie editing software. A Java applet is a program written in the Java programming language that can be included in a Web page. Adobe Flash is a popular multimedia platform not discussed in this chapter. Search the Web for more information on these formats.
BTW
Copyright 2010 Cengage Learning. All Rights Reserved. May not be copied, scanned, or duplicated, in whole or in part. Due to electronic rights, some third party content may be suppressed from the eBook and/or eChapter(s).
Editorial review has deemed that any suppressed content does not materially affect the overall learning experience. Cengage Learning reserves the right to remove additional content at any time if subsequent rights restrictions require it.
HTML 366 HTML Chapter 8 Adding Multimedia Content to Web Pages
Creating or Finding Multimedia FilesYou can obtain multimedia fi les by creating them yourself or fi nding fi les that are
already available. The good thing about creating your own multimedia fi les is that you do not have to be concerned with licensing agreements. The bad thing about creating your own multimedia fi les is that they may not be the same quality as those that are cre-ated professionally. You can create your own audio fi les using a microphone and software designed to edit digital fi les. Many software options are available today for audio creation and editing. If you do use any portion of fi les that have been professionally developed, be certain that you understand and apply all licensing requirements.
For video fi les, a digital camcorder allows you to create clips that can be used on a Web page. This is what has made video Web sites such as YouTube so popular. For the Windows environment, Windows Movie Maker is available on many new computers. MAGIX Movie Edit Pro software is another option that provides online support, blogs, newsletters, and access to free downloads of a variety of software. Corel VideoStudio has simple and more advanced menu system options that novice movie editors and professionals alike can utilize comfortably. Roxio Creator is another software option that allows you to create professional-quality videos. Many other software options for Windows offer free trial versions that can be used for several days or weeks.
For Mac users, iMovie is installed on most new computers and is an excellent option. DVD Studio Pro is another Mac option that provides support for all professional audio formats. Final Cut Studio gives you the fl exibility that you need for movie project work that you do individually or in collaboration with a team. Final Cut Studio allows you to have technical control together with creative options. Many other multimedia software products are available for the Mac operating system as well.
Adobe Premiere Elements is another highly rated software solution for movie editing that can be used on either the Mac or Windows operating systems. Adobe provides a frequently updated online library of templates and effects. As with many multimedia software products, Premier Elements provides the capability to edit as a novice or as a professional.
You might try downloading a free trial of the software, if available, and using it to edit a movie that you have made. You could even try a few different programs to see how they work. Most multimedia software operates in a similar fashion and has a user-friendly help utility that you can use to guide you through the process of editing. Most products also provide templates and effects that you can use to enhance the creative aspects of presenting multimedia.
To fi nd multimedia resources on the Web, search for “free audio or video.” Many Web sites contain these types of multimedia fi les. Again, be certain to understand and apply the license agreements that accompany any multimedia content that you fi nd on the Web.
Embedded vs. External MultimediaEmbedding media is a similar in concept to inserting inline images. The embedded
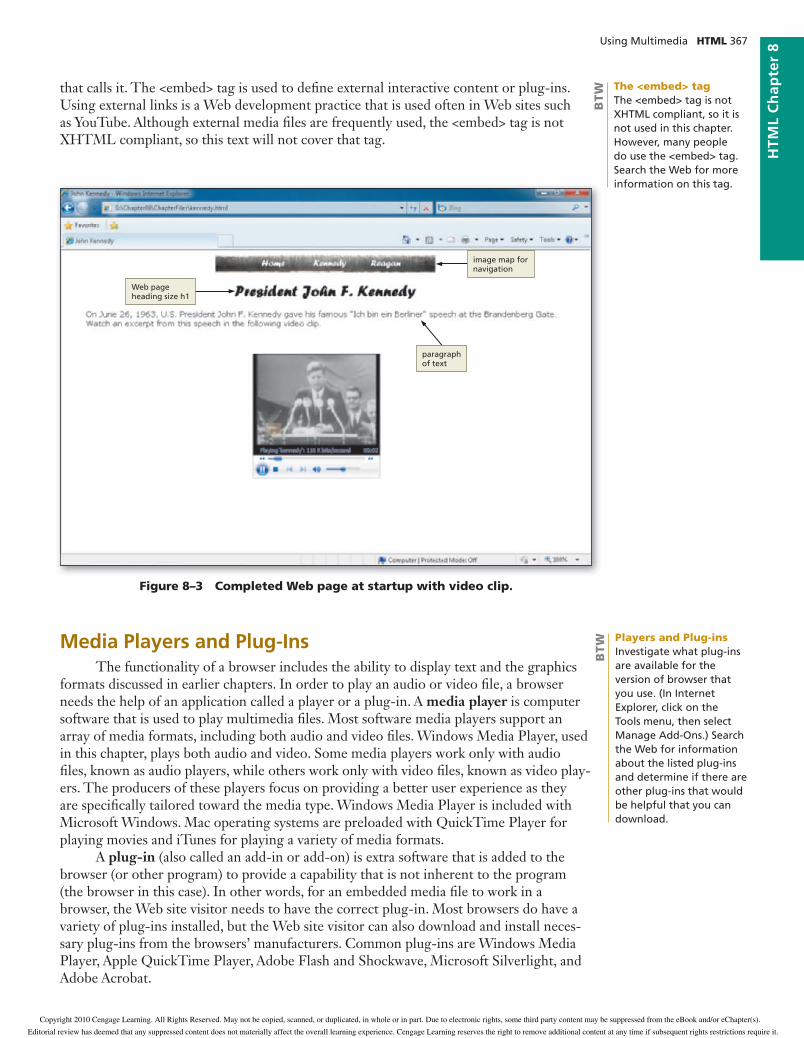
media fi les appear within the Web page and users have access to the audio or video player controls right on the page. Because the media fi le is embedded directly into the Web page, you can complement the audio or video clip resource with surrounding text or graphical images. The <object> tag is used to insert embedded content. Figure 8–3 shows how the embedded video clip of President Kennedy’s speech is supplemented with a heading, text, and a menu bar.
External media fi les are accessed through a link that your Web site visitor clicks. This gives your visitors the option of downloading or not downloading the fi le. Unlike embedded media, the external media is displayed out of context with the Web page
Multimedia SourcesSearch the Web for sources that you can use to download free use audio and video clips. Determine a way to keep track of the site, the specifi c licensing language, and the clips that you download. This is a great way to make sure that you follow the guidelines required by that Web site.
BTW
Multimedia SoftwareMany software products are available to make and edit audio and video content. Search for the names of products that you can use. Price levels vary, but you may be able to fi nd free trials that you can download.
BTW
Copyright 2010 Cengage Learning. All Rights Reserved. May not be copied, scanned, or duplicated, in whole or in part. Due to electronic rights, some third party content may be suppressed from the eBook and/or eChapter(s).
Editorial review has deemed that any suppressed content does not materially affect the overall learning experience. Cengage Learning reserves the right to remove additional content at any time if subsequent rights restrictions require it.
Using Multimedia HTML 367
HTM
L C
hap
ter
8
that calls it. The <embed> tag is used to defi ne external interactive content or plug-ins. Using external links is a Web development practice that is used often in Web sites such as YouTube. Although external media fi les are frequently used, the <embed> tag is not XHTML compliant, so this text will not cover that tag.
Media Players and Plug-Ins The functionality of a browser includes the ability to display text and the graphics
formats discussed in earlier chapters. In order to play an audio or video fi le, a browser needs the help of an application called a player or a plug-in. A media player is computer software that is used to play multimedia fi les. Most software media players support an array of media formats, including both audio and video fi les. Windows Media Player, used in this chapter, plays both audio and video. Some media players work only with audio fi les, known as audio players, while others work only with video fi les, known as video play-ers. The producers of these players focus on providing a better user experience as they are specifi cally tailored toward the media type. Windows Media Player is included with Microsoft Windows. Mac operating systems are preloaded with QuickTime Player for playing movies and iTunes for playing a variety of media formats.
A plug-in (also called an add-in or add-on) is extra software that is added to the browser (or other program) to provide a capability that is not inherent to the program (the browser in this case). In other words, for an embedded media fi le to work in a browser, the Web site visitor needs to have the correct plug-in. Most browsers do have a variety of plug-ins installed, but the Web site visitor can also download and install neces-sary plug-ins from the browsers’ manufacturers. Common plug-ins are Windows Media Player, Apple QuickTime Player, Adobe Flash and Shockwave, Microsoft Silverlight, and Adobe Acrobat.
Figure 8–3 Completed Web page at startup with video clip.
image map for navigation
paragraph of text
Web page heading size h1
Players and Plug-insInvestigate what plug-ins are available for the version of browser that you use. (In Internet Explorer, click on the Tools menu, then select Manage Add-Ons.) Search the Web for information about the listed plug-ins and determine if there are other plug-ins that would be helpful that you can download.
BTW
The <embed> tagThe <embed> tag is not XHTML compliant, so it is not used in this chapter. However, many people do use the <embed> tag. Search the Web for more information on this tag.
BTW
Copyright 2010 Cengage Learning. All Rights Reserved. May not be copied, scanned, or duplicated, in whole or in part. Due to electronic rights, some third party content may be suppressed from the eBook and/or eChapter(s).
Editorial review has deemed that any suppressed content does not materially affect the overall learning experience. Cengage Learning reserves the right to remove additional content at any time if subsequent rights restrictions require it.

HTML 368 HTML Chapter 8 Adding Multimedia Content to Web Pages
Internet Explorer (used in this book) utilizes proprietary ActiveX controls. When IE encounters a multimedia fi le, it searches for the appropriate ActiveX control. If it can-not fi nd it, users are most often asked if they want to install that control. Some browsers direct users to the Web site from which they can download the required plug-in. A sug-gestion to Web developers is to utilize common formats, such as .wmv, .mp4, .m4u, .fl v, and .mp3. It is also a good idea to let your users know what format is being used. If the plug-in is not installed, IE generally provides the capability to install it. Many Web sites today also provide a link to the appropriate manufacturer for an ActiveX control needed to play the fi le.
As you will see in the following section, the various audio and video formats can be played on a variety of players. For embedded multimedia, it is good to use a format supported by multiple players.
Audio and Video File FormatsA variety of audio and video formats can be used on the Web. Table 8–1 lists the
most commonly used audio fi le formats, and Table 8–2 lists common video fi le formats. Audio fi les that are used on the Web often utilize fi le compression techniques. This reduces the size of the fi le, but it can also diminish the sound quality. Uncompressed audio formats included in Table 8–1 are: AIFF, AU, and WAV. In this project, you insert an .mp3 fi le.
Table 8–1 Common Audio File Formats
Format File Extension Description
AIFF .aiff The standard audio fi le format used by Apple• Limited to synthesizers and music fi les• Can be much smaller in size than other formats•
AU .au The standard audio fi le format used by Sun, • UNIX, and Java Can be compressed•
MIDI.mid.rmi
Musical Instrument Digital Interface (MIDI)• Limited to synthesizers and music fi les• Can be much smaller in size than other formats•
MP3 .mp3 One of the most popular formats for music storage• Compresses fi les to approximately 1/10 the size of uncompressed fi les•
MP4 .mp4 Created on basis of the QuickTime format; used for audio and video• Is a quicker, faster, high-quality media• Can be used with QuickTime Player, Adobe Flash Player, or RealPlayer•
RealAudio.ra.ram
Designed for streaming audio over the Internet• Sound quality not as good as other formats•
WAV .wav Standard audio format for Windows• Commonly used for storing uncompressed CD-quality sound fi les• Compression is available to reduce fi le size•
The video format that you choose depends on the visitors you expect to visit your Web site. Are most of your Web site visitors users of Macs or PCs? What is the level of computer (e.g., amount of RAM or cache) and connection speed (e.g., broadband) for your average user? In this project, you insert a .wmv fi le.
Updating or Installing Plug-insYour Web site visitors may not have the plug-ins that are required to play the multimedia content on your Web site. Many Web sites discuss how to best provide users with access to such software.
BTW
Copyright 2010 Cengage Learning. All Rights Reserved. May not be copied, scanned, or duplicated, in whole or in part. Due to electronic rights, some third party content may be suppressed from the eBook and/or eChapter(s).
Editorial review has deemed that any suppressed content does not materially affect the overall learning experience. Cengage Learning reserves the right to remove additional content at any time if subsequent rights restrictions require it.
Adding an Audio File to a Web Page HTML 369
HTM
L C
hap
ter
8
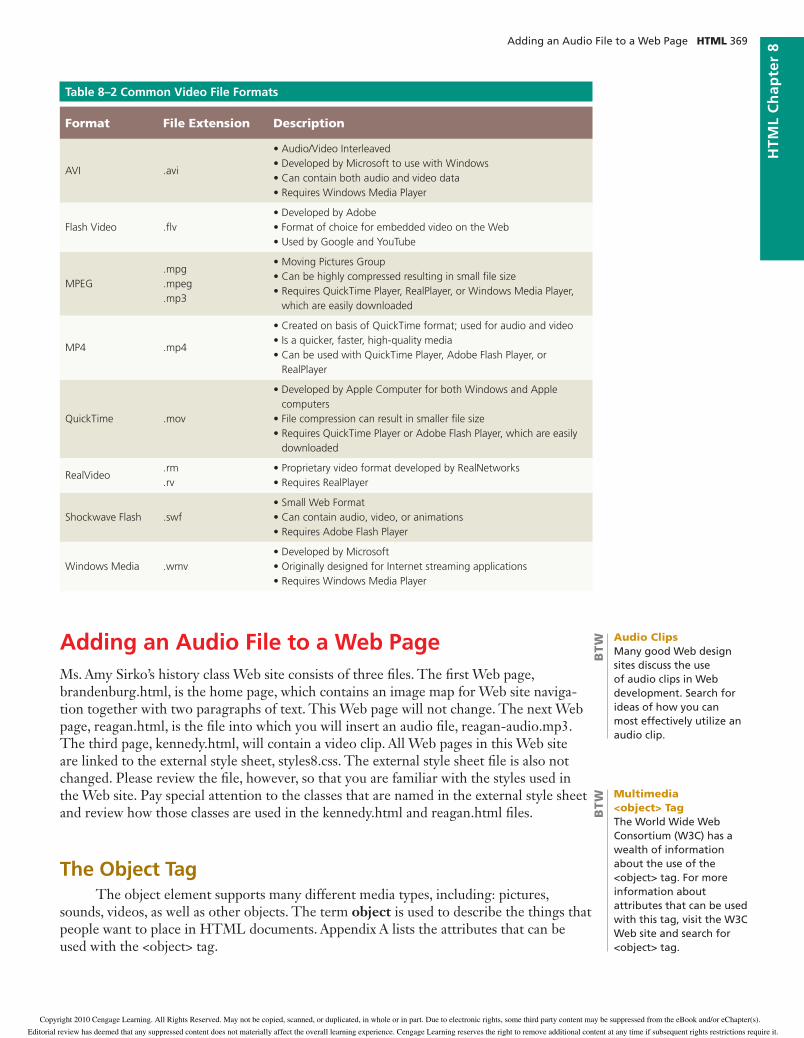
Table 8–2 Common Video File Formats
Format File Extension Description
AVI .avi
Audio/Video Interleaved• Developed by Microsoft to use with Windows• Can contain both audio and video data• Requires Windows Media Player•
Flash Video .fl v Developed by Adobe• Format of choice for embedded video on the • Web Used by Google and YouTube •
MPEG.mpg.mpeg.mp3
Moving Pictures Group• Can be highly compressed resulting in small fi le size• Requires QuickTime Player, RealPlayer, or Windows Media Player, •which are easily downloaded
MP4 .mp4
Created on basis of QuickTime format; used for audio and video• Is a quicker, faster, high-quality media• Can be used with QuickTime Player, Adobe Flash Player, or •RealPlayer
QuickTime .mov
Developed by Apple Computer for both Windows and Apple •computers File compression can result in smaller fi le size• Requires QuickTime Player or Adobe Flash Player, which are easily •downloaded
RealVideo.rm.rv
Proprietary video format developed by RealNetworks• Requires RealPlayer•
Shockwave Flash .swf Small Web Format• Can contain audio, video, or animations• Requires Adobe Flash Player•
Windows Media .wmv Developed by Microsoft• Originally designed for Internet streaming applications• Requires Windows Media Player•
Adding an Audio File to a Web PageMs. Amy Sirko’s history class Web site consists of three fi les. The fi rst Web page, brandenburg.html, is the home page, which contains an image map for Web site naviga-tion together with two paragraphs of text. This Web page will not change. The next Web page, reagan.html, is the fi le into which you will insert an audio fi le, reagan-audio.mp3. The third page, kennedy.html, will contain a video clip. All Web pages in this Web site are linked to the external style sheet, styles8.css. The external style sheet fi le is also not changed. Please review the fi le, however, so that you are familiar with the styles used in the Web site. Pay special attention to the classes that are named in the external style sheet and review how those classes are used in the kennedy.html and reagan.html fi les.
The Object TagThe object element supports many different media types, including: pictures,
sounds, videos, as well as other objects. The term object is used to describe the things that people want to place in HTML documents. Appendix A lists the attributes that can be used with the <object> tag.
Audio ClipsMany good Web design sites discuss the use of audio clips in Web development. Search for ideas of how you can most effectively utilize an audio clip.
BTW
Multimedia <object> TagThe World Wide Web Consortium (W3C) has a wealth of information about the use of the <object> tag. For more information about attributes that can be used with this tag, visit the W3C Web site and search for <object> tag.
BTW
Copyright 2010 Cengage Learning. All Rights Reserved. May not be copied, scanned, or duplicated, in whole or in part. Due to electronic rights, some third party content may be suppressed from the eBook and/or eChapter(s).
Editorial review has deemed that any suppressed content does not materially affect the overall learning experience. Cengage Learning reserves the right to remove additional content at any time if subsequent rights restrictions require it.

HTML 370 HTML Chapter 8 Adding Multimedia Content to Web Pages
To insert the audio clip, you will use the same classid (the Windows Media Player) that you will use for the video clip. The <object> statement used for the audio clip inser-tion is as follows:
<object classid=”clsid:6BF52A52-394A-11D3-B153-00C04F79FAA6” height=”45” width=”250”>
<param name=”URL” value=”reagan-audio.mp3” />
</object>
The classid is an attribute that specifi es which ActiveX control is being used. Table 8–3 shows the classids for the available ActiveX controls. For the insertion of an audio clip, you use the classid for Windows Media Player. It is imperative that you specify the classid correctly, or the multimedia content may not work correctly or at all. The classid is not case sensitive, so you can type the classid string as shown in Table 8–3 or use all lowercase letters. This information can also be found at each manufacturer’s Web site.
Table 8–3 Class IDs for ActiveX Controls
ActiveX Control Class ID
Flash Shockwave Player D27CDB6E-AE6D-11cf-96B8-444553540000
Java Applet 8AD9C840-044E-11D1-B3E9-00805F499D93
QuickTime Player 02BF25D5-8C17-4B23-BC80-D3488ABDDC6B
RealAudio Player CFCDAA03-8BE4-11cf-B84B-0020AFBBCCFA
Windows Media Player 6BF52A52-394A-11d3-B153-00C04F79FAA6
The object statement also includes the height and width attributes — that is, the height and width of the object in pixels. You include the height and width for the audio fi le to identify the view of the player control panel that you want to display. Table 8–4 shows the resulting control panel when you specify different widths. In all cases in Table 8–4, the height of the object is 45 pixels, which provides enough room to view the player control horizontally. These are not exact numbers, but suggestions for a width that displays the image in the right column. You can experiment with the width and height to see what might best fi t your application.
Table 8–4 Control Panel Views for Windows Media Player
Width Setting Resulting Control Display Image
42 pixels Displays the fast forward and play/pause buttons
66 pixels Displays the rewind, fast forward, play/pause, and stop buttons
118 pixels Adds the previous and next buttons
250 pixels Adds a volume control (full control panel)
Copyright 2010 Cengage Learning. All Rights Reserved. May not be copied, scanned, or duplicated, in whole or in part. Due to electronic rights, some third party content may be suppressed from the eBook and/or eChapter(s).
Editorial review has deemed that any suppressed content does not materially affect the overall learning experience. Cengage Learning reserves the right to remove additional content at any time if subsequent rights restrictions require it.

Adding an Audio File to a Web Page HTML 371
HTM
L C
hap
ter
8
Figure 8–4 shows how the various width dimensions display the player control relative to the Web page. In the styles8.css external style sheet, the left margin of the class="audio" is set to 375 pixels. That means the object displays 375 pixels from the left margin, regardless of what control width is set. Figures 8–4a through 8–4d illustrate how the controls shown in Table 8–4 display, with each control starting 375 pixels from the left. Certainly, you would want to adjust the left margin in the external style sheet if you decided to use various widths of the control. As for most Web development decisions, the application purpose would dictate why you would select various widths. For instance, if you wanted to allow Web site visitors to only play and stop the audio clip and not allow them to vary the volume, you would set width to 42 pixels.
Figure 8–4
(a)
(b)
(c)
(d)
fast forward and play buttons only; set to 42 pixels
rewind, fast forward, play, and stop buttons; set to 66 pixels
previous and next buttons added; set to 118 pixels
adds volume control; set to 250 pixels
Copyright 2010 Cengage Learning. All Rights Reserved. May not be copied, scanned, or duplicated, in whole or in part. Due to electronic rights, some third party content may be suppressed from the eBook and/or eChapter(s).
Editorial review has deemed that any suppressed content does not materially affect the overall learning experience. Cengage Learning reserves the right to remove additional content at any time if subsequent rights restrictions require it.
HTML 372 HTML Chapter 8 Adding Multimedia Content to Web Pages
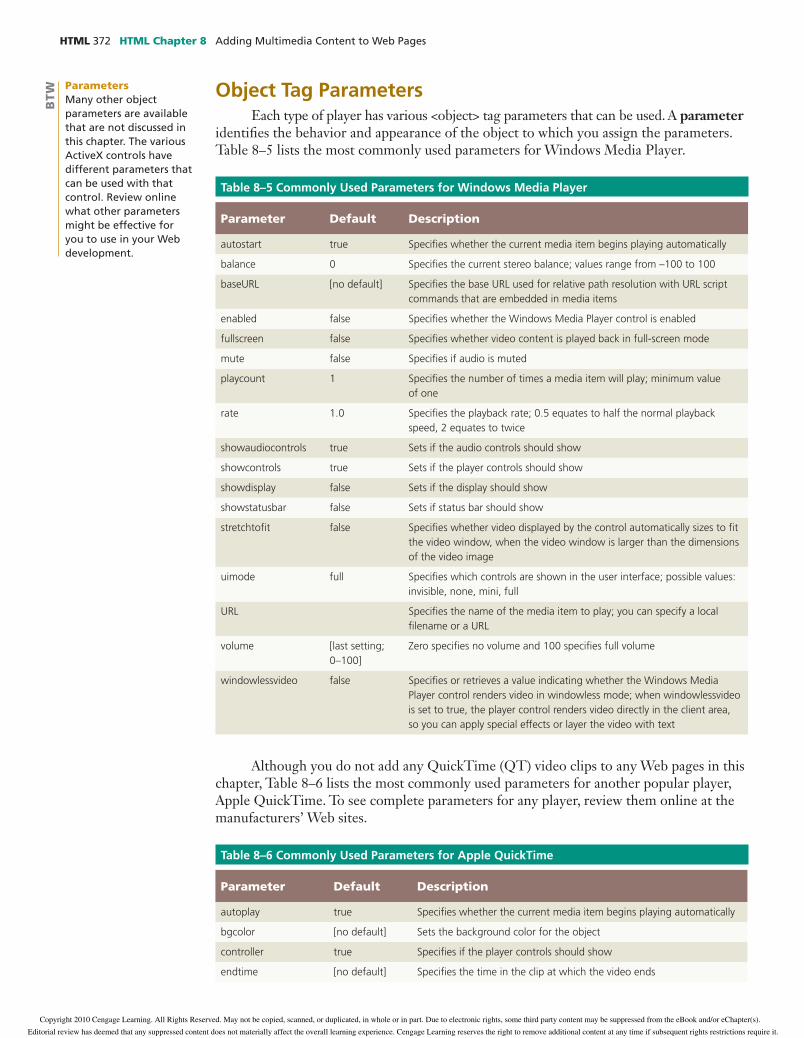
Object Tag ParametersEach type of player has various <object> tag parameters that can be used. A parameter
identifi es the behavior and appearance of the object to which you assign the parameters. Table 8–5 lists the most commonly used parameters for Windows Media Player.
Table 8–5 Commonly Used Parameters for Windows Media Player
Parameter Default Description
autostart true Specifi es whether the current media item begins playing automatically
balance 0 Specifi es the current stereo balance; values range from –100 to 100
baseURL [no default] Specifi es the base URL used for relative path resolution with URL script commands that are embedded in media items
enabled false Specifi es whether the Windows Media Player control is enabled
fullscreen false Specifi es whether video content is played back in full-screen mode
mute false Specifi es if audio is muted
playcount 1 Specifi es the number of times a media item will play; minimum value of one
rate 1.0 Specifi es the playback rate; 0.5 equates to half the normal playback speed, 2 equates to twice
showaudiocontrols true Sets if the audio controls should show
showcontrols true Sets if the player controls should show
showdisplay false Sets if the display should show
showstatusbar false Sets if status bar should show
stretchtofi t false Specifi es whether video displayed by the control automatically sizes to fi t the video window, when the video window is larger than the dimensions of the video image
uimode full Specifi es which controls are shown in the user interface; possible values: invisible, none, mini, full
URL Specifi es the name of the media item to play; you can specify a local fi lename or a URL
volume [last setting; 0–100]
Zero specifi es no volume and 100 specifi es full volume
windowlessvideo false Specifi es or retrieves a value indicating whether the Windows Media Player control renders video in windowless mode; when windowlessvideo is set to true, the player control renders video directly in the client area, so you can apply special effects or layer the video with text
Although you do not add any QuickTime (QT) video clips to any Web pages in this chapter, Table 8–6 lists the most commonly used parameters for another popular player, Apple QuickTime. To see complete parameters for any player, review them online at the manufacturers’ Web sites.
Table 8–6 Commonly Used Parameters for Apple QuickTime
Parameter Default Description
autoplay true Specifi es whether the current media item begins playing automatically
bgcolor [no default] Sets the background color for the object
controller true Specifi es if the player controls should show
endtime [no default] Specifi es the time in the clip at which the video ends
ParametersMany other object parameters are available that are not discussed in this chapter. The various ActiveX controls have different parameters that can be used with that control. Review online what other parameters might be effective for you to use in your Web development.
BTW
Copyright 2010 Cengage Learning. All Rights Reserved. May not be copied, scanned, or duplicated, in whole or in part. Due to electronic rights, some third party content may be suppressed from the eBook and/or eChapter(s).
Editorial review has deemed that any suppressed content does not materially affect the overall learning experience. Cengage Learning reserves the right to remove additional content at any time if subsequent rights restrictions require it.
Adding an Audio File to a Web Page HTML 373
HTM
L C
hap
ter
8
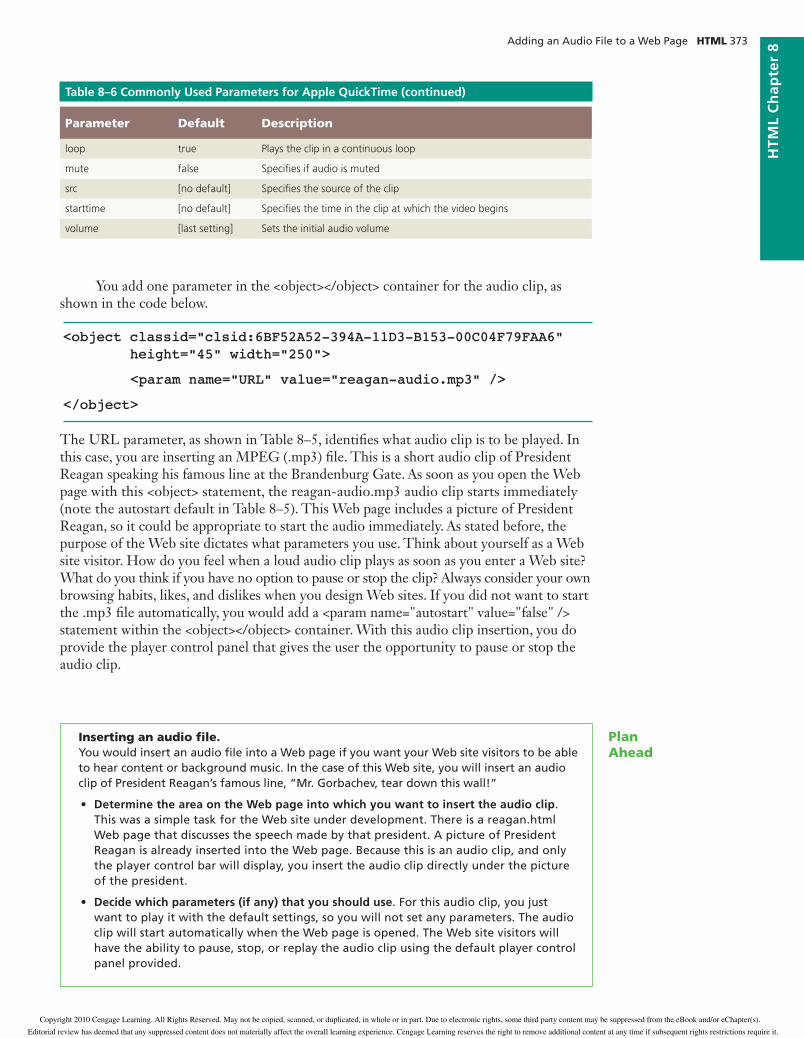
Parameter Default Description
loop true Plays the clip in a continuous loop
mute false Specifi es if audio is muted
src [no default] Specifi es the source of the clip
starttime [no default] Specifi es the time in the clip at which the video begins
volume [last setting] Sets the initial audio volume
You add one parameter in the <object></object> container for the audio clip, as shown in the code below.
<object classid=”clsid:6BF52A52-394A-11D3-B153-00C04F79FAA6” height=”45” width=”250”>
<param name=”URL” value=”reagan-audio.mp3” />
</object>
The URL parameter, as shown in Table 8–5, identifi es what audio clip is to be played. In this case, you are inserting an MPEG (.mp3) fi le. This is a short audio clip of President Reagan speaking his famous line at the Brandenburg Gate. As soon as you open the Web page with this <object> statement, the reagan-audio.mp3 audio clip starts immediately (note the autostart default in Table 8–5). This Web page includes a picture of President Reagan, so it could be appropriate to start the audio immediately. As stated before, the purpose of the Web site dictates what parameters you use. Think about yourself as a Web site visitor. How do you feel when a loud audio clip plays as soon as you enter a Web site? What do you think if you have no option to pause or stop the clip? Always consider your own browsing habits, likes, and dislikes when you design Web sites. If you did not want to start the .mp3 fi le automatically, you would add a <param name="autostart" value="false" /> statement within the <object></object> container. With this audio clip insertion, you do provide the player control panel that gives the user the opportunity to pause or stop the audio clip.
Table 8–6 Commonly Used Parameters for Apple QuickTime (continued)
Inserting an audio fi le.You would insert an audio fi le into a Web page if you want your Web site visitors to be able to hear content or background music. In the case of this Web site, you will insert an audio clip of President Reagan’s famous line, “Mr. Gorbachev, tear down this wall!”
Determine the area on the Web page into which you want to insert the audio clip• . This was a simple task for the Web site under development. There is a reagan.html Web page that discusses the speech made by that president. A picture of President Reagan is already inserted into the Web page. Because this is an audio clip, and only the player control bar will display, you insert the audio clip directly under the picture of the president.
Decide which parameters (if any) that you should use• . For this audio clip, you just want to play it with the default settings, so you will not set any parameters. The audio clip will start automatically when the Web page is opened. The Web site visitors will have the ability to pause, stop, or replay the audio clip using the default player control panel provided.
Plan Ahead
Copyright 2010 Cengage Learning. All Rights Reserved. May not be copied, scanned, or duplicated, in whole or in part. Due to electronic rights, some third party content may be suppressed from the eBook and/or eChapter(s).
Editorial review has deemed that any suppressed content does not materially affect the overall learning experience. Cengage Learning reserves the right to remove additional content at any time if subsequent rights restrictions require it.
HTML 374 HTML Chapter 8 Adding Multimedia Content to Web Pages
To Start Notepad++ and Open an HTML File
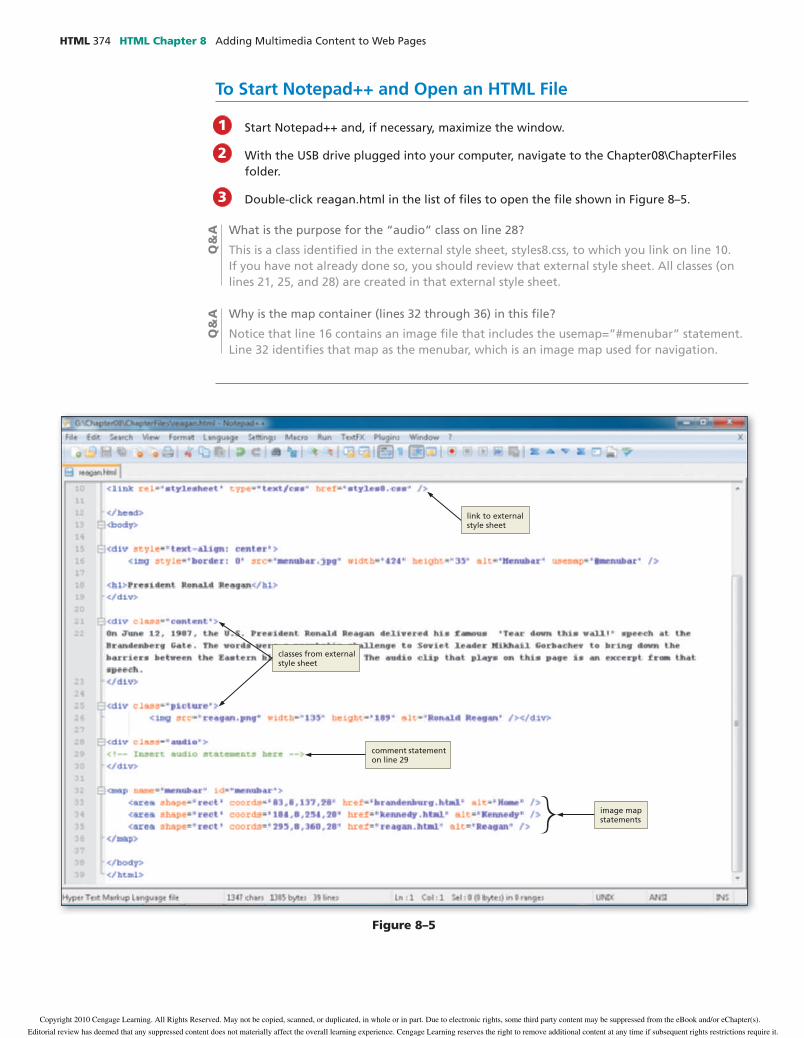
Start Notepad++ and, if necessary, maximize the window.
With the USB drive plugged into your computer, navigate to the Chapter08\ChapterFiles folder.
Double-click reagan.html in the list of fi les to open the fi le shown in Figure 8–5.
What is the purpose for the “audio” class on line 28?
This is a class identifi ed in the external style sheet, styles8.css, to which you link on line 10. If you have not already done so, you should review that external style sheet. All classes (on lines 21, 25, and 28) are created in that external style sheet.
Why is the map container (lines 32 through 36) in this fi le?
Notice that line 16 contains an image fi le that includes the usemap=”#menubar” statement. Line 32 identifi es that map as the menubar, which is an image map used for navigation.
1
2
3Q
&A
Q&
A
Figure 8–5
link to external style sheet
classes from external style sheet
comment statement on line 29
image mapstatements
Copyright 2010 Cengage Learning. All Rights Reserved. May not be copied, scanned, or duplicated, in whole or in part. Due to electronic rights, some third party content may be suppressed from the eBook and/or eChapter(s).
Editorial review has deemed that any suppressed content does not materially affect the overall learning experience. Cengage Learning reserves the right to remove additional content at any time if subsequent rights restrictions require it.
Adding an Audio File to a Web Page HTML 375
HTM
L C
hap
ter
8
To Add an Audio Clip to a Web Page
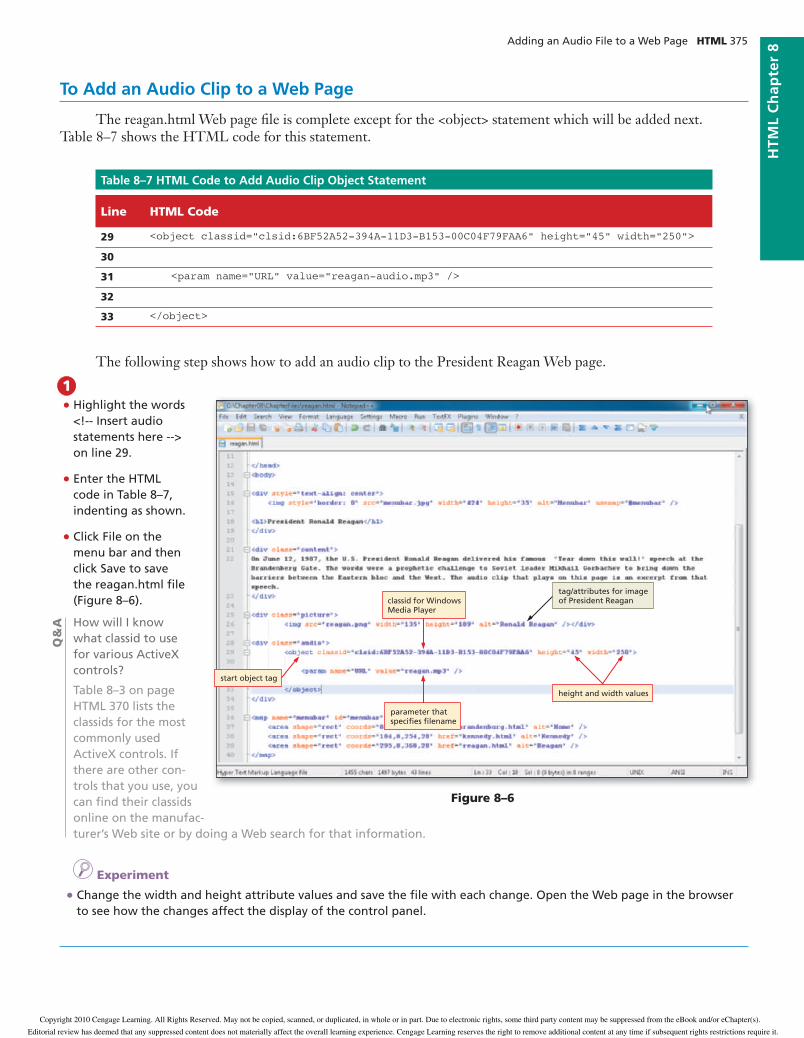
The reagan.html Web page fi le is complete except for the <object> statement which will be added next. Table 8–7 shows the HTML code for this statement.
Table 8–7 HTML Code to Add Audio Clip Object Statement
Line HTML Code
29 <object classid=”clsid:6BF52A52-394A-11D3-B153-00C04F79FAA6” height=”45” width=”250”>
30
31 <param name=”URL” value=”reagan-audio.mp3” />
32
33 </object>
The following step shows how to add an audio clip to the President Reagan Web page.
Highlight the words • <!-- Insert audio statements here --> on line 29.
Enter the HTML • code in Table 8–7, indenting as shown.
Click File on the • menu bar and then click Save to save the reagan.html fi le (Figure 8–6).
How will I know what classid to use for various ActiveX controls?
Table 8–3 on page HTML 370 lists the classids for the most commonly used ActiveX controls. If there are other con-trols that you use, you can fi nd their classids online on the manufac-turer’s Web site or by doing a Web search for that information.
I Experiment
• Change the width and height attribute values and save the fi le with each change. Open the Web page in the browser to see how the changes affect the display of the control panel.
1
Q&
A
Figure 8–6
tag/attributes for image of President Reaganclassid for Windows
Media Player
parameter that specifi es fi lename
height and width values
start object tag
Copyright 2010 Cengage Learning. All Rights Reserved. May not be copied, scanned, or duplicated, in whole or in part. Due to electronic rights, some third party content may be suppressed from the eBook and/or eChapter(s).
Editorial review has deemed that any suppressed content does not materially affect the overall learning experience. Cengage Learning reserves the right to remove additional content at any time if subsequent rights restrictions require it.
HTML 376 HTML Chapter 8 Adding Multimedia Content to Web Pages
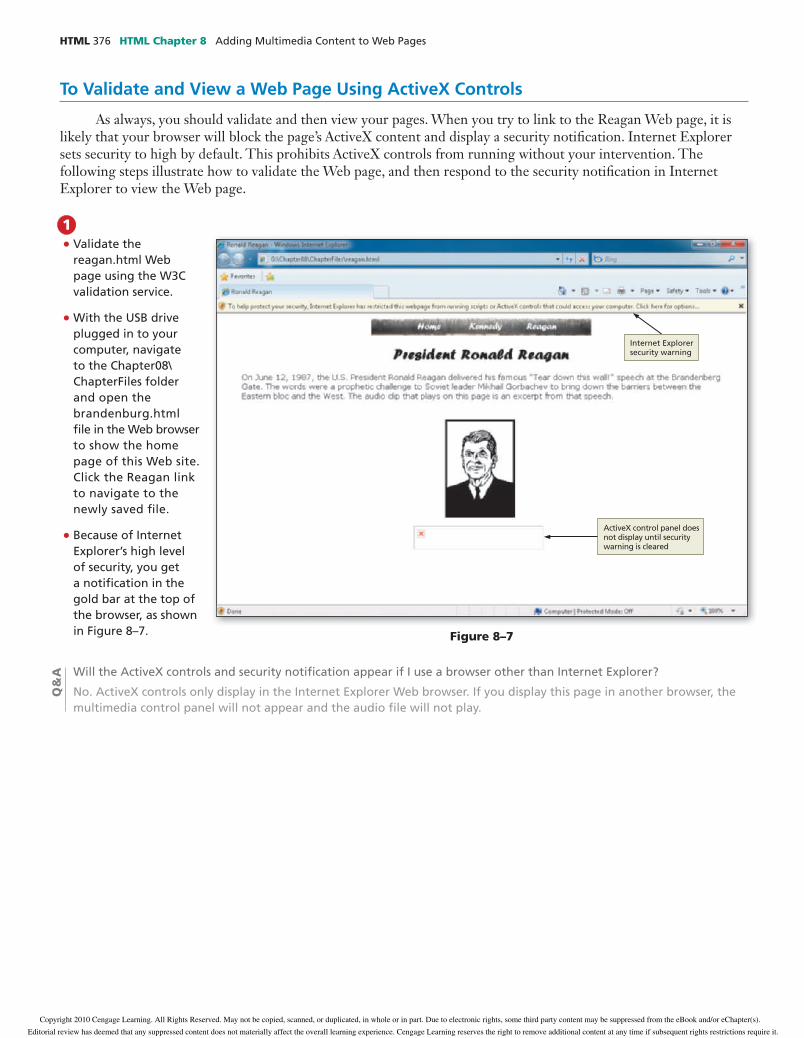
Validate the • reagan.html Web page using the W3C validation service.
With the USB drive • plugged in to your computer, navigate to the Chapter08\ChapterFiles folder and open the brandenburg.html fi le in the Web browser to show the home page of this Web site. Click the Reagan link to navigate to the newly saved fi le.
Because of Internet • Explorer’s high level of security, you get a notifi cation in the gold bar at the top of the browser, as shown in Figure 8–7.
1
Figure 8–7
To Validate and View a Web Page Using ActiveX Controls
As always, you should validate and then view your pages. When you try to link to the Reagan Web page, it is likely that your browser will block the page’s ActiveX content and display a security notifi cation. Internet Explorer sets security to high by default. This prohibits ActiveX controls from running without your intervention. The following steps illustrate how to validate the Web page, and then respond to the security notifi cation in Internet Explorer to view the Web page.
Internet Explorer security warning
ActiveX control panel does not display until security warning is cleared
Will the ActiveX controls and security notifi cation appear if I use a browser other than Internet Explorer?
No. ActiveX controls only display in the Internet Explorer Web browser. If you display this page in another browser, the multimedia control panel will not appear and the audio fi le will not play.
Q&
A
Copyright 2010 Cengage Learning. All Rights Reserved. May not be copied, scanned, or duplicated, in whole or in part. Due to electronic rights, some third party content may be suppressed from the eBook and/or eChapter(s).
Editorial review has deemed that any suppressed content does not materially affect the overall learning experience. Cengage Learning reserves the right to remove additional content at any time if subsequent rights restrictions require it.

Adding an Audio File to a Web Page HTML 377
HTM
L C
hap
ter
8
Click the Allow • Blocked Content option to display the dialog box shown in Figure 8–9.
3
Figure 8–9
Click anywhere in the • gold bar at the top of the browser window to view the options (Figure 8–8).
2
Figure 8–8
Internet Explorer security warning
ActiveX control panel does not display until security warning is cleared
three options for response to security warning
dialog box with security warning; click Yes to run ActiveX control
Allow Blocked Content
Copyright 2010 Cengage Learning. All Rights Reserved. May not be copied, scanned, or duplicated, in whole or in part. Due to electronic rights, some third party content may be suppressed from the eBook and/or eChapter(s).
Editorial review has deemed that any suppressed content does not materially affect the overall learning experience. Cengage Learning reserves the right to remove additional content at any time if subsequent rights restrictions require it.
HTML 378 HTML Chapter 8 Adding Multimedia Content to Web Pages
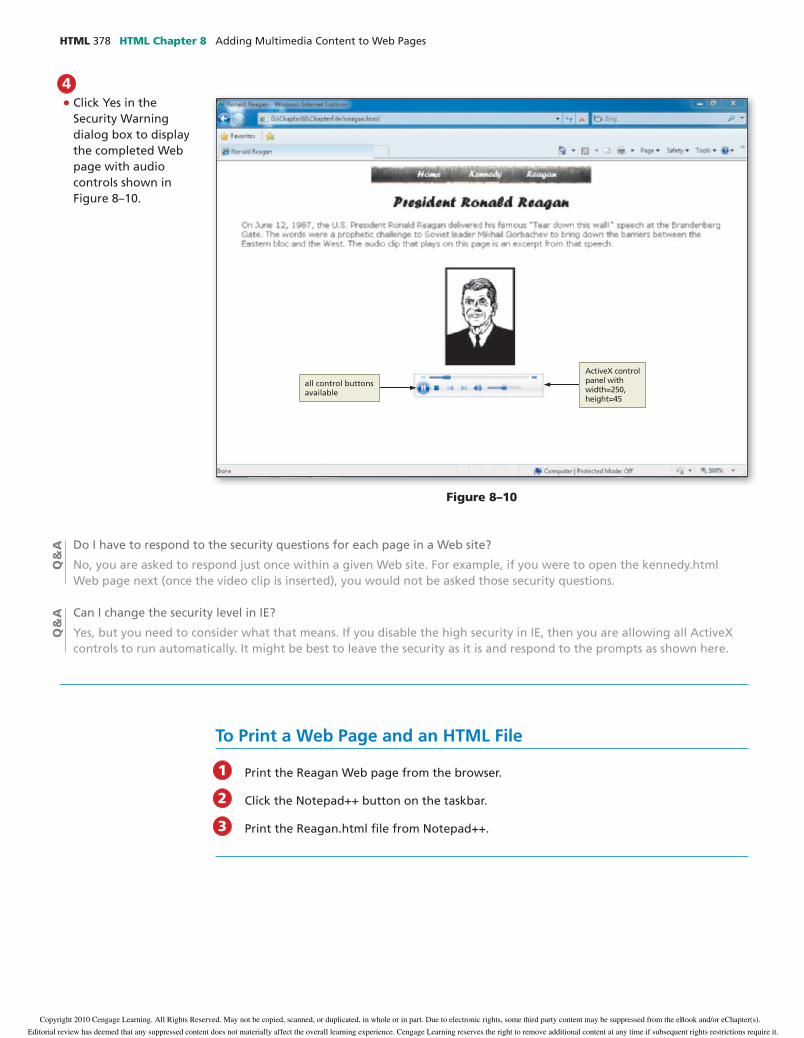
Click Yes in the • Security Warning dialog box to display the completed Web page with audio controls shown in Figure 8–10.
4
Figure 8–10
To Print a Web Page and an HTML File
Print the Reagan Web page from the browser.
Click the Notepad++ button on the taskbar.
Print the Reagan.html fi le from Notepad++.
1
2
3
ActiveX control panel with width=250, height=45
all control buttons available
Do I have to respond to the security questions for each page in a Web site?
No, you are asked to respond just once within a given Web site. For example, if you were to open the kennedy.html Web page next (once the video clip is inserted), you would not be asked those security questions.
Can I change the security level in IE?
Yes, but you need to consider what that means. If you disable the high security in IE, then you are allowing all ActiveX controls to run automatically. It might be best to leave the security as it is and respond to the prompts as shown here.
Q&
AQ
&A
Copyright 2010 Cengage Learning. All Rights Reserved. May not be copied, scanned, or duplicated, in whole or in part. Due to electronic rights, some third party content may be suppressed from the eBook and/or eChapter(s).
Editorial review has deemed that any suppressed content does not materially affect the overall learning experience. Cengage Learning reserves the right to remove additional content at any time if subsequent rights restrictions require it.

Adding a Video Clip to a Web Page HTML 379
HTM
L C
hap
ter
8
Creating a video clip.Video clips can add valuable content to a Web page. There are many uses for video clips. Companies use clips for training or to convey messages from the CEO. Instructors use videos to help students better understand complex topics in online classes. Many people use video clips just for fun on their personal Web sites or on YouTube.
Utilize video clips that enhance the content of the Web page.• In the chapter project, a video clip of a live speech adds value to the Web page.
Determine whether to utilize the autostart parameter.• Sometimes you want to force the user to read some material on the Web page fi rst and then view the corresponding video clip. In this case, you want to turn autostart off and force the user to click play in order to watch the video.
Use uimode and screen stretching parameters as needed.• There are many ways to show a video. Sometimes you want the video to be a small part of a Web page; at other times, you want it to be the entire message or full screen. Sometimes you want a control panel to display; at other times you need no control panel. You need to determine what values to use with the various parameters that add to the viewing experience.
Plan Ahead
Adding a Video Clip to a Web PageThe next step is to add a video fi le, kennedy-video.wmv, to the kennedy.html fi le. You use the <object></object> container for this, just as you did for the audio clip. You continue to use the Windows Media Player (WMP) ActiveX control, so the classid is the same. You add different parameters for this video insertion.
The following section of HTML code shows the statements that you add for this video clip addition.
<object classid=”clsid:6BF52A52-394A-11D3-B153-00C04F79FAA6”>
<param name=”URL” value=”kennedy-video.wmv” />
<param name=”autostart” value=”false” />
<param name=”uimode” value=”full” />
<param name=”stretchtofit” value=”true” />
</object>
Note that the classid is specifi c to the Windows Media Player ActiveX control (see Table 8–3 on page HTML 370). The parameters can be found in Table 8–5 on page HTML 372. You do not enter the width and height attributes this time so that you can see what this movie clip looks like at its default size. You can, however, add width and height attributes in the <object> tag. This is something that you can experiment with. Because you insert the stretchtofi t parameter within the <object></object> container, the movie clip will stretch regardless of the sizes that you specify in the width and height attributes. Remember that you have a link to an external style sheet, styles8.css, so if you do change the width and height, you will probably need to change the left margin dimension as well.
The four parameters used for the video clip insertion are: URL, autostart, uimode, and stretchtofi t. The URL parameter is used in the same way for a video clip as it was for an audio clip. It tells the name of the object that you want to insert. The default for the autostart parameter is "true", which means that a clip will automatically start unless you set autostart to "false" by entering <param name="autostart" value="false" /> as the command. With autostart turned off, your Web site visitor has to click the play button on the ActiveX control panel to start the video clip. Just as with other decisions that are made
Video ClipsVideo clips can have a large fi le size depending on the length of the clip together with the quality of the clip. Search for information about rules-of-thumb for fi le sizes when video clips are incorporated into a Web site.
BTW
Copyright 2010 Cengage Learning. All Rights Reserved. May not be copied, scanned, or duplicated, in whole or in part. Due to electronic rights, some third party content may be suppressed from the eBook and/or eChapter(s).
Editorial review has deemed that any suppressed content does not materially affect the overall learning experience. Cengage Learning reserves the right to remove additional content at any time if subsequent rights restrictions require it.
HTML 380 HTML Chapter 8 Adding Multimedia Content to Web Pages
during the analysis phase of the Web development life cycle, you have to decide what is best for your application. Do you want the audio or video clip to start as soon as the Web page is opened, or is it best to force your user to start them?
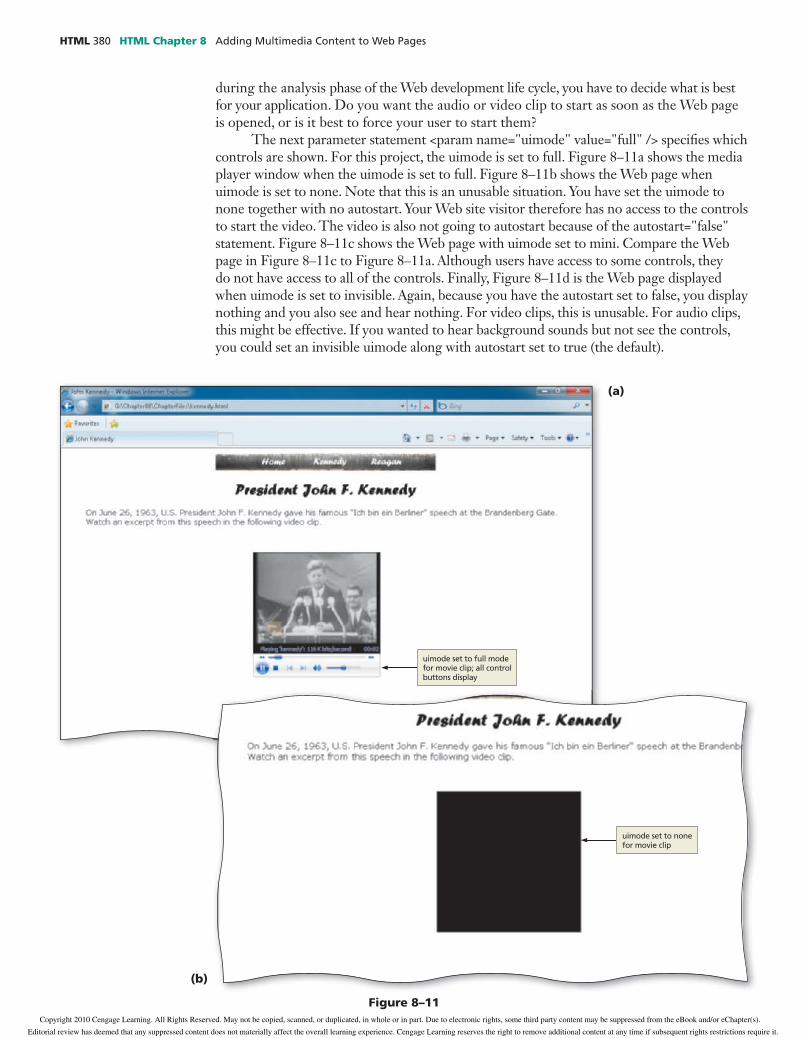
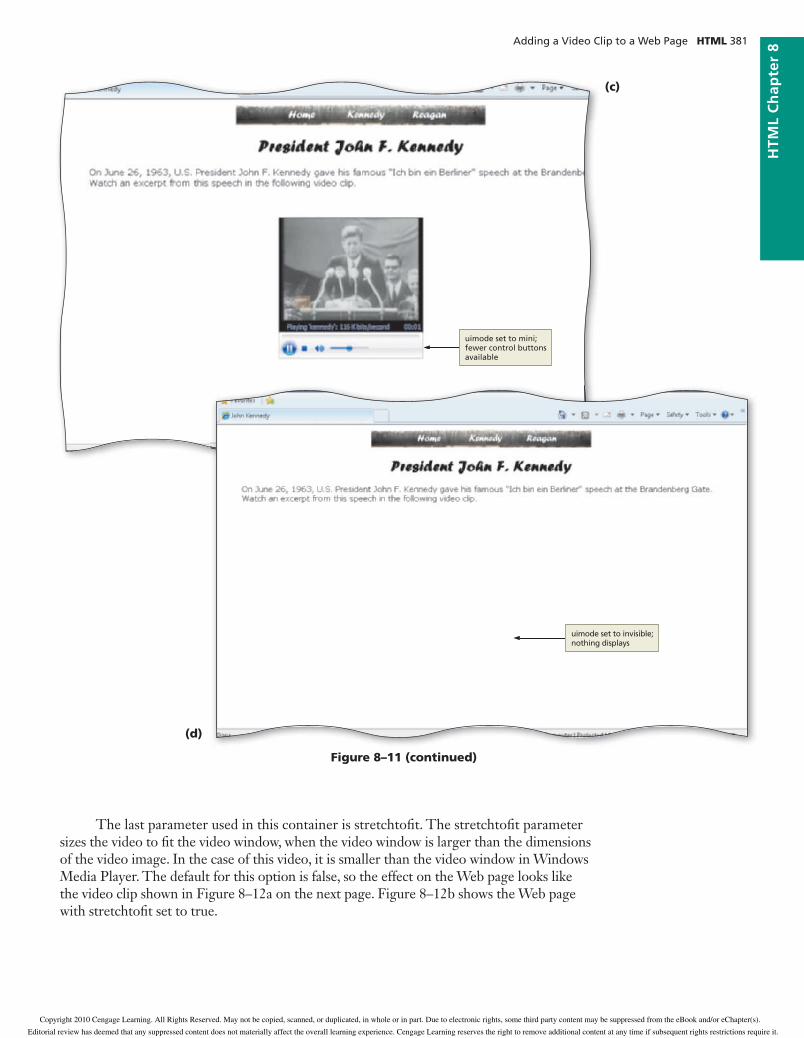
The next parameter statement <param name="uimode" value="full" /> specifi es which controls are shown. For this project, the uimode is set to full. Figure 8–11a shows the media player window when the uimode is set to full. Figure 8–11b shows the Web page when uimode is set to none. Note that this is an unusable situation. You have set the uimode to none together with no autostart. Your Web site visitor therefore has no access to the controls to start the video. The video is also not going to autostart because of the autostart="false" statement. Figure 8–11c shows the Web page with uimode set to mini. Compare the Web page in Figure 8–11c to Figure 8–11a. Although users have access to some controls, they do not have access to all of the controls. Finally, Figure 8–11d is the Web page displayed when uimode is set to invisible. Again, because you have the autostart set to false, you display nothing and you also see and hear nothing. For video clips, this is unusable. For audio clips, this might be effective. If you wanted to hear background sounds but not see the controls, you could set an invisible uimode along with autostart set to true (the default).
Figure 8–11
(a)
(b)
uimode set to full mode for movie clip; all control buttons display
uimode set to none for movie clip
Copyright 2010 Cengage Learning. All Rights Reserved. May not be copied, scanned, or duplicated, in whole or in part. Due to electronic rights, some third party content may be suppressed from the eBook and/or eChapter(s).
Editorial review has deemed that any suppressed content does not materially affect the overall learning experience. Cengage Learning reserves the right to remove additional content at any time if subsequent rights restrictions require it.
Adding a Video Clip to a Web Page HTML 381
HTM
L C
hap
ter
8
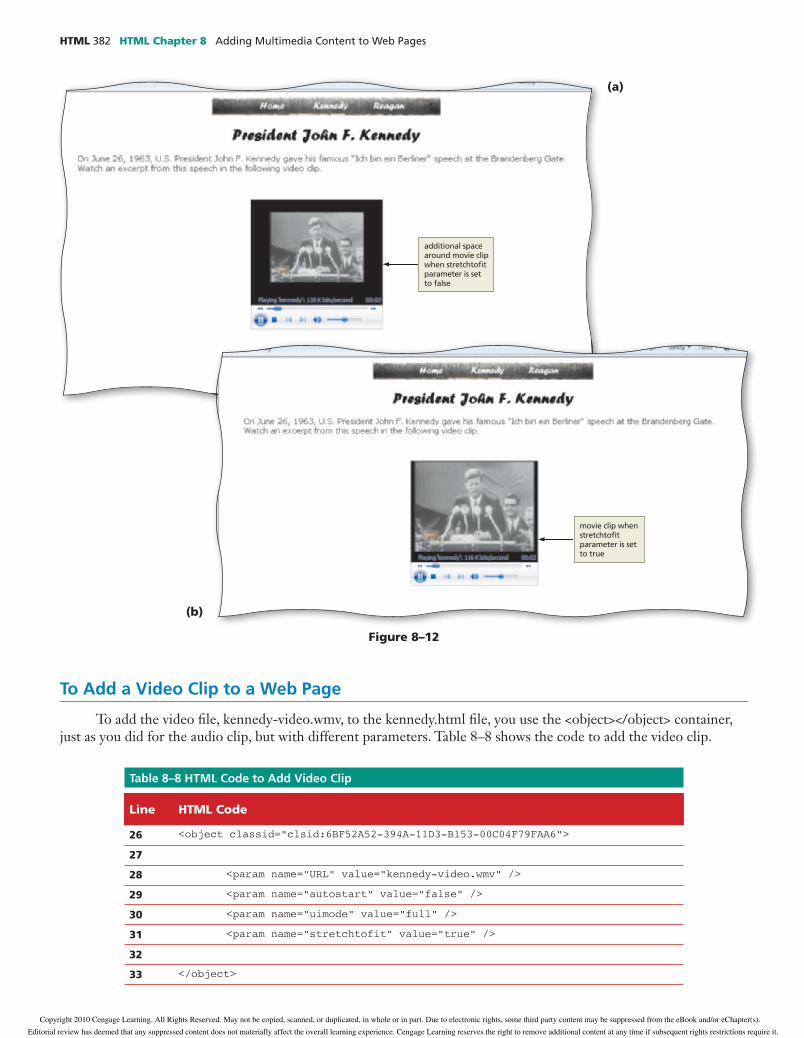
The last parameter used in this container is stretchtofi t. The stretchtofi t parameter sizes the video to fi t the video window, when the video window is larger than the dimensions of the video image. In the case of this video, it is smaller than the video window in Windows Media Player. The default for this option is false, so the effect on the Web page looks like the video clip shown in Figure 8–12a on the next page. Figure 8–12b shows the Web page with stretchtofi t set to true.
Figure 8–11 (continued)
(c)
(d)
uimode set to mini; fewer control buttons available
uimode set to invisible; nothing displays
Copyright 2010 Cengage Learning. All Rights Reserved. May not be copied, scanned, or duplicated, in whole or in part. Due to electronic rights, some third party content may be suppressed from the eBook and/or eChapter(s).
Editorial review has deemed that any suppressed content does not materially affect the overall learning experience. Cengage Learning reserves the right to remove additional content at any time if subsequent rights restrictions require it.
HTML 382 HTML Chapter 8 Adding Multimedia Content to Web Pages
To Add a Video Clip to a Web Page
To add the video fi le, kennedy-video.wmv, to the kennedy.html fi le, you use the <object></object> container, just as you did for the audio clip, but with different parameters. Table 8–8 shows the code to add the video clip.
Figure 8–12
Table 8–8 HTML Code to Add Video Clip
Line HTML Code
26 <object classid=”clsid:6BF52A52-394A-11D3-B153-00C04F79FAA6”>
27
28 <param name=”URL” value=”kennedy-video.wmv” />
29 <param name=”autostart” value=”false” />
30 <param name=”uimode” value=”full” />
31 <param name=”stretchtofit” value=”true” />
32
33 </object>
additional space around movie clip when stretchtofi t parameter is set to false
movie clip when stretchtofi t parameter is set to true
(a)
(b)
Copyright 2010 Cengage Learning. All Rights Reserved. May not be copied, scanned, or duplicated, in whole or in part. Due to electronic rights, some third party content may be suppressed from the eBook and/or eChapter(s).
Editorial review has deemed that any suppressed content does not materially affect the overall learning experience. Cengage Learning reserves the right to remove additional content at any time if subsequent rights restrictions require it.
Adding a Video Clip to a Web Page HTML 383
HTM
L C
hap
ter
8
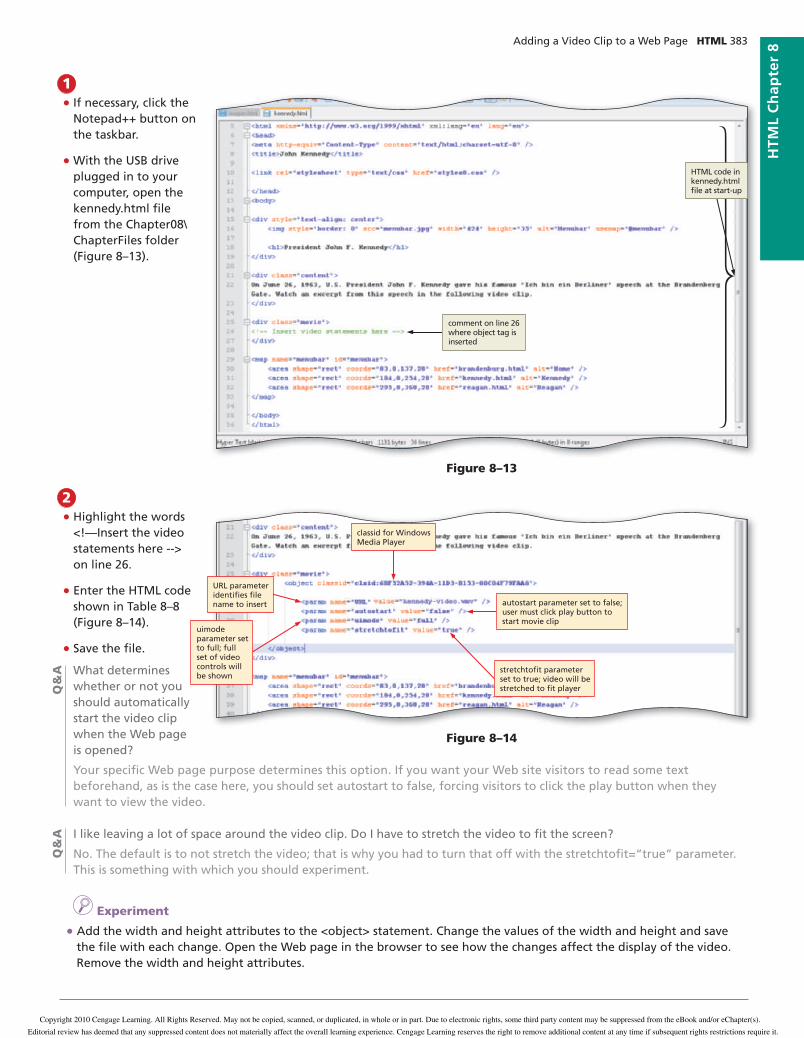
If necessary, click the • Notepad++ button on the taskbar.
With the USB drive • plugged in to your computer, open the kennedy.html fi le from the Chapter08\ChapterFiles folder (Figure 8–13).
1
Figure 8–13
Highlight the words • <!—Insert the video statements here --> on line 26.
Enter the HTML code • shown in Table 8–8 (Figure 8–14).
Save the fi le.• What determines whether or not you should automatically start the video clip when the Web page is opened?
Your specifi c Web page purpose determines this option. If you want your Web site visitors to read some text beforehand, as is the case here, you should set autostart to false, forcing visitors to click the play button when they want to view the video.
I like leaving a lot of space around the video clip. Do I have to stretch the video to fi t the screen?
No. The default is to not stretch the video; that is why you had to turn that off with the stretchtofi t=“true” parameter. This is something with which you should experiment.
I Experiment
• Add the width and height attributes to the <object> statement. Change the values of the width and height and save the fi le with each change. Open the Web page in the browser to see how the changes affect the display of the video. Remove the width and height attributes.
2
Q&
AQ
&A
Figure 8–14
comment on line 26 where object tag is inserted
classid for Windows Media Player
URL parameter identifi es fi le name to insert
uimode parameter set to full; full set of video controls will be shown
autostart parameter set to false; user must click play button to start movie clip
stretchtofi t parameter set to true; video will be stretched to fi t player
HTML code in kennedy.html fi le at start-up
Copyright 2010 Cengage Learning. All Rights Reserved. May not be copied, scanned, or duplicated, in whole or in part. Due to electronic rights, some third party content may be suppressed from the eBook and/or eChapter(s).
Editorial review has deemed that any suppressed content does not materially affect the overall learning experience. Cengage Learning reserves the right to remove additional content at any time if subsequent rights restrictions require it.
HTML 384 HTML Chapter 8 Adding Multimedia Content to Web Pages
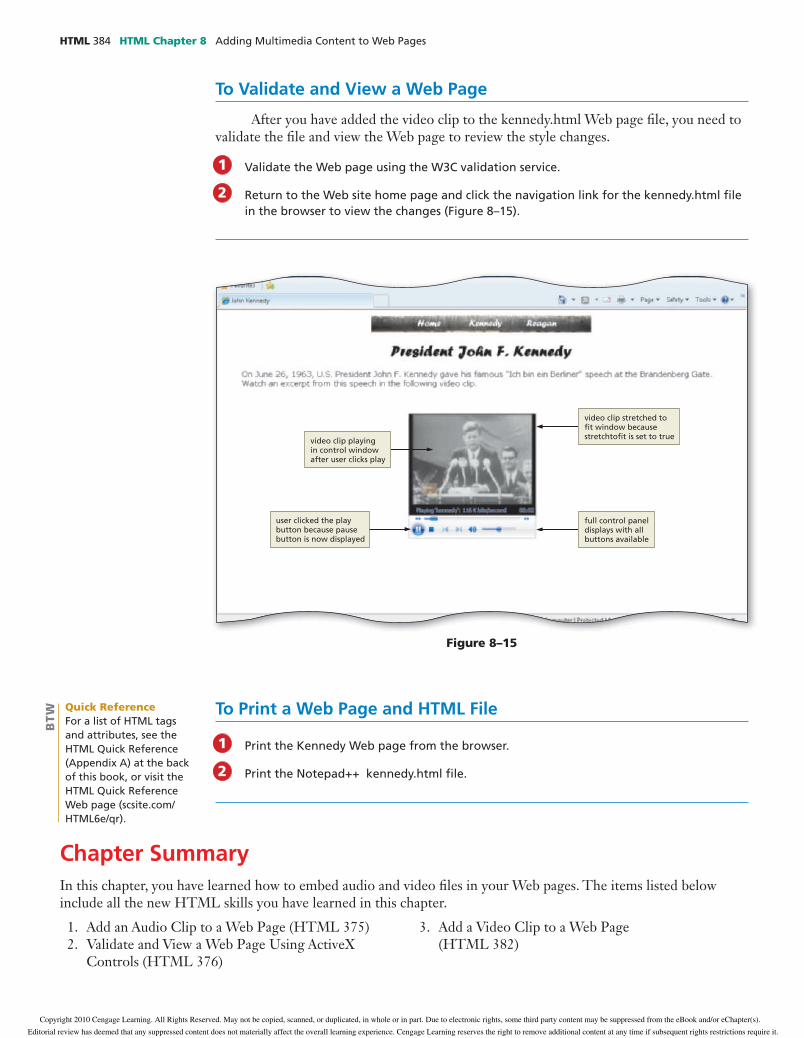
To Validate and View a Web Page
After you have added the video clip to the kennedy.html Web page fi le, you need to validate the fi le and view the Web page to review the style changes.
Validate the Web page using the W3C validation service.
Return to the Web site home page and click the navigation link for the kennedy.html fi le in the browser to view the changes (Figure 8–15).
1
2
Figure 8–15
To Print a Web Page and HTML File
Print the Kennedy Web page from the browser.
Print the Notepad++ kennedy.html fi le.
1
2
Chapter SummaryIn this chapter, you have learned how to embed audio and video fi les in your Web pages. The items listed below include all the new HTML skills you have learned in this chapter.
1. Add an Audio Clip to a Web Page (HTML 375) 2. Validate and View a Web Page Using ActiveX
Controls (HTML 376)
3. Add a Video Clip to a Web Page (HTML 382)
video clip playing in control window after user clicks play
video clip stretched to fi t window because stretchtofi t is set to true
user clicked the play button because pause button is now displayed
full control panel displays with all buttons available
Quick ReferenceFor a list of HTML tags and attributes, see the HTML Quick Reference (Appendix A) at the back of this book, or visit the HTML Quick Reference Web page (scsite.com/HTML6e/qr).
BTW
Copyright 2010 Cengage Learning. All Rights Reserved. May not be copied, scanned, or duplicated, in whole or in part. Due to electronic rights, some third party content may be suppressed from the eBook and/or eChapter(s).
Editorial review has deemed that any suppressed content does not materially affect the overall learning experience. Cengage Learning reserves the right to remove additional content at any time if subsequent rights restrictions require it.

Apply Your Knowledge HTML 385
HTM
L C
hap
ter
8S
TU
DE
NT
AS
SIG
NM
EN
TS
Learn It Online
Test your knowledge of chapter content and key terms.
Instructions: To complete the Learn It Online exercises, start your browser, click the Address bar, and then enter the Web address scsite.com/html6e/learn. When the HTML Learn It Online page is displayed, click the link for the exercise you want to complete and read the instructions.
Chapter Reinforcement TF, MC, and SAA series of true/false, multiple choice, and short answer questions that test your knowledge of the chapter content.
Flash CardsAn interactive learning environment where you identify chapter key terms associated with displayed defi nitions.
Practice TestA series of multiple choice questions that test your knowledge of chapter content and key terms.
Who Wants To Be a Computer Genius?An interactive game that challenges your knowledge of chapter content in the style of a television quiz show.
Wheel of TermsAn interactive game that challenges your knowledge of chapter key terms in the style of the television show Wheel of Fortune.
Crossword Puzzle ChallengeA crossword puzzle that challenges your knowledge of key terms presented in the chapter.
Apply Your Knowledge
Reinforce the skills and apply the concepts you learned in this chapter.
Adding a Background SoundInstructions: Start Notepad++ and a browser. Using your browser, open the apply8-1.html fi le from the Chapter08\Apply folder of the Data Files for Students. See the inside back cover of this book for instructions on downloading the Data Files for Students, or contact your instructor for information about accessing the required fi les. Figure 8–16 shows the Apply Your Knowledge Web page as it should appear in the browser after the necessary code is added.
Figure 8–16
Web page displays while audio clip plays in background; no control panel displays
Continued > Copyright 2010 Cengage Learning. All Rights Reserved. May not be copied, scanned, or duplicated, in whole or in part. Due to electronic rights, some third party content may be suppressed from the eBook and/or eChapter(s).
Editorial review has deemed that any suppressed content does not materially affect the overall learning experience. Cengage Learning reserves the right to remove additional content at any time if subsequent rights restrictions require it.

HTML 386 HTML Chapter 8 Adding Multimedia Content to Web PagesS
TU
DE
NT
AS
SIG
NM
EN
TS
Perform the following tasks:
1. With the apply8-1.html fi le open in Notepad++, add the 04geesefl yhonk.mp3 audio clip with the following options:
a. Insert the audio clip in such a way that no control panel displays. (Hint: Refer to Table 8–4 on page HTML 370.)
b. Repeat the audio clip three times. (Hint: Refer to Table 8–5 on page HTML 372.)
2. Save the fi le as apply8-1solution.html. Validate the code and print the fi le.
3. Submit the solution in the format specifi ed by your instructor.
Extend Your Knowledge
Extend the skills you learned in this chapter and experiment with new skills.
Combining Audio and Video Files Instructions: Start Notepad++. Open the fi le extend8-1.html from the Chapter08\Extend folder of the Data Files for Students. See the inside back cover of this book for instructions on downloading the Data Files for Students, or contact your instructor for information about accessing the required fi les. Save the fi le as extend8-1solution.html. This fi le contains the Web page shown in Figure 8–17.
Figure 8–17
while video clip plays, audio clip plays in background
no control panel displays in ActiveX window
Apply Your Knowledge continued
Copyright 2010 Cengage Learning. All Rights Reserved. May not be copied, scanned, or duplicated, in whole or in part. Due to electronic rights, some third party content may be suppressed from the eBook and/or eChapter(s).
Editorial review has deemed that any suppressed content does not materially affect the overall learning experience. Cengage Learning reserves the right to remove additional content at any time if subsequent rights restrictions require it.
Make It Right HTML 387
HTM
L C
hap
ter
8S
TU
DE
NT
AS
SIG
NM
EN
TS
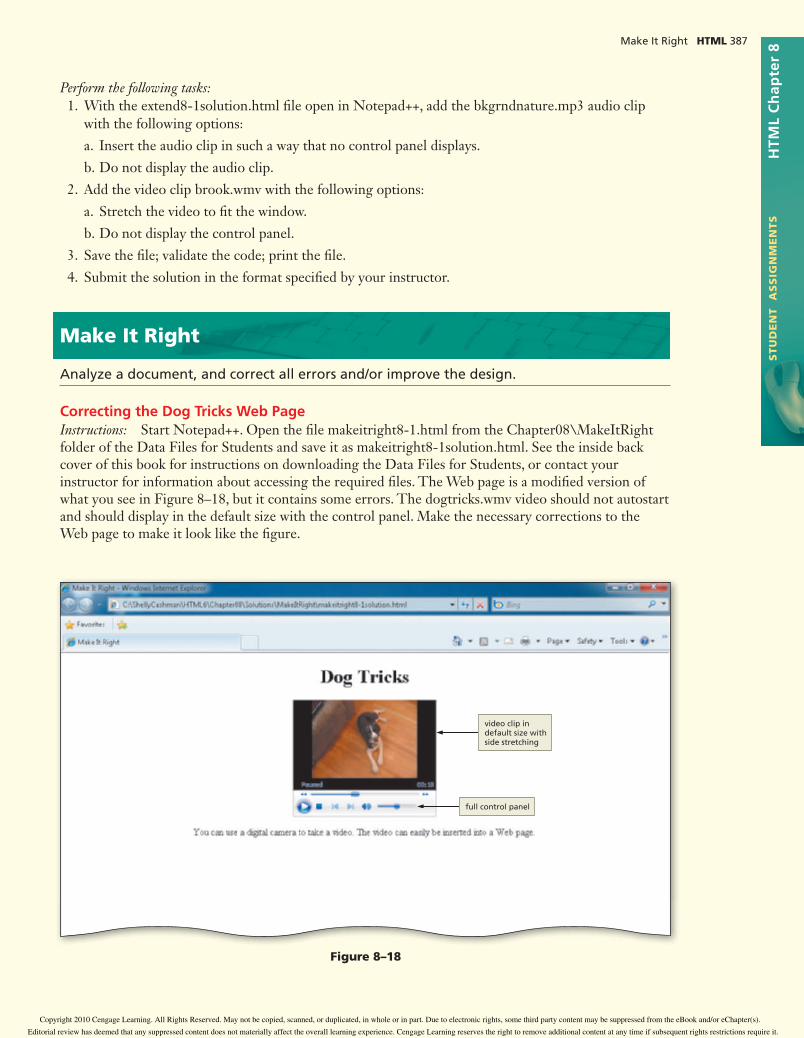
Perform the following tasks:
1. With the extend8-1solution.html fi le open in Notepad++, add the bkgrndnature.mp3 audio clip with the following options:
a. Insert the audio clip in such a way that no control panel displays.
b. Do not display the audio clip.
2. Add the video clip brook.wmv with the following options:
a. Stretch the video to fi t the window.
b. Do not display the control panel.
3. Save the fi le; validate the code; print the fi le.
4. Submit the solution in the format specifi ed by your instructor.
Make It Right
Analyze a document, and correct all errors and/or improve the design.
Correcting the Dog Tricks Web PageInstructions: Start Notepad++. Open the fi le makeitright8-1.html from the Chapter08\MakeItRight folder of the Data Files for Students and save it as makeitright8-1solution.html. See the inside back cover of this book for instructions on downloading the Data Files for Students, or contact your instructor for information about accessing the required fi les. The Web page is a modifi ed version of what you see in Figure 8–18, but it contains some errors. The dogtricks.wmv video should not autostart and should display in the default size with the control panel. Make the necessary corrections to the Web page to make it look like the fi gure.
Figure 8–18
video clip in default size with side stretching
full control panel
Copyright 2010 Cengage Learning. All Rights Reserved. May not be copied, scanned, or duplicated, in whole or in part. Due to electronic rights, some third party content may be suppressed from the eBook and/or eChapter(s).
Editorial review has deemed that any suppressed content does not materially affect the overall learning experience. Cengage Learning reserves the right to remove additional content at any time if subsequent rights restrictions require it.
HTML 388 HTML Chapter 8 Adding Multimedia Content to Web PagesS
TU
DE
NT
AS
SIG
NM
EN
TS
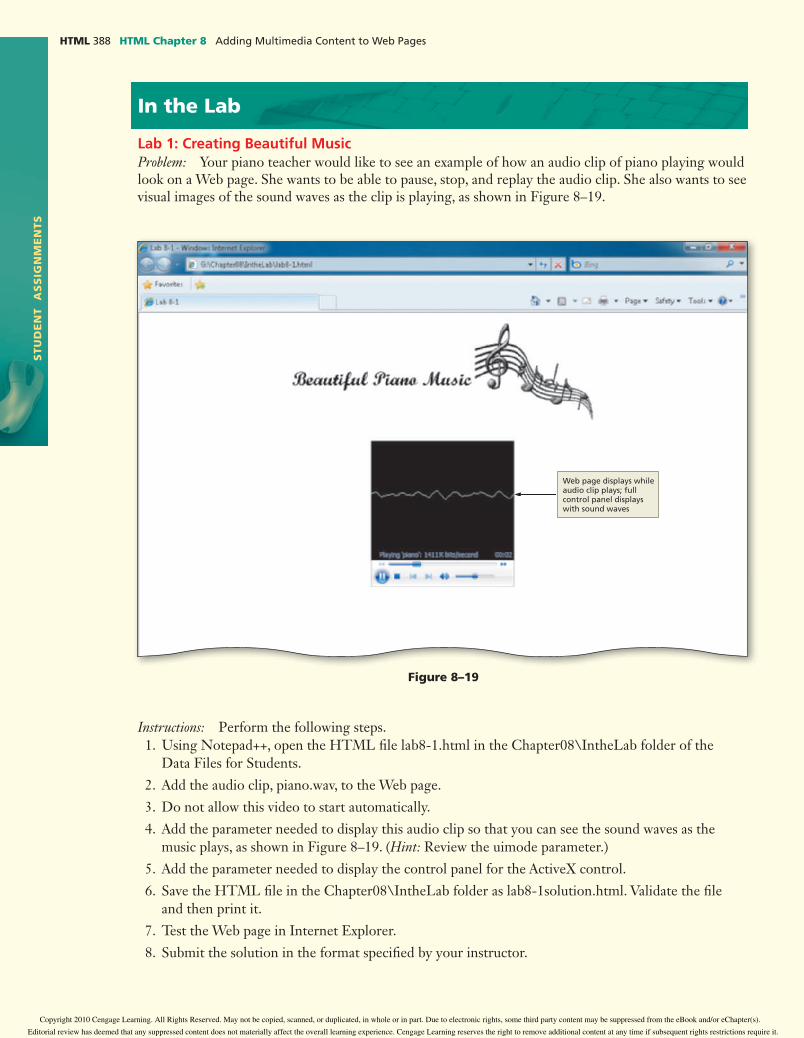
In the Lab
Lab 1: Creating Beautiful MusicProblem: Your piano teacher would like to see an example of how an audio clip of piano playing would look on a Web page. She wants to be able to pause, stop, and replay the audio clip. She also wants to see visual images of the sound waves as the clip is playing, as shown in Figure 8–19.
Figure 8–19
Instructions: Perform the following steps. 1. Using Notepad++, open the HTML fi le lab8-1.html in the Chapter08\IntheLab folder of the
Data Files for Students.
2. Add the audio clip, piano.wav, to the Web page.
3. Do not allow this video to start automatically.
4. Add the parameter needed to display this audio clip so that you can see the sound waves as the music plays, as shown in Figure 8–19. (Hint: Review the uimode parameter.)
5. Add the parameter needed to display the control panel for the ActiveX control.
6. Save the HTML fi le in the Chapter08\IntheLab folder as lab8-1solution.html. Validate the fi le and then print it.
7. Test the Web page in Internet Explorer.
8. Submit the solution in the format specifi ed by your instructor.
Web page displays while audio clip plays; full control panel displays with sound waves
Copyright 2010 Cengage Learning. All Rights Reserved. May not be copied, scanned, or duplicated, in whole or in part. Due to electronic rights, some third party content may be suppressed from the eBook and/or eChapter(s).
Editorial review has deemed that any suppressed content does not materially affect the overall learning experience. Cengage Learning reserves the right to remove additional content at any time if subsequent rights restrictions require it.

In the Lab HTML 389
HTM
L C
hap
ter
8S
TU
DE
NT
AS
SIG
NM
EN
TS
In the Lab
Lab 2: Video on a Full ScreenProblem: Your biology class is learning about bird migration. You have read about how some researchers are attempting to reintroduce whooping cranes in the U.S. and help whooping cranes raised in captivity participate in migration. You have found a video clip that shows these efforts in progress. You decide to create a Web page that will show this video. You want the video to display on the full screen of the monitor, as shown in Figure 8–20.
Figure 8–20
Instructions: Perform the following steps. 1. Using Notepad++, open the HTML fi le lab8-2.html in the Chapter08\IntheLab folder of the Data
Files for Students.
2. Add the video clip whooper.wmv to the Web page.
3. Do not allow this video to start automatically.
4. Add the parameters needed to display this video on a full screen with the full control panel, as shown in Figure 8–20.
5. Save the HTML fi le in the Chapter08\IntheLab folder as lab8-2solution.html. Validate the fi le and then print it.
6. Test the Web page in Internet Explorer.
7. Submit the solution in the format specifi ed by your instructor.
video clip displays in full monitor mode
full control panel displays
Copyright 2010 Cengage Learning. All Rights Reserved. May not be copied, scanned, or duplicated, in whole or in part. Due to electronic rights, some third party content may be suppressed from the eBook and/or eChapter(s).
Editorial review has deemed that any suppressed content does not materially affect the overall learning experience. Cengage Learning reserves the right to remove additional content at any time if subsequent rights restrictions require it.
HTML 390 HTML Chapter 8 Adding Multimedia Content to Web PagesS
TU
DE
NT
AS
SIG
NM
EN
TS
In the Lab
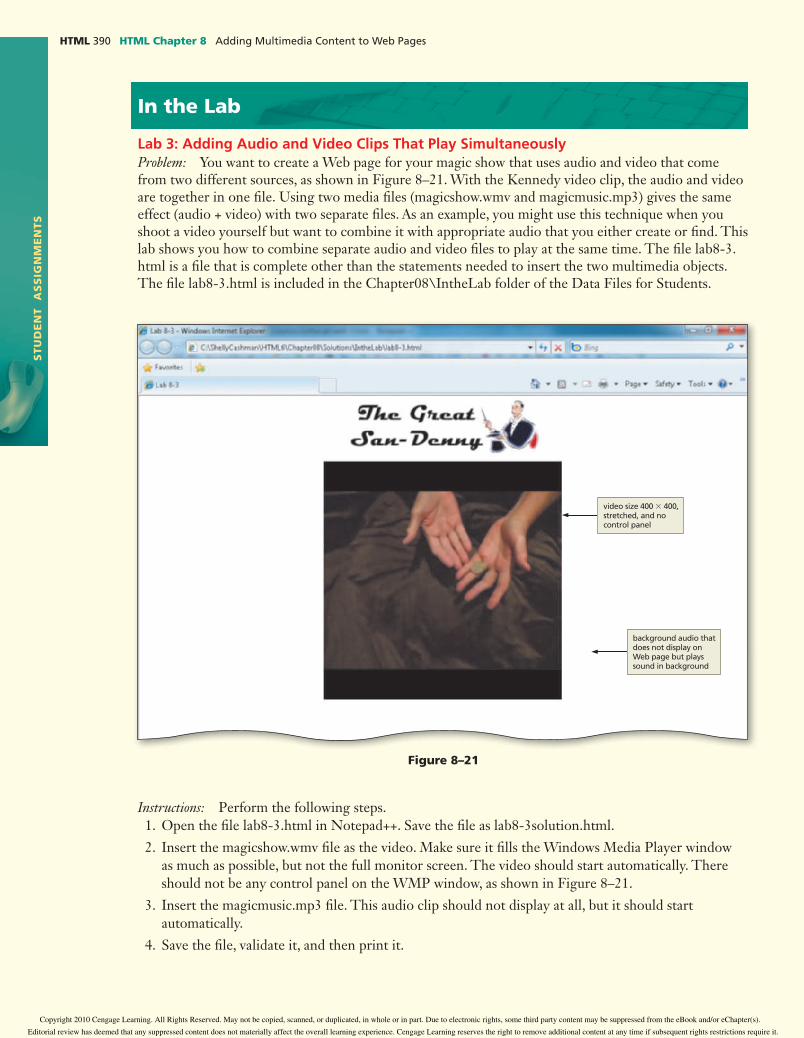
Lab 3: Adding Audio and Video Clips That Play SimultaneouslyProblem: You want to create a Web page for your magic show that uses audio and video that come from two different sources, as shown in Figure 8–21. With the Kennedy video clip, the audio and video are together in one fi le. Using two media fi les (magicshow.wmv and magicmusic.mp3) gives the same effect (audio + video) with two separate fi les. As an example, you might use this technique when you shoot a video yourself but want to combine it with appropriate audio that you either create or fi nd. This lab shows you how to combine separate audio and video fi les to play at the same time. The fi le lab8-3.html is a fi le that is complete other than the statements needed to insert the two multimedia objects. The fi le lab8-3.html is included in the Chapter08\IntheLab folder of the Data Files for Students.
Figure 8–21
Instructions: Perform the following steps. 1. Open the fi le lab8-3.html in Notepad++. Save the fi le as lab8-3solution.html.
2. Insert the magicshow.wmv fi le as the video. Make sure it fi lls the Windows Media Player window as much as possible, but not the full monitor screen. The video should start automatically. There should not be any control panel on the WMP window, as shown in Figure 8–21.
3. Insert the magicmusic.mp3 fi le. This audio clip should not display at all, but it should start automatically.
4. Save the fi le, validate it, and then print it.
video size 400 3 400, stretched, and no control panel
background audio that does not display on Web page but plays sound in background
Copyright 2010 Cengage Learning. All Rights Reserved. May not be copied, scanned, or duplicated, in whole or in part. Due to electronic rights, some third party content may be suppressed from the eBook and/or eChapter(s).
Editorial review has deemed that any suppressed content does not materially affect the overall learning experience. Cengage Learning reserves the right to remove additional content at any time if subsequent rights restrictions require it.
Cases and Places HTML 391
HTM
L C
hap
ter
8S
TU
DE
NT
AS
SIG
NM
EN
TS
Continued >
5. Test the Web page in Internet Explorer.
6. Submit the solution in the format specifi ed by your instructor.
7. Bonus: If you have downloaded video editing software, try to combine these two fi les into one video fi le. How would this change the code that you inserted in Steps 2 and 3?
Cases and Places
Apply your creative thinking and problem-solving skills to design and implement a solution.
• EASIER •• MORE DIFFICULT
• 1: Finding Multimedia Information OnlineSearch on the Internet for an ActiveX control other than those discussed in this chapter (see Table 8–3 on page HTML 370 for ideas). Why would you use Flash in lieu of Windows Media Player or QuickTime? Is the functionality of Java Applets different from or similar to the functionality of Windows Media Player or QuickTime? How does RealAudio differ from its competition? Determine when you would use ActiveX controls other than the ones used in the exercises you have completed in this chapter.
• 2: Other Multimedia FormatsReview the audio and video formats listed in Tables 8–1 and 8–2 on pages HTML 368 and HTML 369. In this chapter, you used only two types of fi les: .mp3 and .wmv. What are the benefi ts of these other formats? How are these formats better or worse than the formats used in the chapter? Why would you use one format over the other? How prevalent is one media format over the others? Search online for free audio or video clips in at least three of the other formats.
•• 3: Movie-Making SoftwareSearch for software that you can use to make or edit movie and audio clips. Most software that can be used to edit or make movies can also be used with audio fi les. Find software that has a free trial period. Download that software and play with it, using the video and audio clips provided in the Data Files for Students. Make sure to copy the fi le that you plan to use and save the original, just in case something happens. As you work with the software, use the Help utility if you have any problems. Demonstrate the software to the class.
•• 4: Adding to the Chapter 8 Web Site
Make It PersonalWho is your favorite U.S. President? Has that president ever given a speech or visited the Berlin Wall? If you cannot fi nd information on that president speaking there, what speech is that president famous for? Find an audio or video clip of that U.S. President and add the clip to the Chapter 8 Web site. If the president served at a time prior to the availability of audio or video clips, what else can you look for? Is there a “reenactment” clip of someone dressed as that president speaking? Can you record the audio for a famous speech and use a picture of the president? What will you have to do to the image map in order to accommodate a new clip? How can you restructure the Web site if you use a speech other than one at the Berlin Wall?
Copyright 2010 Cengage Learning. All Rights Reserved. May not be copied, scanned, or duplicated, in whole or in part. Due to electronic rights, some third party content may be suppressed from the eBook and/or eChapter(s).
Editorial review has deemed that any suppressed content does not materially affect the overall learning experience. Cengage Learning reserves the right to remove additional content at any time if subsequent rights restrictions require it.
HTML 392 HTML Chapter 8 Adding Multimedia Content to Web PagesS
TU
DE
NT
AS
SIG
NM
EN
TS
•• 5: Creating a Video
Working TogetherWork with your team to analyze and design a video that you can use in a Web site of your creation. You might want to storyboard the scenes (i.e., to graphically organize a process with a series of illustrations or images displayed in sequence for the purpose of visualizing the motion) so that it is fully designed. Use a digital camera to fi lm the video. Using the software evaluated in Cases and Places 3, edit the video so that it is a reasonable fi le size (if necessary). Create a Web site in which this video can be inserted. Share your Web site and video with the class.
Cases and Places continued
Copyright 2010 Cengage Learning. All Rights Reserved. May not be copied, scanned, or duplicated, in whole or in part. Due to electronic rights, some third party content may be suppressed from the eBook and/or eChapter(s).
Editorial review has deemed that any suppressed content does not materially affect the overall learning experience. Cengage Learning reserves the right to remove additional content at any time if subsequent rights restrictions require it.