1 ISO e Committee Guide for Secretaries and Convenors - CS10
67
Electronic Committees (eCommittees) User guide for Secretaries and Convenors v5 ITES – [email protected] 2014-03-31
-
Upload
independent -
Category
Documents
-
view
5 -
download
0
Transcript of 1 ISO e Committee Guide for Secretaries and Convenors - CS10
Electronic Committees (eCommittees) User guide for Secretaries and Convenors v5
ITES – [email protected] 2014-03-31

2 0 0BTable of Contents
eCommittees User Guide [email protected]
Table of Contents TABLE OF CONTENTS ............................................................................................................................................. 2
1 INTRODUCTION .................................................................................................................................................. 4
2 LOGGING IN AND LOGGING OUT ........................................................................................................................ 5
2.1 LOGGING IN ..................................................................................................................................................... 5 2.2 LOGGING OUT ................................................................................................................................................... 7 2.3 PASSWORD FORGOTTEN ...................................................................................................................................... 7
3 USER INTERFACE AND NAVIGATION ................................................................................................................... 8
3.1 COMMON NAVIGATION ITEMS .............................................................................................................................. 8 3.2 ITEMS AND ICONS .............................................................................................................................................. 9
3.2.1 Items...................................................................................................................................................... 9 3.2.2 Icons ...................................................................................................................................................... 9
3.3 THE ENTERPRISE WORKSPACE ............................................................................................................................ 10 3.4 ISOTC HOME ................................................................................................................................................. 11 3.5 ACCESSING ECOMMITTEES ................................................................................................................................. 11
3.5.1 Through the Personal menu ................................................................................................................. 12 3.5.2 Through ISOTC Home ........................................................................................................................... 13
4 ELECTRONIC COMMITTEE (ECOMMITTEE) HOMEPAGE .................................................................................... 14
4.1 COMMITTEES HOSTED EXTERNALLY ...................................................................................................................... 15 4.2 NAVIGATION MENU ......................................................................................................................................... 16
4.2.1 Member List ......................................................................................................................................... 17 4.2.2 Email to Secretary ................................................................................................................................ 18 4.2.3 Email to Members ................................................................................................................................ 18 4.2.4 Mail Archive ......................................................................................................................................... 19 4.2.5 N-Documents List ................................................................................................................................. 21 4.2.6 Secretary Member List ......................................................................................................................... 22
4.3 FOLDER STRUCTURE (LIBRARY) ........................................................................................................................... 24 4.3.1 Standard Folder Structure .................................................................................................................... 24 4.3.2 The standard folders ............................................................................................................................ 24
4.4 FORUMS ........................................................................................................................................................ 26 4.4.1 Adding a discussion topic to a Forum ................................................................................................... 26 4.4.2 Viewing a discussion topic and posting replies ..................................................................................... 28 4.4.3 Forum Notifications ............................................................................................................................. 31
4.5 BALLOTS ........................................................................................................................................................ 32 4.6 MEETINGS ..................................................................................................................................................... 32 4.7 STRUCTURE .................................................................................................................................................... 33 4.8 COMMITTEE SCOPE .......................................................................................................................................... 33 4.9 COMMITTEE TASK LIST ...................................................................................................................................... 34
4.9.1 Milestones ........................................................................................................................................... 35 4.9.2 Tasks .................................................................................................................................................... 36 4.9.3 Task Groups ......................................................................................................................................... 39
4.10 NEWS ......................................................................................................................................................... 40 4.10.1 The News Channel .............................................................................................................................. 40 4.10.2 Adding a News item ........................................................................................................................... 41
5 WORKING WITH FOLDERS AND DOCUMENTS .................................................................................................. 43
5.1 WORKING WITH DOCUMENTS ............................................................................................................................. 43 5.1.1 Viewing documents .............................................................................................................................. 43 5.1.2 Downloading several documents in a Zip file ........................................................................................ 44 5.1.3 Zip & E-mail several documents ........................................................................................................... 45
5.2 WORKING WITH FOLDERS .................................................................................................................................. 47
3 0 0BTable of Contents
eCommittees User Guide [email protected]
5.2.1 Adding N-Folders ................................................................................................................................. 47 5.2.2 Adding N-Documents to N-Folders (N-Documents Wizard) ................................................................... 48 5.2.3 Adding Documents to Folders (no N-Numbers) ..................................................................................... 55
5.3 NOTIFICATION OF NEW DOCUMENTS .................................................................................................................... 56 5.4 NOTIFICATION REPORT ..................................................................................................................................... 59
5.4.1 View Notification History ..................................................................................................................... 59 5.4.2 Resending a notification....................................................................................................................... 60
5.5 WITHDRAWING DOCUMENTS ............................................................................................................................. 61 5.6 MOVING OF N DOCUMENT FROM ONE FOLDER TO OTHER FOLDER IN WORKING AREA....................................................... 62
6 SEARCHING ....................................................................................................................................................... 64
6.1 SEARCH OPTIONS ............................................................................................................................................ 64 6.2 SEARCH RESULTS ............................................................................................................................................. 65
7 HELPDESK AND INFO......................................................................................................................................... 67
4 1 1BIntroduction
eCommittees User Guide [email protected]
1 Introduction
The ISOTC Server is using the document management system OpenText Content Server 10 (formerly known as Livelink), which is part of the Enterprise Content Management (ECM) offering by the Canadian company Open Text.
The eCommittees on the ISOTC server are using the Open Text module Communities of Practice (CoP) which was redesigned and optimized for the ISO committee work by ISO Members in the IT Strategies Implementation Group (ITSIG) in 2007.
The basic principle of the ISO eCommittees on the ISOTC server is to provide the secretariats of ISO Committees with the tools to manage their committee work in a decentralized manner through the eCommittee application. This guide addresses the needs of the Committee Secretaries, Working Group Convenors and their support teams as the managers of the main committee processes.
The environment provided by the ISOTC server aims at enabling Secretaries of ISO Committees (and their support teams) as well as WG Convenors to make documents available to their Committee Members and Experts and notify them.
The role of the ISO Central Secretariat is restricted to providing a server with a basic working environment (including Helpdesk and backup services), tools supporting the Committee work and directives to ensure a basic commonality of the working structures between different Committees.
In addition to the eCommittee working environment, the ISOTC server is also the platform that links to other committee work related applications, such as Electronic Balloting, Meeting Management and Project Portal.

5 2 2BLogging in and logging out
eCommittees User Guide [email protected]
2 Logging in and logging out
2.1 Logging in Your username will be sent to you by e-mail after your initial registration by your National Member Body in the ISO Global Directory and will contain a link to choose a password and activate your account. Please follow the instructions in the email to activate your account and choose a password.
a) Start your Internet browser and open the following URL: https://login.iso.org.
You will be directed to the ISO electronic applications login page. Click on "eCommittees (ISOTC)" to access the committee working areas:
Figure 1 - List of ISO electronic applications
b) The public open area of the ISOTC server will be displayed. In the upper right corner of the screen, you'll find the button click to login
Figure 2 - Livelink Log-In
Please note that both username and password are case-sensitive, i.e. they have to be entered exactly as provided.
6 2 2BLogging in and logging out
eCommittees User Guide [email protected]
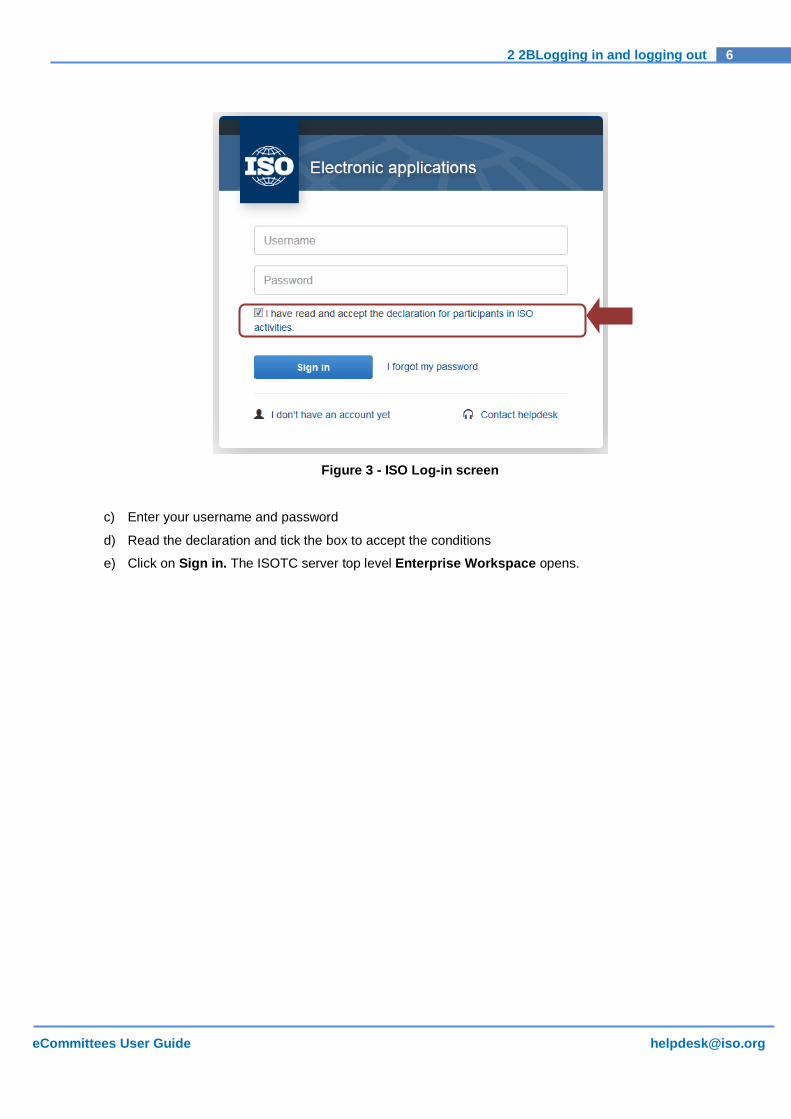
Figure 3 - ISO Log-in screen
c) Enter your username and password
d) Read the declaration and tick the box to accept the conditions
e) Click on Sign in. The ISOTC server top level Enterprise Workspace opens.

7 2 2BLogging in and logging out
eCommittees User Guide [email protected]
2.2 Logging out a) Choose Log-out on the Tools menu.
b) Click on Log-out on the Log-out screen to leave the ISOTC server.
c) You will be forwarded to the list of ISO applications.
Figure 4 - Logout Button
2.3 Password forgotten If you forgot your password, click on the link I have lost my password on the right and follow the instructions on the screen. Within the next few minutes you will receive an e-mail with a link to reset your password.
Figure 5 – Password forgotten

8 3 3BUser interface and navigation
eCommittees User Guide [email protected]
3 User interface and navigation
3.1 Common navigation items Throughout the eCommittees application and the ISOTC server, there are some navigation items that will be common to all screens.
Figure 6 - Common items
Search Bar
Enables a full text search on the ISOTC server and the documents
Global menus These menus appear on every page in the ISOTC server:
— Enterprise: Allows you to access the Enterprise Workspace (top level of the ISOTC server)
— Personal: Allows you to access your Personal Workspace and information pages
— Tools: Allows you to search the ISOTC server, log out, and modify your Livelink settings.
— Allows you to access the Livelink context sensitive help (help for individual pages) and the Table of Contents (all help pages in Livelink).
9 3 3BUser interface and navigation
eCommittees User Guide [email protected]
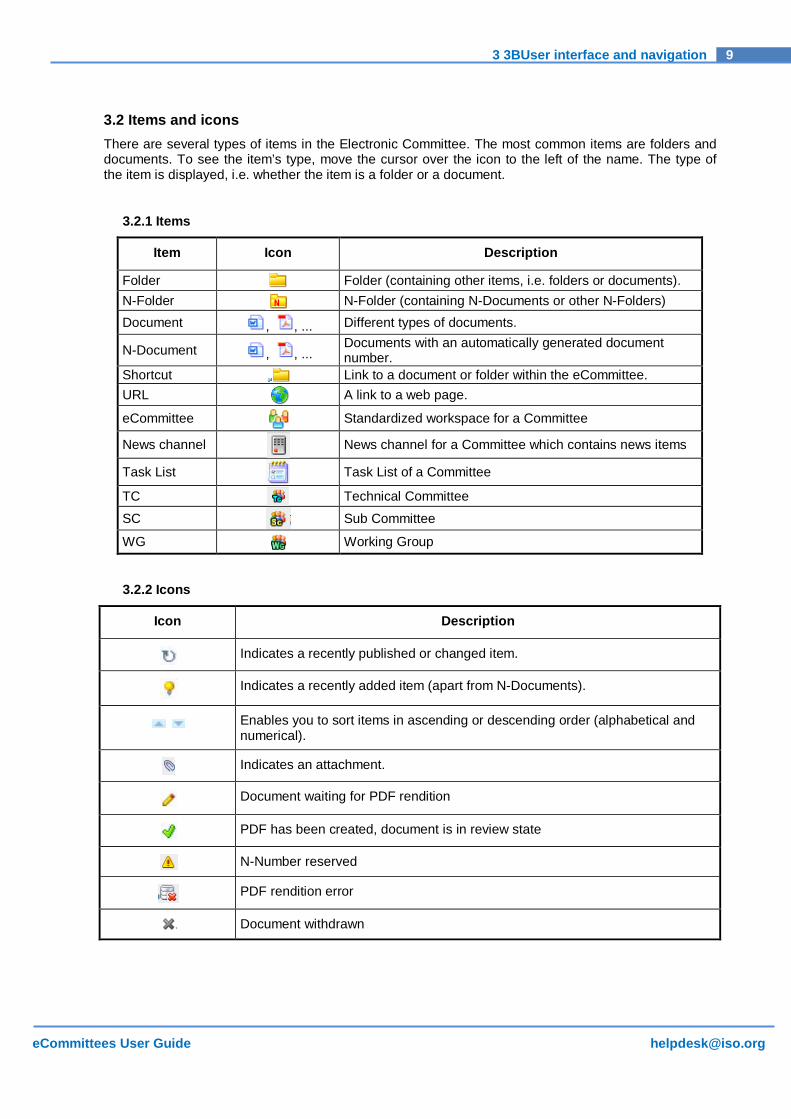
3.2 Items and icons There are several types of items in the Electronic Committee. The most common items are folders and documents. To see the item’s type, move the cursor over the icon to the left of the name. The type of the item is displayed, i.e. whether the item is a folder or a document.
3.2.1 Items
Item Icon Description
Folder Folder (containing other items, i.e. folders or documents). N-Folder N-Folder (containing N-Documents or other N-Folders) Document , , ... Different types of documents.
N-Document , , ... Documents with an automatically generated document number.
Shortcut Link to a document or folder within the eCommittee. URL A link to a web page.
eCommittee Standardized workspace for a Committee
News channel News channel for a Committee which contains news items
Task List Task List of a Committee
TC Technical Committee
SC Sub Committee
WG Working Group
3.2.2 Icons
Icon Description
Indicates a recently published or changed item.
Indicates a recently added item (apart from N-Documents).
Enables you to sort items in ascending or descending order (alphabetical and numerical).
Indicates an attachment.
Document waiting for PDF rendition
PDF has been created, document is in review state
N-Number reserved
PDF rendition error
Document withdrawn
10 3 3BUser interface and navigation
eCommittees User Guide [email protected]
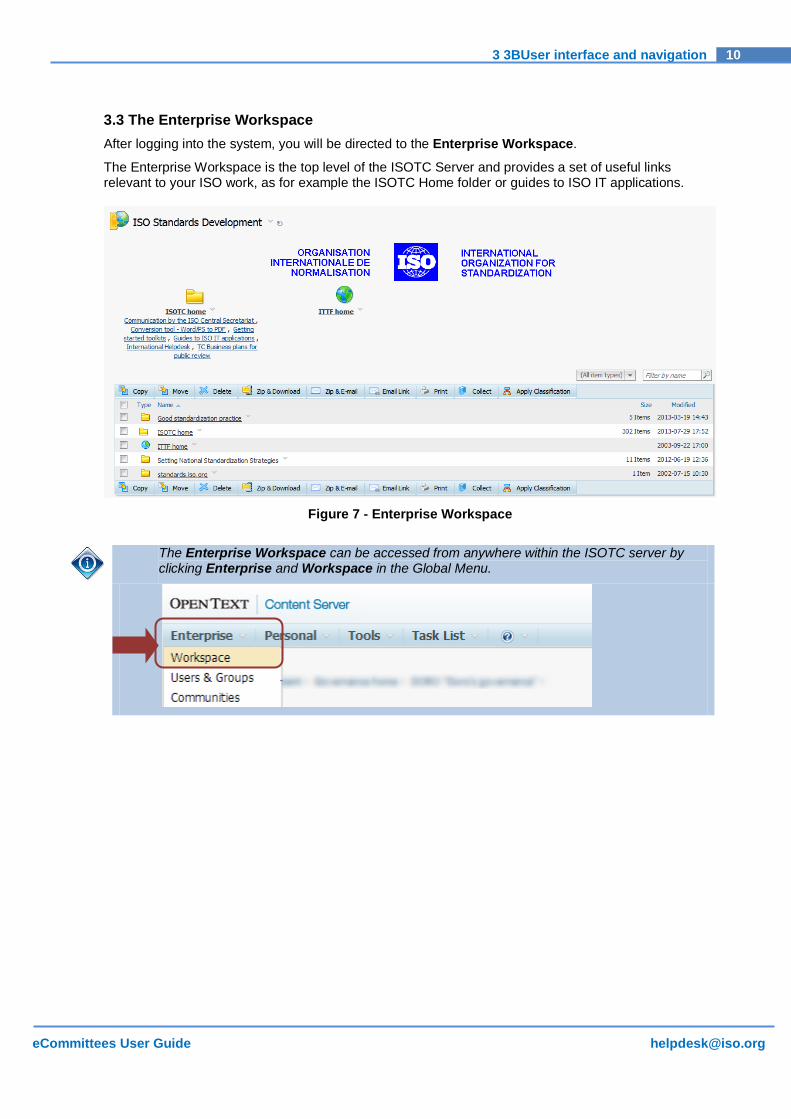
3.3 The Enterprise Workspace After logging into the system, you will be directed to the Enterprise Workspace.
The Enterprise Workspace is the top level of the ISOTC Server and provides a set of useful links relevant to your ISO work, as for example the ISOTC Home folder or guides to ISO IT applications.
Figure 7 - Enterprise Workspace
The Enterprise Workspace can be accessed from anywhere within the ISOTC server by clicking Enterprise and Workspace in the Global Menu.

11 3 3BUser interface and navigation
eCommittees User Guide [email protected]
3.4 ISOTC Home ISOTC Home is the home page to find and access all the ISO Committee and Working Group areas. It also provides a set of links to tools and documents that can be useful to your ISO work, for example a link to the Guides to ISO IT applications.
Figure 8 - ISOTC Home
3.5 Accessing eCommittees On the start page there are two alternatives for finding the Committee you would like to access:
1. Through the Personal menu – this will filter the list of Committees to only show the Committees you are listed in
2. Through ISOTC Home – this will allow you to see the complete list of Committees, regardless of your access rights
You can also access the eCommittees for a particular Committee by typing the following URL in your browser:
http://www.iso.org/ CommitteeName For example to access TC11:
http://www.iso.org/tc11
To access TC11/WG10 :
http://www.iso.org/tc11wg10
Featured Items Easy access links to important and relevant items
List View Links to folders and documents and the eCommittee pages
12 3 3BUser interface and navigation
eCommittees User Guide [email protected]
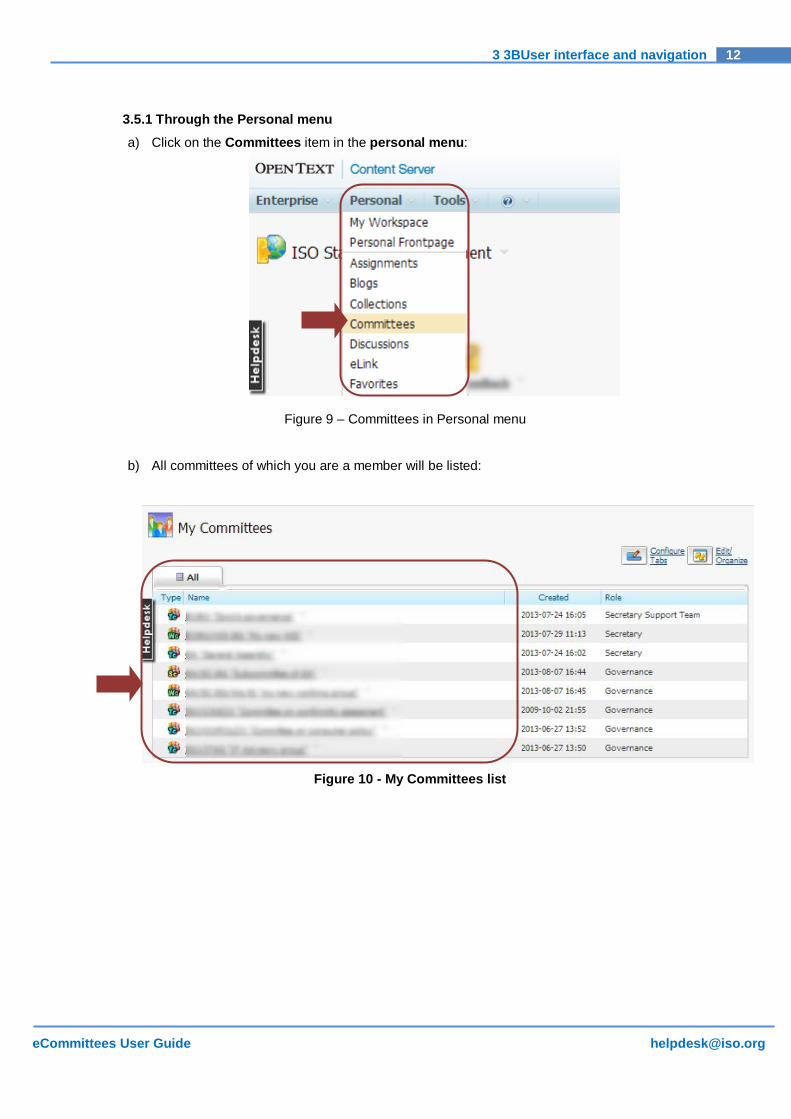
3.5.1 Through the Personal menu a) Click on the Committees item in the personal menu:
Figure 9 – Committees in Personal menu
b) All committees of which you are a member will be listed:
Figure 10 - My Committees list
13 3 3BUser interface and navigation
eCommittees User Guide [email protected]
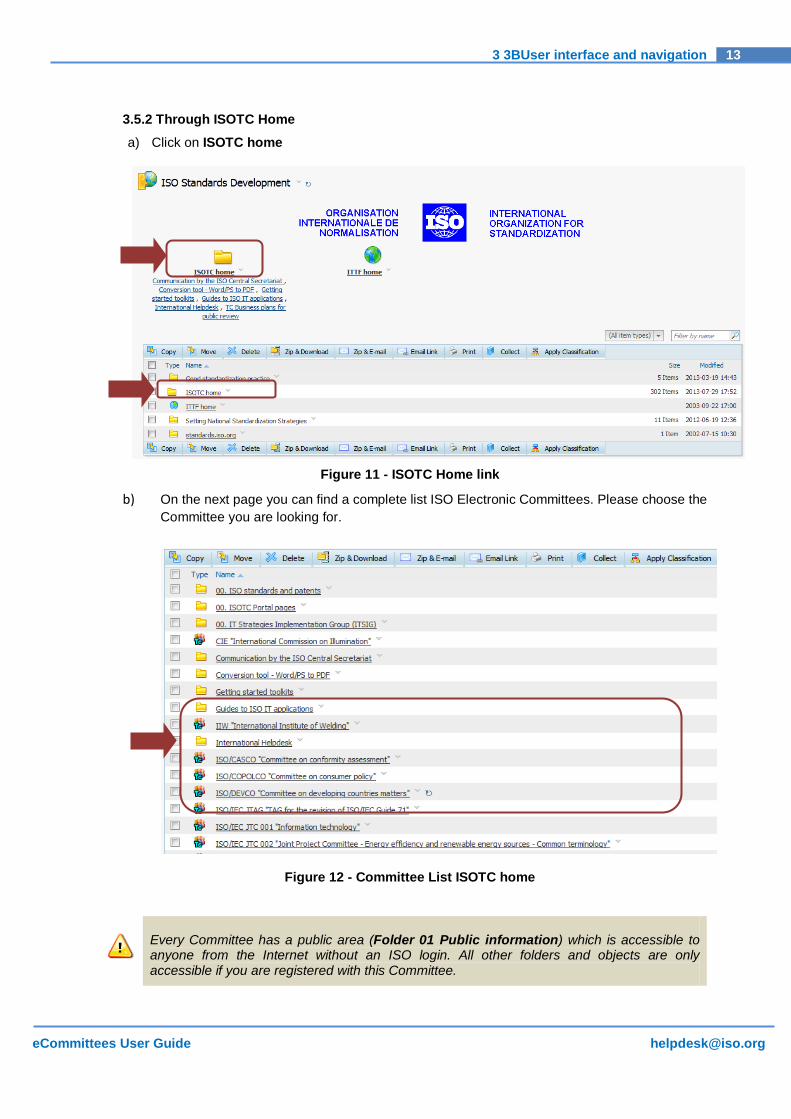
3.5.2 Through ISOTC Home a) Click on ISOTC home
Figure 11 - ISOTC Home link
b) On the next page you can find a complete list ISO Electronic Committees. Please choose the Committee you are looking for.
Figure 12 - Committee List ISOTC home
Every Committee has a public area (Folder 01 Public information) which is accessible to anyone from the Internet without an ISO login. All other folders and objects are only accessible if you are registered with this Committee.
14 4 4BElectronic Committee (eCommittee) Homepage
eCommittees User Guide [email protected]
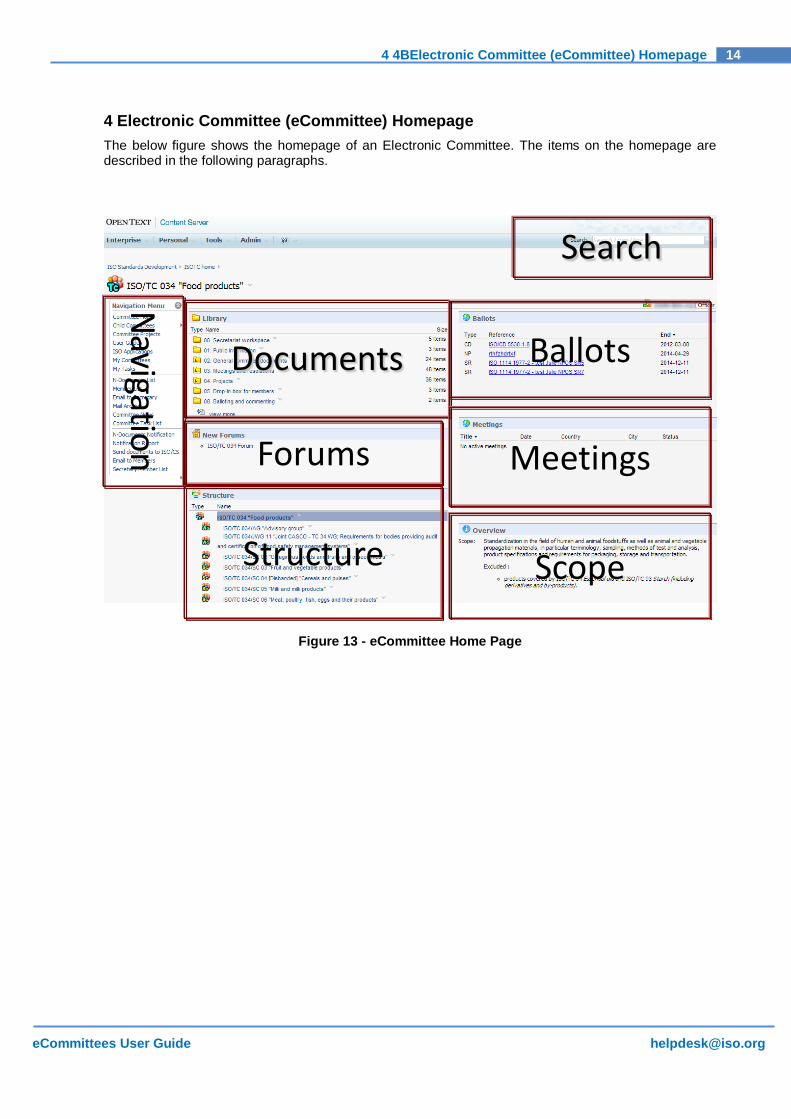
4 Electronic Committee (eCommittee) Homepage The below figure shows the homepage of an Electronic Committee. The items on the homepage are described in the following paragraphs.
Figure 13 - eCommittee Home Page
Documents Ballots
Meetings
Structure
Forums
Navigation
Search
Scope

15 4 4BElectronic Committee (eCommittee) Homepage
eCommittees User Guide [email protected]
4.1 Committees hosted externally Some committees have chosen to use the DIN or AFNOR Livelink servers to host their committee work. In this case, the homepage on ISOTC will be simplified to show you that the work is happening on a different server:
Figure 14 - Committee hosted externally
Even if a committee is working on the DIN or AFNOR server, the Global Directory is the source for membership in the committee. Experts therefore still need to be registered in the ISO Global Directory to gain access to the working area.
Watch out: the password between DIN, AFNOR and ISOTC are not synchronized, therefore you will have different login information for each server.
Navigation
Structure
Link Link to the DIN or AFNOR server hosting the committee
16 4 4BElectronic Committee (eCommittee) Homepage
eCommittees User Guide [email protected]
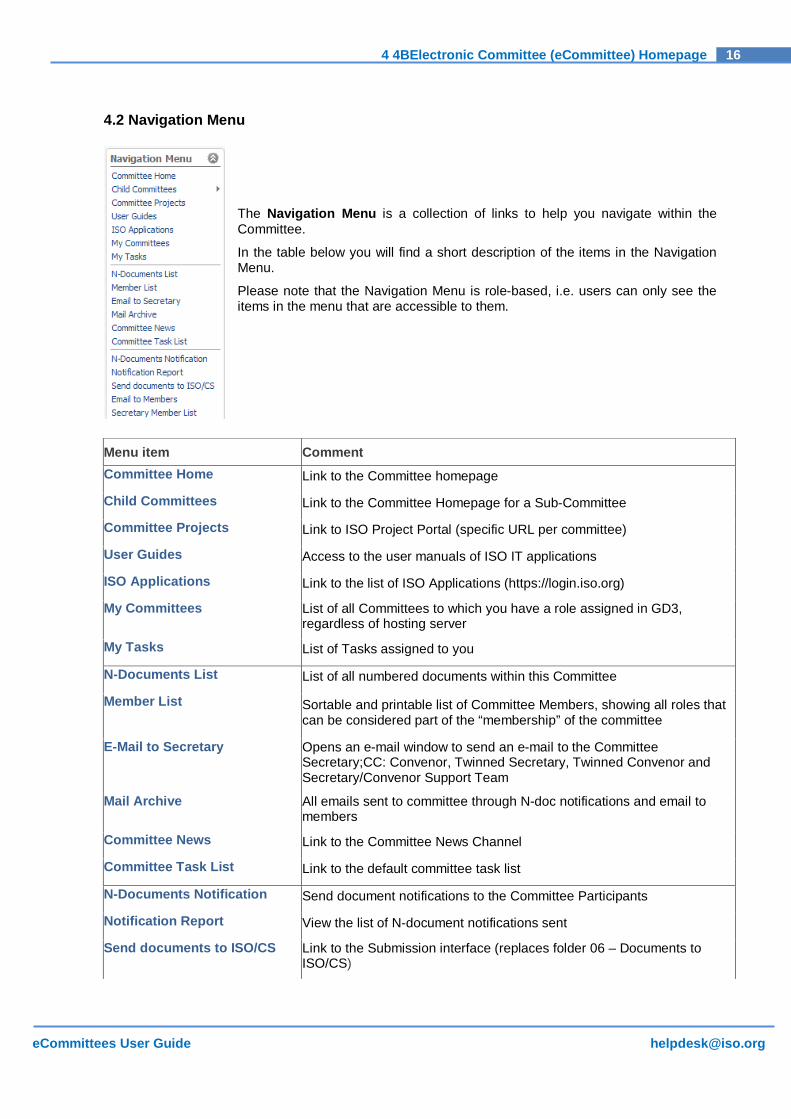
4.2 Navigation Menu
The Navigation Menu is a collection of links to help you navigate within the Committee.
In the table below you will find a short description of the items in the Navigation Menu.
Please note that the Navigation Menu is role-based, i.e. users can only see the items in the menu that are accessible to them.
Menu item Comment Committee Home Link to the Committee homepage
Child Committees Link to the Committee Homepage for a Sub-Committee
Committee Projects Link to ISO Project Portal (specific URL per committee)
User Guides Access to the user manuals of ISO IT applications
ISO Applications Link to the list of ISO Applications (https://login.iso.org)
My Committees List of all Committees to which you have a role assigned in GD3, regardless of hosting server
My Tasks List of Tasks assigned to you
N-Documents List List of all numbered documents within this Committee
Member List Sortable and printable list of Committee Members, showing all roles that can be considered part of the “membership” of the committee
E-Mail to Secretary Opens an e-mail window to send an e-mail to the Committee Secretary;CC: Convenor, Twinned Secretary, Twinned Convenor and Secretary/Convenor Support Team
Mail Archive All emails sent to committee through N-doc notifications and email to members
Committee News Link to the Committee News Channel
Committee Task List Link to the default committee task list
N-Documents Notification Send document notifications to the Committee Participants
Notification Report View the list of N-document notifications sent
Send documents to ISO/CS Link to the Submission interface (replaces folder 06 – Documents to ISO/CS)
17 4 4BElectronic Committee (eCommittee) Homepage
eCommittees User Guide [email protected]
Menu item Comment E-Mail to Members Opens an e-mail window to send an e-mail to the Committee Members
Secretary Member List Sortable and printable list of people that have access to Committee. It shows all roles already included in the Member List, and additionally all other roles that have access to the documents (for example voters, officers of other committees etc)
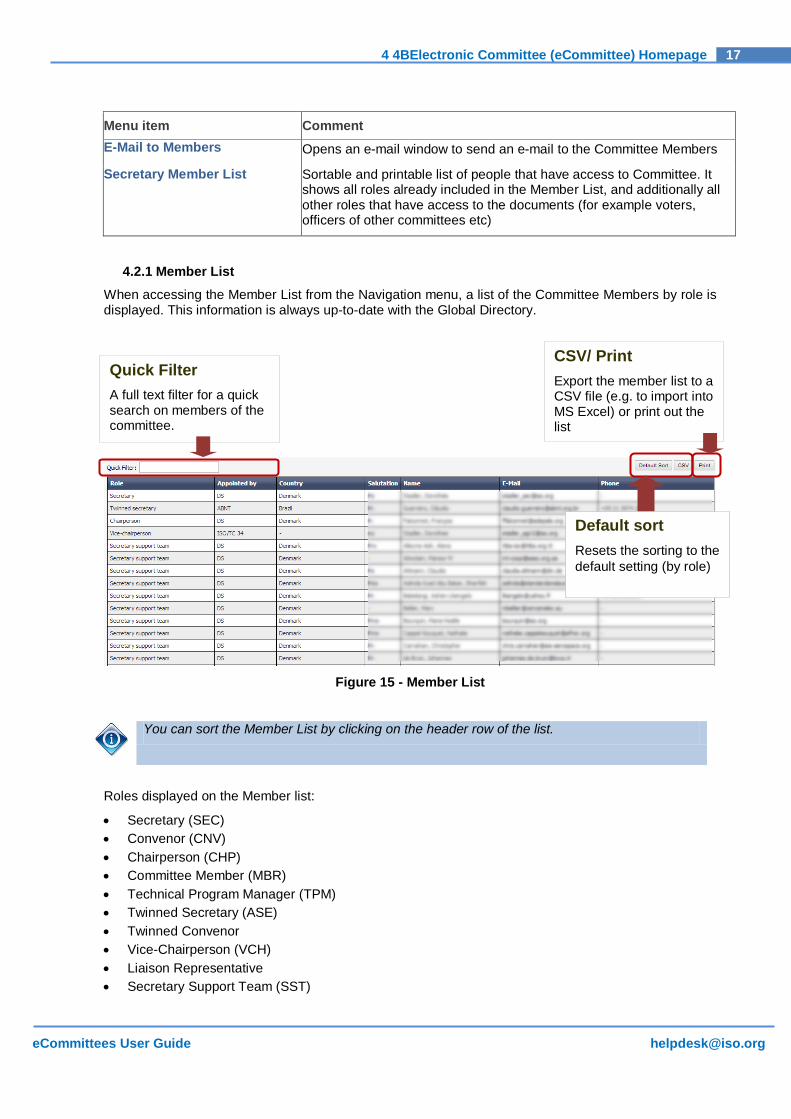
4.2.1 Member List When accessing the Member List from the Navigation menu, a list of the Committee Members by role is displayed. This information is always up-to-date with the Global Directory.
Figure 15 - Member List
You can sort the Member List by clicking on the header row of the list.
Roles displayed on the Member list:
• Secretary (SEC) • Convenor (CNV) • Chairperson (CHP) • Committee Member (MBR) • Technical Program Manager (TPM) • Twinned Secretary (ASE) • Twinned Convenor • Vice-Chairperson (VCH) • Liaison Representative • Secretary Support Team (SST)
Quick Filter A full text filter for a quick search on members of the committee.
CSV/ Print Export the member list to a CSV file (e.g. to import into MS Excel) or print out the list
Default sort Resets the sorting to the default setting (by role)
18 4 4BElectronic Committee (eCommittee) Homepage
eCommittees User Guide [email protected]
• Secretary/ Convenor Support Team (SST) • Chairperson Support Team (CST) • TPM Assistant (TPS) • Decentralized document monitor • Centralized document monitor
4.2.2 Email to Secretary
This menu item enables the Committee Members to send an email to the Committee Leadership directly from the eCommittees application.
By clicking on Email to Secretary, an email window will open where the To: field is pre-populated with the email of the Secretary and the CC: field with the email of the Convenor, Twinned Secretary, Twinned Convenor, Secretary Support Team and Secretary/Convenor Support Team.
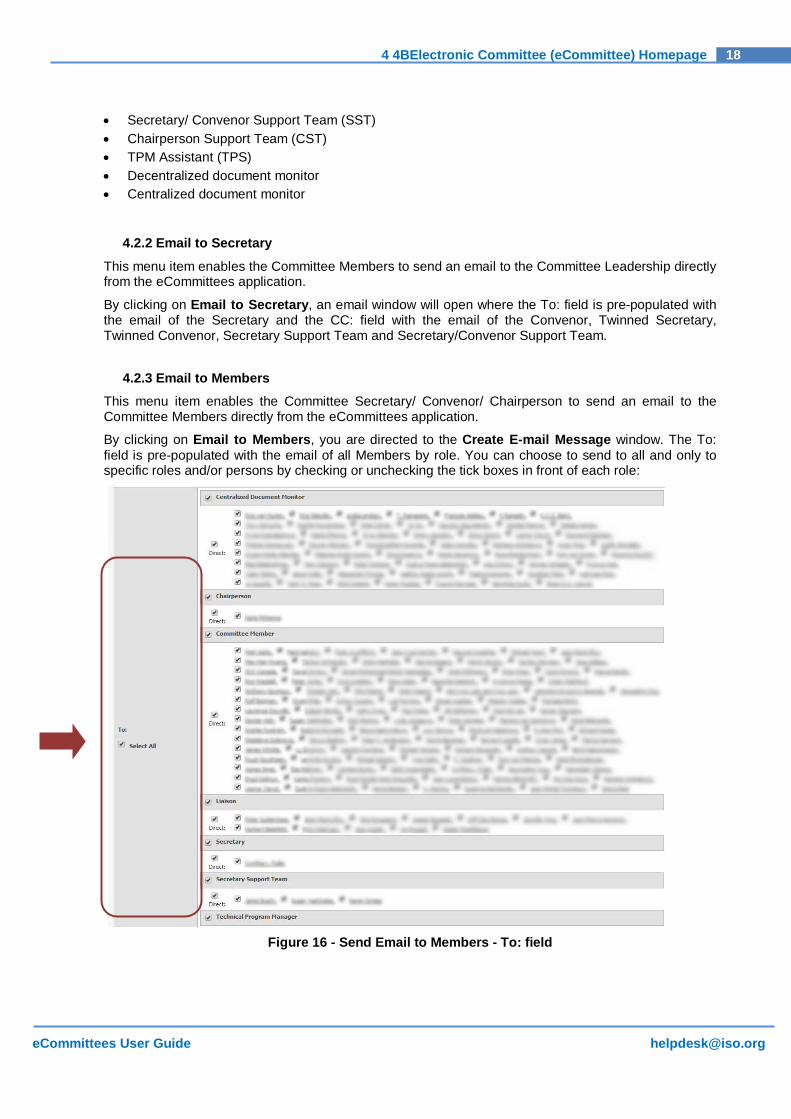
4.2.3 Email to Members
This menu item enables the Committee Secretary/ Convenor/ Chairperson to send an email to the Committee Members directly from the eCommittees application.
By clicking on Email to Members, you are directed to the Create E-mail Message window. The To: field is pre-populated with the email of all Members by role. You can choose to send to all and only to specific roles and/or persons by checking or unchecking the tick boxes in front of each role:
Figure 16 - Send Email to Members - To: field
19 4 4BElectronic Committee (eCommittee) Homepage
eCommittees User Guide [email protected]
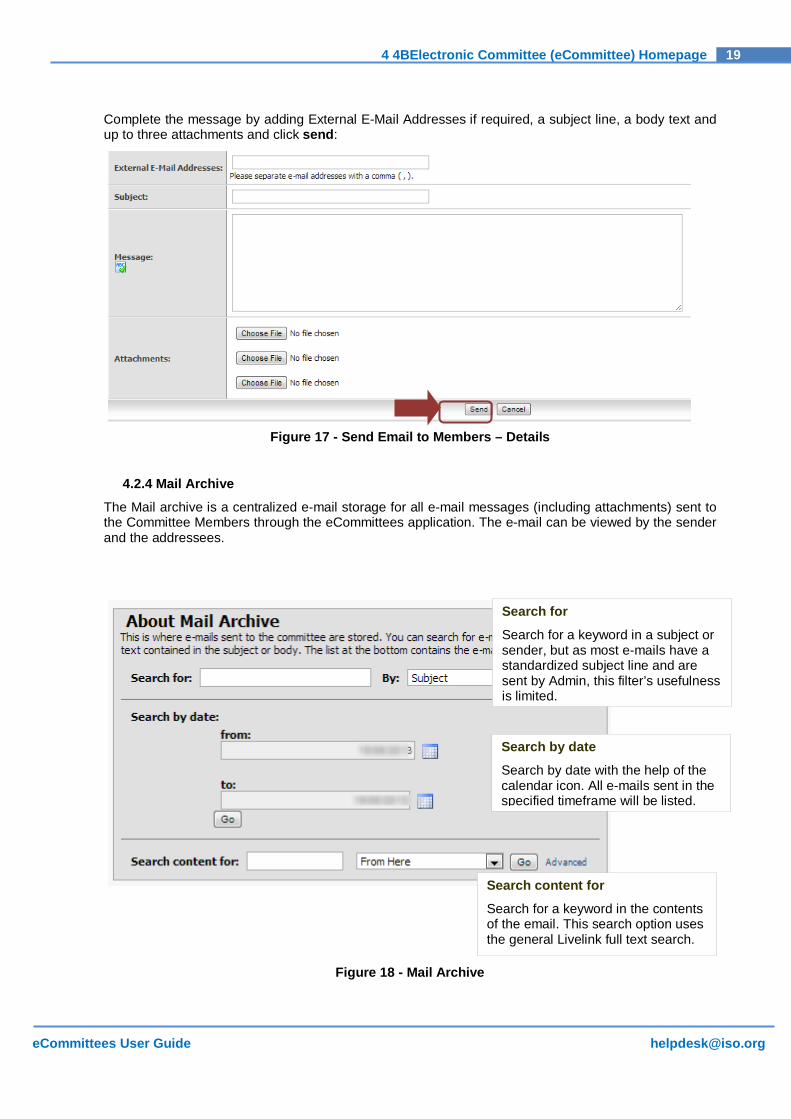
Complete the message by adding External E-Mail Addresses if required, a subject line, a body text and up to three attachments and click send:
Figure 17 - Send Email to Members – Details
4.2.4 Mail Archive
The Mail archive is a centralized e-mail storage for all e-mail messages (including attachments) sent to the Committee Members through the eCommittees application. The e-mail can be viewed by the sender and the addressees.
Figure 18 - Mail Archive
Search for
Search for a keyword in a subject or sender, but as most e-mails have a standardized subject line and are sent by Admin, this filter’s usefulness is limited.
Search by date
Search by date with the help of the calendar icon. All e-mails sent in the specified timeframe will be listed.
Search content for
Search for a keyword in the contents of the email. This search option uses the general Livelink full text search.
20 4 4BElectronic Committee (eCommittee) Homepage
eCommittees User Guide [email protected]
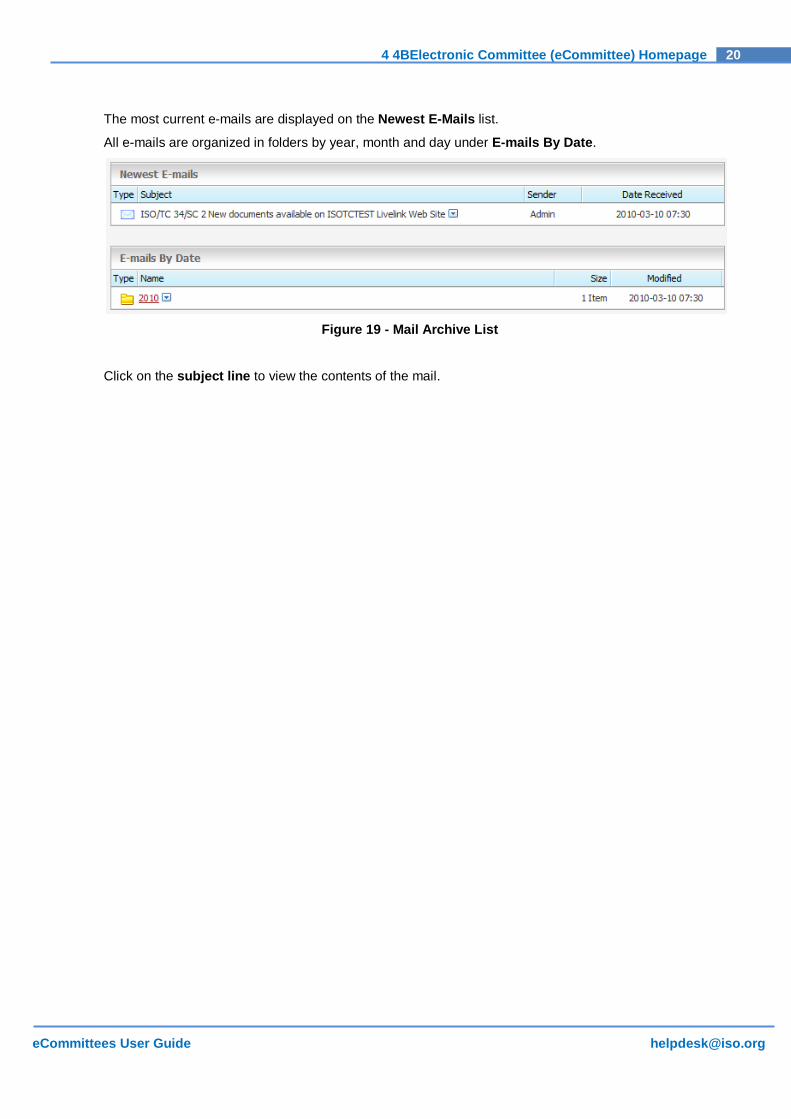
The most current e-mails are displayed on the Newest E-Mails list.
All e-mails are organized in folders by year, month and day under E-mails By Date.
Figure 19 - Mail Archive List
Click on the subject line to view the contents of the mail.

21 4 4BElectronic Committee (eCommittee) Homepage
eCommittees User Guide [email protected]
4.2.5 N-Documents List The N-Documents List lists all numbered documents of the Committee irrespective of their position in the folder structure. The list is sorted by document number, but can be resorted by clicking on the column headers.
Figure 20 - N-Document List
The N-Documents list can be printed by clicking on the Print this page button.
Search in Document Title Search for a keyword in the title of the document
Filter criteria Filter the list based on certain criteria:
— Due Date — Creation Date — N-Number Range — Doc Type/ Sub Type
22 4 4BElectronic Committee (eCommittee) Homepage
eCommittees User Guide [email protected]
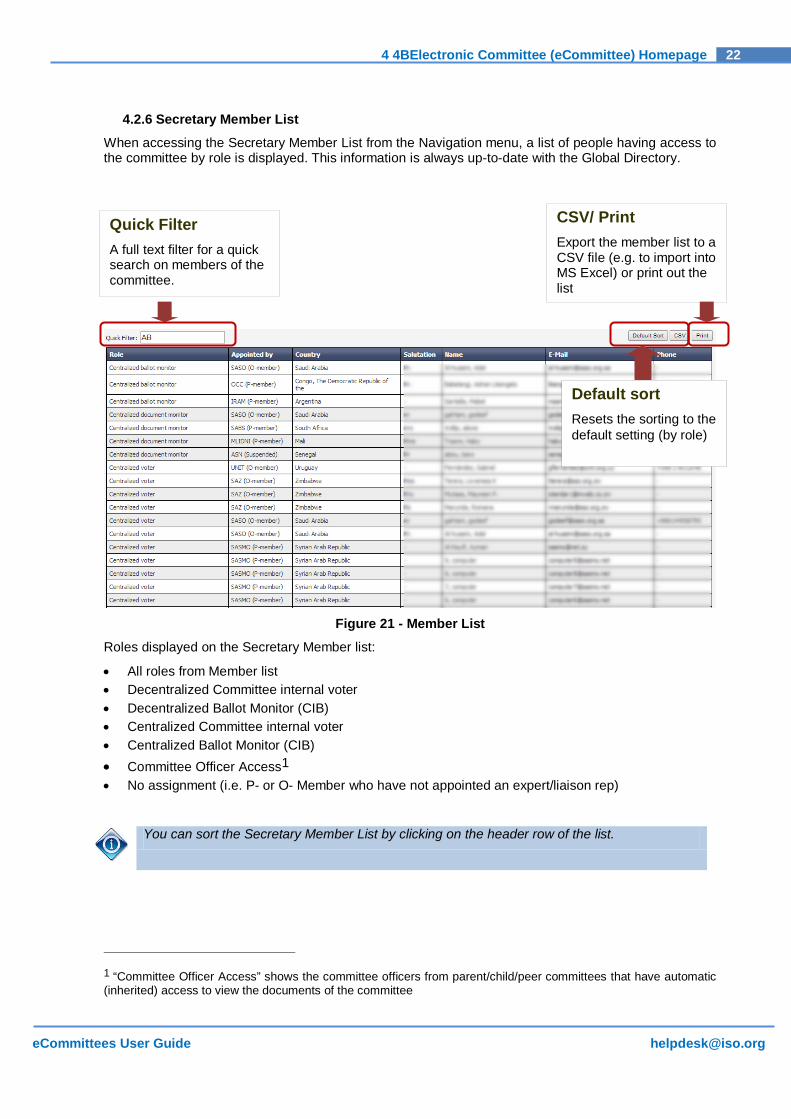
4.2.6 Secretary Member List
When accessing the Secretary Member List from the Navigation menu, a list of people having access to the committee by role is displayed. This information is always up-to-date with the Global Directory.
Figure 21 - Member List
Roles displayed on the Secretary Member list:
• All roles from Member list • Decentralized Committee internal voter • Decentralized Ballot Monitor (CIB) • Centralized Committee internal voter • Centralized Ballot Monitor (CIB) • Committee Officer Access1 • No assignment (i.e. P- or O- Member who have not appointed an expert/liaison rep)
You can sort the Secretary Member List by clicking on the header row of the list.
1 “Committee Officer Access” shows the committee officers from parent/child/peer committees that have automatic (inherited) access to view the documents of the committee
Quick Filter A full text filter for a quick search on members of the committee.
CSV/ Print Export the member list to a CSV file (e.g. to import into MS Excel) or print out the list
Default sort Resets the sorting to the default setting (by role)
23 4 4BElectronic Committee (eCommittee) Homepage
eCommittees User Guide [email protected]
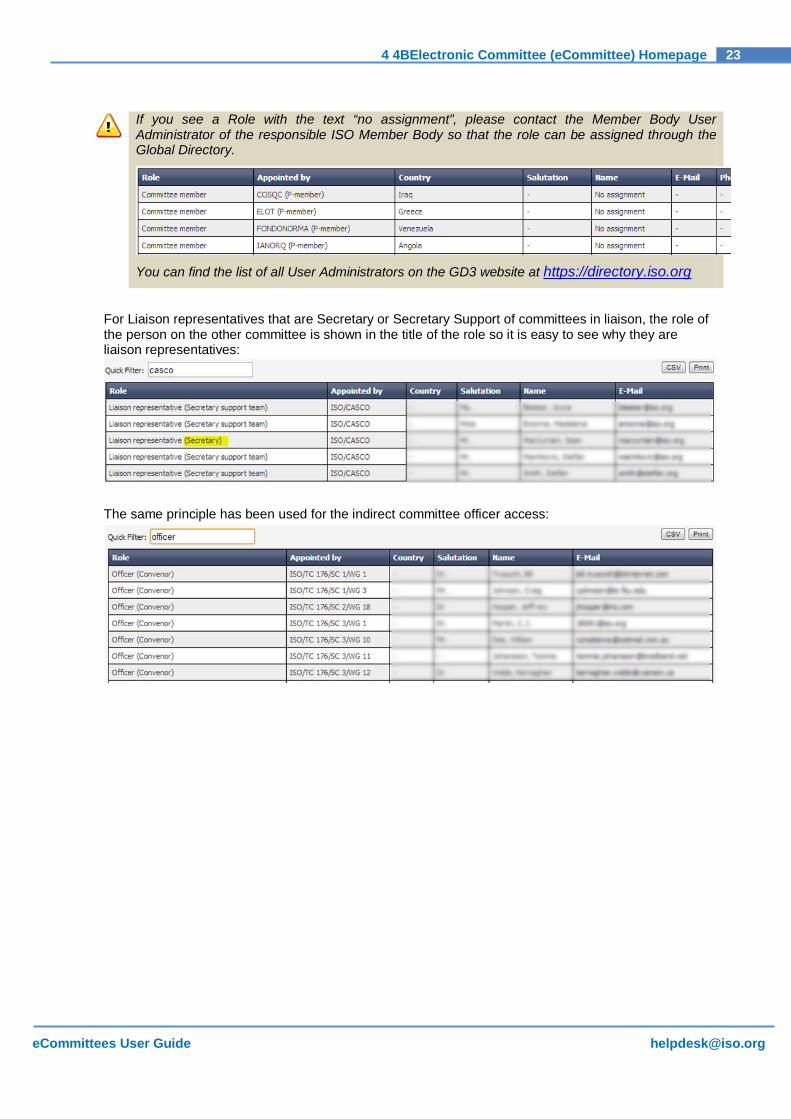
If you see a Role with the text “no assignment”, please contact the Member Body User Administrator of the responsible ISO Member Body so that the role can be assigned through the Global Directory.
You can find the list of all User Administrators on the GD3 website at https://directory.iso.org
For Liaison representatives that are Secretary or Secretary Support of committees in liaison, the role of the person on the other committee is shown in the title of the role so it is easy to see why they are liaison representatives:
The same principle has been used for the indirect committee officer access:
24 4 4BElectronic Committee (eCommittee) Homepage
eCommittees User Guide [email protected]
4.3 Folder Structure (Library) 4.3.1 Standard Folder Structure
All Electronic Committees have a predefined top level folder structure, explained below. The Secretary, the Secretary Support Team and the Convenor may add subfolders inside this default structure to organize their Committee work as they wish.
All Electronic Committees have a predefined folder structure, which is the same for all TCs, SCs and WGs. This folder structure cannot be changed.
You can open a folder by clicking on the folder name. By clicking View More under the folders you can open the library. You will get a full overview of the existing folders.
Historically, the folder structure was free and every Committee Secretary/ Convenor could organize the folders as they saw fit. Therefore, you might still see some TCs, SCs or WGs that have a folder structure which is inconsistent. If this is the case for your committee, please contact the ISO Helpdesk ([email protected]) who will assist you in cleaning up the folder structure.
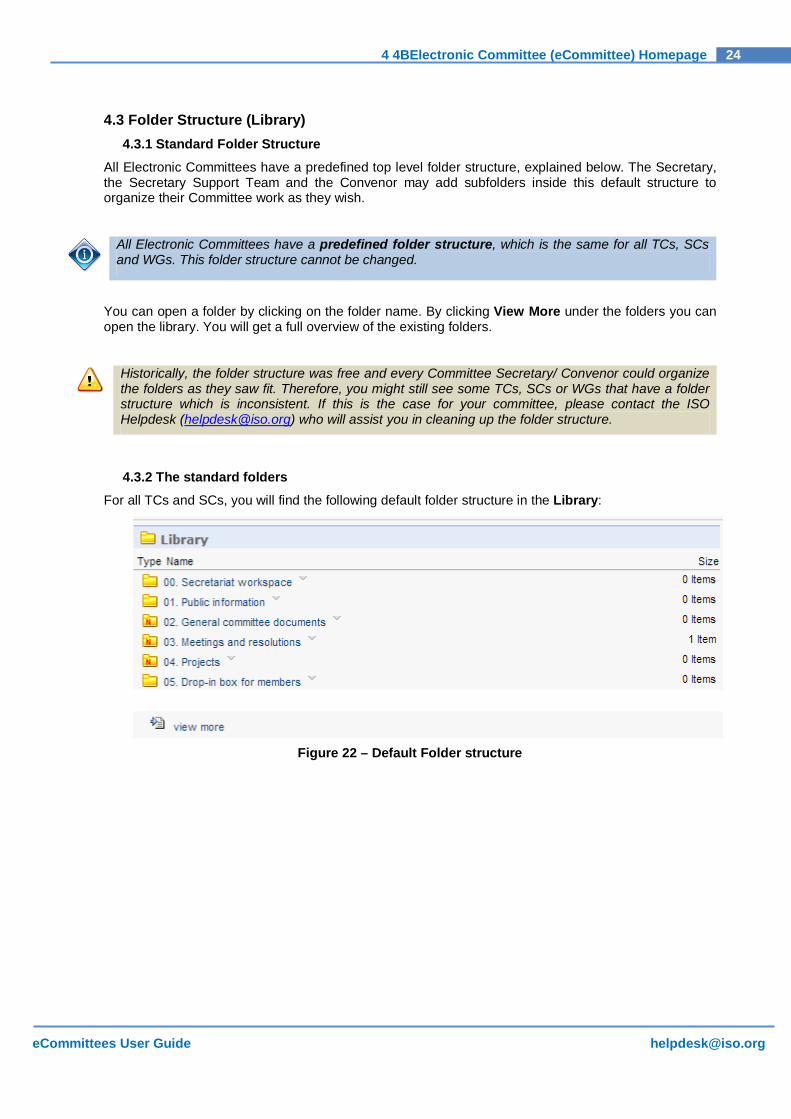
4.3.2 The standard folders For all TCs and SCs, you will find the following default folder structure in the Library:
Figure 22 – Default Folder structure
25 4 4BElectronic Committee (eCommittee) Homepage
eCommittees User Guide [email protected]
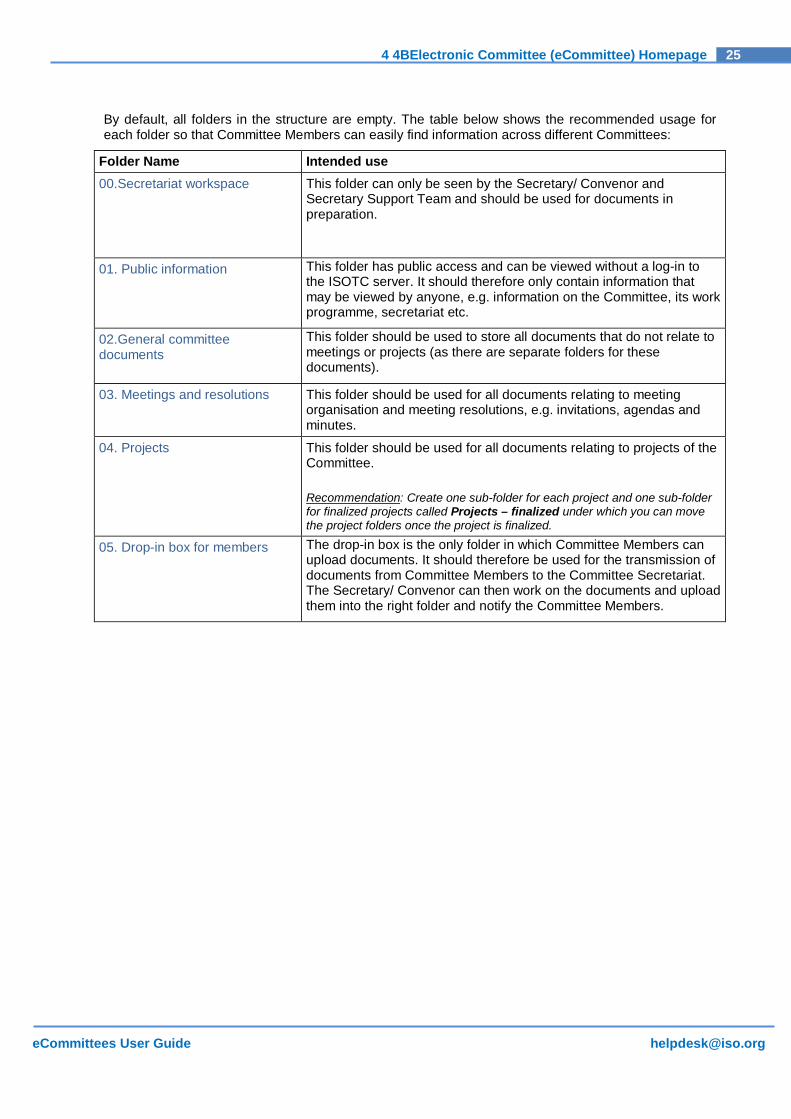
By default, all folders in the structure are empty. The table below shows the recommended usage for each folder so that Committee Members can easily find information across different Committees:
Folder Name Intended use 00.Secretariat workspace This folder can only be seen by the Secretary/ Convenor and
Secretary Support Team and should be used for documents in preparation.
01. Public information This folder has public access and can be viewed without a log-in to the ISOTC server. It should therefore only contain information that may be viewed by anyone, e.g. information on the Committee, its work programme, secretariat etc.
02.General committee documents
This folder should be used to store all documents that do not relate to meetings or projects (as there are separate folders for these documents).
03. Meetings and resolutions This folder should be used for all documents relating to meeting organisation and meeting resolutions, e.g. invitations, agendas and minutes.
04. Projects This folder should be used for all documents relating to projects of the Committee. Recommendation: Create one sub-folder for each project and one sub-folder for finalized projects called Projects – finalized under which you can move the project folders once the project is finalized.
05. Drop-in box for members The drop-in box is the only folder in which Committee Members can upload documents. It should therefore be used for the transmission of documents from Committee Members to the Committee Secretariat. The Secretary/ Convenor can then work on the documents and upload them into the right folder and notify the Committee Members.
26 4 4BElectronic Committee (eCommittee) Homepage
eCommittees User Guide [email protected]
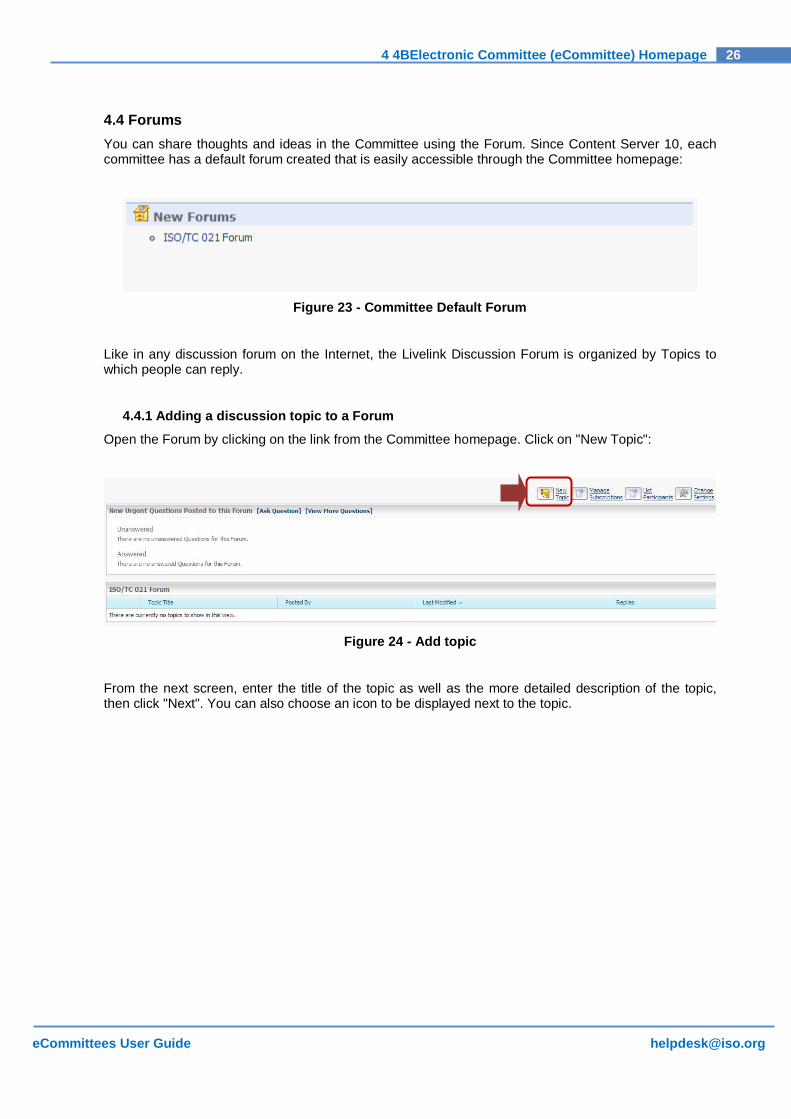
4.4 Forums You can share thoughts and ideas in the Committee using the Forum. Since Content Server 10, each committee has a default forum created that is easily accessible through the Committee homepage:
Figure 23 - Committee Default Forum
Like in any discussion forum on the Internet, the Livelink Discussion Forum is organized by Topics to which people can reply.
4.4.1 Adding a discussion topic to a Forum
Open the Forum by clicking on the link from the Committee homepage. Click on "New Topic":
Figure 24 - Add topic
From the next screen, enter the title of the topic as well as the more detailed description of the topic, then click "Next". You can also choose an icon to be displayed next to the topic.

27 4 4BElectronic Committee (eCommittee) Homepage
eCommittees User Guide [email protected]
Figure 25 - Add topic: General
From the next screen, you can add attachment, refer to particular people or enter a URL relevant to the discussion topic. These items are optional. When you have entered all information you want, click "Finish" to create the topic in the committee Forum:
Figure 26 - Add topic: more Options
The new topic is now available from the Forum page and people can start posting replies:
Figure 27 - new Topic
28 4 4BElectronic Committee (eCommittee) Homepage
eCommittees User Guide [email protected]
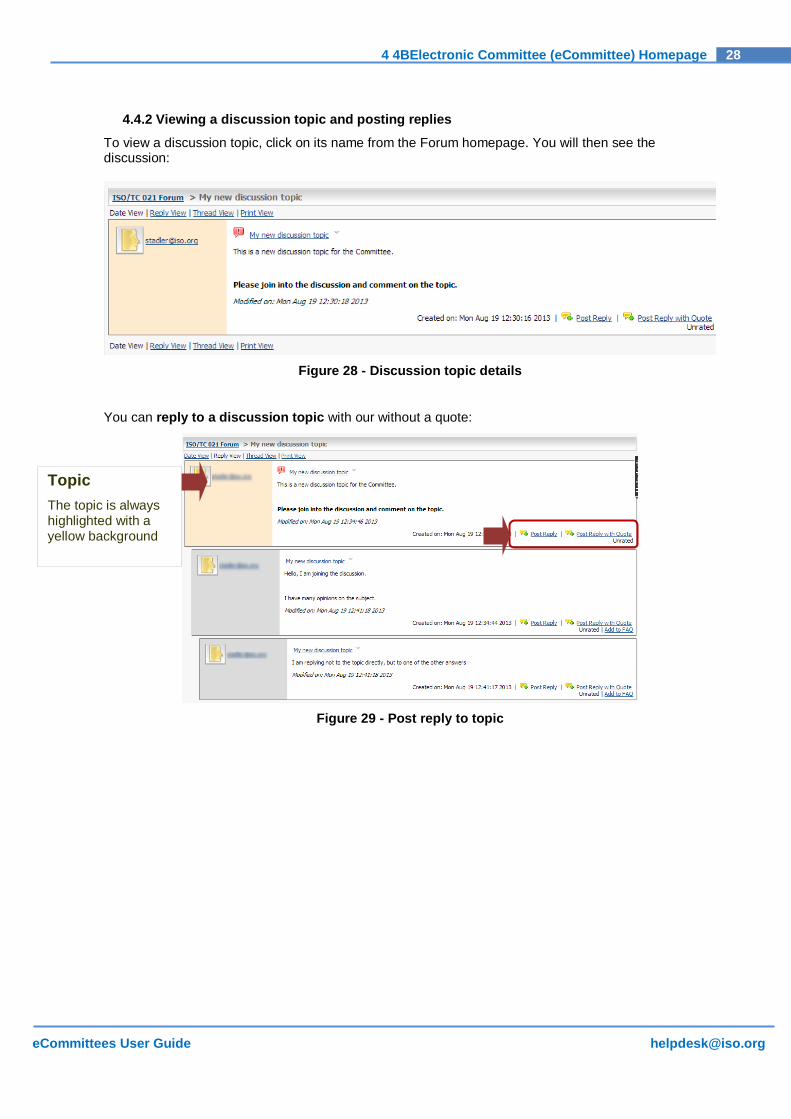
4.4.2 Viewing a discussion topic and posting replies
To view a discussion topic, click on its name from the Forum homepage. You will then see the discussion:
Figure 28 - Discussion topic details
You can reply to a discussion topic with our without a quote:
Figure 29 - Post reply to topic
Topic The topic is always highlighted with a yellow background
29 4 4BElectronic Committee (eCommittee) Homepage
eCommittees User Guide [email protected]
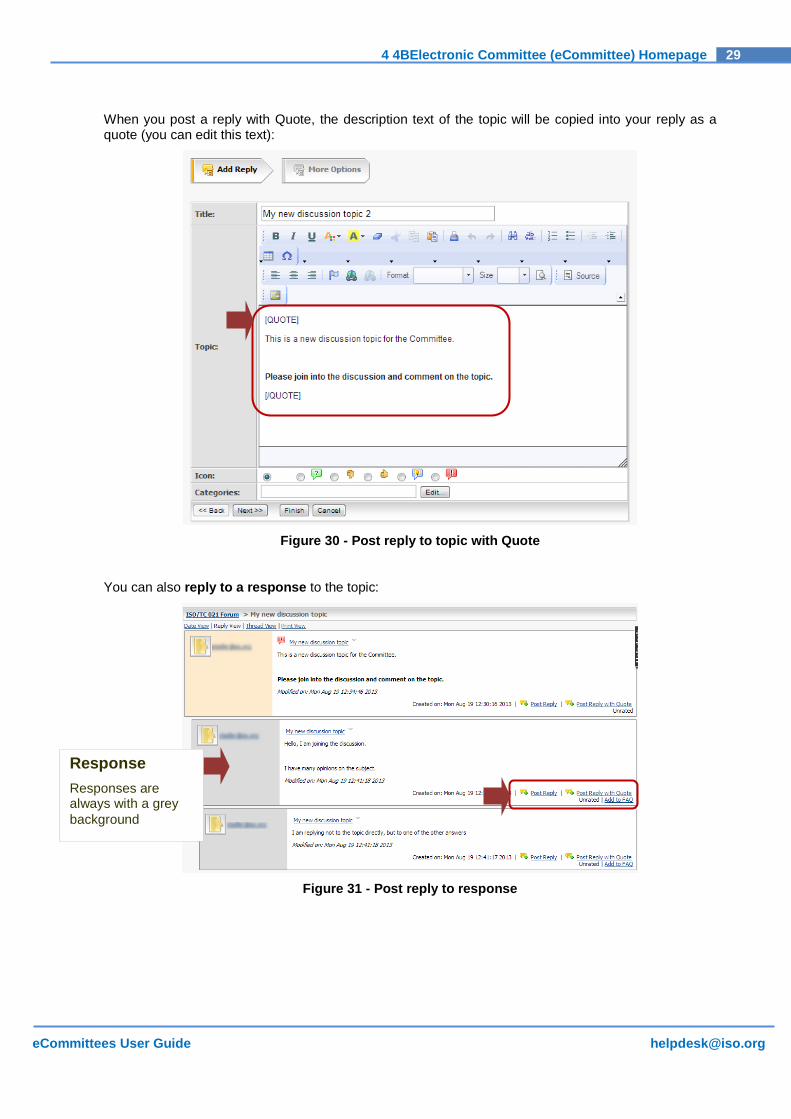
When you post a reply with Quote, the description text of the topic will be copied into your reply as a quote (you can edit this text):
Figure 30 - Post reply to topic with Quote
You can also reply to a response to the topic:
Figure 31 - Post reply to response
Response Responses are always with a grey background
30 4 4BElectronic Committee (eCommittee) Homepage
eCommittees User Guide [email protected]
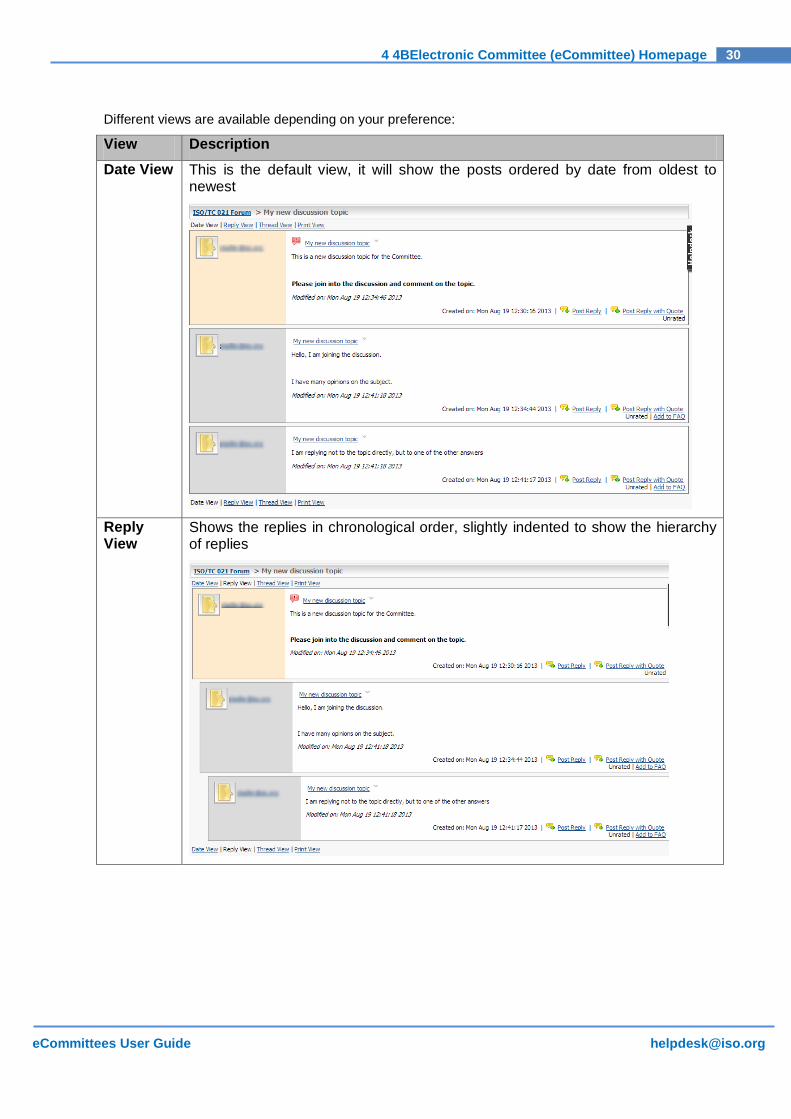
Different views are available depending on your preference:
View Description
Date View This is the default view, it will show the posts ordered by date from oldest to newest
Reply View
Shows the replies in chronological order, slightly indented to show the hierarchy of replies

31 4 4BElectronic Committee (eCommittee) Homepage
eCommittees User Guide [email protected]
View Description Thread View
Shows the topic and the replies, slightly indented to indicate the hierarchy of replies as discussion threads
Print View Opens a separate window to enable easy printing of the discussion topic
4.4.3 Forum Notifications By default, all roles on the committee are notified by email when a new topic or a new response is posted to the Committee Forum. It is not possible to customize the notifications by user. It's either all users in the committee are notified, or none are notified. If there is a problem with these notifications and the frequency, please contact [email protected]
32 4 4BElectronic Committee (eCommittee) Homepage
eCommittees User Guide [email protected]
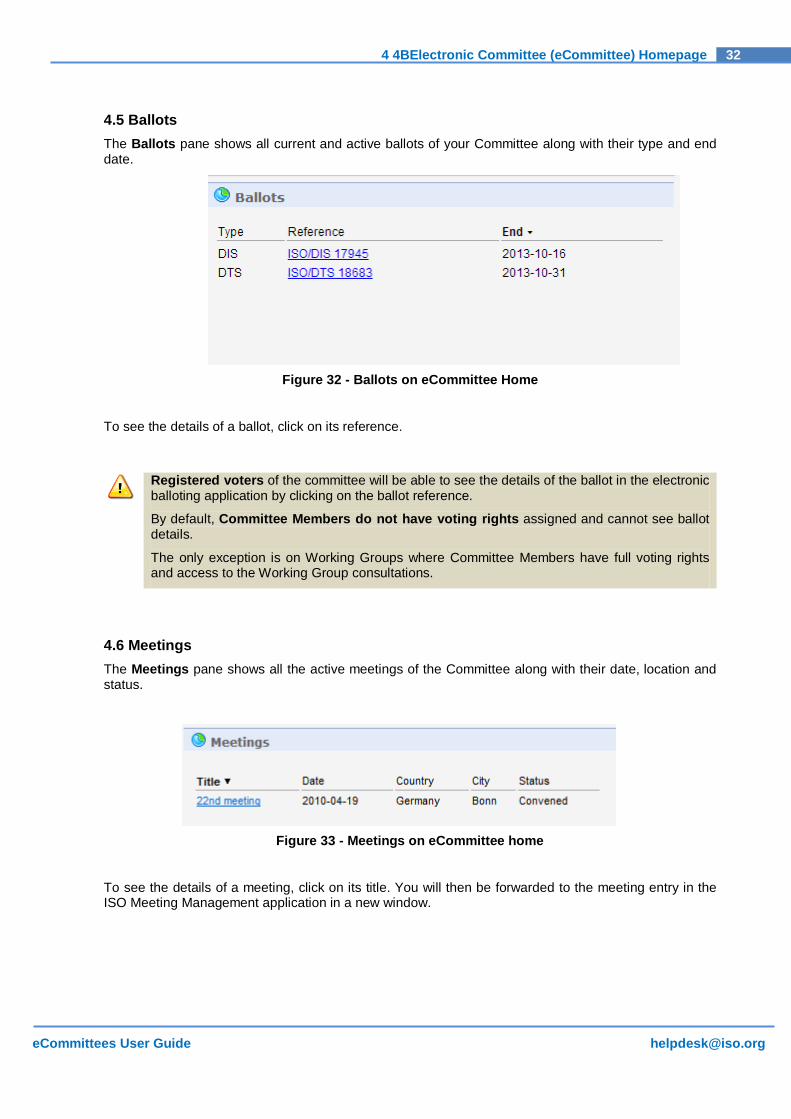
4.5 Ballots The Ballots pane shows all current and active ballots of your Committee along with their type and end date.
Figure 32 - Ballots on eCommittee Home
To see the details of a ballot, click on its reference.
Registered voters of the committee will be able to see the details of the ballot in the electronic balloting application by clicking on the ballot reference.
By default, Committee Members do not have voting rights assigned and cannot see ballot details.
The only exception is on Working Groups where Committee Members have full voting rights and access to the Working Group consultations.
4.6 Meetings The Meetings pane shows all the active meetings of the Committee along with their date, location and status.
Figure 33 - Meetings on eCommittee home
To see the details of a meeting, click on its title. You will then be forwarded to the meeting entry in the ISO Meeting Management application in a new window.
33 4 4BElectronic Committee (eCommittee) Homepage
eCommittees User Guide [email protected]
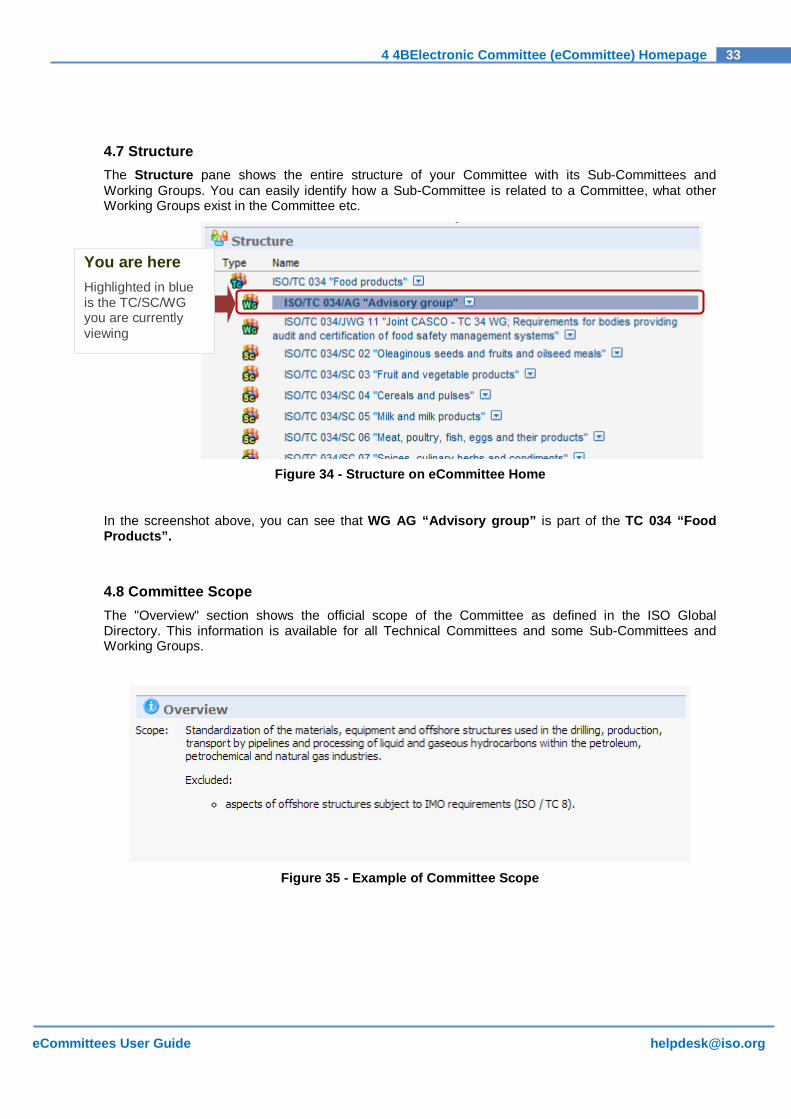
4.7 Structure The Structure pane shows the entire structure of your Committee with its Sub-Committees and Working Groups. You can easily identify how a Sub-Committee is related to a Committee, what other Working Groups exist in the Committee etc.
Figure 34 - Structure on eCommittee Home
In the screenshot above, you can see that WG AG “Advisory group” is part of the TC 034 “Food Products”.
4.8 Committee Scope The "Overview" section shows the official scope of the Committee as defined in the ISO Global Directory. This information is available for all Technical Committees and some Sub-Committees and Working Groups.
Figure 35 - Example of Committee Scope
You are here Highlighted in blue is the TC/SC/WG you are currently viewing
34 4 4BElectronic Committee (eCommittee) Homepage
eCommittees User Guide [email protected]
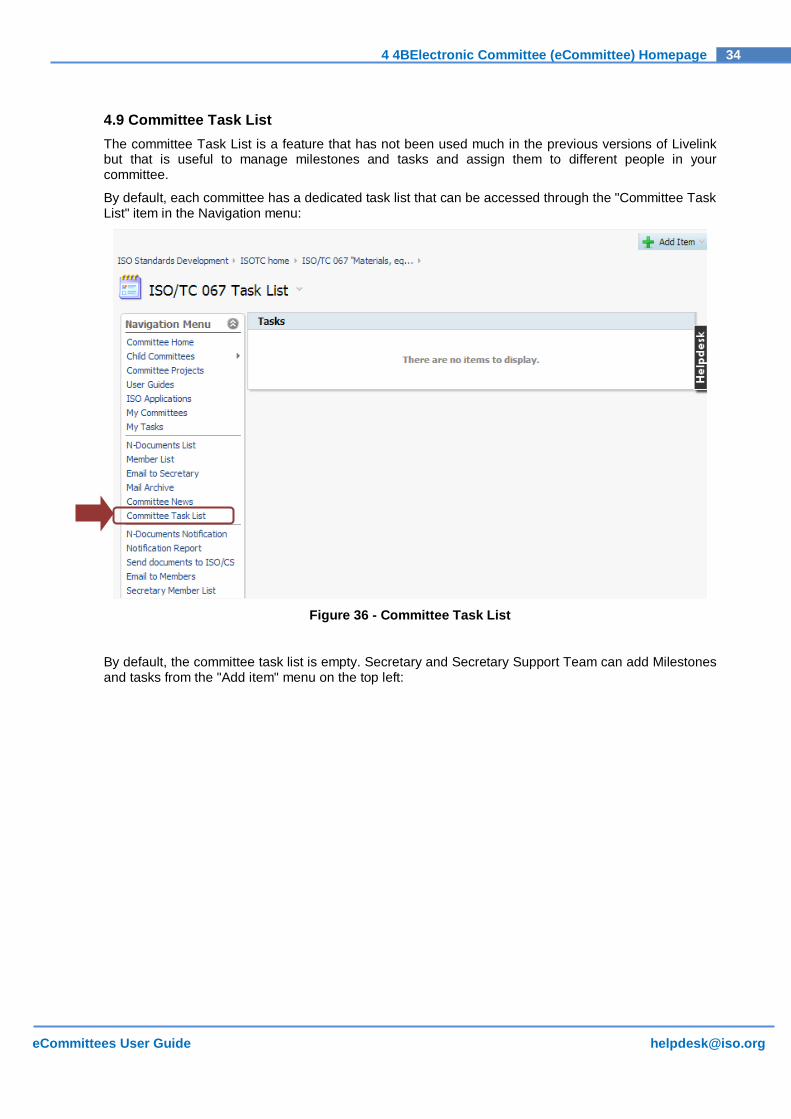
4.9 Committee Task List The committee Task List is a feature that has not been used much in the previous versions of Livelink but that is useful to manage milestones and tasks and assign them to different people in your committee.
By default, each committee has a dedicated task list that can be accessed through the "Committee Task List" item in the Navigation menu:
Figure 36 - Committee Task List
By default, the committee task list is empty. Secretary and Secretary Support Team can add Milestones and tasks from the "Add item" menu on the top left:
35 4 4BElectronic Committee (eCommittee) Homepage
eCommittees User Guide [email protected]
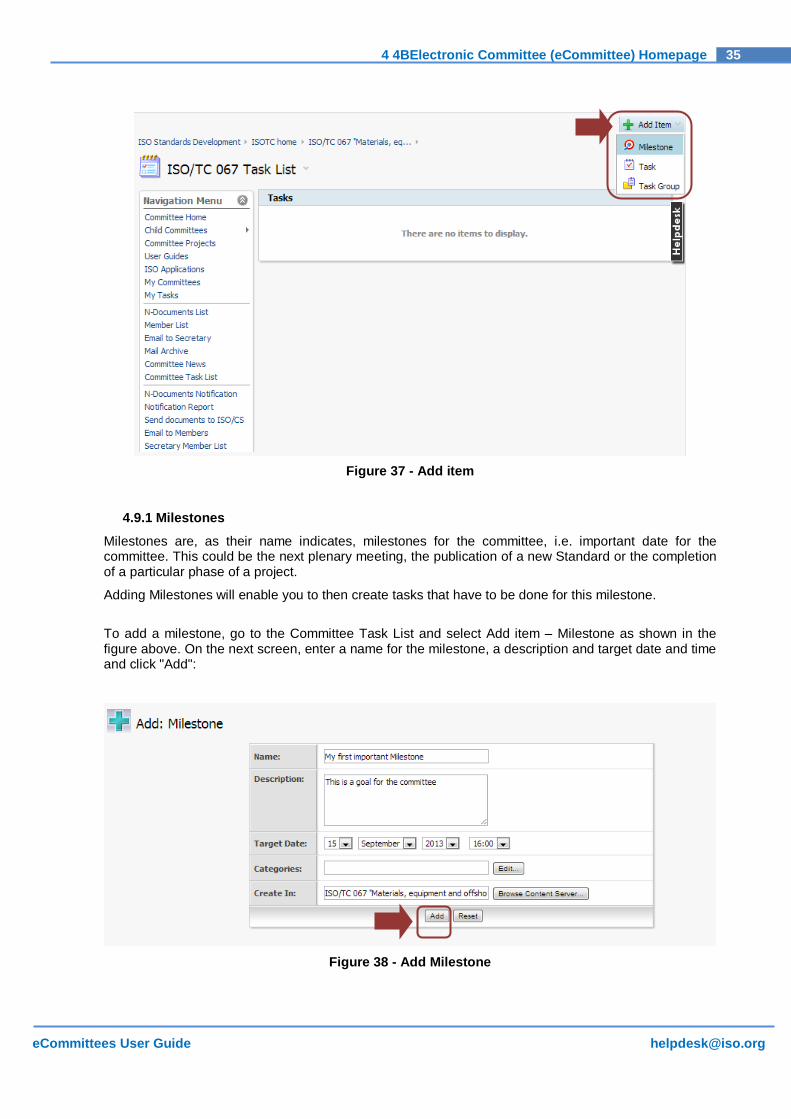
Figure 37 - Add item
4.9.1 Milestones
Milestones are, as their name indicates, milestones for the committee, i.e. important date for the committee. This could be the next plenary meeting, the publication of a new Standard or the completion of a particular phase of a project.
Adding Milestones will enable you to then create tasks that have to be done for this milestone.
To add a milestone, go to the Committee Task List and select Add item – Milestone as shown in the figure above. On the next screen, enter a name for the milestone, a description and target date and time and click "Add":
Figure 38 - Add Milestone
36 4 4BElectronic Committee (eCommittee) Homepage
eCommittees User Guide [email protected]
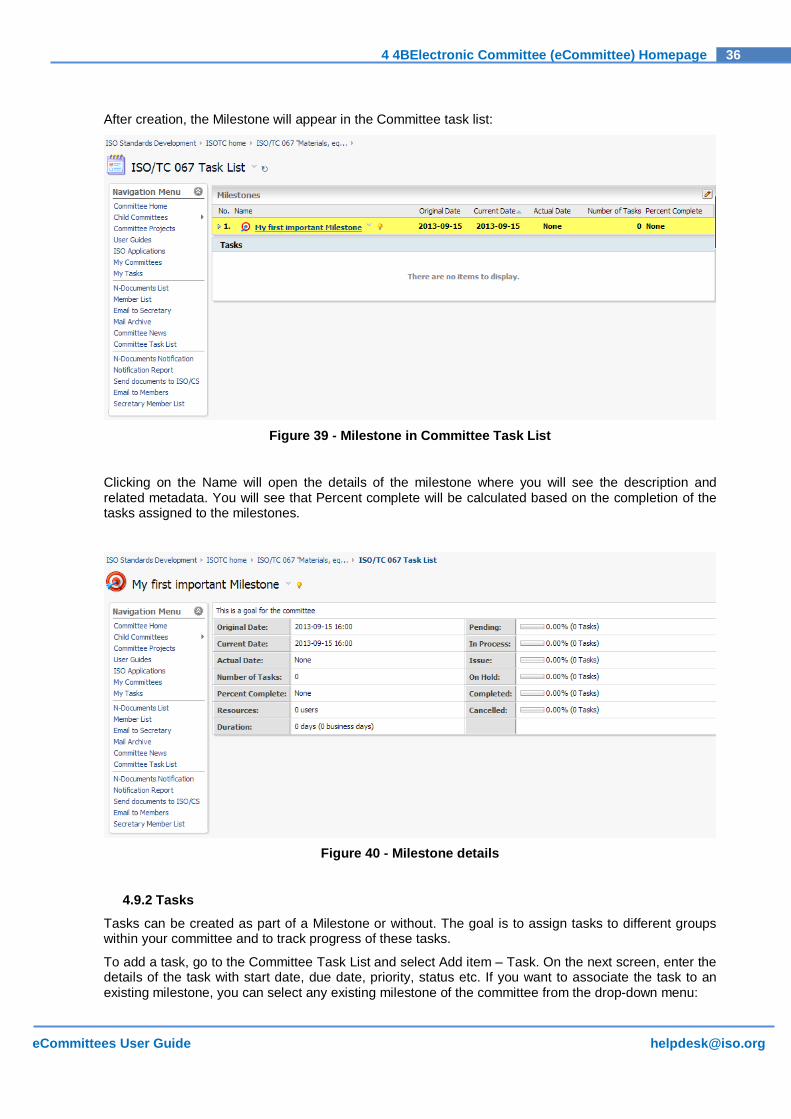
After creation, the Milestone will appear in the Committee task list:
Figure 39 - Milestone in Committee Task List
Clicking on the Name will open the details of the milestone where you will see the description and related metadata. You will see that Percent complete will be calculated based on the completion of the tasks assigned to the milestones.
Figure 40 - Milestone details
4.9.2 Tasks
Tasks can be created as part of a Milestone or without. The goal is to assign tasks to different groups within your committee and to track progress of these tasks.
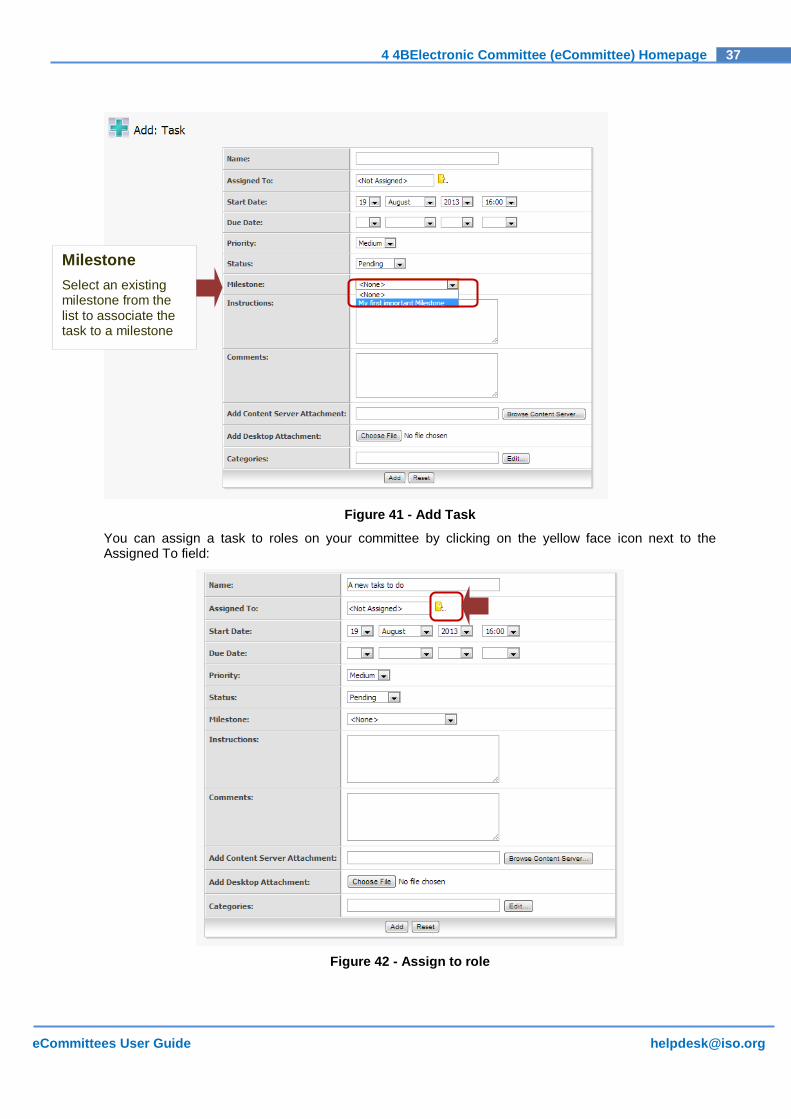
To add a task, go to the Committee Task List and select Add item – Task. On the next screen, enter the details of the task with start date, due date, priority, status etc. If you want to associate the task to an existing milestone, you can select any existing milestone of the committee from the drop-down menu:
37 4 4BElectronic Committee (eCommittee) Homepage
eCommittees User Guide [email protected]
Figure 41 - Add Task
You can assign a task to roles on your committee by clicking on the yellow face icon next to the Assigned To field:
Figure 42 - Assign to role
Milestone Select an existing milestone from the list to associate the task to a milestone

38 4 4BElectronic Committee (eCommittee) Homepage
eCommittees User Guide [email protected]
In the next screen, you will see all role listed, you can select a role by clicking on "select" next to the role:
Figure 43 - Select roles
You can also assign tasks to individuals with a given role. When you click on the name of the role instead of "Select", you will see the list of people assigned to the role and can then individually select people:
Figure 44 - Select individuals
The new task will then appear in the Committee Task List below the milestones:

39 4 4BElectronic Committee (eCommittee) Homepage
eCommittees User Guide [email protected]
Figure 45 - Task on Committee Task List
People that you have assigned tasks to, either directly or through their role on the committee, will see the task appear under "My Tasks", accessible through the Navigation menu.
Here, all tasks assigned to the person from any committee will be grouped in a single view:
4.9.3 Task Groups Task Groups are a way organize tasks. The concept is the same as creating folders to organize files. If you have a lot of tasks in your committee, it could be a good idea to create task groups to keep the list of tasks to a manageable size.
To create a task group, select Add item – Task Group and enter a name and description for the group. You can also select an existing milestone to associate to the task group:
Figure 46 - Add task Group

40 4 4BElectronic Committee (eCommittee) Homepage
eCommittees User Guide [email protected]
4.10 News On the Committee Home page, the News Player located right under the search bar displays news items. You can open the news item by clicking on its name in the News Player.
Figure 47 - News Player
These news items are linked to a News Channel which is managed by the Secretary/Convenor or the Secretary Support Team.
4.10.1 The News Channel For each Committee, a news channel is setup at its creation.
To access the news channel, click on Committee News from the Navigation menu:
Figure 48 – Committee news
41 4 4BElectronic Committee (eCommittee) Homepage
eCommittees User Guide [email protected]
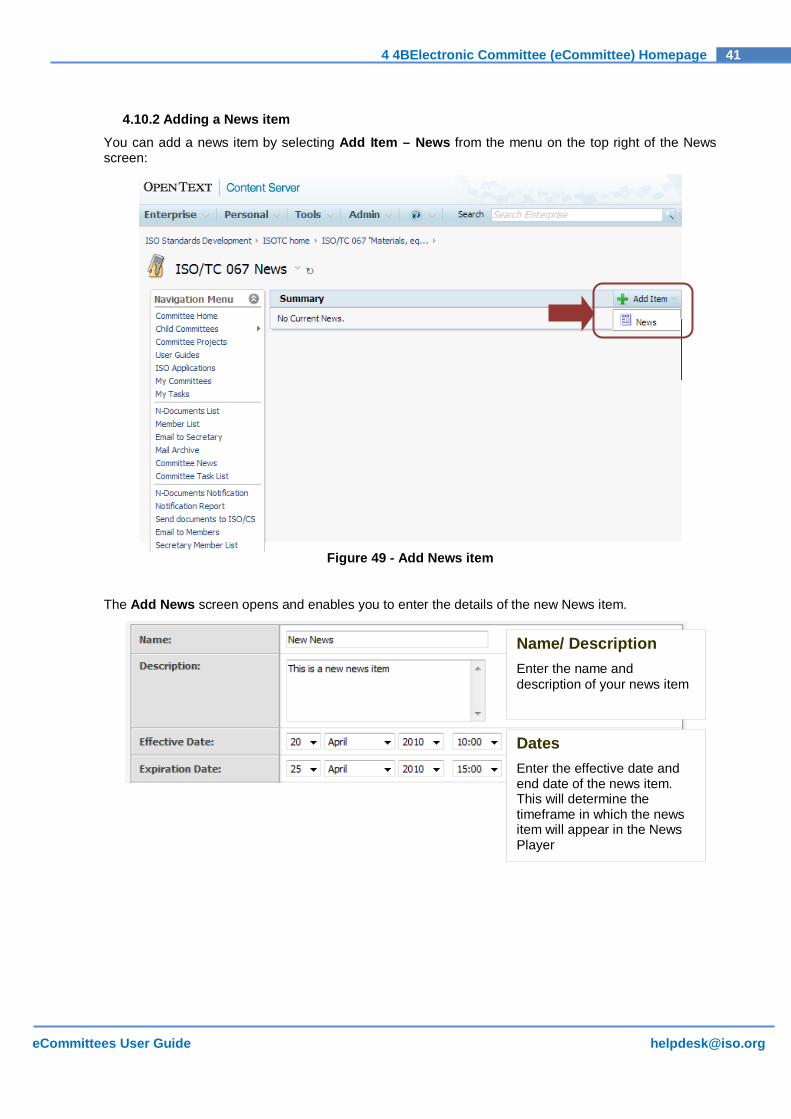
4.10.2 Adding a News item You can add a news item by selecting Add Item – News from the menu on the top right of the News screen:
Figure 49 - Add News item
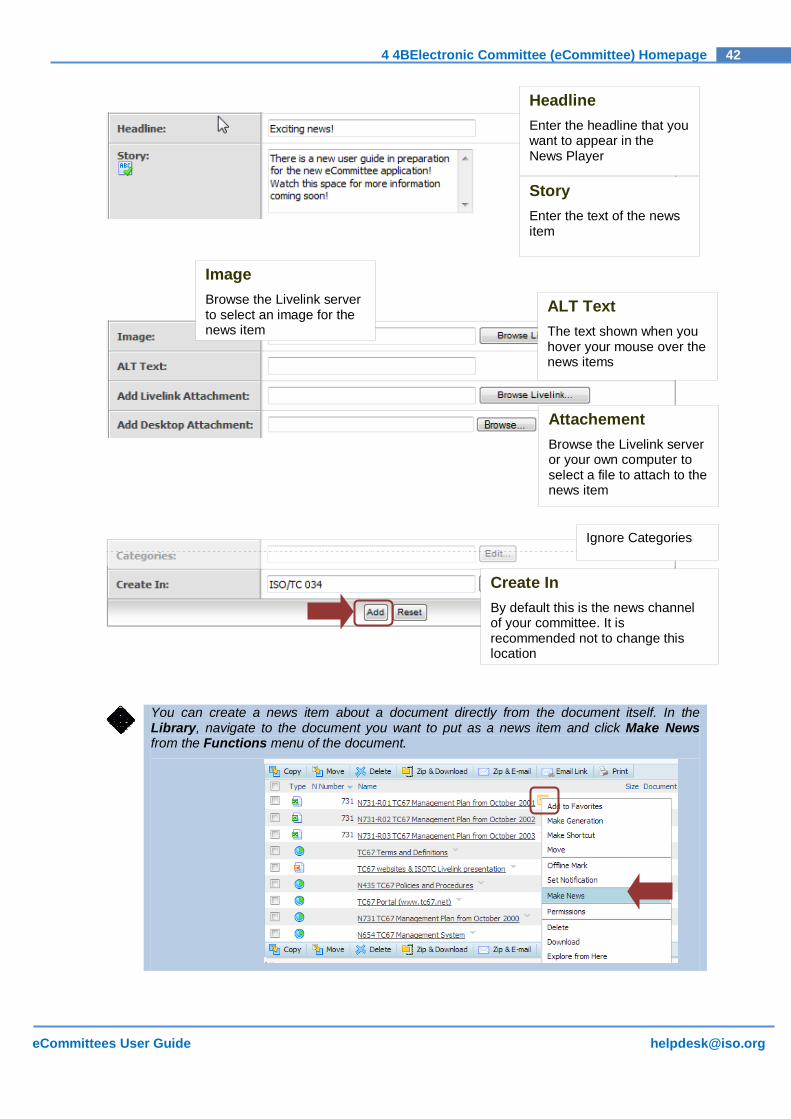
The Add News screen opens and enables you to enter the details of the new News item.
Name/ Description Enter the name and description of your news item
Dates Enter the effective date and end date of the news item. This will determine the timeframe in which the news item will appear in the News Player
42 4 4BElectronic Committee (eCommittee) Homepage
eCommittees User Guide [email protected]
You can create a news item about a document directly from the document itself. In the Library, navigate to the document you want to put as a news item and click Make News from the Functions menu of the document.
Headline Enter the headline that you want to appear in the News Player
Story Enter the text of the news item
Image Browse the Livelink server to select an image for the news item
Attachement Browse the Livelink server or your own computer to select a file to attach to the news item
ALT Text The text shown when you hover your mouse over the news items
Ignore Categories
Create In By default this is the news channel of your committee. It is recommended not to change this location

43 5 5BWorking with Folders and Documents
eCommittees User Guide [email protected]
5 Working with Folders and Documents
5.1 Working with documents 5.1.1 Viewing documents
There are three options to view a document in the eCommittee:
a) Click on the document's icon.
b) Click on the document's name.
c) Click on the small arrow behind the document to open the Functions menu. Select Fetch from the menu for N-Documents, Open or Download for regular documents. The document will either open directly or a download window opens first. This behaviour depends on your computer's settings. In the download window select Open to view the document.
Fetch/ View for N-Documents:
Figure 50 - Fetch Document

44 5 5BWorking with Folders and Documents
eCommittees User Guide [email protected]
5.1.2 Downloading several documents in a Zip file
You can add several documents from a folder into a Zip file and then download to your computer. To open and unpack a Zip archive you may need an archiving program like WinZip.
a) Navigate to the folder from which you would like to download the documents.
b) Select the documents by checking the appropriate check box.
c) Click on the Zip & Download button.
Figure 51 - Select Documents for zip
d) The window Items to be Zipped & Downloaded opens. You can change the suggested download name in the Archive Name field. The items to be downloaded and the number of items are listed under Items.
Figure 52 - Zip Archive settings
e) Click on the Zip & Download button.
Figure 53 - Zip & Download archive
Archive Name You can change the suggested name for the Zip Archive here
Items A list of all items to be included in the Zip Archive

45 5 5BWorking with Folders and Documents
eCommittees User Guide [email protected]
f) Livelink will now prepare the ZIP archive. When it is done, you will see the Zip & Download Status window. Once all items have the status completed, click on the Download the zip file button.
Figure 54 - Zip & Download status
g) When your browser's Download window opens, click Open in the Download window to open the archive or Save to save the archive to your computer.
h) Click OK to return to the Committee page you have been working on before the download.
Figure 55 - Zip & Download status OK
5.1.3 Zip & E-mail several documents
You can send several documents from a folder within an e-mail. To open and unpack a Zip archive you may need a packing program like WinZip.
Before sending documents by e-mail, please remember any copyright issues that might apply and that you accepted by working in the electronic Committee.
a) Navigate to the folder from which you would like to download the documents.
b) Select the documents by checking the appropriate check box. You can only add individual documents, not folders.
c) Click on the Zip & E-mail button.
Figure 56 - Select Documents for Zip & E-mail
46 5 5BWorking with Folders and Documents
eCommittees User Guide [email protected]
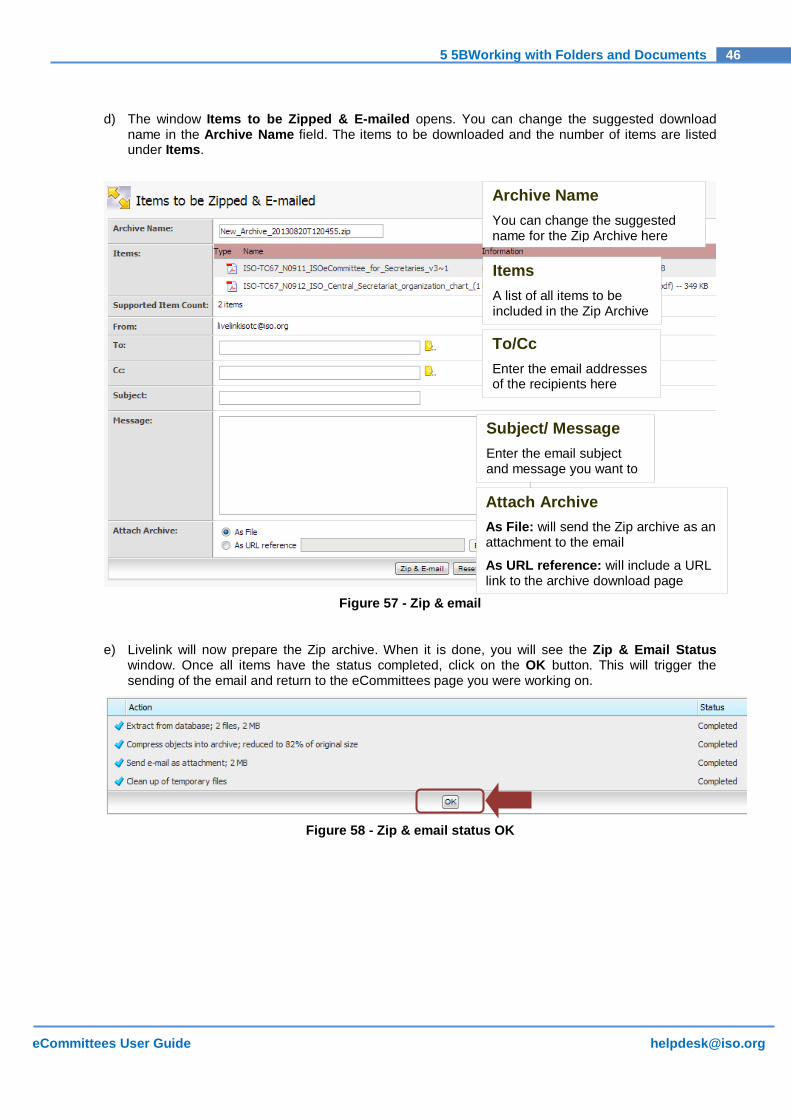
d) The window Items to be Zipped & E-mailed opens. You can change the suggested download name in the Archive Name field. The items to be downloaded and the number of items are listed under Items.
Figure 57 - Zip & email
e) Livelink will now prepare the Zip archive. When it is done, you will see the Zip & Email Status window. Once all items have the status completed, click on the OK button. This will trigger the sending of the email and return to the eCommittees page you were working on.
Figure 58 - Zip & email status OK
Archive Name You can change the suggested name for the Zip Archive here
Items A list of all items to be included in the Zip Archive
To/Cc Enter the email addresses of the recipients here
Subject/ Message Enter the email subject and message you want to
Attach Archive As File: will send the Zip archive as an attachment to the email
As URL reference: will include a URL link to the archive download page
47 5 5BWorking with Folders and Documents
eCommittees User Guide [email protected]
5.2 Working with Folders In eCommittees, the Secretary/ Convenor can add documents and folders inside the default folders. There is a default folder structure in every ISO Committee and one in every working group. This harmonized structure makes it easier for Committee Members and experts to use the eCommittees as they are often working in different Committees.
Most folders in eCommittees are N-folders. In these folders, only n-numbered documents and N-folders can be added.
The table below shows the icons used to differentiate regular folders from N-Folders:
Item Icon Description
Folder A folder is a container containing other items, i.e. folders or documents.
N-Folder An N-Folder is a folder containing N-Documents or other N-Folders.
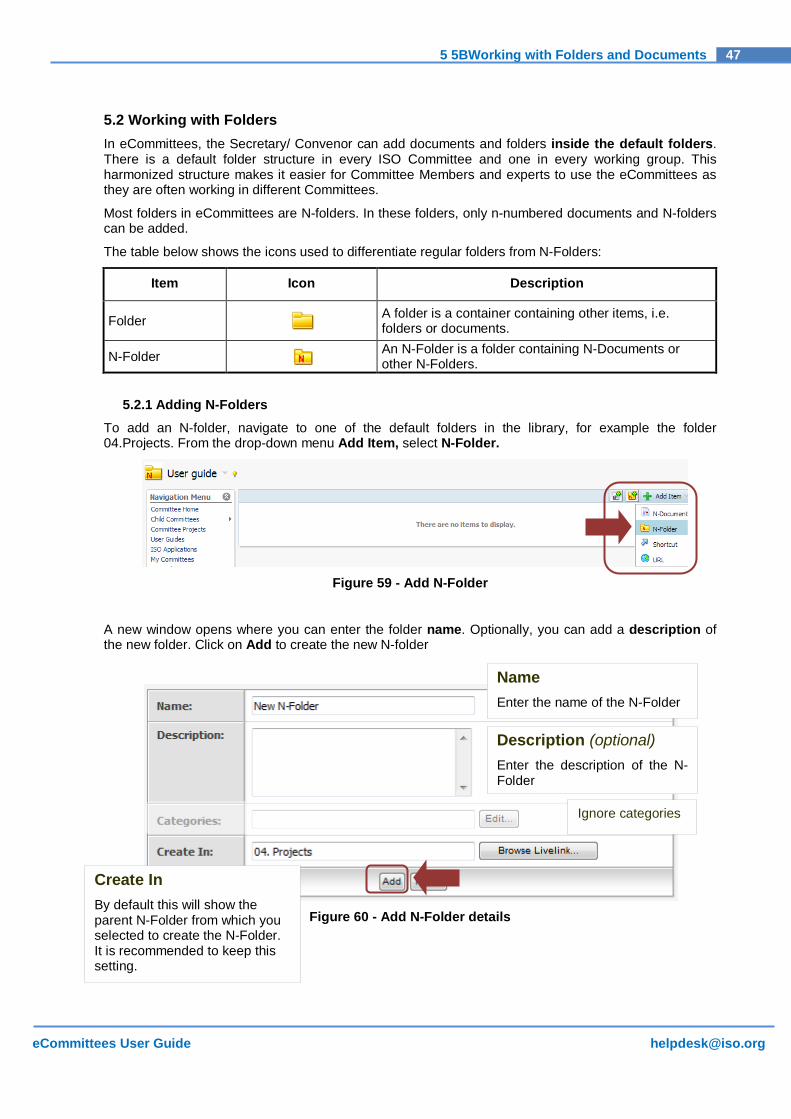
5.2.1 Adding N-Folders To add an N-folder, navigate to one of the default folders in the library, for example the folder 04.Projects. From the drop-down menu Add Item, select N-Folder.
Figure 59 - Add N-Folder
A new window opens where you can enter the folder name. Optionally, you can add a description of the new folder. Click on Add to create the new N-folder
Figure 60 - Add N-Folder details
Name Enter the name of the N-Folder
Description (optional) Enter the description of the N-Folder
Create In By default this will show the parent N-Folder from which you selected to create the N-Folder. It is recommended to keep this setting.
Ignore categories

48 5 5BWorking with Folders and Documents
eCommittees User Guide [email protected]
5.2.2 Adding N-Documents to N-Folders (N-Documents Wizard)
To add an N-Document, navigate to the N-Folder in which you would like to create it and click on Add Item – N-Document:
Figure 61 - Add N-Document
N-Documents can only be created in N-Folders.
Regular documents cannot be added to N-Folders.
The N-Documents Wizard opens which will guide you through the steps of adding an N-Document.
Step 1 – Select the document to upload
Figure 62 - N-Document Wizard
Select Document from Desktop: Browse your computer to upload a document from your computer
Select Document from Livelink: Upload a document that already exists in another folder, for example in the 00.Secretariats workspace.
49 5 5BWorking with Folders and Documents
eCommittees User Guide [email protected]
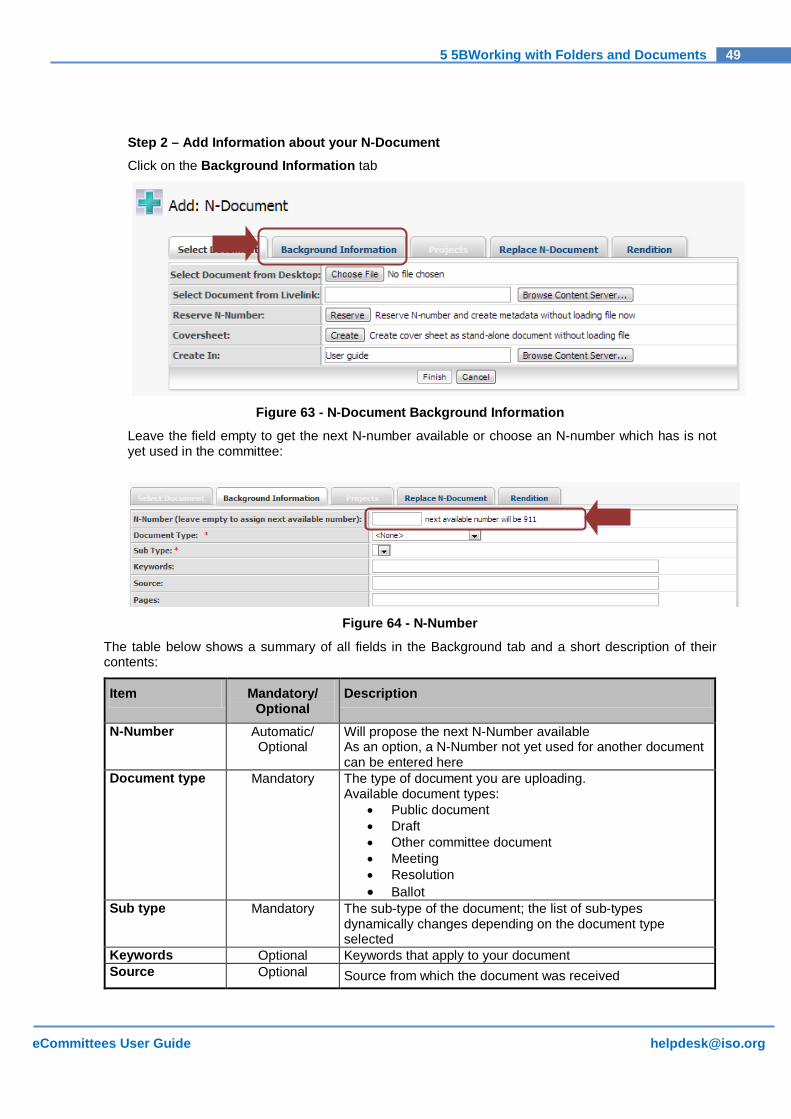
Step 2 – Add Information about your N-Document Click on the Background Information tab
Figure 63 - N-Document Background Information
Leave the field empty to get the next N-number available or choose an N-number which has is not yet used in the committee:
Figure 64 - N-Number
The table below shows a summary of all fields in the Background tab and a short description of their contents:
Item Mandatory/ Optional
Description
N-Number Automatic/ Optional
Will propose the next N-Number available As an option, a N-Number not yet used for another document can be entered here
Document type Mandatory The type of document you are uploading. Available document types:
• Public document • Draft • Other committee document • Meeting • Resolution • Ballot
Sub type Mandatory The sub-type of the document; the list of sub-types dynamically changes depending on the document type selected
Keywords Optional Keywords that apply to your document Source Optional Source from which the document was received

50 5 5BWorking with Folders and Documents
eCommittees User Guide [email protected]
Item Mandatory/ Optional
Description
Pages Optional Number of pages of the document Expected Action Mandatory Which action to you expect from the Committee Members on
this document Available actions:
• Act • Info • Reply • Vote • Comment • Meet
Due date for expected action
Mandatory Date by when the expected action has to be completed by the Committee Members
Complete Title Mandatory The title which will appear in the N-Document list; by default, the name of the file will be displayed
Cover sheet details
Optional Here you can give an introduction to the document which will appear on the cover sheet, a page which will be added to the front of the document
In the Coversheet details field, you can enter the text and format it as you wish using the toolbar which is similar to MS Word toolbars.
Figure 65 - N-Document Coversheet details
Formatting Use the toolbar format the coversheet text like in MS Word
51 5 5BWorking with Folders and Documents
eCommittees User Guide [email protected]
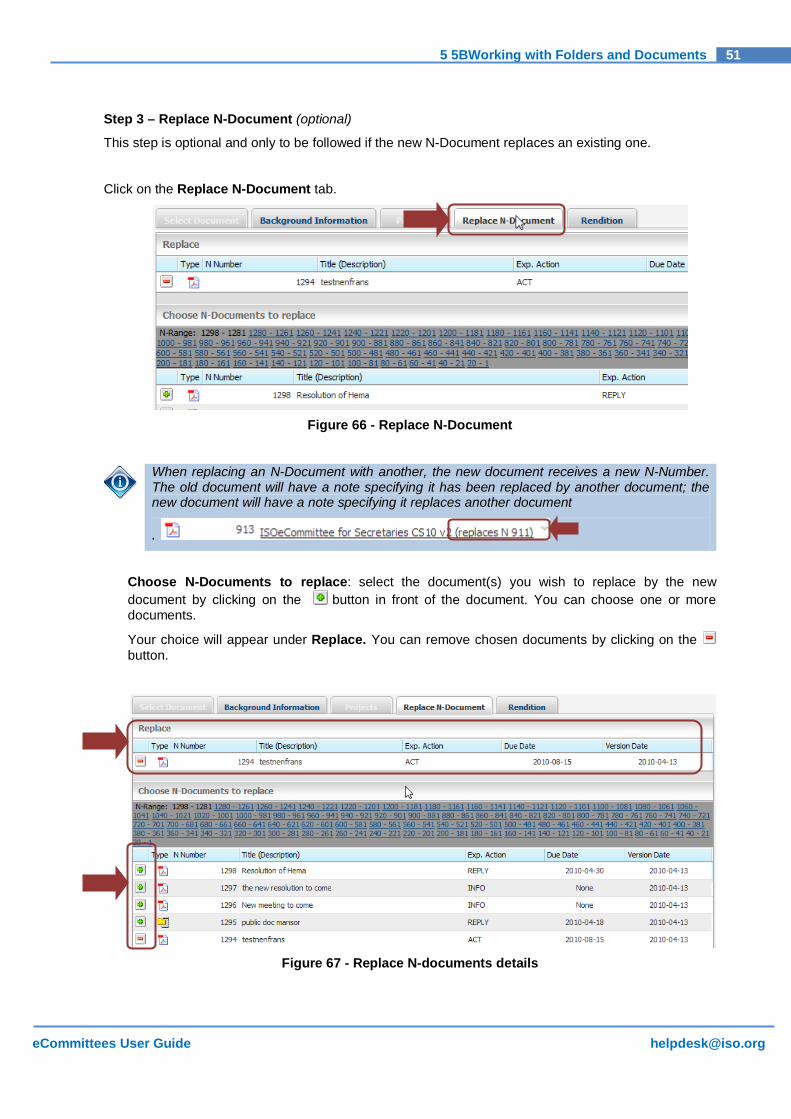
Step 3 – Replace N-Document (optional)
This step is optional and only to be followed if the new N-Document replaces an existing one.
Click on the Replace N-Document tab.
Figure 66 - Replace N-Document
When replacing an N-Document with another, the new document receives a new N-Number. The old document will have a note specifying it has been replaced by another document; the new document will have a note specifying it replaces another document
.
Choose N-Documents to replace: select the document(s) you wish to replace by the new document by clicking on the button in front of the document. You can choose one or more documents.
Your choice will appear under Replace. You can remove chosen documents by clicking on the button.
Figure 67 - Replace N-documents details

52 5 5BWorking with Folders and Documents
eCommittees User Guide [email protected]
If you have a lot of N-Documents, they might not fit on one page. You can narrow down the list of N-Documents by clicking on the range of N-Numbers. The system will then show only the N-Documents in the selected range.
Figure 68 - N-Document range

53 5 5BWorking with Folders and Documents
eCommittees User Guide [email protected]
Step 4 – Rendition
In this step you will be able to choose in which format your document will be uploaded into the eCommittee.
Click on the Rendition tab:
Figure 69 - N-Document rendition
By default, the system will select a PDF rendition with Coversheet. It will show an estimation of how the cover sheet will look. At this stage no N-number is shown on the cover sheet. The N-number will be automatically given during the upload of the document.
You can choose other rendition types as follows:
Rendition type Description
PDF Rendition with Coversheet A PDF of the document will be uploaded into the folder including a coversheet with the information that was entered in the Background Information tab.
PDF Rendition without Coversheet A PDF of the document will be uploaded into the folder

54 5 5BWorking with Folders and Documents
eCommittees User Guide [email protected]
PDF Rendition with N-number stamp A PDF of the document will be uploaded into the folder. The N-Number and the committee will be printed on the document
None (retain original document format)
The document will remain the original file format. Select this option if:
• You want the Committee Members to be able work and edit the document.
• You are uploading a file that cannot be rendered into a PDF, for example a Zip archive.
PDF renditions (with or without coversheet) are only possible for MS Word (.doc, .docx) and Adobe PDF (.pdf) documents!
Step 5 – Finish the upload
Below the cover sheet preview click on Finish and the document will be uploaded in the folder. You will be redirected to the folder in which you have uploaded the new N-Document.
If you have chosen PDF Rendition, you will see a little behind the document. This means, that the PDF Rendition is in process.
Figure 70 - N-Document rendition state
After a few minutes of processing time, please refresh your browser window to see the progress. When the PDF rendition has completed successfully, you will see a sign. This means, that the document is in review state.
Figure 71 - N-Document review state
The document cannot yet be seen by Committee Members. You need to send a notification about new documents to the Committee Members. (see Notification of new documents)
55 5 5BWorking with Folders and Documents
eCommittees User Guide [email protected]
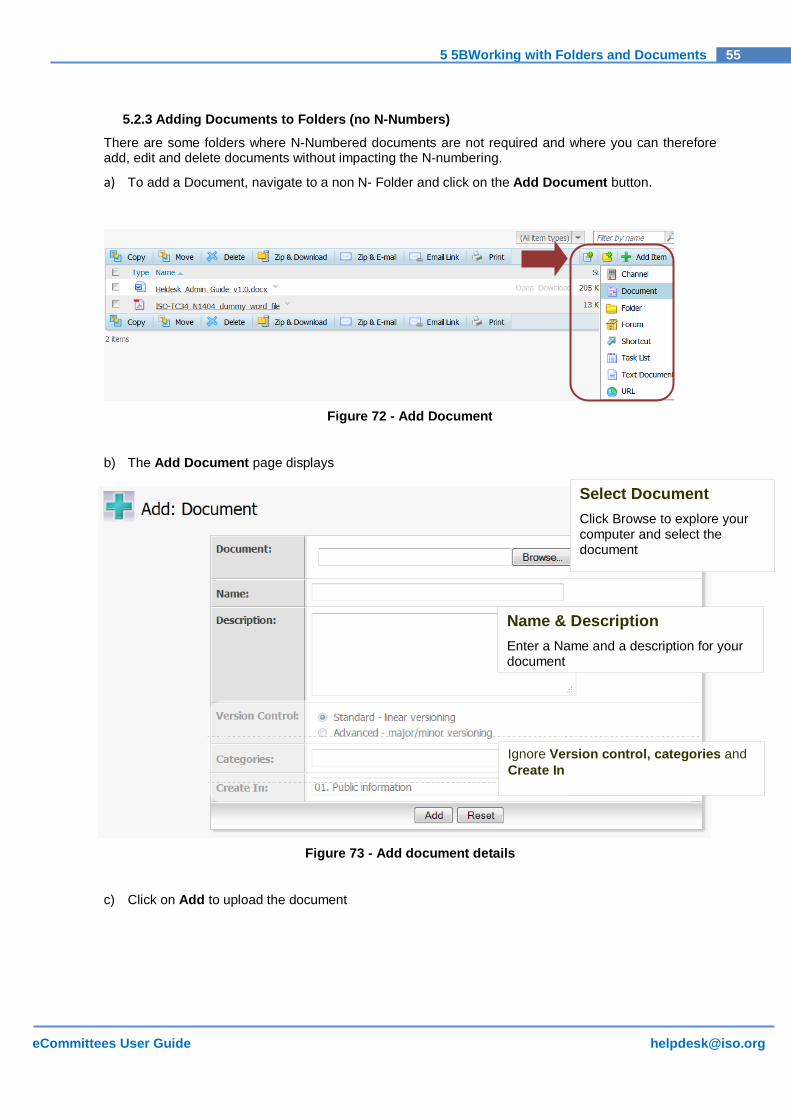
5.2.3 Adding Documents to Folders (no N-Numbers)
There are some folders where N-Numbered documents are not required and where you can therefore add, edit and delete documents without impacting the N-numbering.
a) To add a Document, navigate to a non N- Folder and click on the Add Document button.
Figure 72 - Add Document
b) The Add Document page displays
Figure 73 - Add document details
c) Click on Add to upload the document
Select Document Click Browse to explore your computer and select the document
Name & Description Enter a Name and a description for your document
Ignore Version control, categories and Create In
56 5 5BWorking with Folders and Documents
eCommittees User Guide [email protected]
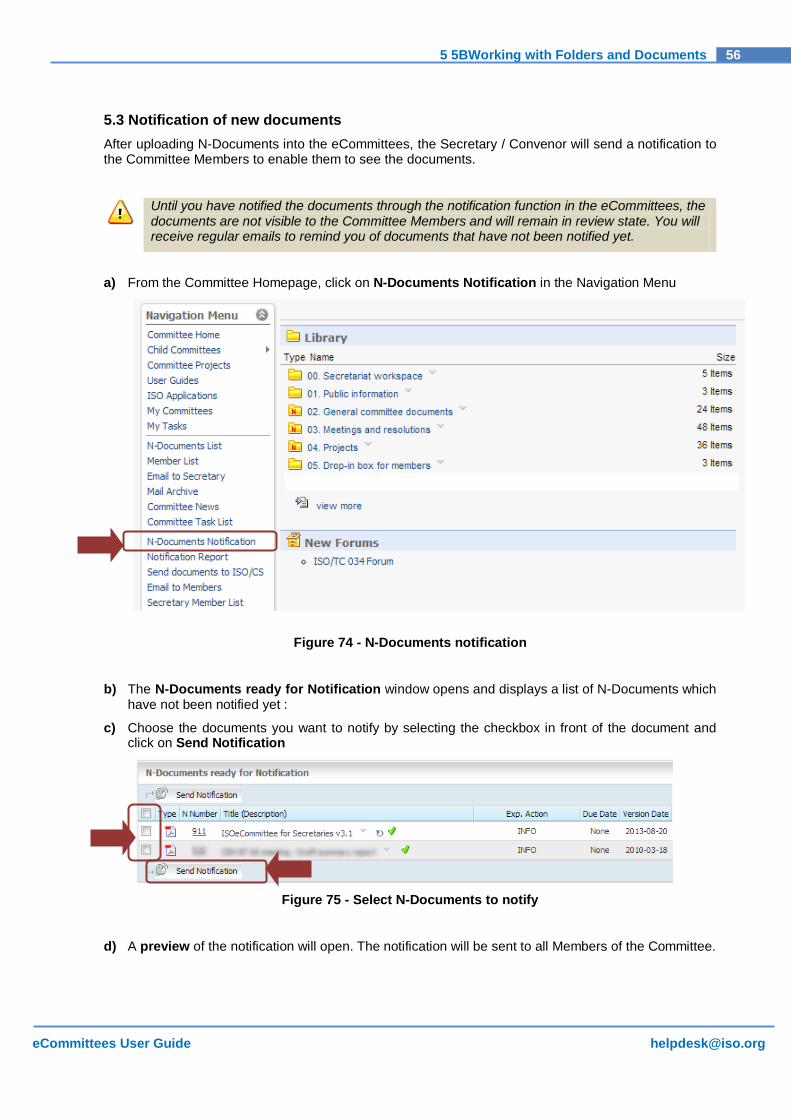
5.3 Notification of new documents After uploading N-Documents into the eCommittees, the Secretary / Convenor will send a notification to the Committee Members to enable them to see the documents.
Until you have notified the documents through the notification function in the eCommittees, the documents are not visible to the Committee Members and will remain in review state. You will receive regular emails to remind you of documents that have not been notified yet.
a) From the Committee Homepage, click on N-Documents Notification in the Navigation Menu
Figure 74 - N-Documents notification
b) The N-Documents ready for Notification window opens and displays a list of N-Documents which have not been notified yet :
c) Choose the documents you want to notify by selecting the checkbox in front of the document and click on Send Notification
Figure 75 - Select N-Documents to notify
d) A preview of the notification will open. The notification will be sent to all Members of the Committee.
57 5 5BWorking with Folders and Documents
eCommittees User Guide [email protected]
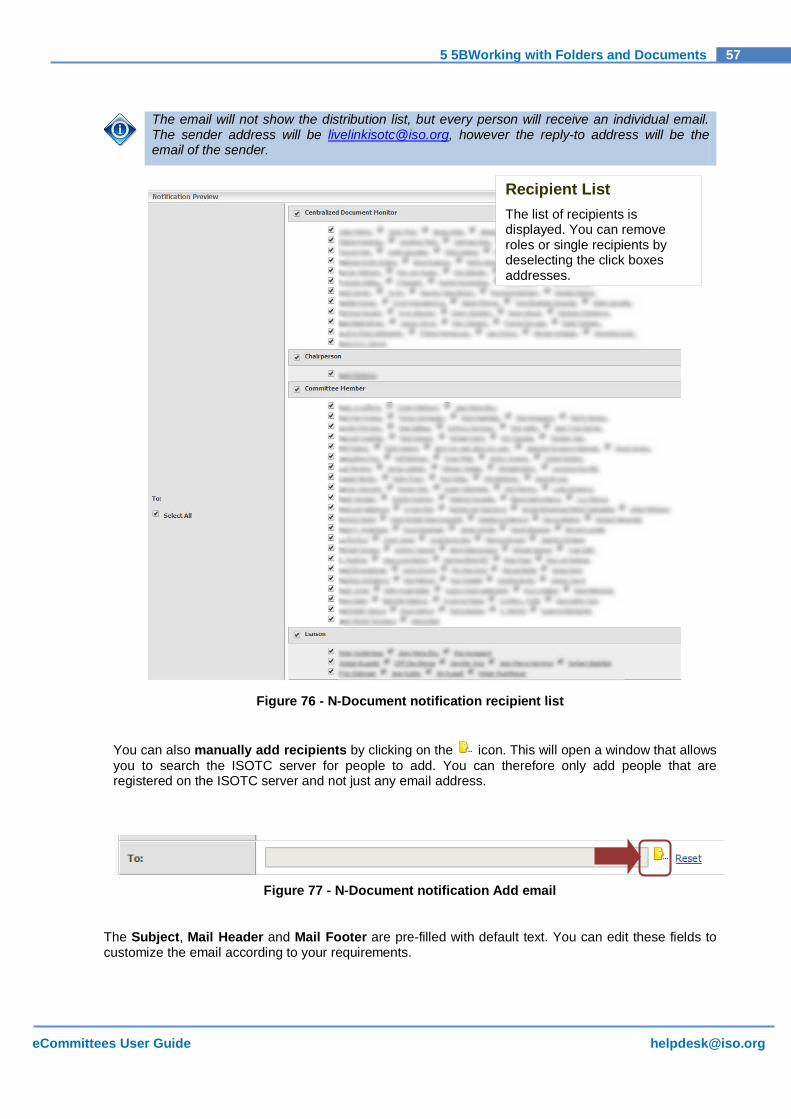
The email will not show the distribution list, but every person will receive an individual email. The sender address will be [email protected], however the reply-to address will be the email of the sender.
Figure 76 - N-Document notification recipient list
You can also manually add recipients by clicking on the icon. This will open a window that allows you to search the ISOTC server for people to add. You can therefore only add people that are registered on the ISOTC server and not just any email address.
Figure 77 - N-Document notification Add email
The Subject, Mail Header and Mail Footer are pre-filled with default text. You can edit these fields to customize the email according to your requirements.
Recipient List The list of recipients is displayed. You can remove roles or single recipients by deselecting the click boxes addresses.

58 5 5BWorking with Folders and Documents
eCommittees User Guide [email protected]
The Mail Content is set with the list of documents you have chosen to notify. It will contain links to the notified documents as well as a link to a Zip-file download of all notified documents. This makes it easy for the Committee Members to access the documents directly from the email.
Figure 78 - N-Document notification details
Placeholders are inserted in the Subject and Mail Footer, for example:
%Committee_Reference% - will be replaced with the Committee reference
%email_of_secretary% - will be replaced with the email address of the Secretary
You can use the following placeholders in the notifications:

59 5 5BWorking with Folders and Documents
eCommittees User Guide [email protected]
e) You can preview the notification email as HTML or Text by clicking on the preview buttons
f) To send the notification email, click on the Send Notification Button. This will send the notification to the selected list of Committee Members. The notified documents will now be visible to all Committee Members.
5.4 Notification Report 5.4.1 View Notification History
In the Notification Report, you have an overview about all the notifications which have been sent to the Committee. Access the Notification Report from the Navigation menu:
Figure 79 - N-Document Notification report
This will open the list of notifications sent inside the Committee with their send date, the email of the sender and the N-Document numbers notified. You can search the notifications by selecting a range of dates from the Search by Send Date area:
Figure 80 - Search Notifications by Date
Search Enter a range of dates and click on Show Notifications
60 5 5BWorking with Folders and Documents
eCommittees User Guide [email protected]
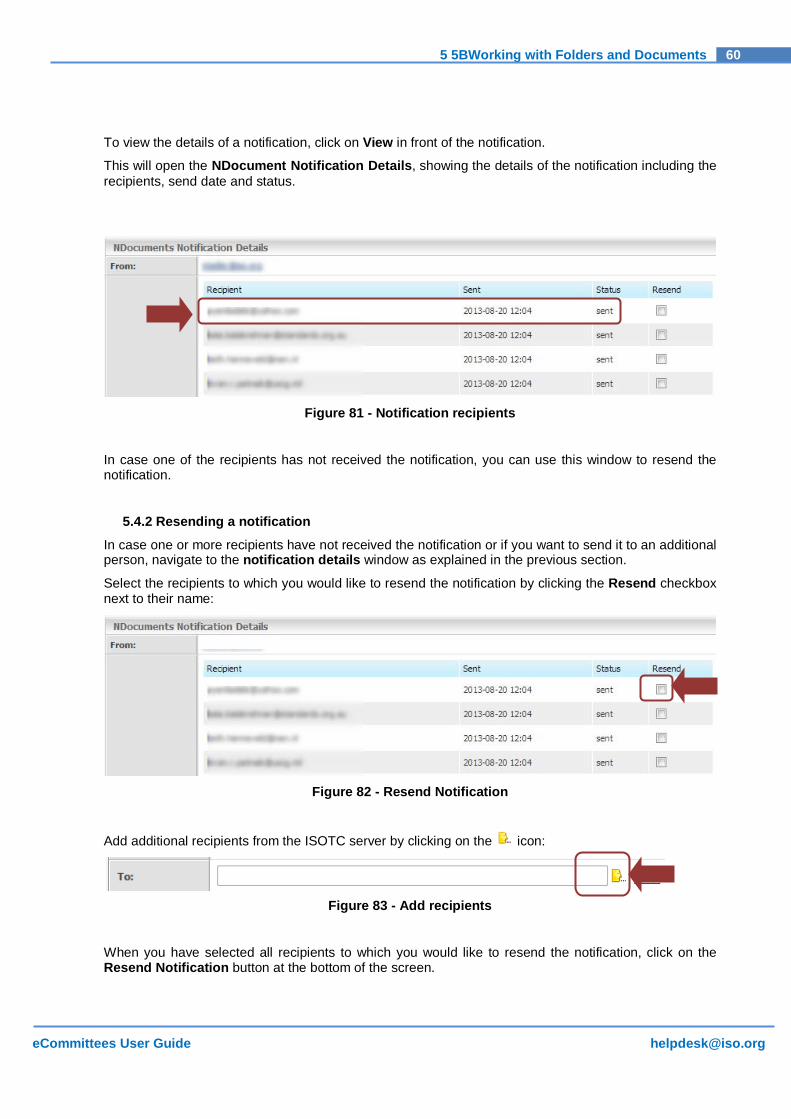
To view the details of a notification, click on View in front of the notification.
This will open the NDocument Notification Details, showing the details of the notification including the recipients, send date and status.
Figure 81 - Notification recipients
In case one of the recipients has not received the notification, you can use this window to resend the notification.
5.4.2 Resending a notification
In case one or more recipients have not received the notification or if you want to send it to an additional person, navigate to the notification details window as explained in the previous section.
Select the recipients to which you would like to resend the notification by clicking the Resend checkbox next to their name:
Figure 82 - Resend Notification
Add additional recipients from the ISOTC server by clicking on the icon:
Figure 83 - Add recipients
When you have selected all recipients to which you would like to resend the notification, click on the Resend Notification button at the bottom of the screen.
61 5 5BWorking with Folders and Documents
eCommittees User Guide [email protected]
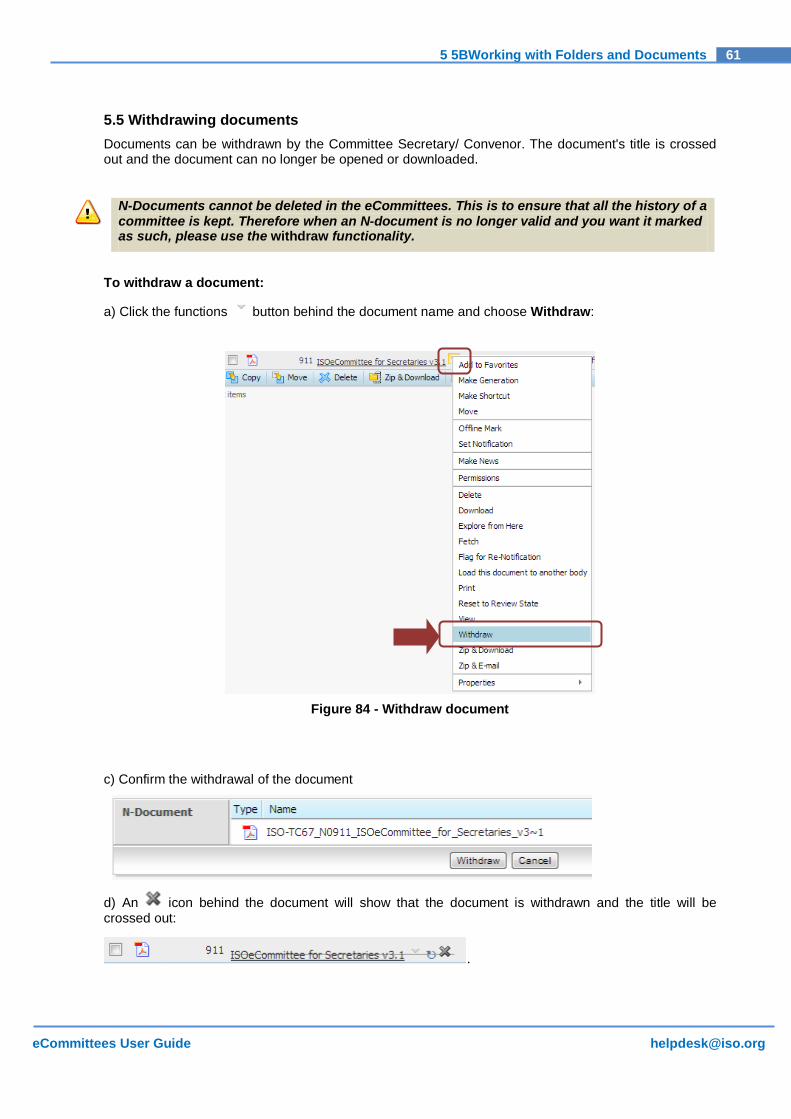
5.5 Withdrawing documents Documents can be withdrawn by the Committee Secretary/ Convenor. The document's title is crossed out and the document can no longer be opened or downloaded.
N-Documents cannot be deleted in the eCommittees. This is to ensure that all the history of a committee is kept. Therefore when an N-document is no longer valid and you want it marked as such, please use the withdraw functionality.
To withdraw a document:
a) Click the functions button behind the document name and choose Withdraw:
Figure 84 - Withdraw document
c) Confirm the withdrawal of the document
d) An icon behind the document will show that the document is withdrawn and the title will be crossed out:
.

62 5 5BWorking with Folders and Documents
eCommittees User Guide [email protected]
Only notified documents can be withdrawn.
While the document has not been notified and is in review state (a icon is next to the document), the document is not yet visible to the Committee Members and can therefore be deleted instead of withdrawn.
5.6 Moving of N document from one folder to other folder in working area Documents can be moved by the Committee Secretary/ Convenor. N-documents can only be moved into other N-folders A document can only be moved in a folder of the same committee. a) Select the file(s) or folder(s) you wish to move and click on the Move button:
Figure 85 – Move document
b) Click on Browse Content Server to select the destination folder:
Figure 86 – Browse Content Server
c) You now need to navigate through the ISOTC server to find the destination Folder. Please follow this path:
ISO Standards Development ISOTC Home Name of the TC Name of the SC (if applicable) Name of the WG (if applicable) Library Folder
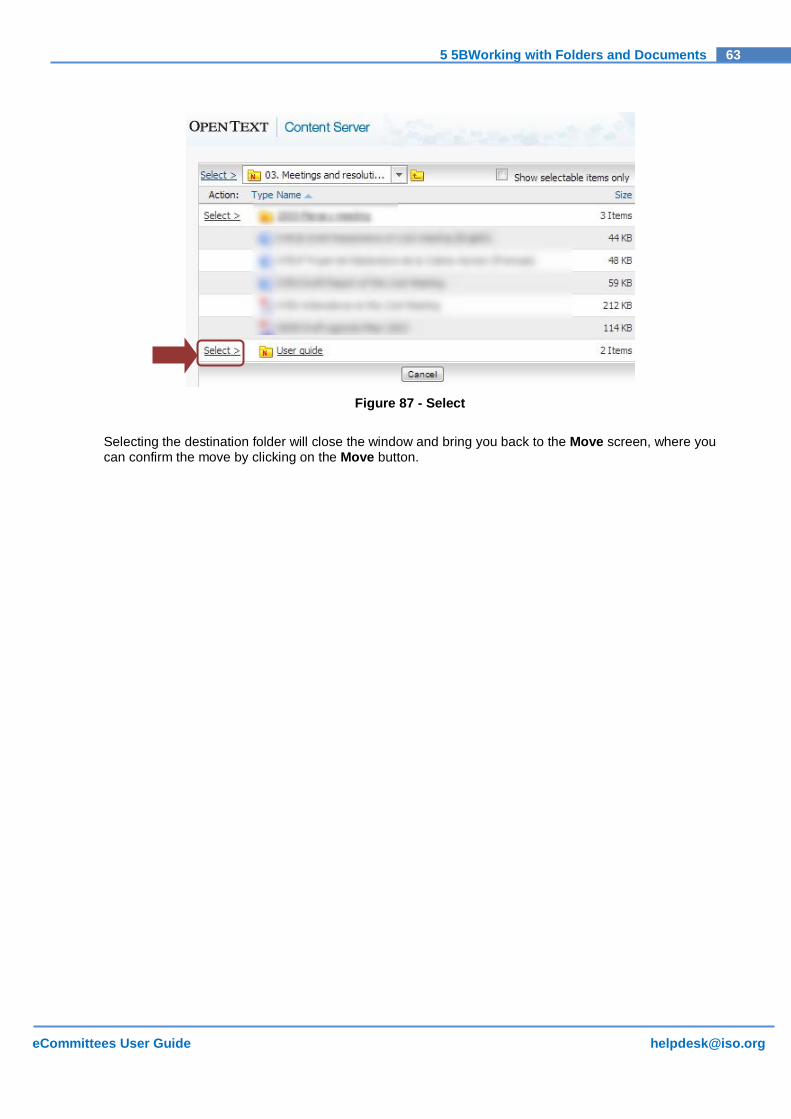
e) When you have reached the folder into which you want to move the document, click on Select next to the folder name:
63 5 5BWorking with Folders and Documents
eCommittees User Guide [email protected]
Figure 87 - Select
Selecting the destination folder will close the window and bring you back to the Move screen, where you can confirm the move by clicking on the Move button.
64 6 6BSearching
eCommittees User Guide [email protected]
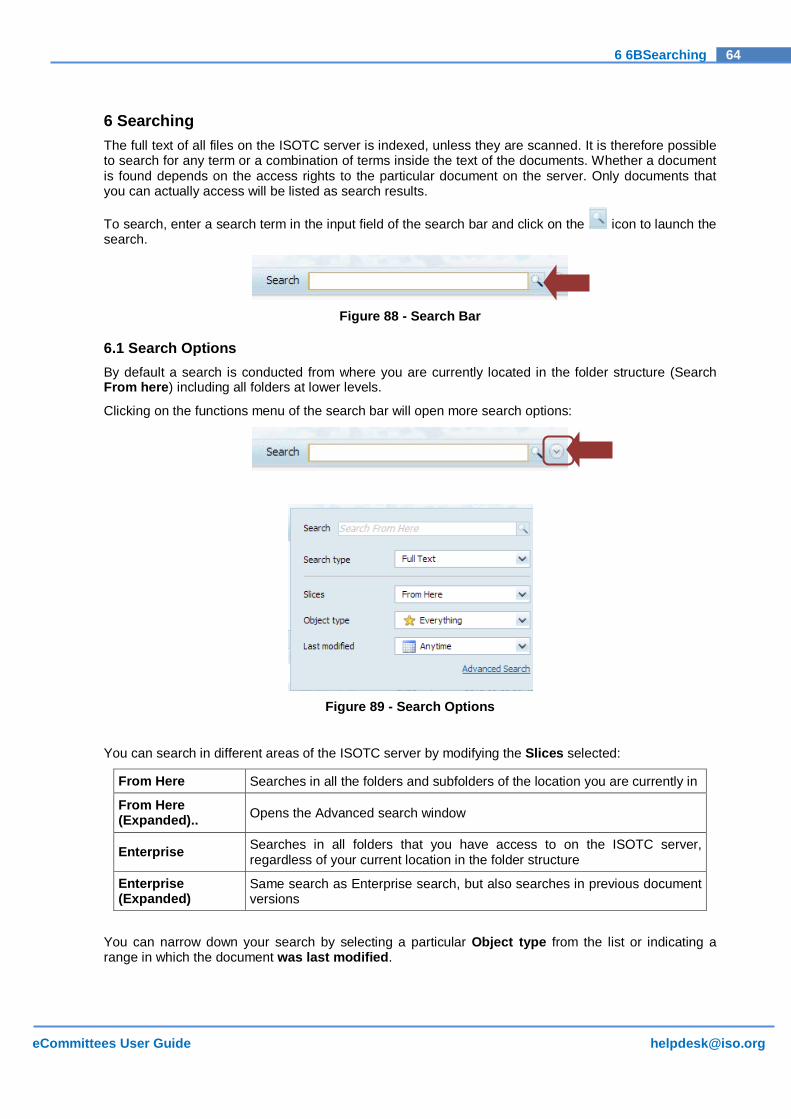
6 Searching The full text of all files on the ISOTC server is indexed, unless they are scanned. It is therefore possible to search for any term or a combination of terms inside the text of the documents. Whether a document is found depends on the access rights to the particular document on the server. Only documents that you can actually access will be listed as search results.
To search, enter a search term in the input field of the search bar and click on the icon to launch the search.
Figure 88 - Search Bar
6.1 Search Options By default a search is conducted from where you are currently located in the folder structure (Search From here) including all folders at lower levels.
Clicking on the functions menu of the search bar will open more search options:
Figure 89 - Search Options
You can search in different areas of the ISOTC server by modifying the Slices selected:
From Here Searches in all the folders and subfolders of the location you are currently in
From Here (Expanded).. Opens the Advanced search window
Enterprise Searches in all folders that you have access to on the ISOTC server, regardless of your current location in the folder structure
Enterprise (Expanded)
Same search as Enterprise search, but also searches in previous document versions
You can narrow down your search by selecting a particular Object type from the list or indicating a range in which the document was last modified.
65 6 6BSearching
eCommittees User Guide [email protected]
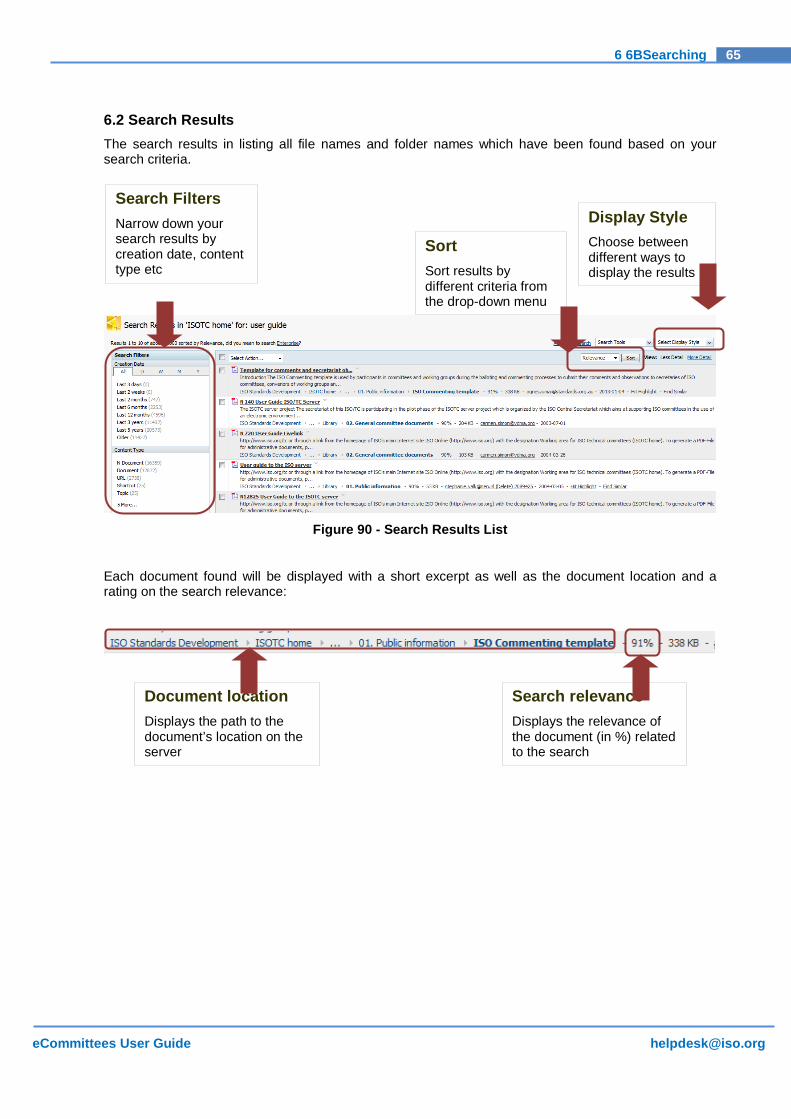
6.2 Search Results The search results in listing all file names and folder names which have been found based on your search criteria.
Figure 90 - Search Results List
Each document found will be displayed with a short excerpt as well as the document location and a rating on the search relevance:
Sort Sort results by different criteria from the drop-down menu
Display Style Choose between different ways to display the results
Document location Displays the path to the document’s location on the server
Search relevance Displays the relevance of the document (in %) related to the search
Search Filters Narrow down your search results by creation date, content type etc
66 6 6BSearching
eCommittees User Guide [email protected]
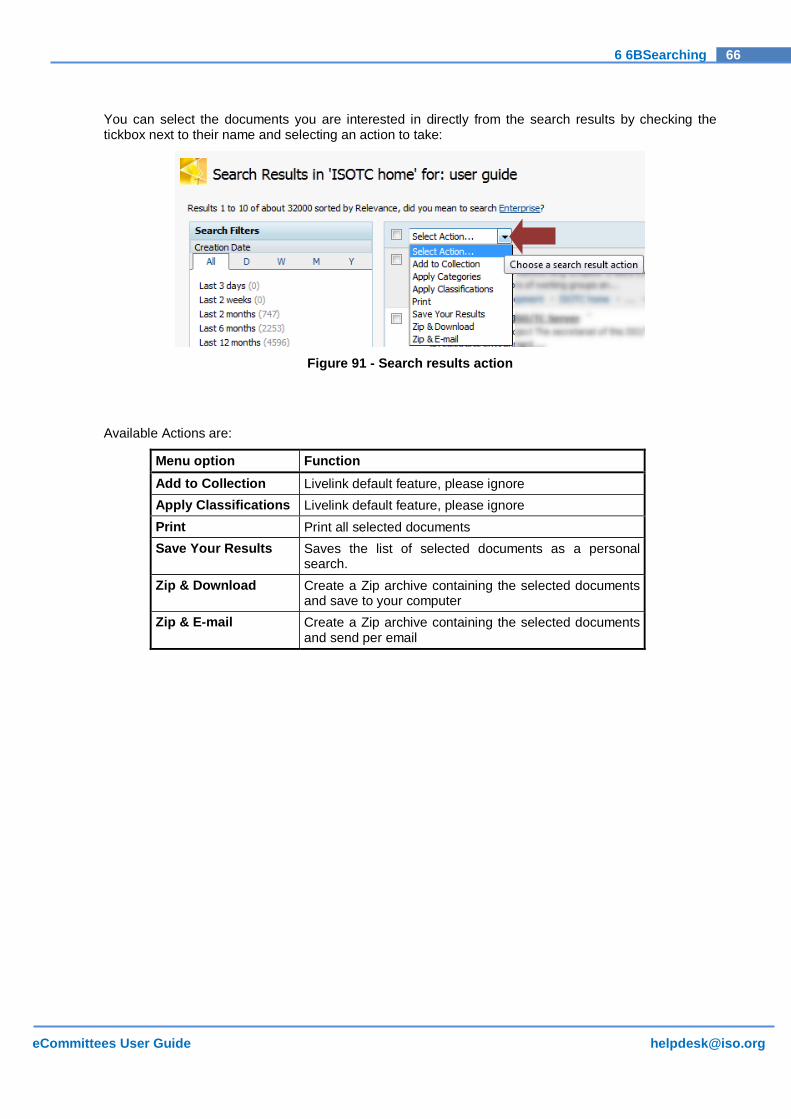
You can select the documents you are interested in directly from the search results by checking the tickbox next to their name and selecting an action to take:
Figure 91 - Search results action
Available Actions are:
Menu option Function Add to Collection Livelink default feature, please ignore Apply Classifications Livelink default feature, please ignore Print Print all selected documents Save Your Results Saves the list of selected documents as a personal
search. Zip & Download Create a Zip archive containing the selected documents
and save to your computer Zip & E-mail Create a Zip archive containing the selected documents
and send per email
67 7 7BHelpdesk and Info
eCommittees User Guide [email protected]
7 Helpdesk and Info For further questions and assistance for eCommittees and other ISO IT applications, please contact the ISO helpdesk [email protected].
For assistance with meeting setup, meeting updates, registration of users to ISO official roles (e.g. Secretary, Convenor, chairperson,..) please contact the ISO STAND Adminstrator at [email protected].
To gain access to the ISOTC eCommittees server, experts need to be registered by their National Standardization Body and assigned a role on a committee. Non-official roles (like Committee Member, Document Monitor) should be assigned by the NSB's user administrator. The list of user administrators can be found under https://directory.iso.org .
You will find the user guides for all ISO applications under http://www.iso.org/e-guides