- Greenturnip web log page
252
www.it-ebooks.info
-
Upload
khangminh22 -
Category
Documents
-
view
1 -
download
0
Transcript of - Greenturnip web log page

Microsoft SharePoint 2010 Enterprise Applications on Windows Phone 7
Create enterprise-ready websites and applications that access Microsoft SharePoint on Windows Phone 7
Todd Spatafore
P U B L I S H I N G
professional expert ise dist i l led
BIRMINGHAM - MUMBAI
www.it-ebooks.info
Microsoft SharePoint 2010 Enterprise Applications on Windows Phone 7
Copyright © 2011 Packt Publishing
All rights reserved. No part of this book may be reproduced, stored in a retrieval system, or transmitted in any form or by any means, without the prior written permission of the publisher, except in the case of brief quotations embedded in critical articles or reviews.
Every effort has been made in the preparation of this book to ensure the accuracy of the information presented. However, the information contained in this book is sold without warranty, either express or implied. Neither the author, nor Packt Publishing, and its dealers and distributors will be held liable for any damages caused or alleged to be caused directly or indirectly by this book.
Packt Publishing has endeavored to provide trademark information about all of the companies and products mentioned in this book by the appropriate use of capitals. However, Packt Publishing cannot guarantee the accuracy of this information.
First published: May 2011
Production Reference: 1170511
Published by Packt Publishing Ltd. 32 Lincoln Road Olton Birmingham, B27 6PA, UK.
ISBN 978-1-849682-58-9
www.packtpub.com
Cover Image by Meir ([email protected])
www.it-ebooks.info

Credits
AuthorTodd Spatafore
ReviewersGilles de Bordeaux
Ray Jensen
Louis-Philippe Pinsonneault
Vikram Pendse
Acquisition EditorKerry George
Development EditorMaitreya Bhakal
Technical EditorAzharuddin Sheikh
Project CoordinatorZainab Bagasrawala
ProofreaderKevin McGowan
IndexerMonica Ajmera Mehta
Production CoordinatorsArvindkumar Gupta
Alwin Roy
Cover WorkArvindkumar Gupta
Alwin Roy
www.it-ebooks.info
Foreword
In 2009, Microsoft Chairman Bill Gates announced the company's leading web application platform for organizations, SharePoint, has exceeded 1 billion dollars in profits with over 100 million licenses sold. I was in the audience when he said that and couldn't help but reflect on how far SharePoint has come in less than a decade. In the subsequent year, Microsoft announced Windows Phone 7 with its target audience of "Life Maximizers". That's probably you: An individual with an equal passion for working smart and living life to its fullest; a person who needs a mobile platform to support that lifestyle.
As you're reading this, you're probably interested in how to develop Windows Phone support for SharePoint. Microsoft took a solid first step in that direction, by providing some SharePoint features as first-class citizens of Windows Phone 7. However, as SharePoint professionals know, a limited built-in feature set isn't where this story ends. Every organization is inherently different, every user has different requirements, and every business has a unique workflow.
Todd Spatafore, the author of the book you're currently reading, recognized this gap and has worked tirelessly to bridge the mobile world and the business world. Customizing SharePoint is at times a daunting and uninviting task, but the moment Windows Phone 7 became available, Todd labored endlessly to bring SharePoint to Windows Phone 7. It requires a visionary person to recognize an untapped integration point and to persue its research and development fully. Todd Spatafore, in my humble opinion, is such a bold thinker and a technology evangelist.
Many leading technology analysts are now predicting Windows Phone 7 will overtake iOS and/or Android in a few years: Gartner, IDC, Pyramid, and others. With SharePoint, adoption at an all-time record high and Windows Phone 7 adoption sky-rocketing, it's essential that resources on how to customize SharePoint for Windows Phone 7 be made available. This book is an Avant-garde work in that field and a superbone at that.
www.it-ebooks.info

If you're interested in taking existing or new SharePoint assets to Windows Phone 7, then this is the book for you.
Sincerely,
Justin Angel
(former) Microsoft Silverlight Program Manager and Microsoft Most Valuable Professional
www.it-ebooks.info
About the Author
Todd Spatafore is a professional web developer and software architect who enjoys living life on the sharp edge of technology. Todd is an expert on HTML, CSS, JavaScript, ASP.NET (WebForms and MVC), C#, and Silverlight. Todd is currently the Director of Technology at Draftfcb.
Before starting at Draftfcb, Todd was a Senior Software Architect for MRM Worldwide. Todd was the principal software architect for many of Microsoft's websites including Windows Server 2008, Microsoft Office 2007 Real Life Tools, and SQL Server 2008. In addition to these defining pages, Todd worked closely with internal teams at Microsoft to introduce a new content management system for Microsoft.com, the fourth most visited website on the Internet. These content management systems were designed and built on top of SharePoint 2010.
Prior to MRM, Todd was a Software Architect building websites such as the California Teachers Association, Novellus, and Technology Credit Union (TechCU). These sites utilized the Microsoft Content Management System, which has since been integrated into SharePoint.
Beyond traditional websites and campaign landing sites, Todd has worked on unique applications such as a Windows Media Center application for ClickStar, a Santa Monica startup designed to showcase independent films from very well-known filmmakers.
Todd maintains his own blog at http://www.spatacoli.com/, on which he muses about current programming topics such as Silverlight, JavaScript, HTML, CSS, and Hyper-V. Currently, Todd is working on a few independent Windows Phone 7 apps, and speaks at MSDN conferences on web application architecture, RIA development in Silverlight, Windows Phone 7, and SharePoint. Follow Todd on Twitter @Spatacoli.
Todd graduated from Montana State University with a BS in Physics.
To my wife Leanne, you will always be walking on top of clouds. My daughter Inara, keep on giggling. "How can I stand here with you and not be moved by you?"
www.it-ebooks.info
About the Reviewers
Gilles de Bordeaux is a software engineer working on embedded systems (Nuclear submarine, Ariane satellite launcher) and applications (payroll, accounting, front and back office for hotel and retail chains). He worked for companies such as Cap Gemini, ICL, AT&T, NCR, Thomson/RCA, and for startups including his own, OpenTV, Vudu, Akimbo, and Wantsa. His specialty is now managing projects, products, programs, and international software development and quality teams. His professional headline is: "Deriving order and predictability out of chaos".
During his free time, Gilles enjoys developing Android and Windows Phone 7 applications. He won a few design and development prizes, both alone and as a member of a team.
I would like to thank my parents for everything they have done, for teaching us hard work and fairness, right from wrong and above all, for showing us the right way all along. Also, I thank them for all of the sacrifices that they have made for me in the past, and for the sacrifices that they continue to make still today.
Ray Jensen has worked as a software professional for the past 25 years and has worked with all the major languages and technologies serving as an architect, designer, and programmer. He has developed government and commercial embedded, desktop, and web applications with many organizations including the US Army, Magnavox, Sony, BAE, and Command Systems. He has also worked as a contractor and an independent software consultant. He continues to work with the latest Adobe and Microsoft applications, web, and database technologies.
He and his wife have lived in many parts of the US and Europe. They currently live in Sunnyvale, CA. and have very busy lives. They enjoy spending time with their family including their three granddaughters. They often combine their passion for photography with sailing in San Francisco Bay or traveling around the globe.
www.it-ebooks.info

I'd like to thank my wife for never complaining about the many hours of time I diverted from our personal life to be a technical editor for this book. She is truly the love of my life and I am blessed to be her husband.
Louis-Philippe Pinsonneault is a senior .NET developer and trainer at Runatserver. He has over 10 years of experience with .NET technology. He is a Microsoft Certified Professional Developer (MCPD) and a Microsoft Certified Technology Specialist .NET Framework 3.5 ASP.NET Application and Silverlight 4. He also teaches Silverlight and ASP.NET at Technologia, Montréal. He was awarded an MVP for Device Application Development in 2010. He works on many Windows Phone 7 applications and is really dedicated to his projects.
I would like to thank my family (Veronick, Sandrine, and Alek) for their support in all of my projects, including the reviewing of this book. Also, to my co-workers who help me bypass my own comfort zone, which makes me grow as a person.
Vikram Pendse is a Microsoft MVP and first Silverlight MVP in India. He is very passionate about Microsoft technologies. He completed his Masters in Computer Management at IndSearch, Pune. He is also involved as a Speaker in various Microsoft events such as Tech.Ed India, Virtual Tech Days, DevCon, and other community events such as CSI Annual Meets, IT Expo, Architect Day, and so on. He actively works with the Pune User Group (http://www.puneusergroup.org) as User Group Lead, which is supported by Microsoft and INETA. Silverlight, Windows Phone 7, C#, WPF, and ASP.NET are his core areas of interest. In the past, he has executed large scale web applications for healthcare and hospitals, which include product development and implementation of HL7 standards. He also created POCs for many banking projects and healthcare applications using cutting edge technologies such as Silverlight, WCF RIA, and LINQ. He maintains his blog at http://pendsevikram.blogspot.com.
I am very grateful to my family and friends for supporting me always for my work and community activities. Also, I am very grateful to India MVP Program and the Silverlight team at Microsoft for their continuous support and encouragement.
www.it-ebooks.info

www.PacktPub.com
Support files, eBooks, discount offers and moreYou might want to visit www.PacktPub.com for support files and downloads related to your book.
Did you know that Packt offers eBook versions of every book published, with PDF and ePub files available? You can upgrade to the eBook version at www.PacktPub.com and as a print book customer, you are entitled to a discount on the eBook copy. Get in touch with us at [email protected] for more details.
At www.PacktPub.com, you can also read a collection of free technical articles, sign up for a range of free newsletters and receive exclusive discounts and offers on Packt books and eBooks.
http://PacktLib.PacktPub.com
Do you need instant solutions to your IT questions? PacktLib is Packt's online digital book library. Here, you can access, read and search across Packt's entire library of books.
Why Subscribe?• Fully searchable across every book published by Packt• Copy & paste, print and bookmark content• On demand and accessible via web browser
Free Access for Packt account holdersIf you have an account with Packt at www.PacktPub.com, you can use this to access PacktLib today and view nine entirely free books. Simply use your login credentials for immediate access.
Instant Updates on New Packt BooksGet notified! Find out when new books are published by following @PacktEnterprise on Twitter, or the Packt Enterprise Facebook page.
www.it-ebooks.info

Table of ContentsPreface 1Chapter 1: Introducing Windows Phone 7 7
Overview of the phone 8Working with e-mail, contacts, and calendars 11
Outlook e-mail 12Calendar 14Contacts 16
Office Hub 18OneNote 19Documents 20
Word 21Excel 24PowerPoint 26
SharePoint Workspace Mobile 27Forefront Unified Access Gateway 29
Windows Marketplace 30Getting apps on the phone 31Marketplace approval process 31
Summary 33Chapter 2: Getting Started with Internet Explorer Mobile 35
Web page architecture 36HyperText Markup Language (HTML) 36Cascading Style Sheets (CSS) 37JavaScript 38Putting HTML, CSS, and JavaScript together 38
Internet Explorer Mobile 40Internet Explorer Mobile User Agent 40Client side browser detection 41Server-side detection 42
www.it-ebooks.info
Table of Contents
[ ii ]
XHTML Mobile Profile 44Enhancing JavaScript in Internet Explorer Mobile 45CSS enhancements 46Available fonts 47Plugins 48HTML5 48
Mobile-friendly META tag settings 48HandheldFriendly 50MobileOptimized 50Viewport 51
Building a simple web page—enhanced for Internet Explorer Mobile 52Support.aspx 52Style.css 56Mobile.css 59Desktop view 60Windows Phone 7 view 61
Summary 63Chapter 3: Enhancing SharePoint Sites for Windows Phone 7 65
Why do we customize SharePoint sites? 66Sites, collections, webs, and web applications 67
Content hierarchy 69Physical objects hierarchy 70Services hierarchy 70
SharePoint development environment 71Visual Studio 2010 SharePoint project types 73SharePoint root 73
Summary of site definitions 75How to build a custom site 78
Creating a site template 80Creating the site 80Adding an issue tracking list to the site 81Removing the Circulations list 82Adding a picture library 84Customizing the home page 86Changing the site theme 87Saving the template 90Testing it out 91Moving a template 92
Summary 92Chapter 4: Building SharePoint Pages for Windows Phone 7 93
The difference between lists and libraries 94Searching content with iFilters 94
www.it-ebooks.info

Table of Contents
[ iii ]
Adding columns to a list 94Customizing the list item output 101
Creating a project for our custom template 102Adding a mapped folder for the custom control template 104Creating the custom template 105Customizing the template 107
Replacing the mobile home page 112Summary 116
Chapter 5: Customizing SharePoint Communities for Windows Phone 7 117
Blogs 117Creating a blog site in SharePoint 118Customizing a SharePoint blog site 119
About this blog 119Categories 120Blog Tools 122Links 125
Getting SharePoint blog sites working well with Windows Phone 7 126Wiki 131
Creating wiki site pages 131Making wiki pages work with Windows Phone 7 133
Summary 134Chapter 6: Introduction to Programming Windows Phone 7 with the SharePoint Client Services 135
Security in SharePoint 2010 135Central Administration 136Site Permissions 138
Using WebClient to get data from the web 139Creating the base project 140Displaying WebClient results by adding a text block 141Creating a WebClient 142Requesting the contents of our SharePoint home page 142Displaying the raw HTML that is returned 142
RSS feeds available from SharePoint 144Parsing XML in Windows Phone 7 146
Replacing the text block display with a list box 147Creating a simple view model for an RSS Item 147Parsing the XML 148Creating a list of RSS Items 149Binding the list of RSS Items to the list box 150
www.it-ebooks.info
Table of Contents
[ iv ]
Simple page navigation 152Building a details view page 152Setting up a new event handler 153Building the Uri for navigation 154Navigating to the details view page 155Handling loaded events on the details page 155
Using the WebBrowser control to display the post 157Adding a WebBrowser to the details view 157Navigating to the post's URL 158
Summary 159Chapter 7: Building a Windows Phone 7 Dashboard Application with SharePoint Data 161
Forms-based authentication 162Connecting with forms based authentication 163Accessing the RSS feeds securely 163Removing anonymous access 167
Managed Client Object Model on the desktop 176ECMAScript interface 176Silverlight interface 177
WCF Data Services to the rescue 178REST 178WCF Data Services and OData 179ASP.NET Web Services 180
Creating a dashboard application 180Creating the calendar 181Reading the calendar data 182
Authentication 182Calendar data service 185
Displaying the calendar data 191Organizing the calendar data 197Creating the task status site 198Reading the task status site data 199Displaying the task status overview chart 204
Summary 208Appendix A: Additional Resources 209
Sites with good information on SharePoint and Windows Phone 7 209MSDN 209
SharePoint 2010 site on MSDN 210The mobile rendering system 211SPListTemplateType Enumeration 212Windows Phone 7 documentation 212
www.it-ebooks.info

Table of Contents
[ v ]
App Hub 212Stack Overflow 212Control vendors 212
Infragistics 213Telerik 213Mindscape 213
Blogs with good articles on SharePoint and Windows Phone 7 214SharePoint Developer Team Blog 214SharePoint in Pictures 214IE for Windows Phone Team Weblog 215JohnPapa.net 216Delay's Blog 216Steve on Security 217Blankenblog 217
Appendix B: What Wasn't Covered in This Book and Why? 219Alerts 219Office Message Service and Short Message Service 220Mobile document viewers 220OData SDK for Windows Phone 7 221Debugging tools 223
Fiddler 223Silverlight Spy 223
Conclusion 224Index 225
www.it-ebooks.info

PrefaceMicrosoft Windows Phone 7 is a reinvention of the Windows Mobile platform and improves productivity by taking a fresh approach to the most common Smartphone business usage scenarios such as e-mail, calendar, contacts, and collaboration. Microsoft SharePoint is a web technology-based server that can be used to build portals, collaboration sites, and also content management sites.
Windows Phone 7 allows you to integrate with Microsoft SharePoint 2010 and create enterprise-ready websites and applications that access Microsoft SharePoint Server on Windows Phone 7. This book will show you how to do so.
The book starts by providing an overview of the out-of-the-box features of Windows Phone 7 for enterprises then moves on to an overview of the web browser that is included on the phone, Internet Explorer Mobile, covering the improvements found compared to the desktop version of Internet Explorer 7 and the limitations of the browser. The book then dives deep into topics such as Windows Phone 7 Web Development, building SharePoint Sites for Windows Phone 7, building SharePoint Pages for Windows Phone 7, and SharePoint Communities amongst others.
What this book coversChapter 1, Introducing Windows Phone 7. Windows Phone 7 is a reinvention of the Windows Mobile platform. This chapter begins with an overview of the phone controls and capabilities. Then Microsoft Outlook capabilities are covered. This includes working with e-mail, contacts, and calendars. Next the full range of Microsoft Office capabilities is reviewed covering OneNote, Word, Excel, PowerPoint, and SharePoint. The chapter concludes with a brief overview of the Windows Marketplace.
www.it-ebooks.info

Preface
[ 2 ]
Chapter 2, Getting Started with Internet Explorer Mobile. Windows Phone 7 includes a mobile version of Internet Explorer that has most of the rendering features found in the desktop Internet Explorer 7 and the JavaScript capabilities of desktop Internet Explorer 8. This chapter begins with a brief discussion of web page architecture. It follows that up with a more in-depth investigation of the browser found in Windows Phone 7. Next is a discussion of the mobile friendly META tag settings. The chapter concludes with an example of building a single web page that will render for both the desktop browsers and Windows Phone 7 Internet Explorer.
Chapter 3, Enhancing SharePoint Sites for Windows Phone 7. SharePoint is a powerful tool and this chapter begins to expose the power found in SharePoint by discussing the customizations available to users and administrators. Next, an overview of the structure of SharePoint from sites to web applications is discussed. Then, an overview of the development environment used for the rest of the book is examined. This leads into a summary of the various site templates available in SharePoint. The chapter concludes with an example of building a custom site.
Chapter 4, Building SharePoint Pages for Windows Phone 7. Within a site, data is stored as either lists or libraries. This chapter begins with an examination of these differences. Then it describes adding columns to a list and customizing the list item output. The chapter ends with an example of replacing the mobile home page.
Chapter 5, Customizing SharePoint Communities for Windows Phone 7. This chapter focuses on customizing SharePoint communities for use on Windows Phone 7. The SharePoint communities of interest are blogs and Wikis.
Chapter 6, Introduction to Programming Windows Phone 7 with the SharePoint Client Services. This chapter moves away from programming SharePoint's web interface for Windows Phone 7 to building Windows Phone 7 applications that utilize SharePoint data. After a brief discussion of security in SharePoint, the chapter provides an example of building a simple RSS reader. The simple RSS reader gets data from an anonymous RSS feed from a SharePoint list, and discusses many of the basics of building a Windows Phone 7 application.
Chapter 7, Building a Windows Phone 7 Dashboard Application with SharePoint Data. The chapter begins with another discussion of security in SharePoint and the example in this chapter utilizes forms based authentication in SharePoint. The example from Chapter 6 is revisited, but this time a username and password are used to access the data. After a brief discussion of the tools available for building SharePoint applications on the desktop the focus turns to building out the dashboard application for Windows Phone 7.
www.it-ebooks.info

Preface
[ 3 ]
Appendix A, Additional Resources. There are a lot of resources on the Internet that provide the bits and pieces required to build the exceptional applications that enterprise consumers will require from their phones. This chapter provides a list of additional resources that could come in handy while developing for both SharePoint and Windows Phone 7.
Appendix B, What wasn't covered in this book and why? This book isn't an exhaustive reference for how to develop Windows Phone 7 applications and sites for SharePoint. This appendix will cover some topics that weren't described in any detail, but might be of use for an enterprise SharePoint application on Windows Phone 7.
What you need for this bookFor working with samples and development situations in the book, two machines and ideally a Windows Phone 7 device will be required.
1. Windows 7 with Visual Studio 2010 and the Windows Phone 7 Development Tools
2. Windows Server 2008 R2 with SharePoint 2010 Foundation, Visual Studio 2010, and the SharePoint 2010 SDK
It is worth noting that the Windows Phone 7 Emulator will not run on a machine running other virtualization software and as such, the Windows 7 machine can neither run on a virtual machine nor on other virtual machines while the emulator is running. For more information on setup, please refer to Chapter 3, Enhancing SharePoint Sites for Windows Phone 7.
Who this book is forIf you are a .NET developer who wants to create enterprise-ready websites and applications that access Microsoft SharePoint Server 2010 on Windows Phone 7, then this book is for you. You should have a basic knowledge of Windows Phone 7 and SharePoint Server 2010. This book also assumes some knowledge of C#, managed code in general, and a basic level of familiarity with Visual Studio.
ConventionsIn this book, you will find a number of styles of text that distinguish between different kinds of information. Here are some examples of these styles, and an explanation of their meaning.
www.it-ebooks.info

Preface
[ 4 ]
Code words in text are shown as follows: "We next take the selected item cast it into an RSSItem and save the result in a variable named selectedItem."
A block of code is set as follows:
var items = from item in rssElement.Descendants("item") select new RSSItem { Title = item.Element("title").Value, Date = item.Element("pubDate").Value, PostUrl = item.Element("link").Value };
When we wish to draw your attention to a particular part of a code block, the relevant lines or items are set in bold:
public DetailsView() { InitializeComponent(); this.Loaded += new RoutedEventHandler(DetailsView_Loaded);}
New terms and important words are shown in bold. Words that you see on the screen, in menus or dialog boxes for example, appear in the text like this: "In the dialog that appears, select Wiki Page Library, as shown in the following screenshot".
Warnings or important notes appear in a box like this.
Tips and tricks appear like this.
Reader feedbackFeedback from our readers is always welcome. Let us know what you think about this book—what you liked or may have disliked. Reader feedback is important for us to develop titles that you really get the most out of.
To send us general feedback, simply send an e-mail to [email protected], and mention the book title via the subject of your message.
If there is a book that you need and would like to see us publish, please send us a note in the SUGGEST A TITLE form on www.packtpub.com or e-mail [email protected].
www.it-ebooks.info

Preface
[ 5 ]
If there is a topic that you have expertise in and you are interested in either writing or contributing to a book, see our author guide on www.packtpub.com/authors.
Customer supportNow that you are the proud owner of a Packt book, we have a number of things to help you to get the most from your purchase.
Downloading the example code for this bookYou can download the example code files for all Packt books you have purchased from your account at http://www.PacktPub.com. If you purchased this book elsewhere, you can visit http://www.PacktPub.com/support and register to have the files e-mailed directly to you.
ErrataAlthough we have taken every care to ensure the accuracy of our content, mistakes do happen. If you find a mistake in one of our books—maybe a mistake in the text or the code—we would be grateful if you would report this to us. By doing so, you can save other readers from frustration and help us improve subsequent versions of this book. If you find any errata, please report them by visiting http://www.packtpub.com/support, selecting your book, clicking on the errata submission form link, and entering the details of your errata. Once your errata are verified, your submission will be accepted and the errata will be uploaded on our website, or added to any list of existing errata, under the Errata section of that title. Any existing errata can be viewed by selecting your title from http://www.packtpub.com/support.
PiracyPiracy of copyright material on the Internet is an ongoing problem across all media. At Packt, we take the protection of our copyright and licenses very seriously. If you come across any illegal copies of our works, in any form, on the Internet, please provide us with the location address or website name immediately so that we can pursue a remedy.
Please contact us at [email protected] with a link to the suspected pirated material.
www.it-ebooks.info

Preface
[ 6 ]
We appreciate your help in protecting our authors, and our ability to bring you valuable content.
QuestionsYou can contact us at [email protected] if you are having a problem with any aspect of the book, and we will do our best to address it.
www.it-ebooks.info

Introducing Windows Phone 7
Windows Phone 7 is a dramatic shift in focus for Microsoft, for both enterprise users and consumers. Windows Mobile 6.5 was rewritten with the consumer in mind to create Windows Phone 7. Microsoft has greatly simplified the user interface and made it so that all Windows Phone 7 devices have the same look and feel. They have also centralized application management into a Marketplace with tight control over the applications that are available to install on the phone. This makes the phone a much more stable platform, but eliminates a convenient management path for enterprises to install their own custom applications. That doesn’t necessarily leave the enterprise user out in the cold though. There are a lot of features within the phone that can work well for an enterprise user.
Windows Phone 7 has the first class support of Microsoft’s Office family of products. Every Windows Phone comes with Word, Excel, Outlook, PowerPoint, and OneNote built-in at no additional fee. Each of these applications is vital to the enterprise user.
Although there are many other features of the phone that come built-in out of the box, we will focus our attention on the enterprise features of the phone. These include the following:
• Overview of the controls• Working with e-mail, contacts, and calendars• Office Hub
° OneNote° Documents° SharePoint
• Windows Marketplace
So, let’s begin with the overview of the phone controls.
www.it-ebooks.info

Introducing Windows Phone 7
[ 8 ]
Overview of the phoneWith Windows Phone 7, Microsoft wanted to create a phone that is familiar no matter which device manufacturer made it. They wanted to have a single user interface that the consumer and developer alike could count on being available. In addition to this user interface, they wanted to make sure that the physical device had the same user input controls across the board. This means that whether our phone is a Samsung Focus or an HTC HD7, it will still have the following:
• A 480x800 pixel resolution capacitive 4-point multi-touch screen. That means no stylus is required.
• A back button• A start button• A search button• A power/sleep button• A camera button• Volume up and down buttons
In the past, Windows Mobile has had a host of different sized and shaped screens available. This made developing applications that ran well on all devices a challenge. With Windows Phone 7, Microsoft defined a single set of hardware and software requirements allowing developers to focus more on their applications and less on testing in the various hardware configurations available.
www.it-ebooks.info

Chapter 1
[ 9 ]
The single screen size is just the beginning. The Back button is a button that programs can take advantage of for their own navigation controls. This is accomplished simply by capturing the back button tapped event and handling it in our own programs. Although we won’t do this in any of the samples in this book, there is an excellent example available on Channel 9’s website at the following URL:
http://channel9.msdn.com/learn/courses/WP7TrainingKit/WP7Silverlight/WindowsPhoneNavigationAndControlsLab/Exercise-3-Introduction-to-Windows-Phone-Services
www.it-ebooks.info
Introducing Windows Phone 7
[ 10 ]
The Start button takes us to the phone’s start screen, closing the application currently running. Through a process named tombstoning, an application can be revived to the state it was in before the application was closed. We will not discuss tombstoning in this book, but an excellent description and example can be found at the following URL:
http://msdn.microsoft.com/en-us/wp7trainingcourse_applicationlifetimewp7lab.aspx
The Search button opens Bing search on the phone. In some applications in the Office Hub, the Search button will allow us to search through documents.
In addition to the preceding specifications for the core user experience of the phone, the device is also required to have the following hardware components:
• Wi-Fi• Camera of at least 5-megapixels and flash• Accelerometer• Location—GPS combined with Web and Cell Tower information• Vibration• FM Radio• Push Notifications• A 1 GHz ARM v7 “Cortex/Scorpion” or better processor• A DirectX 9 rendering-capable GPU• 256 MB of RAM• At least 8 GB of Flash Memory• A compass• Ambient light sensor and proximity sensor
Previous versions of Windows Mobile and Pocket PC were based on a stylus driven screen. The stylus had a very precise location on the screen similar to a mouse cursor. Windows Phone 7 changes that to a touch screen that uses your fingers as the main source of location input. This makes the touch location less precise than the stylus. At the same time though, a stylus input only allowed for a single tap point or gesture. With a 4-point capacitive touch screen multiple fingers used in unison on the screen can accommodate many different input ideas. Those ideas or gestures can be pinching fingers to zoom out or spreading fingers apart to zoom in. We can also put two fingers on the screen and rotate them to cause the underlying user input to turn. This is an important aspect to keep in mind when developing applications and websites for Windows Phone 7.
www.it-ebooks.info

Chapter 1
[ 11 ]
Working with e-mail, contacts, and calendarsMicrosoft Outlook is the backbone of the workplace. Since the early Pocket PC’s, Office Mobile has been around and Outlook Mobile has been a staple in this application suite. Windows Phone 7 continues this tradition by including Outlook Mobile as a premier application on the phone.
Outlook Mobile is the only Office Mobile application that is not found in the Office Hub. In fact, Outlook Mobile is split up into three separate parts on the phone:
1. Outlook e-mail2. Calendar3. Contacts
When setting up the phone, the user is asked to provide their e-mail information. One of the options for e-mail is adding an Exchange account. When you add a Microsoft Exchange account to your phone then your e-mail, contacts, and calendars will be synchronized between the Exchange server and your phone.
www.it-ebooks.info

Introducing Windows Phone 7
[ 12 ]
In a Windows domain, all user accounts and account information are stored in Active Directory. In Active Directory, the user must have ActiveSync enabled on their account before Windows Phone 7 will sync with Exchange. Configuring Active Directory for ActiveSync is beyond the scope of this book, but for instructions, please visit Microsoft TechNet at the following URL:http://technet.microsoft.com/en-us/library/aa997489(EXCHG.65).aspx
Outlook e-mailE-mail is the first of the three main features of Exchange server’s integration into Windows Phone 7 and is probably the most visible. To configure Outlook e-mail, follow these steps:
1. From the main Windows Phone 7 screen, press the right arrow to go to the full menu.
2. Scroll down and select Settings.3. On the System menu, select Email & accounts.4. Select Add an account.5. The second option on the ADD AN ACCOUNT page is Outlook. Select that
option.6. Enter the e-mail address and password in the Email and Password tabs
respectively and select the Sign in button.
If all goes well, you’ll be connected to your Exchange server.
Windows Phone 7 will sync content from e-mail, contacts, and calendar after configuring Outlook. We can specify which of these three we want to synchronize by going into the settings for your e-mail account. To get to the settings for your Outlook account, follow these directions:
1. From the main Windows Phone 7 screen, press the right arrow to go to the full menu.
2. Scroll down and select Settings.3. On the System menu, select Email & accounts.4. Select your Outlook account from the list provided.
www.it-ebooks.info

Chapter 1
[ 13 ]
This is the settings page for the Outlook account. From here, we have the following configuration settings:
• Account name• Download new content• Download email from• Content to sync• User name• Password• Domain• Server• An option for Server requires encrypted (SSL) connection• Logging
The Content to sync option has three checkboxes: one each for Email, Contacts, and Calendar, as shown in the following screenshot:
www.it-ebooks.info

Introducing Windows Phone 7
[ 14 ]
From here, we can decide what gets synched with our phone. The other option that gets used a lot is the Download email from option (shown in the preceding screenshot). This is where we can decide how long to keep an e-mail on the phone. The options available are as follows:
• the last 3 days• the last 7 days• the last 2 weeks• the last month• any time
Synchronizing with Exchange can only happen over the air, through either Wi-Fi or a cellular network. We can specify when the phone will check for new content. The options available are as follows:
• as items arrive• every 15 minutes• every 30 minutes• hourly• manually
The option for as items arrive will tell the Exchange server to push the e-mail directly to the phone. This means that the phone does not have to poll the server for requests on a schedule.
The phone can be connected to a PC using the Zune desktop software. This allows a consumer to set up a synchronization of media content to the phone. This includes music, videos, and pictures being sent to or from the phone. However, the phone will not sync to Exchange through the Zune desktop software. The Zune software can be downloaded from the following URL:http://www.zune.net/download
CalendarThe second feature of Exchange that the phone synchronizes with is the calendar. Calendar events from Exchange will be added to the calendar application in the phone.
www.it-ebooks.info

Chapter 1
[ 15 ]
Appointment reminders come up on the phone just as they do with the desktop version of Outlook. The phone also has a feature where we can specify that we are running late to a meeting. This sends a notification to the meeting organizer letting them know of the delay.
We can create new calendar events by following these directions:
1. Open the Calendar either from the main start screen or from the all programs screen, depending on how the phone is set up.
2. Scroll to find the day of the appointment and tap at the time of the appointment. This will open the NEW APPOINTMENT screen.
3. The first field will be blank and have the cursor in it. This field is for the subject of the appointment.
4. The second field is for the location of the appointment.5. If you have multiple accounts set up on your phone that allows calendar
events, the third field will allow you to select the account. This will default to the Exchange server account typically called Outlook.
6. Ensure the start date, start time, and length are correct, and click on the save icon at the bottom.
There is a more details button that will allow you to change the following items:
• Reminder time• The recurrence of the meeting• Your status (free, tentative, busy, out of office)• A button to allow us to add someone to the meeting.
www.it-ebooks.info

Introducing Windows Phone 7
[ 16 ]
Clicking on the add someone button opens the ATTENDEES screen where we can add required and optional attendees.
On the main calendar screen, appointments from different calendars, such as multiple Outlook accounts, will appear in different colors on the screen, as shown in the preceding screenshot. This is convenient when glancing at a daily schedule to know what times and days are booked.
Multiple Exchange accounts crop up a lot in consulting scenarios. Having multiple colors on a calendar can make it easy to tell that green appointments are for XYZ Corp while purple appointments are for ABC Inc. It’s yet another way that Windows Phone 7 allows us to just glance at the screen and know the information we need.
ContactsThe People hub on the phone is one of the main selling points of the phone. This section allows not only a collection of names, phone numbers, addresses, and e-mail addresses, but it also allows integration into Windows Live Messenger status updates as well as Facebook status updates.
This integration will allow the contacts to have their avatar icon associated with their name in your phone. It also allows, at a glance, a view of people and what they are doing.
www.it-ebooks.info

Chapter 1
[ 17 ]
Although names and addresses will be synchronized between Exchange and the phone, we can still add new people to the phone. To add new contacts, follow these directions:
1. Tap on the People hub, either from the main start screen or from the all applications list.
2. Next to the word all is a graphic icon to search contacts and one to add a contact. Click on the + sign to add a contact.
3. This will open the New Contact dialog.4. From here, we can add a photo from our phone if we have a photo already
taken, or we can take a new photo if we happen to be standing right in front of the person.
5. Click on the + sign next to name and enter the person’s First, Last, Middle, Nickname, Title, and Company information.
6. Click on the check mark to save changes.7. Next, we can select the Account that we want to save this contact to.8. Finally, we can add phone numbers and e-mail addresses, as well as specify a
ringtone and other information.9. The other information includes the following options:
° Address° Website° Birthday° Notes° Anniversary° Significant other° Children° Office location° Job title
10. Click on the save icon at the bottom of the screen to save the contact. After the next sync with the Exchange server, this contact will also appear on our desktop.
Using contacts is just as easy as we expect it to be, but the added integration of the photos from Facebook or Windows Live means that our contacts can add a bit of flair to our phones.
www.it-ebooks.info

Introducing Windows Phone 7
[ 18 ]
Office HubOffice Mobile has been around in various forms since 2000, when it was introduced for the Pocket PC platform. At that time, it was called Pocket Office, but the core Microsoft Office functionality was there in the form of Pocket Word, Pocket Excel, and Pocket Outlook. Over the years PowerPoint and OneNote were added, and the prefix Pocket was changed to the suffix, Mobile.
Today the Office Mobile application suite, with the exception of the Outlook features, lives in an Office Hub on Windows Phone 7. This is where we can find all of our files for viewing and editing on the phone. There are three main sections to the Office Hub, which are as follows:
1. OneNote2. Documents3. SharePoint Workspace Mobile
These are covered briefly in the following sections.
www.it-ebooks.info

Chapter 1
[ 19 ]
OneNoteThere’s been a mobile version of OneNote for Windows Mobile in the past; the version that comes with Windows Phone 7 is truly worthy of the name OneNote. We can synchronize notes with SkyDrive or through SharePoint.
OneNote is a place for storing notes without having to worry about formatting. OneNote is comprised of notebooks. Notebooks have sections, and sections have pages.
There are some limitations on the phone version, such as that we cannot create a new notebook or section on the phone, but we can open, view, and edit any pages in any current section. Also, we can add new pages to existing sections in the notebooks we have on the phone.
So, how do we get a new notebook on the phone? From the desktop version of OneNote, create a new Web Notebook. This will create a new notebook and store it on SkyDrive. Once the new notebook has been created, we can open it from our phone by following these instructions:
1. Open Internet Explorer Mobile.2. Go to the following URL:
http://office.live.com
3. Sign in with the Live ID used to save the OneNote notebook.4. Navigate to the folder that has the OneNote notebook.5. Select Open in OneNote.
www.it-ebooks.info

Introducing Windows Phone 7
[ 20 ]
This will open the notebook in OneNote on the phone, as shown in the following screenshot:
Notes in OneNote are not limited to text and bullet points. We can also add photos and voice recordings to notes. This is done by clicking on the appropriate icon at the bottom of the screen.
The text in OneNote can also be formatted in bold, italics, underline, and strikethrough. We can also use a yellow highlighter background color. This is accomplished by selecting the format option from the menu at the bottom of the screen.
DocumentsThis is the section of the Office Hub that contains the Office documents that are located on your phone and not synchronized anywhere else. This section is split into three parts for the three main types of files in Office.
www.it-ebooks.info

Chapter 1
[ 21 ]
WordMicrosoft Word is a word processor that just about everyone uses. Even if someone doesn’t use Microsoft Word, chances are the word processor that they use will output to Microsoft Word format. Word Mobile for Windows Phone 7 can open and perform basic editing of Word Document files (DOC and DOCX format files), Rich Text Format files (RTF), and simple text files (TXT).
www.it-ebooks.info

Introducing Windows Phone 7
[ 22 ]
The options for modifying the styles of a document are fairly limited. We have six formatting options, which are as follows:
1. Bold2. Italic3. Underline4. Strikethrough5. Font size increase6. Font size decrease
These options are shown in the following screenshot:
We also have three different highlight colors: yellow, green, and red. Finally, we also have a choice of three different font colors, including orange, green, and red. When editing a document, double tap on a word to select it. Then add one of these formatting options. Alternatively, we can just select format from the bottom menu and select the format desired and continue typing on the document.
www.it-ebooks.info

Chapter 1
[ 23 ]
As we type in Word, spell check suggests words right above the software keyboard. We can type the first few letters then tap on the desired word to select the word for auto-completion.
Also, for common misspellings, and just for convenience, some words are auto-corrected. Be aware that some words will try to auto-correct even when our intention is to use the word we are typing.
An excellent example is the word ill. Word Mobile, and Windows Phone 7 in general, will try to auto-correct it to the word I’ll, but what do we do when our intention really was the former? As we are typing the word, but before hitting space at the end, tap out of the keyboard. That will close the auto-completion list and allow us to leave the word ill as it is.
When the phone has no idea what we are trying to type, a familiar red squiggly underline will appear under the word. To correct those words we can double tap to highlight the word. A list of possible corrections will appear above the software keyboard. This list will scroll to the right with a swipe action to see more options.
If the word we typed is spelled correctly and it just isn’t in the dictionary, we can add the word to the dictionary by tapping on the + sign next to the word at the beginning of the list. The phone will store the word in a personal dictionary, and will never tell you again that this word is misspelled.
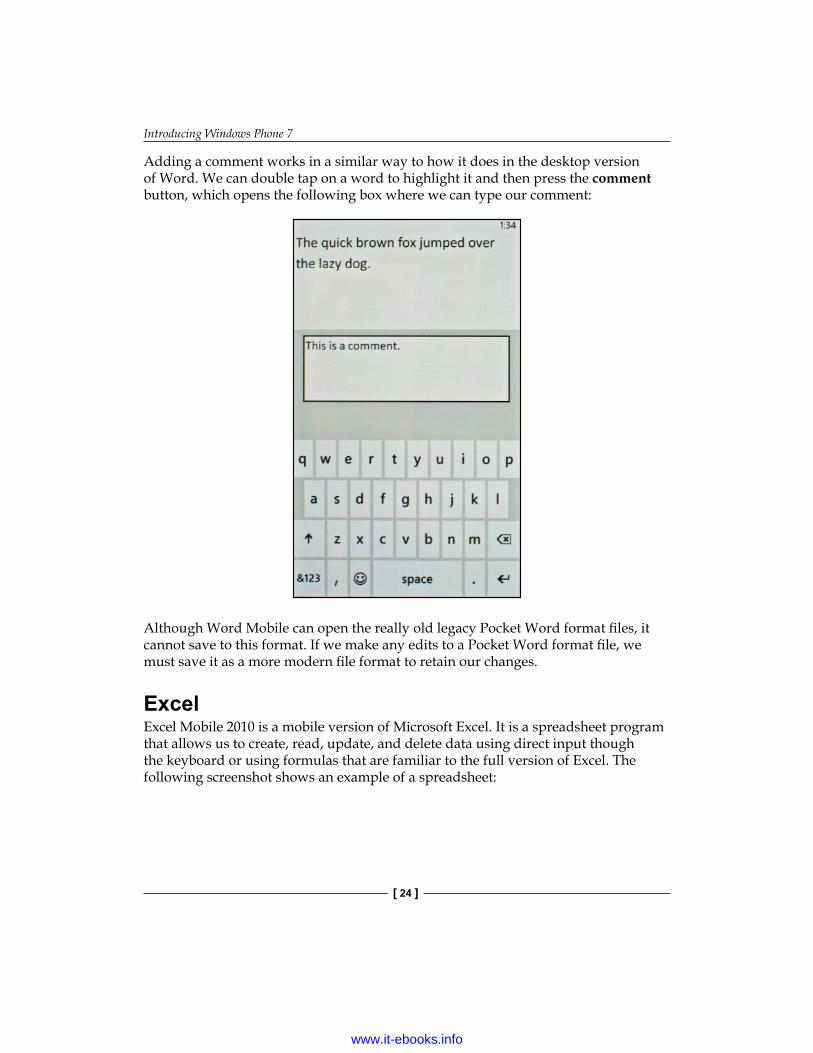
Word Mobile also allows us to add comments to documents. Comments can be added by pressing the button (on the navigation bar), which is shown in the following screenshot:
www.it-ebooks.info
Introducing Windows Phone 7
[ 24 ]
Adding a comment works in a similar way to how it does in the desktop version of Word. We can double tap on a word to highlight it and then press the comment button, which opens the following box where we can type our comment:
Although Word Mobile can open the really old legacy Pocket Word format files, it cannot save to this format. If we make any edits to a Pocket Word format file, we must save it as a more modern file format to retain our changes.
ExcelExcel Mobile 2010 is a mobile version of Microsoft Excel. It is a spreadsheet program that allows us to create, read, update, and delete data using direct input though the keyboard or using formulas that are familiar to the full version of Excel. The following screenshot shows an example of a spreadsheet:
www.it-ebooks.info

Chapter 1
[ 25 ]
In addition to the basic input methods, the editing tool allows us to format cells in the following ways:
• Bold• Italic• Underline• Mark a cell as containing Date information• Mark a cell as containing Currency information• Mark a cell as containing Percentage information• Font color: red, orange, and green• Cell fill color: red, yellow, and green
We can also apply a filter and sort. Once a filter has been applied, we can also remove that filter.
The more advanced features of Excel are not found in the mobile version. Such features include hidden sheets, protection settings (locking cells, or protecting the worksheet), zoom settings, and some chart formatting features. However, the feature set found in Excel Mobile should be more than enough to quickly open a spreadsheet to view or update data, or to quickly start a spreadsheet that we can later open on the desktop to enhance and fill.
www.it-ebooks.info
Introducing Windows Phone 7
[ 26 ]
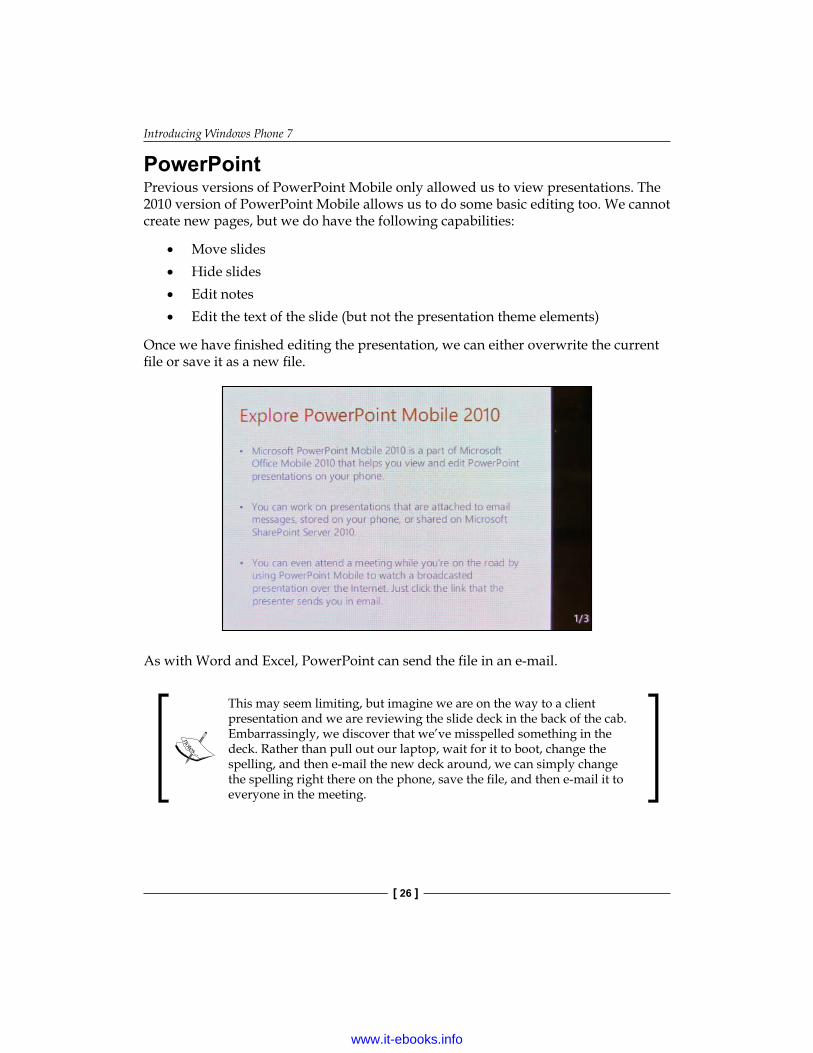
PowerPointPrevious versions of PowerPoint Mobile only allowed us to view presentations. The 2010 version of PowerPoint Mobile allows us to do some basic editing too. We cannot create new pages, but we do have the following capabilities:
• Move slides• Hide slides• Edit notes• Edit the text of the slide (but not the presentation theme elements)
Once we have finished editing the presentation, we can either overwrite the current file or save it as a new file.
As with Word and Excel, PowerPoint can send the file in an e-mail.
This may seem limiting, but imagine we are on the way to a client presentation and we are reviewing the slide deck in the back of the cab. Embarrassingly, we discover that we’ve misspelled something in the deck. Rather than pull out our laptop, wait for it to boot, change the spelling, and then e-mail the new deck around, we can simply change the spelling right there on the phone, save the file, and then e-mail it to everyone in the meeting.
www.it-ebooks.info

Chapter 1
[ 27 ]
SharePoint Workspace MobileSharePoint Workspace Mobile is a part of Office Hub that allows for synchronization of files found in a SharePoint library inside of an organization. To access these files, we must have a Wi-Fi connection to our local intranet. This allows our phone to access the internal SharePoint servers.
The hosted version of SharePoint, Microsoft SharePoint Online, cannot be accessed with the phone at this time.
Follow these directions to open a SharePoint library on Windows Phone 7:
1. From the Office Hub, swipe to the right until SharePoint is on the screen.2. Tap on open URL.3. Enter the URL for the document library, list, or folder, as shown in the
following screenshot:
4. Press the right arrow in the keyboard when finished.
www.it-ebooks.info

Introducing Windows Phone 7
[ 28 ]
5. Windows Phone 7 will attempt to connect. If the phone cannot connect using anonymous or previously saved credentials, it will ask for credentials for login. If it does, enter a User name, Password, and Domain, and then press the done button.
Once connected to a library, SharePoint will display the documents available with an icon indicating the type of Office document each one is. From here, we can open Word, Excel, PowerPoint, and even OneNote notebooks that are stored on the SharePoint server. Opening a document copies it to the phone. Press the … button on the links menu and select Settings to see how much space is being used by the data store. We can clear out the local data cache by following these directions:
1. Tap on the words data store.2. Tap on the clear cache button, as shown in the following screenshot:
3. Then verify that we want to clear the cache by tapping on the clear button.
If we open an item from a SharePoint list, the fields of that list item will appear.
To save the URL for access later, click the … icon, and in the menu that appears select bookmark this link.
To search through a SharePoint library or list, follow these simple steps:
1. From the Office Hub, swipe to the right until SharePoint is on the screen.2. Tap on the all button.3. From the links menu, select the library or list that we want to search through.
www.it-ebooks.info

Chapter 1
[ 29 ]
4. Then press the search button next to the Windows button on the phone.
This type of program specific search isn’t available in many places on the phone, but when it is available, it is a very cool feature.
Forefront Unified Access GatewayWhen working outside the company firewall, it may be of concern how we access the SharePoint libraries. Many organizations merely provide a SharePoint web portal to access internal confidential information. This leaves their SharePoint servers on the web with just a user name and password to secure it. A more secure mechanism to prevent unauthorized access to SharePoint servers is Microsoft Forefront Unified Access Gateway (UAG). UAG allows us to access internal confidential information using a reverse proxy and VPN solution.
Installing and configuring Microsoft Forefront Unified Access Gateway is beyond the scope of this book. For information on how to accomplish this installation, please visit the following Microsoft TechNet site:http://technet.microsoft.com/en-us/library/ff358694.aspx
Authentication methods will be briefly described in Chapters 6 and 7, but it is important to have the knowledge. The following is a link to a Microsoft TechNet page on planning authentication methods:http://technet.microsoft.com/en-us/library/cc262350.aspx
Once our corporation has Microsoft Forefront Unified Access Gateway installed and configured for Office Mobile, connecting to SharePoint sites with Windows Phone 7 is fairly straightforward.
1. From the start screen, swipe right to open the all programs list.2. Scroll down and open the Settings.3. Swipe to the right to the applications list.4. Tap on Office to open the Office settings panel.5. From the Office settings panel, select SharePoint.6. On SharePoint settings, tap on UAG Server.7. In the Forefront UAG server address box, enter the URL of the UAG Server.8. Enter the User name.
www.it-ebooks.info

Introducing Windows Phone 7
[ 30 ]
9. Enter the Password.10. Press the done button, as shown in the following screenshot:
Windows MarketplaceToday, the only mechanism available for getting applications on Windows Phone 7 is through the Windows Marketplace. The marketplace is where all apps can be found. Developers can create new applications and sell them or give them away on this marketplace. This is good news for Independent Software Vendors (ISVs) looking to capitalize on Windows Phone 7.
Corporate clients must also put their applications through the marketplace. This is good in the sense that we get an extra team of professionals QA’ing our application. However, once it is available on the Marketplace, anyone can download the application. This is a troubling issue for many enterprises. Outside of the Windows Marketplace, the only way to get an application on the phone is through either Visual Studio 2010 or Blend 4. Although, this may make sense for developers and IT professionals when developing applications, it is very unlikely that corporate IT infrastructure would require all enterprise clients to install Visual Studio just to have a corporate application available.
www.it-ebooks.info

Chapter 1
[ 31 ]
Until an enterprise deployment mechanism is developed by Microsoft, the Windows Marketplace is the only way average end-users will get applications on their Windows Phone 7 devices. However, we can count on Microsoft to deliver such an enterprise deployment mechanism in the near future.
Getting apps on the phoneToday, to get an application running on the phone outside of the Windows Marketplace, we must have Windows Phone 7 Developer Tools installed. Included in these tools is an application named Windows Phone Developer Registration. This application asks us to login with our Windows Live ID and password that is associated with a valid App Hub account. This will unlock up to three devices and register them for development. The App Hub can be found at http://create.msdn.com
Also included with Windows Phone 7 Developer Tools is an application named Application Deployment. As the name implies, it is a very simple tool to install any application XAP to either a Windows Phone 7 device or the emulator.
Marketplace approval processThere are seven basic steps in the application approval process, which are as follows:
1. Application creation2. Application submission3. XAP File validation4. Adding metadata5. Certification testing6. Signing7. Windows Phone Marketplace
Microsoft uses automated tools to ensure that the application being submitted uses the functionality that we said it did when submitting for approval to the marketplace. For example, if we didn’t state that our application uses location based services and the automated tools discover that we are using GPS location information, then our application will fail the approval process. After the automated process, a human tester installs the application on a phone and tests the functionality on a real device. Anytime a problem is discovered, the developer is presented with a report describing the issues found.
www.it-ebooks.info

Introducing Windows Phone 7
[ 32 ]
Overall, the requirements are fairly straightforward:
• The application must be fully functional.• The application may not sell, link to, or promote mobile voice plans.• The application may not consist of, distribute, or link to alternative
marketplaces.• The applications must not jeopardize the security or functionality of the
device or marketplace.• Over the air install file may not exceed 20 MB; more than that will require
Wi-Fi or direct cable connection to a PC.• An application developer can decide to make a trial version of their
application available. When choosing to provide a trial version, the developer should make sure that the full paid application is well represented in the free trial. Some developers in the community have found that their application ratings are lowered by not having enough functionality in the trial version.
• All advertising in the application must comply with the Microsoft Advertising Creative Acceptance Policy Guide available at the following URL:
http://advertising.microsoft.com/creative-specs
This is a high level listing of the first seven requirements. Read the full guidelines for the full listing of what we can and cannot do in an application within the marketplace.
The full current Application Certification Requirements can be found in a PDF document at the following URL:http://go.microsoft.com/?linkid=9730558
www.it-ebooks.info

Chapter 1
[ 33 ]
SummaryThis chapter has been a brief overview of Windows Phone 7’s capabilities that are of interest to enterprises. It has focused mostly on the Office applications and a little on the Windows Marketplace. Office Mobile has had a long tradition of being a very capable set of tools for the enterprise knowledge worker and the 2010 version found on Windows Phone 7 is a great leap forward in this family. With great advancements in PowerPoint and OneNote, as well as the strong applications of Excel and Word, everything a business user should need for basic mobile device support is available at the touch of a button.
With Outlook Mobile, contacts, calendar events, and Exchange e-mail summary information is available within a single application and synthesized on a single tile. No more opening applications just to find out that there’s no new e-mail. Windows Phone 7 really does allow busy people to glance and move on with their day. Windows Phone 7 was designed around a consumer experience. Keeping the tenets of that consumer experience in mind, we can build applications to suit business needs. Those needs can be as far reaching as displaying lists and libraries from SharePoint in a browser to building a feed reader app to display the updated contents of a library. We could even build a dashboard containing information that would help us run our business with information about who is out of the office or how our projects are going.
In the next chapter, we will focus on Internet Explorer Mobile for Windows Phone 7. We will look at the changes that it provides from Internet Explorer for the desktop, and how we can code websites to take advantage of this browser. We’ll also look at how to code one site that targets two different environments.
www.it-ebooks.info

Getting Started with Internet Explorer Mobile
This chapter will be a brief overview of the web development process. It will begin with an overview of web page architecture. It will then discuss best practices for building web pages. Following that we will discuss how this relates to mobile web development. The chapter will finish up with an overview of mobile web development specific to Windows Phone 7.
At the end of the chapter, we will build a very simple web page. We will see how this simple page would be built for a desktop browser and then how we can optimize it for Windows Phone 7's Internet Explorer Mobile browser by crafting the content and adding a single extra CSS file.
This chapter will cover:
• Web page architecture• Internet Explorer Mobile• Mobile-friendly META tag settings• Building a simple web page enhanced for Internet Explorer Mobile
To get started with Internet Explorer Mobile let's look at basic web page architecture.
www.it-ebooks.info

Getting Started with Internet Explorer Mobile
[ 36 ]
Web page architectureWeb pages on the client side mainly consist of three vital components: HTML, CSS, and JavaScript. The exact version of each of these varies, but in the end it all comes down to these three pieces.
HyperText Markup Language (HTML)HyperText Markup Language (HTML) is the container for the page content. The page should contain just that content and nothing else. A properly coded site would leave the presentation and functionality portions of the page to CSS and JavaScript. In addition, the content should be constructed in a manner that makes logical sense for the content that is being delivered. This is called semantic HTML.
By using semantic HTML, the page content can be readily searchable by a wider range of devices, other than just a desktop browser. Although in this book, we will use this to our advantage to write pages that can be viewed in Windows Phone 7's Internet Explorer Mobile browser, it can also help search engines discover your site content, and assist people with disabilities in getting to your content.
People with disabilities use devices, such as a screen reader, to get the content of a site. These screen readers can only gather information from the actual markup of the site. If we have a PNG image with text in it, the screen reader cannot "see" that information. In that particular case, we can use the alt attribute of the image to provide a hint to the content, but it would be better to put the content inside a paragraph, unordered list, or some other textual tag and then replace it with an image if absolutely required using JavaScript.
The other case that was mentioned earlier was that search engines can better determine the contents of a web page with semantic markup. This will help our page rankings and hopefully drive more visitors to our site.
Think about the HTML markup like the script of a movie. Although we'll add lights, actors, and probably special effects later, right now the black and white text on paper has to convey all of the meaning. The same is true of the HTML markup for your site. As you build websites, constantly keep in mind what information you are trying to impart with the page and make that the focus.
www.it-ebooks.info

Chapter 2
[ 37 ]
Cascading Style Sheets (CSS)Cascading Style Sheets (CSS) are documents that describe the way HTML should be displayed. The CSS language allows the web developer to separate the design aspects (layout, colors, fonts, and so on) from the page content. One could easily change the entire look and feel of a page simply by replacing the CSS files. An amazing group of examples of this is available at http://csszengarden.com. The CSS Zen Garden website demonstrates the amazing power that CSS has on the presentation of HTML content. Utilizing a proper style sheet can result in content that will quickly display the relevant information that a Windows Phone 7 user has come to expect from the applications on the phone.
When developing websites that are going to be viewed on Internet Explorer Mobile, it is important to keep in mind some very important potential problems. Although float works great on desktop browsers and will work on many mobile browsers, the content within these containers may not look good on a small screen.
The CSS float attribute was one of the first tools that allowed web developers to break free from table based layouts, that is, laying out the contents of a page using tables. Float allowed developers to group content in div elements and then float those block elements into position. It is a very powerful tool, but on a mobile device, the limited screen size would hamper the ability for the user to view the content. Instead, they would be constantly scrolling left and right or up and down to find all the content.
A better way of handling this would be to utilize float on the desktop version of the site and then leave the div elements in block display allowing the IE Mobile browser to handle the content layout.
Along these same lines, the CSS attributes, padding and margin, work great for precise positioning of elements on a desktop browser. However, the limited screen real-estate of a Mobile browser limits the usefulness of this positioning power. Try to limit the use of these attributes on the mobile device and only use them to highlight useful information.
Finally, because pixels are absolute values, a pixel is a precise defined scale of measurement with no room for interpretation; the phone has to work more to display those elements that are positioned using pixel measurements. Using points, em, or percentage measurements instead, allow the phone to be more fluid with the layout.
Be sure to test the site on Windows Phone 7 devices to ensure the content is legible and the display is fine.
www.it-ebooks.info

Getting Started with Internet Explorer Mobile
[ 38 ]
JavaScriptJavaScript, otherwise known as ECMAScript, is the scripting language that is used to create dynamic user interfaces and allow a page to update "on the fly". Users have come to expect a certain fluidity to their web experiences, and now with the power of Internet Explorer Mobile for Windows Phone 7, they can have that same power in the palm of their hand.
Remember that the user is probably looking at a 3.5 inch screen, has fingers that are roughly 40-80 pixels square, and those fingers are incapable of registering a hover command to the browser. If your navigation, for example, requires the user to hover over something, this will not work in Internet Explorer Mobile. Instead, make the navigation an easy to use, unordered list of hyperlinks
Putting HTML, CSS, and JavaScript togetherWindows Phone 7 is about getting the relevant information viewable with minimal fuss. The following are some tips for creating a website for Windows Phone 7's Internet Explorer Mobile:
• Show only the content that is relevant for the page requested• Reduce the use of images and colors• Remove the extra-large hero images
° Hero images are those large images usually at the top of the main content section, but usually used as a graphic headline.
° Usually, they don't contain any content and only serve to enhance the design of the site.
• Rearrange the navigation to take up a minimum amount of space• Move the navigation to the bottom of the page if possible• Remove flashy loading screens
Utilizing HTML, CSS, and JavaScript with proper discipline will result in more satisfied customers.
www.it-ebooks.info

Chapter 2
[ 39 ]
Developing websites is not a trivial task. Mastering each of these three components is a great task. It is important, while developing websites, to try and minimize as much duplication as possible, not only in the JavaScript code that so many developers tended to focus on, but also in the CSS and the HTML content. Reducing duplication will allow for maintainable, upgradable, and understandable code.
Also, by reducing duplication, the amount of data sent to the browser is also reduced. This is helpful when dealing with a browser that is connecting from a patchy cellular network.
Historically, building a mobile version of a website meant a completely different team of designers and web developers built a totally separate web application from the desktop version of the site. Then, using the server side code, the mobile browsers were detected and redirected to the mobile version. SharePoint does this by redirecting mobile browsers to {server}/_layout/mobile/mblwiki.aspx?Url=%2FSitePages%2FHome%2Easpx as an example. This book will utilize the practice of building websites where the exact same site is used for both the desktop and the mobile browsers.
When starting a new web application, a general rule of thumb is to use content adaptation techniques for the application. However, for a baseline you must have at least:
• ECMAScript 3• W3C DOM Level 1• W3C standard box model support• CSS2 rendering• Client-side cookies support• XMLHttpRequest object support
By targeting this lowest common denominator of browser, we will ensure that our web applications will run well on most browsers on the web.
Remember that common practices on desktop browsers may end up being annoyances on a mobile device. Try not to open modal dialog boxes, or even open pop-ups. Opening a pop-up window will cause a whole new tab to appear. This may even close a tab that the user had previously opened if they already had six tabs open.
www.it-ebooks.info

Getting Started with Internet Explorer Mobile
[ 40 ]
When designing the user interaction for a website, always keep the user in mind. They are busy people coming to your website. Be kind to them. Give them the information they are looking for without hassle.
Internet Explorer MobileWindows Phone 7 comes with a new browser that is based on the rendering engine of Internet Explorer 7 and some JavaScript improvements from Internet Explorer 8. Additionally, it includes some enhancements that aren't found in either of those desktop browsers.
Internet Explorer Mobile User AgentThe Internet Explorer Mobile User Agent string is as follows:
Mozilla/4.0 (compatible; MSIE 7.0; Windows Phone OS 7.0; Trident/3.1; IEMobile/7.0; <DeviceManufacturer>; <DeviceModel>)
This UA String allows the device manufacturer to insert their name and the model of the phone in the string. Knowing the User Agent string is helpful when reviewing server logs to determine what browsers are coming to your website. This will help you optimize your site for the people who actually are viewing your content.
Like previous versions of Internet Explorer Mobile, the user can select either a Mobile version or a Desktop version display engine. When the Desktop version is selected, the User Agent string changes to the following:
Mozilla/4.0 (compatible; MSIE 7.0; Windows NT 6.1; XBLWP7; ZuneWP7)
Changing the display engine mode can be accomplished on the Internet Explorer SETTINGS screen, as shown in the following screenshot:
www.it-ebooks.info

Chapter 2
[ 41 ]
Although this choice could complicate things, as we develop our sites, we should make careful consideration of how we are going to treat the mobile version, but try not to detect the desktop version. If the user makes a conscious choice to view the desktop version, we should not force them to view something different from what they would see on a real desktop browser.
Client side browser detectionMany people use the user agent string to detect at runtime what to display on the browser. Although this works, there are better techniques to find out if the browser is mobile. Those techniques should be used instead of User Agent detection.
Using property detection instead of browser detection will allow your site to be forward compatible.
www.it-ebooks.info

Getting Started with Internet Explorer Mobile
[ 42 ]
Forward compatibility isn't a very complex idea. It is just thinking about programming so that as new browsers come along with new capabilities, we won't have to rewrite our applications to take advantage of these capabilities. The application just takes advantage of whatever functionality is available to it in whatever browser in which it is currently running. An example of property detection is as follows:
function hasAdvancedDOM() { // check for a feature that is known to be advanced if(document.getElementsByClassName) return true; return false}
Downloading the example code for this bookYou can download the example code files for all Packt books you have purchased from your account at http://www.PacktPub.com. If you purchased this book elsewhere, you can visit http://www.PacktPub.com/support and register to have the files e-mailed directly to you.
The preceding code simply detects if the DOM function document.getElementsByClassName() exists or not. Internet Explorer Mobile has this function, as does Firefox 2+, Safari, Chrome, and Internet Explorer 9. However, previous versions of Internet Explorer Mobile did not have this function. If we had this in a previous version of a website, we wouldn't have to do anything special to get this to work in Windows Phone 7's Internet Explorer Mobile. Although, the code we would actually write in a web page would be much more complicated, this example demonstrates a starting point.
Server-side detectionServer-side detection usually uses the User Agent string along with a large list of mobile device User Agent strings to determine the capabilities of the browsers requesting a page. This list of mobile devices and their capabilities are kept in a .browser file.
www.it-ebooks.info

Chapter 2
[ 43 ]
There are some projects on the web to keep and maintain this .browser file. The best known of these, "Mobile Device Browser File", available at http://mdbf.codeplex.com, lost funding from Microsoft. There is another one that can be found at http://aspnet.codeplex.com/releases/view/41420. We will look at modifying this code manually later in this chapter.
The main topic of this book is SharePoint 2010 development for Windows Phone 7. However, ASP.NET 3.5 SP1 is the framework that SharePoint 2010 development is based on. This framework has a smaller list of browsers in the .browser file than the more current ASP.NET 4. One of the omissions is IEMobile. What this means is that in ASP.NET 4, you can use the following code to detect a mobile browser:
Request.Browser.IsMobileDevice
This code will work in ASP.NET 3.5 SP1, but it will not return true for Windows Phone 7's Internet Explorer Mobile by default.
The simplest solution is to use code like this to detect the IE Mobile browser:
Request.UserAgent.ToString().Contains("IEMobile")
We could probably do better here. In the first place, we could update SharePoint's compat.browser file to include Windows Phone 7. The compat.browser can be found here: <drive>:\inetpub\wwwroot\wss\VirtualDirectories\<site>80\App_Browsers\compat.browser
The structure of this file can be found at the following URL:
http://msdn.microsoft.com/en-us/library/ms228122.aspx
If you look at SharePoint's compat.browser file, the fourth browser listed looks like it might be for the Windows Phone 7 Internet Explorer Mobile. However, a closer examination will show that this browser is actually for the Office Hub in Windows Phone 7. To add the Internet Explorer Mobile browser, copy the browser elements for Internet Explorer Mobile for Windows Mobile 6.5 and edit it like this:
<browser id="IE7MobileDesktopMode" parentID="IE6to9"> <identification> <userAgent match="XBLWP7" /> </identification> <capabilities> <capability name="supportsTouchScreen" value="true" /> </capabilities></browser><browser id=”IE7MobileMobileMode” parentID=”Mozilla”> <identification>
www.it-ebooks.info

Getting Started with Internet Explorer Mobile
[ 44 ]
<userAgent match="(?i)Windows Mobile OS\s7\.\d.*IEMobile/(?'version'\d+)\.(?'minor'\d+)" /> </identification> <capabilities> <capability name="browser" value="IE Mobile" /> <capability name="canInitiateVoiceCall" value="true" /> <capability name="isMobileDevice" value="true" /> <capability name="javascript" value="true" /> <capability name="optimumPageWeight" value="1500" /> <capability name="tables" value="true" /> <capability name="version" value="${version}" /> <capability name="supportsTouchScreen" value="true" /> </capabilities></browser>
This will make our code easier to manage later by allowing us to use the Request.Browser.IsMobileDevice property.
The change here, besides changing the browser ID, is in the regular expression which is used to detect the browser. In the desktop mode, we look for the text, XBLWP7, as this is a very obvious change in the User Agent in this state. For the mobile mode, we copied the IE Mobile 6 plus browser section. Microsoft changed the User Agent slightly between IE Mobile 6 and IE Mobile 7. The change comes in the User Agent, IE Mobile 7 doesn't have a space between the browser name IEMobile and the start of the version number. Instead, it has a forward slash. IE Mobile 6 had a space between the browser name and the version number.
XHTML Mobile ProfileXHTML Mobile Profile (XHTML MP) is a standard designed specifically for mobile phones created by the Open Mobile Alliance. It is derived from XHTML, which itself is a well formed XML version of HTML.
Internet Explorer Mobile will render pages with the extension of xhtml. The desktop version of the browser opens the Save As dialog when a page with that extension is hit. In addition, Internet Explorer Mobile will automatically switch to a mobile friendly view state attempting to automatically adjust the width of the content to fit into a 320 pixel wide viewport.
www.it-ebooks.info

Chapter 2
[ 45 ]
Enhancing JavaScript in Internet Explorer MobileMany people writing their first Windows Phone 7 web application want to figure out how to do screen rotation. It sounds silly, but the browser does not handle it automatically in the emulator. When a user rotates the phone from portrait to landscape (or visa versa), the browser fires an onresize event. To handle the rotation, connect a function to this event and deduce from the difference between the screen.width and screen.height properties if it is in portrait or landscape.
However, on actual phones, the rotation in Internet Explorer Mobile happens automatically. When we rotate the phone, the viewport is automatically stretched to the new width and the address bar moved to the top of the screen. If we want our page to resize on a rotation, we still need to listen to the onresize event.
www.it-ebooks.info

Getting Started with Internet Explorer Mobile
[ 46 ]
JavaScript enhancements include the following three querying functions that should speed up most applications:
getElementsByClassName(name)querySelector(selector)querySelectorAll(selector)
The first is getElementsByClassName(name). This function, in previous versions of Internet Explorer, required one to navigate recursively though the entire DOM tree to find all elements that had the class name specified and return them in an array of elements. The code for this was incredibly slow, but with a native built-in version of this function, it runs amazingly quickly.
The next two querying functions that have been added are almost identical to one other. The first returns the first element in the DOM tree that it finds, and the second returns all elements with the selector pattern specified.
Those functions are querySelector(selector) and querySelectorAll(selector). These functions take a selector (a group of tags, IDs, and classes in a string that looks like a CSS selector) and find matches in the DOM.
CSS enhancementsTo view an element close up, a user can double tap on the element. This will cause the browser to zoom into that element until the width of the content box fits the device screen width. When this happens the developer can specify in CSS how they want to adjust the text size. That is where the –ms-text-size-adjust property comes in value. Using this property, we can increase the font by a predetermined percentage, automatic adjustment, or turn off text size adjustment.
This CSS property is not used in layout when the viewport META tag is present.
Although this isn't an enhancement, it should be noted that fixed positioning acts differently in Internet Explorer Mobile than it does on desktop browsers. On the desktop a fixed position element is fixed to the viewport. That means if something were fixed to the bottom right, it would appear in the bottom right of the browser window, but would always be visible. In Internet Explorer Mobile, this same element is positioned to the bottom right of the document. The user may not see it immediately and have to scroll to the bottom right of the page to actually see it.
www.it-ebooks.info

Chapter 2
[ 47 ]
Available fontsInternet Explorer Mobile for Windows Phone 7 supports the following 13 fonts:
• Arial• Arial Black• Calibri• Comic Sans MS• Courier New• Georgia • Lucinda Sans Unicode• Segoe WP• Times New Roman• Trebuchet MS• Verdana• Tahoma• Webdings
Internet Explorer Mobile does not support downloadable fonts. As websites are developed, designers need to ensure they utilize fonts that are available on the targeted browsers. If the font specified is not available, ensure that a fall-back font is listed in the CSS or provide an image replacement.
Just remember that image replacements are not SEO friendly by default, so be sure to add an alt parameter to the image element.
There is something to be said about the Webdings font. Do not dismiss it as a font that is of no real value. Instead, look at the iconography listed in there. A useful glyph in a large font could be used in place of an image. The full set of audio or video player controls are listed in there, as is the Mona Lisa.
www.it-ebooks.info

Getting Started with Internet Explorer Mobile
[ 48 ]
PluginsOne of the most common questions asked about Internet Explorer Mobile for Windows Phone 7 seems to be, "Does it support Silverlight?" Although the programming model for building Windows Phone 7 apps is Silverlight, these apps are considered out of browser applications. You cannot run Silverlight applications inside the Internet Explorer Mobile browser. Apart from Silverlight, Internet Explorer Mobile for Windows Phone 7 does not currently allow or install third-party plugins, such as Adobe Flash.
This means that sites that require Flash or Silverlight to run will not display correctly. As web developers, we should always be mindful of fall-back solutions to these problems. The fall back can be as simple as a graphic replacement for the Flash or Silverlight piece.
HTML5Most of the Smartphones available today have browser support for HTML5 features, including extended ECMAScript 5 support, as well as CSS3, and new HTML elements such as video, audio, and canvas. One of the really nice features this brings to those phones is the ability to specify the software input panel for input elements in form fields. That is, we can specify that an input field is supposed to be for a telephone number like this:
<input type="tel" id="phoneNumber" />
When we do that, the software input field displays a number pad instead of the QWERTY keyboard.
As Internet Explorer Mobile for Windows Phone 7 was based on Internet Explorer 7 with a few enhancements from Internet Explorer 8, these HTML5 features are not available on the phone today. Microsoft has announced that, in a major update slated for late 2011 or early 2012, the browser included with the phone will be replaced with Internet Explorer 9. At that time, all of these rich HTML5 features will be available right on the phone. This will allow us to write rich web experiences that will work the same on a desktop, a laptop, and our Windows Phone 7 device.
Mobile-friendly META tag settingsBy default, Internet Explorer Mobile will attempt to display the entire width of the web page in the full viewable area of the screen. This results in an unreadable web page, meaning the first thing the viewer must do is a pinch zoom to scale the display enough to read the content.
www.it-ebooks.info

Chapter 2
[ 49 ]
This is a less than desirable user experience. Over the years, three main META tags have been used to identify a page as being "mobile friendly". All three of these META tags also indicate to search engines that the page has been designed with mobile browsers in mind. This may give your page an advantage in page ranking when someone is searching for your content from a mobile device.
META tags are HTML elements that are inserted into the head of a web page. The three META tags described here all provide information to the browser about how to display the page content.
www.it-ebooks.info
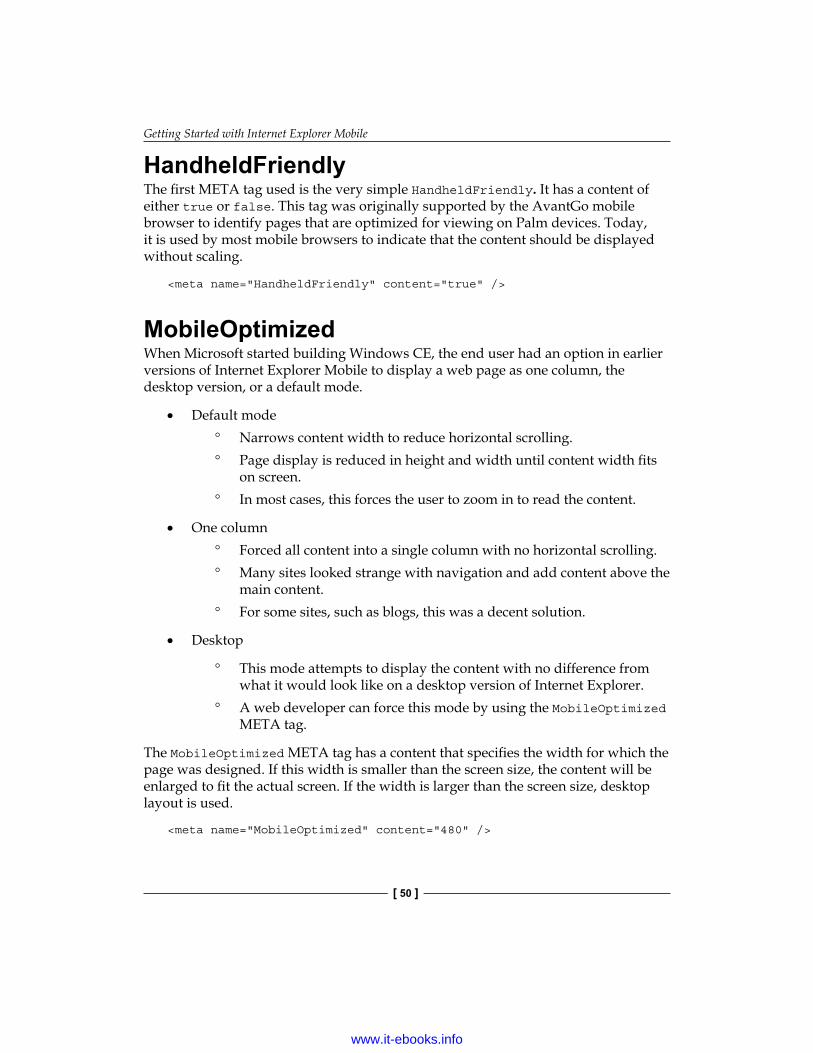
Getting Started with Internet Explorer Mobile
[ 50 ]
HandheldFriendlyThe first META tag used is the very simple HandheldFriendly. It has a content of either true or false. This tag was originally supported by the AvantGo mobile browser to identify pages that are optimized for viewing on Palm devices. Today, it is used by most mobile browsers to indicate that the content should be displayed without scaling.
<meta name="HandheldFriendly" content="true" />
MobileOptimizedWhen Microsoft started building Windows CE, the end user had an option in earlier versions of Internet Explorer Mobile to display a web page as one column, the desktop version, or a default mode.
• Default mode° Narrows content width to reduce horizontal scrolling.° Page display is reduced in height and width until content width fits
on screen.° In most cases, this forces the user to zoom in to read the content.
• One column° Forced all content into a single column with no horizontal scrolling.° Many sites looked strange with navigation and add content above the
main content.° For some sites, such as blogs, this was a decent solution.
• Desktop
° This mode attempts to display the content with no difference from what it would look like on a desktop version of Internet Explorer.
° A web developer can force this mode by using the MobileOptimized META tag.
The MobileOptimized META tag has a content that specifies the width for which the page was designed. If this width is smaller than the screen size, the content will be enlarged to fit the actual screen. If the width is larger than the screen size, desktop layout is used.
<meta name="MobileOptimized" content="480" />
www.it-ebooks.info

Chapter 2
[ 51 ]
Windows Phone 7 devices have a screen resolution of 480x800. If we use this META tag to specify the width of the content to force a desktop layout, it is suggested using one half of the actual website design width.
For example, if we use the fairly standard 960 pixel width, use a MobileOptimized META tag with content of 480 as displayed in the preceding code. This will result in about a 50% zoom on the content, which is still readable in most cases.
ViewportThe viewport is a rectangular area where the browser lays out the content of the web page. This is a fairly easy concept to grasp on a desktop because the viewport is the same as the area inside the chrome of the browser. On a mobile device however, the viewport can be larger than the visible screen.
For Internet Explorer Mobile, the default viewport has a width of 1024 pixels. That means that IE Mobile will lay the page out the same, as if your screen was 1024 pixels wide by default. You can modify this by specifying a width in the same way that the MobileOptimized META tag specifies the width:
<meta name="viewport" content="width=480" />
The flexibility of this META tag is taken advantage of by most modern Smartphone browsers. Though, there are many properties we can set on this META tag, Internet Explorer Mobile supports the following:
• width: Sets the horizontal size of the viewport. This value can be from 320 to 10,000 with 320 as the default setting.
• height: The vertical analogue of the width property which can be set anywhere from 480 to 10,000.
• user-scalable: A binary value with valid settings of yes and no. This value indicates to the browser if the user is able to zoom in and out of the content.
Each of these properties is separated by a comma in the content value of the META tag. A complete example is as follows:
<meta name="viewport" content="width=480, height=800, user-scalable=yes" />
www.it-ebooks.info

Getting Started with Internet Explorer Mobile
[ 52 ]
There are other properties that can be set on the viewport META tag. Those are minimum-scale, maximum-scale, and initial-scale.Also, width and height can use a special value of device-width and device-height, respectively, to set the actual pixel width and height of the device.However, the Internet Explorer Mobile team discovered that by letting device-width be the actual device width (480px) a lot of websites broke. That is to say, they didn't look very good. The IE Mobile team decided that to preserve compatibility with existing mobile websites the special value of device-width for Internet Explorer Mobile for Windows Phone 7 would return the value of 320px.
Though, it doesn't matter in what order these META tags are placed on the page to Internet Explorer Mobile, viewport takes precedence over MobileOptimized, which in turn takes precedence over HandheldFriendly. For full compatibility with the full range of mobile browsers on the market, one should take care to put these tags in the order of precedence from lowest to highest, HandheldFriendly then MobileOptimized, and finally Viewport.
Building a simple web page—enhanced for Internet Explorer MobileAll this theory and we do not have anything to look at for examples. To demonstrate what we have discussed in this chapter, we will write a very simple support home page for a fictitious consultant company. For brevity and to ensure that we can discuss the topics covered in this chapter, this page will not be served from SharePoint. It will be an ASP.NET Web Forms page. Let us dive in with a look at the HTML and CSS for the basic page.
Support.aspxThe following is the code for support.aspx. As you can see, it is fairly generic, and a real page would have a lot more content and imagery.
First, let's look at the page head:
<%@ Page Language="C#" %><!DOCTYPE html PUBLIC "-//W3C//DTD XHTML 1.0 Transitional//EN" "http://www.w3.org/TR/xhtml1/DTD/xhtml1-transitional.dtd"><html xmlns="http://www.w3.org/1999/xhtml"><head lang="en" xml:lang="en-us">
www.it-ebooks.info

Chapter 2
[ 53 ]
<meta http-equiv="X-UA-Compatible" content="IE=edge" /> <title>Support Center</title> <meta name="description" content="" /> <meta name="author" content="Todd Spatafore" /> <meta name="viewport" content="width=480" /> <link rel="Stylesheet" href="style.css?v=1" />
<% if (Request.Browser.IsMobileDevice) { %> <link rel="stylesheet" href="mobile.css?v=1" /> <% } %>
</head>
Like any other web page, this code has the head and body. To the head we have added the meta tag for X-UA-Compatible with a content of IE=edge. This will force IE to run in the most current version of the rendering engine it has available. This setting of edge will ensure that future versions of IE will render using the newest rendering engine. This may not be what we want though. We might want to specify IE=8, since we have only tested our site on Internet Explorer 8; when Internet Explorer 9 comes out, our site may not function properly. In this case though, we'll leave the rendering engine setting to edge.
Also in the head, we set the meta tag as viewport. The value we pick here is width=480. Although we may have used a value of width=device-width for a more generic site, we are specifically targeting Internet Explorer Mobile for Windows Phone 7 in this example and we want to take advantage of the full definition of the screen.
Finally, in the head, we add links to our cascading style sheets. Style sheets get cached fairly easily by browsers. This causes problems when building a site. Besides constantly flushing the browser cache, another way to ensure that we load the most current version of the style sheet is to add a query string value to the request.
Although the query string doesn't mean anything to our server, it is an indication to the requesting browser that the cached version doesn't match and it has to make the actual request to the server.
www.it-ebooks.info

Getting Started with Internet Explorer Mobile
[ 54 ]
The second style sheet added is for mobile specific styles. Windows Phone 7's Internet Explorer Mobile will not load the mobile style sheet if the media type is set to handheld. Instead we use the code Request.Browser.IsMobileDevice on the server side to decide if we should put the style sheet link in the page or not. Although this can be done on the client side using JavaScript, it seems a shame to send all that extra code down the cellular network and make the browser spend even a few milliseconds deciding if the style sheet is needed. In the case of mobile browsers, server side processing can sometimes provide a much better user experience.
<body> <div id="container"> <div id="header"> Lala </div> <div id=”main”> <div id=”mainContent”> <h1>Lala Consulting Customer Support</h1> <p>Lala Consulting is proud to offer a series of programs to inform our customers about all of the services we provide. Currently we have two ongoing programs: In Your Shoes Support Program and Lala University.</p>
Next, we introduce the opening body tag and set up the various containers in our page. All content will live within a div with an ID of container. Next, we have the page header followed by the start of the main content section.
The main content section has a page title in an h1 tag. These header tags are important for search engine optimization, as well as for letting your readers know what's on the page. This title is followed by an introductory paragraph.
<div class="article"> <h4>In Your Shoes Support</h4> <p>The In Your Shoes Support Program offers monthly webinars, a Quarterly Newsletter and an annual Lala Customer Conference</p> </div> <div class="article"> <h4>Lala University</h4> <p>Lala University provides Employees, Distributors, and Partners with access to the most current information available. Classes are taught either on-site or at a convention center. Class size can range from 5 to 500.</p> </div> <div class="article"> <h4>Customer Conference 2010</h4>
www.it-ebooks.info

Chapter 2
[ 55 ]
<p>Lala is excited to announce the 3rd Annual Lala Customer Conference will be held this June at a location to be determined.</p> </div> </div>
The main content continues with three articles. Each article has a title and a paragraph of explanation.
<div id="sidebar"> <ul id="mainNavigation"> <li><a href="about.aspx">About</a></li> <li><a href="services.aspx">Products & Services</a></li> <li><a href="careers.aspx">Careers</a></li> <li><a class="navOn" href="support.aspx">Customer Support</a></li> </ul> </div> </div>
Next, we have the sidebar that contains the main navigation for the site. The navigation is a simple unordered list. This will make it really easy for us to style for both the desktop and for Windows Phone 7.
<div id="footer"> © Copyright 2010 <a href="copyright.aspx">Lala Consulting</a> </div> </div></body></html>
Finally, we end the page with a footer containing the copyright information and close out the rest of our tags.
This page is just your typical two column fixed width page with a header and a footer. There's nothing really special here. It's just the content of the site, and that's the point here. Your content shouldn't be different just because you have a desktop version of the site and a mobile version of the site.
Thought went into the order of content though. The main content of the page is more important than the main navigation; because of that, the main content appears before the sidebar containing the main navigation code. However, as you'll see, on the desktop they are rendered side by side with the navigation on the left.
www.it-ebooks.info

Getting Started with Internet Explorer Mobile
[ 56 ]
Style.cssThe following is the code for style.css. This code represents your typical cascading style sheet. Some people prefer to have a separate reset file that contains every element under the sun and they reset it to some pre-defined baseline. I prefer to reset only the values I actually use in the page.
Beyond the reset, the next interesting thing to point out is the use of points for font-size. This ensures that when the text is resized in the mobile browser it scales well.
html, body, div, h1, h4, p, ul, li , a{ margin:0; padding:0; border:0; vertical-align:baseline; background:transparent; }
We start the main style sheet with a bit of code to standardize all of the elements we use in the site:
body { font:10pt sans-serif; line-height:1.22; background-color: #CEC7C6; }
#container { margin: 0 auto; width: 960px; }
#header { font-size: 5em; background-color: #9CB6D6; width: 100%; text-align: right; }
#main {
www.it-ebooks.info

Chapter 2
[ 57 ]
width: 100%; height: auto !important; min-height: 400px; background-color: #94927B; }
Next, we specify some styles for the page as a whole, the header and the main content area:
#mainContent { float: right; width: 840px; }
#mainContent h1 { font-size: 2.0em; margin: 20px 10px 20px 10px; color: #D8D8D8; }
#mainContent h4 { font-size: 1.3em; text-transform: capitalize; color: #D8D8D8; margin: 10px; }
#mainContent p { font-size: 1.0em; color: White; margin: 10px; }
Next, we specify that the main content area has a width of 840px and floats to the right. We specify some styles for the h1, h4, and p tags to give them the style we are looking for on this site:
#sidebar { float: left; width: 120px;
www.it-ebooks.info
Getting Started with Internet Explorer Mobile
[ 58 ]
background-color: #F7E7BD; height: auto !important; min-height: 400px; font-size: 0.8em; }
#sidebar ul { margin: 0; padding: 20px 0 0 15px; list-style: none; }
#sidebar ul li a.navOn { color: Red;}
We then specify the sidebar style information. The sidebar floats to the left and is 120px wide. Also, the unordered list for our navigation elements is set to not have a list style:
#footer { clear:both; background-color: #B59A73; padding: 20px 0 0 20px; }
.article { display: inline; width: 400px; float: left; }
Finally, we specify that the footer should be clear of either the main content area or the sidebar. This ensures that it will be below both of those. Also, we specify that the articles are displayed inline. They will flow from left to right until there's no more room and then break to a new line.
This CSS is fairly standard; there is no need to have wild style sheets for every version of Internet Explorer. This is especially true if we develop on Internet Explorer and then test the site and tweak for other desktop browsers.
www.it-ebooks.info

Chapter 2
[ 59 ]
Mobile.cssProperly built CSS for the desktop version of the site will lend itself to ensuring the CSS for our mobile version is small. In the following code for mobile.css only those selectors that need to be overridden are specified:
#container { width: 100%; }
#mainContent { width: 100%; }
#mainContent p { width: 100%; font-size: 1.2em; }
#sidebar { float: none; width: 100%; background-color: #F7E7BD; height: auto !important; min-height: 40pt; font-size: 1.2em; }
#sidebar ul { width: 100%; padding: 5pt 0; }
#sidebar ul li { display: inline; float: left; padding: 0 10pt; }#sidebar ul li a.navOn
www.it-ebooks.info

Getting Started with Internet Explorer Mobile
[ 60 ]
{ color: Blue; }
.article { display: block; float: none; }
An important thing to notice here is the measure of units used. Purposely, avoid using absolute measurements, such as pixels. This will allow the Windows Phone 7 browser to resize the content in a way that will be more to the satisfaction of the user.
Desktop viewThe following screenshot shows what the support.aspx page looks like in Internet Explorer 8:
www.it-ebooks.info

Chapter 2
[ 61 ]
Notice that for this example, we've gone truly barebones. The site doesn't have any images or backgrounds that we'd put in a real website. The navigation is simple and appears on the left side of the main content. The links are small and close together. This stops the eye from being drawn to the navigation, and instead puts the visual emphasis on the main site's content.
Although this isn't a real website, the code provides enough of the core concepts needed to get started with building out the mobile version of the site.
Windows Phone 7 viewIt is important enough to keep repeating; the purpose of a version of a website for Windows Phone 7's Internet Explorer Mobile is to get the relevant information in front of the user quickly and without any fluff. A mobile user is on the go and shouldn't have to wade through menus and scroll a thousand times just to get to the main page content. For that reason, I've kept this example really simple. One thing to note is that we could easily add some JavaScript like this:
<script type="text/javascript"> function toggle(me) { var content = me.srcElement.nextSibling; if (content.style.display === "none") content.style.display = "block"; else content.style.display = "none"; } var articles; if (document.getElementsByClassName) articles = document.getElementsByClassName("article"); else articles = document.getElementById("mainContent") .getElementsByTagName("div"); for (var i = 0; i < articles.length; i++) { if (articles[i].childNodes[0].addEventListener) articles[i].childNodes[0].addEventListener ("click", toggle, false); else articles[i].childNodes[0].attachEvent("onclick", toggle); articles[i].childNodes[1].style.display = "none";
}</script>
www.it-ebooks.info

Getting Started with Internet Explorer Mobile
[ 62 ]
This would go through and find all elements in the page with a class name of article and then toggle the visibility of the paragraph based on a click of the title. This also demonstrates the use of testing for functionality rather than for specific browsers. IE8 doesn't have the function document.getElementsByClassName, but Internet Explorer Mobile does have it.
Also, the way events are attached to Internet Explorer differs from the way that other browsers handle this. It takes a little bit of code to ensure functionality is the same for many browsers, but it is a lot less code than trying to figure out all the different browsers that could potentially have each feature.
Although this is a neat thought experiment, it should be noted that something like this should only be done when the number of items on the page would benefit from collapsing content. The following screenshot shows the Windows 7 phone view of the support.aspx page:
www.it-ebooks.info

Chapter 2
[ 63 ]
This has been just a simple example of what can be done with common content and a couple of CSS files. Although this chapter has focused on web pages that are not connected to SharePoint, all of the information presented within will help when we turn our attention to SharePoint for the rest of this book.
SummaryIn this chapter, you learned the basics of web page architecture. This architecture consists of finely crafted HTML, CSS, and JavaScript. Using these three elements can result in pages that are mature and flexible enough to provide a display on both a desktop and a mobile device.
Internet Explorer Mobile for Windows Phone 7 was introduced. As were the new features of JavaScript, including the following:
• document.getElementsByClassName • querySelector(selector)
• querySelectorAll(selector)
These new improvements will enhance the speed of DOM manipulation of which many common programs take advantage.
Next the new CSS property: –ms-text-size-adjust was described and shown to not be used when the viewport meta tag is used.
Finally, the META tags used in handheld devices were described and how to utilize them in websites. These META tags are as follows:
• HandheldFriendly
• MobileOptimized
• Viewport
Of the three, Viewport is the most flexible and popular today.
We put all of this together into a simple sample page that demonstrated how a simple page built for a desktop browser could be transformed to display relevant information to a client in Internet Explorer Mobile. This application showed the desktop rendering, as well as the mobile rendering. It used server side browser detection to decide if the IEMobile version of the CSS should be displayed. It also showed how to lay out the content, so that the important information is at the top of the page and the less important information is located at the bottom.
www.it-ebooks.info

Getting Started with Internet Explorer Mobile
[ 64 ]
In the next chapter, we will start down the path of SharePoint 2010 by looking at SharePoint sites. We will investigate the larger picture of SharePoint, how it is structured and how to set up our development environment. Finally, we'll look at building a sample SharePoint site template and use it to create a new site.
www.it-ebooks.info

Enhancing SharePoint Sites for Windows Phone 7
SharePoint is a very diverse tool. It is important that it is implemented correctly, and figuring out that implementation will keep developers busy for years. Implementing SharePoint is more than just running the setup from a DVD. Thought and care needs to go into deciding what the organization needs and what parts of SharePoint should be exposed. This is the discussion with which we will begin this chapter.
After discussing why we customize SharePoint sites, we will discuss SharePoint itself. We will review the terminology of various components that make up SharePoint. We will compare SharePoint to ASP.NET and IIS.
Next, we will review the development environment and how to set up SharePoint. We will discuss the various options for setting up all the tools that will be needed for developing SharePoint and Windows Phone 7.
Finally, we will investigate how to use Visual Studio 2010 to customize a SharePoint site and then package that site as a template for use in the future. The customizations that we make will be specific to Windows Phone 7. The changes we make to sites will build from the information found in the preceding chapter and be applied to a site template in SharePoint. The topics we will cover in this chapter include the following:
• Why do we customize SharePoint sites?• Sites, collections, webs, and web applications• The SharePoint development environment• Summary of site templates• How to build a custom site
So, let's start this chapter with a discussion of why we customize SharePoint sites.
www.it-ebooks.info

Enhancing SharePoint Sites for Windows Phone 7
[ 66 ]
Why do we customize SharePoint sites?When most people think of SharePoint, they usually think of the default Team Site that is created for them when SharePoint is installed. Most of the implementations that we generally see are nothing more than some IT administrator walking up to a Windows Server and installing SharePoint with default settings for everything. This led to a very negative user experience and countless end users are now averse to ever using SharePoint for anything.
The truth of the matter is that if we take the time to find out what the actual needs of the organization are, we can customize a SharePoint instance to suit the needs of the user. Many people are shocked to learn all the amazing things that SharePoint can do. As stated earlier, this shock is due to people previously using a poorly implemented SharePoint site.
www.it-ebooks.info

Chapter 3
[ 67 ]
This book focuses only on the customization of SharePoint to meet the needs of someone using a Windows Phone 7 device, but many of the ideas can be brought forward into any SharePoint installation.
This chapter focuses on customizing a SharePoint site and packaging it into a template to be used again and again. Please use this knowledge responsibly. If our custom template is perfect for a group in marketing, it probably won't do much more than the default Team Site for a sales team. Use the right template for the job at hand.
One size does not fit all in SharePoint. SharePoint is a very powerful platform that can build just about any application imaginable. Just be sure that the application fits the needs of the user.
Sites, collections, webs, and web applicationsAt its core, SharePoint is a software layer on top of ASP.NET and SQL Server. Although there is a lot more to it, this book isn't designed to be a full intensive developer's guide to SharePoint. Learning SharePoint for Windows Phone 7 will be very easy if we keep in mind that we are actually developing ASP.NET 3.5 SP1 sites and have access to a very rich and easy to understand API for SharePoint.
With IIS 7 and ASP.NET sites, you can have multiple application pools. An application pool consists of a worker process that runs one or more websites. The worker process also has the credentials under which the websites run on the computer. Having multiple application pools in a system allows us to separate applications so that one application won't crash another in the event of a failure.
www.it-ebooks.info

Enhancing SharePoint Sites for Windows Phone 7
[ 68 ]
As stated earlier, each application pool can have multiple websites. Each website is mapped to one or more URLs and is the root for where the development begins for most web applications. The website is the container for all content, both static and dynamic. Within each of these websites, you can have folders as well as virtual directories. Virtual directories are a path name mapped to a physical folder either on the local computer or a remote server. The path name then becomes part of the URL when loading pages from the virtual directory. The path doesn't need to have the same name as the physical directory.
When a person views the website, the pages they see are most likely comprised of many parts like master pages, ASP.NET web forms, and ASP.NET server controls. These parts come together and form the view. These are very powerful tools in a web developer's belt, but when they are not managed properly, they can be difficult to maintain. SharePoint builds on the ASP.NET parts and introduces ideas to help structure sites, so that they are more maintainable.
In SharePoint, we have web applications which can be thought of as the equivalent of IIS Application Pools. Inside each web application, we can have one or more SharePoint site collections. You can think of a SharePoint site collection as an IIS website. Inside each SharePoint site collection is one or more SharePoint sites. These SharePoint sites can be thought of as a virtual directory.
For an introduction to working with IIS, please visit the following website:http://learn.iis.net/
This is where it may get confusing, if you are thinking of site collections as a website. Each site collection has a default SharePoint site named the root. We cannot have a useful site collection without the root site. An empty site collection is as useful as an empty IIS website. Every website in IIS has a single root virtual directory. SharePoint has that same layout. Every site collection has a root site.
www.it-ebooks.info

Chapter 3
[ 69 ]
In ASP.NET, a website has one root virtual directory. That root virtual directory can have folders and additional virtual directories. In SharePoint, a site collection has one root site. The site collection's root site can contain SharePoint webs and SharePoint sites. In this way, a SharePoint web can be thought of as a plain folder from ASP.NET. A SharePoint web is a container for SharePoint lists and libraries, which we will discuss in greater detail in Chapter 4, Building SharePoint Pages for Windows Phone 7.
That leads us to the top of the SharePoint stack. In ASP.NET Web Forms the thing that the browser requests from IIS is a page. In SharePoint the thing that the browser gets from SharePoint is a view of data. This data is contained within an ASP.NET page that lives within the SharePoint context.
The easiest way to think of SharePoint data is in terms of lists and libraries, and what we display to the user is some combination of this data. We combine the lists and library data into ASP.NET web pages and that is what we show to our users.
Content hierarchyAs was mentioned earlier in this chapter, content in SharePoint can be thought of as either lists of data or libraries of documents. In this section, we'll look at the content hierarchy which comprises the lists of data.
Up to now what we have looked at is how IIS is configured to handle SharePoint sites. The previous section took us to the level of SharePoint webs. The content within a SharePoint web is contained in lists. Think of lists in the same way you'd look at a spreadsheet. Spreadsheets have columns and rows. In SharePoint Lists, the columns are called list items and the rows in the column are called fields.
www.it-ebooks.info

Enhancing SharePoint Sites for Windows Phone 7
[ 70 ]
One of the many things that you can do with SharePoint is to open lists in different applications. Microsoft Office has different hooks for opening data for editing in applications, such as Word and Excel. This imagining of the SharePoint list data as an Excel spreadsheet is clearer when you can click on a button on a list and open it in Excel to edit the data.
The hierarchy of the content programming classes is as follows:
We will cover lists and their contents in greater detail in the next chapter.
Physical objects hierarchyThe other content type in SharePoint is libraries. Libraries are easiest to think of as folders and files on a disk. Although this works conceptually, in reality the objects are still stored in the SharePoint database. In the previous section, we imagined lists as an Excel spreadsheet, but you can store a real Excel spreadsheet document as a SharePoint file. It will be stored in a cell of the SharePoint database and appear in the document library.
The hierarchy of physical objects programming classes is as follows:
• SPFarm° SPServer
° SPFolder° SPFile
As with lists, we will dive deeper into physical objects in the next chapter.
Services hierarchyThere is one last hierarchy that will be discussed in Chapter 6 and it is the services hierarchy. This hierarchy includes classes that represent various services available for use in SharePoint. This hierarchy includes classes that represent the various web and Windows OS services available for use in SharePoint.
www.it-ebooks.info

Chapter 3
[ 71 ]
SharePoint development environmentMicrosoft spent a great deal of time during the release of Visual Studio 2010 and SharePoint 2010 creating first class tools, which integrate well and ensure that the build debug release cycle is as frictionless as possible. What this means for developers is that we have a single centralized location for SharePoint development.
When installing Visual Studio 2010, the default option is the Full Install. This installation option includes everything that you need to develop everything from Windows Applications in C++ to MVC Web Applications in C#. If you choose to install Visual Studio 2010 using the Custom installation option, be sure that the option for Microsoft SharePoint Developer Tools is checked (as shown in the following screenshot). This option gives you the tools to create, customize, and extend SharePoint sites.
Although SharePoint can now be installed on Windows Vista SP1 and Windows 7 for development, most professional SharePoint developers strongly recommend not doing so. The main reason, and a truly valid one, is that when developing for SharePoint we will want to have a development environment that matches the production environment. If the production environment is two frontend web servers and one database server, we should duplicate this environment in our development environment.
www.it-ebooks.info

Enhancing SharePoint Sites for Windows Phone 7
[ 72 ]
However, this book focuses on the development of SharePoint websites for Windows Phone 7. Today, the Windows Phone 7 developer tools will not install on Windows Server 2008. Also, the Windows Phone 7 emulator will not run within a Hyper-V guest operating system. As a result of this, for this one aspect of SharePoint development running a Windows Vista SP1 or Windows 7, development environment is a good idea.
Instructions for installing SharePoint on Windows Vista SP1 or Windows 7 can be found at the following URL:http://msdn.microsoft.com/en-us/library/ee554869(office.14).aspx
The basic steps for installing the development environment are as follows:
1. Install Windows Vista SP1 x64 or Windows 7 x642. Install the Prerequisites for SharePoint 20103. Install SharePoint 20104. Install Visual Studio 2010 Professional or higher5. Install the Microsoft SharePoint 2010 SDK6. Install the Microsoft Windows Phone 7 Developer Tools
After installing SharePoint 2010 SDK, a new folder will appear in the Microsoft SDKs folder of the Start menu. This folder contains an HTML Welcome Guide, as well as a compiled help file containing the SDK Documentation. This documentation is very valuable to new developers in SharePoint.
The Windows Phone 7 Developer Tools will install the Windows Phone 7 emulator. Starting up the emulator will show only Internet Explorer Mobile installed on the phone. This book, with the exception of Chapter 1, was written using this emulator. There may be some differences between the emulator and the actual phones and as such, be sure to test all the sites developed with actual devices.
Chapters 3, 4, 5, and 6 will use this single server setup, but Chapter 7 will require using an authentication mechanism that doesn't work in Windows 7. For Chapter 7, having a separate Windows Server 2008 R2 development environment with SharePoint 2010 installed will be required. Having this setup will also help in these early chapters too, but remember that the Windows Phone 7 development tools will not run on Windows Server.
www.it-ebooks.info

Chapter 3
[ 73 ]
Visual Studio 2010 SharePoint project typesVisual Studio 2010 has the following 12 built-in projects for working with SharePoint 2010 sites:
1. Empty SharePoint Project2. Visual Web Part3. Sequential Workflow4. State Machine Workflow5. Business Data Connectivity Model6. Event Receiver7. List Definition8. Content Type9. Module10. Site Definition11. Import Reusable Workflow12. Import SharePoint Solution Package
SharePoint rootThe development activities that we will perform on SharePoint will require knowledge of the file system structure. Once SharePoint has been installed, the SharePoint root folder can be found on the file system at the following location:
<System Drive>:\Program Files\Common Files\Microsoft Shared\Web Server Extensions\14\
www.it-ebooks.info

Enhancing SharePoint Sites for Windows Phone 7
[ 74 ]
This is where we find the default files for the site. When we add a Mapped Folder from Visual Studio (as depicted in the following screenshot) this is where it maps to. Mapped folders are commonly used folders in SharePoint, such as images and layouts. As these folders are so deep in the folder structure, this Visual Studio ability to add a mapped folder is a shortcut to the actual folder. When we deploy a SharePoint solution, the package manager deploys the files to the correct folder in the file system. As we develop applications for SharePoint, there will be detailed instructions for adding these folders where appropriate.
The SharePoint root is important because within this folder is the very important TEMPLATES\LAYOUTS\MOBILE folder. This folder is where all of the mobile view files are housed, that the SharePoint team has developed to optimize for mobile viewing. A complete SharePoint Server 2010 installation has 43 items in this folder, which includes a web.config file in addition to 42 ASPX files.
The SharePoint team has developed these mobile page views to optimize for mobile viewing. Keep in mind that the primary goal of mobile browsing is to get the phone information and get out. Windows Phone 7 users are busy and on a cellular network, they don't have time to wait for fancy background images to download, and to adjust to multiple fonts is too much overhead.
www.it-ebooks.info

Chapter 3
[ 75 ]
At the time of writing, Windows Phone 7 is not recognized as a mobile device and the sites are displayed as their desktop versions. Adding an entry to the browser definition file was reviewed in Chapter 2, and by the time this book is in your hands, there should be an update to SharePoint that will include Windows Phone 7 in the default browser definition file.
For this book, we will assume that Windows Phone 7 will be treated like a mobile device in SharePoint.
Summary of site definitionsSharePoint 2010 comes in the following two versions:
• The free SharePoint Foundation 2010, which replaces the Windows SharePoint Services 3.0 product.
• SharePoint Server 2010, which replaces Microsoft Office SharePoint Server 2007.
As with the previous versions, the Server product builds on top of the functionality provided in the free Foundation/Services product. For example, both Foundation and Server include the following site definitions (with their official descriptions from Microsoft):
• Team Site: A site for teams to quickly organize, author, and share information. It provides a document library, and lists for managing announcements, calendar items, tasks, and discussions.
• Blank Site: A blank site for you to customize based on your requirements.• Document Workspace: A site for colleagues to work together on a document.
It provides a document library for storing the primary document and supporting files, a tasks list for assigning to-do items, and a links list for resources related to the document.
• Basic Meeting Workspace: A site to plan, organize, and capture the results of a meeting. It provides lists for managing the agenda, meeting attendees, and documents.
• Blank Meeting Workspace: A blank meeting site for you to customize based on your requirements.
• Decision Meeting Workspace: A site for meetings that track status or make decisions. It provides lists for creating tasks, storing documents, and recording decisions.
www.it-ebooks.info

Enhancing SharePoint Sites for Windows Phone 7
[ 76 ]
• Social Meeting Workspace: A site to plan social occasions. It provides lists for tracking attendees, providing directions, and storing pictures of the event.
• Multipage Meeting Workspace: A site to plan, organize, and capture the results of a meeting. It provides lists for managing the agenda and meeting attendees in addition to two blank pages for you to customize based on your requirements.
• Blog: A site for a person or team to post ideas, observations, and expertise that site visitors can comment on.
• Group Work Site: This template provides a groupware solution that enables teams to create, organize, and share information quickly and easily. It includes Group Calendar, Circulation, Phone-Call Memo, the Document Library, and other basic lists.
However, SharePoint Server 2010 builds on these types of site definitions and includes the following additional site definitions (again with their official descriptions from Microsoft):
• Assets Web Database: Create an assets database to keep track of assets, including asset details and owners.
• Charitable Contributions Web: Create a database to track information about fundraising campaigns; including donations made by contributors, campaign related events, and pending tasks.
• Contacts Web Database: Create a contacts database to manage information about people that your team works with, such as customers and partners.
• Issues Web Database: Create an issues database to manage a set of issues or problems. You can assign, prioritize, and follow the progress of issues from start to finish.
• Projects Web Database: Create a project tracking database to track multiple projects, and assign tasks to different people.
• Document Center: A site to centrally manage documents in your enterprise.• Records Center: This template creates a site designed for records
management. Records managers can configure the routing table to direct incoming files to specific locations. The site also lets you manage whether records can be deleted or modified after they are added to the repository.
• Business Intelligence Center: A site for presenting Business Intelligence Center.
• My Site Host: A site used for hosting personal sites (My Sites) and the public People Profile page. This template needs to be provisioned only once per User Profile Service Application, please consult the documentation for details.
www.it-ebooks.info

Chapter 3
[ 77 ]
• Personalization Site: A site for delivering personalized views, data, and navigation from this site collection into My Site. It includes personalization specific Web Parts and navigation that is optimized for My Site sites.
• Enterprise Search Center: A site for delivering the search experience. The welcome page includes a search box with two tabs: one for general searches, and another for searches for information about people. You can add and customize tabs to focus on other search scopes or result types.
• Basic Search Center: A site for delivering the search experience. The site includes pages for search results and advanced searches.
• FAST Search Center: A site for delivering the FAST search experience. The welcome page includes a search box with two tabs: one for general searches, and another for searches for information about people. You can add and customize tabs to focus on other search scopes or result types.
• Publishing Portal: A starter site hierarchy for an Internet-facing site or a large intranet portal. This site can be customized easily with distinctive branding. It includes a home page, a sample press release subsite, a Search Center, and a login page. Typically, this site has many more readers than contributors, and it is used to publish web pages with approval workflows.
• Publishing Site: A site for publishing web pages. It includes document and image libraries for storing web publishing assets. By default, only sites with this template can be created under this site.
• Publishing Site With Workflow: A site for publishing web pages on a schedule by using approval workflows. It includes document and image libraries for storing web publishing assets. By default, only sites with this template can be created under this site.
• Enterprise Wiki: A site for publishing knowledge that you capture and want to share across the enterprise. It provides an easy content editing experience in a single location for co-authoring content, discussions, and project management.
• Visio Process Repository: A site for teams to quickly view, share, and store Visio process diagrams. It provides a versioned document library for storing process diagrams, and lists for managing announcements, tasks, and review discussions.
As you can see, most of these sites are just the basic blank sites with different lists, libraries, and web parts installed by default. It is our job as developers to bring out the differences between these sites and make SharePoint work for the problem we are solving. This will make all the difference to the people that use the SharePoint sites on a day-to-day basis.
It is unlikely that we will use all these sites, but it is important to know what is already available for us to build on.
www.it-ebooks.info

Enhancing SharePoint Sites for Windows Phone 7
[ 78 ]
How to build a custom siteBuilding a custom site is actually quite easy. As mentioned earlier, a site is a collection of lists and libraries. They can also contain ASP.NET web parts. To create a custom site, plan the need for the site first. Decide what components are needed and then find a pre-existing site that has the most parts in common. Create a site based on that template and add in the missing pieces. This may require building out custom list definitions, or even custom web parts.
Once all of these pieces are put together and the site has all the required components, choose the Site Settings option from the Site Actions menu. The Site Actions menu is the main point of interest when working with SharePoint sites. It can be thought of as the Start menu of SharePoint.
The Site Settings section gives us access to the main settings for the site. The sections of Site Settings include the following:
• Users and Permissions: Used to set permissions to users and groups.• Galleries: Used to customize site columns, content types, web parts, and
more.• Site Administration: This is where we set the lists and libraries, user alerts,
search settings, and more.• Look and Feel: This is where we can customize the navigation bars, title and
description, as well as the site theme.• Site Actions: Manage site features, delete the site, analytics, and save as a
template.• Reporting Services: Manage shared schedules and reporting services
settings.
These sections are shown in the following screenshot:
www.it-ebooks.info

Chapter 3
[ 79 ]
Within Site Settings there is an option of Save site as template under the Site Actions title (as shown in the preceding screenshot). As the name suggests, this is where we save the current site as a template. The following are the steps required to save a site as a template:
1. Select the option Save site as template.2. Then enter a file name, template name, and description (if desired).3. Chose whether you want to include the content from the current site.4. Once you've finished personalizing the existing site template, select the OK
button to proceed.5. After the template has finished processing, and the operation completed
successfully, we should be able to go to the solution gallery to view the new site template.
www.it-ebooks.info

Enhancing SharePoint Sites for Windows Phone 7
[ 80 ]
Creating a site templateLet us create a template. We'll start with a default site and then customize it. The template that we are creating will be customized for a small group that needs to share files, tasks, calendars, and a bug database. We will then customize the look and feel of the site. Finally, we will save the site as a template, which we can provide to other groups that may want to use the same template.
Creating the siteFrom the description, and limiting ourselves to only the site templates available in SharePoint Foundation, the closest match to what we are trying to accomplish is the Group Work Site. By limiting our options to those found in SharePoint Foundation, we can use this without having an install of the full SharePoint Server 2010.
Before we can create a site template, we need to have a site to save as a template. Carry out the following steps to create a site:
1. Open the SharePoint Central Administration site and select Create Site Collections from the Application Management section, as shown in the following screenshot:
www.it-ebooks.info

Chapter 3
[ 81 ]
The Create Site Collections section is what allows us to create a new top level website in the SharePoint Site Collection.
2. Fill in the requested information including the title, a description if you want, a website address, and the primary site collection administrator (not shown in the preceding screenshot). The template we will select here is the Group Work Site, as this will be our starting point for customizations.
3. Click on the OK button and SharePoint will create the new site for us.4. Once it has finished processing, a success message will appear with a link to
our new site. Click on that link and we can begin customizing the site.
Adding an issue tracking list to the siteTo customize this site, let us add an issue list and a photo library. The issue list will contain the bugs that are found. Often, these bugs will also require screenshots to accompany the bugs. To store these screenshots, a photo library will be used. The following are the steps required for this:
1. To begin this customization, click on the Lists link in the left navigation. Clicking on this header will open the All Site Content view and automatically filter the view to only show the site lists.
The alternative way to get to this same view is to click on the All Site Content option from the Site Actions menu, and select Lists from the View drop-down on the top right.
2. Whichever way we get to this page we will next click on the Create link at the top, next to Site Workflows.
3. Clicking on this link will open the Create Silverlight dialog. From here we can add any item that we have installed.
4. Click on the List link under Filter By and locate Issue Tracking in the center column.
www.it-ebooks.info

Enhancing SharePoint Sites for Windows Phone 7
[ 82 ]
5. Give the list a name, for example Bug List, and then click on the Create button, as shown in the following screenshot:
Removing the Circulations listNow that we've added the Bug List, we probably don't need the Circulations list. This list is used to request confirmation stamps. As we don't need it for our example, carry out the following steps to remove it:
1. Click on the Circulations link in the left navigation.2. Then in the ribbon, at the very top, select List from the List Tools section.3. All the way to the right, there is a button for List Settings. Click on that
button and the List Settings page will appear from the Circulations list, as shown in the following screenshot:
www.it-ebooks.info
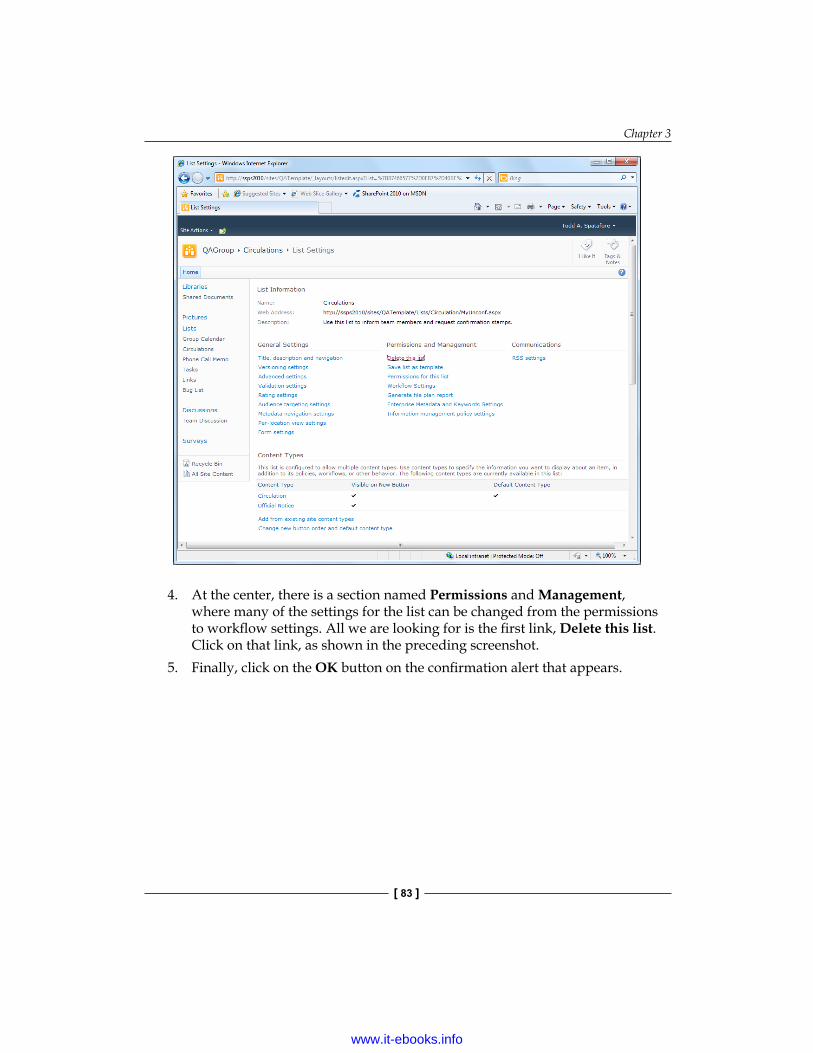
Chapter 3
[ 83 ]
4. At the center, there is a section named Permissions and Management, where many of the settings for the list can be changed from the permissions to workflow settings. All we are looking for is the first link, Delete this list. Click on that link, as shown in the preceding screenshot.
5. Finally, click on the OK button on the confirmation alert that appears.
www.it-ebooks.info

Enhancing SharePoint Sites for Windows Phone 7
[ 84 ]
Adding a picture libraryWhen performing quality assurance (QA) on websites, a lot of images are produced containing screenshots of what appears in each browser. To manage all these images, and so we do not have a separate file server dedicated to bug images, we will create a picture library. To create a dedicated picture library for the bugs, carry out the following steps:
1. Click on the Pictures link on the left navigation bar. Once again, the All Site Content page will appear with the view filtered to show only the Picture Libraries. As there are no picture libraries in the system yet, the main content area will be rather blank.
2. Click on the Create button at the top and once again, we will be presented with the Create dialog.
3. This time, filter by Library and select the Picture Library option.4. Give the new picture library a meaningful name like Bug Image Repository
and click on Create.
The new library will be listed under the Libraries heading in the left navigation. We want to show that it is a Picture Library by putting it under the Pictures heading. To do this, carry out the following steps:
1. Click on Site Settings from the Site Actions menu.2. Then under the Look and Feel section, click on the Quick launch link. The
jhleft navigation section is called the Quick launch bar.3. Click on the edit icon next to the title of the Bug Image Repository and select
the Pictures option in the Heading drop-down list, as shown in the following screenshot.
www.it-ebooks.info
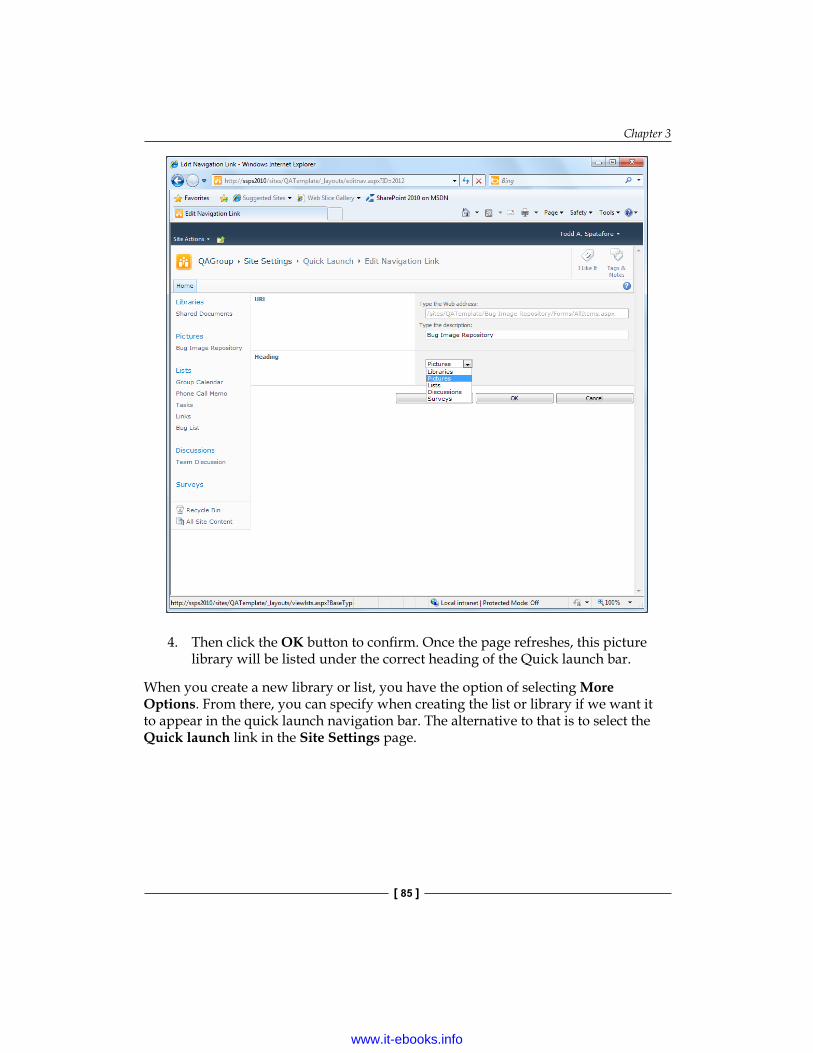
Chapter 3
[ 85 ]
4. Then click the OK button to confirm. Once the page refreshes, this picture library will be listed under the correct heading of the Quick launch bar.
When you create a new library or list, you have the option of selecting More Options. From there, you can specify when creating the list or library if we want it to appear in the quick launch navigation bar. The alternative to that is to select the Quick launch link in the Site Settings page.
www.it-ebooks.info

Enhancing SharePoint Sites for Windows Phone 7
[ 86 ]
Customizing the home pageNext, let us customize the home page. Although it is important to have the Group Calendar available, it is not the most important piece of information for this site. As this site is a QA Group site, it seems obvious that the Bug List should be the primary data source that is visible on the page. Carry out the following steps to customize the home page:
1. On the top bar, click on the Page link and select the Edit Page button on the far left of the ribbon, as shown in the following screenshot:
Now, when you hover the mouse over the title area of a section, a down arrow link and a check box will appear.
2. On the Group Calendar, click on the down arrow and in the context menu that appears, select the Delete option. This will remove the Web Part from the home page, but will not remove the Group Calendar list from the site.
3. Next, click on the link at the top of the center column named Add a Web Part. As the name implies, this will open the Add a Web Part options at the top, just below the ribbon.
4. In the Categories list, ensure Lists and Libraries is selected and, from the Web Parts list, select the Bug List.
5. Finally, click on the Add button.
Before moving on we now have an opportunity to affect the way the site is viewed on a mobile device. The ribbon contains a button named Edit Mobile Page (as shown in the preceding screenshot). To change the order of items displayed on a mobile device, carry out the following steps:
1. Click on this link (Edit Mobile Page) and we can now edit the order in which items appear on the mobile version of this page.
2. Make sure that Bug List is first.3. Next, think about the site and what we want the mobile experience to be like.
For example, maybe the list of Links should really only be needed on the full desktop version of the site. Click on the checkbox next to Links to de-select it.
www.it-ebooks.info

Chapter 3
[ 87 ]
4. Finally, click on the OK button to remove the Links from the mobile version of the site and to save the change that we made by moving Bug List first, as shown in the following screenshot:
Changing the site themeFinally, we are going to make one last change to the site. We are going to change the site theme. Many companies already have a color palate, which they use to standardize all of their websites and corporate communications.
The SharePoint themes are stored in {SharePointRoot}\TEMPLATE\GLOBAL\Lists\themes\ and are in standard Microsoft Office Theme format (.thmx). This means that we can use a program, such as Microsoft PowerPoint to customize the color scheme for our site and then save it as an Office Theme.
www.it-ebooks.info

Enhancing SharePoint Sites for Windows Phone 7
[ 88 ]
The easiest way to get a new theme in the system is through the Theme Gallery. Carry out the following steps to add a new theme to SharePoint.
1. We can navigate to the Theme Gallery by either browsing to Site Theme from the Site Settings page and then selecting the Theme Gallery link in the header, or we can use the following address:http://{server}:{port}/{sitecollection}/_catalogs/theme/
2. From this page, we can select the Add new item link at the bottom of the page to upload our previously created Office Theme file.
For this site, we will use one of the prebuilt themes. To change the site theme, carry out the following steps:
1. From the Site Actions menu, select Site Settings and then click on Site theme in the Look and Feel section.
2. There are 23 prebuilt themes in the system. On this Site theme page, we can select any of the themes and preview it by clicking on the Preview button at the bottom.
3. Click through the different themes available and preview how our site will look with each of them.
4. Finally, select the Ricasso theme and click on the Apply button at the bottom.
The following screenshot shows how our site looks now on a desktop browser:
www.it-ebooks.info

Chapter 3
[ 89 ]
The following screenshot shows how our site looks now on Windows Phone 7:
www.it-ebooks.info
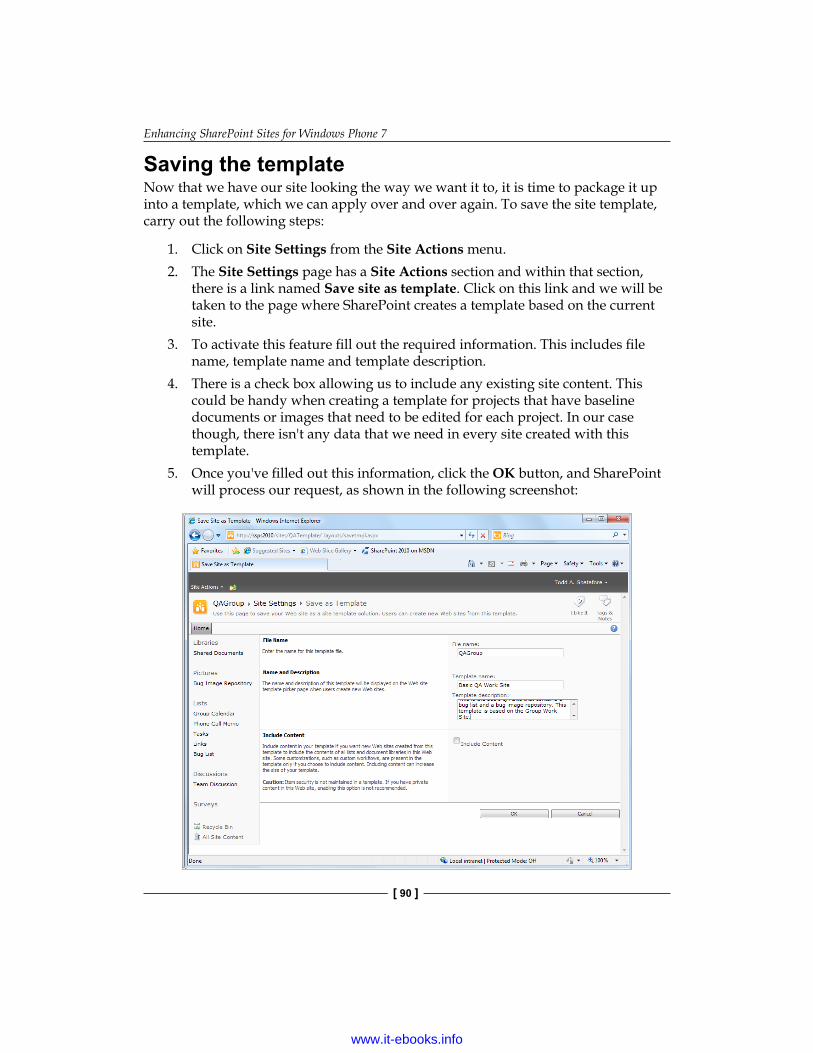
Enhancing SharePoint Sites for Windows Phone 7
[ 90 ]
Saving the templateNow that we have our site looking the way we want it to, it is time to package it up into a template, which we can apply over and over again. To save the site template, carry out the following steps:
1. Click on Site Settings from the Site Actions menu.2. The Site Settings page has a Site Actions section and within that section,
there is a link named Save site as template. Click on this link and we will be taken to the page where SharePoint creates a template based on the current site.
3. To activate this feature fill out the required information. This includes file name, template name and template description.
4. There is a check box allowing us to include any existing site content. This could be handy when creating a template for projects that have baseline documents or images that need to be edited for each project. In our case though, there isn't any data that we need in every site created with this template.
5. Once you've filled out this information, click the OK button, and SharePoint will process our request, as shown in the following screenshot:
www.it-ebooks.info

Chapter 3
[ 91 ]
Testing it outNow that we've saved our site as a template, we can create a new site based on that template. To create a new site based on our customized template, carry out the following steps:
1. Go back to the SharePoint default site and click on the New Site option from the Site Actions menu.
2. The Create dialog will appear and when we scroll all the way to the bottom, we will see the site template that we just created, named QAGroup.
3. Select it and give it a name, and a URL.4. Click on the Create button and SharePoint will create a new site based on the
QA template that we just created:
www.it-ebooks.info

Enhancing SharePoint Sites for Windows Phone 7
[ 92 ]
Moving a templateThe Solution Gallery shows all of the custom templates that have been created in the current solution. The Solution Gallery can be found at the following URL:
http://{server}:{port}/_catalogs/solutions/
Moving a template is a very easy process. Simply, carry out the following steps:
1. From the Solution Gallery, click on the name of the custom template. This will initiate a download of a copy of the WSP file that contains the Site Template.
2. This WSP file is a Windows SharePoint Installer file. It is essentially a ZIP file containing a manifest XML file, as well as definitions for all of the lists, libraries, and Web Parts used in the custom site. This WSP file can be uploaded to any other SharePoint 2010 server.
3. On the SharePoint server to which we are moving the site template, open the Solution Gallery.
4. In the ribbon, at the top, select the Solutions tab.5. Click on the Upload Solution button.6. A modal dialog will appear with a Browse button. Browse to the WSP file
and select it.7. Finally, click on the OK button. This will start the WSP installation process.
When the WSP installation process is finished, the site template will have been moved to the new server.
SummaryIn this chapter, we looked at how SharePoint is configured on a server. We looked at how the various parts build on top of existing technologies in the Microsoft stack, including ASP.NET, SQL Server, and IIS. We also examined the various parts of SharePoint from the web application to site collections and SharePoint sites and webs. We then compared how this matches up to existing ASP.NET frameworks.
Next, we looked at how to set up the development environment for SharePoint, and what was needed to build SharePoint sites for Windows Phone 7.
Finally, we saw how to create a custom SharePoint site template and use it to create a new site based on that template.
In the next chapter, we will take a deeper dive into a site and customize the lists and libraries, as well as the default view presented to the user on their Windows Phone 7 browser.
www.it-ebooks.info

Building SharePoint Pages for Windows Phone 7
In the previous chapter, we looked at the high level structure of a SharePoint site. We built out a template fairly quickly and saved that template, so that we can create new sites based on it whenever we needed. We also briefly looked at an overview of Lists and Libraries.
This chapter will dive deeper into lists, libraries, and list view templates. It may come as a surprise to many that all the data in SharePoint is just content in a list. This is an important thing to know because once we realize that SharePoint is really only a data management tool, we can begin to imagine all of the amazing things that can be done with SharePoint. This book focuses on building SharePoint experiences for Windows Phone 7. It is really important that we do this right because we want our end users to be free to get the information they need and get on with their work. That is the power of SharePoint and Windows Phone 7. It is our job to see that it is done properly. With this in mind, how we display that data to the end user ultimately determines the success of the SharePoint installation.
In this chapter, we will create a custom list view using the web editor, as well as Visual Studio 2010. To be more specific, in this chapter, we will look at the following topics:
• The difference between lists and libraries• Adding columns to a list• Customizing the list item output• Replacing the mobile home page
www.it-ebooks.info

Building SharePoint Pages for Windows Phone 7
[ 94 ]
The difference between lists and librariesThis may seem like a strange place to begin this chapter, but there is usually a lot of confusion around this topic. In the introduction, we mentioned that in SharePoint, ultimately everything is data in a list. This means that there really isn't a difference between lists and libraries except for where that data lives.
In a list, the data lives in various fields of the column. Although a list usually has meta-data associated with it, the bulk of the information is stored in those fields. Usually, when we search for data that is stored in a list, we find the search results in the data itself.
In a library, the data lives inside a file that is stored in a field of the column. Although we can search through the data in a library using various iFilters, for some file types the metadata associated with the file usually has more pertinent information that can be searched.
Searching content with iFiltersThe content within the files in a library can be indexed and searched when an appropriate iFilter is installed. An iFilter gives the search index the ability to read the content or metadata contained within the file. By default, Microsoft Office files can be indexed, but other common files such as Adobe PDF and Tagged Image File Format (TIFF) files need to have an iFilter installed.
Installing and configuring the iFilter for Adobe PDF is a common request and should be done automatically. As it isn't done for us when we install SharePoint, there are several good walkthroughs. One can be found at the following URL:http://support.microsoft.com/kb/2293357/
Adding columns to a listIn the previous chapter, we briefly demonstrated how to create a new list. When you click on Site Actions and select the More Options link, the Create dialog will appear. Anything in this list that is not a site or a page is a list.
The following is the screenshot of the Create dialog showing a selection of lists that we can create:
www.it-ebooks.info

Chapter 4
[ 95 ]
The following screenshot shows the Create dialog displaying a selection of the libraries which we can create:
www.it-ebooks.info

Building SharePoint Pages for Windows Phone 7
[ 96 ]
As can be seen in the preceding screenshot, there are quite a few pre-defined lists and libraries. If there isn't one that meets our needs, then the Custom List is there to help.
Many of these lists provide more than just a list. They also provide a custom view to display the data for that list. For example, if we create a library based on the Picture Viewer, the display provided is very different to the display for a Wiki Page Library.
Later in this chapter, we will customize the display of a list using custom templates, which is the recommended way for altering the list display in SharePoint.
Carry out the following steps to create a blank site for this chapter:
1. Open your SharePoint development site and click on the New Site option from the Site Actions drop-down list at the top left of the screen, as shown in the following screenshot:
2. Select the Blank Site template.3. Give the site a title, for example Chapter4.4. Give the site a URL similar to Chapter4.5. Finally, click on the Create button.
At this point, SharePoint will create the new site and then load the new site for us. If we are successful, the following screenshot shows what we will see:
www.it-ebooks.info

Chapter 4
[ 97 ]
Next, let us create an announcement list that we will customize. Carry out the following steps to add an announcement list to this blank site:
1. From the Site Actions menu, select the More Options… option, as shown in the following screenshot:
www.it-ebooks.info

Building SharePoint Pages for Windows Phone 7
[ 98 ]
2. Select Announcements from the list.3. Give the list a new name, such as Pertinent Blog Announcements.4. Click on the Create button and SharePoint will create the Announcement list.
Every day we get e-mails from co-workers that contain a hyperlink to a blog or a web video. They say that the link is amazing or cool, but it clogs up our inbox. The announcement list that we are creating here could be used as a replacement for the hundreds of e-mails a week that are like that. However, out of the box, the announcement list contains the following three fields:
1. Title2. Body3. Expires
In the background, there are also created by and modified by fields. It would be ideal for the situation we are working on if there was a field to add a hyperlink to the announcement.
To add a hyperlink column to the announcement list, carry out the following steps:
1. In the Quick Launch bar, select the announcement list that we just created.2. From the top navigation bar, select List from the List Tools section.3. In the list ribbon that appears, select the List Settings button on the right.4. Under the Columns heading, there is a link named Create column. Click on
this link.5. Give the column a name such as Interesting Link or something
descriptive.6. Select Hyperlink or Picture for The type of information in this column is:
option.
www.it-ebooks.info

Chapter 4
[ 99 ]
7. Leave the default values for the Additional Column Settings and select the OK button to create the column, as shown in the following screenshot:
www.it-ebooks.info

Building SharePoint Pages for Windows Phone 7
[ 100 ]
After having saved the new column to the list, go back to the list by clicking on Pertinent Blog Announcements in the breadcrumb at the top of the page (see the preceding screenshot). Now when we create a new item in the list, there are two additional form fields to add in the hyperlink, as shown in the following screenshot:
Once we have done all of that we can see what this looks like on the phone by navigating to our Announcement List on the phone, as seen in the following screenshot:
www.it-ebooks.info
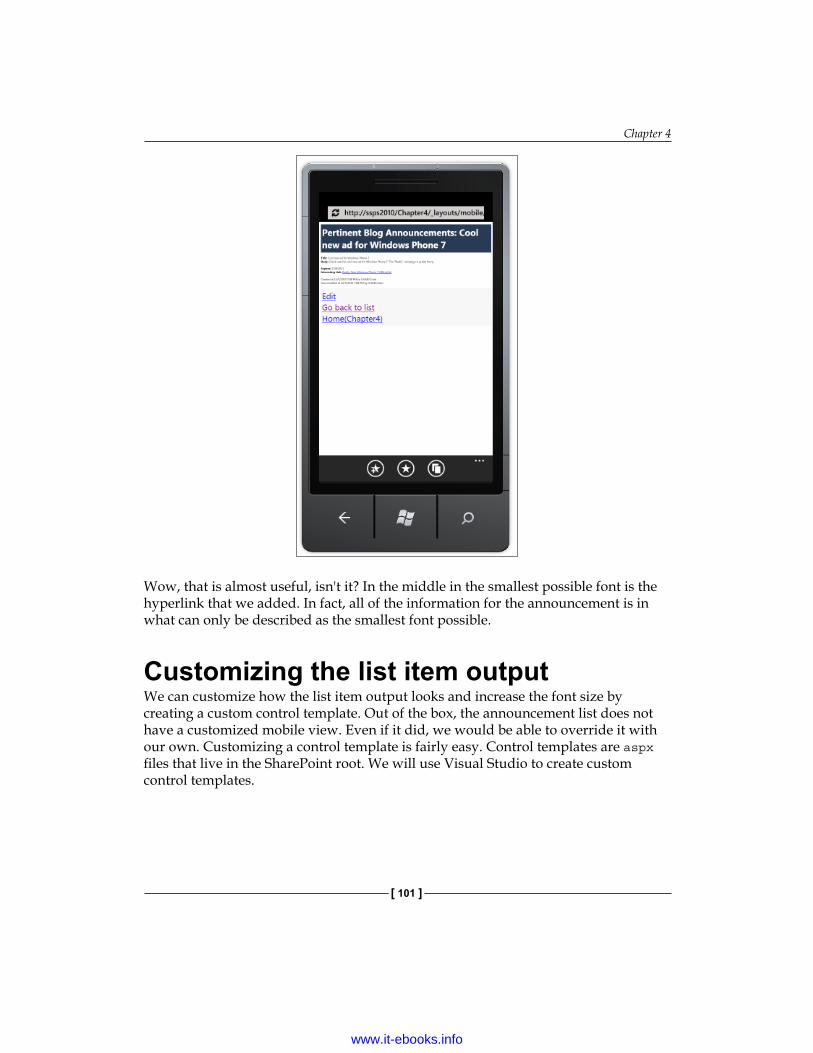
Chapter 4
[ 101 ]
Wow, that is almost useful, isn't it? In the middle in the smallest possible font is the hyperlink that we added. In fact, all of the information for the announcement is in what can only be described as the smallest font possible.
Customizing the list item outputWe can customize how the list item output looks and increase the font size by creating a custom control template. Out of the box, the announcement list does not have a customized mobile view. Even if it did, we would be able to override it with our own. Customizing a control template is fairly easy. Control templates are aspx files that live in the SharePoint root. We will use Visual Studio to create custom control templates.
www.it-ebooks.info

Building SharePoint Pages for Windows Phone 7
[ 102 ]
Creating a project for our custom templateThe first thing we need to do is create a project that will contain our custom control. Carry out the following steps to create a project:
1. Open Visual Studio 2010 as Administrator by right clicking on the icon and selecting Run as administrator on the context menu.
2. Select Yes in the UAC (User Authentication Control) dialog.3. Once Visual Studio has opened, select File | New Project.4. In the 2010 node of the SharePoint templates, select Empty SharePoint
Project.5. Give the project a name similar to CustomAnnouncementForm.6. Give the solution a name, such as Chapter04.
We will be reusing this solution for two more projects in this chapter. That is why we are giving the solution a more generic name to encompass all three projects.
7. Select the OK button, as shown in the following screenshot:
www.it-ebooks.info

Chapter 4
[ 103 ]
This New Project screen may look different depending on what applications are installed and which options are selected when installing Visual Studio 2010.
8. Next, Visual Studio will ask you to Specify the site and security level for debugging. Enter the URL for your SharePoint server and select the trust level of Deploy as a farm solution.
When we build these sites, we need to have full permission on the SharePoint site, as well as full permission to the server. As we need to restart IIS, as well as make modifications to SharePoint that only an administrator can perform, administrator rights to both the development server, as well as administrator rights in SharePoint are required.
9. Click on the Finish button and Visual Studio will create the empty SharePoint project for us, as seen in the following screenshot:
www.it-ebooks.info

Building SharePoint Pages for Windows Phone 7
[ 104 ]
Adding a mapped folder for the custom control templateNow that we have a project to work with, we need to add a SharePoint mapped folder to the control templates. The mapped folder allows us to develop our custom control template in the appropriate folder under the SharePoint root. It allows Visual Studio 2010 to keep track of the files and even allows us to use source control for these files. Then, when we deploy the project, the files will be placed in the correct folder. SharePoint does a lot of rendering based on file convention over configuration. In this case, when the announcement is rendered, SharePoint will only look for templates within this mapped folder. Even if our control is in a subfolder, SharePoint won't find it. So, when we add this mapped folder, don't create a subfolder. Carry out the following steps to add a mapped folder to the project:
1. Right click on the CustomAnnounementForm project in the Solution Explorer.
2. In the context menu that appears, select Add | SharePoint Mapped Folder, as shown in the following screenshot:
3. In the Add SharePoint Mapped Folder tree view that appears, select the arrow to expand TEMPLATE.
4. Once TEMPLATE has been expanded, select CONTROLTEMPLATES and then click on the OK button to map this folder into our solution, as shown in the following screenshot:
www.it-ebooks.info

Chapter 4
[ 105 ]
Now that we have added a mapped folder to our project, we can focus on the custom control template.
Creating the custom templateNow that we have our Visual Studio project created and we have mapped the control templates folder to our project, the next step is to create the user control that will house our custom template. Carry out the following steps to create the user control:
1. In Solution Explorer, right click on CONTROLTEMPLATES.2. Select Add | New Item…3. In the Add New Item dialog that appears, select User Control from the
SharePoint 2010 installed templates.
www.it-ebooks.info

Building SharePoint Pages for Windows Phone 7
[ 106 ]
4. Give the user control the name of Mobile_104_DispForm_Contents.ascx and click on the Add button to create the user control, as shown in the following screenshot:
At this point, Visual Studio will create a baseline user control for us to use. We will be customizing this quite a bit next, but first let's review what we have just accomplished.
In ASP.NET programming, User Controls (ASCX files) are used in ASP.NET Pages (ASPX files) to consolidate common functionality. In SharePoint, they are used in a similar manner.
When a page is rendered for mobile browsers, the following three separate sections make up the page:
1. Header2. Content3. Footer
In this case, we are interested in customizing the contents of the page. The page we are customizing in this example is the display form for the contents. The name we've given to our user control specifies this in the last two parts DispForm_Contents. The first two parts specify that we are modifying the mobile web experience and the 104 is the ListTypeID for the Announcements list.
www.it-ebooks.info

Chapter 4
[ 107 ]
The list of SPListTemplateType enumerations can be found at the following URL:http://msdn.microsoft.com/en-us/library/microsoft.sharepoint.splisttemplatetype.aspx
Combining all this together gives us the file name Mobile_104_DispForm_Contents.aspx. SharePoint does not require that the file name uses this pattern. In fact, this pattern is only needed in the template itself. It is being used here because it helps when looking at the control templates folder to see when something has already been overridden.
Customizing the templateUp to this point, we've done the following:
• Created a project in Visual Studio to hold our custom template.• Mapped a folder to the control templates. This is where our custom template
will live.• Created a blank user control within the control templates folder to house our
custom template.
Now, we will write the code required for the custom template. The code we are writing for this template will be purely visual code. There won't be any need for compiled C# code. As such, the code behind files isn't needed. Delete the following two files, as they are not needed for this template:
1. Mobile_104_DispForm_Contents.ascx.cs
2. Mobile_104_DispForm_Contents.ascx.designer.cs
Finally, let's create the custom template by carrying out the following steps:
1. Open the file Mobile_104_DispForm_Contents.ascx and ensure that the Source view is enabled.
2. Delete all the contents of this file.3. Add the following code to the file to define the user control and assemblies.
<%@ Control Language="C#"%> <%@ Assembly Name="Microsoft.SharePoint, Version=14.0.0.0, Culture=neutral, PublicKeyToken=71e9bce111e9429c" %>
www.it-ebooks.info

Building SharePoint Pages for Windows Phone 7
[ 108 ]
4. Add the following code to register the XML tag prefixes that will be used in the page:<%@ Register TagPrefix="mobile" Namespace="System.Web.UI.MobileControls" Assembly="System.Web.Mobile, Version=1.0.3300.0, Culture=neutral, PublicKeyToken=b03f5f7f11d50a3a" %> <%@ Register TagPrefix="SharePoint" Namespace="Microsoft.SharePoint.WebControls" Assembly="Microsoft.SharePoint, Version=14.0.0.0, Culture=neutral, PublicKeyToken=71e9bce111e9429c" %> <%@ Register TagPrefix="SPMobile" Namespace="Microsoft.SharePoint.MobileControls" Assembly="Microsoft.SharePoint, Version=14.0.0.0, Culture=neutral, PublicKeyToken=71e9bce111e9429c" %>
5. To start the actual template code for the page, add the following code. Although we've named the file for this user control the same as the ID listed here, it is in fact the ID here that lets SharePoint know that this template should be used for rendering the announcements display form contents:<SharePoint:RenderingTemplate runat="server" ID="Mobile_104_DispForm_Contents">…</SharePoint:RenderingTemplate>
6. Next, inside the Rendering Template element that we just added, we add an element that tells the Rendering Template that we are going to specify our own template.<Template>…</Template>
7. This next element nested within the Template element is a div with an inline style attribute to let the browser know that we don't want the default font size, but instead we want a font size of 13 points, as follows:<div style=="font-size: 13pt;">…</div>
8. The first element we put inside the div is a mobile list field, Iterator. Think of this like a foreach loop on the fields inside the current list item. For each field in the list item it will display the field name in bold and the field value followed by a line break.<SPMobile:SPMobileListFieldIterator RunAt="Server" />
www.it-ebooks.info

Chapter 4
[ 109 ]
9. Next, we add the control container that we will insert with the change history inside.<SPMobile:SPMobileControlContainer ID="SPMobileControlContainer1" RunAt="Server">…</SPMobile:SPMobileControlContainer>
10. Finally, add this code inside the mobile control container. This displays the creation date and the last modified date for the announcement followed by a line break (the line break isn't required, but it does give a little extra room before the page footer).
<SPMobile:SPMobileCreatedModifiedPanel ID="SPMobileCreatedModifiedPanel1" RunAt="Server" TemplateName="MobileCreatedModifiedInfo" /><mobile:Label ID="Label1" RunAt="Server" BreakAfter="true" />
Steps 3 and 4 are fairly straightforward user control header elements. We are registering three tag prefixes that we'll be using in the custom template. They are mobile, SharePoint, and SPMobile.
Mobile contains all of the standard web UI mobile controls. These are not SharePoint specific, but we use a label to output a line break after the last modified date.
The SharePoint prefix will encapsulate the SharePoint web controls. This is really the big one, as it is what allows us to override the rendering template for the Announcement form.
Finally, SPMobile contains all of the SharePoint specific mobile controls.
Step 5 is where the actual template is created. The first thing we have is a directive to let SharePoint know that we are a rendering template: SharePoint:RenderingTemplate. The ID here is the same as what we have for the file name, Mobile_104_DispForm_Contents. In this situation, it is required that the ID is as specified with the exception that you can replace the 104 with Announcements if you want to.
When the SharePoint Application in IIS starts, it reads all of the user controls in the control templates folder. This lets SharePoint know what templates to use in any given situation. We could add more than one rendering template in this file and SharePoint would load each one for the intended purpose.
As an example of having multiple rendering templates in one file, MobileDefaultTemplates.ascx contains all of the default settings for all of the mobile templates in SharePoint.
www.it-ebooks.info

Building SharePoint Pages for Windows Phone 7
[ 110 ]
Do not modify the file MobileDefaultTemplates.ascx. Although it may work for a while, this file may get overwritten during a service pack or other SharePoint update. The best way to update a template is through the methods listed in this chapter.
These rendering templates are read in from the control templates folder at application start, we don't actually need to use Visual Studio to create these templates. Visual Studio gives us the flexibility of the deploy option. The deploy option automatically copies the file to the correct location and restarts the SharePoint application for us. Also with Visual Studio, we could debug the template if we had custom code running. Last, but not least, Visual Studio also has great ties into source control systems allowing our application lifecycle management to be managed in the same place we are writing code.
Putting all of this together, the final code for this control looks like the following:
<%@ Control Language="C#"%> <%@ Assembly Name="Microsoft.SharePoint, Version=14.0.0.0, Culture=neutral, PublicKeyToken=71e9bce111e9429c" %>
<%@ Register TagPrefix="mobile" Namespace="System.Web.UI.MobileControls" Assembly="System.Web.Mobile, Version=1.0.3300.0, Culture=neutral, PublicKeyToken=b03f5f7f11d50a3a" %>
<%@ Register TagPrefix="SharePoint" Namespace="Microsoft.SharePoint.WebControls" Assembly="Microsoft.SharePoint, Version=14.0.0.0, Culture=neutral, PublicKeyToken=71e9bce111e9429c" %>
<%@ Register TagPrefix="SPMobile" Namespace="Microsoft.SharePoint.MobileControls" Assembly="Microsoft.SharePoint, Version=14.0.0.0, Culture=neutral, PublicKeyToken=71e9bce111e9429c" %>
<SharePoint:RenderingTemplate runat="server" ID="Mobile_104_DispForm_Contents">
<Template> <div style="font-size: 13pt;"> <SPMobile:SPMobileListFieldIterator RunAt="Server" /> <SPMobile:SPMobileControlContainer ID="SPMobileControlContainer1" RunAt="Server"> <SPMobile:SPMobileCreatedModifiedPanel ID="SPMobileCreatedModifiedPanel1" RunAt="Server" TemplateName="MobileCreatedModifiedInfo" /> <mobile:Label ID="Label1" RunAt="Server" BreakAfter="true" /> </SPMobile:SPMobileControlContainer> </div>
www.it-ebooks.info

Chapter 4
[ 111 ]
</Template></SharePoint:RenderingTemplate>
Save this file and select the Deploy option from the Build menu in Visual Studio. When Visual Studio completes the deployment, open our list in Windows Phone 7, select the list item we created previously, and it should look like the following screenshot:
www.it-ebooks.info
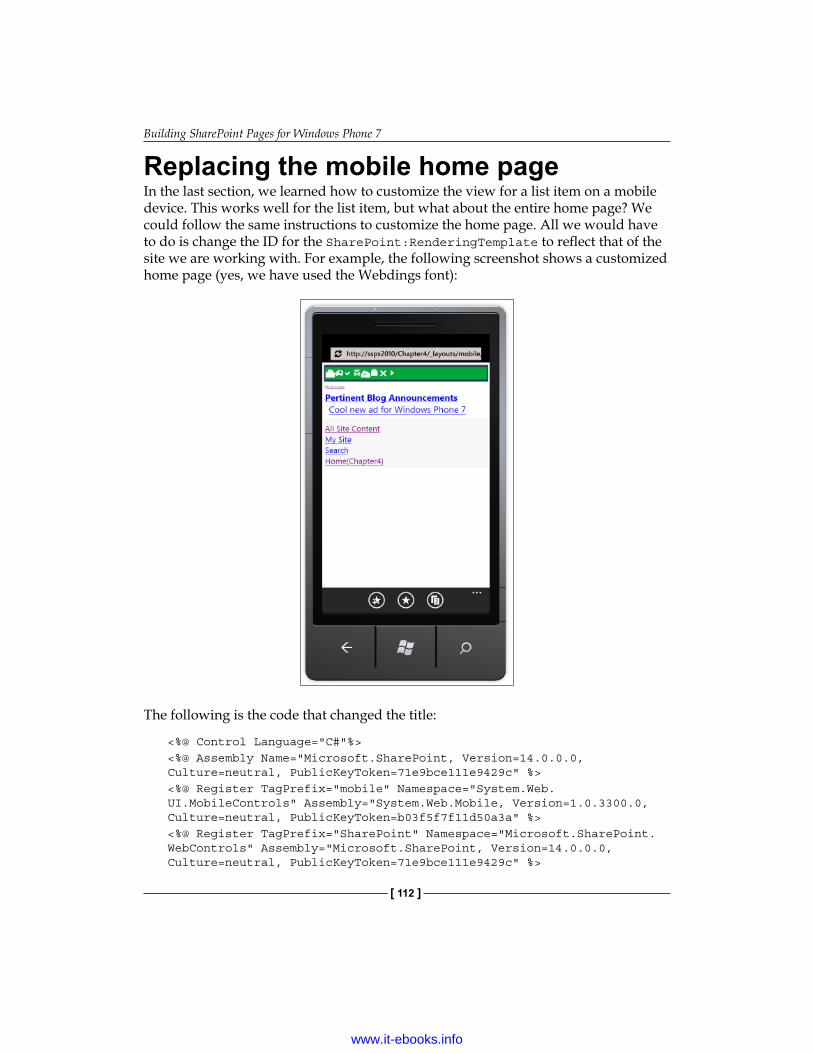
Building SharePoint Pages for Windows Phone 7
[ 112 ]
Replacing the mobile home pageIn the last section, we learned how to customize the view for a list item on a mobile device. This works well for the list item, but what about the entire home page? We could follow the same instructions to customize the home page. All we would have to do is change the ID for the SharePoint:RenderingTemplate to reflect that of the site we are working with. For example, the following screenshot shows a customized home page (yes, we have used the Webdings font):
The following is the code that changed the title:
<%@ Control Language="C#"%> <%@ Assembly Name="Microsoft.SharePoint, Version=14.0.0.0, Culture=neutral, PublicKeyToken=71e9bce111e9429c" %> <%@ Register TagPrefix="mobile" Namespace="System.Web.UI.MobileControls" Assembly="System.Web.Mobile, Version=1.0.3300.0, Culture=neutral, PublicKeyToken=b03f5f7f11d50a3a" %> <%@ Register TagPrefix="SharePoint" Namespace="Microsoft.SharePoint.WebControls" Assembly="Microsoft.SharePoint, Version=14.0.0.0, Culture=neutral, PublicKeyToken=71e9bce111e9429c" %>
www.it-ebooks.info

Chapter 4
[ 113 ]
<%@ Register TagPrefix="SPMobile" Namespace="Microsoft.SharePoint.MobileControls" Assembly="Microsoft.SharePoint, Version=14.0.0.0, Culture=neutral, PublicKeyToken=71e9bce111e9429c" %>
<%@ Register TagPrefix="WPMobile" Namespace="Microsoft.SharePoint.WebPartPages" Assembly="Microsoft.SharePoint, Version=14.0.0.0, Culture=neutral, PublicKeyToken=71e9bce111e9429c" %>
<SharePoint:RenderingTemplate runat="server" ID="WebPartMobile_1_HomePage_Title"> <Template> <SPMobile:SPMobilePaddedPanel runat="server" ForeColor="#FFFFFF" BackColor="#009933" Font-Bold="true" Font-Size="13pt" Font-Names="Webdings"> <WPMobile:WebPartMobilePageTitle RunAt="server" /> </SPMobile:SPMobilePaddedPanel> </Template></SharePoint:RenderingTemplate>
This is almost the same as what we had before. We've changed the ID of the rendering template to target site ID type 1, which is a Blank Site. We could have also used STS instead of ID 1. That would have made the rendering template's ID WebPartMobile_STS_HomePage_Title.
Besides that, we've also added a new tag prefix for SharePoint Web Part Pages, WPMobile. This tag is used for the page title element in the template <WPMobile:WebPartMobilePageTitle runat="server" />.
Again, there's nothing here that's too different from what we did in the previous section. However, what if we wanted something completely different here? What if our designers came to us and asked for something that just isn't possible with the templates as they are right now? That is where the redirection system comes into play.
Carry out the following steps to add in a mobile home page redirect:
1. Create a new empty SharePoint project by right clicking on the Chapter04 solution and select Add | New Project….
2. On the New Project dialog, select SharePoint | 2010 and then select Empty SharePoint Project.
3. Name the new project HomePageRedirect.
As an alternative, we could reuse the existing project created for the custom announcement form, but this will keep our different projects separate.
www.it-ebooks.info

Building SharePoint Pages for Windows Phone 7
[ 114 ]
4. Create a mapped folder to {SharePointRoot}/TEMPLATE/LAYOUTS/MOBILE. This can be accomplished by right clicking on the project name and selecting Add | SharePoint Mapped Folder… and navigating the tree to the Mobile folder.
5. Right click on this new folder in Solution Explorer and create a blank ASPX page by selecting Add | New Item… and then in the Add New Item dialog, select Visual C# | Web | HTML Page.
6. Name the page CustomHomePage.aspx. Notice that we are using the ASPX file extension instead of the HTML extension. This is so we get a nice clean ASP.NET file without the hooks that Visual Studio would put into a SharePoint Application Page.
7. Add the following HTML:<!DOCTYPE HTML PUBLIC "-//W3C//DTD HTML 4.0 Transitional//EN"><html> <head> <title>Custom Home page</title> <meta name="viewport" content="width=480px" /> </head> <body> <h1>Hello World from my custom home page!</h1> </body></html>
8. Next, add a mapped folder to {SharePointRoot}/TEMPLATE/CONTROLTEMPLATES. This can be accomplished by right clicking on the project name and selecting Add | SharePoint Mapped Folder… and navigating the tree to the CONTROLTEMPLATES folder.
9. Right click on this folder and select Add | New Item…10. Select a User Control from the Add New Item dialog and name it Mobile_1_
HomePage.ascx.11. In this file, add the following code:
<%@ Control Language="C#"%> <%@ Assembly Name="Microsoft.SharePoint, Version=14.0.0.0, Culture=neutral, PublicKeyToken=71e9bce111e9429c" %> <%@ Register TagPrefix="SharePoint" Namespace="Microsoft.SharePoint.WebControls" Assembly="Microsoft.SharePoint, Version=14.0.0.0, Culture=neutral, PublicKeyToken=71e9bce111e9429c" %> <%@ Register TagPrefix="SPMobile" Namespace="Microsoft.SharePoint.MobileControls" Assembly="Microsoft.SharePoint, Version=14.0.0.0, Culture=neutral, PublicKeyToken=71e9bce111e9429c" %>
www.it-ebooks.info

Chapter 4
[ 115 ]
<SharePoint:RenderingTemplate runat="server" ID="WebPartMobile_1_HomePage_Title"> <Template>
<SPMobile:SPMobileHomePageRedirection runat="server" PageFileName="CustomHomePage.aspx" />
</Template>
</SharePoint:RenderingTemplate>
12. Save all files and select the Deploy option from the Build menu.13. Load the home page on your Windows Phone and it should look like the
following screenshot:
This is a very simple home page, but since we only used HTML, we can begin to see the power associated with building custom home page experiences.
The interesting part of this code is in step 11. Notice the difference highlighted in the code. This template has a home page redirection in it. This is what tells SharePoint to stop rendering the current page and instead restart on the value of the PageFileName attribute. In this case, the PageFileName attribute is CustomHomePage.aspx. This custom home page is very simple, as it only has a single line of text output for the user. However, from within this page, we have access to the full context and power of SharePoint.
www.it-ebooks.info
Building SharePoint Pages for Windows Phone 7
[ 116 ]
SummaryThis chapter contained a brief overview of the differences between lists and libraries. Once we understood the differences between lists and libraries, we looked closer at a particular list type named the Announcements list. We customized the Announcements list with an additional column. When we opened up the list item view for the Announcement list, we noticed that the default rendering on the Windows Phone was unreadable by default. From there, we created a project in Visual Studio to help us customize the list item rendering template. Next, we looked at how list item rendering templates were related to the home page and customized the home page in a similar manner. Finally, we took the home page customization all the way along the spectrum and replaced the entire page with a custom HTML page.
In the next chapter, we will look into ways of customizing the SharePoint communities' pages for Windows Phone 7. This will give our Windows Phone 7 users the ability to participate in Wiki, Discussion Groups, and Blogs without having to leave the comfort of their phone.
www.it-ebooks.info

Customizing SharePoint Communities for
Windows Phone 7SharePoint is a powerful enterprise content management system. It has an impressive ability to bend to the needs of just about any use case imaginable in an enterprise. That list of use cases also includes several social aspects. When employees are sharing information across multiple departments, it can make a 90,000 employee enterprise feel like a 100 person small company.
This chapter focuses on customizing the SharePoint communities for use on Windows Phone 7. We will investigate the web-based output of the communities, and customize this output using Visual Studio 2010. This chapter will cover the following topics:
• Blogs• Wiki
Let's get started with the discussion of SharePoint communities by taking a look at blogs.
BlogsAt this point in the 21st century, everyone is familiar with what a blog is. In SharePoint, a blog is a site that is characterized by entries of content being listed from newest at the top of the page to oldest at the bottom. Content is determined by the author and can contain metadata such as the author, date, and keywords or tags to designate the categories in which the content belongs.
www.it-ebooks.info

Customizing SharePoint Communities for Windows Phone 7
[ 118 ]
Creating a blog site in SharePointA blog site can either be the root site or a site contained within another site. This is consistent with all site types in SharePoint. The reason this is pointed out though, is that when creating a new SharePoint engagement, it is important to truly think of the overall goal of the website as a whole. If the website will essentially be a blog with other content thrown in from time to time, then it makes sense for the root site to be of the type blog. Otherwise, it makes sense to make the root site something else like the team site or a blank site and then add a blog site within that root site.
This is important to think about because to add a blog to an existing site is fairly straightforward. Simply, carry out the following steps:
1. From the root site, click on the Site Actions menu.2. On the Site Actions menu, select the New Site option.3. From the Installed Items list, select Blog.4. Give the new blog site a Title and a URL name.5. Finally, click on the Create button.
At this point, SharePoint will create a new blog site. The new blog will contain some seed data to get the blog going. There are three categories named appropriately:
• Category 1• Category 2• Category 3
The new blog site will also have a location for archives containing the one entry that was seeded in the site titled Welcome to your Blog! This can all be seen in the following screenshot:
www.it-ebooks.info
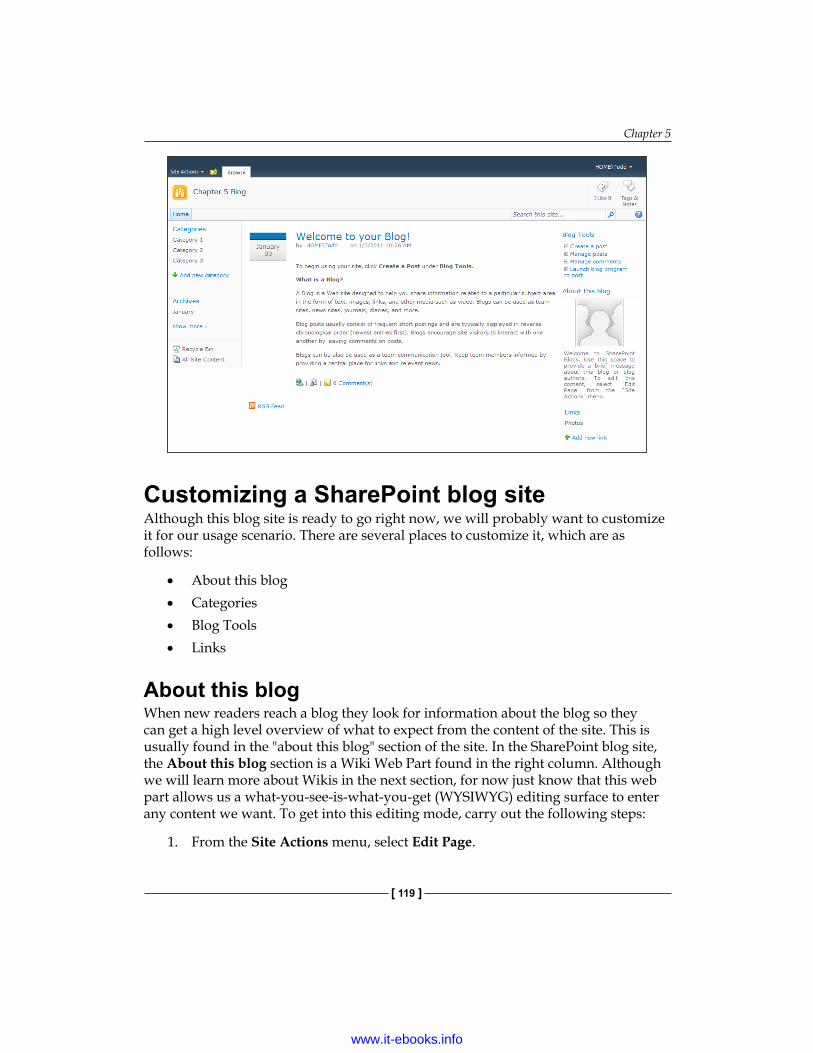
Chapter 5
[ 119 ]
Customizing a SharePoint blog siteAlthough this blog site is ready to go right now, we will probably want to customize it for our usage scenario. There are several places to customize it, which are as follows:
• About this blog• Categories• Blog Tools• Links
About this blogWhen new readers reach a blog they look for information about the blog so they can get a high level overview of what to expect from the content of the site. This is usually found in the "about this blog" section of the site. In the SharePoint blog site, the About this blog section is a Wiki Web Part found in the right column. Although we will learn more about Wikis in the next section, for now just know that this web part allows us a what-you-see-is-what-you-get (WYSIWYG) editing surface to enter any content we want. To get into this editing mode, carry out the following steps:
1. From the Site Actions menu, select Edit Page.
www.it-ebooks.info

Customizing SharePoint Communities for Windows Phone 7
[ 120 ]
2. When the page changes to edit mode, click on the text inside the About this blog section.
3. At this point, the ribbon at the top will have the following four main sections:° Editing Tools: This has the basic text editing tools that are familiar to
anyone who has used Word.° Table Tools: The about section is actually a table with two rows and
one column. The top cell has the image, and the bottom has the text. The Table Tools section of the ribbon allows us to manage this table.
° Page Tools: These are the basic tools that are global to the page and not specific to this section.
° Web Part Tools: This part of the ribbon contains tools that allow us to minimize, restore, or delete the web part. It also allows us to edit the Web Part Properties. These properties include the title, as well as other appearance features such as height and width. It also includes layout information and some advanced features.
CategoriesThe next section to customize on this blog site is the list of categories. When creating a blog entry, we can categorize the contents with a tag. The default categories for a new blog are as follows:
• Category 1• Category 2• Category 3
The following steps show how to customize these categories:
1. Click on the title Categories in the left column. This will open the list page for the categories.
2. The categories list will display the three default categories. For each category, click on the Edit icon, as shown in the following screenshot:
www.it-ebooks.info

Chapter 5
[ 121 ]
3. Change the Title to something that makes sense for the blog which we are creating.
4. Click on the Save button.
Repeat these steps for all three of the default categories. To add more categories, click on the Add new item link below the list of categories. To delete a category, carry out the following steps:
1. Move the pointer over the title of the category.2. This will trigger an arrow to appear to the right of the title next to the edit
icon. Click on this down arrow.3. In the context menu that appears, select the Delete Item option.4. A confirmation message will appear asking if we are sure we want to send it
to the recycle bin. Click on OK and the category will be deleted.
www.it-ebooks.info

Customizing SharePoint Communities for Windows Phone 7
[ 122 ]
Blog ToolsNow that we have a blog, how do we manage the content? This is where the Blog Tools section comes into use. There are 4 links to help us manage the blog, which are as follows:
1. Create a post2. Manage posts3. Manage comments4. Launch blog program to post
Create a postClicking on the Create a post link will open a modal dialog with a form to fill out to create a new blog entry. The fields include the following:
• Title: This is a plain text field used for the title of the entry.• Body: This is a rich text field that utilizes the edit ribbon.• Category: Here we can select the categories that the entry is a part of.• Published: Here we can set a date for our entry to be published. Publishing
an entry in the future is helpful when we have information that isn't supposed to be public knowledge until a specific time and date, or when information needs to be published at a specific time and date.
The preceding fields are shown in the following screenshot:
www.it-ebooks.info

Chapter 5
[ 123 ]
Manage postsBlog entries, like most things in SharePoint, are items in a list. Clicking on the Manage posts link will display all the blog entries. From this list, we can perform many management functions such as the following:
• Manage approval status• Edit entries• View entries• Manage permissions• Delete entries
Manage commentsAll of the comments are managed in a separate list from the blog entries. Clicking on the Manage comments link will display all of the comments for all of the blog entries in this site. From here we can view, edit, or delete the comments, as well as manage permissions.
Managing permissions on comments and posts is a lot like managing permissions elsewhere in SharePoint. By default, the list items inherit the parent permissions, but occasionally we will want to have specific permissions for special cases. We could have a blog entry that we only want a small group of people to see, or maybe we want to save a comment, so that only we can see it. The manage permissions section is how we can deal with these cases. More information on managing permissions can be found in the online help or on TechNet at the following URL:http://technet.microsoft.com/en-us/library/cc721640.aspx
Launch blog program to postAlthough creating a blog entry in the web browser works well, sometimes we may want to use a more powerful tool to create entries. The Launch blog program to post link will open Microsoft Word 2007, or a newer version, to edit a new blog entry.
www.it-ebooks.info

Customizing SharePoint Communities for Windows Phone 7
[ 124 ]
Configuring Windows Live WriterThere is a link in Blog Tools to launch Microsoft Word 2007 or newer, to create a new blog entry. Although Word does a pretty good job of creating new blog entries, there is a free tool from Microsoft, named Windows Live Writer (http://explore.live.com/windows-live-writer) which is true genius when it comes to editing blog entries. Using this tool can make most, if not all, blog posting tasks much easier within SharePoint. Configuring Windows Live Writer for a SharePoint is simple:
1. When setting up Windows Live Writer, select SharePoint from the What blog service do you use?
2. Click on Next and enter the URL of the SharePoint blog.3. Click on Next and provide the SharePoint authentication information.
That's all there is to it. The Windows Live Writer interface also displays a preview of what the blog entry will look like in the site by clicking on the Preview tab at the bottom, as shown in the following screenshot:
www.it-ebooks.info

Chapter 5
[ 125 ]
LinksFinally, the links section allows us to add hyperlinks to the page for easy access to anything. The default entry is to a photo library named Photos. Adding a new link is as simple as the following steps:
1. Click on the Add new link hyperlink.2. Enter the URL for the link.3. Optionally, enter a description that will be used in place of the raw URL for
display.4. Optionally, add any notes. Notes show up when viewing the full list of links.
The full list of links can be viewed by clicking on the title Links from the home page.
5. Click on Save, as shown in the following screenshot:
www.it-ebooks.info

Customizing SharePoint Communities for Windows Phone 7
[ 126 ]
Getting SharePoint blog sites working well with Windows Phone 7As we saw in Chapter 4, the default view of lists is not very easy to read. As a SharePoint blog is a list of blog entries, the default view of all the posts in our blog site looks about the same as we saw with the Announcement list display in Chapter 4.
To customize this section, we can use the same methods that we used in Chapter 4. Specifically, we want to customize and then list item outputs for posts. As we learned back in Chapter 4, we need to create a user control. Carry out the following steps, which are almost identical to what we did in Chapter 4, to increase the font size of the list of blog entries:
1. Open Visual Studio 2010 as Administrator by right clicking on the icon and selecting Run as administrator on the context menu.
www.it-ebooks.info

Chapter 5
[ 127 ]
As we need to be able to restart Windows Services, specifically the IIS services, we need Visual Studio 2010 to run as Administrator; and in order to do that, we need administrator rights on the development server, as well as in SharePoint.
2. Select Yes in the UAC (User Authentication Control) dialog.3. Once Visual Studio has opened, select File | New Project.4. In the 2010 node of the SharePoint templates, select Empty SharePoint
Project.5. Give the project a name similar to CustomBlogForm.6. Give the solution a name, for example Chapter05 and select the OK button.7. Next, Visual Studio will give you the option: Specify the site and security
level for debugging. Enter the URL for your SharePoint server and select the trust level of Deploy as a farm solution.
8. Click on the Finish button and Visual Studio will create the empty SharePoint project for us.
9. Right click on the CustomBlogForm project in Solution Explorer.10. In the context menu that appears, select Add | SharePoint Mapped Folder.11. In the Add SharePoint Mapped Folder tree view that appears, select the
arrow to expand TEMPLATE.12. Once TEMPLATE has been expanded, select CONTROLTEMPLATES.13. Finally, click the OK button to map this folder into our solution.14. In Solution Explorer, right click on CONTROLTEMPLATES and select Add
| New Item….
15. In the Add New Item dialog that appears, select User Control from the SharePoint 2010 installed templates.
16. Give the user control a name: MoblogPostsViewContents.ascx.17. Finally, click on the Add button to create the user control.18. Delete the two files: MoblogPostsViewContents.ascx.cs and
MoblogPostsViewContents.ascx.designer.cs.19. Open the file MoblogPostsViewContents.ascx and ensure that the Source
view is enabled.20. Delete all the contents of this file.
www.it-ebooks.info

Customizing SharePoint Communities for Windows Phone 7
[ 128 ]
21. Add the following code to the file to define the user control and assemblies:<%@ Control Language="C#"%> <%@ Assembly Name="Microsoft.SharePoint, Version=14.0.0.0, Culture=neutral, PublicKeyToken=71e9bce111e9429c" %>
22. Add the following code to register the XML tag prefixes that will be used in the page:<%@ Register TagPrefix="mobile" Namespace="System.Web.UI.MobileControls" Assembly="System.Web.Mobile, Version=1.0.3300.0, Culture=neutral, PublicKeyToken=b03f5f7f11d50a3a" %>
<%@ Register TagPrefix="SharePoint" Namespace="Microsoft.SharePoint.WebControls" Assembly="Microsoft.SharePoint, Version=14.0.0.0, Culture=neutral, PublicKeyToken=71e9bce111e9429c" %>
<%@ Register TagPrefix="SPMobile" Namespace="Microsoft.SharePoint.MobileControls" Assembly="Microsoft.SharePoint, Version=14.0.0.0, Culture=neutral, PublicKeyToken=71e9bce111e9429c" %>
23. To start the actual template code for the page, add the following code. Although we've named the file for this user control the same as the ID listed here, it is in fact the ID here that lets SharePoint know that this template should be used for rendering the announcements display form contents:<SharePoint:RenderingTemplate runat="server" ID="MoblogPostsViewContents">…</SharePoint:RenderingTemplate>
24. Next, inside the Rendering Template element that we just added, we add an element that tells the Rendering Template that we are going to specify our own template.<Template>…</Template>
25. The next element nested within the Template element is a div with an inline style attribute to let the browser know that we don't want the default font size, but instead we want a font size of 13 points:<div style="font-size: 13pt;">…</div>
www.it-ebooks.info

Chapter 5
[ 129 ]
26. Finally, add the default code for the mobile blog rendering:
<SPMobile:SPMobileControlContainer ID="SPMobileControlContainer1" RunAt="Server" BreakAfter="false"> <SPMobile:SPMobileCategoryPicker RunAt="Server" id="CategoryPickerForMoblog" BreakAfter="false" /> <SPMobile:SPMobilePostsRefreshNavigation ID="SPMobilePostsRefreshNavigation1" RunAt="Server" Text="<%$Resources:wss, mobile_button_refresh_text%>" controlforrefresh="CategoryPickerForMoblog" /> <SPMobile:SPMobileComponent ID="SPMobileComponent1" RunAt="Server" TemplateName="MobileDefaultSeparator" /> </SPMobile:SPMobileControlContainer> <SPMobile:SPMobilePostsListItemIterator RunAt="Server" ListItemSeparatorTemplateName="MobileListItemSeparator" /> <SPMobile:SPMobileLabel ID="SPMobileLabel1" RunAt="Server" Text="" Weightless="true" />
Just about everything from step 1 through 25 is the same as what we did in Chapter 4. The big difference in this is the naming convention. In the previous example, we used this naming convention: IntendedPageUse_SiteTypeID_PageType_PageArea and with that we constructed Mobile_104_DispForm_Contents. Blogs use an older naming convention that does away with the underscores and uses the IntendedPageUse of Moblog instead. This results in a page name and a Rendering Template ID of MoblogPostsViewContents.
Just like in Chapter 4, the user control code file name doesn't matter as much as the Rendering Template ID. Unlike in Chapter 4, this example shows the use of a string for SiteTypeID. We could have used the SiteTypeID of 301 instead of the string Posts.
www.it-ebooks.info

Customizing SharePoint Communities for Windows Phone 7
[ 130 ]
Putting all this together and deploying, it results in a view that looks like the following screenshot:
In addition to modifying the all posts view, there are two other pages that can be modified. Those are the Comments and the Category list views. They have a SiteTypeID of 302 and 303 respectively. Combining all three of these site types with the various page types will produce a slew of templates for all our needs.
The list of SPListTemplateType enumerations used for SiteTypeID can be found at the following URL:http://msdn.microsoft.com/en-us/library/microsoft.sharepoint.splisttemplatetype.aspx
www.it-ebooks.info
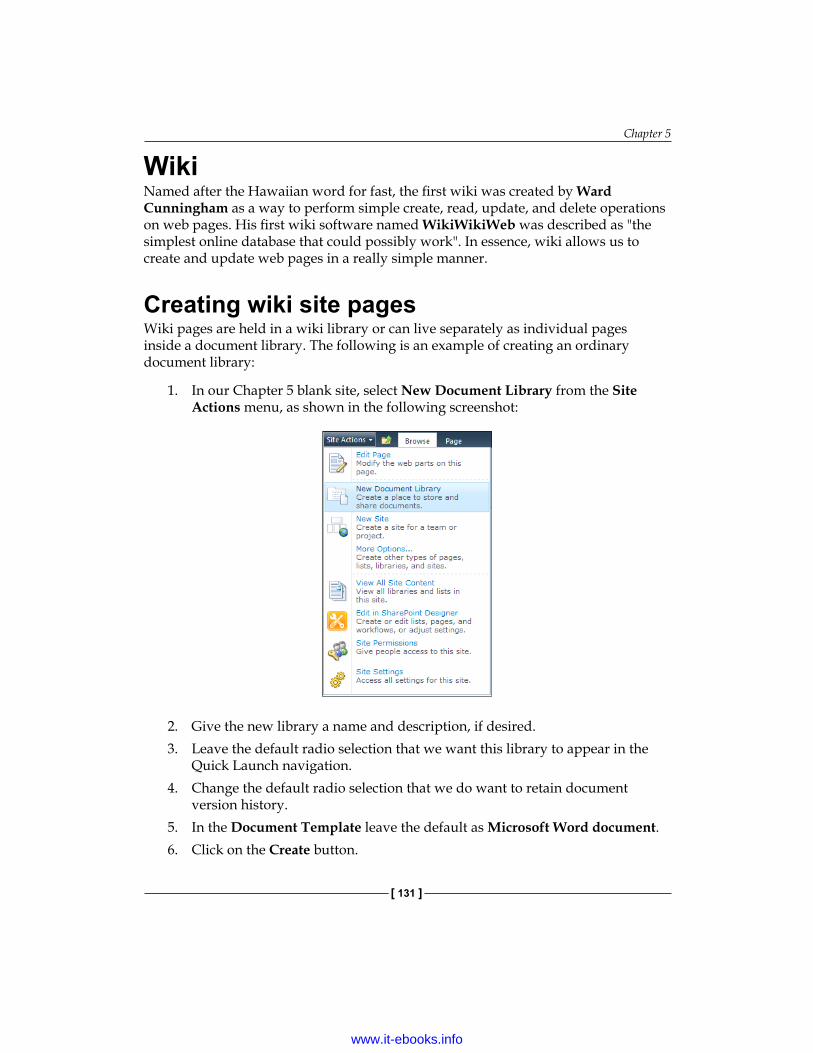
Chapter 5
[ 131 ]
WikiNamed after the Hawaiian word for fast, the first wiki was created by Ward Cunningham as a way to perform simple create, read, update, and delete operations on web pages. His first wiki software named WikiWikiWeb was described as "the simplest online database that could possibly work". In essence, wiki allows us to create and update web pages in a really simple manner.
Creating wiki site pagesWiki pages are held in a wiki library or can live separately as individual pages inside a document library. The following is an example of creating an ordinary document library:
1. In our Chapter 5 blank site, select New Document Library from the Site Actions menu, as shown in the following screenshot:
2. Give the new library a name and description, if desired.3. Leave the default radio selection that we want this library to appear in the
Quick Launch navigation.4. Change the default radio selection that we do want to retain document
version history.5. In the Document Template leave the default as Microsoft Word document.6. Click on the Create button.
www.it-ebooks.info

Customizing SharePoint Communities for Windows Phone 7
[ 132 ]
The document library will be created. As this is a document library, we can upload documents and they will appear here. However, the Site Actions menu now has a new option for New Page. Select this and give the new page a name. SharePoint will create a new wiki page and drop you into the rich text editing experience.
This may not always be the best way to do this type of work. The page will be created when we click on the Save button, there just won't be a link to it anywhere. We'll have to remember the URL and link to it from somewhere.
Another way to create a wiki is to start with a wiki library, as follows:
1. In our Chapter 5 blank site, select More Options… from the Site Actions menu.
2. In the dialog that appears, select Wiki Page Library, as shown in the following screenshot:
3. Give the new library a name, In our example, Wiki Library.4. Finally, click on the Create button.
www.it-ebooks.info

Chapter 5
[ 133 ]
SharePoint will create a Wiki Library and seed it with the following two pages:
1. Home2. How To Use This Library
Although the home page contains information that doesn't need to be kept, the How To Use This Library page contains some very valuable information that should be kept. This page contains some basic information on how wikis work.
Making wiki pages work with Windows Phone 7The great thing about wikis is that we are editing the content directly. If something doesn't look good in the mobile version, just use a desktop browser to edit the page and either increase the font size or rearrange content in the page to make it look good in the mobile version.
www.it-ebooks.info

Customizing SharePoint Communities for Windows Phone 7
[ 134 ]
SummaryThis chapter has introduced two main aspects of social computing with SharePoint 2010. Blogs are simple islands of information that are authored, usually by a single person. Wikis are pages or groups of pages that are usually authored by a group of people and represent a living document repository. Utilizing these in an organization can help bridge the gaps between different groups. Customizing the mobile templates used for these pages will allow Windows Phone 7 users to continue to join in the conversations while mobile.
In the next chapter, we will begin to investigate the client-side programming models available in SharePoint. We will begin to move away from the confines of Windows Phone 7's Internet Explorer Mobile browser and see how we can build Silverlight applications for the phone.
www.it-ebooks.info
Introduction to Programming Windows Phone 7 with the SharePoint Client Services
This chapter will introduce programming Windows Phone 7 applications. We will use RSS feeds that are provided from lists in SharePoint to display information to the Windows Phone 7 user. Throughout the chapter, we will build a simple RSS Reader application for Windows Phone 7 and add complexity to it as we go along. In this chapter, we will cover the following:
• Security in SharePoint 2010• Using WebClient to get data from the web• RSS feeds available from SharePoint• Parsing XML in Windows Phone 7• Simple page navigation• Using the WebBrowser control to display detail
So, let's begin this chapter with a brief discussion on security in SharePoint 2010.
Security in SharePoint 2010We begin this chapter with a discussion on security for a very simple reason: security in SharePoint is tricky. In addition to that one very simple reason, authenticating users against SharePoint from within a Windows Phone 7 client application is even trickier.
www.it-ebooks.info

Introduction to Programming Windows Phone 7 with the SharePoint Client Services
[ 136 ]
Following the directions for installing and setting up an initial web application and the first site collection from the instructions listed in Chapter 3 will result in a site that is so secure Windows Phone 7 connections will be all but impossible.
That is to say, it is not impossible. In this chapter, the example RSS reader that we develop will only use anonymous access to the RSS feeds in SharePoint. Setting up anonymous access is very simple and we'll walk through the steps here.
When writing this chapter, I came across a lot of errors on my testing server, but not my development server. After a couple of days of unsuccessful web searches and reinstalling different components, I discovered the root of my problem was due to the fact that the SharePoint 2010 Prerequisites install a non-final version of ADO.NET Data Services 1.5. Make sure the final version is installed from Microsoft. More information is available at the following URL:http://blogs.msdn.com/b/astoriateam/archive/2010/01/27/data-services-update-for-net-3-5-sp1-available-for-download.aspx
There are two places where we need to make changes to our SharePoint site to enable anonymous access:
• Central Administration• Site Permissions
Central AdministrationFollowing the directions from Chapter 3 resulted in a web application that was set up with Classic Mode Authentication. Classic mode authentication is more or less just classic Windows authentication using NTLM or Kerberos.
Although Internet Explorer Mobile in Windows Phone 7 can do the NTLM authentication, as we've been doing up to now to view SharePoint sites in the browser, the version of Silverlight that is included in Windows Phone 7 cannot currently use this authentication mechanism.
In the next chapter, we will convert our classic mode authenticated site into a Claims Based Authentication site. This will allow us to use forms based authentication along with a more bare metal approach to web connections to gain access to secure content.
For now, let us continue with our path to anonymous access. Carry out the following steps to configure Central Administration for anonymous access:
www.it-ebooks.info

Chapter 6
[ 137 ]
1. From the Start menu, select All Programs.2. Find the folder named Microsoft SharePoint 2010 Products in the list of
programs and click on it.3. Click on SharePoint 2010 Central Administration.4. You need to select the Yes option on the User Account Control dialog that
may appear.
At this point, the home page for SharePoint 2010 Central Administration should appear as displayed in the following screenshot:
Next, click on Manage web applications. The page that appears lists out all of the web applications in the SharePoint site. There should be two items listed here, but it is possible there are more. Select the main website by clicking on its name. This main website is usually titled SharePoint – 80. Once selected, the ribbon bar across the top should light up, as all the icons become active. Carry out the following steps to enable anonymous access:
1. Click on the Authentication Providers icon.2. In the Authentication Providers dialog that appears, select the Default link.3. The Edit Authentication dialog box will appear. In the third section, down
under a heading of Anonymous Access there is a check box listed as Enable anonymous access. Check that box.
www.it-ebooks.info

Introduction to Programming Windows Phone 7 with the SharePoint Client Services
[ 138 ]
4. Scroll all the way to the bottom of the dialog box and select the Save button.5. SharePoint 2010 will process the request. Then, return to the Authentication
Providers dialog box and close it.
There is one more section that may need tweaking and if this is a production environment, it should be considered. That section is Anonymous Policy. Click on the icon for it in the ribbon and a dialog box will appear. From here, we can customize the anonymous policy for the site.
• None – No policy basically leaves the door open for read and write access from anonymous users. This is a good policy to use when anyone who can access the site should also be able to modify the content of the site. This is a good policy for Wiki's.
• Deny Write – Has no write access allows the anonymous users to read the site, but they cannot write, update, or delete content. This is a good policy to use for sites that we want to specify particular authenticated accounts write access, but allow everyone the ability to read the content. Some Wiki's use this policy and a lot of blogs use this policy.
• Deny All – Has no access selecting this removes all permissions to the anonymous user. Secure content should always use this policy.
Site PermissionsOnce we have updated the web application to allow anonymous access, we have to give anonymous users access to the site collection. To do this, we close Central Administration and open our SharePoint site. Once on the site, select Site Permissions from the Site Actions menu.
This will open the Permissions home page. In the ribbon at the top, there is an icon named Anonymous Access. Click on that button and the Anonymous Access dialog will appear, as shown in the following screenshot:
www.it-ebooks.info

Chapter 6
[ 139 ]
This dialog has three radio buttons to fine tune the access that anonymous users have. The key point to remember here is that although we are really opening up the site for everyone to see, we can break the inherit permissions model on a child page at any time if we need to remove anonymous access.
Now that we have opened up our SharePoint site to anonymous users, we can begin to write applications for Windows Phone 7. In a production environment, we may not have the privilege of opening a SharePoint site this wide, but remember that we are only doing it for demonstration purposes here. We have to walk before we can run. Now, let's get started on the RSS reader.
Using WebClient to get data from the webAs was stated in the introduction to this chapter, we are going to build a really simple RSS reader for Windows Phone 7. We are going to keep everything really simple. What that means is that we are going to focus on the pieces of code that actually do something.
www.it-ebooks.info

Introduction to Programming Windows Phone 7 with the SharePoint Client Services
[ 140 ]
This is what we are going to do:
• Create our base project• Add a text block to display the WebClient results• Create a WebClient• Use the WebClient to request the contents of our SharePoint home page• Display the raw HTML that is returned in the text block on the page
First, a quick word about WebClient. WebClient isn't the most robust method of making requests over a network, but it's really simple and works for simple cases, such as the one we are working with. In Chapter 7, we will introduce HttpWebRequest, as it provides us with a mechanism by which we can perform forms authentication.
Creating the base projectWe can start by creating our base project. This RSS reader will use the Visual Studio Silverlight for Windows Phone Windows Phone Application template. Carry out the following steps to start the project:
1. Open Visual Studio 2010.2. Select File from the main menu and then select New Project….3. In the New Project dialog box that appears, select Silverlight for Windows
Phone.4. Then select Windows Phone Application from the list of templates for
Windows Phone.5. Give the project a name, for example SimpleRSSReader.6. Give the Solution a name, for example Chapter06.7. Change the Location as desired and click on the OK button.
At this point, Visual Studio will go off and create the solution and project. When it has finished, MainPage.xaml will appear on the screen in split screen mode, as shown in the following screenshot:
www.it-ebooks.info
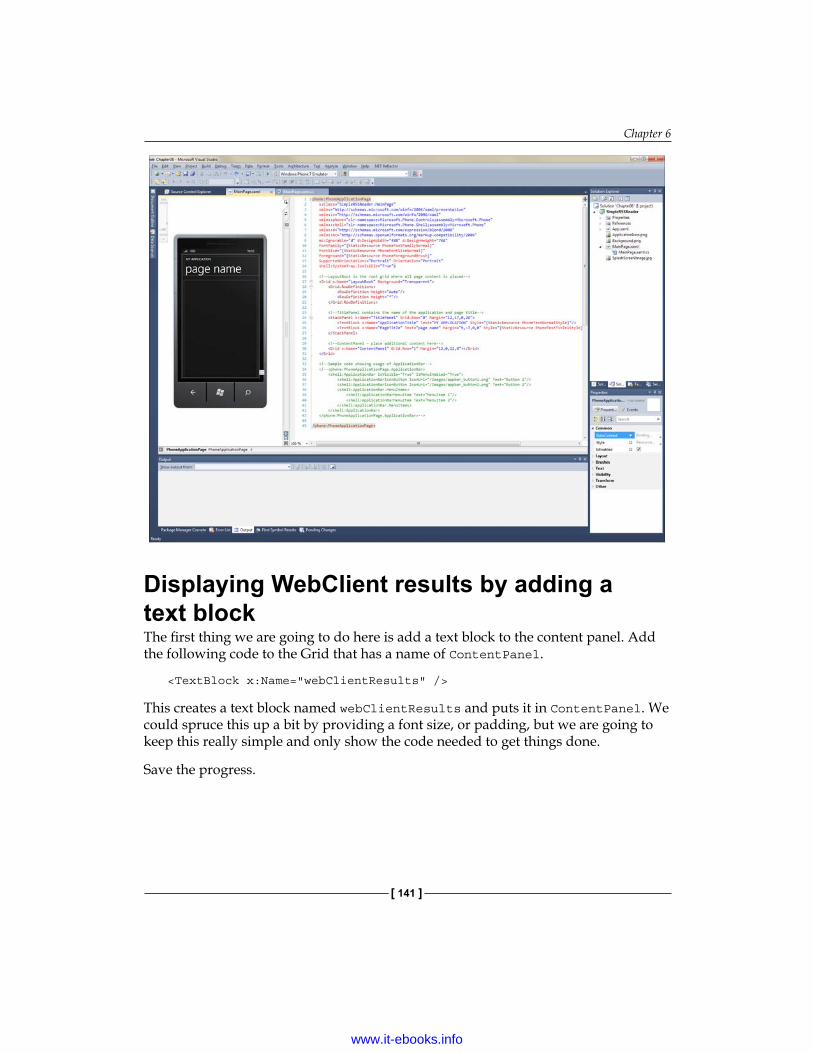
Chapter 6
[ 141 ]
Displaying WebClient results by adding a text blockThe first thing we are going to do here is add a text block to the content panel. Add the following code to the Grid that has a name of ContentPanel.
<TextBlock x:Name="webClientResults" />
This creates a text block named webClientResults and puts it in ContentPanel. We could spruce this up a bit by providing a font size, or padding, but we are going to keep this really simple and only show the code needed to get things done.
Save the progress.
www.it-ebooks.info

Introduction to Programming Windows Phone 7 with the SharePoint Client Services
[ 142 ]
Creating a WebClientOpen up the code behind by either clicking on it in the top tab bar, double-clicking the file name in Solution Explorer, or press F7 while in the XAML code.
In the code behind, create a private member variable, outside the constructor, named client of type WebClient and a private member variable, also outside the constructor, named siteUrl of type string. The siteUrl should have a value that is the URL to your SharePoint home page.
private WebClient client = new WebClient();private string siteUrl = "http://ssps2010/";
These are the variables that we'll be using in just a minute. The first is the WebClient that makes the requests on the network. The second is the Url for our SharePoint home page. This is the address that the WebClient will use to request a web page.
Requesting the contents of our SharePoint home pageNow that we have a WebClient, let us do something with it. Add the following code to the Main Page constructor:
client.DownloadStringCompleted += new DownloadStringCompletedEventHandler(client_DownloadStringCompleted);client.DownloadStringAsync(new Uri(siteUrl));
The first line adds a new event handler to the DownloadStringCompleted event. This event handler is called client_DownloadStringCompleted and we will write it shortly. The second line is what starts an asynchronous request to our SharePoint home page to get the HTML content.
Displaying the raw HTML that is returnedUntil now, we've created a place in the content panel to display our results. We've created a couple of variables. We've added a new event handler for when the WebClient finishes and we've made the web request for our SharePoint home page. Next, we are going to receive the result from the WebClient.
Earlier, when we added a new event handler to the WebClient, we told WebClient that when it finishes downloading the string, it should call our method named client_DownloadStringCompleted. The following is the code for that method:
www.it-ebooks.info
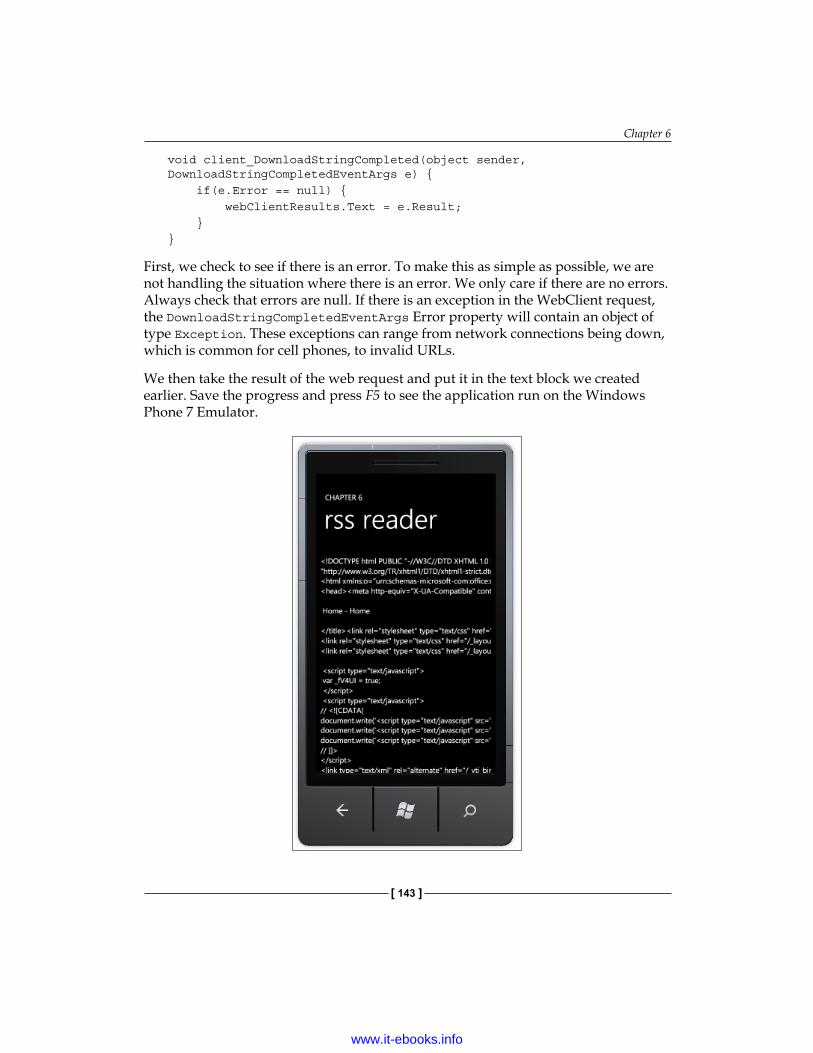
Chapter 6
[ 143 ]
void client_DownloadStringCompleted(object sender, DownloadStringCompletedEventArgs e) { if(e.Error == null) { webClientResults.Text = e.Result; }}
First, we check to see if there is an error. To make this as simple as possible, we are not handling the situation where there is an error. We only care if there are no errors. Always check that errors are null. If there is an exception in the WebClient request, the DownloadStringCompletedEventArgs Error property will contain an object of type Exception. These exceptions can range from network connections being down, which is common for cell phones, to invalid URLs.
We then take the result of the web request and put it in the text block we created earlier. Save the progress and press F5 to see the application run on the Windows Phone 7 Emulator.
www.it-ebooks.info

Introduction to Programming Windows Phone 7 with the SharePoint Client Services
[ 144 ]
In the preceding screenshot, ApplicationTitle and PageTitle have also been updated. Both of these text blocks are found in the XAML in TitlePanel.
We have successfully used WebClient to read data from the web and display it on the screen. It is still in a raw format though, and it isn't much of an RSS reader, especially since this page isn't even RSS. We will get there, but first let's find some RSS in SharePoint.
RSS feeds available from SharePointOne of the really cool things in SharePoint is that almost every list in it has an RSS feed associated with it. Unless specifically set to not emit an RSS feed, all lists have a feed associated with them.
Carry out the following steps to ensure RSS is enabled on a site collection:
1. From the site's home page, select Site Settings from the Site Actions menu.2. On the Site Settings page, under the Site Administration section, select the
RSS link.3. This opens up the page that allows us to enable or disable RSS feeds. Ensure
that the Site Collection RSS and Enable RSS section check boxes are checked.
4. Add in any of the Advanced Settings information that may be required. We won't be using it in our demos, but in production these might be needed.
5. Finally, click on the OK button and SharePoint will save the settings.
The basic question of how to customize the feed from each list comes up a bit and that procedure is actually quite simple.
1. Navigate to the list that we want to customize.2. At the top, click on List in the List Tools section.3. In the list ribbon, click on the List Settings icon. If the icon is disabled, you
may be viewing the site anonymously and will need to login from the link at the top left.
4. Under Communications is a link for RSS settings. Click on that link.
The Modify RSS Settings page has a lot of information that can be customized, from the ability to turn off RSS altogether, down to what columns from the list should be included in the RSS description. The following example is a screenshot of this page:
www.it-ebooks.info

Chapter 6
[ 145 ]
After customizing the content, click on the OK button to save changes.
www.it-ebooks.info

Introduction to Programming Windows Phone 7 with the SharePoint Client Services
[ 146 ]
Now that we have the feed customized, where's the link? Good question. Back on the default view for the list, click on List in the List Tools menu to display the list ribbon. The list ribbon includes a link for the RSS Feed in the middle. Click on it and the feed will open in the browser. Copy the URL because we will use it in the next step of our RSS reader.
Parsing XML in Windows Phone 7Let's go back to the application that we are building in Visual Studio. First, change siteUrl in the MainPage.xaml.cs file to the RSS Feed URL that we got from our list.
private string siteUrl = "http://ssps2010/chapter6/_layouts/listfeed.aspx?List=%7BD45848A1%2D12E8%2D4722%2DAB5B%2D511BF802F8D8%7D&Source=http%3A%2F%2Fssps2010%2Fchapter6%2FLists%2FEngineering%2520Notes%2FAllItems%2Easpx";
Now, rerun the application in the emulator and the raw XML from the RSS feed will appear in the text block. Now that we have the XML feed in a string, we should display it in a more meaningful way. To do that, let's do the following:
1. Replace the text block display with a list box2. Create a simple view model for an RSS Item3. Parse the XML4. Create a list of RSS Items5. Bind the list of RSS Items to the list box
Sounds simple, right? Before we begin though, a quick word about a term we used in step 2. Although we are going to create a view model that will hold each RSS item, we are not following a strict MVVM (Model View ViewModel) pattern here. We are simply utilizing a view model to assist in binding the data to the view. If this application grew up to be a fully featured RSS reader, we would probably want to refactor it to an MVVM pattern, but that is an optimization that we simply don't need right now. Also, it flies in the face of attaining the simplest code that will get the job done here.
www.it-ebooks.info

Chapter 6
[ 147 ]
Replacing the text block display with a list boxThe first step here is to replace the text block that we were using to dump the string output with a list box, where we can display each individual RSS item. To do that, open MainPage.xaml and delete the TextBlock with a name of webClientResults. In its place, enter the following XAML:
<ListBox x:Name="feedListBox"> <ListBox.ItemTemplate> <DataTemplate> <StackPanel HorizontalAlignment="Stretch"> <TextBlock Text="{Binding Title}" TextWrapping="Wrap" /> <TextBlock Text="{Binding Date}" /> </StackPanel> </DataTemplate> </ListBox.ItemTemplate></ListBox>
Working from the inside out, we are going to display each RSS item's title and date. We do this with text blocks and bind the text property to the data for the particular list box item. As the titles can get long, we've included text wrapping on the title.
These text blocks are placed inside a stack panel. This means that the title will be stacked on top of the date. We have also set the width of the stack panel. Without this width, the title text block won't wrap properly.
This stack panel is placed inside the data template for the list box item template. This list box item template is a property of the list box that we've replaced our text block with.
The name of this list box is feedListBox. In the code behind, we will bind the RSS item list to the items source for this list box. Save the progress.
Creating a simple view model for an RSS ItemBefore we can bind the RSS items list to the list box, we need to have a list of RSS items. Before we can have a list of RSS items, we need to define what an RSS item is. This is where the view model comes in. Carry out the following steps to create a class that will house our view model:
1. Right click on the SimpleRSSReader project in Solution Explorer.2. In the context menu that appears, select Add and then select the Class…
option.
www.it-ebooks.info

Introduction to Programming Windows Phone 7 with the SharePoint Client Services
[ 148 ]
3. This will open the Add New Item dialog with the Class template already selected.
4. In the Name field, name the new class as RSSItem.cs.5. Click on the Add button and Visual Studio will create the class and open it in
the main IDE window.
In the class, add the following code:
public string Title { get; set; }public string Date { get; set; }public string PostUrl { get; set; }
This creates three public properties that we will use for our RSS feeds. Although RSS items have more fields associated with them, these are the only three that we will need for this exercise.
Something of note in these properties is the Date field. The publish date of a post is DateTime, but we are using it as a string here for the simple fact that we don't really need a DateTime. When we parse the XML in the next step, it will save us from having to convert from string to DateTime and then back to string when we data bind it to the text block. Save the progress.
Parsing the XMLWe've replaced the text block with a list box and created a simple view model for our RSS items. Next, we will parse the XML string that was returned from the WebClient.
1. In Solution Explorer, right click on References for the SimpleRSSReader project.
2. In the Add Reference dialog box, find System.Xml.Linq and add it to the project.
3. Open the Main Page code behind.4. Add this using statement to the top of the page: using System.Xml.Linq;5. Locate the client_DownloadStringCompleted event handler.6. Delete this line of code: webClientResults.Text = e.Result;7. Add the following code where the preceding line of code was:
var result = e.Result;var rssElement = XElement.Parse(result);
8. Save the file.
www.it-ebooks.info

Chapter 6
[ 149 ]
The first thing we did here was to add a reference to Windows Phone 7's LINQ to XML namespace. This contains classes, such as XElement that we use to parse the XML string, as well as the LINQ engine that we will use in the next step to create the list of RSS items.
Language-Integrated Query, LINQ, was introduced into the .NET Framework in Version 3.5. It provides a general purpose syntax that allows for powerful data processing in .NET. More information on LINQ is available at the following URL:http://msdn.microsoft.com/en-us/library/bb308959.aspx
Next, let's create a list of RSS Items.
Creating a list of RSS ItemsNow we have a place to put the RSS items, we have a model of what an RSS item looks like, and we have an XElement with our RSS feed stuffed in it. The next thing to do is take the XElement and perform a LINQ statement to get a list of RSS Items.
In the previous step, we parsed the XML into a variable named rssElement. Immediately after that, add the following statement:
var items = from item in rssElement.Descendants("item") select new RSSItem { Title = item.Element("title").Value, Date = item.Element("pubDate").Value, PostUrl = item.Element("link").Value };
Wow, that is one statement. What we are doing here is searching through the XElement for all item elements. Once we have an item element, we call it an item and use it to create a new RSSItem. Lines 4, 5, and 6 parse the item element further to get the string values for specific elements in the item element.
Again at this point, you'll notice in line 5 that we could have parsed the publish date as a DateTime, but since we will only ever use it as a string, it's easier to just grab the value as a string.
Once the RSSItem has been created, it is added to the list of RSS items in the variable items. We will use this variable to bind to our list box.
www.it-ebooks.info

Introduction to Programming Windows Phone 7 with the SharePoint Client Services
[ 150 ]
Binding the list of RSS Items to the list boxWe've come to the point where we take the list of RSS items and actually bind that data to the list box we created earlier. This is done in a single line of code, as follows:
feedListBox.ItemsSource = items;
Save the file, build, and then run the application in the Windows Phone 7 Emulator. You will see something similar to the following screenshot:
It's a bit hard to read, so let's go back to the XAML and make some changes to the text blocks.
First, change the Title text block as follows:
<TextBlock Text="{Binding Title}" TextWrapping="Wrap" Style="{StaticResource PhoneTextTitle2Style}" />
www.it-ebooks.info

Chapter 6
[ 151 ]
This adds a style from the static resources included with the phone that is more fitting a title.
Next, change the Date text block as follows:
<TextBlock Text="{Binding Date}" Style="{StaticResource PhoneTextAccentStyle}" />
This adds the accent color from the phone to the date to make it stand out a bit, as shown in the following screenshot:
Windows Phone 7 has customization available to the end user, which allows them to select between 10 different accent colors and an overall theme of dark or light. The advantage of using the built-in Static Resources for Windows Phone 7's styles is that when the end user changes the theme color from dark to light or the accent color to one of the 10 options on the phone, your application will pick it up and look like it's more of a part of the phone.
www.it-ebooks.info

Introduction to Programming Windows Phone 7 with the SharePoint Client Services
[ 152 ]
This works well if that is the goal of your application. If we want to maintain a certain corporate branding though, we should create a custom resource file which contains all of our corporate color schemes and use that resource data. This, of course, is beyond the scope of this book.
Simple page navigationUp to now, we've learned how to create a WebClient to request data from the network. We have used that to get an RSS feed and parse the data into a list of RSS items. We then bound that data to a list box where we displayed the title and the date of the posts. An RSS post is more than just a title and a date though. The user needs some way to read the entire post. In this section, we will perform simple page navigation with the following steps:
• Build a details view page• Set up a new event handler to listen for selected item changes on the list box• When the event handler is triggered, build an Uri for navigation• Navigate to the details view page• Handle the loaded event on the details view page
Building multiple page applications in Windows Phone 7 is a lot like building web applications. Each view has a different page associated with it. Navigating between pages happens with an Uri and a query string in which we will pass the URL for the post link. We will then display that URL link in a message box on the screen.
Building a details view pageThe first thing we do to display the post is create a new page for details. Carry out the following steps to create the details view page:
1. In Solution Explorer, right click on the SimpleRSSReader project.2. In the context menu that appears, select Add and then select New Item….3. In the Add New Item dialog that appears, select the Windows Phone
Portrait Page template.4. Name the new page DetailsView.xaml, as shown in the following
screenshot:
www.it-ebooks.info

Chapter 6
[ 153 ]
5. Click on the Add button and Visual Studio will create the new page.
That's all there is to creating the new details view page. There isn't anything in the page yet. Later in this section, we will listen for the page loaded event and display a message box with the link that was passed in, and in the next section we will add a WebBrowser to the page to display the RSS post. For now, save the page and reopen the MainPage.xaml.cs file.
Setting up a new event handlerBack in the code behind the main page, find the page constructor. We are going to refactor this constructor a bit and add in a page loaded event. Change the constructor to the following code with the highlighted line as the new line. Notice that we've also removed the client event handler and the start for the download. We will add that back in just a second.
public MainPage() { InitializeComponent(); this.Loaded += new RoutedEventHandler(MainPage_Loaded);}
www.it-ebooks.info

Introduction to Programming Windows Phone 7 with the SharePoint Client Services
[ 154 ]
Next, add in the code for this new event handler as follows; notice that we are adding the WebClient event handler and the start of the download again:
void MainPage_Loaded(object sender, RoutedEventArgs e) { client.DownloadStringCompleted += new DownloadStringCompletedEventHandler(client_DownloadStringCompleted); client.DownloadStringAsync(new Uri(siteUrl)); feedListBox.SelectionChanged += new SelectionChangedEventHandler(feedListBox_SelectionChanged); }
Notice the highlighted line of code. This is the new event handler that we are adding to listen for the list box's selection changed event handler. This event is fired when the user selects one of the list box items on the screen.
Finally, we need to build up the base event handler for this selection changed event. Add the following code to the class:
void feedListBox_SelectionChanged(object sender, SelectionChangedEventArgs e) {}
We aren't doing anything in this event yet, but we will in the next part. For now just leave it blank.
Building the Uri for navigationUp to now, we created a details view page and added an event handler on the main page's list box that listens for the selection changed event. Now, we are going to use that event to get the information needed to build the Uri needed for navigation.
In the feedListBox_SelectionChanged event handler, add the following lines of code:
if(feedListBox.SelectedIndex == -1) return;var selectedItem = (RSSItem)feedListBox.SelectedItem;var navigationUri = new Uri("/DetailsView.xaml?selectedItem=" + selectedItem.PostUrl, UriKind.Relative);
To start this off, we first check that an item in the list is selected. If the selected index is -1, then we know that the selected index was just reset. We can ignore this and just return the control of the app to the user.
However, if the selected index is not -1, then something is selected. We next take the selected item cast it into an RSSItem and save the result in a variable named selectedItem.
www.it-ebooks.info

Chapter 6
[ 155 ]
The last line does the following three things.
1. It builds up a string containing the Uri for the details view page we created earlier, and it adds a query string containing the link to the post.
2. It uses this string to create a new Uri.3. It specifies that the kind of Uri that we are building is a relative path. This
means it will look within the XAP for the resource requested. We will use this Uri in the next step to navigate to the details view page.
Navigating to the details view pageIn the last section, we built up an Uri to use to navigate to the details page. In this section, we will use NavigationService to open the details view page. Finally, we will reset the selected index of the list box back to -1 for when the user navigates back to the main page.
Add the following two lines of code below the line where we created the Uri:
NavigationService.Navigate(navigationUri);feedListBox.SelectedIndex = -1;
With the preceding two lines of code, the control of the application will transfer to the navigation system to transition from the main page to the details view page. Finally, the details view page will load and a loaded event will fire. We will take advantage of that event next.
Handling loaded events on the details pageIn the last section, we navigated to the details page and reset the selected index of the feed list box. In this section, we will return our attention to the details page and display the selected item query string parameter that was passed into the page.
First, we need to hook up an event handler to the loaded event. This is similar to what we did in the main page. Add the following highlighted line to the constructor of the details page:
public DetailsView() { InitializeComponent(); this.Loaded += new RoutedEventHandler(DetailsView_Loaded);}
This is exactly the same as what we saw for the main page, only the name of the event handler has changed.
www.it-ebooks.info

Introduction to Programming Windows Phone 7 with the SharePoint Client Services
[ 156 ]
Add the following code below the constructor to handle the event:
void DetailsView_Loaded(object sender, RoutedEventArgs e) { var selectedItem = string.Empty; if(NavigationContext.QueryString.TryGetValue("selectedItem", out selectedItem)) { MessageBox.Show(selectedItem, "SELECTED ITEM", MessageBoxButton.OK); NavigationService.GoBack(); } else { MessageBox.Show("There was a problem", "ERROR", MessageBoxButton.OK); NavigationService.GoBack(); }}
This code block does a lot of things. So, let us go through it line by line. First, we create a variable to hold the value of the selectedItem. In our case, this will be a string that is the URL for the post we want to view.
Next, we begin the conditional statement by trying to get the query string value for selectedItem. This will return a Boolean and if the value is there, we display it in a message box.
If the query string value is not there, we display a simple error message. Both message boxes have an OK button and when the user clicks on the button, the navigation service returns us to the main page.
We are at a point now where we can compile the app and run it. The following screenshot shows what it looks like when navigated to the details view page:
www.it-ebooks.info
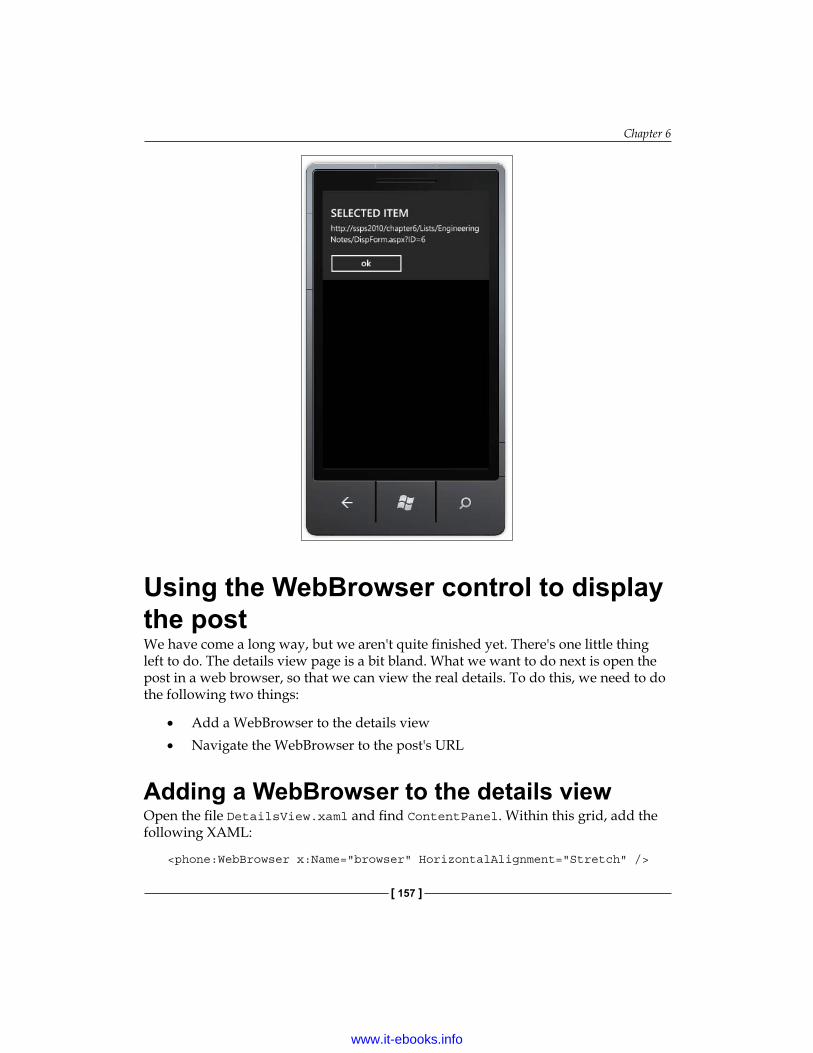
Chapter 6
[ 157 ]
Using the WebBrowser control to display the postWe have come a long way, but we aren't quite finished yet. There's one little thing left to do. The details view page is a bit bland. What we want to do next is open the post in a web browser, so that we can view the real details. To do this, we need to do the following two things:
• Add a WebBrowser to the details view• Navigate the WebBrowser to the post's URL
Adding a WebBrowser to the details viewOpen the file DetailsView.xaml and find ContentPanel. Within this grid, add the following XAML:
<phone:WebBrowser x:Name="browser" HorizontalAlignment="Stretch" />
www.it-ebooks.info

Introduction to Programming Windows Phone 7 with the SharePoint Client Services
[ 158 ]
This adds a WebBrowser control named browser to the content panel. It is important to give the web browser a width by either directly specifying a width or setting HorizontalAlignment to stretch, as we've done here. If we don't give the browser a width, the details page will appear blank.
While we are in the XAML, let's change ApplicationTitle and PageTitle to CHAPTER 6 and details view respectively. It's a minor thing, and not required for the app to work, but it's a good practice to get into. Save the changes and open the code behind for the details view.
Navigating to the post's URLOpen the file DetailsView.xaml.cs and look for the message box that displays the success message. Replace the following two lines of code (close to line 29 and 30):
MessageBox.Show(selectedItem, "SELECTED ITEM", MessageBoxButton.OK);NavigationService.GoBack();
with the following line of code:
Browser.Navigate(new Uri(selectedItem));
This navigates the web browser to the location we passed in earlier. Save the file and compile. Then run the application in the Windows Phone 7 Emulator.
www.it-ebooks.info

Chapter 6
[ 159 ]
SummaryIn this chapter, we took the first steps towards building Windows Phone 7 applications. We first briefly looked at SharePoint security and how to enable anonymous access. Next, we started our simple RSS reader by creating a WebClient to read data from the network and display it on the screen.
Next, we investigated the RSS options available in SharePoint and looked at how to customize those feeds. From those RSS feeds, we used our WebClient to load that data and then parse the XML into a list of RSS items. This was by no means the only way to parse RSS, but it was the simplest way.
Next, we had a brief introduction to page navigation, where we took a selected item and navigated to a details view page. Finally, we used the information we passed to the details view page to navigate a web browser control to the post.
In the next chapter, we will build on the basics learned here to build a dashboard application that will display key performance indicators (KPIs) that could be found within a production SharePoint system. In doing so, we will learn how to use representational state transfer (REST) and WCF Data Services (OData) to get information from SharePoint. We will also expand our knowledge of security in SharePoint by looking at how to use forms based authentication to get data that is not available to anonymous users.
www.it-ebooks.info

Building a Windows Phone 7 Dashboard Application
with SharePoint DataThis chapter will demonstrate many of the custom application paradigms that we encounter as we build enterprise applications for SharePoint 2010 and Windows Phone 7. We will build a simple dashboard that will demonstrate the display of important data and a graph to present information about key performance indicators for a fake company. To get to the data, we will introduce programming against SharePoint 2010 using the client-side API's. This includes using REST and WCF Data Services. We begin this chapter, as we began the last one, with a brief look at security. This chapter will cover the following topics:
• Forms-based authentication• Managed Client Object Model on the desktop• WCF Data Services to the rescue• Dashboard
Earlier in this book, we set up our development environment with SharePoint, Visual Studio, and all the Windows Phone 7 development tools all on one Windows 7 machine. It is at this point in the book where we should leave that behind and move to the more recommended approach of development. That is to say, we should have a SharePoint server separate from our development Windows 7 machine.
Let's start by taking a look at forms-based authentication.
www.it-ebooks.info

Building a Windows Phone 7 Dashboard Application with SharePoint Data
[ 162 ]
Forms-based authenticationIn Chapter 6, we opened our SharePoint site up for anonymous access. We did that so that we could look at the programming of an RSS feed reader against feeds found in SharePoint without having to discuss authentication. In the real world, this isn't a practical solution because our IT administrators would panic at the thought of having corporate data exposed without any authentication.
When building applications for Windows Phone 7 that use data from a SharePoint server, some form of authentication is required. As was stated in Chapter 6 though, NTLM or Kerberos authentication are not supported in the current version of the phone. Another mechanism must be employed to authenticate to SharePoint.
This is where we will use forms-based authentication (FBA) using claims-based authentication. Back in SharePoint 2003, setting up a site for forms-based authentication was a difficult job, and the end result was a very fragile site. This got better in 2007 and with 2010 the steps required for enabling forms-based authentication are very well documented. You can read the instructions here:
http://blogs.msdn.com/b/sridhara/archive/2010/01/07/setting-up-fba-claims-in-sharepoint-2010-with-active-directory-membership-provider.aspx
These instructions do the following:
• Create a new site using claims-based authentication• Configure the central administration site's web.config file for both an LDAP
connection string and a membership provider• Configure the web application's web.config file for both an LDAP
connection string and a membership provider• Configure the Security Token Service Application's (STS) web.config file
for both an LDAP connection and a membership provider• Configure the web application to use the specified membership provider
The trickiest thing in this whole exercise is getting the LDAP URI correct for the Active Directory domain that we need to authenticate against.
These instructions work great if we are just setting up a site for the first time. However, if a site already exists that we want to continue using, we'll need some way to convert an existing web application from classic mode to claims mode. Obviously, the first step in doing this type of thing is to backup the SharePoint environment. Next, follow the instructions from the TechNet website:
http://technet.microsoft.com/en-us/library/gg251985.aspx
www.it-ebooks.info

Chapter 7
[ 163 ]
The decision of what mode we use for authentication should ideally be made before creating the web application. Earlier in this book, it didn't matter because we were using a web interface and our browser could authenticate using NTLM. At this point in our development of Windows Phone 7 applications that get data from SharePoint, we must use the forms-based mode of authentication.
Connecting with forms based authenticationWindows Phone 7 doesn't exactly make it easy for us to connect to SharePoint using forms-based authentication. We have to build all the plumbing ourselves. We also have to leave behind the comfort of the WebClient. In .NET and in Silverlight, the WebClient has the mechanisms needed to pass authentication information along with the requests. Windows Phone 7's implementation of WebClient does not provide that luxury. Instead, we have to build up the authentication requests manually using HttpWebRequest.
HttpWebRequest allows us to have a fine grained control over our request to the server. This allows us to add in whatever headers and cookies we want. This means that we can build a request to the authentication web service for SharePoint and send it off. SharePoint will authenticate the user using forms-based authentication and then provide an authorization cookie that we can pass back to SharePoint on every request. With this authorization cookie, we can access SharePoint securely and our IT teams can sleep at night.
Accessing the RSS feeds securelySo, how can we demonstrate this? Let's return to the simple RSS example from the previous chapter and instead of communicating to the RSS feed using an anonymous connection, let's connect to the RSS feed that is protected by forms-based authentication.
Let's start by creating a new solution for Chapter 7. We will be doing a couple of examples in this chapter, so a generic solution to contain all of these samples will be good.
1. Open Visual Studio 2010.2. From the File menu, select New Project….3. In the Installed Templates list, select Other Project Types.
www.it-ebooks.info

Building a Windows Phone 7 Dashboard Application with SharePoint Data
[ 164 ]
4. Under Other Project Types, select Visual Studio Solutions, as shown in the following screenshot:
5. Give the solution the name Chapter076. Click on the OK button and Visual Studio will create an empty solution
for us.
Next, we'll need a project in this solution. As we will just modify the simple RSS reader we wrote in Chapter 6, let's copy that project folder into the folder created for Chapter 7 and then add it to this solution. The following steps show how to add the copy of this project into this solution:
1. In Solution Explorer in Visual Studio, right click on the solution name.2. In the context menu that appears, select Add and then Existing Project….3. Navigate to the location of the SimpleRSSReader folder.4. Select the SimpleRSSReader.csproj file and click on the Open button.
This will add the Simple RSS Reader that we created in Chapter 6 to the Chapter 7 solution.
www.it-ebooks.info

Chapter 7
[ 165 ]
The WebClient way of getting the RSS feed involved an event handler that was added to our client to listen for the DownloadStringCompleted event. Once the string was downloaded, we parsed the result into an XElement and then used LINQ to XML to get a list of RSSItem that we then data bound to the feedListBox.
We can reuse the part of the event handler that parses the RSS feed and does the data binding by pulling that part out into its own method:
private void ResultsToListBox(string result){ var rssElement = XElement.Parse(result); var items = from item in rssElement.Descendants("item") select new RSSItem { Title = item.Element("title").Value, Date = item.Element("pubDate").Value, PostUrl = item.Element("link").Value }; feedListBox.ItemsSource = items;}
Now, we could update the client_DownloadStringCompleted event handler to use this method, but we aren't going to be using the WebClient anymore. Instead, delete the rest of the client_DownloadStringCompleted event handler method.
As we aren't using the WebClient in this version, remove the client parameter at the top of the class and replace it with a new HttpWebRequest parameter:
private HttpWebRequest webRequest;
Next, remove the initialization code for the WebClient from the MainPage_Loaded event handler. That is to say, remove the following two lines of code:
client.DownloadStringCompleted += new DownloadStringCompletedEventHandler(client_DownloadStringCompleted);client.DownloadStringAsync(new Uri(siteUrl));
In its place, add the new initialization code for the HttpWebRequest. This is what the MainPage_Loaded event handler should look like with the new lines highlighted:
private void MainPage_Loaded(object sender, RoutedEventArgs e){ webRequest = (HttpWebRequest)HttpWebRequest.Create(new
Uri(siteUrl)); webRequest.BeginGetResponse(new AsyncCallback(BlogCallBack),
webRequest);
www.it-ebooks.info
Building a Windows Phone 7 Dashboard Application with SharePoint Data
[ 166 ]
feedListBox.SelectionChanged += new SelectionChangedEventHandler(feedListBox_SelectionChanged);
}
HttpWebRequest handles calls backs a little different to WebClient. They are both asynchronous, which is good because we don't want to block the UI thread, but the HttpWebRequest uses a dependency injection to tell it explicitly what to do when the response comes back. The WebClient doesn't need an event handler. We could just call DownloadStringAsync and the call would go through. With HttpWebRequest, we must pass in a method for it to call when the request goes through.
In this case, we have called that method BlogCallBack. The following is the code for that method:
private void BlogCallBack(IAsyncResult asyncResult){ var request = (HttpWebRequest)asyncResult.AsyncState; var response = (HttpWebResponse)request.
EndGetResponse(asyncResult); using (var sr = new StreamReader(response.GetResponseStream())) { var result = sr.ReadToEnd(); Dispatcher.BeginInvoke(() => ResultsToListBox(result)); }}
This code speaks for itself to a certain extent. First, we get the request object from the result. From the request we can get the response from the server. This will come in the form of a stream, so we'll have to add the following line to the top of our file:
using System.IO;
Next, by framing our StreamReader inside a using statement we are assured that dispose will be called on it, thus freeing up the memory allocation that comes along with a stream.
We read the result and pass that result into the ResultsToListBox method that we extracted earlier. In order to do that though we need to think about one very important thing: At this point in the code, we are not working on the UI thread. The background processor thread cannot interrupt the UI thread. To get around this, we call Dispatcher.BeginInvoke.
Nice and tidy. We compile the code and we have exactly the same thing we ended up with at the end of Chapter 6.
www.it-ebooks.info

Chapter 7
[ 167 ]
Next, let's turn off anonymous access to our SharePoint site. Make sure you've configured it for forms authentication and setup a user account because we'll need it when we try to get access to the RSS feed.
Removing anonymous accessBefore we can make a request to our RSS feed that is protected by forms authentication, we need to authenticate against SharePoint. This will return an authorization cookie that we must return with every request to the server. To get this authorization cookie, we make a request to the authentication web service on SharePoint. Its address is: http://<your server>/_vti_bin/authentication.asmx. Looking at this path in a browser shows that the authentication.asmx web service request needs to be a SOAP POST with a specific format:
POST /_vti_bin/authentication.asmx HTTP/1.1Host: SharePointServerContent-Type: text/xml; charset=utf-8Content-Length: lengthSOAPAction: "http://schemas.microsoft.com/sharepoint/soap/Login"
www.it-ebooks.info

Building a Windows Phone 7 Dashboard Application with SharePoint Data
[ 168 ]
<?xml version="1.0" encoding="utf-8"?><soap:Envelope xmlns:xsi="http://www.w3.org/2001/XMLSchema-instance" xmlns:xsd="http://www.w3.org/2001/XMLSchema" xmlns:soap="http://schemas.xmlsoap.org/soap/envelope/"> <soap:Body> <Login xmlns="http://schemas.microsoft.com/sharepoint/soap/"> <username>string</username> <password>string</password> </Login> </soap:Body></soap:Envelope>
This is a very basic SOAP message. SOAP messages are XML documents sent in the body of a POST to the server. The message itself is contained within an envelope that describes the schema of the message. The message body is contained within a SOAP body. The element name within the body describes the action that we want to take. In this case, we want to login. This element has a payload of the username and password.
In this SOAP message header, we need to specify the Content-Length based on the actual length of the message body that we are sending to the server. That length really depends on the length of the username and password string that we need to supply. Thankfully, HttpWebRequest will add in the Content-Length header for us. We will also add our CookieContainer to the headers for our requests for data. This is how SharePoint will know that we are authenticated.
The response to this web service call will be in the following form:
HTTP/1.1 200 OKContent-Type: text/xml; charset=utf-8Content-Length: length
<?xml version="1.0" encoding="utf-8"?><soap:Envelope xmlns:xsi="http://www.w3.org/2001/XMLSchema-instance" xmlns:xsd="http://www.w3.org/2001/XMLSchema" xmlns:soap="http://schemas.xmlsoap.org/soap/envelope/"> <soap:Body> <LoginResponse xmlns="http://schemas.microsoft.com/sharepoint/
soap/"> <LoginResult> <CookieName>string</CookieName> <ErrorCode>NoError or NotInFormsAuthenticationMode or
PasswordNotMatch</ErrorCode> <TimeoutSeconds>int</TimeoutSeconds> </LoginResult> </LoginResponse>
www.it-ebooks.info

Chapter 7
[ 169 ]
</soap:Body></soap:Envelope>
With this result, we first need to check the ErrorCode. If the ErrorCode is NoError then we know that the cookieJar has been populated with our authentication token.
Enough theory, let's look at an example. We know that we really can't do anything in our application until we authenticate against SharePoint. So, let's open our MainPage.xaml.cs file and rewrite the MainPage_Loaded method.
First though let's hardcode our username and password into class member variables. In a real application, we would have a settings page where the user would enter their credentials, but hardcoding this information for now will demonstrate the concepts that we need to learn. Add the following code inside the class outside of any methods:
private string mUsername = "JQP";
private string mPassword = "P@ssw0rd";
We will also need a variable to hold our cookie when we get it from SharePoint. Add the following class member variable right after the username and password variables:
private CookieContainer cookieJar = new CookieContainer();
So all of the code that we previously had in our MainPage_Loaded method is still important, we just can't run it until we have an authentication token. Let's change the name of this method to LoadFeed:
private void LoadFeed(){ webRequest = (HttpWebRequest)HttpWebRequest.Create(new
Uri(siteUrl)); webRequest.BeginGetResponse(new AsyncCallback(BlogCallBack),
webRequest);
feedListBox.SelectionChanged += new SelectionChangedEventHandler(feedListBox_SelectionChanged);
}
Now once we have our authentication token set, we can make a call to this method. Next, make a new blank MainPage_Loaded event handler. This is where we will start our call to the authentication service. Let's make a call to a new method that we'll call Authenticate. Then create a new method called Authenticate.
www.it-ebooks.info

Building a Windows Phone 7 Dashboard Application with SharePoint Data
[ 170 ]
private void MainPage_Loaded(object sender, RoutedEventArgs e){ Authenticate();}
private void Authenticate(){}
The Authenticate method will create an HttpWebRequest, set the web request headers, and then make a call to the asynchronous BeginGetRequestStream method FBA:BeginGetRequestStream method. Add code to the Authenticate method to appear like this:
private void Authenticate(){ var authWebService = "http://ssps2010/_vti_bin/authentication.
asmx"; var authWebRequest = (HttpWebRequest)HttpWebRequest.
Create(authWebService); authWebRequest.Method = "POST"; authWebRequest.ContentType = "text/xml; charset=utf-8"; authWebRequest.Headers["SOAPAction"] = "http://schemas.microsoft.
com/sharepoint/soap/Login"; authWebRequest.CookieContainer = cookieJar;
authWebRequest.BeginGetRequestStream(new AsyncCallback(AuthenticationRequestCallback), authWebRequest);
}
Let's look at this code line by line. In the First line we instantiate a string that contains the URL for the authentication web service. Be sure to update the URL to point to the appropriate server.
The second line uses a factory to create an HttpWebRequest object for us taking in the authentication web service string we initialized in the first line. Next, we explicitly set the request method to POST. After we set the request method, we set the ContentType header to text/xml; charset=utf-8 to let the Web Service know that what we are sending should be treated as xml encoded in UTF-8.
The next header we add isn't a typical request header, so we have to specify the key explicitly as SOAPAction. This lets the Web Service know that we are sending an action inside of a SOAP envelope. The value for this header specifies which SOAP action should be called. In this case, it's the Login action at the Web Service endpoint that we are calling.
www.it-ebooks.info

Chapter 7
[ 171 ]
Next, we add the empty cookie container to the request. Upon success, this container will be filled with our authentication token. Finally, we tell the web request to begin an asynchronous stream and call the method AuthenticationRequestCallback, so that we can fill the body of the request. Let's look at that code now:
private void AuthenticationRequestCallback(IAsyncResult asyncResult){ var request = (HttpWebRequest)asyncResult.AsyncState; var soapEnvelope = string.Format(@"<?xml version=""1.0"" encoding=""utf-8""?> <soap:Envelope xmlns:xsi=""http://www.w3.org/2001/XMLSchema-instance"" xmlns:xsd=""http://www.w3.org/2001/XMLSchema"" xmlns:soap=""http://schemas.xmlsoap.org/soap/envelope/""> <soap:Body> <Login xmlns=""http://schemas.microsoft.com/sharepoint/soap/""> <username>{0}</username> <password>{1}</password> </Login> </soap:Body> </soap:Envelope>", mUsername, mPassword); var encoder = new UTF8Encoding();
using (var reqStream = request.EndGetRequestStream(asyncResult)) { var body = encoder.GetBytes(soapEnvelope); reqStream.Write(body, 0, body.Length); reqStream.Close(); }
request.BeginGetResponse(new AsyncCallback(AuthenticationResponseCallback), request);}
This isn't as much code as it looks because there's a lot of XML in there. First, we get a reference to the HttpWebRequest from the IAsyncResult that was passed in. Then, we set up the SOAP Envelope. The XML for this SOAP envelope can be found at the following address (modifying the URL for your own SharePoint server):
http://ssps20110/_vti_bin/authentication.asmx?op=Login
www.it-ebooks.info

Building a Windows Phone 7 Dashboard Application with SharePoint Data
[ 172 ]
We replaced the username and password with the hardcoded values that we set at the top of the class and then created a new text encoder. We'll see why we did this in a minute, but in order for this to work, we'll have to add a using statement at the top of the file:
using System.Text;
Next, we open a stream to enter the body of the message. This is where the encoder comes in use. We pass the SOAP envelope string into the UTF-8 encoder and from that encoder we get an array of bytes. This array of bytes then gets sent into the body of the request. Finally, we close the request stream.
The last thing we do in this method is let the system know what to do when the response starts coming back. In this case, we want it to call a method named AuthenticationResponseCallback.
private void AuthenticationResponseCallback(IAsyncResult asyncResult){ var request = (HttpWebRequest)asyncResult.AsyncState; var response = (HttpWebResponse)request.
EndGetResponse(asyncResult); var errorCode = string.Empty; using (var responseStream = new StreamReader(response.
GetResponseStream())) { var xResult = XmlReader.Create(responseStream); xResult.ReadToDescendant("ErrorCode"); errorCode = xResult.ReadElementContentAsString(); xResult.Close(); responseStream.Close(); }
if (!string.IsNullOrEmpty(errorCode) && (errorCode.ToLowerInvariant() == "noerror"))
{ LoadFeed(); }
}
This is the AuthenticationResponseCallback. It looks a lot like the BlogCallBack function we discussed earlier. We start out by getting a reference to the request object and from the request object we get a reference to the response object. We then initialize a variable that will hold the error code. The error code, as we saw from the SOAP definition page, will have one of following three values:
www.it-ebooks.info

Chapter 7
[ 173 ]
1. NoError2. NotInFormsAuthenticationMode3. PasswordNotMatch
In this example, we are only looking for the successful calls and in a production environment, we should handle the error situations by letting the user know that their password was wrong, the server isn't configured properly, or that there was an internal server error.
In a production environment, we would also be interested in making sure the HTTP response code we get back is 200 OK. If it is anything else, we would need to handle it appropriately and in my experience the most common error is 500 Internal Server Error as I mentioned briefly earlier. As mentioned earlier, we will only look for the successful case. The error handling should be dealt with in a production environment though.
The way we get the error code is a little different than the way we get the RSS feed items. In this case, we are using a forward moving XML reader. We use it to read to the element containing the error code and then read the contents of that element into our error code variable. To do this, we need to add a using reference to System.Xml at the top of our file.
using System.Xml;
This is a very convenient way of handling this response because we don't need to create another heavy object in memory that holds all of the values in the XML just to read in one value. The XMLReader and StreamReaders are destroyed almost as soon as they are created and all that is left is a single string.
Finally, once we check that there were no errors we make the call to LoadFeed. We have to modify LoadFeed though to pass our cookie container with its HttpWebRequest as can be seen in the highlighted line of the following code:
private void LoadFeed(){ webRequest = (HttpWebRequest)HttpWebRequest.Create(new
Uri(siteUrl)); webRequest.CookieContainer = cookieJar; webRequest.BeginGetResponse(new AsyncCallback(BlogCallBack),
webRequest); feedListBox.SelectionChanged += new SelectionChangedEventHandler(f
eedListBox_SelectionChanged);}
www.it-ebooks.info

Building a Windows Phone 7 Dashboard Application with SharePoint Data
[ 174 ]
Compile and run the application and you should see the exact same result as before:
The difference is that now the RSS reader is making a call into an authenticated feed. This can be seen by tapping on an item. We haven't passed the authentication cookie on to the web browser, so we see the login page as shown in the following screenshot:
www.it-ebooks.info

Chapter 7
[ 175 ]
We won't continue down the path of how to display the contents of the RSS Item in this book. Instead, now that we are authenticated into the SharePoint site, let's look at getting data from other sources in SharePoint.
The forms-based authentication discussed here still sends the username and password in clear text over the wire. To be more secure from attacks forms-based authentication should be configured to use SSL.
www.it-ebooks.info

Building a Windows Phone 7 Dashboard Application with SharePoint Data
[ 176 ]
Managed Client Object Model on the desktopSharePoint 2010 introduces the managed client object model which allows us to create applications using ECMAScript, .NET managed code, and Silverlight. This new object model is designed around the highly successful server object model and takes a lot of the interfaces directly from the server's API. That means knowing the server object model will provide for an easy transition to the client object model, and vice versa.
ECMAScript is the scripting language standardized by Ecma International in the ECMA-262 specification and ISO/IEC 16262. For more information, please visit the Wikipedia description at the following URL:http://en.wikipedia.org/wiki/ECMAScript
The client object model is not a perfect replication of the server object model. The reason for this design was to build an object model that provides for client level development needs. The result of not providing everything in the client object model that exists in the server object model is a smaller footprint on the libraries, and thus a shorter download time.
Because everything in the client object model exists in the server object model, making a call on these interfaces is a simple WCF service call that relays the information to the server in XML. The request is then performed using the server object model and the response is returned using JavaScript Object Notation (JSON) or OData. As we'll learn, this is important for writing Windows Phone 7 Applications.
ECMAScript interfaceThe .js files needed for the ECMAScript interface are automatically included in the standard SharePoint master page. There is nothing that needs to be added to the web pages to get this interface on the client. We just need to start using it.
Using the ECMAScript interface is relatively easy. We simply need to add a SharePoint Form Digest within the form for the page. These types of pages must run within the context of SharePoint and be deployed to the layouts folder, as described in previous chapters.
www.it-ebooks.info

Chapter 7
[ 177 ]
The form digest class inserts a security validation into the page. It creates a message digest that helps prevent a specific type of attack where a user is tricked into posting information to the server. Basically, this is analogous to the cookie jar that we created earlier. This security validation has a lifetime and cannot be copied and used on another computer.
The ECMAScript interface into SharePoint demonstrates how SharePoint sites were developed for SharePoint. This type of programming works great when we are concerned with websites, as we have been in previous chapters of this book. In Chapter 4 when we created our custom mobile home page, the next step was to create a custom master page that contained all of the required JavaScript files and go to town implementing the various lists and libraries contained within our SharePoint site.
For Windows Phone 7 application programming, building web pages isn't as exciting as building out full featured Silverlight applications.
Silverlight interfaceIn Silverlight, on the desktop we can reference the Client Object Model's DLL from the SharePoint SDK and build our applications against them. This makes for a very satisfying development environment.
The DLL's are registered into the Global Assembly Cache (GAC) on the developer's machine. To reference them in a project, carry out the following steps:
1. Right click on References in Solution Explorer.2. Click on Add Reference.3. On the .NET tab of the Add References dialog box, select the following two
DLL's° Microsoft.SharePoint.Client° Microsoft.SharePoint.Client.Runtime
4. Finally, click on OK.
When the Silverlight application is deployed, the required DLL's are bundled inside the XAP. No additional download or installation is required on the client machine.
Windows Phone 7 applications, although written in Silverlight, only support a subset of Silverlight features. What this means for a developer trying to write Windows Phone 7 applications that take advantage of SharePoint features is that DLL's like those found in the client object model from the SharePoint SDK depend on DLL's that aren't available on Windows Phone 7. Specifically, System.Windows.Browser is missing from the phone. What are we to do in this situation? Enter WCF Data Services.
www.it-ebooks.info

Building a Windows Phone 7 Dashboard Application with SharePoint Data
[ 178 ]
In addition to ECMAScript and Silverlight, there are .NET managed code libraries that can be used to create WinForms or WPF applications that run on Windows. This is beyond the scope of this book, but for the most part the interfaces are the same as the Silverlight API. Their distribution model is slightly different though. One must use the SharePoint Foundation 2010 Client Object Model Redistributable package. Visit the following URL for more information:http://msdn.microsoft.com/en-us/library/ee537247.aspx
WCF Data Services to the rescueDeveloping Windows Phone 7 Applications that integrate with SharePoint data have a lot more in common with developing .NET Managed Applications for the desktop than writing SharePoint Pages or writing Silverlight applications that live inside SharePoint. That is to say while developing custom list templates or Silverlight parts inside SharePoint, these applications have direct access to the SharePoint Context. We will not have that ability in Windows Phone 7.
Although we can't use the managed DLL's that were provided for Silverlight applications in Windows Phone 7, we still have access to the same information and functionality. It's just going to be a lot more work to use them.
The client object model communicates to the server using WCF Data Services, formerly known as ADO.NET Data Services. We will use these same services for our Windows Phone dashboard application. As is the case with a lot of programming problems, there are multiple ways of attacking this problem.
RESTRepresentational State Transfer, or REST, is a way of communicating with services across the Internet or intranet using standard HTTP verbs. Specifically, the common verbs used are GET, POST, PUT, and DELETE. Using simple HttpWebRequests, we can call on the WCF Data Services SharePoint exposes to perform most of the actions that the client object model would have made simple for us.
REST is a fairly generic term for accessing data across a network using a less stuffy format than SOAP. Responses from a REST call are usually either Plain Old XML (POX) or a fairly clean JavaScript Object Notation (JSON). The calls into SharePoint can return XML or JSON, but their output format is a predefined data structure that we'll discuss next.
www.it-ebooks.info

Chapter 7
[ 179 ]
WCF Data Services and ODataIn SharePoint, we can make calls to web services using simple HttpWebRequests. These calls use traditional REST semantics and return data sets either in JSON or in an open data format that Microsoft created named OData. In addition to the traditional REST semantics of using the HTTP protocols and URI strings to tell the server what our intent is with the call, OData defines a QueryString structure for refining our requests.
We make all these calls to the same URL http://<yourserver>/_vti_bin/listdata.svc/ and from this location we can gain access to all of the data in SharePoint. For example, to get all of the calendar items we can make a call to this URL http://<yourserver>/_vti_bin/listdata.svc/Calendar.
Now with the addition of the OData semantics, we can get just the top five calendar events: http://<yourserver>/_vti_bin/listdata.svc/Calendar/?$top=5 or even order the items by start date as follows:
http://<yourserver>/_vti_bin/listdata.svc/Calendar/?$orderby=StartTime&$top=5
To get more information on OData, the best place to start is the official OData website located at the following URL:http://www.odata.org/
In SharePoint, making these calls directly will probably result in a 403 Authentication required error. We'll use the authentication token from earlier in this chapter to make these calls. Also, even with the authentication token, we'll end up with an ATOM response.
ATOM is a data format that uses XML to deliver data. As it is XML based, it is fairly bulky across the wire. It is better than POX though because there is a well-defined schema for passing data through ATOM. That means that for clients accepting ATOM they don't need to know anything about the incoming data in order to deserialize it. Plain old XML requires a lot of knowledge ahead of time for the incoming data.
However, deserialization is a fairly expensive operation. To deserialize ATOM with no prior knowledge of the contents means a lot of reflection and creation of very heavy anonymous objects. Deserialization can come in the form of using the OData tools for Windows Phone 7 from Microsoft. The problem with these tools is they don't support authentication today. On a mobile device, we may be better advised to use alternative methods of getting information.
www.it-ebooks.info

Building a Windows Phone 7 Dashboard Application with SharePoint Data
[ 180 ]
When making the call to the SharePoint server, we can specify that we accept JSON as a response. This will cause SharePoint to return a JSON string. This string is usually half the size of the ATOM string coming across the network. That's a good thing for mobile devices. Deserializing JSON has some of the same problems as ATOM though in creating heavy objects through reflection. There's a built-in JSON deserializer in the System.Runtime.Serialization.Json namespace, but an alternative open source tool named Json.NET is smaller, faster, and easier to use.
In the examples provided in this chapter, we will use LINQ to XML to get just the data we need from an ATOM feed, but when building larger applications you may need a more robust toolset and it is important to know that they are out there. My personal recommendation is to use JSON and the Json.NET deserializer. Since Windows Phone 7 development is still young, other tools will come along to make all of this easier. However, this all depends on the application being built. Sometimes, we just need something that works.
ASP.NET Web ServicesASP.NET Web Services should be considered deprecated. In SharePoint 2007, this was an excellent way to communicate with the server. With SharePoint 2010 though, the web services have been pushed aside for the newer WCF Data Services. The ASP.NET Web Services used SOAP to securely communicate with the server and get responses back. This made the requests and the responses really heavy, which would not be good for employees on a small data plan with their phone. By using more modern techniques, such as REST with JSON, it is very common to see a decrease in network traffic by up to 10x. JSON may be a little slower to deserialize on the phone, but it is much faster than waiting for a large XML package to come across the network.
Creating a dashboard applicationLet's get started on a simple dashboard application for the Windows Phone 7. For this application, we are going to write a simple panorama application in Windows Phone 7. This panorama application will have two sections named Panorama Items. We'll read data from a shared calendar containing days off for employees and display them on the screen. We'll then add another panel that will display a pie chart showing the overall status of all projects currently being worked on. This data will come from a project task status site in our SharePoint site.
The code download for this chapter includes a third tab for the Engineering Notes RSS feed that we've been looking at in Chapter 6 and earlier in this chapter.
www.it-ebooks.info

Chapter 7
[ 181 ]
Creating the calendarBefore we create the calendar, let's create a new site for this chapter. Carry out the following steps to create a new site:
1. Open your SharePoint site.2. From the Site Actions menu, select the New Site option.3. In the Create dialog that appears, select Team Site.4. Give the new site a name of Chapter 75. Give the new site a URL of Chapter07.6. Click on the Create button and SharePoint will create our new site.
The Team Site template includes a calendar that we'll use for this example. Go ahead and enter a few appointments on the calendar, so that we have some data to play with. Your calendar will look similar to the one shown in the following screenshot:
www.it-ebooks.info

Building a Windows Phone 7 Dashboard Application with SharePoint Data
[ 182 ]
Reading the calendar dataNow that we have a calendar to read data from let's read the data into an application for Windows Phone 7. We need a project before we can read the data from this calendar. To create the project, carry out the following steps:
1. Re-open the Chapter 7 solution we created at the beginning of this chapter.2. Right click on the solution Chapter07.3. From the context menu, select Add… and then select New Project.4. From the Add New Project dialog, select Windows Phone Application.5. Give this new project a name such as PanoramaData.
There is a project template for Windows Phone Panorama Application. We are not using that template here because it is wired up for an MVVM pattern. MVVM is an excellent pattern, but in this chapter we are focusing on getting data from SharePoint, not MVVM.
6. Click on the OK button and Visual Studio will create the new project and open the MainPage.xaml file.
AuthenticationLet's work on getting the data first and display the data later. Before we can get data from our SharePoint server, we need to get an authentication token.
For this project, we are going to separate out the authentication code into its own class and call it once. This authentication object will have a property that contains our CookieContainer. We'll inject that authentication token into the classes that will get the calendar data here and the project status data later in the chapter.
For now, let's create our authentication class by carrying out the following instructions:
1. Right click on the PanoramaData project.2. In the context menu that appears, select Add… and then select Class….3. In the Add New Item dialog that appears, name the class
SPAuthentication.cs.4. Click on the Add button and Visual Studio will create the class for us.
www.it-ebooks.info

Chapter 7
[ 183 ]
Now the fun part, let's write some code. First thing is that Visual Studio thinks we are going to be writing a lot of Windows Phone 7 specific code in this file and has helped us out by adding a lot of using statements that we really don't need. Remove all of them and replace them with the following:
using System;using System.IO;using System.Net;using System.Text;using System.Xml;
Next, add the following two member variables that we'll use:
private readonly string mUsername = "JQP";private readonly string mPassword = "P@ssw0rd";
These are the username and password for a user that has read rights to the calendar.
The next line of code we'll add is for the CookieContainer:
public CookieContainer AuthenticationToken { get; private set; }
The final piece of setup code is the class constructor. This initializes the CookieContainer as follows:
public SPAuthentication(){ AuthenticationToken = new CookieContainer();}
The rest of this class will take the code that we wrote previously in this chapter to authenticate. Specifically, we'll take the following methods:
• Authenticate(): change this to a public method!• AuthenticationRequestCallback(IAsyncResult asyncResult)• AuthenticationResponseCallback(IAsyncResult asyncResult)
www.it-ebooks.info
Building a Windows Phone 7 Dashboard Application with SharePoint Data
[ 184 ]
There are a few changes we need to make. First, change Authenticate to be a public method. Second, because the name of the CookieContainer is different, replace the instance of cookieJar with AuthenticationToken in the Authenticate method. The third change we need to make is in the AuthenticationResponseCallback method. We no longer need to call LoadFeed() because that method doesn't exist here. Instead, we should let somebody know that we've authenticated. This is where we'll enter the wonderful world of eventing. For this class we'll use the delegate method of eventing that's been around since .NET 1.0 (we'll get fancier later). Outside the class declaration, but within the namespace, add the following line of code:
public delegate void Authenticated();
Then after the AuthenticationResponseCallback method, add the following code:
public event Authenticated AuthenticationTokenSet;private void OnAuthenticationTokenSet(){ if (AuthenticationTokenSet != null) AuthenticationTokenSet();}
This allows us to register an event handler to listen for when the authentication cookie has been set and then do whatever work needs to be done at that time. How does this code get called though? In the AuthenticationResponseCallback method, replace the LoadFeed(); call with a call to OnAuthenticationTokenSet(); as follows:
private void AuthenticationResponseCallback(IAsyncResult asyncResult){ var request = (HttpWebRequest)asyncResult.AsyncState; var response = (HttpWebResponse)request.
EndGetResponse(asyncResult); var errorCode = string.Empty; using (var responseStream = new StreamReader(response.
GetResponseStream())) { var xResult = XmlReader.Create(responseStream); xResult.ReadToDescendant("ErrorCode"); errorCode = xResult.ReadElementContentAsString(); xResult.Close(); responseStream.Close(); }
if (!string.IsNullOrEmpty(errorCode) && (errorCode.ToLowerInvariant() == "noerror"))
{
www.it-ebooks.info

Chapter 7
[ 185 ]
OnAuthenticationTokenSet(); }}
Now that we can authenticate against SharePoint, open the MainPage.xaml.cs file. We want to make sure all the controls have been loaded into the page and then we can start making connections to the server. Modify the Main Page constructor as follows:
public MainPage(){ InitializeComponents(); this.Loaded += new RoutedEventHandler(MainPage_Loaded);}
This is where we should authenticate against the SharePoint server. First create a member variable inside MainPage.xaml.cs to hold this authentication object as follows:
private SPAuthentication auth;
Next, add code to the MainPage_Loaded event to initialize this variable, set up the event handler, and make the call to authenticate:
void MainPage_Loaded(object sender, RoutedEventArgs e){ auth = new SPAuthentication(); auth.AuthenticationTokenSet += new Authenticated(auth_
AuthenticationTokenSet); auth.Authenticate();}
When the application has successfully authenticated against SharePoint, the event handler named auth_AuthenticationTokenSet will be called. It is in this next event handler where we will call the calendar data service to get the data that we will display.
Calendar data serviceThe calendar data service will pass back a lot of information about each event in the SharePoint calendar. We aren't going to display a lot of information in this application; in fact, we are only going to display the title of the event and the start date. Let's create a simple model to hold this data:
1. Right click on the PanoramaData project.2. In the context menu that appears, select Add and then the Class… option.
www.it-ebooks.info

Building a Windows Phone 7 Dashboard Application with SharePoint Data
[ 186 ]
3. Name the class CalendarItem.cs and click on the Add button.4. Visual Studio will create a blank class for us to use.
Add the following two properties and save the class:
public string Title { get; set; }public DateTime StartDate { get; set; }
What we'll do next is create a class that will call SharePoint to get the data, parse the data into a collection of CalendarItem objects, and expose an IEnumerable of CalendarItems property that we can use to bind to our UI. We will also use an event to alert us when that property changes, so that we know when to bind the data to the UI.
Create a new class in our project named CalendarOfEvents.cs and add the following using statements:
using System.Collections.Generic;using System.ComponentModel;
Add a custom initializer that takes a single parameter as follows:
public CalenderOfEvents(CookieContainer authToken){ mAuthToken = authToken;}
We'll also have to create a member variable to contain the authentication token:
private CookieContainer mAuthToken;
In addition to this member variable, we will need four others:
private readonly string mDataServiceUrl = "http://ssps2010/Chapter07/_vti_bin/listdata.svc";private readonly string mCalendarUri = "/Calendar/";private HttpWebRequest mWebRequest;private IEnumerable<CalendarItem> mEventList;
The first one here will have the URL to the SharePoint data service. The second is the URI to the calendar that we need to get data from. As we are using the default calendar, it should be named "Calendar," but it will be different if it is a custom list. We will be modifying this URI shortly to customize the data that is returned from SharePoint.
www.it-ebooks.info

Chapter 7
[ 187 ]
The third variable is for our web request, and finally the last one will hold the private event list. Why is this private? Well, we are going to modify the class to implement the INotifyPropertyChanged interface:
public class CalendarOfEvents : INotifyPropertyChanged
Then we are going to implement the following interface:
public event PropertyChangedEventHandler PropertyChanged;public void NotifyPropertyChanged(string propertyName){ if (PropertyChanged != null) PropertyChanged(this, new PropertyChangedEventArgs(propertyNa
me));}
Finally, we will add a property that will set the event list and raise the following event:
public IEnumerable<CalendarItem> EventList { get { return mEventList; } private set { mEventList = value; NotifyPropertyChanged("EventList"); }}
Now that all the setup is complete, we can write the action part of this object. This is similar to what we wrote for the RSS feed and the authentication. First, we initialize the request, wait for a callback with the response, and then parse the response.
First up is the LoadEvents method. We will call this method to get the data from SharePoint:
public void LoadEvents(){ mWebRequest = (HttpWebRequest)HttpWebRequest.Create(new
Uri(mDataServiceUrl + mCalendarUri)); mWebRequest.CookieContainer = mAuthToken; mWebRequest.Accept = "application/atom+xml"; mWebRequest.BeginGetResponse(new AsyncCallback(EventsCallback),
mWebRequest);}
www.it-ebooks.info

Building a Windows Phone 7 Dashboard Application with SharePoint Data
[ 188 ]
There are a couple of differences to what we saw earlier in this chapter with the RSS feed. The first is that we need to concatenate the data service URL with the calendar URI to build up the full URI for the web request. The second change is that we are specifying the HTTP header for accept. Here we are telling SharePoint explicitly that we want the response stream to be an ATOM feed. The other choice here would be application/json, but we will just parse the ATOM XML in this example.
When the response comes back, a callback method named EventsCallback is called. This method is almost identical to the one we wrote for the RSS feed earlier. Only the name of the method has changed and instead of binding to a list box, we are calling a parse method here. Add the following code to the class:
private void EventsCallback(IAsyncResult asyncResult){ var request = (HttpWebRequest)asyncResult.AsyncState; var response = (HttpWebResponse)request.
EndGetResponse(asyncResult); using (var sr = new StreamReader(response.GetResponseStream())) { var result = sr.ReadToEnd(); ParseResults(result); }}
Finally, we need to parse the results. This is similar to parsing the RSS feed earlier except this ATOM feed has some XML namespaces that we need to be mindful of. The following is the code for ParseResults:
private void ParseResults(string result){ var atomElement = XElement.Parse(result); XNamespace atom = "http://www.w3.org/2005/Atom"; XNamespace dataServices = "http://schemas.microsoft.com/
ado/2007/08/dataservices"; XNamespace metaData = "http://schemas.microsoft.com/ado/2007/08/
dataservices/metadata"; var entries = from entry in atomElement.Descendants(atom +
"entry") let startDate = DateTime.Parse(entry.Element(atom
+ "content").Element(metaData + "properties").Element(dataServices + "StartTime").Value)
select new CalendarItem { Title = entry.Element(atom + "title").Value, StartDate = startDate };
www.it-ebooks.info

Chapter 7
[ 189 ]
EventList = entries;}
As we use LINQ to XML in here, we need to add a reference to the System.Xml.Linq.dll assembly:
1. Right click on the project PanoramaData in Solution Explorer2. From the context menu that appears, select Add Reference….3. Find System.Xml.Linq and click on Add.
Also, we will need to add using statements for both System.Linq and System.Xml.Linq. The code for this method is a little complex. Basically, you need to know the format of the ATOM entries that are coming back from SharePoint. The following is an example of a single calendar event in SharePoint:
<?xml version="1.0" encoding="utf-8" standalone="yes"?><feed xml:base="http://ssps2010/Chapter07/_vti_bin/listdata.svc/" xmlns:d="http://schemas.microsoft.com/ado/2007/08/dataservices" xmlns:m="http://schemas.microsoft.com/ado/2007/08/dataservices/metadata" xmlns="http://www.w3.org/2005/Atom"> <title type="text">Calendar</title> <id>http://ssps2010/Chapter07/_vti_bin/listdata.svc/Calendar/</id> <updated>2011-02-24T08:57:44Z</updated> <link rel="self" title="Calendar" href="Calendar" /> <entry m:etag="W/"1""> <id>http://ssps2010/Chapter07/_vti_bin/listdata.svc/Calendar(1)</
id> <title type="text">Paul's Birthday</title> <updated>2011-02-23T21:55:19-08:00</updated> <author> <name /> </author> <link rel="edit" title="CalendarItem" href="Calendar(1)" /> <link rel="http://schemas.microsoft.com/ado/2007/08/dataservices/
related/CreatedBy" type="application/atom+xml;type=entry" title="CreatedBy" href="Calendar(1)/CreatedBy" />
<link rel="http://schemas.microsoft.com/ado/2007/08/dataservices/related/ModifiedBy" type="application/atom+xml;type=entry" title="ModifiedBy" href="Calendar(1)/ModifiedBy" />
<link rel="http://schemas.microsoft.com/ado/2007/08/dataservices/related/Attachments" type="application/atom+xml;type=feed" title="Attachments" href="Calendar(1)/Attachments" />
<link rel="http://schemas.microsoft.com/ado/2007/08/dataservices/related/Attendees" type="application/atom+xml;type=feed" title="Attendees" href="Calendar(1)/Attendees" />
www.it-ebooks.info

Building a Windows Phone 7 Dashboard Application with SharePoint Data
[ 190 ]
<link rel="http://schemas.microsoft.com/ado/2007/08/dataservices/related/Category" type="application/atom+xml;type=entry" title="Category" href="Calendar(1)/Category" />
<category term="Microsoft.SharePoint.DataService.CalendarItem" scheme="http://schemas.microsoft.com/ado/2007/08/dataservices/scheme" />
<content type="application/xml"> <m:properties> <d:Id m:type="Edm.Int32">1</d:Id> <d:ContentTypeID>0x010200CF3281A43289874FB1F3B18B10D52A5D
</d:ContentTypeID> <d:ContentType>Event</d:ContentType> <d:Title>Paul's Birthday</d:Title> <d:Modified m:type="Edm.DateTime">2011-02-23T21:55:19
</d:Modified> <d:Created m:type="Edm.DateTime">2011-02-23T21:55:19
</d:Created> <d:CreatedById m:type="Edm.Int32">11</d:CreatedById> <d:ModifiedById m:type="Edm.Int32">11</d:ModifiedById> <d:Owshiddenversion m:type="Edm.Int32">1</d:Owshiddenversion> <d:Version>1.0</d:Version> <d:Path>/Chapter07/Lists/Calendar</d:Path> <d:Location m:null="true" /> <d:StartTime m:type="Edm.DateTime">2011-02-27T00:00:00
</d:StartTime> <d:EndTime m:type=”Edm.DateTime”>2011-02-27T23:59:00
</d:EndTime> <d:Description><div></div></d:Description> <d:AllDayEvent m:type=»Edm.Boolean»>true</d:AllDayEvent> <d:Recurrence m:type=»Edm.Boolean»>false</d:Recurrence> <d:Workspace m:type=»Edm.Boolean»>false</d:Workspace> <d:CategoryValue m:null=»true» /> </m:properties> </content> </entry></feed>
As you can see, there is a lot of information here. The actual StartTime for the event is buried inside a properties element that is inside the content element that is inside the entry element. The d: and the m: are the dataServices and metadata namespaces that we created in the 3rd and 4th lines of the method.
Finally, in this method, we take the entries we get and stuff them into the EventList parameter. The EventList parameter is wired to fire the NotifyPropertyChanged event when it is changed, so we just need to hook up the code in the Main Page.
www.it-ebooks.info

Chapter 7
[ 191 ]
Go back to the MainPage.xaml.cs file and add a new member variable to hold the calendar of events:
private CalendarOfEvents calendar;
Then either find the event handler auth_AuthenticationTokenSet() and add the following code or write one as follows:
void auth_AuthenticationTokenSet(){ calendar = new CalendarOfEvents(auth.AuthenticationToken); calendar.PropertyChanged += new PropertyChangedEventHandler
(propertyChanged); calendar.LoadEvents();}
Here we initialize the calendar object by passing in the authentication token. Then we hook up an event handler to listen for a property change event. Finally, we call LoadEvents to kick off the action.
The event handler we will reuse when we are also calling for a project list, so we need to be sure which property was updated. This is a simple process. For now, this is what our event handler code will look like:
void propertyChanged(object sender, PropertyChangedEventArgs e)
{ if (e.PropertyName.ToLowerInvariant() == "eventlist") Dispatcher.BeginInvoke(() => { /* code to update our UI */
});}
As we can see from the comment inside the code, we have reached the end of what we can do without a UI. We will implement that now.
Displaying the calendar dataThe first thing we need to do is fix the display to show a panorama instead of the default single page application. The panorama controls are in an assembly that isn't included by default in this template. To add these controls, we need to first reference the assembly that contains them. Carry out the following instructions for adding the reference:
1. Right click on the project PanoramaData in Solution Explorer.2. From the context menu that appears, select Add Reference….
www.it-ebooks.info

Building a Windows Phone 7 Dashboard Application with SharePoint Data
[ 192 ]
3. Select Browse… and navigate to C:\Program Files (x86)\Microsoft SDKs\Windows Phone\v7.0\Libraries\Silverlight\.
The actual location of the Windows Phone SDK depends on your system and your installation options. This is the default location for a computer running 64-bit Windows.
4. Select the Microsoft.Phone.Controls.dll assembly and click on Open.5. Finally, click on the Add button in the Add Reference dialog.
At the top of the MainPage.xaml file, there are a series of XML namespace definitions like the following:
xmlns:x="http://schemas.microsoft.com/winfx/2006/xaml"
Add the following line specifying that the namespace controls comes from the Microsoft.Phone.Controls assembly:
xmlns:controls="clr-namespace:Microsoft.Phone.Controls;assembly=Microsoft.Phone.Controls"
Now that we have the namespace that contains the panorama controls, we can replace the LayoutRoot grid with the following code:
<Grid x:Name="LayoutRoot" Background="Transparent"> <controls:Panorama Title="panorama example"> <controls:PanoramaItem Header="calendar"> <Grid> </Grid> </controls:PanoramaItem> </controls:Panorama></Grid>
This recreated the LayoutRoot with a panorama control on the inside. We only have on PanoramaItem for now, but we'll add another in the next section. Inside the PanoramaItem is an empty grid that we will use to populate our calendar information.
To populate that calendar information, let's put a ListBox inside the grid element. Add the following code after the <Grid> and before the </Grid>:
<ListBox x:Name="calendarListBox" HorizontalAlignment="Left"> <ListBox.ItemTemplate> <DataTemplate> </DataTemplate>
www.it-ebooks.info

Chapter 7
[ 193 ]
</ListBox.ItemTemplate></ListBox>
This is the typical boilerplate for a list box. Next, we'll populate the DataTemplate element with a StackPanel containing two TextBlocks. Add the following code after <DataTemplate> but before </DataTemplate>:
<StackPanel Orientation="Horizontal" Width="396"> <TextBlock Text="{Binding StartDate}" VerticalAlignment="Top" HorizontalAlignment="Center" /> <TextBlock Text="{Binding Title}" TextWrapping="Wrap" Width="282"/></StackPanel>
The StackPanel allows us to place the two text blocks right next to each other and let the title wrap in its area.
Now, let's bind the data to the UI. Reopen the MainPage.xaml.cs file and look for the method propertyChanged. Replace the comment /* code to update our UI */ with the following code:
calendarListBox.ItemsSource = calendar.EventList;
Now save the all files, compile, and run the application. It should look something like this:
www.it-ebooks.info

Building a Windows Phone 7 Dashboard Application with SharePoint Data
[ 194 ]
There's a bit of cleanup we should do to make it more readable. First, let's put the whole list in a box. Surround the ListBox with the following code in the MainPage.xaml:
<Border BorderBrush="{StaticResource PhoneForegroundBrush}" BorderThickness="{StaticResource PhoneBorderThickness}" Background="#80808080">ListBox code...</Border>
This will put a border around our list box. The border uses the foreground brush. That means if we are in the dark theme, it will be white and if we are in the light theme it'll be black. Also, we use the phone border thickness static resource because this has been optimized to look best on our phone. Finally, we set the background color to a light gray with partial alpha transparency. If we had an image in the background, it would shine through.
Next, let's look at the start date. For this application, we only want to show the month and day of the event. We could then extend the application to allow the user to tap on an event to see full details. To change the output of the DateTime to a formatted string, we will use a value converter.
Create a new class named DateTimeValueConverter and have it implement the IValueConverter interface. Create the class file by carrying out the following steps:
1. Right click on the PanoramaData project.2. In the context menu that appears, select Add and then the Class… option.3. Name the class DateTimeValueConverter.cs and click on the Add button.4. Visual Studio will create a blank class for us to use.
In the class that is created, add the following using statement:
using System.Windows.Data;
Then add the following code to the class:
public class DateTimeValueConverter : IValueConverter{ public object Convert(object value, Type targetType, object
parameter, System.Globalization.CultureInfo culture) { throw new NotImplementedException(); }
public object ConvertBack(object value, Type targetType, object parameter, System.Globalization.CultureInfo culture)
www.it-ebooks.info

Chapter 7
[ 195 ]
{ throw new NotImplementedException(); }}
The IValueConverter interface defines two methods for converting and converting back. The second method is useful for TwoWay binding, but we are only using OneTime binding in this book. We will only modify the Convert method.
The Value Converter we are writing here is incredibly specific for our situation. Ideally, we'd write a more generic value converter that we could pass any value in and a format string. This would lead to more reusable code.
The following is the code we'll use for the Convert method:
public object Convert(object value, Type targetType, object parameter, System.Globalization.CultureInfo culture){ if (value.GetType() == typeof(DateTime)) { var dt = (DateTime)value; return string.Format("{0}/{1}", dt.Month.ToString(), dt.Day.
ToString()); } else return string.Empty;}
This first ensures that what was sent in is a DateTime. It then formats the string and returns it. Now let's attach it to the UI.
First, we need to add another XML namespace to our XAML. At the top where we added the controls namespace earlier, add the following line:
xmlns:converter="clr-namespace:PanoramaData"
Next, we have to tell our application about the converter. Add the following code before the opening LayoutRoot grid element:
<UserControl.Resources> <converter:DateTimeValueConverter x:Key="DateFormatConverter" /></UserControl.Resources>
www.it-ebooks.info

Building a Windows Phone 7 Dashboard Application with SharePoint Data
[ 196 ]
This lets the app know that when we call for a static resource named DateFormatConverter that what we mean is our new DateTime Value Converter. Now, let's modify the StartTime binding:
<TextBlock Text="{Binding StartDate, Converter={StaticResource DateFormatConverter}}" VerticalAlignment="Top" HorizontalAlignment="Center" Style="{StaticResource PhoneTextLargeStyle}"/>
Let's do a little more design on this before moving on. In the preceding code, we also added a style to make this text much larger. Let's also change the style of the title text block:
<TextBlock Text="{Binding Title}" TextWrapping="Wrap" Width="282" Style="{StaticResource PhoneTextTitle2Style}"/>
Finally, let's surround the start time text block with a border much like we did for the whole calendar:
<Border CornerRadius="10" Background="{StaticResource PhoneAccentBrush}" Height="45" Width="100" Margin="7,7,7,7" VerticalAlignment="Top">StartTime TextBlock…</Border>
This gives us a box under the start time that has the phone accent color. Saving all these changes and running the app will yield this:
www.it-ebooks.info

Chapter 7
[ 197 ]
Organizing the calendar dataThe problem here is that the full day events are listed first and the appointments are listed second. Also, we should probably only show the first six events and we only want events either today or in the future. We can do this very easily by modifying the URI that we pass to the list data service.
Reopen the CalendarOfEvents class file. Modify the member variable mCalendarUri as follows:
private readonly string mCalendarUri = "/Calendar/?$orderby=StartTime&$filter=StartTime%20ge%20DateTime'{0}'&$top=6";
This orders by the StartTime, then gets only items in the future, and finally it only grabs the first six items. The filter for grabbing items greater than or equal to today needs to be formatted when we actually use it. Find the LoadEvents method and change the first line to this:
mWebRequest = (HttpWebRequest)HttpWebRequest.Create(new Uri(mDataServiceUrl + string.Format(mCalendarUri, DateTime.Now.ToString("yyyy-MM-dd"))));
www.it-ebooks.info

Building a Windows Phone 7 Dashboard Application with SharePoint Data
[ 198 ]
This replaces the {0} with the current date. Save everything, compile, and run. The output should look similar to the one shown in the following screenshot:
In this demo, we saw how to get information from a SharePoint calendar using OData. We then bound it to a ListBox, creating a value converter to display the start time in a specific format, and we updated the UI. A panorama with only one panel isn't very interesting though. In the next demo, we'll add a task status site.
Creating the task status siteFor this example, we are going to take a task status site, count all of the projects in each status and use that information to populate a pie chart which we will put on the first pane of our panorama control from the previous example. As we should be old pros now at doing many of the common tasks, we'll go faster in this section.
The first thing we need is a new task status site, so carry out the following steps:
1. Open our Chapter 7 SharePoint site.2. From the quick links menu on the left, select Lists
www.it-ebooks.info

Chapter 7
[ 199 ]
3. At the top, click on the Create link to create a new list.4. This will open the Create dialog.5. Find the Project Tasks template and give it the name ProjectTaskStatus.6. This will create a blank task list. Populate it with some data. Make sure to
give tasks status of In Progress, Completed, or Not Started for each task.
Once finished, the task status site should look like the one shown in the following screenshot:
This really is an idealized example, but the point still is valid.
Reading the task status site dataWe are only interested in the following three statuses from the task status site:
1. In Progress2. Complete3. Not Started
For each of these, we'll need to know how many tasks are in that state. We'll write a really simple class to hold that data.
www.it-ebooks.info

Building a Windows Phone 7 Dashboard Application with SharePoint Data
[ 200 ]
Carry out the following instructions to create the class:
1. Right click on the PanoramaData project.2. In the context menu that appears, select Add and then the Class… option.3. Name the class ProjectStatus.cs and click on the Add button.4. Visual Studio will create a blank class for us to use.
Now enter the following code:
public class ProjectStatus{ public string Status { get; set; } public int Count { get; set; }}
Then we'll create another new class named ProjectTaskStatus.
Carry out the following instructions to create the class:
1. Right click on the PanoramaData project.2. In the context menu that appears, select Add and then the Class… option.3. Name the class ProjectTaskStatus.cs and click on the Add button.4. Visual Studio will create a blank class for us to use.
In the class which is created, add the following using statement:
using System.ComponentModel
This will be where we call SharePoint to get the data. Add the following code to this new class:
public class ProjectTaskStatus : INotifyPropertyChanged{ private CookieContainer mAuthToken; private HttpWebRequest mWebRequest;
public ProjectTaskStatus(CookieContainer authToken) { mAuthToken = authToken; }
public event PropertyChangedEventHandler PropertyChanged; private void NotifyPropertyChanged(string propertyName) { if (PropertyChanged != null)
www.it-ebooks.info

Chapter 7
[ 201 ]
PropertyChanged(this, new PropertyChangedEventArgs (propertyName));
}}
Like the CalendarOfEvents class, the ProjectTaskStatus class will implement the INotifyPropertyChanged event, which will let us know when all of the data has been downloaded. We will have a member variable to hold the authentication token that is passed in to the constructor, and we'll have a member variable for the HttpWebRequest.
Next, let's add a variable for the project URL and one for the query URI:
private readonly string mProjectUrl = "http://ssps2010/Chapter07/_vti_bin/listdata.svc";private readonly string mQueryUri = "/ProjectTaskStatus/?$filter=TaskStatusValue%20eq%20'{0}'&$top=0&$inlinecount=allpages";
The first one is the same as we had in the calendar example. The mQueryUri is a little different. Not only is it looking for data in the ProjectTaskStatus site, but we are looking for specific TaskStatusValues, which we'll cycle through in a minute to get each one.
We don't actually want any of the tasks, so we ask for the system to return the top 0 items. This may sound strange, but if all we want is the number of records then it doesn't make sense to send all the records down to the phone just to count them. We should have SharePoint count them for us. That's exactly what the last part $inlinecount=allpages does for us.
Finally, we'll add a property for our data:
public List<ProjectStatus> Projects { get; set; }
This is a simple generic list of ProjectStatus, but we'll need to initialize it. Add the following line of code to the class constructor:
Projects = new List<ProjectStatus>();
Now we are ready to query the server for data. Let's create a method named LoadData that will call a method named GetCount and pass in the status we are looking for:
public void LoadData(){ GetCount("In Progress"); GetCount("Completed"); GetCount("Not Started");}
www.it-ebooks.info

Building a Windows Phone 7 Dashboard Application with SharePoint Data
[ 202 ]
GetCount will start the actual request to the server with the now familiar three pronged attack:
1. Initialize the web request2. Get the request callback3. Parse the results
Here's the code for GetCount:
private void GetCount(string status){ var uri = new Uri(mProjectUrl + string.Format(mQueryUri, status)); mWebRequest = (HttpWebRequest)HttpWebRequest.Create(uri); mWebRequest.CookieContainer = mAuthToken; mWebRequest.Accept = "application/atom+xml"; mWebRequest.Headers["TaskStatusValue"] = status; mWebRequest.BeginGetResponse(new AsyncCallback(asyncCallback),
mWebRequest);}
This code includes the first of two hacks that I've put in here. We've added a TaskStatusValue header to the request. As we aren't getting any tasks back from the SharePoint server when we are parsing the data, we won't know which of the three statuses we are getting data for. By passing the status in the header, we can just look at the header at the time of parsing and we'll have all the information we need.
The rest of this method is the same as we've used a couple of times in this chapter. Next, let's look at the asyncCallback method.
private void asyncCallback(IAsyncResult asyncResult){ var request = (HttpWebRequest)asyncResult.AsyncState; var response = (HttpWebResponse)request.
EndGetResponse(asyncResult); using (var sr = new StreamReader(response.GetResponseStream())) { var result = sr.ReadToEnd(); ParseResults(result, request.Headers["TaskStatusValue"]); }}
www.it-ebooks.info

Chapter 7
[ 203 ]
You can see here where we pulled the TaskStatusValue out of the request headers, so we can pass it into the ParseResults method. The rest of this is exactly the same as we had in the calendar example. This is a common theme. We are now running into code we've written before several times and it should trigger an indication that we should refactor out the common patterns into their own classes. This three-pronged attack to get data is a prime example of that. We won't do that here, but as we go on, you should see similar patterns.
Finally, let's look at the ParseResults method.
private void ParseResults(string result, string status){ var atomElement = XElement.Parse(result); XNamespace atom = "http://www.w3.org/2005/Atom"; XNamespace dataServices = "http://schemas.microsoft.com/
ado/2007/08/dataservices"; XNamespace metaData = "http://schemas.microsoft.com/ado/2007/08/
dataservices/metadata"; var countString = atomElement.Descendants(metaData + "count").
FirstOrDefault().Value; int count = 0; if (!int.TryParse(countString, out count)) count = 0; Projects.Add(new ProjectStatus { Status = status, Count = count
}); if (Projects.Count > 2) NotifyPropertyChanged("Projects");}
This is boilerplate parsing. We initialize the namespaces and then use LINQ to get the value of the count. This value comes out as a string, so we parse it into an integer. Finally, we add a new Project Status to our Projects property and if we have all three ProjectStatus populated, we call NotifyPropertyChanged.
Let's move back to the MainPage.xaml.cs file and hook up this class. Add a member variable to hold our new ProjectTaskStatus object. Then in the auth_AuthenticationTokenSet method, we previously initialized the calendar object. Add in the following lines to initialize, hook up the propertyChanged event, and start the data load after the lines initializing the calendar:
tasks = new ProjectTaskStatus(auth.AuthenticationToken);tasks.PropertyChanged += new PropertyChangedEventHandler(propertyChanged);tasks.LoadData();
www.it-ebooks.info

Building a Windows Phone 7 Dashboard Application with SharePoint Data
[ 204 ]
Now, we are calling the same event handler when the task list is filled as we did for the calendar event. We already have a conditional in the propertyChanged event handler for calendar events; let's add in a new conditional to listen for the tasks:
void propertyChanged(object sender, PropertyChangedEventArgs e){ if (e.PropertyName.ToLowerInvariant() == "eventlist") Dispatcher.BeginInvoke(() => { calendarListBox.ItemsSource = calendar.EventList; }); else if(e.PropertyName.ToLowerInvariant() == "projects") Dispatcher.BeginInvoke(() => { /* code to update our UI */ });}
The highlighted code shows the new path and this is as far as we can go without our UI.
Displaying the task status overview chartNot too long ago, Microsoft bought a charting company and integrated their components into .NET. Those controls have found their way into the Silverlight Toolkit, which is freely distributed at the following URL:
http://silverlight.codeplex.com
In August of 2010, a Microsoft developer named David Anson took those charts and figured out how to make them work in Windows Phone 7. It isn't hard, you just use the two assemblies and go, but the UI was designed for Silverlight on the web not Silverlight on the phone. David wrote a Resource Dictionary for use with these charts and Windows Phone 7. The following is the URL to the post:
http://blogs.msdn.com/b/delay/archive/2010/08/04/why-didn-t-i-think-of-that-in-the-first-place-windows-phone-7-charting-example-updated-to-include-reusable-platform-consistent-style-and-templates.aspx
It is worth a read, and his blog is a great resource in general.
For displaying the chart, we are going to follow his instructions. First, download his Windows Phone 7 Data Visualization sample linked to from the preceding blog post. Then unblock it and unzip the package. This is a full solution that will demonstrate his example. We only need the two DLL's that are from the Silverlight Toolkit and the PhoneDataVisualizationResource.xaml. Carry out the following directions to add them to our project:
www.it-ebooks.info

Chapter 7
[ 205 ]
1. Right click on the PanoramaData project and select Add Reference…
2. In the Add Reference dialog box, select Browse and navigate to where you unzipped the Windows Phone 7 Data Visualization project.
3. Select the following two DLL's:° System.Windows.Controls.DataVisualization.Toolkit.dll
° System.Windows.Controls.dll
4. Click on the Add button and Visual Studio will add them to our project.5. Right click on the PanoramaData project.6. Select Add and then Existing Item…7. Once again navigate to where you unzipped the Windows Phone 7 Data
Visualization project.8. Select the resource file PhoneDataVisualizationResources.xaml9. Click on the Add button and Visual Studio will add it to our project.
Next, we have to tell our application to use these tools. To tell the application about the phone data visualization resources, open up App.xaml. This file we haven't touched yet, but when dealing with larger scale applications and different design patterns, we would be in here all the time. Right now it's fairly empty. Locate the Application.Resources section and add the highlighted code:
<Application.Resources> <ResourceDictionary> <ResourceDictionary.MergedDictionaries> <ResourceDictionary Source="/PanoramaData;component/
PhoneDataVisualizationResources.xaml" /> </ResourceDictionary.MergedDictionaries> </ResourceDictionary></Application.Resources>
This will merge the resources we just added to the system, so that we can call them using the same familiar syntax we're used to.
Next, let's add the namespace attribute to our MainPage.xaml. We've done this twice before. At the top, there are a series of XML namespaces. Add this one to the list:
xmlns:charting="clr-namespace:System.Windows.Controls.DataVisualization.Charting;assembly=System.Windows.Controls.DataVisualization.Toolkit"
www.it-ebooks.info

Building a Windows Phone 7 Dashboard Application with SharePoint Data
[ 206 ]
Next, we'll need a place to put our chart. Let's make the pie chart the first thing that appears in the application. Find the opening controls:Panorama element and add this on the very next line:
<controls:PanoramaItem Header="status chart"> <Grid> </Grid></controls:PanoramaItem>
This creates another PanoramaItem with a title of "status chart". Next, we'll put the chart inside the grid with the following code:
<charting:Chart Name="ProjectStatusChart" LegendTitle="legend" Style="{StaticResource PhoneChartStyle}" Template="{StaticResource PhoneChartPortraitTemplate}"> </charting:Chart>
This sets up the basic chart with a legend title, a style that is from the PhoneDataVisualizationResource and based on a template from the same resource file. Inside this chart, we'll add a pie chart series:
<charting:PieSeries ItemsSource="{Binding}" DependentValuePath="Count" IndependentValuePath="Status"> <charting:PieSeries.LegendItemStyle> <Style TargetType="charting:LegendItem"> <Setter Property="Margin" Value="5 0 5 0" /> </Style> </charting:PieSeries.LegendItemStyle></charting:PieSeries>
There is a lot going on here. First, we create the pie series and tell it that we will bind to the ItemsSource. The dependent value path is the count or the number of items in each status. The independent value path is the status name. Finally, we add in some style for the legend to supply the margin values.
All of the XAML work is done, now we can hook up the binding. Go back to MainPage.xaml.cs and find the comment /* code to update our UI */ and replace it with the following:
ProjectStatusChart.DataContext = tasks.Projects;
www.it-ebooks.info

Chapter 7
[ 207 ]
We are giving the chart itself a data context here and the pie series will bind off this data context. Once we've finished doing that save, compile, and run. We should see something like this:
This is just the start of what could be a really useful little application. We could have data flowing in from various metrics such as bug tracking systems, backlog reports, burn down charts, employee productivity, sales quota metrics, and so on. Realistically any data that we have in SharePoint could be pulled out and displayed on the Windows Phone 7 app. Also, a pie chart is only one chart that can be displayed here. We could also use bar charts and line charts. Experiment with each of these different types.
www.it-ebooks.info

Building a Windows Phone 7 Dashboard Application with SharePoint Data
[ 208 ]
SummaryWe started this chapter with a discussion of forms-based authentication. We demonstrated how to enable it and how to modify the RSS reader application from Chapter 6 to use forms authentication to get the same data from a protected feed. Next, we were presented with a high level overview of the client object model for programming against SharePoint in the web, Silverlight, and managed .NET applications. We saw that these tools aren't ready yet for Windows Phone 7 and instead turned our attention to using the WCF Data Services to get data from SharePoint from our Windows phones. Finally, we demonstrated this technique by writing a dashboard application that showed a pie chart of the status of projects on one pane and a calendar of events on another.
In the sample code included with this chapter, the RSS reader has also been added to this panorama application.
In the appendices that follow, we will look at a few of the topics not covered in this book, as well as present a list of good resources to follow for help in programming against SharePoint and Windows Phone 7.
www.it-ebooks.info

Additional ResourcesThis book is by no means an exhaustive look at Windows Phone 7 development with SharePoint. There are a lot of resources on the Internet that provide the bits and pieces required to build the exceptional applications that enterprise consumers will require from their phones.
Sites with good information on SharePoint and Windows Phone 7Things in the development world move very fast. For example, when writing this book, copy and paste wasn't available for Windows Phone 7. By the time this book is published, every Windows Phone 7 device will have this feature. Chapter 2 described Internet Explorer Mobile, but later this year it will be replaced by Internet Explorer 9, which will bring with it a lot of the features that other Smartphones already have. This section will point out some really excellent websites to keep an eye on to find out the most current information for both Windows Phone 7 development, as well as SharePoint 2010 development.
MSDNSaying MSDN (http://msdn.microsoft.com) is a good source of development information is about as narrow a statement as saying the Internet has information on it. It is true that just about everything a developer could need to know about developing for Microsoft technologies can be found here. There are some specific starting points that are helpful:
www.it-ebooks.info
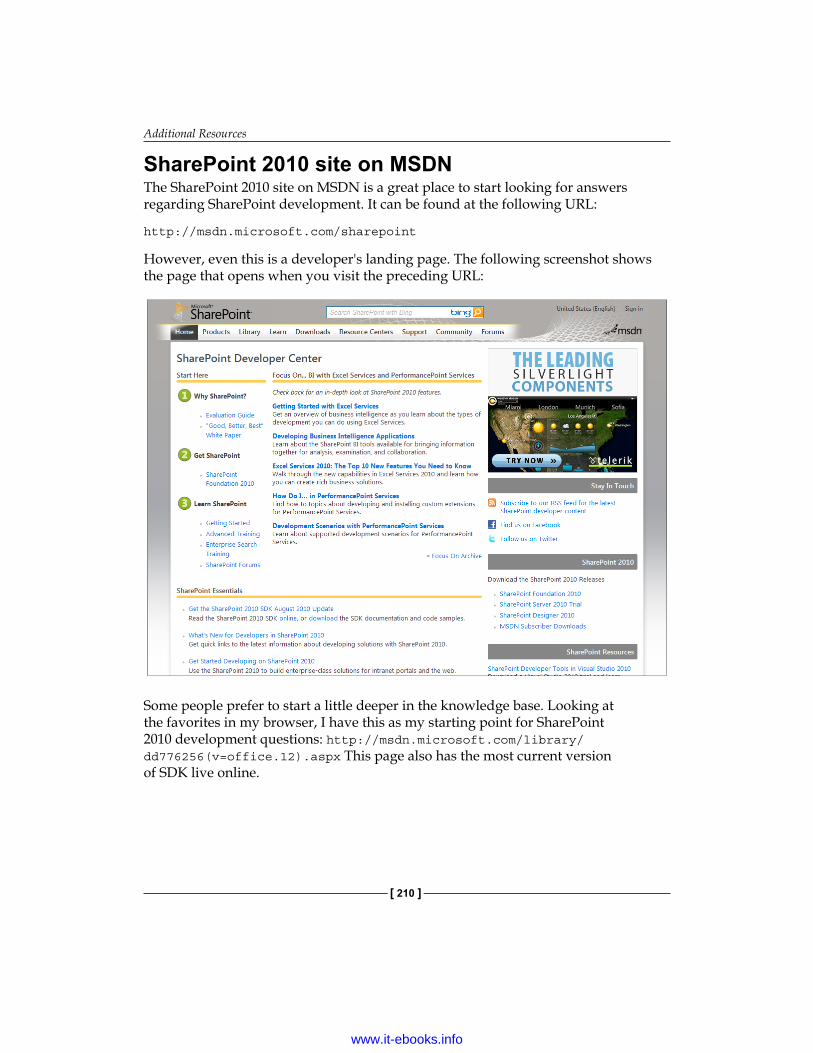
Additional Resources
[ 210 ]
SharePoint 2010 site on MSDNThe SharePoint 2010 site on MSDN is a great place to start looking for answers regarding SharePoint development. It can be found at the following URL:
http://msdn.microsoft.com/sharepoint
However, even this is a developer's landing page. The following screenshot shows the page that opens when you visit the preceding URL:
Some people prefer to start a little deeper in the knowledge base. Looking at the favorites in my browser, I have this as my starting point for SharePoint 2010 development questions: http://msdn.microsoft.com/library/dd776256(v=office.12).aspx This page also has the most current version of SDK live online.
www.it-ebooks.info
Appendix A
[ 211 ]
The mobile rendering systemBuilding out mobile pages is a common task, but we usually need a good source to turn to when we cannot remember exactly how something works. A good bookmark to have for this is the "Mobile Page Rendering System" page in SDK. This page is located at the following URL:
http://msdn.microsoft.com/library/bb862633.aspx
This page has a very clear description of segmented ID's. Segmented ID, as we saw in Chapters 3 and 4, is where we have to set the SharePoint rendering template's ID to a specific naming convention. This naming convention has four different types that follow from the following four categories:
1. Site Type Variable Rendering Templates° Is used when the rendering template varies from site to site.° Format: IntendedPageUse_SiteTypeID_PageType_PageArea
2. List Type Variable Rendering Templates° Is used when the rendering template varies from list to list.° Format: IntendedListUse_ListTypeID_PageType_PageArea
3. Field Type Variable Rendering Templates° Is used depending on the type of field in use.° Format: MobileCustomListField_ListTypeID_FieldType_Field
4. Simple View List Item Rendering Templates° Is used for rendering summary mobile views.° Format: Mobile_ListTypeID_SimpleViewItemRendering
There are a couple of exceptions to these rules. Blog post rendering templates are special. While a lot of documentation out on the web says to use SPMobilePostsListTitle (for example, to get a list of titles), this has the effect of choosing either Moblog_MyPosts_Title or Moblog_AllPosts_Title. If we want one or the other only we should keep this in mind.
The other exception to these rules is redirection templates. We used one to redirect our mobile home page. That used an element named SPMobileHomePageRedirection. We could instead use a segmented ID like this Mobile_SiteTypeID_PageType_Redirect to get the same effect.
www.it-ebooks.info

Additional Resources
[ 212 ]
SPListTemplateType EnumerationMany of the preceding segmented ID's require a list type ID. It is therefore almost a requirement to know what that integer is. That list can be found at the following URL:
http://msdn.microsoft.com/library/Microsoft.sharepoint.splisttemplatetype.aspx
Windows Phone 7 documentationThe official documentation for Windows Phone 7 can be found on MSDN at the following URL:
http://msdn.microsoft.com/en-us/library/ff402535(v=VS.92).aspx
App HubWindows Phone 7 development really does start at the App Hub. The URL for the App Hub is http://create.msdn.com. This is where we go to create our account to publish applications in the marketplace, and this is where we can get the tools to develop for Windows Phone 7.
Stack Overflow Stack Overflow is the ultimate developer forum. Any development question that may come up probably has been answered already on this site. If the question hasn't been asked, just ask and within hours (sometimes minutes) it'll be answered. The App Hub has forums too, but Stack Overflow seems to have a faster churn on information, plus the better answers bubble up to the top. The URL for Stack Overflow is http://stackoverflow.com and look for the Windows-Phone-7 keywords.
Control vendorsWhen building out applications, it is usually best not to reinvent the wheel. A build versus buy approach should be taken, and we may find that it is cheaper to just buy prebuilt components. This is by no means an exhaustive list of control vendors, but it is a list of the most popular ones.
www.it-ebooks.info
Appendix A
[ 213 ]
InfragisticsInfragistics is known for their NetAdvantage suite of tools for everything from Windows Forms to pure jQuery web development. They have a suite of controls for data visualization coming out for Windows Phone 7, but at the time of writing, a public beta has not been made available.
Keep an eye on their website for more information at the following URL:
http://www.infragistics.com
TelerikTelerik was one of the first component vendors to have a suite of controls available for Windows Phone 7 with their RadControls for Windows Phone. The controls currently included in the beta are as follows:
• Animation Framework• DockPanel• ApplicationFrame• DataBoundListBox• Gauge• TransitionControl• DatePicker• JumpList• Window
More information can be found on their website at the following URL:
http://www.telerik.com/products/windows-phone.aspx
MindscapeMindscape recently released their controls for Windows Phone 7 named MindScape Phone Elements. The controls included in the package are as follows:
• WP7 Charting• WP7 Color Picker• WP7 Date Picker• WP7 Dock Panel• WP7 Looping List Box• WP7 Time Picker
www.it-ebooks.info

Additional Resources
[ 214 ]
The charting tools are really impressive and would probably be a welcome replacement for the quick charts we used in Chapter 7. More information can be found on their website at the following URL:
http://www.mindscapehq.com/products/phone-elements
Blogs with good articles on SharePoint and Windows Phone 7Some people may think that blogs are a dying medium for information. These people are wrong. There are a lot of really good blogs out there. The problem with Windows Phone 7 and reading development blogs is that most of the information seems to be from around the time of Microsoft's Mix 10 conference in spring of 2010 or around TechEd in the summer of 2010. Most of that information just doesn't work on the released version of the phone. When reading a blog, be sure to check the date of the entry before trying to code. For example, early builds of OData SDK allowed for authenticated requests, but the final build published in October 2010 does not. However, there are exceptions to this rule, so, be sure to try out the code sample before sticking it into a project with a deadline. Here are some blogs that are useful.
SharePoint Developer Team BlogThe SharePoint team combined their developer blogs into one location to make it easy to find information without having to subscribe to multiple feeds. There are blog entries on everything from SharePoint architecture to job openings. The blog can be found at the following URL:
http://blogs.msdn.com/sharepointdev/
SharePoint in PicturesSharePoint development is huge. I'm not talking about the amount of work that is available. I mean the scale of opportunities to use the SharePoint platform for just about anything. SharePoint in Pictures is an amazing blog that visualizes this platform from object models, architecture, and administrative diagrams. The following screenshot shows one such example:
www.it-ebooks.info

Appendix A
[ 215 ]
This blog can be found at this URL: http://blogs.msdn.com/sharepointpictures
IE for Windows Phone Team WeblogMost of this book talked about customizing SharePoint's web interface for Windows Phone 7. That meant using Internet Explorer for Windows Phone 7. There is a lot of misinformation out on the Internet about IE Mobile and how it works, but the team behind bringing IE to Windows Phone is the absolute authority on the matter. Moreover, they actually listen to the community and have made true changes to the product based on feedback. For example, the CSS selector –ms-text-size-adjust originally was going to support the –webkit-text-size-adjust, but after hearing the logic of why this isn't a good idea, they made the decision to only support the Microsoft specific one.
This blog can be found here: http://blogs.msdn.com/iemobile
www.it-ebooks.info

Additional Resources
[ 216 ]
These guys do an amazing job and they recently announced that later in 2011, Internet Explorer will be upgraded to Internet Explorer 9. This means that the same browsing engine with hardware accelerated graphics and video, the same ECMAScript 5 engine, and the same CSS3 standards will just work the same between the desktop and the phone.
JohnPapa.netOne of the premier authorities on Silverlight development, even before he joined Microsoft as a technical evangelist, has got to be John Papa. He currently hosts Silverlight TV at http://Silverlight.tv and maintains his blog at the following URL:
http://johnpapa.net
Delay's BlogDavid Anson is a Microsoft developer working on Silverlight, WPF, Windows Phone, and web platforms. We used his code in Chapter 7 and I referenced the blog entry that inspired the pie chart that we built to display the task status. His blog is an amazing wealth of information.
He has a post on localizing Windows Phone applications that really outlines all the issues and how to deal with them while building an application that will need to work in multiple locals. This post can be found at the following URL:
http://blogs.msdn.com/b/delay/archive/2010/12/20/quot-and-she-d-say-can-you-see-what-i-m-saying-quot-how-to-localize-a-windows-phone-7-application-that-uses-the-windows-phone-toolkit-into-different-languages.aspxn
All of his Windows Phone 7 entries are available at the following URL:
http://blogs.msdn.com/b/delay/archive/tags/windows+phone/
www.it-ebooks.info

Appendix A
[ 217 ]
Steve on SecuritySteve Syfuhs has a blog entry that describes using Active Directory Federated Services (ADFS) to authenticate Windows Phone 7 clients against an Active Directory. It is possible that using this technique, we could get rid of the forms authentication approach which we discussed in Chapter 7 and replace it with ADFS. His blog entry talking about this approach to security is available at the following URL:
http://blogs.objectsharp.com/cs/blogs/steve/archive/2011/03/02/windows-domain-authentication-on-windows-phone-7.aspx
In general, Steve blogs about security and really does know his stuff. This is a highly recommended blog, mostly because security is one of those topics that we cannot afford to get wrong.
BlankenblogJeff Blankenburg wrote a 31 part series of articles on Windows Phone 7 named 31 Days of Windows Phone 7. This series of blog entries is available at the following URL:
http://www.jeffblankenburg.com/post/31-Days-of-Windows-Phone-7.aspx
www.it-ebooks.info

What Wasn't Covered in This Book and Why?
This book is only about 200 pages and isn't an exhaustive reference for how to develop Windows Phone 7 applications and sites for SharePoint. Also, Microsoft made it fairly hard to build enterprise applications on the phone simply because the first release of the phone is targeted at the consumer. Enterprise deployment of applications were purposely not envisioned for the platform, and as we saw in Chapter 7, writing an application that takes advantage of advanced authentication schemes common in enterprises was also left out of the platform.
In this appendix, we will cover some topics that weren't discussed in any detail, but may be of use for an enterprise SharePoint application on Windows Phone 7. Specifically, we will look at the following:
• Alerts• OMS and SMS messaging• Mobile document viewers• OData SDK for Windows Phone 7
Let's start by looking at SharePoint alerts.
AlertsSharePoint has the ability for a user to listen for events or on a schedule fire an alert. The user is then alerted to the event in the form of an e-mail or SMS. Alerts are commonly setup on forms to help kick off an informal workflow. Alerts can be set on List Items, Documents, Lists, or Libraries. Programmatic control of alerts is also available and SDK has a rich set of examples. Visit the following MSDN site for more information:
http://msdn.microsoft.com/en-us/library/bb897925.aspx
www.it-ebooks.info

What Wasn't Covered in This Book and Why?
[ 220 ]
Office Message Service and Short Message ServiceSharePoint has the ability to send SMS messages to cell phones using a connector named Office Message Service (OMS). When an alert is fired, SharePoint can send an SMS message instead of an e-mail. This is decided upon by the person setting the alert.
Using OMS is just a suggestion though, as most of the actual development work has already been done. We just need to configure it and it'll run. The underlying framework is in place where we could replace it with a solution, such as Twilio (http://www.twilio.com/) instead. Although all of these systems have costs associated with them, the development teams working on the SharePoint system may have experience with one of these other messaging systems. That is a good reason to go with an alternative solution, such as Twilio.
Mobile document viewersSharePoint 2010 includes the ability for a developer to create a custom document viewer for mobile devices. If we had a custom document format that we had a document library of, rather than just view the metadata of the file, we could write a document viewer for Windows Phone 7. This would allow our users to be able to actually open and optionally edit or create this custom file format with their phone.
Creating a mobile document viewer is as easy as creating the custom document viewer page, and registering the page. The document viewer page is built using ASP.NET and deploying the viewer file to the \Layouts\Mobile directory. This is similar to what we did in Chapter 3 and 4 when building out our custom templates. The .aspx page simply needs the logic of how to display the content on the screen.
The second part of creating a mobile document viewer is to register the page. This is done by deploying a special XML file to the %ProgramFiles%\Common Files\Microsoft Shared\web server extensions\14\Config directory. The XML file has a file name convention of mdocview_*.xml where the * is a unique string meant to differentiate our document viewer from any other document viewer out there.
The contents of this XML file are very simple (a simple sample is taken from this URL: http:// msdn.microsoft.com/en-us/library/ff407850.aspx):
<MobileDocViewers> <MobileDocViewer Name="xps" FilePath="/_layouts/mobile/mxps.aspx" QueryId="doc" AppendSourceUrl="true" /></MobileDocViewers>
www.it-ebooks.info

Appendix B
[ 221 ]
In this case, the Name attribute of the MobileDocViewer element specifies the file extension that SharePoint should attribute to our document. Here it is in the XPS file format. Next, the FilePath attribute tells SharePoint where to find the document viewer we wrote earlier. The next two attributes work together to pass information about the document request into the document viewer. The QueryId attribute is the key name for the query string parameter. Finally, AppendSourceUrl set to true passes the original URL request in as the value of the key.
What this means is that when we build out our document viewer, in this case, we can anticipate a query string that looks something like the following:
?doc=http:%2F%2FMyServer%2FShared%20Documents%2FFile%2Exps
Microsoft recommends that when building document viewers that we package them as Features that can be activated at the site collection level. This will also make it easy to deploy, maintain, and use source control.
OData SDK for Windows Phone 7In Chapter 7, we requested data from a WCF Data Service endpoint and got an ATOM result back. Then, we parsed the ATOM result using some brute force methods and LINQ. There's an easier way to do this kind of work and that is with OData SDK for Windows Phone 7. We didn't use it in Chapter 7 because the most current version of OData SDK doesn't support the forms authentication that we needed for SharePoint, but when developing for other open services this toolkit is an amazing deal.
OData SDK for Windows Phone 7 can be found at the following URL:
http://odata.codeplex.com/releases/view/54698
www.it-ebooks.info

What Wasn't Covered in This Book and Why?
[ 222 ]
The following screenshot shows the page that opens when you visit the preceding URL:
Download and unzip it to get to the tools (download the ODataClient_BinariesAndCodeGenToolForWinPhone.zip file). There will be four files in the zip: the two DLL's that we need to include as references in our projects, a readme file, and a code generator tool named DataSvcUtil.exe. This code generator tool will do most of the work of creating the data context to our WCF Data Service.
Then, using the built out data context and classes we can create an instance of the data. It is still good that we understand what is happening though and that is a good reason why it was important to build those queries by hand in Chapter 7.
www.it-ebooks.info

Appendix B
[ 223 ]
Debugging toolsAll developers write bugs. The tools that we use to figure out what went wrong are a big part of our tool kit. Visual Studio has powerful debugging tools built in, but sometimes what is provided in the Visual Studio box isn't enough. For those situations, there are many tools available, but Fiddler and Silverlight Spy are incredibly important tools.
FiddlerFiddler acts as a web proxy to inspect network traffic. This is a tool that a lot of web developers and Silverlight developers depend on to get the network traffic right. This tool can be found at the following URL:
http://www.fiddler2.com/
To make Fiddler work with the Windows Phone 7 emulator, follow the instructions found on the following blog entry:
http://phone7.wordpress.com/2010/10/17/fiddler-and-wp7-emulator-working/
Silverlight SpyXAML is a powerful tool. Once a developer gets over the hump of learning how it works, it is as easy to work with as HTML. Sometimes though it is important to know what is going on in the inside of a running application. That is where Silverlight Spy comes in handy. With Silverlight Spy, we can look at the entire UI tree, monitor events, extract XAML, view statistics, and more. Silverlight Spy is not a free tool though, but it is definitely worth the cost. It can be found at the following URL:
http://firstfloorsoftware.com/silverlightspy/
www.it-ebooks.info

What Wasn't Covered in This Book and Why?
[ 224 ]
ConclusionWe have come a long way. In this book, we have looked at the basics of Windows Phone 7 from the included applications to an in-depth look at Internet Explorer for Mobile that is included with it. Armed with that knowledge, we started building site templates and web templates for SharePoint that will work well with the included browser. Next, we took a brief look at the community aspects of SharePoint. Then, we spent a couple of chapters looking at how to build applications for Windows Phone 7 that get data from SharePoint. Finally, we took a real brief look at the topics not covered by this book, as well as some resources where we can find more information.
I hope that this introductory book has given you the inspiration to go out and forge new enterprise applications with SharePoint and Windows Phone 7.
www.it-ebooks.info
IndexSymbols$inlinecount=allpages 201
AAbout this blog, SharePoint blog site 119,
120add someone button 16alerts 219alt attribute 36announcement list
hyperlink column, adding 98-100anonymous access
customizing 138enabling, steps 137
anonymous access, FBAAuthenticate method 170AuthenticationResponseCallback method
172BeginGetRequestStream method 170BlogCallBack function 172ContentType header, setting to text/xml;
charset=utf-8 170LoadFeed 173MainPage_Loaded event handler 169removing 167, 169StreamReaders 173XMLReader 173
App Hub 212ASP.NET web services 180aspx files 101assets web database 76asyncCallback method 202ATOM 179auth_AuthenticationTokenSet() 191
Authenticate() method 183authentication.asmx web service request
167authentication, dashboard application
about 182AuthenticationResponseCallback method
184class, creating 182CookieContainer 183MainPage_Loaded event 185OnAuthenticationTokenSet(); 184
AuthenticationRequestCallback(IAsyncResult asyncResult) 183
AuthenticationRequestCallback method 171
AuthenticationResponseCallback(IAsyncResult asyncResult) method 183
AuthenticationResponseCallback method 184
BBack button 9basic meeting workspace 75basic search center 77BeginGetRequestStream method 170Blankenblog 217blank meeting workspace 75blank site 75Blank Site template 96blog 76BlogCallBack function 172BlogCallBack method 166blogs
about 117SharePoint blog site, customizing 119
www.it-ebooks.info

[ 226 ]
site, creating in SharePoint 118blogs, on SharePoint and Windows Phone 7
about 214Blankenblog 217delays blog 216IE, for windows phone team weblog 215,
216JohnPapa.net 216SharePoint developer team blog 214SharePoint in pictures 214, 215steve, on security 217
blog tools, SharePoint blog siteabout 122blog program, launching to post 123comments, managing 123post, creating 122posts, managing 123Windows Live Writer, configuring 124
business intelligence center 76
Ccalendar, dashboard application
creating 181calendar data, dashboard application
displaying 191-196organizing 197, 198project creating, steps 182reading 182
calendar data service, dashboard applicationabout 185-190EventList parameter 190
CalendarOfEvents class 201CalendarOfEvents class file 197calendars 14-16Cascading Style Sheets. See CSScategories, SharePoint blog site 120, 121central administration 136, 137charitable contributions web 76circulations list
removing 82, 83claims-based authentication 162client_DownloadStringCompleted event
handler method 165client object model
ECMAScript 176
ECMAScript interface 176, 177on desktop 176Silverlight interface 177, 178
client side browser, Internet Explorer Mobile
detection 41collections 67-69columns
adding, to lists 94-98comments, blog tools
managing 123contacts 16, 17contacts web database 76content hierarchy 69, 70controls:Panorama element 206control vendors
about 212infragistics 213Mindscape 213Telerik 213
Convert method 195CookieContainer 183Create button 96Create dialog 94CSS
about 37enhancing, in Internet Explorer Mobile 46URL 37
CSS float attribute 37custom site, building
about 78circulations list, removing 82, 83home page, customizing 86issue tracking list, adding to site 81picture library, adding 84, 85site, creating 80, 81site template, creating 80site, testing 91site theme, changing 87, 88template, moving 92template, saving 90
custom templatecreating 105-107mapped folder, adding 104, 105project, creating for 102, 103
www.it-ebooks.info

[ 227 ]
Ddashboard application
authentication 182-185calendar, creating 181calendar data, displaying 191-196calendar data, organizing 197, 198calendar data, reading 182calendar data service 185-191creating 180task status overview chart, displaying
204-207task status site, creating 198, 199task status site data, reading 199-203
DataTemplate element 193DateTimeValueConverter class 194debugging tools
about 223fiddler 223Silverlight Spy 223
delays blog 216delegate method 184deploy option 110desktop view 60, 61details view page, simple page navigation
building 152, 153loaded events, handling 155, 156navigating to 155
div elements 37document center 76documents, Office Hub
about 20Excel Mobile 2010 24, 25Microsoft Word 21-24PowerPoint 26
document workspace 75Download email from option 14DownloadStringCompleted event 142, 165
EECMAScript 176ECMAScript. See also JavaScriptECMAScript interface 176, 177enterprise search center 77enterprise wiki 77EventList parameter 190
EventsCallback callback method 188Excel Mobile 2010 24-26
FFAST search center 77FBA
about 162anonymous access, removing 167-175connecting with 163HttpWebRequest 163RSS feeds, accessing securely 163-167
Fiddler 223fields 69fonts, Internet Explorer Mobile 47foreach loop 108forms-based authentication. See FBA
GGetCount method 201Global Assembly Cache (GAC) 177group work site 76
HHandheldFriendly 50home page
customizing 86, 87HTML 36HTML5, Internet Explorer Mobile 48HttpWebRequest 163HyperText Markup Language. See HTML
IiFilters
content, searching with 94Infragistics 213INotifyPropertyChanged event 201INotifyPropertyChanged interface 187Internet Explorer Mobile
client side browser, detection 41CSS, enhancing 46fonts 47HTML5 48JavaScript, enhancing 45, 46
www.it-ebooks.info

[ 228 ]
plugins 48server-side, detection 42-44user agent 40, 41XHTML Mobile Profile (XHTML MP) 44
issues web database 76issue tracking list
adding, to site 81IValueConverter interface 194, 195
JJavaScript
about 38enhancing, in Internet Explorer Mobile 45,
46JavaScript Object Notation (JSON) 176JohnPapa.net 216
KKerberos authentication 162
LLayoutRoot grid 192LayoutRoot grid element 195libraries
and lists, differences 94iFilters, content searching with 94
list boxRSS items list, binding 150-152
list item outputcustomizing 101custom template, creating 105-107mapped folder, adding to custom control
template 104, 105project, creating, for custom template 102,
103template, customizing 108-110
list items 69lists
and libraries, differences 94announcement list, adding to hyperlink
column 98, 100columns, adding to 94-98iFilters, content searching with 94
LoadEvents method 187, 197LoadFeed 169
MMainPage_Loaded event 185MainPage_Loaded event handler 165, 169MainPage_Loaded method 169META tag settings, mobile friendly
about 48, 49HandheldFriendly 50MobileOptimized 50, 51viewport 51
Microsoft.Phone.Controls assembly 192Microsoft Forefront Unified
Access Gateway (UAG) 29Microsoft Word 21-24Mindscape 213mobile.css 59, 60mobile document viewers 220, 221mobile home page
replacing 112-115MobileOptimized 50, 51mobile rendering system 211More Options link 94More Options... option 97mQueryUri 201MSDN
about 209mobile rendering system 211SharePoint 2010 site 210SPListTemplateType Enumeration 212URL 209Windows Phone 7, documentation 212
multipage meeting workspace 76MVVM (Model View ViewModel) pattern
146my site host 76
NNEW APPOINTMENT screen 15new event handler, simple page navigation
setting up 153, 154New Project screen 103NotifyPropertyChanged 203
OOData
and WCF data services 179, 180
www.it-ebooks.info

[ 229 ]
OData SDKfor Windows Phone 7 221, 222
Office Hubabout 18documents 20OneNote 19, 20SharePoint Workspace Mobile 27, 28, 29
Office Message Service (OMS) 220OnAuthenticationTokenSet(); 184OneNote, Office Hub 19, 20Outlook e-mail
about 12configuring, steps 12
PPanoramaData project 194ParseResults method 203People hub 16personalization site 77Pertinent Blog Announcements 100physical objects hierarchy 70picture library
adding 84, 85plugins, Internet Explorer Mobile 48PNG image 36post
displaying, WebBrowser control used 157post, blog tools
creating 122managing 123
projects web database 76ProjectTaskStatus class 200, 201ProjectTaskStatus site 201propertyChanged event 203propertyChanged event handler 204publishing portal 77publishing site 77publishing site, with workflow 77
QquerySelector(selector) 46querySelectorAll(selector) 46
RRepresentational State Transfer. See REST
REST 178ResultsToListBox method 166RSS feeds
available, from SharePoint 144, 145RSS feeds, FBA
accessing, securely 163BlogCallBack method 166client_DownloadStringCompleted event
handler method 165MainPage_Loaded event handler 165project copy, adding to solution 164ResultsToListBox method 166
RSS itemslist, binding to list box 150-152list, creating 149
SSearch button 10security, SharePoint 2010
central administration 136-138site permissions 138, 139
Security Token Service Application (STS) 162
server-side browser, Internet Explorer Mobile
detection 42-44services hierarchy 70SharePoint
about 65blog site, creating 118in pictures 214, 215 RSS feeds, available from 144, 145
SharePoint 2010development environment 71, 72development environment, installing steps
72security 135, 136
SharePoint 2010 siteMSDN 210
SharePoint 2010, versionsfree SharePoint Foundation 2010 75SharePoint Server 2010 75
SharePoint blogs. See Windows Phone 7, blogs on
SharePoint blog site, customizingAbout this blog 119, 120
www.it-ebooks.info

[ 230 ]
blog tools 122categories 120, 121links 125working, with Windows Phone 7 126-130
SharePoint developer team blog 214SharePoint Home page, WebClient
contents, requesting 142SharePoint prefix 109SharePoint root 73-75SharePoint sites
customizing, need for 66, 67SharePoint sites, definitions
assets web database 76basic meeting workspace 75basic search center 77blank meeting workspace 75blank site 75blog 76business intelligence center 76charitable contributins web 76contacts web database 76decision meeting workspace 75document center 76document workspace 75enterprise search center 77enterprise wiki 77FAST search center 77group work site 76issues web database 76multipage meeting workspace 76my site host 76personalization site 77projects web database 76publishing portal 77publishing site 77publishing site, with workflow 77social meeting workspace 76team site 75visio process repository 77
SharePoint Workspace Mobile, Office Hubabout 27Microsoft Forefront Unified Access
Gateway (UAG) 29, 30SharePoint library on Windows Phone 7,
directions for opening 27, 28Short Message Service (SMS) 220Silverlight interface 177, 178
Silverlight Spy 223simple page navigation
about 152details view page, building 152, 153details view page, navigating to 155loaded events, handling on details page
155, 156new event handler, setting up 153, 154Uri, building for navigation 154, 155
simple view modelcreating, for RSS item 147, 148
Site Actions drop-down list 96site permissions 138, 139sites 67-69site settings section 78site template, creating
circulations list, removing 82, 83home page, customizing 86, 87issue tracking list, adding to site 81picture library, adding 84, 85site, creating 80, 81site, testing 91site theme, changing 87template, moving 92template, saving 90
site themechanging 87
SOAPAction 170social meeting workspace 76SPListTemplateType Enumeration 212SPListTemplateType enumerations 107Stack overflow 212Start button 10StartTime binding 196steve
on secuirty 217StreamReader class 166style.css 56-58support.aspx 52-55
TTagged Image File Format (TIFF) files 94task status overview chart, dashboard
applicationdisplaying 204-207
www.it-ebooks.info

[ 231 ]
task status site, dashboard applicationcreating 198, 199
task status site data, dashboard applicationauth_AuthenticationTokenSet method 203ParseResults method 203propertyChanged event 203reading 199-203
team site 75TechNet website
URL 162Telerik 213template
customizing 108-110moving 92saving 90
text blockadding, to display WebClient results 141display, replacing with list box 147
TwilioURL 220
UUAG 29URI, simple page navigation
building 154, 155using statement 194, 200using statements 186
Vvisio process repository 77Visual Studio 2010
SharePoint project types 73
WWCF Data Services
about 178and OData 179, 180ASP.NET web services 180REST 178
web applications 67-69WebBrowser control
adding, to details view 157using, to display post 157
WebClientbase project, creating 140
creating 142raw HTML, displaying 142-144results, displaying by adding text block 141SharePoint Home page contents, requesting
142used, for retrieving data from web 139, 140
web.config file 74, 162web page, architecture
about 36Cascading Style Sheets (CSS) 37HTML, CSS, and JavaScript, merging 38, 39HyperText Markup Language (HTML) 36JavaScript 38
web page, buildingdesktop view 60, 61mobile.css 59, 60style.css 56, 58support.aspx 52-55Windows Phone 7, view 61-63
webs 67-69wiki
about 131pages, working with Windows Phone 7 133site pages, creating 131, 132wiki library 132, 133
wiki library 132, 133wiki site pages
creating 131ordinary document library, example 131
Windows Live Writer, blog toolsconfiguring 124
Windows Marketplaceabout 30application approval, process 31apps, getting on phone 31
Windows Phone 7about 7blogs 214calendars 11-16contacts 11, 16, 17dashboard application 180documentation 212e-mail 11FBA 162OData SDK 221, 222Outlook e-mail 12-14overview 8-10
www.it-ebooks.info

[ 232 ]
wiki pages, working with 133XML, parsing in 146
Windows Phone 7, blogs onBlankenblog 217delays blog 216IE, for windows phone team weblog 215,
216JohnPapa.net 216SharePoint developer team blog 214SharePoint, in pictures 214, 215steve, on security 217
Windows Phone Developer Registration 31Windows phone team weblog
IE for 215, 216
XXHTML Mobile Profile (XHTML MP),
Internet Explorer Mobiledetection 44
XMLparsing 148parsing, in Windows Phone 7 146RSS items list, binding to list box 150-152RSS items list, creating 149simple view model, creating for RSS item
147, 148text block display, replacing with list box
147
ZZune softaware
URL, for downloading 14
www.it-ebooks.info

Thank you for buying Microsoft SharePoint 2010 Enterprise Applications
on Windows Phone 7
About Packt PublishingPackt, pronounced 'packed', published its first book "Mastering phpMyAdmin for Effective MySQL Management" in April 2004 and subsequently continued to specialize in publishing highly focused books on specific technologies and solutions.
Our books and publications share the experiences of your fellow IT professionals in adapting and customizing today's systems, applications, and frameworks. Our solution based books give you the knowledge and power to customize the software and technologies you're using to get the job done. Packt books are more specific and less general than the IT books you have seen in the past. Our unique business model allows us to bring you more focused information, giving you more of what you need to know, and less of what you don't.
Packt is a modern, yet unique publishing company, which focuses on producing quality, cutting-edge books for communities of developers, administrators, and newbies alike. For more information, please visit our website: www.packtpub.com.
About Packt EnterpriseIn 2010, Packt launched two new brands, Packt Enterprise and Packt Open Source, in order to continue its focus on specialization. This book is part of the Packt Enterprise brand, home to books published on enterprise software – software created by major vendors, including (but not limited to) IBM, Microsoft and Oracle, often for use in other corporations. Its titles will offer information relevant to a range of users of this software, including administrators, developers, architects, and end users.
Writing for PacktWe welcome all inquiries from people who are interested in authoring. Book proposals should be sent to [email protected]. If your book idea is still at an early stage and you would like to discuss it first before writing a formal book proposal, contact us; one of our commissioning editors will get in touch with you.
We're not just looking for published authors; if you have strong technical skills but no writing experience, our experienced editors can help you develop a writing career, or simply get some additional reward for your expertise.
www.it-ebooks.info

Microsoft SharePoint 2010 Administration CookbookISBN: 978-1-849681-08-7 Paperback: 288 pages
Over 90 simple but incredibly effective recipes to administer your SharePoint applications
1. Solutions to the most common problems encountered while administering SharePoint in book and eBook formats
2. Upgrade, configure, secure, and back up your SharePoint applications with ease
3. Packed with many recipes for improving collaboration and content management with SharePoint
Microsoft SharePoint 2010 Power User Cookbook: SharePoint AppliedISBN: 978-1-849682-88-6 Paperback: 350 pages
Over 90 advanced recipes for expert-level End Users to unlock the real value of SharePoint in your business
1. Discover how to apply SharePoint far beyond basic functionality
2. Explore the Business Intelligence capabilities of SharePoint with KPIs and custom dashboards
3. Take a deep dive into document management, data integration, electronic forms, and workflow scenarios
Please check www.PacktPub.com for information on our titles
www.it-ebooks.info

Microsoft SharePoint 2010 End User Guide: Business Performance EnhancementISBN: 978-1-849680-66-0 Paperback: 424 pages
Taking the basics to the business with no-coding solutions for SharePoint 2010
1. Designed to offer applicable, no-coding solutions to dramatically enhance the performance of your business
2. Excel at SharePoint intranet functionality to have the most impact on you and your team
3. Drastically enhance your End user SharePoint functionality experience
SharePoint Designer Tutorial: Working with SharePoint WebsitesISBN: 978-1-847194-42-8 Paperback: 188 pages
Get started with SharePoint Designer and learn to put together a business website with SharePoint
1. Become comfortable in the SharePoint Designer environment
2. Learn about SharePoint Designer features as you create a SharePoint website
3. Step-by-step instructions and careful explanations
Please check www.PacktPub.com for information on our titles
www.it-ebooks.info