


Bahasa
Halaman
Hukum


IM7908-7 Sep, 2020
Rev. 02
POWERCRAFT® 191C For use with machine Part Number
POWERCRAFT® 191C K69072-1, Code 76469
THE LINCOLN ELECTRIC COMPANY PTY LTD
35 Byrant Street Padstow NSW 2211
www.lincolnelectric.com.au
Safety Depends on You
PowerCRAFT machine is designed and built with safety in mind. However, your overall safety can be increased by proper installation and thoughtful operation on your part. DO NOT INSTALL, OPERATE OR REPAIR THIS EQUIPMENT WITHOUT READING THIS MANUAL AND THE SAFETY PRECAUTIONS CONTAINED THROUGHOUT. And, most
importantly, think before you act and be careful.
Copyright © 2014 the Shanghai Lincoln Electric Company

Thank you for selecting QUALITY POWERCRAFT® products.
Please examine the packaging and equipment for damage. Claims for material damaged in shipment must be notified immediately to the authorized dealer from whom you purchased the machine.
For future reference, please record your equipment identification information in the table below. Model Name, Code & Serial Number can be found on the machine rating plate.
Declaration of conformity
THE SHANGHAI LINCOLN ELECTRIC COMPANY
Designed in conformance with the following norm:
AS 60974.1
AS/NZS CISPR 11
GB15579.1
IEC 60974-1
IEC 60974-10


A-1 CUSTOMER ASSISTANCE A-1
Read this Operators Manual completely before attempting to use this
equipment. Save this manual and keep i t handy for quick reference. Pay particular attention to the safety instructions we have provided for your
protection. The level of seriousness to be appl ied to each is explained below:

A-2 CUSTOMER ASSISTANCE A-2
Master Table of Contents
Personal Safety………………………………………....…………………………………… I-V
Customer Assistance Policy………………………..……………………………………... A-1
Master Table of Contents……..………….………………………………………………… A-2
Product Description…………..…………………………………………………………….. B-1
Installation…………………………………………………………………………………….. C-1
Technical Specifications………..………………………………………………………….. D-1
Technical Specification Data…………………………………………………………………. D-2
Graphics and their Meanings………………………………………………………………… D-4
Power Source Placement……………………………………………………………………. D-5
Power Supply Configuration…………………………………………………………………. D-6
The installation and Connection for MIG Welding…………………………………………. D-6
Operation………………………………………………………………………………..…….. E-1
Front Control Panel…………………………………………………………………………… E-1
Welding Getting Started……………………………………………………………………… E-4
Suggested Settings Guide………………………………………………………………..….. E-8
Maintenance and Trouble Shooting……………………………………………………… F-1
Accessories………………………………………………………………………………….. G-1
Schematic Wiring Diagram………………………………………………………………… H-1
Warranty………………………………………………………………………………………. J-1

B-1 PRODUCT DESCRIPTION B-1
POWERCRAFT® 191C is multi-purpose 3 in 1 welding power source. It is capable of MIG welding (both gas-shielded and gasless flux-cored welding), stick and TIG welding of mild and stainless steel materials. Its characteristics are high production efficiency, excellent
welding output and easy to carry out all-position welding. The machine is light and portable which is very popular in DIY and semi-professional market.
The highlighted characteristics of POWERCRAFT® 191C Inverter MIG/MMA/TIG Welder:
Featured with compact size and light weight, it is widely used in maintenance and field work.
Provided with input voltage compensation covering ±15% variation and a control circuit reaction speed is less than 1mSec.
Optimum arc characteristics are maintained over a broad range of operating conditions.
High working efficiency. Automatic Wire Feeding can achieve high speed welding.
Both solid and flux-cored wires can be used. The wire diameter range is between Ф0.6- Ф1.2mm.
Convenient connection mode. Quick cable connection makes it quick, safe, simple and reliable.
MMAW(stick welding) is available which can weld general purpose and cellulosic electrodes.
TIG Lift-ARC welding, program control, easy arc start, anti-sticking torch. (Requires optional PRO26V TIG Torch part No. See the G-1)
Note: We reserve the right to update the manual without notification.

C-1 INSTALLATION C-1
SAFETY PRECAUTIONS
ELECTRIC SHOCK can kill.
Only qualified personnel should
perform this installation.
Turn the input power OFF at the
main switch or fuse box before
working on this equipment.
Do not touch electrically live parts or electrode
with skin or wet clothing.
Insulate yourself from work and ground.
Always wear dry insulating gloves.
FUMES AND GASES can be
dangerous.
Keep your head out of fumes.
Use ventilation or exhaust to
remove fumes from breathing zone.
WELDING SPARKS can cause fire or
explosion.
Keep flammable material away.
Do not weld on closed containers.
PLEASE SEE ADDITIONAL WARNING INFORMATION
AT THE FRONT OF THIS OPERATOR’S MANUAL.
SELECT A SUITABLE LOCATION
This power source should not be subjected to rain, nor
should any parts of it be submerged in water. Doing
so may cause improper operation as well as pose a safety
hazard. The best practice is to keep the machine in a dry,
sheltered area.
The bottom of machine must always be placed on a firm,
secure, level surface. There is a danger of the machine
toppling over if this precaution is not taken.
Place the welder where clean cooling air can freely circulate
in through the front louvers and out through the rear louvers.
Water, dirt, dust or any foreign material that can be drawn
into the welder should be kept to a minimum. Failure to
observe these precautions can result in excessive operating
temperatures and nuisance shutdowns.
Locate the POWERCRAFT® machine away from radio
controlled machinery. Normal operation of the welder may
adversely affect the operation of RF controlled equipment,
which may result in bodily injury or damage to the equipment
.
WARNING
CAUTION
INPUT CONNECTIONS
ELECTRIC SHOCK can kill.
Have a qualified electrician install and service this equipment.
Disconnect input power by removing plug from receptacle before working inside machines. Allow machine to sit for 5 minutes minimum to allow the power capacitors to discharge before working inside this equipment.
Do not touch electrically live parts.
INPUT POWER CONNECTION
Check the input voltage, phase, and
frequency supplied to this machine before turning it on. The allowable input voltage is indicated in the technical specification section of this manual and on the rating plate of the machine. Be sure that the machine is earthed (grounded).
INPUT VOLTAGE
The POWERCRAFT® 191C
machine is to be provided with a 240V±15% input voltage, 50/60Hz.
An output guide is provided in the technical specification section of this manual.
ENGINE DRIVEN GENERATOR
The machine is designed to operate on engine driven generators as long as the auxiliary can supply adequate voltage, frequency and power as indicated in the “Technical Specification” Installation Section of this manual. The auxiliary supply of the generator must also meet the following conditions:
Frequency: in the range of 50 and 60 Hz
RMS voltage of the AC waveform:
240V±15%
Peak voltage max. 380V
Generator Minimum 10kVA
It is important to check these conditions because many engine driven generators produce high voltage spikes. Operation of this machine with engine driven generators not conforming to these conditions is not recommend and may damage the machine and is NOT covered by warranty.

C-2 INSTALLATION C-2
Do not attempt to use this equipment until you have thoroughly read all operating
and maintenance manuals supplied with your machine. They include important
safety precautions, detailed operating and maintenance instructions and parts lists.
ELECTRIC SHOCK can kill
Do not touch electrically live parts or electrode with skin or wet clothing
Insulate yourself from work and ground
Always wear dry insulating gloves.
Only qualified personnel should install, use or service this equipment.
Location and Ventilation
Whenever you use the POWERCRAFT® 191C inverter STICK / TIG / MIG Welder be sure
that clean cooling air can flow around the front and rear louvres, (there should be 500mm
clearance for good ventilation). Avoid dusty, dirty areas, particularly if conductive particles
are present in the cooling air. Also keep the machine away from heat sources. If operation
is to be outdoors protect from rain and do not sit in puddles or otherwise submerge it in
water. Such practices pose safety hazards and cause improper operation and corrosion of
parts.
Always operate the POWERCRAFT® 191C Inverter Welder with all panel work installed
to enable correct cooling air flow and protect you from possible electric shock.
Storing
Store the machine in the permissible range of -25 ~ +55℃, in a dry place when it is not
in use. Protect it from dust and dirt. Keep it where it cannot be accidentally damaged from
construction activities, moving vehicles and other hazards.
Stacking
The POWERCRAFT® 191C Inverter Welder CANNOT be stacked.
Tilting
Place the POWERCRAFT® 191C Inverter Welder on a secure, level surface whenever
you use it or store it. Any surfaces you place it on other than the ground must be firm,
non-skid and structurally sound.
.

D-1 TECHNICAL SPECIFICATION D-1
The POWERCRAFT® 191C Inverter Welder permissible environment:
The ambient temperature range:
When welding: -10 ~ +40°C
During transport or in storage: -25 ~ +55°C
Relative humidity:
At 40°C: ≤50%
At 20°C: ≤90%
Avoid excessive dust, acid and corrosive materials in the air as these will damage your machine.
Excessive vibration is not permissible.
Altitude – No more than 1000m.
500mm space about the welding machine, including from walls and other similar obstructions, is required to enable correct flow of cooling air.
Keep protected from rain and direct sun when in use outdoors.
The wind speed for all environment should be less than 1m/s;
The Main Input Voltage Requirement
The voltage wave form should be actual sine wave in shape with a maximum voltage
variation of ±10% of the rated value; the frequency of the voltage wave form should not
exceed a variation of ±10% of the rated value.
The Welding Machine Configuration
The POWERCRAFT® 191C welding machine consists of:-
The upper part of the front panel is equipped with a digital control panel featuring a mode
select button, a wire type select button, a wire size select button as well as two adjustment
knobs – One for Amps, material thickness and wire speed adjustments. The other volts, inductance, hot start and arc force adjustments. While the lower part is furnished with a Euro
style torch quick connector, “+” & “-” quick connectors and polarity selection, The back side
is installed with power switch, gas valve connection, cooling fan and input cable. On the top there is a handle for the convenient of easy transport. Internally there is the primary
transformer, printed circuit board, output reactor, and the heatsink with power semiconductors.
The package consists of:
Order Number Description QTY
K69072-1 Power source *1
IM7908-7 Instruct Manual *1
K69022-15-3M MIG Gun, LG 150C *1
S28416-1 Gas hose clamp *2
K69100-16-3M-C Electrode lead *1
K69100-16-3M-B Work lead *1
E4570 Gas hose *3m
LE250-RG002 Regulator / Flowmeter *1
KP69022-0608 Drive roll 0.6/0.8(solid) *1
KP69022-0912R Drive roll 0.9/1.2(cored) *1
.

D-2 TECHNICAL SPECIFICATION D-2
TECHNICAL SPECIFICATION
INPUT - SINGLE PHASE ONLY
Machine Standard Voltage/Phase/
Frequency Generator required
Maximum
Input
Current
Rated Input
Current
POWERCRAFT® 191C 240+/-15% / 1/50/60 Hz ≥10 kVA 20.5A 10.0A
RATED OUTPUT – DC ONLY
Machine Mode Duty Cycle(1) Amperes Volts at Rated Amperes
POWERCRAFT® 191C
GMAW
23%
60%
100%
180A
120A
90A
23V
20V
18.5V
SMAW
18%
60%
100%
180A
110A
85A
27.2V
24.4V
23.4V
GTAW
25%
60%
100%
180A
120A
90A
17.2V
14.8V
13.6V
The Duty Cycle Above is about 40°C
OUTPU T RANGE
Machine Mode Open Circuit
Voltage
Welding Current
Range
Welding Voltage
Range
POWERCRAFT® 191C
GMAW U0 85V 30A ÷ 180A 15.5V ÷ 23V
SMAW U0 88V
Ur 11.5V 15A ÷ 180A 20.6V ÷ 27.2V
GTAW U0 88V
Ur 11.5V 15A ÷ 180A 10.6V ÷ 17.2V
OTHER PARAMETERS
Machine Power Factor Efficiency Protection Class Insulation Class
POWERCRAFT® 191C 0.99 85% IP21S F
PHYSICAL DIMENSIONS
Machine Length Width Height Weight
POWERCRAFT® 191C 470mm 220mm 340mm 13.75kg(2)

D-3 TECHNICAL SPECIFICATION D-3
TEMPERATURE RANGE
Operating Temperature Range -10°C ~ +40°C(14°F ~ 104°F)
Storage Temperature Range -25°C ~ +55°C(-13°F ~ 131°F)
(1) Based upon 10 minute time period(i.e., for 30% duty cycle, it is 3 minutes on and 7 minutes off) (2) Power source only.
Note: The above parameters are subject to change with the improvement of machine.

D-4 TECHNICAL SPECIFICATION D-4
LG 150C MIG Torch (Gun) Illustration
The LG 150C MIG torch is composed of the Euro connector, connection cable and handle.
There is a gooseneck installed in the handle of the torch. The gas diffuser distributes
shielding gas in the nozzle to provide even shield for the welding arc. A switch on the handle
controls the welding output.
* Turn off the power before assemble/disassemble or replacement of the torch components.
* The cable, nozzle and tip need to be replaced as required.
Graphics and their meanings
Earth / Ground
Descending
MMAW – Manual Metal Arc Welding (Stick)
SMAW – Stick Metal Arc Welding (Stick)
GMAW – Gas Metal Arc Welding (MIG)
GTAW – Gas Tungsten Arc Welding (TIG)
FCAW-SS – Flux Cored Arc Welding-Self Shield
Single-phase AC power source
Single-phase inverter---transformer---rectifier
DC Current
+ : “+” Output connector
- : “-“ Output connector
X : Duty Cycle
I1 : Rated Input Current
I2 : Rated Welding Current
P1 : Rated Input Power
U0 : Rated Open Circuit Voltage
U1 : Rated Input Voltage
U2 : Rated Load V
~50/60 Hz : AC, Rated frequency 50HZ, workable frequency 60HZ
V : Voltage (V)
A : Current (A)

D-5 TECHNICAL SPECIFICATION D-5
Power source Placement
* Avoid excessive dust, acid and corrosive materials in the air.
* Keep protected from rain and direct sun when in use outdoors.
* There should be 500mm space about for the welding machine to have good ventilation.
* Use adequate ventilation when in confined areas.
Connection between Power Source and Input Power Supply
Connect the input cable, (located in the rear panel of the welder), into the single phase 240V
voltage power receptacle of appropriate current capacity and with an appropriately sized circuit breaker.

D-6 TECHNICAL SPECIFICATION D-6
Power supply configure of a welder:
Item POWERCRAFT® 191C
Circuit breaker
(A)
16A
(D-Curve circuit breaker)
Power cord
(mm2) ≥2.5
The installation and connection for MIG welding
* Select a suitable filler wire according to process being used (Lincoln Ultramag S6 for MIG
and Innershield NR211MP for gasless flux cored welding). The wire diameter must be
matched to the drive roll, the liner and contact tip.。
* Open the side panel of wire feeder and mount the wire spool on the spool post. The end of
the wire must be at the bottom of the wire spool, adjacent to wire feeder inlet guide tube.
* The spool post is fitted with a brake; the wing nut in the center of the spool post adjusts the
brake tension. Pull the wire from the reel by hand and adjust the tension to provide some
drag - clockwise will increase the braking and anticlockwise reduces it.
* Release the wire tensioning device on the drive rolls, insert the filler wire end into the inlet
guide tube of wire feeder, align wire with the drive roll groove and feed a short length into
the torch connector so that it protrudes out of the front panel, then replace the tensioner over
the wire. (The filler wire is feed through the torch cable once the input power is switched on.)

D-7 TECHNICAL SPECIFICATION D-7
* Connection between Power Source and Torch
* Insert the torch connector over the protruding wire and into the Euro connector on the front
panel of the welder and rotate the screw cap firmly.
Connection between Power Source and Work Piece
Insert the quick connector of work return cable into the current output (-) terminal on the
lower section of the front panel and then screw in clockwise. The earth clamp is connected
with work piece. The short welding power lead connected to the power source needs to be
connected into (+) output terminal.
* For correct arc performance when using flux-cored gasless wire the polarity needs to be
reversed, connect the (+) and (-) in the opposite way, that is the torch will be (-) and the work
lead will be (+).
Connect the work lead clamp to the work piece as close to the weld as possible.
The installation and connection for stick welding.
a) Connection of electrode lead to the welder.
Connect the quick connector of electrode lead to the (+) output quick connect terminals on
the front panel, turn clockwise and ensure the connection is tight.
b) Connection of the work return lead to the welder.
Connect the quick connector of work return lead to the (-) output quick connect terminals on
the front panel, turn clockwise and ensure the connection is tight.
Connect the work lead clamp to the work piece as close to the weld as possible.

E-1 OPERATION E-1
Front Panel
1. Control knob for: Amp / WFS / Thickness
5. Wire selection button
2. LCD display 6. Wire size selection button
3. Control knob for: Voltage compensation
Voltage Inductance adjustment
Hot start adjustment Arc force adjustment
7. Euro gun connector
8. Spool gun control socket
9. MIG Gun polarity switch plug
4. Welding mode selection button
10. Output terminal (-)
11. Output terminal (+)
12. Spool gun selection switch
(located in wire spool cabinet)

E-2 OPERATION E-2
Control Panel
1. Control Knob - Amp/WFS/Thickness
ALL
The welding current is
displayed once this sign is
on (also during welding).
GMAW
Wire feed speed WFS:
Value in percentage of
nominal value wire feed
speed (m/min).
GMAW
Thickness: The thickness
of the work piece could be
adjusted once the sign is
on.
2. Indicator lights
ALL
Power input
ALL Error
SMAW VRD (MMA only)
3. Control Knob
GMAW
Voltage compensation slightly
adjust the welding voltage in
the synergic MIG process.
GMAW
The welding load voltage
could be controlled and
displayed once the sign is on
(also during welding).
GMAW
Inductance: Arc control is
displayed once the sign is on.
If the value is higher, the arc
will be softer and during
welding is less spatters.
SMAW
(MMA)
Hot Start: A special feature
for MMA welding where the
machine delivers a peak of
current when striking the
arc.
SMAW
(MMA)
ARC FORCE: The output
current is temporarily
increased to clear short
circuit connections between
the electrode and the work
piece
SMAW
(MMA)
VRD: It reduces the welding
power source’s open circuit
voltage.
4. Mode selection Button -
GMAW
Synergic MIG
GMAW
MIG

E-3 OPERATION E-3
GTAW
Lift TIG
MMA
STICK
5. Wire selection Button -
GMAW Fe C25 Gas: 25% CO2 + 75% Ar
GMAW Fe C100 Gas 100% CO2
GMAW SS Gas: 25% CO2 + 75% Ar
FCAW Flux No Gas
GMAW AlSi (4043) When Spool Gun is
connected; 100% Ar
GMAW AlMg(5356) When Spool Gun is
connected; 100% Ar
6. Wire size selection Button -
Rear Panel
Note:
• The ‘Error indicator light’ will come on if the
duty cycle is exceeded. It shows that the inner
temperature is over the permitted level, the
machine should be stopped being used to
allow it cool down. Welding can continue after
the ‘protection indicator light’ is off.
• The power source should be switched off when
not in use.
• Welders should wear protective clothing and
welding helmet to prevent injury from arc and
thermal radiation.
• Care should be taken so as not to expose
others to the welding arc. Use of screening is
recommended.
• Do not weld near Inflammable or explosive
materials.
1. Gas connector
2. Input power cord
3. Power switch
4. Fans

E-4 OPERATION E-4
Welding Getting started
Work piece clean before welding
The joint to be welded must be clean, remove existing rust, greasy dirt, water and paint etc.
MIG welding steps
Loading the Electrode Wire
• Turn the machine off.
• Open the side cover of the machine.
• Unscrew the locking nut of the spool post.
• Load the spool with the wire on the spool post such that the spool turns anticlockwise when the wire is fed into the wire feeder.
• Make sure that the spool locating pin goes into the fitting hole on the spool.
• Screw in the fastening cap of the spool post.
• Put on the drive roll using the correct groove corresponding to the wire diameter.
• Free the end of the wire and cut off the bent end making sure it has no burr.
WARNING
Sharp end of the wire can injure.
• Rotate the wire spool anticlockwise and thread the end of the wire into the wire feeder as
far as the Euro socket.
• Adjust force of pressure roll of the wire feeder properly.
Adjustments of Brake Torque of spool post
To avoid spontaneous unrolling of the welding wire the spool post is fitted with a brake.
Adjustment is carried by rotation of its Allen screw M8, which is placed inside of the spool post frame after unscrewing the fastening cap of the spool post.
26. Fastening cap.
27. Adjusting Allen screw M8.
28. Compression spring.
Turning the Allen screw M8 clockwise increases the spring tension and you can increase the
brake torque
Turning the Allen screw M8 anticlockwise decreases the spring tension and you can
decrease the brake torque.
After finishing of adjustment, you should screw in the fastening cap again.

E-5 OPERATION E-5
Adjusting of Force of Pressure Roll Force
The pressure arm controls the amount of force the drive rolls exert on the wire.
Pressure force is adjusted by turning the adjustment nut clockwise to increase force, counterclockwise to decrease force. Proper adjustment of pressure arm gives the best
welding performance.
WARNING
If the roll pressure is too low the roll will slide on the wire If the roll pressure is set too high the wire may be deformed, which will cause feeding problems in the welding gun. The pressure force should be set properly. Decrease the pressure force slowly until the wire just begins to slide on the drive roll and then increase the force slightly by turning of the adjustment nut by one turn.
Inserting Electrode Wire into Welding Torch
• Turn the welding machine off.
• Depending on welding process, connect the proper gun to the euro socket, the rated parameters of the gun and of the welding machine should be matched.
• Remove the nozzle from the gun and contact tip. Next, lay the gun out flat and straight.
• Turn the welding machine on.
• Depress the gun trigger to feed the wire through the gun liner until the wire comes out of the threaded end.
• When trigger is released spool of wire should not unwind.
• Adjust wire spool brake accordingly.
• Turn the welding machine off.
• Install a proper contact tip to match wire diameter.
• Install the nozzle.
WARNING
Take precaution to keep eyes and hands away from the end of the gun while the wire is being driven out of the threaded end.
Changing Driving Rolls
WARNING
Turn the input power off of the welding power source before installation or changing drive rolls.
POWERCRAFT® 191C MIG is equipped with drive roll V0.6/V0.8 for steel wire. For other
wire sizes, different drive roll kits are available (see "Accessories" chapter) and follow
instructions:
• Turn the welding machine off. • Release the pressure roll lever [1]. • Unscrew the fastening cap [3].
• Change the drive roll [2] with the compatible ones corresponding to the wire used.
• Screw fastening cap back in place [3].

E-6 OPERATION E-6
Gas Connection
A gas cylinder must be installed with a proper flow regulator. Once a gas cylinder with a flow
regulator has been securely installed, connect the gas hose from the regulator to the
machine gas inlet connector. Refer to point [1] of the Figure 3.
WARNING
The welding machine supports all suitable shielding gases including carbon dioxide, argon
and helium at a maximum pressure of 5,0 bars.
Note: When using the GTAW lift process, connect the gas hose from the GTAW torch to the
gas regulator on the shielding gas cylinder.
Welding GMAW, FCAW-SS Process
POWERCRAFT® 191C MIG can weld both GMAW and FCAW-SS process.
Preparation the Machine for Welding GMAW and FCAW-SS Process.
Procedure of begin welding of GMAW or FCAW-SS process:
• Determine the wire polarity for the wire to be used. Consult the wire data for this
information.
• Connect output the gas-cooled gun to GMAW / FCAW-SS process to Euro Socket.
• Depending on the wire polarity being used, connect the work lead to the appropriate
output socket.
• Connect the work lead to the welding piece with the work clamp as close to the weld as
possible.
• Install the proper wire.
• Install the proper drive roll.
• Make a sure, if it is needed (GMAW process), that the shielding gas has been connected.
• Turn the machine on.
• Push the gun trigger to feed the wire through the gun liner until the wire comes out of the
threaded end.
• Install a proper contact tip.
• Install the nozzle.
• Close the left side panel.
• Set welding mode to GMAW /SYN GMAW. The welding machine is now ready to weld.
• Follow all safety and warning statements incorporated in this instruction manual and all
local Health and Safety requirements. Also ensure the correct PPE (personal protection equipment) is used.
E-7 OPERATION E-7
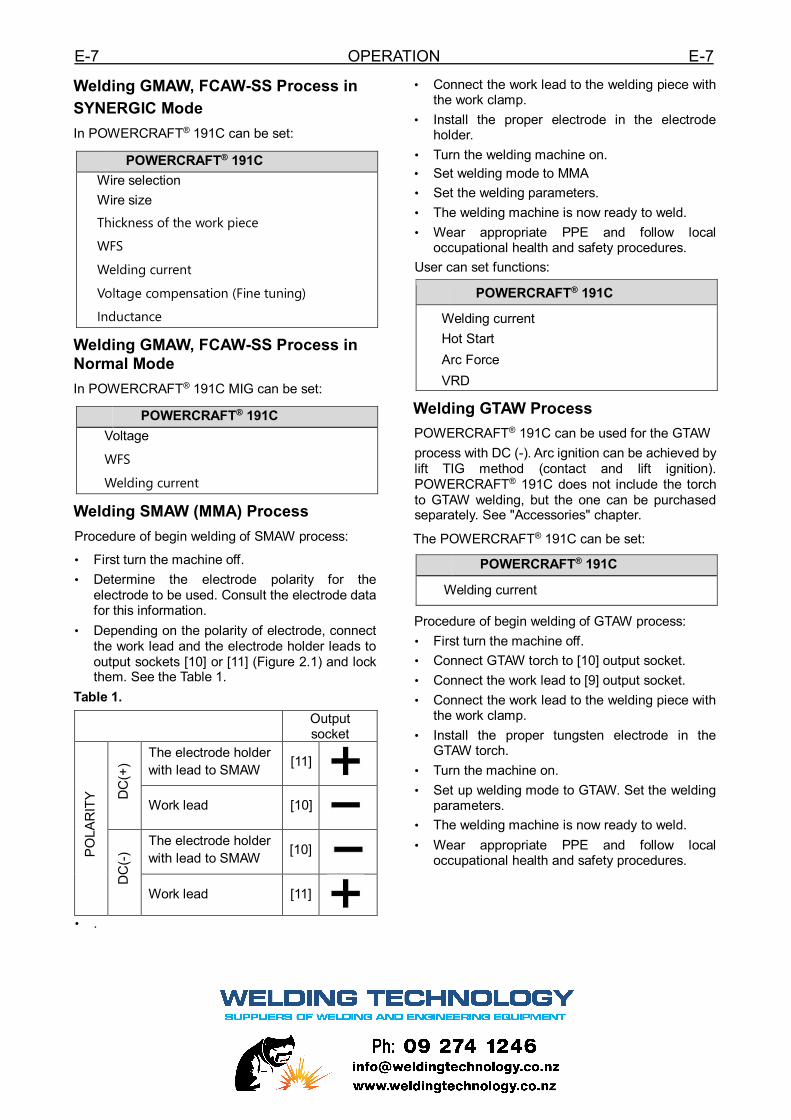
Welding GMAW, FCAW-SS Process in
SYNERGIC Mode
In POWERCRAFT® 191C can be set:
POWERCRAFT® 191C
Wire selection
Wire size
Thickness of the work piece
WFS
Welding current
Voltage compensation (Fine tuning)
Inductance
Welding GMAW, FCAW-SS Process in
Normal Mode
In POWERCRAFT® 191C MIG can be set:
POWERCRAFT® 191C
Voltage
WFS
Welding current
Welding SMAW (MMA) Process
Procedure of begin welding of SMAW process:
• First turn the machine off.
• Determine the electrode polarity for the electrode to be used. Consult the electrode data for this information.
• Depending on the polarity of electrode, connect the work lead and the electrode holder leads to output sockets [10] or [11] (Figure 2.1) and lock them. See the Table 1.
Table 1.
Output socket
PO
LA
RIT
Y
DC
(+)
The electrode holder
with lead to SMAW [11]
Work lead [10]
DC
(-)
The electrode holder
with lead to SMAW [10]
Work lead [11]
• Connect the work lead to the welding piece with the work clamp.
• Install the proper electrode in the electrode holder.
• Turn the welding machine on.
• Set welding mode to MMA
• Set the welding parameters.
• The welding machine is now ready to weld.
• Wear appropriate PPE and follow local occupational health and safety procedures.
User can set functions:
POWERCRAFT® 191C
Welding current
Hot Start
Arc Force
VRD
Welding GTAW Process
POWERCRAFT® 191C can be used for the GTAW
process with DC (-). Arc ignition can be achieved by lift TIG method (contact and lift ignition). POWERCRAFT® 191C does not include the torch to GTAW welding, but the one can be purchased separately. See "Accessories" chapter.
The POWERCRAFT® 191C can be set:
POWERCRAFT® 191C
Welding current
Procedure of begin welding of GTAW process:
• First turn the machine off.
• Connect GTAW torch to [10] output socket.
• Connect the work lead to [9] output socket.
• Connect the work lead to the welding piece with the work clamp.
• Install the proper tungsten electrode in the GTAW torch.
• Turn the machine on.
• Set up welding mode to GTAW. Set the welding parameters.
• The welding machine is now ready to weld.
• Wear appropriate PPE and follow local occupational health and safety procedures.
• .

E - 8 OPERATION E- 8
•

F-1 MAINTANCE AND TROUBLESHOOTING F-1
MAINTENANCE
In order to guarantee the arc welding machine works efficiently and safely, it must be
maintained regularly. Refer to the maintenance items in the following table.
● Warning: For safety while maintaining the machine, please disconnect the supply power
and wait for 5 minutes, until capacitor voltage drops to safe voltage.
All service work should be conducted by an authorized Lincoln Electric field service agent.
Maintenance items
Daily
examination
Check operation of the panel knob’s and switch’s on the front and at the
back of arc welding machine are operational and operate correctly.
If the switch is not operational, replace immediately.
Check the function of the LED display. If it doesn’t work, maintain or
replace the display PCB.
Check fan is operating normally. If the fan is damaged, change
immediately. If the fan does not rotate after the arc welding machine is
overheated, check if something blocking the fan blade, if it is blocked,
remove the obstruction. If the fan still does not rotate, try to spin the blade
in the direction of rotation of fan. If the fan rotates normally, the start
capacitor should be replaced; If not, change the fan.
Check the output terminals for overheating, if so change output terminals.
Ensure welding lead plugs are connected tightly.
Check welding leads for damage. If damaged replace leads.
Monthly
examination
Using dry compressed air to clear the inside of arc welding machine.
Especially remove dust from heat sinks, main voltage transformer,
inductance, IGBT module, the fast recover diode and PCB, etc.
Yearly
examination Have a Lincoln Field service shop perform an insulation resistance test.

F-2 MAINTANCE AND TROUBLESHOOTING F-2
HOW TO USE TROUBLESHOOTING GUIDE
This Troubleshooting Guide is provided to help
you locate and repair possible machine
malfunctions. Simply follow the three-step
procedure listed below.
Step 1: LOCATE PROBLEM (SYMPTOM).
Look under the column labeled “PROBLEM
(SYMPTOM)”. This column describes possible
symptoms that the machine may exhibit. Find
the listing that best describes the symptom
that the machine is exhibiting.
Step 2: POSSIBLE CAUSE
The third column labeled “POSSIBLE CAUSE”
lists the obvious external possibilities that may
contribute to the machine symptom.
Step 3. RECOMMENDED COURSE OF
ACTION
This column provides a course of action for the
Possible Cause.
If you do not understand or are unable to
perform the Recommended Course of Action
safely, contact your local Lincoln Authorized
Field Service Facility.
This Troubleshooting Guide is provided to help
you locate and repair possible machine
malfunctions. Simply follow the three-step
procedure listed below.
Before arc welding machines are dispatched from the factory, they have already been tested.
Therefore no unauthorised modifications are allowed.
Unauthorised repairs performed on this equipment may result in danger to the technician and
machine operator and will invalidate your factory warranty. For your safety and to avoid Electric
Shock, please observe all safety notes and precautions detailed throughout this manual.
If for any reason you do not understand the test procedure or are unable to perform the
tests/repairs safely, contact your Local Authorized Field Service Facility for technical
troubleshooting assistance before you proceed.
ELECTRIC SHOCK can kill 1. Have an electrician install and service
this equipment 2. Turn the input power off at the fuse box
before working on equipment. 3. Do not touch electrically not parts.

F-3 MAINTANCE AND TROUBLESHOOTING F-3
Troubleshooting
No. Problem Possible Cause What to do
1 Yellow Thermal
Indicator is on
Input voltage is too high (≥15%)
Switch off power source; Check the
main supply. Restart welder when power
recovers to normal state.
Input voltage is too low (≤15%)
Switch off power source; Check the
main supply. Restart welder when power
recovers to normal state.
Insufficient ventilation. Improve the ventilation.
Ambient temperature is too high. It will automatically recover when the
temperature reduces.
Exceeding the rated duty-cycle. It will automatically recover when the
temperature reduces.
2 Wire feeding
motor not working
Potentiometer faulty Change potentiometer
Contact tip is blocked. Change nozzle
Drive roll is loose. Increase tension on drive roll
3
Cooling Fan not
working or turning
very slowly
Switch broken Replace the switch
Fan broken Replace or repair the fan
Wire broken or disconnected Check the connection
4
Arc is not stable
and high spatter
levels
Too large contact tip makes the current
unsteady
Change to proper contact tip and / or
drive roll.
Power cable cross sectional area too
small. Change the power cable.
Too low input voltage Correct the input voltage.
Wire feeding resistance is too large Clean or replace the liner and keep the
gun cable straight.
5 Arc will not start
Work cable broken Connect / repair work cable
Work piece has greasy, dirty, rusty or
painted
Clean work piece, ensure good
electrical contact between work clamp
and job.
6 No shielding gas
Torch is not connected properly. Re-connect the torch.
Gas pipe is crimped or blocked. Check gas system.
Gas hose damaged. Repair or replace
7 Others Please contact our Field Service Shop.

F-4 MAINTANCE AND TROUBLESHOOTING F-4
POWERCRAFT® 191C - Spare Parts

F-5 MAINTANCE AND TROUBLESHOOTING F-5
POWERCRAFT® 191C - Spare Parts Item Part Number Description Required
1 S33563-1 Front panel (Plastic) 1
2 S33563-2 Control panel (Metal) 1
3 S33563-3 Knob 2
4 S33563-4 Transparent shield cover 1
5 S33563-5 Display board 1
6 S33563-6 median plate 1
7 S33563-7 9pin socket 1
8 S33563-8 Lead Assembly 1
9 S33563-9 quick connector 2
10 S33563-10 bottom plate 1
11 S33563-11 Main PCB (without DC FAN) 1
12 S33563-12 Inductance 1
13 S33563-13 Rubber Foot 2
14 S33563-14 Heatsink support 1
15 S33563-15 Side plate (without handle) 1
16 S33563-16 Heatsink support 1
17 S33563-17 Handle 1
18 S33563-18 DC Fan 1
19 S33563-19 DC Fan 2
20 S33563-20 Fan hood 2
21 S33563-21 Cable clip 1
22 S33563-22 Input cord with 10A plug 1
23 S33563-23 power switch cover 1
24 S33563-24 power switch 1
25 S33563-25 gas valve connector 1
26 S33563-26 gas valve 1
27 S33563-27 gas valve connector 1
28 S33563-28 wire spool shaft 1
29 S33563-29 insulation block 1
30 S33563-30 wire feeder assembly 1
31 S33563-31 Hinges 2
32 S33563-32 Side plate (without locks) 1
33 S33563-33 Lock 2
34 S33563-34 division plate 1
35 S33563-35 Gun connector 1

F-6 MAINTANCE AND TROUBLESHOOTING F-6
150C MIG Torch - Spare Parts
Part Number Description
K60082-15-3M LINC Gun 150G-3.0m-150A 60%-Euro connection
KP10461-1 Gas nozzle diam.12mm(Pack of 10 pcs)
KP10440-06 Contact tip M6*0.6mm(25mm)(Pack of 10 pcs)
KP10440-08 Contact tip M6*0.8mm(25mm)(Pack of 10 pcs)
KP10440-09 Contact tip M6*0.9mm(25mm)(Pack of 10 pcs)
KP10440-12 Contact tip M6*1.2mm(25mm)(Pack of 10 pcs)
KP10400-1 Spring nozzle support
KP10413-4M Liner with insulation(4.4m) for wire 0.8-1.0mm

F-7 MAINTANCE AND TROUBLESHOOTING F-7
PRO26V-12 Optional TIG Torch (K69082-1)
PRO26V-12 Optional TIG Torch
NO. SLE part number Description Unit Qty
1 S33564-1 Ceramic cup 11mm PCS 1
2 S33564-2 Collet body 2.4mm PCS 1
3 S33564-3 Collet 2.4mm PCS 1
4 S33564-4 Torch Body PCS 1
5 S33564-5 Back Cap Long PCS 1
6 S33564-8 Gas valve PCS 1
7 S33564-6 Tungsten PCS 1
8 S33564-7 Switch Assy PCS 1
9 S33564-11 Switch Lead 4M PCS 1
10 S33564-10 Handle PCS 1
11 S33564-12 Screw Pack PCS 1
12 S33564-13 Knuckle joint PCS 1
13 S33564-14 Leather Sheath PCS 1
14 S33564-9 Cover Connection PCS 1
15 S33564-18 Cover Assy 4M PCS 1
16 S33564-16 9-Pin control plug PCS 1
17 S33564-15 Cable Assy 4M PCS 1
18 S33564-17 Torch Terminal PCS 1

F-8 MAINTANCE AND TROUBLESHOOTING F-8
OPTIONAL – LBT150 SPOOL GUN
(K69083-1)
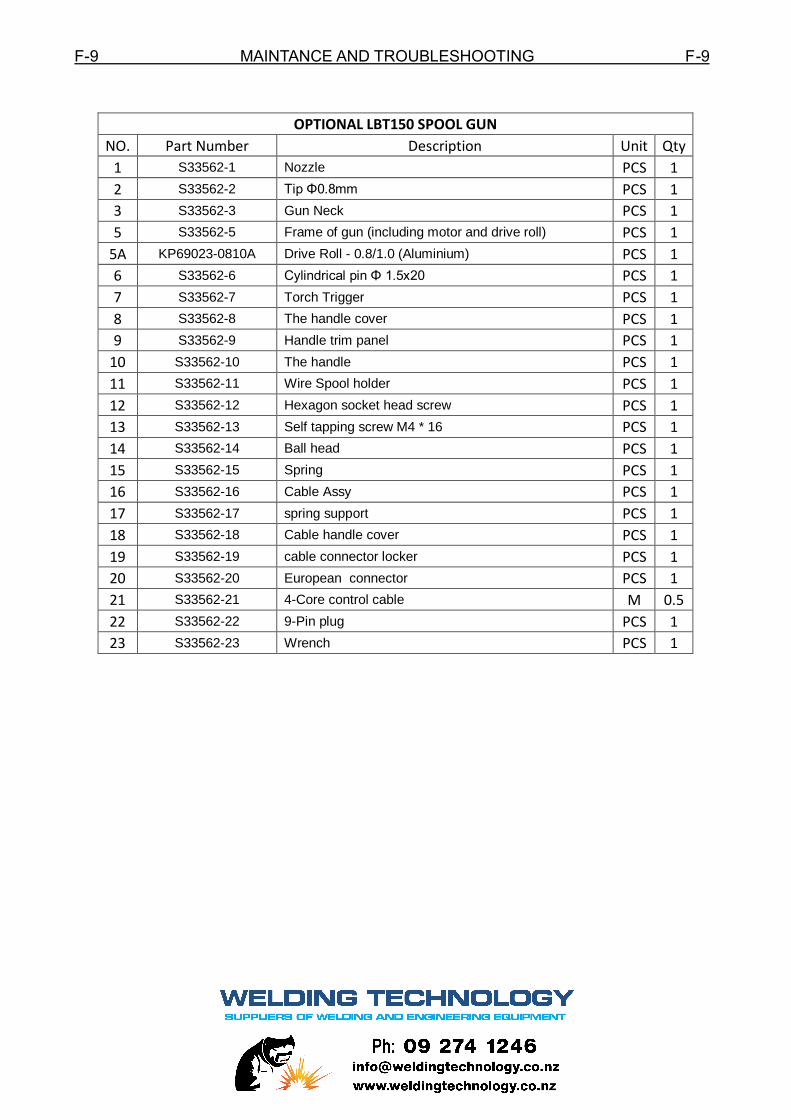
F-9 MAINTANCE AND TROUBLESHOOTING F-9
OPTIONAL LBT150 SPOOL GUN
NO. Part Number Description Unit Qty
1 S33562-1 Nozzle PCS 1
2 S33562-2 Tip Φ0.8mm PCS 1
3 S33562-3 Gun Neck PCS 1
5 S33562-5 Frame of gun (including motor and drive roll) PCS 1
5A KP69023-0810A Drive Roll - 0.8/1.0 (Aluminium) PCS 1
6 S33562-6 Cylindrical pin Φ 1.5x20 PCS 1
7 S33562-7 Torch Trigger PCS 1
8 S33562-8 The handle cover PCS 1
9 S33562-9 Handle trim panel PCS 1
10 S33562-10 The handle PCS 1
11 S33562-11 Wire Spool holder PCS 1
12 S33562-12 Hexagon socket head screw PCS 1
13 S33562-13 Self tapping screw M4 * 16 PCS 1
14 S33562-14 Ball head PCS 1
15 S33562-15 Spring PCS 1
16 S33562-16 Cable Assy PCS 1
17 S33562-17 spring support PCS 1
18 S33562-18 Cable handle cover PCS 1
19 S33562-19 cable connector locker PCS 1
20 S33562-20 European connector PCS 1
21 S33562-21 4-Core control cable M 0.5
22 S33562-22 9-Pin plug PCS 1
23 S33562-23 Wrench PCS 1

G-1 ACCESSORY LIST G-1
Drive Rolls
0.6~0.8~0.9mm Solid KP69022-0608
1.0~1.2mm Solid KP69022-1012
0.9~1.2MM Cored KP69022-0912R
0.9~1.2MM Alum KP69022-0912A
Tig Torch
Tig Torch PRO26V-12 12.5ft K69082-1
Tig Torch PRO26V-25 25ft K69082-2
Mig Gun
Linc Gun 150G,3m,150A@60% Euro connector K60082-15-3M
Spool Gun
Spool gun LBT150 K69083-1
Drive Roll KP69082-0810A

H-1 SCHEMATIC DIAGRAM H-1
Schematic Wiring Diagram

J-1 WARRANTY J-1
Limited Warranty
STATEMENT OF LIMITED WARRANTY
This warranty is given by The Lincoln Electric Company (Australia) Pty Ltd (“Lincoln Electric”), 35 Bryant St, Padstow NSW 2211, Tel: 1300 LINCOLN (1300 546 265).
Under this warranty, Lincoln Electric○R warrants all new machinery and equipment (“goods”)
manufactured by Lincoln Electric○R against defects in workmanship and material subject to certain limitations hereinafter provided.
The benefits to the purchaser given by this warranty are in addition to other rights and remedies of the purchaser under a law in relation to the goods. Our goods come with guarantees that cannot be excluded under the Australian Consumer Law. You are entitled to a replacement or refund for a major failure and compensation for any other reasonably foreseeable loss or damage. You are also entitled to have the goods repaired or replaced if the goods fail to be of acceptable quality and the failure does not amount to a major failure.
This warranty is void if Lincoln Electric or Lincoln Electric’s Authorised Service Facility finds that the equipment has been subjected to improper installation, improper care or abnormal operations. Further, this warranty does not apply to:
• cable wear and consequential damage resulting from cable wear due to flexing and abrasion. The purchaser is responsible for routine inspection of cables for possible wear and to remedy the issue prior to cable failure;
• engines and engine accessories; • any batteries supplied with the goods; • repairs done to the goods and undertaken by the purchaser outside Lincoln
Electric’s premises without written authority from Lincoln Electric obtained prior to any such repair; or
• any damage or failure of the goods as a result of normal wear and tear or the neglect misuse abuse or failure to properly service goods by any purchaser.
PERIOD OF WARRANTY “LINCOLN ELECTRIC BRANDED GOODS”
Lincoln Electric will assume both the parts and labour expense of correcting defects during this warranty period. All warranty periods under this warranty start from the date of purchase from
a Lincoln Electric Authorised Distributor or Lincoln Electric Authorised Service Facility to the original end user or from the date of manufacture if proof of purchase is not available and are as follows:
Three Years
• All Lincoln Electric○R welding machines, wire feeders and plasma cutting machines unless listed in 1 Year or Two Years
Two Years
• All Invertec○R , Tomahawk○R Welders & Plasmas machines unless listed below (exclude V350, TPX, TX, SX & ASPECT Models which are 3 years)
• VIKING™ Helmets (Electronic ADF Lens Only).
One Year
• VRTEX™ 360 Virtual Reality Welder Trainer (not including items listed under 90 day warranty)
• Kjellberg Plasma Cutting Equipment. • Fanuc Robotic Equipment. • Genesis Systems Group Equipment. • Torchmate Cutting Systems
• Weld Engineering Flux Recovery Equipment. • Binzel Robotic Cleaning Stations & Associated Equipment.
• PCA Profile Cutting Machines. • All water coolers (internal and external). • Arc welding and cutting robots and robotic controllers

J-2 WARRANTY J-2
• All stick electrodes, welding wires and fluxes. • All Environmental Systems equipment, including portable units, central units and accessories.
(Does not include consumable items listed under 30-day warranty).
• All welding and cutting accessories including wire feed modules, undercarriages, field installed options that are sold separately, unattached options, welding supplies, standard accessory sets, replacement parts. (Does not include expendable parts and guns/ torches listed under 90 and 30 day warranties).
90 Days
• All Gun and Cable Assemblies (manufactured by Lincoln Electric○R ) and Spool guns. • All MIG, TIG and Plasma Torches.
• All “Pro Torch” TIG Torches.
• VRTEX™ 360 Guns and VR Helmet
30 Days
• All consumable items that may be used with the environmental systems described above. This includes hoses, filters, belts and hose adapters.
• Expendable Parts - Lincoln Electric○R is not responsible for the replacement of any expendable part that is required due to normal wear.
PERIOD OF WARRANTY “POWERCRAFT○R BRANDED GOODS”
Lincoln Electric will assume both the parts and labour expense of correcting defects during this warranty period. All warranty periods under this warranty start from the date of purchase from a
Lincoln Electric Authorised Distributor or Lincoln Electric○R Authorised Service Facility to the original end user or from the date of manufacture if proof of purchase is not available and are as follows:
Three Year Limited Warranty*
• All POWERCRAFT○R welding power sources, wire feeders and plasma cutting machines with a Code number 76205 or higher.
*
POWERCRAFT○R welding power sources Parts Labour
Original main transformer, inductors, rectifiers
3 year 2 year
Original printed circuit boards 2 year 1 year
All other circuits and components including,
but not limited to relays, switches, contactors,
solenoids, fans and electric motors
1 year 1 year
One Year
• All POWERCRAFT○R Welding power sources with a Code number lower than 76205.
• All welding and cutting accessories including wire feed modules, undercarriages, field installed options that are sold separately, unattached options, welding supplies, standard accessory sets, replacement parts. (Does not include expendable parts and guns/ torches listed under 90 and 30 day warranties).
• POWERCRAFT○R Welding Helmet (Electronic ADF Lens Only).
90 Days
• All MIG, TIG and Plasma Torches.
30 Days
• Expendable Parts - Lincoln Electric○R is not responsible for the replacement of any expendable part that is required due to normal wear.

J-3 WARRANTY J-3
WARRANTY CLAIM PROCESS
The purchaser must contact Lincoln Electric○R (see contact details above) within the applicable
warranty period about any defect claimed under this warranty. Lincoln Electric○R may direct the purchaser to one of Lincoln Electric’s Authorised Service Facilities. Determination of warranty on
welding and cutting equipment will be made by Lincoln Electric○R or one of Lincoln Electric’s
Authorised Service Facilities as directed by Lincoln Electric○R . At Lincoln Electric’s request, the
purchaser must return, to Lincoln Electric○R or Lincoln Electric’s Authorised Service Facility, at the
purchaser’s cost, any goods claimed defective under this warranty, or permit Lincoln Electric○R or Lincoln Electric’s Authorised Service Facility to inspect the goods at the purchaser’s premises.
Lincoln Electric○R may at its absolute discretion repair or replace the goods at its own premises
or at such other premises as Lincoln Electric○R may designate provided that all freight charges to and
from Lincoln Electric’s premises or such other premises as Lincoln Electric○R may designate shall be paid by the purchaser.
If Lincoln Electric○R or Lincoln Electric’s Authorised Service Facility confirms the existence of a defect covered by this warranty; the defect will be corrected by repair or replacement at Lincoln Electric’s option.
CUSTOMER ASSISTANCE POLICY
Lincoln Electric○R business is manufacturing and selling high quality welding equipment, consumables, and cutting equipment. Our challenge is to meet the needs of our customers and to exceed their
expectations. On occasion, purchasers may ask Lincoln Electric○R for advice or information about their use of our products. We respond to our customers based on the best information in our possession at
that time. Lincoln Electric○R is not in a position to warrant or guarantee such advice and to the extent permitted by law assumes no liability, with respect to
such information or advice. As a matter of practical consideration, we also cannot assume any responsibility for updating or correcting any such information or advice once it has been given. The provision of information or advice does not create, expand or alter this warranty.
Lincoln Electric○R is a responsive manufacturer, but the selection and use of specific products sold by
Lincoln Electric○R is solely within the control of, and remains the sole responsibility of the customer.
Many variables beyond the control of Lincoln Electric○R affect the results obtained in applying this type of fabrication methods and service requirements.
Copyright © 2022 FDOKUMEN

