


Bahasa
Halaman
Hukum

mySewnet™ Cross StitcherReference Guide
Mac®
The software to which this Reference Guide relates is subject to change without notice. All efforts have been made to ensure the accuracy of the contents of this Reference Guide.
The software described in this book is furnished under a license agreement and may be used only in accordance with the terms of the agreement.
Permission is hereby granted to the licensee of the software to which this guide is related to reproduce and distribute copies of this guide for nonprofit educational purposes. The copyright statement on this page must be included on any copy of this work.
Product names mentioned in this guide may be trademarks or registered trademarks of their respective companies and are hereby acknowledged.
mySewnet, VIKING, PFAFF, PREMIER+ and 6D are trademarks of Singer Sourcing Limited LLC
HUSQVARNA is the trademark of Husqvarna AB. All trademarks are used under license by VSM Group AB.
© 2021 Singer Sourcing Limited LLCAll rights reserved. (Version A)


mySewnet™ Cross Stitcher Contents i
Contents
1 Chapter 1: Welcome to mySewnet™ Cross Stitcher
4 Chapter 2: Tools and Techniques4 The mySewnet™ Cross Stitcher Window5 The Toolbar7 Keyboard Shortcuts and Shortcut Menus10 mySewnet™ Cross Stitcher Terms and Conventions
14 Chapter 3: Managing Cross Stitch Designs14 New15 Opening Cross Stitch Designs17 Notes19 Save22 Export25 Revert To26 Sending Embroideries29
30 Chapter 4: Using the Cross Stitch Design Assistant32 Hints and Tips on QuickCross Designs33 Design Options34 Choose Picture36 Rotate and Crop Picture39 Design Size42 Choose Thread Colors45 Design Preview46 Open Existing Design47 How to Use the Cross Stitch Design Assistant
53 Chapter 5: Viewing Cross Stitch Designs53 View Mode55 Background57 Grid58 Zooming In or Out60 Design Player61 Life View
67 Chapter 6: Planning Cross Stitch Designs67 Hints on Planning Cross Stitch Designs69 Information for Hand Cross Stitchers
ii mySewnet™ Cross Stitcher Contents
71 Design Styles
73 Chapter 7: Choosing and Changing Thread Colors73 Design Window74 Color Select75 Color Selection78 Colors Window78 Pick Color79 Add Color79 Hide and Show Stitches80 Design Properties82 Color Properties
86 Chapter 8: Creating Stitches and Shapes86 Create Stitches and Shapes Window87 Drawing Stitches88 Crosses91 Backstitch93 French Knot94 Flood Fill95 Erase95 Draw a Shape97 Shape Options100 Multiply
104 Chapter 9: Using and Designing Patterns104 Select a Pattern105 Design New Patterns108 How to Use Patterns and Shapes
120 Chapter 10: Creating Text121 Fixed Font126 TrueType Font130 How To Use TrueType Text
134 Chapter 11: Editing Designs134 Edit Crosses, Backstitch and French Knots135 Select137 Modify a Selection137 Get Length138 Cut, Copy, Paste and Duplicate Selected140 Delete140 Undo and Redo
mySewnet™ Cross Stitcher Contents iii
143 Chapter 12: Printing143 Print145 Print an Embroidery Worksheet
147 Chapter 13: Troubleshooting147 Error Messages150 Other Topics
153 Chapter 14: Quick Reference Guide153 Menus161 Toolbars162 Control Panels168 Keyboard Shortcuts
169 Chapter 15: Index

mySewnet™ Cross Stitcher Welcome to mySewnet™ Cross Stitcher 1
1Welcome to mySewnet™ Cross Stitcher
Use mySewnet™ Cross Stitcher to create beautiful cross stitch designs on your computer.
To get started with mySewnet™ Cross Stitcher, open it and create cross stitch designs to embroider on your machine. Cross types include full crosses, half crosses, quarter crosses, half height crosses, half width crosses and mini crosses.
Place outlines of standard and freehand backstitch, and use French knots for the perfect accent. Design traditional cross stitch motifs on the screen or use the Cross Stitch Design Assistant to produce designs automatically from clipart, drawings and photos.
Flood fill areas with crosses of any color. Alternatively, choose a ready made cross stitch or blackwork pattern. Create your own fill patterns, too. Reflect your design up to eight times automatically with the amazing Multiply feature. Draw shapes in different outline and fill styles.
Place text with TrueType® or specially designed fixed fonts.
■ Open mySewnet™ Cross Stitcher by clicking its icon in the Launchpad, or by double-clicking its icon in the Finder. The mySewnet™ Cross Stitcher design area appears.
2 mySewnet™ Cross Stitcher Welcome to mySewnet™ Cross Stitcher
Cross Stitch Design AssistantUse the Cross Stitch Design Assistant to convert pictures automatically to crosses, to load a picture as a background, to load an existing cross stitch design or to start a new design with no picture.
Finding Information
Reference GuideThe Reference Guide shows how to start the app and provides a quick tour of the main screen, and contains full reference information. The Reference Guide is supplied in PDF format , ready for printing.
HelpThe integrated help contains full reference information. Click the Help button . Where available, a help topic appears that is relevant to the selected item. Alternatively, use the Help menu.
Viewing and Printing PDF GuidesTo find all the Reference Guides for your mySewnet™ Embroidery Software, go to the mySewnet™ Guides page, linked to from download.mysewnet.com. Select the desired PDF guide.
Note: To view and print the PDF Guides, you may use Preview which is included in your Mac OS®.
ReadmeThe most up-to-date details about the mySewnet™ Embroidery Software are in the Readme.rtf file available when you install your mySewnet™ Embroidery Software.
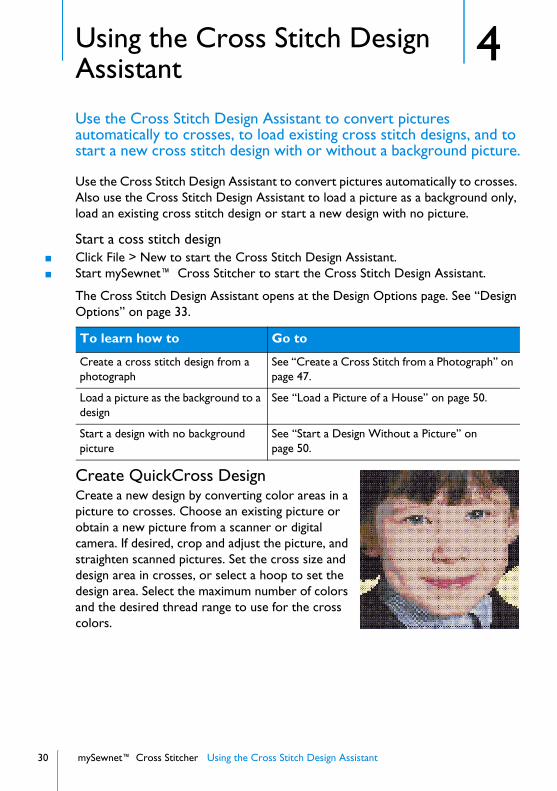
Create QuickCross Design
Load Picture for New Cross Stitch Design
Load Existing Cross Stitch Design
Start a New Cross Design with no Picture
Create a new design by converting color areas in a picture to crosses.
Create a new design by loading a picture, and selecting the cross and design size.
Open an existing cross stitch design, preview it in the assistant, then load it.
Select the desired cross size and design area, then start with a blank work area.
mySewnet™ Cross Stitcher Welcome to mySewnet™ Cross Stitcher 3
Sample FilesSamples are provided for your use. Download the sample files from the Downloads page: download.mysewnet.com. Copy the samples folder to the folder of your choice.
Note: For the exercises in this manual, the mySewnet folder is used.
About mySewnet™ Cross StitcherAccess via the mySewnet™ Cross Stitcher menu. The version number of mySewnet™ Cross Stitcher is given here. You will need this if you contact technical support at any time.
Starting mySewnet™ Cross Stitcher■ Click the mySewnet™ Cross Stitcher icon in the Launchpad.■ Double-click the mySewnet™ Cross Stitcher icon in the Finder.
Close a Document■ Use the red close button at the top left. ■ Choose File > Close.■ Press ⌘W
A saved document is autosaved as it closes. If the document has not been saved, the Save on Close dialog will appear. See “Save On Close” on page 19.
Close AllTo close all documents:
■ Choose File > ⌥ > Close.■ Press ⌥⌘W
Minimize and Maximize■ Use the yellow minimize button at the top left to minimize the current window.■ Use the green zoom button at the top left to switch between a larger and
smaller window size.
Quit mySewnet™ Cross StitcherWhen you quit mySewnet™ Cross Stitcher the open windows are remembered for when the program is next opened.
To quit mySewnet™ Cross Stitcher■ Choose mySewnet™ Cross Stitcher > Quit mySewnet™ Cross Stitcher.■ Press ⌘Q
4 mySewnet™ Cross Stitcher Tools and Techniques
2Tools and Techniques
Get familiar with the tools you use to create designs with mySewnet™ Cross Stitcher.
Each cross stitch design project that you create with mySewnet™ Cross Stitcher is an individual document.
The first time you open mySewnet™ Cross Stitcher (by clicking its icon in the Launchpad or by double-clicking its icon in the Finder), the mySewnet™ Cross Stitcher design area appears. This is where you will create and edit your designs.
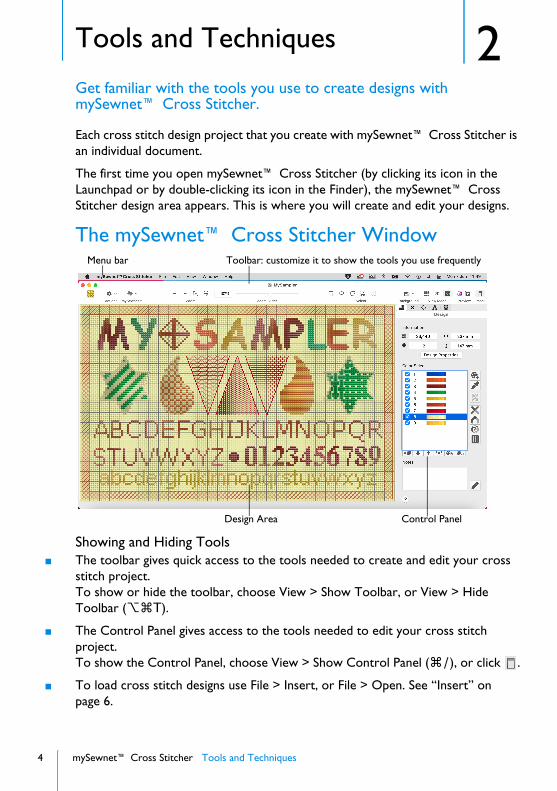
The mySewnet™ Cross Stitcher Window
Showing and Hiding Tools■ The toolbar gives quick access to the tools needed to create and edit your cross
stitch project.To show or hide the toolbar, choose View > Show Toolbar, or View > Hide Toolbar (⌥⌘T).
■ The Control Panel gives access to the tools needed to edit your cross stitch project.To show the Control Panel, choose View > Show Control Panel (⌘/), or click .
■ To load cross stitch designs use File > Insert, or File > Open. See “Insert” on page 6.
Toolbar: customize it to show the tools you use frequently
Control PanelDesign Area
Menu bar
mySewnet™ Cross Stitcher Tools and Techniques 5
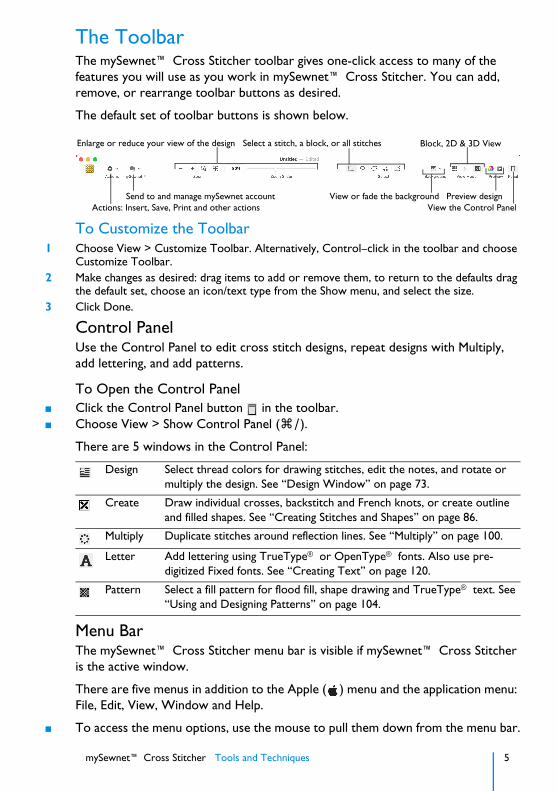
The ToolbarThe mySewnet™ Cross Stitcher toolbar gives one-click access to many of the features you will use as you work in mySewnet™ Cross Stitcher. You can add, remove, or rearrange toolbar buttons as desired.
The default set of toolbar buttons is shown below.
To Customize the Toolbar1 Choose View > Customize Toolbar. Alternatively, Control–click in the toolbar and choose
Customize Toolbar. 2 Make changes as desired: drag items to add or remove them, to return to the defaults drag
the default set, choose an icon/text type from the Show menu, and select the size.3 Click Done.
Control PanelUse the Control Panel to edit cross stitch designs, repeat designs with Multiply, add lettering, and add patterns.
To Open the Control Panel■ Click the Control Panel button in the toolbar.■ Choose View > Show Control Panel (⌘/).
There are 5 windows in the Control Panel:
Menu BarThe mySewnet™ Cross Stitcher menu bar is visible if mySewnet™ Cross Stitcher is the active window.
There are five menus in addition to the Apple ( ) menu and the application menu: File, Edit, View, Window and Help.
■ To access the menu options, use the mouse to pull them down from the menu bar.
Actions: Insert, Save, Print and other actions
Enlarge or reduce your view of the design
View or fade the background
Block, 2D & 3D View
Preview designView the Control Panel
Select a stitch, a block, or all stitches
Send to and manage mySewnet account
Design Select thread colors for drawing stitches, edit the notes, and rotate or multiply the design. See “Design Window” on page 73.
Create Draw individual crosses, backstitch and French knots, or create outline and filled shapes. See “Creating Stitches and Shapes” on page 86.
Multiply Duplicate stitches around reflection lines. See “Multiply” on page 100.
Letter Add lettering using TrueType® or OpenType® fonts. Also use pre-digitized Fixed fonts. See “Creating Text” on page 120.
Pattern Select a fill pattern for flood fill, shape drawing and TrueType® text. See “Using and Designing Patterns” on page 104.
6 mySewnet™ Cross Stitcher Tools and Techniques
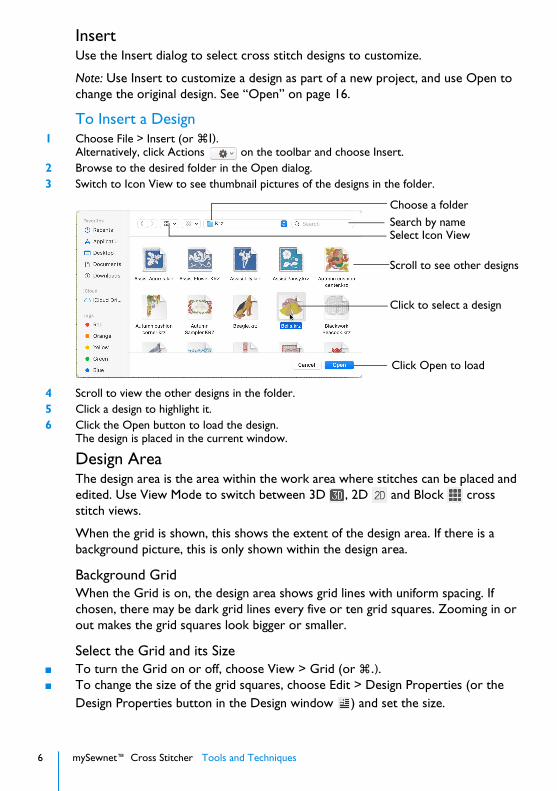
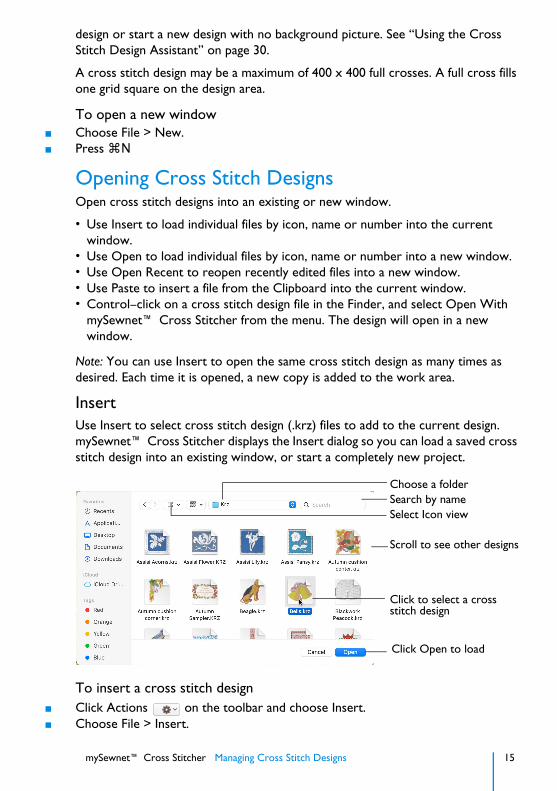
InsertUse the Insert dialog to select cross stitch designs to customize.
Note: Use Insert to customize a design as part of a new project, and use Open to change the original design. See “Open” on page 16.
To Insert a Design1 Choose File > Insert (or ⌘I).
Alternatively, click Actions on the toolbar and choose Insert.2 Browse to the desired folder in the Open dialog.3 Switch to Icon View to see thumbnail pictures of the designs in the folder.
4 Scroll to view the other designs in the folder.5 Click a design to highlight it.6 Click the Open button to load the design.
The design is placed in the current window.
Design AreaThe design area is the area within the work area where stitches can be placed and edited. Use View Mode to switch between 3D , 2D and Block cross stitch views.
When the grid is shown, this shows the extent of the design area. If there is a background picture, this is only shown within the design area.
Background GridWhen the Grid is on, the design area shows grid lines with uniform spacing. If chosen, there may be dark grid lines every five or ten grid squares. Zooming in or out makes the grid squares look bigger or smaller.
Select the Grid and its Size■ To turn the Grid on or off, choose View > Grid (or ⌘.).■ To change the size of the grid squares, choose Edit > Design Properties (or the
Design Properties button in the Design window ) and set the size.
Choose a folder
Click to select a design
Click Open to load
Search by nameSelect Icon View
Scroll to see other designs
mySewnet™ Cross Stitcher Tools and Techniques 7
Design InformationThe stitch count , dimensions (height and width ) and number of colors for the design are shown in the Information area of the Design window.
Note: When French knots are placed on the corners or edges of the design, the created design may be larger than the design area, and the desired hoop. Use the Design Information to check the design size.
Color SelectThe Color Select area of the Design Window shows the colors used in the cross stitch design. See “Color Selection” on page 75.
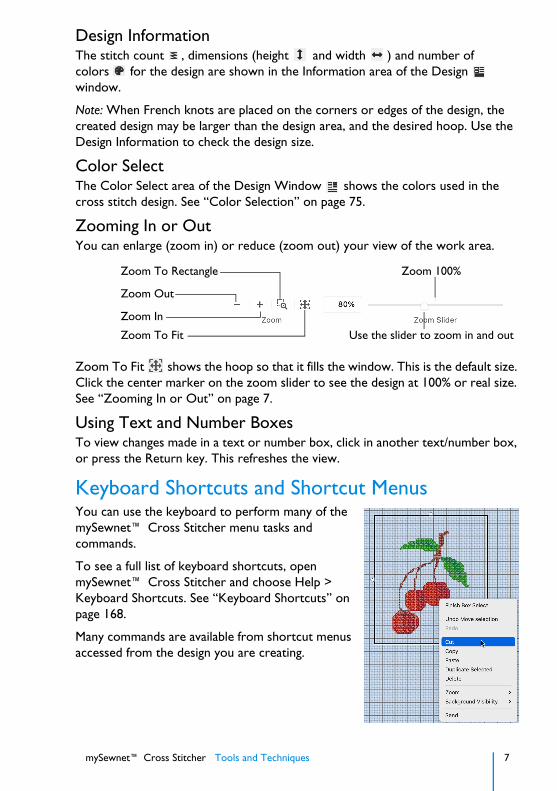
Zooming In or OutYou can enlarge (zoom in) or reduce (zoom out) your view of the work area.
Zoom To Fit shows the hoop so that it fills the window. This is the default size. Click the center marker on the zoom slider to see the design at 100% or real size. See “Zooming In or Out” on page 7.
Using Text and Number BoxesTo view changes made in a text or number box, click in another text/number box, or press the Return key. This refreshes the view.
Keyboard Shortcuts and Shortcut MenusYou can use the keyboard to perform many of the mySewnet™ Cross Stitcher menu tasks and commands.
To see a full list of keyboard shortcuts, open mySewnet™ Cross Stitcher and choose Help > Keyboard Shortcuts. See “Keyboard Shortcuts” on page 168.
Many commands are available from shortcut menus accessed from the design you are creating.
Use the slider to zoom in and out
Zoom To Rectangle
Zoom Out
Zoom To Fit
Zoom In
Zoom 100%

8 mySewnet™ Cross Stitcher Tools and Techniques
To Open a Shortcut Menu■ Press the Control key while you click on a design.■ Right-click on the mouse or trackpad.
Keyboard ShortcutsShortcut key codes
Note: On Mac portable keyboards use Function–Delete or Function–Backspace ( fn ⌫ ) to delete an object.
↵ Return key
⌘ Command key (cmd)
⇧ Shift key
⌦ Delete - full sized keyboard only
⌃ Control key (ctrl)
⌥ Option key (alt)
⇥ Tab key
← Left arrow
→ Right arrow
fn Function key
⌫ Delete back key (backspace)
mySewnet™ Cross Stitcher Tools and Techniques 9
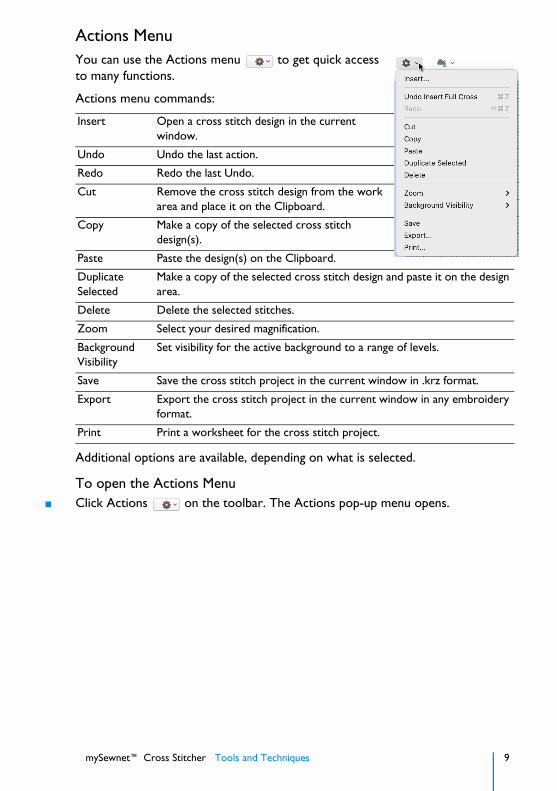
Actions MenuYou can use the Actions menu to get quick access to many functions.
Actions menu commands:
Additional options are available, depending on what is selected.
To open the Actions Menu■ Click Actions on the toolbar. The Actions pop-up menu opens.
Insert Open a cross stitch design in the current window.
Undo Undo the last action.
Redo Redo the last Undo.
Cut Remove the cross stitch design from the work area and place it on the Clipboard.
Copy Make a copy of the selected cross stitch design(s).
Paste Paste the design(s) on the Clipboard.
Duplicate Selected
Make a copy of the selected cross stitch design and paste it on the design area.
Delete Delete the selected stitches.
Zoom Select your desired magnification.
Background Visibility
Set visibility for the active background to a range of levels.
Save Save the cross stitch project in the current window in .krz format.
Export Export the cross stitch project in the current window in any embroidery format.
Print Print a worksheet for the cross stitch project.

10 mySewnet™ Cross Stitcher Tools and Techniques
mySewnet™ Cross Stitcher Terms and ConventionsFor a general overview of terms and conventions, please refer to the mySewnet™ Embroidery Software Reference Guide.
On-screen pointersThe mouse pointer is most commonly shown as an arrow on the screen.
The following pointers are also used:
I-beam Used when entering text, e.g. in the Notes dialog.
Move A four-headed arrow is used when the pointer is over the selection box for selected stitches.
Move crop area A hand is used when moving the crop area in the Rotate and Crop Picture page of the Cross Stitch Design Assistant.
Zoom To Rectangle Used to drag an area to zoom in to.
Adjust/Resize A diagonal double-headed arrow is used when the pointer is over the square corner handle to movewhen moving a crop line in the Rotate and Crop Picture page of the Cross Stitch Design Assistant.
Horizontal A horizontal double-headed arrow is used when the pointer is over the flip horizontal handle on a selection box.
Vertical A vertical double-headed arrow is used when the pointer is over the flip vertical handle on a selection box.
Box Select The Box Select pointer appears when Box Select is chosen.
Freehand Select The Freehand Select pointer appears when Freehand Select is chosen.
Point Select The Point Select pointer appears when Point Select is chosen.
Pick Color The Pick Colors pointer appears when picking colors from a picture or design.
Measure The Measure pointer appears when the Get Length function is selected.
Drawing Pointers
Full Cross The Full Cross pointer appears when placing or removing a Full Cross.
Quarter Cross The Quarter Cross pointer appears when placing or removing a Quarter Cross.
Half Cross Forward The Half Cross Forward pointer appears when placing or removing a Forward Half Cross.
Half Cross Backward The Half Cross Backward pointer appears when placing or removing a Backward Half Cross.
mySewnet™ Cross Stitcher Tools and Techniques 11
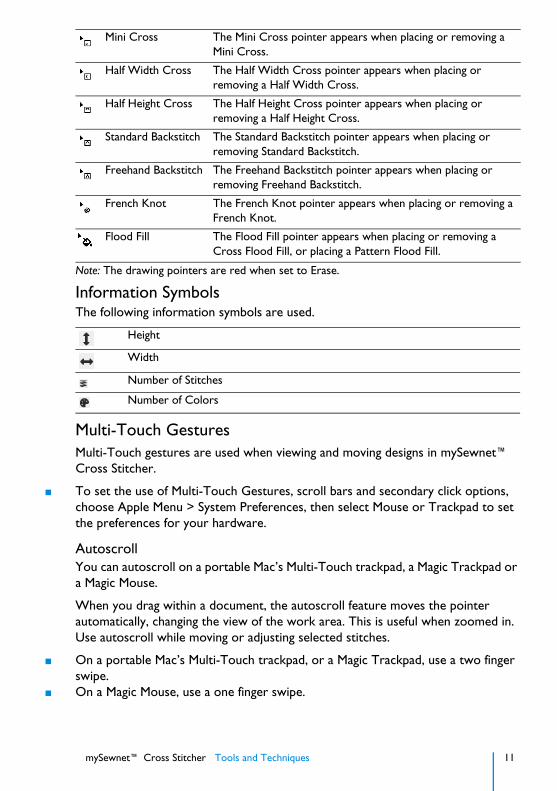
Note: The drawing pointers are red when set to Erase.
Information SymbolsThe following information symbols are used.
Multi-Touch GesturesMulti-Touch gestures are used when viewing and moving designs in mySewnet™ Cross Stitcher.
■ To set the use of Multi-Touch Gestures, scroll bars and secondary click options, choose Apple Menu > System Preferences, then select Mouse or Trackpad to set the preferences for your hardware.
AutoscrollYou can autoscroll on a portable Mac’s Multi-Touch trackpad, a Magic Trackpad or a Magic Mouse.
When you drag within a document, the autoscroll feature moves the pointer automatically, changing the view of the work area. This is useful when zoomed in. Use autoscroll while moving or adjusting selected stitches.
■ On a portable Mac’s Multi-Touch trackpad, or a Magic Trackpad, use a two finger swipe.
■ On a Magic Mouse, use a one finger swipe.
Mini Cross The Mini Cross pointer appears when placing or removing a Mini Cross.
Half Width Cross The Half Width Cross pointer appears when placing or removing a Half Width Cross.
Half Height Cross The Half Height Cross pointer appears when placing or removing a Half Height Cross.
Standard Backstitch The Standard Backstitch pointer appears when placing or removing Standard Backstitch.
Freehand Backstitch The Freehand Backstitch pointer appears when placing or removing Freehand Backstitch.
French Knot The French Knot pointer appears when placing or removing a French Knot.
Flood Fill The Flood Fill pointer appears when placing or removing a Cross Flood Fill, or placing a Pattern Flood Fill.
Height
Width
Number of Stitches
Number of Colors

12 mySewnet™ Cross Stitcher Tools and Techniques
Note: The scroll bars may only appear when you are scrolling. To always show the scroll bars, choose Apple Menu > System Preferences > General > Show scroll bars: Always.
Pinch to zoomYou can use Pinch to zoom on a trackpad to zoom in and out.
■ On a portable Mac’s Multi-Touch trackpad, or a Magic Trackpad, pinch two fingers to zoom in, and spread two fingers to zoom out.
Note: You must set the trackpad scroll and zoom options to Zoom in or out. See “Customizing Multi-Touch Gestures on a Trackpad” on page 12.
Secondary click for Control–clickYou can set a secondary click for Control–click when using a trackpad or the Magic Mouse. A short video demonstrates how to use these gestures.
■ Choose Apple Menu > System Preferences, then select Mouse. In Point & Click, select Secondary Click: Click on right side.
■ Choose Apple Menu > System Preferences, then select Trackpad. In Point & Click, select Secondary Click, then choose a click method in the pop-up menu, for example, Click in bottom right corner.
Customizing Multi-Touch Gestures on a TrackpadThe System Preferences options below show short videos of how the gestures should be used.
1 Choose Apple Menu > System Preferences.2 Select Trackpad.3 To use Pinch to zoom, select Scroll & Zoom, and then select the "Zoom in or out"
checkbox.When Zoom in or out is highlighted, a video demonstrates how to use Pinch to zoom.
4 To use Rotate, select Scroll & Zoom, and then select the Rotate checkbox.A video demonstrates how to use Rotate.
File Formats
Cross Stitch Design FilesmySewnet™ Cross Stitcher loads and stores cross stitch designs in files with the extension .krz.
Note: When a .krz file made in a previous version of Cross Stitcher is loaded, thread colors are automatically identified and converted when the thread manufacturer and thread number matches a mySewnet™ Cross Stitcher thread. Colors that do not match are converted to the Import Thread Range chosen in mySewnet™ Configure.
mySewnet™ Cross Stitcher Tools and Techniques 13
Picture FilesmySewnet™ Cross Stitcher can load any of the following picture file formats: Windows or OS2 Bitmap (.bmp), JPEG-JFIF Compliant (.jpg, .jif, .jpeg), Portable Network Graphics (.png), Tagged Image File Format uncompressed (.tiff, .tif), Camera RAW (.raw & many others), High Dynamic Range (.exr, hdr) and High Efficiency Image Format (.heic).
mySewnet™ Cross Stitcher can create pictures and videos of cross stitch designs from Design Player and Life View.
Embroidery FilesmySewnet™ Cross Stitcher can export embroidery files in any of the following formats: Husqvarna Viking / Pfaff (.vp4, .vp3 and .vip), Brother/Baby Lock/Bernina PEC (.pec), Brother/Baby Lock/Bernina PES (.pes version 2 - 11), Compucon/Singer PSW (.xxx), Husqvarna (.hus ,.shv), Janome (.jef and .sew), Melco (.exp), Pfaff (.pcs), Tajima (.dst) and Toyota (.10*).
Note: The preferred file format for exporting embroideries is .vp4, as this will preserve thread color information and notes.
14 mySewnet™ Cross Stitcher Managing Cross Stitch Designs
3Managing Cross Stitch Designs
Learn how to open cross stitch designs and new windows, how to save and export cross stitch designs, how to combine your cross stitch designs, and how to add notes to them. Cut, copy, paste and duplicate your cross stitch designs, and undo and redo your changes.
Start a new design with New. This starts the Cross Stitch Design Assistant where you can create a new design automatically, load a picture for a new design, load an existing design or start a new design with no picture.
When starting from a blank design, create using any drawing, pattern, shape or lettering feature. However, it is also common to follow a picture. Use the Load Picture for New Cross Stitch Design option of the Cross Stitch Design Assistant to open or scan a picture to follow.
Note: To create or edit your own picture, use mySewnet™ Draw & Paint, or another image editor.
NewUse New to open a new mySewnet™ Cross Stitcher window so that you can create new cross stitch designs, adjust pasted cross stitch designs or place lettering. The Cross Stitch Design Assistant appears, so you can select whether to create a QuickCross Design, load a picture for a new design, load an existing
To learn how to Go to
Start a new design See “New” on page 14.
Add a design to the current project See “Insert” on page 15.
Open an existing project to change it See “Open” on page 16 and “Open Recent” on page 17.
Add notes to your project See “Enter Notes for a Cross Stitch Design” on page 18.
Save your project with its existing name See “Save” on page 19.
Make a copy of your project to save it under a different name
See “Duplicate a Design” on page 21.
Export a copy of your cross stitch design as an embroidery
See “Export” on page 22.
Rename or move the current project See “Rename” on page 24 and “Move To” on page 25.
Revert to a previous version of the project See “Revert To” on page 25.
mySewnet™ Cross Stitcher Managing Cross Stitch Designs 15
design or start a new design with no background picture. See “Using the Cross Stitch Design Assistant” on page 30.
A cross stitch design may be a maximum of 400 x 400 full crosses. A full cross fills one grid square on the design area.
To open a new window■ Choose File > New.■ Press ⌘N
Opening Cross Stitch DesignsOpen cross stitch designs into an existing or new window.
• Use Insert to load individual files by icon, name or number into the current window.
• Use Open to load individual files by icon, name or number into a new window. • Use Open Recent to reopen recently edited files into a new window. • Use Paste to insert a file from the Clipboard into the current window.• Control–click on a cross stitch design file in the Finder, and select Open With
mySewnet™ Cross Stitcher from the menu. The design will open in a new window.
Note: You can use Insert to open the same cross stitch design as many times as desired. Each time it is opened, a new copy is added to the work area.
InsertUse Insert to select cross stitch design (.krz) files to add to the current design. mySewnet™ Cross Stitcher displays the Insert dialog so you can load a saved cross stitch design into an existing window, or start a completely new project.
To insert a cross stitch design■ Click Actions on the toolbar and choose Insert.■ Choose File > Insert.
Choose a folder
Click to select a cross
Click Open to load
Search by nameSelect Icon view
Scroll to see other designs
stitch design

16 mySewnet™ Cross Stitcher Managing Cross Stitch Designs
■ Press ⌘I
Insert a Cross Stitch Design1 Click Actions on the toolbar and choose Insert. Alternatively, choose File > Insert or
⌘I.2 Browse to the desired folder in the Open dialog.3 Switch to Icon View to see thumbnail pictures of the designs in the folder.4 Scroll to view the other designs in the folder.5 Click a cross stitch design to highlight it.6 Click the Open button to load the cross stitch design.
The cross stitch design is placed in the middle of the design area and automatically selected so that it can be moved, mirrored, rotated, copied or cut.Note: You can use Insert to transfer design elements between cross stitch design files. Simply delete all the objects from a design except the desired design element (for instance, in a floral design delete everything except one flower that you want to use somewhere else). Save the isolated design element as a new cross stitch design file (.krz). Open the design where you want to insert the isolated design element, then browse and insert it with Insert. If you do this several times then you will gradually build up your own library of design elements.
OpenUse Open to load an existing design file (extension .krz). mySewnet™ Cross Stitcher displays the Open dialog so you can choose a design to open.
The new window uses the filename as its title.
Note: To avoid accidentally overwriting your original design, it is recommended to use Duplicate or Save As and work from a copy when using Open.
To use Open■ Choose File > Open.■ Press ⌘O■ Double-click on a cross stitch design in Finder.
Choose a folder
Click to select a
Click Open to load
Search by name
cross stitch design
mySewnet™ Cross Stitcher Managing Cross Stitch Designs 17
Open a Cross Stitch Design1 Choose File > Open (or press ⌘O).2 Browse to the desired folder in the Open dialog.3 Click a cross stitch design to highlight it.4 Click the Open button to load the cross stitch design.
The cross stitch design is placed in a new window with its name in the window title.
Open RecentUse Open Recent to open a menu of previously used cross stitch design (.krz) files.
Note: To avoid accidentally overwriting your original cross stitch design, it is recommended to use Duplicate and work from a copy when using Open Recent.
To open a recently used design■ Choose File > Open Recent, and choose a cross stitch design from the menu.
Note: Click File > Open Recent > Clear Menu to remove the list of recent designs.
NotesUse the Notes to add a description or category to your cross stitch design. The Notes box is found on the Design window.
Store up to 2000 characters of notes about a cross stitch design. This information is shown in the Notes box on the Design window.
Note: To keep the Notes information, export your cross stitch designs as embroidery file types Husqvarna Viking / Pfaff (.vp4, .vp3 or .vip).
To Edit the Notes■ In the Design window of the Control Panel , click Edit Notes to open the
Notes dialog and add some text.
Note: Use Option–Return or Control–Return to start a new line of text.
NotesThe Notes dialog allows free text and keywords to be added to the Notes for the selected cross stitch design.
Up to 2000 characters can be entered in the Notes.
Add Keywords for the cross stitch design from the list.

18 mySewnet™ Cross Stitcher Managing Cross Stitch Designs
Enter Notes for a Cross Stitch Design1 Create or Insert a cross stitch design.2 Open the Design window in the Control Panel .3 Click Edit Notes . The Notes dialog appears.4 In the Notes text box add some text to the Notes.
Use Option–Return or Control–Return to start a new line of text.5 To add keywords, select the Keyword from the Category heading or subcategory in the
scrolling list. Then click Add to add them to the Notes.6 Click OK to save your amended Notes. The notes can be seen in the Design window.

mySewnet™ Cross Stitcher Managing Cross Stitch Designs 19
SaveSaveThis saves the contents of the open window as a cross stitch design file in .krz format, with the name you give it, it the Save dialog.
When saving on subsequent occasions, the contents of the open window is saved under its current name as a cross stitch design file format. A backup is made of previous versions.
DuplicateThis makes a copy of the open window using that document’s name, with the word "copy" at the end. Use Save to save this copy under a different name, or in another folder, in the Save dialog.
Save AsUse Save As to save the contents of the current window as a cross stitch design file in .krz format under a new name.
ExportThis saves the contents of the open window in the desired embroidery format according to the chosen options.
Save On CloseIf you make changes to an unsaved cross stitch design, then try to close the design window before saving the changes, a message appears, asking if you want to save the design.
Note: If you have already saved the design, this message will not appear, as an autosave is made as the window closes.
Name the cross stitch design
View the expanded Save dialogSelect a folder to save in

20 mySewnet™ Cross Stitcher Managing Cross Stitch Designs
You are asked about the unsaved design. Choose between:
Note: If you make a mistake when changing a cross stitch design, use Revert To to recover the previous version. See “Revert To” on page 25. After saving you may rename a cross stitch design. See “Rename” on page 24.
Save DialogWhen you save a cross stitch design file for the first time, mySewnet™ Cross Stitcher displays the Save dialog so you can name your cross stitch design.
Note: Depending on previous choices when saving files, the compact or expanded save dialog is shown.
The design is saved in .krz format. This preserves thread color information and notes.
When you save the design subsequently, the existing name is used. A backup is made of previous versions.
Note: Use Revert To to go back to a previous version. See “Revert To” on page 25.
To use Save■ Click Actions on the toolbar and choose Save.■ Choose File > Save.■ Press ⌘S
Save a Cross Stitch Design1 Create a cross stitch design project.2 Click Actions on the toolbar and choose Save to save the design in the Save dialog.
Alternatively, choose File > Save (or press ⌘S).3 In the Save As text box, enter a name for your design.4 Browse to the desired folder, or create a new folder.5 Click the Save button to save the design.
Save Save the changes to the cross stitch design. Use the name and folder selected in the dialog.
Delete Do not save the cross stitch design and continue. The design is discarded without being saved.
Cancel Do not save the cross stitch design, but keep the design window open.
Name the designView the expanded Save dialog
Select a folder to save in

mySewnet™ Cross Stitcher Managing Cross Stitch Designs 21
DuplicateUse Duplicate to make a copy of the cross stitch design in the current window using that design’s name. The new window will use the original name with the word "copy" at the end. You could use Duplicate to remove part of a cross stitch design project and save the changed project under a new name.
Then use Save to save the copied design under a different name and/or folder.
Note: When a design is Duplicated the version history is not kept.
To use Duplicate■ Choose File > Duplicate.■ Press ⇧⌘S
Duplicate a Design1 Create a cross stitch design project.2 Choose File > Save (or press ⌘S) to Save the design. See “Save” on page 19.3 Choose File > Duplicate (or press ⇧⌘S).
A new window is opened containing a copy of the saved design. The new window uses the same name as the original, but with the word "copy" at the end.
4 Choose File > Save (or press ⌘S).5 Save the duplicated design in the Save dialog under the desired name and folder.
Save AsUse Save As to save the contents of the current window as a cross stitch design in .krz format under a new name.
To use Save As■ Choose File > ⌥ > Save As.■ Press ⌥⇧⌘S
22 mySewnet™ Cross Stitcher Managing Cross Stitch Designs
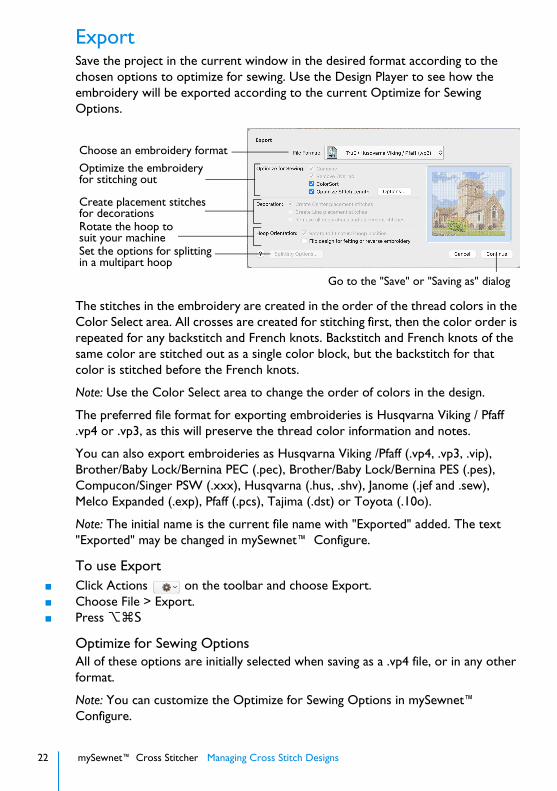
ExportSave the project in the current window in the desired format according to the chosen options to optimize for sewing. Use the Design Player to see how the embroidery will be exported according to the current Optimize for Sewing Options.
The stitches in the embroidery are created in the order of the thread colors in the Color Select area. All crosses are created for stitching first, then the color order is repeated for any backstitch and French knots. Backstitch and French knots of the same color are stitched out as a single color block, but the backstitch for that color is stitched before the French knots.
Note: Use the Color Select area to change the order of colors in the design.
The preferred file format for exporting embroideries is Husqvarna Viking / Pfaff .vp4 or .vp3, as this will preserve the thread color information and notes.
You can also export embroideries as Husqvarna Viking /Pfaff (.vp4, .vp3, .vip), Brother/Baby Lock/Bernina PEC (.pec), Brother/Baby Lock/Bernina PES (.pes), Compucon/Singer PSW (.xxx), Husqvarna (.hus, .shv), Janome (.jef and .sew), Melco Expanded (.exp), Pfaff (.pcs), Tajima (.dst) or Toyota (.10o).
Note: The initial name is the current file name with "Exported" added. The text "Exported" may be changed in mySewnet™ Configure.
To use Export■ Click Actions on the toolbar and choose Export.■ Choose File > Export.■ Press ⌥⌘S
Optimize for Sewing OptionsAll of these options are initially selected when saving as a .vp4 file, or in any other format.
Note: You can customize the Optimize for Sewing Options in mySewnet™ Configure.
Choose an embroidery format
Optimize the embroidery
Go to the "Save" or "Saving as" dialog
Set the options for splitting
Create placement stitches
Rotate the hoop to
for stitching out
for decorations
suit your machine
in a multipart hoop

mySewnet™ Cross Stitcher Managing Cross Stitch Designs 23
Combine: Merge the embroideries into a single embroidery during Export.
Note: Combine is not enabled if there is only one design, and for embroidery formats that are automatically combined.
Remove Overlap: Prevent areas of stitches building up where embroideries overlap.
Remove Overlap is not available when Combine is not enabled.
Note: Only deselect this option if, for example, your embroideries are low density and you wish to have a blend effect where they overlap. Also, some multipart embroideries are created with areas that are designed to overlap each other near the mid-section of a turnable hoop. When viewing these designs in mySewnet™ Embroidery, deselect Remove Overlap before exporting. Deselect Remove Overlap in mySewnet™ Configure, Export, before sending them to the embroidery machine.
ColorSort: Reduce the number of thread colors during Export.
Optimize Stitch Length: Automatically remove small and insignificant stitches. See “Optimize Stitch Length” on page 24.
Note: Cutwork Needle lines in the Inspira Cutwork Needle "thread range" are unaffected by Optimize Stitch Length.
DecorationDecorations are not available in mySewnet™ Cross Stitcher.
Hoop OrientationSet the hoop orientation.
Rotate to fit natural hoop position: Rotate the embroidery if needed to fit with the default hoop orientation for the machine. This option is only available if the hoop on the main screen is in the rotated orientation. It is useful if you prefer to create a "landscape" shaped project in the rotated orientation.
Flip design for felting or reverse embroidery: Flip the embroidery for being stitched in reverse. If an embroidery contains a Felting Needle color effect this option is selected initially.
Splitting optionsMultipart hoops are not available in mySewnet™ Cross Stitcher.
Additional SectionsAdditional dialog sections are available, depending on the chosen file format.
• If .pes is chosen, you can select your machine type, file version, hoop size and rotation.
• If .jef is chosen, you can select your machine type, hoop size and rotation.

24 mySewnet™ Cross Stitcher Managing Cross Stitch Designs
ContinueView the Save, or Saving As dialog, depending on the selected file format.
Export an Embroidery1 Create a cross stitch project.2 Save the cross stitch design. See “Save” on page 19.3 Choose File > Export (or press ⌥⌘S).4 Choose an embroidery format from the pop-up menu.5 Select your optimization options.6 If you are using felting, use "Flip design for felting or reverse embroidery" to flip the design.7 Click Continue.8 The Saving As dialog appears. Save the embroidery as desired.
Optimize Stitch LengthUse Optimize Stitch Length to automatically remove small and insignificant stitches.
Stitch Length SensitivityAdjust the sensitivity of the optimization. Low is set as the default.
■ Choose Low, Medium or High from the pop-up menu.
Minimum Significant Stitch LengthSelect the shortest stitch length that you consider to be significant. Stitches below this length are removed during the optimization process. The default stitch length is 0.8 mm.
Note: Cutwork Needle lines are unaffected by the Minimum Significant Stitch Length.
■ Choose 0.6 mm, 0.8 mm or 1.0 mm from the pop-up menu.
RenameYou can rename the document in the currently selected window.
• If the document has not been saved, the Save dialog is displayed so you can save your design. See “Save” on page 19.
• If the document has been previously saved, you can rename the document in the application title bar.
Adjust the sensitivitySet your shortest desired stitch length

mySewnet™ Cross Stitcher Managing Cross Stitch Designs 25
Rename a document■ Choose File > Rename, then save or rename the document.
Move ToYou can move a document from the folder it is saved in, to another folder.
■ Choose File > Move To, then browse to the destination folder.
Revert ToUse Revert To to return to a previous version of your cross stitch design.
Use Revert To1 Create a cross stitch project by drawing stitches, using existing designs, and creating text.2 Choose File > Save (or press ⌘S) to save the cross stitch design. See “Save” on page 19.3 Change the cross stitch design.4 Choose File > Save (or press ⌘S) to save the cross stitch design again.5 Choose File > Revert To.6 Choose Last Saved, Last Opened, or Browse All Versions from the pop-up menu.7 If you chose Browse All Versions, all of the changes that you have made and saved can be
selected on the screen.8 Click Restore to go back to an older version, or Done to return without reverting.

26 mySewnet™ Cross Stitcher Managing Cross Stitch Designs
Saving and Exporting Designs and Embroideries
Create Cross Stitch and Embroidery Files for a Photo Design1 Open mySewnet™ Cross Stitcher , and in the Design Options page of the Cross Stitch
Design Assistant select Load Existing Cross Stitch Design, and then click Continue.2 In the Open Existing Design page, click the Select File button and browse to /mySewnet/
Samples/Cross Stitch/Krz/Linnet.krz. Click Done to close the assistant.Note: Alternatively, use the design you created in “Create a Cross Stitch from a Photograph” on page 47.
3 Click the central marker in the Zoom Sider to view the design at the size it will be stitched.4 Select the Design window of the Control Panel .5 Click the Design Properties button, and in the Design Properties dialog ensure Thread
Count, Crosses is set to Single (2 Threads). Click OK.6 Click Edit Notes and in the Note dialog enter 'Family Photo'. Click OK.7 Click File > Save and in the Save As dialog browse to the folder /mySewnet/My Designs and
save the file as Linnet.krz.Note: This will save your design as a cross stitch design (.krz) file.
8 Choose File > Export and the Export dialog appears.9 In the File Format pop-up menu, ensure .vp4 is selected. 10 Click Continue. The Save As dialog appears to save the embroidery.11 Browse to the folder /mySewnet/My Designs. Ensure the name is 'Linnet Exported', then
click Save.Note: To print a worksheet for this design, see “Print a Worksheet for an Embroidery” on page 145.
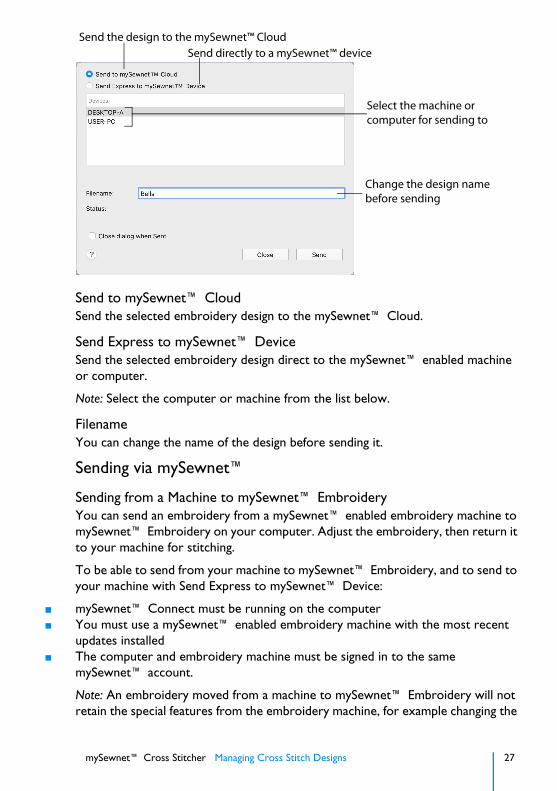
Sending Embroideries Send designs to your mySewnet™ enabled embroidery machine via mySewnet™ from within the mySewnet™ Embroidery Software, or directly from your mySewnet™ account.
Use mySewnet™ Connect to change your mySewnet™ settings.
SendUse the Send dialog to send the selected embroidery to the mySewnet™ Cloud, or to your machine.
mySewnet™ Cross Stitcher Managing Cross Stitch Designs 27
Send to mySewnet™ CloudSend the selected embroidery design to the mySewnet™ Cloud.
Send Express to mySewnet™ DeviceSend the selected embroidery design direct to the mySewnet™ enabled machine or computer.
Note: Select the computer or machine from the list below.
FilenameYou can change the name of the design before sending it.
Sending via mySewnet™
Sending from a Machine to mySewnet™ EmbroideryYou can send an embroidery from a mySewnet™ enabled embroidery machine to mySewnet™ Embroidery on your computer. Adjust the embroidery, then return it to your machine for stitching.
To be able to send from your machine to mySewnet™ Embroidery, and to send to your machine with Send Express to mySewnet™ Device:
■ mySewnet™ Connect must be running on the computer■ You must use a mySewnet™ enabled embroidery machine with the most recent
updates installed■ The computer and embroidery machine must be signed in to the same
mySewnet™ account.
Note: An embroidery moved from a machine to mySewnet™ Embroidery will not retain the special features from the embroidery machine, for example changing the
Send the design to the mySewnet™ Cloud Send directly to a mySewnet™ device
Select the machine or
Change the design name
computer for sending to
before sending

28 mySewnet™ Cross Stitcher Managing Cross Stitch Designs
words in lettering created on the machine, as it is sent as stitches. This is also true of designs sent in the other direction.
Send from an Embroidery Machine1 Go to the embroidery machine.2 Tap the Cloud button at the top and ensure that you are signed in to mySewnet™.3 Select embroidery mode, and then load an embroidery.4 In the machine screen, choose the send to software option. 5 Select the computer to send to, then send the embroidery.
The embroidery will open in a new mySewnet™ Embroidery window.6 When you have adjusted the embroidery, save the changes to your computer.
Note: You can name your computer in the mySewnet tab of mySewnet™ Configure.You can then use Send Express to mySewnet™ Device to return the edited embroidery to your machine for stitching out.
Note: When you send from your embroidery machine to mySewnet™ Embroidery, the embroidery may be sent to a window beneath the active maximized window. The mySewnet™ button flashes to indicate that a design has been sent.
Using Send Express to mySewnet™ Device1 In the File menu, select Send.2 In the Send dialog box, select your machine name from the list.
A message tells you that the design was sent.3 On the machine, tap to accept the design from your computer.4 Stitch out the design.
Note: You can use Send to mySewnet™ in the Finder to send embroideries to mySewnet™. See the mySewnet™ Configure Reference Guide and Help.
mySewnet™ ConnectUse the mySewnet™ Connect module in the mySewnet™ Embroidery Software to access your mySewnet™ settings in mySewnet™ Configure.
Note: To change your mySewnet™ settings, see the mySewnet™ Configure Reference Guide and Help.
Use the mySewnet™ Connect menu to check the status of your mySewnet™ connection.
The System Tray IconWhen mySewnet™ Connect is running, it appears as an icon in the menu bar at the top right of your computer screen. The icon will show whether or not communication is established with your machine as follows:
■ Click the icon to see the mySewnet™ Connect Menu.
Communication established No communication

mySewnet™ Cross Stitcher Managing Cross Stitch Designs 29
Note: Communication is shown as established when a connection exists with mySewnet™.
Starting mySewnet™ ConnectmySewnet™ Connect is set to start automatically when you restart your computer. If it is not open, use the following steps.
1 Open mySewnet™ Configure .2 On the Utilities tab, click Start mySewnet™ Connect . The mySewnet™ Connect
icon can now be seen in the menu bar.3 To close mySewnet™ Connect, click the icon in the menu bar and in the mySewnet™
Connect menu click Quit.
mySewnet™ Connect MenuClick the mySewnet™ Connect icon in the menu bar to see a menu of options.
The menu tells you whether you are signed in to mySewnet™.
Note: For mySewnet™ the current status in mySewnet™ Configure is listed. If you have more than one machine, the first found is used.
■ Select About mySewnet™ Connect to see the version number and copyright. (You will need this version number if you contact technical support at any time.)
■ Select Start Automatically to select or deselect the automatic start when your computer starts.
■ Select mySewnet™ Options to view the mySewnet tab in mySewnet™ Configure.■ Select Help to display help pages about mySewnet™ Connect.■ Select Quit to close mySewnet™ Connect and remove it from the menu bar.
30 mySewnet™ Cross Stitcher Using the Cross Stitch Design Assistant
4Using the Cross Stitch Design Assistant
Use the Cross Stitch Design Assistant to convert pictures automatically to crosses, to load existing cross stitch designs, and to start a new cross stitch design with or without a background picture.
Use the Cross Stitch Design Assistant to convert pictures automatically to crosses. Also use the Cross Stitch Design Assistant to load a picture as a background only, load an existing cross stitch design or start a new design with no picture.
Start a coss stitch design■ Click File > New to start the Cross Stitch Design Assistant.■ Start mySewnet™ Cross Stitcher to start the Cross Stitch Design Assistant.
The Cross Stitch Design Assistant opens at the Design Options page. See “Design Options” on page 33.
Create QuickCross DesignCreate a new design by converting color areas in a picture to crosses. Choose an existing picture or obtain a new picture from a scanner or digital camera. If desired, crop and adjust the picture, and straighten scanned pictures. Set the cross size and design area in crosses, or select a hoop to set the design area. Select the maximum number of colors and the desired thread range to use for the cross colors.
To learn how to Go to
Create a cross stitch design from a photograph
See “Create a Cross Stitch from a Photograph” on page 47.
Load a picture as the background to a design
See “Load a Picture of a House” on page 50.
Start a design with no background picture
See “Start a Design Without a Picture” on page 50.

mySewnet™ Cross Stitcher Using the Cross Stitch Design Assistant 31
Load Picture for New Cross Stitch DesignCreate a new design by loading a picture. If desired, crop and adjust the picture, and straighten scanned pictures. Set the cross size and design area in crosses, or select a hoop to set the design area. The picture is loaded into mySewnet™ Cross Stitcher.
Load Existing Cross Stitch DesignOpen an existing cross stitch design to preview it in the assistant, then close the assistant and load the design in mySewnet™ Cross Stitcher. The design area and palette are set according to the design loaded.
Start a New Cross Stitch Design with no PictureSelect the desired cross size and design area, then close the Cross Stitch Design Assistant and start with a blank work area.
32 mySewnet™ Cross Stitcher Using the Cross Stitch Design Assistant
Hints and Tips on QuickCross DesignsUse Different Thread RangesChoose different Thread Ranges and numbers of colors to see the effect of different selections. For instance, neon thread ranges give 'pop art' effects.
Enhance Eye HighlightsWhen converting a portrait, use Pick Color on the Thread Colors page to select the highlights in the eyes. This will brighten the eyes and enhance the converted picture.
Remove Isolated CrossesAfter the design is created, check for isolated crosses. If an isolated cross is not important for detail, replace it with the surrounding color, or a connected color. This will reduce the number of movement stitches in the finished embroidery.
Reduce Color ChangesReduce the number of colors in the design. To do this, choose a color you wish to keep and then flood fill or paint full crosses over similar colors until only the chosen colors remain. Alternatively, in the Color Select area move the color to below the color you want to merge with, and then merge the two colors. It is recommended to do this one color at a time, so you can see the effect of replacing each color. When you reduce the number of colors this way, the effect is different from deleting colors in the Cross Stitch Design Assistant.
Color OrderUse the Color Select area to change the color order so that the design stitches from the inside out. This helps to reduce the effect of pulling on the fabric.
Add BordersAdd a simple border of backstitch along the edges of the design. Use a contrasting color to make the border stand out.
Add a more elaborate border by increasing the design size by a few squares, then flood fill with crosses or a pattern in the blank squares around the edge. You will need to convert the picture at a size that will allow the design and a border to fit inside the desired hoop.
Note: When you change the design size, the background picture is removed. Save the design first so you have a copy of the design with the background picture, then use a new name for the design with a border.
mySewnet™ Cross Stitcher Using the Cross Stitch Design Assistant 33
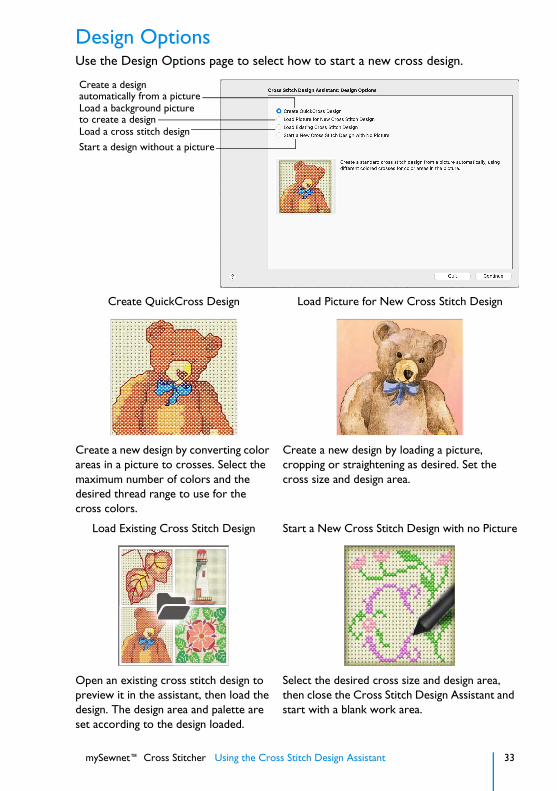
Design OptionsUse the Design Options page to select how to start a new cross design.
Create QuickCross Design Load Picture for New Cross Stitch Design
Create a new design by converting color areas in a picture to crosses. Select the maximum number of colors and the desired thread range to use for the cross colors.
Create a new design by loading a picture, cropping or straightening as desired. Set the cross size and design area.
Load Existing Cross Stitch Design Start a New Cross Stitch Design with no Picture
Open an existing cross stitch design to preview it in the assistant, then load the design. The design area and palette are set according to the design loaded.
Select the desired cross size and design area, then close the Cross Stitch Design Assistant and start with a blank work area.
Create a designautomatically from a pictureLoad a background pictureto create a designLoad a cross stitch designStart a design without a picture
34 mySewnet™ Cross Stitcher Using the Cross Stitch Design Assistant
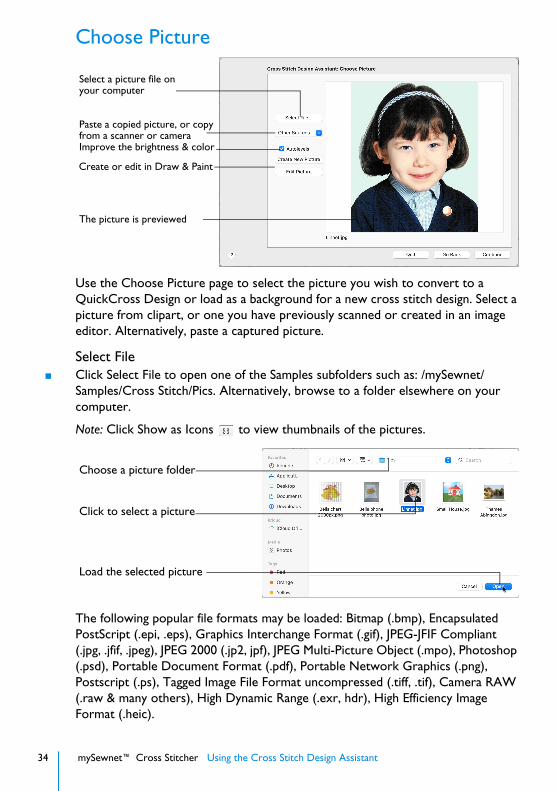
Choose Picture
Use the Choose Picture page to select the picture you wish to convert to a QuickCross Design or load as a background for a new cross stitch design. Select a picture from clipart, or one you have previously scanned or created in an image editor. Alternatively, paste a captured picture.
Select File■ Click Select File to open one of the Samples subfolders such as: /mySewnet/
Samples/Cross Stitch/Pics. Alternatively, browse to a folder elsewhere on your computer.
Note: Click Show as Icons to view thumbnails of the pictures.
The following popular file formats may be loaded: Bitmap (.bmp), Encapsulated PostScript (.epi, .eps), Graphics Interchange Format (.gif), JPEG-JFIF Compliant (.jpg, .jfif, .jpeg), JPEG 2000 (.jp2, jpf), JPEG Multi-Picture Object (.mpo), Photoshop (.psd), Portable Document Format (.pdf), Portable Network Graphics (.png), Postscript (.ps), Tagged Image File Format uncompressed (.tiff, .tif), Camera RAW (.raw & many others), High Dynamic Range (.exr, hdr), High Efficiency Image Format (.heic).
Select a picture file onyour computer
Paste a copied picture, or copy
The picture is previewed
from a scanner or cameraImprove the brightness & color
Create or edit in Draw & Paint
Choose a picture folder
Click to select a picture
Load the selected picture

mySewnet™ Cross Stitcher Using the Cross Stitch Design Assistant 35
These additional formats can also be loaded: Apple Icon (.icns), Fax (.fax & many others), Linux Icon (.xbm), Macintosh Picture (.pct, .pic, .pict), MacPaint (.mac, .pnt, pntg), Microsoft Icon (.cur, .ico), Silicon Graphics (.rgb, .sgi) and Truevision TGA (.targa, tga).
Select a Picture File1 Click the Select File button and the Open dialog appears.2 Browse to the desired folder, for example /mySewnet/Samples/Cross Stitch/Pics.3 Click on a picture.4 Click Open to use the picture in the Choose Picture page.
Click Cancel to exit without selecting a picture.Note: mySewnet™ Cross Stitcher is not used for picture editing or enhancement. If you wish to enhance the picture for conversion to a cross stitch design, use mySewnet™ Draw & Paint or another picture editor.
Other Sources
Paste■ Paste an image from the Clipboard.
ServicesUse Services to import a picture.
• Camera: Import a picture from an integrated MacBook® camera.• Capture Full Screen: make a screenshot of the whole screen.• Capture Selection from Screen: make a screenshot of part of the screen.• Import Image: import a picture from a camera or scanner connected to the
computer.
AutolevelsUse Autolevels to improve the brightness and contrast in most photos. It can also be used to bring out the color in underexposed pictures.
By default Autolevels is enabled.
Note: Occasionally Autolevels does not improve the appearance of a picture, and may need to be switched off.
Create New Picture and Edit PictureCreate a new picture or edit an existing picture in mySewnet™ Draw & Paint.
36 mySewnet™ Cross Stitcher Using the Cross Stitch Design Assistant
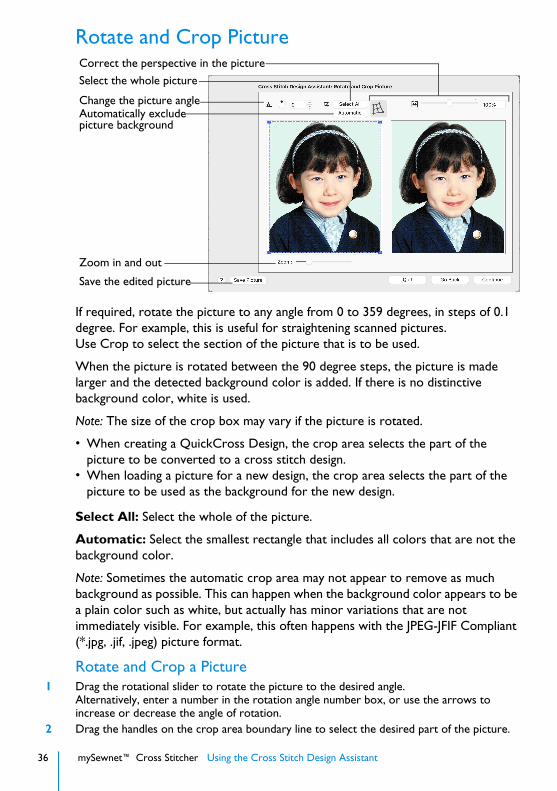
Rotate and Crop Picture
If required, rotate the picture to any angle from 0 to 359 degrees, in steps of 0.1 degree. For example, this is useful for straightening scanned pictures. Use Crop to select the section of the picture that is to be used.
When the picture is rotated between the 90 degree steps, the picture is made larger and the detected background color is added. If there is no distinctive background color, white is used.
Note: The size of the crop box may vary if the picture is rotated.
• When creating a QuickCross Design, the crop area selects the part of the picture to be converted to a cross stitch design.
• When loading a picture for a new design, the crop area selects the part of the picture to be used as the background for the new design.
Select All: Select the whole of the picture.
Automatic: Select the smallest rectangle that includes all colors that are not the background color.
Note: Sometimes the automatic crop area may not appear to remove as much background as possible. This can happen when the background color appears to be a plain color such as white, but actually has minor variations that are not immediately visible. For example, this often happens with the JPEG-JFIF Compliant (*.jpg, .jif, .jpeg) picture format.
Rotate and Crop a Picture1 Drag the rotational slider to rotate the picture to the desired angle.
Alternatively, enter a number in the rotation angle number box, or use the arrows to increase or decrease the angle of rotation.
2 Drag the handles on the crop area boundary line to select the desired part of the picture.
Change the picture angle
Select the whole picture
Automatically excludepicture background
Zoom in and out
Save the edited picture
Correct the perspective in the picture

mySewnet™ Cross Stitcher Using the Cross Stitch Design Assistant 37
Hold the Shift key while dragging to resize the rectangle proportionally.Hold the Option key while dragging to resize the rectangle without moving its center.
3 Drag anywhere inside the crop box to move the crop box.Note: If you need to expand a crop box again, make sure it is not touching the edge of the frame, as this will stop it expanding.
4 If desired, click Automatic to select the crop lines automatically, or click Select All to use the whole of the picture.
Perspective CorrectionTo remove the effects of perspective in a picture, or to correct skew, select Perspective Correction . When using Perspective Correction, the crop handles are red.
Move the red handles so that the crop lines frame the picture. Use the Zoom bar to view the outline of the picture more clearly.
Note: When taking a picture, hold the phone or camera so as to avoid reflected light and shadow on your subject. To get the best possible results with a picture, use a scanner.
Stretch PictureDrag the Stretch Picture slider to make the picture in the Preview wider or narrower.
Save PictureUse Save Picture to save your edited picture.
Change the Perspective in a Picture1 In the Rotate and Crop Picture page, ensure that Perspective Correction is selected.2 Move the pointer over one of the red crop handles in the corner.
The pointer changes to a diagonal double-headed arrow .
Change the picture angleSelect the whole picture
Automatically excludethe picture background
Zoom in and out
Save the edited picture
Use Perspective CorrectionAdjust the proportions of the picture
Drag the red handles toselect an area

38 mySewnet™ Cross Stitcher Using the Cross Stitch Design Assistant
3 Move the red corner handles so that the crop lines frame the picture. The angle of the adjoining crop lines changes.A version of the picture with the perspective corrected appears in the Preview area.Note: When taking a photo for a background or QuickCross design, hold the phone or camera so as to avoid reflected light and shadow on your subject. To get the best possible results with a picture, use a scanner.
4 Drag the Stretch Picture slider to correct the proportions of the picture.5 If desired, Save the edited picture.
ZoomUse the Zoom bar to change the view of the picture. Zoom in (drag the slider to the right) to magnify the view. Zoom out (drag the slider to the left) to shrink the view.
When zoomed in, use the scroll bars or swipe to move around.

mySewnet™ Cross Stitcher Using the Cross Stitch Design Assistant 39
Design Size
Use the Design Size page to set the picture size, hoop and cross size. Set the cross size, then set the desired hoop size. The preview shows the grid squares that fit in that hoop size. If desired, adjust the number of crosses.
Use the lock button (Proportional) to change the proportions of the picture.
Note: When starting a new design with no picture, the preview area shows the grid size of the new design.
Each grid square corresponds to one cross in a cross stitch design. When creating a QuickCross Design, it shows the amount of detail that is kept when the picture is converted to a cross stitch design.
Set the Design Size■ Click the Cross Size up and down arrows or enter a number to change the size of
the crosses, and click the Width or Height up and down arrows to change the number of crosses used in the design.
Cross SizeThis is the Cross Size that is used for the converted design.
Note: Set the Cross Size before using Select Hoop, or changing Height or Width.
■ Set the cross size using the up and down arrows from 1.0 to 30.0mm in steps of 0.1mm, or enter a number.
Select HoopSelect a hoop to set the size of the cross stitch design. The design area will be a best fit to the selected hoop, using the chosen Cross Size.
■ Click the Select Hoop button and choose a hoop in the Hoop Selection dialog.Hoop Selection
Set the size of the crosses
Zoom in and out onthe design
Set dimensions in crosses
Choose hoop to set area
Design dimensions

40 mySewnet™ Cross Stitcher Using the Cross Stitch Design Assistant
Width and HeightWidth and Height set the size in crosses that the picture is when it is converted to a cross stitch design.
■ Adjust the Height and Width in Crosses by entering numbers or clicking the up and down arrows.
ZoomUse the Zoom bar to change the view of the design. Zoom in (drag the slider to the right) to magnify the view. Zoom out (drag the slider to the left) to shrink the view.
When zoomed in, use the scroll bars or swipe to move around.
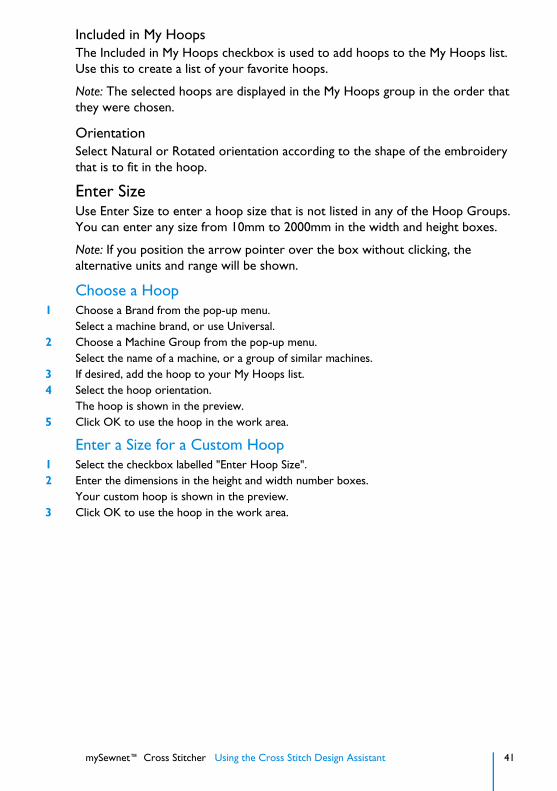
Hoop SelectionUse the Hoop Selection dialog to choose a hoop size for use with a cross stitch design in mySewnet™ Cross Stitcher.
BrandThe pop-up Brand menu shows all the machine brands, and Universal hoops.
Hoop GroupThe pop-up Machine Group menu shows all the machine Hoop Groups.
Note: All available hoops for the selected machine are listed.
Hoop SizeThe Hoop Size list shows the hoops in the chosen Hoop Group. A picture of the selected hoop is shown in the Preview.
Choose a machine brandChoose a machine
Select the hoop size
Select the hoop orientation
Enter a size for a custom hoop
Preview the hoop
Add the hoop to My Hoops
mySewnet™ Cross Stitcher Using the Cross Stitch Design Assistant 41
Included in My HoopsThe Included in My Hoops checkbox is used to add hoops to the My Hoops list. Use this to create a list of your favorite hoops.
Note: The selected hoops are displayed in the My Hoops group in the order that they were chosen.
OrientationSelect Natural or Rotated orientation according to the shape of the embroidery that is to fit in the hoop.
Enter SizeUse Enter Size to enter a hoop size that is not listed in any of the Hoop Groups. You can enter any size from 10mm to 2000mm in the width and height boxes.
Note: If you position the arrow pointer over the box without clicking, the alternative units and range will be shown.
Choose a Hoop1 Choose a Brand from the pop-up menu.
Select a machine brand, or use Universal.2 Choose a Machine Group from the pop-up menu.
Select the name of a machine, or a group of similar machines.3 If desired, add the hoop to your My Hoops list.4 Select the hoop orientation.
The hoop is shown in the preview.5 Click OK to use the hoop in the work area.
Enter a Size for a Custom Hoop1 Select the checkbox labelled "Enter Hoop Size".2 Enter the dimensions in the height and width number boxes.
Your custom hoop is shown in the preview.3 Click OK to use the hoop in the work area.

42 mySewnet™ Cross Stitcher Using the Cross Stitch Design Assistant
Choose Thread Colors
Use the Choose Thread Colors page to match thread colors to colors in the picture for creating a QuickCross Design.
The picture is shown as blocks that correspond to the number of crosses that are created when the picture is converted to a cross stitch design. Thread colors are mapped to the blocks, according to the best match within the number of colors selected from the thread range.
Color SelectionNumber of Colors : Set the number of thread colors used in the cross stitch design. The number of colors is initially set to the recommended number for the picture.
Note: A high number gives a more realistic result for photographs if a suitable Thread Range is used, but this may cause a high number of isolated crosses and more movement stitches in the finished embroidery.
■ Click the Number of Colors up and down arrows or enter a number to change the number of colors.
Apply: Update the list of threads and the thread color preview.
Reset: Return the thread list to the initial (recommended) set of threads.
Note: When Reset is used, any custom thread matches that were made must be re-selected with Edit Selected Color.
Change All Threads ToChange the thread range. Set the thread range used to map the colors of the picture to create the cross stitch design.When a thread range is chosen, each color in the picture is assigned the nearest matching thread color from the chosen thread range.
Set the number of colors
Choose a Thread Range
Add or remove a color
Edit a color
Delete all colors
mySewnet™ Cross Stitcher Using the Cross Stitch Design Assistant 43
■ Choose a thread range from the pop-up menu.
Note: When a new thread range is chosen, all custom thread matches set by Edit Selected Color are lost.
Picture and Thread Color ListThe list shows a thread color for each color currently selected from the picture.
The same thread color may be matched to two or more colors in the picture. Each thread color can be individually changed with Edit Selected Color. When thread colors are changed in the list, the Thread Color Preview is updated.
Note: When more than one color in the picture is matched to the same thread color, the number of color changes in the final embroidery is reduced.
Change Colors
Pick New ColorsUse Pick New Colors to add thread colors to the list by selecting them from the source picture.
Use Pick Color to pick out details in a photograph that are not otherwise well represented in the rest of the picture. For example, highlights in eyes in a portrait may need to be picked out if there are very few white tones in the picture.
Note: The thread color is picked for the clicked color according to the RGB (red, green, blue) value at the point clicked. If there is already a thread color assigned to that exact RGB value, it is highlighted in the list instead of adding a thread color to the list.
Pick a New Thread Color1 Click Pick New Colors .2 Move the pointer over the Source Picture. The pointer changes to an eye-dropper .3 Click the picture to pick up the color under the tip of the eye-dropper.
The nearest matching thread color from the selected Thread Range is automatically selected and added to the thread color list. Because the PhotoStitch effects use a color blending process, the colors are recalculated.Note: To change individual thread colors to a different thread range, select them on the Design window of the control panel on the main screen when the assistant has finished.
Delete Selected ColorUse Delete Selected Color to remove the highlighted color from the list.
Because the PhotoStitch effects use a color blending process, the colors are recalculated. The Thread Color Preview is displayed again, with the reduced set of thread colors.
Edit Selected ColorUse Edit Selected Color to change a thread color.

44 mySewnet™ Cross Stitcher Using the Cross Stitch Design Assistant
Note: It is recommended only to use Edit Selected Color after the main thread range has been selected.
■ Click a color in the list, then click Edit Selected Color. The Color Selection dialog appears so that a different thread color can be chosen. See “Color Selection” on page 75.
Delete All ColorsUse Delete All Colors to remove all the thread colors from the list.Note: Delete All Colors can be used to clear all colors before using Pick New Colors to choose colors from the Source Picture.
PreviewsSource Picture: This shows the original picture, after being rotated and cropped, in full color.
Thread Color Preview: This shows how the thread colors have been chosen to replace colors in the picture. This gives an approximate indication of where thread blocks will be in the final design.
Note: If variegated threads have been selected, only the first color is shown in the preview.
ZoomUse the Zoom bar to change the view of the picture. Zoom in (drag the slider to the right) to magnify the view. Zoom out (drag the slider to the left) to shrink the view.
When zoomed in, use the scroll bars or swipe to move around.

mySewnet™ Cross Stitcher Using the Cross Stitch Design Assistant 45
Design Preview
Use the Design Preview page to view and check the final design before closing the Cross Stitch Design Assistant.
ZoomUse the Zoom bar to change the view of the picture. Zoom in (drag the slider to the right) to magnify the view. Zoom out (drag the slider to the left) to shrink the view.
When zoomed in, use the scroll bars or swipe to move around.
Design InformationThe design information boxes show the number of stitches in the cross stitch design, the height and width and the total number of color changes.
Go BackIf desired, use the Go Back button to go back through the Cross Stitch Design Assistant and modify settings before previewing the design again.
DoneAccept the final design and close the Cross Stitch Design Assistant.
View design information
Place the design inthe work area

46 mySewnet™ Cross Stitcher Using the Cross Stitch Design Assistant
Open Existing DesignUse the Open Existing Design page to select an existing cross stitch design to open in mySewnet™ Cross Stitcher.
Load a DesignClick the Select File button and load a cross stitch design in the open dialog.
Select a Design File1 Click Select File and the Open dialog appears.2 Browse to the desired folder.3 Click on a design to select it.4 Click Open to open the design in the Open Existing Design page.
Click Cancel to exit without selecting a design.
PreviewThe preview area shows the selected design in Block mode, with the name of the design underneath.
Go BackReturn to the Choose Design Type page.
Choose a design folder
Click to select a design
Load the selected design
Scroll to view more designs
mySewnet™ Cross Stitcher Using the Cross Stitch Design Assistant 47
DoneClose the Cross Stitch Design Assistant and load the chosen design on the main screen.
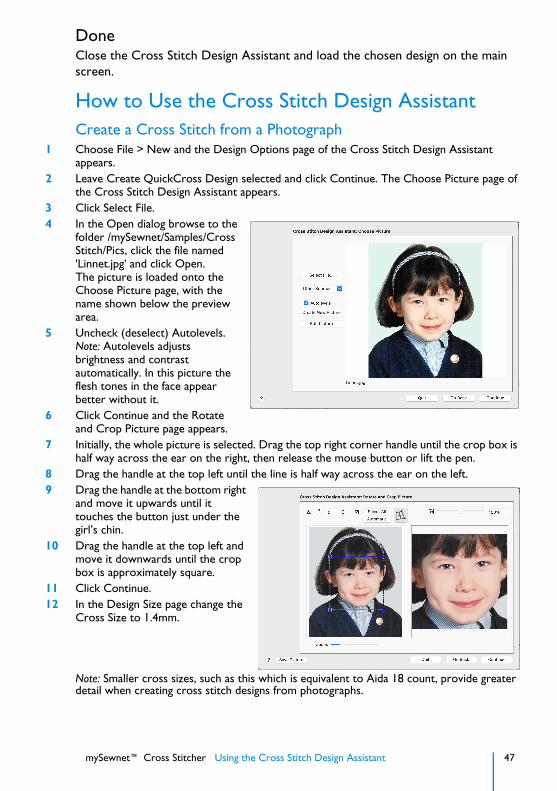
How to Use the Cross Stitch Design AssistantCreate a Cross Stitch from a Photograph
1 Choose File > New and the Design Options page of the Cross Stitch Design Assistant appears.
2 Leave Create QuickCross Design selected and click Continue. The Choose Picture page of the Cross Stitch Design Assistant appears.
3 Click Select File.4 In the Open dialog browse to the
folder /mySewnet/Samples/Cross Stitch/Pics, click the file named 'Linnet.jpg' and click Open. The picture is loaded onto the Choose Picture page, with the name shown below the preview area.
5 Uncheck (deselect) Autolevels.Note: Autolevels adjusts brightness and contrast automatically. In this picture the flesh tones in the face appear better without it.
6 Click Continue and the Rotate and Crop Picture page appears.
7 Initially, the whole picture is selected. Drag the top right corner handle until the crop box is half way across the ear on the right, then release the mouse button or lift the pen.
8 Drag the handle at the top left until the line is half way across the ear on the left.9 Drag the handle at the bottom right
and move it upwards until it touches the button just under the girl’s chin.
10 Drag the handle at the top left and move it downwards until the crop box is approximately square.
11 Click Continue.12 In the Design Size page change the
Cross Size to 1.4mm.
Note: Smaller cross sizes, such as this which is equivalent to Aida 18 count, provide greater detail when creating cross stitch designs from photographs.
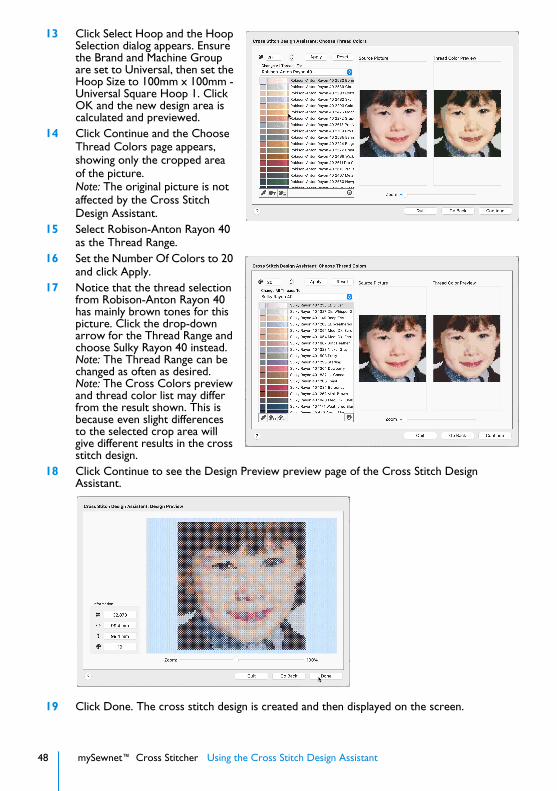
48 mySewnet™ Cross Stitcher Using the Cross Stitch Design Assistant
13 Click Select Hoop and the Hoop Selection dialog appears. Ensure the Brand and Machine Group are set to Universal, then set the Hoop Size to 100mm x 100mm - Universal Square Hoop 1. Click OK and the new design area is calculated and previewed.
14 Click Continue and the Choose Thread Colors page appears, showing only the cropped area of the picture.Note: The original picture is not affected by the Cross Stitch Design Assistant.
15 Select Robison-Anton Rayon 40 as the Thread Range.
16 Set the Number Of Colors to 20 and click Apply.
17 Notice that the thread selection from Robison-Anton Rayon 40 has mainly brown tones for this picture. Click the drop-down arrow for the Thread Range and choose Sulky Rayon 40 instead.Note: The Thread Range can be changed as often as desired.Note: The Cross Colors preview and thread color list may differ from the result shown. This is because even slight differences to the selected crop area will give different results in the cross stitch design.
18 Click Continue to see the Design Preview preview page of the Cross Stitch Design Assistant.
19 Click Done. The cross stitch design is created and then displayed on the screen.

mySewnet™ Cross Stitcher Using the Cross Stitch Design Assistant 49
20 Click Add Color and the Color Selection dialog appears so you can choose a new color for the color worksheet.
21 Select Sulky Rayon 40 as the Thread Range.22 Click Colors to open the Colors window.23 Click Colored Pencils to select the Colored
Pencils color model.24 Click the yellow pencil in the bottom line (Banana),
and the thread list jumps to 1067 (Lemon Yellow).25 This color is rather bright, so click the paler yellow
1061 above it in the list (1061 Pale Yellow).26 Click OK. The new color is added to the Color
Select area.27 Select the Create window of the Control
Panel .28 Click the thread color in the Create area and choose the yellow at the bottom of the pop-
up palette.29 Click the Flood Fill button and the pointer changes to the paint bucket .30 Click the solid background areas on the left and right.
Note: If desired, also fill any individual colored crosses along the edges of the background where it meets the sweater and the girl’s hair. This reduces the number of movement stitches in the finished embroidery.
31 Drag the Zoom slider to the middle point of the range to view the design at approximately the size it will be stitched.
Note: To save design and embroidery files for this cross stitch design, see “Create Cross Stitch and Embroidery Files for a Photo Design” on page 26. To print a worksheet, see “Print a Worksheet for an Embroidery” on page 145.
50 mySewnet™ Cross Stitcher Using the Cross Stitch Design Assistant
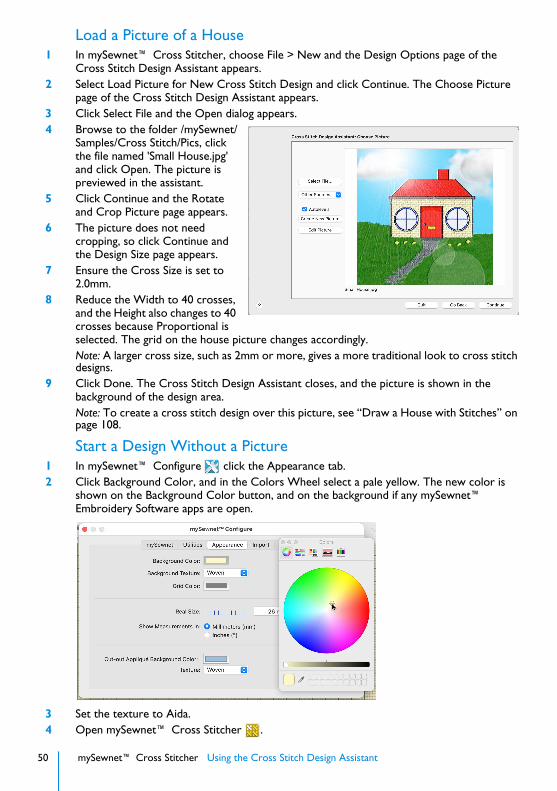
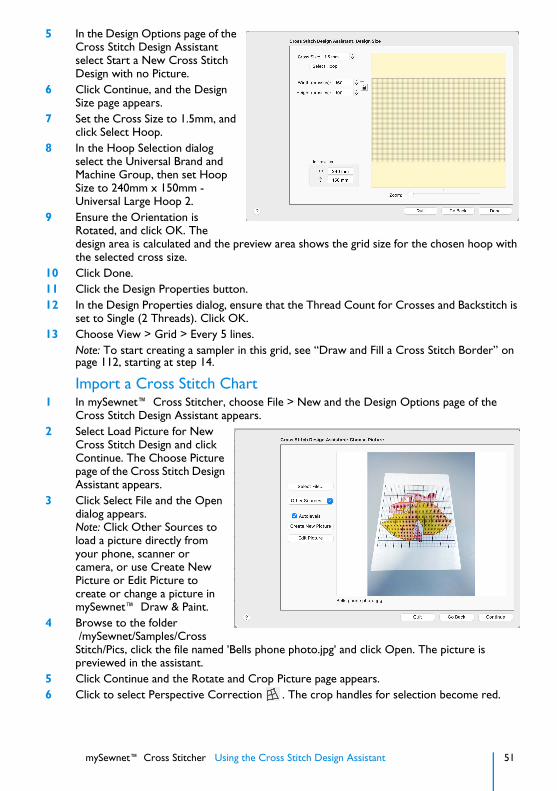
Load a Picture of a House1 In mySewnet™ Cross Stitcher, choose File > New and the Design Options page of the
Cross Stitch Design Assistant appears.2 Select Load Picture for New Cross Stitch Design and click Continue. The Choose Picture
page of the Cross Stitch Design Assistant appears.3 Click Select File and the Open dialog appears.4 Browse to the folder /mySewnet/
Samples/Cross Stitch/Pics, click the file named 'Small House.jpg' and click Open. The picture is previewed in the assistant.
5 Click Continue and the Rotate and Crop Picture page appears.
6 The picture does not need cropping, so click Continue and the Design Size page appears.
7 Ensure the Cross Size is set to 2.0mm.
8 Reduce the Width to 40 crosses, and the Height also changes to 40 crosses because Proportional is selected. The grid on the house picture changes accordingly.Note: A larger cross size, such as 2mm or more, gives a more traditional look to cross stitch designs.
9 Click Done. The Cross Stitch Design Assistant closes, and the picture is shown in the background of the design area.Note: To create a cross stitch design over this picture, see “Draw a House with Stitches” on page 108.
Start a Design Without a Picture1 In mySewnet™ Configure click the Appearance tab.2 Click Background Color, and in the Colors Wheel select a pale yellow. The new color is
shown on the Background Color button, and on the background if any mySewnet™ Embroidery Software apps are open.
3 Set the texture to Aida.4 Open mySewnet™ Cross Stitcher .
mySewnet™ Cross Stitcher Using the Cross Stitch Design Assistant 51
5 In the Design Options page of the Cross Stitch Design Assistant select Start a New Cross Stitch Design with no Picture.
6 Click Continue, and the Design Size page appears.
7 Set the Cross Size to 1.5mm, and click Select Hoop.
8 In the Hoop Selection dialog select the Universal Brand and Machine Group, then set Hoop Size to 240mm x 150mm - Universal Large Hoop 2.
9 Ensure the Orientation is Rotated, and click OK. The design area is calculated and the preview area shows the grid size for the chosen hoop with the selected cross size.
10 Click Done.11 Click the Design Properties button. 12 In the Design Properties dialog, ensure that the Thread Count for Crosses and Backstitch is
set to Single (2 Threads). Click OK.13 Choose View > Grid > Every 5 lines.
Note: To start creating a sampler in this grid, see “Draw and Fill a Cross Stitch Border” on page 112, starting at step 14.
Import a Cross Stitch Chart1 In mySewnet™ Cross Stitcher, choose File > New and the Design Options page of the
Cross Stitch Design Assistant appears.2 Select Load Picture for New
Cross Stitch Design and click Continue. The Choose Picture page of the Cross Stitch Design Assistant appears.
3 Click Select File and the Open dialog appears. Note: Click Other Sources to load a picture directly from your phone, scanner or camera, or use Create New Picture or Edit Picture to create or change a picture in mySewnet™ Draw & Paint.
4 Browse to the folder /mySewnet/Samples/Cross Stitch/Pics, click the file named 'Bells phone photo.jpg' and click Open. The picture is previewed in the assistant.
5 Click Continue and the Rotate and Crop Picture page appears.6 Click to select Perspective Correction . The crop handles for selection become red.
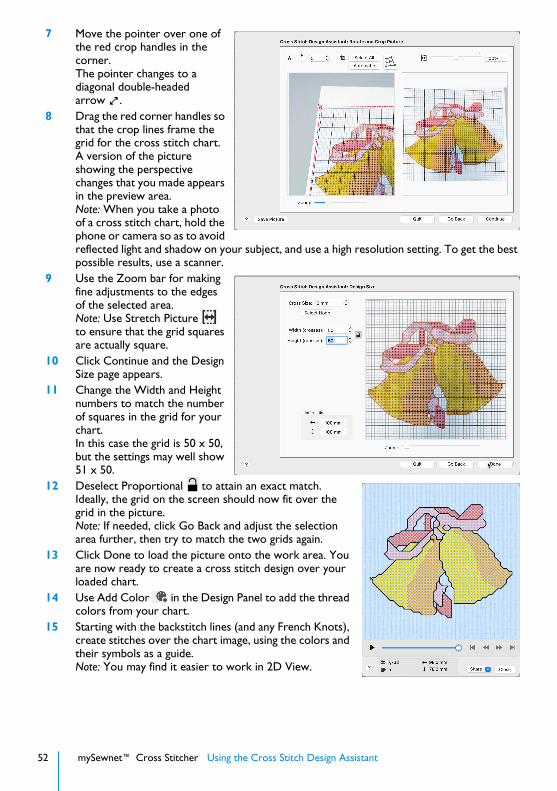
52 mySewnet™ Cross Stitcher Using the Cross Stitch Design Assistant
7 Move the pointer over one of the red crop handles in the corner.The pointer changes to a diagonal double-headed arrow .
8 Drag the red corner handles so that the crop lines frame the grid for the cross stitch chart. A version of the picture showing the perspective changes that you made appears in the preview area.Note: When you take a photo of a cross stitch chart, hold the phone or camera so as to avoid reflected light and shadow on your subject, and use a high resolution setting. To get the best possible results, use a scanner.
9 Use the Zoom bar for making fine adjustments to the edges of the selected area.Note: Use Stretch Picture to ensure that the grid squares are actually square.
10 Click Continue and the Design Size page appears.
11 Change the Width and Height numbers to match the number of squares in the grid for your chart. In this case the grid is 50 x 50, but the settings may well show 51 x 50.
12 Deselect Proportional to attain an exact match. Ideally, the grid on the screen should now fit over the grid in the picture.Note: If needed, click Go Back and adjust the selection area further, then try to match the two grids again.
13 Click Done to load the picture onto the work area. You are now ready to create a cross stitch design over your loaded chart.
14 Use Add Color in the Design Panel to add the thread colors from your chart.
15 Starting with the backstitch lines (and any French Knots), create stitches over the chart image, using the colors and their symbols as a guide.Note: You may find it easier to work in 2D View.
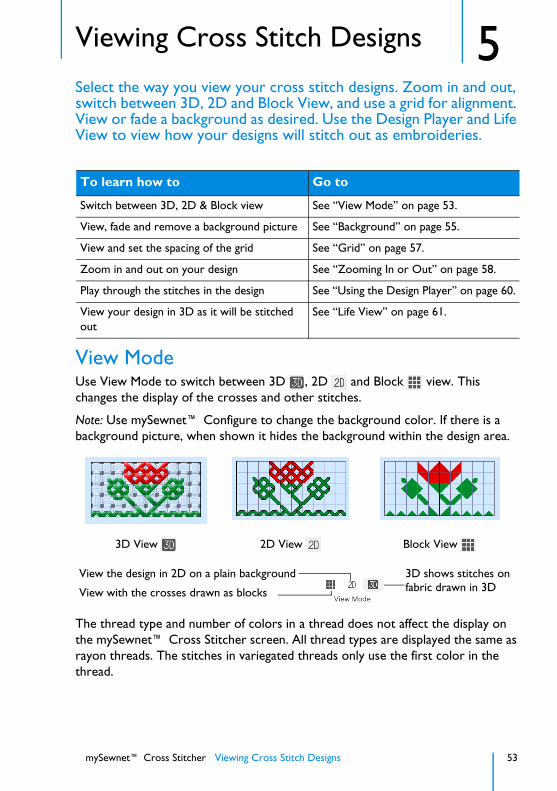
mySewnet™ Cross Stitcher Viewing Cross Stitch Designs 53
5Viewing Cross Stitch Designs
Select the way you view your cross stitch designs. Zoom in and out, switch between 3D, 2D and Block View, and use a grid for alignment. View or fade a background as desired. Use the Design Player and Life View to view how your designs will stitch out as embroideries.
View ModeUse View Mode to switch between 3D , 2D and Block view. This changes the display of the crosses and other stitches.
Note: Use mySewnet™ Configure to change the background color. If there is a background picture, when shown it hides the background within the design area.
The thread type and number of colors in a thread does not affect the display on the mySewnet™ Cross Stitcher screen. All thread types are displayed the same as rayon threads. The stitches in variegated threads only use the first color in the thread.
To learn how to Go to
Switch between 3D, 2D & Block view See “View Mode” on page 53.
View, fade and remove a background picture See “Background” on page 55.
View and set the spacing of the grid See “Grid” on page 57.
Zoom in and out on your design See “Zooming In or Out” on page 58.
Play through the stitches in the design See “Using the Design Player” on page 60.
View your design in 3D as it will be stitched out
See “Life View” on page 61.
3D View 2D View Block View
3D shows stitches onfabric drawn in 3D
View the design in 2D on a plain background
View with the crosses drawn as blocks
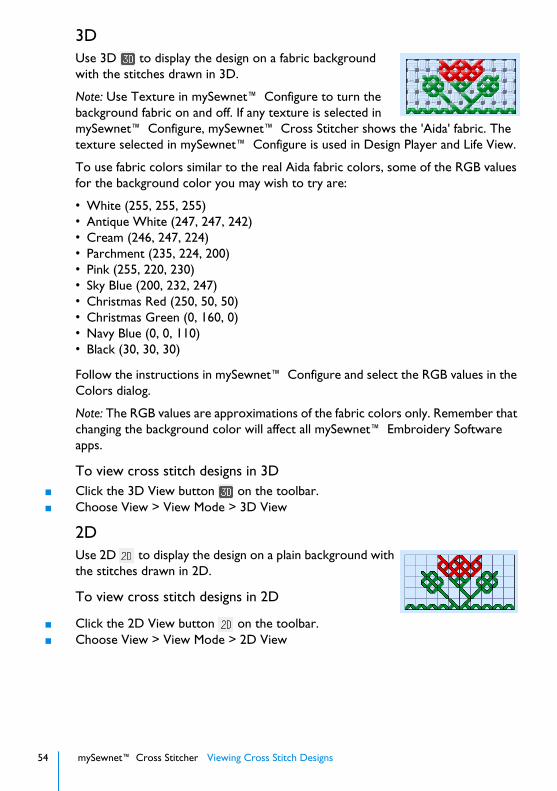
54 mySewnet™ Cross Stitcher Viewing Cross Stitch Designs
3DUse 3D to display the design on a fabric background with the stitches drawn in 3D.
Note: Use Texture in mySewnet™ Configure to turn the background fabric on and off. If any texture is selected in mySewnet™ Configure, mySewnet™ Cross Stitcher shows the 'Aida' fabric. The texture selected in mySewnet™ Configure is used in Design Player and Life View.
To use fabric colors similar to the real Aida fabric colors, some of the RGB values for the background color you may wish to try are:
• White (255, 255, 255)• Antique White (247, 247, 242)• Cream (246, 247, 224)• Parchment (235, 224, 200)• Pink (255, 220, 230)• Sky Blue (200, 232, 247)• Christmas Red (250, 50, 50)• Christmas Green (0, 160, 0)• Navy Blue (0, 0, 110)• Black (30, 30, 30)
Follow the instructions in mySewnet™ Configure and select the RGB values in the Colors dialog.
Note: The RGB values are approximations of the fabric colors only. Remember that changing the background color will affect all mySewnet™ Embroidery Software apps.
To view cross stitch designs in 3D■ Click the 3D View button on the toolbar.■ Choose View > View Mode > 3D View
2DUse 2D to display the design on a plain background with the stitches drawn in 2D.
To view cross stitch designs in 2D
■ Click the 2D View button on the toolbar.■ Choose View > View Mode > 2D View

mySewnet™ Cross Stitcher Viewing Cross Stitch Designs 55
BlockUse Block to display the design on a plain background with the crosses drawn as blocks.
To view cross stitch designs in Block view
■ Click the Block view button on the toolbar.■ Choose View > View Mode > Block
BackgroundUse Background to show or hide the background picture. It is useful to hide the background picture occasionally so that it is easier to see the stitches in the design.
Background VisibilityUse Background Visibility to open a pop-up menu and select one of the background visibility options.
• Background On shows the background at full visibility. See “Background On” on page 55.
• Background Off hides the background. See “Background Off” on page 55.• Fade Background (or ⌘K) opens the Fade Background dialog where you can set
the visibility for the background garment or fabric. See “Fade Background Dialog” on page 56.
■ Click the Background Visibility button on the toolbar, then choose Background On, Fade Background or Background Off from the pop-up menu.
Note: You can also set the visibility of the background with the Background Visibility menu options. See “Background Visibility” on page 56.
Background OnView the background at full visibility.
To use Background On■ Click the Fade Background button on the toolbar, then choose Background On
in the pop-up menu.■ Control–click and choose Background Visibility > Background On.■ Choose View > Background Visibility > Background On.
Background OffHide the background.
To use Background Off■ Click the Fade Background button on the toolbar, then choose Background Off
in the pop-up menu.
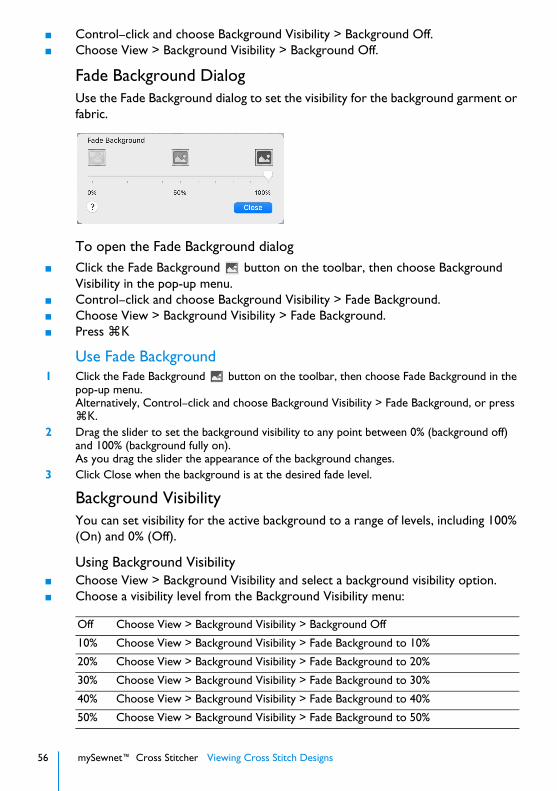
56 mySewnet™ Cross Stitcher Viewing Cross Stitch Designs
■ Control–click and choose Background Visibility > Background Off.■ Choose View > Background Visibility > Background Off.
Fade Background DialogUse the Fade Background dialog to set the visibility for the background garment or fabric.
To open the Fade Background dialog■ Click the Fade Background button on the toolbar, then choose Background
Visibility in the pop-up menu.■ Control–click and choose Background Visibility > Fade Background.■ Choose View > Background Visibility > Fade Background.■ Press ⌘K
Use Fade Background1 Click the Fade Background button on the toolbar, then choose Fade Background in the
pop-up menu.Alternatively, Control–click and choose Background Visibility > Fade Background, or press ⌘K.
2 Drag the slider to set the background visibility to any point between 0% (background off) and 100% (background fully on). As you drag the slider the appearance of the background changes.
3 Click Close when the background is at the desired fade level.
Background VisibilityYou can set visibility for the active background to a range of levels, including 100% (On) and 0% (Off).
Using Background Visibility■ Choose View > Background Visibility and select a background visibility option.■ Choose a visibility level from the Background Visibility menu:
Off Choose View > Background Visibility > Background Off
10% Choose View > Background Visibility > Fade Background to 10%
20% Choose View > Background Visibility > Fade Background to 20%
30% Choose View > Background Visibility > Fade Background to 30%
40% Choose View > Background Visibility > Fade Background to 40%
50% Choose View > Background Visibility > Fade Background to 50%
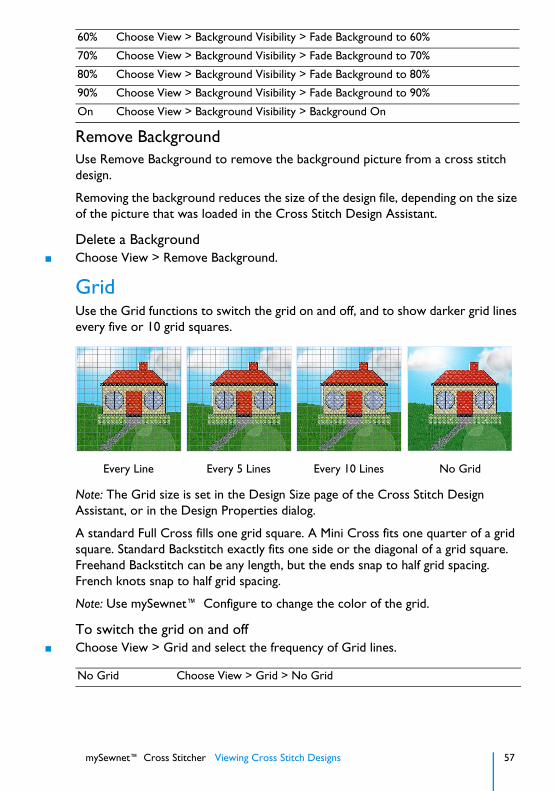
mySewnet™ Cross Stitcher Viewing Cross Stitch Designs 57
Remove BackgroundUse Remove Background to remove the background picture from a cross stitch design.
Removing the background reduces the size of the design file, depending on the size of the picture that was loaded in the Cross Stitch Design Assistant.
Delete a Background■ Choose View > Remove Background.
GridUse the Grid functions to switch the grid on and off, and to show darker grid lines every five or 10 grid squares.
Note: The Grid size is set in the Design Size page of the Cross Stitch Design Assistant, or in the Design Properties dialog.
A standard Full Cross fills one grid square. A Mini Cross fits one quarter of a grid square. Standard Backstitch exactly fits one side or the diagonal of a grid square. Freehand Backstitch can be any length, but the ends snap to half grid spacing. French knots snap to half grid spacing.
Note: Use mySewnet™ Configure to change the color of the grid.
To switch the grid on and off■ Choose View > Grid and select the frequency of Grid lines.
60% Choose View > Background Visibility > Fade Background to 60%
70% Choose View > Background Visibility > Fade Background to 70%
80% Choose View > Background Visibility > Fade Background to 80%
90% Choose View > Background Visibility > Fade Background to 90%
On Choose View > Background Visibility > Background On
Every Line Every 5 Lines Every 10 Lines No Grid
No Grid Choose View > Grid > No Grid

58 mySewnet™ Cross Stitcher Viewing Cross Stitch Designs
Note: The grid position coordinates for the pointer is shown below the Design Area, along with the number of the color for the stitch under the pointer.
Zooming In or OutYou can enlarge (zoom in) or reduce (zoom out) your view of the work area.
Zoom To Fit shows the hoop so that it fills the window. This is the default size. Click the center marker on the zoom slider, or press ⌘1 to see the design at 100% or real size.
To Zoom In■ Click the Zoom In button on the toolbar.■ Choose View > Zoom > Zoom In.■ Press ⌘+■ Drag the zoom slider to the right.■ Use Pinch to zoom on a trackpad (close two fingers) to zoom in.■ Use Zoom To Rectangle or Percentage Zoom to select your desired
magnification.■ Control–click and choose Zoom > Percentage Zoom.
To Zoom Out■ Click the Zoom Out button on the toolbar.■ Choose View > Zoom > Zoom Out.■ Press ⌘-■ Drag the zoom slider to the left.■ Use Pinch to zoom on a trackpad (spread two fingers) to zoom out.■ Use Percentage Zoom to select your desired magnification.■ Control–click and choose Zoom > Percentage Zoom.
Using Zoom To Fit■ Click the Zoom To Fit button on the toolbar.■ Choose View > Zoom > Zoom To Fit.■ Press ⌘0
Every Line Choose View > Grid > Every Line
Every 5 Lines Choose View > Grid > Every 5 Lines
Every 10 Lines Choose View > Grid > Every 10 Lines
Use the slider to zoom in and out
Zoom To Rectangle
Zoom Out
Zoom To Fit
Zoom In
Zoom 100%

mySewnet™ Cross Stitcher Viewing Cross Stitch Designs 59
Zoom To RectangleYou can select the position and size of an area to zoom in on with Zoom To Rectangle.
To Select Zoom To Rectangle■ Click the Zoom To Rectangle button on the toolbar.■ Choose View > Zoom > Zoom To Rectangle.■ Press ⌘*
Magnify an Area with Zoom To Rectangle1 Select Zoom To Rectangle .
The pointer changes to the Zoom To Rectangle pointer .2 Drag a rectangle around the area you want to zoom in to.3 Release the mouse button to zoom in.
Zoom To Rectangle is automatically deselected after you have used it.
PanWhen zoomed in, move around the work area using pan.
Note: The scroll bars may only appear when you are scrolling. To always show the scroll bars, choose Apple Menu > System Preferences > General > Show scroll bars: Always.
■ Drag the scroll bars.■ Swipe with one finger on a Magic Mouse, or two fingers on the trackpad to scroll
in any direction.
Percentage ZoomYou can set zoom percentage levels for the active design from 25% to 800%, with 100% being the real size of the design.
Using Percentage Zoom■ Click Actions on the toolbar and choose Zoom > Percentage Zoom.■ Control–click and choose Zoom > Percentage Zoom.■ Choose a magnification level from the zoom menu:
⌘1 100% Choose View > Zoom > Zoom 100%
⌘2 200% Choose View > Zoom > Zoom 200%
⌘3 400% Choose View > Zoom > Zoom 400%
⌘4 800% Choose View > Zoom > Zoom 800%
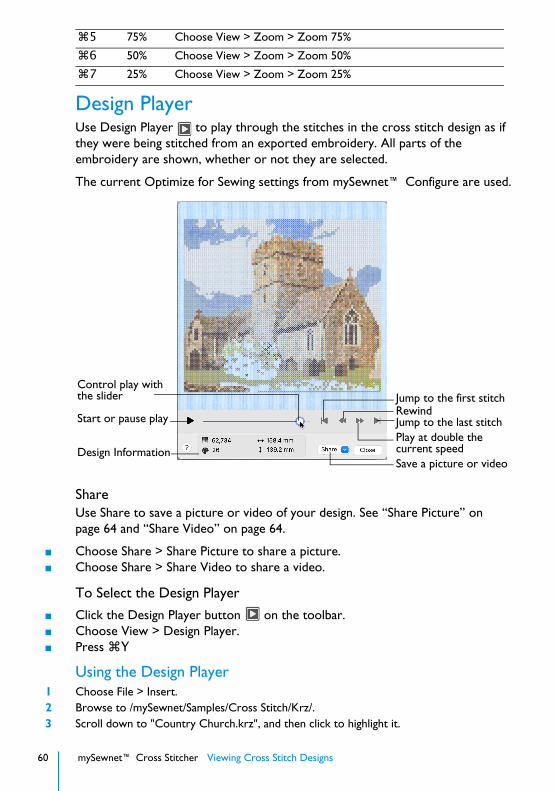
60 mySewnet™ Cross Stitcher Viewing Cross Stitch Designs
Design PlayerUse Design Player to play through the stitches in the cross stitch design as if they were being stitched from an exported embroidery. All parts of the embroidery are shown, whether or not they are selected.
The current Optimize for Sewing settings from mySewnet™ Configure are used.
ShareUse Share to save a picture or video of your design. See “Share Picture” on page 64 and “Share Video” on page 64.
■ Choose Share > Share Picture to share a picture.■ Choose Share > Share Video to share a video.
To Select the Design Player
■ Click the Design Player button on the toolbar.■ Choose View > Design Player.■ Press ⌘Y
Using the Design Player1 Choose File > Insert.2 Browse to /mySewnet/Samples/Cross Stitch/Krz/.3 Scroll down to "Country Church.krz", and then click to highlight it.
⌘5 75% Choose View > Zoom > Zoom 75%
⌘6 50% Choose View > Zoom > Zoom 50%
⌘7 25% Choose View > Zoom > Zoom 25%
Start or pause play
Control play withthe slider
Design Information
Jump to the first stitch
Jump to the last stitchRewind
Play at double thecurrent speedSave a picture or video

mySewnet™ Cross Stitcher Viewing Cross Stitch Designs 61
4 Click Open to load the design into the work area.5 Click Design Player . Alternatively, choose View > Design Player or press ⌘Y.
The Design Player dialog opens.6 Use the Play button at the bottom left to start playing through the stitches in the design.7 Use the controls to play forwards or backwards through the design at different speeds (each
time you click the speed doubles), jump to the start or end of the stitches, and stop at any time.
Life ViewUse Life View to show how an embroidery exported from the project will look in 3D with real-world perspective. Zoom in to see detail, and move and rotate the embroidery in a three-dimensional view. All parts of the embroidery that are within the design area are shown, whether or not they are selected.
Use Life View at any time when you want to see the design with no grid, stitches selected, or markers displayed, and when you want to see the effects of glow in the dark and solar reactive threads.
To Select Life View■ Click the Life View button on the toolbar.■ Choose View > Life View.■ Press ⇧⌘Y
PositionUse the position slider to move to another part of the Life View window.
■ Drag the cross marker in the center of the box to view the desired part of the embroidery, using the zoom slider to control the magnification.
Design Information
Move around the windowChange the 3D viewing angle
Zoom in and out
Light and dark effectsResetAnimate the previewSave a picture or video
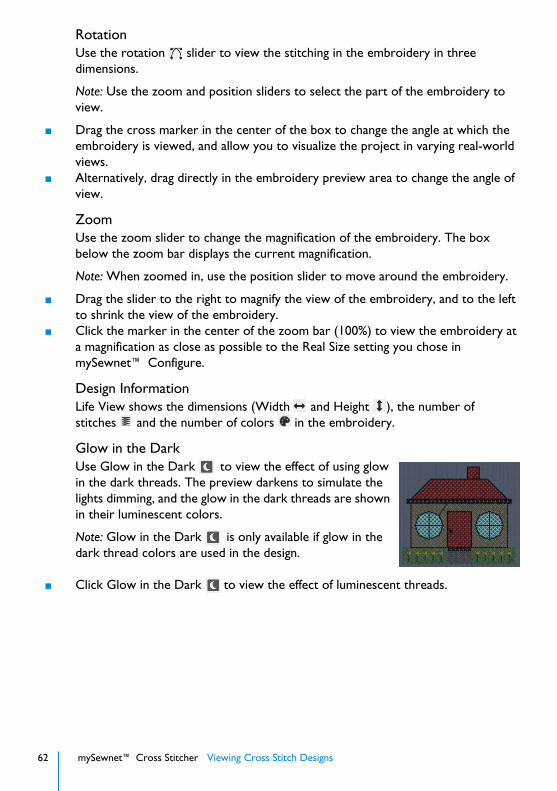
62 mySewnet™ Cross Stitcher Viewing Cross Stitch Designs
RotationUse the rotation slider to view the stitching in the embroidery in three dimensions.
Note: Use the zoom and position sliders to select the part of the embroidery to view.
■ Drag the cross marker in the center of the box to change the angle at which the embroidery is viewed, and allow you to visualize the project in varying real-world views.
■ Alternatively, drag directly in the embroidery preview area to change the angle of view.
ZoomUse the zoom slider to change the magnification of the embroidery. The box below the zoom bar displays the current magnification.
Note: When zoomed in, use the position slider to move around the embroidery.
■ Drag the slider to the right to magnify the view of the embroidery, and to the left to shrink the view of the embroidery.
■ Click the marker in the center of the zoom bar (100%) to view the embroidery at a magnification as close as possible to the Real Size setting you chose in mySewnet™ Configure.
Design InformationLife View shows the dimensions (Width and Height ), the number of stitches and the number of colors in the embroidery.
Glow in the DarkUse Glow in the Dark to view the effect of using glow in the dark threads. The preview darkens to simulate the lights dimming, and the glow in the dark threads are shown in their luminescent colors.
Note: Glow in the Dark is only available if glow in the dark thread colors are used in the design.
■ Click Glow in the Dark to view the effect of luminescent threads.
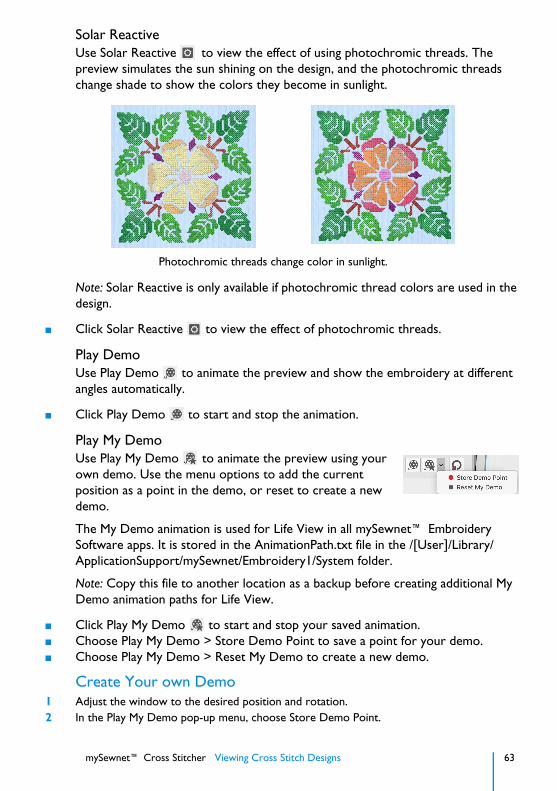
mySewnet™ Cross Stitcher Viewing Cross Stitch Designs 63
Solar ReactiveUse Solar Reactive to view the effect of using photochromic threads. The preview simulates the sun shining on the design, and the photochromic threads change shade to show the colors they become in sunlight.
Note: Solar Reactive is only available if photochromic thread colors are used in the design.
■ Click Solar Reactive to view the effect of photochromic threads.
Play DemoUse Play Demo to animate the preview and show the embroidery at different angles automatically.
■ Click Play Demo to start and stop the animation.
Play My DemoUse Play My Demo to animate the preview using your own demo. Use the menu options to add the current position as a point in the demo, or reset to create a new demo.
The My Demo animation is used for Life View in all mySewnet™ Embroidery Software apps. It is stored in the AnimationPath.txt file in the /[User]/Library/ApplicationSupport/mySewnet/Embroidery1/System folder.
Note: Copy this file to another location as a backup before creating additional My Demo animation paths for Life View.
■ Click Play My Demo to start and stop your saved animation.■ Choose Play My Demo > Store Demo Point to save a point for your demo.■ Choose Play My Demo > Reset My Demo to create a new demo.
Create Your own Demo1 Adjust the window to the desired position and rotation.2 In the Play My Demo pop-up menu, choose Store Demo Point.
Photochromic threads change color in sunlight.
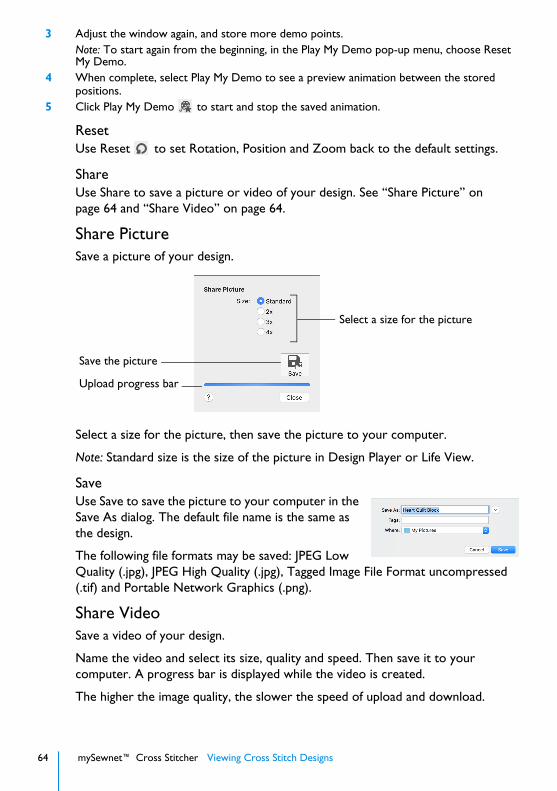
64 mySewnet™ Cross Stitcher Viewing Cross Stitch Designs
3 Adjust the window again, and store more demo points.Note: To start again from the beginning, in the Play My Demo pop-up menu, choose Reset My Demo.
4 When complete, select Play My Demo to see a preview animation between the stored positions.
5 Click Play My Demo to start and stop the saved animation.
ResetUse Reset to set Rotation, Position and Zoom back to the default settings.
ShareUse Share to save a picture or video of your design. See “Share Picture” on page 64 and “Share Video” on page 64.
Share PictureSave a picture of your design.
Select a size for the picture, then save the picture to your computer.
Note: Standard size is the size of the picture in Design Player or Life View.
SaveUse Save to save the picture to your computer in the Save As dialog. The default file name is the same as the design.
The following file formats may be saved: JPEG Low Quality (.jpg), JPEG High Quality (.jpg), Tagged Image File Format uncompressed (.tif) and Portable Network Graphics (.png).
Share VideoSave a video of your design.
Name the video and select its size, quality and speed. Then save it to your computer. A progress bar is displayed while the video is created.
The higher the image quality, the slower the speed of upload and download.
Select a size for the picture
Save the picture
Upload progress bar
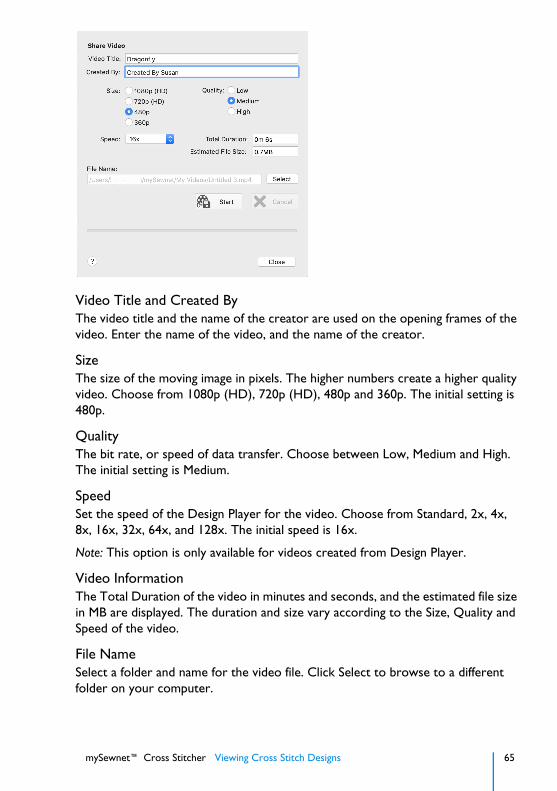
mySewnet™ Cross Stitcher Viewing Cross Stitch Designs 65
Video Title and Created ByThe video title and the name of the creator are used on the opening frames of the video. Enter the name of the video, and the name of the creator.
SizeThe size of the moving image in pixels. The higher numbers create a higher quality video. Choose from 1080p (HD), 720p (HD), 480p and 360p. The initial setting is 480p.
QualityThe bit rate, or speed of data transfer. Choose between Low, Medium and High. The initial setting is Medium.
SpeedSet the speed of the Design Player for the video. Choose from Standard, 2x, 4x, 8x, 16x, 32x, 64x, and 128x. The initial speed is 16x.
Note: This option is only available for videos created from Design Player.
Video InformationThe Total Duration of the video in minutes and seconds, and the estimated file size in MB are displayed. The duration and size vary according to the Size, Quality and Speed of the video.
File NameSelect a folder and name for the video file. Click Select to browse to a different folder on your computer.
66 mySewnet™ Cross Stitcher Viewing Cross Stitch Designs
Start and CancelClick Start to create your video, using the settings that you chose above. A progress bar shows during the creation of the video, with an estimate of the creation time. Click Cancel to stop the video creation.
Note: All other functions in the dialog box are dimmed (grayed out) during video creation.
mySewnet™ Cross Stitcher Planning Cross Stitch Designs 67
6Planning Cross Stitch Designs
Plan the size of your cross stitch design, and the types of stitches you will use to create your cross stitch embroidery.
Hints on Planning Cross Stitch DesignsDesign SizeThe Design Area is determined by the Width x Cross Size and Height x Cross Size. It is shown Design Size page of the Cross Stitch Design Assistant and in Design Properties. The Width and Height in the design Information in the Design window gives the size of the actual embroidery that will be created from the current cross stitch design.
Note: If there are French knots at the edges of a design, the embroidery Width and Height may be greater than the Design Size.
Flood FillWhen an area is flood filled, the fill does not relate to the background picture. An empty area can be flood filled until it meets existing crosses and/or backstitch. A connected area of the same colored crosses can be flood filled until it meets an empty area, backstitch or crosses in a different color.
Sometimes it may help to hide the background picture so that you can clearly see the area you wish to flood fill; for example, if there are lines in the background picture that are similar to backstitch.
Stitch Layers and Movement Stitches in the EmbroideryWhen you Export your design as an embroidery, mySewnet™ Cross Stitcher generates crosses in the color order in the Color Select area. Then the Color Select order is repeated for backstitch and French knots.
If there are backstitch and French knots in the same color, the backstitch is stitched out and then the French knots, all as a single color block. To ensure French knots are stitched after a different backstitch color, use the Color Select area to change the order of thread colors in the palette.
To learn how to Go to
Plan a cross stitch design See “Hints on Planning Cross Stitch Designs” on page 67.
Create hand cross stitch effects See “Information for Hand Cross Stitchers” on page 69.
Create traditional cross stitch and embroidery styles
See “Design Styles” on page 71.

68 mySewnet™ Cross Stitcher Planning Cross Stitch Designs
Crosses and Movement StitchesMovement stitches are automatically placed between each color area, and between crosses of the same color if they are not connected. Minimize movement stitches, and therefore the trims required after embroidery, by linking crosses of a color to at least one other cross in that color.
Note: For a neat finish to your cross stitch embroideries, trim the movement stitches before each color change.
Standard Backstitch and Freehand BackstitchStandard Backstitch is drawn in short sections that snap to the sides and diagonals of grid squares. This means the end points for Standard Backstitch are the corners of the grid squares.
Freehand Backstitch is drawn as a separate layer to Standard Backstitch. Freehand Backstitch is placed using end points that snap to half grid spacing anywhere on the design. This means that a single section of Freehand Backstitch can be any length that will fit within the design.
Although the screen shows Standard Backstitch and Freehand Backstitch as separate layers, they are stitched out together when they are the same color. There will be movement stitches between sections of backstitch if they do not connect at an end point. Freehand Backstitch will not join to other backstitch without a movement stitch if it simply crosses over without the end points connecting. To reduce movement stitches, place Freehand Backstitch so that the end points connect to Standard Backstitch sections or other Freehand Backstitch sections.
Note: It is possible to place Freehand Backstitch directly on top of Standard Backstitch and both sections are stitched. This can be used for special effects, such as thickening a line without having to change the number of threads in Color Properties.
French Knots and Movement StitchesFrench knots are stitched individually. They are not connected to other stitches. Therefore, there are movement stitches to and from all French knots. Use French knots to add decorative details to your designs.
Stitch CountsThe number of stitches shown in the Design window and printouts is an approximation and may not match the number of stitches shown when the embroidery is copied or loaded into other mySewnet™ Embroidery Software apps.
mySewnet™ Cross Stitcher Planning Cross Stitch Designs 69
Printing a WorksheetUse the print option on the File menu to print a worksheet for the embroidery created from the design.
Information for Hand Cross StitchersMany effects from hand cross stitch are possible with mySewnet™ Cross Stitcher. Change the cross size, alter the number of threads and choose different stitch types to create many different styles.
Cross SizeVarying the cross size (in Design Properties) produces a wide range of embroidery results. For example, small cross sizes, such as 1.4mm resemble petit point. Larger cross sizes, such as 1.8mm or 2mm are closer to traditional gros point or cross stitch.
To create cross stitch designs at the same sizes as real counted fabrics, set the Cross Size as shown:
Thread CountAltering the number of threads (in Design Properties and Color Properties) also has an effect. For example, single thread allows the crosses to be seen more clearly. Double or triple thread produces embroidery looking more like 'tapestry' or needlepoint. The number of threads may also be varied depending on the cross size — a small cross size such as 1.4mm often stitches out best using single thread. Cross sizes of 1.6mm, 1.8mm or 2.0mm are often effective with double thread. Designs with larger cross size may benefit from triple thread, especially for backstitch threads.
Aida Count Cross Size
11 2.3mm (0.091")
14 1.8mm (0.071")
16 (also 32 on Linen) 1.6mm (0.063")
18 1.4mm (0.055")
22 1.2mm (0.047")

70 mySewnet™ Cross Stitcher Planning Cross Stitch Designs
Stitch TypesA number of different stitches are used in mySewnet™ Cross Stitcher. A Full Cross is similar to a full cross in hand work, and can be placed as part crosses in quarters and halves.
Small stitches are available as half width, half height and mini crosses.
Use two types of backstitch to create outlines.
Also place French knots in any of nine grid positions for decorative details.
Color CombinationsCertain adaptations to hand cross stitch techniques will produce machine embroidery files that are easier to stitch. For example, combine colors when possible to reduce the number of thread changes required. Always try to link crosses of a color to at least one other cross in that color. This will avoid movement stitches that have to be trimmed after embroidery.
Full Cross Quarter Cross Half Cross Forward Half Cross Backward
Mini Cross Half Height Cross Half Width Cross
Standard Backstitch Freehand Backstitch
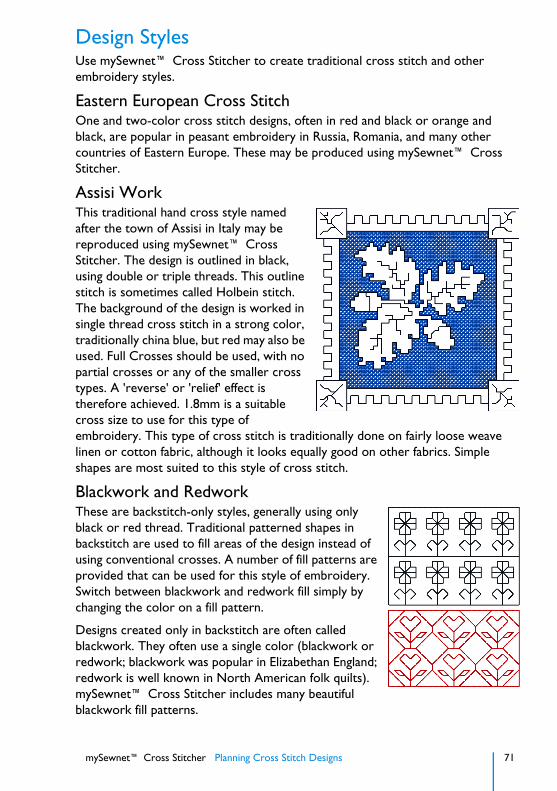
mySewnet™ Cross Stitcher Planning Cross Stitch Designs 71
Design StylesUse mySewnet™ Cross Stitcher to create traditional cross stitch and other embroidery styles.
Eastern European Cross StitchOne and two-color cross stitch designs, often in red and black or orange and black, are popular in peasant embroidery in Russia, Romania, and many other countries of Eastern Europe. These may be produced using mySewnet™ Cross Stitcher.
Assisi WorkThis traditional hand cross style named after the town of Assisi in Italy may be reproduced using mySewnet™ Cross Stitcher. The design is outlined in black, using double or triple threads. This outline stitch is sometimes called Holbein stitch. The background of the design is worked in single thread cross stitch in a strong color, traditionally china blue, but red may also be used. Full Crosses should be used, with no partial crosses or any of the smaller cross types. A 'reverse' or 'relief' effect is therefore achieved. 1.8mm is a suitable cross size to use for this type of embroidery. This type of cross stitch is traditionally done on fairly loose weave linen or cotton fabric, although it looks equally good on other fabrics. Simple shapes are most suited to this style of cross stitch.
Blackwork and RedworkThese are backstitch-only styles, generally using only black or red thread. Traditional patterned shapes in backstitch are used to fill areas of the design instead of using conventional crosses. A number of fill patterns are provided that can be used for this style of embroidery. Switch between blackwork and redwork fill simply by changing the color on a fill pattern.
Designs created only in backstitch are often called blackwork. They often use a single color (blackwork or redwork; blackwork was popular in Elizabethan England; redwork is well known in North American folk quilts). mySewnet™ Cross Stitcher includes many beautiful blackwork fill patterns.
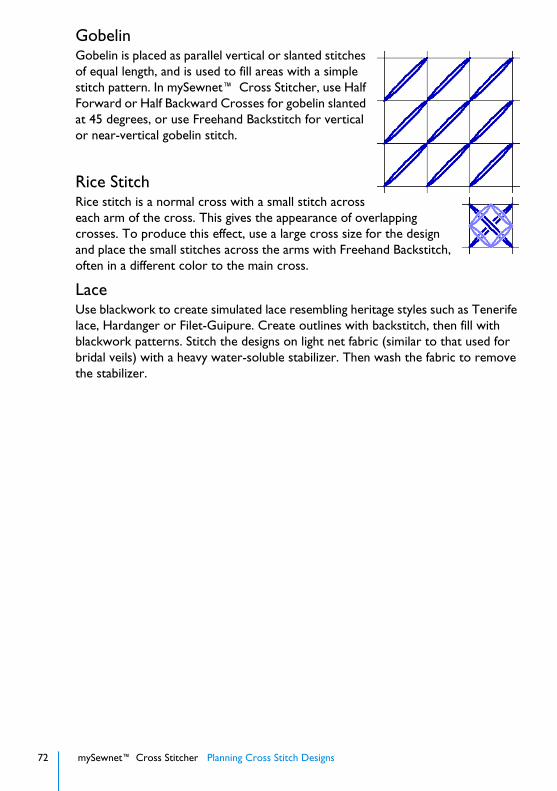
72 mySewnet™ Cross Stitcher Planning Cross Stitch Designs
GobelinGobelin is placed as parallel vertical or slanted stitches of equal length, and is used to fill areas with a simple stitch pattern. In mySewnet™ Cross Stitcher, use Half Forward or Half Backward Crosses for gobelin slanted at 45 degrees, or use Freehand Backstitch for vertical or near-vertical gobelin stitch.
Rice StitchRice stitch is a normal cross with a small stitch across each arm of the cross. This gives the appearance of overlapping crosses. To produce this effect, use a large cross size for the design and place the small stitches across the arms with Freehand Backstitch, often in a different color to the main cross.
LaceUse blackwork to create simulated lace resembling heritage styles such as Tenerife lace, Hardanger or Filet-Guipure. Create outlines with backstitch, then fill with blackwork patterns. Stitch the designs on light net fabric (similar to that used for bridal veils) with a heavy water-soluble stabilizer. Then wash the fabric to remove the stabilizer.
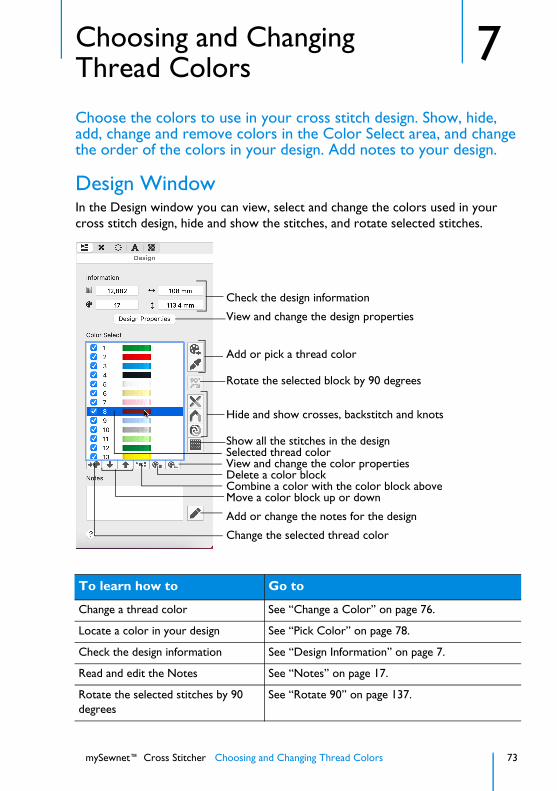
mySewnet™ Cross Stitcher Choosing and Changing Thread Colors 73
7Choosing and Changing Thread Colors
Choose the colors to use in your cross stitch design. Show, hide, add, change and remove colors in the Color Select area, and change the order of the colors in your design. Add notes to your design.
Design WindowIn the Design window you can view, select and change the colors used in your cross stitch design, hide and show the stitches, and rotate selected stitches.
To learn how to Go to
Change a thread color See “Change a Color” on page 76.
Locate a color in your design See “Pick Color” on page 78.
Check the design information See “Design Information” on page 7.
Read and edit the Notes See “Notes” on page 17.
Rotate the selected stitches by 90 degrees
See “Rotate 90” on page 137.
Check the design information
Change the selected thread color
Move a color block up or downCombine a color with the color block above
Rotate the selected block by 90 degrees
View and change the design properties
Add or pick a thread color
Add or change the notes for the design
Delete a color blockView and change the color propertiesSelected thread colorShow all the stitches in the design
Hide and show crosses, backstitch and knots
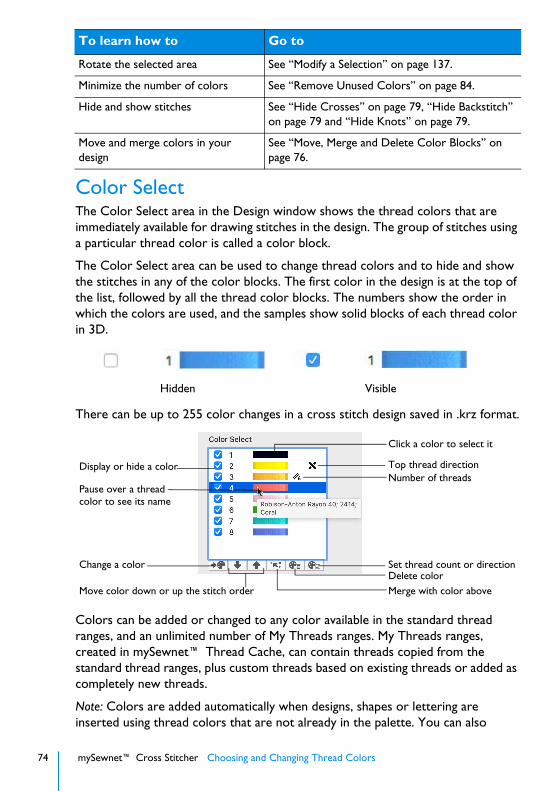
74 mySewnet™ Cross Stitcher Choosing and Changing Thread Colors
Color SelectThe Color Select area in the Design window shows the thread colors that are immediately available for drawing stitches in the design. The group of stitches using a particular thread color is called a color block.
The Color Select area can be used to change thread colors and to hide and show the stitches in any of the color blocks. The first color in the design is at the top of the list, followed by all the thread color blocks. The numbers show the order in which the colors are used, and the samples show solid blocks of each thread color in 3D.
There can be up to 255 color changes in a cross stitch design saved in .krz format.
Colors can be added or changed to any color available in the standard thread ranges, and an unlimited number of My Threads ranges. My Threads ranges, created in mySewnet™ Thread Cache, can contain threads copied from the standard thread ranges, plus custom threads based on existing threads or added as completely new threads.
Note: Colors are added automatically when designs, shapes or lettering are inserted using thread colors that are not already in the palette. You can also
Rotate the selected area See “Modify a Selection” on page 137.
Minimize the number of colors See “Remove Unused Colors” on page 84.
Hide and show stitches See “Hide Crosses” on page 79, “Hide Backstitch” on page 79 and “Hide Knots” on page 79.
Move and merge colors in your design
See “Move, Merge and Delete Color Blocks” on page 76.
Hidden Visible
To learn how to Go to
Click a color to select it
Merge with color above
Pause over a thread
Display or hide a color
Move color down or up the stitch order
color to see its name
Change a colorDelete colorSet thread count or direction
Number of threadsTop thread direction
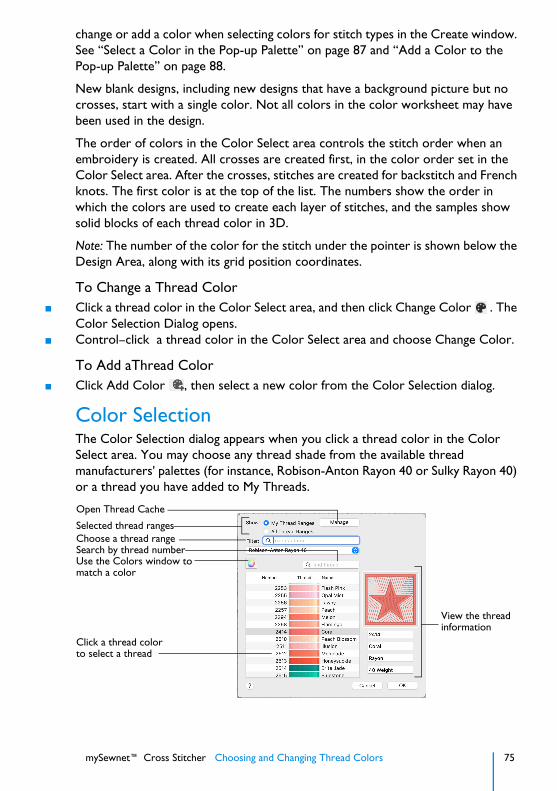
mySewnet™ Cross Stitcher Choosing and Changing Thread Colors 75
change or add a color when selecting colors for stitch types in the Create window. See “Select a Color in the Pop-up Palette” on page 87 and “Add a Color to the Pop-up Palette” on page 88.
New blank designs, including new designs that have a background picture but no crosses, start with a single color. Not all colors in the color worksheet may have been used in the design.
The order of colors in the Color Select area controls the stitch order when an embroidery is created. All crosses are created first, in the color order set in the Color Select area. After the crosses, stitches are created for backstitch and French knots. The first color is at the top of the list. The numbers show the order in which the colors are used to create each layer of stitches, and the samples show solid blocks of each thread color in 3D.
Note: The number of the color for the stitch under the pointer is shown below the Design Area, along with its grid position coordinates.
To Change a Thread Color■ Click a thread color in the Color Select area, and then click Change Color . The
Color Selection Dialog opens.■ Control–click a thread color in the Color Select area and choose Change Color.
To Add aThread Color■ Click Add Color , then select a new color from the Color Selection dialog.
Color SelectionThe Color Selection dialog appears when you click a thread color in the Color Select area. You may choose any thread shade from the available thread manufacturers' palettes (for instance, Robison-Anton Rayon 40 or Sulky Rayon 40) or a thread you have added to My Threads.
Choose a thread rangeSelected thread ranges
Search by thread number
Click a thread colorto select a thread
View the thread
Use the Colors window to
information
match a color
Open Thread Cache

76 mySewnet™ Cross Stitcher Choosing and Changing Thread Colors
When you select a new thread color, the Color Select area shows the color change, and the work area shows the block of stitches in the new color.
Choose a Thread Range■ Select from the pop-up menu of thread ranges or My Thread Ranges.■ Search for a manufacturer, then select from the list of thread ranges.
To Select a Thread Color■ Select colors by visual selection or by entering a shade number. ■ Click the Colors button, and in the Colors window choose a pencil color to
select the nearest matching thread color.
Change a Color1 Click a color you wish to change in the color worksheet, then click the Add Color
button. The Color Selection dialog appears.Note: Alternatively, double-click the color.
2 If required, change the thread range. Select the desired thread range from all thread ranges or only MyThreadRanges. The available shades for the thread range are shown in the list.Note: The Abbreviation shows the reference used for the thread range when threads from that range are added to MyThreads.
3 Click a color in the list to select a thread shade visually. Use the scroll bar to browse through the list of threads.
4 If you know the shade number, click in the Find Thread box then enter the required shade number.
5 Alternatively, click the Colors button, and in the Colors window choose a pencil color to select the nearest matching thread color. This is also a quick way to jump to threads of that color (for example, click the yellow pencil to jump to yellow thread shades).
6 Click Manage to manage your thread ranges in mySewnet™ Thread Cache.7 Click OK to confirm the color selection.
Thread Colors in mySewnet™ Cross StitcherThe thread type and number of colors in a thread does not affect the display on the mySewnet™ Cross Stitcher screen. All thread types are displayed the same as rayon threads. The stitches in variegated threads only use the first color in the thread.
Note: Thread color effects such as puffy foam and special needles such as twin or wing needles are not available in mySewnet™ Cross Stitcher. To use such color effects, export your design and open it in mySewnet™ Embroidery.
Move, Merge and Delete Color BlocksUse the arrows in the color worksheet to change the order of the color blocks, and to select color blocks to merge together selectively. For example, you can keep two adjacent identical color blocks in case you wish to vary them later.
Note: This may be useful if you want to merge two blocks of an identical thread color without affecting the color order of the rest of the design.

mySewnet™ Cross Stitcher Choosing and Changing Thread Colors 77
To select and change colors, see “Color Selection” on page 75.
Move and Merge Colors in the Worksheet1 Select a color block in the worksheet to highlight it.2 Click the up arrow button below the worksheet to move the block up the stitching
order.3 Click the down arrow button below the worksheet to move the block down the
stitching order.4 Click the merge arrow button below the worksheet to combine the selected color
block with the block above it, removing the Color Change command.Note: Use Merge to delete color changes easily. Also use it to combine color blocks with the same thread color, after first moving one of the color blocks so that they are adjacent.
5 Use Delete to remove the selected color, and all stitches using it, from the design.
Color Order ConsiderationsThe order of colors in the Color Select also controls the order of colors in the finished embroidery. While you are creating your cross stitch design, new colors are added when other designs are inserted or when you use shapes, patterns and text. Hence, the order of colors may not be the best order for stitching out when taking into consideration which areas may 'pull in' the most or which colors are on top for stitching out backstitch and French knots.
Stitch PullingGenerally, the largest area of stitches (usually crosses) will pull the most. The effect of this can be avoided by stitching the largest area first. So it may help to move the color with the most stitches to the top of the Color Select area. You can check the stitch counts in the Design Information, and by printing the embroidery worksheet.
Alternatively, change the color order so that the design stitches from the inside out. This is effective when stitching designs that have complete cross coverage, such as designs created with the Cross Stitch Design Assistant.
Backstitch and French KnotsBackstitch and French knots are stitched out together in each color, after all the crosses have been stitched. However, backstitch is stitched before French knots. If you are using French knots for decorative details on top of any backstitch in a different color, move the colors in the Color Select to ensure that the French knot color is stitched out after the backstitch color.
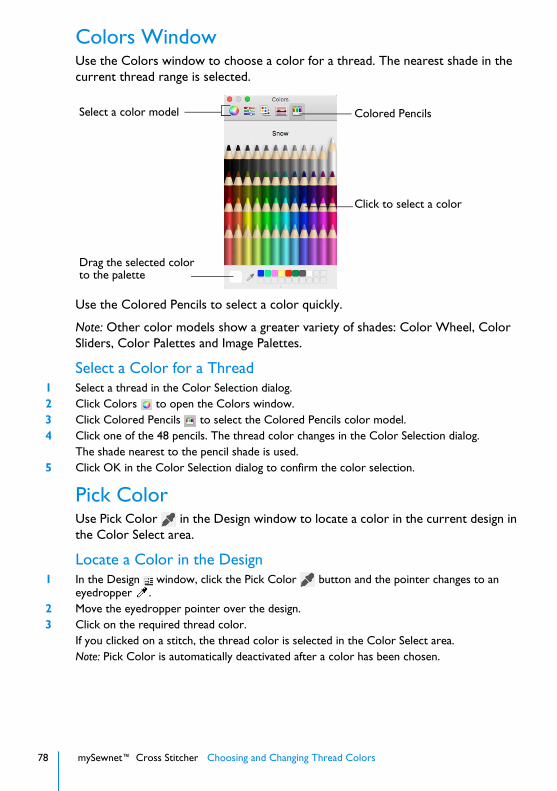
78 mySewnet™ Cross Stitcher Choosing and Changing Thread Colors
Colors WindowUse the Colors window to choose a color for a thread. The nearest shade in the current thread range is selected.
Use the Colored Pencils to select a color quickly.
Note: Other color models show a greater variety of shades: Color Wheel, Color Sliders, Color Palettes and Image Palettes.
Select a Color for a Thread1 Select a thread in the Color Selection dialog.2 Click Colors to open the Colors window.3 Click Colored Pencils to select the Colored Pencils color model.4 Click one of the 48 pencils. The thread color changes in the Color Selection dialog.
The shade nearest to the pencil shade is used.5 Click OK in the Color Selection dialog to confirm the color selection.
Pick ColorUse Pick Color in the Design window to locate a color in the current design in the Color Select area.
Locate a Color in the Design1 In the Design window, click the Pick Color button and the pointer changes to an
eyedropper . 2 Move the eyedropper pointer over the design.3 Click on the required thread color.
If you clicked on a stitch, the thread color is selected in the Color Select area.Note: Pick Color is automatically deactivated after a color has been chosen.
Colored PencilsSelect a color model
Click to select a color
Drag the selected color to the palette
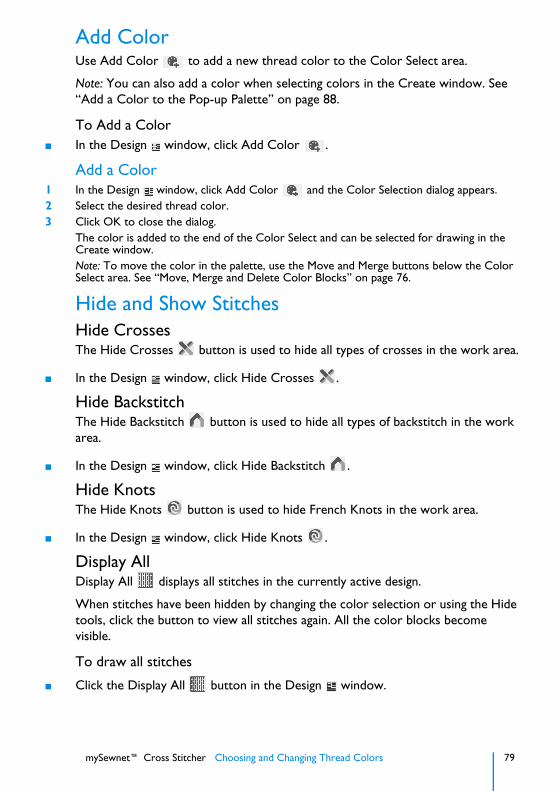
mySewnet™ Cross Stitcher Choosing and Changing Thread Colors 79
Add ColorUse Add Color to add a new thread color to the Color Select area.
Note: You can also add a color when selecting colors in the Create window. See “Add a Color to the Pop-up Palette” on page 88.
To Add a Color■ In the Design window, click Add Color .
Add a Color1 In the Design window, click Add Color and the Color Selection dialog appears.2 Select the desired thread color.3 Click OK to close the dialog.
The color is added to the end of the Color Select and can be selected for drawing in the Create window.Note: To move the color in the palette, use the Move and Merge buttons below the Color Select area. See “Move, Merge and Delete Color Blocks” on page 76.
Hide and Show StitchesHide CrossesThe Hide Crosses button is used to hide all types of crosses in the work area.
■ In the Design window, click Hide Crosses .
Hide BackstitchThe Hide Backstitch button is used to hide all types of backstitch in the work area.
■ In the Design window, click Hide Backstitch .
Hide KnotsThe Hide Knots button is used to hide French Knots in the work area.
■ In the Design window, click Hide Knots .
Display AllDisplay All displays all stitches in the currently active design.
When stitches have been hidden by changing the color selection or using the Hide tools, click the button to view all stitches again. All the color blocks become visible.
To draw all stitches
■ Click the Display All button in the Design window.

80 mySewnet™ Cross Stitcher Choosing and Changing Thread Colors
Design PropertiesUse the Design Properties dialog to set the cross size, the design size, the number of threads, and to set the direction of the top thread for crosses.
Cross SizeSet the Cross Size for the design from 1.0mm to 30.0mm in steps of 0.1mm.
Hand Cross Stitch SizesTo create cross stitch designs at the same sizes as real counted fabrics, set the Cross Size as shown:
Width and HeightSet the Width and Height in crosses (grid squares) for the design from 5 to 400.
When the Width and Height are is increased, grid squares are added to the edges of the design. When the Width and Height are reduced, grid squares are removed from the edges of the design.
Note: Stitches at the edges of a design may be lost when the design size is reduced. Any freehand backstitch that has an end point outside the new design size is removed.
Aida Count Cross Size
11 2.3mm (0.091")
14 1.8mm (0.071")
16 (also 32 on Linen) 1.6mm (0.063")
18 1.4mm (0.055")
22 1.2mm (0.047")
Set the size of the crosses in the designChoose a hoop as a guide to the design size
Set the width and height of the design
Set the number of threads usedfor crosses and backstitch
Set the direction for the cross top thread
Use these settings for all new designs
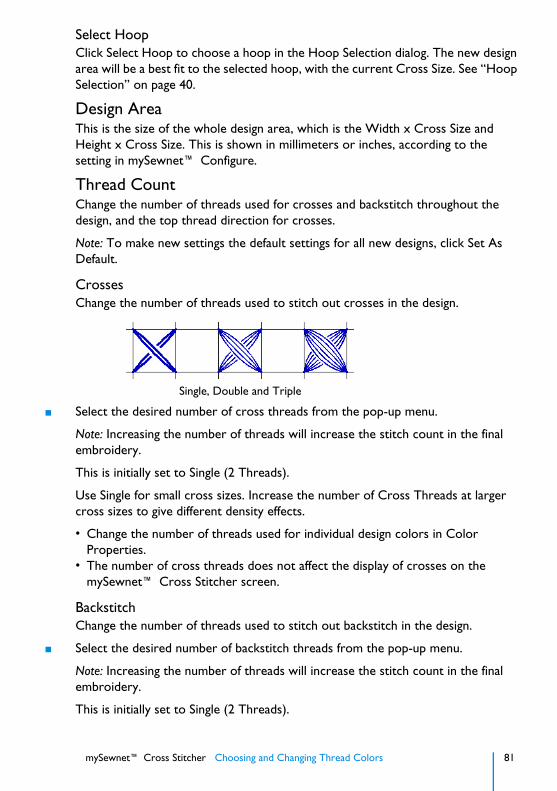
mySewnet™ Cross Stitcher Choosing and Changing Thread Colors 81
Select HoopClick Select Hoop to choose a hoop in the Hoop Selection dialog. The new design area will be a best fit to the selected hoop, with the current Cross Size. See “Hoop Selection” on page 40.
Design AreaThis is the size of the whole design area, which is the Width x Cross Size and Height x Cross Size. This is shown in millimeters or inches, according to the setting in mySewnet™ Configure.
Thread CountChange the number of threads used for crosses and backstitch throughout the design, and the top thread direction for crosses.
Note: To make new settings the default settings for all new designs, click Set As Default.
CrossesChange the number of threads used to stitch out crosses in the design.
■ Select the desired number of cross threads from the pop-up menu.
Note: Increasing the number of threads will increase the stitch count in the final embroidery.
This is initially set to Single (2 Threads).
Use Single for small cross sizes. Increase the number of Cross Threads at larger cross sizes to give different density effects.
• Change the number of threads used for individual design colors in Color Properties.
• The number of cross threads does not affect the display of crosses on the mySewnet™ Cross Stitcher screen.
BackstitchChange the number of threads used to stitch out backstitch in the design.
■ Select the desired number of backstitch threads from the pop-up menu.
Note: Increasing the number of threads will increase the stitch count in the final embroidery.
This is initially set to Single (2 Threads).
Single, Double and Triple
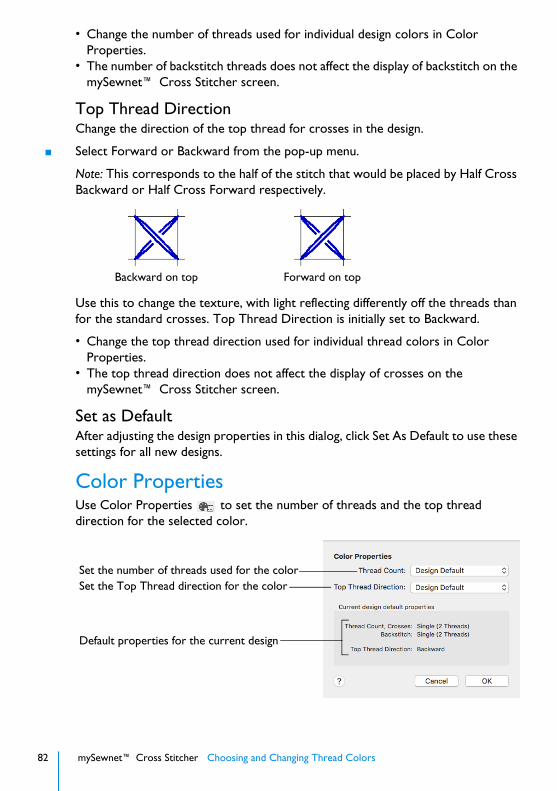
82 mySewnet™ Cross Stitcher Choosing and Changing Thread Colors
• Change the number of threads used for individual design colors in Color Properties.
• The number of backstitch threads does not affect the display of backstitch on the mySewnet™ Cross Stitcher screen.
Top Thread DirectionChange the direction of the top thread for crosses in the design.
■ Select Forward or Backward from the pop-up menu.
Note: This corresponds to the half of the stitch that would be placed by Half Cross Backward or Half Cross Forward respectively.
Use this to change the texture, with light reflecting differently off the threads than for the standard crosses. Top Thread Direction is initially set to Backward.
• Change the top thread direction used for individual thread colors in Color Properties.
• The top thread direction does not affect the display of crosses on the mySewnet™ Cross Stitcher screen.
Set as DefaultAfter adjusting the design properties in this dialog, click Set As Default to use these settings for all new designs.
Color PropertiesUse Color Properties to set the number of threads and the top thread direction for the selected color.
Backward on top Forward on top
Set the number of threads used for the colorSet the Top Thread direction for the color
Default properties for the current design

mySewnet™ Cross Stitcher Choosing and Changing Thread Colors 83
To set the properties for a color■ In the Design window, select the desired color in the Color Select area, then
click the Color Properties button.
Note: Changes in the Color Properties dialog are only applied to the design when you click OK. If you click Cancel, all the current changes are lost.
Thread CountThe Thread Count is the number of strands of thread used to stitch crosses and backstitch. This is normally Single (2 Threads).
All colors in a new design initially have their thread count set to the Design Default, as set in Design Properties. Use this setting to override the design default. When this is changed, it affects the thread count for both crosses and backstitch in the chosen design color.
• Single is normally used for a design Cross Size less than 2mm, with occasional use of Double for emphasis.
• Triple and greater thread counts should only be used when the Cross Size is large and the extra thread count is needed for coverage.
■ Click a color in the Color Select area, then in the Color Properties dialog click the pop-up list for Thread Count and select the desired option.
Note: Changes to thread count are not visible on the mySewnet™ Cross Stitcher screen. Increasing the number of threads increases the stitch count in the embroidery, which can be seen in the stitch count in the Design Information, and using the Design Player and Life View.
Top Thread DirectionThe Top Thread Direction affects which part of a cross is on top.
All colors in a new design initially have their top thread direction set to the Design Default, as set in Design Properties. Use this option to override the design default. When this is changed, it affects full, mini, half width and half height crosses in the chosen color.
Merge Identical ColorsUse Merge Identical Colors to merge the color blocks of threads with identical colors in the design. This is useful, for example, if the same color has been added twice using the color picker, or if the color was used to draw stitches and in a pattern used in a fill.
To Merge Identical Colors in a Design■ Choose Edit > Merge Identical Colors.

84 mySewnet™ Cross Stitcher Choosing and Changing Thread Colors
Remove Unused ColorsUse Remove Unused Colors to delete any thread colors that do not have stitches in the design. This is useful, for example, if you have a lot of similar shades in the palette and you wish to ensure you continue to use only those colors that have already been used.
Note: Unused colors are ignored by the print functions, Design Player and Life View. Therefore, it is not vital to remove unused colors before using these functions.
To Remove the Unused Colors in a Design■ Choose Edit > Remove Unused Colors.
Remove Unused Colors From the Happy House Cross Stitch1 In mySewnet™ Cross Stitcher, choose File > New and in the Design Options page of the
Cross Stitch Design Assistant select Load Existing Cross Stitch Design, then click Continue. In the Open Existing Design page, click Select File and load /mySewnet/Samples/Cross Stitch/Krz/Happy House Extra Colors.krz. Click Open, then click Done.Note: Alternatively, use the design you created in “Add Designs to the Happy House Sampler” on page 141.
2 Select the Design window of the Control Panel . There are 18 colors in the design.3 Choose Edit > Remove Unused Colors. The color list is reduced to the colors used in the
design. The other color was the initial thread color from when the design was created.4 Move the pointer over the colors in the Color Select area. Notice that there are some
Sulky Rayon 40 colors from the inserted Small House design that are similar to Robison-Anton Rayon 40 colors used in the rest of the design. To make the design stitch out more efficiently, some of the similar colors can be replaced.
5 In the color list, click Sulky Rayon 40 1005 Black (number 10 in the list), then click Change Color . The Color Selection dialog appears.
6 In the Thread Range pop-up menu, choose Robison-Anton Rayon 40. The color changes to Robison-Anton Rayon 40 2296 Black. Click OK.
7 Click Sulky Rayon 40 1066 Primrose (number 13 in the list), then click Change Color . In the Color Selection dialog select Robison-Anton Rayon 40 in the Thread Range pop-up menu. Thread 2461 Wheat is selected. Click OK.
8 Click Sulky Rayon 40 1187 Mimosa Yellow (number 16 in the list), then click Change Color . In the Color Selection dialog select Robison-Anton Rayon 40 2326 Daffodil and click OK.
9 Click Sulky Rayon 40 1246 Orange Flame (number 11 in the list), then click Change Color . In the Color Selection dialog select Robison-Anton Rayon 40 2378 Red and click OK.
10 Choose Edit > Merge Identical Colors. The duplicate colors in the list are merged. 11 Click Robison-Anton Rayon 40 2326 Daffodil (now number 9) in the list, then click Move
Color Down until it is below Sulky Rayon 40 569 Garden Green.Note: This is to ensure that the French knots that make the yellow flower heads in the house garden are stitched after the green backstitch stalks.

mySewnet™ Cross Stitcher Choosing and Changing Thread Colors 85
12 Click Notes and in the Notes dialog type 'Happy House Sampler'. Click OK.13 Choose File > Save and the Save As dialog appears.14 If needed, change the folder to /mySewnet/My Designs. Enter the file name 'Happy House'
and click Save.15 Choose File > Print. Click Print to print a worksheet for the embroidery.16 Chose File > Export and the Export dialog appears.17 Ensure that .vp4 is selected, and click Continue.18 In the Save As dialog, ensure that the folder /mySewnet/My Designs is selected. In the File
Name box, leave the name as 'Happy House Exported', then click Save.

86 mySewnet™ Cross Stitcher Creating Stitches and Shapes
8Creating Stitches and Shapes
Learn how to choose a color and draw a design with crosses and backstitch. Flood Fill an area with crosses or a pattern, and create filled and outline shapes.
Create Stitches and Shapes Window
To learn how to Go to
Select a thread color for drawing stitches
See “Select a Color in the Pop-up Palette” on page 87.
Choose a drawing color from the picture or design
See “Pick a Color from the Picture or Design” on page 87.
Add a thread color to the pop-up palette
See “Add a Color to the Pop-up Palette” on page 88.
Draw crosses on the design area See “Draw a line of crosses” on page 88.
Draw backstitch on the design area See “Draw a line of backstitch” on page 92.
Draw French Knots See “French Knot” on page 93.
Draw a cross or pattern Flood Fill area
See “Flood Fill an Area with Crosses” on page 94 and “Flood Fill an Area with a Pattern” on page 95.
Erase an area of stitches See “Erase” on page 95.
Choose a thread color for drawing
Erase stitches of the selected type
Draw a Full, Half or Quarter Cross stitch
Draw Backstitch or French Knots
Draw a Cross or Pattern Flood Fill area
Select No Fill, Cross Fill or Pattern Fill
Select No Outline, Backstitch Outline or Cross Outline
Select the colors for the fill and outline
Smooth the outline of the shapeDraw a Freehand or Point shapeChoose a Shape and place it in the work area

mySewnet™ Cross Stitcher Creating Stitches and Shapes 87
Drawing StitchesDraw stitches of the chosen type and color in the design area. The pointer shows which stitch type is selected, and the Thread Color shows the drawing color.
•
Pop-up Palette
Select a Color in the Pop-up Palette1 Select the Create window of the Control Panel .2 Click to select a stitch type.3 Click Thread Color to open the pop-up color palette.4 Click a color to select it for drawing.5 Draw stitches on the design area. The palette closes.6 Click Thread Color again to select a different color.
Pick ColorUse Pick Color in the pop-up palette to pick a color from the background picture, or the design.
Pick a Color from the Picture or Design1 In the pop-up palette, click the Pick Color button and the pointer changes to an
eyedropper .
Draw a shape with an outline and fill See “Create a Shape” on page 96.
Draw a Freehand or Point Shape See “Draw a Freehand Shape” on page 96 and “Create a Point Shape” on page 97.
Use Multiply to create symmetrical designs quickly and easily
See “Create a Decoration for a Sampler Title with Multiply” on page 102.
To learn how to Go to
Click to open the pop-up palette
Select a stitch type
Add a color to the pop-up palette from the Color Selection dialogPick a color from the background picture or design
Click a color to select it for drawing

88 mySewnet™ Cross Stitcher Creating Stitches and Shapes
2 Move the eyedropper pointer over the design or picture.3 Click on the desired color.
If you clicked on an area in the picture, the Color Selection dialog opens. Select or change the color to add it to the palette.If you clicked on a stitch, the thread color is selected in the pop-up palette.Note: Pick Color is automatically deactivated after a color has been chosen.
Add ColorUse Add Color in the pop-up palette to add a new thread color to the palette and set it as the draw color.
Note: You can also add a color when selecting colors in the Design window. See “Add Color” on page 79.
To Add a Color■ In the Design window, click Add Color .
Add a Color to the Pop-up Palette1 In the pop-up palette, click Add Color and the Color Selection dialog appears.2 Select the desired thread color.3 Click OK to close the dialog.
The color is added to the end of the palette and is selected for drawing.
CrossesThere are four types of crosses:
• A Full Cross fills a whole grid square. Parts of a full cross (Quarter Cross , Half Cross Forward and Half Cross Backward ) can be placed or removed for quarter, half and three-quarter crosses.
• A Half Height Cross is a cross in the top or bottom half of a grid square.• A Half Width Cross is a cross in the left or right half of a grid square.• A Mini Cross is a small cross in any corner of a grid square.
When drawing crosses, any type of cross can replace all or part of any other type of cross. The size of the currently selected cross type determines how much of a grid square is replaced or erased.
Note: Backstitch and French knots are not affected by drawing and erasing crosses.
Draw a line of crosses1 Select the Create window of the Control Panel .2 Use Thread Color in the Create area to select a thread color for drawing.3 In Crosses, click one of the cross buttons to select a cross type.
The pointer shows which cross type you selected.4 Draw a line of crosses.5 Click a different cross button to change the cross type.
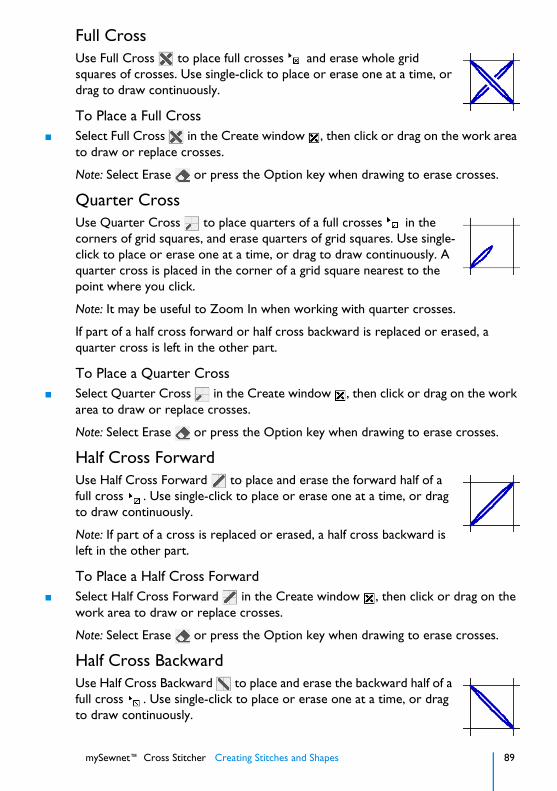
mySewnet™ Cross Stitcher Creating Stitches and Shapes 89
Full CrossUse Full Cross to place full crosses and erase whole grid squares of crosses. Use single-click to place or erase one at a time, or drag to draw continuously.
To Place a Full Cross■ Select Full Cross in the Create window , then click or drag on the work area
to draw or replace crosses.
Note: Select Erase or press the Option key when drawing to erase crosses.
Quarter CrossUse Quarter Cross to place quarters of a full crosses in the corners of grid squares, and erase quarters of grid squares. Use single-click to place or erase one at a time, or drag to draw continuously. A quarter cross is placed in the corner of a grid square nearest to the point where you click.
Note: It may be useful to Zoom In when working with quarter crosses.
If part of a half cross forward or half cross backward is replaced or erased, a quarter cross is left in the other part.
To Place a Quarter Cross■ Select Quarter Cross in the Create window , then click or drag on the work
area to draw or replace crosses.
Note: Select Erase or press the Option key when drawing to erase crosses.
Half Cross ForwardUse Half Cross Forward to place and erase the forward half of a full cross . Use single-click to place or erase one at a time, or drag to draw continuously.
Note: If part of a cross is replaced or erased, a half cross backward is left in the other part.
To Place a Half Cross Forward■ Select Half Cross Forward in the Create window , then click or drag on the
work area to draw or replace crosses.
Note: Select Erase or press the Option key when drawing to erase crosses.
Half Cross BackwardUse Half Cross Backward to place and erase the backward half of a full cross . Use single-click to place or erase one at a time, or drag to draw continuously.

90 mySewnet™ Cross Stitcher Creating Stitches and Shapes
Note: If part of a cross is replaced or erased, a half cross forward is left in the other part.
To Place a Half Cross Backward■ Select Half Cross Backward in the Create window , then click or drag on the
work area to draw or replace crosses.
Note: Select Erase or press the Option key when drawing to erase crosses.
Mini CrossUse Mini Cross to place small crosses that occupy one quarter of a grid square, and erase quarters of grid squares. Mini crosses are sometimes called 'petit point'. Use single-click to place or erase one at a time, or drag draw continuously. A mini cross is placed in the corner of a grid square nearest to the point where you click.
Note: It may be useful to Zoom In when working with mini crosses.
Up to four mini crosses can be placed in each grid square. It is not possible to place or erase part of a mini cross.
If part of a half height or half width cross is replaced or erased, a mini cross is left in the other part.
It is recommended to use a minimum Cross Size of 1.8mm for the design when using Mini Crosses. Use Design Properties to set the Cross Size used by the design.
To Place a Mini Cross■ Select Mini Cross in the Create window , then click or drag on the work area
to draw or replace crosses.
Note: Select Erase or press the Option key when drawing to erase crosses.
Half Width CrossUse Half Width Cross to place small crosses that occupy the left or right half of a grid square , and erase the left or right half of grid squares. Use single-click to place or erase one at a time, or drag draw continuously. A half width cross is placed in the side of a grid square nearest to the point where you click.
Two half width crosses can be placed in each grid square. It is not possible to place or erase part of a half width cross. If part of a half width cross is replaced or erased, the other half becomes a mini cross.
It is recommended to use a minimum Cross Size of 1.6mm for the design when using Half Width Crosses. Use Design Properties to set the Cross Size used by the design.
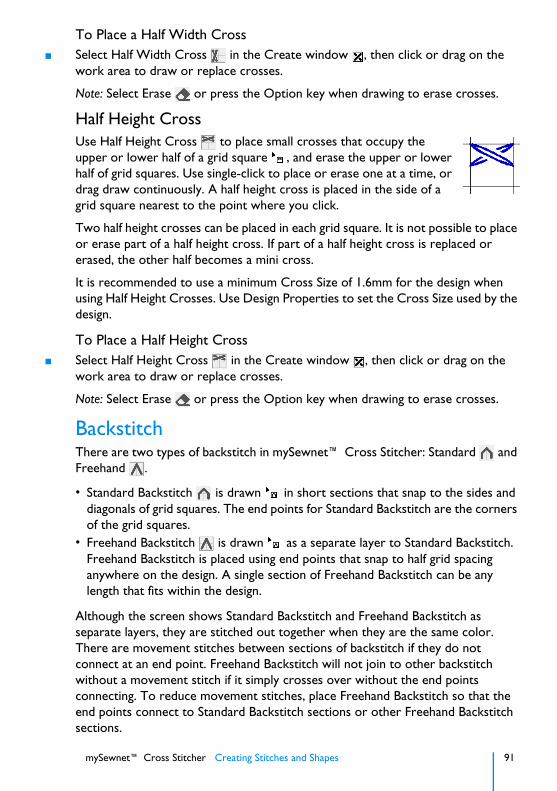
mySewnet™ Cross Stitcher Creating Stitches and Shapes 91
To Place a Half Width Cross■ Select Half Width Cross in the Create window , then click or drag on the
work area to draw or replace crosses.
Note: Select Erase or press the Option key when drawing to erase crosses.
Half Height CrossUse Half Height Cross to place small crosses that occupy the upper or lower half of a grid square , and erase the upper or lower half of grid squares. Use single-click to place or erase one at a time, or drag draw continuously. A half height cross is placed in the side of a grid square nearest to the point where you click.
Two half height crosses can be placed in each grid square. It is not possible to place or erase part of a half height cross. If part of a half height cross is replaced or erased, the other half becomes a mini cross.
It is recommended to use a minimum Cross Size of 1.6mm for the design when using Half Height Crosses. Use Design Properties to set the Cross Size used by the design.
To Place a Half Height Cross■ Select Half Height Cross in the Create window , then click or drag on the
work area to draw or replace crosses.
Note: Select Erase or press the Option key when drawing to erase crosses.
BackstitchThere are two types of backstitch in mySewnet™ Cross Stitcher: Standard and Freehand .
• Standard Backstitch is drawn in short sections that snap to the sides and diagonals of grid squares. The end points for Standard Backstitch are the corners of the grid squares.
• Freehand Backstitch is drawn as a separate layer to Standard Backstitch. Freehand Backstitch is placed using end points that snap to half grid spacing anywhere on the design. A single section of Freehand Backstitch can be any length that fits within the design.
Although the screen shows Standard Backstitch and Freehand Backstitch as separate layers, they are stitched out together when they are the same color. There are movement stitches between sections of backstitch if they do not connect at an end point. Freehand Backstitch will not join to other backstitch without a movement stitch if it simply crosses over without the end points connecting. To reduce movement stitches, place Freehand Backstitch so that the end points connect to Standard Backstitch sections or other Freehand Backstitch sections.

92 mySewnet™ Cross Stitcher Creating Stitches and Shapes
Note: It is possible to place Freehand Backstitch directly on top of Standard Backstitch and both sections are stitched. This can be used for special effects, such as thickening a line without having to change the number of threads in Color Properties.
Draw a line of backstitch1 Select the Create window of the Control Panel .2 Use Thread Color in the Create area to select a thread color for drawing.3 In Backstitch, click Standard or Freehand Backstitch.
The pointer shows which backstitch type you selected.4 Click or drag to draw a line of backstitch.
Standard BackstitchUse Standard Backstitch to outline traditional cross stitch designs or to create blackwork. Standard Backstitch places lines along the sides of grid squares or diagonally across grid squares. Standard Backstitch is stitched out after the crosses.
Use single-click to place or erase individual lines of Standard Backstitch, or drag to draw connected Standard Backstitch lines.
Only standard backstitch can be placed or erased when Standard Backstitch is selected. Crosses, freehand backstitch and French knots are unaffected.
Note: Two diagonal Standard Backstitch lines can produce an effect similar to a Full Cross. It is recommended to avoid placing this in the same square as a Full Cross, because the backstitch will stitch on top of the cross and hide it.
To Draw a Standard Backstitch Line■ Select Standard Backstitch in the Create window , then click or drag on the
work area to draw or replace backstitch lines.
Note: Select Erase or press the Option key when drawing to erase backstitch.
Freehand BackstitchUse Freehand Backstitch to place lines of stitches that can be of any length, with each end snapping to half grid spacing. Each line of freehand backstitch is placed individually by dragging.
Note: When stitches are created, stitch points are placed along the freehand lines where they cross the grid. The end points of the complete line control whether or not a particular line of freehand backstitch is connected to any other lines of backstitch.

mySewnet™ Cross Stitcher Creating Stitches and Shapes 93
Only one line of freehand backstitch can go between any given pair of points on the grid. However, multiple layers of freehand backstitch may be placed on top of each other, as long as they each have at least one different end point. This can be used for different effects, such as making the edge of lacework secure.
To Draw a Freehand Backstitch Line■ Select Freehand Backstitch in the Create window , then click or drag on the
work area to draw or replace backstitch lines.
Note: Select Erase or press the Option key when drawing to erase backstitch.
French KnotUse French Knot to place French knots that snap to half grid spacing. Each French knot is placed or erased with a single click.
Note: French knots are only scaled in comparison to the full cross size when the Cross Size in Design Properties is set between 2mm and 4mm. The French knots will not be any smaller or larger than they are at these limits.
In the created embroidery, French knots are stitched at the end of the same color block as backstitch of the same color.
Note: For designs with a cross size smaller than 4mm, it is recommended to only have one French knot per grid square, or an equivalent spacing. If the French knots are closer than this then they may overlap and produce excessively dense stitches.
Note: When French knots are placed on the corners or edges of the design, the created embroidery may be larger than the design area. If the design is an exact hoop size, this means the embroidery may be too large for the hoop. Check the embroidery Width and Height in the Information section of the Design window.
To Place French Knots■ Select French Knot in the Create window , then click on the work area to
draw or replace knots.
Note: Select Erase or press the Option key when drawing to erase knots.

94 mySewnet™ Cross Stitcher Creating Stitches and Shapes
Flood FillUse Cross Flood Fill or Pattern Flood Fill to fill an area with crosses or a fill pattern. An empty area can be flood filled until it meets existing crosses and/or backstitch. A connected area of the same colored crosses can be flood filled until it meets an empty area, backstitch or crosses in a different color. Crosses are not considered to be connected for flood fill if they only meet at a corner.
When an area is flood filled, the fill does not relate to the background picture. Sometimes it may help to hide the background picture so that you can clearly see the area you wish to flood fill; for example, if there are lines in the background picture that are similar to backstitch.
Note: In some cases, the fill will not go through narrow areas. If the fill could not continuously connect a fill of full crosses through a narrow gap, the gap will act as a barrier to flood fill.
Cross Flood FillUse Cross Flood Fill to fill an area with full crosses. An empty area can be flood filled until it meets existing crosses and/or backstitch.
Flood Fill an Area with Crosses1 Open the Create window in the Control Panel .2 Select the desired thread color for the crosses from the pop-up palette in the Create
section.3 Click the Cross Flood Fill button . The pointer changes to a paint can when it is over
the work area.4 Click an area of the design to fill it with crosses.
Note: Erase can be used with Cross Flood Fill to erase areas of crosses.
Pattern Flood FillUse Pattern Flood Fill to fill an area with a fill pattern. An empty area can be flood filled until it meets existing crosses and/or backstitch.
Flood Fill with Other Cross and Stitch TypesSeveral fill patterns are available to allow areas to be filled with cross types other than full crosses. These can be found in the Cross Basic Category. The cross types are:
• Half Cross Forward• Half Cross Backward• Mini Cross• Half Width Cross• Half Height Cross
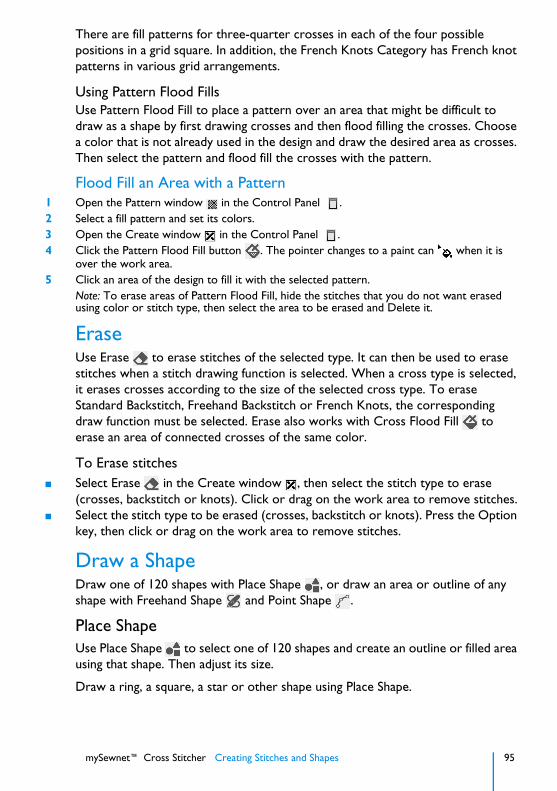
mySewnet™ Cross Stitcher Creating Stitches and Shapes 95
There are fill patterns for three-quarter crosses in each of the four possible positions in a grid square. In addition, the French Knots Category has French knot patterns in various grid arrangements.
Using Pattern Flood FillsUse Pattern Flood Fill to place a pattern over an area that might be difficult to draw as a shape by first drawing crosses and then flood filling the crosses. Choose a color that is not already used in the design and draw the desired area as crosses. Then select the pattern and flood fill the crosses with the pattern.
Flood Fill an Area with a Pattern1 Open the Pattern window in the Control Panel .2 Select a fill pattern and set its colors.3 Open the Create window in the Control Panel .4 Click the Pattern Flood Fill button . The pointer changes to a paint can when it is
over the work area.5 Click an area of the design to fill it with the selected pattern.
Note: To erase areas of Pattern Flood Fill, hide the stitches that you do not want erased using color or stitch type, then select the area to be erased and Delete it.
EraseUse Erase to erase stitches of the selected type. It can then be used to erase stitches when a stitch drawing function is selected. When a cross type is selected, it erases crosses according to the size of the selected cross type. To erase Standard Backstitch, Freehand Backstitch or French Knots, the corresponding draw function must be selected. Erase also works with Cross Flood Fill to erase an area of connected crosses of the same color.
To Erase stitches■ Select Erase in the Create window , then select the stitch type to erase
(crosses, backstitch or knots). Click or drag on the work area to remove stitches.■ Select the stitch type to be erased (crosses, backstitch or knots). Press the Option
key, then click or drag on the work area to remove stitches.
Draw a ShapeDraw one of 120 shapes with Place Shape , or draw an area or outline of any shape with Freehand Shape and Point Shape .
Place ShapeUse Place Shape to select one of 120 shapes and create an outline or filled area using that shape. Then adjust its size.
Draw a ring, a square, a star or other shape using Place Shape.

96 mySewnet™ Cross Stitcher Creating Stitches and Shapes
Select Place Shape■ In the Create window of the Control Panel , choose a Shape from the pop-up
menu, then click Place Shape .
Create a Shape1 In the Shape section of the Create window
select a fill and outline type. See “Shape Options” on page 97.
2 If drawing a shape with a Backstitch Outline , you may select Smooth to smooth the outline of the shape by using three-quarter crosses rather than full crosses.Note: Cross Outline is not affected by Smooth.
3 Click the thread color next to your Fill and Outline choices and select a color for Cross Fill and your outline.
4 Change the colors for a Pattern Fill in the Pattern window. When a fill pattern is selected, its colors may also be changed. See “Select a Pattern” on page 104.Note: If a color is chosen that does not exist in the palette, it is automatically added to the palette when a shape is drawn in that color.
5 Choose a shape from the Shape pop-up menu.6 Click the Shape button to place the shape in the design area.
Note: The outline and fill will use the chosen colors and stitch type.7 Drag the shape to the preferred position, and resize it as desired
using the square corner handles.Note: Hold down Shift as you drag to resize proportionally. Hold down the Option key to resize from the center.
8 Control–click the shape and select Finish Insert Shape Tool to place the shape in the design area
9 If desired, draw another shape or use Undo and draw the shape again.
Freehand ShapeUse Freehand Shape to draw a line to create shape.
Draw a line, and the line is closed automatically to form a shape. Adjust the shape by moving the nodes.
Draw a Freehand Shape1 Select the Create window of the Control Panel .2 In the Shape area select a Fill type and an Outline type.3 Click Freehand Shape . The pointer changes to the Freehand pointer .4 Draw a line on the work area, then release the mouse button. The line is drawn as a closed
line (a loop) with nodes.Note: If the desired line is not achieved when created initially, either redo the line or select and move the nodes as desired.
5 Move the pointer over one of the nodes on the line. The pointer changes to the Move Node pointer . Adjust the node as desired.

mySewnet™ Cross Stitcher Creating Stitches and Shapes 97
Use Shift–click to change a round node to a square node, to make the line straight.6 When your line is as desired, Control–click and choose Finish Freehand Shape to place the
shape.
Point ShapeUse Point Shape to create a shape by placing points to create an irregular outline of curved and straight lines around the desired area.
Create a Point Shape1 Select the Create window of the Control Panel .2 In the Shape area select a Fill type and an Outline type.3 Click Point Shape . The pointer changes to the Point pointer .4 Click to place a series of points for the shape.
As you click the third point on the line, the line becomes closed (it becomes a loop). As you place more points the line adjusts itself. The line may ’swing’ while you place points. Just carry on, you can adjust it afterwards.
5 Use Shift–click to place square nodes for straight lines.6 Move the pointer over one of the nodes on the line. The pointer changes to the Move Node
pointer . Adjust the node as desired.Note: When the Move Node pointer is active you can adjust existing nodes. If you click while the Point pointer is active, another point is added to the line.
7 When your line is as desired, Control–click and choose Finish Point Shape to place the shape.
Shape OptionsFillUse a Cross Fill to draw an area filled with crosses, or a Pattern Fill to draw an area filled with a selected pattern. Use No Fill to create an outline only.
Cross FillUse Cross Fill to draw an area filled with crosses.
Note: To use a cross type other than Full Cross inside the shape, select the desired cross type from the Cross Basic Category of Fill Patterns.
To Draw a Cross Fill Shape■ Select Cross Fill in the Create window , then use Place Shape , Freehand
Shape or Point Shape to draw a cross fill shape.
Pattern FillUse Pattern Fill to draw an area filled with the selected Pattern Fill.
Note: Select a pattern for the Pattern Fill in the Pattern window of the Control Panel . See “Select a Pattern” on page 104.
98 mySewnet™ Cross Stitcher Creating Stitches and Shapes
To Draw a Pattern Fill Shape■ Select Pattern Fill in the Create window , then use Place Shape , Freehand
Shape or Point Shape to draw a pattern fill shape.
No FillUse No Fill to create an outline without a fill.
Note: If both No Outline and No Fill are selected, the Shape options are dimmed.
To Draw an Outline with no Fill■ In the Create window , select one of the Outline options, then select No Fill .
Use Place Shape , Freehand Shape or Point Shape to draw an outline with no fill.
Fill ColorUse this color for the fill in shapes using Cross Fill .
Note: Select the colors for a Pattern Fill in the Pattern window of the Control Panel . See “Select a Pattern” on page 104.
To Select a Fill Color
■ Click the Fill color thread sample and choose a color from the pop-up palette. Use Add Color to select a color in the Color Selection dialog, or Pick Color to select a color from the background picture.
OutlineUse Backstitch Outline to draw shapes as a standard backstitch outline, or Cross Outline to draw shapes as an outline of crosses. Use No Outline to create a fill area with no outline.
Backstitch OutlineUse Backstitch Outline to draw shapes as standard backstitch outlines. The shape is added to the design as a series of standard backstitch lines that are connected at the corners of the shape. The backstitch is drawn in the currently selected Outline color.
To Draw a Backstitch Outline Shape■ Select Backstitch Outline in the Create window , then use Place Shape ,
Freehand Shape or Point Shape to draw a backstitch shape.
Cross OutlineUse Cross Outline to draw shapes as an outline of crosses, one cross wide. The crosses are drawn in the currently selected Outline color.
mySewnet™ Cross Stitcher Creating Stitches and Shapes 99
To Draw a Cross Outline Shape■ Select Cross Outline in the Create window , then use Place Shape ,
Freehand Shape or Point Shape to draw a cross outline shape.
No OutlineUse No Outline to create a fill area with no outline.
Note: If both No Outline and No Fill are selected, the Shape options are dimmed.
To Draw a Fill area without an Outline■ In the Create window , select one of the Fill options, then select No Outline .
Use Place Shape , Freehand Shape or Point Shape to draw a filled shape with no outline.
Outline ColorUse this color for the backstitch and cross outlines around shapes when drawing Backstitch Outline or Cross Outline shapes.
To Select an Outline Color■ Click the Outline color thread sample and choose a color from the pop-up palette.
Use Add Color to select a color in the Color Selection dialog, or Pick Color to select a color from the background picture.
SmoothUse Smooth to smooth the outline around shapes by using three-quarter crosses rather than full crosses for the fill.
Note: Smooth is not initially selected when mySewnet™ Cross Stitcher is opened. It must be selected if you wish to draw smoothed shapes.

100 mySewnet™ Cross Stitcher Creating Stitches and Shapes
MultiplyUse Multiply to create symmetrical designs easily. All changes in the design are reflected across, down or rotated.
Use Multiply to create symmetrical designs quickly and easily. All changes in the design, such as adding and removing stitches, pasting selections and inserting designs, are multiplied.
Note: You cannot use the selection tools to make new selections when Multiply is active. However, you can use them before activating Multiply to select and copy a selection, which can then be pasted and multiplied.
To use Multiply■ Select the Multiply window in the Control Panel , then click Use Multiply
and select one of the Multiply options. Draw or insert the stitches to be reflected.
Enable the Multiply function
Reflect across or down
Multiply your changes 4 times
Multiply your changes 8 times
Click to set a new axis of rotation or reflection
Reset the axis of rotation/reflection in the center of the design area

mySewnet™ Cross Stitcher Creating Stitches and Shapes 101
Choose one of the reflection or rotation options to repeat actions. The blue Multiply reflection lines on the design area show how your actions will be repeated.
Create an Embroidery Pattern with Multiply1 Select the Multiply window in the Control Panel , then click Use Multiply . The blue
reflection line(s) appear in the design area.2 Select one of the Multiply methods to choose the number of reflections and rotations.3 If desired, click Place Center to reposition the central point of the blue Multiply lines.4 Click Reset Center to set the reflection lines to the center of the design area.5 Draw or insert the stitches to be multiplied.6 Click Use Multiply again to remove the reflection lines and return to standard design
creation.
Use Reflect Across to reflect horizontally. Use Reflect Down to reflect vertically.
Use Reflect Across and Down to create four copies around the Multiply center point.
Use Rotate 4-way to create four rotated copies around the Multiply center point.
Use Reflect 8-way to create eight copies. Additional blue lines show the eight segments.
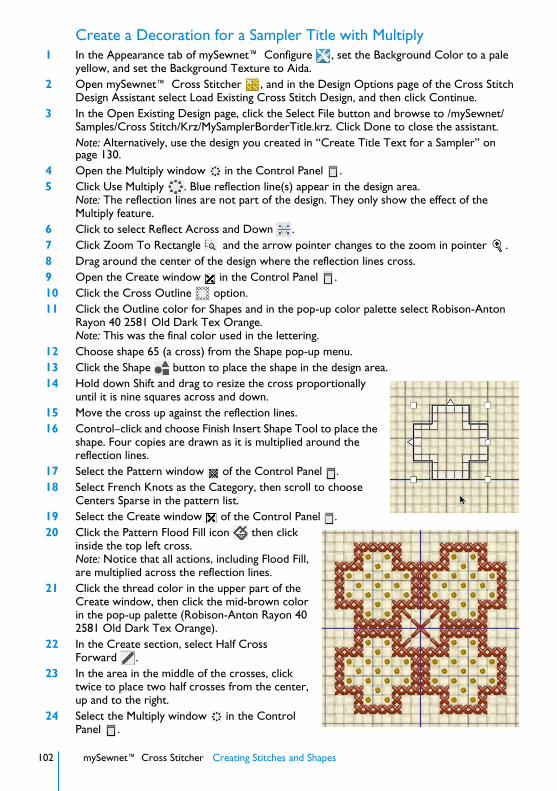
102 mySewnet™ Cross Stitcher Creating Stitches and Shapes
Create a Decoration for a Sampler Title with Multiply1 In the Appearance tab of mySewnet™ Configure , set the Background Color to a pale
yellow, and set the Background Texture to Aida.2 Open mySewnet™ Cross Stitcher , and in the Design Options page of the Cross Stitch
Design Assistant select Load Existing Cross Stitch Design, and then click Continue.3 In the Open Existing Design page, click the Select File button and browse to /mySewnet/
Samples/Cross Stitch/Krz/MySamplerBorderTitle.krz. Click Done to close the assistant.Note: Alternatively, use the design you created in “Create Title Text for a Sampler” on page 130.
4 Open the Multiply window in the Control Panel .5 Click Use Multiply . Blue reflection line(s) appear in the design area.
Note: The reflection lines are not part of the design. They only show the effect of the Multiply feature.
6 Click to select Reflect Across and Down .7 Click Zoom To Rectangle and the arrow pointer changes to the zoom in pointer .8 Drag around the center of the design where the reflection lines cross.9 Open the Create window in the Control Panel .10 Click the Cross Outline option.11 Click the Outline color for Shapes and in the pop-up color palette select Robison-Anton
Rayon 40 2581 Old Dark Tex Orange.Note: This was the final color used in the lettering.
12 Choose shape 65 (a cross) from the Shape pop-up menu.13 Click the Shape button to place the shape in the design area.14 Hold down Shift and drag to resize the cross proportionally
until it is nine squares across and down. 15 Move the cross up against the reflection lines.16 Control–click and choose Finish Insert Shape Tool to place the
shape. Four copies are drawn as it is multiplied around the reflection lines.
17 Select the Pattern window of the Control Panel .18 Select French Knots as the Category, then scroll to choose
Centers Sparse in the pattern list.19 Select the Create window of the Control Panel .20 Click the Pattern Flood Fill icon then click
inside the top left cross.Note: Notice that all actions, including Flood Fill, are multiplied across the reflection lines.
21 Click the thread color in the upper part of the Create window, then click the mid-brown color in the pop-up palette (Robison-Anton Rayon 40 2581 Old Dark Tex Orange).
22 In the Create section, select Half Cross Forward .
23 In the area in the middle of the crosses, click twice to place two half crosses from the center, up and to the right.
24 Select the Multiply window in the Control Panel .
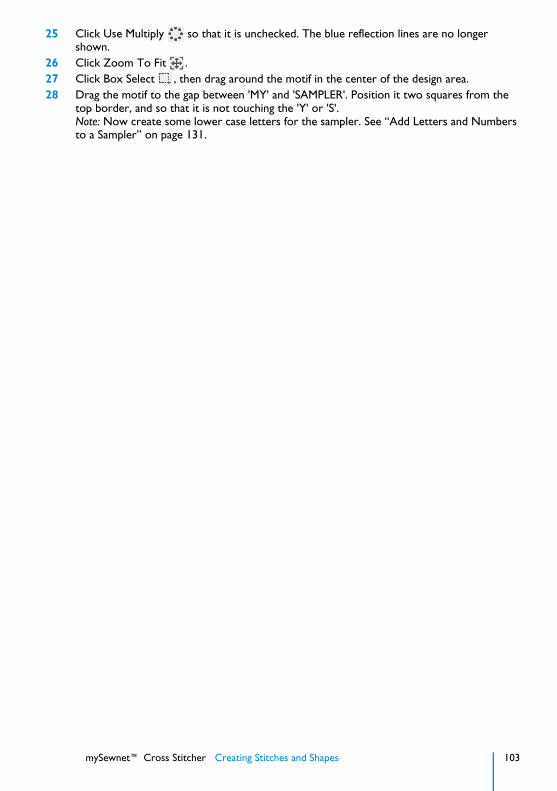
mySewnet™ Cross Stitcher Creating Stitches and Shapes 103
25 Click Use Multiply so that it is unchecked. The blue reflection lines are no longer shown.
26 Click Zoom To Fit .27 Click Box Select , then drag around the motif in the center of the design area.28 Drag the motif to the gap between 'MY' and 'SAMPLER'. Position it two squares from the
top border, and so that it is not touching the 'Y' or 'S'.Note: Now create some lower case letters for the sampler. See “Add Letters and Numbers to a Sampler” on page 131.

104 mySewnet™ Cross Stitcher Using and Designing Patterns
9Using and Designing Patterns
Use the Pattern window to select fill patterns for shapes and font characters, and to create your own fill patterns.
Select a PatternUse the Pattern window to select patterns, the colors for patterns, and to create new patterns. When selected, a pattern can be used for Pattern Flood Fill and in place of crosses inside shapes and TrueType® text.
To learn how to Go to
Select a pattern for a fill See “Select a Fill Pattern” on page 105.
Create a new fill pattern See “Design New Patterns” on page 105.
Choose a Pattern Category
Click a sample to select a Pattern
Preview the pattern
Create a new pattern
Change the thread colors for the pattern
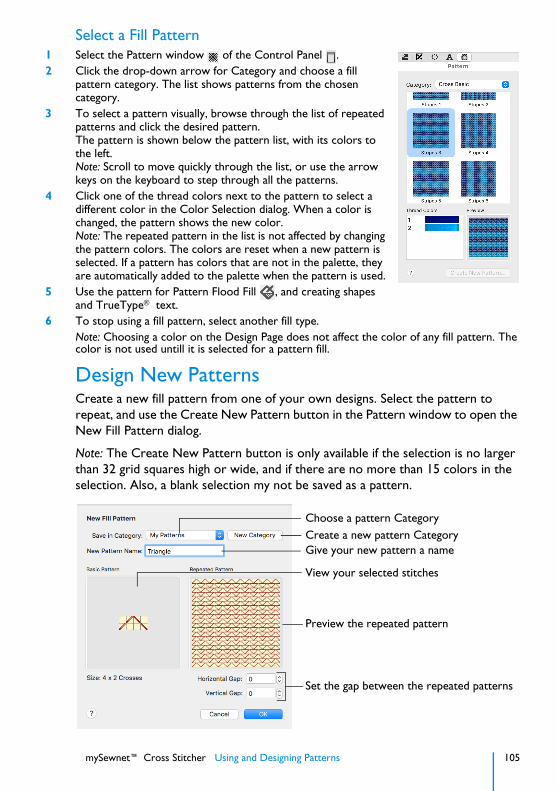
mySewnet™ Cross Stitcher Using and Designing Patterns 105
Select a Fill Pattern1 Select the Pattern window of the Control Panel .2 Click the drop-down arrow for Category and choose a fill
pattern category. The list shows patterns from the chosen category.
3 To select a pattern visually, browse through the list of repeated patterns and click the desired pattern.The pattern is shown below the pattern list, with its colors to the left.Note: Scroll to move quickly through the list, or use the arrow keys on the keyboard to step through all the patterns.
4 Click one of the thread colors next to the pattern to select a different color in the Color Selection dialog. When a color is changed, the pattern shows the new color.Note: The repeated pattern in the list is not affected by changing the pattern colors. The colors are reset when a new pattern is selected. If a pattern has colors that are not in the palette, they are automatically added to the palette when the pattern is used.
5 Use the pattern for Pattern Flood Fill , and creating shapes and TrueType® text.
6 To stop using a fill pattern, select another fill type.Note: Choosing a color on the Design Page does not affect the color of any fill pattern. The color is not used untill it is selected for a pattern fill.
Design New PatternsCreate a new fill pattern from one of your own designs. Select the pattern to repeat, and use the Create New Pattern button in the Pattern window to open the New Fill Pattern dialog.
Note: The Create New Pattern button is only available if the selection is no larger than 32 grid squares high or wide, and if there are no more than 15 colors in the selection. Also, a blank selection my not be saved as a pattern.
Create a new pattern CategoryChoose a pattern Category
Give your new pattern a name
View your selected stitches
Preview the repeated pattern
Set the gap between the repeated patterns

106 mySewnet™ Cross Stitcher Using and Designing Patterns
The Basic Pattern shows the area you selected in the design. The Repeated Pattern shows how the pattern will be repeated when it is used to fill an area. View the Repeated Pattern area to ensure the pattern will give the desired result.
To open the New Fill Pattern dialog■ Select the design to use as a pattern, and in the Pattern window click Create New
Pattern. Adjust and name the design as desired.
Create a New Fill Pattern1 Draw a sample of the pattern you would like to create. 2 Select the sample with Box Select, Freehand Select or Point Select.3 Click Create New Pattern in the Pattern window of the control panel. The New Fill Pattern
dialog appears.4 Click the pop-up menu for Save in Category and choose the desired Category.
Note: My Patterns is the recommended Category and is always selected when the dialog appears. New Categories can be added as needed.
5 Click in the New Pattern Name box and enter a name for the pattern.6 If desired, adjust the Horizontal Gap and Vertical Gap. The Repeated Pattern shows the
effect of adjusting these settings. Note: The maximum Gap size is 32, but the minimum Gap is negative. The Gap can be decreased until each repeat of the pattern overlaps all but one grid square of the previous repeat.
7 Click OK and the fill pattern is saved in the chosen Category. It is automatically selected as the current fill pattern on the Pattern tab.
Stitch Types in Fill PatternsA pattern may contain any stitch type.
Try to ensure that individual crosses are not alone in a pattern, and that there are no short, disconnected sections of backstitch. This reduces the need for movement stitches when the pattern is stitched out.
Freehand BackstitchWhen using freehand backstitch in a pattern, try to use short sections. When a pattern is used to fill an area, freehand backstitch is only placed if both end points lie within the fill area. Both ends of long sections of freehand backstitch are less likely be within the fill area, and may not give the desired result.
Colors in Fill PatternsColors are stored in fill patterns with the current number of threads and top stitch direction, as set in the design or on the individual palette color in the Color Select area. The system fill patterns were designed with Single threads and the top thread as Backward, as these are the most common settings for mySewnet™ Cross Stitcher designs.

mySewnet™ Cross Stitcher Using and Designing Patterns 107
Pattern NamesUse only letters, numbers, spaces and underline characters. The name is used for a file with .cpk extension. This ensures that the file name does not have any invalid characters in it.
Create a New CategoryYou may create a new pattern Category when you are saving a new fill pattern. The new Category is automatically selected for saving the new fill pattern.
Note: Use only letters, numbers, spaces and underline characters. As the name is used for a folder, this ensures that the name will not include any invalid characters.
To create a new pattern Category■ In the New Fill Pattern dialog, click the New Category button. In the New
Category dialog enter a name for the Category and click OK.
Note: If you do not save any fill patterns in the new Category before closing mySewnet™ Cross Stitcher, it will not exist when you restart mySewnet™ Cross Stitcher.
Removing Patterns from a CategorymySewnet™ Cross Stitcher patterns are files with a .cpk extension. They are stored in folders with the Category names within the [User]/Library/ApplicationSupport/mySewnet/Embroidery1/Cross/Patterns folder.
Note: This folder is only present if you have created at least one pattern.
Delete a Fill Pattern1 Open Finder.2 Option–click the Go menu and choose Library.3 Open ApplicationSupport/mySewnet/Embroidery1/Cross/Patterns. The folders that
you created are below this folder.4 Pattern files are in the form Triangle.cpk. Drag the unwanted file to the Trash. 5 Restart mySewnet™ Cross Stitcher and the pattern is no longer available.
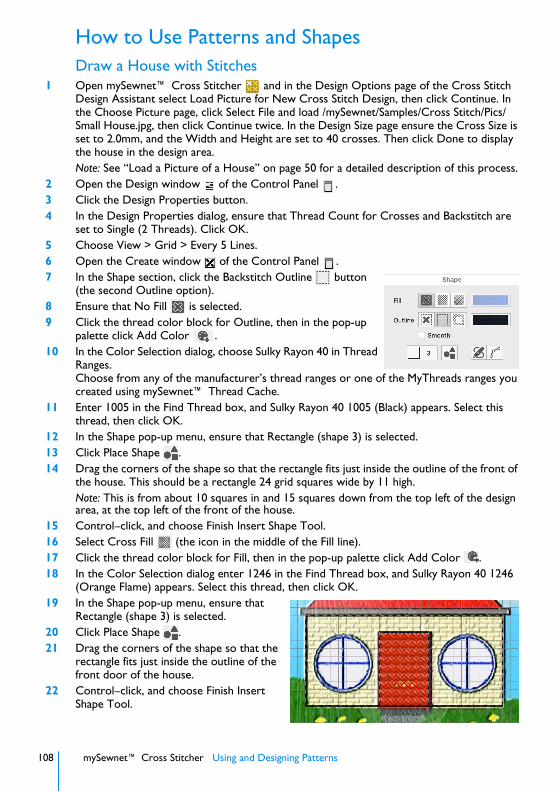
108 mySewnet™ Cross Stitcher Using and Designing Patterns
How to Use Patterns and ShapesDraw a House with Stitches
1 Open mySewnet™ Cross Stitcher and in the Design Options page of the Cross Stitch Design Assistant select Load Picture for New Cross Stitch Design, then click Continue. In the Choose Picture page, click Select File and load /mySewnet/Samples/Cross Stitch/Pics/Small House.jpg, then click Continue twice. In the Design Size page ensure the Cross Size is set to 2.0mm, and the Width and Height are set to 40 crosses. Then click Done to display the house in the design area.Note: See “Load a Picture of a House” on page 50 for a detailed description of this process.
2 Open the Design window of the Control Panel .3 Click the Design Properties button.4 In the Design Properties dialog, ensure that Thread Count for Crosses and Backstitch are
set to Single (2 Threads). Click OK.5 Choose View > Grid > Every 5 Lines.6 Open the Create window of the Control Panel .7 In the Shape section, click the Backstitch Outline button
(the second Outline option).8 Ensure that No Fill is selected.9 Click the thread color block for Outline, then in the pop-up
palette click Add Color .10 In the Color Selection dialog, choose Sulky Rayon 40 in Thread
Ranges.Choose from any of the manufacturer’s thread ranges or one of the MyThreads ranges you created using mySewnet™ Thread Cache.
11 Enter 1005 in the Find Thread box, and Sulky Rayon 40 1005 (Black) appears. Select this thread, then click OK.
12 In the Shape pop-up menu, ensure that Rectangle (shape 3) is selected.13 Click Place Shape .14 Drag the corners of the shape so that the rectangle fits just inside the outline of the front of
the house. This should be a rectangle 24 grid squares wide by 11 high.Note: This is from about 10 squares in and 15 squares down from the top left of the design area, at the top left of the front of the house.
15 Control–click, and choose Finish Insert Shape Tool.16 Select Cross Fill (the icon in the middle of the Fill line).17 Click the thread color block for Fill, then in the pop-up palette click Add Color .18 In the Color Selection dialog enter 1246 in the Find Thread box, and Sulky Rayon 40 1246
(Orange Flame) appears. Select this thread, then click OK.19 In the Shape pop-up menu, ensure that
Rectangle (shape 3) is selected.20 Click Place Shape .21 Drag the corners of the shape so that the
rectangle fits just inside the outline of the front door of the house.
22 Control–click, and choose Finish Insert Shape Tool.
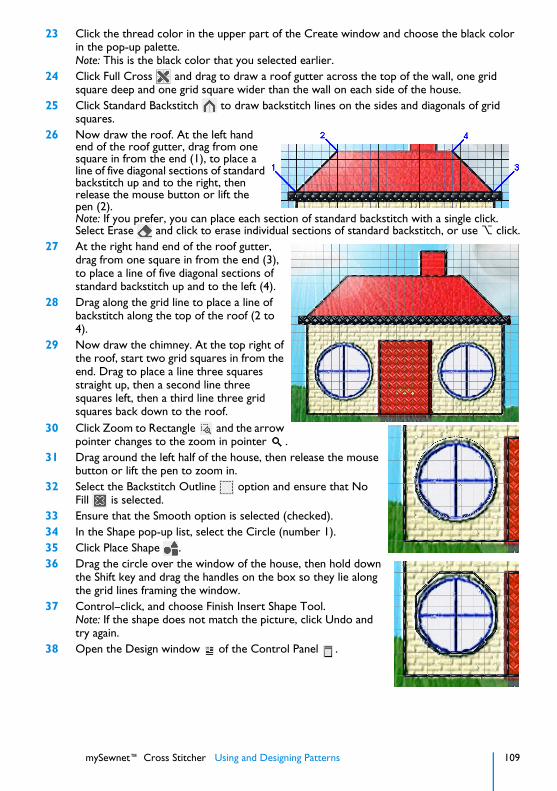
mySewnet™ Cross Stitcher Using and Designing Patterns 109
23 Click the thread color in the upper part of the Create window and choose the black color in the pop-up palette.Note: This is the black color that you selected earlier.
24 Click Full Cross and drag to draw a roof gutter across the top of the wall, one grid square deep and one grid square wider than the wall on each side of the house.
25 Click Standard Backstitch to draw backstitch lines on the sides and diagonals of grid squares.
26 Now draw the roof. At the left hand end of the roof gutter, drag from one square in from the end (1), to place a line of five diagonal sections of standard backstitch up and to the right, then release the mouse button or lift the pen (2).Note: If you prefer, you can place each section of standard backstitch with a single click. Select Erase and click to erase individual sections of standard backstitch, or use ⌥ click.
27 At the right hand end of the roof gutter, drag from one square in from the end (3), to place a line of five diagonal sections of standard backstitch up and to the left (4).
28 Drag along the grid line to place a line of backstitch along the top of the roof (2 to 4).
29 Now draw the chimney. At the top right of the roof, start two grid squares in from the end. Drag to place a line three squares straight up, then a second line three squares left, then a third line three grid squares back down to the roof.
30 Click Zoom to Rectangle and the arrow pointer changes to the zoom in pointer .
31 Drag around the left half of the house, then release the mouse button or lift the pen to zoom in.
32 Select the Backstitch Outline option and ensure that No Fill is selected.
33 Ensure that the Smooth option is selected (checked).34 In the Shape pop-up list, select the Circle (number 1).35 Click Place Shape .36 Drag the circle over the window of the house, then hold down
the Shift key and drag the handles on the box so they lie along the grid lines framing the window.
37 Control–click, and choose Finish Insert Shape Tool.Note: If the shape does not match the picture, click Undo and try again.
38 Open the Design window of the Control Panel .
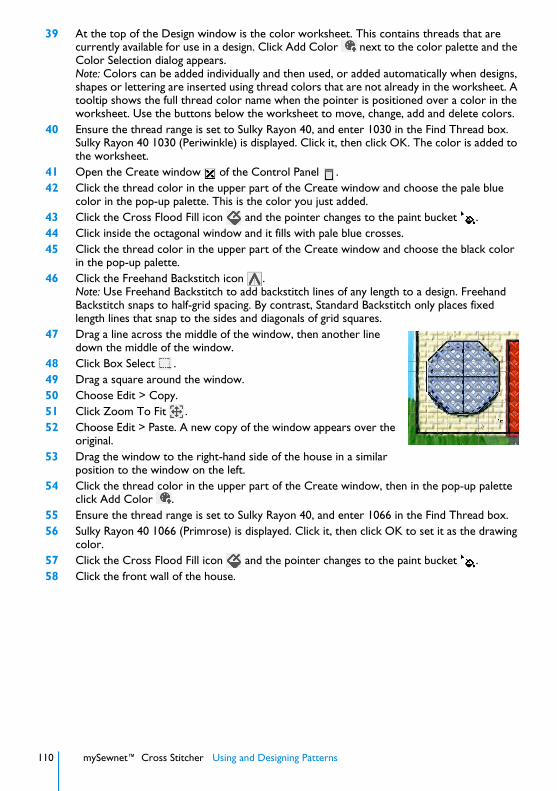
110 mySewnet™ Cross Stitcher Using and Designing Patterns
39 At the top of the Design window is the color worksheet. This contains threads that are currently available for use in a design. Click Add Color next to the color palette and the Color Selection dialog appears.Note: Colors can be added individually and then used, or added automatically when designs, shapes or lettering are inserted using thread colors that are not already in the worksheet. A tooltip shows the full thread color name when the pointer is positioned over a color in the worksheet. Use the buttons below the worksheet to move, change, add and delete colors.
40 Ensure the thread range is set to Sulky Rayon 40, and enter 1030 in the Find Thread box. Sulky Rayon 40 1030 (Periwinkle) is displayed. Click it, then click OK. The color is added to the worksheet.
41 Open the Create window of the Control Panel .42 Click the thread color in the upper part of the Create window and choose the pale blue
color in the pop-up palette. This is the color you just added.43 Click the Cross Flood Fill icon and the pointer changes to the paint bucket .44 Click inside the octagonal window and it fills with pale blue crosses.45 Click the thread color in the upper part of the Create window and choose the black color
in the pop-up palette.46 Click the Freehand Backstitch icon .
Note: Use Freehand Backstitch to add backstitch lines of any length to a design. Freehand Backstitch snaps to half-grid spacing. By contrast, Standard Backstitch only places fixed length lines that snap to the sides and diagonals of grid squares.
47 Drag a line across the middle of the window, then another line down the middle of the window.
48 Click Box Select .49 Drag a square around the window.50 Choose Edit > Copy.51 Click Zoom To Fit .52 Choose Edit > Paste. A new copy of the window appears over the
original.53 Drag the window to the right-hand side of the house in a similar
position to the window on the left.54 Click the thread color in the upper part of the Create window, then in the pop-up palette
click Add Color .55 Ensure the thread range is set to Sulky Rayon 40, and enter 1066 in the Find Thread box. 56 Sulky Rayon 40 1066 (Primrose) is displayed. Click it, then click OK to set it as the drawing
color.57 Click the Cross Flood Fill icon and the pointer changes to the paint bucket .58 Click the front wall of the house.

mySewnet™ Cross Stitcher Using and Designing Patterns 111
59 Click the thread color in the upper part of the Create window, then in the pop-up palette click the red color to set it as the drawing color.This is Sulky Rayon 40 1246 (Orange Flame), the color you used for the door.
60 Click on the main part of the roof and the chimney.Note: You can change the fill color while you still have the Cross Flood Fill tool active.
61 Click the thread color in the upper part of the Create window, then in the pop-up palette click the black to set it as the drawing color.
62 Click the Full Cross icon .63 Drag under the door to place a row of six black crosses as a doorstep. (Alternatively, click
six times to place individual crosses.)64 Click the French Knot icon .65 Click one square in from the left edge of the door and four squares up to place a door
handle.
66 Select No Outline and Cross Fill .67 In the Shape area, click the Fill color for shape drawing, click Add Color , then select
1011 (Steel Gray) from Sulky Rayon 40. Click OK.68 In the Shape pop-up menu, ensure that Rectangle (shape 3) is selected.69 Click Place Shape .70 Drag to create a rectangle under the doorstep that is six crosses wide and three crosses
high. This will make a short path.71 Click the Fill color for shape drawing, click Add Color , then select 1100 (Lt. Grass
Green) from Sulky Rayon 40. Click OK.72 Draw a rectangle of crosses that is 11 wide by four high on the left of the doorstep and
path. It should be two squares wider than the house.73 Click Zoom to Rectangle and the arrow pointer changes to the zoom pointer .74 Drag around the grass rectangle to zoom in.75 Click the thread color in the upper part of the Create window, then in the pop-up palette
click Add Color .76 Ensure the thread range is set to Sulky Rayon 40, and enter 1187 in the Find Thread box.

112 mySewnet™ Cross Stitcher Using and Designing Patterns
77 Sulky Rayon 40 1187 (Mimosa) is displayed. Click it, then click OK to set it as the drawing color.
78 Click French Knot .79 Start two squares in and two squares down from the top left of the grass, and click in the
center of the grid square to place the first yellow flower head. Move right and place four more flower heads in the center of alternate grid squares.
80 Click the thread color in the upper part of the Create window, and in the pop-up palette click Add Color . Select the color Sulky Rayon 40 569 (Garden Green) and click OK.
81 Click Freehand Backstitch .82 Start from the center of a grid square
containing a yellow flower head and drag to draw a backstitch line two grid squares straight down. This is the stem for the flower. Repeat this for the other four flowers.
83 Click Box Select .84 Drag a selection box around the grass and flowers.85 Choose Edit > Copy.86 Click Zoom To Fit .87 Choose Edit > Paste. A new copy of the grass rectangle with flowers appears over the
original.88 Drag the pasted grass to the right-hand side of the path.89 Open the Design window of the Control Panel .90 Click Edit > Remove Unused Colors. The color list is reduced to the eight colors used for
the house.Note: Use File > Save to save the design as Small House.krz, and use File > Export to export the design as Small House_Exported.vp4.
Draw and Fill a Cross Stitch Border1 In mySewnet™ Configure click the Appearance tab.2 Click Background Color, and in the Colors Wheel select a pale yellow. The new color is
shown on the Background Color button, and on the background if any mySewnet™ Embroidery Software apps are open.
3 Set the texture to Aida.4 Open mySewnet™ Cross Stitcher .
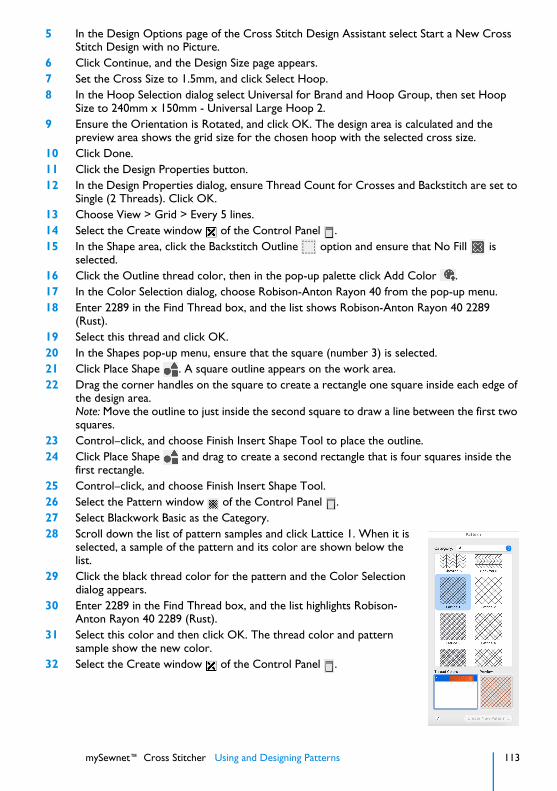
mySewnet™ Cross Stitcher Using and Designing Patterns 113
5 In the Design Options page of the Cross Stitch Design Assistant select Start a New Cross Stitch Design with no Picture.
6 Click Continue, and the Design Size page appears.7 Set the Cross Size to 1.5mm, and click Select Hoop.8 In the Hoop Selection dialog select Universal for Brand and Hoop Group, then set Hoop
Size to 240mm x 150mm - Universal Large Hoop 2. 9 Ensure the Orientation is Rotated, and click OK. The design area is calculated and the
preview area shows the grid size for the chosen hoop with the selected cross size.10 Click Done.11 Click the Design Properties button. 12 In the Design Properties dialog, ensure Thread Count for Crosses and Backstitch are set to
Single (2 Threads). Click OK.13 Choose View > Grid > Every 5 lines.14 Select the Create window of the Control Panel .15 In the Shape area, click the Backstitch Outline option and ensure that No Fill is
selected.16 Click the Outline thread color, then in the pop-up palette click Add Color .17 In the Color Selection dialog, choose Robison-Anton Rayon 40 from the pop-up menu.18 Enter 2289 in the Find Thread box, and the list shows Robison-Anton Rayon 40 2289
(Rust). 19 Select this thread and click OK.20 In the Shapes pop-up menu, ensure that the square (number 3) is selected.21 Click Place Shape . A square outline appears on the work area.22 Drag the corner handles on the square to create a rectangle one square inside each edge of
the design area.Note: Move the outline to just inside the second square to draw a line between the first two squares.
23 Control–click, and choose Finish Insert Shape Tool to place the outline.24 Click Place Shape and drag to create a second rectangle that is four squares inside the
first rectangle.25 Control–click, and choose Finish Insert Shape Tool.26 Select the Pattern window of the Control Panel .27 Select Blackwork Basic as the Category.28 Scroll down the list of pattern samples and click Lattice 1. When it is
selected, a sample of the pattern and its color are shown below the list.
29 Click the black thread color for the pattern and the Color Selection dialog appears.
30 Enter 2289 in the Find Thread box, and the list highlights Robison-Anton Rayon 40 2289 (Rust).
31 Select this color and then click OK. The thread color and pattern sample show the new color.
32 Select the Create window of the Control Panel .
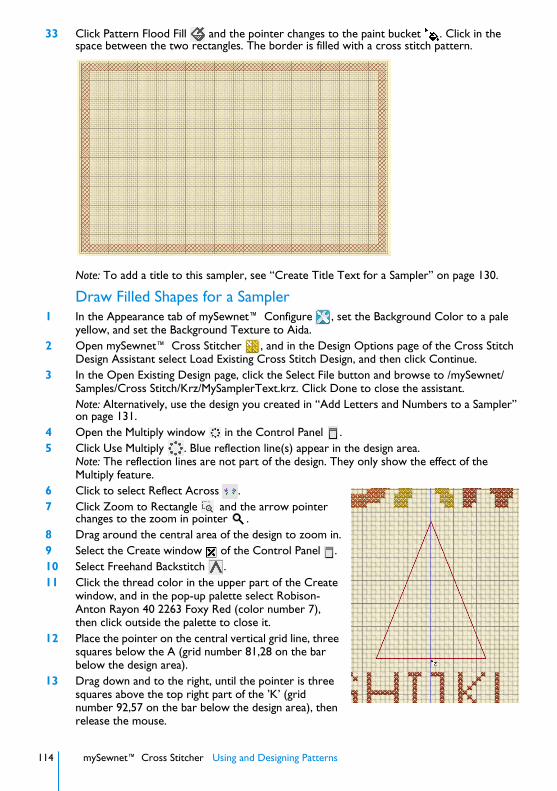
114 mySewnet™ Cross Stitcher Using and Designing Patterns
33 Click Pattern Flood Fill and the pointer changes to the paint bucket . Click in the space between the two rectangles. The border is filled with a cross stitch pattern.
Note: To add a title to this sampler, see “Create Title Text for a Sampler” on page 130.
Draw Filled Shapes for a Sampler1 In the Appearance tab of mySewnet™ Configure , set the Background Color to a pale
yellow, and set the Background Texture to Aida.2 Open mySewnet™ Cross Stitcher , and in the Design Options page of the Cross Stitch
Design Assistant select Load Existing Cross Stitch Design, and then click Continue.3 In the Open Existing Design page, click the Select File button and browse to /mySewnet/
Samples/Cross Stitch/Krz/MySamplerText.krz. Click Done to close the assistant.Note: Alternatively, use the design you created in “Add Letters and Numbers to a Sampler” on page 131.
4 Open the Multiply window in the Control Panel .5 Click Use Multiply . Blue reflection line(s) appear in the design area.
Note: The reflection lines are not part of the design. They only show the effect of the Multiply feature.
6 Click to select Reflect Across .7 Click Zoom to Rectangle and the arrow pointer
changes to the zoom in pointer .8 Drag around the central area of the design to zoom in.9 Select the Create window of the Control Panel .10 Select Freehand Backstitch .11 Click the thread color in the upper part of the Create
window, and in the pop-up palette select Robison-Anton Rayon 40 2263 Foxy Red (color number 7), then click outside the palette to close it.
12 Place the pointer on the central vertical grid line, three squares below the A (grid number 81,28 on the bar below the design area).
13 Drag down and to the right, until the pointer is three squares above the top right part of the ’K’ (grid number 92,57 on the bar below the design area), then release the mouse.

mySewnet™ Cross Stitcher Using and Designing Patterns 115
14 From there, drag to draw a horizontal line to the central vertical grid line to form a triangle.Note: Ensure the triangle is split by the center grid line, so that it is in the center of the design. If not, use Undo and try again.
15 Select the Multiply window in the Control Panel .16 Click Use Multiply so that it is no longer selected. The blue reflection lines are no
longer shown.17 Click Box Select and drag to select the triangle.18 Click Use Multiply .19 Choose Edit > Duplicate Selected. The copy is placed below and to the right of the original,
with a shadow copy to its left.20 Move the pointer over the Flip Vertical handle on the copied block and it becomes the
vertical double-arrow pointer. Click the Flip Vertical handle to mirror the block vertically.21 Move the copy so that it is level with the original triangle, and four squares to the right of it.22 Control–click and choose Finish
Box Select to place the copied triangle.
23 Move to the right of the design area, so that you can see the empty space to the right of the new triangle.
24 Select the Create window of the Control Panel .
25 In the Shape area, for Fill select Cross Fill , and for Outline select No Outline .
26 In the Shape pop-up menu select 77, a teardrop.
27 Click the Shape button to place the shape in the design area.
28 Drag the shape into the space to the right.29 Hold down Shift and drag to resize the shape
proportionally until it is the same height as the triangle, and the tip of the teardrop is two grid squares to the right of the top right tip of the triangle.
30 Control–click and choose Finish Insert Shape Tool to place the shape.
31 Click Cross Outline .32 Click the Outline color for Shapes, and then
in the pop-up palette click Add Color .33 In the Color Selection dialog, enter 2461 in
the Find Thread box (Robison-Anton Rayon 40 2461 Wheat), select this color, then click OK.
34 In the Shape pop-up menu select 39, a star.35 Click the Shape button to place the shape in the design area.36 Drag the shape into the empty space to the right of the teardrop.37 Hold down Shift and drag to resize the star proportionally until it is the same height as the
teardrop, and place it midway between the teardrop and the sampler frame.

116 mySewnet™ Cross Stitcher Using and Designing Patterns
38 Control–click and choose Finish Insert Shape Tool to place the shape.39 Click Zoom To Fit . You can now see all the shapes on the left that were duplicated by
the Multiply feature.
40 Control–click and choose Finish Box Select.41 Select the Multiply window in the Control Panel .42 Click Use Multiply so that it is no longer selected. The blue reflection line is no longer
shown.43 Select the Pattern window of the Control Panel .44 In the Fill Pattern area, scroll down to select the Chevron 1 pattern from the Blackwork
Basic Category.45 Click the color for the pattern. In the Color Selection dialog, enter 2263 in the Find Thread
box (Robison-Anton Rayon 40 2263 Foxy Red), select this color, then click OK.46 Select the Create window of the Control Panel .47 Click the Pattern Flood Fill icon then click inside the center triangle.48 Select the Pattern window of the Control Panel .49 In the Fill Pattern area, scroll up to select the Brick 1 pattern from the Blackwork Basic
Category.50 Click the color for the pattern. In the Color Selection dialog, enter 2263 in the Find Thread
box (Robison-Anton Rayon 40 2263 Foxy Red), select this color, then click OK.51 Click inside the triangle on the right. It is filled with the brick design.
Note: If desired, turn off the grid to see the effect of the brick pattern, then turn the grid on again to continue.
52 In the Cross Basic Category, select the Stripes 3 pattern.53 Click the first color for the pattern. In the Color Selection dialog, enter 2289 in the Find
Thread box (Robison-Anton Rayon 40 2289 Rust), select this color, then click OK.54 Click the second color for the pattern. In the Color Selection dialog, enter 2332 in the Find
Thread box (Robison-Anton Rayon 40 2332 Penny), select this color, then click OK.55 Click in the teardrop shape on the right to fill it with the stripes.56 In the Cross Basic Category, select the Check 4 pattern.57 Click the second color for the pattern. In the Color Selection dialog, enter 2289 in the Find
Thread box (Robison-Anton Rayon 40 2289 Rust), select this color, then click OK.58 Click in the teardrop shape on the left to fill it with the check pattern.59 In the Cross Basic Category, select the Diagonal 4 pattern.

mySewnet™ Cross Stitcher Using and Designing Patterns 117
60 Click the first color for the pattern. In the Color Selection dialog, enter 2461 in the Find Thread box (Robison-Anton Rayon 40 2461 Wheat), select this color, then click OK.
61 Click the second color for the pattern. In the Color Selection dialog, enter 2580 in the Find Thread box (Robison-Anton Rayon 40 2580 Green Grass), select this color, then click OK.
62 Click in the star on the left to fill it with diagonal stripes.63 In the Mixed Category, select the Weave 3 pattern.64 Click the first color for the pattern. In the Color Selection dialog, enter 2461 in the Find
Thread box (Robison-Anton Rayon 40 2461 Wheat), select this color, then click OK.65 Click the second color for the pattern. In the Color Selection dialog, enter 2580 in the Find
Thread box (Robison-Anton Rayon 40 2580 Green Grass), select this color, then click OK.66 Click in the star on the right to fill it with the weave pattern.
Note: To create a new fill pattern for the final triangle, see “Create a Fill for a Triangle in a Sampler” on page 117.
Create a Fill for a Triangle in a Sampler1 In the Appearance tab of mySewnet™ Configure , set the Background Color to a pale
yellow, and set the Background Texture to Aida.2 Open mySewnet™ Cross Stitcher , and in the Design Options page of the Cross Stitch
Design Assistant select Load Existing Cross Stitch Design, and then click Continue.3 In the Open Existing Design page, click Select File and load /mySewnet /Samples/Cross
Stitch/Krz/MySamplerShapesDrawn.krz. Click Done to close the assistant.Alternatively, use the design you created in “Draw Filled Shapes for a Sampler” on page 114.
4 Click Zoom to Rectangle and the arrow pointer changes to the zoom in pointer .5 Drag around the space in between the teardrop and the star on the left.6 Select the Create window of the Control Panel .7 Click the thread color in the upper part of the Create window, and in the pop-up palette,
select color 7, Robison-Anton Rayon 40 2263 Foxy Red.8 Click the Standard Backstitch icon .9 Draw a backstitch triangle. Drag to place four horizontal sections of backstitch, then two
diagonal sections up above the center of the line, then two diagonal sections back down to the end of the line.
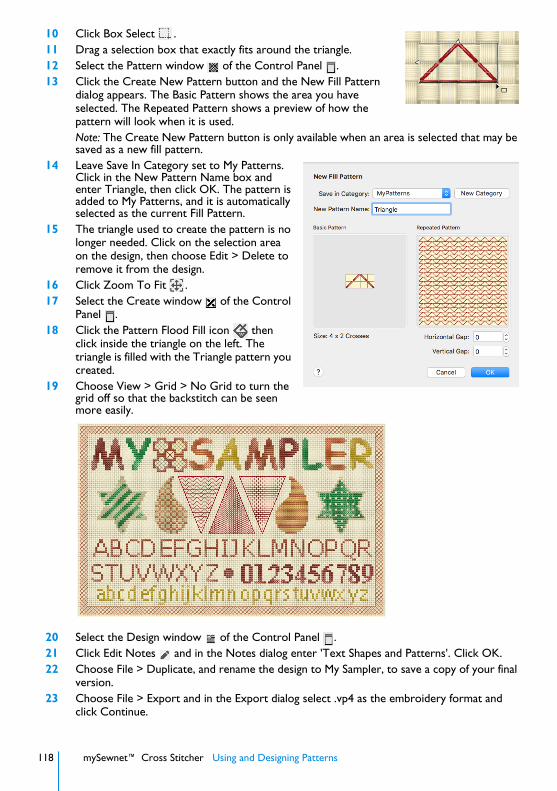
118 mySewnet™ Cross Stitcher Using and Designing Patterns
10 Click Box Select .11 Drag a selection box that exactly fits around the triangle.12 Select the Pattern window of the Control Panel .13 Click the Create New Pattern button and the New Fill Pattern
dialog appears. The Basic Pattern shows the area you have selected. The Repeated Pattern shows a preview of how the pattern will look when it is used.Note: The Create New Pattern button is only available when an area is selected that may be saved as a new fill pattern.
14 Leave Save In Category set to My Patterns. Click in the New Pattern Name box and enter Triangle, then click OK. The pattern is added to My Patterns, and it is automatically selected as the current Fill Pattern.
15 The triangle used to create the pattern is no longer needed. Click on the selection area on the design, then choose Edit > Delete to remove it from the design.
16 Click Zoom To Fit .17 Select the Create window of the Control
Panel .18 Click the Pattern Flood Fill icon then
click inside the triangle on the left. The triangle is filled with the Triangle pattern you created.
19 Choose View > Grid > No Grid to turn the grid off so that the backstitch can be seen more easily.
20 Select the Design window of the Control Panel .21 Click Edit Notes and in the Notes dialog enter 'Text Shapes and Patterns'. Click OK.22 Choose File > Duplicate, and rename the design to My Sampler, to save a copy of your final
version.23 Choose File > Export and in the Export dialog select .vp4 as the embroidery format and
click Continue.
mySewnet™ Cross Stitcher Using and Designing Patterns 119
24 In the Saving as dialog, in the Save In box browse to the folder /mySewnet/My Designs. In the Save As box, leave the name as 'My Sampler Exported', then click Save.
25 Choose File > Print and the Print dialog appears. Click Print to print a worksheet for the embroidery.
Note: After completing this exercise, use the Appearance tab of mySewnet™ Configure to set the Background Color back to the default blue (RGB 211, 233, 255).

120 mySewnet™ Cross Stitcher Creating Text
10Creating Text
Use the Letter window to add text and monograms to your design. You can switch freely between TrueType® and Fixed fonts until your text has the desired appearance.
Use Fixed Font to place text using a mySewnet™ Cross Stitcher pre-defined font. Use TrueType Font to convert TrueType® or OpenType® characters to a font of crosses, crosses with a backstitch outline or just a backstitch outline.
To use a Fixed Font■ Select the Letter window in the Control Panel , then click Fixed Font.
To use a TrueType® Font■ Select the Letter window in the Control Panel , then click TrueType Font.
To learn how to Go to
Create lettering using a mySewnet™ Cross Stitcher system font
See “Create Fixed Font Lettering” on page 121.
Browse for a system font in the viewer See “Font Viewer” on page 122.
Add special characters, e.g. accents See “Emoji and Symbols” on page 123.
Create lettering using a font on your computer
See “Create TrueType® Text” on page 126.
Use a font created from a TrueType® font
See “How To Use TrueType Text” on page 130.

mySewnet™ Cross Stitcher Creating Text 121
Fixed FontUse Fixed Font to place text using pre-defined fonts. Fixed Text is applied according to the design of the characters, which can include any type of stitch.
To Create Lettering using a Fixed Font■ Select the Letter window in the Control Panel , then click the Fixed Font
button. Choose a font, then add some text in the Letters box and click Apply.
Create Fixed Font Lettering1 Open the Letter window in the Control Panel .2 Click Fixed Font at the top of the Letter window.3 Enter the desired text in the Letters box. Press Control–Return
for extra lines of text.4 Click the displayed font, and scroll up or down the Font Viewer
to select a category and font.5 Click to highlight a font in the Viewer, then click OK to select it.
Note: The font names include additional information to the actual name of the lettering style. 2C and 3C indicate the font uses two or three colors. UC indicates the font has only uppercase characters. LC indicates the font has only lowercase characters. At the end of the font name is the font size, which is the height of the 'A' character in grid squares. For instance, Sans Cross 3C 7 uses three colors and the 'A' is seven grid squares high.
6 If there is more than one line of text, select Left , Center or Right Alignment.
Create lettering using a Fixed or TrueType font
Select a font for your lettering in the viewer
Align the text
Select colors for your lettering
Enter some text for your lettering
Place the lettering in the work area
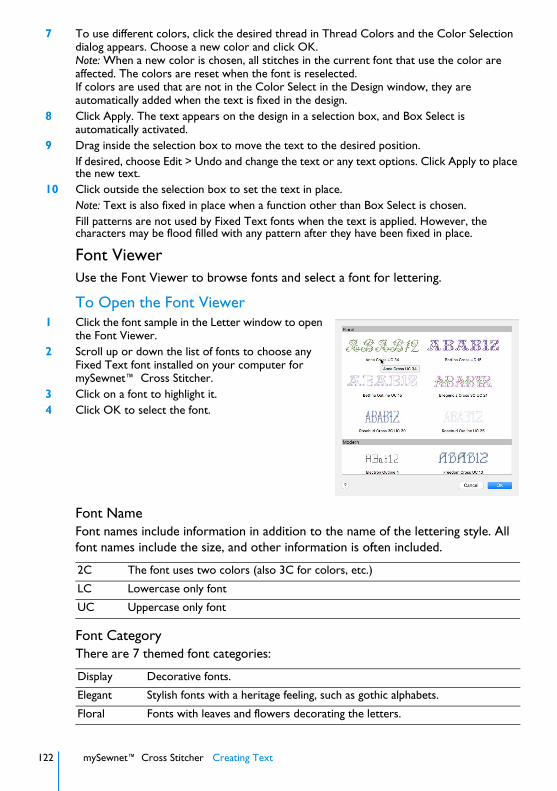
122 mySewnet™ Cross Stitcher Creating Text
7 To use different colors, click the desired thread in Thread Colors and the Color Selection dialog appears. Choose a new color and click OK.Note: When a new color is chosen, all stitches in the current font that use the color are affected. The colors are reset when the font is reselected.If colors are used that are not in the Color Select in the Design window, they are automatically added when the text is fixed in the design.
8 Click Apply. The text appears on the design in a selection box, and Box Select is automatically activated.
9 Drag inside the selection box to move the text to the desired position.If desired, choose Edit > Undo and change the text or any text options. Click Apply to place the new text.
10 Click outside the selection box to set the text in place.Note: Text is also fixed in place when a function other than Box Select is chosen.Fill patterns are not used by Fixed Text fonts when the text is applied. However, the characters may be flood filled with any pattern after they have been fixed in place.
Font ViewerUse the Font Viewer to browse fonts and select a font for lettering.
To Open the Font Viewer1 Click the font sample in the Letter window to open
the Font Viewer.2 Scroll up or down the list of fonts to choose any
Fixed Text font installed on your computer for mySewnet™ Cross Stitcher.
3 Click on a font to highlight it.4 Click OK to select the font.
Font NameFont names include information in addition to the name of the lettering style. All font names include the size, and other information is often included.
Font CategoryThere are 7 themed font categories:
2C The font uses two colors (also 3C for colors, etc.)
LC Lowercase only font
UC Uppercase only font
Display Decorative fonts.
Elegant Stylish fonts with a heritage feeling, such as gothic alphabets.
Floral Fonts with leaves and flowers decorating the letters.
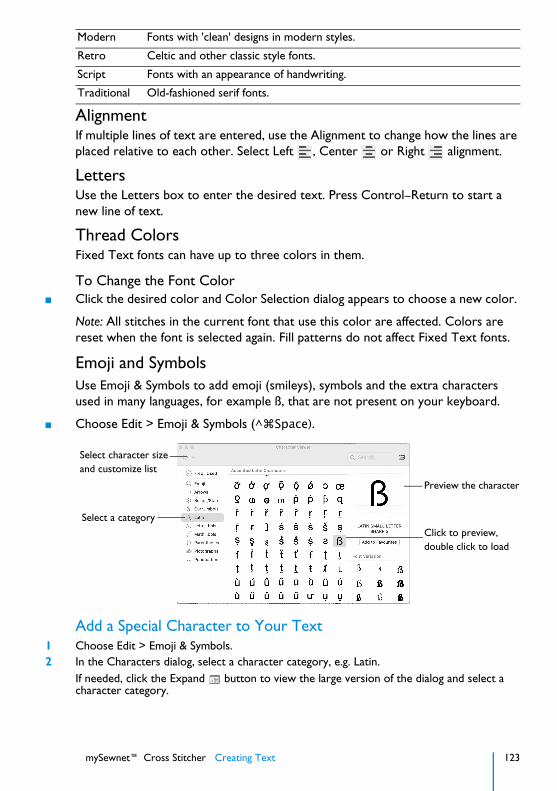
mySewnet™ Cross Stitcher Creating Text 123
AlignmentIf multiple lines of text are entered, use the Alignment to change how the lines are placed relative to each other. Select Left , Center or Right alignment.
LettersUse the Letters box to enter the desired text. Press Control–Return to start a new line of text.
Thread ColorsFixed Text fonts can have up to three colors in them.
To Change the Font Color■ Click the desired color and Color Selection dialog appears to choose a new color.
Note: All stitches in the current font that use this color are affected. Colors are reset when the font is selected again. Fill patterns do not affect Fixed Text fonts.
Emoji and SymbolsUse Emoji & Symbols to add emoji (smileys), symbols and the extra characters used in many languages, for example ß, that are not present on your keyboard.
■ Choose Edit > Emoji & Symbols (^⌘Space).
Add a Special Character to Your Text1 Choose Edit > Emoji & Symbols.2 In the Characters dialog, select a character category, e.g. Latin.
If needed, click the Expand button to view the large version of the dialog and select a character category.
Modern Fonts with 'clean' designs in modern styles.
Retro Celtic and other classic style fonts.
Script Fonts with an appearance of handwriting.
Traditional Old-fashioned serif fonts.
Preview the character
Select a category
Select character sizeand customize list
Click to preview,double click to load

124 mySewnet™ Cross Stitcher Creating Text
3 Click the desired character to select it. The character is previewed.
4 Double-click on the character to place it in the Letters text box.
5 Click Apply to place the lettering in the work area.
Create Text for the Happy House Sampler1 Choose File > New and in the Cross Stitch Design Assistant load the design /mySewnet/
Samples/Cross Stitch/Krz/Line of buds for Happy House.krz.Note: Alternatively, set up the work area and create the line of buds as described in “Place a Border of Buds for the Happy House Sampler” on page 141.
2 Choose View > Grid > Every 5 Lines.3 Select the Letter window of the Control Panel .4 Click Fixed Font at the top of the Letter window.5 Click the displayed font, and in the Font Viewer
scroll down to the Modern category and select the font Sans Cross Narrow 7.Note: The Fixed Font names include the type of stitches in the font, and the number at the end is the height in grid squares of the 'A' character in the font. Additionally, fonts that use more than one color will have 2C (two color) or 3C (three color) in the name.
6 Click 'Sans Cross Narrow 7' in the Modern category to highlight it, then click OK.
7 Click in the Letters box and enter 'Welcome To Our'.
8 Click Apply. The text appears on the design and it is automatically selected with Box Select.
9 Drag the selection so that the text is centered under the top border of buds, and so that the tops of the uppercase letters are two grid squares from the buds, and "W" is three squares from the left edge. The selection box will overlap the buds, but the buds will not be affected.
10 Click the displayed font, and in the Font Viewer select 'Sans Cross 9' in the Modern category. Click OK.
11 In the Letters box, delete the previous text, type 'Happy', and press Control–Return.12 Then type 'House' so that the text is on two lines.13 Click Apply and the text appears on the design, and it is automatically selected with Box
Select. Notice that the text is blue, according to the color used to design the font.14 Choose Edit < Undo.15 In the Thread Colors box, click blue thread color and the Color Selection dialog appears.16 Ensure that Robison-Anton Rayon 40 is selected as the Thread Range.
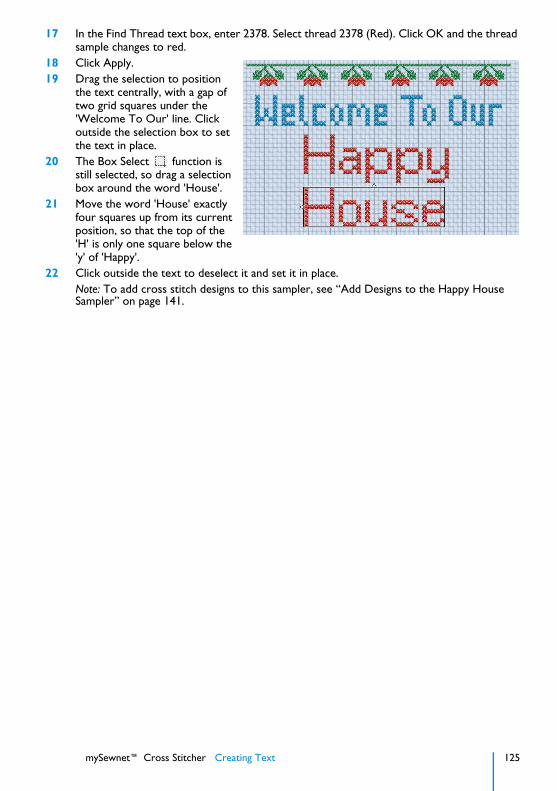
mySewnet™ Cross Stitcher Creating Text 125
17 In the Find Thread text box, enter 2378. Select thread 2378 (Red). Click OK and the thread sample changes to red.
18 Click Apply.19 Drag the selection to position
the text centrally, with a gap of two grid squares under the 'Welcome To Our' line. Click outside the selection box to set the text in place.
20 The Box Select function is still selected, so drag a selection box around the word 'House'.
21 Move the word 'House' exactly four squares up from its current position, so that the top of the 'H' is only one square below the 'y' of 'Happy'.
22 Click outside the text to deselect it and set it in place.Note: To add cross stitch designs to this sampler, see “Add Designs to the Happy House Sampler” on page 141.
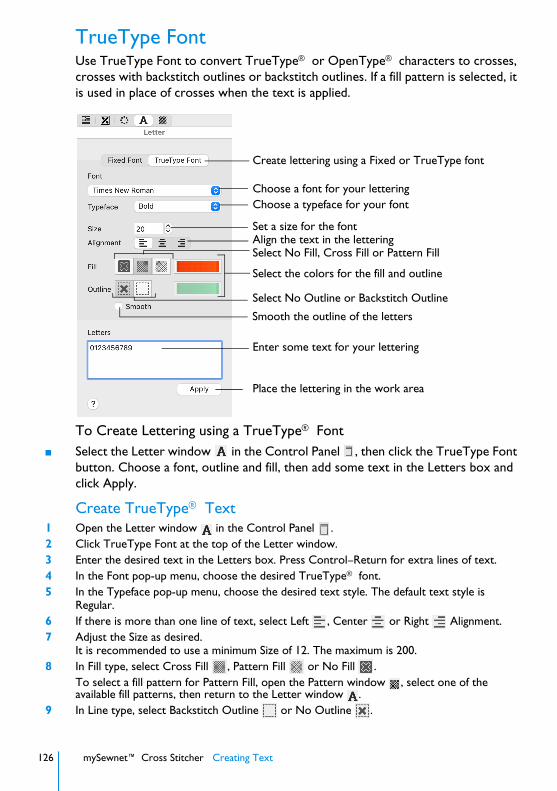
126 mySewnet™ Cross Stitcher Creating Text
TrueType FontUse TrueType Font to convert TrueType® or OpenType® characters to crosses, crosses with backstitch outlines or backstitch outlines. If a fill pattern is selected, it is used in place of crosses when the text is applied.
To Create Lettering using a TrueType® Font■ Select the Letter window in the Control Panel , then click the TrueType Font
button. Choose a font, outline and fill, then add some text in the Letters box and click Apply.
Create TrueType® Text1 Open the Letter window in the Control Panel .2 Click TrueType Font at the top of the Letter window.3 Enter the desired text in the Letters box. Press Control–Return for extra lines of text.4 In the Font pop-up menu, choose the desired TrueType® font.5 In the Typeface pop-up menu, choose the desired text style. The default text style is
Regular.6 If there is more than one line of text, select Left , Center or Right Alignment.7 Adjust the Size as desired.
It is recommended to use a minimum Size of 12. The maximum is 200.8 In Fill type, select Cross Fill , Pattern Fill or No Fill .
To select a fill pattern for Pattern Fill, open the Pattern window , select one of the available fill patterns, then return to the Letter window .
9 In Line type, select Backstitch Outline or No Outline .
Create lettering using a Fixed or TrueType font
Choose a font for your lettering
Align the text in the lettering
Select the colors for the fill and outline
Enter some text for your lettering
Place the lettering in the work area
Select No Fill, Cross Fill or Pattern Fill
Select No Outline or Backstitch Outline
Set a size for the font
Choose a typeface for your font
Smooth the outline of the letters

mySewnet™ Cross Stitcher Creating Text 127
10 If desired, select (check) the Smooth option, to smooth the edges of characters.Note: Smooth uses three-quarter crosses rather than full crosses to smooth the edges. It is recommended to only use this for large characters.
11 If you selected Cross Fill , click the thread color for Fill and the Color Selection dialog appears. Choose a new cross color for the body of the text and click OK.
12 If you selected Backstitch Outline , click the Outline color and the Color Selection dialog appears. Choose a new color for the standard backstitch outline around the characters and click OK.Note: If colors are used that are not in the Color Select area, they are automatically added when the text is fixed in the design.
13 Click Apply. The text appears on the design in a selection box, and Box Select is automatically activated.
14 Drag inside the selection box to move the text to the desired position.To change the text or any text options (including the fill pattern), choose Edit > Undo, change the settings, and click Apply again.
15 Click outside the selection box to set the text in place.
FontUse any TrueType® or OpenType® font installed on your computer.
■ Choose a font from the pop-up list of fonts.
TypefaceUse one of the typefaces available for the your font, for example Regular, Bold or Italic.
■ Choose a typeface from the pop-up list.
SizeUse Size to set the height of the text. Use a minimum of 12 for simple fonts such as Arial, and larger sizes for fonts with more detail.
Note: The maximum Size is 200. It is recommended to place a single character at sizes above 100.
■ Enter a Size for your font in the number box, or use the arrows.
AlignmentIf multiple lines of text are entered, use Alignment to change how the lines are placed relative to each other.
■ Select Left , Center or Right alignment.
LettersUse the Letters box to enter the desired text. Press Control–Return to start a new line of text.

128 mySewnet™ Cross Stitcher Creating Text
FillUse a Cross Fill to create characters filled with crosses, or a Pattern Fill to create characters filled with a selected pattern. Use No Fill to create outline characters.
Cross FillUse Cross Fill to create characters filled with crosses.
Note: To use a cross type other than Full Cross inside the characters, select the desired cross type from the Cross Basic Category of Fill Patterns.
To Create Cross Fill Characters■ Select Cross Fill in the TrueType Font window, enter some text in the Letters
box, then click Apply to view the lettering.
Pattern FillUse Pattern Fill to create characters filled with the selected Pattern Fill.
Note: Select a pattern for the Pattern Fill in the Pattern window of the Control Panel . See “Select a Pattern” on page 104.
To Create Pattern Fill Characters■ Select Pattern Fill in the TrueType Font window, enter some text in the Letters
box, then click Apply to view the lettering.
No FillUse No Fill to create an outline without a fill.
Note: If both No Outline and No Fill are selected, Apply is dimmed.
To Create Outline Characters with no Fill■ In the TrueType Font window, select one of the Outline options, then select No
Fill . Enter some text in the Letters box, then click Apply to view the lettering.
Fill ColorUse this color for the fill in characters using Cross Fill .
Note: Select the colors for a Pattern Fill in the Pattern window of the Control Panel . See “Select a Pattern” on page 104.
To Select a Fill Color
■ Click the Fill color thread sample and choose a color from the pop-up palette. Use Add Color to select a color in the Color Selection dialog, or Pick Color to select a color from the background picture.
OutlineUse Backstitch Outline to create characters with a Freehand Backstitch outline, or use No Outline to create characters without an outline.
mySewnet™ Cross Stitcher Creating Text 129
Backstitch OutlineUse Backstitch Outline to create characters as Freehand Backstitch outlines that snap to half grid spacing. The characters are added to the design as a series of freehand backstitch lines that are connected at the corners. The backstitch is drawn in the currently selected Outline color.
To Create Backstitch Outline Characters■ Select Backstitch Outline in the TrueType Font window, enter some text in the
Letters box, then click Apply to view the lettering.
No OutlineUse No Outline to create a fill area with no outline.
Note: If both No Outline and No Fill are selected, Apply is dimmed.
To Create Fill Characters without an Outline■ In the TrueType Font window, select one of the Fill options, then select No
Outline . Enter some text in the Letters box, then click Apply to view the lettering.
Outline ColorUse this color for the outline when creating Backstitch Outline characters.
To Select an Outline Color
■ Click the Outline color thread sample and choose a color from the pop-up palette. Use Add Color to select a color in the Color Selection dialog, or Pick Color to select a color from the background picture.
SmoothUse Smooth to smooth the outline around characters by using three-quarter crosses rather than full crosses for the fill. It is recommended to use this only for large characters.
ApplyWhen you click Apply, the text appears on the design in a selection box, and Box Select is automatically activated. Drag inside the selection box to move the text to the desired position. The text is not fixed in place until you click outside the selection box.
Note: Text is also fixed in place when a function other than Box Select is chosen.
If desired, change the text and text options and click Apply again. This can be done as often as desired until the text is set in place.
If a fill pattern is selected, you can adjust how it fills the text by moving the lettering and then clicking Apply. When the fill pattern has the desired appearance, move the text to its final position and click outside the selection box.

130 mySewnet™ Cross Stitcher Creating Text
Note: You can select a different fill pattern, but you must return to the Letter window to Apply the text and see the pattern used.
How To Use TrueType TextCreate Title Text for a Sampler
1 In the Appearance tab of mySewnet™ Configure , set the Background Color to a pale yellow, and set the Background Texture to Aida.
2 Open mySewnet™ Cross Stitcher , and in the Design Options page of the Cross Stitch Design Assistant select Load Existing Cross Stitch Design, and then click Continue.
3 In the Open Existing Design page, click the Select File button and browse to /mySewnet/Samples/Cross Stitch/Krz/MySamplerBorderOnly.krz. Click Done to close the assistant.Note: Alternatively, use the design you created in “Draw and Fill a Cross Stitch Border” on page 112.
4 Open the Letter window in the Control Panel .5 Select TrueType Font at the top of the Letter window.6 In the Font pop-up menu select Comic Sans MS, set the Typeface to Bold and the Size to 21.7 In Fill select Cross Fill , and in Outline select No Outline .
Note: Ensure that Smooth is unchecked.8 Click the Fill thread color, and then in the pop-up palette click Add Color .9 In the Color Selection dialog, ensure that Robison-Anton Rayon 40 is selected as the
Thread Range, and in Find Thread enter 2334 to select thread 2334 (Terra Cotta). Click OK.
10 Click in the Letters box.11 Press CAPS LOCK on the keyboard and enter 'MY', two spaces then 'SAMPLER' in the
Letters box. Press CAPS LOCK again to turn it off.12 Click Apply and the text appears on the design area.13 Drag the text to place it in the center, two grid squares below the top border, with two
squares to the left, and one to the right.14 Select the Create window of the Control Panel .15 Click the Create thread color, and then in the pop-up palette click Add Color .16 In the Color Selection dialog, in Find Thread enter 2580 and select Robison-Anton Rayon
40 2580 Green Grass. Click OK.17 Click the Cross Flood Fill icon and the pointer changes to the paint bucket . Click the
'Y' and 'L'.18 Click the Create thread color, and then in the pop-up palette click the second color.
Note: This should be Robison-Anton Rayon 40 2289 Rust. It is the color used by the border. Hover the pointer over color in the palette to check. The first color is the default color, Soldier Blue (2527).
19 Click the 'S' and the 'E'.20 Click the Create thread color, and then in the pop-up palette click Add Color .21 In the Color Selection dialog, in Find Thread enter 2596 and select Robison-Anton Rayon
40 2596 Marine Gold. Click OK.22 Click the 'A' and 'R'.23 Click the Create thread color, and then in the pop-up palette click Add Color .24 In the Color Selection dialog, in Find Thread enter 2581 and select Robison-Anton Rayon
40 2581 Old Dark Tex Orange. Click OK.
mySewnet™ Cross Stitcher Creating Text 131
25 Click the 'M' in the middle of 'SAMPLER'.
Note: To add a decoration to this title with Multiply, see “Create a Decoration for a Sampler Title with Multiply” on page 102.
Add Letters and Numbers to a Sampler1 In the Appearance tab of mySewnet™ Configure , set the Background Color to a pale
yellow, and set the Background Texture to Aida.2 Open mySewnet™ Cross Stitcher , and in the Design Options page of the Cross Stitch
Design Assistant select Load Existing Cross Stitch Design, and then click Continue.3 In the Open Existing Design page, click the Select File button and browse to /mySewnet/
Samples/Cross Stitch/Krz/MySamplerBorderTitleDecorated.krz. Click Done to close the assistant.Note: Alternatively, use the design you created in “Create a Decoration for a Sampler Title with Multiply” on page 102.
4 Open the Letter window in the Control Panel .5 Select TrueType Font at the top of the Letter window.6 In the Font pop-up menu select Lucida Grande, and set Typeface to Regular.7 Set the Size to 10.8 In Fill select Cross Fill , and in Outline select No Outline .9 Click the Fill thread color and in the pop-up palette click color number 5 (this selects
Robison-Anton Rayon 40 2596 Marine Gold), then click outside the palette to close it. 10 In the Letters box, enter 'abcdefghijklmnopqrstuvwxyz', then click Apply.
132 mySewnet™ Cross Stitcher Creating Text
11 Drag the text to the bottom of the design, so the bottoms of the 'g', 'p', 'q' and 'y' are one square up from the border. Click outside the selection box to set the text in place.
12 Change the Font to Times New Roman, set the Typeface to Bold, and set the Size to 14.13 In the Letters box, change the text to '0123456789'.14 Select the Pattern window of the Control Panel .15 Select Cross Basic as the Category, then click Check 1 in the pattern list.16 There are two colors for the pattern. Click the first color and the Color Selection dialog
appears. The color is currently set to Robison-Anton Rayon 40 2461 Wheat. Enter 2263 in the Find Thread box (Robison-Anton Rayon 40 2263 Foxy Red), select this color and click OK.
17 Open the Letter window in the Control Panel , select Pattern Fill , then click Apply. The text uses the fill pattern instead of a plain Cross color.
18 Drag the text to position it so that there are two squares above the lowercase 't' and the '9' is one square from the border on the right. Click outside the selection box to set it in place.
19 Change the Font to Verdana, ensure that Typeface is set to Regular and set the Size to 12.20 In Fill select Cross Fill , and in Outline select No Outline .21 Click the Fill color and in the pop-up palette select thread number 6 (Robison-Anton Rayon
40 2581 Old Dark Tex Orange).
mySewnet™ Cross Stitcher Creating Text 133
22 Press CAPS LOCK on the keyboard and in the Letters box, change the text to 'STUVWXYZ'.
23 Click Apply.24 Drag the text to position it level with the top of the numbers, and two squares from the
border on the left. Click outside the selection box to set the text in place.25 In the Letters box, change the text to 'ABCDEFGHIJKLMNOPQR'. Press CAPS LOCK to
turn it off, and click Apply.26 Drag the text to position it in the middle and so that the tail of the Q is two squares above
the numbers. Click outside the selection box to set the text in place.
27 Select the Create window of the Control Panel .28 Ensure that Cross Fill is selected.29 Click the Fill color for Shapes and in the pop-up palette select color number 6 (Robison-
Anton Rayon 40 2581 Old Dark Tex Orange).30 Select Cross Outline , then click the outline thread color.31 In the pop-up palette select color number 3 (Robison-Anton Rayon 40 2334 Terra Cotta).32 In the Shape pop-up menu select 1, the circle.33 Click Place Shape .34 Press Shift, and drag the corner handles on the circle to form a circle that is roughly five by
five grid squares.35 Place the circle between the Z and the 0.36 Click Zoom to Rectangle and the arrow pointer changes to the zoom in pointer .37 Drag around the gap between the Z and 0.38 Adjust the circle so it is 5 x 5 squares, and is midway between the Z and the 0.39 Control–click and choose Finish Insert Shape Tool in the context menu.
Note: The final shape is the nearest to a circle that can be made at this size.40 Click Zoom To Fit .41 Choose File > Save and the Save As dialog appears.42 Change the folder to /mySewnet/My Designs if necessary. Enter the file name 'My Sampler
Text' and click Save.43 Note: This provides a text sampler that you can decorate later, starting from your
'MySamplerText.krz' design. To add filled shapes to this sampler, see “Draw Filled Shapes for a Sampler” on page 114.
134 mySewnet™ Cross Stitcher Editing Designs
11Editing Designs
This chapter shows you how to replace or erase stitches, how to select stitches and how to modify the selected stitches.
Edit Crosses, Backstitch and French KnotsDraw Color and EraseUse the pop-up palette in the Thread Color area of the Create window to select a drawing color. Click the Erase button, or press the Option ⌥ key when erasing stitches of the selected type.
Edit CrossesUse any type of cross to replace and erase any other type of cross. When drawing full crosses, they will replace or erase any combination of small or part crosses in a grid square. When drawing any other size of cross, they will replace or erase according to their size and shape. Crosses can be drawn, replaced and erased by single clicks or by dragging.
Edit BackstitchStandard and freehand backstitch are edited separately.
Standard backstitch replaces existing standard backstitch if it is drawn in the same place. Standard backstitch can be drawn, replaced and erased by single clicks or dragging.
Freehand backstitch will only replace existing freehand backstitch if it is drawn with exactly the same end points. If either end point is different, a new line of freehand
To learn how to Go to
Changing crosses, backstitch and knots See “Edit Crosses, Backstitch and French Knots” on page 134.
Select an area of stitches See “Select” on page 135.
Flip a block of stitches vertically or horizontally
See “Flip Vertical and Horizontal” on page 137.
Measure the length of an area See “Get Length” on page 137.
Cut, Copy, Paste and Duplicate a selection
See “Cut, Copy, Paste and Duplicate Selected” on page 138.
Delete a selection See “Delete” on page 140.
Undo or Redo an action See “Undo and Redo” on page 140.
mySewnet™ Cross Stitcher Editing Designs 135
backstitch is added. Freehand backstitch is drawn and replaced one line at a time when dragging, and erased one line at a time with single clicks.
Edit French KnotsFrench knots are drawn, replaced and erased individually with single clicks. Only one French knot can exist at each half grid point.
SelectThe select functions in the toolbar allow you to select an area of stitches. A selection can be rotated in 90 degree steps, mirrored, moved, copied and cut.
Note: The select functions may not be used to make new selections when the Multiply function is active.
Selecting stitches■ When stitches are selected, they have a selection box around them on the design
area. Drag inside the selection box to move it.
Note: When making a selection, only stitches that are on grid points that are completely enclosed by the selection line are included in the selection. If the selection line crosses freehand backstitch lines, the freehand backstitch are not included as you have not completely enclosed both ends.
Inserting or pasting a selection■ When a new selection is added to a design by paste, insert design or the text
functions, it is automatically selected and Box Select is activated.
Deselecting a selection■ Click the work area outside a block to deselect it. The selection box around the
block disappears and the selection becomes part of the design. Any colors in the selection that were not in the palette are added to the palette.
Selections are also automatically deselected when any new selection is added to the design, or when other functions that affect the design are activated.
Box SelectUse Box Select to select crosses and backstitch in a rectangular area. Only stitches that are on grid points that are completely enclosed by the selection line are selected.
Box Select is also activated automatically when a block is pasted into a design.
To select cross stitch designs with Box Select■ Click the Box Select button on the toolbar, then drag around the area you
want to select.■ Choose Edit > Box Select, then drag around the area you want to select.
136 mySewnet™ Cross Stitcher Editing Designs
Freehand SelectUse Freehand Select to select crosses and backstitch within an area of any shape.
To select cross stitch designs with Freehand Select■ Click the Freehand Select button on the toolbar, then drag to draw an irregular
outline around the desired stitches.■ Choose Edit > Freehand Select, then drag to draw an irregular outline around the
desired stitches. When you release the mouse the area is closed automatically.
Point SelectUse Point Select to select crosses and backstitch within an area of any shape, defined by a series of points. Only stitches that are on grid points that are completely enclosed by the selection line are selected. Point Select may be easier to use than Freehand Select or Box Select for precise selections.
To select cross stitch designs with Point Select■ Click the Point Select button on the toolbar, then click a series of points to
create an irregular outline of straight and curved lines around the desired stitches. Double-click to finish.
■ Choose Edit > Point Select, then click a series of points to create an irregular outline of straight and curved lines around the desired stitches. Double-click to finish.
Select All VisibleUse Select All Visible to select the whole design automatically. A selection box is shown around the edge of the design.
To Select All Visible■ Click the Select All Visible button on the toolbar.■ Choose Edit > Select All Visible.■ Press ⌘A
Click outside the box, in the work area outside the design, to deselect.
Deselect AllUse Deselect All to deselect every selected stitch.
To Deselect All■ Click the Deselect All button on the toolbar.■ Choose Edit > Deselect All.■ Press ⇧⌘A
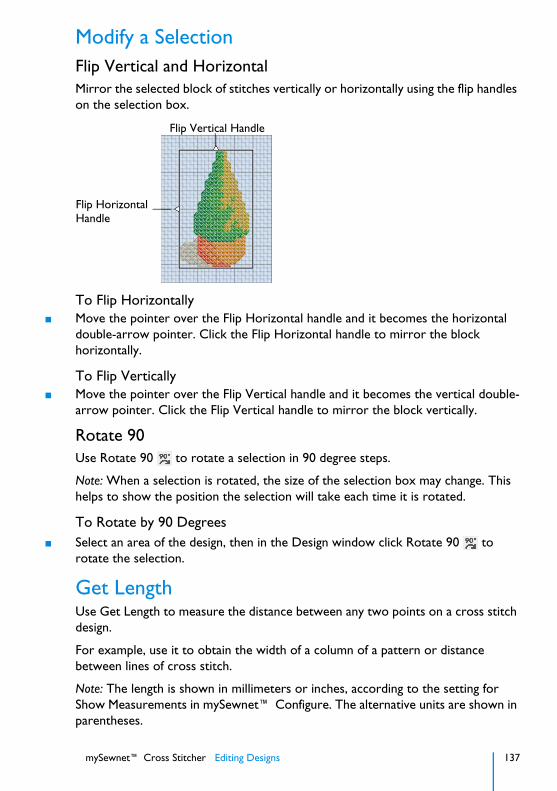
mySewnet™ Cross Stitcher Editing Designs 137
Modify a SelectionFlip Vertical and HorizontalMirror the selected block of stitches vertically or horizontally using the flip handles on the selection box.
To Flip Horizontally■ Move the pointer over the Flip Horizontal handle and it becomes the horizontal
double-arrow pointer. Click the Flip Horizontal handle to mirror the block horizontally.
To Flip Vertically■ Move the pointer over the Flip Vertical handle and it becomes the vertical double-
arrow pointer. Click the Flip Vertical handle to mirror the block vertically.
Rotate 90Use Rotate 90 to rotate a selection in 90 degree steps.
Note: When a selection is rotated, the size of the selection box may change. This helps to show the position the selection will take each time it is rotated.
To Rotate by 90 Degrees■ Select an area of the design, then in the Design window click Rotate 90 to
rotate the selection.
Get LengthUse Get Length to measure the distance between any two points on a cross stitch design.
For example, use it to obtain the width of a column of a pattern or distance between lines of cross stitch.
Note: The length is shown in millimeters or inches, according to the setting for Show Measurements in mySewnet™ Configure. The alternative units are shown in parentheses.
Flip Vertical Handle
Flip HorizontalHandle

138 mySewnet™ Cross Stitcher Editing Designs
To use Get Length■ Choose View > Get Length.
Measure a Design with Get Length1 Open a design.2 Choose View > Get Length. The pointer changes to the
measure pointer .3 Drag across the part of the design you want to measure.
A line shows the length you are measuring, and a tooltip displays the distance.
4 If desired, make a note of the number.5 Drag to measure any other distances, as required.6 Control–click, and choose "Finish Get Length" to deselect
the function.
Cut, Copy, Paste and Duplicate SelectedOnce stitches have been selected with one of the selection tools, they can be cut and copied. Only stitches that are completely enclosed by the selection line are selected. The selection on the clipboard can be pasted as many times as desired within the mySewnet™ Cross Stitcher app.
CutUse Cut to cut out the selection and place the stitches on the clipboard. The selection can then be pasted back in.
To Cut the selected stitches■ Click Actions on the toolbar and choose Cut.■ Choose Edit > Cut.■ Press ⌘X■ Control–click and choose Cut.
CopyUse Copy to copy the selection to the clipboard, without affecting the current selection. The selection can then be pasted back in.
To Copy the selected stitches■ Click Actions on the toolbar and choose Copy.■ Choose Edit > Copy.■ Press ⌘C■ Control–click and choose Copy.
mySewnet™ Cross Stitcher Editing Designs 139
Copy EmbroideryUse Copy Embroidery to copy the selected stitches to the clipboard as an embroidery, without affecting the stitches on the work area. The copied embroidery can then be pasted into any mySewnet™ Embroidery Software app.
To copy the selected stitches as an embroidery■ Choose Edit > Copy Embroidery.■ Press ⇧⌘C
PasteUse Paste to paste the selection on the clipboard back into the design.
Note: When a selection is pasted, it does not become part of the design until it is 'fixed' by being deselected. Therefore, if a part of a design is copied and pasted to a different design, new colors from the pasted selection will not appear in the color worksheet until the selection is fixed in place.
Note: Embroideries that have been copied from other mySewnet™ Embroidery Software apps may not be pasted into mySewnet™ Cross Stitcher because they are not cross stitch designs. However, you may use Copy Embroidery to copy a design from mySewnet™ Cross Stitcher to another mySewnet™ Embroidery Software app.
To Paste the selected stitches■ Click Actions on the toolbar and choose Paste.■ Choose Edit > Paste.■ Press ⌘V■ Control–click and choose Paste.
Duplicate SelectedUse Duplicate Selected to make a copy of the selected stitches. The copy is automatically pasted on the design area below and to the right of the original.
To duplicate the selected stitches■ Select the stitches, then click Actions on the toolbar and choose Duplicate
Selected.■ Choose Edit > Duplicate Selected.■ Press ⌘D■ Control–click and choose Duplicate Selected.

140 mySewnet™ Cross Stitcher Editing Designs
DeleteUse Delete to delete a selection after it has been selected using one of the selection tools.
Note: This function differs from Cut because it does not place the stitches on the Clipboard. Therefore stitches that have been Deleted cannot be pasted into another design (although Undo can be used if the wrong stitches are deleted).
To delete a selected blockSelect the block of stitches, then:
■ Click Actions on the toolbar and choose Delete.■ Control–click the selected block and choose Delete.■ Choose Edit > Delete.■ On full-size keyboards, press Delete ⌦. ■ On Mac portable keyboards, press Function–Delete or Function–Backspace
(fn ⌫ ).
Undo and RedoUndo reverses the last action. The undone action then becomes a Redo.
UndoUse Undo to reverse the last action. If you are not satisfied with the result, click Redo.
Each time you use Undo the undone action becomes a Redo. For instance, you might erase a cross and then Undo the erase. You could now Redo the erase or do something else. If you erase a different cross instead of using Redo then the Redo is lost, along with any other Redos that may have followed.
There are unlimited Undo steps. Undo steps are only lost when you close a design.
To use Undo■ Click Actions on the toolbar and choose Undo.■ Choose Edit > Undo.■ Press ⌘Z■ Control–click and choose Undo.
RedoUse Redo to reverse the last action that was undone by Undo. If you are not satisfied with the result, click Undo.
Redo only works if nothing has happened after the last Undo. For instance, if you change a palette color, then Undo and draw some crosses, then it is not possible to Redo the color change because something different has happened instead.
There are unlimited Redo steps. Redo steps are only lost when you close a design.
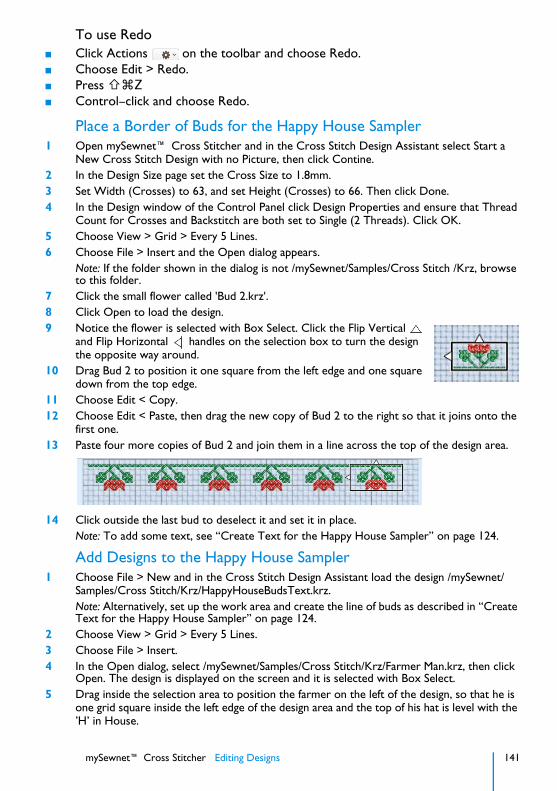
mySewnet™ Cross Stitcher Editing Designs 141
To use Redo■ Click Actions on the toolbar and choose Redo.■ Choose Edit > Redo.■ Press ⇧⌘Z■ Control–click and choose Redo.
Place a Border of Buds for the Happy House Sampler1 Open mySewnet™ Cross Stitcher and in the Cross Stitch Design Assistant select Start a
New Cross Stitch Design with no Picture, then click Contine.2 In the Design Size page set the Cross Size to 1.8mm.3 Set Width (Crosses) to 63, and set Height (Crosses) to 66. Then click Done.4 In the Design window of the Control Panel click Design Properties and ensure that Thread
Count for Crosses and Backstitch are both set to Single (2 Threads). Click OK.5 Choose View > Grid > Every 5 Lines.6 Choose File > Insert and the Open dialog appears.
Note: If the folder shown in the dialog is not /mySewnet/Samples/Cross Stitch /Krz, browse to this folder.
7 Click the small flower called 'Bud 2.krz'.8 Click Open to load the design.9 Notice the flower is selected with Box Select. Click the Flip Vertical
and Flip Horizontal handles on the selection box to turn the design the opposite way around.
10 Drag Bud 2 to position it one square from the left edge and one square down from the top edge.
11 Choose Edit < Copy.12 Choose Edit < Paste, then drag the new copy of Bud 2 to the right so that it joins onto the
first one.13 Paste four more copies of Bud 2 and join them in a line across the top of the design area.
14 Click outside the last bud to deselect it and set it in place.Note: To add some text, see “Create Text for the Happy House Sampler” on page 124.
Add Designs to the Happy House Sampler1 Choose File > New and in the Cross Stitch Design Assistant load the design /mySewnet/
Samples/Cross Stitch/Krz/HappyHouseBudsText.krz.Note: Alternatively, set up the work area and create the line of buds as described in “Create Text for the Happy House Sampler” on page 124.
2 Choose View > Grid > Every 5 Lines.3 Choose File > Insert.4 In the Open dialog, select /mySewnet/Samples/Cross Stitch/Krz/Farmer Man.krz, then click
Open. The design is displayed on the screen and it is selected with Box Select.5 Drag inside the selection area to position the farmer on the left of the design, so that he is
one grid square inside the left edge of the design area and the top of his hat is level with the ’H’ in House.
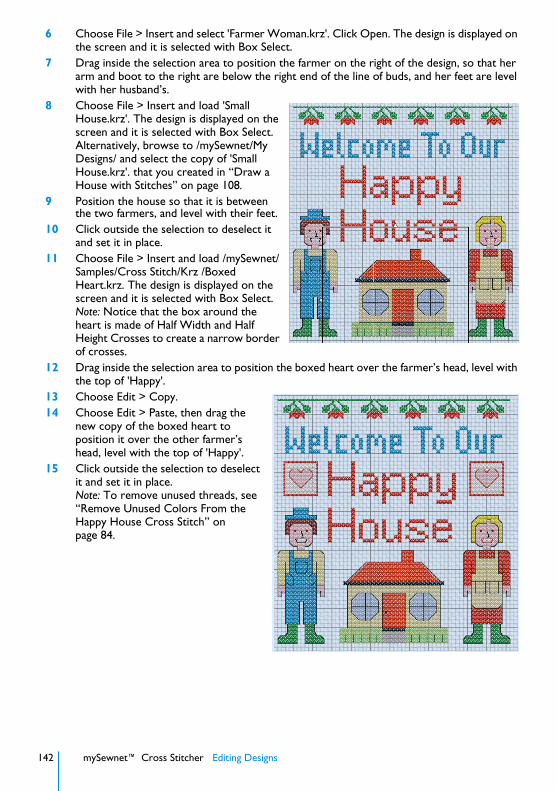
142 mySewnet™ Cross Stitcher Editing Designs
6 Choose File > Insert and select 'Farmer Woman.krz'. Click Open. The design is displayed on the screen and it is selected with Box Select.
7 Drag inside the selection area to position the farmer on the right of the design, so that her arm and boot to the right are below the right end of the line of buds, and her feet are level with her husband’s.
8 Choose File > Insert and load 'Small House.krz'. The design is displayed on the screen and it is selected with Box Select.Alternatively, browse to /mySewnet/My Designs/ and select the copy of 'Small House.krz'. that you created in “Draw a House with Stitches” on page 108.
9 Position the house so that it is between the two farmers, and level with their feet.
10 Click outside the selection to deselect it and set it in place.
11 Choose File > Insert and load /mySewnet/Samples/Cross Stitch/Krz /Boxed Heart.krz. The design is displayed on the screen and it is selected with Box Select.Note: Notice that the box around the heart is made of Half Width and Half Height Crosses to create a narrow border of crosses.
12 Drag inside the selection area to position the boxed heart over the farmer’s head, level with the top of 'Happy'.
13 Choose Edit > Copy.14 Choose Edit > Paste, then drag the
new copy of the boxed heart to position it over the other farmer’s head, level with the top of 'Happy'.
15 Click outside the selection to deselect it and set it in place.Note: To remove unused threads, see “Remove Unused Colors From the Happy House Cross Stitch” on page 84.

mySewnet™ Cross Stitcher Printing 143
12Printing
Use the Print dialog to select your print settings, and to print a worksheet for your cross stitch embroidery.
To open the Print dialog■ Choose File > Print■ Press ⌘P
PrintSelect Show Details to choose the information to be printed with the embroidery, select the printer and page layout, and choose a scale for the printout. Then print the embroidery worksheet.
PreviewDisplay the cross stitch embroidery as it would appear when printed. Other information, such as the Dimension, Color Information, Notes and Settings and Technical Information is shown, depending on the choices made in the Print dialog. Export options such as Combine, Remove Overlap, ColorSort and Optimize Stitch Length are shown, depending on the choices made in the Export dialog. See “Export” on page 22.
If there are multiple pages, step through them with Next Page and Previous Page .
144 mySewnet™ Cross Stitcher Printing
Scale and InformationSelect the information to be printed with the embroidery, such as the Dimensions, Color Information, Notes and Technical Information. In addition, the scale may be altered and a grid turned on or off. Set the Units of Measurement for the Dimensions and Technical Information to mm or inches, as desired.
Design ScaleScale: Select 25%, 50%, 75% or 100%, or To Fit scaling when printing your embroidery. This is how large the embroidery will print compared to the real size of a stitched out embroidery. Use a reduced Design Scale if you want to ensure that the worksheet fits on one page. Use the preview to see how many pages will be printed.
Show Grid: This determines whether or not a grid is printed with the embroidery. If you turn this off you will still get a rectangle representing the hoop.
Flip Design: Select "Flip design for felting or reverse embroidery" to flip the design.
Print InformationThis determines what additional information is printed. Select the information to be printed with the embroidery, such as the Dimensions, Color Information, Notes and Technical Information. All items are selected initially.
Dimensions: The size of the embroidery and the stitch count.
Color Information: The sequence of thread colors used and, if available, the thread specification (range, thread number and name).
Notes: Any notes and settings that are included with the embroidery.
Technical Information: The distance of each edge of the embroidery from the center of the embroidery.
Units of Measurement Set the Units of Measurement for the Dimensions and Technical Information to mm or inches, as desired.
PDFChoose PDF creation settings.
Hide DetailsView a concise version of the Print dialog.
PrinterSelect the printer you want to use.
PresetsChoose a saved printer setup.

mySewnet™ Cross Stitcher Printing 145
CopiesSelect the number of Copies you wish to print, and whether to print on two sides.
PagesSelect the range of pages you wish to print.
Paper SizeSelect the size of paper that the embroidery is to be printed on.
OrientationChoose Portrait or Landscape.
Settings MenuSelect the settings details for the following from the pop-up menu under the app name:
• Layout• Color Matching• Paper Handling• Paper Feed• Cover Page• Supply Levels
LayoutChoose the number of pages per sheet, whether to use a border, and whether to print on two sides, reverse the page orientation, and flip horizontally.
Color MatchingSelect the color match profile.
Paper HandlingSelect page order, whether to collate pages, which pages to print, and scale relative to paper size.
Paper FeedSelect your paper source.
Print an Embroidery WorksheetUse the Print button to print a worksheet in 3D for the embroidery created from your design.
Print a Worksheet for an Embroidery1 Open mySewnet™ Cross Stitcher , and in the Design Options page of the Cross Stitch
Design Assistant select Load Existing Cross Stitch Design, and then click Continue.2 In the Open Existing Design page, click the Select File button and browse to /mySewnet/
Samples/Cross Stitch/Krz/Linnet.krz. Click Done to close the assistant.
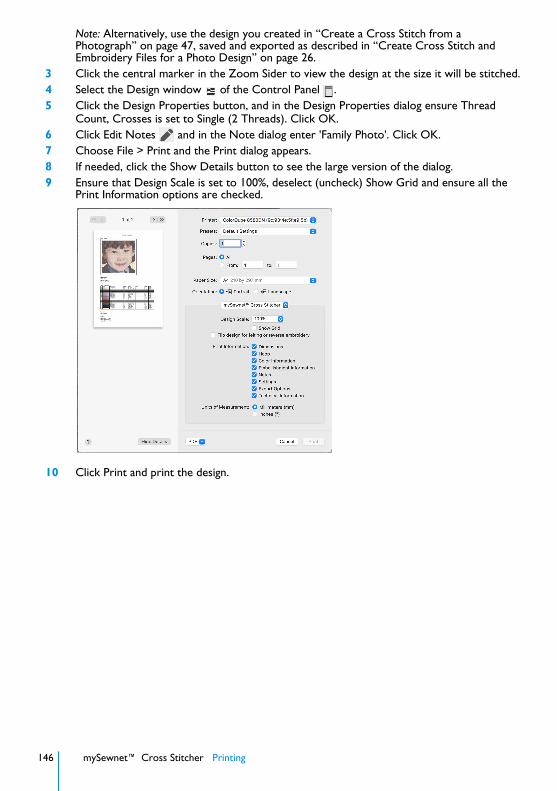
146 mySewnet™ Cross Stitcher Printing
Note: Alternatively, use the design you created in “Create a Cross Stitch from a Photograph” on page 47, saved and exported as described in “Create Cross Stitch and Embroidery Files for a Photo Design” on page 26.
3 Click the central marker in the Zoom Sider to view the design at the size it will be stitched.4 Select the Design window of the Control Panel .5 Click the Design Properties button, and in the Design Properties dialog ensure Thread
Count, Crosses is set to Single (2 Threads). Click OK.6 Click Edit Notes and in the Note dialog enter 'Family Photo'. Click OK.7 Choose File > Print and the Print dialog appears.8 If needed, click the Show Details button to see the large version of the dialog.9 Ensure that Design Scale is set to 100%, deselect (uncheck) Show Grid and ensure all the
Print Information options are checked.
10 Click Print and print the design.
mySewnet™ Cross Stitcher Troubleshooting 147
13Troubleshooting
Error MessagesAcquiring and Loading Pictures
"Not enough memory to load this picture."This message may appear if the picture is very large. If you are loading the picture, use picture editing software to reduce it size. If you are acquiring the picture from a scanner or digital camera, change the settings in the acquiring or scanning application so the picture is smaller.
"LoadImage: GDI+ out of memory."This message could appear if the selected picture is not a valid picture file. For example, it might have an extension such as .bmp or .jpg, yet not be a proper picture file.
Opening Cross Stitch Designs
"Cannot open file "xx.krz". The device is not ready."This message appears if the desired cross stitch design (.krz) file is not where the app expects it to be. For example, if a design was loaded into the program from a USB memory stick, then closed and the memory stick removed. The message would appear if you tried to load the design from the recent files list on the File menu.
"No valid cross stitch data (Unknown file format)."This message appears if the file you are attempting to load is corrupt. For example, it might have a .krz extension, yet not be a proper cross stitch design file.
Saving Cross Stitch Designs
"Exporting to XX failed."This message appears if, for instance, you attempt to save the design to a CD. A CD-ROM is read only, therefore you will not be able to save the design.
Editing Thread Colors
"This will remove all stitches of this color. Do you wish to continue?"This message appears when you select a color in the Color Select area and click Delete, if there are stitches using the selected color in the cross stitch design. Click OK to continue, for example, to remove a color that is only used in the background.
148 mySewnet™ Cross Stitcher Troubleshooting
Choosing Thread Colors
"The color xx has been found in your database, but the thread color is not exactly the same."This message appears if the Thread Range and Color Number of the selected color are identical to those in your thread database, but some aspect of the color is different. It could be a different material or weight, or have additional colors as a variegated thread. This could happen if the design you are attempting to edit was supplied by someone with a different version of the color, for instance if they have edited it in MyThreads, or if they have a later version of the thread database. If you click OK, the color is replaced with the near match. You can alter it to any other color if desired. If you click Cancel, the color will not be changed. To import the new color from an embroidery if it is a MyThreads color, use mySewnet™ Thread Cache. To check for the latest updates for the mySewnet™ Embroidery Software, use Check for Updates in mySewnet™ Configure.
"Could not find xx in your database. Matching to closest thread in yy."This message appears if the Thread Range of the selected color is not found in your thread database. This could happen if the design you are attempting to edit was supplied by someone with a later version of the thread database. If you click OK, the color is replaced with the nearest match in the Import Thread Range you have set in mySewnet™ Configure. You can alter it to any other color if desired. If you click Cancel, the color will not be changed. To check for the latest updates for the mySewnet™ Embroidery Software, use Check for Updates in mySewnet™ Configure.
"Error. Please select a valid thread."This message appears if you attempt to click OK in the Color Selection dialog when MyThreads is selected as the thread range and MyThreads is empty.
To prevent this message appearing again, use mySewnet™ Thread Cache to add at least one thread to MyThreads.
Exporting Embroideries
"The file already exists. Do you want to replace it?"This message appears if an embroidery you are trying to Export has a name that has already been used. Replace the existing embroidery, or choose a new name before exporting.
"Exporting to XX failed. The design was too big for the export format."Certain formats are limited to the number of stitches they can save or the size of hoop used on their specific embroidery machine, for example the .sew or Pfaff (.pcs) file format. If you attempt to save a file in this format that is bigger than the largest available hoop size, or has more stitches than are allowed, this message will appear.
mySewnet™ Cross Stitcher Troubleshooting 149
"Exporting to XX failed."This message appears if, for instance, you attempt to save the embroidery to a CD. A CD-R is read only, therefore you will not be able to save the embroidery.

150 mySewnet™ Cross Stitcher Troubleshooting
Other TopicsScreen Appearance
"I have changed grid color and spacing and now I wish to return to the original settings."Click the Color block and the Colors window appears to allow you to choose a color. The color set by default for your mySewnet™ Software is 127, 127, 127 (RGB). You can use the RGB Sliders in the Colors Sliders tab to return to this color.
To set the Grid to 5 lines (the default setting), choose View > Grid > Every 5 lines.
"I have changed the screen background color and now I wish to return to the original light blue."Use mySewnet™ Configure to change the background color. Click the Color block and the Colors window appears to allow you to choose a color. The color set by default for your mySewnet™ Software is 211, 233, 255 (RGB). You can use the RGB Sliders in the Colors Sliders tab to return to this color.
"I have used a variegated thread, but it is only showing as a single color."Only the first color in a variegated thread is shown in a cross stitch design. To see the effect of a variegated thread, use Design Player or Life View.
"I have placed backstitch, but it is not visible at all zoom levels."If the grid color is similar to the color of backstitch, then the backstitch may blend with the grid at certain zoom levels so that it is hard to see. Turn off the grid temporarily to see where you have placed your backstitch. Backstitch may also be easier to see in Block mode.
"I have loaded a picture for a new design, but the screen is blank when the Cross Stitch Design Assistant closes."The background picture and grid are not shown at the smallest zoom level. In 3D, the fabric is also not shown at the smallest zoom level. When the Cross Stitch Design Assistant closes, the screen automatically zooms to fit the design size chosen in the Cross Stitch Design Assistant. If the design size was large, then the smallest zoom level is used. As there are no stitches, the screen appears to be blank because the picture, fabric and grid are not shown. Zoom in to see the picture, fabric and grid.
"The stitch tools aren’t available when I start a new design."The stitch tools are not available at the smallest zoom level. When the Cross Stitch Design Assistant closes, the screen automatically zooms to fit the design size chosen in the Cross Stitch Design Assistant. If the design size was large, then the smallest zoom level is used. Zoom in and the stitch tools are available.

mySewnet™ Cross Stitcher Troubleshooting 151
"Stitches seem to be missing when I open my cross stitch designs after I have been working for a while."This will only happen if you have used Hide Colors to hide some of the colors or stitches in a design you were working on previously. The Hide Colors options are not reset automatically until you restart mySewnet™ Cross Stitcher. Click the Hide Colors icon, then click Reset.
"I can’t see the picture, fabric or grid when I Zoom To Fit."The background picture and grid are not shown at the smallest zoom level. In 3D, the fabric is also not shown at the smallest zoom level. When Zoom To Fit is used, the smallest zoom level may be used if the design is large. Zoom in to see the picture, fabric and grid.
Flood Fill and Pattern Flood Fill
"I have loaded a picture for a new design, but Flood Fill covers the whole picture when I try to fill colored areas of the picture."Neither Flood Fill nor Pattern Flood Fill are affected by areas of color in the background picture. An empty area of the design will be flood filled until it meets existing crosses or backstitch. A connected area of the same colored crosses can be flood filled until it meets an empty area, backstitch or crosses in a different color. To clearly see the areas that will be flood filled, turn off or fade the background picture.
"Flood Fill does not fill the whole area as expected."In some cases, the fill will not go through narrow areas. If the fill could not continuously connect a fill of full crosses through a narrow gap, the gap will act as a barrier to flood fill.
"I have a pattern that uses freehand backstitch. When I use it to fill an area it does not seem to fill the area completely or some lines of freehand backstitch appear to be missing."When a pattern is used to fill an area, freehand backstitch in the pattern will only be placed when both end points lie within the fill area. Long sections of freehand backstitch are less likely to have both ends in the fill area and may not give the desired result. If you wish to use freehand backstitch in a pattern, try to use short sections where possible.
Editing Cross Stitch Designs
"When I use Rotate 90 on a selection, the selection becomes a square."The selection area is extended by Rotate 90 so that you can clearly see where the selection will be placed by each click of the Rotate 90 icon. The stitches in the selection area are not changed.

152 mySewnet™ Cross Stitcher Troubleshooting
"Nothing seems to happen sometimes when I use Undo after using Erase."Each time you click with Erase, this is recorded as an action you can Undo. If you click in blank space, or you miss the item you are trying to Erase, the action is still recorded for Undo. Hence, when you Undo, the Erase action is undone, even though it seemed to have no effect on the design.
Creating and Stitching Embroideries
"The embroidery is larger than the design size I selected in the Cross Stitch Design Assistant or Design Properties."This may happen if you have French knots on the edges of your design. French knots are drawn by placing their center point on any point that snaps to half grid spacing. Therefore, if they are placed along the edges of the design, half of each French knot is outside the grid. If French knots are placed on all edges of the grid, the resulting embroidery is larger than the design by the size of a French knot.
Note: French knots are only scaled in comparison to the full cross size when the Cross Size in Design Properties is set between 2mm and 4mm. The French knots will not be any smaller or larger than they are at these limits.
"The embroidery seems to have too many stitches."Check the Design Properties dialog to ensure you do not have a large number of strands for crosses and/or backstitch in the design. Increasing the number of strands will increase the number of stitches.
"The embroidery is very thick when it stitches out."Check the Design Properties dialog to ensure you do not have a large number of strands for crosses and/or backstitch in the design. Increasing the number of strands will increase the density of stitches.
"There seem to be some very thick lines of stitching where I used backstitch in the design."Standard Backstitch and Freehand Backstitch are drawn on two separate layers in mySewnet™ Cross Stitcher, but they are stitched out together if they are the same color. In addition to this, Freehand Backstitch can be placed in multiple layers over the same line, as long as the end points of each line are different.
This is used, for example, to place different colors of Freehand Backstitch on top of each other to secure the edges of lace. Each layer will stitch out separately according to the color order in the design, but the same thread color is used in the stitchout to give a single color to the lace effect.
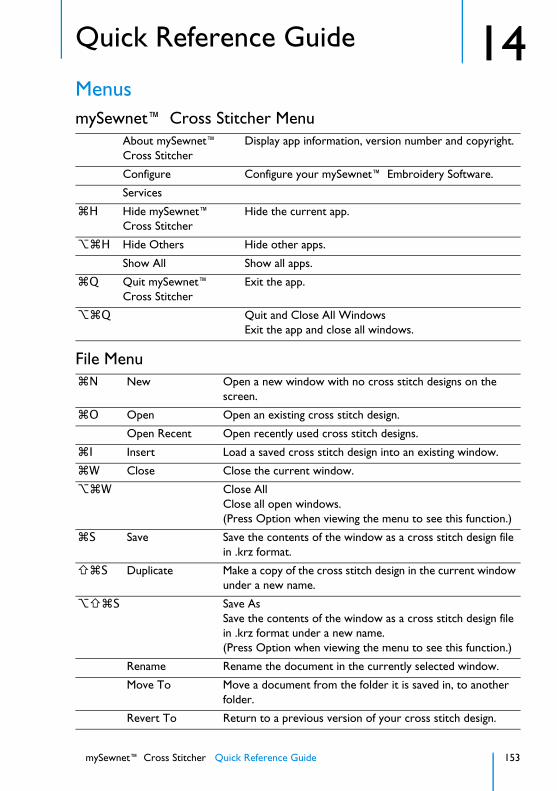
mySewnet™ Cross Stitcher Quick Reference Guide 153
14Quick Reference Guide
MenusmySewnet™ Cross Stitcher Menu
File Menu
About mySewnet™ Cross Stitcher
Display app information, version number and copyright.
Configure Configure your mySewnet™ Embroidery Software.
Services
⌘H Hide mySewnet™ Cross Stitcher
Hide the current app.
⌥⌘H Hide Others Hide other apps.
Show All Show all apps.
⌘Q Quit mySewnet™ Cross Stitcher
Exit the app.
⌥⌘Q Quit and Close All WindowsExit the app and close all windows.
⌘N New Open a new window with no cross stitch designs on the screen.
⌘O Open Open an existing cross stitch design.
Open Recent Open recently used cross stitch designs.
⌘I Insert Load a saved cross stitch design into an existing window.
⌘W Close Close the current window.
⌥⌘W Close AllClose all open windows.(Press Option when viewing the menu to see this function.)
⌘S Save Save the contents of the window as a cross stitch design file in .krz format.
⇧⌘S Duplicate Make a copy of the cross stitch design in the current window under a new name.
⌥⇧⌘S Save AsSave the contents of the window as a cross stitch design file in .krz format under a new name.(Press Option when viewing the menu to see this function.)
Rename Rename the document in the currently selected window.
Move To Move a document from the folder it is saved in, to another folder.
Revert To Return to a previous version of your cross stitch design.
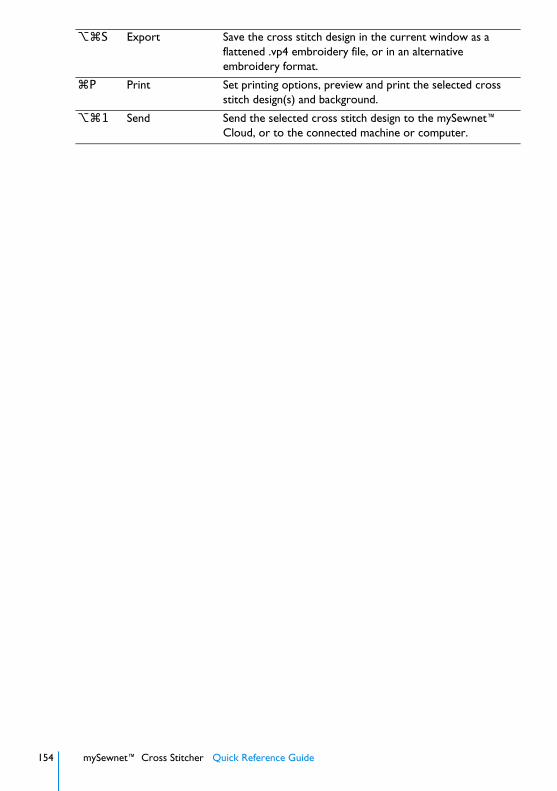
154 mySewnet™ Cross Stitcher Quick Reference Guide
⌥⌘S Export Save the cross stitch design in the current window as a flattened .vp4 embroidery file, or in an alternative embroidery format.
⌘P Print Set printing options, preview and print the selected cross stitch design(s) and background.
⌥⌘1 Send Send the selected cross stitch design to the mySewnet™ Cloud, or to the connected machine or computer.
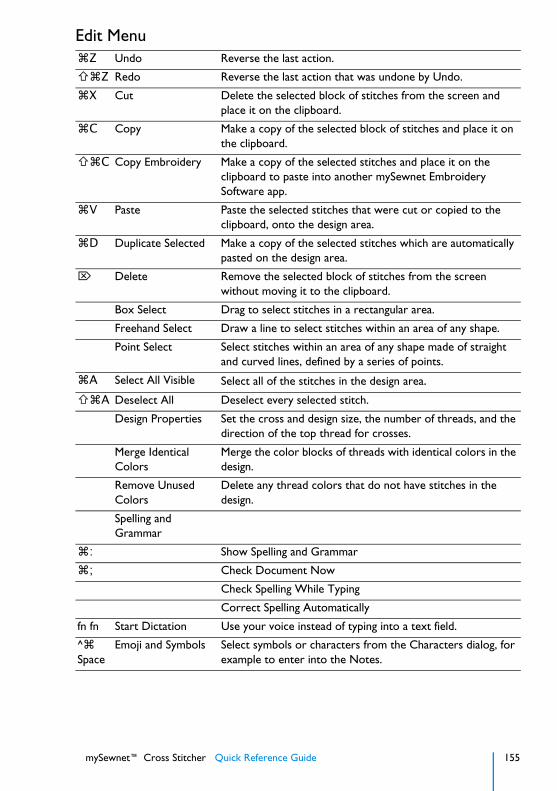
mySewnet™ Cross Stitcher Quick Reference Guide 155
Edit Menu⌘Z Undo Reverse the last action.
⇧⌘Z Redo Reverse the last action that was undone by Undo.
⌘X Cut Delete the selected block of stitches from the screen and place it on the clipboard.
⌘C Copy Make a copy of the selected block of stitches and place it on the clipboard.
⇧⌘C Copy Embroidery Make a copy of the selected stitches and place it on the clipboard to paste into another mySewnet Embroidery Software app.
⌘V Paste Paste the selected stitches that were cut or copied to the clipboard, onto the design area.
⌘D Duplicate Selected Make a copy of the selected stitches which are automatically pasted on the design area.
⌦ Delete Remove the selected block of stitches from the screen without moving it to the clipboard.
Box Select Drag to select stitches in a rectangular area.
Freehand Select Draw a line to select stitches within an area of any shape.
Point Select Select stitches within an area of any shape made of straight and curved lines, defined by a series of points.
⌘A Select All Visible Select all of the stitches in the design area.⇧⌘A Deselect All Deselect every selected stitch.
Design Properties Set the cross and design size, the number of threads, and the direction of the top thread for crosses.
Merge Identical Colors
Merge the color blocks of threads with identical colors in the design.
Remove Unused Colors
Delete any thread colors that do not have stitches in the design.
Spelling and Grammar
⌘: Show Spelling and Grammar
⌘; Check Document Now
Check Spelling While Typing
Correct Spelling Automatically
fn fn Start Dictation Use your voice instead of typing into a text field.
^⌘ Space
Emoji and Symbols Select symbols or characters from the Characters dialog, for example to enter into the Notes.
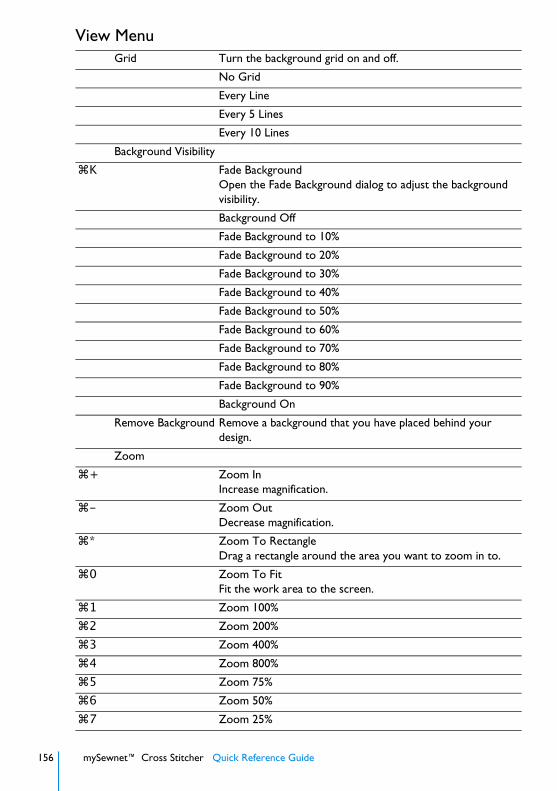
156 mySewnet™ Cross Stitcher Quick Reference Guide
View MenuGrid Turn the background grid on and off.
No Grid
Every Line
Every 5 Lines
Every 10 Lines
Background Visibility
⌘K Fade BackgroundOpen the Fade Background dialog to adjust the background visibility.
Background Off
Fade Background to 10%
Fade Background to 20%
Fade Background to 30%
Fade Background to 40%
Fade Background to 50%
Fade Background to 60%
Fade Background to 70%
Fade Background to 80%
Fade Background to 90%
Background On
Remove Background Remove a background that you have placed behind your design.
Zoom
⌘+ Zoom InIncrease magnification.
⌘- Zoom OutDecrease magnification.
⌘* Zoom To RectangleDrag a rectangle around the area you want to zoom in to.
⌘0 Zoom To FitFit the work area to the screen.
⌘1 Zoom 100%
⌘2 Zoom 200%
⌘3 Zoom 400%
⌘4 Zoom 800%
⌘5 Zoom 75%
⌘6 Zoom 50%
⌘7 Zoom 25%
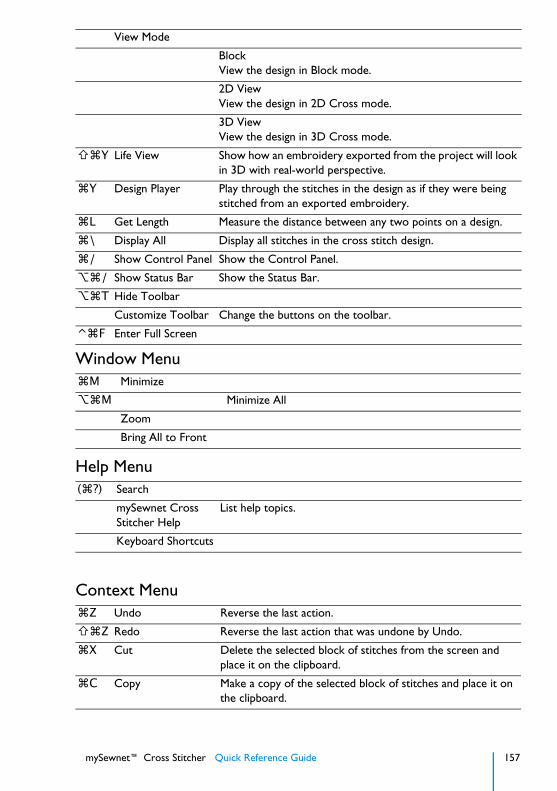
mySewnet™ Cross Stitcher Quick Reference Guide 157
Window Menu
Help Menu
Context Menu
View Mode
BlockView the design in Block mode.
2D ViewView the design in 2D Cross mode.
3D ViewView the design in 3D Cross mode.
⇧⌘Y Life View Show how an embroidery exported from the project will look in 3D with real-world perspective.
⌘Y Design Player Play through the stitches in the design as if they were being stitched from an exported embroidery.
⌘L Get Length Measure the distance between any two points on a design.
⌘\ Display All Display all stitches in the cross stitch design.
⌘/ Show Control Panel Show the Control Panel.
⌥⌘/ Show Status Bar Show the Status Bar.
⌥⌘T Hide Toolbar
Customize Toolbar Change the buttons on the toolbar.
⌃⌘F Enter Full Screen
⌘M Minimize
⌥⌘M Minimize All
Zoom
Bring All to Front
(⌘?) Search
mySewnet Cross Stitcher Help
List help topics.
Keyboard Shortcuts
⌘Z Undo Reverse the last action.
⇧⌘Z Redo Reverse the last action that was undone by Undo.
⌘X Cut Delete the selected block of stitches from the screen and place it on the clipboard.
⌘C Copy Make a copy of the selected block of stitches and place it on the clipboard.

158 mySewnet™ Cross Stitcher Quick Reference Guide
⌘V Paste Paste a block that has been cut or copied to the clipboard onto the screen.
⌘D Duplicate Selected Make a copy of the block which is automatically pasted on the work area.
⌦ Delete Remove the selected block of stitches from the screen without moving it to the clipboard.
Zoom
⌘1 Zoom 100%
⌘2 Zoom 200%
⌘3 Zoom 400%
⌘4 Zoom 800%
⌘5 Zoom 75%
⌘6 Zoom 50%
⌘7 Zoom 25%
Background Visibility
Background On
Fade BackgroundOpen the Fade Background dialog to adjust the background visibility.
Background Off
⌥⌘1 Send Send the selected cross stitch design to the mySewnet™ Cloud, or to the connected machine or computer.
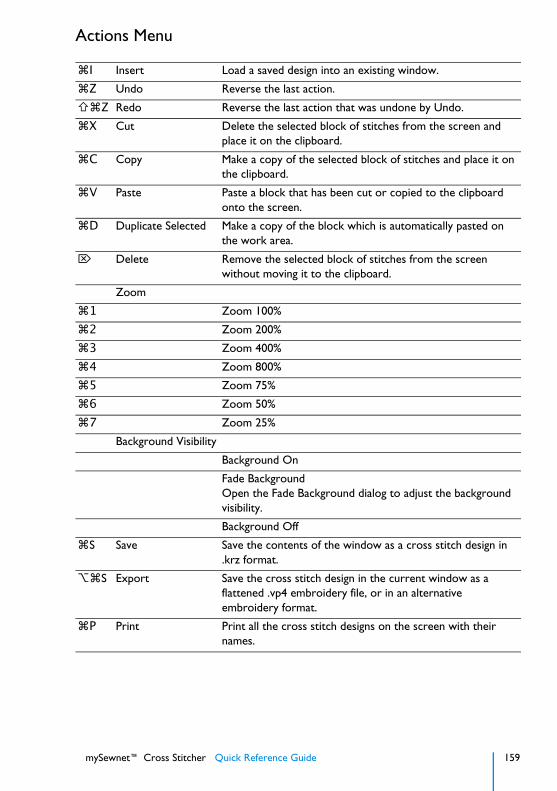
mySewnet™ Cross Stitcher Quick Reference Guide 159
Actions Menu
⌘I Insert Load a saved design into an existing window.
⌘Z Undo Reverse the last action.
⇧⌘Z Redo Reverse the last action that was undone by Undo.
⌘X Cut Delete the selected block of stitches from the screen and place it on the clipboard.
⌘C Copy Make a copy of the selected block of stitches and place it on the clipboard.
⌘V Paste Paste a block that has been cut or copied to the clipboard onto the screen.
⌘D Duplicate Selected Make a copy of the block which is automatically pasted on the work area.
⌦ Delete Remove the selected block of stitches from the screen without moving it to the clipboard.
Zoom
⌘1 Zoom 100%
⌘2 Zoom 200%
⌘3 Zoom 400%
⌘4 Zoom 800%
⌘5 Zoom 75%
⌘6 Zoom 50%
⌘7 Zoom 25%
Background Visibility
Background On
Fade BackgroundOpen the Fade Background dialog to adjust the background visibility.
Background Off
⌘S Save Save the contents of the window as a cross stitch design in .krz format.
⌥⌘S Export Save the cross stitch design in the current window as a flattened .vp4 embroidery file, or in an alternative embroidery format.
⌘P Print Print all the cross stitch designs on the screen with their names.
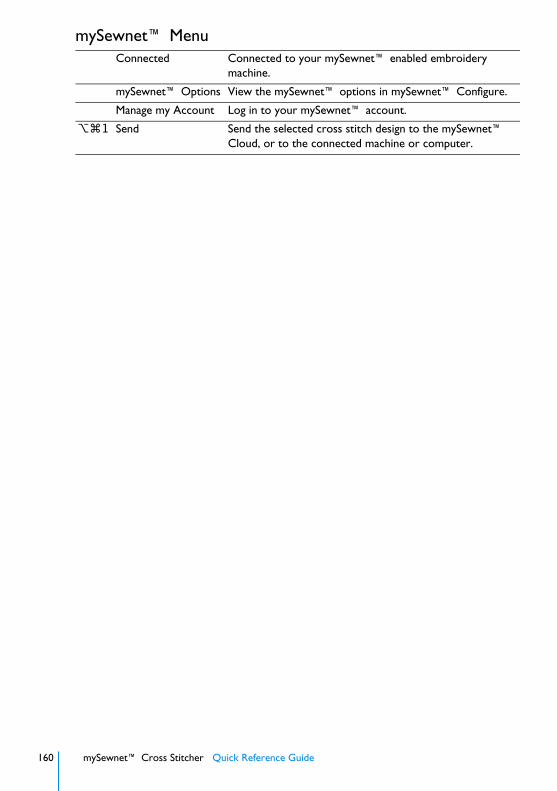
160 mySewnet™ Cross Stitcher Quick Reference Guide
mySewnet™ MenuConnected Connected to your mySewnet™ enabled embroidery
machine.
mySewnet™ Options View the mySewnet™ options in mySewnet™ Configure.
Manage my Account Log in to your mySewnet™ account.
⌥⌘1 Send Send the selected cross stitch design to the mySewnet™ Cloud, or to the connected machine or computer.
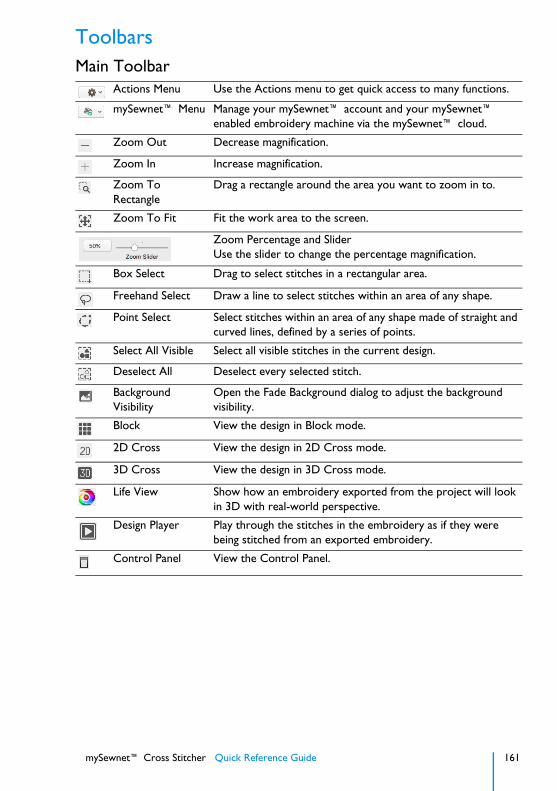
mySewnet™ Cross Stitcher Quick Reference Guide 161
ToolbarsMain Toolbar
Actions Menu Use the Actions menu to get quick access to many functions.
mySewnet™ Menu Manage your mySewnet™ account and your mySewnet™ enabled embroidery machine via the mySewnet™ cloud.
Zoom Out Decrease magnification.
Zoom In Increase magnification.
Zoom To Rectangle
Drag a rectangle around the area you want to zoom in to.
Zoom To Fit Fit the work area to the screen.
Zoom Percentage and SliderUse the slider to change the percentage magnification.
Box Select Drag to select stitches in a rectangular area.
Freehand Select Draw a line to select stitches within an area of any shape.
Point Select Select stitches within an area of any shape made of straight and curved lines, defined by a series of points.
Select All Visible Select all visible stitches in the current design.
Deselect All Deselect every selected stitch.
Background Visibility
Open the Fade Background dialog to adjust the background visibility.
Block View the design in Block mode.
2D Cross View the design in 2D Cross mode.
3D Cross View the design in 3D Cross mode.
Life View Show how an embroidery exported from the project will look in 3D with real-world perspective.
Design Player Play through the stitches in the embroidery as if they were being stitched from an exported embroidery.
Control Panel View the Control Panel.
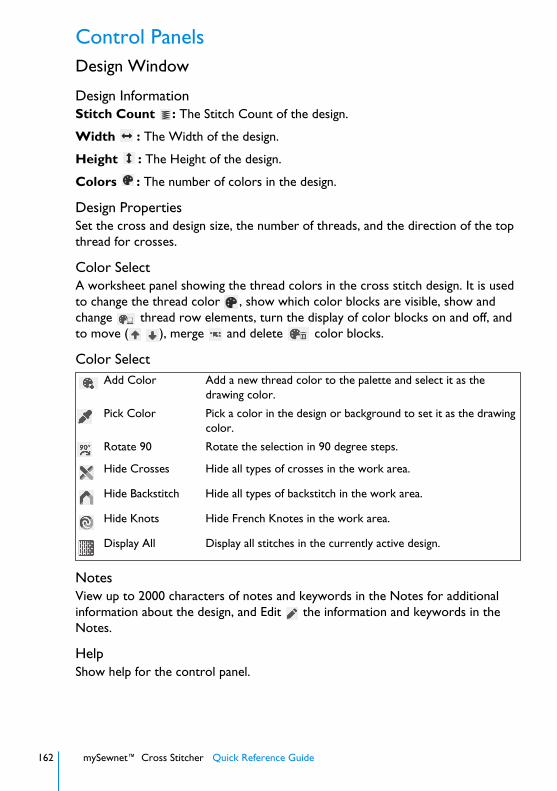
162 mySewnet™ Cross Stitcher Quick Reference Guide
Control PanelsDesign Window
Design InformationStitch Count : The Stitch Count of the design.
Width : The Width of the design.
Height : The Height of the design.
Colors : The number of colors in the design.
Design PropertiesSet the cross and design size, the number of threads, and the direction of the top thread for crosses.
Color SelectA worksheet panel showing the thread colors in the cross stitch design. It is used to change the thread color , show which color blocks are visible, show and change thread row elements, turn the display of color blocks on and off, and to move ( ), merge and delete color blocks.
Color Select
NotesView up to 2000 characters of notes and keywords in the Notes for additional information about the design, and Edit the information and keywords in the Notes.
HelpShow help for the control panel.
Add Color Add a new thread color to the palette and select it as the drawing color.
Pick Color Pick a color in the design or background to set it as the drawing color.
Rotate 90 Rotate the selection in 90 degree steps.
Hide Crosses Hide all types of crosses in the work area.
Hide Backstitch Hide all types of backstitch in the work area.
Hide Knots Hide French Knotes in the work area.
Display All Display all stitches in the currently active design.
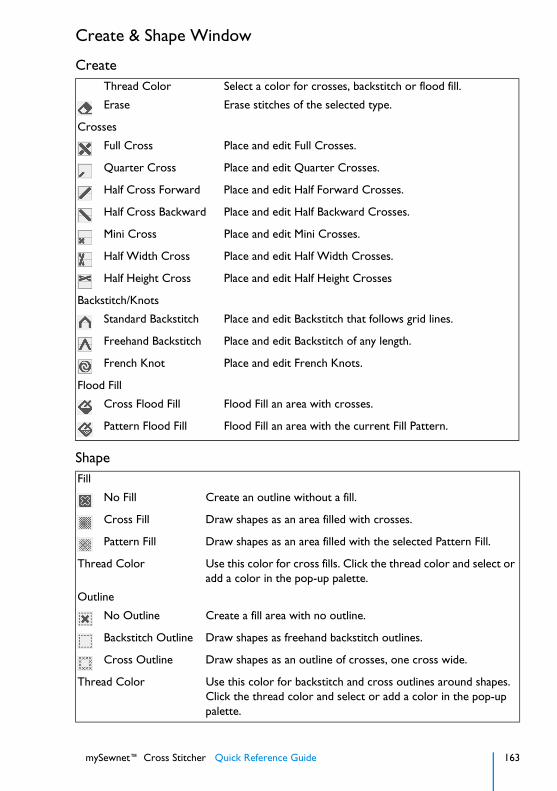
mySewnet™ Cross Stitcher Quick Reference Guide 163
Create & Shape Window
Create
Shape
Thread Color Select a color for crosses, backstitch or flood fill.
Erase Erase stitches of the selected type.
Crosses
Full Cross Place and edit Full Crosses.
Quarter Cross Place and edit Quarter Crosses.
Half Cross Forward Place and edit Half Forward Crosses.
Half Cross Backward Place and edit Half Backward Crosses.
Mini Cross Place and edit Mini Crosses.
Half Width Cross Place and edit Half Width Crosses.
Half Height Cross Place and edit Half Height Crosses
Backstitch/Knots
Standard Backstitch Place and edit Backstitch that follows grid lines.
Freehand Backstitch Place and edit Backstitch of any length.
French Knot Place and edit French Knots.
Flood Fill
Cross Flood Fill Flood Fill an area with crosses.
Pattern Flood Fill Flood Fill an area with the current Fill Pattern.
Fill
No Fill Create an outline without a fill.
Cross Fill Draw shapes as an area filled with crosses.
Pattern Fill Draw shapes as an area filled with the selected Pattern Fill.
Thread Color Use this color for cross fills. Click the thread color and select or add a color in the pop-up palette.
Outline
No Outline Create a fill area with no outline.
Backstitch Outline Draw shapes as freehand backstitch outlines.
Cross Outline Draw shapes as an outline of crosses, one cross wide.
Thread Color Use this color for backstitch and cross outlines around shapes. Click the thread color and select or add a color in the pop-up palette.

164 mySewnet™ Cross Stitcher Quick Reference Guide
HelpShow help for the control panel.
Multiply Window
Smooth Use Smooth to smooth the outline around shapes by using three-quarter crosses rather than full crosses.
Shapes
Shape Menu Select a shape.
Place Shape Create an outline or filled area using the selected shape.
Freehand Shape Draw a line to create shape.
Point Shape Create a shape by placing points.
Use Multiply Turn Multiply on and off. The blue reflection lines are shown on the design when Multiply is switched on.
Reflect Across Reflect the stitches from side to side.
Reflect Down Reflect the stitches from top to bottom.
Reflect Across and Down
Reflect the stitches from side to side and from top to bottom.
Rotate 4-way Create four rotated copies around the Multiply center point.
Reflect 8-way Create eight copies around the Multiply center point.
Place Center Reposition the central point of the blue Multiply lines.
Reset Center Set the reflection lines to the center of the design area.
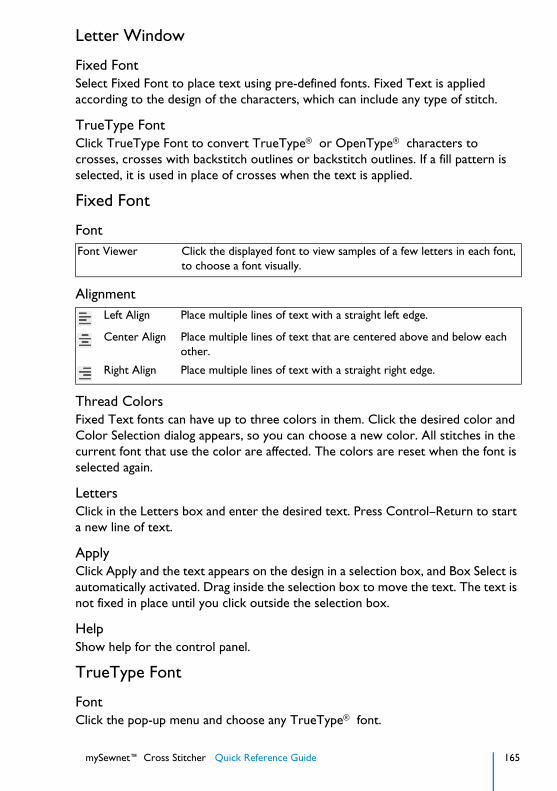
mySewnet™ Cross Stitcher Quick Reference Guide 165
Letter Window
Fixed FontSelect Fixed Font to place text using pre-defined fonts. Fixed Text is applied according to the design of the characters, which can include any type of stitch.
TrueType FontClick TrueType Font to convert TrueType® or OpenType® characters to crosses, crosses with backstitch outlines or backstitch outlines. If a fill pattern is selected, it is used in place of crosses when the text is applied.
Fixed Font
Font
Alignment
Thread ColorsFixed Text fonts can have up to three colors in them. Click the desired color and Color Selection dialog appears, so you can choose a new color. All stitches in the current font that use the color are affected. The colors are reset when the font is selected again.
LettersClick in the Letters box and enter the desired text. Press Control–Return to start a new line of text.
ApplyClick Apply and the text appears on the design in a selection box, and Box Select is automatically activated. Drag inside the selection box to move the text. The text is not fixed in place until you click outside the selection box.
HelpShow help for the control panel.
TrueType Font
FontClick the pop-up menu and choose any TrueType® font.
Font Viewer Click the displayed font to view samples of a few letters in each font, to choose a font visually.
Left Align Place multiple lines of text with a straight left edge.
Center Align Place multiple lines of text that are centered above and below each other.
Right Align Place multiple lines of text with a straight right edge.

166 mySewnet™ Cross Stitcher Quick Reference Guide
TypefaceChoose a typeface for the selected font from the pop-up menu.
SizeUse Size to set the height and width of TrueType® text.
Alignment
Fill
Outline
Smooth
LettersClick in the Letters box and enter the desired text. Press Control–Return to start a new line of text.
ApplyClick Apply and the text appears on the design in a selection box, and Box Select is automatically activated. Drag inside the selection box to move the text. The text is not fixed in place until you click outside the selection box.
HelpShow help for the control panel.
Left Align Place multiple lines of text with a straight left edge.
Center Align Place multiple lines of text that are centered above and below each other.
Right Align Place multiple lines of text with a straight right edge.
No Fill Create an outline without a fill.
Cross Fill Draw text as an area filled with crosses.
Pattern Fill Draw text as an area filled with the selected Pattern Fill.
Thread Color Use this color for cross fills. Click the thread color and select or add a color in the pop-up palette.
No Outline Create a fill area with no outline.
Backstitch Outline Draw text as freehand backstitch outlines.
Thread Color Use this color for backstitch outlines around text. Click the thread color and select or add a color in the pop-up palette.
Smooth Use Smooth to smooth the outline around text by using three-quarter crosses rather than full crosses.
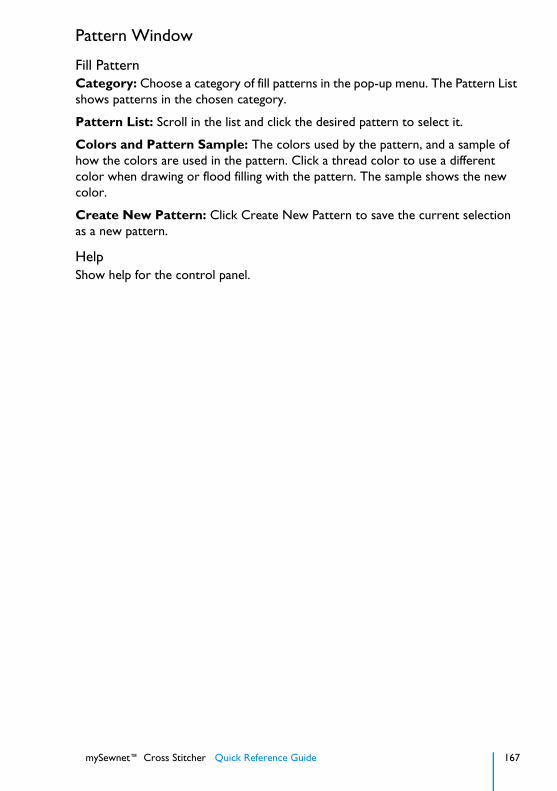
mySewnet™ Cross Stitcher Quick Reference Guide 167
Pattern Window
Fill PatternCategory: Choose a category of fill patterns in the pop-up menu. The Pattern List shows patterns in the chosen category.
Pattern List: Scroll in the list and click the desired pattern to select it.
Colors and Pattern Sample: The colors used by the pattern, and a sample of how the colors are used in the pattern. Click a thread color to use a different color when drawing or flood filling with the pattern. The sample shows the new color.
Create New Pattern: Click Create New Pattern to save the current selection as a new pattern.
HelpShow help for the control panel.
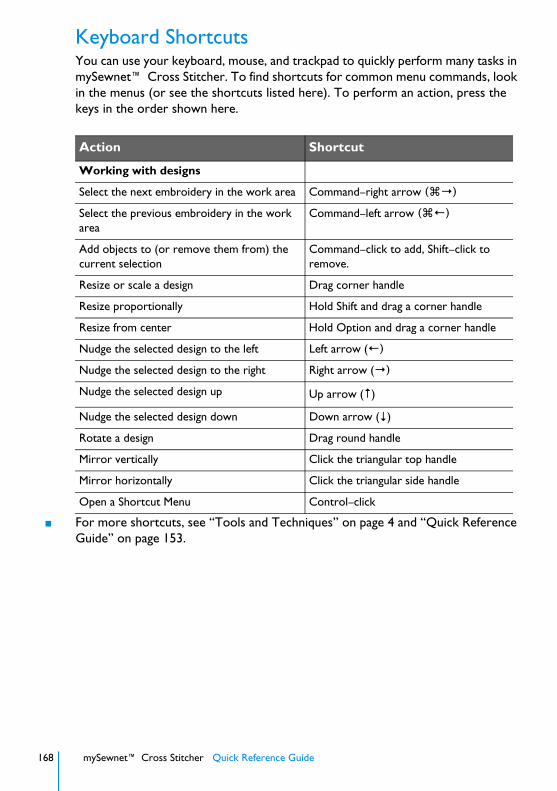
168 mySewnet™ Cross Stitcher Quick Reference Guide
Keyboard ShortcutsYou can use your keyboard, mouse, and trackpad to quickly perform many tasks in mySewnet™ Cross Stitcher. To find shortcuts for common menu commands, look in the menus (or see the shortcuts listed here). To perform an action, press the keys in the order shown here.
■ For more shortcuts, see “Tools and Techniques” on page 4 and “Quick Reference Guide” on page 153.
Action Shortcut
Working with designs
Select the next embroidery in the work area Command–right arrow (⌘→)
Select the previous embroidery in the work area
Command–left arrow (⌘←)
Add objects to (or remove them from) the current selection
Command–click to add, Shift–click to remove.
Resize or scale a design Drag corner handle
Resize proportionally Hold Shift and drag a corner handle
Resize from center Hold Option and drag a corner handle
Nudge the selected design to the left Left arrow (←)
Nudge the selected design to the right Right arrow (→)
Nudge the selected design up Up arrow (↑)
Nudge the selected design down Down arrow (↓)
Rotate a design Drag round handle
Mirror vertically Click the triangular top handle
Mirror horizontally Click the triangular side handle
Open a Shortcut Menu Control–click
mySewnet™ Cross Stitcher Index 169
IndexNumerics2C ..........................................................1212D ............................................................543C ..........................................................1213D ............................................................5490 Degree Rotate ...................................137
AAbbreviation for Thread Range .................76About .........................................................3Add
Borders ............................................32Color..........................................79, 88To Palette Automatically ...96, 122, 127
AidaCount .........................................69, 80Fabric ...............................................54
Alignment .......................123, 127, 165, 166AnimationPath.txt .....................................63Apply ..............................................165, 166Apply Text..............................................129Area
Design ..............................................81Get Length......................................137Work .................................................6
Assisi Work ..............................................71Assistant ...................................................30Autolevel
Cross Stitch Assistant .......................35Automatically
Add to Palette ..................96, 122, 127
BBackground
Color........................................53, 119Fabric ...............................................54Fade..................................................55Grid....................................................6Picture Remove ................................57Picture Removed ..............................32Visibility ............................................56
Background Off.........................................55Background On.........................................55Backstitch .................................................91
And French Knots.......................77, 88Connected........................................92Edit .................................................134Freehand.....................................11, 92Freehand on Top of Standard......68, 92Hide .................................................79Outline .....................................98, 129Standard .....................................11, 92Standard and Freehand......................68Threads ............................................81
Backward
Half Cross ........................................89On Top ............................................82
BarMenu ..................................................5
Blackwork.................................................71Block ........................................................55
Horizontally Flip..............................137Vertically Flip ..................................137
Borders ....................................................32Box Select.................................10, 100, 135
CCamera.....................................................35Category.................................................167
Create New....................................107Font................................................122Removing Patterns ..........................107
ChangeAll To ...............................................42Color................................................83Thread..............................................43Thread Colors ............................43, 73
ChooseThread Colors ..................................42
Choose and Change Thread Colors ..........73Choose Picture ...................................34, 47Close ..........................................................3
Save On ............................................19Close a Document ......................................3Color
Add ............................................79, 88Background...............................53, 119Change .............................................83Combinations ...................................70Configuration..............................22, 82Draw ..............................................134Fill.............................................98, 128Font................................................122Grid..................................................57Information .....................................144Outline .....................................99, 129Pick.............................................78, 87Preview Thread ................................44Reduce Changes ...............................32Select........................................74, 162Selection ...........................................42
Color BlocksMove and Merge ...............................76
Color Order.............................................32Considerations..................................77
Color PaletteThread..............................................74
Color Select..............................................74Color Selection.........................................75Color Worksheet .....................................74
170 mySewnet™ Cross Stitcher Index
Colors ....................................................162Change Thread .................................43Choose and Change Thread..............73Choose Thread.................................42Fixed Text ..............................123, 165In Fill Patterns .................................106In mySewnet Cross Stitcher ..............76Number of........................................42Order of ...........................................22Reduce .............................................42Remove Unused ...............................84Thread..............................................74
Colors and Pattern Sample......................167Colors Window........................................78Combinations of Color .............................70Configuration
Color..........................................22, 82Connected Backstitch ...............................92Considerations
Color Order.....................................77Control Panel .............................................5Control Panels ........................................162Coordinates........................................58, 75Copied Embroideries ..............................139Copies
Print Number .................................145Copy ......................................................138Copy Embroidery ...................................139Corners or Edges with French Knots ....7, 93Count
Thread........................................69, 83Counts
Stitch ................................................68Crayon .....................................................76Create
New Category ................................107Picture ..............................................14QuickCross Design .....................30, 33Stitches .............................................86Text ...............................................120
Create Fixed Font Lettering ....................121Create TrueType® Text .........................126Cross..............................................163, 166
Full .............................................10, 89Half Backward...................................89Half Forward ....................................89Half Height .................................11, 91Half Width..................................11, 90Mini ............................................11, 90Mode ................................................53Outline .............................................98Quarter ......................................10, 89Size.......................................39, 69, 80Threads ............................................81
Cross Fill ..........................................97, 128Cross Flood Fill.........................................94Cross Stitch
Eastern European..............................71Hand Sizes ........................................80
Thread Colors ..................................76Cross Stitch Design
Assistant .......................................2, 30Files ..................................................12Load Existing...............................31, 33Load Picture for New .................31, 33
Cross Stitch DesignsHints on Planning ..............................67Managing...........................................14Viewing .............................................53
Crosses ....................................................88And Movement Stitches ....................68Edit .................................................134Hide .................................................79Remove Isolated ...............................32Zoom In to Mini ...............................90Zoom In to Quarter .........................89
CustomizeToolbar...............................................5
Cut .........................................................138Cutwork Needle Lines ..............................24
DDefault
Set As .........................................81, 82Delete ....................................................140
Thread Color....................................43Delete All
Thread Color....................................44Demo .......................................................63Deselect
Selection .........................................135Deselect All ............................................136Design
Create QuickCross.....................30, 33Element Library.................................16Elements ...........................................16Files ..................................................12Information ...........................7, 62, 162krz from Previous Version ................12Load .................................................46Load Existing...............................31, 33Load Picture for New .................31, 33New with no Picture...................31, 33Open Existing ...................................46Options ............................................33Preview.............................................45Print .................................................69Scale ...............................................144Styles ................................................71
Design Area ..............................................81Design Assistant........................................30Design Edges with French Knots .....7, 67, 93Design New
Patterns ..........................................105Design Player ............................................60
Video Speed......................................65Design Properties .............................80, 162Design Size ...............................7, 39, 67, 80

mySewnet™ Cross Stitcher Index 171
Reduced ...........................................80Design Viewer ............................................6Design Window ......................................162Designs
Edit .................................................134Hints and Tips on QuickCross ..........32Hints on Planning ..............................67Managing...........................................14Open Recently Used .........................17Viewing.............................................53
Different Thread Ranges ...........................32Digital Camera ..........................................35Dimensions
Printing ...........................................144Direction of Top Thread.....................82, 83Display
All.....................................................79Done ........................................................47Double .....................................................81Draw
Shape ................................................95Draw Color and Erase ............................134Drawing Options for Shapes ...................163Duplicate ............................................19, 21
EEastern European Cross Stitch ..................71Edges with French Knots.................7, 67, 93Edit
Backstitch .......................................134Crosses ..........................................134Crosses, Backstitch and French Knots134Designs ...........................................134French Knots ..................................135Menu ..............................................155Picture ........................................14, 35
Eight Copies Multiply ..............................101Embroideries
Copied............................................139Preferred Saving Format ...................13
EmbroideryFiles ..................................................13
Enhance Eye Highlights..............................32Enter Size
Hoop ................................................41Erase ........................................................95
Draw Color ....................................134Pattern Fill ........................................95With Flood Fill..................................94
Error Messages .......................................147Every 10 Lines...........................................57Every 5 Lines ............................................57Every Line .................................................57Existing Cross Stitch Design ................31, 33Exit
Save On ............................................19Export ................................................19, 22Eye Highlights ...........................................32
FFabric
Aida ..................................................54Background.......................................54
FadeBackground.......................................55
FileFormats ............................................12
File Menu ................................................153Files
Cross Stitch Design ..........................12Embroidery .......................................13Picture ..............................................13Sample ................................................3
FillColor........................................98, 128Erase with Flood ...............................94Flood ....................................11, 67, 94Other Cross and Stitch Types...........94Pattern Colors ................................106Pattern in Text ...............................129
Fill Pattern ..............................................167Select..............................................105Stitch Types ....................................106
Fill Patterns and Fixed Text Fonts ...122, 123Fill Through Narrow Gaps ........................94Finding Information .....................................2Fix Text in Place .............................122, 129Fixed Text ......................................121, 165
Colors ....................................123, 165Fixed Text Fonts
Fill Patterns .............................122, 123Flip
Block Horizontally ..........................137Block Vertically ...............................137Vertical and Horizontal ...................137
Flip Design ..............................................144Flood Fill .......................................11, 67, 94
Cross................................................94Erase...........................................94, 95Other Cross and Stitch Types...........94Pattern..............................................94
Font ........................................122, 127, 165Category.........................................122Color..............................................122Fill Patterns .............................122, 123Name .............................................122
Format for Saving Embroideries ................13Formats
File....................................................12Forward Half Cross ..................................89Forward on Top .......................................82Freehand Backstitch ............................11, 92
And Standard Backstitch ...................68Over Standard Backstitch............68, 92
Freehand Select ................................10, 136Freehand Shape.........................................96French Knot........................................11, 93French Knots ......................................77, 88
172 mySewnet™ Cross Stitcher Index
And Movement Stitches ....................68At Design Edges................................67Edit .................................................135On Corners or Edges ...................7, 93Per Grid Square ................................93Scale Limits .......................................93
Full Cross ...........................................10, 89
GGet Length..............................................137Getting Started .................................1, 4, 67Gobelin.....................................................72Grid......................................................6, 57
Color................................................57Every 10 Lines...................................57Every 5 Lines ....................................57Every Line .........................................57French Knots ....................................93No Grid............................................57Off....................................................57On....................................................57Print ...............................................144
Grid PositionPointer .......................................58, 75
GroupHoop ................................................40
GuideReference ...........................................2
Guide Quick Reference...........................153Guides
Viewing and Printing............................2
HHalf Cross Backward ..........................10, 89Half Cross Forward ............................10, 89Half Height Cross ...............................11, 91Half Width Cross................................11, 90Hand Cross Stitch Sizes ............................80Hand Cross Stitchers ................................69Height...............................80, 127, 162, 166Height and Width .....................................40Help .......................162, 164, 165, 166, 167Help Menu ..............................................157Help Online ................................................2Hide
Picture ..............................................55Hide Backstitch .........................................79Hide Crosses ............................................79Hide Knots ...............................................79Hints and Tips on QuickCross Designs .....32Hints on Planning Cross Stitch Designs .....67Hoop
Group...............................................40Select..........................................39, 81Selection ...........................................40Size...................................................40
HorizontalFlip .................................................137
HorizontallyFlip Block ........................................137
IImport Thread Range in mySewnet Configure12Inches .....................................................137Included in My Hoops ...............................41Information
Color..............................................144Design ..........................................7, 62Finding ................................................2For Hand Cross Stitchers..................69Print ...............................................144Readme ..............................................2Technical ........................................144
Insert or Paste Selection .........................135Isolated Crosses
Remove ............................................32
KKeyboard
Shortcuts ........................................168Keyboard Shortcuts and Shortcut Menus ....7Knots
Hide .................................................79krz from Previous Version ........................12
LLace ..........................................................72Layers and Movement Stitches ..................67LC ..........................................................121Length
Get .................................................137Letter Page .............................................165Letters ....................................................127Library of Design Elements........................16Life View...................................................61Limits on French Knot Scaling ...................93Load
Design ..............................................46Existing Cross Stitch Design ........31, 33Picture for New Design ..............31, 33
MMain Toolbar ..........................................161Managing Cross Stitch Designs ..................14Maximize ....................................................3Measurement Units .................................144Menu
Bar......................................................5Edit .................................................155File..................................................153Help ...............................................157View ...............................................156
Menus .....................................................153Merge
Color Blocks.....................................76Merge Identical Colors..............................83Millimeters ..............................................137Mini Cross ..........................................11, 90
Zoom In To ......................................90Minimize .....................................................3Minimum Significant Stitch Length .............24

mySewnet™ Cross Stitcher Index 173
Mirror ....................................................137Mode ........................................................53Modify Selection .....................................137Move
Color Blocks.....................................76Move To ...................................................25Movement Stitches ...................................68
And French Knots.............................68And Stitch Layers ..............................67
Multiply...........................................100, 164Eight Copies ...................................101Four Copies....................................101Rotate ............................................101Selection Tools ...............................100Use.................................................164
Multi-Touch Gestures ...............................11My Demo
Play...................................................63My Hoops .................................................41mySewnet Configure.................57, 119, 137
Import Thread Range ........................12Texture ............................................54
mySewnet™ .............................................26mySewnet™ Machine................................27mySewnet™ Options................................29
NName
Font................................................122Pattern ...........................................107
Narrow Gaps............................................94New .........................................................14
Category.........................................107Cross Stitch Design ....................31, 33Design with no Picture................31, 33Patterns ..........................................105Save ................................................105
New Save ...............................................167No Fill ..............................................98, 128No Grid....................................................57No Outline .......................................99, 129No Picture ..........................................31, 33Notes ...............................................17, 162
Printing ...........................................144Number of Colors
QuickCross Stitch.............................42
OOnline Help ................................................2Open ..................................................15, 16
Existing Design..................................46Recently Used Designs......................17
OpenType®............................................126Optimize Stitch Length..............................24Options
Design ..............................................33Shape ................................................97
Options Shape Drawing ..........................163Order
Color................................................32
Of Colors .........................................22Orientation
Hoop ................................................41Print Setup......................................145
Original Picture.........................................48Outline ...........................................163, 166
Backstitch .................................98, 129Color........................................99, 129Cross................................................98
PPage
Letter .............................................165Pattern............................................167
PaletteAutomatically Add ............96, 122, 127Pop-up ..............................................87Thread Color....................................74
Pan ...........................................................59Paper
Size .................................................145Paste...............................................138, 139
Selection .........................................135Pattern
Colors ............................................106Fill...................................................167List .................................................167Names ............................................107Page ................................................167Sample Colors ................................167Select..............................................104Text Fill ..........................................129
Pattern Fill ........................................97, 128Erase.................................................95
Pattern Flood Fill.......................................94Patterns
And Fixed Text Fonts .............122, 123And Shapes .....................................104Design New ....................................105Removing from Category ................107Stitch Types in Fill ...........................106
PDF Guide View and Print ..........................2PDF Guides.................................................2Pencil ........................................................76Percentage Zoom .....................................59Perspective ...............................................37Photochromic Threads..............................63Pick
Thread Color....................................43Pick Color ..........................................78, 87Picture
And Thread Color List......................43Choose.......................................34, 47Create ..............................................14Edit ...................................................14Editing...............................................35Files ..................................................13For New Cross Stitch Design......31, 33Original.............................................48
174 mySewnet™ Cross Stitcher Index
Remove Background .........................57Removed ..........................................32Rotate ..............................................36Scan ..................................................35Share ................................................64Show and Hide .................................55Source ..............................................44Start New Design with None ......31, 33View .................................................34
Place Center ...........................................164Planning Cross Stitch Designs....................67Point
Shape ................................................97Point Select.............................................136Pointer
Grid Position ..............................58, 75Pop-up Palette ..........................................87Preferred Embroidery Format for Save .....13Preview.....................................................46
Design ..............................................45Thread Color....................................44
Previous krz Version.................................12Print .......................................................143
Design ..............................................69Information.....................................144Range..............................................145Worksheet .......................................69
Printer ....................................................145Print Setup......................................144
Printing ...................................................143PDF Guides ........................................2
Pull on Fabric ............................................77
QQuality
Video................................................65Quarter Cross ....................................10, 89
Zoom In To ......................................89Quick Reference Guide...........................153QuickCross Design .............................30, 33
Hints and Tips...................................32Quit..........................................................29
RRange
Print ...............................................145Readme ......................................................2Recently Used Designs..............................17Redo.......................................................140Reduce Color Changes .............................32Reduce Colors..........................................42Reduced Design Size .................................80Redwork...................................................71Reference
Guide .................................................2Reference Guide .........................................2Reference Guide Quick...........................153Reflect
Across ............................................101Across and Down ...........................101
Down .............................................101Remove
Background Picture.....................32, 57Isolated Crosses ...............................32Patterns from Category ..................107Unused Colors .................................84
Rename ....................................................24Reset Center ..........................................164Reset My Demo ........................................63Revert To .................................................25Rice Stitch.................................................72Right-Click Menu ......................................29Rotate
Picture ..............................................36Rotate 90................................................137Rotate with Multiply................................101
SSample
Files ....................................................3Sample Colors and Pattern......................167Save ..........................................................19Save As .....................................................20Save New .......................................105, 167Save On Close or Exit...............................19Scale
Design ............................................144Limits on French Knots .....................93
Scan Picture ..............................................35Scanner.....................................................35Scroll Bars
Hidden........................................12, 59Select......................................................135
All...................................................136Box...................................10, 100, 135Color..................................42, 75, 162Freehand...................................10, 136Hoop ................................................81Pattern............................................104Point ...............................................136
Select a Fill Pattern .................................105Select Color............................................162Select Hoop ..............................................39Selection
Deselect .........................................135Hoop ................................................40Insert or Paste ................................135Modify ............................................137
Selection ToolsMultiply...........................................100
Send .........................................................26Send Dialog...............................................26Send Express to mySewnet™....................28Set As Default.....................................81, 82Shade Number ..........................................76Shape ........................................................95
Draw ................................................95Freehand...........................................96Options ............................................97

mySewnet™ Cross Stitcher Index 175
Point.................................................97Shape Drawing Options ..........................163Shapes ....................................................163
Using Patterns.................................104Share Picture ............................................64Share Video ..............................................64Shortcut
Keyboard........................................168Show
Measurements ................................137Picture ..............................................55
Show Status Bar ......................................157Single, Double and Triple ..........................81Size .................................................127, 166
Cross....................................39, 69, 80Design ........................................67, 80Hand Cross Stitch.............................80Paper ..............................................145Reduce Design ..................................80
Smooth.............................99, 129, 164, 166Source
Picture ..............................................44Special Characters ..................................123Speed
Video................................................65Standard Backstitch.............................11, 92
And Freehand Backstitch...................68Under Freehand Backstitch .........68, 92
StartNew Design with no Picture .......31, 33
Start Automatically ...................................29Starting mySewnet™ Cross Stitcher ...........3Starting mySewnet™ Machine ...................29Stitch
Counts .............................................68Pulling ...............................................77Rice ..................................................72Sizes for Hand Crosses .....................80Types................................................70Types in Fill Patterns .......................106Types in Flood Fill .............................94
Stitch Count ...........................................162Stitch Layers and Movement Stitches ........67Stitches
Creating............................................86Crosses and Movement ....................68Display All ........................................79French Knots and Movement ............68
Store Demo Point.....................................63Stretch Picture..........................................37Style ...............................................127, 166
Design ..............................................71Sunlight
Light Reaction ...................................63
TTechnical Information .............................144Terms and Conventions............................10Text........................................123, 165, 166
Apply ..............................................129Colors ....................................123, 165Creating..........................................120Fill Pattern ......................................129Fixed.......................................121, 165Fixed in Place ..........................122, 129TrueType................................126, 165
Texture in mySewnet Configure................54Thread
Change .............................................43Count .........................................69, 83Direction ....................................82, 83Photochromic ...................................63
Thread ColorPreview.............................................44
Thread Color Palette ................................74Thread Colors
Change .............................................43Choose.............................................42Choose and Change..........................73In mySewnet Cross Stitcher ..............76
Thread Count ...........................................81Thread Range
Abbreviation .....................................76Import ..............................................12Use Different ....................................32
ThreadsBackstitch .........................................81Cross................................................81
Tips on QuickCross Designs .....................32Toolbar.......................................................5
Customize ..........................................5Main ...............................................161
Toolbars .................................................161Top Thread Direction.........................82, 83Transfer Design Elements .........................16Triple........................................................81Troubleshooting .....................................147TrueType Text ...............................126, 165TrueType® .............................................126Typeface .........................................127, 166Types of Stitch ..........................................70
In Fill Patterns .................................106
UUC .........................................................121Undo ......................................................140Undo and Redo.......................................140Units of Measurement.............................144Unused Colors
Remove ............................................84Use
Cross Stitch Design Assistant............30Different Thread Ranges ...................32Multiply...........................................164
Using Patterns and Shapes.......................104
VVertically
Flip Block ........................................137

176 mySewnet™ Cross Stitcher Index
VideoShare ................................................64
Video Information .....................................65Video Title................................................65View
Life ...................................................61Menu ..............................................156
View Picture .............................................34Viewing and Printing PDF Guides ................2Viewing Cross Stitch Designs ....................53Visibility
Background.......................................56
WWidth .....................................................162Width and Height ...............................40, 80Window .....................................................5
Design ............................................162Work Area .................................................6Worksheet
Color................................................74Worksheet Print .......................................69
ZZoom .......................................................62
By Percentage ...................................59Choose Thread Colors .....................44Commands ...................................7, 58Design Preview .................................45
Zoom In ...................................................58To Mini Crosses ...............................90To Quarter Crosses .........................89
Zoom To Fit .............................................58Zoom To Rectangle ..................................59
Top Related
Copyright © 2022 FDOKUMEN

