


Bahasa
Halaman
Hukum


M’Ath-M’Ath PACS® Software User Guide
1 5 B i s R u e M a r i g n a n P a r i s 7 5 0 0 8 F r a n c e w w w . i i m t . f r P h o n e : + 3 3 1 4 5 7 8 1 1 1 1

User Guide M’Ath-M’AthPACS® EN 05 2016 V3.2.x e Author P-J Touboul 1997-2018 2
The software M’Ath® is a quantification tool of normal and pathological vascular structures, in
semi-automatic or manual mode from sonographic or radiological images, and a tool for
managing patients’ data, images and measurements (archiving, report print out, appointments
list).M’Ath©PACS can communicate with a PACS and has no database.
Do not forget to read the warnings indicated by on pages 18, 28, and 32.
CONTACTS
Intelligence in Medical Technologies
15 Bis Rue Marignan 75008
Support : [email protected]
Phone : +33 1 45 78 11 11
Web site : www.iimt.fr
User Guide M’Ath-M’AthPACS® EN 05 2016 V3.2.x e Author P-J Touboul 1997-2018 3
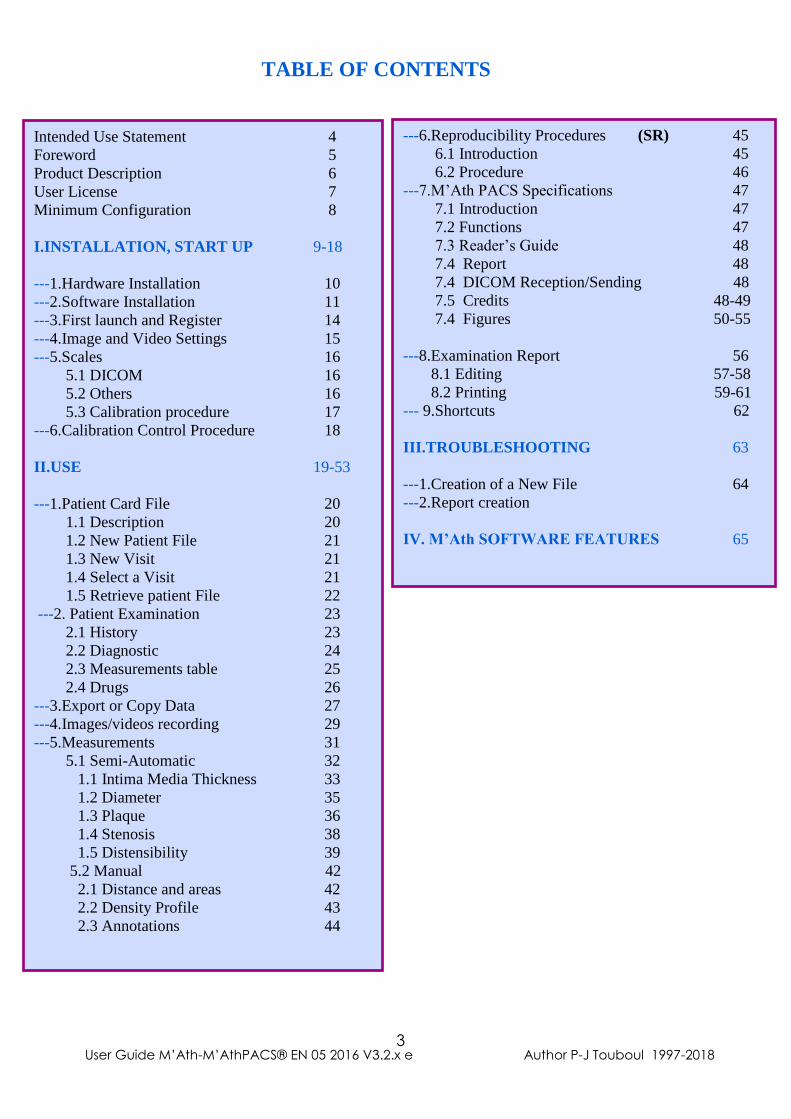
Intended Use Statement 4
Foreword 5
Product Description 6
User License 7
Minimum Configuration 8
I.INSTALLATION, START UP 9-18
---1.Hardware Installation 10
---2.Software Installation 11
---3.First launch and Register 14
---4.Image and Video Settings 15
---5.Scales 16
5.1 DICOM 16
5.2 Others 16
5.3 Calibration procedure 17
---6.Calibration Control Procedure 18
II.USE 19-53
---1.Patient Card File 20
1.1 Description 20
1.2 New Patient File 21
1.3 New Visit 21
1.4 Select a Visit 21
1.5 Retrieve patient File 22
---2. Patient Examination 23
2.1 History 23
2.2 Diagnostic 24
2.3 Measurements table 25
2.4 Drugs 26
---3.Export or Copy Data 27
---4.Images/videos recording 29
---5.Measurements 31
5.1 Semi-Automatic 32
1.1 Intima Media Thickness 33
1.2 Diameter 35
1.3 Plaque 36
1.4 Stenosis 38
1.5 Distensibility 39
5.2 Manual 42
2.1 Distance and areas 42
2.2 Density Profile 43
2.3 Annotations 44
---6.Reproducibility Procedures (SR) 45
6.1 Introduction 45
6.2 Procedure 46
---7.M’Ath PACS Specifications 47
7.1 Introduction 47
7.2 Functions 47
7.3 Reader’s Guide 48
7.4 Report 48
7.4 DICOM Reception/Sending 48
7.5 Credits 48-49
7.4 Figures 50-55
---8.Examination Report 56
8.1 Editing 57-58
8.2 Printing 59-61
--- 9.Shortcuts 62
III.TROUBLESHOOTING 63
---1.Creation of a New File 64
---2.Report creation
IV. M’Ath SOFTWARE FEATURES 65
TABLE OF CONTENTS
User Guide M’Ath-M’AthPACS® EN 05 2016 V3.2.x e Author P-J Touboul 1997-2018 4
This software enables to perform the measurements of the intima media thickness of carotid
and superficial arteries of a patient. It also allows storing clinical data and images in order to
follow the evolution of the disease, and to print a synthetic report of the images selected during
the ultrasound examination.
Biometry is applied to normal and pathological images collected through B-mode ultrasound
examination of carotid arteries. The aim of this software is to perform measurements, archiving
and printing of ultrasound images.
M’Ath® software is dedicated to physicians specialized in vascular pathology. (Cardiologists,
Neurologists, Angiologists, Vascular Surgeons, Radiologists, Sonographers...)
Caution: United States Federal law restricts this device to sale by or on the order of a
physician (or properly licensed practitioner)
It is dedicated to quantification of normal and pathological arteries visualized by ultrasound
techniques (i.e. atherosclerotic or inflammatory diseases).
This medical device has been proven to give reliable measurements with a high number of
samples in a precise, fast and reproducible way. But it does not perform in any way a direct
diagnosis. The most that it could provide is a contribution to the diagnosis. Only the physician
can take the decision regarding the patient management, in accordance to all the data he has.
The results obtained from this medical device must be considered as a part of the overall data.
With this medical device, the physician can carry out a complete organized data acquisition as all
the data regarding the patient are put together in a database. These data are the images and the
video acquired during each examination, the measurements performed at each visit, and also the
patient file identification. Patient data, health information will be protected and not revealed in
any manner, any time to a third party according to rules and regulations in United States.
INTENDED USE STATEMENT
User Guide M’Ath-M’AthPACS® EN 05 2016 V3.2.x e Author P-J Touboul 1997-2018 5
The author, editor and distributors of the software cannot be held responsible for the diagnosis
made from the measurements carried out and generally for decisions made by the practitioner.
The editor of the software and its distributors cannot also be held liable for damages resulting
from the use or the impossibility of using this software or the medium supporting it: loss of
data, bodily injury and financial loss of any kind whatsoever. The editor guarantees that the
software conforms to the written documents accompanying it. The medium has been guaranteed
and tested as working correctly at the time of dispatch. The editor does not accept any liability in
case of wrong operation related to the installation of other software without his approval.
Information contained in this manual may be subject to modification without notice. Any
reproduction of this manual or software is strictly prohibited and may be subject to legal
proceedings. Training adapted to using this product will be proposed to you systematically when
you purchase it.
FOREWORD
User Guide M’Ath-M’AthPACS® EN 05 2016 V3.2.x e Author P-J Touboul 1997-2018 6
B-mode imaging has particularly evolved during these last years improving spatial and densitometry
resolution. Vascular ultrasonography brings a lot of interest by its non traumatic characteristic and the
quality of the information obtained from the vascular structures. The quantification of the parameters
characterizing these structures appeared to be fundamental in order to quantify precisely the data obtained
from the ultrasound examination of the arteries.
Using the dedicated software M’Ath®, the sonographer, the physician, and his/her patient will get a
reproducible and quantified information from ultrasound examination. This software is user-friendly, and
results can be obtained immediately. The simultaneous storage of the results allows a good security and is
time effective. The training is short (half a day) and easy for physicians and technicians.
Additional information and training can be obtained through the hotline: [email protected] or by phone at
+ 33 1 45 78 11 11.
M'Ath® Std includes the measurement, editing and storage of the data and images of the patients.
M’Ath® SR is more dedicated to research as it provides a reproducibility tool ( see page 45).
This software enables the user to take essential measurements of the atherosclerotic lesions of the patient.
The database contains all the information concerning the measures and medical information. It also
allows the user to compare images in order to follow the evolution of the disease, and to print a synthetic
report of the selected images, with all the necessary clinical data of the patient and corresponding
measurements.
M’AthPACS is dedicated to measurements done on images received from PACS . M’Ath PACS
can be installed on a virtual PC to receive DICOM images from pre specified PACS , and send
back images and DICOM pdf reports to this or another PACS.
PRODUCT DESCRIPTION
User Guide M’Ath-M’AthPACS® EN 05 2016 V3.2.x e Author P-J Touboul 1997-2018 7
Warning: You need to accept the IMT license agreement before using the product.
AGREEMENT:
Between the end-user
And
Intelligence in Medical Technologies Company
As soon as you use this software by installing, copying or running it, you recognize being
bound by the terms of this contract. This software is protected by the regulation and the
international treaties as regards to royalties and intellectual property.
Conditions of use:
The software is not sold but is conceded under license with annual renewal. You are authorized
to install and to use a specimen of the software on your computer. The operating systems chosen
by the editor are Windows Seven , Windows 8 Windows 10 and Windows server 2008. You will
be able to use the software only under these operating systems, the editor declining any
responsibility if you use it on other systems. You are not authorized to rebuild the logic of the
product, to uncompile or to disassemble it. The software is conceded under license as a single
product. You are not authorized to dissociate the components from it to use them on several
computers. In the event of update of the product, the update is regarded as component of the
product and cannot thus be dissociated or separately used. You are not authorized to lend or rent
the software. IMT reserves the right to modify the terms of this contract and to terminate it if you
do not observe if you don’t observe these conditions.
USER LICENSE
User Guide M’Ath-M’AthPACS® EN 05 2016 V3.2.x e Author P-J Touboul 1997-2018 8
IMT disclaims any liability on software dysfunction if the PC used does not comply with the
minimal characteristics below. Access runtime or Office 2010 has to be installed before
launching the software. The link below allows a free download of Runtime Access 2010.
* Consult us if different
Minimum Required Configuration
Processor Intel P4 or Higher
RAM Memory 4 Giga bytes or more
Graphic Card 8 Megabytes
Operating System For M’Ath Windows 64bits: Seven/8/10/Server 2008 Windows Seven 32 Bits For M’AthPACS Windows Seven 32 Bits
Frame Grabber * Osprey 100 or Dazzle
Run-Time Access office 2010 Or Office 2010 with access
http://www.microsoft.com/en-
us/download/details.aspx?id=10910
MINIMUM CONFIGURATION

User Guide M’Ath-M’AthPACS® EN 05 2016 V3.2.x e Author P-J Touboul 1997-2018 9
I. Installation & Start up
User Guide M’Ath-M’AthPACS® EN 05 2016 V3.2.x e Author P-J Touboul 1997-2018 10
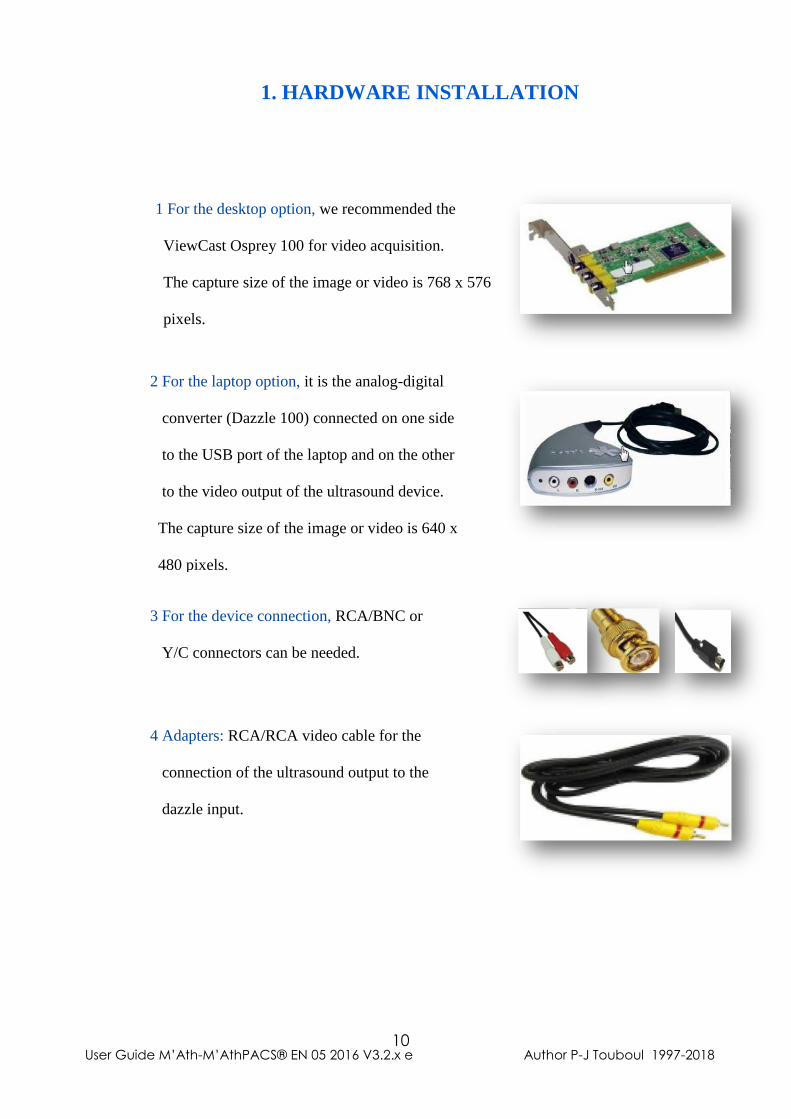
1 For the desktop option, we recommended the
ViewCast Osprey 100 for video acquisition.
The capture size of the image or video is 768 x 576
pixels.
2 For the laptop option, it is the analog-digital
converter (Dazzle 100) connected on one side
to the USB port of the laptop and on the other
to the video output of the ultrasound device.
The capture size of the image or video is 640 x
480 pixels.
3 For the device connection, RCA/BNC or
Y/C connectors can be needed.
4 Adapters: RCA/RCA video cable for the
connection of the ultrasound output to the
dazzle input.
1. HARDWARE INSTALLATION
User Guide M’Ath-M’AthPACS® EN 05 2016 V3.2.x e Author P-J Touboul 1997-2018 11
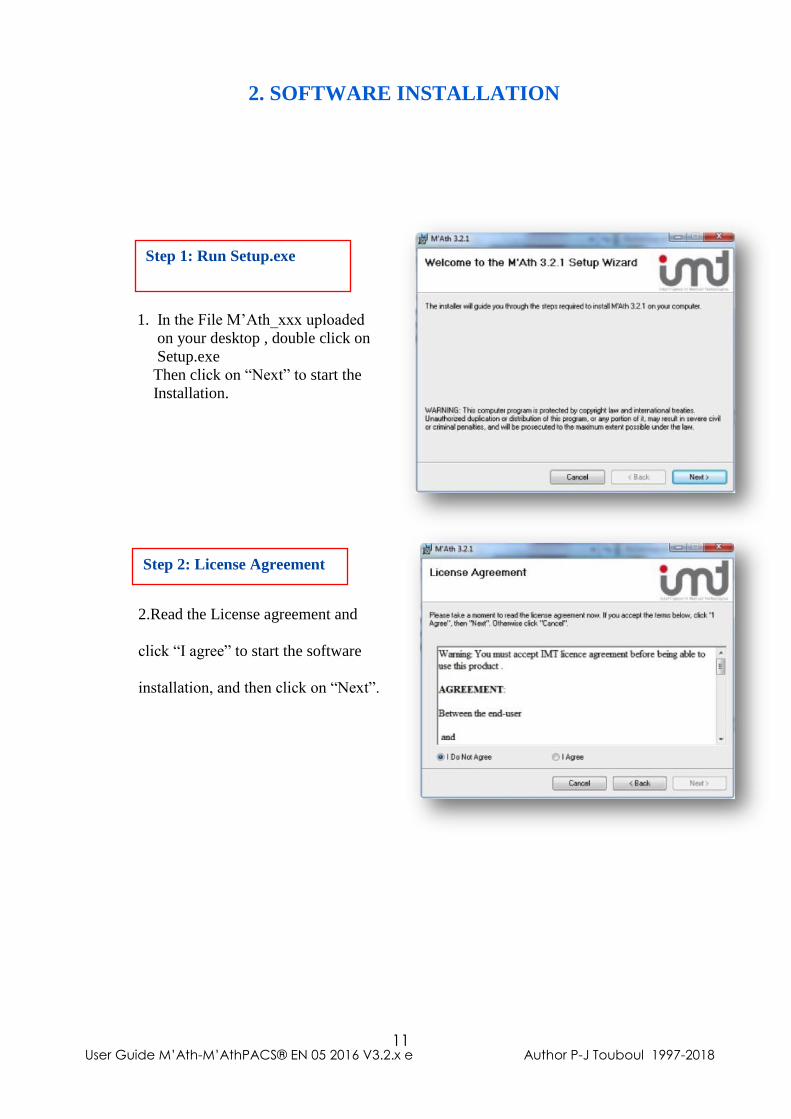
1. In the File M’Ath_xxx uploaded
on your desktop , double click on
Setup.exe
Then click on “Next” to start the
Installation.
.
2.Read the License agreement and
click “I agree” to start the software
installation, and then click on “Next”.
Step 1: Run Setup.exe
Step 2: License Agreement
2. SOFTWARE INSTALLATION
User Guide M’Ath-M’AthPACS® EN 05 2016 V3.2.x e Author P-J Touboul 1997-2018 12
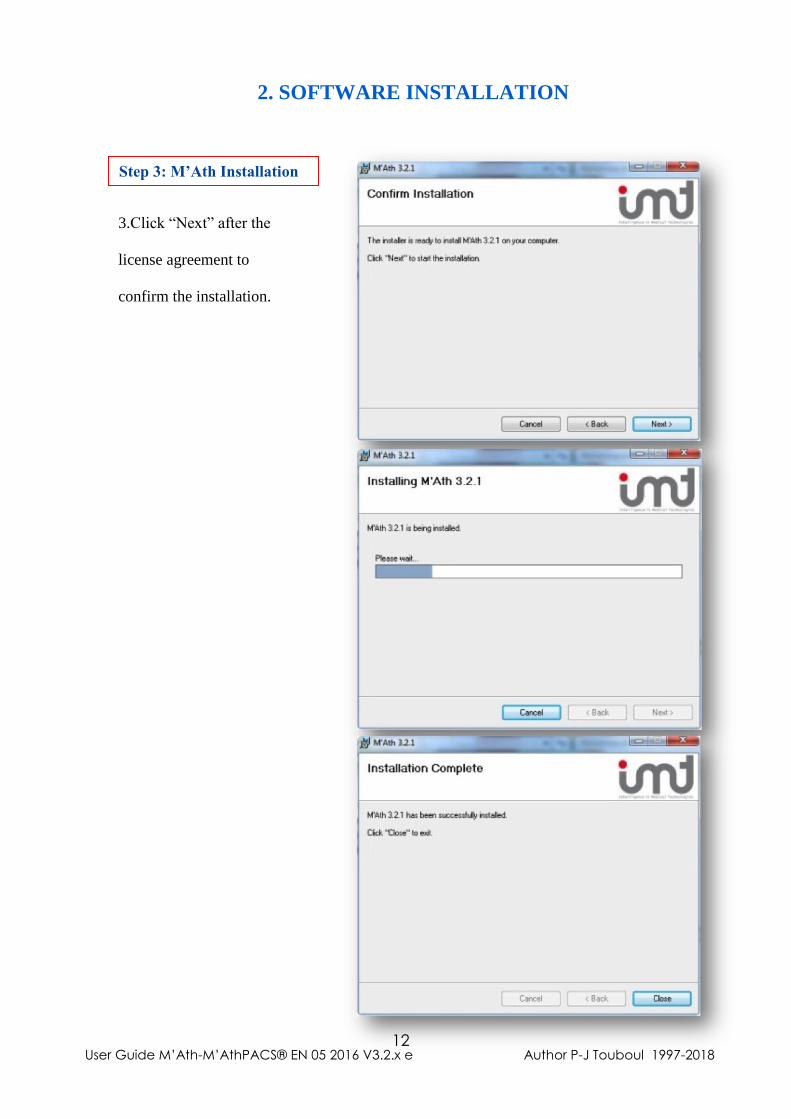
Step 3: M’Ath Installation
3.Click “Next” after the
license agreement to
confirm the installation.
2. SOFTWARE INSTALLATION
User Guide M’Ath-M’AthPACS® EN 05 2016 V3.2.x e Author P-J Touboul 1997-2018 13
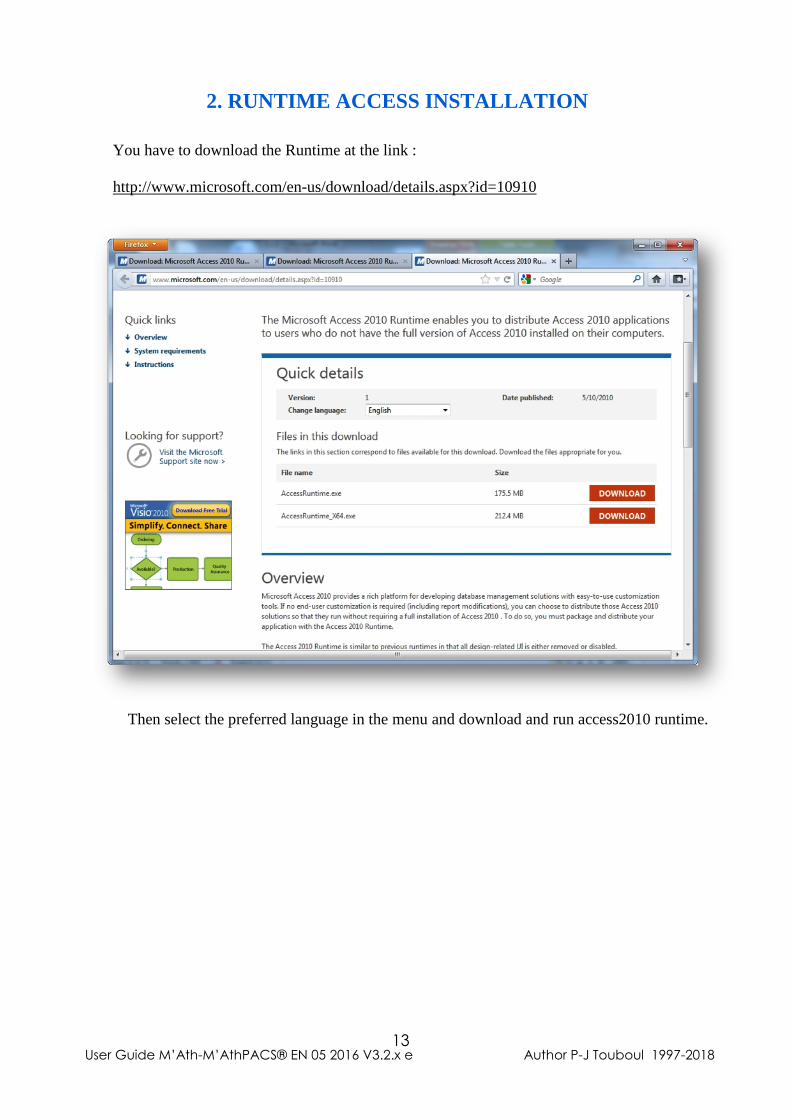
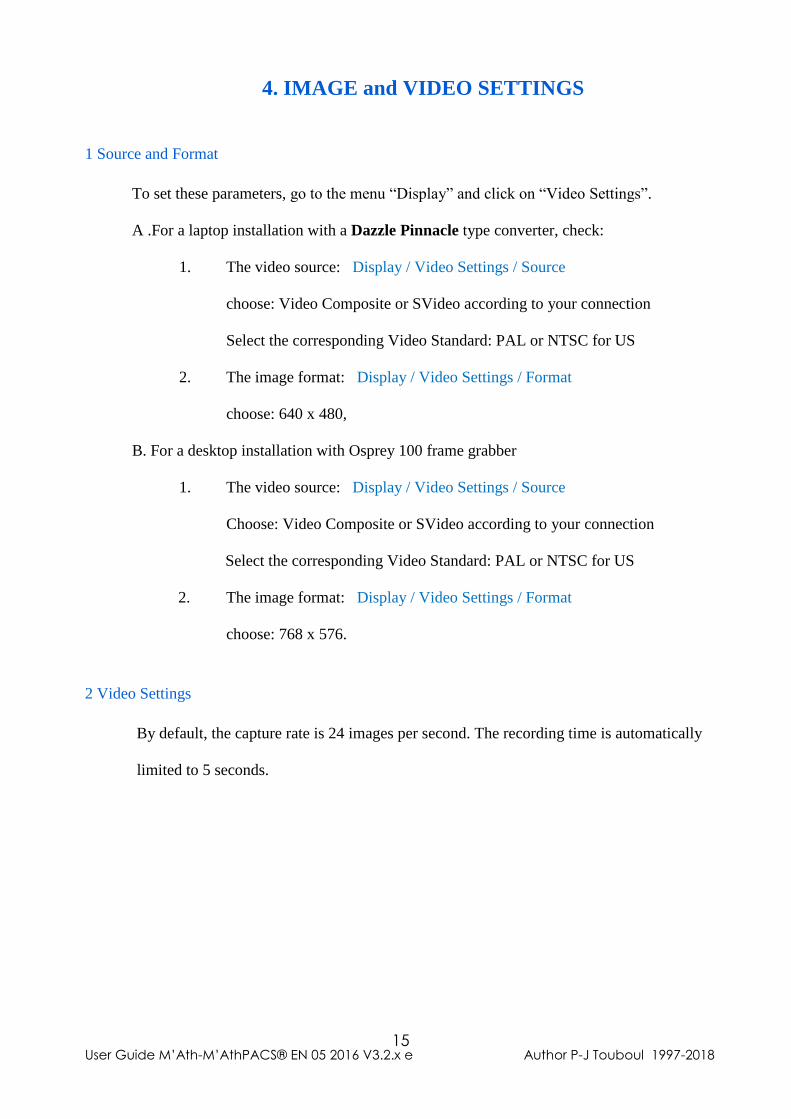
You have to download the Runtime at the link :
http://www.microsoft.com/en-us/download/details.aspx?id=10910
Then select the preferred language in the menu and download and run access2010 runtime.
2. RUNTIME ACCESS INSTALLATION
User Guide M’Ath-M’AthPACS® EN 05 2016 V3.2.x e Author P-J Touboul 1997-2018 14
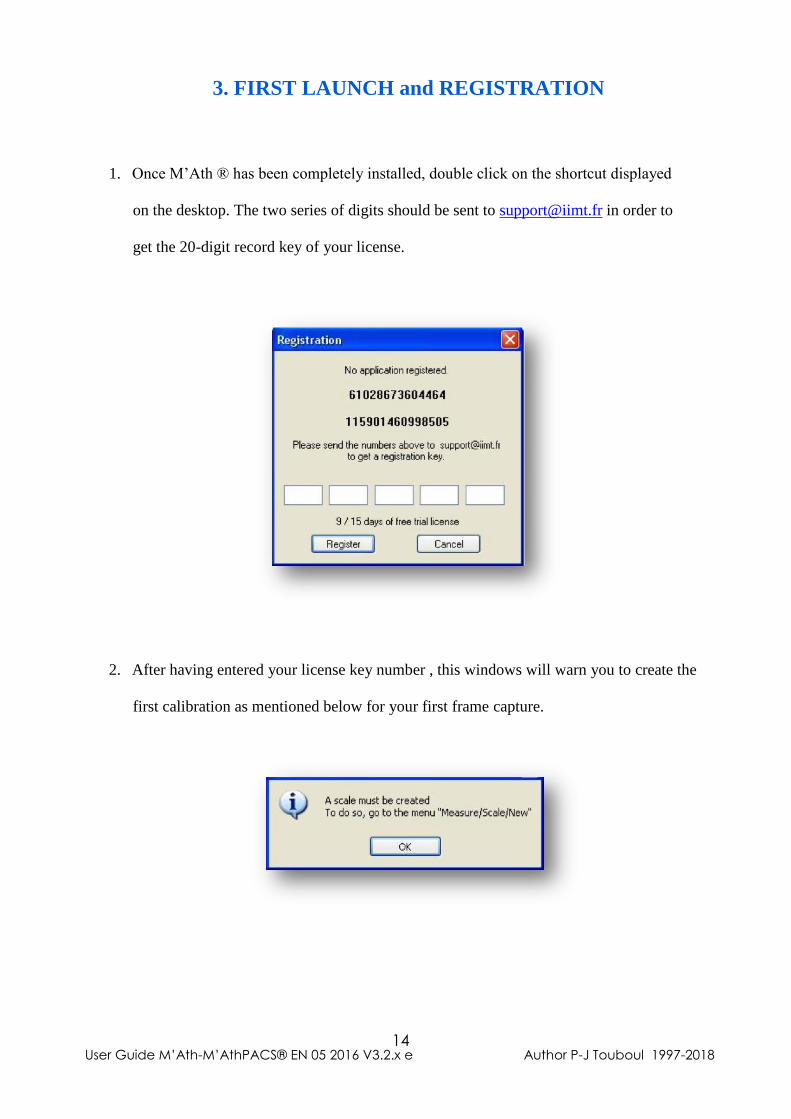
1. Once M’Ath ® has been completely installed, double click on the shortcut displayed
on the desktop. The two series of digits should be sent to [email protected] in order to
get the 20-digit record key of your license.
2. After having entered your license key number , this windows will warn you to create the
first calibration as mentioned below for your first frame capture.
3. FIRST LAUNCH and REGISTRATION
User Guide M’Ath-M’AthPACS® EN 05 2016 V3.2.x e Author P-J Touboul 1997-2018 15
1 Source and Format
To set these parameters, go to the menu “Display” and click on “Video Settings”.
A .For a laptop installation with a Dazzle Pinnacle type converter, check:
1. The video source: Display / Video Settings / Source
choose: Video Composite or SVideo according to your connection
Select the corresponding Video Standard: PAL or NTSC for US
2. The image format: Display / Video Settings / Format
choose: 640 x 480,
B. For a desktop installation with Osprey 100 frame grabber
1. The video source: Display / Video Settings / Source
Choose: Video Composite or SVideo according to your connection
Select the corresponding Video Standard: PAL or NTSC for US
2. The image format: Display / Video Settings / Format
choose: 768 x 576.
2 Video Settings
By default, the capture rate is 24 images per second. The recording time is automatically
limited to 5 seconds.
4. IMAGE and VIDEO SETTINGS
User Guide M’Ath-M’AthPACS® EN 05 2016 V3.2.x e Author P-J Touboul 1997-2018 16
1. DICOM format: the DICOM scale name is automatically displayed in the scale list
box. DICOM Multi Image Format is not supported in this version
2. Other formats: It is necessary to create a calibration.
Any use of the software requires a one-time calibration of the image. You have to
check the Scale name to confirm that it corresponds to the image or video you are
measuring .The number of scales is not limited.
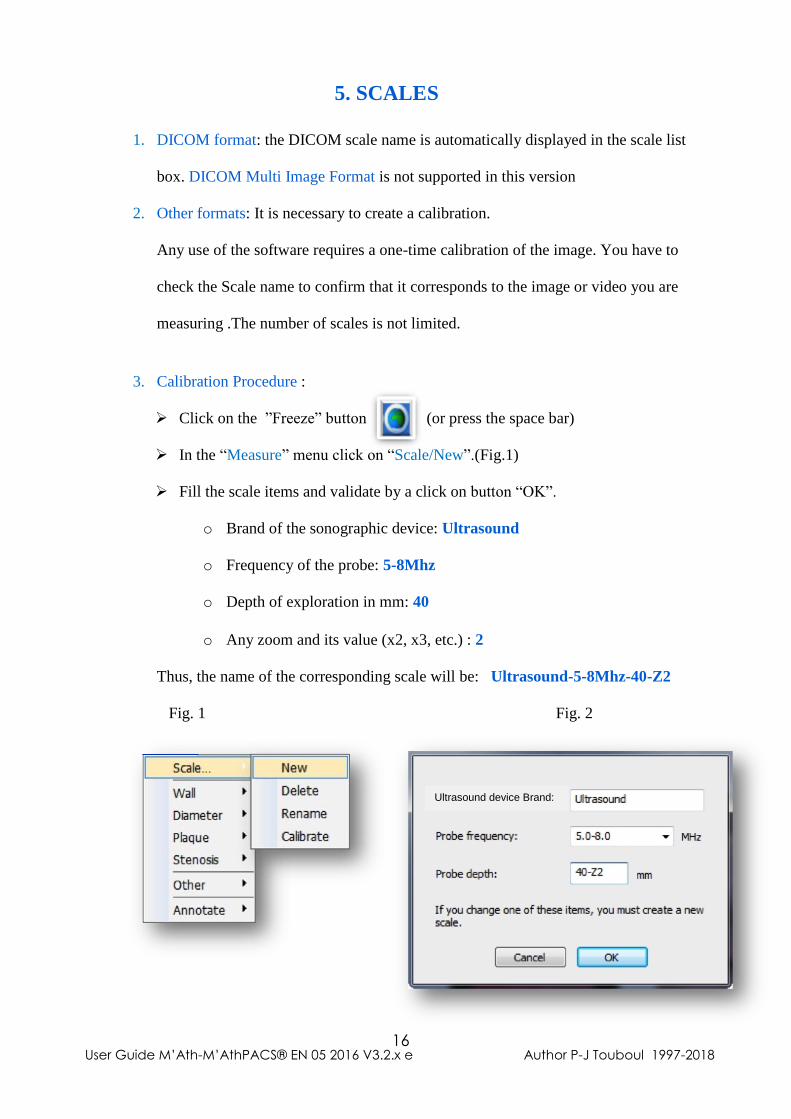
3. Calibration Procedure :
➢ Click on the ”Freeze” button (or press the space bar)
➢ In the “Measure” menu click on “Scale/New”.(Fig.1)
➢ Fill the scale items and validate by a click on button “OK”.
o Brand of the sonographic device: Ultrasound
o Frequency of the probe: 5-8Mhz
o Depth of exploration in mm: 40
o Any zoom and its value (x2, x3, etc.) : 2
Thus, the name of the corresponding scale will be: Ultrasound-5-8Mhz-40-Z2
Fig. 1 Fig. 2
5. SCALES
Ultrasound device Brand:
User Guide M’Ath-M’AthPACS® EN 05 2016 V3.2.x e Author P-J Touboul 1997-2018 17
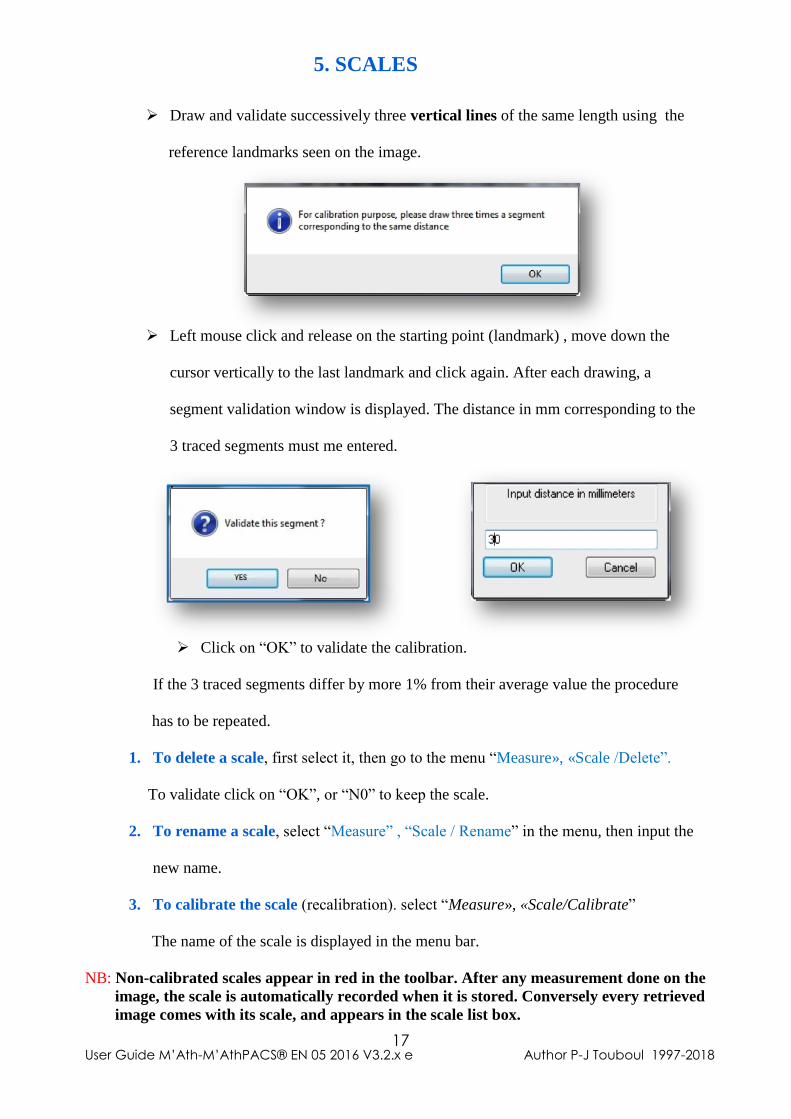
➢ Draw and validate successively three vertical lines of the same length using the
reference landmarks seen on the image.
➢ Left mouse click and release on the starting point (landmark) , move down the
cursor vertically to the last landmark and click again. After each drawing, a
segment validation window is displayed. The distance in mm corresponding to the
3 traced segments must me entered.
.
➢ Click on “OK” to validate the calibration.
If the 3 traced segments differ by more 1% from their average value the procedure
has to be repeated.
1. To delete a scale, first select it, then go to the menu “Measure», «Scale /Delete”.
To validate click on “OK”, or “N0” to keep the scale.
2. To rename a scale, select “Measure” , “Scale / Rename” in the menu, then input the
new name.
3. To calibrate the scale (recalibration). select “Measure», «Scale/Calibrate”
The name of the scale is displayed in the menu bar.
NB: Non-calibrated scales appear in red in the toolbar. After any measurement done on the
image, the scale is automatically recorded when it is stored. Conversely every retrieved
image comes with its scale, and appears in the scale list box.
5. SCALES
User Guide M’Ath-M’AthPACS® EN 05 2016 V3.2.x e Author P-J Touboul 1997-2018 18
To be compliant with quality procedures requirements, the user must check calibration
periodically (each month) in order to validate the whole system of acquisition, capture,
calibration and measurement.
A message box is displayed at first launch of M’Ath® and periodically to warn the user to
check calibration and follow this procedure.
• Create a patient file dedicated to validation,
• Create a visit date,
• Freeze an image on the ultrasound device
• Capture the image on M'Ath®
• Calibrate the image,
• Measure a reference distance with M'Ath® then the same distance on the ultrasound
device.
• Compare the two results.
• If the measurements are not comparable, recalibrate, and then revalidate the scale.
Only the user decides whether or not to conduct the calibration test.
This process protects the system from any error resulting from a geometric deformation of the:
• Video signal output from the ultrasound device.
• Video signal processed by the acquisition card on a PC.
• Unit Display
6. CALIBRATION CONTROL PROCEDURE

User Guide M’Ath-M’AthPACS® EN 05 2016 V3.2.x e Author P-J Touboul 1997-2018 19
II. Use

User Guide M’Ath-M’AthPACS® EN 05 2016 V3.2.x e Author P-J Touboul 1997-2018 20
DESCRIPTION
1. This Card manages all the patient’s clinical and
sonographic data, archiving the images and video
sequences and editing the report of the examination
conducted.
2. Situation: It appears on the left side of the screen.
It can be moved by clicking on the upper left corner
and by holding the left-click.
When this window is restored under the tool bar, the
upper part of the window disappears. The window is
then “docked” to the screen. To hide this card uncheck
“Patient information” in the main menu “Display”.
3. Color: The patient card color can be changed by
pressing F6 key. Colors are successively grey, beige,
blue, yellow and violet.
1. PATIENT CARD
User Guide M’Ath-M’AthPACS® EN 05 2016 V3.2.x e Author P-J Touboul 1997-2018 21
NEW PATIENT FILE
CREATE A NEW VISIT
SELECT A VISIT
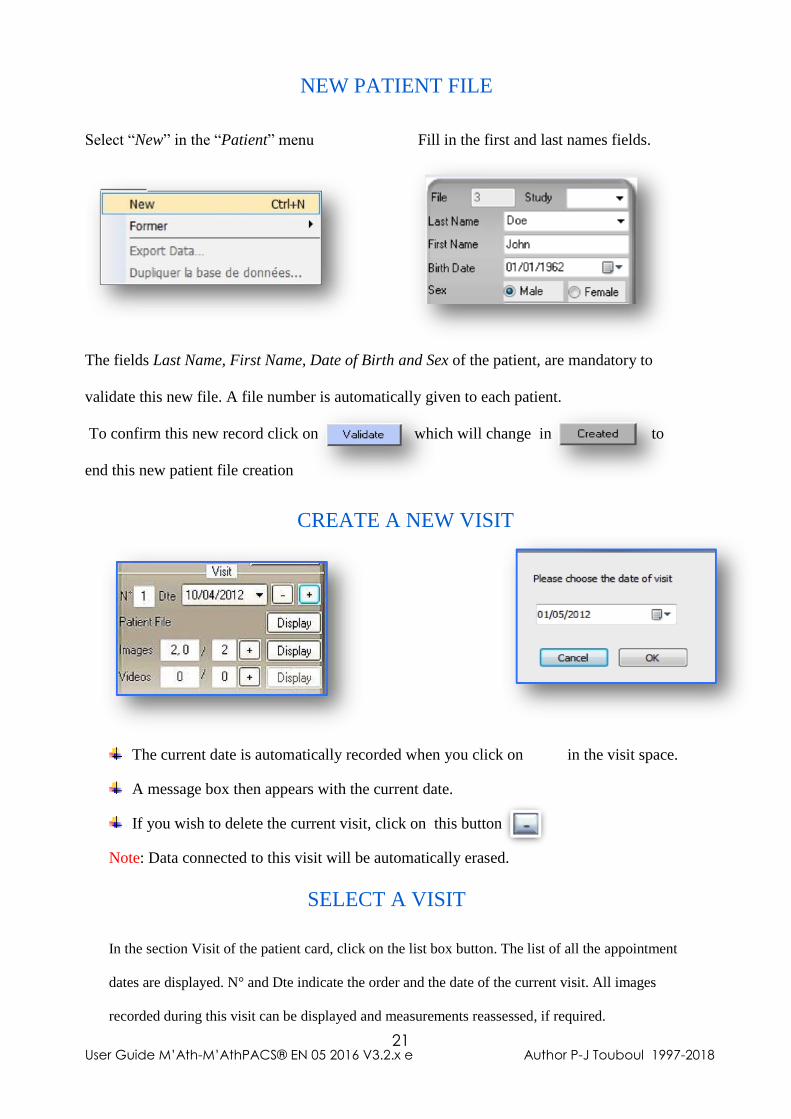
Select “New” in the “Patient” menu Fill in the first and last names fields.
The fields Last Name, First Name, Date of Birth and Sex of the patient, are mandatory to
validate this new file. A file number is automatically given to each patient.
To confirm this new record click on which will change in to
end this new patient file creation
The current date is automatically recorded when you click on in the visit space.
A message box then appears with the current date.
If you wish to delete the current visit, click on this button
Note: Data connected to this visit will be automatically erased.
In the section Visit of the patient card, click on the list box button. The list of all the appointment
dates are displayed. N° and Dte indicate the order and the date of the current visit. All images
recorded during this visit can be displayed and measurements reassessed, if required.
User Guide M’Ath-M’AthPACS® EN 05 2016 V3.2.x e Author P-J Touboul 1997-2018 22
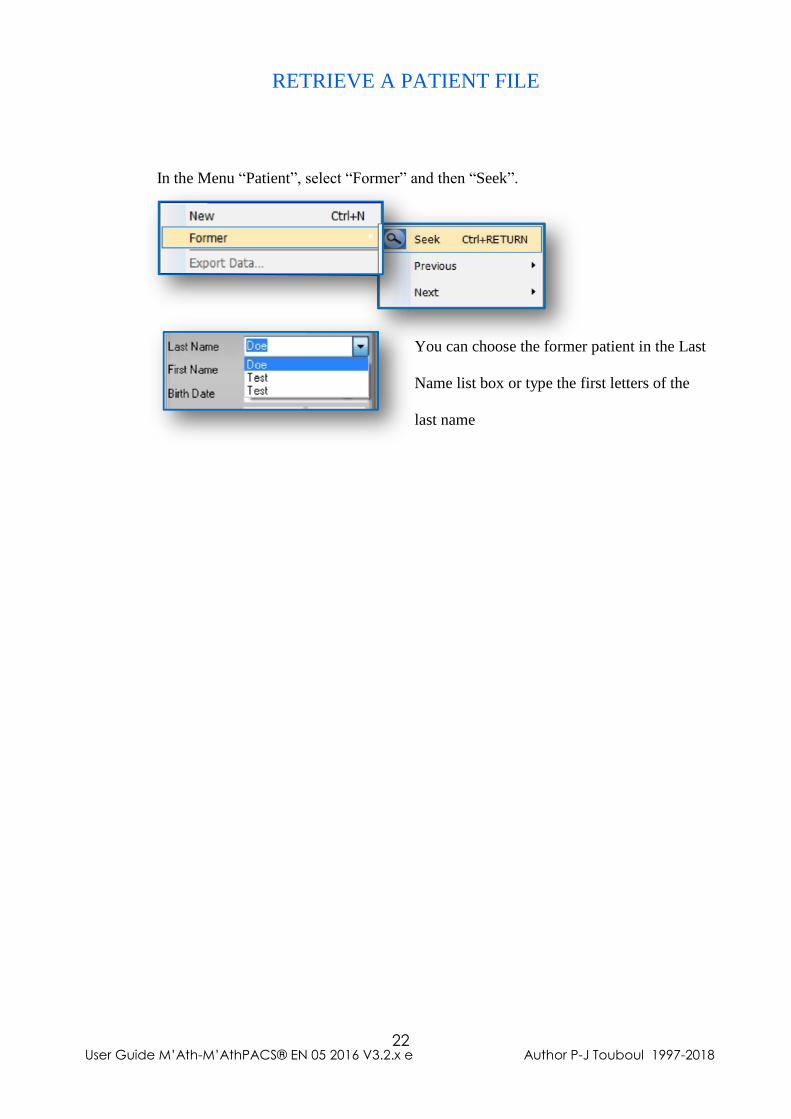
RETRIEVE A PATIENT FILE
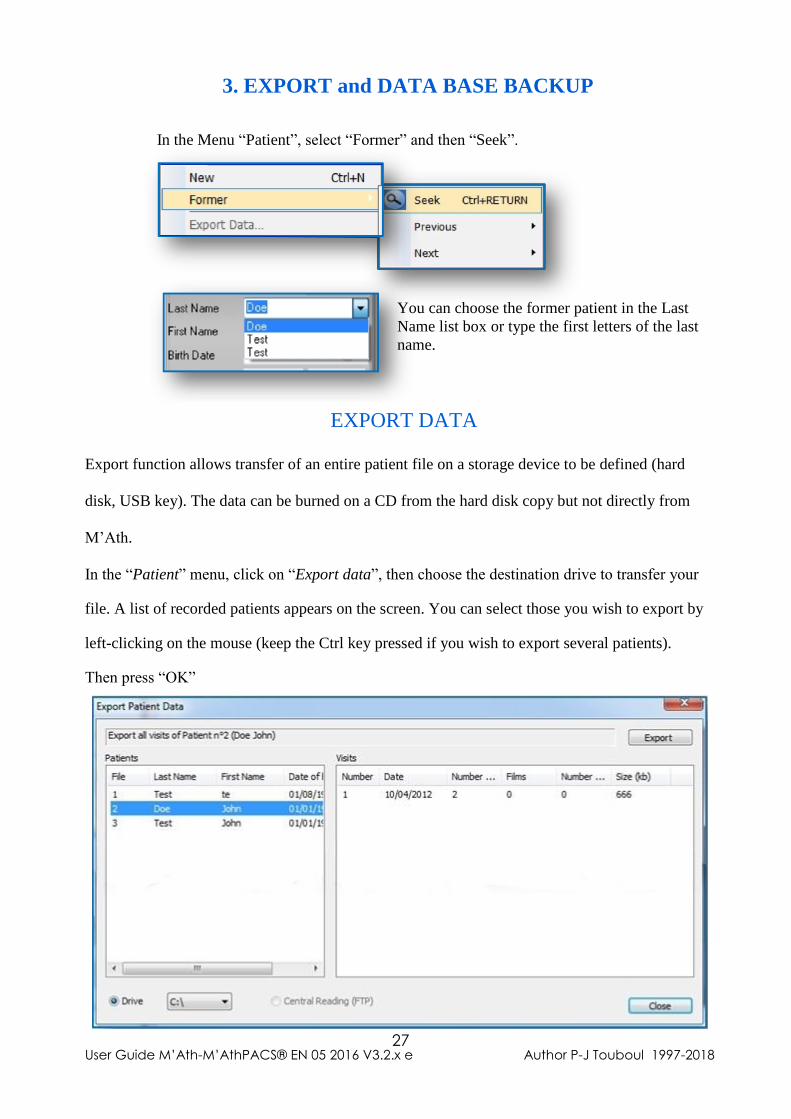
In the Menu “Patient”, select “Former” and then “Seek”.
You can choose the former patient in the Last
Name list box or type the first letters of the
last name
User Guide M’Ath-M’AthPACS® EN 05 2016 V3.2.x e Author P-J Touboul 1997-2018 23
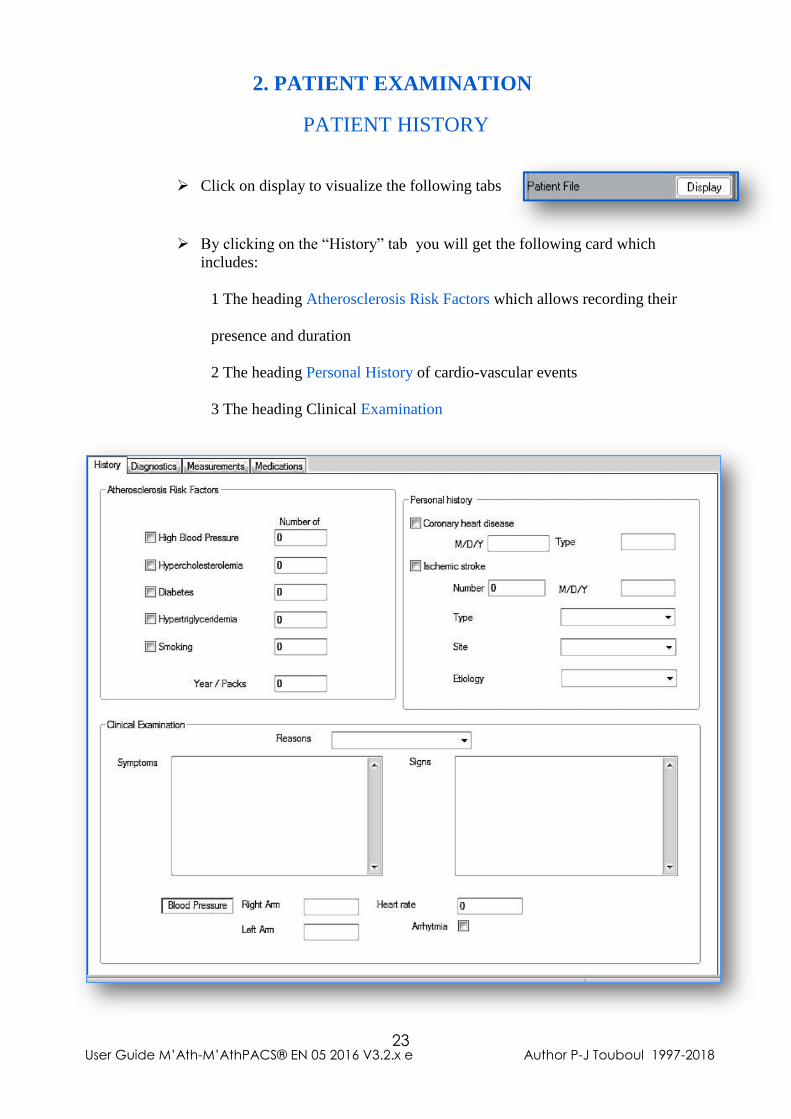
PATIENT HISTORY
➢ Click on display to visualize the following tabs
➢ By clicking on the “History” tab you will get the following card which
includes:
1 The heading Atherosclerosis Risk Factors which allows recording their
presence and duration
2 The heading Personal History of cardio-vascular events
3 The heading Clinical Examination
2. PATIENT EXAMINATION
User Guide M’Ath-M’AthPACS® EN 05 2016 V3.2.x e Author P-J Touboul 1997-2018 24
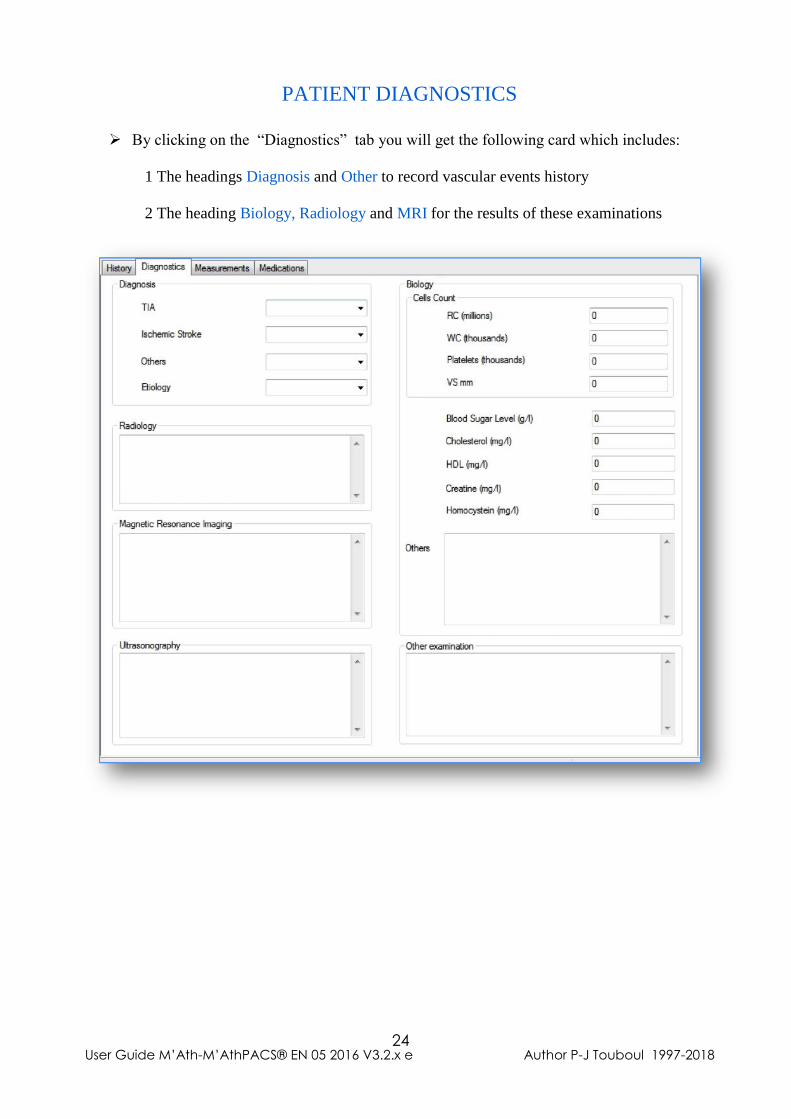
PATIENT DIAGNOSTICS
➢ By clicking on the “Diagnostics” tab you will get the following card which includes:
1 The headings Diagnosis and Other to record vascular events history
2 The heading Biology, Radiology and MRI for the results of these examinations
User Guide M’Ath-M’AthPACS® EN 05 2016 V3.2.x e Author P-J Touboul 1997-2018 25
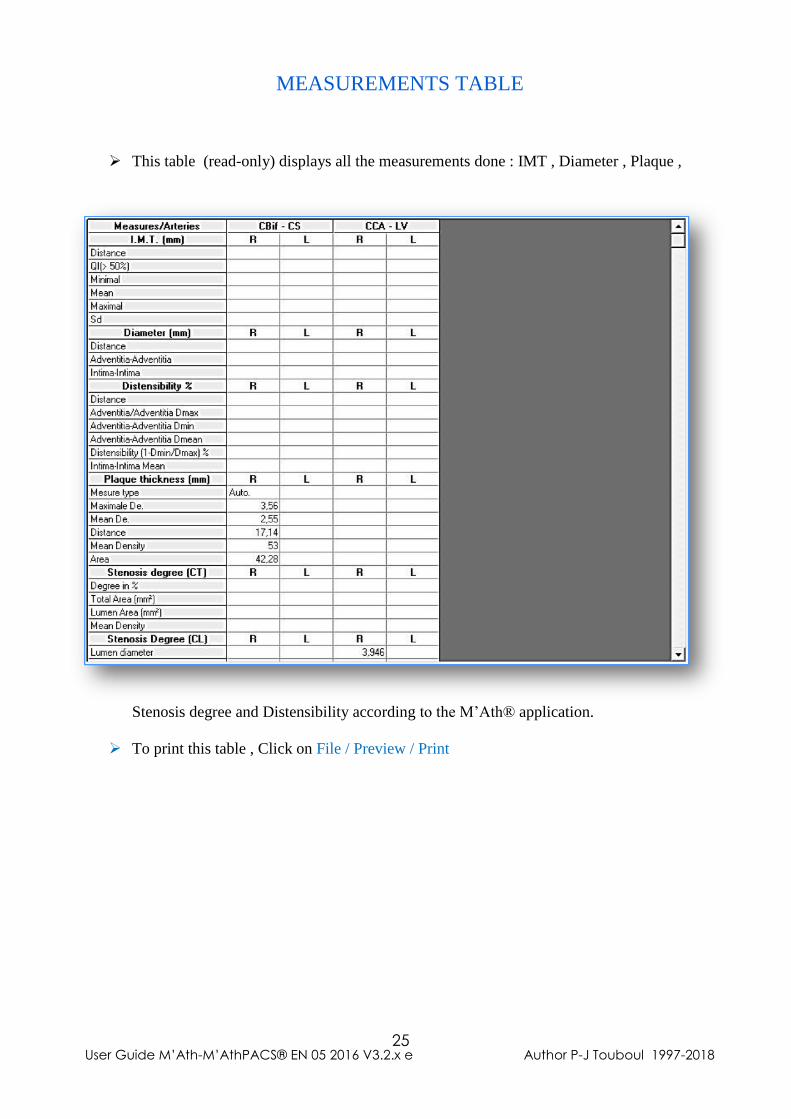
➢ This table (read-only) displays all the measurements done : IMT , Diameter , Plaque ,
Stenosis degree and Distensibility according to the M’Ath® application.
➢ To print this table , Click on File / Preview / Print
MEASUREMENTS TABLE
User Guide M’Ath-M’AthPACS® EN 05 2016 V3.2.x e Author P-J Touboul 1997-2018 26
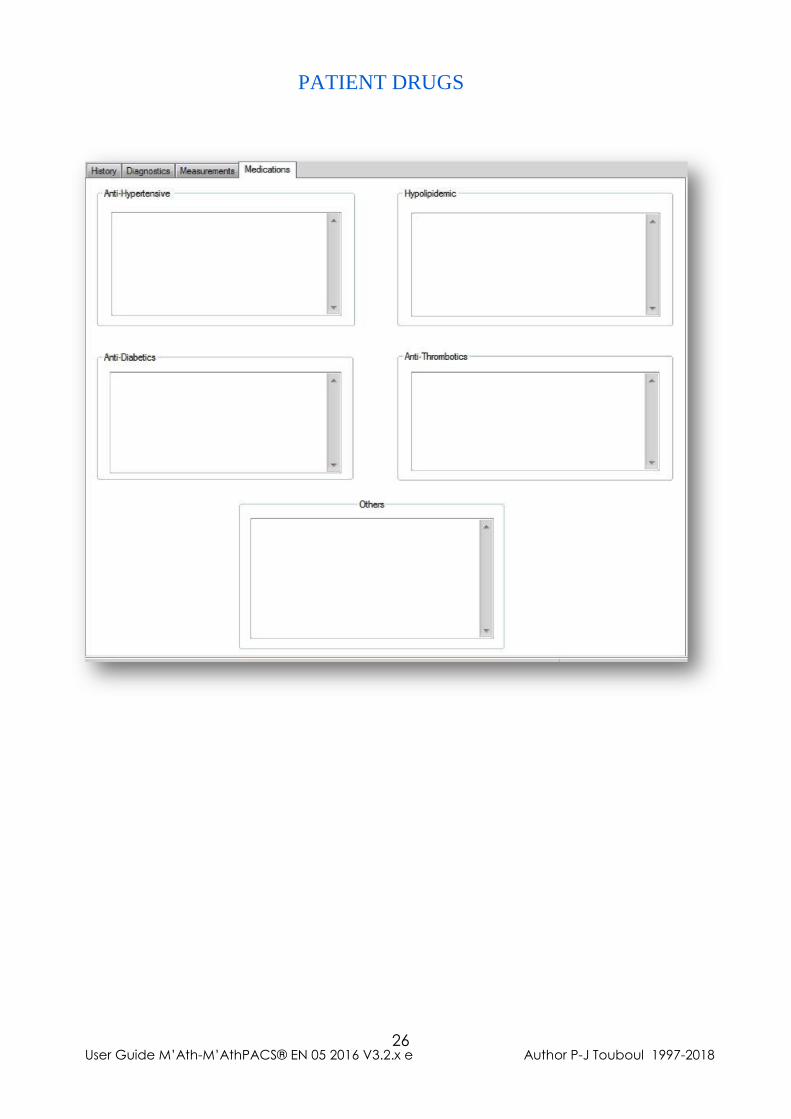
PATIENT DRUGS
User Guide M’Ath-M’AthPACS® EN 05 2016 V3.2.x e Author P-J Touboul 1997-2018 27
EXPORT DATA
In the Menu “Patient”, select “Former” and then “Seek”.
You can choose the former patient in the Last
Name list box or type the first letters of the last
name.
Export function allows transfer of an entire patient file on a storage device to be defined (hard
disk, USB key). The data can be burned on a CD from the hard disk copy but not directly from
M’Ath.
In the “Patient” menu, click on “Export data”, then choose the destination drive to transfer your
file. A list of recorded patients appears on the screen. You can select those you wish to export by
left-clicking on the mouse (keep the Ctrl key pressed if you wish to export several patients).
Then press “OK”
3. EXPORT and DATA BASE BACKUP
User Guide M’Ath-M’AthPACS® EN 05 2016 V3.2.x e Author P-J Touboul 1997-2018 28
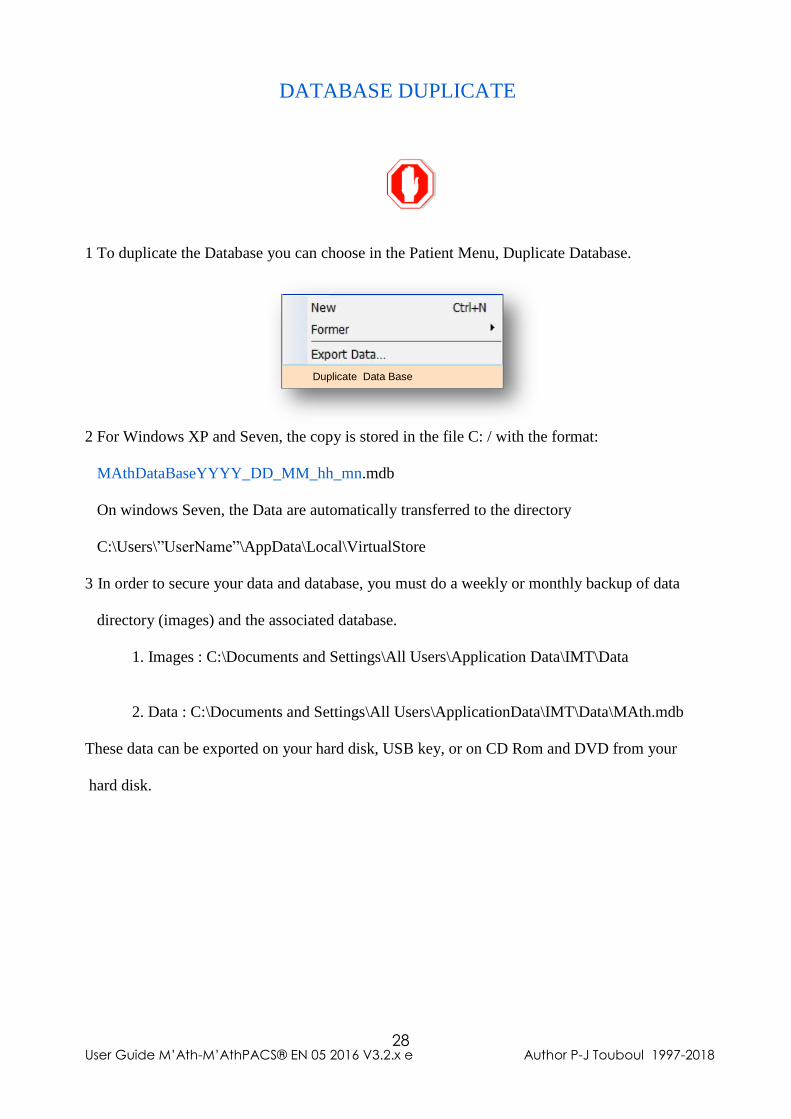
1 To duplicate the Database you can choose in the Patient Menu, Duplicate Database.
2 For Windows XP and Seven, the copy is stored in the file C: / with the format:
MAthDataBaseYYYY_DD_MM_hh_mn.mdb
On windows Seven, the Data are automatically transferred to the directory
C:\Users\”UserName”\AppData\Local\VirtualStore
3 In order to secure your data and database, you must do a weekly or monthly backup of data
directory (images) and the associated database.
1. Images : C:\Documents and Settings\All Users\Application Data\IMT\Data
2. Data : C:\Documents and Settings\All Users\ApplicationData\IMT\Data\MAth.mdb
These data can be exported on your hard disk, USB key, or on CD Rom and DVD from your
hard disk.
DATABASE DUPLICATE
Duplicate Data Base
User Guide M’Ath-M’AthPACS® EN 05 2016 V3.2.x e Author P-J Touboul 1997-2018 29
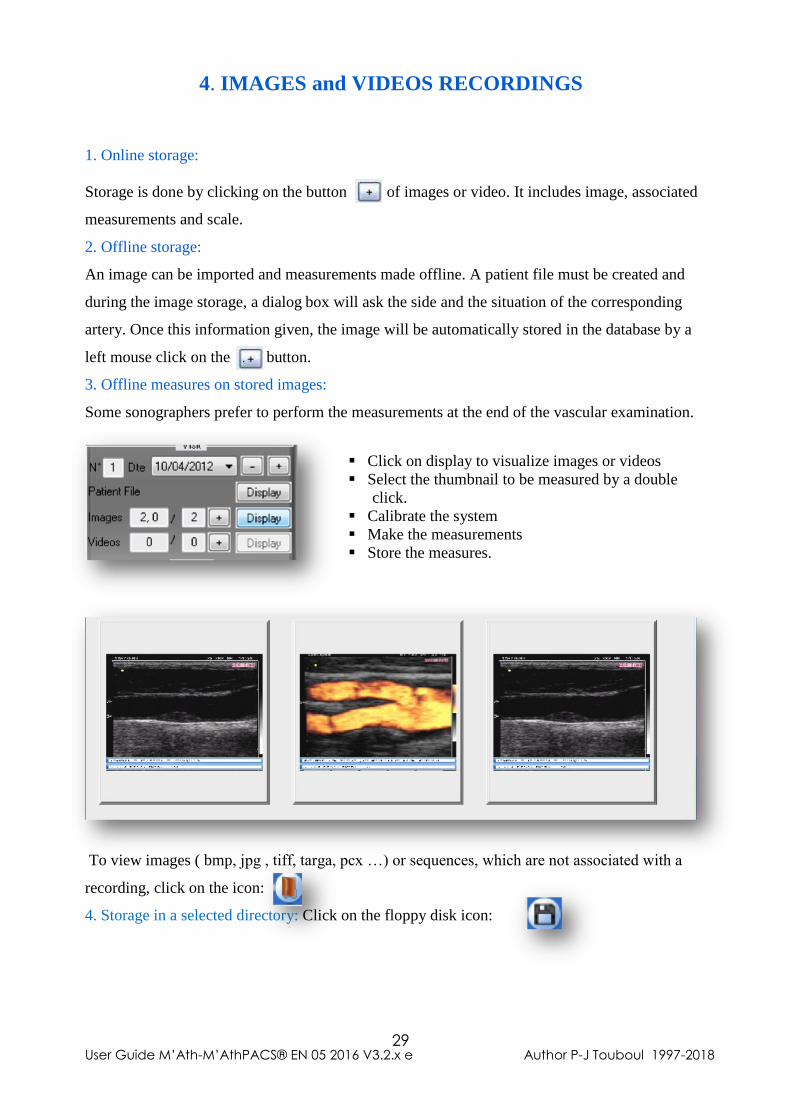
1. Online storage:
Storage is done by clicking on the button of images or video. It includes image, associated
measurements and scale.
2. Offline storage:
An image can be imported and measurements made offline. A patient file must be created and
during the image storage, a dialog box will ask the side and the situation of the corresponding
artery. Once this information given, the image will be automatically stored in the database by a
left mouse click on the . button.
3. Offline measures on stored images:
Some sonographers prefer to perform the measurements at the end of the vascular examination.
▪ Click on display to visualize images or videos
▪ Select the thumbnail to be measured by a double
click.
▪ Calibrate the system
▪ Make the measurements
▪ Store the measures.
To view images ( bmp, jpg , tiff, targa, pcx …) or sequences, which are not associated with a
recording, click on the icon:
4. Storage in a selected directory: Click on the floppy disk icon:
4. IMAGES and VIDEOS RECORDINGS
User Guide M’Ath-M’AthPACS® EN 05 2016 V3.2.x e Author P-J Touboul 1997-2018 30
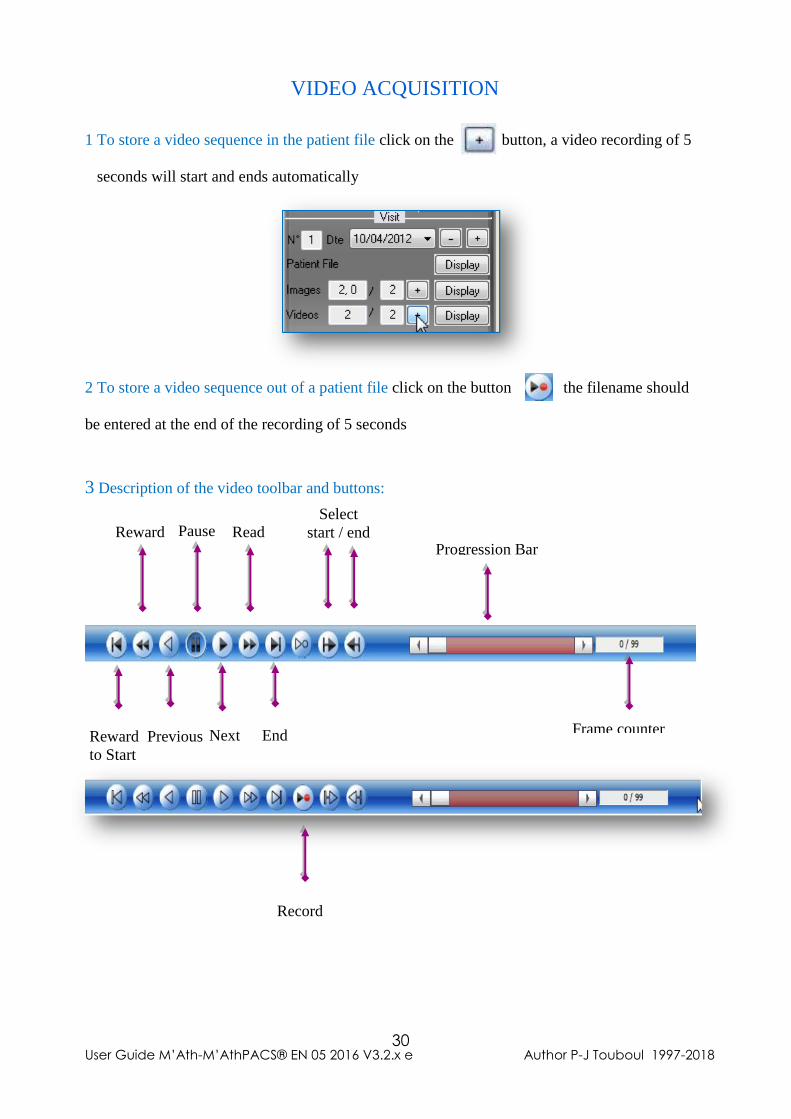
1 To store a video sequence in the patient file click on the button, a video recording of 5
seconds will start and ends automatically
2 To store a video sequence out of a patient file click on the button the filename should
be entered at the end of the recording of 5 seconds
3 Description of the video toolbar and buttons:
VIDEO ACQUISITION
End
Read
Next Previous
Reward
Reward
to Start
Select
start / end Pause
Progression Bar
Frame counter
Record
User Guide M’Ath-M’AthPACS® EN 05 2016 V3.2.x e Author P-J Touboul 1997-2018 31
Different types of measurements are available. Semi-automatic and manual measurements.
Semi-automatic measurements:
1 Mean Intima Media Thickness (I.M.T.)
2 Arterial diameter.
3 Thickness, Area and Density of a plaque.
4 Stenosis degree in cross section.
5 Distensibility.
Manual measurements:
1 Distance between two points.
2 Rectangular area.
`
3 Elliptical area.
4 Polygonal area.
5 Measurement by Density profile.
5. MEASUREMENTS
User Guide M’Ath-M’AthPACS® EN 05 2016 V3.2.x e Author P-J Touboul 1997-2018 32
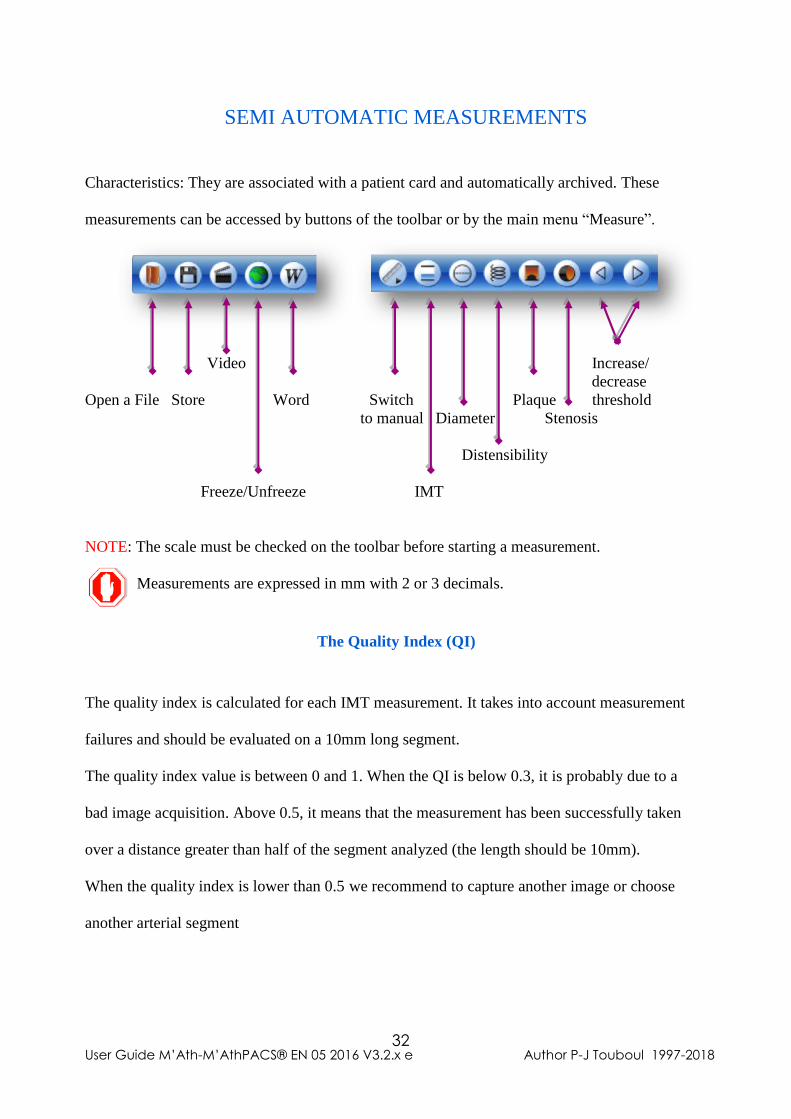
Characteristics: They are associated with a patient card and automatically archived. These
measurements can be accessed by buttons of the toolbar or by the main menu “Measure”.
Video Increase/
decrease
Open a File Store Word Switch Plaque threshold
to manual Diameter Stenosis
Distensibility
Freeze/Unfreeze IMT
NOTE: The scale must be checked on the toolbar before starting a measurement.
Measurements are expressed in mm with 2 or 3 decimals.
The Quality Index (QI)
The quality index is calculated for each IMT measurement. It takes into account measurement
failures and should be evaluated on a 10mm long segment.
The quality index value is between 0 and 1. When the QI is below 0.3, it is probably due to a
bad image acquisition. Above 0.5, it means that the measurement has been successfully taken
over a distance greater than half of the segment analyzed (the length should be 10mm).
When the quality index is lower than 0.5 we recommend to capture another image or choose
another arterial segment
SEMI AUTOMATIC MEASUREMENTS
User Guide M’Ath-M’AthPACS® EN 05 2016 V3.2.x e Author P-J Touboul 1997-2018 33
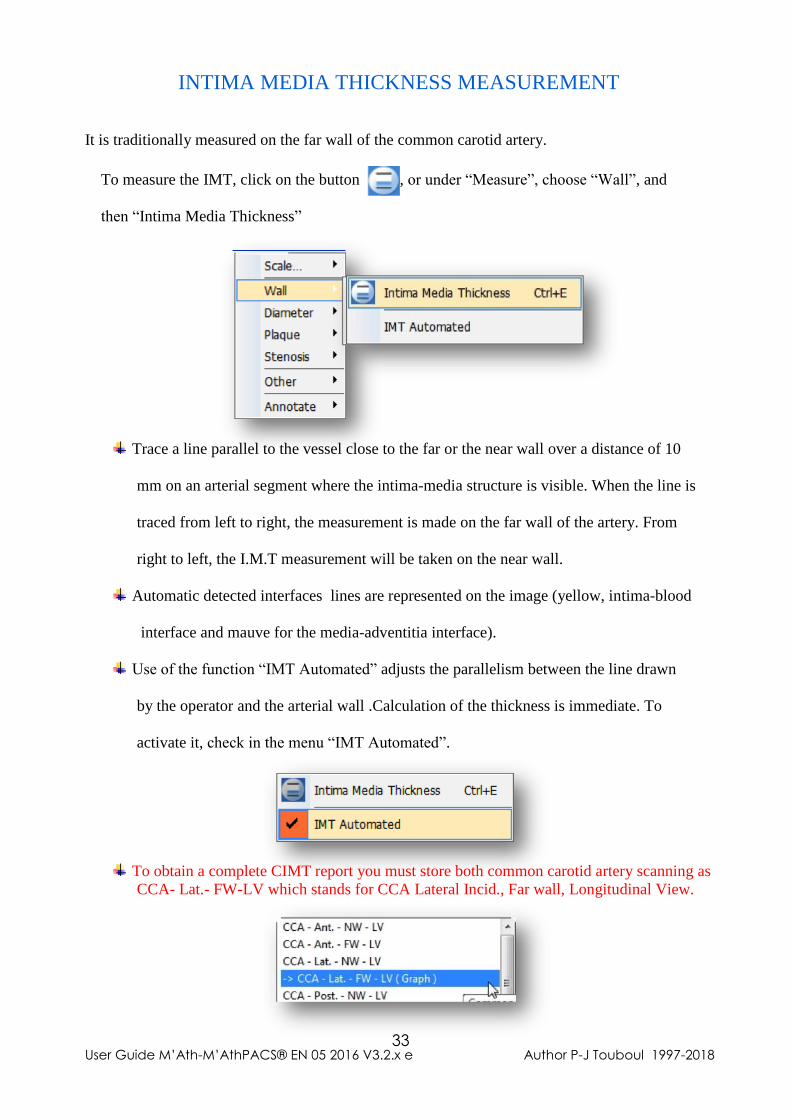
It is traditionally measured on the far wall of the common carotid artery.
To measure the IMT, click on the button , or under “Measure”, choose “Wall”, and
then “Intima Media Thickness”
Trace a line parallel to the vessel close to the far or the near wall over a distance of 10
mm on an arterial segment where the intima-media structure is visible. When the line is
traced from left to right, the measurement is made on the far wall of the artery. From
right to left, the I.M.T measurement will be taken on the near wall.
Automatic detected interfaces lines are represented on the image (yellow, intima-blood
interface and mauve for the media-adventitia interface).
Use of the function “IMT Automated” adjusts the parallelism between the line drawn
by the operator and the arterial wall .Calculation of the thickness is immediate. To
activate it, check in the menu “IMT Automated”.
To obtain a complete CIMT report you must store both common carotid artery scanning as
CCA- Lat.- FW-LV which stands for CCA Lateral Incid., Far wall, Longitudinal View.
INTIMA MEDIA THICKNESS MEASUREMENT
User Guide M’Ath-M’AthPACS® EN 05 2016 V3.2.x e Author P-J Touboul 1997-2018 34
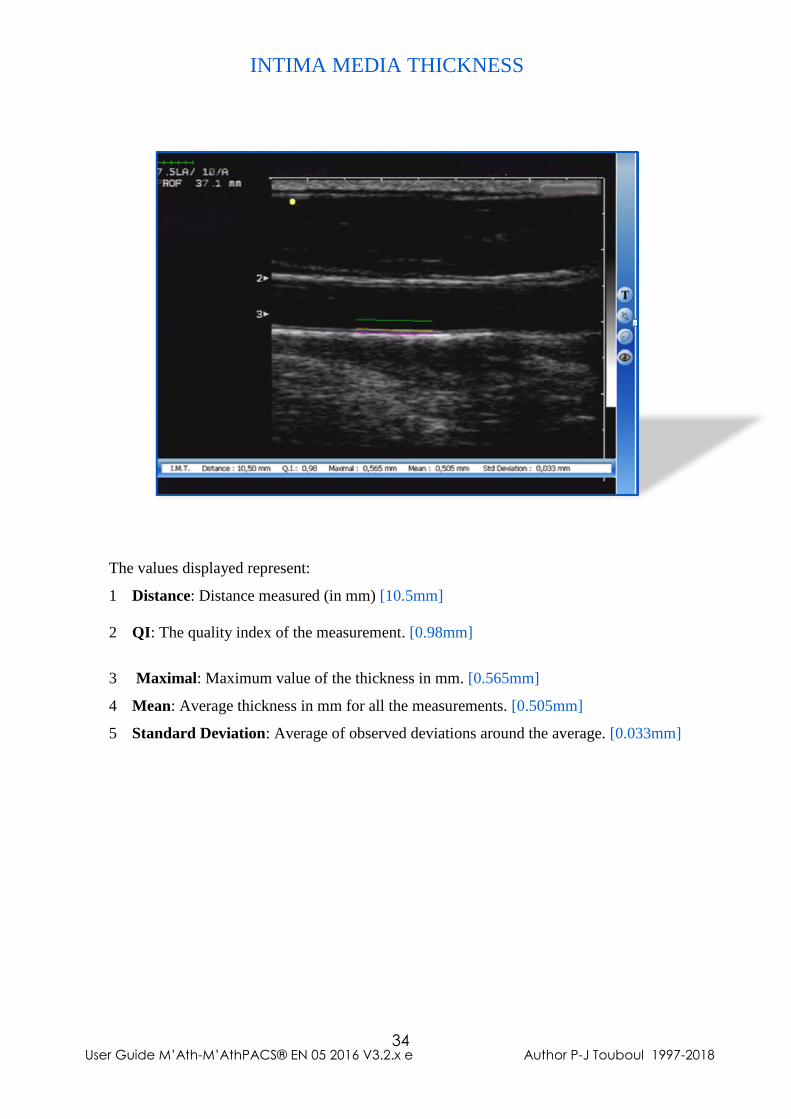
The values displayed represent:
1 Distance: Distance measured (in mm) [10.5mm]
2 QI: The quality index of the measurement. [0.98mm]
3 Maximal: Maximum value of the thickness in mm. [0.565mm]
4 Mean: Average thickness in mm for all the measurements. [0.505mm]
5 Standard Deviation: Average of observed deviations around the average. [0.033mm]
INTIMA MEDIA THICKNESS
User Guide M’Ath-M’AthPACS® EN 05 2016 V3.2.x e Author P-J Touboul 1997-2018 35
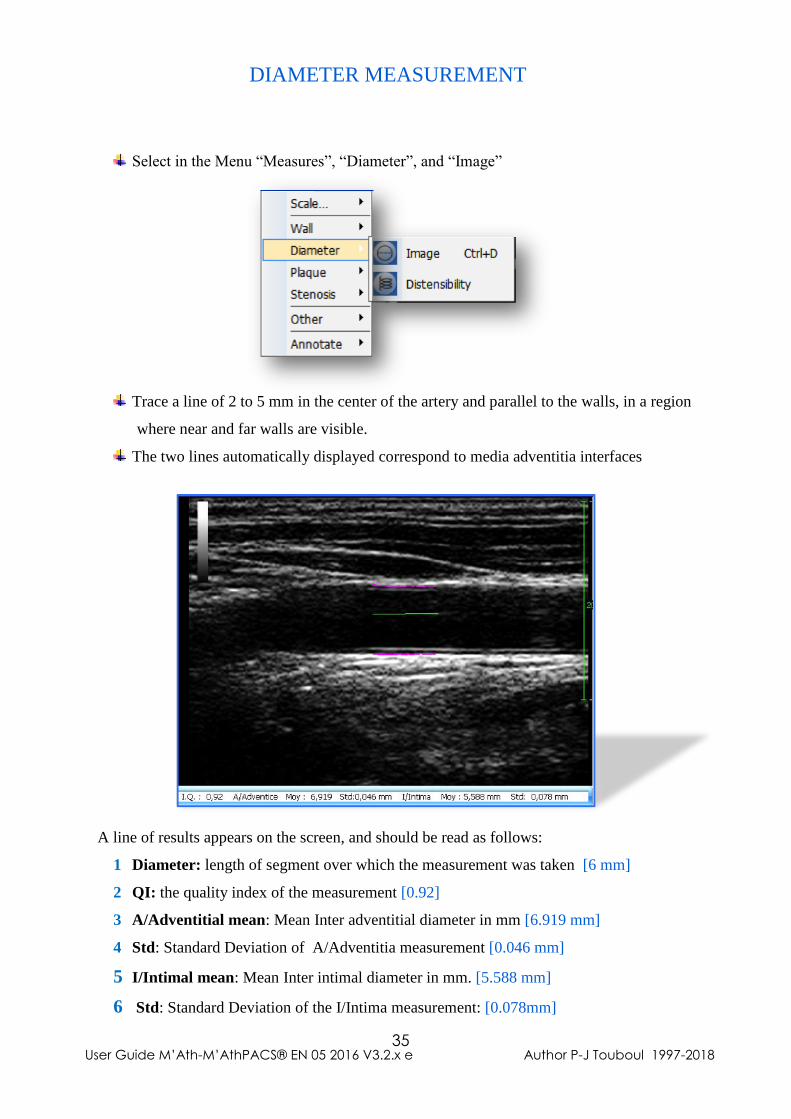
Select in the Menu “Measures”, “Diameter”, and “Image”
Trace a line of 2 to 5 mm in the center of the artery and parallel to the walls, in a region
where near and far walls are visible.
The two lines automatically displayed correspond to media adventitia interfaces
A line of results appears on the screen, and should be read as follows:
1 Diameter: length of segment over which the measurement was taken [6 mm]
2 QI: the quality index of the measurement [0.92]
3 A/Adventitial mean: Mean Inter adventitial diameter in mm [6.919 mm]
4 Std: Standard Deviation of A/Adventitia measurement [0.046 mm]
5 I/Intimal mean: Mean Inter intimal diameter in mm. [5.588 mm]
6 Std: Standard Deviation of the I/Intima measurement: [0.078mm]
DIAMETER MEASUREMENT
User Guide M’Ath-M’AthPACS® EN 05 2016 V3.2.x e Author P-J Touboul 1997-2018 36
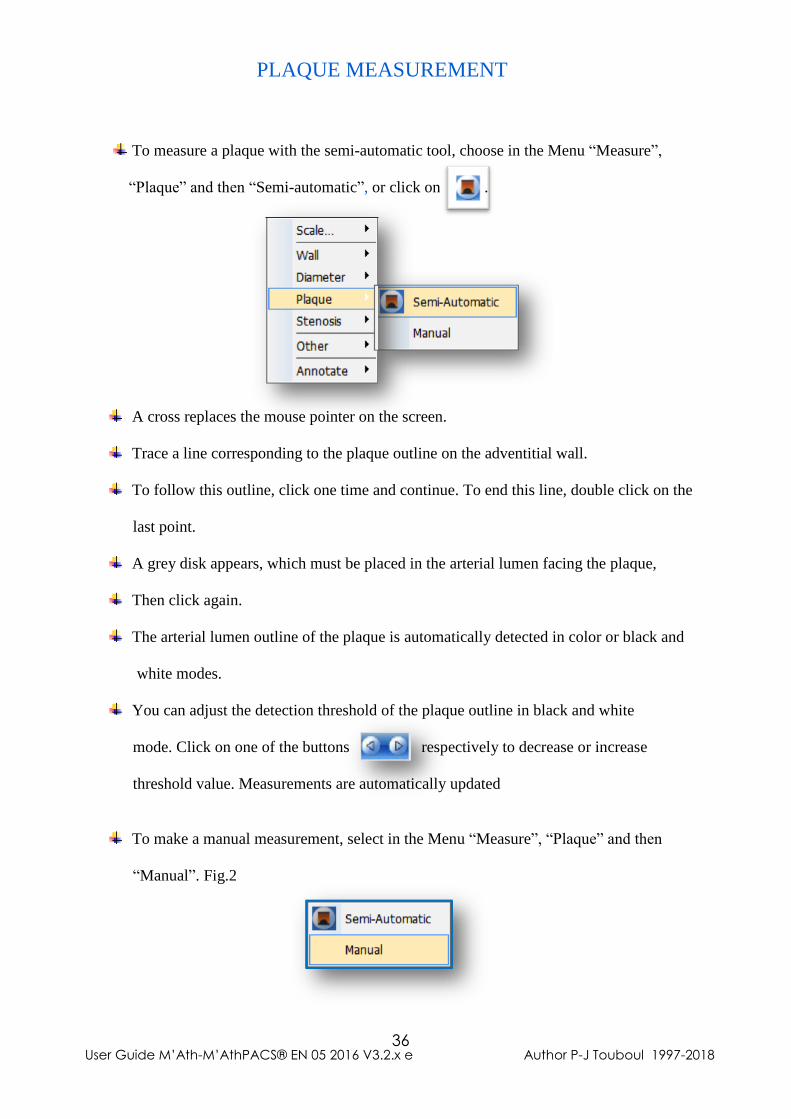
To measure a plaque with the semi-automatic tool, choose in the Menu “Measure”,
“Plaque” and then “Semi-automatic”, or click on .
A cross replaces the mouse pointer on the screen.
Trace a line corresponding to the plaque outline on the adventitial wall.
To follow this outline, click one time and continue. To end this line, double click on the
last point.
A grey disk appears, which must be placed in the arterial lumen facing the plaque,
Then click again.
The arterial lumen outline of the plaque is automatically detected in color or black and
white modes.
You can adjust the detection threshold of the plaque outline in black and white
mode. Click on one of the buttons respectively to decrease or increase
threshold value. Measurements are automatically updated
To make a manual measurement, select in the Menu “Measure”, “Plaque” and then
“Manual”. Fig.2
PLAQUE MEASUREMENT
User Guide M’Ath-M’AthPACS® EN 05 2016 V3.2.x e Author P-J Touboul 1997-2018 37
.
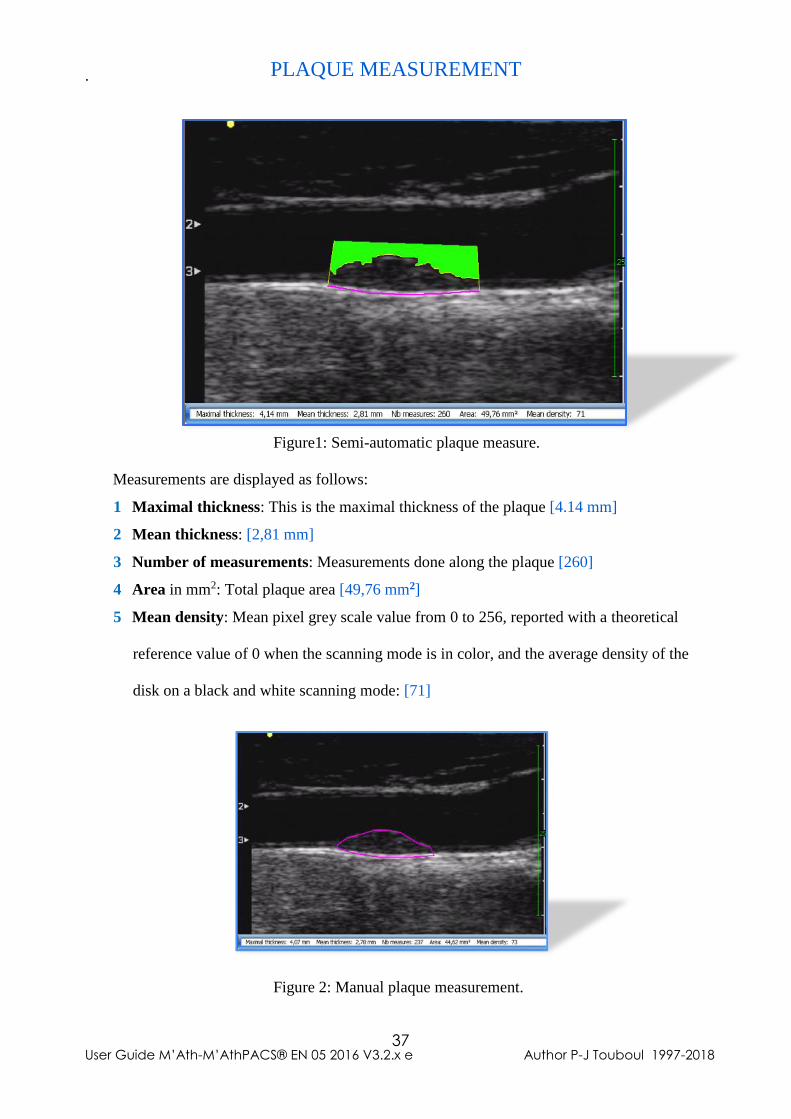
Figure1: Semi-automatic plaque measure.
Measurements are displayed as follows:
1 Maximal thickness: This is the maximal thickness of the plaque [4.14 mm]
2 Mean thickness: [2,81 mm]
3 Number of measurements: Measurements done along the plaque [260]
4 Area in mm2: Total plaque area [49,76 mm2]
5 Mean density: Mean pixel grey scale value from 0 to 256, reported with a theoretical
reference value of 0 when the scanning mode is in color, and the average density of the
disk on a black and white scanning mode: [71]
Figure 2: Manual plaque measurement.
PLAQUE MEASUREMENT
User Guide M’Ath-M’AthPACS® EN 05 2016 V3.2.x e Author P-J Touboul 1997-2018 38
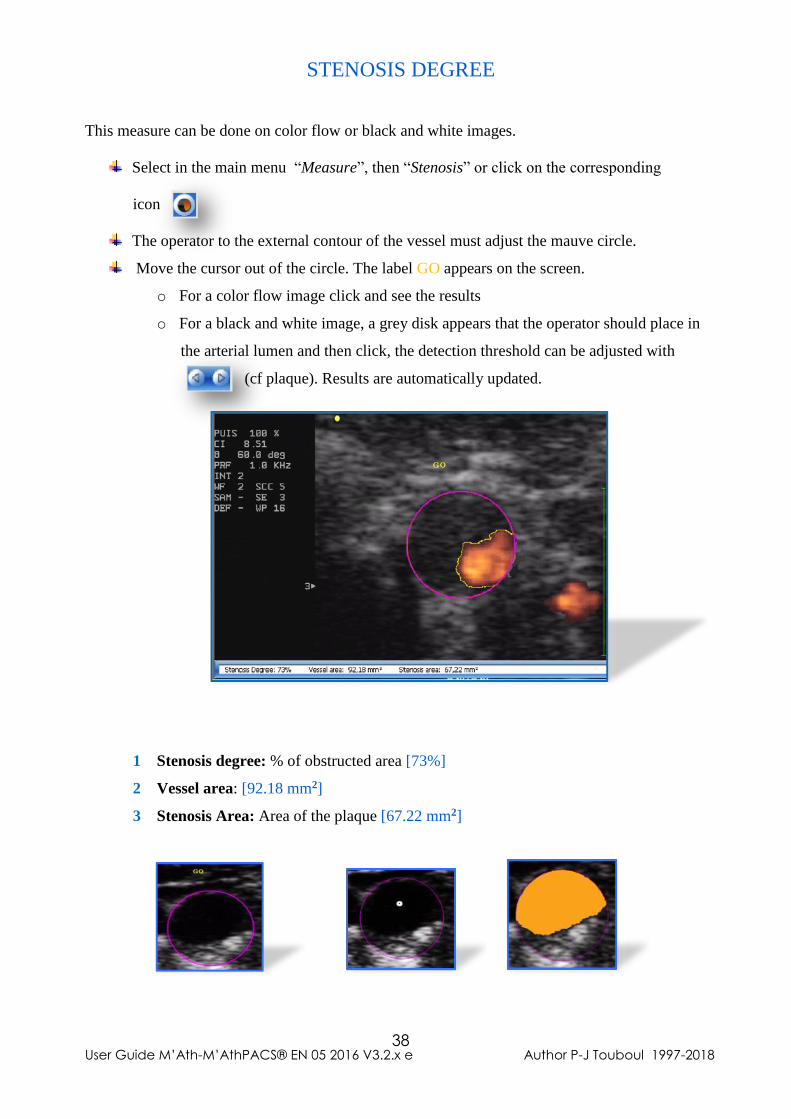
This measure can be done on color flow or black and white images.
Select in the main menu “Measure”, then “Stenosis” or click on the corresponding
icon
The operator to the external contour of the vessel must adjust the mauve circle.
Move the cursor out of the circle. The label GO appears on the screen.
o For a color flow image click and see the results
o For a black and white image, a grey disk appears that the operator should place in
the arterial lumen and then click, the detection threshold can be adjusted with
(cf plaque). Results are automatically updated.
1 Stenosis degree: % of obstructed area [73%]
2 Vessel area: [92.18 mm2]
3 Stenosis Area: Area of the plaque [67.22 mm2]
STENOSIS DEGREE
User Guide M’Ath-M’AthPACS® EN 05 2016 V3.2.x e Author P-J Touboul 1997-2018 39
1 Recommendations for video acquisition:
To measure brachial or carotid distensibility, you should:
o Record 5 seconds of video
o Check the quality of the recording, intima-media thickness should be correctly
visualized during at least 3 cardiac cycles
o Adjusts gain settings to avoid intra luminal artifacts.
o Select the best quality with the functions provided.
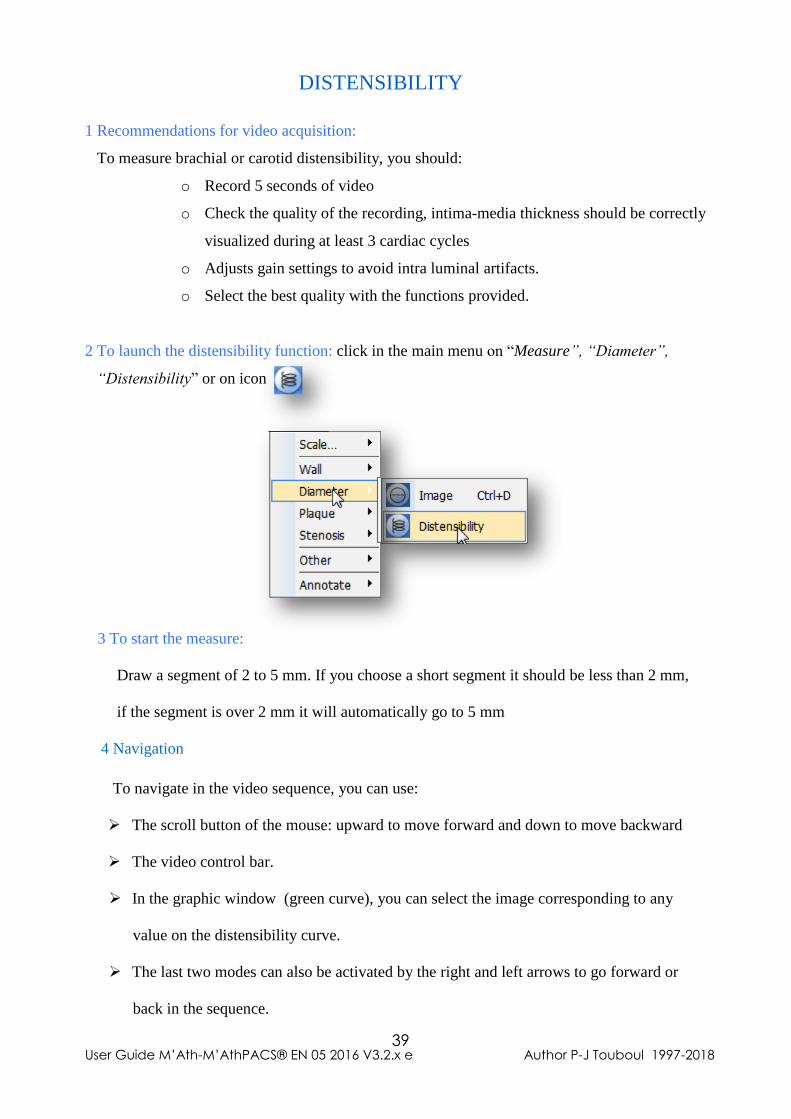
2 To launch the distensibility function: click in the main menu on “Measure”, “Diameter”,
“Distensibility” or on icon
3 To start the measure:
Draw a segment of 2 to 5 mm. If you choose a short segment it should be less than 2 mm,
if the segment is over 2 mm it will automatically go to 5 mm
4 Navigation
To navigate in the video sequence, you can use:
➢ The scroll button of the mouse: upward to move forward and down to move backward
➢ The video control bar.
➢ In the graphic window (green curve), you can select the image corresponding to any
value on the distensibility curve.
➢ The last two modes can also be activated by the right and left arrows to go forward or
back in the sequence.
DISTENSIBILITY
User Guide M’Ath-M’AthPACS® EN 05 2016 V3.2.x e Author P-J Touboul 1997-2018 40
5 Results
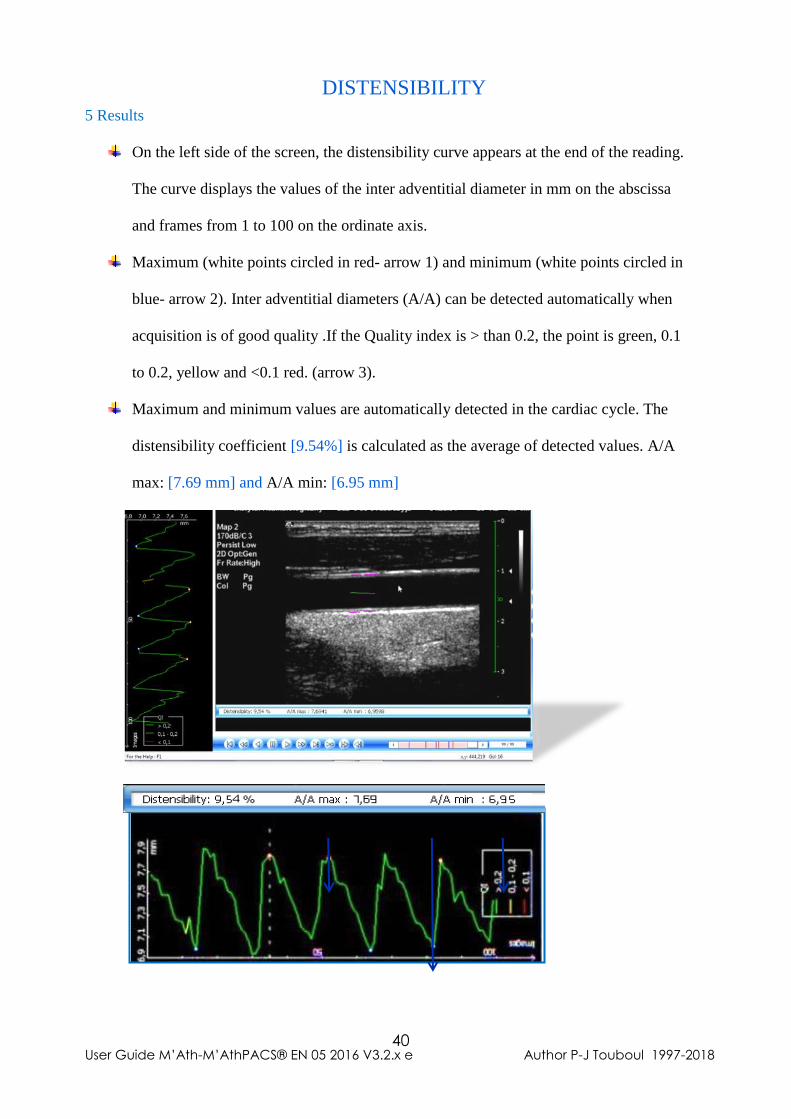
On the left side of the screen, the distensibility curve appears at the end of the reading.
The curve displays the values of the inter adventitial diameter in mm on the abscissa
and frames from 1 to 100 on the ordinate axis.
Maximum (white points circled in red- arrow 1) and minimum (white points circled in
blue- arrow 2). Inter adventitial diameters (A/A) can be detected automatically when
acquisition is of good quality .If the Quality index is > than 0.2, the point is green, 0.1
to 0.2, yellow and <0.1 red. (arrow 3).
Maximum and minimum values are automatically detected in the cardiac cycle. The
distensibility coefficient [9.54%] is calculated as the average of detected values. A/A
max: [7.69 mm] and A/A min: [6.95 mm]
.
1 2 3
DISTENSIBILITY
User Guide M’Ath-M’AthPACS® EN 05 2016 V3.2.x e Author P-J Touboul 1997-2018 41
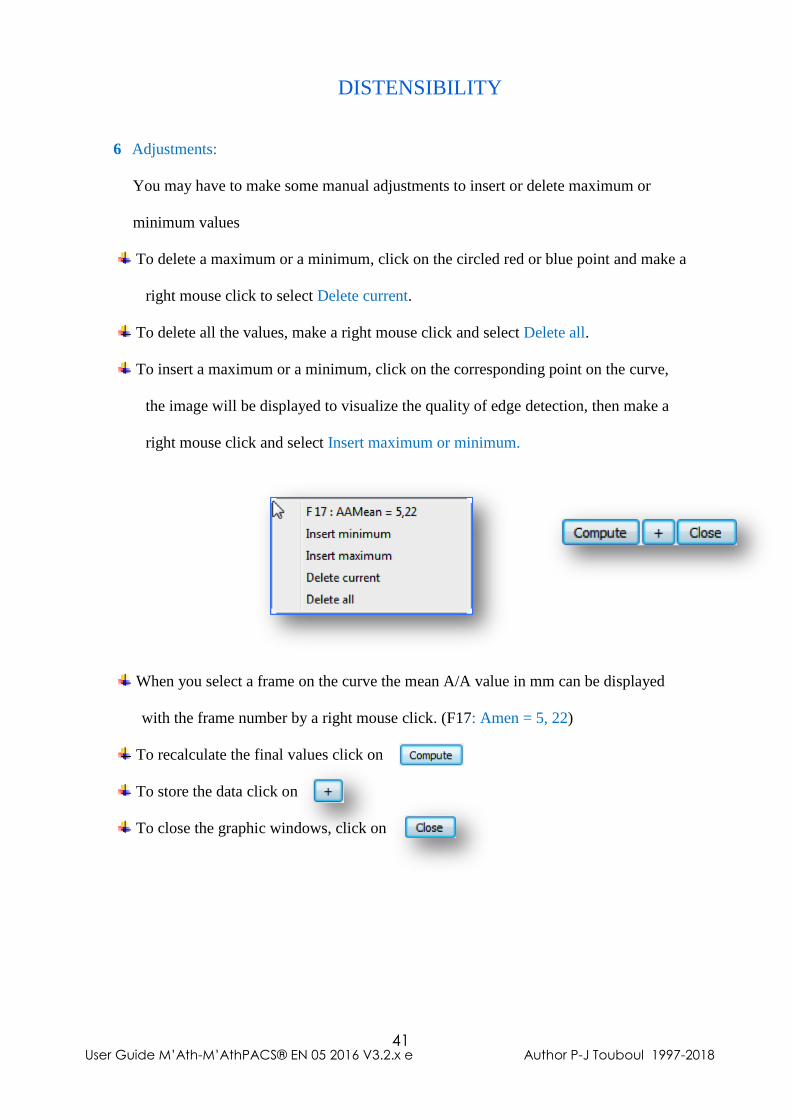
6 Adjustments:
You may have to make some manual adjustments to insert or delete maximum or
minimum values
To delete a maximum or a minimum, click on the circled red or blue point and make a
right mouse click to select Delete current.
To delete all the values, make a right mouse click and select Delete all.
To insert a maximum or a minimum, click on the corresponding point on the curve,
the image will be displayed to visualize the quality of edge detection, then make a
right mouse click and select Insert maximum or minimum.
When you select a frame on the curve the mean A/A value in mm can be displayed
with the frame number by a right mouse click. (F17: Amen = 5, 22)
To recalculate the final values click on
To store the data click on
To close the graphic windows, click on
DISTENSIBILITY
User Guide M’Ath-M’AthPACS® EN 05 2016 V3.2.x e Author P-J Touboul 1997-2018 42
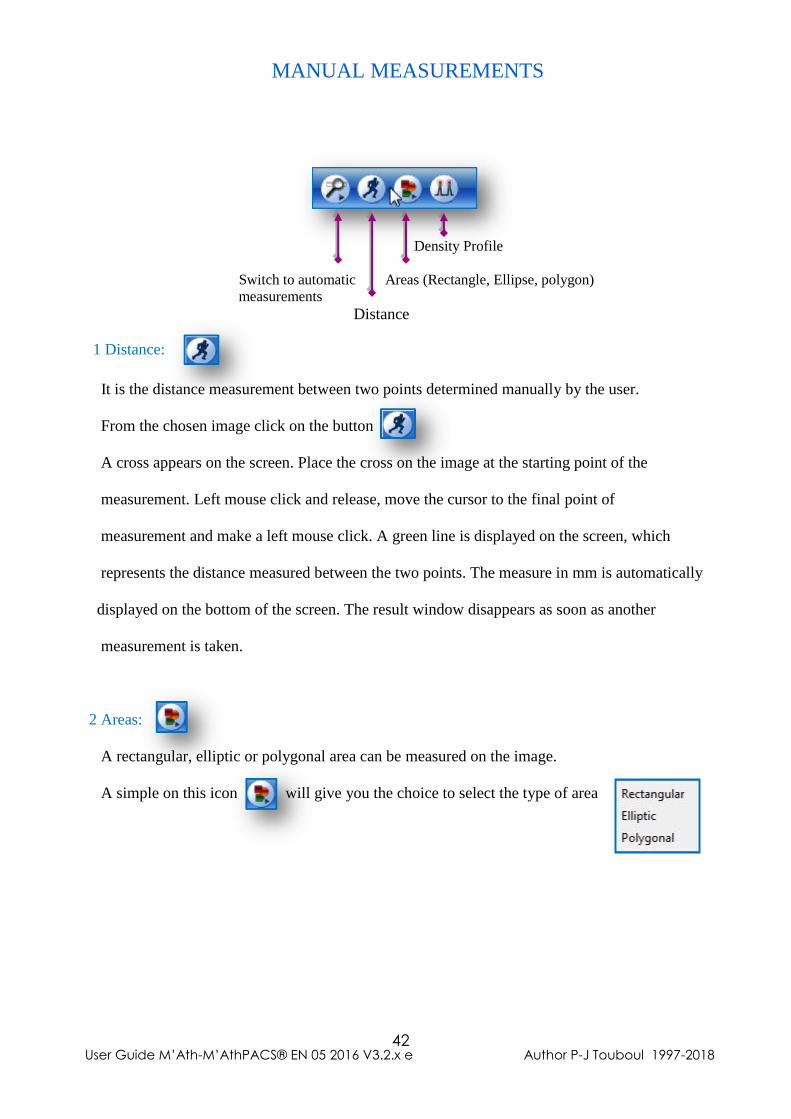
Density Profile
Switch to automatic Areas (Rectangle, Ellipse, polygon)
measurements
Distance
1 Distance:
It is the distance measurement between two points determined manually by the user.
From the chosen image click on the button
A cross appears on the screen. Place the cross on the image at the starting point of the
measurement. Left mouse click and release, move the cursor to the final point of
measurement and make a left mouse click. A green line is displayed on the screen, which
represents the distance measured between the two points. The measure in mm is automatically
displayed on the bottom of the screen. The result window disappears as soon as another
measurement is taken.
2 Areas:
A rectangular, elliptic or polygonal area can be measured on the image.
A simple on this icon will give you the choice to select the type of area
MANUAL MEASUREMENTS
User Guide M’Ath-M’AthPACS® EN 05 2016 V3.2.x e Author P-J Touboul 1997-2018 43
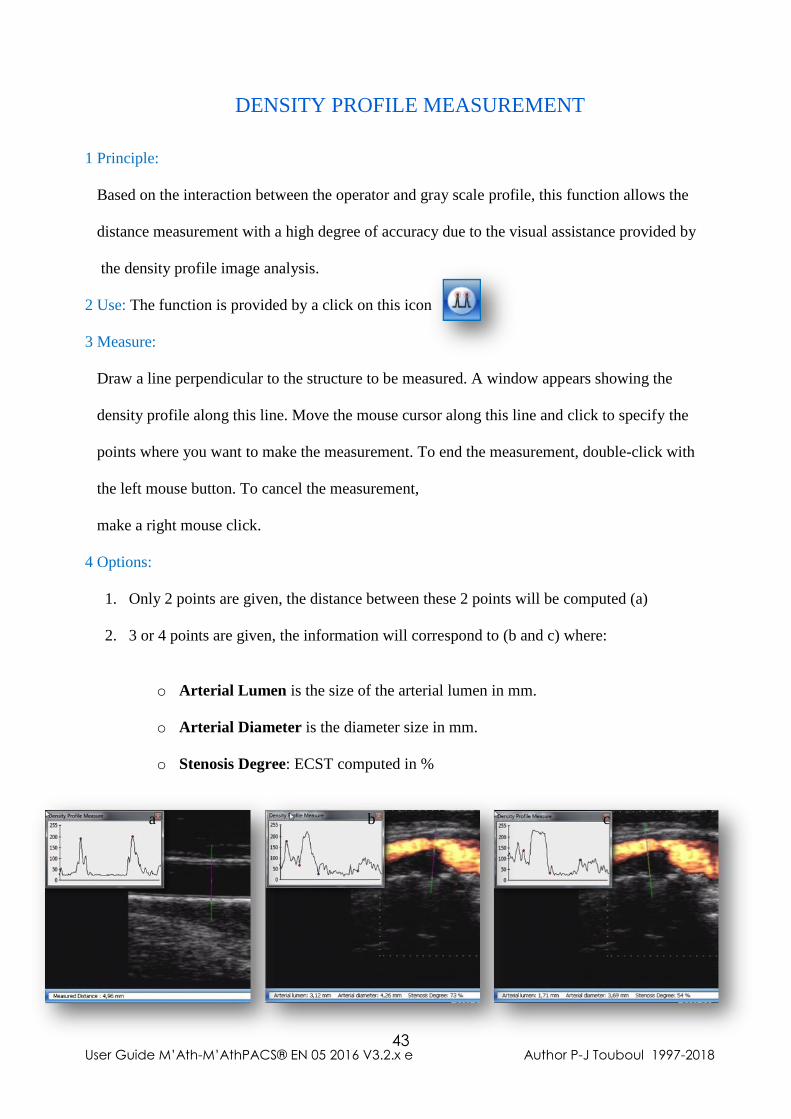
1 Principle:
Based on the interaction between the operator and gray scale profile, this function allows the
distance measurement with a high degree of accuracy due to the visual assistance provided by
the density profile image analysis.
2 Use: The function is provided by a click on this icon
3 Measure:
Draw a line perpendicular to the structure to be measured. A window appears showing the
density profile along this line. Move the mouse cursor along this line and click to specify the
points where you want to make the measurement. To end the measurement, double-click with
the left mouse button. To cancel the measurement,
make a right mouse click.
4 Options:
1. Only 2 points are given, the distance between these 2 points will be computed (a)
2. 3 or 4 points are given, the information will correspond to (b and c) where:
o Arterial Lumen is the size of the arterial lumen in mm.
o Arterial Diameter is the diameter size in mm.
o Stenosis Degree: ECST computed in %
a b c
DENSITY PROFILE MEASUREMENT
User Guide M’Ath-M’AthPACS® EN 05 2016 V3.2.x e Author P-J Touboul 1997-2018 44
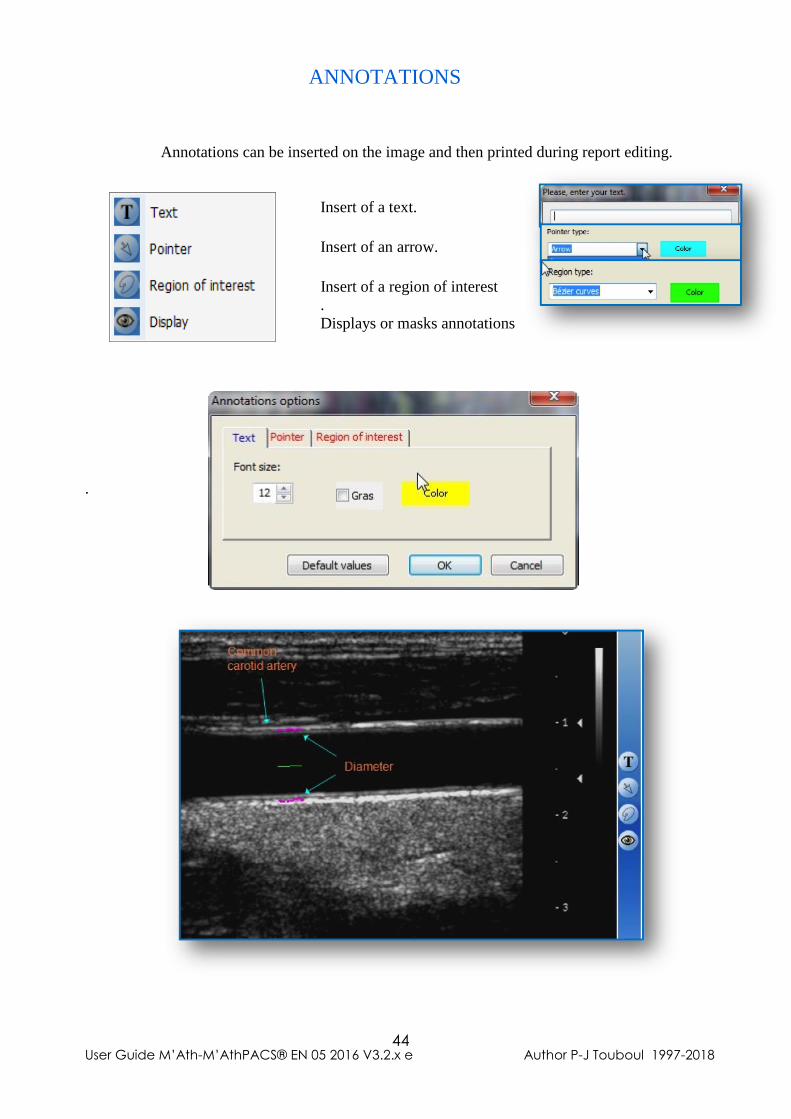
Annotations can be inserted on the image and then printed during report editing.
Insert of a text.
Insert of an arrow.
Insert of a region of interest
.
Displays or masks annotations
.
ANNOTATIONS

User Guide M’Ath-M’AthPACS® EN 05 2016 V3.2.x e Author P-J Touboul 1997-2018 45
1. Introduction: Ultrasound examination highly depends on the angle of the ultrasound
beam under which the vessel is scanned. To reduce measurement variability, the
M’Ath SR procedure will be detailed below. It can be applied to intima media
thickness plaque and stenosis degree follow up. The assistance provided to the
sonographer helps him to obtain comparable angle at 2 successive examinations.
2 Procedure:
➢ At the first examination:
- Patient file and visit creations follow the same procedure.
- When the sonographer stores image he will be asked to choose with or without
mask.
- If you click on “Yes”, the cursor changes to a pencil allowing drawing the mask
made of the main outlines located on the adventitial layer of the artery.
- The line is made of consecutive clicks on the left mouse button.
- A double right mouse click ends the current drawing and starts another line.
- When the mask has been drawn, click on image storage
6 .REPRODUCIBILITY PROCEDURE (SR)

User Guide M’Ath-M’AthPACS® EN 05 2016 V3.2.x e Author P-J Touboul 1997-2018 46
- Then, fill the measurement side and situation box that stores the side, the head
position of the patient during the ultrasound scanning and the probe angle
relative to the body.
➢ At the follow up visit
- Select the patient file and validate
- Select the last visit
- Display stored images
- Double click on the thumbnail corresponding to the region you want to check.
- Create a new visit and start the acquisition mode
- Then you have to superimpose the arterial outlines with the pre-defined mask
Mask Superimposition
NB: You have the possibility to improve the mask at the second examination. If you do it, you
will have to retrieve the last visit for the next examination, to obtain the last mask.
You can display or hide the mask using this icon
User Guide M’Ath-M’AthPACS® EN 05 2016 V3.2.x e Author P-J Touboul 1997-2018 47
7. M’Ath PACS version
1 Introduction:
This version is dedicated to measurements done on images received from PACS . M’Ath PACS
can be installed on a virtual PC to receive DICOM images from pre specified PACS , and send
back images and DICOM pdf reports to this or another PACS.
2 Functions :
Semi automatic intima media thickness , from files received and possibility to send back pdf
reports.
3 Examination Reader Guide in 10 points :
To launch the application , double click on the M’Ath PACS 3.2.1 shortcut on the desktop.
If not previously done , all the examinations which have been performed but not sent the day
before will be resent to the pre specified PACS.
Before starting , the reader needs to set the AE titles , IP address and port for reception and
sending of images and reports. ( Fig c)
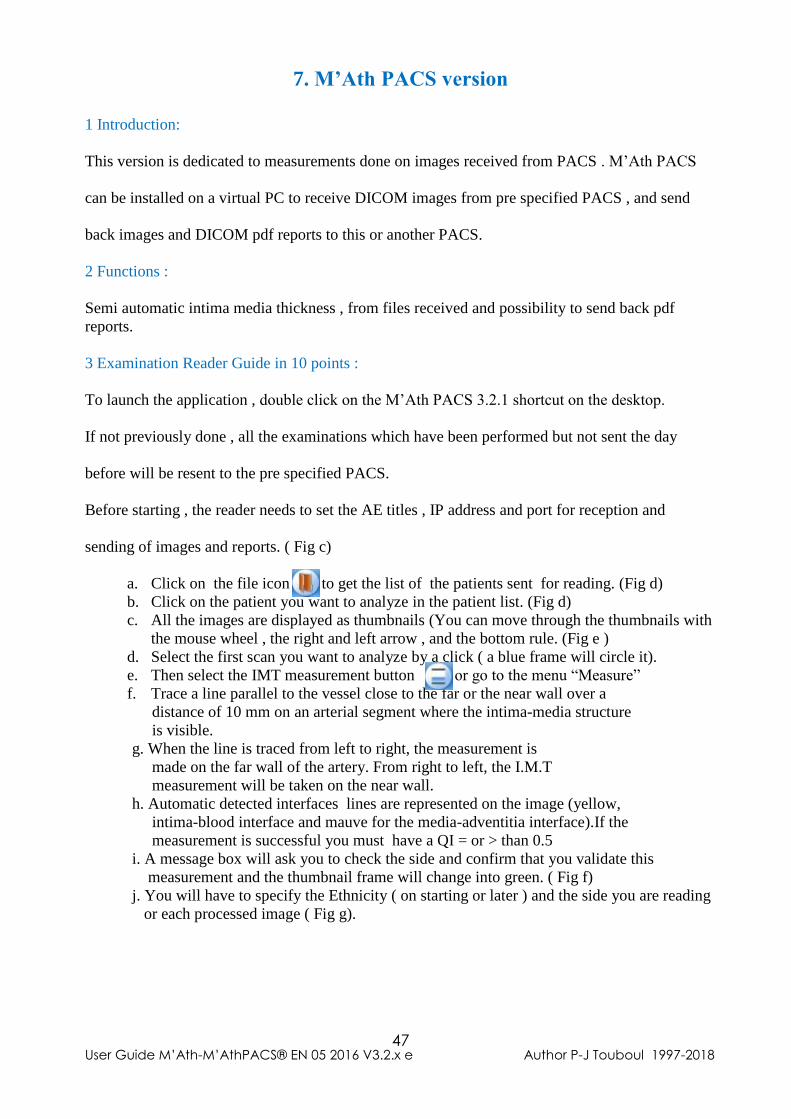
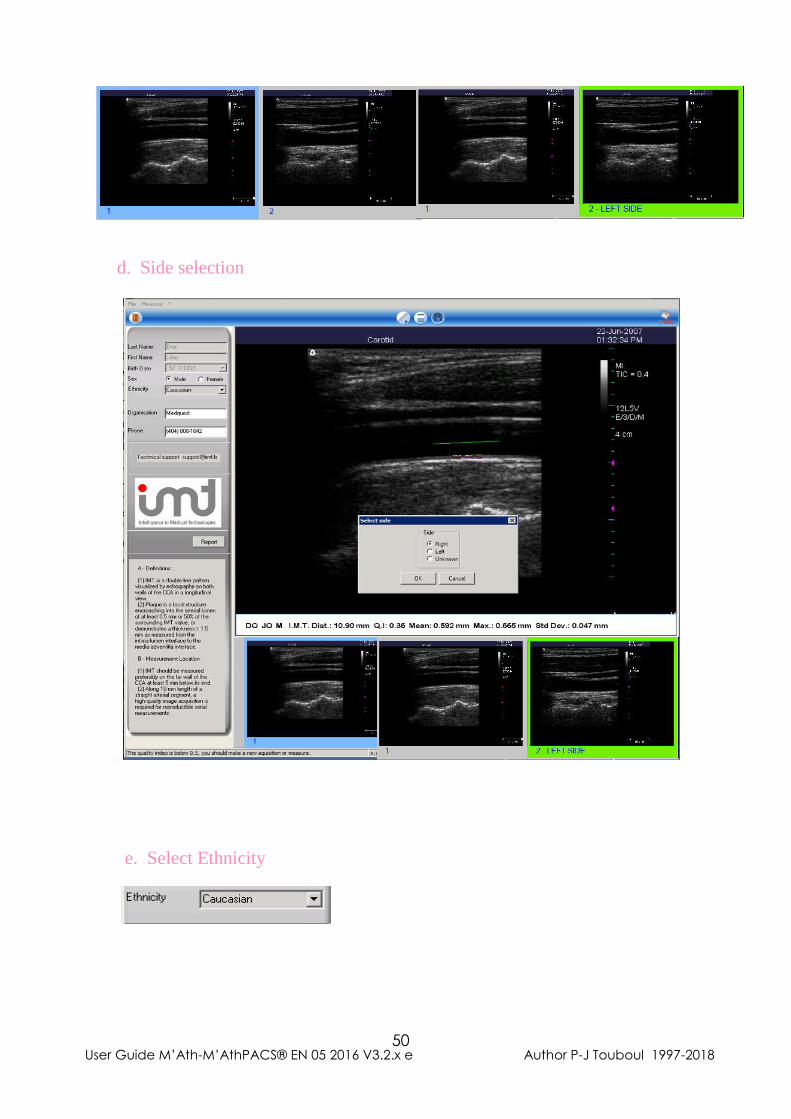
a. Click on the file icon to get the list of the patients sent for reading. (Fig d)
b. Click on the patient you want to analyze in the patient list. (Fig d)
c. All the images are displayed as thumbnails (You can move through the thumbnails with
the mouse wheel , the right and left arrow , and the bottom rule. (Fig e )
d. Select the first scan you want to analyze by a click ( a blue frame will circle it).
e. Then select the IMT measurement button or go to the menu “Measure”
f. Trace a line parallel to the vessel close to the far or the near wall over a
distance of 10 mm on an arterial segment where the intima-media structure
is visible.
g. When the line is traced from left to right, the measurement is
made on the far wall of the artery. From right to left, the I.M.T
measurement will be taken on the near wall.
h. Automatic detected interfaces lines are represented on the image (yellow,
intima-blood interface and mauve for the media-adventitia interface).If the
measurement is successful you must have a QI = or > than 0.5
i. A message box will ask you to check the side and confirm that you validate this
measurement and the thumbnail frame will change into green. ( Fig f)
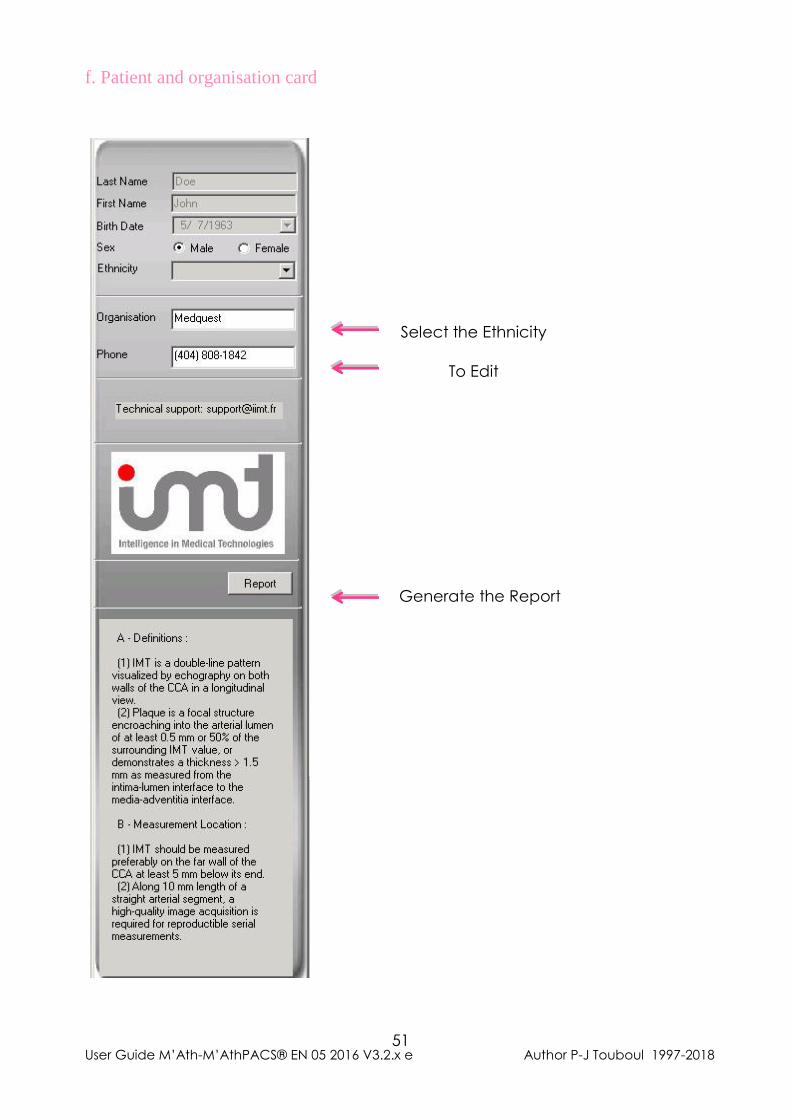
j. You will have to specify the Ethnicity ( on starting or later ) and the side you are reading
or each processed image ( Fig g).
User Guide M’Ath-M’AthPACS® EN 05 2016 V3.2.x e Author P-J Touboul 1997-2018 48
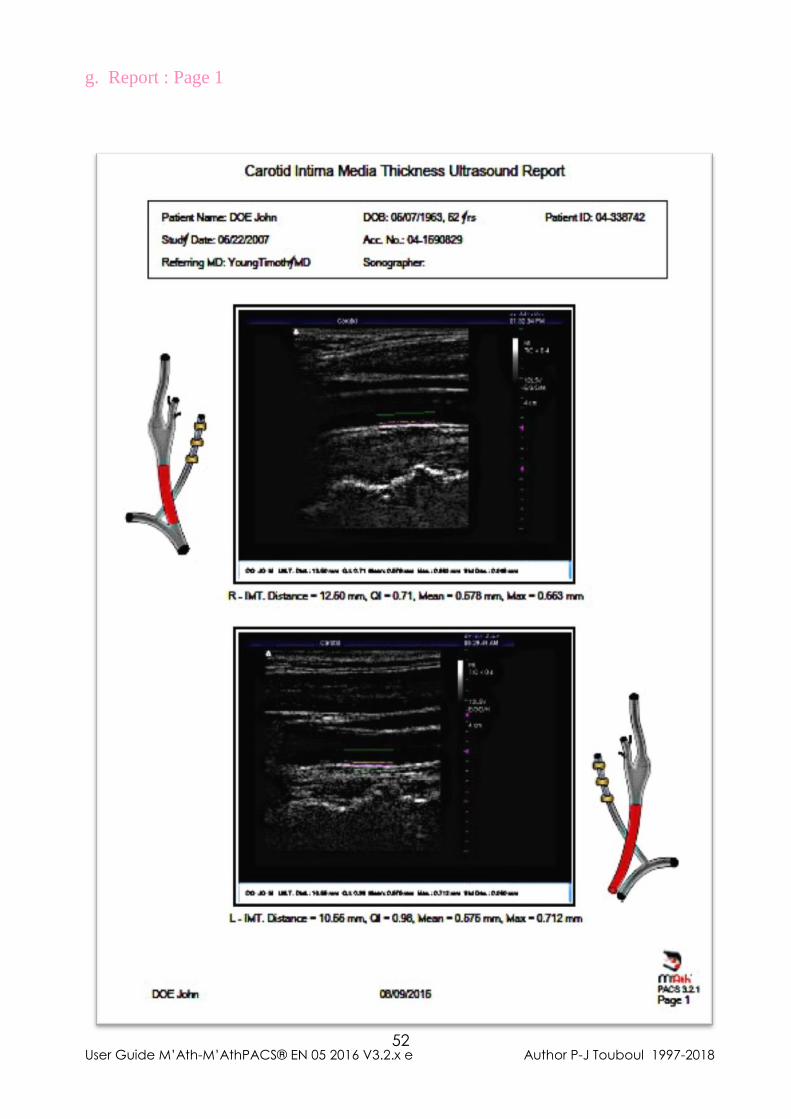
4 Report:
Before creating the report you must check that organization and phone fields are correctly filled on
the patient card panel. ( Fig h)
Click on the button
The results of the measurements are automatically stored in the DICOM tags and in he DICOM
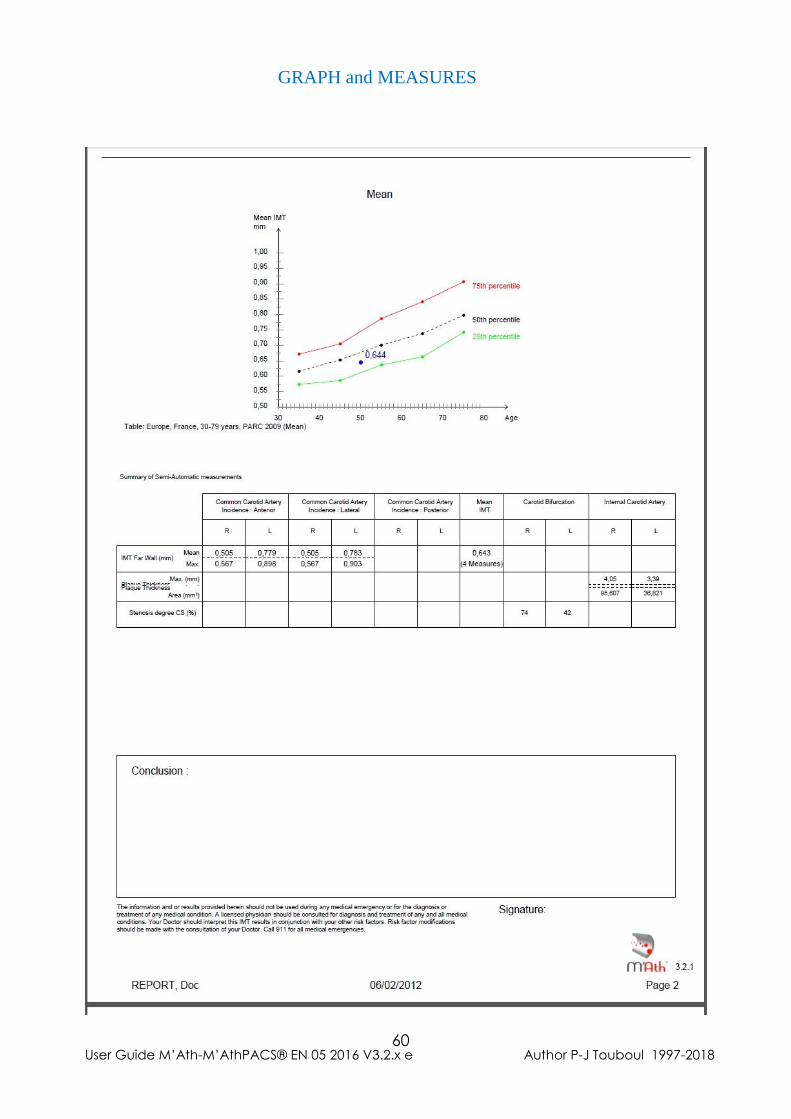
jpeg report. The pdf report shows on page 1 the 2 common carotid artery scanings with the
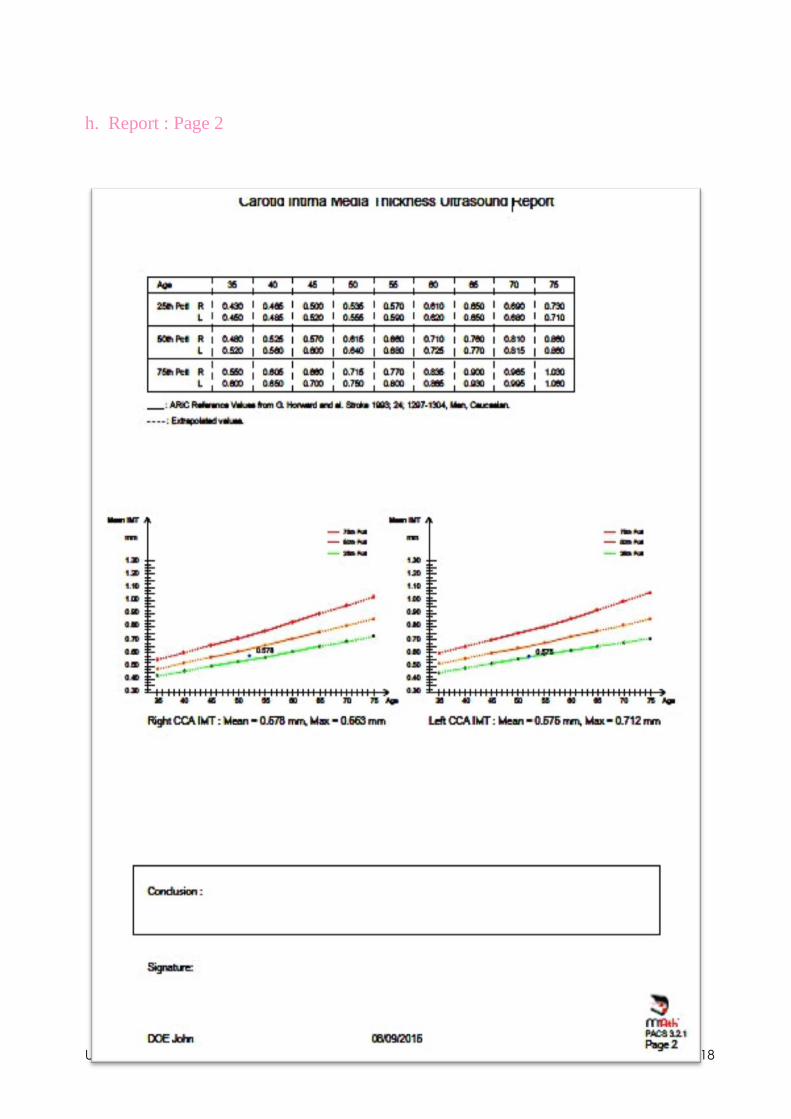
graphics of the IMT detection (Fig i ), on page 2 the graph on which are represented the dots
corresponding to the right and left IMT measurements according to age , sexe and race of an
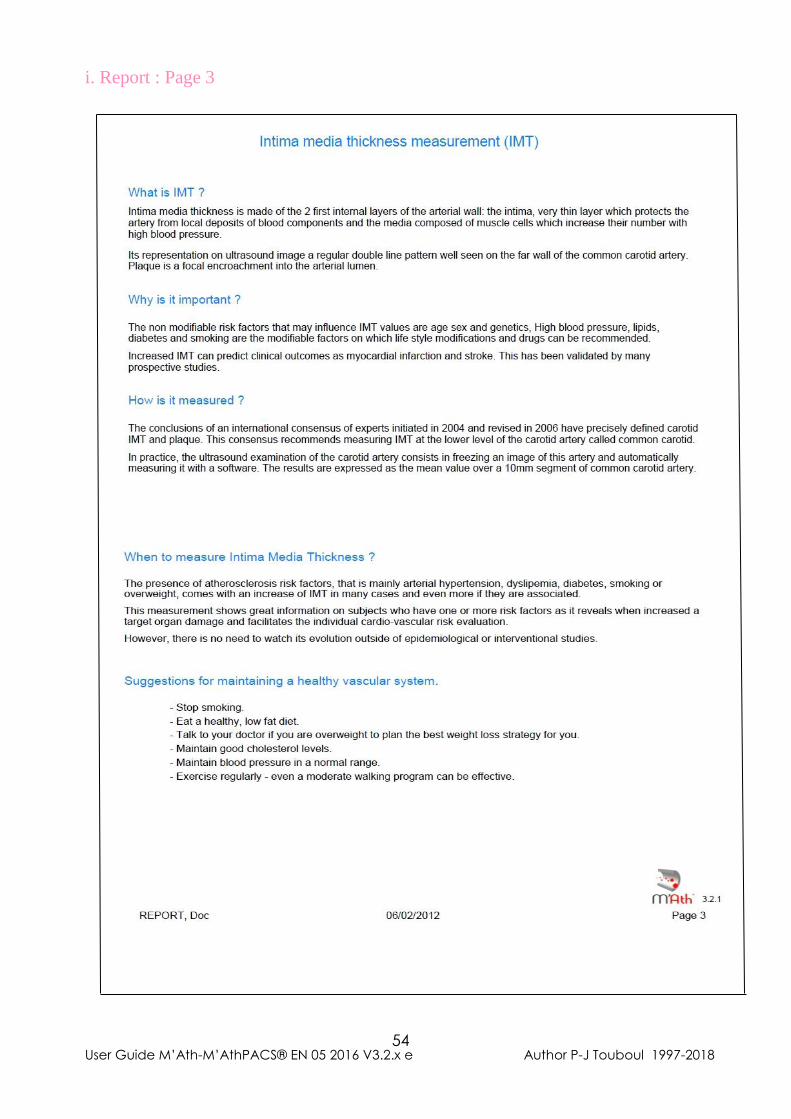
American population* ( ARIC Study) ( Fig j ) and on page 3 , optional informations and
recommendations. ( Fig k )
*References values are extrapolated below 45 and over 65 years.
5 DICOM Reception / Sending:
DICOM Images reception should be done after M’ATH PACS launch.
Check for correct PACS reception and sending configuration ( under the Menu File ).
When images of a patient file have been processed , you could see the pdf report and the 2 images
and DICOM jpeg will be automatically sent back to the selected PACS.
A pdf report is automatically saved under the folder report ( shortcut Data)
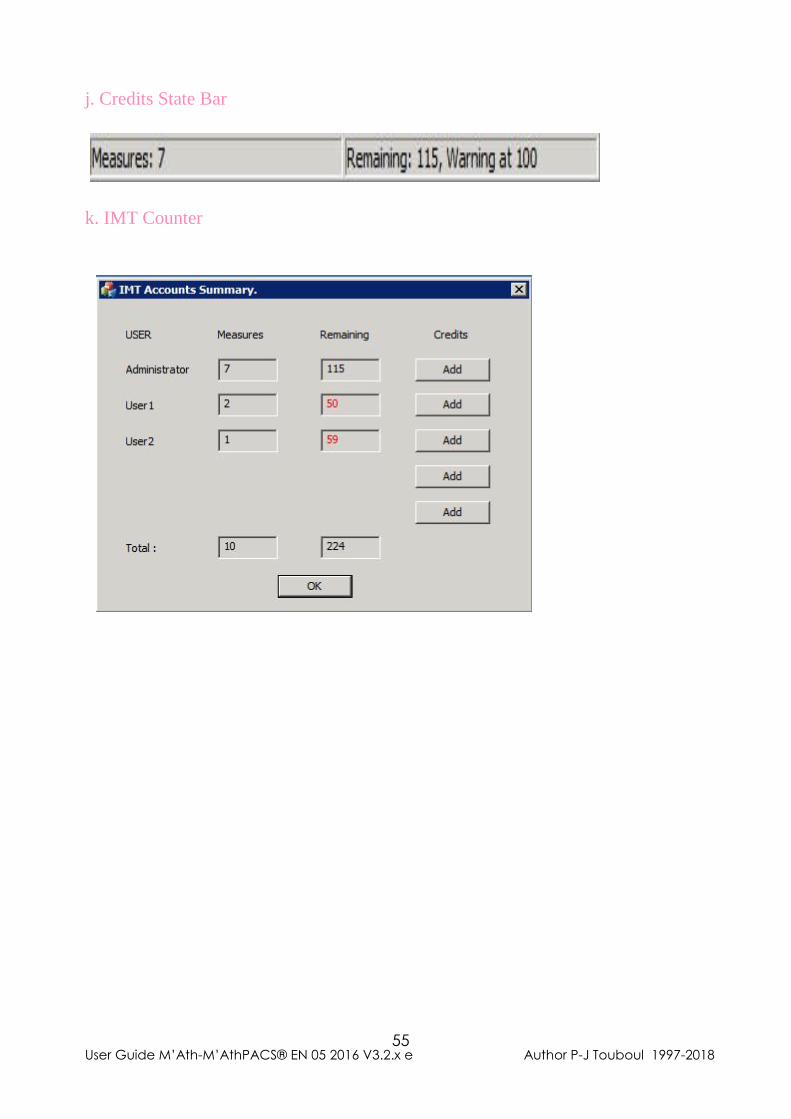
6 Credits :
On the bottom right of the state bar , you can see 3 items :
1 Measures provide you the number of clicks done , one click corresponds to one IMT
measurement. ( Fig l )
No more than 1 credit will be added for the same image during the same reading procedure.
These credits can be ordered at any time. The support can upload the number of credits
ordered within 48h. They are available for each session and must be uploaded with the
counter application. (Fig m ) which can be runned from administrator session.
User Guide M’Ath-M’AthPACS® EN 05 2016 V3.2.x e Author P-J Touboul 1997-2018 49
2 Remaining provides the number of the number of IMT measurements
3 Warning is set at 100 value which means that 50 patients
can be performed before the application stops working.
a. PACS Configuration
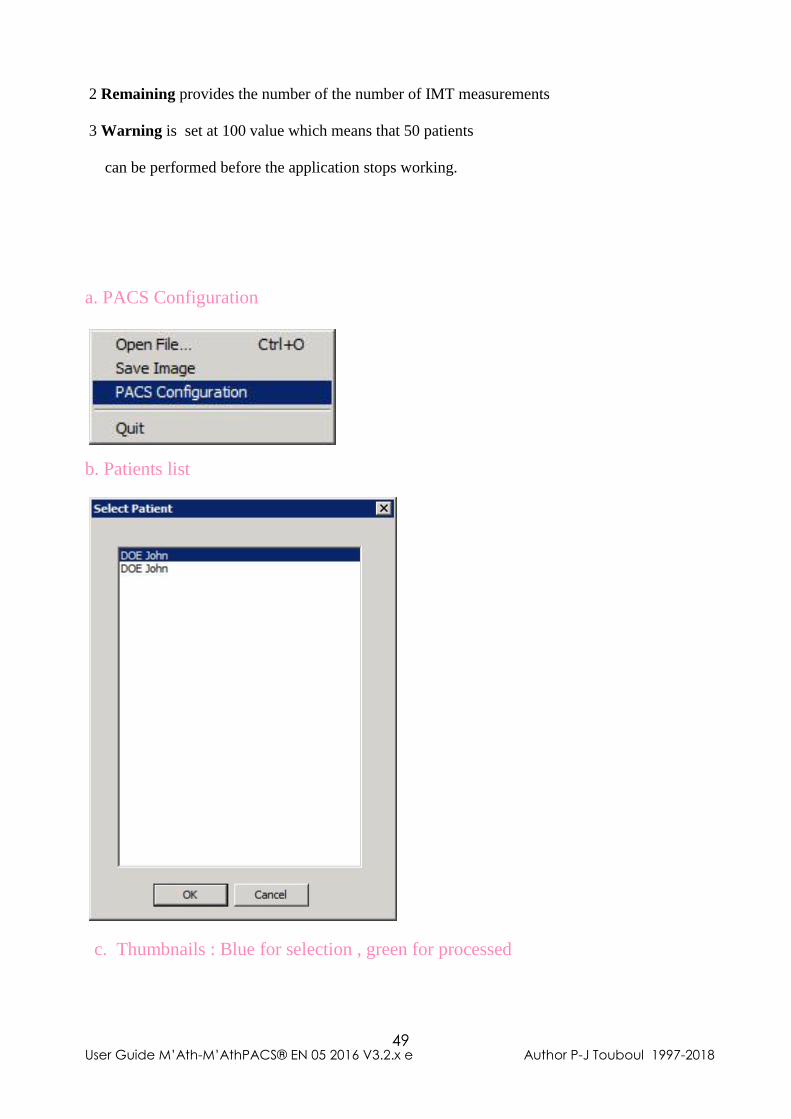
b. Patients list
c. Thumbnails : Blue for selection , green for processed
User Guide M’Ath-M’AthPACS® EN 05 2016 V3.2.x e Author P-J Touboul 1997-2018 50
d. Side selection
e. Select Ethnicity
User Guide M’Ath-M’AthPACS® EN 05 2016 V3.2.x e Author P-J Touboul 1997-2018 51
f. Patient and organisation card
Select the Ethnicity
To Edit
Generate the Report
User Guide M’Ath-M’AthPACS® EN 05 2016 V3.2.x e Author P-J Touboul 1997-2018 52
g. Report : Page 1
User Guide M’Ath-M’AthPACS® EN 05 2016 V3.2.x e Author P-J Touboul 1997-2018 53
h. Report : Page 2
User Guide M’Ath-M’AthPACS® EN 05 2016 V3.2.x e Author P-J Touboul 1997-2018 54
i. Report : Page 3
User Guide M’Ath-M’AthPACS® EN 05 2016 V3.2.x e Author P-J Touboul 1997-2018 55
j. Credits State Bar
k. IMT Counter
User Guide M’Ath-M’AthPACS® EN 05 2016 V3.2.x e Author P-J Touboul 1997-2018 56
8. EXAMINATION REPORT
1 Introduction:
The functions associated to the examination report allow a large flexibility of editing and print
out. You can create CIMT reports or more extensive reports including 3 to 12 images
Reference values tables and graphs including percentiles according to age and sex allow to
address personalized report. Print out includes not only images and conclusion but also all the
measurements and drawings of IMT, plaque and stenosis when they have been measured.
Before starting report section, it is appropriate to install a printer and connect it to your PC.
2 Report Editing:
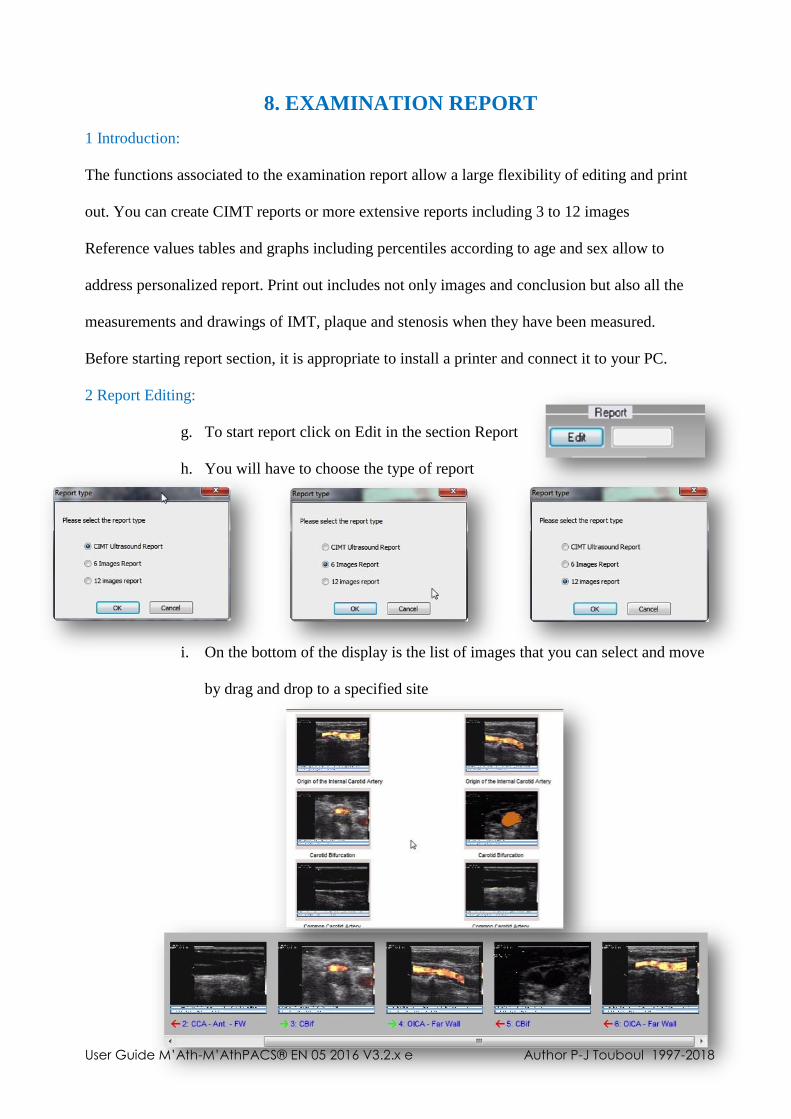
g. To start report click on Edit in the section Report
h. You will have to choose the type of report
i. On the bottom of the display is the list of images that you can select and move
by drag and drop to a specified site
User Guide M’Ath-M’AthPACS® EN 05 2016 V3.2.x e Author P-J Touboul 1997-2018 57
REPORT
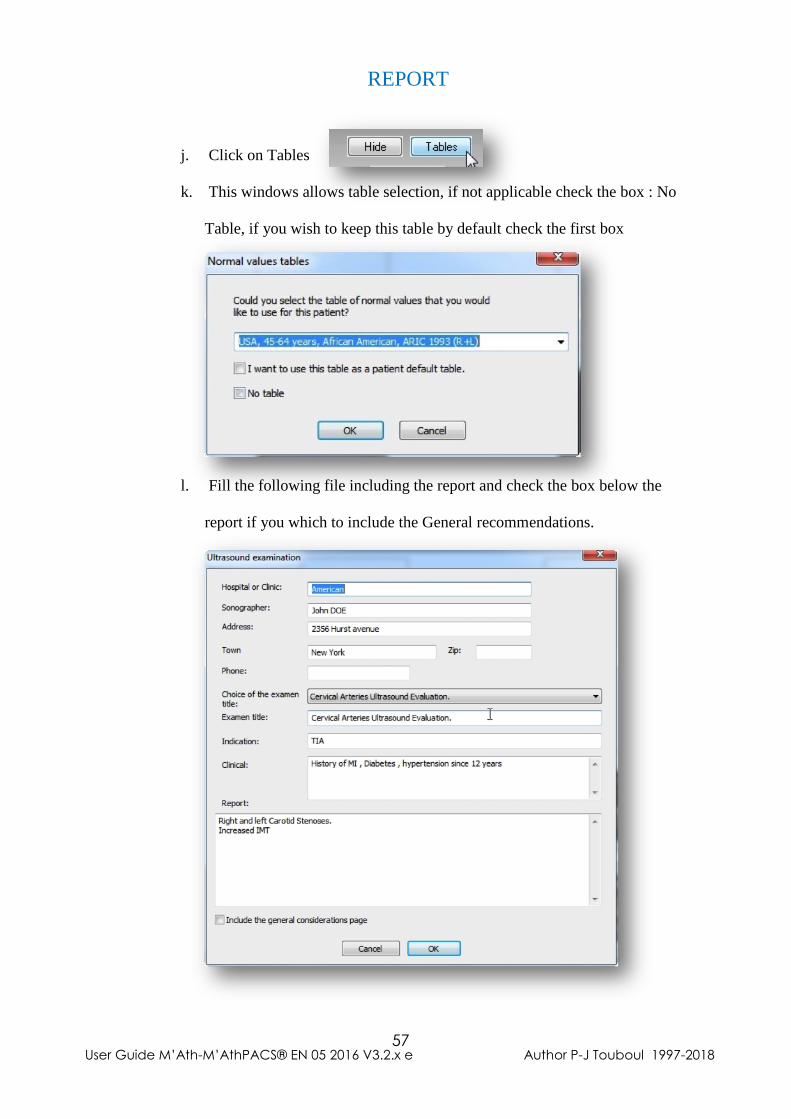
j. Click on Tables
k. This windows allows table selection, if not applicable check the box : No
Table, if you wish to keep this table by default check the first box
l. Fill the following file including the report and check the box below the
report if you which to include the General recommendations.
User Guide M’Ath-M’AthPACS® EN 05 2016 V3.2.x e Author P-J Touboul 1997-2018 58
REPORT
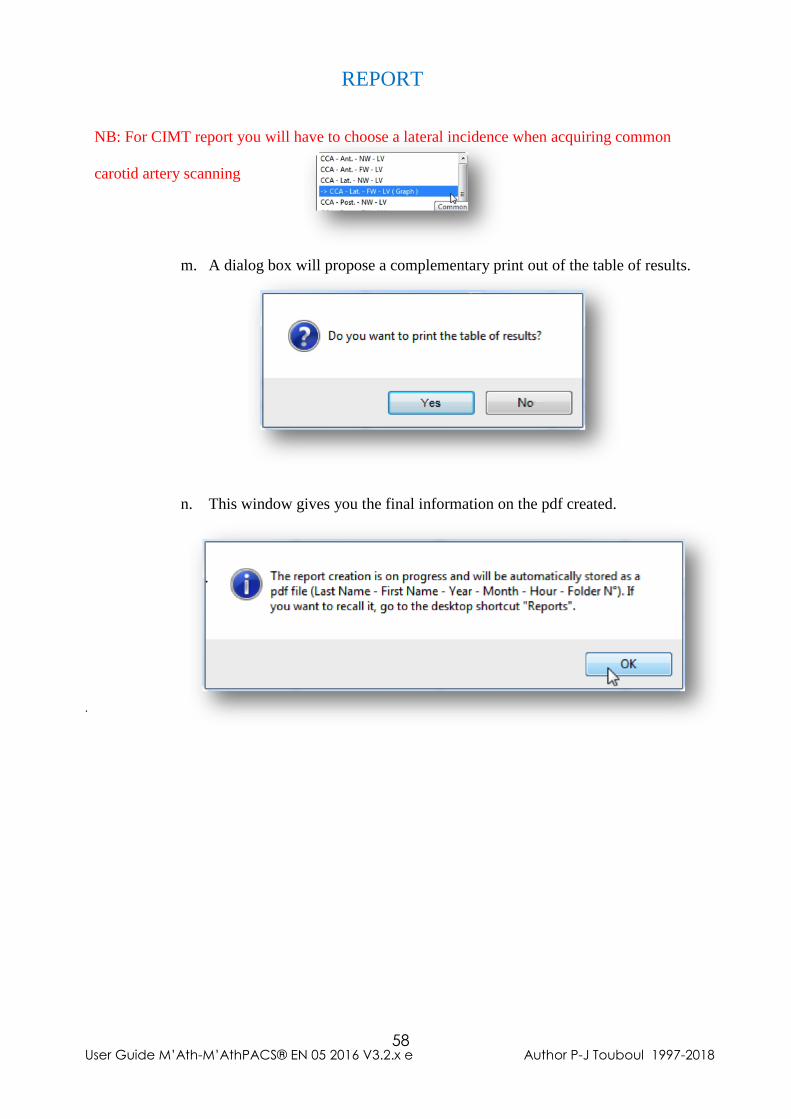
NB: For CIMT report you will have to choose a lateral incidence when acquiring common
carotid artery scanning
m. A dialog box will propose a complementary print out of the table of results.
n. This window gives you the final information on the pdf created.
.
.
User Guide M’Ath-M’AthPACS® EN 05 2016 V3.2.x e Author P-J Touboul 1997-2018 59
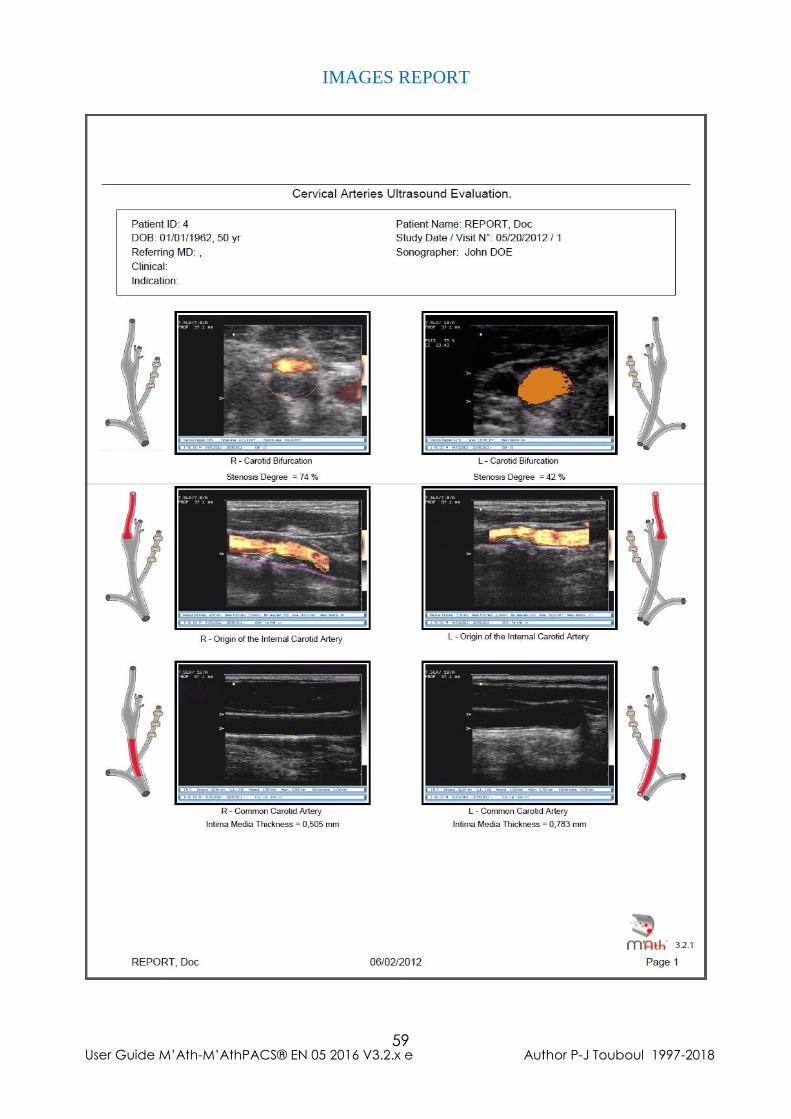
IMAGES REPORT
User Guide M’Ath-M’AthPACS® EN 05 2016 V3.2.x e Author P-J Touboul 1997-2018 60
GRAPH and MEASURES
User Guide M’Ath-M’AthPACS® EN 05 2016 V3.2.x e Author P-J Touboul 1997-2018 61
GENERAL INFORMATION
This information can be skipped on the report.
User Guide M’Ath-M’AthPACS® EN 05 2016 V3.2.x e Author P-J Touboul 1997-2018 62
1. Main menu:
Open File: Ctrl + O
Print: Ctrl + I
IMT measure: Ctrl + E
Diameter measure: Ctrl + D
2. Patient File:
Create a new file: Ctrl + N
Search for a patient: Ctrl + Enter
To access the next file: Ctrl + right arrow
To access the previous file: Ctrl + left arrow
To go forward by 10 files: Ctrl + Up
To go back by 10 files: Ctrl + Down arrow
3. Graphic mode:
Freeze: Space bar
Store: Enter
Record an image under: Ctrl + S
IMT measurement: Ctrl + D
Video mode:
Move to the previous frame: Up or Left arrow
Move to the next frame: Down or Right arrow
Record a sequence: Enter
9. SHORTCUTS

User Guide M’Ath-M’AthPACS® EN 05 2016 V3.2.x e Author P-J Touboul 1997-2018 63
III. TROUBLESHOOTING
User Guide M’Ath-M’AthPACS® EN 05 2016 V3.2.x e Author P-J Touboul 1997-2018 64
TROUBLESHOOTING
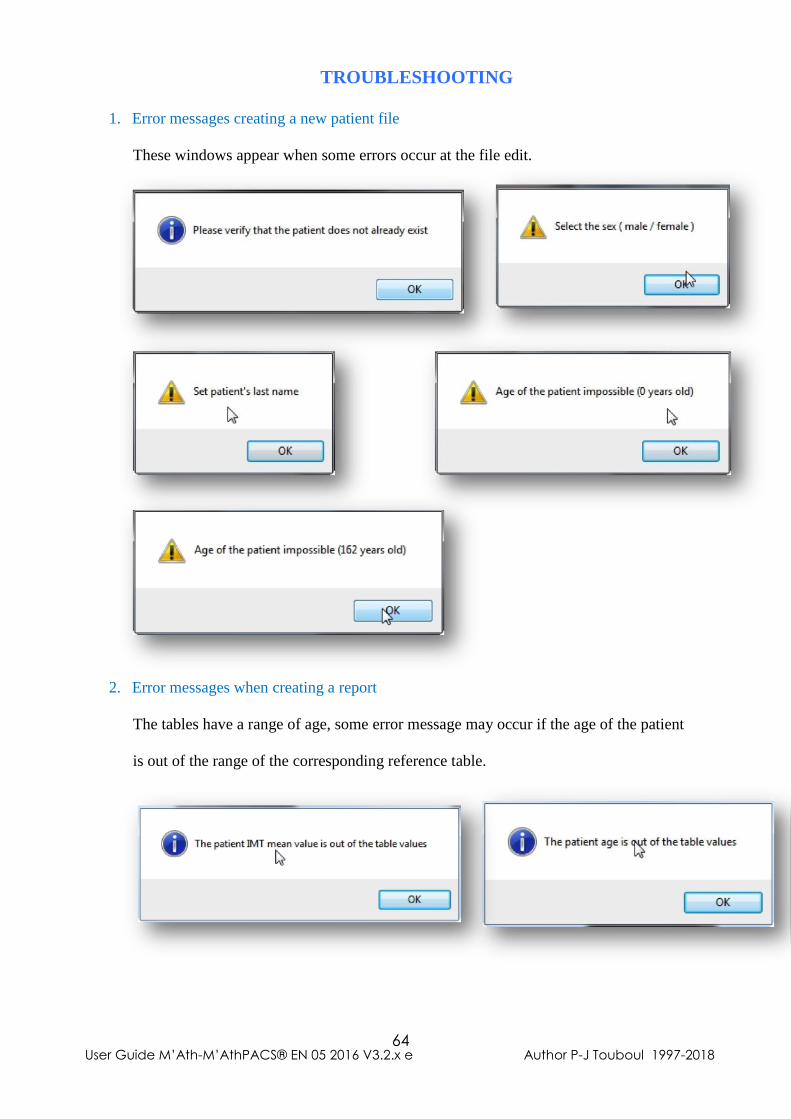
1. Error messages creating a new patient file
These windows appear when some errors occur at the file edit.
2. Error messages when creating a report
The tables have a range of age, some error message may occur if the age of the patient
is out of the range of the corresponding reference table.

User Guide M’Ath-M’AthPACS® EN 05 2016 V3.2.x e Author P-J Touboul 1997-2018 65
IV. M’Ath Software Features
User Guide M’Ath-M’AthPACS® EN 05 2016 V3.2.x e Author P-J Touboul 1997-2018 66
MAIN CHARACTERISTICS
• Real time Video Acquisition;
• DICOM Automatic calibration.
• Multi-lingual (English, French, Italian, German, Spanish)
• Automatic edge detection algorithms for IMT, plaque, distensibility and stenosis degree.
• IMT Quality index.
• Measurement of the Average Intima Thickness.
• Measurement of the degree of stenosis in cross sectional and longitudinal view
• Semi-automatic plaque thickness and area measures.
• Distensibility measurement on video sequence.
• Real time analysis of images and sequences
• Reproducibility function. ( SR) (M’Ath SR section)
• PACS Modality ( M’Ath PACS Section)
• Files exportation.
• Images and videos storage;
• Patient database (Access);
• Automatic calculation of the mean value of Right and Left common carotid arteries;
• Reporting including reference values in US, France, Latin America, Italy ….
• Editing and documented print out of the patient (pdf).
• Used by more than 2000 centers or physicians in more than 50 countries
Top Related
Copyright © 2022 FDOKUMEN

