


Bahasa
Halaman
Hukum


ko
da
k n
ex
pr
es
s G
OL
D S
OLU
TIO
N
CREATIVE And fIlE pREpARATIon guIdElInEs
CREATIVE And fIlE pREpARATIon guIdElInEs
Kodak NexPress Gold SolutionKodak NexPress Gold Solution

Captivate your audience by adding metallic features to digitally-printed communications with the Kodak NexPress Gold Solution.
Stand out from the crowd with print that sparkles
It’s easy to heighten both impact and creativity
with the unique printing capabilities available
only with Kodak NexPress Digital Production
Color Presses.
This guide will walk you through several proven
techniques for getting the most out of printing
with Kodak NexPress Gold Solution, and
provide tips and tricks for how to create your
own metallic effects.
The steps in this guide assume a working
knowledge of Adobe Creative Suite, including
Adobe Illustrator, Photoshop, InDesign and
Acrobat software programs.
This design guide covers:
Proven techniques Vector textures ....................................................1 Raster textures .................................................. 3 Pulling it all together ........................................ 7
Checking your work................................................9
Achieving the best printed effects ...................10
Frequently asked questions ............................... 12
Successfully adding gold effects can be subjective. Be sure to talk with your print provider about the results you want to achieve. Proofing the job before it runs is a great way to make sure your intentions are being fully realized.
Stand out from the crowd with print that sparkles

ko
da
k n
ex
pr
es
s G
OL
D S
OLU
TIO
N
technique 1
These techniques will help you quickly and easily integrate eye-catching gold features into print jobs.
Proven techniques
Creating vector effects
Illustrator software can be used to
create decorative borders that frame
photographic images, and beautiful
vector patterns that stand alone in
applications such as greeting cards
and certificates.
Using gold to create decorative borders is a great way to draw the eye into the piece.
Photographic images are beautifully framed by sparkling gold border art.
Vector patterns can be used to dramatic effect for many types of applications, including greeting
cards and certificates.
1
Proven techniques

3. Create gold elements on a new layer, in position, using Illustrator’s shapes and/or drawing tools.
4. Fill objects with the new “NexPress DryInk gold” swatch..
5. Make sure the only swatches that remain in your file are “NexPress DryInk gold” and white.
6. Delete the reference source file on the bottom layer.
2 Proven techniques: Creating vector elements with Adobe illustrator Software
Get started by creating a new file:
1. Place source graphic on bottom layer for reference, if necessary (this layer will need to be removed from the final file).
2. Create a new spot color swatch
a. Name the swatch “NexPress DryInk gold.” (Make sure you use this exact name, including capital letters and spaces, exactly as it appears above.)
b. Designate it as “Spot”
c. Set the color to CMYK:
0 | 0 | 100 | 25
If you will be placing vector work on top of an image, make both files the same height and width to ensure proper alignment.
7. Save your file: “FileName_gold.eps”
Note: You can combine a variety of gold tints to beautiful effect. Just adjust the percent of “NexPress DryInk gold” in the swatches palette.
Proven techniques: Creating vector elements with Adobe Illustrator Software

ko
da
k n
ex
pr
es
s G
OL
D S
OLU
TIO
N
technique 2
Creating raster effects with Adobe Photoshop Software
You can use NexPress Gold Dry Ink to add
extra sparkle to photographic images.
Proven techniques: Creating raster elements with Adobe Photoshop Software
File Structure Overview
Using NexPress Gold Dry Ink requires creating two files: one with the original color image,
and another for the gold layer, which will be combined with the original in your InDesign
layout.
If the gold layer needs to be perfectly aligned with the original image, it is best to make
both files the exact same height and width.
3
Before NexPress Gold Dry Ink
After addition of NexPress Gold Dry Ink
Proven techniques: Creating raster elements with Adobe Photoshop Software
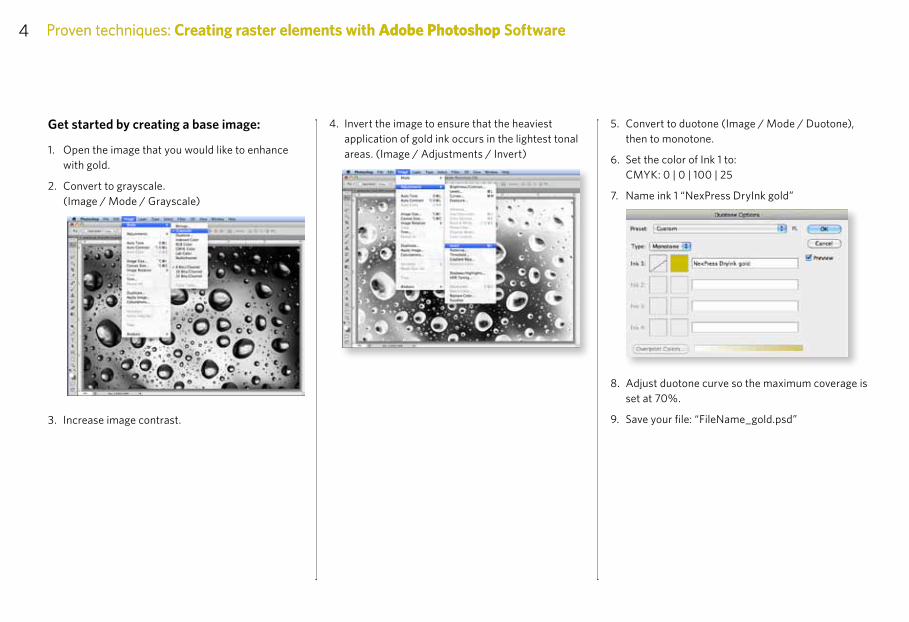
Get started by creating a base image:
1. Open the image that you would like to enhance with gold.
2. Convert to grayscale. (Image / Mode / Grayscale)
3. Increase image contrast.
4 Proven techniques: Creating raster elements with Adobe Photoshop Software
4. Invert the image to ensure that the heaviest application of gold ink occurs in the lightest tonal areas. (Image / Adjustments / Invert)
5. Convert to duotone (Image / Mode / Duotone), then to monotone.
6. Set the color of Ink 1 to: CMYK: 0 | 0 | 100 | 25
7. Name ink 1 “NexPress DryInk gold”
8. Adjust duotone curve so the maximum coverage is set at 70%.
9. Save your file: “FileName_gold.psd”
Proven techniques: Creating raster elements with Adobe Photoshop Software

ko
da
k n
ex
pr
es
s G
OL
D S
OLU
TIO
N
In some cases, you may want to spend time manipulating the inverse mask. For images with highly saturated backgrounds where gold ink would not be either desirable or effective, you may want to mask out the background.
Proven techniques: Creating raster elements with Adobe Photoshop Software
You want the heaviest application of gold ink to occur in the lightest tonal areas of the image.
In this version, we have masked out the image’s red velvet background, over which a gold overprint wouldn’t be noticeable.This image shows a basic inverse mask for the gold layer.
5Proven techniques: Creating raster elements with Adobe Photoshop Software

6 Proven techniques: Creating raster elements with Adobe Photoshop Software
In other cases, you may want to remove dots from image highlights if printing gold in these areas is undesirable. For example, enhancing this fine art image with gold will require additional manipulation to ensure that the lace napkin remains pristine white.
In this version, we have retouched the mask to eliminate any gold ink in highlight areas, which need to remain white.
This image shows a basic inverse mask for the gold layer.
Proven techniques: Creating raster elements with Adobe Photoshop Software

ko
da
k n
ex
pr
es
s G
OL
D S
OLU
TIO
N
Put ting it All together
Proven techniques: Pulling it all together with Adobe inDesign Software
You can have multiple layers for images with gold enhancements, but gold elements must always be on higher layers in order to print correctly. Text or imagery placed on layers above gold elements will knock out the gold beneath.
1. Create a new InDesign document, or open an existing layout.
2. Add 2 new layers in the Layers Palette.
a. Name the TOP layer “gold imagery” (this layer will hold the gold art you created)
b. Name the BOTTOM layer “color imagery” (this layer will hold the original base art or color image files)
3. Place your base art or color image on the bottom layer.
4. Copy it.
5. Paste in Place on the “gold imagery” layer above.
6. Relink the file
a. Select the newly pasted image and go to the Links palette
b. Re-link it to your “gold” raster or vector file
Note: This replaces the top image with the gold art you have created. If your gold file has dimensions that are identical to the source file or base art, both layers will align perfectly.
Pulling it all together with Adobe inDesign
SoftwareStep 7 is critical. A blend mode of “Multiply” tells the NexPress Press to overprint gold ink on top of the image below, rather than knocking it out.
7. With the gold file still selected, go to the Effects palette and select a blend mode of “Multiply” from the drop-down menu.
Doublecheck that you have a “NexPress DryInk gold” spot color in your InDesign swatches palette. It will show up automatically if you have relinked to your gold file correctly.
7Proven techniques: Pulling it all together with Adobe InDesign Software

8 Proven techniques: Pulling it all together with Adobe inDesign Software
8. To add gold typography, add 2 new layers in the Layers palette:
a. Name the TOP layer “gold text”
b. Name the BOTTOM layer “color text”
9. Make sure both text layers are placed above the existing “gold imagery” and “color imagery” layers.
10. On the “color text” layer, lay out your text as you normally would.
11. Select the entire text frame that you want to enhance with gold, then Copy and Paste in Place on the “gold text” layer above.
12. With the copied text still selected, go to the Swatches palette and change the text’s fill and/or stroke to the “NexPress DryInk gold” swatch.
13. Multiply – Keep the entire “gold” text box selected and go the Effects palette. Select “Multiply.”
14. Save your file, make sure that all gold layers are visible, then export a PDF using settings that have been optimized for printing on a NexPress Press, which can be supplied by your print services provider.
VisuAl oVerView
gold image/text layers
• Contains the gold element(s) you created using the “NexPress DryInk gold” color swatch.
• Blend mode must be set to “Multiply” in the Effects palette.
Color image/text layers:
• Contains the corresponding color imagery or text.
• Blend mode should be set to “Normal” in the Effects palette.
The gold effect will vary depending on the fill color of your text, and the tint % of gold applied over it. Consult the Kodak NexPress Gold Color Guide to see the possibilities.
Proven techniques: Pulling it all together with Adobe InDesign Software

ko
da
k n
ex
pr
es
s G
OL
D S
OLU
TIO
NchecKing Your worK
checKing Printer’s ProofsNote: There should be only 1 spot color, named “NexPress DryInk gold.” If you see additional spot colors, convert them to process in the original art, or by using Ink Manager in either InDesign or Acrobat.
3. Mouse over the areas where you expect to have gold dry ink.
a. If you have set up the file correctly, the percentage of “NexPress DryInk gold” will change.
Checking PDF files and printer’s proofs
As a last step, you should check that you have properly prepared your print-ready PDF for printing with Kodak NexPress Gold Dry Ink.1. Open the high resolution PDF file with Acrobat
Professional Software.
2. Go to: Print Production/Output preview (within the Tools menu).
• If gold dry ink has knocked out color that you expected to see underneath it, check your file to be sure that the gold layer’s drop-down menu blend mode is “Multiply.”
• If some gold prints correctly but other parts have been knocked out, check your file to be sure that nothing is directly above the gold in a higher layer.
• Text on a layer above gold should knock out the gold letter by letter. If the text block is knocking out a rectangular area, check that the text layer’s drop-down menu blend mode is “Normal.”
• If there is no gold ink where you expect it, and no higher layer knocking it out, check that the element’s swatch color has been correctly named as “NexPress DryInk gold.”
• If the gold elements print your reference color instead of gold dry ink, ask your print services provider to check their workflow.
9Checking PDF files and printer’s proofs

10 Achieving the best printed results
As with any special effect, experimentation is often required to achieve the most effective results.
Achieving the best gold effects
For extra eye-catching appeal, laminate or UV coat pieces that have been enhanced with NexPress Gold Dry Ink. The coating’s extra sheen makes the gold ink really pop off the page!
With vector art, the color of the final printed result depends in large part on both the undercolor and the percentage of gold you are printing on top of it. The illustrations below demonstrate how differing percentages of gold change the appearance of the final art.
All 4 pattern strips have the same base color: CMYK purple 44 | 99 | 0 | 0
Gold 100%
Gold 60%
Gold 30%
Achieving the best printed results
As with any special effect, experimentation is often required to achieve the most effective results.
Achieving the best gold effects
Gold: None
ko
da
k n
ex
pr
es
s G
OL
D S
OLU
TIO
N
Achieving the best printed results
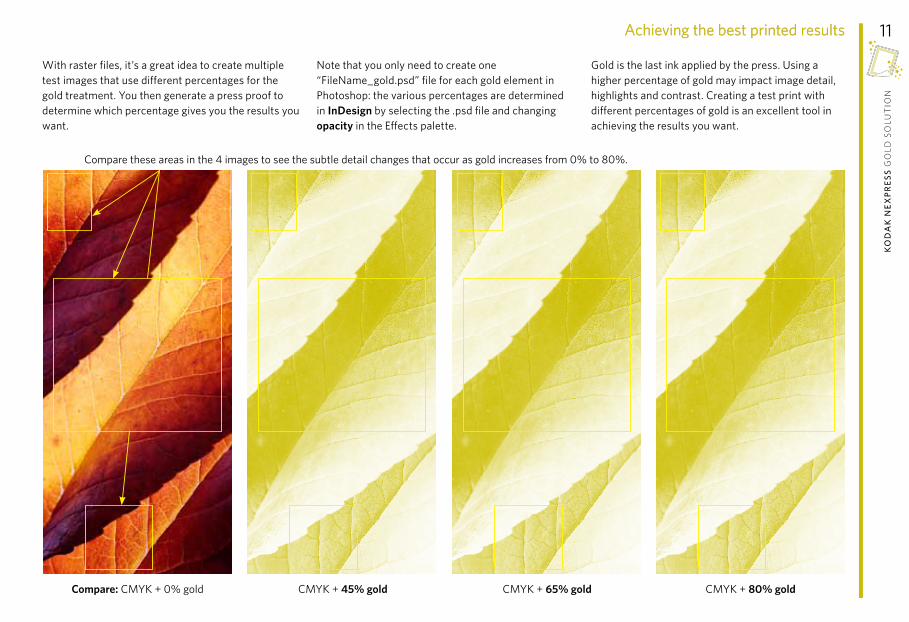
With raster files, it’s a great idea to create multiple test images that use different percentages for the gold treatment. You then generate a press proof to determine which percentage gives you the results you want.
Note that you only need to create one “FileName_gold.psd” file for each gold element in Photoshop: the various percentages are determined in InDesign by selecting the .psd file and changing opacity in the Effects palette.
Gold is the last ink applied by the press. Using a higher percentage of gold may impact image detail, highlights and contrast. Creating a test print with different percentages of gold is an excellent tool in achieving the results you want.
11Achieving the best printed results
CMYK + 80% goldCMYK + 65% goldCMYK + 45% goldCompare: CMYK + 0% gold
Compare these areas in the 4 images to see the subtle detail changes that occur as gold increases from 0% to 80%.

Frequently asked questions
12 Frequently asked questions
Why must the color swatch for gold be named “NexPress DryInk gold”?
The exact name, including capital letters, is very
important. This swatch name is recognized by
the NexPress Press’ front end, which then assigns
gold dry ink to the correct layers. The specific ink
name also enables the front end to automatically
set important press parameters including fuser
temperature, speed and other press settings, to
help for optimum print quality for each of the dry
inks.
(NOTE — there are variations in temperature and
speed for the various specialty inks, therefore the
proper naming convention is required to ensure
optimum quality for all output.) The press also alerts
the operator if gold dry ink is not in the fifth imaging
unit when needed.
Could another “reference color” be used to create artwork, instead of CMYK: 0 | 0 | 100 | 25?
Yes. We chose this mix because it looks gold and
is transparent enough to see through on a monitor.
Whatever color you choose, be consistent! Use
the identical color in all Illustrator, Photoshop
and InDesign Files to avoid multiple reference
colors coming into your production file when you
assemble the job.
Can NexPress Gold Dry Ink be used to achieve metallic effects other than gold?
Yes. By altering the color underneath gold dry
ink, a variety of interesting metallic effects can be
achieved including pewter and bronze tones. Refer
to the Kodak NexPress Color Guide to see what
the possibilities are.
Is NexPress Gold Dry Ink safe, and are pages with gold dry ink recyclable?
Yes. Unlike some other digital printing processes,
pages printed with Kodak NexPress Dry Inks,
including gold, do not contain any Volatile Organic
Compounds (VOC’s) and are easily recycled.
Can common substrates be used?
Yes, the substrate range for gold is the same as
your press boundaries. For a complete list of
qualified substrates visit: http://printlab.rit.edu/
pdf/KodakNexPress-020510_web.pdf
Frequently asked questions
Frequently asked questionsWhy must the color swatch for gold be named “NexPress DryInk gold”?
Could another “reference color” be used to create artwork, instead of CMYK: 0 | 0 | 100 | 25?
Can NexPress Gold Dry Ink be used to achieve metallic effects other than gold?
Is NexPress Gold Dry Ink safe, and are pages with gold dry ink recyclable?
Can common substrates be used?

ko
da
k n
ex
pr
es
s G
OL
D S
OLU
TIO
N
Can there be layers in the final file on top of the gold layer/s?
Yes, but the text, images or graphics on those
layers will knock out any gold ink directly below
them. See page 7 for more tips on this topic.
Do I need to adjust my speed or press settings for gold?
No. As long as your file includes the properly
named ink color (“NexPress DryInk gold”), the
digital front end will automatically select the
optimum press settings.
NOTE — for 120 ppm presses, the operator will need
to move all 5 dry ink stations from position 2 to
position 1 to enable the 83 ppm print rate.
NOTE — operators, do not override or select any
default options that may impact speed or fusing
temperature. The DFE will select the press settings as
appropriate for printing gold dry ink.
Can gold dry ink be laminated or UV coated?
Yes. In fact, we recommend one or the other to
optimize the sparkly effect of NexPress Gold Dry Ink.
NOTE — depending on the solution used, adding a
laminate or UV coating may impact the ability to
de-ink or recycle the finished product.
How will I know what the final piece will look like?
We recommend a press proof before your final
production run to be sure you are achieving the
desired effect. If you are enhancing a 4-color
image and are not sure how much gold is needed
to be most effective, try preparing a test file with
multiple percentages of gold — 20, 50, 70 or 100%
— and to proof the image first before you go into
final your production. See page 11 for more tips on
this testing/proofing technique.
Frequently asked questions
Can other software programs create gold elements?
Yes, as long as the program allows you to
assign a spot color named “NexPress DryInk
gold” to the elements that will print in gold,
“Multiply” that layer with color artwork on
a layer below, and produce a layered, print-
resolution PDF. Talk with your print services
provider about testing the file on their Kodak
NexPress Digital Production Color Press.
13Frequently asked questions
Can there be layers in the final file on top of the gold layer/s?
Do I need to adjust my speed or press settings for gold?
Can gold dry ink be laminated or UV coated?
How will I know what the final piece will look like?
Can other software programs create gold elements?

Produced using Kodak Technologies.
For more information, visit www.kodak.com/go/nexpress
© Kodak, 2013. Kodak and NexPress are trademarks.
Subject to technical change without notice.
Printed on a Kodak NexPress Digital Production Color Press
with the Kodak NexPress Gold Solution.
U.DP.289.0613.en.01
Copyright © 2022 FDOKUMEN

