


Bahasa
Halaman
Hukum


College of Engineering
Department of Mechanical Engineering
Spring 2016-17
Senior Design Project Report
Design & Manufacturing of Automotive Tire Changing Mechanism
In partial fulfillment of the requirements for the
Degree of Bachelor of Science in Mechanical Engineering
Team Members
Student Name Student ID
1 Mohammed Al-Otaibi 201202606
2 Yousef Naffaa 201201700
3 Saeed Al-Ghamdi 201101066
4 Abdullah Al-Zahrani 201101872
Project Advisors:
Advisor Name: Dr. Muhammad Asad
Co-Advisor Name: Dr. Nader Sawalhi

2
Abstract Essentially, most of cars use 4 to 5 lug nuts to fix wheels on cars. The traditional way to
change a car’s wheel tire is to unscrew the locking lug nuts one by one using a lug
wrench. However, sometimes it can be so exhausting and time consuming. In this project,
we have designed and manufactured an automotive tire changing mechanism using a gear
train to unscrew lug nuts simultaneously that can be eventually efficient and time saving.
The mechanism simply works by applying power on the driver gears causing all driven
gears connected to spanners to move at the same time, and eventually unscrew the lug
nuts fixed on the wheel. Additionally, our design has the capacity to unscrew five nuts of
standard sedan cars in 11 seconds. Moreover, our project can be so useful and usable in
many places such as workshops and tire manufacturing companies. In addition, this
project’s importance lies on the motto of “Every second counts.”

3
Acknowledgments
In the name of Allah, the most gracious, all praise to Allah for his blessings in completing
this project. We would like to thank all those who helped us to complete this project and
achieve this project’s objectives. Also, we would like to thank the Mechanical
Engineering Department In our university for building up our engineering knowledge
throughout different courses, which helped us completing this project successfully. This
project wouldn’t have been completed without the constant guidance and help of our
advisor Dr. Muhammad Asad and co-advisor Dr. Nader Sawalhi, and for that we thank
them and appreciate their help very much.

4
Table of Contents:
Abstract ............................................................................................................................... 2 Acknowledgments ............................................................................................................... 3 List of Figures ..................................................................................................................... 6 List of Tables ...................................................................................................................... 7 List of Acronyms (Symbols) ............................................................................................... 8 Chapter 1: Introduction ....................................................................................................... 9
1.1 Project Definition ................................................................................................ 10 1.2 Project Objectives ................................................................................................ 10 1.3 Project Specifications .......................................................................................... 11 1.4 Applications ......................................................................................................... 11
Chapter 2: Literature Review ............................................................................................ 12 2.1 Project background .............................................................................................. 13 2.2 Previous work ...................................................................................................... 13 2.3 Similar Mechanism ............................................................................................ 15 2.4 Comparative Study .............................................................................................. 19
Chapter 3: System Design ................................................................................................. 22 3.1 Design Constraints ............................................................................................... 23 3.2 Design Methodology ........................................................................................... 25 3.3 Design, calculations and selections ..................................................................... 26 3.4 Product Subsystems and Components ................................................................. 33 3.5 Implementation .................................................................................................... 36
Chapter 4: System Testing and Analysis .......................................................................... 41 4.1 Subsystem 1 ......................................................................................................... 42 4.2 Overall Results, Analysis and Discussion ........................................................... 43
Chapter 5: Project Management ........................................................................................ 47 5.1 Project Plan .......................................................................................................... 48 5.2 Contribution of Team Members .......................................................................... 51 5.3 Project Execution Monitoring ............................................................................. 52 5.4 Challenges and Decision Making ........................................................................ 52 5.5 Project Bill of Materials and Budget ................................................................... 53
Chapter 6: Project Analysis ............................................................................................. 54

5
6.1 Life-long Learning .............................................................................................. 55 6.2 Impact of Engineering Solutions ........................................................................ 57 6.3 Contemporary Issues Addressed ......................................................................... 57
Chapter 7: Conclusions and Future Recommendations .................................................... 58 7.1 Summary and conclusions ................................................................................... 59 7.2 Future Recommendations .................................................................................... 59
References ......................................................................................................................... 60 Appendix A: Bill of Materials .......................................................................................... 61 Appendix B: Tables .......................................................................................................... 63 Appendix C: SolidWorks and Drawing ............................................................................ 65

6
List of Figures: Figure 2.1: Two spur gears in mesh .................................................................................. 14 Figure 2.2: Two gears in mesh that have a ratio of 1:3 ..................................................... 15 Figure 2.3: Components of hammer drill .......................................................................... 16 Figure 2.4: Components of impact wrench ....................................................................... 17 Figure 2.5: Most common sizes for detent pin anvil ........................................................ 19 Figure 2.6: Front view of prototype .................................................................................. 21 Figure 2.7: Back view of prototype .................................................................................. 21 Figure 3.1: Assembly from different sides ....................................................................... 26 Figure 3.2: Exploded view of assembly ............................................................................ 26 Figure 3.3: Car hub ........................................................................................................... 27 Figure 3.4: Driver and driven gears in mesh ..................................................................... 29 Figure 3.5: Plate ................................................................................................................ 33 Figure 3.6: Shafts .............................................................................................................. 34 Figure 3.7: Driven Gears ................................................................................................... 34 Figure 3.8: Driver Gears ................................................................................................... 35 Figure 3.9: Manufactured plate ......................................................................................... 36 Figure 3.10: Manufactured driven gears ........................................................................... 36 Figure 3.11: Manufactured shafts ..................................................................................... 37 Figure 3.12: Manufactured driver gears ............................................................................ 37 Figure 3.13: Lock washers ................................................................................................ 38 Figure 3.14: Head of Ratchet ............................................................................................ 38 Figure 3.15: socket wrench ............................................................................................... 39 Figure 3.16: The final prototype (top view) ...................................................................... 39 Figure 3.17: The final prototype (front view) ................................................................... 40 Figure 4.1: An impact wrench .......................................................................................... 42 Figure 4.2: Calculation of speed using a tachometer ........................................................ 43 Figure 4.3: After installing the adaptor to the ratchet wrench .......................................... 45 Figure 4.4: Back view of prototype .................................................................................. 45

7
List of Tables: Table 2.1: Torque measured at each nut for a normal used car ........................................ 20 Table 3.1: A summary of design specification ................................................................. 28 Table 3.2: Driver and driven gears parameters ................................................................. 29 Table 3.3: Parameters for gears, shafts and materials ....................................................... 30 Table 3.4: Ball Bearing Specifications ............................................................................. 32 Table 4.1: Specifications of impact wrench ...................................................................... 42 Table 4.2: Dorman 611-299 Nuts Specification ............................................................... 44 Table 4.3: The time taken to unscrew nuts in seconds ..................................................... 46 Table 5.1: Project’s Gantt chart ........................................................................................ 48 Table 5.2: Contribution of team members ........................................................................ 51 Table 5.3: Project bill of materials and budget ................................................................. 53

8
List of Acronyms (Symbols) used in the report Parameters Symbol Units
Pitch Circle Diameter PCD mm
Module m mm
Center Distance C mm
Teeth N Magnitude
Gear material … …
Nut sizes … mm
Speed n Rev/s
Power P KW
Torque T N.m
Catalog C10 KN
Section modules S m
Polar moment of inertia I m
Max shear stress τmax Pa
Stress !"#$ Pa
Desired life in hours ζD Revolution
Rating life in hours ζR Revolution
Safety of Factor SOF Ratio

9
Chapter 1: Introduction

10
1.1 Project Definition
This project is intended to design and manufacture an automotive tire changing
mechanism. Initially, the general idea behind this mechanism was to have a power source
that’s connected through a shaft to a gear train that has a driver gear, and 5 driven gears
that are connected with spanners to unscrew lug nuts simultaneously. But after we
finalized the calculations, conceptual design and searched for the available materials in
the market we changed the design completely and it will be shown and discussed in the
next chapters. This project is very important to tire manufacturing companies and
workshops, as it can be very efficient and time saving.
1.2 Project Objectives
When it comes to changing tires, most people find it exhausting and time consuming,
because of the traditional way used for changing tires, which is using the tire lug wrench.
Due to the difficulties that people face in changing tires, we came up with the idea of this
project which is to make the procedure of changing tires much easier and time saving.
This project has two main objectives, which are designing and manufacturing an
automotive tire changing mechanism, reduce the time taken to change tires and
optimizing the weight of the prototype.

11
1.3 Project Specifications
• 5 driven gears with a diameter of 71.2mm
• 3 driver gears with a diameter of 31.2mm
• Module of gears is 2.5mm
• 5 shafts with a diameter of 25mm
• Pitch Circle Diameter, PCD for wheel hub (mm): 114.3mm
• Torque (Nm): An impact wrench with a torque of 440N.m
• Power (W): An impact wrench with an output power of 710W.
• Speed (rpm): An impact wrench with load speed of 201 rpm.
1.4 Applications
Time is a very important aspect of life, and as engineers we always seek to come up with
easy and efficient solutions for problems. Therefore, mainly, our project focuses on the
aspect of reducing the amount of time taken in changing tires. This project can be used in
a variety of places, such as workshops and tire manufacturing companies like Michelin,
Continental, Bridgestone and Good Year. On one hand, there are many manufacturing
companies, and workshops that use impact wrenches as a tool for changing tires, and they
have to unscrew only one nut at a time, and that can be considered as a waste of time. On
the other hand, our project can efficiently save time by unscrewing all nuts
simultaneously in 11 seconds.

12
Chapter 2: Literature Review

13
2.1 Project background
The main purpose of using gears is to transfer power from a source to an application.
Moreover, the modern technology of gears in its current form ages backs to only 100
years ago. Nevertheless, the oldest form of gears can be traced back to fourth century
B.C. Greece. In addition, there are a lot of application that involves gearing systems in
them such as, robotics, automotive and power transmissions. Moreover, there are
different types of gears that can be used such us, bevel gears, helical gears and spur gears.
In this project, the gear train that is being used is consisting of spur gears that are meshed
in a way to achieve the aim of this project that is to design and manufacture an
automotive tire changing mechanism.
2.2 Previous work
Gears transmit mechanical power and can be classified to parallel axis gears and non-
parallel gears. One of the types of parallel axis gears is spur gears (Figure 2.1), which is
considered to be the most suitable for machine transmission. Spur gears have straight
teeth, and are mounted on parallel shafts and usually have 20 degree of pressure angle.
This book includes details about spur gears design, specifications, and selection of gears.
This project is based on a gear system where the materials provided in the book are
considered to be a reference for gear systems. It helps to provide the formulas needed to
calculate torque, forces acting on gears, and module. Moreover, it explains how different
types of gears work such as epicycle. So, it is a basic need to design this project. [1]

14
Figure 2.1: Two spur gears in mesh
A bad selection for the motor used in this project leads to poor system performance and
an increase of the cost of installation and maintenance in future. Therefore, engineers are
required to avoid bad selections for design in their work. However, this article explains
procedures in selecting the proper size of motors for the design, and shows an example
illustrating load analysis. It also gives more information such as describing the methods
of selecting other associated components. In this project, to select a motor, we have to
find the torque needed to unscrew the 5 nuts at the same time. So, this article shows a
good example of how to calculate the power needed to transmit torque and selecting the
right motor for our system. [2]
The concepts and terminology of gears is a requirement to design any gear system. Gear
terms and concepts are necessary to design, build and improve gear drive systems. To
design and build a gear drive system, it is necessary to understand all concepts of gears
and their mechanism. Moreover, ratio of gears depends on teeth of gears and tells the
designer how much the driver gear rotates to complete one turn for the driven gear. For
example, if the ratio for two gears is 1:3, this means that the driver gear must turn three
times to get the driven gear to make one complete turn as shown in the figure below.

15
Figure 2.2: Two gears in mesh that have a ratio of 1:3
Another concept discussed in the article is the calculation of center to center. However,
this source clarifies more about spur gears and how they are being used to design a gear
system. [3]
2.3 Similar Mechanism [6] Hammer drills have been used for a long time and they are using a rotating power
with the help of vibration to pulverize the hard material into the surface. Moreover,
sometimes the hammer drill’s bit at the surface of material gets extremely hot, so the tip
is made out of carbide steel to resist the heat.

16
Figure 2.3: Components of hammer drill
In figure 2.3 above, its showing the main component of a drill hammer. First, the motor
of the shaft is passing through the hammer body where there are bearings to support the
shaft. While the shaft ends in the worm gear that transfers the rotational motion to the
large gear. In the center of the large gear, there is a shaft that is attached to the chuck and
drive it. The rotary switch is located on the top of the drill. It allows the users to select
one of two modes of operation, which are counterclockwise and clockwise. Finally, while
the drill is running, the wedge moves downward and forces the hammer mechanism
forward. However, from this hammer mechanism, the design of impact wrenches was
found.
[7] The impact wrench is known as impact gun, air wrench or torque gun. It is a socket
wrench power tool that is designed to deliver torque. An impact wrench is an important
tool for automotive repair work and designed to provide high torque at a medium speed.

17
Therefore, it is different from drill hammer which designed to provide rotational power at
a relatively high speed. But our project is based on the idea of impact wrench which
delivers torque to unscrew the nuts. Moreover, there are two major types of impact
wrenches. There is a compressed air impact wrench known as pneumatic and an electric
impact wrench which uses electrical power. They both deliver the same performance but
air compressed has more power. In addition, their torque is around 100 Nm to 1400 Nm
for heavy duty work. The only difference between them is that the electric impact can be
used anywhere that electric power source is available. On the other hand, a pneumatic
impact is hard to control and adjust the power. As a result of this high power the bolts can
break if the user is not an expert. Moreover, a pneumatic impact wrench is most
commonly used in workshops because it’s half cost the electrical impact and, also has a
smaller size.
Figure 2.4: Components of impact wrench
[8] In figure 2.4, it shows the main components of pneumatic impact wrench. Firstly,
adapter forces up the air through the handle. Then, the air is forced through channel to

18
rotor cylinder where air is compressed. After the air is compressed, it passes through the
blades which convert the air compressed into kinetic energy. Then, the rotor turns by
using centrifugal force which moves the rest of the blades partially out of the rotor where
they are connected to rotor cylinder. In addition, rotor has a central shaft which passes
through a bearing housing. Finally, there is a spline that forces a hammer cage and
hammer to rotate with the rotor.
As known, one of the uses of impact wrenches is to change tires in workshops. Usually,
the procedure takes around 1 min or more to change only one tire. Moreover, it is much
faster than the traditional way with lug wrench. The lug wrench takes at least 15 minutes
and sometimes the bolts are stuck and not easy to remove. In addition, lug wrench
depends on an important factor to unscrew the bolts which is torque required to unscrew
the lug nuts. Therefore, as the radius increases, the lower forces needed to unscrew the
lug nuts. The main issue in using a lug wrench is that sometimes it takes so much effort
to unscrew the nuts. Therefore, workshops use impact wrenches instead of normal lug
wrench.
Detent pin anvil sizes of impact wrench come in different sizes because it depends on
power of impact wrench too. As the torque increases, the Detent pin anvil diameter
increases. So, heavy duty impact wrenches have larger detent pin anvil. Both electrical
and pneumatic impact wrenches use standard sizes such as, 0.25-inch, 0.375-inch, 0.50-
inch as shown in figure 2.5.

19
Figure 2.5: Most common sizes for detent pin anvil
2.4 Comparative Study
The objectives of the project [4] are to design a 4-nut removal mechanism and minimize
the cost of it. This project uses one of most common types of gears, which is spur gears,
to reduce the torque and force. The gear system is made of mild steel and has a 1:21.125
gear ratio and total weight of the product is 5.5 kg. The size of each nut is around 21mm
and pitch circle diameter (PCD) of 114mm. Moreover, distance between nuts is 80mm.
The gear system is supported by power window motor with a force of 2436 N to unscrew
4 nuts simultaneously. In addition, the torque required to unscrew one nut has been
measured by using torque wrench and found the average torque to be around 140Nm. See
table 2.1 [4]

20
Table 2.1: Torque measured at each nut for a normal used car
The torque measured at each nut (Nm)
Tire Nut 1 Nut 2 Nut 3 Nut 4
1 138 143 140 135
2 150 147 135 136
3 140 134 142 160
4 135 133 134 138
AVERAGE VALUE
The project [5] is similar to the previous model, in the number of nuts and usage of spur
gear to transmit motion to other gears. There are two type gears used, which are the
primary gear (driver) and secondary gear (driven). In this model, the primary (driver)
spur gear is connected to the motor by the shaft, which rotate to transmit power by using
the motor. They used base plate made from cast iron to hold the gears and to withstand
the forces from gears and the shaft extensions to hold the mechanism. This leads to
stability and an increase of weight of mechanism. In addition, gears and the motor
weren’t covered and can be seen. Moreover, they claimed that their electrical motor has a
power of 471 KW and minimum toque of 140 Nm, which seems to be too high for
unscrewing lug nuts. The following figures show the design of their project from
different views.
21
Figure 2.6: In the front view, the gear arrangement and the tool arrangement
can be viewed.
Figure 2.7: In the back view, the motor arrangement can be seen. The motor
is connected to the shaft which is connected to the primary gear.

22
Chapter 3: System Design

23
3.1 Design Constraints
3.1.1 Safety
Safety is considered to be an essential requirement for any project. Therefore, in this
project, we will follow the international standards for choosing types of materials and
parts being used that will lead to prevention of any failures caused by the mechanism.
3.1.2 Social & Economics
As we know, time is money. Therefore, using our project will save a lot of time, because
it’s fast and can screw or unscrew 5 lug nuts simultaneously. In addition, compared to the
available mechanisms to change tires in workshops such as impact wrenches, our project
is faster.
3.1.3 Engineering Standards
The project is consisting of many components, which are; gears, bearings, shafts, motor,
and spanners. All of these components were selected based on existing standards such as
SKF catalogue, and American Iron and Steel Institute.
3.1.4 Manufacturability
Our project can be manufactured easily, and it can be used in a wide range of applications
such as tire manufacturing companies, workshops and portable using. On one hand,
gears, bearings, and shafts will be manufactured based on their availability in the market.
On the other hand, the motor will be selected based on the calculations of torque,
horsepower and its availability in the market.

24
3.1.5 Time
As we all know, time is money, and our project is going to perform efficiently and save
time by screwing and unscrewing all lug nuts simultaneously. Instead of using the normal
way to unscrew nuts such as lug wrench, our prototype will allow the user to unscrew all
5 nuts in one move by using a gear train system to generate a torque to unscrew the five
nuts simultaneously.
3.1.6 Quality
Quality of projects is a very important aspect of any design, and in our design we are
making sure that the quality of materials used in the system and its parts is good and
meets the standards.
25
3.2 Design Methodology
Our project can be divided into five phases. First phase is brainstorming where we collect
information about the basic design aspects. In addition, using brainstorming method can
specify the features of our design. In this phase, we define the major aspects needed for
building the prototype such as, gears, shafts, bearings and spanners. Also, in this phase
we conduct the Gantt chart, where we divide the tasks and their time durations for the
project. Second phase includes gathering information about the conceptual design of our
project from, books, journals, and old projects.
Third phase, is analysis and calculation of design. This phase is considered to be an
important phase where manufacturing the prototype depends on it. This phase has a lot of
calculations that include dimensions such as gears centers, pitch diameter, thickness of
gears, size of shafts, number of teeth, and ratio of gears. Moreover, the calculations
include the torque required to unscrew one nut, power transmitted from the motor and
factor of safety (FOS). Additionally, the design of our prototype is made using
SolidWorks. SolidWorks includes all dimensions of the parts, 2D drawing, and assembly
of the parts. Fourth phase is buying parts and manufacturing in market. Also, estimating
the cost and the availability of parts in market whether there are gears, shafts, spanner
and joints, because some parts need to be made in workshops. Finally, fifth phase
includes welding, assembly of parts in workshops and testing our prototype.

26
3.3 Design, calculations and selections
Figure 3.1: Assembly from different sides
Figure 3.2: Exploded view of assembly

27
As shown in figures 3.1 and 3.2, our design has three levels because we couldn’t design a
different size of gears at the one level with a 114.3 PCD without avoiding gear
interference. So, we started to build our design on an actual wheel hub, and we designed
three levels to avoid the gear interference problem. See figure 3.3 below.
Figure 3.3: Car hub
The first level of our design has two driven gears and one driver gear. While the second
level has two driven gears and one driver gear. Lastly, third level has one driven gear and
one driver gear. Therefore, the total number of driven gears is five, and for the driver
gears it’s three. All driven and driver gears are held by 6 shafts. Moreover, gears and

28
shafts are held by a circular plate and six ball bearings to reduce the rotational friction
and support radial loads. Finally, in top of the shaft there is a wheel spanner to unscrew
the lug nuts. Table 3.1 shows a summary of the design specification for gears, shafts, and
the circular plate.
Table 3.1: A summary of design specification
Driver Gear Driven Gear Circular plate Shaft
No. of Teeth (mm) 15 31 - -
PCD (mm) 15.624 35.624 114.3 -
Diameter (mm) 37 37.5 240 25
Module 2.5 2.5 - -
Thickness (mm) 14 14 10 -
Pressure angle 20 20 - -
Length (mm) - - - 111

29
3.3.1 Gears Calculation
Figure 3.4: Driver and driven gears in mesh
Table 3.2: Driver and driven gears parameters
N driven= 31 N driver=15 D driven=71.24 D driver= 31.24
Module is calculated using Eq. 3.1
"(�)*+ = -.= /0..2
30= 2.5"" Eq. 3.1
−BasedonthenumbersofteeththeratioiscalculatedusingEq. 3.1
N#OP( = Q.-RSTUVQ.-RSTUR
= 300W= 2.066 Eq. 3.2
From the diameters of gears, we calculated the center distance Eq. 3.3
Z = [.\]P^+_+[.\]P^+]2
= 71.24+31.242
= 51.24"" Eq. 3.3
30
3.3.2 Torque and Power Calculation
Based on standards for torque and specification to tighten one nut, we need at least is 59
Nm as shown in appendix B. The total torque to unscrew 5 nuts is 59 * 5 = 295 Nm.
Then we can calculate estimate the torque and horsepower needed to unscrew the five
nuts based on ratio of gears:
From the ration of gears, we calculated the torque on driver gears using Eq. 3.4
c.-RSTUVc.-RSTUR
= N#OP( = .dWc.-RSTUR
= 2.1 Eq. 3.4
→ f = .dW..0
= 140.5 N.m
Speed at full load is 25 rpm, we calculated the power without full load using Eq. 3.5
Power = .ghijk
== .(.k0)(h)(02k.W)jk
= 2.9KW Eq. 3.5
Then we found horsepower using Eq. 3.5
1hp = 746W → .dkk/2j
= 3.8hp Eq. 3.6
3.3.3 Material Selection
Table 3.3: Parameters for gears, shafts and materials
M31= 453.527 grams M15= 61.525 grams Dshaft=2.5 mm Shear stress for steel 4140 =
327.5 Mpa
Lshaft=111mm

31
- For all Shafts
We calculated the maximum moment using Eq. 3.7
s"#$ = tu= 4.45(.077) = 0.343 N Eq. 3.7
Section modulus was calculated by using Eq. 3.8
S =v-33.
=v k.k.W ^33.
= 1.534E-06 Eq. 3.8
Maximum stress was calculated using Eq. 3.9
!"#$ = xyz{|
= 224 KPa Eq. 3.9
Maximum shear stress was calculated using Eq. 3.10
}"#$ = cR~=
�ÄÅ.Ç .Å�ÉÇ�
Ñ Å.ÅÉÇ Ä
ÖÉ
= 45.8st# Eq. 3.10
Safety factor was calculated using Eq. 3.11
SOF=xz{ÜáUzRÜàRUÜÜâäRyzàURSzãxz{åáUzRÜàRUÜÜ
= 3./.W2W.ç
= 7.1 Eq. 3.11

32
- Bearing Calculation
Catalog was calculated using Eq. 3.12
Zéè = êëíìèêî
é/ñ= Wkkk .kk jk
0kó
0/3= 3.9KN Eq. 3.12
From SKF website we determined the right bearing which will be provided in the
implantation section. Table 3.4 shows the ball bearing specifications.
Table 3.4: Ball Bearing Specifications
Ball Bearing Specifications (KOYO, No.16005)
Inner diameter 25mm
Outer diameter 47 mm
Thickness 8 mm
Mass bearing 0.055 kg
Basic dynamic load rating 8.06 KN
Basic static load rating 4.75 KN
Fatigue load limit 0.212 KN
Limiting speed 20,000 rev/min
33
3.4 Product Subsystems and Components
Figure 3.5: Plate
Figure 3.5 shows the plate used in our project which has 114.3 mm PCD that will hold
the bearing, shafts, gears and spanners.

34
Figure 3.6: Shafts
Figure 3.6 shows the shafts used that will rotate and transfer the power to other shafts to
unscrew the nuts.
Figure 3.7: Driven Gears
Figure 3.7 shows the driven gears with 31 teeth will rotate and transmit the torque to
other shafts to unscrew the bolts.

35
Figure 3.8: Driver Gears
Figure 3.8 shows the driver gears with 15 teeth will rotate and transmit the torque to other
shafts to unscrew the bolts.

36
3.5 Implementation
Figure 3.9: Manufactured plate
Figure 3.9 shows the plate that is made from cast iron with 13 mm thickness. Each hole
has a circle with 47 mm in diameter to hold the bearing from falling down.
Figure 3.10: Manufactured driven gears
Figure 3.10 shows driven gears with 31 teeth have a keyway to ensure that there is no
relative rotation between two parts and it also enables torque transmission.

37
Figure 3.11: Manufactured shafts
Figure 3.11 shows the 25 mm diameter shafts have keyways to prevent relative rotation.
Figure 3.12: Manufactured driver gears
In figure 3.12, the picture on the left in figure 3.12 shows driver gears with 15 teeth.
While the picture on the right shows the three gears attached to shafts after applying heat
treatment to increase the hardness.

38
Figure 3.13: Lock washers
In figure 3.13, the purpose of using lock washers is to keep bearing from coming loose.
Figure 3.14: Head of Ratchet
In figure 3.14, the purpose of using the head of ratchet wrench is the continues rotatory
motion. It allows only one direction while preventing motion in the opposite direction.
We welded on the top so we can adjust the head wheel spanner to fix lug nuts.

39
Figure 3.15: socket wrench
In figure 3.15, it’s a small tool for tightening and loosening nuts of different sizes.
Figure 3.16: The final prototype (top view)
In figure 3.16, it shows the final prototype from the top view.

40
Figure 3.17: The final prototype (front view)
In figure 3.17, it shows the final prototype from the front view.

41
Chapter 4: System Testing and Analysis

42
4.1 Subsystem 1
We used DW292 1/2" Impact Wrench with Detent Pin Anvil, which can deliver a
powerful forward and reverse torque, which is operated by electrical power. See figure
4.1 The main reason we chose the impact wrench is because it can provide a high torque
with high RPM.
Figure 4.1: An impact wrench
Table 4.1: Specifications of impact wrench
Specifications
Amps 7.5 Amps
Max Torque 440 N.m
No load Speed 2200 rpm
Impacts per Minute: 2700 ipm
Power output= 370 Watts
Power input= 710 Watts
Weight: 3.2 kg
Length: 292 mm
Height:216 mm
Voltage 220V

43
After installing the impact wrench with the prototype, we tested the speed by using a
digital tachometer and found it to be 201 RPM as shown in figure 4.2. The speed was less
than total speed of impact wrench without load because of the high weight of prototype
which is approximately 10 Kg.
Figure 4.2: Calculation of speed using a tachometer
4.2 Overall Results, Analysis and Discussion
Each car has its own sizes of nuts that are fixed in the wheel, and there are standards
provided from manufacturing companies for tightening nuts. So, the torque to unscrew
the nuts is different from a car to another, because the torque to tighten depends on
several points:
44
• Geometry of lug nuts.
• Materials used in manufacturing the nuts such as Aluminum alloys or steel.
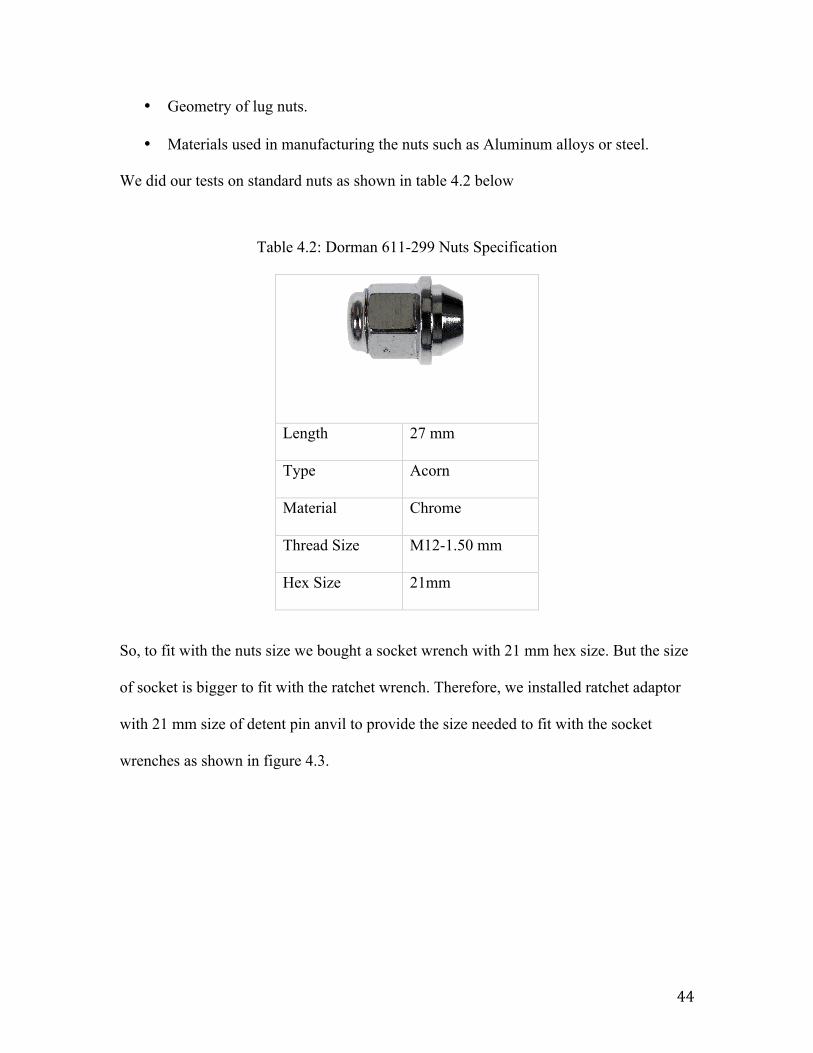
We did our tests on standard nuts as shown in table 4.2 below
Table 4.2: Dorman 611-299 Nuts Specification
Length 27 mm
Type Acorn
Material Chrome
Thread Size M12-1.50 mm
Hex Size 21mm
So, to fit with the nuts size we bought a socket wrench with 21 mm hex size. But the size
of socket is bigger to fit with the ratchet wrench. Therefore, we installed ratchet adaptor
with 21 mm size of detent pin anvil to provide the size needed to fit with the socket
wrenches as shown in figure 4.3.

45
Figure 4.3: After installing the adaptor to the ratchet wrench
Socket wrench can be replaced with different sizes but only M12 thread size. To sum up,
the mechanism doesn’t work with all types of nuts especially the lug nuts larger than 21
mm hex size.
Figure 4.4: Back view of prototype

46
After completing the prototype, we did two main tests. First, we applied a force on the
main shaft to make sure the mechanism works very well before installing the impact
wrench as shown in figure 4.2. The result was that the gears didn’t interfere with each
other. Then we installed the impact wrench to test the mechanism on the nuts of the
wheel.
Table 4.3: The time taken to unscrew nuts in seconds
Type of mechanism Unscrew one nut Unscrew five nuts
Lug wrench 50 250
Impact wrench 10 50
Our design - 11
As a result, our project managed to unscrew all 5 lug nuts simultaneously in 11 seconds.
Therefore, we achieved our objective of saving time, and it’s better than the other
mechanisms which are the lug wrench and impact wrench.

47
Chapter 5: Project Management

48
5.1 Project Plan
Table 5.1 shows the project’s plan and the tasks required from us to finish the project
successfully from the day we started working on it until the last day of the semester.
Moreover, it helped us to manage our time perfectly, because we also had other courses
that required us to do other projects. In addition, we had the advantage of working
together equally in each task, and that made the work easier for us. So, in the end we
managed to go through and finish the tasks mentioned in our Gantt chart successfully in
time.
Table 5.1: Project’s Gantt chart
No Task Assigned to Start Date End Date # Of
Workdays %Completed
1 Meeting with Advisor
All members
16-Feb-17 18-Feb-17 2 100%
2 Meeting with group members (Brainstorming)
All members
18-Feb-17 21-Feb-17 3 100%
3 Assigning Tasks to team
Members
All members
19-Feb-17 20-Feb-17 1 100%
4 Sketch the prototype
(includes the parts such as,
gears, bearings and shafts)
All members
21-Feb-17 25-Feb-17 4 100%
5 Searching for workshops & shops to find the required
All members
24-Feb-17 25-Feb-17 1 100%

49
parts and their costs
6 Start writing the first and
second chapters of the report
All members
24-Feb-17 3-Mar-17 100%
7 Second meeting with team members
All members
3-Mar-17 3-Mar-17 1 100%
8 Completing 1st & 2nd chapters
All members
3-Mar-17 8-Mar-17 5 100%
9 Working on calculation
All members
10-Mar-17 20-Apr-17 40 100%
10 Looking for material of
gears & shafts in workshop
All members
15-Mar-17 17-Mar-17 2 100%
11 Sketching parts, assembly in SolidWorks
All members
17-Mar-17 23-Mar-17 6 100%
12 Completing the conceptual
design for the prototype
All members
23-Mar-17 26-Mar-17 3 100%
13 Testing the prototype using
SolidWorks
All members
27-Mar-17 30-Mar-17 3 100%
14 Making 2D drawings for
the parts
All members
30-Mar-17 2-Apr-17 3 100%
15 Determine the materials needed to
manufacture gears & shafts
All members
3-Apr-17 9-Apr-17 6 100%

50
16 Completing chapter 3
All members
10-Apr-17 14-Apr-17 4 100%
17 Preparing for mid
presentation
All members
18-Apr-17 24-Apr-17 6 100%
18 Midterm presentation
All members
25-Apr-17 25-Apr-17 1 100%
19 Manufacturing of parts and
assembly
All members
25-Apr-17 5-May-17 10 100%
20 Testing the prototype
All members
6-May-17 8-May-17 2 100%
21 Completing chapter 4
All members
5-May-17 6-May-17 7 100%
22 Completing chapter 5
All members
6-May-17 8-May-17 2 100%
23 Completing chapter 6
All members
8-May-17 10-May-17 2 100%
24 Completing chapter 7
All members
10-May-17 12-May-17 2 100%
25 Submission day for the first
final draft of final report
15-May-17 15-May-17 1 100%
26 Preparing for the final
presentations
All members
13-May-17 19-May-17 6 100%
27 Revise the feedback given and modified
our report
All members
19-May-17 24-May-17 5 100%

51
28 Submission date for updated
corrected draft
28-May-17 28-May-17 1 100%
29 Oral Presentation
and prototype summary
Brochure and Stand
29-May-17 29-May-17 1 100%
30 Portfolios 29-May-17 5-Jun-17 1 100%
5.2 Contribution of Team Members
Table 5.2 shows the contribution of each team member of our group in completing this
project’s tasks.
Table 5.2: Contribution of team members
Team member
Contribution percentage
Mohammad Al-Otaibi (Leader)
25%
Yousef Naffaa
25%
Saeed Al-Ghamdi
25%
Abdullah Al-Zahrani
25%

52
5.3 Project Execution Monitoring
• Meeting with advisor and co-advisor:
We met with our advisor Dr. Muhammad Asad and co-advisor Dr. Nader Sawalhi several
times during the semester to get their feedback and guidance.
• Meeting with team members:
We had weekly meetings with all members of our group to complete the required tasks.
Additionally, we did all the tasks with an equal contribution of each member that helped
us in progressing fast and complete the project.
• Testing:
After completing the manufacturing of our prototype, we tested it on an actual wheel to
screw and unscrew all lug nuts simultaneously.
5.4 Challenges and Decision Making
• Material selection:
As we were making our conceptual design of the project, we made our calculations based
on the available manufacturing materials in SolidWorks. Therefore, when we finished our
design, we went to the local market to search for that specific material which is AISI
4340, but we couldn’t find it, but eventually we found an alternative in the market, which
is AISI 4140 and remade our calculations from scratch.

53
5.5 Project Bill of Materials and Budget
Table 5.3 shows the project bill of materials and budget. Mainly, the manufacturing of
this project was expensive because of two main reasons. Firstly, it’s a prototype that is
not manufactured for large quantities. Secondly, we couldn’t find gears in the local
market, so we manufactured them in a workshop that costed us 5000 SR in total.
Table 5.3: Project bill of materials and budget
# Item Description Quantity Price 1 Bearings Koyo 16005 Deep
groove ball bearings
6 120 SR
2 Heads of wheel spanners
21mm 5 75 SR
3 Circular plate 240mm in diameter 1 550 SR
4 Spur gears 2.5M 31T 20PA 14FW
5 3500 SR
5 Spur gears 2.5M 15T 20PA 14FW
3 1500 SR
6 Shafts 111mm in length 25mm in diameter
6 750 SR
7 Motor (Impact wrench)
DW292-220 1 1376 SR
8 Adaptor 3/8”F – 1/2”M AD3812 Japan
5 62.5 SR
9 Socket wrench 5 175 SR
10 Washers 6 24 SR
11 Coupler 1 15 SR
TOTAL 8147.5 SR

54
Chapter 6: Project Analysis

55
6.1 Life-long Learning
We chose this project due to its many applications in many different places such as
workshops and tire manufacturing companies. While working on this project, we have
gained a lot of experience, skills and knowledge that enhanced our abilities to find
solutions for engineering problems. Moreover, in our project, we used PMU E-Resources
and Google Scholar for gaining more knowledge regarding different aspects of our
project. Additionally, our advisor and co-advisor provided us with constant guidance and
useful knowledge that we used in our project throughout the semester that led eventually
to the success of completing it.
6.1.1 Teamwork
Working in a team of four actually helped us gaining many skills that led to the success
of this project such as communication skills, time management and knowing the strengths
and weaknesses of each member, so the tasks can be divided accordingly. Moreover,
working in a team enabled us to accomplish all the tasks efficiently, and complete the
project successfully in time. Additionally, working in a team helped us to share different
ideas and skills from all team members and combine them to generate the design of this
project. Also, teamwork enabled us to gain and develop new skills that we haven’t had
before such as the skill of leadership. The skill of leadership was very important because
you learn to lead all team members to complete difficult tasks and motivate them to share
their opinions freely. Lastly, as we all know, a group of people working together may
solve a difficult problem that an individual cannot.

56
6.1.2 Project and time management
In any project that a group of team members are working on, they will face some
obstacles that may affect their work negatively. Therefore, time management skill was
gained by doing a Gantt chart at the beginning of the semester to write the tasks that has
to be done to finish this project and their time durations. In our Gantt chart that we have
developed, tasks and their time durations were divided among the team members. Also,
all team members have other courses to study for and require doing projects and
assignments that may take a long time to finish. Therefore, time management skill helped
managing each member’s time efficiently and accurately. In addition, time management
skill helped us gaining the skill of creating an effective working environment by setting
of priorities, that helped us finishing the most important tasks at the beginning and then
proceed to the less important ones to finish the project successfully in time.
6.1.3 Engineering skills and software
In this project, we learned a lot about the topics that we have already studied in courses
such as Mechanical Engineering Design I & III, Mechanics of Solids and Manufacturing
courses in a practical way. For example, we did calculations related to torque, gears,
bearings and material selection and applied them to our design to make this project’s
prototype successfully. Moreover, Computer Aided Design course benefited us a lot in
making and designing our project. Moreover, our project was designed using SolidWorks
software due its many advantages of using it. Firstly, it helped us producing accurate
designs of the parts and their assembly. Secondly, we used it to produce 2D drawings of
the design to make the measurements clear to understand and to be applied in the
57
manufacturing phase. Lastly, it helped us Producing animated videos of the motion,
assembly, and disassembly of the design to see the mechanism of it clearly.
6.2 Impact of Engineering Solutions
Our project has many impacts on tire-manufacturing companies and workshops, as it will
benefit them in many ways:
1. It will make the tire changing process a lot easier and save a lot of effort for the
user, while other available changing tire mechanisms such as using lug wrench
are difficult to use and takes so much effort.
2. It will save time, because as mentioned before, using our project will save time
for changing tire process, and as for other available mechanisms it takes a lot of
time. For example, customers at workshops don’t have to wait for long time if the
workshop used our project, and the procedure will be easier.
6.3 Contemporary Issues Addressed
All over the world, when it comes to tire changing process, the first thing that comes to
one’s mind that it’s tiring and takes time and effort. While as mentioned above, our
design will make the process of changing tires easier and save time and effort for users.
Therefore, large tire manufacturing companies such as Michelin, Continental,
Bridgestone and Good Year will benefit from using this project.

58
Chapter 7: Conclusions and Future Recommendations

59
7.1 Summary and conclusions
To sum up, we successfully managed to design and manufacture an automotive tire
changing mechanism that can unscrew 5 lug nuts of a wheel simultaneously. In addition,
this project can be used in a variety of applications such as tire manufacturing companies
and workshops. Moreover, while working on this project during the semester, we have
gained a lot of skills. For example, we used the theoretical knowledge that we have
gained from mechanical engineering courses and apply it in our project practically to
design and manufacture our prototype. Additionally, this project wouldn’t have been
completed, without the equal contribution of each team member in completing the tasks.
Finally, working on this project taught us how to work under pressure, especially that this
semester was short.
7.2 Future Recommendations
Before finalizing the final design for the project, we recommend to search for the
available parts and materials in the market, and find alternatives if the needed materials
or parts are not available. In addition, sometimes you can’t find the needed parts in the
local market, so you have to order them online. Therefore, you have to order them early
because sometimes it takes a lot of time to be delivered and it will affect your project’s
execution plan. Additionally, we recommend sticking to the tasks’ time durations
provided in Gantt chart to avoid any delay in completing the project.

60
References
1- Childs, P. R. N. (2014). Mechanical Design Engineering Handbook Chapter 8(1st Ed.).
Oxford, United Kingdom: Butterworth-Heinemann.
2- Dal Y. Ohm. Drivetech, Inc. (2017), Selection Of Servo Motors And Drives.
3- Spur Gear Terms and Concepts (2017). GEARS Educational Systems 105 Webster St.
Hanover Massachusetts
4- Improvement And Optimization Of Tire Nut Removal With 114 PCD (2006).
University Malaysia Pahang. Azizul Rahman B Abd-Aziz.
5- Design and Fabrication Of Multi Nut Removing Tool (2014). IJSR -
INTERNATIONAL JOURNAL OF SCIENTIFIC RESEARCH
6- Hammer Drill, Impact Wrench, Right-Drill (2017).
7- Richard G. BUDYNAS. J. Keith NI SBETT. " Shigley’s Mechanical Engineering
Design” 10 Th Ed., Mc Graw Hill Education.
8- Juvinall, R.C. And Marshek, K. M., Fundamentals Of Machine Component Design,
John Wiley And Sons, 2000.
9- Nisbett, J. Keith and Budynas, Richard G. Shigley's Mechanical Engineering Design
9th Edition.
10- Pneumatic Pass-Thru Impact Wrench (2014). Florida International University. Ryan
Lucia,
Felipe De La Cruz, Milton Hidalgo Ceotto

61
Appendix A: Bill of Materials

62
Project Bill of Materials and Budget
Table A: Project Bill of Materials and Budget
# Item Description Quantity Price 1 Bearings Koyo 16005 Deep
groove ball bearings 6 120 SR
2 Heads of wheel spanners
21mm 5 75 SR
3 Circular plate 240mm in diameter 1 550 SR
4 Spur gears 2.5M 31T 20PA 14FW
5 3500 SR
5 Spur gears 2.5M 15T 20PA 14FW
3 1500 SR
6 Shafts 111mm in length 25mm in diameter
6 750 SR
7 Motor (Impact wrench)
DW292-220 1 1376 SR
8 Adaptor 3/8”F – 1/2”M AD3812 Japan
5 62.5 SR
9 Socket wrench 5 175 SR
10 Washers 6 24 SR
11 Coupler 1 15 SR
TOTAL 8147.5 SR

63
Appendix B: Tables

64
Table B.1: Specified torque for standard bolts

65
Appendix C: SolidWorks Drawings

1
2
3
4
5
6
ITEM NO. PART NUMBER DESCRIPTION QTY.
1 Disk 1
2 Metric - Spur gear
2.5M 31T 20PA 14FW --
-S31N75H50L25N5
3 Metric - Spur gear
2.5M 15T 20PA 14FW --
-S15N75H50L25N3
4 ShaftLenght= 11.1mm
- Diameter=25mm
6
5 Bearing SKF - 16005 - 14,SI,NC,14_68 6
6 Joint 5
A A
B B
C C
D D
E E
F F
8
8
7
7
6
6
5
5
4
4
3
3
2
2
1
1
Project Advisors:
STUDENT NAME ID
MATERIAL:
Learning Outcome Asse. III/ ME_110
DWG NO.
SCALE:1:5 SHEET 1 OF 1
Exploded View
Design & Manufacturing of Automotive Tire Changing
MechanismMohammad Al-Otaibi 201202606
Saeed Al-Ghamdi 201101066
Yousef Naffaa 201201700
Abdullah Al-Zhrani 201101872
Co-Advisor: Dr. NADER SAWALHIAdvisor: Dr. MUHAMMAD ASAD
SOLIDWORKS Educational Product. For Instructional Use Only

108.71
27
47
13
24
0
A A
B B
C C
D D
E E
F F
8
8
7
7
6
6
5
5
4
4
3
3
2
2
1
1
Project Advisors:
STUDENT NAME ID
MATERIAL:
Learning Outcome Asse. III/ ME_110
DWG NO.
Circularplate
Design & Manufacturing of Automotive Tire Changing
MechanismMohammad Al-Otaibi 201202606
Saeed Al-Ghamdi 201101066
Yousef Naffaa 201201700
Abdullah Al-Zhrani 201101872
Co-Advisor: Dr. NADER SAWALHIAdvisor: Dr. MUHAMMAD ASAD
Cast IronSOLIDWORKS Educational Product. For Instructional Use Only

25
32
111
8
22 81
A A
B B
C C
D D
E E
F F
8
8
7
7
6
6
5
5
4
4
3
3
2
2
1
1
Project Advisors:
STUDENT NAME ID
MATERIAL:
Learning Outcome Asse. III/ ME_110
DWG NO.
Shaft
Design & Manufacturing of Automotive Tire Changing
MechanismMohammad Al-Otaibi 201202606
Saeed Al-Ghamdi 201101066
Yousef Naffaa 201201700
Abdullah Al-Zhrani 201101872
Co-Advisor: Dr. NADER SAWALHIAdvisor: Dr. MUHAMMAD ASAD
AISI 4140SOLIDWORKS Educational Product. For Instructional Use Only

32
25
111
8
42 61
A A
B B
C C
D D
E E
F F
8
8
7
7
6
6
5
5
4
4
3
3
2
2
1
1
Project Advisors:
STUDENT NAME ID
MATERIAL:
Learning Outcome Asse. III/ ME_110
DWG NO.
Sun gear shaft
Design & Manufacturing of Automotive Tire Changing
MechanismMohammad Al-Otaibi 201202606
Saeed Al-Ghamdi 201101066
Yousef Naffaa 201201700
Abdullah Al-Zhrani 201101872
Co-Advisor: Dr. NADER SAWALHIAdvisor: Dr. MUHAMMAD ASAD
AISI 4140SOLIDWORKS Educational Product. For Instructional Use Only

25
R21.25
R15
.62
3.90
1.13
14
A A
B B
C C
D D
E E
F F
8
8
7
7
6
6
5
5
4
4
3
3
2
2
1
1
Project Advisors:
STUDENT NAME ID
MATERIAL:
Learning Outcome Asse. III/ ME_110
DWG NO.
Spurgears2.5M15T20PA14FW
Design & Manufacturing of Automotive Tire Changing
MechanismMohammad Al-Otaibi 201202606
Saeed Al-Ghamdi 201101066
Yousef Naffaa 201201700
Abdullah Al-Zhrani 201101872
Co-Advisor: Dr. NADER SAWALHIAdvisor: Dr. MUHAMMAD ASAD
AISI 4340SOLIDWORKS Educational Product. For Instructional Use Only

R35.62
R41
.25
25
1.50
4.92
9.4
9
2.30
14
A A
B B
C C
D D
E E
F F
8
8
7
7
6
6
5
5
4
4
3
3
2
2
1
1
Project Advisors:
STUDENT NAME ID
MATERIAL:
Learning Outcome Asse. III/ ME_110
DWG NO.
Spurgears2.5M31T20PA14FW
Design & Manufacturing of Automotive Tire Changing
MechanismMohammad Al-Otaibi 201202606
Saeed Al-Ghamdi 201101066
Yousef Naffaa 201201700
Abdullah Al-Zhrani 201101872
Co-Advisor: Dr. NADER SAWALHIAdvisor: Dr. MUHAMMAD ASAD
AISI 4340SOLIDWORKS Educational Product. For Instructional Use Only
Top Related
Copyright © 2022 FDOKUMEN

