


Bahasa
Halaman
Hukum


Dell Wyse ThinOS Version 9.0Administrator’s Guide
November 2020Rev. A04

Notes, cautions, and warnings
NOTE: A NOTE indicates important information that helps you make better use of your product.
CAUTION: A CAUTION indicates either potential damage to hardware or loss of data and tells you how to avoid
the problem.
WARNING: A WARNING indicates a potential for property damage, personal injury, or death.
© 2020 Dell Inc. or its subsidiaries. All rights reserved. Dell, EMC, and other trademarks are trademarks of Dell Inc. or its subsidiaries. Othertrademarks may be trademarks of their respective owners.

Chapter 1: Introduction................................................................................................................. 8Supported platforms...........................................................................................................................................................8What's new in ThinOS 9.0.4024 (MR3) release?........................................................................................................8What's new in ThinOS 9.0.3030 (MR2) release?........................................................................................................8What's new in ThinOS 9.0.2081 (MR1) release?......................................................................................................... 9What's new in Wyse Management Suite 2.1?...............................................................................................................9What's new in ThinOS 9.0?.............................................................................................................................................10What's new in Wyse Management Suite 2.0?............................................................................................................ 10Feature comparison between ThinOS 9.0 and ThinOS 8.6..................................................................................... 10Other documents you may need.................................................................................................................................... 12
Chapter 2: Upgrading the ThinOS firmware................................................................................. 14Register ThinOS devices to Wyse Management Suite............................................................................................. 15
Register ThinOS devices using Wyse Device Agent............................................................................................15Register ThinOS devices by using DHCP option tags.........................................................................................15
Download the ThinOS firmware, BIOS, and application packages.........................................................................16Add ThinOS firmware to the repository........................................................................................................................17Upgrade ThinOS 8.6 to ThinOS 9.x............................................................................................................................... 17Upgrade ThinOS 9.x to later versions using Wyse Management Suite................................................................ 17Upgrade ThinOS 9.x to later versions using Admin Policy Tool..............................................................................18Upload and push ThinOS 9.x application packages using Wyse Management Suite.........................................18Upload and install ThinOS 9.x application packages using Admin Policy Tool.................................................... 19Firmware installation using Dell Wyse USB Imaging Tool.........................................................................................19Upgrade BIOS..................................................................................................................................................................... 19Edit BIOS settings.............................................................................................................................................................20Downgrade to ThinOS 9.0.1136 by using Wyse Management Suite..................................................................... 20Delete ThinOS application packages............................................................................................................................. 21
Chapter 3: Getting started with ThinOS 9.0................................................................................ 22End User License Agreement......................................................................................................................................... 22Configure ThinOS using First Boot Wizard................................................................................................................. 22Configure account privileges for ThinOS.................................................................................................................... 30
Configure account privileges using Admin Policy Tool.......................................................................................30Configure account privileges using Wyse Management Suite.......................................................................... 31
Connect to a remote server............................................................................................................................................ 31Connecting a display......................................................................................................................................................... 31Connecting a printer.........................................................................................................................................................32Desktop overview..............................................................................................................................................................32Using the taskbar.............................................................................................................................................................. 32Classic desktop features................................................................................................................................................. 34
Desktop guidelines.......................................................................................................................................................34Using the shortcut menu........................................................................................................................................... 34Using the desktop menu............................................................................................................................................ 34Configure the Connection Manager....................................................................................................................... 35
Contents
Contents 3

Configuring thin client settings and connection broker settings...........................................................................35Configure ThinOS using Admin Policy Tool.................................................................................................................36
Configure the Admin Policy Tool............................................................................................................................. 36Admin Policy Tool feature list...................................................................................................................................36
Locking the thin client......................................................................................................................................................38Shut down and restart..................................................................................................................................................... 39Battery information...........................................................................................................................................................40Login dialog box features................................................................................................................................................. 41View the system information...........................................................................................................................................41Sleep mode......................................................................................................................................................................... 42
Enable sleep manually.................................................................................................................................................42Import certificates to ThinOS from Admin Policy Tool or Wyse Management Suite....................................... 43ThinOS system variables................................................................................................................................................. 43
Chapter 4: Configuring the global connection settings................................................................ 44
Chapter 5: Configuring connectivity............................................................................................45Configuring the network settings................................................................................................................................. 45
Configure the general settings.................................................................................................................................45Configure the DHCP options settings....................................................................................................................46Configure the ENET settings....................................................................................................................................48Configure the WLAN settings.................................................................................................................................. 50Configure the proxy settings.....................................................................................................................................51
Configuring the remote connections............................................................................................................................53Configure the broker setup.......................................................................................................................................53Configure the General Options................................................................................................................................ 54Configure the authentication settings................................................................................................................... 55
Configuring the central configurations........................................................................................................................ 63Configure the Wyse Management Suite settings................................................................................................63
Configure the VPN Manager.......................................................................................................................................... 64
Chapter 6: Configuring the connection broker—Citrix................................................................ 66Citrix Workspace app feature matrix............................................................................................................................66Configure the Citrix broker setup................................................................................................................................. 68
Classic mode vs Workspace mode.......................................................................................................................... 69Citrix HDX RealTime Optimization Pack for Skype for Business............................................................................71
Install the Citrix package on ThinOS.......................................................................................................................72Set up the Skype for Business application............................................................................................................ 72Using the Skype for Business application.............................................................................................................. 72Verify the Skype for Business connection status................................................................................................ 73Citrix RTME call statistics......................................................................................................................................... 73
Cisco Jabber Softphone for VDI....................................................................................................................................74Install the JVDI package on ThinOS........................................................................................................................74Setting up the Cisco Jabber Softphone for VDI.................................................................................................. 75Using Cisco Jabber......................................................................................................................................................75Using Device Selector................................................................................................................................................ 76Verify the Cisco Jabber connection status........................................................................................................... 76Cisco Jabber call statistics........................................................................................................................................ 77Limitations..................................................................................................................................................................... 77
4 Contents

Microsoft Teams Audio Optimization........................................................................................................................... 77Citrix ADC............................................................................................................................................................................78
Citrix two-factor authentication.............................................................................................................................. 79Configure Citrix ADC using LDAP and RSA.......................................................................................................... 79Configuring Citrix ADC using DUO.......................................................................................................................... 79Configure Citrix ADC using CensorNet MFA authentication............................................................................80Citrix ADC Native OTP...............................................................................................................................................80Citrix Federated Authentication Service SAML with Microsoft Azure Active Directory............................81Configure Citrix NetScaler using Okta................................................................................................................... 82
Citrix Cloud services.........................................................................................................................................................83Getting started with Citrix Cloud............................................................................................................................ 83
Automatically configure using DNS for email discovery ......................................................................................... 83Citrix HDX Adaptive transport (EDT)...........................................................................................................................84
Enable HDX Adaptive Transport.............................................................................................................................. 84HDX Adaptive Display V2................................................................................................................................................ 84
Enable HDX Adaptive Display V2.............................................................................................................................85Browser Content Redirection.........................................................................................................................................85
Enable Browser Content Redirection..................................................................................................................... 85HTML5 Video Redirection...............................................................................................................................................86Windows Media Redirection........................................................................................................................................... 86
Enable Windows Media Redirection........................................................................................................................86Enable UDP audio in a Citrix session............................................................................................................................ 87QUMU Video Optimization Pack for Citrix..................................................................................................................87Keyboard layout synchronization in VDA.....................................................................................................................87
Keyboard enhancements on Windows VDA..........................................................................................................93Citrix Self-Service Password Reset..............................................................................................................................93
Before resetting a password or unlocking an account.......................................................................................93Use the Account Self-Service..................................................................................................................................93Unlock an account.......................................................................................................................................................94
Citrix SuperCodec............................................................................................................................................................. 94Anonymous logon.............................................................................................................................................................. 95Configure the Citrix session properties....................................................................................................................... 95Using multiple displays in a Citrix session................................................................................................................... 95USB Printer Redirection.................................................................................................................................................. 96Configure the Citrix UPD printer ..................................................................................................................................96
Chapter 7: Configuring the thin client local settings....................................................................98Configuring the system preferences............................................................................................................................ 98
Configure the general system preferences...........................................................................................................98Set the time and date.................................................................................................................................................99Set the custom information.................................................................................................................................... 100Configuring power and sleep mode.......................................................................................................................100
Configure the display settings...................................................................................................................................... 102Using the On-Screen Display (OSD).....................................................................................................................105Port preferences on the Wyse 5470 Thin Client............................................................................................... 105Vertical Synchronization.......................................................................................................................................... 105
Configuring the peripherals settings...........................................................................................................................105Configure the keyboard settings........................................................................................................................... 105Configure the mouse settings.................................................................................................................................107Configure the audio settings...................................................................................................................................108
Contents 5

Configure the serial settings................................................................................................................................... 109Configure the camera device...................................................................................................................................110Configure the Bluetooth settings............................................................................................................................ 111Secure Digital cards................................................................................................................................................... 113
Configuring the printer settings....................................................................................................................................113Configure the ports settings....................................................................................................................................114Configure the LPDs settings....................................................................................................................................114Configure the SMBs settings.................................................................................................................................. 115Using the printer setup options.............................................................................................................................. 116Using the Help............................................................................................................................................................. 117
Reset to factory defaults................................................................................................................................................117
Chapter 8: Using the system tools..............................................................................................118Simplified Certificate Enrollment Protocol................................................................................................................. 119
Request the certificate manually........................................................................................................................... 120Request the certificate automatically using Wyse Management Suite........................................................ 122
Trusted Platform Module version 2.0......................................................................................................................... 122
Chapter 9: Using Wyse Management Suite................................................................................. 123Functional areas of Wyse Management Suite console........................................................................................... 123Managing groups and configurations..........................................................................................................................123
Create a default device policy group.................................................................................................................... 123Create a user policy group.......................................................................................................................................125Edit an unmanaged group........................................................................................................................................ 125Remove a group......................................................................................................................................................... 126
Edit the ThinOS 9.x policy settings............................................................................................................................. 126Managing devices............................................................................................................................................................ 127
Search a device using filters on the Devices page............................................................................................ 127Managing Jobs................................................................................................................................................................. 128
Schedule a device command job............................................................................................................................ 128Managing rules................................................................................................................................................................. 129
Editing a registration rule.........................................................................................................................................129Create unmanaged device auto assignment rules ............................................................................................ 130Edit an unmanaged device auto assignment rule...............................................................................................130Disable or delete a rule............................................................................................................................................. 130Save the rule order....................................................................................................................................................130Create a rule for alert notification.......................................................................................................................... 131Edit an alert notification rule....................................................................................................................................131
Managing Events.............................................................................................................................................................. 131Search an event or alert using filters.....................................................................................................................131
Managing users................................................................................................................................................................ 132Add a new admin profile........................................................................................................................................... 132Create auto assignment rules for unmanaged devices.....................................................................................133Add a user.................................................................................................................................................................... 133Bulk import end users............................................................................................................................................... 134Create end-user exceptions.................................................................................................................................... 134
Portal administration....................................................................................................................................................... 134Adding the Active Directory server information.................................................................................................134Wyse Management suite Active Directory group feature matrix...................................................................136
6 Contents

Import unassigned users or user groups to public cloud through active directory....................................138Access Wyse Management Suite file repository................................................................................................ 138
Chapter 10: Troubleshooting your thin client.............................................................................. 141Capture an HTTP log using ThinOS............................................................................................................................ 145System crashes, freezes or restarts abruptly...........................................................................................................145Broker agent login failure...............................................................................................................................................145Citrix desktop and application crashes abruptly...................................................................................................... 145Cisco Jabber and Skype for Business call failure.....................................................................................................146Request a log file using Wyse Management Suite...................................................................................................146View audit logs using Wyse Management Suite.......................................................................................................146System log and trace information................................................................................................................................147Upgrade or conversion troubleshooting and logs.................................................................................................... 147How to debug with new support beyond ThinOS 8?..............................................................................................149How to debug with same support in ThinOS 8?...................................................................................................... 149Common log files and locations....................................................................................................................................149
Chapter 11: Frequently Asked Questions.................................................................................... 150ThinOS-related questions.............................................................................................................................................. 150
How do I upgrade from ThinOS 8.6 to 9.0?........................................................................................................150What should I do if the package installation fails?............................................................................................ 150Is Wyse Management Suite 2.0 the only way to manage ThinOS 9.0?....................................................... 150Is USB Imaging Tool method a possible option for upgrading to ThinOS 9.0?.......................................... 150Can ThinOS 9.0 be installed on a PCoIP device?.............................................................................................. 150Does ThinOS 9.0 support zero desktop?.............................................................................................................150Does ThinOS 9.0 support ThinOS configurations using INI files?................................................................. 150iPhone cannot be redirected to the Citrix Desktop session.............................................................................151Android smartphone is not displayed in the session when redirected or mapped......................................151Does Citrix Workspace app replace Citrix Receiver on ThinOS?................................................................... 151What is Workspace mode on ThinOS 9.0?...........................................................................................................151Can I enable Flash content to be rendered using a local Flash Player on ThinOS 9.0?............................ 151How do I verify if HDX Enlightened Data Transport Protocol is active?...................................................... 151How do I check if HTML5 Video Redirection is working?................................................................................ 151How do I check if QUMU Multimedia URL Redirection is working?............................................................. 152How do I check if Windows Media Redirection is working?............................................................................152Is persistent logging supported in ThinOS 9.0?................................................................................................. 152Is tls.txt file included in network traces on ThinOS 9.0?................................................................................. 152Will ThinOS 9.0 device reboot automatically when the system crashes?................................................... 152
Wyse Management Suite-related questions............................................................................................................. 153What takes precedence between Wyse Management Suite and ThinOS UI when conflicting
settings are enforced?......................................................................................................................................... 153How do I import users from a .csv file?............................................................................................................... 153How do I use Wyse Management Suite file repository?.................................................................................. 153How do I check the version of Wyse Management Suite................................................................................ 154
Contents 7

IntroductionThin clients running Dell Wyse ThinOS firmware are designed solely for optimal thin client security and performance. Theseefficient purpose-built thin clients offer ultrafast access to applications, files, and network resources within Virtual DesktopInfrastructure (VDI) environments. With zero attack surface, unpublished API, and encrypted data Wyse ThinOS is virus andmalware resistant.
Wyse ThinOS requires a management software to configure, operate, and update thereby eliminating the need for IT supportto visit or touch the physical devices. Dell Wyse Management Suite is the next generation management solution that enablesyou to centrally configure, monitor, manage, and optimize your ThinOS-based thin clients. As the number of devices grows, theWyse Management Suite offers process automation and helps lower costs for large deployments of thin clients. With secureHTTPS-based communications and active directory authentication for role-based administration, Wyse Management Suite keepsyour thin clients always up-to-date. The mobile application enables IT to view critical alerts, notifications on the dashboard, andsend real-time commands.
This guide is intended for administrators of thin clients running Wyse ThinOS and using Wyse Management Suite to manage thinclients. It provides information and detailed system configurations to help you design and manage a ThinOS environment usingWyse Management Suite.
Supported platformsThe Dell Wyse ThinOS 9.0 firmware is supported on the following Dell Wyse thin clients:
● Wyse 3040 Thin Client● Wyse 5070 Thin Client● Wyse 5470 Thin Client● Wyse 5470 All-in-One Thin Client
NOTE: Wyse 3040 Thin Client is for users who work mostly on tasks with limited multimedia requirements. It is not
applicable for using multimedia such as BCR, HTML 5 video redirection, Window multimedia redirection, RTOP video call, or
JVDI video call. It is recommended to use Wyse 5070, 5470 AIO, or 5470 thin clients for high multimedia requirements.
What's new in ThinOS 9.0.4024 (MR3) release?● Updated the Citrix package to version 2006_1146. The following are the feature enhancements in Citrix package
v2006_1146:○ Usage of a device-specific printer driver in addition to the Citrix Universal Print Driver (UPD) is supported in a Citrix
session. See, Configuring the printer settings.○ Keyboard layout is set to the server default mode for a predictable keyboard output. This feature enables you to manually
switch the keyboard layout inside a VDA session. See, Keyboard Layout synchronization in VDA.○ Microsoft Teams video call and share screen features are supported in a VDA session. See, Teams audio optimization.
● Fixed issues from the previous ThinOS releases. For more information, see the latest Dell Wyse ThinOS 9.0 Release Notes atwww.dell.com/support.
What's new in ThinOS 9.0.3030 (MR2) release?● Updated the Dell logo on the login window, shutdown window, unlock window, and the admin mode window. For more
information, see Desktop overview, Locking the thin client, and Shut down and restart.● The JVDI package on ThinOS is updated from version 12.8 to 12.9. For more information, see Cisco Jabber Softphone for
VDI.
1
8 Introduction

What's new in ThinOS 9.0.2081 (MR1) release?● ThinOS enhancements
○ Ability to upgrade BIOS using either Admin Policy Tool or Wyse Management Suite. See, Upgrade BIOS.○ Ability to edit BIOS settings using either Admin Policy Tool or Wyse Management Suite. See, Edit BIOS settings.○ Ability to install firmware and application packages using Admin Policy Tool. See, Upgrade ThinOS 9.x to later versions
using Admin Policy Tool.○ Ability to configure the WINS server in the Network Setup window. See, Configure the general settings.○ Ability to import certificates using Admin Policy Tool. See, Import certificates to ThinOS.○ Ability to set videos and moving images as screen saver using Admin Policy Tool. See, Admin Policy Tool feature list.○ Added new options for EAP-PEAP-GTC/EAP-FAST-GTC, default audio devices, DHCP Option tags 12 and 43 in the
Admin Policy Tool. See, Admin Policy Tool feature list.○ Added icons for all the ThinOS local windows that can be minimized and restored from the taskbar. See, Using the
taskbar.○ Added EULA in the First Boot Wizard. End User License Agreement.○ Displays an error message when an invalid DNS server is configured. See, Configure the general settings.○ Reversed the touchpad scroll direction on Wyse 5470 Thin Client. See, Touchpad gestures.○ Supports the dual IPv6 network interface. See, Configure the general settings.○ Supports wireless IPv6. See, Configure the WLAN settings.○ Supports automatic configuration of email-based account discovery using DNS. See, Autoconfiguration of email-based
account discovery using DNS.○ Supports additional ELO touch displays. See the Dell Wyse ThinOS 9.0 MR1 Release Notes at www.dell.com/support.○ Integrated the HID Global Corporation OMNIKEY driver into ThinOS to support HID smart card readers and proximity card
readers. See the Dell Wyse ThinOS 9.0 MR1 Release Notes at www.dell.com/support.○ Implemented a rule to force usage of complex passwords for VNC or Admin Mode.○ Supports audio jack ports on the WD19 Docking Station.○ Supports external displays with more display resolutions on Wyse 5470 Thin clients and Wyse 5470 All-in-One Thin
Clients.○ Removed support for Non-CCID USB smart card keys.○ Removed support for shortcut keys in a session with full screen mode.
● Citrix updates○ Supports Microsoft Teams audio optimization in a Citrix session. See, Microsoft Teams Audio Optimization.○ Upgraded the Citrix RealTime Media Engine (RTME) to version 2.9. See the Dell Wyse ThinOS 9.0 MR1 Release Notes at
www.dell.com/support.○ Upgraded the Citrix package to Citrix workspace app 2004. See the Dell Wyse ThinOS 9.0 MR1 Release Notes at
www.dell.com/support.● Imprivata updates
○ Supports Imprivata ProveID Embedded feature on ThinOS. See, Imprivata OneSign ProveID Embedded.○ Supports Fast User Switching (FUS) feature on ThinOS. See, Configure Fast User Switching on ThinOS.
● Wyse Management Suite updates○ Supports Wyse Management Suite version 2.1.○ Ability to assign a subnet to a file repository using Wyse Management Suite. See, Subnet mapping.○ Ability to create end-user exceptions using Wyse Management Suite. See, Create exceptions for an end user.○ Ability to configure the Active Directory Group setting using Wyse Management Suite. See, Adding the Active Directory
server information.○ Implemented a rule to force usage of complex passwords for VNC or Admin Mode.
For detailed information about the Wyse Management Suite features, see the Dell Wyse Management Suite version 2.1Administrator's Guide at www.dell.com/support.
What's new in Wyse Management Suite 2.1?● Ability to assign a subnet to a file repository using Wyse Management Suite. See, Subnet mapping.● Ability to create end-user exceptions using Wyse Management Suite. See, Create exceptions for an end user.● Ability to configure the Active Directory Group setting using Wyse Management Suite. See, Adding the Active Directory
server information.
Introduction 9

● Implemented a rule to force usage of complex passwords for VNC or Admin Mode. See, Dell Wyse ThinOS 9.0 MR1 ReleaseNotes at www.dell.com/support.
What's new in ThinOS 9.0?ThinOS 9.0 is a Citrix-specific release. Other broker agent connections such as VMware, RDP, and Amazon WorkSpaces arenot supported. You must use either Wyse Management Suite or the local Admin Policy Tool to manage your systems as INIparameters are not supported in ThinOS 9.0. This section provides information about the new and enhanced features that aredelivered in ThinOS 9.0.
● ThinOS enhancements○ Notification messages when firmware or packages are deployed using Wyse Management Suite, see Upgrading the
ThinOS firmware○ Enhanced user interface with modern desktop and icons, see Desktop overview.○ Supports a local admin console (Admin Policy Tool), see Configure the Admin Policy Tool.○ Integrates Citrix Workspace app into ThinOS 9.0.
● Citrix updates○ Supports the workspace mode, see Configure the Citrix broker setup.○ Supports Browser Content Redirection, see Browser Content Redirection.○ Supports Adaptive Transport with EDT, see Citrix HDX Adaptive transport.○ Supports Adaptive Display V2, see Citrix HDX Adaptive Display V2.○ Supports NetScaler Native OTP, see Citrix NetScaler Native OTP.○ Supports Federated Authentication (SAML/Azure AD), see Citrix Federated Authentication Service SAML with Microsoft
Azure Active Directory.○ Supports desktop viewer or toolbar in a Citrix session, see Workspace mode.○ Supports Unicode Keyboard Layout Mapping with Windows VDA, see Keyboard enhancements.
● Management software○ Supports Wyse Management Suite version 2.0
What's new in Wyse Management Suite 2.0?This section provides information about the new and enhanced features that are delivered in Wyse Management Suite 2.0.● ThinOS 9.0 support
○ Provision to upgrade ThinOS 8.6 to ThinOS 9.0, see Upgrade ThinOS 8.6 to ThinOS 9.x.○ Provision to upload and push ThinOS 9.0 application packages, see Upload and push ThinOS 9.0 application packages.○ Provision to create Select groups for ThinOS 9.0, see Managing groups and configurations.
● Wyse Management Suite enhancements○ Enhanced user interface to configure ThinOS 9.0 settings, see Edit the ThinOS 9.x policy settings.
Feature comparison between ThinOS 9.0 and ThinOS8.6The following table provides a feature comparison between ThinOS 9.0 and ThinOS 8.6 local configurations:
Table 1. Feature comparison
Category Feature ThinOS 9.0 ThinOS 8.6
Operating System Signoff, Lock, shut down,reboot
Supported Supported
Sleep mode Supported Supported
Reset to factory defaultsettings
Supported Supported
First Boot Wizard Supported Supported
10 Introduction

Table 1. Feature comparison (continued)
Category Feature ThinOS 9.0 ThinOS 8.6
System Information Supported Supported
Classic desktop mode Supported Supported
Zero desktop mode Not supported Supported
Workspace mode Supported Not applicable
Broker setup Supported Supported
Connection Manager Supported Supported
Global Connection Settings Supported Supported
Certificate Management Supported Supported
SCEP Supported Supported
Screensaver Supported Supported
Locale Limited support¹ Supported
Locking the terminal Supported Supported
Date and time Supported Supported
Troubleshooting options Limited support¹ Supported
Connected devices list Limited support¹ Supported
VNC Limited support¹ Supported
Network IPv4 Supported Supported
IPv6 Supported Supported
Ethernet speed Supported Supported
Wired IEEE802.1xAuthentication
Limited support¹ Supported
Dual NIC Limited support¹ Supported
Proxy Supported Supported
VPN Supported Supported
Wireless Supported Supported
Display Resolution Supported Supported
Rotation Supported Supported
Multi screen mirror/extended mode
Supported Supported
Peripherals Keyboard and keyboardlayouts
Supported Supported
Mouse, mouse speed, swapleft and right
Supported Supported
Serial ports Supported Supported
Camera Supported Supported
Audio (headset/DP audio) Limited support¹ Supported
Touchscreen Limited support¹ Supported
Printer Limited support¹ Supported
Bluetooth Limited support¹ Supported
Introduction 11

Table 1. Feature comparison (continued)
Category Feature ThinOS 9.0 ThinOS 8.6
ThinPrint Not supported Supported
Broker agent Citrix Supported Supported
VMware Not supported Supported
Microsoft Remote Desktop Not supported Supported
Dell vWorkspace Not supported Supported
Amazon Web Services orWorkSpaces
Not supported Supported
Teradici Cloud Access Not supported Supported
Authentication Smart card Limited support¹ Supported
Imprivata OneSign Supported Supported
SECUREMATRIX Not supported Supported
HealthCast Not supported Supported
Management Wyse Management Suite Supported Supported
Admin Policy Tool Supported Not available
Usage of INI parameters Not supported Supported
BIOS update using WyseManagement Suite
Supported Supported
BIOS configuration usingAdmin Policy Tool
Supported Not available
BIOS configuration usingWyse Management Suite
Supported Not available
Firmware upgrade usingWyse Management Suite
Supported Supported
Firmware upgrade usingUSB Imaging Tool
Supported Supported
Package update using WyseManagement Suite
Supported Supported
Package removal usingWyse Management Suite
Supported Supported
DHCP scope options Limited support¹ Supported
Security TPM Supported Supported
Secure Boot Not supported Supported
FIPS Limited Supported—only on WLAN Not supported
¹For feature limitations see the Dell Wyse ThinOS 9.0 Release Notes.
Other documents you may needIn addition to this Guide, you can access the following guides available at www.dell.com/support/manuals.
● The Dell Wyse ThinOS Version 9.0 Migration Guide provides information about downloading the ThinOS 9.0 firmware fromthe Dell support site, and how to upgrade from ThinOS 8.6 firmware to ThinOS 9.0.
● The Dell Wyse ThinOS Version 9.0 Release Notes provides information about new features, fixed issues, and known issues inthis release.
12 Introduction

● The Dell Wyse Management Suite 2.0 Administrator's Guide provides information about configuration, and maintenance ofthe ThinOS 9.0-based thin clients by using the Wyse Management Suite console.
Introduction 13

Upgrading the ThinOS firmwareIt is recommended to use the Wyse Management Suite version 2.0 to upgrade your ThinOS firmware to 9.0. You can also usethe USB Imaging Tool version 3.3.0 to install the ThinOS 9.0 Merlin image on your thin client. If you are using ThinOS v8.5 orearlier versions, you must first upgrade your device to ThinOS v8.6 before installing ThinOS 9.0. ThinOS 9.0 displays a changegroup notification message on the device after you change the group in Wyse Management Suite. A new firmware or packagemessage is also displayed when you deploy a new firmware or package using Wyse Management Suite.
NOTE: You cannot upgrade ThinOS PCoIP version as ThinOS 9.0 does not support PcoIP devices.
CAUTION: All device settings are erased after you upgrade from ThinOS 8.6 to 9.0 except the Wyse
Management Suite server settings. You must back up your device settings before you start the upgrade process.
Once upgraded to ThinOS 9.0, you can downgrade to ThinOS 8.6 only by using Merlin image.
The overall upgrade process using Wyse Management Suite includes the following tasks:
1. Register your thin client to Wyse Management Suite.● Register ThinOS devices using Central Configuration. See Register ThinOS devices using Wyse Device Agent.● Register ThinOS devices using DHCP option tags. See Register devices by using DHCP option tags.
NOTE: You must not disable the on-board NIC on the Wyse Thin Client. If disabled, the Wyse Management Suite
server cannot identify the thin client.
2. Download the ThinOS 9.0 operating system image. See Download the ThinOS firmware.3. Upload the ThinOS 9.0 firmware to the Wyse Management Suite repository. See Add ThinOS firmware to repository.4. Upgrade the ThinOS firmware from 8.6 to 9.x. See Upgrade ThinOS 8.6 to ThinOS 9.x.5. Upgrade the ThinOS firmware from 9.x to later versions. See Upgrade ThinOS 9.x to later versions.6. Deploy the application package using Wyse Management Suite. See Upload and push ThinOS 9.0 application packages.
Table 2. Firmware images
Platform ThinOS firmware image forupgrading from 8.6 to 9.0
ThinOS firmware image for upgrading from 9.0to later versions
Wyse 3040 Thin Client A10Q_wnos rootfs.pkg
Wyse 5070 Thin Client—Celeronprocessor
X10_wnos rootfs.pkg
Wyse 5070 Thin Client—Pentiumprocessor
X10_wnos rootfs.pkg
Wyse 5070 Extended Thin Client—Pentium processor
X10_wnos rootfs.pkg
Wyse 5470 Thin Client X10_wnos rootfs.pkg
Wyse 5470 All-in-One Thin Client X10_wnos rootfs.pkg
Table 3. Package information
Name Description Package installation
Citrix The package is introduced to support Citrix Workspace Appwith RTME client integrated.
Upload the new package using WyseManagement Suite.
JVDI The package is introduced to support Cisco Jabber. Upload the new package using WyseManagement Suite.
Imprivata The package is introduced to support Imprivata withProveID Embedded feature.
Upload the new package using WyseManagement Suite.
2
14 Upgrading the ThinOS firmware

For information about the supported Citrix Workspace App version, Cisco Jabber version, and Imprivata version, see the latestDell Wyse ThinOS 9.0 Release Notes at www.dell.com/support.
NOTE: If the package fails to update, or if the thin client does not work after upgrading to the new firmware, remove all
packages and reboot the thin client. Reinstall the package after the reboot.
Register ThinOS devices to Wyse Management Suite
Register ThinOS devices using Wyse Device Agent
Steps
1. From the desktop menu of the thin client, go to System Setup > Central Configuration.The Central Configuration window is displayed.
2. Enter the Group Registration Key as configured by your administrator for the wanted group.
3. Select the Enable WMS Advanced Settings check box.
4. In the WMS server field, enter the Wyse Management Server URL.
5. In the Group Registration Key field, enter the group registration key as configured by your Wyse Management Suiteadministrator for your group. To verify the setup, click Validate Key. If the key is not validated, verify the group key andWyse Management Suite server URL which you have provided. Ensure that ports mentioned are not blocked by the network.The default ports are 443 and 1883.
NOTE: If the Group Token parameter is not specified, the device is moved to the unmanaged group or quarantine group.
6. Enable or disable CA validation based on your license type. For public cloud, select the Enable CA Validation check box, andfor private cloud, select the Enable CA Validation check box if you have imported certificates from a well-known certificateauthority into your Wyse Management Suite server.
To enable the CA validation option in the private cloud, you must install the same self-signed certificate on the ThinOSdevice as well. If you have not installed the self-signed certificate in the ThinOS device, do not select the Enable CAValidation check box. You can install the certificate to the device by using Wyse Management Suite after registration, andthen enable the CA validation option.
7. Click OK.The device is registered to Wyse Management Suite.
Register ThinOS devices by using DHCP option tags
About this task
You can register the devices by using the following DHCP option tags:
Table 4. Registering device by using DHCP option tags
Option Tag Description
Name—WMS
Data Type—String
Code—165
Description—WMS Server FQDN
This tag points to the Wyse Management Suite server URL. For example,wmsserver.acme.com:443, where wmsserver.acme.com is fully qualifieddomain name of the server where Wyse Management Suite is installed.
Name—CA Validation
Data Type—String
Code—167
Description—Certificate AuthorityValidation
You can enable or disable CA validation option if you are registering yourdevices with Wyse Management Suite on private cloud.
Enter True, if you have imported the SSL certificates from a well-knownauthority for https communication between the client and Wyse ManagementSuite server.
Upgrading the ThinOS firmware 15

Table 4. Registering device by using DHCP option tags (continued)
Option Tag Description
Enter False, if you have not imported the SSL certificates from a well-knownauthority for https communication between the client and Wyse ManagementSuite server.
Name—Group Registration Key
Data Type—String
Code—199
Description—Group Registration Key
This tag directs to the Group Registration Key for the Wyse Management Suiteagent.
Download the ThinOS firmware, BIOS, and applicationpackages
About this task
This section describes the steps to download the ThinOS firmware, BIOS, and application packages from Dell support site.
Steps
1. Go to www.dell.com/support.
2. In the Enter a Service Tag, Serial Number, Service Request, Model, or Keyword field, type the model number of yourdevice, and press Enter or click the search icon.
3. On the product support page, click Drivers & downloads.
4. Select the operating system as ThinOS 9.0.
5. From the list, locate the ThinOS image entry and click the download icon.
Table 5. ThinOS image
Scenario ThinOS image entry on the Dell support site
Upgrade your ThinOS 8.6 to 9.0 <latestversion>
ThinOS 8.6 to ThinOS 9.0 <latest version> Base Image file for DellWyse 3040, 5070, 5470 and 5470 All-in-One Thin Clients
Upgrade your ThinOS from previousversions of ThinOS 9.0 to the latest version
ThinOS 9 to ThinOS 9.0 <latest version> Base Image file for Dell Wyse3040, 5070, 5470 and 5470 All-in-One Thin Clients
Imaging using Dell Wyse USB Imaging Tool ThinOS 9.0 <latest version> Merlin Image file
6. If you want to use ThinOS packages, locate a package and click the download icon.
Table 6. ThinOS packages
ThinOS packages ThinOS image entry on the Dell support site
Citrix Workspace app ThinOS 9.0 <version> Citrix package <version>
Cisco JVDI package ThinOS 9.0 <version> JVDI package <version>
Imprivata package ThinOS 9.0 <version> Imprivata package <version>
7. If you want to install the latest BIOS package, locate the package entry—ThinOS 9.0 <version> BIOS package <version>—for your thin client model and click the download icon.
16 Upgrading the ThinOS firmware

Add ThinOS firmware to the repository
Steps
1. Log in to Wyse Management Suite using your tenant credentials.
2. In the Apps & Data tab, under OS Image Repository, click ThinOS.
3. Click Add Firmware file.The Add File screen is displayed.
4. To select a file, click Browse and go to the location where your file is located.
5. Enter the description for your file.
6. Select the check box if you want to override an existing file.
7. Click Upload.
NOTE:
● The uploaded firmware can be used only to upgrade ThinOS 8.6 to ThinOS 9.0.
● The file is added to the repository when you select the check box but it is not assigned to any of the groups or
devices. To deploy firmware to a device or a group of devices, go to the respective device or group configuration
page.
Upgrade ThinOS 8.6 to ThinOS 9.x
Prerequisites
● The ThinOS conversion image must be added to the ThinOS firmware repository. For more information, see Add ThinOSfirmware to repository.
● Create a group in Wyse Management Suite with a group token. Use this group token to register the ThinOS 8.6 devices.● The thin client must be registered to Wyse Management Suite.● Do not configure any wallpaper settings on Wyse Management Suite.
Steps
1. Go to the Groups & Configs page, and select a group.
2. From the Edit Policies drop-down menu, click ThinOS.The Select ThinOS Configuration Mode window is displayed.
3. Select Advanced Configuration Mode.
4. Go to Firmware Upgrade, and click Configure this item.
5. Clear the Disable Live Upgrade and Verify Signature options.
6. From the Platform Type drop-down list, select the platform.
7. From the Firmware to auto-deploy drop-down list, select the firmware added to the repository.
8. Click Save & Publish.The firmware is deployed to the thin client. The conversion process takes 15-20 s, and the thin client restarts automatically.
NOTE: After you upgrade the firmware, the device is automatically registered to Wyse Management Suite. The
configurations of 8.6 build are not inherited after you upgrade the firmware.
Upgrade ThinOS 9.x to later versions using WyseManagement Suite
Prerequisites
● Ensure that you have installed the ThinOS v9.0.1136 image on the thin client.● Ensure that you have created a group in Wyse Management Suite with a group token. Use this group token to register the
ThinOS 9.x devices.● Ensure that the thin client is registered to Wyse Management Suite.
Upgrading the ThinOS firmware 17

● Ensure that you have not configured any wallpaper settings on Wyse Management Suite. This is applicable when you arerunning ThinOS 9.0.1136 build and want to upgrade to 9.0.2081 build. If the wallpaper is configured simultaneously with theThinOS 9.0.2081 image, the wallpaper fails to download and an error message is displayed. However, this does not affect theupgrade process. Dell Technologies recommends that you disable the Wallpaper settings first, upgrade to 9.0.2081, and thenconfigure the wallpaper again.
NOTE: Dell Technologies recommends that you upgrade ThinOS version 9.0.1136 directly to version 9.0.3030 from
September 9, 2020 onwards. Do not update ThinOS version 9.0.1136 to version 9.0.2081 or 9.0.2108 after September
9, 2020 as it may result in certificate failure.
Steps
1. Go to the Groups & Configs page, and select a group.
2. From the Edit Policies drop-down menu, click ThinOS 9.x.The Configuration Control | ThinOS window is displayed.
3. Click Advanced.
4. In the Firmware field, select OS Firmware Updates.
5. Click Browse to browse and upload the firmware.
6. From the Select the ThinOS Firmware to deploy drop-down menu, select the uploaded firmware.
7. Click Save & Publish.The thin client downloads the firmware and restarts. The firmware version is upgraded.
Upgrade ThinOS 9.x to later versions using AdminPolicy ToolThe firmware upgrade using Admin Policy Tool is supported from ThinOS 9.0 MR1 release onwards.
Prerequisites
Ensure that you have installed the ThinOS v9.0.1136 image on your thin client.NOTE: Dell Technologies recommends that you upgrade ThinOS version 9.0.1136 directly to version 9.0.3030 from
September 9, 2020 onwards. Do not update ThinOS version 9.0.1136 to version 9.0.2081 or 9.0.2108 after September
9, 2020 as it may result in certificate failure.
Steps
1. Go to the Admin Policy Tool on the ThinOS client.
2. In the Configuration Control | ThinOS window is displayed. Click Advanced.
3. In the Firmware field, select OS Firmware Updates.
4. Click Browse to browse and upload the firmware.
5. From the Select the ThinOS Firmware to deploy drop-down menu, select the uploaded firmware.
6. Click Save & Publish.The thin client downloads the firmware and restarts. The firmware version is upgraded.
Upload and push ThinOS 9.x application packagesusing Wyse Management Suite
Prerequisites
● Create a group in Wyse Management Suite with a group token. Use this group token to register the ThinOS 9.x devices.● Register the thin client to Wyse Management Suite.
Steps
1. Go to the Groups & Configs page, and select a group.
18 Upgrading the ThinOS firmware

2. From the Edit Policies drop-down menu, click ThinOS 9.x.The Configuration Control | ThinOS window is displayed.
3. Click Advanced.
4. In the Firmware field, click Application Package Updates.
5. From the Select the ThinOS Package(s) to deploy drop-down menu, select the package.
NOTE: You can upload and deploy multiple firmware packages from the remote repository, tenant cloud repository or
operator cloud repository.
6. Click Save & Publish.The thin client restarts and the application package is installed.
Upload and install ThinOS 9.x application packagesusing Admin Policy Tool
Prerequisites
Ensure that you have installed the ThinOS v9.0 MR1 build.
Steps
1. Go to the Admin Policy Tool on the ThinOS client.The Configuration Control | ThinOS window is displayed.
2. Click Advanced.
3. In the Firmware field, click Application Package Updates.
4. Browse and select the package.
5. From the Select the ThinOS Package(s) to deploy drop-down menu, select the uploaded package.
NOTE: You can select one or more ThinOS application packages simultaneously.
6. Click Save & Publish.The thin client restarts and the application packages are installed.
Firmware installation using Dell Wyse USB ImagingToolUse the Dell Wyse USB Imaging Tool version 3.3.0 to install the ThinOS 9.0 Merlin image on your thin client. For informationabout installation instructions, see the Dell Wyse USB Imaging Tool version 3.3.0 User's Guide at downloads.dell.com/wyse/USBFT/3.1.0/
Upgrade BIOS
Prerequisites
● Ensure that you have downloaded the BIOS file from Dell.com/support to your device.● Ensure that you have registered the thin client to Wyse Management Suite, if you are upgrading BIOS using Wyse
Management Suite.
Steps
1. Open the Admin Policy Tool on the thin client or go to the ThinOS 9.x policy settings on Wyse Management Suite.
2. On the Configuration Control | ThinOS window, click the Advanced tab.
3. Expand Firmware and click BIOS Firmware Updates.
4. Click Browse and select the BIOS file to upload.
5. From the Select the ThinOS BIOS to deploy drop-down list, select the BIOS file that you have uploaded.
Upgrading the ThinOS firmware 19

6. Click Save & Publish.The thin client restarts. BIOS is upgraded on your device.
NOTE: When you use the BIOS upgrade feature for the first time, the BIOS is downloaded even if the existing BIOS
version is the same version that is uploaded.
Edit BIOS settings
Prerequisites
● If you are using Wyse Management Suite, ensure that you have registered the thin client and synchronize the BIOS adminpassword. For more information about using the Sync BIOS Admin Password option, see the Dell Wyse Management Suitev2.1 Administrator's Guide at www.dell.com/support.
● If you are using the Admin Policy Tool, ensure that you enter the current BIOS admin password in the Advanced > BIOSsection.
Steps
1. Open the Admin Policy Tool on the thin client or go to the ThinOS 9.x policy settings on Wyse Management Suite.
2. In the Configuration Control | ThinOS window, click the Advanced tab.
3. Expand BIOS and select your preferred platform.
4. In the System Configuration section, modify the USB ports and audio settings.
5. In the Security section, modify the administrator-related configurations.
6. In the Power Management section, modify the power-saving options.
7. In the POST Behavior section, enable or disable the MAC Address Pass-Through feature. This option is applicable only tothe Wyse 5470 Thin Client.
8. Click Save & Publish
NOTE: If the thin client does not have a BIOS admin password, you can set the password using Admin Policy Tool or
Wyse Management Suite. In this scenario, the client reboots first to apply the BIOS admin password and other BIOS
settings take effect after the second reboot.
Downgrade to ThinOS 9.0.1136 by using WyseManagement Suite
Prerequisites
● Ensure that you have upgraded to the version newer than ThinOS v9.0.1136.● Ensure that your thin client is registered to Wyse Management Suite v2.1.● Ensure that you have created a group in Wyse Management Suite with a group token.● Ensure that you have downloaded the ThinOS v9.0.1136 base image firmware from www.dell.com/support.
Steps
1. Log in to Wyse Management Suite.
2. Go to the Groups & Configs page, and select your preferred group.
3. From the Edit Policies drop-down menu, click ThinOS 9.x.The Configuration Control | ThinOS window is displayed.
4. In the left pane, click Advanced.
5. From the Advanced menu, expand Firmware, and click OS Firmware Updates.
6. Click Browse and select the ThinOS firmware to upload.
7. From the Select the ThinOS Firmware to deploy drop-down menu, select the uploaded firmware.
8. Click Save & Publish.Wait for the thin client to display a message for firmware downgrade. The thin client starts downloading the firmware.
NOTE: You cannot downgrade from ThinOS 9.0 MR1 to ThinOS 8.6.
20 Upgrading the ThinOS firmware

Delete ThinOS application packagesYou can use the ThinOS local UI or the Wyse Management Suite to delete one or more ThinOS packages.
About this task
This section describes steps to delete ThinOS packages using the ThinOS local UI.
Steps
1. Log in to the ThinOS client.
2. From the system menu, go to System Tools > Packages.All the installed ThinOS packages are listed.
3. Select a package that you want to delete and click Delete.
NOTE: To delete all the packages, click Delete all.
4. Click OK to save your settings.
For information about how to delete packages using Wyse Management Suite, see the latest Dell Wyse Management SuiteAdministrator's Guide at www.dell.com/support.
Upgrading the ThinOS firmware 21

Getting started with ThinOS 9.0This chapter helps you to quickly learn the basics and get started with your ThinOS 9.0-based thin client.
End User License AgreementEnd User License Agreement (EULA) is added to ThinOS from the ThinOS 9.0 MR1 release onwards. EULAs must be read andaccepted to continue using ThinOS. By default, Dell EULA and HID EULA are added to ThinOS. The following third-party EULAsare displayed on the EULA screen depending on the ThinOS application packages that you install on the thin client:
● Citrix EULA● Cisco JVDI EULA
The EULA screen is displayed during the following instances:
● When you boot the thin client for the first time.● When you reset a thin client that runs ThinOS 9.0 MR1 or later, to factory settings.
NOTE: If the thin client is managed by Wyse Management Suite, the device does not enter the First Boot Wizard and you
cannot see the EULA screen.
Configure ThinOS using First Boot WizardA First Boot Wizard application runs the first time when you start a thin client with ThinOS. The thin client starts the FirstBoot Wizard application before you enter the ThinOS desktop. Use this application to perform tasks, such as, configuringsystem preferences, setting up the Internet connectivity, loading USB configurations, configuring management software, andconfiguring broker connections.
Prerequisites
If you are an existing thin client user, and you have upgraded to the ThinOS version 9.0 or later, reset your thin client to factorydefault settings to enter the First Boot Wizard.
NOTE: If DHCP contains the Wyse Management Suite configurations, the ThinOS desktop is loaded without entering the
First Boot Wizard and you cannot view the End User License Agreement.
About this task
This section describes how to configure ThinOS using First Boot Wizard.
Steps
1. Connect your thin client to an Ethernet using a wired connection.
NOTE: If you want to use a wireless connection, you can connect to Wi-Fi on the How do You Connect? screen at a
later stage.
2. Turn on your thin client.
The thin client checks for a wired network connection. If the network connection is successful, a welcome screen isdisplayed followed by the EULA screen. For more information about the EULA screen, see End User License Agreement.
3
22 Getting started with ThinOS 9.0

Figure 1. Welcome screen
3. Click Dell EULA or HID EULA from the right pane to read the respective EULAs. If you have installed the ThinOS applicationpackages, ensure that you read the respective EULAs of the third-party applications.
Figure 2. EULA
4. Select the Click here to accept all EULAs check box and click Accept.
5. On the Select Your Language screen, select a language from the Language drop-down list to start ThinOS in the regionallanguage.
Getting started with ThinOS 9.0 23

Figure 3. Select Your Language
6. Click .
7. On the Select Your Keyboard screen, select a keyboard layout from the list.
24 Getting started with ThinOS 9.0

Figure 4. Select Your Keyboard
8. Click .
9. On the Select Your Time Zone screen, select a time zone from the list to set the time zone for your thin client.
Getting started with ThinOS 9.0 25

Figure 5. Select Your Time Zone
The time server with IP addresses or host names is also displayed.
10. Click .
11. On the How do You Connect? screen, do either of the following:● Local network (Ethernet)—Click this option if you have connected the thin client to an Ethernet using a wired
connection.● Wi-Fi Network—Click this option if you want to select a wireless network. From the list, select a wireless network, and
click Connect.
NOTE: The option to define a wireless connection is not available on thin clients without a WLAN module.
● My computer does not connect to the Internet—Click this option if you do not want to establish a networkconnection using the First Boot Wizard screen. You can connect to either wired or wireless connection after you boot tothe ThinOS desktop.
26 Getting started with ThinOS 9.0

Figure 6. How do You Connect?
12. Click .
13. On the How would you like to import ThinOS configuration? screen, do either of the following:● From Wyse Management Suite—Click this option if you want to use Wyse Management Suite to manage your thin
clients.
To register your thin client to Wyse Management Suite, enter the group registration key and the Wyse Management Suiteserver URL. Select the CA validation check box if you want to enable the CA validation feature. The CA validation isrequired when you import certificates into your Wyse Management Suite server. By default, the CA Validation check boxis selected to improve the security when using the Wyse Management Suite cloud.
● From USB—Click this option if you want to import system settings from the USB drive.● Not import any configuration now—Click this option if you do not want to import any ThinOS configurations using the
First Boot Wizard screen.
Getting started with ThinOS 9.0 27

Figure 7. How would you like to import ThinOS configuration?
14. Click .
15. On the Connect to VDI broker screen, enter the Citrix server address.
28 Getting started with ThinOS 9.0

Figure 8. Connect to VDI broker
The broker enables you to connect to full desktops using Citrix Virtual Apps and Desktops or individual applications usingCitrix Virtual Apps from a centralized host through Citrix Workspace App.
To enable the Citrix Workspace based layout of published applications and desktops on the thin client, select the WorkspaceMode check box.
16. Click Done to exit the First Boot Wizard.
Getting started with ThinOS 9.0 29

Figure 9. Done
The device exists from the First Boot Wizard mode, and the ThinOS desktop is displayed.
Configure account privileges for ThinOSAccount privilege is used to control the user permission to access Admin Policy Tool and System Menu options. You can changea user privilege to High, Customize, or None from the Admin Policy Tool or the Wyse Management Suite console. When youset the user privilege to Customize, you can manually select and enable or disable the options in the ThinOS system menu.
The Administrator Mode menu in the Admin Policy Tool is disabled by default. You can enable the administrator mode inthe Admin Policy Tool or the Wyse Management Suite server, and configure an Administrator username and password. TheAdministrator Mode menu is disabled again when a user enters the administrator mode.
Configure account privileges using Admin Policy Tool
About this task
This section describes how to configure account privileges using Admin Policy Tool.
Steps
1. From the desktop menu, click System Setup > Admin Policy Tool.The Configuration Control || ThinOS window is displayed.
2. Click the Standard tab or the Advanced tab.
3. Expand Privacy & Security.
4. Click Account Privileges.
5. Click the Enable Admin Mode slider switch if you want to enable the Administrator mode. When enabled, you must specifythe Admin username and password.
6. From the Privilege Level drop-down list, select a privilege level—None, Customize, or High.
30 Getting started with ThinOS 9.0

When you set the user privilege to Customize, you can manually select options that you want to enable or disable in theThinOS system menu.
7. Click Save & Publish.
Configure account privileges using Wyse Management Suite
About this task
This section describes how to configure account privileges using Wyse Management Suite.
Steps
1. Go to the Groups & Configs tab and select your desired group.
2. Click Edit Policies.
3. Select ThinOS 9.x from the drop down list.The Configuration Control | ThinOS window is displayed.
4. Click the Standard tab or the Advanced tab .
5. Expand Privacy & Security.
6. Click Account Privileges.
7. Click the Enable Admin Mode slider switch if you want to enable the Administrator mode. When enabled, you must specifythe Admin username and password.
8. From the Privilege Level drop-down list, select a privilege level—None, Customize, or High.
When you set the user privilege to Customize, you can manually select options that you want to enable or disable in theThinOS system menu.
9. Click Save & Publish.
Connect to a remote server
About this task
This section describes how to manually connect to a remote server.
Steps
1. From the desktop menu, click System Setup > Remote Connections.The Remote Connections dialog box is displayed.
2. Click the Broker Setup tab and configure the Citrix broker. See, Configuring a Citrix broker setup.
3. Click OK and restart the thin client.After the thin client restarts, the Login dialog box is displayed.
4. Enter the username, password, and domain.After authentication is successful, your desktop is presented with your assigned connection that is defined by the brokerserver.
Connecting a displayDepending on your thin client model, connections to displays can be made using VGA (analog) port, DisplayPort (digital), MiniDisplayPort, USB Type-C port, HDMI, and the proper Dell monitor cables/splitters/adapters.
For more information about ports and connectors, see the hardware documentation of the respective thin clients.
Getting started with ThinOS 9.0 31

Connecting a printerTo connect a local printer to your thin client, ensure that you obtain and use the correct adapter cables. Before use, you mayneed to install the driver for the printer by following the printer driver installation instructions. For information about connectingto a printer, see Configuring the printer setup.
Desktop overviewThinOS boots to the desktop screen. This is the default screen that is displayed after you log in to the thin client—withoutautostart of any connections or applications.
Figure 10. Desktop
The ThinOS desktop consists of the following screen elements:
● Desktop menu —Displays the main menu that provides access to all the ThinOS configurations.● Taskbar—Contains the system tray area that displays the date, time, and notification icons.● Connection and application shortcuts—Provides quick access to available server connections and published applications.● Broker login window—Enables you to log in to the Citrix broker session using your login credentials.
NOTE: The Dell logo is updated from ThinOS 9.0.3030 (MR2) version.
Using the taskbarUse the taskbar to view the date, time, system information, wireless information, volume icon, PNAmenu button, and switch tothe desktop screen.
Figure 11. Taskbar
The following table lists the taskbar elements:
Table 7. Taskbar - System tray elements
Element Description
Date and time Displays the date and time.
32 Getting started with ThinOS 9.0

Table 7. Taskbar - System tray elements (continued)
Element Description
Battery Displays the battery percentage. This option is applicable for Wyse5470 Thin Client.
Show desktop Click this icon to switch between the desktop screen and theactive dialog boxes.
Volume icon Click this icon to increase or decrease the speaker volume or mutethe speaker.
System Information Click this icon to view the system information such as generalsystem details, copyright, event logs, Wyse Management Suitestatus, network connections, and so on.
Wireless icon Displays the wireless connection mode.
PNA menu button Click this icon to use the following options:● Refresh● Disconnect● Reconnect● Logoff● Manage Security Question—This option is available when you
enable SSPR at the server end.
NOTE: The PNA menu button is displayed only after you log into the Citrix broker with classic mode.
From ThinOS 9.0 MR1 release onwards, taskbar icons are added for all ThinOS windows except the login window and the AdminPolicy Tool window. You can use the taskbar icons to minimize and restore the windows.
Table 8. Taskbar - ThinOS local windows icons
Element Taskbar icon
Network Setup
Remote Connections
Central Configuration
VPN Manager
System Preferences
Display
Peripherals
Printer
System Information
System Tools
Troubleshooting
Connection Manager
Getting started with ThinOS 9.0 33

Classic desktop featuresThis section includes information about desktop guidelines, shortcut menu, desktop menu, and Connection Manager.
Desktop guidelines
The classic desktop has a Dell Wyse default background with a horizontal taskbar at the bottom of the screen.
Use the following guidelines:
● Icons representing available server connections and published applications are displayed on the desktop. If you pause themouse pointer over an icon, the information about the connection is displayed. Right-click an icon to open the ConnectionSettings dialog box that displays additional information about the connection. The number of icons that can be displayed onthe desktop depends on the desktop resolution and administrator configuration.
● A server connection and published application can be opened by double-clicking a desktop icon. You can also go to thedesktop icon by using the tab key and press Enter to initiate the connection.
● Right-clicking on the desktop provides a shortcut menu.● Clicking the desktop menu button, or clicking anywhere on the desktop, opens the desktop menu.
Using the shortcut menu
About this task
This section describes how to use the shortcut menu on your thin client.
Steps
1. Right-click on your desktop.The shortcut menu is displayed.
2. On the shortcut menu, you can view and use the following options:
a. Administrator Mode—Lets you select the account privileges. This option is disabled by default. You must enable theoption from Wyse Management Suite server or Admin Policy Tool.
b. Hide all windows—Brings the full desktop to the foreground.c. Copy to clipboard—Copies an image of the full screen, current window, or event log to the clipboard. The clipboard
contents can be pasted to an Independent Computing Architecture (ICA) session. You can copy the full screen or currentwindow to clipboard, and can export the screenshots using the Export Screenshot option in the Troubleshootingdialog box.
d. Purge clipboard—Discards the contents of the clipboard to free up memory. If there are no contents in the clipboard,the Purge clipboard option is disabled.
e. Lock Terminal—Puts the thin client in a locked state when the user has logged in to the system with a password. Thethin client can only be unlocked using the same password.
f. Performance Monitor—Opens the performance monitor.
Using the desktop menu
About this task
This section describes how to use the desktop menu on your thin client.
Steps
1. Click or click anywhere on your desktop.The desktop menu is displayed.
2. On the desktop menu, use the following options to configure the thin client:
● System Setup—Provides access to the following local system setup dialog boxes:
34 Getting started with ThinOS 9.0

○ Network Setup—Allows selection of DHCP or manual entry of network settings, and server locations. This menuselection is disabled for Low-privileged users.
○ Remote Connections—Allows you to configure the Broker agent connection.○ Central Configuration—Allows you to configure the Wyse Management Suite server settings.○ VPN Manager—Allows you to configure the VPN connection.○ System Preferences—Allows you to configure general settings such as screensaver, locale, and time and date.○ Display—Allows you to configure the monitor resolution and refresh rate.○ Peripherals—Allows you to select the peripherals settings such as audio, keyboard, mouse, serial, camera, and
Bluetooth settings.○ Printer Setup—Allows you to configure network printers and local printers that are connected to the thin client.○ Admin Policy Tool—Allows you to configure all the ThinOS settings similar to configuring settings using Wyse
Management Suite.● System Information—Provides the device information.● System Tools—Provides information about devices, certificates, and packages.● Troubleshooting options—Displays the performance monitor graphs, trace and event log settings, and other options
that are useful for troubleshooting your thin client.● Shutdown—Allows you to shut down the system, or restart the operating system.
Configure the Connection Manager
The Connection Manager has a list of connection entries and command buttons available for use with the connections.
About this task
This section describes how to configure the Connection Manager settings.
Steps
1. Go to System Setup > Remote Connections, and configure the Citrix broker setup.
2. Log in to the Citrix broker.
3. On the taskbar, click .The Connection Manager dialog box is displayed.
NOTE: Nonprivileged users can view the Connection Manager but they cannot make changes.
4. In the Connection Manager dialog box, and use the following guidelines:
● Select a connection from the list, and click Connect to establish the Citrix connection.● Click Properties to open the Connection Settings dialog box for the selected connection.
All users can view and edit definitions for the selected connection. Edits are not permanently retained when the usersigns-off.
● Click Sign-off to log off from the thin client.● If you want to reset a selected virtual connection, select a connection from the list, and click Reset VM.● Click the Global Connection Settings tab to open and configure settings that affect all the connections available in the
list.
Configuring thin client settings and connection brokersettingsYou can either use the ThinOS local UI or the Wyse Management Suite to do the following:
● Set up your thin client hardware, look and feel, and system settings○ For configuring these settings using ThinOS local UI, see Configuring connectivity and Configure the thin client local
settings.○ For configuring these settings using Wyse Management Suite, see Edit the ThinOS 9.x policy settings.
● Configure the connection broker settings
Getting started with ThinOS 9.0 35

○ For configuring these settings using ThinOS local UI, see Configuring the connection brokers.○ For configuring these settings using Wyse Management Suite, see Edit the ThinOS 9.x policy settings.
Configure ThinOS using Admin Policy ToolThinOS 9.0 does not support FTP, HTTP, HTTPS file server, and INI parameter settings. You can configure these settings usinga local management tool called Admin Policy Tool.
NOTE: After you reset the thin client to factory default settings, the device starts the First Boot Wizard application by
default. You can use the Admin Policy Tool to change the default settings for First Boot Wizard.
Configure the Admin Policy Tool
Steps
1. From the desktop menu, click System Setup > Admin Policy Tool.The Configuration Control | ThinOS window is displayed.
2. Click the Standard tab or the Advanced tab.
The Standard tab lists all the common settings. The Advanced tab lists all the advanced settings.
3. Expand the options that you want to configure.
4. In the respective fields, click the option that you want to configure.
5. Click Save & Publish.
Admin Policy Tool feature list
The following table contains the list of features that are supported by the Admin Policy Tool from ThinOS 9.0 MR1 releaseonwards:
Table 9. Admin Policy Tool
Feature Sub-Feature ThinOS 9.0MR1
Additional information
Region & LanguageSettings
Region &Language
Supported N/A
Privacy & Security SCEP Supported N/A
Privacy & Security Device Security Supported You must restart the client for all changes to take effect.
Privacy & Security Account Privileges Supported N/A
Privacy & Security Certificates Supported N/A
Broker & Session Global SessionSettings
Supported N/A
Broker & Session Citrix BrokerSettings
Supported N/A
Broker & Session Citrix SessionSettings
Supported N/A
Login Experience 3rd PartyAuthentication
Supported N/A
Login Experience Smart cardSettings
Supported You must restart the client for all changes to take effect.
Login Experience Login Settings Supported N/A
Login Experience Session Settings Supported N/A
Personalization Shortcut Keys Supported You must restart the client for all changes to take effect.
36 Getting started with ThinOS 9.0

Table 9. Admin Policy Tool (continued)
Feature Sub-Feature ThinOS 9.0MR1
Additional information
Personalization Device Info Supported N/A
Personalization Desktop Supported You must restart the client for all changes to take effect.
Personalization Screen Saver Supported N/A
PeripheralManagement
RFIdeas Reader Supported N/A
PeripheralManagement
Printers Supported N/A
PeripheralManagement
Audio Supported You must restart the client for all changes to take effect.
PeripheralManagement
Touch Supported N/A
PeripheralManagement
Serial Port Supported You must restart the client for all changes to take effect.
PeripheralManagement
USB Redirection Supported N/A
PeripheralManagement
Monitor Supported N/A
PeripheralManagement
Mouse Supported N/A
PeripheralManagement
Keyboard Supported N/A
Firmware OS FirmwareUpdates
Supported This feature is supported from ThinOS 9.0 MR1 release onwards.
Firmware ApplicationPackage Updates
Supported This feature is supported from ThinOS 9.0 MR1 release onwards.
Firmware BIOS FirmwareUpdates
Supported This feature is supported from ThinOS 9.0 MR1 release onwards.
System Settings Power and SleepSettings
Supported N/A
System Settings Scheduled RebootSettings
Supported N/A
System Settings ScheduledShutdownSettings
Supported N/A
System Settings Device Settings Supported N/A
Network Configuration Ethernet Settings Supported N/A
Network Configuration DHCP Settings Supported N/A
Network Configuration DNS Settings Supported N/A
Network Configuration VPN Settings Supported N/A
Network Configuration Bluetooth Settings Supported You must restart the client for all changes to take effect.
Network Configuration Proxy Settings Supported N/A
Network Configuration Wireless Supported N/A
Services VNC Service Supported N/A
Getting started with ThinOS 9.0 37

Table 9. Admin Policy Tool (continued)
Feature Sub-Feature ThinOS 9.0MR1
Additional information
Services WMS Settings Supported N/A
Services TroubleshootingSettings
Supported N/A
BIOS Dell Wyse 3040 Supported This feature is supported from ThinOS 9.0 MR1 release onwards.
BIOS Dell Wyse 5070 Supported This feature is supported from ThinOS 9.0 MR1 release onwards.
BIOS Dell Wyse 5470 Supported This feature is supported from ThinOS 9.0 MR1 release onwards.
BIOS Dell Wyse 5470AIO
Supported This feature is supported from ThinOS 9.0 MR1 release onwards.
Important information
● If you are using the Device Security White List Policy setting, you must first specify Hub in the Class field by adding arow. If you do not add Hub to the White list, all USB devices are inaccessible when connected to the thin client.
● It is not recommended to set Vendor and Product ID and Class simultaneously in one row. However, if you configure bothoptions simultaneously, the device first checks the Vendor and Product ID followed by the Class list.
● When you configure the Bluetooth, VNCD server, Bluetooth, VNC Server, NetID License, Serial Port, and Device Securitysettings using the Admin Policy Tool, ensure that you restart the thin client for the settings to take effect.
Locking the thin clientThinOS enables you to lock your thin client so that credentials are required to unlock and use the thin client again. The Dell logois updated from ThinOS 9.0.3030 (MR2) version.
38 Getting started with ThinOS 9.0

Figure 12. Unlock window
Shut down and restart
About this task
This section describes how to use the Shutdown dialog box to either shut down the system or restart the system.
NOTE: The Dell logo is updated from ThinOS 9.0.3030 (MR2) version.
Steps
1. From the desktop menu, click Shutdown.The shutdown dialog box is displayed.
Getting started with ThinOS 9.0 39

Figure 13. Shutdown dialog box
2. Click any of the following options:● Shutdown the system—Enables you to shut down the system.● Restart the system—Enables you to restart the operating system.
3. Click OK to save settings.
Battery informationThis section is applicable to the Wyse 5470 Thin Client. The battery indicator is displayed on the system tray.
The following table contains the battery indicators:
Table 10. Battery indicators
Battery status Icon
While charging with the AC adapter
Battery 90% - 100% without connecting the AC adapter
Battery 50% - 89% without connecting the AC adapter
Battery 25% - 49% without connecting the AC adapter
Battery 9% - 24% without connecting the AC adapter
40 Getting started with ThinOS 9.0

Table 10. Battery indicators (continued)
Battery status Icon
Battery 0% - 8% without connecting the AC adapter
● When the battery is lower than 12%, a notification is displayed at the right-bottom with the remaining percentage.● Plugging in the AC adapter to charge the device increases brightness by 10% and disconnecting the AC adapter decreases
brightness by 10%.● By default, the critical battery level is 5%. When the battery reaches the critical level, ThinOS is turned off automatically.
You must plug in the AC power to power on the thin client.
Login dialog box featuresThe Login dialog box enables you to do the following tasks:
● Log in to the configured server connection.● Obtain system information.● Change or reset your own password, and unlock your account.● Open the Shutdown dialog box by using Ctrl+Alt+Delete.
NOTE: Ctrl+Alt+Delete is disabled by default and you can enable it from the Wyse Management Suite server. If enabled,
Ctrl+Alt+Delete locks terminal and triggers the lock window.
In the Login dialog box, use the following guidelines:
● System Information—Click the Sys Info button to open the System Information dialog box. You can view the thin clientsystem information such as system version, IP address, devices connected to your thin client, event logs and so on.
● Shutdown—Click the Shutdown button to open and use the Shutdown dialog box to shut down, restart, and so on.
View the system informationUse the System Information dialog box to view the system information. You can either click System Information from thedesktop menu or the System Information icon on the taskbar.
The System Information dialog box includes the following elements:
● General tab—Displays the following information:○ System version○ Terminal name○ Serial number○ System Up Time○ Memory size○ Memory Usage○ CPU Speed○ CPU Utilization○ Monitor○ Resolution○ Parallel ports○ Serial ports○ Battery—Wyse 5470 Thin Client only○ Remaining time—Wyse 5470 Thin Client only
● Copyright tab—Displays the software copyright and patent notices.
Click the Acknowledgments button to view the information that is related to third-party software.
● Event Log tab—Displays the thin client start-up steps beginning from system version to checking firmware or errormessages that are helpful for debugging issues. The number of displays and USB devices that are connected to the thinclient, and the Bluetooth initialization are also displayed.
Getting started with ThinOS 9.0 41

When you install packages or restart the ThinOS device, the ThinOS client verifies the version of the installed package. If youhave not installed the latest package version, the details about the current package version and the recommended packageversion are displayed.
● ENET tab—Displays information about wired network connections.● WLAN tab—Displays information about wireless network connections.● About tab—Displays the following information:
○ Platform name○ Operating system○ Build name○ Build version○ BIOS name○ BIOS version○ Citrix Workspace App version○ WMS status
NOTE:
○ Kernel mode—The components are implemented in Kernel according to the specification. The version is displayed
as [max].[min], which is the base version of protocol or server or client of the component.
○ User mode—The components are from the source, or binaries from third-party software that are compiled or
integrated into the ThinOS operating system. The version is displayed as [max].[min].[svn_revision]. The [max] and
[min] is the base version of the third component, and the [svn_revision] is the source control revision of ThinOS.
Using the ThinOS specified version, you can identify the changes between different revisions. For example, the Citrix
Workspace App version is 19.12.0.19. The components are matched to the installed packages. If the packages are
removed, the field remains empty in the About tab.
Sleep modeThe sleep mode enables the power-saving state and quickly resumes full power operations without loss of data.
The sleep mode feature is supported on the following platforms:
● Wyse 5070 Thin Client● Wyse 5470 Thin Client● Wyse 5470 All-in-One Thin Client
The USB interface is closed in sleep mode. All USB devices such as USB drives, Bluetooth, audio devices, video devices, andcamera are reinitialized after resuming from sleep mode.
The wired network, wireless network, and VPN are disconnected in sleep mode. However, the network configurations are saved.
All the ThinOS configurations—VDI configuration, network configuration, and so on—are saved automatically in sleep mode. Ifyou are signed on to broker agent, all the windows are closed automatically and signed off when entering sleep mode. If you arenot signed on to broker agent, the windows are not closed when entering sleep mode.
Enable sleep manually
To enable the Sleep option manually, use either of the following options:
● ThinOS lock window—To enter sleep mode using the ThinOS lock window, do the following:1. Lock your thin client.2. In the ThinOS lock window, click Sleep.3. Click OK.
● Shutdown dialog box—To enter sleep mode using the Shutdown dialog box, do the following:1. Open the Shutdown window.2. Click Sleep, and then click OK.
You can wake the thin client from sleep mode by pressing the power button, any key on the keyboard, or by clicking the mousebutton. To use the USB keyboard or mouse to wake your thin client, you must enable wake on USB in BIOS.
42 Getting started with ThinOS 9.0

Wyse 5470 Thin Client—The AC power must be connected to wake the Wyse 5470 Thin Client using the USB keyboard ormouse. You cannot wake the thin client using the USB keyboard or mouse that is connected to a Dell WD19 docking station. Youcan also wake the Wyse 5470 Thin Client by opening the lid.
Import certificates to ThinOS from Admin Policy Toolor Wyse Management Suite
Steps
1. Open the Admin Policy Tool on your thin client or go to the ThinOS 9.x policy settings on Wyse Management Suite.
2. On the Configuration Control | ThinOS window, click the Advanced tab.
3. Expand Privacy & Security, and click Certificates.
NOTE: Spaces in filenames are not supported when importing certificates, wallpapers, or any other files.
4. Click the Auto Install Certificates slider switch to enable autoinstall of certificates on ThinOS.
5. Browse and select the certificate that you want to upload.
NOTE: Admin Policy Tool supports the .cer, .crt, .der, and .pem certificate file types. Wyse Management Suite
supports .cer, .crt,.pfx, and .pem certificate file types.
6. From the Select Certificates to Upload drop-down list, select the certificate that you have uploaded.
7. Click Save & Publish.
8. Restart the thin client.The certificate is installed on your thin client.
ThinOS system variablesThinOS uses system variables or part of a system variable when defining command values. System variables are oftenused to define unique values for fields such as terminal name or default user. For example, if the client has an IP address123.123.123.022, ACC&Right($FIP,3) results in a value of ACC022. Using system variables makes it easier to manage groups ofdevices that require a unique terminal name or default user.
The following are the ThinOS system variables:
Table 11. ThinOS system variables
Variable Description
$IP IP address
$MAC Mac address
$CMAC Mac address with colon
$TN Terminal name
$SUBNET Subnet mask
$FIP IP Address with xxx.xxx.xxx.xxx, for example,123.123.123.022
$SN Serial number
$VN Version number
Right($xx, i) or and Left($xx, i) Specifies that the variable is to be read from left or right. The $xx is any of aboveparameters and the parameter i specifies the digits for the offset of right or left.
Getting started with ThinOS 9.0 43

Configuring the global connection settingsAbout this task
This section describes how to use the Global Connection Settings dialog box to configure the ICA connection settings.
Steps
1. Log in to the Citrix Broker agent.
2. On the desktop taskbar, click the Connection Manager icon, and then click Global Connection Settings.The Global Connection Settings dialog box is displayed.
3. Click the Session tab to configure the options that are available to all sessions.
The Smart Card check box specifies the default setting for connecting to a smart card reader at system startup.
ICA sessions connect automatically when you connect smart card readers. If you want to use the Disks option to connect toICA sessions automatically, the following are the guidelines:
● More than one disk can be used simultaneously. However, the maximum number of USB drives including differentsubareas is 12.
● Ensure that you save all data and sign off from the session before removing the USB drive.
USB device redirection—By default, audio, video, and printer devices do not use HDX USB for redirection. You can makeselections for the USB device redirection on the Session tab of the Global Connection Settings dialog box.
4. Click the ICA tab, and do the following:
a. Select the check boxes for the options that are available to all ICA sessions.b. Select an audio quality optimized for your connection.
5. Click OK to save your changes.
4
44 Configuring the global connection settings

Configuring connectivityThis chapter helps you understand various configuration settings for a secure connection. To configure the settings on theclassic desktop, click System Setup from the desktop menu, and use the configuration tabs.
Configuring the network settingsUse the network options to configure the network connection based on your requirement.
Configure the general settings
About this task
This section describes how to configure the general network settings on your thin client.
Steps
1. From the desktop menu, click System Setup > Network Setup.The Network setup dialog box is displayed.
2. Click the General tab, and do the following:
Figure 14. General tab
NOTE: If network interfaces are in the same subnet, connection to the same subnet is prioritized last by the interface to
fetch the IP address. Connections to the other subnets are prioritized in the order ENET0, ENET1, and WLAN.
a. To set a default gateway, select the type of network interface from the Select Network Interface as the DefaultGateway drop-down list.
From ThinOS 9.0 MR1 release onwards, ThinOS supports the dual IPv6 network interface. The following networkcombinations are supported:● Wired connection 1 + Wireless connection 1
5
Configuring connectivity 45

● Wired connection 1 + Wired connection 2
NOTE:
The limitation of the dual IPv6 network is that the device cannot automatically determine which connection to use
among the two.
b. Use Static Name Servers—By default, this check box is not selected, and the thin client fetches the server IP addressfrom DHCP. To manually assign the static IP addresses, select the Use Static Name Servers check box and do thefollowing:
NOTE: If name servers are changed using GUI or link down/up, the details are displayed in event logs. In dynamic
mode, if the network is not working, the DNS can be merged from Ethernet and wireless, or from Ethernet 0 and
Ethernet 1.
i. Enter the URL address of the DNS domain in the DNS Domain field.ii. Enter the IP address of the DNS server in the DNS Server field.
However, the use of DNS is optional. DNS enables you to specify remote systems by their host names rather than IPaddresses. If a specific IP address (instead of a name) is entered for a connection, it is used to make the connection.Ensure that you use the DNS domain and the network address of an available DNS server. The function of the DNSdomain entry is to provide a default suffix that is used to resolve the name. The values for these two fields may besupplied by a DHCP server. If the DHCP server supplies these values, they replace any locally configured values. If theDHCP server does not supply these values, the locally configured values are used.
From ThinOS 9.0 MR1 release onwards error tips are displayed when you set an invalid DNS server. A pop-up windowwith the error message is displayed when you click save the invalid DNS server.
NOTE: You can enter the server addresses, each separated by a semicolon. The character limit is 256. The first
address is for the primary DNS server and the rest are secondary DNS servers or backup DNS servers.
c. Enter the IP address of the WINS server in the WINS Server field.
However, the use of WINS is optional. You must specify the network address of an available WINS name server. WINSenables you to specify remote systems by their host names rather than IP addresses. If a specific IP address (instead ofa name) is entered for a connection, it is used to make the connection. These entries can be supplied through DHCP, ifDHCP is used. DNS and WINS provide essentially the same name resolution. If both DNS and WINS are available, the thinclient attempts to resolve the name using DNS first and then WINS. You can enter two WINS Server addresses (primaryand secondary), separated by a semicolon.
d. Enter the digit multiplier of 30 s in the TCP Timeout box to set the time-out value of a TCP connection. The value mustbe either 1 or 2 which means the connection time-out value is from 1 x 30=30 s to 2 x 30=60 s. If the data for connectingto the server is not acknowledged and the connection is timed out, setting the time-out period retransmits the sent dataand again tries to connect to the server until the connection is established.
3. Click OK to save your settings.
Configure the DHCP options settings
About this task
This section describes how to configure the DHCP options settings on your thin client.
Steps
1. From the desktop menu, click System Setup > Network setup.The Network setup dialog box is displayed.
2. Click the Options tab, and do the following:
46 Configuring connectivity

Figure 15. Options tab
a. Interpret DHCP Option IDs—Enter the supported DHCP options. Each value can only be used one time.
Table 12. DHCP option tags
Option Description Additional information
165 Wyse Management Suite server Optional string. Specifies the IP address of the Wyse Management Suiteserver.
166 Wyse Management Suite MQTTserver
Optional string. Specifies the IP address of the MQTT server.
167 Wyse Management Suite CAValidation
Optional string. Specifies the CA validation.
181 PNAgent/ PNLite server list Optional string. The thin client uses the server to authenticate thecredentials of the user. The device obtains a list of ICA publishedapplications valid for the validated credentials. The user supplies thosecredentials when logging in to the thin client.
182 NT domain list for PNAgent/PNLite
Optional string. The thin client creates a drop-down list of domains fromthe information that is supplied in the option tag. The list is availableduring thin client login in the order that is specified in the DHCP option.For example, the first domain that is specified becomes the defaultoption. The selected domain is the one which must authenticate the userID and password. Only the selected domain is used in the authenticationprocess. If the domain list is incomplete and if the user credentials mustbe verified against a domain not in the list, you can type a differentdomain name during login. This is based on the assumption that theserver in option 181 can authenticate against a domain that is notavailable in the list.
199 Wyse Management Suite groupregistration key
Optional string. Specifies a Wyse Management Suite group registrationkey for the Wyse Management Suite agent. When Wyse ManagementSuite is disabled, and the group key of Wyse Management Suite is null,this option takes effect. Wyse Management Suite uses the optionalstring as the group registration key. If the Wyse Management Suite
Configuring connectivity 47

Table 12. DHCP option tags (continued)
Option Description Additional information
server or the MQTT server is null, the Wyse Management Suite agentsets the values to the default server values.
b. Interpret DHCP Vendor-Specific Info—Select this check box for automatic interpretation of the vendor information.c. DHCP Vendor ID—Displays the DHCP vendor ID when the Dynamically allocated over DHCP/BOOTP option is
selected.d. DHCP UserClass ID—Displays the DHCP user class ID when the Dynamically allocated over DHCP/BOOTP option is
selected.
3. Click OK to save your settings.
NOTE: The User Class option for DHCP standard is changed to RFC 3004. You must go to user class settings in DHCP
and add the user class length as in head.
Configure the ENET settings
About this task
This section describes how to configure the Ethernet settings on your thin client.
NOTE: Some authentication types may not work in ThinOS 9.0. For more information, see the ThinOS 9.0 Release Notes.
Steps
1. From the desktop menu, click System Setup > Network setup.The Network setup dialog box is displayed.
2. Click the ENET tab, and do the following:
Figure 16. ENET tab
48 Configuring connectivity

a. From the Ethernet Select drop-down list, select a wired network connection.
NOTE: For Wyse 5070 Thin Client without SFP or RJ45 module, the ENET0 option is selected by default. For
Wyse 5070 thin client with SFP or RJ45 module and Wyse 5470 Thin Client that is connected to Dell WD19 docking
station, select either ENET0 or ENET1 based on your network preference.
b. From the Ethernet Speed drop-down list, select a value for the Ethernet speed. The default value is Auto-Detect. Ifyour network equipment does not support the automatic negotiation, select any of the following values:
● 10 MB Half-Duplex● 10 MB Full-Duplex● 100 MB Half-Duplex● 100 MB Full-Duplex● 1 GB Full-Duplex
NOTE: The 10 MB Full-Duplex value can be selected locally. However, this mode can be negotiated through
Auto-Detect.
c. Click the IPv4 button, and then click Properties to configure the following options:
● Dynamically allocated over DHCP/BOOTP—Select this option to enable your thin client to automatically receiveinformation from the DHCP server. The network administrator must configure the DHCP server by using DHCPoptions to provide information. Any value that is entered locally in the Options tab is replaced by the DHCP value. Ifthe DHCP server fails to provide replacement values, the locally entered value is used.
● Statically specified IP Address—Select this option to manually enter the IP address, subnet mask, and defaultgateway.○ IP Address—Enter a valid network address in the server environment. The network administrator must provide
this information.○ Subnet Mask—Enter the value of the subnet mask. A subnet mask is used to gain access to machines on other
subnets. The subnet mask is used to differentiate the location of other IP addresses with two choices—samesubnet or other subnet. If the location is a different subnet, messages that are sent to that address must besent through the default gateway. This does not depend on the value that is specified through local configurationor through DHCP. The network administrator must provide this value.
○ Default Gateway—Use of gateways is optional. Gateways are used to interconnect multiple networks—routingor delivering IP packets between them. The default gateway is used for accessing the Internet or an intranet withmultiple subnets. If no gateway is specified, the thin client can only address other systems on the same subnet.Enter the address of the router that connects the thin client to the Internet. The address must exist on the samesubnet as the thin client as defined by the IP address and the subnet mask. If DHCP is used, the address can besupplied through DHCP.
d. Click the IPv6 button, and on the Properties tab, configure the following options:
NOTE: The limitation of the dual IPv6 network is that the device cannot automatically determine which connection
to use among the two.
● Select the Dynamically allocated over DHCP/BOOTP option to enable your thin client to automatically receiveinformation from the DHCP server. The network administrator must configure the DHCP server (using DHCP options)to provide information. Any value that is entered locally in the Options tab is replaced by the DHCP value. If theDHCP server fails to provide replacement values, the locally entered value is used.
● Select the Statically specified IP Address option to manually enter the IP address, subnet mask, and defaultgateway.○ IP Address—Enter a valid network address in the server environment. The network administrator must provide
this information.○ Subnet Prefix Len—Enter the prefix length of the IPv6 subnet.○ Default gateway—Use of gateways is optional. For more information, see various IPv4-supported options in this
section.
e. Select the Enable the IEEE 802.1x authentication check box, and from the EAP type drop-down list, select TLS,LEAP, PEAP or FAST.
● TLS—Select this option, and click Properties to configure the Authentication Properties dialog box.○ Select the Validate Server Certificate check box because it is mandatory to validate your server certificate.
NOTE: The CA certificate must be installed on the thin client. The server certificate text field supports a
maximum of approximately 255 characters, and supports multiple server names.
○ Select the Connect to these servers check box, and enter the IP address of the server.○ Click Browse to find and select the client certificate file and the private key file you want.
Configuring connectivity 49

NOTE: Ensure that you select the PFX file only.
○ From the Authenticate drop-down list, select either user authentication or machine authentication that is basedon your choice.
The following kinds of server names are supported—all examples are based on Cert Common namecompany.dell.com:
■ *.dell.com■ *dell.com■ *.comNOTE: Using only the FQDN, that is, company.dell.com does not work. Use one of the options, for example
servername.dell.com (*.dell.com is the most common option as multiple authentication servers may
exist).
● LEAP—Select this option, and click Properties to configure the Authentication Properties dialog box. Be sure touse the correct username and password for authentication. The maximum length for the username or the password is31 characters.
● PEAP—Select this option, and click Properties to configure the Authentication Properties dialog box. Be sure toselect either EAP_GTC or EAP_MSCHAPv2, and then use the correct username, password, and domain. ValidateServer Certificate is optional.
● FAST—Select this option, and click Properties to configure the Authentication Properties dialog box. Be sure toselect either EAP_GTC or EAP_MSCHAPv2, and then use the correct username, password, and domain.
NOTE: During the initial connection with EAP-FAST, when there is a request for a Tunnel PAC from the
authenticator, the PAC is used to complete the authentication. The first-time connection always fails, and
the subsequent connections succeed. Only automatic PAC provisioning is supported. The user/machine PAC
provisioning that is generated with CISCO EAP-FAST utility is not supported.
When EAP-MSCHAPV2 or EAP-GTC is selected for PEAP or FAST authentication, an option to hide the domainis available. Username and password boxes are available for use, but the domain text box is disabled. When EAP-MSCHAPV2 or EAP-GTC is selected for PEAP or FAST authentication, a check box to enable the single sign-onfeature is available.
3. Click OK to save your settings.
Configure the WLAN settings
About this task
This section describes how to configure the wireless settings on your thin client.
NOTE: On the Wyse 5070 Thin Client with an optional SFP module or RJ45 module, you cannot configure the wireless
settings.
Steps
1. From the desktop menu, click System Setup > Network setup.
The Network Setup dialog box is displayed.
2. Click the WLAN tab, and configure the following options:
50 Configuring connectivity

Figure 17. WLAN tab
● Add—Use this option to add and configure a new SSID connection. You can configure the SSID connection from theavailable security type options. After you configure the SSID connection, the added SSID connection is listed on theWLAN tab.
● Remove—Use this option to remove an SSID connection from the list.● Properties—Use this option to view and configure the authentication properties of an SSID connection that is displayed
in the list.● IPv4 Config—Click this option to configure the IPv4 settings for the wireless connection.
To set IPv4 connection using either DHCP or static IP address, configure any one of the following options:○ If you want to enable your thin client to automatically receive information from the DHCP server, click Dynamically
allocated over DHCP/BOOTP.○ If you want to manually configure the IP address, click Statically specified IP Address, and provide the IPv4 details.
● IPv6 Config—Click this option to configure the IPv6 settings for the wireless connection.a. To enable the wireless IPv6, click the IPv6 slider switch. This option is added from ThinOS 9.0 MR1 release onwards.b. To set IPv6 connection using either DHCP or static IP address, configure any one of the following options:
○ If you want to enable your thin client to automatically receive information from the DHCP server, clickDynamically allocated over DHCP/BOOTP.
○ If you want to manually configure the IP address, click Statically specified IP Address, and provide the IPv6details.
● Disable Wireless Device—Select this check box to disable a wireless device.○ Always—Click this radio button if you want to keep the wireless options always disabled.○ EnetUp—Click this radio button if you want to disable the wireless device whenever the wired network is connected.
3. Click OK to save your settings.
Configure the proxy settings
About this task
This section describes how to configure the proxy settings on your thin client.
Configuring connectivity 51

Steps
1. From the desktop menu, click System Setup > Network setup.The Network setup dialog box is displayed.
Table 13. Supported protocols
Component Supportedprotocols
Additional information
Wyse ManagementSuite
HTTP, HTTPS, andSOCKS5
It is recommended to use the SOCKS5 protocol.
Citrix RealTime MediaEngine (RTME)
HTTP and HTTPS N/A
2. Click the Proxy tab, and configure any of the following options:
Figure 18. Proxy tab
a. Configure the proxy servers based on your requirement.
● Enter the HTTP proxy port number or HTTPS proxy port number, username, and password in the respective fields.However, credential pass through ($UN/$PW) is not recommended because it starts before user sign on.
Wyse Management Suite uses both HTTP/HTTPS and MQTT protocols to communicate with the WMS/MQTTserver. However, the HTTP proxy cannot redirect TCP packages to the MQTT server which requires a SOCKS5 proxyserver. If there is only the HTTP server available, the real-time command that requires MQTT does not work.
NOTE: The HTTP/HTTPS proxy default port is 808.
● Enter the SOCKS5 proxy port number, username, and password in the respective fields. If SOCKS5 proxy isconfigured, Wyse Management Suite proxy uses the SOCKS5 only. If SOCKS5 is not configured, then WyseManagement Suite proxy searches for alternative protocols, for example, HTTP in the configuration.
NOTE: The SOCKS5 proxy default port is 1080.
52 Configuring connectivity

● Select the Use the first proxy server for all protocols check box to enable all the protocols to use the sameserver in the HTTP Proxy fields. Both HTTP and HTTPS proxy use the same host and port, and SOCKS5 proxy agentuses HTTP host with default Socks5 port (1080).
b. Specify the supported applications as Wyse Management Suite, FR, and RTME separated by a semicolon in the Applyproxy server on field.
3. Click OK to save your settings.
User scenario
1. Configure the SOCKS5 proxy server host and port.2. Configure the user credentials according to the proxy server settings.
After you restart your system, the client checks in to the Wyse Management Suite server through the SOCKS5 proxy server.MQTT connection is established through the SOCKS5 proxy server. Real-time commands work fine through the SOCKS5proxy server.
3. Connect to the Citrix desktop, configure proxy in the Internet options of the browser, and playback HDX FR through theHTTP/HTTPS proxy authentication.
Configuring the remote connectionsUse the Remote Connections dialog box to configure the connection broker settings, general connection options, andauthentication settings.
Configure the broker setup
About this task
This section describes how to configure the broker setup on your thin client.
Steps
1. From the desktop menu, click System Setup > Remote Connections.The Remote Connections dialog box is displayed.
Figure 19. Broker Setup
Configuring connectivity 53

2. On the Broker Setup tab, select the Citrix option from the Broker type drop-down list. You can configure the brokersetup to connect to the Citrix virtual desktop environments. For instructions about configuring the Citrix broker setup, seeConfiguring the connection brokers.
3. Click OK to save your settings.
Configure the General Options
About this task
This section describes how to configure the general options on your thin client.
Steps
1. From the desktop menu, click System Setup > Remote Connections.The Remote Connections dialog box is displayed.
2. Click the General Options tab, and do the following:
Figure 20. General options
a. Click one of the following options to set the action that the thin client should perform after you exit all sessions:
● None● Sign-off automatically● Shutdown the system automatically—If you select this option, you must specify a time period after which the thin
client shuts down.● Restart the system automatically—If you select this option, you must specify a time period after which the thin
client restarts.
NOTE: By default, None is selected and the thin client automatically returns to the terminal desktop.
b. Enter the default username in the Default Sign-on Username field.c. Enter the default password in the Default Sign-on password field.d. Enter the default domain in the Default Sign-on Domain field.
3. Click OK to save your settings.
54 Configuring connectivity

Configure the authentication settings
About this task
This section describes how to configure the authentication settings on your thin client.
Steps
1. From the desktop menu, click System Setup > Remote connections.The Remote Connections dialog box is displayed.
2. Click the Authentication tab, and select one of the following authentication types:
Figure 21. Authentication tab
● Imprivata—ThinOS supports the following Imprivata features:○ WebAPI—For more information about how to configure the WebAPI feature, see Configure the Imprivata OneSign
server.○ ProveID Embedded—This feature is supported from ThinOS 9.0 MR1 onwards. For more information about how to
configure the ProveID Embedded (PIE) feature, see Imprivata OneSign ProveID Embedded.● None
3. After configuring your preferred authentication, click OK to save your settings.
Configure the Imprivata OneSign server
OneSign Virtual Desktop Access provides a seamless authentication experience and can be combined with single sign-on for NoClick Access to desktops and applications in a virtual desktop environment.
About this task
This section describes how to configure the Imprivata OneSign server on your thin client.
Steps
1. From the desktop menu, click System Setup > Remote Connections .
The Remote Connections dialog box is displayed.
2. Click the Authentication tab, and select the authentication as Imprivata.
3. In the OneSign Server field, enter either https://ip or https://FQDN values of the OneSign server.
The security setting for OneSign server in the Admin Policy Tool controls the security level of OneSign. The security levelis set as high by default and you must import the certificate of the OneSign server before using the OneSign feature. Thecertificate is not required if the security level is set as low.
4. Click OK to save your changes.
5. Restart the thin client.
The Imprivata login dialog box is displayed.
Configuring connectivity 55

The following OneSign features or actions are supported:
● Client and Broker authentication○ Citrix Virtual Apps (formerly Citrix XenApp)○ Citrix Virtual Apps and Desktops (formerly Citrix XenDesktop)
● Kiosk Mode● Fast User Switching● Non-OneSign user VDI access● Hotkey Disconnect● Proximity card reader redirection● Guided Question and Answer login● Authenticate w/Password● Authenticate w/Password + Password Change● Authenticate w/Password + Password Change | New Password is Invalid● Authenticate w/Proximity Card + Password● Authenticate w/Proximity Card + Pin● Authenticate w/Proximity Card + Pin | Pin not enrolled● Authenticate w/Proximity Card Alone | Retrieve Password● Retrieve User Identity Password● Reset User Identity Password● Update User Identity Password● Enroll Proximity Card● Lock/Unlock Terminal with Proximity CardLock/Unlock Terminal with Proximity Card
NOTE: ThinOS supports Imprivata WebAPI version 13. It includes OneSign Objects (WebAPI v13) and Fingerprint
Authentication (WebAPI v13).
Configure objects on Imprivata Server
About this task
This section describes how to configure different objects on the Imprivata server.
Steps
1. To configure the general configuration object, do the following:
a. On the Imprivata server, click Computer policy, and then click General tab.b. Select the check box to enable users to shut down and restart the device from the lock screen.
● Shutdown Allow○ Select the check box to enable the feature. If enabled, the shutdown and restart icons are displayed in the
ThinOS login and locked windows.○ Clear the check box to disable the feature. If disabled, the shutdown and restart icons are not available.
● FailedOneSignAuth Allow—Click either Yes or No. If you are a non-OneSign user, click No to log in to the broker.● Display name format— Use this option to set different formats for the account name that is displayed in pop-up
notifications.
2. To configure the walkway configuration object, do the following:
a. On the Imprivata server, click Computer policy, and then click the Walk Away tab.
● Key mouse inactivity enabled and behavior—Use this option to set the action when the keyboard and mouse are leftidle or inactive. The In addition to keyboard and mouse inactivity check box is not supported.
● Passive proximity cards—Use this option to enable the proximity card usage.○ If you want to use a proximity card to lock the thin client, select the Tap to lock check box.○ If you want to lock the thin client and log in as a different user. Select the Switch users check box.
● Lock warning enabled and type—Use this option to enable or disable warning messages. The following three types aresupported:○ None—No warning messages are displayed.○ Notification balloon—ThinOS displays a notification window.○ Screensaver—Hide the display contents before the thin client locks.
● Warning message—Use this option to customize your warning messages
56 Configuring connectivity

● Lock Screen type—Use this option to set the lock screen type. Only obscure type is supported.● Hot key to lock workstation or log off user—Use this option to set Hot keys for ThinOS. The following keys are
supported:○ F1○ F12○ Backspace○ Del○ Down○ End○ Enter○ Esc○ Home○ Insert○ Left Alt○ Left○ Left Ctrl○ NumLock○ Page Down○ Page Up○ Right Ctrl○ Right○ Right Alt○ Space○ Tab○ Up○ a~z○ A~Z○ 0~9○ Modifier +, %, ^ (Shift, Alt, and Control)
● Suspend action—The server configuration controls this feature on ThinOS.
3. To configure the Self-Service Password Reset (SSPR) configuration object, select the appropriate options on the screen.
The SSPR configuration object controls the Self-Service Password Reset behavior for a user. The enabled attribute specifieswhether the user is allowed to reset their password as part of emergency access. The mandatory attribute specifies whetherthe user must reset their password as part of emergency access.
4. To configure the RFIDeas configuration object, select the appropriate options on the screen.
The RFIDeas configuration object controls the behavior of the RFIDeas readers.
5. To configure the custom background configuration object, do the following:
a. On the Imprivata server, click Computer policy.b. Click the Customization tab and upload a custom background file.
6. To configure the cobranding configuration object, do the following:
a. On the Imprivata server, click Computer policy.b. Click the Customization tab and upload a logo image file.
The logo image impacts all the dialog boxes in ThinOS with raw logo.
7. To modify the text that is displayed in the sign-on UI and lock window, configure the SSPR customization configurationobject.
NOTE: ThinOS supports maximum of 17 characters.
8. To configure the password self-services force enrollment feature, select the check box. This enables you to reset theprimary authentication password.
Enroll a proximity card with Imprivata OneSign
About this task
This section describes how to enroll a proximity card with Imprivata OneSign.
Configuring connectivity 57

Steps
1. Tap the proximity card. The card enrollment page is displayed.
2. Enter the credentials and click OK.Proximity card is enrolled successfully.
Use smart card as proximity card
You can use a smart card as a proximity card to authenticate the user. When you tap the smart card on the smart card reader,the Imprivata agent uses the smart card's unique serial number as the Unique ID (UID) of the proximity card.
About this task
This section describes how to use a smart card as a proximity card.
Steps
1. Log in to the OneSign Administrator console.
2. Go to the Policies page and click Computer Policy.
3. In the Smart card readers section, select the Treat smart card authentications as proximity card authenticationscheck box.
Next steps
To authenticate the user using a proximity card, connect a supported reader to the thin client. Before you tap the card, ensurethat your card is already enrolled to the user. When you tap your card on the reader, the thin client authenticates the user andstarts the VDI connection.
Imprivata Bio-metric Single Sign-On
Fingerprint identification feature is highly reliable, and cannot be replicated, altered, or misappropriated.
The prerequisites of OneSign server are:
● Imprivata v4.9 or later appliance version is needed that supports the WebAPI v5 and later versions.● Fingerprint identification license is required.● Fingerprint reader device is required. ET710 (PID 147e VID 2016) and ET700 (PID 147e VID 3001) are the supported devices.
Supported user scenarios● Signing in or unlocking the ThinOS devices using the Fingerprint authentication.
○ Configure the OneSign server on ThinOS, and then connect the Fingerprint reader device.○ The ThinOS Fingerprint window is displayed automatically after the OneSign server is initialized.○ Fingerprint authentication works on the ThinOS unlock window.
● Unlocking the Virtual Desktop using the Fingerprint authentication.○ Enable the Imprivata Virtual Channel option from the ThinOS Global Connection settings.○ When you lock the virtual desktop in the session, the Fingerprint window is displayed automatically.
● Managing Fingerprints on a virtual desktop.○ Legend Fingerprint Management is supported.○ Fingerprint management with Imprivata Confirm ID enabled is not supported.
Grace period to skip second authentication factor
Grace period enables you to specify a time limit on OneSign server for logging in without the second authentication factor afterthe first login session.
NOTE: After you specify the grace period, you must first use the proximity badge, and then enter password or OneSign PIN
for the initial login.
If you use the proximity card after the time limit that you specified for grace period, the second authentication factor window isdisplayed with the message Grace period expired.
58 Configuring connectivity

If you enter a wrong password or PIN, the second authentication factor window is displayed with the warning message OneSigncould not authenticate you. Try again.
Imprivata OneSign ProveID Embedded
ThinOS supports the Imprivata OneSign ProveID Embedded (PIE) feature that enables secure authentication to virtual desktopsand applications. Using this feature, you can seamlessly access the clinical applications. The PIE solution simplifies access toroaming desktops with Citrix Virtual Apps and Desktops. You can also deploy a Citrix Virtual App hosted desktop with FastUser Switching (FUS) to eliminate the need for generic user log-ins. For more information about the Imprivata OneSign ProveIDEmbedded, see the documentation available at www.imprivata.com.
Table 14. Supported environment
Component Supported environment
Endpoints (Thin Clients) ● Wyse 5470 All-in-One Thin Client● Wyse 5470 Thin Client● Wyse 5070 Thin Client● Wyse 3040 Thin Client
Citrix environment ● Citrix Virtual Apps and Desktop 7.15 CU5● Citrix Virtual Apps and Desktop 7 1912 LTSR
OneSign server 7.1.000.13
PIE Agent on the thin client 7.1.099.0153
Authentication methods ● Network password● Proximity card● Security questions● PIN (as a secondary factor)● Fingerprint biometrics
Table 15. Imprivata ProveID Embedded feature matrix
Feature Description ThinOS 9.0
General Features and Workflows Imprivata Appliance failover Supported
Imprivata offline mode Not applicable
Imprivata self- service password reset Supported
Third-party self- service password reset Not applicable
Non- OneSign user workflow Supported
Spine Combined workflow Not applicable
Smartcard as proximity card workflow Supported
Imprivata Walk Away Security Honors lock command Not applicable
Fade to Lock screensaver Supported
Notification balloon Not applicable
Citrix Workflows Citrix Virtual Desktops Supported
Citrix Virtual Applications Supported
Virtual Kiosk Citrix for Virtual Desktops forDesktops
Supported
Virtual Kiosk for Citrix PublishedApplications
Supported
Primary Authentication Modalities using EndpointOperating System
Password Supported
Proximity card Supported
Configuring connectivity 59

Table 15. Imprivata ProveID Embedded feature matrix (continued)
Feature Description ThinOS 9.0
Smart card Not applicable
Fingerprint biometrics Supported
Question and Answer Supported
Authentication/ Re-Authentication Modalities usingVirtual Channel
Proximity card Supported
Smart card Not applicable
Fingerprint biometrics Supported
Imprivata Hands Free Authentication Supported
The overall PIE configuration on ThinOS includes the following tasks:1. Configure the OneSign Appliance. See, Configure the OneSign Appliance.2. Configure the OneSign Admin Console. See, Configure the OneSign Admin Console.3. Install the Imprivata PIE agent package on ThinOS. See, Install the Imprivata PIE package on ThinOS.4. Enable the PIE mode on ThinOS using Admin Policy Tool or Wyse Management Suite. See, Enable PIE mode on ThinOS.5. If the Security Mode for Imprivata settings is set to High, upload the appliance SSL certificate using any of the following
methods:● Import the SSL certificate manually.● Import the SSL certificate automatically.
6. Configure the FUS on ThinOS (optional step). See, Configure the Fast User Switching on ThinOS.
Configure the OneSign Appliance
Steps
1. Open the OneSign Appliance console.
2. Log in as a super administrator.
3. Click the Network tab and then click Name Resolution.
4. In the Local Host Entries section, click Add.
5. Enter the Fully Qualified Host Name and the DNS IP address.
6. Click OK.
7. Save the configuration.
Configure the OneSign Admin Console
Steps
1. Open the OneSign Admin Console.
2. Log in as an administrator.
3. On the upper-right corner of the page, click the gear icon, and then click ProveID.
4. In the ProveID - API Access section, select the Allow access via ProveID Web API and ProveID Embedded check box.
5. Select the Dell Wyse Cloud Client check box.
6. Save the configuration.
Install the Imprivata PIE package on ThinOS
Steps
1. Go to www.dell.com/support and download the Imprivata package that contains the PIE agent. For more information, seeDownload ThinOS 9.x firmware and packages.
2. Install the Imprivata package using any of the following methods:
60 Configuring connectivity

● Using Wyse Management Suite. For more information, see Upload and push ThinOS application packages using WyseManagement Suite.
● Using Admin Policy Tool. For more information, see Upload and install ThinOS application packages using Admin PolicyTool.
Enable PIE mode on ThinOS
You can either use the ThinOS 9.x policy settings on Wyse Management Suite or the local Admin Policy Tool to enable theImprivata ProveID Embedded (PIE) mode.
Steps
1. Open the Admin Policy Tool on your thin client or go to the ThinOS 9.x policy settings on Wyse Management Suite.
2. In the Configuration Control | ThinOS window, click the Advanced tab.
3. Expand Login Experience and click the 3rd Party Authentication option.The Imprivata Settings window is displayed.
4. From the Select Authentication Type drop-down list, select Imprivata.
5. In the OneSign Server field, enter the list of host names or IP addresses with optional TCP port number, or URLs ofImprivata OneSign servers.
6. Click the Enable ProveID Embedded Mode slider switch to enable the ProveID Embedded mode on ThinOS.
7. In the Delay PIE agent start field, enter the delay time in seconds. Setting this option postpones the start of the PIE agenton the ThinOS client. The default value is set to 0.
8. In the Connection Timeout field, enter the time-out value for the OneSign connection. Setting the time-out periodretransmits the sent data and again tries to connect to the server until the connection is established.
9. From the Security Mode drop-down list, select the value as High or Low. This option specifies the SSL certificationvalidation policy of the OneSign connection. If the value is set to High, you must upload the OneSign appliance SSLcertificate. For more information about how to upload the SSL certificate, see Upload the OneSign appliance SSL certificate.If the value is set to Low, you are not required to upload the appliance OneSign SSL certificate.
10. From the Enable Logging Level drop-down list, select a log level value. Each log message has an associated log level. Youcan access the log files using the Export Logs option in the Troubleshooting window. For more information about how toexport logs, see the Troubleshooting your thin client.
Table 16. Log levels
Log Level Value Description
Critical 0 Critical events that might stop the application.
Error 1 Error events that might allow the application to run.
Info 2 Informational messages that show the progress of the application.
Warning 3 Potentially harmful events.
Debug 4 Informational events that are helpful to debug an application
Promiscuous 5 Promiscuous mode messages.
11. Click Save & Publish.
Uploading OneSign appliance SSL certificate
If the Security Mode for Imprivata settings is set to High, you must upload the OneSign appliance SSL certificate using one ofthe following methods:
● Import the SSL certificate manually.● Import the SSL certificate automatically.
Configuring connectivity 61

Import the OneSign appliance SSL certificate automatically
Prerequisites
● Ensure that you have created a group in Wyse Management Suite with a valid group token.● Ensure that you have registered the ThinOS devices to Wyse Management Suite.● Ensure that you have uploaded the SSL certificate to Apps & Data > File Repository > Inventory.
Steps
1. Log in to Wyse Management Suite.
2. Go to the Groups & Configs page, and select your preferred group.
3. Click Edit Policies > ThinOS 9.x.The Configuration Control | ThinOS window is displayed.
4. Click the Advanced tab.
5. Expand Privacy & Security, and click Certificates.
6. Click the Auto Install Certificates slider switch to enable autoinstall of certificates on ThinOS.
7. From the Select Certificates to Upload drop-down list, select the SSL certificate.
8. Click Save & Publish.The certificate is installed on your thin client.
Import OneSign appliance SSL certificate manually
Prerequisites
Ensure that you have acquired the OneSign appliance SSL certificate and stored the certificate on your USB drive.
Steps
1. Connect the USB drive to the thin client.
2. On the ThinOS client, go to System Tools > Certificates.
3. From the Import From drop-down list, select USB Storage.
4. Click Import.
5. Browse and select the SSL certificate that is stored in the USB drive.
6. Click OK.The certificate is imported to your thin client.
Configure Fast User Switching on ThinOS
Fast User Switching (FUS) is a feature of the Imprivata ProveID Embedded (PIE) agent that enables multiple users to securelyaccess the shared environment. You can deploy a virtual desktop with FUS to eliminate the need for generic user log-ins.
Prerequisites
● Ensure that you have configured your virtual desktop.● Ensure that you have configured the policies on the OneSign server.● Ensure that you have enabled the PIE mode and configured the OneSign server on Admin Policy Tool or Wyse Management
Suite. For more information, see Enable PIE mode on ThinOS.
For more information about how to configure the virtual desktop and OneSign server policies, see the documentation atwww.imprivata.com.
Steps
1. On ThinOS, go to System Setup > Remote Connection > Broker Setup.
2. In the Broker Server field, specify the Citrix Broker agent server details. The format of the Broker agent server must behttps://FQDN/citrix/storeweb.
3. In the Auto Connect List, enter the desktop name to automatically log in to the Citrix session.
62 Configuring connectivity

4. Click OK.
5. Go to System Setup > Remote Connection > General Options.
6. Enter the default sign-on username, password, and domain.
7. Click OK.
Configuring the central configurationsUse the Central Configuration dialog box to configure the Wyse Management Suite server settings.
Configure the Wyse Management Suite settings
About this task
This section describes how to configure the Wyse Management Suite settings on your thin client.
Steps
1. From the desktop menu, click System Setup > Central Configuration.The Central Configuration dialog box is displayed.
2. On the WMS tab, do the following:
Figure 22. Wyse Management Suite
a. Select the Enable Wyse Management Suite (WMS) check box to enable the Wyse Management Suite to discoveryour thin client. By default, this option is selected. Wyse Management Suite service automatically runs after the clientboots.
NOTE: If the first discovery, for example, the Wyse Management Suite service is not successful, it continues until a
discovery is successful. If all discoveries fail, it is started again automatically.
b. Select the DNS SRV record check box if you want the thin client to obtain the Wyse Management Suite values throughDNS server, and then try to register into the Wyse Management Suite server. By default, the check box is selected. Ifthe check box selection is canceled, the thin client cannot obtain the Wyse Management Suite values through the DNSserver.
Configuring connectivity 63

c. In the Group Registration Key field, enter the group registration key as configured by your Wyse Management Suiteadministrator for your group. To verify the key, click Validate Key.
NOTE: A Group Registration Key is not required for the private Wyse Management Suite server. You can provide
the Wyse Management Suite server details to enable the device to check in to Wyse Management Suite. ThinOS
registers to a quarantine tenant in Wyse Management Suite.
d. Select the Enable WMS Advanced Settings check box to enter the Wyse Management Suite server, MQTT serverdetails, and to enable the CA validation. By default, the MQTT server option is disabled. The MQTT server value ispopulated after the ThinOS device is checked in to the Wyse Management Suite.
e. Select the CA validation check box if you want to enable the CA validation feature.
The CA validation is required when you import certificates into your Wyse Management Suite server. By default, the CAValidation check box is selected to improve the security when using the Wyse Management Suite cloud. This changeaffects connections to any of the following servers:● *.dellmobilitymanager.com● *.cloudclientmanager.com● *.wysemanagementsuite.com
Table 17. CA validation
Wyse ManagementSuite deployment
CA Validation
Private cloud When you deploy Wyse Management Suite on a private cloud, the Enable CA Validationcheck box is available to configure after you specify the server details in the WMS Serverfield. By default, the check box is selected.
Public cloud When you deploy Wyse Management Suite on a public cloud, the Enable CA Validationcheck box is selected by default. You cannot disable the Enable CA Validation option.
3. Click OK to save your settings.
NOTE: When you modify the ThinOS policy of the registered thin client using Wyse Management Suite, a dialog box is
displayed prompting you to postpone or restart the thin client. To apply the settings immediately, click Restart Now. If
you want to delay this task, click Postpone.
Configure the VPN ManagerVPN Manager is included to manage Virtual Private Network connections. ThinOS uses the OpenConnect client that is based onthe SSL protocol for connecting to a VPN.
About this task
This section describes how to configure the VPN Manager on your thin client.
Steps
1. From the desktop menu, click System Setup > VPN Manager.The VPN Manager dialog box is displayed.
2. To create a session, click the + icon and do the following:
64 Configuring connectivity

Figure 23. VPN Manager
a. Enter the name of the session in the Name field. This option is mandatory. The maximum character limit is 21 characters.b. Enter the IP address of the VPN server in the Server field. This option is mandatory and is defined as either an IP
address or a hostname. The maximum character limit is 63 characters.c. Enter the login username in the Username field. This option is mandatory. The maximum character limit is 31 characters.d. Enter the password in the Password field. This option is not mandatory. The maximum character limit is 31 characters.e. Click the Auto-connection on system startup button to automatically connect to the VPN when the device restarts.f. Click the Show progress in detail button to display the VPN connection progress.g. Click the Show debug information button to display the VPN debug details for better troubleshooting.h. Click OK.
When connections are created, the Auto column displays which connection is automatically connected when the devicerestarts. Only one session can be set to autoconnect.
3. Select a session and click Connect.
4. Click OK to save your changes.
Configuring connectivity 65

Configuring the connection broker—CitrixIn a Virtual Desktop Infrastructure (VDI) environment, a connection broker is a software entity that enables you to connectto an available desktop. The connection broker facilitates the VDI environment to securely and efficiently manage the centrallyhosted desktop environments. ThinOS 9.0 enables you to configure the Citrix connection broker for accessing Citrix VirtualApps and Desktops.
Citrix offers a complete virtualization solution, where all applications and resources are deployed on a centralized server, andpublished to remote devices. In ThinOS 9.0, Citrix Receiver is replaced by Citrix Workspace app. Citrix Workspace app, a clientsoftware released by Citrix, enables you to access all your virtual apps, desktops, and other Citrix products from a singleworkspace UI. For more information about Citrix Workspace App, see the Citrix documentation at docs.citrix.com.
To access Citrix sessions using Citrix Workspace app, do the following:1. Deploy the Citrix Workspace app package using Wyse Management Suite.2. Go to System Setup > Remote Connections > Broker setup, and configure the Citrix broker.
Citrix Workspace app feature matrix
NOTE: Citrix features that are not listed in the feature matrix table are not supported by ThinOS.
Table 18. Citrix Workspace app feature matrix
Feature* ThinOS 9.0
Citrix Workspace Citrix Virtual Apps Supported
Citrix Virtual Desktops (including Windows and Linuxdesktop)
Supported
Endpoint Management Auto configure using DNS for Email Discovery Not supported
Centralized Management Settings Supported
UI Desktop Viewer/Toolbar Supported
Multi-tasking Supported
Follow Me Sessions (Workspace Control) Supported
HDX Host Core Adaptive transport Supported
Session reliability Supported
Auto-client Reconnect Supported
Browser content redirection Supported
Multiport ICA Supported
HDX IO/Devices/Printing Local Printing Supported
Generic USB Redirection Supported
Client drive mapping / File Transfer Supported
HDX Integration HDX Insight Supported
EUEM Experience Matrix Supported
Session Sharing Supported
HDX Multimedia Audio Playback Supported
Bi-directional Audio (VoIP) Supported
6
66 Configuring the connection broker—Citrix

Table 18. Citrix Workspace app feature matrix (continued)
Feature* ThinOS 9.0
Web-cam redirection Limited support¹
Video playback Supported
Skype for business Optimization pack Supported
Cisco Jabber Unified Communications Optimization Supported
Windows Multimedia redirection Supported
UDP Audio Supported
HDX Graphics H.264-enhanced SuperCodec Supported
Adaptive Display V2 Supported
Client hardware acceleration Supported
3DPro Graphics Supported
External Monitor Support Supported
True Multi Monitor Supported
Authentication Federated Authentication (SAML/Azure AD) Supported
RSA Soft Token/RSA Hard Token Supported
Challenge Response SMS (Radius) Supported
OKTA Multi factor authentication Supported
DUO multi factor authentication Supported
Smart Card (CAC, PIV) Supported
Proximity/Contactless Card Supported
Credential insertion (E.g.. Fast Connect,Storebrowse)
Supported
Pass Through Authentication Supported
NetScaler Native OTP Supported
Anonymous Store Access Supported
Biometric Authentication (Touch ID, Face ID..) Limited supported. Only supports Touch ID.
Security TLS 1.2 Supported
DTLS 1.0 Supported
SHA2 Cert Supported
Remote Access via Citrix Gateway Supported
IPV6 Not supported²
Keyboard enhancements Unicode Keyboard Layout Mapping with WindowsVDA
Supported
*For definitions of each feature, see the Citrix Workspace app feature list at docs.citrix.com.
¹HDX RealTime Webcam Video Compression does not work except for Microsoft Skype for Business Optimization pack andCisco Jabber Unified Communications Optimization.
²ICA session is not launched if you enable only IPv6 client network.
Configuring the connection broker—Citrix 67

Configure the Citrix broker setup
About this task
This section describes how to configure the Citrix broker setup on your thin client.
Steps
1. From the desktop menu, click System Setup > Remote Connections.The Remote Connections dialog box is displayed.
2. On the Broker Setup tab, select Citrix from the Select Broker Type drop-down list, and do the following:
Figure 24. Broker Setup
a. Select the Workspace Mode check box if you want to enable the Citrix Workspace based layout of publishedapplications and desktops.
b. In the Broker Server field, enter the IP address or hostname or FQDN of the Citrix server. You can enter the CitrixNetScaler Gateway URL, StoreFront URL, or the web interface URL.
c. In the Auto Connect List field, enter the name of the connection that is displayed in Connection Manager toautomatically connect after you log in the Citrix broker. You can enter more than one connection name. Each connectionname is separated by semi-colon, and is case-sensitive.
d. Select the Enable automatic reconnection at logon check box if you want to automatically reconnect to thedisconnected sessions or both active and disconnected sessions during login. You must click either of the followingoptions:
● Connect to disconnected session only● Connect to active and disconnected sessions
e. Select the Enable automatic reconnection from button menu check box if you want to automatically reconnect tothe disconnected sessions or both active and disconnected sessions by using the Reconnect button in the button menu.You must click either of the following options:
● Connect to disconnected session only● Connect to active and disconnected sessions
To use the reconnect option, left-click the button menu, and click Reconnect.
68 Configuring the connection broker—Citrix

3. Click OK to save your settings.
Classic mode vs Workspace mode
This section summarizes the differences between classic mode and workspace mode.
Figure 25. Classic mode
Configuring the connection broker—Citrix 69

Figure 26. Workspace mode
Table 19. Classic mode vs Workspace mode
Item Classic mode Workspace mode
How to enable By default, the ThinOS loads the classic modeif you do not select the Workspace mode checkbox during Citrix broker setup.
Select the Workspace mode check box during Citrixbroker setup.
Desktop elements Displays the ThinOS full taskbar and the classicdesktop.
Displays the ThinOS full taskbar and the workspacedesktop.
Access all publisheddesktops
Click the icon on the classic desktop to launchthe published desktop.
Click the Desktops icon on the purple ribbon toaccess all the published desktops.
Access all publishedapps
Click the icon on the classic desktop to launchthe published application.
Click the APPS icon on the purple ribbon to accessall the published desktops.
Access favorites Not applicable Click the Favorites icon on the purple ribbon.
Access ConnectionManager On the left corner of the taskbar, click .
Click the button menu in the upper-right corner ofthe screen, and then click Connection Manager.
Switch accountwhen logged in withmulti server
Displays all icons of desktop and applications.You cannot switch the account.
Click the button menu in the upper-right corner ofthe screen, and then click Sign out.
Refresh Citrixapplication
Click the PNAmenu button on the taskbar, andthen click Refresh.
Click the button menu in the upper-right corner ofthe screen, and then click Refresh.
Reconnect a session Click the PNAmenu button on the taskbar, andthen click Reconnect.
Click the button menu in the upper-right corner ofthe screen, and then click Connection Center >Reconnect.
Disconnect from thesession
Click the PNAmenu button on the taskbar, andthen click Disconnect.
Click the button menu in the upper-right corner ofthe screen, and then click Connection Center >Disconnect .
70 Configuring the connection broker—Citrix

Table 19. Classic mode vs Workspace mode (continued)
Item Classic mode Workspace mode
Log off all theconnected ICAsessions
Click the PNAmenu button on the taskbar, andthen click Logoff.
Click the button menu in the upper-right corner ofthe screen, and then click Connection Center >Logoff.
Sign out of brokeragent
Click the Sign-off button in ConnectionManager or from the Shutdown menu.
Click the button menu in the upper-right corner ofthe screen, and then click Sign out. You can alsoclick Sign out from the Shutdown menu.
Use search bar Not applicable Use the search bar on the upper-right of the screento search for your workspace item. You can openapps directly from the search results.
Access DesktopViewer/Toolbar
Click the Desktop Viewer/Toolbar on the topcenter of the Citrix session screen to use thefollowing toolbar options:
● Home● Switch● Ctrl+Alt+Del● Window● Disconnect● Sign Out● Save Layout
You can switch a session between a windowedand a full-screen session window. Save layout isavailable only for the local AD user session andnot for users who use SAML authentication tolog in to the Citrix session.
Click the Desktop Viewer/Toolbar on the topcenter of the Citrix session screen to use thefollowing toolbar options:
● Home● Switch● Ctrl+Alt+Del● Window● Disconnect● Sign Out● Save Layout
You can switch a session between a windowed anda full-screen session window. Save layout is availableonly for the local AD user session and not for userswho use SAML authentication to log in to the Citrixsession.
Citrix HDX RealTime Optimization Pack for Skype forBusinessThe Citrix HDX RealTime Optimization pack enables you to make high-definition audio and video calls using the Skypefor Business application. For more information about HDX RealTime Optimization Pack, see the Citrix documentation atdocs.citrix.com.
The Citrix HDX RealTime Optimization pack consists of the following two components:
● HDX RealTime Media Engine and Citrix Workspace app that are integrated as a single component on the client-side (Citrixpackage)
● HDX RealTime Connector as the server-side component
The HDX RealTime Media Engine and Citrix Workspace app are combined to constitute a single component that runs on the thinclient. The HDX RealTime connector is the server-side component that runs on the Citrix Virtual Desktops virtual desktops andCitrix Virtual Apps servers. The HDX RealTime connecter that runs on the Citrix server handles the authentication and the mediaprocessing is achieved on the thin client.
NOTE: In every ThinOS release, the Citrix package version may be updated to newer versions.
Table 20. Supported environment
Component Supported platform/supported versions
Endpoints (Thin clients) ● Wyse 5470 All-in-One Thin Client● Wyse 5470 Thin Client● Wyse 5070 Thin Client● Wyse 3040 Thin Client
Citrix environment ● Citrix Virtual Apps and Desktops 7 1811 and later
Configuring the connection broker—Citrix 71

Table 20. Supported environment (continued)
Component Supported platform/supported versions
● Citrix Virtual Apps and Desktops (formerly XenDesktop) 5.6, 6.5, 7.x● Citrix Virtual Apps (formerly XenApp) 6.5, 7.x
Skype for Business client ● Skype for Business 2016● Skype for Business 2015● Lync 2013● Lync 2010
Server backend ● Skype for Business Server 2019● Skype for Business Server 2015● Skype for Business Online—Microsoft Office 365 hosted Skype for
Business Server● Lync 2013 Server
Client component at the endpoint Citrix package for RTME
Install the Citrix package on ThinOS
You must install the Citrix package to use Skype for Business application on ThinOS. To install the ICA package using WyseManagement Suite, see Upload and push ThinOS 9.0 application packages.
Set up the Skype for Business application
About this task
This section describes how to install and use Skype for Business (SFB) on a Citrix desktop.NOTE: Ensure that the thin client does not have USB redirection for video and audio devices to have the RealTime Media
Engine working correctly on your thin client.
Steps
1. Upgrade the ThinOS firmware and install the Citrix package on the thin client using Wyse Management Suite. For moreinformation about firmware upgrade and package installation, see Firmware upgrade and Upload and publish ThinOS 9.0application packages.
2. Go to www.citrix.com and download the appropriate version of the Citrix RealTime Optimization Pack that contains theCitrix HDX RealTime Connector.
3. Install the Citrix HDX RealTime Connector on the Citrix Virtual Desktops or Citrix Virtual Apps servers.
NOTE: If you are running an earlier 1.8 version, you must uninstall the earlier version and install the latest version. If you
are running an earlier 2.x version, you can upgrade the connector to the latest version.
4. Log in to your Citrix desktop and start the Skype for Business application.
Using the Skype for Business application
The following are the salient features:
● Supports Native Skype For Business client menus and operations● Supports more call features, such as call delegation, and response group● Supports video codec H.264-UC and audio codec SILK● Supports Call Admission Control● Supports DSCP/QoS Configuration● Supports Bandwidth Policy Control● Ability to turn off version mismatch warnings for acceptable combinations of RealTime Connector and RealTime Media
Engine● Better initialization to eliminate DNS confusions
72 Configuring the connection broker—Citrix

For more information about Skype for Business in VDI environments, see the Microsoft documentation at docs.microsoft.com.
Use the Skype for Business application to perform the following tasks:
● Start an audio or video call.○ Select a user to call.○ Call from the IM window.○ Type a name or number to call.
● Answer the call.○ Answer an audio call.○ Answer a video call.○ Use the headset button to answer the call.
● Transfer call, mute, or hold call.● Control the video—Pause, end, or Picture-in-Picture (PiP).● Set the volume levels.● Use the dial pad.● Make a conference call.● Help and Hang up.● Minimize, maximize, or close the call video window.● Perform a network health check. Right-click the RTME icon on the taskbar and select Call Statistics to view attributes,
such as received packets, sent packets, video frame rate, video resolution, audio codec, and video codec.
Verify the Skype for Business connection status
About this task
This section describes how to verify the Skype for Business status on your thin client.
Steps
1. Install the correct connector on the Citrix Virtual Desktop or Virtual Apps Server.
2. Install the Citrix package on the ThinOS device.
3. Connect the audio or video devices.
NOTE: Disable the USB redirection for audio or video devices.
4. Connect to a Citrix desktop and start the Skype for Business application.
5. Check the RTOP (bow-tie) icon in the system tray on the taskbar of the virtual desktop.
6. Open the About page from the RTOP icon in the system tray and verify the connection attributes.
If the remote RealTime Media Engine version matches the mediaEngine.Net version, the status is displayed asConnected.
7. Verify the Settings option from the RealTime connector icon.
8. Verify the audio and video devices from the Skype For Business client menus.
9. Establish the video and audio calls.
10. Answer the calls by either clicking the mouse or using the headset button.
11. Click the RealTime connector icon and verify the call statistics.
For more information about verifying your installation and the collecting troubleshooting information, see the Citrixdocumentation at docs.citrix.com.
Citrix RTME call statistics
Table 21. Citrix RTME call statistics
Platform name RTME version Call statistics* Camera
Video resolution Video codec Video frame rate
Wyse 5470 All-in-One Thin Client
2.8 960 x 540 H.264-UC (SW) 30 fps Onboard camera
Configuring the connection broker—Citrix 73

Table 21. Citrix RTME call statistics (continued)
Platform name RTME version Call statistics* Camera
Video resolution Video codec Video frame rate
1280 x 720 H.264-UC (CAM) 30 fps Logitech C930e
Wyse 5470 ThinClient
2.8 960 x 540 H.264-UC (SW) 30 fps Onboard camera
1280 x 720 H.264-UC (CAM) 30 fps Logitech C930e
Wyse 5070 ThinClient
2.8 1280 x 720 H.264-UC (CAM) 30 fps Logitech C930e
Wyse 3040 ThinClient
2.8 848 x 480 H.264-UC (CAM) 30 fps Logitech C930e
*The call statistics data is displayed in the Call Statistics window in the Sent column.
Cisco Jabber Softphone for VDICisco Jabber Softphone for VDI (JVDI) is the Unified Communications solution offered by Cisco for virtual deployments. Itsupports audio conferencing, and instant messaging on the Hosted Virtual Desktops (HVD). The Cisco Jabber Softphone for VDIsoftware offloads the audio processing from the virtual desktop servers to the thin client. All audio and video signals are routeddirectly between the endpoints without entering the HVD.
Cisco Jabber Softphone for VDI enables you to make and receive calls using the Cisco Unified Communications application.Cisco Jabber Softphone for VDI consists of the following two components:● Cisco JVDI Agent● Cisco JVDI ClientCisco JVDI Agent is the JVDI connector that runs on the Citrix desktop or server. Cisco JVDI client is the JVDI package thatruns on the thin client. The Jabber client that runs on the Citrix server handles the authentication and the media processing isachieved on the thin client.
Table 22. Supported environment
Component Supported platforms/supported versions
Thin client ● Wyse 5470 Thin Client● Wyse 5470 All-in-One Thin Client● Wyse 5070 Thin Client● Wyse 3040 Thin Client
Connection broker for the hosted virtual desktops ● Citrix Virtual Apps and Desktops (formerly XenDesktop) 7.15 LTSRand later
● Citrix Virtual Apps (formerly XenApp) 7.15 LTSR and later
Cisco Jabber application on the hosted virtualdesktop
Cisco Jabber 12.8
Cisco JVDI agent on the hosted virtual desktop Cisco JVDI Agent 12.9
Cisco JVDI client on the thin client JVDI.pkg
Install the JVDI package on ThinOS
About this task
You must install the JVDI package to use Cisco Jabber Softphone for VDI. To install the ICA package using Wyse ManagementSuite, see Upload and push ThinOS 9.0 application packages.
74 Configuring the connection broker—Citrix

Setting up the Cisco Jabber Softphone for VDI
About this task
This section describes how to install and use the Cisco Jabber Softphone for VDI on a Citrix desktop.
Steps
1. Go to www.cisco.com, and download the following software:
● Cisco JVDI Agent 12.8● Cisco Jabber application 12.8
2. On the Citrix virtual desktop, install Cisco JVDI Agent. Double-click the file and follow the installation wizard steps.
3. On the Citrix virtual desktop, install Cisco Jabber.
For information about the installation procedure, see the installation guide at www.cisco.com.
4. Update the ThinOS firmware, and install the JVDI.pkg on the ThinOS client using Wyse Management Suite.
For more information about firmware upgrade and package installation, see Firmware upgrade and Upload and publishThinOS 9.0 application packages.
NOTE: If ThinOS running Cisco Jabber (JVDI) fails to register with Cisco Unified Communications Manager, add the
DNS servers and DNS domains that are used by the Citrix host and the Cisco Unified Communications Manager servers
to ThinOS. You can either specify the domain name and server IP on the General tab in Network Setup, or add the
DNS server and domain value to the DHCP server by providing the IP address information to the ThinOS client. For
issues related to Cisco Unified Communications, contact Cisco support.
5. Log in to the Citrix virtual desktop, and sign in to Cisco Jabber using your user credentials.
When you log in for the first time, do the following:
a. On the Cisco Jabber interface, click Advanced Settings.b. Select your account type as Cisco Communications Manager 9 or later.c. Enter the login server address.
NOTE: If the Use my computer for calls option is selected, the Cisco Jabber is automatically registered with Cisco
Unified Communications Manager. This option enables Jabber to work as a Softphone, and use the microphone or
speaker that is connected to the thin client for phone calls.
Using Cisco Jabber
Use the Cisco Jabber application to perform the following tasks:● Start an audio call● Answer the call● Hold or resume the call● Stop the video● Mute or unmute the audio● Turn on or turn off the self-view● Enter or exit the full screen● Merge the calls● Audio conferencing● Transfer the call● Play voice mail● Forward the call to voicemail● Forward the call to another number● Forward voice messages directly● Use the Device Selector menu to switch between headsets● Use the Device Selector menu to switch between cameras● Set up secure phone capabilities● Answer the call on multiple phone devices (Shared Line feature)
Configuring the connection broker—Citrix 75

NOTE: It is recommended that you reduce the video resolution to 640 x 360p with 30fps on the Wyse 3040 Thin Client.
For information about troubleshooting your Cisco Jabber, see the Deployment and Installation Guide for Cisco Jabber Softphonefor VDI at www.cisco.com.
For information about Cisco Jabber-related issues, see the Release notes for Cisco Jabber Softphone for VDI document atwww.cisco.com.
For information about accessories for headsets and speakers, see the Unified Communications Endpoint and Client Accessoriesarticle at www.cisco.com.
Using Device Selector
About this task
Cisco Jabber Softphone for VDI consists of a component called Device Selector. Use the Device Selector menu to manageyour audio devices and cameras.
If you have multiple devices connected to the thin client, you can view your active device, or select a different device. To enablea device, do the following:
Steps
1. In the Windows notification area, click the Device Selector icon.
The available devices are listed.
2. Click a device to make it active.
Verify the Cisco Jabber connection status
About this task
This section describes how to verify the Cisco Jabber connection status on your thin client.
Steps
1. Install the correct connector on the remote desktop.
2. Install the correct package on the ThinOS device.
3. Connect any audio or video devices.
4. Connect to a Citrix desktop, and start the Cisco Jabber application.
5. Open the Settings menu, and go to Help > Show connection status.The Connection Status window is displayed.
6. Click JVDI Details, and confirm the following attributes:
● JVDI Client version● JVDI Agent version● Virtual Channel status● SIP status● Softphone CTI status
7. Establish a video or an audio call.
8. Answer the call by either clicking the mouse or using the headset button.
9. Verify the call statistics.
For more information about verifying your installation and collecting the troubleshooting information, see the Ciscodocumentation at www.cisco.com.
76 Configuring the connection broker—Citrix

Cisco Jabber call statistics
Table 23. Cisco Jabber call statistics
Platform Citrix Apps and Desktops VDI Video resolution Frame rate
Wyse 5470 All-in-OneThin Client
7.15 LTSR CU5 Windows 10 x64 1280 x 720p 25 fps
Wyse 5470 Thin Client 7.15 LTSR CU5 Windows 10 x64 1280 x 720p 25 fps
Wyse 5070 Thin Client 7.15 LTSR CU5 Windows 10 x64 1280 x 720p 30 fps
Wyse 3040 Thin Client 7.15 LTSR CU5 Windows 10 x64 1280 x 720p 30 fps
Wyse 5470 All-in-OneThin Client
7.15 LTSR CU5 Windows 10 x64 640 x 360p 25 fps
Wyse 5470 Thin Client 7.15 LTSR CU5 Windows 10 x64 640 x 360p 25 fps
Wyse 5070 Thin Client 7.15 LTSR CU5 Windows 10 x64 640 x 360p 30 fps
Wyse 3040 Thin Client 7.15 LTSR CU5 Windows 10 x64 640 x 360p 30 fps
Limitations
● When you minimize a VDI desktop, the video screen on the Cisco Jabber application remains on the ThinOS desktop.● When you launch a VDI desktop in window mode, the position of the video screen on the Cisco Jabber application is offset.● When you are making video calls on the Wyse 3040 Thin Client, it is recommended to restrict the video to 360p on the
server side. Due to high CPU usage, video calls in 720p are not supported on the Wyse 3040 Thin Client.● Due to poor video performance, it is recommended not to use 4K displays to make video calls. This limitation is applicable for
all the ThinOS platforms.
Microsoft Teams Audio OptimizationThinOS supports audio optimization for Microsoft Teams using Citrix Workspace app 2004 or later. This feature is supportedfrom ThinOS 9.0 MR1 release onwards. To enable the Microsoft Teams audio optimization feature, you must meet the followingrequirements:
● Install the Microsoft Teams on your VDI desktop. For more information about the Microsoft Teams installation, see theOptimization for Microsoft Teams article at docs.citrix.com.
● Review the system requirements of Citrix Virtual Apps and Desktops and VDA. For more information about the systemrequirements, see the Optimization for Microsoft Teams article at docs.citrix.com.
● Enable the Microsoft Teams redirection policy is enabled in Citrix Studio. For more information about how to enable theMicrosoft Teams redirection, see the Multimedia policy settings article at docs.citrix.com.
On the ThinOS client side, you must download the latest Citrix package from Dell.com/support and install the package usingAdmin Policy Tool or Wyse Management Suite. For information about how to install the ThinOS application packages, seethe Upload and install ThinOS 9.x application packages using Admin Policy Tool or Upload and install ThinOS 9.x applicationpackages using Wyse Management Suite.
To verify if the Microsoft Teams application works in the optimized mode, click About > Version to view the Citrix HDXOptimized legend. For more information about how to verify the Microsoft Teams audio optimization, see the Optimization forMicrosoft Teams article at docs.citrix.com.
Table 24. Microsoft Teams optimization feature matrix
Feature ThinOS
Long audio call Supported
Call - Make audio call Supported
Call - Answer audio call Supported
Call - Make video call Limited support²
Configuring the connection broker—Citrix 77

Table 24. Microsoft Teams optimization feature matrix (continued)
Feature ThinOS
Call - Answer video call Limited support²
Call - Turn camera on or off Not supported
Call - Enter or exit full screen Supported
Call - Hold or resume call Not supported
Call - End call Supported
Call - Mute or unmute audio Supported
Call - Transfer Not supported
Call - Consult then transfer Not supported
Call - Keypad Not applicable
Call - Start or stop recording Not supported
Call - Turn off or turn on incoming video Not supported
Call - Group video call Limited support²
Call - Group audio call Supported
Call - Invite someone during call Supported
Share screen - Desktop Limited support²
Share screen - Microsoft PowerPoint Limited support²
Chat Supported
Audio call in VDI server desktop Supported
Audio call in published Microsoft Teams application Supported
Video call in VDI server desktop Not supported
Video call in published Microsoft Teams application Not supported
Devices - Plugin or unplugin headset Not supported
Devices - Switch headset Not supported
Devices - Plugin or unplugin camera Not supported
Devices - Switch camera Not supported
Headset buttons – Answer, mute, or end call. Limited support¹
¹When using a headset, you cannot answer or end the call. This issue is due to a limitation on Citrix Workspace app 2004 forLinux.
²Video call and share screen features are not supported on Wyse 3040 Thin Client.
For limitations on Microsoft Teams Optimization, see the latest Dell Wyse ThinOS 9.0 Release Notes at www.dell.com/support.
Citrix ADCThinOS supports Citrix Application Delivery Controller (ADC), formerly known as Citrix NetScaler. The following authenticationmethods are supported on ThinOS:● Lightweight Directory Access Protocol (LDAP)● RSA● DUO● SMS PASSCODE● Native OTP
78 Configuring the connection broker—Citrix

● Federated Authentication Service with Azure active directory● OKTA
Citrix two-factor authentication
ThinOS supports Citrix two-factor authentication that authenticates the identity of the user twice before granting access,adding an extra level of security.
For local authentication, there must be a user profile that is created in the Citrix ADC database. For external authentication,the username and password that is entered must be the same as registered in the authentication server. After a successfulvalidation of the username and password, the user is requested for another level of authentication.
ThinOS supports LDAP, RSA+LDAP, SMS Passcode, DUO, OKTA, and Azure MFA authentications by default. The user must onlyprovide the Citrix ADC gateway address.
To log in to NetScaler Gateway that uses LDAP with RSA authentication, you must select LDAP+RSA in the WyseManagement Suite policy. You can also go to Admin Policy Tool and configure the NetScaler/ADC Authentication Methodoption in the Citrix Broker Settings window.
For specific users who want to use Citrix ADC authentication methods, such as LDAP with MFA, it is recommended that youconfigure the NetScaler/ADC Authentication Method with LDAP either using the Wyse Management Suite policy or theAdmin Policy tool.
Configure Citrix ADC using LDAP and RSA
About this task
This section describes how to configure the Citrix ADC (formerly NetScaler) using LDAP and RSA authentication.
Steps
1. Go to NetScaler > NetScaler Gateway > Virtual Servers, and click Edit.
2. Set the primary and secondary authentications based on the following scenarios:
● If you use LDAP and RSA login, ensure that the primary authentication is LDAP and secondary authentication is RADIUS.You must also ensure that the NetScaler Gateway Authentication Method in the Wyse Management Suite policy orthe Admin Policy Tool is configured as LDAP+RSA.
● If you use RSA and LDAP login, ensure that the primary authentication is RADIUS and secondary authentication is LDAP.● If you use only LDAP login, ensure that the primary authentication is LDAP and secondary authentication is none.
3. Go to System Setup > Remote Connections > Broker setup, enter the Citrix ADC server address in the Broker Serverfield.
4. Log off from the client desktop, or restart the thin client.The login window for Citrix ADC is displayed.
For more information about configuring Citrix ADC with LDAP, RSA authentication, see the Citrix NetScaler Gateway Guideat www.citrix.com.
Configuring Citrix ADC using DUO
About this task
To configure the Citrix ADC (formerly NetScaler) using DUO authentication, do the following:
Steps
1. Go to NetScaler > NetScaler Gateway > Virtual Servers, and click Edit.
2. Ensure that the primary authentication is RADIUS that is configured with the DUO authentication RADIUS.
3. Ensure that the secondary authentication is none.
4. Enter the broker address in the ThinOS user interface.
Configuring the connection broker—Citrix 79

Example
For more information about configuring Citrix ADC with DUO authentication, see the Citrix NetScaler Gateway Guide atwww.duo.com.
Configure Citrix ADC using CensorNet MFA authentication
Prerequisites
SMS PASSCODE is re-branded as CensorNet MFA. You can configure the Citrix ADC (formerly NetScaler) to use a OneTime Passcode/Password (OTP) in the form of a personal identification number (PIN) or passcode. To obtain this one-timepassword, you must install CensorNet app on your mobile. After you enter the passcode or PIN, the authentication serverinvalidates the one-time password. You cannot enter the same PIN or password again. For more information about configuringone-time passcode, see the Citrix documentation.
Prerequisites● Citrix ADC (formerly NetScaler) v12.0 and later is installed on your client.● SMS PASSCODE v9.0 SP1 or later is installed and configured in your network. You can download the SMS PASSCODE v9.0
file from download.smspasscode.com/public/6260/SmsPasscode-900sp1.● Remote Authentication Dial-In User Service (RADIUS) authentication policy is configured and bind to the Citrix ADC server.● CensorNet app is installed and configured on your mobile device.
About this task
To use the one-time passcode on ThinOS, do the following:
Steps
1. Log in to ThinOS and connect to the ADC URL.
2. Enter your credentials, and press Enter.The PASSCODE dialog box is displayed. You will receive a push notification from the CensorNet App on your phone with thecode.
3. Click OK.If the authentication is successful, you are logged into the Citrix session.
Citrix ADC Native OTP
Citrix ADC (formerly NetScaler) Native OTP enables Citrix ADC Gateway to use one-time passwords (OTPs) for authenticationwithout the need of an extra authenticating server. A one-time password that is generated by Google Authenticator isconsidered to be highly secure as passcodes are randomly generated.
If you access the Broker agent using Citrix ADC native OTP authentication, lock terminal is not supported. When you try to uselock terminal, a message is displayed where you can click either Continue to log off or clickCancel to stay on the screen.
For more information about Native OTP support for authentication, see the NetScaler Gateway12.0 documentation atdocs.citrix.com.
Log in to Citrix ADC using the passcode
Prerequisites
● Ensure that you are using Citrix ADC (formerly NetScaler) 12.0 build 51.24 and later versions.● Ensure that you have registered your device with Citrix ADC. For a detailed procedure on how to register your device with
Citrix ADC, see the Native OTP support for authentication article at docs.citrix.com.
About this task
This section describes how to log in to Citrix ADC using the OTP.
Steps
1. From the desktop menu, click System setup > Remote Connections.
80 Configuring the connection broker—Citrix

The Remote Connections dialog box is displayed.
2. Click the Broker Setup tab and select Citrix from the Select Broker Type drop-down list.
3. Enter the IP address of the Citrix ADC FQDN server in the Broker Server field.You can configure other options if required.
4. Click OK.The NetScaler login window is displayed.
5. Launch the Google Authenticator application on your phone and get the passcode.
6. In the Citrix ADC login window, enter the passcode and click OK.If the authentication is successful, you are logged into Citrix ADC.
Citrix Federated Authentication Service SAML with MicrosoftAzure Active Directory
ThinOS supports the Citrix Federated Authentication Service with Microsoft Azure Active Directory during single sign-on toCitrix ADC using the Security Assertion Markup Language (SAML) based authentication. The FAS server delegates the userauthentication to the Microsoft ADFS server or Azure AD with Security Assertion Markup Language (SAML). Both, Azure ADMultiple Factors Authentication (MFA) and Self-service password reset (SSPR), are supported.
If you access the Broker agent using SAML, lock terminal is not supported. When you try to use lock terminal, a message isdisplayed where you can click either Continue to log off or click Cancel to stay on the screen.
Enable Azure Multiple Factor Authentication for Citrix ADC Single Sign-onwith SAML Authentication
Prerequisites
● Create an Azure AD user in Azure Active Directory.● Enable the Multiple Factor Authentication (MFA) for the user.● Add the user to Azure AD Citrix ADC (formerly NetScaler) Enterprise application users and groups.● Ensure that the shadow account of the user exists in local domain users group.● Ensure that the SAML authentication policy is enabled. For more information, see the NetScaler Gateway documentation at
docs.citrix.com.
About this task
This section describes how to log in to Citrix ADC using SAML with Azure Multiple Factor Authentication.
Steps
1. From the desktop menu, click System setup > Remote Connections.The Remote Connections dialog box is displayed.
2. On the Broker Setup tab, select Citrix from the Broker type drop-down list.
3. Enter the Citrix ADC Gateway URL in the Broker field, and click OK.The login window is displayed.
4. Enter the username of the Azure AD user and click Next.
5. Enter the initial password for the Azure AD user, and click Sign in.
6. In the More information required window, click Next.
7. On the Additional Security Verification page, do the following:
a. From the How should we contact you? drop-down list, select any one of the following methods:
● Authentication phone● Mobile app
b. If you select Authentication phone, enter your phone number. If you select Mobile App, click Set up and follow theon-screen instructions to add an account to the Microsoft authenticator app.
c. Click Save.
8. Enter the Azure AD username with the initial password again.
Configuring the connection broker—Citrix 81

9. If you are using mobile app, approve the notification. If you are using the authentication phone, verify your informationthrough a phone call or a text code.
10. Log in to Citrix ADC and launch the session.
Enable Azure AD Self-Service Password Reset function for Citrix ADC SingleSign-on with SAML authentication
Prerequisites
1. Create an Azure AD user in Azure Active Directory.2. Add the user to Azure AD Citrix ADC (formerly NetScaler) Enterprise application users and groups.3. Ensure that the shadow account of the user exists in local domain users group.4. Ensure that Self-Service Password Reset Enabled option is selected in Azure AD for the user.
About this task
This section describes how to enable Azure AD Self-Service Password Reset function for Citrix ADC Single Sign-on with SAMLauthentication.
Steps
1. On the Broker setup tab, enter the Citrix ADC Gateway URL, and click OK.The login window is displayed.
2. Enter the user credentials of the Azure AD user and click Next.
3. On the Don't lose access to your account! page, configure the following options:● Authentication Phone
a. Click Set it up now.b. From the drop-down list, select your country code.c. Enter your phone number.d. Click either text me or call me.
A verification code is received on your phone by call or text message.
e. Enter the verification code and click Verify.● Authentication Email
a. Click Set it up now.b. Enter the valid email address.c. Click email me.
A verification code is sent to your email.
d. Enter the verification code and click Verify.
4. Click Finish.
5. Continue with the user login.
Configure Citrix NetScaler using Okta
Okta provides Single Sign-On (SSO) capability using Remote Authentication Dial-In User Service (RADIUS) for Citrix VirtualApps and Desktops. ThinOS supports Okta through the Citrix NetScaler Gateway 11.0 or later. The Okta RADIUS Agent isused for user authentication. The Okta RADIUS server agent assigns the user authentication to Okta using single-factorauthentication (SFA) or multifactor authentication (MFA).
For more information about configuring Citrix NetScaler Gateway to use the Okta RADIUS Agent, see the Citrix NetScalerGateway Radius Configuration Guide at help.okta.com.
NOTE:
● On the ThinOS client, you need UPN at the login window.
● Phone authentication by using Okta is supported only in US and Canada.
82 Configuring the connection broker—Citrix

Limitation
Only OKTA with Citrix Gateway (RADIUS) is verified. However, the StoreFront with OKTA SAML authentication or OKTA withCitrix Gateway (SAML) is not verified ..
Citrix Cloud services
ThinOS supports Citrix Cloud services. It acts as a single management console to deploy applications or desktops on any virtualor cloud setup for a secure digital workspace. For more information about Citrix Cloud services, see the Citrix Cloud article atdocs.citrix.com.
Getting started with Citrix Cloud
About this task
This section describes how to log in to the Citrix Cloud server on your thin client.
Steps
1. From the desktop menu, click System Setup > Remote Connections.The Remote Connections dialog box is displayed.
2. On the Broker Setup tab, select Citrix from the Select Broker Type drop-down list, and do the following:
a. Select the Workspace Mode check box if you want to enable the Citrix Workspace-based layout of publishedapplications and desktops. If this option is not selected, you are logged in to the classic mode.
b. In the Broker Server field, enter the Citrix Cloud URL.c. In the Auto Connect List field, enter the name of the desktops that you want to launch automatically after logging
in to Citrix Cloud. You can enter more than one desktop. Each desktop name is separated by a semi-colon and is casesensitive.
d. Select the Enable automatic reconnection at logon check box if you want to automatically reconnect to thedisconnected sessions or both active and disconnected sessions during login. You must click either of the followingoptions:
● Connect to disconnected session only● Connect to active and disconnected sessions
e. Select the Enable automatic reconnection from button menu check box if you want to automatically reconnect tothe disconnected sessions or both active and disconnected sessions by using the Reconnect button in the button menu.You must click either of the following options:
● Connect to disconnected session only● Connect to active and disconnected sessions
3. Click OK to save your settings.
4. In the login dialog box, enter your domain username and password to log in to Citrix Cloud.
ICA icons are displayed in Connection Manager and on the client desktop.
Automatically configure using DNS for email discoveryYou can connect to a Citrix session by using an email address. The email address is used to discover the StoreFront or NetScalerGateway URL.
Prerequisites
● Install a valid server certificate on the StoreFront/AppController server and Access Gateway appliance.● The full chain or path to the root certificate must be correct.
About this task
This section describes how to connect to a Citrix session by using email-based discovery.
Configuring the connection broker—Citrix 83

Steps
1. Add a service record (SRV) to your DNS server to enable email-based discovery. To add a service record to the DNS server,do the following:
a. Log in to the DNS server.b. Go to DNS > Forward Lookup Zone.c. Right-click Forward Lookup Zone, and click Other New Records.d. In the Resource Record Type dialog box, select Service Location (SRV).e. Click Create Record.f. In the Service field, enter _citrixreceiver.
g. In the Protocol field, enter _tcp.
h. In the Port number field, enter the port number.i. In the Host offering this service field, enter the FQDN and the port for the StoreFront/AppController server or Access
Gateway appliance.
NOTE: You cannot use the same FQDN for both StoreFront and the Access Gateway virtual servers.
2. On ThinOS, go to System Setup > Remote Connections.The Remote Connections dialog box is displayed.
3. On the Broker Setup dialog box, select Citrix from the Broker Type drop-down list.
4. Enter the email address in the Broker Server field, and click OK.
5. Restart the thin client.
6. In the login window, enter your email address and password to log in to the session.
Citrix HDX Adaptive transport (EDT)ThinOS supports Citrix HDX Adaptive transport for Citrix Virtual Apps and Desktops. HDX Adaptive transport enables the ICAvirtual channels to automatically adapt to varying LAN and WLAN connections and improves the data throughput.
For more information about Citrix HDX Adaptive transport, see the Citrix documentation at docs.citrix.com.
Enable HDX Adaptive Transport
About this task
This section describes how to enable the HDX Adaptive Transport policy setting on Citrix Studio.
Steps
1. Go to Citrix Studio > HDX Adaptive Transport policy.
2. Set the value for HDX Adaptive Transport to either Preferred or Diagnostic mode.
For more information about configuration on Citrix Studio, see the Adaptive Transport article at docs.citrix.com.
3. On the ThinOS client, start a session from the Citrix Workspace app.
The connection is established using adaptive transport.
NOTE: If the connection type is HDX and the protocol is UDP, EDT is active for the session. If the protocol is TCP, the
session is in fallback mode.
For information about how to verify if HDX Adaptive Transport is active, see the FAQs section in this guide.
HDX Adaptive Display V2ThinOS supports the selective use of a video codec (H.264) to compress graphics during video playback in an ICA session. Thisfeature combines the H.264 mode and Thinwire Compatible mode for a better user experience.
For more information about HDX Adaptive Display V2, see the Citrix documentation at docs.citrix.com.
84 Configuring the connection broker—Citrix

Enable HDX Adaptive Display V2
About this task
This section describes how to enable HDX Adaptive Display V2 using Citrix Studio.
Steps
1. Go to Citrix Studio > Use video codec for compression policy.
2. Select the For actively changing regions option.
3. On the ThinOS client, launch an ICA desktop.
4. Open the web browser and play your preferred video.
HDX adaptive display V2 is used for video decoding on the ThinOS client. Thinwire uses JPEG (lossy) for complex orphotographic imagery and RLE (lossless) for text imagery. The rest of the screen is decomposed by Thinwire.
For more information about the Use video codec for compression policy, see the Graphics Policy Settings article atdocs.citrix.com.
Browser Content RedirectionBrowser content redirection enables any web browser content, including HTML 5 videos, to be redirected to the ThinOS clientand not redirected on the VDA side.
Browser content redirection proxy setting— If you use the browser content redirection proxy settings, enter a valid proxyaddress and port number in the browser content redirection proxy configuration policy. Citrix Workspace app follows the serverfetch and client render mechanism to fetch URL from VDA and redirect browser content from the client.
NOTE: In ThinOS 9.0, browser content redirection uses a WebkitGTK+ based overlay to render the content. Chromium
Embedded Framework (CEF) for browser content redirection will be enabled in later releases.
Enable Browser Content Redirection
Prerequisites
● If you are using a Chrome browser, import the BCR extension into the browser.● If you are using a IE browser, ensure the Citrix HDXJsInjector add-on exists in the browser.● If you are using an RDS-hosted desktop, and if you are using a IE browser, install the BCR add-on manually from Citrix virtual
apps and desktops IOS installer.
About this task
This section describes how to enable Browser Content Redirection using Citrix Studio.
Steps
1. Go to Citrix Studio > Browser Content Redirection policy.
2. Select the Allowed option.This enables the Browser Content Redirection policy.
3. In the Browser Content Redirection Access Control List (ACL) policy settings, add URLs that can use the browsercontent redirection.
NOTE: Ensure that the URL is not listed in the Browser Content Redirection Blacklist Configuration policy.
4. On the ThinOS client, launch an ICA desktop.
5. Open either IE or Chrome and enter the URL that you have added in the Access Control List (ACL).The browser viewport is rendered on the ThinOS client side. Browser attributes such as Address Bar and Status Bar still runon the VDA side.
For more information about Browser Content Redirection, see the Browser Content Redirection article at docs.citrix.com.
Configuring the connection broker—Citrix 85

HTML5 Video RedirectionHTML5 Video Redirection controls and optimizes the way Citrix Virtual Apps and Desktops servers deliver HTML5 multimediaweb content to users. This feature is available for internal web pages only. It requires the addition of JavaScript to the webpages where the HTML5 multimedia content is available, for example, videos on an internal training site.
The following policies must be enabled on the server side:
● Windows Media redirection—By default this option is enabled.● HTML5 video redirection—By default this option is disabled.
For more information about the ICA Multimedia policy settings, see the Citrix documentation at docs.citrix.com.
For information about how to verify if HTML5 Video Redirection is working, see the FAQs section in this guide.
Windows Media RedirectionWindows Media Redirection enables the audio and video to be rendered on the user device instead of running on the server side.Using the Windows Media Redirection feature, you can optimize the performance of Windows Media player on virtual Windowsdesktops.
For more information about Windows Media Redirection, see the Citrix documentation at docs.citrix.com.
Enable Windows Media Redirection
Prerequisites
Ensure that the Windows Media redirection policy is set to Allowed in Citrix Studio. By default, the value is set to Allowed.
About this task
This section describes how to enable the Windows Media Redirection feature on your thin client.
Steps
1. On the ThinOS desktop, click Connection Manager.
2. Click Global Connection Settings.
3. Select the Enable HDX/MMR check box for the ICA connection.
4. Go to System Setup > Remote Connections.
5. On the Broker Setup tab, enter the Citrix server in the Broker Server field, and click OK.
6. Launch an ICA desktop.
7. Open Windows Media Player and play a video or an audio file.
The following types are supported:● H.264 video● WMV-9 video● WMV-8 video● WMV-7 video● WMC1 video● MP4 video● 4K video● MOV/AVI video● AAC/MP3/WMA file
For information about how to check if Windows Media Redirection is working, see the FAQs section in this guide.
For more information about the ICA Multimedia policy settings, see Citrix Product documentation at docs.citrix.com.
86 Configuring the connection broker—Citrix

Enable UDP audio in a Citrix sessionCitrix recommends that you use audio over User Datagram Protocol (UDP) in low-bandwidth network connections for betteraudio quality. ThinOS does not support UDP audio over Citrix ADC (formerly NetScaler) due to Linux Citrix Workspace applimitation.
Steps
1. Start the Admin Policy Tool on your ThinOS 9.0-based device or open the ThinOS 9.x Policy settings in WyseManagement Suite.
If you are using the Admin Policy Tool on ThinOS, you must first select the audio quality as Medium and then enable UPDaudio. UPD audio is automatically disabled when you select the audio quality as High on Admin Policy Tool. However, theUPD audio is not automatically disabled when you are configuring the setting using Wyse Management Suite. UPD audio maynot work if you set the audio quality as High using Wyse Management Suite.
2. On the Advanced tab, expand Session Settings, and click Citrix Session Settings.
3. In the Basic Settings section, click the Enable UPD Audio toggle key to ON state.
4. From the Audio Quality drop-down list, select Medium.
If you are using the Admin Policy Tool on ThinOS, you must first select the audio quality as Medium and then enable UPDaudio. UPD audio is automatically disabled when you select the audio quality as High on Admin Policy Tool. However, theUPD audio is not automatically disabled when you are configuring the setting using Wyse Management Suite. UPD audio maynot work if you set the audio quality as High using Wyse Management Suite.
QUMU Video Optimization Pack for CitrixQUMU's Video Optimization Pack (VOP) for Citrix enables you to stream quality videos to endpoints managed by Citrix VirtualApps and Desktops servers by enabling client-side fetching. The QVOP video player runs on the client side and the video streamuses the client's network to go directly to QUMU's Video Control Center instead of accessing through VDI desktops.
Prerequisites
Ensure that the Windows Media redirection policy is set to Allowed in Citrix Studio. By default, the value is set to Allowed.
About this task
This section describes how to use QUMU Video Optimization Pack for Citrix on your thin client.
Steps
1. Configure the Citrix server in the Broker setup window.
2. Launch an ICA desktop.
3. Download and install the QUMU Media Player on the remote desktop.
NOTE: Contact your QUMU partner to get the QUMU media player.
4. Open the Internet Explorer browser and play a QUMU published video.
For more information about the ICA Multimedia policy settings, see Citrix Product documentation at docs.citrix.com.
Keyboard layout synchronization in VDAIn Citrix Workspace app, the Keyboard Dynamic synchronization mode functions differently on a Linux client from a Windowsclient. In general, on a Linux client, the keyboard output follows the client keyboard layout, which is different from theWindows VDA layout. Windows clients follow Windows VDA layout which is same as the Windows client keyboard layout. If aLinux client keyboard is synchronized to a Windows VDA, users may observe unpredictable keyboard output. Also, in dynamicsynchronization mode, Citrix Workspace app for Linux does not support VDA users to switch the keyboard layout inside a VDAsession.
Configuring the connection broker—Citrix 87

In the server default mode, both Linux and Windows use the session (VDA) side keyboard layout with predictable output. In thisrelease, ThinOS has a customized Citrix package where the keyboard layout is set to server default mode for predictable output.The keyboard layout that you select on the thin client is not automatically synchronized in the VDA session. VDA users mustselect or switch the keyboard layout inside the VDA session using the Windows Input Method Editor (IME) language bar.
As a VDA administrator, you must configure the VDA desktop with the required keyboard language layout options. The IMElanguage bar must be enabled on the Windows lock screen. The VDA user can select the appropriate keyboard language layouton the Windows lock screen.
In scenarios such as opening a new application in a VDA session, locking, or unlocking the VDA session, the keyboard layout fallsback to the VDA default layout. For example, EN_US. This is a known issue for a Linux client in the server default mode.
You can customize VDA registry settings for a consistent keyboard layout in the VDA session.
● For a desktop operating system VDA, the feature is enabled by default.● For a server operating system VDA, you can enable the feature using the system registry.
1. In the system registry of VDA, go to HKEY_LOCAL_MACHINE\SYSTEM\CurrentControlSet\Control\KeyboardLayout.
2. Create a DWORD entry IgnoreRemoteKeyboardLayout=1.
By default, the IgnoreRemoteKeyboardLayout entry is unavailable. The default keyboard is set to ENG, irrespectiveof the Control Panel setting.
For example, open an application, lock, or unlock the session, the keyboard is set to ENG. To resolve this issue, ensurethat you set IgnoreRemoteKeyboardLayout=1.
For information about the Keyboard Layout Modes and Keyboard Layout rules in Citrix Workspace app, see the Citrix VirtualApps and Desktops keyboard and IME configurations article at www.citrix.com/blogs.
Table 25. Citrix Workspace app keyboard layout configuration for VDA users on ThinOS
VDA user scenario ThinOSbuild
WyseManagementSuite settings
VDA settings Summary
The client keyboard issynchronized to VDA,and the keyboardlayout is not switchedin the VDA desktop orapplication.
Disabled inThinOS9.0.4024
Configure therequired keyboardlayout for localclient users andremote VDA users.
Set the VDApolicy for Dynamicsynchronization.
Keyboard output follows the client Linuxkeyboard layout and not the Windowslayout. As a result, there can beunpredictable mismatch in the keyboardoutput. Citrix Workspace app Linuxkeyboard sync mode does not supportswitching the layout in VDA.
The client keyboard issynchronized to VDA,and the keyboardlayout is switchedin the VDA desktopusing the IMElanguage bar.
The client keyboard issynchronized to VDA,and the keyboardlayout is switchedin VDA publishedapplications using theIME language bar.
The client keyboardis not synchronizedto VDA, and thekeyboard layout isnot switched in theVDA desktop orapplication.
Supported inThinOS9.0.4024 withCitrixpackage2006_1146
Configure therequired keyboardlayout for using theclient locally. Forexample, sign on.There is no impactto the keyboardusage on remoteVDA.
No specific settingsare required.For recommendedsettings, see theVDA settings forserver defaultmode section.
Keyboard layout follows the VDA Windowslayout with predictable output.
Opening a new application in a VDA session,locking or unlocking the VDA session, thekeyboard layout falls back to the VDAdefault layout. For example, EN_US.
The following are the recommended settingsfor VDA administrators:
● Enable multiple layouts in VDA IME.
The client keyboardis not synchronizedto VDA, and the
88 Configuring the connection broker—Citrix

Table 25. Citrix Workspace app keyboard layout configuration for VDA users on ThinOS (continued)
VDA user scenario ThinOSbuild
WyseManagementSuite settings
VDA settings Summary
keyboard layout isnot switched in theVDA desktop usingthe IME language bar.
● Enable IME on the Windows lock screen.● Set the default keyboard layout to any
non-English keyboard layout.● In the system registry of VDA, go to
HKEY_LOCAL_MACHINE\SYSTEM\CurrentControlSet\Control\Keyboard Layout and create the followingDWORD entry:
IgnoreRemoteKeyboardLayout=1.
For more information, see theCitrix article CTX223316 atwww.support.citrix.com.
The client keyboardis not synchronizedto VDA, and thekeyboard layout isnot switched in VDApublished applicationsusing the IMElanguage bar.
Table 26. Language keyboard layout settings
ThinOSkeyboardlayout
Windows layout Wyse Management Suitesettings
CitrixWorkspace appLinux dynamicsynchronization
Recommended settings
Polish Keyboard layoutpartially matcheswith the Windowslayout.
Not supported; will besupported in future release.
Disabled inThinOS 9.0.4024
On ThinOS 9.0.4024 with CitrixWorkspace app 2006_1146, thefollowing are the recommendedsettings:● On the client side, select the
keyboard layout that fully matcheswith the Windows layout for localusage.
● On the VDA side, select the bestlayout from the Windows IMElanguage bar after the connection isestablished.
● For VDA administrators, see theCitrix Workspace app keyboardlayout configuration for VDA userson ThinOS table in this document.
Polish(Legacy)
Keyboard layoutfully matcheswith the Windowslayout.
Not supported; will besupported in future release.
Disabled inThinOS 9.0.4024
French(France)
Keyboard layoutpartially matcheswith the Windowslayout.
Supported Disabled inThinOS 9.0.4024
French(Microsoft)
Keyboard layoutfully matcheswith the Windowslayout.
Not supported; will besupported in future release.
Disabled inThinOS 9.0.4024
Belgian Keyboard layoutdoes not matchwith the Windowslayout.
Not supported; will besupported in future release.
Disabled inThinOS 9.0.4024
Belgian(Comma)
Keyboard layoutfully matcheswith the Windowslayout.
Not supported; will besupported in future release.
Disabled inThinOS 9.0.4024
Spanish Keyboard layoutdoes not matchwith the Windowslayout.
Supported Disabled inThinOS 9.0.4024
VDA settings for Server Default mode
When set to server default mode, the keyboard layout falls back to the VDA default layout. For example, EN_US. This issuecan be related to Citrix Workspace app or Windows server operating system 2016 and 2019. All workarounds may require youto modify registry keys on the server side. For more information about workarounds, see the Citrix articles CTX269153 andCTX223316 at support.citrix.com. If you do not want to modify registry keys, contact the Citrix support team or the Microsoftsupport team.
Configuring the connection broker—Citrix 89

Table 27. Citrix Workspace app Linux keyboard layout settings—Client and VDA
Mode Client-side settings Server or VDA-side settings Additional information
Serverdefault (Thismode is setby default inThinOS9.0.4024).
~/.ICAClient/wfclient.ini[WFClient]keyboardlayout=(ServerDefault)
Setting is configured on theStoreFront server. For example,
C:\inetpub\wwwroot\Citrix\[store name]\App_Data\default.ica[WFClient]keyboardlayout=(ServerDefault)
Set the mode on either the clientside or the server side. Thismode takes the highest priority.
Specifickeyboard(This mode isdisabled inThinOS9.0.4024).
~/.ICAClient/wfclient.ini[WFClient]keyboardlayout=French
Setting is configured on theStoreFront server. For example,
C:\inetpub\wwwroot\Citrix\[store name]\App_Data\default.ica[WFClient]keyboardlayout=French
Set the mode on either the clientside or the server side. You mustset the value in /opt/Citrix/ICAClient/module.ini[KeyboardLayout].
Dynamicsync(Available insubsequentreleaseversions ofXenApp 1912and CitrixWorkspaceApp 1912.However,this mode isdisabled inThinOS9.0.4024).
/opt/Citrix/ICAClient/config/module.ini[ICA 3.0]KeyboardSync=On~/.ICAClient/wfclient.ini[WFClient]keyboardlayout=(UserProfile)
XenApp server version 2006 andhigher—Enable the following policieson the server end:● Set the Client Keyboard
Layout synchronization and IMEimprovement policy to Supportdynamic client keyboardlayout sychronization and IMEimprovement.
● Set the Enable Unicodekeyboard layout mapping toAllowed.
XenApp server version before 2006—There are no policies availableto enable dynamic sync mode. Youmust set the registry key in theWindows VDA desktop Keyboard syncconfiguration. The setting is enabledby default on Windows Server 2012and Windows 10. The setting isdisabled by default on Windows Server2016 and Windows Server 2019.
To enable the setting, add thefollowing registry key:HKLM\Software\Citrix\ICA\IcaIme\DisableKeyboardSyncvalue=DWORD.
To enable Unicode Keyboard LayoutMapping for Windows VDA, add thefollowing registry keys:
● HKEY_LOCAL_MACHINE\SOFTWARE\Citrix\CtxKlMap\EnableKlMap value= DWORD 1
● HKEY_LOCAL_MACHINE\SOFTWARE\Citrix\CtxKlMap\DisableWindowHook value=DWORD 1
Set the mode on both the clientside and the server side.
Sync once(This mode is
/opt/Citrix/ICAClient/config/module.ini
Not available Not available
90 Configuring the connection broker—Citrix
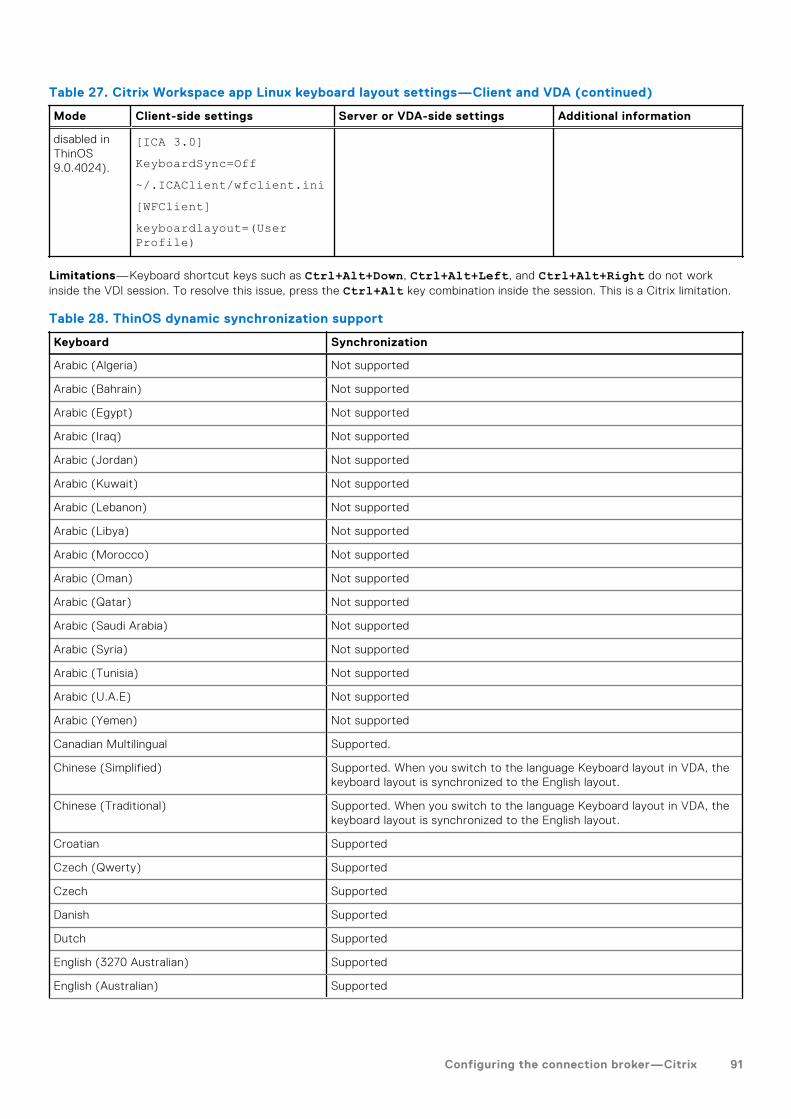
Table 27. Citrix Workspace app Linux keyboard layout settings—Client and VDA (continued)
Mode Client-side settings Server or VDA-side settings Additional information
disabled inThinOS9.0.4024).
[ICA 3.0]KeyboardSync=Off~/.ICAClient/wfclient.ini[WFClient]keyboardlayout=(UserProfile)
Limitations—Keyboard shortcut keys such as Ctrl+Alt+Down, Ctrl+Alt+Left, and Ctrl+Alt+Right do not workinside the VDI session. To resolve this issue, press the Ctrl+Alt key combination inside the session. This is a Citrix limitation.
Table 28. ThinOS dynamic synchronization support
Keyboard Synchronization
Arabic (Algeria) Not supported
Arabic (Bahrain) Not supported
Arabic (Egypt) Not supported
Arabic (Iraq) Not supported
Arabic (Jordan) Not supported
Arabic (Kuwait) Not supported
Arabic (Lebanon) Not supported
Arabic (Libya) Not supported
Arabic (Morocco) Not supported
Arabic (Oman) Not supported
Arabic (Qatar) Not supported
Arabic (Saudi Arabia) Not supported
Arabic (Syria) Not supported
Arabic (Tunisia) Not supported
Arabic (U.A.E) Not supported
Arabic (Yemen) Not supported
Canadian Multilingual Supported.
Chinese (Simplified) Supported. When you switch to the language Keyboard layout in VDA, thekeyboard layout is synchronized to the English layout.
Chinese (Traditional) Supported. When you switch to the language Keyboard layout in VDA, thekeyboard layout is synchronized to the English layout.
Croatian Supported
Czech (Qwerty) Supported
Czech Supported
Danish Supported
Dutch Supported
English (3270 Australian) Supported
English (Australian) Supported
Configuring the connection broker—Citrix 91

Table 28. ThinOS dynamic synchronization support (continued)
Keyboard Synchronization
English (New Zealand) Supported
English (United Kingdom) Supported
English (United States) Supported
Estonian (Estonia) Supported
Finnish Supported
French (Canadian Legacy) Supported
French (Canadian) Not supported
French (France) Supported
French (France Microsoft) Not supported
French (Switzerland) Supported
German (Switzerland) Supported
German Supported
Greek Supported
Hungarian Supported
Icelandic Supported
Italian (Switzerland) Not supported
Italian Supported
Japanese (OADG109A) Supported
Japanese (KWD) Supported. When you switch to the language Keyboard layout in VDA, thekeyboard layout is synchronized to the English layout.
Korean (MS-IME2002) Supported. When you switch to the language Keyboard layout in VDA, thekeyboard layout is synchronized to the English layout.
Korean Supported. When you switch to the language Keyboard layout in VDA, thekeyboard layout is synchronized to the English layout.
Latvian (Latvia) Supported
Lithuanian (IBM) Supported
Lithuanian (Standard) Supported
Norwegian Supported
Polish Supported
Polish (Legacy) Not supported
Portuguese (Brazil) Supported
Portuguese Supported
Romanian Not supported
Russian Supported. When you switch to the language Keyboard layout in VDA, thekeyboard layout is synchronized to the English layout.
Serbian Supported
Slovenian Supported
Spanish Supported
Swedish Supported
92 Configuring the connection broker—Citrix

Table 28. ThinOS dynamic synchronization support (continued)
Keyboard Synchronization
Turkish Supported
U.S.International Not supported
NOTE: Keyboard layout dynamic synchronization mode is disabled in ThinOS v9.0.4024 build.
Keyboard enhancements on Windows VDA
ThinOS supports the Unicode Keyboard Layout Mapping on Citrix Apps and Desktops. This feature enables you to use theUnicode keyboard layout mapping for non-Windows Citrix Workspace app on the Windows VDA.
If you select a localized keyboard layout on the ThinOS local UI, the selected keyboard layout is not synchronized in the ICAsession. However, the client local keyboard layout is mapped to the existing language in the language bar of the session. Forexample, if the existing language is English (United States) in the ICA session, and if you select German layout on the ThinOSlocal UI, then the German language is not displayed on the session language bar. However, the English (United States) keyboardin the ICA session works as a German keyboard layout.
NOTE: When you select a localized keyboard such as German on the ThinOS local UI, you must not manually add the
language again in the ICA session. This is because the output of the manually added German keyboard can be disordered.
Citrix Self-Service Password ResetYou can reset the password or unlock the account after you complete the security questions enrollment.
Supported Environment
● Citrix Virtual Apps and Desktops 7.11 and later versions● Support StoreFront Server 3.7 and later versions● Self-Service Password Reset Server 1.0 and later versions
Supported platforms—All platforms are supported.
Limitation● Supports only StoreFront Server
Before resetting a password or unlocking an account
Before resetting your password or unlocking your account, you must register for the security questions enrollment. To registeryour answers for the security questions, do the following:
1. To access the Security Questions Enrollment window, do the following step that is applicable to the mode:a. In Classic mode, click the Manage Security Questions option from the PNAmenu.b. In Workspace mode, click the TASKS icon on the purple ribbon and click Start.
The Security Questions Enrollment window is displayed.
2. Enter the appropriate answers to the question set.3. Click OK to register the security questions.
Use the Account Self-Service
After the security questions enrollment is complete, and when ThinOS is connected to a StoreFront server with Self-ServicePassword Reset enabled, the Account Self-Service icon is displayed in the sign-on window.
NOTE: If you enter the wrong password more than four times in the Sign-on window, the client automatically enters the
unlock account process.
1. Click the Account Self-Service icon to unlock your account or reset your password.
Configuring the connection broker—Citrix 93

NOTE: You must register the security questions for users before using the unlock account or reset password feature.
2. Click Unlock account or Reset password based on your choice, and then click OK.
Unlock an account
After you register the security questions, do the following to unlock your account:
1. Choose a task (Unlock account) in the Account Self-Service window.2. Enter the username.
The Unlock Account dialog box is displayed.
3. Enter the registered answers to the security questions.
If the provided answers match the registered answers, then the Unlock Account dialog box is displayed.
4. Click OK to successfully unlock your account.
NOTE:
● If the provided answers are incorrect, an error message is displayed.
● If you provide the wrong answers more than three times, you cannot unlock the account or reset the password, and
error messages are displayed.
Reset a password
After you register the security questions, do the following to reset your password:
1. Choose a task (Reset password) in the Account Self-Service window.2. Enter the username.
The Reset Password dialog box is displayed.
3. Enter the registered answers to the security questions.
If the provided answers match the registered answers, then the Reset Password dialog box is displayed.
4. Enter and confirm the new password.5. Click OK to successfully change the password.
If you provide the wrong answers, you cannot reset the password, and an error message is displayed.
Citrix SuperCodecCitrix SuperCodec is a H.264 decoder integrated on the ThinOS client side. The server encodes the session image into theH.264 stream and sends it to the client side. The client decodes the H.264 stream by SuperCodec and display the image on thescreen. This feature improves the user experience, especially for HDX 3D Pro desktops.
Citrix SuperCodec is supported in Citrix Virtual Apps and Desktops (XenApp and XenDesktop) version 7.5 or later versions.
In Citrix Virtual Apps and Desktops version 7.9 and later, the default setting for Use video codec for compression isUse when preferred. For best performance on ThinOS device, it is recommended that you set the Use video codec forcompression policy to For the entire screen. You can set the policy to Do not use video codec. This policy setting allowsThinOS to use ThinWire Plus that saves bandwidth and reduces the CPU overhead. You can also set the policy to For activelychanging regions. This policy setting allows ThinOS to use Selective H.264.
● ThinWire Plus—Equivalent to the Do not use video codec option● Fullscreen H.264—Equivalent to the For the entire screen option● Selective H.264—Equivalent to the For actively changing regions
94 Configuring the connection broker—Citrix

Anonymous logonThe Anonymous logon feature enables the users to log into the StoreFront server configured with unauthenticated storewithout Active Directory (AD) user credentials. It allows unauthenticated users to access the applications instead of ADaccounts.
NOTE: Anonymous logon is not supported with legacy mode of StoreFront server.
Configure the Citrix session properties
About this task
This section describes how to configure the Citrix HDX connections on your thin client.
Steps
1. On the taskbar, click Connection Manager.The Connection Manager dialog box is displayed.
2. Select a Citrix connection from the list, and click Properties.
3. Click the Connection tab and do the following:
You can view Server or Published Application, Connection Description, Browser Servers, Host Name or ApplicationName, and Encryption Level but cannot edit these options.
a. Display Resolution—Select the display resolution for this connection.
If you select the Published Application option, the connection display enables you to select the Seamless DisplayResolution option.
b. Window mode and Full screen mode—Select the initial view of the application and desktop in a windowed screen orfull screen.
c. Autoconnect on start-up—When this option is selected, the thin client automatically connects the session on start-up.d. Reconnect after disconnect—When this option is selected, the thin client automatically reconnects to a session after
a non operator-initiated disconnect. The wait interval is the value that you set in the Delay before reconnecting box(enter the number of s 1–3600). The default is 20 s if you are a stand-alone user.
4. Click the logon tab to view Logging on area.
You can view Login Username, Password, Domain name, and Logon Mode.
5. Click the Options tab, and do the following:
a. Autoconnect to local devices—Select any options—Printers, Serials, Smart Cards, Sound, and Disks—to have the thinclient automatically connect to the devices.
NOTE: USB devices that are connected are managed in Global Connection Settings.
b. Audio Quality—From the drop-down list, select your preferred audio quality.c. Enable session reliability—When enabled, session reliability allows you to momentarily lose connection to the server
without having to re-authenticate upon regaining a connection. Instead of the connection time-out, the session is keptalive on the server and is made available to the client upon regaining connectivity. Session reliability is most relevant forwireless devices.
6. Click OK to save your settings.
Using multiple displays in a Citrix sessionThinOS supports ICA desktop multiple displays in Citrix Virtual Apps and Desktops/Citrix Virtual Apps 7.6 and later versions.
Prerequisites
● Increase the value of MaxVideoMemoryBytes REG_DWORD to support one or more 4K resolution displays. For moreinformation, see the Citrix documentation at support.citrix.com.
● Increase the display memory limit to support more color depth and higher resolution. For more information, see the Citrixdocumentation at citrix.com.
Configuring the connection broker—Citrix 95

Steps
1. Connect multiple displays to ThinOS device.
2. Go to System Setup > Display, disable Mirror Mode, and configure the display layout.
3. Launch an ICA desktop. By default, the ICA desktop is launched in the full-screen mode.
Table 29. Display details
Platforms Best Display resolution Maximum number of system displays
Standard or RDS desktop—Windows 10, 2012 R2, and 2016
HDX 3D Pro desktop—Windows 10 with NVIDIATESLA P40 GPU
Wyse 5070 Extended ThinClient
1920 x 1080 6 4
2560 x 1440 6 4
3840 x 2160 4 4
Wyse 5070 Thin Client—Pentium processor
1920 x 1080 3 3
2560 x 1440 3 3
3840 x 2160 3 3
Wyse 5070 Thin Client—Celeron processor
1920 x 1080 2 2
2560 x 1440 2 2
3840 x 2160 2 2
4. Move the display blocks as per your requirement.NOTE: For more information about the Citrix official multiple displays support, see the Citrix documentation at
support.citrix.com.
USB Printer Redirection
Prerequisites
Go to Citrix Studio, and enable the Client USB device redirection policy.
About this task
This section describes how to configure USB Printer Redirection in a Citrix session.
Steps
1. On the ThinOS desktop, open the Connection Manager window, and click Global Connection Settings.The Global Connection Settings dialog box is displayed.
2. Clear the Exclude printer devices check box, and click OK.
3. Connect a USB printer to the thin client.
4. Log in to a Citrix session.
5. Go to Control Panel > Devices and Printer, and verify if the printer driver is automatically installed.After the printer drive installation is complete, the redirected printer is listed in the Printers section.
Configure the Citrix UPD printerUse of Citrix Universal Printer Driver (Citrix UPD) ensures that all printers that are connected to the thin client can also be usedfrom a virtual desktop or application session without integrating a new printer driver in the data center. Citrix UPD is the base ofCitrix Universal Printer. It is an autocreated printer object that uses the Citrix UPD and is not tied to any specific printer definedon the client.
96 Configuring the connection broker—Citrix

About this task
This section describes how to configure the Citrix UPD usage on your thin client.
Steps
1. Connect a printer to the ThinOS client.
2. From the desktop menu, click System Setup > Printer.
The Printer Setup dialog box is displayed.
3. Enter the name of the printer in the Printer Name box.
4. Enter any string of the Printer identification in the Printer Identification box.
5. Select the type of the printer class from the drop-down list, select the check box to enable the printer device, and click OK.
NOTE: In ThinOS 9.0, only PS class is supported.
6. Start a Citrix Virtual Apps and Desktops application connection.
7. Open the Devices and Printers in the desktop or application. Notice that the printer is mapped as the UPD printer bydefault.
Next steps
To enable the printer server policies for Citrix UPD printer, see the Citrix documentation at docs.citrix.com.
Configuring the connection broker—Citrix 97

Configuring the thin client local settingsYou can configure the local settings on the device using the System Preferences, Display, Peripherals, and Printer Setupdialog boxes. Depending on user privilege level, some dialog boxes and options may not be available for use.
Configuring the system preferencesUse the System Preference dialog box to select the system preferences such as screen saver, time/date, and custominformation settings.
Configure the general system preferences
About this task
This section describes how to configure the general system settings on your thin client.
Steps
1. From the desktop menu, click System Setup > System Preferences.The System Preferences dialog box is displayed.
2. Click the General tab, and do the following:
Figure 27. General tab
a. From the Screen Saver drop-down list, select a screensaver for your device. The default value is set to Turn OffScreen.
The Disabled check box is available if you select the Screen Saver as None. Selecting the Disabled check box disablesthe Timer option and the lock terminal function.
b. In the Timer box, select the idle time after which you want the screensaver to be activated on the thin client. When thethin client is left idle for the specified idle time, the screensaver is initiated. The default value is set to 10 minutes.
c. From the Locale drop-down list, select a language to be activated for the user login-experience. The default language isset to English.
NOTE: Locale changes the language for the user login-experience screens only that are displayed during boot-up
and login. The configuration or administrator screens remain unaltered.
7
98 Configuring the thin client local settings

Only the following messages are applicable for French locales:
● Username/Password/Domain● System Information● Shut down the system, restart the system, reset the system setting to factory default● OK, Cancel● Initiating devices● Looking up IP address from DHCP, Note: Pressing CTRL-ESC keys cancel out of network check● Retry DHCP for an IP address● Waiting for network link. Verify that network cable is plugged into the back of the unit● Check Cable, No Ethernet link● Leave administrator mode● Connecting● Sign off from account● Lock Terminal, Unlock Password● Terminal is locked, Invalid unlock password
d. In the Terminal Name box, specify a name for the thin client. The default is a 14-character string that is composed ofletters WT and followed by the Ethernet MAC address of the device.
NOTE: Some DHCP servers use the value that is entered in the Terminal Name to identify the IP address lease in the
DHCP manager display.
3. Click OK to save your settings.
Set the time and date
About this task
This section describes how to configure the time and date settings on your thin client.
Steps
1. From the desktop menu, click System Setup > System Preferences.The System Preferences dialog box is displayed.
2. Click the Time/Date tab, and do the following:
Figure 28. Time and date
a. From the Time Zone drop-down list, select a time zone where the thin client operates.
Configuring the thin client local settings 99

b. From the Time Format drop-down list, select either 12-hour time format or 24-hour time format.c. From the Date Format drop-down list, select a date format to be used for date and time representation.d. In the Time Servers field, enter the IP addresses or host names of the time server with optional TCP port number.
Each entry with an optional port number is specified as Name-or-IP: port. If not specified, port 80 is used. Whenyou are using user profiles, locations can be supplied through user profiles. The time servers provide the thin clienttime based on the settings of the time zone and daylight saving information. If DHCP is used, locations can be suppliedthrough DHCP.
e. Click the Change Date and Time button to change date and time for secure environments.
3. Click OK to save your settings.
Set the custom information
About this task
This section describes how to set the custom information on your thin client.
Steps
1. From the desktop menu, click System Setup > System Preferences.The System Preferences dialog box is displayed.
Figure 29. Custom information
2. Click the Custom Info tab to enter configuration strings used by the Wyse Management Suite software. The configurationstrings can contain information about the location, user, administrator, and so on.
3. Click OK to save your settings.
The custom field information is transferred to the Windows registry. The information is then available to Wyse ManagementSuite.
Configuring power and sleep mode
About this task
NOTE: Power And Sleep tab is not available on Wyse 3040 Thin Client.
This section describes how to configure the power and sleep mode.
Steps
1. From the desktop menu, click System Setup > System Preferences.The System Preferences dialog box is displayed.
2. Click the Power And Sleep tab.
100 Configuring the thin client local settings

Figure 30. Power And Sleep
3. To set the power and sleep options when the thin client is on battery, change the following options in When on battery:
a. From the Power And Sleep drop-down list, select Power off or Sleep.b. From the Timer drop-down list, select the duration for the thin client to be idle to enter sleep mode or power off.c. From the When I close the lid drop-down list, select any of the following options to set the behavior of the thin client
when the lid is closed:● Turn off the built-in display—Turns off only the built-in display.● Turn off the built-in and external displays—Turns off all the displays that are connected to the thin client.● Shut down device—shuts down the thin client
NOTE: Power And Sleep > When on battery options are only available in Wyse 5470 Thin Client.
Configuring the thin client local settings 101

4. To set the power and sleep options when the thin client is plugged in, change the following options in Power And Sleep >When plugged in:
a. From the Power And Sleep drop-down list, select Power off or Sleep.b. From the Timer drop-down list, select the duration for the thin client to be idle to enter sleep mode or power off.c. From the When I close the lid drop-down list, select any of the following options to set the behavior of the thin client
when the lid is closed:● Turn off the built-in display—Turns off only the built-in display.● Turn off the built-in and external displays—Turns off all the displays that are connected to the thin client.● Shut down device—shuts down the thin client
NOTE: Power And Sleep > When plugged in > When I close the lid drop-down list is only available in Wyse 5470
Thin Client.
5. Click OK to save your settings.
Configure the display settings
About this task
This section provides information about how to configure the display settings for the connected displays.
NOTE: On Wyse 5470 Thin Client, the built-in display stays on by default.
Steps
1. From the desktop menu, click System Setup > Display.The Display Setup dialog box is displayed.
2. In the Display Setup dialog box, configure any of following options:
Figure 31. Display
● Select the Mirror mode check box to enable all connected displays to use the same display settings configured on theprimary display.
102 Configuring the thin client local settings

If you clear the Mirror mode check box, the Span Mode is enabled.
Blocks that are displayed on the screen represent the number of displays connected to the thin client. Each blockrepresents a single display screen.
Figure 32. Dual display setup
Configuring the thin client local settings 103

Figure 33. Mirror display setup
Every display contains a unique display order number and display configuration. You can move the blocks horizontally orvertically and construct the multidisplay layout in mixed directions. To construct a new display layout, move the blocksto your preferred position, and click Apply. A new display layout is created. However, when the block is moved to anincorrect position, the system sets the block to its default position.
NOTE: The Wyse 5070 Extended thin client supports up to six monitors. The Wyse 5470 Thin Client supports up to
three simultaneous displays.
● Select the Make this my main screen check box to set the display as primary display or the main screen. After youset the display as the main screen, the display block is selected with an underline, and the Make this my main screenoption is disabled for that display block. The Make this my main screen option is now available for other display blocks.
NOTE: The Make this my main screen option is effective only in Span Mode and always disabled in Mirror Mode.
● From the Orientation drop-down list, select an option to rotate the display screen in different directions.● From the Resolution drop-down list, select a supported display resolution.
104 Configuring the thin client local settings

NOTE: The default screen resolution on the Wyse 5470 Thin Client is 1366 x 768 or 1920 x 1080 depending on the
configuration. The default screen resolution on the Wyse 5470 All-in-One Thin Client is 1920 x 1080.
○ In Mirror Mode, the resolution list is derived from the intersection of resolutions in all connected displays.○ In Span Mode, select a display block and change its resolution.
3. Click Test.The new display settings are applied, and you can preview the modified display.
4. Click OK to confirm the new settings.
Use the Identify option to know the display order number of the connected displays.
Using the On-Screen Display (OSD)
This section is applicable to Wyse 5470 All-in-One thin client.
Use the On-Screen Display (OSD) buttons on the right of the device to adjust the luminance of the backlight. Minimum is 1 andmaximum is 100.● Press and hold the first button from the top to increase brightness.● Press and hold the second button from the top to decrease brightness.● Press the third button from the top to turn off or turn on the screen.
Port preferences on the Wyse 5470 Thin Client
● HDMI, DisplayPort over USB Type-C, and USB Type-C ports are prioritized over the VGA port.● When a USB Type-C display is present, there is no display on the VGA port.● If a VGA display is present, a third display that is connected is prioritized and the VGA display is turned off.● If a VGA display is not present, a third display that is connected is ignored, or a blank screen is displayed on the third screen.
Vertical Synchronization
Vertical Synchronization or V-Sync enables the ThinOS client to synchronize the frame rate of a video with the monitor refreshrate to avoid screen tearing. Screen tearing occurs when the graphic processor delivers display frames more than your monitorcan process. As a result, the image appears to be cut in half. Enabling VSync synchronizes the output video of the graphicscard to the refresh rate of the monitor. V-Sync is enabled by default on ThinOS. V-Sync cannot be disabled in ThinOS 9.0 MR1release.
Configuring the peripherals settingsUse the Peripherals dialog box to configure the settings for the keyboard, mouse, audio, serial, camera, and Bluetooth.
Configure the keyboard settings
About this task
This section describes how to configure the keyboard settings on your thin client.
Steps
1. From the desktop menu, click System Setup > Peripherals.The Peripherals dialog box is displayed.
2. Click the Keyboard tab, and do the following:
Configuring the thin client local settings 105

Figure 34. Keyboard
a. From the Keyboard Layout drop-down list, select a keyboard layout. The default layout is set to English (UnitedStates).
b. From the Delay before Repeat drop-down list, select the time for Repeat Delay. The time specifies the pause betweenpressing the key on the keyboard and when the key starts repeating itself.
c. Click any of the following options to set the Repeat Rate:
● Slow● Normal● FastRepeat Rate specifies the speed at which the key repeats itself after you press and hold down a key on the keyboard.
d. Click any of the following options to set the Numlock status:
● None● On● OffNumlock specifies whether the Numlock key on the keyboard must be turned on or turned off when you boot theterminal.
e. In the Disabled keys field, enter the keys on the keyboard that must be disabled. Use a comma to separate multipleentries.
3. Click OK to save your settings.
Function key combinations
The Wyse 5470 Thin Client supports the following Function (Fn) key combinations:
Table 30. Fn key combinations
Key ThinOS Local ICA session
Fn + Esc Fn lock/unlock Fn lock/unlock
Fn + F1 Mute Mute
Fn + F2 Volume down Volume down
Fn + F3 Volume up Volume up
Fn + F4 Not applicable—session only Not supported
Fn + F5 Not applicable—session only Not supported
Fn + F6 Not applicable—session only Not supported
Fn + F7 Not applicable Not applicable
Fn + F8 Not supported Not applicable—ThinOS local only
106 Configuring the thin client local settings

Table 30. Fn key combinations (continued)
Key ThinOS Local ICA session
Fn + F9 Opens the ThinOS local displaysettings window
Not supported
Fn + F10 Keyboard light Not applicable—ThinOS local only
Fn + F11 Screen dimming Not applicable—ThinOS local only
Fn + F12 Screen lighting Not applicable—ThinOS local only
Fn + Ctrl Right-click mouse Not supported
Fn + PrtScr Disable wireless device Not applicable—ThinOS local only
Fn + Right arrow Not applicable—session only Go to the end of the page
Fn + Left arrow Not applicable—session only Go to the home page
Fn + Up arrow Not applicable—session only Page up
Fn + Down arrow Not applicable—session only Page down
Fn + Insert Sleep mode Not applicable - ThinOS local only
Configure the mouse settings
About this task
This section describes how to configure the mouse settings on your thin client.
Steps
1. From the desktop menu, click System Setup > Peripherals.The Peripherals dialog box is displayed.
2. Click the Mouse tab, and do the following:
Figure 35. Mouse
a. To increase or decrease the mouse speed, move the Mouse Speed slider either to the right or left.b. From the Pointer size drop-down list, select a value to increase the size of the local mouse pointer. Restart the
computer for the change in pointer size to take effect.c. Select the Swap left and right mouse buttons check box if you want to swap the mouse buttons for left-handed
operations.d. Select the Reverse mouse wheel scroll direction check box if you want to invert the direction of the mouse scroll
wheel.
Configuring the thin client local settings 107

e. Select the Disable trackpad check box if you want to disable the touchpad on the device. This option is applicable onlyto the Wyse 5470 Thin Client.
f. Select the Disable trackpad while typing check box if you want to disable the touchpad while typing using theintegrated keyboard. This option is applicable only to the Wyse 5470 Thin Client.
3. Click OK to save your settings.
Touchpad gestures
This section is applicable to the Wyse 5470 Thin Client.
The touchpad on the Wyse 5470 Thin Client contains two buttons for the right and left mouse-clicks. The following table liststhe supported touchpad gestures on the Wyse 5470 Thin Client:
Table 31. Touchpad gestures
Touchpadgesture
Additional information
Moving the mousecursor
Moving with one finger, the entire touchpad including the area with the buttons can be used for themouse cursor movement.
NOTE: The sensitivity of the cursor movement on the area with the buttons is slower compared tothe other areas. This design is for the stability of the buttons.
Left-click ● Tapping with one finger anywhere on the touchpad works as the mouse left-click.● Pressing the left button on the touchpad works as the mouse left-click.
Right-click ● Tapping with two fingers anywhere on the touchpad works as the mouse right-click.● Pressing the right button on the touchpad as the mouse right-click.
Double-click ● Tapping with two fingers anywhere on the touchpad works as the mouse double-click.● Pressing the left button twice on the touchpad works as mouse double-click.
Moving windows ● Press and hold the left button, and move the window by dragging a second finger on the touchpad.● Dragging a window by tapping twice on the touchpad with one finger.
Zoom Placing two fingers on the touchpad and pinching or stretching out—Not supported.
Scroll Tapping two fingers and moving up or down.
From ThinOS 9.0 MR1 release onwards, the touchpad scroll direction is reversed. Slide two fingers up toscroll down, and slide two fingers down to scroll up.
Configure the audio settings
About this task
This section describes how to configure the audio settings on your thin client:
Steps
1. From the desktop menu, click System Setup > Peripherals.The Peripherals dialog box is displayed.
2. Click the Audio tab, and do the following:
108 Configuring the thin client local settings

Figure 36. Audio
a. From the Playback Devices drop-down list, select the type of the audio device.
● Move the slider either to the right or left to control the volume settings for playback devices.● Select the Mute check box to mute the audio.● Select the Speaker check box to enable the onboard speaker.
b. From the Recorded Devices drop-down list, select the type of the record device.
● Move the slider either to the right or left to control the volume settings for record devices.● Select the Mute check box to mute the audio.
c. Use the Recorder tab to collect information about the speaker and microphone being used. You can examine theperformance of the speaker and microphone being used.
3. Click OK to save your changes.
PulseAudio
PulseAudio is a sound server that runs on ThinOS to deliver audio and manage audio devices. PulseAudio supports multiple audiodevices when using real-time audio applications in ICA sessions.
NOTE: You cannot disable the PulseAudio feature on your ThinOS client.
Configure the serial settings
About this task
This section describes how to configure the serial settings on your thin client.
Steps
1. From the desktop menu, click System Setup > Peripherals.The Peripherals dialog box is displayed.
2. Click the Serial tab and do the following:
Configuring the thin client local settings 109

Figure 37. Serial
a. Click any of the Select Port options to select a COM port. The default port is set to COM 1.b. From the Baud Rate drop-down list, select the Baud Rate. The Baud rate specifies the number of signal changes that
occur per second. The default value is 9600.c. Click any of the Parity options to set the parity property for the serial port connection.d. Click any of the Stop options to set the stop bits for the serial port connection. The default value is 1.e. Click any of the Size options to set the character size for the serial port connection. The default value is 8.f. Click any of the Flow Control options to set the flow control of bytes in the serial port connection.
3. Click OK to save your settings.
Configure the camera device
About this task
This section describes how to enable the camera that is connected to your thin client.
Steps
1. From the desktop menu, click System Setup > Peripherals.The Peripherals dialog box is displayed.
2. Click the Camera tab.
110 Configuring the thin client local settings

Figure 38. Camera
3. From the Device drop-down list, select a camera device that is connected to your thin client.
4. Click Preview.The camera is turned on and you can see yourself or whatever the camera is pointed at.
5. Click Stop to stop the camera preview.
6. Click OK to save your settings.
For Wyse 5470 and Wyse 5470 All-in-One thin clients, the integrated camera on the thin client does not support hardwareencoding, so the performance is limited.
Configure the Bluetooth settings
About this task
This section describes how to configure the Bluetooth settings on your thin client.
Steps
1. From the desktop menu, click System Setup > Peripherals.The Peripherals dialog box is displayed.
2. Click the Bluetooth tab.
Configuring the thin client local settings 111

Figure 39. Bluetooth
Bluetooth-enabled devices such as headsets and mouses that are available in the thin client environment are listed on theBluetooth page. The following attributes are displayed in the list:● Name—Specifies the name of the Bluetooth-enabled device.● Type—Specifies the type of the Bluetooth-enabled devices, such as headsets, mouses, and keyboards.
ThinOS supports Human Interface Devices (HID) devices. HID includes mouse and keyboard. The maximum number ofHIDs that can be connected is seven.
NOTE: ThinOS supports Bluetooth headsets, but only one headset can be connected. Call level audio quality on
headsets is supported. However, multimedia is not supported. Other types of Bluetooth devices are not scanned and
supported.
● Status—The Bluetooth page has two columns, namely, Status and Paired.
Table 32. Bluetooth status
Attribute Value Summary
Status Connected The Bluetooth device is connected to the ThinOS device. It is readyto be used.
Connecting The Bluetooth device is connecting to the ThinOS device.
Disconnected The Bluetooth device is not connected to the ThinOS device.
Paired Yes The Bluetooth device is paired with the ThinOS device.
No The Bluetooth device is not paired with the ThinOS device.
● Address—Displays the address of the Bluetooth device that is connected to your thin client.
The following are the user scenarios and corresponding Bluetooth statuses that are displayed on the Bluetooth page:
Table 33. User scenarios
User scenario Status
Device turned off Disconnected | Paired
Device turned on Connected | Paired
Device disconnected from ThinOS Disconnected | Not Paired
112 Configuring the thin client local settings

3. Select a Bluetooth device that is not connected, and click Connect. If the Bluetooth device is connected successfully, thestatus is displayed as Connected in the Bluetooth window. The following are the functions that are available:
● Scan—All Bluetooth devices enter into Page Scan mode. Different Bluetooth devices enter into the Page Scan mode atdifferent instances such as when a specific button is pressed three times or a specific button is pressed and held untilthe LED turns blue.
● Connect—Select a particular Bluetooth enabled device, and click Connect to connect the selected device to the thinclient. If the Bluetooth device is connected successfully, the status is displayed as Connected in the Bluetooth window.
● Remove—Select a particular Bluetooth device, and click Remove to disconnect and remove the device from the list.● Auto Connect function—The Auto Connect function is designed for HIDs.
○ ThinOS has no HIDs connected such as USB or Bluetooth HIDs.○ The Bluetooth HIDs are configured as Page Scan mode.
When you start the ThinOS client, the Bluetooth HIDs can connect to ThinOS automatically without scanning or pairingoperations. The Bluetooth HIDs automatically reconnect after you restart the ThinOS client.
● Reconnect function—The Reconnect function is designed for HIDs and headsets.
When you restart the system with the Bluetooth device (HID/headset) that is already paired and connected, theBluetooth device automatically reconnects within a few seconds.
For example, you can hover the Bluetooth mouse, and then click a few times for the Bluetooth mouse to reconnectsuccessfully. The Bluetooth headset reconnects automatically, but might require you to manually close or reopen thedevice on certain occasions.
4. Click OK to save your settings.
Secure Digital cards
You can plug in a Secure Digital (SD) card into the Wyse 5470 Thin Client and import a certificate file to the thin client. The SDcard works as a storage device.
Configuring the printer settingsUse the Printer Setup dialog box to configure network printers and local printers that are connected to the thin client. Throughits USB ports, a thin client can support multiple printers. If more than one printer is to be used and another port is not availableon your thin client and the port that is to be used must be shared with a USB modem converter, connect a USB hub to the port.
Based on the Citrix Host Printer Policy settings, ThinOS 9.0 supports the following:
● Device-Specific Printer Driver support—This method allows Citrix hosts to automatically create client redirected printerqueues based on the peripheral management printers settings of the ThinOS client. The following details are used by thehost print manager to automatically create the printer queues:
○ Name—Printer queue name.○ Printer ID (Printer Identification)—Printer driver name.
● Citrix Universal Print Driver support—This method allows Citrix hosts to automatically create printer queues based onthe peripheral management printers settings of the ThinOS client. The following details are used by the host print managerto automatically create the printer queues:○ Name—Printer queue name.○ Class—Printer class that is associated by the Citrix host registry to a printer-specific driver name.
NOTE: ThinOS 8.6 supports the association of PS, PCL5, and PCL4 classes. However, ThinOS 9.0 associations are
limited to the PS class only.
Limitations
● The ThinOS solution to support the client printer redirection functionality is limited to Type 3 printers only. However, thesolution is subject to changes in the future according to the changes made by Citrix.
● After you connect a USB printer to the thin client, the Printer ID information is not automatically displayed in the ThinOSclient Peripheral Management Printer settings menu. This limitation will be resolved in future ThinOS releases.
● ThinOS supports only PS class when using the Citrix Universal Print Driver policy to automatically create ThinOS clientredirected printers. PCL5 and PCL4 classes are not supported. This is a Citrix limitation.
Configuring the thin client local settings 113

Configure the ports settings
About this task
This section describes how to configure the port settings on your thin client:
Steps
1. From the desktop menu, click System Setup > Printer.The Printer Setup dialog box is displayed.
2. Click the Ports tab, and do the following:
Figure 40. Ports
a. Select Port—Select a port from the drop-down list. Selecting LPT1 or LPT2 sets the connection to a direct-connectedUSB printer. If you are using the Wyse 5070 Extended Thin Client, select LPT2 for the USB printer.
b. Printer Name—(Required) Enter the name of the printer.c. Printer Identification—(Required) Enter the type or model of the printer in the exact text of the Windows printer
driver name—including capitalizations and spaces.
Printer mapping in a Citrix session on ThinOS uses Citrix UPD (Universal Printer Driver). You can enter any string in thePrinter Identification field. If not specified, the default name is set to Generic/Text Only.
d. Printer Class—Select the printer class from the drop-down list as PS.e. Enable the printer device—Select this option to enable the directly-connected printer. It enables the device to be
displayed on the remote host.
3. Click OK to save your settings.
Configure the LPDs settings
About this task
This section describes how to configure the LPD settings on your thin client.
Steps
1. From the desktop menu, click System Setup > Printer.The Printer Setup dialog box is displayed.
2. Click the LPDs tab, and do the following when printing to a non-Windows network printer:
114 Configuring the thin client local settings

Figure 41. LPD
NOTE: Be sure to check with your vendor that the printer can accept Line Printer Request print requests.
a. Select LPD—Select the LPD port from the drop-down list.b. Printer Name —Enter the name of the printer. If you do not specify a printer name, the LPD queue name is used
automatically.c. Printer Identification—(Required) Enter the type or model of the printer in the exact text of the Windows printer
driver name—including capitalizations and spaces.
Printer mapping in a Citrix session on ThinOS uses Citrix UPD (Universal Printer Driver). You can enter any string in thePrinter Identification field.
d. LPD Hosts—(Required) The DNS or WINS name of the server for the network printer. An IP address of the printer onthe network can also be entered.
e. LPD Queue Name—(Required) An LPD host maintains a named queue for each supported printer. Enter the name ofthe queue associated with the printer to be used.
This name can be different for each vendor. This field is required and must be correct so that the network printeraccepts incoming print jobs properly.
f. Printer Class—Select the printer class from the drop-down list as PS.g. Enable the printer device—Must be selected to enable the printer. It enables the device to be displayed on the remote
host.
3. Click OK to save your settings.
Configure the SMBs settings
About this task
This section describes how to configure the SMB settings on your thin client.
Steps
1. From the desktop menu, click System Setup > Printer.The Printer Setup dialog box is displayed.
2. Click the SMBs tab, and do the following when printing to a Windows network printer:
Configuring the thin client local settings 115

Figure 42. SMB
a. Select SMB—Select the SMB port from the drop-down list.b. Printer Name—Enter the name of the printer. If you do not specify a printer name, the SMB shared printer name is
used automatically.c. Printer Identification—(Required) Enter the type or model of the printer in the exact text of the Windows printer
driver name—including capitalizations and spaces.
Printer mapping in a Citrix session on ThinOS uses Citrix UPD (Universal Printer Driver). You can enter any string in thePrinter Identification field.
d. \\Host\Printer—(Required) Enter the IP address, computer name, or FQDN of the host and specify the shared nameof the printer. After you specify the values and move the cursor, the SMB credentials dialog box is displayed whichprompts you to enter the host username, password, and the domain name.
NOTE: If the host has not joined any domain, enter WORKGROUP in the domain name field.
e. Printer Class —Select the printer class from the drop-down list as PS.f. Enable the printer device—Must be selected to enable the printer. It enables the device to be displayed on the remote
host.
3. Click OK to save your settings.
Using the printer setup options
About this task
This section describes how to configure the printer setup options.
Steps
1. From the desktop menu, click System Setup > Printer.The Printer Setup dialog box is displayed.
2. Click the Options tab, and select a printer from the Default Printer drop-down list.
116 Configuring the thin client local settings

Figure 43. Options
3. Click OK to save your settings.
Using the Help
When you click the Help tab, the following message is displayed in the text box.
Printer Identification is supplied by printer device. Change it to a Window’s printer driver name or setup a driver mapping file.
Reset to factory defaultsA high-privileged or stand-alone user can reset the thin client to factory default settings from the Shutdown dialog box.Shutdown reset is disabled for low-privileged and nonprivileged users, regardless of the lockdown state.
About this task
This section describes how to reset the thin client to factory default settings.WARNING: Shutdown reset impacts all configuration items, including but not limited to, network configuration
and connections defined in local NV-RAM. However, the terminal name remains unaltered.
Steps
1. From the desktop menu, click Shutdown.The Shutdown dialog box is displayed.
2. Select the Reset the system setting to factory default check box to restore your system settings to default factorysettings.
3. Click OK.
Configuring the thin client local settings 117

Using the system toolsUse the System Tools option to view all the connected devices, installed packages, and imported certificates into the ThinOSclient.
About this task
This section describes how to access the system tools on your thin client.
Steps
1. From the desktop menu, click System Tools.The System Tools dialog box is displayed.
2. Click the Devices tab to view all the locally attached devices, including USB, on applicable platforms. The details about thedisplays connected to the thin client are also displayed.
Figure 44. Devices
3. Click the Certificates tab to view the list of certificates that are imported to the thin client.
8
118 Using the system tools

Figure 45. Certificates
● Use the Enable/Disable FIPS slide switch to enable or disable the Federal Information Processing Standard (FIPS)Publication 140-2 authentication compliance.
● From the Import From drop-down list, select USB Storage, and click Import. Browse and select the appropriatecertificate that is stored in the USB drive.
● Select a certificate from the list, and click View Certificate to details such as version, validity, and serial number. Youcan also view the certificate path and certificate status.
● To manually request a certificate for your client, Click Request Certificate, provide the required details, and then clickRequest Certificate again.
4. Click the Packages tab to view the list of ThinOS packages installed on the thin client.
● To delete a single package, select the package and click Delete.● To delete all the packages, click Delete all.
The following package is displayed on the Package tab:● Citrix package—This package is introduced to support Citrix Workspace app and RealTime Media Engine. You can see
additional details such as the versions and the name of the package by double-clicking the Citrix package.● JVDI package—The package is introduced to support Cisco Jabber.● Imprivata package—The package is introduced to support Imprivata ProveID Embedded feature.
NOTE: In every ThinOS release, the packages may be updated to the latest version.
5. Click OK to save your settings.
Simplified Certificate Enrollment ProtocolSimplified Certificate Enrollment Protocol (SCEP) was used in a closed network where all end-points are trusted. The goal ofSCEP is to support the secure issuance of certificates to network devices in a scalable manner. Within an enterprise domain, itenables network devices that do not run with domain credentials to enroll for certificates from a Certification Authority (CA).
At the end of the transactions that are defined in this protocol, the network device has a private key and associated certificatethat is issued by a CA. Applications on the device may use the key and its associated certificate to interact with other entities onthe network. The most common usage of this certificate on a network device is to authenticate the device in an IPSec session.
ThinOS is treated as a network device. The functionality of ThinOS SCEP includes manual certificate request, automaticcertificate request, and automatic renewal of certificate.
Using the system tools 119

Request the certificate manually
About this task
To request the certificate manually, do the following:
Steps
1. Go to System Tools > Certificates > Request Certificate.
The Request Certificate dialog box is displayed.
120 Using the system tools

Figure 46. Request Certificate
2. Enter the appropriate values in the Request Certificate dialog box, and then click the Request Certificate button.The certificate request is sent to the server, and the client receives the response from server and installs both CA certificateand client certificate.
3. Click Ok to save your changes.
The CA Certificate Hash type supports MD5, SHA1, and SHA256. The request server URL can be an HTTP or HTTPS link.You can add the protocol prefix before the URL.
Using the system tools 121

Request the certificate automatically using Wyse ManagementSuite
Steps
1. Log in to Wyse Management Suite.
2. Go to Groups & Configs and select your preferred group.
3. Expand Edit Policies and click ThinOS 9.x.The Configuration Control | ThinOS window is displayed.
4. In the Advanced tab, click Privacy & Settings.
5. Click SCEP.
6. Click the Enable Auto Enrollment slider switch to enable automatic certificate enrollment using the SCEP server.
7. Click the Enable Auto Renew slider switch to automatically renew the certificate.
8. Click the Select Install CA Certificate slider switch to install the root CA's certificate as a trusted certificate aftersuccessfully getting the client certificate.
9. Specify the country/region name, state, location, and other details.
10. Click Save & Publish.
NOTE: You can also configure the SCEP Administrator URL, Admin User, Admin User Password, and Admin User
Domain options to request for SCEP certificate. If the enrollment password is not specified, the client uses the SCEP
Administrator URL, Admin User, Admin User Password, and Admin User Domain options to request SCEP. If you specify
the enrollment password, the enrollment password is used for SCEP, even though the password entered is invalid. In this
scenario, the SCEP Administrator URL, Admin User, Admin User Password, and Admin User Domain options are ignored.
Trusted Platform Module version 2.0Wyse 5070, Wyse 5470, and Wyse 5470 All-in-One thin clients support disk encryption and decryption through Trusted PlatformModule (TPM) version 2.0. If the key in TPM does not match the current build, the ThinOS will reset to factory settings.
The following SSL/TLS ciphers are supported:● TLS1.2_ECDHE_RSA_WITH_AES_256_GCM_SHA384● TLS1.2_ECDHE_RSA_WITH_AES_128_GCM_SHA256● TLS1.3_AES256_GCM_SHA384● TLS1.3_AES128_GCM_SHA256
122 Using the system tools

Using Wyse Management Suite
Functional areas of Wyse Management Suite consoleThe Wyse Management Suite console is organized into the following functional areas:
About this task
● The Dashboard page provides information about the current status on each functional area of the system.● The Groups & Configs page employs a hierarchical group policy management for device configuration. Optionally,
subgroups of the global group policy can be created to categorize devices according to corporate standards. For example,devices may be grouped based on job function, device type, and so on.
● The Users page enables local users and users imported from the Active Directory to be assigned global administrator, groupadministrator, and viewer roles to log in to Wyse Management Suite. Users are given permissions to perform operationsbased on the roles assigned to them.
● The Devices page enables you to view and manage devices, device types, and device-specific configurations.
● The Apps & Data page provides management of device applications, operating system images, policies, certificate files,logos, and wallpaper images.
● The Rules page enables you to add, edit, and enable or disable rules such as auto grouping and alert notifications.
● The Jobs page enables you to create jobs for tasks such as reboot, WOL, and application or image policy that need to bedeployed on registered devices.
● The Events page enables you to view and audit system events and alerts.
● The Portal Administration page enables you to configure various system settings such as local repository configuration,license subscription and more.
Managing groups and configurationsThe Groups & Configs page enables you to define policies that are required to configure your devices. You can create subgroups of the global group policies and categorize devices based on your requirements. For example, devices may be groupedbased on job functions, device type, and so on.
By default, the Default Device Policy Group and Default User Policy Group are present on the Groups & Configs page.
Devices inherit policies in the order that they are created. The settings that are configured in a default policy group are appliedas default settings in all the policies listed in the default policy group. In a group, all devices present in that group have defaultpolicy group as their default settings.
Create a default device policy group
You can create groups for the global device group policies and categorize devices based on your requirements.
Steps
1. On the Groups & Configs page, click the Default Device Policy Group option.
2. Click .
3. In the Add New Group dialog box, enter the Group Name, Description, Domain and AD Attribute Name.
9
Using Wyse Management Suite 123

NOTE: Select the This is a ThinOS Select group parent option to create a parent select group for ThinOS devices.
For more information, see Create a ThinOS Select group.
4. In the Registration tab, select the Enabled check box under Group Token.
5. Enter the group token.
6. In the Administration tab, you can select the name of group administrators who are tasked with managing this group. Fromthe Available Group Admins box, select the particular group and click the right arrow to move it to the Assigned GroupAdmins box. To move one group from the Assigned Group Admins to Available Group Admins, do the reverse. This stepis optional.
7. Click Save.
The group is added to the list of available groups on the Groups & Configs page.
NOTE: The devices can be registered to a group by entering the group token which is available in the Groups and
Configs page for the respective group.
Create a ThinOS Select group
Steps
1. On the Groups & Configs page, click the Default Device Policy Group option.
2. Click .
3. In the Add New Group dialog box, enter the Group Name and Description.
4. Select the This is a ThinOS Select group parent option.
5. Select the name of the group administrators who are tasked with managing this group. From the Available Group Adminsbox, select the particular group and click the right arrow to move it to the Assigned Group Admins box. To move onegroup from the Assigned Group Admins to Available Group Admins, do the reverse. This step is optional.
6. Click Save.
The group is added to the list of available groups on the Groups & Configs page.
To add sub groups to the created parent group, click the parent group on the Groups & Configs page, and follow the stepsthat are mentioned in Create device policy group.
NOTE: The parent select group can have 10 child select group and you can register the devices to child select group.
NOTE: Profiles can be configured for other operating systems. The created profiles are the same as other custom
groups.
Edit a ThinOS select group
Steps
1. Go to the Groups & Configs page and click the ThinOS select group that you want to edit.
2. Click .
3. In the Editing Default Policy group dialog box, edit the group information such as Group Name and Description.
4. In the Administration tab, you can select the name of group administrators who are tasked with managing this group. Fromthe Available Group Admins box, select the particular group and click the right arrow to move it to the Assigned GroupAdmins box. To move one group from the Assigned Group Admins to Available Group Admins, do the reverse. This stepis optional.
5. Click Save.
Edit a default device policy group
Steps
1. Go to the Groups & Configs page and select the Default Device Policy Group.
124 Using Wyse Management Suite

2. In the Editing Default Device Policy Group dialog box, edit the required group information.
3. Click Save.
Create a user policy group
You can create groups for the global user group policies and categorize users and devices based on their user groups.
Steps
1. On the Groups & Configs page, click the Default User Policy Group option.
2. Click .
3. In the Add New Group dialog box, enter the Group Name, Description, Domain, AD Attribute and AD Attribute Name.
4. Select the name of the group administrators who are tasked with managing this group.
5. From the Available Group Admins box, select the particular group and click the right arrow to move it to the AssignedGroup Admins box.
To move one group from the Assigned Group Admins to Available Group Admins, do the reverse.
6. Click Save.
The group is added to the list of available groups on the Groups & Configs page.
NOTE: A user policy group must be mapped to an AD group or an organizational unit, but not both.
7. Select the Device Group Mapping option to import user groups with device mapping to control the configurations that areapplied to all device groups by default.
NOTE: This feature is available only on Wyse Management Suite Pro license. You can import 100 user groups to Wyse
Management Suite.
Edit a user policy group
Steps
1. Go to the Groups & Configs page and select the default user policy group.
2. Click .
3. In the Editing Default User Policy group dialog box, edit the required group information.
4. Click Save.
Edit an unmanaged group
Devices that belong to the unmanaged group do not use licenses or receive configuration or application-based policies. To adddevices to an unmanaged group, use the unmanaged group device registration key as part of auto registration or manual deviceregistration.
Steps
1. On the Groups & Configs page, select Unmanaged Group.
2. Click .The Editing Unmanaged Group page is displayed. The Group Name displays the name of the group.
3. Edit the following details:● Description—Displays a brief description of the group.● Group Token—Select this option to enable the group token.
4. Click Save.
NOTE: For a public cloud, the group token for an unmanaged group must be enabled to register devices. For a private
cloud, the group token for an unmanaged group is automatically enabled.
Using Wyse Management Suite 125

Remove a group
As an administrator, you can remove a group from the group hierarchy.
Steps
1. In the Groups & Configs page, select the group that you want to delete.
2. Click .A warning message indicating that this action removes one or more groups from the group tree hierarchy is displayed.
3. From the drop-down list, select a new group for users and devices in the current group.
4. Click Remove Group.
NOTE: When you remove a group from the group hierarchy, all users and devices that belong to the deleted group are
moved to a selected group.
Edit the ThinOS 9.x policy settings
Prerequisites
● Create a group with a group token for the devices you want to push the application package.● Register the thin client to Wyse Management Suite.
Steps
1. Go to the Groups & Configs page, and select a group.
2. From the Edit Policies drop-down menu, click ThinOS 9.x.The Configuration Control | ThinOS window is displayed.
3. Click the Advanced option.
Figure 47. Advanced option
4. Select the options that you want to configure.
NOTE: BIOS settings support has been added in Wyse Management Suite 2.1.
5. In the respective fields, click the option that you want to configure.
6. Configure the options as required.
126 Using Wyse Management Suite

7. Click Save & Publish.
NOTE: After you click Save & Publish, the configured settings are also displayed in the Standard tab.
Managing devicesThe Device page enables you tp perform a routine device management task by using the management console. To locate theinventory of the devices, click the Devices tab. You can view a subset of the devices by using various filter criteria, such asgroups or subgroups, device type, operating system type, status, subnet, platform, or time zone.
You can sort the device list based on the following:● Type● Platform● Operating system version● Serial number● IP address● Last user details● Group details● Last check-in time● Registration status● Write filter status
To view the Device Details page of a particular device, click the device entry that is listed on the page. All the configurationparameters of the device and the group level at which each parameter is applied are displayed on the Device Details page.
You can set the configuration parameter that is specific to the device.
NOTE: Parameters that are configured in this section override any parameters that were configured at the groups and/or
at the global level.
Search a device using filters on the Devices page
About this task
To search a device using filters on the Devices page , do the following:
Steps
1. Go to the Devices page.
2. From the Configuration Groups drop-down list, select either the default policy group or the groups which are added by anadministrator.
3. From the Status drop-down list, select any one of the following options:
● Registration○ Registered○ Pre-registered○ Not Registered○ Compliant○ Pending○ Non-Compliant
● Online Status○ Online○ Offline○ Unknown
● Others○ Recently Added
4. From the OS Type drop-down list, select ThinOS.
5. From the OS Subtype drop-down list, select a subtype for your operating system.
6. From the Platform drop-down list, select a platform.
Using Wyse Management Suite 127

7. From the OS Version drop-down list, select an OS version.
8. From the Agent Version drop-down list, select an agent version.
9. From the Subnet/Prefix drop-down list, select a subnet.
10. From the Timezone drop-down list, select the time zone.
11. From the Device Tag drop-down list, select the device tag.
12. Click Save to save the current filter.The Save Current Filter dialog box is displayed.
13. Enter the name and description for the filter.
14. Select the check box to set the current filter as the default option.
15. Click Save Filter.
Managing JobsThe Jobs page enables you to schedule and manage jobs in the management console.
In this page you can see jobs based on the following filtering options:
● Configuration Groups—From the drop-down menu, select the configuration group type.● Scheduled by—From the drop-down menu, select a scheduler who performs the scheduling activity. The available options
are:○ Admin
■ App Policy■ Image Policy■ Device Commands
○ System■ Publish Group Configuration■ Others
● OS Type—From the drop-down menu, select the operating system.● Status—From the drop-down menu, select the status of the job. The available options are:
○ Scheduled○ Running/In Progress○ Completed○ Canceled○ Failed
● Detail Status—From the drop-down menu, select the status in detail. The available options are:○ 1 or more failed○ 1 or more pending○ 1 or more In progress○ 1 or more canceled○ 1 or more completed
● More Actions—From the drop-down menu, select the Sync BIOS Admin Password option. The Sync BIOS AdminPassword Job window is displayed.
Schedule a device command job
Steps
1. On the Jobs page, click Schedule device command job.The Device Command Job screen is displayed.
2. From the Command drop-down list, select a command. The available options are:
● Restart● Wake on LAN● Shutdown● Query
128 Using Wyse Management Suite

The device command is a recurring job. On selected days of the week and at a specific time the commands are sent to theselected devices.
3. From the drop-down list, select the type of operating system.
4. Enter the name of the job.
5. From the drop-down list, select a group name.
6. Enter the job description.
7. From the drop-down list, select the date or time.
8. Enter/select the following details:
● Effective— Enter the starting and ending date.● Start between—Enter the starting and ending time.● On day(s)—Select the days of the week.
9. Click the Preview option to view the details of the scheduled job.
10. On the next page, click the Schedule option to initiate the job.
Managing rulesThe Rules page enables you to add and manage the rules in the Wyse Management Suite console. The following filtering optionsare provided:
● Registration● Unmanaged Device Auto Assignment● Alert Notification
Editing a registration rule
About this task
Configure the rules for unmanaged devices by using the Registration option. To edit a registration rule, do the following:
Steps
1. Go to the Rules page.
2. Click Registration and select the unmanaged devices option.
3. Click Edit Rule.The Edit Rule window is displayed.
You can view the following details:● Rule● Description● Device Target● Group
4. From the drop-down menu, select a target client to apply the Notification Target option and the time duration to apply theNotification Frequency option.
NOTE: The notification frequency can be configured for every 4 hours, every 12 hours, daily, or weekly basis to the
target device.
5. Enter the number of days until you want to apply the rule in the Apply rule after (1–30 days) box.
NOTE: By default, registration of an unmanaged devices are unregistered after 30 days.
6. Click Save.
Using Wyse Management Suite 129

Create unmanaged device auto assignment rules
About this task
To create rules for the unmanaged device auto assignment, do the following:
Steps
1. Click the Rules tab.
2. Select the Unmanaged Device Auto Assignment option.
3. Click the Add Rules tab.
4. Enter the Name, and select the Destination group.
5. Click the Add Condition option, and select the conditions for assigned rules.
6. Click Save.
The rule is displayed in the unmanaged group list. This rule is applied automatically, and the device is listed in the destinationgroup.
NOTE:
● If a select group is set as the Destination Group, the condition Assign device to the destination group is not
available.
● If a select group is set as the Destination Group, the condition Create a group under the destination group for
each unique value is not available.
Edit an unmanaged device auto assignment rule
Steps
1. Click the Rules tab.
2. Select the Unmanaged Device Auto Assignment option.
3. Select the rule and click the Edit option.
4. Enter the Name and select the Destination group.
5. Click the Add Condition option and select the conditions for assigned rules.
6. Click Save.
Disable or delete a rule
Steps
1. Click the Rules tab.
2. Select the Unmanaged Device Auto Assignment option.
3. Select a rule and click the Disable Rule option.The selected rule is disabled.
4. Select the disabled rule and click the Delete Disabled Rule(s) option.The rule is deleted.
Save the rule order
Steps
1. Click the Rules tab.
2. Select the Unmanaged Device Auto Assignment option.
3. Select the rule which you want to move and then move it to the top order.
4. Click Save Rule Order.
130 Using Wyse Management Suite

Create a rule for alert notification
About this task
To create a rule for alert notification, do the following:
Steps
1. Click the Rules tab.
2. Select the Alert Notification option.
3. Click Add Rule.An Add Rule window is displayed.
4. From the Rule drop-down list, select a rule.
5. Enter the Description.
6. From the Group drop-down list, select the preferred option.
7. From the drop-down menu, select a target device to apply Notification Target and the time duration to apply NotificationFrequency.
8. Click Save.
Edit an alert notification rule
Steps
1. Click the Rules tab.
2. Select the Alert Notification option.
3. Click Edit Rule.An Edit Rule window is displayed.
4. From the Rule drop-down list, select a rule.
5. Enter the Description.
6. From the Groups drop-down list, select a group.
7. From the drop-down list, select a target device to apply Notification Target and the time duration to apply NotificationFrequency.
8. Click Save.
Managing EventsThe Events page enables you to view all events and alerts in the management system using the management console. It alsoprovides instructions on viewing an audit of events and alerts for system auditing purposes.
A summary of events and alerts is used to obtain an easy-to-read daily summary of what has happened in the system. The Auditwindow arranges the information into a typical audit log-view. You can view the timestamp, event type, source, and descriptionof each event in the order of time.
Search an event or alert using filters
Steps
1. Click Events.The Events page is displayed.
2. From the Configuration Groups drop-down menu, select either the default policy group or the groups which are added byan administrator.
3. From the Events or Alerts drop-down menu, select any one of the following options:
● Events● Current Alerts● Alert History
Using Wyse Management Suite 131

4. From the Timeframe drop-down menu, select any one of the following operating systems:
This option enables you to view the events which occurred in a particular timeframe. The available options in the drop-downmenu are:● Today● Yesterday● This Week● Custom
5. From the Event Type drop-down menu, select the operating system.
All the events are classified under particular groups. The available options in the drop-down menu are:● Access● Registration● Configuration● Remote Commands● Management● Compliance
Managing usersThe Users page enables you to perform a routine user management task in the management console. The following are the twotypes of users:● Administrators—Wyse Management Suite administrator can be assigned the role of a global administrator, group
administrator, or viewer.○ A Global Administrator has access to all the Wyse Management Suite functions.○ A Group Administrator has access to all assets and functions for specific groups that are assigned to them.○ A viewer has read-only access to all the data and can be assigned permissions to trigger the specific real-time
commands, such as shutdown and restart.
If you select administrator, you can perform any of the following actions:○ Add Admin○ Edit Admin○ Activate Admin (s)○ Deactivate Admin (s)○ Delete Admin (s)○ Unlock Admin (s)
● Unassigned Admins—Users imported from the AD server are displayed on the Unassigned admins page. You can laterassign a role to these users from the portal.
For better and faster management of users, select the users of your choice based on the available filter options. If you selectUnmanaged Users, you can perform any of the following actions:○ Edit User○ Activate User (s)○ Deactivate User (s)○ Delete User (s)
NOTE: To import users from the .CSV file, click Bulk Import.
Add a new admin profile
Steps
1. Go to the Users page.
2. Click Administrator (s).
3. Click Add Admin.The New Admin User window is displayed.
4. Enter your email ID and username in the respective fields.
132 Using Wyse Management Suite

5. Select the check box to use the same username as mentioned in the email.
6. Do one of the following:● If you click the Personal Information tab, enter the following details:
○ First name○ Last name○ Title○ Mobile phone number
● If you click the Roles tab, enter the following details:a. In the Roles section, from the Role drop-down list, select the Administrator role.
○ Global Administrator○ Group Administrator○ Viewer
NOTE: If you select the Administrator role as Viewer, the following administrative tasks are displayed:
■ Query Device
■ Unregister Device
■ Restart/Shutdown Device
■ Change Group Assignment
■ Remote Shadow
■ Lock Device
■ Wipe Device
■ Send Message
■ WOL Device
b. In the Password section, do the following:
i. Enter the custom password.ii. To generate any random password, select the Generate random password radio button.
7. Click Save.
Create auto assignment rules for unmanaged devices
Steps
1. Click the Rules tab.
2. Select the Unmanaged Device Auto Assignment option.
3. Click the Add Rules tab.
4. Enter the Name and select the Destination group.
5. Click the Add Condition option and select the conditions for assigned rules.
6. Click Save.
The rule is displayed in the unmanaged group list. This rule is applied automatically and the device is listed in the destinationgroup.
Add a user
Steps
1. Click the Users tab.
2. Click End Users.
3. Click Add User.The Add User window is displayed.
4. Enter the username, domain, first name, last name, email address, title, and phone number.
5. Click Save.
Using Wyse Management Suite 133

Bulk import end users
Steps
1. Click Users.The Users page is displayed.
2. Select the End Users option.
3. Click Bulk Import.The Bulk Import window is displayed.
4. Click Browse, and select the .csv file.
5. Click Import.
Create end-user exceptions
You can configure and deploy settings to an individual user. The settings are applied to the user account and are applied to thethin client when the user logs in. This option is applicable only to thin clients running ThinOS 9.x operating system.
Steps
1. Click the Users tab.
2. Click End Users.
3. Select a user.The End User Details page is displayed.
4. Click the Edit Policies drop-down menu and select the operating system.
5. Configure the required policies and click Save and Publish.
NOTE: This feature is applicable only to thin clients running ThinOS 9.x operating system. There is no limit on the
number of end users in the on-premise environment. You can add 10000 users in a public cloud.
Portal administrationThe Portal administration page enables the system administration to perform tasks that are required to set up and maintainyour system.
Adding the Active Directory server information
You can import Active Directory users and user groups to the Wyse Management Suite private cloud.
Steps
1. Log in to the Wyse Management Suite private cloud.
2. Go to Portal Admin > Console Settings > Active Directory (AD).
3. Click the Add AD Server Information link.
4. Enter the server details such as AD Server Name, Domain Name, Server URL, and Port.
5. Click Save.
6. Click Import.
7. Enter the username and password.
NOTE: To search groups and users, you can filter them based on Search Base, and Group name contains options.
You can enter the values as following:
● OU=<OU Name>, for example, OU=TestOU● DC=<Child Domain>, DC=<Parent Domain>, DC=com, for example, DC=Skynet, DC=Alpha, DC=ComYou can enter a space after a comma, but you cannot use single or double quotes.
134 Using Wyse Management Suite

8. Click Login.
9. On the User Group page, click Group name and enter the group name.
10. In the Search field, type the group name that you want to select.
11. Select a group.The selected group is moved to the right pane of the page.
12. In the User Name Contents field, enter the user name .
13. Click Import Users or Import Groups.
NOTE: If you provide an invalid name or do not provide a last name, or provide any email address as name, then the
entries cannot be imported into Wyse Management Suite. These entries are skipped during the user import process.
The Wyse Management Suite portal displays a confirmation message with the number of imported active directory users.The imported active directory users are listed at Users tab > Unassigned Admins.
14. To assign different roles or permissions, select a user and click Edit User.
After you assign the roles to the active directory user, they are moved to the Administrators tab on the Users page.
Next steps
Active directory users can log in to the Wyse Management Suite Management portal by using the domain credentials. To log into the Wyse Management Suite portal, do the following:1. Start the Wyse Management Suite management portal.2. On the login screen, click the Sign in with your domain credentials link.
3. Enter the domain user credentials, and click Sign In.
To log in to the Wyse Management Suite portal using child domain credentials, do the following:
1. Start the Wyse Management Suite management portal.2. On the login screen, click the Sign in with your domain credentials link.
3. Click Change user domain.4. Enter the user credentials and the complete domain name.5. Click Sign In.
The imported Active Directory users can be activated or deactivated on the Users page by using the global administrator login.If your account is deactivated, you cannot log in to the Wyse Management Suite Management portal.
NOTE: To import the users using LDAPS protocol, complete the following steps:
1. Import the AD Domain Server Root Certificate into Java Key Store Manually using
the keytool. For example, <C:\Program Files\DELL\WMS\jdk1.8.0_152\jre\bin>keytool.exe>-importcert -alias "WIN-O358EA52H8H" -keystore "<C:\ProgramFiles\DELL\WMS\jdk1.8.0_152\jre\lib\security\cacerts>" -storepass changeit -file"Root Certificate Path"
2. Restart Tomcat service.
Configuring Active Directory Federation Services feature on public cloud
You can configure Active Directory Federation Services (ADFS) on a public cloud.
Steps
1. On the Portal Admin page, under Console Settings, click Active Directory (AD).
2. Enter the Wyse Management Suite details to ADFS. To know the location details on the ADFS server where you must uploadthe Wyse Management Suite .xml files, hover over the information (i) icon.
NOTE: To download the Wyse Management Suite .xml file, click the download link.
3. Set the Wyse Management Suite rules in ADFS. To know the custom claim rule details, hover over the information (i) icon.
NOTE: To view the Wyse Management rules, click the Show WMS Rules link. You can also download the Wyse
Management Suite rules by clicking the link that is provided in the Wyse Management Suite Rules window.
Using Wyse Management Suite 135

4. To configure the ADFS details, click Add Configuration, and do the following:
NOTE: To allow tenants to follow the ADFS configuration, upload the ADFS metadata file.
a. To upload the .XML file stored on your thin client, click Load XML file.
The file is available at https://adfs.example.com/FederationMetadata/2007–06/FederationMetadata.xml.
b. Enter the details of the entity ID and X.509 signing certificate in the respective boxes.c. Enter the ADFS login URL address and the ADFS logout URL address in the respective boxes.d. To enable tenants to configure Single Sign-On by using ADFS, select the Enable SSO login using ADFS check box. This
feature follows the Security Assertion and Markup Language (SAML) standard specification.e. To validate the configuration information, click Test ADFS Login. This enables tenants to test their setup before saving.
NOTE: Tenants can activate/deactivate SSO login by using ADFS.
5. Click Save.
6. After you save the metadata file, click Update Configuration.
NOTE: Tenants can log in and log out by using their AD credentials that are configured from their ADFS. You must
ensure that the AD users are imported to the Wyse Management Suite server. On the login page, click Sign in and
enter your domain credentials. You must provide the email address of your AD user and sign in. To import a user to
the public cloud , remote repository must be installed. For more information about the ADFS documentation, go to
Technet.microsoft.com.
Results
After the ADFS test connection is successful, import the users using AD connector present in the remote repository.
Wyse Management suite Active Directory group feature matrix
Table 34. Wyse Management suite Active Directory group feature matrix
Feature Sub-Feature AD User Group User Exception Select Group
Region&LanguageSettings
Region & Language Supported Supported Supported
Privacy&Security SCEP Not applicable Not applicable Not applicable
Privacy&Security Device Security Not applicable Not applicable Not applicable
Privacy&Security Account Privileges Not applicable Not applicable Not applicable
Privacy&Security Certificates Not applicable Not applicable Not applicable
Broker&Session Global SessionSettings
Supported Supported Supported
Broker&Session Citrix Broker Settings Supported Supported Supported
Broker&Session Citrix Session Settings Supported Supported Supported
Login Experience 3rd PartyAuthentication
Not applicable Not applicable Supported
Login Experience SmartCard Settings Not applicable Not applicable Supported
Login Experience Login Settings Not applicable Not applicable Supported
Login Experience Session setttings Not applicable Not applicable Supported
Personalization Shortcut Keys Supported Supported Supported
Personalization Device Info Supported Supported Supported
Personalization Desktop Supported Supported Supported
136 Using Wyse Management Suite

Table 34. Wyse Management suite Active Directory group feature matrix (continued)
Feature Sub-Feature AD User Group User Exception Select Group
Personalization Screen Saver Supported Supported Supported
PeripheralManagement
RFIdeas Reader Supported Supported Supported
PeripheralManagement
Printers Supported Supported Supported
PeripheralManagement
Audio Supported Supported Supported
PeripheralManagement
Touch Supported Supported Supported
PeripheralManagement
Serial Port Supported Supported Supported
PeripheralManagement
USB Redirection Supported Supported Supported
PeripheralManagement
Monitor Supported Supported Supported
PeripheralManagement
Mouse Supported Supported Supported
PeripheralManagement
Keyboard Supported Supported Supported
Firmware OS Firmware Updates Not applicable Not applicable Not applicable
Firmware Application PackageUpdates
Not applicable Not applicable Not applicable
Firmware BIOS FirmwareUpdates
Not applicable Not applicable Not applicable
System Settings Power and SleepSettings
Not applicable Not applicable Not applicable
System Settings Scheduled RebootSettings
Not applicable Not applicable Not applicable
System Settings Scheduled ShutdownSettings
Not applicable Not applicable Not applicable
System Settings Device Settings Not applicable Not applicable Not applicable
NetworkConfiguration
Ethernet Settings Not applicable Not applicable Not applicable
NetworkConfiguration
DHCP Settings Not applicable Not applicable Not applicable
NetworkConfiguration
DNS Settings Not applicable Not applicable Not applicable
NetworkConfiguration
VPN Settings Not applicable Not applicable Not applicable
NetworkConfiguration
Bluetooth Settings Not applicable Not applicable Not applicable
NetworkConfiguration
Proxy Settings Not applicable Not applicable Not applicable
NetworkConfiguration
Wireless Not applicable Not applicable Not applicable
Using Wyse Management Suite 137

Table 34. Wyse Management suite Active Directory group feature matrix (continued)
Feature Sub-Feature AD User Group User Exception Select Group
Services VNC Service Not applicable Not applicable Not applicable
Services WMS Settings Not applicable Not applicable Not applicable
Services TroubleshootingSettings
Not applicable Not applicable Not applicable
BIOS Dell Wyse 3040 Not applicable Not applicable Not applicable
BIOS Dell Wyse 5070 Not applicable Not applicable Not applicable
BIOS Dell Wyse 5470 Not applicable Not applicable Not applicable
BIOS Dell Wyse 5470 AIO Not applicable Not applicable Not applicable
Import unassigned users or user groups to public cloud throughactive directory
Steps
1. Download and install the file repository, see Accessing file repository. The repository must be installed by using the companynetwork and must have the access to the AD server to pull the users.
2. Register the repository to public cloud. Once registered, follow the steps mentioned on the UI to import the users to WyseManagement Suite public cloud. You can edit the roles of the AD user after importing to Wyse Management Suite publiccloud.
3. Set up ADFS on public cloud.
Access Wyse Management Suite file repository
File repositories are places where files are stored and organized. Wyse Management Suite has two types of repositories:● Local Repository—During the Wyse Management Suite private cloud installation, provide the local repository path in
the Wyse Management Suite installer. After the installation, go to Portal Admin > File Repository and select the localrepository. Click the Edit option to view and edit the repository settings.
● Wyse Management Suite Repository—Log in to Wyse Management Suite public cloud, go to ,Portal Admin > FileRepository and download the Wyse Management Suite repository installer. After the installation, register the WyseManagement Suite repository to Wyse Management Suite Management server by providing the required information.
You can enable the Automatic Replication option to replicate files that are added to any of the file repositories to otherrepositories. When you enable this option, an alert message is displayed. You can select the Replicate existing files check boxto replicate the existing files to your file repositories.
Replicate existing file option is applicable if the repository is already registered. When a new repository is registered, then allthe files are copied to the new repository. You can view the file replication status in the Events page.
The Image Pull templates are not replicated automatically to other repositories. You must copy these files manually.
File Replication feature is supported only on repositories from Wyse Management Suite 2.0 and later versions.
You cannot import self-signed certificate of the remote repository to the Wyse Management Suite server. If the CA Validation isenabled for remote repository, then the replication of files from the remote repository to the local repository fails.
To use Wyse Management Suite repository, do the following:
1. Download the Wyse Management Suite repository from the public cloud console.2. After the installation process, start the application.3. On the Wyse Management Suite Repository page, enter the credentials to register the Wyse Management Suite repository
to Wyse Management Suite server.4. If you enable the Register to Public WMS Management Portal option, you can register the repository to Wyse
Management Suite public cloud.5. Click the Sync Files option to send the sync file command.6. Click Check In and then click Send Command to send the device information command to the device.
138 Using Wyse Management Suite
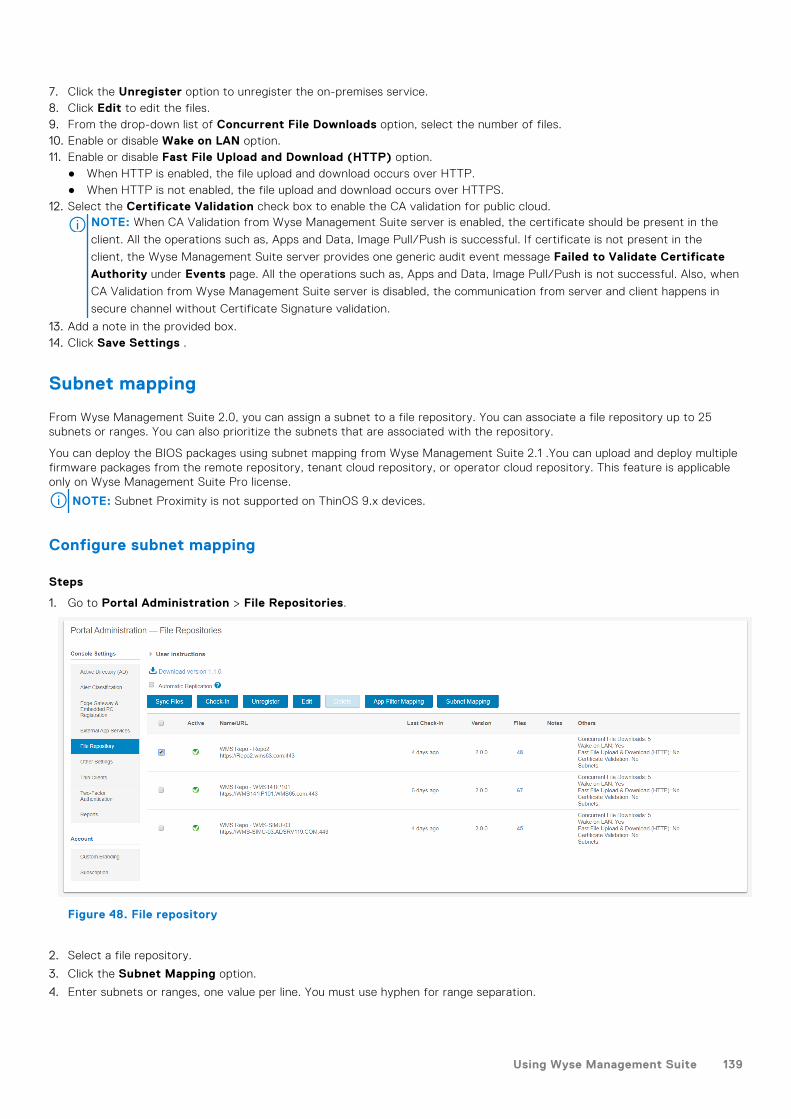
7. Click the Unregister option to unregister the on-premises service.8. Click Edit to edit the files.9. From the drop-down list of Concurrent File Downloads option, select the number of files.10. Enable or disable Wake on LAN option.11. Enable or disable Fast File Upload and Download (HTTP) option.
● When HTTP is enabled, the file upload and download occurs over HTTP.● When HTTP is not enabled, the file upload and download occurs over HTTPS.
12. Select the Certificate Validation check box to enable the CA validation for public cloud.NOTE: When CA Validation from Wyse Management Suite server is enabled, the certificate should be present in the
client. All the operations such as, Apps and Data, Image Pull/Push is successful. If certificate is not present in the
client, the Wyse Management Suite server provides one generic audit event message Failed to Validate Certificate
Authority under Events page. All the operations such as, Apps and Data, Image Pull/Push is not successful. Also, when
CA Validation from Wyse Management Suite server is disabled, the communication from server and client happens in
secure channel without Certificate Signature validation.
13. Add a note in the provided box.14. Click Save Settings .
Subnet mapping
From Wyse Management Suite 2.0, you can assign a subnet to a file repository. You can associate a file repository up to 25subnets or ranges. You can also prioritize the subnets that are associated with the repository.
You can deploy the BIOS packages using subnet mapping from Wyse Management Suite 2.1 .You can upload and deploy multiplefirmware packages from the remote repository, tenant cloud repository, or operator cloud repository. This feature is applicableonly on Wyse Management Suite Pro license.
NOTE: Subnet Proximity is not supported on ThinOS 9.x devices.
Configure subnet mapping
Steps
1. Go to Portal Administration > File Repositories.
Figure 48. File repository
2. Select a file repository.
3. Click the Subnet Mapping option.
4. Enter subnets or ranges, one value per line. You must use hyphen for range separation.
Using Wyse Management Suite 139

5. Optionally, clear the Allow devices from subnets not mapped to this file repository to download files from thisrepository as a fallback method using subnet proximity check box if you want the file repository to be accessed onlythrough the configured subnets or ranges.
NOTE: The Allow devices from subnets not mapped to this file repository to download files from this
repository as a fallback method using subnet proximity option is selected by default. This feature is not supported
on ThinOS 9.x devices.
140 Using Wyse Management Suite

Troubleshooting your thin clientAbout this task
You can use the troubleshooting options on the ThinOS desktop to troubleshoot your device.
Steps
1. From the desktop menu, click Troubleshooting.The Troubleshooting dialog box is displayed.
2. Click the General tab, and use the following guidelines:
Figure 49. General
● Click the Performance Monitor option to display the CPU usage history with the Memory, and Networking information.The graphs display on top of all windows.
● Click the Export System Setting option to export the system settings file to the USB drive that is connected to thethin client. Password is mandatory for the exported file. The file is stored in the /wnos/trouble_shoot/ folder of theUSB drive.
● Click the Export Screenshot option to export the system screenshots to the USB drive that is connected to the thinclient. The file is stored in the root folder of the USB drive.
● Click the Export logs option to export the system log files to the USB drive that is connected to the thin client. The fileis stored in the root folder of the USB drive—system_log_201910107_125610.tgz.
● Click the Import System Setting option to import the system settings file from the USB drive that is connected to thethin client. The file is stored in the /wnos/trouble_shoot/ folder of the USB drive.
3. Click the Capture tab, and do the following:
10
Troubleshooting your thin client 141

Figure 50. Capture
● Capture Network Packets—Use this option to capture network-related logs.a. Connect a USB drive to the thin client.b. To start logging the unexpected error messages, enable the Capture Network Packets option, and click OK.c. To stop logging the unexpected error messages, disable the Capture Network Packets option, and click OK.d. Open the Troubleshooting window, and click Export Logs on the General tab. The log file is stored in the root
folder of the USB drive—system_log_201910107_125610.tgz.
e. Extract the tgz file. The log files are available at ./var/log/netmng/.
● Capture Wireless Packets—Use this option to capture wireless network-related logs.a. Connect a USB drive to the thin client.b. To start logging the unexpected error messages, enable the Capture Wireless Packets option, and click OK.c. To stop logging the unexpected error messages, disable the Capture Wireless Packets option, and click OK.d. Open the Troubleshooting window, and click Export Logs on the General tab. The log file is stored in the root
folder of the USB drive—system_log_201910107_125610.tgz.
e. Extract the tgz file. The log files are available at ./var/log/netmng/.
● Capture USB Packets—Use this option to capture USB packets.a. Connect a USB drive to the thin client.b. To start logging the unexpected error messages, enable the Capture USB Packets option, and click OK.c. To stop logging the unexpected error messages, disable the Capture USB Packets option, and click OK.d. Open the Troubleshooting window, and click Export Logs on the General tab. The log file is stored in the root
folder of the USB drive—system_log_201910107_125610.tgz.
e. Extract the tgz file. The log files are available at ./compat/linux/var/usbdump/.
4. Click the Ping tab, and do the following:
142 Troubleshooting your thin client

Figure 51. Ping
a. Enter the IP address, DNS-registered hostname, or WINS-registered hostname of the target.b. Click Start.
The data area displays the ping response messages. The ping command sends one echo request per second, calculatesround-trip times and packet loss statistics, and displays a brief summary upon completing the calculation. If the host isoperational and on the network, it responds to the echo request. By default, echo requests are sent until interrupted byclicking Stop.
NOTE:
Ping sends an echo request to a network host. The host parameter is either a valid hostname or an IP address. If the
host is operational and on the network, it responds to the echo request. Ping sends one echo request per second and
calculates round-trip times and packet loss statistics. It displays a brief summary upon completion of the calculation.
NOTE: Not all network equipment responds to ping packets, as it is a common mechanism that is used in denial-of-
service attacks. Lack of response does not necessarily indicate that the target of the ping is unusable for other
purposes.
5. Click the Trace Route tab, and do the following:
Troubleshooting your thin client 143
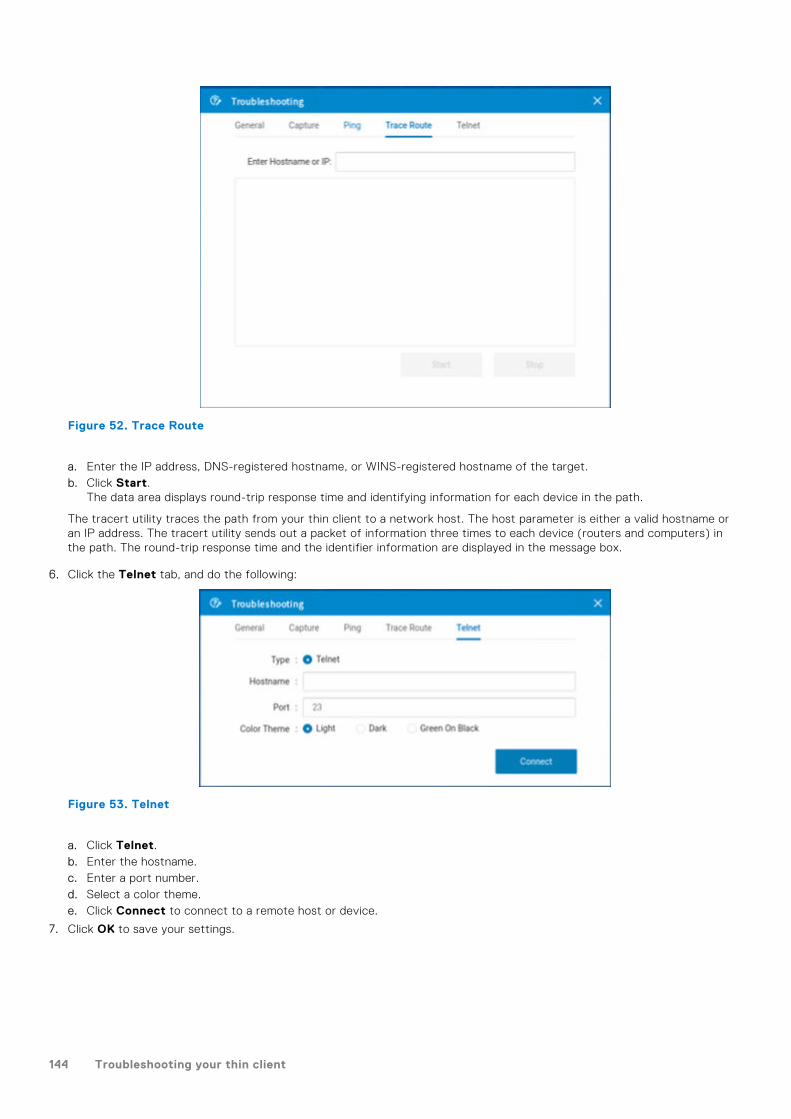
Figure 52. Trace Route
a. Enter the IP address, DNS-registered hostname, or WINS-registered hostname of the target.b. Click Start.
The data area displays round-trip response time and identifying information for each device in the path.
The tracert utility traces the path from your thin client to a network host. The host parameter is either a valid hostname oran IP address. The tracert utility sends out a packet of information three times to each device (routers and computers) inthe path. The round-trip response time and the identifier information are displayed in the message box.
6. Click the Telnet tab, and do the following:
Figure 53. Telnet
a. Click Telnet.b. Enter the hostname.c. Enter a port number.d. Select a color theme.e. Click Connect to connect to a remote host or device.
7. Click OK to save your settings.
144 Troubleshooting your thin client

Capture an HTTP log using ThinOS
About this task
To capture an HTTP log, do the following:
Steps
1. From the desktop menu, click System Setup > Admin Policy Tool.The Configuration Control || ThinOS window is displayed.
2. In the Troubleshooting Settings window, click the Enable HTTP Log option.The HTTP log feature is enabled on the thin client.
3. Log in to the Citrix session.
If the authentication fails, do the following:
a. Open the Troubleshooting window from the left menu on the ThinOS desktop.b. Connect the USB drive to the thin client, and click Export logs.
All trace files including the event logs are exported to the USB drive. The log file is saved in the root folder of the USBdrive—system_log_20191107_125610.tgz.
c. Extract the tgz file, and verify if the http.log file is available.
System crashes, freezes or restarts abruptlyIf the system crashes, freezes, or restarts abruptly, coredump is generated. You must export logs to analyze the root cause forfailure.
About this task
To export logs, do the following:
Steps
1. Reboot the thin client.
2. Export relevant logs using one of the following methods:● Use the Export logs option on the General tab in the Troubleshooting window on the ThinOS client.● Use the Wyse Management Suite console.
3. Analyze the detailed error log report.
Broker agent login failureIf login to a Broker agent connection fails, you must do either of the following:
● Capture an HTTP log and analyze the detailed error log report.● If the Broker agent can be accessed on a ThinOS 8.6 client, capture the network log and analyze the detailed error log
report.
Citrix desktop and application crashes abruptlyIf the Citrix desktop or application crashes abruptly, but the ThinOS client is still working, then a coredump is generated. Youmust export logs to analyze the root cause for failure.
About this task
To export logs, do the following:
Steps
1. Reboot the thin client.
Troubleshooting your thin client 145

2. Export relevant logs using one of the following methods:● Use the Export logs option on the General tab in the Troubleshooting window on the ThinOS client.● Use the Wyse Management Suite console.
3. Analyze the detailed error log report.
Cisco Jabber and Skype for Business call failureIf the Cisco Jabber call or the Skype for Business call fails, but the ThinOS client is still working, then a coredump is generated.You must export logs to analyze the root cause for failure.
About this task
To export logs, do the following:
Steps
1. Reboot the thin client.
2. Export relevant logs using one of the following methods:● Use the Export logs option on the General tab in the Troubleshooting window on the ThinOS client.● Use the Wyse Management Suite console.
3. Analyze the detailed error log report.
Request a log file using Wyse Management Suite
Prerequisites
The device must be enabled to pull the log file.
Steps
1. Go to the Devices page, and click a particular device.
The device details are displayed.
2. Click the Device Log tab.
3. Click Request Log File.
4. After the log files are uploaded to the Wyse Management Suite server, click the Click here link, and download the logs.
NOTE: The ThinOS device uploads the system logs.
View audit logs using Wyse Management Suite
Steps
1. Go to Events > Audit.
2. From the Configuration Groups drop-down list, select a group for which you want to view the audit log.
3. From the Timeframe drop-down list, select the time period to view the events that occurred during that time period.The Audit window arranges the information into a typical audit log-view. You can view the timestamp, event type, source,and description of each event in the order of time.
146 Troubleshooting your thin client

System log and trace information
Log/trace size and configuration
Table 35. Log/trace size and configuration
Type Cleanup after maximumsize
Comments
System log 10 MB No encryption. It is required that admin users do not open thisaccess to all other users. Only enable for target users.
Network/wireless trace 10 MB
USB packet 10 MB
HTTP log 10 MB
System configuration During export, ask admin to encrypt with password
How to enable and collect logs?
Table 36. Enabling and collecting logs
Type Enabling Capturing Collecting
System log Always enabled Always captured Using Wyse Management Suite orUSB drive
Network/wireless trace Enable in AdminPolicy Tool
Reboot after enabling Using Wyse Management Suite orUSB drive
USB packet Enable in AdminPolicy Tool
Reboot after enabling Using Wyse Management Suite orUSB drive
HTTP log Enable in AdminPolicy Tool
Reboot after enabling Using Wyse Management Suite orUSB drive
Upgrade or conversion troubleshooting and logs
Upgrade using Merlin image—individual user
After a successful upgrade process, if there is no Wyse Management Suite, the system reboots to ThinOS 9.0 OOBE screen.Citrix PKG is part of the Merlin image.
Wyse Management Suite deployment
1. Refer Migration Guide or Wyse Management Suite 2.0 Administrator's Guide.2. Upgrade Wyse Management Suite version to 2.0.
At this stage the client is still running ThinOS 8.6
3. Wyse Management Suite admin user configures two sets of policies: one for ThinOS 8.6 and the other for ThinOS 9.0.
For example, upload the ThinOS 9.0 conversion image to ThinOS 8.6 policy and upload ThinOS 9.0 PKG to ThinOS 9.0 policy.At this stage the client is still running ThinOS 8.6
4. Push the conversion image from ThinOS 8.6 policy.
At this stage, the client updates from ThinOS 8.6 to 9.0 and starts reading the policy.
5. To finish the upgrade process, update ThinOS 9.0 PKG from ThinOS 9.0 policy.
Troubleshooting your thin client 147

Wyse Management Suite admin-How to verify whether correct images orPKG files are uploaded?
● Check the Wyse Management Suite uploading progress indicator and completion message.● Verify whether the uploaded files are showing up in the Wyse Management Suite image or PKG dropdown.
How to verify a download or installation are in progress?
● There is no progress bar or success message from Wyse Management Suite.● After successful completion, the managed group and unit version information is updated in Wyse Management Suite.● On ThinOS 8.6, initially there are messages in the event log. After retrieving the image, the installation starts similar to
ThinOS 8.6, followed by a system reboot, and the installation continues in ThinOS 9.0. After the installation, the systemreboots to ThinOS 9.0
How to verify whether the image installation is completed successfully?
● After the last auto reboot, the thin client boots up to the Wyse Management Suite configuration from group 9.0 policy.● Verify the success info and system info in the unit system information or package information.
How to recover during a failure?
● If there is a failure message stating Upgrade break cannot boot up, use USB recovery.● If there is a wrong image or PKG, and the device shows wrong screen or info, use USB recovery.
How to verify whether the thin client is working properly?
Go to System information > Event Log and see if the system info or PKG versions are correct.
If any unexpected issues occur before VDI logon, collect the following data:● General troubleshooting
○ General > Export system setting○ General > Export Screenshot○ General > Export logs
● Network troubleshooting○ Capture > Capture Network Packets○ Capture > Capture Wireless Packets
● Peripherals troubleshooting○ Capture > Capture USB Packets
Logs to capture during VDI logon failure
If you face VDI or cloud sign on failure, go to Capture > Http log and collect the data for analysis.
Logs to capture when session failure after launch
After you signed on VDI or cloud, if the remote desktop connection failed to launch or failed after launch, go to General >Export logs and collect the data for analysis.
Important information
● The System configuration export is encrypted with a password and the administrator is prompted to provide passwordprotection upon using this option.
148 Troubleshooting your thin client

● System log and trace are not encrypted, but users cannot read any data from it. The design will be updated in ThinOS 9.1.● Administrator must manage the enablement of the export options on the thin client. It is recommended to not enable export
options to all users.
How to debug with new support beyond ThinOS 8?Reproduce the problem with any other ThinOS 9 unit and capture logs/trace from ThinOS 9 for support analysis.
How to debug with same support in ThinOS 8?Capture the ThinOS 9 related logs/trace and also capture the related logs/trace in ThinOS 8 following same steps where itworks. Send both to the support team for comparison and analysis. This can help isolate the root cause sooner.
Common log files and locationsThe file is named in the pattern system_log_yyyymmdd_hhmmss.tgz. The following table contains the locations where the logfiles are saved.
Table 37. Common log file locations
Type Location
Device log …\compat\linux\home\tmp\wlogd\wlogd.log
Citrix … \compat\linux\var\volatile\log\citrix.log
Smart card AuthManager …\compat\linux\home\warthog\.ICAClient\logs
RTME …\compat\linux\var\volatile\log\RTMediaEngineSRV\MediaEngineSRVDebugLogs
JVDI …\compat\linux\var\volatile\log\cisco\
Network …\compat\linux\var\volatile\log\netmng\nn.log or …\compat\linux\var\log\netmng (see wireshark log)
Coredump …\var\crash\vmcore.0zst
System daemon …\compat\linux\home\tmp\wlogd\wlogd.log
xorg server logs …\compat\linux\tmp\wlogd
Troubleshooting your thin client 149

Frequently Asked Questions
ThinOS-related questionsThis section contains frequently asked questions related to Wyse ThinOS.
How do I upgrade from ThinOS 8.6 to 9.0?
You must use the Wyse Management Suite version 2.0 to upgrade from ThinOS 8.6 to 9.0. For the firmware upgrade procedure,see Firmware upgrade and package deployment.
What should I do if the package installation fails?
If the thin client does not work after upgrading to the new firmware, or if the package fails to update, remove all packages andreboot the thin client. After rebooting the thin client, reinstall the package.
Is Wyse Management Suite 2.0 the only way to manage ThinOS9.0?
ThinOS 9.0-devices can be managed using either Wyse Management Suite or Admin Policy Tool.
Is USB Imaging Tool method a possible option for upgrading toThinOS 9.0?
It is recommended to use Wyse Management Suite version 2.0 to upgrade your thin clients since you cannot deploy large-scaleclients using the USB Imaging Tool. However, you can use the USB Imaging Tool method for installing ThinOS 9.0 on a singledevice.
Can ThinOS 9.0 be installed on a PCoIP device?
ThinOS 9.0 does not support PCoIP devices.
Does ThinOS 9.0 support zero desktop?
ThinOS 9.0 does not support zero desktop and zero toolbars. You can use the classic desktop to access menus andconfiguration tabs.
Does ThinOS 9.0 support ThinOS configurations using INI files?
ThinOS 9.0 does not support INI files. You need to use Wyse Management Suite 2.0 to configure the ThinOS settings remotely.
11
150 Frequently Asked Questions

iPhone cannot be redirected to the Citrix Desktop session
Steps
1. Open Global Connection Settings.
2. Uncheck Exclude disk devices and Exclude audio devices.
Android smartphone is not displayed in the session whenredirected or mapped
You must select the option to transfer images on your smartphone when you connect the USB cable.
Does Citrix Workspace app replace Citrix Receiver on ThinOS?
In ThinOS 9.0, Citrix Receiver is replaced by Citrix Workspace app. Citrix Workspace app, a client software released by Citrix,enables you to access all your virtual apps, desktops, and other Citrix products from a single workspace UI. You must deploy theICA package using Wyse Management Suite to install the Citrix Workspace app on ThinOS 9.0.
For more information about deploying packages using Wyse Management Suite, see How to upload and push ThinOS 9.0application packages.
What is Workspace mode on ThinOS 9.0?
Workspace mode enables you to customize the look and feel of your ThinOS to match the Citrix Workspace-based layout ofpublished applications and desktops. Workspace mode displays both the ThinOS full taskbar and the workspace desktop. Youcan select the Workspace Mode check box in the Broker Setup window.
Can I enable Flash content to be rendered using a local Flash Playeron ThinOS 9.0?
ThinOS 9.0 does not support the Flash Redirection feature. Hence, you cannot enable Flash content to be rendered using a localFlash Player.
How do I verify if HDX Enlightened Data Transport Protocol isactive?
To verify if HDX Enlightened Data Transport Protocol is active:
● In an ICA desktop session, run the command netstat -a -p UDP in command prompt, and check if the VDA is using UDPports 1494 and 2598.
● In an ICA desktop session, run the command ctxsession.exe in command prompt, and check if the transport protocol isusing UDP > CGP > ICA.
● Go to Citrix Director, access the session details and check if the Connection Type/Protocol is UDP.
Alternatively, you can use the HDX Monitor tool to check parameter Component_Protocol=UDP-CGP-ICA.
For more information, see the article CTX220730 at www.support.citrix.com.
How do I check if HTML5 Video Redirection is working?
Prerequisites
Ensure that you have enabled the HTML5 video redirection policy on the server side.
Frequently Asked Questions 151

Steps
1. Launch a Citrix session on your thin client.
2. Open a web browser and play a video.
3. Move the browser on the screen or scroll the browser.
4. Notice a delay or jump in the video window.This noticeable lag in the video window indicates that the video is being redirected.
How do I check if QUMU Multimedia URL Redirection is working?
Prerequisites
Ensure that you have installed the QUMU on the remote desktop.
Steps
1. Launch a Citrix session on your thin client.
2. Open a web browser and play a QUMU published video.
3. Move the browser on the screen or scroll the browser.
4. Notice a delay or jump in the video window.This noticeable lag in the video window indicates that the video is being redirected.
How do I check if Windows Media Redirection is working?
Prerequisites
● Ensure that the Windows Media redirection policy is set to Allowed in Citrix Studio.● Ensure that you have enabled the Enable HDX/MMR check box in the Global Connection Settings dialog box on the
ThinOS client.
Steps
1. Connect to a Citrix server, and launch an ICA desktop.
2. Play a video or an audio file using Windows Media Player.
3. Drag and move the Windows Media Player.Notice that the video graphic and the media player window frame are in different layer.
You can also determine if Windows Media Redirection is working using the method that is described in the CTX215173 articleat support.citrix.com.
Is persistent logging supported in ThinOS 9.0?
Persistent logging is not supported in ThinOS 9.0.
Is tls.txt file included in network traces on ThinOS 9.0?
The tls.txt file is not included in network traces for ThinOS 9.0.
Will ThinOS 9.0 device reboot automatically when the systemcrashes?
ThinOS 9.0-based device automatically reboots when the system crashes. System backs up the data every one hour. If any keyapplications, such as ThinOS window crashes, the system still runs and is recovered without a reboot.
152 Frequently Asked Questions

Wyse Management Suite-related questionsThis section contains frequently asked questions related to Wyse Management Suite.
What takes precedence between Wyse Management Suite andThinOS UI when conflicting settings are enforced?
Any settings that are configured using Wyse Management Suite take precedence over the settings that were configured locallyon the ThinOS client or published using the Admin Policy Tool. The settings that are configured locally in the ThinOS are syncedto Admin Policy Tool but not to Wyse Management Suite.
The following order defines the priority set for ThinOS configurations:
Wyse Management Suite Policies > Admin Policy Tool > Local ThinOS UI
How do I import users from a .csv file?
Steps
1. Click Users.The Users page is displayed.
2. Select the Unassigned Admins option.
3. Click Bulk Import.The Bulk Import window is displayed.
4. Click Browse and select the .csv file.
5. Click Import.
How do I use Wyse Management Suite file repository?
Steps
1. Download the Wyse Management Suite repository from the public cloud console.
2. After the installation process, start the application.
3. On the Wyse Management Suite Repository page, enter the credentials to register the Wyse Management Suite repositoryto the Wyse Management Suite server.
4. To register the repository to the Wyse Management Suite public cloud, enable the Register to Public WMS ManagementPortal option.
5. Click the Sync Files option to send the sync file command.
6. Click Check In and then click Send Command to send the device information command to the device.
7. Click the Unregister option to unregister the on-premises service.
8. Click Edit to edit the files.
a. From the drop-down list of Concurrent File Downloads option, select the number of files.b. Enable or disable Wake on LAN option.c. Enable or disable Fast File Upload and Download (HTTP) option.
● When HTTP is enabled, the file upload and download occurs over HTTP.● When HTTP is not enabled, the file upload and download occurs over HTTPS.
d. Select the Certificate Validation check box to enable the CA validation for a public cloud.
NOTE:
● When CA Validation from the Wyse Management Suite server is enabled, the certificate should be present in the
client. All the operations, such as, Apps and Data, Image Pull/Push is successful. If the certificate is not present
in the client, the Wyse Management Suite server provides one generic audit event message Failed to Validate
Certificate Authority under Events page. All the operations, such as, Apps and Data, Image Pull/Push is not
successful.
Frequently Asked Questions 153

● When CA Validation from Wyse Management Suite server is disabled, then the communication from server and
client happens in a secure channel without Certificate Signature validation.
e. Add a note in the provided box.f. Click Save Settings .
How do I check the version of Wyse Management Suite
Steps
1. Log in to Wyse Management Suite.
2. Go to Portal Administration > Subscription.The Wyse Management Suite version is displayed in the Server Information field.
154 Frequently Asked Questions
Top Related
Copyright © 2022 FDOKUMEN

