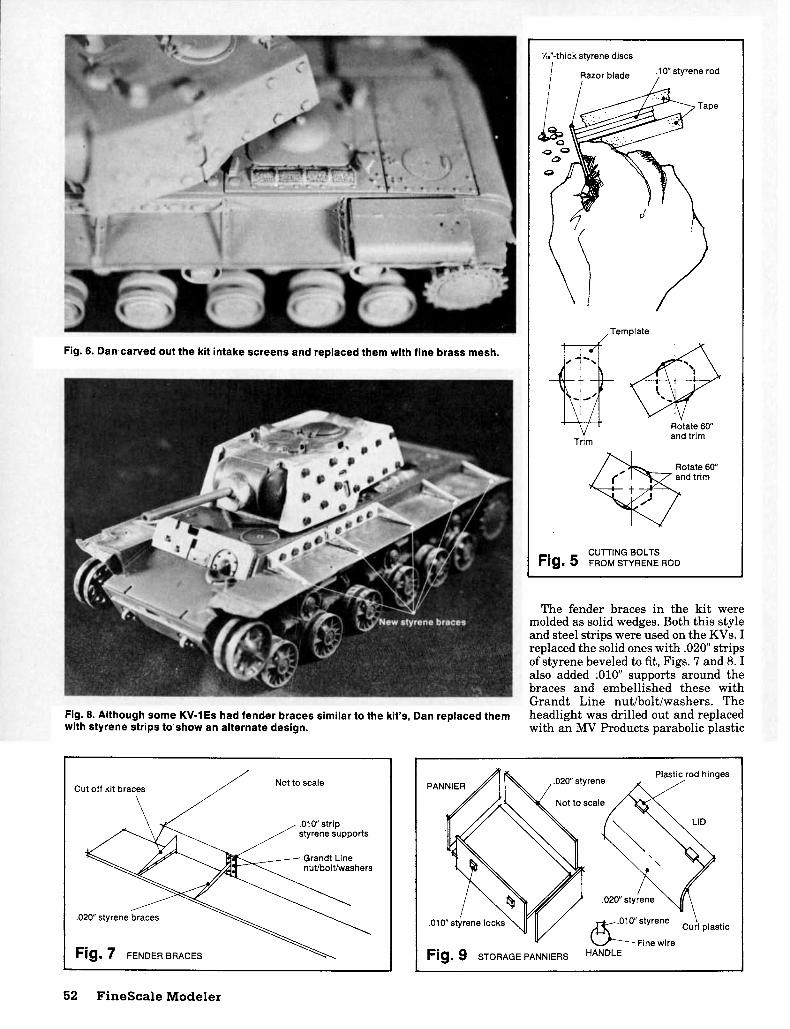
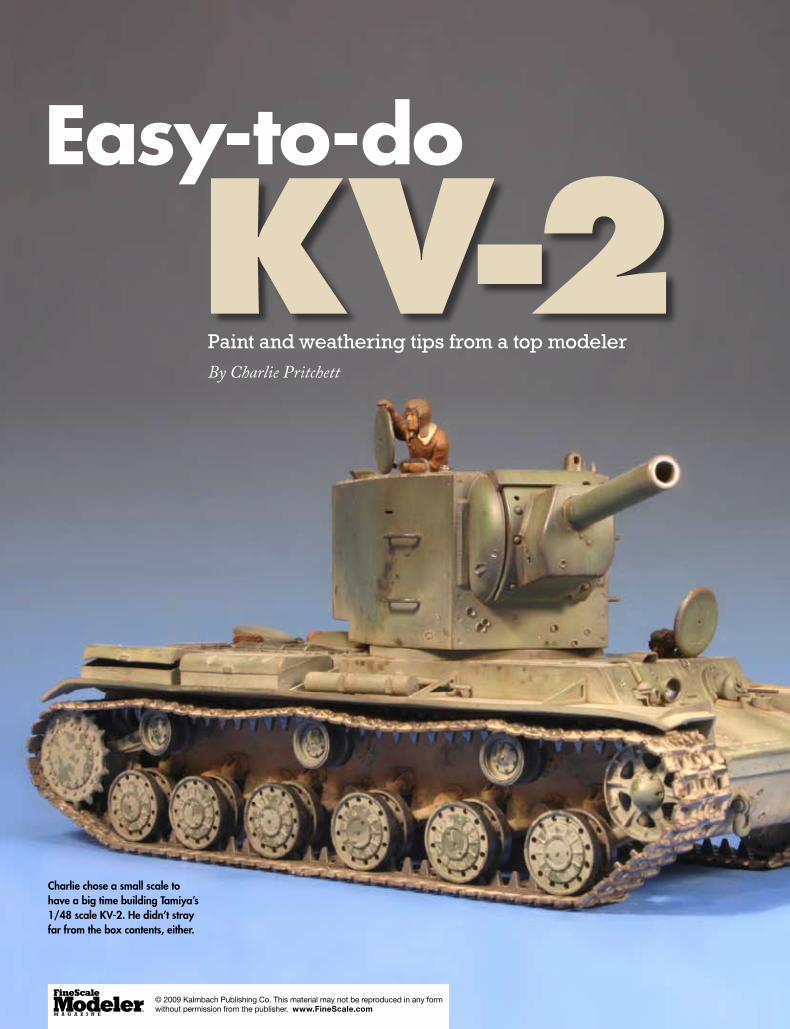
wwii tanks - FineScale Modeler
38
Tips and techniques for creating better models www.finescale.com MODELING WWII TANKS
-
Upload
khangminh22 -
Category
Documents
-
view
3 -
download
0
Transcript of wwii tanks - FineScale Modeler

Tips and techniques for creating better models
www.finescale.com
MODELING WWII TANKS
36 FineScale Modeler April 1999
V isit almost any hobby shop and you’ll discover thatbehind the display of brand-new, state-of-the-art kitsare rows and rows of older kits. While their level of
detail may leave a little to be desired, most have accurate out-lines, and with a few detailing tricks and aftermarket parts, ahas-been kit can be transformed into a real head turner.
Tamiya’s KV-1 (kit No. MM-166) is a perfect candidate forsuch treatment. Originally released in the early ’70s, the kit istypical of the battery-operated “carpet crawlers” of the era.Fortunately, the KV-1’s hull was big enough to swallow up themotorization pack without modification, and aftermarket indi-vidual-link tracks are available to replace the kit’s poorly detailedvinyl tracks.
The kit portrays a standard-production KV-1 with a cast tur- 1Sheet-styrene armor covers the kit’s motorization holes.
ArmorImprovementsArmorImprovementsBringing Tamiya’s early-’70s Russian KV-1up to modern standardsBy Cookie Sewell
.015" styrene
© 2009 Kalmbach Publishing Co. This material may not be reproduced in any form without permission from the publisher. www.FineScale.com
April 1999 FineScale Modeler 37
ret; it’s likely based on the sample sent to the United States bythe Soviets in 1942, which currently resides at AberdeenProving Ground’s Ordnance Museum. A trip to the museumwith my camera provided plenty of reference photos.
I wanted to model a tank used by the Leningrad Front in1942. It was a slightly different version, with a squared-off reardeck, so I’d have to do a little plastic surgery.
Getting started. I started the project with the lowerhull; it’s full of holes for the motorization system. The holes onthe bottom surface are the easiest to fix. Full-size KV-1s had a20mm steel-plate belly pan. I made one from .015" sheet styreneand added it to the model, 1. I cut holes through it to representthe escape hatch under the driver’s position, an electrical-systemaccess hatch, and two drain holes under the final drives at therear of the hull.
Filling the holes in the sides of the hull was more difficult, asthey cut through the mounts for the drive wheels. Like many of
Tamiya’s early kits, the hull is .050" thick, making it easy to cutaccurate filler plugs from sheet styrene. After cutting the plugsto shape, I insert them in the slots and backed them with piecesof scrap plastic.
Each side of the hull has a slot that cuts through the mold-ed-in circular drive-wheel mount. Filling the slot is easy, butrestoring the missing section of the mount requires more work.After measuring the mount, I cut an identical ring out of sheetstyrene, then sliced out a section to match the missing piece ofthe mount. A little filler hid all of the joints, and Grandt Linebolts added detail, 2.
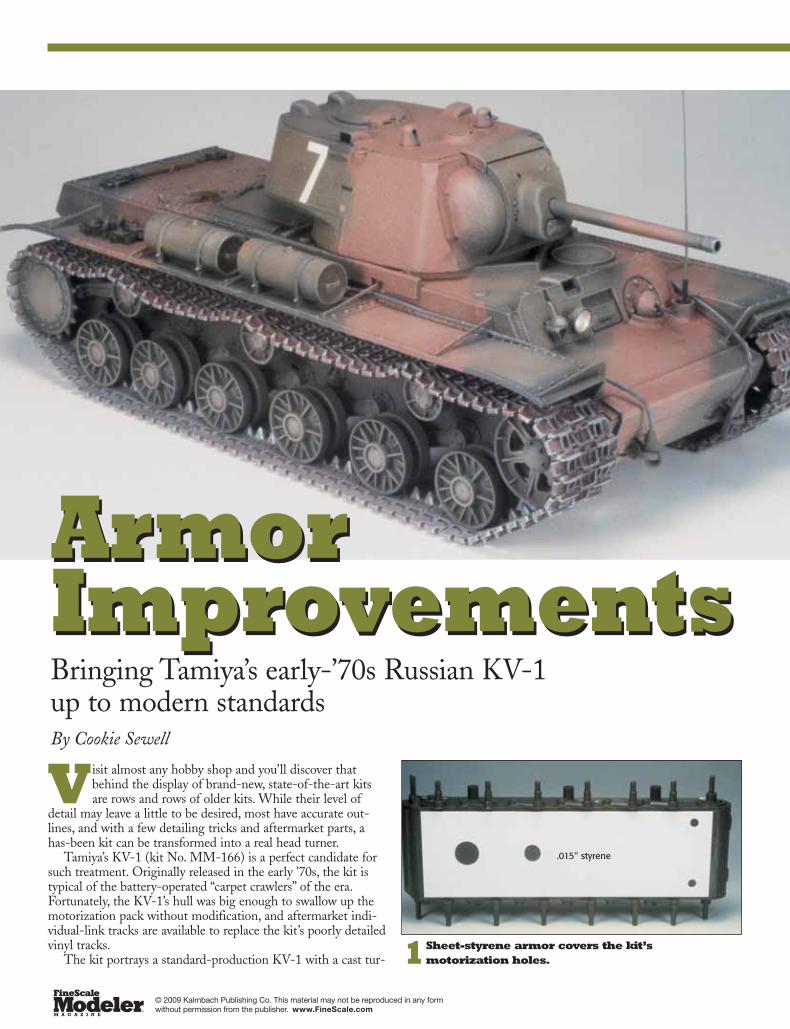
Modelkasten’s tracks are good – too good, in fact. The tracklinks are close to scale, but most of the model’s running gear isnot. To get the tracks to fit properly I had to file down the driv-er teeth until the notches in the links would fit down over theteeth and touch the face of the driver, 3. Afterward I addedGrandt Line bolts to the outside face of the inner half of the
3You’ll need to file down the driver teeth beforethey’ll work with aftermarket tracks.
5Carefully remove the fenders with a razor sawand set them aside.
1/35 Scale
2Strengthen all of the hull plugs with scrap-plasticbacking plates.
Drive-wheelmount
Backing plate
Kit partModified part
4Installing the individual-link tracks was tedious,but the results were worth it.
Grandt Line bolts
Mud scraper

38 FineScale Modeler April 1999
driver, using the outside driver half as a guide.Make sure the drivers rotate freely after you install them –
this will make it easier to adjust the tracks for tension and fitwhen you install them. I installed the mud scrapers just beforethe top track run, 4. Remember that the KV-1 had “dead”tracks, which tend to stretch and sag.
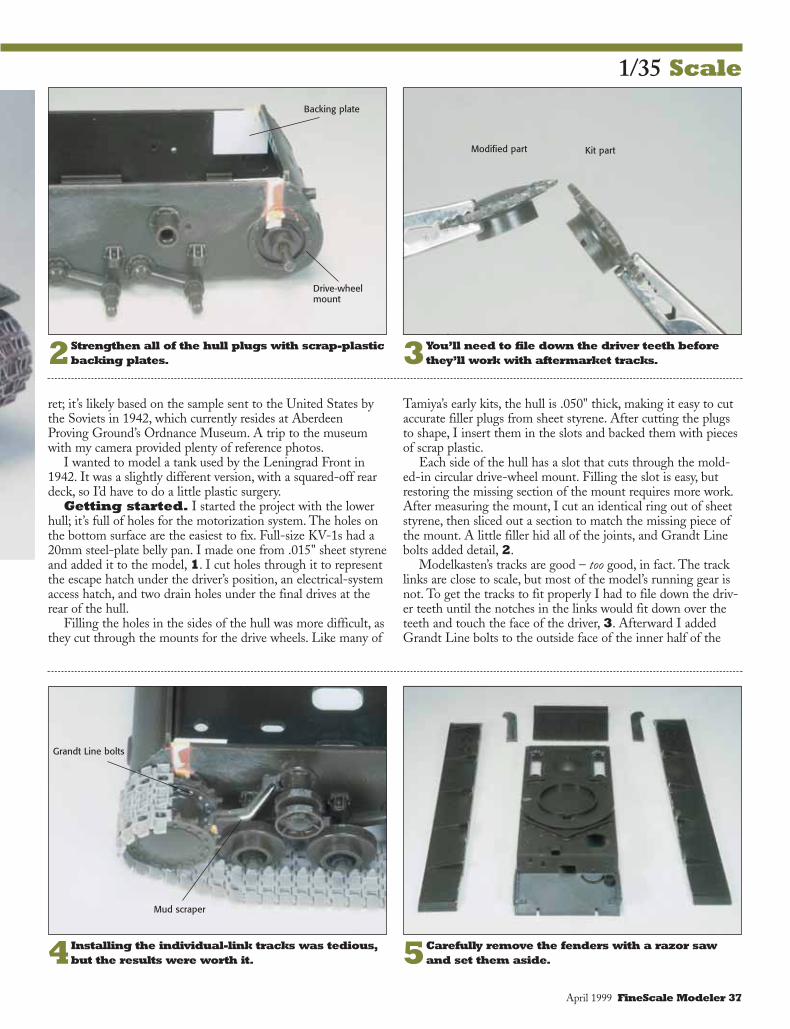
Upper hull. Moving to the upper hull, I decided thatsince I was going to add a new rear end, I might as well replacethe kit’s thick fenders. I’d use them as patterns for the new ones,though, so after I removed them I set them aside, 5.
I drilled out all of the hull’s grilles with a motor tool, andtrimmed the openings with a hobby knife, 6. Afterward I cutoff the rear of the hull right behind the engine deck.
The new rear end was constructed from sheet styrene using“layered” construction, a technique that enables me to build inrealistic joints and panel lines without scribing. After buildingthe new rear end using .040" sheet styrene, I added an outer fac-
ing using pieces of .010" sheet. By leaving small gaps betweenthe .010" pieces, I get realistic, uniform panel lines.
Using a razor blade, I removed the prominent bolts andmounts from the kit hull and transplanted them to the appro-priate positions on the new hull. I also added a set of shovelsfrom an Italeri/Zvezda T-34 kit.
I detailed the engine deck using parts from Eduard’s pho-toetched set. I also added new lift rings and a few Grandt Lineparts, 7. Before I added the deck to the model, I roughed up theedges with a file to simulate torch marks – the full-size deck wascrudely cut from armor plate.
Next I added a new rear radiator exhaust grille I made fromextruded-aluminum mesh. It’s a simple rectangular screen overthe exhaust vent, 8.
Using the kit parts as a guide, I made a new exhaust-deflec-tor plate from .010" sheet and backed it with .030" mounts, 9.
The KV-1 had armored covers over its radiators to keep shell
9Cut a hole in the left end of the exhaust-deflectorplate for the armored taillight.
6Drill out the grilles, then clean up the openingswith a hobby knife. 7The completed engine deck with its photoetched
grilles in place.
8Extruded-aluminum mesh has the correct dia-mond-shaped pattern for the exhaust grille.
Opening forarmored taillight
April 1999 FineScale Modeler 39
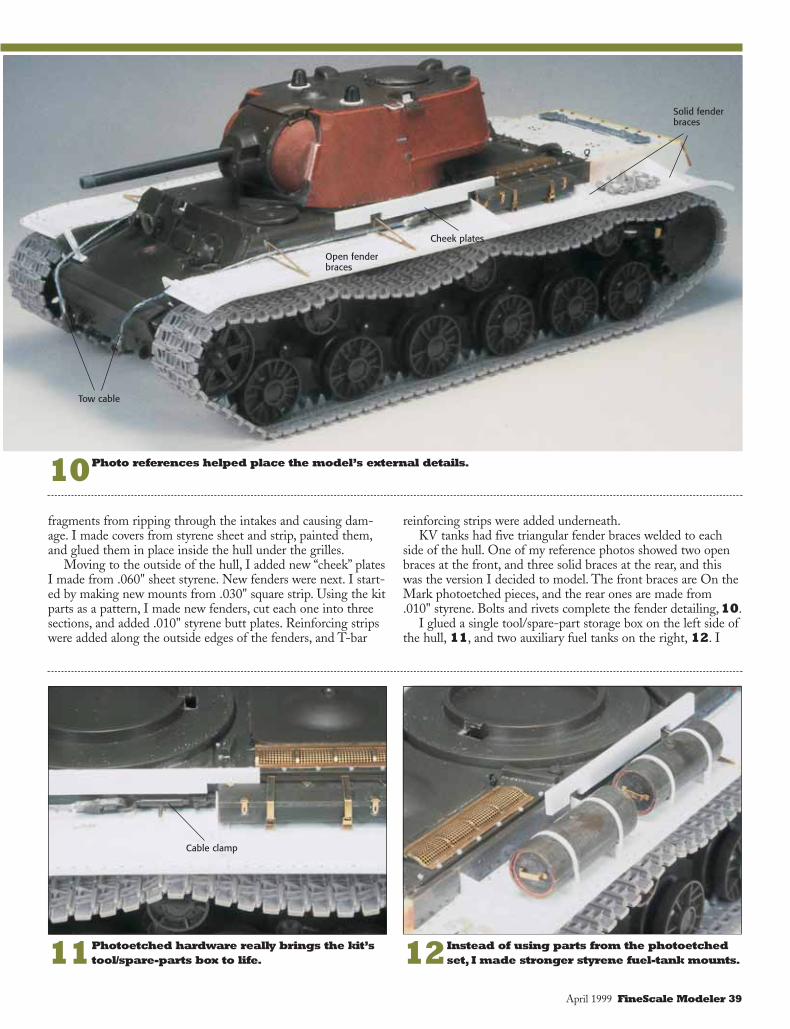
fragments from ripping through the intakes and causing dam-age. I made covers from styrene sheet and strip, painted them,and glued them in place inside the hull under the grilles.
Moving to the outside of the hull, I added new “cheek” platesI made from .060" sheet styrene. New fenders were next. I start-ed by making new mounts from .030" square strip. Using the kitparts as a pattern, I made new fenders, cut each one into threesections, and added .010" styrene butt plates. Reinforcing stripswere added along the outside edges of the fenders, and T-bar
reinforcing strips were added underneath.KV tanks had five triangular fender braces welded to each
side of the hull. One of my reference photos showed two openbraces at the front, and three solid braces at the rear, and thiswas the version I decided to model. The front braces are On theMark photoetched pieces, and the rear ones are made from.010" styrene. Bolts and rivets complete the fender detailing,10.
I glued a single tool/spare-part storage box on the left side ofthe hull, 11, and two auxiliary fuel tanks on the right, 12. I
11Photoetched hardware really brings the kit’stool/spare-parts box to life. 12Instead of using parts from the photoetched
set, I made stronger styrene fuel-tank mounts.
Cable clamp
Open fenderbraces
Solid fenderbraces
Cheek plates
Tow cable
10Photo references helped place the model’s external details.

used Eduard’s fittings for the storage box, and made fuel-tankmounts from .005" and .010" styrene.
Turret detail. Tamiya’s kit really shows its age whenyou examine the surface of the turret. The KV-1’s turret had apronounced cast texture, and the kit’s version is far too smooth.Some of the other details are lacking, too, so I had plenty ofreworking to do.
Since I wanted to model an uparmored version of the KV-1,I needed to add a reinforcing ring around the rear machine-gunmount and a massive mold-separation line around the lower-rear portion of the turret. I made the reinforcing ring from sheetstyrene, cemented it to the back of the turret, and sanded it toshape, 13. Stretched sprue simulates the mold-separation line. Iadded styrene “cheek” pads on the front of the turret.
I decided to use a mixture of Dr. Microtools putty and Testorliquid cement to add the cast texture to the turret. Using a cut-
40 FineScale Modeler April 1999
down brush from the glue bottle, I applied the mixture to theturret in small areas, usually around 1" square. While the mix-ture was still wet, I stippled it with the stubby brush, 14. Thetrick is to keep at it – don’t stop even if the putty starts to peaklike a meringue pie! Repeat the process until all of the cast sur-faces are covered. After about 30 minutes, give all of the surfacesa second coat of putty. With a little light sanding, the surfacewill have a realistic cast appearance, 15.
The Soviets trimmed the rear of the cast turret crudely; toreplicate it, I notched the lower-rear section of the turret with ahobby knife.
I finished the turret with several detail parts. I trimmed offthe kit’s crude PT-4-7 sights and replaced them with ones fromTamiya’s T-34/76 (kit No. 3559). I added a T-34 F-35 gun bar-rel and made interiors and periscope heads for all of the kit’speriscopes.
Final details. First I painted the tracks. I applied abase coat of Floquil red oxide and allowed it to dry thoroughly.A black wash filled the recesses, and dry-brushing with silversimulated wear.
My KV-1 would wear a two-tone paint scheme, with a red-brown pattern added over the camouflage green. I airbrushed ona coat of Floquil RLM 72 dark green, then added the red pat-tern using Floquil German red brown, 16. The red pattern wasonly applied to the upper surfaces of the tank, so some maskingmay be necessary.
After I applied a black wash to the model and did little dry-brushing, I airbrushed on a coat of Future floor polish to preparethe model for decals. After I applied them, a coat of TestorDullcote, followed by a coat of Floquil dust, gave everything theproper look.
Like many of Tamiya’s early armor kits, the KV-1 is a sur-vivor. With a little extra work and some basic techniques, itholds up nicely against newer kits in my collection. FSM
15The finished turret, before paint. Stretched-sprue makes a realistic mold-separation line.
Stretched-sprue mold-separation line
14An old paint-bottle cap is perfect for mixingputty and liquid cement.
Brush from liquid-cementbottle
13A circle template helped make a reinforcingring for the rear machine-gun mount.

April 1999 FineScale Modeler 41
SOURCES
Detail parts
Eduard distributed byPrecision Parts Corp.,P.O. Box 305, Ogdensburg, NY13669, ✆613-224-9071
Grandt Line Products1040B Shary Court, Concord,CA 94518, ✆510-671-0143
Modelkasten availablefrom VLS, 811 Lone Star Drive,O’Fallon, MO 63366,✆314-281-5700
On the Mark ModelsP.O. Box 663, Louisville, CO80027, ✆303-665-9424
Paint, cement
Floquil-Polly S 206 MilvanDrive, Weston, ON M9L 1Z9,Canada, ✆888-476-5597
Testor 620 Buckbee St.,Rockford, IL 61104-4891,✆815-962-6654
Putty
Dr. Microtools P.O. Box21585, Columbus, OH 43221
Styrene components
Evergreen ScaleModels 12808 NE 125th Way, Kirkland, WA 98034
16A top view of the model after application ofthe paint scheme and decals.
© 2009 Kalmbach Publishing Co. This material may not be reproduced in any form without permission from the publisher. www.FineScale.com


© 2009 Kalmbach Publishing Co. This material may not be reproduced in any form without permission from the publisher. www.FineScale.com


© 2009 Kalmbach Publishing Co. This material may not be reproduced in any form without permission from the publisher. www.FineScale.com


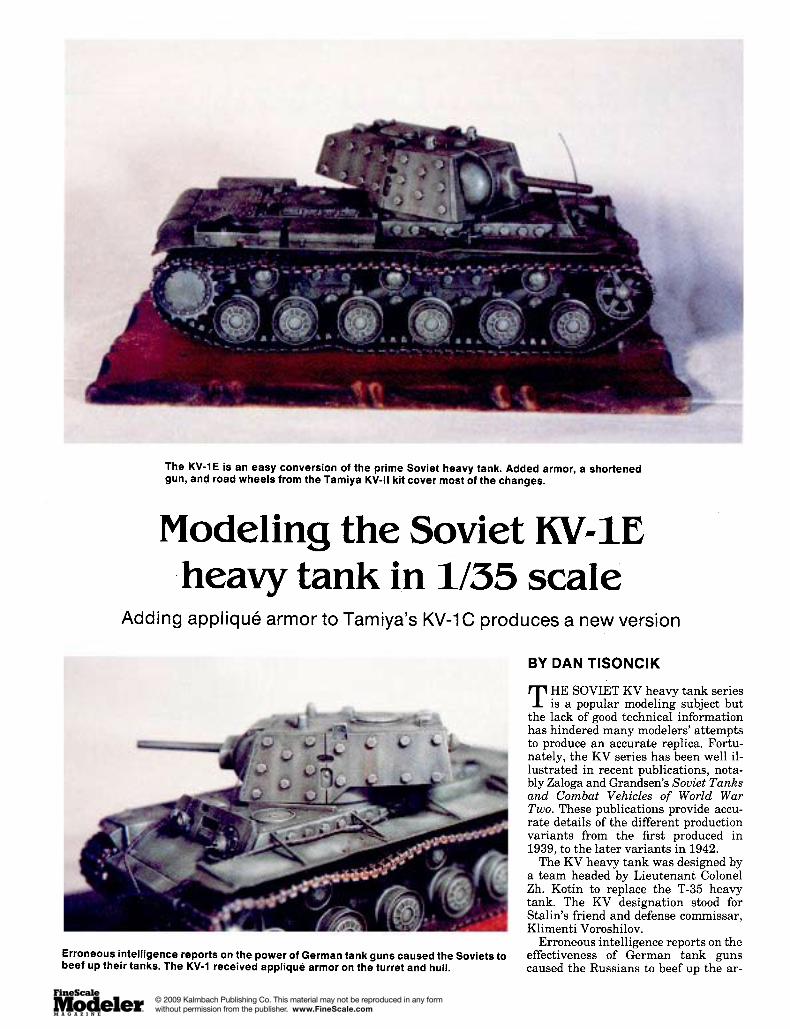
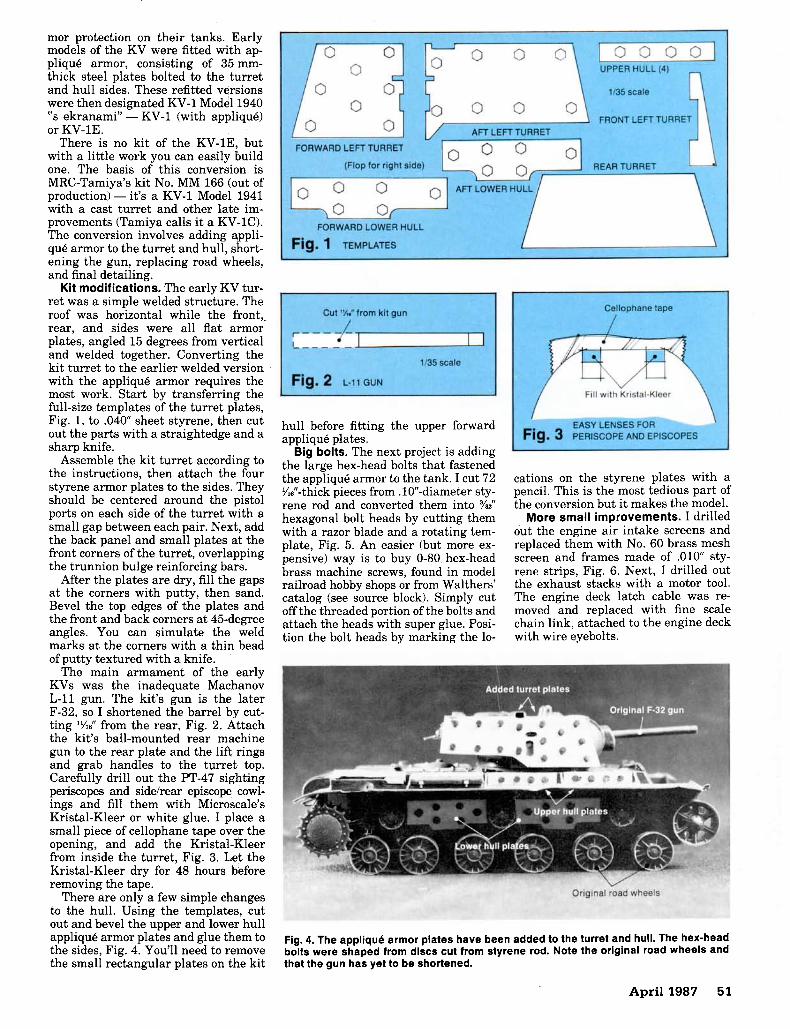
30 FineScale Modeler February 2008
KV-2Paint and weathering tips from a top modelerBy Charlie Pritchett
Charlie chose a small scale to have a big time building Tamiya’s 1/48 scale KV-2. He didn’t stray far from the box contents, either.
Easy-to-do
© 2009 Kalmbach Publishing Co. This material may not be reproduced in any form without permission from the publisher. www.FineScale.com
KV-2
ike many modelers, I was puzzled when Tamiya, with its long line of 1/35 scale armor, started releasing
these kits in 1/48 scale. However, being a sucker for anything new from Tamiya, I couldn’t resist.
I didn’t really care for the diecastmetal lower hulls that come with these models, but I’ve gotten
used to them. The only drawbacks are that, in most cases, the suspension cannot be articulated, and the large
posts for screwing the hull halves together prohibit adding a full interior.
Nevertheless, these 1/48 scale kits are well detailed, easily built, and a relaxing break from intricate 1/35 scale builds. Now, when I finish in a fraction of the time I would spend in 1/35 scale, instead of asking “Why?” I think, “Why not?”
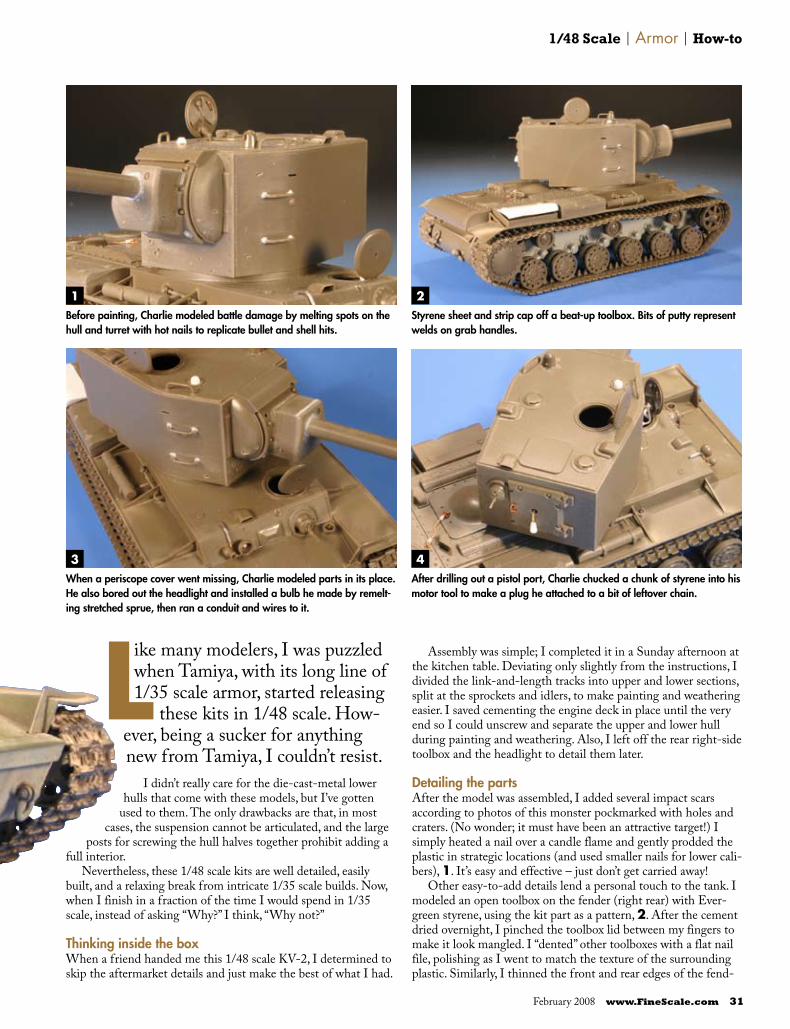
Thinking inside the boxWhen a friend handed me this 1/48 scale KV2, I determined to skip the aftermarket details and just make the best of what I had.
Assembly was simple; I completed it in a Sunday afternoon at the kitchen table. Deviating only slightly from the instructions, I divided the linkandlength tracks into upper and lower sections, split at the sprockets and idlers, to make painting and weathering easier. I saved cementing the engine deck in place until the very end so I could unscrew and separate the upper and lower hull during painting and weathering. Also, I left off the rear rightside toolbox and the headlight to detail them later.
Detailing the partsAfter the model was assembled, I added several impact scars according to photos of this monster pockmarked with holes and craters. (No wonder; it must have been an attractive target!) I simply heated a nail over a candle flame and gently prodded the plastic in strategic locations (and used smaller nails for lower calibers), 1. It’s easy and effective – just don’t get carried away!
Other easytoadd details lend a personal touch to the tank. I modeled an open toolbox on the fender (right rear) with Evergreen styrene, using the kit part as a pattern, 2. After the cement dried overnight, I pinched the toolbox lid between my fingers to make it look mangled. I “dented” other toolboxes with a flat nail file, polishing as I went to match the texture of the surrounding plastic. Similarly, I thinned the front and rear edges of the fend
1/ 48 Scale | Armor | How-to
Before painting, Charlie modeled battle damage by melting spots on the hull and turret with hot nails to replicate bullet and shell hits.
Styrene sheet and strip cap off a beat-up toolbox. Bits of putty represent welds on grab handles.
When a periscope cover went missing, Charlie modeled parts in its place. He also bored out the headlight and installed a bulb he made by remelt-ing stretched sprue, then ran a conduit and wires to it.
After drilling out a pistol port, Charlie chucked a chunk of styrene into his motor tool to make a plug he attached to a bit of leftover chain.
1 2
3 4
February 2008 www.FineScale.com 31

32 FineScale Modeler February 2008
ers with a file before gently pinching them between my fingers to bend and distort them.
Typically (for me), I dropped the right periscope cover on the floor and it disappeared, never to be seen again. I used a punchanddie set to shape a styrene piece depicting the periscope removed from its socket, 3.
I chucked a spherical burr in my motor tool and drilled out the headlight, then installed a bulb I made from a piece of stretched sprue melted back over a small flame, 3. To simulate
electrical plumbing, I annealed a short section of steel tubing and bent it to form the conduit, then ran two fine copper wires from the conduit to the lamp and horn. I drilled out the pistol port on the rear turret plate and fashioned a new plug from styrene rod chucked in my motor tool, then attached a photoetchedmetal chain left over from an Aber 1/35 scale German tool set, 4.
PaintingI began by airbrushing a few thin coats of Testors Model Masters
Starting his finish with a base coat of Model Master burnt umber … … Charlie applied a custom-mixed, panel-by-panel coat of olive green …
… then lightened it a little and airbrushed highlights. Dry-brushing with burnt umber produced darker shades in worn spots.
In Australia and New Zealand, Vegemite is a healthful food spread. Here, it’s used for masking paint.
With Vegemite masks applied to spots on the hull, turret, and road wheels, Charlie sprays a dusty coat of Tamiya buff.
9 10
5 6
7 8

February 2008 www.FineScale.com 33
raw umber enamel over the entire model, tracks and all, 5.If I don’t find the color I want in a jar, I mix one. In this case, I
mixed an olive green for the second coat and airbrushed the centers of all of the major surfaces, 6. Adding a few drops of white and yellow to the olivegreen mix, I airbrushed a final, highlight coat, 7. Then I set the model aside to dry overnight.
The next day, I dipped a large, flat brush into the original raw umber base color, wiped most of it onto a paper towel, and gently drybrushed raised details and edges of the model, 8, adding definition and repairing some olivegreen overspray. I wanted the paint to look faded and oxidized, with the contact points darker from wear.
And weatheringI borrowed a chippedpaint masking technique from a New Zealand modeler, Lee Smith, based on Kraft Vegemite, a yeast extract with a consistency like peanut butter but no oily residue (I didn’t taste it). I avoided a long trip by finding this Australian product at a local World Market.
In my case, I wasn’t trying to model chipped paint but to depict dust using Vegemite as a temporary mask. I loaded some on a small brush and dabbed it on areas I wanted to mask from the dust coat, 9. Then I airbrushed a thin layer of Tamiya buff on the lower hull, running gear, and turret sides, 10. The Tamiya waterbased paint dries rapidly; soon after painting I took the model to the kitchen sink and washed off the Vegemite. This left a homely patchwork of “clean” spots in the layer of dust, an effect
I smoothed out by gently scouring the dusty areas with a ScotchBrite pad, 11. This removed much of the dust, leaving it in corners and crevices. I repeated the process but left more of the dust, especially on lower surfaces, 12. The patchy effect looked good on the wheels to simulate areas where thin, dried mud flakes off, 13.
Many KV2 photos show stains all over the vehicles, even in
The effect is moderated by light scrubbing with a Scotch-Brite pad. Leaving more buff at the bottom replicates dust build-up.
Sharp edges in the buff coat depict flaking mud and scraped grime. Other blemishes are mixed in artist oils and selectively applied.
Weathering extends to the engine deck, where darker shades replicate oil spots and soot from the exhaust. Powdered pigments give texture to the corrosion on the exhaust. Charlie opened an engine hatch to create interest but covered the empty interior with flat black.
11 12
13 14
15

34 FineScale Modeler February 2008
seemingly illogical locations. I simulated these stains by selectively applying raw umber and burnt sienna artist oils thinned and mixed with Weber Turpenoid, a less aggressive turpentine substitute, 14. For the engine deck, 15, I mixed in a little black for more contrast to simulate oil stains. I added more or less Turpenoid to vary the intensity and transparency of the stains. Exhaust pipes were painted and textured with a fresh coat of burnt sienna artist oil, then treated with rustcolored pigment powders applied with a small brush. Soot from the exhausts was simulated by gently scrubbing black pigment powders onto the surface with a dry brush, then blowing away the excess.
Throughout the painting and weathering, I assembled and disassembled the model several times. This allowed me to check the uniformity of the weathering process, and provided easy access to areas hard to reach otherwise, such as the driving surfaces of the road wheels.
The polished metal of steel wheels rolling on steel tracks was achieved with a graphite pencil, 16. I also added graphite to impact points and edges on the turret, hull, and hatches, 17. The graphite was further polished with an artist’s blending stick, 18, typically used on charcoal, pastel, and pencil drawings. The tracks were simply weathered with a wash of earthcolored pigment
… as well as worn edges …
… while a blending stick keeps the effect from looking fakey. A watery wash of buff shows dust on the turret top …
… and faint rain streaks on vertical surfaces. A machine gun barrel is easily replaced with steel tubing.
17
18 19
20 21
A graphite pencil is just the thing for bare steel on road wheels …
16
February 2008 www.FineScale.com 35
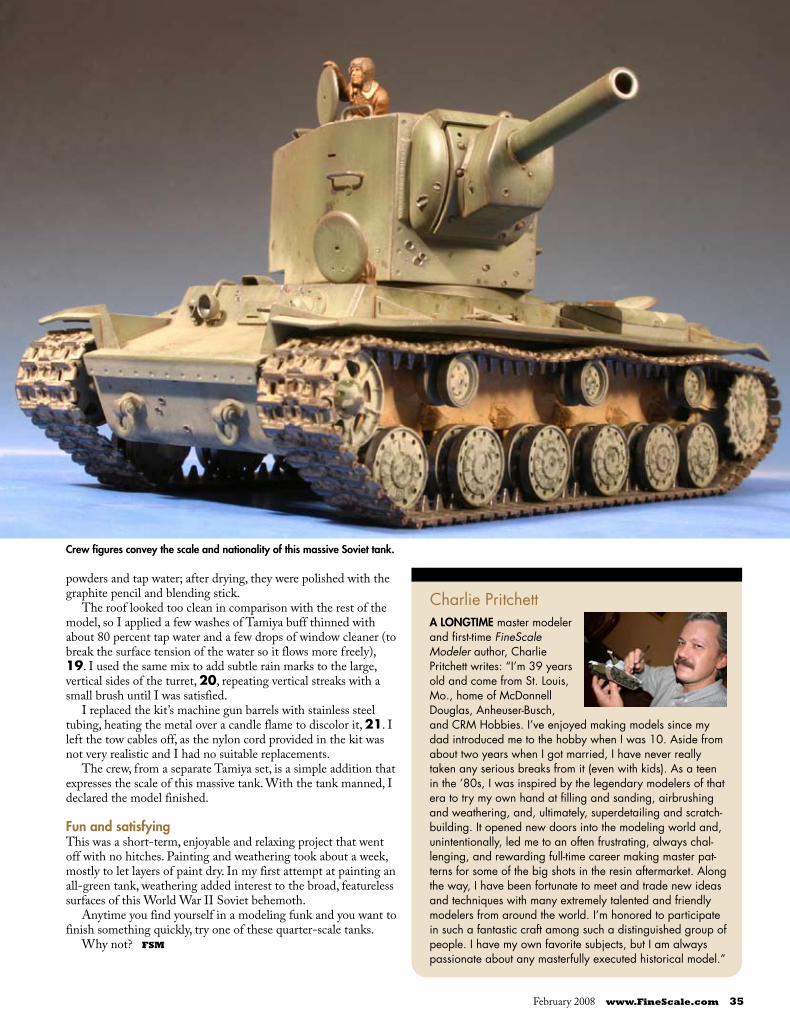
powders and tap water; after drying, they were polished with the graphite pencil and blending stick.
The roof looked too clean in comparison with the rest of the model, so I applied a few washes of Tamiya buff thinned with about 80 percent tap water and a few drops of window cleaner (to break the surface tension of the water so it flows more freely), 19. I used the same mix to add subtle rain marks to the large, vertical sides of the turret, 20, repeating vertical streaks with a small brush until I was satisfied.
I replaced the kit’s machine gun barrels with stainless steel tubing, heating the metal over a candle flame to discolor it, 21. I left the tow cables off, as the nylon cord provided in the kit was not very realistic and I had no suitable replacements.
The crew, from a separate Tamiya set, is a simple addition that expresses the scale of this massive tank. With the tank manned, I declared the model finished.
Fun and satisfyingThis was a shortterm, enjoyable and relaxing project that went off with no hitches. Painting and weathering took about a week, mostly to let layers of paint dry. In my first attempt at painting an allgreen tank, weathering added interest to the broad, featureless surfaces of this World War II Soviet behemoth.
Anytime you find yourself in a modeling funk and you want to finish something quickly, try one of these quarterscale tanks.
Why not? FSM
Crew figures convey the scale and nationality of this massive Soviet tank.
Charlie PritchettA LONgTIMe master modeler and first-time FineScale Modeler author, Charlie Pritchett writes: “I’m 39 years old and come from St. Louis, Mo., home of McDonnell Douglas, Anheuser-Busch, and CRM Hobbies. I’ve enjoyed making models since my dad introduced me to the hobby when I was 10. Aside from about two years when I got married, I have never really taken any serious breaks from it (even with kids). As a teen in the ’80s, I was inspired by the legendary modelers of that era to try my own hand at filling and sanding, airbrushing and weathering, and, ultimately, superdetailing and scratch-building. It opened new doors into the modeling world and, unintentionally, led me to an often frustrating, always chal-lenging, and rewarding full-time career making master pat-terns for some of the big shots in the resin aftermarket. Along the way, I have been fortunate to meet and trade new ideas and techniques with many extremely talented and friendly modelers from around the world. I’m honored to participate in such a fantastic craft among such a distinguished group of people. I have my own favorite subjects, but I am always passionate about any masterfully executed historical model.”
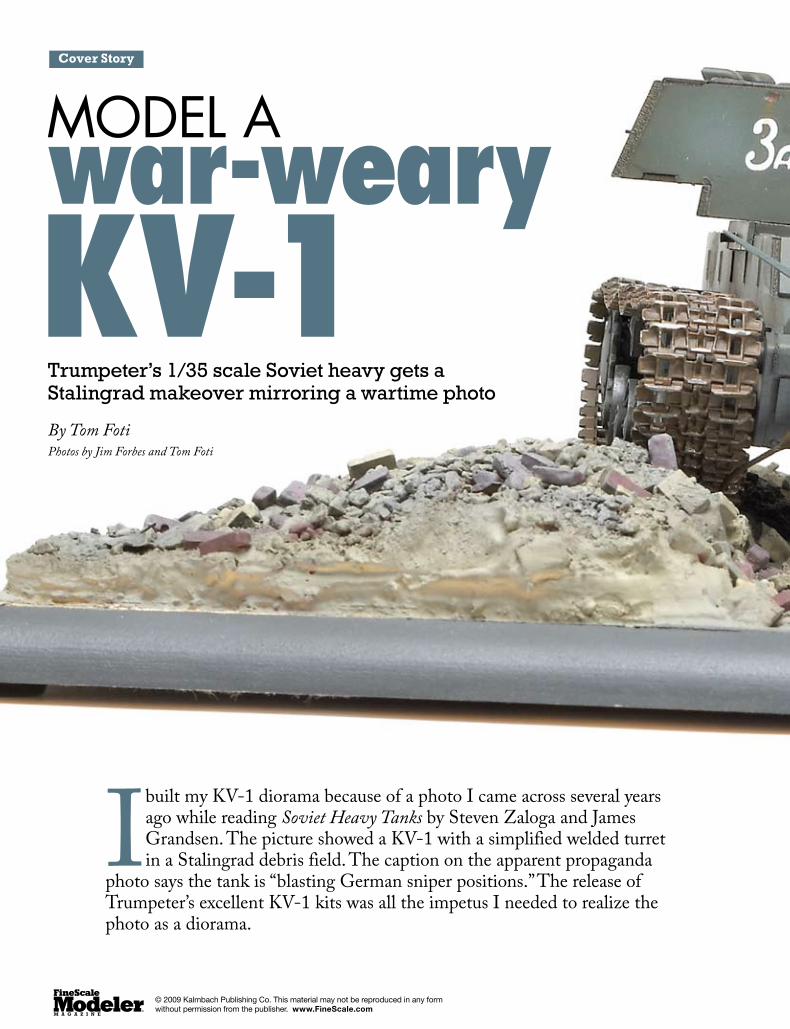
Cover Story
20 FineScale Modeler January 2008 January 2008 www.FineScale.com 2120 FineScale Modeler January 2008 January 2008 www.FineScale.com 21
model a war-weary KV-1Trumpeter’s 1/35 scale Soviet heavy gets a Stalingrad makeover mirroring a wartime photo
By Tom FotiPhotos by Jim Forbes and Tom Foti
I built my KV-1 diorama because of a photo I came across several years ago while reading Soviet Heavy Tanks by Steven Zaloga and James Grandsen. The picture showed a KV-1 with a simplified welded turret in a Stalingrad debris field. The caption on the apparent propaganda
photo says the tank is “blasting German sniper positions.” The release of Trumpeter’s excellent KV-1 kits was all the impetus I needed to realize the photo as a diorama.
© 2009 Kalmbach Publishing Co. This material may not be reproduced in any form without permission from the publisher. www.FineScale.com

20 FineScale Modeler January 2008 January 2008 www.FineScale.com 2120 FineScale Modeler January 2008 January 2008 www.FineScale.com 21
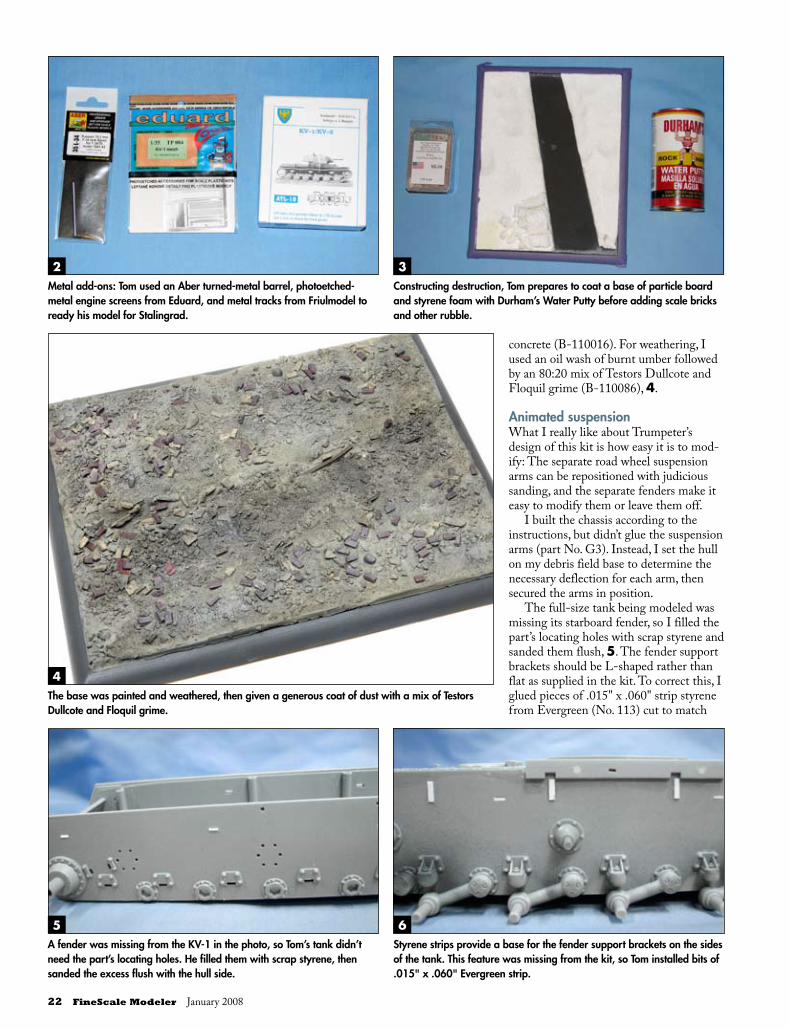
Heavy metalTrumpeter’s KV-1 model 1942 simplified turret tank (kit No. 00358) had the correct turret, 1. For extra detail, I added engine screens from Eduard, an Aber turned-metal barrel, and Friulmodel metal tracks (ATL-10), 2. Kagero’s Camouflage & Decals book Eastern Front Part 1 featured decals for the subject tank.
Urban renewalStarting with an 8" x 11" piece of particle-board, I used styrene foam to build up the
terrain around a central depression. Then, I covered the base with Durham’s Rock Hard Water Putty, 3. While the putty was still wet, I covered the area with 1/35 scale red and white brick debris from Tiger Productions. After the groundwork dried, I applied scenic cement from a spray bot-tle to hold the debris in place and seal the base.
I painted the groundwork with Floquil enamels, starting with a base coat of con-crete (B-110082). Details were picked out with boxcar red (B-110074) and aged
1/35 Scale | armor | How-to
Modeled after a photo, Tom’s KV-1 takes aim from the rubble of Stalingrad.
1Tom constructed his dioramic base around Trumpeter’s kit of a KV-1 model 1942 with a simplified turret (No. 00358).
22 FineScale Modeler January 2008
concrete (B-110016). For weathering, I used an oil wash of burnt umber followed by an 80:20 mix of Testors Dullcote and Floquil grime (B-110086), 4.
Animated suspensionWhat I really like about Trumpeter’s design of this kit is how easy it is to mod-ify: The separate road wheel suspension arms can be repositioned with judicious sanding, and the separate fenders make it easy to modify them or leave them off.
I built the chassis according to the instructions, but didn’t glue the suspension arms (part No. G3). Instead, I set the hull on my debris field base to determine the necessary deflection for each arm, then secured the arms in position.
The full-size tank being modeled was missing its starboard fender, so I filled the part’s locating holes with scrap styrene and sanded them flush, 5. The fender support brackets should be L-shaped rather than flat as supplied in the kit. To correct this, I glued pieces of .015" x .060" strip styrene from Evergreen (No. 113) cut to match
5 6
4The base was painted and weathered, then given a generous coat of dust with a mix of Testors Dullcote and Floquil grime.
2 3Constructing destruction, Tom prepares to coat a base of particle board and styrene foam with Durham’s Water Putty before adding scale bricks and other rubble.
Metal add-ons: Tom used an Aber turned-metal barrel, photoetched-metal engine screens from Eduard, and metal tracks from Friulmodel to ready his model for Stalingrad.
A fender was missing from the KV-1 in the photo, so Tom’s tank didn’t need the part’s locating holes. He filled them with scrap styrene, then sanded the excess flush with the hull side.
Styrene strips provide a base for the fender support brackets on the sides of the tank. This feature was missing from the kit, so Tom installed bits of .015" x .060" Evergreen strip.

January 2008 www.FineScale.com 23
the height of the bracket at the attach-ment points on the hull sides, 6.
Grilling outIf this kit has a weakness, it is the engine intake grilles (part No. D9) on the rear deck. Trumpeter molded them solid, so the nicely molded intake deflection lou-vers can’t be seen. Eduard comes to the rescue with photoetched-metal screens, 7.
First, I removed the molded-on mesh with a round cutter bit in a battery-pow-ered rotary tool, 8. I thinned the resulting frame before super gluing the new mesh into position. After attaching them to the model, the see-through screens really look the part, 9.
On trackI replaced the kit’s tracks with a set from Friulmodel because the detail is nice and they look right. They act like the full-size tank’s tracks, drooping and conforming to terrain, and sagging over return rollers. I
7
9
Eduard’s photoetched-metal screens provide a simple way to add the perfect touch of realism to the engine deck of a KV-1, easily replacing the solid molded detail of the kit.
8Tom uses a cutter bit in a motor tool to remove plastic and open up the screens for the engine intakes in preparation for installing photoetched-metal replacements.
In place and painted, the Eduard screens become a convincing feature on Tom’s 1/35 scale model.
10Friulmodel’s metal links, which perfectly replicate the action of full-size tracks, are easy to assemble with the provided wire and a pair of snips.
11The metal tracks’ flexibility and weight make them conform to the terrain and sag realistically between return rollers.

24 FineScale Modeler January 2008
assembled them by inserting a piece of the supplied wire into the hole, then nipping it off close to the link, 10. I used 87 links per side, and the result looks great running over the terrain on the base, 11.
I built the turret straight from the box, adding the Aber turned-metal barrel in place of the plastic kit part, 12. I used the kit piece to establish the proper length for the barrel.
Color of warI painted my KV-1 with Gunze Sangyo acrylics, which dry with a semigloss finish. The road wheels’ rims were wiped with SnJ aluminum powder to simulate metal worn bare by operation.
I applied the decals to the turret’s glossy surface, then weathered the tank with a wash of black and burnt umber art-ist’s oils applied to the panel lines. I
added rust, soot, and other stains with Tamiya weathering pastels.
To dull down the finish, I airbrushed an 80:20 mix of Testors Dullcote and Floquil grime, replicating the dusty condi-tions of a bombed-out city.
Now I had a battered, bent, and dirty KV-1 heavy tank on a debris field amid the ruins of Stalingrad, just like the photo that inspired my project. FSM
SOURCESPhotoetched-metal screens, Eduard (TP 084), 420-47-611-8259, www.eduard.czMetal gun barrel, Aber (35L-34), 48-32-203-24-05, www.aber.net.plRock Hard Water Putty, Durham’s, 515-243-0491, www.waterputty.com
REFERENCESSoviet Heavy Tanks, Steven J. Zaloga and James Grandsen, Osprey Publishing, Oxford, United KingdomCamouflage & Decals: Eastern Front Part 1, Stanislaw Jabloński and Rafal Dudziński, Kagero, Lublin, Poland
You can almost see the smoke and smell the cordite when you look at Tom’s model; minor modifications give his KV-1 individuality.
Tom built the kit’s turret out of the box, but replaced the main gun barrel with a turned-metal offer-ing from Aber. The new gun barrel even has rifling!
12
Bent fender bracket
missing starboard fender
Turned-aluminum barrel
Photoetched-metal engine screens
Friulmodel metal tracks
damage to front of port fender

16 FineScale Modeler December 2006
ArmorGiving Trumpeter’s Model 1942 KV-1
“the look” Armored fighting vehicles evolved quickly in the terrible crucible
of World War II. But in the first years of the war, the toughest
bully on the block just might have been the Soviet Union’s
mammoth 45-ton KV-1 tank. Although it was prone to mechanical
breakdowns, and was later eclipsed by other weapons, the KV-1’s
76mm gun could dish out punishing firepower – and this massive tank’s
90mm-thick armor could take a severe pounding, too.
Trumpeter’s Model 1942 KV-1, dressed for winter warfare: Modeler Mike Kirchoff makes it look easy – and he says painting and weathering really is easy.
By Mike Kirchoff
Painting & Weathering
© 2009 Kalmbach Publishing Co. This material may not be reproduced in any form without permission from the publisher. www.FineScale.com

December 2006 www.finescale.com 17
ArmorThe big ideaRather than an attempt to create a historically accurate and detailed model, this project could be more appropriately defined as a simple study of the trinity of armor-model finishing: textur-ing, painting, and weathering.
To demonstrate, I chose Trumpeter’s excellent 1/35 scale Soviet KV-1 Model 1942 Heavy Cast Turret (No. 00359), an ideal subject for finishing. With its angular, slab-sided hull con-struction, and large, cast turret, the Model 1942 is a perfect “can-vas” for a full battery of effects.
The two-tone winter camouflage scheme on the box art was simple yet intriguing. Bolstered by a photo of tanks from this very unit in action on the Kalinin front (page 25 of Stalin’s Heavy Tanks 1941-45: The KV & IS Heavy Tanks, by Steven Zaloga), I decided to take a stab at this distinctive green-and-white scheme.
First stepsIt’s convenient to model basic effects, such as torch-cut edges as well as rolled and cast armor textures, before assembly.
For the rough-cut edges typically found on armor plates, I use the backside of a No. 11 hobby-knife blade. Drawing the blade perpendicular to the edge and allowing it to randomly skip and
chatter will leave a series of neat “notches.” Occasionally, I’ll even use an abbreviated sawing motion to create deeper grooves. Fol-low photo references to keep this effect “to scale.”
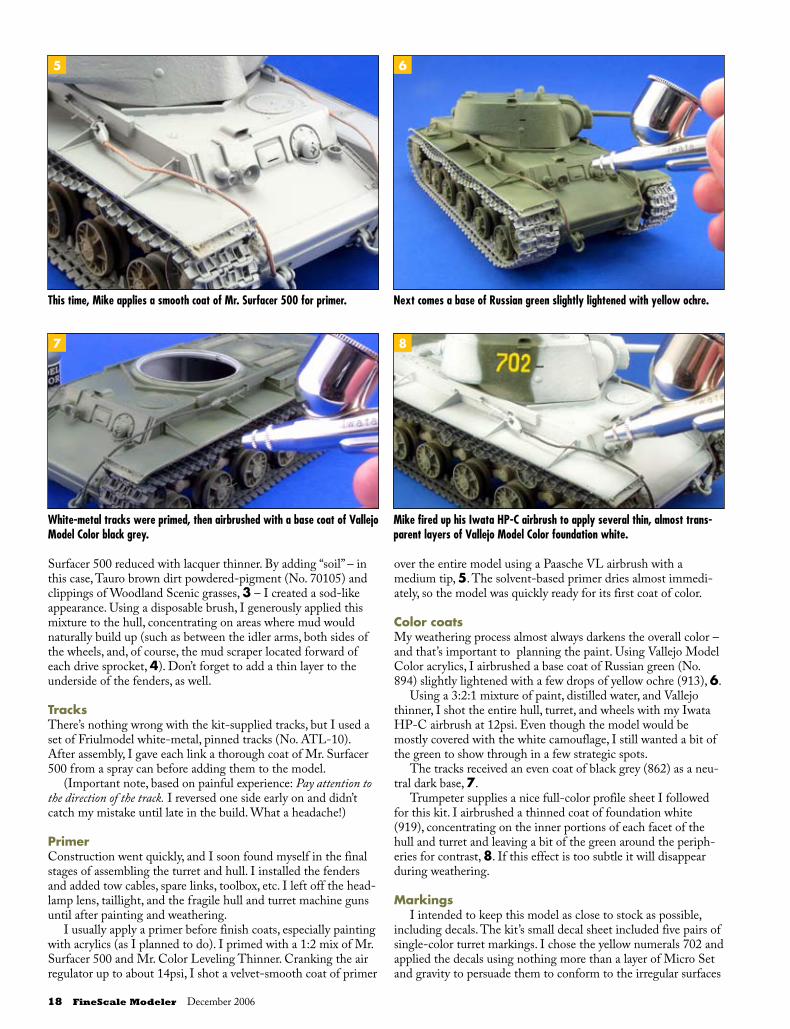
I wanted to add character to the KV-1 hull’s wide expanses of armor plating. After assembling major hull components and road wheels, sprockets, and idlers, I textured plates with a thin coat of Gunze Sangyo Mr. Surfacer 500 applied with a short-bristled brush, 1. Leaving off the fenders makes it easier to work on the hull sides. I avoided areas below the fender line (later, they would be slathered with mud). After drying, the flat surfaces were gently sanded with 600-grit paper to even out the effect, 2.
The turret and mantlet received a similar but heavier treat-ment to replicate the heavy cast armor. Again, photos can tell you how far to take this technique.
MudIn winter camouflage, this vehicle needed a thorough application of mud. I achieved this in two stages – a thick precoating applied before the hull assembly is completed, and a final layer that would be almost a straight application of liquefied pigment pow-der after the model had been painted and weathered.
For the thicker concoction of mud, I used a base of Mr.
1/35 Scale | Armor | How-to
1 2
3 4
Rolled armor is rough stuff. Mike achieves this texture by stippling these panels with Mr. Surfacer 500.
Light sanding slightly smoothes the stippled surfaces and keeps the textur-ing effect from looking exaggerated.
The makings of mud: Mix Woodland Scenics grass, Mr. Surfacer 500, Tauro powdered-pigment brown dirt, and lacquer thinner.
Mike uses an old brush to apply a thick build-up of mud and sod.
18 FineScale Modeler December 2006
Surfacer 500 reduced with lacquer thinner. By adding “soil” – in this case, Tauro brown dirt powdered-pigment (No. 70105) and clippings of Woodland Scenic grasses, 3 – I created a sod-like appearance. Using a disposable brush, I generously applied this mixture to the hull, concentrating on areas where mud would naturally build up (such as between the idler arms, both sides of the wheels, and, of course, the mud scraper located forward of each drive sprocket, 4). Don’t forget to add a thin layer to the underside of the fenders, as well.
TracksThere’s nothing wrong with the kit-supplied tracks, but I used a set of Friulmodel white-metal, pinned tracks (No. ATL-10). After assembly, I gave each link a thorough coat of Mr. Surfacer 500 from a spray can before adding them to the model.
(Important note, based on painful experience: Pay attention to the direction of the track. I reversed one side early on and didn’t catch my mistake until late in the build. What a headache!)
PrimerConstruction went quickly, and I soon found myself in the final stages of assembling the turret and hull. I installed the fenders and added tow cables, spare links, toolbox, etc. I left off the head-lamp lens, taillight, and the fragile hull and turret machine guns until after painting and weathering.
I usually apply a primer before finish coats, especially painting with acrylics (as I planned to do). I primed with a 1:2 mix of Mr. Surfacer 500 and Mr. Color Leveling Thinner. Cranking the air regulator up to about 14psi, I shot a velvet-smooth coat of primer
over the entire model using a Paasche VL airbrush with a medium tip, 5. The solvent-based primer dries almost immedi-ately, so the model was quickly ready for its first coat of color.
Color coatsMy weathering process almost always darkens the overall color – and that’s important to planning the paint. Using Vallejo Model Color acrylics, I airbrushed a base coat of Russian green (No. 894) slightly lightened with a few drops of yellow ochre (913), 6.
Using a 3:2:1 mixture of paint, distilled water, and Vallejo thinner, I shot the entire hull, turret, and wheels with my Iwata HP-C airbrush at 12psi. Even though the model would be mostly covered with the white camouflage, I still wanted a bit of the green to show through in a few strategic spots.
The tracks received an even coat of black grey (862) as a neu-tral dark base, 7.
Trumpeter supplies a nice full-color profile sheet I followed for this kit. I airbrushed a thinned coat of foundation white (919), concentrating on the inner portions of each facet of the hull and turret and leaving a bit of the green around the periph-eries for contrast, 8. If this effect is too subtle it will disappear during weathering.
MarkingsI intended to keep this model as close to stock as possible,
including decals. The kit’s small decal sheet included five pairs of single-color turret markings. I chose the yellow numerals 702 and applied the decals using nothing more than a layer of Micro Set and gravity to persuade them to conform to the irregular surfaces
5 6
7 8
This time, Mike applies a smooth coat of Mr. Surfacer 500 for primer. Next comes a base of Russian green slightly lightened with yellow ochre.
White-metal tracks were primed, then airbrushed with a base coat of Vallejo Model Color black grey.
Mike fired up his Iwata HP-C airbrush to apply several thin, almost trans-parent layers of Vallejo Model Color foundation white.
December 2006 www.finescale.com 19
of turret armor. Just two treatments of solvent got the decals to settle down. When the decals were dry, I gently washed them with distilled water followed by a light dusting of Testors Dullcote to help hide what remained of the carrier film.
WeatheringWeathering allows armor builders the greatest freedom of artistic expression – and it’s really a lot easier than you think.
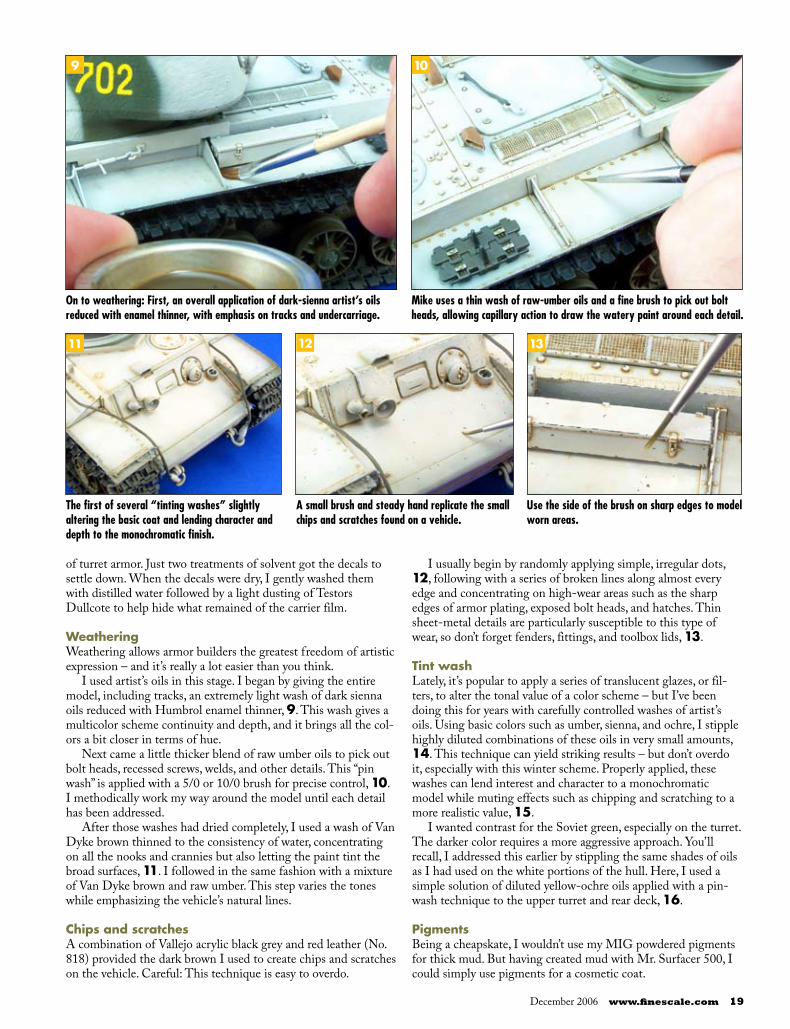
I used artist’s oils in this stage. I began by giving the entire model, including tracks, an extremely light wash of dark sienna oils reduced with Humbrol enamel thinner, 9. This wash gives a multicolor scheme continuity and depth, and it brings all the col-ors a bit closer in terms of hue.
Next came a little thicker blend of raw umber oils to pick out bolt heads, recessed screws, welds, and other details. This “pin wash” is applied with a 5/0 or 10/0 brush for precise control, 10. I methodically work my way around the model until each detail has been addressed.
After those washes had dried completely, I used a wash of Van Dyke brown thinned to the consistency of water, concentrating on all the nooks and crannies but also letting the paint tint the broad surfaces, 11. I followed in the same fashion with a mixture of Van Dyke brown and raw umber. This step varies the tones while emphasizing the vehicle’s natural lines.
Chips and scratchesA combination of Vallejo acrylic black grey and red leather (No. 818) provided the dark brown I used to create chips and scratches on the vehicle. Careful: This technique is easy to overdo.
I usually begin by randomly applying simple, irregular dots, 12, following with a series of broken lines along almost every edge and concentrating on high-wear areas such as the sharp edges of armor plating, exposed bolt heads, and hatches. Thin sheet-metal details are particularly susceptible to this type of wear, so don’t forget fenders, fittings, and toolbox lids, 13.
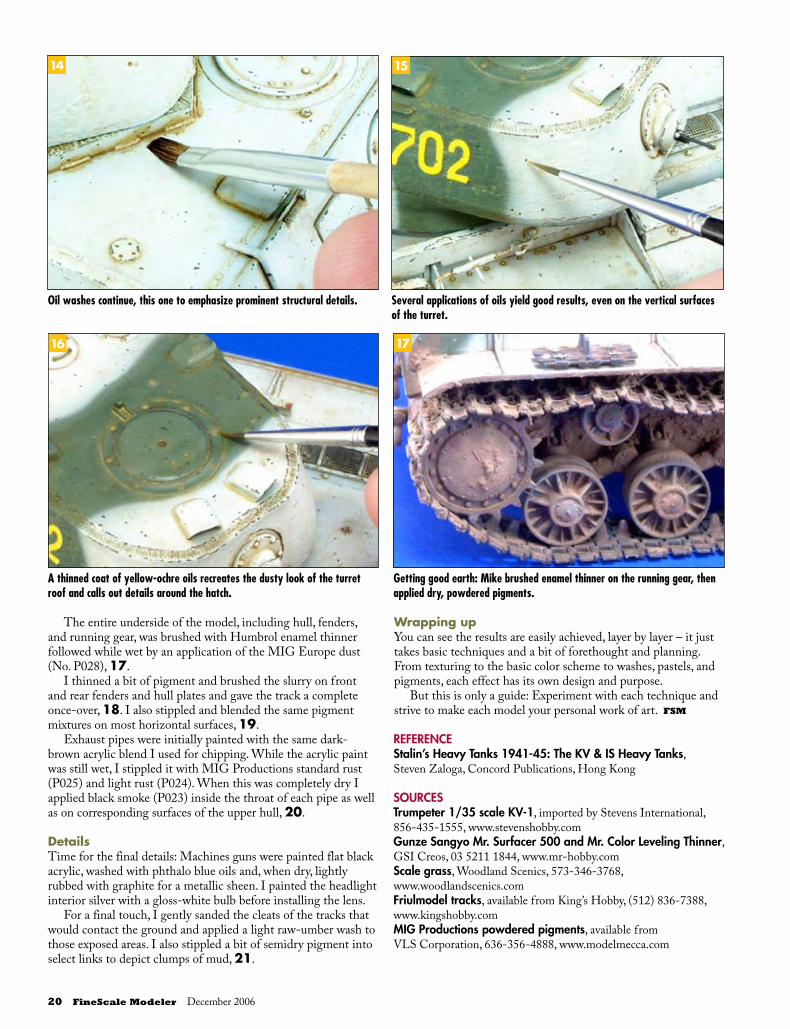
Tint washLately, it’s popular to apply a series of translucent glazes, or fil-ters, to alter the tonal value of a color scheme – but I’ve been doing this for years with carefully controlled washes of artist’s oils. Using basic colors such as umber, sienna, and ochre, I stipple highly diluted combinations of these oils in very small amounts, 14. This technique can yield striking results – but don’t overdo it, especially with this winter scheme. Properly applied, these washes can lend interest and character to a monochromatic model while muting effects such as chipping and scratching to a more realistic value, 15.
I wanted contrast for the Soviet green, especially on the turret. The darker color requires a more aggressive approach. You’ll recall, I addressed this earlier by stippling the same shades of oils as I had used on the white portions of the hull. Here, I used a simple solution of diluted yellow-ochre oils applied with a pin-wash technique to the upper turret and rear deck, 16.
PigmentsBeing a cheapskate, I wouldn’t use my MIG powdered pigments for thick mud. But having created mud with Mr. Surfacer 500, I could simply use pigments for a cosmetic coat.
9 10
11 12
On to weathering: First, an overall application of dark-sienna artist’s oils reduced with enamel thinner, with emphasis on tracks and undercarriage.
Mike uses a thin wash of raw-umber oils and a fine brush to pick out bolt heads, allowing capillary action to draw the watery paint around each detail.
The first of several “tinting washes” slightly altering the basic coat and lending character and depth to the monochromatic finish.
A small brush and steady hand replicate the small chips and scratches found on a vehicle.
Use the side of the brush on sharp edges to model worn areas.
13
20 FineScale Modeler December 2006
The entire underside of the model, including hull, fenders, and running gear, was brushed with Humbrol enamel thinner followed while wet by an application of the MIG Europe dust (No. P028), 17.
I thinned a bit of pigment and brushed the slurry on front and rear fenders and hull plates and gave the track a complete once-over, 18. I also stippled and blended the same pigment mixtures on most horizontal surfaces, 19.
Exhaust pipes were initially painted with the same dark-brown acrylic blend I used for chipping. While the acrylic paint was still wet, I stippled it with MIG Productions standard rust (P025) and light rust (P024). When this was completely dry I applied black smoke (P023) inside the throat of each pipe as well as on corresponding surfaces of the upper hull, 20.
DetailsTime for the final details: Machines guns were painted flat black acrylic, washed with phthalo blue oils and, when dry, lightly rubbed with graphite for a metallic sheen. I painted the headlight interior silver with a gloss-white bulb before installing the lens.
For a final touch, I gently sanded the cleats of the tracks that would contact the ground and applied a light raw-umber wash to those exposed areas. I also stippled a bit of semidry pigment into select links to depict clumps of mud, 21.
Wrapping upYou can see the results are easily achieved, layer by layer – it just takes basic techniques and a bit of forethought and planning. From texturing to the basic color scheme to washes, pastels, and pigments, each effect has its own design and purpose.
But this is only a guide: Experiment with each technique and strive to make each model your personal work of art. FSM
REFERENCEStalin’s Heavy Tanks 1941-45: The KV & IS Heavy Tanks,Steven Zaloga, Concord Publications, Hong Kong
SOURCESTrumpeter 1/35 scale KV-1, imported by Stevens International, 856-435-1555, www.stevenshobby.comGunze Sangyo Mr. Surfacer 500 and Mr. Color Leveling Thinner, GSI Creos, 03 5211 1844, www.mr-hobby.comScale grass, Woodland Scenics, 573-346-3768,www.woodlandscenics.comFriulmodel tracks, available from King’s Hobby, (512) 836-7388, www.kingshobby.comMIG Productions powdered pigments, available fromVLS Corporation, 636-356-4888, www.modelmecca.com
Oil washes continue, this one to emphasize prominent structural details. Several applications of oils yield good results, even on the vertical surfaces of the turret.
A thinned coat of yellow-ochre oils recreates the dusty look of the turret roof and calls out details around the hatch.
Getting good earth: Mike brushed enamel thinner on the running gear, then applied dry, powdered pigments.
14 15
16 17

December 2006 www.finescale.com 21
The culmination of several efforts: Layers of washes, painted details, and powdered pigments add up to a lifelike model.
Mixing powdered pigments with thinner creates a slurry to apply to the lower parts of the vehicle.
Using the same mixture, Mike stippled pigment on fenders and other hori-zontal surfaces to replicate mud and grime.
A combination of acrylic paints and pigments finished the exhaust stacks. Mike blended in black pigment to show soot on the rear deck.
More pigment, more mud; a semidry mix makes good clods.
18 19
20 21
Meet Mike KirchoffAn engineering technician from
Independence, Kansas, Mike cites Sheperd Paine, Bob Steinbrunn, and Francois Verlinden as early inspirations. A self-professed student of the art of modeling, Mike enjoys picking up the newest methods and ideas but f inds much more reward in sharing what he’s learned with others. His main interests are World War II and modern armor and dioramas, as well as the occasional aircraft to keep his airbrushing skills honed.
Mike also has worked as a sportswriter, often covering his beloved Kansas City Chiefs, and is a recently retired professional drummer. Now he builds armor and aircraft-related master pat-terns, designs custom artwork, and still f inds time to enjoy his latest endeavor – writing modeling articles. Mike and his wife, Linda (“my best friend and harshest critic,” he writes), have been married 28 years.