Working with EPM Automate for Oracle Enterprise ...
84
Oracle ® Cloud Working with EPM Automate for Oracle Enterprise Performance Management Cloud E71316-15
-
Upload
khangminh22 -
Category
Documents
-
view
0 -
download
0
Transcript of Working with EPM Automate for Oracle Enterprise ...

Oracle® CloudWorking with EPM Automate for Oracle Enterprise Performance
Management Cloud
E71316-15

Oracle Cloud Working with EPM Automate for Oracle Enterprise Performance Management Cloud,
E71316-15
Copyright © 2016, 2017, Oracle and/or its affiliates. All rights reserved.
Primary Author: EPM Information Development Team
This software and related documentation are provided under a license agreement containing restrictions onuse and disclosure and are protected by intellectual property laws. Except as expressly permitted in yourlicense agreement or allowed by law, you may not use, copy, reproduce, translate, broadcast, modify, license,transmit, distribute, exhibit, perform, publish, or display any part, in any form, or by any means. Reverseengineering, disassembly, or decompilation of this software, unless required by law for interoperability, isprohibited.
The information contained herein is subject to change without notice and is not warranted to be error-free. Ifyou find any errors, please report them to us in writing.
If this is software or related documentation that is delivered to the U.S. Government or anyone licensing it onbehalf of the U.S. Government, then the following notice is applicable:
U.S. GOVERNMENT END USERS: Oracle programs, including any operating system, integrated software,any programs installed on the hardware, and/or documentation, delivered to U.S. Government end users are"commercial computer software" pursuant to the applicable Federal Acquisition Regulation and agency-specific supplemental regulations. As such, use, duplication, disclosure, modification, and adaptation of theprograms, including any operating system, integrated software, any programs installed on the hardware,and/or documentation, shall be subject to license terms and license restrictions applicable to the programs.No other rights are granted to the U.S. Government.
This software or hardware is developed for general use in a variety of information management applications.It is not developed or intended for use in any inherently dangerous applications, including applications thatmay create a risk of personal injury. If you use this software or hardware in dangerous applications, then youshall be responsible to take all appropriate fail-safe, backup, redundancy, and other measures to ensure itssafe use. Oracle Corporation and its affiliates disclaim any liability for any damages caused by use of thissoftware or hardware in dangerous applications.
Oracle and Java are registered trademarks of Oracle and/or its affiliates. Other names may be trademarks oftheir respective owners.
Intel and Intel Xeon are trademarks or registered trademarks of Intel Corporation. All SPARC trademarks areused under license and are trademarks or registered trademarks of SPARC International, Inc. AMD, Opteron,the AMD logo, and the AMD Opteron logo are trademarks or registered trademarks of Advanced MicroDevices. UNIX is a registered trademark of The Open Group.
This software or hardware and documentation may provide access to or information about content, products,and services from third parties. Oracle Corporation and its affiliates are not responsible for and expresslydisclaim all warranties of any kind with respect to third-party content, products, and services unlessotherwise set forth in an applicable agreement between you and Oracle. Oracle Corporation and its affiliateswill not be responsible for any loss, costs, or damages incurred due to your access to or use of third-partycontent, products, or services, except as set forth in an applicable agreement between you and Oracle.

Contents
Documentation Accessibility ...................................................................................................................... v
Documentation Feedback ......................................................................................................................... vii
1 About the EPM Automate Utility
Installing the Utility.................................................................................................................................. 1-2
Windows............................................................................................................................................ 1-2
Linux/UNIX...................................................................................................................................... 1-3
2 Command Reference
Commands at a Glance ............................................................................................................................ 2-1
Oracle Planning and Budgeting Cloud and Oracle Enterprise Planning and Budgeting Cloud
Commands ........................................................................................................................................... 2-3
Oracle Financial Consolidation and Close Cloud Commands .......................................................... 2-4
Oracle Tax Reporting Cloud Commands.............................................................................................. 2-4
Oracle Profitability and Cost Management Cloud Commands......................................................... 2-5
Oracle Account Reconciliation Cloud Commands .............................................................................. 2-5
About Running EPM Automate Utility Commands ........................................................................... 2-5
Prerequisites...................................................................................................................................... 2-6
Default File Locations ...................................................................................................................... 2-7
EPM Automate Utility Commands........................................................................................................ 2-7
Exit Codes ................................................................................................................................................ 2-32
Running the EPM Automate Utility .................................................................................................... 2-37
Windows.......................................................................................................................................... 2-38
Linux ................................................................................................................................................ 2-38
Running Multiple Instances of the Utility .................................................................................. 2-39
3 Command Execution Sample Scenarios
Oracle Planning and Budgeting Cloud and Oracle Enterprise Planning and Budgeting Cloud
Sample Scenarios................................................................................................................................. 3-1
Scenario 1: Import Metadata into Application............................................................................. 3-2
iii
Scenario 2: Import Data, Run a Calculation Script, and Copy Data from a Block Storage
Database to an Aggregate Storage Database .......................................................................... 3-2
Scenario 3: Export and Download Metadata and Data .............................................................. 3-2
Scenario 4: Remove Unnecessary Files from a Service Instance................................................ 3-3
Scenario 5: Export and Download Application Data .................................................................. 3-3
Scenario 6: Clone a Service Instance .............................................................................................. 3-4
Scenario 7: Import Data into Data Management, Run a Data Load Rule, and Export Data
to Planning................................................................................................................................... 3-5
Scenario 8: Backing up Application Snapshot to a Computer................................................... 3-5
Scenario 9: Automating Daily Data Integration........................................................................... 3-6
Scenario 10: Automating the Cloning of Instances...................................................................... 3-8
Scenario 11: Automating Activity Report Downloads to a Local Computer ........................ 3-11
Scenario 12: Counting the Number of Provisioned Users........................................................ 3-14
Oracle Account Reconciliation Cloud Sample Scenarios.................................................................. 3-16
Scenario 1: Load Preformatted Balances into a Period ............................................................. 3-16
Scenario 2: Use a Snapshot to Recover From Crash .................................................................. 3-16
Oracle Profitability and Cost Management Cloud Sample Scenarios ............................................ 3-17
Scenario 1: Import Metadata into Application........................................................................... 3-17
Scenario 2: Import Data and Run Program Rules...................................................................... 3-17
Automating Script Execution................................................................................................................ 3-18
Monitoring EPM Automate Utility Activities .................................................................................... 3-19
4 Replicating an EPM Cloud Instance
Setting up Daily Replication ................................................................................................................... 4-1
Setting up On-Demand Replications ..................................................................................................... 4-2
Configuring the Secondary Instance...................................................................................................... 4-2
A Preparing to Run the Replay Command
About the Replay Command .................................................................................................................. A-1
Prerequisites .............................................................................................................................................. A-1
Creating HAR Files................................................................................................................................... A-2
Creating Replay Files ............................................................................................................................... A-4
Generating Trace Files.............................................................................................................................. A-5
A Sample Replay Session......................................................................................................................... A-5
iv

Documentation Accessibility
For information about Oracle's commitment to accessibility, visit the OracleAccessibility Program website at http://www.oracle.com/pls/topic/lookup?ctx=acc&id=docacc.
Access to Oracle Support
Oracle customers that have purchased support have access to electronic supportthrough My Oracle Support. For information, visit http://www.oracle.com/pls/topic/lookup?ctx=acc&id=info or visit http://www.oracle.com/pls/topic/lookup?ctx=acc&id=trs if you are hearing impaired.
v

Documentation Feedback
Send feedback on this documentation to: [email protected]
Follow EPM Information Development on these social media sites:
LinkedIn - http://www.linkedin.com/groups?gid=3127051&goback=.gmp_3127051
Twitter - http://twitter.com/hyperionepminfo
Facebook - http://www.facebook.com/pages/Hyperion-EPM-Info/102682103112642
Google+ - https://plus.google.com/106915048672979407731/#106915048672979407731/posts
YouTube - https://www.youtube.com/user/EvolvingBI
vii


1About the EPM Automate Utility
The EPM Automate Utility enables Service Administrators to remotely perform taskswithin Oracle Enterprise Performance Management Cloud instances. EPM Cloudincludes Oracle Planning and Budgeting Cloud, Oracle Enterprise Planning andBudgeting Cloud, Oracle Financial Consolidation and Close Cloud, OracleProfitability and Cost Management Cloud, Oracle Account Reconciliation Cloud,Oracle Tax Reporting Cloud, and Oracle Enterprise Performance Reporting Cloud.
Note: This guide does not apply to Oracle Enterprise Performance ReportingCloud.
EPM Automate Utility enables Service Administrators to automate many repeatabletasks including the following:
• Import and export metadata, data, artifact and application snapshots, templates,and Data Management mappings
• Upload files into service instances, list files, and delete files from the service
• Download snapshots, reports, and metadata and data files from the service
• Run business rules on data, and refresh the application
• Copy data from one database to another; typically, from a block storage databaseto an aggregate storage database or from a block storage database to another blockstorage database
• Run a Data Management batch rule
• Generate Data Management reports, provisioning report, and user audit report
• Import pre-mapped balance data, currency rates, pre-mapped transactions,balances data, and profiles into Oracle Account Reconciliation Cloud
• Copy profiles to a period to initiate the reconciliation process
• Deploy the calculation cube of a Oracle Profitability and Cost Management Cloudapplication
• Clear, copy, and delete Point of Views in Oracle Profitability and CostManagement Cloud applications
• Replay Oracle Smart View for Office load on a service instance to enableperformance testing under heavy load
• Import supplemental data from a file into Oracle Financial Consolidation andClose Cloud
About the EPM Automate Utility 1-1

The utility uses Transport Layer Security 1.2 (TLS 1.2) to secure communicationbetween the your computer and the service.
You can create scripts that are capable of completing a wide array of tasks andautomate their execution using a scheduler. For example, you can create a script todownload the daily maintenance backup from service instances to create local backupsof your artifacts and data.
Video overview of the EPM Automate Utility
Tutorial: How to execute Oracle Planning and Budgeting Cloud commandsusing EPM Automate Utility
Installing the UtilityThe EPM Automate Utility installer for Windows and Linux/UNIX is available fromthe service.
Note:
This utility may be used only on 64-bit operating systems that are currentlysupported by the operating system vendor.
The EPM Automate Utility uses the proxy settings specified on your computer.However, the utility does not work if authentication at proxy server is enabled foryour network.
Note:
The EPM Automate Utility does not work with corporate SSO (identityprovider) credentials. Because users cannot sign in using corporatecredentials, the user accounts for accessing the utility must be maintained inthe service.
If you configured your subscription for SSO, you must also enable users tosign-in with their identity domain credentials. See Enabling Sign In WithIdentity Domain Credentials in Administering Oracle Cloud IdentityManagement.
Windows
By default, the EPM Automate Utility is installed in C:/Oracle/EPM Automate.
To install the utility:
1. From the Windows computer where you want to install the utility, access a serviceinstance.
2. On the Home page, access Setting and Actions by clicking your user name.
3. Click Downloads.
Installing the Utility
1-2 Oracle Cloud Working with EPM Automate for Oracle Enterprise Performance Management Cloud

4. In the Downloads page, click Download for Windows in the EPM Automatesection.
5. Save the installer to your computer.
6. Right-click the installer (EPM Automate.exe), and select Run asadministrator.
7. In User Account Control, click Yes.
8. Follow on-screen prompts to complete the installation.
Linux/UNIX
To install the utility:
1. Access a service instance.
2. On the Home page, access Setting and Actions by clicking your user name.
3. Click Downloads.
4. In the Downloads page, click Download for Linux in the EPM Automate section.
5. Save the installer (EPMAutomate.tar) in a directory in which you have read/write/execute privileges.
6. Using a command such as the following, extract the contents of the installer:
tar -xvf EPMAutomate.tar
Installing the Utility
About the EPM Automate Utility 1-3

Installing the Utility
1-4 Working with EPM Automate for Oracle Enterprise Performance Management Cloud

2Command Reference
EPM Automate Utility is not supported for Oracle Enterprise Performance ReportingCloud.
• Commands at a Glance
• Oracle Planning and Budgeting Cloud and Oracle Enterprise Planning andBudgeting Cloud Commands
• Oracle Financial Consolidation and Close Cloud Commands
• Oracle Tax Reporting Cloud Commands
• Oracle Account Reconciliation Cloud Commands
• Oracle Profitability and Cost Management Cloud Commands
Each service uses a combination of general commands and service-specific commandsdescribed in this chapter.
Commands at a Glance
Table 2-1 Alphabetical List of EPM Automate Commands
Command Name PBCS EPBCS FCCS TRCS PCMCS ARCS
applydatagrants
clearcube
clearpov
copypov
copysnapshotfrominstance
createreconciliations
deletefile
deletepov
deploycube
downloadfile
enableapp
encrypt
exportdata
Command Reference 2-1
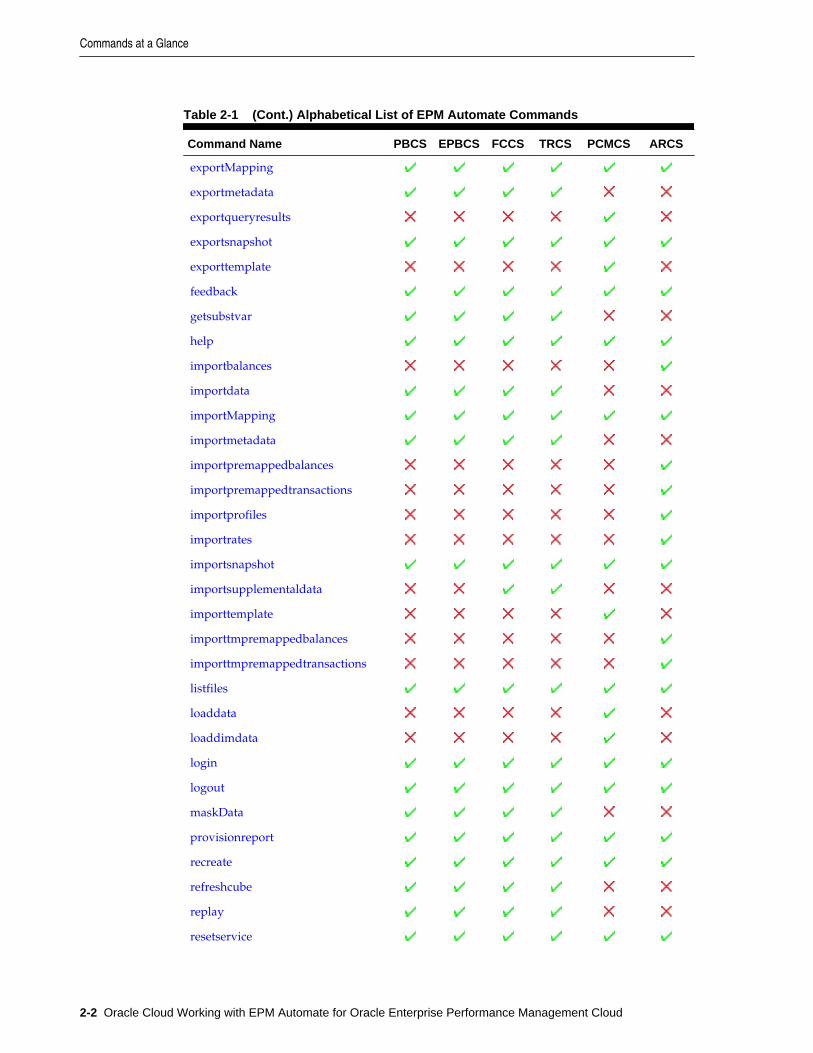
Table 2-1 (Cont.) Alphabetical List of EPM Automate Commands
Command Name PBCS EPBCS FCCS TRCS PCMCS ARCS
exportMapping
exportmetadata
exportqueryresults
exportsnapshot
exporttemplate
feedback
getsubstvar
help
importbalances
importdata
importMapping
importmetadata
importpremappedbalances
importpremappedtransactions
importprofiles
importrates
importsnapshot
importsupplementaldata
importtemplate
importtmpremappedbalances
importtmpremappedtransactions
listfiles
loaddata
loaddimdata
login
logout
maskData
provisionreport
recreate
refreshcube
replay
resetservice
Commands at a Glance
2-2 Oracle Cloud Working with EPM Automate for Oracle Enterprise Performance Management Cloud

Table 2-1 (Cont.) Alphabetical List of EPM Automate Commands
Command Name PBCS EPBCS FCCS TRCS PCMCS ARCS
runautomatch
runbatch
runbusinessrule
runcalc
rundatarule
runDMReport
runplantypemap
setdemodates
setperiodstatus
setsubstvars
uploadfile
userauditreport
Oracle Planning and Budgeting Cloud and Oracle Enterprise Planningand Budgeting Cloud Commands
Commands for Oracle Planning and Budgeting Cloud and Oracle Enterprise Planningand Budgeting Cloud
clearcube
copysnapshotfrominstance
deletefile
downloadfile
encrypt
exportdata
exportMapping
exportmetadata
exportsnapshot
feedback
getsubstvar
help
importdata
importMapping
importmetadata
importsnapshot
listfiles
login
logout
maskData
provisionreport
recreate
refreshcube
replay
resetservice
runbatch
runbusinessrule
rundatarule
runDMReport
runplantypemap
setsubstvars
uploadfile
userauditreport
Oracle Planning and Budgeting Cloud and Oracle Enterprise Planning and Budgeting Cloud Commands
Command Reference 2-3

Oracle Financial Consolidation and Close Cloud Commands
EPM Automate Utility Commands for Oracle Financial Consolidation and Close Cloud
copysnapshotfrominstance
deletefile
downloadfile
encrypt
exportdata
exportMapping
exportmetadata
exportsnapshot
feedback
getsubstvar
help
importdata
importMapping
importmetadata
importsnapshot
importsupplementaldata
listfiles
login
logout
maskData
provisionreport
recreate
refreshcube
replay
resetservice
runbatch
runbusinessrule
rundatarule
runDMReport
runplantypemap
setdemodates
setsubstvars
uploadfile
userauditreport
Oracle Tax Reporting Cloud Commands
EPM Automate Utility Commands for Oracle Tax Reporting Cloud
copysnapshotfrominstance
deletefile
downloadfile
encrypt
exportdata
exportMapping
exportmetadata
exportsnapshot
feedback
getsubstvar
help
importdata
importMapping
importmetadata
importsnapshot
importsupplementaldata
listfiles
login
logout
maskData
provisionreport
recreate
refreshcube
replay
resetservice
runbatch
runbusinessrule
rundatarule
runDMReport
runplantypemap
setdemodates
setsubstvars
uploadfile
userauditreport
Oracle Financial Consolidation and Close Cloud Commands
2-4 Oracle Cloud Working with EPM Automate for Oracle Enterprise Performance Management Cloud

Oracle Profitability and Cost Management Cloud Commands
EPM Automate Utility Commands for Oracle Profitability and Cost Management Cloud
applydatagrants
clearpov
copypov
copysnapshotfrominstance
deletefile
deletepov
deploycube
downloadfile
enableapp
encrypt
exportMapping
exportqueryresults
exportsnapshot
exporttemplate
feedback
help
importMapping
importsnapshot
importtemplate
listfiles
loaddata
loaddimdata
login
logout
provisionreport
recreate
resetservice
runbatch
runcalc
rundatarule
runDMReport
uploadfile
userauditreport
Oracle Account Reconciliation Cloud Commands
EPM Automate Utility Commands for Oracle Account Reconciliation Cloud
copysnapshotfrominstance
createreconciliations
deletefile
downloadfile
encrypt
exportMapping
exportsnapshot
feedback
help
importbalances
importMapping
importpremappedbalances
importpremappedtransactions
importprofiles
importrates
importsnapshot
listfiles
login
importtmpremappedbalances
importtmpremappedtransactions
logout
provisionreport
recreate
resetservice
runautomatch
runbatch
rundatarule
runDMReport
setdemodates
setperiodstatus
uploadfile
userauditreport
About Running EPM Automate Utility CommandsAll services excepting Oracle Enterprise Performance Reporting Cloud use these EPMAutomate Utility commands. For a list of the commands used by each service, see:
• Oracle Planning and Budgeting Cloud and Oracle Enterprise Planning andBudgeting Cloud Commands
• Oracle Financial Consolidation and Close Cloud Commands
• Oracle Tax Reporting Cloud Commands
• Oracle Account Reconciliation Cloud Commands
• Oracle Profitability and Cost Management Cloud Commands
Oracle Profitability and Cost Management Cloud Commands
Command Reference 2-5

Prerequisites
General
• You must be a Service Administrator to execute commands.
• Any file required to execute a command must exist within the service instance.You use the uploadfile command to upload files.
See Default File Locations for information on the default file location used by eachservice.
• Parameter values that contain a space character; for example, comments, locationnames and folder paths, must be enclosed in quotation marks.
Oracle Planning and Budgeting Cloud
• Jobs
Many of the commands discussed in the following section require jobs. Jobs areactions, such as importing or exporting data, that can be started immediately orscheduled for a later time; for example, importing or exporting data, andrefreshing the database.
Using the Jobs Console, you must create appropriate jobs to perform the followingoperations. For detailed instructions on creating jobs in Oracle HyperionPlanning, see Managing Jobs in Administering Planning for Oracle Planning andBudgeting Cloud.
– Import data into an application
– Export data from an application
– Import metadata into an application
– Export metadata from an application
– Copy data from one a block storage database to an aggregate storage databaseor from a block storage database to another block storage database
• Business Rules
Business rules that you want to execute must exist in the application.
You use Oracle Hyperion Calculation Manager to create business rules, which arethen deployed into the application. See Designing with Calculation Manager forOracle Enterprise Performance Management Cloud.
Data Management
• Data Rules
Data load rules define how Data Management loads data from a file. You musthave predefined data load rules to load data using the utility.
• Batches
About Running EPM Automate Utility Commands
2-6 Oracle Cloud Working with EPM Automate for Oracle Enterprise Performance Management Cloud
You can load data using batches defined in Data Management. Using a batch,Service Administrators can combine many load rules in a batch and execute themin serial or parallel mode.
Default File Locations
• The default location to which the utility uploads files, and stores the files fordownload, is accessible to these applications. You must upload files to thislocation if you plan to process them using a process that is native to theseapplications.
– Planning
– Enterprise Planning
– Account Reconciliation
– Financial Consolidation and Close
– Tax Reporting
You can use the Inbox/Outbox Explorer to browse the files stored in the defaultlocation. Application snapshots that you create using the utility are not listed inthe Inbox/Outbox Explorer; you can view them from the Snapshots tab ofMigration.
• Files that are to be processed using a native Profitability and Cost Managementprocess must be uploaded into profitinbox. Files exported by Profitability andCost Management processes are stored in profitoutbox. You use the FileExplorer to browse these files.
• Files that are to be processed using Data Management must be available in theinbox or in a folder within it. By default, files exported using Data Managementare stored in outbox while Data Management report outputs are stored in DataManagement outbox/report folder. You use the Data Management FileBrowser to browse these files.
EPM Automate Utility CommandsFor a list of the commands used by each service, see:
• Oracle Planning and Budgeting Cloud and Oracle Enterprise Planning andBudgeting Cloud Commands
• Oracle Financial Consolidation and Close Cloud Commands
• Oracle Tax Reporting Cloud Commands
• Oracle Account Reconciliation Cloud Commands
• Oracle Profitability and Cost Management Cloud Commands
For information on status codes used by the utility, see Exit Codes.
applydatagrants
Refreshes the data grants, which control access to Essbase data slices, so that theymatch the data grants defined in a Oracle Profitability and Cost Management Cloudapplication.
EPM Automate Utility Commands
Command Reference 2-7

User and group level data grants that you make in the Oracle Profitability and CostManagement Cloud application are automatically synchronized in Essbase. Use thiscommand to synchronize access to Essbase data if you suspect a discordance betweenthe data grant in the application and the filters in Essbase.
The time required to complete this operation depends on the size of the application.Make sure that the data grant refresh operation finishes before the application isbacked up during the next maintenance window. Because the application should notbe used while this operation is in progress, Oracle recommends that you schedule thisoperation for a time when users are not working with the application.
Usage: epmautomate applydatagrants APPLICATION_NAME, whereAPPLICATION_NAME is the name of the Oracle Profitability and Cost ManagementCloud application for which data grants are to be recreated.
Example: epmautomate applydatagrants BksML12
clearcube
Deletes specific data from input and reporting cubes using the settings specified in ajob of type clear cube. This command does not delete the application definition inthe application’s relational tables. See Clearing Cubes in Administering Planning forOracle Planning and Budgeting Cloud.
Usage: epmautomate clearcube JOB_NAME, where: JOB_NAME is the name of ajob defined in the application.
Example: epmautomate clearcube ClearPlan1
clearpov
Clears model artifacts and data from a Point of View (POV) combination in anapplication.
Usage: epmautomate clearpov APPLICATION_NAME POV_NAMEPARAMETER=VALUE stringDelimiter="DELIMITER" where:
• APPLICATION_NAME is the name of a Oracle Profitability and Cost ManagementCloud application
• POV_NAME is a POV in the application
• PARAMETER=VALUE indicates runtime parameters and their values to clear thePOV. Specify as many parameter and value pairings as the process requires. Validparameters and their values:
– isManageRule=true|false
specifies whether to clear rules
– isInputData=true|false specifies whether to clear input data
– isAdjustmentValues=true|false specifies whether to clear adjustmentvalues
– isAllocatedValues=true|false specifies whether to clear allocationvalues
EPM Automate Utility Commands
2-8 Oracle Cloud Working with EPM Automate for Oracle Enterprise Performance Management Cloud

Note:
Parameter values (true or false) must be in all lower case.
• stringDelimiter="DELIMITER" specifies the delimiter used in POV values.Delimiter must be enclosed in double quotation marks.
Example: epmautomate clearpov BksML12 2012_Jan_ActualisManageRule=true isInputData=true isAdjustmentValues=trueisAllocatedValues=true stringDelimter =”_”
copypov
Copies the model artifacts and Essbase cube data from a source POV to a destinationPOV.
Usage: epmautomate copypov APPLICATION_NAME SOURCE_POV_NAMETARGET_POV_NAME PARAMETER=VALUE Delimter="DELIMITER", where:
• APPLICATION_NAME is the name of the Oracle Profitability and CostManagement Cloud application that contains the source POV.
• SOURCE_POV_NAME is the name of the source POV in the specified application
• TARGET_POV_NAME is the name of a valid target POV in Draft status
• PARAMETER=VALUE indicates runtime parameters and their values to copy thePOV. Specify as many parameter and value pairings as the process requires. Validparameters and their values:
– isManageRule=true|false
specifies whether to clear rules
– isInputData=true|false specifies whether to clear input data
– modelViewName specifies the name of the data slice that is to be copied fromthe source POV to the target POV.
– createDestPOV=true|false specifies whether to create the target POV ifit does not exist
– isAllocatedValues=true|false specifies whether to clear allocationvales
Note:
Parameter values (true or false) must be in all lower case.
• Delimter="DELIMITER" specifies the delimiter used in POV values. Delimitermust be enclosed in double quotation marks.
Example:epmautomate copypov BksML12 2012_Jan_Actual2012_Feb_Actual isManageRule=true isInputData=truemodelViewName="Balancing - 5 Customer Costs" createDestPOV=trueDELIMITER=”_”
EPM Automate Utility Commands
Command Reference 2-9

copysnapshotfrominstance
Migrates (clones) an instance by copying a snapshot from an instance (source) to thecurrent instance (target); for example from a test instance to a production instance.
Usage: epmautomate copysnapshotfrominstance SNAPSHOT_NAMEUSERNAME PASSWORD_FILE URL IDENTITYDOMAIN,where:
• SNAPSHOT_NAME is the name of an existing snapshot in the source instance.
• USERNAME is the user name of a Service Administrator of the source instance.
• PASSWORD_FILE is the name and location of the file containing the encryptedpassword of the Service Administrator of the source instance.
• URL is the URL of the source instance.
• IDENTITYDOMAIN is the identity domain of the source instance.
Example: epmautomate copysnapshotfrominstance "Artifact Snapshot"serviceAdmin C:\mySecuredir\password.epw https://test-cloud-pln.pbcs.us1.oraclecloud.com myprodIdentityDomain
createreconciliations
Copies the profiles to a specified period.
Usage: epmautomate createreconciliations PERIOD SAVED_FILTER,where:
• PERIOD is the name of a period
• SAVED_FILTER is the name of a saved public filter. If you do not specify a savedfilter, the utility copies all applicable profiles
Examples:
• epmautomate createreconciliations “January 2015”
• epmautomate createreconciliations “January 2015” “CorporateRecs”
deletefile
Deletes a file or application snapshot from the default upload location, a DataManagement folder, or from profitinbox/profitoutbox. To delete a file from a locationother than the default upload location, you must specify the file location.
Usage: epmautomate deletefile FILE_NAME
Examples:
• Delete from default upload location: epmautomate deletefile data.csv
• Delete from default download location: epmautomate deletefile outbox/data.csv
• Delete artifact backup (named applicationbackupOctober30):epmautomate deletefile applicationbackupOctober30
• Delete from profitinbox: epmautomate deletefile profitinbox/data.csv
EPM Automate Utility Commands
2-10 Oracle Cloud Working with EPM Automate for Oracle Enterprise Performance Management Cloud

• Delete fromprofitoutbox: epmautomate deletefile profitoutbox/data.csv
• Delete from a Data Management folder: epmautomate deletefile outbox/dm_data/data.csv
deletepov
Deletes model artifacts and Essbase cube data from a POV.
Usage: epmautomate deletepov APPLICATION_NAME POV_NAMEDelimter="DELIMITER", where:
• APPLICATION_NAME is the name of the Oracle Profitability and CostManagement Cloud application that contains the POV to be deleted.
• POV_NAME is the name of the POV to be deleted
• Delimiter ="DELIMITER" specifies the delimiter used in POV values.Delimiter must be enclosed in double quotation marks.
example: epmautomate deletepov BksML12 2012_Jan_Actual
deploycube
Deploys or redeploys the calculation cube of a Oracle Profitability and CostManagement Cloud application.
Usage: epmautomate deploycube APPLICATION_NAME PARAMETER=VALUEcomment="comment" where:
• APPLICATION_NAME is the name of a Oracle Profitability and Cost ManagementCloud application
• PARAMETER=VALUE indicates runtime parameters and their values to deploy thecube. Specify as many parameter and value pairings as the process requires. Validparameters and their values:
Note:
Parameter values (true or false) must be in all lower case.
– isKeepData=true|false
specifies whether to preserve existing data, if any
– isReplaceCube=true|false specifies whether to replace the existingcube
– isRunNow=true|false specifies whether to run the process right away
• comment is an optional comment enclosed in double quotation marks
Example: epmautomate deploycube BksML12 isKeepData=trueisReplaceCube=true isRunNow=true comment=”Test cube deployment”
EPM Automate Utility Commands
Command Reference 2-11

downloadfile
Downloads a file from a service instance to the local computer. This command is usedto download data, metadata, and back up snapshots for local storage. The file isdownloaded into the folder from which you run the utility.
Usage: epmautomate downloadfile "[FILE_PATH]/FILE_NAME"
Examples:
• Download from default download location: epmautomate downloadfiledata.csv
• Download from a Data Management folder: epmautomate downloadfileoutbox/dm_data/data.csv
• Download from profitoutbox: epmautomate downloadfile profitOutbox/data.csv
enableapp
Enables an application.
Usage: epmautomate enableapp APPLICATION_NAME, whereAPPLICATION_NAME is the name of the Oracle Profitability and Cost ManagementCloud application that you want to enable.
Example: epmautomate enableapp BksML12
encrypt
Uses Advanced Encryption Standard (AES) to encrypt your password and store it in apassword file. Encrypting your password is a onetime process.
Usage: epmautomate encrypt PASSWORD KEY PASSWORD_FILE where:
• PASSWORD is the password of the Service Administrator in the service. You cannotuse corporate credentials with the EPM Automate Utility.
• KEY is the private key that is to be used to encrypt the password.
• PASSWORD_FILE is the name and location of the file that stores the encryptedpassword. The password file must use the .epw extension.
Example: epmautomate encrypt P@ssword1 myKey C:\mySecuredir\password.epw
exportdata
Exports application data into a ZIP file using the export data settings, including filename, specified in a job of type export data. The exported data file is stored in thedefault download location from where you can download it to your computer. Use theInbox/Outbox Explorer to view details of the exported file.
Usage: epmautomate exportdata JOB_NAME [FILE_NAME], where: JOB_NAMEis the name of a job defined in the application and FILE_NAME is the name of the ZIPfile (optional) into which data is to be exported.
Example: epmautomate exportdata dailydataexport dailyData.zip
EPM Automate Utility Commands
2-12 Oracle Cloud Working with EPM Automate for Oracle Enterprise Performance Management Cloud

exportMapping
Exports mapping rules of a specific dimension or location to create a mapping rule file.You must specify the file name and a location within the outbox (for example, outbox/exportedAccountMap.txt or outbox/france sales/exportedAccountMap.txt) to exportmappings. Use the downloadfile command to download the exported mapping fileto a local computer.
Usage: epmautomate exportMapping DIMENSION_NAME|ALL FILE_NAMELOCATION, where
• DIMENSION_NAME|ALL is the source dimension from which mappings are to beexported. Specify the name of the dimension from which mappings are to beexported or ALL to export mappings from all dimensions of a location.
• FILE_NAME is a unique name for the mapping file and a location within theoutbox.
• LOCATION is the Data Management location for which mapping rules should beexported.
Examples:
• epmautomate exportMapping Account outbox/exportedAccountMap.txt "France Sales"
• epmautomate exportMapping ALL "outbox/france sales/exportedAccountMap.txt" "France Sales"
exportmetadata
Exports metadata into a file using the settings specified in a job of type exportmetadata. The file containing the exported data is stored in the default downloadlocation from where you can download it to a local computer.
Optionally, you can specify a file name for the exported data, which overrides thedefault file name (job name that is used to export metadata). Metadata is exported as aZIP file only.
Usage: epmautomate exportmetadata JOB_NAME [FILE_NAME], whereJOB_NAME is the name of a job defined in the application and FILE_NAME is thename of the ZIP file into which metadata is to be exported.
Example: epmautomate exportmetadata dailyAccountexportAccountexport.ZIP
exportqueryresults
Runs a query defined in an application and exports results into a text file. The queryresult file is stored in profitoutbox; you can download it using the downloadfilecommand.
Usage: epmautomate exportqueryresults APPLICATION_NAMEfileName=FILE_NAME [queryName=QUERY_NAME][exportOnlyLevel0Flg=true], where:
• APPLICATION_NAME is the name of the Oracle Profitability and CostManagement Cloud application in which you want to run the query
• fileName is the name of the .TXT file that will store the query results
EPM Automate Utility Commands
Command Reference 2-13

• queryName is an optional parameter that identifies a query that is defined in theapplication. Query names that contain space character must be enclosed in doublequotation marks.
Do not specify a query name if you want to export all Essbase data belonging tothe application.
The following conditions may cause this command to create an empty data file:
– A badly formed query that retrieves no data
– A query that generates too much data. In this scenario, consider narrowingthe scope of the query so that it retrieves less data or break the query intosmaller queries
See Managing Oracle Profitability and Cost Management Cloud Queries inAdministering Oracle Profitability and Cost Management Cloud.
• exportOnlyLevel0Flg is an optional parameter that specifies whether the dataretrieved by the query should be at the lowest granularity. Specify this parametervalue in all lower case.
This parameter is ignored if you are exporting all application data by omitting thequery name.
Examples:
• Export all application data:
epmautomate exportqueryresults BksML12fileName=”MyQuery1.txt”
• Export results of a specific query:
epmautomate exportqueryresults BksML12fileName=”MyQuery1.txt” queryName=”My Product Query”exportOnlyLevel0Flg=true
exportsnapshot
Repeats a previously performed export operation to create a snapshot of Migrationcontent. You can download the exported snapshot from the default location.
Usage: epmautomate exportsnapshot SNAPSHOT_NAME whereSNAPSHOT_NAME is the name of an existing snapshot in Migration. This snapshot isreplaced by the new snapshot.
Example: epmautomate exportsnapshot October16FullApp
exporttemplate
Exports an application as a template into a .ZIP file. The exported file is stored inprofitoutbox. You can download it to a local computer using the downloadfilecommand.
Usage: epmautomate exporttemplate APPLICATION_NAME File_Name,where:
• APPLICATION_NAME is the name of the Oracle Profitability and CostManagement Cloud application that you want to export as template
• File_Name is the name for the template file
EPM Automate Utility Commands
2-14 Oracle Cloud Working with EPM Automate for Oracle Enterprise Performance Management Cloud

Example: epmautomate exporttemplate BksML12 template1
feedback
Sends feedback to Oracle and to the Service Administrators of the instance. Thiscommand, which mimics the Provide Feedback feature of the service, is especiallyuseful for providing feedback (text only) to Oracle in cases where the user interface isunresponsive or you encounter an issue while running the utility.
For information on the Provide Feedback feature, see Providing Feedback to Oracle inUsing Oracle Planning and Budgeting Cloud.
Note:
Comments must be enclosed in quotation marks.
Usage: epmautomate feedback "comment" [screenshot="FILE_PATH"]
Examples:
• Windows: epmautomate feedback "runplantypemapCampaignToReporting ClearData=True did not clear data fromaggregate storage" screenshot=C:/feedback/issue.jpg
• Linux: epmautomate feedback "runplantypemapCampaignToReporting ClearData=True did not clear data fromaggregate storage" screenshot=/scratch/screens/issue.jpg
getsubstvar
Retrieves the values of substitution variables and displays them on screen inCUBE_NAME.SUBSTVAR=value format, for example, Plan2.CurYear=2016.Application level substitution variable values are displayed inALL.SUBSTVAR=value format, for example, ALL.CurYear=2016
Usage: epmautomate getsubstvar CUBE_NAME|ALL [name=VARIABLE_NAME],where:
• CUBE_NAME is the cube (for example, Plan1, Plan2) from which you want toretrieve the substitution variable. Use ALL to retrieve substitution variables at theapplication level.
• name=VARIABLE_NAME optionally identifies the substitution variable for whichyou want to retrieve value. If you do not specify a variable name, the commandretrieves the value of all substitution variables.
Examples:
• Get the value of all substitution variables at the application and cube level:epmautomate getsubstvar ALL
• Get the value of one specific substitution variable at the application level:epmautomate getsubstvar ALL name=CurYear
• Get the value of all substitution variables at the cube level: epmautomategetsubstvar Plan2
EPM Automate Utility Commands
Command Reference 2-15

• Get the value of a specific substitution variable at the cube level: epmautomategetsubstvar Plan2 name=CurYear
help
Displays help for all commands.
Usage: epmautomate help
Example: epmautomate help
importbalances
Uses Data Management to import balances data from a data load definition.
Usage: epmautomate importbalances DL_DEFINITION PERIOD where:
• DL_DEFINITION is an existing data load definition in Oracle AccountReconciliation Cloud.
• PERIOD is the name of a period.
Example: epmautomate importbalances DailyLoad “January 2016”
importdata
Imports data from a file into the application using the import data settings specified ina job of type import data. Use the uploadfile command to upload the file containingapplication data to the default upload location.
Optionally, you can specify the name of the ZIP, CSV or TXT (Essbase format data file)file from which data is to be imported. If you specify a file name, the import file namein the job is ignored.
If the job is defined to import data in Essbase format, the ZIP file must contain anEssbase format TXT file. For other import jobs, the ZIP file may contain one or moreCSV files that identifies the import sequence in the file names; for example,data1-3.csv, data2-3.csv, and data3-3.csv.
Usage: epmautomate importdata JOB_NAME [FILE_NAME], where: JOB_NAMEis the name of a job defined in the application and FILE_NAME identifies the ZIP orCSV file from which data is to be imported.
Example: epmautomate importdata dailydataload dailydata.zip
importMapping
Imports mappings from a mapping import file, which was previously uploaded to theservice. Use the uploadfile command to upload files into Data Management inbox or afolder within it.
Usage: epmautomate importMapping DIMENSION_NAME|ALL FILE_NAMEIMPORT_MODE VALIDATION_MODE LOCATION, where
• DIMENSION_NAME|ALL indicates the recipient of the mapping. Specify the nameof the dimension into which mappings are to be imported or ALL to import allmappings included in the file to appropriate dimensions.
• FILE_NAME is the name and location of the mapping import file available in DataManagement inbox or a directory within it. Specify the file name (TXT files in
EPM Automate Utility Commands
2-16 Oracle Cloud Working with EPM Automate for Oracle Enterprise Performance Management Cloud

standard Data Management format) and its path (for example, inbox/AccountMap.txt or inbox/pbcs_maps/AccountMap.txt).
• IMPORT_MODE is either REPLACE to clear existing mapping rules beforeimporting mappings or MERGE to add new mapping rules to exiting rules.
• VALIDATION_MODE is TRUE to validate target members against the application orFALSE to load the mapping file without running validations.
• LOCATION is the Data Management location for which mapping rules should beloaded.
Examples:
• epmautomate importMapping Account inbox/AccountMap.txt MERGEFALSE "France Sales"
• epmautomate importMapping ALL "inbox/France Sales/AllMaps.txt" MERGE FALSE "France Sales" (loads mappings from themapping import file into all mapped dimensions in France Sales location)
importmetadata
Imports metadata into the application using the import data settings specified in a jobof type import metadata. Optionally, you can specify the name of the ZIP file fromwhich metadata is to be imported. Use the uploadfile command to upload the filecontaining the metadata to the default upload location.
The contents of the ZIP file that you specify take precedence over the file namesdefined in the job. The ZIP file may contain one or more CSV files. The file namescontaining metadata for dimensions should match the import file names defined in thejob or end with _DIMENSIONNAME.csv; for example, metadata_Entity.csv,metadata_HSP_Smart Lists.csv, and metadata_Exchange Rates.csv.
Note:
Only the metadata for the dimensions for which metadata import is set up inthe job is imported. Metadata for other dimensions, if contained in the ZIP file,are ignored.
Usage: epmautomate importmetadata JOB_NAME [FILE_NAME] , whereJOB_NAME is the name of a job defined in the application and FILE_NAME is thename of the ZIP file from which metadata is to be imported.
Example: epmautomate importmetadata importAccountimportAccount.zip
importpremappedbalances
Imports pre-mapped balance data from a file in the Oracle Account ReconciliationCloud repository.
Usage: epmautomate importpremappedbalances PERIOD FILE_NAMEBALANCE_TYPE CURRENCY_BUCKET, where:
• PERIOD is the name of a period
• FILE_NAME is the name of the CSV file containing the data to be imported
EPM Automate Utility Commands
Command Reference 2-17

• BALANCE_TYPE is SRC or SUB
• CURRENCY_BUCKET is Entered, Functional or Reporting
Example: epmautomate importpremappedbalances “January 2015”dailydata.csv SRC Reporting
importpremappedtransactions
Imports pre-mapped transactions from a CSV file in the Oracle Account ReconciliationCloud repository.
Usage: epmautomate importpremappedtransactions PERIODTRANSACTION_TYPE FILE_NAME DATE_FORMAT, where:
• PERIOD is the name of a period
• TRANSACTION_TYPE is one of the following:
– BEX for adjustment to explained balance
– SRC for adjustment to source system
– SUB for adjustment to subsystem
• FILE_NAME is the name of the CSV file from which data is to be imported
• DATE_FORMAT is date format text string; for example, MMM d, yyyy.
Example: epmautomate importpremappedtransactions “January 2015”“BEX” transactions.csv “MMM d, yyyy”
importprofiles
Imports new profile definitions from a CSV file in the Oracle Account ReconciliationCloud repository.
Usage: epmautomate importprofiles FILE_NAME PROFILE_TYPE METHODDATE_FORMAT, where:
• FILE_NAME is the name of the CSV file from which data is to be imported
• PROFILE_TYPE is either profiles or children
• METHOD is either Replace or Update
• DATE_FORMAT is a date format text string; for example, MMM d, yyyy
Example: eppmatomate importprofiles NewRecProfiles.csv ProfilesReplace “MMM d, yyyy”
importrates
Imports currency rates from a CSV file in the Oracle Account Reconciliation Cloudrepository.
Usage: epmautomate importrates PERIOD RATE_TYPE REPLACE_MODEFILE_NAME, where:
• PERIOD is the name of a period
• RATE_TYPE is a predefined rate type
EPM Automate Utility Commands
2-18 Oracle Cloud Working with EPM Automate for Oracle Enterprise Performance Management Cloud
• REPLACEMENT_MODE is Replace or ReplaceAll
• FILE_NAME is the name of the CSV file from which rates are to be imported
Example: epmautomate importrates “January 2015” Actual ReplaceAllavgrates.csv
importsnapshot
Imports the contents of a snapshot into the service instance. The snapshot you importmust be available in the default upload location. Use the uploadfile command toupload a snapshot to the default location.
The activities that you can complete using this command depend on your role.
• Service Administrators can import only application artifacts into a serviceinstance.
• Identity Domain Administrators can import only identity domain artifacts.
• Service Administrators who are also assigned the Identity Domain Administratorrole can import application content into the service instance and identity domainartifacts (users and their role assignments) into the identity domain of the serviceinstance.
If a user, who is not in the identity domain, is referenced in the snapshot beingimported, the utility creates a user in the identity domain and assigns the defaultpassword that you specify in the command. By default, the user will be requiredto reset password during first sign in.
Usage: epmautomate importsnapshot SNAPSHOT_NAME[userPassword=DEFAULT_PASSWORD] [resetPassword=true|false], where
• SNAPSHOT_NAME is the name of a snapshot in the default upload location.
• userPassword indicates the default password that you want to assign to newusers who are created in the identity domain. The password that you specify mustmeet the minimum identity domain password requirements.
• resetPassword indicates whether the new user must change the password atthe first log in. Unless this optional parameter is set to false, the new user willbe forced to change the password at the first sign in.
Examples:
• Import application artifacts
epmautomate importsnapshot October16FullApp
• Import application and identity domain artifacts (for Service Administratorswith Identity Domain Administrator role only.)
– epmautomate importsnapshot October16FullAppuserPassword=Password1
This command forces new users to reset their password after they sign in forthe first time.
– epmautomate importsnapshot October16FullAppuserPassword=Password1 resetPassword=false
This command allows users to retain the default password if they so choose.
EPM Automate Utility Commands
Command Reference 2-19
importsupplementaldata
Note:
All command parameters must be enclosed in double quotation marks.
Imports supplemental data from a file into the application. Use the uploadfilecommand to upload the file containing the data to the default upload location.
Usage: epmautomate importsupplementaldata "FILE_NAME""DATA_SET_NAME" "YEAR" "PERIOD_NAME" "SCENARIO_NAME", where:
• FILE_NAME is the name of a CSV file, available in the default upload location, thatcontains properly formatted supplemental data.
• DATA_SET_NAME is the name of the data set into which the supplemental data inthe file should be imported.
• YEAR is the year for which the data set is deployed.
• PERIOD_NAME is name of the period to which the data set is deployed.
• SCENARIO_NAME is the name of the scenario to which the data set is deployed.
Example: epmautomate importsupplementaldata "DatasetImport.csv""EmployeeDataSet" "FY17" "Jan" "Actual"
importtemplate
Creates an application structure by importing from a template file that exists inprofitinbox. You can upload a template file into profitinbox using the uploadfilecommand.
Usage: epmautomate importtemplate APPLICATION_NAME File_NameisApplicationOverwrite=true|false, where:
• APPLICATION_NAME is the name of the Oracle Profitability and CostManagement Cloud application that you want to create by importing the template
• File_Name is the name of the .ZIP file containing application template. This filemust exist in profitinbox.
• isApplicationOverwrite specifies whether to overwrite the existingapplication, if any. Specify this parameter value in all lower case.
Example: epmautomate importtemplate BksML12 template1.zipisApplicationOverwrite=true
importtmpremappedbalances
For a specific data source, imports pre-mapped balances data from a file in OracleAccount Reconciliation Cloud repository into Transaction Matching.
See Importing Data in Reconciling Accounts with Oracle Account Reconciliation Cloud forimport file format requirements and information about importing data.
EPM Automate Utility Commands
2-20 Oracle Cloud Working with EPM Automate for Oracle Enterprise Performance Management Cloud

Note:
Unlike from the Jobs screen, you can import pre-mapped balances data onlyfrom one file at a time.
Use the uploadfile command to upload the balances file to the service.
Usage: epmautomate importtmpremappedbalances RECONCILIATION_TYPEDATA_SOURCE FILE_NAME [DATE_FORMAT], where:
• RECONCILIATION_TYPE is the reconciliation type defined in Oracle AccountReconciliation Cloud.
• DATA_SOURCE is the identifier of the data source associated with thereconciliation type that you specified.
• FILE_NAME is the name of the CSV file containing details of the balances toimport. This file must be available in the service.
• DATE_FORMAT is an optional parameter that indicates the format of the date fieldsincluded in the balances import file. Default is DD-MMM-YYYY, which is the onlycurrently supported format.
Example: epmautomate importtmpremappedbalances "INTERCOMPANY""AP" dailybalances.csv
importtmpremappedtransactions
For a specific data source, imports pre-mapped transactions data from a file in OracleAccount Reconciliation Cloud repository into Transaction Matching. Use the uploadfile command to upload the transactions file to the service.
See Importing Data in Reconciling Accounts with Oracle Account Reconciliation Cloud forimport file format requirements and information about importing data.
Note:
• Unlike from the Jobs screen, you can import pre-mapped transactionsdata only from one file at a time.
• After importing pre-mapped transactions for all data sources, run therunautomatch command.
Usage: epmautomate importtmpremappedtransactionsRECONCILIATION_TYPE DATA_SOURCE FILE_NAME [DATE_FORMAT], where:
• RECONCILIATION_TYPE is a reconciliation type defined in Oracle AccountReconciliation Cloud.
• DATA_SOURCE is the identifier of the data source associated with thereconciliation type that you specified.
• FILE_NAME is the name of the CSV file containing the transactions to import. Thisfile must be available in the service.
EPM Automate Utility Commands
Command Reference 2-21
• DATE_FORMAT is an optional parameter that indicates the format of the date fieldsincluded in the transactions import file. Default is DD-MMM-YYYY, which is theonly format that is currently supported.
Example: epmautomate importtmpremappedtransactions "INTERCOMPANY""AP" dailydata.csv
listfiles
Lists the files in the default location, Data Management folders, and profitinbox/profitoutbox. This command does not list Migration snapshots.
Usage: epmautomate listfiles
loaddata
Load data into a calculation cube using a file available in profitinbox. Use the uploadfile command to load files into profitinbox.
Usage: epmautomate loaddata APPLICATION_NAMEPARAMETER=VALUE[rulesFileName=File_Name] dataFileName=File_Name,where:
• APPLICATION_NAME is the name of the Oracle Profitability and CostManagement Cloud application into which you want to load data
• PARAMETER=VALUE indicates runtime parameters and their values to load data.Specify as many parameter and value pairings as the process requires. Validparameters and their values:
– clearAllDataFlag=true|false specifies whether to clear existing datain the application cube
– dataLoadValue=OVERWRITE_EXISTING_VALUES|ADD_TO_EXISTINGspecifies how to handle existing data
Note:
Rule file name and data file name must be enclosed in double quotationmarks.
• [rulesFileName=File_Name] name of a rules file (optional) available inprofitinbox
• dataFileName=File_Name specifies a data load file available in profitinbox.
Example: epmautomate loaddata BksML12 clearAllDataFlag=truedataLoadValue=”OVERWRITE_EXISTING_VALUES”rulesFileName=”rule1.txt” dataFileName=”data1.txt”
loaddimdata
Loads dimension metadata from a file in profitinbox into an application. Use the uploadfile command to load files into profitinbox.
Usage: epmautomate loaddimdata APPLICATION_NAMEdataFileName=File_Name, where:
EPM Automate Utility Commands
2-22 Oracle Cloud Working with EPM Automate for Oracle Enterprise Performance Management Cloud
• APPLICATION_NAME is the name of the Oracle Profitability and CostManagement Cloud application into which you want to load dimension metadata
• dataFileName=File_Name specifies a a dimension metadata load file availablein profitinbox
Example: epmautomate loaddimdata BksML12dataFileName=”dimdata1.txt”
login
Establishes a secure connection to a service instance. You sign in to initiate a session,which remains active until you sign out. You cannot use corporate credentials to signin with this utility.
Note:
When using this command in batch files to automate activities, Oraclerecommends that you use encrypted passwords to avoid recording clear textpasswords in batch files.
Usage:
• Using an unencrypted password: epmautomate login USERNAME PASSWORDURL IDENTITYDOMAIN
• Using an encrypted password: epmautomate login USERNAMEPASSWORD_FILE URL IDENTITYDOMAIN
In these commands:
• USERNAME is the user name of a Service Administrator.
• PASSWORD is the password of the Service Administrator.
• PASSWORD_FILE is the name and location of the file that stores the encryptedpassword of the Service Administrator.
• URL is the URL of the service instance to which to connect.
• IDENTITYDOMAIN is the identity domain of the service instance.
Examples:
• Using an unencrypted password:
epmautomate login serviceAdmin P@ssword1 https://test-cloud-pln.pbcs.us1.oraclecloud.com myIdentityDomain
• Using an encrypted password:
epmautomate login serviceAdmin C:\mySecuredir\password.epwhttps://test-cloud-pln.pbcs.us1.oraclecloud.commyIdentityDomain
logout
Terminates your current connection with a service instance.
EPM Automate Utility Commands
Command Reference 2-23

Usage: epmautomate logout
maskData
Masks application data to ensure data privacy. Use this command only on testinstances to hide sensitive data from application developers.
WARNING: Do not use this command on production instances because it randomizescurrent application data, rendering it meaningless. You cannot undo the effects of thiscommand. If you mistakenly masked the data in a service instance, you must restorethe data from a back up or from the maintenance snapshot.
Usage: epmautomate maskData [–f] where -f is an option to force the start of themasking process without user confirmation. If you do not use the -f option, the utilityprompts you to confirm your action.
provisionreport
Generates a provisioning report (.CSV file) and stores it in the default downloadlocation from where you can download it to your computer. This report containsinformation on the roles assigned to users and inheritance information that shows thesequence of inheritance starting with the original role that was responsible forgranting the provisioned role to the user.
Usage: epmautomate provisionreport REPORT_NAME where REPORT_NAME isthe name of the report file.
Example: epmautomate provisionreport myProvReport.CSV
recreate
Restores a service instance to a clean state by refreshing the deployment. This processdeletes the existing application and all user defined artifacts from the service instance.After recreating the service, you can create a new application or import an applicationusing Migration or the EPM Automate Utility.
Caution:
Using this command results in the loss of existing data and artifacts. Perform acomplete backup of the application before you recreate a service instance.
Usage: epmautomate recreate [-f] where -f is the option to force the recreateprocess to start without user confirmation. If you do not use the -f option, the utilityprompts you to confirm your action.
Example: epmautomate recreate -f recreates the current instance withoutprompting for confirmation.
refreshcube
Refreshes the application cube. Typically, you refresh the cube after importingmetadata into the application.
The time required to complete a cube refresh operation depends on the changes thatyou made to the application structure and the impact it has on the cube. For example,a refresh after updating a sparse block storage cube member may not take much timewhile a cube refresh after updating a dense block storage cube member or anaggregate storage cube member could take a considerable amount of time. You must
EPM Automate Utility Commands
2-24 Oracle Cloud Working with EPM Automate for Oracle Enterprise Performance Management Cloud

ensure that the cube refresh operation complete before the application is backed upduring the next maintenance window.
Usage: epmautomate refreshcube [JOB_NAME] where
JOB_NAME is, optionally, the name of a job defined in the application
Example: epmautomate refreshcube dailyCubeRefresh
replay
Replays Oracle Smart View for Office load on a service instance to enable performancetesting under heavy load to verify that user experience is acceptable when the serviceis under specified load.
You must create the replay file that identifies the Smart View activities that should beexecuted on the service. See Preparing to Run the Replay Command for detailsinformation on how to create the replay file.
Usage: epmautomate replay REPLAY_FILE_NAME.csv duration=N[trace=true] where:
• REPLAY_FILE_NAME is a CSV file that stores the activities to be executed on theservice instance.
• Duration indicates the number of minutes for which activities are executed onthe service instance.
• trace=true is an optional setting that instructs the utility to create trace files inXML format.
If this optional setting is specified, the utility creates one folder for each HAR fileincluded in the replay CSV file and stores all related trace files in it. For eachactivity in the HAR file, the utility generates one trace file that contains SmartView response. Trace files are named trace-N.xml; for example, trace-1.xmlwhere N is a counter that starts at 1.
The folders that store the trace files are created in the directory from which EPMAutomate Utility is run. The utility uses a combination of current server systemtime and HAR file name in YYYY_MM_DD_HH_MM_SS_HAR_FILE_NAME format toname the folders. For example, if HAR file name is forecast1.har, the foldername may be 2016_06_08_10_21_42_forecast1.
Example: epmautomate replay forecast1.csv duration=15
See A Sample Replay Session for detailed steps involved in executing this command.
resetservice
Restarts the service instance. Use this command only when you observe severeperformance degradation or if you receive error messages indicating that the instanceis unusable. Service reset does not affect your application customizations (for example,locale change, settings related to theme and currency, etc.). Reset takes up to 15minutes.
Note:
Comments must be enclosed in quotation marks.
EPM Automate Utility Commands
Command Reference 2-25

Usage: epmautomate resetservice "comment"
Example: epmautomate resetservice "Users experience unacceptablyslow connctions"
runautomatch
Runs the Auto Match process to match transactions using the rules defined by aService Administrator. You can monitor the status of the auto match process on theJob History tab in Oracle Account Reconciliation Cloud.
Note: Run this command after you import transactions data into TransactionMatching using the importtmpremappedtransactions command. Afterrunning auto match, run the importtmpremappedbalances command toimport balances data into Transaction Matching.
Usage: epmautomate runautomatch RECONCILIATION_TYPE, whereRECONCILIATION_TYPE is a reconciliation type defined in Oracle AccountReconciliation Cloud.
Example: epmautomate runautomatch INTERCOMPANY
runbatch
Executes a Data Management batch.
If batch execution mode in Data Management is set to Serial, control is returned whenall the jobs in the batch are completed; if it is set to Parallel, control is returned whenall jobs in the batch are submitted for execution.
Usage: epmautomate runbatch BATCH_NAME, where
BATCH_NAME is the name of a batch defined in Data Management.
Examples: epmautomate runbatch Accounting_batch
runbusinessrule
Launches a business rule or ruleset.
Usage: epmautomate runbusinessrule RULE_NAME [PARAMETER=VALUE],where:
• RULE_NAME is the name of a business rule exactly as it is defined in the serviceinstance.
• PARAMETER=VALUE indicates optional runtime parameters and their valuesrequired to execute the business rule.
Specify runtime parameters for launching rules only. If you are executing rulesets,the command ignores any runtime parameters that you specify. Rulesets are runusing default values that you specified while creating the ruleset using OracleHyperion Calculation Manager.
EPM Automate Utility Commands
2-26 Oracle Cloud Working with EPM Automate for Oracle Enterprise Performance Management Cloud

Note:
The rule is executed against the plan type to which it was deployed.
Use PARAMETER=VALUE pairing to specify as many runtime prompts as thebusiness rule requires. The following example uses two runtime prompts(Period and Entity) and their values (Q1 and USA).
Example: epmautomate runbusinessrule RollupUSSales Period=Q1Entity=USA
runcalc
Runs calculations in an application.
Usage: epmautomate runcalc APPLICATION_NAME POV_NAMEPARAMETER=VALUE [comment="comment"] stringDelimter"DELIMITER",where:
• APPLICATION_NAME is the name of the Oracle Profitability and CostManagement Cloud application that contains the POV to be calculated.
• POV_NAME is the name of the POV to be calculated
• PARAMETER=VALUE indicates runtime parameters and their values to run thecalculation. Specify as many parameter and value pairings as the process requires.Valid parameters and their values:
– isClearCalculated=true|false specifies whether to clear existingcalculations
– isExecuteCalculations=true|false specifies whether to runcalculations
– isRunNow=true|false set this value to true to run the process now orfalse to run the process later
– subsetStart specifies the sequence number of the first rule in the rule set torun
– subsetEnd specifies the sequence number of the last rule in the rule set torun
– ruleSetName identifies the rule set that contains the calculations you wantto run
– ruleName name of the rule to run (to run a single rule)
– exeType=All_Rules|Single_Rule identifies the rule execution type
– comment is an optional comment enclosed in double quotation marks
– stringDelimter is the delimiter used in POV values
Note:
Parameter values (true or false) must be in all lower case.
EPM Automate Utility Commands
Command Reference 2-27

Example: epmautomate runcalc BksML12 2012_Jan_ActualisClearCalculated=true isExecuteCalculations=true isRunNow=truesubsetStart=10 subsetEnd =20 ruleSetName=” Utilities ExpenseAdjustment" ruleName ="Occupancy Expense Allocations" exeType=”ALL_RULES” comment=”Test calculation” stringDelimiter=”_
rundatarule
Executes a Data Management data load rule based on the start period and end period,and import or export options that you specify.
Usage: epmautomate rundatarule RULE_NAME START_PERIOD END_PERIODIMPORT_MODE EXPORT_MODE [FILE_NAME], where:
• RULE_NAME is a name of a data load rule defined in Data Management. Youshould enclose the rule name in quotation marks if it contains space.
• START_PERIOD is the first period for which data is to be loaded. This periodname must be defined in Data Management period mapping.
• END_PERIOD is, for multi-period data load, the last period for which data is to beloaded. For single period load, enter the same period as start period. This periodname must be defined in Data Management period mapping.
• IMPORT_MODE determines how the data is imported into Data Management.Acceptable values are:
– APPEND to add to the existing POV data in Data Management
– REPLACE to delete the POV data and replace it with the data from the file
– RECALCULATE to recalculate the data
– NONE to skip data import into Data Management staging table
• EXPORT_MODE determines how the data is exported to the application. Acceptablevalues are:
Note:
For Oracle Financial Consolidation and Close Cloud, only the followingexport modes are supported:
– MERGE to merge the data in the Data Management staging table with theexisting data
– REPLACE to remove entries from DM staging table and replace with thosefrom the data load
– NONE to skip data export from Data Management to the application
EPM Automate Utility Commands
2-28 Oracle Cloud Working with EPM Automate for Oracle Enterprise Performance Management Cloud
Note:
For Oracle Fusion Cloud as a target, only the following export modes aresupported:
– MERGE to merge the data in the Data Management staging table with theexisting data
– NONE to skip data export from Data Management to the application
– STORE_DATA to merge the data in the Data Management staging table withthe existing data
– ADD_DATA to add the data in the Data Management staging table to theapplication
– SUBTRACT_DATA to subtract the data in the Data Management staging tablefrom existing data
– REPLACE_DATA to clear the POV data and replace it with data in the DataManagement staging table. The data is cleared for Scenario, Version, Year,Period, and Entity
– NONE to skip data export from Data Management to the application
• FILE_NAME is an optional file name. If you do not specify a file name, EPMAutomate Utility imports the data contained in the file name specified in the loaddata rule. This file must be available in the inbox folder or in a folder within it.
Note: Import and Export mode settings are case-sensitive.
Examples:
• Multi-period Import: epmautomate rundatarule VisionActual Mar-15Jun-15 REPLACE STORE_DATA inbox/Vision/GLActual.dat
• Single-period Import: epmautomate rundatarule "Vision Actual"Mar-15 Mar-15 REPLACE STORE_DATA inbox/Vision/GLActual.dat
runDMReport
Creates a Data Management report and stores it in the outbox/reports folder. Usethe downloadfile command to download the report to a local computer.
The generated report is named based on the ID of the Data Management job thatgenerates the report and the report format. For example, if the report job ID is 2112and the report output format that you specify is PDF, the report name is 2112.pdf.The report name is displayed in the console after the report is generated. You can alsoidentify the report name from the Process Details tab in Data Management or by usingthe listfiles command.
Usage: epmautomate runDMReport REPORT_NAME PARAMETER=Value"Report Output Format=[PDF|HTML|XLS|XLSX]", where
• REPORT_NAME is the name of the Data Management report template to be usedfor generating the report.
EPM Automate Utility Commands
Command Reference 2-29

• PARAMETER=Value indicates report parameters and their values. You specify asmany parameters as required in PARAMETER=Value format. The list of requiredparameters depends on the report that you want to generate.
Note:
Report run time parameters are defined when you design your reports. To runthis command, you must generate and copy these parameters and values tothe utility from the Workflow tab. To generate runtime parameters of a report,in the Workflow tab of Data Management, click Report Execution and thenselect a group from Report Group. Select the report for which you want togenerate the parameters, then click Create Report Script. Optionally, specifyreport parameter values, then select an output format, and then click OK. Usethe parameters shown in Generate Report Script to specify runtimeparameters and values to generate the report
• Report Output Format indicates the report output format. Valid options arePDF, HTML,XLS, and XLSX. The default report format is PDF.
Example: epmautomate runreport "TB Current Location By TargetAcct (Cat,Per)" "Period=Jul 14" "Category=Forecast""Location=FCSTtoVISCONSOL1" "Rule Name=FCSTtoVISCONSOL1" "ReportOutput Format=HTML"
runplantypemap
Copies data from a block storage database to an aggregate storage database or from ablock storage to another block storage based on the settings specified in a job of typeplan type map.
Usage: epmautomate runplantypemap JOB_NAME [clearData=true|false],where:
• JOB_NAME is the name of a job of type plan type map defined in theapplication.
• clearData is an optional setting that indicates whether the data in the targetdatabase should be removed before copying data. If this parameter value is notset, the default value True is used.
Example: epmautomate runplantypemap CampaignToReportingclearData=false
setdemodates
Use this command only on installations setup with Oracle internal demo data.
For Oracle Account Reconciliation Cloud only: Renames the periods in OracleAccount Reconciliation Cloud to be consistent with the specified date. It also resetsdates for all reconciliations that have associated Demo Code attribute values ofsetdemodate or setdemodatenostatuschage.
This command handles reconciliations in up to two periods; a current period and aprior (historic) period. If reconciliations from more than two periods are tagged withthe Demo Code attribute, the command treats those periods as being in the priorperiod. Reconciliations that do not have this attribute value are not affected.
EPM Automate Utility Commands
2-30 Oracle Cloud Working with EPM Automate for Oracle Enterprise Performance Management Cloud
• If the value is setdemodate, the command resets the reconciliation dates basedon the specified date and returns it to Open with Preparer status
• If the value is setdemodatenostatuschage, the command resets thereconciliation dates based on the specified date without changing thereconciliation status
For Oracle Financial Consolidation and Close Cloud and Oracle Tax ReportingCloud only: This command resets the tasks start and end dates, and other related dateinformation, to make the tasks look good for a demo. It calculates the new task datesbased on the value of the SETDEMODATES attribute set in the task along with the valueof the Demo Date value that you provide. If Demo Date value is not specified, thecommand uses today's date to calculate the new task dates.
Note: Tasks in schedules that do not have SETDEMODATES value are notaffected.
Based on the Demo Date that you specify, this command moves forward all datesassociated with the task. This includes core run time dates (start date, end date, etc.)and ancillary dates including those of history, individual workflow due dates, andstart date (actual). Task status is not affected.
Usage: epmautomate setdemodates [DEMO_DATE] where DEMO_DATE is anoptional date in YYYY-MM-DD format. Reconciliations are reset to the current date ifyou do not specify this value.
Example: epmautomate setdemodates 2017-02-15
setperiodstatus
Sets a specific period status.
Usage: epmautomate setperiodstatus PERIOD STATUS, where:
• PERIOD is the name of a period
• STATUS is OPEN, CLOSED or LOCKED
Example: epmautomate setperiodstatus “January 2015” OPEN
setsubstvars
Creates or updates substitution variables at application or cube level. You cannot usethis command to set multiple values and/or functions for substitution variables.
Usage: epmautomate setsubstvars CUBE_NAME SUBSTVAR=VALUE[SUBSTVAR=VALUE], where:
• CUBE_NAME is the cube (for example, Plan1, Plan2) for which the substitutionvariable is created or updated. Use All instead of acube name to set or updatesubstitution variable at the application level.
• SUBSTVAR is the name of the substitution variable for which a value is to be set orupdated.
• VALUE is the new substitution variable value.
Examples:
EPM Automate Utility Commands
Command Reference 2-31

• Create or update one substitution variable at the application level: epmautomatesetsubstvars ALL CurYear=2015 CurPeriod=Jan
• Create or update substitution variables at cube level: epmautomatesetsubstvars Plan2 CurYear=2013 CurPeriod=Jan
uploadfile
Uploads a file from the local computer to the service. Use this command to uploadfiles containing data, metadata, rule definitions, dimension definitions, mappedtransactions, templates, and backup snapshots.
Usage: epmautomate uploadfile "FILE_NAME" [DATA_MANAGEMENT_FOLDER| profitinbox]
Examples:
• Upload into default location: epmautomate uploadfile "C:/pbcsdata/quarterlydata.csv"
• Upload into a Data Management folder: epmautomate uploadfile "C:/fdmee_data/data.zip" inbox/repository
• Upload into profitinbox (Oracle Profitability and Cost Management Cloud):epmautomate uploadfile "C:/profitability_data/data.zip"profitinbox
userauditreport
Generates a user audit report (.CSV file) and stores it in the default download locationfrom where you can download it to your computer. This report contains informationon the users who signed into a service instance over a specified period of time. Itshows the IP address of the computer from which the user logged in and the date andtime at which the user accessed the service instance.
Usage: epmautomate userauditreport FROM_DATE TO_DATE REPORT_NAMEwhere:
• FROM_DATE indicates the start date (in YYYY-MM-DD format) of the period forwhich the audit report is to be generated
• TO_DATE indicates the end date (in YYYY-MM-DD format) of the period for whichthe audit report is to be generated
• REPORT_NAME is the name of the report file
Example: epmautomate userauditreport 2016-10-15 2016-12-15myAuditReport.CSV
Exit CodesThe EPM Automate Utility returns an exit code and message to indicate the status ofthe operation. Exit codes are grouped under five code numbers; each code mayindicate many error conditions. Review the accompanying message to identify thespecific condition that caused the error. Additionally, the utility creates a log file(COMMANDNAME_TIMESTAMP.log, for example,uploadfile_16_11_2016_11_27_10.log) for each failed command execution.Log files are created on the computer from which you run the utility.
Exit Codes
2-32 Oracle Cloud Working with EPM Automate for Oracle Enterprise Performance Management Cloud

Exit Code 1 Errors
Command failed to execute The utility uses this exit code to display messagesrelated to HTTP status code 200 and 400. These codes are returned by the REST APIsthat the utility uses.
Insufficient privileges to perform the operation This error isdisplayed if the user whose credentials are used to sign into the service does not havesufficient privileges to perform the operation you attempted.
Sign in with an account that has sufficient privileges to perform the operation.Generally, only Service Administrators are allowed to perform operations in theservice.
Resource does not exist This error is displayed if the file or snapshot that youwant to delete or download does not exist in the service.
Use the listfiles command to verify the file name and its location.
Invalid snapshot SNAPSHOT This error is displayed when the service is unable tovalidate the snapshot that you specified for the export or import operation.
Verify that you are using a valid snapshot.
Internal server error. Unable to delete file: FILE_NAME Pleaseissue "Provide Feedback" with details This error is displayed if the file orsnapshot could not be deleted from the service due to a server error.
Report this issue to Oracle using the Feedback command or the Provide Feedbackfeature.
Invalid file: FILE_NAME This error is displayed if the file or snapshot that youwant to delete or download does not exist in the service or if the file name is not in therequired format.
Use the listfiles command to verify the file name and its location.
Recreate is running for a long time. Please contact support Thiserror is displayed if the recreate operation that you initiated is not completed withinone hour.
Report this issue to Oracle using the Feedback command or the Provide Feedbackfeature.
Reset service is running for a long time. Please contact supportThis error is displayed if the reset service operation that you initiated is not completedwithin one hour.
Report this issue to Oracle using the Feedback command or the Provide Feedbackfeature.
Cannot perform operation. Another instance is in progress.Please try after some time This error is displayed if you try to execute thecopysnapshotfrominstance command when another instance of the command isactive.
Wait for the copysnapshotfrominstance command to finish before attempting torun the command again.
Cannot perform operation. Another maintenance script is inprogress. Please try after some time This error is displayed if you attemptto execute the copysnapshotfrominstance, recreate or resetservicecommand when daily maintenance or service reset process is running.
Exit Codes
Command Reference 2-33

Rerun the operation after the maintenance or reset process finishes.
Login to source instance failed: SOURCE_URL This error is displayed ifthe utility is unable to sign in to the source instance to initiate thecopysnapshotfrominstance command
Verify that the credentials, identity domain and URL that is used to access the sourceinstance are valid.
Internal server error. Copy snapshot from source instancefailed. Please issue "Provide Feedback" with details This error isdisplayed when the utility encounters an unexpected while running thecopysnapshotfrominstance process.
Report this issue to Oracle using the Feedback command or the Provide Feedbackfeature.
Internal server error. Please issue "Provide Feedback" withdetails This error is displayed to indicate many internal server conditions thatrequire corrective actions by Oracle.
Report this issue to Oracle using the Feedback command or the Provide Feedbackfeature.
Snapshot SNAPSHOT_NAME already exists. Please delete thesnapshot and rerun the command This error is displayed when you downloador upload a snapshot into a location where another snapshot with identical name ispresent.
Delete or remove the existing snapshot and then retry the command.
Error in extracting the snapshot. Please retry with a propersnapshot This error is displayed if the utility is unable to extract snapshot contentswhen running the importsnapshot command.
Verify that the snapshot is valid.
Internal server error. Unable to open file for write. Pleaseissue "Provide Feedback" with details This error is displayed if errorscause the creating or updating of CSV files, for example while generating the AuditReport.
Report this issue to Oracle using the Feedback command or the Provide Feedbackfeature.
No matching records found, please select a different date rangeThis error is displayed if you run the userauditreport command to generate theAudit Report for a date range for which audit data is not available.
Specify a valid date range and then rerun the userauditreport command. Notethat the service maintains audit history for the last 120 days only.
File with same name exists: FILE_NAME, please choose a differentfilename This error is displayed if a report with the Audit Report name youspecified exists in the service.
Delete the existing file from the service or specify a different file name and then rerunthe userauditreport command.
Operation failed with status $1. Please issue "Provide Feedback"This message indicates an internal server error that cause the reset service or recreateservice process to fail.
Exit Codes
2-34 Oracle Cloud Working with EPM Automate for Oracle Enterprise Performance Management Cloud
Report this issue to Oracle using the Feedback command or the Provide Feedbackfeature.
Exit Code 6 Errors
Service Unavailable Service is not available because of HTTP Error 404.
Verify service availability by accessing the service from a browser on the computerfrom which you are running the utility. If the service is down for any reason, wait awhile and try again or contact Oracle support.
Read/Write timeout This error is displayed if the client socket times out (sockettime out is 15 minutes) during any read/write operation due to slow network orfirewall issues.
Rerun the failed command when network through put is high. If the failure is due tofirewall settings, contact your Network Administrator.
Exit Code 7 ErrorsThe utility displays this error if it is unable to execute a command. The error message;for example, Invalid command, specifies why the error occurred.
EPM Automate doesn't support proxies which requireauthentication The proxy settings on your computer is configured to authenticatewith a proxy server before your browser can access the internet. The utility does notwork if authentication at proxy server is enabled for your network.
Contact your network administrator.
Unable to open password file FILE_NAME Invalid encrypted password file,for example, PASSWORD_FILE.EPW. The utility did not find the file in the locationthat you specified or the file is not in the required format.
Verify the file name and path. If the file cannot be parsed because of invalid format,use the encrypt command to recreate the file.
Unable to parse password file FILE_NAME The utility was unable to parsethe encrypted password file because of invalid format or because it has beencorrupted.
Use the encrypt command to recreate the file.
Unable to connect to URL. Root cause MESSAGE This error is displayed if aconnection cannot be established because of a bad URL or invalid proxy settings onthe computer. The message that is displayed as the root cause details the underlyingfailure resulting from incorrect proxy server configuration or from using an incorrectURL.
• Verify that you are using a valid URL
• If your organization requires the use of a proxy server to connect to the internet,verify that the proxy setting in Internet Explorer is accurate. Contact yourNetwork Administrator if you need assistance.
Unable to connect to URL Unsupported Protocol The login commandfailed because the URL specified uses an unsupported protocol. Accompanying errormessage identifies the unsupported protocol.
Ensure that the URL that you are using with the login command uses the secureprotocol (HTTPS).
Exit Codes
Command Reference 2-35

Session is not authenticated. Please execute the “login” commandbefore executing any other command You attempted to run a commandbefore establishing a session using the login command.
Run the login command to establish a secure connection to a service instance beforeattempting to execute other commands.
Invalid parameter This message indicates a usage error in a command caused byIncorrect sequence of command parameters or the absence of some required commandparameter values.
Review and correct command parameters and the sequence in which they arespecified.
COMMAND_NAME command is not supported by SERVICE_TYPE The utilitywas not able to run the command against the service to which you are connectedbecause the service does not support the command.
See Command Reference for lists of commands that are supported by each servicetype.
File does not exist in location: PATH The utility was unable to find thefile that you want to process, for example, using the upload or replay command.
Ensure that the file name and path are accurate.
Unable to open file for read: PATH The utility was unable to read from thespecified file.
Ensure that the file is in the required format. Verify that the user running the utilityhas read access to the file.
Unable to open file for write: PATH The utility was unable to write to thespecified file.
Ensure that the file is not locked by another process. Verify that the user running theutility has write access to the file.
Invalid command The utility encountered an unsupported command.
Verify that the utility supports the command; also ensure that the command name isspelled correctly.
Invalid date format An utility encountered an invalid date format.
Specify the report generation dates in a supported date format.
FROMDATE DATE cannot be greater than TODATE DATE The utilityencountered a to date that is earlier than the from date.
Ensure that the to date in a specified date range is a later date than the from date.
Exceeded maximum number of feedbacks (6) for a day This error isdisplayed when you exceed the number of feedback that you can submit using thefeedback command.
File with the same name already exists in the download pathPATH. Please delete the file and rerun the command This error isdisplayed when you attempt to download a file into a location that already has a filethat matches the name of the file being downloaded.
Delete, rename or move the existing file and then rerun the command.
File is empty: PATH This error is displayed if the replay file does not have anycontent.
Exit Codes
2-36 Oracle Cloud Working with EPM Automate for Oracle Enterprise Performance Management Cloud

Make sure that the replay file (CSV file) lists the credentials (user name and password)and the name of the HAR files that are to be used to run the replay command.
Unable to encrypt the password as localhost cannot be resolved.Ensure that hostnames are mapped properly to IP addresses Thiserror is displayed if the utility is unable to resolve the localhost definition to a MACaddress because the hosts file on your computer contains a server name instead oflocalhost for the address 127.0.0.1.
Ensure that the hosts file specify localhost as the server name for 127.0.0.1
Exit Code 9 Errors
Invalid credentials This error is displayed when the user name or passwordused with the login command is incorrect.
Specify valid credentials for the instance to which you are attempting to connect.
Authentication failed while executing command. Please retry Thiserror is displayed when basic authentication fails during execution of a commandother than login. This error may also occur for HTTP calls when a commandexecution is retried (up to three times).
Exit Code 11 Errors
Internal server error MESSAGE This error is displayed if the utility encountersunknown exceptions that are not related to HTTP connections. Includes server errors503 and 500.
Unable to connect to URL: MESSAGE This error is displayed when the server isunavailable. Error message indicates the exception that caused the command to fail.
If the server is unavailable, contact Oracle Support. If the message indicates issueswith the URL, verify that the URL that you are using is valid.
Running the EPM Automate UtilityYou must be a Service Administrator to perform tasks using the EPM AutomateUtility.
The EPM Automate Utility uses the proxy settings specified on your computer.However, the utility does not work if authentication at proxy server is enabled foryour network.
Generating Debug Log File
Oracle Support will ask you for a debug log file of the session to troubleshootproblems that you encountered while running the EPM Automate Utility. The utilitysupports the -d option to generate debug messages, which can then be redirected to afile using > directive. You can create a debug file for one command or a batchexecution file or script containing several commands.
Usage: epmautomate command [command_parameters] -d > log_file2>&1
Windows Example: epmautomate downloadfile "Artifact Snapshot" -d> C:\logs\download_log.txt 2>&1
Linux Example: epmautomate.sh downloadfile "Artifact Snapshot" -d> ./logs/download_log 2>&1
Running the EPM Automate Utility
Command Reference 2-37

Windows
Before running the EPM Automate Utility, ensure that you can access your serviceinstance from the computer from which you are running the utility.
To run the EPM Automate Utility on a Windows client:
1. Click Start, then All Programs, then EPM Automate, and then Launch EPMAutomate. The EPM Automate command prompt is displayed.
2. Optional: Navigate to the directory from which you want to perform operationsusing the EPM Automate Utility.
3. Optional: Generate a password encryption file. You use the password encryptionfile to pass encrypted password to initiate a session.
epmautomate encrypt P@ssword1 myKey C:/mySecuredir/password.epw
4. Start a session as a Service Administrator. Use a command such as the following:
• Using an unencrypted password:
epmautomate login serviceAdmin P@ssword1 https://test-cloudpln.pbcs_us1.oraclecloud.com myIdentityDomain
• Using an encrypted password:
epmautomate login serviceAdmin C:\mySecuredir\password.epw https://test-cloudpln.pbcs_us1.oraclecloud.com myIdentityDomain
5. Enter commands to execute the tasks you want to complete. See one of thefollowing topics for a description of the commands, their usage, and examples.
• Oracle Planning and Budgeting Cloud and Oracle Enterprise Planning andBudgeting Cloud Commands
• Oracle Financial Consolidation and Close Cloud Commands
• Oracle Tax Reporting Cloud Commands
• Oracle Account Reconciliation Cloud Commands
• Oracle Profitability and Cost Management Cloud Commands
See Exit Codes for information on command execution status.
6. Sign out of the service instance. Use the following command:
epmautomate logout
Linux
Note:
Ensure that JAVA_HOME is set in the PATH variable of your .profile file oras a shell environment variable.
To run the EPM Automate Utility on a Linux client:
Running the EPM Automate Utility
2-38 Oracle Cloud Working with EPM Automate for Oracle Enterprise Performance Management Cloud

1. Open a terminal window and navigate to the directory where you installed theEPM Automate Utility.
2. Optional: Generate a password encryption file. You use the password encryptionfile to pass an encrypted password instead of an unencrypted password to initiate asession.
epmautomate encrypt P@ssword1 myKey ../misc/encrypt/password.epw
3. Start a session as a Service Administrator. Use a command such as the following:
• Using an unencrypted password:
./bin/epmautomate.sh login serviceAdmin P@ssword1 https://test-cloudpln.pbcs_us1.oraclecloud.com myIdentityDomain
• Using an encrypted password:
./bin/epmautomate.sh login serviceAdmin ../misc/encrypt/password.epw https://test-cloudpln.pbcs_us1.oraclecloud.com myIdentityDomain
4. Enter commands to execute the tasks you want to complete. See one of thefollowing topics for a description of the commands, their usage, and examples.
• Oracle Planning and Budgeting Cloud and Oracle Enterprise Planning andBudgeting Cloud Commands
• Oracle Financial Consolidation and Close Cloud Commands
• Oracle Tax Reporting Cloud Commands
• Oracle Account Reconciliation Cloud Commands
• Oracle Profitability and Cost Management Cloud Commands
See Exit Codes for information on command execution status.
5. Sign out of the service instance. Use the following command:
./bin/epmautomate.sh logout
Running Multiple Instances of the UtilityRun the EPM Automate Utility from separate directories if you need to connect tomultiple service instances in parallel using an installation of the utility.
For example, you need to simultaneously refresh the Planning application cube inhttps:// cloudpln.pbcs.us1.oraclecloud.com and https://testcloudpln. pbcs.us1.oraclecloud.com. In this scenario, you shouldexecute the utility from separate directories; for example, from C:/scripts/MyService to connect to the first instance and from C:/scripts/MyServicetestto connect to the second instance, and run the cuberefresh command.
Running the EPM Automate Utility
Command Reference 2-39

Running the EPM Automate Utility
2-40 Working with EPM Automate for Oracle Enterprise Performance Management Cloud

3Command Execution Sample Scenarios
• Oracle Planning and Budgeting Cloud and Oracle Enterprise Planning andBudgeting Cloud Sample Scenarios
• Oracle Account Reconciliation Cloud Sample Scenarios
• Oracle Profitability and Cost Management Cloud Sample Scenarios
Oracle Planning and Budgeting Cloud and Oracle Enterprise Planningand Budgeting Cloud Sample Scenarios
• Scenario 1: Import Metadata into Application
• Scenario 2: Import Data, Run a Calculation Script, and Copy Data from a BlockStorage Database to an Aggregate Storage Database
• Scenario 3: Export and Download Metadata and Data
• Scenario 4: Remove Unnecessary Files from a Service Instance
• Scenario 5: Export and Download Application Data
• Scenario 6: Clone a Service Instance
• Scenario 7: Import Data into Data Management, Run a Data Load Rule, andExport Data to Planning
• Scenario 8: Backing up Application Snapshot to a Computer
• Scenario 9: Automating Daily Data Integration
• Scenario 10: Automating the Cloning of Instances
• Scenario 11: Automating Activity Report Downloads to a Local Computer
• Scenario 12: Counting the Number of Provisioned Users
The preceding scenarios use a sequence of commands to complete various activitiesusing the EPM Automate Utility. They use the following fictitious credentials to signinto a sample service instance:
• User name: serviceAdmin
• Password file: C:/mySecuredir/password.epw
This file is manually created. See the encrypt command in EPM AutomateUtility Commands
• Service URL: https://test-cloud-pln.pbcs.us1.oraclecloud.com
Command Execution Sample Scenarios 3-1
• Identity domain: myIdentityDomain
Scenario 1: Import Metadata into ApplicationIn this scenario, you run a sequence of commands to complete these steps:
• Sign in to the instance.
• Upload metadata file accounts.zip.
• Import metadata from accounts.zip into the application using jobaccountMetadata.
• Refresh the cube.
• Sign out.
epmautomate login serviceAdmin C:\mySecuredir\password.epw https://test-cloud-pln.pbcs.us1.oraclecloud.com myIdentityDomainepmautomate uploadfile accounts.zipepmautomate importmetadata accountMetadata accounts.zipepmautomate refreshcubeepmautomate logout
Scenario 2: Import Data, Run a Calculation Script, and Copy Data from a Block StorageDatabase to an Aggregate Storage Database
In this scenario, you run a sequence of commands to complete these steps:
• Sign in to the instance.
• Upload a file data.csv.
• Import data from data.csv into the application using job loadingq1data.
• Refresh the cube.
• Run business rule RevenueAllocation deployed to plan type RollupUSSaleswith runtime prompts Quarter=Q1 Entity=USA to transform data.
• Push data to an aggregate storage database using job CampaignToReporting.
• Sign out.
epmautomate login serviceAdmin C:\mySecuredir\password.epw https://test-cloud-pln.pbcs.us1.oraclecloud.com myIdentityDomainepmautomate uploadfile data.csvepmautomate importdata loadingq1data data.csvepmautomate refreshcubeepmautomate runbusinessrule RevenueAllocation Quarter=Q1 Entity=USAepmautomate runplantypemap CampaignToReporting clearData=trueepmautomate logout
Scenario 3: Export and Download Metadata and DataIn this scenario, you run a sequence of commands to complete these steps:
• Sign in to the instance.
• Export the metadata into entityData.zip using job exportentitymetadata.
Oracle Planning and Budgeting Cloud and Oracle Enterprise Planning and Budgeting Cloud Sample Scenarios
3-2 Oracle Cloud Working with EPM Automate for Oracle Enterprise Performance Management Cloud

• Export the application data into forecastData.zip using job forecastdata.
• List the contents of the Oracle Hyperion Planning Inbox/Outbox.
• Download the exported data files (exportentitydata.zip andforecastdata.zip) from the Planning Inbox/Outbox to the local computer.
• Sign out.
epmautomate login serviceAdmin C:\mySecuredir\password.epw https://test-cloud-pln.pbcs.us1.oraclecloud.com myIdentityDomainepmautomate exportmetadata exportentitymetadata entityData.zipepmautomate exportdata forecastdata forecastData.zipepmautomate listfilesepmautomate downloadfile entityData.zipepmautomate downloadfile forecastData.zipepmautomate logout
Scenario 4: Remove Unnecessary Files from a Service InstanceIn this scenario, you run a sequence of commands to complete these steps:
• Sign in to the service instance.
• List the contents of Inbox/Outbox.
• Delete files entitymetadata.csv and forecastdata.csv from Inbox/Outbox.
• Sign out.
epmautomate login serviceAdmin C:\mySecuredir\password.epw https://test-cloud-pln.pbcs.us1.oraclecloud.com myIdentityDomainepmautomate listfilesepmautomate deletefile entitymetadata.csvepmautomate deletefile forecastdata.csvepmautomate logout
Scenario 5: Export and Download Application DataIn this scenario, you run a sequence of commands to complete these steps:
• Sign in to the service instance.
• Create data backups (entitydata.zip and forecastdata.zip).
• List files in the Inbox/Outbox to verify that the backups are present.
• Download (entitydata.zip and forecastdata.zip) to a local computer.
• Sign out.
epmautomate login serviceAdmin C:\mySecuredir\password.epw https://test-cloud-pln.pbcs.us1.oraclecloud.com myIdentityDomainepmautomate exportmetadata exportentitymetadata entityData.zipepmautomate exportdata entitydata entitydata.zipepmautomate exportdata forecastdata forecastdata.zipepmautomate listfilesepmautomate downloadfile entityData.zipepmautomate downloadfile forecastData.zipepmautomate logout
Oracle Planning and Budgeting Cloud and Oracle Enterprise Planning and Budgeting Cloud Sample Scenarios
Command Execution Sample Scenarios 3-3

Scenario 6: Clone a Service InstanceYou might clone a service instance for many reasons. This scenario assumes that youclone an instance to protect against loss of service. It also assumes that you are usingthe application snapshot that was created in the source instance during daily servicemaintenance.
Prerequisites
The identity domain used by the service instance you are cloning (source) and theservice instance that you are creating as the clone (target) should use an identical set ofusers and role assignments.
• If the source and target reside in the same data center, they should share anidentity domain.
• If the source and target do not share a data center, you must manually create theset of users and role assignments of the source in the identity domain of the target.
Cloning an InstanceThis scenario uses the following source information:
• URL: https://test-cloud-pln.pbcs.us1.oraclecloud.com
• Identity Domain: myprodIdentityDomain
To clone a service instance, you run commands that complete these steps:
• Sign in to the target instance where you want to establish the clone using thesecredentials:
– User name: serviceAdmin
It is assumed that serviceAdmin is also assigned to the Identity DomainAdministrator role that enables this user to create the new users referenced inthe artifact snapshot.
– Password file: C:/mySecuredir/password2.epw
You must create this file. See encrypt.
– URL: https://test-cloud-pln.pbcs.us2.oraclecloud.com
– Identity Domain: myNewIdentityDomain
• Re-create the service instance.
• Delete Artifact Snapshot if it is present.
• Copy a snapshot Artifact Snapshot from the source instance to the targetinstance.
• Import artifacts from Artifact Snapshot into the service instance and createnew users in the identity domain.
• Sign out.
epmautomate login serviceAdmin C:\mySecuredir\password2.epw https://test-cloud-pln.pbcs.us2.oraclecloud.com myNewIdentityDomainepmautomate recreate -f
Oracle Planning and Budgeting Cloud and Oracle Enterprise Planning and Budgeting Cloud Sample Scenarios
3-4 Oracle Cloud Working with EPM Automate for Oracle Enterprise Performance Management Cloud
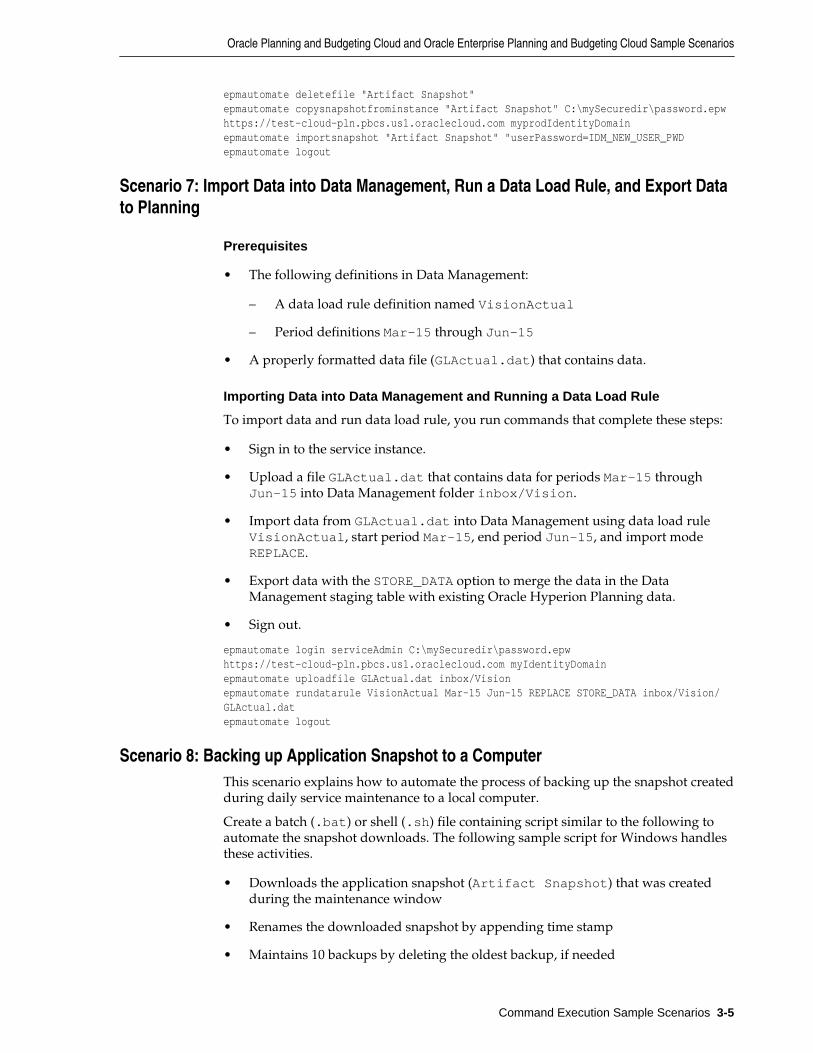
epmautomate deletefile "Artifact Snapshot"epmautomate copysnapshotfrominstance "Artifact Snapshot" C:\mySecuredir\password.epw https://test-cloud-pln.pbcs.us1.oraclecloud.com myprodIdentityDomainepmautomate importsnapshot "Artifact Snapshot" "userPassword=IDM_NEW_USER_PWDepmautomate logout
Scenario 7: Import Data into Data Management, Run a Data Load Rule, and Export Datato Planning
Prerequisites
• The following definitions in Data Management:
– A data load rule definition named VisionActual
– Period definitions Mar-15 through Jun-15
• A properly formatted data file (GLActual.dat) that contains data.
Importing Data into Data Management and Running a Data Load Rule
To import data and run data load rule, you run commands that complete these steps:
• Sign in to the service instance.
• Upload a file GLActual.dat that contains data for periods Mar-15 throughJun-15 into Data Management folder inbox/Vision.
• Import data from GLActual.dat into Data Management using data load ruleVisionActual, start period Mar-15, end period Jun-15, and import modeREPLACE.
• Export data with the STORE_DATA option to merge the data in the DataManagement staging table with existing Oracle Hyperion Planning data.
• Sign out.
epmautomate login serviceAdmin C:\mySecuredir\password.epw https://test-cloud-pln.pbcs.us1.oraclecloud.com myIdentityDomainepmautomate uploadfile GLActual.dat inbox/Visionepmautomate rundatarule VisionActual Mar-15 Jun-15 REPLACE STORE_DATA inbox/Vision/GLActual.datepmautomate logout
Scenario 8: Backing up Application Snapshot to a ComputerThis scenario explains how to automate the process of backing up the snapshot createdduring daily service maintenance to a local computer.
Create a batch (.bat) or shell (.sh) file containing script similar to the following toautomate the snapshot downloads. The following sample script for Windows handlesthese activities.
• Downloads the application snapshot (Artifact Snapshot) that was createdduring the maintenance window
• Renames the downloaded snapshot by appending time stamp
• Maintains 10 backups by deleting the oldest backup, if needed
Oracle Planning and Budgeting Cloud and Oracle Enterprise Planning and Budgeting Cloud Sample Scenarios
Command Execution Sample Scenarios 3-5

Note:
If you repurpose this script for your use, modify the values of SET url, SETuser, and SET NumberOfBackups parameters as needed.
See Automating Script Execution for information on scheduling the script usingWindows Task Scheduler.
@echo offrem Sample script to download and maintain 10 maintenance backupsrem Update the following three parameters
SET url=https://test-cloud-pln.pbcs.us1.oraclecloud.comSET [email protected] NumberOfBackups=10SET password=%1SET SnapshotName=Artifact Snapshot
rem EPM Automate commandsCD /D %~dp0
call epmautomate login %user% %password% %url%IF %ERRORLEVEL% NEQ 0 goto :ERROR
call epmautomate downloadfile "%SnapshotName%"IF %ERRORLEVEL% NEQ 0 goto :ERROR
call epmautomate logoutIF %ERRORLEVEL% NEQ 0 goto :ERROR
rem Renames the downloaded artifacts, keeps the last 10 backups
Set Timestamp=%date:~4,2%_%date:~7,2%_%date:~10,4%_%time:~1,1%%time:~3,2%%ren "%SnapshotName%.zip" "%SnapshotName%_%Timestamp%.zip"
SET Count=0FOR %%A IN ("%SnapshotName%*.*") DO SET /A Count += 1IF %Count% gtr %NumberOfBackups% FOR %%A IN ("%SnapshotName%*.*") DO del "%%A" && GOTO EOF
:EOF
echo Scheduled Task Completed successfullyexit /b %errorlevel%:ERROR
echo Failed with error #%errorlevel%.exit /b %errorlevel%
Scenario 9: Automating Daily Data IntegrationCreate a batch (.bat) or shell (.sh) file that contains script similar to the following toautomate data integration-related activities. The following sample script for Windowsautomates daily application data integration by completing these activities:
• Sign into a service instance.
• Delete DailyPlanData if it is present.
Oracle Planning and Budgeting Cloud and Oracle Enterprise Planning and Budgeting Cloud Sample Scenarios
3-6 Oracle Cloud Working with EPM Automate for Oracle Enterprise Performance Management Cloud

• Upload DailyPlanData into the service.
• Run business rule Clear Plan Targets on plan type Plan1.
• Import data using job name LoadDailyPlan.
• Run business rule Balance Sheet - Plan.
• Run business rule Allocate Plan Targets.
• Delete DailyTarget.zip if it is present.
• Export data into DailyTarget.zip using job name ExportDailyTarget.
• Download DailyTarget.zip to your server and appends the timestamp.
• Sign out of Oracle Planning and Budgeting Cloud.
Note:
If you repurpose this script for your use, ensure that you modify the values ofSET url, SET user, and SET domain parameters. Additionally, you maymodify the values of dataimportfilename, dataexportfilename,importdatajobname, exportdatajobname, br_clear,br_calculatebalancesheet, and br_allocatetarget parameters tosuit your requirements
See Automating Script Execution for information on scheduling the script usingWindows Task Scheduler.
@echo off
rem Sample Script to demonstrate daily data integration with rem Oracle Planning and Budgeting Cloud Services application.rem This script uploads Plan data, clears target numbers,.rem runs a business rule to calculate balance sheet data, and .rem recalculates target numbers on the Vision demo application
rem Please input the below parametersSET url=https://test-cloud-pln.pbcs.us1.oraclecloud.comSET [email protected] domain=myIdentitydomainSET dataimportfilename=DailyPlanData.csvSET dataexportfilename=DailyTargetSET importdatajobname=LoadDailyPlanSET exportdatajobname=ExportDailyTargetSET br_clear=Clear Plan TargetsSET br_calculatebalancesheet=Balance Sheet - PlanSET br_allocatetarget=Allocate Plan Targets
SET password=%1
rem Executing EPM Automate commands
CD /D %~dp0call epmautomate login %user% %password% %url% %domain%IF %ERRORLEVEL% NEQ 0 goto :ERROR
for /f %%i in ('call epmautomate listfiles') do if %%i==%dataimportfilename% (call
Oracle Planning and Budgeting Cloud and Oracle Enterprise Planning and Budgeting Cloud Sample Scenarios
Command Execution Sample Scenarios 3-7
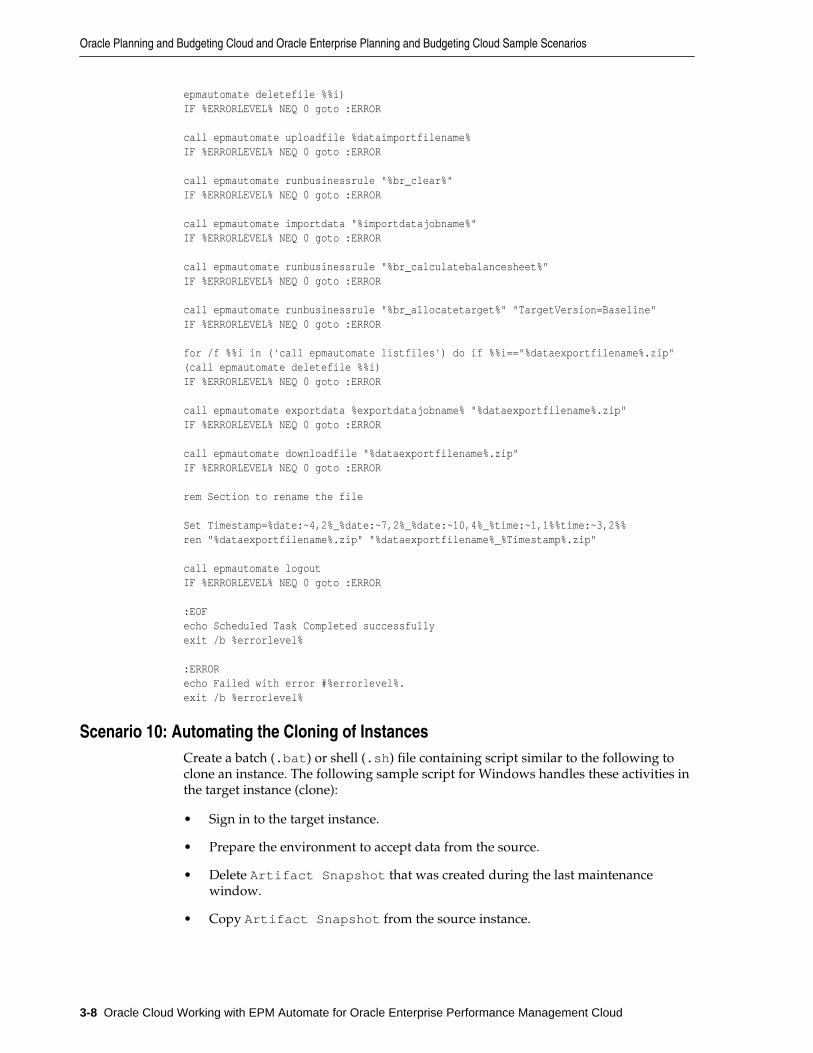
epmautomate deletefile %%i)IF %ERRORLEVEL% NEQ 0 goto :ERROR
call epmautomate uploadfile %dataimportfilename%IF %ERRORLEVEL% NEQ 0 goto :ERROR
call epmautomate runbusinessrule "%br_clear%"IF %ERRORLEVEL% NEQ 0 goto :ERROR
call epmautomate importdata "%importdatajobname%"IF %ERRORLEVEL% NEQ 0 goto :ERROR
call epmautomate runbusinessrule "%br_calculatebalancesheet%"IF %ERRORLEVEL% NEQ 0 goto :ERROR
call epmautomate runbusinessrule "%br_allocatetarget%" "TargetVersion=Baseline"IF %ERRORLEVEL% NEQ 0 goto :ERROR
for /f %%i in ('call epmautomate listfiles') do if %%i=="%dataexportfilename%.zip" (call epmautomate deletefile %%i)IF %ERRORLEVEL% NEQ 0 goto :ERROR
call epmautomate exportdata %exportdatajobname% "%dataexportfilename%.zip"IF %ERRORLEVEL% NEQ 0 goto :ERROR
call epmautomate downloadfile "%dataexportfilename%.zip"IF %ERRORLEVEL% NEQ 0 goto :ERROR
rem Section to rename the file
Set Timestamp=%date:~4,2%_%date:~7,2%_%date:~10,4%_%time:~1,1%%time:~3,2%%ren "%dataexportfilename%.zip" "%dataexportfilename%_%Timestamp%.zip"
call epmautomate logoutIF %ERRORLEVEL% NEQ 0 goto :ERROR
:EOFecho Scheduled Task Completed successfullyexit /b %errorlevel%
:ERRORecho Failed with error #%errorlevel%.exit /b %errorlevel%
Scenario 10: Automating the Cloning of InstancesCreate a batch (.bat) or shell (.sh) file containing script similar to the following toclone an instance. The following sample script for Windows handles these activities inthe target instance (clone):
• Sign in to the target instance.
• Prepare the environment to accept data from the source.
• Delete Artifact Snapshot that was created during the last maintenancewindow.
• Copy Artifact Snapshot from the source instance.
Oracle Planning and Budgeting Cloud and Oracle Enterprise Planning and Budgeting Cloud Sample Scenarios
3-8 Oracle Cloud Working with EPM Automate for Oracle Enterprise Performance Management Cloud
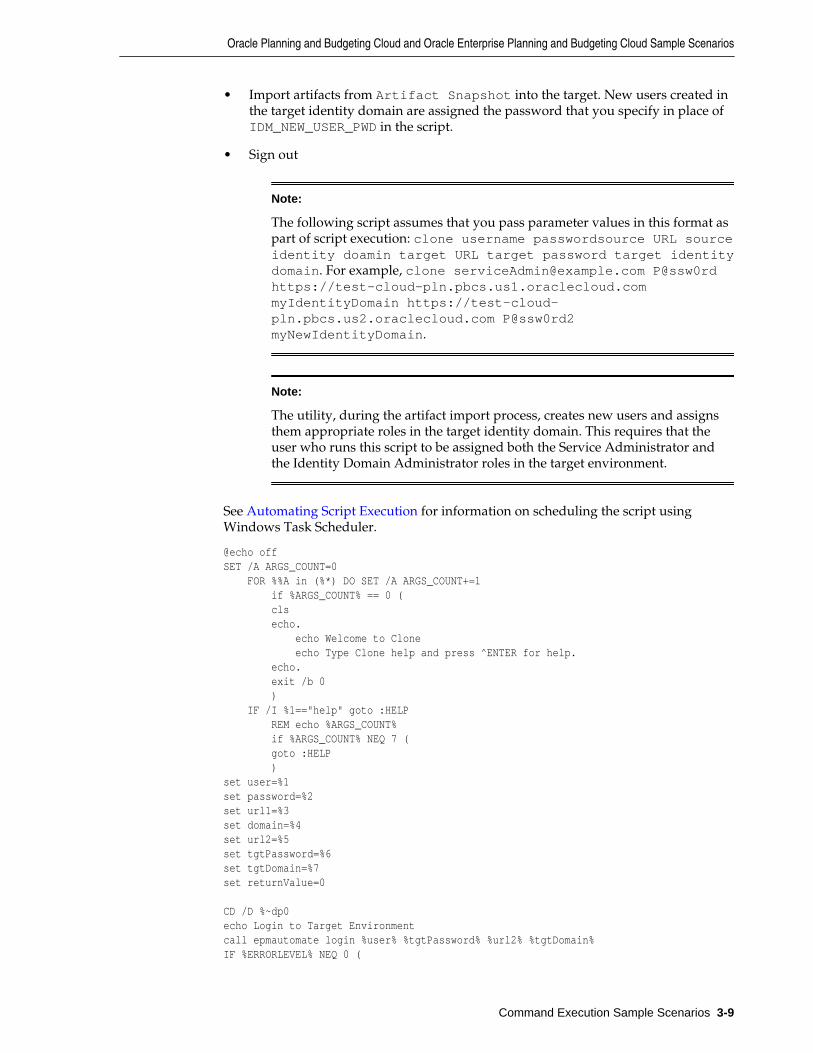
• Import artifacts from Artifact Snapshot into the target. New users created inthe target identity domain are assigned the password that you specify in place ofIDM_NEW_USER_PWD in the script.
• Sign out
Note:
The following script assumes that you pass parameter values in this format aspart of script execution: clone username passwordsource URL sourceidentity doamin target URL target password target identitydomain. For example, clone [email protected] P@ssw0rdhttps://test-cloud-pln.pbcs.us1.oraclecloud.commyIdentityDomain https://test-cloud-pln.pbcs.us2.oraclecloud.com P@ssw0rd2myNewIdentityDomain.
Note:
The utility, during the artifact import process, creates new users and assignsthem appropriate roles in the target identity domain. This requires that theuser who runs this script to be assigned both the Service Administrator andthe Identity Domain Administrator roles in the target environment.
See Automating Script Execution for information on scheduling the script usingWindows Task Scheduler.
@echo offSET /A ARGS_COUNT=0 FOR %%A in (%*) DO SET /A ARGS_COUNT+=1 if %ARGS_COUNT% == 0 ( cls echo. echo Welcome to Clone echo Type Clone help and press ^ENTER for help. echo. exit /b 0 ) IF /I %1=="help" goto :HELP REM echo %ARGS_COUNT% if %ARGS_COUNT% NEQ 7 ( goto :HELP )set user=%1set password=%2set url1=%3set domain=%4set url2=%5set tgtPassword=%6set tgtDomain=%7set returnValue=0
CD /D %~dp0echo Login to Target Environmentcall epmautomate login %user% %tgtPassword% %url2% %tgtDomain%IF %ERRORLEVEL% NEQ 0 (
Oracle Planning and Budgeting Cloud and Oracle Enterprise Planning and Budgeting Cloud Sample Scenarios
Command Execution Sample Scenarios 3-9
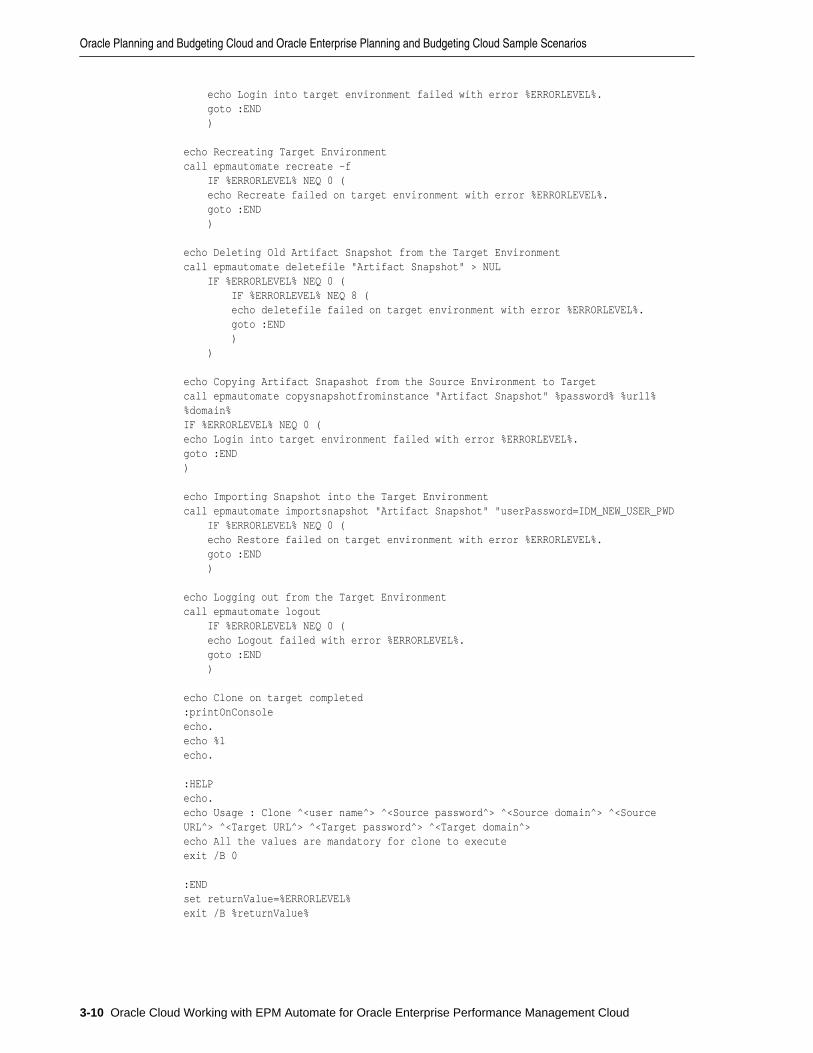
echo Login into target environment failed with error %ERRORLEVEL%. goto :END )
echo Recreating Target Environmentcall epmautomate recreate -f IF %ERRORLEVEL% NEQ 0 ( echo Recreate failed on target environment with error %ERRORLEVEL%. goto :END )
echo Deleting Old Artifact Snapshot from the Target Environmentcall epmautomate deletefile "Artifact Snapshot" > NUL IF %ERRORLEVEL% NEQ 0 ( IF %ERRORLEVEL% NEQ 8 ( echo deletefile failed on target environment with error %ERRORLEVEL%. goto :END ) )
echo Copying Artifact Snapashot from the Source Environment to Target call epmautomate copysnapshotfrominstance "Artifact Snapshot" %password% %url1% %domain%IF %ERRORLEVEL% NEQ 0 (echo Login into target environment failed with error %ERRORLEVEL%.goto :END)
echo Importing Snapshot into the Target Environmentcall epmautomate importsnapshot "Artifact Snapshot" "userPassword=IDM_NEW_USER_PWD IF %ERRORLEVEL% NEQ 0 ( echo Restore failed on target environment with error %ERRORLEVEL%. goto :END )
echo Logging out from the Target Environmentcall epmautomate logout IF %ERRORLEVEL% NEQ 0 ( echo Logout failed with error %ERRORLEVEL%. goto :END )
echo Clone on target completed:printOnConsoleecho.echo %1echo.
:HELPecho.echo Usage : Clone ^<user name^> ^<Source password^> ^<Source domain^> ^<Source URL^> ^<Target URL^> ^<Target password^> ^<Target domain^>echo All the values are mandatory for clone to executeexit /B 0
:ENDset returnValue=%ERRORLEVEL%exit /B %returnValue%
Oracle Planning and Budgeting Cloud and Oracle Enterprise Planning and Budgeting Cloud Sample Scenarios
3-10 Oracle Cloud Working with EPM Automate for Oracle Enterprise Performance Management Cloud
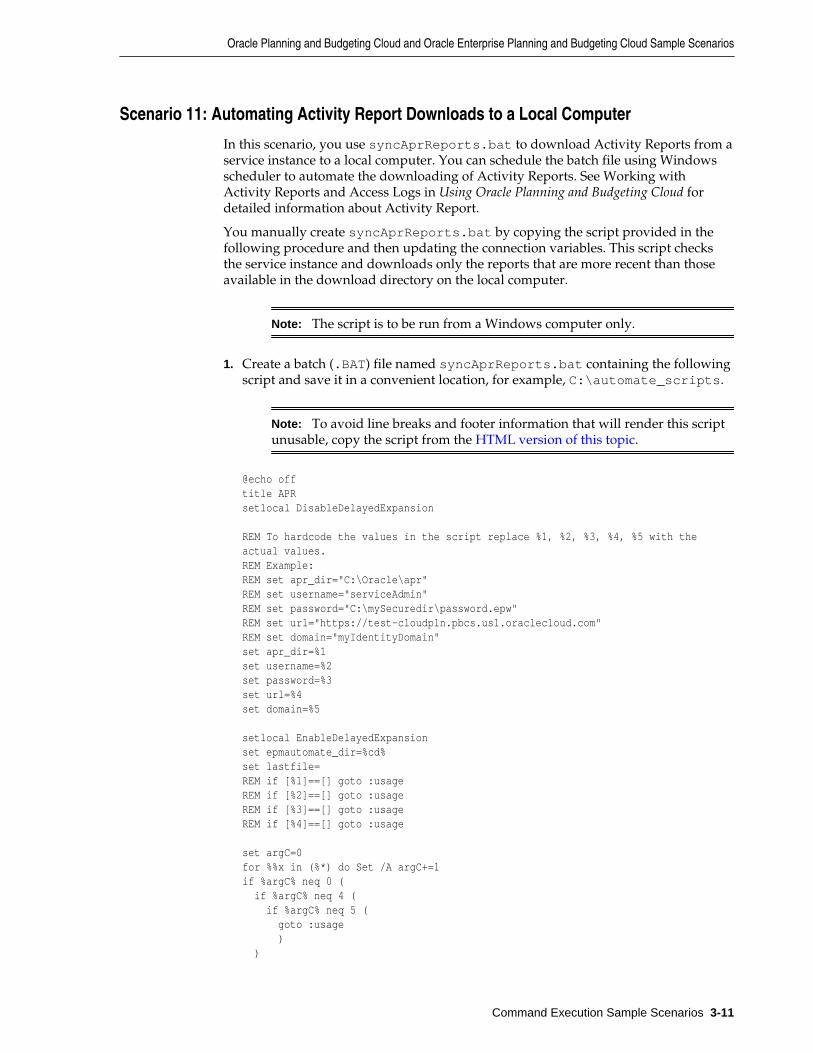
Scenario 11: Automating Activity Report Downloads to a Local Computer
In this scenario, you use syncAprReports.bat to download Activity Reports from aservice instance to a local computer. You can schedule the batch file using Windowsscheduler to automate the downloading of Activity Reports. See Working withActivity Reports and Access Logs in Using Oracle Planning and Budgeting Cloud fordetailed information about Activity Report.
You manually create syncAprReports.bat by copying the script provided in thefollowing procedure and then updating the connection variables. This script checksthe service instance and downloads only the reports that are more recent than thoseavailable in the download directory on the local computer.
Note: The script is to be run from a Windows computer only.
1. Create a batch (.BAT) file named syncAprReports.bat containing the followingscript and save it in a convenient location, for example, C:\automate_scripts.
Note: To avoid line breaks and footer information that will render this scriptunusable, copy the script from the HTML version of this topic.
@echo offtitle APRsetlocal DisableDelayedExpansion
REM To hardcode the values in the script replace %1, %2, %3, %4, %5 with the actual values.REM Example:REM set apr_dir="C:\Oracle\apr"REM set username="serviceAdmin"REM set password="C:\mySecuredir\password.epw"REM set url="https://test-cloudpln.pbcs.us1.oraclecloud.com"REM set domain="myIdentityDomain"set apr_dir=%1set username=%2set password=%3set url=%4set domain=%5
setlocal EnableDelayedExpansionset epmautomate_dir=%cd%set lastfile=REM if [%1]==[] goto :usageREM if [%2]==[] goto :usageREM if [%3]==[] goto :usageREM if [%4]==[] goto :usage
set argC=0for %%x in (%*) do Set /A argC+=1if %argC% neq 0 ( if %argC% neq 4 ( if %argC% neq 5 ( goto :usage ) )
Oracle Planning and Budgeting Cloud and Oracle Enterprise Planning and Budgeting Cloud Sample Scenarios
Command Execution Sample Scenarios 3-11
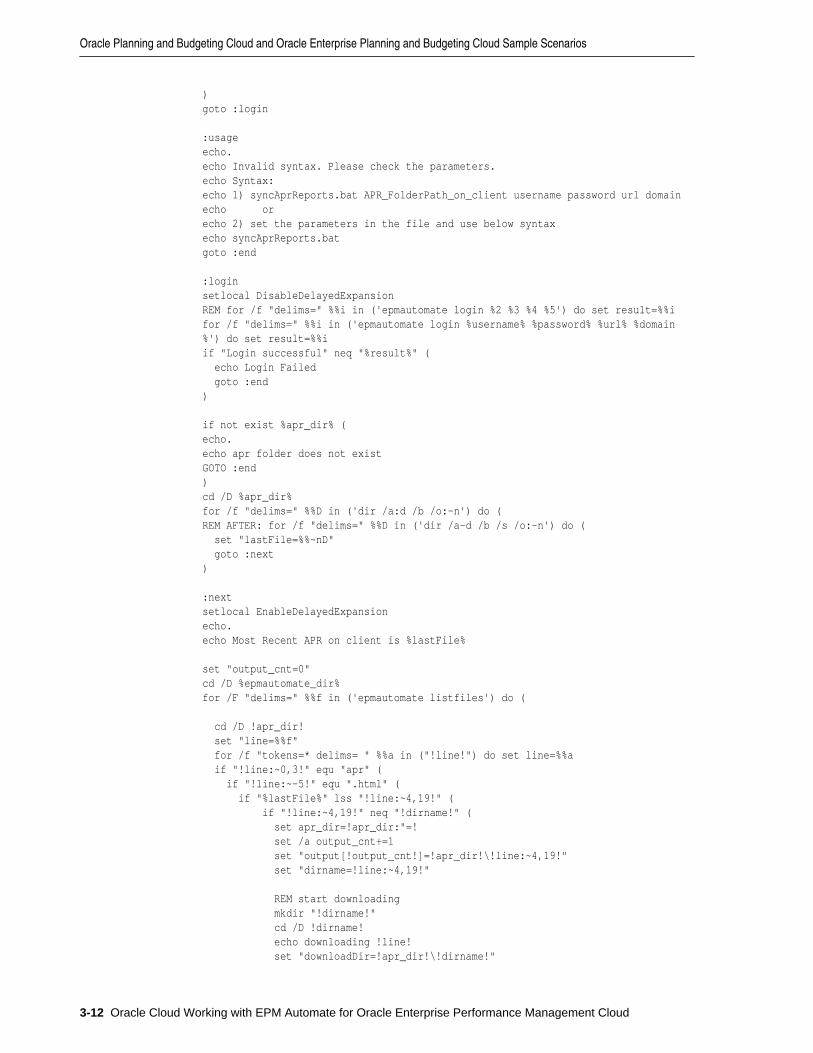
)goto :login
:usageecho.echo Invalid syntax. Please check the parameters.echo Syntax:echo 1) syncAprReports.bat APR_FolderPath_on_client username password url domainecho or echo 2) set the parameters in the file and use below syntaxecho syncAprReports.batgoto :end
:loginsetlocal DisableDelayedExpansionREM for /f "delims=" %%i in ('epmautomate login %2 %3 %4 %5') do set result=%%ifor /f "delims=" %%i in ('epmautomate login %username% %password% %url% %domain%') do set result=%%iif "Login successful" neq "%result%" ( echo Login Failed goto :end)
if not exist %apr_dir% (echo.echo apr folder does not exist GOTO :end)cd /D %apr_dir%for /f "delims=" %%D in ('dir /a:d /b /o:-n') do ( REM AFTER: for /f "delims=" %%D in ('dir /a-d /b /s /o:-n') do ( set "lastFile=%%~nD" goto :next)
:nextsetlocal EnableDelayedExpansionecho.echo Most Recent APR on client is %lastFile%
set "output_cnt=0"cd /D %epmautomate_dir%for /F "delims=" %%f in ('epmautomate listfiles') do (
cd /D !apr_dir! set "line=%%f" for /f "tokens=* delims= " %%a in ("!line!") do set line=%%a if "!line:~0,3!" equ "apr" ( if "!line:~-5!" equ ".html" ( if "%lastFile%" lss "!line:~4,19!" ( if "!line:~4,19!" neq "!dirname!" ( set apr_dir=!apr_dir:"=! set /a output_cnt+=1 set "output[!output_cnt!]=!apr_dir!\!line:~4,19!" set "dirname=!line:~4,19!" REM start downloading mkdir "!dirname!" cd /D !dirname! echo downloading !line! set "downloadDir=!apr_dir!\!dirname!"
Oracle Planning and Budgeting Cloud and Oracle Enterprise Planning and Budgeting Cloud Sample Scenarios
3-12 Oracle Cloud Working with EPM Automate for Oracle Enterprise Performance Management Cloud

cd /D %epmautomate_dir% for /f "delims=" %%i in ('epmautomate downloadfile "!line!"') do set result1=%%i move "!line:~24!" "!downloadDir!" > nul echo !result1! REM end downloading ) else ( REM start downloading cd /D !dirname! echo downloading !line! set apr_dir=!apr_dir:"=! set "downloadDir=!apr_dir!\!dirname!" cd /D %epmautomate_dir% for /f "delims=" %%i in ('epmautomate downloadfile "!line!"') do set result1=%%i move "!line:~24!" "!downloadDir!" > nul echo !result1! REM end downloading ) ) else ( REM TO-DO ) ) ))
echo.echo %output_cnt% APR's downloadedfor /L %%n in (1 1 !output_cnt!) DO echo !output[%%n]!goto :end
:endcd /D %epmautomate_dir%endlocal
2. Modify syncAprReports.bat to set the values for the parameters in thefollowing table. These values are used to access the service instance to downloadActivity Reports.
Table 3-1 Variable Values to Include in syncAprReports.bat
Variable Expected Value
set apr_dir=%1 Specify the directory into which Activity Reports are to bedownloaded.Example: set apr_dir="C:\Oracle\apr"
set username=%2 An Oracle Enterprise Performance Management Cloud user namethat is to be used to sign into the service instance to downloadActivity Reports.Example: set username="ServiceAdmin"
Oracle Planning and Budgeting Cloud and Oracle Enterprise Planning and Budgeting Cloud Sample Scenarios
Command Execution Sample Scenarios 3-13

Table 3-1 (Cont.) Variable Values to Include in syncAprReports.bat
Variable Expected Value
set password=%3 The name and location of the file that stores the encryptedpassword of the user specified by the username variable. You mayalso specify the plain text password of the user (not recommended).See the encrypt command in General EPM Automate UtilityCommands for information on creating an encrypted password file.
Examples:
set password="C:\mySecuredir\password.epw"
set password="P@ssword1"
set url=%4 The URL of the service instanceExample: set url="https://test-cloudpln.pbcs.us1.oraclecloud.com"
set domain=%5 The identity domain that services the service instance.Example: set domain="myIdentityDomain"
3. Using Windows Scheduler, schedule syncAprReports.bat. See AutomatingScript Execution for detailed steps.
Scenario 12: Counting the Number of Provisioned UsersThis scenario explains how to automate the process of generating the ProvisioningReport to count the number of users in a service instance.
Create provisionedUsersCount.bat by copying the following script to count andlist the users identified in the report.
Note:
Input parameters for running this script are username, password/password_file, service_url, identity_domain andprovision_report_file_name.
@echo offset paramRequiredMessage=Syntax: provisionedUsersCount.bat [username] [password/password_file] [url] [identity_domain][provision_report_file_name]
if "%~1" == "" ( echo User Name is missing. echo %paramRequiredMessage% exit /b 1)if "%~2" == "" ( echo Password or Password_File is missing. echo %paramRequiredMessage% exit /b 1)if "%~3" == "" ( echo URL is missing. echo %paramRequiredMessage% exit /b 1)if "%~4" == "" (
Oracle Planning and Budgeting Cloud and Oracle Enterprise Planning and Budgeting Cloud Sample Scenarios
3-14 Oracle Cloud Working with EPM Automate for Oracle Enterprise Performance Management Cloud

echo Identity Domain is missing. echo %paramRequiredMessage% exit /b 1)if "%~5" == "" ( echo Provision Report File Name is missing. echo %paramRequiredMessage% exit /b 1)
call epmautomate.bat login %~1 "%~2" %~3 %~4if %errorlevel% NEQ 0 exit /b 1call epmautomate.bat provisionreport "%5"if %errorlevel% NEQ 0 exit /b 1call epmautomate.bat downloadfile "%5"if %errorlevel% NEQ 0 exit /b 1
set filePath="%cd%\%5"
if exist %filePath% ( SETLOCAL EnableDelayedExpansion set /a lineCount=0 set /a userCount=0 set userHeaderFound=false for /f "tokens=*" %%A in ( 'type %filePath%' ) do ( set /a lineCount+=1 set line=%%A if !lineCount!==3 ( set lineStartsWith=!line:~0,5! if "!lineStartsWith!"=="User," set userHeaderFound=true ) if !userHeaderFound!==true if !lineCount! gtr 3 ( for /f "delims=," %%i in ("!line!") do ( set userName=%%i ) if NOT !userName! == "" ( if !userCount! gtr 0 if NOT !userName! == !lastUserName! ( set /a userCount+=1 set users[!userCount!]=!userName! ) if !userCount! == 0 ( set /a userCount+=1 set users[!userCount!]=!userName! ) set lastUserName=!userName! ) ) ) echo Number of Users: !userCount! for /l %%n in (1,1,!userCount!) do ( echo !users[%%n]! ) endlocal
) else ( echo Invalid provisioning report file path - %filePath%.)
Oracle Planning and Budgeting Cloud and Oracle Enterprise Planning and Budgeting Cloud Sample Scenarios
Command Execution Sample Scenarios 3-15

Oracle Account Reconciliation Cloud Sample Scenarios• Scenario 1: Load Preformatted Balances into a Period
• Scenario 2: Use a Snapshot to Recover From Crash
The preceding scenarios use a sequence of commands to complete various activitiesusing the EPM Automate Utility. They use the following fictitious credentials to signinto a sample service instance:
• User name: serviceAdmin
• Password file: C:/mySecuredir/password.epw
This is a manually created file. See the encrypt command in EPM AutomateUtility Commands
• Service URL: https://test-cloud-arcs.us1.oraclecloud.com
• Identity domain: myARCSDomain
Scenario 1: Load Preformatted Balances into a PeriodIn this scenario, you run a sequence of commands to complete these steps:
• Sign in to the instance.
• Upload preformatted balance data to Oracle Account Reconciliation Cloud fromC:/Staging/April15Bal.csv, which was created from a third party GeneralLedger application.
• Import mapped data from April15Bal.csv into April 2015.
• Delete April15Bal.csv from Oracle Account Reconciliation Cloud.
• Sign out
epmautomate login serviceAdmin C:\mySecuredir\password.epw https://test-cloud-arcs.us1.oraclecloud.commyARCSDomainepmautomate uploadfile “C:/Staging/ARMBalUpload.csv”epmautomate importpremappedbalances “April 2015” ARMBalUPload.csvepmautomate deletefile ARMBalUpload.csvepmautomate logout
Scenario 2: Use a Snapshot to Recover From Crash
Prerequisites
A daily snapshot (for example, April15FullApp) of all artifacts and data from theservice has been backed up to a local server.
Restoring data and Artifacts
In this scenario, you run a sequence of commands to complete these steps:
• Sign in to the instance using an account that has the Service Administrator andIdentity Domain Administrator roles.
Oracle Account Reconciliation Cloud Sample Scenarios
3-16 Oracle Cloud Working with EPM Automate for Oracle Enterprise Performance Management Cloud

• Upload backed up snapshot C:/dailybackups/April15FullApp to theservice.
• Import artifacts and data from April15FullApp.
• Delete April15FullApp.
• Sign out.
epmautomate login serviceAdmin C:\mySecuredir\password.epw https://test-cloud-arcs.us1.oraclecloud.com myARCSDomainepmautomate uploadfile “C:/dailybackups/April15FullApp”epmautomate importsnapshot April15FullApp "userPassword=IDM_NEW_USER_PWD"epmautomate deletefile “April15FullApp”mautomate logout
Oracle Profitability and Cost Management Cloud Sample Scenarios• Scenario 1: Import Metadata into Application
• Scenario 2: Import Data and Run Program Rules
The preceding scenarios use a sequence of commands to complete various activitiesusing the EPM Automate Utility. They use the following fictitious credentials to signinto a sample service instance:
• User name: serviceAdmin
• Password file: C:/mySecuredir/password.epw
This file is manually created. See the encrypt command in EPM AutomateUtility Commands
• Service URL: https://test-cloud.pcmcs.us1.oraclecloud.com
• Identity domain: myIdentityDomain
Scenario 1: Import Metadata into ApplicationIn this scenario, you run a sequence of commands to complete these steps:
• Sign in to the instance.
• Upload metadata file dimdata1.txt.
• Import metadata from dimdata1.txt into application BksML12.
• Enable the application.
• Sign out.
epmautomate login serviceAdmin C:\mySecuredir\password.epw https://test-cloud.pcmcs.us1.oraclecloud.com myIdentityDomainepmautomate uploadfile "c:\profit_data\dimdata1.txt" profitinboxepmautomate loaddimdata BksML12 dataFileName=dimdata1.txtepmautomate enableapp BksML12epmautomate logout
Scenario 2: Import Data and Run Program RulesIn this scenario, you run a sequence of commands to complete these steps:
Oracle Profitability and Cost Management Cloud Sample Scenarios
Command Execution Sample Scenarios 3-17

• Sign in to the instance.
• Upload data file c:\profit_data\profitdata1.txt into profitinbox.
• Upload rule file c:\profit_data\rule1.txt nto profitinbox.
• Load data from profitdata1.txt into application BksML12 to overwriteexisting values.
• Run all rules.
• Sign out.
epmautomate login serviceAdmin C:\mySecuredir\password.epw https://test-cloud.pcmcs.us1.oraclecloud.com myIdentityDomainepmautomate uploadfile "c:\profit_data\profitdata1.txt" profitinboxepmautomate uploadfile "c:\profit_data\rule1.txt" profitinboxepmautomate loaddata BksML12 clearAllDataFlag=True dataLoadValue=”OVERWRITE_EXISTING_VALUES” rulesFileName=”rule1.txt” dataFileName=”profitdata1.txt”epmautomate logout
Automating Script ExecutionA Service Administrator schedules scripts in Windows Task Scheduler or uses a cronjob to automate activities using the EPM Automate Utility.
To schedule EPM Automate Utility script execution using Windows Task Scheduler:
1. Click Start, then Control Panel, and then Administrative Tools.
2. Open Task Scheduler.
3. Select Action, and then Create Basic Task.
4. Enter a task name and an optional description, and then click Next.
5. In Task Trigger, select a schedule for running the script, and then click Next.
6. In the next screen, specify other schedule parameters, and then click Next.
7. In Action, ensure that Start a program is selected.
8. In Start a Program, complete these steps:
a. In Program/script, browse and select the script that you want to schedule.
b. In Add arguments (optional), enter the password of the Service Administratoridentified by the SET user script parameter.
c. In Start in (optional), enter the location where the EPM Automate Utility isinstalled; generally, C:/Oracle/EPMAutomate/bin.
d. Click Next.
9. In Summary, select Open the Properties dialog for this task when I click Finish,and then click Finish.
10. In General, select these security options, and then click OK.
• Run whether user is logged in or not
Automating Script Execution
3-18 Oracle Cloud Working with EPM Automate for Oracle Enterprise Performance Management Cloud
• Run with highest privileges
Monitoring EPM Automate Utility ActivitiesTo help you identify the status of the operation that you initialized, the utility displaysstatus codes in the console from which you run the EPM Automate Utility. See ExitCodes.
Use the Oracle Hyperion Planning Job Console to monitor the jobs that you executeusing EPM Automate Utility. See Managing Jobs in Administering Planning for OraclePlanning and Budgeting Cloud for details.
Monitoring EPM Automate Utility Activities
Command Execution Sample Scenarios 3-19

Monitoring EPM Automate Utility Activities
3-20 Working with EPM Automate for Oracle Enterprise Performance Management Cloud

4Replicating an EPM Cloud Instance
This appendix discusses the steps involved in configuring a secondary OracleEnterprise Performance Management Cloud instance to ensure availability of service ifthe primary Oracle data center becomes unavailable due to unforeseen circumstances.Creating a secondary instance of a service involves these steps:
Note:
The procedures discussed in this appendix are not applicable to OracleEnterprise Performance Reporting Cloud.
• Setting up daily artifact replication by copying the maintenance snapshot from theprimary instance to the secondary instance.
• Configuring optional on-demand replication to create and upload artifactsnapshots at desired intervals
• Configuring the secondary instance
Setting up Daily ReplicationOracle performs routine maintenance on each service instance on a daily basis. Duringthis one hour service maintenance window, Oracle creates a maintenance snapshot bybacking up the contents of the service instance (existing data and artifacts, includinguser and role assignments from the identity domain). To replicate service, you use theEPM Automate Utility to copy the artifact snapshot from the primary instance to thesecondary instance.
To setup daily service replication:
1. Create a script file that contains the following EPM Automate Utility commands.This script replicates the application snapshot from the primary instance to thesecondary instance. This meets a 24 hour Recovery Point Objective (RPO) and twohour Recovery Time Objective (RTO).
Note: Be sure to change the user name, password file, identity domain names,and service URLs. For information on creating an encrypted password file, seethe encrypt commend in Working with EPM Automate for Oracle EnterprisePerformance Management Cloud.
REM Sign in to the secondary instanceepmautomate login serviceAdmin secondaryPassword.epw secondary_URL secondaryDomainREM Delete the existing artifact snapshotepmautomate deletefile "Artifact Snapshot"REM Copy the snapshot from the primary instance
Replicating an EPM Cloud Instance 4-1

epmautomate copysnapshotfrominstance "Artifact Snapshot" primaryPassword.epw primary_URL primaryDomainREM Sign out of the secondary instanceepmautomate logout
2. Using a scheduler; for example, Windows Task Scheduler, schedule the executionof the script file so that it runs two hours from the beginning of the maintenancewindow.
3. Set identical Maintenance Window start time on both the primary and secondaryinstances. See Setting Service Maintenance Time for more information.
Setting up On-Demand ReplicationsTo reduce the RPO, you can create on-demand snapshots of the primary instance andthen copy them to the secondary instance. For example, you can create and schedulean EPM Automate Utility script that runs every six hours between the dailyreplications to reduce the RPO from 24 to six hours.
Note: During on-demand snapshot creation, the primary service instance isplaced in read only mode for a few minutes.
To setup on-demand replication:
1. Create a script file that contains the following EPM Automate Utility commands.This script replicates the application snapshot from the primary instance to thesecondary instance.
Note: Be sure to change the user name, password file, identity domain names,and service URLs. For information on creating an encrypted password file, seethe encrypt commend in Working with EPM Automate for Oracle EnterprisePerformance Management Cloud.
REM Sign in to the primary instanceepmautomate login serviceAdmin primaryPassword.epw primary_URL primaryDomainREM Create a snapshot and then sign outepmautomate exportsnapshot "Artifact Snapshot"epmautomate logoutREM Sign in to the secondary instanceepmautomate login serviceAdmin secondaryPassword.epw secondary_URL secondaryDomainREM Copy the snapshot from the primary instanceepmautomate copysnapshotfrominstance "Artifact Snapshot" primaryPassword.epw primary_URL primaryDomainREM Sign out of the secondary instanceepmautomate logout
2. Using a scheduler; for example, Windows Task Scheduler, schedule the executionof the script file to run as needed to meet the desired RPO.
Configuring the Secondary InstanceComplete this procedure only if you need to activate the secondary instance when theprimary instance is unavailable for an extended period.
To configure the secondary instance:
Setting up On-Demand Replications
4-2 Oracle Cloud Working with EPM Automate for Oracle Enterprise Performance Management Cloud

1. Start an EPM Automate Utility session and complete these activities.
• Sign in to the secondary instance using an account that has both the ServiceAdministrator and the Identity Domain Administrator roles. Be sure to specifythe appropriate user name, password, domain name, and service instanceURL.
• Recreate the service instance
• Import application and identity domain artifacts from the snapshot.
• Sign out
You can complete the preceding activities by running the following commands. See EPM Automate Utility Commands for detailed information on these commands:
epmautomate login serviceAdmin secondaryPassword.epw secondary_URL secondaryDomainepmautomate recreate –fepmautomate importsnapshot “Artifact Snapshot” "userPassword=IDM_NEW_USER_PWD"epmautomate logout
2. Sign into the secondary service instance and verify that all data is available.
3. Send the URL of the secondary instance to all users.
Configuring the Secondary Instance
Replicating an EPM Cloud Instance 4-3

Configuring the Secondary Instance
4-4 Working with EPM Automate for Oracle Enterprise Performance Management Cloud

APreparing to Run the Replay Command
This section describes the steps Service Administrators must complete before runningthe replay EPM Automate Utility command.
• About the Replay Command
• Prerequisites
• Creating HAR Files
• Creating Replay Files
• Generating Trace Files
• A Sample Replay Session
About the Replay CommandThe replay command replays the Oracle Smart View for Office load on a serviceinstance to enable performance testing under heavy load to verify that user experienceis acceptable when the service is under specified load. For example, you can test theuser experience on a test instance under heavy load to ensure that the service willperform well after you migrate the application from the test instance to the productioninstance.
Prerequisites• Identify forms that require major processing on the service instance. Forms that
deal with large amounts of data, or forms that include complex calculations aregood candidates. For example, forms that are used to submit forecast, processesinvolved in creating ad-hoc and static reports may exert heavy loads on theservice.
• Install Fiddler if necessary. EPM Automate Utility requires an HTTP Archiveformat (HAR) 1.1 file that contains the log of your web browser's interaction withOracle Smart View for Office. You use Fiddler to create this file. If you do not havefiddler installed, download and install the latest version of Fiddler.
• Run the major activities that you identified previously on a number of forms. Youuse Smart View to run the activities and Fiddler to capture activity details and toexport them to HAR files. See Creating HAR Files for details.
• Create a replay CSV file that lists the credentials (user names and passwords) andthe name of the HAR files to run. Each row in the file may contain a the user nameand password of a unique user to simulate multiple simultaneous user sessions.See Creating Replay Files for details
Preparing to Run the Replay Command A-1
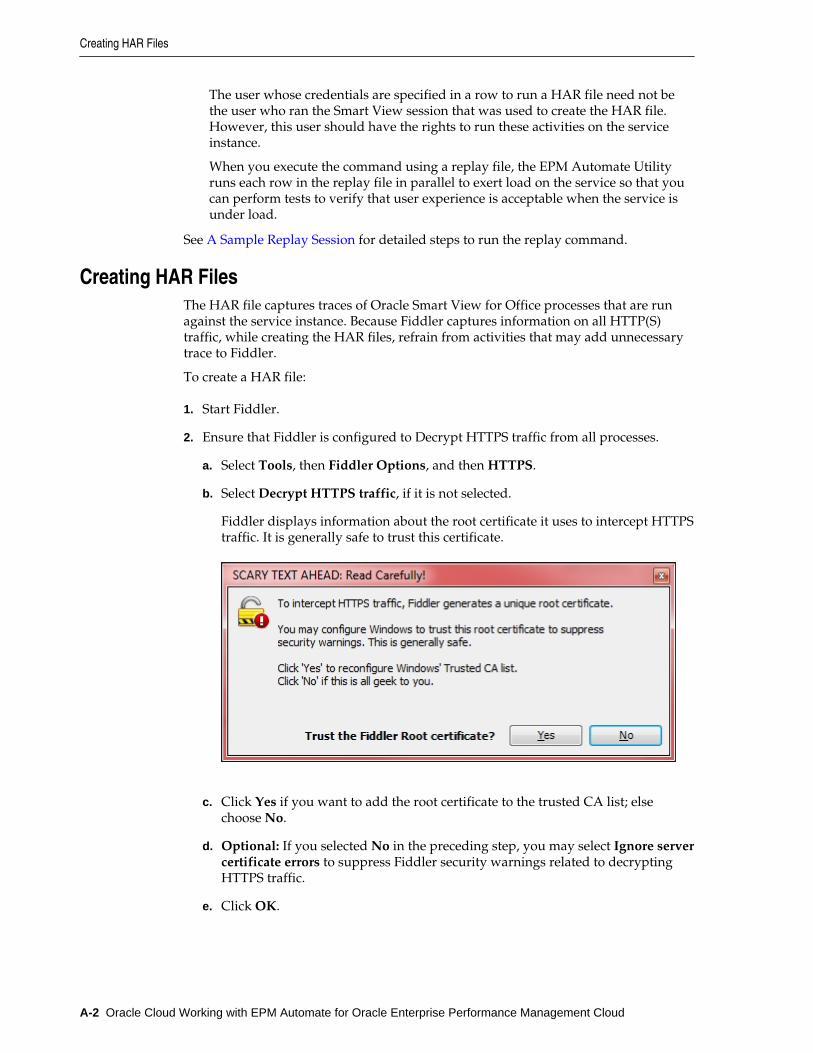
The user whose credentials are specified in a row to run a HAR file need not bethe user who ran the Smart View session that was used to create the HAR file.However, this user should have the rights to run these activities on the serviceinstance.
When you execute the command using a replay file, the EPM Automate Utilityruns each row in the replay file in parallel to exert load on the service so that youcan perform tests to verify that user experience is acceptable when the service isunder load.
See A Sample Replay Session for detailed steps to run the replay command.
Creating HAR FilesThe HAR file captures traces of Oracle Smart View for Office processes that are runagainst the service instance. Because Fiddler captures information on all HTTP(S)traffic, while creating the HAR files, refrain from activities that may add unnecessarytrace to Fiddler.
To create a HAR file:
1. Start Fiddler.
2. Ensure that Fiddler is configured to Decrypt HTTPS traffic from all processes.
a. Select Tools, then Fiddler Options, and then HTTPS.
b. Select Decrypt HTTPS traffic, if it is not selected.
Fiddler displays information about the root certificate it uses to intercept HTTPStraffic. It is generally safe to trust this certificate.
c. Click Yes if you want to add the root certificate to the trusted CA list; elsechoose No.
d. Optional: If you selected No in the preceding step, you may select Ignore servercertificate errors to suppress Fiddler security warnings related to decryptingHTTPS traffic.
e. Click OK.
Creating HAR Files
A-2 Oracle Cloud Working with EPM Automate for Oracle Enterprise Performance Management Cloud

3. Start Smart View and access the service instance for which you want to capturetrace.
4. In Smart View, open the forms or run the activities that exert heavy processing loadon the service instance.
Fiddler records the Smart View processes that you initiated.
Creating HAR Files
Preparing to Run the Replay Command A-3

5. In Fiddler, complete these steps:
a. Select File, then Export Sessions, and then either All Sessions orSelected Sessions. If you were connected to other web sites while runningFiddler, select Selected Sessions to choose the sessions relevant to theservice instance.
b. In Select Export Format, select HTTPArchive v1.1 as the export format.
c. Click Next.
d. In Export As HTTPArcive v1.1, select the directory where you want tostore the file and specify a file name.
e. Click Save.
Creating Replay FilesA replay file is a CSV file that lists the credentials (user name and password) and thename of the HAR files that are to be run to load the system using the replay EPMAutomate Utility command. Ensure that the user name and password that you specifyhas the rights to run the activities included in the HAR file.
On executing the replay command, the EPM Automate Utility runs each row in thereplay file in parallel to exert load on the service. For example, if your replay filecontains 10 rows, the utility replays 10 sessions so that you can perform tests to verifythat user experience is acceptable when the service is under specified load. Eachactivity included in the HAR file is run serially.
See EPM Automate Utility Commands for information on running the replaycommand.
To create a replay file:
1. Open Microsoft Office Excel and start a new worksheet.
2. Enter a user name, password, and the location of a HAR file in Columns A, B, andC respectively of row 1.
Repeat this step to create additional rows.
Note: You must specify the absolute path to the location of the HAR file.
Creating Replay Files
A-4 Oracle Cloud Working with EPM Automate for Oracle Enterprise Performance Management Cloud

3. Save the file
4. In Save As, complete these steps:
a. Select the directory where you want to store the replay file.
b. In File Name, specify a name, and in Save as type, select CSV (Commadelimited) (*.csv).
c. Click Save.
A sample replay file may be as follows:
Generating Trace FilesWhile running the replay command, you can generate trace files to share with OracleSupport to troubleshoot issues. Oracle Support uses trace files to understand how theservice instance handled a Oracle Smart View for Office activity.
You use the optional trace=true parameter with the replay command to generatetrace files in XML format. If you use this parameter, for each activity in the HAR file,the EPM Automate Utility creates a trace file that contains Smart View response to theactivity.
Trace files are named trace-N.xml; for example, trace-1.xml where N is a counterthat starts at 1. If multiple identically named HAR files are specified in the replay file,the utility consolidates the trace files in one folder.
Trace files related to a HAR file are stored in a folder within the directory from whichyou run the EPM Automate Utility. The utility creates one folder for each HAR filelisted in the replay file. The utility uses a combination of current server system timeand HAR file name in YYYY_MM_DD_HH_MM_SS_HAR_FILE_NAME format to namethe folders. For example, if HAR file name is forecast1.har, the folder name maybe 2016_06_08_10_21_42_forecast1.
A Sample Replay SessionThis section assumes the following:
• You created the following HAR files. Each HAR file may contain the same set ofactivities. See Creating HAR Files for detailed information.
– C:\Oracle\EPM Automate\forecast_vision_plan1.har
– C:\Oracle\EPM Automate\forecast_vision_plan2.har
– C:\Oracle\EPM Automate\forecast_plan2.har
Generating Trace Files
Preparing to Run the Replay Command A-5

• You created a replay file C:\Oracle\EPM Automate\vision_forecast_replay.csv with the following content (see CreatingReplay Files for details):
epm_default_cloud_admin,Password123,C:\Oracle\EPM Automate\forecast_vision_plan1.harepm_default_cloud_admin,Password123,C:\Oracle\EPM Automate\forecast_vision_plan2.harepm_default_cloud_admin,Password123,C:\Oracle\EPM Automate\forecast_plan2.har
To run the replay command:
1. In a Command Prompt window, navigate to the directory; for example, C:\Oracle\EPM Automate\bin, where the EPM Automate Utility is installed.
2. Sign in to a service instance and then execute the replay command:
epmautomate login service_administrator Password1 https://test-cloud-pln.pbcs.us1.oraclecloud.com myIdentityDomain
epmautomate replay "c:\Oracle\EPM Automate\vision_forecast_replay.csv" duration=12 trace=true
The utility displays replay information in the console and ends processing after thespecified duration (12 minutes in the preceding example). It also creates tracefolders and files because the preceding command includes the trace=trueparameter. The following illustration depicts the information displayed for asample session:
Because the command was executed from C:\Oracle\EPM Automate\bin, theutility stored the trace files in the following folders. Note that these folders arenamed based on the HAR file names.
A Sample Replay Session
A-6 Oracle Cloud Working with EPM Automate for Oracle Enterprise Performance Management Cloud

• C:\Oracle\EPM Automate\bin\[email protected]
• C:\Oracle\EPM Automate\bin\[email protected]
• C:\Oracle\EPM Automate\bin\[email protected]
3. Sign out of the instance:
epmautomate logout
A Sample Replay Session
Preparing to Run the Replay Command A-7

A Sample Replay Session
A-8 Working with EPM Automate for Oracle Enterprise Performance Management Cloud