WinRunner® - Tutorial Version 6.0 - Support
162
Online Guide Find Books Online Again Help Find WinRunner ® Tutorial Version 6.0
-
Upload
khangminh22 -
Category
Documents
-
view
0 -
download
0
Transcript of WinRunner® - Tutorial Version 6.0 - Support

Online Guide
Find
BooksOnline
Again
Help
FindWinRunner®
TutorialVersion 6.0

Table of Contents
WinRunner Tutorial page 2
Back
Find
Find
Help
ChapterTop of
BooksOnline
Again
0Table of Contents
Welcome to the WinRunner Tutorial............................................... 3
Lesson 1: Introducing WinRunner .............................................. 11
Lesson 2: Getting Started with RapidTest ................................. 20
Lesson 3: Recording Tests .......................................................... 38
Lesson 4: Synchronizing Tests ................................................... 54
Lesson 5: Checking GUI Objects ................................................ 67
Lesson 6: Checking Bitmaps ...................................................... 82
Lesson 7: Programming Tests with TSL .................................... 96
Lesson 8: Reading Text ............................................................. 112
Lesson 9: Creating Batch Tests ................................................ 131
Lesson 10: Maintaining Your Test Scripts ............................... 141
Lesson 11: Where Do You Go from Here? ............................... 156

Welcome to the WinRunner Tutorial
WinRunner Tutorial page 3
Back
Find
Find
Help
ChapterTop of
BooksOnline
Again
0Welcome to the WinRunner Tutorial
Welcome to the WinRunner Tutorial, a self-paced guide that teaches you the basics of testing your application with WinRunner. This tutorial is designed to familiarize you with the process of creating and executing automated tests and analyzing the test results.

WinRunner Tutorial page 4
Welcome to the WinRunner Tutorial
Back
Find
Find
Help
ChapterTop of
BooksOnline
Again
Using this Tutorial
The tutorial is divided into 11 short lessons. In each lesson you will create and run tests on the sample Flight Reservation application (Flight 1A and Flight 1B) located in your WinRunner program group. Note that this application is Year 2000 compliant.
The sample Flight Reservation application comes in two versions: Flight 1A and Flight 1B. Flight 1A is a fully working product, while Flight 1B has some “bugs” built into it. These versions are used together in the WinRunner Tutorial to simulate the development process, in which the performance of one version of an application is compared with that of another.
After completing the tutorial, you can apply the skills you learned to your own application.
Lesson 1, Introducing WinRunner compares automated and manual testing methods. It introduces the WinRunner testing process and familiarizes you with the WinRunner user interface.
Lesson 2, Getting Started with RapidTest shows you how to use the RapidTest Script wizard to quickly generate tests and to teach WinRunner descriptions of the GUI (Graphical User Interface) objects in an application. When you execute tests, WinRunner uses these descriptions to help it locate the objects in your application. After using the wizard, you will run a test and examine the results.

Welcome to the WinRunner Tutorial
WinRunner Tutorial page 5
Back
Find
Find
Help
ChapterTop of
BooksOnline
Again
Lesson 3, Recording Tests teaches you how to record a test script and explains the basics of Test Script Language (TSL)—Mercury Interactive’s C-like programming language designed for creating scripts.
Lesson 4, Synchronizing Tests shows you how to synchronize a test so that it can run successfully even when an application responds slowly to input.
Lesson 5, Checking GUI Objects shows you how to create a test that checks GUI objects. You will use the test to compare the behavior of GUI objects in different versions of the sample application.
Lesson 6, Checking Bitmaps shows you how to create and run a test that checks bitmaps in your application. You will run the test on different versions of the sample application and examine any differences, pixel by pixel.
Lesson 7, Programming Tests with TSL shows you how to use visual programming to add functions and logic to your recorded test scripts.
Lesson 8, Reading Text teaches you how to read and check text found in GUI objects and bitmaps.
Lesson 9, Creating Batch Tests shows you how to create a batch test which will automatically run the tests you created in earlier lessons.
Lesson 10, Maintaining Your Test Scripts teaches you how to update the GUI object descriptions learned by WinRunner, so that you can continue to use your test scripts as the application changes.

WinRunner Tutorial page 6
Welcome to the WinRunner Tutorial
Back
Find
Find
Help
ChapterTop of
BooksOnline
Again
Lesson 11, Where Do You Go from Here? tells you how to get started testing your own application and where you can find more information about WinRunner.
As you work through the lessons, keep in mind that you are learning the basics for testing any application. Each lesson should take approximately 20 minutes.

Welcome to the WinRunner Tutorial
WinRunner Tutorial page 7
Back
Find
Find
Help
ChapterTop of
BooksOnline
Again
WinRunner Documentation Set
In addition to this tutorial, WinRunner comes with a complete set of documentation:
WinRunner Installation Guide describes how to install WinRunner on a single computer or a network.
WinRunner User’s Guide explains how to use WinRunner to meet the special testing requirements of your application.
WinRunner Customization Guide explains how to customize WinRunner to meet the special testing requirements of your application.
WebTest User’s Guide teaches you how to use the WebTest add-in to test your Web site.
TSL Reference Guide describes Test Script Language (TSL) and the functions it contains.

WinRunner Tutorial page 8
Welcome to the WinRunner Tutorial
Back
Find
Find
Help
ChapterTop of
BooksOnline
Again
Online Resources
WinRunner includes the following online resources:
Read Me First provides last-minute news and information about WinRunner.
What’s New in WinRunner describes the newest features in the latest versions of WinRunner.
Books Online displays the complete documentation set in PDF format. Online books can be read and printed using Adobe Acrobat Reader 4.0, which is included in the installation package. Check Mercury Interactive’s Customer Support web site for updates to WinRunner online books.
WinRunner Context-Sensitive Help provides immediate answers to questions that arise as you work with WinRunner. It describes menu commands and dialog boxes, and shows you how to perform WinRunner tasks. Check Mercury Interactive’s Customer Support Web site for updates to WinRunner help files.
TSL Online Reference describes Test Script Language (TSL), the functions it contains, and examples of how to use the functions. Check Mercury Interactive’s Customer Support Web site for updates to the TSL Online Reference.
WinRunner Sample Tests includes utilities and sample tests with accompanying explanations. Check Mercury Interactive’s Customer Support Web site for updates to WinRunner help files.
WinRunner Quick Preview opens an overview of WinRunner in your default browser.

Welcome to the WinRunner Tutorial
WinRunner Tutorial page 9
Back
Find
Find
Help
ChapterTop of
BooksOnline
Again
Technical Support Online uses your default Web browser to open Mercury Interactive’s Customer Support Web site.
Support Information presents Mercury Interactive’s Customer Support Web site and home page, the e-mail address for requesting information, the name of the relevant news group, the location of Mercury Interactive’s public FTP site, and a list of Mercury Interactive’s offices around the world.
Mercury Interactive on the Web uses your default web browser to open Mercury Interactive’s home page. This site provides you with the most up-to-date information on Mercury Interactive and its products. This includes new software releases, seminars and trade shows, customer support, educational services, and more.

WinRunner Tutorial page 10
Welcome to the WinRunner Tutorial
Back
Find
Find
Help
ChapterTop of
BooksOnline
Again
Typographical Conventions
This book uses the following typographical conventions:
Bold Bold text indicates function names and the elements of the functions that are to be typed in literally.
Italics Italic text indicates variable names.
Helvetica The Helvetica font is used for examples and statements that are to be typed in literally.
[ ] Square brackets enclose optional parameters.
{ } Curly brackets indicate that one of the enclosed values must be assigned to the current parameter.
... In a line of syntax, three dots indicate that more items of the same format may be included. In a program example, three dots are used to indicate lines of a program that have been intentionally omitted.
| A vertical bar indicates that either of the two options separated by the bar should be selected.

Introducing WinRunner
WinRunner Tutorial Lesson 1, page 11
Back
Find
Find
Help
ChapterTop of
BooksOnline
Again
1Introducing WinRunner
This lesson:
• describes the benefits of automated testing
• introduces the WinRunner testing process
• takes you on a short tour of the WinRunner user interface

Introducing WinRunner
WinRunner Tutorial Lesson 1, page 12
In
Back
Find
Find
Help
ChapterTop of
BooksOnline
Again
The Benefits of Automated Testing
If you have ever manually tested software, you are aware of the drawbacks. Manual testing is a time-consuming and tedious process, which requires a heavy investment in human resources. Worst of all, time constraints often make it impossible to manually test and retest every feature before the software is released. This leaves you wondering whether serious bugs have gone undetected.
Automated testing with WinRunner dramatically speeds up the testing process. You can create test scripts that check all aspects of your application, and then run these tests on each new build. As WinRunner runs tests, it simulates a human user by moving the mouse cursor over the application, clicking Graphical User Interface (GUI) objects, and entering keyboard input—but WinRunner does this faster than any human user.

Introducing WinRunner
WinRunner Tutorial Lesson 1, page 13
In
Back
Find
Find
Help
ChapterTop of
BooksOnline
Again
With WinRunner you can also save time by running batch tests overnight. You simply start the batch run before you leave work in the evening, and review the results when you return in the morning.
Benefits of Automated Testing
Fast WinRunner executes tests faster than human users.
ReliableTests perform the same operations each time they are run, thereby eliminating human error.
RepeatableYou can test how the software reacts under repeated execution of the same operations.
ProgrammableYou can program sophisticated tests that pull out hidden information from the application.
ComprehensiveYou can build a suite of tests that covers every feature in your application.
ReusableYou can reuse tests on different versions of an application, even if the user interface changes.

Introducing WinRunner
WinRunner Tutorial Lesson 1, page 14
In
Back
Find
Find
Help
ChapterTop of
BooksOnline
Again
Understanding the Testing Process
The WinRunner testing process consists of 6 main phases:
1 Start by running the RapidTest Script wizard on your application in order to teach WinRunner a description of every GUI object the application contains. The wizard automatically generates a series of tests which you can immediately run on your application.
2 Create additional test scripts that test the functionality of your application. Use recording and/or programming to build test scripts written in Mercury Interactive’s Test Script Language (TSL).
3 Debug the tests to check that they operate smoothly and without interruption.
4 Run the tests on a new version of the application in order to verify the application’s behavior.
5 Examine the test results to pinpoint defects in the application.
6 If you have the Remote Defect Reporter, you can report any defects to a database. The Remote Defect Reporter is included in the Test Director, Mercury Interactive’s software test management tool.

Introducing WinRunner
WinRunner Tutorial Lesson 1, page 15
In
Back
Find
Find
Help
ChapterTop of
BooksOnline
Again
Exploring the WinRunner Window
Before you begin creating tests, you should familiarize yourself with the WinRunner main window.
To open WinRunner:
Choose Programs > WinRunner > WinRunner on the Start menu.
The first time you start WinRunner, the Welcome to WinRunner window opens, followed by the WinRunner main screen and the “What’s New” section of the WinRunner Help file. From here you can choose to run the RapidTest Script wizard, open an existing test, or create a new test.

Introducing WinRunner
WinRunner Tutorial Lesson 1, page 16
In
Back
Find
Find
Help
ChapterTop of
BooksOnline
Again
If you do not want this window to appear the next time you start WinRunner, clear the Show at Startup check box.
Each test you create or run is displayed by WinRunner in a test window. You can open many tests at one time.
1 The WinRunner window displays all open tests.
2 Each test appears in its own test window. You use this window to record, program, and edit test scripts.
3 Buttons on the Standard toolbar help you quickly open, run, and save tests.
4 The User toolbar provides easy access to test creation tools.
5 The status bar displays information about selected commands and the current test run.
➁ ➂➀
➃➄

Introducing WinRunner
WinRunner Tutorial Lesson 1, page 17
In
Back
Find
Find
Help
ChapterTop of
BooksOnline
Again
The Standard toolbar provides easy access to frequently performed testing tasks, such as opening, executing, and saving tests, and viewing test results.
PauseRun from Arrow
Record—Context SensitiveOpen
Help Toggle Breakpoint
Step Into
StopRun from TopRun ModeSaveNew
Break in Function
Add Watch
Test Results
Step

Introducing WinRunner
WinRunner Tutorial Lesson 1, page 18
In
Back
Find
Find
Help
ChapterTop of
BooksOnline
Again
The User toolbar displays the tools you frequently use to create test scripts. By default, the User toolbar is hidden. To display the User toolbar choose Window > User Toolbar. When you create tests, you can minimize the WinRunner window and work exclusively from the toolbar.
The User Toolbar is customizable. You can choose to add or remove buttons.
Insert Function for Object/Window
Record - Context Sensitive
Stop
GUI Checkpoint for Object/Window
GUI Checkpoint for Multiple Objects
Bitmap Checkpoint for Object/Window
Bitmap Checkpoint for Screen Area
Synchronization Point for Object/Window Property
Synchronization Point for Object/Window Bitmap
Get Text from Object/Window
Get Text from Screen Area
Synchronization Point for Screen Area Bitmap
Database Checkpoint
Insert Function from Function Generator

Introducing WinRunner
WinRunner Tutorial Lesson 1, page 19
In
Back
Find
Find
Help
ChapterTop of
BooksOnline
Again
The commands on the Standard toolbar and the User toolbar are described in detail in subsequent lessons.
Note that you can also execute many commands using softkeys. You can configure the softie combinations for your keyboard using the Softie configuration in your WinRunner program group. For more information, see Chapter 2, “WinRunner at a Glance,” in your WinRunner User’s Guide.
Now that you are familiar with the main WinRunner window, take a few minutes to explore these window components before proceeding to the next lesson.

Getting Started with RapidTest
WinRunner Tutorial Lesson 2, page 20
Back
Find
Find
Help
ChapterTop of
BooksOnline
Again
2Getting Started with RapidTest
This lesson:
• describes how WinRunner identifies GUI objects in an application
• explains how to use the RapidTest Script wizard to learn descriptions of GUI objects and to generate tests
• shows you how to run a test
• helps you analyze the test results

Getting Started with RapidTest
WinRunner Tutorial Lesson 2, page 21
In
Back
Find
Find
Help
ChapterTop of
BooksOnline
Again
How Does WinRunner Identify GUI Objects?
GUI applications are made up of GUI objects such as windows, buttons, lists, and menus. Before you begin creating and running tests on an application, you should use the RapidTest Script wizard, which learns the description of all the GUI objects your application contains. The wizard opens windows, examines their GUI objects, and saves the object descriptions in a GUI map file. Later, when you run tests, WinRunner uses this file to identify and locate objects.
When WinRunner learns the description of a GUI object, it looks at the object’s physical properties. Each GUI object has many properties such as “class,” “label,” “width,” “height”, “handle,” and “enabled” to name a few. WinRunner, however, only learns the properties that uniquely distinguish an object from all other objects in the application. For more information regarding properties, refer to Chapter 6, “Configuring the GUI Map,” in the WinRunner User’s Guide.
For example, when WinRunner looks at an OK button, it might see that the button is located in an Open window, belongs to the pushbutton object class, and has the text label “OK.”

Getting Started with RapidTest
WinRunner Tutorial Lesson 2, page 22
In
Back
Find
Find
Help
ChapterTop of
BooksOnline
Again
Spying on GUI Objects
To help you understand how WinRunner identifies GUI objects, examine the objects in the sample Flight Reservation application.
1 Open the Flight Reservation application.
Choose Programs > WinRunner > Sample Applications > Flight 1A on the Start menu. The Login window opens.
2 Start WinRunner.
Choose Programs > WinRunner > WinRunner on the Start menu. In the Welcome window, click the New Test button. If the Welcome window does not open, choose File > New.

Getting Started with RapidTest
WinRunner Tutorial Lesson 2, page 23
In
Back
Find
Find
Help
ChapterTop of
BooksOnline
Again
3 Open the GUI Spy. This tool lets you “spy” on the properties of GUI objects.
Choose Tools > GUI Spy. The GUI Spy opens. Position the GUI Spy on the desktop so that both the Login window and the GUI Spy are clearly visible.

Getting Started with RapidTest
WinRunner Tutorial Lesson 2, page 24
In
Back
Find
Find
Help
ChapterTop of
BooksOnline
Again
4 View the properties that provide a unique description of the OK button.
In the GUI Spy, click the Spy button. Move the pointer over objects in the Login window. Notice that each object flashes as you move the pointer over it, and the GUI Spy displays its properties. Place the pointer over the OK button and press Ctrl Left + F3. This freezes the OK button’s description in the GUI Spy.
Getting Started with RapidTest
WinRunner Tutorial Lesson 2, page 25
In
Back
Find
Find
Help
ChapterTop of
BooksOnline
Again
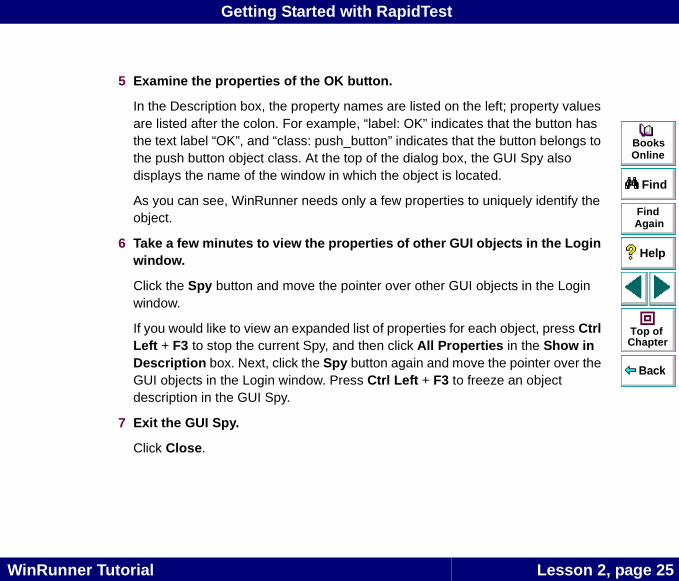
5 Examine the properties of the OK button.
In the Description box, the property names are listed on the left; property values are listed after the colon. For example, “label: OK” indicates that the button has the text label “OK”, and “class: push_button” indicates that the button belongs to the push button object class. At the top of the dialog box, the GUI Spy also displays the name of the window in which the object is located.
As you can see, WinRunner needs only a few properties to uniquely identify the object.
6 Take a few minutes to view the properties of other GUI objects in the Login window.
Click the Spy button and move the pointer over other GUI objects in the Login window.
If you would like to view an expanded list of properties for each object, press Ctrl Left + F3 to stop the current Spy, and then click All Properties in the Show in Description box. Next, click the Spy button again and move the pointer over the GUI objects in the Login window. Press Ctrl Left + F3 to freeze an object description in the GUI Spy.
7 Exit the GUI Spy.
Click Close.

Getting Started with RapidTest
WinRunner Tutorial Lesson 2, page 26
In
Back
Find
Find
Help
ChapterTop of
BooksOnline
Again
Using the RapidTest Script Wizard
The RapidTest Script wizard enables you to quickly start the testing process. You should run this wizard before starting to create test scripts.
The RapidTest Script wizard performs two important tasks:
• It systematically opens the windows in your application and learns the description of every GUI object. The wizard stores this information in a GUI map file.
• It automatically generates tests based on the information it learned as it navigated through the application.
To observe WinRunner’s learning and test creation processes, use the RapidTest Script wizard on the Flight Reservation application.

Getting Started with RapidTest
WinRunner Tutorial Lesson 2, page 27
In
Back
Find
Find
Help
ChapterTop of
BooksOnline
Again
Note: The RapidTest Script wizard is not available when either the Terminal Emulator or the WebTest add-in is loaded. Therefore, if you are using these add-ins, do not complete this section or the following sections of this lesson. Instead, after you create and run tests in the other tutorial lessons, you must save your temporary GUI map file whenever you close WinRunner or close a test script you want to save. A temporary GUI map file contains the information that WinRunner learns about GUI objects in your application.
You can specify the name and location of your GUI map file. Your GUI map file must always have the .gui extension. When you create a new test or open an existing test in this tutorial, you must load the GUI map file. For more information on saving and loading the GUI map, refer to Chapter 4, “Creating the GUI Map,” in your WinRunner User’s Guide.
1 Log in to the Flight Reservation application.
If the Login window is open, type your name and the password mercury and click OK. The name you type must be at least four characters long.
If the Login window is not already open on your desktop, choose Programs > WinRunner > Sample Applications > Flight 1A on the Start menu and then log in, as described in the previous paragraph.

Getting Started with RapidTest
WinRunner Tutorial Lesson 2, page 28
In
Back
Find
Find
Help
ChapterTop of
BooksOnline
Again
2 Open WinRunner.
If WinRunner is not already open, choose Programs > WinRunner > WinRunner on the Start menu.
3 Open a new test.
If the Welcome window is open, click the New Test button. Otherwise, choose File > New. A new test window opens in WinRunner.
4 Start the RapidTest Script wizard.
Choose Create > RapidTest Script Wizard. Click Next in the wizard’s Welcome screen to advance to the next screen.

Getting Started with RapidTest
WinRunner Tutorial Lesson 2, page 29
In
Back
Find
Find
Help
ChapterTop of
BooksOnline
Again
5 Point to the application you want to test.
Click the button and then click the Flight Reservation application. The application name appears in the wizard. Click Next.
6 Select the User Interface test.
The wizard can automatically generate tests. For the purposes of the exercise, check that the User Interface Test check box is selected and the GUI Regression Test check box is cleared. The User Interface test will check that the Flight Reservation application complies with Microsoft user interface standards. Click Next.
Note: A regression test is performed when the tester wishes to see the progress of the testing process by performing identical tests before and after a bug has been fixed. A regression test allows the tester to compare expected results of a test with the actual results.
7 Accept the default navigation controls.
Navigation controls tell WinRunner which GUI objects are used to open windows. The Flight Reservation application uses the default navigation controls (... and > >) so you do not need to define additional controls. Click Next.

Getting Started with RapidTest
WinRunner Tutorial Lesson 2, page 30
In
Back
Find
Find
Help
ChapterTop of
BooksOnline
Again
8 Set the learning flow to “Express.”
The learning flow determines how WinRunner will walk through your application. Two modes are available: Express and Comprehensive. Comprehensive mode lets you customize how the wizard learns descriptions of GUI objects. First-time WinRunner users should use Express mode.
Click the Learn button. The wizard begins walking through the application, pulling down menus, opening windows, and learning object descriptions. This process takes a few minutes.
If a pop-up message notifies you that an interface element is disabled, click the Continue button in the message box.
If the wizard cannot close a window, it will ask you to show it how to close the window. Follow the directions on the screen.
9 Accept “No” in the Start Application screen.
You can choose to have WinRunner automatically open the Flight Reservation application each time you start WinRunner. Accept the default “No.” Click Next.
10 Save the GUI information and a startup script.
The wizard saves the GUI information in a GUI map file.
The wizard also creates a startup script. This script is automatically run each time you start WinRunner. It contains a command which loads the GUI map file so that WinRunner will be ready to test your application.
Accept the default paths and file names or define different ones. Make sure that you have write permission for the selected folders. Click Next.

Getting Started with RapidTest
WinRunner Tutorial Lesson 2, page 31
In
Back
Find
Find
Help
ChapterTop of
BooksOnline
Again
11 Save the User Interface test.
Accept the default path and file name (UI) for the User Interface test and click Next.
12 Click OK in the Congratulations screen.
The User Interface test is displayed in a WinRunner test window.

Getting Started with RapidTest
WinRunner Tutorial Lesson 2, page 32
In
Back
Find
Find
Help
ChapterTop of
BooksOnline
Again
Running the User Interface Test
You are now ready to run the User Interface test script on the Flight Reservation application. The User Interface test determines whether the application complies with the Microsoft user interface standards. It checks that:
• GUI objects do not overlap
• GUI objects are aligned in windows
• text labels on GUI objects begin with capital letters
• text labels on GUI objects are clearly visible
• OK and Cancel buttons appear in every window
• a system menu is available in every window
To run the User Interface test:
1 Check that WinRunner and the Flight Reservation application are still open on your desktop.
2 Make sure that the UI test window is active in WinRunner.
Click the title bar of the UI test window.

Getting Started with RapidTest
WinRunner Tutorial Lesson 2, page 33
In
Back
Find
Find
Help
ChapterTop of
BooksOnline
Again
3 Choose Run from Top.
Choose Run > Run from Top or click the Run from Top button. The Run Test dialog box opens.
4 Choose a Test Run name.
Define the name of the directory in which WinRunner will store the results of the test. Accept the default name “res1.”
Note that at the bottom of the dialog box is a Display Test Results at end of run check box. When this check box is selected, WinRunner automatically displays the test results when the test run is completed. Make sure that this check box is selected.

Getting Started with RapidTest
WinRunner Tutorial Lesson 2, page 34
In
Back
Find
Find
Help
ChapterTop of
BooksOnline
Again
5 Run the UI test.
Click OK in the Run Test dialog box. WinRunner immediately begins running the UI test. Watch how WinRunner opens each window in the Flight Reservation application.
6 Review the test results.
When the test run is completed, the test results automatically appear in the WinRunner Test Results window. See the next section to learn how to analyze the test results.

Getting Started with RapidTest
WinRunner Tutorial Lesson 2, page 35
In
Back
Find
Find
Help
ChapterTop of
BooksOnline
Again
Analyzing Test Results
Once a test run is completed, you can immediately review the test results in the WinRunner Test Results window. WinRunner color-codes results (green = passed, red = failed) so that you can quickly draw conclusions about the success or failure of the test.

Getting Started with RapidTest
WinRunner Tutorial Lesson 2, page 36
In
Back
Find
Find
Help
ChapterTop of
BooksOnline
Again
1 Make sure that the WinRunner Test Results window is open and displays the results of the UI test.
If the WinRunner Test Results window is not currently open, first click the UI test window to activate it, and then choose Tools > Test Results or click the Test Results button.
1 Displays the name of the current test.
2 Shows the current results directory name.
3 Shows whether a test run passed or failed.
4 Includes general information about the test run such as date, operator name, and total run time. To view these details, double click the Information icon.
5 The test log section lists the major events that occurred during the test run. It also lists the test script line at which each event occurred.
➁ ➂➀
➄➃

Getting Started with RapidTest
WinRunner Tutorial Lesson 2, page 37
In
Back
Find
Find
Help
ChapterTop of
BooksOnline
Again
2 Review the results and determine whether the Flight Reservation application complies with the Microsoft user interface standards.
3 Close the Test Results window.
Choose File > Exit in the WinRunner Test Results window.
4 Close the UI test.
Choose File > Close.
5 Close the Flight Reservation application.
Choose File > Exit.

Recording Tests
WinRunner Tutorial Lesson 3, page 38
Back
Find
Find
Help
ChapterTop of
BooksOnline
Again
3Recording Tests
This lesson:
• describes Context Sensitive and Analog record modes
• shows you how to record a test script
• helps you read the test script
• shows you how to run the recorded test and analyze the results

Recording Tests
WinRunner Tutorial Lesson 3, page 39
In
Back
Find
Find
Help
ChapterTop of
BooksOnline
Again
Choosing a Record Mode
By recording, you can quickly create automated test scripts. You simply work with your application as you normally would, clicking objects with the mouse and entering keyboard input. WinRunner records the operations you perform and generates statements in TSL, Mercury Interactive’s Test Script Language. These statements appear as a script in a WinRunner test window.
Before you begin recording a test, you should plan the main stages of the test and select the appropriate record mode. Two record modes are available: Context Sensitive and Analog.
Context SensitiveContext Sensitive mode records the operations you perform in terms of the GUI objects in your application. WinRunner identifies each object you click (such as a window, menu, list, or button), and the type of operation you perform (such as press, enable, move, or select).
For example, if you record a mouse click on the OK button in the Flight Reservation Login window, WinRunner records the following TSL statement in your test script:
button_press ("OK");
When you run the script, WinRunner reads the command, looks for the OK button, and presses it.
ContextSensitive
Analog

Recording Tests
WinRunner Tutorial Lesson 3, page 40
In
Back
Find
Find
Help
ChapterTop of
BooksOnline
Again
AnalogIn Analog mode, WinRunner records the exact coordinates traveled by the mouse, as well as mouse clicks and keyboard input. For example, if you click the OK button in the Login window, WinRunner records statements that look like this:
When this statement is recorded... it really means:move_locator_track (1); mouse trackmtype ("<T110><kLeft>-"); left mouse button pressmtype ("<kLeft>+"); left mouse button release
When you run the test, WinRunner retraces the recorded movements using absolute screen coordinates. If your application is located in a different position on the desktop, or the user interface has changed, WinRunner is not able to execute the test correctly.
You should record in Analog mode only when exact mouse movements are an important part of your test, for example, when recreating a drawing.

Recording Tests
WinRunner Tutorial Lesson 3, page 41
In
Back
Find
Find
Help
ChapterTop of
BooksOnline
Again
When choosing a record mode, consider the following points:
If you are testing an application which contains both GUI objects and bitmap areas, you can switch between modes as you record. This will be discussed later in the lesson.
Choose Context Sensitive if... Choose Analog if...
The application contains GUI objects.The application contains bitmap areas (such as a drawing area).
Exact mouse movements are not required.Exact mouse movements are required.
You plan to reuse the test in different versions of the application.

Recording Tests
WinRunner Tutorial Lesson 3, page 42
In
Back
Find
Find
Help
ChapterTop of
BooksOnline
Again
Recording a Context Sensitive Test
In this exercise you will create a script that tests the process of opening an order in the Flight Reservation application. You will create the script by recording in Context Sensitive mode.
1 Open WinRunner.
If WinRunner is not already open, choose Programs > WinRunner > WinRunner on the Start menu.
2 Open a new test.
If the Welcome window is open, click the New Test button. Otherwise, choose File > New. A new test window opens in WinRunner.

Recording Tests
WinRunner Tutorial Lesson 3, page 43
In
Back
Find
Find
Help
ChapterTop of
BooksOnline
Again
3 Start the Flight Reservation application and log in.
Choose Programs > WinRunner > Sample Applications > Flight 1A on the Start menu. In the Login window, type your name and the password mercury, and click OK. The name you type must be at least four characters long. Position the Flight Reservation application and WinRunner so that they are both clearly visible on your desktop.

Recording Tests
WinRunner Tutorial Lesson 3, page 44
In
Back
Find
Find
Help
ChapterTop of
BooksOnline
Again
4 Start recording in Context Sensitive mode.
Choose Create > Record—Context Sensitive or click the Record button on the toolbar. From this point on, WinRunner will record all mouse clicks and keyboard input.
5 Open order #3.
In the Flight Reservation application, choose File > Open Order. In the Open Order dialog box, select the Order No. check box. Type 3 in the adjacent box, and click OK.
Watch how WinRunner generates a test script in the test window as you work.
6 Stop recording.
In WinRunner, choose Create > Stop Recording or click the Stop button on the toolbar.
7 Save the test.
Choose File > Save or click the Save button on the toolbar. Save the test as lesson3 in a convenient location on your hard drive. Click Save to close the Save Test dialog box.
Note that WinRunner saves the lesson3 test in the file system as a folder, and not as an individual file. This folder contains the test script and the results generated when you run the test.

Recording Tests
WinRunner Tutorial Lesson 3, page 45
In
Back
Find
Find
Help
ChapterTop of
BooksOnline
Again
Understanding the Test Script
In the previous exercise, you recorded the process of opening a flight order in the Flight Reservation application. As you worked, WinRunner generated a test script similiar to the following:
set_window ("Flight Reservation", 10);menu_select_item ("File;Open Order...");set_window ("Open Order", 10);button_set ("Order No.", ON);edit_set ("Edit", "3");button_press ("OK");
As you can see, the recorded TSL statements describe the objects you selected and the actions you performed. For example, when you selected a menu item, WinRunner generated a menu_select_item statement.
The following points will help you understand your test script:
• When you click an object, WinRunner assigns the object a logical name, which is usually the object’s text label. The logical name makes it easy for you to read the test script. For example, when you selected the Order No. check box, WinRunner recorded the following statement:
button_set ("Order No.", ON);
“Order No.” is the object’s logical name.

Recording Tests
WinRunner Tutorial Lesson 3, page 46
In
Back
Find
Find
Help
ChapterTop of
BooksOnline
Again
• WinRunner generates a set_window statement each time you begin working in a new window. The statements following set_window perform operations on objects within this window. For example, when you opened the Open Order dialog box, WinRunner recorded the following statement:
set_window ("Open Order", 10);
• When you enter keyboard input, WinRunner generates a type, an obj_type, or an edit_set statement in the test script. For example, when you typed 3 in the Order Number box, WinRunner generated the following statement:
edit_set ("Edit", "3");
For more information about the different ways in which WinRunner records keyboard input, choose Help > TSL Online Reference.

Recording Tests
WinRunner Tutorial Lesson 3, page 47
In
Back
Find
Find
Help
ChapterTop of
BooksOnline
Again
Recording in Analog Mode
In this exercise you will test the process of sending a fax. You will start recording in Context Sensitive mode, switch to Analog mode in order to add a signature to the fax, and then switch back to Context Sensitive mode.
1 In the lesson3 test, place the cursor below the last line of the script.
You will add the new test segment to the lesson3 test. If the test is not already open, choose File > Open and select the test. In the lesson3 test window, place the cursor below the last line of the test.
2 Start Recording in Context Sensitive mode.
Choose Create > Record—Context Sensitive or click the Record button on the toolbar.

Recording Tests
WinRunner Tutorial Lesson 3, page 48
In
Back
Find
Find
Help
ChapterTop of
BooksOnline
Again
3 Open the Fax Order form and fill in a fax number.
In the Flight Reservation application, choose File > Fax Order. Click in the Fax Number box, and type 4155551234.
4 Select the Send Signature with Order check box.
5 Sign the fax in Context Sensitive mode.
Sign your name in the Agent Signature box.
Watch how WinRunner records your signature.

Recording Tests
WinRunner Tutorial Lesson 3, page 49
In
Back
Find
Find
Help
ChapterTop of
BooksOnline
Again
6 Clear the signature.
Click the Clear Signature button.
7 Move the Fax Order window to a different position on your desktop.
Before switching to Analog mode, reposition the window in which you are working.
8 Sign the fax again in Analog mode.
Press F2 on your keyboard or click the Record button again to switch to Analog mode. Sign your name in the Agent Signature box.
Watch how WinRunner records your signature.
9 Switch back to Context Sensitive mode and send the fax.
Press F2 or click the Record button to switch back to Context Sensitive mode. Click Send. The application will simulate the process of sending the fax.
10 Stop Recording.
Choose Create > Stop Recording or click the Stop button.
11 Save the test.
Choose File > Save or click the Save button.

Recording Tests
WinRunner Tutorial Lesson 3, page 50
In
Back
Find
Find
Help
ChapterTop of
BooksOnline
Again
Running the Test and Analyzing the Results
You are now ready to run your recorded test script and to analyze the test results. WinRunner provides 3 modes for running tests. You select a mode from the toolbar.
• Use Verify mode when running a test to check the behavior of your application, and when you want to save the test results.
• Use Debug mode when you want to check that the test script runs smoothly without errors in syntax. See Lesson 7 for more information.
• Use Update mode when you want to create new expected results for a GUI checkpoint or bitmap checkpoint. See Lessons 5 and 6 for more information.
To run the test:
1 Check that WinRunner and the main window of the Flight Reservation application are open on your desktop.
2 Make sure that the lesson3 test window is active in WinRunner. If the test is not already open, choose File > Open.
Click the title bar of the lesson3 test window. If the test is not already open, choose File > Open and select the test.
3 Make sure the main window of the Flight Reservation application is active.
If any dialog boxes are open, close them.

Recording Tests
WinRunner Tutorial Lesson 3, page 51
In
Back
Find
Find
Help
ChapterTop of
BooksOnline
Again
4 Make sure that Verify mode is selected in the toolbar.
5 Choose Run from Top.
Choose Run > Run from Top or click the Run from Top button. The Run Test dialog box opens. Accept the default test run name “res1.” Make sure that the Display Test Results at End of Run check box is selected.
6 Run the test.
Click OK in the Run Test dialog box. WinRunner starts running the test.
Watch how WinRunner opens windows and selects objects. Also watch what happens when WinRunner draws the signature in Context Sensitive mode and in Analog mode.
7 Review the test results.
When the test run is completed, the test results appear in the WinRunner Test Results window. Note that the test result is “OK”, indicating that the test was run successfully.
8 Close the test results.
Choose File > Exit.
9 Close the lesson3 test.
Choose File > Close.
10 Close the Flight Reservation application.
Choose File > Exit.

Recording Tests
WinRunner Tutorial Lesson 3, page 52
In
Back
Find
Find
Help
ChapterTop of
BooksOnline
Again
Recording Tips
• Before starting to record, you should close applications that are not required for the test.
• Create the test so that it ends where it started. For example, if the test opens an application, make sure that it also closes the application at the end of the test run. This ensures that WinRunner is prepared to run repeated executions of the same test.
• When recording in Analog mode, avoid holding down the mouse button if this results in a repeated action. For example, do not hold down the mouse button to scroll a window. Instead, scroll by clicking the scrollbar arrow repeatedly. This enables WinRunner to accurately execute the test.
• Before switching from Context Sensitive mode to Analog mode during a recording session, always move the current window to a new position on the desktop. This ensures that when you run the test, the mouse pointer will reach the correct areas of the window during the Analog portion of the test.
• When recording, if you click a non-standard GUI object, WinRunner generates a generic obj_mouse_click statement in the test script. For example, if you click a graph object, it records:
obj_mouse_click (GS_Drawing, 8, 53, LEFT);

Recording Tests
WinRunner Tutorial Lesson 3, page 53
In
Back
Find
Find
Help
ChapterTop of
BooksOnline
Again
If your application contains a non-standard GUI object which behaves like a standard GUI object, you can map this object to a standard object class so that WinRunner will record more intuitive statements in the test script. For more information refer to Chapter 6, “Configuring the GUI Map” in your WinRunner User’s Guide.
• When recording, if you click on an object whose description was not learned by the RapidTest Script wizard, WinRunner learns a description of the object and adds it to a temporary GUI map file. For more information, refer to Chapter 4 “Creating the GUI Map” in your WinRunner User’s Guide.
• To easily switch between Context Sensitive and Analog modes, press F2.

Synchronizing Tests
WinRunner Tutorial Lesson 4, page 54
Back
Find
Find
Help
ChapterTop of
BooksOnline
Again
4Synchronizing Tests
This lesson:
• describes when you should synchronize a test
• shows you how to synchronize a test
• shows you how to run the test and analyze the results

Synchronizing Tests
WinRunner Tutorial Lesson 4, page 55
In
Back
Find
Find
Help
ChapterTop of
BooksOnline
Again
When Should You Synchronize?
When you run tests, your application may not always respond to input with the same speed. For example, it might take a few seconds:
• to retrieve information from a database
• for a window to pop up
• for a progress bar to reach 100%
• for a status message to appear
WinRunner waits a set amount of time for an application to respond to input. The default amount of time that WinRunner waits is up to 10 seconds. If the application responds slowly during a test run, WinRunner’s default wait time may not be enough, and WinRunner may try to continue the test before the application is ready. The test run will then unexpectedly fail.
If you discover a synchronization problem between the test and your application, you can either:
• increase the default time that the WinRunner waits. To do so, you change the value of the Timeout for Checkpoints and CS Statements option in the Run tab of the General Options dialog box (Settings > General Options). This method affects all your tests and slows down many other Context Sensitive operations.

Synchronizing Tests
WinRunner Tutorial Lesson 4, page 56
In
Back
Find
Find
Help
ChapterTop of
BooksOnline
Again
In the following exercises you will:
✔ create a test which opens a new order in the Flight Reservation application and inserts the order into the database
✔ change the synchronization settings
✔ identify a synchronization problem
✔ synchronize the test
✔ run the synchronized test
Synchronizing Tests
WinRunner Tutorial Lesson 4, page 57
In
Back
Find
Find
Help
ChapterTop of
BooksOnline
Again
Creating a Test
In this first exercise you will create a test that opens a new order in the Flight Reservation application and inserts the order into a database.
1 Start WinRunner and open a new test.
If WinRunner is not already open, choose Programs > WinRunner > WinRunner on the Start menu. If the Welcome window is open, click the New Test button. Otherwise, choose File > New. A new test window opens.
2 Start the Flight Reservation application and log in.
Choose Programs > WinRunner > Sample Applications > Flight 1A on the Start menu. In the Login window, type your name and the password mercury, and click OK. Reposition the Flight Reservation application and WinRunner so that they are both clearly visible on your desktop.
3 Start Recording in Context Sensitive mode.
Choose Create > Record—Context Sensitive or click the Record button on the toolbar. WinRunner will start recording the test.
4 Create a new order.
Choose File > New Order in the Flight Reservation application.

Synchronizing Tests
WinRunner Tutorial Lesson 4, page 58
In
Back
Find
Find
Help
ChapterTop of
BooksOnline
Again
5 Fill in flight and passenger information.
6 Insert the order into the database.
Click the Insert Order button. When the insertion is complete, the “Insert Done” message appears in the status bar.
➀ Entertomorrow’s date in MM/DD/YY format.
➁
➂
➃
➄
Click the Flights button, then double-click a flight.
Enter your name.
Select First Class.➅
Select San Francisco.
Select Los Angeles.

Synchronizing Tests
WinRunner Tutorial Lesson 4, page 59
In
Back
Find
Find
Help
ChapterTop of
BooksOnline
Again
7 Delete the order.
Click the Delete Order button and click Yes in the message window to confirm the deletion.
8 Stop recording.
Choose Create > Stop Recording or click the Stop button.
9 Save the test.
Choose File > Save. Save the test as lesson4 in a convenient location on your hard drive. Click Save to close the Save Test dialog box.

Synchronizing Tests
WinRunner Tutorial Lesson 4, page 60
In
Back
Find
Find
Help
ChapterTop of
BooksOnline
Again
Changing the Synchronization Setting
The default amount of time that WinRunner waits for an application to respond to input is 10 seconds. To run the test you have recorded with a synchronization problem, you must change this synchronization setting.
1 Open the General Options dialog box.
Choose Settings > General Options.

Synchronizing Tests
WinRunner Tutorial Lesson 4, page 61
In
Back
Find
Find
Help
ChapterTop of
BooksOnline
Again
2 Click the Run tab.
3 Change the value to 1000 milliseconds (1 second).
In the Timeout for Checkpoints and CS statements box, change the value to “1000”.
4 Click OK to close the dialog box.
Change the value to 1000.

Synchronizing Tests
WinRunner Tutorial Lesson 4, page 62
In
Back
Find
Find
Help
ChapterTop of
BooksOnline
Again
Identifying a Synchronization Problem
You are now ready to execute the lesson4 test. As the test runs, look for a synchronization problem.
1 Make sure that the lesson4 test window is active in WinRunner.
Click the title bar of the lesson4 test window.
2 Choose Run from Top.
Choose Run > Run from Top or click the Run from Top button. The Run Test dialog box opens. Accept the default test run name “res1.”
3 Run the test.
Click OK in the Run Test dialog box. WinRunner starts running the test. Watch what happens when WinRunner attempts to click the Delete button.
4 Click Pause in the WinRunner message window.
WinRunner failed to click the Delete Order button because the button is still disabled. This error occurred because WinRunner did not wait until the Insert Order operation was completed.

Synchronizing Tests
WinRunner Tutorial Lesson 4, page 63
In
Back
Find
Find
Help
ChapterTop of
BooksOnline
Again
Synchronizing the Test
In this exercise you will insert a synchronization point into the lesson4 test script. The synchronization point will capture a bitmap image of the “Insert Done” message in the status bar. Later on when you run the test, WinRunner will wait for the “Insert Done” message to appear before it attempts to click the Delete Order button.
1 Make sure that the lesson4 test window is active in WinRunner.
Click the title bar of the lesson4 test window.
2 Place the cursor at the point where you want to synchronize the test.
Add a blank line below the button_press ("Insert Order"); statement. Place the cursor at the beginning of the blank line.
3 Synchronize the test so that it waits for the “Insert Done” message to appear in the status bar.
Choose Create > Synchronization Point > For Object/Window Bitmap or click the Wait Bitmap - Point button on the User toolbar.
Use the pointer to click the status bar in the Flight Reservation window. WinRunner automatically inserts an obj_wait_bitmap synchronization point into the test script. This statement instructs WinRunner to wait 1 second for the “Insert Done” message to appear in the status bar.

Synchronizing Tests
WinRunner Tutorial Lesson 4, page 64
In
Back
Find
Find
Help
ChapterTop of
BooksOnline
Again
4 Manually change the 1 second wait in the script to a 10 second wait.
The one second wait which was inserted in the previous step isn’t long enough, so find the statement:
obj_wait_bitmap("Insert Done...", "Img1", 1);and change the 1 at the end of the statement to a 10, to indicate a 10 second wait.
5 Save the test.
Choose File > Save or click the Save button.
A synchronization point appears as obj_wait_bitmap or win_wait_bitmap statements in the test script. For example:
obj_wait_bitmap("Insert Done...", "Img1", 10);
Insert Done... is the object’s logical name.
lmg1 is the file containing a captured image of the object.
10 is the time (in seconds) that WinRunner waits for the image to appear in the application. This time is added to the default time defined by the timeout-msec testing option. (In the above exercise, WinRunner waits a total of 11 seconds).

Synchronizing Tests
WinRunner Tutorial Lesson 4, page 65
In
Back
Find
Find
Help
ChapterTop of
BooksOnline
Again
Running the Synchronized Test
In this exercise you will run the synchronized test script and examine the test results.
1 Make sure that the lesson4 test window is active in WinRunner.
Click the title bar of the lesson4 test window.
2 Check that Verify mode is selected in the Standard toolbar.
Verify mode will stay in effect until you choose a different mode.
3 Choose Run from Top.
Choose Run > Run from Top or click the Run from Top button. The Run Test dialog box opens. Accept the default name “res2.” Make sure that the Display Test Results at End of Run check box is selected.
4 Run the test.
Click OK in the Run Test dialog box. WinRunner starts running the test from the first line in the script.
Watch how WinRunner waits for the “Insert Done” message to appear in the status bar.

Synchronizing Tests
WinRunner Tutorial Lesson 4, page 66
In
Back
Find
Find
Help
ChapterTop of
BooksOnline
Again
5 Review the results.
When the test run is completed, the test results appear in the WinRunner Test Results window. Note that a “wait for bitmap” event appears in green in the test log section. This indicates that synchronization was performed successfully. You can double-click this event to see a bitmap image of the status bar.
6 Close the Test Results window.
Choose File > Exit.
7 Close the lesson4 test.
Choose File > Close in WinRunner.
8 Close the Flight Reservation application.
Choose File > Exit.
9 Change the timeout value back to 10000 milliseconds (10 seconds).
Choose Settings > General Options to open the General Options dialog box. Click the Run tab. In the Timeout for Checkpoints and CS statements box, change the current value to “10000”. Click OK to close the dialog box.
To learn about additional synchronization methods, read Chapter 14, “Synchronizing Test Execution” in your WinRunner User’s Guide.

Checking GUI Objects
WinRunner Tutorial Lesson 5, page 67
Back
Find
Find
Help
ChapterTop of
BooksOnline
Again
5Checking GUI Objects
This lesson:
• explains how to check the behavior of GUI objects
• shows you how to create a test that checks GUI objects
• shows you how to run the test on different versions of an application and examine the results

Checking GUI Objects
WinRunner Tutorial Lesson 5, page 68
In
Back
Find
Find
Help
ChapterTop of
BooksOnline
Again
How Do You Check GUI Objects?
When working with an application, you can determine whether it is functioning properly according to the behavior of its GUI objects. If a GUI object does not respond to input as expected, a defect probably exists somewhere in the application’s code.
You check GUI objects by creating GUI checkpoints. A GUI checkpoint examines the behavior of an object’s properties. For example, you can check:
the content of a field
whether a radio button is on or off
whether a pushbutton is enabled or disabled
To create a GUI checkpoint for a single object, you point to it in an application. If you single-click the object, a checklist with the default checks for the object you selected is inserted into your test script. A checklist contains information about the GUI object and the selected properties to check. If you double-click the object, the

Checking GUI Objects
WinRunner Tutorial Lesson 5, page 69
In
Back
Find
Find
Help
ChapterTop of
BooksOnline
Again
Check GUI dialog box opens and displays the object you selected. Select the properties you want to check, and click OK to insert a checklist for the object into your test script.
Whether you choose to check an object’s default properties or you specify the properties of an object you want to check, WinRunner captures the current values of those properties and saves this information as expected results. It then inserts an obj_check_gui statement into the test script if you are checking an object, or a win_check_gui statement if you are checking a window.
When you run this test on a new version of the application, WinRunner compares the expected behavior of the object with its actual behavior in the application.
Select the properties you want to check. The default check for a push button is “Enabled”.
This dialog box opens when you double-click the Insert Order push button.

Checking GUI Objects
WinRunner Tutorial Lesson 5, page 70
In
Back
Find
Find
Help
ChapterTop of
BooksOnline
Again
Adding GUI Checkpoints to a Test Script
In this exercise you will check that objects in the Flight Reservation Open Order dialog box function properly when you open an existing order.
1 Start WinRunner and open a new test.
If WinRunner is not already open, choose Programs > WinRunner > WinRunner on the Start menu. If the Welcome window is open, click the New Test button. Otherwise, choose File > New. A new test window opens.
2 Start the Flight Reservation application and log in.
Choose Programs > WinRunner > Sample Applications > Flight 1A on the Start menu. In the Login window, type your name and the password mercury, and click OK. Reposition the Flight Reservation application and WinRunner so that they are both clearly visible on your desktop.
3 Start recording in Context Sensitive mode.
Choose Create > Record—Context Sensitive or click the Record button on the User toolbar.

Checking GUI Objects
WinRunner Tutorial Lesson 5, page 71
In
Back
Find
Find
Help
ChapterTop of
BooksOnline
Again
4 Open the Open Order dialog box.
Choose File > Open Order in the Flight Reservation application.
5 Create a GUI checkpoint for the Order No. check box.
Choose Create > GUI Checkpoint > For Object/Window, or click the GUI Checkpoint for Object/Window button on the User toolbar.
Use the pointer to double-click the Order No. check box. The Check GUI dialog box opens and displays the available checks. Accept the default check “State.” This check captures the current state (off) of the check box and stores it as expected results.
Click OK in the Check GUI dialog box to insert the checkpoint into the test script. The checkpoint appears as an obj_check_gui statement.

Checking GUI Objects
WinRunner Tutorial Lesson 5, page 72
In
Back
Find
Find
Help
ChapterTop of
BooksOnline
Again
6 Enter “4” as the Order No.
Mark the Order No. check box. Click in the Order No. text box and type 4.
7 Create another GUI checkpoint for the Order No. check box.
Choose Create > GUI Checkpoint > For Object/Window or click the GUI Checkpoint for Object/Window button on the Floating Toolbar.
Use the pointer to single-click the Order No. check box. WinRunner immediately inserts a checkpoint into the test script (an obj_check_gui statement) that uses the default check “State.” (Use this shortcut when you want to use only the default check for an object.) This check captures the current state (on) of the check box and stores it as expected results.
8 Create a GUI checkpoint for the Customer Name check box.
Choose Create > GUI Checkpoint > For Object/Window or click the GUI Checkpoint for Object/Window button on the Test Creation toolbar.
Use the pointer to double-click the Customer Name check box. The Check GUI dialog box opens and displays the available checks. Accept the default check “State” and select “Enabled” as an additional check. The State check captures the current state (off) of the check box; the Enabled check captures the current condition (disabled) of the check box.
Click OK in the Check GUI dialog box to insert the checkpoint into the test script. The checkpoint appears an as obj_check_gui statement.

Checking GUI Objects
WinRunner Tutorial Lesson 5, page 73
In
Back
Find
Find
Help
ChapterTop of
BooksOnline
Again
9 Click OK in the Open Order dialog box to open the order.
10 Stop recording.
Choose Create > Stop Recording or click the Stop button.
11 Save the test.
Choose File > Save or click the Save button. Save the test as lesson5 in a convenient location on your hard drive. Click Save to close the Save Test dialog box.
GUI checkpoints appear as obj_check_gui or win_check_gui statements in the test script. For example:
obj_check_gui("Order No.", "list1.ckl", "gui1", 1)
Order No. is the object’s logical name.
list1.ckl is the checklist containing the checks you selected.
gui1 is the file containing the captured GUI data.
1 is the time (in seconds) needed to perform the check. This time is added to the value of the timeout_msec test option. See Lesson 4 for more information.

Checking GUI Objects
WinRunner Tutorial Lesson 5, page 74
In
Back
Find
Find
Help
ChapterTop of
BooksOnline
Again
Running the Test
You will now run the lesson5 test in order to verify that the test runs smoothly.
1 Make sure that the Flight Reservation application is open on your desktop.
2 In WinRunner, check that Verify mode is selected in the Standard toolbar.
3 Choose Run from Top.
Choose Run > Run from Top, or click the Run from Top button. The Run Test dialog box opens. Accept the default test run name “res1.” Make sure that the Display Test Results at End of Run check box is selected.
4 Run the test.
Click OK in the Run Test dialog box.
5 Review the results.
When the test run is completed, the test results appear in the WinRunner Test Results window. In the test log section all “end GUI checkpoint” events should appear in green (indicating success).

Checking GUI Objects
WinRunner Tutorial Lesson 5, page 75
In
Back
Find
Find
Help
ChapterTop of
BooksOnline
Again
Double-click an end GUI checkpoint event to view detailed results of a GUI checkpoint. The GUI Checkpoint Results dialog box opens. Select Customer Name to display the dialog box as follows:
Lists the objects in the checkpoint
Lists expected results
Names the window containing the objects
Indicates whether a property check passed or failed
Indicates whether an object passed or failed
Lists the specified arguments
Lists actual results
Lists the property checks performed

Checking GUI Objects
WinRunner Tutorial Lesson 5, page 76
In
Back
Find
Find
Help
ChapterTop of
BooksOnline
Again
Note: You can specify the arguments for a check on selected properties. For more information refer to the “Checking GUI Objects” chapter in the WinRunner User’s Guide.
6 Close the test results.
Click OK to close the GUI Checkpoint Results dialog box. Then choose File > Exit to close the Test Results window.
7 Close the Flight Reservation application.
Choose File > Exit.

Checking GUI Objects
WinRunner Tutorial Lesson 5, page 77
In
Back
Find
Find
Help
ChapterTop of
BooksOnline
Again
Running the Test on a New Version
In this exercise you will run the lesson5 test on a new version of the Flight Reservation application in order to check the behavior of its GUI objects.
1 Open version 1B of the Flight Reservation application.
Choose Programs > WinRunner > Sample Applications > Flight 1B on the Start menu. In the Login window, type your name and the password mercury, and click OK. Position the Flight Reservation application and WinRunner so that they are both clearly visible on your desktop.
2 Make sure that lesson5 is the active test.
Click in the lesson5 test window in WinRunner.
3 Check that Verify mode is selected in the toolbar.
4 Choose Run from Top.
Choose Run > Run from Top, or click the Run from Top button. The Run Test dialog box opens. Accept the default test run name “res2.” Make sure that the Display Test Results at End of Run check box is selected.
5 Run the test.
Click OK. The test run begins.
If a mismatch is detected at a GUI checkpoint, click Continue in the message window.

Checking GUI Objects
WinRunner Tutorial Lesson 5, page 78
In
Back
Find
Find
Help
ChapterTop of
BooksOnline
Again
6 Review the results.
When the test run is completed, the test results appear in the WinRunner Test Results window. In the test log section, one “end GUI checkpoint” statement appears in red and its Result field lists “Failed.” This indicates that one or more of the checks performed on the object failed.
Double-click the red “end GUI checkpoint” event to view detailed results of the failed check. The GUI Checkpoint Results dialog box opens. Select Customer Name to display the dialog box as follows:
The expected result is “off”.
The actual result is “on”.
The check on the Customer Name check box failed.
The check on the Enabled property of the Customer Name check box failed.

Checking GUI Objects
WinRunner Tutorial Lesson 5, page 79
In
Back
Find
Find
Help
ChapterTop of
BooksOnline
Again
7 Close the Test Results window.
Click OK in the GUI Checkpoint Results dialog box and then choose File > Exit to close the Test Results window.
8 Close the lesson5 test.
Choose File > Close.
9 Close version 1B of the Flight Reservation application.
Choose File > Exit.

Checking GUI Objects
WinRunner Tutorial Lesson 5, page 80
In
Back
Find
Find
Help
ChapterTop of
BooksOnline
Again
GUI Checkpoint Tips
• You can create a single GUI checkpoint that checks several or all objects in a window. Choose Create > GUI Checkpoint > For Multiple Objects. The Create GUI Checkpoint dialog box opens, which enables you to add objects to the GUI checkpoint and to specify the checks you want to perform on those objects. When you finish creating the checkpoint, WinRunner inserts a win_check_gui statement into the test script, which includes a checklist for the selected objects.
• For overnight test runs, you can instruct WinRunner not to display a message when a GUI mismatch is detected. Choose Settings > General Options. In the General Options dialog box, click the Run tab, and clear the Break when Verification Fails check box. This enables the test to run without interruption.

Checking GUI Objects
WinRunner Tutorial Lesson 5, page 81
In
Back
Find
Find
Help
ChapterTop of
BooksOnline
Again
For more information on setting test run options, refer to Chapter 35, “Setting Global Testing Options,” and Chapter 34, Setting Testing Options from a Test Script,” in the WinRunner User’s Guide.
• If you want to create new expected results for a GUI checkpoint, run the test in Update mode. WinRunner overwrites the existing expected GUI data with new data captured during the Update run.
For more information on GUI checkpoints, refer to Chapter 9, “Checking GUI Objects,” in the WinRunner User’s Guide.

Checking Bitmaps
WinRunner Tutorial Lesson 6, page 82
Back
Find
Find
Help
ChapterTop of
BooksOnline
Again
6Checking Bitmaps
This lesson:
• explains how to check bitmap images in your application
• shows you how to create a test that checks bitmaps
• shows you how to run the test in order to compare bitmaps in different versions of an application
• helps you analyze the results

Checking Bitmaps
WinRunner Tutorial Lesson 6, page 83
In
Back
Find
Find
Help
ChapterTop of
BooksOnline
Again
How Do You Check a Bitmap?
If your application contains bitmap areas, such as drawings or graphs, you can check these areas using a bitmap checkpoint. A bitmap checkpoint compares captured bitmap images pixel by pixel.
To create a bitmap checkpoint, you indicate an area, window, or object that you want to check.
WinRunner captures a bitmap image and saves it as expected results. It then inserts an obj_check_bitmap statement into the test script if it captures an object, or a win_check_bitmap statement if it captures an area or window.
When you run the test on a new version of the application, WinRunner compares the expected bitmap with the actual bitmap in the application. If any differences are detected, you can view a picture of the differences from the Test Results window.

Checking Bitmaps
WinRunner Tutorial Lesson 6, page 84
In
Back
Find
Find
Help
ChapterTop of
BooksOnline
Again
Adding Bitmap Checkpoints to a Test Script
In this exercise you will test the Agent Signature box in the Fax Order dialog box. You will use a bitmap checkpoint to check that you can sign your name in the box. Then you will use another bitmap checkpoint to check that the box clears when you click the Clear Signature button.
1 Start WinRunner and open a new test.
If WinRunner is not already open, choose Programs > WinRunner > WinRunner on the Start menu. If the Welcome window is open, click the New Test button. Otherwise, choose File > New. A new test window opens.
2 Start the Flight Reservation application and log in.
Choose Programs > WinRunner > Sample Applications > Flight 1A on the Start menu. In the Login window, type your name and the password mercury, and click OK. Reposition the Flight Reservation application and WinRunner so that they are both clearly visible on your desktop.
3 Start recording in Context Sensitive mode.
Choose Create > Record—Context Sensitive or click the Record button on the toolbar.
4 Open order #6.
In the Flight Reservation application, choose File > Open Order. In the Open Order dialog box, select the Order No. check box and type “6” in the adjacent box. Click OK to open the order.

Checking Bitmaps
WinRunner Tutorial Lesson 6, page 85
In
Back
Find
Find
Help
ChapterTop of
BooksOnline
Again
5 Open the Fax Order dialog box.
Choose File > Fax Order.
6 Enter a 10-digit fax number in the Fax Number box.
You do not need to type in parentheses or dashes.
7 Move the Fax Order dialog box.
Position the dialog box above the Flight Reservation window.
8 Switch to Analog mode.
Press F2 on your keyboard or click the Record button to switch to Analog mode.
9 Sign your name in the Agent Signature box.
10 Switch back to Context Sensitive mode.
Press F2 on your keyboard or click the Record button to switch back to Context Sensitive mode.
11 Insert a bitmap checkpoint that checks your signature.
Choose Create > Bitmap Checkpoint > For Object/Window or click the Bitmap Checkpoint for Object/Window button on the User toolbar.
Use the pointer to click the Agent Signature box. WinRunner captures the bitmap and inserts an obj_check_bitmap statement into the test script.
12 Click the Clear Signature button.
The signature is cleared from the Agent Signature box.

Checking Bitmaps
WinRunner Tutorial Lesson 6, page 86
In
Back
Find
Find
Help
ChapterTop of
BooksOnline
Again
13 Insert another bitmap checkpoint that checks the Agent Signature box.
Choose Create > Bitmap Checkpoint > For Object/Window or click the Bitmap Checkpoint for Object/Window button on the User toolbar.
Use the pointer to click the Agent Signature box. WinRunner captures a bitmap and inserts an obj_check_bitmap statement into the test script.
14 Click the Cancel button on the Fax Order dialog box.
15 Stop recording.
Choose Create > Stop Recording or click the Stop button.

Checking Bitmaps
WinRunner Tutorial Lesson 6, page 87
In
Back
Find
Find
Help
ChapterTop of
BooksOnline
Again
16 Save the test.
Choose File > Save or click the Save button. Save the test as lesson6 in a convenient location on your hard drive. Click Save to close the Save Test dialog box.
Bitmap checkpoints appear as obj_check_bitmap or win_check_bitmap statements in the test script.For example:
obj_check_bitmap("(static)", "Img1", 1);
static is the object or area’s logical name.
Img1 is the file containing the captured bitmap.
1 is the time (in seconds) needed to perform the check. This time is added to the value of the timeout_msec test option. See Lesson 4 for more information.

Checking Bitmaps
WinRunner Tutorial Lesson 6, page 88
In
Back
Find
Find
Help
ChapterTop of
BooksOnline
Again
Viewing Expected Results
You can now view the expected results of the lesson6 test.
1 Open the WinRunner Test Results window.
Choose Tools > Test Results or click the Test Results button. The Test Results window opens.
2 View the captured bitmaps.
In the test log section, double-click the first “capture bitmap” event, or select it and click the Display button.

Checking Bitmaps
WinRunner Tutorial Lesson 6, page 89
In
Back
Find
Find
Help
ChapterTop of
BooksOnline
Again
Next, double-click the second “capture bitmap” event, or select it and click the Display button.
3 Close the Test Results window.
Close the bitmaps and choose File > Exit to close the Test Results window.

Checking Bitmaps
WinRunner Tutorial Lesson 6, page 90
In
Back
Find
Find
Help
ChapterTop of
BooksOnline
Again
Running the Test on a New Version
You can now run the test on a new version of the Flight Reservation application.
1 Close Flight Reservation 1A.
Choose File > Exit.
2 Open Flight Reservation 1B.
Choose Programs > WinRunner > Sample Applications > Flight 1B on the Start menu. In the Login window, type your name and the password mercury, and click OK. Reposition the Flight Reservation application and WinRunner so that they are both clearly visible on your desktop.
3 Make sure that lesson6 is the active test.
Click in the lesson6 test window.
4 Check that Verify mode is selected in the Standard toolbar.
5 Choose Run from Top.
Choose Run > Run from Top, or click the Run from Top button. The Run Test dialog box opens. Accept the default test run name “res1.” Make sure that the Display Test Results at End of Run check box is selected.
6 Run the test.
Click OK. The test run begins.
If a mismatch is detected at a bitmap checkpoint, click Continue in the message window.

Checking Bitmaps
WinRunner Tutorial Lesson 6, page 91
In
Back
Find
Find
Help
ChapterTop of
BooksOnline
Again
7 Review the results.
When the test run is completed, the test results appear in the WinRunner Test Results window.
8 Close the Test Results window.
Choose File > Exit to close the Test Results window.
The test failed because the Agent Signature field did not clear when WinRunner clicked the Clear Signature button.
Double-click the failed bitmap checkpoint to view the expected, actual, and difference bitmaps.

Checking Bitmaps
WinRunner Tutorial Lesson 6, page 92
In
Back
Find
Find
Help
ChapterTop of
BooksOnline
Again
9 Close the lesson6 test.
Choose File > Close.
10 Close version 1B of the Flight Reservation application.
Choose File > Exit.

Checking Bitmaps
WinRunner Tutorial Lesson 6, page 93
In
Back
Find
Find
Help
ChapterTop of
BooksOnline
Again
Bitmap Checkpoint Tips
• To capture an area, choose Create > Bitmap Checkpoint > For Screen Area or click the Bitmap Checkpoint for Screen Area button on the User toolbar. Use the crosshairs pointer to mark the area that you want WinRunner to capture. WinRunner inserts a win_check_bitmap statement into your test script. This statement includes additional parameters that define the position (x- and y-coordinates) and size (width and height) of the area.

Checking Bitmaps
WinRunner Tutorial Lesson 6, page 94
In
Back
Find
Find
Help
ChapterTop of
BooksOnline
Again
• For overnight test runs, you can instruct WinRunner not to display a message when a bitmap mismatch is detected. Choose Settings > General Options. In the General Options dialog box, click the Run tab and clear the Break when Verification Fails check box. This enables the test to run unattended.
• When running a test that includes bitmap checkpoints, make sure that the screen display settings are the same as when the test script was created. If the screen settings are different, WinRunner will report a bitmap mismatch.

Checking Bitmaps
WinRunner Tutorial Lesson 6, page 95
In
Back
Find
Find
Help
ChapterTop of
BooksOnline
Again
• If you want to create new expected results for a bitmap checkpoint, run the test in Update mode. WinRunner overwrites the existing expected bitmaps with new expected bitmaps captured during the Update run.
For more information on bitmap checkpoints, refer to Chapter 13, “Checking Bitmaps” in the WinRunner User’s Guide.

Programming Tests with TSL
WinRunner Tutorial Lesson 7, page 96
Back
Find
Find
Help
ChapterTop of
BooksOnline
Again
7Programming Tests with TSL
This lesson:
• shows you how to use visual programming to add functions to your recorded test scripts
• shows you how to add decision-making logic to a test script
• helps you debug a test script
• lets you run a test on a new version of an application and analyze the results

Programming Tests with TSL
WinRunner Tutorial Lesson 7, page 97
In
Back
Find
Find
Help
ChapterTop of
BooksOnline
Again
How Do You Program Tests with TSL?
When you record a test, WinRunner generates TSL statements in a test script each time you click a GUI object or type on the keyboard. In addition to the recorded TSL functions, TSL includes many other built-in functions which can increase the power and flexibility of your tests. You can quickly add these functions to a test script using WinRunner’s visual programming tool, the Function Generator. All functions located in the Function Generator are explained in the TSL Online Reference.
The Function Generator enables you to add TSL functions in two ways:
• You can point to a GUI object and let WinRunner “suggest” an appropriate function. You can then insert this function into the test script.
• You can select a function from a list. Functions are presented both by category and alphabetically.
You can further enhance your test scripts by adding logic. Simply type programming elements such as conditional statements, loops, and arithmetic operators directly into the test window.

Programming Tests with TSL
WinRunner Tutorial Lesson 7, page 98
In
Back
Find
Find
Help
ChapterTop of
BooksOnline
Again
In the following exercises your goal is to create a test that:
✔ opens an order
✔ opens the Fax Order dialog box
✔ checks that the total is equal to the number of tickets ordered multiplied by the price per ticket
✔ reports whether the total is correct or incorrect

Programming Tests with TSL
WinRunner Tutorial Lesson 7, page 99
In
Back
Find
Find
Help
ChapterTop of
BooksOnline
Again
Recording a Basic Test Script
Start by recording the process of opening an order in the Flight Reservation application and opening the Fax Order dialog box.
1 Start WinRunner and open a new test.
If WinRunner is not already open, choose Programs > WinRunner > WinRunner on the Start menu. If the Welcome window is open, click the New Test button. Otherwise, choose File > New. A new test window opens.
2 Open the Flight Reservation application and log in.
Choose Programs > WinRunner > Sample Applications > Flight 1A on the Start menu. In the Login window, type your name and the password mercury, and click OK. Reposition the Flight Reservation application and WinRunner so that they are both clearly visible on your desktop.
3 Start recording in Context Sensitive mode.
Choose Create > Record—Context Sensitive or click the Record button on the toolbar.
4 Open order #4.
In the Flight Reservation application, choose File > Open Order. In the Open Order dialog box, select the Order No. check box and type “4” in the adjacent box. Click OK to open the order.

Programming Tests with TSL
WinRunner Tutorial Lesson 7, page 100
In
Back
Find
Find
Help
ChapterTop of
BooksOnline
Again
5 Open the Fax Order dialog box.
Choose File > Fax Order.
6 Click Cancel to close the dialog box.
7 Stop recording.
Choose Create > Stop Recording or click the Stop button.
8 Save the test.
Choose File > Save or click the Save button. Save the test as lesson7 in a convenient location on your hard drive. Click Save to close the Save Test dialog box.

Programming Tests with TSL
WinRunner Tutorial Lesson 7, page 101
In
Back
Find
Find
Help
ChapterTop of
BooksOnline
Again
Using the Function Generator to Insert Functions
You are now ready to add functions to the test script which query the # Tickets, Ticket Price, and Total fields in the Fax Order dialog box.
1 Insert a blank line above the button_press ("Cancel"); statement and place the cursor at the beginning of this line.
2 Open the Fax Order dialog box.
Choose File > Fax Order.
3 Query the # Tickets field.
Choose Create > Insert Function > For Object/Window or click the Insert Function for Object/Window button on the User toolbar. Use the pointer to click the # Tickets field.
The Function Generator opens and suggests the edit_get_text function.
This function reads the text in the # Tickets field and assigns it to a variable. The default variable name is text. Change the variable name to tickets by typing in the field.
edit_get_text("# Tickets:",tickets);
Click Paste to add the function to the test script.

Programming Tests with TSL
WinRunner Tutorial Lesson 7, page 102
In
Back
Find
Find
Help
ChapterTop of
BooksOnline
Again
4 Query the Ticket Price field.
Choose Create > Insert Function > For Object/Window or click the Insert Function for Object/Window button on the User toolbar. Use the pointer to click the Ticket Price field.
The Function Generator opens and suggests the edit_get_text function. Change the name of the text variable to price.
edit_get_text("Ticket Price:",price);
Click Paste to add the function to the test script.
5 Query the Total field.
Choose Create > Insert Function > For Object/Window or click theInsert Function For Object/Window button on the User toolbar. Use the pointer to click the Total field.
The Function Generator opens and suggests the edit_get_text function. Change the name of the text variable to total.
edit_get_text("Total:",total);
Click Paste to add the function to the test script.

Programming Tests with TSL
WinRunner Tutorial Lesson 7, page 103
In
Back
Find
Find
Help
ChapterTop of
BooksOnline
Again
6 Close the Fax Order dialog box.
Click Cancel to close the dialog box.
7 Save the test.
Choose File > Save or click the Save button.

Programming Tests with TSL
WinRunner Tutorial Lesson 7, page 104
In
Back
Find
Find
Help
ChapterTop of
BooksOnline
Again
Adding Logic to the Test Script
In this exercise you will program decision-making logic into the test script using an if/else statement. This will enable the test to:
• check that the total is equal to the number of tickets ordered multiplied by the price per ticket
• report whether the total is correct or incorrect
1 Place the cursor below the last edit_get_text statement in the lesson7 script.
2 Add the following statements to the test script exactly as they appear below.
if (tickets*price == total)tl_step ("total", 0, "Total is correct.");
elsetl_step ("total", 1, "Total is incorrect.");

Programming Tests with TSL
WinRunner Tutorial Lesson 7, page 105
In
Back
Find
Find
Help
ChapterTop of
BooksOnline
Again
In plain English these statements mean: “If tickets multiplied by price equals total, report that the total is correct, otherwise (else) report that the total is incorrect.” See “Understanding tl_step” below for more information on the tl_step function.
3 Save the test.
Choose File > Save or click the Save button.
You can use the Function Generator to quickly insert tl_step statements into the test script. Choose Create > Insert Function > From Function Generator or choose Insert Function From Function from the Test Creation toolbar.

Programming Tests with TSL
WinRunner Tutorial Lesson 7, page 106
In
Back
Find
Find
Help
ChapterTop of
BooksOnline
Again
Understanding tl_step
In most cases when you run a test, WinRunner reports an overall test result of pass or fail. By adding tl_step statements to your test script, you can determine whether a particular operation within the test passed or failed, and send a message to the report.
For example:
tl_step ("total", 1, "Total is incorrect.");
total is the name you assign to this operation.
1 causes WinRunner to report that the operation failed. If you use 0, WinRunner reports that the operation passed.
Total is incorrect is the message sent to the report. You can write any message that will make the test results meaningful.
For more information regarding the tl_step function, refer to the TSL Online Reference in WinRunner.

Programming Tests with TSL
WinRunner Tutorial Lesson 7, page 107
In
Back
Find
Find
Help
ChapterTop of
BooksOnline
Again
Debugging the Test Script
After enhancing a test with programming elements, you should check that the test runs smoothly, without errors in syntax and logic. WinRunner provides debugging tools which make this process quick and easy.
You can:
• run the test line by line using the Step commands
• define breakpoints that enable you to stop running the test at a specified line or function in the test script
• monitor the values of variables and expressions using the Watch List
When you debug a test script, you should run your test in Debug mode. (To run a test in Debug mode, select Debug from the Run Mode list on the Standard toolbar.) The test results are saved in a debug directory. Each time you run the test in Debug mode, WinRunner overwrites the previous debug results.
In this exercise you will control the test run using the Step command. If any error messages appear, examine the test script and try to fix the problem.
1 Select Debug mode from the Run Mode list on the Standard toolbar.
Debug mode will remain in effect until you select a different mode.
2 Place the execution marker –> next to the first line in the test script.
Click in the left margin, next to the first line in the test script.

Programming Tests with TSL
WinRunner Tutorial Lesson 7, page 108
In
Back
Find
Find
Help
ChapterTop of
BooksOnline
Again
3 Choose Run > Step or click the Step button to run the first line in the test script.
WinRunner runs the first line of the test.
4 Use the Step button to run the entire test, line by line.
Click the Step button to run each line of the test script.
5 Click Stop.
Click the Stop button to tell WinRunner that you have completed the Debug test run.
6 Review the test results in the WinRunner Test Results window.
Choose Tools > Test Results or click the Test Results button. The WinRunner Test Results window displays the results of the Debug test run.
7 Close the Test Results window.
Choose File > Exit.
8 Exit the Flight Reservation application.
Choose File > Exit.
For more information on debugging test scripts, refer to Part VI, “Debugging Tests” in your WinRunner User’s Guide.

Programming Tests with TSL
WinRunner Tutorial Lesson 7, page 109
In
Back
Find
Find
Help
ChapterTop of
BooksOnline
Again
Running the Test on a New Version
Once the test script is debugged, you can run it on a new version of the Flight Reservation application.
1 Open version 1B of the Flight Reservation application.
Choose Programs > WinRunner > Sample Applications > Flight 1B on the Start menu. In the Login window, type your name and the password mercury, and click OK. Reposition the Flight Reservation application and WinRunner so that they are both clearly visible on your desktop.
2 Select Verify mode from the Run Mode list on the Standard toolbar.
Verify mode will remain in effect until you select a different mode.
3 Choose Run from Top.
Choose Run > Run from Top, or click the Run from Top button. The Run Test dialog box opens. Accept the default test run name “res1.” Make sure that the Display Test Results at End of Run check box is selected.
4 Run the test.
Click OK in the Run Test dialog box. The test run begins.

Programming Tests with TSL
WinRunner Tutorial Lesson 7, page 110
In
Back
Find
Find
Help
ChapterTop of
BooksOnline
Again
5 Review the test results.
When the test run is completed, the test results appear in the WinRunner Test Results window.
The number of tickets multiplied by the price equals the total. Therefore the tl_step statement reports “pass”.

Programming Tests with TSL
WinRunner Tutorial Lesson 7, page 111
In
Back
Find
Find
Help
ChapterTop of
BooksOnline
Again
You can double-click the tl_step statement in the test log to view the full details:
Notice that the message “Total is correct” is the same message you wrote in the test script. Click OK to close the message.
6 Close the test results.
Choose File > Exit to close the Test Results window.
7 Close the lesson7 test.
Choose File > Close.
8 Close version 1B of the Flight Reservation application.
Choose File > Exit.

Reading Text
WinRunner Tutorial Lesson 8, page 112
Back
Find
Find
Help
ChapterTop of
BooksOnline
Again
8Reading Text
This lesson:
• describes how you can read text from bitmaps and non-standard GUI objects
• shows you how to teach WinRunner the fonts used by an application
• lets you create a test which reads and verifies text
• lets you run the test and analyze the results

Reading Text
WinRunner Tutorial Lesson 8, page 113
In
Back
Find
Find
Help
ChapterTop of
BooksOnline
Again
How Do You Read Text from an Application?
You can read text from any bitmap image or GUI object by adding text checkpoints to a test script. A text checkpoint reads the text from the application. You then add programming elements to the test script which verify that the text is correct.
For example, you can use a text checkpoint to:
• verify a range of values
• calculate values
• perform certain operations only if specified text is read from the screen
To create a text checkpoint, you indicate the area, object, or window that contains the text you want to read.
WinRunner inserts a win_get_text or obj_get_text statement into the test script and assigns the text to a variable. To verify the text you add programming elements to the script.
Note that when you want to read text from a standard GUI object (such as an edit field, a list, or a menu), you should use a GUI checkpoint, which does not require programming. Use a text checkpoint only when you want to read text from a bitmap image or a non-standard GUI object.

Reading Text
WinRunner Tutorial Lesson 8, page 114
In
Back
Find
Find
Help
ChapterTop of
BooksOnline
Again
In the following exercises you create a test that:
✔ opens a graph and reads the total number of tickets sold
✔ creates a new order for the purchase of one ticket
✔ opens the graph again and checks that the total number of tickets sold was updated
✔ reports whether the number is correct or incorrect

Reading Text
WinRunner Tutorial Lesson 8, page 115
In
Back
Find
Find
Help
ChapterTop of
BooksOnline
Again
Reading Text from an Application
In this exercise you will record the process of opening the graph in the Flight Reservation application to read the total number of tickets sold, creating a new order, and opening the graph again. In the next exercise you will add programming elements to the test script that verify the text in the graph.
Note that in order for WinRunner to read text on computers with certain display drivers, including ATI, you must learn the fonts in the Flight Reservation application before you can perform this exercise. If WinRunner fails to read text in the exercise below, stop the exercise, follow the instructions in “Teaching Fonts to WinRunner” in the next section, and repeat this exercise from the beginning.
1 Start WinRunner and open a new test.
If WinRunner is not already open, choose Programs > WinRunner > WinRunner on the Start menu. If the Welcome window is open, click the New Test button. Otherwise, choose File > New. A new test window opens.
2 Open the Flight Reservation application and log in.
Choose Programs > WinRunner > Sample Applications > Flight 1A on the Start menu. In the Login window, type your name and the password mercury, and click OK. Reposition the Flight Reservation application and WinRunner so that they are both clearly visible on your desktop.
3 Start recording in Context Sensitive mode.
Choose Create > Record—Context Sensitive or click the Record button.

Reading Text
WinRunner Tutorial Lesson 8, page 116
In
Back
Find
Find
Help
ChapterTop of
BooksOnline
Again
4 Open the graph.
In the Flight Reservation application, choose Analysis > Graphs.
5 Read the total from the graph.
Choose Create > Get Text > From Screen Area, or click the Get Text From Screen Area button on the User toolbar.
Use the crosshairs pointer and the left mouse button to drag a rectangle around the total.

Reading Text
WinRunner Tutorial Lesson 8, page 117
In
Back
Find
Find
Help
ChapterTop of
BooksOnline
Again
Click the right mouse button to finish the operation. WinRunner inserts an obj_get_text statement into the test script. The text appears in the script as a comment, for example #34.
Note: If the #No text found comment is inserted into your test script above the obj_get_text statement, it means that the display driver of your computer is preventing WinRunner from recognizing the font in the Flight Reservation application. If this happens, follow the instructions in Teaching Fonts to WinRunner on page 122, and then start this exercise from the beginning.
6 Close the graph.
7 Create a new order.
Choose File > New Order in the Flight Reservation application.

Reading Text
WinRunner Tutorial Lesson 8, page 118
In
Back
Find
Find
Help
ChapterTop of
BooksOnline
Again
8 Enter flight and passenger information.
9 Insert the order into the database.
Click the Insert Order button. When the insertion is complete, the message “Insert Done” appears in the status bar.
➀
➁
➂
➃
➄
Click the Flights button and double-click a flight.
Enter your name.
Order 1 ticket.➅
Enter tomorrow’s date.
Select Denver.
Select San Francisco.

Reading Text
WinRunner Tutorial Lesson 8, page 119
In
Back
Find
Find
Help
ChapterTop of
BooksOnline
Again
10 Synchronize the test so that it waits for the “Insert Done” message to appear in the status bar.
Choose the Create > Bitmap Checkpoint > For Object/Window command or click the Bitmap Checkpoint For Object/Window button on the User toolbar.
Use the pointer to click the “Insert Done” message.
11 Open the graph again.
Choose Analysis > Graphs.
12 Read the total from the graph.
Choose Create > Get Text > From Screen Area, or click the Get Text From Screen Area button on the User toolbar.

Reading Text
WinRunner Tutorial Lesson 8, page 120
In
Back
Find
Find
Help
ChapterTop of
BooksOnline
Again
Use the crosshairs pointer and the left mouse button to drag a rectangle around the total.
Click the right mouse button to finish the operation. WinRunner inserts an obj_get_text statement into the test script.
13 Close the graph.
14 Stop recording.
Choose Create > Stop Recording or click the Stop button.

Reading Text
WinRunner Tutorial Lesson 8, page 121
In
Back
Find
Find
Help
ChapterTop of
BooksOnline
Again
15 Save the test.
Choose File > Save or click the Save button. Name the test lesson8 and click Save.
When WinRunner reads text from the screen, it inserts a win_get_text or obj_get_text statement into the test script. For example:
obj_get_text("GS_Drawing", text, 346, 252, 373, 272);
GS_Drawing is the logical name of the non-standard GUI object containing the text.
text is the variable which stores the text you selected.
346, 252, 373, 272 are the coordinates of the rectangle you marked around the text.

Reading Text
WinRunner Tutorial Lesson 8, page 122
In
Back
Find
Find
Help
ChapterTop of
BooksOnline
Again
Teaching Fonts to WinRunner
In the following exercise you will teach WinRunner the font used by the Flights Reservation application. Note that you only need to perform this exercise now if WinRunner did not recognize text in the previous exercise. In general, you only need to teach fonts to WinRunner if it does not automatically recognize the fonts in the application you are testing.
To teach a font to WinRunner you:
• learn the set of characters (font) used by your application
• create a font group, a collection of fonts grouped together for specific testing purposes
• activate the font group by adding the setvar TSL function to a test script
Learning FontsYou use the WinRunner Fonts Expert to learn the fonts used by your application.
1 Start WinRunner and open a new test.
If WinRunner is not already open, choose Programs > WinRunner > WinRunner on the Start menu. If the Welcome window is open, click the New Test button. Otherwise, choose File > New. A new test window opens.

Reading Text
WinRunner Tutorial Lesson 8, page 123
In
Back
Find
Find
Help
ChapterTop of
BooksOnline
Again
2 Open the Fonts Expert.
In WinRunner, choose Tools > Fonts Expert. The Font Expert window opens.
3 Open the Learn Font window.
In the Fonts Expert, choose Font > Learn. The Learn Fonts window opens.
4 Name the font in the Flight Reservation flights.
In the Font Name box, type flights.
5 Describe the properties of the flights font.
Click the Select Font button to open the Font dialog box. The Flight Reservation font is MS Sans Serif, Bold, 8 points. Select these properties in the window and click OK.
6 Learn the flights font.
In the Learn Font window, click the Learn Font button. When the learn process is completed, the Existing Characters box displays the characters learned and the Properties box displays the font’s properties.
7 Close the Learn Fonts window.
Click Close.

Reading Text
WinRunner Tutorial Lesson 8, page 124
In
Back
Find
Find
Help
ChapterTop of
BooksOnline
Again
Creating a Font GroupAfter WinRunner learns a font, you must assign it to a font group. A font group can contain one or more fonts. In this exercise you will create a font group which contains only the flights font.
1 Open the Font Groups window.
In the Fonts Expert, choose Font > Groups.
2 Create a Font Group called flt_res and assign the flights font to it.
Type the name flt_res into the Group Name field. Select “flights” in the Fonts in Library box. Click the New button.
3 Close the Font Groups window and the Fonts Expert.
Click Close.
4 Close the Fonts Expert.
Choose Font > Exit.
Activating a Font GroupThe final step before you can read text is to activate the font group. You do this in the General Options dialog box.
1 Open a blank test window in WinRunner.
If a blank test window is not currently open, choose File > New.

Reading Text
WinRunner Tutorial Lesson 8, page 125
In
Back
Find
Find
Help
ChapterTop of
BooksOnline
Again
2 Activate the flt_res font group and the Image Text Recognition mechanism.
Choose Settings > General Options. In the General Options dialog box, click the Text Recognition tab. In the Font Group box, type flt_res. Select the Use Image Text Recognition Mechanism check box.
Note: You can also activate a font group using the fontgrp testing option by adding a setvar statement to a test script. To do so, in the test window type:
setvar ("fontgrp", "flt_res");
Keep in mind that only one font group can be active at a time. If you use a setvar statement to activate a font group, then the font group remains active only during the current WinRunner testing session. If you close WinRunner and restart it, you must run the setvar statement again in order to reactivate the font group. For more information on using the setvar function, refer to Chapter 34, “Setting Testing Options from a Test Script,” in your WinRunner User’s Guide.

Reading Text
WinRunner Tutorial Lesson 8, page 126
In
Back
Find
Find
Help
ChapterTop of
BooksOnline
Again
Verifying Text
In this exercise you add an if/else statement to the test script in order to determine whether the total was updated in the graph after you placed an order.
1 In the first obj_get_text statement in the lesson8 test script, change the text variable to first_total.
2 In the second obj_get_text statement in the test script, change the text variable to new_total.
3 Place the cursor below the last line of the script.
4 Add the following statements to the test script exactly as they appear below.
if (new_total == first_total + 1)tl_step ("graph total", 0, "Total is correct.");
elsetl_step ("graph total", 1, "Total is incorrect.");
In plain English, these statements mean “If new_total equals first_total plus 1, report that the total is correct, otherwise (else) report that the total is incorrect.”
For a description of the tl_step function, review Lesson 7, “Programming Tests with TSL.”
5 Save the test.
Choose File > Save or click the Save button.

Reading Text
WinRunner Tutorial Lesson 8, page 127
In
Back
Find
Find
Help
ChapterTop of
BooksOnline
Again
Debugging the Test ScriptYou should now run the test in Debug mode in order to check for errors in syntax and logic. If any error messages appear, look over the test script and try to fix the problem.
1 Select Debug mode from the Run Mode list on the Standard toolbar.
Debug mode will stay in effect until you select a different mode.
2 Run the test.
Choose Create > Run from Top or click the Run from Top button. If you prefer to run the test line-by-line, use the Step button.
3 Review the test results in the WinRunner Test Results window.
Choose Tools > Test Results or click the Test Results button. The WinRunner Test Results window displays the results of the Debug test run.
If the tl_step event failed, a problem exists in the test script. Examine the script and try to fix the problem.
4 Exit the Flight Reservation application.
Choose File > Exit.

Reading Text
WinRunner Tutorial Lesson 8, page 128
In
Back
Find
Find
Help
ChapterTop of
BooksOnline
Again
Running the Test on a New Version
Once the test script is debugged, you can run it on a new version of the Flight Reservation application.
1 Open version 1B of the Flight Reservation application.
Choose Programs > WinRunner > Sample Applications > Flight 1B on the Start menu. In the Login window, type your name and the password mercury, and click OK. Reposition the Flight Reservation application and WinRunner so that they are both clearly visible on your desktop.
2 In WinRunner, select Verify mode from the Run Mode list on the Standard toolbar.
Verify mode will stay in effect until you select a different mode.
3 Choose Run from Top.
Choose Run > Run from Top, or click the Run from Top button. The Run Test dialog box opens. Accept the default test run name “res1.” Make sure that the Display Test Results at End of Run check box is selected.
4 Run the test.
Click OK in the Run Test dialog box. The test run begins.

Reading Text
WinRunner Tutorial Lesson 8, page 129
In
Back
Find
Find
Help
ChapterTop of
BooksOnline
Again
5 Review the test results.
The test fails because the graph was not updated after WinRunner placed an order for one ticket. WinRunner read the total number of orders from the graph and concluded that the text is incorrect.
6 Close the report.
Choose File > Exit.
7 Close the lesson8 test.
Choose File > Close.
8 Close version 1B of the Flight Reservation application.
Choose File > Exit.

Reading Text
WinRunner Tutorial Lesson 8, page 130
In
Back
Find
Find
Help
ChapterTop of
BooksOnline
Again
Text Checkpoint Tips
• Before you create a script that reads text, determine where the text is located. If the text is part of a standard GUI object, use a GUI checkpoint or TSL functions such as edit_get_text or button_get_info. If the text is part of a non-standard GUI object, use the Create > Get Text > From Object/Window command. If the text is part of a bitmap, use the Create > Get Text > From Screen Area command.
• When WinRunner reads text from the application, the text appears in the script as a comment (a comment is preceded by #). If the comment #no text was found appears in the script, WinRunner does not recognize your application font. Use the Font Expert to teach WinRunner this font.
• TSL includes additional functions that enable you to work with text such as win_find_text, obj_find_text, and compare_text. For more information, refer to Chapter 13, “Checking Text,” in your WinRunner User’s Guide.

Creating Batch Tests
WinRunner Tutorial Lesson 9, page 131
Back
Find
Find
Help
ChapterTop of
BooksOnline
Again
9Creating Batch Tests
This lesson:
• describes how you can use a batch test to run a suite of tests unattended
• helps you create a batch test
• helps you run the batch test and analyze the results

Creating Batch Tests
WinRunner Tutorial Lesson 9, page 132
In
Back
Find
Find
Help
ChapterTop of
BooksOnline
Again
What Is a Batch Test?
Imagine that you have revised your application and you want to run old test scripts on the revised product. Instead of running each test individually, by using a batch test you can run all the tests you want, leave for lunch, and when you get back, see the results of all your tests on your screen.
A batch test looks and behaves like a regular test script, except for two main differences:
• It contains call statements, which open other tests. For example:
call "c:\\qa\\flights\\lesson8"();
During a test run, WinRunner interprets a call statement, and then opens and runs the “called” test. When the called test is done, WinRunner returns to the batch test and continues the run.
• You choose the Run in Batch Mode option on the Run tab of the General Options dialog box (Settings > General Options) before running the test. This option instructs WinRunner to suppress messages that would otherwise interrupt the test. For example, if WinRunner detects a bitmap mismatch, it does not prompt you to pause the test run.
When you review the results of a batch test run, you can see the overall results of the batch test (pass or fail), as well as the results of each test called by the batch test.

Creating Batch Tests
WinRunner Tutorial Lesson 9, page 133
In
Back
Find
Find
Help
ChapterTop of
BooksOnline
Again
Programming a Batch Test
In this exercise you will create a batch test that:
✔ calls tests that you created in earlier lessons (lesson5, lesson6, and lesson7)
✔ runs each called test 3 times in order to check how the Flight Reservation application handles the stress of repeated execution.
1 Start WinRunner and open a new test.
If WinRunner is not already open, choose Programs > WinRunner > WinRunner on the Start menu. If the Welcome window is open, click the New Test button. Otherwise, choose File > New. A new test window opens.
2 Program call statements in the test script that call lesson5, lesson6, and lesson7.
Type the call statements into the new test window. The statements should look like this:
call "c:\\qa\\flights\\lesson5"();call "c:\\qa\\flights\\lesson6"();call "c:\\qa\\flights\\lesson7"();
In your test script, replace c:\\qa\\flights with the directory path which contains your tests. When you type in the path, use double backslashes between the directory names.

Creating Batch Tests
WinRunner Tutorial Lesson 9, page 134
In
Back
Find
Find
Help
ChapterTop of
BooksOnline
Again
3 Define a loop so that each test is called 3 times.
Define a loop around the call statements so that the test script looks like this:
for (i=0; i<3; i++){call "c:\\qa\\flights\\lesson5"();call "c:\\qa\\flights\\lesson6"();call "c:\\qa\\flights\\lesson7"();}
In plain English, this means “Run lesson5, lesson6, and lesson7, and then loop back and run each test again. Repeat this process until each test is run 3 times.” Note that the brackets { } define which statements are included in the loop.
4 Choose the Batch Run option in the General Options dialog box.
Choose Settings > General Options. In the General Options dialog box, click the Run tab. Then select the Run in Batch Mode check box. Click OK to close the General Options dialog box.
5 Save the batch test.
Choose File > Save or click the Save button. Name the test batch.

Creating Batch Tests
WinRunner Tutorial Lesson 9, page 135
In
Back
Find
Find
Help
ChapterTop of
BooksOnline
Again
Running the Batch Test on Version 1B
You are now ready to run the batch test in order to check the Flight Reservation application. When you run the test, WinRunner will compare the expected results of each test to the actual results in the application. It uses the expected results stored when you created the tests in earlier lessons.
1 Open version 1B of the Flight Reservation application and log in.
Choose Programs > WinRunner > Sample Applications > Flight 1B on the Start menu. In the Login window, type your name and the password mercury, and click OK. Reposition the Flight Reservation application and WinRunner so that they are both clearly visible on your desktop.
2 In WinRunner, select Verify mode from the Run Mode list on the Standard toolbar.
3 Choose Run from Top.
Choose Run > Run from Top, or click the Run from Top button. The Run Test dialog box opens. Accept the default test run name “res1.” Make sure that the Display Test Results at End of Run check box is selected.
4 Run the test.
Click OK in the Run Test dialog box. The test run begins. The test run consists of nine different test executions and may take some time.
Watch how WinRunner opens and runs each called test, and loops back to execute the tests again (for a total of 3 times).

Creating Batch Tests
WinRunner Tutorial Lesson 9, page 136
In
Back
Find
Find
Help
ChapterTop of
BooksOnline
Again
Analyzing the Batch Test Results
Once the batch test run is completed, you can analyze the results in the WinRunner Test Results window. The Test Results window displays the overall result (pass or fail) of the batch test, as well as a result for each called test. The batch test fails if any of the called tests failed.
1 Open the WinRunner Test Results window and display the res1 results of the batch test.
If the WinRunner Test Results window is not currently open, click on the batch test window and choose Tools > Test Results, or click the Test Results button.

Creating Batch Tests
WinRunner Tutorial Lesson 9, page 137
In
Back
Find
Find
Help
ChapterTop of
BooksOnline
Again
2 View the results of the batch test.
The batch test failed because one or more of the called tests failed. As you have seen in earlier lessons, version 1B contains some bugs.
The test tree shows all the tests called during the batch test run. Since each test was called 3 times, the test names appear 3 times in the list.
Displays the current results directory name.
Lists all the events that occurred during the batch test run.
A “call test” event indicates that a called test was opened and run.
A “return” event indicates that control was returned to the batch test.
Shows whether the batch test passed or failed.

Creating Batch Tests
WinRunner Tutorial Lesson 9, page 138
In
Back
Find
Find
Help
ChapterTop of
BooksOnline
Again
3 View the results of the called tests.
Click a test name in the test tree to view the results of a called test.
Remember that lesson6 uses a bitmap checkpoint to check that the Agent Signature field in the Fax Order dialog box clears after WinRunner clicks the Clear Signature button. Since the field did not clear, the bitmap checkpoint detected a mismatch. You can double-click the failed event to display the expected, actual, and difference results.
The highlighted test indicates which test results are currently displayed. In this case, lesson6 results appear in the Test Results window.
Displays the current results directory name.
Shows whether the called test passed or failed.
Lists all the events that occurred when the test was called.

Creating Batch Tests
WinRunner Tutorial Lesson 9, page 139
In
Back
Find
Find
Help
ChapterTop of
BooksOnline
Again
4 Close the Test Results window.
Choose File > Exit.
5 Close the batch test.
Choose File > Close.
6 Clear the Batch Run option in the General Options dialog box.
Once you are finished running the batch test, clear the Batch Run option. Choose Settings > General Options. In the General Options dialog box, click the Run tab. Then clear the Run in Batch Mode check box and click OK.
7 Close version 1B of the Flight Reservation application.
Choose File > Exit.

Creating Batch Tests
WinRunner Tutorial Lesson 9, page 140
In
Back
Find
Find
Help
ChapterTop of
BooksOnline
Again
Batch Test Tips
• By defining search paths, you can instruct WinRunner to search for called tests in certain directories. Choose Settings > General Options. In the General Options dialog box, click the Folders tab. In the Search Path for Called Tests box, simply define the paths in which the tests are located. This enables you to include only the test name in a call statement. For example:
call "lesson6"();
For more information on defining search paths for called tests, refer to Chapter 35, “Setting Global Testing Options,” in your WinRunner User’s Guide.
• You can pass parameter values from the batch test to a called test. Parameter values are defined within the parentheses of a call statement.
call test_name ([parameter1, parameter2, ...]);
• Remember that you must select the Run in Batch Mode option in the General Options dialog box in order for the batch test to run unattended.
For more information on creating batch tests, refer to Chapter 19, “Calling Tests” and Chapter 27, “Running Batch Tests” in your WinRunner User’s Guide.

Maintaining Your Test Scripts
WinRunner Tutorial Lesson 10, page 141
Back
Find
Find
Help
ChapterTop of
BooksOnline
Again
10Maintaining Your Test Scripts
This lesson:
• explains how the GUI map enables you to continue using your existing test scripts after the user interface changes in your application
• shows you how to edit existing object descriptions or add new descriptions to the GUI map
• shows you how to use the Run wizard to automatically update the GUI map

Maintaining Your Test Scripts
WinRunner Tutorial Lesson 10, page 142
In
Back
Find
Find
Help
ChapterTop of
BooksOnline
Again
What Happens When the User Interface Changes?
Consider this scenario: you have just spent several weeks creating a suite of automated tests that covers the entire functionality of your application. The application developers then build a new version with an improved user interface. They change some objects, add new objects, and remove others. How can you test this new version using your existing tests?
WinRunner provides an easy solution. Instead of manually editing every test script, you can update the GUI map. The GUI map contains descriptions of the objects in your application. It is created when you use the RapidTest Script wizard to learn the objects in your application. This information is saved in a GUI map file.
An object description in the GUI map is composed of:
• a logical name, a short intuitive name describing the object. This is the name you see in the test script. For example:
button_press ("Insert Order");
Insert Order is the object’s logical name.

Maintaining Your Test Scripts
WinRunner Tutorial Lesson 10, page 143
In
Back
Find
Find
Help
ChapterTop of
BooksOnline
Again
• a physical description, a list of properties that uniquely identify the object. For example:
{class: push_buttonlabel: "Insert Order"}
The button belongs to the push_button object class and has the label “Insert Order.”
When you run a test, WinRunner reads an object’s logical name in the test script and refers to its physical description in the GUI map. WinRunner then uses this description to find the object in the application under test.
If an object changes in an application, you must update its physical description in the GUI map so that WinRunner can continue to find it during the test run.
In the following exercises you will:
✔ edit an object description in the GUI map
✔ add objects to the GUI map
✔ use the Run wizard to automatically detect user interface changes and update the GUI map

Maintaining Your Test Scripts
WinRunner Tutorial Lesson 10, page 144
In
Back
Find
Find
Help
ChapterTop of
BooksOnline
Again
Editing Object Descriptions in the GUI Map
Suppose that in a new version of the Flight Reservation application, the Insert Order button is changed to an Insert button. In order to continue running tests that use the Insert Order button, you must edit the label in the button’s physical description in the GUI map. You can change the physical description using regular expressions. For additional information, refer to the WinRunner User’s Guide.
1 Start WinRunner and open a new test.
If WinRunner is not already open, choose Programs > WinRunner > WinRunner on the Start menu. If the Welcome window is open, click the New Test button. Otherwise, choose File > New. A new test window opens.

Maintaining Your Test Scripts
WinRunner Tutorial Lesson 10, page 145
In
Back
Find
Find
Help
ChapterTop of
BooksOnline
Again
2 Open the GUI map editor.
Choose Tools > GUI Map Editor. The GUI Map Editor opens and displays the current contents of the GUI Map.
Objects are listed in a tree, according to the window in which they are located.
When this checkbox is selected, the physical description of the selected object or window is displayed below.
Within the tree, the object is identified by its class using an icon, and by its logical name.

Maintaining Your Test Scripts
WinRunner Tutorial Lesson 10, page 146
In
Back
Find
Find
Help
ChapterTop of
BooksOnline
Again
The GUI Map Editor displays the object names in a tree. Next to each name is an icon representing the object’s type. The objects are grouped according to the window in which they are located. You can double-click a window to collapse or expand the view of its objects.
3 Find the Insert Order button in the tree.
In the GUI Map Editor, choose View > Collapse Objects Tree to view only the windows.
When you collapse the tree, only windows are listed.

Maintaining Your Test Scripts
WinRunner Tutorial Lesson 10, page 147
In
Back
Find
Find
Help
ChapterTop of
BooksOnline
Again
Double-click the Flight Reservation window to view its objects. Scroll down until you locate the Insert Order button.
4 View the Insert Order button’s physical description.
Click the Insert Order button in the tree.

Maintaining Your Test Scripts
WinRunner Tutorial Lesson 10, page 148
In
Back
Find
Find
Help
ChapterTop of
BooksOnline
Again
5 Modify the Insert Order button’s physical description.
Click the Modify button or double-click the Insert Order button. The Modify dialog box opens and displays the button’s logical name and physical description.

Maintaining Your Test Scripts
WinRunner Tutorial Lesson 10, page 149
In
Back
Find
Find
Help
ChapterTop of
BooksOnline
Again
In the Physical Description box, change the label property from Insert Order to Insert.
Click OK to close the dialog box.
6 Close the GUI Map Editor.
In the GUI Map Editor, choose File > Exit.
The next time you run a test that contains the logical name “Insert Order”, WinRunner will locate the Insert button in the Flight Reservation window.

Maintaining Your Test Scripts
WinRunner Tutorial Lesson 10, page 150
In
Back
Find
Find
Help
ChapterTop of
BooksOnline
Again
Adding GUI Objects to the GUI Map
If your application contains new objects, you can add them to the GUI map without running the RapidTest Script wizard again. You simply use the Learn button in the GUI Map Editor to learn descriptions of the objects. You can learn the description of a single object or all the objects in a window.
In this exercise you will add the objects in the Flight Reservation Login window to the GUI map.
1 Open the Flight Reservation Login window.
2 Choose Programs > WinRunner > Sample Applications > Flight 1A on the Start menu.
3 Open the GUI map.
Choose Tools > GUI Map Editor. The GUI Map Editor opens.
4 Learn all the objects in the Login window.
Click the Learn button. Use the pointer to click the title bar of the Login window.

Maintaining Your Test Scripts
WinRunner Tutorial Lesson 10, page 151
In
Back
Find
Find
Help
ChapterTop of
BooksOnline
Again
A message prompts you to learn all the objects in the window. Click Yes.
Watch as WinRunner learns a description of each object in the Login window and adds it to the GUI Map.
5 Find the Login window objects in the GUI Map Editor tree.
6 Close the GUI Map Editor.
In the GUI Map Editor, choose File > Exit.
7 Close the Login window.
Click Cancel.

Maintaining Your Test Scripts
WinRunner Tutorial Lesson 10, page 152
In
Back
Find
Find
Help
ChapterTop of
BooksOnline
Again
Updating the GUI Map with the Run Wizard
During a test run, if WinRunner cannot locate an object mentioned in the test script, the Run wizard opens. The Run wizard helps you update the GUI map so that your tests can run smoothly. It prompts you to point to the object in your application, determines why it could not find the object, and then offers a solution. In most cases the Run wizard will automatically modify the object description in the GUI map or add a new object description.
For example, suppose you run a test that clicks the Insert Order button in the Flight Reservation window.
button_press ("Insert Order");

Maintaining Your Test Scripts
WinRunner Tutorial Lesson 10, page 153
In
Back
Find
Find
Help
ChapterTop of
BooksOnline
Again
If the Insert Order button is changed to an Insert button, the Run wizard opens during a test run and describes the problem.

Maintaining Your Test Scripts
WinRunner Tutorial Lesson 10, page 154
In
Back
Find
Find
Help
ChapterTop of
BooksOnline
Again
You click the hand button in the wizard and click the Insert button in the Flight Reservation program. The Run wizard then offers a solution:
When you click OK, WinRunner automatically modifies the object’s physical description in the GUI map and then resumes the test run.
If you would like to see for yourself how the Run wizard works:
1 Open the GUI map (Tools > GUI Map Editor).
2 Delete the “Fly From” object from the GUI Map Editor tree.
The Fly From object is listed under the Flight Reservation window. Select this object and click the Delete button in the GUI Map Editor.

Maintaining Your Test Scripts
WinRunner Tutorial Lesson 10, page 155
In
Back
Find
Find
Help
ChapterTop of
BooksOnline
Again
3 Open Flight Reservation 1A.
Choose Programs > WinRunner > Sample Applications > Flight 1A on the Start menu. In the Login window, type your name and the password mercury, and click OK. Reposition the Flight Reservation application and WinRunner so that they are both clearly visible on your desktop.
4 In WinRunner, open the lesson4 test and run it.
Watch what happens when WinRunner reaches the statement
list_select_item ("Fly From:", "Los Angeles"); 5 Follow the Run wizard instructions.
The Run wizard asks you to point to the Fly From object and then adds the object description to the GUI map. WinRunner then continues the test run.
6 Find the object description in the GUI map.
When WinRunner completes the test run, return to the GUI Map Editor and look for the Fly From object description. You can see that the Run wizard has added the object to the tree.
7 Close the GUI Map.
In the GUI Map Editor, choose File > Exit.
8 Close the Flight Reservation application.
Choose File > Exit.

Where Do You Go from Here?
WinRunner Tutorial Lesson 11, page 156
Back
Find
Find
Help
ChapterTop of
BooksOnline
Again
11Where Do You Go from Here?
Now that you have completed the exercises in Lessons 1 through 10, you are ready to apply the WinRunner concepts and skills you learned to your own application.
This lesson:
• shows you how to start testing your application
• describes where you find additional information about WinRunner
Where Do You Go from Here?
WinRunner Tutorial Lesson 11, page 157
In
Back
Find
Find
Help
ChapterTop of
BooksOnline
Again
Getting Started
In order to start testing your application you should use the RapidTest Script wizard to learn a description of every object it contains. However, before doing this, remove the sample application’s object descriptions from the GUI map.
To get started:
1 Close all applications on your desktop except for WinRunner and the application you want to test.
2 Clear the GUI map.
The GUI map currently contains descriptions of objects in the sample application. Since you no longer need these descriptions, you should clear the GUI map.
To clear the GUI map, open the GUI Map Editor (Tools > GUI Map Editor) and choose File > Close All. When prompted, click OK to discard any descriptions found in the temporary GUI map file. When prompted, click Yes to clear the temporary buffer. WinRunner will close all open GUI map files and will also delete any descriptions found in the temporary GUI map file.
Choose File > Exit to close the GUI Map Editor.

Where Do You Go from Here?
WinRunner Tutorial Lesson 11, page 158
In
Back
Find
Find
Help
ChapterTop of
BooksOnline
Again
3 Run the RapidTest Script Wizard on your application. Learn object descriptions in Comprehensive mode.
You should now use the RapidTest Script Wizard to learn a description of each object in your application. Choose Create > RapidTest Script Wizard and follow the instructions on the screen.
When the wizard asks you to choose a learning flow, choose Comprehensive. This mode lets you control how WinRunner learns object descriptions. It enables you to customize logical names and map custom objects to a standard object class.
After the learning process is completed, the wizard creates a GUI map file and a startup script. If you are working in a testing group, store this information on a shared network drive.
If you need help while using the wizard, click the Help button on the appropriate screen.
4 Create tests!
Once you finish using the wizard, you can start creating tests in WinRunner. Use recording, programming, or a combination of both to build your automated test scripts.

Where Do You Go from Here?
WinRunner Tutorial Lesson 11, page 159
In
Back
Find
Find
Help
ChapterTop of
BooksOnline
Again
Getting Additional Information
For more information on WinRunner and TSL, refer to the user guides and online resources provided with WinRunner.
Documentation SetIn addition to this tutorial, WinRunner comes with a complete set of documentation:
WinRunner User’s Guide provides step-by-step instructions on how to use WinRunner to test your application. It describes many useful testing tasks and options not covered in this tutorial.
WinRunner Installation Guide explains how to install WinRunner on a single computer or on a network.
WinRunner Customization Guide explains how to customize WinRunner to meet the special testing requirements of your application.
WebTest User’s Guide teaches you how to use the WebTest add-in to test your Web site.
TSL Reference Guide describes Test Script Language (TSL) and the functions it contains.

Where Do You Go from Here?
WinRunner Tutorial Lesson 11, page 160
In
Back
Find
Find
Help
ChapterTop of
BooksOnline
Again
Online ResourcesWinRunner includes the following online resources:
Read Me First provides last-minute news and information about WinRunner.
What’s New in WinRunner describes the newest features in the latest versions of WinRunner.
Books Online displays the complete documentation set in PDF format. Online books can be read and printed using Adobe Acrobat Reader 3.01, which is included in the installation package. Check Mercury Interactive’s Customer Support web site for updates to WinRunner online books.
Note that in order to view the Books Online you must first install the Acrobat Reader. To install the Acrobat Reader, choose Programs > WinRunner > Documentation > Acrobat Reader Setup on the Start menu.
WinRunner Context Sensitive Help provides immediate answers to questions that arise as you work with WinRunner. It describes menu commands and dialog boxes, and shows you how to perform WinRunner tasks. Check Mercury Interactive’s Customer Support web site for updates to WinRunner help files.
TSL Online Reference describes Test Script Language (TSL), the functions it contains, and examples of how to use the functions. Check Mercury Interactive’s Customer Support site for updates to the TSL Online Reference.

Where Do You Go from Here?
WinRunner Tutorial Lesson 11, page 161
In
Back
Find
Find
Help
ChapterTop of
BooksOnline
Again
WinRunner Sample Tests includes utilities and sample tests with accompanying explanations. Check Mercury Interactive’s Customer Support site for updates to WinRunner help files.
WinRunner Quick Preview opens an overview of WinRunner in your default browser.
Technical Support Online uses your default web browser to open Mercury Interactive’s Customer Support web site.
Support Information presents the locations of Mercury Interactive’s Customer Support web site and home page, the e-mail address for sending information requests, the name of the relevant news group, the location of Mercury Interactive’s public FTP site, and a list of Mercury Interactive’s offices around the world.
Mercury Interactive on the Web uses your default web browser to open Mercury Interactive’s home page. This site provides you with the most up-to-date information on Mercury Interactive and its products. This includes new software releases, seminars and trade shows, customer support, educational services, and more.

In
Find
BooksOnline
Again
Find
Help
Back
WinRunner Tutorial, Version 6.0
© Copyright 1994 - 1999 by Mercury Interactive Corporation
All rights reserved. All text and figures included in this publication are the exclusive property of Mercury Interactive Corporation, and may not be copied, reproduced, or used in any way without the express permission in writing of Mercury Interactive. Information in this document is subject to change without notice and does not represent a commitment on the part of Mercury Interactive.
Mercury Interactive may have patents or pending patent applications covering subject matter in this document. The furnishing of this document does not give you any license to these patents except as expressly provided in any written license agreement from Mercury Interactive.
WinRunner, XRunner, and LoadRunner are registered trademarks of Mercury Interactive Corporation. Astra, Astra SiteManager, Astra SiteTest, RapidTest, QuickTest, Visual Testing, Action Tracker, Link Doctor, Change Viewer, Dynamic Scan, Fast Scan, and Visual Web Display are trademarks of Mercury Interactive Corporation in the United States and/or other countries.
This document also contains registered trademarks, trademarks and service marks that are owned by their respective companies or organizations. Mercury Interactive Corporation disclaims any responsibility for specifying which marks are owned by which companies or organizations.
If you have any comments or suggestions regarding this document, please send them via e-mail to [email protected].
Mercury Interactive Corporation1325 Borregas Avenue Sunnyvale, CA 94089 Tel. (408)822-5200 (800) TEST-911Fax. (408)822-5300
WRTUT6.0/01