
Web Development project with JavaEE - Theseus
65
Anatolii Shakhov Web Development project with JavaEE Bachelor’s Thesis Information Technology May 2015
-
Upload
khangminh22 -
Category
Documents
-
view
0 -
download
0
Transcript of Web Development project with JavaEE - Theseus

Anatolii Shakhov
Web Development project with JavaEE
Bachelor’s Thesis Information Technology
May 2015

DESCRIPTION
Date of the bachelor's thesis
28.05.2015
Author(s)
Anatolii Shakhov
Degree programme and option
Information Technology
Name of the bachelor's thesis
WEB DEVELOPMENT PROJECT WITH JAVAEE Abstract
The aim of the study is to create a web application (internet auction) for the Company X from the scratch. The application is based on Java platform and it allows people to sell and buy items using a fixed price or a bidding system. The auction provides access to every item added by the other users using a built-in search, as well as the possibility to add, edit, purchase and place bids on different items. Theoretical background required for the development and the whole process with noticeable parts are presented in the text. This study does not cover the basics of Java programming or database develop-ment. It provides an overview of the technologies and specific frameworks required for the develop-ment of a web application. The second part of the study covers an implementation and practical ap-plication of the technologies. It provides the detailed information about the development of the appli-cation from the database setup to the interaction between the client and the server. The study provides an overview of modern web development technologies as well as the information about their usage. It can be used by both beginner and amateur level web developers, students and anyone who would like to learn how to build web applications. Subject headings, (keywords)
Web development, online trading, bidding, JavaEE, JavaServer Faces Pages Language URN
61
English
Remarks, notes on appendices
Tutor
Matti Koivisto
Bachelor’s thesis assigned by
Unspecified Company

CONTENTS
1. INTRODUCTION................................................................................................ 1
2. CONCEPTS BEHIND THE JAVA EE DEVELOPMENT ................................. 3
2.1. Java EE ....................................................................................................... 3
2.1.1. JSF and JSP ................................................................................... 4
2.1.2. Managed Bean ............................................................................... 6
2.2. Primefaces and XHTML ............................................................................. 7
2.2.1. Basic layout ................................................................................... 8
2.2.2. Primefaces ................................................................................... 10
2.3. Integrated Development Environment and Version Control .................... 10
2.4. Database .................................................................................................... 11
2.4.1. Spring JDBC template ................................................................. 12
3. STARTING POINTS ......................................................................................... 15
3.1. Installing Software .................................................................................... 15
3.2. Planning .................................................................................................... 17
3.3. Time Management .................................................................................... 18
4. DEVELOPING THE BASICS ........................................................................... 20
4.1. What is it all about? .................................................................................. 20
4.2. Project structure ........................................................................................ 21
4.2.1. Packages and Classes .................................................................. 21
4.2.2. Maven and pom.xml .................................................................... 22
4.2.3. Database access ........................................................................... 23
4.2.4. Basic layout ................................................................................. 24
4.2.5. Maps ............................................................................................ 25
5. DEVELOPING DEALS..................................................................................... 26
5.1. Add new deal ............................................................................... 26
5.1.1. File upload ................................................................................... 28
5.1.2. Add location ................................................................................ 30
5.2. Search for deals ......................................................................................... 30
5.2.1. Paginator ...................................................................................... 32
5.3. View deal .................................................................................................. 33
5.3.1. Metadata and variables ................................................................ 34
5.4. Edit deal .................................................................................................... 35
5.5. Location .................................................................................................... 35

5.6. Bidding ..................................................................................................... 37
5.6.1. Set new bid .................................................................................. 37
5.6.2. List of bids ................................................................................... 37
5.6.3. Show latest bids ........................................................................... 38
6. LAYOUT ........................................................................................................... 40
6.1. Color scheme ............................................................................................ 40
6.2. Tab view ................................................................................................... 41
6.3. Main page ................................................................................................. 42
6.4. Rewriting existing components ................................................................ 43
6.5. Challenges ................................................................................................. 44
6.5.1. Forms ........................................................................................... 44
6.5.2. Resources ..................................................................................... 45
7. PURCHASING .................................................................................................. 46
7.1. Purchasing a product ................................................................................. 46
7.1.1. User notifications......................................................................... 47
7.1.2. Deal status ................................................................................... 48
7.1.3. Purchase confirmation ................................................................. 49
7.2. Time challenge .......................................................................................... 50
7.3. Printing invoice ......................................................................................... 51
7.3.1. Layout .......................................................................................... 52
7.3.2. Date and time ............................................................................... 53
7.3.3. TAX and VAT ............................................................................. 53
8. TESTING ........................................................................................................... 55
9. CONCLUSION .................................................................................................. 57
BIBLIOGRAPHY ........................................................................................................ 59

1
1. INTRODUCTION
JavaEE is enterprise-level software which provides a variety of tools for Java programmers.
Alongside with this tool and an IDE (Integrated Development Environment) programmers can
achieve really great output software solutions. I decided to use this tool for this study, because
it is community-driven, one of the most popular huge enterprise programming platforms, and
Java itself is natively supported by almost any machine, despite the operating system installed
on it. Also, this thesis work is conducted and supported by the company which did not want to
reveal its identity. Therefore, in the text below I will refer to it as Company X. The company
has requirements for the tools used during the process.
The aim of the study is to conduct a study on modern web-development technologies and to
use them to create an online auction web application from scratch. It does not mean that I will
start from the “invention of the wheel”, but it means that I will use supporting libraries, litera-
ture and knowledge gathered by other people to connect them into a single, practically-
oriented study.
The theoretical part of the thesis contains overall information about technologies used during
the development process (JavaEE, JSF, MySQL, PrimeFaces, NetBeans IDE, Maven,
OpenLayers). This list seems too long, but these technologies connected together provide un-
beatable tools to create a working product. Another important part of the theoretical process is
the ability to search for the information – references, comments, other people’s thoughts and
theoretical advice from the supervising company are mentioned as well. Finally, the theoreti-
cal part contains my personal observations, connected to the selected technologies.
The practical part of the study shows how I implemented the selected technologies in the pro-
ject. From now on, I will use the word project, when referring to the practical part of the
study. With this decision it might be easier to divide the parts logically. The practical part
provides code samples, interface views and database structure, and does not tell just literal
facts about code and functions. In the practical part you can take a look at the whole devel-
opment process and face the problems that occurred during the long working hours together
with the author – me.
By now you might be wondering, why I decided to use this particular topic? First of all, Java
is an extremely popular development platform. It is widely used and is already implemented

2
by many companies, from large to small ones. I am interested in the project where I can learn
a lot, put knowledge into practice and to have a great project for my future portfolio. The last,
but not the least reason is curiosity. I have not worked with any of these technologies before
(not to mention MySQL and basic Java development), and wanted to widen my current
knowledge in programming. I am a versatile person, who enjoys obtaining knowledge from as
many sources as possible. In other words, this challenge literally ignited my passion for work.
This study has a solid structure, following these main steps:
Research for the most suitable technologies
Setting up the IDE
Starting implementation and documenting the theoretical part
Weekly meetings with company executives to reconcile further development steps and
current progress
Structuring, connecting and testing the database to the existing functions
Testing, polishing and bug fixing process
Every step is followed by thorough documentation and testing to provide the result and to
move further.
This thesis does not share confidential details about the internet auction application, because
the company has strict policies concerning data sharing. However, the mechanisms and ex-
planations are written down to present the whole idea about the features of the application and
its main contents. The whole development process is conducted by two students working on
separate parts of the project. I am working with Mikhail Rumiantcev dividing tasks to provide
a working product for the company executives. Mikhail will work on the user account integra-
tion, registration and login filter which will restrict unauthorized access to the service. My
part is mainly based on the products of the web-shop application. I am responsible for imple-
menting and creating every interface needed for interaction with products added on the web
site. The relevant database tables, purchasing, maps, bidding and layout design are included in
my work.

3
2. CONCEPTS BEHIND THE JAVA EE DEVELOPMENT
Let’s start with a small introduction about Java programming and the concepts of the object-
oriented programming. Basically, Java is a programming language and a whole computing
platform which was developed in 1995 by Sun Microsystems and later became Oracle Corpo-
ration (Java, Oracle 2015). This is a unique language which is used in a majority of electron-
ics worldwide. Most of the electronic devices support Java on a native level – the applications
written in Java can be launched on any Java virtual machine and are not dependent on the
machine architecture. Java should not be mixed up with JavaScript, because the last one is a
scripting language, while Java is a programming language. Scripts are special programs, or
functions, which can execute or automate task execution. JavaScript is used in Web Devel-
opment most of the time. Even though this thesis utilizes the power of Java, I am using JavaS-
cript as well for the interactions between different elements on a page and for the implementa-
tion of maps on this service.
2.1. Java EE
Basic Java (or Java SE) offers the core functionality of the Java programming language. Java
EE (enterprise edition) provides extended mechanisms which are suitable for large-scale envi-
ronments and big companies. Moreover, the official Oracle web page provides the following
information: “The Java EE platform provides an API and runtime environment for developing
and running large-scale, multi-tiered, scalable, reliable, and secure network applications” (Or-
acle 2012). This is one of the reasons why we agreed to use Java in this network project. It is
scalable, multipurpose and secure. At the beginning of the actual development I could not
understand why we had to use Java instead of simple JavaScript libraries to handle all the
operations on the web service. I thought that it might be too heavy for the purpose and too
hard to implement. When I had got used to the syntax, common functions and particular fea-
tures I understood that with this language we can work out a very powerful platform using the
same efforts as during the development of a simple application with JavaScript.
In JavaEE word multi-tiered plays a huge role. The tier information is based on the official
Oracle Java Documentation (Oracle 2014). It means that the application consists of separate
isolated layers which are named tiers. Basically, there are three main tiers in a web applica-
tion: a client tier, a middle tier and a data tier. The client tier contains users which access the
JavaEE server and the actual application. The middle tier contains two separate areas, web

4
layer and business layer. Content generation, application flow and the information which is
displayed to users are present on the web layer of the application. In this tier such technolo-
gies as JavaServer Faces, Expression Language and Servlets are used. The middle tier also
contains the business layer, which is responsible for the business logic for the application.
Enterprise JavaBeans, RESTful web services and Java Persistence API are common technolo-
gies for the layer. The data tier contains systems and methods related to the database devel-
opment, database servers, enterprise-level resource planning systems and mainframes.
2.1.1. JSF and JSP
JavaServer Faces and JavaServer Pages are the main technologies inside the Java EE. They
both offer ways to interact between Java and web pages, but their methods are different. JSP
is a Java view technology. The code is written inside the view pages. It supports Expression
Language (EL), which helps to call Java functions from the web page (The Java EE 6 Tutorial
2015, 2.6). In JSF the code is compiled on the server and afterwards it shows the output on a
user machine. JSF uses the Expression language as well as utilizes Managed Beans and sup-
ports templates.
Expression language provides the connection between a view layer (presentation layer) and
the service layer of the application. With its help we can call Java functions right from the
web pages. Basic syntax of the expression is as follows:
“#{managedBeanName.functionName()}”
Both functions and variables can be called/used from the page with the EL, but only the
functions located in Managed Beans can be called.
JSF framework allows us to develop server side components and use them inside our web
application. In a nutshell, JSF architecture is based on the MVC architecture (Model – View –
Controller). In another words, Model consists of objects for an application, View holds both
web pages and view classes, and Controller executes functions and provides the functionality
behind the “view curtains”. In the real environment I am using five different layers to ease the
development of the application and to create logical connections between separate layers. The
model in Figure 1 was kindly presented and explained to me by my supervisor in the company
(Plosila 2015). I used this model to implement the architecture for the application and to show
what these layers mean.

5
The first one (View) is the layer with web pages. It is similar to any common HTML
project – we have resources, styles and basic user interaction components. The only
difference from the plain HTML is that JSF requires the use of XHTML pages, or JSP
pages instead (The difference is explained later).
Another view layer (sometimes called User Interface) holds the Beans of the project.
From the XHTML page the application can access methods and objects of Beans
inside the UI layer.
The next stage in the hierarchy is a Service (Logic) layer. Service layer contains every
Java class, doing tasks inside the application. These classes provide basic functionality
of the service, or the application.
DAO layer is another stage in the hierarchy which connects our logic to the database.
Every time we have to store variables, numbers and strings for an indefinite amount of
time, the database comes into play. An application sends relevant fields and values
into the database via the Data Access Object classes. These classes prepare SQL
statements and send requests into the database.
The last but not the least layer in this architecture is called Data Transfer Object
(DTO). These classes hold objects and their properties, accessed with getters and
setters. For instance, if we have an object “Table”, its .java class will contain such
properties as: height, width, color, material, shape. These properties are assigned
FIGURE 1. JavaEE application layers

6
special methods, called getters and setters which help us to get and set their properties
accordingly from other classes. To create an object in Java, a new instance of its class
has to be created. To make a Table object, we will call: Table table = new Table(); to
instantiate it. After this step its properties can be changed. By default, all of them are
equal to null. To set some of the properties, we can use syntax: table.setSize(37);
table.setShape(“Square”);. Hence, we are not changing anything inside DTO classes.
We are creating instances of the classes and assigning their properties, stated in the
parent class.
Basically, this model has a vast importance in terms of service development. In case we
would like to add a mobile application for the service later, we will not have to create the
logic from scratch, because it will be separated from the View layer. In case the project will
require a full redesign – we can change the View layer only, leaving every function from the
Service layer untouched.
2.1.2. Managed Bean
Basically, Java Bean is a class, encapsulating different objects into a single object whose
properties can be accessed via getters and setters. Bean is a serializable class, which means
that it can be saved, or sent as a single flow of bytes, and later reconstructed in memory (Tu-
torials Point 2015b). In the JSF world, Managed Bean is marked with annotation shown in
Figure 2.
This annotation allows our View layer to access objects and methods inside a Bean. To call a
method from a Managed Bean, the Expression language is used. This way we can control eve-
ry function inside the service layer straight from the view.
Every bean has an important parameter called scope. Java is an object-oriented programming
language, forcing objects to be one of the most important aspects of the language. The scope
is a parameter which defines for how long the bean and objects inside it will exist. The scope
FIGURE 2. Managed Bean annotation

7
holds beans and objects which have to be available across the application (Geary, Horstmann
2010, 51-55). To simplify, let’s illustrate an example:
We have an object called “pizza”. It has a default parameter of “@RequestScoped”. It means
that pizza will exist until we will eat it – we get a pizza and we eat it right away. If it would
have the parameter “@ViewScoped”, the pizza would be suitable as a meal for the time we
look at it. Afterwards we stop looking at it and leave the pizzeria – it means that the object
pizza is destroyed. When the pizza has a parameter “@SessionScoped”, it exists for the time
the restaurant is open, and with “@ApplicationScoped” – pizza exists for the whole time, until
the restaurant will be closed for maintenance.
Scope works the same way inside the JSF applications. “@RequestScoped” means that the
bean and objects inside will exist during the HTTP request-response: “@ViewScoped” will
keep the bean until the new page (or view) is opened. “@SessionScoped” will keep the bean
alive from the very first HTTP request until the last one, and “@ApplicationScoped” property
will keep the bean alive for the lifetime of the application. These annotations serve a very
important role during the application lifecycle. We can define for how long we need some
objects to exist – either they are session objects (like current user, product list), or they are
one-time variables, needed to complete one request. These annotations should be placed thor-
oughly, because sometimes it might cause problems: when we would need an empty object,
some variables could be left from the previous one (example of Session scope).
2.2. Primefaces and XHTML
The View layer of the application is the part where the user interacts with the service. It con-
tains web pages and elements, alongside with styling and animations. To provide a usable UI
every click should be considered. A good developer should figure out every action a potential
user might take on the page. Thus, a fluid UI is important. What is the concept behind usabil-
ity? How to decide, whether to use simple layouts instead of complicated user interface
flows? And what does “adaptive design” mean?
First of all, usability is the overall quality of the interface, which reflects how easily user can
interact with the defined interface. Recalling Albert Einstein’s phrase, I will describe this term
in a sentence: “Make things as simple as possible, but not simpler” (Einstein 1933). To pro-
vide a usable interface we have to consider modern trends, color scheme, layout and common

8
styles. Even though the company did not require perfect design iterations, the UI should still
remain usable and comfortable for most people. To provide smooth transitions and obvious
elements, I am using a Primefaces library, along with standard JSF layout elements.
There are two most popular approaches to a versatile design. We all remember the times when
people had only mobile phones with mechanical keyboards and even big antennas. At those
times people did not think about variations in web design. However, nowadays more and
more companies have to support different screen sizes to make their web pages look good on
any type of devices. There are two terms connected to the appearance of the web elements on
different screen sizes: Adaptive design and Responsive design. Even though they are similar
to each other and have the same purpose, they use different methods to provide a comfortable
experience for the so-called mobile users. Adaptive design uses viewports (types of screens) –
in most cases there are three of them – which define the type of the device used. It is easier for
web designers to use this approach, because they have to consider just three different layouts.
According to Dustin Cartwright (Cartwright 2014), responsive design uses fluid transitions
and percentages in most of its elements. It is trickier to make a web page with the responsive
design, because developers have to think, how to make elements move and resize correctly
according to the screen size.
2.2.1. Basic layout
There are a number of differences between common HTML and the improved XHTML files.
XHTML stands for Extensible HyperText Markup Language. This language is very similar to
HTML, but the rules are stricter. The elements should always be closed with </element>
proper tags. The elements must be in lowercase. The elements must be properly nested. In the
beginning of the XHTML document line DOCTYPE is mandatory (W3schools 2015). With
Extensible language we can add important element libraries in the beginning of the document,
just stating the prefix which will be used to call the element (<h:link> will add an HTML
<link> element on the web page).
9
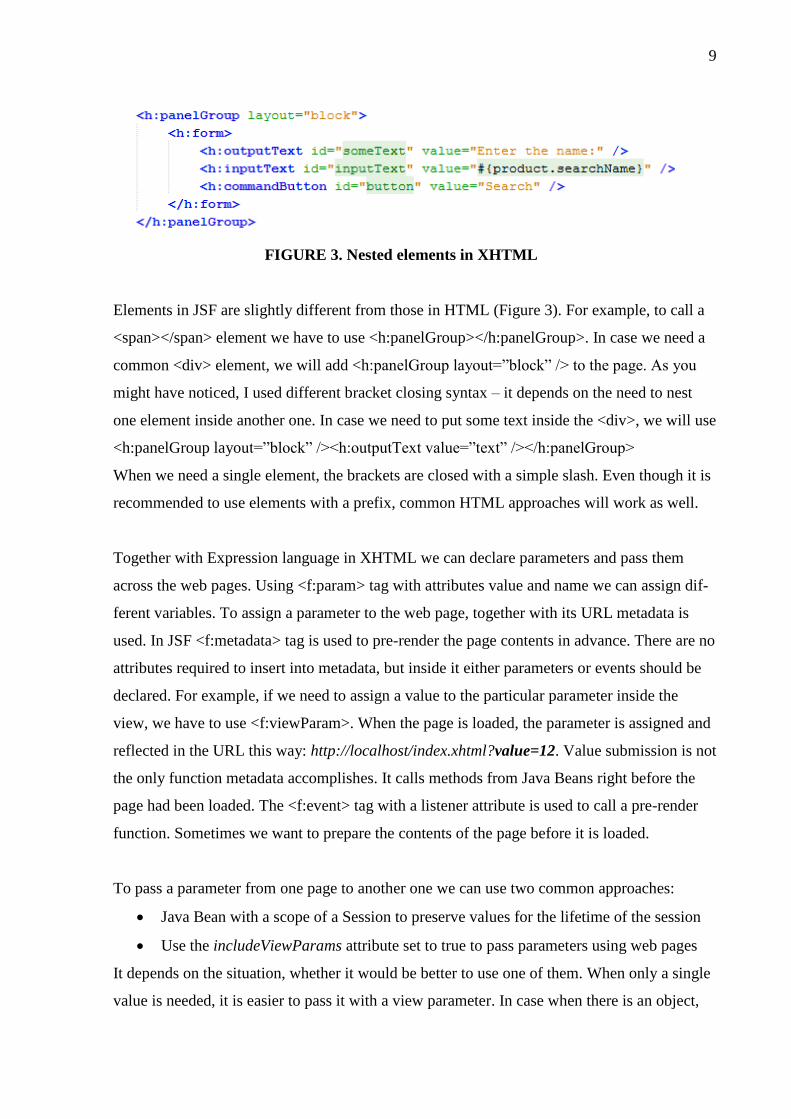
Elements in JSF are slightly different from those in HTML (Figure 3). For example, to call a
<span></span> element we have to use <h:panelGroup></h:panelGroup>. In case we need a
common <div> element, we will add <h:panelGroup layout=”block” /> to the page. As you
might have noticed, I used different bracket closing syntax – it depends on the need to nest
one element inside another one. In case we need to put some text inside the <div>, we will use
<h:panelGroup layout=”block” /><h:outputText value=”text” /></h:panelGroup>
When we need a single element, the brackets are closed with a simple slash. Even though it is
recommended to use elements with a prefix, common HTML approaches will work as well.
Together with Expression language in XHTML we can declare parameters and pass them
across the web pages. Using <f:param> tag with attributes value and name we can assign dif-
ferent variables. To assign a parameter to the web page, together with its URL metadata is
used. In JSF <f:metadata> tag is used to pre-render the page contents in advance. There are no
attributes required to insert into metadata, but inside it either parameters or events should be
declared. For example, if we need to assign a value to the particular parameter inside the
view, we have to use <f:viewParam>. When the page is loaded, the parameter is assigned and
reflected in the URL this way: http://localhost/index.xhtml?value=12. Value submission is not
the only function metadata accomplishes. It calls methods from Java Beans right before the
page had been loaded. The <f:event> tag with a listener attribute is used to call a pre-render
function. Sometimes we want to prepare the contents of the page before it is loaded.
To pass a parameter from one page to another one we can use two common approaches:
Java Bean with a scope of a Session to preserve values for the lifetime of the session
Use the includeViewParams attribute set to true to pass parameters using web pages
It depends on the situation, whether it would be better to use one of them. When only a single
value is needed, it is easier to pass it with a view parameter. In case when there is an object,
FIGURE 3. Nested elements in XHTML

10
Java Beans is the way to go. Otherwise, we can pass a parameter together with the method
call, to form an object or to retrieve it from the database.
2.2.2. Primefaces
Primefaces is “an ultimate JSF framework” – states the message on the official website
(Primefaces 2015). It provides access to hundreds of ready-made components, together with
their functionality and custom styles. The Primefaces framework widens the basic JSF func-
tionality without the need to customize each component separately. Primefaces components
already have pre-defined classes and can be called directly from stylesheet files. Apart from
highly customizable and versatile components the framework provides a variety of themes
which can be easily used inside the project. High availability, huge community and ease of
use are among the strengths of this tool. Here are the main benefits of the framework over the
standard JSF approach (Çivici 2015, 10):
Variety of components
Single Jar file to install
Variety of themes
Ajax support
Huge community
To use the framework inside the layout, you have to define the correct URL in the beginning
of the XHTML document as follows: xmlns:p="http://primefaces.org/ui. Later every compo-
nent is available with the prefix “p:”. On the official website we can find a Showcase section
where every single element is presented as an example, together with the relevant part of
code. Inside the project I used these components most of the time. Primefaces library is light-
weight. The setup requires the user to download one jar file and to add it to the classpath.
Moreover, it is fully compatible with Netbeans IDE where the editor can suggest options for
different components and close different tags.
2.3. Integrated Development Environment and Version Control
During the development of the project I was working inside two different development envi-
ronments: Eclipse and NetBeans. Both of them have benefits and drawbacks, but finally I
started using NetBeans. The choice of the switch was made, because Eclipse could not com-
pete with the performance NetBeans offered. Another decision-making criterion was the
number of pre-installed features. When you first download Eclipse, you have to check the
11
requirements for the workspace and download add-ons from the Eclipse marketplace, or any
other trusted resource. After that, you have to configure them to finalize the workspace prepa-
ration. In case of NetBeans, functionality needed for the dynamic web project came out of the
box. Subversion and GIT are pre-installed; Maven components and even most of the libraries
are already installed. Predictive functionality is a superior feature for every developer, willing
to work efficiently. Predictions in NetBeans seemed much faster and provided more precise
results. Finally, the performance drop during the development in Eclipse took its toll. Net-
Beans could load classes with a superior speed, the cold start of the application was far less
than in Eclipse and application deployment took less of our valuable time. Thereby I decided
to proceed with NetBeans.
This project is a result of cooperation which would not be possible without the Subversion
(also abbreviated as SVN). SVN is a version control system which allows storing and retriev-
ing different versions of the product over time (Collins-Sussman et al. 2011, 14). This system
allows different people working on the same project to connect their work into a single appli-
cation. From the start I had exactly the same project with my teammate. Afterwards, I started
working on my part of the service, while he was doing his own job. When the new function is
added, I am uploading my code to SVN and the teammate will receive it into his project. This
way of working allows people from different departments to continue working on the same
project at the same time, dynamically adding different functions. Another important feature is
the ability to restore any file to the previous version, in case a user made fatal changes in the
application.
2.4. Database
Together with the company representatives we had agreed to use the MySQL database for the
project. MySQL is a database system with the client-server architecture, mainly depending on
the server (DuBois 2006, 1). In the database context the application is on the client side.
MySQL is a relational database system, which means that the database contains different
pieces of information connected to each other. In case of this technology, data is divided into
tables, connected with foreign key fields.
Every command sent from a client is passed to the server, called mysqld. The server executes
a command and sends the result to the client when needed. When the server is installed, it
starts system process which listens for connections on the specified port. During the installa-

12
tion of MySQL we have to specify the port and sign in credentials, to provide an external ac-
cess to the database. Using these credentials client can establish a connection from the appli-
cation directly to the mysqld server.
MySQL is a relational database divided into tables. To connect tables, we have to use foreign
key relationships. It means that we have to create a connection between two key fields: the
field in the parent table (Primary key), and the field in the child table (Foreign key), which
will have the same values (DuBois 2006, 579). With the foreign key constraint more complex
queries become available. An important notice about foreign keys is the ability to remove and
update related tables. When adding the foreign key to the table, additional action can be speci-
fied – either update, or delete action. The ON DELETE statement will cause child tables to be
removed, when the parent table is removed. The ON UPDATE statement will cause an update
in child tables, when relevant data is updated in a parent table (Dyer 2008, 87). These options
can and should be used on most of the child tables, because they have to respond to changes
from the parent tables.
We can join multiple tables into a single result, as well as search for multiple objects from
another table and putting them into a list, related to the current object. To retrieve the data
from multiple tables both joins and subqueries can be used (DuBois 2006, 151 - 152). A join
statement matches results from multiple tables and puts them into a single table. A subquery
is a query nested into another query.
2.4.1. Spring JDBC template
The Spring framework itself provides an infrastructure for the Java application, helping to
manage transitions, beans and databases. In the project only the part of the framework was
used – JDBC template. JDBC (Java Database Connectivity) template is the classic Spring
JDBC approach, which helps to open and close the connection, prepare and execute a state-
ment, process exceptions and handle transactions (Spring Framework 2014, 14.1). Therefore,
Spring JDBC template handles almost every operation and simplifies the database access
greatly. Also it can prevent possible errors caused when writing the code – for example, a
developer can forget to close the connection and it will lead to the memory leak.
Spring framework relies on XML files, and most of its operations are passing through them.
To include the JDBC template into the application, we have to add Spring dependencies to

13
Maven: org.springframework and mysql-connector-java. The next step is to configure the
XML files with database connection properties and beans (Young 2010). Main Spring config-
uration file is placed to the resource folder of the application. It holds information about every
bean connected to the framework. In the same folder we place two more files - datasource.xml
and beans.xml, which will hold information required for the framework. An example of the
database configuration file is presented in Figure 4.
Information about every bean which requires access to the database is placed into the
beans.xml file. In the current context naming bean does not necessarily mean that the class
stated in the XML file should be a bean. When the data access classes are stated in the file,
Spring will have access to those classes and later they can use JDBC template to get the ac-
cess to the database.
Spring framework mainly relies on XML files, but on the Java side programmers use JDBC
classes to establish a connection and send SQL queries to the database. Using the template in
the application requires additional dependencies. To make database programming more con-
venient, Spring offers JdbcDaoSupport class. To use JDBC template in a class we have to
extend the mentioned support class in the target DAO class. With the JdbcDaoSupport we can
call the command getJdbcTemplate() with additional parameters to specify the purpose of the
command – either the new record has to be added to the database, or an old one has to be up-
dated with a new data. There are three basic operations which JDBC template executes
(Spring Framework 2014, 14.2.1):
Query
Update
FIGURE 4. Spring datasource.xml configuration file

14
Execute
Query operation, or queryForObject() is called to query the database for an object. This oper-
ation queries the database with a specified SQL statement and returns an object as the result.
The query also requires an object creation process. It cannot get the object with required fields
from the database without an additional class called RowMapper. Inside the query operation a
new instance of the RowMapper class is created. Inside the mapping class new object is creat-
ed and its properties are assigned, using the result set which came from the query operation.
Finally, new object is created and returned as the result.
Update operation performs three different actions – insert, update and delete row in the data-
base. The syntax is the same for every operation: getJdbcTemplate().update(), but the SQL
statements are different – they specify an exact action on the database.
The last operation is used to execute any other arbitrary SQL statement. There are many var-
iations of the execute operation, for example, a new table can be created using an execute
operation and correct SQL statement. Even though, I did not use this operation in the applica-
tion.

15
3. STARTING POINTS
We had to create the application from scratch. This is a long time project, requiring thorough
planning and time management. With the Company X we decided to meet every week and
show the progress. At first we wanted to use SCRUM with daily meetings and strict rules for
the development, but dropped this idea because we did not feel comfortable with time syn-
chronization – I was attending some courses and my teammate had other courses. We could
not manage our daily meetings on a normal basis and just agreed on weekly meetings with the
company representatives. They guided us over the development. Every Thursday we received
new TODO lists from them and got to work. The development process cannot start straighta-
way. It requires good planning and some initial preparations.
3.1. Installing Software
One of the first steps on a development line is software choices. Different purposes for the
software always have their requirements for functionalities, performance and ease of use. We
had already decided on the technologies and now I had to prepare my workspace for intensive
work. I started with the download of Netbeans IDE (Integrated Development Environment).
The installation is pretty simple and straightforward.
The JavaEE project requires a server where we can run it and JDK installed to run and to
compile the Java code. At the beginning we decided to use Tomcat, because it is lightweight
and starts pretty fast. Later we switched to Glassfish. For both of them there were two op-
tions: either the server will be installed as a standalone application which can be started from
the system, and the GUI can be accessed from the web browser, or the server is downloaded
in one single folder and can be accessed from within the IDE. In this case it does not require
installation and I went for this option. The reason is simple: it is faster to start the application
from the IDE than deploying it to the server every time when something has to be tested.
Even though the installed server could be added to an IDE as well, I still chose the second
option.
JDK was installed with an .exe file, just like any other common application. Although, the
JDK installation is accomplished with a couple of clicks, Glassfish server requires additional
tuning inside the system. To show the server where JDK is installed, we have to add the Envi-

16
ronment Variables to the system. In Windows operating system the variables can be set from
the properties tab in My Computer, see Figure 5.
The name of the variable is JAVA_HOME and the value is the full path to the folder where
JDK was installed.
Afterwards, I had to add newly created JDK folder to Netbeans. Now it knows where the plat-
form is located on the machine. The next step is to add a server. Just like in the previous step,
I chose the location of the server on my local storage and pressed “Finish”.
Previously I was developing for an Android, and I got used to its keyboard shortcuts. In Net-
beans it is possible to switch between different profiles: IntelliJ Idea, Eclipse, Emacs and Net-
beans. I was familiar with IntelliJ preset and did not want to learn new shortcuts.
When the workspace was ready, I had to install the software to access and manage databases.
MySQL was considered as the option for this project so I visited their website and download-
ed the whole bundle. The installation of MySQL is long and the only important point was to
add a root user and create the password for him. Later these credentials are used by the appli-
cation to establish a connection to the database. The rest fields were left untouched. With the
FIGURE 5. Setting JAVA_HOME variable

17
installation of MySQL a special tool called MySQL Workbench was also installed. From this
program a user can manage connections and databases in a simple and efficient way. After the
MySQL was installed, everything was prepared for the development.
3.2. Planning
As I mentioned previously, this project became a tough nut to crack for us. It required precise
planning with a good attitude towards the development. As far as I am concerned, projects
where participants do not have enough motivation usually either take too long to release them,
or are not successful at all. In our case I had motivation for the thesis study and brilliant expe-
rience which I could obtain from it.
We started with the structure of the service, functionalities it had to include and with compari-
son to the other popular resources. The initial planning took almost two weeks for the data-
base structure and possible functions. Figure 6 shows how the brainstorming process took
place and which questions we had to consider during the first steps.
These questions helped us to discover what was really important and which details may be
dropped, what the time frame was and how to finish the development within it, how to start
and where to get the information from. At the meeting we had chosen a step-by-step plan:
Create a database schema with the most important tables (Users, Products, Location,
Bidding)
FIGURE 6. Brainstorming visualisation

18
Create a mock-up in HTML to get a better understanding about the future project
Create a project in Netbeans
Add default packages for Model, View, DTO and DAO
Create basic views with needed elements, similar to the view on the mock-up
Add methods in Java and connect them to View
Test the software, fix the bugs and identify areas of improvement
According to the plan, the project should have been done in a couple of months. The work
was started right away, and here I faced the first serious challenge on a long development
path. This challenge was connected with good time management, which I had to learn.
3.3. Time Management
In this section I will move away from the technical part and describe the challenge I had in the
beginning and how I coped with that. Even though the development should have taken a cou-
ple of months, it took me three months in total to start the actual development, going from
mock-up to the service. The problem was that I did not know how to start, where to start and
did not plan everything carefully. After the first meeting all the information was just memo-
rized and not written down. I had different ideas about the project, but all of them remained
unrealized, because I did not write them down. Another point of interest was my attitude to-
wards work. For me the initial weeks were passing by in a similar way: on Thursday we had a
meeting where we showed the progress of the project and received further suggestions and
tasks. After the meeting I thought that I had the whole week ahead. Therefore, I could concen-
trate on my studies and have some rest in the evening. On Fridays I usually got to work for an
hour or two, after that the thought about the last working day of the week could not leave my
head. Therefore I thought: “There is so much time ahead, and this is Friday. I have to relax a
bit”. As you can guess, both Saturday and Sunday were real weekends, and I could not make
myself to work during the weekend.
All in all, I had three days left to finish the weekly tasks. Besides thesis work I also had clas-
ses and homework, hence, I could not focus one hundred percent on the work and did it only
on Tuesdays and Wednesdays. Especially Wednesday evening was the hardest, because I had
to finish all the tasks, or at least to do every possible action for that.
Every Thursday I could show some results, which were almost satisfactory, but not even close
to the plan we had in the beginning. And this slow development could take us ages to finish

19
the project. I did not want to reinvent the wheel either to go deeply into the process, and
thought that what other people did plus my additions would do the job fine. I was so wrong at
that time. Later on the project owner from the company provided negative feedback on the
development speed. And there was the real starting point. At the moment, I am grateful to him
for these comments, because they made me think about how I work, how I spend my time and
what the reasons for these delays were. I understood that the development is a thorough pro-
cess, which does not allow distractions and gaps – otherwise the project might fail.
I learnt from the past mistakes and started the actual development. My new schedule did not
include any weekends, or evening rest. Everything I could afford myself were breaks for
snacks, nights rest and a few hours in the evening to relax. With the new schedule, I got to
work quickly. And only working around 10 hours per day I realized the need for thorough
planning. I could not start the work without a plan. It feels like when you go to the shop
knowing you have to buy something, but have no idea which products will be better for the
lunch time. And I started writing TODO lists every Thursday, right after the meeting. They
helped me to keep the records of the tasks completed and pending. Also, I could set the priori-
ty for different tasks, in case some functions were more important than the others.
Alongside with task lists, I started drawing. Schematics, layouts and some relations between
different components became simpler with this technique. I could visualize anything and spell
it out clearly, because it was on paper. Every new meeting did not seem something frightening
for me, like before, when I did not have much to show. From now on I could not wait until the
meeting, because I really had something to show.
Every experience in our life is valuable. It is either a good one, or it is a bad experience. From
these types of situations we learn something new and can prevent failures in the future. This
situation showed me the importance of planning and time management. It taught me how to
work, instead of procrastinating.

20
4. DEVELOPING THE BASICS
In this chapter I will explain how the service was developed, which challenges I was facing. It
is also a guide for creating an application with JavaServer Faces, including both schematics,
pieces of code and examples. There is no need to show step-by-step the whole development
process. Hence, I will introduce the key points and interesting parts of the development.
4.1. What is it all about?
The web service I am writing about provides auction functionality for people. It allows regis-
tered users to create deals on the service, push description, add some pictures and set up pric-
es. In the context of this study deal means an item added to the service which has some prod-
ucts listed inside it. After the Deal added step it will be saved to the database of deals and
products, and later on other users can see it on the web site. They can access it via search or
via the main page where recent deals are listed. On the web service people can find multiple
deals, some of them might contain multiple products, and thus, there is a possibility to add
different products to a single deal.
Every deal has a location connected to it. With this location potential buyers can check where
the product is located. If a seller wants to add the location of the product, he can simply put a
point on the map while he creates a new deal. Deals have different product types and these
types are connected to different colors on the map. Color codes with icons help people to fig-
ure out, which types of products are sold in their area. When the user clicks on the icon, he
will see the name of the product and short description for it. Clicking on the name will lead
the user to the product page where he can view more information and purchase the product as
well.
One of the most important parts of the auction is a purchase process. It must be organized
properly, because when the system involves money transfers and security should be a well
thought matter. Together with the company we decided not to implement a complex payment
system for the following reasons: it requires monthly payments for usage, and the service we
are building is a working prototype. According to these facts we decided to add invoices, so
that people can simply print them, go to the bank and pay the bill. When the seller receives
money, he can send a product to the buyer.

21
4.2. Project structure
The question of almost everybody who does not know much about programming is always
similar: “How do you begin?” I had the same question right before the start. The answer is
simple – think, plan and get to work. No more questions here. And, I did it – started thinking
about the basic structure of the project. Which file types should it include and which extra
libraries might I need. There is a project structure below in Figure 7.
4.2.1. Packages and Classes
As the picture shows, the project contains seven packages. The beans package contains View
beans classes, Maps package for connection between products and location, and Servlets
package to include possible servlets for the service. In a folder structure, the project contains
three main folders: “webapp” containing XHTML files and their resources, “java” folder with
packages and .java classes and “resources” folder for platform-specific resources. Spring con-
figuration files should be placed there as well as .properties files.
The folder with web pages also has subfolders. META-INF folder acts as an API configura-
tion files directory. Static files and resources are placed there for specific libraries (BalusC
2011). Under the META folder you can see a WEB-INF folder. There we place a web.xml
file, libraries, templates and configuration files. Web.xml is a configuration file for the service.
FIGURE 7. Project structure

22
From this file I can manage servlets (and when adding a servlet to the project, it must be de-
clared in web.xml), add filters (in our case it is a login filter), declare connection to the data-
base and provide a list of welcome files. Welcome files are the pages which users can see
when they enter the address of the service in their web browsers. In web.xml we also have a
timeout value for the session. This value will define the time when Beans will exist (only if
the user will not do any actions on the service).
Under the “lib” (libraries) folder we have to place additional libraries required by the plat-
form. In my case this folder was unnecessary, because the project was built and run on a
Glassfish server with Maven. Maven prepared the project and automatically added libraries to
the WEB-INF folder after the compilation. The templates folder contains elements of the in-
terface which are repeated multiple times. For example, a top bar, or a side menu are placed
into the single .xhtml file and later inserted on every page needed. In this folder there is a fac-
es-config.xml file which has a path to the resources file. In the resources file most of the texts
on the service are stored. To provide a future Multilanguage support, we have to include files
with .properties extensions. I will also explain it later.
4.2.2. Maven and pom.xml
Maven is a powerful tool for modern Java development. This tool simplifies the build process
and helps developers to add libraries to the project in a convenient way. Its main purpose is
building, cleaning and organizing the project structure; preparing it for the deployment to the
server. It checks for possible errors and failures in the code during the build process, so that
the application will be started. I had created the basic project structure and my teammate add-
ed Maven support for it. It was a bit tricky, because if you create the project in Netbeans you
cannot convert it to Maven. You have to use some external tools, or Eclipse (the last one sup-
ports adding Maven project nature). When the project with Maven support was created, it was
uploaded to Subversion.
Maven has a pom.xml file where it stores basic configuration together with a list of libraries,
used by the project.
FIGURE 8. Maven dependency

23
Every library is added as a dependency (Figure 8). Today most of the libraries on the web
already have this dependencies information, in case developers work with Maven. And, here
comes another Netbeans benefit: if you click on the version number and press “ctrl + space”,
it will automatically fetch all the versions of the library available. Very useful functionality,
especially when some libraries which mentioned on the internet are outdated. Adding a few
lines to the pom.xml file is not enough. To add the library to the project you should right-click
on the dependencies folder and choose “Download declared dependencies”. At this step Ma-
ven will search over repositories and download requested versions. In addition to that, we can
download Javadoc for the library. Javadoc is additional information connected to methods
inside these libraries. This information helps in understanding how different methods work, in
case a user does not use the internet to search for the information and only operates with the
library itself. Sometimes input parameters are described in Javadoc, which is also superior
when you do not know which values are required by a particular method. If you would like to
view the documentation to a method in Netbeans, you can press “ctrl + q” and you will see
the information in a small popup.
4.2.3. Database access
To store user data and values from the service we have to put them into the database. DAO
classes in the application are responsible for CRUD operations. CRUD is short for copy, read,
update and delete. They act as a bridge between the Java and SQL tables. Functions in DAO
classes use CRUD operations to work with the database.
FIGURE 9. Database connection

24
In the very beginning, I decided to use a straightforward approach to work with the database
(Figure 9). Most of the time advanced developers use tools from Hibernate, or Spring, to ac-
cess the database, because their tools simplify and speed up the access. But in our case, I had
to think about functionalities and against real architecture. I wanted to implement as many
functions as possible, and only after that fix the architecture. This is not a good practice, and it
feels like another good lesson. Alternative solutions are faster and easier, also the code looks
better. Later I switched to the JDBC template and included the Spring framework. Another
point for a side database framework is performance issues. While in the code above we have
to “hard-code” the connection details every time when we need to get an access to the data-
base, in the JDBC world connection details are written in a separate configuration file, and the
whole paragraph shortens to three commands: getConnection(), SQL statement and closeCon-
nection(): as simple as it looks like.
4.2.4. Basic layout
To run the program we have to see the output to understand whether it is working, or not. At
this stage XHTML comes into the game. First of all, I had created a new index.xhtml page,
where I put a simple “Hello world!” phrase to test if the application was working. I pressed
the green triangle which starts an application and the build process started. First of all, appli-
cation is checked, cleaned and built by Maven. The next step is to start the server and Net-
beans automatically serves these needs. And later on, the new window is opened in a web
browser and we can see the result shown in Figure 10.
This was my first error. I could not start the app with just a sample page. I did not know that
the problem was inside the web.xml file. It had an auto-generated content, which placed an
index.html file to the welcome file list. Netbeans never shows errors in xml files; just some-
times it can provide information about the location of the problematic file. And the problem
FIGURE 10. Startup problem

25
was in the file extension. I had an .xhtml page, while the welcome file name was ending with
.html. Would you find this one letter error fast? Neither did I and I thought that there was
something wrong with the server, or with packages. Finally, I felt a relief when I found this
annoying error. Hello, World!
After that I needed to create separate folders for the Cascade Style Sheet and JavaScript files.
I created a folder “resources” under the web pages and placed two more folders there: “css”
and “js”. From the xhtml pages we can simply access them by using the path:
/resources/folder_name/file_name. Like in a common HTML, we define resources for the
page in the Head section.
I did not think much about the landing page in the beginning. Thereby, just for the start I de-
cided to put links to other pages in a big list on the main page. It was not convenient, but it
suited the initial needs. The idea was to create every relevant page and later connect them
using the landing page. Moreover, the login and signup pages were required as well.
4.2.5. Maps
The service supported location and the possibility to view locations for the products. To pro-
vide this functionality I had to use one of the frameworks on the internet which could provide
a free access to GIS systems. Luckily, I had experience with OpenLayers platform, built on
the JavaScript. It was simple and easy to implement. Currently, there are two major versions
available: OpenLayers 2 and OpenLayers 3. Developers of the platform made a lot of changes
on the third version, while I was used to the second one. Therefore, I decided to go with the
one in which I was quite fluent at the moment.
As you might have seen above, there is a js folder in the project structure. I cannot explain
any reason why I called it like this, but the library for OpenLayers is placed into that folder.
To start OpenLayers, we have to do these steps:
Download OpenLayers.js file containing the whole library.
Add links to JS files in the head of the page.
Add div to the web page where the map will be placed.
Call <init> function to start the map.
The OpenLayers map might require an additional CSS configuration file, and I used it to cre-
ate different sizes of the map.

26
5. DEVELOPING DEALS
This chapter shows how I implemented the basic operations to add, update and search for
deals on the service. In the internet auction you can find a variety of deals, offered by other
people. As I mentioned previously, it will have both deals and multiple products inside each
deal. This is a good idea when someone would like to sell their goods in a bundle. For in-
stance, if I want to sell a camera with a flashlight and tripod, I will simply add multiple prod-
ucts to the deal.
5.1. Add new deal
In the very beginning, people have to fill the service with their own goods. To do that, they
need a functionality to add deals. Before the start, I have to understand which properties deals
should include. At first, I started with simple deals, containing only one product. A deal
should have: name, description, price, quantity, location and information about seller. To
make the service usable, information about the seller should be added automatically. And to
create a more interactive experience, I had to add a map interface to the “New deal” page.
This way the user can put a point to the map where he or his goods are located. This is espe-
cially useful for selling cars: if the car is located in another town, or far from the house, peo-
ple will understand where they can get it. And, the seller will add in the description additional
information about the product. An interesting part here is how to establish a connection be-
tween input values and Java beans (Figure 11).
First of all, I added input fields to the page with labels, using Primefaces <p:inputText> com-
ponent. It has a value field, which can be connected to the value in a bean. There can be two
options for storing objects in beans: either the object is stored straight inside the bean in
which it will be used, or there is another bean in the project, which holds every object for the
XHTML input Session Bean,
“deal” object
ProductView ProductService ProductDao
FIGURE 11. The process of passing information from a form to the database

27
duration set in the bean annotation. This structure helps to manage and maintain different ob-
ject throughout the application lifecycle. The schematic is here, but how does it work?
Initially, user types text into relevant fields. The value of every input field is connected to the
property of an object inside the session bean. As you can guess from the name, Session Bean
has a scope of session. Values in the form are connected using Expression language: value =
“#{sessionBean.deal.dealProperty}”. When every value is entered the user clicks on the
Submit button to add a new deal. Note: both input fields and a command button should be
placed in a one form. In every other case, the data will not be sent to the managed bean. When
I was learning server faces, I had a trouble because I did not know how forms were working.
At first, I tried to submit values without the form and JSF provided a good explanation that
the CommandButton component should be nested in a form. I did it, but values were not sub-
mitted. An hour of thinking brought me to the idea that when I submit a form, not just a single
button should be inside the form, but every value which should be submitted must be placed
in the same form.
When the form is submitted, command button calls function in the ProductView bean to add a
new deal. To get an object in one bean from another one, we have to call this bean. To do so, I
used a “@ManagedProperty” annotation and getters/setters for the object Session Bean, see
Figure 12.
This is also called a Bean injection. It is similar to calling a method from another class. First
of all, we create an instance of the class, and then we call its methods or get the variables from
that method. In beans it works similar way: we declare managed property for the bean which
methods, or variables we would like to access, define getters and setters for that bean and
voila! We can call them as usual with command sessionBean.getDeal. After I had received
this bean, I can get its object deal with updated fields and the method above. Now I have to
pass the deal object to another level called Product Service. To do that, I call an instance of
the class Product Service and call a method addDeal(deal) there.
FIGURE 12. Injecting one bean into another

28
In the service layer we validate and prepare objects for further actions. On the current step I
do not have anything to validate or prepare, thus I will simply create an instance of Product
Dao class and call the method addDealToDb(deal). The deal is passed to Data Access Object
layer. In DAO I create an SQL string to add deal to the table with deals: “INSERT INTO deal
(name, description, price, quantity) VALUES(?,?,?,?)”. First of all, I prepare the statement
with SQL string. Then, using command preparedStatement.setString(1, deal.getName()) I
specify that the value name in the SQL string equals to the name of the deal. Depending on
the type of the value, set command will differ too. After every value for the statement is set, I
call preparedStatement.executeUpdate() to process an SQL query.
This is the whole process how the deal is added to database. It is simple, and without any ex-
tensions. I will make it more complicated and convenient.
5.1.1. File upload
Uploading a file was the first serious issue I had faced in the project. I had to decide: either
images will be stored in the database in a BLOB format, or the database will be a lightweight,
containing only the names of the images. Of course, not thinking about the performance I de-
cided to use BLOB format and put the images straight to the database. At that time I did not
know, how long it would take for the database to get the file with the size of 1MB and encode
it to the actual image. I tried to save the image in BLOB format to the database and failed. So
I decided to store just filenames in the database and the actual images on the server.
To save an image to the server, it has to be converted first. For the upload interface I used
Primefaces component called fileUpload. Connecting this component to a deal’s image field
we can receive the file of an UploadedFile type. This type is Primefaces model, which allows
getting the filename and an input stream straight from the file. I have to create a new helper
class, which will save the file to our server and return its name. The class is called
FileUploader.
When the user adds a new deal, the deal is added to the database. Do you remember about the
service layer? Now I need it. In the service layer I am creating a new instance of FileUploader
class and send the file received from the user. In case the user did not upload anything, an
auto-generated name “no_image.png” will be added as an image name. If there is a file,
FileUploader starts saving process. To save the file to the server, we have to specify a full
29
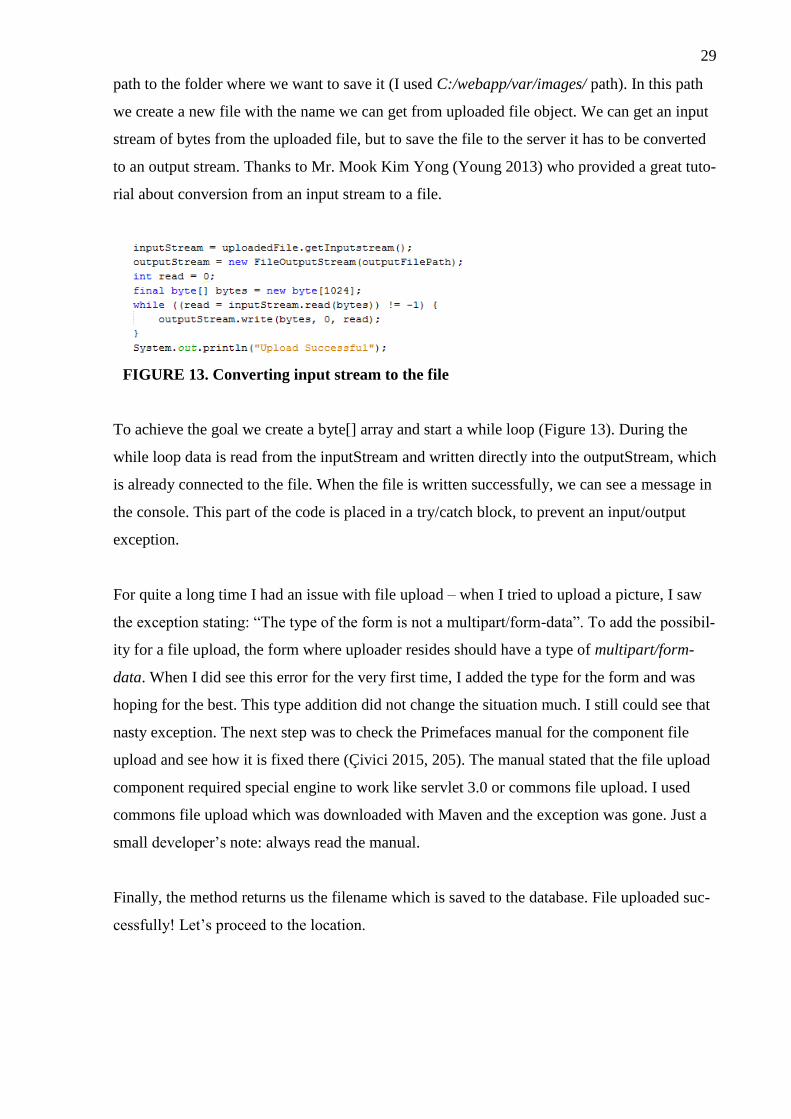
path to the folder where we want to save it (I used C:/webapp/var/images/ path). In this path
we create a new file with the name we can get from uploaded file object. We can get an input
stream of bytes from the uploaded file, but to save the file to the server it has to be converted
to an output stream. Thanks to Mr. Mook Kim Yong (Young 2013) who provided a great tuto-
rial about conversion from an input stream to a file.
To achieve the goal we create a byte[] array and start a while loop (Figure 13). During the
while loop data is read from the inputStream and written directly into the outputStream, which
is already connected to the file. When the file is written successfully, we can see a message in
the console. This part of the code is placed in a try/catch block, to prevent an input/output
exception.
For quite a long time I had an issue with file upload – when I tried to upload a picture, I saw
the exception stating: “The type of the form is not a multipart/form-data”. To add the possibil-
ity for a file upload, the form where uploader resides should have a type of multipart/form-
data. When I did see this error for the very first time, I added the type for the form and was
hoping for the best. This type addition did not change the situation much. I still could see that
nasty exception. The next step was to check the Primefaces manual for the component file
upload and see how it is fixed there (Çivici 2015, 205). The manual stated that the file upload
component required special engine to work like servlet 3.0 or commons file upload. I used
commons file upload which was downloaded with Maven and the exception was gone. Just a
small developer’s note: always read the manual.
Finally, the method returns us the filename which is saved to the database. File uploaded suc-
cessfully! Let’s proceed to the location.
FIGURE 13. Converting input stream to the file
30
5.1.2. Add location
The platform will show a location if a user adds it to the deal. Here I used OpenLayers to get
the coordinates from the map, JSF to receive them and to send to JavaBean, and Java to pro-
cess the coordinates and to save them to the database.
To provide a more structured approach, I decided to use a separate table in the database. Eve-
ry location point will be saved to the table called “location” with the coordinates, ID of the
deal, name, description and type. This separation may complicate the code from one point of
view, but I will explain the need for this: how does it work?
In OpenLayers we read coordinates when a user adds the point. Afterwards, we send these
coordinates to our XHTML page. There are two possibilities to send data from JS to JSF: cre-
ate a servlet which will receive and manage the data, or send data to a hidden input and post it
with other input components inside the form. I chose the second approach, because it was
much easier for one set of coordinates. When the coordinates are sent together with the form,
object Deal receives them and stores in the dealCoordinates field. When the deal is processed
in the service layer, we get relevant information from it and create a new LocationPoint ob-
ject. Name, description, type and coordinates are assigned to the location point, together with
the ID of the corresponding deal. One interesting question was, how did I get an ID of the
deal before it was saved to the database? True, I had to add the deal to the database first and
make the method to return a generated ID of the deal. MySQL allows returning the generated
key, which I used after the deal was added. Now the location point had an ID of the deal and
could go straight to LocationDao, where similar to DealDao methods will help to add the
point to the database.
5.2. Search for deals
Another important component of the internet auction is the ability to search through all the
deals on the service. How does it work? Just like on most popular resources, a user enters a
keyword and on the new page he can see the results of the search. The results are presented in
a list of items, corresponding to the entered search term. The algorithm behind the search is
pretty simple: I create an SQL-query to search through deals and find every deal which name
or description is similar to the search term. When database had found every deal matching the
conditions, Java adds them to the list and shows them to a user.

31
The first step is to send a query and create a list of items. To accomplish this, I added a new
page with an input field and a search button. This field was connected to the value
searchName inside the ProductView class. After the user had entered something into the input
field, he presses the search button and waits for the result. After the button is pressed, the
method with return type of ArrayList<Deal> calls DAO layer to get the list of deals from the
database. In DAO layer I establish a connection and send an SQL-query: “SELECT * FROM
deal WHERE name LIKE ‘%” + searchName + “%’ OR description LIKE ‘%” +
searchName”%’”. This will result in a list of products, matching searchName pattern. The
percentage symbol in a query is added to define wildcard characters from the left and from the
right parts of the searched word.
An important step while creating SQL queries is a spell check. While MySQL Workbench
offers a built-in spell checker, in Netbeans we create a query of type String, therefore it is
displayed with a solid orange color (Figure 14).
I had discovered, that the best practice here is to create a query in MySQL editor, shown in
Figure 15, check it and then copy-paste it as a string in the application.
When the list is received, I will use the “for” loop to iterate through the results and add every
deal to the list. Thinking further, there might be different search types implemented, like a
search over user products, or purchased products. We will have to prepare a new list with deal
objects every time. In a DAO world, I have to prepare statement and obtain the result. To re-
ceive a list of objects from the database, I am using while loop to iterate through the results
and ResultSet to get the current row. First of all, I assign the result of the query to the result
set. Afterwards, I add the while loop and get all the results with a method while (re-
FIGURE 15. SQL syntax in MySQL Workbench
FIGURE 14. SQL syntax in Netbeans editor

32
sultSet.next()){}. To get each value, I am using function resultSet.get(“value”). Every new
object is added to the list of deals and finally returned from the method to the view.
5.2.1. Paginator
Now the search works, and the aim is to show results on the web page. JSF tools for display-
ing lists will help in this task greatly. Data table element is one of the recommended ap-
proaches to show the data on the page. Data table uses lists as input values and define attrib-
ute var, which is used to reference each item in the list. JSF offers another element to show a
list of elements but customize their view - <ui:repeat>. When we want to display multiple
divs with items in them, we have to use it. In our case, I started using the second approach.
Ui:repeat is an element similar to data table, but it does not put items into the table. The ele-
ments will be located on the page in a number of tiles, following each other (Figure 16).
When the user presses the search button, search name variable is assigned. To the repeat ele-
ment we assign the function #{product.getSearchResults()} to the value attribute, which re-
turns array list of results. The var attribute is selectedDeal. Note: in my case managed bean
class ProductView has a name of “product”, and at first I named var attribute as a product too.
The problem is that sometimes JSF tried to call managed bean, and sometimes it called the
item from the list, because the name was similar. Therefore var attribute should never have
the same name as any of the beans inside the application. Inside the repeat element we can
easily call normal attributes of the object from the list. Now the elements are displayed on the
page, but I still have one important matter. How will the <ui:repeat> show a thousand of ele-
ments?
Paginator will help to solve this problem. Paginator is a helper element in Primefaces library,
which adds multiple pages to a large amount of data. This element adds a more convenient
way to display large lists of elements. Even though this function is a must for the platform,
Element 1
Element 2
FIGURE 16. Repeating elements from the list

33
<ui:repeat> does not have a built-in pagination functionality. I would have to create a custom
Paginator to divide the list into readable pages. So I had to use a workaround: data table in
Primefaces library had a Paginator inside, which was already set up for this element. And an
idea came to my mind. I decided to use a one-column table with Paginator enabled. In a single
column I placed the very same div, as I did in the “repeat” and customized CSS file to display
it correctly. Now every item from the list is displayed on the page.
The challenge for me was creating a PanelGrid element and locating everything inside the
grid. I did not know much about tables in HTML and this absence of knowledge played a bad
trick on me. I could not understand how columns and rows are related in a panel grid. I
checked Primefaces manual, and found the basic layout – first defining row and defining col-
umns inside the row. The problem was that in some rows multiple columns were placed,
while in a few rows I could see just one column. Those columns had attributes rowspan. This
attribute sets a number of rows which the column will use. To understand the layout of a Pan-
elGrid, I used the grouping example from the official Primefaces showcase. It contains multi-
ple rows and columns, has rowspan and colspan attributes. After a couple of hours of playing
with panel grids, I understood the idea and implemented the required panel to every element
from the list. You can read more about the layout in the Layout chapter.
5.3. View deal
This is the next step, which follows items search. When a user clicks on any deal from the list,
he expects to see more information about the deal – description, location and information
about the seller. This data is received from the database as a single object and displayed on
the page using JSF Expression language. As a part of the learning process, I had to solve an
important matter of page rendering and method calling in JSF (Figure 17).
Deal 1
Deal 2
Deal 3
Search page
Deal 2
Description
Location
Seller
Item page
FIGURE 17. Open deal from the list

34
In the product view class I had created an object currentDeal, which stored a deal from the
database. In the search page, every item in the list had a link, pointing to the item page. When
the link was clicked, Java searched the requested product in a database (by item id) and as-
signed it to the current deal in the product bean. On the requested page information from cur-
rent deal was displayed on the page, using my favorite panel grid element. Everything worked
fine, until I thought about the URL links to different products. In the current approach when
the user clicked on any deal from the list, the page with the deal was opened and displayed
correct information, but the URL was always the same – main_product.xhtml. Copying and
pasting the link in a browser would result in displaying information about the current deal
object from the managed bean. What if the user would like to share the product, or just go
straight to the desired URL?
5.3.1. Metadata and variables
Metadata is an interesting part, especially during the research process. I did not know any-
thing about metadata and about this possibility when I was searching for an appropriate solu-
tion, so I had to think – how to get the URL and send it to Java, with requested product id.
As I explained in the theory section, metadata helps to render the page contents before user
can see it, prepare the content and get variables from the URL. This is the approach I was
looking for to get the right URL in a browser. Through the URL we can pass variables and
use them at the pre-render stage. I added a viewParam value with the id of the deal – it was
connected to the parameter dealId inside the product managed bean. Pre-rendering view
called function in Java which received the deal from the database and assigned it to the cur-
rent deal in a bean. Thus, the page will show the current deal and display the right parameter
in the URL link.
Now it is not efficient anymore to call the function which gets the object from the database.
On the contrary, search page has an <f:param> element with the value of an id, and when the
user clicks the link, this parameter is sent straight to the next page with the URL.

35
5.4. Edit deal
Sometimes people might need the function to edit their existing deals. If there is something
wrong in the description, or the name does not match exactly the deal content, a user will re-
quire the editing possibility.
I started with Java classes. First of all, I added method in DAO, which will send updated
fields to the database. One interesting note: updating and sending every field one by one is not
a good practice, because this path will lead to a very unnecessarily complex system. The best
option here is sending the whole object and updating every field, even if no changes were
done there. How to do that?
In the XHTML page for deal editing I add input fields connected to the relevant fields in a
current deal object inside our managed bean (do you see how important managed bean
ProductView is now?). If the user changes any of these values and presses “Update” button –
the whole object currentDeal will be sent to DAO and uploaded to the database. Update but-
ton produces non-ajax action, it means that the page with the deal will be refreshed and new
values will be taken from the database.
5.5. Location
The service provides information about the location of deals on the map. Previously I de-
scribed how I added the location information to the database. After that I need to display it
and to cover multiple outcomes.
Every deal page should provide information about the location of the products on the map. To
make this possible, I had to send data from the database, prepare it and open this data with
JavaScript. To add multiple points to the map we have to combine them into a one single file
with coordinates, names and styles. To add multiple points to the map I decided to use KML
(Keyhole Markup Language). OpenLayers has defined a method to work with the KML files
and add data from them straight to the map. Basically, the KML file is similar to a JSON file.
It is an xml file which contains names and attributes of each point or area and styles defined
for the whole layer and coordinates. For this task I had to solve two problems: how to send the
data and how to show the area, or point, on the map when the user opens a deal page.
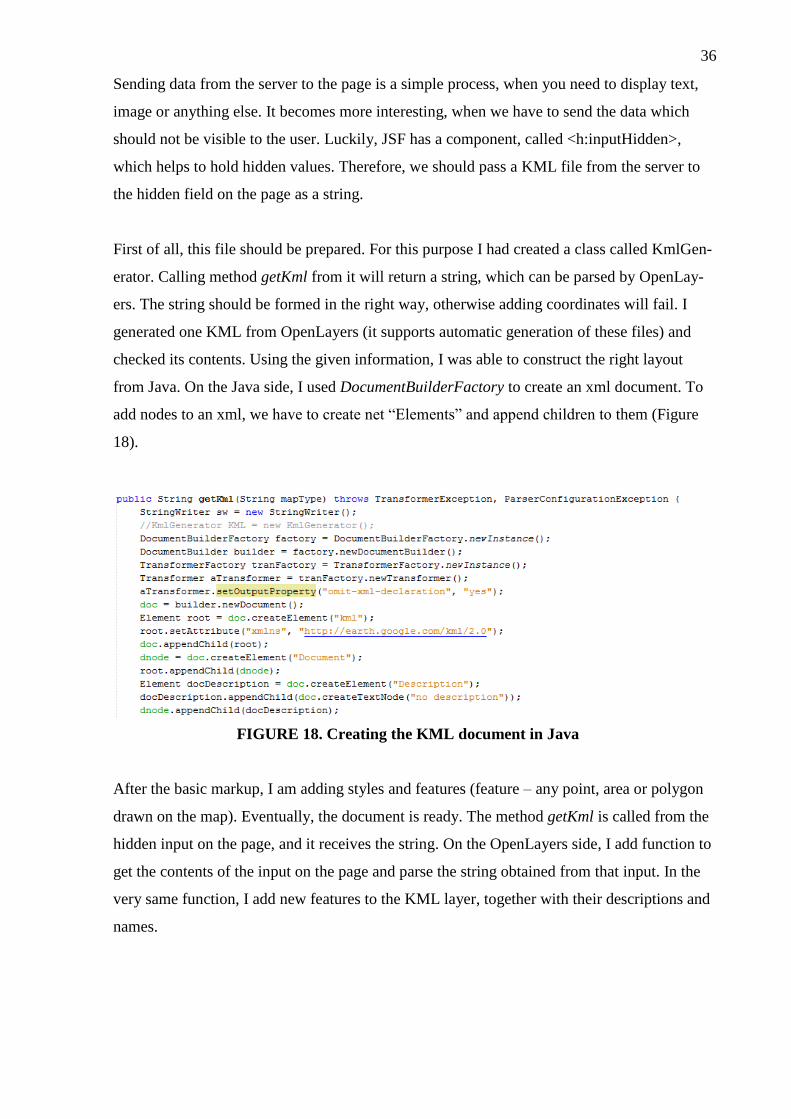
36
Sending data from the server to the page is a simple process, when you need to display text,
image or anything else. It becomes more interesting, when we have to send the data which
should not be visible to the user. Luckily, JSF has a component, called <h:inputHidden>,
which helps to hold hidden values. Therefore, we should pass a KML file from the server to
the hidden field on the page as a string.
First of all, this file should be prepared. For this purpose I had created a class called KmlGen-
erator. Calling method getKml from it will return a string, which can be parsed by OpenLay-
ers. The string should be formed in the right way, otherwise adding coordinates will fail. I
generated one KML from OpenLayers (it supports automatic generation of these files) and
checked its contents. Using the given information, I was able to construct the right layout
from Java. On the Java side, I used DocumentBuilderFactory to create an xml document. To
add nodes to an xml, we have to create net “Elements” and append children to them (Figure
18).
After the basic markup, I am adding styles and features (feature – any point, area or polygon
drawn on the map). Eventually, the document is ready. The method getKml is called from the
hidden input on the page, and it receives the string. On the OpenLayers side, I add function to
get the contents of the input on the page and parse the string obtained from that input. In the
very same function, I add new features to the KML layer, together with their descriptions and
names.
FIGURE 18. Creating the KML document in Java

37
5.6. Bidding
Bidding is one of the most important parts of the internet auction. People would like to place
their bids and win the product at the best price possible. To add the bidding functionality, I
had to consider many aspects of the bidding on auctions:
How can the seller specify the date when bidding ends?
What should be the minimum bidding value and should the seller specify it?
Should people have an ability to cancel their bids?
Can the seller cancel a bid?
How to validate if a new bid is higher than the previous one?
How to check if the product was bought for a fixed price, or won in the auction?
These questions are enough for a thorough planning. It required not only figuring out how to
add new bids, but also how to make the bidding system fair enough for every user.
5.6.1. Set new bid
Setting new bid process is quite similar to the adding deal. When a potential buyer enters his
bid value into the input field and presses “Place Bid” button, the bid is prepared and sent to
the database. In the back-end, object Bid has a value of the bid, the id of the user, the id of the
deal and the date when the bid was placed. This whole object is sent to the database and
stored there. When the user adds his bid, the page should be refreshed in order to update the
list of bids for the deal.
5.6.2. List of bids
When bids are in the database, we need to get them in a list, which should be displayed on the
product page. Remember two key points here: we have to show latest bids on the page and
bids should be placed in the descending order. First of all, I created a method to get the list of
bids from the database by the deal id. MySQL sent all the bids with the specified identifica-
tion number and Java created an array from them. The only problem is that the list is unor-
dered. We can both sort the list in the database, or in Java. To sort a list in MySQL only one
command is enough. To sort the list in Java, we have to use Comparator. Comparator is an
interface, which helps to sort objects (Oracle 2015a). I decided to proceed with Java approach,
because I could learn something new from it, while the SQL path was much more straight-
forward.

38
To sort the list in Java based on the value of the object we have to include a custom Compara-
tor (Figure 19).
First of all, we have to set up a new Comparator object and tell it to work with Bid objects.
Then we use “@Override” annotation to override the existing method in comparator, which
compares values. The method receives two bids, and compares their values using com-
pareTo() method. Created Comparator is used in the sort method, to order the whole list of
bids. In the end we receive a sorted list of bids. Now we can put the list to the web page.
5.6.3. Show latest bids
On the main product page users should be able to see the list of bids, to understand how high
should be the value of their own bid. I wanted to show the list of bids on the main product
page, the whole list. My mistake was that I did not evaluate the possible number of bids for a
product. In case there would be 20 bids, the information about the product would go deep
down the page, because the list of bids will be too big. For this purpose, I added two separate
lists to the page. The first one contains three latest bids. Under the list users can press “Show
more…” to see all the bids for the product (Figure 20).
FIGURE 19. Custom comparator for bidding list

39
This way to display bids does not distract users and provides an overview of the situation.
Displaying only one deal would lead to misunderstanding – potential seller will not know at
once, if there are more bids for the product. With three latest bids he can see the situation at
the moment and make a decision immediately. Under the input field I placed a grey infor-
mation message about the possible valid size of the bid. It helps people to put the right bid.
Buyers cannot cancel the bid. Otherwise, it will lead to an undesired behavior. On the start I
thought that this ability should exist on the auction, in case someone put the wrong bid. But
later I understood that buyer can abuse this functionality, putting too high bids and removing
them right before the bidding ends. Now when we have deals and basic functionality, we can
move further to the layout section.
FIGURE 20. Latest bids list

40
6. LAYOUT
In this chapter I will tell you more about the UI of the service. Providing a great product can-
not consist of only coding, or only the designing part. A good programmer should be able to
find a happy medium between those two. On a trading platform the user interface is an im-
portant part. Since some people might spend a couple of hours every day there, the web envi-
ronment should be simple and comfortable for them. The section below give information
about the colors used, components and their positioning on web pages.
6.1. Color scheme
Depending on the colors, the whole idea behind the service might be changed. It is explained
by the difference in color perception. When choosing colors for the service, I have to think
about possible influence of the color and how it will affect the human eye. For instance, blue
color makes people feel safe and calm. Green color is the color of nature, money and security.
Red colors are related to energy, strength and danger as well. Human beings subconsciously
feel the difference between various colors. Therefore, every color is important. To make sure
that every user feels secure and comfortable, I decided to use the color combination, which is
shown in Figure 21.
The dark green color is used for the top bar, to highlight the main menu of the auction. Grey
color is used mainly as a background color – it adds a simple look and does not bother eyes.
Lighter green color is mainly used for relevant actions, such as Purchase button, Edit button,
and most of the buttons which will lead a user to any important action. This color helps peo-
ple to navigate. Orange color is not widely used, because the main palette includes green as
the major color and orange dilutes the greenness. Usually, three main colors are enough to
create a pretty look and not distract the user from the information. Red color is used for the
Delete buttons on the service.
FIGURE 21. Color palette used on the service

41
6.2. Tab view
In order to provide navigation over the service, most web developers use side or top naviga-
tion menu. The links in the menu can redirect a user to the most important pages of the ser-
vice. This menu is used all over the application, because the menu is a component which
should be accessible from anywhere. This menu became a challenge since I tried to simplify
the code. In the beginning of the development we had a list of links duplicated on every page.
It was not convenient and would result in time consuming operations, in case the new link is
added. If it would happen, a developer should add the link to every page where the menu is
implemented. To improve the situation, I had used templates to provide a universal access for
different components.
In JSF templating allows to create reusable elements or parts of the page and use them any-
where inside the application. Footer, header and menu are placed inside the templates folder
and included into web pages. Although both footer and header should always have the same
layout, menu might change its contents depending on the page it is displayed. In Figure 22
you can see tabbed menu inside the personal user pages. It contains the link to the personal
account page where a user can see his personal details. The next link redirects to the pur-
chased deals page where the list of purchased deals is presented. Under the “My deals” link
the page with a list of deals added by the user is displayed. The menu also contains the link to
the page where the user can create a new deal and the link to the preferences page. On the
preferences page the user can set up the default map position and additional personal details.
As you can see, chosen tab is highlighted, while the others are lit grey. Highlighting helps
users to keep track on which tab or page they are now – this small improvement adds a level
of simplicity and usability, but it requires a workaround. To highlight the name of the opened
FIGURE 22. Tabbed interface in personal pages

42
tab, we have to include the top menu code into every related page and hard-code the style into
the element. This turned into the easiest method, since there is no possibility to check the page
name straight from the element. If we will use Java for this purpose, it would cause an addi-
tional load and a small performance drop. Therefore, I decided to add the menu to every page
and set the highlighted style from the element.
6.3. Main page
The main (landing) page is used to display the latest content on the service. When a user logs
into the service he is redirected to the main page. Basically, the auction should provide the
information about the products sold by users, interactive map, the information about recently
added users and latest news section. Sections on the main page are placed in a specific order
(Figure 23).
I created this layout in order to show the most recent information and latest news to users.
This approach should help to ease an access to the relevant information. Every section in the
layout is interactive and will change its content depending on the situation on the auction. For
example, in the latest products section users can view latest deals, or even most popular prod-
ucts. The popular users section displays information about the trusted sellers or the most ac-
SEARCH BUTTON
MAP
Latest
products
block
Popular
users
block
Latest
news
block
FIGURE 23. Layout of the main page

43
tive ones. In the latest news section users can view the information about the service like the
most recent changes and updates. The biggest Map section provides a quick access to every
deal added to the auction. From the map users can see every deal in their area and move
straight to the required deal.
6.4. Rewriting existing components
When I started the development, I tried to use as many components as possible, to get the idea
about their functionalities. What I noticed is that every component was similar to the previous
one. All of them had the same uniform and simple style, which was grey and outdated. Both
Primefaces library and standard JSF library have basic layout which can be changed using the
CSS files. Also, there are around 40 pre-defined themes in Primefaces. These themes are ap-
plied using maven dependency and web.xml file settings. In this case I decided to add custom
colors, shadows and borders to components, therefore I had to check the manual and rewrite
existing components. This is an easy process, when you know how to accomplish it. Other-
wise you might end up removing border for every component you can find from the browser
“inspect” window.
Primefaces manual is a powerful tool for every developer, working with this framework. Cre-
ators included every single component, alongside with examples, source code and classes to
change the appearance. Every component in Primefaces library already has the style defined,
thus I was simply adding relevant styles in the CSS file. Let’s take a closer look at the pur-
chase button style (Figure 24).
FIGURE 24. Purchase button CSS style

44
As you can see, it has attributes border, background color and color to create a simple button
with defined style. Primefaces button also has pre-defined border, text decoration and back-
ground image parameters, thus I had to add none attributes to those values. This style is ap-
plied to the element of a class purchaseButton. In some places on the service I have elements
which rewrite basic Primefaces button, using the name of its class respectively. To prevent the
purchase button from using wrong styles, I added !important attribute right after the color
name. It means that this style will be applied to the class and it cannot be rewritten by other
style definitions. This attribute helps to keep the required color, no matter which styles try to
rewrite the basic component.
Another good example of component rewriting is a panel component. Basic Primefaces panel
has a border around it, while I do not need this border anywhere on the service. Most of the
components inside Primefaces have class names starting with “ui” letters, and the component
I needed to change is called ui-panel. Adding border attribute to a single class changed every
panel used on the service to a borderless look. To rewrite any other component from
Primefaces, we have to check the UI class in the manual and add the relevant attributes to our
CSS file.
6.5. Challenges
Before the university I was fond of graphical editing software and the magic behind Adobe
design products. In this software tasks like changing the position of different elements, or the
overall look is very easy and efficient. In the world of web design, everything becomes more
complicated. To position an element on the page we have to think about the relative position-
ing, about other elements around it and how to make it look good on most of the devices. We
can do anything with the elements, but we cannot do it like in graphical editing software –
taking a panel and moving it to another place requires more actions and coding to be done.
6.5.1. Forms
What is a form in HTML? This is the component, which gathers data from the user input and
send it to the back-end application (Tutorials Point 2015a). I did not know exactly how these
forms process data and how do they work. Thereby I used them everywhere, around
Primefaces components. In the beginning I had mentioned that some components, like Com-
mand buttons and Command links require to be placed inside the form. From that point I got a

45
strong idea that every command component should be places inside a separate form. With a
wrong thought and bad approach I started nesting one form inside another, and had different
forms on pages. When the button was clicked, information was submitted partly, because of a
number of forms inside each other.
Later I had checked the functions behind forms operations and figured out that forms cannot
be nested. Otherwise this will lead to unexpected results. Even though we can understand how
one form might submit data from another form, Java cannot interpret these results correctly
and will show error logs. A form on the web can be compared to a simple real world form,
when we need to fill out fields and give the form to a shop assistant, or to a bank clerk. We
submit the form and receive the result. The same formula is used in web, where forms are
submitted to send the data and request for a response.
6.5.2. Resources
Every web application requires resources, which will be used to show the content to the user.
Even the information from the database is a resource, but in this subchapter I will tell you
about the image resources.
What could be wrong when getting images on the page? To add an image to the page, we use
<h:graphicImage> tag with a value, containing path to the image required. This is easy for
resources placed inside the resource folder in the application. But when we need to get the
image straight from the server (or the laptop in my case), we have to use the whole path to the
resource. I created a folder on the laptop on the “C:” drive where every image should be
stored. When I tried to add a graphic image with the whole path to the image – it could not
find the resource. So I tried to use the simple <img> tag with the src attribute. In the source I
had to include the whole path to the image resource. To achieve that, I added #{re-
quest.contextPath} method to get the relative path on the server plus created a servlet which
was responsible to get the image and stream it to the HTTP servlet response (BalusC, 2007).
Using the servlet to get the path to the resource folder on the server and an image name, taken
from the database, I was able to display images from the folder on the server. The main prob-
lem was in the path of the image, because JSF component <h:graphicImage> was automati-
cally adding the web application context path to the image path and could not reach the target
image from the outside of the application.
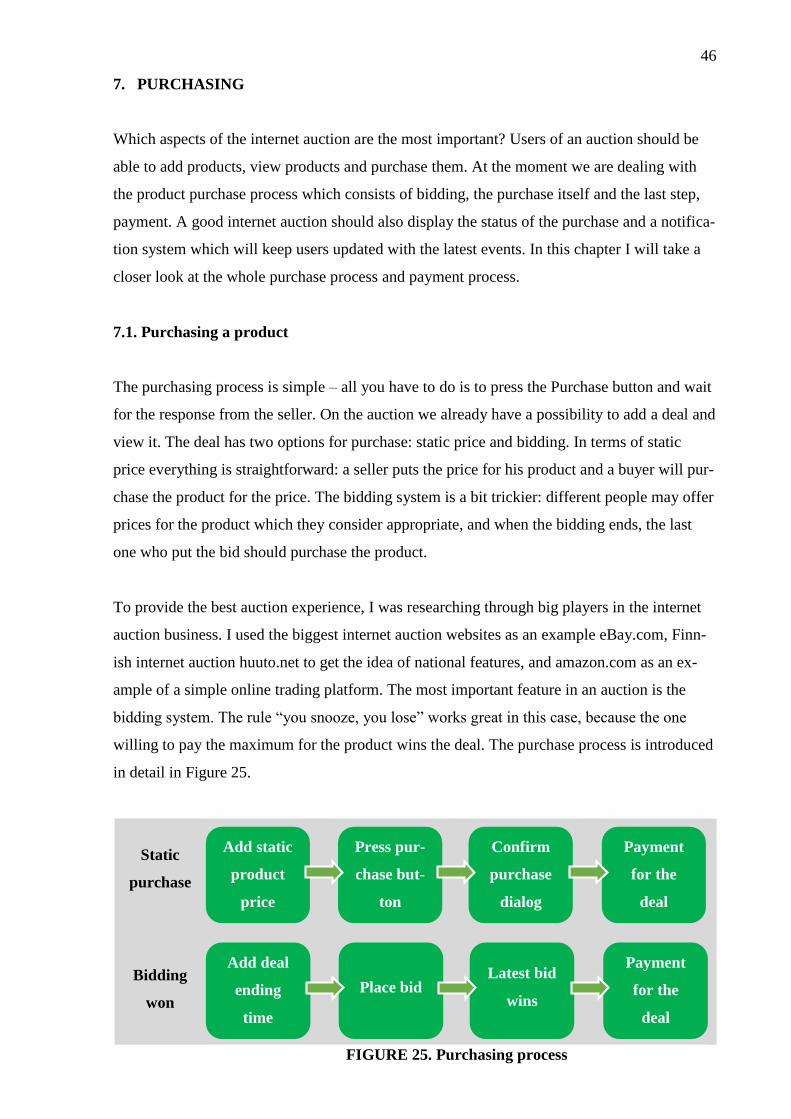
46
7. PURCHASING
Which aspects of the internet auction are the most important? Users of an auction should be
able to add products, view products and purchase them. At the moment we are dealing with
the product purchase process which consists of bidding, the purchase itself and the last step,
payment. A good internet auction should also display the status of the purchase and a notifica-
tion system which will keep users updated with the latest events. In this chapter I will take a
closer look at the whole purchase process and payment process.
7.1. Purchasing a product
The purchasing process is simple – all you have to do is to press the Purchase button and wait
for the response from the seller. On the auction we already have a possibility to add a deal and
view it. The deal has two options for purchase: static price and bidding. In terms of static
price everything is straightforward: a seller puts the price for his product and a buyer will pur-
chase the product for the price. The bidding system is a bit trickier: different people may offer
prices for the product which they consider appropriate, and when the bidding ends, the last
one who put the bid should purchase the product.
To provide the best auction experience, I was researching through big players in the internet
auction business. I used the biggest internet auction websites as an example eBay.com, Finn-
ish internet auction huuto.net to get the idea of national features, and amazon.com as an ex-
ample of a simple online trading platform. The most important feature in an auction is the
bidding system. The rule “you snooze, you lose” works great in this case, because the one
willing to pay the maximum for the product wins the deal. The purchase process is introduced
in detail in Figure 25.
Add deal
ending
time
Place bid Latest bid
wins
Payment
for the
deal
FIGURE 25. Purchasing process
Add static
product
price
Press pur-
chase but-
ton
Confirm
purchase
dialog
Payment
for the
deal
Static
purchase
Bidding
won

47
Next, I will explain this process in-depth from a more technical aspect. Users can both pur-
chase an item for a fixed price, or try to win it. Depending on the purchase type, the outcome
should be different. The outcome in this context means the final price for the product. When
the product is purchased, the deal becomes “purchased” and its Boolean value “purchased”
changes to true. It means that the deal will not be displayed in the deal search anymore. On
the contrary, it will be shown in the list of purchased deals. Also, together with the purchased
status the deal gets a date of the purchase, id of the buyer and confirmations from two parties
(confirmation is explained later in this chapter.) In case the deal was won by a user, the deal
will contain a Boolean value bid_won. I will use it to display the final price. Object prepara-
tion is done in the ProductView class, because we have to use the user id and it would be
much more efficient not to send multiple values to the Service layer. The deal status is
changed now: both the seller and buyer have to confirm that they would like to proceed fur-
ther.
7.1.1. User notifications
When the product is purchased, the seller has to accept the purchase. But how does he know,
if the product had been bought? There are two components required for people awareness:
notifications and status of the deal.
Notifications should help people to understand, if somebody has bought their products, or has
already confirmed the purchase. To accomplish it, I decided to implement the notification
system on the service.
The list of new notifications and the date when they appeared is shown after the click on the
red circle (Figure 26). The number inside the circle is the number of new unread notifications
respectively. To make the system work I needed another table in the database, which would
hold all the notifications on the service. Every notification should have the text value, sender,
receiver and the date when it was added. On the back-end I had created a new method called
FIGURE 26. New notifications icon

48
addNotification(), which adds new notification to the database. Now every time when we
need to notify the user, we just call the method and pass the target user id to it.
To display notification on the page, I am using header template, where the red icon is dis-
played. In the header you can see the account name and the number of notifications. On the
most popular services people can see inbox, notifications and can access their account. The
header is displayed on every page of the auction, thus notifications will be accessible from
any page as well. When user clicks on a notification, the page with the product opens and the
notifications is removed from the database.
7.1.2. Deal status
If user opens the deal page from a notification panel and sees nothing – he will be confused.
Therefore the status of the deal is required to show additional information about the deal. Sta-
tus will show, which actions are required on the deal to proceed further.
Narrow blue stripe shows the current status of the deal (Figure 27). This stripe is created and
evaluated straight on the page. To accomplish this task, I will use JSTL (JavaServer Pages
Standard Tag Library). This library adds support for common functions, such as conditionals
and iteration to the web page (Oracle 2015b). Blue stripe is a simple div with the text inside.
Depending on the status of the deal, text and the icon might be changed, as well as the color
of the stripe. To add the condition to the element render, we have to evaluate something, be-
fore it will be displayed on the page. Evaluation starts with tag <c:choose>, followed by
<c:when test = ‘condition’>. If the condition is true, the code inside will be rendered. Other-
wise, it will not be rendered at all. We are checking, if the deal was purchased and if the deal
was accepted by any party. Depending on the condition, personalized text message will be
displayed – either the deal is ready for payment, or it waits for the acceptance.
FIGURE 27. Deal status message

49
7.1.3. Purchase confirmation
Right before the purchase is done, the user needs to see the confirmation for his order. It is not
a required step, but still a highly recommended option. Nobody is perfect, and sometimes
people make mistakes. Confirmations are invented to decrease the mistake probability. When
a user confirms the purchase and his personal data, he ensures the integrity of data and
checks, whether the order is correct. This additional check adds a level of confidence for both
parties that the order is correct and their information, too. A simple dialog box with details
about the deal and possibility to change the contact information is shown to user, after he
presses the Purchase button. Figure 28 introduces the purchase confirmation dialog.
Also, final payment requires a contract which should be accepted. In real life contracts are
signed by both sides, but in the digital world most of the documents are signed online. I de-
cided not to implement another system into the existing one, adding electronic signatures. But
I still needed the acceptance by both seller and buyer. Hence, I added the Accept deal button
when the deal is already purchased. It means that both sides have to accept the deal, before
one can pay for it and another one may send the required product.
The current Deal object has two more Booleans now: buyerAccepted and sellerAccepted. First
of all, the deal status can check these fields to provide latest information about the deal. Also,
this information is used for the final step – a contract between a seller and a buyer.
FIGURE 28. Purchase confirmation dialog

50
7.2. Time challenge
Another challenge I faced during the development of the trading platform was a challenge
related to time. It is not related to the time management, but to the information about the cur-
rent time. I had to include date and time in multiple places all over the platform: purchase
date, bidding date and time, notification time and much more. But, I could not manage to save
the time to the database. And finally, it became a challenge for me which I had to solve. Let
me tell you something about the Time object in Java.
In the Java world, a time can be obtained with a simple call: calendar.getInstance().getTime().
If we pass this method to an object, we will get the object of java.util.date class. Via this
method we can get the current date and time in a full format (it contains day of the week, time
zone and even the area). Using this object and correct formatting options we can get either
date, or time, or even both of them in the desired format as a string value. For me it was obvi-
ous to get the current date, convert it to string and afterwards send it to the database. But I
thought that this approach will work for static variables only – when the date will not be
needed anymore. In case when calculations would be involved, we have to store the date in
the right format in a database.
The very first approach which came to my mind was to convert string back to the date object.
I thought that if it can be converted from the date to a simple string, the reverse conversion
may do the trick? This is the harder way, but I gave it a try. I could convert the date to string
and backwards, but somehow from the input of “Jan 12, 2015 14:05” I was receiving “2015
Jan 12 00:00:00:0” in the output. From the internet I had found that parsing string into date
sometimes might fail, if the input number or the format was incorrect, and I dropped this idea.
Eventually, I decided to move on and find out appropriate date format, which would suit best
the SQL table. At least it was after unsuccessful attempts of adding java.util.date object into
the database. After a few search engine queries, I had found out that the MySQL database is
able to receive an object of java.sql.timestamp type. But first of all our date object has to be
converted to the desired format. A few minutes later I had found the right approach to convert
date from one format to another – we have to create a new Timestamp object and pass the
current time as a variable into it: new Timestamp(date.getTime()) will result in a correct date
of the suitable for the database type.

51
7.3. Printing invoice
An important part of any internet auction is an ability to pay for a successful deal. This auc-
tion is not an exception. We had to consider different possibilities for online payments and
together with the company came to a decision: we will not use any online banking systems in
the service, because it is a prototype, and the banking system implementation requires ex-
treme precision and does not allow to fail, because money are involved. What we came up to
is invoicing system. It is absolutely legal and free to use. Using invoices, buyers can send
money directly to the product seller, or a deal owner and receive the deal afterwards. The only
drawback in invoicing is the requirement for additional actions from both parties – a buyer
has to use his internet bank, or even visit the normal bank to carry the payment; a deal owner
has to get the confirmation when payment arrives and send the package. Online payment
would involve just the input of relevant bank data, while afterwards the money is transferred
to the deal owner account. When the payment succeeded, the service would have sent the no-
tification to product seller about the successful payment. Therefore, online payments are the
most convenient way to carry bank transfers on e-shopping applications, such as our auction.
In this subchapter I will describe the process of creating a simple invoice document in pdf
format, how I figured out the correct layout and which tools helped me in this task.
To create a document in Java, we have to specify the type of the document, its path and the
contents of the document. In our case, I needed to create a PDF file, insert required dynamic
values into it, calculate the final price and let the user download it. To achieve the desired
result, I had to use external library. Researching over the internet I had found a suitable li-
brary, called “iText”. Installing iText is easy – I had to add the com.itextpdf dependency to
Maven and it could easily recognize the required library. When the library was added, I creat-
ed a new class with the name InvoiceGenerator. Inside the generator I added every method to
print an invoice. I used sample code from the tutorial (MySampleCode 2015) to get used to
the new library. In the source code I had found very useful information about multiple pages
print and document layout.
When the invoice is created, user should be able to save it for printing. And Primefaces great-
ly helps in this task – it has a component <p:fileDownload> which receives the generated file
and provides a possibility for download. To make things easier, I added a link with the name
“contract”. User clicks on the link and the browser offers him to save the generated file. It’s as
easy as abc.
52
7.3.1. Layout
This was the most complicated part in the invoice creation process. To print an invoice, we
have to create a couple of methods, which would let to create it and download the file. To
create the layout, we have to specify the position of every single element in the invoice. From
one point of view it might sound hard, but in reality it is just tediously. There was not simple
path here and I started from the plan, or call it a draft of the invoice. First of all, I had to look
for other good invoice templates to get the idea how it should look like.
I tried to use the least number of lines to reduce the complexity of the layout. I know the sit-
uation, when a buyer looks at the receipt, or invoice and cannot find total price, or even a
short description of the product, because too many tables are used in the document. Let’s look
at the code.
In the source I had found a great way of working with iText: dividing the creation into the
smaller steps and reusing them all over the document. The key element in iText is called
PdfContentByte. This object holds information about the style and position of the text. With
this component we can start writing text, set its font, draw the line and do any operation con-
nected to writing or drawing. For the reusable methods I used createHeadings and createCon-
tent. These methods take strings and positioning as input parameters. Then, I started adding
other methods to generate another parts of the document – tables, footer and header, deal de-
tails and final contract details.
Describing every method and every line in the document may lead to a boring read, so I
would show you one interesting feature of iText. To calculate the layout of the document, we
have to start from the bottom left corner, just like in the coordinate plane. Therefore, when
entering the coordinates for a line or a text, we have to specify x-coordinate first, and then y-
coordinate. To draw a rectangle, we have to specify its x, y coordinates, width and height.
Sometimes it might confuse, because when you draw lines and start drawing rectangle, you
might think: “These last two values should be the coordinates of the top right corner!” And
you will end up with the wrong figure drawn. The layout was a tough nut because of the test-
ing phase. Now the service is complicated enough to reach the invoice download process. So
every time when some line was in the wrong place I had to redeploy the app, log into the auc-
tion, find the product and print an invoice to check whether the new layout was correct.

53
7.3.2. Date and time
Printing invoice requires additional information about the date when it was printed and the
last date for payment. After the time challenge I was able to get the date from the database,
convert it into the java.util format and create a string with the correct date pattern (in this con-
text pattern means how the date and time are displayed, for instance: dd.MM.yyyy). I added
date when the product was accepted by both parties and had to add the last payment date.
From the Company I received information that usually the last payment day should be no later
than 30 days from the date when the contract was accepted.
Java has a special function to add, or subtract a specified number of days, months and even
years. We get the instance of the Java Calendar - Calendar.getInstance(), set its time to the
time received from the database and use function calendar.add(Calendar.DATE, 30), which
will add 30 days to the given date. After the new date is calculated, we can format it to the
pattern which was described above.
7.3.3. TAX and VAT
The price for the product is specified by a user. But it should be calculated based on taxes,
specific for his country. Therefore we need a versatile tax calculation system, which will pro-
vide a precise final price. Different options were coming to my mind:
Create a single tax level and agree about it with the local regulations (bad design ap-
proach, because when the service is available worldwide, tax levels are different from
country to country)
Add taxes based on the place of residence of a buyer (not so good approach, because
sometimes the tax might become higher, or lower. In this case support team for the
product should monitor tax levels in different countries)
Create automatic system, which will get data from other sources about tax levels in
different countries (this approach looks the most promising and convenient, but it
would take too long to implement this system, so this option is not valid too)
Let user be the boss (in the user preferences screen a buyer or a seller can set up tax
levels by themselves)

54
We had a discussion with the company and decided to proceed with the last option. It is not as
convenient as an automatic system, but it will work precisely, even though requiring addition-
al actions from users.
To make it real, two new variables are added to the database table with deals, and to the deal
object: taxLevel and vatLevel. In the user preferences screen I had added additional input
fields to specify the levels for the current user. In the invoice these levels are used to calculate
the final price. To get the price, we have to subtract the tax specified and add VAT level (24%
in Finland). When the price is too precise, we have to add Math.round to it, multiply by one
hundred and divide the result by the same value to obtain the price with a precision of two
digits. Finally, we can get the total price and add it to the PDF document.

55
8. TESTING
Before the product is ready for the release, it has to be tested first. Otherwise unexpected
bugs, lags and fatal errors will take place. It is always better when the developer is able to find
them and not a final user. I did not use any special software to test the application. I was
searching for bugs by carrying out common and uncommon actions, pressing every single
button at different time and trying to do anything, users might be able to do on the service. At
least twenty percent of the development time is usually spent to figure out, what a user can do
wrong in the application.
For the test I was using a less powerful laptop to see, how the service will work on a weaker
system. With the weaker laptop I found out that the database connection was slower than in-
tended. To find out the problem, I went through basic steps to determine the possible issues
with the low performance in the application level (Schwartz et al. 2012, 605 – 607). In the
DAO level the application had called too many queries, when it was not needed. The database
has separate tables for bids, deals and locations. When I was receiving the list of deals from
the database, I also added relevant bids to every deal and locations. I used nested calls for
each deal in the list. I did not need the list of bids or location in a simple search page though.
Figure 29 shows the difference between calls to the database.
Deal 1
Bid 1
Bid 2
Location
Deal 3
Bid 1
Bid 2
Location
Deal 2
Bid 1
Location
Deal 1
Deal 2
Deal 3
Deal 4
Old deal list call New deal list call
FIGURE 29. Getting lists of deals from database

56
After improving the code, I started receiving only the list of deals from the database. Now the
system worked much faster and I could feel the difference on the weaker machine.
During the testing phase I could find some bugs related to copying and pasting code. Some-
times to develop and write the code faster I was copying my working parts of code and insert-
ing them into the new place. After a few improvements they were operating in a new place,
simplifying the job for me and working as intended. Actually, this is a wrong approach. From
this research project I understood one important idea about the development process – avoid
copying the code as much as possible. Only in some particular cases, when duplicate compo-
nents are required it might be a good idea. In any other case you might end up checking every
line of the new code, because somewhere you forgot to change an important parameter. We
are all human beings, and we should understand the risks of the inattention.
Here’s another interesting example from the testing phase. The page with a deal was loading
slower than other pages. Even though it did not load anything too complex, the performance
was low. I tried to look at the code and find the possible cause for this behavior. Nothing
helped, because everything seemed fine to me. So, I decided to clean the code from old com-
ments, in case the web browser could read anything from there, and it worked! Old com-
ments, which had Expression language values inside them were read by the compiler and exe-
cuted together with the normal code. Somehow the normal comment block did not affect the
Expression language and even commented methods from it were executed. Thus, some meth-
ods were executed twice, and in some places of the code even three times. This was the bot-
tleneck which I had fixed by removing the old commented code. Just in case I might need
some blocks of the commented code, I simply removed the hash “#” symbol, and the Expres-
sion language call turned into the common string. I did not expect this type of behavior, and it
was really hard to figure out why some functions were executed multiple times. Since then, I
always check commented code for the Expression language in it.

57
9. CONCLUSION
This chapter introduces a short summary of the study and my own experience together with
the final thoughts about the project. In the study we have passed through the whole develop-
ment process. It started with the review of the most important components in the theoretical
part and continued with the actual development.
It took time to start the project, to learn how to make it real and to understand how to make it
suitable for users. During the development I had to work on my own and find the right solu-
tions by myself. I have reached the aim of the study: I was able to conduct a study using the
modern web-development technologies and to use them to create an online auction web appli-
cation. The aim was completed from both aspects, practical and theoretical. The practical ap-
proach would not be possible without a theoretical background. In the theoretical part I was
able to evaluate the technologies mentioned in the beginning of the study and to figure out the
best approaches to create the application. During the practical part I was developing the work-
ing internet auction from scratch using the knowledge I received from books and web sources.
The application has a complex logical structure, based on JavaEE and the JavaServer Faces
technologies. It allows users to sell, to bid and to purchase products. The selection of the par-
ticular technologies was acknowledged and approved during the development process. We
had meetings with the Company on a weekly basis. During these meetings every new step
was discussed and further work was thoroughly planned. At the final stage the product was
tested and presented to the Company. As the result, the product met their requirements and
was approved for a future development and implementation into the existing system.
The study was limited by the timeframe and thus some of the functions like online payment
system, tax calculations and multiple photos of the product are still missing. Another limiting
factor was the requirements of the Company. I had to implement only the features which were
requested and approve every new one with them (for example, TAX levels setting.) Even
though the requirements limitation exists, I was able to implement the requested functions.
The last limitation is a confidentiality issue: I could not describe every feature and some of
the design specifications in the study.
The company we were working on together with my teammate has all the rights for the prod-
uct we have created. As we had agreed in the beginning, this product was just a model, or a
prototype for the real product which they would like to implement some time later. For the

58
future development I would propose the real payments system, internationalization feature (to
support multiple languages) and the improvement for the current design approach. Most of the
modern systems implement a variety of functions to make a user feel comfortable while using
them. Therefore, the project could be improved with the built-in forum, shopping cart and the
helpdesk service.
I would like to mention how much I have learnt from the team and the Company where I was
both doing the study and creating the internet auction. I had their support and help all over the
hard study path. From there I had obtained a valuable knowledge: how to code, how to work
in a team and how to meet the deadline. None of this would be possible without the solid the-
oretical background and the ability to learn which I gained during my university studies. To
sum up, I have reached the target and received an important experience for my career.

59
BIBLIOGRAPHY
Books:
Baron Schwartz, Peter Zaitsev, and Vadim Tkachenko 2012. High Performance MySQL.
Third Edition. O’Reilly Media, Inc.
David Geary, Cay Horstmann 2010. Core JavaServer Faces. Third Edition. Pearson Educa-
tion, Inc.
Paul DuBois 2006. MySQL Cookbook. Second Edition. O’Reilly Media, Inc.
Russell J.T. Dyer 2008. MySQL in a Nutshell. Second Edition. O’Reilly Media, Inc.
Electronic sources
Albert Einstein 1933. Quote. WWW pages.
http://quoteinvestigator.com/2011/05/13/einstein-simple/. Referred 18.04.2015.
BalusC, StackOverflow 2011. Explanation of the META-INF folder. WWW pages.
http://stackoverflow.com/questions/5609272/why-some-resource-files-are-put-under-meta-
inf-directory Updated 10.04.2011. Referred 22.02.2015.
BalusC, The BalusC Code blog 2007. How to get images from server in JSF. WWW pages.
http://balusc.blogspot.fi/2007/04/imageservlet.html Updated 08.04.2007.
Referred 17.03.2015.
Ben Collins-Sussman, Brian W. Fitzpatrick, and C. Michael Pilato 2002 – 2011. Version Con-
trol With Subversion. WWW document.
http://svnbook.red-bean.com/en/1.7/svn-book.pdf Referred 25.03.2015.
Çağatay Çivici 2015. Primefaces User Guide. WWW document.
http://www.primefaces.org/docs/guide/primefaces_user_guide_5_1.pdf Referred 02.02.2015.

60
Dustin Cartwright. Web Designer Depot 2014. Comparison between Responsive and Adap-
tive design. WWW pages.
http://www.webdesignerdepot.com/2014/05/responsive-vs-adaptive-webdesign-which-is-best-
for-you/ Updated 19.05.2014. Referred 20.03.2015.
Java, Oracle 2015. Definition of Java technology. The company’s WWW pages.
https://www.java.com/en/download/faq/whatis_java.xml Referred 12.02.2015.
Mook Kim Yong, Mkyong 2010. Spring with JDBC example. WWW pages.
http://www.mkyong.com/spring/maven-spring-jdbc-example/ Updated 30.08.2012.
Referred 8.03.2015.
Mook Kim Yong, Mkyong 2009. How to convert InputStream to File in Java. WWW pages.
http://www.mkyong.com/java/how-to-convert-inputstream-to-file-in-java/
Updated 10.04.2013. Referred 15.03.2015.
MySampleCode 2015. Blog article. How to generate PDF in Java. WWW pages.
http://www.mysamplecode.com/2012/10/generate-pdf-using-java-and-itext.html
Referred 03.04.2015.
Oracle 2012. Difference between Java versions and their descriptions. The company’s WWW
pages.
http://docs.oracle.com/javaee/6/firstcup/doc/gkhoy.html Referred 22.02.2015.
Oracle 2014. Java documentation. Overview of enterprise applications. The company’s
WWW pages.
https://docs.oracle.com/javaee/7/firstcup/java-ee001.htm Referred 21.02.2015.
Oracle 2015a. description of Comparator interface. The company’s WWW pages.
https://docs.oracle.com/javase/7/docs/api/java/util/Comparator.html Referred 25.03.2015.
Oracle 2015b. Description of JSTL. The company’s WWW pages.
http://www.oracle.com/technetwork/java/index-jsp-135995.html Referred 12.04.2015.
Primefaces 2015. Official page of the framework. The company’s WWW pages.

61
http://www.primefaces.org/ Referred 6.02.2015.
Spring Framework. Reference Documentation 2014. JDBC template explanation. WWW pag-
es.
http://docs.spring.io/spring/docs/current/spring-framework-reference/htmlsingle/#jdbc-
introduction Referred 13.04.2015.
The Java EE 6 Tutorial, part 2 chapter 6, 2015. Overview of the EL. WWW pages.
http://docs.oracle.com/javaee/6/tutorial/doc/bnahq.html Referred 9.02.2015.
Tutorials Point 2015a. HTML forms tutorial. WWW pages.
http://www.tutorialspoint.com/html/html_forms.htm Referred 20.03.2015.
Tutorials Point 2015b. Java Serialization explanation. WWW pages.
http://www.tutorialspoint.com/java/java_serialization.htm Referred 16.02.2015
W3Schools 2015. Article about the features of XHTML language. WWW pages.
http://www.w3schools.com/html/html_xhtml.asp Referred 13.02.2015.
Personal notice
Veli-Matti Plosila 2015. Introduction speech. Web application layers. Referred 24.02.2015.
http://docs.spring.io/spring/docs/current/spring-framework-reference/htmlsingle/%23jdbc-introduction