Vespa LX 125 i.e. - 150 i.e. - Bellamoto
104
Vespa would like to thank you for choosing one of its products. We have prepared this manual to help you to get the very best from your vehicle. Please read it carefully before riding the vehicle for the first time. It contains information, tips and precautions for using your vehicle. It also describes features, details and devices to assure you that you have made the right choice. We believe that if you follow our suggestions, you will soon get to know your new vehicle and it will serve you well for a long time to come. This booklet forms an integral part of the vehicle; should the vehicle be sold, it must be transferred to the new owner. Vespa LX 125 i.e. - 150 i.e.
-
Upload
khangminh22 -
Category
Documents
-
view
2 -
download
0
Transcript of Vespa LX 125 i.e. - 150 i.e. - Bellamoto

Vespa would like to thank you
for choosing one of its products. We have prepared this manual to help you to get the very best from your vehicle. Please read it carefully before ridingthe vehicle for the first time. It contains information, tips and precautions for using your vehicle. It also describes features, details and devices to assureyou that you have made the right choice. We believe that if you follow our suggestions, you will soon get to know your new vehicle and it will serve youwell for a long time to come. This booklet forms an integral part of the vehicle; should the vehicle be sold, it must be transferred to the new owner.
Vespa LX 125 i.e. - 150 i.e.

The instructions given in this manual are intended to provide a clear, simple guide to using your vehicle; this booklet also details routine maintenanceprocedures and regular checks that should be carried out on the vehicle at an authorised Dealer or Service Centres. The booklet also containsinstructions for simple repairs. Any operations not specifically described in this booklet require the use of special tools and/or particular technicalknowledge: to carry out these operations, refer to any authorised Dealer or Service Centres.
2

Personal safety
Failure to completely observe these instructions will result in serious risk of personalinjury.
Safeguarding the environment
Sections marked with this symbol indicate the correct use of the vehicle to prevent dam-aging the environment.
Vehicle intactness
The incomplete or non-observance of these regulations leads to the risk of seriousdamage to the vehicle and sometimes even the invalidity of the guarantee.
The signs that you see on this page are very important. They are used to highlight partsof the booklet that should be read with particular care. The different symbols are usedto make each topic in the manual simple and quick to locate.
3

4
INDEX
GENERAL RULES....................................................................... 7Foreword............................................................................... 8Carbon monoxide.................................................................. 8Fuel....................................................................................... 9Hot components.................................................................... 10High voltage cable................................................................. 10Rear wheel............................................................................ 11Shock-absorbers................................................................... 11Used engine oil...................................................................... 12Brake fluid............................................................................. 12Battery hydrogen gas and electrolyte.................................... 13Reporting of defects that affect safety................................... 13Road regulations and use of the motorscooter..................... 14Tampering............................................................................. 15Problems that may affect the motorscooter emissions.......... 17Protective clothing................................................................. 17Helmets and eye protection................................................... 17Additional riding gear............................................................. 17
VEHICLE...................................................................................... 19Dashboard................................................................................ 21Analogue instrument panel....................................................... 22Clock......................................................................................... 23Key switch................................................................................. 24
Locking the steering wheel.................................................... 24Releasing the steering wheel................................................ 24
Switch direction indicators........................................................ 25Horn button............................................................................... 25Light switch............................................................................... 26Start-up button.......................................................................... 26The immobilizer system............................................................ 26
Keys...................................................................................... 27Immobilizer device enabled indicator led.............................. 28Operation............................................................................... 28
Opening the saddle............................................................... 30Identification.............................................................................. 31Rear top box opening................................................................ 31Bag clip..................................................................................... 32Helmet Anti-theft Device........................................................... 32
USE.............................................................................................. 33Checks...................................................................................... 34Refuelling.................................................................................. 34Tyre pressure............................................................................ 35Shock absorbers adjustment.................................................... 36Running in................................................................................. 37Starting up the engine............................................................... 38
Precautions........................................................................... 39Difficult start up......................................................................... 40Stopping the engine.................................................................. 41Anti-theft ring............................................................................. 41Catalytic silencer....................................................................... 42Stand......................................................................................... 42Automatic transmission............................................................. 43Safe driving............................................................................... 43Basic safety rules...................................................................... 47Clothing..................................................................................... 50Additional riding gear................................................................ 50Accessories............................................................................... 51Load.......................................................................................... 52
MAINTENANCE........................................................................... 53Engine oil level.......................................................................... 54
Engine oil level check............................................................ 54Engine oil top-up................................................................... 55Warning light (insufficient oil pressure)................................. 55Engine oil change.................................................................. 56
Hub oil level.............................................................................. 57Tyres......................................................................................... 59
5

Spark plug dismantlement........................................................ 60Removing the air filter............................................................... 61Air filter cleaning....................................................................... 62Checking the brake oil level...................................................... 63Battery....................................................................................... 66
Use of a new battery............................................................. 67Long periods of inactivity.......................................................... 67Fuses........................................................................................ 69Front light group........................................................................ 74
Headlight adjustment............................................................. 76Front direction indicators........................................................... 77Rear optical unit........................................................................ 77Rear turn indicators................................................................... 78Number plate light..................................................................... 78Rear-view mirrors...................................................................... 79Front disc brake........................................................................ 79Rear drum brake....................................................................... 80Puncture.................................................................................... 82Periods of inactivity................................................................... 82Cleaning the vehicle.................................................................. 83Troubleshooting........................................................................ 85
TECHNICAL DATA...................................................................... 89Toolkit....................................................................................... 95
SPARE PARTS AND ACCESSORIES........................................ 97Warnings................................................................................... 98
SCHEDULED MAINTENANCE.................................................... 99Scheduled servicing table......................................................... 100
6

Vespa LX 125 i.e. - 150 i.e.
Chap. 01General rules
7

Foreword
This manual is a fundamental and integral part of the vehicle itself. It should alwaysbe kept in the vehicle and accompany the vehicle in the event of resale. Piaggio hascompiled this manual to provide the owner with correct, up to date information. How-ever, as Piaggio is constantly improving its products, there may be a some minordifferences between the vehicle itself and the contents of this manual. Should youhave any queries regarding the vehicle, contact your local Piaggio dealer, which re-ceives the most recent technical information directly from the manufacturer. For anytests or repair work not expressly described in this manual, to purchase original spareparts, accessories and other original Piaggio products, or for assistance in the caseof specific problems, please contact you local Authorised Piaggio Service Centre. Ateam of professionals will be at hand to offer prompt, appropriate assistance. Thankyou for choosing Piaggio. Have a great journey!
Carbon monoxide
If it is necessary to let the engine run in order to carry out some work, make sure thatthe area in which you are operating is properly ventilated. Never run the engine inenclosed spaces. If it is necessary to work indoors, use an exhaust evacuation system.
WARNING
WARNING: THE EXHAUST FUMES CONTAIN CARBON MONOXIDE, A POISON-OUS GAS THAT CAN CAUSE LOSS OF CONSCIOUSNESS AND EVEN DEATH.
8
1 G
ener
al ru
les

Fuel
WARNING
WARNING: GASOLINE IS EXTREMELY FLAMMABLE AND IN SOME CONDI-TIONS CAN BECOME EXPLOSIVE. THEREFORE, IT IS NECESSARY TO REFUELAND CARRY OUT MAINTENANCE OPERATIONS INVOLVING THE FUEL SYS-TEM IN A WELL VENTILATED AREA WITH THE ENGINE OFF. DO NOT REFUELOR PERFORM ANY MAINTENANCE ON THE FUEL SYSTEM WITH THE ENGINERUNNING. DO NOT SMOKE WHILE REFUELLING OR NEAR FUEL VAPOURS.NEVER ALLOW ANY PORTION OF THE FUEL SYSTEM TO COME IN CONTACTWITH OPEN FLAMES, SPARKS AND/OR OTHER HEAT SOURCES. BE CAREFULTO AVOID SPILLING FUEL WHEN YOU ARE REFUELLING. SPILLED FUELCOULD IGNITE WHEN IT CONTACTS HOT ENGINE OR EXHAUST SYSTEM SUR-FACES. IF YOU ACCIDENTALLY SPILL SOME FUEL, MAKE SURE THAT IT ISWIPED UP OR COMPLETELY EVAPORATED BEFORE STARTING THE VEHI-CLE.
Since gasoline expands in the fuel tank when the vehicle is sitting in the open sun,never fill the tank completely to the brim. Leave at least one inch of expansion space.Avoid any contact of the fuel with your skin, and avoid inhalation of fuel vapours. Donot ever attempt to siphon fuel from one container to another using your mouth assuction for a siphon hose. Use a manual pump or a similar system.
WARNING
WARNING: GASOLINE IS POISONOUS AND CARCINOGEN AND CONTAINSCHEMICAL SUBSTANCES THAT CAUSE BIRTH DEFECTS AND OTHER RE-PRODUCTIVE PROBLEMS. IF GASOLINE SHOULD BE ACCIDENTALLY SPIL-LED ON THE SKIN OR CLOTHES, IMMEDIATELY WASH IT OFF WITH SOAP ANDWATER AND CHANGE CLOTHES.
9
1 General rules
Should you accidentally spill gasoline in your eyes, flush with a large quantity of waterand immediately contact a health professional. Should you accidentally get gasolineinto your mouth, do not induce vomiting. Drink a large quantity of milk or clear waterand immediately contact a health professional. If your vehicle overturns, it may leakgasoline which is extremely flammable. Flames or sparks may ignite the gasoline,which will not only destroy the vehicle but also could do serious property damage tosurrounding property and cause serious injuries or even death.DISPOSE OF UNWANTED GASOLINE PROPERLY, DO NOT DUMP IT INTOSTORM DRAINS, SINKS OR TOILETS.
KEEP GASOLINE AWAY FROM CHILDREN.
Hot components
WARNING
WARNING: THE ENGINE AND ALL PARTS OF THE EXHAUST SYSTEM, ASWELL AS THE BRAKING SYSTEM, BECOME VERY HOT AND REMAIN HOT FORSOME TIME AFTER THE MOTORCYCLE AND THE ENGINE ARE STOPPED. BE-FORE HANDLING ANY COMPONENT OF YOUR MOTORCYCLE AFTER RIDING,ENSURE THAT IT HAS COOLED SUFFICIENTLY TO BE SAFE TO HANDLE.
High voltage cable
WARNING
WARNING:
10
1 G
ener
al ru
les

STARTING THE ENGINE, WHILE KEEPING IN YOUR HANDS THE HIGH VOLT-AGE CABLE DISCONNECTED FROM THE SPARK PLUG, IS EXTREMELY DAN-GEROUS.
Rear wheel
WARNING
WARNING: BE VERY CAREFUL TO KEEP YOUR FINGERS, ALL YOUR OTHERBODY PARTS, AND ANY OBJECT WELL CLEAR OF THE REAR WHEEL WHILETHE ENGINE IS RUNNING AND THE VEHICLE IS RESTING ON ITS STAND. FAIL-URE TO OBSERVE THIS WARNING CAN LEAD TO SERIOUS PERSONAL IN-JURY, AS WELL AS DAMAGE TO YOUR ENGINE.
Shock-absorbers
WARNING
WARNING: DO NOT DISASSEMBLE THE FRONT AND REAR SHOCK-ABSORB-ER. THE SHOCK-ABSORBERS HAVE PRE-LOADED SPRINGS. DISASSEMBLYCAN CAUSE SERIOUS INJURY AND EVEN DEATH.
11
1 General rules

Used engine oil
WARNING
WARNING: THE OIL USED CONTAINS ENVIRONMENTALLY HARMFUL SUB-STANCES. FOR THE REPLACEMENT OF THE HUB OIL WE RECOMMEND TURN-ING TO AN AUTHORISED PIAGGIO SERVICE CENTRE THAT IS EQUIPPED FORTHE DISPOSAL OF USED OIL IN RESPECT OF NATURE AND LEGAL REGULA-TIONS.
Brake fluid
WARNING
WARNING: BRAKE FLUID IS EXTREMELY POISONOUS. NEVER ALLOW BRAKEFLUID TO BE INGESTED OR SWALLOWED. SHOULD BRAKE FLUID ACCIDEN-TALLY BE SWALLOWED, DRINK LARGE QUANTITIES OF MILK OR PURE WA-TER AND IMMEDIATELY SEEK PROFESSIONAL MEDICAL ASSISTANCE.BRAKE FLUID IS HIGHLY DESTRUCTIVE TO SKIN AND EYE TISSUE. SHOULDYOU ACCIDENTALLY SPILL BRAKE FLUID ON YOURSELF, REMOVE THE CON-TAMINATED CLOTHING, WASH YOUR BODY WITH SOAP AND WARM WATERIMMEDIATELY AND SEEK PROFESSIONAL MEDICAL ASSISTANCE. SHOULDYOU ACCIDENTALLY SPLASH BRAKE FLUID INTO YOUR EYES, FLUSH WITHA LARGE QUANTITY OF COOL, CLEAR WATER AND IMMEDIATELY SEEK PRO-FESSIONAL MEDICAL ASSISTANCE. KEEP BRAKE FLUID AWAY FROM CHIL-DREN.
12
1 G
ener
al ru
les

Battery hydrogen gas and electrolyte
WARNING
WARNING: VEHICLE BATTERIES GIVE OFF NOXIOUS AND EXPLOSIVEGASES; KEEP CIGARETTES, FLAMES AND SPARKS AWAY FROM THE BAT-TERY. PROVIDE ADEQUATE VENTILATION WHEN OPERATING OR RECHARG-ING THE BATTERY. DURING RECHARGING OR USE, MAKE SURE THAT THEROOM IS PROPERLY VENTILATED AND AVOID INHALING THE GASES RE-LEASED DURING THE RECHARGING. THE BATTERY CONTAINS SULPHURICACID (ELECTROLYTE). CONTACT WITH THE SKIN OR EYES MAY CAUSE SE-RIOUS BURNS. ALWAYS WEAR PROTECTIVE CLOTHING, RUBBER GLOVES,AND TIGHT FITTING GOGGLES OR A FACE SHIELD WHEN WORKING AROUNDTHE BATTERY, ESPECIALLY WHEN FILLING THE BATTERY WITH EITHER WA-TER OR ELECTROLYTE. IN CASE OF CONTACT WITH THE SKIN, FLUSH IM-MEDIATELY WITH PLENTY OF WATER. IN CASE OF CONTACT WITH THE EYES,FLUSH WITH PLENTY OF WATER FOR AT LEAST 15 MINUTES. IMMEDIATELYCONSULT A HEALTH PROFESSIONAL. THE ELECTROLYTE IS POISONOUS. IFTHE ELECTROLYTE IS ACCIDENTALLY SWALLOWED, DRINK LARGE QUAN-TITIES OF WATER OR MILK AND THEN FOLLOW WITH MAGNESIA, BEATENEGG OR VEGETABLE OIL. IMMEDIATELY CONSULT A HEALTH PROFESSIO-NAL. KEEP AWAY FROM CHILDREN.
Reporting of defects that affect safety
WARNING: BEFORE SWITCHING ON THE ENGINE, THOROUGHLY READ THECONTENTS OF THIS MANUAL AND, IN PARTICULAR, THE CHAPTERS "PER-SONAL SAFETY - CARE FOR THE ENVIRONMENT - VEHICLE SAFETY". YOURSAFETY AND THE SAFETY OF THOSE AROUND YOU DOES NOT ONLY DE-
13
1 General rules

PEND ON YOUR RIDING ABILITY, BUT ALSO ON YOUR KNOWLEDGE OF THESCOOTER ITSELF AND ROAD SAFETY RULES.
Road regulations and use of the motorscooter
Rules of the road vary from country to country or state to state. It is essential that youunderstand in advance the rules of the road of the country or of the state in which yourvehicle will be used.
WARNING
WARNING: THIS SCOOTER HAS BEEN DESIGNED AND MANUFACTURED FORUSE ON ROADS OR EVEN AND ASPHALTED SURFACES, ONLY. DO NOT USETHE SCOOTER ON UN-ASPHALTED SURFACES TO PREVENT ANY FALLS OROTHER TYPES OF ACCIDENTS.
WARNING
PIAGGIO RECOMMENDS YOU NOT TO RIDE YOUR MOTORSCOOTER ONSTATE OR NATIONAL HIGHWAYS, FREEWAYS OR EXPRESSWAYS.
Origin of the emissions
The combustion process produces carbon monoxide and hydrocarbons. Controllinghydrocarbon emissions is very important as in certain cases, these compounds reactwith sunlight to photochemical gases. While carbon monoxide does not react in thesame way as hydrocarbons, it is highly toxic. Piaggio uses an Electronic Fuel Injectionsystem (EFI) to minimise emissions of carbon monoxide and hydrocarbons.
14
1 G
ener
al ru
les

Exhaust emission control system
The exhaust gas emissions control system must work in conjunction with an electronicfuel injection system (EFI), which requires no adjustment by the client. The idle speedand fuel air mixture can only be adjusted by an Authorised Piaggio/Vespa ServiceCentre with specific electronic instruments (diagnostic tester for scooters). The ex-haust gas emissions control system is separate from the evaporative crankcaseemissions control system.
Crankcase emission control system
The vehicles are equipped with an evaporative emission control system consisting ofan activated carbon canister with the relevant pipes. This system prevents the escapeof fuel vapours from the fuel tank.
Tampering
WARNING
WARNING: TAMPERING WITH THE NOISE CONTROL SYSTEM IS PROHIBITED.FEDERAL LAW PROHIBITS THE FOLLOWING ACTS:
A) REMOVAL OR RENDERING INOPERATIVE BY ANY PERSON OTHER THANFOR PURPOSES OF MAINTENANCE, REPAIR, OR REPLACEMENT, ANY DE-VICE OR ELEMENT OF DESIGN INCORPORATED INTO ANY NEW MOTOR-SCOOTER FOR THE PURPOSE OF NOISE CONTROL PRIOR TO ITS SALE ORDELIVERY TO THE ULTIMATE PURCHASER OR WHILE IT IS IN USE.
B) USE OF THE MOTORSCOOTER AFTER SUCH DEVICE OR ELEMENT OF DE-SIGN HAS BEEN REMOVED OR RENDERED INOPERATIVE BY ANY PERSON.AMONG THOSE ACTS PRESUMED TO CONSTITUTE TAMPERING ARE THEACTS LISTED BELOW:
15
1 General rules

A) REMOVAL OF, OR PUNCTURING THE MUFFLER, BAFFLES, HEADER PIPESOR ANY OTHER COMPONENT WHICH CONDUCTS EXHAUST GASES.
B) REMOVAL OR PUNCTURING OF ANY PART OF THE INTAKE SYSTEM.
C) LACK OF PROPER MAINTENANCE.
D) REPLACEMENT OF ANY MOVING PART OF THE MOTORSCOOTER, ORPARTS OF THE EXHAUST OR INTAKE SYSTEM, WITH PARTS OTHER THANTHOSE SPECIFIED BY PIAGGIO.
CAUTION
CAUTION: IT IS STRICTLY FORBIDDEN TO MODIFY ANY PART OR FEATUREOF YOUR MOTORSCOOTER TO INCREASE THE HORSE POWER OR PER-FORMANCE. ANY SUCH MODIFICATION IS STRICTLY ILLEGAL. FURTHER,SERIOUS DAMAGE MAY BE DONE TO YOUR MOTORCYCLE, WORSE, ANYSUCH MODIFICATIONS MAY MAKE YOUR MOTORCYCLE UNSAFE, WHICHCOULD LEAD TO AN UPSET OR ACCIDENT, WITH CONSEQUENT SERIOUS IN-JURY OR EVEN DEATH. FURTHER, ANY SUCH MODIFICATION WILL IMMEDI-ATELY AND COMPLETELY VOID THE WARRANTY. PLEASE CONSULT YOURFRANCHISED PIAGGIO DEALER TO DETERMINE WHAT ACCESSORIES MAYBE INSTALLED WITHOUT CHANGING THE PERFORMANCE OR VOIDING THEWARRANTY.
CAUTION
CAUTION: THE VEHICLE SHOULD BE CHECKED FOR REPAIR OR REPLACE-MENT IF THE MOTORSCOOTER NOISE HAS INCREASED SIGNIFICANTLYTHROUGH USE. OTHERWISE, THE OWNER MAY BECOME SUBJECT TO PEN-ALTIES UNDER STATE AND LOCAL ORDINANCES.
16
1 G
ener
al ru
les

Problems that may affect the motorscooter emissions
If any of the following symptoms are observed, immediately have your motorscooterinspected and repaired by Authorised Piaggio Service Center.Symptoms:
• Difficulty starting or stalling after starting.• Irregular idle.• Misfiring or backfiring during acceleration.• After-burning (backfiring).• Poor engine performance, degraded handling, or poor fuel economy.
Protective clothing
For your safety, we strongly recommend that you always wear an approved motorcyclehelmet, eye protection, boots, gloves, long pants, and a long-sleeved shirt or jacketwhenever you ride. Although complete protection is not possible, wearing proper gearcan reduce the chance of injury. See your PIAGGIO Dealer for stylish, comfortableand effective riding gear suggestions.
Helmets and eye protection
Your helmet is most important item of riding gear as it offers the best protection pos-sible against head injury. The helmet must be comfortable and fitted correctly. Wearinga helmet with bright colours or with reflector strips makes you more visible in traffic.Remember that a full face helmet offers even more protection than an open helmet.Always remember to fasten your helmet correctly.
Additional riding gear
In addition to a helmet and eye protection, we also recommend:• Properly fitted boots with nonslip soles to help protect your feet and ankles.• Leather gloves to keep your hands warm and help prevent blisters, cuts,
burns and bruises.
17
1 General rules

• A motorcycle riding suit or jacket for comfort as well as protection.Brightly coloured and reflective clothing can help make you more notice- able in traffic.Be sure to avoid loose clothes that could get caught on any part of your motorscooter.
18
1 G
ener
al ru
les

Vespa LX 125 i.e. - 150 i.e.
Chap. 02Vehicle
19

02_01
20
2 Ve
hicl
e

Dashboard (02_01)
A = Ignition key-switch
B = Horn button
C = Turn indicator switch
D = Light switches
E = Left hand grip
F = Rear brake control lever
G = Analogue instrument panel
H = Front brake control lever
I = Throttle grip
L = Start-up button
21
2 Vehicle

02_02
Analogue instrument panel (02_02)
M = Engine management indicator light
22
2 Ve
hicl
e

N = Oil pressure warning light
O = Turn indicator warning light
P = High-beam warning linght
Q = /Low beam
R = Fuel level warning light
S = Fuel gauge
T = Speedometer
U = Immobilizer LED warning light
V = Digital clock
Z = Odometer
02_03
Clock (02_03)
Positioned on the instrument panel, it displays the hours and minutes from 1 to 12, A(a.m.) or P (p.m.). By pressing «T» the clock can also display month, day and seconds.Use button «U» to set the various clock functions. The digital clock runs from a battery(which lasts about two years) accessible by lifting the entire instrument panel. Youshould contact an Authorized Piaggio Service Center to change the clock battery.
DEAD BATTERIES ARE HARMFUL TO THE ENVIRONMENT. THEY MUST DIS-POSED OF IN SUITABLE CONTAINERS AS PRESCRIBED BY THE REGULA-TIONS IN FORCE.strong>
23
2 Vehicle

02_04
Key switch (02_04)
LOCK = Starting not enabled, key can be removed, steering lock on, glove compart-ment locked.OFF = Starting not enabled, key can be removed, steering lock off, glove compartmentcan be opened.
ON = Ready position, burglar alarm deactivated, key not extractable, glove compart-ment can be opened.
Locking the steering wheel
Turn the steering wheel left (to the end of the stroke), turn the key to «LOCK» andremove it.
DO NOT TURN THE KEY TO «LOCK» OR «OFF» WHILE RIDING.
Releasing the steering wheel
Insert the key and turn it to «OFF».
DO NOT TURN THE KEY TO «LOCK» OR «OFF» WHILE RIDING. IF YOU AT-TEMPT TO TURN THE KEY TO «LOCK», THE HANDLEBARS WILL LOCK IN ONEPOSITION; IF YOU ATTEMPT TO TURN THE KEY TO «OFF», THE ENGINE WILLIMMEDIATLY STOP. IN BOTH CASES YOU WILL LOSE CONTROL AND A SERI-OUS ACCIDENT CAN HAPPEN, LEADING TO INJURY OR EVEN DEATH.
24
2 Ve
hicl
e

02_05
Switch direction indicators (02_05)
Lever «C» towards «1» = left turn indicators switched on;
Lever «C» towards «2» = right turn indicators switched on;
The lever «C» automatically goes back to its «0» position and the indicators remainon; push the lever «C» to turn them off.
02_06
Horn button (02_06)
Push the button «B» to sound the horn.
25
2 Vehicle

02_07
Light switch (02_07)
When the light switch «D» is set to «0», the low-beam light is on. When set to «1»,the high-beam light is activated.
02_08
Start-up button (02_08)
To start the engine, pull either of the two brake levers and then push the button «L».
The immobilizer system
In order to enhance theft protection, the vehicle is equipped with a «PIAGGIO IMMO-BILIZER » electronic engine locking device that is activated automatically when theignition switch is removed. Upon start-up, the «PIAGGIO IMMOBILIZER» systemchecks the starter key, and only if this key is recognised will the Immobiliser systemallow the vehicle to be started.
26
2 Ve
hicl
e

02_09
02_10
02_11
Keys (02_09, 02_10, 02_11)
The vehicle is supplied with two types of keys. The red-handgrip key «A» is the"MASTER" key. Only a single copy of this key is supplied, which is necessary to pro-gram all your other keys and for your dealer to perform some maintenance operations.We therefore recommend that it be used only under exceptional circumstances. Theblue key «B» (single copy supplied) is used for normal operations and for start-up.
Together with the keys comes a CODE CARD which is imprinted with the mechanicalcode of the keys.
WARNING
LOOSING THE RED KEY PREVENTS ANY REPAIRS OF THE 'PIAGGIO IMMO-BILIZER' SYSTEM AND THE ENGINE CONTROL UNIT.
WARNING
KEEP THE 'CODE CARD' AND THE RED HANDGRIP KEY IN A SAFE PLACE (NOTON YOUR VEHICLE).
27
2 Vehicle
02_12
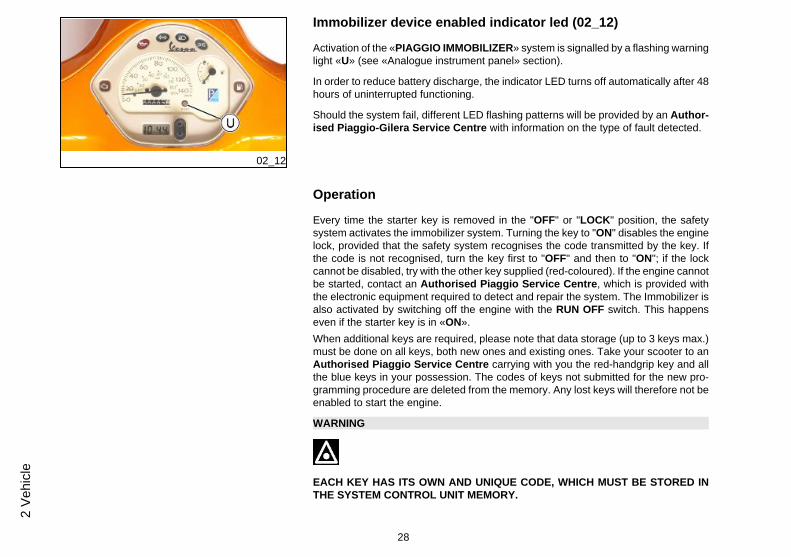
Immobilizer device enabled indicator led (02_12)
Activation of the «PIAGGIO IMMOBILIZER» system is signalled by a flashing warninglight «U» (see «Analogue instrument panel» section).
In order to reduce battery discharge, the indicator LED turns off automatically after 48hours of uninterrupted functioning.
Should the system fail, different LED flashing patterns will be provided by an Author-ised Piaggio-Gilera Service Centre with information on the type of fault detected.
Operation
Every time the starter key is removed in the "OFF" or "LOCK" position, the safetysystem activates the immobilizer system. Turning the key to "ON" disables the enginelock, provided that the safety system recognises the code transmitted by the key. Ifthe code is not recognised, turn the key first to "OFF" and then to "ON"; if the lockcannot be disabled, try with the other key supplied (red-coloured). If the engine cannotbe started, contact an Authorised Piaggio Service Centre, which is provided withthe electronic equipment required to detect and repair the system. The Immobilizer isalso activated by switching off the engine with the RUN OFF switch. This happenseven if the starter key is in «ON».When additional keys are required, please note that data storage (up to 3 keys max.)must be done on all keys, both new ones and existing ones. Take your scooter to anAuthorised Piaggio Service Centre carrying with you the red-handgrip key and allthe blue keys in your possession. The codes of keys not submitted for the new pro-gramming procedure are deleted from the memory. Any lost keys will therefore not beenabled to start the engine.
WARNING
EACH KEY HAS ITS OWN AND UNIQUE CODE, WHICH MUST BE STORED INTHE SYSTEM CONTROL UNIT MEMORY.
28
2 Ve
hicl
e

VIOLENT SHOCKS MAY AFFECT THE ELECTRONIC COMPONENTS OF THEKEY.
IF OWNERSHIP OF THE VEHICLE IS TRANSFERRED TO ANOTHER PERSON,THE KEY WITH THE RED GRIP (AS WELL AS THE OTHER KEYS) AND THE"CODE CARD" MUST BE ALSO TRANSFERRED TO THE NEW OWNER.
Procedure start - red key
Insert the red ignition key in the switch key (in "OFF" position) and turn it to "ON". After1 - 3 seconds, turn the key to «OFF » again and pull it out.
Intermediate step - blu key
Within ten seconds after pulling out the red key, insert the black key and promptly turnit to «ON». After 1-3 seconds, turn the key to "OFF" again and pull it out.
In this way, a maximum of 3 blue keys can be programmed by repeating the aboveprocedure and keeping the indicated times.
Final step - red key
After extracting the last blue key, insert the brown key again and turn it to «ON» (carryout this operation within 10 seconds after extracting the previous key). Leave it in thisposition for 1 to 3 seconds and return it to «OFF».
29
2 Vehicle

Proper programming check
Insert the red key disabling the transponder (i.e., tilt the key cap by 90°) and turn thekey to "ON". Perform the engine start-up operation. Ensure that the engine does notstart. Insert the blue key and repeat the start-up operation. Check that engine starts.
WARNING
SHOULD THE ENGINE START WITH THE RED KEY (WITH TRANSPONDER OFF),OR IN THE EVENT OF WRONG OPERATION DURING PROGRAMMING, REPEATTHE PROCEDURE FROM THE BEGINNING.
02_13
Opening the saddle (02_13)
Insert the key into the seat lock «A», turn it anti-clockwise and lift the seat forwards.
30
2 Ve
hicl
e
02_14
02_15
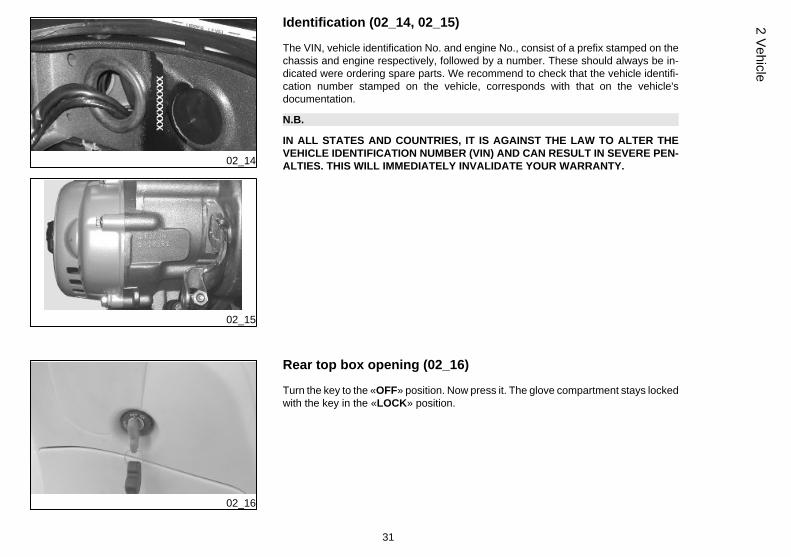
Identification (02_14, 02_15)
The VIN, vehicle identification No. and engine No., consist of a prefix stamped on thechassis and engine respectively, followed by a number. These should always be in-dicated were ordering spare parts. We recommend to check that the vehicle identifi-cation number stamped on the vehicle, corresponds with that on the vehicle'sdocumentation.
N.B.
IN ALL STATES AND COUNTRIES, IT IS AGAINST THE LAW TO ALTER THEVEHICLE IDENTIFICATION NUMBER (VIN) AND CAN RESULT IN SEVERE PEN-ALTIES. THIS WILL IMMEDIATELY INVALIDATE YOUR WARRANTY.
02_16
Rear top box opening (02_16)
Turn the key to the «OFF» position. Now press it. The glove compartment stays lockedwith the key in the «LOCK» position.
31
2 Vehicle
02_17
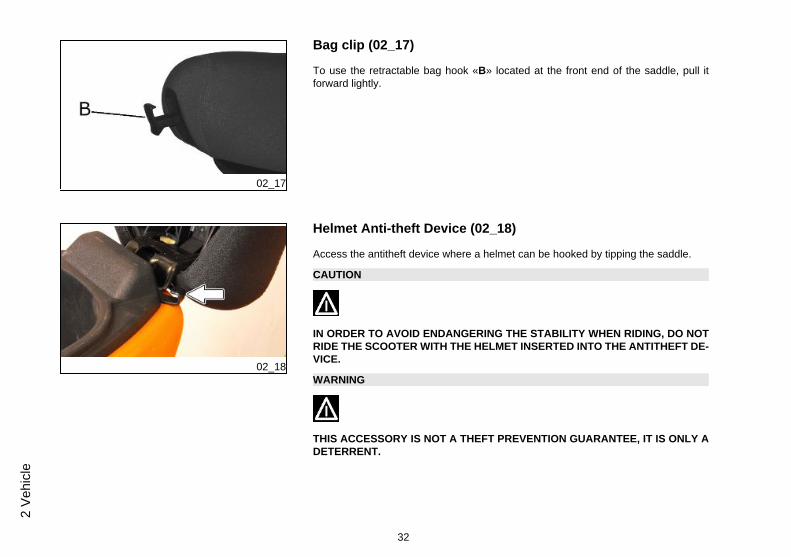
Bag clip (02_17)
To use the retractable bag hook «B» located at the front end of the saddle, pull itforward lightly.
02_18
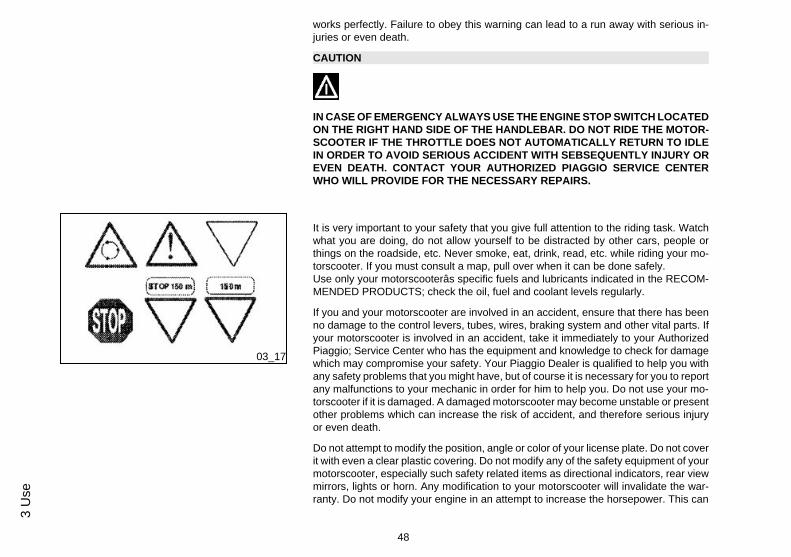
Helmet Anti-theft Device (02_18)
Access the antitheft device where a helmet can be hooked by tipping the saddle.
CAUTION
IN ORDER TO AVOID ENDANGERING THE STABILITY WHEN RIDING, DO NOTRIDE THE SCOOTER WITH THE HELMET INSERTED INTO THE ANTITHEFT DE-VICE.
WARNING
THIS ACCESSORY IS NOT A THEFT PREVENTION GUARANTEE, IT IS ONLY ADETERRENT.
32
2 Ve
hicl
e

Vespa LX 125 i.e. - 150 i.e.
Chap. 03Use
33

Checks
Before using the vehicle, check:1. That the fuel and oil tanks are full.2. The oil level in the rear hub.3. That the tires are correctly inflated.4. That the headlight, tail light and direction indicators are in good working order.5. That the front and rear brakes are in good working order.6. The level in the brake fluid tank.
ALWAYS INSPECT YOUR VEHICLE EACH TIME BEFORE YOU USE IT TO MAKESURE THAT IT IS IN SAFE OPERATING CONDITION. ALWAYS FOLLOW THEINSPECTION AND MAINTENANCE SCHEDULED THAT ARE SHOWN IN THISOWNER'S MANUAL. FAILURE DETECT A DANGEROUS MAINTENANCE CON-DITION OR FAULT IN THE VEHICLE, CAN LEAD TO A SERIOUS ACCIDENT,INJURY OR EVEN DEATH.
Refuelling (03_01)
Fill fuel tank «A» with unleaded gasoline. Minimum octane rating (M+R)/2 method 90.The rider is informed when fuel is low by the fuel warning light on the dashboard. Fillthe engine oil tank «B» with recommended oil. The rider is informed when engine two-stroke oil is low by the oil warning light on the dashboard.
IT IS HIGHLY UNADVISABLE TO REFUEL USING METHODS OTHER THAN NOR-MAL FUEL PUMPS. IF PETROL IS NOT COMPLETELY CLEAN IT CAN DAMAGETHE FUEL SUPPLY SYSTEM FILTERS.
34
3 U
se

03_01
SWITCH OFF THE ENGINE BEFORE REFUELLING WITH GASOLINE. GASOLINEIS HIGHLY INFLAMMABLE. DO NOT SMOKE AND KEEP OPEN FLAMES AT ADISTANCE: FIRE HAZARD. DO NOT INHALE FUEL FUMES. DO NOT ALLOWGASOLINE TO COME INTO CONTACT WITH THE HOT ENGINE AND ANY PLAS-TIC PARTS.
CAUTION: DO NOT ALLOW GASOLINE TO COME INTO CONTACT WITH THEHOT ENGINE AND ANY PLASTIC PARTS.
Tyre pressure
Check the tire pressure and wear periodically around every 500 km. The tires areequipped with a wear indicator and should be replaced as soon as these indicatorsbecome visible on the tread. Also check that there are no cuts on the sides of the tiresor irregular tread wear; in this case refer to authorized garages or those equipped toreplace the tires
CAUTION
TYRE PRESSURE SHOULD BE CHECKED WHEN TYRES ARE COLD.INCOR-RECT TYRE PRESSURE CAUSES ABNORMAL TYRE WEAR AND MAKES RID-ING DANGEROUS.
TYRES MUST BE REPLACED WHEN THE TREAD REACHES THE WEAR LIMITSSET FORTH BY LAW.
35
3 Use

CharacteristicFront tire pressure
1,6 bar (23.2 psi)
Rear tyre pressure
2,0 bar (29 psi)
Rear tyre pressure (with passenger)
2,8 bar (41 bar)
03_02
Shock absorbers adjustment (03_02, 03_03)
The preload of the spring can be adjusted to 4 positions using the ring nut located inthe lower part of the shock absorbers and the specific spanner supplied.
Position 1: minimum preload: rider only
Position 2 medium preload: rider only
Position 3 medium preload: rider and passenger
Position 4: maximum preload: rider, passenger, and luggage.
In order to carry out this operation you will need to use the specific spanner in the kit.Spring preload increases by turning the ring nut towards «A», but decreases if the ringnut is turned towards «B».
CAUTION
RIDING THE VEHICLE WITH THE SPRING PRELOADING NOT CORRECTLY SETFOR THE RIDER AND POSSIBLE PASSENGER, COULD REDUCE THE COM-FORT OF THE RIDE AND THE PRECISION OF THE STEERING.
36
3 U
se

03_03
WARNING
WE RECOMMEND WEARING GLOVES WHILE CARRYING OUT THIS OPERA-TION IN ORDER TO AVOID INJURIES.
03_04
Running in (03_04)
WARNING
DURING THE FIRST 1000 KM DO NOT RIDE THE VEHICLE OVER 80% OF ITSMAXIMUM SPEED. AVOID TWISTING THE THROTTLE GRIP FULLY OR KEEP-ING A CONSTANT SPEED ALONG LONG SECTIONS OF ROAD. AFTER THEFIRST 1000 KM, GRADUALLY INCREASE SPEED UNTIL REACHING THE MAX-IMUM PERFORMANCE.
37
3 Use

03_05
03_06
03_07
Starting up the engine (03_05, 03_06, 03_07, 03_08, 03_09)
The vehicle is equipped with automatic transmission with direct drive, so that startingis effected by turning the throttle grip to idle speed; to start-off from a stationary posi-tion, progressively twist the throttle grip. The vehicle is equipped with an electrical fuelpump that switches on automatically as soon as the engine is started.
To start it up, it is necessary to:
- Rest the vehicle on its centre stand, ensuring the rear wheel is not touching theground.
- Keep the throttle grip to idle speed.
- Insert the key into the ignition key and turn it to « ON».
- Wait for the engine control telltale light to turn off.
- Push the starter button «A» after pulling the front brake lever « B» or the rear brakelever «C».
CAUTION
DO NOT CARRY OUT THESE OPERATIONS IN CLOSED AREAS SINCE EX-HAUST GASES ARE TOXIC.
CAUTION
DUE TO THE HIGH TEMPERATURES THE CATALYTIC CONVERTER CANREACH, ALWAYS TAKE CARE, WHEN PARKING THE VEHICLE, THAT THE SI-LENCER DOES NOT COME INTO CONTACT WITH FLAMMABLE MATERIALS,TO AVOID SERIOUS BURNS.
38
3 U
se

03_08
03_09
WARNING
THE SYSTEM IS DESIGNED TO INHIBIT STARTING THE VEHICLE WHEN ONEATTEMPTS TO START THE ENGINE WITH THE THROTTLE GRIP OPEN, THUSPREVENTING AN INCORRECT MANOEUVRE. THEREFORE KEEP THE THROT-TLE GRIP ON IDLE SPEED OR PARTIALLY OPEN IF NECESSARY.
Precautions
WARNING
NEVER STRESS THE ENGINE AT LOW TEMPERATURES IN ORDER TO AVOIDPOSSIBLE DAMAGE. BE CAREFUL NEVER TO EXCEED THE MAXIMUM SPEEDWHILE RUNNING DOWNHILL, IN ORDER TO AVOID DAMAGING THE ENGINE.IN ANY CASE, IN ORDER TO PRESERVE THE ENGINE FROM PROLONGEDOVERREVVING, THE REVOLUTION LIMITER WILL BE ACTIVATED IF THE EN-GINE SPEED EXCEEDS THE ESTABLISHED THRESHOLD. DO NOT ACTIVATE
39
3 Use

THE REVOLUTION LIMITER RECURRENTLY SO AS TO AVOID DAMAGING THECATALYTIC CONVERTER.
WARNING
AFTER A LONG DISTANCE COVERED AT THE MAXIMUM SPEED, DO NOT STOPTHE ENGINE IMMEDIATELY, BUT LET IT RUN AT IDLE FOR A FEW SECONDS.
03_10
Difficult start up (03_10)
In the rare case of a flooded engine, and in order to facilitate starting, try putting thevehicle into motion with the throttle slightly open. It is however necessary, once theengine is started, to take your vehicle to an Authorised Service Centre to determinethe cause of this problem and to re-establish the vehicle proper functioning.
40
3 U
se

03_11
Stopping the engine (03_11)
Stop acceleration, then turn the key start-up switch to «OFF». The engine turns offand the key can be removed.
CAUTION
DUE TO THE HIGH TEMPERATURES THE CATALYTIC CONVERTER CANREACH, ALWAYS TAKE CARE, WHEN PARKING THE VEHICLE, THAT THE SI-LENCER DOES NOT COME INTO CONTACT WITH FLAMMABLE MATERIALS,TO AVOID SERIOUS BURNS.
03_12
Anti-theft ring (03_12)
The ring shown in the figure, located on the right side of the vehicle is used to fastenthe vehicle to a stable object using a vehicle chain. Do not use the ring for other pur-poses.
WARNING
THIS ACCESSORY IS NOT A THEFT PREVENTION GUARANTEE, IT IS ONLY ADETERRENT.
41
3 Use

03_13
Catalytic silencer (03_13)
CAUTION
TAMPERING WITH THE CATALYTIC SILENCER MAY CAUSE SEVERE DAMAGETO THE ENGINE.
CAUTION
WHEN PARKING THE VEHICLE, DUE TO THE HIGH TEMPERATURES THE CAT-ALYTIC CONVERTER CAN REACH, ALWAYS BE CAREFUL THAT THE MUF-FLER DOES NOT COME INTO CONTACT WITH FLAMMABLE MATERIALS, TOAVOID SERIOUS BURNS.
03_14
Stand (03_14)
Lower the projection of the centre stand by kicking the bracket while pulling the vehiclebackward, holding onto the handlebars.
42
3 U
se

Automatic transmission
Your vehicle is equipped with an automatic transmission and centrifugal clutch to makeyour riding experience simple and pleasant. This system is designed to provide thebest performance (acceleration and consumption) while driving on both flat roads anduphill. If you happen to stop on an uphill slope (traffic light, queue, etc.) only use thebrake to keep the vehicle still, leaving the engine at idling speed. Using the engineto keep the vehicle still, can in fact cause the clutch to overheat due to the rub-bing of the clutch masses themselves on the capstan. It is therefore best to avoidprolonged clutch slipping conditions, (in addition to that mentioned above) such asrunning up hill with a full load on steep slopes or starting up with driver and passengeron slopes of over 25%. Observe the following precautions if the clutch overheats:1. Do not persist in this condition of use.2. Let the clutch cool down with the engine at idling speed for a few minutes.
Safe driving
Some simple pieces of advice follow that will enable you to use your vehicle daily, inrelative safety and peace of mind. Your ability and your mechanical knowledge formthe basis of safe driving. We recommend trying out the vehicle in traffic free zones, inorder to acquire a good knowledge of the vehicle it self.1. Before driving off, remember to put on your helmet and fasten it correctly.2. Reduce speed and drive prudently on bad roads.3. After having driven over a long section of wet roads without having used the
brakes, the braking effect will initially be smaller. In these driving conditionsit is best to activate the brakes periodically in order to expel the water filmbetween disk and brake pads.
4. Do not brake hard on a wet surface, on dirt tracks or on any slippery roadsurface.
5. Avoid driving off by mounting the vehicle when resting on the support. In anycase, the rear wheel should not be turning when in comes into contact withthe ground, in order to avoid abrupt departures.
6. If the vehicle is often used on roads covered with sand, mud, snow and salt,etc., we recommend cleaning the brake disc frequently with a non-aggressive
43
3 Use

detergent in order to avoid the formation of abrasive buildups inside the holesleading to the consequent early wear of the brake pads.
CAUTION
ALWAYS DRIVE WITHIN THE LIMITS OF YOUR ABILITY. DRIVING WHILEDRUNK OR UNDER THE EFFECT OF DRUGS OR CERTAIN MEDICINES IS EX-TREMELY DANGEROUS.
CAUTION
DO NOT ADJUST THE MIRRORS WHILE DRIVING. THIS COULD CAUSE YOU TOLOSE CONTROL OF THE VEHICLE.
CAUTION
ANY ELABORATION THAT MODIFIES THE VEHICLE'S PERFORMANCES, SUCHAS ANY ALTERATION TO ORIGINAL PARTS OF THE STRUCTURE RENDER THEVEHICLE NO LONGER CONFORMING TO THE APPROVED TYPE AND DAN-GEROUS FOR DRIVING SAFETY, AS WELL AS BEING PROHIBITED BY LAW.
CAUTION
DO NOT PLACE ANYTHING INSIDE THE FRONT PART OF THE FAIRING BE-TWEEN THE HANDLEBAR AND THE DASHBOARD. ANY OBJECT PLACED INTHIS AREA COULD JAM THE FORKS, AND ALSO COULD RESTRICT VISIBILITYOF THE DASHBOARD.
44
3 U
se

CAUTION
NEVER TAKE YOUR HANDS OFF THE HAND GRIPS NOR YOUR FEET OFF THEFOOTREST WHILE YOU ARE RIDING. FAILURE TO DO THIS COULD UPSET THESTABILITY OF THE VEHICLE. BEFORE RIDING AWAY, MAKE SURE THAT THESTAND IS COMPLETELY UP. FAILURE TO FOLLOW THESE WARNINGS MAYCAUSE AN ACCIDENT WITH CONSEQUENT RISK OF SERIOUS INJURY OREVEN DEATH.
To ride away:• Allow the throttle to return to idle, apply the rear brake, then remove the ve-
hicle from the stand.• Get on the vehicle, keeping at least one foot on the ground in order not to
loose balance.• Before driving, be sure that the rear view mirrors are correctly adjusted.
WARNING
WHEN THE VEHICLE IS NEW TO YOU, PRACTICE LOOKING IN THE REAR VIEWMIRRORS. ONLY EXPERIENCE WILL ALLOW YOU TO CORRECTLY DETER-MINE THE EXACT LOCATION OF OTHER VEHICLES AND OBJECTS BEHINDYOU.
• To begin, release the brake lever and accelerate by gently rotating the throttlegrip; the vehicle will start moving.
• Ride at reduced speed for the first few miles in order to warm up the engine.
45
3 Use

CAUTION
WHEN BRAKING, REDUCE THE THROTTLE AND APPLY BOTH BRAKES SI-MULTANEOUSLY IN ORDER TO OBTAIN THE BEST BRAKE PERFORMANCE.BY APPLYING ONLY THE FRONT BRAKE OR ONLY THE REAR BRAKE, YOUREDUCE THE BRAKING EFFICIENCY CONSIDERABLY, AND RUN THE RISK OFLOCKING UP ONE WHEEL. THIS CAN CAUSE AN UPSET AND SUBSEQUENTSERIOUS INJURY OR EVEN DEATH.
Do not attempt to maintain your position on a hill by running the engine. This will veryquickly destroy the transmission, and overheat the engine. Before entering a turn, slowthe motorscooter using the brakes, to a constant speed and then accelerate slightlythrough the turn. Avoid braking at the last moment. This can cause you to lose controlof your vehicle. If the brakes are operated continuously on downhill grades, the discsand pads will overheat, reducing the braking efficiency. Use the brakes as little aspossible to maintain a safe speed. Never coast downhill with the engine off.Pay very close attention to any obstacles or variations of the road surface. Unevenroads, rails, manhole covers, painted traffic stripes, traffic dots all become slipperywhen wet. Avoid particularly steel plates which are sometimes used during road main-tenance. They become more slippery than ice once they are wet by rain. If you mustride on such surfaces, decrease your speed and operate the throttle, brakes andsteering very gently.
Always use the turn signals any time you intend to change lanes or change direction,and avoid sudden or abrupt turning.
Switch off the direction indicators as soon as you have changed direction.
Overtake and pass with care, especially in rainy weather. A water cloud created bylarger vehicles will reduce visibility and the slip stream could cause you to lose controlof your vehicle.
46
3 U
se

03_15
03_16
Basic safety rules (03_15, 03_16, 03_17)
The instructions given below cover normal operation of your motorscooter and mustbe carefully observed. By following these rules you will enhance your own safety andthe safety of others. You will also maximize the life and utility of your motorscooter.Motorscooters obviously do not provide some of the protection provided by automo-biles, therefore it is essential that you wear appropriate protective clothing. Neveroperate your motorscooter without wearing a helmet, gloves, eye protection, a heavyjacket, sturdy footwear, and sturdy full length pants. However, do not assume thateven the best clothing and helmet will protect you in the event of an upset or a crashwith another vehicle. At best, this gear provides some protection from scrapes andscratches, but very little, if any, impact protection. Be sure that you meet all the re-quirements prescribed by local law, including driver's license, minimum age, training,insurance, taxes, motorcycle registration, license plate, etc. When you first receiveyour motorscooter, practice by riding in areas where there is no traffic. Do not attemptto ride in heavy traffic until you are thoroughly experienced and riding your motor-scooter has become second nature to you. Most states prohibit the operation of thissize motorscooter on freeways or expressways. Be sure that it is legal to use yourmotorscooter before you take any particular road. A new motorscooter must be care-fully broken in, see paragraph. RUNNING IN. Before starting the engine, make surethat the brakes, transmission and throttle controls function properly and that the fueland oil supply is adequate. The exhaust system, brakes, and some other parts of themotorscooter become very hot during operation. Do not touch any of these parts.Some medicines or drugs, illegal or prescription, and alcohol significantly increase therisk of accidents. Do not ride while you are under the influence of alcohol or drugs,whether they illegal or prescription. Make sure you are in good physical condition andnot ill before riding your motorscooter. Do not ride your motorscooter when you areparticularly tired. Alcohol, drugs and fatigue are leading causes of motorscooter ac-cidents. Many accidents are caused by the rider's inexperience and lack of training.Do not ride your motorscooter until you have received training from a recognizedtraining organization such as the Motorcycle Safety Foundation. Remember that ridinga motorscooter, though easy and fun, is quite different from driving a car. Do not as-sume that you can operate your motorscooter safety just because you are a competentautomobile driver. Never lend your motorscooter to others unless you are sure thatthey are competent and properly licensed motorcycle operators. If the throttle sticksopen, it may cause a collision with another vehicle or an upset. If the trottle sticks, turnoff the engine with the engine stop switch located on the right hand side of the han-dlebar. Do not attempt to restart the engine until the throttle has been repaired and
47
3 Use
works perfectly. Failure to obey this warning can lead to a run away with serious in-juries or even death.
CAUTION
IN CASE OF EMERGENCY ALWAYS USE THE ENGINE STOP SWITCH LOCATEDON THE RIGHT HAND SIDE OF THE HANDLEBAR. DO NOT RIDE THE MOTOR-SCOOTER IF THE THROTTLE DOES NOT AUTOMATICALLY RETURN TO IDLEIN ORDER TO AVOID SERIOUS ACCIDENT WITH SEBSEQUENTLY INJURY OREVEN DEATH. CONTACT YOUR AUTHORIZED PIAGGIO SERVICE CENTERWHO WILL PROVIDE FOR THE NECESSARY REPAIRS.
03_17
It is very important to your safety that you give full attention to the riding task. Watchwhat you are doing, do not allow yourself to be distracted by other cars, people orthings on the roadside, etc. Never smoke, eat, drink, read, etc. while riding your mo-torscooter. If you must consult a map, pull over when it can be done safely.Use only your motorscooterâs specific fuels and lubricants indicated in the RECOM-MENDED PRODUCTS; check the oil, fuel and coolant levels regularly.
If you and your motorscooter are involved in an accident, ensure that there has beenno damage to the control levers, tubes, wires, braking system and other vital parts. Ifyour motorscooter is involved in an accident, take it immediately to your AuthorizedPiaggio; Service Center who has the equipment and knowledge to check for damagewhich may compromise your safety. Your Piaggio Dealer is qualified to help you withany safety problems that you might have, but of course it is necessary for you to reportany malfunctions to your mechanic in order for him to help you. Do not use your mo-torscooter if it is damaged. A damaged motorscooter may become unstable or presentother problems which can increase the risk of accident, and therefore serious injuryor even death.
Do not attempt to modify the position, angle or color of your license plate. Do not coverit with even a clear plastic covering. Do not modify any of the safety equipment of yourmotorscooter, especially such safety related items as directional indicators, rear viewmirrors, lights or horn. Any modification to your motorscooter will invalidate the war-ranty. Do not modify your engine in an attempt to increase the horsepower. This can
48
3 U
se

result in irreparable damage to the engine, as well as degradation of the performanceand handling of your motorscooter which could lead to an upset, and serious injury oreven death. Have your motorscooter repaired only with original parts, and use onlyoriginal Piaggio accessories.
The use of aftermarket accessories and parts can seriously compromise the safety ofyour motorscooter as well as affect its performance, stability and serviceability. Anymodification which affects performance or safety voids your warranty completely. Forthe reasons stated above, tampering with the exhaust emission or noise control sys-tems of your motorscooter can lead to large fines. Also, in some jurisdictions, helmetsare required by law, and in all jurisdictions, you must maintain your motorcycle incurrent registration (License plate up-to-date). Also, many jurisdictions require a spe-cial motorcycle license, and you must not ride your motorscooter without having firstobtained this license. This motorscooter was not designed to be equipped with a side-car or to be used to tow trailers, motorcycles, motorscooters or bicycles.
Piaggio does not manufacture side- cars or trailers and therefore cannot predict theeffects of such accessories on the maneuverability or stability of your motorscooter:it can only warn that such effects may be negative and that any damage to the mo-torscooter components caused by the use of such accessories will not be covered bythe warranty.
Never race other motorscooters or motorcycles with your motorscooter. Brake withboth the front and rear brakes. The use of one brake only for sudden braking maycause the motorscooter to skid or make the rider lose control of the motorscooter itself.Always ride at a safe speed and avoid unnecessary hard acceleration. This also re-duces fuel consumption and increases the life of the motorscooter. If you must rideyour motorscooter in rainy weather, or on loose surfaces, remember that traction isgreatly reduced. Under these conditions, all handling of the motorscooter must bedone gradually and smoothly. Sudden acceleration, braking or turning may cause youto lose control of your motorscooter. When traction is reduced, accelerate graduallyand when slowing down release throttle and use your motorscooter engine braking inso far as possible, instead of braking abruptly. Avoid rapid, harsh application of thebrakes.
Gradually open and close the throttle, to avoid spinning or skidding the rear wheel.On rough road surfaces, slow down and ride with particular care. Avoid wide openthrottle accelerations, unless they are necessary for passing. Remember that exces-
49
3 Use

sively aggressive cornering can cause your motorscooterâs tires to lose traction,which can result in an upset and serious injury or even death.
Always observe posted and statutory speed limits, but do not assume that you canride as fast as the speed limit allows under all road conditions. Slowing down a littlecan greatly increase your safety under all road conditions. Do not ride your motor-scooter off road. Do not tamper with the muffler system or the emission control systemof your motorscooter. This is not only bad for the environment, it can subject you toserious penalties.
Clothing
Before riding the scooter, make sure that your riding clothing is in good conditions.Helmet shall be worn in adequate manner, and glasses or any other eye protection,shall be clean. Research and experience showed that very often other vehicles' driversdo not see motorbike riders. To increase your visibility, wear light-reflecting clothing,such as a jacket or clothes (jacket, gloves, trousers...) with reflecting inserts. Payspecial attention to the approaching cars and lorries that could be about to turn left.Many accidents motorbikes are involved into are caused by car drivers coming fromthe opposite direction not signalling to the bike rider their intention to turn left.
Inevitably, car driver will see the biker, but he will swear not to have seen him beforeturning and cutting in on him. Be careful! Wear protective clothing, preferably in brilliantcolours and/or light-reflecting. You will thus be more visible to other drivers/riders, andyou will reduce the possibility of being knocked, and be more protected in case ofaccident. Always wear helmet. Many accidents are fatal due to severe head injuries.
Additional riding gear
In addition to a helmet and eye protection, we also recommend:• Sturdy boots with non-slip soles to help protect your feet and ankles.• Leather gloves to keep your hands warm and help prevent blisters, cuts,
burns and bruises.
50
3 U
se

• A motorscooter riding suit or jacket for comfort as well as protection. Bright-colored and reflective clothing can help make you more noticeable in traffic.Be sure to avoid loose clothes that could get caught on any part of your mo-torscooter.
Clothing should be very tight-fitting and fastened at the wrists and ankles. Strings,belts and ties should not be hanging loose; prevent these and other objects from in-terfering with driving by getting entangled with moving parts or driving mechanisms.Do not carry sharp objects in your pockets that could be dangerous in case of an upset.For example, pens or mechanical pencils, etc. Also, make sure that your passengersfollow this recommendation.
Accessories
The owner of the motorscooter is responsible for the choice, installation and use ofany accessory. The installation of inappropriate accessories or the overloading of themotorscooter may result in the instability of the motorscooter itself and cause acci-dents with consequent risk of serious injuries or even death. Windshields, in particular,can be dangerous, as they can break and injure the rider or passenger in case of anaccident. If you have any doubt with regard to any accessory you would like to install,or any load you would like to carry, consult your local Piaggio Dealer beforehand.Avoid installing accessories that cover horns or lights, or that could impair their func-tions. Don't install accessories that limit the suspension stroke or the steering angle,that interfere with the operations of the controls, or that reduce the scooter's lean anglein turns. Also, don't install accessories that could hamper your access to the variouscontrols, since this could prolong reaction time during an emergency. Fairings andwindshields, or any other accessory that presents a considerable cross section, mayproduce aerodynamic forces that will affect the stability of the motorscooter, particu-larly at high speeds or in cross winds.Make sure that anything carried on your motorscooter is securely attached, and cannotcome loose and jam the wheels, forks, etc. Do not install any electrical accessories,and do not modify the electrical system of your motorscooter. Anything that couldcause an electrical overload or other fault could cause the motorscooter to suddenlystop, the lights to dim or fail, or the horn and other safety accessories not to work. Useonly Piaggio genuine accesories.
51
3 Use
Load
Do not overload your motorscooter. Attach luggage or packages as closely' as pos-sible to the center of your motorscooter and distribute the load from side to side asevenly as possible, to keep imbalance to a minimum. Remember that loads tend toloosen with riding, so frequently check the security of your load. Do not hang anythingfrom your motorscooter handlebar, fenders, or forks, because this will upset the han-dling of your motorscooter, and could prevent you from avoiding an accident.Failure to heed this warning can lead to an upset with subsequent serious injury oreven death. Do not ride with your crash helmet hung from the strap because it couldeasily become entangled with the wheels, fenders, or forks, causing an upset andsubsequent serious injury or even death. When carrying a passenger, remember thatyour motorscooter's handling is degraded, that the brakes are less efficient, and thecenter of gravity is higher and further to the rear. This makes it more likely that thefront wheel will come up off the ground, especially on acceleration. Therefore, youshould avoid hard acceleration and hard braking. Many accidents are caused by in-experienced rider carrying passengers. Remember that allowance must be made forthe extra weight of the passenger far all driving maneuvers. Avoid abrupt and exces-sive acceleration. Always slow down in time and calculate longer stopping andmaneuvering distances. Noncompliance with these instructions may lead to the over-turning of the motorscooter or to other accidents with consequent serious injuries oreven death. Never carry loosely packaged items and make sure that everything thatyou carry on your motorscooter is carefully secured. Do not carry packages whichprotrude from the luggage rack or which cover any of the signal lights, the headlight,or the horn.
Children or animals must not be carried anywhere on your motorscooter. Overloadingyour motorscooter seriously reduces its stability and maneuverability and can lead toan upset with subsequent serious injury or death.
52
3 U
se

Vespa LX 125 i.e. - 150 i.e.
Chap. 04Maintenance
53

Engine oil level
Engine oil is used in 4-stroke engines in order to lubricate the timing gears, the bronzebushes and the thermal group. An insufficient quantity of oil can cause seriousdamage to the engine itself. In all 4T engines, the decay of the oil characteristics,as well as a certain evel of consumption, should be considered normal. Consumptioncan particularly reflect the conditions of use (i.e. when driving at "full acceleration" allthe time, oil consumption increases). In order to prevent any problems, it is advis-able to check the oil level more frequently than indicated in the ScheduledMaintenance Table or before undertaking a long trip. The vehicle is equippedwith an oil pressure light on the instrument panel.
04_01
04_02
Engine oil level check (04_01, 04_02)
Every time the vehicle is used, visually inspect the level of the engine oil when theengine is cold (after completely unscrewing the oil cap/dipstick). The oil level shouldbe somewhere between the MAX and MIN index marks on the level rod; «A»; whilethe oil is being checked, the vehicle must be resting on its centre stand on an even,horizontal surface.
If the check is carried out after the vehicle has been used, and therefore with a hotengine, the level line will be lower; in order to carry out a correct check, wait at least10 minutes after the engine has been stopped so as to get the correct level.
54
4 M
aint
enan
ce

ENGINE OIL CAPACITYEngine oil ~ 1.100 cm³
04_03
Engine oil top-up (04_03)
Always check oil level before carrying out top-ups and add oil without exceeding theMAX level. An engine oil check-up and top-up should be carried out as indicated inthe scheduled maintenance table at an Authorized Service Centre.
04_04
Warning light (insufficient oil pressure) (04_04)
The vehicle is equipped with a warning light that lights up when the key is turned tothe «ON» position. However, this light should switch off once the engine has beenstarted. If the warning light still lights while braking, at idle speed or while turninga corner, it is necessary to check the oil level and top up if required. If, afterhaving topped up the oil, the warning light persists in still lights while braking,at idle speed or while turning a corner, it will be necessary to turn to an Author-ized Piaggio Service Centre.
55
4 Maintenance

04_05
04_06
04_07
Engine oil change (04_05, 04_06, 04_07)
The oil and the cartridge filter «C» must be changed as indicated in the scheduledmaintenance tables at an Authorised Service Centre. The engine should be emptiedby draining the oil from the drainage plug «B» of the gauze filter on the flywheel side.In order to facilitate oil drainage, loosen the cap/dipstick. Since a certain quantity ofoil still remains in the circuit, refill with approx. 850 ÷ 900 cm³ of oil through the cap«A. Then start up the vehicle, leave it running for a few minutes and switch it off: after5 minutes, check the level and if necessary, top-up without exceeding the MAXlevel. The cartridge filter must be replaced at every oil change. For top-ups andchanges, use new oil of the recommended type.
WARNING
RUNNING THE ENGINE WITH INSUFFICIENT LUBRICATION OR WITH INADE-QUATE LUBRICANTS ACCELERATES THE WEAR AND TEAR OF THE MOVINGPARTS AND CAN CAUSE IRREVERSIBLE DAMAGE.
WARNING
EXCESSIVE OIL LEVEL TOP-UPS CAN LEAD TO INCRUSTATIONS AND VEHI-CLE MALFUNCTIONING.
CAUTION
USED OILS CONTAIN SUBSTANCES HARMFUL TO THE ENVIRONMENT. FOROIL REPLACEMENT, CONTACT AN AUTHORISED SERVICE CENTRE, WHICHIS EQUIPPED TO DISPOSE OF USED OILS IN AN ENVIRONMENTALLY FRIEND-LY AND LEGAL WAY.
56
4 M
aint
enan
ce

CAUTION
THE USE OF OIL OTHER THAN THAT RECOMMENDED CAN SHORTEN THELIFE OF THE ENGINE.
Recommended productsEngine oil
Engine oilSAE 5W-40, API SL, ACEA A3, JASO MA Synthetic oil
04_08
Hub oil level (04_08, 04_09, 04_10)
Make sure there is oil in the rear hub checking this at the intervals specified in thescheduled maintenance table.
To check the rear hub oil level, proceed as follows:
-Park the vehicle on level ground and rest it on its centre stand.
- Unscrew the oil dipstick «A» and dry it with a clean cloth. Reinsert it by screwing itin completely.
- Pull out the dipstick and check that the oil level is between the MIN and MAX refer-ence marks. If the oil level is below the MIN notch, refill the hub with the right amountof oil.
- Screw up the oil dipstick back in and make sure it is locked properly in place.
N.B.
THE REFERENCE MARKS ON THE HUB OIL LEVEL DIPSTICK, EXCEPT FORTHE ONE INDICATING THE "MAX" LEVEL, REFER TO OTHER MODELS BY THEMANUFACTURER AND HAVE NO SPECIFIC FUNCTION FOR THIS MODEL.
57
4 Maintenance

04_09
CAUTION
RIDING THE VEHICLE WITH INSUFFICIENT HUB LUBRICATION OR WITH CON-TAMINATED OR IMPROPER LUBRICANTS ACCELERATES THE WEAR ANDTEAR OF THE MOVING PARTS AND CAN CAUSE SERIOUS DAMAGE.
CAUTION
USED OILS CONTAIN SUBSTANCES HARMFUL TO THE ENVIRONMENT. FOROIL CHANGE, CONTACT AN AUTHORISED SERVICE CENTRE WHICH IS EQUIP-PED TO DISPOSE OF USED OILS IN AN ENVIRONMENTALLY FRIENDLY ANDLEGAL WAY.
Recommended productsAGIP ROTRA 80W-90
Rear hub oilSAE 80W/90 Oil that exceeds the requirements of API GL3 specifications
04_10
REPLACEMENT
1) Remove the oil dipstick.
2) Unscrew the oil drainage screw «B» and drain out all the oil.
3) Screw back the drainage screw and refill the hub using the recommended oil quan-tity and type.
58
4 M
aint
enan
ce

HUB OIL CAPACITYTransmission oil 100 cm³
04_11
Tyres (04_11)
Periodically check the inflation pressure of each tire. The tires have tread wear indi-cators and must be replaced as soon as the indicators are visible on the tread. Checkalso for cuts on the tires walls and uneven tread wear. Tires must be replaced by anauthorized Piaggio service center, or center equipped for changing tires.
N.B.
THE TIRES MUST BE CHECKED WHEN THE TIRES ARE COLD.
CharacteristicTire pressure (front wheel)
23.2 psi (1.6 bar)
Tire pressure (rear wheel)
29 psi (2 bar)
Tire pressure (rear wheel driver and passenger)
41 psi (2.8 bar)
59
4 Maintenance
04_12
04_13
04_14
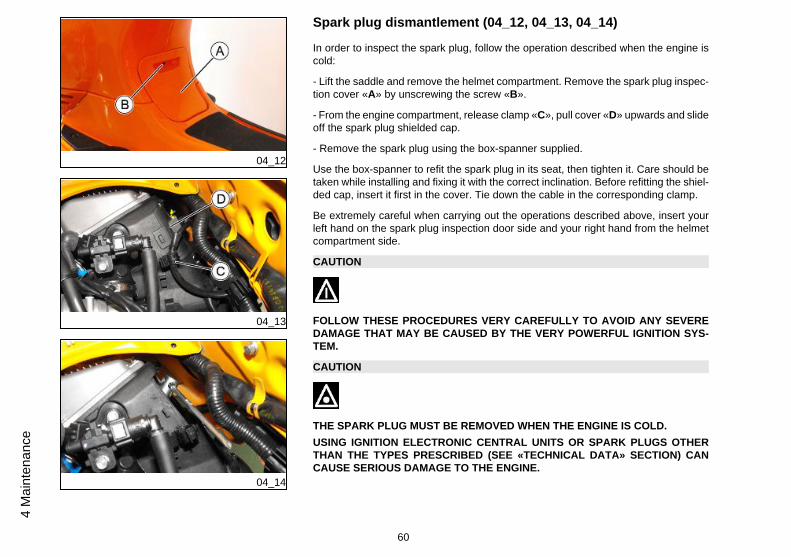
Spark plug dismantlement (04_12, 04_13, 04_14)
In order to inspect the spark plug, follow the operation described when the engine iscold:
- Lift the saddle and remove the helmet compartment. Remove the spark plug inspec-tion cover «A» by unscrewing the screw «B».
- From the engine compartment, release clamp «C», pull cover «D» upwards and slideoff the spark plug shielded cap.
- Remove the spark plug using the box-spanner supplied.
Use the box-spanner to refit the spark plug in its seat, then tighten it. Care should betaken while installing and fixing it with the correct inclination. Before refitting the shiel-ded cap, insert it first in the cover. Tie down the cable in the corresponding clamp.
Be extremely careful when carrying out the operations described above, insert yourleft hand on the spark plug inspection door side and your right hand from the helmetcompartment side.
CAUTION
FOLLOW THESE PROCEDURES VERY CAREFULLY TO AVOID ANY SEVEREDAMAGE THAT MAY BE CAUSED BY THE VERY POWERFUL IGNITION SYS-TEM.
CAUTION
THE SPARK PLUG MUST BE REMOVED WHEN THE ENGINE IS COLD.USING IGNITION ELECTRONIC CENTRAL UNITS OR SPARK PLUGS OTHERTHAN THE TYPES PRESCRIBED (SEE «TECHNICAL DATA» SECTION) CANCAUSE SERIOUS DAMAGE TO THE ENGINE.
60
4 M
aint
enan
ce

CAUTION
PERFORM THE OPERATIONS CAREFULLY.DO NOT DAMAGE THE TONGUES OR THEIR SEATS. HANDLE THE PAINTEDAND PLASTIC COMPONENTS CAREFULLY. DO NOT SCRATCH OR DAMAGETHEM.
RECOMMENDED SPARK PLUGSpark plug (125 cm³) NGK CR8EB
Spark plug (150 cm³) NGK CR7EB
Electrode gap 0,7 ÷ 0,8 mm
04_15
Removing the air filter (04_15, 04_16)
Remove the side fairing by undoing the screw «A» and the smaller screw «B». Takeoff air cleaner cover «D» after having unscrewed the 6 fixing screws «C», then takeout the filter.
CAUTION
IN CASE OF RIDING ON DUSTY ROADS IT IS ADVISABLE TO CLEAN THE AIRFILTER MORE FREQUENTLY THAN INDICATED IN THE RELEVANT CHAPTERON SCHEDULED MAINTENANCE.
61
4 Maintenance

04_16
04_17
Air filter cleaning (04_17)
1. Wash the sponge with water and neutral soap.
2. Dry it with a clean cloth and small blasts of compressed air.
3. Soak the sponge with a mixture of 50% petrol and 50% specified oil.
4. Gently squeeze the filter element without twisting it, let it drip and then refit it.
CAUTION
IF THE VEHICLE IS USED ON DUSTY ROADS IT IS NECESSARY TO CARRY OUTMAINTENANCE CHECKS OF THE AIR FILTER MORE OFTEN TO AVOID DAM-AGING THE ENGINE.
Recommended productsOil for air filter sponge
Oil for air filter spongeMineral oil with specific additives for increased adhesiveness
62
4 M
aint
enan
ce

04_18
04_19
Checking the brake oil level (04_18, 04_19)
The brake fluid reservoir is equipped with a sight glass «A». The sight glass showsthe level in the reservoir.
With sight glass «A» completely covered with fluid, the level is above Min. If the leveldrops, even slightly, the fluid level is considered Min.
If no fluid is visible through the sight glass, the fluid level is below Minimum. The brakefluid level may fall due to wear of the brake pads. If this happens take the scooter toan Authorized Piaggio Service Center for a general check-up of the brakes. If youneed to fill up the fluid follow the steps listed below. Unscrew the 2 screws «B» removethe reservoir cap «C» and pour in the required quantity of fluid (the brake fluid levelmust be above minimum). Check the level with the reservoir in a horizontal position,i.e. with the handlebars straight and the scooter perfectly level.
ONLY USE DOT 4 CLASSIFIED BRAKE FLUIDS. THE BRAKE CIRCUIT FLUIDHAS A STRONG CORROSIVE POWER: DO NOT LET IT COME INTO CONTACTWITH THE PAINTED PARTS.
AVOID CONTACT OF THE BRAKE FLUID WITH EYES, SKIN, AND CLOTHING. INCASE OF CONTACT, RINSE WITH WATER. THE BRAKING CIRCUIT FLUID ISHYGROSCOPIC, THAT IS TO SAY IT ABSORBS HUMIDITY FROM THE SUR-ROUNDING AIR. IF THE HUMIDITY IN THE BRAKE FLUID EXCEEDS A CERTAINVALUE, IT WILL LEAD TO INEFFICIENT BRAKING. NEVER USE BRAKE FLUIDCONTAINED IN CONTAINERS THAT HAVE ALREADY BEEN OPENED, OR PAR-TIALLY USED.
63
4 Maintenance

IN NORMAL CLIMATIC CONDITIONS IT IS ADVISABLE TO REPLACE THEBRAKE FLUID EVERY 2 YEAR. NEVER USE BRAKE FLUID CONTAINED IN AL-READY OPEN OR PARTIALLY USED CONTAINERS.
N.B.
BRAKE FLUID TENDS TO ABSORB MOISTURE FROM THE AIR. IF THE BRAKEFLUID IN THE CIRCUIT CONTAINS EXCESS MOISTURE, BRAKING EFFICIENCYWILL BE IMPAIRED.
ALWAYS USE SYNTHETIC BRAKE FLUID (IDENTIFIED BY THE MARKING (O)ON THE CONTAINER). MINERAL TYPE BRAKE FLUID WILL DAMAGE THE RUB-BER SEALS ON THE BRAKE CIRCUIT AND MUST NOT BE USED ON ANYACCOUNT.
DO NOT RIDE YOUR VEHICLE WITH WORN OR MALFUNCTIONING BRAKES!THE BRAKES ARE THE MOST IMPORTANT SAFETY SYSTEM OF YOUR VEHI-CLE. USING THE MOTOR-SCOOTER WITH BRAKES THAT ARE ANYTHINGLESS THAN PERFECT IS VERY LIKELY TO LEAD TO A COLLISION OR UPSET,WITH CONSEQUENT RISK OF SERIOUS INJURY OR DEATH.CHECK THE BRAKE PAD WEAR, AS SHOWN ON PAR. «CHECKING THE BRAKEPAD WEAR». HAVE YOUR BRAKES SERVICED BY YOUR LOCAL PIAGGIODEALER.
WET CONDITIONS SERIOUSLY DEGRADE THE PERFORMANCE OF YOURBRAKES. WHEN THE ROAD IS WET FROM RAIN, YOU SHOULD PLAN TO USE
64
4 M
aint
enan
ce

DOUBLE THE NORMAL STOPPING DISTANCES SINCE BOTH THE BRAKESTHEMSELVES AND THE TRACTION OF THE TIRES ON THE ROAD ARE RE-DUCED BY THE PRESENCE OF WATER. WATER ON THE BRAKES FROMWASHING YOUR VEHICLE, OR SPLASHED UP FROM WET ROADS, OR CROSS-ING PUDDLES OR DITCHES,CAN WET THE BRAKES SUFFICIENTLY TOGREATLY REDUCE THEIR EFFECTIVENESS. WHENEVER THE BRAKES HAVEBECOME WET. ALWAYS DRY THEM BY GENTLY APPLYING THE BRAKES, RE-PEATEDLY, UNTIL THE HEAT CAUSES THE BRAKES TO DRY, AND FULLBRAKE FUNCTION IS RESTORED. FAILURE TO FOLLOW THIS PROCEDURECAN LEAD TO LOSS OF BRAKE EFFECTIVENESS AND A SERIOUS ACCIDENT.
THE BRAKES ARE EXTREMELY IMPORTANT FOR YOUR SAFETY. DO NOT USETHE VEHICLE IF THE BRAKES DO NOT WORK PERFECTLY. ALWAYS CHECKTHE BRAKE EFFICIENCY BEFORE RIDING.
IF THE "FEEL" OR POSITION OF THE BRAKE LEVER CHANGES, THIS MAY BEDUE TO SOME PROBLEM IN THE HYDRAULIC BRAKE SYSTEM. IF YOU HAVEANY DOUBT REGARDING THE PERFECT FUNCTIONING OF YOUR BRAKESYSTEM, OR IF THE NORMAL PRERIDE CHECKS INDICATE ANY DISCREPAN-CY, CONTACT YOUR LOCAL PIAGGIO DEALER OR AUTHORIZED PIAGGIOSERVICE CENTER BEFORE RIDING.
PAY SPECIAL ATTENTION TO THE BRAKE DISC AND FRICTION MATERIAL,MAKING SURE THAT THEY ARE NEITHER DIRTY OR OIL, ESPECIALLY AFTERMAINTENANCE OPERATIONS OR INSPECTIONS. CHECK THE BRAKE LINE,MAKE SURE THAT IT IS NOT TWISTED, CRIMPED, OR LEAKING.KEEP AWAY FROM CHILDREN.
65
4 Maintenance

DISPOSE OF USED BRAKE FLUID PROPERLY. SEE THE GENERAL WARNINGSON PAGE 5 (BRAKE FLUID).
04_20
Battery (04_20)
To reach the battery, lift the seat, then remove the battery compartment door by re-moving the Phillips screw, "A", shown in the figure.
The battery is the electrical device which requires the most frequent inspections anddiligent maintenance.
DEAD BATTERIES CAN HARM THE ENVIRONMENT. THE COLLECTION ANDDISPOSAL SHOULD BE CARRIED OUT IN COMPLIANCE WITH CURRENT REG-ULATIONS.
THE ELECTROLYTE CONTAINS SULPHURIC ACID: AVOID CONTACT WITHEYES, SKIN AND CLOTHES. IN THE CASE OF ACCIDENTAL CONTACT, RINSEWITH PLENTY OF WATER AND CONSULT A DOCTOR.
DO NOT DISCONNECT THE BATTERY CABLES WITH THE ENGINE RUNNING,THIS CAN CAUSE IRREPARABLE DAMAGE TO THE VEHICLE ELECTRONICCENTRAL POWER UNIT.
66
4 M
aint
enan
ce

04_21
Use of a new battery (04_21)
To install a new battery:1. Place the battery in its housing.
2. Connect the positive pole «+» first and then the negative pole «-».
3. Fit the battery cover.
CAUTION
DO NOT REVERSE THE POLARITY: RISK OF SHORT CIRCUIT AND DAMAGETO THE ELECTRICAL SYSTEM.
WARNING
USED BATTERIES ARE HARMFUL FOR THE ENVIRONMENT. COLLECTIONAND DISPOSAL SHOULD BE CARRIED OUT IN COMPLIANCE WITH REGULA-TIONS IN FORCE.
CharacteristicBattery
Sealed, 12 V / 10 Ah
Long periods of inactivity
Battery performance will decrease if the vehicle is not used for a long time. This is theresult of a natural phenomenon of battery discharging and due to possible residualabsorption of the vehicle, due to components with constant power supply. Poor batteryperformance may also be due to environmental conditions and the cleanness of the
67
4 Maintenance

leads. One of the following processes should be effected to avoid difficult starting and/or irreparable damage to the battery:• At least once a month start the engine and run it slightly above idle speed,
for 10- 15 minutes. This keeps all the engine components, as well as thebattery, in good working order.
• Store the vehicle (as described in the «Periods of inactivity» section) andremove the battery. The battery must be clean, completely charged and stor-ed in a dry and wellventilated area. Recharge at least once every twomonths.
THE BATTERY MUST BE CHARGED WITH A CURRENT EQUAL TO 1/10 OF THERATED CAPACITY OF THE BATTERY AND FOR NOT LONGER THAN 10 HOURS.TAKE THE VEHICLE TO AN AUTHORIZED PIAGGIO SERVICE CENTER FORTHIS OPERATION. WHEN REMOUNTING THE BATTERY MAKE SURE THE TER-MINALS ARE CORRECTLY CONNECTED TO THE LEADS.
DO NOT DISCONNECT THE BATTERY CABLES WITH THE ENGINE RUNNING,THIS CAN CAUSE IRREPARABLE DAMAGE TO THE VEHICLE ELECTRONICCENTRAL POWER UNIT.
68
4 M
aint
enan
ce

04_22
04_23
04_24
Fuses (04_22, 04_23, 04_24, 04_25, 04_26, 04_27)
The electrical system is protected by:
- a 20A and a 15A fuse in terminal block «A» located in the battery compartment underthe saddle;
- 10A and a 7.5A fuse in terminal block «B», two x 7.5A fuses in terminal block «C»located inside the front shield under the steering cover;
To reach them:
- Using a screwdriver, remove the clip-on badge «D».
- Unscrew the screw «E».
- Turn the handlebar completely to one side. Push the steering column cover upwardsand pull to release the retaining tongues.
Before replacing a fuse, find and solve the failure that caused it to blow. Do not replacethe fuse with any alternative form of conductor
CAUTION
IN ORDER TO AVOID DAMAGING THE ELECTRIC SYSTEM, NEVER DISCON-NECT THE WIRING WHILE THE ENGINE IS RUNNING. DO NOT TIP THE VEHICLETOO MUCH IN ORDER TO AVOID DANGEROUS LEAKAGE OF THE BATTERYELECTROLYTE.
CAUTION
MODIFICATIONS OR REPAIRS TO THE ELECTRICAL SYSTEM, PERFORMEDINCORRECTLY OR WITHOUT STRICT ATTENTION TO THE TECHNICAL SPEC-IFICATIONS OF THE SYSTEM CAN CAUSE MALFUNCTIONING AND RISK OFFIRE.
69
4 Maintenance

04_25
04_26
04_27
CAUTION
PERFORM THE OPERATIONS CAREFULLY.DO NOT DAMAGE THE TONGUES OR THEIR SEATS. HANDLE THE PAINTEDAND PLASTIC COMPONENTS CAREFULLY. DO NOT SCRATCH OR DAMAGETHEM.
70
4 M
aint
enan
ce

FUSESFuse No. 1 Capacity: 20A
Protected circuits: battery-powered recharge system andfuse No. 4. Live power supply tofuses No. 2, 3 and 5.
Location:battery compartment.
Fuse No. 2 Capacity: 7.5A
Protected circuits: live powersupply to injection load solenoid,Immobilizer aerial, ECU.
Location:steering cover.
Fuse No. 3 Capacity: 7.5 A
Protected circuits: live powersupply to instrument panel, horn,turn indicator control device, stoplight, starter relay.
Location:steering cover.
Fuse No. 4 Capacity: 10 A
Protected circuits: battery-powered headlight solenoid,antitheft-device pre-installation.
Location:steering cover.
Fuse No. 5 Capacity: 7.5A
71
4 Maintenance

Protected circuits: live powersupply to daylight running light,dashboard lighting.
Location:steering cover.
Fuse No. 6 Capacity: 15A
Protected circuits: battery-powered injection solenoid, ECU,Immobilizer LED.
Location:battery compartment.
BULBSHigh/low beam light bulb Type: Halogen (H4)
Power: 12V - 55/60W
Quantity: 1
Front side light bulb Type: Incandescent (W2.1x9.5d)
Power: 12V - 5W
Quantity: 1
Front turn indicator light bulb Type: Incandescent (BA 15s)
Power: 12V - 10W
Quantity: 1 RHS + 1 LHS
72
4 M
aint
enan
ce

Rear turn indicator light bulb Type: Incandescent (BA 15s)
Power: 12V - 10W
Quantity: 1 RHS + 1 LHS
Stop and tail light bulb Type: Incandescent (BAY 15s)
Power: 12V - 21/5W
Quantity: 1
License plate bulb Type: Incandescent (W2.1 x 9.5D)
Power: 12V - 5W
Quantity: 1
Instrument panel bulb Typ: Incandescent
Power: 12V - 2W
Quantity: 6
Instrumental panel warning lightbulbs
Typ: Incandescent
Power: 12V - 2 W
Quantity: 9
73
4 Maintenance
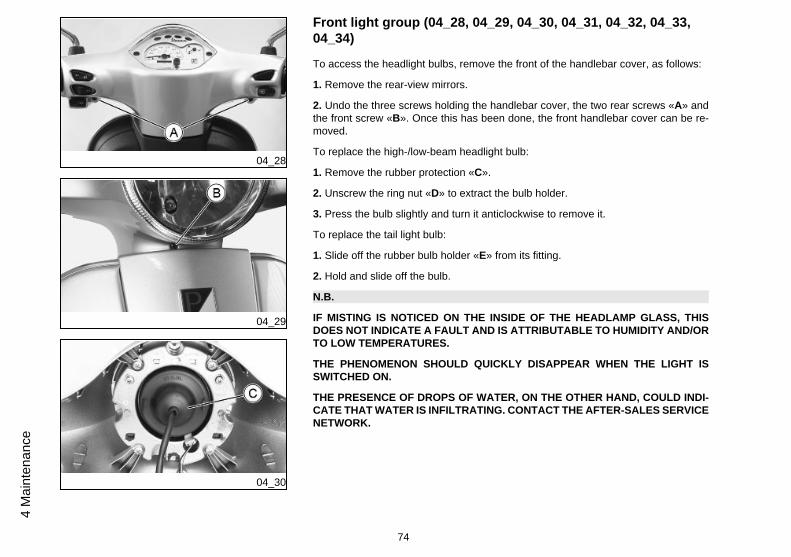
04_28
04_29
04_30
Front light group (04_28, 04_29, 04_30, 04_31, 04_32, 04_33,04_34)
To access the headlight bulbs, remove the front of the handlebar cover, as follows:
1. Remove the rear-view mirrors.
2. Undo the three screws holding the handlebar cover, the two rear screws «A» andthe front screw «B». Once this has been done, the front handlebar cover can be re-moved.
To replace the high-/low-beam headlight bulb:
1. Remove the rubber protection «C».
2. Unscrew the ring nut «D» to extract the bulb holder.
3. Press the bulb slightly and turn it anticlockwise to remove it.
To replace the tail light bulb:
1. Slide off the rubber bulb holder «E» from its fitting.
2. Hold and slide off the bulb.
N.B.
IF MISTING IS NOTICED ON THE INSIDE OF THE HEADLAMP GLASS, THISDOES NOT INDICATE A FAULT AND IS ATTRIBUTABLE TO HUMIDITY AND/ORTO LOW TEMPERATURES.
THE PHENOMENON SHOULD QUICKLY DISAPPEAR WHEN THE LIGHT ISSWITCHED ON.
THE PRESENCE OF DROPS OF WATER, ON THE OTHER HAND, COULD INDI-CATE THAT WATER IS INFILTRATING. CONTACT THE AFTER-SALES SERVICENETWORK.
74
4 M
aint
enan
ce

04_31
04_32
CAUTION
DO NOT CARRY ANY GARMENTS ON THE FRONT HEADLIGHT ASSEMBLY.THIS MAY CAUSE BULBS TO OVERHEAT AND THEREFORE ABNORMALWEAR.
CAUTION
PERFORM THE OPERATIONS CAREFULLY.DO NOT DAMAGE THE TONGUES OR THEIR SEATS. HANDLE THE PAINTEDAND PLASTIC COMPONENTS CAREFULLY. DO NOT SCRATCH OR DAMAGETHEM.
CAUTION
DO NOT PULL THE ELECTRICAL WIRING TO EXTRACT THE BULB HOLDER.
04_33
To replace the bulbs:1. Remove the turn indicator from its fitting by undoing the screw «A».
2. Take out the bulb holder «B» from its fitting by turning it anticlockwise.
3. Press the bulb, turn it anticlockwise and then take it out.
To refit, proceed in reverse order.
75
4 Maintenance

04_34
04_35
04_36
Headlight adjustment (04_35, 04_36)
Proceed as follows:1. Place the vehicle, in riding order and with the tires inflated to the prescribed pres-sure, on flat ground, 10 m away from a half-lit white screen. Make sure the vehicleaxis is perpendicular to the screen;
2. Turn the headlight on and make sure the projection of the light beam is between7/10 and 9/10 of the distance measured from the ground to the center of the headlight;
3. Adjust the headlight as necessary, via screw «A».
WARNING
THE PROCEDURE DESCRIBED ABOVE COMPLIES WITH THE "EURONORM"CONCERNING THE MAX. AND MIN. HEIGHT OF THE LIGHT BEAM OF A ROADVEHICLE. PLEASE CHECK WITH THE LOCAL AUTHORITIES FOR THE RE-QUIREMENTS WHICH MUST BE FULFILLED IN EVERY SINGLE COUNTRYWHERE THE VEHICLE IS TO BE USED.
76
4 M
aint
enan
ce

04_37
Front direction indicators (04_37)
To replace the front turn signal light bulbs, remove the lens by loosening the set screw«A», and extract the bulb socket from its housing; carefully push the bulb downwards,turn it by approx. 30°, and then extract it. For the refitting operations, proceed in thereverse order.
04_38
Rear optical unit (04_38)
In order to reach the taillight bulb, it is necessary to remove the 2 set screws «D». Toremove the light bulb, press and rotate it by approx. 30° and then extract it. For therefitting follow the same operations in the reverse order.
WARNING
IF YOU NOTICE ANY MIST DEVELOPING WITHIN THE INTERNAL SURFACE OFTHE HEADLIGHT, THIS IS PERFECTLY NORMAL AND IS SIMPLY DUE TO THEHIGH LEVEL OF HUMIDITY AND/OR LOW ATMOSPHERIC TEMPERATURE.THE PHENOMENON WILL RAPIDLY DISAPPEAR ONCE THE HEADLIGHT ISSWITCHED ON. HOWEVER,
THE PRESENCE OF WATER DROPS MAY INDICATE AN INFILTRATION,PLEASE CONTACT YOUR LOCAL PIAGGIO SERVICE STATION.
77
4 Maintenance
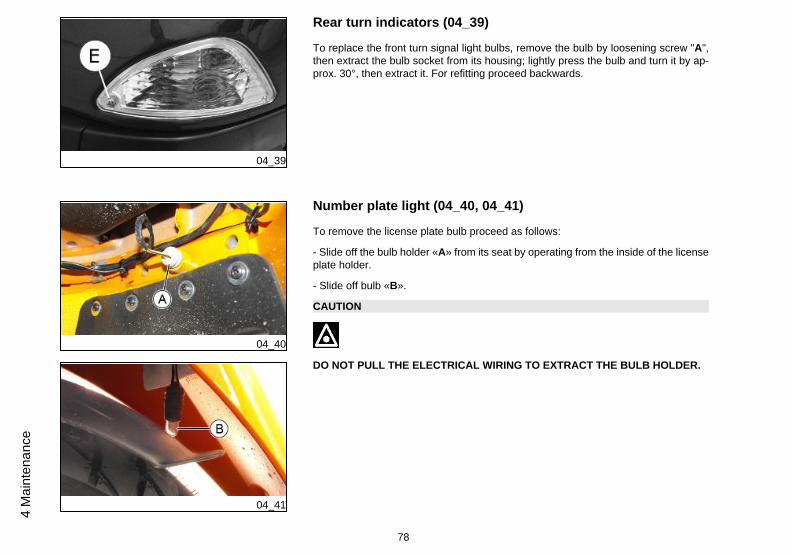
04_39
Rear turn indicators (04_39)
To replace the front turn signal light bulbs, remove the bulb by loosening screw "A",then extract the bulb socket from its housing; lightly press the bulb and turn it by ap-prox. 30°, then extract it. For refitting proceed backwards.
04_40
04_41
Number plate light (04_40, 04_41)
To remove the license plate bulb proceed as follows:
- Slide off the bulb holder «A» from its seat by operating from the inside of the licenseplate holder.
- Slide off bulb «B».
CAUTION
DO NOT PULL THE ELECTRICAL WIRING TO EXTRACT THE BULB HOLDER.
78
4 M
aint
enan
ce

04_42
Rear-view mirrors (04_42)
To adjust the stem position, lift the rubber protection and loosen nut «A» using anopen wrench (opening 13 mm); orientate the stem in the desired position and tighenthe screw again. The rearview mirror is mounted on the stem by a ball joint «B». Themirror can be adjusted moving it by hand to the desired position.
04_43
Front disc brake (04_43)
Wear of the disc and brake pads is automatically corrected so there will be no effecton braking efficiency. The brakes therefore require no adjustment. A spongy feel whenyou pull the lever probably means you have air in the circuit or the brake is malfunc-tioning. In these cases, keep in mind the importance of your brakes in terms of roadsafety, we recommend to bring the scooter to an Authorized Piaggio Service Centre.He will have the equipment and knowledge to ensure that the front brake is workingperfectly.
WARNING: CHECK THE BRAKE PADS AFTER THE FIRST 1.000 KM AND EVERY6.000 KM THEREAFTER. IF THE THICKNESS OF ONE OR BOTH PADS IS IN THEREGION OF 1.5 MM, BOTH PADS MUST BE CHANGED. THIS OPERATIONSHOULD BE CARRIED OUT BY AN AUTHORIZED PIAGGIO SERVICE CENTER.FIT ONLY GENUINE ORIGINAL PIAGGIO REPLACEMENT PADS. NON GENUINEPADS MIGHT NOT WORK PERFECTLY RESULTING TO BRAKE FAILURES ANDA SERIOUS RISK OF INJURIES OR EVEN DEATH.
79
4 Maintenance

WARNING: AFTER FITTING NEW BRAKE PADS DO NOT USE THE MOTOR-SCOOTER UNTIL YOU HAVE ACTIVATED THE BRAKE LEVER REPEATEDLYTO BED IN THE BRAKES AND RESTORE THE LEVER TO ITS CORRECT POSI-TION.
Rear drum brake (04_44)
Adjust register nut «B» and slacken locknut «A» as shown in figure. When adjustingthe rear brake remember that the rear wheel must turn freely when the lever is in therest position. When you have finished adjusting the brake, tighten locknut «A».
04_44
• Measure the distance covered by the lever before the brake starts its brakingaction. The idle stroke at the end of the brake lever must be likewise, about10 mm.
• Apply the brake repeatedly and make sure that the wheel turns freely afterthe lever has been released.
• Ride the vehicle, ensuring that the rear brake is working properly.
WARNING: THE BRAKES ARE THE PARTS THAT MOST ENSURE YOUR SAFE-TY AND FOR THIS REASON THEY MUST ALWAYS BE IN PERFECT WORKINGORDER. IF IN DOUBT REGARDING THE PERFECT FUNCTIONING OF THEBRAKING SYSTEM AND IN CASE YOU ARE NOT ABLE TO CARRY OUT THEUSUAL CHECKING OPERATIONS, CONTACT YOUR LOCAL PIAGGIO DEALER.
N.B.
HEAT THAT IS GENERATED DURING NORMAL USE OF THE BRAKES WILLCHANGE THE CLEARANCE BETWEEN THE BRAKE SHOE AND THE DRUM.
80
4 M
aint
enan
ce

BECAUSE OF THIS, YOU SHOULD CHECK THE CLEARANCE WITH THEBRAKES AT NORMAL OPERATING TEMPERATURE.
• TEST THE BRAKES AFTER ANY ADJUSTMENT TO ENSURE THATTHEY FUNCTION PROPERLY.
WARNING: IF THE ADJUSTER CAN BE SCREWED COMPLETELY ON TO THEREAR BRAKE ROD, OR THE INDICATOR POINTER (1) POINTS BEYOND THEREFERENCE TOOTH (R), THE BRAKE SHOES ARE WORN OUT. IN THIS CASE,PLEASE CONTACT YOUR LOCAL PIAGGIO DEALER.
WARNING: RIDING WITH WORN REAR BRAKE PADS CAN LEAD TO AN UPSET,SERIOUS ACCIDENT, AND INJURY OR EVEN DEATH.
CAUTION: AFTER SERVICING THE BRAKES, ALWAYS CHECK THEM FORFUNCTION. IF THE STROKE OF THE LEVER IS EXCESSIVE, OR IF YOU DETECTTHAT THE EFFECTIVENESS OF THE BRAKES IS REDUCED IN ANY WAY, HAVEYOUR VEHICLE SERVICED BY YOUR LOCAL PIAGGIO DEALER. HE WILL HAVETHE EQUIPMENT AND KNOWLEDGE TO ENSURE THAT THE REAR BRAKE ISWORKING PERFECTLY.
N.B.
FOR OPTIMAL EFFICIENCY, THE BRAKES SHOULD START TO ACT AFTERAPPROX. 10 MM, OF LEVER MOVEMENT.
81
4 Maintenance

04_45
Puncture (04_45)
The vehicle is equipped with Tubeless tires (without inner tube). In the case of apuncture the deflation is very slow, translating into greater driving safety, unlike thatwhich takes place for a tire with air chamber. In the case of a puncture you may carryout an emergency repair with the use of an "inflate and repair" type cylinder. For adefinitive repair turn to an Authorized PIAGGIO Dealer or Service Centre. The re-placement of a tire leads to the dismantlement of the relative wheel. For theseoperations turn to a Authorized PIAGGIO Dealer or Service Centre.
N.B.
FOR THE USE OF THE CYLINDER FOLLOW ALL THE INSTRUCTIONS ON THEPACKAGING.
THE WHEELS, COMPLETE WITH TIRES, SHOULD ALWAYS BE BALANCED.USING THE VEHICLE WITH A LOW PRESSURE TIRE OR WITH AN INCORRECTBALANCE CAN LEAD TO DANGEROUS STEERING VIBRATIONS.
DO NOT RIDE YOUR SCOOTER WITH A LEAKING OR REPAIRED TIRE EXCEPTTO MOVE TO SAFETY. "A LEAKING, PATCHED, OR REPAIRED TIRE IS MUCHMORE LIKELY TO FAIL SUDDENLY THAT A SOUND TIRE. IF THIS HAPPENS TOYOU, YOU WILL LOSE CONTROL OF YOUR SCOOTER, AND SURELY CRASH,WITH RESULTING SERIOUS INJURY OR DEATH. RIDE YOUR SCOOTER WITHONLY SOUND, PROPERLY INFLATED TIRES."
Periods of inactivity (04_46)
DISPOSE OF UNWANTED FUEL PROPERLY• Place the vehicle on the center stand.• Stop the engine and watt until it has cooled down.
82
4 M
aint
enan
ce
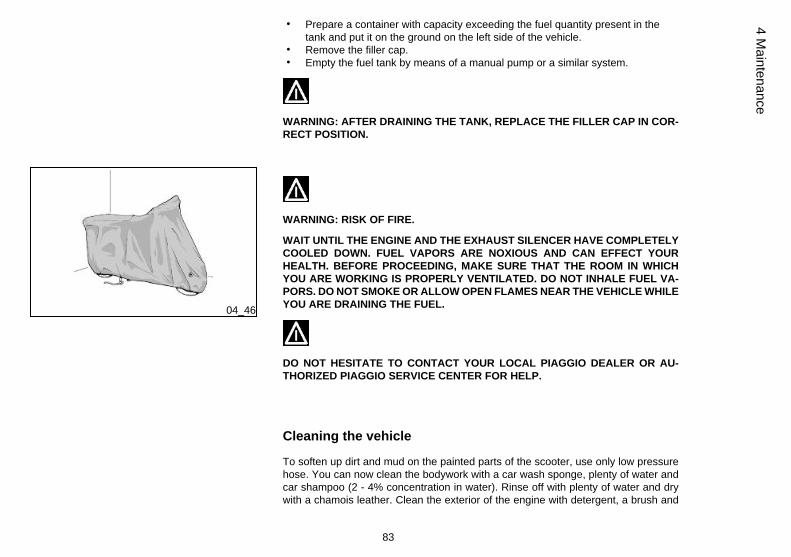
• Prepare a container with capacity exceeding the fuel quantity present in thetank and put it on the ground on the left side of the vehicle.
• Remove the filler cap.• Empty the fuel tank by means of a manual pump or a similar system.
WARNING: AFTER DRAINING THE TANK, REPLACE THE FILLER CAP IN COR-RECT POSITION.
04_46
WARNING: RISK OF FIRE.
WAIT UNTIL THE ENGINE AND THE EXHAUST SILENCER HAVE COMPLETELYCOOLED DOWN. FUEL VAPORS ARE NOXIOUS AND CAN EFFECT YOURHEALTH. BEFORE PROCEEDING, MAKE SURE THAT THE ROOM IN WHICHYOU ARE WORKING IS PROPERLY VENTILATED. DO NOT INHALE FUEL VA-PORS. DO NOT SMOKE OR ALLOW OPEN FLAMES NEAR THE VEHICLE WHILEYOU ARE DRAINING THE FUEL.
DO NOT HESITATE TO CONTACT YOUR LOCAL PIAGGIO DEALER OR AU-THORIZED PIAGGIO SERVICE CENTER FOR HELP.
Cleaning the vehicle
To soften up dirt and mud on the painted parts of the scooter, use only low pressurehose. You can now clean the bodywork with a car wash sponge, plenty of water andcar shampoo (2 - 4% concentration in water). Rinse off with plenty of water and drywith a chamois leather. Clean the exterior of the engine with detergent, a brush and
83
4 Maintenance

clean rags. Always wash the bodywork thoroughly before applying polish. Do not allowwater to enter the exhaust pipe or the air vents on the transmission case.
DETERGENTS CAN POLLUTE RIVERS, STREAMS AND THE SOIL. DO NOTWASH THE MOTORSCOOTER IN THE ROAD. RESPECT THE ENVIRONMENT(LIMIT THE AMOUNT OF SOAP YOU USE).
WARNING: DO NOT WASH THE MOTORSCOOTER IN THE SUN - ESPECIALLYIN WARM WEATHER WHEN THE BODYWORK HEATS UP. IN THESE CONDI-TIONS THE DETERGENT WILL DRY BEFORE THE BODYWORK CAN BE RINSEDAND CAN DAMAGE THE PAINTWORK. DO NOT USE RAGS SOAKED IN GASO-LINE OR DIESEL TO CLEAN PAINTED SURFACES OR PLASTIC PARTS OF THESCOOTER OR DAMAGE TO THE FINISH MAY RESULT.
WARNING
THE USE OF A HIGH-PRESSURE WATER JET IS STRONGLY DISCOURAGEDFOR ANY ENGINE CLEANING OPERATION; HOWEVER, IF NO OTHER MEANSARE AVAILABLE, IT IS THEN NECESSARY TO:• ONLY USE FAN SPRAY JETS.• KEEP NOZZLE AT LEAST 60 CM AWAY FROM THE VEHICLE.• DO NOT USE WATER AT TEMPERATURES ABOVE 40°C.• DO NOT USE HIGH-PRESSURE WATER JETS.• DO NOT STEAM WASH.• DO NOT DIRECT THE JET STRAIGHT TO THE WIRING AND COOLING SLIT ONTHE TRANSMISSION COVER.
84
4 M
aint
enan
ce

WARNING: WHEN CLEANING THE SADDLE ONLY USE WATER AND DETER-GENT.
CAUTION: WHEN CLEANING THE WINDSHIELD (IF INSTALLED):
• ONLY USE A SOFT CLOTH AND WARM WATER WITH A MILD DETER-GENT
• DO NOT ALLOW ANY ALCALINE OR STRONG ACID DEANER, GASO-LINE, BRAKE FLUID OR ANY OTHER SOLVENT TO CONTACT THEWINDSHIELD.
REPLACE WINDSHIELD IF BECOMES SCRATCHED SO AS TO INTERFEREWITH VIEW.
Troubleshooting
STARTING FAILURE
Fuse blown Replace the blown fuse and havethe vehicle checked by anAuthorised Service Centre.
85
4 Maintenance

STARTING DIFFICULTIES (SEE «START-UP PROBLEMS» SECTION)Lack of fuel in tank. Refuelling
Injection system fault Contact an Authorized ServiceCentre
Fuel pump fault Contact an Authorized ServiceCentre
Flat battery Recharge the battery.
* IMPORTANT: DO NOT USE THE SCOOTER TO THE COMPLETEEXHAUSTION OF FUEL; SHOULD THIS OCCUR, DO NOTATTEMPT TO START THE ENGINE. TURN THE IGNITION KEY TO«OFF» AND TOP-UP THE FUEL TANK AS SOON AS POSSIBLE.FAILURE TO FOLLOW THESE GUIDELINES COULD DAMAGE THEFUEL PUMP AND/OR THE CATALYTIC CONVERTER.
IGNITION PROBLEMS
Faulty spark plug Contact an Authorised ServiceCentre.
Faulty ignition / injection controlunit. Due to the presence of highvoltage, this check should only becarried out by an expert.
Contact an Authorized ServiceCentre
86
4 M
aint
enan
ce

LACK OF COMPRESSION
Loose spark plug. Screw in the spark plug tightly
Cylinder head loose, piston gasrings worn.
Contact an Authorised ServiceCentre.
Valve stuck Contact an Authorised ServiceCentre.
HIGH CONSUMPTION AND LOW PERFORMANCEClogged or dirty air filter Try to blow out with compressed
air, otherwise replace the filter
INSUFFICIENT BRAKINGGreasy disc. Worn pads. Faultybraking system. Presence of air inthe front and rear brake circuit.
Contact an Authorised ServiceCentre.
INEFFICIENT SUSPENSIONShock absorber fault, oil leak, endbuffers damaged; shock absorberpreloading incorrectly set
Contact an Authorised ServiceCentre.
87
4 Maintenance

AUTOMATIC TRANSMISSION PROBLEMSCVT rollers and/or drive beltdamaged
Contact an Authorised ServiceCentre.
88
4 M
aint
enan
ce

Vespa LX 125 i.e. - 150 i.e.
Chap. 05Technical data
89

05_01
90
5 Te
chni
cal d
ata

125 ENGINE SPECIFICATIONSType Single-cylinder, 4-stroke
Engine capacity 124 cm³
Bore x stroke 57.0 x 48.6 mm
Compression ratio 10.6 ± 0.5: 1
Engine idle speed 1650 ± 100 rpm
Timing system 2 valves, single overheadcamshaft, chain-driven.
Valve clearance Intake: 0.10 mm Exhaust: 0.15 mm
Max. power 7.7 kW at 8,250 rpm
MAX. torque 9.6 Nm at 7,250 rpm
Transmission CVT expandable pulley variatorwith torque server, V-belt, self-ventilating dry automaticcentrifugal clutch and transmissionhousing with forced-circulation aircooling.
Final reduction gear Gear reduction unit in oil bath.
Lubrication Engine lubrication with lobe pump(inside crankcase), chain-driven,with double filter: mesh and paper.
Cooling Forced-air circulation cooling.
Electric starter
Ignition Capacitive discharge ignition, withvariable advance and separate HVcoil.
91
5 Technical data

Ignition advance Three-dimensional map managedby control unit
Spark plug (125 cm³) NGK CR8EB
Fuel system Electronic injection with Ø 28 mmthrottle body, single injector
Fuel Unleaded petrol
Exhaust silencer Absorption-type exhaust mufflerwith catalytic converter.
Emissions compliance EURO 3
150 ENGINE SPECIFICATIONSType Single-cylinder, 4-stroke
Engine capacity 151 cm³
Bore x stroke 62.8 x 48.6 mm
Compression ratio 10.6 ± 0.5 : 1
Engine idle speed 1,650±100 rpm
Timing system 2 valves, single overheadcamshaft, chain-driven.
Valve clearance Intake: 0.10 mm Exhaust: 0.15 mm
Max. power 8.9 kW at 7,750 rpm
MAX. torque 11.8 Nm at 6,500 rpm
Transmission CVT expandable pulley variatorwith torque server, V-belt, self-ventilating dry automatic
92
5 Te
chni
cal d
ata

centrifugal clutch and transmissionhousing with forced-circulation aircooling.
Final reduction gear Gear reduction unit in oil bath.
Lubrication Engine lubrication with lobe pump(inside crankcase), chain-driven,with double filter: mesh and paper.
Cooling Forced-air circulation cooling.
Electric starter
Ignition Capacitive discharge ignition, withvariable advance and separate HVcoil.
Ignition advance Three-dimensional map managedby control unit
Spark plug (150 cm³) NGK CR7EB
Fuel system Electronic injection with Ø 28 mmthrottle body, single injector
Fuel Unleaded petrol
Exhaust silencer Absorption-type exhaust mufflerwith catalytic converter.
Emissions compliance EURO 3
VEHICLE SPECIFICATIONSChassis Stamped plate body with welded
structural reinforcements.
93
5 Technical data

Front suspension Single arm with helical spring andsingle double-acting hydraulicshock absorber.
Rear suspension Double-acting shock absorber,adjustable to four positions atpreloading.
Front brake Disk type Ø 200 mm, with hydrauliccommand operated from thehandlebars with right-hand lever.
Rear brake Drum type Ø 110 mm, withmechanical command operatedfrom the handlebar with left-handlever.
Wheel rim type Light alloy wheel rims.
Front wheel rim 11" x 2.50
Rear wheel rim 10'' x 3.00
Front tyre Tubeless, 110/70 - 11'' 45L
Rear tyre Tubeless, 120/70 - 10'' 54L
Front tyre pressure (withpassenger)
23 PSI (23 PSI) (1.6 bar (1,6 bar))
Rear tyre pressure (withpassenger)
29 PSI (41 PSI) (2.0 bar (2.8 bar))
Kerb weight 110 ± 5 kg
Maximum admissible mass 304 kg
Battery Sealed, 12 V / 10 Ah
94
5 Te
chni
cal d
ata

CAPACITYEngine oil 1.000 cm³
Transmission oil 100 cm³
Fuel tank (reserve) ~ 8,5 l (2 l)
05_02
Toolkit (05_02)
Spanners: one box wrench (16 mm); a double screwdriver. The tools are located in atoolbox under the saddle.
95
5 Technical data

96
5 Te
chni
cal d
ata

Vespa LX 125 i.e. - 150 i.e.
Chap. 06Spare parts and
accessories
97

06_01
Warnings (06_01)
WE RECOMMEND THE USE OF ORIGINAL PIAGGIO SPARE PARTS, THE ONLYPARTS THAT OFFER THE SAME QUALITY GUARANTEE AS THE ORIGINALPARTS ASSEMBLED ON THE VEHICLE. IT SHOULD BE REMEMBERED THATTHE USE OF NON ORIGINAL SPARE PARTS CAUSES THE GUARANTEE TOBECOME INVALID.
PIAGGIO MARKETS ITS OWN LINE OF ACCESSORIES THAT ARE THEREFOREALSO RECOGNIZED AND GUARANTEED IN RELATION TO THEIR USE. IT ISTHEREFORE INDISPENSABLE TO TURN TO AN AUTHORIZED PIAGGIO DEAL-ER OR SERVICE CENTRE, IN ORDER TO SELECT THEM AND HAVE THEMCORRECTLY ASSEMBLED. THE USE OF NON ORIGINAL ACCESSORIES AND/OR THOSE NOT CORRESPONDING TO THE PRODUCT MODEL CAN COMPRO-MISE THE STABILITY AND FUNCTION OF THE VEHICLE, LEADING TO CONSE-QUENT DANGEROUS DRIVING AND RELATIVE RISK TO THE DRIVER.
98
6 Sp
are
parts
and
acc
esso
ries

Vespa LX 125 i.e. - 150 i.e.
Chap. 07Scheduled
maintenance
99

07_01
Scheduled servicing table (07_01)
Adequate maintenance is fundamental to ensuring long-lasting, optimum operationand performance of your vehicle.
To this end, a series of checks and maintenance operations (at the owner's expense)have been suggested, which are included in the summary table on the following page.Any minor faults should be reported without delay to an Authorised Service Centreor Dealer without waiting until the next scheduled service to solve it.
It is indispensable to have your vehicle serviced to the prescribed intervals of time,even if you have not reached the predicted mileage. Punctual vehicle servicing isnecessary for the correct use of the guarantee. For all further information regardingthe Guarantee application modes and the execution of the "Programmed Mainte-nance" refer to the "Guarantee Booklet".
TABLE OF SCHEDULED MAINTENANCE SERVICESKm x 1.000 1 6 12 18 24 30 36 42 48 54 60
Valve clearance A A A A
Sliding shoes / CVT rollers I R I R I R I R I R
Drive belt I R I R I R I R I R
Cylinder ventilation system C C
Engine oil * R R R R R R R R R R R
Hub oil R I I I R I I I R I I
Oil filter R R R R R R R R R R
Mesh oil filter C C C C C C C C C C C
Air filter C C C C C C C C C C
Brake fluid ** I I I I I I I I I I I
100
7 Sc
hedu
led
mai
nten
ance

Km x 1.000 1 6 12 18 24 30 36 42 48 54 60
Brake levers L L L L L L
Brake pads I I I I I I I I I I I
Electrical system and battery I I I I I I I I I I I
Spark plug I R I R I R I R I R
Headlight direction adjustment A A A A A
Centre stand bracket L L L L L L L L L L
Transmission L L L L L
Throttle control A A A A A A
Odometer gear L L L L L
Suspension I I I I I
Steering A A A A A A
Safety fasteners I I I I I I
Tyre pressure and wear I I I I I I I I I I I
Vehicle road test I I I I I I I I I I I
I: CHECK AND CLEAN, ADJUST, LUBRICATE OR REPLACE IF NECESSARY.
C: CLEAN, R: REPLACE, A: ADJUST, L: LUBRICATE
* Check the level every 3000 Km
** Replace every 2 years
101
7 Scheduled maintenance

RECOMMENDED PRODUCTS TABLEProduct Description Specifications
Oil to lubricate flexible transmission Oil to lubricate flexible transmission (trottlecontrol)
Oil for 4 stroke engines.
Brake fluid Brake fluid FMVSS DOT 4 Synthetic fluid
Oil for air filter sponge Oil for air filter sponge Mineral oil with specific additives for increasedadhesiveness
Rear hub oil Rear hub oil SAE 80W/90 Oil that exceeds therequirements of API GL3 specifications
Engine oil Engine oil SAE 5W-40, API SL, ACEA A3, JASO MASynthetic oil
102
7 Sc
hedu
led
mai
nten
ance

TABLE OF CONTENTS
AAir filter: 61, 62
BBattery: 13, 66, 67Brake: 12, 63, 79, 80Brake fluid: 12
CChecks: 34Clock: 23
DDisc brake: 79
EEngine oil: 12, 54–56
FFuel: 9Fuses: 69
HHeadlight: 76Horn: 25Hub oil: 57
IIdentification: 31Immobilizer: 26, 28Instrument panel: 22
KKey switch: 24Keys: 27
LLight switch: 26
MMaintenance: 53, 99Mirrors: 79
PPuncture: 82
RRefuelling: 34Riding: 17, 50
SSaddle: 30Scheduled maintenance: 99Shock absorbers: 36Spark plug: 60
Stand: 42Start-up: 26Switch: 24–26
TTechnical Data: 89Toolkit: 95Top box: 31Transmission: 43Turn indicators: 78Tyre pressure: 35Tyres: 59
VVehicle: 19, 83
103

The descriptions and illustrations given in this publication are not binding. While the basic specifications as described and illustrated in this manualremain unchanged, PIAGGIO-GILERA reserves the right, at any time and without being required to update this publication beforehand, to make anychanges to components, parts or accessories, which it considers necessary to improve the product or which are required for manufacturing or con-struction reasons.
Not all versions/models shown in this publication are available in all countries. The availability of each model should be checked at the official Piaggio sales network.
"© Copyright 2008 - PIAGGIO & C. S.p.A. Pontedera. All rights reserved. Reproduction of this publication in whole or in part is prohibited."
PIAGGIO & C. S.p.A. - Aftersales
V.le Rinaldo Piaggio, 23 - 56025 PONTEDERA (Pi)


![Alfonso XIII [i.e. Trece] y sus primeras notas](https://static.fdokumen.com/doc/165x107/632916ac5faf4cacd40199e3/alfonso-xiii-ie-trece-y-sus-primeras-notas.jpg)