VDH Guidelines for Healthcare Procedures in Schools
667
0
-
Upload
khangminh22 -
Category
Documents
-
view
0 -
download
0
Transcript of VDH Guidelines for Healthcare Procedures in Schools

0

VDH Guidelines for Healthcare Procedures in Schools
Guidelines for Healthcare
Procedures in Schools
EDITOR
Vickie H. Southall, MSN, RN, NCSN
Assistant Professor of Nursing
University of Virginia School of Nursing
CONSULTING EDITOR
Janet B. Wright, BSN, RN, NCSN
School & Adolescent Health Specialist
Office of Family Health Services
Virginia Department of Health
2017 Revision
VDH Guidelines for Healthcare Procedures in Schools
Forward
The Virginia Department of Health (VDH) is pleased to present a revised edition of the
Guidelines for Healthcare Procedures in Schools (2015), a resource document for school
personnel.
The Guidelines are intended to provide guidance to school administrators, school nurses,
teachers and other school staff members on the care of students with special health care needs
during the school day.
The Guidelines also present current, practical health information and recommendations for the
development of local programs and policies related to health care services for these students.
Through these Guidelines, VDH is committed to continued collaboration with the Virginia
Department of Education to assure that all schools in the Commonwealth have a safe and healthy
learning environment.

VDH Guidelines for Healthcare Procedures in Schools
Acknowledgements
The Guidelines for Healthcare Procedures in Schools was revised with funding provided by the
Preventive Health and Health Services Block Grant (PHHSBG).
Special thanks are extended to Vickie H. Southall, MSN, RN, NCSN, the primary editor of the
revised Guidelines and the primary author of the Guidelines for Specialized Health Care
Procedures (2003), a review panel of health care provider subject matter experts, school nurses,
school of nursing faculty, Dr. Bethany Geldmaker, PhD, PNP, RN, Virginia Department of
Health, Tia Campbell, MSN, RN, NCSN, FNASN, formerly with the Virginia Department of
Education, and consulting formatting editor, Cailin W. Richardson. The consulting editor is Janet
B. Wright, BSN, RN, NCSN, with the Virginia Department of Health Office of Family Health
Services.
Guidelines for Healthcare Procedures in Schools Review Panel
Norma B. Bergey, MSN, RN, NCSN
Assistant Professor, Clinical Lab Coordinator
Hampton University, College of Virginia Beach
Hampton, Virginia
Tia Campbell, MSN, RN, NCSN, FNASN
Director of Student Health Services
Chesterfield County Public Schools
Midlothian, Virginia
Nicole Famularo, RD, CDE
Certified Diabetes Educator
Children’s Hospital of the King’s Daughters
Norfolk, Virginia
Renee Freeman, RN, CDE, CDTC
Certified Diabetes Educator
Children’s Hospital of the King’s Daughters
Norfolk, Virginia

VDH Guidelines for Healthcare Procedures in Schools
Glory Gill, MPA, BSN, RN
Health Services Coordinator
Hampton City Public Schools
Hampton, Virginia
Nancy Griggs, BSN, RN, NCDE
School Nurse
National Certified Diabetes Educator
Woodbridge, Virginia
Karen N. Harriman, FNP-BC, MSN, CDE
Family Nurse Practitioner
Pediatric Specialists of Virginia
Fairfax, Virginia
Mary Claire Ikenberry, MS, BSN
Clinical Coordinator
Virginia Commonwealth University Sports Medicine Center
Richmond, Virginia
Deborah Miles, RN, CDE, DCTC
Certified Diabetes Educator
Children’s Hospital of the King’s Daughters
Norfolk, Virginia
Kerry Miller
Associate Director-Pupil Transportation
Virginia Department of Education
Richmond, Virginia
Kathy O’Hara, RN
Epilepsy Nurse Clinician
Department of Neurology at VCU Medical Center
Richmond, Virginia

VDH Guidelines for Healthcare Procedures in Schools
Sally W. Southard, MSN, PNP, BC, AE-C
Pediatric Nurse Practitioner
Carilion Children’s Pediatric Pulmonology & Allergy Clinical Instructor
Virginia Tech Carilion School of Medicine
Roanoke, Virginia
Julie A. Strunk, PhD, RN
Associate Professor
James Madison University School of Nursing
Harrisonburg, Virginia
Nancy Thompson, MS, RN, CPNP
Pediatric Nurse Practitioner
Children’s Hospital of Richmond at VCU Health
Richmond, Virginia
1
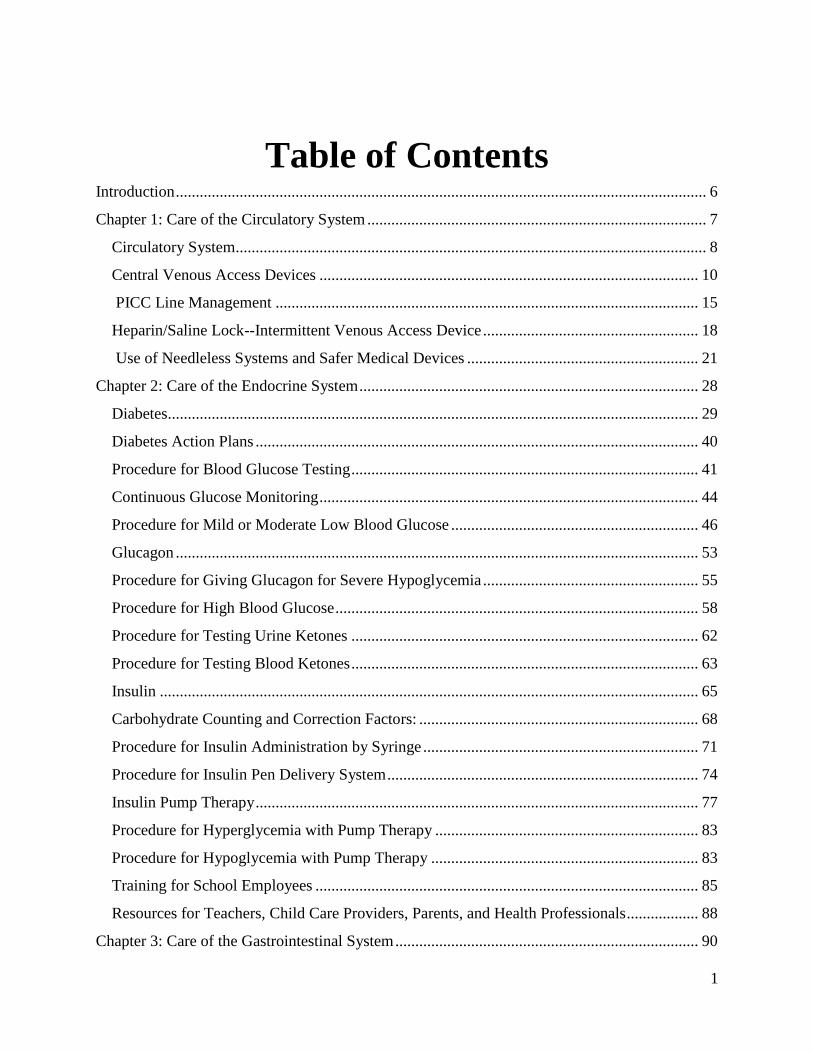
Table of Contents Introduction ..................................................................................................................................... 6
Chapter 1: Care of the Circulatory System ..................................................................................... 7
Circulatory System...................................................................................................................... 8
Central Venous Access Devices ............................................................................................... 10
PICC Line Management .......................................................................................................... 15
Heparin/Saline Lock--Intermittent Venous Access Device ...................................................... 18
Use of Needleless Systems and Safer Medical Devices .......................................................... 21
Chapter 2: Care of the Endocrine System ..................................................................................... 28
Diabetes..................................................................................................................................... 29
Diabetes Action Plans ............................................................................................................... 40
Procedure for Blood Glucose Testing ....................................................................................... 41
Continuous Glucose Monitoring ............................................................................................... 44
Procedure for Mild or Moderate Low Blood Glucose .............................................................. 46
Glucagon ................................................................................................................................... 53
Procedure for Giving Glucagon for Severe Hypoglycemia ...................................................... 55
Procedure for High Blood Glucose ........................................................................................... 58
Procedure for Testing Urine Ketones ....................................................................................... 62
Procedure for Testing Blood Ketones ....................................................................................... 63
Insulin ....................................................................................................................................... 65
Carbohydrate Counting and Correction Factors: ...................................................................... 68
Procedure for Insulin Administration by Syringe ..................................................................... 71
Procedure for Insulin Pen Delivery System .............................................................................. 74
Insulin Pump Therapy ............................................................................................................... 77
Procedure for Hyperglycemia with Pump Therapy .................................................................. 83
Procedure for Hypoglycemia with Pump Therapy ................................................................... 83
Training for School Employees ................................................................................................ 85
Resources for Teachers, Child Care Providers, Parents, and Health Professionals .................. 88
Chapter 3: Care of the Gastrointestinal System ............................................................................ 90

VDH Guidelines for Healthcare Procedures in Schools
Gastrointestinal System ............................................................................................................ 91
Gastrostomy Tube ..................................................................................................................... 95
Procedure for Gastrostomy Tube Feeding— Continuous Feeding by Pump or Slow Drip
Method .................................................................................................................................... 103
Skin-Level or Low Profile Gastrostomy Devices ................................................................... 112
Procedure for Skin-Level Gastrostomy Device (G-Button) Feeding—Bolus Method ........... 116
Procedure for Skin-Level Gastrostomy Device (G-Button) Feeding—Slow Drip or Continuous
Feeding by Pump .................................................................................................................... 120
Jejunostomy Tube ................................................................................................................... 130
Procedure for Jejunostomy Tube Feeding – Continuous Feeding by Pump ........................... 134
Colostomy ............................................................................................................................... 145
Procedure for Emptying a Colostomy ..................................................................................... 149
Procedure for Changing a Colostomy Pouch .......................................................................... 151
Ileostomy................................................................................................................................. 158
Procedure for Emptying an Ileostomy .................................................................................... 162
Procedure for Changing an Ileostomy Pouch ......................................................................... 164
Ileoanal Reservoir and Continent Ileostomy........................................................................... 170
Chapter 4: Care of the Musculoskeletal System and Mobility Care ........................................... 172
Musculoskeletal System and Mobility Care ........................................................................... 173
Physical Mobility Assistance .................................................................................................. 175
Procedure for Positioning a Student ....................................................................................... 177
Procedure for Assisting Student with a Cane ......................................................................... 180
Procedure for Assisting a Student with Crutches ................................................................... 182
Procedure for Assisting a Student with a Walker ................................................................... 186
Procedure for Assisting a Student with a Wheelchair ............................................................ 188
Assisting a Student with a Prosthesis...................................................................................... 192
Assisting a Student with an Orthosis ...................................................................................... 195
Procedure for Cast Care .......................................................................................................... 198
Procedure for Principles of Good Body Mechanics ............................................................... 203
Chapter 5: Care of the Neurological System .............................................................................. 207
Concussion Management ........................................................................................................ 208

VDH Guidelines for Healthcare Procedures in Schools
Procedure to Follow After a Possible Concussion .................................................................. 220
Seizure Management ............................................................................................................... 225
Procedure for Managing a Seizure .......................................................................................... 236
Rectal Diazepam for Seizures ................................................................................................. 246
Procedure for Administering Rectal Diazepam ...................................................................... 249
Vagal Nerve Stimulation for Seizures .................................................................................... 254
Procedure for Activating Vagal Nerve Stimulation ................................................................ 258
Ventricular Shunt .................................................................................................................... 260
Procedure for Monitoring a Ventricular Shunt ....................................................................... 262
Chapter 6: Care of the Respiratory System ................................................................................. 266
Respiratory System ................................................................................................................. 267
Asthma .................................................................................................................................... 270
Peak Expiratory Flow Rate Monitoring .................................................................................. 286
Procedure for Peak Flow Rate Monitoring ............................................................................. 289
Procedure for Using a Metered Dose Inhaler (MDI) .............................................................. 292
Procedure for Using Spacers with Metered Dose Inhalers ..................................................... 295
Procedure for Using Dry-Powder Inhalers ............................................................................. 299
Nebulizer Treatments .............................................................................................................. 301
Procedure for Nebulizer Aerosol Treatment ........................................................................... 304
Oxygen Use ............................................................................................................................. 309
Procedure for Using a Nasal Cannula ..................................................................................... 316
Procedure for Using an Oxygen Mask .................................................................................... 318
Pulse Oximetry........................................................................................................................ 323
Procedure for Measuring Pulse Oximetry............................................................................... 326
Tracheostomy .......................................................................................................................... 330
Tracheal Suctioning ................................................................................................................ 336
Procedure for Tracheal Suctioning Using One-Time Use Catheter ........................................ 340
Tracheal Suctioning Using a Sleeved or Inline Suction Catheter ........................................... 346
Tracheostomy Tube Changes .................................................................................................. 354
Procedure for Changing a Tracheostomy Tube ...................................................................... 358
Procedure for Using Oxygen with a Tracheostomy Collar ..................................................... 364

VDH Guidelines for Healthcare Procedures in Schools
Manual Resuscitation Bag ...................................................................................................... 366
Procedure for Using a Manual Resuscitation Bag with a Tracheostomy ............................... 368
Nose and Mouth Suctioning.................................................................................................... 370
Procedure for Nose and Mouth Suctioning Using Suction Machine ...................................... 372
Procedure for Nose and Mouth Suctioning with a Bulb Syringe............................................ 375
Chest Physiotherapy Postural Drainage and Percussion ......................................................... 378
Procedure for Manual Chest Physiotherapy (CPT) ................................................................ 381
Procedure for Chest Physiotherapy (CPT) Using a Vest ........................................................ 385
Use of Mechanical Ventilators ................................................................................................ 387
Ventilator Safety Checks ........................................................................................................ 391
Ventilator Parameters.............................................................................................................. 394
Ventilator Modes .................................................................................................................... 396
Ventilator Alarms.................................................................................................................... 397
Checking the Ventilator .......................................................................................................... 402
Chapter 7: Special Care Issues .................................................................................................... 404
Attention Deficit Hyperactivity Disorder (ADHD) ................................................................ 405
Management of ADHD ........................................................................................................... 410
Managing Food Allergies in Schools ...................................................................................... 423
Managing Anaphylaxis ........................................................................................................... 439
Responding to Anaphylaxis .................................................................................................... 445
Procedure for Using an Epinephrine Auto-Injector ................................................................ 447
Recognize Anaphylaxis Symptoms ........................................................................................ 458
Managing Latex Allergies....................................................................................................... 465
Trauma-Informed Care ........................................................................................................... 476
Recommendations to Help Students Develop Resilience ....................................................... 480
School Nurse Interventions to Prevent Violence .................................................................... 483
Recommendations to Build Resiliency in Students and Parents Exposed to Intimate Partner
Violence .................................................................................................................................. 484
Policy Recommendations to Decrease the Effects of Trauma on Children ............................ 487
Measuring Body Temperatures ............................................................................................... 488
Chapter 8: Care of the Urinary System ....................................................................................... 496

VDH Guidelines for Healthcare Procedures in Schools
Urinary System ....................................................................................................................... 497
Clean Intermittent Catheterization .......................................................................................... 499
Procedure for Clean Intermittent Catheterization—Male ....................................................... 502
Procedure for Clean Intermittent Catheterization—Female ................................................... 505
Indwelling Urinary Catheter ................................................................................................... 511
Procedure for Monitoring an Indwelling Urinary Catheter .................................................... 513
External Urinary Catheter ....................................................................................................... 517
Procedure for Application and Removal of External Catheter ............................................... 519
Ostomies for Urinary Elimination .......................................................................................... 523
Procedure for Changing a Urostomy Pouch ........................................................................... 527
Procedure for Catheterizing a Continent Urostomy, Vesicostomy or Appendicovesicostomy
................................................................................................................................................. 530
Peritoneal Dialysis .................................................................................................................. 535
Hemodialysis........................................................................................................................... 544
Appendix A ................................................................................................................................. 553
Appendix B ................................................................................................................................. 571

VDH Guidelines for Healthcare Procedures in Schools 6
Introduction
The Guidelines for Health Care Procedures in Schools is intended to enhance the
educational experience of students with health care needs by providing guidance to school
nurses, teachers, and other staff regarding the health care of the students within the school
setting. The Guidelines are based on current nursing and medical protocols for the care of
children with special health care needs.
Parents or guardians have the primary responsibility for providing appropriate health care
for their children. Whenever possible, parents and guardians are encouraged to work with
their health care provider to administer medications and specialized health care procedures
before or after school.
When procedures and medications need to be administered during school hours, the
parents or guardians, health care provider, student (if appropriate), and school nurse
should develop an individualized healthcare plan (IHP) to outline what needs to be done
during the school day. Parents or guardians also need to provide the school with
comprehensive health care information, medications, equipment, and supplies to help
school staff care for their child. Emergency Action Plans (EAPs) should be developed
as appropriate.
The Guidelines are intended to provide a broad framework for planning appropriate
health care services for students. Because each student is different with a unique array of
needs, these guidelines should not be the sole source or a substitute for development of an
IHP that addresses the student’s health care needs. The Guidelines for Health Care
Procedures in Schools does not attempt to provide medical advice and should not be used
as a substitute for professional medical consultation. It should be used as a tool to help
school staff care for students with special health care needs. When utilizing the
Guidelines, the school nurse should always practice within the scope of nursing practice
in accordance with the Virginia Nurse Practice Acts.
The Guidelines are divided into eight sections reflecting systems of the body. Each
section is further divided into an overview of the system, selected chronic conditions
within the system, and an alphabetical listing of procedures affecting that system.
Appendix A includes sample individualized health care plans. Appendix B includes
checklists that may be used to train staff on procedures.

VDH Guidelines for Healthcare Procedures in Schools 7
Chapter 1: Care of the Circulatory
System
Overview
Central venous access devices
Management of PICC lines
Heparin/saline lock
Needleless systems and safer medical devices
One-handed needle recapping

VDH Guidelines for Healthcare Procedures in Schools 8
Circulatory System
Overview
The circulatory system is composed of the heart and the blood vessels. The heart acts as a
pump to transport blood via blood vessels throughout the body. The blood delivers oxygen
and nutrients to all parts of the body and returns carbon dioxide and waste products to the
lungs and kidneys to be eliminated. Each day the average heart beats 100,000 times and
pumps about 2,000 gallons of blood.
The heart is a muscular
pump with four
chambers and valves
that open and close to let
blood flow in only one
direction. The right
atrium receives
deoxygenated blood
from the body. Blood
flows through the
tricuspid valve into the
right ventricle. The
right ventricle then
contracts and pumps
blood through the
pulmonary valve into the
pulmonary artery leading to the lungs.
In the lungs, carbon dioxide is released and oxygen is picked up by the blood. The oxygen-
rich blood returns to the heart via the pulmonary vein into the left atrium. From there, it
passes through the mitral valve into the left ventricle. The left ventricle has the strongest
pump because it must pump this oxygenated blood through the aortic valve with enough
force to push it through the aorta to all parts of the body.
The blood is transported to the body through a complex network of one way vessels, which if
laid end to end, would extend for 60,000 miles. The arteries carry oxygen-rich blood away
from the heart to the body. These arteries branch into smaller vessels called arterioles,
which branch into the tiny capillaries where cells of the body can exchange their carbon
dioxide and wastes for the oxygen and nutrients.
Veins take deoxygenated blood from the capillaries and return it to the heart. Veins are
thinner than arteries with some having one-way valves to prevent blood from pooling in the

VDH Guidelines for Healthcare Procedures in Schools 9
extremities. The veins get larger in size as they return closer to the heart. The large veins
inside the chest and abdomen are called central veins.
Sources:
American Heart Association. (2012). Circulatory system. Available online at
http://www.heart.org/HEARTORG/Giving/Circulatory-System-or-Cardiovascular-
System_UCM_428851_Article.jsp
American Heart Association. 2014 How the healthy heart works. Available online at
http://www.heart.org/HEARTORG/Conditions/CongenitalHeartDefects/AboutConge
nitalHeartDefects/How-the-Healthy-Heart-Works_UCM_307016_Article.jsp
Smith, S., Duell, D. & Martin, B. (2012). Clinical nursing skills: Basic to advanced skills
(8th ed.). Boston: Pearson, 1226-1235.
National Heart, Lung, & Blood Institute. (2011). Circulation and blood vessels. Available
online at http://www.nhlbi.nih.gov/health/health-topics/topics/hhw/circulation
National Heart, Lung, & Blood Institute. (2011). How the heart works. Available online at
http://www.nhlbi.nih.gov/health/health-topics/topics/chd/heartworks
National Heart, Lung, & Blood Institute. (2011). What is the heart? Available online at
http://www.nhlbi.nih.gov/health/health-topics/topics/hhw/.
Texas Heart Institute. (2015). The cardiovascular system. Available online at
www.tmc.edu/thi/anatomy1.html.
Illustration Source:
National Heart, Lung, & Blood Institute. (2011). How the heart works. Available online at
http://www.nhlbi.nih.gov/health/health-topics/topics/chd/heartworks

VDH Guidelines for Healthcare Procedures in Schools 10
Central Venous Access Devices
Overview
A central venous access device (CVAD) is a sterile intravenous catheter (tube) inserted into a
large “central” vein (e.g., subclavian vein). It may also be called a "central line" or central
venous catheter (CVC). A student may receive a CVAD if there is need for long-term
intravenous access, such as the need for chemotherapy, extended antibiotic therapy, total
parenteral nutrition (TPN), or frequent venipuncture (blood drawing).
There are several types of CVADs. The tunneled catheter is often called by its
manufacturer’s name---Hickman, Broviac, Leonard, or Groshong. It is inserted surgically
into the central vein, tunneled under the skin, and has a separate exit site, typically located in
the upper chest. The portion of the catheter that is tunneled under the skin contains a Dacron
cuff, which helps to hold the catheter in place while it heals and helps prevent infections by
stopping bacteria from entering the tunnel and traveling up the vein. You may also find an
antimicrobial cuff (trade name VitaCuff) which significantly reduces incident of catheter-
related infection. The tunneled catheter may have one, two, or three ports (entrance lines),
which will normally need to be flushed with heparin each day. Such flushing is usually done
at home. (Catheters with a Groshong valve prevent backflow of blood unless negative
pressure is applied. There is usually no need for heparin flushes and external clamps are not
used on Groshong catheters). The tunneled catheter will also have a sterile dressing covering
it to prevent it from becoming infected. This dressing should be changed according to a
schedule, as specified by the health care provider, and whenever it becomes wet, soiled, or
the edges are no longer intact. Routine dressing changes are done at home, but dressing
changes may need to be done at school if the dressing becomes wet, soiled, or loose.
The non-tunneled catheter is similar to the tunneled catheter in appearance except that it is
inserted directly into a central vein. It is usually a temporary CVAD and not seen in the
school setting because it is not secured as well under the skin. Care for the non-tunneled
catheter is the same as that for the tunneled except that extreme care must be taken not to
dislodge it. If the student has a non-tunneled catheter, consideration should be given to
homebound instruction where there would be less risk for harm to the catheter.
Another type of CVAD is the totally implanted device (TID) such as the Port-A-Cath,
Mediport, PowerPort, or BardPort. They may also be called a totally implanted venous
access device (TIVAD). This CVAD consists of a small reservoir that is totally implanted
under the skin. When it is not being used, it has no tubing on the outside of the skin, does not
need a dressing, and has a lower risk of becoming infected. However, when it needs to be
used, the child must be stuck with a needle. Only non-coring Huber needles can be used to
access the totally implanted CVAD to prevent damage to the port. When the TID is being

VDH Guidelines for Healthcare Procedures in Schools 11
used for intravenous therapy it may also need to be flushed and have its dressing changed,
but flushes and dressing changes are not routinely done in schools.
A fourth type of central line is a peripherally inserted central catheter (PICC), which is
inserted into a peripheral vein and threaded to a large, central vein. See section on
Management of PICC lines.
When flushing CVADs, follow manufacturer recommendations for the size of syringe needed
for the specific type of line. Generally, smaller syringes exert too much pressure and can
cause a rupture in the catheter or reservoir. Therefore, 10-milliter (10 cc) syringes should be
used, unless specified otherwise in student's individualized healthcare plan (IHP). All
connections should be luer-locked.
Settings and Staff
Due to the risk for infection and the need for privacy, most CVAD dressing changes are done
at home. CVAD dressing may be reinforced at school, which should take place in a clean,
private room such as the health room. Privacy regarding the student’s medical condition and
need for a CVAD should also be maintained unless the family chooses to disclose it. The
student can participate in school activities, but participation in physical education activities
must be determined on an individual basis by the student’s health care provider.
Due to the risk of infection and/or injury, reinforcement of central line dressing should be
performed by a registered nurse using sterile technique. Administering medications through
intravenous lines and central line dressing changes are not usually responsibilities of a school
nurse, but protecting the tubing and dressing from injury is. Non-medical school staff should
not perform any procedures with central lines. Any school personnel who has regular contact
with a student who has a CVAD must receive general training from a health care personnel
covering the student’s specific needs, potential problems, and implementation of the
established emergency plan. Most importantly, they should be instructed what to do if the
CVAD is damaged or becomes dislodged, wet, or damp.
Individualized Healthcare Plan (IHP)
Each student’s IHP must be tailored to the individual’s needs. A sample plan is included in
Appendix A. When preparing an IHP for a student with a central venous access device, the
following items should be considered:
• The student’s underlying condition and potential problems associated with the
condition or treatment
• Type of CVAD—tunneled, non-tunneled, implanted, or peripherally inserted
• Specific orders from student's healthcare provider for care at school
• The need for readily-available additional dressing supplies including a spare clamp
• Informing school staff who have regular contact with the student about the CVAD
and general safety guidelines

VDH Guidelines for Healthcare Procedures in Schools 12
• Reporting any fever or site changes to the school nurse, family and/or health care
provider
• Determination of when, and under what conditions, the tubing or the dressing should
be handled
• Never use scissors near the catheter
• Steps to be taken if a complication occurs
• Latex allergy precautions
• Standard precautions
Sources:
Bowden, V., & Greenberg, C. (2012). Pediatric nursing procedures (Third ed.).
Philadelphia: Wolters Kluwer Health/Lippincott Williams & Wilkins, 367-390.
CDC. (2011). Guidelines for the Prevention of Intravascular Catheter-Related Infections.
Available online at http://www.cdc.gov/hicpac/pdf/guidelines/bsi-guidelines-
2011.pdf.
Children's Mercy Hospital. (2012). Central line at school. Available online at
https://www.childrensmercy.org/content/uploadedFiles/Care_Cards/CMH-11-
384p.pdf.
Connecticut State Department of Education. (2012). Clinical procedure guidelines for
Connecticut school nurses. Middlebury, CT: CSDOE, 68-69.
Hockenberry, M., & Wilson, D. (2015). Wong's nursing care of infants and children. (10th
ed.). St. Louis: Elsevier Mosby, 1078-1084.
National Institutes of Health Clinical Center. (2011). Managing your tunneled catheter.
Available online at http://www.cc.nih.gov/ccc/patient_education/pepubs/hickman.pdf
Porter, S., Branowicki, P., & Palfrey, J. (2014). Supporting students with special health care
needs: Guidelines and procedures for schools (3rd ed.). Baltimore: Paul H. Brookes
Publishing, 249-266.
Selekman, J. (2013). School nursing: A comprehensive text. (2nd ed.). Philadelphia: F.A.
Davis, 1057-1059.
Smith, S., Duell, D. & Martin, B. (2012). Clinical nursing skills: Basic to advanced skills
(8th ed.). Boston: Pearson, 1109-1127, 1140-1150.
Wisconsin Improving School Health Services Project. (2015). Central venous line dressing
change. Available online at http://www.wishesproject.org/?page_id=283/?tab=4.

VDH Guidelines for Healthcare Procedures in Schools 13
Possible Problems with Central Venous Access Devices
Equipment Needed to be Available at all times for Emergencies (family supplies
equipment):
• Small smooth-edged clamp
• Sterile gauze
• Tape
• Gloves (sterile and clean)
• Mask, if ordered
Problems
• Temperature elevation; redness, swelling, or drainage at the CVAD site; chills,
increased fatigue, irritability or headache
Notify the school nurse, family, and/or healthcare provider immediately as these are
possible indications of infection. Swelling may indicate infiltration.
• Arm, shoulder, or neck pain
Infiltration or thrombosis could be developing. Also, if implanted Dacron cuff has not
fully healed, excessive sneezing, coughing, or vomiting may cause catheter migration.
Notify school nurse, family and/or healthcare provider immediately.
• Difficulty breathing; chest pain
Clamp the line and lie student on left side to help prevent an air bubble from entering the
heart.
Do not let the student walk!
Initiate the school emergency plan. The student should be transported as soon as
possible to the appropriate hospital emergency room. If the school nurse is not
available, pinch the tubing with a clamp or fingers and call the emergency medical
team. Notify the school nurse, family, and/or healthcare provider immediately.
• Blood in the tubing or bleeding from the end of the tubing
Put on sterile gloves. If blood is noted in the line or coming from the end of the line,
check to see if the clamp is open or if the cap is off. If so, close the clamp or replace
cap. Notify the school nurse and the family. If the clamp is not functioning properly, the
tubing should be firmly pinched closed and the school nurse, family, and healthcare
provider notified immediately according to the student’s emergency plan.
• CVAC is pulled or falls out
Inspect the exterior of the dressing. If the dressing is intact and the tape still holds the
looped catheter, it is probable that no significant trauma to the student or the line has
occurred. The school nurse, family, and the health care provider should be notified. If the
tape or dressing has been disrupted, the dressing should be reinforced by the school nurse
and the family and healthcare provider notified.

VDH Guidelines for Healthcare Procedures in Schools 14
If the catheter has fallen out, stay calm. Reassure the student. The CVAD exit site
should immediately be covered with sterile gauze or a clean dressing if a sterile one is not
readily available. Apply firm pressure to the exit site (bleeding should be minimal).
Notify the school nurse, healthcare provider and family immediately. Activate the
school emergency plan.
• Catheter tubing breaks
Clamp the catheter above the break (closest to the skin) or pinch it off by folding catheter
onto itself and wrap the broken end with sterile gauze. Notify the school nurse, family
and healthcare provider immediately. Initiate the emergency action plan. The
catheter can sometimes be repaired by the health care provider at the hospital.
Sources:
Bowden, V., & Greenberg, C. (2012). Pediatric nursing procedures (Third ed.). Philadelphia:
Wolters Kluwer Health/Lippincott Williams & Wilkins, 367-390.
Centers for Disease Control and Prevention. (2011). Guidelines for the prevention of intravascular
catheter-related infections. Available online at
http://www.cdc.gov/hicpac/pdf/guidelines/bsi-guidelines-2011.pdf.
Children's Mercy Hospital. (2012). Central line at school. Available online at
https://www.childrensmercy.org/content/uploadedFiles/Care_Cards/CMH-11-384p.pdf.
Connecticut State Department of Education. (2012). Clinical procedure guidelines for Connecticut
school nurses. Middlebury, CT: CSDOE, 68-69.
Hockenberry, M., & Wilson, D. (2015). Wong's nursing care of infants and children. (10th ed.). St.
Louis: Elsevier Mosby, 1078-1084.
Joint Commission. (2013). CVC Maintenance Bundle. CLABSI Toolkit Tool. Available online:
http://www.jointcommission.org/assets/1/6/CLABSI_Toolkit_Tool_3-
22_CVC_Maintenance_Bundles.pdf
National Institutes of Health Clinical Center. (2011). Managing your tunneled catheter. Available
online at http://www.cc.nih.gov/ccc/patient_education/pepubs/hickman.pdf.
Porter, S., Branowicki, P., & Palfrey, J. (2014). Supporting Students with Special Health Care Needs:
Guidelines and Procedures for Schools (3rd ed.). Baltimore: Paul H. Brookes Publishing,
249-266.
Selekman, J. (2013). School nursing: A comprehensive text. (2nd ed.). Philadelphia: F.A. Davis,
1057-1059.
Smith, S., Duell, D. & Martin, B. (2012). Clinical nursing skills: Basic to advanced skills (8th ed.).
Boston: Pearson, 1109-1127, 1140-1150.
Wisconsin Improving School Health Services Project. (2015). Central venous line dressing change.
Available online at http://www.wishesproject.org/?page_id=283/?tab=4.

VDH Guidelines for Healthcare Procedures in Schools 15
General Information for
Students with Central Venous Access Devices
Date: ___________________
To: _____________________________ ________________________
(Teachers, Instructional assistants, Bus drivers, etc)
Name of Student: ______________________________________
This student has a central venous access device (CVAD), a plastic tube that has been placed into a large
vein close to the heart. The tube may be used for nutritional support or medications.
The tubing, located on the chest (sometimes on the arm for peripherally inserted central catheters), may or
may not be visible and is covered by a bandage to protect the site. No one should routinely touch the
tubing or dressing. The CVAD should not cause any discomfort if it is secured properly.
The CVAD usually is clamped or capped during school or during transport. However, some students may
have the tubing connected to an intravenous fluid solution. Usually routine CVAD care is done at home or
in the school clinic.
Most students with CVADs are able to participate in school activities. The student’s health care provider
and family need to determine, in writing, any physical activity restrictions. Basically, the CVAD should
not be bumped during activity and the tubing should not be pulled. The dressing should not get soiled or
wet. If it does, the school nurse and family should be notified.
This student should have an Emergency Action Care Plan and all staff who have contact with this student
should be familiar with how to initiate the plan.
Contact _______________________________ at __________________ (phone number/pager) for
additional information or if the student experiences any problems with the CVAD.
Source: Adapted from: Porter, S, Haynie, M, Bierle, T, Caldwell, TH, & Palfrey, JS (Eds.). (1997). Children and Youth
Assisted by Medical Technology in Educational Settings: Guidelines for Care. (2nd ed.). Baltimore: Paul H. Brookes
Publishing.

VDH Guidelines for Healthcare Procedures in Schools 16
PICC Line Management
Overview
A peripherally inserted central catheter (PICC) is a long intravenous (IV) line which is
inserted into a peripheral vein and threaded (often with a guide wire) to a large, central vein.
It is usually used for IV therapy of short to moderate length, but has been used longer. It is
frequently used for outpatient IV medication therapy lasting 1-6 weeks because it has fewer
problems with infiltration and phlebitis than peripheral IVs, yet it costs less (does not need to
be inserted in the operating room) and has fewer complications than other central venous
access devices.
PICC lines are most often inserted into the antecubital fossa (inner aspect of the elbow) and
threaded through the basilic or cephalic vein to the superior vena cava (which flows into the
heart). PICC lines may have a single or double lumen. For short-term therapy not requiring
total parenteral nutrition, they may be trimmed before insertion and only inserted “midline,”
ending near the axillary vein. The site of the PICC line is covered with a sterile dressing,
which should be treated like other CVAD dressings.
Precautions
PICC lines are generally treated like central venous catheters in catheter care. Dressing
changes are usually done of a prescribed schedule and heparin flushes are done at home
daily. Dressing changes should be done using sterile technique, but should not be done at
school. If the dressing becomes soiled or damp, the registered school nurse should reinforce
the dressing and call the parent.
It is important to remember that most PICC lines are not sutured into place. Extra care
must be taken not to pull the catheter out of the insertion site. PICC lines cannot be
removed in the same manner as other peripherally inserted catheters or heparin locks.
In general, treat them like central lines. If problems occur with a PICC line, the school
nurse, family and healthcare provider must be notified.
Due to their location (usually the arm), PICC sites may not be covered by clothing. If not, a
wrap or mesh may provide added protection at school if ordered by the healthcare provider.
If the PICC line is in the arm, there should be no heavy lifting, push-ups, or pull-ups. Orders
regarding activity level and restrictions should be provided by the healthcare provider.

VDH Guidelines for Healthcare Procedures in Schools 17
Sources:
Bowden, V., & Greenberg, C. (2012). Pediatric nursing procedures (Third ed.).
Philadelphia: Wolters Kluwer Health/Lippincott Williams & Wilkins, 359-366.
CDC. (2011). Guidelines for the Prevention of Intravascular Catheter-Related Infections.
Available online at http://www.cdc.gov/hicpac/pdf/guidelines/bsi-guidelines-
2011.pdf.
Children's Mercy Hospital. (2012). Central line at school. Available online at
https://www.childrensmercy.org/content/uploadedFiles/Care_Cards/CMH-11-
384p.pdf.
Connecticut State Department of Education. (2012). Clinical procedure guidelines for
Connecticut school nurses. Middlebury, CT: CSDOE, 68-69.
Hockenberry, M., & Wilson, D. (2015). Wong's nursing care of infants and children. (10th
ed.). St. Louis: Elsevier Mosby, 1080-1081.
Joint Commission. (2013). CVC Maintenance Bundle. CLABSI Toolkit Tool. Available
online: http://www.jointcommission.org/assets/1/6/CLABSI_Toolkit_Tool_3-
22_CVC_Maintenance_Bundles.pdf.
National Institutes of Health Clinical Center. (2003). Managing your non-tunneled catheter.
Available online at http://www.cc.nih.gov/ccc/patient_education/pepubs/piccsicc.pdf.
Porter, S., Branowicki, P., & Palfrey, J. (2014). Supporting Students with Special Health
Care Needs: Guidelines and Procedures for Schools (3rd ed.). Baltimore: Paul H.
Brookes Publishing, 249-266.
Selekman, J. (2013). School nursing: A comprehensive text. (2nd ed.). Philadelphia: F.A.
Davis, 1057-1059.
Smith, S., Duell, D. & Martin, B. (2012). Clinical nursing skills: Basic to advanced skills
(8th ed.). Boston: Pearson, 1152-1157.
VDH Guidelines for Healthcare Procedures in Schools 18
Heparin/Saline Lock--Intermittent Venous Access Device
Overview
Students who do not need continuous intravenous (IV) infusion, yet still require peripheral
IV access for intermittent medication or fluids, may have a heparin or saline lock. An
intermittent intravenous device such as this permits the student to move around more easily.
These IV catheters are used for short-term courses of medication or fluids.
Heparin prevents blood from clotting in the catheter. Heparin or saline in the intermittent
device is replaced on a regular basis by injecting a prescribed amount of heparin or saline
into the hub or cap. Caps must be scrubbed with alcohol using a twisting friction motion for
10-15 seconds before injecting a flush or medication. Studies indicate either heparin or
saline are effective flushes if the IV catheter is larger than 24 gauge. Some studies indicate
heparin is more effective in catheters as small as 24 gauge. Heparin flushes may cause more
discomfort than saline for some students.
Settings and Staff
Procedures such as flushes and dressing changes should be done at home. The student’s
activity may need to be limited to prevent dislodging the IV catheter. Catheter insertion sites
affected by the motion of a joint should be supported (e.g., using an armboard or handboard)
to avoid risk of infiltration or mechanical phlebitis from motion of the catheter inside the
vein.
Due to the risk of infection, reinforcement of the IV catheter dressing should be performed
by a registered school nurse using sterile technique. Non-medical school staff should not
perform this procedure. Any school personnel who have regular contact with a student with
a heparin/saline lock or venous access device should receive training that covers potential
problems and implementation of the student emergency care plan.
Individualized Health Plan (IHP)
Each student’s IHP must be tailored to the individual’s needs. A sample plan is included in
Appendix A. When preparing an IHP for a student with a peripheral heparin/saline lock, the
following items should be considered:
• Healthcare provider's order for an intermittent venous access device
• Protection of the IV site from bumping or injury
• Activity level restrictions
• Whether catheter tubing stays clamped
• Signs of IV site infiltration or infection

VDH Guidelines for Healthcare Procedures in Schools 19
• Symptoms which require notification of school nurse, family, and/or health care
provider
• Safe storage and disposal of supplies
• Latex allergy precautions
• Standard precautions
Sources:
Bowden, V., & Greenberg, C. (2012). Pediatric nursing procedures (Third ed.).
Philadelphia: Wolters Kluwer Health/Lippincott Williams & Wilkins, 324-327; 634-
637.
Hockenberry, M., & Wilson, D. (2015). Wong's nursing care of infants and children. (10th
ed.). St. Louis: Elsevier Mosby, 921-923.
Joint Commission. (2013). CVC Maintenance Bundle. CLABSI Toolkit Tool. Available
online: http://www.jointcommission.org/assets/1/6/CLABSI_Toolkit_Tool_3-
22_CVC_Maintenance_Bundles.pdf
Joint Commission. (2013). "Scrub the Hub." CLABSI Toolkit Tool. Available online:
http://www.jointcommission.org/assets/1/6/CLABSI_Toolkit_Tool_3-
21_Scrub_the_Hub.pdf
Mok, E., Kwong, T., & Chan, M. (2007). A randomized controlled trial for maintaining
peripheral intravenous lock in children. International Journal of Nursing Practice,
13(1):33-45. Available online at http://onlinelibrary.wiley.com/doi/10.1111/j.1440-
172X.2006.00607.x/abstract.
Selekman, J. (2013). School nursing: A comprehensive text. (2nd ed.). Philadelphia: F.A.
Davis, 1057.

VDH Guidelines for Healthcare Procedures in Schools 20
Possible Problems with a Heparin/Saline Lock
• Tender, red, swollen, or warm IV site
IV catheter may be displaced or infiltrated, causing the intravenous fluid to enter the
tissue, or the vein may be inflamed. Notify the school nurse and call the family
immediately.
• Wet or bloody IV dressing
Male adaptor (cap) may be dislodged. IV catheter itself may have slipped out of the vein
or IV site may be infiltrated. Reinforce with dry dressing and call family.
• Red streak noted above IV site
Vein may be inflamed (phlebitis). Notify school nurse, family and/or health care
provider.
Sources:
Bowden, V., & Greenberg, C. (2012). Pediatric nursing procedures (Third ed.).
Philadelphia: Wolters Kluwer Health/Lippincott Williams & Wilkins, 324-327; 634-
637.
Hockenberry, M., & Wilson, D. (2015). Wong's nursing care of infants and children. (10th
ed.). St. Louis: Elsevier Mosby, 921-923.
Joint Commission. (2013). CVC Maintenance Bundle. CLABSI Toolkit Tool. Available
online: http://www.jointcommission.org/assets/1/6/CLABSI_Toolkit_Tool_3-
22_CVC_Maintenance_Bundles.pdf
Joint Commission. (2013). "Scrub the Hub." CLABSI Toolkit Tool. Available online:
http://www.jointcommission.org/assets/1/6/CLABSI_Toolkit_Tool_3-
21_Scrub_the_Hub.pdf
Mok, E., Kwong, T., & Chan, M. (2007). A randomized controlled trial for maintaining
peripheral intravenous lock in children. International Journal of Nursing Practice,
13(1):33-45. Available at http://onlinelibrary.wiley.com/doi/10.1111/j.1440-
172X.2006.00607.x/abstract.
Selekman, J. (2013). School nursing: A comprehensive text. (2nd ed.). Philadelphia: F.A.
Davis, 1057.

VDH Guidelines for Healthcare Procedures in Schools 21
General Information for
Students with Heparin/Saline Locks
Date: ___________________
To: _____________________________ _________________________________
(Teachers, Instructional assistants, Bus drivers, etc)
Name of Student: ______________________________________
This student has an intravenous (IV) catheter (tube) in a vein in his or her arm or hand. The
tubing is held in place with tape. This IV tube is used to give the student medication or fluids.
When the student is not receiving medications or fluids, the IV tube is closed with a heparin or
saline lock. The student may have activity restrictions.
The student should not dislodge the tubing or get it soiled or wet.
Contact _______________________________ at __________________ (phone
number/pager) for additional information or if the student experiences any problems with the
IV tubing.
Source: Adapted from: Porter, S, Haynie, M, Bierle, T, Caldwell, TH, & Palfrey, JS (Eds.). (1997). Children
and Youth Assisted by Medical Technology in Educational Settings: Guidelines for Care. (2nd ed.). Baltimore:
Paul H. Brookes Publishing.

VDH Guidelines for Healthcare Procedures in Schools 22
Use of Needleless Systems and Safer Medical Devices
Overview
Injuries from contaminated needles expose healthcare workers to a number of diseases,
including human immunodeficiency virus (HIV), Hepatitis-B virus, and Hepatitis-C virus.
According to the Centers for Disease Control and Prevention (CDC), approximately 600,000-
800,000 needlestick accidents occurred each year prior to 2000.
The Needlestick Safety and Prevention Act of 2000 was passed in an effort to reduce the
risks of disease transmission and injury from needles and other sharps. During 2001, the
Occupational Safety and Health Administration (OSHA) revised the Bloodborne Pathogens
standard to comply with the new law. As a result, facilities are required to utilize safer
medical devices as they become available. These “safer medical devices” replace sharps
with non-needle devices or incorporate safety features designed to reduce the likelihood of
injury and have greatly decreased such injuries.
Any facility or organization that employs individuals who might reasonably experience
occupational exposure to blood or other potentially infectious materials must comply with the
regulation, even if the facility has never had a needlestick injury. In schools, the presence of
large numbers of children, as well as the safety of nurses and other health care workers, make
the use of needleless systems and safer medical devices a high priority.
A variety of products have been developed to reduce accidental needlesticks. Some safety
products are “passive” and automatically engage the safety mechanism whenever they are
used, while “active” products require the user to activate the safety component. There are so
many new products available and being developed that it would be impossible to describe the
procedure for using each one. Users are directed to follow manufacturer’s specific
instructions for each device.
The International Health Care Worker Safety Center at the University of Virginia maintains a
List of Safety-Engineered Sharp Devices and other products designed to prevent occupational
exposures to bloodborne pathogens. The list includes the types of safety devices and each
device’s manufacturer. It also provides a list of all the manufacturers and their contact
information, including phone number, fax number, email address, and mailing address.
See:http://www.healthsystem.virginia.edu/pub/epinet/new/safetydevice.html.
Types of Safer Medical Devices
Below is an outline and brief description of some of the types of safer medical devices:
A. Injection Equipment
• Needle guards—after injection:
o user pushes safety cover/sheath forward until it locks
o user grasps sleeve and twists flanges to loosen sleeve and pull down
over retracting needle

VDH Guidelines for Healthcare Procedures in Schools 23
• Needle guards—hinged recap
o Needle has a pre-attached sheath. After injection, user presses sheath
against a hard surface, locking it in place over needle.
• Retractable needles
o When user fully depresses plunger, the needle automatically retracts
from patient and is encapsulated within the syringe
o Safety sheath covers needle when user pushes button on the syringe
o User rotates plunger to release needle and pull plunger back so needle
retracts and becomes encapsulated
• Needleless jet injection
o Needle-free delivery of intramuscular or subcutaneous injections using
CO2 as a power source to eject medication, which then penetrates the
skin
• Pre-Filled syringes
o Syringes pre-filled with common medications and various needle safety
devices
B. IV Medication Delivery Systems (not usually done at school)
• Needleless IV access—blunted cannula
o Blunt plastic cannula with pre-slit, resealing synthetic injection sites
• Needleless IV access—valve/access ports and connectors
o Two-way reflux valve activated by standard male luer lock; valve closes
automatically when luer is removed
o Capless valve activated by standard male luer lock
o Capless valve which uses positive displacement to expel fluid when the
luer lock taper is removed, preventing any backflow—becoming
increasingly popular because it prevents the retrograde return of blood,
thus reducing clotting and contamination risks; this tubing should
usually not be clamped until luer lock is removed;
• Prefilled medication cartridge with safety needles/guards—often part of a
specific IV product system line
• Recessed/protected needles
o Recessed needles which lock onto injection ports, usually at Y-sites
• Medication vial adapters
C. IV Insertion Equipment
• Shielded or retracting peripheral IV catheters
o Needle retracts automatically into a needle shield when the needle is
withdrawn from catheter
o Push button shielding retracts needle into needle shield
o Telescoping needle shield that covers stylet as it is withdrawn
o Safety clip automatically engages and covers needle tip as it is withdrawn
• Shielded midline catheters
• Guidewire introducers

VDH Guidelines for Healthcare Procedures in Schools 24
D. Lancets
• Laser lancets
• Retracting lancets
• Strip lancets
E. Sharps Disposal Containers—list of manufacturers available on website
F. Other Safer Medical Devices not often used in school settings
• Blood collection equipment
• Laboratory devices
• Blood bank devices
• Nuclear medicine devices
• Surgical scalpels
• Blunted suture needles
• Alternative skin closure devices
• Other surgical sharps protection
• Hemodialysis and apheresis devices
• Fluid sampling devices
• Bone marrow collection system
• Other miscellaneous products

VDH Guidelines for Healthcare Procedures in Schools 25
Sources:
Hockenberry, M., & Wilson, D. (2015). Wong's nursing care of infants and children. (10th
ed.). St. Louis: Elsevier Mosby, 928.
Hurley, ML. (2001). Safer needle devices: resource review. RN 64(10): 24ns15-24ns24.
International Health Care Worker Safety Center. (2013). List of safety-engineered sharp
devices and other products designed to prevent occupational exposures to bloodborne
pathogens. University of Virginia, Charlottesville, VA Available online at
http://www.healthsystem.virginia.edu/pub/epinet/new/safetydevice.html.
International Safety Center. (2015). Epinet. Available online at
http://internationalsafetycenter.org/use-epinet/.
National Institute for Occupation Safety and Health (NIOSH). (2013). Available online at
http://www.cdc.gov/niosh/stopsticks/sharpsinjuries.html.
Occupational Safety and Health Administration. (2001). Occupational Exposure to
bloodborne pathogens; Needlestick and other sharps injuries; Final Rule. Federal
Register 66(12), 18 January 2001.
Occupational Safety and Health Administration. (2015). Bloodborne pathogens and
needlestick prevention. Available online at
https://www.osha.gov/SLTC/bloodbornepathogens.
Occupational Safety and Health Administration. (2015). Needlestick safety and prevention
act: Frequently asked questions. Available online at
https://www.osha.gov/needlesticks/needlefaq.html.
2014 Sharps safety vendors. Available online at http://www.hpnonline.com/inside/2014-
12/1412-SSG.pdf.

VDH Guidelines for Healthcare Procedures in Schools 26
Procedure for One-Handed Needle Recapping
Due to the risk of injury, needles should rarely ever be recapped. Use this procedure only
when a sharps disposal box is unavailable or when the needle is used in such a way that it has
had no chance of becoming contaminated. Needlestick injuries place workers at risk for
bloodborne pathogens. After a needle has been used, it should be disposed of in the nearest
sharps container. It should never be placed (capped or uncapped) in regular trash.
1. Wash hands and apply gloves.
2. Before using the needle, place the needle cover on a
flat, solid, immovable object such as the edge of a
table. The open end of the needle cap should face
the worker and be within reach of the dominant
hand.
3. Give the injection, or use the needle and syringe to
draw up solution.
4. Place the tip of the needle inside the open end of the
needle cap and gently slide the needle into the cap.
5. Once the needle is inside the cap, gently lift the
syringe just off the table with the needle cap
pointed upwards.
6. Carefully point the capped needle against the table
and use the table’s resistance to completely cap the
needle.
7. At the first opportunity, dispose of the needle and
syringe in an appropriate container.
8. Remove gloves and wash hands.

VDH Guidelines for Healthcare Procedures in Schools 27
Sources:
U.S. Food and Drug Administration. (2014). What to do if you can't find a sharps disposal
container. Available online at
http://www.fda.gov/MedicalDevices/ProductsandMedicalProcedures/HomeHealthand
Consumer/ConsumerProducts/Sharps/ucm263259.htm
University of Maryland Environmental Safety. (n.d.). Factsheet: Needle recapping.
Available online at https://www.des.umd.edu/biosafety/rest/recap.pdf.
Illustration Source: Vickie H. Southall.

VDH Guidelines for Healthcare Procedures in Schools 28
Chapter 2: Care of the Endocrine
System
Diabetes Overview
DMMP and Action Plans
Glucose Testing
Continuous Glucose Monitor
Low Blood Glucose
Glucagon
High Blood Glucose
Ketone Testing
Insulin
Carbohydrate Counting and Correction Factor
Insulin Syringes
Insulin Pens
Insulin Pumps
Training
Resources

VDH Guidelines for Healthcare Procedures in Schools 29
Diabetes
Overview
Diabetes is a chronic disease in which the body either does not make, or does not properly
use insulin, a hormone needed to convert sugar, starches, and other food into energy. People
with diabetes develop increased blood glucose (sugar) levels because they lack insulin, have
insufficient insulin, or are resistant to insulin’s effects. High levels of glucose build up in the
blood and spill into the urine; as a result, the body loses its main source of fuel.
When insulin is no longer made, it must be obtained from another source—insulin shots or
insulin pump. When the body does not use insulin properly, oral medications may be taken
instead of, or in addition to, insulin shots. Neither insulin nor other medications, however,
are cures for diabetes: they only help control the disease.
Taking care of diabetes is important. If not treated, diabetes can lead to serious health
problems and impact the ability to learn. The disease can affect the blood vessels, eyes,
kidneys, nerves, gums, and teeth. It is the leading cause of adult blindness, lower limb
amputations, and kidney failure. People with diabetes also have a higher risk of heart disease
and stroke. Some of these problems can occur in teens and young adults who develop
diabetes during childhood. The good news is that research shows that these problems can be
greatly reduced or delayed by keeping blood glucose levels under control.
Types of Diabetes
Type 1. Type 1 diabetes mellitus (T1DM) is a complex metabolic disease. In T1DM, the
immune system attacks the beta cells (the insulin-producing cells of the pancreas) and
destroys them. Without insulin, glucose in the blood cannot be converted into a form the
body can use for energy. Because the pancreas can no longer produce insulin, people with
type 1 diabetes need to take insulin daily to live. T1DM can occur at any age, but it begins
most often in children and young adults. T1DM can not be prevented.
Symptoms
• Increased thirst and urination
• Constant hunger
• Weight loss
• Blurred vision
• Fatigue
Risk Factors
• Genetics
• Environment

VDH Guidelines for Healthcare Procedures in Schools 30
Type 2. The first step in the development of type 2 diabetes mellitus (T2DM) is usually a
problem with the body’s response to insulin, or insulin resistance. For reasons scientists do
not completely understand, the body cannot use its insulin very well. This means that the
body needs increasing amounts of insulin to control blood glucose. The pancreas tries to
make more insulin, but after several years, insulin production may drop off.
T2DM used to be found mainly in overweight adults ages 40 or older. Now, as more
children and adolescents in the United States become overweight and inactive, T2DM is
occurring in younger people, including children and adolescents. To control their diabetes,
children with T2DM may need to take oral medication, insulin, or both. The risk of getting
T2DM can be decreased by avoiding obesity through healthy diet and plenty of exercise.
Symptoms
• Fatigue
• Increased thirst and urination
• Nausea
• Unexplained weight loss
• Blurred vision
• Frequent infections
• Slow healing of wounds or sores
Risk Factors
• Being overweight (greater than 85th percentile for height/weight)
• Having a family member who has T2DM
• Being African American, Hispanic/Latino American, American Indian, Asian
American or Pacific Islander American
• Having a mother who developed gestational diabetes while pregnant
• Having high blood pressure, high cholesterol, high lipid levels
• Being inactive
Understanding Diabetes and Ketoacidosis
The pancreas makes enzymes and hormones. Enzymes help digest or breakdown the food
into glucose. Insulin is a hormone secreted by the beta cells of the pancreas. Insulin goes
straight into the blood and enables glucose to enter other cells of the body. Glucose is a
simple sugar that is present in the blood and is used by the body for energy. When someone
has diabetes, the pancreas doesn’t make enough insulin or the body becomes resistant to its
insulin. When there is not enough effective insulin, glucose cannot enter the cells.

VDH Guidelines for Healthcare Procedures in Schools 31
Body cells need to have glucose to provide the energy to do their jobs. When glucose cannot
be used for energy, the level of glucose builds up in the blood stream. When excess glucose
builds up in the blood, the kidneys filter it out into the urine. In the process the body uses
and loses a lot of water. This causes increased thirst. Hunger is another symptom of diabetes
caused by the body losing calories as a result of its inability to utilize the glucose from food
that is consumed. This leads to weight loss and fatigue.
When the body can’t use glucose, it uses its own fat and muscle tissue for energy. Ketones
are acids that are left in the blood when fat is used for energy. As ketone production
increases, ketone blood levels increase causing diabetic ketoacidosis (DKA), a medical
emergency. The body will try to get rid of ketones through the kidneys and lungs.
Symptoms of nausea, vomiting, and eventually, coma occur. The ketones will show up in the
urine and will also cause the breath to smell fruity.
Management of Diabetes
The goal of effective diabetes management is to control blood glucose levels by keeping
them within a target range that is determined for each child. Optimal blood glucose helps to
promote normal growth and development and allows for optimal learning. Effective diabetes
management is needed to prevent the immediate dangers of blood glucose levels that are too
high or too low. As noted earlier, research has shown that maintaining blood glucose levels
within a target range can prevent or delay the long-term complications of diabetes, such as
heart attack, stroke, blindness, kidney failure, nerve disease, and amputations of the foot or
leg.
The key to optimal blood glucose control is to carefully balance food, exercise, and insulin or
medication. As a general rule, food makes blood glucose go up, and exercise and insulin
make blood glucose levels go down. Several other factors, such as growth and puberty,
mental stress, illness, or injury can also affect blood glucose levels. With all of these factors
coming into play, maintaining good blood glucose control is a constant juggling act—24
hours a day, 7 days a week.
Monitoring Blood Glucose
Students with diabetes check (or test) their blood glucose levels throughout the day using a
blood glucose meter (or sometimes now using a continuous glucose monitoring sensor). The
meter gives a reading of the level of glucose in the blood at the time it is being checked.
Monitoring involves pricking the skin with a lancet at the fingertip, forearm, or other test site
to obtain a drop of blood and placing the drop on a special test strip that is inserted in a
glucose meter. If blood glucose levels are too low (hypoglycemia) or too high
(hyperglycemia), students can then take corrective action, such as eating, modifying their
activity level, or administering insulin. Low blood glucose levels, which can be life-
threatening, present the greatest immediate danger to people with diabetes.

VDH Guidelines for Healthcare Procedures in Schools 32
Health care providers generally recommend that students check their blood glucose during
the school day, usually before eating lunch or snacks, before physical activity, or whenever
there are symptoms of hypoglycemia or hyperglycemia. In young children, symptoms may
be subtle; blood glucose should be checked whenever symptoms are suspected. Many
students can check their own blood glucose level; others will need supervision; and others
will need to have the entire task performed by a school nurse or designated, trained,
unlicensed assistive personnel (UAP). Students who can self-check can be allowed to do so
whenever they need to, and at any school location. Being able to do so can help achieve
better glucose control, independence in managing their diabetes, less stigma, and less time
out of class. Frequency, supervision, and implementation of testing should be covered in the
student’s individualized health care plan.
Possible Causes of Hypoglycemia
• Too much insulin
• Too little food
• Extra physical activity
• Being ill, especially with vomiting
• Stress
Signs of Hypoglycemia—Low Blood Glucose
Mild Symptoms
• Hunger
• Shakiness
• Weakness
• Paleness
• Blurred vision
• Increased heart rate/palpitations
• Sleepiness
• Changed behavior
• Sweating
• Anxiety
• Headache
• Dilated pupils
Moderate to Severe Symptoms
• Yawning
• Irritability/frustration
• Extreme tiredness/fatigue
• Inability to swallow
• Sudden crying
• Confusion
• Restlessness
• Dazed appearance
• Having a seizure or convulsion
• Unconsciousness/coma
Possible Causes of Hyperglycemia
• Too little insulin
• Expired insulin
• Decreased physical activity
• Illness, injury
• Stress or emotions
• Hormonal variations

VDH Guidelines for Healthcare Procedures in Schools 33
Signs of Hyperglycemia—High Blood Glucose
Mild Symptoms
• Increased thirst
• Increased urination
• Dry mouth
• Fatigue
• Numbness or tingling
• Agitation, fidgetiness, irritability
• Increased hunger
• Nausea
• Blurred vision
• Weakness
• Lack of concentration
Moderate Symptoms
• Decreased appetite
• Nausea
• Abdominal pain
• Vomiting
• Sunken eyes
• Weight loss
Severe Symptoms
• Continued vomiting
• Sleepiness
• Coma or unconsciousness
• Very weak
• Deep breathing, fruity smell
• Possible ketones

VDH Guidelines for Healthcare Procedures in Schools 34
Nutrition Planning
Although students with diabetes have the same nutritional needs as other students, there are
special considerations for the school setting. Structured meals and snacks contribute to
optimal glucose control and assist in preventing hypoglycemia. Timing of snacks is based on
peak insulin action times (when the insulin is most effective in lowering the blood glucose)
and activity. Therefore snacks must be allowed according to pre-scheduled daily snacks and
/or for treatment of hypoglycemia. Students with diabetes usually have an individualized
meal plan based upon carbohydrate counting. All meal plans are nutritionally sound and
encourage the daily calorie requirements needed for optimal growth and development.
Carbohydrate counting involves calculating the number of grams of carbohydrate. This
information, which can be obtained from nutrition information labels, is used to determine
the amount of insulin the student needs to control blood glucose for any given meal or snack.
Carbohydrate counting is the preferred method for determining food choices and portion
sizes (see Carbohydrate Counting section).
The exchange system is an older system that groups foods in six different lists, each with a
set nutritional value. A meal plan is prepared that recommends prescribed exchanges or
servings from each food group for each meal and snack. The exchange lists include the
following food groups: (1) bread/starch, (2) fruit, (3) milk, (4) vegetables, (5) meat/protein
foods, and (6) fats. The exchange system is not usually recommended for use in T1DM.
It is important for school personnel working with students who have diabetes to realize that
any food eaten that contains carbohydrate must be worked into the meal plan, even if it is
labeled “sugar free.” .
Physical Activity
Exercise and physical activity are critical components of diabetes management. Everyone
can benefit from regular exercise, but it is even more important for a student with diabetes.
In addition to maintaining cardiovascular fitness and controlling weight, physical activity can
help to lower blood glucose levels.
Students with diabetes should participate fully in physical education classes and team sports.
To maintain blood glucose levels within their target ranges during extra physical activity,
students may make adjustments in their insulin and food intake. To prevent hypoglycemia,
they also may need to check their blood glucose levels more frequently while engaging in
physical activity. General guidelines for blood glucose levels before exercise are that they
should be over 100 and under 250. When the blood glucose level is over 300, a test for
ketones should be done (if recommended by the health care provider) before exercising. If
ketone results are moderate or large, the student should not exercise.

VDH Guidelines for Healthcare Procedures in Schools 35
The student with diabetes should eat prior to exercising if it has been more than two hours
since the student has eaten. It is best to exercise or take physical education 30-60 minutes
after a meal to allow time for food to be absorbed. A person with diabetes always needs to
have a fast-acting sugar and a complex carbohydrate readily available for treatment of low
blood sugar, along with plenty of water. Physical education instructors and sports coaches
should be able to recognize and assist with the treatment of hypoglycemia.
Exercise increases the flow of blood in general, but especially to the muscles that are being
used the most. Insulin is absorbed faster when there is increased blood flow to the exercising
muscles. For example, if the insulin is injected in the arm before a run or swim, it may be
absorbed quickly and cause a low blood sugar. Muscles use stored energy while exercising
and after exercise, the muscles need to replace this stored sugar. They do this by taking
glucose out of the blood, which may continue for up to 12 hours after exercising.
Students using insulin pumps may disconnect from the pump for sports activities. If they
keep the pump on, they may set a temporary, reduced rate of insulin while they are playing.
The student’s individualized health care plan should include specific instructions for physical
activity.
Implications for Education
Students with diabetes should have adequate time for taking medication, checking blood
glucose, and eating. School personnel can help eliminate barriers to these activities.
Students also may need to have additional access to food or drink and to the restroom.
Students with hyperglycemia or hypoglycemia often do not concentrate well, and blood
glucose may need to be checked before and during academic testing. If a serious high or low
blood glucose episode occurs, a student may need to be excused with an opportunity for
retake.
Planning for Disasters and Emergencies
In the event of natural disasters or other emergency situations, students may need to stay at
school. The family, therefore, must provide an emergency supply kit containing a 72
hour supply of the following items as appropriate:
• Blood glucose meter, testing strips,
lancets and batteries for meter
• Insulin, syringes, & supplies
• Insulin pump and supplies
• Other medications
• Glucagon emergency kit
• Antiseptic wipes
• Urine ketones strips/Blood ketone
meter and strips
• Fast-acting source of glucose
• Carbohydrate-containing snacks
• Hypoglycemia food supplies (for 3
episodes): quick-acting sugar and
carbohydrate/protein snacks
• Continuous glucose monitoring
supplies/equipment

VDH Guidelines for Healthcare Procedures in Schools 36
Settings and Staff
As with all medical conditions, every effort should be made to protect the student’s privacy.
It is important for students to be able to check their blood glucose levels and respond to
levels that are too high to too low as quickly as possible. Accordingly, if recommended by
the healthcare provider, students shall be permitted to check their blood glucose level and
respond to the results at any school location or at any school activity (Code of Virginia §22.1-
274.01:1). Taking immediate action is important so that the symptoms don’t get worse and
students don’t miss time in the classroom. Blood glucose monitoring does not present a
danger to other students or staff members when there is a plan for proper disposal of
lancets and other materials that come into contact with blood. The family and the school
should agree on the plan, which should be consistent with Standard Precautions and local
waste-disposal laws. The plan should specify the level of supervision needed for testing and
treatment.
All school staff members who have responsibility for students with diabetes should receive
training that provides a basic understanding of the disease and the students’ needs, how to
identify medical emergencies, and whom to contact in case of an emergency.
A few school staff members should receive training from a qualified health care professional
in student-specific routine and emergency diabetes care tasks so that at least one staff
member is always available for younger, less experienced students and for any student with
diabetes in case of an emergency. All students with diabetes will need help with emergency
medical care. The Code of Virginia § 22.1-274 ensures that in school buildings with ten or
more instructional & administrative employees, that at least two employees be trained in the
administration of insulin and glucagon at a school if one or more students diagnosed with
diabetes is in attendance. The Department of Education has published a manual to use in training
school employees to administer glucagon and insulin.
Individualized Healthcare Plan (IHP)
Every student with diabetes needs a detailed IHP tailored to the individual’s needs. It should
cover procedures for diabetic management as well as possible problems and emergencies that
may arise.
The National Diabetes Education Program recommends developing a plan with at least three
components: (1) the Diabetes Medical Management Plan (DMMP), which contains the
prescribed diabetes health care regimen developed by the healthcare provider, (2) an
individualized healthcare plan developed by the school nurse, and (3) a Quick Reference
Emergency Action Plan describing how to recognize hypoglycemia and hyperglycemia and
what to do as soon as signs of these conditions are observed. Some students may also need
an education plan (individualized education plan [IEP] or a 504 plan) explaining what
accommodations, education aids, and services are needed. A sample DMMP and Quick

VDH Guidelines for Healthcare Procedures in Schools 37
Reference Emergency Plan follow this section. It may be copied and used to develop a plan
for each student. A sample IHP can be found in Appendix A. For a student with diabetes,
the following items should receive particular attention:
Diabetes Medical Management Plan
• Date of diagnosis
• Current health status
• Emergency contact information
• Student’s willingness and ability to perform self-management tasks at school
• Lists of diabetes equipment and supplies with schedule for quality control checks of
equipment
• Plan for storage of diabetic supplies and access in an emergency
• Specific healthcare provider orders
o Blood glucose monitoring
o Insulin, glucagon, and other medications to be given at school
o Meal and snack plan
o Carbohydrate counting
o Correction factors
o Exercise requirements
o Additional monitoring, such as testing for ketones
o Continuous glucose monitoring (CGM)
• Exercise requirements
• Typical signs, symptoms, and prescribed treatment for hypoglycemia
• Typical signs, symptoms, and prescribed treatment for hyperglycemia
• Latex or other allergy precautions
Individualized Healthcare Plan (IHP)
• Where and when blood glucose monitoring and treatment will take place
• Location of student’s diabetes management supplies
• Identification of designated, trained, unlicensed assistive personnel who can conduct
blood glucose checking, insulin and glucagon administration, and treatment of
hypoglycemia and hyperglycemia
• Emergency contact information for family and healthcare provider
• Free access to the restroom and water fountain
• Nutritional needs, including provisions for meals and snacks and obtaining nutritional
(especially carbohydrate) information from dietary staff
• Specific healthcare provider orders
o Blood glucose monitoring
o Insulin, glucagon, and other medications to be given at school
o Meal and snack plan
o Carbohydrate counting
o Correction factors
o Exercise requirements
o Additional monitoring, such as testing for ketones
• Exercise requirements

VDH Guidelines for Healthcare Procedures in Schools 38
• Typical signs, symptoms, and prescribed treatment for hypoglycemia
• Desired goals and outcomes for health and education
• Full participation in all school-sponsored activities and field trips, with coverage by
designated, trained unlicensed personnel
• Alternative times for academic exams if student is experiencing hypoglycemia or
hyperglycemia
• Flexible policies regarding absences for doctors’ appointments and diabetes-related
illness
• Disaster planning and storage of 72 hour supply of medication, food supplies and
water
• Maintenance of confidentiality and the student’s right to privacy
• Other accommodations as identified
• Standard precautions
Emergency Care Plans for Hypoglycemia and Hyperglycemia
• Symptoms of hypoglycemia and hyperglycemia
• Actions to take when hypoglycemia or hyperglycemia occur
• Emergency contact information and phone numbers
• Basic information on the underlying health condition(s)
Sources:
American Diabetes Association. (2015, revised). Diabetes care tasks at school: What key
personnel need to know. PowerPoint and training modules. Available online:
http://www.diabetes.org/living-with-diabetes/parents-and-kids/diabetes-care-at-
school/school-staff-trainings/diabetes-care-tasks.html
American Diabetes Association. (n.d.). Diabetes medical management plan. Available for
download: http://www.diabetes.org/living-with-diabetes/parents-and-kids/diabetes-
care-at-school/written-care-plans/diabetes-medical-management.html
Bowden, V., & Greenberg, C. (2012). Pediatric nursing procedures (Third ed.).
Philadelphia: Wolters Kluwer Health/Lippincott Williams & Wilkins, 17-123.
Code of Virginia. (1999). § 22.1-274. School health services. Available online
http://leg1.state.va.us/lis.htm
Connecticut State Department of Education. (2012). Clinical procedure guidelines for
Connecticut school nurses. Middlebury, CT: CSDOE, 57-58, 70.
Hockenberry, M., & Wilson, D. (2015). Wong's nursing care of infants and children (10th
ed.). St. Louis: Elsevier Mosby 1519-1539.

VDH Guidelines for Healthcare Procedures in Schools 39
Levitsky, L. & Misra, M. (2015). Management of type 1 diabetes mellitus in children and
adolescents. UpToDate Topic 5817 Version 26.0.
National Association of School Nurses. (2012). Diabetes management in the school setting.
Position Statement. Available online:
http://www.nasn.org/PolicyAdvocacy/PositionPapersandReports/NASNPositionState
mentsFullView/tabid/462/ArticleId/22/Diabetes-Management-in-the-School-Setting-
Adopted-January-2012
National Diabetes Education Program. (2016). Helping the student with diabetes succeed: A
guide for school personnel. Available online https://www.niddk.nih.gov/health-
information/health-communication-programs/ndep/health-care-professionals/school-
guide/Pages/publicationdetail.aspx
National Library of Medicine. (2015). Diabetes. PubMed Health. Available online:
http://www.ncbi.nlm.nih.gov/pubmedhealth/PMHT0024704/
Porter, S., Branowicki, P., & Palfrey, J. (2014). Supporting students with special health care
needs: Guidelines and procedures for schools (3rd ed.). Baltimore: Paul H. Brookes
Publishing, 387-450.
Selekman, J. (2013). School nursing: A comprehensive text (2nd ed.). Philadelphia: F.A.
Davis, 872-896.
Virginia Department of Education. (2015). Training public school employees in the
administration of insulin and glucagon. Devore, C. & Campbell, T. (Eds.).
Available online:
http://www.doe.virginia.gov/support/health_medical/medication/manual_training_ins
ulin-glucagon.pdf
Virginia Diabetes Council. (2009). Virginia Diabetes Medical Management Plan and
Protocol: A Supplement to the National Diabetes Education Program’s Helping the
Student with Diabetes Succeed: A Guide for School Personnel. Available online:
https://s3.amazonaws.com/ClubExpressClubFiles/947464/documents/MicrosoftWord
-
VirginiaDiabetesMedicalManagementPlanandProtocolFINAL.pdf?AWSAccessKeyId
=AKIAIB6I23VLJX7E4J7Q&Expires=1441026141&response-content-
disposition=inline%3B%20filename%3DMicrosoftWord-
VirginiaDiabetesMedicalManagementPlanandProtocolFINAL.pdf&Signature=%2Bqt
M2IKaOPWzYQuy9iuMI%2F5nviA%3D

VDH Guidelines for Healthcare Procedures in Schools 40
Diabetes Action Plans
1. Virginia Diabetes Medical Management Plan (DMMP)
Visit the Virginia Diabetes Council website for the most current school DMMP
template at http://www.virginiadiabetes.org/
2. Individual Health Care Plan (IHP)
3. Emergency Care Plan (ECP)
Sample templates of the following documents are available in section three of the NDEP
guide, Helping the Student with Diabetes Succeed: A Guide for School Personnel, by the
U.S. Department of Health and Human Resources, National Diabetes Education Program
(NDEP) at https://www.niddk.nih.gov/health-information/health-communication-
programs/ndep/health-care-professionals/school-guide/Pages/publicationdetail.aspx:
• Diabetes Medical Management Plan (DMMP)
• Individual Health Care Plan (IHP)
• Emergency Care Plans (ECP) for
Hypoglycemia and Hyperglycemia
Source: The National Diabetes Education Program. (2016). Helping the Student with Diabetes Succeed: A
Guide for School Personnel. (Publication NDEP-61, 2nd ed.). Bethesda, MD: U. S. Department of Health and
Human Services. Available online: https://www.niddk.nih.gov/health-information/health-communication-
programs/ndep/health-care-professionals/school-guide/Pages/publicationdetail.aspx

VDH Guidelines for Healthcare Procedures in Schools 41
Procedure for Blood Glucose Testing
As of March 2015, there were 59 companies offering 220 glucose monitoring devices, each
operating differently (http://www.medicalexpo.com/medical-manufacturer/blood-glucose-
meter-607.html). Therefore, it is essential that families provide manufacturer instructions for
the specific glucose monitoring device to the school. Below are general guidelines for blood
glucose testing. However, individuals involved with glucose monitoring should be familiar
with the manufacturer’s instructions of the device they are using to ensure correct operation
of the device for accurate readings, proper cleaning, battery replacement, and storage. At
school, blood glucose is most often tested before meals, whenever a student feels blood
glucose may be low (or high), and sometimes before physical activity.
1. Review directions for blood testing meter if not familiar with it.
2. Wash hands.
3. Assemble equipment:
• Alcohol prep pad
• Finger lancing device
• Blood glucose testing meter (for example, Accuchek,
Bayer Contour, One Touch Ultra, Therasense Freestyle,
Fora, True Metrix, etc.)
• Blood testing strips for specific electronic meter
• Tissue or cotton balls or spot bandage
• Gloves
• Student log
4. Wash hands and area to be tested with soap and water. If the
caregiver is performing the procedure, put on gloves.
Washing student’s hands and test site is sufficient for
prepping the site; however, alcohol may be used for further
prepping. The site selected must be dry before pricking.
Alcohol may cause toughening of the skin or burning sensation. If moisture (water or
alcohol) remains on the skin it may alter test results.
5. Place glucose testing strip into electronic meter according to manufacturer’s instructions.
6. Prepare lancing device according to manufacturer’s instructions.
If school personnel are performing the procedure, then a disposable lancing device must
be used. Some meters allow testing on forearms. The lancet device used for forearm
testing is not disposable; therefore, the child may only use the forearm if independently
able to use the lancing device. Also, blood glucose readings from alternate sites such as
the forearm, tend to lag about 15 minutes behind readings obtained from a fingerstick.

VDH Guidelines for Healthcare Procedures in Schools 42
Therefore, fingersticks should be used to assess blood sugars
whenever hypoglycemia is suspected.
7. Select a site. If using a finger, use the top sides of fingertips. Hang
the arm below the level of the heart for 30 seconds to increase
blood flow.The tips of the fingertips may be more sensitive.
8. Puncture the site with the lancing device. Gently squeeze the
finger in a downward motion to obtain a large enough drop of
blood to cover the test pad on the test strip.
Avoid squeezing the site excessively because excess squeezing can
contaminate the sample with tissue fluid as well as causing
hemolysis of sample and trauma to the site.
9. Place blood on testing strip and complete instructions according to manufacturer’s
instructions. Compress lanced area with tissue or cotton ball until bleeding stops.
10. Dispose of test strip and tissue or cotton ball in lined wastebasket. Dispose of lancing
device in sharps container.
11. Remove and dispose of gloves. Wash hands.
12. Record results in student log. Refer to student’s DMMP or IHP for actions. Refer to the
“Quick Reference Emergency Plans” on the preceding two pages for sample actions.
Sources:
American Diabetes Association. (2015, revised). Diabetes care tasks at school: What key
personnel need to know. PowerPoint and training modules. Available online:
http://www.diabetes.org/living-with-diabetes/parents-and-kids/diabetes-care-at-
school/school-staff-trainings/diabetes-care-tasks.html
Bowden, V., & Greenberg, C. (2012). Pediatric nursing procedures (Third ed.).
Philadelphia: Wolters Kluwer Health/Lippincott Williams & Wilkins, 118-123.
Connecticut State Department of Education. (2012). Clinical procedure guidelines for
Connecticut school nurses. Middlebury, CT: CSDOE, 57-58, 70.
Hockenberry, M., & Wilson, D. (2015). Wong's nursing care of infants and children (10th
ed.). St. Louis: Elsevier Mosby 1519-1539.
Levitsky, L. & Misra, M. (2015). Management of type 1 diabetes mellitus in children and
adolescents. UpToDate Topic 5817 Version 26.0.

VDH Guidelines for Healthcare Procedures in Schools 43
National Diabetes Education Program. (2016). Helping the student with diabetes succeed: A
guide for school personnel. Available online https://www.niddk.nih.gov/health-
information/health-communication-programs/ndep/health-care-professionals/school-
guide/Pages/publicationdetail.aspx
Porter, S., Branowicki, P., & Palfrey, J. (2014). Supporting students with special health care
needs: Guidelines and procedures for schools (3rd ed.). Baltimore: Paul H. Brookes
Publishing, 419-422.
Selekman, J. (2013). School nursing: A comprehensive text (2nd ed.). Philadelphia: F.A.
Davis, 887-888.
Virginia Department of Education. (2015). Training public school employees in the
administration of insulin and glucagon. Devore, C. & Campbell, T. (Eds.).
Available online:
http://www.doe.virginia.gov/support/health_medical/medication/manual_training_ins
ulin-glucagon.pdf
Virginia Diabetes Council. (2009). Virginia Diabetes Medical Management Plan and
Protocol: A Supplement to the National Diabetes Education Program’s Helping the
Student with Diabetes Succeed: A Guide for School Personnel. Available online:
http://www.virginiadiabetes.org/content.aspx?page_id=22&club_id=947464&module
_id=121884
Wisconsin Improving School Health Services Project. (2015). Glucose monitoring.
Available online: http://www.wishesproject.org/?page_id=294/?tab=5
Illustration Source:
National Institute of Diabetes and Digestive and Kidney Diseases, National Institutes of
Health. (n.d.). Image Library. NO1593_H.. Available online at
https://www.catalog.niddk.nih.gov/ImageLibrary
National Institute of Diabetes and Digestive and Kidney Diseases, National Institutes of
Health. (n.d.). Image Library. NO1085_H.. Available online at
https://www.catalog.niddk.nih.gov/ImageLibrary

VDH Guidelines for Healthcare Procedures in Schools 44
Continuous Glucose Monitoring
Overview
Continuous glucose monitors (CGM) monitor and record blood glucose levels throughout the
day. It uses a tiny sensor inserted under the skin to check glucose levels in the interstitial
tissues. The sensor can stay in place for several days to a week before needing to be
replaced. A transmitter in the sensor sends information about the glucose levels wirelessly to
a monitor. The monitor may be part of an insulin pump or may be a separate device that
looks similar to a pager or cell phone and can be carried in a purse, backpack, or pocket. The
CGM sets off an alert when glucose levels are trending too high or too low. Some models
can send information directly to certain insulin pumps where insulin adjustments can be
made.
CGM sensors typically take readings at 5-minute intervals. Special software downloads the
glucose readings to a computer and analyzes patterns and trends. CGM systems may enable
better glucose control through constant monitoring that allow corrections before glucose
levels get too high or low. CGM systems monitor interstitial glucose levels so they tend to
lag blood glucose levels slightly. If the CGM alarms, the student should use conventional
blood glucose monitoring to check blood glucose levels to determine what specific
adjustments should be made. Advances in continuous glucose monitoring continue with the
hope that in the future, they will provide reliable feedback and a mechanism to provide
insulin in a manner more like normal pancreatic function.
Examples of CGM systems:

VDH Guidelines for Healthcare Procedures in Schools 45
Sources:
Neithercott, T. (2014). Continuous glucose monitors 2014. Diabetes Forecast, January
2014. Available online: http://www.diabetesforecast.org/2014/Jan/continuous-
glucose-monitors.html
National Diabetes Education Program. (2016). Helping the student with diabetes succeed: A
guide for school personnel. Available online https://www.niddk.nih.gov/health-
information/health-communication-programs/ndep/health-care-professionals/school-
guide/Pages/publicationdetail.aspx
National Institutes of Diabetes and Digestive and Kidney Diseases. (2009). Continuous
glucose monitoring. National Institutes of Health Publication # 09-4551. Available
online: http://www.niddk.nih.gov/health-information/health-
topics/Diabetes/continuous-glucose-monitoring/Pages/index.aspx
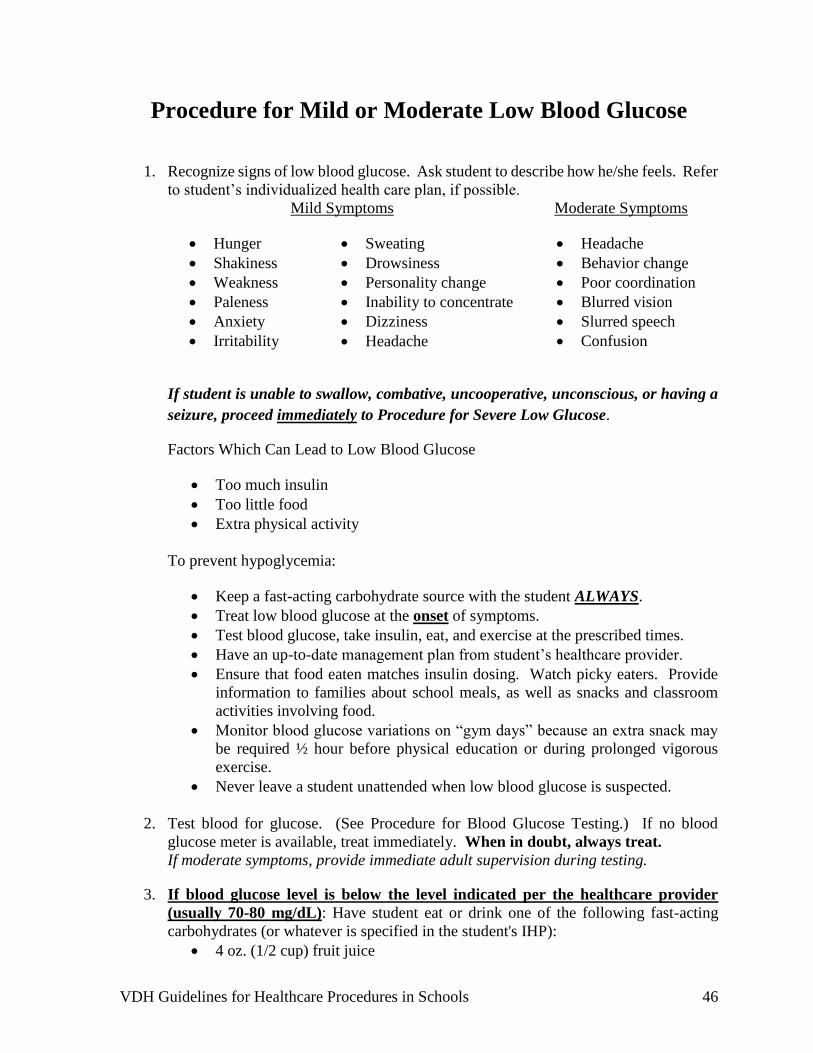
VDH Guidelines for Healthcare Procedures in Schools 46
Procedure for Mild or Moderate Low Blood Glucose
1. Recognize signs of low blood glucose. Ask student to describe how he/she feels. Refer
to student’s individualized health care plan, if possible.
Mild Symptoms Moderate Symptoms
• Hunger
• Shakiness
• Weakness
• Paleness
• Anxiety
• Irritability
• Sweating
• Drowsiness
• Personality change
• Inability to concentrate
• Dizziness
• Headache
• Headache
• Behavior change
• Poor coordination
• Blurred vision
• Slurred speech
• Confusion
If student is unable to swallow, combative, uncooperative, unconscious, or having a
seizure, proceed immediately to Procedure for Severe Low Glucose.
Factors Which Can Lead to Low Blood Glucose
• Too much insulin
• Too little food
• Extra physical activity
To prevent hypoglycemia:
• Keep a fast-acting carbohydrate source with the student ALWAYS.
• Treat low blood glucose at the onset of symptoms.
• Test blood glucose, take insulin, eat, and exercise at the prescribed times.
• Have an up-to-date management plan from student’s healthcare provider.
• Ensure that food eaten matches insulin dosing. Watch picky eaters. Provide
information to families about school meals, as well as snacks and classroom
activities involving food.
• Monitor blood glucose variations on “gym days” because an extra snack may
be required ½ hour before physical education or during prolonged vigorous
exercise.
• Never leave a student unattended when low blood glucose is suspected.
2. Test blood for glucose. (See Procedure for Blood Glucose Testing.) If no blood
glucose meter is available, treat immediately. When in doubt, always treat.
If moderate symptoms, provide immediate adult supervision during testing.
3. If blood glucose level is below the level indicated per the healthcare provider
(usually 70-80 mg/dL): Have student eat or drink one of the following fast-acting
carbohydrates (or whatever is specified in the student's IHP):
• 4 oz. (1/2 cup) fruit juice

VDH Guidelines for Healthcare Procedures in Schools 47
• 2-4 glucose tablets (chewed thoroughly before swallowing)
• 6 ounces of regular (not diet) soda (about half a can)
• 1 tube of glucose gel or cake decorating frosting
• 4-6 small hard candies
• 1-2 tablespoons of honey
Treat “on the spot.” The student should never be left alone or sent anywhere alone
when experiencing hypoglycemia. Students should be permitted to carry a source of
glucose with them at all times.
If blood glucose is above 80 and student is not feeling well, repeat test to verify results.
4. Observe for 10-15 minutes, then recheck blood glucose.
5. If blood glucose is over 80 and student is feeling better:
• Provide extra carbohydrate and protein snack if over 1 hour until lunch or snack
time, if ordered in student’s IHP.
• Resume classroom activities if fully recovered.
6. Repeat food if symptoms persist or blood glucose level is less than the level indicated
per the health care provider (usually 70-80mg/dL).
7. If no improvement, call school nurse and family.
8. If pupil becomes unable to participate in care, proceed immediately to Emergency
Procedure for Severe Blood Glucose.

VDH Guidelines for Healthcare Procedures in Schools 48
Sources:
American Diabetes Association. (2015, revised). Diabetes care tasks at school: What key
personnel need to know. PowerPoint and training modules. Available online:
http://www.diabetes.org/living-with-diabetes/parents-and-kids/diabetes-care-at-
school/school-staff-trainings/diabetes-care-tasks.html
Bowden, V., & Greenberg, C. (2012). Pediatric nursing procedures (Third ed.).
Philadelphia: Wolters Kluwer Health/Lippincott Williams & Wilkins, 118-123.
Connecticut State Department of Education. (2012). Clinical procedure guidelines for
Connecticut school nurses. Middlebury, CT: CSDOE, 57-58, 70.
Hockenberry, M., & Wilson, D. (2015). Wong's nursing care of infants and children (10th
ed.). St. Louis: Elsevier Mosby 1519-1539.
Levitsky, L. & Misra, M. (2015). Management of type 1 diabetes mellitus in children and
adolescents. UpToDate Topic 5817 Version 26.0.
National Diabetes Education Program. (2016). Helping the student with diabetes succeed: A
guide for school personnel. Available online https://www.niddk.nih.gov/health-
information/health-communication-programs/ndep/health-care-professionals/school-
guide/Pages/publicationdetail.aspx
Porter, S., Branowicki, P., & Palfrey, J. (2014). Supporting students with special health care
needs: Guidelines and procedures for schools (3rd ed.). Baltimore: Paul H. Brookes
Publishing, 419-422.
Selekman, J. (2013). School nursing: A comprehensive text (2nd ed.). Philadelphia: F.A.
Davis, 887-888.
Virginia Department of Education. (2015). Training public school employees in the
administration of insulin and glucagon. Devore, C. & Campbell, T. (Eds.).
Available online:
http://www.doe.virginia.gov/support/health_medical/medication/manual_training_ins
ulin-glucagon.pdf
Virginia Diabetes Council. (2009). Virginia Diabetes Medical Management Plan and
Protocol: A Supplement to the National Diabetes Education Program’s Helping the
Student with Diabetes Succeed: A Guide for School Personnel. Available online:
http://www.virginiadiabetes.org/content.aspx?page_id=22&club_id=947464&module
_id=121884

VDH Guidelines for Healthcare Procedures in Schools 49
Wisconsin Improving School Health Services Project. (2015). Glucose monitoring.
Available online: http://www.wishesproject.org/?page_id=294/?tab=5

VDH Guidelines for Healthcare Procedures in Schools 50
Emergency Procedure for Severe Low Blood Glucose
Hypoglycemia/Insulin Reaction
1. Verify signs of severe low blood glucose:
• Unable to swallow
• Unconscious
• Combative
• Uncooperative
• Having seizures
Signs are so severe that student cannot participate in care.
Factors Which Can Lead to Low Blood Glucose
• Too much insulin
• Too little food
• Extra physical activity
To prevent hypoglycemia:
• Keep a fast-acting carbohydrate source with the student ALWAYS.
• Treat low blood glucose at the onset of symptoms.
• Eat, take insulin, test blood glucose, and exercise at the prescribed times.
• Have an up-to-date management plan from student’s healthcare provider.
• Ensure that food eaten matches insulin dosing. Watch picky eaters. Provide
information to families about school meals (monthly menus with carbohydrate
counting), as well as snacks and classroom activities involving food.
• Monitor blood glucose variations on “gym days” because an extra snack may
be required ½ hour before physical education or during prolonged vigorous
exercise.
2. Have someone call emergency medical services (911 in most areas), school nurse,
and family. Student should not be left unattended.
If seizure occurs (due to hypoglycemia), follow procedure for Managing a Seizure.
3. Place student on side or in upright position if restless/uncooperative.
Maintain head position to one side to prevent aspiration
4. Do not attempt to give food or put anything in the student’s mouth.
Student may aspirate or choke.
5. Give glucagon injection, if ordered in student’s IHP. See Procedure for Giving
Glucagon on next page.

VDH Guidelines for Healthcare Procedures in Schools 51
6. If student becomes alert after receiving glucagon, stay with student until emergency
services arrive. Student may be given sips of fruit juice or regular soda once awake
and able to drink.
7. Document in student log.
Sources:
American Diabetes Association. (2015, revised). Diabetes care tasks at school: What key
personnel need to know. PowerPoint and training modules. Available online:
http://www.diabetes.org/living-with-diabetes/parents-and-kids/diabetes-care-at-
school/school-staff-trainings/diabetes-care-tasks.html
Bowden, V., & Greenberg, C. (2012). Pediatric nursing procedures (Third ed.).
Philadelphia: Wolters Kluwer Health/Lippincott Williams & Wilkins, 118-123.
Connecticut State Department of Education. (2012). Clinical procedure guidelines for
Connecticut school nurses. Middlebury, CT: CSDOE, 57-58, 70.
Hockenberry, M., & Wilson, D. (2015). Wong's nursing care of infants and children (10th
ed.). St. Louis: Elsevier Mosby 1519-1539.
Levitsky, L. & Misra, M. (2015). Management of type 1 diabetes mellitus in children and
adolescents. UpToDate Topic 5817 Version 26.0.
National Diabetes Education Program. (2016). Helping the student with diabetes succeed: A
guide for school personnel. Available online https://www.niddk.nih.gov/health-
information/health-communication-programs/ndep/health-care-professionals/school-
guide/Pages/publicationdetail.aspx
Porter, S., Branowicki, P., & Palfrey, J. (2014). Supporting students with special health care
needs: Guidelines and procedures for schools (3rd ed.). Baltimore: Paul H. Brookes
Publishing, 419-422.
Selekman, J. (2013). School nursing: A comprehensive text (2nd ed.). Philadelphia: F.A.
Davis, 887-888.
Virginia Department of Education. (2015). Training public school employees in the
administration of insulin and glucagon. Devore, C. & Campbell, T. (Eds.).

VDH Guidelines for Healthcare Procedures in Schools 52
Available online:
http://www.doe.virginia.gov/support/health_medical/medication/ma
nual_training_insulin-glucagon.pdf
Virginia Diabetes Council. (2009). Virginia Diabetes Medical Management Plan and
Protocol: A Supplement to the National Diabetes Education Program’s Helping the
Student with Diabetes Succeed: A Guide for School Personnel. Available online:
http://www.virginiadiabetes.org/content.aspx?page_id=22&club_id=947464&module
_id=121884
Wisconsin Improving School Health Services Project. (2015). Glucose monitoring.
Available online: http://www.wishesproject.org/?page_id=294/?tab=5

VDH Guidelines for Healthcare Procedures in Schools 53
Glucagon
Definition
Glucagon is a hormone that occurs naturally in the body. It is produced in the pancreas and
raises blood glucose levels by causing the release of glycogen (a form of stored
carbohydrate) from the liver that raises blood glucose levels.
Purpose
Glucagon injections are prescription medications used to treat serious hypoglycemia. If it is
specified in the student’s individualized health plan (IHP), glucagon should be used when the
student is unconscious, having seizures, or cannot eat or drink safely. Severe hypoglycemia
can cause brain damage or death.
Although it may cause nausea and vomiting when the student regains consciousness,
glucagon is a life-saving treatment that cannot harm a student.
Storage
The glucagon kit should be stored at room temperature in a place designated by the student’s
IHP. It may be kept by the student. The expiration date should be checked, and it should not
be administered if expired, discolored, or does not dissolve well. It should not be mixed until
it needs to be given. Combine the glucagon for injection immediately before use by
following the instructions that are included with the glucagon kit. (Expired glucagon kits can
be used for training sessions.)
Sources:
American Diabetes Association. (2015, revised). Diabetes care tasks at school: What key
personnel need to know. PowerPoint and training modules. Available online:
http://www.diabetes.org/living-with-diabetes/parents-and-kids/diabetes-care-at-
school/school-staff-trainings/diabetes-care-tasks.html
Hockenberry, M., & Wilson, D. (2015). Wong's nursing care of infants and children (10th
ed.). St. Louis: Elsevier Mosby 1519-1539.
National Diabetes Education Program. (2016). Helping the student with diabetes succeed: A
guide for school personnel. Available online https://www.niddk.nih.gov/health-
information/health-communication-programs/ndep/health-care-professionals/school-
guide/Pages/publicationdetail.aspx

VDH Guidelines for Healthcare Procedures in Schools 54
Porter, S., Branowicki, P., & Palfrey, J. (2014). Supporting students with special health care
needs: Guidelines and procedures for schools (3rd ed.). Baltimore: Paul H. Brookes
Publishing, 387-450.
Selekman, J. (2013). School nursing: A comprehensive text (2nd ed.). Philadelphia: F.A.
Davis, 872-896.
Virginia Department of Education. (2015). Training public school employees in the
administration of insulin and glucagon. Devore, C. & Campbell, T. (Eds.).
Available online:
http://www.doe.virginia.gov/support/health_medical/medication/manual_training_ins
ulin-glucagon.pdf
Virginia Diabetes Council. (2009). Virginia Diabetes Medical Management Plan and
Protocol: A Supplement to the National Diabetes Education Program’s Helping the
Student with Diabetes Succeed: A Guide for School Personnel. Available online:
http://www.virginiadiabetes.org/content.aspx?page_id=22&club_id=947464&module
_id=121884
Wisconsin Improving School Health Services Project. (2015). Administration of glucagon.
Available online: http://www.wishesproject.org/?page_id=2483/?tab=5

VDH Guidelines for Healthcare Procedures in Schools 55
Procedure for Giving Glucagon for Severe Hypoglycemia
1. Verify signs of severe low blood glucose:
• Unable to swallow
• Unconscious
• Combative
• Uncooperative
• Having seizures
Signs are so severe that student cannot participate in care.
2. Have someone call emergency medical services, school nurse, and family.
Student should not be left unattended.
If seizure occurs, follow procedure for Managing a Seizure.
3. Place pupil on side or in upright position if restless/uncooperative.
Maintain head position to one side to prevent aspiration
4. Obtain glucagon kit. Wash hands (if possible) and put on gloves.
5. Determine glucagon dose and route for administering the medication per the health care
provider orders.
6. Flip cap off glass vial (bottle) containing dry powder. Remove needle
cover from syringe.
7. Take the fluid-filled syringe in the glucagon emergency
kit and inject the fluid into the vial containing the
glucagon powder. Gently swirl, shake or roll to mix per
manufacturer’s instructions until all powder is dissolved
and solution is clear. Inspect medication for color,
clarity, and presence of lumps. Solution should be clear
and colorless before use.
8. Hold vial upside down and withdraw the prescribed amount (usually all)
of glucagon back into the syringe. The prescribed amount should be
specified in the student’s individualized health plan. Withdraw needle
from vial.
Generally, if the student weighs >45 pounds, the full vial (1 cc) of
glucagon may be injected. If the child weighs <45 pounds, inject ½ of
the solution.

VDH Guidelines for Healthcare Procedures in Schools 56
9. When possible, the injection site should be exposed and cleaned. However, glucagon
can be administered through clothing, if necessary. Suggested sites include the outer
thigh, upper outer buttock, or arm.
10. Inject needle straight into muscle of site and inject glucagon.
11. Withdraw needle and press site with cotton ball or wipe. Massage injection site for
10 seconds; apply bandage if needed.
12. Do not recap syringe. Put used syringe in sharps container.
13. Stay with the student. It may take 15-20 minutes for student to regain consciousness.
Turn student on side because glucagon may cause vomiting.
14. Recheck blood sugar. Follow the student’s specific instructions in IHP or DMMP for
response to results. Some students may have a second injection of glucagon ordered
if glucose remains low.
15. The student may be given sips of fruit juice or regular soda once awake and able to
drink. This may be followed with a snack containing proteins and carbohydrates such
as peanut butter sandwich or cheese crackers to keep blood sugar levels elevated to
normal levels and to prevent recurrence.
16. Don’t be surprised if student does not remember being unconscious, incoherent or has
a headache. Blood sugar may also rise over 200 and nausea or vomiting may occur.
17. When emergency services arrive, turn care of the student over to the emergency crew.
Notify school nurse and family.
18. Document in student log.

VDH Guidelines for Healthcare Procedures in Schools 57
Sources:
American Diabetes Association. (2015, revised). Diabetes care tasks at school: What key
personnel need to know. PowerPoint and training modules. Available online:
http://www.diabetes.org/living-with-diabetes/parents-and-kids/diabetes-care-at-
school/school-staff-trainings/diabetes-care-tasks.html
Hockenberry, M., & Wilson, D. (2015). Wong's nursing care of infants and children (10th
ed.). St. Louis: Elsevier Mosby 1519-1539.
Lilly. (2017). How to use glucagon. Available online: http://www.lillyglucagon.com/#how-
to-use
National Diabetes Education Program. (2016). Helping the student with diabetes succeed: A
guide for school personnel. Available online https://www.niddk.nih.gov/health-
information/health-communication-programs/ndep/health-care-professionals/school-
guide/Pages/publicationdetail.aspx
Porter, S., Branowicki, P., & Palfrey, J. (2014). Supporting students with special health care
needs: Guidelines and procedures for schools (3rd ed.). Baltimore: Paul H. Brookes
Publishing, 387-450.
Selekman, J. (2013). School nursing: A comprehensive text (2nd ed.). Philadelphia: F.A.
Davis, 872-896.
Virginia Department of Education. (2015). Training public school employees in the
administration of insulin and glucagon. Devore, C. & Campbell, T. (Eds.).
Available online:
http://www.doe.virginia.gov/support/health_medical/medication/manual_training_ins
ulin-glucagon.pdf
Virginia Diabetes Council. (2009). Virginia Diabetes Medical Management Plan and
Protocol: A Supplement to the National Diabetes Education Program’s Helping the
Student with Diabetes Succeed: A Guide for School Personnel. Available online:
http://www.virginiadiabetes.org/content.aspx?page_id=22&club_id=947464&module
_id=121884
Wisconsin Improving School Health Services Project. (2015). Administration of glucagon.
Available online: http://www.wishesproject.org/?page_id=2483/?tab=5

VDH Guidelines for Healthcare Procedures in Schools 58
Procedure for High Blood Glucose
Hyperglycemia
1. Observe/Recognize signs of high blood glucose, although student may frequently be
asymptomatic:
Mild Symptoms
• Increased thirst
• Frequent urination
• Dry mouth
• Fatigue
• Numbness or tingling
• Agitation, fidgetiness, irritability
• Inability to concentrate
• Hunger
• Blurred vision
• Urine ketones (negative-small)
Moderate Symptoms
• Decreased appetite
• Nausea
• Abdominal pain/stomach cramps
• Vomiting
• Sunken eyes
• Weight loss
• Dry mouth
• Urine ketones (moderate-large)
Severe Symptoms
• Continued vomiting
• Sleepiness
• Confusion
• Coma or unconsciousness
• Very weak
• Deep breathing, fruity smell
• Ketones (moderate-large)

VDH Guidelines for Healthcare Procedures in Schools 59
Factors Which Can Lead to High Blood Glucose (hyperglycemia):
• Too little insulin
• Expired insulin
• Too much food (for insulin
taken)
• Decreased physical activity
• Any combination of the above
• Illness, injury
• Stress or emotions
• Hormonal fluctuations
• Menstrual periods
• Overtreating hypoglycemia
To prevent hyperglycemia:
• Test blood glucose, take insulin, eat, and exercise at the prescribed times.
• Have an up-to-date management plan from student’s healthcare provider.
• Ensure that food eaten matches insulin dosing. Monitor food intake. Report
binge eating.
• Provide information to families about school meals (monthly menus with
carbohydrate counting), as well as snacks and classroom activities involving
food. Consult family when snack, meal, or exercise times must be changed
and prior to extra snacks.
• Take appropriate action if a missed dose is suspected or if an insulin pump
malfunctions.
• Avoid “overtreating” low blood sugar reactions.
• Respect the students; realize their limits.
2. Test blood glucose. (See Procedure for Blood Glucose Testing)
3. Initiate care per healthcare provider’s orders for high blood glucose. This may
include insulin administration, checking for ketones, and possibly activity restriction
(exercising when ketones are present may elevate blood glucose levels even further).
Insulin administration during hyperglycemia may be referred to as a “sliding scale
insulin” or "correction factor" order. Refer to student’s individualized health care
plan.
4. Check urine and/or blood ketones as prescribed by the healthcare provider in the
DMMP. (Reference the procedure for Testing Urine Ketones and/or Blood Ketones
in chapter.)
5. Encourage student to drink water, generally 16-24 ounces over 2 hours or 8 ounces
per hour. Allow free use of the bathroom.
If student resumes classroom activities, he/she may need to use a water bottle in class
to ensure adequate fluid intake.
6. If student is feeling okay, he or she may resume classroom activities. If student does
not feel well (nausea, lethargy, headache), then the family should be called.
7. Recheck blood glucose according to student’s individualized plan.
8. If the student develops severe stomach pains, vomiting and/or rapid breathing, call
emergency medical services, school nurse, and family immediately.
9. Document care in student log.
VDH Guidelines for Healthcare Procedures in Schools 60
Sources:
American Diabetes Association. (2015, revised). Diabetes care tasks at school: What key
personnel need to know. PowerPoint and training modules. Available online:
http://www.diabetes.org/living-with-diabetes/parents-and-kids/diabetes-care-at-
school/school-staff-trainings/diabetes-care-tasks.html
Bowden, V., & Greenberg, C. (2012). Pediatric nursing procedures (Third ed.).
Philadelphia: Wolters Kluwer Health/Lippincott Williams & Wilkins, 118-123.
Connecticut State Department of Education. (2012). Clinical procedure guidelines for
Connecticut school nurses. Middlebury, CT: CSDOE, 57-58, 70.
Hockenberry, M., & Wilson, D. (2015). Wong's nursing care of infants and children (10th
ed.). St. Louis: Elsevier Mosby 1519-1539.
Levitsky, L. & Misra, M. (2015). Management of type 1 diabetes mellitus in children and
adolescents. UpToDate Topic 5817 Version 26.0.
National Diabetes Education Program. (2016). Helping the student with diabetes succeed: A
guide for school personnel. Available online https://www.niddk.nih.gov/health-
information/health-communication-programs/ndep/health-care-professionals/school-
guide/Pages/publicationdetail.aspx
Porter, S., Branowicki, P., & Palfrey, J. (2014). Supporting students with special health care
needs: Guidelines and procedures for schools (3rd ed.). Baltimore: Paul H. Brookes
Publishing, 419-422.
Selekman, J. (2013). School nursing: A comprehensive text (2nd ed.). Philadelphia: F.A.
Davis, 887-888.
Virginia Department of Education. (2015). Training public school employees in the
administration of insulin and glucagon. Devore, C. & Campbell, T. (Eds.).
Available online:
http://www.doe.virginia.gov/support/health_medical/medication/manual_training_ins
ulin-glucagon.pdf
Virginia Diabetes Council. (2009). Virginia Diabetes Medical Management Plan and
Protocol: A Supplement to the National Diabetes Education Program’s Helping the
Student with Diabetes Succeed: A Guide for School Personnel. Available online:
http://www.virginiadiabetes.org/content.aspx?page_id=22&club_id=947464&module
_id=121884

VDH Guidelines for Healthcare Procedures in Schools 61
Wisconsin Improving School Health Services Project. (2015). Glucose monitoring.
Available online: http://www.wishesproject.org/?page_id=294/?tab=5

VDH Guidelines for Healthcare Procedures in Schools 62
Procedure for Testing Urine Ketones
When the body can’t use glucose, it uses its own fat and muscle tissue for energy. Ketones
are acids that are left in the blood when fat is used for energy. As ketone production
increases, ketone blood levels increase causing diabetic ketoacidosis, also referred to as
“DKA,” and may occur with hyperglycemia. Symptoms of hyperglycemia include nausea,
vomiting, possible ketones and coma.
The body will try to get rid of ketones through the kidneys and lungs. The ketones will show
up in the urine and may also cause the breath to smell fruity. Other symptoms include
nausea, vomiting, abdominal pain, thirst, frequent urination, and drowsiness. If testing for
urine ketones shows medium or large ketones to be present, extra insulin may be needed, if
specified in the student’s individualized health plan (IHP).
If ketones are not detected early, particularly during illness, they will build up in the body
and DKA may result. DKA is the number one reason for hospitalizing children with
diabetes. Early detection of ketones and treatment helps to prevent hospitalizations for DKA.
1. Wash hands. Review directions for urine ketone testing if not familiar with them.
2. Assemble equipment:
• Bottle of ketone strips--check expiration date
• Urine cup
• Gloves
3. Put on gloves.
4. Saturate the test strip with urine by one of the following methods:
• Student urinates in cup, and then test strip is dipped into urine.
• Student holds test strip in urine flow.
If assisting the student, wear disposable gloves during this procedure.
5. Dip the ketone test strip in the cup containing urine.
6. Wait the exact amount of time for test strip to develop, per directions
on test strip bottle (usually 15 seconds).
7. Compare color of strip to chart on bottle. Results will be read as
negative, small, moderate, or large. Refer to student’s individualized
health plan for actions. Generally, if results are moderate or
large, student should not engage in physical activity and family should be called
to take student home for observation and/or medical care.
8. Remove gloves and wash hands.
9. If urine ketone results are trace or small,
increase fluid intake.
10. Record results in student log. Notify
school nurse and family.

VDH Guidelines for Healthcare Procedures in Schools 63
Procedure for Testing Blood Ketones
1. Review directions for blood ketone testing if not familiar with them.
2. Wash hands.
3. Assemble equipment:
• Finger lancing device
• Ketone testing meter
• Ketone testing strip in foil packet for specific ketone testing
meter
• Tissue or cotton ball
• Gloves
• Student log
4. Wash hands and area to be tested with soap and water. Pat dry.
If the caregiver is performing the procedure, put on gloves. Washing
student’s hands and test site is sufficient for prepping the site.
5. Remove the ketone test strip from its foil packet, and insert the three
black lines at the end of the test strip into the ketone testing meter
strip port. Refer to manufacturer’s instructions as needed.
6. Push the test strip in until it stops.
7. Prepare the lancing device according to manufacturer’s instructions.
8. Puncture the top side of the fingertip with the lancing device. Gently
squeeze the finger in a downward motion to obtain a large enough
drop of blood to cover the purple area on the top of the test strip
until the monitor begins to test.
9. Compress lanced area with tissue or cotton ball until bleeding stops.
10. The blood ß-ketone result will show on the meter display window
with the word KETONE.
11. Dispose of test strip and tissue or cotton ball in lined wastebasket.
Dispose of lancing device in sharps container.
12. Remove and dispose of gloves. Wash hands.
13. Record results in student log. Refer to student’s DMMP for actions.

VDH Guidelines for Healthcare Procedures in Schools 64
Sources:
American Diabetes Association. (2015, revised). Diabetes care tasks at school: What key
personnel need to know. PowerPoint and training modules. Available online:
http://www.diabetes.org/living-with-diabetes/parents-and-kids/diabetes-care-at-
school/school-staff-trainings/diabetes-care-tasks.html
Hockenberry, M., & Wilson, D. (2015). Wong's nursing care of infants and children (10th
ed.). St. Louis: Elsevier Mosby 1519-1539.
Levitsky, L. & Misra, M. (2015). Management of type 1 diabetes mellitus in children and
adolescents. UpToDate Topic 5817 Version 26.0.
National Diabetes Education Program. (2016). Helping the student with diabetes succeed: A
guide for school personnel. Available online https://www.niddk.nih.gov/health-
information/health-communication-programs/ndep/health-care-professionals/school-
guide/Pages/publicationdetail.aspx
Porter, S., Branowicki, P., & Palfrey, J. (2014). Supporting students with special health care
needs: Guidelines and procedures for schools (3rd ed.). Baltimore: Paul H. Brookes
Publishing, 419-422.
Selekman, J. (2013). School nursing: A comprehensive text (2nd ed.). Philadelphia: F.A.
Davis, 887-888.
Virginia Department of Education. (2015). Training public school employees in the
administration of insulin and glucagon. Devore, C. & Campbell, T. (Eds.).
Available online:
http://www.doe.virginia.gov/support/health_medical/medication/manual_training_ins
ulin-glucagon.pdf
Wisconsin Improving School Health Services Project. (2015). Ketone testing. Available
online: http://www.wishesproject.org/?page_id=471/?tab=4

VDH Guidelines for Healthcare Procedures in Schools 65
Insulin
Definition
Insulin is a hormone constructed of proteins that is normally produced by the pancreas. It is
needed to help glucose enter the cells of the body and be used for energy. Students with
Type 1 Diabetes (and some students with Type 2 Diabetes) need daily injections of insulin.
Several days without insulin can cause a life-threatening condition of ketoacidosis, coma, and
eventually death. Insulin dosage is tailored to each student based on blood glucose
monitoring. The goal of insulin therapy is to maintain near normal blood glucose levels
while avoiding hypoglycemia. Insulin is administered by two or more subcutaneous
injections each day or continuously by a portable insulin pump.
Storage
Insulin can be affected by extremes in temperature, which can denature the protein and
decrease or eliminate its effect. It is recommended that unopened insulin be stored in a
refrigerator where it maintains potency until the expiration date on its label.
Opened insulin or insulin stored in pens or cartridges can be left unrefrigerated at
temperatures 59-86ºF. It should be kept away from direct sunlight and heat and not be left in
the glovebox of a car. Once opened, the date should be written on the vial and is usually
good for 30 days, although one brand of insulin now says it maintains potency for 60 days at
room temperature. Follow manufacturer's instructions for storage and use by dates, which
should be noted in the student's individualized healthcare plan (IHP).
Dosage and Administration
Insulin doses are measured in “units.” There are 1000 units of insulin in a 10 milliliter vial
and 300 units in an insulin pen. One unit of insulin can alter a blood glucose level; therefore,
it is imperative that the ordered dosage be EXACT!
The number of insulin units to be given is ordered by the child’s licensed healthcare
provider--physician or nurse practitioner. The amount or dose of insulin will be adjusted
based on several factors including blood glucose levels, carbohydrates consumed, and
physical activity.
Insulin injections are given with a small needle subcutaneously (area between the skin and
the muscle). The only syringes used to inject insulin should be insulin syringes (orange tip).
Tuberculin syringes and other 1 or 3- milliliter syringes should never be used because they
are not calibrated for insulin. Sites should be rotated to avoid scar tissue or fatty cell growth
under the skin.

VDH Guidelines for Healthcare Procedures in Schools 66
Insulin Delivery Systems
Insulin delivery methods include syringes, insulin pens, and insulin pumps. In addition,
syringes can be attached to several types of spring-loaded aids which make injection easier.
See procedure sections for insulin syringes, insulin pens and insulin pumps for more
information.
Other insulin delivery systems such as inhaled insulin and pancreas transplants are being
studied and may be used in the future.
Types of Insulin
Insulin can be classified as rapid-acting, short-acting, intermediate-acting, or long-acting.
The different types vary in onset of action (length of time the insulin takes to start working),
peak action (when the insulin has its strongest effect), and duration of action (the length of
time the insulin usually lasts). Rapid-acting and short-acting insulin can be used for meal
coverage or carbohydrate coverage and correction doses (doses given in order to decrease an
elevated blood glucose). If an extra dose of rapid or short-acting insulin is given, the blood
glucose should be checked approximately 30 minutes to 2 hours later, or as specified in
student’s IHP. Some insulin orders may call for the mixing of a short-acting insulin with a
longer-acting insulin, but these combinations are usually not given during school hours.
Some insulin formulations come already mixed with intermediate and short or rapid-acting
insulins combined. Long-acting insulins glarine, detemir, and degludec should not be mixed
with any other insulin in one syringe. See chart below for insulin action times:
Insulin Action Times
Type
of Insulin
Names Onset of
Action (how
long before it starts
to work)
Peak Action (when the insulin has
the strongest effect)
Duration of
Action (how long the insulin
usually lasts)
Rapid-Acting Lispro (Humalog)
Aspart (Novolog)
Glulisine (Apidra)
5-15 minutes
5-15 minutes
5-15 minutes
30-90 minutes
1-2 hours
30-90 minutes
2-4 hours
2-4 hours
2-4 hours
Short-Acting Regular (Humulin
R, Novolin R)
30-60
minutes
2-3 hours 5-8 hours
Intermediate-
Acting
NPH (Humulin N,
Novolin N)
2-4 hours
6-10 hours
10-18 hours
Long-Acting
(basal)
Glarine (Lantus,
basaglar) Detemir
(Levemir)
Degludec
(Tresiba)
2-4 hours
3-8 hours
peakless
peakless
24 hours
6-24 hours

VDH Guidelines for Healthcare Procedures in Schools 67
Sources:
American Diabetes Association. (2015, revised). Diabetes care tasks at school: What key
personnel need to know. PowerPoint and training modules. Available online:
http://www.diabetes.org/living-with-diabetes/parents-and-kids/diabetes-care-at-
school/school-staff-trainings/diabetes-care-tasks.html
Bowden, V., & Greenberg, C. (2012). Pediatric nursing procedures (Third ed.).
Philadelphia: Wolters Kluwer Health/Lippincott Williams & Wilkins, 17-123.
Hockenberry, M., & Wilson, D. (2015). Wong's nursing care of infants and children (10th
ed.). St. Louis: Elsevier Mosby 1524-1526.
Levitsky, L. & Misra, M. (2015). Management of type 1 diabetes mellitus in children and
adolescents. UpToDate Topic 5817 Version 26.0.
National Diabetes Education Program. (2016). Helping the student with diabetes succeed: A
guide for school personnel. Available online https://www.niddk.nih.gov/health-
information/health-communication-programs/ndep/health-care-professionals/school-
guide/Pages/publicationdetail.aspx
Porter, S., Branowicki, P., & Palfrey, J. (2014). Supporting students with special health care
needs: Guidelines and procedures for schools (3rd ed.). Baltimore: Paul H. Brookes
Publishing, 390-414.
Selekman, J. (2013). School nursing: A comprehensive text (2nd ed.). Philadelphia: F.A.
Davis, 880-885.
Virginia Department of Education. (2015). Training public school employees in the
administration of insulin and glucagon. Devore, C. & Campbell, T. (Eds.).
Available online:
http://www.doe.virginia.gov/support/health_medical/medication/manual_training_ins
ulin-glucagon.pdf
Virginia Diabetes Council. (2009). Virginia Diabetes Medical Management Plan and
Protocol: A Supplement to the National Diabetes Education Program’s Helping the
Student with Diabetes Succeed: A Guide for School Personnel. Available online:
http://www.virginiadiabetes.org/content.aspx?page_id=22&club_id=947464&module
_id=121884
Wisconsin Improving School Health Services Project. (2015). Insulin administration by
syringe. Available online: http://www.wishesproject.org/?page_id=2461/?tab=5

VDH Guidelines for Healthcare Procedures in Schools 68
Carbohydrate Counting and Correction Factors:
Procedure for Determining Insulin Dosages
Overview
Carbohydrate (carb) counting is one common method of maintaining healthy blood glucose
levels for students who have diabetes. Carbohydrates are the starches and sugars found in
grains, pasta, dried beans, starchy vegetables, fruits, dairy products, and sweets. A student
with diabetes who ingests carbohydrates needs insulin to utilize the glucose in the
carbohydrate. By calculating the amount of carbohydrates to be eaten, the student or
caregiver can determine how much insulin is needed to cover the carbohydrates in that meal.
Food labels list the amount of carbohydrates in a serving of the food. Care needs to be taken
in noting the serving size and accounting for this in determining the amount of carbohydrates
to be consumed. In school cafeterias, the dietary or food service manager has access to the
nutritional content of foods and can provide a listing for students with diabetes and the adults
trained to assist them with carb counting. If food is brought from home, the family should
calculate the carbohydrate count. A number of books contain information on carbohydrate
counting, as well as a number of "apps" for cell phones and tablets.
One method of meal planning using carb counting is to follow a consistent carb intake meal
plan and ingest the same amount of carbohydrates each day along with taking intermediate-
acting insulin in the morning and possibly taking a preset amount of rapid-acting insulin at
lunch. These students do not adjust their mealtime insulin doses, but this method requires
that they consume the same, predetermined amount of carbohydrates every day.
A method allowing more flexibility is to adjust the amount of insulin given to the amount of
carbs to be consumed, which is the method more commonly used today. This method is
often combined with adding a "correction factor" for the blood glucose level to determine a
total dose of insulin at each mealtime to maintain blood glucose in the target range.
The insulin-to-carbohydrate ratio is the amount of insulin prescribed in a student's DMMP
for a specific amount of carbohydrates. The healthcare provider will commonly express the
amount as a ratio. One unit of insulin for every 15 grams of carbohydrates will be a 1:15
ratio; one unit of insulin for every 30 grams of carbohydrates will be a 1:30 ratio.
The correction factor is the amount of insulin given for a level of blood glucose above a
student's target glucose level (somewhat similar to diabetic management of the past called
"sliding scale insulin"). The actual blood glucose is subtracted from the target blood glucose
and divided by the correction factor will dictate how much insulin is needed to decrease the
actual level to the target level. For example, if the correction factor is 1 unit of insulin for
every 50 mg/dL over 150, and the student's blood glucose is 250, then 2 units of insulin is the
correction dose. It is important to note that an additional correction dose should not be given

VDH Guidelines for Healthcare Procedures in Schools 69
within 3 hours after having been given insulin for a meal/snack, after treatment for
hypoglycemia (low blood glucose) or after a previous correction dose.
Many students with diabetes use both the insulin-to-carbohydrate ratio and a correction factor
to determine the amount of insulin they need before each meal. The two amounts are
combined for one dose of insulin before meals.
Sample Calculation for Computing Insulin Dose using both Insulin-to-Carb Ratio and
Blood Glucose Correction Factor
Note: This is only an example--values from a student's DMMP must be used
instead of the sample values.
1. Insulin to carb ratio--Student's DMMP states insulin-to-carb ration is 1:15
a. Determine how much insulin is needed for carbs--on this day, the student's
meal contains 45 grams of carbohydrate
b. Divide the total number of grams of carbs in the meal by the insulin-to carb
ratio
*Calculation: 45 grams of carbs ÷ 15 grams/unit = 3 units of insulin
2. Blood glucose correction factor--Student's DMMP states correction factor is 1 unit of
rapid-acting insulin for each 50 mg/dL that the blood glucose level is over the target
of 150 mg/dL
a. Determine premeal glucose and target glucose--on this day, the student's
premeal glucose is 250; target glucose is 150
b. Subtract target glucose from actual glucose--on this day 250-150=100
c. Divide the difference by the correction factor
*Calculation: 250 mg/dL (premeal glucose) - 150 mg/dL (target glucose) = 100
mg/dL
100 mg/dL ÷ 50 mg/dL/unit = 2 units
3. Total dose
a. Add the number of units from the insulin-to-carb ratio and correction factor
*Calculation: 3 units + 2 units = 5 units
On this day, when the student's blood glucose is 250 and the student's meal contains 45
grams of carbohydrates, the student will receive 5 units of insulin.

VDH Guidelines for Healthcare Procedures in Schools 70
Sources:
Devore, C. & Campbell, T. (Eds.) for Virginia Department of Education. (2015). Training
public school employees in the administration of insulin and glucagon. pp. 32-35.
Available online:
http://www.doe.virginia.gov/support/health_medical/medication/manual_training_ins
ulin-glucagon.pdf
National Diabetes Education Program. (2016). Helping the student with diabetes succeed: A
guide for school personnel. Available online https://www.niddk.nih.gov/health-
information/health-communication-programs/ndep/health-care-professionals/school-
guide/Pages/publicationdetail.aspx
Porter, S., Branowicki, P., & Palfrey, J. (2014). Supporting students with special health care
needs: Guidelines and procedures for schools (3rd ed.). Baltimore: Paul H. Brookes
Publishing, 416-418.
Selekman, J. (2013). School nursing: A comprehensive text (2nd ed.). Philadelphia: F.A.
Davis, 883.

VDH Guidelines for Healthcare Procedures in Schools 71
Procedure for Insulin Administration by Syringe
Injection of Regular or Humalog/Novolog/Apidra Insulin (and no mixing with other
insulins)
Obtain a blood glucose reading before administering insulin per health care provider orders.
1. Wash hands.
2. Assemble equipment:
• Vial of insulin
• Syringe with needle (use only an insulin
syringe)
• Alcohol prep pad
• Cotton balls or spot bandage (optional)
• Gloves (if done by anyone other than
student)
• Sharps container
3. Determine insulin dose by health care provider
orders.
4. If insulin is cold, warm in the palm of hand to room temperature.
Injecting cold insulin can cause pain and may affect absorption.
5. Put on gloves.
6. If this is a new bottle of insulin, remove the flat, colored cap. Do not remove the
rubber stopper or the metal band under the cap. Check expiration date of the vial of
insulin. Write the date opened on the vial.
7. Clean the rubber top of the insulin vial with alcohol and let dry for a few seconds.
8. Remove the cap from the syringe. Fill the syringe with air equal to the number of
units of insulin needed. Inject air into Regular or Humalog/Novolog/Apidra insulin
bottle with syringe remaining in bottle, invert and pull plunger back beyond the
number of units desired. Keeping the syringe in an upright position and the needle
below the liquid in the vial, clear any air by pulling plunger back and tapping syringe
to raise air bubbles to the top. Push plunger to desired amount of units, ensuring that
no air bubbles remain and withdraw the syringe.
Air is always injected into the vial to prevent creating a vacuum inside the vial as
insulin is removed. Air bubbles left in the syringe can alter the desired dose.

VDH Guidelines for Healthcare Procedures in Schools 72
9. Slip needle back into cap without touching cap or needle. (See Procedure for One-
Handed Needle Recapping if syringe must be recapped.)
10. Review the insulin order. It is always a good idea to have a second person check the
insulin dose after drawing it up, if possible.
11. Select the site to be used and prep with alcohol and let dry. If area is dirty, first wash
with soap and water and dry. Ask the student if they have a preferred site and listen
to the student's guidance.
Any subcutaneous tissue can be used for injection
sites. The best absorption is in the lower
abdomen, followed by the upper, outer arms, tops
of the thighs and lastly the upper areas of the
buttocks. Exercise and heat (like the warmth from
a heating pad or whirlpool) hastens absorption of
an injected area.
12. Pinch up skin and tissue with one hand. With the
other hand, hold the syringe, with the eye of the
needle pointing upward, like a pencil. Dart the needle into the “soft pocket” (area
that lies directly in front or in back of the pinched up skin) at a 90 degree angle.
13. Inject the insulin in one to five seconds. (Do not aspirate or pull back the plunger.)
Release pinched up skin and remove needle while applying gentle pressure at the
injection site for 10-15 seconds. This will help to prevent leakage from the site.
Take care to avoid injecting into the muscle, as it will hasten absorption. Do not
massage the area as it irritates the tissue and hastens absorption.
14. Dispose of syringe with needle intact into a sharps container being careful to point it
away from the student while disposing of it.
Recapping a contaminated needle can result in a needlestick injury.
15. Document in student log the dose and type of insulin given, time given, the site used,
and any reactions or problems. If there are any problems or concerns, contact the
school nurse and/or family.

VDH Guidelines for Healthcare Procedures in Schools 73
Sources:
American Diabetes Association. (2015, revised). Diabetes care tasks at school: What key
personnel need to know. PowerPoint and training modules. Available online:
http://www.diabetes.org/living-with-diabetes/parents-and-kids/diabetes-care-at-
school/school-staff-trainings/diabetes-care-tasks.html
Bowden, V., & Greenberg, C. (2012). Pediatric nursing procedures (Third ed.).
Philadelphia: Wolters Kluwer Health/Lippincott Williams & Wilkins, 17-123.
Hockenberry, M., & Wilson, D. (2015). Wong's nursing care of infants and children (10th
ed.). St. Louis: Elsevier Mosby 1524-1526.
Levitsky, L. & Misra, M. (2015). Management of type 1 diabetes mellitus in children and
adolescents. UpToDate Topic 5817 Version 26.0.
National Diabetes Education Program. (2016). Helping the student with diabetes succeed: A
guide for school personnel. Available online https://www.niddk.nih.gov/health-
information/health-communication-programs/ndep/health-care-professionals/school-
guide/Pages/publicationdetail.aspx
Porter, S., Branowicki, P., & Palfrey, J. (2014). Supporting students with special health care
needs: Guidelines and procedures for schools (3rd ed.). Baltimore: Paul H. Brookes
Publishing, 390-414.
Selekman, J. (2013). School nursing: A comprehensive text (2nd ed.). Philadelphia: F.A.
Davis, 880-885.
Virginia Department of Education. (2015). Training public school employees in the
administration of insulin and glucagon. Devore, C. & Campbell, T. (Eds.).
Available online:
http://www.doe.virginia.gov/support/health_medical/medication/manual_training_ins
ulin-glucagon.pdf
Virginia Diabetes Council. (2009). Virginia Diabetes Medical Management Plan and
Protocol: A Supplement to the National Diabetes Education Program’s Helping the
Student with Diabetes Succeed: A Guide for School Personnel. Available online:
http://www.virginiadiabetes.org/content.aspx?page_id=22&club_id=947464&module
_id=121884
Wisconsin Improving School Health Services Project. (2015). Insulin administration by
syringe. Available online: http://www.wishesproject.org/?page_id=2461/?tab=5

VDH Guidelines for Healthcare Procedures in Schools 74
Procedure for Insulin Pen Delivery System
An insulin pen is an insulin delivery system that has the visual appearance of a writing pen; it
consists of a cartridge holder (insulin must be purchased in prescribed cartridges), a piston
rod (this is a screw mechanism that adjusts the desired dose), a dose indicator window (dose
is indicated by visual numbers), a push button (this delivers the insulin), and a pen
encasement.
The purpose of an insulin pen is to provide insulin injections with a convenient and accurate
device. Insulin pens assist in preventing dose errors that may occur with reading the lines on
a syringe and drawing from a vial. Insulin pens are easier to use and easier to carry around
than a syringe and vial. Some pens can be purchased with the insulin cartridge already in
place (these are considered “disposable pens”) while other pens require “loading” of a
specific insulin cartridge. The cartridge in an insulin pen is generally good for 30 days once
the first dose has been used, however check the manufacturer's instructions to verify. Insulin
pens do not allow manual mixing of insulins, although some pens come with a premixed
blend of shorter-acting and intermediate-acting insulin.
1. Obtain a blood glucose reading prior to insulin administration per health care provider
orders.
2. Determine insulin dose with
healthcare provider’s orders.
3. Wash hands and put on gloves.
4. Assemble equipment:
• Insulin pen device
• Pen needle
• Alcohol prep pad
• Cotton balls or spot bandage
(optional)
• Gloves (if done by anyone other than student)
• Sharps container
5. Check insulin type/brand. This must match health care provider’s orders exactly.
6. Check the “opened date” on pen and the level of insulin remaining in the insulin
cartridge.
Cartridges are made for multiple doses. Ensure that enough insulin remains in the
cartridge for accurate dosing.

VDH Guidelines for Healthcare Procedures in Schools 75
7. Attach new needle. Remove outer plastic cap and plastic needle cover. Place outer cap
on a flat surface with open end facing up.
This will assist in needle disposal after insulin is given.
8. Dial in two units of insulin to perform an “air shot” to “prime the pump.” Insulin should
appear at needle tip. If it does not, repeat procedure.
Change in temperatures can cause air intake. This procedure ensures that any
accumulated air will be released, thereby ensuring accurate insulin dosage.
9. Dial in prescribed dose. Double check the dose and get a second person to verify, if
possible.
10. Ask the student if they have a preferred site for injection and listen to the student's
guidance.
11. Cleanse skin with alcohol and allow to dry before injecting.
12. Pinch up the skin at selected area and dart the needle into the soft pocket at a 90 degree
angle.
The soft pocket lies directly in front of or in back of the pinched up skin. Do not pinch
skin if using a nano pen needle.
13. Press the button at the end of the pen to inject the insulin.
14. Count slowly to ten seconds and then remove the needle.
Some pen manufacturers require a longer count.
15. Grasping the pen, place the needle into plastic needle cap that was left upright on a flat
surface. Unscrew the needle tip and carefully discard into a sharps container.
Do not lift the cap up with fingers to cover needle tip. Leave cap on the counter and use
the pen to place the needle into the cap to avoid possibility of fingerstick injury (see
Procedure for One-Handed Needle Recapping). The needle must be changed after each
injection, as leaving the pen needle attached leaves an OPEN passageway into the insulin
and contamination may occur.
16. Document in student log the dose and type of insulin given, time given, the site used, and
any reactions or problems. If there are any problems or concerns, contact the school
nurse and/or family.
17. If an accidental needle stick occurs with a contaminated needle, wash the area thoroughly
with soap and warm water, allowing bleeding to occur to cleanse the wound. Notify your
supervisor immediately in accordance with the school division’s Bloodborne Exposure
Control Plan.

VDH Guidelines for Healthcare Procedures in Schools 76
Sources:
American Diabetes Association. (2015, revised). Diabetes care tasks at school: What key
personnel need to know. PowerPoint and training modules. Available online:
http://www.diabetes.org/living-with-diabetes/parents-and-kids/diabetes-care-at-
school/school-staff-trainings/diabetes-care-tasks.html
Hockenberry, M., & Wilson, D. (2015). Wong's nursing care of infants and children (10th
ed.). St. Louis: Elsevier Mosby 1524-1526.
Levitsky, L. & Misra, M. (2015). Management of type 1 diabetes mellitus in children and
adolescents. UpToDate Topic 5817 Version 26.0.
National Diabetes Education Program. (2016). Helping the student with diabetes succeed: A
guide for school personnel. Available online https://www.niddk.nih.gov/health-
information/health-communication-programs/ndep/health-care-professionals/school-
guide/Pages/publicationdetail.aspx
Porter, S., Branowicki, P., & Palfrey, J. (2014). Supporting students with special health care
needs: Guidelines and procedures for schools (3rd ed.). Baltimore: Paul H. Brookes
Publishing, 405-407.
Selekman, J. (2013). School nursing: A comprehensive text (2nd ed.). Philadelphia: F.A.
Davis, 884.
Virginia Department of Education. (2015). Training public school employees in the
administration of insulin and glucagon. Devore, C. & Campbell, T. (Eds.).
Available online:
http://www.doe.virginia.gov/support/health_medical/medication/manual_training_ins
ulin-glucagon.pdf
Virginia Diabetes Council. (2009). Virginia Diabetes Medical Management Plan and
Protocol: A Supplement to the National Diabetes Education Program’s Helping the
Student with Diabetes Succeed: A Guide for School Personnel. Available online:
http://www.virginiadiabetes.org/content.aspx?page_id=22&club_id=947464&module
_id=121884
Wisconsin Improving School Health Services Project. (2015). Insulin administration by
syringe. Available online: http://www.wishesproject.org/?page_id=2461/?tab=5.

VDH Guidelines for Healthcare Procedures in Schools 77
Insulin Pump Therapy
Overview
Insulin Pump Therapy, or Continuous Subcutaneous Insulin Infusion (CSII), is a method of
insulin delivery that uses a small mechanical pump to deliver doses of rapid or short acting
insulin. The pump is about the size and weight of a small cell phone. It holds a reservoir of
insulin inside the pump and is programmed to deliver the insulin through a thin plastic tube
called an infusion set. The infusion set is inserted via a needle that is covered by a cannula
(catheter) just below the skin. Once inserted, the needle is removed and the cannula stays in
place for two to three days. The process of inserting an infusion set is very similar to giving
an insulin shot, except that it only needs to be done every two or three days. When it is time
to change the infusion set, a new infusion set is inserted into a different site. There is a
disconnect mechanism that allows students to remove the pump (while leaving the cannula in
place) if needed for bathing or sports.
An alternate insulin pump mechanism has two components: a waterproof "pod" type pump
attached to the body and a separate handheld computer that programs delivery of insulin from
the pod. This tubeless system allows the student to leave the pump on while bathing,
swimming, or playing sports. Routine site changes for any type of insulin pump therapy
are performed at home by the student or family.
Use of insulin pumps has been increasing, especially for students with type 1 diabetes.
Insulin dosing is more precise (to 1/100th of a unit) and allows continuous insulin
delivery/absorption to more naturally mimic normal blood insulin/glucose levels with
additional bolus doses to match food intake and activity. The system allows more flexibility
for mealtimes and has been shown to improve growth in children, decrease the incidence of
hypoglycemia, and decrease the incidence of long-term diabetes complications.
The disadvantages of the system include increased expense, technical malfunctions, skin
infections, and more calculations on the part of the student or caregiver. The system requires
a student and family to commit to counting dietary carbohydrates, monitoring blood glucose,
judging the impact of exercise on insulin requirements, and making the appropriate
adjustments to insulin infusion rates. Many families are already doing that and find the pump
can facilitate management. The other disadvantage is that the system does not use any long-
acting insulin so if the pump malfunctions, blood glucose levels can rise quickly.
Improved systems are continually becoming available, some of which can automatically
adjust insulin infusions to match blood glucose levels without requiring calculations.
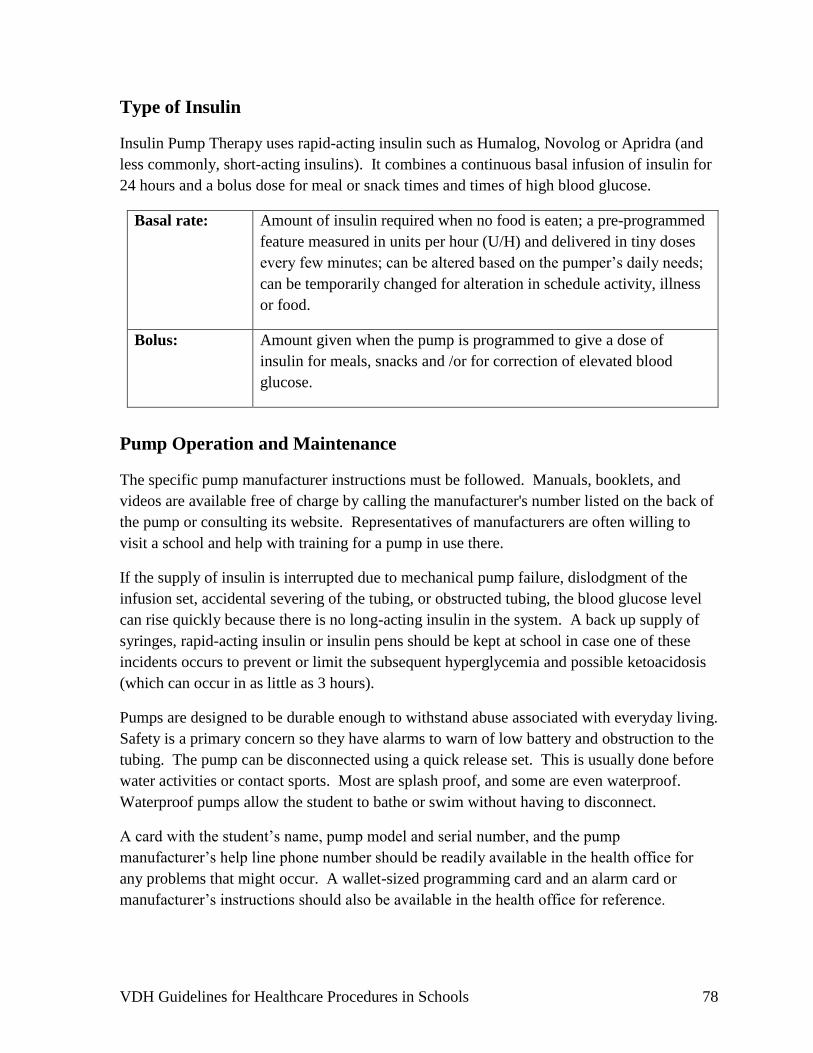
VDH Guidelines for Healthcare Procedures in Schools 78
Type of Insulin
Insulin Pump Therapy uses rapid-acting insulin such as Humalog, Novolog or Apridra (and
less commonly, short-acting insulins). It combines a continuous basal infusion of insulin for
24 hours and a bolus dose for meal or snack times and times of high blood glucose.
Basal rate: Amount of insulin required when no food is eaten; a pre-programmed
feature measured in units per hour (U/H) and delivered in tiny doses
every few minutes; can be altered based on the pumper’s daily needs;
can be temporarily changed for alteration in schedule activity, illness
or food.
Bolus: Amount given when the pump is programmed to give a dose of
insulin for meals, snacks and /or for correction of elevated blood
glucose.
Pump Operation and Maintenance
The specific pump manufacturer instructions must be followed. Manuals, booklets, and
videos are available free of charge by calling the manufacturer's number listed on the back of
the pump or consulting its website. Representatives of manufacturers are often willing to
visit a school and help with training for a pump in use there.
If the supply of insulin is interrupted due to mechanical pump failure, dislodgment of the
infusion set, accidental severing of the tubing, or obstructed tubing, the blood glucose level
can rise quickly because there is no long-acting insulin in the system. A back up supply of
syringes, rapid-acting insulin or insulin pens should be kept at school in case one of these
incidents occurs to prevent or limit the subsequent hyperglycemia and possible ketoacidosis
(which can occur in as little as 3 hours).
Pumps are designed to be durable enough to withstand abuse associated with everyday living.
Safety is a primary concern so they have alarms to warn of low battery and obstruction to the
tubing. The pump can be disconnected using a quick release set. This is usually done before
water activities or contact sports. Most are splash proof, and some are even waterproof.
Waterproof pumps allow the student to bathe or swim without having to disconnect.
A card with the student’s name, pump model and serial number, and the pump
manufacturer’s help line phone number should be readily available in the health office for
any problems that might occur. A wallet-sized programming card and an alarm card or
manufacturer’s instructions should also be available in the health office for reference.

VDH Guidelines for Healthcare Procedures in Schools 79
Contact information for companies that make or sell insulin pumps in the United
States:
Company Phone Website
Animas (One Touch) 877-937-7867 www.animascorp.com
Medtronic MiniMed
(Paradigm, 530 with Enlite )
800-646-4633 www.minimed.com
OmniPod (Insulet) 800-591-3455 www.myomnipod.com
Roche (Accu-chek) 800-668-4578 www.accu-chekinsulinpumps.com
Tandem (t:slim) 858-366-6900 www.tandemdiabetes.com

VDH Guidelines for Healthcare Procedures in Schools 80
Image Source: Children with Diabetes. (2014). Insulin pump therapy. Available online:
http://childrenwithdiabetes.com/pumps/.
Insulin Pump Skills
School nurses and designated, trained, unlicensed assistive personnel should be trained in
operating the individual student’s insulin delivery system.
Assessment of the following skills can be used in determining a student’s ability to
independently manage Insulin Pump Therapy:
• Appropriately counts carbohydrates
• Calculates appropriate correction dose based on healthcare provider orders
• Calculates total dose based on healthcare provider’s orders for carbohydrate
consumption and correction dose
• Programs appropriate bolus
• Adjusts temporary rate for exercise
• Disconnects and reconnects tubing
• Inserts new infusion set
• Fills reservoir and primes tubing
• Troubleshoots alarms appropriately
• Appropriately identifies high and low blood glucose levels
• Cares for skin site
• Recognizes pump malfunctions (dead batteries, no delivery, high pressure alarm)
• Replace batteries, as needed
• Uses standard precautions including proper disposal of sharps and contaminated
wastes

VDH Guidelines for Healthcare Procedures in Schools 81
Insulin Pump Supplies
The following extra supplies should be provided by the family and kept in a designated
place at school.
• Infusion set
• Reservoir
• Insulin
• Skin prep items
• Alcohol wipes
• Syringe or pen injector (in case of infusion set or insulin pump malfunction)
• Pump batteries
• Inserter (if used)
• Manufacturers manual, alarm card, contact phone numbers
Sources:
American Diabetes Association. (2015, revised). Diabetes care tasks at school: What key
personnel need to know. PowerPoint and training modules. Available online:
http://www.diabetes.org/living-with-diabetes/parents-and-kids/diabetes-care-at-
school/school-staff-trainings/diabetes-care-tasks.html
Brown, C. (2016). 21st-century diabetes: Technology leads the way. NASN School Nurse,
31,(5), 254-256. doi: 10.1177/1942602X16661198
Children with Diabetes. (2014). Insulin pump therapy. Available online:
http://childrenwithdiabetes.com/pumps/
Hockenberry, M., & Wilson, D. (2015). Wong's nursing care of infants and children (10th
ed.). St. Louis: Elsevier Mosby 1525-1526.
Levitsky, L. & Misra, M. (2015). Management of type 1 diabetes mellitus in children and
adolescents. UpToDate Topic 5817 Version 26.0.
National Diabetes Education Program. (2016). Helping the student with diabetes succeed: A
guide for school personnel. Available online https://www.niddk.nih.gov/health-
information/health-communication-programs/ndep/health-care-professionals/school-
guide/Pages/publicationdetail.aspx

VDH Guidelines for Healthcare Procedures in Schools 82
Porter, S., Branowicki, P., & Palfrey, J. (2014). Supporting students with special health care
needs: Guidelines and procedures for schools (3rd ed.). Baltimore: Paul H. Brookes
Publishing, 408-414.
Selekman, J. (2013). School nursing: A comprehensive text (2nd ed.). Philadelphia: F.A.
Davis, 884.
Virginia Department of Education. (2015). Training public school employees in the
administration of insulin and glucagon. Devore, C. & Campbell, T. (Eds.).
Available online:
http://www.doe.virginia.gov/support/health_medical/medication/manual_training_ins
ulin-glucagon.pdf
Virginia Diabetes Council. (2009). Virginia Diabetes Medical Management Plan and
Protocol: A Supplement to the National Diabetes Education Program’s Helping the
Student with Diabetes Succeed: A Guide for School Personnel. Available online:
http://www.virginiadiabetes.org/content.aspx?page_id=22&club_id=947464&module
_id=121884
Wisconsin Improving School Health Services Project. (2015). Insulin administration by
syringe. Available online: http://www.wishesproject.org/?page_id=2461/?tab=5.

VDH Guidelines for Healthcare Procedures in Schools 83
Procedure for Hyperglycemia with Pump Therapy
1. Follow the instructions in the student’s DMMP and IHP for hyperglycemia to include
checking and treatment for blood glucose, urine and/or blood ketones as prescribed by the
health care provider. Reference the “Procedure for High Blood Glucose” (previous
section) as appropriate.
2. Check site for leakage, cannula dislodgement, redness and/or tenderness.
Redness and/or tenderness at the site may indicate obstruction. The blood glucose can
rise quickly since the delivery of short-acting insulin has been interrupted and there is no
long-acting insulin in the body.
3. For an infusion site malfunction, insert new infusion set and/or replace reservoir or pod,
or administer insulin by syringe or pen. (Refer to student’s DMMP and IHP.)
4. For a suspected insulin pump malfunction, suspend or remove pump and administer
insulin by syringe or pen. (Refer to student’s DMMP and IHP.)
Procedure for Hypoglycemia with Pump Therapy
1. Follow “Procedure for Low Blood Glucose” (previous section) and instructions in
student's IHP or DMMP for low blood glucose while receiving insulin pump therapy.
Follow pump-specific directions if pump therapy must be suspended.
Even students who usually function independently may require assistance during
hypoglycemia due to mental status changes. School personnel working with students
with diabetes need to be able to recognize signs of low blood glucose and when to obtain
assistance. The pump can be programmed to “suspend” function during exercise so
hypoglycemia can be avoided or extra carbohydrates can be consumed for every 30
minutes of exercise.
2. If problems continue, notify the school nurse.
School nurse will notify family and/or health care provider according to student’s IHP or
DMMP.

VDH Guidelines for Healthcare Procedures in Schools 84
Contact information for companies that make or sell insulin pumps in the United States:
Company Phone Website
Animas 877-937-7867 www.animascorp.com
Medtronic MiniMed 800-646-4633 www.minimed.com
OmniPod (Insulet) 800-591-3455 www.myomnipod.com
Roche 800-668-4578 www.accu-chekinsulinpumps.com
Tandem 858-366-6900 www.tandemdiabetes.com

VDH Guidelines for Healthcare Procedures in Schools 85
Training for School Employees
The National Diabetes Education Program (2016) has recommended the following levels of
training for school staff to provide effective diabetes management. Training for unlicensed
staff should be completed by a diabetes-trained healthcare professional such as the school
nurse or a certified diabetes educator.
Level 1. All school personnel should receive training that provides a basic understanding
of diabetes, how to recognize and respond to the signs and symptoms of low blood glucose
(hypoglycemia) and high blood glucose (hyperglycemia), and whom to contact immediately
in case of emergency.
Level 2. Classroom teachers and all school personnel who have responsibility for
students with diabetes throughout the school day should receive Level 1 training plus
additional training to carry out their individual roles and responsibilities and to know what to
do in case of a diabetic emergency in the absence of a school nurse.
Level 3. One or more school staff members should receive in-depth training about
diabetes and routine and emergency care for each student with diabetes from a
registered nurse, licensed physician, or certified diabetes educator such as the school nurse or
a certified diabetes nurse educator. This training will help ensure that a school staff member
is always available to help younger or less-experienced students or those with additional
physical or mental impairments perform diabetes care tasks (e.g., administering insulin or
checking their blood glucose) in the absence of a school nurse.
The Code of Virginia §22.1-274 ensures that in a school building with ten or more
instructional & administrative employees, that at least two employees be trained in the
administration of insulin and glucagon at a school if one or more students diagnosed with
diabetes is in attendance. The Virginia Department of Education has published a
comprehensive training guide, Manual for Training Public School employees in the
Administration of Insulin and Glucagon, that can be used in training staff about diabetes.
Sources:
Adapted from Helping the Student with Diabetes Succeed: A Guide for School Personnel.
National Diabetes Education Program, U.S. Department of Health and Human
Resources. (2016). NIH Publication No. 10-5217 Available online
https://www.niddk.nih.gov/health-information/health-communication-
programs/ndep/health-care-professionals/school-guide/Pages/publicationdetail.aspx

VDH Guidelines for Healthcare Procedures in Schools 86
Code of Virginia. (1999). § 22.1-274. School health services. Available online
http://leg1.state.va.us/lis.htm
Actions for the School Nurse
School nurses are the key school staff members to coordinate care for students with diabetes
at school. Evidence-based practice in diabetes care and diabetes technology constantly
evolves as new evidence and therapies/devices are developed. The school nurse (SN) leads
the team at school and, according to the National Diabetes Education Program, should take
the following actions:
• Understand the SN role in ensuring compliance with federal and state laws that may
apply to students with diabetes.
• Understand state laws regarding delegation of nursing tasks.
• Obtain and review the student's current DMMP.
• Using the medical orders in the DMMP and information obtained from a thorough
nursing assessment, develop an IHP which promotes independence and self-care
consistent with the student's abilities.
• Prepare the student's Emergency Care Plans for hypoglycemia and hyperglycemia
based on the orders in the DMMP.
• Facilitate the initial school health team meeting to discuss implementing the student's
DMMP and IHP.
• Serve as the school health expert on the school teams that create and implement the
student’s 504 plan, the IEP, or other educational plan.
• Plan and implement diabetes management training for the trained diabetes personnel
and all staff who have responsibility for the student with diabetes.
• Obtain materials and medical supplies necessary for performing diabetes care tasks
from the family.
• Perform routine and emergency diabetes care tasks.
• Maintain accurate documentation of all diabetes care provided at school.
• Provide ongoing education and training as the school year progresses for staff.
• Assess competence and provide ongoing supervision of trained diabetes personnel.
• Conduct ongoing, periodic assessments of the student with diabetes and update the
IHP.
• Help ensure that the student has a supportive learning environment and is treated the
same as students without diabetes.
• Distribute the NDEP primer to all school personnel who have responsibility for
students with diabetes.

VDH Guidelines for Healthcare Procedures in Schools 87
• Provide education and act as a resource on managing diabetes at school to the student,
family and school staff.
• Act as an advocate for students to help them meet their diabetes healthcare needs.
• Assist the classroom teachers with developing plans for substitute teachers.
• Assist the physical education teacher with managing the student's physical activity at
school.
• Collaborate with coworkers and outside agencies to obtain nutrition information for
families.
• Communicate with the student's family--and with their permission--communicate
with the student's diabetes healthcare team about progress and concerns.
• Treat the student with diabetes the same as other students, except to respond to their
medical needs.
• Respect the student's confidentiality and right to privacy.
Adapted from Helping the Student with Diabetes Succeed: A Guide for School Personnel.
National Diabetes Education Program, U.S. Department of Health and Human
Resources. (2016). Available online https://www.niddk.nih.gov/health-
information/health-communication-programs/ndep/health-care-professionals/school-
guide/Pages/publicationdetail.aspx

VDH Guidelines for Healthcare Procedures in Schools 88
Resources for Teachers, Child Care Providers, Parents,
and Health Professionals
American Diabetes Association. (2015, revised). Diabetes Care Tasks at School: What Key
Personnel Need to Know. PowerPoint and training modules. Available online:
http://www.diabetes.org/living-with-diabetes/parents-and-kids/diabetes-care-at-
school/school-staff-trainings/diabetes-care-tasks.html
American Diabetes Association. Written Care Plans. Website has links to samples of
Diabetes Medical Management Plans (DMMP), 504 Plans, and Individual Education Plans
for students with diabetes. Plans in both English and Spanish available as well as
recommendations to consider. Available online: http://www.diabetes.org/living-with-
diabetes/parents-and-kids/diabetes-care-at-school/written-care-plans/
American Diabetes Association. State Laws, Regulations, and Policies for School Diabetes
Care for Virginia. Can also use website to look up information about other states. Available
online: http://www.diabetes.org/living-with-diabetes/parents-and-kids/diabetes-care-at-
school/legal-protections/school-laws-and-policies/state-laws-and-policies-
display.html?state=VA
American Diabetes Association. Everyday Wisdom Kit. Under revision in 2015, available
from www.diabetes.org when completed.
Children with Diabetes. Non-profit website dedicated to providing online support for
families with children with diabetes. Includes resources for pump clothing (pump packs,
pump pouches) and other accessories. Available online: www.childrenwithdiabetes.org
Children with Diabetes. Diabetes at School. Resources for students, classmates of students
with diabetes, teachers of students with diabetes, and other school-related resources.
Available online: http://www.childrenwithdiabetes.com/d_0q_000.htm
Everyday Magic. (2015). Resources developed by Disney and Lilly Diabetes to help
children and families manage diabetes, especially newly-diagnosed diabetics. Includes
videos, books, digital books, and other digital resources. Available:
http://www.t1everydaymagic.com/
Sandra Hollenberg. My Own Book About Pumping. Book for children with easy-to-
understand information about insulin pumps (good introduction for adults too!). Can be
downloaded at: http://grandmasandy.org/books/ABOUT_PUMPING.pdf
JDRF (Juvenile Diabetes Research Foundation). T1D in School website. Has a School
Advisory Toolkit for Families and a variety of other resources. Available online:
http://jdrf.org/life-with-t1d/starting-school/
VDH Guidelines for Healthcare Procedures in Schools 89
National Association of Chronic Disease Directors. Diabetes School Health Resources.
Extensive listing of resources for students with diabetes. Available online
http://www.chronicdisease.org/?page=DiabetesSchoolResour
National Association of School Nurses. Managing Diabetes at School: Tool for the School
Nurse. Manual adapted from NASN H.A.N.D.S. (Helping Administer to the Needs of the
Student with Diabetes in School) program. Available for a fee at www.nasn.org
National Diabetes Education Program, U.S. Department of Health and Human Resources.
(2016). Helping the Student with Diabetes Succeed: A Guide for School Personnel. NIH
Publication No. 10-5217. Available at https://www.niddk.nih.gov/health-information/health-
communication-programs/ndep/health-care-professionals/school-
guide/Pages/publicationdetail.aspx or calling 1-800-860-8747 or 1-888-693-6337.
National Diabetes Education Program. Diabetes HealthSense. Variety of resources for
living well including diet and exercise resources and stress management in video and website
form. Available online: http://ndep.nih.gov/resources/diabetes-healthsense/index.aspx.
National Diabetes Education Program. Publications. Extensive listing of online and print
publications to help with all topics relating to diabetes. Can use filter to find resources for
specific age groups or topics. Resources available for students, families, healthcare
professionals, and community organizations. Available online:
http://ndep.nih.gov/index.aspx
Virginia Diabetes Council. School Resources, Forms and Protocols. Periodic
review/revision. Includes DMMP forms, other forms, links to websites, and Virginia
Diabetes Medical Management Plan and Protocol Supplement. Available at:
http://www.virginiadiabetes.org/ and click on "School Forms."
Virginia Department of Education. (2015). Manual for Training Public School Employees
in the Administration of Insulin and Glucagon. Not only has information about insulin and
glucagon, also has extensive information about all topics relating to students with diabetes,
including regulations, care plans, therapeutic management, and self care. Available online:
http://www.doe.virginia.gov/support/health_medical/medication/manual_training_insulin-
glucagon.pdf
Note: The National Diabetes Education Program, U.S. Department of Health and Human
Resources guide, Helping the Student with Diabetes Succeed: A Guide for School Personnel,
was updated and released in 2016. It is available online at https://www.niddk.nih.gov/health-
information/health-communication-programs/ndep/health-care-professionals/school-
guide/Pages/publicationdetail.aspx.
VDH Guidelines for Healthcare Procedures in Schools 90
Chapter 3: Care of the
Gastrointestinal System
Overview
Gastrostomy Tube
Gastrostomy Tube Feeding
Skin-Level Gastrostomy (G-Button)
G-Button Feeding
Nasogastric Tube
Jejunostomy Tube
Jejunostomy Tube Feeding
Colostomy
Ileostomy
Ileoanal Reservoir

VDH Guidelines for Healthcare Procedures in Schools 91
Gastrointestinal System
Overview
The gastrointestinal, or digestive, system consists of a series of hollow organs joined in a
long, twisting tube from the mouth to the anus. Inside this tube is a lining called the mucosa.
In the mouth, stomach, and small intestine, the mucosa contain tiny glands that produce
juices to help digest food. Two solid organs, the liver and the pancreas, produce digestive
juices that reach the intestine through small tubes. Digestion is the process by which food and
drink are broken down into their smallest parts so that the body can use them to build and
nourish cells and to provide energy. Digestion begins in the mouth, where the food is
chewed into smaller pieces and then swallowed.
Movement of Food Through the System
The large, hollow organs of the
digestive system contain muscles that
enable their walls to move. The
movement of organ walls can propel
food and liquid and also can mix the
contents within each organ. This
movement of the esophagus, stomach,
and intestine is called peristalsis. The
action of peristalsis looks like an
ocean wave moving through the
muscle.
The first major muscle movement
occurs when food or liquid is
swallowed. Although we are able to
start swallowing by choice, once the
swallow begins, it becomes
involuntary and proceeds under the
control of the nerves.
The esophagus is the organ into which
the swallowed food is pushed. It
connects the throat above with the
stomach below. At the junction of the
esophagus and stomach, there is a
ring-like valve closing the passage between the two organs. However, as the food approaches
the closed ring, the surrounding muscles relax and allow the food to pass.

VDH Guidelines for Healthcare Procedures in Schools 92
The food then enters the stomach, a curved, pouch-like organ, which has three mechanical
tasks. First, the stomach must store the swallowed food and liquid. This requires the muscle
of the upper part of the stomach to relax and accept large volumes of swallowed material.
The second job is to mix up the food, liquid, and digestive juice produced by the stomach.
The lower part of the stomach mixes these materials by its muscle action. The third task of
the stomach is to empty its contents slowly into the small intestine.
As the food is digested in the small intestine and dissolved by the juices from the pancreas,
liver, and intestine, the contents of the intestine are mixed and pushed forward to allow
further digestion. The sections of the small intestine are the duodenum, jejunum, and ileum.
Finally, all of the digested nutrients are absorbed through the intestinal walls. The waste
products of this process include undigested parts of the food, known as fiber, and older cells
that have been shed from the mucosa. These materials are propelled into the large intestine,
also called the colon, where they remain, usually for a day or two, until the feces are expelled
by a bowel movement through the rectum.
Production of Digestive Juices
The glands that act first in digestion are in the mouth--the salivary glands. Saliva
produced by these glands contains an enzyme that begins to digest the starch from food
into smaller molecules.
The next set of digestive glands is in the stomach lining. They produce stomach acid and an
enzyme that digests protein. One of the unsolved puzzles of the digestive system is why the
acid juice of the stomach does not dissolve the tissue of the stomach itself. In most people,
the stomach mucosa is able to resist the juice, although food and other tissues of the body
cannot.
After the stomach empties the food and juice mixture into the small intestine, the juices of
two other digestive organs mix with the food to continue the process of digestion. One of
these organs is the pancreas. It produces a juice that contains a wide array of enzymes to
break down the carbohydrate, fat, and protein in food. Other enzymes that are active in the
process come from glands in the wall of the intestine.
The liver produces yet another digestive juice--bile. Between meals, the bile is stored in the
gallbladder. At mealtime, it is squeezed out of the gallbladder into the bile ducts to reach the
intestine and mix with the fat in food. The bile acids dissolve the fat into the watery contents
of the intestine, much like detergents that dissolve grease from a frying pan. After the fat is
dissolved, it is digested by enzymes from the pancreas and the lining of the intestine.

VDH Guidelines for Healthcare Procedures in Schools 93
Absorption and Transport of Nutrients
Digested molecules of food, as well as water and minerals from the diet, are absorbed
from the upper small intestine. Most absorbed materials cross the mucosa into the blood
and are carried off in the bloodstream to other parts of the body for storage or further
chemical change. As already noted, this part of the process varies with different types of
nutrients. Bacteria in the GI tract, also known as gut flora, help with digestion.
Carbohydrates. The digestible carbohydrates are broken into simpler molecules by enzymes
in the saliva, in juice produced by the pancreas, and in the lining of the small intestine. Starch
is digested in two steps: First, an enzyme in the saliva and pancreatic juice breaks the starch
into molecules called maltose; then an enzyme in the lining of the small intestine (maltase)
splits the maltose into glucose molecules that can be absorbed into the blood. Glucose is
carried through the bloodstream to the liver, where it is stored or used to provide energy for
the work of the body.
Protein. Foods such as meat, eggs, and beans consist of giant molecules of protein that must
be digested by enzymes before they can be used to build and repair body tissues. An enzyme
in the juice of the stomach starts the digestion of swallowed protein. Further digestion of the
protein is completed in the small intestine. Here, several enzymes from the pancreatic juice
and the lining of the intestine carry out the breakdown of huge protein molecules into small
molecules called amino acids. These small molecules can be absorbed from the small
intestine into the blood and then be carried to all parts of the body to build the walls and
other parts of cells.
Fats. Fat molecules are a rich source of energy for the body. The first step in digestion of a
fat such as butter is to dissolve it into the watery content of the intestinal cavity. The bile
acids produced by the liver act as natural detergents to dissolve fat in water and allow the
enzymes to break the large fat molecules into smaller molecules, some of which are fatty
acids and cholesterol. The bile acids combine with the fatty acids and cholesterol and help
these molecules to move into the cells of the mucosa. In these cells the small molecules are
formed back into large molecules, most of which pass into vessels (called lymphatics) near
the intestine. These small vessels carry the reformed fat to the veins of the chest, and the
blood carries the fat to storage depots in different parts of the body.
Vitamins. Another vital part of our food that is absorbed from the small intestine is the class
of chemicals called vitamins. The two different types of vitamins are classified by the fluid in
which they can be dissolved: water-soluble vitamins (all the B vitamins and vitamin C) and
fat-soluble vitamins (vitamins A, D, and K).
Passage of Wastes
The remaining undigested parts of food and older cells from the lining of the GI tract lining
form the waste products of the digestive process. Peristaltic waves propel the wastes through
the large intestine where water is absorbed and wastes become solid stool. The rectum stores
stool until it is pushed out of the body during a bowel movement.

VDH Guidelines for Healthcare Procedures in Schools 94
Source:
National Institute of Diabetes and Digestive and Kidney Diseases, National Institutes of
Health. (2013). Your Digestive System and How It Works. NIH Publication No. 13-
2681. Available online at http://www.niddk.nih.gov/health-information/health-
topics/Anatomy/your-digestive-system/Documents/Digestive_System_508.pdf
Van Dahm, K. 92012). Pediatric feeding disorders: Evaluation and treatment. Framingham:
Therapro, 55-73.
Illustration Source:
National Institute of Diabetes and Digestive and Kidney Diseases, National Institutes of
Health. (2013). Your Digestive System and How It Works. NIH Publication No. 13-
2681. Available online at http://www.niddk.nih.gov/health-information/health-
topics/Anatomy/your-digestive-system/Documents/Digestive_System_508.pdf

VDH Guidelines for Healthcare Procedures in Schools 95
Gastrostomy Tube
Overview
A gastrostomy is a surgically created opening into the stomach. A gastrostomy tube,
commonly referred to as a G-tube, is a silicon or polyurethane catheter held in place by an
external crossbar on the skin and by an internal stabilizer, balloon, or a retention dome
(mushroom) inside the stomach. The tube can be placed initially by surgery or
percutaneously (PEG).
The G-tube is used to administer fluids, food, and
medication to the student. The G-tube feeding may be
done by continuous or bolus feeds. Continuous feeds are
given over a number of hours via slow drip and controlled
by a feeding pump. Bolus feeds are specified amounts of
feeds delivered over a short period of time (usually 15-30
minutes). The tube remains in the stomach at all times,
but can be clamped between feedings to prevent leakage
of stomach contents.
Some children do not tolerate the tube clamped. There should be directions in the child’s
feeding order specifying when to clamp the tube.
Gastrostomy tubes can be used to drain or vent stomach contents, but indications for long
term use in students are usually due to:
• Need for supplemental calories due to increased needs from a disease process, such
as cystic fibrosis or malabsorption disorders.
• Inability to consume adequate calories by mouth, which may be due to anatomical,
behavioral, or psychosocial factors, such as esophageal atresia (incomplete
development of the food pipe), failure to thrive, or cerebral palsy.
• Risk for choking and aspiration due to impaired swallowing or severe reflux.
Settings and Staff
Students can receive feedings anywhere. Many of the pumps are small and designed to be
easily worn or carried in a back pack at all times. Bolus feeds should be done in a clean area
because they are more open to the environment. Student’s desire for privacy and possible
need for stationery activities during a feed should be considered in determining where feeds
will take place. Many students with G-tubes will receive their feeds during the night or at
home, eliminating the need for any feeds during the school day.

VDH Guidelines for Healthcare Procedures in Schools 96
Students who require venting or drainage of their G-tubes may need to have this done in a
clean, private area such as the health office. Venting can also be achieved with the use of a
Farrell bag with or without meals. G-tubes are usually covered by the student’s clothing and
do not interfere with normal school activities. Participation in physical education activities
may require modification and are determined on an individual basis.
A G-tube feeding may be administered by the school nurse, family member, teacher, or other
staff person who has received training in appropriate techniques and problem management.
The student should be encouraged to assist with the G-tube feeding as much as possible.
Excessive pulling on the G-tube should be avoided because it can cause pain and irritation to
the gastric mucosa and or dislodgement.
School personnel who have regular contact with a student who has a G-tube should receive
training covering the student’s specific needs, potential problems, and implementation of the
established emergency plan.
Individualized Healthcare Plan (IHP)
Each student’s IHP must be tailored to the individual’s needs. A sample plan is included in
Appendix A. When preparing an IHP for a student with a gastrostomy tube, the following
items should be considered:
• Underlying condition and possible problems associated with the condition or
treatment
• Size and type of feeding device
• Length of G-tube outside of the body (important to know in determining whether G-
tube has migrated either further into the stomach or out of the stomach)
• Healthcare provider's orders for care and use of the G-tube
• Whether the student receives bolus or continuous feeds
• Amount, type, and frequency of formula to be received
• Storage of formula
• How long formula may be used after container opened
• When the tube should be flushed, such as before and after administration of feeds or
medications
• Amount (volume) and type of flush liquid
• Type of portable pump and its specific instructions
• Positioning during and after feeding
• Activity level during and after feeding

VDH Guidelines for Healthcare Procedures in Schools 97
• Whether student should receive oral stimulation during feeding
• Measurement of gastric residuals, if needed
• Medication administration schedule, if needed
• Amount of food or drink a student can take by mouth
• Determining the need for venting of the G-tube
• Determining the need for clamping
• Patency of gastrostomy tract and time frame for reinsertion should the G-tube fall out
• Date tube was originally placed
• How to clean the site, if needed
• Actions to take if student has vomiting, abdominal distension, or pain
• Manufacturer’s specific instructions for any supplies or equipment
• Feeding guidelines during student transport
• Latex allergy precautions
• Standard precautions
Sources:
Bowden, V., & Greenberg, C. (2012). Pediatric nursing procedures (Third ed.).
Philadelphia: Wolters Kluwer Health/Lippincott Williams & Wilkins, 249-260, 275-
283.
Cincinnati Children's Hospital. (2012). Gastrostomy tube (G-tube) home care. Available
online at http://www.cincinnatichildrens.org/health/g/g-tube-care/
Connecticut State Department of Education. (2012). Clinical procedure guidelines for
Connecticut school nurses. Middlebury, CT: CSDOE, 71-75.

VDH Guidelines for Healthcare Procedures in Schools 98
Hockenberry, M., & Wilson, D. (2015). Wong's nursing care of infants and children. (10th
ed.). St. Louis: Elsevier Mosby, 937-938.
National Library of Medicine. (2014). Feeding tube insertion-gastrostomy. MedlinePlus.
Available online at http://www.nlm.nih.gov/medlineplus/ency/article/002937.htm
Porter, S., Branowicki, P., & Palfrey, J. (2014). Supporting students with special health care
needs: Guidelines and procedures for schools (3rd ed.). Baltimore: Paul H. Brookes
Publishing, 211-219.
Rady's Children's Hospital. (2012). Guide to gastrostomy tubes. San Diego. Slideshow
available online at http://www.slideshare.net/missnicoletait/guide-to-gastrostomy-
tubes.
Selekman, J. (2013). School nursing: A comprehensive text (2nd ed.). Philadelphia: F.A.
Davis, 1032-1040.
Simmons, Remmington R. (2013). The percutaneous endoscopic gastrostomy tube: A nurse’s
guide to PEG tubes. Medsurg Nursing, 22(2), 77-83.
Smith, S., Duell, D. & Martin, B. (2012). Clinical nursing skills: Basic to advanced skills
(8th ed.). Boston: Pearson, 664-675.
Steller, JJ & L Bevington. (2004). Buttons and bows: Understanding enteral devices.
Presentation at GI Nursing: Regional Pediatric GI and Nutrition Nursing
Conference, Children’s Hospital of Philadelphia, March 26, 2004.
Tkacz, Browne, N., Flanigan, L.M., McComiskay, C.A., Piper, P. (2013). Nursing care of the
pediatric surgical patient (Third ed.). Massachusetts: Jones & Barlett, 101-112.
Illustration Source:
Rady's Children's Hospital. (2012). Guide to gastrostomy tubes. San Diego. Slideshow
available online at http://www.slideshare.net/missnicoletait/guide-to-gastrostomy-
tubes
Used with permission.

VDH Guidelines for Healthcare Procedures in Schools 99
Procedure for Gastrostomy Tube Feeding—Bolus Method
1. Wash hands.
2. Gather and assemble equipment:
Note: Equipment and feeding supplies
are provided by family.
• Liquid formula or feeding solution, at
room temperature
• 60 ml catheter-tipped syringe or other
feeding container for feeding
• Clamp or plug for end of tube
• Water (to flush tubing before and after
feeding)
• Rubber bands and safety pins (to secure
G-tube to clothing)
• Gloves
Identify size and type of G-tube. Shake can well to mix formula and note expiration date.
It is recommended that students receive a ready-to-feed commercial formula. Potential
problems with a homemade blenderized recipe include inaccurate mixing, which may alter
the nutrients and calorie content; separation of solids and liquids in the solution, which
may clog the tube; and increased risk of contamination due to improper handling,
preparation, or storage. Usually opened formula must be used within 24 hours. Check
student IHP for storage instructions.
Tube feedings should be administered at room temperature. Some students get cramps if
the feeding solution is too cold. If a blenderized formula is brought to school, it should be
refrigerated until mealtime and warmed to room temperature. This may be achieved by
holding the container with the formula under warm water for several minutes. A
microwave should not be used for this procedure due to its uneven heat distribution.
3. Shake formula (to mix) and measure prescribed amount of formula to be infused.
4. Explain procedure using explanations the student can understand. Encourage the student
to do as much of the procedure as is capable, so as to achieve maximum self-care skills.
5. Position student upright or as specified in student's individualized health plan (IHP).

VDH Guidelines for Healthcare Procedures in Schools 100
Students usually sit (or may lie on their right side with their head elevated) during feeding.
Tubing may be pinned to shirt. Make sure clamp is not pressing on skin.
6. Inspect skin at gastrostomy site for redness, tenderness, swelling or irritation, or presence
of drainage or gastric leakage.
Report abnormal findings to school nurse and family.
7. Wash hands and put on gloves.
8. Remove plug (cap) from G-tube and insert a catheter-tipped syringe into the end of feeding
tube.
G-tube is still clamped. Do not pull on gastrostomy tubing as this can cause pain and
injury to the site or dislodgement.
9. Check residual prior to feeding, if ordered. Checking residuals is typically not needed if
gastrostomy is well established (over 6 weeks old). Unclamp the tubing and gently draw
back on the plunger to remove any liquid or medication that may be left in the stomach
(i.e., residuals). Return residuals to stomach.
Most students do not need to have residuals checked. If they do, note the amount that was
withdrawn from the feeding tube and return the contents of the syringe to the stomach
because stomach contents contain electrolytes and digestive enzymes. Removing them can
result in electrolyte imbalance. Adjust the feeding volume according to health care
provider’s orders if a residual is present. If the residual is greater than recommended,
hold feeding, wait 30-45 minutes, and check again.
10. Clamp the gastrostomy tubing, disconnect the syringe, and remove plunger from syringe.
11. Reinsert catheter tip of syringe into tubing.
Syringe should be held 6 inches above level of stomach or at prescribed height.
12. Unclamp tube, and allow bubbles to escape.
13. G-tubes should be flushed with 15-30 ml tepid tap water before feedings or medication.
Follow guidelines in student's IHP.
14. Administer medication, if prescribed, either before or after a feeding, as specified in
student's IHP. Use liquid medication, if possible. Flushing with water between each
medication and not mixing the medications can help to prevent clogging of tube. If the
liquid is thick, it might need to be diluted with a little water to prevent clogging.
15. Slowly pour feeding/fluid into syringe and allow to flow in by gravity.
If a container other than a syringe is used for the feeding, unclamp tubing and allow it to
flow in by gravity, using the same procedure. The flow of feeding may need to be initiated

VDH Guidelines for Healthcare Procedures in Schools 101
by placing plunger into barrel of syringe and depressing slightly to get it started (and then
remove plunger).
Be alert to any unusual changes in the student’s tolerance of the feeding.
Nausea/vomiting, cramping, or diarrhea may indicate that the feeding is being given
too quickly or formula is too cold.
16. Continue to pour feeding into syringe as contents empty into stomach. Keep syringe
partially filled to prevent air from entering stomach.
Depending on the age and capabilities of the student, have him/her assist with the feeding
by holding syringe or pouring fluid into it. Provide oral stimulation, if ordered.
17. Raise or lower syringe or container to adjust flow to prescribed rate.
The higher the syringe is held, the faster the feeding will flow into the stomach.
18. When feeding is completed, pour prescribed amount of water, usually 15-30 ml, into
syringe and flush tubing. This will clear tubing of feeding and medication.
19. Open G-tube to air, if ordered.
Venting allows drainage of fluid or release of gas bubbles in the stomach. May help if
student has a problem with gas.
20. Clamp tubing, remove barrel of syringe, and reinsert plug into end of tubing.
Clamp tubing prior to removing the syringe or stomach contents may leak out of the tube.
21. Secure tubing and tuck inside clothes, but not inside diaper or underpants.
22. Refer to student's IHP for guidelines regarding positioning and activity after feeding. Most
students should remain upright for 30 minutes after feeding.
23. Wash syringe and other reusable equipment in soapy water. Rinse thoroughly, dry, and
store appropriately.
Open formula is good for 24-48 hours. Check label or student's IHP to determine how
long it may safely be used. Open formula should be stored in the refrigerator in clean
plastic containers (not the original can), labeled with the date it was opened. Discard any
open formula after 48 hours.
24. Remove gloves. Wash hands.
25. Document feeding, any medication, residual amount, feeding tolerance, and any concern
about gastrostomy site in student’s log. Notify school nurse and family of any changes or
concerns.
VDH Guidelines for Healthcare Procedures in Schools 102
Sources:
Bowden, V., & Greenberg, C. (2012). Pediatric nursing procedures (Third ed.). Philadelphia:
Wolters Kluwer Health/Lippincott Williams & Wilkins, 249-260.
Cincinnati Children's Hospital (2012). Gastrostomy feeding by syringe. Available online at
http://www.cincinnatichildrens.org/health/g/g-tube-syringe/
Connecticut State Department of Education. (2012). Clinical procedure guidelines for
Connecticut school nurses. Middlebury, CT: CSDOE, 71-75.
Hockenberry, M., & Wilson, D. (2015). Wong's nursing care of infants and children (10th
ed.). St. Louis: Elsevier Mosby, 937-938.
National Library of Medicine. (2014). Gastrostomy feeding tube--bolus. MedlinePlus.
Available online at
http://www.nlm.nih.gov/medlineplus/ency/patientinstructions/000165.htm
Nettina, S. (2013). Lippincott manual of nursing practice (10th ed.). Baltimore: Wolters
Kluwer Health.
Porter, S., Branowicki, P., & Palfrey, J. (2014). Supporting students with special health care
needs: Guidelines and procedures for schools (3rd ed.). Baltimore: Paul H. Brookes
Publishing, 211-216.
Rady's Children's Hospital. (2012). Guide to gastrostomy tubes. San Diego. Slideshow
available online at http://www.slideshare.net/missnicoletait/guide-to-gastrostomy-
tubes.
Selekman, J. (2013). School nursing: A comprehensive text (2nd ed.). Philadelphia: F.A.
Davis, 1032-1040.
Smith, S., Duell, D. & Martin, B. (2012). Clinical nursing skills: Basic to advanced skills
(8th ed.). Boston: Pearson, 664-675.
Wisconsin Improving School Health Services Project. (2015). Gastrostomy tube bolus
feeding. Available online at http://www.wishesproject.org/?page_id=324/?tab=5
Illustration Source:
Rady's Children's Hospital. (2012). Guide to gastrostomy tubes. San Diego. Slideshow
available online at http://www.slideshare.net/missnicoletait/guide-to-gastrostomy-
tubes
Used with permission.

VDH Guidelines for Healthcare Procedures in Schools 103
Procedure for Gastrostomy Tube Feeding— Continuous
Feeding by Pump or Slow Drip Method
1. Wash hands.
2. Gather and assemble equipment:
Note: Equipment and feeding supplies are
provided by family.
• Liquid formula or feeding solution, at room
temperature
• 60 ml catheter-tipped syringe or other feeding
container for feeding
• Feeding bag and tubing
• Feeding pump and stand or carry-pack, if needed
• Clamp or plug for end of tube
• Water (to flush tubing before and after feeding)
• Rubber bands and safety pins (to secure G-tube
to clothing)
• Gloves
Identify size and type of G-tube. Shake can well to mix formula and note expiration date.
It is recommended that students receive a ready-to-feed commercial formula. Potential
problems with a homemade blenderized recipe include inaccurate mixing, which may alter
the nutrients and calorie content; separation of solids and liquids in the solution, which
may clog the tube; and increased risk of contamination due to improper handling,
preparation, or storage. Usually opened formula must be used within 24 hours. Check
student IHP for storage instructions.
Tube feedings should be administered at room temperature. Some students get cramps if
the feeding solution is too cold. If a blenderized formula is brought to school, it should be
refrigerated until mealtime and warmed to room temperature. This may be achieved by
holding the container with the formula under warm water for several minutes. A
microwave should not be used for this procedure due to its uneven heat distribution..
3. Shake formula (to mix) and measure prescribed amount of formula to be infused.
Stomach
VDH Guidelines for Healthcare Procedures in Schools 104
4. Explain procedure using explanations the student can understand. Encourage the student
to do as much of the procedure as is capable, so as to achieve maximum self-care skills.
5. Position student upright or as specified in student's IHP.
Students usually sit (or may lie on their right side with their head elevated) during feeding.
Tubing may be pinned to shirt. Make sure clamp is not pressing on skin.
6. Inspect skin at gastrostomy site for redness, tenderness, swelling or irritation, or presence
of drainage or gastric leakage. Observe for abdominal distension and report if noted.
Report abnormal findings to school nurse and family.
7. Wash hands and put on gloves.
8. Remove plug (cap) from G-tube and insert a catheter-tipped syringe into the end of feeding
tube.
G-tube is still clamped. Do not pull on gastrostomy tubing as this can cause pain and
injury to the site or dislodgement.
9. Check residual prior to feeding, if ordered. Checking residual is typically NOT needed if
gastrostomy is well established. If needed, unclamp the tubing and gently draw back on
the plunger to remove any liquid or medication that may be left in the stomach (i.e.,
residuals). Return residuals to stomach. Clamp the gastrostomy tubing and disconnect the
catheter tip syringe.
Many students do not need to have residuals checked. Note the amount that was withdrawn
from the feeding tube and return the contents of the syringe to the stomach because stomach
contents contain electrolytes and digestive enzymes. Removing them can result in
electrolyte imbalance. Adjust the feeding volume according to health care provider’s
orders if a residual is present. If the residual is greater than recommended, hold feeding,
wait 30-45 minutes, and check again.
10. Pour feeding/fluids into feeding bag. Run through tubing and fill drip chamber according
to tubing directions. Run formula through rest of tubing to the tip. Clamp.
11. Hang bag on pole above pump or at height to achieve prescribed flow. If a pump is used,
insert tubing in pump mechanism and set proper flow rate. Some students may have pumps
which are designed to hold the feeding and be worn around the waist or over the shoulder.
Follow manufacturer instructions for use and student's IHP for activity level.
12. G-tubes should be flushed with 15-30 ml tepid tap water before feedings or medication.
Follow guidelines in student's IHP.
13. Administer medication, if prescribed, either before or after a feeding, as specified in student
IHP. Use liquid medication, if possible. Flushing with water between each medication

VDH Guidelines for Healthcare Procedures in Schools 105
and not mixing the medications can help to prevent clogging of tube. If the liquid is thick,
it might need to be diluted with a little water to prevent clogging.
14. Insert tip of feeding bag tubing into G-tube. Connection may be taped or luer-locked to
prevent disconnection. Unclamp G-tube.
Be careful not to apply unnecessary pull on gastrostomy.
15. Open roller clamp of feeding bag tubing and adjust until drips flow at prescribed rate. If
pump is used, open clamp completely, set rate on pump, and monitor for correct rate.
Be alert to any unusual changes in the student’s tolerance of the feeding.
Nausea/vomiting, cramping, or diarrhea may indicate that the feeding is being given
too quickly or formula is too cold.
16. For continuous feeding with pump, add feeding as needed to prevent bag from becoming
empty. No more than 4 hours worth of feeding should be hung at any time to prevent
contamination.
17. If a single feeding is completed (bag empties), clamp feeding bag tubing, and clamp G-
tube.
18. Disconnect feeding bag and tubing from G-tube.
19. Unclamp G-tube and use a syringe to flush with water (usually 15-30 ml), unless ordered
otherwise.
This will clear tubing of feeding and medication.
20. Open G-tube to air, if ordered.
Venting allows drainage of fluid or release of gas bubbles in the stomach. This may help
if student has a problem with gas.
21. Clamp and plug G-tube.
22. Secure tubing and tuck inside clothes, but not inside diaper or underpants.
23. Refer to student's IHP regarding positioning and activity after feeding. Students are usually
kept in an upright position for at least 30 minutes after feeding if there are no conflicting
orders.
The feeding tube can be disconnected while the student is being transported to and from
school.
24. Wash syringe and other reusable equipment in soapy water. Rinse thoroughly, dry, and
store appropriately.

VDH Guidelines for Healthcare Procedures in Schools 106
Open formula is good for 24-48 hours. Check label or student's IHP to determine how
long it may safely be used. Open formula should be stored in the refrigerator in clean
plastic containers (not the original can), labeled with the date it was opened. Discard any
open formula after 48 hours.
25. Remove gloves. Wash hands.
26. Document feeding, any medication, residual amount, feeding tolerance, and any concern
about gastrostomy site in student’s log and notify school nurse and family of any changes
or concerns.
VDH Guidelines for Healthcare Procedures in Schools 107
Sources:
Bowden, V., & Greenberg, C. (2012). Pediatric nursing procedures (3rd ed.). Philadelphia:
Wolters Kluwer Health/Lippincott Williams & Wilkins, 249-260.
Cincinnati Children's Hospital (2012). Gastrostomy feeding by syringe. Available online at
http://www.cincinnatichildrens.org/health/g/g-tube-care
Connecticut State Department of Education. (2012). Clinical procedure guidelines for
Connecticut school nurses. Middlebury, CT: CSDOE, 71-75.
Hockenberry, M., & Wilson, D. (2015). Wong's nursing care of infants and children (10th
ed.). St. Louis: Elsevier Mosby, 937-938.
National Library of Medicine. (2012). Gastrostomy feeding tube feeding--pump.
MedlinePlus. Available online at
http://www.nlm.nih.gov/medlineplus/ency/patientinstructions/000333.htm
Porter, S., Branowicki, P., & Palfrey, J. (2014). Supporting students with special health care
needs: Guidelines and procedures for schools (3rd ed.). Baltimore: Paul H. Brookes
Publishing, 217-219.
Selekman, J. (2013). School nursing: A comprehensive text (2nd ed.). Philadelphia: F.A.
Davis, 1032-1040.
Smith, S., Duell, D. & Martin, B. (2012). Clinical nursing skills: Basic to advanced skills
(8th ed.). Boston: Pearson, 664-675.
Wisconsin Improving School Health Services Project. (2015). Gastrostomy tube continuous
feeding/slow drip. Available online at
http://www.wishesproject.org/?page_id=334/?tab=5
Image Source:
Rady's Children's Hospital. (2012). Guide to gastrostomy tubes. San Diego. Slideshow
available online at http://www.slideshare.net/missnicoletait/guide-to-gastrostomy-
tubes
Used with permission.

VDH Guidelines for Healthcare Procedures in Schools 108
Possible Problems That May Occur with Gastrostomy Feeds
• Breathing difficulties, choking, coughing, and/or color changes
Stop feeding immediately. There may be aspiration of feeding into the lungs. Call
school nurse if not present. Notify family and activate the school emergency plan. The
most significant risk with tube feedings is aspiration of feeding into the lungs. Be sure
student is positioned with head elevated at least 30 degrees.
Keys to preventing aspiration:
o Proper positioning--head above heart during feeding and for 30 minutes after
o Monitoring for coughing, gagging, vomiting, difficulty breathing during feeding
o Ensuring tube is in place.
• Nausea and/or cramping
Make sure feeding is at room temperature.
Check feeding rate. Rate may need to be slowed. Check the length of the G-tube to see
if it has migrated either inward or outward.
If problem continues, notify school nurse, family, and/or health care provider.
• Vomiting
If all the above have been checked, stop feeding, call school nurse or family. Remove
residual and vent, if ordered. Nurse can check for bloating and reduced bowel sounds.
• Blocked gastrostomy tubing
Make sure all clamps on tubing are open.
May be due to inadequate flushing, slow flow rate, or very thick fluid. Check tube
position. Flush with 20-30 ml warm water. Carbonated beverages and juice have not
proven effective in unclogging the tubing. Some students may have a prescribed
declogging agent specified in their IHP that can be tried. Squeeze or roll gastrostomy
tubing with fingers moving slowly down toward student’s stomach. Do not use stylet
(guidewire) to try and unclog as this may damage G-tube. If blockage remains, contact
school nurse or family.
• Leakage
Check position of tube. Make sure length of tubing outside the skin remains the same
(catheter has not migrated). Gently pull on the G-tube to make sure it is against the
inside of the stomach wall. Check volume in balloon (if present). Adjust external
stabilizer for appropriate fit. Check to make sure plug on medication port is on securely
and not leaking.
VDH Guidelines for Healthcare Procedures in Schools 109
• Redness/irritation/bleeding at site
Check G-tube site for leakage. Clean stoma site if leakage of
food/fluid/medication/stomach contents come in contact with skin. Keep site dry. Make
sure tubing is not being pulled. Loosen external stabilizer if it is too tight. Do not use a
baby bottle nipple as a stabilizer as this traps moisture and puts too much pressure on the
area. Avoid allowing tube to dangle—secure to clothing. Skin barrier or other protective
skin preparations may be used, if ordered. Refer to student's IHP for cleaning or dressing
instructions. In general, soap and water are only cleansing agents needed. If a dressing is
needed, use only precut gauze because threads from hand-cut gauze can adhere to the
stoma. Solutions such as hydrogen peroxide can interfere with skin healing, cause
hypergranulation, and should be avoided, unless specifically ordered.
Look for other signs of infection. Notify school nurse and family of gastrostomy site
concerns.
• G-tube comes out
Follow guidelines in student IHP. The G-tube may need to be reinserted immediately if a
student’s tract closes quickly (usually if gastrostomy is less than 1-2 months old). Cover
the site with a dry dressing or large bandage. Notify family. Activate student's
emergency action plan.

VDH Guidelines for Healthcare Procedures in Schools 110
Sources:
Bowden, V., & Greenberg, C. (2012). Pediatric nursing procedures (Third ed.). Philadelphia:
Wolters Kluwer Health/Lippincott Williams & Wilkins, 249-260.
Cincinnati Children's Hospital (2012). Gastrostomy tube (G-tube) home care. Available
online at http://www.cincinnatichildrens.org/health/g/g-tube-care/
Connecticut State Department of Education. (2012). Clinical procedure guidelines for
Connecticut school nurses. Middlebury, CT: CSDOE, 71-75.
Hockenberry, M., & Wilson, D. (2015). Wong's nursing care of infants and children (10th
ed.). St. Louis: Elsevier Mosby, 937-938.
National Library of Medicine. (2014). Gastrostomy feeding tube--bolus. MedlinePlus.
Available online at
http://www.nlm.nih.gov/medlineplus/ency/patientinstructions/000165.htm
Porter, S., Branowicki, P., & Palfrey, J. (2014). Supporting students with special health care
needs: Guidelines and procedures for schools (3rd ed.). Baltimore: Paul H. Brookes
Publishing, 219.
Rady's Children's Hospital. (2012). Guide to gastrostomy tubes. San Diego. Slideshow
available online at http://www.slideshare.net/missnicoletait/guide-to-gastrostomy-
tubes
Selekman, J. (2013). School nursing: A comprehensive text (2nd ed.). Philadelphia: F.A.
Davis, 1032-1040.
Smith, S., Duell, D. & Martin, B. (2012). Clinical nursing skills: Basic to advanced skills
(8th ed.). Boston: Pearson, 664-675.
Wisconsin Improving School Health Services Project. (2015). Gastrostomy tube bolus
feeding. Available online at http://www.wishesproject.org/?page_id=324/?tab=5

VDH Guidelines for Healthcare Procedures in Schools 111
General Information for
Students with Gastrostomy Tubes
Date: ___________________
To: _____________________________ _________________________________
(Teachers, Instructional assistants, Bus drivers, etc)
Name of Student: ______________________________________
This student has a gastrostomy tube (G-tube) inserted into his or her stomach. The G-tube is
used to administer food, medication, and fluids directly into the stomach and may be used
during the school day.
The student may receive feedings or medication through the G-tube as needed during the
school day in the classroom, the lunchroom, or the health office. The tube is held in place at
all times and is clamped or capped between feedings or medication administration. The tube
is covered by clothing and should not cause any discomfort for the student.
The student should be able to fully participate in physical education classes unless he or she
has another condition that would interfere with full participation.
Special arrangements may need to be made for feedings and medication administration
during field trips.
Contact _______________________________ at __________________ (phone number) for
additional information or if the student experiences any problems with the G-tube.
Source: Adapted from: Porter, S., Haynie, M., Bierle, T., Caldwell, T.H., & Palfrey, J.S. (Eds.). (1997).
Children and youth assisted by medical technology in educational settings: Guidelines for care (2nd ed.).
Baltimore: Paul H. Brookes Publishing.

VDH Guidelines for Healthcare Procedures in Schools 112
Skin-Level or Low Profile Gastrostomy Devices (Gastrostomy Feeding Button)
Overview
A gastrostomy is a surgically created opening into the
stomach through the surface of the abdomen. Once
the gastrostomy site has well healed, a smaller device
may be used instead of the lengthy tube. The skin-
level or low profile gastrostomy device may also be
called a G-button, MIC-KEY button, Mini-One,
Nutriport, or Bard button, depending on the
manufacturer. The silicon or polyurethane device
consists of an internal stabilizer in the stomach (fluid-
filled balloon or mushroom-shaped dome) and an
external stabilizer (crossbar, triangle, or wings) on the
surface of the skin. The internal stabilizer has an
antireflux valve so that stomach contents do not spill
out when the device is unplugged. The device
remains in place at all times and is covered by a safety plug when not in use. The safety plug
is sometimes compared, in appearance, to the opening on a beach ball. Feedings are
administered by attaching a small extension tube to the device. When the feeding is over, the
tube is removed and the safety plug closed. Families often prefer a skin level device because
there is no bulky tube to manage under clothing when the child is not received a feeding.
Skin-level gastrostomies can be used to drain or vent stomach contents, but indications for
long term use in students are usually due to:
• Need for supplemental calories due to increased needs from a disease process, such
as cystic fibrosis or malabsorption disorders.
• Inability to consume adequate calories by mouth, which may be due to anatomical,
behavioral, or psychosocial factors, such as esophageal atresia (incomplete
development of the food pipe), failure to thrive or cerebral palsy.
• Risk for choking and aspiration due to impaired swallowing or severe reflux.
Skin-level gastrostomy devices are typically inserted at the time of surgery when the
gastrostomy stoma is created. They are typically changed every 3 months to prevent balloon
failure.
Settings and Staff
Students can receive feedings anywhere. Many of the pumps are small and designed to be
easily worn or carried at all times. Bolus feeds should be done in a clean area because they
Stomach

VDH Guidelines for Healthcare Procedures in Schools 113
are more open to the environment. Student’s desire for privacy and possible need for
stationery activities during a feed should be considered in determining where feeds will take
place. Many students with G-buttons will receive their feeds during the night, eliminating
the need for any feeds during the school day.
G-buttons are covered by the student’s clothing and do not interfere with normal school
activities. Participation in physical education activities may require modification and are
determined on an individual basis.
Feedings using skin-level gastrostomy devices can be administered by the school nurse,
family member, teacher, or other staff person who has received training in appropriate
techniques and problem management. The student should be encouraged to assist with the
feeding as much as possible.
School personnel who have regular contact with a student who has a skin-level gastrostomy
device should receive training covering the student’s specific needs, potential problems, and
implementation of the established emergency plan.
Individualized Healthcare Plan (IHP)
Each student’s IHP must be tailored to the individual’s needs. A sample plan is included in
Appendix A. When preparing an IHP for a student with a skin-level gastrostomy device, the
following items should be considered:
• Underlying condition and possible problems associated with the condition or
treatment
• Size and type of feeding device
• Whether device has a balloon or a retention bolster internally to hold it in place
• Length of G-button outside of the body (important to know in determining whether
G-button has migrated either further into the stomach or out of the stomach)
• Healthcare provider's order for G-button and care
• Whether the student receives bolus or continuous feeds
• Amount, type, and frequency of formula to be received
• Storage of formula
• How long formula made be used after container opened
• When the tube should be flushed, such as before and after administration of feeds or
medications
• Amount (volume) and type of flush liquid
• Type of portable pump and its specific instructions
• Positioning during and after feeding
• Activity level during and after feeding
• Whether student should receive oral stimulation during feeding
• Measurement of gastric residuals, if needed
• Medication administration schedule, if needed
• Amount of food or drink a student can take by mouth

VDH Guidelines for Healthcare Procedures in Schools 114
• Determining the need for venting of the gastrostomy device
• Determining the need for clamping the gastrostomy device
• Patency of gastrostomy tract and time frame for reinsertion should the device fall out
• Date tube was originally placed
• How to clean the site, if needed
• Actions to take if student has vomiting, abdominal distension, or pain
• Manufacturer’s specific instructions for any supplies or equipment
• Feeding guidelines during student transport
• Latex allergy precautions
• Standard precautions
Sources:
Applied Medical Technology. (2013). Patient education guide: guidance and support to
help you manage your gastrostomy tube Balloon Mini One buttons. Available online
at http://www.amtinnovation.com/pdf/AMT_BalloonPatientCare.pdf
Bowden, V., & Greenberg, C. (2012). Pediatric nursing procedures (Third ed.).
Philadelphia: Wolters Kluwer Health/Lippincott Williams & Wilkins, 249-260, 275-
283.
Connecticut State Department of Education. (2012). Clinical procedure guidelines for
Connecticut school nurses. Middlebury, CT: CSDOE, 71-75.

VDH Guidelines for Healthcare Procedures in Schools 115
Feeding Tube Awareness Foundation. (2014). What you need to know now: A parent's
introduction to tube feeding. Available online at
http://www.feedingtubeawareness.org/ParentGuide.pdf
Halyard (formerly Kimberly-Clark Health Care). (2015). Mic-Key care and usage guide.
Available online at http://www.mic-key.com/resources/mic-keystar-care-usage-
guide.aspx
Hockenberry, M., & Wilson, D. (2015). Wong's nursing care of infants and children (10th
ed.). St. Louis: Elsevier Mosby, 937-938.
National Library of Medicine. (2014). Feeding tube insertion-gastrostomy. MedlinePlus.
Available online at http://www.nlm.nih.gov/medlineplus/ency/article/002937.htm
Novotny, N., Vegeler R, Breckler, F., & Rescorla, F. (2009). Percutaneous endoscopic
gastrostomy buttons in children: superior to tubes. Journal of Pediatric Surgery,
44(6), 1193-6.
Porter, S., Branowicki, P., & Palfrey, J. (2014). Supporting students with special health care
needs: Guidelines and procedures for schools (3rd ed.). Baltimore: Paul H. Brookes
Publishing, 220-227.
Rady's Children's Hospital. (2012). Guide to gastrostomy tubes. San Diego. Slideshow
available online at http://www.slideshare.net/missnicoletait/guide-to-gastrostomy-
tubes
Selekman, J. (2013). School nursing: A comprehensive text (2nd ed.). Philadelphia: F.A.
Davis, 1032-1040.
Smith, S., Duell, D. & Martin, B. (2012). Clinical nursing skills: Basic to advanced skills
(8th ed.). Boston: Pearson, 664-675.
Wisconsin Improving School Health Services Project. (2015). Gastrostomy button bolus
feeding. Available online at http://www.wishesproject.org/?page_id=351/?tab=5
Illustration Source:
Rady's Children's Hospital. (2012). Guide to gastrostomy tubes. San Diego. Slideshow
available online at http://www.slideshare.net/missnicoletait/guide-to-gastrostomy-
tubes
Used with permission.

VDH Guidelines for Healthcare Procedures in Schools 116
Procedure for Skin-Level Gastrostomy Device (G-Button)
Feeding—Bolus Method
1. Wash hands.
2. Gather and assemble equipment:
Note: Equipment and feeding supplies are provided by family.
• Liquid formula or feeding solution, at room temperature
• 60 ml catheter-tipped syringe or other
feeding container for feeding
• Adaptor with tubing and clamp (varies
with type of device)
• Water (to flush tubing before and after
feeding)
• Rubber bands and safety pins (to secure G-
tube to clothing)
• Gloves
Identify size and type of gastrostomy device. Shake can well to mix formula and note
expiration date. It is recommended that students receive a ready-to-feed commercial
formula. Potential problems with a homemade blenderized recipe include inaccurate
mixing, which may alter the nutrients and calorie content; separation of solids and
liquids in the solution, which may clog the tube; and increased risk of contamination due
to improper handling, preparation, or storage. Generally, opened formula must be used
within 24-48 hour. Check student IHP for storage instructions.
Tube feedings should be administered at room temperature. Some students get cramps
if the feeding solution is too cold. If a blenderized formula is brought to school, it should
be refrigerated until mealtime and warmed to room temperature. This may be achieved
by holding the container with the formula under warm water for several minutes. A
microwave should not be used for this procedure due to its uneven heat distribution.
3. Measure prescribed amount of formula to be infused.
4. Explain procedure using explanations the student can understand. Encourage the student
to do as much of the procedure as is capable, so as to achieve maximum self-care skills.
5. Position student upright as specified in student plan.
Students usually sit (or may lie on their right side with their head elevated) during
feeding.
Stomach

VDH Guidelines for Healthcare Procedures in Schools 117
6. Inspect skin at gastrostomy site for redness, tenderness, swelling or irritation, or presence
of drainage or gastric leakage.
Report abnormal findings to school nurse and family.
7. Wash hands and put on gloves.
8. Rotate (turn 90 degrees) external stabilizer/bolster according to student's IHP, if ordered.
This may help prevent adhesions.
9. Open the safety plug on the gastrostomy device.
10. Insert adaptor and tubing into gastrostomy device according to manufacturer instructions
(some adaptors lock by lining up two black
guide lines). Stabilize the button to avoid
pushing it into the student's belly. Hold
firmly by the feeding port (not the flange).
11. Flush with 10-30 ml tepid tap water before
feedings or medications to verify placement
and functionality. Follow guidelines in
student's IHP.
12. Administer medication, if prescribed, either
before or after a feeding, as specified in
student's IHP. Use liquid medication, if
possible. Flushing with water between each
medication and not mixing the medications can help to prevent clogging of tube. If the
liquid is thick, it might need to be diluted with a little water to prevent clogging.
13. Remove plunger from syringe and attach the adaptor tubing to the feeding syringe.
14. Slowly pour feeding/fluid into syringe and allow to flow in by gravity.
If a container other than a syringe is used for the feeding, unclamp tubing and allow it to
flow in by gravity, using the same procedure. The flow of feeding may need to be
initiated by placing plunger into barrel of syringe and depressing slightly to get it started
(and then remove plunger).
Be alert to any unusual changes in the student’s tolerance of the feeding.
Nausea/vomiting, cramping, or diarrhea may indicate that the feeding is being given
too quickly or formula is too cold.
15. Continue to pour feeding into syringe as contents empty into stomach. Keep syringe
partially filled to prevent air from entering stomach.
Depending on the age and capabilities of the student, have him/her assist with the feeding
by holding syringe or pouring fluid into it. Provide oral stimulation, if ordered.
Stomach
h

VDH Guidelines for Healthcare Procedures in Schools 118
16. Raise or lower syringe or container to adjust flow to prescribed rate.
The higher the syringe is held, the faster the feeding will flow into the stomach.
17. When feeding is completed, pour prescribed amount of water into syringe and flush
tubing. This will clear tubing of feeding and medication.
18. Clamp adapter tubing, remove from gastrostomy device, and close safety plug into
gastrostomy device.
19. Refer to student's IHP regarding positioning and activity after feeding. Usually student
should remain upright for at least thirty minutes.
20. Wash syringe and other reusable equipment in soapy water. Rinse thoroughly, dry, and
store appropriately.
Open formula is good for 24-48 hours. Check label or student's IHP to determine how
long it may safely be used. Open formula should be stored in the refrigerator in clean
plastic containers (not the original can), labeled with the date it was opened. Discard any
open formula after 48 hours.
21. Remove gloves. Wash hands.
22. Document feeding, any medication, feeding tolerance, and any concern about
gastrostomy site in student’s log and notify family of any changes or concerns.
Sources:
Applied Medical Technology. (2013). Patient education guide: guidance and support to
help you manage your gastrostomy tube Balloon Mini One buttons. Available online
at http://www.amtinnovation.com/pdf/AMT_BalloonPatientCare.pdf
Bowden, V., & Greenberg, C. (2012). Pediatric nursing procedures (Third ed.).
Philadelphia: Wolters Kluwer Health/Lippincott Williams & Wilkins, 249-260, 275-
283.
Connecticut State Department of Education. (2012). Clinical procedure guidelines for
Connecticut school nurses. Middlebury, CT: CSDOE, 71-75.
Feeding Tube Awareness Foundation. (2014). What you need to know now: A parent's
introduction to tube feeding. Available online at
http://www.feedingtubeawareness.org/ParentGuide.pdf

VDH Guidelines for Healthcare Procedures in Schools 119
Halyard (formerly Kimberly-Clark Health Care). (2015). Mic-Key care and usage guide.
Available online at http://www.mic-key.com/resources/mic-keystar-care-usage-
guide.aspx
Hockenberry, M., & Wilson, D. (2015). Wong's nursing care of infants and children (10th
ed.). St. Louis: Elsevier Mosby, 937-938.
National Library of Medicine. (2014). Gastrostomy feeding tube--bolus. MedlinePlus.
Available online at
http://www.nlm.nih.gov/medlineplus/ency/patientinstructions/000165.htm
Novotny, N., Vegeler R, Breckler, F., & Rescorla, F. (2009). Percutaneous endoscopic
gastrostomy buttons in children: superior to tubes. Journal of Pediatric Surgery,
44(6), 1193-6.
Porter, S., Branowicki, P., & Palfrey, J. (2014). Supporting students with special health care
needs: Guidelines and procedures for schools (3rd ed.). Baltimore: Paul H. Brookes
Publishing, 220-227.
Rady's Children's Hospital. (2012). Guide to gastrostomy tubes. San Diego. Slideshow
available online at http://www.slideshare.net/missnicoletait/guide-to-gastrostomy-
tubes
Selekman, J. (2013). School nursing: A comprehensive text (2nd ed.). Philadelphia: F.A.
Davis, 1032-1040.
Smith, S., Duell, D. & Martin, B. (2012). Clinical nursing skills: Basic to advanced skills
(8th ed.). Boston: Pearson, 664-675.
Wisconsin Improving School Health Services Project. (2015). Gastrostomy button bolus
feeding. Available online at http://www.wishesproject.org/?page_id=351/?tab=5
Illustration Source:
Rady's Children's Hospital. (2012). Guide to gastrostomy tubes. San Diego. Slideshow
available online at http://www.slideshare.net/missnicoletait/guide-to-gastrostomy-
tubes
Used with permission.

VDH Guidelines for Healthcare Procedures in Schools 120
Procedure for Skin-Level Gastrostomy Device (G-Button)
Feeding—Slow Drip or Continuous Feeding by Pump
1. Wash hands.
2. Gather and assemble equipment:
Note: Equipment and feeding supplies are provided by family.
• Liquid formula or feeding solution, at room temperature
• 60 ml catheter-tipped syringe or other
feeding container for feeding
• Feeding bag and tubing
• Feeding pump and stand or carry-pack, if
needed
• Adaptor with tubing and clamp (varies
with size and type of device)
• Water (to flush tubing before and after
feeding)
• Rubber bands and safety pins (to secure G-tube to clothing)
• Gloves
Identify size and type of gastrostomy device. Shake can well to mix formula and note
expiration date. It is recommended that students receive a ready-to-feed commercial
formula. Potential problems with a homemade blenderized recipe include inaccurate
mixing, which may alter the nutrients and calorie content; separation of solids and
liquids in the solution, which may clog the tube; and increased risk of contamination due
to improper handling, preparation, or storage. Usually opened formula must be used
within 24 hours. Check student IHP for storage instructions.
Tube feedings should be administered at room temperature. Some students get cramps
if the feeding solution is too cold. If a blenderized formula is brought to school, it should
be refrigerated until mealtime and warmed to room temperature. This may be achieved
by holding the container with the formula under warm water for several minutes. A
microwave should not be used for this procedure due to its uneven heat distribution.
3. Measure prescribed amount of formula to be infused.
4. Explain procedure using explanations the student can understand. Encourage the student
to do as much of the procedure as is capable, so as to achieve maximum self-care skills.
Stomach
ch

VDH Guidelines for Healthcare Procedures in Schools 121
5. Position student upright as specified in student plan.
Students usually sit (or may lie on their right side with their head elevated) during
feeding).
6. Inspect skin at gastrostomy site for redness, tenderness, swelling or irritation, or presence
of drainage or gastric leakage.
Report abnormal findings to school nurse and family.
7. Wash hands and put on gloves.
8. Rotate (turn 90 degrees) external stabilizer/bolster according to student's IHP, if ordered.
This may help prevent adhesions.
9. Open the safety plug on the gastrostomy device.
10. Insert adaptor and tubing into gastrostomy device according to manufacturer instructions
(some adaptors lock into place).
11. Flush with 10-30 ml tepid tap water before feedings or medications. Follow student-
specific guidelines.
12. Administer medication, if prescribed, either
before or after a feeding, as specified in
student guidelines. Use liquid medication, if
possible. Flushing with water between each
medication and not mixing the medications
can help to prevent clogging of tube.
13. Insert adaptor and tubing into gastrostomy
device according to manufacturer
instructions (some adaptors lock into place).
14. Attach the adaptor tubing to feeding bag
tubing.
15. Open clamp of feeding bag tubing and adjust until drips flow at prescribed rate. If pump
is used, open clamp completely, set rate on pump, and monitor for correct rate.
Be alert to any unusual changes in the student’s tolerance of the feeding.
Nausea/vomiting, cramping, or diarrhea may indicate that the feeding is being given
too quickly or formula is too cold.
16. For continuous feeding with pump, add feeding as needed to prevent bag from becoming
empty. No more than 4 hours worth of feeding should be hung at any time to prevent
contamination.
Stomach

VDH Guidelines for Healthcare Procedures in Schools 122
17. If a single feeding is completed (bag empties), clamp feeding bag tubing, and disconnect
feeding bag from adaptor tubing.
18. Use a syringe to flush the gastrostomy device with water (usually 15-30 ml), unless
ordered otherwise.
This will clear device of feeding and medication.
19. Remove adaptor tubing and close safety plug.
20. Refer to student's IHP regarding positioning and activity after feeding. Usually student
should remain upright for at least thirty minutes.
The feeding tube can be disconnected while the student is being transported to and from
school.
21. Wash syringe and other reusable equipment in soapy water. Rinse thoroughly, dry, and
store appropriately.
Open formula is good for 24-48 hours. Check label or student's IHP to determine how
long it may safely be used. Open formula should be stored in the refrigerator in clean
plastic containers (not the original can), labeled with the date it was opened. Discard any
open formula after 48 hours.
22. Remove gloves. Wash hands.
23. Document feeding, any medication, residual amount, feeding tolerance, and any concern
about gastrostomy site in student’s log. Notify family of any changes or concerns.

VDH Guidelines for Healthcare Procedures in Schools 123
Sources:
Applied Medical Technology. (2013). Patient education guide: guidance and support to
help you manage your gastrostomy tube Balloon Mini One buttons. Available online
at http://www.amtinnovation.com/pdf/AMT_BalloonPatientCare.pdf
Bowden, V., & Greenberg, C. (2012). Pediatric nursing procedures (Third ed.).
Philadelphia: Wolters Kluwer Health/Lippincott Williams & Wilkins, 249-260, 275-
283.
Connecticut State Department of Education. (2012). Clinical procedure guidelines for
Connecticut school nurses. Middlebury, CT: CSDOE, 71-75.
Feeding Tube Awareness Foundation. (2014). What you need to know now: A parent's
introduction to tube feeding. Available online at
http://www.feedingtubeawareness.org/ParentGuide.pdf
Halyard (formerly Kimberly-Clark Health Care). (2015). Mic-Key care and usage guide.
Available online at http://www.mic-key.com/resources/mic-keystar-care-usage-
guide.aspx
Hockenberry, M., & Wilson, D. (2015). Wong's nursing care of infants and children (10th
ed.). St. Louis: Elsevier Mosby, 937-938.
National Library of Medicine. (2012). Gastrostomy feeding tube feeding--pump.
MedlinePlus. Available online at
http://www.nlm.nih.gov/medlineplus/ency/patientinstructions/000333.htm
Novotny, N., Vegeler R, Breckler, F., & Rescorla, F. (2009). Percutaneous endoscopic
gastrostomy buttons in children: superior to tubes. Journal of Pediatric Surgery,
44(6), 1193-6.
Porter, S., Branowicki, P., & Palfrey, J. (2014). Supporting students with special health care
needs: Guidelines and procedures for schools (3rd ed.). Baltimore: Paul H. Brookes
Publishing, 220-227.
Rady's Children's Hospital. (2012). Guide to gastrostomy tubes. San Diego. Slideshow
available online at http://www.slideshare.net/missnicoletait/guide-to-gastrostomy-
tubes
Selekman, J. (2013). School nursing: A comprehensive text (2nd ed.). Philadelphia: F.A.
Davis, 1032-1040.

VDH Guidelines for Healthcare Procedures in Schools 124
Smith, S., Duell, D. & Martin, B. (2012). Clinical nursing skills: Basic to advanced skills
(8th ed.). Boston: Pearson, 664-675.
Wisconsin Improving School Health Services Project. (2015). Gastrostomy button
continuous feeding/slow drip. Available online at
http://www.wishesproject.org/?page_id=360/?tab=5
Illustration source:
Rady's Children's Hospital. (2012). Guide to gastrostomy tubes. San Diego. Slideshow
available online at http://www.slideshare.net/missnicoletait/guide-to-gastrostomy-
tubes
Used with permission.

VDH Guidelines for Healthcare Procedures in Schools 125
Possible Problems with Skin-Level Gastrostomy Devices (G-
button)
• Breathing difficulties, choking, coughing, and/or color changes
Stop feeding immediately. There may be aspiration of feeding into the lungs. Call
school nurse if not present. Notify family and activate the school emergency plan. The
most significant risk with tube feedings is aspiration of feeding into the lungs. Be sure
student is positioned with head elevated at least 30 degrees.
Keys to preventing aspiration:
o Proper positioning--head above heart during feeding and 30 minutes after
o Monitoring for coughing, gagging, vomiting, difficulty breathing during feeding
o Ensuring tube is in place.
• Nausea and/or cramping
Make sure feeding is at room temperature.
Check feeding rate. Rate may need to be slowed. Check the length of the G-tube to see
if it has migrated either inward or outward.
If problem continues, notify school nurse, family, and/or health care provider.
• Vomiting
If all the above have been checked, stop feeding, call school nurse or family. Remove
residual and vent, if ordered. Nurse can check for bloating and reduced bowel sounds.
• Blocked gastrostomy tubing
Make sure all clamps on tubing are open.
May be due to inadequate flushing, slow flow rate, or very thick fluid. Check tube
position. Flush with 20-30 ml warm water. Carbonated beverages and juice have not
proven effective in unclogging the tubing. Some students may have a prescribed
declogging agent specified in their IHP that can be tried. Squeeze or roll gastrostomy
tubing with fingers moving slowly down toward student’s stomach. Do not use stylet
(guidewire) to try and unclog as this may damage G-tube. If blockage remains, contact
school nurse or family.
• Leakage
Check position of tube. Make sure length of tubing outside the skin remains the same
(catheter has not migrated). Gently pull on the G-tube to make sure it is against the
inside of the stomach wall. Check volume in balloon (if present). Adjust external
stabilizer for appropriate fit.

VDH Guidelines for Healthcare Procedures in Schools 126
• Redness/irritation/bleeding at site
Check G-tube site for leakage. Clean stoma site if leakage of
food/fluid/medication/stomach contents come in contact with skin. Keep site dry. Make
sure tubing is not being pulled. Loosen external stabilizer if it is too tight. Do not use a
baby bottle nipple as a stabilizer as this traps moisture and puts too much pressure on the
area. Avoid allowing tube to dangle—secure to clothing. Skin barrier or other protective
skin preparations may be used, if ordered. Refer to student's IHP for cleaning or dressing
instructions. In general, soap and water are only cleansing agents needed. If a dressing is
needed, use only precut gauze because threads from hand-cut gauze can adhere to the
stoma. Solutions such as hydrogen peroxide can interfere with skin healing, cause
hypergranulation, and should be avoided, unless specifically ordered.
Look for other signs of infection. Notify school nurse and family of gastrostomy site
concerns.
• G-tube comes out
Follow guidelines in student IHP. The G-tube may need to be reinserted immediately if a
student’s tract closes quickly (often if gastrostomy is less than 1-2 months old). Cover
the site with a dry dressing or large bandage. Notify family. Activate student's
emergency action plan.
Sources:
Applied Medical Technology. (2013). Patient education guide: guidance and support to
help you manage your gastrostomy tube Balloon Mini One buttons. Available online
at http://www.amtinnovation.com/pdf/AMT_BalloonPatientCare.pdf
Bowden, V., & Greenberg, C. (2012). Pediatric nursing procedures (Third ed.). Philadelphia:
Wolters Kluwer Health/Lippincott Williams & Wilkins, 249-260.
Cincinnati Children's Hospital (2012). Gastrostomy tube (G-tube) home care. Available
online at http://www.cincinnatichildrens.org/health/g/g-tube-care/

VDH Guidelines for Healthcare Procedures in Schools 127
Connecticut State Department of Education. (2012). Clinical procedure guidelines for
Connecticut school nurses. Middlebury, CT: CSDOE, 71-75.
Feeding Tube Awareness Foundation. (2014). What you need to know now: A parent's
introduction to tube feeding. Available online at
http://www.feedingtubeawareness.org/ParentGuide.pdf
Halyard (formerly Kimberly-Clark Health Care). (2015). Mic-Key care and usage guide.
Available online at http://www.mic-key.com/resources/mic-keystar-care-usage-
guide.aspx
Hockenberry, M., & Wilson, D. (2015). Wong's nursing care of infants and children (10th
ed.). St. Louis: Elsevier Mosby, 937-938.
National Library of Medicine. (2014). Gastrostomy feeding tube--bolus. MedlinePlus.
Available online at
http://www.nlm.nih.gov/medlineplus/ency/patientinstructions/000165.htm
Porter, S., Branowicki, P., & Palfrey, J. (2014). Supporting students with special health care
needs: Guidelines and procedures for schools (3rd ed.). Baltimore: Paul H. Brookes
Publishing, 227.
Rady's Children's Hospital. (2012). Guide to gastrostomy tubes. San Diego. Slideshow
available online at http://www.slideshare.net/missnicoletait/guide-to-gastrostomy-
tubes
Selekman, J. (2013). School nursing: A comprehensive text (2nd ed.). Philadelphia: F.A.
Davis, 1032-1040.
Simmons, Remmington R. (2013). The percutaneous endoscopic gastrostomy tube: A nurse’s
guide to PEG tubes. Medsurg Nursing, 22(2), 77-83.
Smith, S., Duell, D. & Martin, B. (2012). Clinical nursing skills: Basic to advanced skills
(8th ed.). Boston: Pearson, 664-675.
Tkacz, Browne, N., Flanigan, L.M., McComiskay, C.A., Piper, P. (2013). Nursing care of the
pediatric surgical patient (Third ed.). Massachusetts: Jones & Barlett, 101-112.
Wisconsin Improving School Health Services Project. (2015). Gastrostomy button
continuous feeding/slow drip. Available online at
http://www.wishesproject.org/?page_id=360/?tab=5
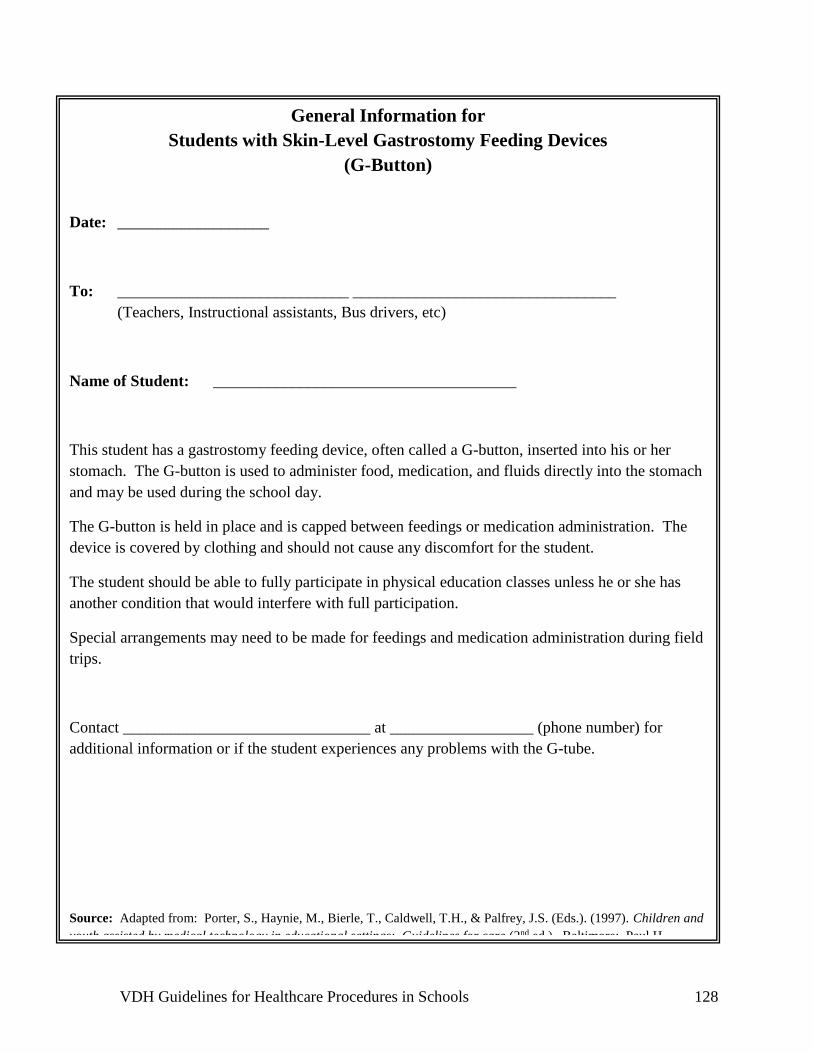
VDH Guidelines for Healthcare Procedures in Schools 128
General Information for
Students with Skin-Level Gastrostomy Feeding Devices
(G-Button)
Date: ___________________
To: _____________________________ _________________________________
(Teachers, Instructional assistants, Bus drivers, etc)
Name of Student: ______________________________________
This student has a gastrostomy feeding device, often called a G-button, inserted into his or her
stomach. The G-button is used to administer food, medication, and fluids directly into the stomach
and may be used during the school day.
The G-button is held in place and is capped between feedings or medication administration. The
device is covered by clothing and should not cause any discomfort for the student.
The student should be able to fully participate in physical education classes unless he or she has
another condition that would interfere with full participation.
Special arrangements may need to be made for feedings and medication administration during field
trips.
Contact _______________________________ at __________________ (phone number) for
additional information or if the student experiences any problems with the G-tube.
Source: Adapted from: Porter, S., Haynie, M., Bierle, T., Caldwell, T.H., & Palfrey, J.S. (Eds.). (1997). Children and
youth assisted by medical technology in educational settings: Guidelines for care (2nd ed.). Baltimore: Paul H.
Brookes Publishing.

VDH Guidelines for Healthcare Procedures in Schools 129
Nasogastric Tube
A nasogastric tube (NG-tube) is a rubber or plastic tube that passes through a nostril, down
the throat and esophagus, and into the stomach. It can be used to give liquids, medication,
and feedings when needed. NG-tubes are usually used for relatively short periods of time
during hospitalizations. If access to the stomach is needed for longer periods, a gastrostomy
is usually performed. Due to the concerns about aspiration and reflux, NG tubes are rarely
encountered in the school setting now. If a student does present to school with an NG tube or
an NJ (nasojejunal) tube, the student will require very detailed, individualized instructions for
all aspects of its care. Work with the health care provider and family to develop detailed
instructions for the student's IHP and emergency action plan.

VDH Guidelines for Healthcare Procedures in Schools 130
Jejunostomy Tube
Overview
A jejunostomy is a surgically created opening into the part of the small intestine that lies
between the duodenum and the ileum. The jejunostomy tube (J-tube) is a silicon catheter that
may be placed directly through the skin of the abdomen into the jejunum and can usually be
found on the right side of the abdomen.
Some students may have a G-tube and a J-tube in the same stoma. There may be two
separate tubes or one tube with several different ports. Other students may have two stomas
with a gastrostomy device in one and a jejunostomy device in the other. When there are two
stomas, the gastrostomy device may just be
used for venting.
The gastrojejunal tube (G-J tube) is a single
tube with three limbs, including a gastric
port, a jejunal port, and a balloon inflation
limb to hold the tube in place. It is inserted
through a gastrostomy site and threaded
through the pylorus into the jejunum. The
tube remains in the small intestine at all
times and must not move in or out. There
may be a tube on the outside of the skin or a
skin-level feeding device (G-J button).
Certain medications may not be
administered into the jejunum and must be
administered through the gastric port of the
G-J tube.
Used to bypass the mouth and stomach and
to administer food and fluids directly into the jejunum, the jejunostomy poses less risk for
aspiration and gastroesophageal reflux. It may be used when the student has a depressed gag
reflex, an obstruction in the esophagus or stomach, or an intestinal pseudo-obstruction. It
may also be used when the stomach cannot be used, such as after stomach surgery or when
there is a problem with stomach emptying. Residuals are usually not checked with J-tubes.
Feedings are given continuously over several hours. Bolus feedings are not given via the
jejunostomy since this may cause dumping syndrome and malabsorption of nutrients.
Jejunal feedings are administered slowly as a continuous drip over a number of hours. The
jejunum does not tolerate larger, bolus feeds. J-tubes and G-J tubes should not be rotated to
avoid potential kinking or dislodgement. They should be flushed with water, 15-30 ml.,
every 6 hours to prevent clogging.
Feed directly
- May vent stomach
with syringe or
Farrell bag.
VDH Guidelines for Healthcare Procedures in Schools 131
Settings and Staff
Students can receive feedings anywhere. Many of the pumps are small and designed to be
easily worn or carried at all times. Student’s desire for privacy and possible need for
stationery activities during a feed should be considered in determining where feeds will take
place. A few students with J-tubes may not need to receive feeds during the school day.
Students who require venting or drainage of their gastrostomy tubes should have this done in
a clean, private area such as the health office. Some children may have the gastrostomy tube
part vented continuously to a small drainage bag. J-Tubes and G-Tubes are usually covered
by the student’s clothing and do not interfere with normal school activities. Participation in
physical education activities may require modification and are determined on an individual
basis.
A jejunostomy feeding may be administered by the school nurse (RN or LPN). It should not
be done by a non-licensed health assistant. The student should be encouraged to assist with
the J-tube feeding as much as possible.
School personnel who have regular contact with a student who has a J-tube should receive
training covering the student’s specific needs, potential problems, and implementation of the
established emergency plan.
Individualized Healthcare Plan (IHP)
Each student’s IHP must be tailored to the individual’s needs. A sample plan is included in
Appendix A. When preparing an IHP for a student with a jejunostomy, the following items
should be considered:
• Underlying condition and possible problems associated with the condition or
treatment
• Size and type of feeding device
• Length of J-tube or G-J-tube outside of the body (important to know in determining
whether the tube has migrated)
• Healthcare provider's order for G-J tube and its care
• Amount, type, and frequency of formula to be received
• Storage of formula
• How long formula made be used after container opened
• When the tube should be flushed, such as before and after administration of feeds or
medications
• Amount (volume) and type of flush liquid
• Whether G-tube needs venting during jejunostomy feeds
VDH Guidelines for Healthcare Procedures in Schools 132
• Type of portable pump and its specific instructions
• Positioning during and after feeding
• Activity level during and after feeding
• Whether medications are administered through J-tube or G-tube
• Amount of food or drink a student can take by mouth
• Patency of jejunostomy tract and time frame for reinsertion should the J-tube fall out
• Actions to take if student has vomiting, abdominal distension, or pain
• Manufacturer’s specific instructions for any supplies or equipment
• Feeding guidelines during student transport
• Latex allergy precautions
• Standard precautions

VDH Guidelines for Healthcare Procedures in Schools 133
Sources:
Bowden, V., & Greenberg, C. (2012). Pediatric nursing procedures (3rd ed.). Philadelphia:
Wolters Kluwer Health/Lippincott Williams & Wilkins, 249-260, 275-283.
Cincinnati Children's Hospital (2012). Gastrostomy-Jejunostomy tube care. Available online
at http://www.cincinnatichildrens.org/health/g/gastro-jejuno-tube/
Connecticut State Department of Education. (2012). Clinical procedure guidelines for
Connecticut school nurses. Middlebury, CT: CSDOE, 71-75.
Halyard (formerly Kimberly-Clark Health Care). (2015). Mic-Key care and usage guide.
Available online at http://www.mic-key.com/resources/mic-keystar-care-usage-
guide.aspx
Hockenberry, M., & Wilson, D. (2015). Wong's nursing care of infants and children (10th
ed.). St. Louis: Elsevier Mosby, 937-938.
National Library of Medicine. (2012). Jejunostomy feeding tube . MedlinePlus. Available
online at http
http://www.nlm.nih.gov/medlineplus/ency/patientinstructions/000181.htm.
Porter, S., Branowicki, P., & Palfrey, J. (2014). Supporting students with special health care
needs: Guidelines and procedures for schools (3rd ed.). Baltimore: Paul H. Brookes
Publishing, 236-243.
Rady's Children's Hospital. (2012). Guide to gastrostomy tubes. San Diego. Slideshow
available online at http://www.slideshare.net/missnicoletait/guide-to-gastrostomy-
tubes
Selekman, J. (2013). School nursing: A comprehensive text (2nd ed.). Philadelphia: F.A.
Davis, 1032-1040.
Smith, S., Duell, D. & Martin, B. (2012). Clinical nursing skills: Basic to advanced skills
(8th ed.). Boston: Pearson, 664-675.
Wisconsin Improving School Health Services Project. (2015). Jejunostomy tube continuous
feeding. Available online at http://www.wishesproject.org/?page_id=380/?tab=5
Illustration Source:
Rady's Children's Hospital. (2012). Guide to gastrostomy tubes. San Diego. Slideshow
available online at http://www.slideshare.net/missnicoletait/guide-to-gastrostomy-
tubes. Used with permission.

VDH Guidelines for Healthcare Procedures in Schools 134
Procedure for Jejunostomy Tube Feeding – Continuous
Feeding by Pump
1. Wash hands.
2. Gather and assemble equipment:
Note: Equipment and feeding supplies are provided by family.
• Liquid formula or feeding solution, at room
temperature
• 10 ml syringe
• Feeding bag and tubing
• Feeding pump and stand or carry-pack, if
needed
• Clamp or plug for end of tube
• Water (to flush tubing before and after
feeding)
• Rubber bands and safety pins (to secure J-
tube to clothing)
• Gloves
Identify size and type of J-tube. Shake can well
to mix formula and note expiration date. It is recommended that students receive a
ready-to-feed commercial formula. Potential problems with a homemade blenderized
recipe include inaccurate mixing, which may alter the nutrients and calorie content;
separation of solids and liquids in the solution, which may clog the tube; and increased
risk of contamination due to improper handling, preparation, or storage. Usually opened
formula must be used within 24-48 hours. Check student IHP for storage instructions.
Tube feedings should be administered at room temperature. Some students get cramps
if the feeding solution is too cold. If a blenderized formula is brought to school, it should
be refrigerated until mealtime and warmed to room temperature. This may be achieved
by holding the container with the formula under warm water for several minutes. A
microwave should not be used for this procedure due to its uneven heat distribution.
3. Shake formula (to mix) and measure prescribed amount of formula to be infused.

VDH Guidelines for Healthcare Procedures in Schools 135
4. Explain procedure using explanations the student can understand. Encourage the student
to do as much of the procedure as is capable, so as to achieve maximum self-care skills.
5. Position student upright as specified in student plan.
Students usually sit (or may lie on their right side with their head elevated) during
feeding. Tubing may be pinned to shirt. Make sure clamp is not pressing on skin.
6. Wash hands and put on gloves.
7. Inspect skin at gastrostomy/jejunostomy site(s) for redness, tenderness, swelling or
irritation, or presence of drainage or gastric leakage. Observe whether tubing length is
marked at entrance.
Report abnormal findings to school nurse and family.
8. Pour feeding/fluids into feeding bag. Run through tubing and fill drip chamber according
to tubing directions. Run through rest of tubing to the tip. Clamp.
9. Hang bag on pole above pump or at height to achieve prescribed flow. If a pump is used,
insert tubing in pump mechanism and set proper flow rate. Some students may have
pumps which are designed to hold the feeding and be worn around the waist or over the
shoulder. Follow manufacturer instructions for use and student's IHP for activity level
during feed.
10. J-tubes should be flushed with 5-10 ml tepid water before the administration of feeds or
medications. Open safety plug and insert tubing into J-tube. Follow guidelines in
student's IHP.
11. Administer medication, if prescribed, either before or after a feeding, as specified in
student's IHP. Always flush before administering medications. Use liquid medication, if
possible. Flushing with water between each medication and not mixing the medications
can help to prevent clogging of tube. If the liquid is thick, it might need to be diluted
with a little water to prevent clogging. Certain medications may not be administered into
the jejunum and must be administered through the gastric port of a G-J tube.
12. Insert tip of feeding bag tubing into J-tube. Connection may be taped or luer-locked to
prevent disconnection. Unclamp J-tube.
Be careful not to apply unnecessary pull on jejunostomy.
13. Vent G-tube if ordered during feeding. Syringe or drainage bag may be used for venting.
14. Open roller clamp of feeding bag tubing and adjust until drips flow at prescribed rate.
However, feeding pump will usually be ordered. If feeding pump is used, open clamp
completely, set rate on pump, and monitor for correct rate.

VDH Guidelines for Healthcare Procedures in Schools 136
Be alert to any unusual changes in the student’s tolerance of the feeding.
Nausea/vomiting, cramping, or diarrhea may indicate that the feeding is being given
too quickly or formula is too cold.
15. For continuous feeding with pump, add feeding as needed to prevent bag from becoming
empty. No more than 4 hours worth of feeding should be hung at any time to prevent
contamination. Flush jejunostomy 4 times a day with 15-30 ml. water to prevent
clogging.
16. If a feeding is completed (bag empties) during school time, clamp feeding bag tubing,
and clamp J-tube.
17. Disconnect feeding bag and tubing from J-tube.
18. Unclamp J-tube and use a syringe to flush with water, usually 5-10 ml as prescribed in
student's IHP.
This will clear tubing of feeding and medication and help to prevent obstruction.
19. Clamp and plug J-tube.
20. Secure tubing and tuck inside clothes, but not inside diaper or underpants.
21. Refer to student IHP regarding positioning and activity after feeding. Students are usually
kept in an upright position for at least 30 minutes after feeding if there are no conflicting
orders.
The feeding tube can be disconnected while the student is being transported to and from
school.
22. Wash syringe and other reusable equipment in soapy water. Rinse thoroughly, dry, and
store appropriately.
Open formula is good for 24-48 hours. Check label or student guidelines to determine
how long it may safely be used. Open formula should be stored in clean plastic
containers, labeled correctly (not the original can) in the refrigerator. Discard any open
formula after 48 hours.
23. Remove gloves. Wash hands.
24. Document feeding, any medication, residual amount, feeding tolerance, and any concern
about jejunostomy/gastrostomy site in student’s log. Notify school nurse and family of
any changes or concerns.

VDH Guidelines for Healthcare Procedures in Schools 137
Sources:
Bowden, V., & Greenberg, C. (2012). Pediatric nursing procedures (3rd ed.). Philadelphia:
Wolters Kluwer Health/Lippincott Williams & Wilkins, 249-260.
Cincinnati Children's Hospital (2012). Gastrostomy-Jejunostomy tube care. Available online
at http://www.cincinnatichildrens.org/health/g/gastro-jejuno-tube/
Connecticut State Department of Education. (2012). Clinical procedure guidelines for
Connecticut school nurses. Middlebury, CT: CSDOE, 71-75.
Halyard (formerly Kimberly-Clark Health Care). (2015). Mic-Key care and usage guide.
Available online at http://www.mic-key.com/resources/mic-keystar-care-usage-
guide.aspx
Hockenberry, M., & Wilson, D. (2015). Wong's nursing care of infants and children (10th
ed.). St. Louis: Elsevier Mosby, 937-938.
National Library of Medicine. (2012). Jejunostomy feeding tube . MedlinePlus. Available
online at http
http://www.nlm.nih.gov/medlineplus/ency/patientinstructions/000181.htm
Porter, S., Branowicki, P., & Palfrey, J. (2014). Supporting Students with special health care
needs: Guidelines and procedures for schools (3rd ed.). Baltimore: Paul H. Brookes
Publishing, 236-243.
Rady's Children's Hospital. (2012). Guide to gastrostomy tubes. San Diego. Slideshow
available online at http://www.slideshare.net/missnicoletait/guide-to-gastrostomy-
tubes
Selekman, J. (2013). School nursing: A comprehensive text (2nd ed.). Philadelphia: F.A.
Davis, 1032-1040.
Simmons, Remmington R. (2013). The percutaneous endoscopic gastrostomy tube: A nurse’s
guide to PEG tubes. Medsurg Nursing, 22(2), 77-83.
Smith, S., Duell, D. & Martin, B. (2012). Clinical nursing skills: Basic to advanced skills
(8th ed.). Boston: Pearson, 664-675.
Tkacz, Browne, N., Flanigan, L.M., McComiskay, C.A., Piper, P. (2013). Nursing care of the
pediatric surgical patient (Third ed.). Massachusetts: Jones & Barlett, 101-112.
Wisconsin Improving School Health Services Project. (2015). Jejunostomy tube continuous
feeding. Available online at http://www.wishesproject.org/?page_id=380/?tab=5

VDH Guidelines for Healthcare Procedures in Schools 138
Illustration Source:
Rady's Children's Hospital. (2012). Guide to gastrostomy tubes. San Diego. Slideshow
available online at http://www.slideshare.net/missnicoletait/guide-to-gastrostomy-
tubes
Used with permission.
VDH Guidelines for Healthcare Procedures in Schools 139
Possible Problems that May Occur with Jejunostomies
• Breathing difficulties, choking, coughing, and/or color changes
Some students may experience increased respiratory secretions while receiving feedings
and may need suctioning. Stop feeding and follow student-specific instructions for
suctioning. Position student with head elevated at least 30 degrees. If problem continues
after suctioning, notify school nurse and family.
• Sweating, increased heart rate, pale skin color, irritability, diarrhea
This may be signs of dumping syndrome, which can occur when volume or type of
formula is increased. The feeding will usually need to be stopped until symptoms
subside. Notify school nurse and family and follow student's IHP.
• Nausea and/or cramping
Make sure feeding is at room temperature. Check feeding rate. Rate may need to be
decreased. If problem continues, notify school nurse and family.
• Vomiting
Jejunostomy tube may be dislodged from jejunum. Stop feeding. Notify school nurse,
health care provider, and family.
May need to vent G-tube if it was clamped during jejunal feeding.
• Jejunal feeding contents in G-tube drainage
J-tube may be dislodged from jejunum. Stop feeding. Notify school nurse, family,
and/or health care provider.
• Blocked jejunostomy tubing
Make sure all tubing clamps are open.
May be due to inadequate flushing, slow flow rate, or very thick fluid. Check tube
position. Flush with 5 ml warm water. Carbonated beverages and juice have not proven
effective in unclogging the tubing. Squeeze or roll jejunostomy tubing with fingers
moving slowing down toward student’s stomach. Do not use stylet (guidewire) to try and
unclog as it may damage tube. If blockage remains, contact school nurse or family.
• Leakage
Drainage from jejunostomy is very caustic. Make sure tubing is not being pulled.
Check position of tube. Make sure length of tubing outside the skin remains the same
(catheter has not migrated). Check plug on G-J tube to make sure gastric port is securely
attached.

VDH Guidelines for Healthcare Procedures in Schools 140
• Redness/irritation/bleeding at the site
Check site for leakage. Drainage from jejunostomy is very caustic. Clean stoma site if
leakage of food/fluid/medication/stomach or intestinal contents come in contact with
skin. Keep site dry. Make sure tubing is not being pulled. Loosen external stabilizer if it
is too tight. Avoid allowing tube to dangle—secure to clothing. Skin barrier or other
protective skin preparations may be used, if ordered. Refer to student's IHP for cleaning
or dressing instructions. In general, soap and water are only cleansing agents needed. If
a dressing is needed, use only precut gauze because threads from hand-cut gauze can
adhere to the stoma. Solutions such as hydrogen peroxide can interfere with skin healing
and should be avoided, unless specifically ordered. Monitor for other signs of infection.
Notify school nurse and family of any concerns.
• J-tube falls out
Follow guidelines in student's IHP. Cover the site with dry dressing or large bandage. A
tube may need to be reinserted immediately to keep site open if a student’s tract closes
quickly, but must be inserted by the student's health care provider. Notify the school nurse,
family and health care provider. A backup gastrostomy tube should be placed in stoma tract until
J-tube can be replaced.
Sources:
Bowden, V., & Greenberg, C. (2012). Pediatric nursing procedures (3rd ed.). Philadelphia:
Wolters Kluwer Health/Lippincott Williams & Wilkins, 249-260.
Cincinnati Children's Hospital (2012). Gastrostomy-Jejunostomy tube care. Available online
at http://www.cincinnatichildrens.org/health/g/gastro-jejuno-tube/
Connecticut State Department of Education. (2012). Clinical procedure guidelines for
Connecticut school nurses. Middlebury, CT: CSDOE, 71-75.
Halyard (formerly Kimberly-Clark Health Care). (2015). Mic-Key care and usage guide.
Available online at http://www.mic-key.com/resources/mic-keystar-care-usage-
guide.aspx
Hockenberry, M., & Wilson, D. (2015). Wong's nursing care of infants and children (10th
ed.). St. Louis: Elsevier Mosby, 937-938.
National Library of Medicine. (2012). Jejunostomy feeding tube . MedlinePlus. Available
online at http
http://www.nlm.nih.gov/medlineplus/ency/patientinstructions/000181.htm

VDH Guidelines for Healthcare Procedures in Schools 141
Porter, S., Branowicki, P., & Palfrey, J. (2014). Supporting students with special health care
needs: Guidelines and procedures for schools (3rd ed.). Baltimore: Paul H. Brookes
Publishing, 236-243.
Rady's Children's Hospital. (2012). Guide to gastrostomy tubes. San Diego. Slideshow
available online at http://www.slideshare.net/missnicoletait/guide-to-gastrostomy-
tubes
Selekman, J. (2013). School nursing: A comprehensive text (2nd ed.). Philadelphia: F.A.
Davis, 1032-1040.
Smith, S., Duell, D. & Martin, B. (2012). Clinical nursing skills: Basic to advanced skills
(8th ed.). Boston: Pearson, 664-675.
Wisconsin Improving School Health Services Project. (2015). Jejunostomy tube continuous
feeding. Available online at http://www.wishesproject.org/?page_id=380/?tab=5

VDH Guidelines for Healthcare Procedures in Schools 142
General Information for
Students with Jejunostomy Tubes
Date: ___________________
To: _______________________________________________________________
(Teachers, Instructional assistants, Bus drivers, etc)
Name of Student: ______________________________________
This student has a jejunostomy tube (J-tube) inserted into the small intestine. The J-tube is used to
administer food, medication, and fluids directly into the small intestine and may be used during the
school day.
The tube is held in place at all times and is clamped or capped between feedings or medication
administration. The tube is covered by clothing and should not cause any discomfort for the student.
The student’s privacy should be assured during feedings and medication administration.
The student should be able to fully participate in physical education classes unless he or she has another
condition that would interfere with full participation.
Special arrangements may need to be made for feedings and medication administration during field
trips.
Contact _______________________________ at __________________ (phone number) for additional
information or if the student experiences any problems with the J-tube.
Source: Adapted from: Porter, S., Haynie, M., Bierle, T., Caldwell, T.H., & Palfrey, J.S. (Eds.). (1997). Children and
youth assisted by medical technology in educational settings: Guidelines for care (2nd ed.). Baltimore: Paul H. Brookes
Publishing.

VDH Guidelines for Healthcare Procedures in Schools 143
General Information Sheet
Students with Jejunostomy Tubes
Dear (teacher, instructional assistant, bus driver):
_______________________________________ [Student’s name] has a condition that
requires a jejunostomy tube (J-tube). This is a simple and safe way of giving food, medication,
and fluids directly into the intestine because the student is unable to take these by mouth.
The jejunostomy is a surgical opening into the jejunum (part of the small intestine). A flexible
tube (i.e., the J-tube) is put into the surgical opening. It is held in place on the outside at all
times. The tube is clamped or capped between feedings to prevent leakage. The J-tube usually
does not cause the student discomfort and is covered by clothing.
The student may receive feedings or medication through the J-tube as needed during the
schoolday in the classroom, the lunchroom, or the health office. Unless he or she has a
condition that otherwise would interfere with participation in physical education or other
activities, there is no reason why he or she cannot participate fully. Special consideration may
be needed, however, for field trips or other activities during which the student may not be able
to receive a regularly scheduled feeding.
The following staff members have been trained to deal with any problems that may arise with
this student:
______________________________________________________________
______________________________________________________________
______________________________________________________________
For more information about J-tubes or the student’s needs, consult the school nurse or family.
Source: Porter, S., Haynie, M., Bierle, T., Caldwell, T. H., & Palfrey, J. S. (Eds.). (1997). Children and Youth
Assisted by Medical Technology in Educational Settings: Guidelines for Care. (2nd ed.). Baltimore: Paul H.
Brookes Publishing

VDH Guidelines for Healthcare Procedures in Schools 144
Nasojejunal Tube
A nasojejunal tube (NJ-tube) is a tiny rubber or plastic tube that passes through a nostril,
down the throat and esophagus, stomach, and into the jejunum of the small intestine. It can
be used to give liquids, medication, and feedings when needed. NJ-tubes are usually used
only during hospitalizations. If access to the jejunum is needed for longer periods, a gastric-
jejunostomy is usually performed. Due to the concerns about aspiration and reflux, NJ tubes
are rarely encountered in the school setting now. If a student does present to school with an a
NJ (nasojejunal) tube, the student will require very detailed, individualized instructions for
all aspects of its care. Work with the health care provider and family to develop detailed
instructions for the student's IHP and emergency action plan.

VDH Guidelines for Healthcare Procedures in Schools 145
Colostomy Overview
A colostomy is a surgically-created opening in the
large intestine (colon) used to eliminate fecal material.
A piece of the colon is brought through the abdominal
wall out to the skin surface of the abdomen and folded
back onto itself to form a stoma. The stoma is red or
dark pink in color and moist, much like the mucosal
lining of the mouth. A colostomy can be permanent or
temporary.
Colostomies are named for the portion of the colon
used to form the stoma. The character of the stool that
is drained also depends on the location of the
colostomy. An ostomy in the sigmoid or descending
colon (most common) will be found on the left side of the abdomen and will pass stool that is
soft and semi-formed because it will have passed through most of the colon where the water
is absorbed. However, an ostomy in the transverse colon or ascending colon will pass stool
that is semi-liquid.
Some students may have two stomas. One stoma connects to the proximal end of the
intestine and functions as the colostomy where stool will come out. The other end, the mucus
fistula, is connected to the remaining part of the intestine which passes only the mucus that is
produced by the portion of the colon no longer connected to the rest of the digestive tract.
Students receive ostomies for a variety of reasons. Some have birth defects such as
imperforate anus, spina bifida, or Hirschsprung’s Disease that require an alternate method of
bowel elimination. Others may receive a colostomy due to ulcerative colitis, Crohn’s
disease, polyposis, injury, or nerve damage.
A pouch is worn over the colostomy to collect stool. Pouch
systems can be reusable or disposable, drainable or close-
bottomed, and one-piece or two-piece. Pouches typically last
1-7 days. They protect the stoma, as well as the skin around
the stoma (peristomal). Stomas are rich in blood supply and
may bleed slightly if irritated or rubbed. Because the stoma
itself does not have nerve endings, irritation of the stoma does
not usually cause discomfort. However, the skin surrounding
the stoma does have nerve endings and may be sensitive to
manipulation of the stoma or to contact with any discharge
from the stoma. Therefore, good skin care and a properly
fitting pouch are essential to preventing irritation and

VDH Guidelines for Healthcare Procedures in Schools 146
breakdown at the stoma site. If the opening of the pouch is too large, it can expose skin to
fecal matter and moisture. If it is too tight or constrictive, it can cut or injure the stoma. A
skin barrier is also usually applied around the stoma to protect it.
Settings and Staff
The pouch should be emptied whenever it is one-third to one-half full or if a leak occurs.
The student’s privacy must be ensured whether the student cares for the ostomy by
him/herself or receives assistance. Pouch changes are routinely performed at home, but may
need to be done at school if a leak occurs or the pouch fills. A student with an ostomy should
be able to participate in all school activities, including physical education.
Emptying and cleaning the pouch can be done by the student, the school nurse, or any adult
trained in appropriate techniques and problem management of ostomies. Application of the
pouch is best done by a registered or licensed practical school nurse if the student requires
assistance. School staff who have regular contact with a student with a colostomy should
receive general training covering the student’s specific needs, potential problems, and
implementation of the established emergency plan.
Individualized Healthcare Plan (IHP)
Each student’s IHP must be tailored to the individual’s needs. A sample plan is included in
Appendix A. When preparing an IHP for a student with a colostomy, the following items
should be considered:
• Underlying condition and possible problems associated with the condition or treatment
• Type of ostomy and pouch
• Any doctor's orders for special care or procedures
• Student's ability to provide self-care
• Access to a change of clothing at school
• Access to private bathroom
• Stoma care—cleansing supplies and frequency; barrier supplies
• Stoma appearance and changes that require reporting
• Usual stool consistency, frequency, amount
• Latex allergy precautions
• Standard precautions
Sources:

VDH Guidelines for Healthcare Procedures in Schools 147
Bowden, V., & Greenberg, C. (2012). Pediatric nursing procedures (3rd ed.). Philadelphia:
Wolters Kluwer Health/Lippincott Williams & Wilkins, 519-525.
Connecticut State Department of Education. (2012). Clinical procedure guidelines for
Connecticut school nurses. Middlebury, CT: CSDOE, 93-94.
Hockenberry, M., & Wilson, D. (2015). Wong's nursing care of infants and children (10th
ed.). St. Louis: Elsevier Mosby, 940-941.
Hollister. (2007). Caring for your child with an ostomy. Available online at
https://www.hollister.com/us/files/pdfs/osted_pcb_pediatric.pdf
National Institute of Diabetes and Digestive and Kidney Diseases, National Institutes of
Health. (2014). Ostomy surgery of the bowel. NIH Publication No. 14-4641.
Available online at http://www.niddk.nih.gov/health-information/health-
topics/digestive-diseases/ostomy-surgery-
bowel/Documents/Ostomy_Surgery_508.pdf.
Porter, S., Branowicki, P., & Palfrey, J. (2014). Supporting students with special health care
needs: Guidelines and procedures for schools (3rd ed.). Baltimore: Paul H. Brookes
Publishing, 291-298.
Selekman, J. (2013). School nursing: A comprehensive text (2nd ed.). Philadelphia: F.A.
Davis, 1041-1042.
Smith, S., Duell, D. & Martin, B. (2012). Clinical nursing skills: Basic to advanced skills
(8th ed.). Boston: Pearson, 823-826, 846-855.
United Ostomy Associations of America. (2011). Colostomy guide. Available online:
http://www.ostomy.org/uploaded/files/ostomy_info/ColostomyGuide.pdf?direct=1
Wisconsin Improving School Health Services Project. (2015). Ostomy care. Available online
at http://www.wishesproject.org/?page_id=428/?tab=5
Illustration Sources:
National Institute of Diabetes and Digestive and Kidney Diseases, National Institutes of
Health. (2014).
Image Library. NO1666. Available online at
https://www.catalog.niddk.nih.gov/ImageLibrary
National Institute of Diabetes and Digestive and Kidney Diseases, National Institutes of
Health. (2014).

VDH Guidelines for Healthcare Procedures in Schools 148
Image Library. NO1739. Available online at
https://www.catalog.niddk.nih.gov/ImageLibrary

VDH Guidelines for Healthcare Procedures in Schools 149
Procedure for Emptying a Colostomy
1. Wash hands.
2. Assemble equipment:
Note: Family provides equipment and supplies. Student should have a complete
set of ostomy supplies at school with a spare pouch and clip/pouch closure.
• Tissue, wet washcloth, paper towel, or wet wipe
• Toilet or container to dispose of wastes
• Gloves, if pouch is to be emptied by someone other than student
• Clean pouch with clip closure
• Extra pouch supplies
3. Explain procedure using explanations the student can understand. Encourage the
student to do as much of the procedure as is capable, so as to achieve maximum self-
care skills.
4. Wash hands and put on gloves. Wash student's hands if they are assisting.
5. Empty when 1/3-1/3 full of stool or gas. If emptying into a toilet, place a piece of
toilet paper in toilet to prevent splashing.
6. Tilt the bottom of the pouch upward and remove the clamp.
7. Fold the bottom of the pouch up to form a cuff before emptying.
Cuff helps keep bottom of pouch clean during emptying.
8. Slowly unfold end of pouch and empty contents of pouch into toilet or container.
Sliding your hands down the outside of the pouch can help to push out the stool.
9. Wipe the bottom of the pouch with tissue, wet washcloth, paper towel, or wet wipe
and unfold cuff. Pouch deodorant can be applied, if specified in student's IHP. Do
not use oils or soap because they can weaken the pouch seal. Rinsing with water can
also weaken the skin barrier seal and should be avoided.
10. Re-apply clamp closure.
11. Flatus can be released through the gas release valve, if the pouch has one. If there is
no valve, flatus can be expelled by tilting the bottom of the pouch upward, releasing
the clamp, and expelling the flatus. Re-apply clamp.
12. Flush wastes in toilet.
13. Remove gloves and wash hands. Wash student's hands also if they assist.

VDH Guidelines for Healthcare Procedures in Schools 150
14. Report any change in student’s usual pattern to school nurse and family.
15. Document actions and observations.
Sources:
Bowden, V., & Greenberg, C. (2012). Pediatric nursing procedures (3rd ed.). Philadelphia:
Wolters Kluwer Health/Lippincott Williams & Wilkins, 519-525.
Connecticut State Department of Education. (2012). Clinical procedure guidelines for
Connecticut school nurses. Middlebury, CT: CSDOE , 93-94.
Hockenberry, M., & Wilson, D. (2015). Wong's nursing care of infants and children (10th
ed.). St. Louis: Elsevier Mosby, 940-941.
Hollister. (2007). Caring for your child with an ostomy. Available online at
https://www.hollister.com/us/files/pdfs/osted_pcb_pediatric.pdf
National Institute of Diabetes and Digestive and Kidney Diseases, National Institutes of
Health. (2014). Ostomy surgery of the bowel. NIH Publication No. 14-4641.
Available online at http://www.niddk.nih.gov/health-information/health-
topics/digestive-diseases/ostomy-surgery-
bowel/Documents/Ostomy_Surgery_508.pdf
Porter, S., Branowicki, P., & Palfrey, J. (2014). Supporting students with special health care
needs: Guidelines and procedures for schools (3rd ed.). Baltimore: Paul H. Brookes
Publishing, 291-298.
Selekman, J. (2013). School nursing: A comprehensive text (2nd ed.). Philadelphia: F.A.
Davis, 1041-1042.
Smith, S., Duell, D. & Martin, B. (2012). Clinical nursing skills: Basic to advanced skills
(8th ed.). Boston: Pearson, 823-826, 846-853.
United Ostomy Associations of America. (2011). Colostomy guide. Available online:
http://www.ostomy.org/uploaded/files/ostomy_info/ColostomyGuide.pdf?direct=1
Wisconsin Improving School Health Services Project. (2015). Emptying ostomy pouch.
Available online at http://www.wishesproject.org/?page_id=262/?tab=5

VDH Guidelines for Healthcare Procedures in Schools 151
Procedure for Changing a Colostomy Pouch
1. Wash hands.
2. Assemble equipment:
Note: Family provides equipment and supplies. Student should have a complete
set of ostomy supplies at school with a spare pouch and clip/pouch closure. Routine
pouch changes should be performed at home.
• Water
• Skin cleanser
• Soft cloth or gauze or tissues
• Clean pouch with clip closure
• Protective paste or powder, if used
• Skin barrier
• Measuring guide, if needed
• Belt, if used
• Gloves, if pouch is to be changed by someone other than student
• Tape, if needed
• Scissors, if needed
3. Explain procedure using explanations the student can understand. Encourage the
student to do as much of the procedure as is capable, so as to achieve maximum self-
care skills.
4. Wash hands and put on gloves.
5. Empty contents of old pouch into toilet, bedpan, or other designated container (see
previous procedure).
6. Starting at the outer top edge, use the dominant hand to carefully pull away the used
pouch and skin barrier while pressing the skin downward from the bag with the non-
dominant hand. Remove more by pushing the skin down than by pulling the bag off
the skin.
7. Save clamp for reuse (unless specified otherwise). Dispose of used pouch in
appropriate receptacle.
8. Wash the peristomal area with water and a clean cloth or gauze or whatever is
specified in student’s IHP. Do not scrub. Use minimal pressure to prevent a
prolapse of the stoma. Cover the stoma with gauze or tissue to prevent leakage.
Make sure the skin around the stoma is clean and allow to dry.
Scrubbing can damage the stoma and cause bleeding.

VDH Guidelines for Healthcare Procedures in Schools 152
9. Examine the stoma for integrity (note whether it has come further out or moved
further in) and any of signs of necrosis. Assess the skin for redness, irritation, rash,
bleeding, or breakdown.
If there is any change in the stoma, notify school nurse and/or family immediately.
If there is skin irritation, follow guidelines in student's IHP. Medications, ointments,
or adhesives are generally not used on the damaged skin because they make it more
difficult for the pouch to stick. Skin irritation should be reported to school nurse
and/or family.
10. If a skin barrier is used that requires fitting, measure stoma using measuring guide or
per student's IHP. Cut wafer-barrier and pouch to fit stoma. Some wafer-barriers are
single items, but many are attached to pouch. Remove paper from wafer. Save paper
to use as a guide for cutting openings for future pouch changes (if stoma size is
stable).
11. If specified in IHP, apply a ring of protective paste to opening on wafer barrier or
apply around stoma. Remove used gauze/tissue from stoma and discard in
appropriate receptacle.
12. If one-piece wafer/pouch used, remove paper from outer adhesive area of pouch and
apply wafer/pouch over stoma. If two-piece setup used, place wafer barrier on skin
around stoma, remove backing from pouch, and apply pouch to wafer and skin.
Some two piece systems require pouch to be snapped together.
13. Firmly press the pouch and skin barrier so there are no wrinkles and no leaks. Hold
in place for 30-60 seconds.
Body warmth will soften rigid wafer and improve adhesion to skin
14. Use clamp to seal pouch. Make sure bowed end of clamp is next to body.
Bowed end conforms to body providing a better fit and keeping clamp from sticking
out through clothing.
15. If a belt is used to fasten pouch, attach to pouch.
16. Remove gloves and wash hands.
17. Document in student log that procedure was done and condition of stoma and skin.
Report to school nurse and family any change in stoma, skin, or tolerance of the
procedure.

VDH Guidelines for Healthcare Procedures in Schools 153
Sources:
Bowden, V., & Greenberg, C. (2012). Pediatric nursing procedures (3rd ed.). Philadelphia:
Wolters Kluwer Health/Lippincott Williams & Wilkins, 519-525.
Connecticut State Department of Education. (2012). Clinical procedure guidelines for
Connecticut school nurses. Middlebury, CT: CSDOE , 93-94.
Hockenberry, M., & Wilson, D. (2015). Wong's nursing care of infants and children (10th
ed.). St. Louis: Elsevier Mosby, 940-941.
Hollister. (2007). Caring for your child with an ostomy. Available online at
https://www.hollister.com/us/files/pdfs/osted_pcb_pediatric.pdf
National Institute of Diabetes and Digestive and Kidney Diseases, National Institutes of
Health. (2014). Ostomy surgery of the bowel. NIH Publication No. 14-4641.
Available online at http://www.niddk.nih.gov/health-information/health-
topics/digestive-diseases/ostomy-surgery-
bowel/Documents/Ostomy_Surgery_508.pdf
Porter, S., Branowicki, P., & Palfrey, J. (2014). Supporting students with special health care
needs: Guidelines and procedures for schools (3rd ed.). Baltimore: Paul H. Brookes
Publishing, 291-298.
Selekman, J. (2013). School nursing: A comprehensive text (2nd ed.). Philadelphia: F.A.
Davis, 1041-1042.
Smith, S., Duell, D. & Martin, B. (2012). Clinical nursing skills: Basic to advanced skills
(8th ed.). Boston: Pearson, 823-826, 846-853.
United Ostomy Associations of America. (2011). Colostomy guide. Available online:
http://www.ostomy.org/uploaded/files/ostomy_info/ColostomyGuide.pdf?direct=1
Wisconsin Improving School Health Services Project. (2015). Ostomy care. Available
online at http://www.wishesproject.org/?page_id=428/?tab=5

VDH Guidelines for Healthcare Procedures in Schools 154
Possible Problems When Caring for a Student with a Colostomy
• Odor
Odor should not be detected when the student keeps pouch closed. If there is an odor,
check for a leak around the stoma or for a leak in the pouch itself. Do not make any
pinholes in pouch to release gas because doing so destroys the odor proof seal.
Commercial deodorants are available if family wants them.
• Leakage
Empty pouch and do not allow it to get over 1/3 full before emptying. Check to see if
there are any wrinkles or leaks and if the pouch is the proper size for the stoma. Reapply
pouch. Use skin barrier paste, if ordered, to help form a seal.
• Bleeding from stoma
Stomas are rich in blood supply and may bleed slightly if irritated or rubbed. Be careful
not to rub during cleaning or nick with a fingernail. Check to see if the opening of the
pouch may be cutting or rubbing the stoma. If the bleeding does not stop quickly, apply
gentle pressure and notify the school nurse and family. If a large area of the stoma
appears to be bleeding, notify the family, school nurse, or health care provider.
• Dark, dusky colored, or black stoma
Activate the emergency plan and notify school nurse, family and/or health care
provider immediately. Integrity of stoma may be compromised.
• Irritation or skin breakdown around stoma; discharge from area; itching or
burning under the pouch
Make sure pouch and skin barrier are sized correctly. If leaking or incorrectly sized,
replace with proper sized pouch and barrier. Follow student-specific guidelines for skin
care. Apply protective paste between barrier and skin, if ordered. Check to see if student
is using any new ostomy products which could be causing an allergic reaction. Notify the
school nurse, family, or health care provider.
• Red rash; rash may extend beyond peristomal area
Student may have a yeast infection. Clean and dry the skin carefully and notify the
school nurse and the family. Keep skin dry.
• Stoma appears to increase in size; part of intestine showing through stoma, or stoma
sinks below skin surface If the amount of intestinal tissue showing is more than usual, the stoma may be
prolapsing (intestine being pushed out through the opening). The tissue may appear
swollen, and the student may experience cramping and vomiting. If stoma sinks below
skin level, it may be retracting. Contact the school nurse, family, and/or health care
provider immediately.
• Change in stool pattern

VDH Guidelines for Healthcare Procedures in Schools 155
Assess recent diet history for changes. Assess for other signs of infection or illness such
as fever or pain. If the student experiences a significant change in the number or
consistency of stools, contact the family.
• Pain and tenderness in the stoma or abdominal area, no output from the stoma for
4-5 hours, cramping, nausea and/or vomiting; watery green or ribbon-like output
Intestine or stoma may be developing an obstruction. Notify school nurse and family
immediately.
• Student has body image concerns
Encourage student to voice concerns. Discuss with family as appropriate. Refer to
United Ostomy Association of America (www.UOAA.org or 1-800-826-0826) or nearest
enterostomal therapy nurse (wound ostomy certified nurse) for assistance. (Wound
Ostomy and Continence Nurses 1-888-224-9626). Videos and brochures are available
from UOAA and other organizations such as the Crohn’s and Colitis Foundation of
America.

VDH Guidelines for Healthcare Procedures in Schools 156
Sources:
Bowden, V., & Greenberg, C. (2012). Pediatric nursing procedures (3rd ed.). Philadelphia:
Wolters Kluwer Health/Lippincott Williams & Wilkins, 519-525.
Connecticut State Department of Education. (2012). Clinical procedure guidelines for
Connecticut school nurses. Middlebury, CT: CSDOE, 93-94.
Hockenberry, M., & Wilson, D. (2015). Wong's nursing care of infants and children (10th
ed.). St. Louis: Elsevier Mosby, 940-941.
Hollister. (2007). Caring for your child with an ostomy. Available online at
https://www.hollister.com/us/files/pdfs/osted_pcb_pediatric.pdf
National Institute of Diabetes and Digestive and Kidney Diseases, National Institutes of
Health. (2014). Ostomy surgery of the bowel. NIH Publication No. 14-4641.
Available online at http://www.niddk.nih.gov/health-information/health-
topics/digestive-diseases/ostomy-surgery-
bowel/Documents/Ostomy_Surgery_508.pdf
Porter, S., Branowicki, P., & Palfrey, J. (2014). Supporting students with special health care
needs: Guidelines and procedures for schools (3rd ed.). Baltimore: Paul H. Brookes
Publishing, 291-298.
Selekman, J. (2013). School nursing: A comprehensive text (2nd ed.). Philadelphia: F.A.
Davis, 1041-1042.
Smith, S., Duell, D. & Martin, B. (2012). Clinical nursing skills: Basic to advanced skills
(8th ed.). Boston: Pearson, 823-826, 846-853.
United Ostomy Associations of America. (2011). Colostomy guide. Available online:
http://www.ostomy.org/uploaded/files/ostomy_info/ColostomyGuide.pdf?direct=1
Wisconsin Improving School Health Services Project. (2015). Emptying ostomy pouch.
Available online at http://www.wishesproject.org/?page_id=262/?tab=5
Wisconsin Improving School Health Services Project. (2015). Ostomy care. Available
online at http://www.wishesproject.org/?page_id=428/?tab=5
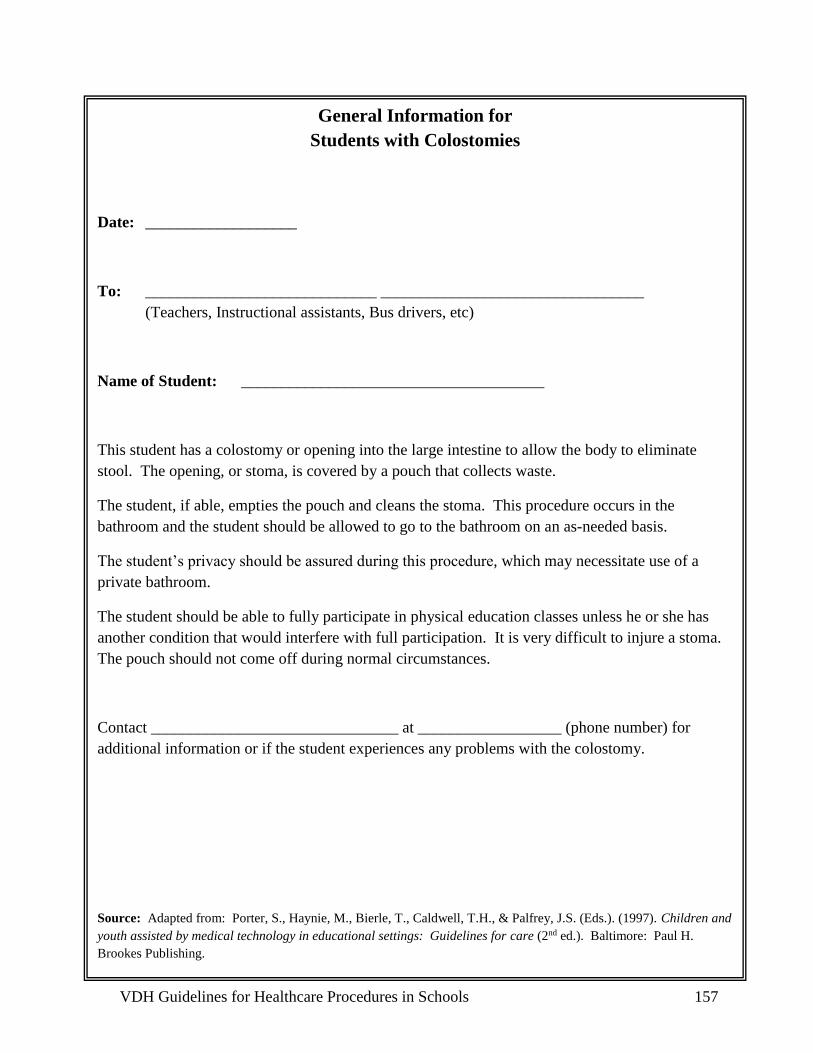
VDH Guidelines for Healthcare Procedures in Schools 157
General Information for
Students with Colostomies
Date: ___________________
To: _____________________________ _________________________________
(Teachers, Instructional assistants, Bus drivers, etc)
Name of Student: ______________________________________
This student has a colostomy or opening into the large intestine to allow the body to eliminate
stool. The opening, or stoma, is covered by a pouch that collects waste.
The student, if able, empties the pouch and cleans the stoma. This procedure occurs in the
bathroom and the student should be allowed to go to the bathroom on an as-needed basis.
The student’s privacy should be assured during this procedure, which may necessitate use of a
private bathroom.
The student should be able to fully participate in physical education classes unless he or she has
another condition that would interfere with full participation. It is very difficult to injure a stoma.
The pouch should not come off during normal circumstances.
Contact _______________________________ at __________________ (phone number) for
additional information or if the student experiences any problems with the colostomy.
Source: Adapted from: Porter, S., Haynie, M., Bierle, T., Caldwell, T.H., & Palfrey, J.S. (Eds.). (1997). Children and
youth assisted by medical technology in educational settings: Guidelines for care (2nd ed.). Baltimore: Paul H.
Brookes Publishing.

VDH Guidelines for Healthcare Procedures in Schools 158
Ileostomy
Overview
An ileostomy is a surgically-created opening in
the section of the small intestine called the ileum
that is used to eliminate fecal material. A piece
of the ileum is brought through the abdominal
wall out to the skin surface of the abdomen and
folded back onto itself to form a stoma. The
stoma is red or dark pink in color and moist,
much like the mucosal lining of the mouth. It is
about the size of a quarter and is usually located
in the lower right part of the abdomen near the
beltline.
The discharge from an ileostomy is much looser
and more liquefied than the fecal material from a
colostomy because food is not completely
digested until it passes through the colon where
most water absorption takes place. The discharge
also contains digestive enzymes, which are very irritating and caustic to skin. Ileostomies
drain fairly constantly with more after meals and less during the night. Some foods may pass
through fairly intact without being digested very much.
A pouch is worn over the ileostomy to collect waste. Because the output from an ileostomy is
so caustic, it is very important to have a proper fitting pouch and good skin care. Pouches for
ileostomies sometimes protrude or use convex inserts to help the stoma protrude more to
decrease the possibility of stool getting under the pouch. Pouch systems can be reusable or
disposable, drainable or close-bottomed, and one-piece or two-piece. Pouches typically last
1-7 days. They protect the stoma, as well as the skin around the stoma (peristomal). Stomas
are rich in blood supply and may bleed slightly if irritated or rubbed. Because the stoma
itself does not have nerve endings, irritation of the stoma does not usually cause discomfort.
However, the skin surrounding the stoma does have nerve endings and may be sensitive to
manipulation of the stoma or to contact with any discharge from the stoma. Therefore, good
skin care and a properly fitting pouch are essential to preventing irritation and breakdown at
the stoma site. If the opening of the pouch is too large, it can expose skin to fecal matter and
moisture. If it is too tight or constrictive, it can cut or injure the stoma. A skin barrier is also
usually applied around the stoma to protect it. The best time to change an ileostomy pouch is
when the bowel is least active, usually 2-4 hours after meals.
VDH Guidelines for Healthcare Procedures in Schools 159
Reasons to call the family and health care provider:
• no output from the ileostomy for 4-6 hours accompanied by cramping and nausea
• persistent nausea and vomiting
• cramps which last more than 2-3 hours
• watery discharge which last more than 5-6 hours
• deep cut in the stoma
• significant change in stoma size or color
• severe skin irritation or ulcers
• excessive bleeding from the stoma
• continuous bleeding where the stoma and skin join
• unusually strong odor--may indicate infection
Settings and Staff
The ileostomy pouch should be emptied whenever it is one-third to one-half full or if a leak
occurs. The student’s privacy must be ensured whether the student cares for the ostomy by
him/herself or receives assistance. Pouch changes are routinely performed at home, but may
need to be done at school if a leak occurs. A student should be able to participate in all
school activities, including physical education.
Emptying and cleaning the pouch can be done by the student, the school nurse, or any adult
trained in appropriate techniques and problem management of ostomies. Application of the
pouch is best done by a registered or licensed practical nurse if the student requires
assistance, but can be done by a specially trained adult. School staff who have regular
contact with a student with an ileostomy should receive general training covering the
student’s specific needs, potential problems, and implementation of the established
emergency plan.
Individualized Healthcare Plan (IHP)
Each student’s IHP must be tailored to the individual’s needs. A sample plan is included in
Appendix A. When preparing an IHP for a student with a ileostomy, the following items
should be considered:
• Underlying condition and possible problems associated with the condition or treatment
• Type of pouch and supplies
• Any doctor's orders for special care or procedures
• How often pouch should be emptied
• Student's ability to provide self-care
• Access to a change of clothing at school
• Access to private bathroom
• Stoma care—cleansing supplies and frequency; barrier supplies
• Stoma appearance and changes that require reporting
• Usual stool consistency, frequency, amount

VDH Guidelines for Healthcare Procedures in Schools 160
• Diet modification, if needed
• Latex allergy precautions
• Standard precautions

VDH Guidelines for Healthcare Procedures in Schools 161
Sources:
Bowden, V., & Greenberg, C. (2012). Pediatric nursing procedures (3rd ed.). Philadelphia:
Wolters Kluwer Health/Lippincott Williams & Wilkins, 519-525.
Connecticut State Department of Education. (2012). Clinical procedure guidelines for
Connecticut school nurses. Middlebury, CT: CSDOE , 93-94.
Hockenberry, M., & Wilson, D. (2015). Wong's nursing care of infants and children (10th
ed.). St. Louis: Elsevier Mosby, 940-941.
Hollister. (2007). Caring for your child with an ostomy. Available online at
https://www.hollister.com/us/files/pdfs/osted_pcb_pediatric.pdf
National Institute of Diabetes and Digestive and Kidney Diseases, National Institutes of
Health. (2014). Ostomy surgery of the bowel. NIH Publication No. 14-4641.
Available online at http://www.niddk.nih.gov/health-information/health-
topics/digestive-diseases/ostomy-surgery-
bowel/Documents/Ostomy_Surgery_508.pdf
Porter, S., Branowicki, P., & Palfrey, J. (2014). Supporting students with special health care
needs: Guidelines and procedures for schools (3rd ed.). Baltimore: Paul H. Brookes
Publishing, 299-303.
Selekman, J. (2013). School nursing: A comprehensive text (2nd ed.). Philadelphia: F.A.
Davis, 1041-1042.
Smith, S., Duell, D. & Martin, B. (2012). Clinical nursing skills: Basic to advanced skills
(8th ed.). Boston: Pearson, 823-826, 846-853.
United Ostomy Associations of America. (2011). Ileostomy Guide. Available online:
http://www.ostomy.org/uploaded/files/ostomy_info/IleostomyGuide.pdf?direct=1
Wisconsin Improving School Health Services Project. (2015). Emptying ostomy pouch.
Available online at http://www.wishesproject.org/?page_id=262/?tab=5
Wisconsin Improving School Health Services Project. (2015). Ostomy care. Available
online at http://www.wishesproject.org/?page_id=428/?tab=5
Illustration Source:
National Institute of Diabetes and Digestive and Kidney Diseases, National Institutes of
Health. (2014). Image Library. NO1740. Available online at
https://www.catalog.niddk.nih.gov/ImageLibrary.
VDH Guidelines for Healthcare Procedures in Schools 162
Procedure for Emptying an Ileostomy
1. Wash hands.
2. Assemble equipment:
Note: Family provides equipment and supplies. Student should have a complete
set of ostomy supplies at school with a spare pouch and clip/pouch closure.
• Tissue, wet washcloth, paper towel, or wet wipe
• Toilet or container to dispose of wastes
• Gloves, if pouch is to be emptied by someone other than student
• Clean pouch with clip closure
• Extra pouch supplies
3. Explain procedure using explanations the student can understand. Encourage the
student to do as much of the procedure as is capable, so as to achieve maximum self-
care skills.
4. Wash hands and put on gloves.
5. Empty when 1/3-1/3 full of stool or gas. If emptying into a toilet, place a piece of
toilet paper in toilet to prevent splashing.
6. Tilt the bottom of the pouch upward and remove the clamp.
7. Fold the bottom of the pouch up to form a cuff before emptying.
Cuff helps keep bottom of pouch clean during emptying.
8. Slowly unfold end of pouch and empty contents of pouch into toilet or container.
9. Wipe the bottom of the pouch with tissue, wet washcloth, paper towel, or wet wipe
and unfold cuff. Pouch deodorant can be applied, if specified in student's IHP. Do
not use oils or soap because they can weaken the pouch seal. Rinsing with water can
also weaken the skin barrier seal and should be avoided.
10. Re-apply clamp closure.
11. Flatus can be released through the gas release valve, if the pouch has one. If there is
no valve, flatus can be expelled by tilting the bottom of the pouch upward, releasing
the clamp, and expelling the flatus. Re-apply clamp.
12. Flush wastes in toilet.
13. Remove gloves and wash hands. Wash student's hands if they assist.
14. Report any change in student’s usual pattern to school nurse and family.

VDH Guidelines for Healthcare Procedures in Schools 163
15. Document actions and observations.
Sources:
Bowden, V., & Greenberg, C. (2012). Pediatric nursing procedures (3rd ed.). Philadelphia:
Wolters Kluwer Health/Lippincott Williams & Wilkins, 519-525.
Connecticut State Department of Education. (2012). Clinical procedure guidelines for
Connecticut school nurses. Middlebury, CT: CSDOE , 93-94.
Hockenberry, M., & Wilson, D. (2015). Wong's nursing care of infants and children (10th
ed.). St. Louis: Elsevier Mosby, 940-941.
Hollister. (2007). Caring for your child with an ostomy. Available online at
https://www.hollister.com/us/files/pdfs/osted_pcb_pediatric.pdf
National Institute of Diabetes and Digestive and Kidney Diseases, National Institutes of
Health. (2014). Ostomy surgery of the bowel. NIH Publication No. 14-4641.
Available online at http://www.niddk.nih.gov/health-information/health-
topics/digestive-diseases/ostomy-surgery-
bowel/Documents/Ostomy_Surgery_508.pdf
Porter, S., Branowicki, P., & Palfrey, J. (2014). Supporting students with special health care
needs: Guidelines and procedures for schools (3rd ed.). Baltimore: Paul H. Brookes
Publishing, 299-303.
Selekman, J. (2013). School nursing: A comprehensive text (2nd ed.). Philadelphia: F.A.
Davis, 1041-1042.
Smith, S., Duell, D. & Martin, B. (2012). Clinical nursing skills: Basic to advanced skills
(8th ed.). Boston: Pearson, 823-826, 846-853.
United Ostomy Associations of America. (2011). Ileostomy Guide. Available online:
http://www.ostomy.org/uploaded/files/ostomy_info/IleostomyGuide.pdf?direct=1
Wisconsin Improving School Health Services Project. (2015). Emptying ostomy pouch.
Available online at http://www.wishesproject.org/?page_id=262/?tab=5
Wisconsin Improving School Health Services Project. (2015). Ostomy care. Available
online at http://www.wishesproject.org/?page_id=428/?tab=5

VDH Guidelines for Healthcare Procedures in Schools 164
Procedure for Changing an Ileostomy Pouch
1. Wash hands.
2. Assemble equipment:
Note: Family provides equipment and supplies. Student should have a complete
set of ostomy supplies at school with a spare pouch and clip/pouch closure. Routine
pouch changes should be performed at home.
• Water
• Skin cleanser
• Soft cloth or gauze or tissues
• Clean pouch with clip closure
• Protective paste or powder, if used
• Skin barrier
• Measuring guide, if needed
• Belt, if used
• Gloves, if pouch is to be changed by someone other than student
• Tape, if needed
• Scissors, if needed
3. Explain procedure using explanations the student can understand. Encourage the
student to do as much of the procedure as is capable, so as to achieve maximum self-
care skills.
4. Wash hands and put on gloves.
5. Empty contents of old pouch into toilet, bedpan, or other designated container.
Placing a piece of toilet paper in the toilet before emptying can help to prevent
splashing.
6. Starting at the outer top edge, press the skin downward from the bag with the non-
dominant hand while carefully removing the used pouch with the dominant hand.
7. Save clamp for reuse (unless specified otherwise). Dispose of used pouch in
appropriate receptacle.
8. Wash the peristomal area with water and a clean cloth or gauze or whatever is
specified in student’s IHP. Do not use baby wipes on the skin because they can leave
a film on the skin and prevent a good seal. Do not scrub. Use minimal pressure to
prevent a prolapse of the stoma. Cover the stoma with gauze or tissue to prevent
leakage. Make sure the skin around the stoma is clean and allow to dry.
Scrubbing can damage the stoma and cause bleeding.

VDH Guidelines for Healthcare Procedures in Schools 165
9. Examine the stoma for integrity (whether it has come further out or moved further in)
and any of signs of necrosis. Assess the skin for redness, irritation, rash, bleeding, or
breakdown.
If there is any change in the stoma, notify school nurse and/or family immediately.
If there is skin irritation, follow guidelines in student's IHP. Medications, ointments,
or adhesives are generally not used on the damaged skin because they make it more
difficult for the pouch to stick. Skin irritation should be reported to school nurse
and/or family.
10. If a skin barrier is used that requires fitting, measure stoma using measuring guide or
per student's IHP. Cut wafer-barrier to fit stoma. Be careful not to puncture the
pouch. Some wafer-barriers are single items, but many are attached to pouch.
Remove paper from wafer. Save paper to use as a guide for cutting openings for
future pouch changes (if stoma size is stable).
11. If specified, apply a ring of protective paste to opening on wafer barrier or apply
around stoma. Remove used gauze/tissue from stoma and discard in appropriate
receptacle.
12. If one-piece wafer/pouch used, remove paper from outer adhesive area of pouch and
apply wafer/pouch over stoma. If two-piece setup used, place wafer barrier on skin
around stoma, remove backing from pouch, and apply pouch to wafer and skin.
Some two piece systems require pouch to be snapped together.
13. Firmly press the pouch and skin barrier so there are no wrinkles and no leaks. Hold
in place for 30-60 seconds.
Body warmth will soften rigid wafer and improve adhesion to skin.
14. Use clamp to seal pouch. Make sure bowed end of clamp is next to body.
Bowed end conforms to body providing a better fit and keeping clamp from sticking
out through clothing.
15. If a belt is used to fasten pouch, attach to pouch.
16. Remove gloves and wash hands.
17. Document in student log that procedure was done and condition of stoma and skin.
Report to school nurse and family any change in stoma, skin, or tolerance of the
procedure.

VDH Guidelines for Healthcare Procedures in Schools 166
Sources:
Bowden, V., & Greenberg, C. (2012). Pediatric nursing procedures (3rd ed.). Philadelphia:
Wolters Kluwer Health/Lippincott Williams & Wilkins, 519-525.
Connecticut State Department of Education. (2012). Clinical procedure guidelines for
Connecticut school nurses. Middlebury, CT: CSDOE , 93-94.
Hockenberry, M., & Wilson, D. (2015). Wong's nursing care of infants and children (10th
ed.). St. Louis: Elsevier Mosby, 940-941.
Hollister. (2007). Caring for your child with an ostomy. Available online at
https://www.hollister.com/us/files/pdfs/osted_pcb_pediatric.pdf
Hollister. (2007). Punchkins two-piece pouching systems. Ostomy care tips. Available
online at https://www.hollister.com/us/files/care_tips/tips_Pouchkins%20Two-
Piece%20Pouching%20Systems.pdf
National Institute of Diabetes and Digestive and Kidney Diseases, National Institutes of
Health. (2014). Ostomy surgery of the bowel. NIH Publication No. 14-4641.
Available online at http://www.niddk.nih.gov/health-information/health-
topics/digestive-diseases/ostomy-surgery-
bowel/Documents/Ostomy_Surgery_508.pdf
Porter, S., Branowicki, P., & Palfrey, J. (2014). Supporting students with special health care
needs: Guidelines and procedures for schools (3rd ed.). Baltimore: Paul H. Brookes
Publishing, 299-303.
Selekman, J. (2013). School nursing: A comprehensive text (2nd ed.). Philadelphia: F.A.
Davis, 1041-1042.
Smith, S., Duell, D. & Martin, B. (2012). Clinical nursing skills: Basic to advanced skills
(8th ed.). Boston: Pearson, 823-826, 846-853.
United Ostomy Associations of America. (2011). Ileostomy Guide. Available online:
http://www.ostomy.org/uploaded/files/ostomy_info/IleostomyGuide.pdf?direct=1
Wisconsin Improving School Health Services Project. (2015). Emptying ostomy pouch.
Available online at http://www.wishesproject.org/?page_id=262/?tab=5
Wisconsin Improving School Health Services Project. (2015). Ostomy care. Available
online at http://www.wishesproject.org/?page_id=428/?tab=5
VDH Guidelines for Healthcare Procedures in Schools 167
Possible Problems When Caring for a Student with an Ileostomy
• Odor
Odor should not be detected when the student keeps pouch closed. If there is an odor,
check for a leak around the stoma or for a leak in the pouch itself. Do not make any
pinholes in pouch to release gas because doing so destroys the odor proof seal.
Commercial deodorants are available if family wants them.
• Leakage
Empty pouch and do not allow it to get over 1/3 full before emptying. Check to see if
there are any wrinkles or leaks and if the pouch is the proper size for the stoma. Reapply
pouch. Use skin barrier paste, if ordered, to help form a seal.
• Bleeding from stoma
Stomas are rich in blood supply and may bleed slightly if irritated or rubbed. Be careful
not to rub during cleaning or nick with a fingernail. Check to see if the opening of the
pouch may be cutting or rubbing the stoma. If the bleeding does not stop quickly, apply
gentle pressure and notify the family. If a large area of the stoma appears to be bleeding,
notify the family, school nurse, or health care provider.
• Dark, dusky colored, or black stoma
Activate the emergency plan and notify family and/or health care provider
immediately. Integrity of stoma may be compromised.
• Irritation or skin breakdown around stoma; discharge from area; itching or
burning under the pouch
Make sure pouch and skin barrier are sized correctly. If leaking or incorrectly sized,
replace with proper sized pouch and barrier. Follow student-specific guidelines for skin
care. Apply protective paste between barrier and skin, if ordered. Check to see if student
is using any new ostomy products which could be causing an allergic reaction. Notify the
school nurse, family, or health care provider.
• Red rash; rash may extend beyond peristomal area
Student may have a yeast infection. Clean and dry the skin carefully and notify the
school nurse and the family. Keep skin dry.
• Stoma appears to increase in size; part of intestine showing through stoma, or stoma
sinks below skin surface If the amount of intestinal tissue showing is more than usual, the stoma may be
prolapsing (intestine being pushed out through the opening). The tissue may appear
swollen, and the student may experience cramping and vomiting. If stoma sinks below
skin level, it may be retracting. Contact the school nurse, family, and/or health care
provider immediately.
• Change in stool pattern

VDH Guidelines for Healthcare Procedures in Schools 168
Assess recent diet history for changes. Assess for other signs of infection or illness such
as fever or pain. If the student experiences a significant change in the number or
consistency of stools, contact the family.
• Pain and tenderness in the stoma or abdominal area, no output from the stoma for
4-5 hours, cramping, nausea and/or vomiting; watery green or ribbon-like output
Intestine or stoma may be developing an obstruction. Notify school nurse and family
immediately.
• Student has body image concerns
Encourage student to voice concerns. Discuss with family as appropriate. Refer to
United Ostomy Association of America (www.UOAA.org or 1-800-826-0826) or nearest
enterostomal therapy nurse (wound ostomy certified nurse) for assistance. (Wound
Ostomy and Continence Nurses 1-888-224-9626). Videos and brochures are available
from UOAA and other organizations such as the Crohn’s and Colitis Foundation of
America.

VDH Guidelines for Healthcare Procedures in Schools 169
Sources:
Bowden, V., & Greenberg, C. (2012). Pediatric nursing procedures (3rd ed.). Philadelphia:
Wolters Kluwer Health/Lippincott Williams & Wilkins, 519-525.
Connecticut State Department of Education. (2012). Clinical procedure guidelines for
Connecticut school nurses. Middlebury, CT: CSDOE , 93-94.
Hockenberry, M., & Wilson, D. (2015). Wong's nursing care of infants and children (10th
ed.). St. Louis: Elsevier Mosby, 940-941.
Hollister. (2007). Caring for your child with an ostomy. Available online at
https://www.hollister.com/us/files/pdfs/osted_pcb_pediatric.pdf
National Institute of Diabetes and Digestive and Kidney Diseases, National Institutes of
Health. (2014). Ostomy surgery of the bowel. NIH Publication No. 14-4641.
Available online at http://www.niddk.nih.gov/health-information/health-
topics/digestive-diseases/ostomy-surgery-
bowel/Documents/Ostomy_Surgery_508.pdf
Porter, S., Branowicki, P., & Palfrey, J. (2014). Supporting students with special health care
needs: Guidelines and procedures for schools (3rd ed.). Baltimore: Paul H. Brookes
Publishing, 299-303.
Selekman, J. (2013). School nursing: A comprehensive text (2nd ed.). Philadelphia: F.A.
Davis, 1041-1042.
Smith, S., Duell, D. & Martin, B. (2012). Clinical nursing skills: Basic to advanced skills
(8th ed.). Boston: Pearson, 823-826, 846-853.
United Ostomy Associations of America. (2011). Ileostomy guide. Available online:
http://www.ostomy.org/uploaded/files/ostomy_info/IleostomyGuide.pdf?direct=1
Wisconsin Improving School Health Services Project. (2015). Emptying ostomy pouch.
Available online at http://www.wishesproject.org/?page_id=262/?tab=5
Wisconsin Improving School Health Services Project. (2015). Ostomy care. Available
online at http://www.wishesproject.org/?page_id=428/?tab=5
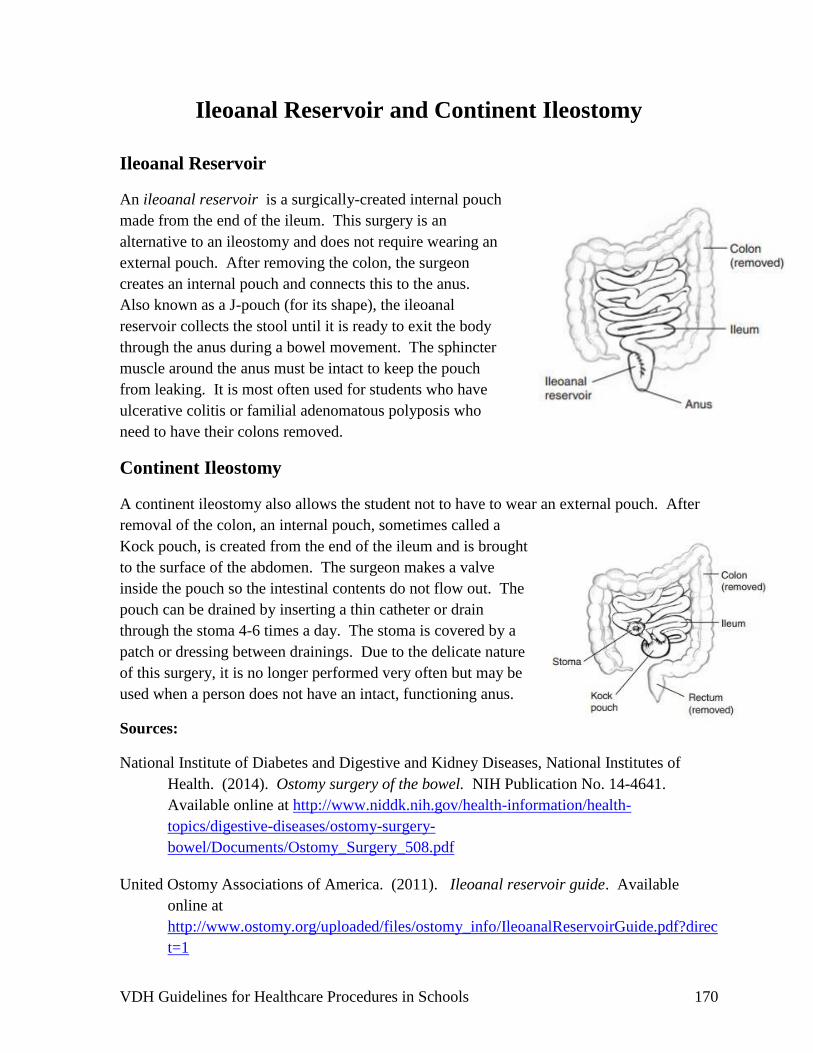
VDH Guidelines for Healthcare Procedures in Schools 170
Ileoanal Reservoir and Continent Ileostomy
Ileoanal Reservoir
An ileoanal reservoir is a surgically-created internal pouch
made from the end of the ileum. This surgery is an
alternative to an ileostomy and does not require wearing an
external pouch. After removing the colon, the surgeon
creates an internal pouch and connects this to the anus.
Also known as a J-pouch (for its shape), the ileoanal
reservoir collects the stool until it is ready to exit the body
through the anus during a bowel movement. The sphincter
muscle around the anus must be intact to keep the pouch
from leaking. It is most often used for students who have
ulcerative colitis or familial adenomatous polyposis who
need to have their colons removed.
Continent Ileostomy
A continent ileostomy also allows the student not to have to wear an external pouch. After
removal of the colon, an internal pouch, sometimes called a
Kock pouch, is created from the end of the ileum and is brought
to the surface of the abdomen. The surgeon makes a valve
inside the pouch so the intestinal contents do not flow out. The
pouch can be drained by inserting a thin catheter or drain
through the stoma 4-6 times a day. The stoma is covered by a
patch or dressing between drainings. Due to the delicate nature
of this surgery, it is no longer performed very often but may be
used when a person does not have an intact, functioning anus.
Sources:
National Institute of Diabetes and Digestive and Kidney Diseases, National Institutes of
Health. (2014). Ostomy surgery of the bowel. NIH Publication No. 14-4641.
Available online at http://www.niddk.nih.gov/health-information/health-
topics/digestive-diseases/ostomy-surgery-
bowel/Documents/Ostomy_Surgery_508.pdf
United Ostomy Associations of America. (2011). Ileoanal reservoir guide. Available
online at
http://www.ostomy.org/uploaded/files/ostomy_info/IleoanalReservoirGuide.pdf?direc
t=1

VDH Guidelines for Healthcare Procedures in Schools 171
General Information for
Students with Ileostomies
Date: ___________________
To: _____________________________ _________________________________
(Teachers, Instructional assistants, Bus drivers, etc)
Name of Student: ______________________________________
This student has an ileostomy, or opening into the small intestine to allow the body to eliminate
stool. The opening, or stoma, is covered by a pouch that collects stool.
The student usually empties the pouch and cleans the stoma. This procedure occurs in the
bathroom and the student should be allowed to go to the bathroom on an as needed basis.
The student’s privacy should be assured during this procedure, which may necessitate use of a
private bathroom.
The student should be able to fully participate in physical education classes unless he or she has
another condition that would interfere with full participation. It is very difficult to injure a stoma.
The pouch should not come off during normal circumstances.
Contact _______________________________ at __________________ (phone number) for
additional information or if the student experiences any problems with the ileostomy.
Source: Adapted from: Porter, S., Haynie, M., Bierle, T., Caldwell, T.H., & Palfrey, J.S. (Eds.). (1997). Children
and youth assisted by medical technology in educational settings: Guidelines for care (2nd ed.). Baltimore: Paul H.
Brookes Publishing.

VDH Guidelines for Healthcare Procedures in Schools 172
Chapter 4: Care of the
Musculoskeletal System and Mobility
Care
Overview
Physical Mobility Assistance
Positioning a Student
Assisting with a Cane
Assisting with Crutches
Assisting with a Walker
Assisting with a Wheelchair
Assisting with a Prosthesis
Assisting with an Orthosis
Cast Care
Principles of Good Body Mechanics

VDH Guidelines for Healthcare Procedures in Schools 173
Musculoskeletal System and Mobility Care
Overview
Movement of the body is dependent on the proper functioning of the musculoskeletal and
nervous systems. If any body part is altered or injured, the result can be a loss or change in
the body’s ability to move. Mobility impacts how a student can access the educational
environment, and therefore, assessment and support of mobility is an important issue for
school nurses and all educational personnel who work with children.
Positioning is an important consideration in maintaining optimal functioning. Not only does
it impact mobility and access to education, it can reduce muscle tension, which can affect
pain and the ability to concentrate on academics. Collaboration between the school nurse,
health care provider, teachers, physical therapists, and occupational therapists can assist in
determining the most appropriate positioning and assistive devices for students with special
musculoskeletal needs.
Muscle movement and functioning may be altered by a number of causes. Injuries to an
extremity can cause permanent or temporary loss of function. Damage to a portion of a
student’s brain may result in an interruption in the transmission of impulses to the muscles
and loss of the muscles’ ability to function. In addition, muscles may lose their ability to
contract because of disease or deterioration due to a decrease in the number of nerves acting
upon them. They may also lose function due to lack of use.
Routine daily activities help keep muscles loose and pliable by maintaining range of motion
in the joints and related muscles. If movement is less frequent and limited, the muscles
become less pliable and shortened. The shortened muscles can pull the joint into an
abnormal position, creating a contracture. Contractures cause greater effort for movement,
increased wear on the joints, and further decreased range of motion. Loss of normal muscle
movement can make bones porous and soft.
Adaptive equipment (desk, chairs, feeding equipment) and frequent movement can be used in
assisting the student to maintain optimal function in the school environment. Activities in the
classroom, cafeteria, and physical education program may need to be modified to meet the
student’s needs. All adaptive equipment and assistive devices, owned by the school division,
should be checked for proper condition and function on a frequent basis per school division
policy to ensure the safety of the student. Frequent use can cause wear and tear over time
and lead to accidents or injuries. Devices that belong to the student and brought to school
should be properly labeled. If maintenance or operational issues are identified, the parent or
guardian should be notified before further use.

VDH Guidelines for Healthcare Procedures in Schools 174
Sources:
Southall, V.H. (2004). Guidelines for specialized healthcare procedures. Virginia
Department of Health , 133-155.
Selekman, J. (2013). School nursing: A comprehensive text. (2nd ed.). Philadelphia: F.A.
Davis, 1044-1045.

VDH Guidelines for Healthcare Procedures in Schools 175
Physical Mobility Assistance
Overview
The purpose of the following procedures is to help the student who requires physical mobility
assistance to maintain good range of motion, good muscle length, and as much independence
as possible in normal daily activities. Mobility is important to students’ growth and
development. Inactivity can lead to a decrease in the functional capabilities of body systems
and ability of students to access their educational plan. The major consequences of impaired
mobility are loss of muscle strength and endurance, bone demineralization, loss of joint
mobility and contractures, increased workload on the heart, pooling of blood in the
extremities, shallow respirations, decreased basal metabolic rate, decreased gastrointestinal
motility, and nerve degeneration. Decreased mobility can also have a profound effect on
children’s development of independence, creativity, and sense of mastery. It is important to
encourage students to be as active as their conditions allow.
Settings and Staff
Students who need physical mobility assistance participate in regular school activities with
modifications that should be determined by the family, health care provider, physical
therapist, occupational therapist, school nurse, and school staff. Staff who have contact with
the student should be familiar with how to assist the student with movement and positioning.
Support of the student who requires assistive devices for ambulation can be administered by
the school nurse, physical therapist, occupational therapist, family, instructional aide, or other
staff person who has general training in the assistive device of the student. General training
should cover the student’s specific health care needs, use of assistive devices, potential
problems, appropriate lifting procedures and how to obtain assistance should problems occur.
Individualized Healthcare Plan (IHP)
Each student’s IHP must be tailored to the individual’s needs. A sample plan is included in
Appendix A. When preparing an IHP for a student who requires assistance with mobility,
the following items should be considered:
• Student’s underlying condition and possible problems associated with the condition
• Student’s baseline status (including skin condition, level of mobility)
• Health Care Provider’s orders for mobility devices and mobility support
• Type of physical mobility assistance student requires
• Reason student requires the physical mobility assistance
• Care and use of any assistive device
• When assistive device is to be used
• Transportation needs and plans

VDH Guidelines for Healthcare Procedures in Schools 176
• Standard precautions
Sources:
Hockenberry, M., & Wilson, D. (2015). Wong's nursing care of infants and children. (10th
ed.). St. Louis: Elsevier Mosby, 1547-1556.
Selekman, J. (2013). School nursing: A comprehensive text. (2nd ed.). Philadelphia: F.A.
Davis, 1044-1045.
Smith, S., Duell, D. & Martin, B. (2012). Clinical nursing skills: Basic to advanced skills
(8th ed.). Boston: Pearson, 335-337.
Southall, V. (2004).Guidelines for specialized healthcare procedures. Virginia Department
of Health, 133-155.

VDH Guidelines for Healthcare Procedures in Schools 177
Procedure for Positioning a Student
1. Review the health care provider’s orders and student’s individualized health care plan.
2. Explain the procedure to the student at his/her level of understanding. Encourage the
student to participate as much as possible.
3. Wash hands.
4. Assemble equipment as needed for positioning of student. Know how the equipment
works before using it with the student. Equipment varies with students and position.
Talk with family to determine which equipment is used at home.
5. Have assistance available as needed to ensure the safety of the student and staff. The
degree of assistance depends on the student’s size, how much the student can assist the
procedure, and the size and physical ability of the staff person.
6. Follow the principles of good body mechanics when lifting or moving the student.
Good body mechanics can help prevent back injury.
7. Change the student’s position as needed or as specified. Change position frequently,
unless contraindicated, to prevent dependent edema and to stimulate circulation.
Positioning should be individualized for each student.
8. The following guidelines are for positioning a student who does not have musculoskeletal
abnormalities such as a dislocated hip. The guidelines may not be appropriate for all
students. These guidelines should only be used after consulting the student’s health care
provider, physical therapist, school nurse, or other persons who are knowledgeable about
the student’s condition.
Position Action
Supine Position (on back)
Head is in alignment with the spine, both
laterally, and front to back.
Place pillow under head, so that it reaches
under the shoulders.
Position trunk so that hip flexion is
minimized.
Place small pillow under the small of the back,
if comfortable.
Slightly flex arms at elbow. Position arms comfortably at side with hands
open. Use handroll if necessary.

VDH Guidelines for Healthcare Procedures in Schools 178
Position Action
Extend legs in neutral position with toes
pointed to ceiling.
Support feet with a vertical support, so that
student can brace his/her feet to keep them
upright.
Suspend heels in the space between cot
and footboard.
Place small pillow under ankles to prevent
pressure on heels.
Place hip rolls under greater trochanter
(hip) in the area of hip joint and upper
thigh.
Place small pillows or rolled towels by the hips
and upper thigh to prevent legs from turning
outward.
Lateral Position (on side)
Align head with spine. Place pillow under head.
Align body so that it is not twisted. Place pillow lengthwise at the back, anchor
the pillow by pushing pillowcase edge under
student’s back. Then fold outer side of pillow
under and tuck it against the student for added
support.
Support slight hip abduction by
positioning hip slightly forward.
Flex hip and knee of upper leg, bringing upper
leg forward so that it doesn’t rest on lower leg.
Position pillow lengthwise under upper leg
supporting the entire leg including the foot and
ankle.
Flex arm at elbow and shoulder joint.
Position lower arm in comfortable position.
Place upper arm and hand on pillow with
elbow and shoulder flexed. Use hand roll if
necessary.
Prone (on stomach)
Turn head laterally and align with body. Turn head to side and place on small flat
pillow if necessary.
Abduct arms (slightly away from body)
and externally rotate at the shoulder
joint. Flex elbows.
Place arms at side, using handrolls if
necessary. Place small foam pads or pillows
as needed under shoulders.

VDH Guidelines for Healthcare Procedures in Schools 179
Position Action
Place small flat support under pelvis at
level of umbilicus and extending to
upper third of thigh.
Place flat pillow under abdomen to align spine
and help breathing (unless individual is obese
or abdomen protrudes).
Place lower extremities in neutral
position.
Extend legs in a comfortable position.
Suspend toes over edge of cot. Either position student so that the toes extend
over the end of the cot or place a pillow under
the ankles so the toes do not touch or rub
against the cot.
9. Inspect skin surfaces regularly for signs of irritation, redness, or evidence of pressure.
10. Make sure the student is safe and comfortable.
11. Wash hands.
12. Clean and store equipment as needed.
13. Document change of position in the student’s log. Report any changes from student’s
usual pattern to school nurse and family.
Sources:
Smith, S., Duell, D. & Martin, B. (2012). Clinical nursing skills: Basic to advanced skills
(8th ed.). Boston: Pearson, 348-353.
Southall, V.H. (2004). Guidelines for specialized healthcare procedures. Virginia
Department of Health, 133-155.
Wisconsin Improving School Health Services Project. (2015). Transfer procedures.
Available online at http://www.wishesproject.org/uaptraining.

VDH Guidelines for Healthcare Procedures in Schools 180
Procedure for Assisting Student with a Cane
Note: Equipment and supplies are provided by families.
1. Review the health care provider’s orders and student’s individualized health care plan.
2. Verify if the student will be using 1 or 2 canes and the type of cane used:
• Straight-legged or standard cane
• Tripod or three-pronged cane
• Quad cane
3. Explain the procedure to the student at his/her level of understanding. Encourage the
student to participate as much as possible.
4. Check the fit of the cane for the student’s height. With the student standing with his/her
elbow flexed at a 20-30-degree angle, place the cane tip 6 inches to the side of the little
toe, the handle should be approximately level with the greater trochanter (hip).
5. Make sure that the cane has the student’s name on it.
6. Teach and/or reinforce gait:
• Hold the cane on the stronger (unaffected) side. This offers the most support.
• Keep the cane close to the body to avoid leaning on it.
• Advance the cane 4 inches in front of the body and move the weaker leg even with
the cane.
• Shift weight to affected leg and cane and move unaffected leg ahead of cane.
During teaching, accompany student by walking on unaffected side.
If the student is unable to hold the cane with the hand opposite the weak leg, he/she can
hold the cane on the same side as the weak leg and advance both cane and weak leg
together.
7. Teach stair climbing:
• Upstairs: Advance unaffected leg up to next step; followed by the cane; followed by
the weaker leg.
• Downstairs: Place the cane and weaker leg on next lower step, and then step down
with the unaffected leg.

VDH Guidelines for Healthcare Procedures in Schools 181
8. Arrange for the student to use the elevator. Use of the elevator decreases the possibility
of injury to the student or others on the stairs. If an elevator is not available, the student
may need all of his/her classes on the ground floor.
9. Arrange transportation as needed for fire drills and emergency evacuations. Elevators are
not available during fire drills. Prearrange an evacuation plan for the student prior to fire
drills or emergencies.
10. Safety tips:
• Make sure rubber cane tips are in good repair. Tips should be wide, provide good
suction, and replaced promptly if worn.
Check that screws and nuts are tight.
• Designate a place in the classroom for the cane. (Cane should be kept next to the
student in the classroom if possible but placed so that it is not a safety hazard for
others).
• Encourage student to keep hands free to handle cane. Student should be encouraged
to carry possessions in a light backpack or have another person carry the possessions.
• If necessary, arrange for student to leave each class 5 minutes early. Leaving early
allows the student to be out of the hall during regular changing of classes.
11. Document teaching and student’s ability to walk with a cane.
Sources:
Hockenberry, M., & Wilson, D. (2015). Wong's nursing care of infants and children. (10th
ed.). St. Louis: Elsevier Mosby, 1565-1566.
Southall, V.H. (2004). Guidelines for specialized healthcare procedures. Virginia
Department of Health, 140.
Selekman, J. (2013). School nursing: A comprehensive text. (2nd ed.). Philadelphia: F.A.
Davis, 1044-1045.
Smith, S., Duell, D. & Martin, B. (2012). Clinical nursing skills: Basic to advanced skills
(8th ed.). Boston: Pearson, 388-390.
VDH Guidelines for Healthcare Procedures in Schools 182
Wilkinson, J.M., Treas, L.S., Barnett, K.L., & Smith, M.H. (2016). Fundamentals of
nursing: Vol. 2: Thinking, doing, and caring. Philadelphia: F.A.Davis, 639-640.
Procedure for Assisting a Student with Crutches
Note: Equipment and supplies are provided by families.
Crutches are one type of mobility device used when students cannot bear weight while
walking, can only bear partial weight, or need support for balance while wearing braces.
There are several different types of crutches and selection depends on the student’s needs.
Forearm crutches and trough crutches are most frequently used by students with varying
degrees of paralysis who use them long term with braces for support in walking. A newer
type of crutch is the leg support crutch or knee walker/knee scooter crutch. This “crutch”
works best for injuries to the ankle or lower leg and looks much like a scooter with a seat for
the affected leg. The most common type of crutch is the axillary swing-through crutch and
the instructions below are primarily for this type of crutch.
1. Review the health care provider’s orders and student’s individualized health care plan.
2. Explain the procedure to the student at his/her level of understanding. Stress safety.
Encourage the student to participate as much as possible.
3. Encourage student to wear non-skid, hard soled, low heeled shoes.
4. Check the crutches for the appropriate length while the student is standing erect. Place
the crutch tip 6 inches in front of the student and 4-6 inches to the side (tripod position).
The arm-piece of the axillary crutch should be 2-3 finger widths from the axilla.
5. Check the handpiece. The handpiece should allow a 20-30 degree flexion of the elbow
when the arm piece is 2-3 finger-widths below the axilla.
6. Use axillary arm pads. Teach student to place body weight on the palms, never on the
axilla.
7. Check to make sure the crutches have intact rubber tips on the bottom for stability.
8. Make sure that the crutches have the student’s name on them.
9. Verify that the student is using the gait prescribed by the health care provider.
Crutch Gaits:
• 2-Point Gait

VDH Guidelines for Healthcare Procedures in Schools 183
Advance right crutch and left foot together; then left crutch and right foot
together.
Requires at least partial weight bearing on each foot. Requires more balance than
4-Point Gait.
• 3-Point Gait
Balance weight on crutches. Advance both crutches and the weaker extremity at
the same time; then advance the stronger extremity.
Requires strength and balance because the arms must support all the body’s
weight. Requires bearing all of weight on one foot. Useful when student cannot
bear weight on one foot or when student has only one leg.
• 4-Point Gait
Advance right crutch; then left foot; then left crutch; then right foot.
This gait is used by a student who can move each leg separately and can bear
some weight on each foot.
• Swing-To & Swing-Through Gait
Swing-to gait: advance both crutches forward; swing body to a position even with
the crutches.
Swing-through gait: advance both crutches forward; swing body past crutches;
bring crutches in front of body.
Usually used when student’s lower extremities are paralyzed or the student uses
braces.
10. Teach student how to stand:
• Hold both crutches together in hand on affected side
• Push down on stable support base with free hand; put weight on stronger leg; lift
body
• Stand with back straight; bear weight on unaffected leg and crutches
• Place both crutches on same level as feet
• Advance unaffected leg while bearing down on crutches
• Pull affected leg and crutches while bearing weight on unaffected leg
11. Teach student how to sit:
• Make sure chair is stationary or braced against wall. Stand in front of chair, facing
forward.
• Place unaffected leg against chair.
• Hold crutches together in hand on affected side.

VDH Guidelines for Healthcare Procedures in Schools 184
• Keep back straight and gently ease down supporting weight on crutches and
unaffected leg
• When almost seated, gently hold on to arm of chair and complete the movement
12. Teach walking upstairs:
• Place crutches on same level as feet
• Shift weight to crutches and advance unaffected leg to next step
• Shift weight to unaffected leg and lift affected leg and crutches up to step
13. Teach walking downstairs:
• Place both crutches on same level as feet
• Shift weight to unaffected leg
• Lower crutches to next step
• Shift weight to crutches and transfer unaffected leg to step with crutches
14. Arrange for the student to use the elevator. Use of the elevator decreases the possibility
of injury to the student or others on the stairs. If an elevator is not available, the student
may need all of his/her classes on the ground floor.
15. Arrange transportation as needed for fire drills and emergency evacuations. Prearrange
evacuation plans and make sure both student and staff are aware of them. Elevators are
not available during fire drills.
16. Safety tips:
• Make sure rubber tips are in good repair. Tips should be wide, provide good suction,
and replaced promptly if worn.
• Make sure screws and nuts are tight.
• Designate a place in the classroom for the crutches. (Crutches should be kept next to
the student in the classroom if possible but placed so that they are not a safety hazard
for others).
• Encourage student to keep hands free to handle the crutches. Student should carry
possessions in a lightweight backpack or have another person help carry the student’s
possessions.
• It is usually beneficial to arrange for student to leave each class 5 minutes early to be
out of the hall during regular changing of classes.
• Use elevator instead of stair walking whenever possible to decrease risk of accidents.
17. Document teaching and student’s ability to walk with crutches.

VDH Guidelines for Healthcare Procedures in Schools 185
Sources:
Hockenberry, M., & Wilson, D. (2015). Wong's nursing care of infants and children. (10th
ed.). St. Louis: Elsevier Mosby, 1565-1566.
Southall, V.H. (2004). Guidelines for specialized healthcare procedures. Virginia
Department of Health, 140.
Selekman, J. (2013). School nursing: A comprehensive text. (2nd ed.). Philadelphia: F.A.
Davis, 1044-1045.
Smith, S., Duell, D. & Martin, B. (2012). Clinical nursing skills: Basic to advanced skills
(8th ed.). Boston: Pearson, 391-397.
Wilkinson, J.M., Treas, L.S., Barnett, K.L., & Smith, M.H. (2016). Fundamentals of
nursing: Vol. 2: Thinking, doing, and caring. Philadelphia: F.A.Davis, 639-640.
.

VDH Guidelines for Healthcare Procedures in Schools 186
Procedure for Assisting a Student with a Walker
Note: Equipment and supplies are provided by families.
1. Review the health care provider’s orders and student’s individualized health care plan.
2. Explain the procedure to the student at his/her level of understanding. Encourage the
student to participate as much as possible.
3. Check the fit of the walker for the student’s height. With the student standing erect and
in line with the rear legs of the walker, the student‘s elbows should be flexed at a 20-30
degree angle when his/her hands are on the grips. A newer type of walker is a “knee
walker” which can be used in place of crutches for a lower leg or ankle injury. It looks
much like a scooter with a seat for the affected leg.
4. Make sure the walker has the student’s name on it.
5. Teach and/or reinforce the gait:
• Use the arms to move the walker forward 6-8 inches without flexing the trunk
forward. (If the walker does not have wheels, it should be picked up instead of
sliding it).
• Move the weaker leg first while bearing weight on the walker.
• Move the stronger leg even with the first.
• The student’s body should not come into contact with the crossbar.
6. Do not allow the student to use the walker on the stairs or inclines.
7. Arrange for the student to use the elevator.
8. Arrange transportation as needed for fire drills and emergency evacuations. Prearrange
evacuation plans and make sure both student and staff are aware of them.
9. Safety tips:
• Make sure rubber tips are in good repair. Tips should be wide, provide good suction,
and replaced promptly if worn.
• Make sure screws and nuts are tight.
• Designate a place in the classroom for the walker. (Walkers should be kept next to
the student in the classroom if possible but placed so it is not a safety hazard for
others).
• Encourage student to keep hands free to handle the walker. Student should carry
possessions in a lightweight backpack or have another person help carry the student’s
VDH Guidelines for Healthcare Procedures in Schools 187
possessions. Do not hang book bags or other items from the walker because it may
make the walker too heavy to move safely.
• If necessary, arrange for student to leave each class 5 minutes early to be out of the
hall during regular changing of classes.
10. Document teaching and student’s ability to walk with a walker.
Sources:
Hockenberry, M., & Wilson, D. (2015). Wong's nursing care of infants and children. (10th
ed.). St. Louis: Elsevier Mosby, 1565-1566.
Southall, V.H. (2004). Guidelines for specialized healthcare procedures. Virginia
Department of Health, 140.
Selekman, J. (2013). School nursing: A comprehensive text. (2nd ed.). Philadelphia: F.A.
Davis, 1044-1045.
Smith, S., Duell, D. & Martin, B. (2012). Clinical nursing skills: Basic to advanced skills
(8th ed.). Boston: Pearson, 387.
Wilkinson, J.M., Treas, L.S., Barnett, K.L., & Smith, M.H. (2016). Fundamentals of
nursing: Vol. 2: Thinking, doing, and caring. Philadelphia: F.A.Davis, 639-640.
Wisconsin Improving School Health Services Project. (2015). Transfer procedures. Available
online at http://www.wishesproject.org/uaptraining.

VDH Guidelines for Healthcare Procedures in Schools 188
Procedure for Assisting a Student with a Wheelchair
Note: Equipment and supplies are provided by families.
1. Assess the need for assistance with a wheelchair at school.
Review the health care provider’s orders and student’s individualized health care plan.
2. Explain the procedure to the student at his/her level of understanding. Encourage the
student to participate as much as possible.
3. Obtain a consultation with a physical therapist, if needed.
The physical therapist can assist and facilitate implementation of the health care
provider’s orders for a wheelchair and can make recommendations regarding
accessibility.
4. Verify that everywhere the student needs to go in the school is fully wheelchair
accessible. Provide student with precautions regarding most accessible routes.
5. Teach and assist the student to monitor for skin irritations and pressure areas. Students
with compromised sensation may have pressure relief cushions or adaptations. Monitor
for rubbing and skin irritation as student grows.
6. Teach and assist the student to move from a surface the height of the wheelchair seat to
the wheelchair:
• Position wheelchair towards student’s strongest side at a 45-degree angle to the
transfer seat. Lock the wheels.
• Move student to the edge of the transfer seat.
Allow student to assist as much as possible.
• Standing in front of student, place arms under student’s axilla or around student’s
back.
• Rock student and, on a count of three, pivot student into wheelchair.
• Position student in wheelchair to minimize pressure areas.
• Remain in front of student to assess stability.
Allow student to sit for 2 minutes. Observe for dizziness relating to orthostatic
hypotension. Do not leave student until he/she is stable. Safety belt can be used with
larger students. Smaller students may be moved more easily by putting one arm
under student’s knees and the other supporting neck/back while lifting from transfer
seat to wheelchair. Maintain good body mechanics when doing any lifting.
7. Teach and assist the student to move to a standing position as appropriate:
• Lock wheelchair wheels.
VDH Guidelines for Healthcare Procedures in Schools 189
• Make sure student can bear weight. Allow student to help as much as possible.
• Instruct student to move to edge of cot or chair with hands on chair arms or cot edge.
• Place one knee between student’s knees (if student has a weak knee, brace it with
your knee).
• Instruct student to put stronger foot slightly under him.
• Bend knees, lean slightly forward, and place arms around student’s waist. Grasp a
strong belt around the student’s waist.
Stand close to cot with feet wide apart for a broad base of support.
• Instruct student to push down with his/her arms, lean forward, and stand up on the
count of 3.
• Hold student closely.
• On count of 3, rock weight to back foot bringing student forward to standing.
Use a cue that both you and the student can understand.
• Instruct student to lock knees.
• Allow time for the student to balance him/herself, then pivot the student slowly until
he/she is seated in the chair.
8. Teach and assist the student to move from a standing to a sitting position:
• Lock wheelchair wheels.
• Allow student to assist as much as possible.
• Remind student to feel back of chair with his/her legs.
• Instruct student to reach back for chair arms.
• Hold the student at the waist by grasping a strong belt.
• Shift weight to forward leg and guide student as he/she bends knees and sits in the
chair.
• Make sure student is safe and secure.
Use a seatbelt or harness as needed.
9. Recharge batteries on motorized chairs or scooters each day according to battery
manufacturer’s directions.
10. Arrange for the student to use the elevator.
Use of the elevator decreases the possibility of injury to the student or others. If an
elevator is not available, the student may need all of his/her classes on the ground floor.

VDH Guidelines for Healthcare Procedures in Schools 190
11. Arrange transportation as needed for fire drills and emergency evacuations. Prearrange
evacuation plans and make sure both student and staff are aware of them.
Elevators are not available during fire drills.
12. Assess transportation of the student and wheelchair between home and school. Whenever
possible, student should be transferred from a wheelchair to an appropriate federally-
approved child/occupant restraint system when being transported. If transportation in a
wheelchair is necessary, the student should be transported facing forward and only in
vehicles that can be adapted to secure a wheelchair. Ones using a lap and shoulder belt
that can be secured to the vehicle and a 4-point strap tie down system are preferable.
Vehicle drivers, teachers, aides, nurses, and monitors should be able to demonstrate the
ability to correctly use whatever restraint system is used and know what to do in an
emergency.
13. Wheelchair safety tips:
• Check rear wheels for movement when brakes are locked.
Brakes need to be repaired when they are ineffective or out of alignment. (Note:
Routine maintenance should be performed at home.)
• Make sure seatbelt is fastened.
• Feet should be on footrests.
• Arms and legs should be inside the chair when passing through a doorway.
• Always lock brakes when wheelchair is stopped, even if empty.
• Push at a walking speed. Hold on to wheelchair when pushing it.
Extra caution should be taken on gravel or uneven surfaces because the front wheels
could become stuck and the wheelchair might tip over.
• Back wheelchair down ramps and curbs.
Both wheels should go over curb together so chair does not tip.
• Push wheelchair forward going up ramps and curbs.
Tip chair back so that front wheels clear the curb. After clearing, put front wheels
down on surface and lift back wheels over curb.
• Never tilt chair far back, turn sharply, or stop rapidly.
14. If necessary, arrange for student to leave each class 5 minutes early.
Leaving early allows the student to be out of the hall during regular changing of
classes.
15. Document teaching and review student safety points.

VDH Guidelines for Healthcare Procedures in Schools 191
Sources:
Hockenberry, M., & Wilson, D. (2015). Wong's nursing care of infants and children. (10th
ed.). St. Louis: Elsevier Mosby, 1566-1567.
Porter, S., Branowicki, P., & Palfrey, J. (2014). Supporting students with special health care
needs: Guidelines and procedures for schools (3rd ed.). Baltimore: Paul H. Brookes
Publishing, 147-148
Southall, V.H. (2004). Guidelines for specialized healthcare procedures. Virginia
Department of Health, 143-144.
Selekman, J. (2013). School nursing: A comprehensive text. (2nd ed.). Philadelphia: F.A.
Davis, 1044-1045.
Wisconsin Improving School Health Services Project. (2015). Transfer procedures. Available
online at http://www.wishesproject.org/uaptraining.
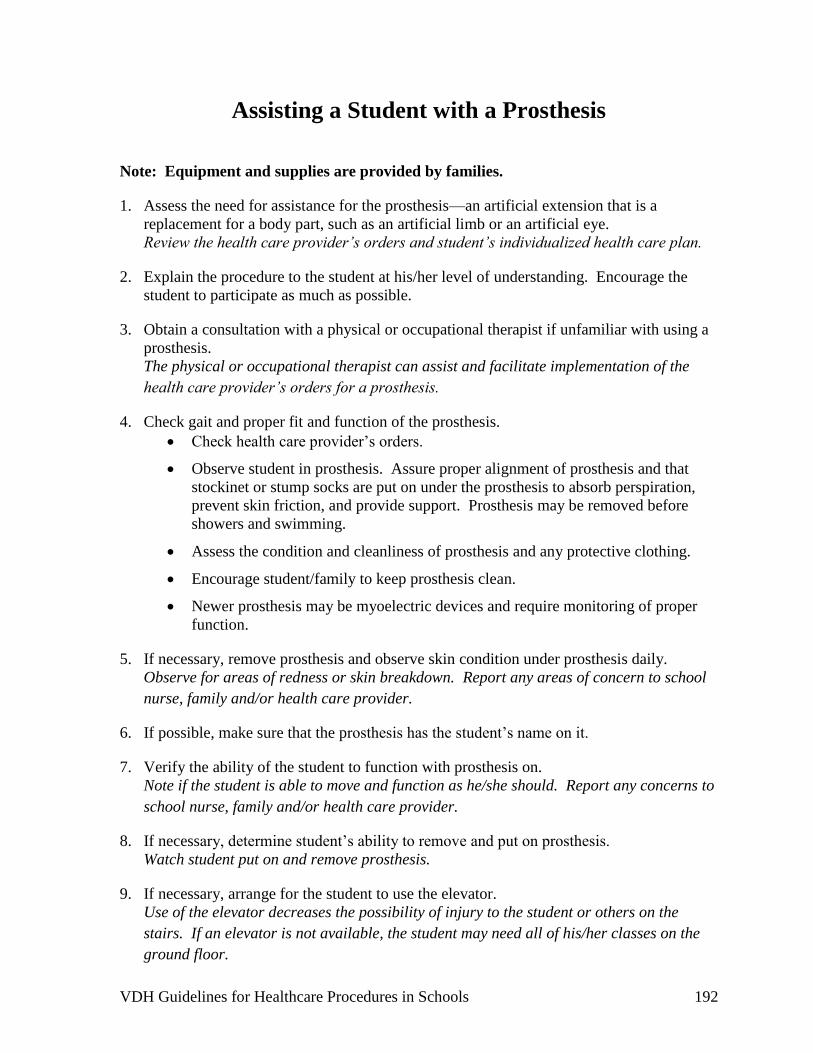
VDH Guidelines for Healthcare Procedures in Schools 192
Assisting a Student with a Prosthesis
Note: Equipment and supplies are provided by families.
1. Assess the need for assistance for the prosthesis—an artificial extension that is a
replacement for a body part, such as an artificial limb or an artificial eye.
Review the health care provider’s orders and student’s individualized health care plan.
2. Explain the procedure to the student at his/her level of understanding. Encourage the
student to participate as much as possible.
3. Obtain a consultation with a physical or occupational therapist if unfamiliar with using a
prosthesis.
The physical or occupational therapist can assist and facilitate implementation of the
health care provider’s orders for a prosthesis.
4. Check gait and proper fit and function of the prosthesis.
• Check health care provider’s orders.
• Observe student in prosthesis. Assure proper alignment of prosthesis and that
stockinet or stump socks are put on under the prosthesis to absorb perspiration,
prevent skin friction, and provide support. Prosthesis may be removed before
showers and swimming.
• Assess the condition and cleanliness of prosthesis and any protective clothing.
• Encourage student/family to keep prosthesis clean.
• Newer prosthesis may be myoelectric devices and require monitoring of proper
function.
5. If necessary, remove prosthesis and observe skin condition under prosthesis daily.
Observe for areas of redness or skin breakdown. Report any areas of concern to school
nurse, family and/or health care provider.
6. If possible, make sure that the prosthesis has the student’s name on it.
7. Verify the ability of the student to function with prosthesis on.
Note if the student is able to move and function as he/she should. Report any concerns to
school nurse, family and/or health care provider.
8. If necessary, determine student’s ability to remove and put on prosthesis.
Watch student put on and remove prosthesis.
9. If necessary, arrange for the student to use the elevator.
Use of the elevator decreases the possibility of injury to the student or others on the
stairs. If an elevator is not available, the student may need all of his/her classes on the
ground floor.

VDH Guidelines for Healthcare Procedures in Schools 193
10. Arrange transportation as needed for fire drills and emergency evacuations. Prearrange
evacuation plans and make sure both student and staff are aware of them.
Elevators are not available during fire drills.
11. Document care and findings on student log. Notify school nurse, family and/or health
care provider of any problems, changes, or concerns.

VDH Guidelines for Healthcare Procedures in Schools 194
Possible Problems for a Student with a Prosthesis
• Inflamed joint
Signs of inflamed joint are pain, warmth, swelling, or redness at joint. Notify school
nurse, family and/or health care provider of any signs of inflammation.
• Reddened area on the skin under prosthesis
May be beginning stage of pressure sore. Remove prosthesis if allowed. If reddened
area does not disappear after 20 minutes, notify school nurse, family and/or health
care provider.
• Too small or ill-fitting equipment
Notify school nurse, family and/or health care provider.
• Joint contracture
Characterized by stiffness or tightness in joint with resistance to movement. Notify
school nurse, family and/or health care provider of any decrease in movement of the
joint.
Sources:
Bowden, V., & Greenberg, C. (2012). Pediatric nursing procedures (Third ed.).
Philadelphia: Wolters Kluwer Health/Lippincott Williams & Wilkins, 604-605.
Hockenberry, M., & Wilson, D. (2015). Wong's nursing care of infants and children. (10th
ed.). St. Louis: Elsevier Mosby, 1563-1566.
Southall, V.H. (2004). Guidelines for specialized healthcare procedures. Virginia
Department of Health, 145.

VDH Guidelines for Healthcare Procedures in Schools 195
Assisting a Student with an Orthosis
Note: Equipment and supplies are provided by families.
1. Assess the need for assistance for the orthosis or orthotic—an orthopedic device that is
used to support a body part. It may be called a splint or a brace. Other examples include
shoe lifts and cranial molding helmets. Specific orthoses describe the area of the body
they treat and are often abbreviated. For example, the ankle-foot orthoses are referred to
as AFOs, knee-ankle-foot orthoses as KAFOs, and thoracolumbosacral orthoses as
TLSOs.
Review the health care provider’s orders and student’s individualized health care plan.
2. Explain the procedure to the student at his/her level of understanding. Encourage the
student to participate as much as possible.
3. Obtain a consultation with a physical or occupational therapist if unfamiliar with using
the orthosis.
The physical or occupational therapist can assist and facilitate implementation of the
health care provider’s orders for the orthosis.
4. Check gait and proper fit and function of the orthosis.
• Check health care provider’s orders.
• Check full length of orthosis.
• Observe student in orthosis. Mechanical joints should match body joints.
• Observe orthosis for: worn areas, loose or missing buckles, straps or screws,
cracks in the plastic, dents in the metal, condition of related areas (such as shoes).
• Encourage student/family to keep orthosis clean.
• A layer of thin clothing (such as a cotton undershirt or socks) can be worn under
most orthoses to protect the skin. Keep clothing free from wrinkles.
5. If allowed, remove orthosis and observe skin condition under orthosis daily.
Observe for areas of redness or skin breakdown. Report any areas of concern to family
and/or health care provider.
6. If the child has decreased sensation, check circulation and skin condition frequently. If
the child complains of a burning sensation under the orthosis, remove the orthosis (unless
contraindicated) and observe skin for reddened areas.
7. Make sure that the orthosis has the student’s name on it.
8. Verify the ability of the student to function with orthosis on.
Note if the student is able to move and function as he/she should. Report any concerns to
school nurse, family and/or health care provider.
9. Determine student’s ability to put on and remove orthosis.
Watch student put on and remove orthosis.

VDH Guidelines for Healthcare Procedures in Schools 196
10. If necessary, arrange for the student to use the elevator.
Use of the elevator decreases the possibility of injury to the student or others on the
stairs. If an elevator is not available, the student may need all of his/her classes on the
ground floor.
11. Arrange transportation as needed for fire drills and emergency evacuations. Prearrange
evacuation plans and make sure both student and staff are aware of them.
Elevators are not available during fire drills.
12. Document care and findings on student log.
Notify school nurse, family and/or health care provider of any problems, changes, or
concerns.

VDH Guidelines for Healthcare Procedures in Schools 197
Possible Problems for a Student with an Orthosis
• Inflamed joint
Signs of inflamed joint are pain, warmth, swelling, or redness at joint. Notify school
nurse, family and/or health care provider of any signs of inflammation.
• Reddened area on the skin under orthosis
May be beginning stage of pressure sore. Remove orthosis if allowed. If reddened
area does not disappear after 20 minutes, notify school nurse, family and/or health
care provider.
• Too small or ill-fitting equipment
Notify school nurse, family and/or health care provider.
• Joint contracture
Characterized by stiffness or tightness in joint with resistance to movement. Notify
school nurse, family and/or health care provider of any decrease in movement of the
joint.
Sources:
Bowden, V., & Greenberg, C. (2012). Pediatric nursing procedures (Third ed.).
Philadelphia: Wolters Kluwer Health/Lippincott Williams & Wilkins, 604-605.s
Hockenberry, M., & Wilson, D. (2015). Wong's nursing care of infants and children. (10th
ed.). St. Louis: Elsevier Mosby, 1563-1566.
Southall, V.H. (2004). Guidelines for specialized healthcare procedures. Virginia
Department of Health, 145.

VDH Guidelines for Healthcare Procedures in Schools 198
Procedure for Cast Care
Note: Equipment and supplies are provided by families.
1. Assess why the student received a cast. Casts are typically applied to injured limbs to
immobilize them and allow bones, ligaments, tendons, or muscles to heal.
Review the health care provider’s orders and student’s individualized healthcare plan.
2. Determine the type of cast and whether the student is allowed to bear weight on it.
Casting Materials
• Synthetic-to include fiberglass or mixture of polypropylene, nylon and polyester.
These are the most common casting materials used with children as they are
lightweight and durable. Available in colors and prints. Material may or may not
be water proof. Prolonged wear or demanding activities may lead to cracks or
splits in the cast causing skin irritation or damage.
• Plaster of Paris—usually reserved for situations that require close conformity or
small irregularly shaped areas such as the hand. Relatively heavy and must be
kept dry.
3. Explain the procedure to the student at his/her level of understanding. Encourage the
student to participate as much as possible.
4. Check cast fit. Observe affected body part that is visible. Check for:
• Color, swelling, and warmth of extremity
Extremity should be same color as a comparable extremity and warm, with no
swelling (may have some swelling initially).
• Capillary refill of toes or fingers
Capillary refill can be checked by pressing on the nailbeds of the toes or fingers.
After releasing the nailbed, the color should return rapidly to the nailbed in 3
seconds or less.
• Sensation and movement of toes or fingers
The student’s ability to move and feel the extremity can be evaluated by viewing
his/her response to touch and asking him to wiggle toes/fingers. Report any changes
to school nurse, family and/or health care providers.
5. Observe the condition of the cast. Observe cast for cracks, dents, or soft spots. Edges
should not be soft or crumbly. Remind student not to put anything inside the cast,
especially pencils and other items found at school. Encourage student/family to keep cast
clean.
6. Observe for any complaints or problems noted by the student especially the five “Ps”:
pain, pallor, paresthesia, paralysis, pulselessness.

VDH Guidelines for Healthcare Procedures in Schools 199
Notify family and/or health care provider of any pain, color change, pressure, numbness,
or decreased sensation in affected body part. Observe for skin rashes or reddened areas
around the cast. Notify family and/or health care provider of any concerns.
7. Protect cast from soiling. Some synthetic casts can be wiped with mild soap and water.
If a student has a cast which borders the perineal area, do not cut a diaper to fit the area
because the raw areas of the diaper give off debris that can get under the cast and irritate
the skin.
Cover cast with plastic wrap as needed at mealtimes and with elimination. If plastic
wrap is soiled or wet, remove plastic wrap, clean skin, and reapply wrap.
8. Do not use oily substances (skin lotions) or powder in or around the edges of the cast. Oil
softens skin and can lead to skin breakdown, as well as softening of the cast. Powder will
cake under the cast and cause skin breakdown. (Some references recommend rubbing the
skin with isopropyl alcohol (70%) four times a day to toughen the skin. However, no
scientific data could be found to support this practice). Do not use alcohol on red or
irritated skin.
9. If student is immobile, change position as needed to prevent breakdown. Avoid allowing
affected limb to hang down for more than 30 minutes.
10. Petaling cast edges with adhesive tape or moleskin may decrease skin irritation and
protect the edges of the cast. Do not put padding in cast.
Padding such as cotton or tissues may fall down in cast and decrease circulation.
11. Caution student not to scratch under the cast. Itching can sometimes be relieved by an
ice pack or by tapping on the cast.
Scratching can cause a break in the skin and lead to an infection.
12. If student has a spica cast, do not use the bar to lift student. Reclining wheelchairs can be
used to accommodate the child in a spica cast.
Placing pressure on the bar may damage the cast.
13. If needed, arrange for the student to use the elevator.
Use of the elevator decreases the possibility of injury to the student or others on the
stairs. If an elevator is not available, the student may need all of his/her classes on the
ground floor.
14. Assess transportation needs of the student between home and school. Some casts may
make it difficult to secure the student in an appropriate restraint system. Special vests,
such as the E-Z-On Vest, and car safety seats have been designed for transport and some
health care facilities may have these available for loan. Vehicle drivers, teachers, aides,
nurses, and monitors should be able to demonstrate the ability to correctly use whatever
restraint system is employed and know what to do in an emergency.
15. If needed, arrange transportation as needed for fire drills and emergency evacuations.
Prearrange evacuation plans and make sure both student and staff are aware of them.
Elevators are not available during fire drills.

VDH Guidelines for Healthcare Procedures in Schools 200
16. Document care and findings on student log.
Notify school nurse, family and/or health care provider of any problems, changes, or
concerns.
Sources:
Bowden, V., & Greenberg, C. (2012). Pediatric nursing procedures (Third ed.).
Philadelphia: Wolters Kluwer Health/Lippincott Williams & Wilkins, 166-175.
Gockley, A., Hennikus, W., Lavin S.T., Rzucidlo, S, and Rieghard, C. (2015).
Transportation of children in spica casts in the USA. Journal of Pediatric
Orthopedics, 277-280. Available online at
http://www.ncbi.nlm.nih.gov/pubmed/26018926.
Hockenberry, M., & Wilson, D. (2015). Wong's nursing care of infants and children. (10th
ed.). St. Louis: Elsevier Mosby, 1556-1559.
Smith, S., Duell, D. & Martin, B. (2012). Clinical nursing skills: Basic to advanced skills
(8th ed.). Boston: Pearson, 1017-1022
Southall, V.H. (2004). Guidelines for specialized healthcare procedures. Virginia
Department of Health, 149-151.
.
VDH Guidelines for Healthcare Procedures in Schools 201
Problems that May Occur with Casts
Presence of pain greater than expected, decreased or absent movement, pain with
stretching toes or fingers, decreased sensation in the affected extremity.
These are indicators of pressure build-up under the cast. Pressure decreases
circulation to the affected extremity. Decrease in circulation can result in damage to
muscle tissue and nerves. If pressure causes a decrease in circulation as described,
raise casted extremity above rest of the student’s body and contact school nurse,
family, and health care provider immediately so that pressure can be relieved.
• Damaged cast
Immobilize extremity and notify school nurse, family, and health care provider of the
extent of the damage.
• Plaster of Paris cast becomes wet or soiled
Allow to air-dry. If wet area is large or cast is soiled, contact school nurse or family.
• Cast too tight
Signs include: pale to white color of fingers or toes, fingers or toes cool or cold to
touch, swelling of affected body part, numbness or tingling, decrease or absence of
sensation or movement. May indicate beginning of reduced circulation to extremity
due to pressure under the cast. Elevate extremity and notify school nurse, family
and/or health care provider immediately.
• Pain or gestures of pain
May be due to pressure areas resulting from improper molding of cast, food, or
foreign particles under cast, which can cause irritation and skin breakdown. Report
any complaints or gestures of pain to school nurse, family and/or health care provider.
• Drainage on cast or odor from cast
May be due to an open sore, sloughing of the skin under the cast, or infection. Report
any drainage or odor to school nurse, family and/or health care provider for
assessment.

VDH Guidelines for Healthcare Procedures in Schools 202
Sources:
Bowden, V., & Greenberg, C. (2012). Pediatric nursing procedures (Third ed.).
Philadelphia: Wolters Kluwer Health/Lippincott Williams & Wilkins, 166-175.
Gockley, A., Hennikus, W., Lavin S.T., Rzucidlo, S, and Rieghard, C. (2015).
Transportation of children in spica casts in the USA. Journal of Pediatric
Orthopedics, 277-280. Available online at
http://www.ncbi.nlm.nih.gov/pubmed/26018926.
Hockenberry, M., & Wilson, D. (2015). Wong's nursing care of infants and children. (10th
ed.). St. Louis: Elsevier Mosby, 1556-1559.
Southall, V.H. (2004). Guidelines for specialized healthcare procedures. Virginia
Department of Health, 149-151.
Smith, S., Duell, D. & Martin, B. (2012). Clinical nursing skills: Basic to advanced skills
(8th ed.). Boston: Pearson, 1017-1022.

VDH Guidelines for Healthcare Procedures in Schools 203
Procedure for Principles of Good Body Mechanics
1. Determine the need for assistance in moving or turning a student. Obtain help to lift a
large load or student. Do not lift a load that is too heavy for you.
Good body mechanics can assist in moving and lifting of heavy objects or students while
minimizing injury to the staff member or student. However, additional personnel and/or
assistive devices may be required in the safe movement of students or heavy objects. The
National Institute for Occupational Safety and Health (NIOSH) recommends that the
average worker avoid lifting more than 50 pounds without assistance, and evidence-
based practice research indicates that injuries are minimized if workers use assistive
devices to lift more than 35 pounds.
2. Explain the procedure to the student at his/her level of understanding. Encourage the
student to participate as much as possible.
3. When moving a heavy object or student:
• Use proper posture at all times. Maintain lower back in good alignment while
standing or sitting.
Proper posture decreases the chance of back injuries.
• Assess the need for assistance and secure as much additional assistance as is needed
for safe moves.
This may involve using the assistance of other personnel or the use of assistive
devices. Many assistive devices are available for help in moving students and their
use should be explored when developing an individualized health plan to assist in the
student’s mobility. Transfer belts, transfer boards, and items such as transfer sheets
are simple items that can be helpful in moving students.
• If possible, pull it, push it, roll it, or lower it rather than lifting it.
Work with the force of gravity by pulling, pushing, rolling or lowering, rather than
working against the force of gravity by lifting the load.
• Stand close to the object or student to be moved.
Provides a good center of gravity and good balance for moving the load and an even
distribution of weight.
• Provide a broad base of support.
Have feet at least 12 inches apart with one foot slightly in front of the other.
• Keep back straight, knees and hips flexed, weight distributed on both feet, and
shoulders in line with pelvis.
Flexing knees allows strong muscles of the legs to do the work of lifting. Avoid
twisting movement of the spine. Do not keep back rigid because it will lead to back
strain and decrease flexibility.

VDH Guidelines for Healthcare Procedures in Schools 204
• Use as many muscle groups as possible for moving the object or student. Move the
hip and shoulders as one unit.
Leg and arm muscles reduce the workload on the back and support the load.
• Avoid leaning and stretching. When working at lower levels, do not stoop by
bending over. Instead flex body at knees, and keeping back straight, use thigh and
gluteal muscles to accomplish task.
• Breathe during the moving effort.
Breathing provides for good oxygenation of the muscles and prevents dizziness and
injury.
• To change the direction of the movement, pivot feet, turn with short steps, and turn
the whole body without twisting the upper torso.
To lower an object or student, always bend straight down toward the resting place,
never twist to lower an object or student. Lowering straight down prevents twisting
sprains and injuries to the back.
• Use a verbal count of 1-2-3 to coordinate movements with the student or the staff
member assisting with moving the student or object.
Coordination of movements will prevent jerky movements, which could lead to back
strain and injury.
• Take rest periods to avoid straining.
4. When lifting a heavy object or student:
• Assess need for assistance
• Squat
• Stand to lift
• Carry object close to body
• Carry using muscles that pull shoulder blades together
Lifting in this manner lessens back strain.
VDH Guidelines for Healthcare Procedures in Schools 205
Sources:
National Institute for Occupational Safety and Health. (2010). Safe patient handling
training for schools of nursing. Center for Disease Control and Prevention. DHHS
(NIOSH) Publication # 2009-127.
National Institute for Occupational Safety and Health. (2010). Strains, sprains, and pains in
home healthcare: Working in an uncontrolled environment. NIOSH Science Blog.
Available online at http://blogs.cdc.gov/niosh-science-
blog/2010/04/16/homehealthcare/.
Selekman, J. (2013). School nursing: A comprehensive text. (2nd ed.). Philadelphia: F.A.
Davis, 1045-1047.
Smith, S., Duell, D. & Martin, B. (2012). Clinical nursing skills: Basic to advanced skills
(8th ed.). Boston: Pearson, 336-347.

VDH Guidelines for Healthcare Procedures in Schools 206
General Information for Students
Who Require Assistance with Physical Mobility
Date: ___________________
To: _____________________________ _________________________________
(Teachers, Instructional assistants, Bus drivers, etc)
Name of Student: ______________________________________
This student uses one or more of the following devices to help with movement (please check):
Cane
Crutches
Walker
Prosthesis ( a replacement for a missing limb)
Brace or splint
Cast
Wheelchair
Other __________________________________________
Students using one of these devices may need more time to move from one area to another.
They also may need the following physical assistance or special devices to avoid falls or to
otherwise keep the student safe:
_______________________________________________________________________
_______________________________________________________________________
_______________________________________________________________________
Contact __________________________ at _____________________ (phone number) for additional
information or if the student experiences any problems when using these devices.

VDH Guidelines for Healthcare Procedures in Schools 207
Chapter 5: Care of the Neurological
System
Concussion Assessment & Management
Seizure Management
Rectal Diazepam Administration
Vagal Nerve Stimulation
Ventricular Shunt

VDH Guidelines for Healthcare Procedures in Schools 208
Concussion Management
Overview
A concussion is a type of brain injury that results from a blow or jolt to the head or body that
causes a sudden jarring of the head. The brain bounces back and forth inside the bony skull.
A concussion can occur with, or without, a loss of consciousness. Research shows that
inability to remember what happened just prior to the injury and just after the injury may be a
more reliable indicator of a concussion than loss of consciousness. Concussions can be more
serious on young, developing brains. At school, concussions are most common in physical
education classes and while playing athletics, but can occur in a classroom or hall if a student
hits his/her head on a desk, floor, or other student. To prevent further injury, it is important
to recognize when a student may have sustained a concussion and respond appropriately.
The best treatment for a concussion is physical and cognitive rest.
Research has shown that metabolic changes take place in the brain as a result of a
concussion. These changes make the brain susceptible to serious injury shortly after a
concussion. If a student receives a second blow to the head, the brain's regulatory
mechanisms can fail, causing massive cerebral edema, brain herniation, and sudden death.
While this is rare, the devastating consequences of Second Impact Syndrome make it
imperative that concussions are managed correctly.
Signs and Symptoms
Students who exhibit one or more of the signs and symptoms listed below after receiving a
blow to the head should be referred to an appropriate health care provider experienced in
evaluating concussions. The Virginia Board of Education defines an appropriate provider as
a physician, nurse practitioner, physician assistant, neuropsychologist, or licensed athletic
trainer. Concussions do not show up on an MRI or CAT scan, but these tests may be done to
rule out other serious brain injuries.
Signs of Concussion
• Appears dazed or stunned
• Is confused about what has happened
• Answers questions slowly or inaccurately
• Slurs words
• Repeats questions
• Can't remember what happened prior to injury
• Can't remember what happened after the injury
• Exhibits difficulties with balance or coordination
• Loses consciousness (even briefly)
• Shows behavior or personality changes

VDH Guidelines for Healthcare Procedures in Schools 209
Symptoms Reported by Student
Physical
• Headache or pressure in head
• Nausea or vomiting
• Fatigue or feeling tired
• Blurry or double vision
• Sensitivity to light or noise
• Numbness or tingling
• Dizziness or balance problems
• Just does not "feel right"
Emotional
• Irritable
• Sad
• More emotional than usual
• Nervous
Thinking/Remembering
• Difficulty thinking clearly
• Difficulty concentrating
• Feeling slowed down
• Feeling sluggish or groggy
Sleep
• Drowsy
• Sleeps more than usual
• Sleeps less than usual
• Has trouble falling asleep
Role of School Nurse
The primary role of the school nurse is to recognize when an injury may have caused a
concussion and refer the student to appropriate resources to prevent further injury. When the
student returns to school after a concussion, the nurse can assess for ongoing symptoms and
help to develop a plan that will support recovery. It is important that the school and the nurse
have plans and procedures in place ahead of time to deal with concussions. The CDC has
developed a concussion action plan, which can be found under Resources at the end of this
section. The nurse can also educate parents, staff, coaches, and students about concussions
and how to manage them. The nurse can review school facilities and policies to help prevent
concussions, especially repeat concussions, and help create a safe school environment. Most
recently, the CDC is trying to reshape the culture around concussion and encourage student

VDH Guidelines for Healthcare Procedures in Schools 210
athletes to recognize the seriousness of concussions and to take time to heal before resuming
activity (Concussion at Play: Opportunities to Reshape the Culture Around Concussion,
2015). School nurses can be an important influence in protecting students and promoting a
safer culture around concussions.
Virginia Regulations
(See also below 2015 Revised Virginia Regulations)
In 2010, the General Assembly passed the Student Athlete Protection Act with amendments
added in 2014 (see Code of Virginia §22.1-271.5 and §22.1-271.6) directing the Board of
Education to develop guidelines on policies for concussions in student-athletes. Below are
the main points of the law:
• Each school division must develop policies and procedures for suspected concussions
in student-athletes, including both physical activity and academic guidelines
• Each student athlete and the student athlete's parent/guardian must review
information on concussion signs and symptoms on an annual basis and sign that they
have read and understand the information.
• If any student athlete is suspected to have sustained a concussion in a practice or
game, the athlete shall be removed from the activity and not return to play that day.
The student must be free of any concussion symptoms to resume play in the future
and receive written clearance from a licensed health care provider.
• A licensed Health Care Provider (MD, NP, PA, licensed athletic trainer) will use a
standardized concussion sideline assessment tool such as Sport Concussion
Assessment Tool-3 (SCAT3), Sudden Assessment for Concussions (SAC), or
Balance Error Scoring System (BESS) to test cognitive ability and postural stability.
• A concussion policy team will review and refine local concussion management
policies annually.
• Each school division will develop policies to ensure staff and volunteers are trained in
recognition of concussions and concussion management and may encourage other
organizations using their athletic facilities to train their staff and volunteers in
concussion management.
These regulations are often referred to as "Return to Play" guidelines. Although each
student's care is individualized, in general, most guidelines recommend that student athletes
resume a graduated, modified return to play schedule as recommended by the Zurich
Consensus Statement and the American Academy of Pediatrics. This means that after a
documented concussion, the student would not resume full play in a game for seven days
after the injury and providing there are no remaining symptoms of concussion. This may
include modifications for other physical activities in which the student participates, such as
physical education classes and recess. If increasing activity results in symptoms, the activity
is reduced until symptoms resolve. In encouraging student athletes to allow adequate healing
time, the CDC has adopted the motto "Better to miss one game than the whole season."

VDH Guidelines for Healthcare Procedures in Schools 211
Research has shown that post-concussion symptoms are resolved in 7-10 days for 90% of
students. Individualized return to play plans must be developed for the remaining 10%.
Return to Learning
As research determined the need for physical rest after a concussion, the need for cognitive
rest also became apparent. Since one of the brain's primary functions is completing cognitive
tasks, it was recognized that cognitive rest is also important to healing after a concussion.
However, since most students look normal after a concussion, educators and parents may fail
to recognize the need for academic adjustments. If a student sprains an ankle, adults
typically would not force the student to walk with full weightbearing immediately after
injury and would allow time for healing. Similarly, allowing cognitive rest may help to
minimize symptoms and facilitate a quicker recovery from a concussion. The more severe
the concussion, the more time may be needed for rest and healing. Much more research
needs to be done on this subject to determine evidence-based guidelines for mental rest after
a concussion. In general, it has been recommended that if a student cannot concentrate
without headache or other symptoms for 30 minutes, rest at home might be best. Rest also
means no video games, texting, computer work, loud music, or heavy reading. Lighter
activities such as watching television or interacting with family might be recommended until
symptoms subside.
The CDC recommends that when students return to school after a concussion, school
professionals should watch for:
• Problems concentrating or paying attention
• Longer time needed to complete assignments
• Difficulty remembering or learning new material
• Difficulty organizing tasks or moving from one task to the next
• Irritability
• Inappropriate or impulsive behavior
• Decreased ability to cope with stress
• Being more emotional than usual
• Fatigue or drowsiness
• Difficulty handling the lights and sounds in a school environment
• Physical symptoms such as headache, nausea, dizziness.
If a student is still experiencing symptoms after a concussion, the following adjustments to
their academic program can be considered:
• Absence, initially after concussion
• Return to school but with a shortened day
• Reduction in workload at school; prioritizing assignments
• Allowance of more time to complete assignments
• Postponement of standardized or any high stakes testing
VDH Guidelines for Healthcare Procedures in Schools 212
• Allowing student to take cognitive breaks in between classes in a quiet place
• Modification or exclusion from physical education classes and recess--but not
substituting a mental activity for them
• Providing class notes from a teacher or fellow student
• Limited screen time
• Treatment with authorized medications
• Allowing student to eat lunch in a quiet location.
During the student's recovery, it is essential for communication and collaboration between
the educational staff, school nurse, family, and student. Schools might want to consider a
case manager for the student until symptoms disappear. If the student's symptoms persist
beyond 4 weeks and affect his ability to fully participate in his education, a team may need to
develop accommodations or a 504 plan. It has been noted that students with special needs,
attention deficits, and learning disorders may have greater difficulty recovering from a
concussion. Moreover, students who have had more than one concussion may take longer to
recover.
Revised Virginia Regulations (2015)
In 2015, the Virginia Board of Education added guidelines (Code of Virginia §22.1-271.6)
for a Return to Learn Protocol with the following recommendations:
1. A student recovering from a brain injury shall gradually increase cognitive activities
progressing through some or all of the following phases. Some students may need
total rest with a gradual return to school, while others will be able to continue doing
academic work with minimal instructional modifications. The decision to progress
from one phase to another should reflect the absence of any relevant signs or
symptoms, and should be based on the recommendation of the student’s appropriate
licensed health care provider in collaboration with school staff, including teachers,
school counselors, school administrators, psychologists, nurses, clinic aides, or others
as determined by local school division concussion policy.
a. Home: Rest
Phase 1: Cognitive and physical rest may include
• minimal cognitive activities – limit reading, computer use, texting,
television, and/or video games;
• no homework;
• no driving; and
• minimal physical activity.

VDH Guidelines for Healthcare Procedures in Schools 213
Phase 2: Light cognitive mental activity may include
• up to 30 minutes of sustained cognitive exertion;
• no prolonged concentration;
• no driving; and
• limited physical activity.
Student will progress to part-time school attendance when able to tolerate a minimum of
30 minutes of sustained cognitive exertion without exacerbation of symptoms or
reemergence of previously resolved symptoms.
b. School: Part-time
Phase 3: Maximum instructional modifications including, but not limited to
• shortened days with built-in breaks;
• modified environment (e.g., limiting time in hallway, identifying quiet
and/or dark spaces);
• established learning priorities;
• exclusion from standardized and classroom testing;
• extra time, extra assistance, and/or modified assignments;
• rest and recovery once out of school; and
• elimination or reduction of homework.
Student will progress to the moderate instructional modification phase when able to
tolerate part-time return with moderate instructional modifications without exacerbation
of symptoms or re-emergence of previously resolved symptoms.
Phase 4: Moderate instructional modifications including, but not limited to
• established priorities for learning;
• limited homework;
• alternative grading strategies;
• built-in breaks;
• modified and/or limited classroom testing, exclusion from standardized
testing; and
• reduction of extra time, assistance, and/or modification of assignments as
needed.
Student will progress to the minimal instructional modification phase when able to
tolerate full-time school attendance without exacerbation of existing symptoms or
reemergence of previously resolved symptoms.

VDH Guidelines for Healthcare Procedures in Schools 214
c. School: Full-time
Phase 5: Minimal instructional modification - instructional strategies may include,
but are not limited to
• built-in breaks;
• limited formative and summative testing, exclusion from standardized
testing;
• reduction of extra time, assistance, and modification of assignments; and
• continuation of instructional modification and supports in academically
challenging subjects that require cognitive overexertion and stress.
Student will progress to nonmodified school participation when able to handle sustained
cognitive exertion without exacerbation of symptoms or re-emergence of previously
resolved symptoms.
Phase 6: Attends all classes; maintains full academic load/homework; requires no
instructional modifications.
Progression through the above phases shall be governed by the presence or resolution
of symptoms resulting from a concussion experienced by the student including, but
are not limited to
a. difficulty with attention, concentration, organization, long-term and short-term
memory, reasoning, planning, and problem solving;
b. fatigue, drowsiness, difficulties handling a stimulating school environment
(e.g., sensitivity to light and sound);
c. inappropriate or impulsive behavior during class, greater irritability, less able
to cope with stress, more emotional than usual; and
d. physical symptoms (e.g., headache, nausea, dizziness).
2. Progression through gradually increasing cognitive demands should adhere to the
following guidelines:
a. increase the amount of time in school;
b. increase the nature and amount of work, the length of time spent on the work,
c. or the type or difficulty of work (change only one of these variables at a time);
d. if symptoms do not worsen, demands may continue to be gradually increased;
e. if symptoms do worsen, the activity should be discontinued for at least 20 minutes
and the student allowed to rest

VDH Guidelines for Healthcare Procedures in Schools 215
1) if the symptoms are relieved with rest, the student may reattempt the
activity at or below the level that produced symptoms; and
2) if the symptoms are not relieved with rest, the student should discontinue
the current activity for the day and reattempt when symptoms have lessened or
resolved (such as the next day).
3. If symptoms persist or fail to improve over time, additional in-school support may be
required with consideration for further evaluation. If the student is three to four
weeks post injury without significant evidence of improvement, a 504 plan should be
considered.
4. A student-athlete shall progress to a stage where he or she no longer requires
instructional modifications or other support before being cleared to return to full
athletic participation (return-to-play).
The American Academy of Pediatrics (AAP) Return to Learn Following a
Concussion Guidelines (October 2013), and the American Medical Society for Sports
Medicine (AMSSM) Position Statement (2013), are available online to assist health
care providers, student-athletes, their families, and school divisions, as needed.
VDH Guidelines for Healthcare Procedures in Schools 216
Resources
HEADS UP toolkit. Comprehensive toolkit for concussions available from the Centers for
Disease Control and Prevention (CDC) at http://www.cdc.gov/headsup/index.html
Acute Concussion Evaluation Care Plan. Available online:
http://www.cdc.gov/concussion/headsup/pdf/ACE_care_plan_school_version_a.pdf
Concussion Signs and Symptoms Checklist. Available online:
http://www.cdc.gov/concussion/pdf/TBI_schools_checklist_508-a.pdf
Concussion at Play: Opportunities to Reshape the Culture Around Concussion. A 2015
CDC report designed to build a culture in sports where athletes lower their chances of
concussion and recognize and report concussion symptoms so they can properly
recover. Available online:
http://www.cdc.gov/headsup/pdfs/resources/concussion_at_play_playbook-a.pdf
Concussion in Sports--What You Need to Know. National Federation of State High School
Associations' (NFHS) online coach education course, endorsed by the CDC, provides
a guide to understanding, recognizing and properly managing concussion in high
school sports. Available online: www.nfhslearn.com
Oregon Center for Applied Science (ORCAS) ACTive® course, an online training and
certification program that gives sports coaches the tools and information to protect
players from sports concussions. Funded by the National Institutes of Health,
available online: http://activecoach.orcasinc.com
Virginia Board of Education. (2011). Guidelines for Policies on Concussions in Student-
Athletes. Senate Bill 652, the 2010 General Assembly, Code of Virginia § 22.1-
271.5.
Virginia Department of Health. (2015). A Review and Update of Concussion Management.
Web-based training CME available free of charge online:
https://va.train.org/DesktopModules/eLearning/CourseDetails/CourseDetailsForm.asp
x?courseId=1056291
Sources:
American Academy of Family Physicians. (2014). Evaluation and management of
concussion in athletes: Recommendations from the AAN. American Family
Physician, 89(7): 585-587.

VDH Guidelines for Healthcare Procedures in Schools 217
Bey, T. & Ostick, B. (2009). Second impact syndrome. Western Journal of Emergency
Medicine 10(1):6-10. Available online:
http://www.ncbi.nlm.nih.gov/pmc/articles/PMC2672291/
Brown, B. (n.d.). BrainSTEPS presents: Concussions in the classroom-Return to learning.
Pennsylvania Department of Education. Video presentation available online:
http://www.pattan.net/Videos/Browse/Single/?code_name=brainsteps_presents_conc
ussions_in_the
BrainSTEPS. (n.d. ). Returning to school after concussion: Recommended protocol.
Pennsylvania Department of Education. Available online: http://pattan.net-
website.s3.amazonaws.com/images/2013/01/11/BrSTP%20Ret%20Protocol%201-13-
wb.pdf
Centers for Disease Control and Prevention. (2015). Concussion danger signs. Available
online: http://www.cdc.gov/headsup/basics/concussion_danger_signs.html
Centers for Disease Control and Prevention. (2015). HEADS UP. Available online:
http://www.cdc.gov/headsup/index.html
Centers for Disease Control and Prevention. (2015). HEADS UP A fact sheet for school
nurses. Available online:
http://www.cdc.gov/headsup/pdfs/schools/tbi_factsheet_nurse-508-a.pdf
Centers for Disease Control and Prevention. (2015). HEADS UP Concussion signs and
symptoms. Available online:
http://www.cdc.gov/headsup/basics/concussion_symptoms.html
Centers for Disease Control and Prevention. (2015). HEADS UP Returning to sports and
activities. Available online:
http://www.cdc.gov/headsup/basics/return_to_sports.html
Centers for Disease Control and Prevention. (2015). HEADS UP to Schools: School Nurses.
Available online: http://www.cdc.gov/headsup/schools/nurses.html
Child SCAT 3. (2013). Sport Concussion Assessment Tool for children ages 5 to 12 years.
British Journal of Sports Medicine 47:263. Available online: http://vafp.org/wp-
content/uploads/2013/01/SCAT3.pdf
Diazk A. & Wychoff, L. (2013) Concussions: The role of the school nurse. NASN School
Nurse, 28: 110-11.

VDH Guidelines for Healthcare Procedures in Schools 218
Gioia, G & Collins, M. (2008). Acute Concussion Evaluation Care Plan. Centers for
Disease Control and Prevention Heads Up tool kit. Available online:
http://www.cdc.gov/concussion/headsup/pdf/ACE_care_plan_school_version_a.pdf
Giza, C, Kutcher, J., Ashwal, S., etal. (2013). Summary of evidence-based guideline update:
Evaluation and management of concussion in sports: Report of the Guideline
Development subcommittee of the American Academy of Neurology. Available
online:
http://www.neurology.org/content/early/2013/03/15/WNL.0b013e31828d57dd
Halstead, M., McAvoy, K., Devore, C., Carl, R., Lee, J. & Logan, K. (2015). Returning to
learning following a concussion. Pediatrics 132(5): 948-957. Available online:
http://pediatrics.aappublications.org/content/132/5/948.full.pdf+html
Halstead, M. & Walter, K. (2010). Sport-Related concussion in children and adolescents.
Pediatrics 126(3): 597-615. This policy was reaffirmed by the American Academy
of Pediatrics on October 27, 2014, Pediatrics 134(5): e1520.
National Association of School Nurses. (2012). Concussions--The role of the school nurse.
Position Statement. Available online:
http://www.nasn.org/PolicyAdvocacy/PositionPapersandReports/NASNPositionState
mentsFullView/tabid/462/ArticleId/218/Concussions-The-Role-of-the-School-Nurse-
Adopted-January-2012
McAvoy, K. (2010). REAP the benefits of good concussion management: How every
family, school and medical professional can create a community-based concussion
management program. Denver: rocky McCrory, P et al. (2012). Consensus
statement on concussion in sport. 4th International Conference on Concussion in
Sport, Zurich.
Meehan, W. & Bachur, R. (2015). The recommendation for rest following acute concussion.
Pediatrics 15(2): 362-363. Available online:
http://pediatrics.aappublications.org/content/135/2/362.full.pdf+html
Mountain Youth Sports Institute Center for Concussion. Available online:
http://ochspioneers.org/sites/default/files/pages/REAP_0.pdf
Pennsylvania Department of Health. (2015). BrainSTEPS: Strategies Teaching Educators,
Parents, & Students. Website with many resources: http://www.brainsteps.net/
Rocky Mountain Hospital for Children. (n.d.) Returning to school after a concussion.
Available online:
http://rockymountainhospitalforchildren.com/util/documents/Returning%20to%20Sch
ool%20After%20a%20Concussion.pdf

VDH Guidelines for Healthcare Procedures in Schools 219
SCAT 3. (2013). Sport Concussion Assessment Tool--3rd ed. British Journal of Sports
Medicine 47:259. Available online: http://vafp.org/wp-
content/uploads/2013/01/SCAT3.pdf
Thomas, D., Apps, J., Hoffmann, R., McCrea, M., & Hammeke, T. (2015). Benefits of strict
rest after acute concussion: A randomized controlled trial. Pediatrics doi:
10.1542/peds.2014-0966.
Virginia Board of Education. (2015). Guidelines for policies on concussions in student-
athletes. Senate Bill 652 of the 2010 General Assembly, House Bill 410 & Senate Bill
172 of the 2014 General Assembly and House Bill 1096 of the 2014 General
Assembly, Code of Virginia § 22.1-271.5. Available online:
http://www.doe.virginia.gov/boe/guidance/health/2015_guidelines_concussions_in_st
udent_athletes.pdf
Virginia Board of Education. (2011). Guidelines for policies on concussions in student-
athletes. Senate Bill 652, the 2010 General Assembly, Code of Virginia § 22.1-271.5.
Virginia Department of Health. (2015). A review and update of concussion management.
Web-based training CME available online:
https://va.train.org/DesktopModules/eLearning/CourseDetails/CourseDetailsForm.asp
x?courseId=1056291
Wing, R., Amanullah, S., Jacobs, E., Clark, M., & Merritt, C. (2015). Heads Up:
Communication in key in school nurses' preparedness for facilitating "Return to
Learn" following concussion. Clinical Pediatrics June 29, 2015 doi:
0009922815592879.
Wisconsin School Health Services Project. (2014).Management of concussion in the school
setting. Available:
http://www.google.com/url?sa=t&rct=j&q=&esrc=s&frm=1&source=web&cd=2&ca
d=rja&uact=8&ved=0CCQQFjABahUKEwjI6Ju88oDHAhUMoIAKHf8HAOI&url=
http%3A%2F%2Fwww.wpha.org%2Fresource%2Fresmgr%2FWiSHES_Project%2F
Concussion_policy_and_proce.docx&ei=QRG5VYjEA4zAggT_j4CQDg&usg=AFQj
CNF2c79Q0_9gh-rf79pZ1Gmdysdv1g&bvm=bv.99028883,d.eXY
Zirkle, P. & Brown, B. (2015). K-12 students with concussions: A legal perspective.
Journal of School Nursing, 31(2): 99-109.

VDH Guidelines for Healthcare Procedures in Schools 220
Procedure to Follow After a Possible Concussion
1. Observe for concussion danger signs and contact Emergency Medical Services if any
of the following are observed:
a. loss of consciousness
b. headache that gets worse and does not go away
c. cannot remember what happened just prior to injury or what happened
afterwards
d. weakness, numbness, or decreased coordination
e. repeated vomiting or nausea
f. one pupil larger than the other
g. slurred speech
h. seizures
i. cannot recognize people or places
j. very drowsy or cannot be awakened
k. becomes increasingly confused, restless, or agitated
l. has unusual behavior or just doesn't "act right"
These maybe signs of a concussion or of a more serious brain injury and need to be
evaluated immediately.
2. Observe student for signs and symptoms of a concussion for at least 30 minutes.
Some symptoms might take time to develop.
3. Complete the Concussion Signs and Symptoms Checklist (on next page) and monitor
during the observation period.
The form includes an easy-to-use checklist to evaluate when the student arrives at the
clinic, 15 minutes later, 30 minutes later, and ongoing assessment if symptoms
persist.
4. After 30 minutes, if there are no further symptoms, return student to class but advise
no participation in sports or other active activities for the rest of the day.
5. Notify the student's family that the student had an injury to the head. Send an
information sheet home with student for parents describing how to monitor for further
symptoms.
Alerts family to monitor for signs of head injury and gives them information on which
signs to observe and report.
6. If student sees a Healthcare Provider, monitor for problems on return to school.

VDH Guidelines for Healthcare Procedures in Schools 221

VDH Guidelines for Healthcare Procedures in Schools 222

VDH Guidelines for Healthcare Procedures in Schools 223

VDH Guidelines for Healthcare Procedures in Schools 224

VDH Guidelines for Healthcare Procedures in Schools 225
Seizure Management
Overview
A seizure is an event in which there is a temporary change in behavior resulting from a
sudden, abnormal burst of electrical activity in the brain. If the electrical disturbance is
limited to only one area of the brain, then the result is a partial seizure. The location of the
initial electrical malfunction and the extent of its spread determine the clinical manifestations
of the seizure. For example, the student may experience confusion, loss of awareness,
aimless movements, jerking movements or uncontrolled body movements. Sometimes the
student may just exhibit purposeless, repetitive actions such as hand wringing or lip
smacking. There may or may not be a loss of consciousness and awareness. If the electrical
disturbance affects the entire brain, the result is a generalized seizure.
Epilepsy is defined as a chronic condition that is characterized by 2 or more recurrent
seizures. Many students with epilepsy have more than one seizure type. Nearly 3 million
people in the US have epilepsy, and approximately 1 in 26 people will develop epilepsy at
some point in their lifetime. Between 0.5 and 1% of students are affected. It may become
less frequent and resolve as a child ages.
Some seizures may result from an acute medical illness (e.g., during a hypoglycemic episode
for a diabetic) or an acute injury (e.g., head injury) and cease once the illness is treated.
Some children may have one seizure without the cause ever being known.
Classification of Seizures
Seizures may be generalized motor or non-motor and affect the entire body, or focal aware
and focal impaired awareness where one area of the brain is affected resulting in more
localized symptoms. The following table summarizes the classification of seizures which
was updated in 2016 by the International League Against Epilepsy:
Generalized Motor
Seizures Clinical Manifestations
Tonic-clonic seizures
(formerly known as grand
mal seizures; affects the
entire brain at the onset)
The eyes roll upward, the student loses consciousness,
falls to the ground, and becomes rigid as muscles tighten
(tonic phase). This is followed by jerking movements of
the entire body (clonic phase) as muscles undergo
rhythmic tightening and relaxation. During this phase, the
student may become incontinent of stool and urine as

VDH Guidelines for Healthcare Procedures in Schools 226
Generalized Motor
Seizures Clinical Manifestations
Onset: any age
his/her muscles contract and relax. Breathing may be
shallow or even stop briefly (rare), but renews as jerking
movements end.
Generalized seizures usually last 1-2 minutes. After the
tonic-clonic phase, movement slows and is followed by
drowsiness or deep sleep that can last several hours
(postictal state).
Atonic seizures
(also known as drop
attacks)
Onset: age 2-5
Manifested as a sudden, momentary loss of motor tone.
The student may or may not lose consciousness.
A mild atonic seizure may cause a sudden, brief head
drop. During a more severe atonic seizure, the student
may suddenly fall to the ground, lose consciousness
briefly, and then get up as if nothing happened. If a
student has frequent atonic seizures, a helmet may be
worn to prevent injury to the head or face. These seizures
tend to be resistant to drug therapy.
Myoclonic seizures Characterized by sudden, brief contractures of a muscle or
group of muscles without loss of consciousness and no
postictal state.
Generalized Non-Motor
Seizures Clinical Manifestations
Absence seizures
(formerly called petit mal
seizures, “lapses,” or
“staring spells”)
Onset: age 4-12
These seizures are characterized by a brief loss of
consciousness with minimal or no alteration in muscle
tone and sometimes go unrecognized. There is no
warning and the seizures can be mistaken for daydreaming
or inattentiveness.
Students may:
• Simply stare blankly for 5-10 seconds or blink
• Drop objects because of loss of muscle tone
• Have minor movements such as lip-smacking
• Experience twitching or slight hand movements
The student will be unable to recall what happened during
these brief periods of “blankness.” If untreated, seizures
may occur many times a day.

VDH Guidelines for Healthcare Procedures in Schools 227
Generalized Motor
Seizures Clinical Manifestations
Seizures can be precipitated by fatigue, stress,
hypoglycemia, or hyperventilation.
Focal Seizures Clinical Manifestations
Focal aware seizures
(formerly called “partial” or
“simple partial” seizures)
affects just one part of the
brain
Onset: any age
Manifestations are dependent on the area affected and tend
to be localized. The student may be aware of the seizure,
remember the experience, but may be limited in how he or
she can interact while it is happening. For example, a
student’s eyes or eyes and head turn to one side and the
arm on that side may be extended with the fingers
clenched. The student may appear to be looking toward
the closed fist. A focal aware seizure may also manifest
as a tingling in the hand or face, as a visual distortion, or a
sudden strange feeling.
It is important for an eyewitness to give a clear description
of the seizure, especially which body parts are initially
involved, to aid in diagnosis and treatment. Also, noting
the circumstances that precipitated the episode can help in
treatment.
Students may also experience a postictal stage after a
partial seizure. Focal aware seizures may spread and
become generalized. Consciousness is never impaired.
Focal Impaired Awareness
Seizures
(formerly known as
“complex partial” or
“psychomotor” seizures,
begin in one area of the
brain and spread to other
areas)
Onset: age 3 and up
The most common type of seizures. These seizures first
begin with an aura or warning that the seizure is about to
occur. The aura may be described as a strange feeling in
the pit of the stomach that rises up to the throat, or a
sensation that is accompanied by odd or unpleasant odors
or tastes, auditory or visual hallucinations, or feelings of
elation or strangeness.
A student may cry or run for help. If a student
experiencing a focal impaired awareness seizure is
touched or restrained, he/she may become combative.
During this time, the student is often unaware of his/her

VDH Guidelines for Healthcare Procedures in Schools 228
Focal Seizures Clinical Manifestations
environment and unable to respond appropriately to the
environment.
After the aura, the student may suddenly become limp or
stiff, appear dazed, and confused. The most obvious
behaviors may be lip smacking, repeating words, chewing,
picking at clothing, drooling, and swallowing.
Focal impaired awareness seizures may spread and
become generalized. Consciousness is always impaired.
In addition, a number of epilepsy syndromes have been identified. They include: Benign
Rolandic Epilepsy, Lennox-Gastaut Syndrome, Landau-Kleffner Syndrome, Rasmussen's
Syndrome, Juvenile Myoclonic Epilepsy, Frontal Lobe Epilepsy, Temporal Lobe Epilepsy,
and Progressive Myoclonic Epilepsy.
Potential Settings
Many students with a history of seizures attend regular classrooms and participate in regular
school activities, with modifications that are determined by the parents, health care provider,
school nurse, and school staff. As with all medical conditions, every effort is made to protect
the student’s privacy, especially during the occurrence of a seizure. School personnel having
contact with the student need to be familiar with the student’s medications and potential side
effects, be able to recognize signs of seizure-related behavior, know what to do when signs
are observed, and know how to implement the established school emergency plan.
Medications Currently Used to Treat Seizures
(This list includes only some of the most common medications available to treat
seizures.) Additional medications to treat seizures may become available for use in the U.S.
as approved by the FDA and as prescribed by the health care provider.
Generic Name Trade
Name Seizure Type Adverse Reactions
Carbamazepine Tegretol Secondary tonic/clonic
Focal Impaired
awareness
Allergic reactions,
dizziness, ataxia, poor
muscle coordination,
nausea, behavioral changes,

VDH Guidelines for Healthcare Procedures in Schools 229
Generic Name Trade
Name Seizure Type Adverse Reactions
Focal aware blurred or double vision,
aplastic anemia, hepatitis
Clonazepam Klonopin Absence
Myoclonic
Tonic/clonic
Sedation, hyperactivity,
aggressiveness, slurred
speech, double vision,
ataxia, behavior changes,
increased salivation
Ethosuximide Zarontin Absence GI upset, loss of appetite,
headache, lethargy,
behavior changes,
dizziness, dystonia,
myelosuppression, drug-
induced lupus
Felbamate—used
only with caution
and informed
consent due to
serious adverse
reactions
Felbatol Focal and generalized
(reserved for severe
epilepsy)
Aplastic anemia, hepatic
failure, anorexia, weight
loss, nausea, insomnia,
headache, fatigue
Gabapentin Neurontin Focal Somnolence, dizziness,
ataxia, fatigue, weight gain
Lacosamide Vimpat Focal Dizziness, headache,
nausea, double vision
Lamotigine Lamictal Focal
Tonic-clonic
Absence
Myoclonic
Somnolence, dizziness,
rash, nausea, blurred
vision, tremor
Levetiracetam Keppra Focal
Myoclonic
Drowsiness, dizziness,
behavioral problems

VDH Guidelines for Healthcare Procedures in Schools 230
Generic Name Trade
Name Seizure Type Adverse Reactions
Phenobarbital Luminal Tonic-clonic
Focal
Febrile
Sedation, hyperactivity,
changes in sleep pattern,
inattention, irritability,
cognitive impairment
Phenytoin Dilantin Tonic-clonic
Focal impaired
awareness
Focal aware
Gingival hyperplasia,
hirsutism, nystagmus,
blurred or double vision,
ataxia, rashes, folate
deficiency, drug-induced
lupus, myelosuppression
Pregabalin Lyrica Focal Blurred vision, dizziness,
dry mouth, weight gain,
sleepiness, swelling of
hands and feet, trouble
concentrating
Primidione Mysoline Tonic-clonic
Focal impaired
awareness
Focal aware
Sedation, hyperactivity,
ataxia, behavior changes,
rare hematological and
hypersensitivity reactions
Rufinamide Banzel Lennox-Gestaut
Syndrome (also
known as myoclonic-
astatic epilepsy)
Allergic reactions,
dizziness, drowsiness,
headache, nausea, fatigue,
vomiting, appetite changes,
sore throat, blurred vision,
tremor, blood in urine,
behavior and mood
changes, insomnia, suicidal
thoughts
Tiagabine Gabatril Focal Dizziness, somnolence,
headache, depression

VDH Guidelines for Healthcare Procedures in Schools 231
Generic Name Trade
Name Seizure Type Adverse Reactions
Topiramate Topamax Focal
Tonic-clonic
Atonic
Myoclonic
Absence
Somnolence, anorexia,
fatigue, difficulty with
concentration, nervousness
Valium Diastat
(rectal)
See next section for
more information
Dizziness, headache,
insomnia. sleepiness,
blurred vision, vomiting,
nausea diarrhea, tremors,
appetite loss
Valproate
Valproic acid
Depakote
Depakene
Depacon
(injection)
Myoclonic
Absence
Tonic-clonic
Mixed seizures types
Hair loss, tremor, elevated
liver enzymes and liver
failure, irregular menses,
increased appetite, upset
stomach, nausea and
vomiting, pancreatitis
thrombocytopenia
Other new drugs being used include Celontin (Methsuximide), Clobazam (Onfi), Mebaral
(Mephobarbital), Peganone (Ethotoin), Sabril (Vigabatrin), and Tridione (Trinethaione).
Many antiepileptic drugs are now available as once a day or twice a day dosing formulations.
Diet Therapy
In specific cases, students with seizures may be prescribed a ketogenic diet for treatment and
control of seizures. Usually this diet is prescribed for students with poorly controlled
seizures who cannot tolerate the side effects of antiepileptic medications.
The ketogenic diet is designed to create a state of ketosis which has been found to
metabolically improve seizure control in certain cases. It is most often used for myoclonic
seizures, but has been used for tonic-clonic and complex partial seizures. The diet is high in
fats (80-90%) and low in carbohydrates and proteins. Consumption of this diet forces the
body to use fats as the primary energy source instead of glucose and causes ketosis. It is a

VDH Guidelines for Healthcare Procedures in Schools 232
carefully calculated diet and requires daily monitoring to maintain ketosis. A student on a
ketogenic diet is followed by a registered dietitian and has a prescribed meal plan to follow
daily. Coordination between the student’s neurologist, dietitian, family, and school is
recommended for the development of a successful individualized healthcare plan (IHP).
Even a small amount of sugar can disrupt the diet so the food consumed by students on it
must be monitored closely. The diet is low in vitamins and minerals so vitamin supplements
are usually recommended.
Monitoring
The purpose of seizure monitoring is to protect the student from injury during a seizure, to
carefully observe the seizure in order to provide information for the management of the
seizure disorder, and to distinguish between behaviors related to a seizure and those
behaviors not related to it.
Monitoring provides the health care provider with the information needed to better manage
the student’s medication. An increase in the number of seizures may indicate that the student
needs a change in medication, or that he/she is not receiving the prescribed medication.
Approximately 30% of all people with epilepsy seizures are never controlled and are referred
to as drug resistant epilepsy. In addition, antiepileptic medication can be toxic. Therefore,
any side effects from the medication should be documented and reported to the family and/or
health care provider. Careful monitoring of the student can improve the management of
seizures.
Service Animals
See section in Special Care Issues chapter and Code of Virginia §51.5-44.
Signs of an Emergency
Most seizures are self-limiting and are not medical emergencies. A series of consecutive
seizures in which the student does not regain consciousness is called status epilepticus, and is
a medical emergency. Immediate medical care is required. Many students will have rescue
medication ordered for seizure emergencies. Seizures which last longer than 5 minutes
require emergency medical services. Seizures lasting longer than 30 minutes can cause brain
damage. Status epilepticus can lead to respiratory failure, brain damage, and death.
Therefore, it is critical that the student receive immediate medical attention.

VDH Guidelines for Healthcare Procedures in Schools 233
Managing a Seizure
Managing a seizure in school consists of protecting the student, observing the student, and
getting medical assistance when needed. The procedures on the following pages are
guidelines for managing a student having a seizure and what to do after the student has a
seizure. Included in the guidelines is the First Aid Flow Chart for Seizures algorithm.
Individualized Healthcare Plan
Each student’s IHP must be tailored to the individual’s needs. A sample plan is included in
Appendix A. When preparing an IHP for a student with seizures, the following items should
be considered:
• Student’s underlying condition and possible problems associated with the condition
or treatment.
• Type of seizures student experiences and typical course of seizure
• Student’s baseline or normal behaviors.
• Healthcare provider's orders for medications and care
• Whether student experiences auras, or can anticipate when seizures may occur
• Behaviors that indicate a seizure may be about to occur
• Actions to take if the student has a seizure
• Medications the student is taking and signs of adverse reactions or toxicity
• Who is to be notified when the student has a seizure
• Determining the need for seizure precautions, and what these precautions will be
• Guidelines for service animal, if prescribed
• Latex allergy precautions
• Standard precautions

VDH Guidelines for Healthcare Procedures in Schools 234
Sources:
Centers for Disease Control and Prevention. (2014). Epilepsy. Available online:
http://www.cdc.gov/epilepsy/index.html
Epilepsy Foundation of America. (2008). Legal Rights of Children with Epilepsy in School
and Child Care – An Advocate’s Manual. Margolis, L. (Ed.). Available online:
http://www.epilepsynorcal.org/docs/Education_DayCare.pdf
Epilepsy Foundation of Virginia. (2012). Virginia School Nurse Seizure Update 2012.
Available online: http://www.efva.org/upload/schoolnursemanual2012.pdf
Fisher, R.S., Shafer, P.O., & D’Souza, C. (2016). 2017 revised classification of seizures.
Retrieved February 14, 2017 from http://www.epilepsy.com/article/2016/12/2017-
revised-classification-seizures
Hockenberry, M., & Wilson, D. (2015). Wong's nursing care of infants and children (10th
ed.). St. Louis: Elsevier Mosby, 1463-1481.
National Library of Medicine Medline Plus. (2014). Seizures. Available online:
http://www.nlm.nih.gov/medlineplus/seizures.html
Levy, R., Copper, P, & Giri P. (2012) Ketogenic diet and other dietary treatments for
epilepsy. Cochrane Database Systematic Review 2012 (3): Article CD001903.
Porter, S., Branowicki, P., & Palfrey, J. (2014). Supporting Students with Special Health
Care Needs: Guidelines and Procedures for Schools (3rd ed.). Baltimore: Paul H.
Brookes Publishing, 451-463.
Selekman, J. (2013). School nursing: A comprehensive text. (2nd ed.). Philadelphia: F.A.
Davis, 1003-1027.
Wilfong, A. (2015). Treatment of seizures in children. UpToDate, Waltham, MA, 2015.

VDH Guidelines for Healthcare Procedures in Schools 235
Wisconsin Improving School Health Services Project. (2014). Seizures. Available online at
http://www.wishesproject.org/wp-content/uploads/seizures.pdfs
Note:
Additional resources can be found at the Epilepsy Foundation website:
www.epilepsy.com, and in the Virginia School Nurse Seizure Update 2012 at
http://www.efva.org/upload/schoolnursemanual2012.pdf
Epilepsy 101 power point slides and videos are available at
https://www.aesnet.org/epilepsy_101
VDH Guidelines for Healthcare Procedures in Schools 236
Procedure for Managing a Seizure
If a student has a seizure:
1. Remain calm.
No one can stop a seizure once it starts. If the first person remains calm, it will help others
stay calm too. Talk calmly and reassuringly during and after the seizure, which will help as
the student recovers from the seizure.
2. Time the seizure. Document all of the student's activity during a seizure: time the seizure
began, time the seizure ended, area of body where the seizure began, any movement of the
seizure from one area of the body to another, type of movements of the head, face, and/or
arms.
3. Check for medical alert I.D. and follow student's individualized healthcare plan (IHP) or
seizure action plan. If applicable, provide seizure rescue treatment, if prescribed
(medications, such as rectal diazepam, or treatments, such as a vagal nerve stimulator,
which can be used as needed to stop clusters of seizures, seizures that last longer than usual,
or seizures that occur at predictable times).
4. Have an adult stay with the student during the seizure to monitor his/her progress.
5. Put on gloves, if available.
6. If student is standing or sitting, gently lower student to the ground to avoid a fall. Clear the
area of anything that could hurt the student. Do not attempt to restrain student or use
force. If the student is wandering or confused, help steer him or her clear of unsafe
situations.
Restraining will not stop a seizure and can lead to injuries and make the student more
confused and agitated, causing more injury. Do not remove the student from a wheelchair
unless necessary.
7. Turn student on their side unless injury exists. If possible, put something flat and soft (like
a folded blanket or jacket) under student’s head so the student does not bang head against
the floor.
This positioning prevents the tongue from blocking airway and helps the student not to
choke on secretions.
8. Do not place anything in the student’s mouth.
Padded tongue blades and airways are not accepted practice because they may induce
vomiting, cause potential damage to teeth, and may be aspirated. A person cannot
"swallow their tongue."
9. Loosen tight clothing, especially around the student’s neck. Remove eyeglasses.

VDH Guidelines for Healthcare Procedures in Schools 237
10. Do not give the student any oral medications or anything to drink during a seizure.
11. Provide emotional support. Keep additional, unneeded onlookers away.
It can be embarrassing and confusing for a person to wake up to a crowd of people.
12. Call (911) Emergency Medical Services if:
• Student stops breathing.
• Seizure lasts more than 5 minutes.
• This is student's first seizure.
• Repeated seizures without regaining consciousness.
• Student cannot be awakened and is unresponsive to pain after seizure ends.
• Pupils are not equal in size after seizure.
• There is evidence of student injury.
• Student has diabetes or is pregnant.
• Seizure occurs in water.
• Parents request emergency evaluation
Prepare school environment to be as safe as possible for the student who has a history of
seizures.
Be aware of the potential for head injuries with uncontrolled seizures. The student may
require a lightweight helmet for head protection, especially for seizures that produce
sudden changes in muscle tone (atonic, myoclonic, akinetic). Prepare for potential
problems associated with seizures. For example, if the student has copious secretions with
a seizure, a bulb syringe or suction machine will need to be available.
Pathways and environments should be free of unnecessary objects. For example, unused
toys, wheelchairs, storage boxes, etc. should be removed from the environment.
Supervision during use of hazardous machinery or equipment (such as that found in a shop
class) should be available.
After a Student Has a Seizure:
1. After the seizure is over, clear secretions from the student’s mouth with a bulb syringe or
suction catheter. Keep student on his/her side.
Do not try to clear the student’s mouth until the seizure has ended.
2. Monitor student’s breathing.
Check position of head and tongue. Reposition if head is hyperextended. If student is not
breathing, activate the school emergency plan and begin CPR.
3. Talk with student to determine student’s level of awareness.

VDH Guidelines for Healthcare Procedures in Schools 238
Note if the student is alert, confused, drowsy, etc. and document findings.
If student remains unconscious after seizure is over, maintain open airway and assess
breathing. If necessary, begin rescue breathing or CPR.
4. Determine and document whether or not the student is able to move arms and legs, or if
there is change in the student’s ability to move.
5. Check for injuries and provide care, if needed. If student remains unconscious after seizure
is over, maintain open airway and continue to assess breathing. If necessary, start Rescue
Breathing or CPR.
6. Check for loss of control of urine and stool, and for any injuries. Provide privacy.
Loss of control is very embarrassing to the student. Clean the student to make him/her
more comfortable.
7. Remain with the student until he or she has regained full awareness of his or her
surroundings. Make the student comfortable; allow him/her to sleep as needed. Do not
give food or liquids until fully alert and swallowing reflex has returned.
After the seizure, the student may sleep for 30 minutes up to a number of hours (postictal
period). Refer to the First Aid Flow Chart for Seizures to determine the disposition of the
student post seizure.
8. Document the length of seizure, what happened during and after the seizure. Report if there
is a change in the frequency or type of seizure activity.
Notify school nurse, family and/or health care provider as designated in the IHP.
Resources for Learning to Manage Seizures:
The National Association for School Nurses, in partnership with the Epilepsy Foundation, has a
video continuing education program available online for school nurses, Managing Students
with Seizures: School Nurse Training Program at http://www.epilepsy.com/get-help/services-
and-support/training-programs/managing-students-seizures-school-nurse-training.
The Epilepsy Foundation also has developed Seizure Training for School Personnel which is
appropriate for teachers, bus drivers, instructional assistants, and other education staff. It can
be accessed online or using a kit with a DVD, PowerPoint, and facilitator's guide, which can be
ordered at http://www.epilepsy.com/get-help/services-and-support/training-programs/seizure-
training-school-personnel. They also have another video Seizure First Aid available online at
http://www.epilepsy.com/get-help/seizure-first-aid.

VDH Guidelines for Healthcare Procedures in Schools 239
The Epilepsy Foundation of Virginia has developed a video specifically for school bus drivers
available on YouTube at https://www.youtube.com/watch?v=_I6UKZOelXk.
Many additional resources can be found at the Epilepsy Foundation website: www.epilepsy.com
and in the Virginia School Nurse Seizure Update 2012 at
http://www.efva.org/upload/schoolnursemanual2012.pdf.
Sources:
Centers for Disease Control and Prevention. (2014). Seizure First Aid. Available online:
http://www.cdc.gov/epilepsy/basics/first-aid.htm
Epilepsy Foundation. (2014). Seizure First Aid. Available online
http://www.epilepsy.com/learn/treating-seizures-and-epilepsy/seizure-first-aid
Epilepsy Foundation of America. (2014). Your child at school and child care. Available
online: http://www.epilepsy.com/learn/seizures-youth/about-kids/your-child-school-
and-child-care
Epilepsy Foundation of Virginia. (2012). Virginia School Nurse Seizure Update 2012.
Available online: http://www.efva.org/upload/schoolnursemanual2012.pdf
Hockenberry, M., & Wilson, D. (2015). Wong's nursing care of infants and children (10th ed.).
St. Louis: Elsevier Mosby, 1463-1481.
National Library of Medicine Medline Plus. (2014). Seizures. Available online:
http://www.nlm.nih.gov/medlineplus/seizures.html
Porter, S., Branowicki, P., & Palfrey, J. (2014). Supporting students with special health care
needs: Guidelines and procedures for schools (3rd ed.). Baltimore: Paul H. Brookes
Publishing, 451-463.
Schachter, S & Shafer, P. (2014). Seizure First Aid. Video from Epilepsy Foundation
available online: http://www.epilepsy.com/get-help/seizure-first-aid
Selekman, J. (2013). School nursing: A comprehensive text (2nd ed.). Philadelphia: F.A.
Davis, 1003-1027.
Wilfong, A. (2015). Treatment of seizures in children. UpToDate, Waltham, MA, 2015.
Wisconsin Improving School Health Services Project. (2014). Seizures. Available online at
http://www.wishesproject.org/wp-content/uploads/seizures.pdf

VDH Guidelines for Healthcare Procedures in Schools 240

VDH Guidelines for Healthcare Procedures in Schools 241
Available online at: http://www.epilepsychicago.org/seizure-action-planning-forms/

VDH Guidelines for Healthcare Procedures in Schools 242
Available online at:
http://www.epilepsy.com/sites/core/files/atoms/files/tips_seizure_observation_recording.pdf

VDH Guidelines for Healthcare Procedures in Schools 243
Available online at: http://www.epilepsychicago.org/seizure-action-planning-forms/

VDH Guidelines for Healthcare Procedures in Schools 244
Available online at: http://end-epilepsy.org/pdf/2014-09-07/8-Seizure%20First%20Aid.pdf
VDH Guidelines for Healthcare Procedures in Schools 245
General Information for
Students Who May Have a Seizure
Date: ___________________
To: _____________________________ _________________________________
(Teachers, Instructional assistants, Bus drivers, etc)
Name of Student: ______________________________________
This student has had seizures in the past. He or she may be taking medications to prevent a seizure
from occurring again. A seizure is an event in which there is a temporary change in behavior
resulting from a sudden, abnormal burst of electrical activity in the brain.
Most students who experience seizures are able to participate in regular school activities. Some
students may be able to anticipate when they are getting ready to have a seizure. If a seizure is noted,
or if the student tells you that a seizure is about to occur, remain calm and contact the school nurse,
family, or designated contact person. Some students may have a service dog which can warn them of
an impending seizure.
Seizures usually last less than 5 minutes. Call for help, but do not leave the student. Do NOT try to
put anything in the student’s mouth during a seizure. If student is standing or sitting, gently lower
student to the ground to avoid a fall. Place student on side or stomach. Monitor the student’s ability
to breathe and remove hard objects that might accidentally be hit.
This student should have an Emergency Action Care Plan and all staff who have contact with this
student should be familiar with how to initiate the plan. Any unusual behaviors or seizure activity
should be reported to the school nurse and family.
Additional training for staff can be found in the Seizure Training for School Personnel guide at
www.epilepsy.com website and specific information and video for bus drivers can be found on
YouTube at https://www.youtube.com/watch?v=_I6UKZOelXk.
Please contact ________________________ at __________________ (phone number) for additional
information or if the student experiences any problems with seizures.

VDH Guidelines for Healthcare Procedures in Schools 246
Rectal Diazepam for Seizures
Epilepsy is a chronic condition that is characterized by recurrent seizures. A seizure is an event
in which there is a temporary change in behavior resulting from a sudden, abnormal burst of
electrical activity in the brain. Many students with epilepsy have more than one seizure type
and may have other symptoms as well. Some students continue to experience seizures despite
medical treatment. Acute prolonged or repetitive seizures are detrimental to a student’s health.
Studies show that rectal diazepam can be a safe and effective treatment for acute repetitive or
prolonged seizures. Although intravenous diazepam can produce serious respiratory
depression, published studies of rectal diazepam have found no instances of serious respiratory
depression. The most common side effect of rectal diazepam is sleepiness. Other side effects
that have been reported include dizziness, headache, poor coordination, pain, nervousness,
slowed speech, diarrhea, and rash. The greatest incidence of side effects is when more than one
dose is given.
Rectal diazepam is available as a rectal gel. The most commonly prescribed form is Diastat®,
a rectal gel that comes pre-packaged as a quick delivery set in a syringe with a flexible, molded
tip. Diastat Acudial 10 mg or 20 mg syringes are dialed and locked to the prescribed dose. A
2.5 mg Diastat syringe is also available. It can be stored for three years at room temperature.
Settings and Staff
The need to give rectal diazepam can occur anywhere. Measures should be taken to protect the
privacy of the student as much as possible. Students who may require rectal diazepam on the
bus should have an adult aide available on the bus. Guidelines regarding where and how
diazepam can be administered should be covered in the student’s individualized healthcare plan
(IHP).
Rectal diazepam can be administered by a registered nurse, licensed practical nurse, or other
adult with specialized training in appropriate techniques and problem management. Guidelines
regarding who can administer rectal diazepam should be included in the student’s health care
plan. It has been approved by the U.S. Food and Drug Administration for use by family
members or other non-medical caregivers. Virginia law states that school personnel specially
trained in administration of rectal diazepam may administer it (specific training for unlicensed
assistive personnel in Virginia public schools available from Virginia Department of Education
listed in reference list). These persons should also have training in cardiopulmonary
resuscitation. Any school personnel who has regular contact with a student who requires rectal
diazepam should receive general training covering the student’s specific needs, potential
problems and implementation of the established school emergency plan.

VDH Guidelines for Healthcare Procedures in Schools 247
Individualized Healthcare Plan
Each student’s IHP must be tailored to the individual’s needs. A sample plan is included in
Appendix A. When preparing an IHP for a student who requires rectal diazepam for seizures,
the following items should be considered:
• Details of events which would necessitate the administration of rectal diazepam
• Need to call 911 and activate the emergency plan when rectal diazepam is given
• Healthcare Provider's order for rectal diazepam
• Student’s underlying condition and possible problems associated with the condition or
treatment.
• Type of seizures student experiences and typical course of seizure
• Actions to take when the student has a seizure
• Side effects to monitor
• What to do if respiratory depression is noted
• Student’s baseline or normal behaviors.
• Whether student experiences auras, or can anticipate when seizures may occur
• Behaviors that indicate a seizure may be about to occur
• Other medications the student is taking and signs of adverse reactions or toxicity
• Who is to be notified when the student has a seizure
• Latex allergy precautions
• Standard precautions

VDH Guidelines for Healthcare Procedures in Schools 248
Sources:
Epilepsy Foundation. (2015). Epilepsy. Available online:
http://www.epilepsy.com/learn/about-epilepsy-basics
Epilepsy Foundation of America. (2008). Legal Rights of Children with Epilepsy in School
and Child Care – An Advocate’s Manual. Margolis, L. (Ed.). Available online:
http://www.epilepsynorcal.org/docs/Education_DayCare.pdf
Epilepsy Foundation of Virginia. (2012). Virginia School Nurse Seizure Update 2012.
Available online: http://www.efva.org/upload/schoolnursemanual2012.pdf
Hockenberry, M., & Wilson, D. (2015). Wong's nursing care of infants and children (10th ed.).
St. Louis: Elsevier Mosby, 1463-1481.
National Association of School Nurses. (2003). Position Statement: The role of the school
nurse caring for a student requiring a rectal medication for seizures. Available online
at www.nasn.org
National Library of Medicine Medline Plus. (2014). Seizures. Available online:
http://www.nlm.nih.gov/medlineplus/seizures.html
Porter, S., Branowicki, P., & Palfrey, J. (2014). Supporting students with special health care
needs: Guidelines and procedures for schools (3rd ed.). Baltimore: Paul H. Brookes
Publishing, 454-457.
Selekman, J. (2013). School nursing: A comprehensive text (2nd ed.). Philadelphia: F.A.
Davis, 1009-1015.
Virginia Department of Education. (2006). Manual for training of public school employees in
the administration of medication. (G. P. Smith & E.G. Cruise, Eds.) Richmond, VA:
Virginia Department of Education. Available online:
http://www.doe.virginia.gov/support/health_medical/medication/manual_training_admi
n-meds.pdf
Wilfong, A. (2015). Treatment of seizures in children. UpToDate, Waltham, MA, 2015.

VDH Guidelines for Healthcare Procedures in Schools 249
Procedure for Administering Rectal Diazepam
Note: Equipment, medication and supplies provided by parents.
1. Review procedure prior to having to implement it.
2. Verify the medication order--including dosage, and circumstances under which rectal
diazepam should be administered..
3. Put on gloves.
4. Obtain assistance of another adult, if possible. Ensure student privacy during
administration.
5. Call 911 and activate the emergency plan.
911 must be called and the emergency plan activated whenever rectal diazepam is given
by school personnel.
6. Remove protective cover from the medication syringe and lubricate the rectal tip with
lubricating jelly (comes with syringe).
7. Turn the student on his or her side (left side preferable) facing you. Bend the upper leg
forward and separate the buttocks to expose the rectum. Place soft item under head, if
possible.
8. If using Diastat© Acudial syringe, make sure that dose display window indicates prescribed
dose and that green "ready ban" is visible.
9. Separate the buttocks and gently insert the syringe tip into the rectum. The rim should be
snug against the rectal opening. Slowly count to three while gently pushing in the plunger.
Count to three again before removing the syringe. Hold the buttocks together while
counting to three one more time to prevent leakage.
Rim should be snug against rectal opening.
10. Keep the student on their side facing you and note the time the medication was given.
11. Keep the student on his or her side and observe for side effects. Monitor respiratory status
throughout the seizures and afterwards.
Respiratory depression can be a consequence of a seizure and/or of seizure medications.
12. Remove gloves and wash hands when appropriate.
13. Document the administration of diazepam, student’s response, and implementation of the
school emergency plan. Dispose of rectal syringe according to package insert instructions.
Make sure someone remains with the student to observe for side effects and seizure activity.

VDH Guidelines for Healthcare Procedures in Schools 250
Note: The Manual for the Training of Public School Employees in the Administration of
Medication includes instruction on administering rectal medication and is available from the
Virginia Department of Education (2006) online:
http://www.doe.virginia.gov/support/health_medical/medication/manual_training_admin-
meds.pdf
Sources:
Epilepsy Foundation. (2015). Epilepsy. Available online: http://www.epilepsy.com/learn/about-
epilepsy-basics
Epilepsy Foundation of America. (2008). Legal Rights of Children with Epilepsy in School and Child
Care – An Advocate’s Manual. Margolis, L. (Ed.). Available online:
http://www.epilepsynorcal.org/docs/Education_DayCare.pdf
Epilepsy Foundation of Virginia. (2012). Virginia School Nurse Seizure Update 2012. Available
online: http://www.efva.org/upload/schoolnursemanual2012.pdf
Hockenberry, M., & Wilson, D. (2015). Wong's nursing care of infants and children (10th ed.). St.
Louis: Elsevier Mosby, 1463-1481.
National Association of School Nurses. (2003). Position Statement: The role of the school nurse
caring for a student requiring a rectal medication for seizures. Available online at
www.nasn.org
National Library of Medicine Medline Plus. (2014). Seizures. Available online:
http://www.nlm.nih.gov/medlineplus/seizures.html
Porter, S., Branowicki, P., & Palfrey, J. (2014). Supporting students with special health care needs:
Guidelines and procedures for schools (3rd ed.). Baltimore: Paul H. Brookes Publishing, 454-
457.
Selekman, J. (2013). School nursing: A comprehensive text (2nd ed.). Philadelphia: F.A. Davis, 1009-
1015.
Virginia Department of Education. (2006). Manual for training of public school employees in the
administration of medication. (G. P. Smith & E.G. Cruise, Eds.) Richmond, VA: Virginia
Department of Education. Available online:
http://www.doe.virginia.gov/support/health_medical/medication/manual_training_admin-
meds.pdf
Wilfong, A. (2015). Treatment of seizures in children. UpToDate, Waltham, MA, 2015.

VDH Guidelines for Healthcare Procedures in Schools 251
VDH Guidelines for Healthcare Procedures in Schools 252
Available online at: http://end-epilepsy.org/pdf/2014-09-07/16-Diastat-
SZ%20ACTION%20PLAN%20WITH%20EMERG%20CARE%20INSTR.pdf

VDH Guidelines for Healthcare Procedures in Schools 253
Seizure Action Plan with Diastat from Epilepsy Foundation of Virginia (2014).

VDH Guidelines for Healthcare Procedures in Schools 254
Vagal Nerve Stimulation for Seizures
Epilepsy is a chronic condition that is characterized by recurrent seizures. A seizure is an event
in which there is a temporary change in behavior resulting from a sudden, abnormal burst of
electrical activity in the brain. Many students with epilepsy have more than one seizure type
and may have other symptoms as well. Some students continue to experience seizures despite
medical treatment. Acute prolonged or repetitive seizures are detrimental to a student’s health.
Vagal nerve stimulation (VNS) has been found to reduce the
frequency and intensity of some seizures. It involves the insertion of
a device similar to a pacemaker under the skin on the left side of the
chest. This vagal nerve stimulator sends intermittent electrical signals
to the brain by stimulating the left vagus nerve in the neck. The
vagus nerve is one of the cranial nerves (X) that controls the muscles
responsible for swallowing, coughing and voice sounds. It is not fully
understood how VNS works, but the theory is that the stimulation
alters nerve pathways that lead to a seizure. Benefits of VNS are not
always apparent immediately. Seizure activity may improve
immediately, or it may improve over a two-year time period.
The vagal nerve stimulator works in two ways. It is automatically programmed to deliver
stimulation; typically the stimulator activates “on” for 30 seconds once every 5 minutes, but has
many other settings set by the healthcare provider. It can also be activated to give extra
stimulations manually between pre-programmed stimulations by placing a magnet over the
stimulator and then removing the magnet. A newer VNS device, AspireSR has been designed
to detect possible seizure activity and can automatically deliver additional stimulation when it
detects a rapid heart rate rise, an indication of an impending seizure in 82% of patients with
epilepsy.
VNS is FDA approved for children and adults 12 years of age and older, but is used in many
young children.
The VNS system consists of a pulse generator which is battery-
operated and looks much like a pacemaker implanted under the
skin of the chest. Programming of the generator is accomplished
with a wand attached to a computer. A strong magnet can also
be used to activate the VNS on demand if the student senses that
a seizure is about to occur or has just started. In addition, the
magnet can temporarily suspend activity of the VNS if activation
of the VNS affects normal eating, speaking, or singing. Portable magnets can be carried or
worn by students.

VDH Guidelines for Healthcare Procedures in Schools 255
The most common side effects of VNS are hoarseness and tingling or pain in the throat or neck.
Cough, headache, and ear pain have also been reported. Side effects tend to diminish over
time. Equipment that could interfere with the stimulator should be avoided. This includes
strong magnets, MRI scanners, hair clippers, computers, and loudspeaker magnets. Areas
which display pacemaker warning signs should also be avoided. The additional handheld
magnets supplied for manual stimulation of the system can damage credit cards, and cell
phones.
Settings and Staff
The VNS system delivers stimulation on a regular, ongoing basis. The need for additional VNS
to prevent a seizure can occur anywhere. Measures should be taken to protect the privacy of
the student.
VNS can be administered by the student or by an adult with training in appropriate VNS
techniques and problem management. Any school personnel who has regular contact with a
student who requires VNS should receive general training covering the student’s specific needs,
potential problems and implementation of the established emergency plan. This training should
include what to do when a seizure occurs and how and when to activate VNS.
Individualized Healthcare Plan
Each student’s IHP must be tailored to the individual’s needs. A sample plan is included in
Appendix A. When preparing an IHP for a student who might require vagal nerve stimulation,
the following items should be considered:
• Student’s underlying condition and possible problems associated with the condition or
treatment.
• Type of seizures student experiences and typical course of seizure
• Whether student experiences auras, or can anticipate when seizures are about to occur
• Behaviors that indicate a seizure may be about to occur
• Actions to take when the student has a seizure
• When and how to use VNS magnets
• When to check Pulse Generator battery
• Side effects to monitor
• Student’s baseline or normal behaviors.
• Other medications the student is taking and signs of adverse reactions or toxicity
• Standard precautions

VDH Guidelines for Healthcare Procedures in Schools 256
Sources:
Cyberonics. (2013). An Introduction to VNS Therapy for people with epilepsy and their families.
Available online: http://us.cyberonics.com/sites/default/files/Patient_Brochure_FINAL.pdf
Cyberonics. (2015). Epilepsy Patient Manual for Vagus Nerve Stimulation with the VNS Therapy
System. Houston, TX: Cyberonics, Inc. Available online: http://us.cyberonics.com/support-
center/resource-library
Cyberonics. (2015). Introducing AspireSR. Available online: http://www.aspiresr.com/
Cyberonics. (2015). Patient Essentials: Patient's Manual for Epilepsy. Available online:
http://us.cyberonics.com/en/vns-therapy-for-epilepsy/healthcare-professionals/vns-
therapy/manuals-page/
Epilepsy Foundation of America. (2008). Legal Rights of Children with Epilepsy in School and Child
Care – An Advocate’s Manual. Margolis, L. (Ed.). Available online:
http://www.epilepsynorcal.org/docs/Education_DayCare.pdf
Epilepsy Foundation of Virginia. (2012). Virginia School Nurse Seizure Update 2012. Available
online: http://www.efva.org/upload/schoolnursemanual2012.pdf
Hockenberry, M., & Wilson, D. (2015). Wong's nursing care of infants and children (10th ed.). St.
Louis: Elsevier Mosby, 1473.
Mayo Clinic. (2015). Vagus nerve stimulation. Available online http://www.mayoclinic.org/tests-
procedures/vagus-nerve-stimulation/basics/definition/prc-20020476?p=1
National Library of Medicine Medline Plus. (2014). Seizures. Available online:
http://www.nlm.nih.gov/medlineplus/seizures.html
Porter, S., Branowicki, P., & Palfrey, J. (2014). Supporting students with special health care needs:
Guidelines and procedures for schools (3rd ed.). Baltimore: Paul H. Brookes Publishing, 457-
460.
Selekman, J. (2013). School nursing: A comprehensive text. (2nd ed.). Philadelphia: F.A. Davis, 1015-
1016.
Wilfong, A. (2015). Treatment of seizures in children. UpToDate, Waltham, MA, 2015.
Illustration Sources:
U.S. Food and Drug Administration. (2013). VNS Therapy System. Accessed July 25, 2015 online:
http://www.fda.gov/MedicalDevices/ProductsandMedicalProcedures/DeviceApprovalsandClear
ances/Recently-ApprovedDevices/ucm078532.htm
VDH Guidelines for Healthcare Procedures in Schools 257
U.S. Food and Drug Administration. (2013). For Vagus Nerve Stimulation with the VNS Therapy
System. Accessed July 25, 2015 online:
http://www.fda.gov/ohrms/dockets/ac/04/briefing/4047b1_05_Depression%20Patient's%20Man
ual.htm

VDH Guidelines for Healthcare Procedures in Schools 258
Procedure for Activating Vagal Nerve Stimulation
Note: Equipment and supplies provided by parents/guardians.
1. Review literature that comes with the vagal nerve stimulator.
2. Student or trained caregiver should keep magnet with student at all times. The watch-style
magnet attaches to the wrist with a wristband. The pager-style magnet comes with a belt
clip so that the magnet and clip can be removed as a unit from the belt without coming
apart. Always keep magnets at least 10 inches away from tablet computers, credit cards,
televisions, computers, microwave ovens, watches, or other
magnets.
3. If student senses a seizure is about to occur, place the
magnet over the Pulse Generator site for one second and
then move it away. This will cause the VNS system to
deliver extra stimulation. This can be done by the student
or by any adult trained in using VNS.
To use the pager-style magnet, remove the belt clip and
magnet from the belt and place the label against the Pulse
Generator. To use the watch-style magnet, position the
wrist so that the label can be placed over the generator.
4. To temporarily stop stimulation (turn “off” the Pulse Generator) when student needs to sing
or speak in public, while eating, or if stimulation is ever painful, put the magnet over the
Pulse Generator and leave it there. The Pulse Generator will not stimulate while the magnet
is in place over top of it, but it will start when the magnet is removed. The magnet should
not be used for more than four hours in a row because it can decrease the Pulse Generator
battery.
5. Check the pulse generator battery on a regular basis. Pass the magnet over the Pulse
Generator for one second to see if it causes a stimulation and is working.
6. If stimulation ever hurts, hold the magnet in place to stop stimulation and contact school
nurse, family, and health care provider immediately.
7. If student complains, of sore throat, hoarseness, or any other problems with the VNS,
document in student log and notify the school nurse and family.

VDH Guidelines for Healthcare Procedures in Schools 259
Sources:
Cyberonics. (2013). An Introduction to VNS Therapy for people with epilepsy and their
families. Available online:
http://us.cyberonics.com/sites/default/files/Patient_Brochure_FINAL.pdf
Cyberonics. (2015). Epilepsy Patient Manual for Vagus Nerve Stimulation with the VNS
Therapy System. Houston, TX: Cyberonics, Inc. Available online:
http://us.cyberonics.com/support-center/resource-library
Cyberonics. (2015). Introducing AspireSR. Available online: http://www.aspiresr.com/
Cyberonics. (2015). Patient Essentials: Patient's Manual for Epilepsy. Available online:
http://us.cyberonics.com/en/vns-therapy-for-epilepsy/healthcare-professionals/vns-
therapy/manuals-page/
Epilepsy Foundation of Virginia. (2012). Virginia School Nurse Seizure Update 2012.
Available online: http://www.efva.org/upload/schoolnursemanual2012.pdf
Hockenberry, M., & Wilson, D. (2015). Wong's nursing care of infants and children (10th ed.).
St. Louis: Elsevier Mosby, 1473.
Mayo Clinic. (2015). Vagus nerve stimulation. Available online http://www.mayoclinic.org/tests-procedures/vagus-nerve-
stimulation/basics/definition/prc-20020476?p=1
National Library of Medicine Medline Plus. (2014). Seizures. Available online:
http://www.nlm.nih.gov/medlineplus/seizures.html
Porter, S., Branowicki, P., & Palfrey, J. (2014). Supporting Students with Special Health Care
Needs: Guidelines and Procedures for Schools (3rd ed.). Baltimore: Paul H. Brookes
Publishing, 457-460.
Selekman, J. (2013). School nursing: A comprehensive text. (2nd ed.). Philadelphia: F.A.
Davis, 1015-1016.
Wilfong, A. (2015). Treatment of seizures in children. UpToDate, Waltham, MA, 2015.

VDH Guidelines for Healthcare Procedures in Schools 260
Ventricular Shunt
Overview
A ventricular shunt is a method of treatment for hydrocephalus, excess cerebrospinal fluid in
the ventricles of the brain. A ventricular shunt is surgically placed to drain the excess fluid
from the ventricles in the brain into another part of the body. The most common type is the
ventriculoperitoneal shunt (VP-shunt), which drains fluid from the ventricles of the brain to the
peritoneal (abdominal) cavity. A ventriculoatrial shunt (VA-shunt)
drains the excess fluid to the right chamber of the heart, the right
atrium.
Students who have a shunt need routine monitoring to ensure the proper
functioning of the shunt. Shunts can become infected, obstructed,
disconnected, or kinked. If the shunt malfunctions, cerebrospinal fluid
does not drain properly and the student with hydrocephalus can develop
increased intracranial pressure and possible brain damage. Shunt
malfunctions can be detected by a change in behavior, headache,
irritability, vomiting, and/or difficulties with coordination. Shunt
monitoring involves watching for behaviors that may indicate the shunt
is not functioning. The family is the best source of information with regards to what signs the
student is most likely to exhibit when the shunt is not functioning properly. Any such signs
should be reported to the school nurse, family and/or health care provider immediately.
Settings and Staff
Students with a shunt can attend a regular classroom. Many students with a shunt are able to
participate in regular school activities, with modifications determined by the family, health care
provider, school nurse, and school staff. Activities that may result in damage to the shunt, such
as contact sports, may be restricted.
Monitoring of a ventricular shunt may be performed by the school nurse, family, teacher aide,
or other staff person who has training in monitoring the shunt of the student. General training
should cover the student’s specific health care needs, signs of increased intracranial pressure,
potential problems, and how to implement the established emergency plan.
Individualized Healthcare Plan
Each student’s IHP must be tailored to the individual’s needs. A sample plan is included in
Appendix A. When preparing an IHP for a student with a ventricular shunt, the following
items should be considered:
VDH Guidelines for Healthcare Procedures in Schools 261
Student’s underlying condition and possible problems associated with the condition or
treatment
• Student’s baseline or normal behaviors
• Behaviors that indicate that there may be a malfunction of the shunt. The family can
usually describe which behaviors are specifically indicative of shunt malfunction in
their child
• Symptoms and behaviors which should be reported to the school nurse and family
• Medications the student is taking and signs of adverse reactions or toxicity
• Health Care Providers orders regarding shunt and monitoring
• Determination of the need for seizure precautions
• Latex allergy precautions
• Standard precautions
Sources:
Hockenberry, M., & Wilson, D. (2015). Wong's nursing care of infants and children (10th ed.).
St. Louis: Elsevier Mosby, 1483-1490.
National Hydrocephalus Foundation. (2014). What is hydrocephalus? Available online:
http://nhfonline.org/hydrocephalus-defined.htm
National Library of Medicine Medline Plus. (2013). Ventriculoperitoneal shunting. Available
online: http://www.nlm.nih.gov/medlineplus/ency/article/003019.htm
National Library of Medicine Medline Plus. (2014). Ventriculoperitoneal shunt--discharge.
Available online:
https://www.nlm.nih.gov/medlineplus/ency/patientinstructions/000149.htm
Porter, S., Branowicki, P., & Palfrey, J. (2014). Supporting students with special health care
needs: Guidelines and procedures for schools (3rd ed.). Baltimore: Paul H. Brookes
Publishing, 464-467.
Selekman, J. (2013). School nursing: A comprehensive text (2nd ed.). Philadelphia: F.A.
Davis, 748-750.
Illustration sources:
National Hydrocephalus foundation. (2014). Treatment of hydrocephalus. Available online
http://nhfonline.org. Used with permission.

VDH Guidelines for Healthcare Procedures in Schools 262
Procedure for Monitoring a Ventricular Shunt
1. Document observations of the student’s:
• Behavior
• Level of activity
• Response to, and awareness of, the environment
• Coordination
Using knowledge of the student’s usual behavior can help staff discriminate between usual
and unusual behavior.
2. Obtain baseline measurements of student’s vital signs, especially blood pressure and pulse
rate.
3. Document any signs of shunt malfunction or signs of infection in the school health record
or student’s log. Alert school nurse and family of any changes or concerns.
See below for signs of shunt malfunction or infection.

VDH Guidelines for Healthcare Procedures in Schools 263
Possible Problems with Ventricular Shunts
• Signs Of Increased Intracranial Pressure
o Headache
o Nausea
o Vomiting
o Double vision or blurred vision
o Irritability or restlessness
o Personality change
o Lethargy or drowsiness
o Inability to follow simple commands
o Decreased orientation to time and place
o Seizures
When a shunt malfunctions, the fluid in the ventricles builds up, resulting in increased
intracranial pressure (increased pressure in the brain). School personnel who are uncertain
of their observations should consult with the school nurse and/or family to determine if the
health care provider should be notified.
It is important that the school staff learn what is normal behavior for the individual student
and what behaviors indicate the presence of increased intracranial pressure. Seizures must
be monitored by the school staff and treated appropriately. (See section on Seizures in this
manual).
• Persistent Increased Pressure
If the pressure continues to increase in the ventricles, the student’s pupils (the dark area in
the center of the eye) may become smaller and react very slowly to light. If the pressure
continues to increase, the student may complain of increased headache and the student’s
pupils may enlarge and become fixed when exposed to light. The pulse may decrease,
breathing may become irregular, and eventually, death may occur.
The physician may determine that the valve of the shunt must be pumped to reduce
intracranial pressure. The risks involved with the pumping of the shunt are great. If too
much cerebrospinal fluid is removed, there is a resulting decrease in the amount of pressure
in the brain. The ventricles may collapse inward, resulting in additional brain damage.
This procedure should never be done in a school setting by non-physician school staff.
• Signs of shunt infection
o Nausea
o Vomiting
o Headache
o Lethargy
o Fever
o Feeding problems
VDH Guidelines for Healthcare Procedures in Schools 264
Any signs of shunt infection should be reported to the school nurse, family and/or
healthcare provider. A shunt infection requires administration of antibiotics. The shunt
may need to be replaced if the infection is not treated successfully.
Sources:
Hockenberry, M., & Wilson, D. (2015). Wong's nursing care of infants and children (10th ed.).
St. Louis: Elsevier Mosby, 1483-1490.
National Hydrocephalus Foundation. (2014). What is hydrocephalus? Available online:
http://nhfonline.org/hydrocephalus-defined.htm
National Library of Medicine Medline Plus. (2013). Ventriculoperitoneal shunting. Available
online: http://www.nlm.nih.gov/medlineplus/ency/article/003019.htm
National Library of Medicine Medline Plus. (2014). Ventriculoperitoneal shunt--discharge.
Available online:
https://www.nlm.nih.gov/medlineplus/ency/patientinstructions/000149.htm
Porter, S., Branowicki, P., & Palfrey, J. (2014). Supporting students with special health care
needs: Guidelines and procedures for schools (3rd ed.). Baltimore: Paul H. Brookes
Publishing, 464-467.
Selekman, J. (2013). School nursing: A comprehensive text (2nd ed.). Philadelphia: F.A.
Davis, 748-750.

VDH Guidelines for Healthcare Procedures in Schools 265
General Information for
Students with Ventricular Shunts
Date: ___________________
To: _____________________________ _________________________________
(Teachers, Instructional assistants, Bus drivers, etc)
Name of Student: ______________________________________
This student has a ventricular shunt used to drain excess fluid from the brain. The shunt is
under the skin and is not visible except for a slight bulge.
Most students with ventricular shunts are able to participate in regular school activities, but may
need to avoid contact sports. Blows to the head should be avoided. If a blow to the head
occurs, the school nurse and family should be notified and the student should be observed
closely for any changes in behavior.
Any other changes in behavior should be reported to the school nurse and family.
Contact _______________________________ at __________________ (phone number) for
additional information or if the student experiences any problems with the ventricular shunt.
Source: Adapted from: Porter, S, Haynie, M, Bierle, T, Caldwell, TH, & Palfrey, JS (Eds.). (1997). Children and
youth assisted by medical technology in educational settings: Guidelines for care (2nd ed.). Baltimore: Paul H.
Brookes Publishing.

VDH Guidelines for Healthcare Procedures in Schools 266
Chapter 6: Care of the Respiratory
System
Asthma
Peak Expiratory Flow Rate Monitoring
Inhalers and Spacers
Nebulizer Treatments
Oxygen Use
Nasal Cannula
Oxygen Mask
Pulse Oximetry
Tracheostomy
Tracheal Suctioning
Tracheostomy Tube Changes
Tracheostomy Oxygen Administration
Manual Resuscitator
Nose and Mouth Suctioning
Chest Physiotherapy Postural Drainage and Percussion
Mechanical Ventilators

VDH Guidelines for Healthcare Procedures in Schools 267
Respiratory System
Overview
The respiratory system brings air into the body. In the lungs, oxygen from the air is exchanged
for carbon dioxide. The oxygen in the air travels from the alveoli of the lungs through the
bloodstream (with the help of hemoglobin) to cells in all parts of the body. The cells use the
oxygen as fuel and give off carbon dioxide as a waste gas. This waste is carried by the blood
back to the lungs to be eliminated. The average adult takes 15-20 breaths per minute--over
20,000 breaths per day.
The structures of the upper airway filter, warm, and humidify the air taken in. Air enters the
body through the nose and mouth. Sinuses, hollow bones of the head, help to warm and humidify
the air, while hairs in the nose filter it. The air passes through the pharynx at the back of the
throat and the larynx, which contains the vocal cords.
The air then enters the lower airway at the trachea (sometimes called the “windpipe”). A flap
of tissue called the epiglottis covers the windpipe during swallowing so that food and drink do
not enter the lungs. The trachea divides into two main bronchi. The bronchi further divide into
bronchioles, which divide many times until the alveoli are reached. It is in the alveoli, which
are covered in tiny capillary blood vessels, that the oxygen in the air is exchanged for carbon
dioxide from the body. The respiratory tract is lined with mucus and tiny hairs called cilia
which trap and then push out dust particles. Most of the airways are surrounded by smooth
muscle, which can tighten and narrow.

VDH Guidelines for Healthcare Procedures in Schools 268
The diaphragm is a dome-shaped muscle that separates the chest cavity from the abdominal
cavity. When the diaphragm and intercostal muscles of the ribs contract, they pull downwards,
allowing air to enter on inspiration. Nervous centers in the brain and spinal cord control the
initiation of breathing by the diaphragm.
Disorders Involving the Respiratory System
A variety of diseases and conditions can affect the respiratory system and lead to ineffective gas
exchange. They can be categorized by the structures they affect:
• Disorders affecting the upper airway
o Abnormalities of the nasal or oral cavity such as cleft palate
o Abnormalities of the facial muscles or bones
o Neuromuscular diseases such as muscular dystrophy and other progressive
neurological diseases
o Conditions which affect swallowing and the protection of the airways from
food
• Disorders affecting the lower airway
o Conditions causing bronchospasm, such as asthma
o Infectious diseases such as bronchitis which cause a buildup of mucus of fluid
that narrows the airways and limits airflow
o Diseases such as cystic fibrosis which cause excessive mucus that can clog the
airways
o Abnormalities of the trachea and bronchi which can cause narrowing (stenosis),
obstruction (swelling or tumors) or abnormally limp airways (tracheomalacia)
o Chronic obstructive pulmonary disease (COPD) which is usually caused by
smoking or air pollutants which damage the airways and alveoli
• Disorders of the alveoli
o Bronchopulmonary dysplasia (chronic lung disease)
o Pneumonia
• Disorders affecting the respiratory muscles
o Spinal cord injuries
o Progressive degenerative neuromuscular diseases such as muscular dystrophy
• Disorders affecting the central nervous system’s stimulus to breathe
o Brain damage from birth, trauma, drowning
o Progressive neurological conditions
o High spinal cord injuries
Sources:

VDH Guidelines for Healthcare Procedures in Schools 269
American Lung Association. (2015). Your lungs. Available online: http://www.lung.org/your-
lungs/.
National Heart, Lung, and & Blood Institute (2012). The respiratory system. Available
online: http://www.nhlbi.nih.gov/health/health-topics/topics/hlw/system
Porter, S., Branowicki, P., & Palfrey, J. (2014). Supporting students with special health care
needs: Guidelines and procedures for schools (3rd ed.). Baltimore: Paul H. Brookes
Publishing, 313-315.
Illustration Source:
National Heart, Lung, and & Blood Institute (2012). The respiratory system. Available
online: http://www.nhlbi.nih.gov/health/health-topics/topics/hlw/system

VDH Guidelines for Healthcare Procedures in Schools 270
Asthma
Overview
Asthma is a major public health problem of increasing concern. Approximately 10% of
children in the United States have been reported to have asthma, and asthma prevalence among
children increased 28% from 2001-2011. Asthma is one of the leading causes of school
absences and the third leading cause of hospitalization for children. The Centers for Disease
Control and Prevention (CDC) estimates that asthma results in 10.5 million lost school days
each year. The impact of illness and death is disproportionately higher among low-income
populations, minorities, and inner-city children.
The CDC created the National Asthma Control Program to support the goals and objectives of
Healthy People 2020 for asthma. The goals of the program are to reduce the number of deaths,
hospitalizations, emergency department visits, school or work days missed, and limitations on
activity due to asthma.
Definition
Asthma is a chronic lung disease that causes airway inflammation. Inflamed airways are
particularly sensitive and tend to overreact to certain “triggers.” Triggers can include numerous
physical, chemical, and pharmacologic agents, such as allergens, viral infections, cold air, and
exercise. When the airways react to a trigger, three physiologic processes happen:
1. Bronchospasm, contraction or squeezing of the involuntary muscle surrounding the
airway
2. Inflammation and edema (swelling) of the mucous membranes of the airways
3. Excessive, thick secretions from mucous glands.
Bronchospasm, edema, and increased mucus narrow the airway and result in less air getting
into and out of the lungs thereby causing wheezing, coughing, chest tightness, and/or difficulty
breathing. The CDC describes it as "trying to breathe through a straw stuffed with cotton."
Wheezing is a high-pitched whistling or squeaky sound that can be made when air moves
through narrowed airways. These symptoms can be mild or moderate and affect activity levels,
or they can be severe and life threatening. Therefore, persons caring for a student with asthma
need knowledge and skill to assess and support the student.
Common Asthma Triggers
Asthma triggers and symptoms vary from one person to another. Several categories of triggers
have been identified:

VDH Guidelines for Healthcare Procedures in Schools 271
• Allergens such as pollen, mold, animal dander, dust mites, and cockroaches.
• Irritants such as cigarette smoke, chalk dust, perfume, pesticides, strong odors, cold air,
and weather changes.
• Medical conditions such as viral respiratory infections and gastric reflux.
• Physical exercise, especially during cold weather. Exercise-induced asthma (EIA) is
precipitated by vigorous physical activity and can occur in most children with asthma.
Environmental Control in Schools
Although triggers to asthma cannot be eliminated, it is important to identify ways to decrease
exposure to as many triggers as possible. All schools should be smoke free to avoid
secondhand exposure to cigarette smoke. Efforts to minimize environmental irritants in the
school setting include decreasing exposure to harsh cleaning supplies, reducing exposure to
chalk dust, chemical irritants in science and art classes, and exhaust fumes from idling buses,
decreasing or eliminating animals in school, using Integrated Pest Management techniques to
reduce the need for insecticides, central air conditioning to keep pollen and dust outside, and
decreasing mold by controlling moisture problems.
Recommendations of Expert Panel Report-3 Asthma Guidelines
The National Asthma Education and Prevention Program (National Heart, Lung, and Blood
Institute of the National Institutes of Health) has established guidelines for diagnosis and
management of asthma since 1991. Its (third) Expert Panel Report 3 was presented in 2007
(most recent update as of April 2016). The six key messages from the EPR-3 Asthma
Guidelines are:
1. Inhaled corticosteroids are the most effective anti-inflammatory medication for long
term management of persistent asthma.
2. Use written action plans to guide patient self-management.
3. Asthma severity should be assessed at the initial visit to determine initial treatment.
4. Assess and monitor asthma control at all follow up visits and adjust treatment as
necessary.
5. Schedule periodic, follow up visits (at least every 6 months).
6. Act to control environmental exposures that worsen asthma.
In addition, four other key messages have been identified by asthma care groups:
All patients should also receive:
7. Asthma education by a qualified health professional
8. Referral to an asthma specialist, when appropriate
9. Education regarding the danger of overuse of short-acting beta-agonists
10. Information regarding risk factors for death from asthma.

VDH Guidelines for Healthcare Procedures in Schools 272
Managing Asthma in Schools
The National Asthma Education and Prevention Program School Asthma Subcommittee has
developed guidelines for schools to use in developing a plan to assist their students with
asthma. Copies of Managing Asthma: A Guide for Schools can be downloaded or mailed
without charge (see Resources in this section). The action items identified for school asthma
management are:
1. Establish an asthma management team.
• designate one person to coordinate and oversee asthma management activities
• involve staff from across the school to ensure coordination
2. Identify students who have asthma.
• identify and track students who have asthma and the services they need
• ensure that students with asthma have a written asthma action plan on file
3. Provide care, support, and resources.
• provide students who have asthma with access to appropriate support services,
resources, and assistance from trained personnel (including case management)
• assess students' asthma control (e.g., peak flow meter, medication use)
• encourage interaction with the student's health care provider
• document and evaluate services provided to students who have asthma
4. Ensure quick and easy access to prescribed medications.
• ensure medication access during all school and school-sponsored activities
• support students who have asthma who carry and administer their own
medications (Code of Virginia §22.1-274.2)
5. Maintain a school-wide plan for emergencies.
• develop clear emergency procedures for responding to asthma attacks
• ensure availability of appropriate asthma medications and devices in case of
emergency
• facilitate re-entry to school following an asthma attack
6. Provide a healthy school environment.
• establish an indoor air quality program
• regularly assess environmental risks
• reduce allergens, irritants, and other asthma triggers
7. Enable full participation.
• encourage and support full participation of students who have asthma
• modify activities when necessary
• watch for reluctance or inability to participate in activities
8. Educate students, staff, and families.
• provide asthma education to students who have asthma and their families to help
improve their asthma self-management skills
• conduct in-services for all staff about managing asthma and allergies
• provide asthma education for the entire student body
9. Promote partnerships.
• facilitate open and cooperative exchange of information among school staff,
parents, and guardians, students, and health care providers

VDH Guidelines for Healthcare Procedures in Schools 273
• coordinate school asthma activities as much as possible with other school
programs and with community service organizations that can provide additional
resources
Studies have found that school nurses can play a significant role in helping students manage
their asthma. The following page outlines specific roles and responsibilities the National
Asthma Education and Prevention Program recommended for school nurses in a school's
Asthma Management Plan:

VDH Guidelines for Healthcare Procedures in Schools 274
.
From: Managing Asthma: A Guide for Schools. Copies available from NHLBI

VDH Guidelines for Healthcare Procedures in Schools 275
Monitoring and Use of Peak Flow Meters
The use of a peak flow meter is an important part of asthma care that allows earlier detection of
asthma flare ups in order to prevent more serious attacks. The peak expiratory flow meter
(PEFM) is a portable, hand-held device used to measure the ability to move air out of the lungs.
The PEFM is commonly used over a two-week period to determine the student’s normal peak
expiratory flow rate, the volume of air that can be forcibly expelled from the airways. This rate
can then be used for comparison when the child has signs of breathing difficulty. Students with
asthma (especially moderate or severe asthma) or other respiratory conditions can use peak
flow readings to help recognize early changes that may be signs of worsening respiratory status
or to determine the severity of an asthmatic episode. Altered peak flow readings can
sometimes detect airway changes before symptoms appear. (Readings are effort-dependent,
meaning that a poor effort will yield poor results). Readings can be used to guide use of
additional medication and to help determine when to seek emergency care.
Peak flow rate monitoring can be performed by the student, school nurse, family, teacher, aide,
or other staff person who has had general training in its use. General training should cover the
student’s specific health care needs, how to obtain a peak flow reading, and to use the student’s
established action plan based on peak flow results. See Procedure for Peak Flow Rate
Monitoring and students’ individualized plans for further guidelines.
Administering Medication
There are two basic types of medications used to control asthma symptoms. One type of
medication is used for quick relief when a student has asthma symptoms and usually involves
bronchodilators to relax the muscles and open the airways. The other type of medication is
used to prevent asthma symptoms by decreasing inflammation. It is important to understand
the differences between the two types. Each treats different problems associated with asthma
and should never be used interchangeably.
Emergency, Quick Relief, or Rescue Medications work very quickly and are used to
open the airways in asthma attacks. They are usually bronchodilators and work by
relaxing the muscles surrounding the airways so that the airways open and allow the
child to breathe easier. They may be used before exercise to keep the airways open.
Quick relief medications often are delivered through metered dose inhalers (MDI) and
usually work for about four hours. Students should always have ready access to their
emergency inhaler. See Procedure for Use of Metered Dose Inhalers. Examples of
common bronchodilators that are emergency medications include:
• Albuterol (Proventil, Ventolin, ProAir)
• Levalbuterol (Xopenex)
VDH Guidelines for Healthcare Procedures in Schools 276
Prevention Medications include anti-inflammatory and other long-acting medications
to prevent asthma symptoms. They work slowly (over 12-24 hours) and keep airways
open by decreasing the inflammation or swelling in the airways and the amount of
mucus produced. These medications are given on a regular basis (often for weeks or
months at a time) and are usually administered outside of school hours. They generally
will not stop an acute asthma attack. Students may use a combination of more than one
long-acting medication to control asthma symptoms. Examples of common prevention
medications include:
Metered Dose or Diskus Inhalers:
Corticosteroids
• Beclomethasone (QVAR, Vanceril)
• Budesonide (Pulmicort)
• Ciclesonide (Alvesco)
• Flunisolide (Aerospan)
• Fluticasone (Flovent)
• Mometasone (Asmanex)
Nonsteroidal
• Cromolyn sodium (Intal)
Combined Medication (inhaled corticosteroid + long-acting beta-agonist)
• Fluticasone/Salmeterol (Advair)
• Budesonide/Formoterol (Symbicort)
• Mometasone/Formoterol (Dulera)
Oral Medications
Corticosteroids
• Methylprednisolone (Medrol)
• Prednisolone (Pediapred, Prelone)
• Prednisone (Orasone, Sterapred)
Leukotriene modifiers
• Montelukast (Singulair)
• Zafirlukast (Accolate)
• Zileuton (Zyflo)

VDH Guidelines for Healthcare Procedures in Schools 277
Theophylline (rarely used)
• Slo-bid, Theo-Dur, Elixophyllin, Theochron
Immunomodulators
• Omalizumab (Xolair subcutaneous injection, 1-2 times/month)
• Mepolizumab (Nucala subcutaneous injection monthly)
Treating Asthma Attacks
The most common symptoms of asthma are coughing, wheezing, chest tightness, and shortness
of breath. Symptoms may occur after physical exercise or at any time after exposure to an
allergen, irritant, or weather change. Other symptoms include having less energy than usual,
tightening of neck muscles with breathing, sucking in of the chest with each breath
(retractions), and grayish, cyanotic tint to nail beds and lips. Children may have difficulty
talking or become anxious when they have an asthma attack. Very young children may
complain of stomach aches, headaches, or scratchy throats when their asthma is worsening.
During an asthma attack, it is important to stay calm, have the student sit in a comfortable
position, and follow the instructions on the student’s Emergency Asthma Action Plan. Get a
peak flow reading, if a peak flow meter (PFM) is available, and administer medication if that is
part of the Emergency Asthma Action Plan. Re-assess the student and if no improvement or
symptoms worsen, follow the Action Plan, including notifying and getting help from the people
identified in the plan. Do not leave the student unattended.

VDH Guidelines for Healthcare Procedures in Schools 278
Physical Education and Sports Adjustments
Some students have exercise-induced asthma (EIA), which occurs after vigorous exercise or
activity. In addition, any student with asthma can experience EIA. The goal of managing EIA
is to allow students to participate in any activity without asthma symptoms. These students may
need inhaled medication prior to exercise. Therefore, medication should be available and
convenient. Teachers and coaches need to be aware that the student may need medication
before participating in vigorous exercise and may need to stop the activity if asthma symptoms
occur. Activity may need to be limited for a student who has recently had an asthma attack.
Warm-up and cool-down periods may be needed. The student with asthma may not be able to
exercise on a recently-mowed field or during very cold weather. Guidelines for physical
activity and need for medication should be covered in the student’s individualized healthcare
plan (IHP). Additional plans may need to be developed for activities occurring after school
hours.
Asthma Education and Training
In general, students should be taught to be responsible for managing their own asthma. An
asthma education program in the school helps students learn how to control their asthma
symptoms and prevent acute attacks. Family and school staff also need to learn about asthma
and its management. To provide comprehensive management of asthma in students, there must
be collaboration between the student, the family, the health care provider, and the school.
Communication and planning is essential to successful collaboration. See Resources at the end
of this section.
Individualized Healthcare Plan (IHP)
Each student’s IHP must be tailored to the individual’s needs. It is extremely important for the
student with asthma to have written plans in place outlining how to manage the student’s
asthma on a daily basis and detailing what to do in an emergency.
An IHP for the student with asthma should consist of two components. The first, the Asthma
Care Plan is a detailed outline of how to manage the student’s asthma, including daily
management, monitoring, medications, physical activity guidelines, as well as emergency
management and emergency contacts. The second, the Asthma Action Plan (or Emergency
Asthma Action Plan) includes only the information that is essential to know if the child needs
immediate care for an asthma attack.
It should be noted that Section 22.1-274.2 of the Code of Virginia requires local school boards
to develop and implement policies to permit a student with asthma to possess and self-
administer inhaled asthma medications during the school day, on school property, or at school-
sponsored activities. Written permission from both the student’s parent and health care
provider, as well as an individualized health care plan, are required.

VDH Guidelines for Healthcare Procedures in Schools 279
A sample Virginia Asthma Action Plan follows this section and can be used in developing
individual action plans.
In developing an IHP for a student with asthma, the following items should receive particular
attention:
• Student’s baseline status, including, color, respiratory rate, pulse, and blood pressure
and assessment of changes in this status
• Healthcare provider's orders for management of asthma
• Asthma triggers, especially those that might be encountered at school
• Medications, both preventive and emergency medications, including which ones will be
kept at school and whether student may carry/use medication outside the school clinic
(with healthcare provider's orders)
• Student’s self-care skills and knowledge of early signs of respiratory distress
• Emergency contact information
• Need for peak flow monitoring. If used, include student’s best peak flow reading, the
frequency/timing of measurements, and reasons for obtaining additional measurements
• Symptoms usually exhibited by student at the onset of asthma flare-ups
• Symptoms exhibited by student which require prompt or emergency action
• Protocol for handling increased symptoms or emergency situations
• Determination of peak flow rate values that should be reported to family
• Emergency contact information for family and health care provider
• Activity modifications, if any
• Identity of school personnel who need to know the student’s Action Plan and
identification of personnel who can assist in an emergency
• Schedule and instructions for cleaning of any tubing and equipment needed
• Plan or system for determining when an MDI needs to be replaced
• Maintenance of confidentiality and the student’s right to privacy
• Standard precautions

VDH Guidelines for Healthcare Procedures in Schools 280
Resources:
Managing Asthma: A Guide for Schools 2014 Edition, National Institutes of Health (NIH)
Publication #14-2650. Available for download or mailed without charge at:
http://catalog.nhlbi.nih.gov/catalog/product/Managing-Asthma-A-Guide-for-Schools-
2014-Edition-/14-2650.
So You Have Asthma: A Guide for Patients and their Families, NIH publication #13-5248.
Available for download or mailed without charge at:
www.nhlbi.nih.gov/health/resources/lung/asthma-guide.htm.
Managing Asthma Triggers, National Association of School Nurses (NASN). Online free
training for continuing education hours. Available at:
https://www.pathlms.com/nasn/courses/607.
Know How to Use Your Asthma Inhaler, CDC videos that demonstrate correct use of inhalers
and spacers. Available online: http://www.cdc.gov/asthma/inhaler_video/default.htm.
Asthma Action Plan Assessment: A Tool for School Nurse Assessment, NIH. Available on page
51 of Managing Asthma or for download at:
www.nhlbi.nih.gov/health/prof/lung/asthma/asth_act_plan_frm.pdf
Teaming Up for Asthma Control, School Nurse Online-Module, Children's Hospital, University
of Missouri Health Care. Online educational video with resources for both the school
nurse and the student with asthma. Available online:
http://video.esgn.tv/player.php?p=z80240ko.
Asthma: A Presentation of Asthma Management and Prevention, Centers for Disease Control
and Prevention. Slide presentation (75 slides with speaker notes) that can be used to
discuss asthma, risk factors, management, and public health response. Available online:
http://www.cdc.gov/asthma/speakit/default.htm.
Is the Asthma Action Plan Working? A Tool for School Nurse Assessment, National Asthma
Education Prevention Program and NASN. Form available online:
http://www.nhlbi.nih.gov/files/docs/resources/lung/asth_act_plan_frm.pdf.
Lungtropolis® Where Kids with Asthma Learn to Play – American Lung Association.
Interactive online game that helps children learn about asthma while saving
Lungtropolis from the evil mucus mob. Targeted to children ages 5-10. Available
online: http://www.lung.org/lung-disease/asthma/taking-control-of-asthma/for-parents-
of-children-with-asthma/lungtropolis.html.
Quest for the Code Asthma Game, Starlight Foundation. Online interactive game that helps
kids learn how to manage their asthma. Knowledge of asthma, including asthma
triggers and medications, is the secret weapon in challenging the villains! Available
online: http://asthma.starlight.org/.
Open Airways for Schools, American Lung Association. Award-winning program to help
elementary school children learn to better manage their asthma. Information available
at http://www.lung.org/lung-disease/asthma/creating-asthma-friendly-
environments/asthma-in-schools/open-airways-for-schools/index.html.
Back to School with Asthma Toolkit, American Lung Association. Includes sample letters,
forms, guidelines for students with asthma. Available online:

VDH Guidelines for Healthcare Procedures in Schools 281
http://www.lung.org/lung-disease/asthma/creating-asthma-friendly-
environments/asthma-in-schools/back-to-school-with-asthma/back-to-school-with-
asthma-toolkit.html.
School Nurse Evidence-Based Clinical Guidelines: Asthma, National Association of School
Nurses. These evidence-based guidelines are sold as an eBook and provide current
information for caring for students with asthma.
Asthma Home Environment Checklist. Environmental Protection Agency (EPA). Checklist to
use at home to assess for allergens.
Sources:
American Lung Association. (2014). Asthma and children fact sheet. Available online:
http://www.lung.org/lung-disease/asthma/resources/facts-and-figures/asthma-children-
fact-sheet.html
American Lung Association. (2013). Joint statement on improving asthma management in
schools. Nine health and education groups issues this statement. Available online:
http://www.lung.org/lung-disease/asthma/becoming-an-advocate/national-asthma-
public-policy-agenda/joint-statement-improve-asthma-mgmt-schools.pdf
American Lung Association. (2015). Strategies for addressing asthma. Priority messages
with tips and resources from Expert Panel Report 3. Available online:
http://www.lung.org/lung-disease/asthma/for-health-professionals-and-
volunteers/strategies-for-addressing-asthma.html
Asthma and Allergy Foundation of America. (2015). Asthma facts and figures. Available
online: https://www.aafa.org/display.cfm?sub=42&id=8
Centers for Disease Control and Prevention. (2015). Asthma. Atlanta, Georgia: CDC.
Available at http://www.cdc.gov/asthma/
Centers for Disease Control and Prevention. (2013). Asthma facts. Atlanta, Georgia: CDC.
Available at http://www.cdc.gov/asthma/pdfs/asthma_facts_program_grantees.pdf
Centers for Disease Control and Prevention. (n.d.). Breathing easier. Atlanta, Georgia: CDC.
Available at http://www.cdc.gov/asthma/pdfs/breathing_easier_brochure.pdf
Connecticut State Department of Education. (2012). Clinical procedure guidelines for
Connecticut school nurses. Middlebury, CT: CSDOE, 53-55.
Environmental Protection Agency. (2010). Managing asthma in the school environment:
Indoor air quality tools for schools. EPA 402-K-10-004. Available online:
www.epa.goviaq/schools

VDH Guidelines for Healthcare Procedures in Schools 282
Hennessy-Harstad, E. (2012). Asthma and adolescents: Review of strategies to improve
control. Journal of School Nursing 29(1): 39-51.
Hockenberry, M., & Wilson, D. (2015). Wong's nursing care of infants and children. (10th ed.).
St. Louis: Elsevier Mosby, 1215-1233.
Minnesota Department of Health. (2010). 2010 National Institutes of Health (NIH) NAEPP
2007 Asthma Guideline UPDATE. PowerPoint by Susan Ross. Available online:
http://www.health.state.mn.us/asthma/documents/pppresent/11.2010_07erp3medprof.pd
f
National Asthma Education and Prevention Program Expert Panel Report 3. (2007).
Guidelines for the diagnosis and management of asthma. National Heart Lung and
Blood Institute, National Institutes of Health Publication # 08-5846. Available online:
http://www.nhlbi.nih.gov/files/docs/guidelines/asthsumm.pdf
National Asthma Education and Prevention Program. (2014). How asthma friendly is your
school? National Heart Lung and Blood Institute. Available online:
http://www.nhlbi.nih.gov/files/docs/public/lung/asthma_friendly_checklist_en.pdf
National Asthma Education and Prevention Program. (2014). Tipsheets. Available online:
http://www.nhlbi.nih.gov/files/docs/public/lung/asthma_tipsheets.pdf
National Heart Lung and Blood Institute. (2007). Asthma Action Plan. U.S. Department of
health and Human Services. National Institutes of Health. NIH Publication # 14-2650.
Available online: http://www.nhlbi.nih.gov/files/docs/public/lung/asthma_actplan.pdf
National Heart Lung and Blood Institute. (2012). Asthma care quick reference: Diagnosing
and managing asthma. U.S. Department of Health and Human Services. National
Institutes of Health. NIH Publication # 12-5075. Available online:
http://www.nhlbi.nih.gov/files/docs/guidelines/asthma_qrg.pdf
National Heart Lung and Blood Institute. (2015). Current clinical practice guidelines and
reports: Asthma. Available online: http://www.nhlbi.nih.gov/health-
pro/guidelines/current
National Heart Lung and Blood Institute. (2014). Managing asthma: A guide for schools. U.S.
Department of Health and Human Services. National Institutes of Health. NIH
Publication # 14-2650.
National Heart Lung and Blood Institute. (2014). What is asthma? Available online:
http://www.nhlbi.nih.gov/health/health-topics/topics/asthma

VDH Guidelines for Healthcare Procedures in Schools 283
Selekman, J. (2013). School nursing: A comprehensive text (2nd ed.). Philadelphia: F.A.
Davis, 817-839.
Virginia Asthma Coalition. (2015). Virginia Asthma Action Plan. Available for download:
http://www.virginiaasthmacoalition.org/documents/VAAP_FINAL_5_12_15.pdf.
Fillable online form available for download:
http://www.virginiaasthmacoalition.org/asthmaactionplan.html
Virginia Asthma Coalition. (2010). Virginia Asthma Plan 2011-2016. Prepared by Patti Kiger.
Available online: http://virginiaasthmacoalition.org/documents/AsthmaPlan.8.30.10.pdf

VDH Guidelines for Healthcare Procedures in Schools 284

VDH Guidelines for Healthcare Procedures in Schools 285
Alternate plan for younger children
Source: National Asthma Education and Prevention Program Expert Panel Report 3 (2007)

VDH Guidelines for Healthcare Procedures in Schools 286

VDH Guidelines for Healthcare Procedures in Schools 287

VDH Guidelines for Healthcare Procedures in Schools 288
Peak Expiratory Flow Rate Monitoring
Overview
A peak flow meter (PFM) is a portable, hand-held device used to measure Peak Expiratory
Flow Rate (PEFR), or the ability to move air out of the lungs. To determine a student's baseline
air flow, the PFM is used frequently over a two-week period to determine the student’s PEFR.
This rate can then be used for comparison when the child has signs of breathing difficulty.
Students with asthma (especially moderate or severe asthma) or other respiratory conditions
can use peak flow readings to help recognize early changes that may be signs of worsening
respiratory status or determine the severity of an asthmatic episode. Altered peak flow readings
can sometimes detect airway changes before symptoms appear. Readings can be used to guide
use of additional medication and when to seek emergency care. Peak flow measurement is
dependent on both the effort and technique utilized so it should not be the only measure used in
assessing a student's respiratory status. It should be noted that flow rates are generally slightly
lower in the mornings than the afternoons.
Settings and Staff
There are no restrictions as to where peak expiratory flow rate monitoring can be done. The
setting should be clean and appropriate to the student’s need/desire for privacy. Students with
peak flow meters can attend a regular classroom and participate in regular school activities.
Peak flow rate monitoring can be performed by the student, school nurse, family, teacher, aide,
or other staff person who has had general training in using peak flow meters. General training
should cover the student’s specific health care needs, how to obtain a peak flow reading, and
how to implement the established action plan.
Individualized Healthcare Plan (IHP)
Each student’s IHP must be tailored to the individual’s needs. A sample plan is included in
Appendix A. When preparing an IHP for the student who needs peak flow rate monitoring, the
following items should be considered:
• Need for student to measure peak flow rates
• Healthcare provider orders for peak expiratory flow rate monitoring
• Student’s underlying condition and possible problems associated with the condition or
treatment
• Frequency/timing of measurements and reasons for obtaining additional measurements
• Determination of peak flow rate values that should be reported to family and/or health
care provider
• Development of an action plan using peak flow values to guide interventions
• Student’s baseline status, including color, respiratory rate, pulse, and blood pressure and
assessment of changes in this status
• Student’s self-care skills and knowledge of early signs of respiratory distress

VDH Guidelines for Healthcare Procedures in Schools 289
• Standard precautions
Procedure for Peak Flow Rate Monitoring
1. Determine need for peak flow rate monitoring. The student may ask for a measurement.
Review orders for obtaining baseline ratings and assessment
ratings. Assess student’s status: respiratory rate, depth,
effort, pulse, restlessness, color, retractions, cough, wheezing,
and lung sounds.
2. Wash hands.
3. Assemble equipment:
• Peak flow meter
• Chart or log of student’s peak flow readings
4. Explain procedure using explanations the student can
understand. Encourage the student to do as much of the
procedure as is capable, so as to achieve maximum self-care
skills.
5. Before each use, make sure the sliding marker or indicator
arrow is at the bottom of the numbered scale on the meter
(zero or lowest number).
Connect mouthpiece to peak flow meter, if not already attached.
6. Advise the student to stand up straight and remove any gum or food from the mouth.
7. Instruct the student take a deep breath, filling the lungs completely.
8. Have the student place the mouthpiece of the meter in the mouth and close the lips tightly
around the mouthpiece.
Be sure the tongue is kept away from the opening of the mouthpiece.
9. In one breath, have the student blow out as hard and as quickly as possible—a “fast hard
blast”—until he/she has blown as much air as possible out of the lungs.
The force of the air coming out of the lungs causes the marker to move along the numbered
scale. When exhaling, students should make a “hah” sound, not a “tah” sound. A “hah”
sound is just exhaled air, while a “tah” sound is made with the tongue and does not give an
accurate measurement.
10. Note the number achieved by the marker on the numbered scale.
11. Repeat steps 5-10 two more times.
The student should obtain similar numbers for all three tries. Inconsistent numbers may
indicate incorrect technique. If the student coughs or uses incorrect technique, do not use
that number.
12. Record the highest number achieved in the student’s chart or log. Readings should be
obtained over several weeks when the student is not having respiratory problems to

VDH Guidelines for Healthcare Procedures in Schools 290
determine the student’s “personal best” or usual peak flow rate. Many health care providers
advise measuring peak flow rates close to the same time each morning. Peak flow rates
may be lower in the mornings than late afternoons.
13. After these readings have been obtained, the student’s peak flow rate can be measured on a
regular basis or on an “as needed” basis according to guidelines in the student's IHP.
Compare any peak flow rates with student’s personal best or normal peak flow rate. Follow
healthcare provider’s guidelines for any recommended actions.
Generally, three zones (correlated to traffic light colors of green, yellow, and red for easy
interpretation) are used to interpret peak flow rates. Be aware of the following general
guidelines, but follow health care provider’s specific guidelines for each student:
Zone Peak Flow Rate Action
Green 80-100% ☺
Continue regular management plan. No additional action
needed.
Yellow 50-80%
Airways are narrowing and may require additional
treatment. Symptoms can get better or worse depending
on actions taken. Refer to the individualized health care
plan or action plan for instructions and medication use.
Red <50%
Medical Alert—severe narrowing may be occurring.
Implement asthma action plan predetermined by
healthcare provider. Notify school nurse, family and/or
health care provider if peak flow rate does not return to
yellow or green zone.
14. Document peak flow reading and any action taken.
Report to the school nurse and family any changes from the student’s usual pattern.
15. Care for peak flow meter according to instructions. Meters can be cleaned in mild
detergent and hot water. Rinse and dry thoroughly before storage.
Dirt collected in the meter can make measurements inaccurate. Germs or mucus can also
collect in the meter.

VDH Guidelines for Healthcare Procedures in Schools 291
Sources:
Bowden, V., & Greenberg, C. (2012). Pediatric nursing procedures (Third ed.). Philadelphia:
Wolters Kluwer Health/Lippincott Williams & Wilkins, 543-545.
Connecticut State Department of Education. (2012). Clinical procedure guidelines for
Connecticut school nurses. Middlebury, CT: CSDOE, 53-55.
Hockenberry, M., & Wilson, D. (2015). Wong's nursing care of infants and children (10th ed.).
St. Louis: Elsevier Mosby, 1220-1221.
National Heart Lung and Blood Institute. (2014). How to use a peak flow meter. In Managing
Asthma: A Guide for Schools, NIH publication #14-2650, p. 55.
National Asthma Education and Prevention Program. (2014). Tipsheets. Available online:
http://www.nhlbi.nih.gov/files/docs/public/lung/asthma_tipsheets.pdf
Selekman, J. (2013). School nursing: A comprehensive text (2nd ed.). Philadelphia: F.A.
Davis, 832-835.
Illustration source:
National Heart lung and Blood Institute. (2014). How to use a peak flow meter. In Managing
Asthma: A Guide for Schools, NIH publication #14-2650, p. 55.

VDH Guidelines for Healthcare Procedures in Schools 292
Procedure for Using a Metered Dose Inhaler (MDI)
A metered dose inhaler (MDI) is a device used to deliver asthma medication directly to the
lungs. It consists of a canister of pressurized medication that fits into a plastic sleeve connected
to a mouthpiece. The MDI propels aerosolized medication into the airway. In comparison,
medications taken in pill form must travel through the body to reach the lungs and generally
require much higher doses than the inhaled forms. With an inhaler, the dose is delivered to the
lungs where it is immediately absorbed, which also decreases the chance of medication side
effects to the rest of the body. A prescription from the student’s health care provider is
required for inhalers to be used at school.
However, the medication sprayed from the MDI may not reach the lungs if correct technique is
not used. Research has shown that many students (and adults) do not know how to correctly
use their inhaler. It is important to assess technique and not just assume those with asthma
know the correct way, no matter how long they have been using an inhaler.
It can be difficult to determine how much medication remains in an MDI. Putting the canister
in water to see if it is empty does not work and can harm the inhaler. Most MDI’s now have
counters. The number of doses in a canister is written on the MDI. If the MDI is used on a
regular basis, the date it will run empty can be calculated by dividing the number of doses by
the number of puffs used per day. For example, if the MDI has 200 doses and is ordered 2
puffs twice a day (4 puffs total per day), then it should last 50 days. However, if an MDI is
used as an emergency or rescue inhaler, then a running count of how many doses have been
used can be kept. Because it can be difficult to keep this count, having two inhalers available
so a refill is available when one runs out ensures that the medication will always be available.
Section 22.1-274.2 of the Code of Virginia requires local school boards to develop and
implement policies to permit a student with asthma to possess and self-administer inhaled
asthma medications during the school day, on school property, or at school-sponsored
activities. Written permission from both the student’s parent/guardian and health care provider,
as well as an individualized health care plan, are required. Asthma rescue medication should
always be easily accessible in an emergency.
Using a Metered Dose Inhaler
1. Wash hands.
2. Explain procedure at student’s level of understanding.
By teaching correct technique for using an MDI, the caregiver helps the
student achieve maximum self-care skills and ensures that the correct
amount of medication is obtained.

VDH Guidelines for Healthcare Procedures in Schools 293
3. Have the student stand, and using the thumb and one or two fingers, hold the inhaler
upright, with the mouthpiece end down and pointing towards his face.
4. Remove the cap and shake the inhaler 10-15 times.
This mixes the medication with the propellants. Check medication to see how much shaking
is needed. A few brands (Alvesco, QVAR) do not require shaking.
5. Tilt the head back slightly and breathe all the way out.
6. Position the inhaler in one of three ways:
• Hold inhaler 1-2 inches away from open mouth--OR--
• Place inhaler in mouth and form a seal with lips--OR--
• Use a spacer to hold inhaler. See Procedure for Using Spacers. This method is preferred
as it delivers twice as much medicine to the lungs.
7. Press down on the inhaler to release medication while starting to breathe in slowly for 3-5
seconds.
8. Hold breath for 10 seconds to allow medicine to reach deeply into the lungs. Then breathe
out slowly.
9. Repeat puff as directed by the student-specific order. For emergency, quick-relief, or
rescue medicine (beta 2-agonists), wait 1 minute between puffs.
Waiting one minute allows airway to dilate from first dose of medicine and may allow more
of the second puff to penetrate better. There is no need to wait between puffs for other
medications (corticosteroids and non-steroidals).
10. When done, wipe off the mouthpiece and replace the cap.
11. Rinse out mouth with water, if possible.
12. Document medication given in student log (and student response, if specified in plan).
Inhalers should be stored in a cool, dry place. Never store in the glove compartment of a car
because the inhaler begins to lose effectiveness at high temperatures. It is best to store the
inhaler in a plastic bag while carrying in a pocket or purse. The MDI may need to be primed if
is new or hasn't been used for a long time to ensure the correct amount of medication is in each
puff. Follow specific MDI instructions for how many sprays/puffs into the air are needed to
prime the inhaler.

VDH Guidelines for Healthcare Procedures in Schools 294
Sources:
Allergy and Asthma Network. (n.d.). Metered-dose inhalers (MDI). Available online:
http://www.allergyasthmanetwork.org/education/asthma/treatment-and-medications/how-use-
metered-dose-inhaler-mdi/
American Academy of Family Physicians. (2014). How to use a metered dose inhaler. Available
online: http://familydoctor.org/familydoctor/en/diseases-conditions/asthma/treatment/how-to-
use-a-metered-dose-inhaler.html
American Lung Association. (2012). How to use a metered-dose inhaler. Available online:
http://www.lung.org/assets/video/colorbox/pdfs/metered-dose-inhaler-spacer.pdf
Bowden, V., & Greenberg, C. (2012). Pediatric nursing procedures (Third ed.). Philadelphia: Wolters
Kluwer Health/Lippincott Williams & Wilkins, 545-548.
Center for Disease Control and Prevention. (2014). Know how to use your asthma inhaler. Videos
using students to teach correct inhaler use. Available online:
http://www.cdc.gov/asthma/inhaler_video/default.htm
Center for Disease Control and Prevention. (2014). Know how to use your asthma inhaler. Instruction
sheets. Available online: http://www.cdc.gov/asthma/pdfs/Inhaler_Spacer_FactSheet.pdf;
http://www.cdc.gov/asthma/pdfs/Inhaler_in_Mouth_FactSheet.pdf;
http://www.cdc.gov/asthma/pdfs/Inhaler_2inches_from_Mouth_FactSheet.pdf
Corjulo, M. (2011). Mastering the metered-dose inhaler: an essential step toward improving
asthma control in school. NASN School Nurse, 26, 285.
Hockenberry, M., & Wilson, D. (2015). Wong's nursing care of infants and children (10th ed.). St.
Louis: Elsevier Mosby, 1222-1225.
National Heart Lung and Blood Institute. (2014). How to use a metered-dose inhaler. In Managing
Asthma: A Guide for Schools, NIH publication #14-2650, p. 57.
National Asthma Education and Prevention Program. (2014). Tipsheets. Available online:
http://www.nhlbi.nih.gov/files/docs/public/lung/asthma_tipsheets.pdf
Porter, S., Branowicki, P., & Palfrey, J. (2014). Supporting students with special health care needs:
Guidelines and procedures for schools (3rd ed.). Baltimore: Paul H. Brookes Publishing, 351.
Selekman, J. (2013). School nursing: A comprehensive text (2nd ed.). Philadelphia: F.A. Davis, 831-
834.
Wisconsin Improving School Health Services Project. (2015). Inhaler with spacer. Available online:
http://www.wishesproject.org/?page_id=192/?tab=5

VDH Guidelines for Healthcare Procedures in Schools 295
Procedure for Using Spacers with Metered Dose Inhalers
Many people (especially young children) find it difficult to coordinate the spraying of a
metered dose inhaler (MDI) and the inhalation of the medication. Sometimes the puffs are
miss-timed and only make it part of the way into the airways, and some of the medication is
deposited in the mouth or on the back of the throat instead of the lungs.
A spacer is a hollow tube that attaches to a MDI. It slows down or "holds" a dose of
medication until a student is able to take it in. The medication is sprayed into the spacer instead
of the mouth. As the student inhales, the medication passes quickly through the mouth and
throat, reducing the amount of medication released into the air and preventing it from being
sprayed directly in the mouth or throat. It helps a student get the most from their inhaled
asthma medicine. The spacer usually has a one-way valve that prevents the student from
exhaling into the spacer. Some studies have shown that the larger volume spacers delivered
more medication than the small volume spacers. Some spacers have masks which cover the
nose and mouth for younger children enabling more medicine to be inhaled. Spacers without
masks should not be used until the child is 7-8 years of age.
Using a Spacer with a Metered Dose Inhaler
1. Wash hands.
2. Explain procedure at student’s level of understanding.
By teaching correct technique for using a spacer with an MDI, the caregiver helps the
student achieve maximum self-care skills and ensures that the correct amount of medication
is obtained.
3. Remove the plastic cap from the MDI and the spacer.
4. Shake the MDI and insert into the back of the spacer.
5. Breathe out deeply.
6. Put the mouthpiece of the spacer into the mouth between the teeth and
close the lips around it.
7. Press down on the MDI to spray one puff from the MDI into the spacer.
8. Take a long slow breath through the mouth and hold breath for 5-10
seconds.
If a whistling sound is heard, the student is breathing in too quickly.
9. Take the spacer out of the mouth and breathe normally.

VDH Guidelines for Healthcare Procedures in Schools 296
10. If a second puff is ordered, wait at least one minute between puffs.
11. Rinse mouth with water and spit out.
12. Document medication given in student log.
13. At least once a week, wash the spacer in warm water and thoroughly dry.
Using an InspirEase® Spacer with a Metered Dose Inhaler
1. Wash hands.
2. Explain procedure at student’s level of understanding.
By teaching correct technique for using a spacer with an MDI, the caregiver helps the
student achieve maximum self-care skills and ensures that the correct amount of medication
is obtained.
3. Remove the aerosol can from the MDI plastic holder and shake it.
4. The Inspirease spacer consists of a mouthpiece and a reservoir bag. Place the mouthpiece
into the opening of the reservoir bag, making sure to line up the locking tabs. Twist to lock.
5. Carefully untwist or extend the reservoir bag until it is completely
open.
6. Insert the stem of the canister securely into the adaptor port of the
mouthpiece.
7. Breathe out deeply.
8. Place the mouthpiece between the teeth and seal the lips tightly
around it.
9. Press down on the MDI to spray one puff from the MDI into the InspirEase.
10. Take a long slow breath through the mouth and hold breath for 5-10 seconds.
If a whistling sound is heard, the student is breathing in too quickly.
11. Breathe out into the bag slowly, keeping the lips around the mouthpiece.
12. Breathe in again slowly and hold breath for 5-10 seconds.
13. If a second puff is ordered, wait at least one minute between puffs.
14. Document medication given in student log.
15. Wash and dry the mouth piece with warm water and try thoroughly once per day. The
reservoir bag should not be washed, but needs to be replaced every 2-4 weeks, or sooner if
it gets a hole or tear.

VDH Guidelines for Healthcare Procedures in Schools 297
Sources:
Barry, P. & O'Callaghan, C. (1996). Inhalational drug delivery from seven different spacer
devices. Thorax 51(8): 835-840.
Bowden, V., & Greenberg, C. (2012). Pediatric nursing procedures (Third ed.). Philadelphia:
Wolters Kluwer Health/Lippincott Williams & Wilkins, 545-548.
Colorado Asthma Coalition. (2012). Using a spacer with your inhaler. Available online:
http://www.lung.org/associations/states/colorado/assets/pdfs/using-a-spacer-with-your-
2.pdf
Center for Disease Control and Prevention. (2014). Know how to use your asthma inhaler.
Videos using students to teach correct inhaler use. Available online:
http://www.cdc.gov/asthma/inhaler_video/default.htm
Center for Disease Control and Prevention. (2014). Know how to use your asthma inhaler.
Instruction sheets. Available online:
http://www.cdc.gov/asthma/pdfs/Inhaler_Spacer_FactSheet.pdf;
http://www.cdc.gov/asthma/pdfs/Inhaler_in_Mouth_FactSheet.pdf;
http://www.cdc.gov/asthma/pdfs/Inhaler_2inches_from_Mouth_FactSheet.pdf
Corjulo, M. (2011). Mastering the metered-dose inhaler: an essential step toward improving
asthma control in school. NASN School Nurse, 26, 285.
Hockenberry, M., & Wilson, D. (2015). Wong's nursing care of infants and children (10th ed.).
St. Louis: Elsevier Mosby, 1222-1225.
Minnesota Healthy Learners Asthma Initiative. (n.d.). How to use a metered dose inhaler with
InspirEase spacer. Available online:
http://www.health.state.mn.us/asthma/documents/mdwinstruct.pdf
National Heart Lung and Blood Institute. (2014). How to use a metered-dose inhaler. In
Managing Asthma: A Guide for Schools, NIH publication #14-2650, p. 57.
National Asthma Education and Prevention Program. (2014). Tipsheets. Available online:
http://www.nhlbi.nih.gov/files/docs/public/lung/asthma_tipsheets.pdf
Porter, S., Branowicki, P., & Palfrey, J. (2014). Supporting students with special health care
needs: Guidelines and procedures for schools (3rd ed.). Baltimore: Paul H. Brookes
Publishing, 351.
Selekman, J. (2013). School nursing: A comprehensive text (2nd ed.). Philadelphia: F.A.
Davis, 831-834.

VDH Guidelines for Healthcare Procedures in Schools 298
WebMD. (2013). How to use a metered dose inhaler with an InspirEase spacer. Available
online: http://www.webmd.com/asthma/metered-dose-inhaler-spacer
Wisconsin Improving School Health Services Project. (2015). Inhaler with spacer. Available
online: http://www.wishesproject.org/?page_id=192/?tab=5

VDH Guidelines for Healthcare Procedures in Schools 299
Procedure for Using Dry-Powder Inhalers
Dry-powder inhalers (DPIs) dispense medication in a very fine, powdered form. The
medication particles are so small that they can easily reach the tiniest airways. Because every
DPI works a little differently, the instructions must be read before using. Some DPIs have dose
counters, which can make it easier to tell when the inhaler is almost empty. Cold temperatures
don’t reduce the effectiveness of DPIs as they might with some MDIs. General instructions for
most DPIs:
1. Wash hands.
2. Follow the manufacturer’s instructions to prime the DPI and load a prescribed dose of the
dry-powder medicine.
There is no need to shake the DPI. Shaking can result in losing some powder.
3. Stand up.
4. Breathe out slowly for 3-5 seconds.
5. Place mouthpiece of inhaler in mouth and close lips around it to form a tight seal. Inhale
deeply and forcefully.
The DPI is breath-activated, so the student can
control the rate at which the medication is inhaled.
It needs to be inhaled with sufficient force to assure
accurate delivery of medication to the lungs. Most
DPIs require closing the mouth tightly around the
mouthpiece of the inhaler.
6. Hold breath for 10 seconds and then exhale slowly.
7. If specified in the student IHP, repeat the procedure
for the correct number of doses. One inhalation from a DPI often provides the same dosage
as two puffs of a comparable medication from a MDI.
8. Wipe the mouthpiece at least weekly with a dry cloth. Do NOT use water to clean the dry
powder inhaler.
9. Document medication given in student log and student response.

VDH Guidelines for Healthcare Procedures in Schools 300
Diskhaler® and Diskus® are two other common types of dry-powder inhalers. However, they
are used for preventive medications, which are not likely to be administered at school, so more
specific instructions for these devices will not be covered here. Instructions can usually be
found with the devices and are also available online at:
http://www.asthma.ca/adults/treatment/diskus.php
http://www.asthma.ca/adults/treatment/diskhaler.php
http://www.nhlbi.nih.gov/files/docs/public/lung/asthma_tipsheets.pdf
Sources:
American Lung Association. (n.d.). How to use a dry powder inhaler. Available online:
http://www.lung.org/assets/video/colorbox/pdfs/aerolizer.pdf
Bowden, V., & Greenberg, C. (2012). Pediatric nursing procedures (Third ed.). Philadelphia:
Wolters Kluwer Health/Lippincott Williams & Wilkins, 545-548.
Center for Disease Control and Prevention. (2014). Know how to use your asthma inhaler.
Videos using students to teach correct inhaler use. Available online:
http://www.cdc.gov/asthma/inhaler_video/default.htm
Corjulo, M. (2011). Mastering the metered-dose inhaler: an essential step toward improving
asthma control in school. NASN School Nurse, 26, 285.
Hockenberry, M., & Wilson, D. (2015). Wong's nursing care of infants and children (10th ed.).
St. Louis: Elsevier Mosby, 1222-1225.
National Heart Lung and Blood Institute. (2014). How to use a dry powder inhaler. In
Managing Asthma: A Guide for Schools, NIH publication #14-2650, p. 58.
National Asthma Education and Prevention Program. (2014). Tipsheets. Available online:
http://www.nhlbi.nih.gov/files/docs/public/lung/asthma_tipsheets.pdf
Selekman, J. (2013). School nursing: A comprehensive text (2nd ed.). Philadelphia: F.A.
Davis, 831-834.

VDH Guidelines for Healthcare Procedures in Schools 301
Nebulizer Treatments
Overview
Nebulizers use compressed air to break up medications into super fine particles and deliver
them as a mist to be inhaled directly into the lungs. The compressed air is forced through a cup
with liquid medication, forming a mist. The mist is directed into a mask or mouthpiece, which
the student wears while receiving the treatments. Studies have found that inhaling smaller
doses of medication directly into the lungs is more efficient and causes fewer side effects than
taking the same medication in pill or liquid form. Nebulizers are often used with children
because the procedure is easier to coordinate and use than metered dose inhalers.
All nebulizers have the same basic features—an air compressor, connecting tubing, air inlet, air
outlet, medication cup, and either a face mask or a T-adaptor (which fits in the mouth). The
mask directs air to the nose and mouth and is easier for younger children to use. The T adaptor
directs air to the mouthpiece while allowing exhaled air to escape.
Settings and Staff
The compressor on the nebulizer makes a great deal of
noise so nebulizer treatments are best done in a private,
clean area such as the health office. Students who
require nebulizer treatments can attend a regular
classroom and participate in regular school activities.
Physical education activities may need modification if
the student is receiving the nebulized medication
because of bronchoconstriction.
A nebulizer treatment can be administered by the
school nurse, family, teacher, or other adult with
proven competency-based training in appropriate
techniques and problem management. Many students can perform nebulizer treatments by
themselves. Those who can’t should be encouraged to assist with the treatment as much as
possible. Any school personnel who has regular contact with a student who requires a
nebulizer treatment should receive training covering the student’s specific needs, potential
problems, and implementation of the established emergency plan.
Individualized Healthcare Plan (IHP)
Each student’s IHP must be tailored to the individual’s needs. A sample plan is included in
Appendix A. When preparing an IHP for a student requiring nebulizer treatments, the
following items should be considered:
• Determining the need to receive nebulizer treatment
• Healthcare provider order

VDH Guidelines for Healthcare Procedures in Schools 302
• Medication to be administered and side effects and precautions
• Frequency of treatments and whether treatments are on a regular or “as needed” basis
• Action to take if student becomes shaky or jittery during nebulizer treatment
• Student’s self-care skills and knowledge of need for treatments
• Student’s knowledge of early signs of respiratory distress
• Response to treatment and necessity for repeat treatments (per health care provider
order)
• Whether there is a need for activity modifications
• Identification of allergens and triggers of wheezing for students with asthma
• Whether there is a need for peak flow readings before and/or after treatment
• Need for chest physical therapy and/or suctioning
• Frequency and type of cleaning of nebulizer components
• Latex allergy precautions
• Standard precautions

VDH Guidelines for Healthcare Procedures in Schools 303
Sources:
Bowden, V., & Greenberg, C. (2012). Pediatric nursing procedures (Third ed.). Philadelphia:
Wolters Kluwer Health/Lippincott Williams & Wilkins, 545-548.
Center for Disease Control and Prevention. (2014). Know how to use your asthma inhaler.
Videos using students to teach correct inhaler use. Available online:
http://www.cdc.gov/asthma/inhaler_video/default.htm
Connecticut State Department of Education. (2012). Clinical procedure guidelines for
Connecticut school nurses. Middlebury, CT: CSDOE, 53-55.
Corjulo, M. (2011). Mastering the metered-dose inhaler: an essential step toward improving
asthma control in school. NASN School Nurse, 26, 285.
Hockenberry, M., & Wilson, D. (2015). Wong's nursing care of infants and children (10th ed.).
St. Louis: Elsevier Mosby, 1222-1225.
National Heart Lung and Blood Institute. (2014). How to use a dry powder inhaler. In
Managing Asthma: A Guide for Schools, NIH publication #14-2650, p. 58.
National Asthma Education and Prevention Program. (2014). Tipsheets. Available online:
http://www.nhlbi.nih.gov/files/docs/public/lung/asthma_tipsheets.pdf
Selekman, J. (2013). School nursing: A comprehensive text (2nd ed.). Philadelphia: F.A.
Davis, 831-834.
Porter, S., Branowicki, P., & Palfrey, J. (2014). Supporting students with special health care
needs: Guidelines and procedures for schools (3rd ed.). Baltimore: Paul H. Brookes
Publishing, 351-355.
Wisconsin Improving School Health Services Project. (2015). Nebulizer. Written procedure
and video available online: http://www.wishesproject.org/?page_id=209/?tab=5
Illustration Source:
National Asthma Education and Prevention Program. (2014). Tipsheets. Available online:
http://www.nhlbi.nih.gov/files/docs/public/lung/asthma_tipsheets.pdf
VDH Guidelines for Healthcare Procedures in Schools 304
Procedure for Nebulizer Aerosol Treatment
1. Determine need for treatment based on health care provider’s order. The student may ask
for treatment.
Assess student’s respiratory status: rate, depth, effort, wheezing, cough, retractions, breath
sounds, and color.
2. Wash hands.
3. Assemble equipment:
• Compressor
• Connecting tubing
• Nebulizer medication chamber
• Mask, or mouthpiece with T adaptor
• Medication
• Diluting solution
• Syringe, if needed for measuring
• Filter disc/exhalation filter, if needed
4. Place the unit on a firm, flat surface.
Most compressors are electrically powered; some may be battery powered.
5. Attach one end of the connecting tubing to the compressor’s air outlet.
6. Unscrew the top from the nebulizer cup. Most nebulizer cups unscrew from the top.
7. Most nebulized medication comes premixed and packaged in a unit-dose dosette so the
entire contents should be squirted into the bottom half of the nebulizer cup and then the top
screwed back on.
If the medication requires mixing, place the prescribed amount of medicine and diluting
solution into the nebulizer cup and screw the cup back together.
8. Attach the other end of the connecting tubing to the bottom of the medication cup.
9. Keeping the cup vertical, attach face mask or T tube with mouthpiece to the top of the cup.
10. Have the student sit in a comfortable position.
11. Turn on power switch.
A fine mist should be visible.
12. Have student place mouthpiece in mouth and seal lips around mouthpiece, or place mask
over nose and mouth (or tracheostomy, if applicable).

VDH Guidelines for Healthcare Procedures in Schools 305
13. Instruct student to breathe normally in and out of the mouthpiece or mask.
14. Every 1-2 minutes have student take a deep breath, hold breath briefly, then exhale slowly
and resume normal breathing. Most treatments last 10-15 minutes.
Taking some deep breaths ensures that the medicine gets to the lower airways, not just the
mouth.
15. Keep the nebulizer cup upright. The cup may require gentle tapping to make sure all the
dose is utilized.
16. When all the medication has been aerosolized, turn off power.
17. Remove mouthpiece or mask.
18. Assess student’s respiratory status. If student is still having difficulty breathing after
nebulizer treatment or is wheezing, follow student-specific action plan.
19. Wash mouthpiece or mask and nebulizer cup. Allow to thoroughly dry on a paper towel
before storing. Do not wash tubing with water. Refer to cleaning instructions for other
parts.
20. Wash hands.
21. Document treatment. Report to school nurse and family any changes in the student’s usual
pattern of tolerating the procedure.
Cleaning and care of equipment: After each use, rinse medication cup, mouthpiece, and mask
under warm running water for 30 seconds. Shake off excess water. Allow to dry. When parts
are dry, store them in a clean plastic bag. Do not wash tubing. Replace tubing if it becomes
cloudy, discolored, or wet inside. Once or twice a week: Clean nebulizer parts more
thoroughly according to manufacturer’s instructions. If no instructions, parts can be soaked in
solution of 1 cup white vinegar and 2 cups warm water for 30 minutes. Rinse thoroughly after
soaking. Some parts may be boiled or cleaned in dishwasher.
Thorough cleaning can be done at home. Cleaning the equipment prevents clogging and
malfunction and reduces infection. Compressors can be used for multiple students. Other parts
are student-specific.

VDH Guidelines for Healthcare Procedures in Schools 306
Sources:
Bowden, V., & Greenberg, C. (2012). Pediatric nursing procedures (Third ed.). Philadelphia:
Wolters Kluwer Health/Lippincott Williams & Wilkins, 545-548.
Center for Disease Control and Prevention. (2014). Know how to use your asthma inhaler.
Videos using students to teach correct inhaler use. Available online:
http://www.cdc.gov/asthma/inhaler_video/default.htm
Connecticut State Department of Education. (2012). Clinical procedure guidelines for
Connecticut school nurses. Middlebury, CT: CSDOE, 53-55.
Corjulo, M. (2011). Mastering the metered-dose inhaler: an essential step toward improving
asthma control in school. NASN School Nurse, 26, 285.
Hockenberry, M., & Wilson, D. (2015). Wong's nursing care of infants and children (10th ed.).
St. Louis: Elsevier Mosby, 1222-1225.
National Heart Lung and Blood Institute. (2014). How to use a dry powder inhaler. In
Managing Asthma: A Guide for Schools, NIH publication #14-2650, p. 58.
National Asthma Education and Prevention Program. (2014). Tipsheets. Available online:
http://www.nhlbi.nih.gov/files/docs/public/lung/asthma_tipsheets.pdf
Selekman, J. (2013). School nursing: A comprehensive text (2nd ed.). Philadelphia: F.A.
Davis, 831-834.
Porter, S., Branowicki, P., & Palfrey, J. (2014). Supporting students with special health care
needs: Guidelines and procedures for schools (3rd ed.). Baltimore: Paul H. Brookes
Publishing, 351-355.
Wisconsin Improving School Health Services Project. (2015). Nebulizer. Written procedure
and video available online: http://www.wishesproject.org/?page_id=209/?tab=5

VDH Guidelines for Healthcare Procedures in Schools 307
Possible Problems That May Occur During Nebulizer Treatments
• Chest tightness, coughing, wheezing, shortness of breath, retractions (pulling in of rib
cage)
Follow Emergency Asthma Action Plan. Give nebulizer treatment, if ordered. Nebulized
bronchodilators can act quickly to help with breathing. Notify school nurse and family.
• Breathing gets increasingly difficult. Cough or wheeze worsens.
Stay calm. Reassure student. Document vital signs.
Follow Emergency Asthma Action Plan and notify school nurse and family.
• Struggling to breathe or hunching over after treatment is finished
Follow Emergency Asthma Action Plan. Call 911, if necessary.
Notify school nurse, family, and health care provider.
• Dizziness, lightheadedness
Student may be breathing too rapidly. Encourage student to take slower breaths. If
persists, stop treatment and continue when student is feeling better.
• Becomes shaky or jittery during bronchodilator treatment
Medication may be causing increased heart rate. Follow student guidelines for care.

VDH Guidelines for Healthcare Procedures in Schools 308
Sources:
Bowden, V., & Greenberg, C. (2012). Pediatric nursing procedures (Third ed.). Philadelphia: Wolters
Kluwer Health/Lippincott Williams & Wilkins, 545-548.
Center for Disease Control and Prevention. (2014). Know how to use your asthma inhaler. Videos
using students to teach correct inhaler use. Available online:
http://www.cdc.gov/asthma/inhaler_video/default.htm
Connecticut State Department of Education. (2012). Clinical procedure guidelines for Connecticut
school nurses. Middlebury, CT: CSDOE, 53-55.
Corjulo, M. (2011). Mastering the metered-dose inhaler: an essential step toward improving
asthma control in school. NASN School Nurse, 26, 285.
Hockenberry, M., & Wilson, D. (2015). Wong's nursing care of infants and children (10th ed.). St.
Louis: Elsevier Mosby, 1222-1225.
National Heart Lung and Blood Institute. (2014). How to use a dry powder inhaler. In Managing
Asthma: A Guide for Schools, NIH publication #14-2650, p. 58.
National Asthma Education and Prevention Program. (2014). Tipsheets. Available online:
http://www.nhlbi.nih.gov/files/docs/public/lung/asthma_tipsheets.pdf
Selekman, J. (2013). School nursing: A comprehensive text (2nd ed.). Philadelphia: F.A. Davis, 831-
834.
Porter, S., Branowicki, P., & Palfrey, J. (2014). Supporting students with special health care needs:
Guidelines and procedures for schools (3rd ed.). Baltimore: Paul H. Brookes Publishing, 351-
355.
Wisconsin Improving School Health Services Project. (2015). Nebulizer. Written procedure and video
available online: http://www.wishesproject.org/?page_id=209/?tab=5

VDH Guidelines for Healthcare Procedures in Schools 309
Information for Students
Who Need Nebulizer Treatments
Date: ___________________
To: _____________________________ _________________________________
(Teachers, Instructional assistants, Bus drivers, etc)
Name of Student: ______________________________________
This student requires nebulizer treatments to deliver medications in a mist form directly into
his or her lungs.
The student will have the necessary equipment at school to administer the medication
through the nebulizer and this information will be included in the student’s health care plan.
The procedure will be conducted by a trained staff member. The student may be able to
request a nebulizer treatment and assist with the procedure.
The student may be able to participate in many school activities. Modifications should be
approved by the family, health care provider, and school.
Contact _______________________________ at __________________ (phone number) for
additional information or if the student experiences any problems with the nebulizer.
Source:
Adapted from: Porter, S, Haynie, M, Bierle, T, Caldwell, TH, & Palfrey, JS (Eds.). (1997). Children and youth
assisted by medical technology in educational settings: Guidelines for care (2nd ed.). Baltimore: Paul H.
Brookes Publishing.

VDH Guidelines for Healthcare Procedures in Schools 310
Oxygen Use
Overview
Oxygen is needed for all body functions. A student may need supplemental oxygen therapy
when hypoxia or hypoxemia results from a respiratory condition, a cardiac condition, or
increased metabolic demands.
Early signs of hypoxia:
• Restlessness • Visual disturbances
• Anxious look • Tachypnea
• Confusion or change in behavior • Tachycardia
• Headache • Dyspnea
Chronic hypoxia:
• Polycythemia • Elevated pCO2
• Clubbing of fingers and toes • Chronic pO2 <55
• Peripheral edema • Right-sided heart failure
Advanced hypoxia:
• Hypotension • Cyanosis
• Bradycardia • Metabolic acidosis
Oxygen Sources
Note: Oxygen is considered a medication and requires health care provider orders.
Oxygen Gas
A common source of pure oxygen is oxygen gas stored under pressure in a metal tank. This is
especially common for students who need oxygen on a standby basis or who use a ventilator.
Tanks come in a variety of sizes and portability. The amount of oxygen remaining in a tank is
indicated on the pressure gauge of the tank. Regulators or flowmeters are attached to the tank
to control the amount of oxygen the student receives. Oxygen delivery tubing is attached to the
“Christmas tree” adapter on the regulator or flowmeter. Oxygen cylinders should be secured in
an upright position. Because the oxygen is stored under high pressure, the tank can be a safety
hazard. Its cumbersome design and need for frequent refills are also disadvantages.
Oxygen Liquid

VDH Guidelines for Healthcare Procedures in Schools 311
The liquid oxygen system includes a large liquid thermal reservoir that stores the pure oxygen
as a liquid at -300º Fahrenheit. These tanks also come in a variety of sizes and portability. A
portable unit that can be worn over the shoulder can supply oxygen for several hours.
Equipment for both gas and liquid oxygen include:
• Regulator with pressure gauge and flowmeter
• Tank stand or carrier
• Humidification source
• Oxygen tubing
• Mask or cannula
• Wrench for gas tank valve
Oxygen Concentrator
This electronically powered machine extracts oxygen molecules from room air and
concentrates it for delivery to the student. It can be used for low oxygen flow less than 4
liter/minute. Its advantage is that it does not require a tank or need refills. However, it does
require an electrical outlet so it is not as portable. Units can have a back-up battery that
functions during a power outlet or when temporarily portable. The units have air filters that
require cleaning.
Equipment for the oxygen concentrator:
• Humidification source
• Oxygen tubing
• Mask or cannula
• Emergency oxygen tank for power failure
Safety Precautions for Oxygen Use
• Do not smoke or allow open flames near oxygen. Post “No Smoking” or “Oxygen in
Use” signs at the door. Oxygen supports combustion and a small spark can cause a fire.
• Do not allow oil, grease, or any other highly flammable material to come into contact
with any part of the oxygen setup. Do not lubricate any fittings with oil and do not
handle equipment with greasy hands or rags.
• Store oxygen away from heaters, radiators, and other heat sources, including the hot
sun.
• Avoid use of friction-type toys or battery-operated devices due to chance of sparks.
• Make sure all electrical devices in the area use grounded three-prong plugs.
• Keep fire extinguishers near the classroom and available in other areas of school.
• Never put anything over an oxygen tank.
• Keep a spare oxygen source, extra tubing, and other tank equipment readily available.

VDH Guidelines for Healthcare Procedures in Schools 312
• When using a gas tank, make sure that it is secured upright in its stand (including during
transport) and cannot be knocked over (it can become a missile).
• Check the alarm system—pinch tubing to obstruct flow and see if alarm sounds when
oxygen stopped.
• Make sure that oxygen tubing does not become kinked (except for brief testing),
obstructed, punctured, or disconnected.
• Use the flowmeter setting prescribed by the student’s health care provider.
• Liquid oxygen can evaporate while in a portable unit--check the level often.
• To check if an oxygen tank is empty, look at the red area on the dial. If it reads less
than 500 pounds per square inch (PSI), the tank is empty and needs replacing.
• Keep the name of the home oxygen company and its telephone contact posted on/near
the oxygen equipment and in the student’s health care plan. Contact the company if any
equipment does not appear to function correctly.
• Notify the local fire department and emergency medical services that oxygen is in use at
the school.
Settings and Staff
Whenever a student is receiving oxygen therapy:
• There should be no smoking, open flame, or heat source close to the oxygen
because these may increase the risk of fire.
• Check equipment and oxygen supply at least daily, or as specified by student’s
care plan.
NOTE: The Virginia Department of Education has taken the position that students who need to
be accompanied by a supply of oxygen can be transported by the school bus under the
following conditions:
• An aide, attendant, nurse, etc. who has received specific training for administration of
oxygen and general training on the student’s special needs, shall accompany and sit next
to the student;
• Only the driver, aide, and the student should be on the vehicle when oxygen is present;
• The tank or cylinder shall be removed from the bus when the student departs;
• If a portable oxygen system (backpack) comparable to a “C” or “D” type that
holds 200-400 liters is used, then the student can be transported on the same bus as
other students;
• The oxygen equipment (backpack tank) shall be mounted and securely fastened to the
bus body in an upright position so that valves are protected from possible breakage and
to prevent exposure to intense heat. Mounting should be as near as practical to the
student’s seating position. If a wheelchair is used, the oxygen may be secured to the
properly secured wheelchair. If oxygen is necessary during transportation, instead of
removing the cylinder from its mounting, a small amount of regular oxygen extension
tubing from the cylinder, which should be adjacent to the student’s seating position, to a
face mask shall be considered.

VDH Guidelines for Healthcare Procedures in Schools 313
(Memo from Barbara Goodman, Principal Specialist, Pupil Transportation, Virginia Department of
Education to Frank C. Dixon, Director of Transportation, Fairfax County Schools, April 21, 1994.)
NOTE: The Virginia Department of Education has taken the position that students who need to
be accompanied by a supply of oxygen can be transported by the school bus under the
following conditions:
• It is strongly recommended that an aide, attendant, nurse, etc. who has received specific
training for administration of oxygen and general training on the student’s special
needs, accompany and sit next to the student;
• Oxygen should only be carried when medically necessary and specified in a student's
IEP or IHP. Emergency plans should be developed in advance of need.
• Oxygen cylinders should be checked for cracks, leaks, or other defects
• Carry the cylinder carefully using both hands--the cylinder is susceptible to valve
damage if dropped or carried by the valve or regulator
• Each cylinder should be secured upright to prevent movement, stored away from
sources of potential sparks or heat, and in a location that allows all passengers free
egress from emergency exits. It should not be secured in a location where a wheel chair
occupant could strike against it in a crash situation.
• It is recommended that a decal indicating compressed oxygen is on board the bus should
be placed in a visible place on the exterior of the bus. (Virginia Department of Education, Transporting children with special needs: Transporting of oxygen on
school buses, 2012).
The school nurse or other adult with proven competency-based training in appropriate
techniques and problem management may administer oxygen through a nasal cannula or mask.
Use of a tracheostomy collar may require a registered nurse or respiratory therapist with
training, depending on the care needs of the student with a tracheostomy and as specified in the
student’s individualized health care plan. Any school personnel who have regular contact with
a student who requires oxygen should receive general training covering the student’s specific
needs, potential problems and implementation of the established emergency plan.
Individualized Healthcare Plan (IHP)
Each student’s IHP must be tailored to the individual’s needs. A sample plan is included in
Appendix A. When preparing an IHP for a student requiring supplemental oxygen use, the
following items should be considered:
• Student’s underlying condition and possible problems associated with the condition or
treatment
• Health care provider's order for oxygen including how and when it is to be administered
• Student’s baseline respiratory status, including color, breath sounds, respiratory rate,
pulse, and blood pressure
• Need and frequency for pulse oximetry readings
• Signs and symptoms shown by the student when not receiving adequate oxygen (e.g.,
cyanosis, agitation, distress)

VDH Guidelines for Healthcare Procedures in Schools 314
• Student’s ability to request assistance or extra oxygen when needed
• Percentage and/or liter flow of oxygen prescribed (for both routine use and for
emergencies)
• Adaptation of classroom for oxygen equipment and supplies, including storage and
transport
• Access to oxygen supply in other areas of the school (i.e., portable or stationary)
• Posting of oxygen safety precautions including “oxygen in use” warnings and other
oxygen safety precautions
• Need for transportation of oxygen to and from school
• Spare oxygen supply and safe storage when not in use
• Latex allergy precautions
• Standard precautions

VDH Guidelines for Healthcare Procedures in Schools 315
Sources:
Bowden, V., & Greenberg, C. (2012). Pediatric nursing procedures (Third ed.). Philadelphia:
Wolters Kluwer Health/Lippincott Williams & Wilkins, 526-533.
California Thoracic Society. (2010). Home care of children on ventilators: A parent's guide.
Available online:
http://www.calthoracic.org/sites/default/files/Vent_Dependant_Children_booklet_0.pdf
Connecticut State Department of Education. (2012). Clinical procedure guidelines for
Connecticut school nurses. Middlebury, CT: CSDOE, 95-98.
Hockenberry, M., & Wilson, D. (2015). Wong's nursing care of infants and children (10th ed.).
St. Louis: Elsevier Mosby, 1140-1142.
Porter, S., Branowicki, P., & Palfrey, J. (2014). Supporting students with special health care
needs: Guidelines and procedures for schools (3rd ed.). Baltimore: Paul H. Brookes
Publishing 315-318.
Selekman, J. (2013). School nursing: A comprehensive text (2nd ed.). Philadelphia: F.A.
Davis, 1054-1055.
Smith, S., Duell, D. & Martin, B. (2012). Clinical nursing skills: Basic to advanced skills (8th
ed.). Boston: Pearson,1183-1189.
U. S. Department of Transportation Pipeline and Hazardous Materials Safety Administration.
(2006). DOT guidance for the safe transportation of medical oxygen for personal use
on buses and trains. (Per phone call to DOT on August 19, 2015, this is the most up-to-
date guidance for medical oxygen transport on buses). Available online:
http://www.phmsa.dot.gov/pv_obj_cache/pv_obj_id_D79BAC5723BD92C322CF6966
EE7C02DAC75B0100/filename/gstomo.pdf
Virginia Department of Education. (2012). Transporting children with special needs:
Transporting of oxygen on school buses. Available online:
http://www.doe.virginia.gov/support/transportation/regulations/va_oxygen_transport.pd
f
Wisconsin Improving School Health Services Project. (2015). Administering oxygen. Available
online: http://www.wishesproject.org/?page_id=132/?tab=4

VDH Guidelines for Healthcare Procedures in Schools 316
Procedure for Using a Nasal Cannula
A nasal cannula uses small plastic prongs which fit in the student’s nostrils and attach to
oxygen delivery tubing. It is easy, comfortable, and usually tolerated well because it allows
eating and talking. It cannot be used to deliver oxygen concentrations greater than 40% or
when there is an obstruction to the nasal passages, such as from swelling, a deviated septum or
polyps.
1. Review oxygen safety precautions (see previous section).
2. Wash hands.
3. Assemble equipment:
• Oxygen source and backup
Make sure that tank has enough oxygen.
• Cannula and tubing
• Humidity source, if needed and ordered
• Adaptor for connecting tubing
• Extra connecting tubing, if needed for mobility
4. Explain procedure using explanations the student can understand. Encourage the student to
do as much of the procedure as is capable, so as to achieve maximum self-care skills.
5. Securely attach cannula tubing to oxygen source.
Usually a “Christmas tree” adaptor is used to attach the tubing to the oxygen source.
Attach humidifier, if ordered. Humidification of low flow oxygen is often not needed and
may contribute to bacterial growth. Make sure that all connections are secure to prevent
leaks.
6. Turn on the oxygen source. A highly visible information card stating oxygen liter flow
should be attached to the regulator.
7. Set flowmeter to the flow rate prescribed by healthcare provider. Do not change this
setting without first contacting the healthcare provider.
Oxygen liter flow can be ordered as a set liter flow rate (e.g., 2 liters per minute) or as a
range (e.g., 2-4 liters per minute) based on student’s needs.
8. Check cannula prongs to make sure that oxygen is coming out.
Hold them up to your hand and feel for flow coming out. If no flow is felt, check oxygen
supply (make sure tank still has oxygen), connections for leaks, flow rate, and tubing for
obstruction.

VDH Guidelines for Healthcare Procedures in Schools 317
9. Gently place cannula prongs into each of student’s nostrils. Make sure both prongs are in
the nostrils. Loop the tubing over each ear then under the chin. Tubing can be secured by
sliding the adjuster up under the chin. Check with the student to make sure it is
comfortable. Do not apply too tightly because this can occlude the nostrils and put excess
pressure on facial structures. Assess skin integrity frequently for signs of skin breakdown.
If the student is not comfortable, the cannula tubing can be secured behind the head rather
than under the chin. If using an elastic strap to secure the cannula, position it over the ears
and around the back of the head.
10. If ordered, provide nares care with ONLY water-soluble products.
Do not use petroleum products such as petroleum jelly because they are combustible and
difficult to clear from the mucosa.
11. Wash hands.
12. Document procedure on student’s log sheet. Notify the school nurse and family if there are
any changes in student’s usual pattern.
Sources:
Bowden, V., & Greenberg, C. (2012). Pediatric nursing procedures (Third ed.). Philadelphia:
Wolters Kluwer Health/Lippincott Williams & Wilkins, 526-533.
Connecticut State Department of Education. (2012). Clinical procedure guidelines for
Connecticut school nurses. Middlebury, CT: CSDOE, 95-98.
Hockenberry, M., & Wilson, D. (2015). Wong's nursing care of infants and children (10th ed.).
St. Louis: Elsevier Mosby, 1140-1142.
Porter, S., Branowicki, P., & Palfrey, J. (2014). Supporting students with special health care
needs: Guidelines and procedures for schools (3rd ed.). Baltimore: Paul H. Brookes
Publishing, 315-318.
Selekman, J. (2013). School nursing: A comprehensive text (2nd ed.). Philadelphia: F.A.
Davis, 1054-1055.
Smith, S., Duell, D. & Martin, B. (2012). Clinical nursing skills: Basic to advanced skills (8th
ed.). Boston: Pearson,1183-1189.
Wisconsin Improving School Health Services Project. (2015). Administering oxygen. Available
online: http://www.wishesproject.org/?page_id=132/?tab=4
VDH Guidelines for Healthcare Procedures in Schools 318
Procedure for Using an Oxygen Mask
In an oxygen mask, oxygen flows in through tubing at the bottom of the mask and out through
large holes on the sides. It is useful when nasal passages are blocked and can be used to deliver
higher concentrations of oxygen than the nasal cannula.
1. Review oxygen safety precautions (see previous section).
2. Wash hands.
3. Assemble equipment:
• Oxygen source and backup
Make sure that tank has enough oxygen.
• Mask and tubing
• Humidity source, if needed and ordered
• Adaptor for connecting tubing
• Extra connecting tubing, if needed for mobility
4. Explain procedure using explanations the student can understand. Encourage the student to
do as much of the procedure as is capable, so as to achieve maximum self-care skills.
5. Securely attach cannula tubing to oxygen source.
Usually a “Christmas tree” adaptor is used to attach the tubing to the oxygen source. Attach
humidifier, if ordered. Make sure that all connections are secure to prevent leaks.
6. Turn on the oxygen source. A highly visible information card stating oxygen liter flow should
be attached to the regulator.
7. Set flowmeter to the flow rate prescribed by health care provider. Do not change this setting
without first contacting the health care provider.
Oxygen liter flow can be ordered as a set liter flow rate (e.g., 2 liters per minute) or as a
range (e.g., 2-4 liters per minute) based on student’s needs.
8. Check oxygen mask for flow.
Hold mask up to your hand and feel for flow coming out. If no flow is felt, check oxygen
supply (make sure tank still has oxygen), connections for leaks, flow rate, and tubing for
obstruction.
9. Place the mask over the student’s nose, mouth, and chin. Mold the flexible metal edge to
the bridge of the nose. Adjust the elastic band around the student’s head to hold the mask
firmly but comfortably and without excess pressure on the face.

VDH Guidelines for Healthcare Procedures in Schools 319
10. Make sure that the student is comfortable with the mask and that the mask does not touch
the eyes. Assess skin integrity frequently for signs of skin breakdown.
11. Wash hands.
12. Document procedure and problems on student’s log sheet. Notify the school nurse and
family if there are any changes in student’s usual pattern.

VDH Guidelines for Healthcare Procedures in Schools 320
Possible Problems for Students Requiring Supplemental Oxygen
• Redness, dryness, or bleeding of the nares, face or tracheostomy area
Check to make sure devices are not attached too tightly and that they have sufficient
humidity, if ordered. Never use powders or petroleum products on the student’s face.
Petroleum products are combustible and difficult to clear from mucosa. Powders can be
aerosolized and irritate the airways. Notify school nurse and family who can discuss
problem with health care provider.
• Raid breathing or shortness of breath
Agitation, confusion, dizziness, or headache
Retractions or pulling in of the muscles at the neck or chest
Rapid or pounding pulse
Blue color or pallor of the lips or nails
Stay calm and reassure student.
Check student:
o Check nasal cannula, mask, or tracheostomy collar for correct placement.
o Make sure student’s mouth, nose, or tracheostomy tube is not obstructed by food
or mucus and that student is positioned so that airway is not blocked.
o Check tracheostomy tube placement.
o Make sure collar is not out of position or obstructing tracheostomy tube.
o With students of African or Mediterranean descent, be careful when assessing
for cyanosis, especially around the mouth, because this area may be dark blue
normally. Carefully evaluate on an individual basis.
Check equipment. Check oxygen flow--if flow is weak or inadequate:
o Make sure regulator, flowmeter, and valve are on correct settings.
o Make sure tank still has gas and is working properly. If not, replace with
backup.
o Check all connections.
o Check that tubing is not kinked or blocked.
o Make sure tubing is not obstructed by water condensing in the tubing. Empty
water from tube frequently when using humidified mist.
Increased oxygen flow may be needed. Notify school nurse, family and/or health care
provider.
• Continues to show signs of respiratory distress, becomes unconscious, or has a
respiratory arrest. Initiate school emergency plan and notify school nurse and family.
Begin cardiopulmonary resuscitation if needed.

VDH Guidelines for Healthcare Procedures in Schools 321
Sources:
Bowden, V., & Greenberg, C. (2012). Pediatric nursing procedures (Third ed.). Philadelphia:
Wolters Kluwer Health/Lippincott Williams & Wilkins, 526-533.
Connecticut State Department of Education. (2012). Clinical procedure guidelines for
Connecticut school nurses. Middlebury, CT: CSDOE, 95-98.
Hockenberry, M., & Wilson, D. (2015). Wong's nursing care of infants and children (10th ed.).
St. Louis: Elsevier Mosby, 1140-1142.
Porter, S., Branowicki, P., & Palfrey, J. (2014). Supporting students with special health care
needs: Guidelines and procedures for schools (3rd ed.). Baltimore: Paul H. Brookes
Publishing, 315-318.
Selekman, J. (2013). School nursing: A comprehensive text (2nd ed.). Philadelphia: F.A.
Davis, 1054-1055.
Smith, S., Duell, D. & Martin, B. (2012). Clinical nursing skills: Basic to advanced skills (8th
ed.). Boston: Pearson,1183-1189.
Wisconsin Improving School Health Services Project. (2015). Administering oxygen. Available
online: http://www.wishesproject.org/?page_id=132/?tab=4

VDH Guidelines for Healthcare Procedures in Schools 322
General Information for
Students with Supplemental Oxygen
Date: ___________________
To: _____________________________ _________________________________
(Teachers, Instructional assistants, Bus drivers, etc)
Name of Student: ______________________________________
This student needs to use additional oxygen during the school day.
The oxygen usually is administered through a mask or tubing inserted into the student’s nose or
into a tracheostomy collar. The oxygen is kept in a small tank and should always remain with
the student. Students may use oxygen continuously or intermittently, depending on their care
plan.
This student may be able to participate in many school activities. Modifications should be
approved by the family, health care provider, and school.
Open flames and smoking should be prohibited in rooms in which a student is using oxygen.
Contact _______________________________ at __________________ (phone number) for
additional information or if the student experiences any problems with the use of oxygen.
Source:
Adapted from: Porter, S., Haynie, M., Bierle, T., Caldwell, T. H., & Palfrey, J. S. (Eds.). (1997). Children and
youth assisted by medical technology in educational settings: guidelines for care (2nd ed.). Baltimore: Paul H.
Brookes Publishing

VDH Guidelines for Healthcare Procedures in Schools 323
Pulse Oximetry
Overview
Pulse oximetry measures the percentage of hemoglobin saturated with oxygen. Students with
ventilation/perfusion abnormalities such as asthma or congestive heart failure may benefit from
pulse oximetry and the measurement of oxygen saturation (SaO2 ). The pulse oximeter consists
of a probe with a light-emitting diode (LED) and a light-sensitive photodetector, connected by
cable to an oximeter. The oximeter measures the absorption (amplitude) of two wavelengths of
light passing through body parts with a high perfusion of arterial blood. The procedure is
noninvasive, painless, and reliable.
It is important to remember that pulse oximetry measures oxygen saturation (SaO2), not the
actual amount of oxygen in the blood. The partial pressure of oxygen (PaO2) can be correlated
with the SaO2 by means of the oxyhemoglobin dissociation curve. A SaO2 reading of 90%
correlates with a PaO2 reading of approximately 60 mmHg. In most students, normal oxygen
saturation is expected to be equal to or greater than 95%, with 90% as the lowest acceptable
value. However, many health care providers prefer a SaO2 of 93% as the lowest acceptable
value (correlates to PaO2 of 70 mmHg). Anemia, pH, and body temperature changes can
impact oxygen saturation values. Some students with chronic anemia, heart conditions, or
other conditions may normally run lower oxygen saturations. For a student with asthma, a
decrease in oxygenation is a very late sign of distress, so relying on pulse oximetry could be
falsely reassuring during an asthma attack. It is important to use pulse oximetry as just one
component of a complete respiratory assessment. Acceptable values for students requiring
pulse oximetry should be specified in their individualized health care plans.
Settings and Staff
There are no restrictions as to where pulse oximetry can be done. The setting should be clean
and appropriate to the student’s need/desire for privacy. Students with oximeters can attend a
regular classroom and participate in regular school activities, with modifications as needed and
as determined by the family, health care provider, school nurse, and school staff.
Pulse oximetry can be performed by the school nurse, family, teacher aide, or other staff person
who has had general training in pulse oximetry. General training should cover the student’s
specific health care needs, how to select a sensor site and apply the probe/sensor, reporting
values to the proper person, potential problems, how to obtain assistance should problems
occur, and how to implement the established emergency plan. The most complex aspect of
pulse oximetry is interpreting the results. Guidelines should be specified in the student’s
individualized health care plan. If there are questions or concerns about a value, the school
nurse, family, and/or health care provider should be contacted for assistance.

VDH Guidelines for Healthcare Procedures in Schools 324
Individualized Healthcare Plan (IHP)
Each student’s IHP must be tailored to the individual’s needs. A sample plan is included in
Appendix A. When preparing an IHP for a student who requires pulse oximetry, the following
items should be considered:
• Need for student to receive pulse oximetry
• Whether oximetry is to be continuous or intermittent
• Frequency of measurements if intermittent and alarm limits if continuous
• Student’s underlying condition and possible problems associated with the condition or
treatment
• Determination of oxygen saturation values that should be immediately reported to
school nurse, family and/or health care provider
• Determination of oxygen saturation values that require specific interventions, such as
oxygen or medication administration
• Student’s baseline status, including color, respiratory rate, pulse, and blood pressure and
assessment of changes in this status
• Student’s self-care skills and knowledge of early signs of respiratory distress
• Latex allergy precautions—if child is latex sensitive, clip-on probes (not adhesive
probes) should be used
• Standard precautions
VDH Guidelines for Healthcare Procedures in Schools 325
Sources:
Bowden, V., & Greenberg, C. (2012). Pediatric nursing procedures (Third ed.). Philadelphia: Wolters
Kluwer Health/Lippincott Williams & Wilkins, 606-611.
Connecticut State Department of Education. (2012). Clinical procedure guidelines for Connecticut
school nurses. Middlebury, CT: CSDOE, 99-100.
DeSisto, M. (n.d.). The ABCs of using pulse oximeters in schools. NASN Radio recording available at:
http://www.jackstreet.com/jackstreet/WNASN.DeSisto.cfm
Hockenberry, M., & Wilson, D. (2015). Wong's nursing care of infants and children (10th ed.). St.
Louis: Elsevier Mosby, 1138-1139.
Porter, S., Branowicki, P., & Palfrey, J. (2014). Supporting students with special health care needs:
Guidelines and procedures for schools (3rd ed.). Baltimore: Paul H. Brookes Publishing, 373-
375.
Selekman, J. (2013). School nursing: A comprehensive text (2nd ed.). Philadelphia: F.A. Davis, 540-
541, 1045-1047.
Smith, S., Duell, D. & Martin, B. (2012). Clinical nursing skills: Basic to advanced skills (8th ed.).
Boston: Pearson,1182-1183.
Wisconsin Improving School Health Services Project. (2015). Pulse oximetry monitoring. Available
online: http://www.wishesproject.org/?page_id=219/?tab=4

VDH Guidelines for Healthcare Procedures in Schools 326
Procedure for Measuring Pulse Oximetry
1. Determine need for oximetry. The student may ask for a measurement.
Assess student’s status: respiratory rate, depth, effort, pulse, restlessness, color,
retractions, cough, wheezing, and lung sounds.
2. Wash hands.
3. Explain procedure using explanations the student can understand. Encourage the
student to do as much of the procedure as is capable, so as to achieve maximum self-
care skills.
4. Position student as recommended.
Usually performed while the student is sitting to decrease motion artifact that can
interfere with measurement. Should not be performed in direct sunlight or under bright
lights because these lights can interfere with the performance of the saturation sensor.
Sensors can be covered to protect from bright lighting.
5. Instruct student to breathe normally, if necessary.
Normal breathing prevents large fluctuations in minute ventilation and possible
changes in oxygen saturation.
6. Select appropriate site to apply sensor/probe bases on peripheral circulation. Site must
have adequate capillary refill and be free of moisture. It must not be edematous,
hypothermic, or have nail polish. Fingers, toes, and earlobes are the most commonly
used sites.
Nail polish and moisture can affect light transmission and
falsely alter saturation. Hypothermia can cause
vasoconstriction, altering saturation.
7. Attach pulse oximeter sensor/probe to selected site. The
light-emitting diode (LED) and photodetector must face each
other with a tissue pad in between. The light source (LED)
is usually positioned on top of the nail. The clip-on probe
attaches like a clothespin to a fingertip. Adhesive sensor must be applied so that light
source is on one side of finger and detector is directly opposite facing it.
8. Attach sensor cable to oximeter and turn machine on. Observe waveform display and
listen for audible beep or watch for reading.
Light or waveform fluctuates with each pulsation and reflects pulse strength. Poor light
waveform may indicate signal is too weak to give accurate oxygen saturation readings.
9. Correlate oximeter pulse rate with client’s apical or radial pulse.
VDH Guidelines for Healthcare Procedures in Schools 327
Oximeter pulse rate, student’s radial pulse, and apical pulse rate should be similar. If
differences exist, inaccurate oxygen saturation readings may be obtained. Reevaluate
the site and placement of sensor/probe.
10. Read saturation level on digital display when readout reaches constant value (after at
least 10 seconds) and pulse display is strong.
11. If continuous oxygen saturation monitoring is ordered, verify the alarm limits and alarm
volume. Limits should be set as ordered in student-specific plan. Assess sensor/probe
site every 2-4 hours and rotate site every 4-8 hours to prevent burns from the sensors.
12. If intermittent monitoring is ordered, remove probe and turn off oximeter power after
reading. If adhesive sensor is used, place on the plastic backing for future use. Store
probe and oximeter in appropriate location.
13. Wash hands. If the oximeter probe is used for more than one student, it should be
cleaned between uses according to manufacturer recommendations.
14. Record oxygen saturation readings in student log. Note any change in respiratory status
at this time.
15. Compare readings with student baseline and acceptable values. Report to the school
nurse and family any changes from the student’s usual pattern.

VDH Guidelines for Healthcare Procedures in Schools 328
Sources:
Bowden, V., & Greenberg, C. (2012). Pediatric nursing procedures (Third ed.). Philadelphia:
Wolters Kluwer Health/Lippincott Williams & Wilkins, 606-611.
Connecticut State Department of Education. (2012). Clinical procedure guidelines for
Connecticut school nurses. Middlebury, CT: CSDOE, 99-100.
DeSisto, M. (n.d.). The ABCs of using pulse oximeters in schools. NASN Radio recording
available at: http://www.jackstreet.com/jackstreet/WNASN.DeSisto.cfm
Hockenberry, M., & Wilson, D. (2015). Wong's nursing care of infants and children (10th ed.).
St. Louis: Elsevier Mosby, 1138-1139.
Porter, S., Branowicki, P., & Palfrey, J. (2014). Supporting students with special health care
needs: Guidelines and procedures for schools (3rd ed.). Baltimore: Paul H. Brookes
Publishing, 373-375.
Selekman, J. (2013). School nursing: A comprehensive text (2nd ed.). Philadelphia: F.A.
Davis, 540-541, 1045-1047.
Smith, S., Duell, D. & Martin, B. (2012). Clinical nursing skills: Basic to advanced skills (8th
ed.). Boston: Pearson,1182-1183.
Wisconsin Improving School Health Services Project. (2015). Pulse oximetry monitoring.
Available online: http://www.wishesproject.org/?page_id=219/?tab=4

VDH Guidelines for Healthcare Procedures in Schools 329
Possible Problems with Pulse Oximetry
• No reading on oximeter
Check to see if sensors are properly aligned or clip is securely on finger.
Make sure wires are intact and securely fastened.
Check that oximeter has charged batteries or is plugged in and electrical outlet is
functioning.
• Low oxygen saturation readings but student has no sign of respiratory distress
Check:
o Correlation between pulse rate and oximeter pulse reading. If they differ, re-
position probe.
o Capillary refill. Loosen any tight-fitting clothes. If circulation decreased, choose
different site for probe.
o Light source on probe.
o If limb is being moved during reading, may need to switch to another site.
o Adhesion of sensor/probe to skin site (unless using clip type).
o Assess for hypothermia. If extremity is cold, move probe or warm extremity.
o Lighting in the room. Bright direct lighting or bright sunlight can affect readings.
o Probe/sensor site for sweating, nail polish.
• Low oxygen saturation readings and student has signs of respiratory distress
Follow guidelines in student's individualized health plan. Administer oxygen or suction
student, if prescribed. If distress persists, notify school nurse, family and/or health care
provider. Be prepared to implement school emergency plan.
• Irritation of probe/sensor site
Move probe/sensor. Assess site every 2-8 hours as needed or specified. Notify school
nurse and family of irritation.

VDH Guidelines for Healthcare Procedures in Schools 330
Tracheostomy
Overview
A tracheostomy is a surgically-created opening (stoma) in the neck and trachea (windpipe). It
provides a way for air to go into and out of the lungs. A curved plastic tube is inserted into the
stoma to keep it open for breathing. In children without tracheostomies, air is filtered,
moistened, and heated as it passes through the nose or mouth. Children with tracheostomies
bypass the upper airway and need extra care to moisten and protect their lower airway. Most
students with tracheostomies are able to speak, eat, and drink, but require careful monitoring.
There are a variety of conditions that may necessitate a tracheostomy. Some children are born
with a trachea whose walls collapse easily
occluding the airway (tracheomalacia).
Others have neuromuscular conditions,
laryngeal spasm, vocal cord paralysis, or
congenital anomalies which compromise the
airway. Children who require long-term
respiratory support (e.g., ventilators) because
of such disorders as spinal cord injuries or
bronchopulmonary dysplasia frequently
receive tracheostomies. Other reasons for a
tracheostomy include subglottic stenosis,
Treacher Collins or Pierre Robin Syndrome,
severe neck or mouth injuries, facial or airway
burns, and anaphylaxis (severe allergic
reaction).
Equipment Needed for Tracheostomy Care
The student with a tracheostomy should always have access to the equipment listed below. The
equipment should be checked daily and may be carried in a backpack. It is supplied by the
family and must be carried with the student at all times.
• Spare tracheostomy tube (same size as current one) and obturator
• One size smaller tracheostomy tube
• Gauze pads
• Tracheostomy ties or Velcro ties
• Suction machine
• Suction catheters
• Sterile or clean gloves, per guidelines in student's individualized healthcare plan (IHP)
• Sterile or clean cotton-tip swabs, if required
• Pipe cleaners, if needed for cleaning of an inner cannula

VDH Guidelines for Healthcare Procedures in Schools 331
• Water-based lubricant
• Manual resuscitator with adaptor (Ambu bag)
• saline or ½ strength hydrogen peroxide (diluted with saline or distilled water)
• Scissors, blunt nosed
• Heat Moisture Exchanger (HME), more commonly known as artificial nose, for
protecting tracheostomy from dry or cold air and dust or other particles, if specified.
The artificial nose must be changed if it appears to be saturated with moisture or
secretions. Do not rinse. Discard and replace if saturated.
• Device to deliver humidity, if prescribed
• Device to deliver oxygen, if prescribed
• Hand-powered suction device (back-up suction)
• Syringe to inflate or deflate tracheostomy cuff, if needed
• Hand sanitizer
• List of emergency phone numbers
• Note with child’s brief medical history
Settings and Staff
Students with tracheostomies can usually attend general classes with their peers. Participation
in other school activities must be decided on an individual basis by the health care provider,
family and school professionals. Some children with tracheostomies require a trained caregiver
to accompany them at all times. Staff who work with children who have tracheostomies should
receive special training in how to recognize breathing difficulty and specialized CPR. They
should also know how to activate the student’s emergency plan.
Students with tracheostomies should avoid areas where there might be a lot of dust. This
includes chalk dust and playground dust. Normally the nose and mouth filters, warms, and
moistens the air before it reaches the lungs. Students with tracheostomies do not have this
filtering system and take air directly into the trachea (windpipe) and then the lungs. Most
students who have a tracheostomy will wear a heat moisture exchanger (may be called an
artificial "nose") to protect from this.
Routine tracheostomy care, including such procedures as stoma care and tube changes, should
be performed at home. If additional routine care is necessary, it should be done in a clean,
private area such as the health office. In an emergency, the care can be done wherever the
patient is at that moment. For this reason, a suction machine and a complete set of supplies and
equipment for tracheostomy care should accompany the student at all times (see above). This
can be transported in a backpack or “go bag.”
Tracheal care for students who require care in school, such as suctioning, cleaning, use of a
tracheostomy collar, or other daily care, should be provided by a registered school nurse,
licensed respiratory therapist, licensed practical nurse or other specifically trained unlicensed
assistive personnel under the supervision of a registered nurse. These caregivers should have

VDH Guidelines for Healthcare Procedures in Schools 332
proven, competency-based training in appropriate techniques and problem management. All
staff in contact with students who have tracheostomies should have specialized
cardiopulmonary resuscitation training. They should be able to recognize signs of
breathing difficulty and should know how to activate the student’s emergency plan.
Any school personnel who have regular contact with a student who has a tracheostomy must
receive general training covering the student's specific needs, potential problems, and
implementation of the established school emergency plan. Staff should not use powders,
aerosols (i.e., room deodorizers), small particles, such as sand, glitter, lint, chalk dust, and
animal hair, small pieces of food and water, or glue or chemicals with strong fumes near a
student with a tracheostomy. Students who may have accidental contact with any of these
potential hazards should have some kind of protective covering for the tracheostomy.
Individualized Healthcare Plan (IHP)
Each student’s IHP must be tailored to the individual’s needs. A sample plan is included in
Appendix A. When preparing an IHP for a student with a tracheostomy, the following items
should be considered:
• Underlying condition and possible problems associated with the condition or treatment
• Health care provider's order for tracheostomy and its care
• Size and type of tracheostomy tube
• Student’s baseline color, respiratory rate, pulse, blood pressure, secretions
• Student specific signs of respiratory distress
• Need for filtering or humidity (e.g., artificial nose)
• Suctioning guidelines—frequency, size of catheter, special instructions
• Equipment and supplies needed, including instructions for use
• Back up equipment and personnel
• Portable equipment and responsibility for transporting equipment
• Student’s self care ability and ability to request assistance
• Emergency action plan, including all phone numbers
• Identification of individuals capable of assisting student or caregivers
• Staffing needs to provide safe care for the student and plan for absences
• Avoidance of small particles in the air, such as chalk dust, aerosols, glitter, small toys,
and sand
• Need for additional fluids
• Speech and communication needs
• Disaster care planning
• Means of communicating between school personnel when immediate help is needed
(e.g., walkie-talkies, intercoms, telephones, cellular phones)
• Latex allergy precautions
• Standard precautions

VDH Guidelines for Healthcare Procedures in Schools 333
Sources:
Bowden, V., & Greenberg, C. (2012). Pediatric nursing procedures (Third ed.). Philadelphia: Wolters
Kluwer Health/Lippincott Williams & Wilkins, 664-682.
Cincinnati Children's Hospital. (2011). Best evidence statement (BESt): Basic pediatric tracheostomy
care. In conjunction with Agency for Healthcare Research and Quality. Cincinnati, OH.
Available online: https://www.nlm.nih.gov/medlineplus/ency/patientinstructions/000076.htm
Connecticut State Department of Education. (2012). Clinical procedure guidelines for Connecticut
school nurses. Middlebury, CT: CSDOE, 104-110.
Hockenberry, M., & Wilson, D. (2015). Wong's nursing care of infants and children (10th ed.). St.
Louis: Elsevier Mosby, 1150-1155.
Essential Evidence Plus. (2013). Tracheostomy care. Duodecim Medical Publications Ltd.
Medline Plus. (2014). Tracheostomy care. National Library of Medicine. Available online:
https://www.nlm.nih.gov/medlineplus/ency/patientinstructions/000076.htm
Medline Plus. (2014). Tracheostomy--eating. National Library of Medicine. Available online:
https://www.nlm.nih.gov/medlineplus/ency/patientinstructions/000464.htm
Mitchell, R., et al. (2012). Clinical consensus statement: Tracheostomy care. Otolaryngology Head
Neck Surgery 148 (1): 6-20. doi:10.1177/0194599812460376. Available online:
http://oto.sagepub.com/content/148/1/6.full.pdf+html
National Heart, Lung, and Blood Institute. (2012). Living with a tracheostomy. National Institutes of
Health. Available online: http://www.nhlbi.nih.gov/health/health-topics/topics/trach/livingwith
National Heart, Lung, and Blood Institute. (2012). What is a tracheostomy? National Institutes of
Health. Available online: http://www.nhlbi.nih.gov/health/health-topics/topics/trach
Porter, S., Branowicki, P., & Palfrey, J. (2014). Supporting students with special health care needs:
Guidelines and procedures for schools (3rd ed.). Baltimore: Paul H. Brookes Publishing, 325-
345.
Selekman, J. (2013). School nursing: A comprehensive text (2nd ed.). Philadelphia: F.A. Davis, 540-
541, 1047-1053.
Smith, S., Duell, D. & Martin, B. (2012). Clinical nursing skills: Basic to advanced skills (8th ed.).
Boston: Pearson, 1202-1212.
Wisconsin Improving School Health Services Project. (2015). Respiratory section. Available online:
http://www.wishesproject.org/?page_id=8
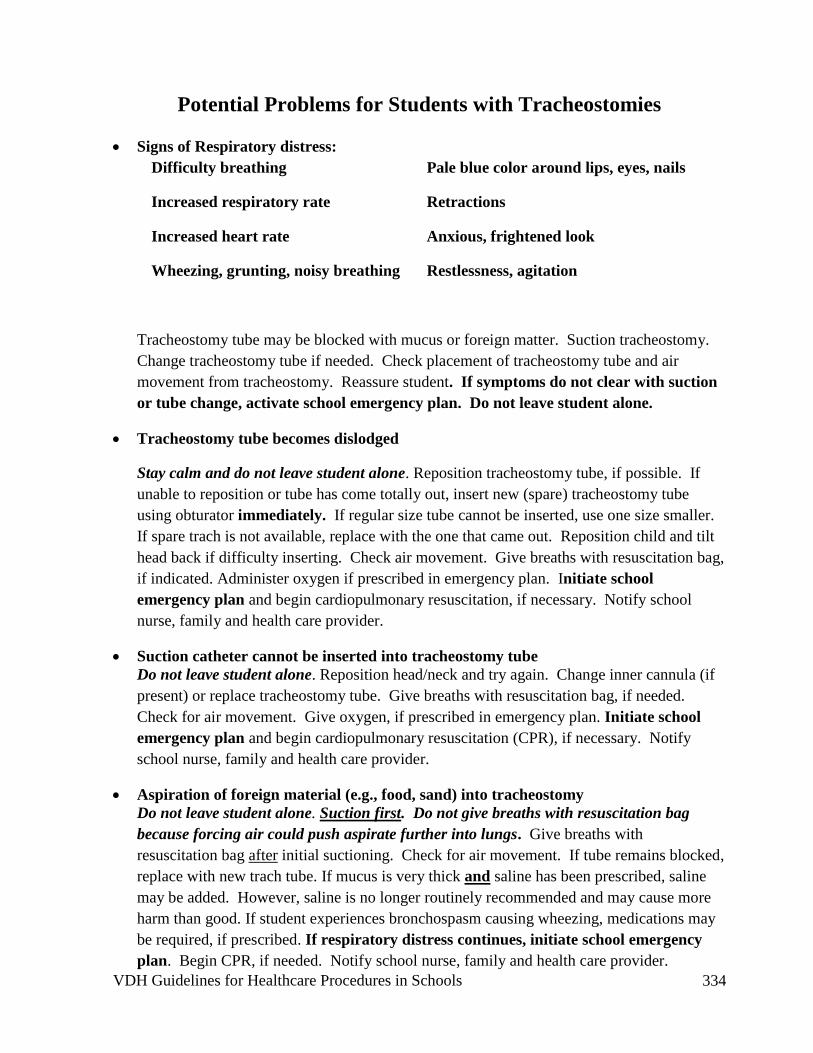
VDH Guidelines for Healthcare Procedures in Schools 334
Potential Problems for Students with Tracheostomies
• Signs of Respiratory distress:
Difficulty breathing Pale blue color around lips, eyes, nails
Increased respiratory rate Retractions
Increased heart rate Anxious, frightened look
Wheezing, grunting, noisy breathing Restlessness, agitation
Tracheostomy tube may be blocked with mucus or foreign matter. Suction tracheostomy.
Change tracheostomy tube if needed. Check placement of tracheostomy tube and air
movement from tracheostomy. Reassure student. If symptoms do not clear with suction
or tube change, activate school emergency plan. Do not leave student alone.
• Tracheostomy tube becomes dislodged
Stay calm and do not leave student alone. Reposition tracheostomy tube, if possible. If
unable to reposition or tube has come totally out, insert new (spare) tracheostomy tube
using obturator immediately. If regular size tube cannot be inserted, use one size smaller.
If spare trach is not available, replace with the one that came out. Reposition child and tilt
head back if difficulty inserting. Check air movement. Give breaths with resuscitation bag,
if indicated. Administer oxygen if prescribed in emergency plan. Initiate school
emergency plan and begin cardiopulmonary resuscitation, if necessary. Notify school
nurse, family and health care provider.
• Suction catheter cannot be inserted into tracheostomy tube
Do not leave student alone. Reposition head/neck and try again. Change inner cannula (if
present) or replace tracheostomy tube. Give breaths with resuscitation bag, if needed.
Check for air movement. Give oxygen, if prescribed in emergency plan. Initiate school
emergency plan and begin cardiopulmonary resuscitation (CPR), if necessary. Notify
school nurse, family and health care provider.
• Aspiration of foreign material (e.g., food, sand) into tracheostomy
Do not leave student alone. Suction first. Do not give breaths with resuscitation bag
because forcing air could push aspirate further into lungs. Give breaths with
resuscitation bag after initial suctioning. Check for air movement. If tube remains blocked,
replace with new trach tube. If mucus is very thick and saline has been prescribed, saline
may be added. However, saline is no longer routinely recommended and may cause more
harm than good. If student experiences bronchospasm causing wheezing, medications may
be required, if prescribed. If respiratory distress continues, initiate school emergency
plan. Begin CPR, if needed. Notify school nurse, family and health care provider.

VDH Guidelines for Healthcare Procedures in Schools 335
• Distress during suctioning
Limit suctioning to 5-10 seconds or less. Suction more frequently for shorter periods.
Make sure catheter is no more than ½ the diameter of the tracheostomy. Activate school
emergency plan if distress persists. Notify school nurse and family.
• Dressing becomes wet
Replace dressing with similar dressing. Use pre-slit gauze if possible. If pre-slit gauze is
not available, use 4”x4” gauze unfolded to 8”x4.” Fold lengthwise, then fold gauze corners
up in a “U” shape and slide under tracheostomy ties around outer opening of tracheostomy
tube. (Fibers from freshly-cut gauze can enter site so do not use cut gauze).
• Excessive secretions requiring frequent suctioning
May require more frequent suctioning or more humidity. Suction as needed. Encourage
fluid intake to thin mucus. Yellow or green mucus may indicate infection and should be
reported immediately.
• Fever or chills; yellow or green secretions; foul odor, congested lung sounds;
listlessness, increased mucus
Possible signs of infection. Document and notify school nurse and family.
• Redness or skin breakdown at the stoma
Clean site as specified in student's individualized healthcare plan and make sure dressing
stays dry. (Studies have shown that most sites should be cleaned with just water or soap
and water). Check that ties are not too tight (should allow one finger to be inserted
comfortably between tie and neck). Document appearance of site in student log and notify
school nurse and family of any changes.
• Bleeding or pain at stoma site
Notify school nurse and family. May be due to infection, trauma, or excessive coughing.
• Pink or red streaked secretions from tracheostomy
May occur as a result of suctioning. Check suction pressure (should always be less than
100 mmHg for children and 120 mmHg for adolescents). Limit suctioning to 5 seconds at a
time. Notify family. If actual bleeding observed, notify school nurse and family
immediately and activate school emergency plan.

VDH Guidelines for Healthcare Procedures in Schools 336
General Information for
Students with Tracheostomies
Date: ___________________
To: _____________________________ _________________________________
(Teachers, Instructional assistants, Bus drivers, etc)
Name of Student: ______________________________________
This student has a tracheostomy, or opening in the neck to allow the student to breathe
through an opening in the windpipe. A tube may be inserted into the opening and secured to
the neck with Velcro or ties. Some tracheostomy openings may not be covered.
This student:
Is able to eat and drink normally by mouth
Is not able to eat and drink normally by mouth
Is able to speak normally
Is unable to speak normally
Does tracheostomy care at home
Has a caregiver with him or her to do tracheostomy care at school
This student may be able to participate in many school activities. Modifications should be
approved by the family, health care provider, and school.
The student may need to avoid certain activities (such as swimming) and should avoid
exposure to other students with respiratory infections (such as colds). Specific
recommendations will be included in the student’s Individualized Health Care Plan.
School staff in frequent contact with this student are encouraged to complete
cardiopulmonary resuscitation (CPR) training and specialized training for people with
tracheostomies.
Contact _____________________________ at __________________ (phone number) for
additional information or if the student experiences any problems with the tracheostomy.
Source:
Adapted from: Porter, S, Haynie, M, Bierle, T, Caldwell, TH, & Palfrey, JS (Eds.). (1997). Children and youth
assisted by medical technology in educational settings: Guidelines for care (2nd ed.). Baltimore: Paul H.
Brookes Publishing.

VDH Guidelines for Healthcare Procedures in Schools 337
Tracheal Suctioning
Overview
A tracheostomy tube bypasses the upper airway’s filtering, humidifying, and warming
mechanisms. In response to this, the body produces more mucus. The tracheostomy tube
usually needs suctioning to remove mucus from the tube and the trachea to allow for more
effective breathing. Suctioning involves passing a vacuum-type tube into the tracheostomy to
remove excess mucus and debris. Many students need suctioning every 4-6 hours. New
tracheostomies may need more frequent suctioning. Some children may be able to request
suctioning when it is needed; others must rely on caregivers to assess the need.
Indications that suctioning might be needed include:
• Fast breathing, increased difficulty breathing
• Increased coughing
• Noisy, rattling breath sounds
• Bubbles of mucus visible in the tracheostomy
• Whistling noise from tracheostomy
• Irritability, anxious look
• Poor color
• Decreased air movement into and out of the tracheostomy
• Congestion prior to eating or drinking
• After nebulizer treatments or chest percussion and drainage
Settings and Staff
Routine suctioning can be done in a classroom if a clean, non-busy area is available, but in
most cases is done in a clean, private area to protect student’s privacy and to protect the
classroom from disruptions involving the noisy suctioning procedure. Emergency suctioning
should be done as soon as possible wherever the student might be. If an electric suction
machine is used, a grounded electric outlet must be available. Portable suctioning equipment
should accompany the student at all times.
Tracheal suctioning should be provided by a registered school nurse, licensed respiratory
therapist, or licensed practical nurse or other specifically trained unlicensed assistive personnel
under the supervision of a registered school nurse. These caregivers should have proven,
competency-based training in appropriate techniques and problem management. All staff in
contact with students who have tracheostomies should have specialized cardiopulmonary
resuscitation training. They should be able to recognize signs of breathing difficulty and
should know how to activate the student’s emergency plan.

VDH Guidelines for Healthcare Procedures in Schools 338
Any school personnel who have regular contact with a student with a tracheostomy must
receive general training covering the student's specific needs, potential problems, and
implementation of the established emergency plan.
Individualized Healthcare Plan (IHP)
Each student’s IHP must be tailored to the individual’s needs. A sample plan is included in
Appendix A. When preparing an IHP for a student who requires tracheal suctioning, the
following items should be considered:
• Underlying condition and possible problems associated with the condition or treatment
• Healthcare provider's order for suctioning
• Size and type of tracheostomy tube
• Student’s baseline color, respiratory rate, pulse, blood pressure, secretions
• Student specific signs of respiratory distress
• Need for filtering or humidity (e.g., artificial nose)
• Type of suction catheter (one-time use versus sleeved or inline)
• Suctioning guidelines—frequency, size of catheter, special instructions
• Length of tracheostomy tube measured to determine depth of suctioning
• Appropriate pressure settings if suction machine has a vacuum setting
• Need for breaths with a manual resuscitation bag
• Equipment and supplies needed
• Back up equipment and personnel
• Portable equipment and responsibility for transporting equipment
• Student’s self care ability and ability to request assistance
• Emergency action plan, including all phone numbers
• Identification of individuals capable of assisting student or caregivers
• Staffing needs to provide safe care for the student and plan for absences
• Avoidance of small particles in the air, such as chalk dust, aerosols, glitter, small toys,
and sand
• Latex allergy precautions
• Standard precautions

VDH Guidelines for Healthcare Procedures in Schools 339
Sources:
Aaron’s Tracheostomy Page. (2014). Suctioning a Tracheostomy. Available at
www.tracheostomy.com/suction.htm
Bowden, V., & Greenberg, C. (2012). Pediatric nursing procedures (Third ed.). Philadelphia: Wolters
Kluwer Health/Lippincott Williams & Wilkins, 672-677.
Cincinnati Children's Hospital. (2011). Best evidence statement (BESt): Basic pediatric tracheostomy
care. In conjunction with Agency for Healthcare Research and Quality. Cincinnati, OH.
Available online: https://www.nlm.nih.gov/medlineplus/ency/patientinstructions/000076.htm
Connecticut State Department of Education. (2012). Clinical procedure guidelines for Connecticut
school nurses. Middlebury, CT: CSDOE, 107-108.
Hockenberry, M., & Wilson, D. (2015). Wong's nursing care of infants and children (10th ed.). St.
Louis: Elsevier Mosby, 1152-1153.
Essential Evidence Plus. (2013). Tracheostomy care. Duodecim Medical Publications Ltd.
Medline Plus. (2014). Tracheostomy care. National Library of Medicine. Available online:
https://www.nlm.nih.gov/medlineplus/ency/patientinstructions/000076.htm
Mitchell, R., et al. (2012). Clinical consensus statement: Tracheostomy care. Otolaryngology Head
Neck Surgery 148 (1): 6-20. doi:10.1177/0194599812460376. Available online:
http://oto.sagepub.com/content/148/1/6.full.pdf+html
National Heart, Lung, and Blood Institute. (2012). Living with a tracheostomy. National Institutes of
Health. Available online: http://www.nhlbi.nih.gov/health/health-topics/topics/trach/livingwith
National Heart, Lung, and Blood Institute. (2012). What is a tracheostomy? National Institutes of
Health. Available online: http://www.nhlbi.nih.gov/health/health-topics/topics/trach
Porter, S., Branowicki, P., & Palfrey, J. (2014). Supporting students with special health care needs:
Guidelines and procedures for schools (3rd ed.). Baltimore: Paul H. Brookes Publishing, 333-
336.
Selekman, J. (2013). School nursing: A comprehensive text (2nd ed.). Philadelphia: F.A. Davis, 540-
541, 1048-1050.
Smith, S., Duell, D. & Martin, B. (2012). Clinical nursing skills: Basic to advanced skills (8th ed.).
Boston: Pearson, 1202-1212.
Wisconsin Improving School Health Services Project. (2015). Tracheostomy suctioning: Clean
technique. Available with an instructional video online:
http://www.wishesproject.org/?page_id=245/?tab=5

VDH Guidelines for Healthcare Procedures in Schools 340
Procedure for Tracheal Suctioning Using One-Time Use
Catheter
Equipment for suctioning must be available for use at ALL times.
Note: Family supplies equipment and supplies.
1. Wash hands.
2. Gather equipment and materials:
• Suction machine and manual backup
Student should also have a portable suction machine or manual device that can
travel with them throughout school and during transport to and from home. A
manual means of suctioning should also be available as a back up at all times in
case of power failure, equipment malfunction, or lack of electrical outlet.
• Correctly-sized suction catheter
Suction catheters should be no greater than ½ the diameter of the tracheostomy
tube. To determine how deep the suction catheter should be inserted, determine the
length of the tube from the package, family or health care provider. Pre-marked
suction catheters are recommended.
• Sterile saline or sterile water to clear catheter
• Container for saline or water
• Disposable gloves, latex and powder free; sterile or clean according to student IHP
• Self-inflating manual resuscitation (Ambu) bag with adaptor for tracheostomy
• Plastic bag for disposal of materials
• Saline dosettes, ONLY if prescribed—no longer routinely used
3. Determine depth to be suctioned prior to suctioning. This should be in student's IHP
and/or noted on suction catheters.
Suctioning should normally be shallow, only to the end of the tracheostomy tube, to avoid
damage to respiratory tissues.
4. Position student as specified in their IHP. Although not required, it is advisable to have
another person available for assistance if needed.
Most students are suctioned while seated upright at school.
5. Explain procedure using explanations the student can understand. Encourage the student to
do as much of the procedure as is capable, so as to achieve maximum self-care skills.

VDH Guidelines for Healthcare Procedures in Schools 341
6. Encourage student to cough up any secretions. If nebulizer treatment, postural drainage, or
percussion is ordered for the student, it may be beneficial to do these prior to suctioning.
Coughing may eliminate the need for suctioning.
7. Turn on suction machine. A suction of 80-100 mmHg is usually recommended for children
and 80-120 mmHg for adolescents. Put finger at end of connecting tube to confirm suction.
8. Wash hands.
9. Open suction catheter or kit.
Peel paper back without touching the inside of the package to maintain sterility.
10. Pour a small amount of sterile saline or sterile water into container.
This will be used to moisten the catheter and to clear out secretions in the catheter.
11. Put on gloves. A mask, goggles, or face shield may be required with some students to fully
protect caregiver from coughed-up mucus.
12. Holding the connecting end of the suction catheter in the dominant hand, secure it to the
suction machine tubing (held in non-dominant hand). Leave the other end of catheter in its
covering.
The dominant hand should remain “sterile/clean.” It should not touch anything but the
sterile catheter. The non-dominant hand should be used to turn on switches or touch other
objects.
13. Do NOT manually ventilate with resuscitation
bag and/or hyperoxygenate prior to suctioning
unless it is specifically prescribed.
There is controversy over whether this
intervention is helpful and usually is no longer
done. Delivering a manual breath when
secretions are in the tracheostomy tube can serve
to force this mucus deeper into the airway.
Stable children without a ventilator typically do
not require extra oxygenation prior to
suctioning.
14. Holding suction catheter 2-3 inches from tip with
dominant hand, insert tip of catheter in sterile
saline or sterile water.
15. Cover vent hole with thumb of non-dominant
hand to suction a small amount of saline through
catheter.

VDH Guidelines for Healthcare Procedures in Schools 342
This tests that suction is functioning. This also helps to lubricate the tip of the catheter and
clear out any secretions in the connecting tubing. Do not use lubricant other than water
because the lubricant can dry and cause airway occlusion.
16. With thumb off vent hole, gently but quickly insert catheter into tracheostomy. Do not
suction while catheter is being inserted because it can damage tracheal mucosa, as well as
increase hypoxia. Do not insert catheter beyond the distal end of the tracheostomy tube.
Guide catheter with sterile, dominant hand. If the catheter is inserted too deeply, this can
cause irritation/injury to the trachea, as well as bronchospasm. Determine the length of the
tracheostomy tube from the package, family, or health care provider prior to suctioning.
Coughing indicates that the suction catheter possibly has passed the end of the
tracheostomy tube.
17. Cover vent hole intermittently with thumb while withdrawing catheter. Rotate catheter
gently between thumb and index finger while suctioning and withdrawing.
This helps to reach all secretions in the tracheostomy tube and prevent injury to tracheal
mucosal lining. Uncovering intermittently and rotating catheter helps prevent damage to
mucosal lining.
Each insertion and withdrawal of the catheter must take no longer than 5-10 seconds.
Extended suctioning can block the airway and cause a serious drop in student’s oxygen
level.
18. Allow the student to rest and breathe or give breaths with resuscitator bag between
suctioning passes. The timing of each suctioning pass and the length of the rest period
depend on student’s tolerance of the procedure and absence of complications. Suction
saline again through catheter to rinse secretions from catheter and tubing.
This helps student get new oxygen/air into lungs.
19. Do not routinely use saline to loosen secretions. Only if prescribed, insert several drops
of saline into tracheostomy with non-dominant hand. Manually ventilate with resuscitation
bag to disperse saline, only if ordered.
Saline may push secretions back down the airway. It was once used to loosen or thin thick
or dry secretions. Research indicates it may increase airway contamination, decrease
oxygen saturations, and do a poor job of thinning secretions. It is not recommended unless
it is specifically ordered.
20. If moist, gurgling noises or whistling sounds are still heard, or if mucus is seen at the
tracheostomy opening, repeat suctioning procedure (steps 16-19). Usually there should be
no more than three suctioning passes. Assess student’s color and respiratory status
throughout the procedure. If student was receiving oxygen by mask before suctioning,
reapplication of mask between passes might be needed.
If appropriate, ask the student if he or she needs repeat suctioning.

VDH Guidelines for Healthcare Procedures in Schools 343
21. The nose and back of the mouth may be suctioned if needed after completion of tracheal
suctioning.
After the nose and mouth are suctioned, the catheter cannot be reused to suction the
tracheostomy.
22. Rinse catheter and connecting tubing with normal saline until clear. Use continuous
suction.
Removes catheter sections in the tubing. Secretions left in tubing decrease suctioning
efficiency and provide environment for growth of microorganisms.
23. Disconnect catheter from suction tubing. Wrap catheter around gloved hand. Pull glove off
inside out so that catheter remains rolled in glove. Place first glove in remaining gloved
hand. Pull off other glove over first glove to seal in contaminated tubing.
For each suctioning session, a new catheter should be used. Sleeved catheters (see next
procedure) may be reused as long as they are not used to suction nose and mouth. Consult
family and health care provider for student-specific use.
24. Discard used suction catheter in appropriate receptacle. Turn off suction. Wash hands.
25. Note color, consistency (e.g., thin, thick), and quantity of secretions. Compare student’s
respiratory assessments before and after suctioning. Document procedure on student’s log
sheet and notify school nurse and family of any changes from student’s usual pattern.
26. Be sure suction equipment and supplies are restocked, checked daily, and ready for
immediate use.

VDH Guidelines for Healthcare Procedures in Schools 344
Sources:
Aaron’s Tracheostomy Page. (2014). Suctioning a Tracheostomy. Available at
www.tracheostomy.com/suction.htm
Bowden, V., & Greenberg, C. (2012). Pedia tric nursing procedures (Third ed.). Philadelphia:
Wolters Kluwer Health/Lippincott Williams & Wilkins, 672-677.
Cincinnati Children's Hospital. (2011). Best evidence statement (BESt): Basic pediatric
tracheostomy care. In conjunction with Agency for Healthcare Research and Quality.
Cincinnati, OH. Available online:
https://www.nlm.nih.gov/medlineplus/ency/patientinstructions/000076.htm
Connecticut State Department of Education. (2012). Clinical procedure guidelines for
Connecticut school nurses. Middlebury, CT: CSDOE, 107-108.
Hockenberry, M., & Wilson, D. (2015). Wong's nursing care of infants and children (10th ed.).
St. Louis: Elsevier Mosby, 1152-1153.
Essential Evidence Plus. (2013). Tracheostomy care. Duodecim Medical Publications Ltd.
Medline Plus. (2014). Tracheostomy care. National Library of Medicine. Available online:
https://www.nlm.nih.gov/medlineplus/ency/patientinstructions/000076.htm
Mitchell, R., et al. (2012). Clinical consensus statement: Tracheostomy care. Otolaryngology
Head Neck Surgery 148 (1): 6-20. doi:10.1177/0194599812460376. Available online:
http://oto.sagepub.com/content/148/1/6.full.pdf+html
National Heart, Lung, and Blood Institute. (2012). Living with a tracheostomy. National
Institutes of Health. Available online: http://www.nhlbi.nih.gov/health/health-
topics/topics/trach/livingwith
National Heart, Lung, and Blood Institute. (2012). What is a tracheostomy? National
Institutes of Health. Available online: http://www.nhlbi.nih.gov/health/health-
topics/topics/trach
Porter, S., Branowicki, P., & Palfrey, J. (2014). Supporting students with special health care
needs: Guidelines and procedures for schools (3rd ed.). Baltimore: Paul H. Brookes
Publishing, 333-336.
Selekman, J. (2013). School nursing: A comprehensive text (2nd ed.). Philadelphia: F.A.
Davis, 540-541, 1048-1050.
Smith, S., Duell, D. & Martin, B. (2012). Clinical nursing skills: Basic to advanced skills (8th
ed.). Boston: Pearson, 1202-1212.

VDH Guidelines for Healthcare Procedures in Schools 345
Wisconsin Improving School Health Services Project. (2015). Tracheostomy suctioning: Clean
technique. Available with an instructional video online:
http://www.wishesproject.org/?page_id=245/?tab=5
Illustration Source: The Center for Pediatric Emergency Medicine (CPEM). Teaching
resource for instructors in prehospital pediatrics. Illustrations by Susan Gilbert.

VDH Guidelines for Healthcare Procedures in Schools 346
Tracheal Suctioning Using a Sleeved or Inline Suction
Catheter
Overview
Sleeved or inline suction catheters may be used for tracheal suctioning. A sleeved catheter
consists of a sterile suction catheter inside a clear plastic sheath or “sleeve.” The catheter can
be threaded into the trachea and retracted back into the sleeve after suctioning. The catheter
never comes in contact with the environment, only the inside of the sleeve and the inside of the
trachea. Therefore, the catheter can be used for multiple suctionings. Usually the sleeved
catheter is used for a 24 hour period and then discarded; however, some sleeved catheters have
been designed to be used for 72 hours before being discarded. Research studies have
demonstrated that people using sleeved catheters generally have less risk of developing a lung
infection than those using conventional disposable catheters. The cost of each sleeved catheter
is many times the cost of a single-use catheter. However, most studies have found that when
the number of catheters, sterile gloves, and nurse’s time are factored into the costs, sleeved
catheters are less expensive, or comparable, in cost. Other studies have found that suctioning is
done more frequently on patients with sleeved catheters because the setup and procedure are
easier. Additionally, sleeved catheters designed for ventilators can be attached to the ventilator
tubing to form a closed tracheal suctioning system, allowing suctioning to take place without
opening the system. This closed system has been found to decrease the risk of infection, as
well as minimize oxygen desaturation during suctioning because the tubing system does not
need to be opened to accomplish suctioning.
Note: Family provides equipment and supplies.
Procedure
1. Follow steps 1-10 for tracheal suctioning.
2. Put on gloves.
3. Attach the control valve of the sleeved catheter to the
connecting suction tubing (if not already connected).
4. Turn on machine to appropriate vacuum setting for student,
usually 80-100 mmHg for children and 80-120 mmHg for
adolescents.
5. Suction a small amount of sterile water or saline.
This lubricates the tube, ensures that the tubing is clear of secretions, and tests the
functioning of the suction system.
6. If student is ventilator dependent, attach a T-piece to the ventilator breathing circuit and
connect the T-piece to the student’s tracheostomy.
VDH Guidelines for Healthcare Procedures in Schools 347
7. Using the thumb and index finger of the dominant hand, advance the catheter through
the tracheostomy tube and into the tracheobronchial tree. It may be necessary to gently
retract the catheter sleeve as the catheter is advanced.
8. Do not suction while catheter is being inserted because it can damage tracheal mucosa,
as well as increase hypoxia. Do not insert catheter beyond the distal end of the
tracheostomy tube.
9. Cover vent hole intermittently with thumb while withdrawing catheter. Rotate catheter
gently between thumb and index finger while suctioning and withdrawing.
This helps to reach all secretions in the tracheostomy tube and prevent injury to
tracheal mucosal lining. Uncovering intermittently and rotating catheter helps prevent
damage to mucosal lining.
Each insertion and withdrawal of the catheter must take no longer than 5-10 seconds.
Extended suctioning can block the airway and cause a serious drop in student’s
oxygen level.
10. Allow the student to rest and breathe or give breaths with resuscitator bag between
suctioning passes. The timing of each suctioning pass and the length of the rest period
depend on student’s tolerance of the procedure and absence of complications. This
helps student get new oxygen/air into lungs. Suction saline again through catheter to
rinse secretions from catheter and tubing.
11. Do not routinely use saline to loosen secretions. Only if prescribed, insert several
drops of saline into tracheostomy with non-dominant hand. Manually ventilate with
resuscitation bag to disperse saline, if ordered.
Saline may push secretions back down the airway. It was once used to loosen or thin
thick or dry secretions. Research indicates it may increase airway contamination,
decrease oxygen saturations, and do a poor job of thinning secretions.
contamination, decrease oxygen saturation, and may not help clear secretions.
12. If moist, gurgling noises or whistling sounds are heard or if mucus is seen at the
tracheostomy opening, repeat suctioning procedure (steps 7-9). Assess student’s color
and respiratory status throughout the procedure.
If appropriate, ask the student if he or she needs repeat suctioning.
13. Rinse the catheter and connecting tubing with normal saline until clear.
This step is particularly important with sleeved catheters because they are reused and
any secretions left in the catheter can provide an environment for growth of
microorganisms.
VDH Guidelines for Healthcare Procedures in Schools 348
14. Sleeved catheters can be reused for up to 24-72 hours. Follow manufacturer-specific
and guidelines in student's IHP. They cannot be reused in the trachea if they are used to
suction the mouth and nose.
15. Remove gloves. Wash hands.
16. Note color, consistency (e.g., thin, thick), and quantity of secretions. Compare student’s
respiratory assessments before and after suctioning. Document procedure on student’s
log sheet and notify school nurse and family of any changes from student’s usual
pattern.
17. Be sure suction equipment and supplies are restocked, checked daily, and ready for
immediate use.

VDH Guidelines for Healthcare Procedures in Schools 349
Sources:
Aaron’s Tracheostomy Page. (2014). Suctioning a Tracheostomy. Available at
www.tracheostomy.com/suction.htm
Bowden, V., & Greenberg, C. (2012). Pediatric nursing procedures (Third ed.). Philadelphia:
Wolters Kluwer Health/Lippincott Williams & Wilkins, 672-677.
Cincinnati Children's Hospital. (2011). Best evidence statement (BESt): Basic pediatric
tracheostomy care. In conjunction with Agency for Healthcare Research and Quality.
Cincinnati, OH. Available online:
https://www.nlm.nih.gov/medlineplus/ency/patientinstructions/000076.htm
Connecticut State Department of Education. (2012). Clinical procedure guidelines for
Connecticut school nurses. Middlebury, CT: CSDOE, 107-108.
Hockenberry, M., & Wilson, D. (2015). Wong's nursing care of infants and children (10th ed.).
St. Louis: Elsevier Mosby, 1152-1153.
Essential Evidence Plus. (2013). Tracheostomy care. Duodecim Medical Publications Ltd.
Medline Plus. (2014). Tracheostomy care. National Library of Medicine. Available online:
https://www.nlm.nih.gov/medlineplus/ency/patientinstructions/000076.htm
Mitchell, R., et al. (2012). Clinical consensus statement: Tracheostomy care. Otolaryngology
Head Neck Surgery 148 (1): 6-20. doi:10.1177/0194599812460376. Available online:
http://oto.sagepub.com/content/148/1/6.full.pdf+html
National Heart, Lung, and Blood Institute. (2012). Living with a tracheostomy. National
Institutes of Health. Available online: http://www.nhlbi.nih.gov/health/health-
topics/topics/trach/livingwith
National Heart, Lung, and Blood Institute. (2012). What is a tracheostomy? National
Institutes of Health. Available online: http://www.nhlbi.nih.gov/health/health-
topics/topics/trach
National Institutes of Health, Warren G. Magnuson Clinical Center Critical Care Medicine
Department. (2000). Airway Suctioning and the Use of the Ballard Closed Tracheal
Suctioning System. Available at
http://www.cc.nih.gov/ccmd/pdf_doc/Airway%20Management/01-aiarwaysuctioning-
bal.pdf
Porter, S., Branowicki, P., & Palfrey, J. (2014). Supporting students with special health care
needs: Guidelines and procedures for schools (3rd ed.). Baltimore: Paul H. Brookes
Publishing, 333-336.

VDH Guidelines for Healthcare Procedures in Schools 350
Selekman, J. (2013). School nursing: A comprehensive text (2nd ed.). Philadelphia: F.A.
Davis, 540-541, 1048-1050.
Smith, S., Duell, D. & Martin, B. (2012). Clinical nursing skills: Basic to advanced skills (8th
ed.). Boston: Pearson, 1202-1212.
Wisconsin Improving School Health Services Project. (2015). Tracheostomy suctioning: Clean
technique. Available with an instructional video online:
http://www.wishesproject.org/?page_id=245/?tab=5

VDH Guidelines for Healthcare Procedures in Schools 351
Possible Problems When Suctioning
• Signs of Respiratory distress:
Difficulty breathing Pale blue color around lips, eyes, nails
Increased respiratory rate Retractions
Increased heart rate Anxious, frightened look
Wheezing, grunting, noisy breathing Restlessness, agitation
Tracheostomy tube may be blocked with mucus or foreign matter. Suction tracheostomy.
Change tracheostomy tube, if needed. Check placement of tracheostomy tube and air
movement from tracheostomy. Reassure student. If symptoms do not clear with suction
or tube change, activate school emergency plan. Do not leave student alone.
• Tracheostomy tube becomes dislodged
Stay calm and do not leave student alone. Reposition tracheostomy tube, if possible. If
unable to reposition or tube has come totally out, insert new (spare) tracheostomy tube
using obturator immediately. If regular size tube cannot be inserted, use one size smaller.
If spare trach is not available, replace with the one that came out. Reposition child and tilt
head back if difficulty inserting. Check air movement. Give breaths with resuscitation bag,
if indicated. Administer oxygen if prescribed in emergency plan. Initiate school
emergency plan and begin cardiopulmonary resuscitation, if necessary. Notify school
nurse, family and health care provider.
• Suction catheter cannot be inserted into tracheostomy tube
Do not leave student alone. Reposition head/neck and try again. Change inner cannula (if
present) or replace tracheostomy tube. Give breaths with resuscitation bag, if needed.
Check for air movement. Give oxygen, if prescribed in emergency plan. Initiate school
emergency plan and begin cardiopulmonary resuscitation (CPR), if necessary. Notify
school nurse, family and health care provider.
• Bleeding during suctioning
If pink or blood-streaked secretions, check suction pressure (should always be less than 120
mmHg). Limit suctioning to 5 seconds at a time. Notify school nurse and family.
If a large amount of blood is suctioned or the students develops respiratory distress while
being suctioned, activate the school emergency plan and notify school nurse and family.
Reassure student.

VDH Guidelines for Healthcare Procedures in Schools 352
• Bronchospasm during suctioning
May be due to excessive suctioning. Reassure student and help student to calm down. If
unable to withdraw catheter, disconnect from connecting tubing and hold oxygen near end
of suction catheter. If bronchospasm relaxes, remove catheter. If bronchospasm remains,
student may require medication (e.g., bronchodilator). Notify school nurse, family and
health care provider. Be prepared to initiate school emergency plan.

VDH Guidelines for Healthcare Procedures in Schools 353
Information for Students
Who Need Tracheal Suctioning
Date: ___________________
To: _____________________________ _________________________________
(Teachers, Instructional assistants, Bus drivers, etc)
Name of Student: ______________________________________
This student has a tracheostomy, or opening in the neck to allow the student to breathe
through an opening in the windpipe. A tube may be inserted into the opening and secured
to the neck with Velcro or ties. Other tracheostomy openings may not be covered.
Occasionally, the tracheostomy tube may need to be cleared of mucous and other
secretions through tracheal suctioning. The student may be able to assist with the
procedure.
If a student needs suctioning, the equipment must be available to the student at all times.
In addition, a trained staff member will help the student suction the tracheostomy.
This student may be able to participate in many school activities. Modifications should be
approved by the family, health care provider, and school.
School staff in frequent contact with this student are encouraged to complete
cardiopulmonary resuscitation (CPR) training and specialized training for people with
tracheostomies.
Contact _____________________________ at __________________ (phone number) for
additional information or if the student experiences any problems with the tracheal
suctioning.
Source:
Adapted from: Porter, S., Haynie, M., Bierle, T., Caldwell, T. H., & Palfrey, J. S. (Eds.). (1997). Children
and youth assisted by medical technology in educational settings: guidelines for care (2nd ed.). Baltimore:
Paul H. Brookes Publishing

VDH Guidelines for Healthcare Procedures in Schools 354
Tracheostomy Tube Changes
Overview
Tracheostomy tubes are typically changed every 2-4 weeks to prevent mucus or bacteria
buildup. However, a tube may need to be changed if it becomes blocked or accidentally
dislodged. At school, tracheostomy tube changes should only be done in an emergency
situation. Two people should be present during the procedure unless this is not practical in an
emergency.
Settings and Staff
Routine tracheostomy tube changes should be
performed at home, ideally on an empty stomach when
the airway is relatively free of mucus. If a tracheostomy
becomes blocked or accidentally comes out, the tube
must be changed or reinserted immediately--wherever
the student is, even if conditions are not ideal.
Tracheostomy tube changes should be provided by a
registered school nurse, licensed respiratory therapist, or
licensed practical nurse under the supervision of a
registered school nurse. These caregivers should have
proven, competency-based training in appropriate
techniques and problem management. All staff in
contact with students who have tracheostomies
should have specialized cardiopulmonary
resuscitation training. They should be able to recognize signs of breathing difficulty and
should know how to activate the student’s emergency plan.
Any school personnel who have regular contact with a student with a tracheostomy must
receive general training covering the student's specific needs, potential problems, and
implementation of the established school emergency plan. The tracheostomy checklist in the
appendices can be used as a baseline for competency based training in performing the
procedure and problem management.
Individualized Healthcare Plan (IHP)
Each student’s IHP must be tailored to the individual’s needs. A sample plan is included in
Appendix A. When preparing an IHP for a student who needs a tracheostomy tube change, the
following items should be considered (most should already be in the IHP for the student's
tracheostomy):
• Underlying condition and possible problems associated with the condition or treatment

VDH Guidelines for Healthcare Procedures in Schools 355
• Health care provider's order for tracheostomy care and tube change
• Size and type of tracheostomy tube
• Use of an obturator
• Type of ties, gauze, and/or skin care
• Portable equipment and supplies and responsibility for transporting them with student
• Student’s baseline color, respiratory rate, pulse, blood pressure, secretions
• Student specific signs of respiratory distress
• Student’s self care ability and ability to request assistance
• Emergency action plan, including all phone numbers
• Identification of individuals capable of assisting
• Student’s need for support during reinsertion
• Student’s ability to breathe without a tracheostomy tube
• Any known difficulties that might be encountered during reinsertion
• Staffing needs to provide safe care for the student and plan for absences
• Latex allergy precautions
• Standard precautions

VDH Guidelines for Healthcare Procedures in Schools 356
Sources:
Aaron’s Tracheostomy Page. (2014). Suctioning a Tracheostomy. Available at
www.tracheostomy.com/suction.htm
Bowden, V., & Greenberg, C. (2012). Pediatric nursing procedures (Third ed.). Philadelphia:
Wolters Kluwer Health/Lippincott Williams & Wilkins, 672-677.
Cincinnati Children's Hospital. (2011). Best evidence statement (BESt): Basic pediatric
tracheostomy care. In conjunction with Agency for Healthcare Research and Quality.
Cincinnati, OH. Available online:
https://www.nlm.nih.gov/medlineplus/ency/patientinstructions/000076.htm
Connecticut State Department of Education. (2012). Clinical procedure guidelines for
Connecticut school nurses. Middlebury, CT: CSDOE, 108-109.
Hockenberry, M., & Wilson, D. (2015). Wong's nursing care of infants and children (10th ed.).
St. Louis: Elsevier Mosby, 1152-1153.
Essential Evidence Plus. (2013). Tracheostomy care. Duodecim Medical Publications Ltd.
Medline Plus. (2014). Tracheostomy care. National Library of Medicine. Available online:
https://www.nlm.nih.gov/medlineplus/ency/patientinstructions/000076.htm
Mitchell, R., et al. (2012). Clinical consensus statement: Tracheostomy care. Otolaryngology
Head Neck Surgery 148 (1): 6-20. doi:10.1177/0194599812460376. Available online:
http://oto.sagepub.com/content/148/1/6.full.pdf+html
National Heart, Lung, and Blood Institute. (2012). Living with a tracheostomy. National
Institutes of Health. Available online: http://www.nhlbi.nih.gov/health/health-
topics/topics/trach/livingwith
National Heart, Lung, and Blood Institute. (2012). What is a tracheostomy? National
Institutes of Health. Available online: http://www.nhlbi.nih.gov/health/health-
topics/topics/trach
National Institutes of Health, Warren G. Magnuson Clinical Center Critical Care Medicine
Department. (2000). Airway Suctioning and the Use of the Ballard Closed Tracheal
Suctioning System. Available at
http://www.cc.nih.gov/ccmd/pdf_doc/Airway%20Management/01-aiarwaysuctioning-
bal.pdf
Porter, S., Branowicki, P., & Palfrey, J. (2014). Supporting students with special health care
needs: Guidelines and procedures for schools (3rd ed.). Baltimore: Paul H. Brookes
Publishing, 337-342

VDH Guidelines for Healthcare Procedures in Schools 357
Selekman, J. (2013). School nursing: A comprehensive text (2nd ed.). Philadelphia: F.A.
Davis, 540-541, 1048-1050.
Smith, S., Duell, D. & Martin, B. (2012). Clinical nursing skills: Basic to advanced skills (8th
ed.). Boston: Pearson, 1202-1212.
Wisconsin Improving School Health Services Project. (2015). Reinserting Tracheostomy Tube.
Available http://www.wishesproject.org/?page_id=228/?tab=4
Illustration Source: The Center for Pediatric Emergency Medicine (CPEM). Teaching
resource for instructors in prehospital pediatrics. Illustrations by Susan Gilbert.

VDH Guidelines for Healthcare Procedures in Schools 358
Procedure for Changing a Tracheostomy Tube
Note: Family provides equipment and supplies.
1. Wash hands.
2. Gather equipment and materials:
• Exact size and type of tracheostomy tube ordered for student
Always have a spare clean tracheostomy tube available and ready for use.
• Tracheostomy tube one size smaller than currently being used.
Used if difficulty encountered with insertion of regular-sized tube
• Velcro ties, twill tape, or other ties to hold tracheostomy tube in place
• Obturator, if needed (used as a guide for insertion)
• Blunt scissors
• Syringe to inflate and deflate cuff, if tube has a cuff
• Sterile water-soluble lubricant or sterile saline
Never use Vaseline or oil-based lubricants.
• Resuscitation bag and mask
• Blanket roll, if needed, to position student’s neck
• Stethoscope
• Oxygen, if ordered
• Suctioning device and supplies
• Gloves
• Another person to assist, if possible
3. Explain procedure using explanations the student can understand. Encourage the student to
do as much of the procedure as is capable, so as to achieve maximum self-care skills.
4. Position student as recommended/ordered.
Best positioning is usually to have student lie on back with a blanket roll under the
shoulders.
5. Wash hands.
6. Have spare Velcro ties or pre-cut tracheostomy ties ready.
7. Open tracheostomy tube package. Keep tube clean. Do not touch curved part of tube that
is inserted into trachea.

VDH Guidelines for Healthcare Procedures in Schools 359
8. Put on sterile gloves. Protective facial gear may be needed if student has excessive
secretions and coughs during insertion.
9. Insert obturator into clean tracheostomy tube.
10. Attach Velcro holder or tracheostomy ties to one side of new tube.
11. If ordered, lubricate end of tracheostomy tube with water-based lubricant or sterile saline
sparingly.
Lubrication may decrease the trauma to tracheal tissue, but sometimes is not used due to
possibility of aspiration.
12. Administer supplemental oxygen, if ordered.
13. Have assistant hold old tube in place while cutting/removing the ties. If tube is being
changed by one person, do not remove ties until clean tracheostomy tube is in hand.
Always hold the tube when ties are not secure because a cough can dislodge the tube.
14. When the new tube is ready (in hand), have assistant remove old tube.
15. Gently and quickly insert the new tube in a smooth curving motion directing the tip of the
tube toward the back of the neck in a downward and inward arc. Hold in place until
secured because changing the tracheostomy tube will usually cause the child to cough.
Back and downward motion follows the natural curve of the trachea. Do not force the tube
as this could damage the trachea. Reposition neck and try again.
16. If an obturator is used, stabilize the flanges of the tracheostomy tube and immediately
remove the obturator after the tube is inserted. Insert inner cannula, if it is used, at this
time. Continue to hold in place until secured with ties.
Hold the tracheostomy tube in place at all times. A person is unable to breathe when the
obturator is in place in the tracheostomy tube.
17. Listen and feel for air movement through tracheostomy tube. Observe the student for signs
of respiratory distress. Assistant may listen with stethoscope for breath sounds.
18. Secure tube in place with ties or Velcro holder. If using ties, the tracheostomy ties should
be tied in a double or triple knot. They should never be tied in a bow because they can
accidentally become untied. The ties should be loose enough that one finger can be slipped
in between the ties and the neck. Note: some students may have a metal chain trach holder
instead.
19. Listen with stethoscope to assess breath sounds. Watch chest rise with breath. Give 2-4
breaths with resuscitation bag or provide oxygenation as ordered, if indicated based on
student’s respiratory status. Suction, if needed.
A small amount of bleeding may occur around tube or be in secretions after tracheostomy
change. If unusual or persistent bleeding is present, notify the school nurse, family and
health care provider.

VDH Guidelines for Healthcare Procedures in Schools 360
20. Most tracheostomy tubes used at schools will not require cuff inflation or an inner cannula,
but follow student's IHP for guidance on this.
21. Do skin care, if needed (see guidelines in student's IHP), and reapply gauze around and
under tracheostomy tube and ties.
Use pre-slit gauze or commercially-prepared tracheostomy dressings. Do not cut regular
gauze to fit because tiny fibers from cut gauze can enter tracheostomy.
22. Discard used equipment according to standard precautions guidelines.
23. Remove gloves and wash hands.
24. Document procedure and problems or concerns on student’s log sheet. Notify school nurse
and family of tracheostomy change.
25. Replenish supplies.

VDH Guidelines for Healthcare Procedures in Schools 361
Sources:
Aaron’s Tracheostomy Page. (2014). Changing a Tracheostomy Tube. Available at
www.tracheostomy.com/care/change.htm
Bowden, V., & Greenberg, C. (2012). Pediatric nursing procedures (Third ed.). Philadelphia:
Wolters Kluwer Health/Lippincott Williams & Wilkins, 678-682.
Cincinnati Children's Hospital. (2011). Best evidence statement (BESt): Basic pediatric
tracheostomy care. In conjunction with Agency for Healthcare Research and Quality.
Cincinnati, OH. Available online:
https://www.nlm.nih.gov/medlineplus/ency/patientinstructions/000076.htm
Connecticut State Department of Education. (2012). Clinical procedure guidelines for
Connecticut school nurses. Middlebury, CT: CSDOE, 108-109.
Hockenberry, M., & Wilson, D. (2015). Wong's nursing care of infants and children (10th ed.).
St. Louis: Elsevier Mosby, 1153-1155.
Essential Evidence Plus. (2013). Tracheostomy care. Duodecim Medical Publications Ltd.
Medline Plus. (2014). Tracheostomy care. National Library of Medicine. Available online:
https://www.nlm.nih.gov/medlineplus/ency/patientinstructions/000076.htm
Mitchell, R., et al. (2012). Clinical consensus statement: Tracheostomy care. Otolaryngology
Head Neck Surgery 148 (1): 6-20. doi:10.1177/0194599812460376. Available online:
http://oto.sagepub.com/content/148/1/6.full.pdf+html
National Heart, Lung, and Blood Institute. (2012). Living with a tracheostomy. National
Institutes of Health. Available online: http://www.nhlbi.nih.gov/health/health-
topics/topics/trach/livingwith
Porter, S., Branowicki, P., & Palfrey, J. (2014). Supporting students with special health care
needs: Guidelines and procedures for schools (3rd ed.). Baltimore: Paul H. Brookes
Publishing, 337-342
Selekman, J. (2013). School nursing: A comprehensive text (2nd ed.). Philadelphia: F.A.
Davis, 540-541, 1047-1050.
Smith, S., Duell, D. & Martin, B. (2012). Clinical nursing skills: Basic to advanced skills (8th
ed.). Boston: Pearson, 1202-1212.
Wisconsin Improving School Health Services Project. (2015). Reinserting Tracheostomy Tube.
Available http://www.wishesproject.org/?page_id=228/?tab=4

VDH Guidelines for Healthcare Procedures in Schools 362
Possible Problems with Tracheostomy Tube Changes
• If the tracheostomy tube comes out and student is not showing signs of distress.
Call for assistance. Do not leave student alone. Follow procedure for tracheostomy tube
change.
• If the tracheostomy tube comes out and student shows signs of respiratory distress
As soon as possible, attempt to insert tracheostomy tube as outlined in procedure.
• If the tracheostomy tube comes out and new tube has been inserted and the student is
still having difficulty
Listen for breath sounds and assess airway. Tube may need to be repositioned or reinserted.
Administer oxygen via the tracheostomy. Suction tracheostomy. Consider using
bronchodilators, if ordered. If distress persists, initiate emergency school plan. Begin
cardiopulmonary resuscitation (CPR), if necessary. Use manual resuscitation bag, if
indicated.
• Tracheostomy tube cannot be reinserted
Never leave student alone. Call for assistance.
This may be due to a bronchospasm or poor positioning:
• Reassure and reposition the student. Retry.
• Try using obturator if it has not been used.
• Try to insert one size smaller tracheostomy tube.
• Encourage the student to take a deep breath—be prepared to insert tube if stoma opens.
• Administer flow of oxygen directly to the tracheostomy stoma.
• Give rescue breathing through natural airway and tape over tracheal stoma.
• If tracheostomy tube cannot be inserted and the student has increasing respiratory
distress and/or respiratory arrest.
Initiate the school emergency plan. Begin CPR with mouth-to-mouth or mouth-to-
mask breathing, using standard precautions. Tracheostomy stoma may be covered
with thumb if an air leak is present. Never leave student alone. Call for assistance.
• Aspiration of foreign material into tracheostomy
Always suction first. If the manual resuscitator bag is used prior to suctioning, it can
force the foreign material further into the lungs.
Check air movement. If tracheostomy tube remains blocked by matter, change
tracheostomy tube. Give breaths with resuscitation bag after initial suctioning. Check for
air movement and give breaths with resuscitation bag if indicated. Administer oxygen if
prescribed in emergency plan. If bronchospasm occurs, give medication, if prescribed.

VDH Guidelines for Healthcare Procedures in Schools 363
Respiratory distress or arrest can occur with any aspiration. Be prepared to initiate school
emergency plan. Begin CPR after suctioning, if needed. Notify school nurse, family and
health care provider. Wearing a Heat Moisture Exchanger (HME), also known as an
artificial nose or tracheostomy filter, can help prevent aspiration of foreign materials into
the trachea.

VDH Guidelines for Healthcare Procedures in Schools 364
Procedure for Using Oxygen with a Tracheostomy Collar
A tracheostomy collar is used to deliver oxygen or humidified air to a tracheostomy. It is often
used with a humidifying device to prevent development of dry, thick secretions which can plug
the tracheostomy.
Note: Family provides equipment, supplies, and oxygen.
1. Review oxygen safety precautions (see previous section).
2. Wash hands.
3. Assemble equipment:
• Tracheostomy collar
• Humidifier
• Heating device, if indicated
• Oxygen tubing
• Wide bore tubing
• Nipple adaptor
• Oxygen source, if needed
• Gloves
4. Set up humidification device according to guidelines in student's IHP.
5. Explain procedure using explanations the student can understand. Encourage the student to
do as much of the procedure as is capable, so as to achieve maximum self-care skills.
6. Put on gloves.
7. Securely attach tubing to air or oxygen source. Some students may only require humidified
room air and not need oxygen.
Usually a “Christmas tree” adaptor is used to attach the tubing to the oxygen source or
compressed air. Attach humidifier, if ordered. Make sure that all connections are secure
to prevent leaks.
8. If oxygen prescribed, turn on the oxygen source. A highly visible information card stating
oxygen liter flow should be attached to the regulator.
9. Set flowmeter to the flow rate specified by health care provider. Do not change this
setting without first contacting the health care provider.
Oxygen liter flow can be ordered as a set liter flow rate (e.g., 2 liters per minute) or as a
range (e.g., 2-4 liters per minute) based on student’s needs.

VDH Guidelines for Healthcare Procedures in Schools 365
10. Connect to heater and/or humidifier, if ordered. Place one end of the wide bore tubing on
the collar and the other on the humidifier or heater.
Some students may use cool mist.
11. With prolonged humidification, moisture condensates and collects in the tubing. When this
happens, the flow of air/oxygen may be blocked. Therefore, the water in the tubing
requires periodic emptying.
12. With compressed air/oxygen on, look for mist coming out of the end of tubing (hold up to
light for easier viewing).
If this is not present, check that all connections are secure and compressed air/oxygen is
flowing. Briefly turn on higher flow to see if mist is present, and then return to ordered
flow.
13. Place collar on student’s neck over tracheostomy tube in the midline.
Adjust tracheostomy collar so that it is snug but not uncomfortable for student.
14. Remove gloves and wash hands.
15. Document procedure on student’s log sheet. Notify the school nurse and family if there are
any changes in student’s usual pattern.
Sources:
Bowden, V., & Greenberg, C. (2012). Pediatric nursing procedures (Third ed.). Philadelphia:
Wolters Kluwer Health/Lippincott Williams & Wilkins, 526-531.
Cincinnati Children's Hospital. (2011). Best evidence statement (BESt): Basic pediatric
tracheostomy care. In conjunction with Agency for Healthcare Research and Quality.
Cincinnati, OH. Available online:
https://www.nlm.nih.gov/medlineplus/ency/patientinstructions/000076.htm
Essential Evidence Plus. (2013). Tracheostomy care. Duodecim Medical Publications Ltd.
Mitchell, R., et al. (2012). Clinical consensus statement: Tracheostomy care. Otolaryngology
Head Neck Surgery 148 (1): 6-20. doi:10.1177/0194599812460376. Available online:
http://oto.sagepub.com/content/148/1/6.full.pdf+html
Porter, S., Branowicki, P., & Palfrey, J. (2014). Supporting students with special health care
needs: Guidelines and procedures for schools (3rd ed.). Baltimore: Paul H. Brookes
Publishing, 343-345.
Wisconsin Improving School Health Services Project. (2015). Manual resuscitation with
Tracheostomy. Available online: http://www.wishesproject.org/?page_id=207/?tab=4

VDH Guidelines for Healthcare Procedures in Schools 366
Manual Resuscitation Bag
Overview
A manual resuscitation bag (e.g., Ambu bag) is a hollow, football-shaped, self-inflating bag
used to give breaths of air and oxygen to a student who is unable to take adequate breaths on
his or her own. The bag can be used with a mask that covers the student’s mouth and nose, or it
can be attached to a tracheostomy tube. When squeezed, the air is pushed out of the bag and
into the student. When the bag is released, air flows out of the lungs through the exhalation
(non-rebreathing) valve
Students with tracheostomies and students who use ventilators should have manual
resuscitation bags with them at all times. Resuscitation bags can be used when the student is
having difficulty breathing or if the student stops breathing on his or her own. They may also
be used to give extra breaths or oxygen during tracheostomy or ventilator care. They
frequently are used to give extra oxygen after suctioning. They may also be used to give
breaths if a ventilator fails or loses power.
Settings and Staff
Routine care using resuscitation bags should be done in a clean, private area such as the health
office.
In emergency situations, manual resuscitation bags should be used wherever the student might
be.
Emergency care should be addressed in the student’s individualized health care plan and
appropriate training should be provided to personnel.
Any school personnel who have regular contact with a student who may require the use of a
manual resuscitator during an emergency should receive training covering the student’s special
needs, potential problems, and implementation of the established emergency plan.

VDH Guidelines for Healthcare Procedures in Schools 367
Sources:
Bowden, V., & Greenberg, C. (2012). Pediatric nursing procedures (Third ed.). Philadelphia:
Wolters Kluwer Health/Lippincott Williams & Wilkins, 526-531.
Cincinnati Children's Hospital. (2011). Best evidence statement (BESt): Basic pediatric
tracheostomy care. In conjunction with Agency for Healthcare Research and Quality.
Cincinnati, OH. Available online:
https://www.nlm.nih.gov/medlineplus/ency/patientinstructions/000076.htm.
Essential Evidence Plus. (2013). Tracheostomy care. Duodecim Medical Publications Ltd.
Mitchell, R., et al. (2012). Clinical consensus statement: Tracheostomy care. Otolaryngology
Head Neck Surgery 148 (1): 6-20. doi:10.1177/0194599812460376. Available online:
http://oto.sagepub.com/content/148/1/6.full.pdf+html
Porter, S., Branowicki, P., & Palfrey, J. (2014). Supporting students with special health care
needs: Guidelines and procedures for schools (3rd ed.). Baltimore: Paul H. Brookes
Publishing, 343-345.
Wisconsin Improving School Health Services Project. (2015). Manual resuscitation with
Tracheostomy. Available online: http://www.wishesproject.org/?page_id=207/?tab=4

VDH Guidelines for Healthcare Procedures in Schools 368
Procedure for Using a Manual Resuscitation Bag with a
Tracheostomy
Note: Family provides equipment, supplies, and oxygen.
1. Wash hands.
2. Assemble equipment:
• Manual resuscitation bag (e.g., Ambu bag)
• Adaptor for tracheostomy tube
• Oxygen source with appropriate tubing, if needed
• Tracheostomy or ventilator supplies, as appropriate
3. Explain procedure using explanations the student can understand. Encourage the student to
do as much of the procedure as is capable, so as to achieve maximum self-care skills.
4. Keep bag near the student for quick access. Make sure tracheostomy connector is in place.
If oxygen is to be used, connect oxygen tubing to the oxygen port of the bag and make sure
oxygen is flowing at the prescribed flow rate.
5. Attach the tracheostomy connector part of the bag snugly to the tracheostomy tube. Steady
tracheostomy tube with non-dominant hand while securing connector to prevent accidental
dislodgement.
6. Squeeze the bag to deliver breaths. Squeeze hard enough to make the student’s chest rise.
Two hands may be needed to squeeze for larger students. Try to coordinate with the
student’s own breathing efforts. As the student starts to breathe in, squeeze the bag. If
resistance is felt, or the student looks distressed, make sure the tube is patent and the
breaths are being coordinated with the student’s own breaths.
If the student is unable to breathe on his or her own, squeeze the manual resuscitator at a
regular rate to deliver the number of breaths per minute specified in the student's IHP. If no
rate is specified, give 16-20 breaths for younger students and 12-16 for older students and
adolescents.
7. Assess respiratory status, including skin color, for effectiveness of bagging.
8. When “bagging” is no longer needed, carefully remove resuscitation bag from
tracheostomy tube. Hold tracheostomy tube steady with non-dominant hand to prevent
pulling or accidentally dislodging it. If student requires a tracheostomy collar with oxygen,
be sure to re-connect this when resuscitation bag no longer needed.
9. Wash hands.

VDH Guidelines for Healthcare Procedures in Schools 369
10. Document procedure on student’s log sheet. Notify school nurse and family if there are
any changes in student's usual pattern.
Sources:
Cincinnati Children's Hospital. (2011). Best evidence statement (BESt): Basic pediatric
tracheostomy care. In conjunction with Agency for Healthcare Research and Quality.
Cincinnati, OH. Available online:
https://www.nlm.nih.gov/medlineplus/ency/patientinstructions/000076.htm
Essential Evidence Plus. (2013). Tracheostomy care. Duodecim Medical Publications Ltd.
Mitchell, R., et al. (2012). Clinical consensus statement: Tracheostomy care. Otolaryngology
Head Neck Surgery 148 (1): 6-20. doi:10.1177/0194599812460376. Available online:
http://oto.sagepub.com/content/148/1/6.full.pdf+html
Porter, S., Branowicki, P., & Palfrey, J. (2014). Supporting students with special health care
needs: Guidelines and procedures for schools (3rd ed.). Baltimore: Paul H. Brookes
Publishing, 343-345.
Wisconsin Improving School Health Services Project. (2015). Manual resuscitation with
Tracheostomy. Available online: http://www.wishesproject.org/?page_id=207/?tab=4
VDH Guidelines for Healthcare Procedures in Schools 370
Nose and Mouth Suctioning
Overview
The nose and/or mouth can be suctioned when the student needs assistance in removing
secretions from the airway. Some students may be able to request suctioning and assist with
the procedure. Other students will need the caregiver to recognize when suctioning is needed.
Suctioning may be needed when student’s breathing becomes noisy or excess secretions are
seen in the mouth or at the back of the throat. Gurgling, bubbling, or rattling breath sounds
may be heard. The student may show signs of respiratory distress, such as increased
respirations, difficulty breathing, excessive coughing, choking, anxiousness, irritability, or
color changes.
Settings and Staff
Emergency suctioning should be done wherever the student is located. For this reason, students
likely to need suctioning should have portable suctioning equipment with them during transport
and when traveling through school. Routine suctioning should be done in a clean, private area
with accessibility to an electrical outlet. It can be done in a corner of a classroom, but tends to
be noisy and disruptive to class so it is usually done in a school health office.
Suctioning of the nose and mouth can be performed by an unlicensed assistive personnel with
proven competency-based training in appropriate techniques and problem management.
Pharyngeal suctioning should be done by a school nurse (RN or LPN), respiratory therapist, or
trained unlicensed assistive personnel under the supervision of a registered school nurse.
School personnel who have regular contact with a student who requires nose and mouth
suctioning should receive training that covering the student’s special needs, potential problems,
and implementation of the established emergency plan.
Individualized Healthcare Plan (IHP)
Each student’s IHP must be tailored to the individual’s needs. A sample plan is included in
Appendix A. When preparing an IHP for a student who needs suctioning of the nose and
mouth, the following items should be considered:
• Student’s underlying condition and the possible complications arising from the
condition or treatment
• Student’s baseline respiratory status, including respiratory rate and usual amount of
secretions
• Student-specific signs of respiratory distress (e.g., noisy breathing, agitation)
• Healthcare provider's order for suctioning
• Ability of the student to request assistance or suctioning
• Frequency of suctioning and routine indications for suctioning

VDH Guidelines for Healthcare Procedures in Schools 371
• Indications for additional suctioning
• Position of student during suctioning
• Depth of suctioning
• Type of suction catheters (size and whether they can be reused)
• Cleaning of Yankauer or tonsil tip suction, if prescribed
• Suction machine and pressure settings
• Latex allergy precautions
• Standard precautions
Sources:
Connecticut State Department of Education. (2012). Clinical procedure guidelines for
Connecticut school nurses. Middlebury, CT: CSDOE, 101-103.
Hockenberry, M., & Wilson, D. (2015). Wong's nursing care of infants and children (10th ed.).
St. Louis: Elsevier Mosby, 1152-1153.
Porter, S., Branowicki, P., & Palfrey, J. (2014). Supporting students with special health care
needs: Guidelines and procedures for schools (3rd ed.). Baltimore: Paul H. Brookes
Publishing, 346-350.
Selekman, J. (2013). School nursing: A comprehensive text (2nd ed.). Philadelphia: F.A.
Davis, 1048-1053.

VDH Guidelines for Healthcare Procedures in Schools 372
Procedure for Nose and Mouth Suctioning Using Suction
Machine
Note: Family provides equipment, and supplies.
1. Wash hands.
2. Gather equipment and materials:
• Suction machine and tubing
Equipment for suctioning must be assembled and ready for quick use at all times.
It should be checked daily by specified personnel.
• Suction catheter of the appropriate size, or Yankauer or tonsil tip suction catheter
(oral suction catheters)
• Bulb syringe or other manual backup suction
• Disposable gloves
• Plastic bag for disposal of materials
• Water or saline to clean and lubricate catheter, with container
3. Position student as recommended/ordered. Most students are suctioned in the semi-
Fowler’s (head elevated, semi-recumbent) position or in a sitting position.
Position may vary and should be recommended in student IHP.
4. Explain procedure using explanations the student can understand. Encourage the student to
do as much of the procedure as is capable, so as to achieve maximum self-care skills.
5. Switch on suction machine and check for suction by placing finger at end of connecting
tubing. Set suction as specified, usually between 60-120 mmHg pressure.
6. Encourage student to cough and expel secretions.
Coughing may eliminate need for suctioning or bring secretions up for easier suctioning.
7. Open suction catheter or kit, being careful not to touch the inside of the package.
Keeps catheter clean and reduces risk of infection.
8. Put on gloves.
9. Holding the connecting end of the suction catheter in the dominant hand, secure it to the
suction machine tubing (held in non-dominant hand). Leave the other end of catheter in its
covering.

VDH Guidelines for Healthcare Procedures in Schools 373
The dominant hand should remain clean/sterile. It should not touch anything but the
catheter. The non-dominant hand should be used to turn on switches and touch other
objects.
10. Remove covering from end of suction catheter with non-dominant hand while holding
catheter in dominant hand.
11. Hold suction catheter 2-3 inches from its tip with dominant hand and insert tip in water.
12. Cover vent hole with thumb of non-dominant hand to suction a small amount of saline
through catheter.
This tests that suction is functioning. This also helps to lubricate the tip of the catheter and
clear out any secretions in the connecting tubing. Do not use lubricant other than water
because the lubricant can dry and cause airway occlusion.
13. With thumb off vent hole, insert catheter gently into the nose to the prescribed depth
specified in student guidelines. Always suction the nose first because there are more
bacteria in the mouth.
Many students may only need to have the anterior part of the nose suctioned. Be gentle
because the nose bleeds easily. If the nose secretions are too thick, a few drops of saline
can be put in each nostril.
14. Cover vent hole with non-dominant thumb while suctioning and withdrawing catheter.
Gently rotate catheter between thumb and index finger while suctioning and withdrawing.
Rotating the suction catheter prevents it from attaching to the mucosa and damaging the
mucous membrane. If the catheter sticks, remove thumb from vent hole to release suction.
15. If student is still congested, repeat nasal suction. Between passes, suction water to rinse
secretions out of catheter.
16. With thumb off vent hole, insert catheter gently into the mouth.
17. Cover vent hole with non-dominant thumb. Gently rotate catheter between thumb and
index finger while suctioning and withdrawing to minimize damage to the oral mucosa.
18. If oral suctioning only is being done with a Yankauer or tonsil tip suction catheter, insert
Yankauer into mouth along gum line and move around mouth until secretions are cleared.
Yankauer is a plastic, rod shaped catheter with holes at the end. It provides continuous
suction and is not controlled with a finger adaptor.
Parts of the mouth to be suctioned include the back of the throat, the cheeks, and under the
tongue. Be careful when suctioning the back of the throat as this may cause the student to
gag and vomit.
19. If gurgling noises persist, repeat mouth suctioning procedure with same catheter. Between
passes, water can be suctioned to rinse secretions out of catheter. Monitor student’s
respiratory status throughout the procedure.

VDH Guidelines for Healthcare Procedures in Schools 374
If appropriate, ask the student if he or she needs repeat suctioning. If suctioning of the nose
is needed after suctioning of the mouth, a clean catheter should be used.
20. Rinse catheter and connecting tubing with water until clear, using continuous suction.
Secretions left in tubing decrease suctioning efficiency and provide environment for growth
of microorganisms.
21. Disconnect catheter from suction tubing. Wrap catheter around gloved hand. Pull glove off
inside out so that catheter remains rolled in glove. Place first glove in remaining gloved
hand. Pull off other glove over first glove to seal in contaminated tubing. If only Yankauer
(or tonsil tip) suction catheter is used for oral suctioning, it may be stored in clean container
for future use. Follow guidelines in student's IHP.
22. Discard disposable used suction catheter with gloves in appropriate receptacle. Turn off
suction. Wash hands.
23. Note color, consistency (e.g., thin, thick), and quantity of secretions. Document procedures
on student’s log sheet and notify school nurse and family of any changes or problems.
24. Be sure suction equipment and supplies are restocked and checked daily and are ready for
immediate use.
Sources:
Connecticut State Department of Education. (2012). Clinical procedure guidelines for
Connecticut school nurses. Middlebury, CT: CSDOE, 101-103.
Hockenberry, M., & Wilson, D. (2015). Wong's nursing care of infants and children (10th ed.).
St. Louis: Elsevier Mosby, 1152-1153.
Porter, S., Branowicki, P., & Palfrey, J. (2014). Supporting students with special health care
needs: Guidelines and procedures for schools (3rd ed.). Baltimore: Paul H. Brookes
Publishing, 346-350.
Selekman, J. (2013). School nursing: A comprehensive text (2nd ed.). Philadelphia: F.A.
Davis, 1048-1053.

VDH Guidelines for Healthcare Procedures in Schools 375
Procedure for Nose and Mouth Suctioning with a Bulb
Syringe
Note: Family provides equipment, and supplies.
1. Wash hands.
2. Gather and assemble equipment:
• Bulb syringe (nasal aspirator)
• Saline
• Tissues
• Disposable gloves
3. Explain procedure using explanations the student can understand. Encourage the student to
do as much of the procedure as is capable, so as to achieve maximum self-care skills.
4. Position student as recommended in student's individualized health plan.
5. Put on gloves.
6. Hold bulb syringe in palm of hand with long tip between index and middle finger. Squeeze
the bulb syringe flat with thumb. Place the tip gently into the nose or mouth, where
secretions are visible or audible, and let the bulb fill up.
When suctioning the mouth, suction under the tongue, inside the cheeks, and in the back of
the throat. Be careful in suctioning the back of the throat because this may cause the
student to gag and vomit.
7. Remove the bulb syringe from the nose or mouth. Hold the syringe over a tissue or basin
and squeeze the bulb to push out the secretions; then let it refill with air.
8. Repeat steps 6 and 7 as needed until nose and mouth are clear.
9. If nose secretions are too thick, a few drops of saline can be put in the edge of each nostril
before suctioning with bulb syringe.
10. Clean bulb syringe in hot soapy water, rinse with fresh water, let dry, and store.
11. Dispose of tissues in appropriate receptacle.
12. Remove gloves.
13. Wash hands.
14. Note color, consistency, and amount of secretions on student’s log sheet and notify school
nurse and family of any changes or problems.

VDH Guidelines for Healthcare Procedures in Schools 376
Sources:
Connecticut State Department of Education. (2012). Clinical procedure guidelines for
Connecticut school nurses. Middlebury, CT: CSDOE, 101-103.
Hockenberry, M., & Wilson, D. (2015). Wong's nursing care of infants and children (10th ed.).
St. Louis: Elsevier Mosby, 1152-1153.
Porter, S., Branowicki, P., & Palfrey, J. (2014). Supporting students with special health care
needs: Guidelines and procedures for schools (3rd ed.). Baltimore: Paul H. Brookes
Publishing, 346-350.
Selekman, J. (2013). School nursing: A comprehensive text (2nd ed.). Philadelphia: F.A.
Davis, 1048-1053.

VDH Guidelines for Healthcare Procedures in Schools 377
Possible Problems with Nose and Mouth Suctioning
• Nosebleed during suctioning
Stop suctioning. Gently squeeze bridge of nose and hold for 5 minutes.
After bleeding has stopped, refrain from using that side of the nose for suctioning until
cleared by family or health care provider.
• Gagging or vomiting during suctioning.
Gagging is probably caused by catheter going down too far. Withdraw a little and try to
finish suctioning. If vomiting occurs, remove catheter and position student to keep
airway open. Calm student and make sure that he or she is breathing without problems.
If student still needs suctioning, proceed carefully and try suctioning less deeply.
Sources:
Connecticut State Department of Education. (2012). Clinical procedure guidelines for
Connecticut school nurses. Middlebury, CT: CSDOE, 101-103.
Hockenberry, M., & Wilson, D. (2015). Wong's nursing care of infants and children (10th ed.).
St. Louis: Elsevier Mosby, 1152-1153.
Porter, S., Branowicki, P., & Palfrey, J. (2014). Supporting students with special health care
needs: Guidelines and procedures for schools (3rd ed.). Baltimore: Paul H. Brookes
Publishing, 346-350.
Selekman, J. (2013). School nursing: A comprehensive text (2nd ed.). Philadelphia: F.A.
Davis, 1048-1053.

VDH Guidelines for Healthcare Procedures in Schools 378
General Information for Students
Who Need Nose and Mouth Suctioning with a Bulb Syringe
Date: ___________________
To: _____________________________ _________________________________
(Teachers, Instructional assistants, Bus drivers, etc)
Name of Student: ______________________________________
This student requires occasional suctioning with a bulb syringe to clear secretions and mucous
from the airway to help the student breathe better.
The procedure will be conducted by a trained staff member. The student may be able to request
suctioning and assist with the procedure.
Staff working with the student should know what signs the student displays when suctioning is
needed.
If a student needs suctioning, the suctioning equipment must be with the student at all times.
The student may be able to participate in many school activities. Modifications should be
approved by the family, health care provider, and school.
Contact _______________________________ at __________________ (phone number) for
additional information or if the student experiences any problems with the suctioning procedure.
Source:
Adapted from: Porter, S., Haynie, M., Bierle, T., Caldwell, T. H., & Palfrey, J. S. (Eds.). (1997). Children and
youth assisted by medical technology in educational settings: guidelines for care (2nd ed.). Baltimore: Paul H.
Brookes Publishing.

VDH Guidelines for Healthcare Procedures in Schools 379
Chest Physiotherapy Postural Drainage and Percussion
Overview
Chest physiotherapy (CPT) can be an important part of treatment of acute and chronic
respiratory conditions, such as bronchitis, cystic fibrosis, pneumonia, and asthma. CPT is
performed to improve pulmonary hygiene and to maintain normal airway function by
promoting the drainage and coughing up of secretions from the lungs.
In the traditional manual method, the student is placed in various positions to allow gravity to
be used to promote drainage of secretions from the lungs and percussion of the chest wall is
done to help loosen secretions for removal. However, most students who need CPT on a
regular basis (e.g., students with cystic fibrosis) have it done using a mechanical vest that
provides high-frequency chest wall oscillation. Using a vest saves caregiver time and promotes
greater independence for students in providing their own therapy.
Settings and Staff
Manual CPT should be performed in a setting that allows for proper positioning and privacy of
the student. Small students can be placed in the lap of a staff person. Older and larger students
can be placed on a slant board, a padded wedge board, or a bed or couch with pillows to
position the student. CPT should generally not be performed for at least one hour after feeding
or meds. CPT using a mechanical vest can be performed wherever the privacy concerns of the
student are respected. Some students may prefer remaining in the classroom.
CPT may be administered by the school nurse, family, teacher aide, or other staff person who
has had general training in CPT of the student. General training should cover the student’s
specific health care needs, potential problems, how to obtain assistance should problems occur,
and how to implement the established emergency plan.
Individual Healthcare Plan
Each student’s IHP must be tailored to the individual’s needs. A sample plan is included in
Appendix A. When preparing an IHP for a student who needs CPT, the following items should
be considered:
• Student’s underlying condition and possible problems associated with the condition or
treatment
• Health care provider orders for chest physiotherapy
• Student’s baseline status, including color, respiratory rate, pulse, and blood pressure

VDH Guidelines for Healthcare Procedures in Schools 380
• Positions to be used during CPT
• Use of airway clearance assistive devices such as vests or mechanical vibrators
• Timing of CPT in relation to feeding schedule
• Frequency of CPT
• Student’s tolerance of CPT
• Contraindications to CPT, such as the presence of fractured ribs or bleeding disorder
• Signs and symptoms shown by the student when not receiving adequate oxygen (e.g.,
cyanosis, agitation, distress)
• Possible need for pulse oximeter readings during CPT
• Possible need for suctioning
• Standard precautions
Sources:
Bowden, V., & Greenberg, C. (2012). Pediatric nursing procedures (Third ed.). Philadelphia:
Wolters Kluwer Health/Lippincott Williams & Wilkins, 188-193.
UTMB Respiratory Care Services. (2014). Chest physiotherapy using the vest. Available
online: http://www.utmb.edu/policies_and_procedures/Non-
IHOP/Respiratory/Respiratory_Care_Services/07.03.11%20Chest%20Physiotherapy%2
0Using%20the%20Vest.pdf
Hockenberry, M., & Wilson, D. (2015). Wong's nursing care of infants and children (10th ed.).
St. Louis: Elsevier Mosby, 1143-1145.
Porter, S., Branowicki, P., & Palfrey, J. (2014). Supporting students with special health care
needs: Guidelines and procedures for schools (3rd ed.). Baltimore: Paul H. Brookes
Publishing, 376-378.
Selekman, J. (2013). School nursing: A comprehensive text (2nd ed.). Philadelphia: F.A.
Davis, 1053.

VDH Guidelines for Healthcare Procedures in Schools 381
Procedure for Manual Chest Physiotherapy (CPT)
1. Wash hands.
2. Assemble the equipment:
• Pillows
• Tissues
• Suction equipment, if needed
• Wastebasket with plastic liner
• Vest airway clearance system, if prescribed
Choose a time for the procedure when at least one hour has passed since the student has
eaten.
3. Check health care provider orders for CPT and frequency prescribed.
4. Perform a baseline respiratory assessment.
Student may be placed on a pulse oximeter during CPT because desaturation may occur
during CPT.
5. Explain procedure using explanations the student can understand. Emphasize that the staff
person is not “hitting” the student.
Smooth muscles of the tracheobronchial tree may constrict because of fear, tension, or
discomfort. Therefore, a relaxed, cooperative student will receive more effective CPT.
6. Use the following sequence for percussing and/or vibrating (if prescribed) each lobe of the
lung:
• Place the student in one of the 10 positions.
To percuss all the lobes of the lungs, the student should be placed in 10 different
positions. The different positions use the principle of gravity to promote drainage of the
tracheobronchial tree. The student is positioned so that the mucus collected in each
bronchus is able to drain downward toward the trachea where it can be coughed out or
suctioned out. Placing the student in a head down position facilitates drainage of the
lung bases. Placing the student in a sitting position facilitates drainage in the apical
segment of the upper lobe. In the unstable student, these positions may be modified
(i.e., the head down position would be inappropriate for a student with increased
intracranial pressure or abdominal distention).
• Percuss over selected area for 1-2 minutes or amount of time specified in student's IHP.

VDH Guidelines for Healthcare Procedures in Schools 382
Percussion facilitates drainage by jarring the secretions. A cupped hand or soft mask
creates an air pocket that softens the blow of the percussion and transfers the energy
from the percussion into the lung. When using the hands to percuss, hold the hands
cupped with fingers and thumb together. The cupped hand striking the chest wall
should create a hollow sound, not a slapping sound. Keep the wrists loose and elbows
partially flexed. Strike the chest rapidly with alternating hands. Percussion is
performed over a single layer of clothing, not over buttons, snaps, or zippers.
• If ordered, use vibration over specified areas.
Vibration is done with a firm, shaking pressure applied to the chest wall during
exhalation. Vibration may shake mucus loose or increase the velocity and turbulence of
exhaled air, facilitating mucus removal.
• Instruct student to cough into tissue following percussion of each location. Discard
used tissues into lined wastebaskets.
Coughing is most effective if the student is sitting up so that diaphragmatic excursion is
maximal. Ideally, the student should take several deep breaths and then follow the last
breath with a deep cough. Initial coughing attempts may not produce sputum. As
further positioning and percussion are provided, coughing will become more
productive. Students with ineffective or suppressed coughs can be suctioned. (Use of
vibration may break bones when students have abnormal bone conditions or are
receiving medication such as steroids.)
7. For percussing students over 40 pounds, the following positions may be used:
• Position 1—student on stomach with right side of torso
and right arm elevated on pillow—used for percussing
posterior segment of right, upper lobe, over right scapular
area. Depending on the student’s weight, additional
pillows may be needed to obtain desired elevation in all
positions.
• Position 2—student on stomach with left side of torso and
left arm elevation on pillow—for posterior segment of left
upper lobe, over left scapular area. The left bronchus is
more vertical, thus requiring a nearly 45 degree elevation.

VDH Guidelines for Healthcare Procedures in Schools 383
• Position 3—student flat on back with pillows placed
under head and knees—anterior segments of the right and
left upper lobes, between the clavicle and nipple area.
• Position 4—student on back. Turn hips ¼ turn to the right.
Elevate hips 10-12 inches with pillows. Use additional
pillows as needed to hold hips to the right—for percussing
lingular process of the left lung, from left armpit to nipple
area.
• Position 5—student on back. Turn hips ¼ turn to the left.
Elevate hips 10-12 inches with pillows. Use additional
pillows as needed to hold hips to the left—for percussing the
right middle lobe, from right armpit to nipple area.
• Position 6—student flat on stomach with pillows under
stomach and lower legs/feet—for apical segments of right
and left lower lobes, over lower scapular area.
• Position 7—student on back with hips elevated 16-18
inches with pillows—for anterior basal segment of right
and left lower lobes, over lower chest area below nipples.
• Position 8—student on stomach with hips elevated 16-18
inches with pillows—for basal segments of right and left
lower lobes, over lower chest areas (avoid kidneys).
• Position 9—student on right side with hips elevated 16-18
inches with pillows —for lateral basal segment of left
lower lobe, over left side from beneath armpit to end of rib
cage.

VDH Guidelines for Healthcare Procedures in Schools 384
• Position 10—student on left side with hips
elevated 16-18 inches with pillows—for lateral
basal segment of right lower lobe, over right side
from beneath armpit to end of ribcage.
8. The techniques for percussing students under 40 pounds (18 kg) and other students in a
sitting position are as follows:
• Person who is performing the percussing sits in a chair with legs outstretched at a 45
degree angle and with the bottom of your feet braced against a solid, upright object. A
pillow is placed in front of your knees. The student is placed face down on your lap
with the student’s chin resting on the pillow.
This position is correct for percussing posterior basal segments of lower lobes, over
area from lower scapulae to end of ribcage. Note: Young children and infants usually
have no upper lobe involvement requiring percussion. Percuss with light pressure.
• Seated as before, hold student face up on your lap with the student’s head resting on the
pillow.
This position is correct for percussing anterior segments of lower lobes, over the area
from below nipple to end of rib cage.
9. At the end of the procedure, have wastebaskets contents disposed of utilizing standard
precautions.
10. Document CPT on student’s health record or treatment log.
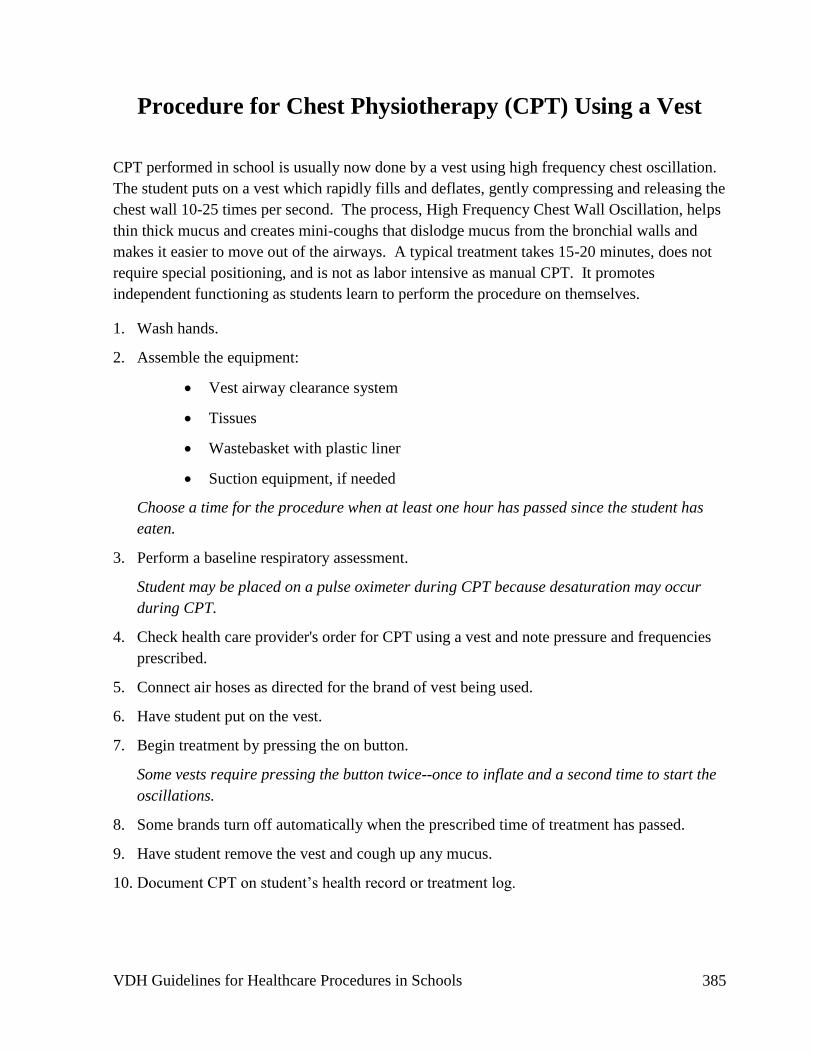
VDH Guidelines for Healthcare Procedures in Schools 385
Procedure for Chest Physiotherapy (CPT) Using a Vest
CPT performed in school is usually now done by a vest using high frequency chest oscillation.
The student puts on a vest which rapidly fills and deflates, gently compressing and releasing the
chest wall 10-25 times per second. The process, High Frequency Chest Wall Oscillation, helps
thin thick mucus and creates mini-coughs that dislodge mucus from the bronchial walls and
makes it easier to move out of the airways. A typical treatment takes 15-20 minutes, does not
require special positioning, and is not as labor intensive as manual CPT. It promotes
independent functioning as students learn to perform the procedure on themselves.
1. Wash hands.
2. Assemble the equipment:
• Vest airway clearance system
• Tissues
• Wastebasket with plastic liner
• Suction equipment, if needed
Choose a time for the procedure when at least one hour has passed since the student has
eaten.
3. Perform a baseline respiratory assessment.
Student may be placed on a pulse oximeter during CPT because desaturation may occur
during CPT.
4. Check health care provider's order for CPT using a vest and note pressure and frequencies
prescribed.
5. Connect air hoses as directed for the brand of vest being used.
6. Have student put on the vest.
7. Begin treatment by pressing the on button.
Some vests require pressing the button twice--once to inflate and a second time to start the
oscillations.
8. Some brands turn off automatically when the prescribed time of treatment has passed.
9. Have student remove the vest and cough up any mucus.
10. Document CPT on student’s health record or treatment log.

VDH Guidelines for Healthcare Procedures in Schools 386
Sources:
Bowden, V., & Greenberg, C. (2012). Pediatric nursing procedures (Third ed.). Philadelphia:
Wolters Kluwer Health/Lippincott Williams & Wilkins, 188-193.
UTMB Respiratory Care Services. (2014). Chest physiotherapy using the vest. Available
online: http://www.utmb.edu/policies_and_procedures/Non-
IHOP/Respiratory/Respiratory_Care_Services/07.03.11%20Chest%20Physiotherapy%2
0Using%20the%20Vest.pdf
Hockenberry, M., & Wilson, D. (2015). Wong's nursing care of infants and children (10th ed.).
St. Louis: Elsevier Mosby, 1143-1145.
Porter, S., Branowicki, P., & Palfrey, J. (2014). Supporting students with special health care
needs: Guidelines and procedures for schools (3rd ed.). Baltimore: Paul H. Brookes
Publishing, 376-378.
Selekman, J. (2013). School nursing: A comprehensive text (2nd ed.). Philadelphia: F.A.
Davis, 1053.

VDH Guidelines for Healthcare Procedures in Schools 387
Use of Mechanical Ventilators
This section provides a general overview of basic ventilator terminology, appropriate
personnel, and possible problems and emergency management. It is NOT intended to be used
as a comprehensive guide to understanding, maintaining, or troubleshooting ventilators. Other
manuals and training are available for this. Also, each student on mechanical ventilation should
have a detailed individualized healthcare plan describing specific guidelines for that student's
ventilator and care.
Overview
Mechanical ventilators deliver air to the lungs when the student is not able to do so. They may
use either positive or negative pressure to ventilate the student. Positive pressure ventilators
exert a positive pressure on the airway to push air into the lungs. Negative pressure ventilators
act by creating negative pressure, which pulls air into the lungs. Ventilators help to sustain life
when a student cannot breathe adequately on his or her own.
Most ventilators are positive pressure ventilators that deliver air through a mask, cannula,
endotracheal tube, or tracheostomy tube. In the school setting, the student almost always has a
tracheostomy and may need a ventilator due to lung damage, neurological damage (e.g., spinal
cord injuries), or muscle weakness (e.g., muscular dystrophy). The ventilator is small enough
to be portable and usually mounts on the back of a wheelchair. Negative pressure ventilators,
such as the iron lung, shell (cuirass) ventilator, and the body wrap (raincoat) ventilator are
much larger and used primarily for neuromuscular disorders. They are rarely encountered in
the school setting.
The ventilator can provide total respiratory support for a person who cannot breathe unassisted
or can assist the student who is able to breathe, but whose respiratory ability is not adequate.
The student may breathe partially on his or her own just requiring extra breaths by the
ventilator or needing positive end expiratory pressure (PEEP) to keep the alveoli open.
Humidification is also needed for the student who has a tracheostomy requiring ventilation.
Families with ventilator-dependent children need much support. They usually have nursing and
other support services coming into the home. They may experience burnout or stress regarding
the student's multiple needs. The student on mechanical ventilation is dependent on others for
many things. Anxiety related to this dependence on others and to communication difficulties
may present many challenges and needs.

VDH Guidelines for Healthcare Procedures in Schools 388
Settings
Most students who require ventilators will need them at all times, including transport to and
from school. Maintaining a power source will be critical wherever the student may be. Any
potential site should have a back-up power source and grounded electrical outlets available.
Any student at school with a ventilator must also have a "go bag" or other supply kit containing
a manual resuscitation bag, a spare tracheostomy tube, and suction equipment and supplies.
See "go-bag" checklist in the Appendix.
Staff Preparation
Care of the student assisted by a ventilator should be performed by a qualified registered school
nurse or respiratory therapist, or licensed practical nurse or other specifically trained unlicensed
assistive personnel under the supervision of a registered school nurse.
Providing educational services to a student assisted by mechanical ventilation is a complex and
challenging commitment. There are various health care delivery service models, and some
utilize nonmedical personnel to provide ventilator care.
All caregivers should:
• Be aware of state nurse practice acts that may specify current care delivery and
delegation issues
• Be trained in student-specific ventilator procedures due to the technical and unique
nature of care
• Be immediately available to the student who is dependent on mechanical ventilation in
all school environments, including the classroom and transportation vehicle
• Understand the amount of assistance each student requires from the ventilator
• Know specialized cardiopulmonary resuscitation for students with tracheostomies
All school personnel who have regular contact with a student requiring mechanical ventilation
must receive training covering the student’s specific needs, potential problems, and
implementation of the established emergency plan.
The basic skills checklists for troubleshooting the ventilator machine and ventilator alarms in
Appendix B can be used as a foundation for ventilator training. However, their use alone does
not constitute comprehensive competency-based training. Additional training in student-
specific techniques, equipment, and health care needs is essential and should be documented.
Individual Healthcare Plan (IHP)
Each student’s IHP must be tailored to the individual’s needs. A sample plan is included in
Appendix A. When preparing an IHP for a student who requires the use of a ventilator, the
following items should be considered:

VDH Guidelines for Healthcare Procedures in Schools 389
• Underlying condition and the possible problems arising from the condition or treatment
• Healthcare provider's orders for ventilation and settings
• Degree of ventilator dependency
• Ventilator settings and the frequency that settings should be checked
• Student’s ability to request assistance
• Baseline respiratory status
• Signs and symptoms of respiratory distress (e.g., cyanosis, agitation)
• Appropriate response to ventilator alarms
• Personnel needed to provide qualified care
• Plan for caregiver absences
• Back-up power supply available at all times (e.g., battery, generator)
• Written emergency plan
• Emergency card with ventilator settings posted near ventilator at all times
• Phone list with numbers of family, healthcare providers, home care agency, and
medical equipment supplier
• Routine suctioning schedule and guidelines/indications for additional suctioning
• Tracheostomy tube size and type
• Plan for tracheostomy care and supplies (see section on tracheostomies)
• Need for humidification and/or oxygen
• Use of pulse oximetry
• Measures to prevent respiratory infection
• Notification of EMS, power company, phone company, and fire department of
ventilator dependent student and /or oxygen use at school
• Plan for transport to and from school
• Latex allergy precautions
• Standard precautions

VDH Guidelines for Healthcare Procedures in Schools 390
Source:
Bowden, V., & Greenberg, C. (2012). Pediatric nursing procedures (Third ed.). Philadelphia:
Wolters Kluwer Health/Lippincott Williams & Wilkins.
California Thoracic Society. (2010). Home care of children on ventilators: A parent's guide.
Available online:
http://www.calthoracic.org/sites/default/files/Vent_Dependant_Children_booklet_0.pdf
Connecticut State Department of Education. (2012). Clinical procedure guidelines for
Connecticut school nurses. Middlebury, CT: CSDOE, 86-87 .
De, A., Kun, S. & Keens, T. (2015). Home care ventilation for children: Lessons learned at
Children's Hospital Los Angeles. Available online: http://respiratory-care-sleep-
medicine.advanceweb.com/Features/Articles/Home-Care-Ventilation-For-Children.aspx
Hegarty, L. (2011). Caring for the Chronically Trached and/ or Ventilator Dependent Child in
the School Setting. Presentation at Kids, School and Medical Needs. Mesa, AZ: Banner
Desert Medical Center.
McDonald, J. (2004). Ventilator Awareness: An Educational Resource for School Teachers.
Tracheostomy.com. Available online:
http://www.tracheostomy.com/resources/pdf/ventilator_awareness.pdf
Porter, S., Branowicki, P., & Palfrey, J. (2014). Supporting students with special health care
needs: Guidelines and procedures for schools (3rd ed.). Baltimore: Paul H. Brookes
Publishing, 356-368.
Selekman, J. (2013). School nursing: A comprehensive text (2nd ed.). Philadelphia: F.A.
Davis1053-1054.

VDH Guidelines for Healthcare Procedures in Schools 391
Ventilator Safety Checks
Standard ventilator features should be checked each day when the student arrives at school and
more often as specified by the student's IHP. Setting up a routine is highly recommended.
Note: Family provides equipment and supplies.
1. Before focusing on the machines and devices, focus first on the student--assess breathing
and general health.
2. Are the ventilator settings the same as ordered by the healthcare provider? Check each
setting. Make sure a card with ventilator settings is posted near the ventilator at all times.
Keep the ventilator out of direct sunlight.
3. Check the power source:
Power source must be available and must be connected for machine to function. Outlets
must be accessible and grounded. No other devices should be plugged into the outlet (to
help to avoid a short from occurring).
• Internal battery
Internal battery is generally a 12-volt DC battery intended for emergency use only.
• External battery
External battery is connected to the ventilator via a cable and will operate for
approximately 10 hours if fully charged. Make sure the external battery is not touching
the ventilator because the battery might heat up and be damaged.
• Back-up battery
The back-up battery may be kept at home.
• Emergency power supply
4. Check ventilator circuit. Drain tubing of excess water. Check for kinks in the tubing.
Inspect for wear and cracks. Check connections for tightness. Make sure tubing is routed
to prevent water from draining into the student's airway or back into the humidifier or
ventilator.
Tubing and equipment required:
• Pressure tubing
The ventilator circuit consists of the tubing that is attached to the ventilator and the
student’s tracheostomy tube and other components such as the humidifier and the
exhalation and PEEP valves. The tubing carries the air from the ventilator to the
student.

VDH Guidelines for Healthcare Procedures in Schools 392
• Valves:
o Exhalation valve
Caution always should be taken not to block or obstruct the exhalation valve
with the student’s clothing or equipment.
o PEEP valve
• Other adaptors needed for a particular student including spares of each one
Routine cleaning of ventilator circuits should be done at home daily or as needed.
5. Check oxygen source (if prescribed for the student):
• Adequate supply of oxygen, functioning gauge, and spare tank
Ensure adequate supply of oxygen is available for the day. Identify flow in liters per
minute (LPM) and percentage of oxygen.
• Connection to ventilator and spare tubing
6. Check humidification source:
Any student whose nose and mouth are bypassed by a tracheostomy tube needs a source of
humidification. The humidifier must have an adequate amount of water and be set at a safe
temperature. Make sure the student's head is higher than the humidifier. Many students use
a heat-moisture exchanger (HME) for humidification. Check the "artificial nose" (HME) to
make sure it is not wet or dirty (can set off the high-pressure alarm).
• Heat-moisture exchanger
• Passive condenser
7. Check alarms:
Alarms should never be turned off. All ventilator alarm settings should be written on the
emergency card posted on a visible side of the ventilator.
• High and low pressure
• Volume
• Power source
8. Other equipment that should be checked daily:
Each student with a ventilator should have a “go bag” containing all of these supplies.
• Manual resuscitation bag and adaptor or mask
• Spare tracheostomy tube and supplies
• Suctioning equipment

VDH Guidelines for Healthcare Procedures in Schools 393
Source:
Bowden, V., & Greenberg, C. (2012). Pediatric nursing procedures (Third ed.). Philadelphia:
Wolters Kluwer Health/Lippincott Williams & Wilkins.
California Thoracic Society. (2010). Home care of children on ventilators: A parent's guide.
Available online:
http://www.calthoracic.org/sites/default/files/Vent_Dependant_Children_booklet_0.pdf
Connecticut State Department of Education. (2012). Clinical procedure guidelines for
Connecticut school nurses. Middlebury, CT: CSDOE, 86-87.
De, A., Kun, S. & Keens, T. (2015). Home care ventilation for children: Lessons learned at
Children's Hospital Los Angeles. Available online: http://respiratory-care-sleep-
medicine.advanceweb.com/Features/Articles/Home-Care-Ventilation-For-Children.aspx
Hegarty, L. (2011). Caring for the Chronically Trached and/ or Ventilator Dependent Child in
the School Setting. Presentation at Kids, School and Medical Needs. Mesa, AZ: Banner
Desert Medical Center.
McDonald, J. (2004). Ventilator Awareness: An Educational Resource for School Teachers.
Tracheostomy.com. Available online:
http://www.tracheostomy.com/resources/pdf/ventilator_awareness.pdf
Porter, S., Branowicki, P., & Palfrey, J. (2014). Supporting students with special health care
needs: Guidelines and procedures for schools (3rd ed.). Baltimore: Paul H. Brookes
Publishing, 356-368.
Selekman, J. (2013). School nursing: A comprehensive text (2nd ed.). Philadelphia: F.A.
Davis1053-1054.

VDH Guidelines for Healthcare Procedures in Schools 394
Ventilator Parameters
Ventilator parameters are prescribed for each student requiring ventilator assistance. They
should be checked upon arrival at school and several times during the day as specified in the
student's IHP, or more frequently if the student’s status changes. A clearly-visible card, stating
the student’s ventilator settings, should be mounted on the ventilator.
• Tidal Volume (VT)
The amount of air (cc's) in each breath. Determined by the student’s size.
• Respiratory rate
Number of breaths per minute delivered by the ventilator; also called frequency.
• Oxygen
Delivered in liters/minute. Order usually specifies desired O2 saturation level.
• Peak inspiratory pressure (PIP)
Amount of pressure required to inflate the lungs to the prescribed tidal volume.
• Positive end expiratory pressure (PEEP)
Amount of pressure needed to keep the lungs from collapsing after exhalation.
• Inspiratory time ("I" Time)
The amount of time in the vent cycle used to deliver a breath. The I:E ratio describes the
amount of inspiratory versus expiratory time taken with each breath and can be adjusted to
fit the individual student's needs.
• Sigh volume
Large, ventilator-delivered breath that is usually 1 1/2 times as large as the tidal volume
VDH Guidelines for Healthcare Procedures in Schools 395
Sources:
Bowden, V., & Greenberg, C. (2012). Pediatric nursing procedures (Third ed.). Philadelphia:
Wolters Kluwer Health/Lippincott Williams & Wilkins.
California Thoracic Society. (2010). Home care of children on ventilators: A parent's guide.
Available online:
http://www.calthoracic.org/sites/default/files/Vent_Dependant_Children_booklet_0.pdf
Connecticut State Department of Education. (2012). Clinical procedure guidelines for
Connecticut school nurses. Middlebury, CT: CSDOE, 86-87.
De, A., Kun, S. & Keens, T. (2015). Home care ventilation for children: Lessons learned at
Children's Hospital Los Angeles. Available online: http://respiratory-care-sleep-
medicine.advanceweb.com/Features/Articles/Home-Care-Ventilation-For-Children.aspx
Porter, S., Branowicki, P., & Palfrey, J. (2014). Supporting students with special health care
needs: Guidelines and procedures for schools (3rd ed.). Baltimore: Paul H. Brookes
Publishing, 356-368.
Selekman, J. (2013). School nursing: A comprehensive text (2nd ed.). Philadelphia: F.A.
Davis1053-1054.

VDH Guidelines for Healthcare Procedures in Schools 396
Ventilator Modes
• Assist control (AC)
With each spontaneous breath the student takes, a preset tidal volume is triggered and
delivered. If the student does not take spontaneous breaths, the ventilator automatically
delivers a breath at a preset rate and tidal volume.
• Synchronized intermittent mandatory ventilation (SIMV)
A mandatory number of mechanical breaths are synchronized with the student's
spontaneous breaths at a preset frequency and volume. Allows the student to breathe in
between the ventilator breaths at his or her own tidal volume. The ventilator senses the
student's spontaneous breath and synchronizes the timed ventilator breath with the student's
inspiratory effort, reducing competition between machine breaths and spontaneous breaths.
• Pressure support ventilation (PSV)
When the child takes a spontaneous breath, the ventilator delivers a preset sustained peak
pressure throughout the inspiratory phase, thus resulting in increased tidal volume. the
higher the pressure support, the larger the tidal volume.
• Intermittent mandatory ventilation (IMV)
Delivers a preset number of mechanical breaths at a preset tidal volume but allows the
student to breathe in between the ventilator breaths at their own tidal volume.
• Continuous positive airway pressure (CPAP)
A constant elevated level of airway pressure is maintained during inspiration and expiration
with each spontaneous breath the child takes. Essentially PEEP without ventilator-
delivered breaths of any type. It is student triggered and terminate.
• Control mode; Controlled mandatory ventilation (CMV)
A mechanical breath is automatically given at a preset rate and tidal volume. Used for
apneic or chemically paralyzed students.
• Pressure regulated volume control (PRVC)
A preset peak inspiratory pressure and preset tidal volume are maintained during each
spontaneous breath. May be used as a supplement, such as with a student who has
muscular dystrophy.

VDH Guidelines for Healthcare Procedures in Schools 397
Ventilator Alarms
Ventilator alarms must remain on at all times.
• High-pressure alarm
Reflects an excessive inspiratory pressure. May indicate increased resistance or
obstruction. Commonly caused by:
o coughing--can briefly cause "back pressure" in the tubing
o airway obstruction--can be caused by a mucous plug
o bent or kinked tubing
o excessive water in the tubing
o a new piston seal that is tight
o changes in student's breathing--e.g., breathing hard and fast
• Low-pressure alarm
Indicates a too-low inspiratory pressure. Warns of a leak in the system; may signal that
adequate volume is not being delivered. Commonly caused by:
o ventilator tubing becoming disconnected
o loose connection in the tubing circuit
o leaks in the exhalation valve
o humidification jar not tightly closed
o exhalation and pressure tubing have been accidentally switched
o cracks, tears, or holes somewhere in the tubing
• Power source alarm
Indicates a change in power. Alarms should never be turned off. May provide warning
when battery source is getting low.
• Temperature alarm
The majority of home care ventilators do not have temperature alarms built into the
humidifier unit. The temperature of inspired gas can be checked with an in-line
thermometer. Check water level and assess connections.

VDH Guidelines for Healthcare Procedures in Schools 398
Possible Problems When Using a Ventilator that Requires
Immediate Attention
• Respiratory distress
o increased shortness of breath
o agitation
o blueness or pallor of lips or nail beds
o retractions (pulling in of chest muscles)
o rapid or pounding pulse
o confusion
Immediately check and reassure the student. Call for assistance. Never leave the student
alone.
Check:
o if student needs suctioning
o for occlusion of the tracheostomy tube by a plug or secretions
o whether student may be coughing or doing something else to raise pressure
transiently for a dislodged tube or other airway problems
o connections to the ventilator
o exhalation valve to see if it is obstructed
o power source for ventilator
o adequacy of oxygen supply
Student may be disconnected from the ventilator and ventilated by a manual resuscitation
bag if needed while being checked.
• Dislodged tracheostomy
Change the tracheostomy tube. (See tracheostomy section).
• Blocked tracheostomy
Suction tracheostomy. If still blocked, replace trach.
• Increased secretions
Suction tracheostomy more frequently.
• Wheezing
Check student's IHP. Administer bronchodilators or give nebulizer treatment, if ordered.
Notify school nurse and family if continued wheezing. Consider tracheostomy tube change
if not resolved with nebulizer and suction. May be partially occluded by retained
secretions.
• Respiratory distress persists or student becomes unconscious
Activate school emergency plan immediately. Continue using manual resuscitator.
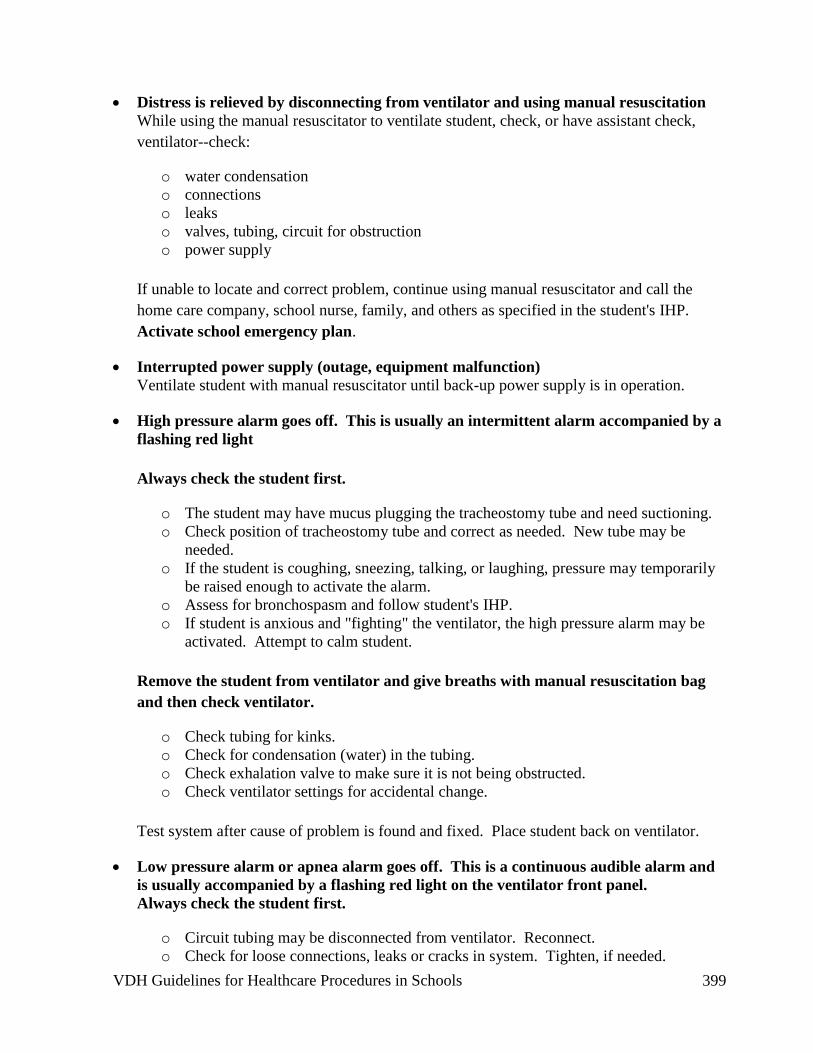
VDH Guidelines for Healthcare Procedures in Schools 399
• Distress is relieved by disconnecting from ventilator and using manual resuscitation
While using the manual resuscitator to ventilate student, check, or have assistant check,
ventilator--check:
o water condensation
o connections
o leaks
o valves, tubing, circuit for obstruction
o power supply
If unable to locate and correct problem, continue using manual resuscitator and call the
home care company, school nurse, family, and others as specified in the student's IHP.
Activate school emergency plan.
• Interrupted power supply (outage, equipment malfunction)
Ventilate student with manual resuscitator until back-up power supply is in operation.
• High pressure alarm goes off. This is usually an intermittent alarm accompanied by a
flashing red light
Always check the student first.
o The student may have mucus plugging the tracheostomy tube and need suctioning.
o Check position of tracheostomy tube and correct as needed. New tube may be
needed.
o If the student is coughing, sneezing, talking, or laughing, pressure may temporarily
be raised enough to activate the alarm.
o Assess for bronchospasm and follow student's IHP.
o If student is anxious and "fighting" the ventilator, the high pressure alarm may be
activated. Attempt to calm student.
Remove the student from ventilator and give breaths with manual resuscitation bag
and then check ventilator.
o Check tubing for kinks.
o Check for condensation (water) in the tubing.
o Check exhalation valve to make sure it is not being obstructed.
o Check ventilator settings for accidental change.
Test system after cause of problem is found and fixed. Place student back on ventilator.
• Low pressure alarm or apnea alarm goes off. This is a continuous audible alarm and
is usually accompanied by a flashing red light on the ventilator front panel.
Always check the student first.
o Circuit tubing may be disconnected from ventilator. Reconnect.
o Check for loose connections, leaks or cracks in system. Tighten, if needed.

VDH Guidelines for Healthcare Procedures in Schools 400
o Check tracheostomy tube for correct placement.
o If student has a cuffed tube, check for leak in cuff.
o Replace exhalation valve if it is wet or punctured.
o Check for accidental change in ventilator settings.
Remove the student from ventilator and give breaths with manual resuscitation bag
and check the ventilator.
Test system after cause of problem is found and fixed. Place student back on ventilator.
• Power alarm sounds. This is a continuous alarm, usually accompanied by a flashing
light as well.
The alarm may sound whenever power source is interrupted (e.g., battery change). Check
to see that power source is functioning. Make sure ventilator plugged in outlet and power
supply available if using AC power. If all three power sources fail, remove student from
ventilator. Give breaths with manual resuscitation bag and activate the school
emergency plan.

VDH Guidelines for Healthcare Procedures in Schools 401
Source:
Bowden, V., & Greenberg, C. (2012). Pediatric nursing procedures (Third ed.). Philadelphia: Wolters
Kluwer Health/Lippincott Williams & Wilkins.
California Thoracic Society. (2010). Home care of children on ventilators: A parent's guide.
Available online:
http://www.calthoracic.org/sites/default/files/Vent_Dependant_Children_booklet_0.pdf
Connecticut State Department of Education. (2012). Clinical procedure guidelines for Connecticut
school nurses. Middlebury, CT: CSDOE, 86-87.
De, A., Kun, S. & Keens, T. (2015). Home care ventilation for children: Lessons learned at Children's
Hospital Los Angeles. Available online: http://respiratory-care-sleep-
medicine.advanceweb.com/Features/Articles/Home-Care-Ventilation-For-Children.aspx
Hegarty, L. (2011). Caring for the Chronically Trached and/ or Ventilator Dependent Child in the
School Setting. Presentation at Kids, School and Medical Needs. Mesa, AZ: Banner Desert
Medical Center.
McDonald, J. (2004). Ventilator Awareness: An Educational Resource for School Teachers.
Tracheostomy.com. Available online:
http://www.tracheostomy.com/resources/pdf/ventilator_awareness.pdf
Porter, S., Branowicki, P., & Palfrey, J. (2014). Supporting students with special health care needs:
Guidelines and procedures for schools (3rd ed.). Baltimore: Paul H. Brookes Publishing, 356-
368.
Selekman, J. (2013). School nursing: A comprehensive text (2nd ed.). Philadelphia: F.A. Davis1053-
1054.

VDH Guidelines for Healthcare Procedures in Schools 402
Checking the Ventilator
The California Thoracic Society has developed an "A-B-C-D" acronym to help in remembering
what to check first in an emergency with a ventilator.
A is for Airway
1. Check the tracheostomy tube is in place. Ventilator alarms might not go off even if a
tracheostomy tube has fallen partly—or all of the way—out.
2. Suction the trach and make sure that air is moving through it.
3. When in doubt, change the tracheostomy tube.
4. If none of these steps help, then start CPR.
B is for Breathing Machine (i.e., mechanical ventilator)
1. If the trach isn’t plugged and it is in the right place, then check the ventilator.
2. Are the settings right?
3. Which alarm is going off?
4. Is the ventilator working at all? Make sure the electrical cord is plugged all the way in to
the back of the ventilator and into the wall outlet.
5. Check to make sure that the ventilator tubing is free of excess moisture.
6. Check the battery.
7. When in doubt—and if your child looks blue or lethargic—use the manual
resuscitation bag (Ambu-bag™) to resuscitate by hand, and then switch to the back-
up ventilator. Use oxygen with the Ambu-bag™.
C is for Child
1. Once you are sure that there is no problem with either the airway or the breathing machine,
look at the child from head to toe. Is he coming down with an illness? Is the child irritable
or less alert? Does the child interact with caregivers? Notice if a fever, an increase or
change in secretions, sweating, or fast heartbeat are present.
D is for Discussion with your doctor
1. If the child is in extreme distress, call 9-1-1.
2. If the child seems okay, but showing some respiratory symptoms such as coming down with
a cold, notify the parent. Recommend that the parent call the doctor to let him/her know the
child is behaving differently than normal. The health care team is relying on daily
caregivers to provide information about changes in assessment.
California Thoracic Society. (2010). Home Care of Children on Ventilators: A Parent's Guide. p. 39-40.

VDH Guidelines for Healthcare Procedures in Schools 403
General Information Sheet .
Information for Students
Who Use Mechanical Ventilators
Date: ___________________
To: _____________________________ _________________________________
(Teachers, Instructional assistants, Bus drivers, etc)
Name of Student: ______________________________________
This student requires a ventilator, or breathing machine, to push air into the lungs. The
ventilator usually is attached through a tracheostomy tube (see tracheostomy care).
The ventilator is powered by a battery or other power source and must be with the student
at all times, including during transportation.
Ventilator care will be conducted by a trained caregiver who will be with the student at all
times.
The student’s health care plan will address care needs during the day, feeding issues; and
avoidance of exposure to respiratory infections including colds.
Contact _______________________________ at __________________ (phone number)
for additional information or if the student experiences any problems with the ventilator.
School staff in frequent contact with this student are encouraged to complete
cardiopulmonary resuscitation (CPR) training and specialized training for people with
tracheostomies.
Source:
Adapted from: Porter, S., Haynie, M., Bierle, T., Caldwell, T. H., & Palfrey, J. S. (Eds.). (1997). Children
and youth assisted by medical technology in educational settings: guidelines for care (2nd ed.). Baltimore:
Paul H. Brookes Publishing.
VDH Guidelines for Healthcare Procedures in Schools 404
Chapter 7: Special Care
Issues
Attention Deficit/Hyperactivity Disorder
Food Allergies
Managing Food Allergies in Schools
Latex Allergies
Service Animals in Schools
Trauma-Informed Care
Measuring Body Temperature

VDH Guidelines for Healthcare Procedures in Schools 405
Attention Deficit Hyperactivity Disorder (ADHD)
Overview
Attention deficit hyperactivity disorder (ADHD), first described in the medical literature in
1902, is the most common behavioral disorder diagnosed in childhood.
The core symptoms of ADHD include developmentally inappropriate levels of attention,
concentration, activity, distractibility, and/or impulsivity. Symptoms of ADHD are first
apparent in preschool or early elementary school and cause problems in more than one setting,
such as both school and home.
Children with ADHD may experience academic difficulties, rejection by peers, and higher
injury rates. Adolescents and adults with untreated ADHD are at greater risk for substance
abuse, as well as injuries and dysfunctional social relationships. Parents of children with
ADHD often experience frustration, marital discord, and additional financial expenses. Long
term adverse consequences from ADHD include negative effects on academic performance,
vocational success, and social functioning.
Children with ADHD present challenges and often need more services from the health care,
judicial, education, and social service systems. In 2011, The American Academy of Pediatrics
estimated that 8% of school age children had ADHD while the FDA and CDC found 11% of
children had been diagnosed with ADHD (other estimates range from 2-15%), with a higher
rate among boys than girls.
Current Diagnostic Criteria
According to the Diagnostic and Statistical Manual, 5th Edition (DSM-5), there are three
presentations of ADHD:
• Primarily Hyperactive/Impulsive—exhibit 6 or more symptoms of
hyperactivity/impulsivity
• Primarily Inattentive–exhibit 6 or more symptoms of inattention.
• Combined—exhibits 6 or more symptoms of both hyperactivity/impulsivity and
inattention; most children with ADHD exhibit this presentation.
To be diagnosed with ADHD, the child must not only meet these behavioral criteria, he/she
must demonstrate functional impairment, display symptoms in two or more settings, and have
had evidence of onset of symptoms before the age of twelve. For many years, diagnostic
criteria for ADHD focused on children. DSM-5 recognizes that ADHD often persists into
adulthood and includes guidelines for diagnosing and treating adults. People 17 and older
must have at least five symptoms of inattention or hyperactivity/impulsivity.

VDH Guidelines for Healthcare Procedures in Schools 406
It is important to realize that students with ADHD may have other co-existing conditions, such
as learning disabilities, oppositional defiant disorder, and/or anxiety disorders, although many
students have ADHD alone. Not all students with inattention, hyperactivity, and impulsivity
have ADHD. A comprehensive evaluation must take place for diagnosis. Generally, this
evaluation will include interviews with both the parents and the student, as well as observations
of the student in school. Rating scales from both the parents and educators are often used in
this process. In addition, psychoeducational testing can be useful in the evaluation to rule out
specific medical syndromes, neurologic disorders, pervasive developmental disorders, and
sensory deficits. Psychological evaluation can help evaluate for conduct disorders, oppositional
defiant disorders, anxiety, depression, adjustment reaction, obsessive-compulsive disorder,
family dysfunction, or poor environmental fit.
The underlying cause of ADHD is not understood. Research indicates that the disorder may
have a genetic link and may be related to a biochemical imbalance or structural anomaly in the
brain. Children born preterm have a 2-3 times greater risk of developing ADHD. However, the
exact cause of ADHD in any specific student cannot usually be determined.
The DSM-5 diagnostic criteria for ADHD are based upon the following five observable
characteristics:
A. Either 1 or 2
1. Six or more of the following symptoms of inattention presentation have persisted
for at least 6 months to a degree that is maladaptive and inconsistent with the
developmental level:
• Often fails to give close attention to details or makes careless mistakes in schoolwork,
work, or other activities.
• Often has difficulty sustaining attention in tasks or play activities.
• Often does not listen when spoken to directly.
• Often does not follow through on instructions and fails to finish schoolwork, chores, or
duties in the workplace (not due to oppositional behavior or failure to understand
instructions).
• Often has difficulty organizing tasks and activities.
• Often avoids, dislikes, or is reluctant to engage in tasks that require sustained mental
effort (such as schoolwork or homework).
• Often loses things necessary for tasks or activities (e.g., toys, school assignments, pencils,
or books).
• Is easily distracted by extraneous stimuli.
• Is often forgetful in daily activities.
2. Six or more of the following symptoms of hyperactivity/impulsivity presentation
have persisted for at least six months to a degree that is maladaptive and
inconsistent with the developmental level:

VDH Guidelines for Healthcare Procedures in Schools 407
Hyperactivity
• Often fidgets with hands or feet or squirms in seat.
• Often leaves seat in classroom or in other situations in which remaining seated is
expected.
• Often runs about or climbs excessively in situations in which it is inappropriate (in
adolescents and adults, may be limited to subjective feelings of restlessness).
• Often has difficulty playing or engaging in activities quietly.
• Is often “on the go” or often acts as if “driven by a motor.”
• Often talks excessively.
Impulsivity
• Often blurts out answers before questions have been completed.
• Often has difficulty awaiting a turn.
• Often interrupts or intrudes on others (e.g., butts into conversations or games).
3. Some hyperactive impulsive or inattentive symptoms that caused impairment were
present before 12 years of age.
4. Some impairment from the symptoms is present in two or more settings (e.g., at
school or at work or at home).
5. There must be clear evidence of clinically significant impairment in social,
academic, or occupational functioning.
6. The symptoms do not occur exclusively during the course of schizophrenia, or other
psychotic disorder, and are not better accounted for by another mental disorder (e.g.,
mood disorder, anxiety disorder, dissociative disorder, or a personality disorder).
DSM-5 does allow a person to be diagnosed with ADHD and Autism Spectrum
Disorder.
The Vanderbilt ADHD Rating Scales are recommended as part of the evaluation and diagnosis
of ADHD in children and adolescents. The following behavioral rating scales can be used in
addition to the initial evaluation: Conners' Rating Scales (the revised Conners' Parent Rating
Scale [CPRS-R], the revised Conners' Teacher Rating Scale [CTRS-R], and the Conners'/Wells
Self-Report of Symptoms rating scale [CASS]), Achenbach Scales: Child Behavioral Checklist
(CBCL), Teacher Report Form (TRF), Youth Self Report (YSR), ADHD Rating Scale – IV
(ADHD RS-IV) (DSM-IV-based), and the Swan, Nolan, and Pelham Questionnaire (SNAP)
(DSM-IV-based).

VDH Guidelines for Healthcare Procedures in Schools 408
Sources:
AHRQ-CMS Pediatric Quality Measures Program. (2014). Behavior therapy as first-line
treatment for preschool-aged children with ADHD. Measure Developer: Pediatric
Measurement Center of Excellence (PMCoE). Available online:
http://www.ahrq.gov/sites/default/files/wysiwyg/policymakers/chipra/factsheets/chipra_
1415-p005-2-ef.pdf.
Agency for Healthcare Research and Quality. (December 1999). Treatment of Attention
Deficit Hyperactivity Disorder. Summary, Evidence Report/Technology Assessment:
Number 11. AHRQ Publication No. 99-E017. http://www.ahrq.gov/clinic/epcsums/
adhdsum.htm
American Academy of Pediatrics. (2011). Clinical practice guideline for the diagnosis,
evaluation, and treatment of attention-deficit/hyperactivity disorder in children and
adolescents. Pediatrics 128: 1007-1022.
American Academy of Pediatrics. (2011). Implementing the key action statements: An
algorithm and explanation for process of care for the evaluation, diagnosis, treatment,
and monitoring of ADHD in children and adolescents. Pediatrics 128: S111-S1121.
American Psychiatric Association (2013). Attention deficit/Hyperactivity disorder factsheet.
Available online: http://www.dsm5.org/Documents/ADHD%20Fact%20Sheet.pdf
American Psychiatric Association (2013). Diagnostic and statistical manual of mental
disorders (DSM-5), Washington, D.C.: American Psychiatric Association.
Centers for Disease Control and Prevention. (2015). ADHD Recommendations. Available
online: http://www.cdc.gov/ncbddd/adhd/guidelines.html
Centers for Disease Control and Prevention. (2015). CDC publishes first national study on use
of behavioral therapy, medication and dietary supplements for ADHD in children.
News Release. Available online: http://www.cdc.gov/media/releases/2015/p0401-
adhd.html
Charach A, Dashti B, Carson P, Booker L, Lim CG, Lillie E, et al. (2011). Attention deficit
hyperactivity disorder: effectiveness of treatment in at-risk preschoolers; Long-term
effectiveness in all ages; and variability in prevalence, diagnosis, and treatment.
Comparative Effectiveness Review No. 44. AHRQ Publication No. 12-EHC003-EF.
Rockville, MD: Agency for Healthcare Research and Quality.. Available at:
www.effectivehealthcare.ahrq.gov/reports/final.cfm
Children and Adults with Attention-Deficit/Hyperactivity Disorder. (2013). ADHD and the
DSM-5 Factsheet 2.0. National Resource Center on AD/HD. Available online:

VDH Guidelines for Healthcare Procedures in Schools 409
http://www.help4adhd.org/documents/adhd%20and%20the%20dsm%205%20fact%20s
heet%202.0.pdf
Food and Drug Administration. (2015). Dealing with ADHD: What you need to know.
Consumer Update August 6, 2015. Available online:
www.fda.gov/ForConsumers/ConsumerUpdates/ucm269188.htm
Development Group of the Clinical Practice Guideline on Attention Deficit Hyperactivity
Disorder. (2010). Clinical practice guideline on attention deficit hyperactivity disorder
(ADHD) in children and adolescents. Madrid (Spain): Catalan Agency for Health
Information, Assessment and Quality. In: National Guideline Clearinghouse (NGC)
[Web site]. Rockville (MD): Agency for Healthcare Research and Quality (AHRQ);
2013 July (revised 2015 July). Available online:
http://www.guideline.gov/content.aspx?id=45143&search=attention+deficit
National Guideline Clearinghouse (NGC). (2014). Guideline synthesis: Diagnosis and
treatment of attention deficit hyperactivity disorder (ADHD). In: National Guideline
Clearinghouse (NGC) [Web site]. Rockville (MD): Agency for Healthcare Research and
Quality (AHRQ); 2011 Mar (revised 2014 Oct). Available online:
http://www.guideline.gov/syntheses/synthesis.aspx?id=48532&search=attention+deficit
National Institutes of Health. (February 2000). Consensus Development Conference
Statement: Diagnosis and treatment of attention-deficit/hyperactivity disorder (ADHD).
Journal of the American Academy of Child and Adolescent Psychiatry 39:182-193.
Southammakosane, C. & Schmitz, K. (2015). Pediatric psychopharmacology for treatment of
ADHD, depression, and anxiety: State-of-the-Art review article. Pediatrics 136(2):
351-359.
Virginia Department of Health. (November 2002). The Prevalence of Methylphenidate and
Amphetamine Prescriptions in the Commonwealth. House Document No. 12 pursuant
to House Joint Resolution 122. Richmond, VA.

VDH Guidelines for Healthcare Procedures in Schools 410
Management of ADHD
Clinical Practice Guidelines
The American Academy of Pediatrics (AAP) partnered with the Agency for Healthcare
Research and Quality (AHRQ) and other agencies in developing the evidence base for clinical
practice guidelines for the treatment of ADHD. They recommend use of stimulant medication
and/or behavioral therapy to reach target goals. They emphasize that primary care clinicians
should collaborate with both parents/guardians and school-based professionals to monitor the
progress and effectiveness of interventions.
Action Statement 1: The primary care clinician should initiate an evaluation for ADHD for any
child 4 through 18 years of age who presents with academic or behavioral problems and
symptoms of inattention, hyperactivity, or impulsivity (quality of evidence B/strong
recommendation).
Action Statement 2: To make a diagnosis of ADHD, the primary care clinician should
determine that Diagnostic and Statistical Manual of Mental Disorders, Fifth Edition Text
Revision (DSM-5) criteria have been met (including documentation of impairment in more than
1 major setting), and information should be obtained primarily from reports from parents or
guardians, teachers, and other school and mental health clinicians involved in the child's care.
The primary care clinician should also rule out any alternative cause (quality of evidence
B/strong recommendation).
Action Statement 3: In the evaluation of a child for ADHD, the primary care clinician should
include assessment for other conditions that might coexist with ADHD, including emotional or
behavioral (e.g., anxiety, depressive, oppositional defiant, and conduct disorders),
developmental (e.g., learning and language disorders or other neurodevelopmental disorders),
and physical (e.g., tics, sleep apnea) conditions (quality of evidence B/strong
recommendation).
Action Statement 4: The primary care clinician should recognize ADHD as a chronic condition
and, therefore, consider children and adolescents with ADHD as children and youth with special
health care needs. Management of children and youth with special health care needs should
follow the principles of the chronic care model and the medical home (quality of evidence
B/strong recommendation).
Action Statement 5: Recommendations for treatment of children and youth with ADHD vary
depending on the patient's age.
Action Statement 5a: For preschool-aged children (4-5 years of age), the primary care clinician
should prescribe evidence-based parent and/or teacher-administered behavior therapy as the first
line of treatment (quality of evidence A/strong recommendation) and may prescribe
methylphenidate if the behavior interventions do not provide significant improvement and there

VDH Guidelines for Healthcare Procedures in Schools 411
is moderate-to-severe continuing disturbance in the child's function. In areas in which evidence-
based behavioral treatments are not available, the clinician needs to weigh the risks of starting
medication at an early age against the harm of delaying diagnosis and treatment (quality of
evidence B/recommendation).
Action Statement 5b: For elementary school-aged children (6-11 years of age), the primary
care clinician should prescribe U.S. Food and Drug Administration (FDA) approved
medications for ADHD (quality of evidence A/strong recommendation) and/or evidence
based parent- and/or teacher administered behavior therapy as treatment for ADHD, preferably
both (quality of evidence B/strong recommendation). The evidence is particularly strong for
stimulant medications and sufficient but less strong for atomoxetine, extended-release
guanfacine, and extended-release clonidine (in that order) (quality of evidence A/strong
recommendation). The school environment, program, or placement is a part of any treatment
plan.
Action Statement 6: Primary care clinicians should titrate doses of medication for ADHD to
achieve maximum benefit with minimum adverse effects (quality of evidence B/strong
recommendation).
Pharmacotherapies
Psychopharmocologic agents represent one part of a thorough treatment plan for children aged
6 and older after the diagnosis of ADHD has been confirmed. Prior to starting the use of
stimulants, baseline assessments of blood pressure, pulse, height, weight, and physical
examination should be done.
First-line treatment recommended by the AAP and AHRQ, as specified in Recommendation 5B
above, involve the use of one of the stimulant medications: methylphenidate,
dextroamphetamine, or amphetamine salts. No significant differences in efficacy have been
found among the stimulants available and combination therapies are not routinely
recommended. Several long-acting forms of ADHD medications are approved for use and have
gained popularity because their once-daily dosing can be done at home and does not require
administration during the day at school.
Because they are controlled substances, stimulants should have locked storage and receive
careful documentation upon receiving and dispensing them.
There have been some reports of crushing and intranasal abuse of stimulants by students and/or
family members. Concerta, a long-acting form of methylphenidate, cannot be crushed and
abused because it contains a high molecular polymer that is mixed with the methylphenidate. If
a crushed tablet is mixed with water, the tablet forms a gel that makes methylphenidate
separation from the polymer nearly impossible.

VDH Guidelines for Healthcare Procedures in Schools 412
The stimulant medication pemoline (Cylert) was once widely used, but is no longer
recommended due to its risk of hepatotoxicity.
School personnel in Virginia are prohibited from recommending the use of psychotropic
medications for any student. They may recommend that a student be evaluated by an
appropriate medical practitioner. (Reference Code of Virginia § 22.1-274.3)
The table below summarizes the medications used for ADHD:
Drug
Pharmaco-kinetics
DBE=Duration of
behavioral effect)
Comments
Amphetamine Mixtures
• Adderall DBE=4-6 hrs May require multiple dosing.
• Adderall XR DBE=12 hrs. Once daily dosing.
Dextroamphetamine
• Dexedrine tablet DBE=4-6 hrs. Inexpensive. May require multiple
dosing. Greater abuse potential?
• Dexedrine Spansule DBE 6-8 hrs. Slow onset.
Lisdexamfetamine
• Vyvanse
DBE=10-14 hrs.
Once daily dosing.
Long-acting stimulants may have
greater effects on sleep and appetite.
Methylphenidate Preparations
• Concerta DBE=10-12 hrs.
Once daily. Quick onset; long
duration.
Cannot be crushed.
• Metadate CD DBE=9 hrs. Once daily. Quick onset.
• Ritalin DBE=3-5 hrs. Requires multiple daily dosing.
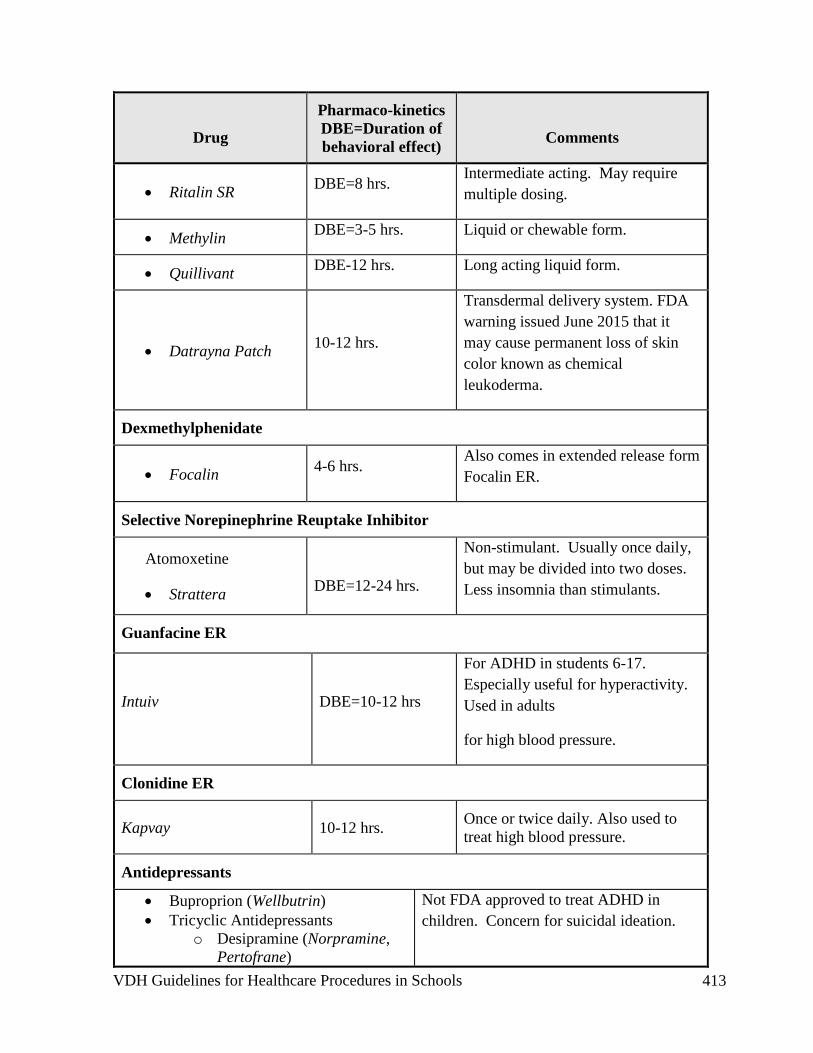
VDH Guidelines for Healthcare Procedures in Schools 413
Drug
Pharmaco-kinetics
DBE=Duration of
behavioral effect)
Comments
• Ritalin SR DBE=8 hrs.
Intermediate acting. May require
multiple dosing.
• Methylin DBE=3-5 hrs. Liquid or chewable form.
• Quillivant DBE-12 hrs. Long acting liquid form.
• Datrayna Patch 10-12 hrs.
Transdermal delivery system. FDA
warning issued June 2015 that it
may cause permanent loss of skin
color known as chemical
leukoderma.
Dexmethylphenidate
• Focalin 4-6 hrs.
Also comes in extended release form
Focalin ER.
Selective Norepinephrine Reuptake Inhibitor
Atomoxetine
• Strattera
DBE=12-24 hrs.
Non-stimulant. Usually once daily,
but may be divided into two doses.
Less insomnia than stimulants.
Guanfacine ER
Intuiv DBE=10-12 hrs
For ADHD in students 6-17.
Especially useful for hyperactivity.
Used in adults
for high blood pressure.
Clonidine ER
Kapvay 10-12 hrs. Once or twice daily. Also used to
treat high blood pressure.
Antidepressants
• Buproprion (Wellbutrin)
• Tricyclic Antidepressants
o Desipramine (Norpramine,
Pertofrane)
Not FDA approved to treat ADHD in
children. Concern for suicidal ideation.

VDH Guidelines for Healthcare Procedures in Schools 414
Drug
Pharmaco-kinetics
DBE=Duration of
behavioral effect)
Comments
o Imipramine (Tofranil)
• Nortriptyline (Pamelor, Aventyl)
• Venlafexine (Effexor)
• Escitalopram (Lexapro)
• Seratraline (Zoloft)
May be tried if stimulants aren’t tolerated
or student has other medical conditions.
Sources:
AHRQ-CMS Pediatric Quality Measures Program. (2014). Behavior therapy as first-line
treatment for preschool-aged children with ADHD. Measure Developer: Pediatric
Measurement Center of Excellence (PMCoE). Available online:
http://www.ahrq.gov/sites/default/files/wysiwyg/policymakers/chipra/factsheets/chipra_
1415-p005-2-ef.pdf
Agency for Healthcare Research and Quality. (December 1999). Treatment of Attention
Deficit Hyperactivity Disorder. Summary, Evidence Report/Technology Assessment:
Number 11. AHRQ Publication No. 99-E017. Available online:
http://www.ahrq.gov/clinic/epcsums/ adhdsum.htm
American Academy of Pediatrics. (2011). Clinical practice guideline for the diagnosis,
evaluation, and treatment of attention-deficit/hyperactivity disorder in children and
adolescents. Pediatrics 128: 1007-1022.
American Academy of Pediatrics. (2011). Implementing the key action statements: An
algorithm and explanation for process of care for the evaluation, diagnosis, treatment,
and monitoring of ADHD in children and adolescents. Pediatrics 128: S111-S1121.
Centers for Disease Control and Prevention. (2015). ADHD Recommendations. Available
online: http://www.cdc.gov/ncbddd/adhd/guidelines.html
Centers for Disease Control and Prevention. (2015). CDC publishes first national study on use
of behavioral therapy, medication and dietary supplements for ADHD in children.
News Release. Available online: http://www.cdc.gov/media/releases/2015/p0401-
adhd.html
Charach A, Dashti B, Carson P, Booker L, Lim CG, Lillie E, et al. (2011). Attention deficit
hyperactivity disorder: effectiveness of treatment in at-risk preschoolers; Long-term
effectiveness in all ages; and variability in prevalence, diagnosis, and treatment.
Comparative Effectiveness Review No. 44. AHRQ Publication No. 12-EHC003-EF.

VDH Guidelines for Healthcare Procedures in Schools 415
Rockville, MD: Agency for Healthcare Research and Quality. Available at:
www.effectivehealthcare.ahrq.gov/reports/final.cfm
Food and Drug Administration. (2015). Dealing with ADHD: What you need to know.
Consumer Update August 6, 2015. Available online:
www.fda.gov/ForConsumers/ConsumerUpdates/ucm269188.htm
Development Group of the Clinical Practice Guideline on Attention Deficit Hyperactivity
Disorder. (2010). Clinical practice guideline on attention deficit hyperactivity disorder
(ADHD) in children and adolescents. Madrid (Spain): Catalan Agency for Health
Information, Assessment and Quality. In: National Guideline Clearinghouse (NGC)
[Web site]. Rockville (MD): Agency for Healthcare Research and Quality (AHRQ);
2013 July (revised 2015 July). Available online:
http://www.guideline.gov/content.aspx?id=45143&search=attention+deficit
National Guideline Clearinghouse (NGC). (2014). Guideline synthesis: Diagnosis and
treatment of attention deficit hyperactivity disorder (ADHD). In: National Guideline
Clearinghouse (NGC) [Web site]. Rockville (MD): Agency for Healthcare Research and
Quality (AHRQ); 2011 Mar (revised 2014 Oct). Available:
http://www.guideline.gov/syntheses/synthesis.aspx?id=48532&search=attention+deficit
National Institutes of Health. (February 2000). Consensus Development Conference
Statement: Diagnosis and treatment of attention-deficit/hyperactivity disorder (ADHD).
Journal of the American Academy of Child and Adolescent Psychiatry 39:182-193.
Southammakosane, C. & Schmitz, K. (2015). Pediatric psychopharmacology for treatment of
ADHD, depression, and anxiety: State-of-the-Art review article. Pediatrics 136(2):
351-359.
Virginia Department of Health. (November 2002). The Prevalence of Methylphenidate and
Amphetamine Prescriptions in the Commonwealth. House Document No. 12 pursuant
to House Joint Resolution 122. Richmond, VA.

VDH Guidelines for Healthcare Procedures in Schools 416
School Based Interventions
The teacher and other school personnel’s attitude toward ADHD is important for educational
success. Understanding the disorder encourages use of appropriate interventions and strategies.
Open communication between school professionals and parents is critical in success of the
child with ADHD. Classroom interventions may involve making environmental, instructional,
behavioral, and social modifications. Each child with ADHD can benefit from a plan
individualized to his or her needs. Possible modifications can include:
Environmental:
• Seat in quiet area
• Seat near good role model
• Increase distance between desks
• Allow student to stand while working
• Provide notebook with dividers
• Reward neatness of desk/area; do not punish sloppiness
• Use tape recorder instead of writing notes, assignments, or homework
• Allow frequent breaks to walk or stretch
• Structure a similar routine for each day
• Seat near teacher
• Colorize/organize subjects with folders and/or notebooks
Instructional:
• Allow extra time to complete tasks
• Shorten assignments
• Break long assignments into smaller parts; give assignments one at a time
• Reduce amount of homework; require fewer correct responses; pair written and oral
instructions
• Provide peer assistance in note taking
• Remind students to recheck work
• Review instructions and directions frequently
• Avoid oral reading in front of class if difficult area for student
• Accept oral responses
• Accept use of word processor or computer
• Limit quantity of written work
• Accept use of calculator
• Provide immediate feedback
• Model math and writing processes
• Read to the student frequently
• Highlight relevant information
• Use timer to set limit for task completion
• Limit the amount of work on one page
• Vary test responses

VDH Guidelines for Healthcare Procedures in Schools 417
• Provide hands on approach to learning
• Provide information in small steps
• Break tasks down into small steps
• Review information frequently and provide repetition
• Summarize key points provide student a copy of lecture notes
• Use outlining, webbing, and visual diagrams
• Practice dictation
• Illustrate vocabulary
• Verbalize steps in the process; talk slower when giving directions
• Provide wait time for response to question
• Use graph paper for math assignments
• Adjust type, difficulty and sequence of material required
Behavioral:
• Encourage self-monitoring
• Provide visual charts
• Post simply and clearly written rules
• Provide cues and prompts as reminders
• Ignore minor inappropriate behavior
• Increase immediacy of rewards and consequences
• Provide visual of hierarchy of consequences
• Supervise closely during unstructured periods
• Avoid lecturing and criticism
• Model appropriate behaviors
• Use behavior contract for one behavior at a time with appropriate reward
• Call on only when hand is raised
• Speak softly in non-threatening manner
• Provide leadership role opportunities
• Reinforce compliant behavior immediately and consistently
• Provide purposeful learning assignments
• Include high interest activities
• Practice verbally rehearsing the appropriate behavior
• Provide opportunity for practicing the appropriate behavior
• Use home-based consequences
• Stick to set limits
• Directly verbalize expectations
• Plan ahead for new activities or unstructured events
• Be flexible
• Learn to increase structure
• Establish one goal at a time
• Give the student two choices to decide upon
• Avoid creating competitive situations and activities
VDH Guidelines for Healthcare Procedures in Schools 418
Social:
• Increase contact by touch or name
• Structure interactions
• Promote acceptable social behavior
• Assign special responsibilities to boost self esteem
• Send positive notes home
• Train appropriate anger control
• Provide encouragement
• Teach social skills directly
• Foster acceptance of differences among peers
Student and Parent/Guardian Issues
The student with ADHD has to cope with frequent health care provider visits and medication
adjustments. He or she must also learn to handle related frustration, social, and behavioral
concerns. Having difficulty controlling behavior according to classroom expectations, along
with discipline referrals and academic difficulties, greatly influence the development of the
student’s self-esteem. Each student must be evaluated on an individual basis and his strengths
must be emphasized.
Students with ADHD may also have great difficulty complying with parental instructions. The
parents/guardians, in return, may become frustrated trying to manage their student’s behavior
effectively. Homework often becomes an issue of concern due to failure to complete the
assignment within a reasonable amount of time and with reasonable effort. Supervision can
become an issue due to the student’s impulsivity and poor judgment.
Other demands may be placed upon the parents/guardians and siblings of students with ADHD,
which may result in high levels of family stress. Support groups, behavioral consultation, and
counseling can help families adapt.
National Institutes of Health Consensus Statement on ADHD
The National Institutes of Health (NIH) held a consensus development conference of experts in
the field to examine what was known about ADHD. Consensus statements often do not
represent the latest findings in a particular field because such findings need to be further studied
and replicated before becoming widely accepted as standards. The value of consensus
statements is that they reflect an “educated consensus” of what is known about a particular
subject and are developed by scientists and citizens chosen for their expertise and impartiality.
Results of the a development conference on ADHD were published in 2000 and addressed six
key questions with the following statements (this is the most recent consensus statement).

VDH Guidelines for Healthcare Procedures in Schools 419
What is the scientific evidence to support ADHD as a disorder?
Although no independent valid test exists for ADHD, diagnosis “can be made reliably using
well-tested diagnostic interview methods….Evidence supporting the validity of ADHD
includes the long-term developmental course of ADHD over time, cross-national studies
revealing similar risk factors, familial aggregation of ADHD, and heritability” (NIH, 2000).
The consensus statement notes that there appears to be a central nervous system basis for
ADHD, but further research is needed to definitely determine this. Problems of diagnosis
include differentiation from other behavioral disorders and determining “the appropriate
boundary between the normal population and those with ADHD.” It also notes the need for
research to determine diagnostic criteria for young children, adolescents, and adults.
What is the impact of ADHD on individuals, families, and society?
ADHD represents a costly, major public health issue. Children with ADHD experience
rejection by peers, academic difficulties, and higher injury rates. Adolescents, and later, some
adults with untreated ADHD are at greater risk for substance abuse, injuries, and dysfunctional
social relationships. Parents of children with ADHD experience frustration, marital discord,
and additional financial expense. In society, persons with ADHD need more services from the
health care system, the judicial system, schools, and social services. Families face difficult
treatment decisions made worse by “the media war between those who overstate the benefits of
treatment and those who overstate the dangers of treatment” (NIH, 2000).
What are the effective treatments for ADHD?
Short-term trials of both stimulants and psychosocial treatments have established their efficacy
in alleviating symptoms of inattention, hyperactivity, impulsivity, and aggressiveness.
Psychosocial therapies include behavioral strategies such as reward/consequence management,
parent/guardian training, and teacher training. Cognitive-behavioral treatment is not effective.
Studies comparing stimulants with psychosocial treatment consistently report greater efficacy
with stimulants. Alternative treatments such as diet management, vitamins, herbs, biofeedback,
and perceptual stimulation demonstrate inconsistent results and have not been proven effective.
What are the risks of the use of stimulant medication and other treatments?
There appear to be no conclusive evidence that stimulant use is harmful. However, studies of
long-term effects are not available. Adverse drug reactions are usually dose related. There
may be short-term effects on growth rate, but ultimate height is not affected. Data is limited
and conflicting as to whether stimulant use increases the risk of substance abuse—more
research is needed in this area. The increased use of stimulants may result in a risk of
oversupply and illicit use for society.

VDH Guidelines for Healthcare Procedures in Schools 420
What are the existing diagnostic and treatment practices, and what are the barriers to
appropriate identification, evaluation, and intervention?
There are wide variations in practice among communities and physicians, suggesting no
consensus. Children may sometimes be underdiagnosed and sometimes be overdiagnosed.
Closer follow-up and collaboration between clinician, family, and school personnel is needed.
Barriers to care include negative media portrayal of ADHD, the lack of specialists to care for
children with ADHD, inadequate collaboration between the educational system and the
practitioner and insurance coverage that limit reimbursement for mental health treatments.
What are the directions for future research?
A list of ten areas needing research is delineated. Moreover, the need for research into the
etiology of ADHD is emphasized because as long as the cause is not known, there are no
universal strategies for prevention.

VDH Guidelines for Healthcare Procedures in Schools 421
Sources:
AHRQ-CMS Pediatric Quality Measures Program. (2014). Behavior Therapy as First-Line
Treatment for Preschool-Aged Children with ADHD. Measure Developer: Pediatric
Measurement Center of Excellence (PMCoE). Available online:
http://www.ahrq.gov/sites/default/files/wysiwyg/policymakers/chipra/factsheets/chipra_
1415-p005-2-ef.pdf
Agency for Healthcare Research and Quality. (December 1999). Treatment of Attention
Deficit Hyperactivity Disorder. Summary, Evidence Report/Technology Assessment:
Number 11. AHRQ Publication No. 99-E017. Available online:
http://www.ahrq.gov/clinic/epcsums/ adhdsum.htm
American Academy of Pediatrics. (2011). Clinical Practice Guideline for the Diagnosis,
Evaluation, and Treatment of Attention-Deficit/Hyperactivity Disorder in Children and
Adolescents. Pediatrics 128: 1007-1022.
American Academy of Pediatrics. (2011). Implementing the Key Action Statements: An
Algorithm and Explanation for Process of Care for the Evaluation, Diagnosis,
Treatment, and Monitoring of ADHD in Children and Adolescents. Pediatrics 128:
S111-S1121.
American Psychiatric Association (2013). Attention deficit/Hyperactivity disorder factsheet.
Available online: http://www.dsm5.org/Documents/ADHD%20Fact%20Sheet.pdf
American Psychiatric Association (2013). Diagnostic and statistical manual of mental
disorders (DSM-5), Washington, D.C.: American Psychiatric Association.
Centers for Disease Control and Prevention. (2015). ADHD Recommendations. Available
online: http://www.cdc.gov/ncbddd/adhd/guidelines.html
Centers for Disease Control and Prevention. (2015). CDC publishes first national study on use
of behavioral therapy, medication and dietary supplements for ADHD in children.
News Release. Available online: http://www.cdc.gov/media/releases/2015/p0401-
adhd.html
Charach A, Dashti B, Carson P, Booker L, Lim CG, Lillie E, et al. (2011). Attention Deficit
Hyperactivity Disorder: Effectiveness of Treatment in At-Risk Preschoolers; Long-
Term Effectiveness in All Ages; and Variability in Prevalence, Diagnosis, and
Treatment. Comparative Effectiveness Review No. 44. AHRQ Publication No. 12-
EHC003-EF. Rockville, MD: Agency for Healthcare Research and Quality. Available
at: www.effectivehealthcare.ahrq.gov/reports/final.cfm

VDH Guidelines for Healthcare Procedures in Schools 422
Children and Adults with Attention-Deficit/Hyperactivity Disorder. (2013). ADHD and the
DSM-5 Factsheet 2.0. National Resource Center on AD/HD. Available online:
http://www.help4adhd.org/documents/adhd%20and%20the%20dsm%205%20fact%20s
heet%202.0.pdf
Development Group of the Clinical Practice Guideline on Attention Deficit Hyperactivity
Disorder. (2010). Clinical practice guideline on attention deficit hyperactivity disorder
(ADHD) in children and adolescents. Madrid (Spain): Catalan Agency for Health
Information, Assessment and Quality. In: National Guideline Clearinghouse (NGC)
[Web site]. Rockville (MD): Agency for Healthcare Research and Quality (AHRQ);
2013 July (revised 2015 July). Available online:
http://www.guideline.gov/content.aspx?id=45143&search=attention+deficit
National Guideline Clearinghouse (NGC). (2014). Guideline synthesis: Diagnosis and
treatment of attention deficit hyperactivity disorder (ADHD). In: National Guideline
Clearinghouse (NGC) [Web site]. Rockville (MD): Agency for Healthcare Research and
Quality (AHRQ); 2011 Mar (revised 2014 Oct). Available online:
http://www.guideline.gov/syntheses/synthesis.aspx?id=48532&search=attention+deficit
National Institutes of Health. (February 2000). Consensus Development Conference
Statement: Diagnosis and treatment of attention-deficit/hyperactivity disorder (ADHD).
Journal of the American Academy of Child and Adolescent Psychiatry 39:182-193.
Southammakosane, C. & Schmitz, K. (2015). Pediatric Psychopharmacology for treatment of
ADHD, depression, and anxiety: State-of-the-Art review article. Pediatrics 136(2):
351-359.
Virginia Department of Health. (November 2002). The Prevalence of Methylphenidate and
Amphetamine Prescriptions in the Commonwealth. House Document No. 12 pursuant
to House Joint Resolution 122. Richmond, VA.

VDH Guidelines for Healthcare Procedures in Schools 423
Managing Food Allergies in Schools
Overview
Food allergies can be life threatening. They refer to reactions involving immunologic reactions
(usually IgE) to particular foods. They may be immediate or delayed, mild or severe. When
severe, food allergies can cause systemic (throughout the body) hypersensitivity reactions in
cardiovascular, respiratory, gastrointestinal, and cutaneous tissues. The problem is growing.
According to the American Academy of Pediatrics, 8% of children in the U.S. have a food
allergy.
Reactions may occur from actual ingestion of a food or from contact with the food. This
contact may occur anywhere at school—in the cafeteria, in the classroom, on the bus, or on the
playground. Students with severe allergies may experience an allergic reaction just from
sniffing the offending food, from touching another student who has handled the offending food,
or from utensils that have touched the offending food and later touch another food that the
student ingests.
Allergic reactions to food are increasing and are among the most common medical emergencies
that occur at school. Almost 18% of students with food allergies are reported to have had an
allergic reaction at school. Avoidance of the offending food(s) is the only way to prevent a
reaction. The principles of successful management of food allergies are prevention and
preparedness--avoiding the allergen and preparing for treatment of acute allergic reactions.
The list of foods that can cause allergic reactions is unlimited. However, several foods
typically cause the vast majority of severe allergic reactions in school-age children and include:
• Peanuts
• Tree nuts (e.g., pecans, walnuts)
• Fish (e.g., cod, whitefish)
• Shellfish (shrimp, lobster, crab, scallops, or oysters).
Ingredients containing these foods (such as peanut oil or peanut flour) may also be hidden in
other prepared foods. These foods can cause severe anaphylactic reactions, and sensitivity
continues throughout life.
Other foods that are commonly associated with allergic reactions include:
• Milk
• Eggs
• Soybeans
• Wheat
Reactions to these foods, however, tend to be less severe and may lessen as the child gets older.
Many children are said to “outgrow” these allergies.
Food allergy and food intolerance are often confused. For comparison, food intolerances refer
to reactions that are non-immunologic, such as lactose intolerance involving a deficiency of an

VDH Guidelines for Healthcare Procedures in Schools 424
enzyme necessary for the digestion of milk. Food sensitivities involve digestive reactions and
other symptoms that occur after eating particular food additives such as food coloring,
monosodium glutamate, or sulfites (used in dried fruits). Celiac disease is a gluten-sensitive
enteropathy. Although it has symptoms which make it look like an allergy, it is not an IgE-
mediated immune response. It may be an autoimmune response that results in the body
attacking normal tissue in the GI tract in response to eating products that contain gluten (such
as wheat, barley, or oats).
Settings and Staff
Management of food allergies should occur throughout the entire school day and in all settings.
Allergic reactions to food do not just occur in the cafeteria. Materials used in class projects or
snacks in the classroom can trigger a reaction. Contact with other students who have had
contact with allergy-causing food(s) can also cause an allergic reaction. Students interacting on
a bus can accidentally expose an allergic student to an allergen.
Some schools may designate areas or tables in the cafeteria where certain foods are not allowed
to decrease exposure. However, according to the National Association of School Nurses
(NASN) Position Statement, “completely banning nuts or other foods is not recommended as it
is 1) not possible to control what other people bring onto the school grounds, and 2) does not
provide the allergic student with an environment where he/she can safely learn to navigate a
world containing nuts….A ban can create a false sense of security.”
All school personnel who have contact with the student with food allergies should know how to
decrease the risk of allergic reactions and how to activate the Food Allergy Action Plan or
established school emergency plan for the student.
The Centers for Disease Control & Prevention has compiled an extensive list of
recommendations for schools in the management of food allergies. Voluntary Guidelines for
Managing Food Allergies In Schools and Early Care and Education Programs is available to
all schools by calling 1-800-CDC-INFO or going online to www.cdc.gov/healthyyouth.
Individualized Healthcare Plan (IHP)
Each student’s individualized healthcare plan (IHP) must be tailored to the individual’s needs.
Any student with prescribed epinephrine should have an IHP that discusses continuous
monitoring, emergency plans, and evaluation. A sample Food Allergy Action Plan (Food
Allergy & Anaphylaxis Emergency Care Plan) is included.
Managing a Food Allergy
• Some points to remember in the management of food allergies include:
• Teach the student with a food allergy how to manage the allergy (as developmentally
appropriate), including how to avoid unsafe foods and foods with unknown ingredients,

VDH Guidelines for Healthcare Procedures in Schools 425
how to read food labels, symptoms of allergic reactions, and how to get help when
needed
• Obtain healthcare provider orders for care
• Collaborate with the family to develop strategies to manage the allergy
• Develop a written Allergy Action Plan
• Have appropriate medications available in the event of an emergency (and not locked
away)
• Develop plans for field trips, school bus rides, substitute teacher days, and after-school
programs which allow the student to participate while accommodating his/her needs
• Develop plans for carrying and storing epinephrine for students who have permission to
self-carry
• Make sure that all personnel who interact with the student on a regular basis know how
to recognize symptoms of an allergic reaction and know what to do if one occurs
• Institute a “no sharing” food policy between students
• Avoid foods whose ingredients are unknown. Recognize other names for allergenic
foods on food labels (e.g., casein hydrolysate for milk).
• Consider designating a table where a particular allergic food could not be eaten if a
student has a severe allergy (e.g., peanut-free table). However, it is not possible or
advisable to make a school “nut free” or “allergy free.” It can be “nut aware” or
“allergy aware”.
• Consider informing parents/guardians of other students if a severe allergy exists with
parental permission
• Teach classmates (especially adolescents) how to respond to an allergic reaction
• Expand “no bullying” policies to cover students who are bullied due to food allergies
and restrictions
• Teach food service workers to avoid cross-contamination in preparing or cleaning up
foods
• Inform students and staff that hand sanitizers do not remove food proteins—use soap
and water to do so
• Plan for yearly training on food allergy and epinephrine use
• Communicate with all parents/guardians about allergy awareness policies. When
parents/guardians don’t understand why certain school policies exist, they may not
comply and may become resentful. Teaching basics can increase acceptance and
compliance.

VDH Guidelines for Healthcare Procedures in Schools 426
Resources--School Food Allergy Program
Many resources exist for help in developing food allergy management programs in schools.
Some of these include:
1. Safe at School and Ready to Learn, National School Boards Association, a comprehensive
manual to guide development of policies for managing food allergies in schools. It can be
accessed free online: www.nsba.org/foodallergyguide.pdf.
2. Voluntary Guidelines for Managing Food Allergies in Schools and Early Care and
Education Programs, Centers for Disease Control and Prevention (CDC), comprehensive
guidelines for school food allergy management. Developed by Food Allergy Research
Education, NASN, and CDC. Available online from www.cdc.gov or
www.foodallergy.org/cdc.
3. Online Food Allergy Tool Kit, National Association of School Nurses. Contains a variety
of factsheets, guidelines, articles, checklists, sample forms, and care plans for managing
food allergies at school. Available online:
http://www.nasn.org/ToolsResources/FoodAllergyandAnaphylaxis.
4. Guidelines for the Diagnosis and Management of Food Allergy in the United States,
Summary for Patients, Families, and Caregiver, National Institute of Allergy and Infectious
Diseases, National Institutes of Health. Available online:
http://www.niaid.nih.gov/topics/foodAllergy/clinical/Documents/FAguidelinesPatient.pdf.
5. Managing Food Allergies in the School Setting (2011). Twenty minute video developed by
Food Allergy Research Education in cooperation with the CDC, NASN, and SCBA to help
schools manage food allergies. Available online:
https://www.youtube.com/watch?v=zvM8EaQpckw.
6. How to C.A.R.E. for Students with Food Allergies: What Educators Should Know. Free
online interactive course teaches educators how to prepare for food allergy and anaphylaxis.
Available online: http://allergyready.com/.
7. Be a PAL: Protect a Life from Food Allergies. This program teaches children how to avoid
allergen exposure and how to deal with a reaction. Available online:
http://www.foodallergy.org/be-a-pal.
8. Resources to help children understand the seriousness of food allergies.
• Fabulous Me, Piper Lee and the Peanut Butter Itch by Tolya Thompson
• Alexander, the Elephant Who Couldn’t Eat Peanuts Book Series (Reference
www.store.foodallergy.org)
• Arthur Family Health Video, “Binky Goes Nuts: Understanding Peanut Allergies”
(Reference www.pbskids.org)
9. It’s Not a Joke, Food Allergy Research Education program that addresses food allergy
bullying. Available online: https://www.foodallergy.org/its-not-a-joke.

VDH Guidelines for Healthcare Procedures in Schools 427
10. Kids Living with Food Allergies, video by the Food Allergy Research & Education (FARE)
using children with allergies to help other children understand food allergies. Available
online:
http://www.bing.com/videos/search?q=kids+living+with+food+allergies+video+by+fare&q
pvt=kids+living+with+food+allergies+video+by+fare&view=detail&mid=2A5A82AA7FF
B9DBAAF062A5A82AA7FFB9DBAAF06&FORM=VRDGAR
• The Virginia General Assembly passed legislation in 2012 and 2013 that requires local
education agencies to adopt and implement policies for the possession and
administration of epinephrine in Virginia public schools. Resources that school
divisions may use in developing these policies can be found later in this section and in
the Recognition and Treatment of Anaphylaxis in the School Setting Guidelines (2013)
in the Virginia School Health Guidelines available online:
http://www.vdh.virginia.gov/livewell/programs/schoolage/documents/Anaphylaxis_Sch
ool_Setting_Guidelines.pdf
Federal Regulations
The United States Department of Agriculture (USDA) outlines federal regulations for providing
meals to students with special dietary needs in the manual, Accommodating Children with
Special Dietary Needs in School Nutrition Programs for School Food Service Staff (2001,
rev.2013) available online:
http://www.fns.usda.gov/sites/default/files/special_dietary_needs.pdf) and includes a section on
food allergies.
Schools participating in a federally-funded school nutrition program must provide substitutions
to the standard meal for disabled students and may make substitutions for non-disabled students
with medically-certified dietary needs.
The form entitled Physician’s Statement for Students with Special Dietary Needs must be
completed and submitted to the school nutrition program for each student with special dietary
needs. Any changes to the statement must be made in writing. A copy of this form, as well as
more details of the regulation, can be found in the Virginia Department of Education (VDOE)
Superintendents Memos #8 dated October 11, 2002 and later in this section.
Sources:
American Academy of Allergy Asthma & Immunology. (2013). Anaphylaxis. Available
online: http://www.aaaai.org/conditions-and-treatments/allergies/anaphylaxis.aspx
American Celiac Disease Alliance. (2015). What is celiac disease? Available online:
http://americanceliac.org/celiac-disease/
Centers for Disease Control and Prevention. (2015). Food Allergies. Available online:
http://www.cdc.gov/healthyyouth/foodallergies/
VDH Guidelines for Healthcare Procedures in Schools 428
Centers for Disease Control and Prevention. (2013). Voluntary guidelines for managing food
allergies in schools and early care and education programs. Washington, DC: US
Department of Health and eHuman Services. Available online:
www.cdc.gov/HealthyYouth/foodallergies/pdf/13_243135_A_Food_Allergy_Web_508.
Connecticut State Department of Education. (2012). Guidelines for managing life-threatening
food allergies in Connecticut schools. Available online:
http://www.sde.ct.gov/sde/lib/sde/pdf/publications/food_allergies/food_allergies.pdf
Food Allergy Research and Education. (2015). Resources for schools. Available online:
http://www.foodallergy.org/resources/schools
Food Safety Modernization Act. (2011). Available online:
http://www.fda.gov/Food/GuidanceRegulation/FSMA/default.htm
Gupta R, Dyer A, Jain N, & Greenhawt M. (2013). Childhood food allergies: current diagnosis,
treatment, and management strategies. Mayo Clinic Proceedings : 88(5):512-26
Hockenberry, M., & Wilson, D. (2015). Wong's nursing care of infants and children (10th ed.).
St. Louis: Elsevier Mosby, 957-961.
Illinois State Board of Education. (2010). Guidelines for managing life-threatening food
allergies in Illinois schools. Available online:
http://www.isbe.state.il.us/nutrition/pdf/food_allergy_guidelines.pdf
Jackson, V. (2013). School nurse’s role in supporting food allergy safe schools. NASN School
Nurse 28:76-77.
National Association of School Nurses. (2014). Food allergy management in the school
setting: Clinical conversations for the school nurse. Available online:
https://www.nasn.org/portals/0/resources/Clinical_Conversations_2014_2015.pdf
National School Board Association. (2012). Safe at School and Ready to Learn: A
Comprehensive Policy Guide for Protecting Students with Life-Threatening Food
Allergies. Alexandria, VA: NSBA. – Available online: http://www.nsba.org/safe-
school-and-ready-learn-comprehensive-policy-guide-protecting-students-life-
threatening-food#sthash.2KMQixcf.dpuf
Pistiner, M. & Lee, J. (2012). Creating a new community of support for students with food
allergies. NASN School Nurse 27:260-266.
Porter, S., Branowicki, P., & Palfrey, J. (2014). Supporting students with special health care
needs: Guidelines and procedures for schools (3rd ed.). Baltimore: Paul H. Brookes
Publishing, 163-173.
Selekman, J. (2013). School nursing: A comprehensive text (2nd ed.). Philadelphia: F.A. Davis,
787-790, 805-814.
Sicherer, S., & Mahr, T. (2010). Clinical report—management of food allergy in the school
setting. Pediatrics. doi:10.1542/peds.2010-2575
Virginia Department of Health. (2013). Recognition and treatment of anaphylaxis in the school
setting. Available online:

VDH Guidelines for Healthcare Procedures in Schools 429
http://www.vdh.virginia.gov/livewell/programs/schoolage/documents/Anaphylaxis_Sch
ool_Setting_Guidelines.pdf
Wahl, A, Stephens, H. Ruffo, M., & Jones, A. (2015). The evaluation of a food allergy and
epinephrine autoinjector training program for personnel who care for children in schools
and community settings. Journal of School Nursing, 31:91-98.
Wisconsin School Health Services Project. (2014). Food allergies: Managing and preventing
acute reactions in the school setting. Available online:
http://www.wpha.org/?page=Resourcesprojects

VDH Guidelines for Healthcare Procedures in Schools 430

VDH Guidelines for Healthcare Procedures in Schools 431
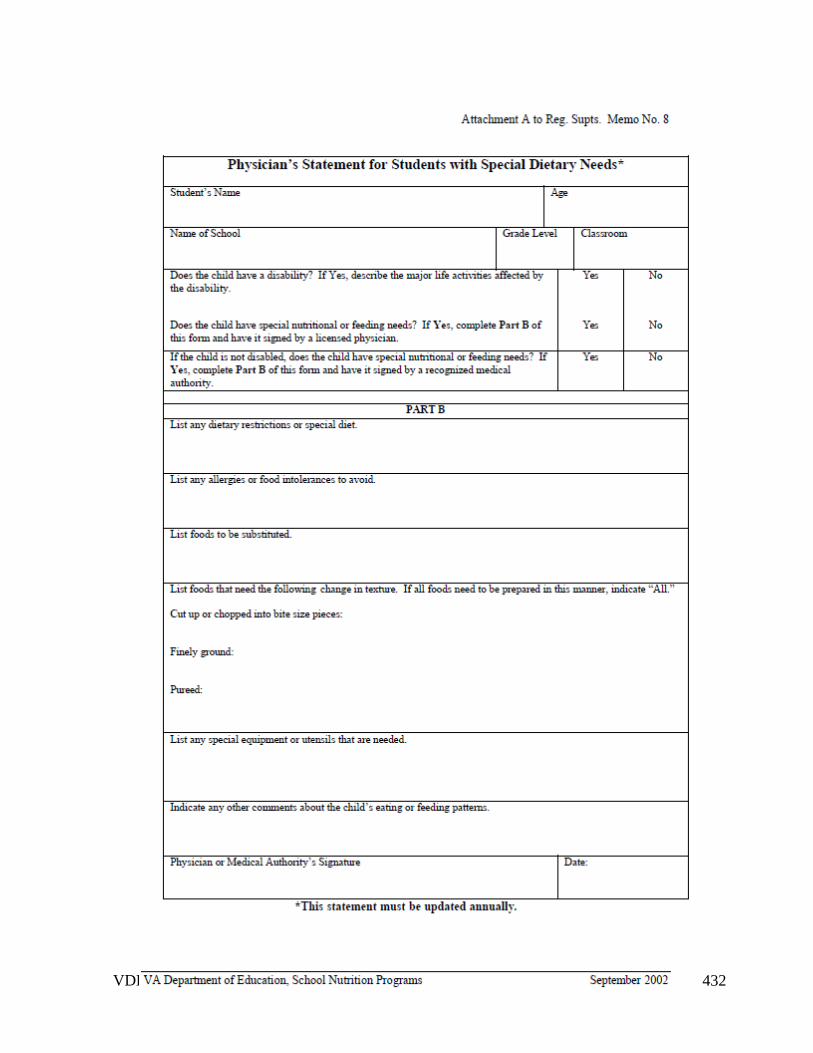
VDH Guidelines for Healthcare Procedures in Schools 432

VDH Guidelines for Healthcare Procedures in Schools 433

VDH Guidelines for Healthcare Procedures in Schools 434

VDH Guidelines for Healthcare Procedures in Schools 435

VDH Guidelines for Healthcare Procedures in Schools 436

VDH Guidelines for Healthcare Procedures in Schools 437

VDH Guidelines for Healthcare Procedures in Schools 438

VDH Guidelines for Healthcare Procedures in Schools 439
Managing Anaphylaxis
Overview
Anaphylaxis is a severe, sudden, systemic, potentially fatal allergic reaction that occurs when
the immune system responds to a substance in the environment and can involve the skin,
respiratory tract, gastrointestinal tract, and cardiovascular system. Symptoms typically occur
within minutes to two hours after contact with the allergy-causing substance. Anaphylaxis can
rapidly progress to airway constriction, skin and intestinal irritation, and altered heart rhythms.
Without prompt treatment in severe cases, it can lead to complete airway obstruction, shock,
and death.
Common food triggers include:
• Peanuts
• Tree nuts (walnuts, cashews)
• Shellfish
• Fish
• Milk
• Eggs
• Soy
• Wheat
Other common triggers include:
• Insect bites/stings
• Medications
• Latex/rubber
Individuals who have been allergic to foods and have asthma are believed to be at a higher risk
for developing an anaphylactic reaction. Adolescents who have asthma , along with peanut and
tree nut allergy, and do not have quick access to an EpiPen® during a reaction are at highest
risk for a fatal reaction.
Symptoms of an Anaphylactic Reaction
An anaphylactic reaction can include:
• Hives
• Itching
• Flushing or redness of the skin
• Sudden difficulty breathing

VDH Guidelines for Healthcare Procedures in Schools 440
• Wheezing
• Swelling of the lips, tongue or throat
• Throat tightness, difficulty swallowing
• Drop in blood pressure
• Tingling sensation or metallic taste in mouth
• Vomiting, diarrhea
• Feeling of apprehension, agitation
Young children may not be able to accurately articulate these symptoms and may say things
like, “my tongue itches,” "my tongue has hair on it," “there’s something stuck in my throat,”
“there are bugs in my ears,” “I can’t swallow,” "my throat feels thick," or “I can’t breathe.”
Symptoms may occur within a few minutes but may worsen over hours. Symptoms also may
resolve, but reoccur two to three hours later (without re-exposure to the allergen).
Treatment
Epinephrine is used to treat an anaphylactic reaction by reversing the symptoms. This
medication is available via prescription in an auto-injecting pen; examples include an EpiPen®
or EpiPen® Jr., Epinephrine Auto-Injector, or as Adrenaclick®. Another mode of delivery is
the Auvi-Q®, a compact auto-injector of epinephrine which has an audio component to assist in
administering the injection. Generic auto-injectors may become available in the future, but the
FDA has not designated any of them as therapeutically equivalent yet.
Epinephrine should be administered as soon as the individual feels the symptoms of
anaphylaxis. Students who have been prescribed epinephrine should carry it with them (if
appropriate) or have immediate access to the medication at all times. It should be stored away
from light at room temperature (59-86º F) and not in a refrigerator or the glove compartment
of a car.
The dose of epinephrine administered should be 0.15 mg intramuscularly in the outer
thigh for students weighing 33- 66 pounds and 0.3 mg for students weighing more than 66
pounds. (According to the CDC growth charts, 66 pounds is in the 50th percentile for 9-year-
olds). Note: **The American Academy of Pediatrics has recommended modifying the dosage
to 0.15mg for students under 55 pounds and 0.3mg for those over 55 pounds so some
prescriptions may indicate this, and the guideline may be changed in the future. Every auto-
injector brand is available in both 0.15mg and 0.3mg doses and has training devices available to
demonstrate and practice their use.
Epinephrine administration should result in an immediate call to Emergency Medical Services
or 911. A second injection may be needed in 5-15 minutes if symptoms do not subside. The
student should not be left alone and may experience a bi-phasic reaction where symptoms
reappear 2 or 3 hours later without another exposure to the allergen. There is no absolute

VDH Guidelines for Healthcare Procedures in Schools 441
contraindication to the administration of epinephrine. Experts agree that when in doubt about
an anaphylactic reaction, the best option is to administer epinephrine.
Antihistamines and asthma medications should never be prescribed instead of epinephrine
because they cannot reverse the symptoms of anaphylaxis.
3 R's for Treating Anaphylaxis
• Recognize symptoms early
• React quickly
• Review what happened and plan to prevent it from reoccurring (avoid the trigger)
Keep in mind that families will often be very anxious when bringing their child to school if
he/she has a history of anaphylaxis. Open communication and collaboration between family
and school can help lessen fears for everyone.
Virginia Regulations
In 2012, Virginia enacted legislation to require local school boards to adopt and implement
policies for the possession and administration of epinephrine in Virginia public schools by the
beginning of the 2012-13 school year; and in 2013 amended the Code to protect from liability
those who administer it (§54.1-3408 and §8.01-225). The regulation below is from the Code of
Virginia:
§22.1-274.2 C. By the beginning of the 2013-2014 school year, local school boards
shall adopt and implement policies for the possession and administration of epinephrine
in every school, to be administered by any school nurse, employee of the school board,
employee of a local governing body, or employee of a local health department who is
authorized by a prescriber and trained in the administration of epinephrine to any
student believed to be having an anaphylactic reaction.
The Virginia Department of Health in collaboration with the Department of Education
published an extensive set of guidelines relating to recognizing and treating anaphylaxis in
schools. They can be found at
http://www.vdh.virginia.gov/livewell/programs/schoolage/documents/Anaphylaxis_School_Set
ting_Guidelines.pdf
Every school division has been recommended to adopt policies for:
• possession and administration of epinephrine
• standing orders for non-specific student epinephrine and to have at least two doses of
each dose of epinephrine available (unless every student is over 66 pounds)
• identification of staff trained in the administration of epinephrine
• training school employees in recognizing and responding to anaphylaxis

VDH Guidelines for Healthcare Procedures in Schools 442
• procedures for documenting administration and reporting
• procedures for purchasing, storing, and maintaining supplies (checking expirations)
• guidelines for parents of students with known needs for epinephrine to have orders, an
IHP, and their own supply of epinephrine available the entire school year
Sources:
Adrenaclick®. (2015). Adrenaclick for anaphylactic emergencies. Available online
http://adrenaclick.com/index.php. For trainers, call 1-855-EPINEPH.
American Academy of Allergy Asthma & Immunology. (2013). Anaphylaxis. Available
online: http://www.aaaai.org/conditions-and-treatments/allergies/anaphylaxis.aspx
Centers for Disease Control and Prevention. (2015). Food Allergies. Available online:
http://www.cdc.gov/healthyyouth/foodallergies/
Centers for Disease Control and Prevention. (2013). Voluntary Guidelines for Managing Food
Allergies In Schools and Early Care and Education Programs. Washington, DC: US
Department of Health and Human Services. Available online:
www.cdc.gov/HealthyYouth/foodallergies/pdf/13_243135_A_Food_Allergy_Web_508.
Connecticut State Department of Education. (2012). Guidelines for managing life-threatening
food allergies in Connecticut schools. Available online:
http://www.sde.ct.gov/sde/lib/sde/pdf/publications/food_allergies/food_allergies.pdf
Food Allergy Research and Education. (2015). Resources for schools. Available online:
http://www.foodallergy.org/resources/schools
Food Safety Modernization Act. (2011). Available online:
http://www.fda.gov/Food/GuidanceRegulation/FSMA/default.htm
Gregory, N. (2012). The case for stock epinephrine in schools. NASN School Nurse 27:222-
225.
Gupta RS, Dyer AA, Jain N, Greenhawt MJ. (2013). Childhood food allergies: current
diagnosis, treatment, and management strategies. Mayo Clinic Proceedings: 88(5):512-
26.
Hockenberry, M., & Wilson, D. (2015). Wong's nursing care of infants and children (10th ed.).
St. Louis: Elsevier Mosby, 965-967.

VDH Guidelines for Healthcare Procedures in Schools 443
Illinois State Board of Education. (2010). Guidelines for managing life-threatening food
allergies in Illinois schools. Available online:
http://www.isbe.state.il.us/nutrition/pdf/food_allergy_guidelines.pdf
Jackson, V. (2013). School nurse’s role in supporting food allergy safe schools. NASN School
Nurse 28:76-77.
National Association of School Nurses. (2012). Allergy/anaphylaxis management in the school
setting. Position statement. Available online:
https://www.nasn.org/PolicyAdvocacy/PositionPapersandReports/NASNPositionStatem
entsFullView/tabid/462/ArticleId/9/Allergy-Anaphylaxis-Management-in-the-School-
Setting-Revised-June-2012
National Association of School Nurses. (2014). Food allergy management in the school
setting: Clinical conversations for the school nurse. Available online:
https://www.nasn.org/portals/0/resources/Clinical_Conversations_2014_2015.pdf
National Association State Boards of Education. (2013). Discussion Guide Anaphylaxis and
Schools: Developing Policies for Treating Students with Severe Allergic Reactions.
Arlington, Virginia: National Association of State Boards of Education. Available
online: http://www.nasbe.org/wp-content/uploads/Anaphylaxis-Discussion-Guide_10-
30-13.pdf
National School Board Association. (2012). Safe at School and Ready to Learn: A
Comprehensive Policy Guide for Protecting Students with Life-Threatening Food
Allergies – Available online: http://www.nsba.org/safe-school-and-ready-learn-
comprehensive-policy-guide-protecting-students-life-threatening-
food#sthash.2KMQixcf.dpuf
Pistiner, M. & Lee, J. (2012). Creating a new community of support for students with food
allergies. NASN School Nurse 27:260-266.
Porter, S., Branowicki, P., & Palfrey, J. (2014). Supporting students with special health care
needs: Guidelines and procedures for schools (3rd ed.). Baltimore: Paul H. Brookes
Publishing, 163-173.
Schoessler, S. & White, M. (2014). Recognition and treatment of anaphylaxis in the school
setting: The essential role of the school nurse. The Journal of School Nursing 29(6);
407-415.

VDH Guidelines for Healthcare Procedures in Schools 444
Selekman, J. (2013). School nursing: A comprehensive text (2nd ed.). Philadelphia: F.A.
Davis, 787-790, 805-814.
Sicherer, S., & Mahr, T. (2010). Clinical report—management of food allergy in the school
setting. Pediatrics. doi:10.1542/peds.2010-2575
Virginia Department of Health. (2012). Recognition and treatment of anaphylaxis in the
school setting. Available online:
http://www.vdh.virginia.gov/livewell/programs/schoolage/documents/Anaphylaxis_Sch
ool_Setting_Guidelines.pdf
Wisconsin School Health Services Project. (2014). Food allergies: Managing and preventing
acute reactions in the school setting. Available online:
http://www.wpha.org/?page=Resourcesprojects

VDH Guidelines for Healthcare Procedures in Schools 445
Responding to Anaphylaxis
1. Based on symptoms, determine that an anaphylactic reaction appears to be occurring.
Act quickly. It is safer to give epinephrine than to delay treatment. Anaphylaxis is a
life-threatening reaction.
2. (If you are alone and are able to provide epinephrine, call out or yell for help as you
immediately go to get the epinephrine. Do not take extra time seeking others until you have
provided the epinephrine.)
3. (If you are alone and do not know how to provide epinephrine, call out or yell for help. If
someone is available to help you, have them get the personnel trained to provide
epinephrine and the epinephrine while you dial 911 and follow the dispatcher’s instructions.
Advise 911 operator that anaphylaxis is suspected and epinephrine is available. Your goal
is to get someone (EMS or trained personnel) to provide epinephrine and care as soon
as possible.
4. Select appropriate epinephrine auto-injector to administer, based on weight.
Dosage: 0.15 mg Epinephrine auto-injector IM, if less than 66 pounds
0.30 mg Epinephrine auto-injector IM, if 66 pounds or greater
Frequency: If symptoms persist or return, a second dose should be administered 5-
15 minutes after first dose.
5. Inject epinephrine via auto-injector: Pull off safety release cap. Swing and jab firmly into
upper, outer thigh, (through clothing if necessary). Hold in place for *5 or 10 seconds to
deliver medication and then remove. *Note: Check manufacturer instructions for time of
delivery of medication. Massage the area for 10 more seconds. Note the time.
6. Call or have a bystander call 911 immediately or activate the Emergency Medical System
(EMS). Advise 911 operator that anaphylaxis is suspected and epinephrine was given.
7. Keep the individual either lying down or seated. If they lose consciousness, check if they
are breathing and have a pulse. If not, begin CPR (cardiopulmonary resuscitation), call out
for help and continue CPR until the individual regains a pulse and is breathing or until EMS
arrives and takes over.
8. Call School Nurse/Front Office school personnel and advise of situation.
9. Repeat the dose after 5 to 15 minutes if symptoms persist.
10. Stay with the individual until EMS arrives, continuing to follow the directions in No. 5
above if repeat dose needed.
11. Provide EMS with used Epinephrine auto injector labeled with name, date, and time
administered to transport to the ER with the student.

VDH Guidelines for Healthcare Procedures in Schools 446
12. Assure parents/guardians have been notified and advised to promptly let the student’s
primary care physician know about the episode of suspected anaphylaxis.
13. Complete required documentation of incident. (See Attachment: Sample Report of
Anaphylactic Reaction.)
14. Order replacement epinephrine auto injector(s).

VDH Guidelines for Healthcare Procedures in Schools 447
Procedure for Using an Epinephrine Auto-Injector
EpiPen® or EpiPen Jr.®
1. Remove the EpiPen Auto-Injector from the plastic carrying case.
2. Pull off the blue safety release cap.
3. Swing and firmly push (jab) orange tip against mid-outer thigh.
4. Hold for approximately 10 seconds
5. Remove and massage the area for 10 seconds.
6. Save the EpiPen unit to label and send with the student when EMS
arrives.
Auvi-Q ™
1. Remove the outer case of Auvi-Q. This will automatically activate the voice instructions.
2. Pull off red safety guard.
3. Place black end against mid-outer thigh.
4. Press firmly and hold for 5 seconds.
5. Remove from thigh.
6. Save the Auvi-Q unit to label and send with the student when EMS arrives.
Adrenaclick®
1. Remove the outer case.
2. Remove gray caps labeled “1” and “2”
3. Place red rounded tip against mid-outer thigh (can go
through clothes).
4. Press down hard until needle penetrates.
5. Hold for 10 seconds. Remove from thigh.
6. Save the Adrenaclick unit to label and send with the student when EMS arrives.
Resources for Learning How to Use Epinephrine Auto-Injectors

VDH Guidelines for Healthcare Procedures in Schools 448
Auvi-Q®: www.auvi-q.com
• Training Video https://www.auvi-q.com/hcp/school-nurse-
resources?s_mcid=AQDH1DM
• Trainers available.
• Mobile app https://www.auvi-q.com/mobile-app
EpiPen®, EpiPen Jr.®: www.epipen.com/How-to-Use-
EpiPen
• Training Video https://www.epipen.com/about-epipen/how-to-
use-epipen
• Trainers available Call1-800-395-3376 or
https://www.epipen.com/en/resources/order-a-training-device
• My EpiPlan® app for iPhone or Android:
https://www.epipen.com/en/about-epipen/my-epiplan-app
Adrenaclick®: http://adrenaclick.com/index.php
• Training Video:
http://adrenaclick.com/how_to_use_adrenaclick_epinephrine_injection_USP_auto_injec
tor.php
• Trainers available, call 1-855-EPINEPH

VDH Guidelines for Healthcare Procedures in Schools 449
Sample Protocol for Treatment of Symptoms of Anaphylaxis -
Epinephrine Autoinjector Administration by School Health Professionals and
Trained Personnel For School Age Children – Kindergarten - Grade 12
ARE SIGNS AND SYMPTOMS OF POSSIBLE ANAPHYLAXIS PRESENT AND WAS
THERE AN EXPOSURE TO A POSSIBLE TRIGGER (food, insect sting, latex,
medication or other trigger)?
Contact the school nurse immediately.
If YES, proceed with this protocol.
If NO, see Signs, Symptoms & Triggers section on the next page.
If the student has an Emergency Care Plan, follow the plan immediately.
Are any of these signs and symptoms
present and severe?
Or is there a COMBINATION of symptoms
from different body areas?
LUNG: Short of breath, wheeze,
repetitive cough SKIN: Hives, itchy rashes, swelling (eyes, lips)
HEART: Pale, blue, faint, weak pulse,
dizzy, confused GUT: Vomiting, cramping pain, diarrhea
THROAT: Tight, hoarse, trouble
breathing/swallowing
HEENT: Runny nose, sneezing, swollen eyes,
phlegm throat
MOUTH: Obstructive swelling (tongue
and/or lips)
OTHER: Confusion, agitation, feeling of
impending doom
SKIN: Hives over body If YES, quickly follow the protocol below:
If No, see Signs, Symptoms & Triggers section
on next page.
DO NOT DELAY TREATING ANAPHYLAXIS.
When in doubt, give epinephrine. Contact the School Nurse
immediately.
Treating anaphylaxis in the first few minutes can save a life. Not all anaphylaxis
has skin symptoms.

VDH Guidelines for Healthcare Procedures in Schools 450
Physician Signature: Date:
See next page for additional information.
Protocol Notes - For an emergency, follow the directions on the next page.
Follow the building emergency response plan/protocol and:
1. IMMEDIATELY ADMINISTER EPINEPHRINE AUTOINJECTOR PER STANDING ORDER:
▪ 0.15 mg - body weight less than 55 pounds (see reverse page if weight unknown)
▪ 0.3 mg - body weight 55 pounds or more
▪ Inject into middle outer side of upper leg, note time and site of injection
▪ Stay with student and monitor closely
2. Designate a person to call Emergency Medical System (911) and request ambulance with epinephrine
3. Designate a person to notify, school administration and student’s emergency contact(s)
3. Stay with and observe student until EMS (ambulance) arrives.
▪ Maintain airway, monitor circulation, start CPR as necessary.
▪ Do not have the student rise to an upright position.
▪ Consider lying on the back with legs elevated, but alternative positioning is needed for vomiting
(side lying, head to side) or difficulty breathing (sitting).
▪ Observe for changes until EMS arrives.
4. IF NO IMPROVEMENT OR IF SYMPTOMS WORSEN IN ABOUT 5 OR MORE MINUTES,
ADMINISTER A SECOND EPINEPHRINE DOSE according to local policy
▪ Provide EMS with identifying information, observed signs and symptoms, time epinephrine administered,
used epinephrine autoinjector to take with to the hospital
▪ Transport to the Emergency Department via EMS even if symptoms seem to get better.

VDH Guidelines for Healthcare Procedures in Schools 451
Epinephrine Autoinjector Administration by School Health Professionals
and Trained Personnel
DO NOT DELAY TREATING ANAPHYLAXIS.
Treating anaphylaxis in the first few minutes can save a life.
School nurse administration is preferable. Training non-licensed staff to recognize and treat
first time anaphylaxis requires extensive and well thought out training.1 Nursing assessment
cannot be delegated.
Signs, Symptoms & Triggers:
▪ SEVERE SYMPTOMS WITH NO KNOWN TRIGGER: Seeing rashes such as hives
AND additional serious symptoms warrant epinephrine administration.
If no trigger found and symptoms are severe, then consider asthma, fainting, heart
condition, seizure, viral illness and contact the school nurse. If there is no school nurse
available, contact the school designee for assistance and CALL 911 as needed per district
guidelines.
When unsure or unclear, do not let concerns over whether severe difficulty breathing is
caused by anaphylaxis or asthma keep you from using epinephrine. Severe asthma can be
treated with epinephrine.4
▪ MILD SYMPTOMS: Whether or not there was exposure to a known trigger, refer to the
school nurse to monitor closely and assess. Do not delay administration of epinephrine if
symptoms progress.
Do not leave the student. Mild symptoms can quickly become severe.
If symptoms become severe, administer epinephrine per protocol on reverse.
Determining the proper dose of stock epinephrine (recommended):
Currently several methods may be used to decide at what weight or age to give an adult
strength dose autoinjector.
Weight based, although most accurate, may not be practical in emergency situations and
an alternative method should be determined by local policy. Do not delay giving
epinephrine to obtain weight.
See your state’s regulations and train accordingly.

VDH Guidelines for Healthcare Procedures in Schools 452
Weight Length Grade Age Epinephrine
Autoinjector
Less than 55 lb.
(25kg)2
Less than 125 cm.
(measure top of head
to heel) Consider
using tape or a string
of this length and
storing with stock
epinephrine
Pre-k or
Kindergarten 3 – 6
0.15 mg Junior
May give adult dose
if pediatric dose
unavailable.
Greater or equal to
55 lbs. (25kg)2
Greater than or equal
to 125 cm. (measure
top of head to heel)
1st grade and
up
7 –
adult 0.30 mg Adult
Transporting to the hospital:
▪ Students should always be transported to the hospital following administration of
epinephrine.
▪ They are at risk for a secondary or biphasic reaction which may require immediate
treatment (as many as 1/3 of children will experience a secondary reaction).3
After an emergency event:
▪ Make sure parents/guardians are notified to follow up with private physician. Follow up
with family - evaluate plan.
▪ In the case of the student with known history, discuss how exposure occurred and if new
allergen avoidance measures are needed. For students with no previous history of
anaphylaxis, consider developing an IHP in collaboration with the PCP for possible future
occurrences.
▪ Complete documentation per district policy.
▪ Make sure replacement epinephrine autoinjector is obtained.
▪ Review response and emergency communication, update as needed to improve outcomes.
1Role of the School Nurse in Providing School Health Services. Council on School Health Pediatrics
2008;121;1052.
2Sicherer, S. & Simons, E. (2007). Self-injectable epinephrine for first-aid management of anaphylaxis.
Pediatrics, 119 (3), 638 – 646. NIAID food allergy guidelines 6.3.1, accessed from
http://www.niaid.nih.gov/topics/foodallergy/clinical/Pages/default.aspx
3Schoessler, S. & White, M. (2013). Recognition and treatment of anaphylaxis in the school setting: The essential
role of the school nurse. Journal of School Nursing, 29, 407 – 415. doi: 10.1177/1059840513506014
4 NAEPP Suggested Emergency Nursing Protocol for Students with Asthma Symptoms Who Don’t Have a
Personal Asthma Action Plan at http://www.nhlbi.nih.gov/files/docs/resources/lung/sch-emer-actplan.pdf

VDH Guidelines for Healthcare Procedures in Schools 453

VDH Guidelines for Healthcare Procedures in Schools 454
Report of Epinephrine Administration
Student Demographics and Health History
School District: _________________________________________________________
Name of School: _________________________________________________________
Age: ______
Type of Person: Student Staff Visitor Gender: M F
Ethnicity: Spanish/Hispanic/Latino: Yes No
Race: American Indian/Alaskan Native African American Asian Native Hawaiian/other
Pacific Islander White Other
History of severe or life-threatening allergy: Yes, Known by student/family Yes, Known by school
Unknown
If known, specify type of allergy: ____________________________________________
If yes, was allergy action plan available at school? Yes No Unknown
History of anaphylaxis: Yes, known by student/family Yes, known by school
Unknown
Previous epinephrine use: Yes, by student/family Yes, at school No Unknown
Diagnosis/History of asthma: Yes, known by student/family Yes, known by school No
Unknown
School Plans and Medical Orders
Individual Health Care Plan (IHCP) in place? Yes No Unknown
Written school district policy on management of life-threatening allergies in place?
Yes No Unknown
Does the student have a student specific order for epinephrine? Yes No Unknown
Expiration date of epinephrine _____________________ Unknown

VDH Guidelines for Healthcare Procedures in Schools 455
Epinephrine Administration Incident Reporting
Date/Time of occurrence: ______________________________________________________
Vital signs: BP_____/____ Temp ______ Pulse __________ Respiration _________
If known, specify trigger that precipitated this allergic episode:
Food Insect Sting Exercise Medication Latex
Other _________________________ Unknown
If food was a trigger, please specify which food:
______________________________________________________________________________
Please check: Ingested Touched Inhaled
Other Specify: ____________________________________________________
Did reaction begin prior to school? Yes No Unknown
Location where symptoms developed:
Classroom Cafeteria Health Office Playground Bus
Other Specify: _____________________________________
How did exposure occur?
___________________________________________________________________________________
___________________________________________________________________________________
___________________________________________________________________________________
________________________
Symptoms (Check all that apply):
Respiratory Cough Difficulty breathing Hoarse voice Nasal congestion/rhinorrhea
Oral Pruritis Swollen (throat, tongue) Shortness of Breath Stridor
Wheezing Difficulty swallowing Sneezing
GI Abdominal discomfort Diarrhea Nausea Vomiting Uterine cramping
Skin Angioedema Cyanosis Flushing Diaphoresis General pruritis
General rash Hives Lip swelling Localized rash
Cardiac/Vascular Chest discomfort Dizziness Loss of consciousness Faint/Weak
pulse Hypotension Tachycardia Pale Tightness (chest, throat)
Other Irritability Metallic taste Headache Red eyes

VDH Guidelines for Healthcare Procedures in Schools 456
Location where epinephrine administered: Health Office
Other Specify: ___________________________________________________
Location of epinephrine storage: Health Office
Other Specify: ___________________________________________________
Epinephrine administered by: RN Self Other
If epinephrine was self-administered by a student at school or a school-sponsored function, was the
student formally trained?
Yes If known, date of training: ___________________ No
Did the student follow school protocols to notify school personnel and activate EMS?
Yes No NA
If epinephrine was administered by other, please specify:___________________________
Was this person formally trained? Yes Date of training _________________ No Don’t
know
Time elapsed between onset of symptoms and communication of symptoms:
_______________________________________________minutes
Time elapsed between communication of symptoms and administration of epinephrine:
_______________________ _______________minutes
Parent notified of epinephrine administration: (time)
Was a second dose of epinephrine required? Yes No Unknown
If yes, was that dose administered at the school prior to arrival of EMS? Yes No
Unknown
Approximate time between the first and second dose ___________________________________
Biphasic reaction: Yes No Unknown
Disposition
EMS notified at: (time) _______________________________
Transferred to ER: Yes No Unknown
If yes, transferred via ambulance Parent/Guardian Other Discharged after
_______ hours
Parent: At school Will come to school Will meet student at hospital
Other:

VDH Guidelines for Healthcare Procedures in Schools 457
Hospitalized: Yes If yes, discharged after _________days
No Name of hospital:
Student/Staff/Visitor outcome:
___________________________________________________________
If first occurrence of allergic reaction:
Was the individual prescribed an epinephrine autoinjector in the ER? Yes No Do not
know
If yes, who provided the epinephrine autoinjector training?
ER PCP School Nurse Other ______________ Don’t know
Did the ER refer the individual to PCP and/or allergist for follow-up? Yes No Do not
know
School Follow-up
Did a debriefing meeting occur? Yes No
Did family notify prescribing MD? Yes No Unknown
Recommendation for changes: Protocol change Policy change Educational change
Information sharing None
Comments (include names of school staff, parent, others who attend debriefing):
___________________________________________________________________________________
___________________________________________________________________________________
___________________________________________________________________________________
___________________________________________________________________________________
___________________________________________________________________________________
___________________________________________________________________________________
___________________________________________________________________________________
Form completed by: ______________________________________________________ (please print)
Date:___________________________________
Title:___________________________________________________
Phone number: (_______) ________ - ____________ Ext.: _________
Email : ___________________________________________________
School District:_____________________________________________________________________
School address:_____________________________________________________________________
Rev 03/2017 - Please complete all pages. Revised and used with permission of the MA Department of Health, School
Health Unit

VDH Guidelines for Healthcare Procedures in Schools 458
Recognize Anaphylaxis Symptoms

VDH Guidelines for Healthcare Procedures in Schools 459
Source: American Academy of Allergy, Asthma & Immunology. Available online:
http://www.aaaai.org/conditions-and-treatments/allergies/anaphylaxis.aspx

VDH Guidelines for Healthcare Procedures in Schools 460
Sample Anaphylaxis Policy(from Virginia Department of Education)
(Severe Allergic Reaction)
It is the policy of ___________________________ Public Schools to provide at least two (2)
doses of auto-injectable epinephrine (hereinafter called ‘unassigned or stock epinephrine’) in
each school, to be administered by a school nurse or employee of the school board who is
authorized and trained in the administration of epinephrine to any student believed to be having
an anaphylactic reaction on school premises, during the academic day. The Code of Virginia
(§8.01-225) provides civil protection for employees of a school board who are appropriately
trained to administer epinephrine.
Policy Limitations
Parents of students with known life threatening allergies and/or anaphylaxis should provide the
school with written instructions from the students’ health care provider for handling
anaphylaxis and all necessary medications for implementing the student specific order on an
annual basis. This anaphylaxis policy is not intended to replace student specific orders or parent
provided individual medications. This policy does not extend to activities off school grounds
(including transportation to and from school, field trips, etc.) or outside of the academic day
(sporting events, extra-curricular activities, etc.).
Overview
Anaphylaxis is a severe systemic allergic reaction from exposure to allergens that is rapid in
onset and can cause death. Common allergens include animal dander, fish, latex, milk,
shellfish, tree nuts, eggs, insect venom, medications, peanuts, soy, and wheat. A severe allergic
reaction usually occurs quickly; death has been reported to occur within minutes. An
anaphylactic reaction can occur up to one to two hours after exposure to the allergen.
Symptoms of Anaphylaxis
• Shortness of breath or tightness of chest; difficulty in or absence of breathing
• Sneezing, wheezing or coughing
• Difficulty swallowing
• Swelling of lips, eyes, face, tongue, throat or elsewhere
• Low blood pressure, dizziness and/or fainting
• Heart beat complaints: rapid or decreased
• Blueness around lips, inside lips, eyelids
• Sweating and anxiety
• Itching, with or without hives; raised red rash in any area of the body
• Skin flushing or color becomes pale
• Hoarseness

VDH Guidelines for Healthcare Procedures in Schools 461
• Sense of impending disaster or approaching death
• Loss of bowel or bladder control
• Nausea, abdominal pain, vomiting and diarrhea
• Burning sensation, especially face or chest
• Loss of consciousness
Although anaphylactic reactions typically result in multiple symptoms, reactions may vary. A
single symptom may indicate anaphylaxis. Epinephrine should be administered promptly at
the first sign of anaphylaxis. It is safer to administer epinephrine than to delay treatment
for anaphylaxis.
Training
Building level administration shall be responsible for identifying at least two employees, in
addition to the school nurse (RN or LPN), to be trained in the administration of epinephrine by
auto-injector. Only trained personnel should administer epinephrine to a student believed to be
having an anaphylactic reaction. Training shall be conducted in accordance with the most
current edition of the Virginia Department of Education’s Manual for Training Public School
Employees in the Administration of Medication. Training shall be conducted annually or more
often as needed.
Standing Orders
Standing orders are written to cover multiple people as opposed to individual-specific orders,
which are written for one person. _______________________ Public Schools shall designate
an authorized medical provider (MD, DO, PA, or NP with prescriptive authority) to prescribe
non-student specific epinephrine for the school division, to be administered to any student
believed to be having an anaphylactic reaction on school grounds, during the academic day.
Standing orders must be renewed annually and with any change in prescriber.
Responding to Anaphylaxis
If student-specific orders are on file they should be followed for students with known life
threatening allergies and/or anaphylaxis.
For suspected anaphylaxis without specific orders:
1. Based on symptoms, determine that an anaphylactic reaction is occurring.
2. Act quickly. It is safer to give epinephrine than to delay treatment. This is a life and
death decision.
3. Determine the proper dose and administer epinephrine. Note the time.
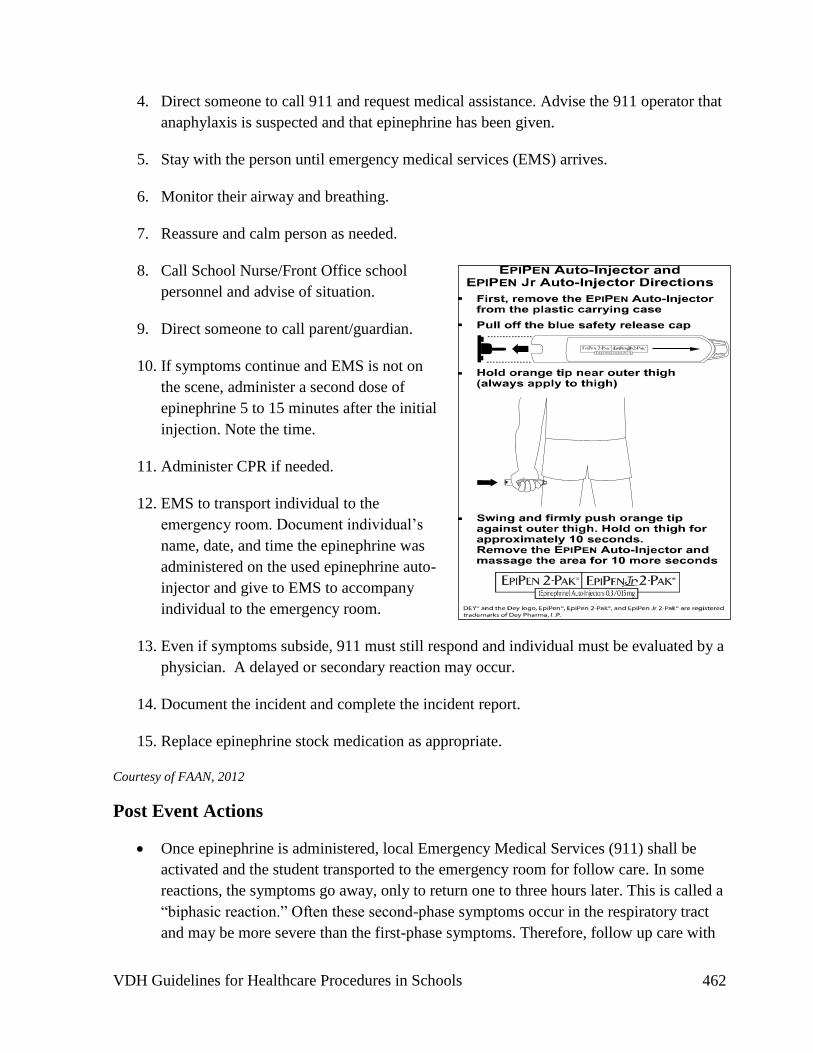
VDH Guidelines for Healthcare Procedures in Schools 462
4. Direct someone to call 911 and request medical assistance. Advise the 911 operator that
anaphylaxis is suspected and that epinephrine has been given.
5. Stay with the person until emergency medical services (EMS) arrives.
6. Monitor their airway and breathing.
7. Reassure and calm person as needed.
8. Call School Nurse/Front Office school
personnel and advise of situation.
9. Direct someone to call parent/guardian.
10. If symptoms continue and EMS is not on
the scene, administer a second dose of
epinephrine 5 to 15 minutes after the initial
injection. Note the time.
11. Administer CPR if needed.
12. EMS to transport individual to the
emergency room. Document individual’s
name, date, and time the epinephrine was
administered on the used epinephrine auto-
injector and give to EMS to accompany
individual to the emergency room.
13. Even if symptoms subside, 911 must still respond and individual must be evaluated by a
physician. A delayed or secondary reaction may occur.
14. Document the incident and complete the incident report.
15. Replace epinephrine stock medication as appropriate.
Courtesy of FAAN, 2012
Post Event Actions
• Once epinephrine is administered, local Emergency Medical Services (911) shall be
activated and the student transported to the emergency room for follow care. In some
reactions, the symptoms go away, only to return one to three hours later. This is called a
“biphasic reaction.” Often these second-phase symptoms occur in the respiratory tract
and may be more severe than the first-phase symptoms. Therefore, follow up care with

VDH Guidelines for Healthcare Procedures in Schools 463
a health care provider is necessary. The student will not be allowed to remain at school
or return to school on the day epinephrine is administered.
• Document the event.
• Complete incident report.
• Replace epinephrine stock medication immediately.
Storage, Access and Maintenance
Epinephrine should be stored in a safe, unlocked and accessible location, in a dark place at
room temperature (between 59-86 degrees F). Epinephrine should not be maintained in a
locked cabinet or behind locked doors. Staff should be made aware of the storage location in
each school. It should be protected from exposure to heat, cold or freezing temperatures.
Exposure to sunlight will hasten deterioration of epinephrine more rapidly than exposure to
room temperatures. The expiration date of epinephrine solutions should be periodically
checked; the drug should be replaced if it is approaching the expiration date. The contents
should periodically be inspected through the clear window of the auto-injector. The solution
should be clear; if it is discolored or contains solid particles, replace the unit.
Each school should maintain documentation that stock epinephrine has been checked on a
monthly basis to ensure proper storage, expiration date, and medication stability.
The school division shall maintain a sufficient number of extra doses of epinephrine for
replacement of used or expired school stock on the day it is used or discarded. Expired auto-
injectors or those with discolored solution or solid particles should not be used. Discard them in
a sharps container.
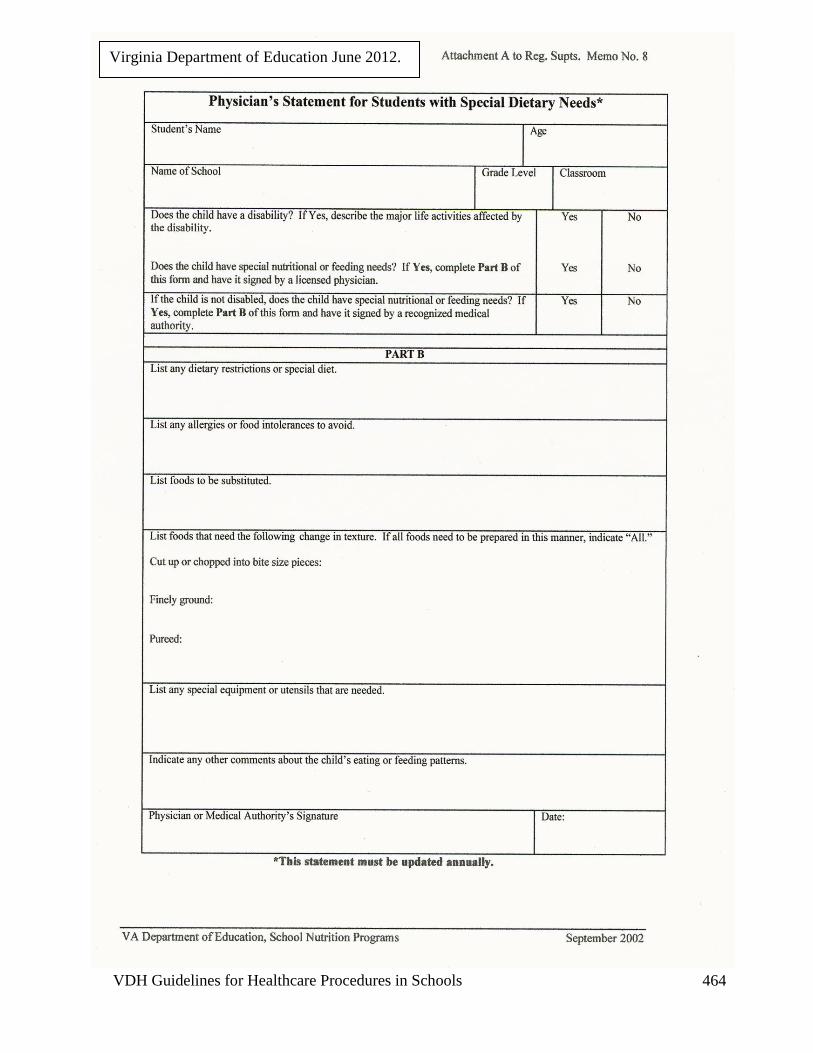
VDH Guidelines for Healthcare Procedures in Schools 464
Virginia Department of Education June 2012.

VDH Guidelines for Healthcare Procedures in Schools 465
Managing Latex Allergies
Latex is a natural rubber which is used to manufacture many medical supplies such as gloves,
catheters and other tubing, as well as common household items. Common items which may
contain latex:
Medical items: Non-medical items:
• Ace wraps
• Band-Aids
• Catheters
• Elastic bandages
• Gloves
• Intravenous set up ports
• Medication vials
• Pads on crutches
• Tape
• Tourniquets
• Wheelchair cushions
• Art supplies
• Balloons
• Elastic in clothing
• Erasers
• Pacifiers
• Rubber balls
• Rubber bands
• Rubber mats, carpet backs
• Toys (Koosh ball)
Latex allergies are frequently identified in individuals who have repeated and prolonged
exposure to rubber. Therefore, individuals who have multiple surgeries or procedures
involving contact with latex (e.g., students with spina bifida), health professionals, and others
who use latex products on a frequent basis are at risk for developing a hypersensitivity to latex.
Approximately 2/3 students with spina bifida or multiple surgeries and 8-17% of health care
workers have developed latex allergies. Non-latex gloves should be used in school settings.
Research indicates that there is a link between latex allergies and certain food allergies. It
found that latex has similar antigenic characteristics to a variety of fruits. Individuals with
latex allergies have experienced a range of allergic reactions including rashes, asthma, and
anaphylaxis with the ingestion of certain foods. Offending foods commonly include bananas,
chestnuts, walnuts, avocados, kiwi, and papaya. Food that has been handled by latex gloves
may also cause a reaction in a latex-sensitive student.
Latex reactions include watery eyes, wheezing, rash, hives, swelling, and in severe cases, life
threatening anaphylactic shock. Allergic responses can occur when latex-containing items:
• Touch the skin
• Touch mucous membranes, including the mouth, urethra, rectum, or genitals
• Enter the bloodstream
• Are inhaled (often carried by the powder from latex gloves or balloons)
• Come into contact with internal organs during surgery

VDH Guidelines for Healthcare Procedures in Schools 466
Recommendations for individuals with latex allergies:
• Use non-latex products which are usually made of vinyl, silicone, or plastic (these
alternative products are recommended not only for those with a history of latex allergy,
but also for individuals who are at risk for developing this allergy, such as health care
workers and persons with spina bifida or urologic problems)
• Do not eat the offending foods
• Do not eat items that are made with these foods
• Avoid these foods even if they have been eaten without problems in the past (repeated
exposures may cause increased sensitivity to the foods)
It is important to remember that packages labeled “hypoallergenic” are not necessarily
latex free.
Students with known sensitivity to latex should have a plan with specific guidelines for that
student. School personnel who use latex products should be aware of the possibility of allergic
reactions. Communication with students and families about this allergy and documentation of
the allergy are recommended. Allergic individuals should discuss with their primary health
care provider the possible use of Medic alert tags, injectable epinephrine kits, and prophylactic
medication.
The next two pages contain lists of items in the community and hospital that often contain
latex, along with a list of latex-safe alternatives. The list is compiled by the Spina Bifida
Association of America and updated annually. An updated list can be obtained online at
www.sbaa.org or from the

VDH Guidelines for Healthcare Procedures in Schools 467
Sources:
American Academy of Allergy Asthma & Immunology. (2015). Latex allergy. Available online:
http://www.aaaai.org/conditions-and-treatments/Library/At-a-Glance/Latex-Allergy.aspx
American College of Allergy, Asthma & Immunology. (2014). Latex allergy. Available online:
http://acaai.org/allergies/types/skin-allergies/latex-allergy
American Latex Allergy Association. (2011). School safety guidelines for latex-allergic students (2nd
ed.). Singer, WI: American Latex Allergy Association.
Asthma and Allergy Foundation of America. (2015). Latex allergy. Available online:
https://www.aafa.org/display.cfm?id=9&sub=21&cont=383
Grier, T. (n.d.). Latex Allergy: Latex Cross‐reactive foods Fact Sheet. American Latex Allergy
Association. Available online: http://latexallergyresources.org/latex-cross-reactive-foods-fact-
sheet
Kelly, K. (n.d.). Latex allergy fact sheet. American Latex Allergy Association. Available online:
http://latexallergyresources.org/allergy-fact-sheet.
National Library of Medicine Medline Plus. (n.d.). Latex allergy. Available online at
http://www.nlm.nih.gov/medlineplus/latexallergy.html
Spina Bifida Association. (2015). Latex list. Available online: http://spinabifidaassociation.org/latex

VDH Guidelines for Healthcare Procedures in Schools 468

VDH Guidelines for Healthcare Procedures in Schools 469
Spina Bifida Association. (2015). Natural rubber latex allergy. Available online:
http://spinabifidaassociation.org/blog/infosheets/natural-rubber-latex-allergy/

VDH Guidelines for Healthcare Procedures in Schools 470

VDH Guidelines for Healthcare Procedures in Schools 471

VDH Guidelines for Healthcare Procedures in Schools 472
Service Animals in Schools
Overview
The Americans with Disabilities Act (ADA) defines a service animal as any dog or miniature
horse individually trained to do work or perform tasks for the benefit of an individual with a
disability. Service animals are working animals who have been trained to provide service
directly related to a person's disability. Animals whose function is to provide comfort or
emotional support do not qualify as service animals under ADA.
Examples of tasks that service animals can perform include:
• assisting people who are blind or have low vision with navigation and other tasks
• alerting people who are deaf or hard of hearing
• pulling a wheelchair
• retrieving or carrying items
• opening doors
• alerting and assisting a person who is having a seizure
• sensing and alerting a person with diabetes to hypoglycemia or hyperglycemia
• alerting a person to the presence of an allergen
• providing physical support and assistance with balance and stability
• calming a person with Post Traumatic Stress Disorder during an anxiety attack
• reminding a person with mental illness to take prescribed medications
A trained service dog can be called a guide dog, hearing dog, assistance dog, seizure alert dog,
diabetic alert dog, mobility dog, psychiatric service dog, or autism service dog. A trained
service dog is NOT called a skilled companion dog, therapy dog, social dog, facility dog,
agility dog, police dog, helping dog, support dog, or search and rescue dog. Service animals
must be healthy (with appropriate immunizations), housebroken, and trained.
Legal Guidelines
The guidelines for service animals in schools in Virginia fall under these regulations:
• Code of Virginia, § 51.5-44
• Americans with Disabilities Act (ADA), as amended implementing regulations at 28
CFR Parts 35 and 36
• The Rehabilitation Act of 1973, as amended
• Individuals with Disabilities Education Act (IDEA), implementing regulations at
34CFR Part 300
• Virginians with Disabilities Act

VDH Guidelines for Healthcare Procedures in Schools 473
Service animals must be allowed to accompany students and staff with disabilities in all areas
of the school where the public is normally allowed to go. The animal must be under control of
its handler. This usually means on a leash or harness unless the animal needs to be able to
move about more freely to accomplish its work and then it needs to be under voice control of
the handler. In Virginia, a service dog for students with visual impairment must be identified
by a harness, for students with hearing impairments by a blaze orange leash, and for students
with mobility impairments by a harness, backpack, or vest identifying it as a trained service
dog. Service animals are not pets so a "no pet" policy cannot be applied to them.
School divisions are not responsible for the care (including feeding and elimination) or
supervision of a service animal. Often, the student is the handler for the service animal. When
this is not possible, arrangements are worked out between the family and school division.
Schools may request that a service animal be removed if it is out of control and the handler
does not take effective action to control it. Under ADA, a school division may not require
proof of service animal "certification" or "licensing."
Service animals have usually been accepted when they were working with a student with
observable physical disabilities. As the use and number of service animals increases with
students with less observable disabilities, concerns have arisen. Most commonly, they relate to
other students and staff who have allergies or identified fears of dogs. Virginia recognizes that
service animals must be qualified and carefully weighed against the right of other students who
are equally entitled to receive educational benefits at the school. However, ADA requirements
of 2010 state that "allergies and fear of dogs are not valid reasons for denying access or
refusing service to people using service animals. When a person who is allergic to dog dander
and a person who uses a service animal must spend time in the same room or classroom, they
both should be accommodated by assigning them, if possible, to different locations within the
room or different rooms in the facility."
Types of Service Dogs
Most people are aware of service dogs which provide services to people with visual, hearing, or
mobility impairments. In recent years, other dogs have been specially trained to work with
other health conditions.
• Diabetic Alert Dogs (DADs)--these dogs have been shown to be able to detect changes
in blood sugar and alert their owners to both hypoglycemia and hyperglycemia. Some
studies have found that they can help decrease the number of hypoglycemic episodes
and improve hemoglobin A1C levels.
• Seizure Alert Dogs (SADs) or Seizure Response Dogs (SRDs)--although there is less
scientific literature about these dogs, it is speculated that SADs can detect an odor or
other autonomic characteristic (such as increased heart rate) and warn their owner of an
impending seizure so that the person can get to a safe location, take extra anti-seizure
medication, or use a Vagal Nerve Stimulator to thwart a seizure. If the individual
experiences a seizure, the dog can respond to keep them safe or get assistance.

VDH Guidelines for Healthcare Procedures in Schools 474
• Autism Service Dogs--to meet ADA requirements, these dogs must not be used for just
emotional support. Some dogs have been used to prevent elopement (such as running
into traffic) or to alert a caregiver to self-injurious behavior. This safety support could
facilitate independent functioning of the child with autism. However, since ADA states
that service dogs must be controlled by their handler, and students with autism do not
assume responsibility for their dog, there can be differing views about the use of autism
service dogs.
Individualized Healthcare Plan (IHP)
Each student’s individualized healthcare plan (IHP) must be tailored to the individual’s needs.
Any student requiring a service animal should have an IHP that considers the following:
• Reason for the service animal
• Type of training the animal has had as well as medical/immunization records
• Need for notification of parents of other students in the class
• Plan for service animal's control and care at school including:
o handling
o hydration
o rest place for the service animal
o elimination
• Emergency evacuation plan
• Fire drill plan/participation
• Transportation
• Alternate plans if the service animal or its primary handler (if not the student) is not
able to accompany the student to school
• Training for staff or aides who may handle the service animal
• Educational program to educate students and staff on how to interact appropriately with
the service animal.

VDH Guidelines for Healthcare Procedures in Schools 475
Sources:
Brown, S. & Goldstein, L. (2011). Can seizure-alert dogs predict seizures? Epilepsy Research
97: 236-242.
Dalziel, D., Uthman, B., McGorray, S., & Reep, R. (2003). Seizure-alert dogs: a review and
preliminary study. Seizure 12: 115-120.
Gonder-Frederick, L, Rice, P., Warren, D., Vajda, K. & Shepard, J. (2013). Diabetic alert
dogs: A preliminary survey of current users. Diabetes Care, 36:e47.
Hill, D., King, S., & Mrachko, A. (2013). Students with autism, service dogs, and public
schools: A review of state laws. Journal of Disability Policy Studies
doi:10.177/1044207313477204.
Minchella, L. (2011). Hot topics in special needs school nursing: Service animals in schools.
NASN School Nurse. doi: 10.1177/1942602X11399385.
National Association of School Nurses (2014). Service animals in school. Position statement.
Available online: www.nasn.org
Selekman, J. (2013). School nursing: A comprehensive text (2nd ed.). Philadelphia: F.A.
Davis, 271-272.
United States Department of Justice (USDJ). (2011). ADA 2010 Revised requirements:
Service animals. Available online: http://www.ada.gov/service_animals_2010.htm
Virginia Department of Education. (2011). Guidelines for school division policy and
procedures regarding service animals in Virginia's public schools. Available online:
http://www.doe.virginia.gov/special_ed/tech_asst_prof_dev/guidance_service_dog.pdf

VDH Guidelines for Healthcare Procedures in Schools 476
Trauma-Informed Care
Overview
Students are frequently exposed to violence in their homes and communities. There is growing
scientific evidence that this exposure can have a permanent negative effect on the chemical and
physical structures of the brain. Exposure to violence can result in the experience of trauma.
Prolonged activation of the stress response systems can cause cognitive impairments such as
trouble with attention, concentration, and memory. Stress on other body systems (endocrine,
cardiovascular, immune-response) can increase the risk for stress-related disease in adulthood.
An Attorney General's task force has reported that 46 million children, or two out of every
three children in the United States, are exposed to an act of violence, crime, abuse, or
psychological trauma in any given year. Potentially traumatic events include being the victim
of, or witnessing family violence, community violence (such as gang violence or shootings),
natural disasters, child abuse or neglect, sexual assault, or bullying. Girls are more likely to
experience sexual assault, dating violence, and child abuse while boys are more likely to
witness physical harm and scenes of war, fire, and natural disasters. Events that cause great
stress to the maturing brain are called adverse childhood experiences (ACE) and include the
death of a parent, divorce, abuse or neglect, witnessing domestic violence, incarceration of a
family member, and living with someone who has a mental illness or substance abuse problem.
Some researchers also include chronic economic hardship, social exclusion by peers, and being
treated unfairly due to race or gender orientation. Children who have received repeated "doses"
of trauma or ACEs have been found to be at increased risk for disease (cardiovascular, lung,
and liver), depression, substance abuse, obesity, violence, and risky sexual behaviors.
Caring adults can act as a buffer against the harmful effects of trauma and chronic stress.
Every child is unique and responds differently to trauma. Younger children may cling to
caregivers, cry, or regress in behavior while adolescents may engage in risky behavior,
substance use, or have suicidal thoughts. Recognizing signs of exposure to violence can help in
identifying which students may need support and assistance in coping with chronic stress or
exposure to violence. Bowen and Mahnke (2015) published this list of behaviors to monitor:
• anxiousness and irritability
• trouble concentrating and/or sleeping
• easily startled
• hyper vigilance or watchfulness
• withdrawal from social interactions
• dissociation (detachment, forgetfulness)
• challenging behaviors such as picking fights, disobeying, aggressive outbursts
• avoidance of places where trauma may have occurred
• physical signs of abuse or of self-injury

VDH Guidelines for Healthcare Procedures in Schools 477
• feelings of powerlessness
• traumatic play (reenacting play with toys or playmates)
• trouble developing or maintaining relationships with peers
• regression in development
• substance use
• risky sexual behavior
Settings and Staff
Although most cases of exposure to violence do not occur on school grounds, students can
certainly exhibit manifestations of such exposure at school. Any adult at school can assist in
helping children cope with the stress they experience. Additionally, school staff are mandated
reporters--obligated by law to report evidence of child abuse and neglect to child protective
services (CPS).
When violence does occur on school grounds, the National Association of School Nurses notes
that school nurses have knowledge and skills that can be used to address violent behaviors by
their ability to coordinate emergency response until rescue teams arrive, provide nursing care
for injured students, apply crisis intervention strategies to help resolve conflicts, identify and
refer students who need counseling, and participate on crisis intervention teams.
Care for the Student
Even when students are exposed to violence, many show resilience and are not traumatized or
permanently harmed. A student can have protective factors that reduce the effect of the
stressful event on the student's life. Protective factors can be internal (temperament, conflict
resolution skills) or external (strong relationships, mentors, healthy caregivers, stable living
environments, safe places to play, positive school climate). See the Guidelines that follow for
ways that school nurses and other educational staff can help to develop resilient students and
support students who are exposed to traumatic events.
Students from low socioeconomic backgrounds are particularly vulnerable to family and
community violence. Their families are also more likely to be stressed themselves and have
limited resources to offer their children. Many of these students have Medicaid, which can be
an important source of reimbursement for physical and behavioral health services for those who
have experienced violence and trauma. Students covered by Medicaid are entitled to a special
benefit called Early and Periodic Screening, Diagnosis and Treatment (EPSDT), which covers
some mental health services not otherwise covered by Medicaid. Both screenings and
treatment are covered by this benefit, although it can be challenging for families to navigate the
system without assistance.
Students exposed to violence can have lasting physical, mental, and emotional harm. They may
develop difficulties with attachment, anxiety, and aggressive behaviors, which impair their
capacity for partnering and parenting later in life. The Futures Without Violence organization

VDH Guidelines for Healthcare Procedures in Schools 478
has proposed 16 recommendations to help all students develop resilience and cope with the
effects of exposure to violence and trauma. Specific recommendations for supporting students
exposed to Intimate Partner Violence (IPV) follow. Finally, policy recommendations to ensure
students thrive in supportive communities will be covered. Research demonstrating that caring
adults can help students become more resilient provide the basis for these recommendations.
Sources:
Attorney General's National Task Force on Children Exposed to Violence. (2012). Defending
childhood: Protect Heal Thrive. Available online:
http://www.justice.gov/sites/default/files/defendingchildhood/legacy/2012/12/12/cev-
executive-sum.pdf
Bowen, E. & Mahnke, A. (2015). Everyday magic: 16 ways adults can support children
exposed to violence and trauma. L. Kinnicutt (Ed.) Futures Without Violence project
supported by Grant # 2011-MU-MU-K011 from the Office of Juvenile Justice and
Delinquency Prevention, U.S. Department of Justice. Available online:
http://d3vc4vygg8dc62.cloudfront.net/wp-content/uploads/Everyday-Magic-16-Ways-
Adult-Can-Support-Children-2015.pdf or http://www.futureswithoutviolence.org
Child Trends. (2013). Adverse experiences: Indicators on children and youth. Available
online: http://www.childtrends.org/wp-
content/uploads/2013/07/124_Adverse_Experiences.pdf
DeBoard-Lucas, R. Wasserman, K., Groves, B, & Bair-Merritt, M. (2013). Promising futures:
16 trauma-informed, evidence-based recommendations for advocates working with
children exposed to intimate partner violence. Davis, L. (Ed.) Paper supported by Grant
#98EV0401 from Children, Youth and Families, Family and Youth Services Bureau,
U.S. Department of Health and Human Services. Available online:
http://promising.futureswithoutviolence.org/files/2013/01/16-Trauma-Informed-
Evidence-Based-Recommendations-For-Advocates2.pdf
Department of Medical Assistance Services. (2012). Early, Periodic, Screening, Diagnosis
and Treatment EPSDT Program Fact Sheet. Richmond, VA. Available online:
http://dmasva.dmas.virginia.gov/content_atchs/mch/mch-epsdt_fs.pdf
Finkelhor, D., Turner, H., Ormrod, R., Hamby, S. & Kracke, K. (2009). Children's exposure
to violence: A comprehensive national survey. Office of Juvenile Justice and
Delinquency Prevention, U.S. Department of Justice. Available online:
https://www.ncjrs.gov/pdffiles1/ojjdp/227744.pdf

VDH Guidelines for Healthcare Procedures in Schools 479
Futures Without Violence. (2015). Safe, healthy, and ready to learn: Policy recommendations
to ensure children thrive in supportive communities free from violence and trauma.
Executive Summary prepared for 14 collaborating organizations. Available online:
http://d3vc4vygg8dc62.cloudfront.net/wp-content/uploads/Safe-Healthy-and-Ready-to-
Learn_Full-Report.pdf.
Futures Without Violence. (2015). Early and Periodic Screening, Diagnosis and Treatment
(EPDST) for children who have experienced trauma: The basics for advocates. Policy
Brief. Available online: https://d3vc4vygg8dc62.cloudfront.net/wp-
content/uploads/EPSDT-Policy-Brief-2014-FINAL.pdf or
http://www.futureswithoutviolence.org
National Association of School Nurses (2013). School violence, role of the school nurse in
prevention. Position Statement. Available online:
http://www.nasn.org/PolicyAdvocacy/PositionPapersandReports/NASNPositionStateme
ntsFullView/tabid/462/ArticleId/566/School-Violence-Role-of-the-School-Nurse-in-
Prevention-Adopted-June-2013
Virginia Medicaid. (2015). EPSDT provider manuals. Available online:
https://virginiamedicaid.dmas.virginia.gov/wps/portal/ProviderManual

VDH Guidelines for Healthcare Procedures in Schools 480
Recommendations to Help Students Develop Resilience
Adapted from: Everyday Magic: 16 Ways Adults Can Support Children Exposed to Violence
and Trauma (2015).
1. Take care of yourself. Dealing with challenging behaviors can be difficult and listening to
a student's story can be stressful. It can trigger past experiences with trauma and interfere
with supporting children. Taking care of oneself can help a person to become a more
effective caregiver.
2. Reach out, connect, and support. Make connections with the students you see each day.
Greet them by name and create a welcoming environment that will help them feel valued
and increase their sense of belonging to a community.
3. Be a good listener. Practice respectful active listening to show children they are heard and
valued. Establishing an emotional, non-judgmental connection can help to build trust while
listening is a tool that can help them express their thoughts and make sense of their
experience. However, do not force a student to discuss an experience that has been
traumatic because doing so can re-traumatize. Let the student take the lead and set the tone.
Using reflection and helping a student identify their emotions through words can promote
healing. Always keep in mind mandatory reporting laws.
4. Answer a child's questions honestly but age appropriately. Use basic understanding
language for elementary-age children, acknowledging that sometimes bad things happen
that we can't explain. More direct language with discussion and analysis can be appropriate
for adolescents. If the adolescent is angry, try to remain calm and help to discover the basis
for his/her anger.
5. Respect a child's cultural background. A strong cultural identity can be a protective
factor and should be supported. Connect students with supportive cultural resources in the
community. If language barriers exist, use reassuring body language and basic
conversation that show interest and care.
6. Don't make promises you can't keep. Students may look to adults for safety after
traumatizing events. However, you cannot promise safety if that is not possible, especially
for children living in communities where violence is common. You can say "I will do
everything in my power to keep you safe" or "I have some good ideas about what we can do
to help you feel better." You can brainstorm what students can do if feeling unsafe or
overwhelmed and can discuss safe places they can go at home or ways to stay safe in their
community. Praise them for being brave in sharing fear-provoking feelings. Help them to
identify other adults that might be able to support them.
VDH Guidelines for Healthcare Procedures in Schools 481
7. Reduce stress and build coping skills. Supportive adults who help create safe
environments can help students decrease chronic stress and overcome adversity. They can
help students identify soothing activities (such as listening to music, talking with a friend,
playing with a pet, taking a walk or writing in a journal) which have helped them feel better
in the past. They can help them identify unhealthy coping strategies (such as getting angry,
lashing out at others, drinking, or smoking) and help them replace those strategies with
more effective ones.
8. Connect children to what they love. Adults can help children identify their strengths and
natural talents and encourage them to flourish, giving them positive feelings to feel good
about. By actively listening to students, adults can discover what activities students enjoy
and encourage them to seek out those activities when they are stressed, and to develop
mastery and leadership skills in those areas. Encouraging extracurricular activities can also
help to decrease social isolation and increase relationships with peers and other adults.
Encouraging volunteering and using student strengths to help others can assist in
developing a sense of purpose and self value.
9. Help children manage their emotions. Students who have been traumatized may exhibit
challenging behaviors. Helping students to see the connection between their emotions and
their behaviors can help them understand their emotional reactions and begin to develop
better coping behaviors. For example, using supportive language such as, "If that happened
to me, I might feel the same way too. It is okay to be sad, but it is not okay to [insert unsafe
behavior]."
10. Support peer relationships for children exposed to trauma. Students who have been
exposed to trauma may react with impulsive, regressive, or withdrawn behaviors. Helping
them identify supportive friends that make them feel happy and confident can increase their
coping skills and inspire them to mimic the behaviors of their supportive friends.
11. Be a role model. Watching how adults handle stress and how they calmly deal with
stressors can be a model for a child learning to cope with stress. Showing respect and
compassion for others while being optimistic and resourceful can set a powerful example
for students. Adults can help students identify signs of unhealthy relationships and
unhealthy ways of dealing with stress (such as yelling, disrespectful language, name calling,
hitting, or kicking).
12. Be a mentor. Mentoring is one proven way to help develop resiliency. Mentors who can
provide consistent, caring support over time help children develop a sense of worth and
become important role models for future behavior.
13. Identify a child's "anchors." Anchors are members of the student's support network and
may be parents, teachers, coaches, grandparents, siblings, faith leaders, school staff,
neighbors and friends. Discovering who provides support or who the student looks up to is

VDH Guidelines for Healthcare Procedures in Schools 482
part of helping to cultivate this network of supportive persons in the student's life. By
working together, a more resilient environment can be created. Also, some of the student's
support network may have also been traumatized (e.g. the parent in an abusive situation)
and supporting that person can better prepare them to help the traumatized student.
14. Create calm, stable, and predictable environments. Students exposed to trauma may be
extra vigilant or in a constant state of worry and sensory overload, always on alert for
possible threats. This heightened state of alertness can affect their ability to concentrate and
finish their schoolwork. Providing a calm environment and structure where students can
predict what is going to happen next can help lessen their sense of uneasiness. Promoting
an atmosphere of no bullying or teasing also removes that potential stressor.
15. If a child uses challenging or difficult behavior, do not resort to shaming or isolating
punishments. When students are exposed to trauma, they may act aggressively or use
other challenging behaviors to control their environment (and their feelings). While
misbehavior cannot be tolerated, there is a need to recognize that the behaviors may be a
reaction to trauma and that the student needs to feel safe and secure. Setting up clear, firm
limits and developing logical (not punitive) consequences may help the student to develop
self control and lessen negative behaviors.
16. Be pro-active and search out child-supporting resources in your community. Each
community has trained mental health professionals, school social workers, faith-based
organizations, and child advocacy groups that can assist in supporting students who have
been affected by trauma. Help students and their families connect to these resources as
appropriate. If there are not adequate resources, work together with others in the
community to develop this type of care.

VDH Guidelines for Healthcare Procedures in Schools 483
School Nurse Interventions to Prevent Violence
Adapted from the National Association of School Nurses Position Statement School Violence,
Role of the School Nurse in Prevention (2013)
1. Facilitate student connectedness to the school community.
2. Engage parents in school activities that promote connections with their children and
foster communication, problem-solving, limit setting, and monitoring of children.
3. Support activities that help establish a climate that promotes respect for others.
4. Support policies of zero tolerance for weapons on school property.
5. Advocate for adult monitoring of hallways between classes, during lunch, on the
playground, and at the beginning and end of the school day.
6. Serve as positive role models and help develop mentoring programs for at risk youth.
7. Educate students and their families about gun safety.
8. Assist in the creation of a safe school environment that promotes trust and caring.
9. Engage in classroom discussions that facilitate respectful communication.
10. Facilitate building skills in communication, problem-solving, anger management,
coping, and conflict resolution throughout the school.

VDH Guidelines for Healthcare Procedures in Schools 484
Recommendations to Build Resiliency in Students and
Parents Exposed to Intimate Partner Violence
Intimate Partner Violence (IPV) has also been known as domestic violence or abuse within
families. It is a potent stressor for students whether that student has been a target of the abuse
or has observed a family member who is a target of abuse. Caring adults can help students heal
and thrive. These recommendations are adapted from Promising Futures: 16 Trauma-
informed, Evidence-based recommendations for Advocates Working with Children Exposed to
Intimate Partner Violence published by Futures Without Violence in 2013.
1. Recognize that children of all ages, from infancy through adolescence, are
vulnerable to the adverse impact of IPV exposure. Many people think that infants
and children exposed to violence cannot remember it and will not be damaged by it, but
research has shown that it can affect the neurodevelopment of their brain and how they
act in later childhood and beyond.
2. Establish a respectful and trusting relationship with the child's mother. Many
mothers who are victims of IVP are ashamed and guilty about how their children have
been affected. Their protective actions may be misinterpreted as poor parenting and
their reluctance to seek help may be due to fear of the abuser retaliating. Letting
mothers know that you understand their predicament can help to develop a trusting
relationship and can encourage the mother to be more receptive to taking steps to
improve the situation. Note: fathers can be the abused in a family relationship, but
because mothers are much more likely to be the abused in IPV, this set of guidelines
writes the recommendations with that in mind.
3. Let mothers and children know that it is ok to talk about what has happened if the
child would like to engage in this type of discussion. In families with IPV, mothers
avoid discussing the situation with their children, trying to shield their children from
trauma. However, many children want to discuss it and it may be a powerful way for
the children to heal. Parents may need support in learning how to talk with their
children and determining their readiness.
4. Tell children that violence is not their fault; if children say that the violence is their
fault or that they should have stopped it, tell them directly that they are not
responsible for violence and that it is not their job to intervene (or coach their
mothers to do so). Children often think egocentrically and blame themselves for
violence in the home. Children who blame themselves for the violence have more
behavior problems than those who were told it was not their fault.

VDH Guidelines for Healthcare Procedures in Schools 485
5. Foster children's self-esteem by showing and telling them that they are lovable,
competent and important. Developing self esteem and personal skills is tied to
resilience in children. Help parents to know how to respond to their children's stress
and provide physical comfort to children (following their children's lead). The parents
may never have received hugs or cuddling when they were young.
6. Help children know what to expect. Establishing a structured and predictable routine
(such as regular meals and bedtime) can help children feel more secure.
7. Model and encourage good friendship skills. Students who have good friend
networks are more resilient and have higher self esteem. Students exposed to IPV have
fewer behavior problems if they feel accepted by their peers.
8. Use emotion words to help children understand how others might feel during
disagreements.
9. Recognize that when children are disruptive, they are generally feeling out of
control and may not have the ability to use other strategies to express themselves.
Students who grow up in violent homes may be hyper vigilant and have difficulty
controlling their emotions and behaviors. Approaching them calmly and respectfully
while avoiding shaming and humiliating them with demands helps them learn that they
can trust helping adults.
10. Incorporate the family's culture into interventions, and support mothers and
children to explore the values, norms, and cultural meanings that impact their
choices and give them strength. Culture is a central part of a student's identity and
helps to shape values and norms. Work with the culture, not against it.
11. Actively teach and model alternatives to violence. Help students learn conflict
resolution skills and healthy ways of playing. Help them to see disagreements from
other perspectives so that they do not think differing viewpoints are examples of
hostility.
12. Involve mothers in conversations with their children about the children's views of
the abuse. Students may both fear and love an abusing parent and need to discuss these
conflicting emotions. Discussing the students perceptions of the acceptability of
violence is important because they are more likely to be aggressive if they view
violence as a norm.
13. Discuss child development with mothers. Mothers in homes with IPV often describe
inappropriate expectations of their children and attribute negative motives to difficult
developmentally appropriate behaviors.

VDH Guidelines for Healthcare Procedures in Schools 486
14. Help mothers teach their children how to label their emotions. When mothers help
their children recognize and cope with strong emotions, the children gain a sense of
mastery over them and learn to manage their behavior.
15. Address mothers parenting stress. When mothers learn effective parenting strategies
and are empowered to communicate with their children, their children have fewer
behavior problems. Remind parents that they are the most important people in their
children's lives.
16. Work with mothers to help them extend both their own and their child's social
support network. Social supports include friends, family, and community members.
Increasing support networks contributes to resilience and helps to develop supportive
relationships.
VDH Guidelines for Healthcare Procedures in Schools 487
Policy Recommendations to Decrease the Effects of Trauma
on Children
A partnership of 14 organizations with leaders in health, education, justice, and child
development, developed policy goals to prevent and address childhood exposure to violence
and trauma. These are the goals they established for the United States in the Executive
Summary: Safe, Healthy, and Ready to Learn: Policy Recommendations to Ensure Children
Thrive in Supportive Communities Free from Violence and Trauma (Futures Without Violence,
2015).
1. Invest early in parents and young children.
2. Help schools promote positive school climates, be trauma sensitive, and raise
achievement.
3. Train educators, health care workers, and other child-serving professionals about
preventing and responding to youth violence and trauma.
4. Prevent violence and trauma; expand violence prevention efforts to reduce children's
exposure to violence.
5. Improve intra-and inter-governmental coordination and alignment.
6. Increase the availability of trauma-informed services for children and families.
7. Increase public awareness and knowledge of childhood violence and trauma.

VDH Guidelines for Healthcare Procedures in Schools 488
Measuring Body Temperatures
Overview
Measuring body temperature is one assessment used in evaluating the physical status of a
student. Elevated temperature can be one indication of an infectious or inflammatory process
in the body. Temperature can be measured at several sites in the body via the oral, rectal,
axillary, skin, temporal artery, or tympanic membrane route. Due to privacy issues, rectal
temperatures should generally not be measured at school. Although glass thermometers were
used for many years, they are no longer considered safe due to the hazards of mercury and
should NOT be used in schools.
According to Selekman, there is no agreement as to the most effective thermometer to use in
the school setting. Many school nurses are using temporal artery thermometers because the
newest ones do not have to touch the student's skin to record temperatures, which saves money
on probe covers/disposable supplies. Temporal artery thermometers are recommended as the
thermometer of choice for students with autism (and other students who become apprehensive
about contact with thermometers) because no physical contact needs to occur when using the
newer temporal artery thermometers.
Axillary Temperature Measurement Using Electronic Thermometer
1. Assess need for axillary measurement. For example, young children may not be able to
hold thermometer under their tongues properly for accurate temperature measurement.
2. Wash hands. Put on disposable gloves (optional).
Use of an oral probe cover minimizes the need to wear gloves because it can be
removed without physical contact.
3. Explain the way temperature will be taken and importance of maintaining proper
thermometer position until reading is complete.
Students can be curious about such measurements and may remove thermometer to
check results before they are complete.
4. Remove thermometer pack from charging unit and grasp top of oral probe.
5. Slide probe into disposable plastic probe cover.
6. Move clothing away from shoulder and arm. Raise student’s arm and gently place
probe into the center of axilla, keeping tip close to skin and not clothing. Lower arm
over probe and place arm across student’s chest.
7. Leave thermometer probe in place until audible signal occurs and student’s temperature
appears on digital display.
8. Remove probe from axilla.

VDH Guidelines for Healthcare Procedures in Schools 489
9. Return probe to storage position of thermometer. Return thermometer to charger.
10. Remove gloves, if worn, and dispose of appropriately. Wash hands.
11. Record temperature. Notify school nurse and family if there is a change from student’s
usual temperature.
Oral Temperature Measurement Using Chemical Dot Thermometer
Chemical dot thermometers are disposable, single-use thermometers with specific chemical
mixtures in each dot that melt and change color to measure temperature in increments of two
tenths of a degree. They are easy to read and can also be used for axillary temperatures, but
must be kept away from heat. They should be stored in areas where temperatures do not
exceed 86°. If unused thermometers are exposed to heat greater than 95°F, then they should be
placed in a freezer for one hour and then left at room temperature for 24 hours before using.
1. Wash hands. Put on clean gloves (optional).
2. Explain the way temperature will be taken and importance of maintaining proper
position until reading is complete.
3. Students may not be familiar with chemical dot thermometer and may remove
thermometer to check results before they are complete.
4. Gently place dotted end of thermometer under the student’s tongue in the left or right
posterior pocket (not in the pocket in front of the tongue).
5. Heat from superficial blood vessels in sublingual pocket produces the temperature
reading.
6. Have child keep mouth closed without biting the thermometer.
7. Leave thermometer probe in place for 3 minutes (for some brands, one minute).
8. Remove thermometer and wait 10-15 seconds for the color change to stabilize before
reading. With most brands, the last blue dot indicates the correct temperature.
9. Dispose of thermometer in appropriate receptacle.
10. Wash hands.
Oral Temperature Measurement Using Electronic Thermometer
1. Assess factors which may influence oral temperature measurement. Recent intake of
cold or hot beverages, use of oxygen mask, or open-mouth breathing can affect
accuracy of measurement.
2. Wash hands. Put on disposable gloves (optional).

VDH Guidelines for Healthcare Procedures in Schools 490
Use of an oral probe cover minimizes the need to wear gloves because it can be
removed without physical contact.
3. Explain the way temperature will be taken and importance of maintaining proper
thermometer position until reading is complete.
Students can be curious about such measurements and may remove thermometer to
check results before they are complete.
4. Remove thermometer pack from charging unit and grasp top of oral probe.
5. Slide probe into disposable plastic probe cover.
6. Gently place thermometer probe under the student’s tongue in the left or right posterior
pocket (not in the pocket in front of the tongue).
With electronic thermometers, temperatures in the left or right sublingual pocket are
higher than in the area in front of the tongue. Heat from superficial blood vessels in
sublingual pocket produces the temperature reading.
7. Have child keep mouth closed without biting the thermometer.
Holding the thermometer may achieve more accurate readings for some students.
8. Leave thermometer probe in place until audible signal occurs and student’s temperature
appears on digital display.
9. Remove thermometer probe from under client’s tongue. Discard plastic probe cover
into appropriate receptacle.
Note: Small digital thermometers designed for home use may run on
batteries/microprocessor chip instead of a charger and utilize disposable plastic sleeve
covers. Care should be taken when removing the sleeves because it is easier to become
contaminated with saliva than when using the hard plastic probe covers.
10. Return probe to storage position of thermometer. Return thermometer to charger.
11. Remove gloves, if worn, and dispose of appropriately. Wash hands.
12. Record temperature. Notify school nurse and family if there is a change from student’s
usual temperature.
Oral Temperature Measurement Using Glass Thermometers
DO NOT USE. See Steps to Take in the Event of a Mercury Spill at the end of this
section.

VDH Guidelines for Healthcare Procedures in Schools 491
Skin Temperature Measurement Using Plastic Strip Thermometers
Plastic strip thermometers are disposable thermometers that use temperature-sensitive patch or
tape to measure temperature. Their accuracy has been variable.
1. Wash hands.
2. Explain the way temperature will be taken.
3. Place strip on forehead until color change occurs, usually about 15 seconds.
4. Remove strip and dispose in appropriate receptacle.
5. Wash hands.
6. Record temperature. Notify school nurse and family if there is a change from student’s
usual temperature.
Temporal Artery Temperature Measurement
One of the newest methods for measuring temperature is the temporal artery thermometer. It
uses infrared technology to measure the temperature of the skin surface over the temporal
artery, a major artery of the head. It is quick, noninvasive, and easy to use and recommended
as a screening method of temperature measurement. (Some studies have questioned whether it
is as accurate as some other measures when measuring febrile babies over time).
There are now two different temporal artery thermometers available. The newest requires no
contact with the skin and is preferred for students with autism. Always follow the instructions
of the particular thermometer that is being used.
Instructions for Non-Contact Temporal Artery Thermometers:
1. Explain the way temperature will be taken. Students may not be familiar with temporal
artery thermometer and may fear it.
2. Make sure the thermometer is in the body temperature taking mode if it is also one that
can be used to measure ambient temperature or the temperature of liquids.
3. Wipe perspiration or hair from student's forehead.
4. Hold the thermometer 1-3 inches from the student (follow specific device instructions
for distance). Press and release the "SCAN" button. Temperature will immediately
display.
5. Record temperature. Notify school nurse and family if there is a change from student’s
usual temperature.

VDH Guidelines for Healthcare Procedures in Schools 492
Instructions for Temporal Artery Thermometers that touch the forehead:
1. Wash hands.
2. Explain the way temperature will be taken
Students may not be familiar with temporal artery thermometer and may fear it.
3. Wipe perspiration or hair from student's forehead.
4. Remove protective cap. Be sure lens is clean.
5. Gently position the probe flat on the center of the forehead, midway between the
eyebrow and hairline. Press and hold the SCAN button.
6. Lightly slide the thermometer across the forehead keeping the sensor flat and in contact
with the skin until you reach the hairline. Lift the probe from the forehead and touch
the neck just behind the ear lobe.
A beeping can be heard and a red LED light will blink to indicate a temperature
measurement is taking place. Accuracy of reading is increased if both forehead and
neck are scanned, especially if moisture or sweat is present on forehead.
7. Release the SCAN button and remove the thermometer from the head.
8. Read the temperature on the display. Temperatures obtained by temporal artery
thermometers may be 0.8-1.0°F (0.4°C) higher than those obtained by oral
thermometers (they correlate closer to rectal temperatures).
Thermometer will shut off automatically after 30 seconds.
9. Wait at least 30 seconds before re-scanning for a temperature.
10. Replace the protective cap on thermometer to protect the sensor when not in use.
11. Wash hands.
12. Record temperature. Notify school nurse and family if there is a change from student’s
usual temperature.
Tympanic Membrane Temperature Measurement
Tympanic membrane thermometers measure temperature by detecting the infrared heat
produced by the eardrum and surrounding tissue. The tympanic membrane is used because
both the eardrum and hypothalamus (temperature-regulating center) have the same blood
circulation. The measurement is quick, noninvasive, and generally well tolerated, but there are
conflicting views regarding its absolute accuracy. Generally, the accuracy is dependent on
utilizing proper technique and absence of earwax. Many times, the thermometer is not
positioned correctly in the ear canal.
1. Wash hands.

VDH Guidelines for Healthcare Procedures in Schools 493
2. Explain the way temperature will be taken and importance of maintaining proper
position until reading is complete.
Students may not be familiar with tympanic thermometer and may fear that it could
cause pain.
3. Right-handed persons should measure temperature from student’s right ear and left-
handed persons should measure from student’s left ear because the less acute the angle
of approach, the better the probe seal.
4. Attach a clean (disposable) probe cover.
5. Perform an ear tug to straighten the ear canal—gently pull ear up and back.
Pulling up and back straightens the ear canal in children over 3 years of age. In
children under 3, pull pinna down and back.
6. While tugging the ear, insert the covered probe tip gently into the ear canal, pointing at
the midpoint between the eyebrow and the sideburn on the opposite side of the face. Fit
probe snugly into the canal.
Temperature is most accurate with maximum exposure of the tympanic membrane.
Gentle pressure seals the ear canal from room temperature, which can alter readings
greatly.
7. Press the activation button. Digital reading of temperature appears within 2 seconds.
Some studies suggest taking three measurements and recording the highest reading to
obtain the most accurate reading.
8. Carefully remove thermometer from ear canal.
9. Press the ejector button and dispose of probe cover in appropriate receptacle.
Pressing ejector button causes digital reading to disappear.
10. Wash hands.
11. Record temperature. Notify school nurse and family if there is a change from student’s
usual temperature.
Steps to Take in the Event of a Mercury Spill
Glass mercury thermometers were once standard in schools and medical centers. However,
concerns regarding the safety of the mercury within glass thermometers prompted most states
to ban mercury thermometers in schools and for the general phase out of the manufacture and
calibration of mercury thermometers. Mercury is a neurotoxin and even low levels of mercury
exposure can pose harm. Mercury’s most dangerous attribute is its ability to vaporize and form
a hazardous gas. Mercury thermometers should never be used in schools. Most schools no
longer have them although some have been found in science labs and back cabinets where their

VDH Guidelines for Healthcare Procedures in Schools 494
existence had been forgotten. Many people mistakenly believe that skin exposure to mercury
is the biggest problem and try to clean up mercury spills with caution to avoid touching
mercury in the cleanup. However, mercury vaporizes easily and inhalation poses the greatest
threat to people. If a mercury spill occurs:
1. Evacuate the immediate area and ventilate as well as possible.
2. Contact an environmental consultant at the health department or an environmental
services department for cleanup and disposal instructions.
3. Do NOT attempt to clean up a mercury spill using rags or a vacuum. This will only
disperse the mercury and encourage volatilization.
4. Do NOT use household cleaning products to clean the spill, especially products
containing ammonia or chlorine because a toxic gas may be produced.
5. Do NOT use a broom. The mercury will break into smaller beads and spread further.
6. Do NOT use a vacuum because this will release mercury into the air.
7. Do NOT touch spilled mercury droplets. If skin contact occurs, immediately flush area
with water for 15 minutes.
8. Complete occurrence report as directed by institution procedure.
Sources:
Batra, P. & Goyal, S. (2013). Comparison of rectal, axillary, tympanic, and temporal artery
thermometry in the emergency room. Pediatric Emergency Care, 29(1): 63-66.
Bowden, V., & Greenberg, C. (2012). Pediatric nursing procedures (Third ed.). Philadelphia:
Wolters Kluwer Health/Lippincott Williams & Wilkins, 788-794.
Carleton, E., Fry, B., Mulligan, A., Bell, A., & Brossart, C. (2012). Temporal artery
thermometer use in the prehospital setting. Canadian Journal of Emergency Medicine,
14(1): 7-13.
Environmental Protection Agency. (2014). Phase-out of mercury thermometers used in
industrial and laboratory settings. Available online:
http://www.epa.gov/mercury/thermometer.htm
Hockenberry, M., & Wilson, D. (2015). Wong's nursing care of infants and children (10th ed.).
St. Louis: Elsevier Mosby, 118-121, 259.
Marshall, E. (2014). Increasing prevalence of autism: Implications for school nursing. NASN
School Nurse, 29(5): 241-243.
VDH Guidelines for Healthcare Procedures in Schools 495
Moore, A., Carrigan, J. Solomon, D., & Tart, R. (2014). Temporal artery thermometry to
detect pediatric fever. Clinical Nursing Research, 1-8.
Pappas, M. (2012). Understanding the different methods for taking a temperature. NASN
School Nurse, 27(5): 254-255.
Reynolds, et al (2014). Are temporal artery temperatures accurate enough to replace rectal
temperature measurement in pediatric ED patients? Journal of Emergency Nursing,
40(1): 46-50.
Selekman, J. (2013). School nursing: A comprehensive text (2nd ed.). Philadelphia: F.A.
Davis, 353.
Teran, C. Torrez-Llanos, J., Teran-Miranda, T. Balderrama, C. Shah, N., & Villarroel, P.
(2012). Clinical accuracy of a non-contact infrared skin thermometer in pediatric
practice. Child Care Health and Development 38: 471-476.

VDH Guidelines for Healthcare Procedures in Schools 496
Chapter 8: Care of the Urinary
System
Overview
Clean Intermittent Catheterization
Indwelling Urinary Catheter
External Urinary Catheter
Urostomy
Continent Urostomy, Vesicostomy, or Appendicovesicostomy
Peritoneal Dialysis
Hemodialysis

VDH Guidelines for Healthcare Procedures in Schools 497
Urinary System
Overview
The urinary system filters waste material and water from the blood and
excretes it from the body as urine.
The kidneys are two bean-shaped organs, each about the size of a fist,
that are located on either side of the spine, just below the rib cage.
They remove a type of waste called urea from the blood and regulate
the amount of water in the body. Renal arteries carry blood to the
kidneys, where the waste is removed and renal veins take the cleansed
blood away from the kidneys. Every day, the kidneys filter about 120-
150 quarts of blood to produce about 1-2 quarts of urine. As much as
90% of the water that the kidneys remove from the blood is returned to
the bloodstream after the waste is filtered out. The kidneys are also
involved in regulating blood pressure, regulating the levels of
electrolytes such as potassium and phosphate, the creation of red blood
cells, and calcium absorption.
From the kidneys, urine travels down two thin tubes called ureters to the bladder.
The bladder is a hollow muscular organ, which stores urine until it is ready to be excreted from
the body. Circular muscles called sphincters close tightly around the opening of the bladder
and help keep urine from leaking.
During urination, urine passes from the bladder through the urethra, a tube leading from the
bladder to the external opening of the body. This opening is called the meatus and is located at
the tip of the penis in boys and between the labia, immediately above the vagina, in girls.

VDH Guidelines for Healthcare Procedures in Schools 498
Sources:
National Institute of Diabetes and Digestive and Kidney Diseases. (May 2014). The kidneys
and how they work. Bethesda, MD: National Institutes of Health. NIH Publication No.
14-3195. Available online: http://www.niddk.nih.gov/health-information/health-
topics/Anatomy/kidneys-how-they-work/Documents/yourkidneys_508.pdf
National Institute of Diabetes and Digestive and Kidney Diseases. (December 2013). Your
urinary system and how it works. Bethesda, MD: National Institutes of Health. NIH
Publication No. 14-3195. Available online: http://www.niddk.nih.gov/health-
information/health-topics/Anatomy/urinary-tract-how-it-
works/Documents/YourUrinary_508.pdf
Illustration Source:
National Institute of Diabetes and Digestive and Kidney Diseases. (May 2014). The kidneys
and how they work. Bethesda, MD: National Institutes of Health. NIH Publication No.
14-3195. Available online: http://www.niddk.nih.gov/health-information/health-
topics/Anatomy/kidneys-how-they-work/Documents/yourkidneys_508.pdf

VDH Guidelines for Healthcare Procedures in Schools 499
Clean Intermittent Catheterization
Overview
Clean intermittent catheterization (CIC) is a clean (not sterile) procedure used to empty the
bladder. It is generally performed by/for students who cannot urinate spontaneously or who
cannot fully empty their bladder when they urinate. Often children with myelomeningocele
(spina bifida) or spinal cord injury have neurogenic bladders. When urine sits in the bladder
for long periods of time, infection can develop. CIC helps to prevent urinary tract infections by
emptying the bladder every few hours and prevents wetting from urine overflowing from a full
bladder. The catheter is inserted for just long enough to drain the urine and is then removed.
Depending upon the cognitive status of the child, he/she can be taught to perform the CIC
procedure for themselves, often starting around the age of six. For most children, intermittent
self-catheterization is a clean procedure and sometimes the same catheter can be used for weeks
at a time between washings. Self-catheters are straight tubes without the side balloon inflation
ports found on indwelling catheters. They are also more rigid than indwelling catheters to
make insertion easier.
Settings and Staff
CIC can be done in a regular bathroom, health office, or any other facility where the student’s
privacy is ensured. Toilet facilities will need to be wheelchair accessible and have bars or
supports for the student needing such assistance. Some students may need to lie down on a bed
or cot to be catheterized.
A school nurse (RN or LPN) or health assistant with competency-based training in CIC and
problem management can safely do this procedure. Students should be encouraged to learn this
procedure and do it themselves, if able. However, it is important to note that some of these
students may still need some supervision. School personnel who have regular contact with the
student requiring CIC should receive general training that covers the student’s specific needs,
potential problems, and implementation of the established emergency plan.
Individualized Healthcare Plan (IHP)
Each student’s IHP must be tailored to the individual’s needs. A sample plan is included in
Appendix A. When preparing an IHP for a student requiring clean intermittent catheterization,
the following items should be considered:

VDH Guidelines for Healthcare Procedures in Schools 500
• Underlying condition and possible problems associated with the condition or treatment
• Healthcare provider's orders for catheterization and equipment to be used
• Individual baseline status, including urine color, amount, and pattern of continence
• Student’s ability to self-catheterize and how to foster independence in performing the
procedure
• Depending upon the technique (clean or sterile), non-latex gloves should be worn
• Frequency of catheterizations
• Flexible timing of catheterization to accommodate classroom schedule, field trips, and
other school events
• Position of student during catheterization
• Whether catheters are reused or disposed after each use
• Cleaning procedure for reusable catheters
• Whether gloves are needed and whether they need to be sterile or clean
• Medications that may affect urine color, amount, and odor
• Student’s need for assistance/monitoring with catheterization, clothing and leg braces
• Access to a change of clothing at school
• Student’s need for additional fluids and types of recommended fluids
• Student's history of urinary tract infections
• Access to an additional adult’s presence when school staff perform catheterization
• Avoidance of latex gloves and latex catheters even if student does not have a latex
allergy yet
• Standard precautions

VDH Guidelines for Healthcare Procedures in Schools 501
Sources:
Bowden, V., & Greenberg, C. (2012). Pediatric nursing procedures (Third ed.). Philadelphia:
Wolters Kluwer Health/Lippincott Williams & Wilkins, 716-719.
Hockenberry, M., & Wilson, D. (2015). Wong's nursing care of infants and children. (10th ed.).
St. Louis: Elsevier Mosby, 1636, 1659-1660.
National Library of Medicine Medline Plus. (2012). Self catheterization--female. Available
online at http://www.nlm.nih.gov/medlineplus/ency/patientinstructions/000144.htm
National Library of Medicine Medline Plus. (2012). Self catheterization--male. Available
online at http://www.nlm.nih.gov/medlineplus/ency/patientinstructions/000143.htm
Porter, S., Branowicki, P., & Palfrey, J. (2014). Supporting students with special health care
needs: Guidelines and procedures for schools (3rd ed.). Baltimore: Paul H. Brookes
Publishing, 280-289.
Selekman, J. (2013). School nursing: A comprehensive text. (2nd ed.). Philadelphia: F.A.
Davis, 1042-1044.
Wyndale, J, Brauner, A, Geerlings, S., Koves, B., Peter, T., and Bjerklund-Johanson, T.
(2012). Clean intermittent catheterization and urinary tract infection: Review and guide
for future research. British Journal of Urology International, 110: E910-E917.

VDH Guidelines for Healthcare Procedures in Schools 502
Procedure for Clean Intermittent Catheterization—Male
Note: Family provides equipment and supplies.
1. Wash hands.
2. Assemble equipment:
3. Water-soluble lubricant (e.g., K-Y Jelly, Lubrifax, Surgilube)
• Catheter
• Wet wipes or cotton balls (nonsterile) plus mild soap and water or student-
specific cleansing supplies
• Storage receptacle for catheter, such as a sealed plastic bag
• Toilet or container for urine
• Non-latex gloves, if person other than student does procedure
• If the student does the procedure unassisted, gloves may not be needed;
however, the student should wash his hands with soap and water before and
after performing the procedure.
4. Have another adult present for the procedure, if possible.
5. Having two adults present protects both the student and the caregiver.
6. Explain procedure using explanations the student can understand. Encourage him to do
as much of the procedure as he is capable, so as to achieve maximum self-care skills.
7. Position the student.
8. The student may be catheterized lying down, standing, or sitting. If able, he may stand
at or sit on the toilet. If unable to sit or stand, he may lie on his back. A receptacle to
catch the flow of urine from the catheter is required.
9. Wash hands and put on non-latex gloves.
10. Lubricate the first 3 inches of the catheter with a water-soluble lubricant and place on
clean surface.
11. Cleanse the penis by washing the glans with soapy cotton balls or cleansing supplies
specified in student's IHP. Hold the penis below the glans. Foreskin may be retracted
on uncircumcised males. Beginning at the urethra, use circular motions to wash away
from the meatus. Do this three times using a clean cotton ball each time you wash the
penis.
12. Starting at the meatus and washing toward the base of the penis helps remove bacteria
from the area.

VDH Guidelines for Healthcare Procedures in Schools 503
13. Holding the penis at a 45-90 degree angle from the abdomen, use the dominant hand to
gently insert catheter into the urethral opening.
14. If resistance is met at the bladder sphincter, use gentle but firm pressure until the
sphincter relaxes. Encouraging the child to breathe deeply may help to relax the
urinary tract. Do not force catheter. If unusual resistance is felt, notify the school
nurse and family. Make sure the other end of the catheter is in a receptacle or over the
toilet to catch urine.
15. Insert the catheter until urine begins to flow. Continue to advance the catheter
approximately one inch further and hold in place. When the flow stops, insert catheter
slightly more and then withdraw a little to make sure all urine is drained. Rotate the
catheter so that catheter openings have reached all areas of the bladder.
16. It may be helpful to have the student bear down a couple of times while the catheter is
in place.
17. After the bladder is emptied, pinch catheter and withdraw.
18. This prevents urine still in catheter from flowing back into the bladder during
withdrawal.
19. If the student is uncircumcised, move the foreskin back over the glans when finished.
20. Failure to return the foreskin can lead to swelling of the penis and impairment of
circulation.
21. Wipe off any excess lubricant or urine.
22. Assist student in dressing, if needed.
23. Measure and record the urine volume, if ordered. Dispose of urine appropriately.
24. If using a one-time use catheter, wrap catheter around gloved palm, pull glove over
catheter when degloving (to contain it) and dispose of according to school's infection
control procedure.
25. If using a reusable catheter, wash, rinse, dry, and store the catheter in appropriate
container according to student's IHP.
26. Examples of storage receptacles include a sealed plastic bag, a urine specimen
container, and a clean pencil case. The reusable catheter(s) should be sent home with
student to be cleaned. Dispose of catheters when they become brittle upon repeated
use.
27. Remove gloves and wash hands.
28. Document on log sheet that the procedure was done. Report to the school nurse and
family any changes such as cloudy urine, mucus, blood, foul odor, color changes,
unusual wetting between catheterizations, which may be signs of infection.
VDH Guidelines for Healthcare Procedures in Schools 504
Sources:
American Academy of Pediatrics. (2015). Clean Intermittent Catheterizations. Available
online https://www.healthychildren.org/English/health-
issues/conditions/chronic/Pages/Clean-Intermittent-Catheterization.aspx
Bowden, V., & Greenberg, C. (2012). Pediatric nursing procedures (Third ed.). Philadelphia:
Wolters Kluwer Health/Lippincott Williams & Wilkins, 716-719.
Connecticut State Department of Education. (2012). Clinical procedure guidelines for
Connecticut school nurses. Middlebury, CT: CSDOE, 59-61.
Hockenberry, M., & Wilson, D. (2015). Wong's nursing care of infants and children. (10th ed.).
St. Louis: Elsevier Mosby, 1636, 1659-1660.
National Library of Medicine Medline Plus. (2012). Self catheterization--male. Available
online at http://www.nlm.nih.gov/medlineplus/ency/patientinstructions/000143.htm
Porter, S., Branowicki, P., & Palfrey, J. (2014). Supporting students with special health care
needs: Guidelines and procedures for schools (3rd ed.). Baltimore: Paul H. Brookes
Publishing, 280-289.
Selekman, J. (2013). School nursing: A comprehensive text. (2nd ed.). Philadelphia: F.A.
Davis, 1042-1044.
Wisconsin Improving School Health Services Project. (2015). Clean intermittent
catheterization male. Available online
http://www.wishesproject.org/?page_id=119/?tab=4 (Video also available).

VDH Guidelines for Healthcare Procedures in Schools 505
Procedure for Clean Intermittent Catheterization—Female
Note: Family provides equipment and supplies.
1. Wash hands.
2. Assemble equipment:
• Water-soluble lubricant (e.g., K-Y Jelly, Lubrifax, Surgilube)
• Catheter
▪ Wet wipes or cotton balls (nonsterile) plus mild soap and water or student-specific
cleansing supplies
▪ Storage receptacle for catheter, such as a sealed plastic bag
• Toilet or container for urine
• Non-latex gloves, if person other than student does procedure
If the student does the procedure unassisted, gloves may not be needed; however, the
student should wash her hands with soap and water before and after performing the
procedure.
3. Have another adult present for the procedure, if possible.
Having two adults present protects both the student and the caregiver.
4. Explain procedure using explanations the student can understand. Encourage her to do as
much of the procedure as she is capable, so as to achieve maximum self-care skills.
5. Position the student.
The student may be catheterized lying down, standing, or sitting. If able, she may stand at
or sit on the toilet. If unable to sit or stand, she may lie on her back. A receptacle to catch
the flow of urine from the catheter is required.
6. Wash hands and put on non-latex gloves.
7. Lubricate the first 3 inches of the catheter with a water-soluble lubricant and place on clean
surface.
8. Separate the labia and hold open with non-dominant hand. Cleanse, starting at the top of
the labia and going down toward the rectum. Use a clean cotton ball each time. Wash three
times: once down the middle and once down each side.
Do not cleanse in a circular motion because doing so may move bacteria from the rectal
area towards the urethra.
9. Locate the urinary meatus (opening). Gently insert the catheter until there is urine.

VDH Guidelines for Healthcare Procedures in Schools 506
The female urethra is short and straight. Keep the other end of the catheter over the toilet
or the receptacle. If no urine is obtained, the catheter may have slipped into the vagina
instead of the urethra.
10. When urine flow stops, insert catheter slightly more. If no more urine is obtained,
withdraw it slightly and rotate catheter so that catheter openings have reached all areas of
the bladder.
It may be helpful to have the student bear down a couple of times while the catheter is in
place to ensure that all urine has been drained completely.
11. After bladder is completely empty, pinch catheter and withdraw.
This prevents urine still in catheter from flowing back into the bladder during withdrawal.
12. Wipe off any excess lubricant or urine.
13. Assist student in dressing, if needed.
14. Measure and record the urine volume, if ordered. Dispose of urine.
15. If using a one-time use catheter, wrap catheter around gloved palm, pull glove over catheter
when degloving (to contain it) and dispose of according to school's infection control
procedure.
16. If using a reusable catheter, wash, rinse, dry, and store the catheter in appropriate container
according to student's IHP.
Examples of storage receptacles include a sealed plastic bag, a urine specimen container,
and a clean pencil case. The reusable catheter(s) should be sent home with student to be
cleaned. Dispose of catheters when they become brittle upon repeated use.
17. Remove gloves and wash hands.
18. Document on log sheet that the procedure was done. Report to the school nurse and family
any changes such as cloudy urine, mucus, blood, foul odor, color changes, unusual wetting
between catheterizations, which may be signs of infection.

VDH Guidelines for Healthcare Procedures in Schools 507
Sources:
American Academy of Pediatrics. (2015). Clean Intermittent Catheterizations. Available
online https://www.healthychildren.org/English/health-
issues/conditions/chronic/Pages/Clean-Intermittent-Catheterization.aspx
Bowden, V., & Greenberg, C. (2012). Pediatric nursing procedures (Third ed.). Philadelphia:
Wolters Kluwer Health/Lippincott Williams & Wilkins, 716-719.
Connecticut State Department of Education. (2012). Clinical procedure guidelines for
Connecticut school nurses. Middlebury, CT: CSDOE, 59-61.
Hockenberry, M., & Wilson, D. (2015). Wong's nursing care of infants and children. (10th ed.).
St. Louis: Elsevier Mosby, 1636, 1659-1660.
National Library of Medicine Medline Plus. (2012). Self catheterization--female. Available
online at http://www.nlm.nih.gov/medlineplus/ency/patientinstructions/000144.htm
Porter, S., Branowicki, P., & Palfrey, J. (2014). Supporting students with special health care
needs: Guidelines and procedures for schools (3rd ed.). Baltimore: Paul H. Brookes
Publishing, 280-289.
Selekman, J. (2013). School nursing: A comprehensive text. (2nd ed.). Philadelphia: F.A.
Davis, 1042-1044.
Wisconsin Improving School Health Services Project. (2015). Clean intermittent
catheterization female. Available online
http://www.wishesproject.org/?page_id=88/?tab=4 (Video also available).

VDH Guidelines for Healthcare Procedures in Schools 508
Possible Problems for Students Using
Clean Intermittent Catheterization
• Cloudy urine, blood in urine, foul odor, color changes, unusual wetting between
catheterizations, nausea/vomiting, urgency
These may be signs of a urinary tract infection. Always report to school nurse and family
any changes in the student’s usual pattern or tolerance of procedure.
• Inability to pass catheter
This may be due to increased sphincter tone caused by anxiety or spasm. Encourage the
child to relax by breathing slowly and deeply.
In boys: Reposition the penis and use gentle but firm pressure until the sphincter relaxes.
Sometimes it helps to have boys flex at hips to decrease reflex resistance of bladder
sphincter.
In girls: Check catheter placement because the catheter may be in the vagina. If catheter is
in the vagina, leave catheter in vagina temporarily as a landmark indicating where not to
insert, and insert another clean catheter.
If still unsuccessful, notify school nurse, family or health care provider for further
instructions.
• No urine obtained during catheterization
Check position of catheter. This may be due to improper placement of catheter or the
bladder may be empty. Check for wetness. Sometimes the patient is using a catheter that is
too small. In this case, urine actually dribbles around the catheter when catheterizing and
urine also dribbles out of the bladder intermittently.
• Bleeding from urethra
This may be due to trauma to the urethra or to a urinary tract infection. Contact school nurse,
family and health care provider.

VDH Guidelines for Healthcare Procedures in Schools 509
Sources:
American Academy of Pediatrics. (2015). Clean Intermittent Catheterizations. Available
online https://www.healthychildren.org/English/health-
issues/conditions/chronic/Pages/Clean-Intermittent-Catheterization.aspx
Bowden, V., & Greenberg, C. (2012). Pediatric nursing procedures (Third ed.). Philadelphia:
Wolters Kluwer Health/Lippincott Williams & Wilkins, 716-719.
Connecticut State Department of Education. (2012). Clinical procedure guidelines for
Connecticut school nurses. Middlebury, CT: CSDOE, 59-61.
Hockenberry, M., & Wilson, D. (2015). Wong's nursing care of infants and children. (10th ed.).
St. Louis: Elsevier Mosby, 1636, 1659-1660.
National Library of Medicine Medline Plus. (2012). Self catheterization--female. Available
online at http://www.nlm.nih.gov/medlineplus/ency/patientinstructions/000144.htm
Porter, S., Branowicki, P., & Palfrey, J. (2014). Supporting students with special health care
needs: Guidelines and procedures for schools (3rd ed.). Baltimore: Paul H. Brookes
Publishing, 280-289.
Selekman, J. (2013). School nursing: A comprehensive text. (2nd ed.). Philadelphia: F.A.
Davis, 1042-1044.
Wisconsin Improving School Health Services Project. (2015). Clean intermittent
catheterization female. Available online
http://www.wishesproject.org/?page_id=88/?tab=4 (Video also available).
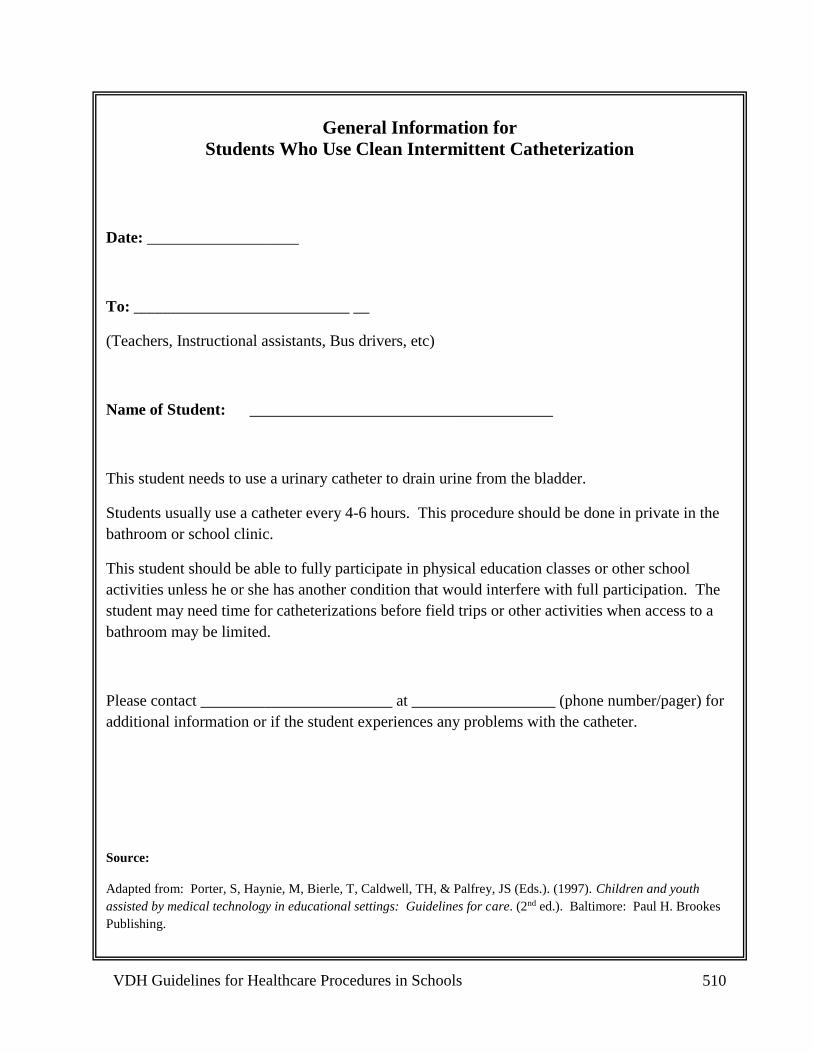
VDH Guidelines for Healthcare Procedures in Schools 510
General Information for
Students Who Use Clean Intermittent Catheterization
Date: ___________________
To: ___________________________ __
(Teachers, Instructional assistants, Bus drivers, etc)
Name of Student: ______________________________________
This student needs to use a urinary catheter to drain urine from the bladder.
Students usually use a catheter every 4-6 hours. This procedure should be done in private in the
bathroom or school clinic.
This student should be able to fully participate in physical education classes or other school
activities unless he or she has another condition that would interfere with full participation. The
student may need time for catheterizations before field trips or other activities when access to a
bathroom may be limited.
Please contact ________________________ at __________________ (phone number/pager) for
additional information or if the student experiences any problems with the catheter.
Source:
Adapted from: Porter, S, Haynie, M, Bierle, T, Caldwell, TH, & Palfrey, JS (Eds.). (1997). Children and youth
assisted by medical technology in educational settings: Guidelines for care. (2nd ed.). Baltimore: Paul H. Brookes
Publishing.

VDH Guidelines for Healthcare Procedures in Schools 511
Indwelling Urinary Catheter
Overview
Indwelling urinary catheters used outside the hospital setting for students are usually used after
surgical procedures on the urinary tract. A retention or Foley catheter is introduced through the
urethra into the bladder. The retention catheter contains a smaller tube within the larger tube.
This smaller tube is connected to a balloon near the insertion tip. After the catheter is inserted,
the balloon is inflated with water to hold the catheter in place in the bladder. The Foley
catheter has two openings at the end, one to drain the urine, the other to inflate/deflate the
balloon.
Catheters are sized by the diameter of the lumen--the larger the number, the larger the lumen
(i.e., 8F, 10F, 12F). The balloons of retention catheters are sized by the volume of fluid used to
inflate them and usually have a 5-milliliter capacity.
Settings and Staff
As with all health-related conditions, every effort should be made to protect the student’s
privacy. Procedures such as emptying the urinary collection bag can be done in regular toilet
facilities in the school or the nurse’s office or any other facility where the student’s privacy is
ensured.
Care of an indwelling catheter may be managed by the school nurse, family, teacher aide, or
other staff person who has received training in care of the indwelling catheter of the student.
General training should cover the student’s specific health care needs, potential problems, how
to obtain assistance should problems occur, and when to activate the emergency plan.
Individualized Healthcare Plan
Each student’s IHP must be tailored to the individual’s needs. A sample plan is included in
Appendix A. When preparing an IHP for a student with an indwelling urinary catheter, the
following items should be considered:
• Student’s underlying condition and possible problems associated with the condition or
treatment
• Health Care Provider's order for the catheter and its care
• Type of catheter and volume of retention balloon

VDH Guidelines for Healthcare Procedures in Schools 512
• Medications that may affect urine color, amount, and odor
• Student’s ability for self-care and fostering independence in performing the procedure
• Individual baseline status, including urine color and amount
• Student’s need for additional fluids and type of recommended fluids
• Positioning of catheter tubing and collection device/bag
• Measures to be taken if catheter is dislodged, leaking, or obstructed
• Instructions for maintaining a closed system
• Access to an additional adult’s presence when school staff perform catheterization
• Latex allergy precautions
• Standard precautions
• Non-latex gloves should be worn at all times when providing care for the student with
an indwelling catheter
Sources:
Bowden, V., & Greenberg, C. (2012). Pediatric nursing procedures (Third ed.). Philadelphia:
Wolters Kluwer Health/Lippincott Williams & Wilkins, 712-715.
Centers for Disease Control. (2009). Guideline for prevention of catheter-associated urinary
tract infections 2009. Available online
http://www.cdc.gov/hicpac/pdf/CAUTI/CAUTIguideline2009final.pdf
Connecticut State Department of Education. (2012). Clinical procedure guidelines for
Connecticut school nurses. Middlebury, CT: CSDOE, 64-65.
Smith, S., Duell, D. & Martin, B. (2012). Clinical nursing skills: Basic to advanced skills (8th
ed.). Boston: Pearson, 783-784.
Wilkinson, J.M., Treas, L.S., Barnett, K.L., & Smith, M.H. (2016). Fundamentals of nursing:
Vol. 2: Thinking, doing, and caring. Philadelphia: F.A.Davis, 532, 544-548.

VDH Guidelines for Healthcare Procedures in Schools 513
Procedure for Monitoring an Indwelling Urinary Catheter
1. To empty the drainage bag:
• Wash hands and put on non-latex gloves.
• Open outlet valve or clamp on urinary collection device and allow contents of bag to
drain into a urinal or other collection device.
• Do not allow end of outlet tubing on collection device/bag to touch collection device
or floor.
Bacteria on the collection device could be transferred to the urinary collection
system, which could result in urinary tract or kidney infection.
• Do not lift collection device/bag or tubing above the level of student’s bladder.
Urine can flow back into the bladder if tubing or bag is raised, which could
increase risk of infection.
• Close the clamp of valve on the urinary collection device/bag.
• Wipe the end of the outlet tubing with alcohol or other disinfectant if specified in
student's IHP and replace the end of the tubing into the slot on the collection bag.
• Do not disconnect catheter itself from drainage tubing unless ordered by health care
provider.
Opening the drainage system can allow contaminants to enter, increasing the risk of
infection. Catheter-associated urinary tract infections (CAUTI) are a great risk to
students with indwelling urinary catheters.
• Dispose of urine from collection device into toilet.
• Dispose of gloves and wash hands.
2. Observe and document on student’s log the color, amount, sediment buildup, and
appearance of urine each time the collection device/bag is emptied.
3. Monitor amount of urine in the urinary collection device/bag every 2 hours.
Urine output should be at least 1 ml per kg of body weight per hour. A student who weighs
20 kg (44 lbs) should have at least 20 ml of urine per hour. If less than this amount of urine
is noted for the student, the school nurse and/or the family should be notified.
4. Encourage fluid intake to prevent sediment buildup and infection, unless contraindicated.
5. Clamp the tubing whenever the collection device/bag must be lifted higher than the
student’s bladder. Avoid raising it whenever possible to prevent reflux of urine into the
bladder.

VDH Guidelines for Healthcare Procedures in Schools 514
6. Keep the catheter and collection tubing free from kinks. Loop tubing so that neither the
tubing not the collection bag rests on the floor.
7. Any blood or discharge from the urethra or any change in the student’s urine should be
immediately reported to the school nurse and/or the family.
Blood, discharge, change in urine could be a sign of trauma to, or infection of, the urinary
system.
8. Indwelling catheters are typically maintained only temporarily so as to avoid CAUTIs.
Check with family and student's health care provider if catheter use is maintained.
NOTE: Only qualified persons (i.e., registered or licensed practical nurse) should reinsert
or remove an indwelling catheter using sterile technique and only with a physician’s
order.
Sources:
Bowden, V., & Greenberg, C. (2012). Pediatric nursing procedures (Third ed.). Philadelphia:
Wolters Kluwer Health/Lippincott Williams & Wilkins, 712-715.
Centers for Disease Control. (2009). Guideline for prevention of catheter-associated urinary
tract infections 2009. Available online
http://www.cdc.gov/hicpac/pdf/CAUTI/CAUTIguideline2009final.pdf
Connecticut State Department of Education. (2012). Clinical procedure guidelines for
Connecticut school nurses. Middlebury, CT: CSDOE, 64-65.
Smith, S., Duell, D. & Martin, B. (2012). Clinical nursing skills: Basic to advanced skills (8th
ed.). Boston: Pearson, 783-784.
Wilkinson, J.M., Treas, L.S., Barnett, K.L., & Smith, M.H. (2016). Fundamentals of nursing:
Vol. 2: Thinking, doing, and caring. Philadelphia: F.A.Davis, 532, 544-548.

VDH Guidelines for Healthcare Procedures in Schools 515
Possible Problems with an Indwelling Urinary Catheter
• Bleeding from urethra
This may be due to trauma to the urethra or urinary tract infection. Contact school nurse,
family and/or health care provider.
• Cloudy urine, mucus, blood, foul odor, color changes in the urine
This may be due to a urinary tract infection. Always report to the school nurse and family
any changes in the student’s usual pattern.
• Urine output less than 1 ml/kg/hr
Notify school nurse, family and /or health care provider.
• Dark, concentrated urine.
Increase fluid intake. Notify school nurse and family if urine does not become lighter in
color.
• Student has chills, fever, or flank pain.
This may be due to a urinary tract infection. Report to the school nurse and family.
Sources:
Bowden, V., & Greenberg, C. (2012). Pediatric nursing procedures (Third ed.). Philadelphia:
Wolters Kluwer Health/Lippincott Williams & Wilkins, 712-715.
Centers for Disease Control. (2009). Guideline for prevention of catheter-associated urinary
tract infections 2009. Available online
http://www.cdc.gov/hicpac/pdf/CAUTI/CAUTIguideline2009final.pdf
Connecticut State Department of Education. (2012). Clinical procedure guidelines for
Connecticut school nurses. Middlebury, CT: CSDOE, 64-65.
Smith, S., Duell, D. & Martin, B. (2012). Clinical nursing skills: Basic to advanced skills (8th
ed.). Boston: Pearson, 783-784.
Wilkinson, J.M., Treas, L.S., Barnett, K.L., & Smith, M.H. (2016). Fundamentals of nursing:
Vol. 2: Thinking, doing, and caring. Philadelphia: F.A.Davis, 532, 544-548.

VDH Guidelines for Healthcare Procedures in Schools 516
General Information for
Students Who Use Indwelling Urinary Catheters
Date: ___________________
To: _____________________________ _____
(Teachers, Instructional assistants, Bus drivers, etc)
Name of Student: ______________________________________
This student uses an indwelling urinary catheter, or small tube attached to a collection bag, to drain
urine from the bladder. The bag should be drained by the student (or by another person) 3 to 4 times
a day. This procedure should be done in private in the bathroom or school clinic. The bag should
always be kept below the level of the student's bladder, and the tubing should be kept off of the
floor.
The student may need modifications to participate in physical education classes.
The student may need time to empty the bag prior to field trips or other activities when access to a
bathroom may be a problem.
Contact _____________________________ at __________________ (phone number/pager) for
additional information or if the student experiences any problems with the catheter.
Source:
Adapted from Porter, S, Haynie, M, Bierle, T, Caldwell, TH, & Palfrey, JS (Eds.). (1997). Children and youth assisted
by medical technology in educational settings: Guidelines for care. (2nd ed.). Baltimore: Paul H. Brookes Publishing.

VDH Guidelines for Healthcare Procedures in Schools 517
External Urinary Catheter
Overview
An external urinary catheter is used to keep dry the clothing of incontinent male students or
male students with dribbling or poor control of voiding.
Settings and Staff
The removal and application of a condom-type external urinary collection device is usually not
done during school hours. Procedures such as emptying the urinary collection bag can be done
in regular toilet facilities in the school or the nurse’s office or any other facility where the
student’s privacy is ensured. As with all health related conditions, every effort should be made
to protect the student’s privacy.
Removal and application of an external urinary catheter may be performed by the school nurse,
family member, teacher aide, or other staff person who has general training in external urinary
catheters. General training should cover the student’s specific health care needs, potential
problems, and how to obtain assistance should problems occur. If possible, two adults should
be present whenever the procedure is done at school.
Individualized Healthcare Plan
Each student’s IHP must be tailored to the individual’s needs. A sample plan is included in
Appendix A. When preparing an IHP for a student with an external urinary catheter, the
following items should be considered:
• Underlying condition and problems associated with the condition or treatment
• Health care provider's order for external catheter and its care
• Student’s ability for self-care and fostering independence in performing the procedure
• Individual baseline status, including urine color and amount
• Type of adhesive used to increase catheter adherence to penis
• Medications that would affect urine color, amount, and odor
• Student’s need for additional fluids and type of recommended fluids
• Positioning of catheter tubing and collection device/bag
• Access to a change of clothing in the educational setting

VDH Guidelines for Healthcare Procedures in Schools 518
• Access to an additional adult’s presence if school staff have to re-apply or adjust
external catheter
• Latex allergy precautions
• Standard precautions
Sources:
Centers for Disease Control. (2009). Guideline for prevention of catheter-associated urinary
tract infections 2009. Available online
http://www.cdc.gov/hicpac/pdf/CAUTI/CAUTIguideline2009final.pdf
Connecticut State Department of Education. (2012). Clinical procedure guidelines for
Connecticut school nurses. Middlebury, CT: CSDOE, 62-63.
Smith, S., Duell, D. & Martin, B. (2012). Clinical nursing skills: Basic to advanced skills (8th
ed.). Boston: Pearson, 767-770.
Wilkinson, J.M., Treas, L.S., Barnett, K.L., & Smith, M.H. (2016). Fundamentals of nursing:
Vol. 2: Thinking, doing, and caring. Philadelphia: F.A.Davis, 548-550.
VDH Guidelines for Healthcare Procedures in Schools 519
Procedure for Application and Removal of External
Catheter
Note: Family provides equipment and supplies.
1. Wash hands.
2. Assemble equipment:
• Water-soluble lubricant (e.g., K-Y Jelly, Lubrifax, Surgilube)
• Skin adhesive or tincture of benzoin and cotton tipped applicators
• Adhesive remover
• Condom-type urine collection device
• One-inch wide elastic adhesive
• Scissors
• Paper towels
• Non-latex gloves
3. Explain procedure using explanations the student can understand. Encourage him to do as
much of the procedure as he is capable, so as to achieve maximum self-care skills.
4. Have another adult present for the procedure.
Having two adults present protects both the student and the caregiver.
5. Position the student.
The external catheter may be applied while the student is lying down, standing, or sitting.
6. Wash hands and put on non-latex gloves.
7. Remove previously applied urinary collection device as follows:
• Carefully clip condom and tape near junction of the penis.
• Pull condom and tape off gently.
8. Inspect skin of penis. If it is irritated, DO NOT apply collection device until area clears.
Disposable waterproof undergarments (diapers) can be used until skin clears.
9. If necessary, cleanse shaft of penis with adhesive remover as specified in student IHP.
Old adhesive must be removed so that new adhesive will adhere well.
10. If necessary, cleanse shaft of penis and perineal area with soap and water. Dry area
thoroughly.
VDH Guidelines for Healthcare Procedures in Schools 520
Cleansing reduces skin irritation, odor, and possibility of infection. Adhesive remover, if
left on the skin, will dry out and irritate the skin of the penis.
11. Make a small hole in the center of the paper towel and place over the shaft of the penis until
the towel covers the area below the penis.
Paper towel must cover pubic hair to protect it from adhesive spray.
12. Roll condom-type collection device onto glans of penis, leaving 1-2 inch space between the
end of the tubing and the end of the penis.
Space is left to prevent irritation from plastic insert rubbing against glans. Space also
allows for elongation of penis during an erection.
13. Holding condom in place on glans (condom prevents contact of spray on glans):
• Spray thin layer of adhesive around entire shaft of penis and allow it to become
“tacky” (may take 60 seconds).
-OR-
• Apply tincture of benzoin to the shaft of the penis (not on glans) with cotton-tipped
applicators and allow the benzoin to dry.
-OR-
• Some external catheters require the placement of a special adhesive strip onto
the penis before the application of the external catheter.
14. Unroll condom-type collection device to cover shaft of penis.
15. If ordered by health care provider, spiral wrap penile shaft with strip of elastic adhesive
tape. Do not overlap the tape.
Do not wrap tape completely around the penis. Strip should be spiral wrapped and not
overlap itself. Overlapping tape may cause constriction of blood supply to penis.
16. Clip and remove ring of condom catheter.
Ring must be completely removed to prevent pressure damage.
17. Attach condom catheter to leg bag or drainage bag. Be sure condom is not twisted and
tubing is not kinked.
Positioning of leg bag may vary according to student’s activity and level of functioning.
Twisted condom catheter obstructs urine flow.
18. Empty collection bag before it becomes full. Full bag puts more tension on the catheter
and may contribute to problems keeping the catheter intact.
19. Remove gloves. Dispose of gloves and used supplies.
20. Wash hands.

VDH Guidelines for Healthcare Procedures in Schools 521
21. Document in student record the application and removal of external catheter and condition
of student’s skin.
Report to school nurse and family any change in student’s usual pattern.
Sources:
Centers for Disease Control. (2009). Guideline for prevention of catheter-associated urinary
tract infections 2009. Available online
http://www.cdc.gov/hicpac/pdf/CAUTI/CAUTIguideline2009final.pdf
Connecticut State Department of Education. (2012). Clinical procedure guidelines for
Connecticut school nurses. Middlebury, CT: CSDOE, 62-63.
Schauer, B. & Skorin, L. (2012). Tincture of benzoin improves efficacy of medical tape.
Primary Care Optometry News. Available online:
http://www.healio.com/optometry/cornea-external-disease/news/print/primary-care-
optometry-news/%7B27caa61a-ded8-4377-9586-7cc7d9dff0b5%7D/tincture-of-
benzoin-improves-efficacy-of-medical-tape
Smith, S., Duell, D. & Martin, B. (2012). Clinical nursing skills: Basic to advanced skills (8th
ed.). Boston: Pearson, 767-770.
Wilkinson, J.M., Treas, L.S., Barnett, K.L., & Smith, M.H. (2016). Fundamentals of nursing:
Vol. 2: Thinking, doing, and caring. Philadelphia: F.A.Davis, 548-550.

VDH Guidelines for Healthcare Procedures in Schools 522
Possible Problems with an External Urinary Catheter
• Bleeding from the urethra
This may be due to trauma to the urethra or urinary tract infection. Contact school nurse,
family and health care provider.
• Cloudy urine, mucus, blood, foul odor, color changes in the urine
May indicate a urinary tract infection. Always report to school nurse and family any changes in
the student’s usual pattern.
• Skin of penis irritated
Remove external catheter and put incontinence garments (diapers) on the student until skin clears.
Check with school nurse and family regarding type of adherence used.
• Leaking of urine around condom catheter
Use smaller condom to provide wrinkle-free application. Make sure penis is thoroughly dry
before applying condom system. Replace or rewrap adhesive. Contact school nurse and family
if this happens frequently.
Sources:
Centers for Disease Control. (2009). Guideline for prevention of catheter-associated urinary
tract infections 2009. Available online
http://www.cdc.gov/hicpac/pdf/CAUTI/CAUTIguideline2009final.pdf
Connecticut State Department of Education. (2012). Clinical procedure guidelines for
Connecticut school nurses. Middlebury, CT: CSDOE, 62-63.
Smith, S., Duell, D. & Martin, B. (2012). Clinical nursing skills: Basic to advanced skills (8th
ed.). Boston: Pearson, 767-770.
Wilkinson, J.M., Treas, L.S., Barnett, K.L., & Smith, M.H. (2016). Fundamentals of nursing:
Vol. 2: Thinking, doing, and caring. Philadelphia: F.A.Davis, 548-550.
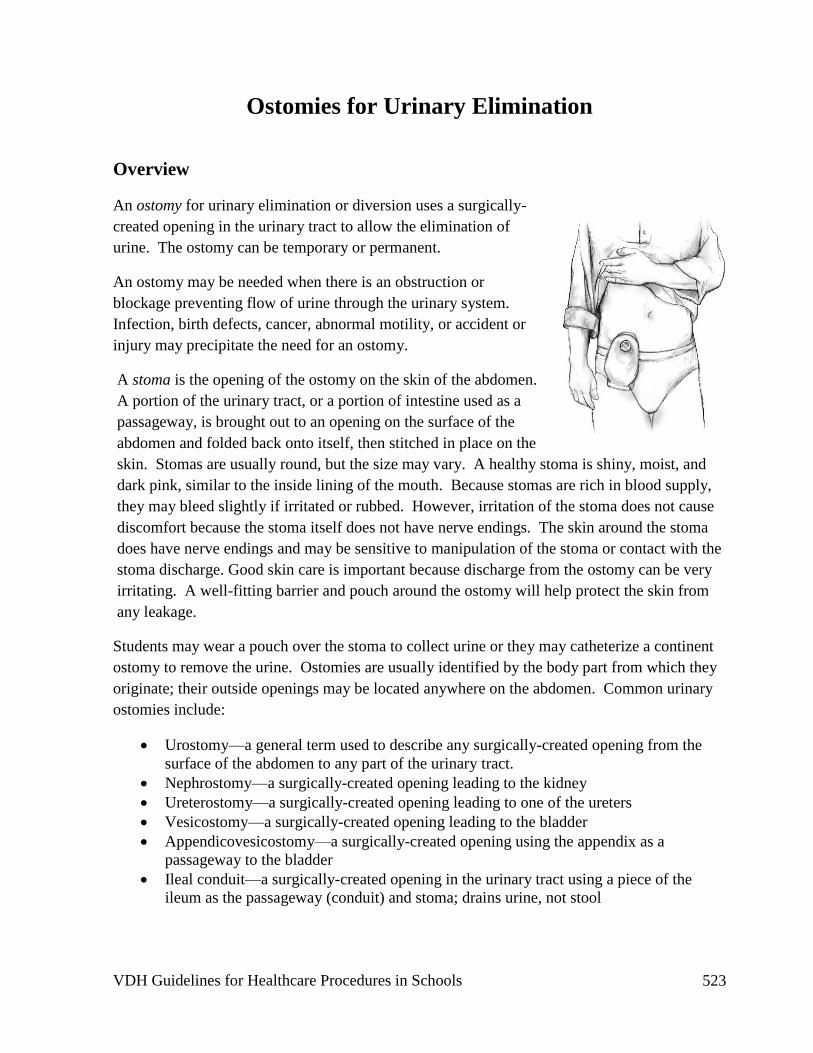
VDH Guidelines for Healthcare Procedures in Schools 523
Ostomies for Urinary Elimination
Overview
An ostomy for urinary elimination or diversion uses a surgically-
created opening in the urinary tract to allow the elimination of
urine. The ostomy can be temporary or permanent.
An ostomy may be needed when there is an obstruction or
blockage preventing flow of urine through the urinary system.
Infection, birth defects, cancer, abnormal motility, or accident or
injury may precipitate the need for an ostomy.
A stoma is the opening of the ostomy on the skin of the abdomen.
A portion of the urinary tract, or a portion of intestine used as a
passageway, is brought out to an opening on the surface of the
abdomen and folded back onto itself, then stitched in place on the
skin. Stomas are usually round, but the size may vary. A healthy stoma is shiny, moist, and
dark pink, similar to the inside lining of the mouth. Because stomas are rich in blood supply,
they may bleed slightly if irritated or rubbed. However, irritation of the stoma does not cause
discomfort because the stoma itself does not have nerve endings. The skin around the stoma
does have nerve endings and may be sensitive to manipulation of the stoma or contact with the
stoma discharge. Good skin care is important because discharge from the ostomy can be very
irritating. A well-fitting barrier and pouch around the ostomy will help protect the skin from
any leakage.
Students may wear a pouch over the stoma to collect urine or they may catheterize a continent
ostomy to remove the urine. Ostomies are usually identified by the body part from which they
originate; their outside openings may be located anywhere on the abdomen. Common urinary
ostomies include:
• Urostomy—a general term used to describe any surgically-created opening from the
surface of the abdomen to any part of the urinary tract.
• Nephrostomy—a surgically-created opening leading to the kidney
• Ureterostomy—a surgically-created opening leading to one of the ureters
• Vesicostomy—a surgically-created opening leading to the bladder
• Appendicovesicostomy—a surgically-created opening using the appendix as a
passageway to the bladder
• Ileal conduit—a surgically-created opening in the urinary tract using a piece of the
ileum as the passageway (conduit) and stoma; drains urine, not stool

VDH Guidelines for Healthcare Procedures in Schools 524
Nephrostomy Ureterostomy Ileal Conduit
Some urostomies constantly drain urine as it is made. The ostomy
appliance should be emptied when it is 1/3 full to prevent leakage.
Others are connected to an internally-constructed pouch and
designed to remain continent until the stoma is accessed by a
catheter.
The continent stoma can be covered with a small bandage or left
open depending on the student’s preference.
Settings and Staff
Stoma care and catheterization should be done in a private place, such as a bathroom or the
health room. The pouch should be emptied when it is 1/3 full or if a leak occurs. Some
students may want to keep an extra change of clothes at school in case of leakage. The student
should be able to participate in all school activities, including physical education.
The student should be encouraged to perform stoma care and catheterization of the continent
stoma, if possible. Care can be done by the school nurse (RN or LPN) with documented
competency-based training in appropriate techniques and problem management. School
personnel who have regular contact with a student who has an ostomy should receive general
training covering the student’s specific needs, potential problems, and implementation of the
established emergency plan.

VDH Guidelines for Healthcare Procedures in Schools 525
Individualized Healthcare Plan
Each student’s IHP must be tailored to the individual’s needs. A sample plan is included in
Appendix A. When preparing an IHP for a student with a urostomy, the following items should
be considered:
• Student’s underlying condition and possible problems associated with the condition
• Student’s ability for self-care and support to accomplish self-care (should have a private
bathroom with a sink available)
• Healthcare provider's order for procedures and treatments
• Type of ostomy and type of pouch system
• What to do if the urostomy has an odor (may indicate infection or leak)
• Student’s need for additional fluids and type of recommended fluids
• Additional supplies for use at school, including a spare pouch (if used)
• Access to a change of clothing at school
• Student’s baseline status (e.g., urine volume, urine color)
• Latex allergy precautions
• Standard precautions

VDH Guidelines for Healthcare Procedures in Schools 526
Sources:
Bowden, V., & Greenberg, C. (2012). Pediatric nursing procedures (Third ed.). Philadelphia:
Wolters Kluwer Health/Lippincott Williams & Wilkins, 519-525.
Gray, E, Blackinton, J., & White, G. (2006). Stoma care in the school setting. The Journal of
School Nursing 22: 74-80.
National Institute of Diabetes and Digestive and Kidney Diseases. (2013). Urinary diversion.
NIH Publication No. 13-5629. Available online: http://www.niddk.nih.gov/health-
information/health-topics/urologic-disease/urinary-
diversion/Documents/Urinary_Diversion.pdf
Porter, S., Branowicki, P., & Palfrey, J. (2014). Supporting students with special health care
needs: Guidelines and procedures for schools (3rd ed.). Baltimore: Paul H. Brookes
Publishing, 304-312.
Smith, S., Duell, D. & Martin, B. (2012). Clinical nursing skills: Basic to advanced skills (8th
ed.). Boston: Pearson, 798-803.
United Ostomy Associations of America. (2011). Urostomy guide. Available online:
http://www.ostomy.org/uploaded/files/ostomy_info/UrostomyGuide.pdf?direct=1
Wilkinson, J.M., Treas, L.S., Barnett, K.L., & Smith, M.H. (2016). Fundamentals of nursing:
Vol. 1: Theory, concepts, and applications. Philadelphia: F.A.Davis, 738-739.
Illustration Sources:
National Institute of Diabetes and Digestive and Kidney Diseases. (2013). Urinary diversion.
NIH Publication No. 13-5629. Available online: http://www.niddk.nih.gov/health-
information/health-topics/urologic-disease/urinary-
diversion/Documents/Urinary_Diversion.pdf
National Institute of Diabetes and Digestive and Kidney Diseases, National Institutes of Health.
(2014). Image Library. NO563_H.. Available online at
https://www.catalog.niddk.nih.gov/ImageLibrary

VDH Guidelines for Healthcare Procedures in Schools 527
Procedure for Changing a Urostomy Pouch
Note: Family provides equipment and supplies. Urostomy pouches should not routinely
be changed at school, but may require changing if leaking.
1. Wash hands.
2. Assemble equipment:
• Soap and water or student-specific cleanser
• Soft cloth or gauze
• Skin prep
• Skin barrier
• Replacement pouch and belt
• Measuring guide, if needed
• Scissors, if specified
• Adhesive
• Non-latex gloves, if pouch is to be changed by someone other than student (make
sure that student has washed hands with soap and water prior to and
proceeding procedure)
• Tape, if needed
• Container to store used pouch
• Disinfectant solution for cleaning pouch
Students should keep a complete set of supplies at school including a spare pouch
and pouch clip closure. The pouch for ureterostomies must have an antireflux valve
to prevent urine from re-entering the stoma.
3. Explain procedure using explanations the student can understand. Encourage the student to
do as much of the procedure as is capable, so as to achieve maximum self-care skills.
4. Wash hands and put on gloves.
5. Empty contents of used pouch into toilet or appropriate receptacle. Dry drainage port with
toilet paper.
6. Gently remove the used pouch and skin barrier. Instead of pulling the bag off the skin, push
the skin away from the bag.
7. If the new skin barrier needs fitting, use student-specific guidelines to measure stoma and
prepare barrier.

VDH Guidelines for Healthcare Procedures in Schools 528
Opening should be large enough to prevent pressure on the stoma, but small enough to
prevent leaking on the skin.
8. Wash the stoma using water alone, soap and water, or cleanser specified in student's IHP
with a clean cloth or gauze. Do not scrub the stoma as this may cause irritation or
bleeding.
Chemical or perfumed wipes can also irritate delicate skin.
9. Cover the stoma with gauze or cloth to wick leakage, and then clean the skin around the
stoma.
10. Inspect skin for redness, rash, bleeding, blistering, or drainage.
If there is skin irritation, follow guidelines in student's IHP for care. Do not apply
medication, ointment, or adhesive to damaged skin because doing so can make it more
difficult for the pouch to adhere to the skin. Notify the school nurse and/or family if there is
skin irritation.
11. Pat skin dry with dry gauze or cloth.
12. Using instructions in student's IHP to prepare skin, place skin barrier on skin around stoma,
starting at the bottom and working up around the stoma.
Starting at the bottom helps ensure a good seal there, where leaks most commonly occur.
13. Remove used gauze and discard in appropriate receptacle.
14. Peel backing from adhesive on pouch and apply adhesive to pouch.
15. Center the new pouch directly over the stoma.
16. Using fingertips, firmly press adhesive of the pouch to the skin barrier making sure there
are no wrinkles and no leaks. Start at the bottom and work up around the stoma.
The pouch can be opened to allow in a small amount of air. Seal the bottom if the pouch
has a bottom drain. If a belt is used to secure pouch, attach to pouch.
17. Dispose of used pouch and supplies in appropriate receptacle.
18. Remove gloves and wash hands.
19. Document completion of the procedure in log, including any significant observations.
Notify school nurse and family of any change in stoma or urine pattern.
Sources:

VDH Guidelines for Healthcare Procedures in Schools 529
Bowden, V., & Greenberg, C. (2012). Pediatric nursing procedures (Third ed.). Philadelphia:
Wolters Kluwer Health/Lippincott Williams & Wilkins, 519-525.
Gray, E, Blackinton, J., & White, G. (2006). Stoma care in the school setting. The Journal of
School Nursing 22: 74-80.
National Institute of Diabetes and Digestive and Kidney Diseases. (2013). Urinary diversion.
NIH Publication No. 13-5629. Available online: http://www.niddk.nih.gov/health-
information/health-topics/urologic-disease/urinary-
diversion/Documents/Urinary_Diversion.pdf
Porter, S., Branowicki, P., & Palfrey, J. (2014). Supporting students with special health care
needs: Guidelines and procedures for schools (3rd ed.). Baltimore: Paul H. Brookes
Publishing, 304-312.
Smith, S., Duell, D. & Martin, B. (2012). Clinical nursing skills: Basic to advanced skills (8th
ed.). Boston: Pearson, 798-803.
United Ostomy Associations of America. (2011). Urostomy Guide. Available online:
http://www.ostomy.org/uploaded/files/ostomy_info/UrostomyGuide.pdf?direct=1
Wilkinson, J.M., Treas, L.S., Barnett, K.L., & Smith, M.H. (2016). Fundamentals of nursing:
Vol. 1: Theory, concepts, and applications. Philadelphia: F.A. Davis, 738-739.

VDH Guidelines for Healthcare Procedures in Schools 530
Procedure for Catheterizing a Continent Urostomy,
Vesicostomy or Appendicovesicostomy
Note: Family provides equipment and supplies.
1. Wash hands.
2. Assemble equipment:
• Soap and water or alcohol-free wipes or other cleansing agent as specified in
student's IHP
• Non-latex gloves, if catheterization is to be done by someone other than student
• Catheter
• Water-soluble lubricant (e.g., KY jelly)
• Catheter storage bag
• Container to collect and dispose of urine if unable to perform procedure while
student sits on toilet
• Small adhesive bandage or stoma covering
Students should maintain adequate supplies at school for multiple catheterizations.
3. Explain procedure using explanations the student can understand. Encourage the student to
do as much of the procedure as is capable, so as to achieve maximum self-care skills.
4. Wash hands and put on gloves.
5. Wash the stoma gently using cleansing supplies, if ordered. Do not scrub.
Cleansing may remove debris and decreases chance of infection.
6. Lubricate catheter tip with water-soluble lubricant.
Lubrication aids insertion and may prevent tissue trauma.
7. Hold the catheter near the tip and insert into the stoma until a flow of urine is passed.
Insert the catheter approximately ½-1 inch further.
Make sure the other end of the catheter is in either a collection container to catch urine or
over the toilet. If slight resistance is felt, it may help to twist the catheter or aim it
downwards while the student takes a deep breath.
8. Leave the catheter in the stoma until the flow of urine stops.
In an appendicovesicostomy, the stoma may be higher than the bladder so the catheter
needs to be held lower than the level of the bladder to facilitate complete emptying. The

VDH Guidelines for Healthcare Procedures in Schools 531
flow of urine can also be impeded by a mucus plug. If this occurs, the catheter should be
removed and rinsed, lubricated, and reinserted. Occasionally the continent urostomy may
need to be gently irrigated if there is presence of persistent mucus. A physician’s order is
needed for urostomy irrigation.
9. Slowly withdraw the catheter.
Sometimes there is an additional gush of urine. Pinching the catheter can prevent urine
still in catheter from flowing back into the stoma during withdrawal.
10. Cover stoma with bandage or stoma covering.
11. Dispose of urine in toilet, noting volume and appearance.
12. Wash and dry equipment. Store in appropriate container, such as a sealed plastic bag.
13. Remove gloves and wash hands.
14. Document procedure in log. Report to the school nurse and family any changes--cloudy
urine, mucus, blood, foul odor, color changes, or unusual wetting between catheterizations.
Sources:
Bowden, V., & Greenberg, C. (2012). Pediatric nursing procedures (Third ed.). Philadelphia:
Wolters Kluwer Health/Lippincott Williams & Wilkins, 519-525.
Gray, E, Blackinton, J., & White, G. (2006). Stoma care in the school setting. The Journal of
School Nursing 22: 74-80.
National Institute of Diabetes and Digestive and Kidney Diseases. (2013). Urinary diversion.
NIH Publication No. 13-5629. Available online: http://www.niddk.nih.gov/health-
information/health-topics/urologic-disease/urinary-
diversion/Documents/Urinary_Diversion.pdf
Porter, S., Branowicki, P., & Palfrey, J. (2014). Supporting students with special health care
needs: Guidelines and procedures for schools (3rd ed.). Baltimore: Paul H. Brookes
Publishing, 304-312.
Smith, S., Duell, D. & Martin, B. (2012). Clinical nursing skills: Basic to advanced skills (8th
ed.). Boston: Pearson, 798-803.
United Ostomy Associations of America. (2011). Urostomy guide. Available online:
http://www.ostomy.org/uploaded/files/ostomy_info/UrostomyGuide.pdf?direct=1
Wilkinson, J.M., Treas, L.S., Barnett, K.L., & Smith, M.H. (2016). Fundamentals of nursing:
Vol. 1: Theory, concepts, and applications. Philadelphia: F.A. Davis, 738-739.

VDH Guidelines for Healthcare Procedures in Schools 532
Possible Problems with Urostomies
• Urine leakage
Empty pouch when it is 1/3 full. Check to see if the pouch has a leak, if there are wrinkles
in the adhesive attachment, or if the pouch size is correct for the stoma. Apply new pouch if
necessary. The continent stoma may be getting too full and need more frequent
catheterizations.
• Irritation or skin breakdown around stoma; raw or weeping skin
This may be due to improper stoma care or to inadequate barrier on the skin. In addition,
some skin preparations or products can cause a reaction. Notify the school nurse, family or
health care provider.
• Foul odor, cloudy urine
If there is an odor, check for a leak around the stoma or in the pouch itself. Urinary tract
infections can also cause the urine to have a strong smell. Some foods such as asparagus and
B-complex foods may cause a distinctive odor.
• Change in the flow of urine, especially a decrease
This can occur if there is inadequate intake or if the urostomy (especially a ureterostomy) has
narrowed. Report any changes in urine flow to the school nurse and family.
• Bleeding from stoma
The stoma becomes irritated very easily. This can happen if it is rubbed too hard during
cleaning, an irritating cleanser is used or it is scratched with a fingernail. Usually the bleeding
stops quickly, but if it does not, apply gentle pressure and notify the school nurse. If a large
area of the stoma is bleeding, notify the school nurse, family or the health care provider.
• Rash with small red spots on the stoma or skin around the stoma
Clean and dry the skin carefully and notify the family. Student may have a yeast infection.
Notify school nurse and family.

VDH Guidelines for Healthcare Procedures in Schools 533
Sources:
Bowden, V., & Greenberg, C. (2012). Pediatric nursing procedures (Third ed.). Philadelphia:
Wolters Kluwer Health/Lippincott Williams & Wilkins, 519-525.
Gray, E, Blackinton, J., & White, G. (2006). Stoma care in the school setting. The Journal of
School Nursing 22: 74-80.
National Institute of Diabetes and Digestive and Kidney Diseases. (2013). Urinary diversion.
NIH Publication No. 13-5629. Available online: http://www.niddk.nih.gov/health-
information/health-topics/urologic-disease/urinary-
diversion/Documents/Urinary_Diversion.pdf
Porter, S., Branowicki, P., & Palfrey, J. (2014). Supporting students with special health care
needs: Guidelines and procedures for schools (3rd ed.). Baltimore: Paul H. Brookes
Publishing, 304-312.
Smith, S., Duell, D. & Martin, B. (2012). Clinical nursing skills: Basic to advanced skills (8th
ed.). Boston: Pearson, 798-803.
United Ostomy Associations of America. (2011). Urostomy guide. Available online:
http://www.ostomy.org/uploaded/files/ostomy_info/UrostomyGuide.pdf?direct=1
Wilkinson, J.M., Treas, L.S., Barnett, K.L., & Smith, M.H. (2016). Fundamentals of nursing:
Vol. 1: Theory, concepts, and applications. Philadelphia: F.A.Davis, 738-739.

VDH Guidelines for Healthcare Procedures in Schools 534
General Information for
Students with Urostomies
Date: ___________________
To: _____________________________
(Teachers, Instructional assistants, Bus drivers, etc)
Name of Student: ______________________________________
This student has a urostomy, or opening into the abdomen, to allow the body to eliminate urine.
The opening, or stoma, is covered by a plastic pouch that collects urine.
The student usually empties the pouch and cleans the stoma without assistance. Some students
may catheterize the stoma. This procedure should be done in the bathroom. The student’s privacy
should be assured during the procedure and the student should be allowed to go to the bathroom on
an as needed basis.
The student should be able to fully participate in physical education classes unless he or she has
another condition that would interfere with full participation. It is very difficult to injure a stoma.
The pouch should not come off during normal circumstances.
Please contact ________________________ at __________________ (phone number/pager) for
additional information or if the student experiences any problems with the urostomy.
Source:
Adapted from: Porter, S, Haynie, M, Bierle, T, Caldwell, TH, & Palfrey, JS (Eds.). (1997). Children and youth
assisted by medical technology in educational settings: Guidelines for care. (2nd ed.). Baltimore: Paul H. Brookes
Publishing.

VDH Guidelines for Healthcare Procedures in Schools 535
Peritoneal Dialysis
Overview
Healthy kidneys cleanse the blood by removing excess fluid, minerals, and wastes. They also
make hormones that keep the bones strong and blood healthy. When kidneys fail, harmful
wastes build up in the body, blood pressure may rise, the body may retain excess fluid and not
make enough red blood cells. When kidney failure occurs, a student needs treatment to replace
the work of the failed kidneys.
The two methods for treating renal failure are dialysis and kidney transplantation. During
dialysis, a filter is used to rid the body of waste products and excess fluid. There are two types
of dialysis: peritoneal dialysis and hemodialysis.
Peritoneal dialysis uses the semi-permeable lining of the abdomen, the peritoneum, to filter
waste products via the processes of osmosis and diffusion. A soft tube called a catheter is used
to fill the abdominal cavity with a cleansing solution, or dialysate. The peritoneum allows
waste products and extra fluid to pass from the blood into the dialysis solution. The solution
contains a sugar called dextrose that can pull wastes and extra fluid into the abdominal cavity.
These wastes and fluid then leave the body when the dialysis solution is drained. There are two
forms of peritoneal dialysis:
• Continuous Cycling Peritoneal Dialysis (CCPD) uses a machine called a cycler to instill
and drain the dialysate 3-5 times during the night. Depending on the student’s comfort,
the peritoneal cavity may or may not be left full of dialysate during the 12 hours that he
or she is not undergoing CCPD. This is generally the preferred method of peritoneal
dialysis for students because it can be done overnight and causes less disruption to the
school day.

VDH Guidelines for Healthcare Procedures in Schools 536
• Continuous Ambulatory Peritoneal Dialysis
(CAPD) doesn’t require a machine and is
carried out continuously throughout each 24-
hour period. The dialysate solution is
instilled by gravity through a catheter into the
abdominal space and drained out, by gravity,
at regular intervals. The process of draining
and filling is called an exchange and takes
about 30-40 minutes. The period the
dialysate stays in the abdomen is called the
dwell time and usually lasts 4-6 hours.
In peritoneal dialysis, a catheter (e.g., Tenckhoff) is
placed surgically in the abdomen and tunneled under
the skin. One or two cuffs (subcutaneous cuff and
peritoneal cuff) help to keep the catheter in place and prevent bacteria from traveling along the
catheter from outside into the abdominal cavity. The outside end of the catheter has either a
cap or a length of tubing with a rolled-up empty dialysate bag attached, which can be tucked
into the student’s clothing or in a carrying pouch. The catheter should always be protected and
covered by a dressing and clothing to protect it from tugging or pulling because a break in the
system or skin tearing could occur.
Infection is the most common complication of peritoneal dialysis. Repeated peritoneal
infections, peritonitis, can lead to peritoneal membrane failure and the inability to use the
peritoneum for further dialysis. Therefore, every effort must be made to prevent infection.
Signs of infection include fever, pain, redness, nausea, and a tender, distended abdomen. Any
signs of infection require prompt attention and notification of the school nurse, family, and
health care provider.
Settings and Staff
Due to the risk for infection and the need for privacy, procedures such as dialysate exchange or
dressing changes should take place at home or in a clean, private room such as the health room.
The student can participate in school activities, but participation in physical education activities
must be determined on an individual basis by the student’s health care provider.
Only the school nurse (RN or LPN) with competency-based training in peritoneal dialysis
should perform this procedure due to the high risk for infection or injury. Peritoneal
dialysis training usually takes place in a dialysis unit. Simply changing the dressing at the exit
site can be performed by a registered nurse using sterile technique. The skin around the
catheter site must be kept clean and dry because skin breakdown can also lead to peritonitis.

VDH Guidelines for Healthcare Procedures in Schools 537
School personnel who have regular contact with a student who has a peritoneal dialysis catheter
should receive general training covering the student’s specific needs, potential problems, and
implementation of the established emergency plan.
Individualized Healthcare Plan
Each student’s IHP must be tailored to the individual’s needs. A sample plan is included in
Appendix A. When preparing an IHP for a student receiving peritoneal dialysis, the following
items should be considered:
• Student’s underlying condition and potential problems associated with the condition or
treatment
• Health care provider's orders for procedures and treatments
• Observations which need to be reported to the health care provider
• Medication requirements
• Diet restrictions, most significantly, foods with high potassium and protein content
• Requirements for blood pressure monitoring
• Susceptibility to infections, especially peritonitis
• Restrictions about touching the tubing or the dressing
• Activity restrictions
• Provision of supplies by family for emergency care
• Body image concerns
• Latex allergy precautions
• Standard precautions

VDH Guidelines for Healthcare Procedures in Schools 538
Sources:
Hockenberry, M., & Wilson, D. (2015). Wong's nursing care of infants and children. (10th ed.).
St. Louis: Elsevier Mosby, 1036-1038.
National Institute of Diabetes and Digestive and Kidney Diseases. (November 2007). Kidney
Failure: Choosing a Treatment That’s Right for You. Bethesda, MD: National
Institutes of Health. NIH Publication No. 08-2412. Available online:
http://www.niddk.nih.gov/health-information/health-topics/kidney-disease/kidney-
failure-choosing-a-treatment-thats-right-for-you/Documents/choosingtreatment_508.pdf
National Institute of Diabetes and Digestive and Kidney Diseases. (April 2006). Treatment
Methods for Kidney Failure: Peritoneal Dialysis. Bethesda, MD: National Institutes
of Health. NIH Publication No. 06-4688. Available online:
http://www.niddk.nih.gov/health-information/health-topics/kidney-disease/peritoneal-
dialysis/Documents/peritoneal_508.pdf
National Kidney Foundation. (2015). Nutrition and peritoneal dialysis. Available online:
https://www.kidney.org/atoz/content/nutripd
Porter, S., Branowicki, P., & Palfrey, J. (2014). Supporting students with special health care
needs: Guidelines and procedures for schools (3rd ed.). Baltimore: Paul H. Brookes
Publishing, 273-278.
Selekman, J. (2013). School nursing: A comprehensive text. (2nd ed.). Philadelphia: F.A.
Davis, 775-778.
Smith, S., Duell, D. & Martin, B. (2012). Clinical nursing skills: Basic to advanced skills (8th
ed.). Boston: Pearson, 813-815.
Illustration Sources:
National Institute of Diabetes and Digestive and Kidney Diseases, National Institutes of Health.
(2014). Image Library. N00615. Available online at
https://www.catalog.niddk.nih.gov/ImageLibrary
National Institute of Diabetes and Digestive and Kidney Diseases, National Institutes of Health.
(2014). Image Library. N01699. Available online at
https://www.catalog.niddk.nih.gov/ImageLibrary

VDH Guidelines for Healthcare Procedures in Schools 539
Possible Problems for the Student Requiring Peritoneal Dialysis
• Abdominal pain, fever, nausea, vomiting, unusual color or cloudiness of used dialysate,
redness or pain around the catheter. This is a potential emergency. Be prepared to
activate the school emergency plan. Have student rest. Take vital signs. Notify school
nurse, family or dialysis unit immediately because peritonitis can develop within a few
hours.
• Catheter is pulled or tugged
Examine catheter tubing for any leaks or breaks. Notify the school nurse. Using sterile
technique (including wearing a mask and sterile gloves), the school nurse can remove
dressing, and check for any trauma or tears in the skin. If any leaking or trauma has
occurred, notify family or dialysis unit immediately. Cover site with a sterile dressing.
• Tubing becomes disconnected
If the catheter and tubing become disconnected, cover open end with a sterile dressing.
Stop the flow of dialysate from the catheter by bending the catheter. Secure the folded,
bent catheter to stop dialysate flow. Call school nurse, family and dialysis unit
immediately.
• Cover on the end of the catheter comes off
Cover the catheter end with sterile gauze. Make sure roller clamp is intact and dialysate not
leaking. If clamp is open, close it. Notify school nurse and family.
• Dressing or skin near catheter becomes dirty or wet
Notify the school nurse and family so that skin can be cleaned and sterile dressing applied.
• Dressing at exit site comes off
Using sterile technique (including mask and sterile gloves), place sterile split gauze on the
skin around the catheter. Cover both the catheter and gauze with second gauze and secure
with specified tape. Notify school nurse and family.

VDH Guidelines for Healthcare Procedures in Schools 540
Sources:
Hockenberry, M., & Wilson, D. (2015). Wong's nursing care of infants and children. (10th ed.).
St. Louis: Elsevier Mosby , 1036-1038.
National Institute of Diabetes and Digestive and Kidney Diseases. (April 2006). Treatment
Methods for Kidney Failure: Peritoneal Dialysis. Bethesda, MD: National Institutes
of Health. NIH Publication No. 06-4688. Available online:
http://www.niddk.nih.gov/health-information/health-topics/kidney-disease/peritoneal-
dialysis/Documents/peritoneal_508.pdf
Porter, S., Branowicki, P., & Palfrey, J. (2014). Supporting students with special health care
needs: Guidelines and procedures for schools (3rd ed.). Baltimore: Paul H. Brookes
Publishing, 273-278.
Selekman, J. (2013). School nursing: A comprehensive text. (2nd ed.). Philadelphia: F.A.
Davis, 775-778.
Smith, S., Duell, D. & Martin, B. (2012). Clinical nursing skills: Basic to advanced skills (8th
ed.). Boston: Pearson, 813-815.

VDH Guidelines for Healthcare Procedures in Schools 541
Possible Problems for Student with Renal Failure
• Chest pain, numbness in face or limbs, and generalized weakness
Activate the school emergency plan and notify the school nurse, family and health care
provider.
Most students on dialysis need to control the amount of potassium in their diet because too
much potassium can interfere with the heart muscle’s ability to pump, causing irregular
heartbeat and possibly even cardiac arrest. These symptoms may indicate an unsafe
potassium level. Potassium is a mineral found in many foods, including salt substitutes,
bananas, oranges, dark leafy greens, avocados, potatoes, yogurt, beans, chocolate, and nuts.
• Shortness of breath
Student could be developing fluid in the lungs. Check vital signs and record. Have the
student sit and rest. If difficult breathing continues or increases, activate the school
emergency plan and notify the school nurse, family and health care provider. Keep the
student in a sitting position while waiting for the ambulance. Leaning forward over a table
or chair may facilitate ease of respiration.
• Sudden onset of localized pain, usually felt while moving or walking
Activate the emergency plan and notify the school nurse and family.
Students with renal failure often lose calcium, causing bones to become brittle and break
with even a minor injury. Document location of pain and assess need for immobilizing area
of pain.

VDH Guidelines for Healthcare Procedures in Schools 542
Sources:
Hockenberry, M., & Wilson, D. (2015). Wong's nursing care of infants and children. (10th ed.).
St. Louis: Elsevier Mosby, 1036-1038.
National Institute of Diabetes and Digestive and Kidney Diseases. (November 2007). Kidney
Failure: Choosing a Treatment That’s Right for You. Bethesda, MD: National
Institutes of Health. NIH Publication No. 08-2412. Available online:
http://www.niddk.nih.gov/health-information/health-topics/kidney-disease/kidney-
failure-choosing-a-treatment-thats-right-for-you/Documents/choosingtreatment_508.pdf
National Institute of Diabetes and Digestive and Kidney Diseases. (April 2006). Treatment
Methods for Kidney Failure: Peritoneal Dialysis. Bethesda, MD: National Institutes
of Health. NIH Publication No. 06-4688. Available online:
http://www.niddk.nih.gov/health-information/health-topics/kidney-disease/peritoneal-
dialysis/Documents/peritoneal_508.pdf
National Kidney Foundation. (2015). Nutrition and peritoneal dialysis. Available online:
https://www.kidney.org/atoz/content/nutripd
Porter, S., Branowicki, P., & Palfrey, J. (2014). Supporting students with special health care
needs: Guidelines and procedures for schools (3rd ed.). Baltimore: Paul H. Brookes
Publishing, 273-278.
Selekman, J. (2013). School nursing: A comprehensive text. (2nd ed.). Philadelphia: F.A.
Davis, 775-778.
Smith, S., Duell, D. & Martin, B. (2012). Clinical nursing skills: Basic to advanced skills (8th
ed.). Boston: Pearson, 813-815.

VDH Guidelines for Healthcare Procedures in Schools 543
General Information for
Students with Peritoneal Dialysis Catheters
Date: ___________________
To: _____________________________
(Teachers, Instructional assistants, Bus drivers, etc)
Name of Student: ______________________________________
This student has a catheter, or tube, into the abdomen to help remove waste products through a
procedure called peritoneal dialysis.
The tube may be closed and covered or it may be attached to a bag of solution. In either case, the
bag and tubing are covered by the student’s clothing.
The bag and catheter should not be touched except in an emergency.
All staff who have contact with this student should be familiar with the emergency plan and
how to initiate it.
The student should be able to participate in school activities.
The student needs permission from his or her health care provider to participate in physical
education classes or swimming. The student should avoid bumping the catheter or pulling on the
tubing.
Please contact ________________________ at __________________ (phone number/pager) for
additional information or if the student experiences any problems with the catheter.
Source:
Adapted from: Porter, S, Haynie, M, Bierle, T, Caldwell, TH, & Palfrey, JS (Eds.). (1997). Children and youth assisted
by medical technology in educational settings: Guidelines for care. (2nd ed.). Baltimore: Paul H. Brookes Publishing.
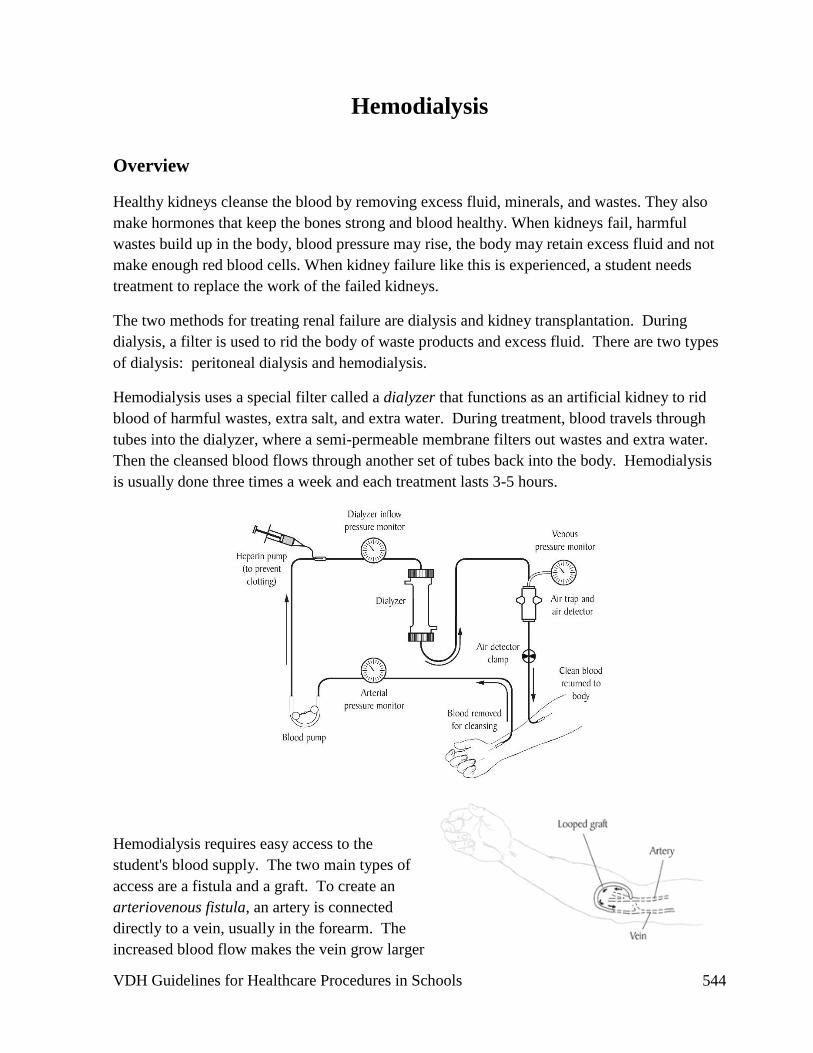
VDH Guidelines for Healthcare Procedures in Schools 544
Hemodialysis
Overview
Healthy kidneys cleanse the blood by removing excess fluid, minerals, and wastes. They also
make hormones that keep the bones strong and blood healthy. When kidneys fail, harmful
wastes build up in the body, blood pressure may rise, the body may retain excess fluid and not
make enough red blood cells. When kidney failure like this is experienced, a student needs
treatment to replace the work of the failed kidneys.
The two methods for treating renal failure are dialysis and kidney transplantation. During
dialysis, a filter is used to rid the body of waste products and excess fluid. There are two types
of dialysis: peritoneal dialysis and hemodialysis.
Hemodialysis uses a special filter called a dialyzer that functions as an artificial kidney to rid
blood of harmful wastes, extra salt, and extra water. During treatment, blood travels through
tubes into the dialyzer, where a semi-permeable membrane filters out wastes and extra water.
Then the cleansed blood flows through another set of tubes back into the body. Hemodialysis
is usually done three times a week and each treatment lasts 3-5 hours.
Hemodialysis requires easy access to the
student's blood supply. The two main types of
access are a fistula and a graft. To create an
arteriovenous fistula, an artery is connected
directly to a vein, usually in the forearm. The
increased blood flow makes the vein grow larger

VDH Guidelines for Healthcare Procedures in Schools 545
and stronger so that it can be used for repeated needle insertions. However, it may take several
weeks before it is ready to be used. A graft connects an artery to a vein using a synthetic tube
and can be used sooner than a fistula; however, it is
more likely to experience infection and clotting so it is not normally used for long-term
dialysis. Hemodialysis is performed in the hospital, dialysis unit, or at
home by specially-trained health care providers.
Care of the Arteriovenous Fistula
Because vascular access problems are the most common reason
for hospitalization among students on hemodialysis, the fistula
must receive special care. The fistula can be checked by lightly
placing clean fingers over to feel a vibration, the thrill, or by
placing a clean stethoscope over it and listening for a loud
buzzing sound, the bruit. This indicates patency of the fistula.
The school nurse should become familiar with the bruit. If any
changes are noted in the bruit, the student’s emergency school
plan should be initiated. Anything that causes decreased blood
flow to the fistula area should be avoided. Do not draw blood or
measure blood pressure in the arm or leg on which the fistula is
located. Lying on the fistula, carrying heavy objects, and
wearing watches or bracelets should also be avoided.
Settings and Staff
Every effort should be made to protect the student’s privacy. Checking the bruit of a fistula on
an arm can be performed in any setting; checking the patency of a thigh fistula requires a more
private setting, such as the health room.
A student with an arteriovenous fistula can normally participate in regular school activities.
Participation in athletics or activities where the student is around sharp equipment can be
decided on an individual basis by the health care provider.
School personnel who have regular contact with a student who has a fistula should receive
general training covering the student’s specific needs, potential problems, and how to
implement the established emergency plan. If the student knows how to check fistula patency,
he or she should notify the people identified in the emergency plan if there are any changes in
the bruit. Fistula care should be done by a registered school nurse with proven competency-
based training in appropriate techniques and problem management.

VDH Guidelines for Healthcare Procedures in Schools 546
Individualized Healthcare Plan
Each student’s IHP must be tailored to the individual’s needs. A sample plan is included in
Appendix A. When preparing an IHP for a student receiving hemodialysis, the following items
should be considered:
• Student's underlying condition and potential problems associated with the condition or
treatment
• Plans to ensure that school staff who have regular contact with the student are aware
that the student has a fistula and be familiar with the baseline appearance of the fistula
and vibration of the bruit
• Emergency contact information including dialysis center
• Healthcare Provider's orders for procedures and treatments
• Location of fistula or graft and any special precautions
• Frequency of checking fistula
• Notifying the school nurse and family or health care provider immediately if student
has:
o fever
o pain in the fistula
o loss of bruit or bulging of the fistula
• Medication requirements
• Frequency of blood pressure measurements (should not be done on limb with fistula)
• Diet restrictions, especially foods high in potassium, sodium, or phosphorus
• Fluid restrictions
• Activity restrictions
• Susceptibility to infections, especially chicken pox
• Latex allergy precautions
• Standard precautions
The following school issues should be considered when working with a student needing
hemodialysis:
• Reducing amount of written homework.
• Using tape recorders and computers if fistula placement affects student's ability to write.

VDH Guidelines for Healthcare Procedures in Schools 547
• Dialysis scheduling.
• Using flexibility in scheduling subjects during dialysis time.
• Possibility of frequent hospitalizations.
• Providing textbooks, workbooks, and worksheets for hospital tutor.
• Monitoring student performance, both in class and in the hospital.
• Make-up work and tests.
• Home tutoring when illness prevents student from attending school.
• Evaluation of performance and review work after long absences.
• Making outlines and notes available to student.
• Contracts to modify amount of work and still achieve educational goals.
• Assessing for fatigue.
• Avoiding after-school tutorial sessions.
• Access to school elevator in case of fatigue or bone disease.

VDH Guidelines for Healthcare Procedures in Schools 548
Sources:
Hockenberry, M., & Wilson, D. (2015). Wong's nursing care of infants and children. (10th ed.).
St. Louis: Elsevier Mosby , 1036-1036.
National Institute of Diabetes and Digestive and Kidney Diseases. (November 2007). Kidney
failure: Choosing a treatment that’s right for you. Bethesda, MD: National Institutes
of Health. NIH Publication No. 08-2412. Available online:
http://www.niddk.nih.gov/health-information/health-topics/kidney-disease/kidney-
failure-choosing-a-treatment-thats-right-for-you/Documents/choosingtreatment_508.pdf
National Institute of Diabetes and Digestive and Kidney Diseases. (December 2006).
Treatment methods for kidney failure: Hemodialysis. Bethesda, MD: National
Institutes of Health. NIH Publication No. 07-4666. Available online:
http://www.niddk.nih.gov/health-information/health-topics/kidney-
disease/hemodialysis/Documents/hemodialysis_508.pdf
National Kidney Foundation. (2015). Nutrition and peritoneal dialysis. Available online:
https://www.kidney.org/atoz/content/nutripd
National Library of Medicine Medline Plus. (2014). Taking care of your vascular access for
hemodialysis. Available online:
http://www.nlm.nih.gov/medlineplus/ency/patientinstructions/000591.htm
Porter, S., Branowicki, P., & Palfrey, J. (2014). Supporting students with special health care
needs: Guidelines and procedures for schools (3rd ed.). Baltimore: Paul H. Brookes
Publishing, 268-272.
Selekman, J. (2013). School nursing: A comprehensive text. (2nd ed.). Philadelphia: F.A.
Davis, 775-778.
Smith, S., Duell, D. & Martin, B. (2012). Clinical nursing skills: Basic to advanced skills (8th
ed.). Boston: Pearson, 805-810.
Illustration Sources:
National Institute of Diabetes and Digestive and Kidney Diseases, National Institutes of Health.
(2014). Image Library. N00550. Available online at
https://www.catalog.niddk.nih.gov/ImageLibrary
VDH Guidelines for Healthcare Procedures in Schools 549
National Institute of Diabetes and Digestive and Kidney Diseases, National Institutes of Health.
(2014). Image Library. N00590. Available online at
https://www.catalog.niddk.nih.gov/ImageLibrary
National Institute of Diabetes and Digestive and Kidney Diseases, National Institutes of Health.
(2014). Image Library. N01725. Available online at
https://www.catalog.niddk.nih.gov/ImageLibrary

VDH Guidelines for Healthcare Procedures in Schools 550
Possible Problems for the Student Requiring Hemodialysis
• Oozing or bleeding
Usually due to the scab from the last needle puncture coming off. Put on sterile gloves and
apply direct pressure to the oozing site using folded gauze. Apply only enough pressure to
stop the oozing of blood yet still feel the bruit. Once bleeding has stopped apply a small
band aid. If bleeding continues for more than 10 minutes, notify school nurse, family and
dialysis center.
• Injury or trauma to the fistula
Arterial blood has been rerouted to the fistula so the student could lose a large quantity of
blood in a very short period of time if there is damage to the fistula. A cut into the
fistula will cause the blood to spurt out. Activate the school emergency plan. Put on
sterile gloves, a face shield (if available) and apply pressure with sterile gauze directly to
the bleeding site.
• No bruit detected when fistula is palpated or auscultated with a stethoscope
Try both palpation and auscultation to assess bruit. Palpate distal pulses and observe
capillary refill in extremity digits to check circulation. Have the student lie down and check
blood pressure. If blood pressure is low or bruit still cannot be felt, call the school
nurse, dialysis unit and the family. If clotting has occurred, success of de-clotting
depends on how quickly treatment is initiated.

VDH Guidelines for Healthcare Procedures in Schools 551
Sources:
Hockenberry, M., & Wilson, D. (2015). Wong's nursing care of infants and children. (10th ed.).
St. Louis: Elsevier Mosby , 1036-1036.
National Institute of Diabetes and Digestive and Kidney Diseases. (November 2007). Kidney
failure: Choosing a treatment that’s right for you. Bethesda, MD: National Institutes
of Health. NIH Publication No. 08-2412. Available online:
http://www.niddk.nih.gov/health-information/health-topics/kidney-disease/kidney-
failure-choosing-a-treatment-thats-right-for-you/Documents/choosingtreatment_508.pdf
National Institute of Diabetes and Digestive and Kidney Diseases. (December 2006).
Treatment Methods for Kidney Failure: Hemodialysis. Bethesda, MD: National
Institutes of Health. NIH Publication No. 07-4666. Available online:
http://www.niddk.nih.gov/health-information/health-topics/kidney-
disease/hemodialysis/Documents/hemodialysis_508.pdf
National Kidney Foundation. (2015). Nutrition and peritoneal dialysis. Available online:
https://www.kidney.org/atoz/content/nutripd
National Library of Medicine Medline Plus. (2014). Taking care of your vascular access for
hemodialysis. Available online:
http://www.nlm.nih.gov/medlineplus/ency/patientinstructions/000591.htm
Porter, S., Branowicki, P., & Palfrey, J. (2014). Supporting students with special health care
needs: Guidelines and procedures for schools (3rd ed.). Baltimore: Paul H. Brookes
Publishing, 268-272.
Selekman, J. (2013). School nursing: A comprehensive text. (2nd ed.). Philadelphia: F.A.
Davis, 775-778.
Smith, S., Duell, D. & Martin, B. (2012). Clinical nursing skills: Basic to advanced skills (8th
ed.). Boston: Pearson, 805-810.

VDH Guidelines for Healthcare Procedures in Schools 552
General Information for
Students Receiving Hemodialysis
Date: ___________________
To: _____________________________
(Teachers, Instructional assistants, Bus drivers, etc)
Name of Student: ______________________________________
This student has a fistula, or a surgical joining of an artery and vein, located in his or her
________________________________. The fistula is used to help remove waste products
through a procedure called hemodialysis.
The fistula often is covered by the student’s clothing.
No tight-fitting objects (i.e., watch, elastic band) should be worn on an arm with a fistula. The
student also should not bump the area around the fistula.
Fistula care is usually done at home or in the dialysis unit.
The student should be able to participate in school activities.
The student needs permission from his or her health care provider to participate in physical
education activities and classes with any limitations noted: ___________________________
__________________________________________________________________________
All staff who have contact with this student should be familiar with the school emergency
plan and how to initiate it.
Please contact ________________________ at __________________ (phone number/pager) for
additional information or if the student experiences any problems with the fistula.
Source:
Adapted from: Porter, S, Haynie, M, Bierle, T, Caldwell, TH, & Palfrey, JS (Eds.). (1997). Children and youth
assisted by medical technology in educational settings: Guidelines for care. (2nd ed.). Baltimore: Paul H. Brookes
Publishing.

VDH Guidelines for Healthcare Procedures in Schools 553
Appendix A
Individualized Health Care Plans
Emergency Plan Procedure Information Sheet Daily Log
Medical Order Forms
Parent Authorization Form

VDH Guidelines for Healthcare Procedures in Schools 554
Components of an Individualized Healthcare Plan
Who should have an Individualized Healthcare Plan (IHP)?
Students with mild to severe health care needs and require frequent nursing services at school
should have an IHCP.
What is the purpose of an IHP?
The IHP helps assure consistent, safe health care for the student, protects the school nurse in legal
proceedings, and provides documentation regarding the extent of services provided. Each IHP
should be individualized to meet the needs of the student.
What should the IHP include?
The IHP should include the following four components:
1. Nursing assessment
2. Nursing diagnoses
3. Nursing interventions
4. Expected outcomes
Each IHP may include additional components to meet the needs of the student. The IHP should
be revised when the student’s physical condition or care changes. Each IHP should be consistent
with minimum standards of care.
IHPs also should address:
• Physical education classes, if appropriate
• Special activities (i.e., swimming)
• Field trips
• Classroom parties
• Off-campus work opportunities
• Bus transportation
• Medical equipment, supplies, and services
Who should develop and sign the IHP?

VDH Guidelines for Healthcare Procedures in Schools 555
The following individuals should help develop and then sign the IHP:
• Parents/Guardians
• Student
• Medical provider (optional)
• Registered school nurse
Parents or legal guardians must authorize, in writing, care provided for their minor children.
Medical providers (physicians, nurse practitioners, physician assistants) must provide written
orders for medical treatments provided at school.
How often should the IHP be updated?
The IHP should be updated as appropriate and revised at least annually (i.e., at least once each
school year) or after significant changes occur in the student’s health status.
What is the Emergency Care Plan or Emergency Action Plan?
The Emergency Care Plan (ECP) is required when a chronic condition has the potential to
result in a medical emergency. The ECP is a component of the IHP.

VDH Guidelines for Healthcare Procedures in Schools 556
Components of an Individualized Healthcare
Plan (IHP)
1. Assessment
The assessment provides the background information for the IHP and includes:
Health history
Current health status
Self-care skills/needs
Psychosocial status
Health issues related to learning
2. Nursing Diagnosis
A nursing diagnosis summarizes the current health status of the student based on the student’s response to the health condition and defines what the school nurse can
contribute as an autonomous practitioner.
3. Goals
Goals are clear, concise, realistic descriptions of desired outcomes. They may be short-
term or long-term but they must be measurable.
4. Nursing Interventions
A nursing intervention is any treatment performed to reach a goal or desired outcome.
5. Student Outcome
An outcome describes what the student is expected to do. It must be realistic and measurable.
6. Evaluation
The evaluation consists of periodically reviewing the student’s goals and outcomes;
VDH Guidelines for Healthcare Procedures in Schools 557
comparing actual versus predicted outcomes; reviewing the interventions; and, if
necessary, modifying the IHP. Evaluations also should occur when the student’s
health status changes significantly or when the medical provider changes the
student’s prescribed treatment or medications.
Sources:
National Association of School Nurses. (2015). Individualized healthcare plans: The role of the
school nurse (Position Statement). Silver Spring, MD: Author.
Schwab, N. (2005). Legal issues in school health services: A resource for school
administrators, school attorneys, school nurses. Authors Choice Press.

VDH Guidelines for Healthcare Procedures in Schools 558
Individualized Healthcare Plan (IHP)
Student:
Name Date of Birth
Prepared By:
School Nurse Date
Approved By:
Parent/Guardian(s) Date
Parent/Guardian(s) Date
Approved By:
Student Date
Approved By:
Medical Provider (optional) Date
Next Review & Revision Due:

VDH Guidelines for Healthcare Procedures in Schools 559
Individualized Healthcare Plan
Demographics
Student Name _______________________________ Birth Date _________________
Home Address ______________________________ Home Phone _______________
___________________________________________
Parent/Guardian ______________________________ Phone ___________________
Parent/Guardian ______________________________ Phone ___________________
Caregiver ___________________________________
Language Spoken at Home ______________________
Emergency Contacts:
________________________ __________________ ____________________
Name Relationship Phone
________________________ __________________ ____________________
Name Relationship Phone

VDH Guidelines for Healthcare Procedures in Schools 560
Medical Care
Primary Healthcare Provider______________________ Phone __________________
Specialty Healthcare Provider ____________________ Phone __________________
Health History
Brief Health History
_____________________________________________________________________
_____________________________________________________________________
_____________________________________________________________________
_____________________________________________________________________
_____________________________________________________________________
_____________________________________________________________________
Special Healthcare Needs _______________________________________________
_____________________________________________________________________
_____________________________________________________________________
VDH Guidelines for Healthcare Procedures in Schools 561
Current Health Status (Baseline status, e.g., skin color/integrity, vital signs, mobility)
____________________________________________________________________
_____________________________________________________________________
_____________________________________________________________________
Student Participation in Care _____________________________________________
____________________________________________________________________
____________________________________________________________________
Health Issues Related to Learning _________________________________________
____________________________________________________________________
_____________________________________________________________________
Activity Considerations (physical education, field trips, extracurricular activities)
____________________________________________________________________
____________________________________________________________________
_____________________________________________________________________
Equipment, Supplies, Services ____________________________________________

VDH Guidelines for Healthcare Procedures in Schools 562
_____________________________________________________________________
_____________________________________________________________________
Other considerations ___________________________________________________
____________________________________________________________________
_____________________________________________________________________
_____________________________________________________________________

VDH Guidelines for Healthcare Procedures in Schools 563
Medication & Dietary Needs
Current Medications (dose, route, time)
_____________________________________________________________________________
_____________________________________________________________________________
_____________________________________________________________________________
Special Dietary Requirements
____________________________________________________________________________
____________________________________________________________________________
____________________________________________________________________________
Allergies (include type of reaction)
____________________________________________________________________________
____________________________________________________________________________
____________________________________________________________________________

VDH Guidelines for Healthcare Procedures in Schools 564
Individualized Health Care Plan - Components
Procedures
Procedure ___________________________________________________________________________
Assessment Data
Nursing Diagnosis Goals Nursing Interventions Expected Outcomes

VDH Guidelines for Healthcare Procedures in Schools 565
Frequency ________________________________________ Times_________________________
Position of student during procedure ______________________________________________________
Ability of student to assist/perform procedure _______________________________________________
Location for procedure _________________________________________________________________
Equipment needed
____________________________________________________________________________________
____________________________________________________________________________________
____________________________________________________________________________________
Procedural considerations & precautions
____________________________________________________________________________________
____________________________________________________________________________________
____________________________________________________________________________________
Staff qualified to assist with procedure
____________________________________________________________________________________
____________________________________________________________________________________
___________________________________________________________________________________
Daily Log
Student Name Class/Grade

VDH Guidelines for Healthcare Procedures in Schools 566
Procedure
Parent Phone
Date/Time Procedure notes Observations Time for Prep,
Proc, Doc Completed by
Emergency Care Plan (or Emergency Action Plan)
Student Name Class/Grade

VDH Guidelines for Healthcare Procedures in Schools 567
Parent/Guardian Phone
Parent/Guardian Phone
Healthcare Provider Phone
If you see this Do this
In an emergency occurs:
1. Stay with child
2. Call or have someone else call the school nurse
3. If the school nurse is not available, the following staff members are trained to initiate the emergency care
plan.
________________________________________
________________________________________
________________________________________
VDH Guidelines for Healthcare Procedures in Schools 568

VDH Guidelines for Healthcare Procedures in Schools 569

VDH Guidelines for Healthcare Procedures in Schools 570

VDH Guidelines for Healthcare Procedures in Schools 571

VDH Guidelines for Healthcare Procedures in Schools 572
Appendix B
Skills checklists for procedures
Gastrointestinal system
Musculoskeletal system
Neurological system
Respiratory system
Urinary system
Sample diabetes care skills checklists are located in the Virginia Department of Education Manual
for Training Public School Employees in the Administration of Insulin and Glucagon, Appendix C:
Sample Skills Checklists
Reference: http://www.doe.virginia.gov/support/health_medical/index.shtml

VDH Guidelines for Healthcare Procedures in Schools 573
Skills Checklist: Gastrostomy Feeding Bolus Method
Student’s Name: ___________________________ Teacher: ____________________________
Person Trained: ____________________________ Position: ___________________________
Instructor: ________________________________
Explanation/Return Demonstration Training
Date
Return
Demon
Date
Supervision
Date Date Date Date Date
Preparation:
1. Reviews student’s IHP for student-specific
instructions
2. Reviews standard precautions
3. Identifies student’s ability to participate in
procedure
4. Identifies where procedure is done (respects
privacy)
5. Identifies possible problems and appropriate
actions
6. Identifies size _____ and type ______ of G-
tube
7. Identifies student-specific instructions for
guidelines as to:
• __________ time(s) of feeding
• __________ ml (amount)
• __________ formula (type)
• __________ duration (minutes)
• __________ position of student
Identifies Supplies:
1. Liquid formula or feeding solution, at room
temperature
2. 60 ml catheter-tipped syringe or other feeding
container for feeding
3. Clamp or plug for end of tube
4. Water (to flush tubing before and after feeding)
5. Rubber bands and safety pins (to secure G-tube
to clothing)
6. Gloves
Procedure:
1. Washes hands
2. Assembles equipment
3. Shakes formula to mix and measures amount
4. Positions student and explains procedure
5. Washes hands and dons gloves
6. Inspects skin
7. Removes cap and inserts syringe. Aspirates (if
ordered)

VDH Guidelines for Healthcare Procedures in Schools 574
Explanation/Return Demonstration Training
Date
Return
Demon
Date
Supervision
Date Date Date Date Date
8. Measures residual (if needed) and returns to
stomach
9. If stomach contents are over _______ ml,
subtract from feeding
10. Clamps tubing and removes syringe
11. Attaches syringe without plunger to feeding
port. Unclamps tube.
12. Flushes with 15-30 ml water (or as specified)
13. Administers medications, if ordered, flushing
before and after
14. Pours room temperature formula into syringe
15. Allows feeding to flow in slowly by gravity
16. Adjusts height of syringe to achieve prescribed
flow rate
17. Observes tolerance of feeding
18. Keeps syringe partially filled until feeding
complete
19. Flushes with prescribed amount of water,
usually 15-30 ml
20. Opens G-tube to air, if ordered
21. Clamps tubing, removes syringe, and reinserts
plug
22. Secures tubing
23. Washes and dries supplies as specified
24. Washes hands
25. Documents procedure and observations
26. Notifies family of any changes
Procedure approved by:
_________________________________________ ____________________
Parent/Guardian signature Date
I have received and understand the training.
________________________________________ ____________________
Trainee Signature Date
________________________________________ ____________________
Trainer Signature (RN) Date
________________________________________ ____________________
Supervising RN Signature Date

VDH Guidelines for Healthcare Procedures in Schools 575
Skills Checklist: Gastrostomy Feeding Slow Drip or Continuous Method
Student’s Name: ___________________________ Teacher: ____________________________
Person Trained: ____________________________ Position: ___________________________
Instructor: ________________________________
Explanation/Return Demonstration Training
Date
Return
Demon
Date
Supervision
Date Date Date Date Date
Preparation:
1. Reviews student’s IHP for student-specific
instructions
2. Reviews standard precautions
3. Identifies student’s ability to participate in
procedure
4. Identifies where procedure is done (respects
privacy) and student’s activity level
5. Identifies possible problems and appropriate
actions
6. Identifies size _____ and type ______ of G-
tube
7. Identifies student-specific instructions for
guidelines as to:
• __________ time(s) of feeding
• __________ ml (amount)
• __________ formula (type)
• __________ duration (minutes)
• __________ position of student
Identifies Supplies:
1. Liquid formula or feeding solution, at room
temperature
2. 60 ml catheter-tipped syringe or other feeding
container for feeding
3. Feeding bag and tubing
4. Feeding pump and stand or carry-pack, if
needed
5. Clamp or plug for end of tube
6. Water (to flush tubing before and after feeding)
7. Rubber bands and safety pins (to secure G-tube
to clothing)
8. Gloves
Procedure:
1. Washes hands
2. Assembles equipment
3. Shakes formula to mix and measures amount
4. Positions student and explains procedure
5. Washes hands and dons gloves

VDH Guidelines for Healthcare Procedures in Schools 576
Explanation/Return Demonstration Training
Date
Return
Demon
Date
Supervision
Date Date Date Date Date
6. Inspects skin
7. Removes cap and inserts syringe. Aspirates (if
ordered)
8. Measures residual (if needed) and returns to
stomach
9. If stomach contents are over _______ ml,
subtracts from feeding
10. Clamps tubing and removes syringe
11. Fills feeding bag with room temperature
feeding, primes tubing, and hangs bag
12. Flushes with 15-30 ml water (or as specified)
13. Administers medications, if ordered, flushing
before and after
14. Inserts tip of tubing into G-tube, secures, and
unclamps
15. Adjusts flow rate
16. Observes tolerance of feeding
17. Keeps bag partially filled until feeding
complete; does not hang more than 4 hours’
worth of feeding at one time
18. If single feeding completed, disconnects, and
flushes with prescribed amount of water,
usually 15-30 ml
19. Opens G-tube to air, if ordered
20. Clamps tubing, removes syringe, and reinserts
plug
21. Secures tubing
22. Washes and dries supplies as specified
23. Washes hands
24. Documents procedure and observations
25. Notifies family of any changes
Procedure approved by:
_________________________________________ ____________________
Parent/Guardian signature Date
I have received and understand the training.
________________________________________ ____________________
Trainee Signature Date
________________________________________ ____________________
Trainer Signature (RN) Date
________________________________________ ____________________
Supervising RN Signature Date

VDH Guidelines for Healthcare Procedures in Schools 577
Skills Checklist: Skin-Level Gastrostomy Feeding Bolus Method
Student’s Name: ___________________________ Teacher: ____________________________
Person Trained: ____________________________ Position: ___________________________
Instructor: ________________________________
Explanation/Return Demonstration Training
Date
Return
Demon
Date
Supervision
Date Date Date Date Date
Preparation:
1. Reviews student’s IHP for student-specific
instructions
2. Reviews standard precautions
3. Identifies student’s ability to participate in
procedure
4. Identifies where procedure is done (respects
privacy)
5. Identifies possible problems and appropriate
actions
6. Identifies size _____ and type ______ of
gastrostomy device
7. Identifies student-specific instructions for
guidelines as to:
• __________ time(s) of feeding
• __________ ml (amount)
• __________ formula (type)
• __________ duration (minutes)
• __________ position of student
Identifies Supplies:
1. Liquid formula or feeding solution, at room
temperature
2. 60 ml catheter-tipped syringe or other feeding
container for feeding
3. Adaptor with tubing and clamp
4. Water (to flush tubing before and after feeding)
5. Gloves
Procedure:
1. Washes hands
2. Assembles equipment
3. Shakes formula to mix and measures amount
4. Positions student and explains procedure.
5. Washes hands and dons gloves

VDH Guidelines for Healthcare Procedures in Schools 578
Explanation/Return Demonstration Training
Date
Return
Demon
Date
Supervision
Date Date Date Date Date
6. Inspects skin and rotates bolster, if ordered.
7. Opens safety plug
8. Inserts adaptor and tubing
9. Flushes with 15-30 ml water (or as specified)
10. Administers medications, if ordered, flushing
before and after
11. Attaches syringe without plunger to feeding
port
12. Pours room temperature formula into syringe
13. Allows feeding to flow in slowly by gravity
14. Adjusts height of syringe to achieve prescribed
flow rate
15. Observes tolerance of feeding
16. Keeps syringe partially filled until feeding
complete
17. Flushes with prescribed amount of water,
usually 15-30 ml
18. Clamps tubing, removes syringe, and reinserts
plug
19. Washes and dries supplies as specified
20. Washes hands
21. Documents procedure and observations
22. Notifies family of any changes
Procedure approved by:
_________________________________________ ____________________
Parent/Guardian signature Date
I have received and understand the training.
________________________________________ ____________________
Trainee Signature Date
________________________________________ ____________________
Trainer Signature (RN) Date
________________________________________ ____________________
Supervising RN Signature Date

VDH Guidelines for Healthcare Procedures in Schools 579
Skills Checklist: Skin-Level Gastrostomy Feeding Slow Drip or
Continuous Method
Student’s Name: ___________________________ Teacher: ____________________________
Person Trained: ____________________________ Position: ___________________________
Instructor: _______________________
Explanation/Return Demonstration Training
Date
Return
Demon
Date
Supervision
Date Date Date Date Date
Preparation:
1. Reviews student’s IHP for student-specific
instructions
2. Reviews standard precautions
3. Identifies student’s ability to participate in
procedure
4. Identifies where procedure is done (respects
privacy) and student’s activity level
5. Identifies possible problems and appropriate
actions
6. Identifies size _____ and type ______ of
gastrostomy device
7. Identifies student-specific instructions for
guidelines as to:
• __________ time(s) of feeding
• __________ ml (amount)
• __________ formula (type)
• __________ duration (minutes)
• __________ position of student
Identifies Supplies:
1. Liquid formula or feeding solution, at room
temperature
2. 60 ml catheter-tipped syringe or other feeding
container for feeding
3. Feeding bag and tubing
4. Feeding pump and stand or carry-pack, if
needed
5. Clamp or plug for end of tube
6. Water (to flush tubing before and after feeding)
7. Rubber bands and safety pins (to secure device
to clothing)
8. Gloves
Procedure:
1. Washes hands

VDH Guidelines for Healthcare Procedures in Schools 580
Explanation/Return Demonstration Training
Date
Return
Demon
Date
Supervision
Date Date Date Date Date
2. Assembles equipment
3. Shakes formula to mix and measures amount
4. Positions student and explains procedure.
5. Washes hands and dons gloves
6. Inspects skin and rotates bolster, if ordered.
7. Opens safety plug
8. Inserts adaptor and tubing
9. Fills feeding bag with room temperature
feeding, primes tubing, and hangs bag
10. Flushes device with 15-30 ml water (or as
specified)
11. Administers medications, if ordered, flushing
before and after
12. Attaches adaptor tubing to feeding bag tubing,
secures, and unclamps
13. Adjusts flow rate
14. Observes tolerance of feeding
15. Keeps bag partially filled until feeding
complete; does not hang more than 4 hours’
worth of feeding
16. If single feeding completed, disconnects, and
flushes with prescribed amount of water,
usually 15-30 ml. Removes adaptor tubing and
closes safety plug
17. Secures tubing if continuous feeding
18. Washes and dries supplies as specified
19. Washes hands
20. Documents procedure and observations
21. Notifies family of any changes
Procedure approved by:
_________________________________________ ____________________
Parent/Guardian signature Date
I have received and understand the training.
________________________________________ ____________________
Trainee Signature Date
________________________________________ ____________________
Trainer Signature (RN) Date
________________________________________ ____________________
Supervising RN Signature Date

VDH Guidelines for Healthcare Procedures in Schools 581
Skills Checklist: Jejunostomy Feeding Continuous Feeding by Pump
Student’s Name: ___________________________ Teacher: ____________________________
Person Trained: ____________________________ Position: ___________________________
Instructor: _______________________
Explanation/Return Demonstration Training
Date
Return
Demon
Date
Supervision
Date Date Date Date Date
Preparation:
1. Reviews student’s IHP for student-specific
instructions
2. Reviews standard precautions
3. Identifies student’s ability to participate in
procedure
4. Identifies where procedure is done (respects
privacy) and student’s activity level
5. Identifies possible problems and appropriate
actions
6. Identifies size _____ and type ______ of
jejunostomy device
7. Identifies student-specific instructions for
guidelines as to:
• __________ time(s) of feeding
• __________ ml (amount)
• __________ formula (type)
• __________ duration (minutes)
• __________ position of student
Identifies Supplies:
1. Liquid formula or feeding solution, at room
temperature
2. 10 ml catheter-tipped syringe or other feeding
container for feeding
3. Feeding bag and tubing
4. Feeding pump and stand or carry-pack, if
needed
5. Clamp or plug for end of tube
6. Water (to flush tubing before and after feeding)
7. Rubber bands and safety pins (to secure device
to clothing)
8. Gloves
Procedure:
1. Washes hands
2. Assembles equipment
3. Shakes formula to mix and measures amount

VDH Guidelines for Healthcare Procedures in Schools 582
Explanation/Return Demonstration Training
Date
Return
Demon
Date
Supervision
Date Date Date Date Date
4. Positions student and explains procedure.
5. Washes hands and dons gloves
6. Inspects skin
7. Fills feeding bag with room temperature
feeding, primes tubing, and hangs bag
8. Opens safety plug
9. Inserts adaptor and tubing
10. Flushes with 5-10 ml water (or as specified)
11. Administers medications, if ordered, flushing
before and after
12. Attaches adaptor tubing to feeding bag tubing,
secures, and unclamps
13. Vents G-tube, if present and ordered
14. Adjusts flow rate on pump
15. Assesses tolerance of feeding
16. Keeps bag partially filled until feeding
complete; does not hang more than 4 hours’
worth of feeding
17. If single feeding completed, disconnects, and
flushes with prescribed amount of water,
usually 5-10 ml. Removes adaptor tubing and
closes safety plug
18. Secures tubing if continuous feeding
19. Washes and dries supplies as specified
20. Removes gloves and washes hands
21. Documents procedure and observations
22. Notifies family of any changes
Procedure approved by:
_________________________________________ ____________________
Parent/Guardian signature Date
I have received and understand the training.
________________________________________ ____________________
Trainee Signature Date
________________________________________ ____________________
Trainer Signature (RN) Date
________________________________________ ____________________
Supervising RN Signature Date

VDH Guidelines for Healthcare Procedures in Schools 583
Skills Checklist: Emptying a Colostomy
Student’s Name: ___________________________ Teacher: ____________________________
Person Trained: ____________________________ Position: ___________________________
Instructor: _______________________
Explanation/Return Demonstration
Training
Date
Return
Demon
Date
Supervision
Date Date Date Date Date
Preparation:
1. Reviews student’s IHP for student-specific
instructions
2. Reviews standard precautions
3. Identifies student’s ability to participate in
procedure
4. Identifies where procedure is done
(respects privacy)
5. Identifies possible problems and
appropriate actions
6. Identifies when ______ and how often
_______colostomy should be emptied
Identifies Supplies:
1. Tissue, wet washcloth, paper towel, or wet
wipe
2. Toilet or container to dispose of wastes
3. Gloves, if pouch is to be emptied by
someone other than student
4. Clean pouch with clip closure
5. Extra pouch supplies
Procedure:
1. Washes hands
2. Assembles equipment
3. Positions student and explains procedure
4. Washes hands and dons gloves
5. Tilts the bottom of the pouch and removes
clamp
6. Folds bottom to form cuff

VDH Guidelines for Healthcare Procedures in Schools 584
Explanation/Return Demonstration
Training
Date
Return
Demon
Date
Supervision
Date Date Date Date Date
7. Slowly unfolds end and empty contents
8. Wipes pouch
9. Re-applies clamp
10. Disposes of wastes
11. Removes gloves and washes hands
12. Documents procedure and reports any
changes
Procedure approved by:
_________________________________________ ____________________
Parent/Guardian signature Date
I have received and understand the training.
________________________________________ ____________________
Trainee Signature Date
________________________________________ ____________________
Trainer Signature (RN) Date
________________________________________ ____________________
Supervising RN Signature Date

VDH Guidelines for Healthcare Procedures in Schools 585
Skills Checklist: Changing a Colostomy Pouch
Student’s Name: ___________________________ Teacher: ____________________________
Person Trained: ____________________________ Position: ___________________________
Instructor: _______________________
Explanation/Return Demonstration Training
Date
Return
Demon
Date
Supervision
Date Date Date Date Date
Preparation:
1. Reviews student’s IHP for student-specific
instructions
2. Reviews standard precautions
3. Identifies student’s ability to participate in
procedure
4. Identifies where procedure is done (respects
privacy)
5. Identifies possible problems and appropriate
actions
6. Identifies times/reasons for changes:
______________________________
Identifies Supplies:
1. Water
2. Skin cleanser
3. Soft cloth or gauze or tissues
4. Clean pouch with clip closure
5. Protective paste or powder, if used
6. Skin barrier
7. Measuring guide, if needed
8. Belt, if used
9. Gloves, if pouch is to be changed by someone
other than student
10. Tape, if needed
11. Scissors, if needed
Procedure:
1. Washes hands
2. Assembles equipment
3. Positions student and explains procedure
4. Washes hands and dons gloves

VDH Guidelines for Healthcare Procedures in Schools 586
Explanation/Return Demonstration Training
Date
Return
Demon
Date
Supervision
Date Date Date Date Date
5. Empties contents of old pouch
6. Carefully separates pouch and skin barrier
7. Saves clamp for future use
8. Gently washes peristomal area and allows to
dry
9. Assesses stoma for integrity
10. Measures stoma and cuts barrier and pouch to
fit
11. Removes paper and saves to use as a guide if
needed
12. Applies protective paste, if ordered
13. Applies barrier /wafer/pouch/ correctly
14. Holds pouch/barrier in place for 30-60 seconds
15. Seals pouch with clamp
16. Fastens pouch to belt, if used
17. Disposes of supplies appropriately
18. Removes gloves and washes hands
19. Documents procedure and reports any changes
Procedure approved by:
_________________________________________ ____________________
Parent/Guardian signature Date
I have received and understand the training.
________________________________________ ____________________
Trainee Signature Date
________________________________________ ____________________
Trainer Signature (RN) Date
________________________________________ ____________________
Supervising RN Signature Date

VDH Guidelines for Healthcare Procedures in Schools 587
Skills Checklist: Emptying an Ileostomy
Student’s Name: ___________________________ Teacher: ____________________________
Person Trained: ____________________________ Position: ___________________________
Instructor: _______________________
Explanation/Return Demonstration Training
Date
Return
Demon
Date
Supervision
Date Date Date Date Date
Preparation:
1. Reviews student’s IHP for student-specific
instructions
2. Reviews standard precautions
3. Identifies student’s ability to participate in
procedure
4. Identifies where procedure is done
(respects privacy)
5. Identifies possible problems and
appropriate actions
6. Identifies when ______ and how often
_______ileostomy should be emptied
Identifies Supplies:
1. Tissue, wet washcloth, paper towel, or wet
wipe
2. Toilet or container to dispose of wastes
3. Gloves, if pouch is to be emptied by
someone other than student
4. Clean pouch with clip closure
5. Extra pouch supplies
Procedure:
1. Washes hands
2. Assembles equipment
3. Positions student and explains procedure
4. Washes hands and dons gloves
5. Tilts the bottom of the pouch and removes
clamp
6. Folds bottom to form cuff
7. Slowly unfolds end and empty contents
8. Wipes pouch
9. Re-applies clamp

VDH Guidelines for Healthcare Procedures in Schools 588
Explanation/Return Demonstration Training
Date
Return
Demon
Date
Supervision
Date Date Date Date Date
10. Disposes of wastes
11. Removes gloves and washes hands
12. Documents procedure and reports any
changes
Procedure approved by:
_________________________________________ ____________________
Parent/Guardian signature Date
I have received and understand the training.
________________________________________ ____________________
Trainee Signature Date
________________________________________ ____________________
Trainer Signature (RN) Date
________________________________________ ____________________
Supervising RN Signature Date

VDH Guidelines for Healthcare Procedures in Schools 589
Skills Checklist: Changing an Ileostomy Pouch
Student’s Name: ___________________________ Teacher: ____________________________
Person Trained: ____________________________ Position: ___________________________
Instructor: _______________________
Explanation/Return Demonstration Training
Date
Return
Demon
Date
Supervision
Date Date Date Date Date
Preparation:
1. Reviews student’s IHP for student-specific
instructions
1. Reviews standard precautions
2. Identifies student’s ability to participate in
procedure
3. Identifies where procedure is done (respects
privacy)
4. Identifies possible problems and appropriate
actions
5. Identifies times/reasons for changes:
______________________________
Identifies Supplies:
12. Water
1. Skin cleanser
2. Soft cloth or gauze or tissues
3. Clean pouch with clip closure
4. Protective paste or powder, if used
5. Skin barrier
6. Measuring guide, if needed
7. Belt, if used
8. Gloves, if pouch is to be changed by someone
other than student
9. Tape, if needed
10. Scissors, if needed
Procedure:
1. Washes hands
2. Assembles equipment
3. Positions student and explains procedure
4. Washes hands and dons gloves
5. Empties contents of old pouch
6. Carefully separates pouch and skin barrier
7. Saves clamp for future use

VDH Guidelines for Healthcare Procedures in Schools 590
Explanation/Return Demonstration Training
Date
Return
Demon
Date
Supervision
Date Date Date Date Date
8. Gently washes peristomal area, allows to dry,
and places gauze over stoma
9. Assesses stoma for integrity
10. Measures stoma and cuts barrier and pouch to
fit
11. Removes paper and saves to use as a guide if
needed
12. Apply protective paste, if ordered
13. Applies barrier/wafer/pouch correctly
14. Holds pouch/barrier in place for 30-60 seconds
15. Seals pouch with clamp
16. Fastens pouch to belt, if used
17. Disposes of supplies appropriately
18. Removes gloves and washes hands
19. Documents procedure and reports any changes
Procedure approved by:
_________________________________________ ____________________
Parent/Guardian signature Date
I have received and understand the training.
________________________________________ ____________________
Trainee Signature Date
________________________________________ ____________________
Trainer Signature (RN) Date
________________________________________ ____________________
Supervising RN Signature Date

VDH Guidelines for Healthcare Procedures in Schools 591
Skills Checklist: Positioning a Student
Student’s Name: ___________________________ Teacher: ____________________________
Person Trained: ____________________________ Position: ___________________________
Instructor: _______________________
Explanation/Return Demonstration
Training
Date
Return
Demon
Date
Supervision
Date Date Date Date Date
Preparation:
1. Reviews student’s IHP for student-specific
instructions
2. Identifies student’s ability to participate in
procedure
3. Identifies possible problems and appropriate
actions
Procedure:
1. Washes hands
2. Explains procedure
3. Assembles equipment as needed
4. Obtains assistance if needed
5. Follows principles of good body mechanics
6. Change student’s position as needed
7. Inspects skin
8. Ensures comfort
9. Washes hands
10. Cleans and stores equipment as needed
11. Documents and reports any changes
Procedure approved by:
_________________________________________ ____________________
Parent/Guardian signature Date
I have received and understand the training.
________________________________________ ____________________
Trainee Signature Date
________________________________________ ____________________
Trainer Signature (RN) Date
________________________________________ ____________________
Supervising RN Signature Date

VDH Guidelines for Healthcare Procedures in Schools 592
Skills Checklist: Assisting a Student with a Cane
Student’s Name: ___________________________ Teacher: ____________________________
Person Trained: ____________________________ Position: ___________________________
Instructor: _______________________
Explanation/Return Demonstration Training
Date
Return
Demon
Date
Supervision
Date Date Date Date Date
Preparation: 1. Reviews student’s IHP for student-specific
instructions
4. Identifies student’s ability to participate in
procedure
5. Identifies possible problems and appropriate
actions
6. Identifies type of cane(s) used:
__________________________
7. Identifies type of gait: _____________
Procedure:
1. Washes hands
2. Explains procedure
3. Assembles equipment as needed
4. Obtains assistance if needed
5. Checks fit of cane
6. Teaches/reinforces gait
7. Teaches stair climbing as needed
8. Arranges for use of elevator 9. Arranges transportation during emergencies and
drills
10. Describes safety tips
11. Cleans and stores equipment as needed
12. Documents and reports any changes
Procedure approved by:
_________________________________________ ____________________
Parent/Guardian signature Date
I have received and understand the training.
________________________________________ ____________________
Trainee Signature Date
________________________________________ ____________________
Trainer Signature (RN) Date
________________________________________ ____________________
Supervising RN Signature Date

VDH Guidelines for Healthcare Procedures in Schools 593
Skills Checklist: Assisting a Student with Crutches
Student’s Name: ___________________________ Teacher: ____________________________
Person Trained: ____________________________ Position: ___________________________
Instructor: _______________________
Explanation/Return Demonstration Trainin
g Date
Retur
n
Demo
n Date
Supervision
Date Date Date Date Date
Preparation:
1. Reviews student’s IHP for student-specific
instructions
2. Identifies student’s ability to participate in procedure
3. Identifies possible problems and appropriate actions
4. Identifies type of crutches used:
__________________________
5. Identifies type of gait: _____________
Procedure:
1. Washes hands
2. Explains procedure
3. Assembles equipment as needed
4. Encourages proper shoes
5. Checks fit of crutches
6. Checks handpieces and arm pads
7. Teaches/reinforces gait
8. Teaches/reinforces sitting
9. Teaches stair climbing as needed
10. Arranges for use of elevator
11. Arranges transportation during emergencies and
drills
12. Describes safety tips
13. Cleans and stores equipment as needed
14. Documents and reports any changes
Procedure approved by:
_________________________________________ ____________________
Parent/Guardian signature Date
I have received and understand the training.
________________________________________ ____________________
Trainee Signature Date
________________________________________ ____________________
Trainer Signature (RN) Date

VDH Guidelines for Healthcare Procedures in Schools 594
________________________________________ ____________________
Supervising RN Signature Date
Skills Checklist: Assisting a Student with a Walker
Student’s Name: ___________________________ Teacher: ____________________________
Person Trained: ____________________________ Position: ___________________________
Instructor: _______________________
Explanation/Return Demonstration Training
Date
Return
Demon
Date
Supervision
Date Date Date Date Date
Preparation:
1. Reviews student’s IHP for student-specific
instructions
2. Identifies student’s ability to participate in
procedure
3. Identifies possible problems and appropriate
actions
4. Identifies type of walker used:
__________________________
Procedure:
1. Washes hands
2. Explains procedure and encourages student to
participate
3. Assembles equipment as needed
4. Checks fit of walker
5. Teaches/reinforces gait
6. Does not allow use on stairs
7. Arranges for use of elevator
8. Arranges transportation during emergencies and
drills
9. Describes safety tips
10. Cleans and stores equipment as needed
11. Documents and reports any changes
Procedure approved by:
_________________________________________ ____________________
Parent/Guardian signature Date
I have received and understand the training.
________________________________________ ____________________
Trainee Signature Date
________________________________________ ____________________
Trainer Signature (RN) Date

VDH Guidelines for Healthcare Procedures in Schools 595
________________________________________ ____________________
Supervising RN Signature Date

VDH Guidelines for Healthcare Procedures in Schools 596
Skills Checklist: Assisting a Student with a Wheelchair
Student’s Name: ___________________________ Teacher: ____________________________
Person Trained: ____________________________ Position: ___________________________
Instructor: _______________________
Explanation/Return Demonstration Training
Date
Return
Demon
Date
Supervision
Date Date Date Date Date
Preparation:
1. Reviews student’s IHP for student-specific
instructions
2. Identifies student’s ability to participate in
procedure
3. Identifies possible problems and appropriate
actions
4. Identifies type of wheelchair used:
__________________________
Procedure:
1. Washes hands
2. Explains procedure and encourages student to
participate
3. Assembles equipment as needed
4. Checks all areas of school and grounds for
wheelchair accessibility
5. Monitors for skin irritations and pressure areas
6. Teaches and assists moving from a surface to
wheelchair
7. Teaches and assists moving from sitting to
standing
8. Teaches and assists moving from standing to
sitting
9. Locks wheelchair whenever appropriate
10. Uses a seatbelt or harness whenever needed for
safety
11. Stays with student until stable
12. Maintains good body mechanics
13. Recharges batteries as needed
14. Arranges for use of elevator
15. Arranges transportation during emergencies and
drills
16. Describes safety tips
17. Cleans and stores equipment as needed
18. Documents and reports any changes

VDH Guidelines for Healthcare Procedures in Schools 597
Procedure approved by:
_________________________________________ ____________________
Parent/Guardian signature Date
I have received and understand the training.
________________________________________ ____________________
Trainee Signature Date
________________________________________ ____________________
Trainer Signature (RN) Date
________________________________________ ____________________
Supervising RN Signature Date

VDH Guidelines for Healthcare Procedures in Schools 598
Skills Checklist: Assisting a Student with a Prosthesis
Student’s Name: ___________________________ Teacher: ____________________________
Person Trained: ____________________________ Position: ___________________________
Instructor: _______________________
Explanation/Return Demonstration Training
Date
Return
Demon
Date
Supervision
Date Date Date Date Date
Preparation:
1. Reviews student’s IHP for student-specific
instructions
2. Identifies student’s ability to participate in
procedure
3. Identifies possible problems and appropriate
actions
4. Identifies type of prosthesis used:
__________________________
Procedure:
1. Washes hands
2. Explains procedure and encourages student to
participate
3. Assembles equipment as needed
4. Checks gait if applicable
5. Checks proper fit, alignment, and function of
prosthesis
6. Inspects skin for redness or breakdown
7. Arranges for use of elevator if needed
8. Arranges transportation during emergencies and
drills if needed
9. Documents and reports any changes
Procedure approved by:
_________________________________________ ____________________
Parent/Guardian signature Date
I have received and understand the training.
________________________________________ ____________________
Trainee Signature Date
________________________________________ ____________________
Trainer Signature (RN) Date
________________________________________ ____________________
Supervising RN Signature Date

VDH Guidelines for Healthcare Procedures in Schools 599
Skills Checklist: Assisting a Student with an Orthosis
Student’s Name: ___________________________ Teacher: ____________________________
Person Trained: ____________________________ Position: ___________________________
Instructor: _______________________
Explanation/Return Demonstration Training
Date
Return
Demon
Date
Supervision
Date Date Date Date Date
Preparation:
1. Reviews student’s IHP for student-specific
instructions
2. Identifies student’s ability to participate in procedure
3. Identifies possible problems and appropriate actions
4. Identifies type of orthosis used:
__________________________
Procedure:
1. Washes hands
2. Explains procedure and encourages student to
participate
3. Assembles equipment as needed and checks for wear
and any defects
4. Determines student’s ability to put on and remove
orthosis
5. Checks gait
6. Checks proper fit, alignment, and function of
orthosis
7. Inspects skin for redness or breakdown
8. Checks circulation and skin if student has any
complaints of burning, pain, or decreased sensation
9. Arranges for use of elevator if needed
10. Arranges transportation during emergencies and
drills if needed
11. Documents and reports any changes
Procedure approved by:
_________________________________________ ____________________
Parent/Guardian signature Date
I have received and understand the training.
________________________________________ ____________________
Trainee Signature Date
________________________________________ ____________________
Trainer Signature (RN) Date
________________________________________ ____________________
VDH Guidelines for Healthcare Procedures in Schools 600
Supervising RN Signature Date
Skills Checklist: Cast Care
Student’s Name: ___________________________ Teacher: ____________________________
Person Trained: ____________________________ Position: ___________________________
Instructor: _______________________
Explanation/Return Demonstration Trainin
g Date
Return
Demon
Date
Supervision
Date Date Date Date Date
Preparation:
1. Reviews student’s IHP for student-specific instructions
2. Identifies student’s ability to participate in procedure
3. Identifies possible problems and appropriate actions
4. Identifies type of casting material used:
__________________________
5. Identifies whether weight bearing or not
_______________________________
Procedure:
1. Washes hands
2. Explains procedure and encourages student to
participate
3. Checks cast for wear and any defects
4. Cautions student not to put anything inside cast or
scratch under cast
5. Checks cast fit by checking color, swelling, capillary
refill, sensation and movement
6. Observes for the five “Ps”
7. Protects cast from soiling
8. Inspects skin for redness or breakdown
9. Changes position and keeps affected limb elevated as
needed; does not use bar on spica cast to lift student
10. Arranges for use of elevator if needed
11. Arranges transportation during emergencies and drills if
needed
12. Documents and reports any changes
Procedure approved by:
_________________________________________ ____________________
Parent/Guardian signature Date
I have received and understand the training.
________________________________________ ____________________
Trainee Signature Date
________________________________________ ____________________
Trainer Signature (RN) Date

VDH Guidelines for Healthcare Procedures in Schools 601
________________________________________ ____________________
Supervising RN Signature Date
Skills Checklist: Body Mechanics
Student’s Name: ___________________________ Teacher: ____________________________
Person Trained: ____________________________ Position: ___________________________
Instructor: _______________________
Explanation/Return Demonstration Training
Date
Return
Demon
Date
Supervision
Date Date Date Date Date
Principles:
1. Obtains help when needed to lift heavy loads
2. Uses proper posture
3. When possible, pushes, pulls, rolls, or lowers objects
instead of lifting
4. Stands close to objects to be moved
5. Provides broad base of support
6. Keeps back straight, knees and hips flexed, weight
distributed on both feet, and shoulders in line with
pelvis
7. Flexes knees instead of stooping
8. Avoids twisting of torso
9. Uses verbal counts to coordinate movements with
others
10. Squats and stands to lift rather than bending over and
lifting
11. Carries objects close to body
12. Carries using muscles that pull shoulder blades
together
Procedure approved by:
_________________________________________ ____________________
Parent/Guardian signature Date
I have received and understand the training.
________________________________________ ____________________
Trainee Signature Date
________________________________________ ____________________
Trainer Signature (RN) Date
________________________________________ ____________________

VDH Guidelines for Healthcare Procedures in Schools 602
Supervising RN Signature Date

VDH Guidelines for Healthcare Procedures in Schools 603
Skills Checklist: Administering Rectal Diazepam
Student’s Name: ___________________________ Teacher: ____________________________
Person Trained: ____________________________ Position: ___________________________
Instructor: _______________________
Explanation/Return Demonstration Training
Date
Return
Demon
Date
Supervision
Date Date Date Date Date
Preparation:
1. Reviews student’s IHP for student-specific
instructions
2. Reviews standard precautions
3. Identifies possible problems and appropriate
actions
4. Reviews cardiopulmonary resuscitation training
5. Verifies medication dose Diazepam________ mg
Identifies Supplies:
1. Gloves
2. Medication syringe with rectal diazepam
3. Lubricating jelly (comes with syringe)
Procedure:
1. Washes hands if possible
2. Assembles equipment and obtains assistance if
possible
3. Dons gloves
4. Removes protective syringe cover and lubricates
tip
5. Turns student on left side
6. Gently inserts syringe tip in rectum
7. Slowly pushes in medication
8. Removes syringe and holds buttocks together
9. Notes time medication given
10. Calls 911 and activates emergency plan
11. Constantly monitors for side effects, especially
respiratory
12. Removes gloves and washes hands
13. Documents diazepam administration, student
response, and implementation of emergency plan
Procedure approved by:
_________________________________________ ____________________

VDH Guidelines for Healthcare Procedures in Schools 604
Parent/Guardian signature Date
I have received and understand the training.
________________________________________ ____________________
Trainee Signature Date
________________________________________ ____________________
Trainer Signature (RN) Date
________________________________________ ____________________
Supervising RN Signature Date
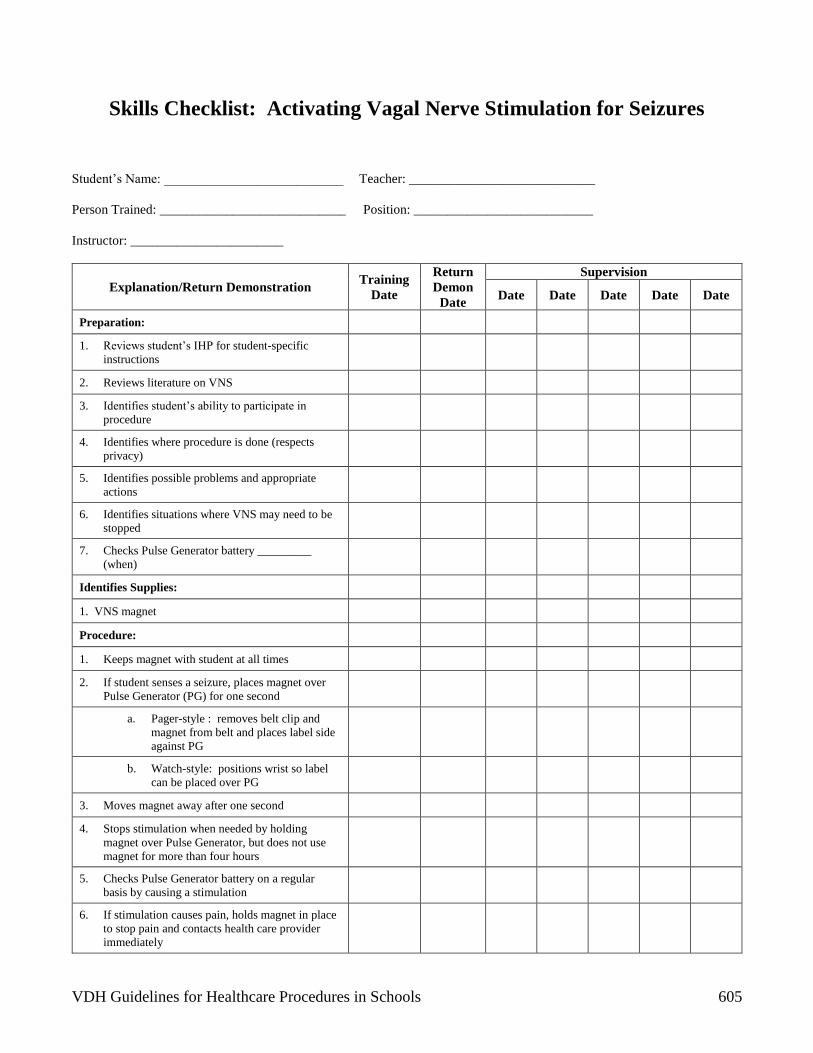
VDH Guidelines for Healthcare Procedures in Schools 605
Skills Checklist: Activating Vagal Nerve Stimulation for Seizures
Student’s Name: ___________________________ Teacher: ____________________________
Person Trained: ____________________________ Position: ___________________________
Instructor: _______________________
Explanation/Return Demonstration Training
Date
Return
Demon
Date
Supervision
Date Date Date Date Date
Preparation:
1. Reviews student’s IHP for student-specific
instructions
2. Reviews literature on VNS
3. Identifies student’s ability to participate in
procedure
4. Identifies where procedure is done (respects
privacy)
5. Identifies possible problems and appropriate
actions
6. Identifies situations where VNS may need to be
stopped
7. Checks Pulse Generator battery _________
(when)
Identifies Supplies:
1. VNS magnet
Procedure:
1. Keeps magnet with student at all times
2. If student senses a seizure, places magnet over
Pulse Generator (PG) for one second
a. Pager-style : removes belt clip and
magnet from belt and places label side
against PG
b. Watch-style: positions wrist so label
can be placed over PG
3. Moves magnet away after one second
4. Stops stimulation when needed by holding
magnet over Pulse Generator, but does not use
magnet for more than four hours
5. Checks Pulse Generator battery on a regular
basis by causing a stimulation
6. If stimulation causes pain, holds magnet in place
to stop pain and contacts health care provider
immediately

VDH Guidelines for Healthcare Procedures in Schools 606
Explanation/Return Demonstration Training
Date
Return
Demon
Date
Supervision
Date Date Date Date Date
7. Documents and reports any complaints of sore
throat, hoarseness, or other problems
8. Reports any changes to nurse & family
Procedure approved by:
_________________________________________ ____________________
Parent/Guardian signature Date
I have received and understand the training.
________________________________________ ____________________
Trainee Signature Date
________________________________________ ____________________
Trainer Signature (RN) Date
________________________________________ ____________________
Supervising RN Signature Date

VDH Guidelines for Healthcare Procedures in Schools 607
Skills Checklist: Monitoring a Ventricular Shunt
Student’s Name: ___________________________ Teacher: ____________________________
Person Trained: ____________________________ Position: ___________________________
Instructor: _______________________
Explanation/Return Demonstration Training
Date
Return
Demon
Date
Supervision
Date Date Date Date Date
Preparation:
1. Reviews student’s IHP for student-specific
instructions
2. Reviews standard precautions
3. Identifies student’s ability to participate in
procedure
4. Identifies possible problems and appropriate
actions
5. Identifies student-specific signs of shunt
malfunction (specify)
______________________________________
______________________________________
______________________________________
___
6. Reviews other possible signs of shunt
malfunction
Identifies Supplies:
1. Blood pressure cuff and stethoscope
Procedure:
1. Documents baseline behavior, level of activity,
coordination, and response to environment
2. Obtains baseline vital signs
3. Observes for signs of shunt malfunction
4. Notifies school nurse and family of any changes
or concerns
Procedure approved by:
_________________________________________ ____________________
Parent/Guardian signature Date
I have received and understand the training.
________________________________________ ____________________
Trainee Signature Date
________________________________________ ____________________
Trainer Signature (RN) Date
________________________________________ ____________________

VDH Guidelines for Healthcare Procedures in Schools 608
Supervising RN Signature Date
Skills Checklist: Peak Flow Rate Monitoring
Student’s Name: ___________________________ Teacher: ____________________________
Person Trained: ____________________________ Position: ___________________________
Instructor: _______________________
Explanation/Return Demonstration Training
Date
Return
Demon
Date
Supervision
Date Date Date Date Date
Preparation:
1. Reviews student’s IHP for student-specific
instructions
2. Reviews standard precautions
3. Identifies student’s ability to participate in procedure
4. Identifies where procedure is done (respects privacy)
5. Identifies possible problems and appropriate actions
6. Identifies when and how often to measure peak flow
rate (PFR)_______
_______________________________
7. Identifies values for student:
• __________ Green
• __________ Yellow
• __________ Red
Identifies Supplies:
1. Peak flow meter
2. Chart or log of peak flow readings
Procedure:
1. Washes hands
2. Assembles equipment as needed
3. Explains procedure
4. Makes sure sliding marker starts at zero
5. Advises student to stand and to clear mouth
6. Instructs student to take deep breath, place
mouthpiece in mouth and blow out as hard as
possible
7. Notes number achieved and repeats two more times
8. Records highest number

VDH Guidelines for Healthcare Procedures in Schools 609
Explanation/Return Demonstration Training
Date
Return
Demon
Date
Supervision
Date Date Date Date Date
9. Measures PFR on a regular basis and as needed
10. Correctly compares measurements and takes
appropriate actions
11. Washes and dries meter as specified
12. Documents PFR reading and any actions taken
13. Reports significant changes
Procedure approved by:
_________________________________________ ____________________
Parent/Guardian signature Date
I have received and understand the training.
________________________________________ ____________________
Trainee Signature Date
________________________________________ ____________________
Trainer Signature (RN) Date
________________________________________ ____________________
Supervising RN Signature Date

VDH Guidelines for Healthcare Procedures in Schools 610
Skills Checklist: Using a Metered Dose Inhaler
Student’s Name: ___________________________ Teacher: ____________________________
Person Trained: ____________________________ Position: ___________________________
Instructor: _______________________
Explanation/Return Demonstration Training
Date
Return
Demon
Date
Supervision
Date Date Date Date Date
Preparation:
1. Reviews student’s IHP for student-specific
instructions
2. Reviews standard precautions
3. Identifies student’s ability to participate in
procedure
4. Identifies where procedure is done (respects
privacy)
5. Identifies possible problems and appropriate
actions
6. Identifies: type of MDI ____________
medication______________________ type of
spacer if used _____________
7. Identifies when and how often to use metered dose
inhaler (MDI)_______
_______________________________
Identifies Supplies:
1. Metered dose inhaler
2. Medication log
Procedure:
1. Washes hands
2. Assembles equipment as needed
3. Explains procedure
4. Has student stand and hold MDI correctly
5. Removes cap and shakes MDI
6. Tilts head and breathes out
7. Positions MDI 1-2 inches from mouth or uses
spacer
8. Follows correct procedure for any spacer used
9. Presses to release medication while breathing in
slowly
10. Holds breath for 10 seconds
11. Repeats puff as ordered

VDH Guidelines for Healthcare Procedures in Schools 611
Explanation/Return Demonstration Training
Date
Return
Demon
Date
Supervision
Date Date Date Date Date
12. Waits one minute between puffs of rescue
medications
13. Wipes off mouthpiece and replaces cap
14. Washes hands
15. Documents medication and student response
Procedure approved by:
_________________________________________ ____________________
Parent/Guardian signature Date
I have received and understand the training.
________________________________________ ____________________
Trainee Signature Date
________________________________________ ____________________
Trainer Signature (RN) Date
________________________________________ ____________________
Supervising RN Signature Date
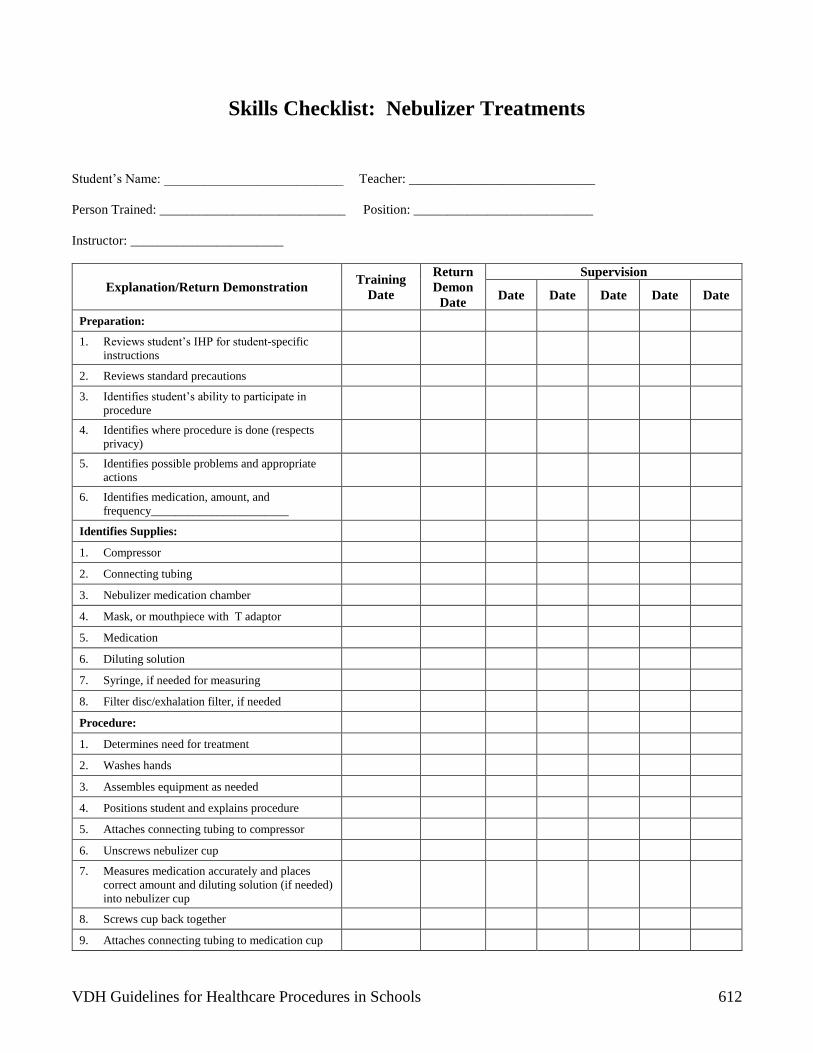
VDH Guidelines for Healthcare Procedures in Schools 612
Skills Checklist: Nebulizer Treatments
Student’s Name: ___________________________ Teacher: ____________________________
Person Trained: ____________________________ Position: ___________________________
Instructor: _______________________
Explanation/Return Demonstration Training
Date
Return
Demon
Date
Supervision
Date Date Date Date Date
Preparation:
1. Reviews student’s IHP for student-specific
instructions
2. Reviews standard precautions
3. Identifies student’s ability to participate in
procedure
4. Identifies where procedure is done (respects
privacy)
5. Identifies possible problems and appropriate
actions
6. Identifies medication, amount, and
frequency_______________________
Identifies Supplies:
1. Compressor
2. Connecting tubing
3. Nebulizer medication chamber
4. Mask, or mouthpiece with T adaptor
5. Medication
6. Diluting solution
7. Syringe, if needed for measuring
8. Filter disc/exhalation filter, if needed
Procedure:
1. Determines need for treatment
2. Washes hands
3. Assembles equipment as needed
4. Positions student and explains procedure
5. Attaches connecting tubing to compressor
6. Unscrews nebulizer cup
7. Measures medication accurately and places
correct amount and diluting solution (if needed)
into nebulizer cup
8. Screws cup back together
9. Attaches connecting tubing to medication cup
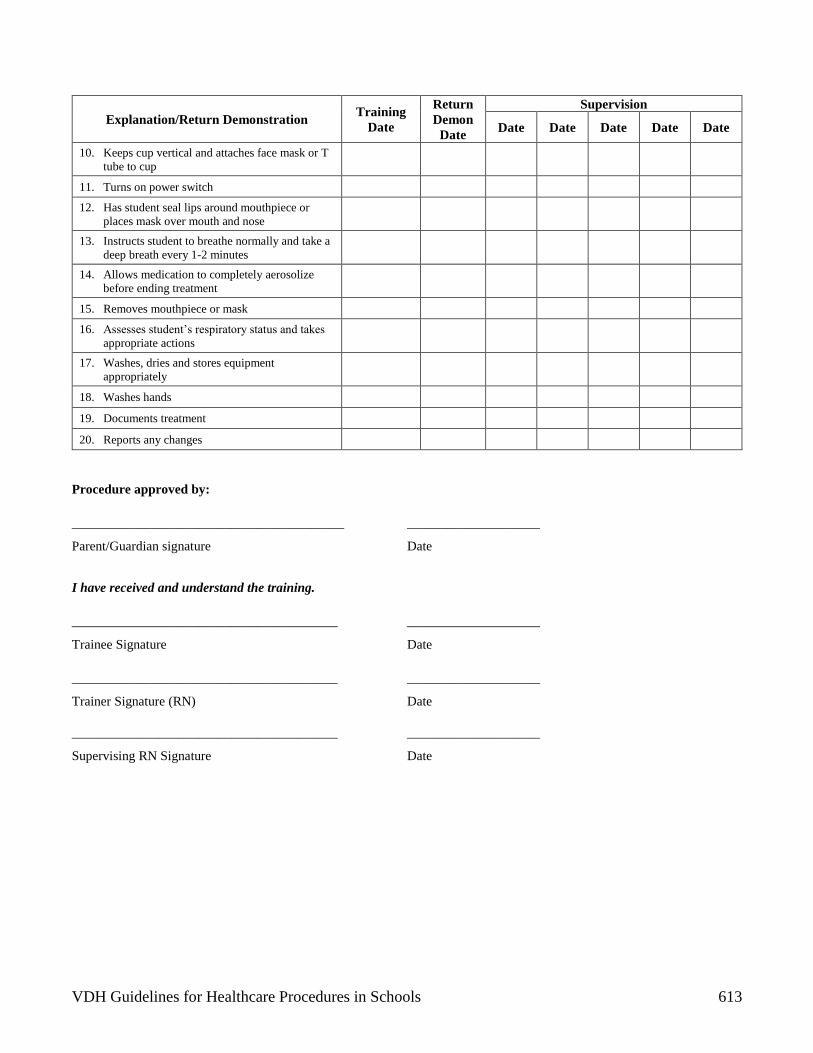
VDH Guidelines for Healthcare Procedures in Schools 613
Explanation/Return Demonstration Training
Date
Return
Demon
Date
Supervision
Date Date Date Date Date
10. Keeps cup vertical and attaches face mask or T
tube to cup
11. Turns on power switch
12. Has student seal lips around mouthpiece or
places mask over mouth and nose
13. Instructs student to breathe normally and take a
deep breath every 1-2 minutes
14. Allows medication to completely aerosolize
before ending treatment
15. Removes mouthpiece or mask
16. Assesses student’s respiratory status and takes
appropriate actions
17. Washes, dries and stores equipment
appropriately
18. Washes hands
19. Documents treatment
20. Reports any changes
Procedure approved by:
_________________________________________ ____________________
Parent/Guardian signature Date
I have received and understand the training.
________________________________________ ____________________
Trainee Signature Date
________________________________________ ____________________
Trainer Signature (RN) Date
________________________________________ ____________________
Supervising RN Signature Date

VDH Guidelines for Healthcare Procedures in Schools 614
Skills Checklist: Oxygen Cylinder
Student’s Name: ___________________________ Teacher: ____________________________
Person Trained: ____________________________ Position: ___________________________
Instructor: _______________________
Explanation/Return Demonstration Training
Date
Return
Demon
Date
Supervision
Date Date Date Date Date
Preparation:
1. Reviews student’s IHP for student-specific
instructions
2. Reviews standard precautions
3. Identifies student’s ability to participate in
procedure
4. Identifies where procedure is done (respects
privacy)
5. Identifies possible problems and appropriate
actions
6. Identifies oxygen safety precautions
Identifies supplies:
1. Oxygen cylinder with key
2. Oxygen regulator
3. Flowmeter
4. Delivery device with oxygen tubing
5. Humidifier, if needed
6. Tank Stand
Procedure:
1. Positions student and explains procedure
2. Washes hands
3. Prepares tank and regulator
4. Turns on tank
5. Checks pressure in tank
6. Estimates amount of time tank will last
7. Connects delivery device and humidifier (if
needed) to cylinder
8. Adjusts flow to ordered liters per minute;
checks delivery device to make sure oxygen is
coming out
9. Provides oxygen to student using delivery
device prescribed
10. Monitors PSI, flow, and time while tank is
being used

VDH Guidelines for Healthcare Procedures in Schools 615
Explanation/Return Demonstration Training
Date
Return
Demon
Date
Supervision
Date Date Date Date Date
11. Monitors student’s respiratory status while
oxygen being used
12. Turns off tank before turning off flowmeter
when oxygen no longer needed or tank is
changed
13. Stores tank safely
14. Washes hands
15. Documents procedure and observations
16. Notifies family of any changes
Procedure approved by:
_________________________________________ ____________________
Parent/Guardian signature Date
I have received and understand the training.
________________________________________ ____________________
Trainee Signature Date
________________________________________ ____________________
Trainer Signature (RN) Date
________________________________________ ____________________
Supervising RN Signature Date

VDH Guidelines for Healthcare Procedures in Schools 616
Skills Checklist: Liquid Oxygen System
Student’s Name: ___________________________ Teacher: ____________________________
Person Trained: ____________________________ Position: ___________________________
Instructor: _______________________
Explanation/Return Demonstration Training
Date
Return
Demon
Date
Supervision
Date Date Date Date Date
Preparation:
1. Reviews student’s IHP for student-specific
instructions
2. Reviews standard precautions
3. Identifies student’s ability to participate in
procedure
4. Identifies where procedure is done (respects
privacy)
5. Identifies possible problems and appropriate
actions
6. Identifies oxygen safety precautions
Identifies Supplies:
1. Liquid oxygen system
2. Delivery device with oxygen tubing
3. Humidifier, if needed
Procedure:
1. Positions student and explains procedure
2. Washes hands
3. Assembles supplies and prepares unit
4. Checks level of fluid
5. Connects delivery device and humidifier to
liquid system
6. Adjusts flow to prescribed rate; checks delivery
device to make sure oxygen is coming out
7. Provides oxygen to student using delivery
device prescribed
8. Monitors flow
9. Monitors student’s respiratory status while
oxygen being used
10. Turns off cylinder before turning off flowmeter
when oxygen no longer needed or cylinder is
changed

VDH Guidelines for Healthcare Procedures in Schools 617
Explanation/Return Demonstration Training
Date
Return
Demon
Date
Supervision
Date Date Date Date Date
11. Washes hands
12. Monitors level of liquid daily and stores
cylinder safely
13. Documents procedure and observations
14. Notifies family of any changes
Procedure approved by:
_________________________________________ ____________________
Parent/Guardian signature Date
I have received and understand the training.
________________________________________ ____________________
Trainee Signature Date
________________________________________ ____________________
Trainer Signature (RN) Date
________________________________________ ____________________
Supervising RN Signature Date
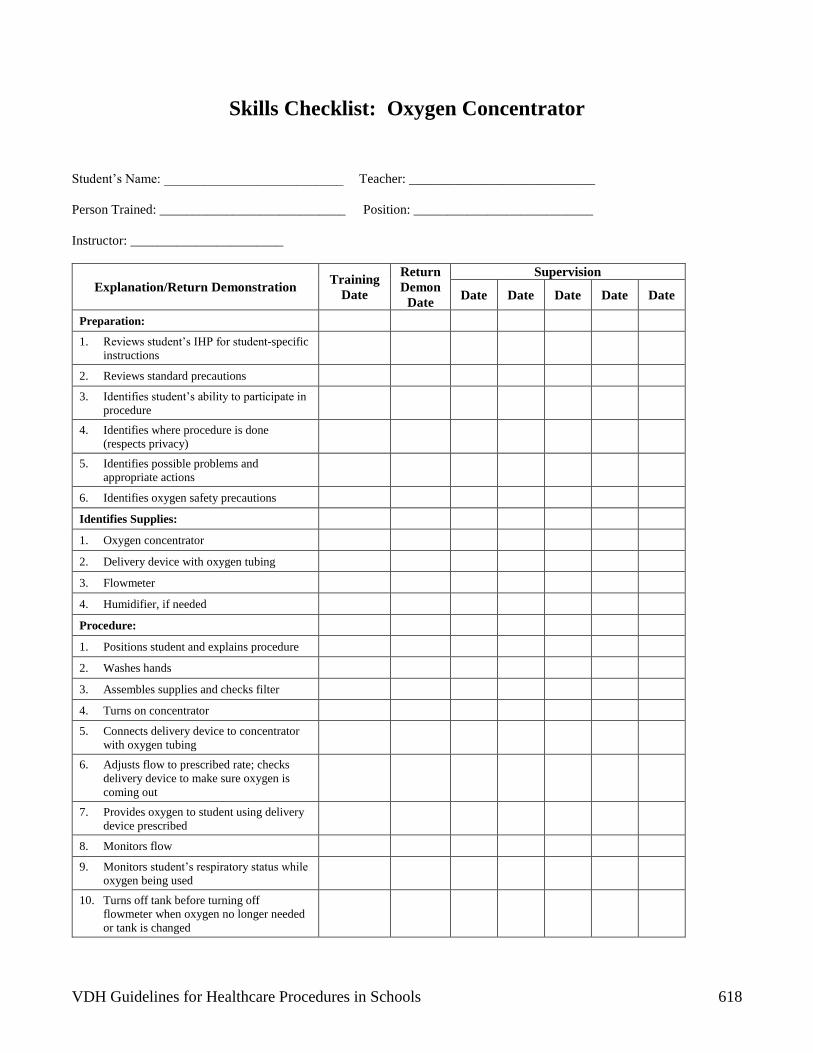
VDH Guidelines for Healthcare Procedures in Schools 618
Skills Checklist: Oxygen Concentrator
Student’s Name: ___________________________ Teacher: ____________________________
Person Trained: ____________________________ Position: ___________________________
Instructor: _______________________
Explanation/Return Demonstration Training
Date
Return
Demon
Date
Supervision
Date Date Date Date Date
Preparation:
1. Reviews student’s IHP for student-specific
instructions
2. Reviews standard precautions
3. Identifies student’s ability to participate in
procedure
4. Identifies where procedure is done
(respects privacy)
5. Identifies possible problems and
appropriate actions
6. Identifies oxygen safety precautions
Identifies Supplies:
1. Oxygen concentrator
2. Delivery device with oxygen tubing
3. Flowmeter
4. Humidifier, if needed
Procedure:
1. Positions student and explains procedure
2. Washes hands
3. Assembles supplies and checks filter
4. Turns on concentrator
5. Connects delivery device to concentrator
with oxygen tubing
6. Adjusts flow to prescribed rate; checks
delivery device to make sure oxygen is
coming out
7. Provides oxygen to student using delivery
device prescribed
8. Monitors flow
9. Monitors student’s respiratory status while
oxygen being used
10. Turns off tank before turning off
flowmeter when oxygen no longer needed
or tank is changed

VDH Guidelines for Healthcare Procedures in Schools 619
Explanation/Return Demonstration Training
Date
Return
Demon
Date
Supervision
Date Date Date Date Date
11. Washes hands
12. Documents procedure and observations
13. Notifies family of any changes
Procedure approved by:
_________________________________________ ____________________
Parent/Guardian signature Date
I have received and understand the training.
________________________________________ ____________________
Trainee Signature Date
________________________________________ ____________________
Trainer Signature (RN) Date
________________________________________ ____________________
Supervising RN Signature Date

VDH Guidelines for Healthcare Procedures in Schools 620
Skills Checklist: Go Bag Supplies
Student’s Name: ___________________________ Teacher: ____________________________
Person Trained: ____________________________ Position: ___________________________
Instructor: _______________________
Explanation/Return Demonstration Trainin
g Date
Return
Demon
Date
Supervision
Date Date Date Date Date
Identifies Supplies and Their Use:
1. Resuscitator bag
2. Extra tracheostomy tube with ties (and obturator if
needed)
3. Extra tracheostomy tube one size smaller
4. 3 ml Syringe
5. Suction catheters
6. Gloves
7. Bulb syringe
8. Portable suction machine
9. Blunt scissors
10. Tissues
11. Hydrogen peroxide
12. Cotton-tipped applicators
13. Pipe cleaners, if needed
14. Pre-cut tracheal gauze/sponges
15. Saline or water-soluble lubricant
16. Saline vials or dosettes
17. Passive condenser
18. List of emergency phone numbers
19. List of go bag supplies
20. Emergency plan
21. Any other items specified in IHP
_______________________________
Procedure approved by:
_________________________________________ ____________________
Parent/Guardian signature Date
I have received and understand the training.
________________________________________ ____________________
Trainee Signature Date
________________________________________ ____________________
Trainer Signature (RN) Date
________________________________________ ____________________
Supervising RN Signature Date
VDH Guidelines for Healthcare Procedures in Schools 621
Skills Checklist: Nasal Cannula
Student’s Name: ___________________________ Teacher: ____________________________
Person Trained: ____________________________ Position: ___________________________
Instructor: _______________________
Explanation/Return Demonstration Training
Date
Return
Demon
Date
Supervision
Date Date Date Date Date
Preparation:
1. Reviews student’s IHP for student-specific
instructions
2. Reviews standard precautions
3. Identifies student’s ability to participate in
procedure
4. Identifies where procedure is done
5. Identifies oxygen flow rate__________
6. Identifies possible problems and appropriate
actions
7. Identifies oxygen safety precautions
Identifies Supplies:
1. Oxygen source and backup
2. Cannula and tubing
3. Humidity source, if needed
4. Adaptor for connecting tubing
5. Extra connecting tubing, if needed for mobility
Procedure:
1. Reviews oxygen safety precautions
2. Washes hands
3. Gathers equipment
4. Positions student and explains procedure
5. Attaches cannula tubing to oxygen
6. Turns on oxygen
7. Correctly sets flowmeter
8. Checks prongs for flow
9. Gently places prongs in nostrils
10. Loops tubing and ensures comfort

VDH Guidelines for Healthcare Procedures in Schools 622
Explanation/Return Demonstration Training
Date
Return
Demon
Date
Supervision
Date Date Date Date Date
11. Uses only water-soluble nasal care products, if
needed
12. Washes hands
13. Documents procedure and observations
14. Notifies family of any changes
Procedure approved by:
_________________________________________ ____________________
Parent/Guardian signature Date
I have received and understand the training.
________________________________________ ____________________
Trainee Signature Date
________________________________________ ____________________
Trainer Signature (RN) Date
________________________________________ ____________________
Supervising RN Signature Date

VDH Guidelines for Healthcare Procedures in Schools 623
Skills Checklist: Oxygen Mask
Student’s Name: ___________________________ Teacher: ____________________________
Person Trained: ____________________________ Position: ___________________________
Instructor: _______________________
Explanation/Return Demonstration Training
Date
Return
Demon
Date
Supervision
Date Date Date Date Date
Preparation:
1. Reviews student’s IHP for student-specific
instructions
2. Reviews standard precautions
3. Identifies student’s ability to participate in
procedure
4. Identifies where procedure is done
5. Identifies oxygen flow rate__________
6. Identifies possible problems and appropriate
actions
7. Identifies oxygen safety precautions
Identifies Supplies:
1. Oxygen source and backup
2. Mask and tubing
3. Humidity source, if needed
4. Adaptor for connecting tubing
5. Extra connecting tubing, if needed for mobility
Procedure:
1. Reviews oxygen safety precautions
2. Washes hands
3. Assembles equipment
4. Positions student and explains procedure
5. Attaches tubing to mask and oxygen
6. Turns on oxygen
7. Correctly sets flowmeter
8. Checks mask for flow
9. Correctly places mask over student’s nose,
mouth, and chin
10. Adjusts elastic band and ensures comfort

VDH Guidelines for Healthcare Procedures in Schools 624
Explanation/Return Demonstration Training
Date
Return
Demon
Date
Supervision
Date Date Date Date Date
11. Washes hands
12. Documents procedure and observations
13. Notifies family of any changes
Procedure approved by:
_________________________________________ ____________________
Parent/Guardian signature Date
I have received and understand the training.
________________________________________ ____________________
Trainee Signature Date
________________________________________ ____________________
Trainer Signature (RN) Date
________________________________________ ____________________
Supervising RN Signature Date

VDH Guidelines for Healthcare Procedures in Schools 625
Skills Checklist: Pulse Oximetry
Student’s Name: ___________________________ Teacher: ____________________________
Person Trained: ____________________________ Position: ___________________________
Instructor: _______________________
Explanation/Return Demonstration Training
Date
Return
Demon
Date
Supervision
Date Date Date Date Date
Preparation:
1. Reviews student’s IHP for student-specific
instructions
2. Reviews standard precautions
3. Identifies student’s ability to participate in
procedure
4. Identifies where procedure is done
5. Identifies acceptable pulse oximetry values for
student _______________
6. Identifies possible problems and appropriate
actions
Identifies Supplies:
1. Oximeter
2. Oximeter probe or sensor
Procedure:
1. Determines need for oximetry
2. Washes hands
3. Assembles equipment
4. Positions student and explains procedure
5. Selects appropriate site for sensor
6. Attaches sensor correctly; makes sure light
source and photodetector are directly opposite
7. Attaches sensor cable to oximeter (if needed)
8. Turns on machine
9. Correlates oximeter pulse rate with radial pulse
10. Reads saturation level
11. Verifies alarms and sets limits
___________________
12. Removes sensor if intermittent monitoring and
correctly stores supplies

VDH Guidelines for Healthcare Procedures in Schools 626
Explanation/Return Demonstration Training
Date
Return
Demon
Date
Supervision
Date Date Date Date Date
13. Washes hands
14. Documents readings and observations of
respiratory status
15. Notifies family of any changes
Procedure approved by:
_________________________________________ ____________________
Parent/Guardian signature Date
I have received and understand the training.
________________________________________ ____________________
Trainee Signature Date
________________________________________ ____________________
Trainer Signature (RN) Date
________________________________________ ____________________
Supervising RN Signature Date

VDH Guidelines for Healthcare Procedures in Schools 627
Skills Checklist: Tracheal Suctioning
Student’s Name: ___________________________ Teacher: ____________________________
Person Trained: ____________________________ Position: ___________________________
Instructor: _______________________
Explanation/Return Demonstration Training
Date
Return
Demon
Date
Supervision
Date Date Date Date Date
Preparation:
1. Reviews student’s IHP for student-specific
instructions
2. Reviews standard precautions
3. Identifies student’s ability to participate in
procedure
4. Identifies where procedure is done
5. Identifies possible problems and appropriate
actions
Identifies Supplies:
1. Suction machine and manual backup
2. Correctly-sized suction catheter
3. Sterile saline or water
4. Container for saline or water
5. Gloves
6. Resuscitator bag with tracheostomy adaptor
7. Saline, if prescribed
Procedure:
1. Washes hands
2. Assembles equipment
3. Positions student and explains procedure
4. Encourages student to cough up secretions
5. Turns on suction machine and checks for function
6. Washes hands
7. Opens suction catheter or kit
8. Pours saline/water into container
9. Dons gloves and other protective gear as needed
10. Connects suction catheter to suction machine
tubing

VDH Guidelines for Healthcare Procedures in Schools 628
Explanation/Return Demonstration Training
Date
Return
Demon
Date
Supervision
Date Date Date Date Date
11. Checks function by suctioning up water
12. Determines depth of suctioning needed
13. Inserts catheter into tracheostomy tube without
suction
14. Applies suction; twirls catheter between fingers as
it is pulled out
15. Uses no more than 5-10 seconds for each
suctioning pass
16. Maintains sterile technique while suctioning
17. Allows rest and gives breaths with resuscitator bag
between passes
18. Does not routinely instill saline unless specifically
ordered
19. Repeats suctioning as needed for removal of
secretions
20. Suctions nose and mouth if indicated
21. Rinses catheter and tubing until clear
22. Disconnects catheter from tubing and disposes of
catheter and gloves properly
23. Turns off suction
24. Washes hands
25. Documents color, consistency, and quantity of
secretions as well as respiratory status
26. Reports any changes
27. Makes sure equipment and supplies are restocked
and ready for next use
Procedure approved by:
_________________________________________ ____________________
Parent/Guardian signature Date
I have received and understand the training.
________________________________________ ____________________
Trainee Signature Date
________________________________________ ____________________
Trainer Signature (RN) Date
________________________________________ ____________________
VDH Guidelines for Healthcare Procedures in Schools 629
Supervising RN Signature Date
Skills Checklist: Tracheal Suctioning Using a Sleeved Catheter
Student’s Name: ___________________________ Teacher: ____________________________
Person Trained: ____________________________ Position: ___________________________
Instructor: _______________________
Explanation/Return Demonstration Training
Date
Return
Demon
Date
Supervision
Date Date Date Date Date
Preparation:
1. Reviews student’s IHP for student-specific
instructions
2. Reviews standard precautions
3. Identifies student’s ability to participate in
procedure
4. Identifies where procedure is done
5. Identifies possible problems and appropriate
actions
Identifies Supplies:
1. Suction machine and manual backup
2. Correctly-sized sleeved suction catheter
3. Sterile saline or water
4. Container for saline or water
5. Gloves
6. Resuscitator bag with tracheostomy adaptor
7. Saline, if prescribed
Procedure:
1. Washes hands
2. Assembles equipment
3. Positions student and explains procedure
4. Encourages student to cough up secretions
5. Turns on suction machine and checks for function
6. Washes hands
7. Opens suction catheter or kit
8. Pours saline/water into container
9. Dons gloves and other protective gear as needed

VDH Guidelines for Healthcare Procedures in Schools 630
Explanation/Return Demonstration Training
Date
Return
Demon
Date
Supervision
Date Date Date Date Date
10. Attaches control valve of sleeved catheter to
connecting suction tubing
11. Checks function by suctioning up water
12. If ventilator dependent, attaches T-piece to
ventilator circuit and connects to tracheostomy
13. Determines depth of suctioning needed
14. Advances catheter into tracheostomy tube without
suction
15. Applies suction; twirls catheter between fingers as
it is pulled out
16. Uses no more than 5-10 seconds for each
suctioning pass
17. Allows rest and gives breaths with resuscitator bag
between passes
18. Does not routinely instill saline
19. Repeats suctioning as needed for removal of
secretions
20. Rinses catheter and tubing until clear
21. Stores catheter for re-use as specified in IHP
22. Does not reuse catheter if it is used to suction
mouth or nose
23. Turns off suction
24. Removes gloves and washes hands
25. Documents color, consistency, and quantity of
secretions as well as respiratory status
26. Reports any changes
27. Makes sure equipment and supplies are restocked
and ready for use
Procedure approved by:
_________________________________________ ____________________
Parent/Guardian signature Date
I have received and understand the training.
________________________________________ ____________________
Trainee Signature Date
________________________________________ ____________________
Trainer Signature (RN) Date

VDH Guidelines for Healthcare Procedures in Schools 631
________________________________________ ____________________
Supervising RN Signature Date
Skills Checklist: Tracheostomy Tube Changes
Student’s Name: ___________________________ Teacher: ____________________________
Person Trained: ____________________________ Position: ___________________________
Instructor: _______________________
Explanation/Return Demonstration Training
Date
Return
Demon
Date
Supervision
Date Date Date Date Date
Preparation:
1. Reviews student’s IHP for student-specific
instructions
2. Reviews standard precautions
3. Identifies student’s ability to participate in
procedure
4. Identifies where procedure is done
5. Identifies type and size of trach tube
____________________________
6. Identifies possible problems and appropriate
actions
Identifies Supplies:
1. Exact size and type of tracheostomy tube
ordered for student
2. Tracheostomy tube one size smaller than
currently being used.
3. Velcro ties, twill tape, or other ties
4. Obturator, if needed (used as a guide for
insertion)
5. Blunt scissors
6. Syringe to inflate and deflate cuff, if tube has a
cuff
7. Sterile water-soluble lubricant or sterile saline
8. Resuscitation bag
9. Blanket roll, if needed, to position student’s
neck
10. Stethoscope
11. Oxygen, if ordered
12. Suctioning device and supplies
13. Gloves
14. Another person to assist, if possible
Procedure:

VDH Guidelines for Healthcare Procedures in Schools 632
Explanation/Return Demonstration Training
Date
Return
Demon
Date
Supervision
Date Date Date Date Date
1. Changes only when necessary at school, not on
a routine basis
2. Washes hands
3. Assembles equipment
4. Positions student and explains procedure
5. Washes hands
6. Keeps spare ties ready
7. Opens tracheostomy tube package maintaining
sterile technique
8. Dons gloves and other protective gear as
needed
9. Inserts obturator into tracheostomy tube
10. Attaches ties to one side of new tube
11. Lubricates tube sparingly if ordered
12. Administers supplemental oxygen if ordered
13. Cuts ties; holds tube securely in place when ties
are not secure
14. With new tube ready, removes old tube
15. Inserts new tube, secures, and removes
obturator immediately
16. Inserts inner cannula if needed
17. Listens and feels for air movement and assesses
respiratory status
18. If tube has cuff, inflates cuff
19. Secures tube with ties
20. Does skin care if needed and applies gauze
21. Discards used supplies properly
22. Removes gloves and washes hands
23. Documents color, consistency, and quantity of
secretions as well as respiratory status
24. Notifies family of any changes
Procedure approved by:
_________________________________________ ____________________
Parent/Guardian signature Date
I have received and understand the training.
________________________________________ ____________________
Trainee Signature Date
________________________________________ ____________________

VDH Guidelines for Healthcare Procedures in Schools 633
Trainer Signature (RN) Date
________________________________________ ____________________
Supervising RN Signature Date
Skills Checklist: Using Oxygen with a Tracheostomy Collar
Student’s Name: ___________________________ Teacher: ____________________________
Person Trained: ____________________________ Position: ___________________________
Instructor: _______________________
Explanation/Return Demonstration Training
Date
Return
Demon
Date
Supervision
Date Date Date Date Date
Preparation:
1. Reviews student’s IHP for student-specific
instructions
2. Reviews standard precautions
3. Identifies student’s ability to participate in
procedure
4. Identifies where procedure is done
5. Identifies possible problems and appropriate
actions
6. Identifies oxygen flow rate _________
7. Reviews oxygen safety precautions
Identifies Supplies:
1. Tracheostomy collar
2. Humidifier
3. Heating device, if indicated
4. Oxygen tubing
5. Wide bore tubing
6. Nipple adaptor
7. Oxygen source
Procedure:
1. Washes hands
2. Assembles equipment
3. Positions student and explains procedure
4. Sets up humidification device
5. Attaches tubing to air/oxygen

VDH Guidelines for Healthcare Procedures in Schools 634
Explanation/Return Demonstration Training
Date
Return
Demon
Date
Supervision
Date Date Date Date Date
6. Turns on oxygen
7. Sets flow rate correctly
8. Connects to heater and/or humidifier
9. Confirms mist coming out of tubing
10. Empties tubing when water condensation builds
up
11. Places collar over tracheostomy correctly
12. Washes hands
13. Documents procedure and respiratory status
14. Reports any changes or concerns
Procedure approved by:
_________________________________________ ____________________
Parent/Guardian signature Date
I have received and understand the training.
________________________________________ ____________________
Trainee Signature Date
________________________________________ ____________________
Trainer Signature (RN) Date
________________________________________ ____________________
Supervising RN Signature Date

VDH Guidelines for Healthcare Procedures in Schools 635
Skills Checklist: Using a Manual Resuscitator with a Tracheostomy
Student’s Name: ___________________________ Teacher: ____________________________
Person Trained: ____________________________ Position: ___________________________
Instructor: _______________________
Explanation/Return Demonstration Training
Date
Return
Demon
Date
Supervision
Date Date Date Date Date
Preparation:
1. Reviews student’s IHP for student-specific
instructions
2. Reviews standard precautions
3. Identifies student’s ability to participate in
procedure
4. Identifies where procedure is done
5. Identifies possible problems and appropriate
actions
6. Reviews oxygen safety precautions
Identifies Supplies:
1. Manual resuscitator bag (e.g. Ambu)
2. Adaptor for tracheostomy tube
3. Oxygen source with appropriate tubing, if
needed
4. Tracheostomy or ventilator supplies, as
appropriate
Procedure:
1. Washes hands
2. Assembles equipment
3. Positions student and explains procedure
4. Keeps bag near student with attachments ready
for student use
5. Attaches bag to tracheostomy tube
6. Squeezes bag appropriately to deliver breaths
7. Coordinates with students breaths and delivers
correct rate
8. Assesses effectiveness of bagging
9. Disconnects when bagging no longer needed
10. Washes hands

VDH Guidelines for Healthcare Procedures in Schools 636
Explanation/Return Demonstration Training
Date
Return
Demon
Date
Supervision
Date Date Date Date Date
11. Documents procedure and respiratory status
12. Notifies family of any changes or concerns
Procedure approved by:
_________________________________________ ____________________
Parent/Guardian signature Date
I have received and understand the training.
________________________________________ ____________________
Trainee Signature Date
________________________________________ ____________________
Trainer Signature (RN) Date
________________________________________ ____________________
Supervising RN Signature Date

VDH Guidelines for Healthcare Procedures in Schools 637
Skills Checklist: Nose and Mouth Suctioning Using Suction Machine
Student’s Name: ___________________________ Teacher: ____________________________
Person Trained: ____________________________ Position: ___________________________
Instructor: _______________________
Explanation/Return Demonstration Training
Date
Return
Demon
Date
Supervision
Date Date Date Date Date
Preparation:
1. Reviews student’s IHP for student-specific
instructions
2. Reviews standard precautions
3. Identifies student’s ability to participate in
procedure
4. Identifies where procedure is done
5. Identifies possible problems and appropriate
actions
Identifies Supplies:
1. Suction machine and tubing
2. Suction catheter of the appropriate size, or
Yankauer or tonsil tip suction catheter
3. Bulb syringe or other manual backup suction
4. Disposable gloves
5. Plastic bag for disposal of materials
6. Water or saline to clean and lubricate catheter,
with container
Procedure:
1. Washes hands
2. Assembles equipment
3. Positions student and explains procedure
4. Switches on suction machine and checks
suction
5. Encourages student to cough up secretions
6. Opens suction catheter without touching inside
of package
7. Dons gloves
8. Connects catheter to suction tubing
9. Checks suction by drawing up water

VDH Guidelines for Healthcare Procedures in Schools 638
Explanation/Return Demonstration Training
Date
Return
Demon
Date
Supervision
Date Date Date Date Date
10. Inserts catheter into nose
11. Covers vent hole and suctions while
withdrawing catheter
12. Repeats suctioning of nose as needed
13. Suctions mouth after nose
14. If using Yankauer, suctions in mouth along
gum line and other parts of mouth as needed
15. Rinses catheter and tubing with water
16. Disconnects catheter from tubing and disposes
of catheter appropriately
17. Removes gloves and washes hands
18. Documents procedure and respiratory status
19. Reports any changes
Procedure approved by:
_________________________________________ ____________________
Parent/Guardian signature Date
I have received and understand the training.
________________________________________ ____________________
Trainee Signature Date
________________________________________ ____________________
Trainer Signature (RN) Date
________________________________________ ____________________
Supervising RN Signature Date

VDH Guidelines for Healthcare Procedures in Schools 639
Skills Checklist: Nose and Mouth Suctioning with a Bulb Syringe
Student’s Name: ___________________________ Teacher: ____________________________
Person Trained: ____________________________ Position: ___________________________
Instructor: _______________________
Explanation/Return Demonstration Training
Date
Return
Demon
Date
Supervision
Date Date Date Date Date
Preparation:
1. Reviews student’s IHP for student-specific
instructions
2. Reviews standard precautions
3. Identifies student’s ability to participate in
procedure
4. Identifies where procedure is done
5. Identifies possible problems and appropriate
actions
Identifies Supplies:
1. Bulb syringe
2. Saline
3. Tissues
4. Disposable gloves
Procedure:
1. Washes hands
2. Assembles equipment
3. Positions student and explains procedure
4. Dons gloves
5. Holds bulb syringe in palm with tip between index
and middle finger
6. Squeezes bulb syringe flat with thumb
7. Places tip gently in nose or mouth and lets bulb
fill up
8. Removes from nose or mouth and squirts
secretions into tissue or basin
9. Repeats suctioning of nose and mouth as needed
10. Suctions mouth after nose if both are suctioned
11. Loosens secretions with saline if needed
12. Cleans bulb syringe in hot soapy water; rinses,
dries, and stores

VDH Guidelines for Healthcare Procedures in Schools 640
Explanation/Return Demonstration Training
Date
Return
Demon
Date
Supervision
Date Date Date Date Date
13. Disposes of tissues appropriately
14. Removes gloves and washes hands
15. Documents procedure and character of secretions
16. Reports any changes
Procedure approved by:
_________________________________________ ____________________
Parent/Guardian signature Date
I have received and understand the training.
________________________________________ ____________________
Trainee Signature Date
________________________________________ ____________________
Trainer Signature (RN) Date
________________________________________ ____________________
Supervising RN Signature Date

VDH Guidelines for Healthcare Procedures in Schools 641
Skills Checklist: Chest Physiotherapy (CPT)
Student’s Name: ___________________________ Teacher: ____________________________
Person Trained: ____________________________ Position: ___________________________
Instructor: _______________________
Explanation/Return Demonstration Training
Date
Return
Demon
Date
Supervision
Date Date Date Date Date
Preparation:
1. Reviews student’s IHP for student-specific
instructions
2. Reviews standard precautions
3. Identifies student’s ability to participate in
procedure
4. Identifies where procedure is done
5. Identifies possible problems and
appropriate actions
6. Identifies positions to be used for CPT
__________________________________
__________________________________
__________________________________
__________________________________
___________________
Identifies Supplies:
1. Pillows
2. Suction equipment, if needed
3. Tissues
4. Wastebasket with plastic liner
5. Vest airway clearance system, if prescribed
Procedure:
1. Washes hands
2. Assembles equipment
3. Explains procedure
4. Places vest airway clearance system on
student if prescribed
5. Positions student as specified
6. Percusses over selected area for specified
time ____________
7. Uses vibration over area if specified
8. Instructs student to cough into tissue
following percussion

VDH Guidelines for Healthcare Procedures in Schools 642
Explanation/Return Demonstration Training
Date
Return
Demon
Date
Supervision
Date Date Date Date Date
9. Performs CPT over each area specified
10. Disposes of tissues appropriately
11. Washes hands
12. Documents CPT and reports any changes
Procedure approved by:
_________________________________________ ____________________
Parent/Guardian signature Date
I have received and understand the training.
________________________________________ ____________________
Trainee Signature Date
________________________________________ ____________________
Trainer Signature (RN) Date
________________________________________ ____________________
Supervising RN Signature Date

VDH Guidelines for Healthcare Procedures in Schools 643
Skills Checklist: Ventilator Machine/Circuit and Settings
Student’s Name: ___________________________ Teacher: ____________________________
Person Trained: ____________________________ Position: ___________________________
Instructor: _______________________
Explanation/Return Demonstration Training
Date
Return
Demon
Date
Supervision
Date Date Date Date Date
Identifies Components and Use:
1. Power source
• Accessible, grounded outlets
• Internal battery
• External battery
• Back-up battery
• Emergency power supply
2. Circuit
• Pressure tubing
• Exhalation valve
• PEEP valve
• Other adaptors as needed
3. Oxygen source
• Adequate supply, spare tank, gauge
• Connection to ventilator and spare
tubing
• Flow rate and oxygen percentage
4. Humidification source
• Passive condenser
• Heat moisture exchanger
5. Patient pressure manometer
6. Alarms
• High and low pressure
• Volume
• Power source
• Temperature (if present)
7. Manual resuscitator bag and adaptor

VDH Guidelines for Healthcare Procedures in Schools 644
Explanation/Return Demonstration Training
Date
Return
Demon
Date
Supervision
Date Date Date Date Date
8. Spare tracheostomy tube and supplies (go-bag
supplies)
9. Suctioning equipment
Ventilator Parameters:
1. Tidal volume
2. Respiratory rate
3. Oxygen
4. Peak inspiratory pressure
5. Positive end expiratory pressure
6. Inspiratory time
7. Sigh volume
Ventilator Modes
1. Assist control (AC)
2. Intermittent mandatory ventilation (IMV)
3. Synchronized intermittent mandatory ventilation
(SIMV)
4. Pressure support ventilation (PSV)
5. Continuous positive airway pressure (CPAP)
6. Controlled mandatory ventilation (CMV)
7. Pressure regulated volume control (PRVC)
***Use of this checklist alone does not constitute comprehensive competency-based training in
ventilator oversight. Additional training is essential and should be documented.***
Procedure approved by:
_________________________________________ ____________________
Parent/Guardian signature Date
I have received and understand the training.
________________________________________ ____________________
Trainee Signature Date
________________________________________ ____________________
Trainer Signature (RN) Date
________________________________________ ____________________

VDH Guidelines for Healthcare Procedures in Schools 645
Supervising RN Signature Date

VDH Guidelines for Healthcare Procedures in Schools 646
Skills Checklist: Ventilator Troubleshooting Alarms
Student’s Name: ___________________________ Teacher: ____________________________
Person Trained: ____________________________ Position: ___________________________
Instructor: _______________________
Explanation/Return Demonstration Training
Date
Return
Demon
Date
Supervision
Date Date Date Date Date
Procedure if Alarm Sounds
1. Identifies which alarm is sounding
2. Always checks student first when alarm sounds
3. Removes student from ventilator and gives
breaths with resuscitator bag if problem not
immediately correctly within a few seconds
4. Identifies high pressure alarm sound:
• Student may have mucus and need
suctioning. Suctions as needed
• Checks position of tracheostomy tube.
Corrects or replaces as needed
• Checks for student coughing, sneezing,
talking, or laughing which can trigger
alarm
• Assesses for bronchospasm
• Observes for student anxiety and
“fighting” of ventilator. Calms as needed
• Checks tubing for kinks
• Checks for condensation in tubing
• Checks exhalation valve for obstruction
• Checks for accidental change of ventilator
settings
5. Identifies low pressure alarm sound:
• Checks for tubing disconnection.
Reconnects if needed
• Checks for loose connections, leaks, or
cracks in system. Tightens, if needed
• Checks tracheostomy tube for correct
placement and corrects or replaces
• Checks for leak in cuff, if present
• Checks exhalation valve for moisture or
puncture

VDH Guidelines for Healthcare Procedures in Schools 647
Explanation/Return Demonstration Training
Date
Return
Demon
Date
Supervision
Date Date Date Date Date
• Checks for accidental change of ventilator
settings
6. Identifies power alarm sound:
• Makes sure ventilator plugged into outlet
if using AC power
• Checks AC power, internal battery,
external battery
• If all power sources fail, removes from
ventilator, gives breaths with resuscitator
bag and activates emergency plan
7. Places student back on ventilator when problem
is solved
8. Resets alarms if needed
9. Activates emergency plan if needed. Gives
breaths with manual resuscitator bag as long as
necessary
***Use of this checklist alone does not constitute comprehensive competency-based training in
ventilator alarm troubleshooting. Additional training is essential and should be documented.***
Procedure approved by:
_________________________________________ ____________________
Parent/Guardian signature Date
I have received and understand the training.
________________________________________ ____________________
Trainee Signature Date
________________________________________ ____________________
Trainer Signature (RN) Date
________________________________________ ____________________
Supervising RN Signature Date
____________________
Supervising RN Signature Date

VDH Guidelines for Healthcare Procedures in Schools 648
Skills Checklist: Clean Intermittent Catheterization--Male
Student’s Name: ___________________________ Teacher: ____________________________
Person Trained: ____________________________ Position: ___________________________
Instructor: _______________________
Explanation/Return Demonstration Training
Date
Return
Demon
Date
Supervision
Date Date Date Date Date
Preparation:
1. Reviews student’s IHP for student-specific
instructions
2. Reviews standard precautions
3. Identifies student’s ability to participate in
procedure
4. Identifies possible problems and appropriate
actions
5. Identifies where procedure is done
_________________________ (respects privacy)
6. Identifies times for clean intermittent
catheterizations (CIC)
_______________________________
7. Identifies student position for CIC
_______________________________
Identifies Supplies:
1. Water-soluble lubricant
2. Catheter (e.g., plastic, polyvinylchloride, metal)
3. Wet wipes or cotton balls plus mild soap and
water or student-specific cleansing supplies
4. Storage receptacle for catheter, such as a sealed
plastic bag
5. Toilet or container for urine
6. Gloves, if person other than student does
procedure
Procedure:
1. Washes hands
2. Assembles equipment and obtains assistance if
possible
3. Explains procedure and positions student

VDH Guidelines for Healthcare Procedures in Schools 649
Explanation/Return Demonstration Training
Date
Return
Demon
Date
Supervision
Date Date Date Date Date
4. Washes hands and dons gloves
Chooses non-latex gloves
5. Lubricates first 3 inches of catheter with water-
soluble lubricant
6. Cleanses penis as specified
_______________________________
7. Uses each swab/cotton ball only once in cleaning
8. Wipes/swabs a minimum of three times
9. Foreskin may be retracted for cleaning if needed
10. Holding penis at a 45-90 degree angle, gently
inserts catheter
11. Does not force catheter if unusual resistance is
felt
12. Advances catheter until urine begins to flow
13. When flow stops, advances catheter a little
further, then rotates and withdraws slightly to
completely drain bladder
14. Pinches catheter and withdraws
15. Pulls foreskin back over glans, if not circumcised
16. Wipes off excess lubricant and assists student in
dressing
17. Measures and records urine volume, if ordered
18. Disposes of urine appropriately
19. Washes, rinses, dries, and stores catheter
appropriately
20. Removes gloves and washes hands
21. Documents procedure and characteristics of urine
22. Reports any changes
Procedure approved by:
_________________________________________ ____________________
Parent/Guardian signature Date
I have received and understand the training.
________________________________________ ____________________
Trainee Signature Date
________________________________________ ____________________

VDH Guidelines for Healthcare Procedures in Schools 650
Trainer Signature (RN) Date
________________________________________ ____________________
Supervising RN Signature Date

VDH Guidelines for Healthcare Procedures in Schools 651
Skills Checklist: Clean Intermittent Catheterization--Female
Student’s Name: ___________________________ Teacher: ____________________________
Person Trained: ____________________________ Position: ___________________________
Instructor: _______________________
Explanation/Return Demonstration Training
Date
Return
Demon
Date
Supervision
Date Date Date Date Date
Preparation:
1. Reviews student’s IHP for student-specific
instructions
2. Reviews standard precautions
3. Identifies student’s ability to participate in
procedure
4. Identifies possible problems and appropriate
actions
5. Identifies where procedure is done
_________________________ (respects
privacy)
6. Identifies times for clean intermittent
catheterizations (CIC)
_______________________________
7. Identifies student position for CIC
_______________________________
Identifies Supplies:
1. Water-soluble lubricant
2. Catheter (e.g., plastic, polyvinylchloride, metal)
3. Wet wipes or cotton balls plus mild soap and
water or student-specific cleansing supplies
4. Storage receptacle for catheter, such as a sealed
plastic bag
5. Toilet or container for urine
6. Gloves, if person other than student does
procedure
Procedure:
1. Washes hands
2. Assembles equipment and obtains assistance if
possible
3. Explains procedure and positions student
4. Washes hands and dons gloves
Chooses non-latex gloves

VDH Guidelines for Healthcare Procedures in Schools 652
Explanation/Return Demonstration Training
Date
Return
Demon
Date
Supervision
Date Date Date Date Date
5. Lubricates first 3 inches of catheter with water-
soluble lubricant
6. Separates the labia and cleanses starting at top
of labia and going down toward rectum
7. Uses each swab/cotton ball only once in
cleaning
8. Wipes/swabs three times
9. Does not use a circular motion in cleaning
10. Locates the urinary meatus
11. Gently inserts until urine begins to flow
12. Does not force catheter if unusual resistance is
felt
13. When flow stops, advances catheter a little
further, then rotates and withdraws slightly to
completely drain bladder
14. Pinches catheter and withdraws
15. Wipes off excess lubricant and assists student in
dressing
16. Measures and records urine volume, if ordered
17. Disposes of urine appropriately
18. Washes, rinses, dries, and stores catheter
appropriately
19. Removes gloves and washes hands
20. Documents procedure and characteristics of
urine
21. Reports any changes
Procedure approved by:
_________________________________________ ____________________
Parent/Guardian signature Date
I have received and understand the training.
________________________________________ ____________________
Trainee Signature Date
________________________________________ ____________________
Trainer Signature (RN) Date
________________________________________ ____________________

VDH Guidelines for Healthcare Procedures in Schools 653
Supervising RN Signature Date

VDH Guidelines for Healthcare Procedures in Schools 654
Skills Checklist: Monitoring an Indwelling Urinary Catheter
Student’s Name: ___________________________ Teacher: ____________________________
Person Trained: ____________________________ Position: ___________________________
Instructor: _______________________
Explanation/Return Demonstration Training
Date
Return
Demon
Date
Supervision
Date Date Date Date Date
Preparation:
1. Reviews student’s IHP for student-specific
instructions
2. Reviews standard precautions
3. Identifies student’s ability to participate in
procedure
4. Identifies possible problems and appropriate
actions
5. Identifies where procedure is done
_________________________ (respects
privacy)
Identifies Supplies:
1. Gloves
Procedure:
1. Monitors urine output for adequacy
2. Encourages fluid intake
3. Avoids lifting collection device or tubing above
bladder
When Emptying Drainage Bag:
4. Washes hands and dons gloves
5. Opens outlet valve and drains urine into
appropriate container
6. Does not allow end of tubing to touch anything
which could contaminate it
7. Does not lift tubing or bag above bladder level
8. Closes clamp/valve
9. Measures and records urine volume
10. Does not disconnect catheter from drainage
tubing
11. Disposes of urine and gloves appropriately
12. Washes hands after any contact with drainage
bag, tubing, or catheter

VDH Guidelines for Healthcare Procedures in Schools 655
Explanation/Return Demonstration Training
Date
Return
Demon
Date
Supervision
Date Date Date Date Date
13. Documents procedure and characteristics of
urine
14. Reports any changes
Procedure approved by:
_________________________________________ ____________________
Parent/Guardian signature Date
I have received and understand the training.
________________________________________ ____________________
Trainee Signature Date
________________________________________ ____________________
Trainer Signature (RN) Date
________________________________________ ____________________
Supervising RN Signature Date

VDH Guidelines for Healthcare Procedures in Schools 656
Skills Checklist: Care of External Urinary Catheter
Student’s Name: ___________________________ Teacher: ____________________________
Person Trained: ____________________________ Position: ___________________________
Instructor: _______________________
Explanation/Return Demonstration Training
Date
Return
Demon
Date
Supervision
Date Date Date Date Date
Preparation:
1. Reviews student’s IHP for student-specific
instructions
2. Reviews standard precautions
3. Identifies student’s ability to participate in
procedure
4. Identifies possible problems and appropriate
actions
5. Identifies where procedure is done
_________________________ (respects
privacy)
Identifies Supplies:
1. Water-soluble lubricant
2. Skin adhesive or tincture of benzoin and cotton
tipped applicators
3. Adhesive remover
4. Condom-type urine collection device
5. One-inch wide elastic adhesive
6. Scissors
7. Paper towels
8. Gloves
Procedure:
1. Washes hands
2. Assembles equipment
3. Explains procedure and positions student
4. Arranges for another adult to be present, if
possible
5. Wash hands and dons gloves
6. Gently removes existing external catheter
7. Inspects skin of penis
8. Does not apply collection device if skin irritated

VDH Guidelines for Healthcare Procedures in Schools 657
Explanation/Return Demonstration Training
Date
Return
Demon
Date
Supervision
Date Date Date Date Date
9. Cleanses shaft of penis as needed and dries
thoroughly
10. Makes small hole in center of paper towel and
places if over shaft of penis to decrease contact
between adhesive and hair
11. Rolls external catheter onto glans, leaving 1/2 -
2 inch space between ends of tubing and penis
12. Applies adhesive to shaft of penis; does not
apply adhesive on glans
13. Unrolls condom-type collection device to cover
shaft of penis
14. If ordered, spiral wraps strip of elastic tape
15. Does not overlap tape or wrap tape completely
around penis
16. Clips and removes ring of condom, if present
17. Attaches condom to leg bag or drainage bag
18. Empties collection bag before it becomes full
19. Disposes of urine and gloves appropriately
20. Washes hands after any contact with drainage
bag, tubing, or catheter
21. Documents procedure and characteristics of
urine
22. Reports any changes
Procedure approved by:
_________________________________________ ____________________
Parent/Guardian signature Date
I have received and understand the training.
________________________________________ ____________________
Trainee Signature Date
________________________________________ ____________________
Trainer Signature (RN) Date
________________________________________ ____________________
Supervising RN Signature Date

VDH Guidelines for Healthcare Procedures in Schools 658
Skills Checklist: Changing an Urostomy Pouch
Student’s Name: ___________________________ Teacher: ____________________________
Person Trained: ____________________________ Position: ___________________________
Instructor: _______________________
Explanation/Return Demonstration Training
Date
Return
Demon
Date
Supervision
Date Date Date Date Date
Preparation:
1. Reviews student’s IHP for student-specific
instructions
2. Reviews standard precautions
3. Identifies student’s ability to participate in
procedure
4. Identifies where procedure is done (respects
privacy)
5. Identifies possible problems and appropriate
actions
6. Identifies times/reasons for changes:
______________________________
Identifies Supplies:
1. Water
2. Skin cleanser
3. Soft cloth or gauze or tissues
4. Replacement pouch and belt
5. Skin prep
6. Skin barrier
7. Measuring guide, if needed
8. Container to store pouch
9. Adhesive
10. Gloves, if pouch is to be changed by someone
other than student
11. Tape, if needed
12. Scissors, if needed
Procedure:
1. Washes hands
2. Assembles equipment
3. Positions student and explains procedure

VDH Guidelines for Healthcare Procedures in Schools 659
Explanation/Return Demonstration Training
Date
Return
Demon
Date
Supervision
Date Date Date Date Date
4. Washes hands and dons gloves
5. Empties contents of old pouch
6. Carefully removes pouch and skin barrier
7. Gently washes peristomal area, allows to dry,
and places gauze over stoma
8. Assesses stoma/skin for integrity
9. Measures stoma and cuts barrier and pouch to
fit
10. Removes paper and saves to use as a guide
11. Pats skin dry
12. Applies barrier correctly
13. Removes used gauze/cloth and discards
14. Centers new pouch over stoma/barrier
15. Makes sure there are no wrinkles Holds
pouch/barrier in place for 30-60 seconds
16. Makes sure pouch is sealed
17. Fastens pouch to belt, if used
18. Disposes of supplies appropriately
19. Removes gloves and washes hands
20. Documents procedure and reports any changes
Procedure approved by:
_________________________________________ ____________________
Parent/Guardian signature Date
I have received and understand the training.
________________________________________ ____________________
Trainee Signature Date
________________________________________ ____________________
Trainer Signature (RN) Date
________________________________________ ____________________
Supervising RN Signature Date

VDH Guidelines for Healthcare Procedures in Schools 660
Skills Checklist: Catheterizing a Continent Urostomy, Vesicostomy,
Appendicovesicostomy, or Umbilical (Mitrofanoff) Stoma
Student’s Name: ___________________________ Teacher: ____________________________
Person Trained: ____________________________ Position: ___________________________
Instructor: _______________________
Explanation/Return Demonstration Training
Date
Return
Demon
Date
Supervision
Date Date Date Date Date
Preparation:
1. Reviews student’s IHP for student-specific
instructions
2. Reviews standard precautions
3. Identifies student’s ability to participate in
procedure
4. Identifies possible problems and appropriate
actions
5. Identifies where procedure is done
_________________________ (respects
privacy)
6. Identifies type and anatomy of ostomy and
stoma ______________________
______________________________________
________________________
7. Identifies times for clean intermittent
catheterizations (CIC)
_______________________________
8. Identifies student position for CIC
_______________________________
Identifies Supplies:
1. Soap and water or alcohol-free towelette
2. Gloves, if pouch is to be changed by someone
other than student
3. Catheter
4. Water-soluble lubricant
5. Catheter storage bag
6. Container to collect and dispose of urine if
unable to perform procedure while student sits
on toilet
7. Small adhesive bandage or stoma covering
Procedure:
1. Washes hands

VDH Guidelines for Healthcare Procedures in Schools 661
Explanation/Return Demonstration Training
Date
Return
Demon
Date
Supervision
Date Date Date Date Date
2. Assembles equipment
3. Explains procedure and positions student
4. Wash hands and dons gloves
5. Washes stoma with __________________
(cleansing supplies)
6. Lubricates catheter tip with water-soluble
lubricant
7. Holding catheter near the tip, gently inserts into
stoma until urine flows
8. Leaves catheter in stoma until urine flow stops
9. Slowly withdraws catheter
10. Covers stoma with covering or as specified
11. Observes, measures, and disposes of urine
properly
12. Washes, dries and stores equipment per student
specific guidelines
13. Removes gloves and washes hands
14. Documents procedure and characteristics of
urine
15. Reports any changes
Procedure approved by:
_________________________________________ ____________________
Parent/Guardian signature Date
I have received and understand the training.
________________________________________ ____________________
Trainee Signature Date
________________________________________ ____________________
Trainer Signature (RN) Date
________________________________________ ____________________
Supervising RN Signature Date