Using the Rich Text Editor in the Special Education IEP Writer ...
24
Using the Rich Text Editor in the Special Education IEP Writer K12 Systems
-
Upload
khangminh22 -
Category
Documents
-
view
1 -
download
0
Transcript of Using the Rich Text Editor in the Special Education IEP Writer ...
Using the Rich Text Editor in the
Special Education IEP Writer
K12 Systems
Page 2
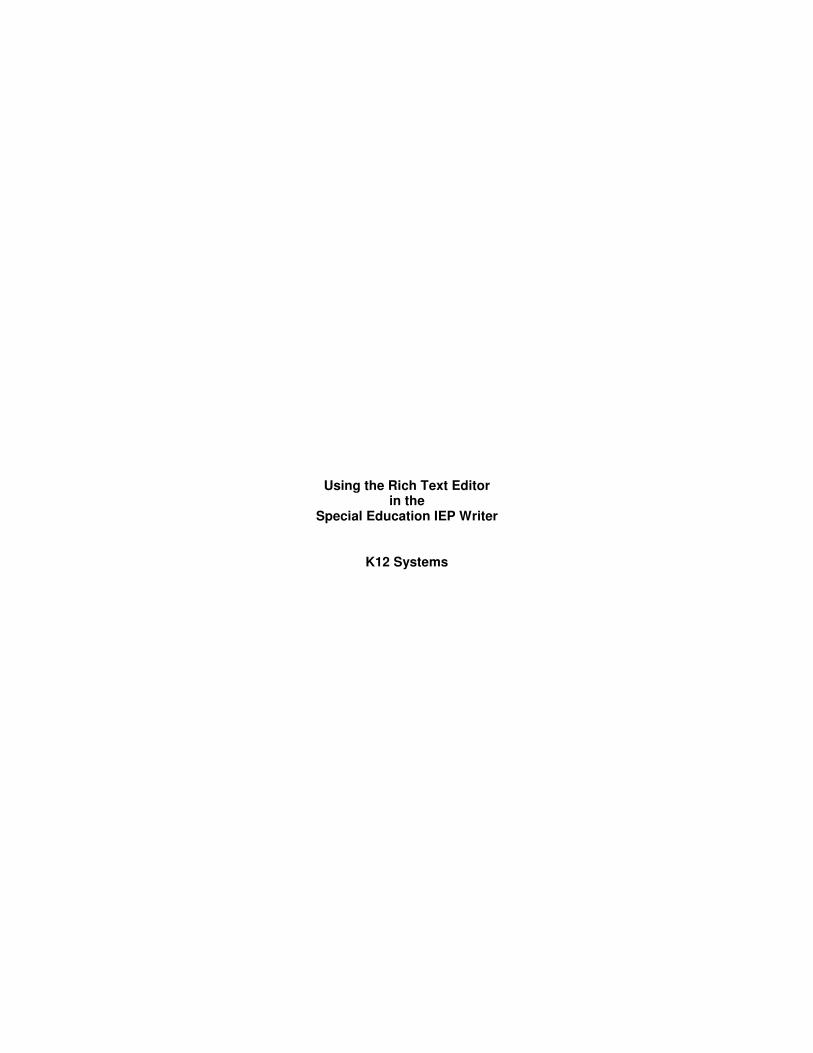
Table of Contents Using the Rich Text Editor ......................................................................................................................... 3
The RTE Toolbar. ..................................................................................................................................... 4 Copy and Cut functions .......................................................................................................................... 4 Paste functions. ....................................................................................................................................... 6
Pasting text that was entered from within the RTE .......................................................................... 6 Pasting text from Word documents ................................................................................................... 7 Pasting text from other (non Word) documents. .............................................................................. 8
Spell Checking. ........................................................................................................................................ 9 Undo / Redo changes .............................................................................................................................. 9 Search for text. ...................................................................................................................................... 10 Replacing text. ....................................................................................................................................... 11 Working with Tables .............................................................................................................................. 12
Inserting a table. ................................................................................................................................ 12 Changing table properties. ............................................................................................................... 13 Adding Rows ...................................................................................................................................... 13 Adding Columns ................................................................................................................................ 13 Deleting columns. .............................................................................................................................. 14 Merging or Splitting cells. ................................................................................................................. 14 Deleting a table .................................................................................................................................. 15
Controlling Page Breaks for Printing .................................................................................................. 16 Inserting a horizontal line ..................................................................................................................... 17 Formatting Text. .................................................................................................................................... 17
Using Clip Text .......................................................................................................................................... 20 Saving Text as Clip Text ....................................................................................................................... 20 Making Clip Text “generic”................................................................................................................... 22 Inserting Clip Text in the document. ................................................................................................... 23 Managing Clip Text ................................................................................................................................ 24
Page 3
Using the Rich Text Editor
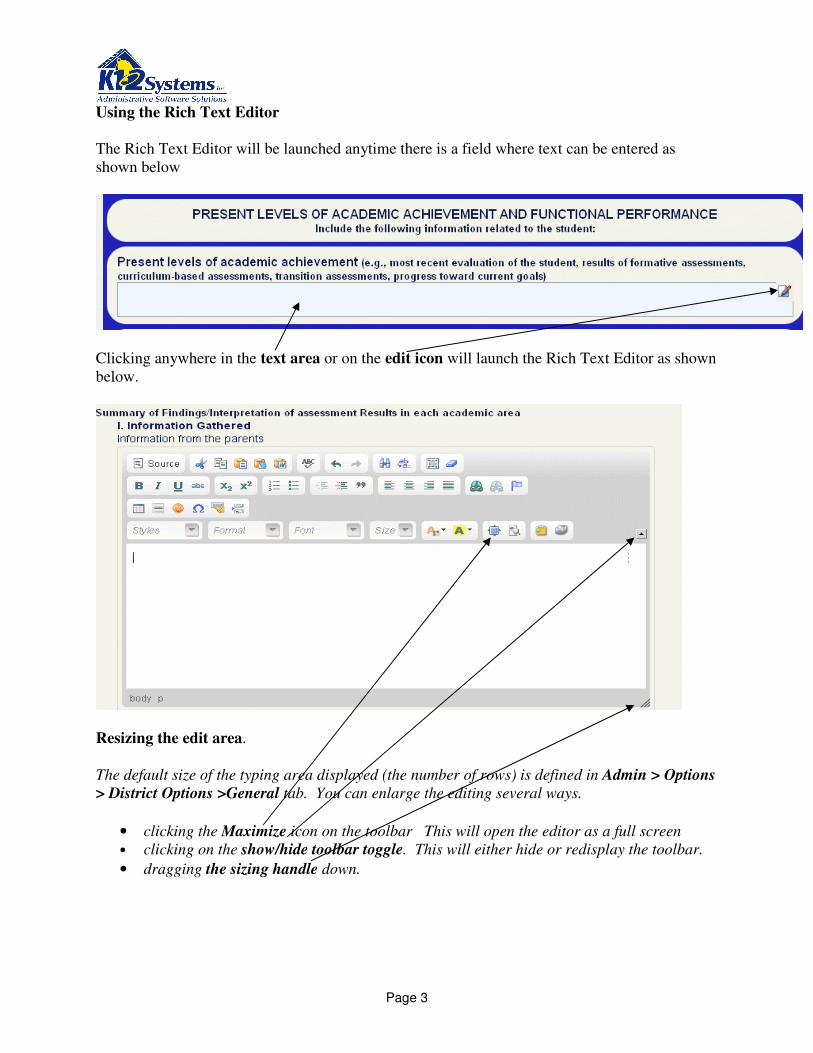
The Rich Text Editor will be launched anytime there is a field where text can be entered as
shown below
Clicking anywhere in the text area or on the edit icon will launch the Rich Text Editor as shown
below.
Resizing the edit area.
The default size of the typing area displayed (the number of rows) is defined in Admin > Options
> District Options >General tab. You can enlarge the editing several ways.
• clicking the Maximize icon on the toolbar This will open the editor as a full screen
• clicking on the show/hide toolbar toggle. This will either hide or redisplay the toolbar.
• dragging the sizing handle down.

Page 4
The RTE Toolbar.
Shown above is the RTE toolbar. The icons in the toolbar provide access to functions used in
preparing the document. Holding the mouse on any icon will display a tool tip that identifies the
function of the icon as shown. The functions of each icon is summarized below:
Clicking the Source icon will display the HTML code that defines how the browser
displays the document. Removing or altering any HTML tags will affect the way the
document displays and how it is printed. Unless you know HTML, it is unlikely you will
need this function.
Copy and Cut functions
The next set of icons are Cut, and Copy,.
Cut
Copy
Clicking the Cut icon will cause selected text to be removed from the document. The selected
text will be placed on the clipboard.
NOTE: Depending on your browser, when you click on the Cut icon, the browser may display
the following message:

Page 5
If this message occurs you will need to use Ctrl-X to perform cut operation instead of the Cut
icon or right click / cut.
Clicking Copy icon will cause selected text to be copied to the clipboard.
NOTE: Depending on your browser, when you click on the Copy icon, the browser may
display the following message:
If this message occurs you will need to use Ctrl-C to do copy operations instead of using the
Copy icon or the right click / copy key combination
Page 6
Paste functions.
Pasting text that was entered from within the RTE
Although the RTE allows you to enter and format text, the document it produces is different
from the documents produced in other text editors. The RTE is actually creating an HTML
document that can be displayed by a web browser. All HTML documents contain “tags”. Tags
are elements embedded in the text that define how the browser should display the text. These
tags follow very specifically defined rules. The tags are required and must adhere to the defined
rules. When you use the RTE to enter and format text, the editor is inserting the correct HTML
tags. (Other text processing software inserts proprietary tags that define how the text should be
formatted) When you copy (or cut) text created using the RTE, the HTML tags will also be
copied. Therefore pasting text that was entered using the RTE is straightforward and can be
done using the Paste icon.
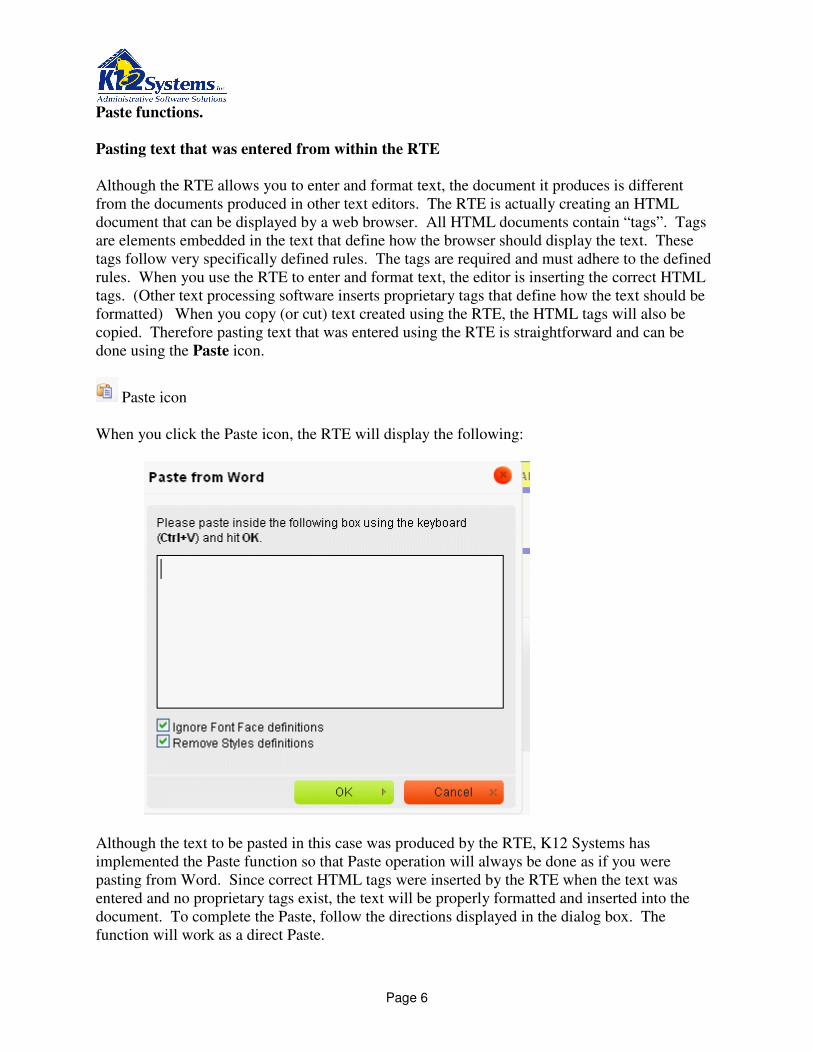
Paste icon
When you click the Paste icon, the RTE will display the following:
Although the text to be pasted in this case was produced by the RTE, K12 Systems has
implemented the Paste function so that Paste operation will always be done as if you were
pasting from Word. Since correct HTML tags were inserted by the RTE when the text was
entered and no proprietary tags exist, the text will be properly formatted and inserted into the
document. To complete the Paste, follow the directions displayed in the dialog box. The
function will work as a direct Paste.
Page 7
Pasting text from Word documents
It is not uncommon to want to paste text created by Microsoft Word into a RTE document.
Because Word is not designed to create HTML documents, the text will not contain HTML tags.
However, the text is likely to contain proprietary tags that are used exclusively by Word. To
assure that the pasted text is displayed (and eventually printed) properly, it is necessary to either
remove proprietary tags or to translate the proprietary tags that exist in the Word source into
HTML tags that define the same formatting. This is the purpose of the Paste from Word
function when the source is in fact a Word document. Paste From Word will translate the
proprietary tags in Word to correct HTML tags.
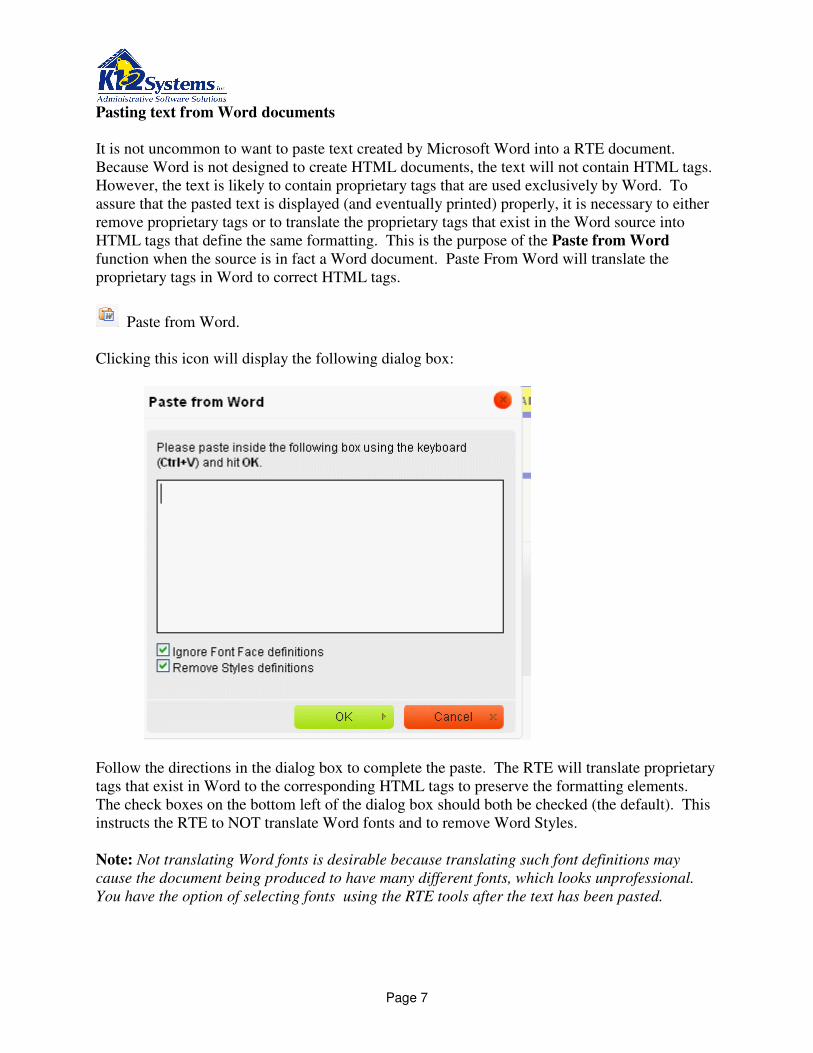
Paste from Word.
Clicking this icon will display the following dialog box:
Follow the directions in the dialog box to complete the paste. The RTE will translate proprietary
tags that exist in Word to the corresponding HTML tags to preserve the formatting elements.
The check boxes on the bottom left of the dialog box should both be checked (the default). This
instructs the RTE to NOT translate Word fonts and to remove Word Styles.
Note: Not translating Word fonts is desirable because translating such font definitions may
cause the document being produced to have many different fonts, which looks unprofessional.
You have the option of selecting fonts using the RTE tools after the text has been pasted.

Page 8
Note: The Paste from Word function will correctly translate the proprietary Word tags in most
cases. However, K12 cannot guarantee that pasting from Word will result in properly formatted
text 100% of time.
Pasting text from other (non Word) documents.
It is not uncommon to want to paste text created by software other than Word into a RTE
document. Because these other text processing programs are not designed to create HTML
documents, the text will not contain HTML tags. However, the text is likely to contain hidden
elements (proprietary tags) that are used by that package. Since the source of non Word
documents is not known, it is impossible to translate proprietary tags since they would vary
depending upon the source text editor used to create the original document. When text from a
non Word text processing program is pasted into the RTE, it is necessary to remove all
proprietary. This is the purpose of the Paste as Text icon. The Paste as Text function will
remove ALL proprietary tags. These tags are likely to have defined various formatting.
Therefore, the formatting present in the original document will be lost. You can then use the
RTE to format the text.
Paste as Text
Clicking this icon will display the following dialog box:
To complete the Paste, follow the directions displayed in the dialog box. All proprietary tags
will be removed from the text. Any necessary HTLM tags will be inserted .
Page 9
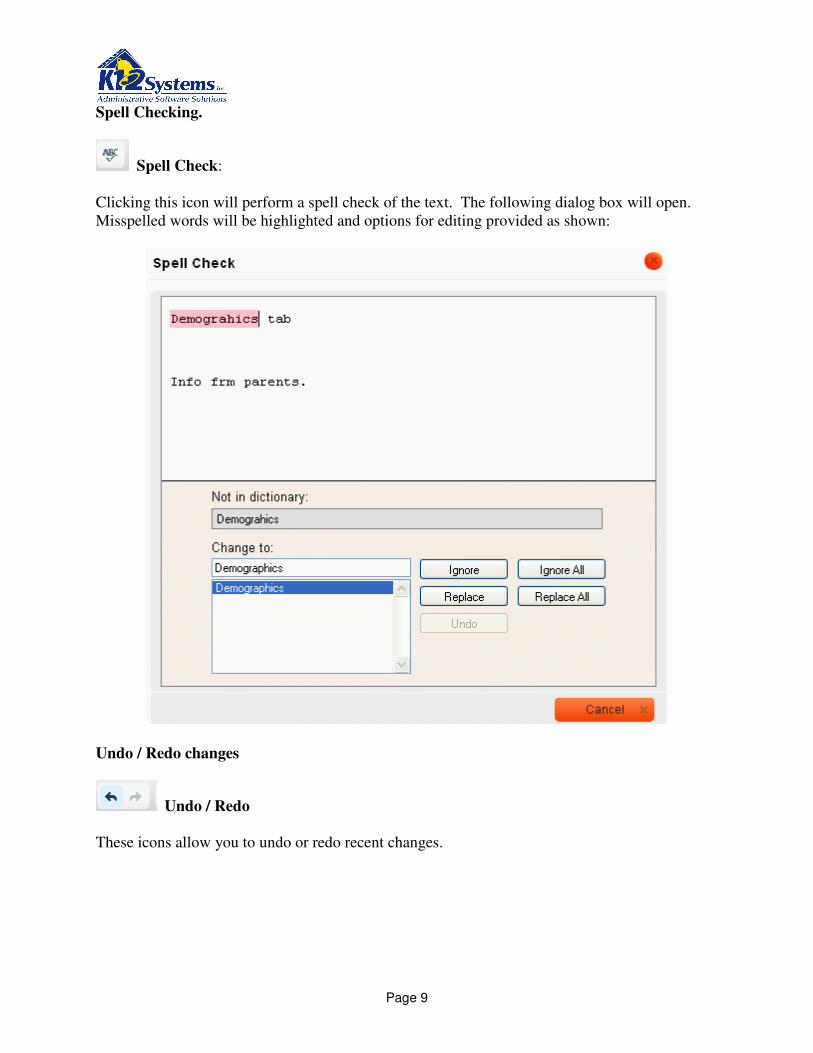
Spell Checking.
Spell Check:
Clicking this icon will perform a spell check of the text. The following dialog box will open.
Misspelled words will be highlighted and options for editing provided as shown:
Undo / Redo changes
Undo / Redo
These icons allow you to undo or redo recent changes.
Page 10
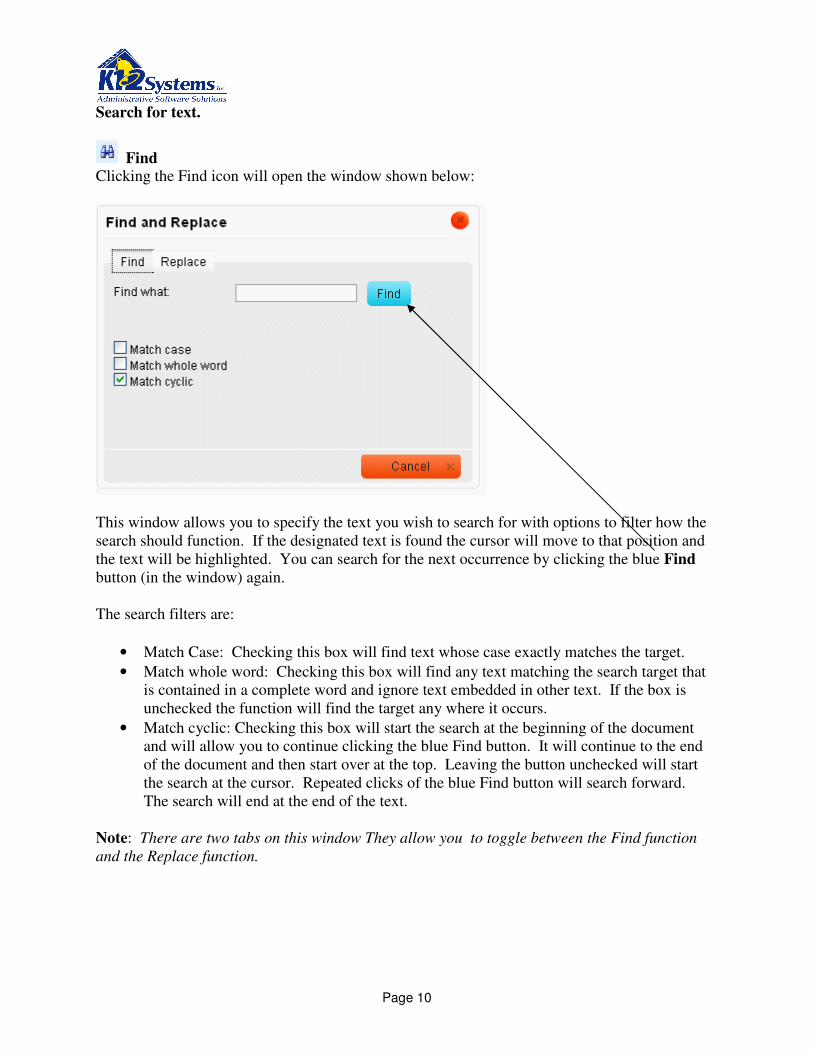
Search for text.
Find Clicking the Find icon will open the window shown below:
This window allows you to specify the text you wish to search for with options to filter how the
search should function. If the designated text is found the cursor will move to that position and
the text will be highlighted. You can search for the next occurrence by clicking the blue Find
button (in the window) again.
The search filters are:
• Match Case: Checking this box will find text whose case exactly matches the target.
• Match whole word: Checking this box will find any text matching the search target that
is contained in a complete word and ignore text embedded in other text. If the box is
unchecked the function will find the target any where it occurs.
• Match cyclic: Checking this box will start the search at the beginning of the document
and will allow you to continue clicking the blue Find button. It will continue to the end
of the document and then start over at the top. Leaving the button unchecked will start
the search at the cursor. Repeated clicks of the blue Find button will search forward.
The search will end at the end of the text.
Note: There are two tabs on this window They allow you to toggle between the Find function
and the Replace function.
Page 11
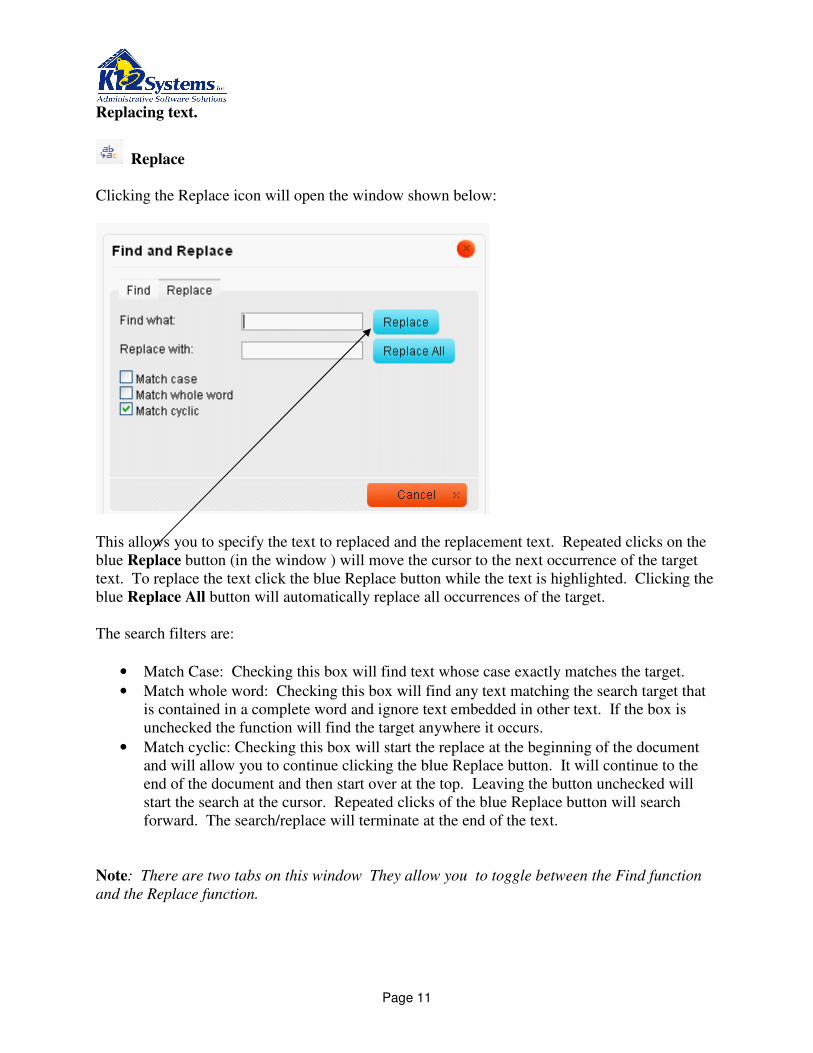
Replacing text.
Replace
Clicking the Replace icon will open the window shown below:
This allows you to specify the text to replaced and the replacement text. Repeated clicks on the
blue Replace button (in the window ) will move the cursor to the next occurrence of the target
text. To replace the text click the blue Replace button while the text is highlighted. Clicking the
blue Replace All button will automatically replace all occurrences of the target.
The search filters are:
• Match Case: Checking this box will find text whose case exactly matches the target.
• Match whole word: Checking this box will find any text matching the search target that
is contained in a complete word and ignore text embedded in other text. If the box is
unchecked the function will find the target anywhere it occurs.
• Match cyclic: Checking this box will start the replace at the beginning of the document
and will allow you to continue clicking the blue Replace button. It will continue to the
end of the document and then start over at the top. Leaving the button unchecked will
start the search at the cursor. Repeated clicks of the blue Replace button will search
forward. The search/replace will terminate at the end of the text.
Note: There are two tabs on this window They allow you to toggle between the Find function
and the Replace function.
Page 12
Working with Tables
The RTE supports the creation of tables. To insert a table use the Table icon.
Inserting a table.
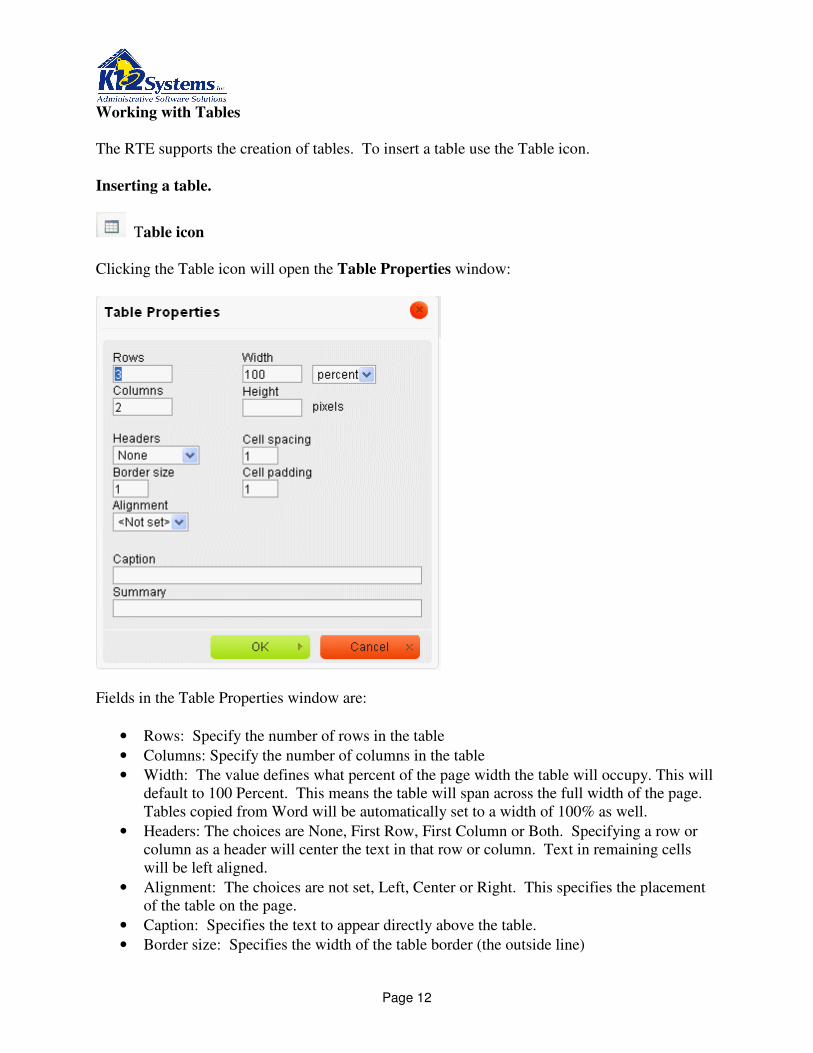
Table icon
Clicking the Table icon will open the Table Properties window:
Fields in the Table Properties window are:
• Rows: Specify the number of rows in the table
• Columns: Specify the number of columns in the table
• Width: The value defines what percent of the page width the table will occupy. This will
default to 100 Percent. This means the table will span across the full width of the page.
Tables copied from Word will be automatically set to a width of 100% as well.
• Headers: The choices are None, First Row, First Column or Both. Specifying a row or
column as a header will center the text in that row or column. Text in remaining cells
will be left aligned.
• Alignment: The choices are not set, Left, Center or Right. This specifies the placement
of the table on the page.
• Caption: Specifies the text to appear directly above the table.
• Border size: Specifies the width of the table border (the outside line)
Page 13
Clicking OK will insert the table at the cursor position. Text can then be entered in the cells.
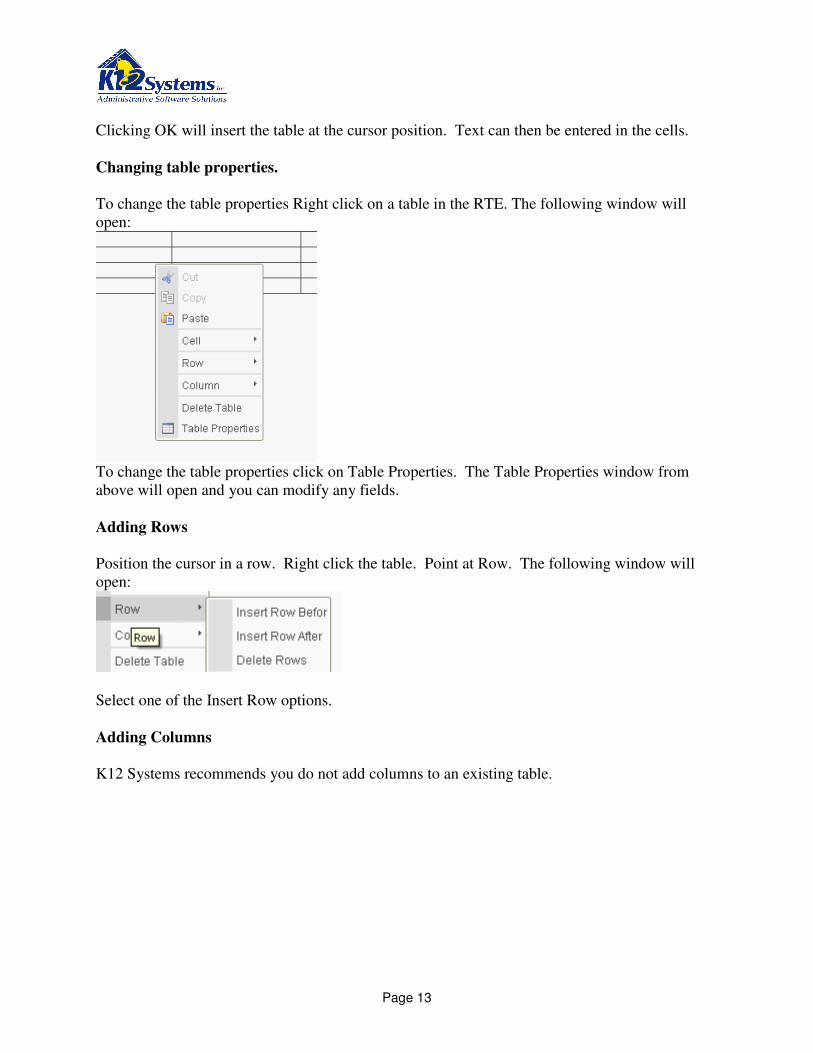
Changing table properties.
To change the table properties Right click on a table in the RTE. The following window will
open:
To change the table properties click on Table Properties. The Table Properties window from
above will open and you can modify any fields.
Adding Rows
Position the cursor in a row. Right click the table. Point at Row. The following window will
open:
Select one of the Insert Row options.
Adding Columns
K12 Systems recommends you do not add columns to an existing table.

Page 14
Deleting rows
Position the cursor in the desired row or highlight multiple rows. Right click the table. Point at
Row. The following window will open:
Select Delete Rows. The selected rows will be deleted.
Deleting columns.
Position the cursor in the column you wish to delete or highlight multiple columns. Right click
the table. Point at Column. The following windows will open:
Select Delete Columns. The specified column(s) will be deleted.
Merging or Splitting cells.
To merge or split a cell, position the cursor in the desired cell(s). Right click the table. Point at
Cell. Click Cell Properties. The Cell Properties window will open:

Page 15
The Columns Span field defines how many columns of the table the cell should occupy. Setting
the value to a whole number less than or equal to the number of columns in the table will have
the effect of merging the cells into a single cell spanning the specified number of columns.
The Rows Span field defines how many rows of the table the cell should occupy. Setting the
value to a whole number less than or equal to the number of rows in the table will have the effect
of expanding the cell to span the specified number of rows.
You cannot split cells in a table. However, if you previously merged cells (used the Column
Span value), you CAN un-merge them. Set the Column Span value to 1 (or leave it blank)
Deleting a table
To delete a table, you MUST use the Delete table tool. Right click on the table. Click on Delete
Table.
Page 16
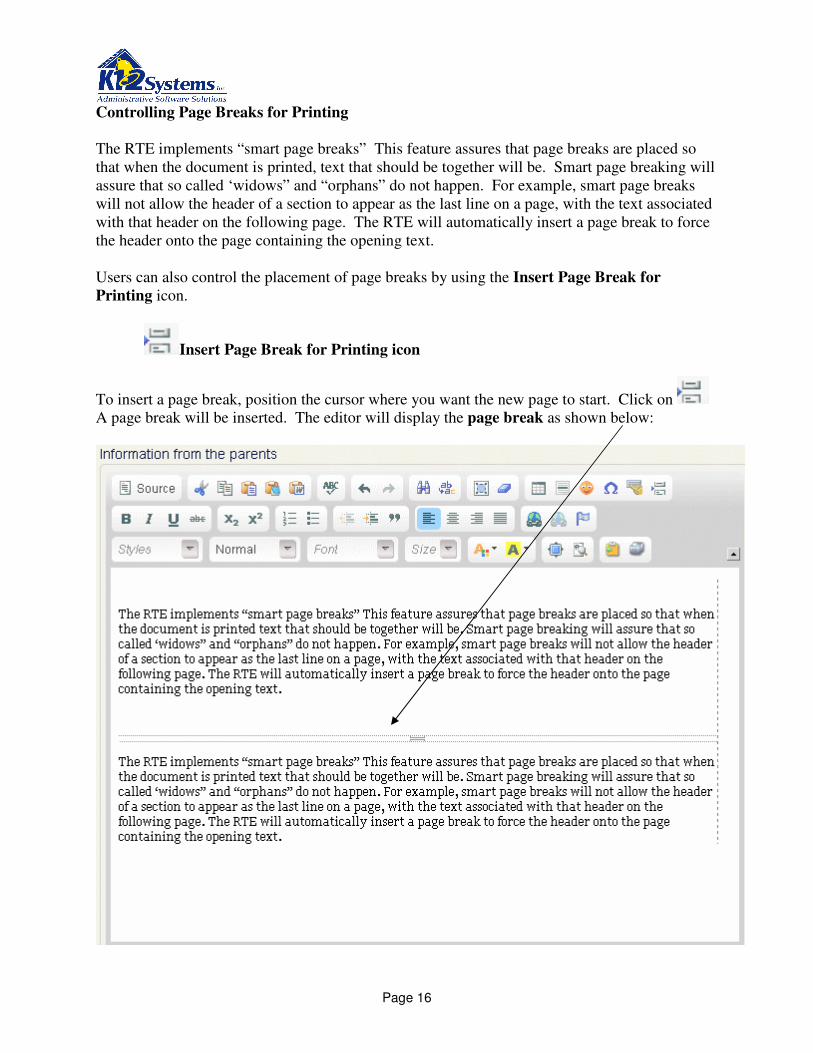
Controlling Page Breaks for Printing
The RTE implements “smart page breaks” This feature assures that page breaks are placed so
that when the document is printed, text that should be together will be. Smart page breaking will
assure that so called ‘widows” and “orphans” do not happen. For example, smart page breaks
will not allow the header of a section to appear as the last line on a page, with the text associated
with that header on the following page. The RTE will automatically insert a page break to force
the header onto the page containing the opening text.
Users can also control the placement of page breaks by using the Insert Page Break for
Printing icon.
Insert Page Break for Printing icon
To insert a page break, position the cursor where you want the new page to start. Click on
A page break will be inserted. The editor will display the page break as shown below:
Page 17
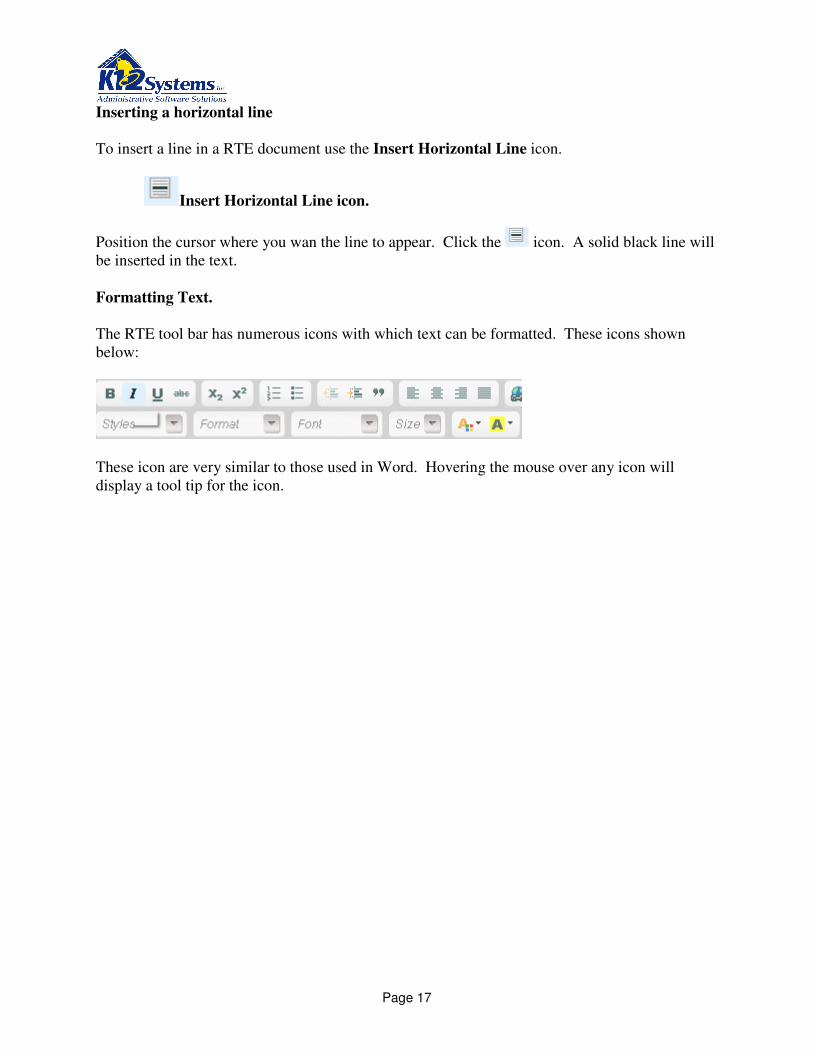
Inserting a horizontal line
To insert a line in a RTE document use the Insert Horizontal Line icon.
Insert Horizontal Line icon.
Position the cursor where you wan the line to appear. Click the icon. A solid black line will
be inserted in the text.
Formatting Text.
The RTE tool bar has numerous icons with which text can be formatted. These icons shown
below:
These icon are very similar to those used in Word. Hovering the mouse over any icon will
display a tool tip for the icon.
Page 18
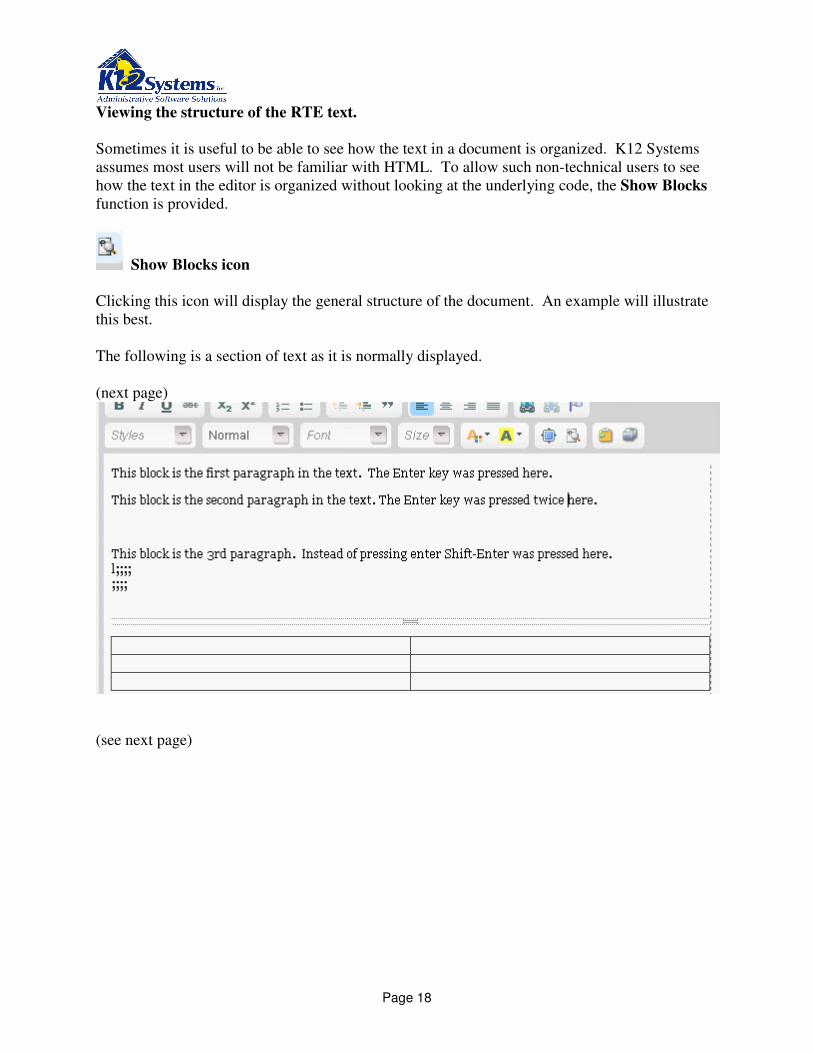
Viewing the structure of the RTE text.
Sometimes it is useful to be able to see how the text in a document is organized. K12 Systems
assumes most users will not be familiar with HTML. To allow such non-technical users to see
how the text in the editor is organized without looking at the underlying code, the Show Blocks
function is provided.
Show Blocks icon
Clicking this icon will display the general structure of the document. An example will illustrate
this best.
The following is a section of text as it is normally displayed.
(next page)
(see next page)
Page 19
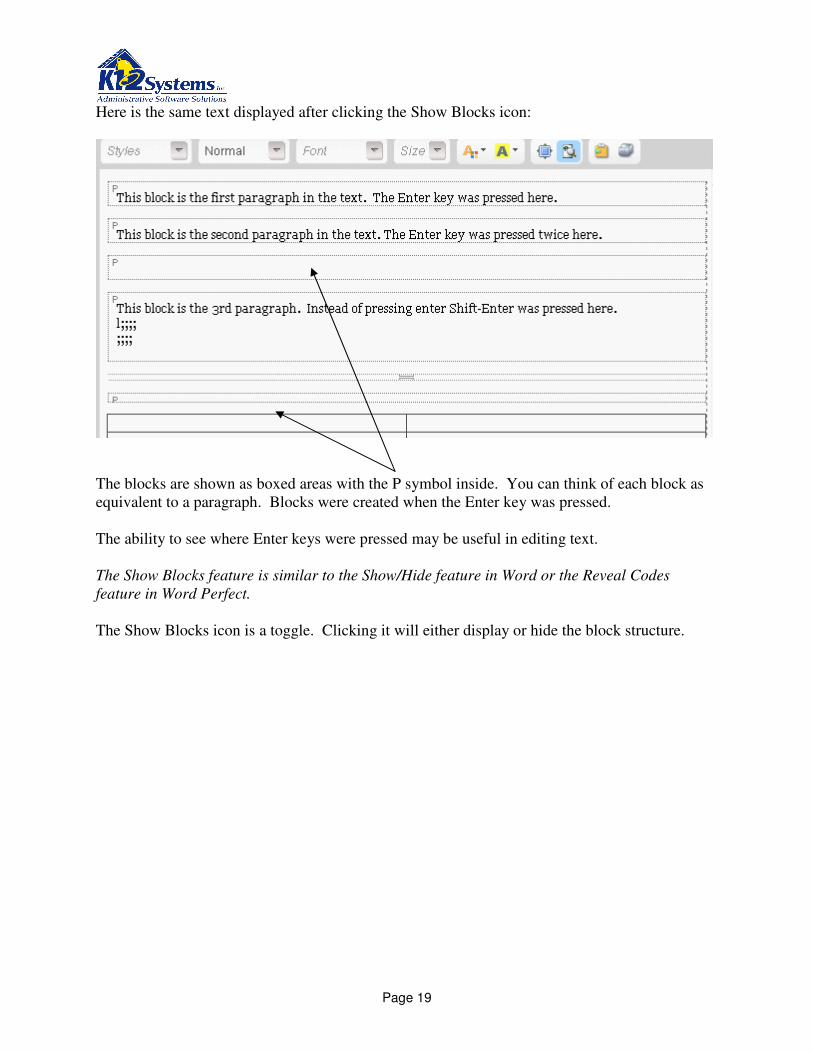
Here is the same text displayed after clicking the Show Blocks icon:
The blocks are shown as boxed areas with the P symbol inside. You can think of each block as
equivalent to a paragraph. Blocks were created when the Enter key was pressed.
The ability to see where Enter keys were pressed may be useful in editing text.
The Show Blocks feature is similar to the Show/Hide feature in Word or the Reveal Codes
feature in Word Perfect.
The Show Blocks icon is a toggle. Clicking it will either display or hide the block structure.

Page 20
Using Clip Text
The Clip Text feature of the Rich Text Editor is a tool that allows users to define, catalog and
insert pre-defined text into specific sections of a document. The IEP-Writer automatically
organizes clip text based on the section of the final document in which the text will appear. The
system will catalog clip text sections into one of two categories: District Clip Text and
Personal Clip Text. District level clip text is available to all users of the IEP Writer. Personal
clip text is available only to the user who saved it. The following section describes how to
define and save clip text and how to insert defined clip text in a document.
Saving Text as Clip Text
After you have entered text into the RTE you can save it as clip text. If you have necessary
security rights you will be able to save the text as either District Clip Text or Personal Clip Text.
All users can save text as personal clip text. The system will catalog the clip text based on the
field in the document where it is created and will be available for insertion ONLY into that field.
Suppose we are working on an IEP and are filling out the section Present Levels of Academic
Achievement and Functional Performance and have typed some text into the editor as shown
below.
You can save the entire text from the section (the default), or highlight the text you want to save.
1) Click the Save Clip Text icon
Page 21
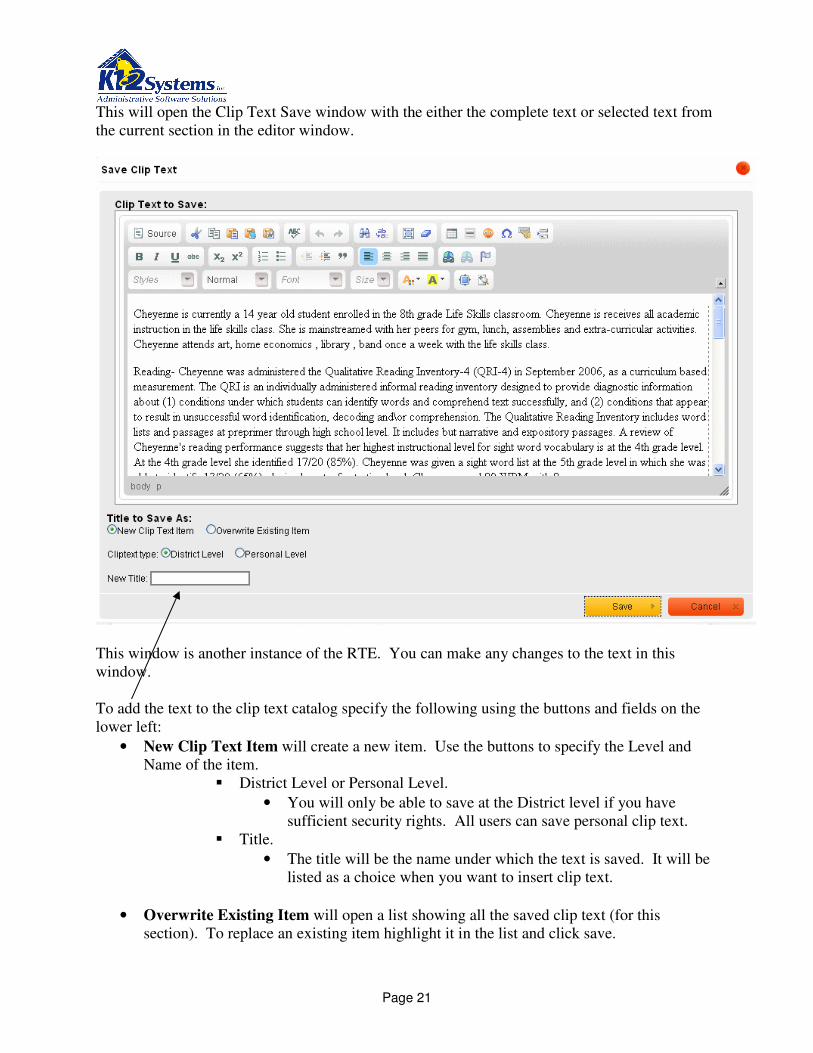
This will open the Clip Text Save window with the either the complete text or selected text from
the current section in the editor window.
This window is another instance of the RTE. You can make any changes to the text in this
window.
To add the text to the clip text catalog specify the following using the buttons and fields on the
lower left:
• New Clip Text Item will create a new item. Use the buttons to specify the Level and
Name of the item.
� District Level or Personal Level.
• You will only be able to save at the District level if you have
sufficient security rights. All users can save personal clip text.
� Title.
• The title will be the name under which the text is saved. It will be
listed as a choice when you want to insert clip text.
• Overwrite Existing Item will open a list showing all the saved clip text (for this
section). To replace an existing item highlight it in the list and click save.

Page 22
The system will automatically save the text under the section of the document you were working
on. The text will be available for insertion ONLY within that section.
Making Clip Text “generic”.
It may be expedient to create clip text that it is somewhat generic before you save it. Consider
the text from the example above:
A DRA was administered to Sara on 2/20/09 on a Level L.( Mid-2nd grade). She read
with 96% accuracy, self-corrected better than 1:2 miscues and read at 54 words per
minute, which is at a 1st grade level.. Her fluency score was 9/16 (Instructional) and her
Comprehension score was 15/28 ( Instructional). The DRA results show that she is
instructional in the areas of prediction, retelling (including sequence of events, characters
and details), language/vocabulary. She needed 1-2 teacher prompts to predict and retell.
She scored at the Intervention level in the Interpretation category showing little
understanding of important test implications. She scored as Independent on the Reflection
category by identifying a specific event and providing reasons for her opinion. Her
probes were 52 WPM and her Foresight was Below Basic.
Some of the text is very specific to the child (Sara). If it was saved as clip text and subsequently
inserted in a document, you would need to edit all such child specific items. If you forget, you
run the risk of producing a document that has text that would not be accurate for the individual.
Therefore, it is wise to use “place holders” in the clip text and then use the replace tool in the
RTE to fill in the correct data. Using the text above, you might do something like:
A DRA was administered to <name> on <date>. On a Level L.( Mid-2nd
grade). She read
with <read %> accuracy…..
The idea is to create “place holders” like <name> and <date>. Now when you insert the clip text
into a document, you can use the Replace function in the RTE to replace <name> with the
appropriate name, <date> with the appropriate date etc. If the name occurred several places in
the text, replacing all occurrences of <name> with the appropriate name will correctly replace
every occurrence.
Page 23
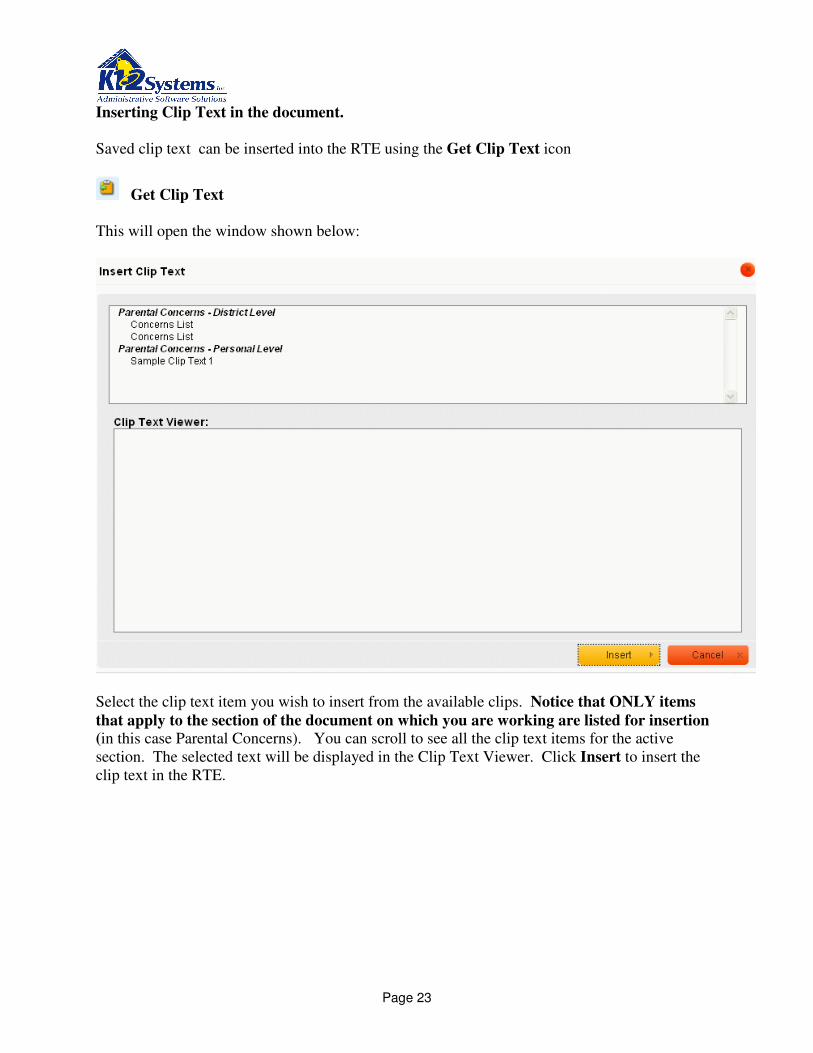
Inserting Clip Text in the document.
Saved clip text can be inserted into the RTE using the Get Clip Text icon
Get Clip Text
This will open the window shown below:
Select the clip text item you wish to insert from the available clips. Notice that ONLY items
that apply to the section of the document on which you are working are listed for insertion
(in this case Parental Concerns). You can scroll to see all the clip text items for the active
section. The selected text will be displayed in the Clip Text Viewer. Click Insert to insert the
clip text in the RTE.
Page 24
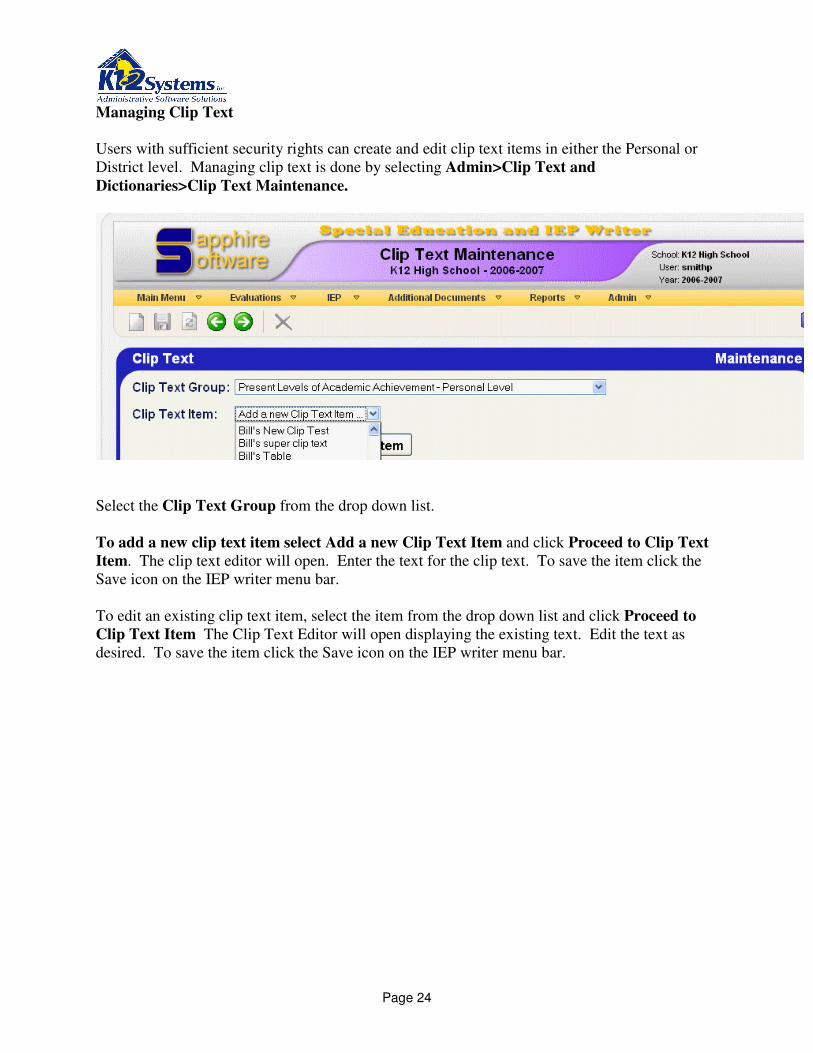
Managing Clip Text
Users with sufficient security rights can create and edit clip text items in either the Personal or
District level. Managing clip text is done by selecting Admin>Clip Text and
Dictionaries>Clip Text Maintenance.
Select the Clip Text Group from the drop down list.
To add a new clip text item select Add a new Clip Text Item and click Proceed to Clip Text
Item. The clip text editor will open. Enter the text for the clip text. To save the item click the
Save icon on the IEP writer menu bar.
To edit an existing clip text item, select the item from the drop down list and click Proceed to
Clip Text Item The Clip Text Editor will open displaying the existing text. Edit the text as
desired. To save the item click the Save icon on the IEP writer menu bar.