Using the JOSM Editor - GISCorps
13
Using the JOSM Editor This document has three parts: ● USING JOSM ON A GISCorps—HOT PROJECT: the basic steps to using JOSM on one of our projects ● LEARNING TO USE JOSM – a guide to learning JOSM, with miscellaneous topics ● RESOURCES – links to information about OSM and the JOSM Editor USING JOSM ON A GISCorps—HOT PROJECT If you are new to JOSM, go to the section of this document about learning to use JOSM. Once you have some familiarity with JOSM, you can gain experience editing by participating in a project using the steps listed below. 1. Launch JOSM. On Windows 7, click on its shortcut icon; when you get the “Do you want to run this application?”, click Run; this brings you to the JOSM start screen. 2. Activate Remote Control. Make sure Remote Control is turned on (this allows the Task Manager to send data directly to your JOSM session): go to Edit⇨Preferences; on the left click on the Remote Control icon (third from bottom), put a check in the box “Enable remote control”, click OK. 3. Ensure required plugins are installed. Some projects require the use of plugins. It is recommended that you install several (buildings_tools, geochat, imagery_offset_db, utilsplugin2) so that they are always available when you open JOSM (you only need to do this once). Go to Edit⇨Preferences; on the left click on the Configure Available Plugins icon (fourth from top). You will see a list of plugins in alphabetical order; find the four recommended plugins and put a checkmark next to them (if a checkmark already is there, the plugin already is installed); click on OK. You will get a message saying that you have to restart JOSM so go ahead and do that. The Remote Control and plugin settings are ‘sticky’; that is they stay in effect until you turn them off, so you should only have to do the above steps once. In general, any changes made to JOSM Preferences are sticky and will be remembered from one session to the next. 4. Get OSM data. After the plugins are installed you should be back at the JOSM start screen. Leave JOSM open and go to your internet browser and navigate to the Tasking Manager ; select a job to work on, go to its webpage, and read the Description and Instructions (if you are working on a GISCorps—HOT Project, you will be given the URL of the Project, and links to documents that describe the project). After you have familiarized yourself with the project and are ready to edit, click on the project’s
-
Upload
khangminh22 -
Category
Documents
-
view
0 -
download
0
Transcript of Using the JOSM Editor - GISCorps

Using the JOSM Editor
This document has three parts:
● USING JOSM ON A GISCorps—HOT PROJECT: the basic steps to using JOSM on one of our
projects
● LEARNING TO USE JOSM – a guide to learning JOSM, with miscellaneous topics
● RESOURCES – links to information about OSM and the JOSM Editor
USING JOSM ON A GISCorps—HOT PROJECT
If you are new to JOSM, go to the section of this document about learning to use JOSM. Once you
have some familiarity with JOSM, you can gain experience editing by participating in a project using
the steps listed below.
1. Launch JOSM. On Windows 7, click on its shortcut icon; when you get the “Do you want to run this
application?”, click Run; this brings you to the JOSM start screen.
2. Activate Remote Control. Make sure Remote Control is turned on (this allows the Task Manager
to send data directly to your JOSM session): go to Edit⇨Preferences; on the left click on the
Remote Control icon (third from bottom), put a check in the box “Enable remote control”, click
OK.
3. Ensure required plugins are installed. Some projects require the use of plugins. It is
recommended that you install several (buildings_tools, geochat, imagery_offset_db,
utilsplugin2) so that they are always available when you open JOSM (you only need to do this
once). Go to Edit⇨Preferences; on the left click on the Configure Available Plugins icon (fourth
from top). You will see a list of plugins in alphabetical order; find the four recommended plugins
and put a checkmark next to them (if a checkmark already is there, the plugin already is
installed); click on OK. You will get a message saying that you have to restart JOSM so go ahead
and do that.
The Remote Control and plugin settings are ‘sticky’; that is they stay in effect until you turn them
off, so you should only have to do the above steps once. In general, any changes made to JOSM
Preferences are sticky and will be remembered from one session to the next.
4. Get OSM data. After the plugins are installed you should be back at the JOSM start screen. Leave
JOSM open and go to your internet browser and navigate to the Tasking Manager; select a job to
work on, go to its webpage, and read the Description and Instructions (if you are working on a
GISCorps—HOT Project, you will be given the URL of the Project, and links to documents that
describe the project).
After you have familiarized yourself with the project and are ready to edit, click on the project’s

Task tab in the Tasking Manager. Click on a tile to work on and click on “Yes, I want to work on this
task”.
Now the Remote Control magic happens: in the Task tab of the Task Manager, click on the JOSM
button; this will automatically load the data for your tile into JOSM!
Note that the only data that has been downloaded are ways and nodes that are completely or
partially within your tile boundary (some ways that are partially within your tile may extend
outside of your tile, and in this case you will see the complete way, but you will only see ways
that have at least one node within your tile). You will not see data that are completely outside
your tile, so remember to only create new objects which are at least partially inside your tile,
otherwise you may create duplicate data! Also it is best not to delete roads or rivers which
extend outside of your tile area because this may cause conflicts.
JOSM is an “offline” editor; that is, you have contacted the server to download a bunch of data,
but the server has no idea what you are doing until you contact it again to upload data. In general,
you should choose a tile that is small enough that you can finish it in one editing session.
Remember that the Task Manager only keeps a tile checked out for 119 minutes of inactivity, so if
you wait longer than that before you upload your data, other people could check out your tile,
which could result in a lot of conflicts!
If you only have time to partially work on a tile, you could make changes within the 119 minute
time period and upload your changes. Then close down JOSM and release the tile in the Task
Manager. Then when you have more time, check out an available tile and start the process all
over again.
You can also split tasks in the Tasking Manager by selecting a tile in the Task tab and then clicking
on the Split button; do this if you think a large tile will take longer to finish than the time you can
dedicate for the mapping.
5. Get Imagery. Some projects use the standard Bing imagery as a data source, and some use an
alternative source – this information can be found in the Instructions tab. If Bing is used, in JOSM
select Imagery⇨Bing Sat. If another source is used, in the Instructions tab of the Task Manager
you will see a link to the imagery; hover over this link and you will see a message to click on the
link, so go ahead and click on the imagery link. This will send you to a web page that just says
“OK”, but if you go back to JOSM, you now will see the imagery there!
NOTE: some imagery is very bright in places (especially the white rooftops); you can experiment
with shading it back by going to Imagery⇨Imagery Preferences, and in the Settings tab, adjust the
Fade settings (try a Fade Color of black, and a fade amount of about one-third). There is also a
‘Adjust Opacity of the layer’ button in the Layer Box on top of the right panel.

6. Select an Offset. Some imagery may have an offset from OSM data; in this case the Project
instructions may discuss using an imagery offset from an online offset database. In these cases if
you Zoom in to an area in your tile where there are some existing buildings and roads you will see
that the buildings are offset from the new imagery. To fix this, select Imagery⇨Get Imagery
Offset . Now you will see the Imagery Offset Database window, which lists the four Offset
Locations (control points) nearest to your map extent, with the closest one listed first. For each
Offset, the number in the top right is how far the Offset Location is from the center of your
current map extent; and the arrow and number on the left show how big the offset is and in which
direction). In general you will want to use the first (and closest offset); if you click on it, the
imagery is immediately shifted (and the direction arrow symbol on the right of the offset changes
to a dot, to show that you are using that offset). For more information on offsets, see the section
below on “Imagery Offsets”.
7. Edit the Data. Once you have a offset that works for you (if necessary), start editing the data! If
you are new to JOSM, refer to the section below on “Learning to use JOSM” for some tips on
editing data.
8. Validate Data. When you are finished editing your data, you should validate it by opening the
Validate window (Windows⇨Validation Results) and click on the Validation button. You will then
see a list of Errors and Warnings, each of which should be examined and fixed if necessary: errors
should all be fixed, but some warnings may be found to be not relevant. For more info see the
section below on “Quality Control and Validation”.
9. Upload Data. Once your are finished with your edits and validation, you should upload the data.
NOTE: If you want to only make a few edits on a tile, and then upload them, you can do that. After
the upload, you can continue to work on the tile, and then upload some more changes. But you
should endeavor to complete all of your work within the 119-minute Task Manager time limit.
You should NOT save a local copy of OSM data on your computer as an .osm file and then plan to
get back to it tomorrow, because in the meantime someone else might check out your tile and be
making changes which would conflict with yours.
Uploads are done with File⇨Upload data. You may then see the “Suspicious data found” window.
If there are Validation messages which you have not resolved, click on Cancel and fix the
problems; if you have already looked at these problems and found no issues, then click on
“Continue upload”. This brings you to the Upload window. Be sure to copy/paste the changeset
tags from the Instructions tab of the Tasking Manager into the box labeled “Provide a brief
comment for the changes you are uploading”; you also could put imagery source information into
the box labeled “Specify the data source for the changes”; this might be “Bing” or “Worldview-2”
or some other imagery source. Then click on the Upload Changes button, and the upload process
will begin.

If there are conflicts between your data and data on the server, the “Conflicts Detected” window
will open. This usually only happens if you have edited data outside of your tile. None of your
changes can be uploaded until you resolve any conflicts. For more information on resolving
conflicts, see the section below on “Resolving Conflicts”.
When you are finished editing a tile and your upload is successful you will get a message “Upload
Successful”. After uploading JOSM data, it often is useful to look at the area in the iD editor
where you can get an idea of how your edits fit in with the data around your tile; for example, you
can see where roads do not connect properly; and the road symbology used in iD makes it easier
to see inconsistencies on how adjacent road segments are tagged. Fix these errors in iD, save
the changes, and mark the tile as finished. You can then shut down JOSM, or if you want to do
another tile, remove the layers from JOSM (or re-start JOSM) and start the process over again.
Congratulations on finishing a tile with JOSM!
LEARNING TO USE JOSM
JOSM is the Java OpenStreetMap Editor. It is a powerful desktop application for editing OSM data. It is
an offline editor. Typically you download data from OSM, edit it, and then upload your changes back
to OSM. You also have the option of saving the data to an .osm file on your computer, but this
generally is not done except for training purposes, since a data file on your computer is likely to
quickly get out-of-date as people make changes to the online version of the data.
Because JOSM is such a full-featured program, it is beyond the scope of this document to teach you
everything; instead we will present the highlights of what you need to know to use JOSM in
GISCorps—HOT projects.
Install JOSM. It is recommended that you download the josm.jnlp file to do the installation. On
Windows 7 (this procedure was not tested by me for other operating systems), you double-click on
the jnpl file to start the installation. This opens up Java which then downloads the program and
installs it.
The installation creates a JOSM folder in your Start menu from which you can launch the program; go
ahead and launch it; when you get the “Do you want to run this application?” message, click Run; this
brings you to the JOSM start screen
JOSM Plugins. The JOSM program is supplemented by a series of Plugins which are optional to install.
It is recommended that you install the following plug-ins:
● buildings_tools: allows you to quickly add buildings to the database
● geochat: see users that are editing nearby and talk with them using built-in instant
messaging
● imagery_offset_db: share imagery offsets from a central database
● utilsplugin2: additional editing tools

To install these plugins, go to Edit⇨Preferences; on the left click on the Configure Available Plugins
icon (fourth from top). You will see a list of plugins in alphabetical order; find the four plugins listed
above and put a check mark next to them. Click on OK; you will get a message saying that you have to
restart JOSM so go ahead and do that.
Learning resources. There are *many* resources available for learning JOSM. The JOSM/Guide is the
original manual. There is an online Help system which can be reached by choosing Help⇨Help.
LearnOSM has several chapters about JOSM. There are a series of videos about JOSM. Some of these
documents may be a little out of date, since JOSM is always changing. A good way to get started is
with the “Getting Started With JOSM” tutorial, which uses a .osm file to practice editing.
Some basic operations in JOSM.
● Right-click and move to pan (different than in iD and than in ArcMap!).
● Scroll-wheel towards yourself to zoom out; away from yourself to zoom in.
● Push A to enter add feature mode; and S to enter select mode.
● To create a way, hit A, click once to create the first node, continue clicking, and double-click
when done. Note that ways have direction, which is shown with red arrows between nodes
when the way is selected. To complete a way that is closed, single-click on the closing node.
● To continue an existing way, hover over an existing end node (cursor changes to show a +),
and start clicking.
● To start a new way from along an existing way: hover over the existing way and the cursor will
change to a arrow-+ or arrow-[ depending on if you are over an existing node or not; if not
over an existing node, one will be created. Note that the existing way is not split where the
new way starts.
● Modifying an existing way: Nodes are shown as circles; the small x between nodes is a place
to drag to modify geometry, and a new node will be added after you finish dragging; or you
can double-click on an existing selected way to add a node to the way. NOTE: if you try to drag
a feature by grabbing it while not hovering over x or o, the whole feature will move.
● Deleting edits: click the undo button. When deleting a way, each undo removes one node,
and a final click is needed to remove the initial node.
● Deleting ways: select the way and push the delete key.
● To add a tag to a new residential road, select the way, then select
Presets⇨Highways⇨Streets⇨Residential. Alternatively, click the Add button (or click Alt-A) in
the Tags window, type “hi <tab> <yes> and click OK. The window remembers recently used
tags, so often you just need to select from a list. Another way is to digitize a bunch of
features, for example buildings, then select them all (Search for “untagged type:way”)and
add the building=yes tag to the group.
● To copy/paste a circular building:
o Zoom in enough so that you can select an existing circular building between its nodes
o Select a building and push ctrl-C.
o Place the cursor where you want the building copied; push ctrl-V

o Move the cursor to a new location; push ctrl-V
o Change the diameter if necessary by pushing alt-ctrl and dragging
● To copy rectangular buildings:
o Select and copy as for circular buildings
o To rotate a new building, in select mode push Ctrl-Shift and rotate
o You also can enter Extrude mode and resize the building (in either add or select
mode, select the extrude tool (the right-angle icon in the left toolbar), and then
select the object to be modified)
● The Search box (Edit⇨Search) can be used to find features of interest. Here are some
examples:
o Type:node untagged –child: finds untagged unused nodes
o Untagged type=way: to select buildings that have not yet been tagged
o Type:node child wall: to select wall nodes that have been tagged, so that the tag can
be removed (nodes in a way should not be tagged, only the way itself)
● The Filter dialog (click on Filter icon) will disable/hide various objects – this can de-clutter the
display, particularly for shaded areas. The Filter is active only if the Filter window is open. Use
the same syntax as for the Search box—with the filter, those items that match the criteria can
be removed from view. The Filter window has 5 columns:
o Enable: put a check mark next to a filter criterion to make the matching objects
inactive (shown in black)
o Hide: put a check mark next to a filter criterion to make the matching objects hidden
(a criterion must be enabled before hide can also be checked)
o Text: the filter criterion; some examples are:
▪ Type:node – removes nodes
▪ -highway – shows only highways
▪ -modified – only show changed objects
o Inverse filter: check to reverse the selection
o Filter mode: set in the filter Edit window (rsel, asel, unsel)
Miscellaneous JOSM Topics
Imagery Offsets. It is a fact of life that satellite and aerial imagery has built in variable warps which
may not have been completely georectified by the provider. That is why offsets exist between
different imagery. You can load two imagery datasets into your JOSM map to compare them.
Lacking high-precision GPS control points, we cannot be sure which dataset is most correct; one
dataset (usually Bing, because it is available everywhere) is chosen to be the standard for our OSM
data. Therefore the second imagery source must be shifted to line up with the Bing imagery (or
existing OSM data). A second imagery source often is added to a project when it is of a more recent
date than Bing.

The project leader can create an online database of control points for the study area. Once this is in
place, this is how the offset procedure works:
1. Zoom to an area in JOSM where you want to work. Make sure that the second imagery source
is the top most imagery layer in the Layers list. Click on Imagery⇨Get Imagery Offset to find
the closest control point.
2. Click on the topmost control point in the list and see how well the applied offset causes any
existing OSM data to line up with the new imagery. You can also compare the new imagery
with Bing imagery. If it doesn’t seem to be a very good match, you can try further away
control points, but generally these will do a poorer job. NOTE: once you have applied an
offset, there does not seem to be a way to remove that offset other than by selecting a
different offset, or by creating your own 0;0 offset.
3. Make your edits using the best available existing Imagery offset. It is recommended that
volunteers do not create their own offsets.
4. Zoom to another area where you wish to work. If the current offset no longer seems very
good, open the Imagery Offset Database to see if there is a better control point closer to your
new area of work, and if so, apply that offset.
Displaying your tile area. The default behavior of JOSM is to show the area outside your tile with a
cross-hatch pattern, but this makes it difficult to see the imagery outside of your tile (which you
sometimes need to do to make sense of things). You can turn off this cross-hatching by going to
Edit⇨Preferences⇨Display Settings (first icon on left). In this window, choose the OSM Data tab, and
remove the checkmark from “Draw boundaries from downloaded data”. Then click OK.
Now you need a frame of reference, so go back to the Task Manager in your browser and right-click on
the .gpx file link in the Task tab to download the gpx file for your tile (right-click and select “Save link
as…”).
Now load the tile boundary into JOSM by going in JOSM to File⇨Open and navigate to the .gpx file
that you just downloaded. Now you will see your tile boundary on your map (thin black line) and in
the Layers list (if your Layers list is not open, you can open it by clicking on the Layers icon about
one-third of the way down on the left side of your screen). The tile boundary is difficult to see
because it is a thin black line, so change the color of the line to red or cyan by right-clicking on the
layer name in the Layers window and selecting “Customize color” and select red or cyan (or some
other color easy to see); then click OK.
Be sure to confine your editing of objects to things that are inside this tile boundary! Some confusing
and difficult-to-resolve conflicts may result if, for example, you delete a highway that is partially
within your tile, but also extends outside of your tile. This is because the deleted highway may
connect to (and share nodes with) additional roads outside of your tile which are not even visible to
you in JOSM. Therefore, if you wish to fix data that are partially outside of your tile, it is
recommended that you do this later by using the iD editor, which has access to the complete OSM
database.

Using Shortcut keys. JOSM has many shortcut keys which are well documented. You might want to
make a printed copy of these for easy reference. The most important shortcut keys might be:
● A: add mode (cursor is a crosshair): You use Add mode when you want to start adding nodes.
When you finish adding an object it is automatically selected
● S: select mode (cursor is an arrow with a rectangle next to it): Left-click to select an existing
object (the object will turn red). <Shift>Left-click (cursor changes to
arrow-with-rectangle-with-Plus-inside) to add objects to the selection. Be careful when
selecting a way with many dense nodes—first zoom in so that you can be sure you are clicking
on a way rather than a node.
● Q: Orthoginalize selected area object. It is preferred that buildings in JOSM have right-angles
unless they are obviously otherwise.
● Shift-O: to construct a circle, draw a diameter (click once for each node) and hit shift-O
● P: split way at selected node (to split a way where two ways intersect, select the way,
shift-select the node at the intersection, then push P).
● C: combine selected ways
● Esc: unselect all
● Alt-A: add tag
● Ctrl-C: copy a way
● Ctrl-V: paste a way
● Z: zoom into area by dragging a map extent
● X: enter extrude mode
Using the Undo button. The Undo button (on the top horizontal toolbar) can be very useful.
Sometimes you are in Add mode and by mistake left-click to try and pan -- oops, this adds a tiny
node. Click Undo to get rid of it. Sometimes you start adding a way, and then decide you don’t want
it: keep clicking on Undo until all the nodes disappear, and don’t forget to get rid of the tiny starting
node! Sometimes you are digitizing a way and you put a node in the wrong place: click Undo once to
delete the last node, then click on the last good node to start continuing the way again.
Tagging features. Immediately after you create a new way it is selected and you can use Alt-A to open
the tag Add Value window to tag it, or alternatively click on one of the Preset buttons along the top of
the screen. If you need to select a way to tag it, enter Select mode (S), and click on a location
between nodes so that the way is selected and not an individual node.
Beware of using click-drag (in select mode) to select one or more buildings: this selects nodes as well
as ways, and if you then apply a tag to all selected objects, the nodes of the buildings will be tagged
as well as the building ways, which is incorrect..
Adding rectangular buildings. Buildings should be orthogonal polygons (unless they are circular
buildings). To add an orthogonal building, construct a closed way around the building, then press Q

to orthogonalize the shape. To add a round building, add a two-node way that is the diameter of the
building, then click Shift-O to make a circle. After you add a building, click on Alt-A to add a tag to it.
When working with square or rectangular buildings that are of a very common size/shape, you often
can create one, and then use Ctrl-C and Ctrl-V to copy it (put your cursor at the center of the new
location before pressing Ctrl-V). If necessary you can resize a building by selecting it and then
pressing Ctrl-Alt to enlarge or shrink it; or click on Shift-Ctrl to rotate it.
But the very best way to create many rectangular buildings quickly is to use the buildings_tools
plugin . Once this is installed you get a new Draw Buildings mode on the left toolbar. Click on it
to activate it; then in your map click once on one corner of the building; click a second time on an
adjacent corner of the building, preferentially on the longer side of the building; then move the
cursor at a right-angle to your two-node way to extrude the building to it’s proper width and click
again. The building is added, automatically tagged (with building=yes), and unselected! Repeat for
the next new building! NOTE: when you make your first click, be sure your cursor is stopped; if it is
moving even slightly, the tool will act unpredictably.
The Buildings tool has a second mode that is useful when many rectangular buildings all face in the
same direction but are of different sizes. Create a prototype rectangular building using the steps
listed above. Then make sure the new prototype building is selected and click on the Building tool.
Now you create a new building with a single click-drag: click on one corner and drag to the opposite
corner. To exit this mode, unselect the prototype building (push the Escape key).
Adding complex, squared-shape buildings. Here is an example of a more complex building:
Use the building tool (shortcut: B) to create the main length and width.
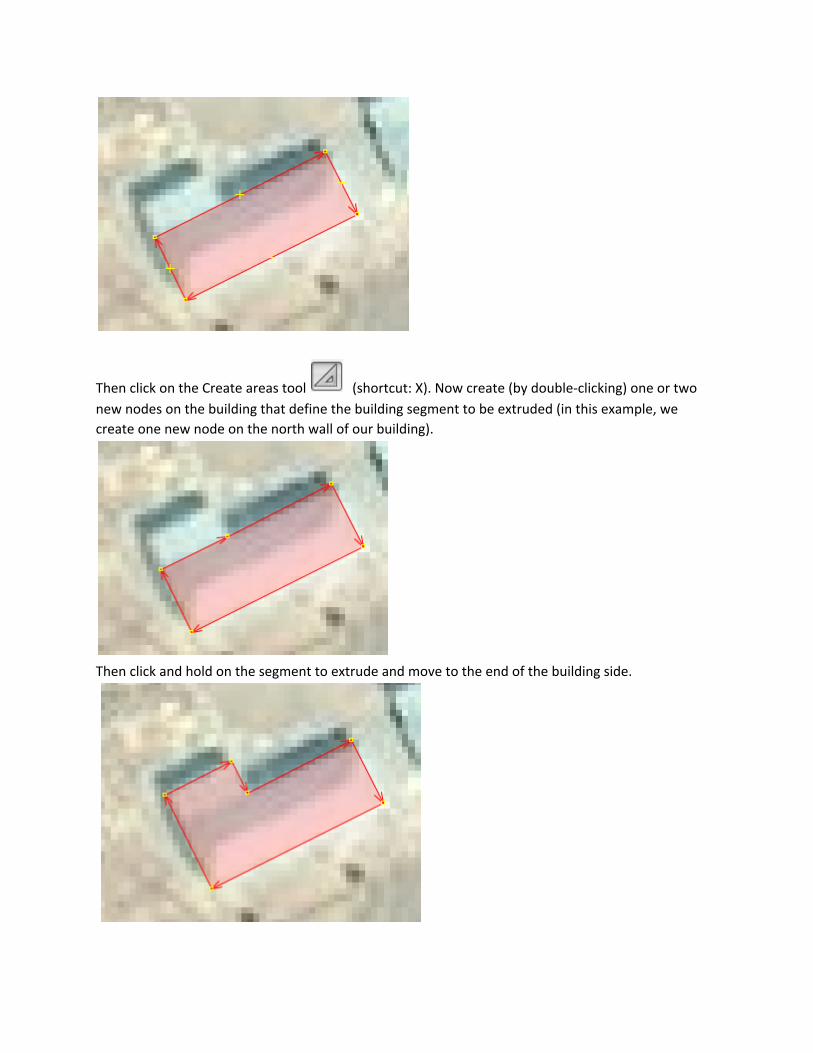
Then click on the Create areas tool (shortcut: X). Now create (by double-clicking) one or two
new nodes on the building that define the building segment to be extruded (in this example, we
create one new node on the north wall of our building).
Then click and hold on the segment to extrude and move to the end of the building side.

Quality Control and Validation. Before uploading data back to OSM, you should run the Validate tool.
To do this, make sure no features are selected (click Selection⇨Unselect All if you are unsure), then
open the Validation window (Windows⇨Validation Results), and click on the Validate button.
Validate looks for about 25 kinds of common problems.
After the tool is run, ways and nodes with problems will be surrounded with a yellow halo. You can
click on a result, and it then will be highlighted in yellow (if you click on a different finding, the
yellow highlighting does not disappear till you change the map extent). You can right-click on an error
to zoom to it. If the Fix button is activated when selecting a finding, then an auto fix is possible;
otherwise you will have to do a manual fix. Errors are things that must be fixed; warnings may be
allowable.
Some common errors:
● Duplicated nodes: two nodes with the same coordinates; they should be merged into one
node (ie tags combined).
● Incomplete ways: ways with one node – not sure how this problem arises.
● Tag issues: misspelled keys or values, empty properties.
Some common warnings:
● Unamed ways: a highway is supposed to have a name, but in developing countries it is very
common they do not, so do not mind this warning
● Way end node near other highway: a highway ending close to, but not connected to another
highway: often they should be joined.
● Crossing ways: ways that cross each other without sharing a common node. We were told for
this project that this was not a requirement, but in general, transportation networks should
have shared nodes at intersections unless there is a bridge or underpass.
● Untagged ways: each way should have at least one tag.
● Overlapping ways: This locates ways with more than one adjacent common node. May not be
a problem; in particular area ways often share a common boundary (ie, riverbank areas).
Useful however to find buildings that overlap other buildings, or walls that overlap buildings.
Resolving Conflicts. When uploading data, the software may find conflicts with existing data, either
because other people are simultaneously editing the same area, or because you edited a feature that
extends and connects with features outside of your download area (when you make an edit of this
type, the software often warns you right away). The most common error is in deleting a way that
extends outside your download area and which connects with ways outside your download area—the
changeset then wants to delete the shared node (which is a conflict). The data uploader will not
upload a changeset until the conflicts have been resolved; the conflicts are resolved using the
Resolve Conflicts window. In this window you can choose to keep the version which is on the server –
this probably is the safest way to go. You will get a series of conflict resolution windows if you have
multiple conflicts; when they are all resolved, the upload will proceed.

The best strategy is to avoid conflicts by not deleting objects that extend outside of your download
area. These kinds of border edits are best done using the ID editor.
Validation of other volunteer’s tiles. Once you have become proficient in editing data and you have
been approved to validate, you may wish to start choosing tiles to Validate in the Task Manager. This
type of Validation is a more complete process than just using the JOSM Validate Tool.
To Validate another volunteer’s tile, click on an edited tile (one that is red), click on Validate, and
download the data into JOSM. Once you have an edited tile loaded into JOSM, there are several
Quality Assurance checks you should make:
● Run JOSM Validate on the data. Do this just like you did on your own data (described in the
previous section).
● Check for problems with tagging. Choose Selection⇨Select All to select all the data in the tile,
and then open the Tag window, which will have a summary of all the keys used in the
data--look for keys that we normally do not use. Tagging of roads seems especially subjective
in some cases, but volunteers should follow guidelines such as those available in the Wiki
topic for “Highway Tag Africa”.
● Use the Search function (Edit⇨Search) to locate data that may be a problem. Look at the OSM
Wiki Help page for Search to find out how Search works. Some useful searches:
○ Search for a tag key or value that should not be used (for example, fence)
○ Search for: building:-yes to find buildings not tagged with yes
○ Search for: barrier:-wall to find barriers not tagged with wall
○ Search for: highway:-residential to find roads not tagged with residential
○ Search for: type:node untagged –child to find untagged unused nodes
○ Seach for: type:relation to see if there are any relations – usually there should not be
any, but if there are, check to see they are valid
○ Search for: type:node child wall to find wall nodes that have been tagged, so that the
tag can be removed
○ Search for: type:node child building to find building nodes that have been tagged
● After you have checked for errors, scan the tile carefully to see if there is missing data, or
incorrect data. Some things to look for:
○ Buildings that are not squared, or do not accurately represent the shape of the
building
○ Features that are not captured
○ Features with bad geometry
○ Duplicate features
○ Walls that are closed ways tagged as areas
○ Roads that are captured poorly. These can be improved by using the “Improve Way
Accuracy” tool.
○ Roads that have unneeded nodes (for example, many nodes over a very straight
stretch. These extra nodes must be removed manually.

○ Roads that are too long. These should be split into segments.
○ Roads that are too short. These should be merged (unless the segment
After QA errors have been fixed, upload your changes, review the tile if you wish in the ID editor
(useful for checking ways that continue onto adjacent tiles), and when you are done click the Validate
button in the Tasking Manager.
If you find a tile which has a number of problems, indicating that it has been processed by a beginner,
you may want to contact them (the name of the volunteer is present in the Tasking Manager--when
you select the tile a history of who worked on it appears) to gently suggest ways in which they might
improve their work. You can contact them by sending a message in OSM’s built-in message system.
If you find yourself getting interested in Quality Assurance of OSM data, there is a Wiki quality
assurance page that discusses all sorts of tools that can be used. on data.
RESOURCES
OpenStreetMap Home page: The open map of the world!
OpenStreetMap Wiki: Information about all things about OSM
OSM Q&A website: Place to ask questions about OSM
Get JOSM: Website to download the program
JOSM Wiki Page: Info about JOSM and links to tutorials and help files
Tasking Manager: List of current tasks