Using Memory-Map - BHS Access & Bridleways Officers ...
10
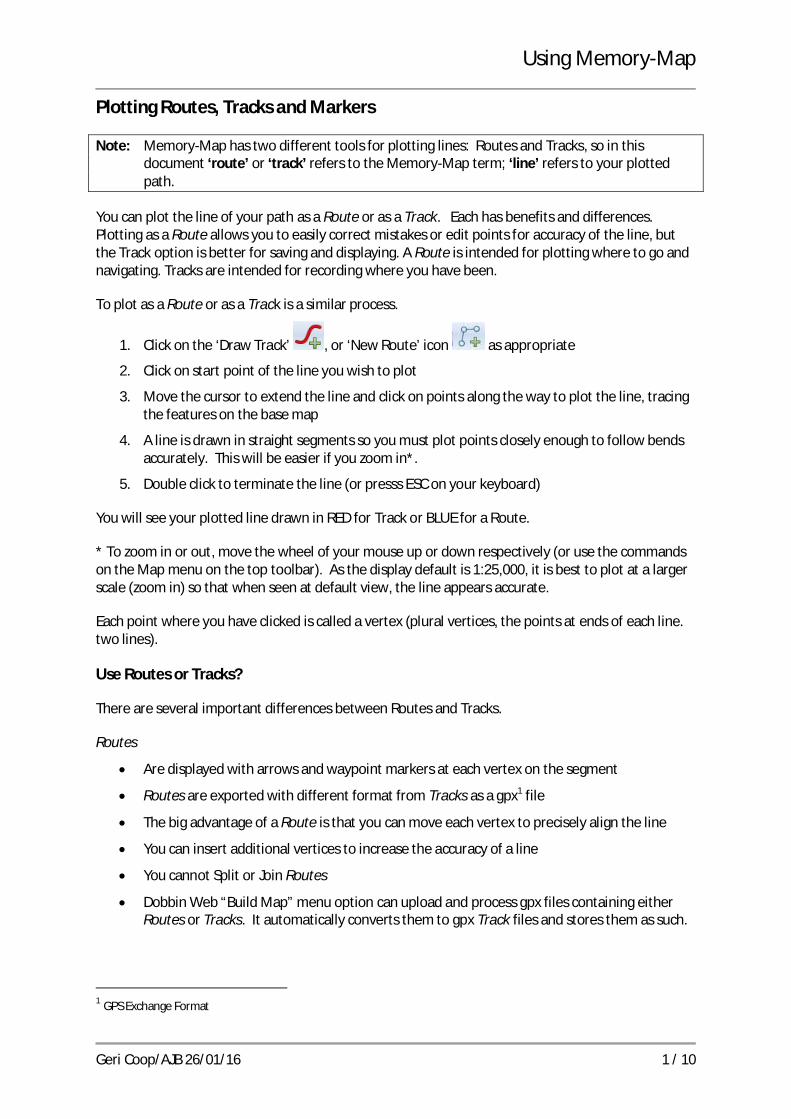
Using Memory-Map Geri Coop/AJB 26/01/16 1 / 10 Plotting Routes, Tracks and Markers Note: Memory-Map has two different tools for plotting lines: Routes and Tracks, so in this document ‘route’ or ‘track’ refers to the Memory-Map term; ‘line’ refers to your plotted path. You can plot the line of your path as a Route or as a Track. Each has benefits and differences. Plotting as a Route allows you to easily correct mistakes or edit points for accuracy of the line, but the Track option is better for saving and displaying. A Route is intended for plotting where to go and navigating. Tracks are intended for recording where you have been. To plot as a Route or as a Track is a similar process. 1. Click on the ‘Draw Track’ , or ‘New Route’ icon as appropriate 2. Click on start point of the line you wish to plot 3. Move the cursor to extend the line and click on points along the way to plot the line, tracing the features on the base map 4. A line is drawn in straight segments so you must plot points closely enough to follow bends accurately. This will be easier if you zoom in*. 5. Double click to terminate the line (or presss ESC on your keyboard) You will see your plotted line drawn in RED for Track or BLUE for a Route. * To zoom in or out, move the wheel of your mouse up or down respectively (or use the commands on the Map menu on the top toolbar). As the display default is 1:25,000, it is best to plot at a larger scale (zoom in) so that when seen at default view, the line appears accurate. Each point where you have clicked is called a vertex (plural vertices, the points at ends of each line. two lines). Use Routes or Tracks? There are several important differences between Routes and Tracks. Routes x Are displayed with arrows and waypoint markers at each vertex on the segment x Routes are exported with different format from Tracks as a gpx 1 file x The big advantage of a Route is that you can move each vertex to precisely align the line x You can insert additional vertices to increase the accuracy of a line x You cannot Split or Join Routes x Dobbin Web “Build Map” menu option can upload and process gpx files containing either Routes or Tracks. It automatically converts them to gpx Track files and stores them as such. 1 GPS Exchange Format
-
Upload
khangminh22 -
Category
Documents
-
view
0 -
download
0
Transcript of Using Memory-Map - BHS Access & Bridleways Officers ...
Using Memory-Map
Geri Coop/AJB 26/01/16 1 / 10
Plotting Routes, Tracks and Markers
Note: Memory-Map has two different tools for plotting lines: Routes and Tracks, so in thisdocument ‘route’ or ‘track’ refers to the Memory-Map term; ‘line’ refers to your plottedpath.
You can plot the line of your path as a Route or as a Track. Each has benefits and differences.Plotting as a Route allows you to easily correct mistakes or edit points for accuracy of the line, butthe Track option is better for saving and displaying. A Route is intended for plotting where to go andnavigating. Tracks are intended for recording where you have been.
To plot as a Route or as a Track is a similar process.
1. Click on the ‘Draw Track’ , or ‘New Route’ icon as appropriate
2. Click on start point of the line you wish to plot
3. Move the cursor to extend the line and click on points along the way to plot the line, tracingthe features on the base map
4. A line is drawn in straight segments so you must plot points closely enough to follow bendsaccurately. This will be easier if you zoom in*.
5. Double click to terminate the line (or presss ESC on your keyboard)
You will see your plotted line drawn in RED for Track or BLUE for a Route.
* To zoom in or out, move the wheel of your mouse up or down respectively (or use the commandson the Map menu on the top toolbar). As the display default is 1:25,000, it is best to plot at a largerscale (zoom in) so that when seen at default view, the line appears accurate.
Each point where you have clicked is called a vertex (plural vertices, the points at ends of each line.two lines).
Use Routes or Tracks?
There are several important differences between Routes and Tracks.
Routes
Are displayed with arrows and waypoint markers at each vertex on the segment
Routes are exported with different format from Tracks as a gpx1 file
The big advantage of a Route is that you can move each vertex to precisely align the line
You can insert additional vertices to increase the accuracy of a line
You cannot Split or Join Routes
Dobbin Web “Build Map” menu option can upload and process gpx files containing eitherRoutes or Tracks. It automatically converts them to gpx Track files and stores them as such.
1 GPS Exchange Format
Using Memory-Map
Geri Coop/AJB 26/01/16 2 / 10
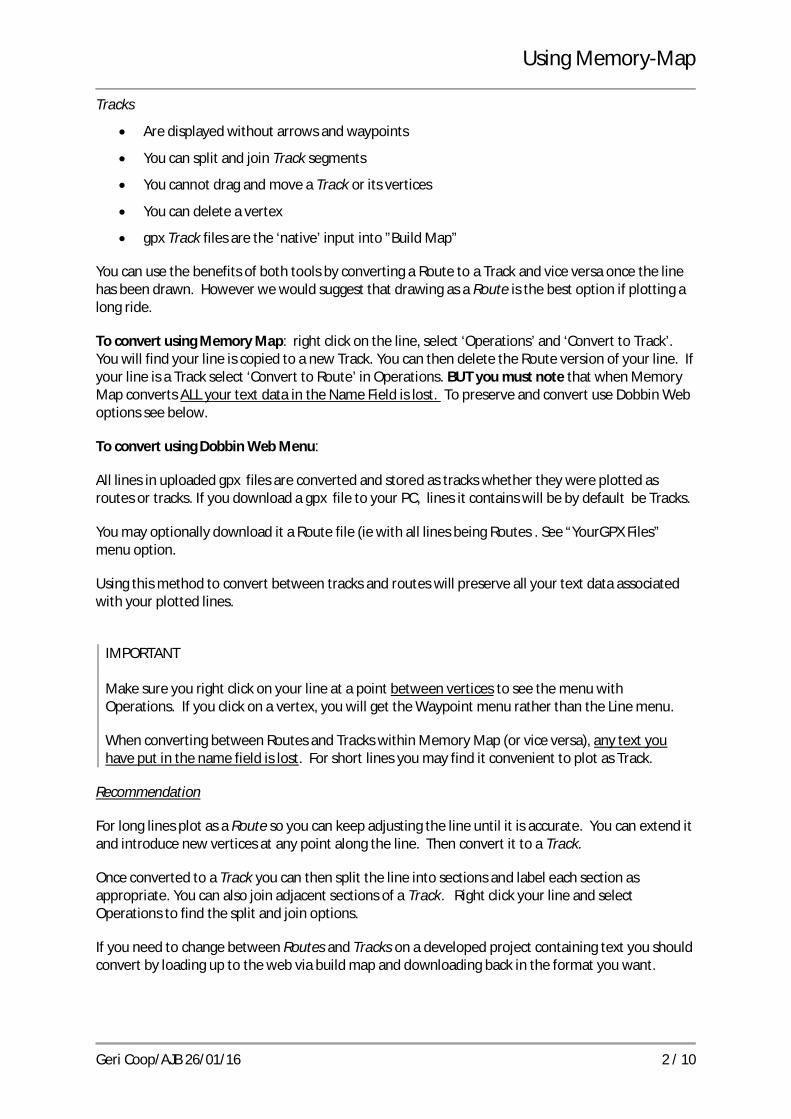
Tracks
Are displayed without arrows and waypoints
You can split and join Track segments
You cannot drag and move a Track or its vertices
You can delete a vertex
gpx Track files are the ‘native’ input into ”Build Map”
You can use the benefits of both tools by converting a Route to a Track and vice versa once the linehas been drawn. However we would suggest that drawing as a Route is the best option if plotting along ride.
To convert using Memory Map: right click on the line, select ‘Operations’ and ‘Convert to Track’.You will find your line is copied to a new Track. You can then delete the Route version of your line. Ifyour line is a Track select ‘Convert to Route’ in Operations. BUT you must note that when MemoryMap converts ALL your text data in the Name Field is lost. To preserve and convert use Dobbin Weboptions see below.
To convert using Dobbin Web Menu:
All lines in uploaded gpx files are converted and stored as tracks whether they were plotted asroutes or tracks. If you download a gpx file to your PC, lines it contains will be by default be Tracks.
You may optionally download it a Route file (ie with all lines being Routes . See “YourGPX Files”menu option.
Using this method to convert between tracks and routes will preserve all your text data associatedwith your plotted lines.
IMPORTANT
Make sure you right click on your line at a point between vertices to see the menu withOperations. If you click on a vertex, you will get the Waypoint menu rather than the Line menu.
When converting between Routes and Tracks within Memory Map (or vice versa), any text youhave put in the name field is lost. For short lines you may find it convenient to plot as Track.
Recommendation
For long lines plot as a Route so you can keep adjusting the line until it is accurate. You can extend itand introduce new vertices at any point along the line. Then convert it to a Track.
Once converted to a Track you can then split the line into sections and label each section asappropriate. You can also join adjacent sections of a Track. Right click your line and selectOperations to find the split and join options.
If you need to change between Routes and Tracks on a developed project containing text you shouldconvert by loading up to the web via build map and downloading back in the format you want.
Using Memory-Map
Geri Coop/AJB 26/01/16 3 / 10
Editing Routes and Tracks
Routes
Routes are always displayed with arrow and waypoints. Route waypoints are automatic anddisappear when you delete the Route.
Click any vertex and drag it to adjust your line.
Right click anywhere on the line and select ‘Insert Waymarker’ and then adjust the positionof the new waymarker by drag and drop.
Right click on Route and click ‘Operations’ and select ‘Convert to Track’ to make copy of yourline as a Track.
Right click on Route and click ‘Delete’ if you want to delete the whole line.
Tracks
You cannot adjust vertices once drawn (but you can edit Tracks by splitting, deleting,redrawing and joining).
If you make a mistake you can press Ctrl Z to delete the last segment you have drawn(before you terminate the line) but this also terminates the line.
You can continue drawing by starting a new segment continuing from the last.
You can then join this segment to the original by right clicking at the point to join andselecting Operations/Join Track.
You can split an existing Track, delete a section, redraw and join all the lines to make oneTrack again.
You can convert to Route, edit and then convert back BUT you will lose any properties thatyou have modified including name and associated text.
Right click on Track to select the line and bring up the menu (click between vertices, not on avertex). The useful options on this menu are:
1. Operations – enables you to split and join a Track and convert to a Route
2. Properties – enables you to name and colour a Track and change its width
3. Delete – deletes the selected Track
To Split a Track
Right click on the vertex where you want to break the line, select Operations/Split.
To join two Tracks
Right click on one of the adjacent Track segments you wish to join and selectOperations/Join. The two ends will be joined if they are reasonably close. If there is too biga gap, plot an extra short line in the gap then try again, joining to first one end, then theother.
Using Memory-Map
Geri Coop/AJB 26/01/16 4 / 10
To Delete
Right click on the Track segment (will be highlighted) and select Delete
Track Properties
To adjust the properties of a Track
Double click (or right click on the Track and click Properties.) On the menu that appears theitems of relevance are:
1. Track Name
2. Colour: with sub parameters, Width, Style, and Transparency
Enter a new name for your Track and the new name is automatically saved. The name canbe as long as you like and can contain a description of the Track. (Please see the followingsection for proposed conventions for naming your routes.)
Try adjusting the colour; close window when done.
Hover your mouse on the Track and its name and length will be displayed.
Adding Markers
Named markers may be added and a choice of symbol displayed for the marker. To add a marker toyour map:
Click on and click on the map where you want your marker.
Double click (or right click) on the marker to access properties where you can name themarker and also change the symbol displayed.
You can add text in the comment box to be displayed for the marker.
Text Labels
Text labels can only be used for your own local use in Memory-Map. They cannot be displayed onweb maps.
Click and click where you want the label. Adjust the text as necessary.
These labels are shown on the map in Memory-Map, but these labels are not exported (in .gpx file)so will not appear when map is displayed on the website. These labels should only be used for yourown use when displaying your maps on Memory-Map. You can hide them at any time by clearing thetick in the Text overlay object.
Moving Markers and Labels
Grab the marker or label and move to a new position

Using Memory-Map
Geri Coop/AJB 26/01/16 5 / 10
Saving and Exporting Your Data
Memory-Map automatically saves your work when you close your session and it automatically startswith the same maps displayed and overlays loaded – they are in a temporary workspace – but youare strongly recommended to save your work to named files for safety and security, don’t rely onthe automatic save. You can save your work in different formats and in whole or in parts.
To save all your work: click Overlay (on top toolbar) and Export All.
This will save all the routes, tracks and markers that you have loaded or drawn on yourcurrent session of Memory-Map.
By default up until Memory Map Version 6.1.0 the data will be saved as a Memory-MapOverlay (MMO) file. This is a proprietary format. It saves all your work complete includingcolours, widths and any text drawn on your map.
From Memory Map 6.1.0 onwards, your overlay data will be saved by default as a GPX file.From this version onwards the GPX file written also contains all colours, widths BUT NOTany. If you use text (for local annotation) you need to use MMO format to save it.
Once saved it is safe to clear the Memory-Map temporary workspace. Click Overlay andDelete All.
To avoid confusion with unsaved and temporary work, you are strongly recommended to dothis frequently and always before starting a new project.
To load saved work: Click Overlay and Import and select one of your saved files to load. This willcompletely restore the line (and markers) to your workspace exactly as you saved it.
To save parts of your work: right click on a line or marker in the Overlay Objects Window and click‘Save as’. ‘Save as’ is exactly the same as ‘Export’ apart from saving only specific parts of your work.You can also find Save As by right clicking on the line.
Exporting/Saving in other formats:
By default (until version 6.1.0) your work is saved as a Memory-Map Overlay (mmo) file. To saveyour work for upload to the web maps you need file type GPS Exchange Format (gpx). – GPX file.
To save as gpx (or any other file type) click Options in the save box when Exporting/Savingand choose gpx from the list of formats.
GPS Exchange Format is read by most GPSs and mapping software. It is also a format GenOSMapsoftware can read to convert to OS Open Space for the web (Ridemaps uses GenOSMap).
Note: This format records track and overlay names (see below)
Before MM V6.1.0, it does not record (or pass on) properties such as colour or width
If Memory-Map says you are not licensed to export in gpx format , you need to activate your licencefor this option. Click ‘Help’ and then ‘License Management’. Select GPS features and ‘Activate’.

Using Memory-Map
Geri Coop/AJB 26/01/16 6 / 10
Overlays
When you have added tracks and markers and view properties you will notice that another windowappears (default left side of screen) which shows all the objects you have drawn.
By default the item you have drawn will appear under either Marks, Routes or Tracks. Marks,Routes and Tracks are ‘top level’ Overlay Objects (or Categories, Overlays and Categories aresynonymous in this context.) which can have sub levels revealed by clicking the plus sign to the left.It becomes a minus sign, which you can click to hide the sub levels.
If you clear the tick on Marks (click it to clear) you will find that the Marks on the map will not bedisplayed; the same for clearing the tick on Tracks and Routes, they are no longer visible. You cantoggle display of any individual feature under a top level Overlay by clearing or adding the tick.
The Overlay/Category feature is a very important tool for organising and maintaining your data.
Organising your Data
The Overlay Objects structure is similar to the folder structure on your computer and objects can bemoved/dragged between categories as you can move files from folder to folder in windows.
New sub-categories can be added under the top level categories. Right Click on a category or subcategory and click ‘New Category’. Once Category is created you can rename it.
To rename a category or track/mark, click on the name and once selected click again.
By default new objects you draw appear under the default categories of Marks, Track or Routerespectively.
You can create new categories and move your objects (lines or markers) to be under the new ordifferent named category by dragging and dropping, that is, select your object in the Overlay Objectslist and drag it to its new category (hold down the left mouse click while moving the mouse until thecursor is in the new location then let go). Commonly, categories may be the name of a promotedroute or an area or a type of record e.g. obstructions, promoted routes.
Another, and sometimes better way, of organising your data is to complete a section of your workthen Rename the default category from Track to e.g. South Loch Ness Trail. When you next create anew Track, it will automatically create the Track category again and the new line will be listed there.
A double click will display the properties of an object which can then be edited.
Using Memory-Map
Geri Coop/AJB 26/01/16 7 / 10
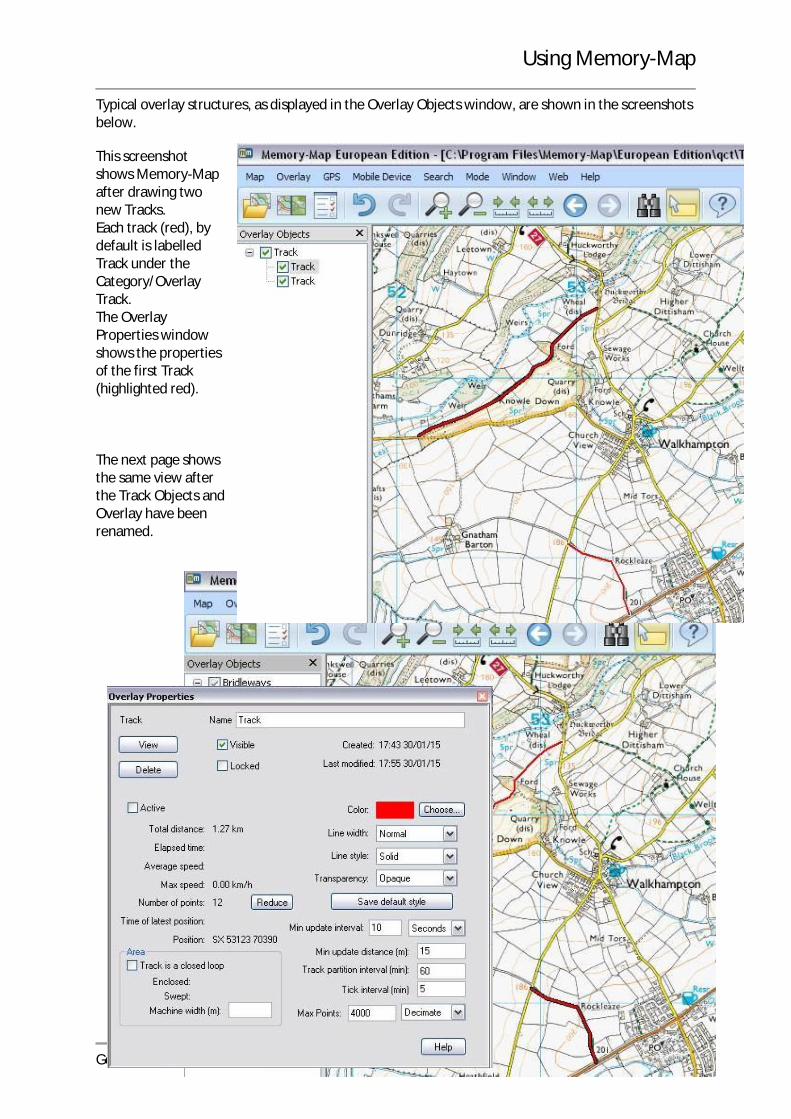
Typical overlay structures, as displayed in the Overlay Objects window, are shown in the screenshotsbelow.
This screenshotshows Memory-Mapafter drawing twonew Tracks.Each track (red), bydefault is labelledTrack under theCategory/OverlayTrack.The OverlayProperties windowshows the propertiesof the first Track(highlighted red).
The next page showsthe same view afterthe Track Objects andOverlay have beenrenamed.
Using Memory-Map
Geri Coop/AJB 26/01/16 8 / 10
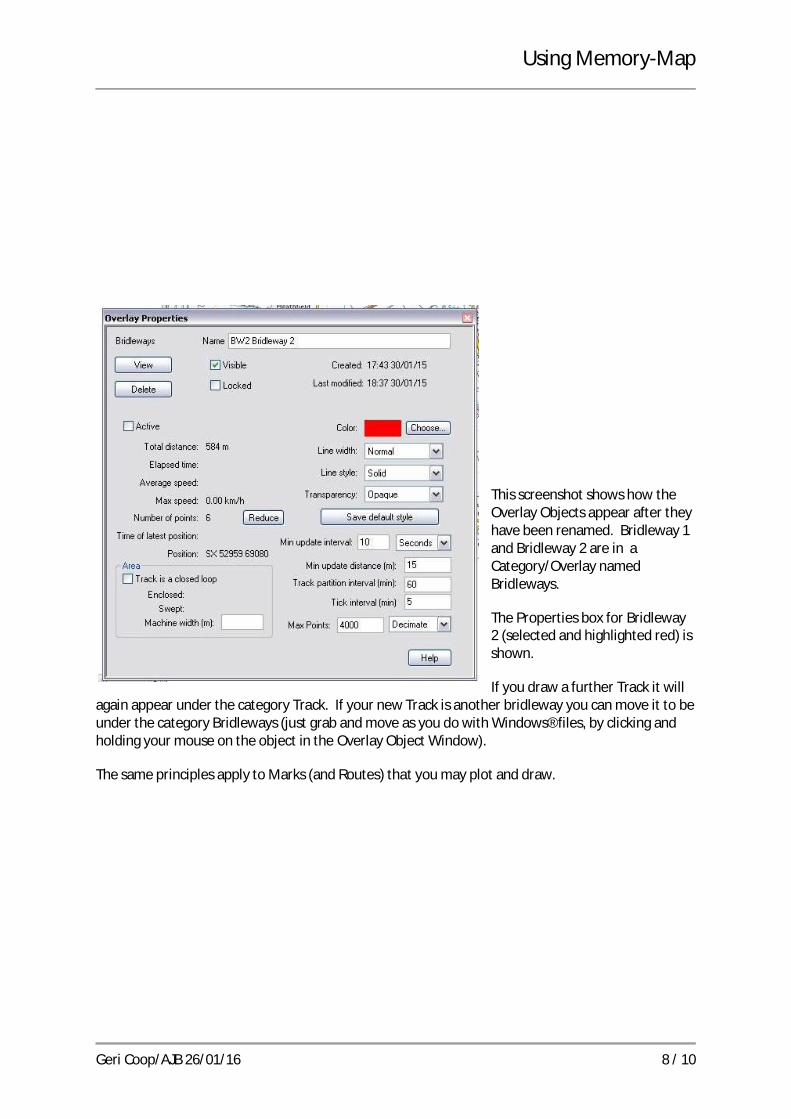
This screenshot shows how theOverlay Objects appear after theyhave been renamed. Bridleway 1and Bridleway 2 are in aCategory/Overlay namedBridleways.
The Properties box for Bridleway2 (selected and highlighted red) isshown.
If you draw a further Track it willagain appear under the category Track. If your new Track is another bridleway you can move it to beunder the category Bridleways (just grab and move as you do with Windows® files, by clicking andholding your mouse on the object in the Overlay Object Window).
The same principles apply to Marks (and Routes) that you may plot and draw.

Using Memory-Map
Geri Coop/AJB 26/01/16 9 / 10
The screenshot below showshow the rides of Scotlandhave been organised. Thereare three top level categories:Key Markers, Trails andWaypoint Markers.
If you look under ‘Trails’ youwill see that the AE Eskdalesub-category has beenexpanded (by clicking +) toshow the three Track sectionsforming the AE Eskdale ride.
Unless you are organising many types of data you may not need such a structure. However it isimportant to understand that Overlay/Category structure enables you to organise your work in thesame way that you use Windows® folders to organise your files.
Thus you can either save your work as a single Memory-Map (mmo) file or you can save them asindividual files.

Using Memory-Map
Geri Coop/AJB 26/01/16 10 / 10
Categories for Research Records
If you are contributing to the dataset of unrecorded routes, it is worth thinking early on whatcategories might be useful because it is much easier to add your new track to a category as soon asyou do it. Unfortunately, there is no easy way in Memory-Map of moving several objects at once(block select) by cut-and-paste or by drag-and-drop so after some months of inputting, with a fewhundred lines and text blocks, it is a very laborious task to start categorising them. Suggestions frompeople who have been entering unrecorded routes have been categories for:
Application made (for modification order)
Application in preparation
Some evidence found (commonly where one route is being researched and another routenearby is noticed in the same document)
Inclosure awarded as … (useful where all routes in an Award are systematically plotted)
Other Route with Public Access (ORPA on Ordnance Survey)
One benefit of undertaking the categorisation is that you can then make any, all or none of thecategories easily visible. It is also possible to quickly copy a line to appear in more than onecategory, e.g Inclosure Award and Application in preparation.


![14-30222 [20-2014] Elford BHS-1 Memorandum Decision.pdf](https://static.fdokumen.com/doc/165x107/631a5f71c51d6b41aa04cd12/14-30222-20-2014-elford-bhs-1-memorandum-decisionpdf.jpg)