User's manual Installation - Arimec
12
User’s manual Installation MU
-
Upload
khangminh22 -
Category
Documents
-
view
1 -
download
0
Transcript of User's manual Installation - Arimec
User’s manualInstallation
MU


MUINDEX
1. PRESENTATION2. INTRODUCTION3. TECHNICAL CHARACTERISTICS4. UNPACKING AND VERIFICATIONOF THE CONTENTS5. PRIOR WARNINGS6. INSTALLATION7. MAINTENANCE8. WARRANTY9. MAINTENANCE SERVICE BOOK
444
445689
English
English
4
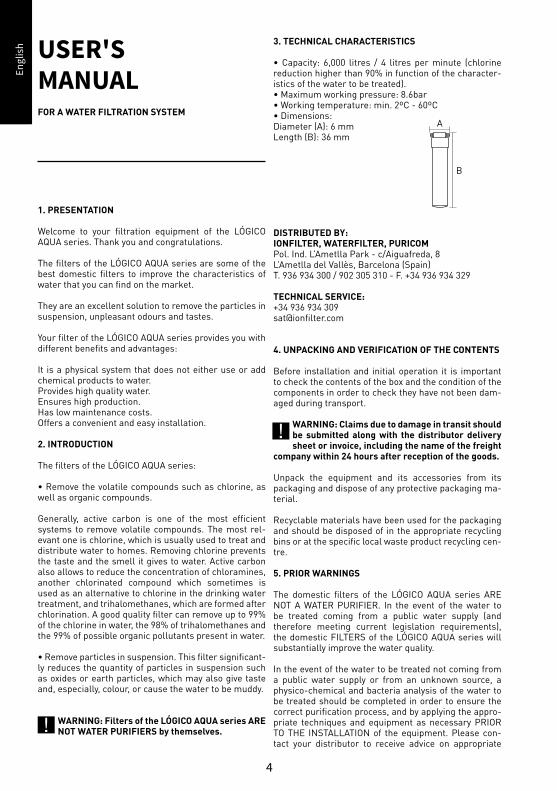
1. PRESENTATION
Welcome to your filtration equipment of the LÓGICO AQUA series. Thank you and congratulations.
The filters of the LÓGICO AQUA series are some of the best domestic filters to improve the characteristics of water that you can find on the market.
They are an excellent solution to remove the particles in suspension, unpleasant odours and tastes.
Your filter of the LÓGICO AQUA series provides you with different benefits and advantages:
It is a physical system that does not either use or add chemical products to water.Provides high quality water.Ensures high production.Has low maintenance costs.Offers a convenient and easy installation.
2. INTRODUCTION
The filters of the LÓGICO AQUA series: • Remove the volatile compounds such as chlorine, as well as organic compounds.
Generally, active carbon is one of the most efficient systems to remove volatile compounds. The most rel-evant one is chlorine, which is usually used to treat and distribute water to homes. Removing chlorine prevents the taste and the smell it gives to water. Active carbon also allows to reduce the concentration of chloramines, another chlorinated compound which sometimes is used as an alternative to chlorine in the drinking water treatment, and trihalomethanes, which are formed after chlorination. A good quality filter can remove up to 99% of the chlorine in water, the 98% of trihalomethanes and the 99% of possible organic pollutants present in water.
• Remove particles in suspension. This filter significant-ly reduces the quantity of particles in suspension such as oxides or earth particles, which may also give taste and, especially, colour, or cause the water to be muddy.
WARNING: Filters of the LÓGICO AQUA series ARE NOT WATER PURIFIERS by themselves.
3. TECHNICAL CHARACTERISTICS
• Capacity: 6,000 litres / 4 litres per minute (chlorine reduction higher than 90% in function of the character-istics of the water to be treated).• Maximum working pressure: 8.6bar• Working temperature: min. 2ºC - 60ºC• Dimensions:Diameter (A): 6 mmLength (B): 36 mm
DISTRIBUTED BY:IONFILTER, WATERFILTER, PURICOMPol. Ind. L’Ametlla Park - c/Aiguafreda, 8L’Ametlla del Vallès, Barcelona (Spain)T. 936 934 300 / 902 305 310 - F. +34 936 934 329
TECHNICAL SERVICE:+34 936 934 [email protected]
4. UNPACKING AND VERIFICATION OF THE CONTENTS
Before installation and initial operation it is important to check the contents of the box and the condition of the components in order to check they have not been dam-aged during transport.
WARNING: Claims due to damage in transit should be submitted along with the distributor delivery sheet or invoice, including the name of the freight
company within 24 hours after reception of the goods.
Unpack the equipment and its accessories from its packaging and dispose of any protective packaging ma-terial.
Recyclable materials have been used for the packaging and should be disposed of in the appropriate recycling bins or at the specific local waste product recycling cen-tre.
5. PRIOR WARNINGS
The domestic filters of the LÓGICO AQUA series ARE NOT A WATER PURIFIER. In the event of the water to be treated coming from a public water supply (and therefore meeting current legislation requirements), the domestic FILTERS of the LÓGICO AQUA series will substantially improve the water quality.
In the event of the water to be treated not coming from a public water supply or from an unknown source, a physico-chemical and bacteria analysis of the water to be treated should be completed in order to ensure the correct purification process, and by applying the appro-priate techniques and equipment as necessary PRIOR TO THE INSTALLATION of the equipment. Please con-tact your distributor to receive advice on appropriate
A
B
USER'SMANUALFOR A WATER FILTRATION SYSTEM
English
English
5
treatment.
6. INSTALLATION
WARNING: The work must be carried out under adequate hygienic conditions, taking the neces-sary precautions with everything related to the
materials that are going to be in contact with the water to be treated or consumed.
6.1. INSTALLATION OF THE AGUA DIRECT PACK
1. Choose the filter location under the sink. Before fixing the head in its definitive location, check that the dimen-sions of the flexible pipes are long enough to carry out the installation.
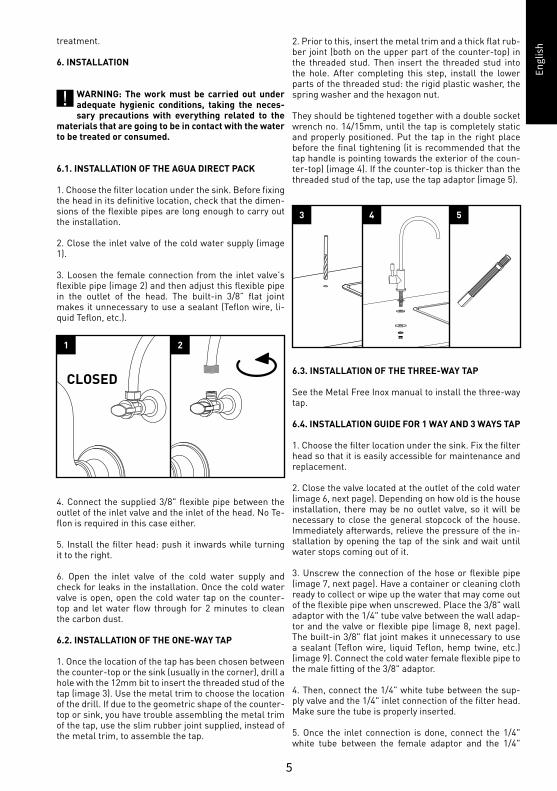
2. Close the inlet valve of the cold water supply (image 1). 3. Loosen the female connection from the inlet valve's flexible pipe (image 2) and then adjust this flexible pipe in the outlet of the head. The built-in 3/8” flat joint makes it unnecessary to use a sealant (Teflon wire, li-quid Teflon, etc.).
4. Connect the supplied 3/8" flexible pipe between the outlet of the inlet valve and the inlet of the head. No Te-flon is required in this case either.
5. Install the filter head: push it inwards while turning it to the right.
6. Open the inlet valve of the cold water supply and check for leaks in the installation. Once the cold water valve is open, open the cold water tap on the counter-top and let water flow through for 2 minutes to clean the carbon dust.
6.2. INSTALLATION OF THE ONE-WAY TAP
1. Once the location of the tap has been chosen between the counter-top or the sink (usually in the corner), drill a hole with the 12mm bit to insert the threaded stud of the tap (image 3). Use the metal trim to choose the location of the drill. If due to the geometric shape of the counter-top or sink, you have trouble assembling the metal trim of the tap, use the slim rubber joint supplied, instead of the metal trim, to assemble the tap.
CLOSED
2. Prior to this, insert the metal trim and a thick flat rub-ber joint (both on the upper part of the counter-top) in the threaded stud. Then insert the threaded stud into the hole. After completing this step, install the lower parts of the threaded stud: the rigid plastic washer, the spring washer and the hexagon nut.
They should be tightened together with a double socket wrench no. 14/15mm, until the tap is completely static and properly positioned. Put the tap in the right place before the final tightening (it is recommended that the tap handle is pointing towards the exterior of the coun-ter-top) (image 4). If the counter-top is thicker than the threaded stud of the tap, use the tap adaptor (image 5).
6.3. INSTALLATION OF THE THREE-WAY TAP
See the Metal Free Inox manual to install the three-way tap.
6.4. INSTALLATION GUIDE FOR 1 WAY AND 3 WAYS TAP
1. Choose the filter location under the sink. Fix the filter head so that it is easily accessible for maintenance and replacement.
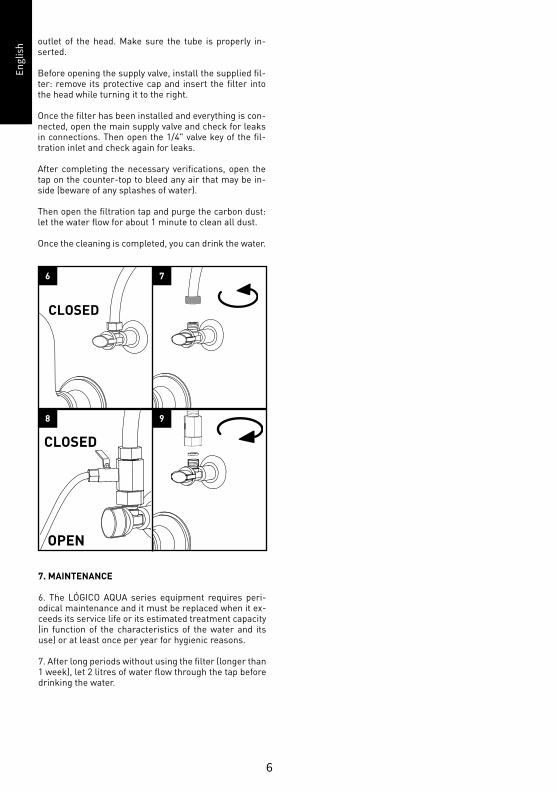
2. Close the valve located at the outlet of the cold water (image 6, next page). Depending on how old is the house installation, there may be no outlet valve, so it will be necessary to close the general stopcock of the house. Immediately afterwards, relieve the pressure of the in-stallation by opening the tap of the sink and wait until water stops coming out of it.
3. Unscrew the connection of the hose or flexible pipe (image 7, next page). Have a container or cleaning cloth ready to collect or wipe up the water that may come out of the flexible pipe when unscrewed. Place the 3/8" wall adaptor with the 1/4" tube valve between the wall adap-tor and the valve or flexible pipe (image 8, next page). The built-in 3/8" flat joint makes it unnecessary to use a sealant (Teflon wire, liquid Teflon, hemp twine, etc.) (image 9). Connect the cold water female flexible pipe to the male fitting of the 3/8" adaptor.
4. Then, connect the 1/4" white tube between the sup-ply valve and the 1/4" inlet connection of the filter head. Make sure the tube is properly inserted.
5. Once the inlet connection is done, connect the 1/4" white tube between the female adaptor and the 1/4"
1
3
2
4 5
English
English
6
outlet of the head. Make sure the tube is properly in-serted.
Before opening the supply valve, install the supplied fil-ter: remove its protective cap and insert the filter into the head while turning it to the right.
Once the filter has been installed and everything is con-nected, open the main supply valve and check for leaks in connections. Then open the 1/4" valve key of the fil-tration inlet and check again for leaks.
After completing the necessary verifications, open the tap on the counter-top to bleed any air that may be in-side (beware of any splashes of water).
Then open the filtration tap and purge the carbon dust: let the water flow for about 1 minute to clean all dust.
Once the cleaning is completed, you can drink the water.
7. MAINTENANCE
6. The LÓGICO AQUA series equipment requires peri-odical maintenance and it must be replaced when it ex-ceeds its service life or its estimated treatment capacity (in function of the characteristics of the water and its use) or at least once per year for hygienic reasons.
7. After long periods without using the filter (longer than 1 week), let 2 litres of water flow through the tap before drinking the water.
CLOSED
CLOSED
OPEN
6
8
7
9
English
English
7
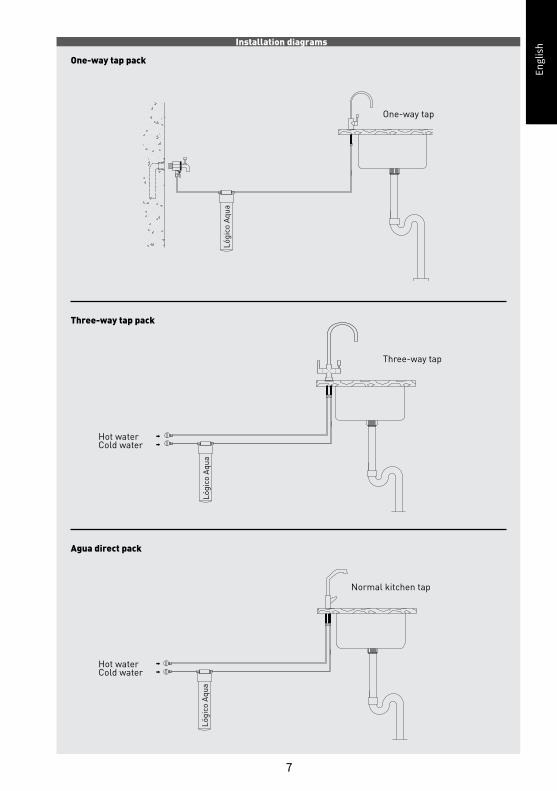
Installation diagrams
One-way tap pack
Three-way tap pack
Agua direct pack
Hot water
Hot water
Three-way tap
Normal kitchen tap
One-way tap
Cold water
Cold water
Lógi
co A
qua
Lógi
co A
qua
Lógi
co A
qua

English
English
8
8. WARRANTY
EQUIPMENT GUARANTEE FOR THE END USER:
The distributor guarantees this equipment for a period of two years against any fault found, and in accordance with the provisions of RD (Royal Decree) 1/2007 of the 16th of November (Amended text of the General Law for the Protection of Consumers and Users). This guarantee encompasses reparation and replacement of defective parts by personnel authorised by the distributor or by the Official Technical Assistance Service (SAT), either at the location of installation or at their respective workshops. Labour and shipping costs incurred by said repairs are included in the guarantee. IF/PEU/PAM* will not be liable to honour the warranty in the event of parts, which are subject to general wear and tear, lack of due maintenance, damage or other incidents due to the consequence of misuse or inappropriate use in accordance with conditions, and functional limits of said equipment as indicated by the manufacturer. Furthermore, the warranty will be rendered invalid in the event of poor use or in the event of said equipment being modified or repaired by personnel not authorised by the distributor or by the official SAT. Replacement parts under warranty shall remain the property of IF/PEU/PAM*.IF/PEU/PAM* shall be held responsible for any lack of conformity of equipment in relation to its origin, identity or appropriateness of the products, in accordance with equipment type and end use. Taking into account the equipment’s characteristics, in order for the warranty to cover any lack of conformity, the adherence to the installation and working technical conditions which appear in this warranty is essential, as well as the submission of either a sales invoice or receipt. Failure to comply with said conditions my invalidate this warranty, taking into account the relevance of the equipment’s aim and conditions and working limits.The distributor guarantees that the installed equipment is appropriate for the improvement of the quality of the water to be treated, in accordance with the equipment’s characteristics and current legislation.The installation personnel will be responsible for any lack of conformity which arises from any incorrect application, installation or initial operation of said equipment. For any warranty claim the submission of the sales receipt is required. The 2-year period is calculated from the date the equipment is purchased from the distributor.If during the warranty period the equipment encounters any issues please contact your local distributor.
* IF/PEU/PAM = IONFILTER / PURICOM EUROPE / PURICOM AMÉRICA

English
English
9
9. MAINTENANCE SERVICE BOOK
MAINTENANCE COMPLETE
REPAIR
SANITATION
OTHERS
/ /
/ /
/ /
/ /
MAINTENANCE COMPLETE
REPAIR
SANITATION
OTHERS
/ /
/ /
/ /
/ /
MAINTENANCE COMPLETE
REPAIR
SANITATION
OTHERS
/ /
/ /
/ /
/ /
MAINTENANCE COMPLETE
REPAIR
SANITATION
OTHERS
/ /
/ /
/ /
/ /
MAINTENANCE COMPLETE
REPAIR
SANITATION
OTHERS
/ /
/ /
/ /
/ /
TYPE OF SERVICEDATE NAME, SIGNATURE AND STAMP AUTHORISED TECHNICIAN
MAINTENANCE COMPLETE
REPAIR
SANITATION
OTHERS
/ /
INITIAL OPERATION/ /
/ /
/ /
/ /
TECHNICIAN
ORDINARY
EXTRAORDINARY
WARRANTY
STAMP
TECHNICIAN ORDINARY
EXTRAORDINARY
WARRANTY
STAMP
TECHNICIAN ORDINARY
EXTRAORDINARY
WARRANTY
STAMP
TECHNICIAN ORDINARY
EXTRAORDINARY
WARRANTY
STAMP
TECHNICIAN ORDINARY
EXTRAORDINARY
WARRANTY
STAMP
TECHNICIAN ORDINARY
EXTRAORDINARY
WARRANTY
STAMP
English
English
10
9. MAINTENANCE SERVICE BOOK
MAINTENANCE COMPLETE
REPAIR
SANITATION
OTHERS
/ /
/ /
/ /
/ /
MAINTENANCE COMPLETE
REPAIR
SANITATION
OTHERS
/ /
/ /
/ /
/ /
MAINTENANCE COMPLETE
REPAIR
SANITATION
OTHERS
/ /
/ /
/ /
/ /
MAINTENANCE COMPLETE
REPAIR
SANITATION
OTHERS
/ /
/ /
/ /
/ /
MAINTENANCE COMPLETE
REPAIR
SANITATION
OTHERS
/ /
/ /
/ /
/ /
TYPE OF SERVICEDATE NAME, SIGNATURE AND STAMP AUTHORISED TECHNICIAN
MAINTENANCE COMPLETE
REPAIR
SANITATION
OTHERS
/ /
INITIAL OPERATION/ /
/ /
/ /
/ /
TECHNICIAN
ORDINARY
EXTRAORDINARY
WARRANTY
STAMP
TECHNICIAN ORDINARY
EXTRAORDINARY
WARRANTY
STAMP
TECHNICIAN ORDINARY
EXTRAORDINARY
WARRANTY
STAMP
TECHNICIAN ORDINARY
EXTRAORDINARY
WARRANTY
STAMP
TECHNICIAN ORDINARY
EXTRAORDINARY
WARRANTY
STAMP
TECHNICIAN ORDINARY
EXTRAORDINARY
WARRANTY
STAMP

English
English
11
10. NOTES

MULÓGICOAQUA2016
MU