User Manual MiniFuse 2 - Arturia
45
USER MANUAL _MINIFUSE 2
-
Upload
khangminh22 -
Category
Documents
-
view
4 -
download
0
Transcript of User Manual MiniFuse 2 - Arturia

USER MANUAL
_MINIFUSE 2

Special Thanks
DIRECTIONFrédéric BRUN Kevin MOLCARD
DEVELOPMENTJérôme LAURENT
Daire O'NEILL
Timothée BEHETY
Aurore BAUD
Benjamin REYNIER
Arthur RÖNISCH
Lionel FERRAGUT
Nadine LANTHEAUME
Jérôme BLANC
DESIGNMartin DUTASTA Morgan PERRIER Axel HARTMANN
TESTINGThomas BARBIER Matthieu BOSSHARDT Emilie JACUSZIN
BETA TESTINGPaolo NEGRI
Marco CORREIA
Bernd WALDSTÄDT
Khutornoy Maksim
JUREVICH
Erik VAN DE VOSSENBERG
Luca LEFÈVRE
David BIRDWELL
Navi RETLAV
Gert BRAAKMAN
Pierre GACHET
Charles CAPSIS IV
Andrew HENDERSON
Chuck ZWICKY
George WARE
Tony FLYING SQUIRREL
Terence MARSDEN
Kirke GODFREY
Adán SÁNCHEZ DE PEDRO
CRESPO
Are LEISTAD
Luis RODRIGUEZ
MANUALStephan VANKOV
Jimmy MICHON
Holger STEINBRINK
Minoru KOIKE
Gala KHALIFE
Justin TROMBLEY
© ARTURIA SA – 2021 – All rights reserved.26 avenue Jean Kuntzmann38330 Montbonnot-Saint-MartinFRANCEwww.arturia.com
Information contained in this manual is subject to change without notice and does notrepresent a commitment on the part of Arturia. The software described in this manual isprovided under the terms of a license agreement or non-disclosure agreement. The softwarelicense agreement specifies the terms and conditions for its lawful use. No part of thismanual may be reproduced or transmitted in any form or by any purpose other thanpurchaser’s personal use, without the express written permission of ARTURIA S.A.
All other products, logos or company names quoted in this manual are trademarks orregistered trademarks of their respective owners.
Product version: 1.0.0
Revision date: 28 September 2021

Thank you for purchasing the Arturia MiniFuse2!
This manual covers the features and operation of Arturia’s MiniFuse 2. MiniFuse 2 is aprofessional-grade audio interface that empowers the recording and production of musicand audio content. Whether in the studio, on the road, or at home, we are confident that theMiniFuse 2 will become an indispensable tool in your kit.
Be sure to register your MiniFuse 2 as soon as possible! There is a sticker on the bottompanel that contains the serial number of your unit and an unlock code. These are requiredduring the online registration process at www.arturia.com. You may want to record theseelsewhere or take a photo of the sticker in case it becomes damaged.
Registering your MiniFuse 2 provides the following benefits:
• Access to the latest version of the Arturia Software Center and MiniFuse ControlCenter applications
• Special offers restricted to MiniFuse owners
As a registered owner, you also have access to an exclusive software bundle that includes:
• Arturia's Pre 1973, Rev PLATE-140, Delay TAPE-201, Chorus JUN-6 audio effects
• Arturia's Analog Lab Intro containing thousands of ready-to-use instruments andsounds
• Ableton Live Lite
• NI Guitar Rig 6 LE
• 3-month complimentary subscription to Splice
• 3-month complimentary subscription to Auto-Tune Unlimited
• Exclusive Ableton Live Lite sessions curated by producers around the globe
MiniFuse 2 is easy to use, so you’ll probably start experimenting with it right out of the box.However, please be sure to read this manual even if you are an experienced user, as wedescribe many useful tips that will help you get the most out of your purchase. We're sureyou will find MiniFuse 2 a powerful tool in your setup and we hope you'll use it to its fullestpotential.
Happy music making!
The Arturia team

Special Message Section
Specifications Subject to Change:
The information contained in this manual is believed to be correct at the time of printing.However, Arturia reserves the right to change or modify any of the specifications withoutnotice or obligation to update the hardware that has been purchased.
IMPORTANT:
The product and its software, when used in combination with an amplifier, headphones orspeakers, may be able to produce sound levels that could cause permanent hearing loss.DO NOT operate for long periods of time at a high level or at a level that is uncomfortable.
If you encounter any hearing loss or ringing in the ears, you should consult an audiologist.
NOTICE:
Service charges incurred due to a lack of knowledge relating to how a function or featureworks (when the product is operating as designed) are not covered by the manufacturer’swarranty, and are therefore the owner's responsibility. Please study this manual carefullyand consult your dealer before requesting service.
Precautions include, but are not limited to, the following:
1. Read and understand all the instructions.
2. Always follow the instructions on the device.
3. Before cleaning the device, always remove the USB cable. When cleaning, use asoft and dry cloth. Do not use gasoline, alcohol, acetone, turpentine or any otherorganic solutions; do not use a liquid cleaner, spray or cloth that is too wet.
4. Do not use the device near water or moisture, such as a bathtub, sink, swimmingpool or similar place.
5. Do not place the device in an unstable position where it might accidentally fallover.
6. Do not place heavy objects on the device. Do not block openings or vents of thedevice; these locations are used for air circulation to prevent the device fromoverheating. Do not place the device near a heat vent at any location with poorair circulation.
7. Do not open or insert anything into the device that may cause a fire or electricalshock.
8. Do not spill any kind of liquid onto the device.
9. Always take the device to a qualified service center. You will invalidate yourwarranty if you open and remove the cover, and improper assembly may causeelectrical shock or other malfunctions.
10. Do not use the device with thunder and lightning present; otherwise it may causelong distance electrical shock.
11. Do not expose the device to hot sunlight.
12. Do not use the device when there is a gas leak nearby.
13. Arturia is not responsible for any damage or data loss caused by improperoperation of the device.

Table Of Contents1. INTRODUCTION............................................................................................................................................................. 2
1.1. WHAT IS AN AUDIO INTERFACE AND WHY DO I NEED ONE?.................................................................. 2
1.2. MINIFUSE 2 FEATURES OVERVIEW........................................................................................................................... 2
2. CONNECTION DIAGRAM......................................................................................................................................... 33. FRONT PANEL FEATURES........................................................................................................................................ 44. REAR PANEL FEATURES ........................................................................................................................................... 65. SETUP................................................................................................................................................................................... 7
5.1. Changing default system audio input and output .......................................................................................... 85.1.1. MacOS................................................................................................................................................................................................................................... 8
5.1.2. Windows ......................................................................................................................................................................................................................... 10
5.2. Using the MiniFuse 2 as an audio device with your DAW....................................................................... 115.2.1. Configuring audio in Ableton Live................................................................................................................................................................... 12
5.2.2. Configuring audio in FL Studio ........................................................................................................................................................................ 13
5.2.3. Configuring audio in Analog Lab ................................................................................................................................................................... 14
5.3. Recording audio into your DAW............................................................................................................................... 15
5.4. Using the MiniFuse 2 as a MIDI device with your DAW .......................................................................... 165.4.1. Configuring MIDI in Ableton Live .................................................................................................................................................................... 16
5.4.2. Configuring MIDI in FL Studio........................................................................................................................................................................... 17
5.4.3. Configuring MIDI in Analog Lab..................................................................................................................................................................... 18
5.5. Recording MIDI from the MiniFuse 2 into your DAW................................................................................. 19
6. MINIFUSE CONTROL CENTER .......................................................................................................................... 206.1. Top Toolbar ............................................................................................................................................................................ 20
6.2. Device Controls ................................................................................................................................................................... 22
7. LOOPBACK RECORDING FEATURE................................................................................................................. 247.1. Routing computer audio to the Loopback output/input ............................................................................ 24
7.1.1. Recording all computer audio............................................................................................................................................................................ 24
7.1.2. Record audio from specific applications ................................................................................................................................................... 28
7.1.3. Recording into your DAW.................................................................................................................................................................................... 30
8. A QUICK PRIMER ON DIGITAL AUDIO........................................................................................................ 328.1. What is latency?................................................................................................................................................................. 32
8.2. Sample Rate.......................................................................................................................................................................... 33
8.3. Buffer Size.............................................................................................................................................................................. 34
8.4. A red herring......................................................................................................................................................................... 34
8.5. How to deal with latency.............................................................................................................................................. 358.5.1. Recording live audio................................................................................................................................................................................................ 35
8.5.2. Recording a MIDI part .......................................................................................................................................................................................... 35
8.5.3. Mixing and mastering ........................................................................................................................................................................................... 35
9. SPECIFICATIONS....................................................................................................................................................... 369.1. Box Contents.......................................................................................................................................................................... 36
9.2. Hardware Specifications .............................................................................................................................................. 37
10. Declaration of Conformity................................................................................................................................ 3911. Software License Agreement .......................................................................................................................... 40

1. INTRODUCTION
Thank you for purchasing our compact audio interface, the MiniFuse 2. We at Arturia arecommitted to delivering excellent products that satisfy the needs of modern musiciansand producers - we are confident that the MiniFuse 2 will be a perfect companion to anycomputer-based music production and recording setup.
1.1. WHAT IS AN AUDIO INTERFACE AND WHY DO I NEED ONE?
An audio interface is an outboard device that handles processing of audio input andoutput. While all laptop and desktop computers these days come equipped with integratedsoundcards, in practice these are only meant for casual use and are, in most cases,insufficient for the demanding tasks of audio production and recording. Our MiniFuse 2is an affordable, professional-grade dedicated audio interface that offers the followingadvantages over a typical onboard soundcard:
• Optimized for low-latency performance
• Microphone preamp(s) for crisp, present recording of vocals and instruments
• High-impedance input(s) to directly record your guitar or bass.
• Headphone and speaker system outputs for flexible monitoring
• Loopback recording for recording computer audio without any messy hardwareor software configurations.
• Direct Monitoring for monitoring your performance without any processinglatency.
1.2. MINIFUSE 2 FEATURES OVERVIEW
• 2 x combo Mic/Inst/Line XLR inputs with optional 48V phantom power
• 2 x 1/4" TRS balanced line outputs
• 1 x 1/4" stereo headphone output
• 1 x 5-pin MIDI input
• 1 x 5-pin MIDI output
• 1 x USB2 type A hub (low power)
• USB-C interface compatible with PC, Mac, fully USB 2.0 compatible
• Bus-powered
• Up to 192kHZ / 24bits
• Loopback stereo input (at all sample rates)
2 Arturia - User Manual MiniFuse 2 - INTRODUCTION

2. CONNECTION DIAGRAM
1 : XLR/TRS combo inputs for microphones, guitars/basses or other instruments
2 : Monitor Volume knob
3 : Headphones output
1 : TRS outputs to connect powered speakers or mixers/amplifiers
2 : MIDI input/output to control a synthesizer, drum machine or some other Midi device
3 : USB hub port allowing connection of thumb drives, controllers or other USB devicesrequiring less than 250mA
4 : Connection to the computer
Note: We strongly recommend using the included cable with your interface when connecting your
device to a computer to avoid any connectivity issues. The included USB cable has been specially
designed for the Arturia MiniFuse 2.
Arturia - User Manual MiniFuse 2 - CONNECTION DIAGRAM 3

3. FRONT PANEL FEATURES
The front panel of the MiniFuse 2 provides access to most of the essential features on theunit.
1. The combo jack(s) accept two different kinds of input - XLR and TRS - allowing you toconnect a variety of microphones and instruments into the MiniFuse. The type of input isdetermined by the Guitar and 48V switches next to the input.
2. The Inst switch toggles the high-impedance circuit for the corresponding input.
When recording instruments with pickups, like guitar and bass, using the high-impedance setting
adjusts the internal circuit so that you can plug the instrument directly into the input without having
to first plug into an amp or a direct box. When using other types of inputs, like synthesizers or
microphones, leave this switch in the inactive position.
3. 48V switch turns on phantom power for the input(s). Phantom power delivers a powercurrent to a connected microphone and may be required to get a good signal out of certaintypes of microphones. Please read the following recommendations regarding when andhow to use phantom power:
Only certain types of microphones, like condenser microphones, require phantom power to function
properly. Please check your microphone’s user manual to determine which type it is. Phantom power
may damage some equipment, like certain ribbon microphones. Ensure that you are only using
phantom power with microphones that require it. Do not connect or disconnect microphones while
phantom power is turned on. Turn off phantom power first, then connect or disconnect the microphone.
4. The Gain knob controls the gain of the input preamp. Use it to adjust the volume of theinput to ensure that you are capturing a good signal without overloading. The knob alsofeatures a LED indicator to help with setting input gain. When an instrument or microphonesource is detected, the LED will illuminate blue. If the input signal overloads, the LED willilluminate red. If this happens, turn down the Gain knob.
High-resolution input metering is available through the MiniFuse Control Center [p.20] application.
4 Arturia - User Manual MiniFuse 2 - FRONT PANEL FEATURES

5. Monitor Volume knob controls the volume of the signal sent to the speakers (outputs L &R on the rear panel).
6. Monitor Mix knob controls the mix of direct input signal (Direct Monitoring) and computeraudio playback. Its default position is Fully Clockwise. At minimum position, you will onlyhear signal from the interface input(s). As you turn up the knob, you will gradually crossfadeto computer playback. At maximum position, you will only hear computer playback.
Recording live instruments on a computer can sometimes present challenges, depending on your
computer configuration and CPU load. Since your computer processes incoming and outgoing audio
in buffer “chunks”, this can result in delayed playback of the input signal, which can create distracting
echoes that could throw off a performance. Instead of monitoring the input signal through software, the
MiniFuse 2 gives you the option of using Direct Monitoring. Direct Monitoring sends the input signal(s)
directly to the outputs, allowing you to listen to the input(s) directly without any latency introduced by
computer processing. To read more about latency and how to best deal with it, please see the A Quick
Primer On Digital Audio [p.32] section of this manual.
7. Direct Mono switch controls how the input signals are distributed across the stereooutput when using Direct Monitoring. In the inactive position, input 1 is sent to the left channel(output 1) while input 2 is sent to the right channel (output 2). In the active position, inputs1 and 2 are turned into mono signals that are sent to both channels; effectively this meansthat both inputs will play back centered in the stereo image instead of panned to onespeaker or the other.
The Direct Mono switch only impacts how signal from the inputs is routed to the speakers and
headphones. It does not have any effect on the stereo image of computer playback.
8. The 1/4” stereo headphone output can be used for connecting headphones. Theheadphone output mirrors the Monitor Output but has its own independent volume control.
9. Headphone Volume adjusts the volume of the headphone output.
Listening to loud music for prolonged durations of time through headphones can have a negative
impact on your hearing. When using headphones, we recommend taking frequent breaks to give your
ears a rest and avoiding high volumes for prolonged durations.
Arturia - User Manual MiniFuse 2 - FRONT PANEL FEATURES 5

4. REAR PANEL FEATURES
The rear panel of the MiniFuse 2 provides access to audio and MIDI connections.
1. Outputs - these 1/4” balanced stereo outputs can be connected directly to activestudio speakers or other devices such as amplifiers and mixers.
2. MIDI In - connect MIDI devices to this jack using a standard 5-pin MIDI cable.Devices connected to this input can be used to trigger and control softwareinstruments and effects.
3. MIDI Out - this output allows you to output MIDI data from your computer tocontrol other MIDI-compatible hardware devices.
4. Hub - this convenient USB port allows you to plug in other USB devices, likethumb drives or MIDI controllers.
While the Hub port is sufficient for powering most controllers and portable drives
up to 250mA, it may not provide enough power for some devices that require higher
power draw. In these situations, we recommend plugging these devices directly into your
computer, or into a separate powered USB hub.
5. USB - connect the interface to your computer by plugging the supplied USB cableinto this port and your computer. This connection provides power to the interfaceand enables communication between the interface and your computer.
6. Kensington lock - this optional security slot can be used for securing the interfaceusing a Kensington lock cable.
6 Arturia - User Manual MiniFuse 2 - REAR PANEL FEATURES

5. SETUP
The first time you connect the MiniFuse 2 to your computer, it will appear as an external diskdrive.
Open the drive to access its contents, and double-click the Click here to Get Started link.
This link will open the MiniFuse registration page in your web browser. Follow theinstructions there to register your unit and download the MiniFuse Control Centerapplication.
Benefits of registering:
• Free exclusive effects and instruments from Arturia, Ableton, and many more
• Access to tutorials, sound banks, and helpful content to get you started
• Regular free firmware updates
• Exclusive discounts on Arturia products as a registered user
While it is possible to use the MiniFuse 2 immediately without the MiniFuse Control Center
application, we highly recommend following the steps outlined in this section to initialize your MiniFuse
2 so that you can take advantage of all of its features. The MiniFuse Control Center installer includes the
MiniFuse ASIO driver for Windows, enabling the best performances from your MiniFuse.
Once you have downloaded and installed the MiniFuse Control Center application, double-click to start it.
You will see the following pop-up window. Press Ok to complete the installation.
Arturia - User Manual MiniFuse 2 - SETUP 7

Congratulations, your MiniFuse 2 is now ready to use! For more information and supportonline, you may visit www.arturia.com/support.
For more information on the features available in the MiniFuse Control Center application,see the MiniFuse Control Center [p.20] section of this manual.
5.1. Changing default system audio input and output
If you would like to use the MiniFuse 2 as your computer's default audio playback andrecording device, please follow the instructions below.
Most pro audio applications have their own audio preferences where you can select the MiniFuse 2
as the active audio device. If you intend to only use the MiniFuse for playback and recording with these
applications, it is not necessary to change the default system audio input and output.
5.1.1. MacOS
1. Navigate to your Applications folder.
2. Double-click System Preferences.
3. Click the Sound icon.
4. If you would like all computer audio - such as audio from browsers and movie players- to be played back through the MiniFuse 2, click the Output tab and select the MiniFuse asthe default output device.
8 Arturia - User Manual MiniFuse 2 - SETUP
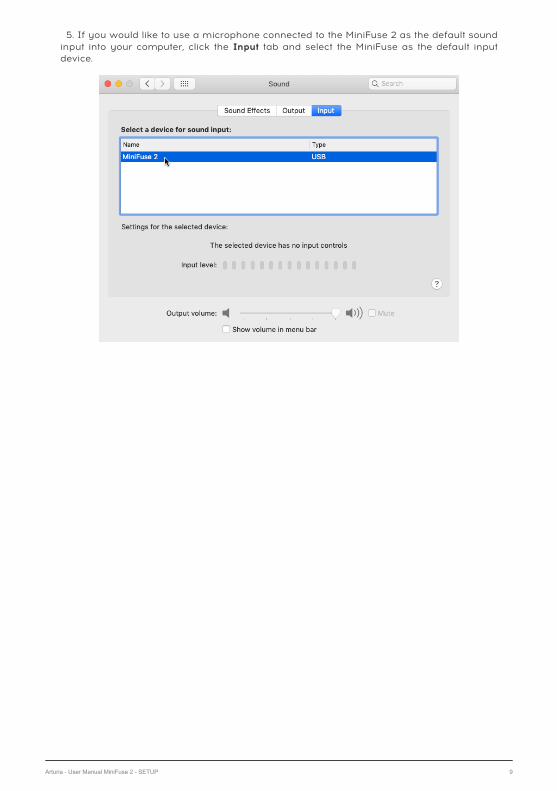
5. If you would like to use a microphone connected to the MiniFuse 2 as the default soundinput into your computer, click the Input tab and select the MiniFuse as the default inputdevice.
Arturia - User Manual MiniFuse 2 - SETUP 9

5.1.2. Windows
1. Navigate to Settings.
2. Click the Sound tab.
3. If you would like all computer audio - such as audio from browsers and movieplayers - to be played back through the MiniFuse 2, choose "MAIN Left/Right(MiniFuse 2) from the Output menu.
4. If you would like to use a microphone connected to the MiniFuse 2 as the defaultsound input into your computer, choose the input channel from the Input menu.
10 Arturia - User Manual MiniFuse 2 - SETUP

5.2. Using the MiniFuse 2 as an audio device with yourDAW
Most audio applications have their own audio settings, where you can select the activeaudio device. Here we will show you how to configure the MiniFuse 2 with several audioapplications. The process will be similar in other audio applications.
Core Audio is a native Mac audio protocol. All audio devices are built on top of this framework.
Windows contains several available audio protocols. ASIO is optimized for low-latency and high-fidelity.
We recommend using the ASIO driver provided by Arturia for best results.
Regardless of which application you use, there will be several additional important controlsin the audio preferences:
• Buffer Size determines how quickly the computer will process audio data - thesmaller the buffer size the faster it will process audio, resulting in less latency atthe expense of higher CPU usage.
• Sample Rate specifies the sampling rate at which the MiniFuse 2 converts audio.CD quality sample rate is 44,100Hz.
For more information on buffer size, sample rate, and their impact on latency, see the A Quick
Primer On Digital Audio [p.32] section of this manual.
Arturia - User Manual MiniFuse 2 - SETUP 11

5.2.1. Configuring audio in Ableton Live
In Ableton Live, go to the Live menu and click Preferences.
In the Preferences window, click the Audio tab to access the audio device settings.
Select CoreAudio (MacOS) or ASIO (Windows) in the Driver Type menu.
Select the MiniFuse 2 in the Audio Input Device and Audio Output Device menus.
If you need to enable or disable specific input or output channels, you can click the Input Config or
Output Config buttons.
12 Arturia - User Manual MiniFuse 2 - SETUP

5.2.2. Configuring audio in FL Studio
In FL Studio, click the Options menu, then click Audio Settings.
In the Device menu select the MiniFuse.
Arturia - User Manual MiniFuse 2 - SETUP 13

5.2.3. Configuring audio in Analog Lab
Our own Analog Lab software can work in standalone or plug-in mode. When using thestandalone application, follow these steps to configure it for use with the MiniFuse 2:
In Analog Lab, click the Menu button at the top left (three horizontal lines), then click AudioMIDI Settings.
In the Audio MIDI Settings window, select CoreAudio (MacOS) or ASIO (Windows) in theDevice section.
In the menu below, select the MiniFuse 2.
In the Output Channels section select Output Left + Right; this is the main speaker outputfrom the MiniFuse.
You can press the Play button in the Test Tone section - you should hear a short tone playedback through the MiniFuse 2.
For more tips and in-depth information on how to configure various DAWs, please be sure to visit
the MiniFuse FAQ.
14 Arturia - User Manual MiniFuse 2 - SETUP

5.3. Recording audio into your DAW
Once your DAW has been configured to use the MiniFuse 2 as an input audio device, createa new audio track where you would like to record your performance. Here we will show theprocess in Ableton Live. It will be similar in other applications.
In the Audio From menu, select External Input.
In the menu below, select the input channel where you have connected the instrument ormicrophone you would like to record.
If you would like to record a stereo sound source, like a synthesizer or drum machine, select a stereo
pair from the menu.
Press the Record Arm button on the track - you should now hear the audio input played backthrough the computer.
If you do not wish to hear the input, you can turn off the Track Activator button, or change the
Monitor setting to Off.
Next, press the Record button in your DAW's transport and it will begin playing back thearrangement and recording onto this track.
Arturia - User Manual MiniFuse 2 - SETUP 15
5.4. Using the MiniFuse 2 as a MIDI device with your DAW
The MiniFuse 2 features standard 5-pin MIDI input and output ports on the rear panel thatcan be used to connect MIDI-compatible devices to your computer.
While most MIDI controllers nowadays come with direct MIDI-over-USB connectivity, there are
devices like synthesizers and drum machines that only feature standard 5-pin MIDI input and output
ports. These devices can be connected to your computer and integrated into your workflow through the
MiniFuse.
IMPORTANT: Note that MIDI input and output will only work once the MiniFuse ControlCenter is installed on the computer. You can access the MiniFuse Control Center installationby clicking the MiniFuse in your Finder / Explorer and visiting the link contained inside.
You may need to enable these MIDI ports in your DAW to be able to use them. Here we willshow you how to do this in several audio applications. The process will be similar in otheraudio applications.
5.4.1. Configuring MIDI in Ableton Live
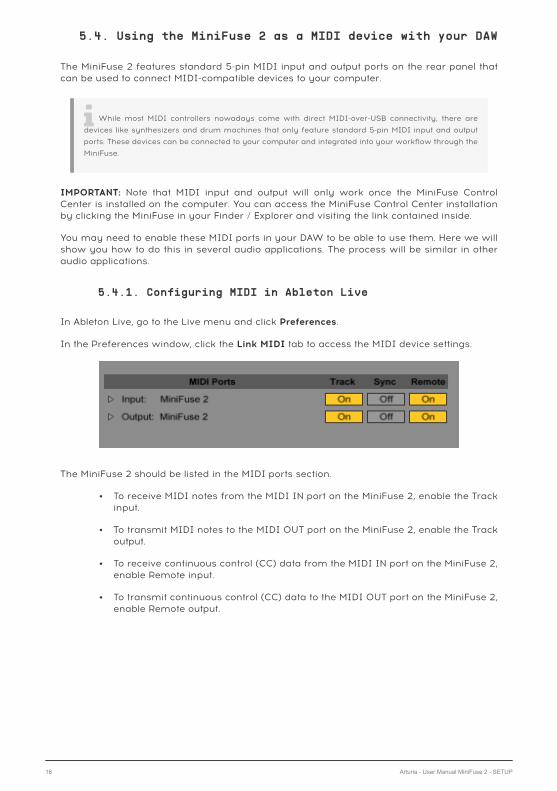
In Ableton Live, go to the Live menu and click Preferences.
In the Preferences window, click the Link MIDI tab to access the MIDI device settings.
The MiniFuse 2 should be listed in the MIDI ports section.
• To receive MIDI notes from the MIDI IN port on the MiniFuse 2, enable the Trackinput.
• To transmit MIDI notes to the MIDI OUT port on the MiniFuse 2, enable the Trackoutput.
• To receive continuous control (CC) data from the MIDI IN port on the MiniFuse 2,enable Remote input.
• To transmit continuous control (CC) data to the MIDI OUT port on the MiniFuse 2,enable Remote output.
16 Arturia - User Manual MiniFuse 2 - SETUP

5.4.2. Configuring MIDI in FL Studio
In FL Studio, select the MiniFuse 2, then click the Enable button. You should now receive MIDIsignal from the MiniFuse into your DAW
Arturia - User Manual MiniFuse 2 - SETUP 17

5.4.3. Configuring MIDI in Analog Lab
When using our Analog Lab software in standalone mode, you will need to enable the MIDIports you want to use:
In Analog Lab, click the Menu button at the top left (three horizontal lines), then click AudioMIDI Settings.
In the MIDI Devices menu, enable MiniFuse 2. You should now receive MIDI signal in AnalogLab.
18 Arturia - User Manual MiniFuse 2 - SETUP

5.5. Recording MIDI from the MiniFuse 2 into your DAW
Once the MiniFuse 2 has been configured as a MIDI device in your DAW's settings, create anew Instrument (MIDI) track.
Place a software instrument like a synthesizer or drum machine on this track.
In the MIDI From menu select the MiniFuse 2, or you can leave this menu to All Ins toreceive MIDI from all connected devices, including the MiniFuse.
Click the channel's Record Arm button. Now when you adjust controls or press pads or keyson your connected MIDI device, you should see the MIDI activity bar light up to indicate thatthis channel is receiving MIDI. Depending on the software device loaded onto the channel,you should also hear sound being produced from it.
Next, press the Record button in your DAW's transport and it will begin recording your MIDIperformance onto this track.
Arturia - User Manual MiniFuse 2 - SETUP 19

6. MINIFUSE CONTROL CENTER
Your MiniFuse 2 includes a convenient control center application that makes it possible toaccess many of its features directly from your computer.
The application can be found in:
• Mac: Applications\Arturia\MiniFuse Control Center
• Windows: C:\Program Files (x86)\Arturia\MiniFuse Control Center
6.1. Top Toolbar
Clicking on the Main Menu icon in the upper left corner provides access to:
• Resize Window adjusts the size of the application for optimal viewing.
• Manual opens this user manual.
• About displays the software version and other information.
To the right of the application logo you can access the Device Selection. If more than oneMiniFuse devices are connected to your machine you can click the device name and selecta device from the list to access its settings.
The Sample Rate displays the currently selected sample rate.
Sample rate can be changed in your host application or computer settings.
The Gear button in the upper right display the firmware update window. Here you can checkthe selected device's current firmware version, and see if there are any updates available.
Firmware updates are an important way of offering you continued product support and new
features. We recommend checking for updates periodically to ensure that you are getting the most
optimal experience with your MiniFuse 2.
20 Arturia - User Manual MiniFuse 2 - MINIFUSE CONTROL CENTER
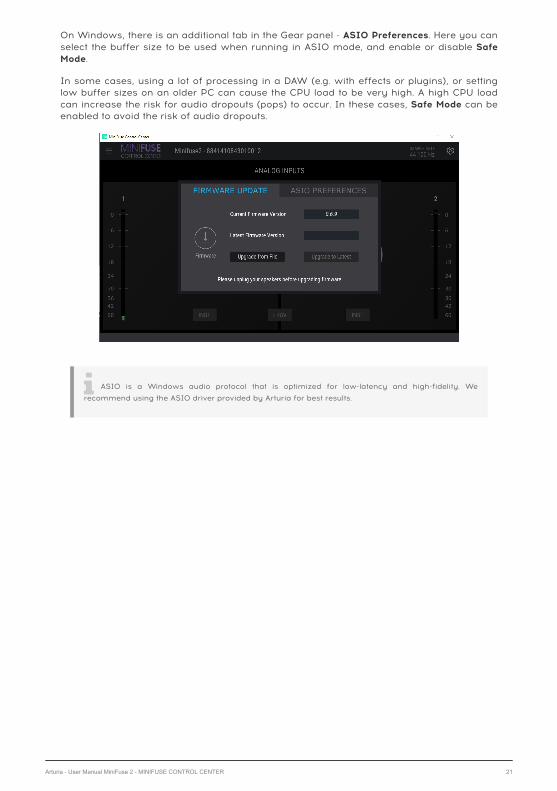
On Windows, there is an additional tab in the Gear panel - ASIO Preferences. Here you canselect the buffer size to be used when running in ASIO mode, and enable or disable SafeMode.
In some cases, using a lot of processing in a DAW (e.g. with effects or plugins), or settinglow buffer sizes on an older PC can cause the CPU load to be very high. A high CPU loadcan increase the risk for audio dropouts (pops) to occur. In these cases, Safe Mode can beenabled to avoid the risk of audio dropouts.
ASIO is a Windows audio protocol that is optimized for low-latency and high-fidelity. We
recommend using the ASIO driver provided by Arturia for best results.
Arturia - User Manual MiniFuse 2 - MINIFUSE CONTROL CENTER 21

6.2. Device Controls
The central area of the application provides access to various device controls, making iteasy to change certain settings directly from your computer.
Inst switch toggles the high-impedance circuit for the corresponding input.
48V switch turns on phantom power for the input(s). Phantom power delivers a powercurrent to a connected microphone and may be required to get a good signal out of certaintypes of microphones.
For more information on the Inst and 48V features, please see the Front Panel Features [p.4] section
of this manual.
Level Meters provide a high-resolution display of input levels for the corresponding input.These can be useful when setting the Gain for the input. The meter features a Clip indicatorwhich lets you know if the input has been overloaded, or "clipped". Once the Clip indicatorhas been activated, it will remain lit until you click to deactivate it.
Be careful not to overload the inputs, which will result in distorted recordings. Giving yourself plenty
of "headroom" will ensure that you don't distort the recording in loud parts of the performance.
When recording at bit rates like 24 or 32 bit, you do not need to push the input Gain very high. This
is because the noise floor at higher bit rates is much lower than that of 16 bit recordings, so turning up
a quieter high-bitrate recording after the fact will not add any noticeable noise to the mix.
22 Arturia - User Manual MiniFuse 2 - MINIFUSE CONTROL CENTER

The light green area of the meter, from -36dB to -6dB, is the optimal range we recommend for
capturing a good signal without clipping. See the 3 examples below - the one on the left is too quiet,
the example in the middle is too loud and may result in distorted recording. The example on the right
shows the ideal volume range to ensure crisp and clean recordings with lots of detail.
Arturia - User Manual MiniFuse 2 - MINIFUSE CONTROL CENTER 23

7. LOOPBACK RECORDING FEATURE
The MiniFuse Loopback Recording feature allows you to record any audio playing onyour computer directly into your recording application, without the need for complicatedsoftware workarounds. Loopback Recording uses a pair of virtual inputs on the MiniFuseinto which you can "plug" any computer audio, vastly expanding the types of sound sourcesavailable for recording into your projects.
7.1. Routing computer audio to the Loopback output/input
There are two different options available to you, depending on your system and software:
• Record all computer audio - all applications playing audio will be recorded. Thisis usually used to record audio from applications like web browsers and movieplayers.
• Record audio from specific applications - selectively choose which applicationsget recorded. This depends on whether your application allows you to route itsoutput to a specific destination.
Next, we'll walk you through the steps of setting up each recording scenario.
7.1.1. Recording all computer audio
To record all audio playing from your computer, you will need to change the default systemaudio output so that it is routed to the MiniFuse's internal Loopback input.
7.1.1.1. Change system audio output on Mac
1. Go to the Applications folder and open System Preferences.
2. Click Sound and ensure that "MiniFuse 2" is selected in the Output tab.
24 Arturia - User Manual MiniFuse 2 - LOOPBACK RECORDING FEATURE

3. Next, go back to the Application folder and open the Utilities folder.
4. Open the Audio MIDI Setup application.
5. In the Window menu, select Show Audio Devices.
6. Click the MiniFuse 2 in the left panel, then click Configure Speakers.
Arturia - User Manual MiniFuse 2 - LOOPBACK RECORDING FEATURE 25

7. Now click the menu for the "Left front" speaker, and change its setting to "Loopback Left".
8. Repeat step 7, this time for the "Right front" speaker.
9. Your computer will now play all audio through the Loopback input on the MiniFuse,allowing you to record it into your recording application.
Once you change your system output to use the Loopback output, you will not be able to hear any
computer audio until you a) record-enable a channel in your recording application, or b) switch the
output back to "Main Left/Right" inside the Configure Speakers panel in Audio MIDI Setup.
26 Arturia - User Manual MiniFuse 2 - LOOPBACK RECORDING FEATURE

7.1.1.2. Change system audio output on Windows
1. In the Windows taskbar, click the Speaker icon, then click the arrow to expand the view.
2. You will see a menu of available outputs. By default this will be set to "MAIN Left/Right", which will route any computer audio through the speaker outputs on the rear of theMiniFuse.
3. To route to Loopback instead, select the "LOOPBACK Left/Right" output.
Once you change your system output to use the Loopback output, you will not be able to hear any
computer audio until you a) record-enable a channel in your recording application, or b) switch the
output back to "MAIN Left/Right" from the Speaker icon in the taskbar.
4. To change the output back, select "MAIN Left/Right" output from the menu.
Arturia - User Manual MiniFuse 2 - LOOPBACK RECORDING FEATURE 27

7.1.2. Record audio from specific applications
Some applications allow you to set an audio output independent of the system output. Ifthis is possible in the application you wish to record, you can route its audio output to theMiniFuse Loopback output to record its audio into your DAW.
Here we will show you how to configure Reason to send its audio to the Loopback output.The process will be similar for other applications.
1. In the Reason menu, click Preferences.
2. Click the Audio tab, and set the Audio Device to MiniFuse 2.
3. Click the Channels button next to Active Output Channels.
28 Arturia - User Manual MiniFuse 2 - LOOPBACK RECORDING FEATURE
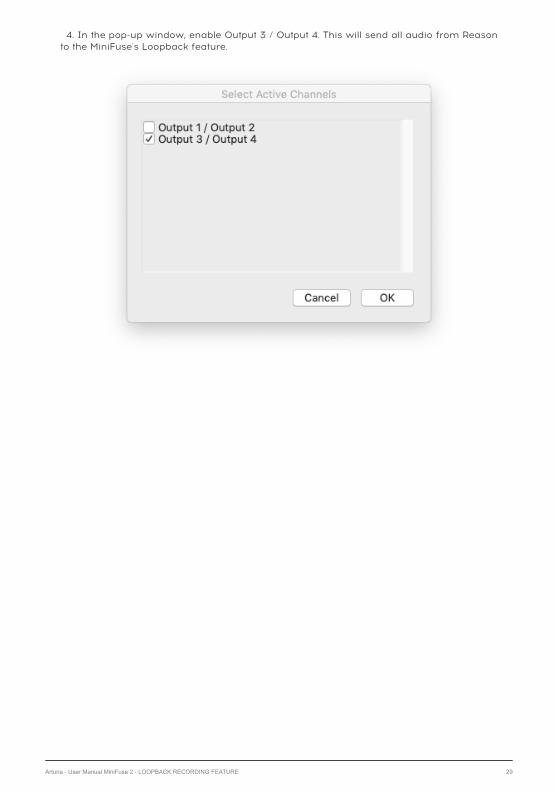
4. In the pop-up window, enable Output 3 / Output 4. This will send all audio from Reasonto the MiniFuse's Loopback feature.
Arturia - User Manual MiniFuse 2 - LOOPBACK RECORDING FEATURE 29

7.1.3. Recording into your DAW
Now that you have configured audio to be sent to the Loopback output, either from the entiresystem or a specific application, open your preferred audio recording application. Here wewill show the process in Ableton Live. The process will be similar in other applications.
1. In the application's preferences, ensure that the MiniFuse 2 is configured to be used asan input device.
2. Next, create a new audio track in your project.
3. Select Loopback (channels 3 & 4) as the audio input for the track and record-enable thetrack. You should now hear your computer audio playing through your DAW, and the metershould display an audio level.
4. You are now ready to record. When ready, press the Record button in your application.
30 Arturia - User Manual MiniFuse 2 - LOOPBACK RECORDING FEATURE

5. Once you are done recording and wish to set your computer system output back toregular operation, return to the system audio preferences and change the system output touse the Main outputs:
• On Mac, go back to the Configure Speakers panel in Applications / Utilities /Audio MIDI Setup, and change the speaker outputs to "Main Left" and "Main Right".
• On Windows, click the Speaker icon in the taskbar, and select "MAIN Left/Right"from the menu.
Arturia - User Manual MiniFuse 2 - LOOPBACK RECORDING FEATURE 31

8. A QUICK PRIMER ON DIGITAL AUDIO
To get the most out of your computer and audio interface, it is important to be familiarwith several key concepts in digital audio. We'll explain these quickly below, so that youunderstand their impact on performance. Once you are familiar with these concepts, youwill know how to best calibrate your interface and computer settings to handle differenttypes of audio tasks.
8.1. What is latency?
Latency is the amount of time that it takes your computer to process incoming and outgoingsound. Latency is an important consideration when recording live instruments or MIDI parts,as the delay between the input (audio or MIDI) and the audio output may negatively impactthe performance and recording - think of how distracting it can be to hear your own voicewith a short echo while on a phone call.
Latency is a direct byproduct of sample rate and buffer size settings, so adjusting thesesettings in your host application or the audio driver will have an impact on latency.
32 Arturia - User Manual MiniFuse 2 - A QUICK PRIMER ON DIGITAL AUDIO

8.2. Sample Rate
In the digital realm, analog audio signals are represented by discrete points in time, or"samples". When played back through a digital-to-analog converter, like those in computersoundcards, the digital samples are reproduced into a smooth audio signal. You can thinkof it like frames in a movie - each frame is a still snapshot, but when played back at a fastenough rate (24+ frames per second) our eyes perceive the sequence of static frames ascontinuous motion.
The sampling rate describes how many digital sampling points, or "frames", are used toapproximate the audio signal over time. This also determines the highest frequency that canbe captured or reproduced by the digital representation. The Nyquist–Shannon samplingtheorem states that this is equal to 1/2 of the sample rate so, for example, the highest soundfrequency that can be reproduced by a sample rate of 48kHz is 24kHz.
The average range of human hearing is 20 to 20,000Hz (or 20kHz). For most audioapplications we recommend using a sample rate of 44.1kHz or 48kHz. Sample rate of CD-quality audio is 44.1kHz. Higher sample rates will result in significantly higher CPU usage,without much benefit to be gained in most circumstances.
Higher sample rates like 96kHz can be useful in sound design applications where you would like
flexibility to apply extreme pitch adjustments to the recording. A sound recorded at 96kHz and played
at half-speed would still be able to reproduce frequencies up to 24kHz, while the same sound recorded
at 48kHz and played at half speed will only be able to reproduce frequencies up to 12kHz.
Arturia - User Manual MiniFuse 2 - A QUICK PRIMER ON DIGITAL AUDIO 33

8.3. Buffer Size
Buffer size is expressed in samples and is usually found in your application's audio settings.Think of the buffer like a bucket. As soon as it fills up with samples, it is carried away tothe output. So, the smaller the bucket (buffer) the quicker it will get filled up and sent to theoutput, and therefore will play back with less latency. The trade off, however, is that smallerbuffer sizes require your computer's CPU to work harder. Conversely, the bigger the bucket(buffer) the longer it will take to fill up and be sent to the output. This decreases the load onyour CPU at the expense of more latency. As you will see below, changing the buffer sizedepending on the type of audio task being performed is common practice.
If you experience clicks and pops in your projects, try increasing the buffer size in your host
application or the audio driver.
8.4. A red herring
When experimenting with these settings, you may notice that latency decreases noticeablywhen using higher sample rates at the same buffer size. To go back to the bucket analogy,the sample rate is like water flowing through a hose - if your increase the water flow (highersample rate), the same bucket will fill up faster and will be carried away to the outputsooner. However, keep in mind that high sample rates come at a cost of significantly higherCPU usage, so this is not a recommended way of dealing with latency.
34 Arturia - User Manual MiniFuse 2 - A QUICK PRIMER ON DIGITAL AUDIO

8.5. How to deal with latency
There are several ways to effectively deal with latency depending on the situation. Once youare familiar with the concepts outlined above, you will be able to dynamically adjust yoursystem settings to accommodate various scenarios.
8.5.1. Recording live audio
When recording live audio from instruments and microphones, you probably want to avoidlatency altogether. The MiniFuse features Direct Monitoring which will route the input(s)directly through the speakers or headphones. This lets you immediately hear what you’rerecording without incurring any latency from computer processing. Direct Monitoring isoffered as a continuous Monitor Mix knob that you can use to control the balance betweendirect signal and computer signal.
When using Direct Monitoring, you may need to turn off monitoring for the recording channel in
your DAW to prevent an echo through the speakers or headphones. Direct monitoring routes the input(s)
directly out of the outputs, so you will not be able to hear any software processing or effects that you
may have applied to the recording channel in your application. For best results, we also recommend
shutting down other CPU-intensive applications while recording live audio.
8.5.2. Recording a MIDI part
Since recording MIDI parts relies on the computer to produce sounds from your playing,Direct Monitoring is not an option in this scenario. When recording MIDI parts, you will mostlikely want to set a low audio buffer size in your host application’s audio settings to minimizethe delay between pressing a key and hearing the sound. We recommend buffer sizes of128-256 samples but you could go lower or may need to go higher, depending on yourparticular computer system and how much CPU your project is using.
8.5.3. Mixing and mastering
Mixing and mastering are not time-critical tasks, so latency is not as important in thesesituations. It’s also likely that by this stage your project has quite a few tracks and plugins,so your CPU may already be working hard to keep up. For mixing and mastering purposeswe recommend buffer sizes of 1024-2048 samples. Again, depending on your specificsystem and project you may be able to use lower settings.
Arturia - User Manual MiniFuse 2 - A QUICK PRIMER ON DIGITAL AUDIO 35

9. SPECIFICATIONS
9.1. Box Contents
• Audio interface
• USB-C to USB-A cable
• Exclusive software bundle containing:◦ Arturia's Pre 1973, Rev PLATE-140, Delay TAPE-201, Chorus JUN-6
audio effects
◦ Arturia's Analog Lab Intro containing thousands of ready-to-useinstruments and sounds
◦ Ableton Live Lite
◦ NI Guitar Rig 6 LE
◦ 3-month complimentary subscription to Splice
◦ 3-month complimentary subscription to Auto-Tune Unlimited
◦ Ableton Live Lite sessions curated by producers around the globe
36 Arturia - User Manual MiniFuse 2 - SPECIFICATIONS

9.2. Hardware Specifications
Line Inputs
Input impedance 16kΩ
Maximum input Level +22dBu
Gain range 56dB
Frequency response 20Hz to 20kHz +/-0.05dB (min gain)
Dynamic range 110dB typical (A-weighted)
THD+N @ 1kHz -100dB typical (un-weighted)
Cross-talk @ 1kHz -116dB
Instrument Inputs
Input impedance 1.1MΩ
Maximum input Level +11.5dBu
Gain range 56dB
Frequency response 20Hz to 20kHz +/-0.06dB (min gain)
Dynamic range 110dB typical (A-weighted)
THD+N @ 1kHz -91dB typical (A-weighted)
Microphone Preamps
Input impedance 2.5kΩ
Maximum input Level +9dBu
Gain range 56dB
Equivalent Input Noise (EIN) -129dB typical (A-weighted)
Frequency response 20Hz to 20kHz +/-0.06dB (min gain)
Dynamic range 110dB typical (A-weighted)
THD+N @ 1kHz -100dB typical (A-weighted)
Cross-talk @ 1kHz -116dB
Speaker Outputs
Output impedance 94Ω
Maximum output Level +12dBu
Frequency response 20Hz to 20kHz +/-0.09dB
Dynamic range 107.5dB typical (A-weighted)
THD+N @ 1kHz -101dB typical (un-weighted)
Arturia - User Manual MiniFuse 2 - SPECIFICATIONS 37

Phones
Output impedance 10Ω
Maximum output Level +11.4dBu
Frequency response 20Hz to 20kHz +/-0.09dB
Dynamic range 104dB (A-weighted)
Power @ 33ohm 137mW
Various
Supported frequency rates 44.1 kHz, 48 kHz, 88.2 kHz, 96 kHz, 176.4 kHz, 192 kHz
USB 2 Audio compatibility Windows, Mac OS
38 Arturia - User Manual MiniFuse 2 - SPECIFICATIONS

10. DECLARATION OF CONFORMITY
USA
Important notice: DO NOT MODIFY THE UNIT!
This product, when installed as indicated in the instructions contained in this manual, meetsFCC requirement. Modifications not expressly approved by Arturia may avoid your authority,granted by the FCC, to use the product.
IMPORTANT: When connecting this product to accessories and/or another product, use onlyhigh quality shielded cables. Cable (s) supplied with this product MUST be used. Follow allinstallation instructions. Failure to follow instructions could void your FFC authorization touse this product in the USA.
NOTE: This product has been tested and found to comply with the limits for a Class BDigital device, pursuant to Part 15 of the FCC rules. These limits are designed to providea reasonable protection against harmful interference in a residential environment. Thisequipment generate, use and radiate radio frequency energy and, if not installed and usedaccording to the instructions found in the users manual, may cause interferences harmfulto the operation to other electronic devices. Compliance with FCC regulations does notguarantee that interferences will not occur in all the installations. If this product is found tobe the source of interferences, which can be determined by turning the unit “OFF” and “ON”,please try to eliminate the problem by using one of the following measures:
• Relocate either this product or the device that is affected by the interference.
• Use power outlets that are on different branch (circuit breaker or fuse) circuits orinstall AC line filter(s).
• In the case of radio or TV interferences, relocate/ reorient the antenna. If theantenna lead-in is 300 ohm ribbon lead, change the lead-in to coaxial cable.
• If these corrective measures do not bring any satisfied results, please contactthe local retailer authorized to distribute this type of product. If you cannot locatethe appropriate retailer, please contact Arturia.
The above statements apply ONLY to those products distributed in the USA.
CANADA
NOTICE: This class B digital apparatus meets all the requirements of the CanadianInterference-Causing Equipment Regulation.
AVIS: Cet appareil numérique de la classe B respecte toutes les exigences du Règlement surle matériel brouilleur du Canada.
EUROPE
This product complies with the requirements of European Directive 89/336/EEC
This product may not work correctly by the influence of electro-static discharge; if ithappens, simply restart the product.
Arturia - User Manual MiniFuse 2 - Declaration of Conformity 39

11. SOFTWARE LICENSE AGREEMENT
In consideration of payment of the Licensee fee, which is a portion of the price you paid,Arturia, as Licensor, grants to you (hereinafter termed “Licensee”) a nonexclusive right touse this copy of the SOFTWARE.
All intellectual property rights in the software belong to Arturia SA (hereinafter: “Arturia”).Arturia permits you only to copy, download, install and use the software in accordance withthe terms and conditions of this Agreement.
The product contains product activation for protection against unlawful copying. The OEMsoftware can be used only following registration.
Internet access is required for the activation process. The terms and conditions for use of thesoftware by you, the end-user, appear below. By installing the software on your computeryou agree to these terms and conditions. Please read the following text carefully in itsentirety. If you do not approve these terms and conditions, you must not install this software.In this event give the product back to where you have purchased it (including all writtenmaterial, the complete undamaged packing as well as the enclosed hardware) immediatelybut at the latest within 30 days in return for a refund of the purchase price.
1. Software Ownership Arturia shall retain full and complete title to the SOFTWARE recordedon the enclosed disks and all subsequent copies of the SOFTWARE, regardless of the mediaor form on or in which the original disks or copies may exist. The License is not a sale of theoriginal SOFTWARE.
2. Grant of License Arturia grants you a non-exclusive license for the use of the softwareaccording to the terms and conditions of this Agreement. You may not lease, loan or sub-license the software. The use of the software within a network is illegal where there is thepossibility of a contemporaneous multiple use of the program.
You are entitled to prepare a backup copy of the software which will not be used forpurposes other than storage purposes.
You shall have no further right or interest to use the software other than the limited rights asspecified in this Agreement. Arturia reserves all rights not expressly granted.
3. Activation of the Software Arturia may use a compulsory activation of the software anda compulsory registration of the OEM software for license control to protect the softwareagainst unlawful copying. If you do not accept the terms and conditions of this Agreement,the software will not work.
In such a case the product including the software may only be returned within 30 daysfollowing acquisition of the product. Upon return a claim according to § 11 shall not apply.
4. Support, Upgrades and Updates after Product Registration You can only receive support,upgrades and updates following the personal product registration. Support is provided onlyfor the current version and for the previous version during one year after publication of thenew version. Arturia can modify and partly or completely adjust the nature of the support(hotline, forum on the website etc.), upgrades and updates at any time.
The product registration is possible during the activation process or at any time later throughthe Internet. In such a process you are asked to agree to the storage and use of yourpersonal data (name, address, contact, email-address, and license data) for the purposesspecified above. Arturia may also forward these data to engaged third parties, in particulardistributors, for support purposes and for the verification of the upgrade or update right.
5. No Unbundling The software usually contains a variety of different files which in itsconfiguration ensure the complete functionality of the software. The software may be usedas one product only. It is not required that you use or install all components of the software.You must not arrange components of the software in a new way and develop a modifiedversion of the software or a new product as a result. The configuration of the software maynot be modified for the purpose of distribution, assignment or resale.
40 Arturia - User Manual MiniFuse 2 - Software License Agreement

6. Assignment of Rights You may assign all your rights to use the software to anotherperson subject to the conditions that (a) you assign to this other person (i) this Agreementand (ii) the software or hardware provided with the software, packed or preinstalledthereon, including all copies, upgrades, updates, backup copies and previous versions,which granted a right to an update or upgrade on this software, (b) you do not retainupgrades, updates, backup copies und previous versions of this software and (c) therecipient accepts the terms and conditions of this Agreement as well as other regulationspursuant to which you acquired a valid software license.
A return of the product due to a failure to accept the terms and conditions of this Agreement,e.g. the product activation, shall not be possible following the assignment of rights.
7. Upgrades and Updates You must have a valid license for the previous or more inferiorversion of the software in order to be allowed to use an upgrade or update for the software.Upon transferring this previous or more inferior version of the software to third parties theright to use the upgrade or update of the software shall expire.
The acquisition of an upgrade or update does not in itself confer any right to use thesoftware.
The right of support for the previous or inferior version of the software expires upon theinstallation of an upgrade or update.
8. Limited Warranty Arturia warrants that the disks on which the software is furnished isfree from defects in materials and workmanship under normal use for a period of thirty (30)days from the date of purchase. Your receipt shall be evidence of the date of purchase. Anyimplied warranties on the software are limited to thirty (30) days from the date of purchase.Some states do not allow limitations on duration of an implied warranty, so the abovelimitation may not apply to you. All programs and accompanying materials are provided “asis” without warranty of any kind. The complete risk as to the quality and performance of theprograms is with you. Should the program prove defective, you assume the entire cost of allnecessary servicing, repair or correction.
9. Remedies Arturia's entire liability and your exclusive remedy shall be at Arturia's optioneither (a) return of the purchase price or (b) replacement of the disk that does not meet theLimited Warranty and which is returned to Arturia with a copy of your receipt. This limitedWarranty is void if failure of the software has resulted from accident, abuse, modification,or misapplication. Any replacement software will be warranted for the remainder of theoriginal warranty period or thirty (30) days, whichever is longer.
10. No other Warranties The above warranties are in lieu of all other warranties, expressedor implied, including but not limited to, the implied warranties of merchantability and fitnessfor a particular purpose. No oral or written information or advice given by Arturia, its dealers,distributors, agents or employees shall create a warranty or in any way increase the scopeof this limited warranty.
11. No Liability for Consequential Damages Neither Arturia nor anyone else involved inthe creation, production, or delivery of this product shall be liable for any direct, indirect,consequential, or incidental damages arising out of the use of, or inability to use this product(including without limitation, damages for loss of business profits, business interruption, lossof business information and the like) even if Arturia was previously advised of the possibilityof such damages. Some states do not allow limitations on the length of an implied warrantyor the exclusion or limitation of incidental or consequential damages, so the above limitationor exclusions may not apply to you. This warranty gives you specific legal rights, and youmay also have other rights which vary from state to state.
Arturia - User Manual MiniFuse 2 - Software License Agreement 41