![arXiv:math/9806133v1 [math.AG] 23 Jun 1998](https://static.fdokumen.com/doc/165x107/631c61a3b8a98572c10ce0b1/arxivmath9806133v1-mathag-23-jun-1998.jpg)
User Manual Jun-6 V - Arturia
63
USER MANUAL _JUN-6 V
-
Upload
khangminh22 -
Category
Documents
-
view
1 -
download
0
Transcript of User Manual Jun-6 V - Arturia

USER MANUAL
_JUN-6 V

Special Thanks
DIRECTIONFrédéric Brun Kevin Molcard
DEVELOPMENTRaynald Dantigny
Kevin Arcas
Rasmus Kurstein
Alexandre Adam
Yann Burrer
Samuel Limier
Corentin Comte
Marie Pauli
Pierre-Lin Laneyrie
Baptiste Aubry
Timothée Behety
Mathieu Nocenti
Simon Conan
Loris De Marco
Cyril Lepinette
Antoine Moreau
Markus Bollinger
DESIGNEdouard Madeuf
Morgan Perrier
Florian Rameau
Shaun Ellwood
Baptiste Le Goff
SOUND DESIGNJean-Michel Blanchet
Maxime Audfray
Lily Jordy
Simon Gallifet
SolidTrax
Sonar Traffic
Thomas Koot
TESTINGFlorian Marin
Maxime Audfray
Christophe Tessa
Thomas Barbier
Benjamin Renard
BETA TESTINGDan Tinen
Terry Marsden
Marco Correia
Gary Morgan
Gustavo Bravetti
Chuck Zwicky
Peter Tomlinson
David Harman
Guillaume Hernandez
Pagnier
Fernando Manuel
Rodrigues
Andrew Henderson
Dwight Davies
Angel Alvarado
Paolo Negri
MANUALFernando MANUEL
RODRIGUES (author)
Florence BURY
Camille DALEMANS
Roger Lyons
Minoru KOIKE
Vincent LE HEN
Charlotte METAIS
Jose RENDON
Holger STEINBRINK
Jack VAN
© ARTURIA SA – 2020 – All rights reserved.26 avenue Jean Kuntzmann38330 Montbonnot-Saint-MartinFRANCEwww.arturia.com
Information contained in this manual is subject to change without notice and does notrepresent a commitment on the part of Arturia. The software described in this manual isprovided under the terms of a license agreement or non-disclosure agreement. The softwarelicense agreement specifies the terms and conditions for its lawful use. No part of thismanual may be reproduced or transmitted in any form or by any purpose other thanpurchaser’s personal use, without the express written permission of ARTURIA S.A.

All other products, logos or company names quoted in this manual are trademarks orregistered trademarks of their respective owners.
Product version: 1.0
Revision date: 8 December 2020

Thank you for purchasing Arturia's Jun-6 V!This manual covers the features and operation of the Jun-6 V.
Be sure to register your software as soon as possible! When you purchased Jun-6 V youwere sent a serial number and an unlock code by e-mail. These are required during the on-line registration process.
Special Messages
Specifications Subject to Change:
The information contained in this manual is believed to be correct at the time of printing.However, Arturia reserves the right to change or modify any of the specifications or featureswithout notice or obligation.
IMPORTANT:
The software, when used in combination with an amplifier, headphones or speakers, maybe able to produce sound levels that could cause permanent hearing loss. DO NOT operatefor long periods of time at a high level or at a level that is uncomfortable.
If you encounter any hearing loss or ringing in the ears, you should consult an audiologist.

IntroductionCongratulations on your purchase of Arturia's Jun-6 V
Since the late 1990s, Arturia has received acclaim from players and reviewers alike fordesigning state-of-the art software emulations of the venerable analog synthesizers fromthe 1960s to the 1980s. From the Modular V, back in 2004, to Origin, a modular systemintroduced in 2010, to the Matrix 12 V (2015), the Synclavier V (2016), followed by the CMIV and the DX7 V (2017) and, last but not the least, Pigments, our first original softwaresynthesizer, Arturia's passion for synthesizers and sonic purity has given demandingmusicians the best software instruments for professional audio production.
Recently, Arturia launched its latest emulation, this time covering one of the most celebratedpolysynths of the pre-MIDI era. This was the Arturia OB-Xa V.
With the launch of a new version of the V (Vintage) Collection, Arturia consolidates itsposition as a leader in the field of modeled vintage instruments software.
The ARTURIA Jun-6 V is one of the new instrument emulations included in the currentversion of our acclaimed bundle, and it benefits from more than twenty years of experiencein recreating the most iconic tools of the past.
ARTURIA has a passion for excellence and accuracy. This has led us to conduct an extensiveanalysis of every aspect of one of the most famous and iconic synthesizers of the eighties. Itwas also a synth which definitely marked that era and has lately achieved "vintage" status,with prices rising up in the second-hand market. We have carefully studied and reproducedthe behavior of its electrical circuits and modules. We have also added many features, someeven unimaginable in the days that unit was first launched.
Jun-6 V runs as a stand-alone virtual instrument, as well as a plug-in in all major formatsinside your DAW. It has an easy MIDI learn functionality for hands-on control of mostparameters, and as a plug-in also allows parameter automation for greater creative control.
DISCLAIMER: All manufacturer and product names mentioned in this manual aretrademarks of their respective owners, which are in no way associated or affiliated withArturia. The trademarks of other manufacturers mentioned are used solely to identify theproducts of those manufacturers whose features and sound were studied during Jun-6 Vdevelopment. All names of equipment inventors and manufacturers have been included forillustrative and educational purposes only and do not suggest any affiliation or endorsementof Jun-6 V by any equipment inventor or manufacturer.
The Arturia team
Table Of Contents1. WELCOME TO THE JUN-6 V................................................................................................................................... 3
1.1. What is the Juno-6? ............................................................................................................................................................. 3
1.2. Some historical facts........................................................................................................................................................... 31.2.1. Whos' who of Juno users ........................................................................................................................................................................................ 4
1.3. Does a Juno emulation still make sense?............................................................................................................ 4
1.4. Arturia's Jun-6 V..................................................................................................................................................................... 5
2. ACTIVATION AND FIRST START.......................................................................................................................... 62.1. System Requirements ........................................................................................................................................................ 6
2.2. Activate the Arturia Jun-6 V license ......................................................................................................................... 62.2.1. The Arturia Software Center (ASC)................................................................................................................................................................... 6
2.3. Initial Setup .............................................................................................................................................................................. 72.3.1. Audio and MIDI Settings: Windows................................................................................................................................................................. 7
2.3.2. Audio and MIDI Settings: macOS .................................................................................................................................................................... 8
2.3.3. Jun-6 V as a plug-in .................................................................................................................................................................................................. 9
3. JUN-6 V OVERVIEW ................................................................................................................................................ 103.1. What can you do with Jun-6 V? .............................................................................................................................. 10
3.1.1. The original Juno's limitations........................................................................................................................................................................... 10
3.1.2. The Jun-6 V's main features................................................................................................................................................................................. 11
3.2. Getting hands-on with the Jun-6 V......................................................................................................................... 133.2.1. Oscillator Basics.......................................................................................................................................................................................................... 13
3.2.2. Filter Basics ................................................................................................................................................................................................................... 14
3.2.3. More Envelope Features ....................................................................................................................................................................................... 15
3.2.4. Chorus and Arpeggiator ....................................................................................................................................................................................... 16
3.2.5. Using the Advanced Section Modulations ................................................................................................................................................. 17
3.2.6. Using the effects........................................................................................................................................................................................................ 18
3.2.7. Automating the Jun-6 V with MIDI................................................................................................................................................................ 19
4. The User Interface .................................................................................................................................................... 214.1. High-Level Overview.......................................................................................................................................................... 21
4.2. The Upper Toolbar ............................................................................................................................................................. 214.2.1. The Jun-6 V menu .................................................................................................................................................................................................... 22
4.2.2. Browsing Presets ..................................................................................................................................................................................................... 24
4.2.3. Side Panel ..................................................................................................................................................................................................................... 24
4.3. The Lower Toolbar ............................................................................................................................................................ 25
4.4. Side Panel............................................................................................................................................................................... 244.4.1. MIDI controller configuration............................................................................................................................................................................ 26
4.4.2. Assigning / Un-assigning controls ................................................................................................................................................................. 27
4.4.3. Min / Max value sliders ......................................................................................................................................................................................... 27
4.4.4. Relative control option .......................................................................................................................................................................................... 28
4.4.5. Unassigning or "un-learning" a MIDI mapping .................................................................................................................................... 29
4.5. The Preset Browser in Detail .................................................................................................................................... 304.5.1. Browse Presets With MIDI Controller........................................................................................................................................................... 31
4.5.2. Playlists............................................................................................................................................................................................................................ 31
5. JUN-6 V CONTROL PANEL ................................................................................................................................... 325.1. Main Control Panel ............................................................................................................................................................ 32
5.1.1. Hold Button ..................................................................................................................................................................................................................... 32
5.1.2. Chord Mode................................................................................................................................................................................................................... 33
5.1.3. Arpeggio .......................................................................................................................................................................................................................... 34
5.1.4. LFO...................................................................................................................................................................................................................................... 35
5.1.5. DCO (Digitally Controlled Oscillator) ............................................................................................................................................................. 37
5.1.6. HPF (High-Pass Filter).............................................................................................................................................................................................. 41
5.1.7. VCF (Voltage-Controlled Filter)........................................................................................................................................................................... 41
5.1.8. VCA (Voltage-Controlled Amplifier) ............................................................................................................................................................... 44
5.1.9. ENV (Envelope Generator) ................................................................................................................................................................................... 45
5.1.10. Chorus............................................................................................................................................................................................................................ 46
5.1.11. Tune .................................................................................................................................................................................................................................... 47
5.1.12. Volume............................................................................................................................................................................................................................. 47
5.1.13. Voice Calibration....................................................................................................................................................................................................... 47
5.2. Advanced Control Panel ............................................................................................................................................... 485.2.1. Assign (Modulation Matrix) ................................................................................................................................................................................. 48
5.2.2. LFO 2 ................................................................................................................................................................................................................................ 49

5.2.3. ENV 2 ................................................................................................................................................................................................................................. 51
5.2.4. Delay ................................................................................................................................................................................................................................ 52
5.2.5. Reverb.............................................................................................................................................................................................................................. 53
5.2.6. Virtual Keyboard....................................................................................................................................................................................................... 54
6. Software License Agreement............................................................................................................................ 57

1. WELCOME TO THE JUN-6 V
1.1. What is the Juno-6?
In 1982, the Juno-6 - a relatively cheap single oscillator synth - was Roland's answer tothe Korg Polysix, which dominated the lower-end segment of the market at the time. Afterlaunching the high-end Jupiter-8, Roland felt the need to fill the gap for that segment. With areduced but very clever set of features, a great built-in chorus unit that contributed to givingit a very big and fat sound (and stereo), the Juno-6 had everything to become a success.
1.2. Some historical facts
Back in 1981, Roland created one of best analog polyphonic synthesizers that ever existed -the Jupiter-8. Already a major player in the synth world, the company had launched severalsynths since its foundation in 1972, including modular systems like the System-100m andSystem-700. These contributed to establishing Roland as one of the main contenders in themarket for this new type of electronic musical instruments.
Roland's first polyphonic synthesizer was the Jupiter-4, but with the launch of the Jupiter-8,they firmly established their position as a leader in the polyphonic synth segment, directlycompeting with big names such as Moog, Sequential Circuits and Oberheim.
Yet, the Jupiter-8 was expensive - unaffordable for most musicians. That's where the Juno-6came into play.
Greatly simplified when compared with the monster that was the Jupiter-8, the Juno-6nevertheless offered six-voice polyphony for a fraction of the price of its flagship brother.Sure, it was simple, but that simplicity, based on a carefully selected set of features and acontrol panel which was beautiful, clear and well designed, invited musicians to also createtheir own sounds. In fact, the Juno-6 is one of the simplest synths ever built. Yet, it soundsgreat.
Much of this great sound is due to the presence of a gorgeous chorus unit. This chorus unitwas so important and sounded so big that some jokingly describe the Juno-6 as a chorusunit with a synth attached.
Shortly after the launch of the Juno-6, Roland introduced the Juno-60, which was basicallythe same synth, with added memory slots for patch storage, and the new DCB port,which allowed interconnectivity with several devices. This DCB port, already present in theJupiter-8 as well, served as the basis for the MIDI technology that would appear shortlyafter that. Roland played a big role in the definition of that standard.
As a matter of fact, the Juno-6/Juno-60 were the last synths Roland launched in the pre-MIDI era.
3 Arturia - User Manual Jun-6 V - WELCOME TO THE JUN-6 V

1.2.1. Whos' who of Juno users
Sure, the Juno does not have as extensive a list of famous users as other synths. After all, itwas a lower-end synth. But still, there were some.
Madonna (the Juno-6 was featured in "Borderline", in 1983), A-Ha (they reportedly used aJuno-60 in the smash hit "Take On Me", layered with a DX7), Enya (featured in "CaribbeanBlue"), Duran Duran (featured in "Save a Prayer"), The Cure, Sean Lennon, Faithless, AstralProjection, Vince Clarke, Men At Work, Flock of Seagulls, Eurythmics, Mr. Fingers (featuredin "Can You Fell It"), Niels Frahm... these are some of the big names who used the Juno-6/Juno-60.
More recently, we can mention the British band Metronomy. It is also used by manyproducers pretty much worldwide.
1.3. Does a Juno emulation still make sense?
The original Juno was the polyphonic synth for the masses. Very easy to program andoperate, great-sounding and relatively cheap, it immediately conquered its place. And it hasbeen gaining vintage status lately.
The Jun-6 V preserves the best qualities of the Juno, like the immediacy and convenience ofprogramming, and the great sound. Arturia's goal was to create a synthesizer that everyonewould feel compelled to program and be comfortable creating their own sounds with.
The advantages of a software version of the Juno over its hardware counterpart areconsiderable. For example:
• It's much cheaper than its hardware counterpart (which is still a very sought-after synth, with prices rising);
• You can use as many instances as you wish;
• The instrument has been modernized and supplemented with some welcomefeatures, such as expanded polyphony (up to 36 voices), unison, a secondenvelope and LFO, velocity sensitivity, aftertouch, etc.;
• You can use MIDI to control and automate several parameters. Actually, you canuse MIDI to play it, something you cannot do with the original.
• You will still have a very simple and great-sounding synth;
• Due to its immediacy and simplicity, it is a great tool to start learning synthesis;
Arturia - User Manual Jun-6 V - WELCOME TO THE JUN-6 V 4

1.4. Arturia's Jun-6 V
That's why we, at Arturia, believe that a Juno emulation still makes sense. We felt trulycompelled to create the Jun-6 V. Of course, being an Arturia product, it wasn't enough tosimply model the original hardware. As usual, we pushed it further, adding some tastefulnew features that honor the original while making it more useful in a modern context.
For example, you have two extra effect processors - a Delay and a Reverb. Together withthe luscious chorus, they contribute to creating a really big sound. You also have an extraenvelope. This was a feature that was very much missed in the original Juno. This secondenvelope can be assigned to the VCA, leaving Envelope 1 free to modulate the filter. Thisway, you can have a filter contour that is independent of the volume contour, which is reallyimportant on countless occasions.
You also have a second LFO. LFOs are very important modulation sources, and we cannever have enough of them. Yet the original hardware unit was restricted to just one, limitedto a single waveform at that. Here, you have a second one, enriched with a choice of sixwaveforms.
These two extra modulation sources can also process several other parameters. Courtesyof mini modulation matrices, you have two extra freely assignable destinations for each ofthe two modulators. Besides that, the second Envelope Generator is also hard-wired to theVCA, where it is one of the choices.
There are also assignable slots for the Mod Wheel, Velocity and Aftertouch. Last but notleast, the oscillators can be calibrated to emulate different aging stages (from Good to Poor),and you have a Chord player, which allows to play chords with a single note.
We hope you are as excited about this great instrument as we are. Now, it's time to play itand get some sound. Let's go!
5 Arturia - User Manual Jun-6 V - WELCOME TO THE JUN-6 V

2. ACTIVATION AND FIRST START
2.1. System Requirements
The Arturia Jun-6 V plug-in works on computers equipped with :
Win 8+ 10.13+
You can use the Jun-6 V as an AAX, Audio Unit, VST2 or VST3 plug-in (64-bit only).
2.2. Activate the Arturia Jun-6 V license
Once the software has been installed, the next step should be to activate your license, sothat you can use it without limitations.
This is a simple process which involves a different software program: the Arturia SoftwareCenter.
2.2.1. The Arturia Software Center (ASC)
If you have not already installed the ASC, go to this web page: Arturia Updates & Manuals
Look for the Arturia Software Center at the top of the page, and then download the versionof the installer that you need for your system (macOS or Windows).
Follow the installation instructions and then:
• Launch the Arturia Software Center (ASC)
• Log into your Arturia account
• Scroll down to the My Products section of the ASC
• Click the Activate button
That's all there is to it!
Arturia - User Manual Jun-6 V - ACTIVATION AND FIRST START 6

2.3. Initial Setup
The first time you launch Jun-6 V in standalone mode, you'll be asked to define the Audiosettings (and MIDI settings) for the instrument. These settings can be accessed at any timeby clicking the Main Menu icon at the top left of the Upper Toolbar (the "hamburger" symbolthat's becoming a standard), then click Audio Midi Settings. We will cover all the options ofthe Main Menu later in this manual.
2.3.1. Audio and MIDI Settings: Windows
This is where you define what kind of audio interface will be used to play the instrument,as well as the MIDI controller. It works in a very similar way in both macOS and Windows,although the names for the devices available to you will depend on the operating systemand hardware you are using.
Let's look at the options one by one, starting from the top:
• Device lets you choose which audio driver you want to use to route sound outof the instrument. You may choose your computer’s own audio driver (WindowsAudio), DirectSound (which is also an internal Windows driver), or an ASIOdriver (which will offer you the best performance). The name of your hardwareappears in this field, and may vary according to the option you take.
7 Arturia - User Manual Jun-6 V - ACTIVATION AND FIRST START
• Output Channels lets you select which of the available outputs will be used toroute audio out. Some audio interfaces offer more than the regular stereo out,but if you don't have one of these, only one pair will appear as an option. If youhave a multi-output audio interface, you can select any specific pair of outputs.
• The Buffer Size menu lets you select the size of the audio buffer your computeruses to calculate sound. The smaller the buffer, the faster it will play a note afterpressing a key. A larger buffer means a lower CPU load as the computer hasmore time to process the audio, but can result in a slight delay between pressingthe key and hearing the note. A fast, modern computer should easily be ableto operate at a buffer size of 256 or even 128 samples without creating pops orclicks in the sound. Usually, a buffer of 256 samples is more than acceptable. Ifyou are getting clicks, try raising the buffer a little.
• The Sample Rate menu is where you define how many times per second thedigital audio will be sampled before it is converted into analog (audible) sound.Higher sample rates mean more definition but demand more CPU power. Theoptions available will depend on the audio interface hardware you are using.Modern computers’ own hardware may operate at high sample rates, up to 96kHz. The latest external audio interfaces may go even higher, even the simpleones. Usually, there's no need to use such high sample rates. A value of 44.1 kHzor 48 kHz is perfectly fine (audio CDs work at 44.1 kHz).
• The Show Control Panel button will jump to the system control panel forwhatever audio device is selected. Be aware that some audio hardware may nothave a Control Panel, or that Control Panel can be a generic OS one.
• Play Test Tone helps you troubleshoot audio issues by confirming whether soundcan be heard through the correct device.
• MIDI Devices is where you will see your connected MIDI devices. All MIDIdevices available should be seen in the list. Click the check box of the MIDI device(or port, if you happen to have a multi-port MIDI device) you want to use totrigger the instrument. In standalone mode, Jun-6 V listens for all MIDI channelsso there’s no need to specify a channel. You can specify more than one MIDIdevice at once.
• Tempo defines the internal tempo used by the Jun-6 V to play time sync elementswhen in standalone mode, like synchronized effects. When used as a plug-in, theinstrument will always synchronize to the host tempo.
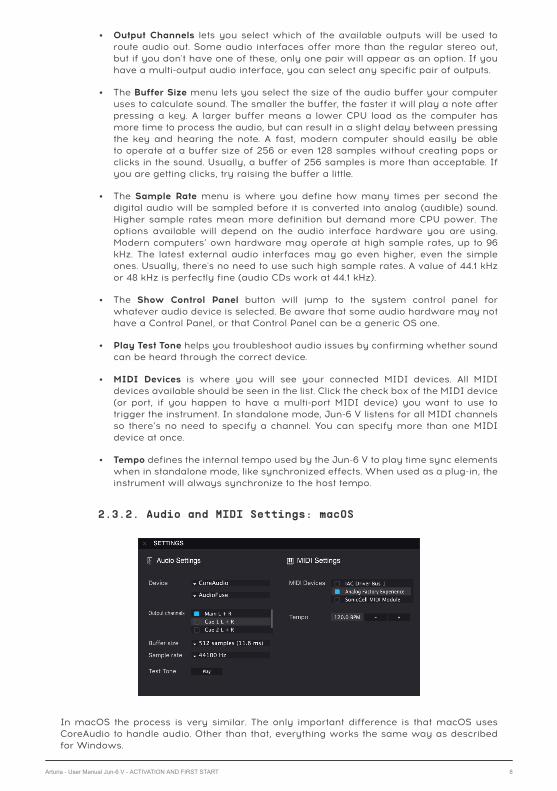
2.3.2. Audio and MIDI Settings: macOS
In macOS the process is very similar. The only important difference is that macOS usesCoreAudio to handle audio. Other than that, everything works the same way as describedfor Windows.
Arturia - User Manual Jun-6 V - ACTIVATION AND FIRST START 8

2.3.3. Jun-6 V as a plug-in
Jun-6 V comes in VST2, VST3, AU and AAX plug-in formats for use in all major digital audioworkstations (DAW) including Live, Logic, Cubase, Pro Tools and others. Unlike the hardware,you can load as many instances as you find useful. The Jun-6 V also has some other bigadvantages over hardware:
• The instrument will now synchronize to your DAW’s host tempo/bpm rate, whentempo is a factor;
• You can automate numerous parameters using your DAW’s automation system;
• You can use more than one instance of Jun-6 V in a DAW project. In standalonemode you can also open more than one instance (for example to copyparameters from a preset to another, or to try layered presets);
• You can route Jun-6 V’s audio outputs freely inside your DAW using the DAW’sown audio routing system, for mixing and further processing;
• Any additional audio effects your DAW has available may be used to process thesound, including delay, chorus, filters, etc.;
• Your settings and current instrument state will become recorded in your project,and you can pick up exactly where you left off the next time you open it.
9 Arturia - User Manual Jun-6 V - ACTIVATION AND FIRST START

3. JUN-6 V OVERVIEW
3.1. What can you do with Jun-6 V?
3.1.1. The original Juno's limitations
The Juno-6 was a very simple synth, intended as a polyphonic synth for the masses. Theoriginal manufacturers cut corners wherever they could, yet the final product was still agreat-sounding synth. Despite its deceivingly simple appearance, it is capable of great stringsounds, great brass sounds, powerful basses and leads, amazing pads, and even some veryconvincing percussion sounds and special synthesizer sound effects.
Even more amazing: all that is achieved with a single oscillator! Indeed, the Juno only hasa single analog oscillator (digitally controlled), though it is capable of summing severalwaveforms to create a fatter and more varied sound. By adding a variable pulse(controllable manually or automated through the envelope or the LFO) and a very brightsaw, you can already produce many sounds. You can also add to this a sub-oscillator(square wave) pitched one octave lower, and an independent noise source (white noise).
The sub-oscillator and the noise source have their own volume control fader, which meansyou can control their volumes independently.
The multiple sound sources are then sent through the filter section. This section has twofilters, as was already the case for the Jupiter-8. First, there is a -24 dB resonant Low-Pass Filter, followed by a -6 dB High-Pass Filter (although the control panel may suggestotherwise). The LPF wasn't exactly the same as that of the Jupiter-8 (whose Low-Pass filterwas capable of switching between -12 dB and -24 dB per octave, for example), but it wasbased on the same chip, so it is a very powerful and high-quality filter as well.
The Low-Pass Filter is resonant up to self-oscillation, and may be controlled by key-follow, envelope (both positively and negatively) and LFO. All these controls may be activesimultaneously, and each has its own fader to control the modulation intensity. Again, thisis a detail which gives a lot of versatility to the sound.
Finally, the VCA may be controlled through a Gate triggered by the keyboard (which meansthat the sound will be On as soon as a key is pressed, and Off as soon as it is released) orthrough the Envelope Generator.
As far as controls are concerned, you only have one LFO and one Envelope Generator.This is maybe the biggest limitation. The synthesizer also features a very simple but veryeffective arpeggiator, with a range of up to three octaves, and configurable between Up,Down or Up and Down. Arpeggio rate is variable.
Last but not the least, Roland introduced an effect in the synth for the first time: a gorgeousChorus unit, with three possible settings (I, II and I + II). This chorus unit is mostlyresponsible for the fat and huge sound the synth is capable of. It also masked the fact thatthe synth only had one oscillator, because the chorus gives it a sound depth and stereoimage which create the illusion that it has much more. In fact, the chorus is so important forthe sound that some jokingly said the Juno is a chorus unit with a synth attached.
Arturia - User Manual Jun-6 V - JUN-6 V OVERVIEW 10

To sum it up, despite its simple appearance and reduced set of features (when compared toother polyphonic synthesizers on the market, like the Prophet-5, the Oberheims and Juno'sbig brother Jupiter-8), the Juno was a great-sounding synth which offered a lot of "bang forthe buck". It had everything to become popular, and so it did.
3.1.2. The Jun-6 V's main features
With the Jun-6 V, you will be able to use all the features that made the Juno-6 a great synth,and some more. As usual, Arturia expanded the options with some additions that, whilepreserving the simplicity and immediacy of the synthesizer, greatly expand its potential.
Sound generation rests upon an emulation of the same single DCO that was featured inthe original. Although it was an analog oscillator, it was controlled digitally for the sake ofstability and to prevent it from going out of pitch. That's why the Juno-6 was so stable, andgreat to use on stage. But besides that, it preserved all the qualities inherent to a real analogoscillator.
This DCO has two main waveforms. The first one is a variable pulse which can produceany waveform from a plain square to the narrower pulse waveform (without reachingsilence). Pulse width can be changed manually, or dynamically modulated by the LFO orthe Envelope. This means that the Jun-6 V has true Pulse Width Modulation (PWM) which,by the way, sounds beautiful and allows for great string and pad sounds.
Adding to this, you have a very bright saw waveform, which beautifully complements thevariable pulse. These two waveforms can be summed to achieve a bigger sound (especiallywhen the pulse waveform is being modulated).
But that's not all. You also have a sub-oscillator, which sounds an octave lower than themain oscillator, and produces a fixed square wave. This may be important, for example, toproduce percussive sounds like kicks, add "oomph" to the basses, or create a pitch anchorwhen using sounds with self-oscillating resonance.
Finally, you have a white noise source, also independent. The sub-oscillator square and thenoise have their own independent volume fader control.
These sound sources are then routed to the filter section, where the main -24 dB resonantLow-Pass Filter is placed before a -6 dB non-resonant High-Pass Filter. (This allowed Rolandto put a single high-pass, instead of per voice filter, as on the Jupiter.) This filter is a greatsounding one, capable of resonance up to self-oscillation, and greatly contributes to theoverall sound. The original, although not the same filter as in the Jupiter-8 (that one wascapable of -12 dB and -24 dB per octave cutoff), was also a very good sounding analog filter,and based on the same chip.
Finally, the Jun-6 V's main modulation sources, as is the case with the original, are an ADSRenvelope (labeled ENV) and an LFO.
11 Arturia - User Manual Jun-6 V - JUN-6 V OVERVIEW

The envelope has very fast Attack and Decay segments which, when set to the zero position,produce an audible "click" that may be used very effectively in organ sounds, percussivesounds, pianos, etc.
The LFO produces a single triangle waveform and doesn't go very fast, but it works verywell with the rest and is very good and effective when used as a modulation source for thefilter or for PWM (Pulse Width Modulation).
The filter may be modulated by the envelope, the LFO and also by the keyboard position.The filter envelope modulation can even be inverted - another nice feature that adds morepossibilities.
In the hardware, key-follow cannot be in tune for the entire keyboard. We simulate badcalibration with our voice dispersion, so if you are in setting 2 or 3 for the voice calibration,you will experience this out-of-tune key-follow. However, if you are in vaoice calibrationsetting 1, you will have the key-follow apply properly to the whole keyboard.
The VCA can be controlled by the same envelope or by a Gate, triggered by the keyboard.When set to Gate, the sound is triggered as soon as you press a key, and stops as soonas you release the key. This is another uncommon feature inherited from the modulars andwhich could help in some situations, since you only had one envelope in the original.
However, as we have said, the Jun-6 V has some added features that may override theoriginal's limitations. The main ones are the addition of a second envelope and a secondLFO (with several waveform choices).
It also has assignable destination slots for the Mod Wheel, Velocity, Aftertouch, and twomodulation destinations for the second Envelope and the second LFO (besides thehardwired VCA destination for the envelope 2).
Finally, besides the original chorus, the Jun-6 V also features two additional effects: Delayand Reverb.
Arturia - User Manual Jun-6 V - JUN-6 V OVERVIEW 12

3.2. Getting hands-on with the Jun-6 V
3.2.1. Oscillator Basics
To get an idea of Jun-6 V's oscillator capabilities, we suggest you try the following:
• Open the Jun-6 V in standalone mode;
• If you haven't done it yet, define the Audio and MIDI settings to be able to workwith the instrument. For more information about the Audio and MIDI Settings,please read the entry [p.7] in Chapter 2 of this manual;
• Load the "Default" preset;
• Play some notes with your MIDI keyboard. If everything was set up properly,you should hear a saw sound playing;
• Now click the saw button to turn it Off. Jun-6 V doesn't produce a sound anymore.Click the square/pulse button. This activates the variable pulse waveform. Sincethe pulse depth is at zero (the PWM fader is in the lowest position), you'll hear asquare wave;
• PWM modulation is set to manual, so if you drag the fader up, you'll see thesound becoming "buzzier", "narrower", and more nasal. The higher the pulse, themore narrow and nasal the sound becomes. This is very effective for string-like sounds, for oboe-like, harpsichord-like, and also for pads, especially whencoupled with filtering and resonance;
• Now let's experiment with PWM, using the LFO. Place the PWM fader at half(value 0.500). Now turn the PWM switch from manual to LFO. You'll hear avibrato sound, caused by the LFO modulating the pulse value. You may drag theLFO rate down, to get a subtler modulation. 2.00 Hz may be a good value. Also,to get a rising modulation fade, drag the LFO delay time up;
• Now to make the sound a little heavier, you may add a small amount of lowfrequencies. This can be done with the sub-oscillator. Click the Sub button, anddrag the fader up slowly, until you become satisfied with the results;
• To make the sound a little more "atmospheric", you may also add a small amountof noise. This may sound strange, but some noise added to pad-like sounds canproduce wonderful sounds. Please try it to hear if the result pleases you.
Jun-6 V LFO (Low Frequency Oscillator) and DCO(Digitally Controlled Oscillator)
13 Arturia - User Manual Jun-6 V - JUN-6 V OVERVIEW

• We haven't touched the envelope yet. This is a very important modulationresource, since the envelope may transform a sound completely, turning a stringsound into a piano sound, for example. Right now, you are using a kind of neutralenvelope contour which lets the sound pass basically unaltered. Let's transformthis into a kind of string envelope with a little room reverb. First drag the Attackup to around 75 ms. Then, drag the Decay down to 0. Now, drag the Release upto around 300 ms (this gives a little "tail" to the sound);
♪: To manage a precise editing of the different values, you may use" Ctrl + Drag". This way, the values
change more slowly, allowing you to reach the precise value you want.
• Now that we have a string-like envelope, and since our sound is somehow"atmospheric" (assuming you added some noise), let's make it more "pad"-like.Raise the Attack up to 300 ms. Raise the Decay up to the maximum value. Lowerthe Sustain to around middle position. Raise the Release up to around 700 ms. Ifyou play a few notes, you'll notice a whispering atmospheric sound coming out.And we haven't yet touched the filter (nor the chorus);
3.2.2. Filter Basics
Now that you have experienced some of the capabilities of the oscillator section, it's timeto move on to the filter section. This section of Jun-6 V is very good. Although the Low-Pass filter only has a -24 dB per octave configuration, it is a very good-sounding filter, withresonance up to self-oscillation. And the High-Pass filter, although with a roll-off of only 6dB per octave and no modulation capabilities, is good to act as a kind of EQ filter in somesituations.
• Let's keep going with the whispering sound. This sound is good to discover thecapabilities of the Low-Pass filter. First, drag down the filter fader to around 750Hz. The sound becomes mellower, and the "whispering" quality disappears;
• Now let's turn on the envelope modulation. This is a very important resource,since it allows the filter to act dynamically over time. Drag the envelope faderto around 0.350. The sound will regain some of its "whispering" quality, but thistime with a softer feel;
• Experiment with the Resonance parameter. If you drag it up, you'll notice thesound becoming narrower, and the noisy part of the sound becoming moreprominent. This is because the frequencies around the Cutoff point areincreasing with the Resonance;
• Now add a little LFO modulation. Remember that the LFO doesn't startimmediately, since we raised the Delay parameter. If you place the LFOmodulation at around 0.100, a nicer vibrato effect will appear after a little while;
Jun-6 V Filter (both the High-Pass Filter and the VoltageControlled Low-Pass Filter) and Envelope Generator
Arturia - User Manual Jun-6 V - JUN-6 V OVERVIEW 14

3.2.3. More Envelope Features
We have already seen the Oscillator and Filter sections. We have also seen the LFO and theEnvelope in action. But there is more to the Envelope that we would like to cover here. Let'stry something else:
• First, let's start with a completely different sound. Turn the Sub and the Noise allthe way down. We will just keep the PWM part of the Oscillator;
• Now, change the PWM modulation from the LFO to the Envelope. The Envelopecontour will now also control the PWM depth;
• In the filter section, drag the LFO fader modulation down to 0. The sound isnow static, though it still has the pad-like character. This is because we haven'ttouched the Envelope contour yet. That's what we will do next, to get a soundmore like a harpsichord;
• Drag the Attack down to 0. Place the Decay at around 10.000 s. Sustain will alsobe dragged down to 0. Release will be placed at around 40 ms, to try to mimicthe noise of the key releasing;
• Now, you have to tweak the filter a little. Drag the Cutoff value to around 1000Hz. Resonance should be at around 4.80. Now, to give it the final touch, loom forthe best filter Envelope modulation setting. We chose 0.370;
• Play a few notes, You'll hear what's called an Analog Synth Harpsichord. Butwe're not finished yet. It's time to experience the power of an inverted Envelopemodulation;
• Drag the Envelope polarity switch down (to the position with an inverted envelopepicture). You'll hear basically no sound. Drag the Release fader to 0;
• Now drag the filter to around 23500 Hz and the Resonance value to around 7.50.Now, you have a sound with an EP-like Attack, followed by a filter sweep. Youmay try to add the Saw wave to beef up the sound a little. This is just an exampleof the transformation power that an inverted modulation has over the sound;
• You may now try different Envelope modulation values, and also check thekeyboard position modulation. Both have a very noticeable effect on the sound.Play at will with these two until you find something that interests you;
15 Arturia - User Manual Jun-6 V - JUN-6 V OVERVIEW

3.2.4. Chorus and Arpeggiator
Let's move on to the Chorus and the Arpeggiator:
• We will start with a completely different sound. Turn the Sub and the Noise allthe way down. We will just keep the PWM part of the Oscillator;
• Now click the On button of the Arpeggiator. Change the mode to Up & Downand the Range to two octaves. Play a chord. You'll start to hear a relatively fastarpeggio playing up and down;
• Turn Sync Off. The rate will now be manually controlled. You'll hear the arpeggioplaying at a much slower speed. Raise the rate value until you reach more or lessthe same speed as before (it should be around 8.50 Hz). When the arpeggiatoris playing in sync, it will synchronize to the tempo of the host, which is verywelcome. The rate is defined with musical values;
• If you turn the Hold button On, the current chord will remain, and you will haveyour hands free to play another instrument over that chord. You only need to getback to the Jun-6 V when you want to change chords. The Hold feature is alsogreat to have the synth play while you are programming sounds;
• Now that you have the arpeggio playing, you can experiment a little more withthe envelope and the filter. Start by raising the Release value. You'll notice acertain tail to the sound. Raise the Envelope value, and also experiment withdifferent Cutoff and Resonance values;
• Raise the KBD (keyboard position) fader. This changes the way the filter actsalong the keyboard.
• Now, it's time to turn On the famous Chorus. Press the I button. You'll notice thesound "opens" in the stereo field. This is because the chorus, when in position Iand II, works in Stereo. We'll give more details in Chapter 4;
• Press the I button to turn it Off and press the II button to turn it On. This is adifferent chorus setting, with a little more modulation and also Stereo;
• Now press button I again. The two buttons are now On. This is position III. Inthis position, the Chorus becomes mono and adds a kind of vibrato to the sound.Turn the II button again to turn it Off. We will just keep Chorus I for now;
♪: The Arpeggiator, when used with the Hold button, is great to have a sound playing while you
experiment with the synth controls to program your own sounds.
Jun-6 V Hold button, the new Chord Selector and Chordbutton (added by Arturia), and the Arpeggiator controls,
including the new Sync button also added by Arturia.
Arturia - User Manual Jun-6 V - JUN-6 V OVERVIEW 16

3.2.5. Using the Advanced Section Modulations
Now that you have experimented with the Arpeggiator and the Chorus, it's time to try out theextra features we have added to this synth. We aimed to keep it very simple and inviting,for the users to feel comfortable programming it, but we decided that a few more featureswouldn't hurt. To access these, press the "Advanced" button in the right corner of the UpperToolbar. So, let's go a little deeper:
• Start by changing the VCA envelope to Envelope 2. The original Juno only hadone envelope, so the same values were used to control the filter and the VCA.Sometimes, this wasn't so good, and we felt the need for a second envelope.Here, you can finally use a second envelope, and have different envelope valuesfor the Filter and the VCA;
• Set all values to zero. You would expect the sound to stop completely. Well, notquite. The Juno envelope is very fast and produces "clicks" when set this way.You'll notice them immediately;
• Now raise the Decay a little. The tail will disappear, and only the EP-like attackwill remain. Select VCF Frequency in the first Destination slot for the Envelope.You now have both envelopes modulating the Filter. Turn the amount knob all theway to the right;
♪: Having an extra Envelope and LFO, as well as a Delay and a Reverb, adds a lot more variety and
possibilities to the Jun-6 V, although it remains very simple to program.
Jun-6 V Chorus and Master sections. The chorus unitfeatured in the original was one of the most famous
features of the synth. This Chorus faithfully emulates thatunit.
17 Arturia - User Manual Jun-6 V - JUN-6 V OVERVIEW

• Finally, click the LFO 2's first destination slot and select VCA level. Turn the knobto the right. You'll hear a vibrato added to the sound. You may control the vibratosound. If you want, you can now save your new preset. To do that, click theArturia button in the Upper Toolbar and choose the option "Save Preset As", givingit a new name. You can also define tags.
3.2.6. Using the effects
Now let's play with the effects a little. The Jun-6 V only has a Delay and a Reverb (besidesthe Chorus that was included in the original), but these can do a lot for the sound:
• Let's activate the extra effects. Raise the Delay Dry/Wet fader value. Although theDelay and the Reverb are turned On, the Dry/Wet fader is in the Dry position,which means they are not being heard. By raising the fader, you'll hear the Delayeffect. Raise it up halfway;
• Do the same with the Reverb. Now you have both Reverb and Delay added tothe Chorus. You could never have gotten this sound with the original Juno, unlessyou were using external effect units.
♪: Almost all effects have a Dry/Wet control which allows to balance the mix between processed and
unprocessed sound. The Jun-6 V effects come turned On but with the Dry/Wet fader in the Dry position,
which means their effect is not felt. To "activate" them you just need to raise the Dry/Wet fader. But you
can also turn them Off, of course.
And that's it. We have traveled through many of the main features of the Jun-6 V. You arenow ready to use the instrument, and create some great sounds with it. But you may wantto add some MIDI control...
Jun-6 V Advanced Panel modulators section, with all the advanced options available tomodulate the synth.
The two extra effects added by Arturia to the Jun-6 V, present in theAdvanced Panel: Delay and Reverb.
Arturia - User Manual Jun-6 V - JUN-6 V OVERVIEW 18

3.2.7. Automating the Jun-6 V with MIDI
It is now time to see how you can control the different features of the Jun-6 V through MIDI.
• You may leave the instrument exactly where you were just now. Click the "cogwheel" icon in the right-hand corner of the Upper Toolbar. This opens a newsection on the right side of the GUI. There are four Tabs in this section: Settings,MIDI, Macro, and Tutorials;
• You want to use the "MIDI Learn" function, so please click the "MIDI" tab.
• Now, many of the controls in the Jun-6 V become purple, which means theyare ready to "learn" MIDI automation controls. You may also notice that somecontrols are red instead of purple. It means those controls are already assigned.If that's the case, the parameter names appear listed in the right-side panel, withthe MIDI Channel and CC (Continuous Control) already assigned. By default, nocontrols come pre-assigned in the Jun-6 V.
♪: Volume is usually controlled by MIDI Controller #7, so you may want to assign this controller to
the Volume, as we did.
• We will now automate the PWM fader control through MIDI. This fader controlseither the PWM depth (if the switch is set to manual) or the modulation that isintroduced by the modulator assigned (either the Envelope or the LFO). Click thePWM control to make it ready to "learn" a MIDI controller and automate it. A blackbox contour will appear around that control.
Jun-6 V ready to "MIDI learning" (several controls are purple). Notice the black box contouraround the PWM control. That control is set to learn, as soon as a MIDI control is moved.Notice also that several controls are red- it means they are already assigned. In the panelto the right, you can see which MIDI Continuous Controllers are assigned, and the control
ranges.
19 Arturia - User Manual Jun-6 V - JUN-6 V OVERVIEW

• Now move the control knob/fader of the MIDI controller you want to use tocontrol that parameter. If the connections are well established, you shouldsee the parameter assigned to the PWM control. If your controller offers thatpossibility, and the control you selected is of the right type, you should select "IsRelative" to make sure that when you touch that parameter the control will notjump suddenly. For more information about this feature, refer to the section onRelative Control option [p.28] in the USER INTERFACE chapter.
• You may assign as many parameters as you want. You just need to have enoughMIDI CC available and, if you want to use your keyboard controller, enoughcontrollers to assign them to;
This hands-on tutorial is now finished. You may keep reading this manual or go on playingthe Jun-6 V.
Arturia - User Manual Jun-6 V - JUN-6 V OVERVIEW 20

4. THE USER INTERFACE
In this chapter we’ll start with an overview of the Jun-6 V user interface. This will give youan idea of how the instrument is organized and where to find things. The point here is toestablish how the interface is composed at a high level.
4.1. High-Level Overview
The Jun-6 V is neatly subdivided into three sections.
1. The Upper Toolbar: This is where you handle administrative tasks such assaving, loading and browsing presets, editing various setup and configurationparameters, adjusting MIDI mappings and accessing advanced features.
2. The Main Panel: Here is where you will likely spend most of your time whenworking with Jun-6 V. It contains a detailed reproduction of the Jun-6 V paneland features.
3. The Lower Toolbar: This section provides quick access to a number of importantparameters and useful bits of information such as CPU usage, panic button andundo history.
4.2. The Upper Toolbar
The toolbar that runs along the top of the instrument provides access to many usefulfeatures including the Jun-6 V menu, preset browsing features, access to the "advanced"Screen mode and lastly the gear button which opens the side panel giving access to variousMIDI functions including global MIDI channel and mapping features.
Jun-6 V Upper Toolbar
21 Arturia - User Manual Jun-6 V - The User Interface

4.2.1. The Jun-6 V menu
Clicking the Jun-6 V box at the top-left corner opens a drop-down menu and lets you accessten important features.
• New Preset: This option creates a new preset with default settings on allparameters. It is a good place to start if you would like to create a new soundfrom scratch.
• Save Preset: This option will overwrite the currently loaded preset with anychanges you have made. If you would like to save the current preset under adifferent name, use the "Save As…" option below.
• Save Preset As… This lets you save your preset under a different name. Clickingthis option reveals a window where you can name your preset and enterinformation about it.
♪: Arturia's powerful browsing system lets you save much more than just a preset name. For
example, you can enter the Author's name, select a Bank and Type, select tags that describe the sound,
and even create your own Bank, Type, and Characteristics. This information can be read by the preset
browser and is useful for searching the presets banks later. You can even enter freeform text comments
in the Comments field, which is handy for providing a more detailed description of a sound. This can
help you remember a sound or to provide context to other users with which you are collaborating.
Jun-6 V "Save As" dialog box
Arturia - User Manual Jun-6 V - The User Interface 22
• Import: This command lets you import a preset file, which can be either a singlepreset or an entire bank of presets.
• Export Menu: You can export presets in two ways: as a single preset or as a bank.
◦ Export Preset: Exporting a single preset is handy when you want toshare a preset with someone else. The default path to these files willappear in the "save" window, but you can create a folder at anotherlocation if you like. The saved preset can be reloaded using the ImportPreset menu option.
◦ Export Bank: This option can be used to export an entire bank ofsounds from the instrument, which is useful for backing up or sharingpresets. Saved banks can be reloaded using the Import Preset menuoption.
• Resize Window: The window can be resized from 50% to 200% of its originalsize without any visual artifacts. On a smaller screen such as a laptop you maywish to reduce the interface size so it doesn’t dominate the display. On a largerscreen or a second monitor you can increase the size to get a better view of thecontrols. The controls work the same at any zoom level but smaller controls canbe easier to see at higher magnification levels.
♪: While working with Jun-6 V, you can also use the keyboard shortcuts Ctrl & +/- (or Cmd & +/-) to
quickly adjust the window size.
• Audio Settings: (only available in Standalone mode) Here you manage the waythe instrument transmits audio and receives MIDI. See the section Audio andMIDI settings for more information about this topic.
!: The Audio Settings menu is only available in when using Jun-6 V in Standalone mode. When using
it as a plugin, the host software handles all of the parameters in this menu including audio and MIDI
routing, buffer size settings, and more.
• Tutorials: Jun-6 V comes with tutorials that walk you through different featuresof the instrument. Select one of the tutorials to get step-by-step descriptions ofhow to make the most of the Jun-6 V features.
• Help: This section provides handy links to the Jun-6 V User Guide and FrequentlyAsked Questions page on Arturia’s website. Note that accessing these pages willrequire an Internet connection.
• About: Here you can view the Jun-6 V version and developer credits. Click theAbout window again to close it.
23 Arturia - User Manual Jun-6 V - The User Interface

4.2.2. Browsing Presets
Jun-6 V comes packed with lots of great-sounding factory presets and we hope you'll createmany more of your own custom presets. To help you search through large numbers ofpresets, we have a powerful preset browser with a number of features to help you findsounds quickly.
The browsing features of the Toolbar (shown above) include the following:
• The Preset Browser (on the left) opens and closes the preset browser. This iscovered in detail in the next section of this guide
• The Like Button allows you to tag presets as favorites. Click the like button to likeor unlike the preset.
• The Preset Name is listed next in the toolbar. Clicking on the name reveals a pull-down menu with other available presets. Click on any name to load that presetor click away from the menu to close it.
• The Arrow icons select the previous or next preset in the filtered list. This is thesame as clicking on the preset name and selecting the next option in the list, butdoes it with only one click.
♪: The Previous and Next arrows can be MIDI mapped. This means you can use buttons on your
MIDI Controller to easily step through the available presets without having to use the mouse at all.
4.2.3. Side Panel
At the far right of the Toolbar, you will find the Gear icon which when pressed opens up theSide Panel. The Side Panel gives access to various MIDI related options. In here you canset the global MIDI channel, set up MIDI controller mapping to virtually any parameter ofthe Jun-6 V, select either a generic MIDI keyboard controller OR one of Arturia's own MIDIcontrollers, set up the Macros and access the tutorials.
Arturia - User Manual Jun-6 V - The User Interface 24

4.3. The Lower Toolbar
The Lower Toolbar runs along the bottom of the user interface and provides quick access toseveral important parameters and useful bits of information.
• Parameter Name on the left displays the name of the parameter as you adjustcontrols. The current value of the control is listed in a tooltip that appears next tothe control.
• Undo undoes the last change.
• Redo redoes the last change.
!: The Undo and Redo buttons only become visible AFTER you have started editing on the Main Panel.
Try moving the Freq (or any other) control now and you'll notice the Undo button will magically appear.
• Undo History lets you to see a list of recent changes. Click on a change to restorethe patch to that state. This can be useful in the event you happened to go too farin your sound design and want to revert to an earlier configuration.
• CPU Meter-Panic Button displays the current CPU usage of the instrument andwhen pressed it resets all MIDI signals in the event of stuck notes or other issues.
!: If the CPU meter is high, you may hear clicks, pops and other audible glitches in playback. In
this case, consider increasing the audio buffer size setting. This is found under Audio Settings when
working in Standalone Mode or in your host music software's preferences menu. Alternatively, you can
limit polyphony with the Poly and Unison settings.
25 Arturia - User Manual Jun-6 V - The User Interface

4.4. Side Panel
The Gear icon at the top right side of the upper toolbar opens up the Side Panel.
• Settings this sets the global MIDI channel for the Jun-6 V
♪: By default, Jun-6 V will receive MIDI data on all 16 MIDI channels (All setting). You can change this
by selecting a specific channel here. You will need to do this if, for example, you want to use an external
controller with multiple instances of Jun-6 V. In this situation, every instance can be set to a unique
channel, and you can change the preset or MIDI channel on your controller to control the different
instances of Jun-6 V.
• MIDI this section lets you set the MIDI controller you are using and setup themapping of MIDI CC commands.
4.4.1. MIDI controller configuration
If you click on the drop-down menu to the right of where it says MIDI Controller you canset whether your using a generic MIDI controller or one of Arturia's own. Underneath thisyou have the MIDI configuration dropdown menu. Here you can manage different setupsof MIDI mappings for controlling Jun-6 V. For example, if you have multiple hardwarecontrollers (small "live performance" keyboard, large "studio" keyboard, pad based controller,etc.), you can create a profile for each of them just once and then quickly load it here. Thissaves you from having to redo the MIDI mapping assignments from scratch each time youswap hardware.
Once you have created a profile, you can save, delete, import or export it using the optionsin this menu.
Your MIDI Mapping profiles are listed at the bottom of this pull-down menu and the currentlyactive profile has a checkmark next to it.
Underneath this you will see all the MIDI mappings currently setup. MIDI-assignableparameters are shown highlighted and you can map physical controls on your MIDIController to them. A typical example might be to map a real expression pedal to the MasterVolume control, or a physical knob on the MIDI controller to the Frequency knob of the Filtermodule.
Arturia - User Manual Jun-6 V - The User Interface 26

Purple controls are unassigned whereas red ones have already been assigned to anexternal MIDI control.
4.4.2. Assigning / Un-assigning controls
When MIDI Learn mode is switched on, click on any purple control to select it. Then turna knob, move a slider or push a button on your MIDI controller. Your selected on-screencontrol will change from purple to red, indicating that a link has been made between yourhardware control and the on-screen software parameter.
!: Pitch Bend is a reserved MIDI controller that cannot be assigned to other controls.
4.4.3. Min / Max value sliders
By default, a hardware control will span the entire range of the on-screen control (i.e., from0 to 100%). The minimum and maximum value sliders let you restrict the range somethingother than 0%-100%. This is very useful for making sure you cannot accidentally make thesound too quiet or too loud when performing.
27 Arturia - User Manual Jun-6 V - The User Interface

4.4.4. Relative control option
If you right click on a mapped parameter in the list, you can make a parameter "absolute" or"relative". Only change to "relative" if your hardware MIDI control is sending "relative" MIDImessages. If the MIDI controller is sending out "absolute" messages leave itbset to "absolute"(this is the more common behavior).
A "relative" change instructs the receiving device to increase or decrease its current value.The receiving device (Jun-6 V in this case) interprets this command as "increase/decreaseyour current value." This type of control is often implemented on "endless" or "360 degree"knobs that do not have hard stops at the ends of their range. The advantage of this is thatphysical knobs always remain in sync with on-screen controls. However, not all hardwaredevices support this mode of operation which is why both options are available in Jun-6 V.
♪: There are two common types of messages when working with MIDI knobs: Absolute and Relative.
Absolute positioning sends the exact position of the knob as a specific numerical value (i.e., "Set value
to 54, 55, 56, etc.") when you turn the knob on your hardware controller. This is the most common
implementation and is almost always used when using potentiometer knobs with "hard" stops at the
ends. One downside to this implementation is that if you change presets, your physical knob and on-
screen control will be "out of sync" with each other and turning the physical control can cause the on-
screen control to suddenly jump to that position.
Arturia - User Manual Jun-6 V - The User Interface 28

4.4.5. Unassigning or "un-learning" a MIDI mapping
Click on an assigned parameter to highlight it then press the delete button on the keyboardto disconnect.
• Macro this function lets you setup the functionality of the macro section. Basicallya macro lets you change a group of parameters together and there are 4available (you can see the status of the 4 macros along the lower toolbar). Themacro is selected using the back or forward arrows either side of the name andif you click on the name it can be changed.
You can add extra controls into the macro by selecting "add control" and clicking on thedesired control on the panel. You will see it get added to the macro control list and you canset upper and lower limits for each control. When you tweak one of the macro controls inthe lower toolbar you will see all the link controls move. Very handy indeed!
29 Arturia - User Manual Jun-6 V - The User Interface

4.5. The Preset Browser in Detail
The Preset Browser (shown above) is where you can search through all of the presets. Openthe Preset Browser by clicking the library symbol on the toolbar. To close the Preset Browserand return to the main screen, click the "X" that appears in the Toolbar.
To narrow down your choice and help you find the sounds you want, you can enterkeywords in the search bar. You can narrow your search further by clicking on one of thedrop down menus under the search bar which lists categories and has tags to point you inthe right direction. You can cancel the list by pressing "clear all".
The results of your search are listed in the middle column. You can easily audition anydisplayed preset by clicking on it and playing a connected MIDI keyboard. You can sort thelist results in various ways by clicking the column headers directly above the preset names.If you’re feeling spontaneous, click the Shuffle button at the top right to randomly select onepreset from the results list. This is a fun and quick way to audition sounds without having tostep through the list one-by-one.
Details about the currently selected preset are listed in the right column.
♪: Factory presets cannot be modified, deleted or overwritten. Only “User” (user generated) presets
can be deleted, overwritten or saved under a different name. This is done by using the “Delete” “Save”
or “Save As” buttons at the bottom of the right column. If you have modified a Factory preset and would
like to save it, you must save your modified preset under a different name (only the “Save As” option
appears in this case since you cannot delete or overwrite factory sounds).
Arturia - User Manual Jun-6 V - The User Interface 30

4.5.1. Browse Presets With MIDI Controller
This option allows you to browse presets using the Browse knobs on Arturia MIDIControllers. This makes it incredibly efficient to quickly audition sounds without having toreach for the mouse. To use this feature, select your Arturia controller from the menu and itsBrowse knob will be automatically mapped to preset browsing.
4.5.2. Playlists
In the lower left corner of the Preset Browser window is a feature titled Playlists. This is usedto collect presets into collection groups, such as a set list for a particular performance or aset of presets related to a particular studio project.
4.5.2.1. Add a playlist
To create a playlist, click the + New Playlist button. Give the playlist a name and it will appearin the Playlists menu. To rename the playlist at any time, double click on the name.
4.5.2.2. Add a preset to the playlist
You can use the Search window to locate the presets you want to add to your playlist. Onceyou have found the right preset, click and drag it onto the playlist name on the left.
You will see a message which tells you that the new preset will be duplicated. Jun-6 V willcreate a copy of the preset so that you can modify settings in the playlist presets withoutimpacting the original preset it is based on, and vice versa.
To view the contents of a playlist, click on the playlist name.
4.5.2.3. Re-order the presets in the playlist
Presets may be reorganized within a playlist. For example, to move a preset from slot 3 toslot 1, drag and drop the preset to the desired location.
This will move the preset into the new location.
4.5.2.4. Remove a preset from the playlist
To remove a preset from a playlist, right click on the preset name.
4.5.2.5. Delete a playlist
To delete a playlist, right click on the playlist name.
31 Arturia - User Manual Jun-6 V - The User Interface

5. JUN-6 V CONTROL PANEL
The Jun-6 V instrument default window mimics the aspect of the original Juno. Therefore,you only have a small control panel, with the controls for the LFO, DCO, Filter, Envelope,Arpeggiator, and the famous Chorus.
Besides this simple main panel, which we consider inviting to editing, and a great tool to beintroduced to analog synthesis, you have some more features in the advanced panel, like asecond LFO, a second Envelope, some modulation matrices, Delay and Reverb effects, etc.This Advanced Panel is positioned above the Main Panel and closed by default. To open it,you need to press the "ADVANCED" button in the Upper Toolbar.
We will look deeper into these when we reach the Advanced Control Panel [p.48] entry.
5.1. Main Control Panel
The Jun-6 V main control panel only has a few controls. Just like the original keyboard,is is a very simple control panel, since the synth itself has a simpler set of features whencompared to other synths like the Jup-8 V which is also part of the Arturia V Collection.
♪: Just like its hardware counterpart, the Jun-6 V is a very simple synth. This makes it ideal to learn
(and teach) the basics of synthesis. However, you shouldn't be fooled by its simplicity. Thanks to a very
cleverly selected set of features, and an amazing chorus unit, the original has a great sound, which we
preserved in this emulation.
Several waveforms can be mixed, including a variable Pulse with Pulse Width Modulation.There are even some great extras, like sensitivity to velocity, aftertouch, and the possibilityto automate waveform mixing and modulation of the Pulse Width. Also, being a MIDIinstrument (which wasn't the case of its ancestor), the Jun-6 V responds to many realtimecontrols through MIDI, which greatly contributes to the expressiveness of the instrument.
5.1.1. Hold Button
In the original, this button, when pressed, maintains the sound even after you release thekeys. The number of notes that can be held depends on the polyphony. If the notes beingheld exceed the polyphonic capacity, only the latest played keys will remain sounding.
Arturia - User Manual Jun-6 V - JUN-6 V CONTROL PANEL 32

Also, volume depends on the VCA control. If the VCA is being controlled by an envelope witha Sustain value of 0, the sound will still fade to 0, despite the Hold key being pressed.
This key is great to keep a chord or an arpeggio playing while you are programming sounds.
5.1.2. Chord Mode
In the original, this feature (and control) didn't exist. It is one of several new featuresintroduced by Arturia. When the Chord button is pressed, the keys play chords instead ofsingle notes. The chord root note is defined by the key being played (the chord builds overthat note). If you play more than one note, you will hear juxtaposed chords.
There is a pre-defined number of chords (and intervals). First choice is Octave (plays singleoctaves), then Fifth (plays octaves and fifths), then Suspended (Sus4 chords), minor, Major,etc.
Finally, there is a Custom button which allows you to define your own chords. So, if youwant diminished or augmented chords, be aware that you will be able to have at least oneof them added.
5.1.2.1. On
Selects the Chord option. When the button is On, any key you press will play the chosenchord type over that key. By default, Chord button is Off.
5.1.2.2. Select
This button opens the chord choice dialog box. This is where you select which chord willplay. To close the window, just click the Esc key on your computer keyboard.
If the Chord key is On and the Arpeggiator is also On, the chord will be played arpeggiated.If more than one note is held, you will hear two or more chords being arpeggiatedsimultaneously.
Jun-6 V Chord Selection screen.
33 Arturia - User Manual Jun-6 V - JUN-6 V CONTROL PANEL

5.1.3. Arpeggio
The Juno's arpeggiator offers the usual configuration options, but lacks one of the nicestfunctions: a random mode. Basically, it was the same arpeggiator you could already find inthe Jupiter-4/8 and the Roland 100M keyboard.
The arpeggiator of the Jun-6 V has the same range as the original, but offers somemore variety, thanks mainly to the Sync option (one of the advantages of being a virtualinstrument and having MIDI capabilities).
5.1.3.1. On
This button turns the arpeggiator On and Off. When On, the red LED lits up. By default it isOff.
5.1.3.2. Mode
This sets the behavior Mode of the arpeggiator. Just like the original, it can be positionedto go Up, go Down, or Up and Down. Up plays notes from the lowest to the highest. Upand Down plays notes from the lowest to the highest and back. Down plays notes from thehighest to the lowest. The default position is Up.
5.1.3.3. Range
This switch defines how many octaves are played by the arpeggiator. The range can beset to 1 (one octave only), 2 (two octaves) and 3 (three octaves). The starting note is alwaysthe lowest note played, and the arpeggio always plays according to the notes being held.Therefore, if you play a bass note, and then a chord one octave higher, the arpeggio willstart with that bass note, and then jump to the lowest note of the chord.
Many interesting patterns can be obtained by combining the chords being played with therange. For example, with a range of 2 and two notes in the lower region, you can establishvery interesting ostinato bass patterns.
It can be even more fun if you combine these patterns with a carefully set Delay, andsyncing tempi with the host.
Jun-6 V Hold and Chord buttons, and the Arpeggiatorsection
Arturia - User Manual Jun-6 V - JUN-6 V CONTROL PANEL 34

5.1.3.4. Rate
This defines the speed at which the arpeggiator plays. When not in Sync, the speed isexpressed in Hz and is absolute. In this mode, the Rate goes from 1.36 Hz up to 45.0 Hz. Justto give you an idea, the lowest value can be compared to quarter-notes played at around 60BPM. The highest value is a cloud of notes almost impossible to differentiate. Default valueis 8.0 Hz, which is equivalent to sixteenth notes at around 80 BPM.
5.1.3.5. Sync
This is another new feature introduced by Arturia. The original arpeggiator couldn't besynchronized (except by using an external clock like those produced by hardwaresequencers, for example - in that case, the external clock would take over the Rate control),but you have that possibility here.
When in Sync, Rate is expressed in musical values, ranging from 1 (a whole note, or anentire 4/4 bar) up to 1/64 (a 64th note). Default is 3/16 (dotted eighth note).
♪: An arpeggio can only play if some keys are being held, unless you are using the Hold button, in
which case you can release the keys. In this case, the arpeggio will keep playing until the Hold button
is turned Off. If you are using a MIDI keyboard controller with a Sustain pedal, or use the MIDI CC #64,
these will have the same effect as the Hold button. With the arpeggio On, voice allocation is set to Cycle.
If you use the synth with noticeable dispersion levels (for example, by switching the Voice Calibration
to Poor) this can create interesting results.
5.1.4. LFO
LFO is an acronym for "Low Frequency Oscillator". As the name implies, an LFO is anoscillator which produces low frequencies. These are usually inaudible (below the audiblelow threshold, which is around 40 Hz). Therefore, an LFO isn't used to produce sound. Yet,an LFO may be used for several important tasks in a synthesizer environment. Its main useis for modulation purposes - either modulating the Pulse Width, the cutoff frequency, theoscillator pitch, etc.
The main LFO in Jun-6 V can only produce a triangle waveform. That's why you don't havea choice for the waveform.
5.1.4.1. Sync
Again, you have the possibility to sync the rate with the host tempo. Sync times are muchslower than in the arpeggiator. Here, the lowest sync value is 8, which means 8 whole notes,or eight 4/4 bars. The highest value is 1/32 (a 32nd note). Default is 1/16 (a 16th note, whichmay be quite fast, depending on the purpose and the host tempo).
You can also use dotted values and triplets. For example, 3/4 is a dotted half-note, 1/3 is adotted quarter-note, 1/6 is a quarter-note triplet, 1/12 is an eight-note triplet. And so on.
35 Arturia - User Manual Jun-6 V - JUN-6 V CONTROL PANEL

5.1.4.2. Rate
Rate is where you define the speed of the LFO. There are two modes: Absolute and Sync(which we just referred to above). In Absolute mode, rate is expressed in Hz, as expected,and has a range from 0.038 Hz up to 21.5 Hz, which is already quite fast. Default value inAbsolute mode is 1.000 Hz.
5.1.4.3. Delay Time
This is where you define the time it takes for the LFO to start working. It applies a fade to theLFO amplitude after a key is pressed. When the LFO is modulating the Pulse Width (PWM),the Delay setting is not applied.
Delay Time range goes from 0.007 up to 2.89 seconds. It is also influenced by the LFO delaymode. Default value is the minimum value (basically: no delay).
5.1.4.4. Delay Mode and Retrigger
This parameter determines how the LFO behaves and is retriggered. Unlike the hardwareunit, which had a button to retrigger the LFO, here you have two keyboard trigger modes.
When set to the higher position, the LFO delay is triggered by each key, with two phases: aninitial Auto Delay plus a soft rise (tempo defined by the Delay Time parameter).
The lower position retriggers the LFO each time a key is pressed too. Once triggered, the LFOwave curve starts rising immediately, with NO initial delay, according to the tempo definedin the Delay Time parameter.
5.1.4.5. LFO Mod Wheel
This wheel, which is hardwired to the Mod Wheel of any MIDI keyboard controller, as wellas the MIDI CC #01, controls two other parameters: DCO and VCF. For more informationabout this, please refer to the Virtual Keyboard LFO Mod Wheel [p.55] entry later in thischapter.
Jun-6 V LFO and DCO.
Arturia - User Manual Jun-6 V - JUN-6 V CONTROL PANEL 36

5.1.5. DCO (Digitally Controlled Oscillator)
The Jun-6 V, just like its hardware counterpart, features a single oscillator. The originalanalog oscillator was Digitally Controlled, hence the name DCO. Digital controlling preventedit from going out of tune, meaning that the Junos were the first analog synths that could goon stage and play an entire gig without drifting out of tune. Besides being great-sounding,they were also stable and reliable.
The Jun-6 V DCO has three waveforms plus white noise (which means four sound sourcesin total). Although you cannot tune them individually, you can however control the volumesof the sub-oscillator and the noise source independently, and switch On and Off each of theother two waveforms. This, coupled with the PWM capabilities, can lead to very interestingsounds.
5.1.5.1. LFO
This fader defines the depth of the vibrato effect (pitch modulation intensity) applied tothe DCO by the LFO. This parameter is independent of the modulation applied by the ModWheel, which may also affect the DCO pitch. For more information about this, please readthe Virtual Keyboard LFO Mod Wheel [p.55] entry later in this chapter.
Modulation intensity goes from 0.00 up to 1.00. Default is 0.00 (no modulation).
5.1.5.2. PWM
One of the most desirable features in any synth, PWM is an acronym for Pulse WidthModulation. A pulse wave is a rectangle wave. When the pulse value is at 0, both periodsof the waveform have an equal length, so the waveform produced is a square wave (pulsevalue is 50% of the waveform length). If you expand one of the periods, consequentlyshortening the other, the waveform starts sounding more and more "narrow" and "nasal".This is where the "pulse" name comes from, and changing the periods' duration is called"changing the pulse". The change of waveform is caused by the change of harmonicspectrum. At 50% pulse (0 value in the case of the Jun-6 V), the waveform contains thefundamental and the odd-numbered harmonics with an amplitude relation where each nthharmonic amplitude is 1/ *n* of the fundamental (first harmonic) amplitude. This is whatproduces a perfect square waveform.
37 Arturia - User Manual Jun-6 V - JUN-6 V CONTROL PANEL
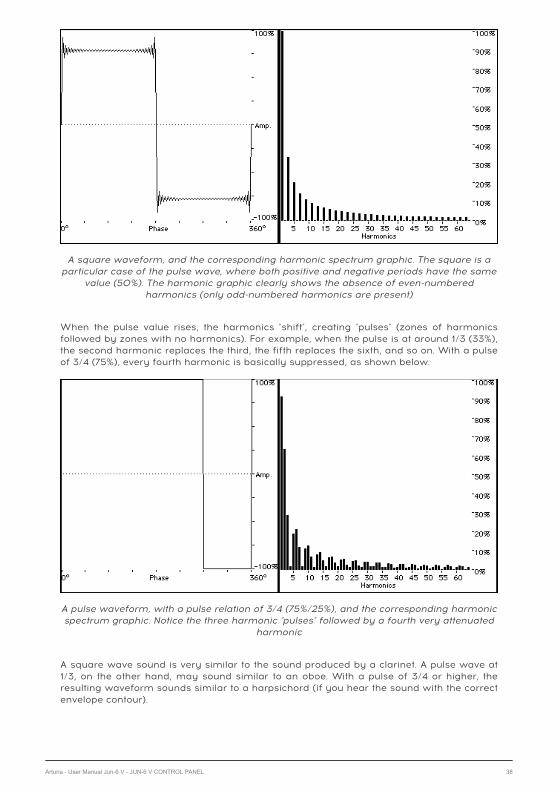
When the pulse value rises, the harmonics "shift", creating "pulses" (zones of harmonicsfollowed by zones with no harmonics). For example, when the pulse is at around 1/3 (33%),the second harmonic replaces the third, the fifth replaces the sixth, and so on. With a pulseof 3/4 (75%), every fourth harmonic is basically suppressed, as shown below.
A square wave sound is very similar to the sound produced by a clarinet. A pulse wave at1/3, on the other hand, may sound similar to an oboe. With a pulse of 3/4 or higher, theresulting waveform sounds similar to a harpsichord (if you hear the sound with the correctenvelope contour).
A square waveform, and the corresponding harmonic spectrum graphic. The square is aparticular case of the pulse wave, where both positive and negative periods have the same
value (50%). The harmonic graphic clearly shows the absence of even-numberedharmonics (only odd-numbered harmonics are present)
A pulse waveform, with a pulse relation of 3/4 (75%/25%), and the corresponding harmonicspectrum graphic. Notice the three harmonic "pulses" followed by a fourth very attenuated
harmonic
Arturia - User Manual Jun-6 V - JUN-6 V CONTROL PANEL 38

When the Pulse Width is being modulated, the waveform's harmonic content variesaccording to the modulation index. Consequently, the waveform also varies, creating asound that changes continuously, in a lively manner. This is great to produce string sounds,pad-like sounds, brass sounds, etc.
The PWM fader acts both as a manual controller for the Pulse Width value (when the switchis set to manual) as well as a modulation intensity controller, when the PWM is set toanother source (LFO or Envelope).
5.1.5.3. PWM Switch
This switch selects the modulation source for the pulse width. By default, it is set to Manual.In this position, the pulse width is defined manually with the PWM fader.
5.1.5.4. Manual
Manual PWM range goes from 0.00 up to 1.00. In the 0 position, it produces a square wave.At maximum value, a very narrow pulse wave is produced. Contrary to what you mightexpect, the Juno pulse doesn't go up to silence, even in the maximum position.
Default position is 0.00 (square wave - no PWM).
5.1.5.5. LFO
In this position, the pulse width is modulated by the LFO rate (frequency). Modulationintensity is set by the PWM fader, which changes from setting the pulse to controlling themodulation intensity.
5.1.5.6. Envelope
In this position, the pulse width is modulated by the main ADSR Envelope (ENV). Modulationintensity is, once again, set by the PWM fader, which changes from setting the pulse tocontrolling the modulation intensity. Modulation rate is set by the envelope contour.
♪: When it is set to MAN, the Pulse Width is fixed, unless you move the PWM fader. When it is set
to LFO or ENV, the Pulse Width is controlled by the corresponding signal from the LFO or the Envelope
Generator. In that case, the PWM fader sets the modulation intensity.
5.1.5.7. Pulse Wave On/Off Button
This activates the Pulse waveform on the DCO.
39 Arturia - User Manual Jun-6 V - JUN-6 V CONTROL PANEL
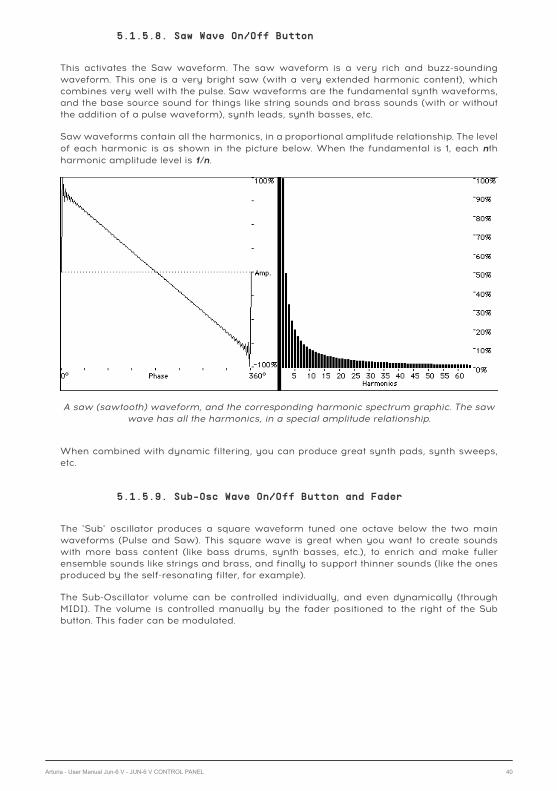
5.1.5.8. Saw Wave On/Off Button
This activates the Saw waveform. The saw waveform is a very rich and buzz-soundingwaveform. This one is a very bright saw (with a very extended harmonic content), whichcombines very well with the pulse. Saw waveforms are the fundamental synth waveforms,and the base source sound for things like string sounds and brass sounds (with or withoutthe addition of a pulse waveform), synth leads, synth basses, etc.
Saw waveforms contain all the harmonics, in a proportional amplitude relationship. The levelof each harmonic is as shown in the picture below. When the fundamental is 1, each nthharmonic amplitude level is 1/n.
When combined with dynamic filtering, you can produce great synth pads, synth sweeps,etc.
5.1.5.9. Sub-Osc Wave On/Off Button and Fader
The "Sub" oscillator produces a square waveform tuned one octave below the two mainwaveforms (Pulse and Saw). This square wave is great when you want to create soundswith more bass content (like bass drums, synth basses, etc.), to enrich and make fullerensemble sounds like strings and brass, and finally to support thinner sounds (like the onesproduced by the self-resonating filter, for example).
The Sub-Oscillator volume can be controlled individually, and even dynamically (throughMIDI). The volume is controlled manually by the fader positioned to the right of the Subbutton. This fader can be modulated.
A saw (sawtooth) waveform, and the corresponding harmonic spectrum graphic. The sawwave has all the harmonics, in a special amplitude relationship.
Arturia - User Manual Jun-6 V - JUN-6 V CONTROL PANEL 40

5.1.5.10. Noise Fader
Besides the two main waveforms and the sub-osc square waveform, the Juno also had anextra noise source. This can be used to add some "atmosphere" to pad sounds or to simulatethe breath in the attack of some sounds, like wind instruments for example.
This noise source produces white noise, and the intensity is controlled by its own fader.Again, in the Jun-6 V you have the possibility to control this dynamically, for examplethrough MIDI, using the MIDI Learn button.
5.1.6. HPF (High-Pass Filter)
The High-Pass Filter is a -6 dB filter (a soft filter) which cuts the low frequencies. As thefilter is not voltage controlled, cutoff point can only be changed by moving the control fader.Therefore, this is another great candidate for MIDI modulation control.
In its lowest position, the DCO output passes through unchanged. As you raise the knob, thefrequencies around the cutoff point will be slightly boosted and frequencies below that pointare cut according to the filter roll-off.
The High-Pass Filter is great to soften the content of sounds that have a lot of low end. Itmay also create an artificial narrowness to leads, strings and pads. Finally, it is fundamentalfor bell-like sounds.
5.1.7. VCF (Voltage-Controlled Filter)
This is the classic synthesizer resonant low-pass filter. Cutoff slope is fixed at -24 dB. Thisis the main difference between this filter and the Jupiter one, which could be changedbetween -12 dB and -24 dB. Apart from that, they work pretty much the same way, as theywere based on the same chip. And, what's even more important, both are great-sounding.In a synth, the filter acts by changing the spectrum content of the oscillator waveforms.
41 Arturia - User Manual Jun-6 V - JUN-6 V CONTROL PANEL

5.1.7.1. Freq (Cutoff)
This is where you define the filter cutoff point. Frequencies above the cutoff point will beattenuated at a slope of -24 dB per octave. Contrary to what happens with the HPF, thiscutoff point may be modulated in several ways, and with several sources. You have threemain modulation sources: Envelope Generator, LFO and Keyboard Position. To make thingseven more interesting, the Envelope modulation polarity may be inverted.
All modulation sources may be active at the same time.
5.1.7.2. Res (Resonance)
Resonance emphasizes the frequencies around the cutoff point, creating a resonant node.The more resonance is added, the more prominent this node becomes. At values nearingmaximum, it could even start self-oscillating, producing a sound similar to a sine wave. Thiswave may be tuned using the cutoff control.
Resonance adds brightness to the sound. The higher the cutoff point, the higher the resonantnode, and the brighter the sound. On very low cutoff points, resonance can produce a strong"thump" that sounds great on drum sounds and basses.
On pads and strings, it contributes to making the sounds "shine". If you add some noise tothe sound, resonance may turn the noise into a "whoosh".
Of course, all these effects may also be controlled dynamically. Since resonance is tiedto the cutoff point, by modulating the cutoff you automatically modulate the addedresonances. Resonance is perhaps the most idiosyncratic effect produced by a synthesizer.
5.1.7.3. Env Polarity Switch
This is another great feature that was introduced by Roland in the Jupiter, and was kept inthe Juno for the filter. When the polarity is positive, the Envelope Generator works as usual -it starts rising as set in the Attack time segment, reaches the top, then starts decaying as setin the Decay time segment, until it reaches the Sustain level. It will then remain there untilthe key is released, when it starts fading to 0 as set in the Release time segment.
When the polarity is negative, instead of rising, all Envelope segments will fall. Therefore, ifyou have a low cutoff point, you will not hear anything, since it will be subtracting from avalue that was already near zero. That's why, to use the inverted polarity, it's better to havea high cutoff value. With a high enough value, you will hear the filter close, then open againup to the Sustain, and then rise up to 0 modulation.
5.1.7.4. Env (Modulation Intensity Control)
This is where you set the filter modulation intensity commanded by the Envelope Generator.The way the filter responds to the Envelope Generator was described above - there are two,depending on the polarity in use, but any of them is a very important source of modulationand sonic variety. The well-known filter sweep effect, for example, is achieved by a slowAttack envelope with a high Sustain level (with maybe a small Decay, if the Sustain level isnot near the top). In this case, the EG polarity must be positive.
Arturia - User Manual Jun-6 V - JUN-6 V CONTROL PANEL 42

5.1.7.5. LFO (Modulation Intensity Control)
The LFO modulation works differently from the envelope. While the latter is a one-waytravelling modulator, the former is a periodic modulator (after all, it's an oscillator). Beingperiodic means that it constantly loops at the frequency you set. This leads to differentresults depending on the oscillation speed. Lower frequencies (slower oscillation) leads tolong and very slow changes in timbre. This is good for sounds like strings, pads, brass, etc.The filter sweep may also be obtained by modulating the cutoff with a slow oscillating LFO(in this case, the sweep will be periodic and even in sync with the music tempo thanks tothe changes introduced by Arturia).
Faster oscillations may lead to special effects, and are a fertile field for experimentation.
5.1.7.6. Kbd (Keyboard Position Modulation Intensity Control)
Keyboard position (also known as Key Follow) is not always seen as a modulator, especiallyfor the filter. Yet it can be very good to achieve some results, especially when used inconjunction with the Envelope Generator.
Key Follow may prevent unexpected changes in timbre due to filtering. When modulatingthe filter cutoff with the Keyboard position, the cutoff frequency will follow the pitchfrequencies, this way creating a flexible filtering point that automatically adjusts to notefrequency.
♪: You can use the the Low-Pass Filter as a sine oscillator. To get this, set the resonance and Key-
follow to the max, use an external sound reference to get A 440 (the A above the central C) and adjust
the cutoff until the resonance peak reaches that same frequency (44o Hz). You now have the self-
oscillation tuned, and you can get a sine out of the filter, perfectly in tune.
43 Arturia - User Manual Jun-6 V - JUN-6 V CONTROL PANEL

5.1.8. VCA (Voltage-Controlled Amplifier)
VCA is where the volume amplitude of the synth is controlled. Usually, the volume contour isdynamically controlled by an Envelope Generator, but the Juno also had the option to havethe output gated (when we press a key, it would activate the VCA, while the "Off" woulddeactivate it, turning off the sound). The source control is set by the VCA switch.
5.1.8.1. Env
When the switch is set to the ENV position, the output volume is controlled by the mainEnvelope Generator (Envelope 1). This is the Default setting.
5.1.8.2. Gate
When the switch is set to the Gate position, the output volume is controlled by the keys. Eachtime a key is pressed, it activates the VCA output. In analog synthesizers, the keys triggera voltage Gate, hence the name. The output Gate remains open for that key sound until thekey is released. This is an On/Off action.
5.1.8.3. Env2
Another novelty introduced by Arturia. When the switch is set to this position, the VCA Outputis controlled by Envelope Generator 2 (which is the EG featured in the Advanced ControlPanel).
Jun-6 V VCA section and Envelope 1 (Main Envelope)
Arturia - User Manual Jun-6 V - JUN-6 V CONTROL PANEL 44

5.1.9. ENV (Envelope Generator)
An Envelope Generator is a module which generates a control voltage that can be applied tothe VCF or the VCA of a synthesizer, creating a contour which controls the volume or toneof the sound over time. The Juno envelope was very fast and "snappy", with the ability toproduce "clicks" even when all segments were set to zero. This feature is reproduced in theJun-6 V.
5.1.9.1. A (Attack Time)
Attack sets the time the sound takes to reach its maximum volume after the key is triggered.Range goes from 1 ms to 2.970 seconds (almost three seconds). Default value is 1 ms(minimum value).
5.1.9.2. D (Decay Time)
Decay sets the time required for the sound to drop from the maximum point to the Sustainlevel. Range goes from 2 ms to 19.000 seconds (nineteen seconds). Default value is 2 ms(minimum value).
5.1.9.3. S (Sustain Level)
This segment sets the volume for the sustained part of the sound. Once this level is reached,the sound remains there until the key is released. Default sustain level is 1.00 (maximumvalue).
5.1.9.4. R (Release Time)
This segment sets the time needed for the sound to reach zero after the key is released.Range goes from 2 ms to 17.000 seconds (seventeen seconds). Default value is 10 ms.
45 Arturia - User Manual Jun-6 V - JUN-6 V CONTROL PANEL

5.1.10. Chorus
The Chorus is one of the most important features of the Juno, and consequently of the Jun-6V. It adds spaciousness and richness to the sound, and transforms the sound from mono tostereo. Having a single oscillator, the Juno could have sounded much thinner than the otherRoland synths.
The chorus effect, by creating a stereo image and adding detuning and spaciousness to thesound, works as if the synth effectively had more than one oscillator.
The chorus effect works by sending a signal to two hard-panned delay lines. The amountof delay is modulated with an LFO, which causes gradual changes in the frequency of theresulting signal, thus varying the copied signal’s pitch. By altering the left and right channels'delay rates inversely and then combining the wet signal with the dry signal, this achieves astereo chorus effect. As a result, the chorus effect creates a thicker sound, to almost make itsound as though there were more than one oscillator slightly detuned from one another.
The Juno-6 chorus effect made a remarkable impression when the synth was first released,and remains one of its most notable characteristics. It was (is) noisy, but much-loved for itsswirling spatial textures.
The Jun-6 V chorus noise can be deactivated in the small section in the upper left part of theMain Control Panel, hidden by the trap door. When the noise button is Off, there will be nonoise produced by the Chorus.
5.1.10.1. I
In this position, the chorus LFO has a lower frequency and less modulation, which leads toa lighter chorusing effect.
5.1.10.2. II
This position produces a thicker, more modulated chorus signal.
5.1.10.3. I + II
This position produces a different kind of effect. The two delays lines are no longer panned,which means the signal remains mono. The LFO also oscillates much faster, which createsa kind of vibrato effect.
Jun-6 V Chorus and Mater sections
Arturia - User Manual Jun-6 V - JUN-6 V CONTROL PANEL 46

5.1.11. Tune
This is the Master Tune of the synth. By default, it is set to 440 Hz, which is the referencetuning used in Western music, but you can set it to whatever master tuning you want.
Range goes from 400 Hz to 480 Hz.
5.1.12. Volume
This is the Master Volume. Range goes from -60 dB up to 0 dB. Default volume is set to -15dB.
5.1.13. Voice Calibration
This panel is usually hidden behind a trap door in the upper left part of the Main ControlPanel. Clicking it opens the door, while clicking again will close it.
When the door lid is open, it reveals a set of four buttons. Three are for voice calibration,while the fourth is to turn off the noise produced by the Chorus.
Analog synthesizers are subject to calibration drifts, component aging and tolerance. Thesephenomena introduce disparities between the voices at several levels, like the oscillators'volumes, waveforms, the filters' cutoff and resonance, the envelopes' times, etc... This is partof what makes the analog synths sound organic.
There are three voice calibration positions:
1. The position labeled Good produces a sound that can be associated with apristine unit, coming out of the factory.
2. The position labeled Avg (Average) produces a sound that can be associated witha unit that has already been used for some time, but is still in workable condition.
3. The position labeled Poor produces a sound typical of a unit in need of servicingand calibrating.
Please feel free to experiment. At least, you may be sure that you don't really need to takeyour synth to a repair service facility. And, who knows, maybe you happen to like the soundof a "poor"-sounding synth.
47 Arturia - User Manual Jun-6 V - JUN-6 V CONTROL PANEL

5.2. Advanced Control Panel
The Advanced control panel is where the majority of extra features added by Arturia can beaccessed. You can reach it by pressing the "Advanced" button in the top right corner of theUpper Toolbar. When the Advanced Panel is open, that button is "lit up" (white letters over ablack background). When the Advanced Panel is closed, the button is grayed out.
Let's take a look at the extra features you can access in the Advanced Control Panel:
5.2.1. Assign (Modulation Matrix)
This is a set of three slots to assign different keyboard controls to destinations. The sourcemodulators are pre-assigned, but you have a choice of 35 destinations, among them severalparameters of the DCO, VCF, Envelopes, LFOs, and even the effects (Delay and Reverb).
5.2.1.1. Mod Wheel
The Modulation Wheel is a parameter present in many synths. Yet, there wasn't one onthe original Juno - just a trigger button for the LFO. The Jun-6 V has a real Mod Wheel,hardwired to the DCO and the VCF, and a slot to assign it to an extra destination.
That one is a bipolar modulation slot, which means that it can have positive or negativemodulation values. The knob on the right sets the modulation intensity, and goes from - 1.00to 1.00. Default is 0.00 (no modulation).
Arturia - User Manual Jun-6 V - JUN-6 V CONTROL PANEL 48

5.2.1.2. Velocity
Another parameter we take for granted today. Yet, when the Juno was launched. only a fewsynths were velocity sensitive. This slot allows to assign velocity to one destination amongthe 35 you have to choose from. VCF Cutoff is a great option for that.
This is also a bipolar modulation slot, which means that it can have positive or negativemodulation values. The knob on the right sets the modulation intensity, and goes from - 1.00to 1.00. Default is 0.00 (no modulation).
5.2.1.3. Aftertouch
Another keyboard parameter that only a few (usually high-end) synthesizers featured. Eventoday, not many synths respond to aftertouch (and many MIDI controllers also don't havethis feature).
Before trying to use this modulator, please make sure that your keyboard is capable oftransmitting aftertouch messages (also known as pressure). If it can, you have an extrasource of expressivity. You can assign here a destination to use that control.
Again, this is a bipolar modulation slot, which means that it can modulate the destinationboth positively or negatively. The knob on the right sets the modulation intensity, and goesfrom - 1.00 to 1.00. Default is 0.00 (no modulation).
♪: The original Juno didn't respond to velocity or aftertouch. It didn't have MIDI control either. The
Jun-6 V is velocity sensitive, responds to aftertouch, and can even have a variable mix (MIDI-controlled)
of the sub-oscillator and the noise source. Although the original was (and still is) a great and reliable
synth, the Jun-6 V is much more expressive and allows much more sound creativity, especially when
automated through MIDI.
5.2.2. LFO 2
This is the advanced panel for the second LFO, which was added to the synth by Arturia.LFOs are very important modulation sources, and you never have too many of them.
Besides, this second LFO is much more complete. You have a choice of six waveforms,among them the Sample & Hold which is a very important feature in synthesizers (inmodular systems, Sample & Hold modules were even usually a module on their own).
5.2.2.1. Sync
As with all the time sensitive parameters in the Jun-6 V, you also have a sync option here, togive you the possibility to sync the rate with the host tempo. The sync values available areidentical to those available in LFO 1. The lowest sync value is 8, which means 8 whole notes,or eight 4/4 bars. The highest value is 1/32 (a 32nd note). Default is 1/16 (a 16th note, whichmay be quite fast, depending on the purpose and the host tempo).
Triplets and dotted values are also available, but are indicated in fractions. For example, 3/4is a dotted half-note, 1/3 is a dotted quarter-note, 1/6 is a quarter-note triplet, 1/12 is an eight-note triplet. And so on.
When in sync, the default value for the LFO 2 rate is 1/16 (a sixteenth-note).
49 Arturia - User Manual Jun-6 V - JUN-6 V CONTROL PANEL

5.2.2.2. Rate
Rate is where you define the speed of the LFO. When in sync, the LFO speed is defined inmusical values, as stated above. When not in sync, the LFO speed (rate) is defined in Hz, asexpected.
Rate speed in Hz starts at 0.038 Hz (exactly the same lower value as LFO 1), but goes up to30 Hz, This is considerably faster than the maximum rate for LFO 1. Default value in absolutemode is 1.000 Hz, the same value used for the first LFO.
5.2.2.3. Waveforms
Contrary to LFO 1, which has a fixed waveform, LFO 2 offers you six choices. This is muchbetter, of course, and a great addition to the modulation options available.
So, besides the sine wave, you have triangle, saw and ramp (inverted saw), square andsample & hold. These extra waveforms add a lot of versatility to the LFO. Also, it isn'thardwired to any destination. To assign it, you need to use the two destination boxes to theright.
5.2.2.4. Retrigg
This switch defines if and how the LFO phase is retriggered. It has three positions: Off,Mono and Poly. Off means the LFO oscillates freely and doesn't retrigger at all. Mono meansthat the LFO phase is retriggered each time a key is pressed. In this position, the LFO ismonophonic.
Finally, you have the Poly position. In this mode, the LFO is polyphonic but it is stillretriggered each time a key is pressed.
5.2.2.5. Destination
As with the keyboard modulation options, you also have a choice of 35 destinations here,among them several parameters of the DCO, VCF, Envelopes, LFOs, and even the effects(Delay and Reverb). By default, the destination boxes are set to None.
To the right of each destination box, you have a knob to control the modulation intensity.These modulations are bipolar, which means that they can be positive or negative. The knobsets the modulation intensity between positive or negative values, and goes from - 1.00 to1.00. Default is 0.00 (no modulation).
Jun-6 V advanced modulation sections, including the mini modulation matrices, LFO 2 andEnvelope Generator 2.
Arturia - User Manual Jun-6 V - JUN-6 V CONTROL PANEL 50

5.2.3. ENV 2
This envelope is a duplication of Envelope 1. Each segment has exactly the samecharacteristics and ranges.
As with the original, it is very fast and "snappy", with the ability to produce "clicks" even whenall segments are set to zero.
The envelope is hardwired to the VCA (it is one of the options to modulate it). This allows youto have different contours for the filter and amplitude, something that's not possible with theoriginal Juno.
Besides that, you have two extra destinations available to choose, through destination boxessimilar to those of LFO 2.
5.2.3.1. A (Attack Time)
Attack sets the time the sound takes to reach its maximum volume after the key is triggered.Range goes from 1 ms to 2.970 seconds (almost three seconds). Default value is 1 ms(minimum value).
5.2.3.2. D (Decay Time)
Decay sets the time required for the sound to drop from the maximum point to the Sustainlevel. Range goes from 2 ms to 19.000 seconds (nineteen seconds). Default value is 2 ms(minimum value).
5.2.3.3. S (Sustain Level)
This segment sets the volume for the sustained part of the sound. Once this level is reached,the sound remains there until the key is released. Default sustain value is 1.00 (maximumvalue).
5.2.3.4. R (Release Time)
This segment sets the time needed for the sound to reach zero after the key is released.Range goes from 2 ms to 17.000 seconds (seventeen seconds). Default value is 10 ms.
5.2.3.5. Destination
This sections is similar to that of LFO 2. Therefore, you have the same choice of 35destinations, among them several parameters of the DCO, VCF, Envelopes, LFOs, and eventhe effects (Delay and Reverb). By default, the destination boxes are set to None.
To the right of each destination box, you have a knob to control the modulation intensity.These modulations are bipolar, which means that they can be positive or negative. Whenusing negative values, the behavior of the envelope modulation is similar to what wasdescribed in the filter section [p.42], so please refer to that section to better understand it.
The knob sets the modulation intensity between positive or negative values, and goes from- 1.00 to 1.00. Default is 0.00 (no modulation).
51 Arturia - User Manual Jun-6 V - JUN-6 V CONTROL PANEL

5.2.4. Delay
This Delay is a simplified version of the same effect Arturia has been using in its othersynthesizers, like for example our celebrated Pigments synthesizer.
It has a reduced set of parameters, to make it simple to operate. This way, we remainfaithful to the principle that everything in this synth should be simple and easy to program.
5.2.4.1. On Button
This button switches the Delay On and Off. By default, it is On.
5.2.4.2. Time
This defines the delay time. It may be in sync with the host tempo, in which case it assumesmusical values. When not in sync, the time is displayed in absolute terms, and ranges from2.00 ms up to 2000 ms. Default is 250 ms.
5.2.4.3. Sync
When the sync button is switched on, the delay tempo is synchronized with the host tempo.When this is the case, the Time parameter values are displayed in musical values. Minimumdelay time in this case is 1/32 (32nd note) and maximum delay time is 2 bars.
Sync values may also be set to triplets and dotted, using the bar reference. In this case, 3/4is a dotted half-note, 1/3 is a dotted quarter-note, 1/6 is a quarter-note triplet, 1/12 is an eight-note triplet, etc.
5.2.4.4. Feedback
Feedback is the parameter that sets the amount of signal that is reinjected into the delaychannel. The more feedback, the stronger the effect. Range goes from 0.00 to 1.00 (youcan think of this as a percentage value). Default value is 0.300.
5.2.4.5. Stereo
This sets the amount of stereo dispersion (spread) of the delay signal. This is anotherpercentage parameter, ranging from 0.00 to 1.00. Here too, the default value is 0.300.
Arturia - User Manual Jun-6 V - JUN-6 V CONTROL PANEL 52

5.2.4.6. Dry/Wet
One of the most important parameters. This allows to balance the mix between processedand unprocessed signal. When the Dry/Wet parameter is set to 0.00 you will not hear anyeffect - just the Dry signal. When the parameter is set to 1.00 only the processed signal willbe heard.
Range is again between 0.00 and 1.00. Default, in this case, is 0.00 (no effect, just drysignal).
5.2.5. Reverb
As with Delay, Reverb is a simplified version of the same effect Arturia has been using in itsother synthesizers, like for example our Pigments synthesizer.
This also has a reduced set of parameters, to make it simple to operate.
5.2.5.1. On Button
This button switches the Reverb On and Off. By default, it is On.
5.2.5.2. Size
This parameter sets the size of the room or space (basically, the reverb "body"). The biggerthe size, the more reverb is added.
Range goes from 0.00 to 1.00, which may not mean much to you in this case. So, think ofit this way: a value close to 0 is a very small and dry space, with almost no reverberation.A value close to 1 is a very large space, that will mask the sound a lot and has a very longreverberation tail.
Default value is 0.643 which may be considered a Large Hall. A value close to a Small Hallwill be around 0.400.
Jun-6 V extra effects: Delay and Reverb.
53 Arturia - User Manual Jun-6 V - JUN-6 V CONTROL PANEL

5.2.5.3. Damp
This parameter determines how much and how fast the higher frequency content isattenuated. The higher the damping, the faster the high frequencies will decay. In a room,this parameter defines the absorption coefficient of the reflective surfaces.
Range goes from 0.00 to 1.00. Default value is set to 0.600.
5.2.5.4. Decay
This parameter controls the length of the reverb effect (how much time it will last). It shouldbe articulated with the Damp parameter for a more realistic effect.
Range goes from 0.00 to 1.00. Default value is set to 0.460.
5.2.5.5. Predelay
This controls the time between the original signal and the first echoes (early reflections).This parameter is set in milliseconds.
Range goes from 0.00 s to 0.200 s. Default value is set to 0.020 s.
5.2.5.6. Dry/Wet
Dry/Wet works pretty much the same way as the Dry/Wet parameter for Delay. It allows tobalance the mix between processed and unprocessed signal. When the Dry/Wet parameteris set to 0.00, you will not hear any effect - just the Dry signal. When the parameter is setto 1.00 only the processed signal will be heard.
Range is again between 0.00 and 1.00. Default, in this case, is 0.00 (no effect, just drysignal).
5.2.6. Virtual Keyboard
This virtual keyboard, which is positioned at the bottom of the window, allows you to playthe instrument with your mouse. You may also play it with the computer keyboard, usingthe middle row keys (the row that starts with A key) for the white keys, and the row aboveit (the one that starts with the Q key) for the black keys.
Z and X keys (the first two keys in the lower row) allow to transpose the keyboard range.
Arturia also included the performance controls present in the original synthesizer, locatedon the left side of the keyboard.
5.2.6.1. Bender (Keyboard Side Panel)
Bender is the Roland version of the Pitch Wheel. It "bends" horizontally, contrary to the usualvertical movement of the Pitch Wheel often seen in other brands' synthesizers. This wheelhas two hardwired destinations: DCO and VCF, just as in the original unit.
Default position is zero (middle position), and the wheel resets to default position whenreleased.
Arturia - User Manual Jun-6 V - JUN-6 V CONTROL PANEL 54

5.2.6.2. DCO Modulation Fader
This controls the modulation intensity applied to the DCO by the Bender. It will modulate thepitch.
Modulation range is 12 semitones. Default position is 2 semitones.
5.2.6.3. VCF Modulation Fader
This controls the modulation intensity applied to the VCF by the Bender. It will modulate thelow-pass filter cutoff.
Range goes from 0.00 to 1.00. Default position is 0.00.
5.2.6.4. LFO Mod Wheel (Keyboard Side Panel)
The original synthesizer didn't have a modulation wheel. Instead, it only had a button toretrigger the LFO. However, we decided that a modulation wheel should be included, as it isa standard performance control on pretty much every analog synthesizer ever launched.
When the modulation wheel is moved up, it increases the amount of modulation applied bythe LFO to the hardwired destinations (DCO and VCF) according to the modulation intensityset by the respective faders. This wheel doesn't reset to zero when released.
It will also modulate a third parameter, if there is one set in the Advanced Panel [p.48].
5.2.6.5. DCO Modulation Fader
This controls the modulation intensity applied to the DCO by the Mod Wheel. It will modulatethe pitch.
Modulation range is from 0.00 to 1.00. Default position is 0.020.
5.2.6.6. VCF Modulation Fader
This controls the modulation intensity applied to the VCF by the Mod Wheel. It will modulatethe filter cutoff.
Range goes from 0.00 to 1.00. Default position is 0.00.
5.2.6.7. Unison Switch
The Unison switch turns On unison for the Jun-6 V. Unison stacks slightly detuned voicesin each note, to make it sound "fatter". This is a feature that was present in many analogsynthesizers, but not in the original Juno. Yet, we added it to the Jun-6 V.
55 Arturia - User Manual Jun-6 V - JUN-6 V CONTROL PANEL

5.2.6.8. Unison Detune
Detune determines the amount of pitch variation between each voice. Depending if Unisonis On or Off, it works as follows:
If Unison is On, it controls the amount of detuning for each unison stacked voice, to createanything from a subtle unison effect to heavily detuned aggressive stacked voices.
If Unison is Off, the range is scaled to add an analog feel to the DCO pitch tracking.
5.2.6.9. Portamento
Portamento creates a kind of "glissando" between two played notes. The control sets thetime it takes for the pitch to transition between the first note and the second note.
Pitch transition is triggered when the second key is pressed. At this moment, pitch transitiondoesn't stop until it reaches the destination pitch.
♪: This is a Time portamento. This method is more suitable for chords, as each note will take the
same time to go from pitch A to pitch B.
Arturia - User Manual Jun-6 V - JUN-6 V CONTROL PANEL 56

6. SOFTWARE LICENSE AGREEMENT
In consideration of payment of the Licensee fee, which is a portion of the price you paid,Arturia, as Licensor, grants to you (hereinafter termed “Licensee”) a nonexclusive right touse this copy of the SOFTWARE.
All intellectual property rights in the software belong to Arturia SA (hereinafter: “Arturia”).Arturia permits you only to copy, download, install and use the software in accordance withthe terms and conditions of this Agreement.
The product contains product activation for protection against unlawful copying. The OEMsoftware can be used only following registration.
Internet access is required for the activation process. The terms and conditions for use of thesoftware by you, the end-user, appear below. By installing the software on your computeryou agree to these terms and conditions. Please read the following text carefully in itsentirety. If you do not approve these terms and conditions, you must not install this software.In this event give the product back to where you have purchased it (including all writtenmaterial, the complete undamaged packing as well as the enclosed hardware) immediatelybut at the latest within 30 days in return for a refund of the purchase price.
1. Software Ownership Arturia shall retain full and complete title to the SOFTWARE recordedon the enclosed disks and all subsequent copies of the SOFTWARE, regardless of the mediaor form on or in which the original disks or copies may exist. The License is not a sale of theoriginal SOFTWARE.
2. Grant of License Arturia grants you a non-exclusive license for the use of the softwareaccording to the terms and conditions of this Agreement. You may not lease, loan or sub-license the software. The use of the software within a network is illegal where there is thepossibility of a contemporaneous multiple use of the program.
You are entitled to prepare a backup copy of the software which will not be used forpurposes other than storage purposes.
You shall have no further right or interest to use the software other than the limited rights asspecified in this Agreement. Arturia reserves all rights not expressly granted.
3. Activation of the Software Arturia may use a compulsory activation of the software anda compulsory registration of the OEM software for license control to protect the softwareagainst unlawful copying. If you do not accept the terms and conditions of this Agreement,the software will not work.
In such a case the product including the software may only be returned within 30 daysfollowing acquisition of the product. Upon return a claim according to § 11 shall not apply.
4. Support, Upgrades and Updates after Product Registration You can only receive support,upgrades and updates following the personal product registration. Support is provided onlyfor the current version and for the previous version during one year after publication of thenew version. Arturia can modify and partly or completely adjust the nature of the support(hotline, forum on the website etc.), upgrades and updates at any time.
The product registration is possible during the activation process or at any time later throughthe Internet. In such a process you are asked to agree to the storage and use of yourpersonal data (name, address, contact, email-address, and license data) for the purposesspecified above. Arturia may also forward these data to engaged third parties, in particulardistributors, for support purposes and for the verification of the upgrade or update right.
5. No Unbundling The software usually contains a variety of different files which in itsconfiguration ensure the complete functionality of the software. The software may be usedas one product only. It is not required that you use or install all components of the software.You must not arrange components of the software in a new way and develop a modifiedversion of the software or a new product as a result. The configuration of the software maynot be modified for the purpose of distribution, assignment or resale.
57 Arturia - User Manual Jun-6 V - Software License Agreement

6. Assignment of Rights You may assign all your rights to use the software to anotherperson subject to the conditions that (a) you assign to this other person (i) this Agreementand (ii) the software or hardware provided with the software, packed or preinstalledthereon, including all copies, upgrades, updates, backup copies and previous versions,which granted a right to an update or upgrade on this software, (b) you do not retainupgrades, updates, backup copies and previous versions of this software and (c) therecipient accepts the terms and conditions of this Agreement as well as other regulationspursuant to which you acquired a valid software license.
A return of the product due to a failure to accept the terms and conditions of this Agreement,e.g. the product activation, shall not be possible following the assignment of rights.
7. Upgrades and Updates You must have a valid license for the previous or more inferiorversion of the software in order to be allowed to use an upgrade or update for the software.Upon transferring this previous or more inferior version of the software to third parties theright to use the upgrade or update of the software shall expire.
The acquisition of an upgrade or update does not in itself confer any right to use thesoftware.
The right of support for the previous or inferior version of the software expires upon theinstallation of an upgrade or update.
8. Limited Warranty Arturia warrants that the disks on which the software is furnished isfree from defects in materials and workmanship under normal use for a period of thirty (30)days from the date of purchase. Your receipt shall be evidence of the date of purchase. Anyimplied warranties on the software are limited to thirty (30) days from the date of purchase.Some states do not allow limitations on duration of an implied warranty, so the abovelimitation may not apply to you. All programs and accompanying materials are provided “asis” without warranty of any kind. The complete risk as to the quality and performance of theprograms is with you. Should the program prove defective, you assume the entire cost of allnecessary servicing, repair or correction.
9. Remedies Arturia's entire liability and your exclusive remedy shall be at Arturia's optioneither (a) return of the purchase price or (b) replacement of the disk that does not meet theLimited Warranty and which is returned to Arturia with a copy of your receipt. This limitedWarranty is void if failure of the software has resulted from accident, abuse, modification,or misapplication. Any replacement software will be warranted for the remainder of theoriginal warranty period or thirty (30) days, whichever is longer.
10. No other Warranties The above warranties are in lieu of all other warranties, expressedor implied, including but not limited to, the implied warranties of merchantability and fitnessfor a particular purpose. No oral or written information or advice given by Arturia, its dealers,distributors, agents or employees shall create a warranty or in any way increase the scopeof this limited warranty.
11. No Liability for Consequential Damages Neither Arturia nor anyone else involved inthe creation, production, or delivery of this product shall be liable for any direct, indirect,consequential, or incidental damages arising out of the use of, or inability to use this product(including without limitation, damages for loss of business profits, business interruption, lossof business information and the like) even if Arturia was previously advised of the possibilityof such damages. Some states do not allow limitations on the length of an implied warrantyor the exclusion or limitation of incidental or consequential damages, so the above limitationor exclusions may not apply to you. This warranty gives you specific legal rights, and youmay also have other rights which vary from state to state.
Arturia - User Manual Jun-6 V - Software License Agreement 58


![arXiv:2106.07524v2 [eess.IV] 21 Jun 2021](https://static.fdokumen.com/doc/165x107/631c68c8b8a98572c10ce3ef/arxiv210607524v2-eessiv-21-jun-2021.jpg)