User manual - CAREL
102
High Efficiency Solutions UltraCella NO POWER & SIGNAL CABLES TOGETHER READ CAREFULLY IN THE TEXT! Electronic control for Cold Rooms User manual
-
Upload
khangminh22 -
Category
Documents
-
view
2 -
download
0
Transcript of User manual - CAREL
H i g h E f f i c i e n c y S o l u t i o n s
UltraCella
NO POWER & SIGNAL CABLES
TOGETHER
READ CAREFULLY IN THE TEXT!
Electronic control for Cold Rooms
User manual

3
ENG
UltraCella +0300083EN - rel. 2.2 - 06.02.2018
WARNING
CAREL developed its products thanks to the several years of experience in the
HVAC field, continuous investment in technological innovation of the product,
rigorous quality procedures and processes with in-circuit and function tests on
100% of its production, as well as the most innovative production technologies
available on the market. CAREL and its branch offices/affiliates do not guarantee,
in any case, that all the aspects of the product and the software included in the
product will respond to the demands of the final application, even if the product is
built according to state-of-the-art techniques.
The client (builder, developer or installer of the final equipment) assumes every
responsibility and risk relating to the configuration of the product in order to reach
the expected results in relation to the specific final installation and/or equipment.
CAREL, in this case, through specific agreements, can intervene as consultant for
the positive result of the final start-up machine/application, but in no case can it be
held responsible for the positive working of the final equipment/apparatus.
The CAREL product is a state-of-the-art product, whose operation is specified in the
technical documentation supplied with the product or can be downloaded, even
prior to purchase, from the website www.carel.com.
Each CAREL product, in relation to its advanced technological level, needs a phase
of definition / configuration / programming / commissioning so that it can function
at its best for the specific application. The lack of such phase of study, as indicated
in the manual, can cause the final product to malfunction of which CAREL cannot
be held responsible.
Only qualified personnel can install or carry out technical assistance interventions
on the product.
The final client must use the product only in the manner described in the
documentation related to the product itself.
Without excluding proper compliance with further warnings present in the manual,
it is stressed that in any case it is necessary, for each CAREL product:
• Not allow the electronic circuits getting wet. Rain, humidity and all types of
liquids or condensate contain corrosive mineral substances that can damage
the electrical circuits. In any case, the product should be used and stored in
environments that respect the temperature and humidity limits specified in the
manual;
• Not to install the device in a particularly hot environments. Temperatures that
are too high can shorten the duration of the electronic devices, damaging them
and distorting or melting the parts in plastic. In any case, the product should be
used and stored in environments that respect the temperature and humidity
limits specified in the manual;
• Not to try to open the device in any way different than that indicated in the
manual;
• Not to drop, hit or shake the device, because the internal circuits and
mechanisms could suffer irreparable damage.
• Not to use corrosive chemical products, aggressive solvents or detergents to
clean the device;
• Not to use the product in application environments different than those
specified in the technical manual.
All the above reported suggestions are also valid for the control, serial boards,
programming keys or however for any other accessory in the CAREL product
portfolio.
CAREL adopts a continuous development policy. Therefore, CAREL reserves the
right to carry out modifications and improvements on any product described in
this document without prior notice.
The technical data in the manual can undergo modifications without forewarning.
The liability of CAREL in relation to its products is specified in the CAREL general
contract conditions, available on the website www.carel.com and/or by specific
agreements with customers; specifically, to the extent where allowed by applicable
legislation, in no case will CAREL, its employees or subsidiaries be liable for any
lost earnings or sales, losses of data and information, costs of replacement
goods or services, damage to things or people, downtime or any direct, indirect,
incidental, actual, punitive, exemplary, special or consequential damage of any
kind whatsoever, whether contractual, extra-contractual or due to negligence, or
any other liabilities deriving from the installation, use or impossibility to use the
product, even if CAREL or its subsidiaries are warned of the possibility of such
damage.
DISPOSAL
INFORMATION FOR THE USERS REGARDING THE CORRECT HANDLING OF WASTE ELECTRIC AND ELECTRONIC EQUIPMENT (WEEE)
With reference to European Parliament and Council Directive 2002/96/EC issued
on 27 January 2003 and the related national implementation legislation, please
note that:
• WEEE cannot be disposed of as municipal waste, said waste must be collected
separately;
• the public or private waste collection systems defined by local legislation must
be used. Moreover, the equipment can be returned to the distributor at the end
of its working life when buying new equipment;
• this equipment may contain dangerous substances: improper use or incorrect
disposal of such may have negative effects on human health and on the
environment;
• the symbol (crossed-out wheeley bin) shown on the product or on the
packaging and on the instruction sheet indicates that the equipment has been
introduced onto the market after 13 August 2005 and that it must be disposed
of separately;
• in the event of illegal disposal of electrical and electronic waste, the penalties are
specified by local waste disposal legislation.
Materials warranty: 2 years (from the date of production, excluding consumables).
Type-approval: the quality and safety of CAREL S.P.A. products are guaranteed by
the design system and ISO 9001 certified production.
HACCP: CAUTION
The Food Safety programs based on HACCP procedures and on certain national
standards, require that the devices used for food preservation are periodically
checked to make sure that the measuring errors are within the allowed limits of
the application of use.
Carel recommends compliance with the indications of European standard
“Temperature recorders and thermometers for transport, storage and distribution
of chilled, frozen, deep-frozen/ quick-frozen food and ice cream – PERIODIC
VERIFICATION “, EN 13486 -2001 (or subsequent updates)or similar standards and
prescriptions applicable in the country of use.
The manual contains further indications regarding technical feature, proper
installation and configuration of the product.
NO POWER& SIGNAL CABLES
TOGETHER
READ CAREFULLY IN THE TEXT!
WARNING: separate the probe cables and the digital input cables as
much as possible from the inductive load and power cables to prevent
possible electro-magnetic interference. Never introduce power cables
and signal cables (including those of electric control board) into the same
cable troughs.

5
ENG
UltraCella +0300083EN - rel. 2.2 - 06.02.2018
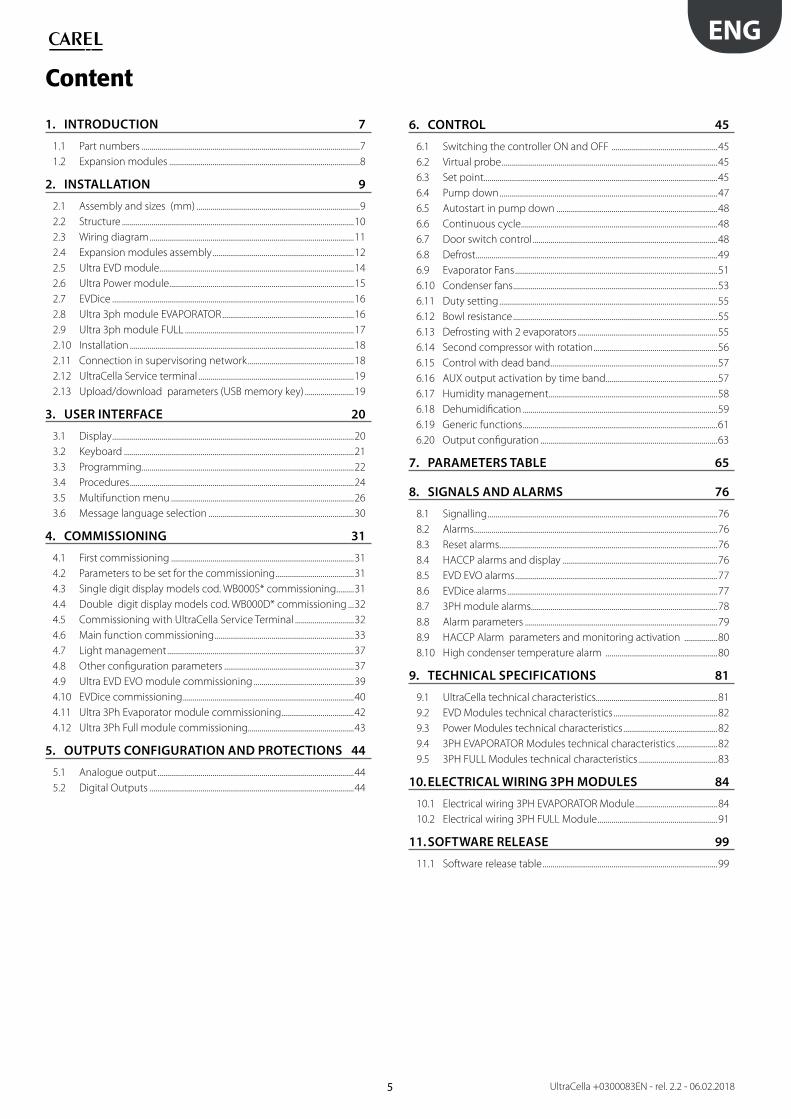
Content
1. INTRODUCTION 7
1.1 Part numbers ...............................................................................................................7
1.2 Expansion modules .................................................................................................8
2. INSTALLATION 9
2.1 Assembly and sizes (mm) ...................................................................................9
2.2 Structure ......................................................................................................................10
2.3 Wiring diagram ........................................................................................................11
2.4 Expansion modules assembly ........................................................................12
2.5 Ultra EVD module ...................................................................................................14
2.6 Ultra Power module ..............................................................................................15
2.7 EVDice ...........................................................................................................................16
2.8 Ultra 3ph module EVAPORATOR ...................................................................16
2.9 Ultra 3ph module FULL ......................................................................................17
2.10 Installation ..................................................................................................................18
2.11 Connection in supervisoring network ......................................................18
2.12 UltraCella Service terminal ...............................................................................19
2.13 Upload/download parameters (USB memory key) .........................19
3. USER INTERFACE 20
3.1 Display ...........................................................................................................................20
3.2 Keyboard .....................................................................................................................21
3.3 Programming ............................................................................................................22
3.4 Procedures ..................................................................................................................24
3.5 Multifunction menu .............................................................................................26
3.6 Message language selection ..........................................................................30
4. COMMISSIONING 31
4.1 First commissioning .............................................................................................31
4.2 Parameters to be set for the commissioning ........................................31
4.3 Single digit display models cod. WB000S* commissioning .........31
4.4 Double digit display models cod. WB000D* commissioning ...32
4.5 Commissioning with UltraCella Service Terminal ..............................32
4.6 Main function commissioning .......................................................................33
4.7 Light management ...............................................................................................37
4.8 Other configuration parameters ..................................................................37
4.9 Ultra EVD EVO module commissioning ...................................................39
4.10 EVDice commissioning .......................................................................................40
4.11 Ultra 3Ph Evaporator module commissioning.....................................42
4.12 Ultra 3Ph Full module commissioning......................................................43
5. OUTPUTS CONFIGURATION AND PROTECTIONS 44
5.1 Analogue output ....................................................................................................44
5.2 Digital Outputs ........................................................................................................44
6. CONTROL 45
6.1 Switching the controller ON and OFF ......................................................45
6.2 Virtual probe ..............................................................................................................45
6.3 Set point.......................................................................................................................45
6.4 Pump down ...............................................................................................................47
6.5 Autostart in pump down ..................................................................................48
6.6 Continuous cycle ....................................................................................................48
6.7 Door switch control ..............................................................................................48
6.8 Defrost ...........................................................................................................................49
6.9 Evaporator Fans .......................................................................................................51
6.10 Condenser fans ........................................................................................................53
6.11 Duty setting ...............................................................................................................55
6.12 Bowl resistance ........................................................................................................55
6.13 Defrosting with 2 evaporators .......................................................................55
6.14 Second compressor with rotation ...............................................................56
6.15 Control with dead band .....................................................................................57
6.16 AUX output activation by time band.........................................................57
6.17 Humidity management......................................................................................58
6.18 Dehumidification ...................................................................................................59
6.19 Generic functions ...................................................................................................61
6.20 Output configuration ..........................................................................................63
7. PARAMETERS TABLE 65
8. SIGNALS AND ALARMS 76
8.1 Signalling .....................................................................................................................76
8.2 Alarms............................................................................................................................76
8.3 Reset alarms ...............................................................................................................76
8.4 HACCP alarms and display ...............................................................................76
8.5 EVD EVO alarms .......................................................................................................77
8.6 EVDice alarms ...........................................................................................................77
8.7 3PH module alarms...............................................................................................78
8.8 Alarm parameters ..................................................................................................79
8.9 HACCP Alarm parameters and monitoring activation .................80
8.10 High condenser temperature alarm .........................................................80
9. TECHNICAL SPECIFICATIONS 81
9.1 UltraCella technical characteristics..............................................................81
9.2 EVD Modules technical characteristics .....................................................82
9.3 Power Modules technical characteristics ................................................82
9.4 3PH EVAPORATOR Modules technical characteristics .....................82
9.5 3PH FULL Modules technical characteristics ........................................83
10. ELECTRICAL WIRING 3PH MODULES 84
10.1 Electrical wiring 3PH EVAPORATOR Module ..........................................84
10.2 Electrical wiring 3PH FULL Module .............................................................91
11. SOFTWARE RELEASE 99
11.1 Software release table .........................................................................................99


7
ENG
UltraCella +0300083EN - rel. 2.2 - 06.02.2018
1. INTRODUCTION
Ultracella is a family of products consisting of a control system for the
basic functions of a cold room to which can be added further modules for
accessory functionalities (e.g. electronic valve, power relays, etc.).
The user interface ensures ease in use and it consists, depending on the
models, of:
• wide led display on which can be viewed the operating temperature
and the active loads;
• a graphic terminal with text strings in multiple languages, which
guide the user during commissioning (wizard). It is also equipped with
contextual help menus accessible during programming, that provide
an accurate description of the alarms.
The graphic terminal is also available as a “service tool”, which is useful
when the control has the only LED interface.
UltraCella has a port for the insertion of a USB memory key to:
• load the languages for the graphic terminal during the first
commissioning;
• parameters upload/download;
• other operations reserved for the service centre (e.g. software update);
• download log of temperature recorded.
When mounting the optional modules are matched to the right of the
main control system and connected to it with watertight coupling, to
ensure the IP degree of protection of the assembly.
Main characteristics:
• 6 relay outputs: compressor, defrost, fan, light, AUX1, AUX2;
• assembly on guide DIN or wall;
• LED board with bright display with 3 digits, with decimal point and
icons that indicate the operating status;
• integration of the keys in the front panel (LED board) to ensure a high
degree of protection (IP65) and safety during operation and cleaning;
• availability of 10 sets of parameters (recipes) preloaded by CAREL
but modifiable, corresponding to the same number of parameters
configurations, to adapt the control to the specific conservation needs
required by the cold room;
• navigation on intuitive user interface with contextual backlight
keyboard;
• defrost can be driven using the keyboard, digital input and supervisor;
• various types of defrost managements, on one or two evaporators:
natural (with stop compressor), resistance, hot gas;
• control of compressors with up to 2 Hp or up to 3 Hp with the
accessory power module;
• temperature control with virtual adjustment probe;
• digital inputs that can be configurated for alarm activation, enabling or
activating defrost, door switch, auxiliary output, on / off, etc;
• control of 1 compressor with double step or of two compressors, even
with rotation;
• keyboard safety: operation of the single keys can be disabled to avoid
tampering;
• light management by door switch or dedicated key;
• alarm buzzer;
• HACCP function: temperature monitoring and adjustment in case of
alarm due to high temperature during operation or after black out;
• RS485 network connection for remote monitoring and supervision
sytems.
The accessory modules allow:
• the installation of the electronic expansion valve, using the module
with CAREL EVD Evolution driver dedicated to the control of superheat;
• compressor control with power relay of up to 3 Hp;
• the use of a single-phase circuit breaker switch in addition to the
power relay.
UltraCella
Fig. 1.a
1.1 Part numbers
P/N DescriptionWB000S**F0 UltraCella, led display with single rowWB000D**F0 UltraCella, led display with double row
Tab. 1.a
Fig. 1.b Fig. 1.c
8
ENG
UltraCella +0300083EN - rel. 2.2 - 06.02.2018
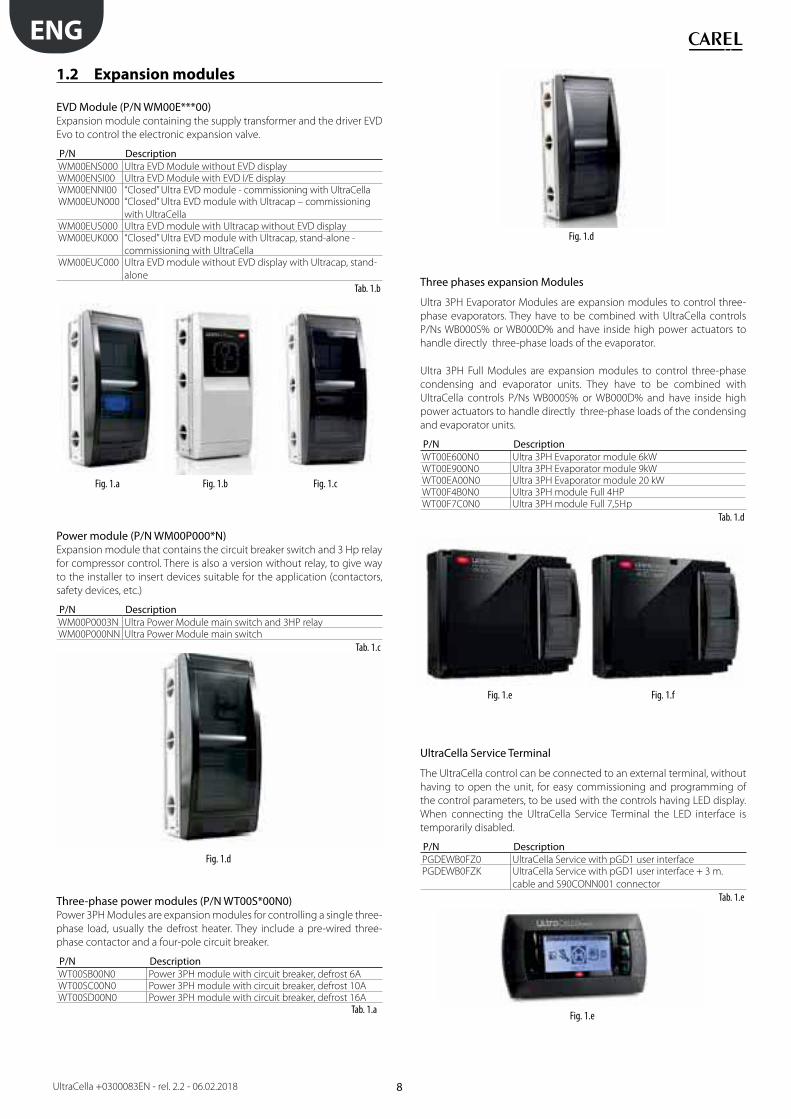
1.2 Expansion modules
EVD Module (P/N WM00E***00)Expansion module containing the supply transformer and the driver EVD
Evo to control the electronic expansion valve.
P/N DescriptionWM00ENS000 Ultra EVD Module without EVD displayWM00ENSI00 Ultra EVD Module with EVD I/E displayWM00ENNI00 “Closed” Ultra EVD module - commissioning with UltraCellaWM00EUN000 “Closed” Ultra EVD module with Ultracap – commissioning
with UltraCella WM00EUS000 Ultra EVD module with Ultracap without EVD displayWM00EUK000 “Closed” Ultra EVD module with Ultracap, stand-alone -
commissioning with UltraCellaWM00EUC000 Ultra EVD module without EVD display with Ultracap, stand-
alone
Tab. 1.b
Fig. 1.a Fig. 1.b Fig. 1.c
Power module (P/N WM00P000*N)Expansion module that contains the circuit breaker switch and 3 Hp relay
for compressor control. There is also a version without relay, to give way
to the installer to insert devices suitable for the application (contactors,
safety devices, etc.)
P/N DescriptionWM00P0003N Ultra Power Module main switch and 3HP relayWM00P000NN Ultra Power Module main switch
Tab. 1.c
Fig. 1.d
Three-phase power modules (P/N WT00S*00N0)Power 3PH Modules are expansion modules for controlling a single three-
phase load, usually the defrost heater. They include a pre-wired three-
phase contactor and a four-pole circuit breaker.
P/N DescriptionWT00SB00N0 Power 3PH module with circuit breaker, defrost 6AWT00SC00N0 Power 3PH module with circuit breaker, defrost 10AWT00SD00N0 Power 3PH module with circuit breaker, defrost 16A
Tab. 1.a
Fig. 1.d
Three phases expansion Modules
Ultra 3PH Evaporator Modules are expansion modules to control three-
phase evaporators. They have to be combined with UltraCella controls
P/Ns WB000S% or WB000D% and have inside high power actuators to
handle directly three-phase loads of the evaporator.
Ultra 3PH Full Modules are expansion modules to control three-phase
condensing and evaporator units. They have to be combined with
UltraCella controls P/Ns WB000S% or WB000D% and have inside high
power actuators to handle directly three-phase loads of the condensing
and evaporator units.
P/N DescriptionWT00E600N0 Ultra 3PH Evaporator module 6kWWT00E900N0 Ultra 3PH Evaporator module 9kWWT00EA00N0 Ultra 3PH Evaporator module 20 kWWT00F4B0N0 Ultra 3PH module Full 4HPWT00F7C0N0 Ultra 3PH module Full 7,5Hp
Tab. 1.d
Fig. 1.e Fig. 1.f
UltraCella Service Terminal
The UltraCella control can be connected to an external terminal, without
having to open the unit, for easy commissioning and programming of
the control parameters, to be used with the controls having LED display.
When connecting the UltraCella Service Terminal the LED interface is
temporarily disabled.
P/N DescriptionPGDEWB0FZ0 UltraCella Service with pGD1 user interfacePGDEWB0FZK UltraCella Service with pGD1 user interface + 3 m.
cable and S90CONN001 connector
Tab. 1.e
Fig. 1.e
9
ENG
UltraCella +0300083EN - rel. 2.2 - 06.02.2018
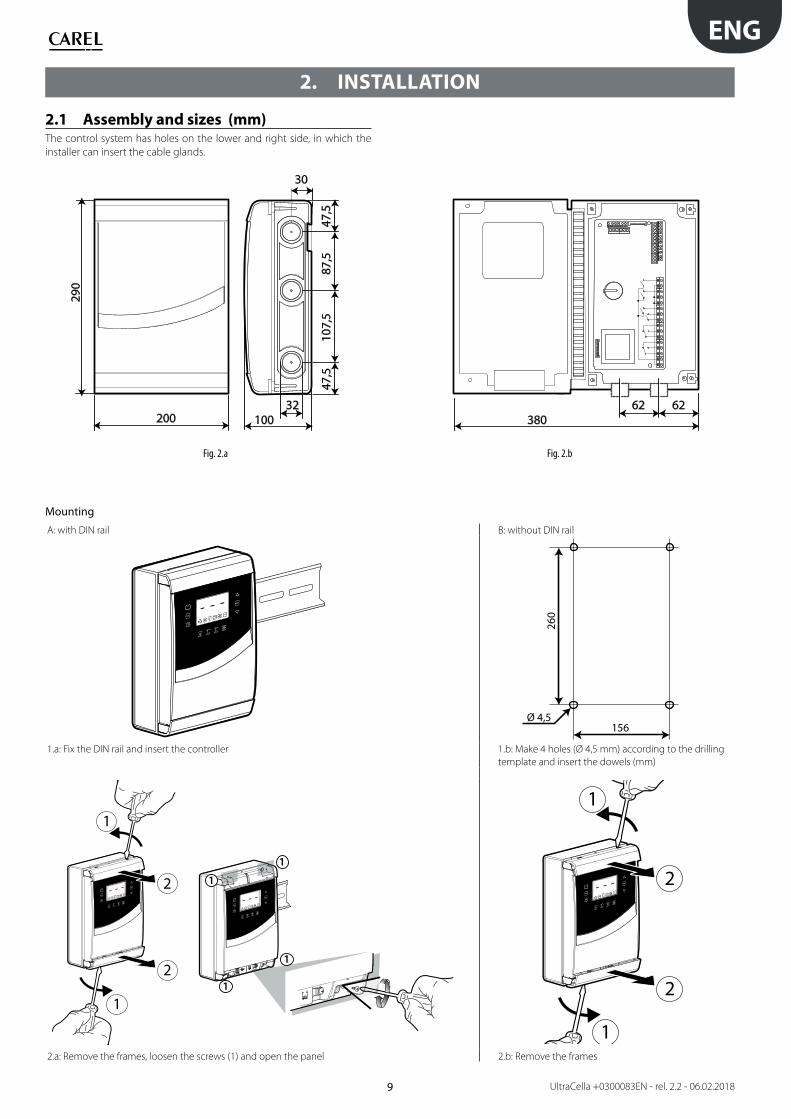
2. INSTALLATION
2.1 Assembly and sizes (mm)The control system has holes on the lower and right side, in which the
installer can insert the cable glands.
200
290
87,5
107,
547
,547
,5
30
32100
N
62 62380
Fig. 2.a Fig. 2.b
Mounting
A: with DIN rail B: without DIN rail
1 21 2 260
156Ø 4,5
1.a: Fix the DIN rail and insert the controller 1.b: Make 4 holes (Ø 4,5 mm) according to the drilling
template and insert the dowels (mm)
2
2
12
12
1
1
1
1
1
1
12
12
2
2
12
12
1
12.a: Remove the frames, loosen the screws (1) and open the panel 2.b: Remove the frames
10
ENG
UltraCella +0300083EN - rel. 2.2 - 06.02.2018
N
B
A A
A A
B
1
1
1
1
12
12
2
12
12
2
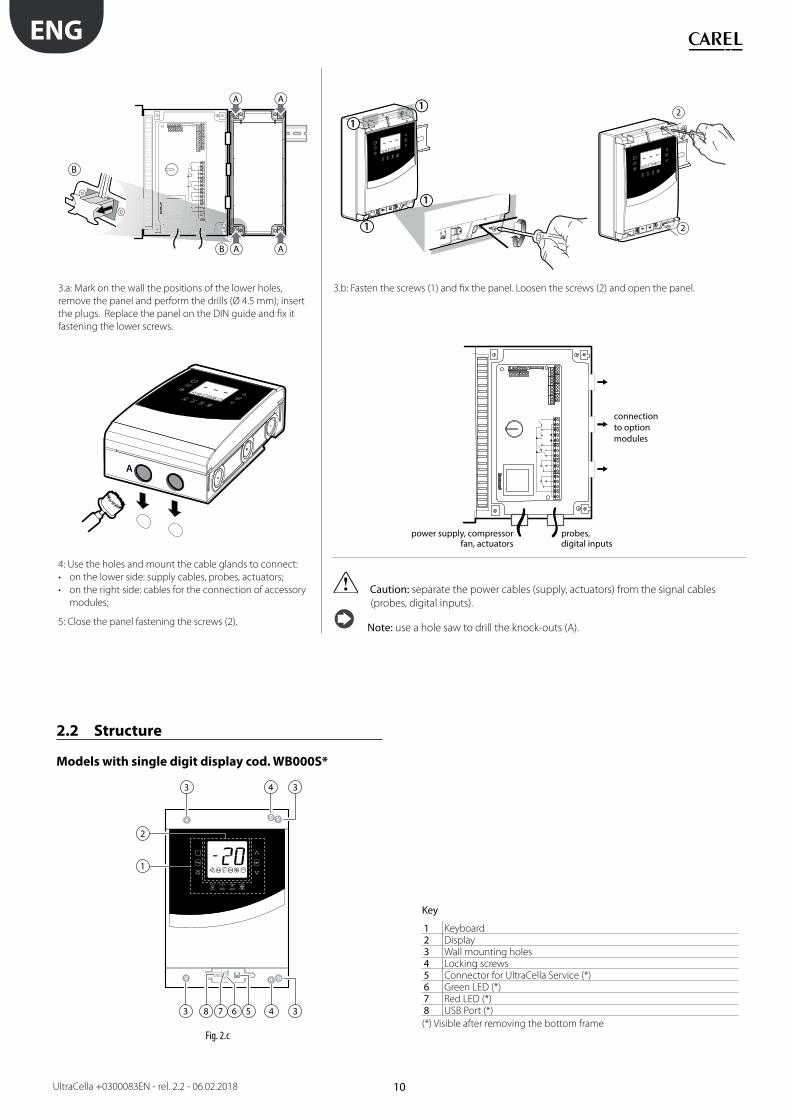
3.a: Mark on the wall the positions of the lower holes,
remove the panel and perform the drills (Ø 4.5 mm); insert
the plugs. Replace the panel on the DIN guide and fix it
fastening the lower screws.
3.b: Fasten the screws (1) and fix the panel. Loosen the screws (2) and open the panel.
A
12
12
N
power supply, compressorfan, actuators
probes,digital inputs
connection to option modules
4: Use the holes and mount the cable glands to connect:
• on the lower side: supply cables, probes, actuators;
• on the right side: cables for the connection of accessory
modules;
5: Close the panel fastening the screws (2).
Caution: separate the power cables (supply, actuators) from the signal cables
(probes, digital inputs).
Note: use a hole saw to drill the knock-outs (A).
2.2 Structure
Models with single digit display cod. WB000S*
1
2
3 4 3
3 45678 3
Key
1 Keyboard2 Display3 Wall mounting holes4 Locking screws5 Connector for UltraCella Service (*)6 Green LED (*)7 Red LED (*)8 USB Port (*)
(*) Visible after removing the bottom frame
Fig. 2.c

11
ENG
UltraCella +0300083EN - rel. 2.2 - 06.02.2018
Models with double digit display cod. WB000D*
1
2
3 4 3
3 45678 3
Key
1 Keyboard2 Display3 Wall mounting holes4 Locking screws5 Connector for UltraCella Service (*)6 Green LED (*)7 Red LED (*)8 USB port (*)
(*) Visible after removing the bottom frame
Fig. 2.d
2.3 Wiring diagram
FieldBus
24 Vac
BMS
R6
R5
R4
R3
R2
R1
230 V20 A max
EN60730-1UL 873
250 V
R5 - R612 (10) A12 A res. 2HP12FLA 72 LRA
CAREL NTC, PT1000
CAREL NTC, PT1000CAREL NTC, PT1000
CAREL NTC, analog input 0 to 10 Vdc
B5 analog
input
(4 to 20 mA)
OUTM+V
0 to 5 Vdc
DI1
Door switch
B3B2B1
48 47 46 45 44 43
49 50 51 52 53 54
VLG
ND
GN
DRx/Tx+Rx/Tx-
GN
D
Rx/Tx+Rx/Tx-G
ND
Rx/Tx+Rx/Tx-G
ND
Y1B4B5
DI1DI2DI3
GND5 VREF+ Vdc
302928272625
212019
18
17
16
15
14
13
12
11
10
9
8
7
6
5
4
3
2
1
242322
analog output (0 to 10 Vdc)
EN60730-1UL 873
250 V
R3 - R410 A res.5 (3) A10 A res. 5FLA18 LRA
EN60730-1UL 873
250 V
R1 - R28 (4) A N.O.8 A res. 2FLA12 LRA
DEF
FAN
LIGHT
UltraCella Control
343536
373839
404142
333231
GND
to graphic terminal display
to remote terminal display
to LED display board
to c
onne
ctor
boa
rd
CMP
Key
B1…B5 Analogue inputs 1…5DI1 Door switchDI2, DI3 Digital inputs 2, 3Y1 0…10 V analogue outputGND Grounding for signals5 VREF Ratiometric pressure
probe power supply+Vdc Active probe supply
(humidity)CMP DO1 (*) CompressorDEF DO2 (*) DefrostFAN DO3 (*) Evaporator fanLIGHT DO4 (*) LightAUX1 DO5 (*) Auxiliary
output 1AUX2 DO6 (*) Auxiliary
output 2L, N Power SupplyFieldbus Fieldbus Serial (19200
Baud, 8 bit, 2 bit stop, no
parity)BMS BMS Serial
(*) Digital outputs display in the
multifunction module (see chap. 3).
Fig. 2.e

12
ENG
UltraCella +0300083EN - rel. 2.2 - 06.02.2018
2.4 Expansion modules assembly
Dimensions (mm)
260
drilling template
47,5
47,5
30
128 110
290
87,5
107,
5
Ø32
103
Ø 4,5
47,5
47,5
30
101
87,5
107,
5
Ø32
Fig. 2.f
Overall drilling template (mm)If UltraCella and expansion modules have to be mounted at the same
time, use the overall drilling template.
260
103
Ø 4,5 mm
156 24
DIN RAIL
UltraCella ExpansionModule
3343
214
Fig. 2.g
LayoutIf more than one expansion modules it is to assemble, use the
arrangement of figure to optimize the wiring.
1 21 2
UltraCella Control Power Module EVD Module
Fig. 2.h
Mounting
A B
12
12
3
1 21 2
3
2
2
1 21 2
1
1
1: Use a hole saw to drill the panel in correspondence with the predrilled
holes (steps A, B). If present, fasten the DIN rail for the module.
2: Remove the faceplates. Unscrew the screws (3) and open the
UltraCella control
WM00ENS000WM00ENSI00
WM00ENNI00

13
ENG
UltraCella +0300083EN - rel. 2.2 - 06.02.2018
1 1
11
2
1
1
2
N
B
A A
A A
B
3: Raise the cover or remove the faceplates and unscrew the screws to
remove the panel and open the module.
4: Put the module close to UltraCella control and insert the coupling
clamps supplied as standard.
14
ENG
UltraCella +0300083EN - rel. 2.2 - 06.02.2018
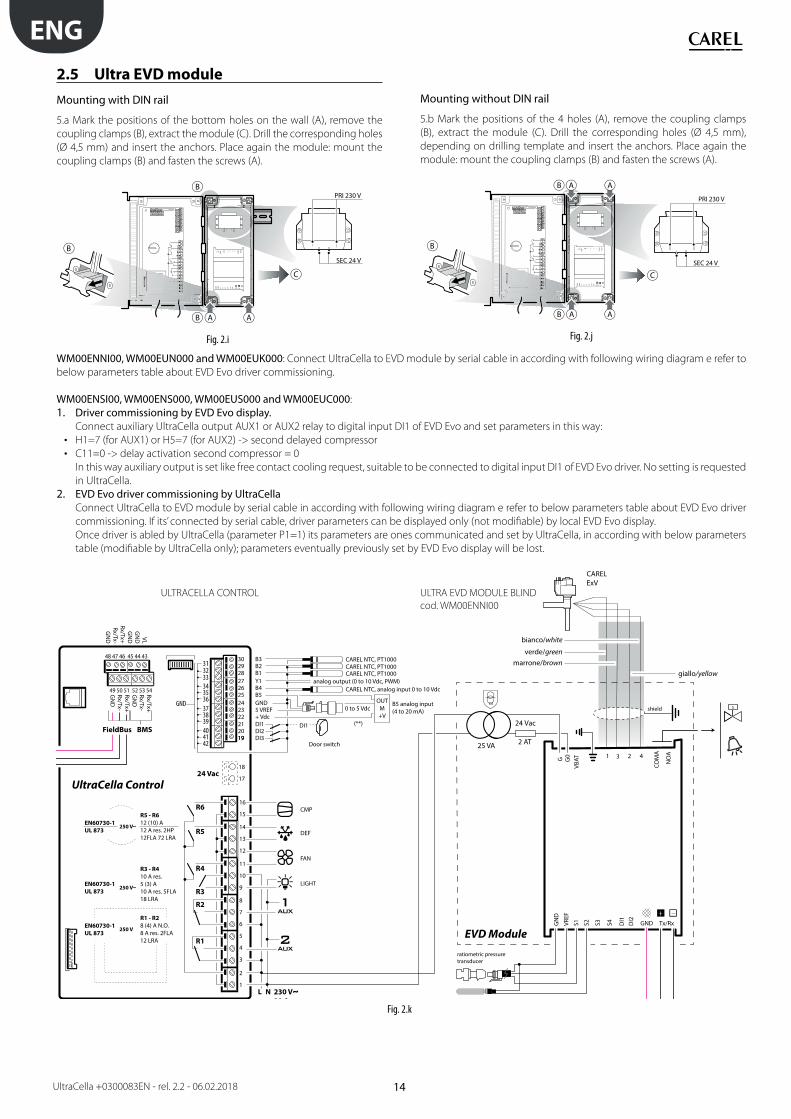
2.5 Ultra EVD module
Mounting with DIN rail
5.a Mark the positions of the bottom holes on the wall (A), remove the
coupling clamps (B), extract the module (C). Drill the corresponding holes
(Ø 4,5 mm) and insert the anchors. Place again the module: mount the
coupling clamps (B) and fasten the screws (A).
G G0
VBAT
COM
A
NO
A1 3 2 4
Tx/RxGNDDI1
S4S3S2S1GN
D
DI2
VREF
N
C
B
PRI 230 V
SEC 24 V
B
B
A A
Fig. 2.i
Mounting without DIN rail
5.b Mark the positions of the 4 holes (A), remove the coupling clamps
(B), extract the module (C). Drill the corresponding holes (Ø 4,5 mm),
depending on drilling template and insert the anchors. Place again the
module: mount the coupling clamps (B) and fasten the screws (A).
G G0
VBAT
COM
A
NO
A1 3 2 4
Tx/RxGNDDI1
S4S3S2S1GN
D
DI2
VREF
N
C
B
PRI 230 V
SEC 24 V
B
B A A
A A
Fig. 2.j
WM00ENNI00, WM00EUN000 and WM00EUK000: Connect UltraCella to EVD module by serial cable in according with following wiring diagram e refer to
below parameters table about EVD Evo driver commissioning.
WM00ENSI00, WM00ENS000, WM00EUS000 and WM00EUC000:
1. Driver commissioning by EVD Evo display.Connect auxiliary UltraCella output AUX1 or AUX2 relay to digital input DI1 of EVD Evo and set parameters in this way:
• H1=7 (for AUX1) or H5=7 (for AUX2) -> second delayed compressor
• C11=0 -> delay activation second compressor = 0
In this way auxiliary output is set like free contact cooling request, suitable to be connected to digital input DI1 of EVD Evo driver. No setting is requested
in UltraCella.
2. EVD Evo driver commissioning by UltraCellaConnect UltraCella to EVD module by serial cable in according with following wiring diagram e refer to below parameters table about EVD Evo driver
commissioning. If its’ connected by serial cable, driver parameters can be displayed only (not modifiable) by local EVD Evo display.
Once driver is abled by UltraCella (parameter P1=1) its parameters are ones communicated and set by UltraCella, in according with below parameters
table (modifiable by UltraCella only); parameters eventually previously set by EVD Evo display will be lost.G G
0VB
AT
COM
A
NO
A1 3 2 4
GND Tx/RxDI1
S4S3S2S1GN
D
DI2
VREF
2 AT
24 Vac
25 VA
shield
NTC
ratiometric pressuretransducer
S
CAREL ExV
giallo/yellow
bianco/white
verde/greenmarrone/brown
24 Vac
BMS
R6
R5
R4
R3
R2
R1
230 V20 A
EN60730-1UL 873
250 V
R5 - R612 (10) A12 A res. 2HP12FLA 72 LRA
CAREL NTC, PT1000CAREL NTC, PT1000CAREL NTC, PT1000
CAREL NTC, analog input 0 to 10 Vdc
B5 analog input(4 to 20 mA)
OUTM+V
0 to 5 Vdc
DI1 (**)
Door switch
B3B2B1
48 47 46 45 44 43
49 50 51 52 53 54
VLG
ND
GN
DRx/Tx+Rx/Tx-
GN
D
Rx/Tx+Rx/Tx-G
ND
Rx/Tx+Rx/Tx-G
ND
Y1B4B5
DI1DI2DI3
GND5 VREF+ Vdc
19
18
17
16
15
14
13
12
11
10
9
8
7
6
5
4
3
2
1
analog output (0 to 10 Vdc, PWM)
EN60730-1UL 873
250 V
R3 - R410 A res.5 (3) A10 A res. 5FLA18 LRA
EN60730-1UL 873
250 V
R1 - R28 (4) A N.O.8 A res. 2FLA12 LRA
CMP
DEF
FAN
LIGHT
UltraCella Control
EVD Module
302928272625
212019
242322
343536
373839
404142
333231
GND
FieldBus
Fig. 2.k
ULTRACELLA CONTROL ULTRA EVD MODULE BLIND
cod. WM00ENNI00
15
ENG
UltraCella +0300083EN - rel. 2.2 - 06.02.2018
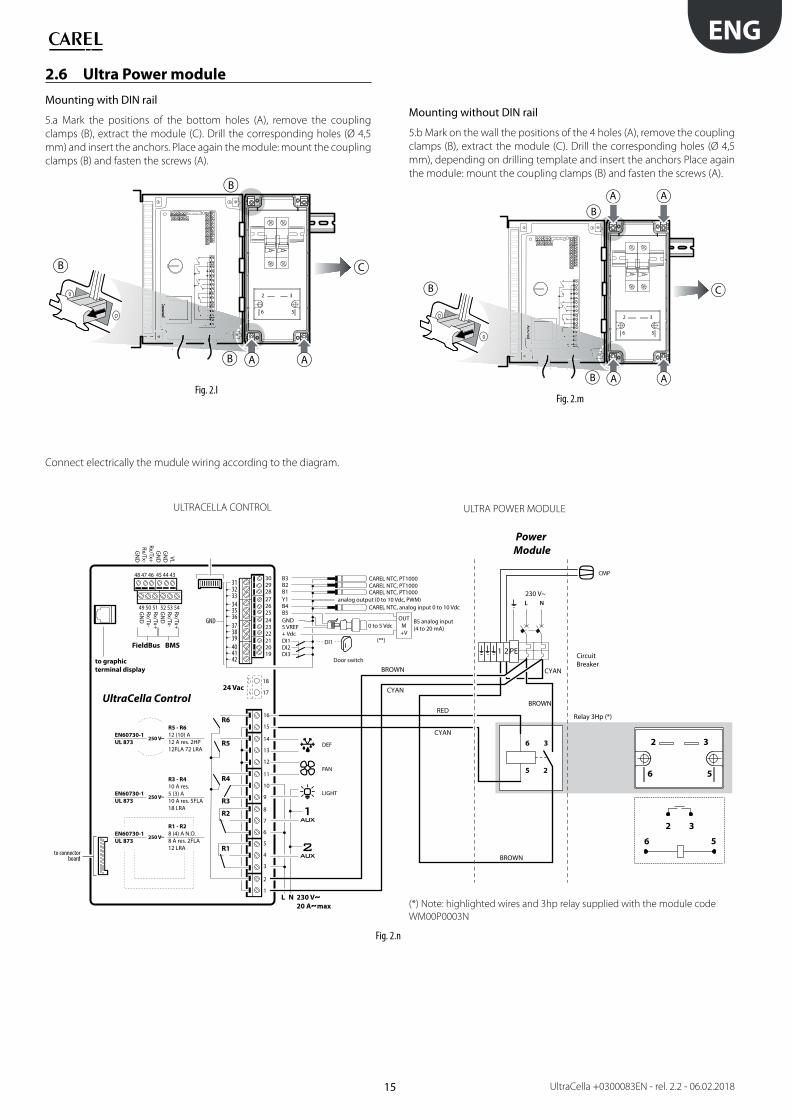
2.6 Ultra Power module
Mounting with DIN rail
5.a Mark the positions of the bottom holes (A), remove the coupling
clamps (B), extract the module (C). Drill the corresponding holes (Ø 4,5
mm) and insert the anchors. Place again the module: mount the coupling
clamps (B) and fasten the screws (A).
N
2 3
6 5
CB
B A A
B
Fig. 2.l
Mounting without DIN rail
5.b Mark on the wall the positions of the 4 holes (A), remove the coupling
clamps (B), extract the module (C). Drill the corresponding holes (Ø 4,5
mm), depending on drilling template and insert the anchors Place again
the module: mount the coupling clamps (B) and fasten the screws (A).
N
2 3
6 5
CB
B A A
B
AA
Fig. 2.m
Connect electrically the mudule wiring according to the diagram.
FieldBus
L N
230 V~
CMP
CircuitBreaker
Relay 3Hp (*)
2 3
6 5
6 5
2 3
6 3
5 2
PE1 2
24 Vac
BMS
R6
R5
R4
R3
R2
R1
230 V20 A max
EN60730-1UL 873
250 V
R5 - R612 (10) A12 A res. 2HP12FLA 72 LRA
48 47 46 45 44 43
49 50 51 52 53 54
VLGN
DGN
DRx/Tx+Rx/Tx-
GN
D
Rx/Tx+Rx/Tx-GN
DRx/Tx+Rx/Tx-GN
D
18
17
16
15
14
13
12
11
10
9
8
7
6
5
4
3
2
1
EN60730-1UL 873
250 V
R3 - R410 A res.5 (3) A10 A res. 5FLA18 LRA
EN60730-1UL 873
250 V
R1 - R28 (4) A N.O.8 A res. 2FLA12 LRA
DEF
FAN
LIGHT
UltraCella Control
Power Module
to graphic terminal display
to connectorboard
BROWN
BROWN
CYAN
RED
CYAN
CAREL NTC, PT1000CAREL NTC, PT1000CAREL NTC, PT1000
CAREL NTC, analog input 0 to 10 Vdc
B5 analog input(4 to 20 mA)
OUTM+V
0 to 5 Vdc
DI1 (**)
Door switch
B3B2B1Y1B4B5
DI1DI2DI3
GND5 VREF+ Vdc
analog output (0 to 10 Vdc, PWM)
302928272625
212019
242322
343536
373839
404142
333231
GND
CYAN
BROWN
Fig. 2.n
ULTRACELLA CONTROL ULTRA POWER MODULE
(*) Note: highlighted wires and 3hp relay supplied with the module code
WM00P0003N
16
ENG
UltraCella +0300083EN - rel. 2.2 - 06.02.2018
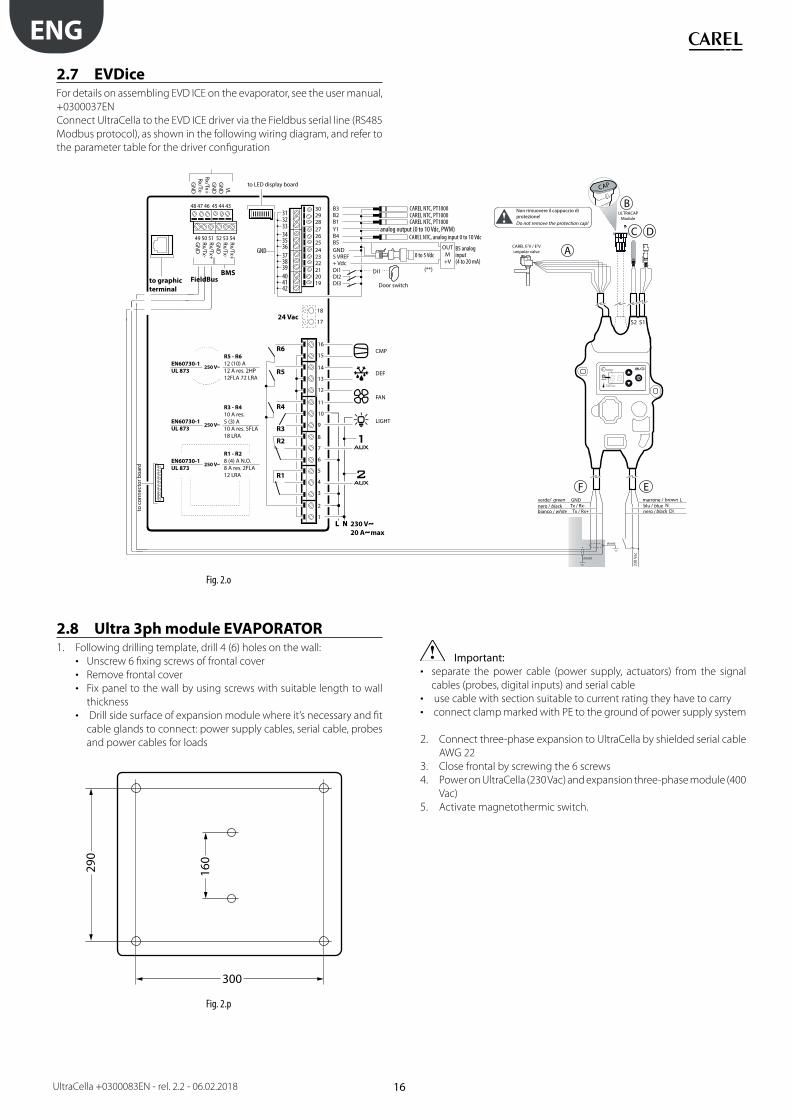
2.7 EVDiceFor details on assembling EVD ICE on the evaporator, see the user manual,
+0300037EN
Connect UltraCella to the EVD ICE driver via the Fieldbus serial line (RS485
Modbus protocol), as shown in the following wiring diagram, and refer to
the parameter table for the driver configuration
shield
shield
230
Vac
S2 S1
CAP
C D
A
B
F E
Non rimuovere il cappuccio di protezione!Do not remove the protection cap!
ULTRACAPModule
CAREL E2V / E3Vunipolar valve
GASType
Mode
Super Heat
verde/ nero /bianco / white
greenblack
GNDTx / Rx-
Tx / Rx+
marrone / blu /
brownblue
LN
nero / black DI
230 V20 A max
24 Vac
to graphicterminal
FieldBusBMS
R6
R5
R4
R3
R2
R1
EN60730-1UL 873
250 V
R5 - R612 (10) A12 A res. 2HP12FLA 72 LRA
to LED display board
CAREL NTC, PT1000CAREL NTC, PT1000CAREL NTC, PT1000
CAREL NTC, analog input 0 to 10 Vdc
B5 analog input(4 to 20 mA)
OUTM+V
0 to 5 Vdc
DI1 (**)
Door switch
to c
onne
ctor
boa
rd
B3B2B1
48 47 46 45 44 43
49 50 51 52 53 54
VLG
ND
GN
DRx/Tx+Rx/Tx-
GN
D
Rx/Tx+Rx/Tx-G
ND
Rx/Tx+Rx/Tx-G
ND
Y1B4B5
DI1DI2DI3
GND5 VREF+ Vdc
18
17
16
15
14
13
12
11
10
9
8
7
6
5
4
3
2
1
analog output (0 to 10 Vdc, PWM)
EN60730-1UL 873
250 V
R3 - R410 A res.5 (3) A10 A res. 5FLA18 LRA
EN60730-1UL 873
250 V
R1 - R28 (4) A N.O.8 A res. 2FLA12 LRA
CMP
DEF
FAN
LIGHT
302928272625
212019
242322
343536
373839
404142
333231
GND
Fig. 2.o
2.8 Ultra 3ph module EVAPORATOR1. Following drilling template, drill 4 (6) holes on the wall:
• Unscrew 6 fixing screws of frontal cover
• Remove frontal cover
• Fix panel to the wall by using screws with suitable length to wall
thickness
• Drill side surface of expansion module where it’s necessary and fit
cable glands to connect: power supply cables, serial cable, probes
and power cables for loads
300
290
160
Fig. 2.p
Important:• separate the power cable (power supply, actuators) from the signal
cables (probes, digital inputs) and serial cable
• use cable with section suitable to current rating they have to carry
• connect clamp marked with PE to the ground of power supply system
2. Connect three-phase expansion to UltraCella by shielded serial cable
AWG 22
3. Close frontal by screwing the 6 screws
4. Power on UltraCella (230 Vac) and expansion three-phase module (400
Vac)
5. Activate magnetothermic switch.
17
ENG
UltraCella +0300083EN - rel. 2.2 - 06.02.2018
QF1KM2 KM1
QF2
AP1
XP1XA1
KR3
KR2
Ultra 3PHI/O module
XXA1
KR2
AP1
KR2
Ultra 3PHI/O module
CMP
DEF
FAN
LIGHT
to co
nnec
tor b
oard
CAREL NTC, PT1000CAREL NTC, PT1000CAREL NTC, PT1000
analog output (0 to 10 Vdc, PWM)
CAREL NTC, analog input 0 to 10 VdcB5
analog
input
(4 to 20 mA)
0 to 5Vdc
- + GN
D
GN
DY
109
2727
110
2626
117
1818
118
2020
119
1919
120
2222
128
1616
129
1515
140
2828
141
2929
142
3030
143
2929
146
3131
147
2929
148
2525
149
2424
160
3232
161
3333
162
3434
PE1
17
PE2
PE3
AUX1
:1AU
X 1
AUX1
:2AU
X 1
TS1
term
osta
to d
i sic
urez
zaTS
1te
rmos
tato
di s
icur
ezza
SP3
Clic
son
evap
orat
ore
SP3
Clic
son
evap
orat
ore
AP3
:LU
ltraC
ella
AP3
:NU
ltraC
ella
ST1
defr
ost
ST1
defr
ost
ST2
defr
ost a
uxST
2de
fros
t aux
TS2:
Yve
ntila
tore
eva
pora
tore
0-1
0 Vd
cTS
2:G
ND
vent
ilato
re e
vapo
rato
re 0
-10
Vdc
AUX2
:1co
nsen
so u
nita
' mot
ocon
dens
ante
AUX2
:2co
nsen
so u
nita
' mot
ocon
dens
ante
AP1
:J6/-
cont
rollo
AP1
:J6/+
cont
rollo
AP1
:J6/G
ND
cont
rollo
Fig. 2.q
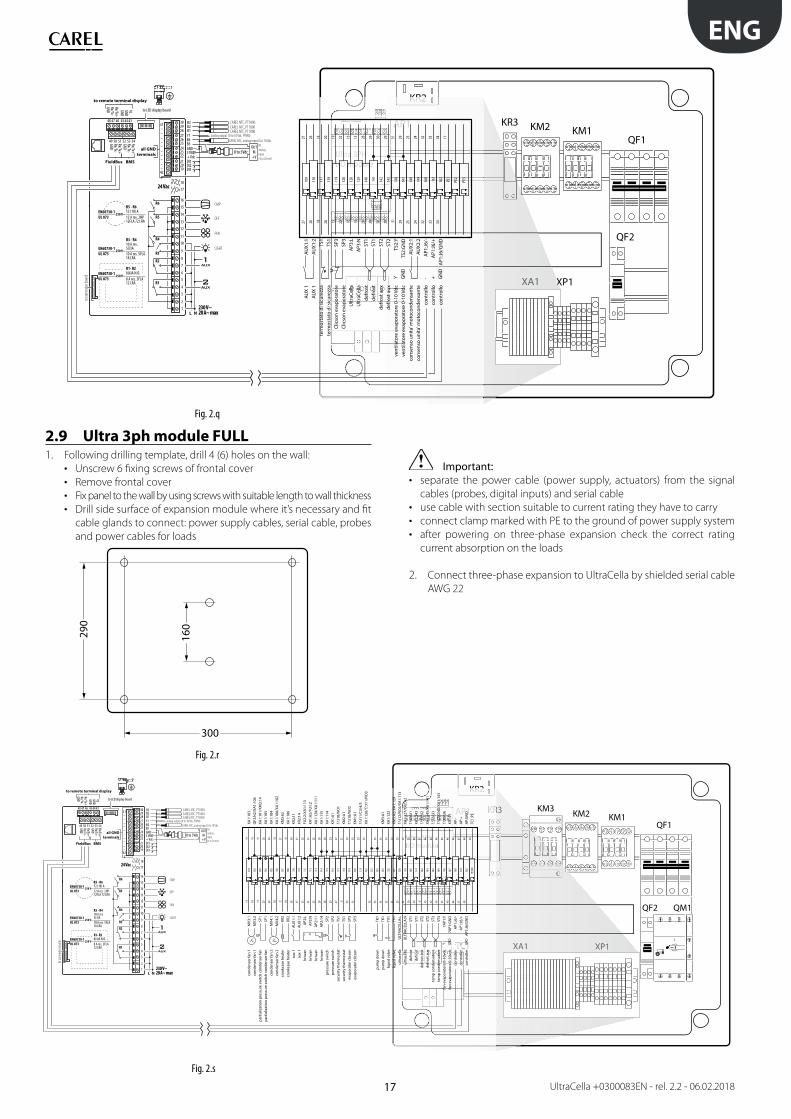
2.9 Ultra 3ph module FULL1. Following drilling template, drill 4 (6) holes on the wall:
• Unscrew 6 fixing screws of frontal cover
• Remove frontal cover
• Fix panel to the wall by using screws with suitable length to wall thickness
• Drill side surface of expansion module where it’s necessary and fit
cable glands to connect: power supply cables, serial cable, probes
and power cables for loads
300
290
160
Fig. 2.r
Important:• separate the power cable (power supply, actuators) from the signal
cables (probes, digital inputs) and serial cable
• use cable with section suitable to current rating they have to carry
• connect clamp marked with PE to the ground of power supply system
• after powering on three-phase expansion check the correct rating
current absorption on the loads
2. Connect three-phase expansion to UltraCella by shielded serial cable
AWG 22
QF1KM2KM3
KM1
QF2 QM1
AP1
XP1XA1TC1
KR2
Ultra 3PHI/O module
KR3
63708090
XP1XA1
KR2
R3AP1
TC1
KR2
Ultra 3PHI/O module
KR
CMP
DEF
FAN
LIGHT
to co
nnec
tor b
oard
CAREL NTC, PT1000CAREL NTC, PT1000CAREL NTC, PT1000
analog output (0 to 10 Vdc, PWM)
CAREL NTC, analog input 0 to 10 VdcB5
analog
input
(4 to 20 mA)
0 to 5Vdc
101
19XA
1:10
319
102
18Q
F2:N
2/XA
1:10
618
103
19XA
1:10
1/KM
3:14
19
104
20XA
1:10
520
105
20XA
1:10
420
106
18XA
1:10
8/XA
1:10
218
107
21KM
3:62
21
108
18XA
1:10
618
109
38KR
2:11
38
110
37KR
2:14
37
111
25FU
2:2/
XA1:
113
25
112
24KR
1:A
2/FU
1:2
24
113
25XA
1:12
8/XA
1:11
125
114
28XA
1:11
528
115
28XA
1:11
428
116
29KR
1:A
129
117
27??
:J10/
NO
127
118
31KM
2:A
131
119
30??
:J10/
NO
230
120
33KM
1:A
133
121
29??
:J11/
C3/4
/512
232
XA1:
126/
??:J1
1/N
O3
123
35
124
3535
125
34KM
3:A
134
126
32XA
1:12
232
127
24KM
3:A
2/XA
1:12
924
128
25??
:J12/
NC6
/XA
1:11
325
129
24XA
1:12
7/KR
2:A
224
140
39??
:J2/U
139
141
40XA
1:14
340
142
41??
:J2/U
241
143
40XA
1:14
5/XA
1:14
140
144
42??
:J2/U
342
145
40??
:J2/G
ND
/XA
1:14
340
146
45??
:J2/U
645
147
40KR
1:11
40
160
46A
P:-
46
161
47A
P:+
47
162
48A
P:G
ND
48
PE10
926
TC1:
PE
M1
M1
P P PL N
- + GND
GND
Y
cond
ense
r fan
1M
V3:1
cond
ense
r fan
1M
V3:2
part
ializ
atio
n pr
essu
re s
witc
h co
nden
ser f
anSP
1pa
rtia
lizat
ion
pres
sure
sw
itch
cond
ense
r fan
SP1
cond
ense
r fan
2M
V4:1
cond
ense
r fan
2M
V4:2
cran
kcas
e he
ater
RR2
cran
kcas
e he
ater
RR2
aux
1AU
X1:1
aux
1AU
X1:2
kriw
anA
P2:L
kriw
anA
P2:N
kriw
anA
P2:1
1kr
iwan
AP2
:14
pres
sure
sw
itch
SP2
pres
sure
sw
itch
SP2
secu
rity
ther
mos
tat
TS1
secu
rity
ther
mos
tat
TS1
evap
orat
or c
licso
nSP
3ev
apor
ator
clic
son
SP3
pum
p do
wn
TK1
pum
p do
wn
TK1
liqui
d va
lve
YV1
liqui
d va
lve
YV1
ultr
acel
laU
LTRA
CELL
A:L
ultr
acel
laU
LTRA
CELL
A:N
defr
ost
ST1
defr
ost
ST1
defr
ost a
uxST
2de
fros
t aux
ST2
tem
p co
nden
sato
reST
3te
mp
cond
ensa
tore
ST3
fan
evap
orat
ore
0-10
vdc
7AP1
:Yfa
n ev
apor
ator
e 0-
10vd
c7A
P1:G
ND
cont
rolle
rA
P1:J6
/-co
ntro
ller
AP1
:J6/+
cont
rolle
rA
P1:J6
/GN
D
Fig. 2.s

18
ENG
UltraCella +0300083EN - rel. 2.2 - 06.02.2018
3. Close frontal by screwing the 6 screws
4. At the first start-up of the unit, it’s suggested to calibrate motor circuit
breaker on effective compressor absorption rating
5. Power on UltraCella (230Vac) and expansion three-phase module
(400Vac)
6. Activate magnetothermic switch and motor circuit breaker
2.10 InstallationProceed as follows for installation, making reference to the wiring
diagrams in the previous paragraphs:
1. Connect the supply and probes: the probes can be remote-controlled up
to a maximum distance of 10 metres from the controller as long as
cables with minimum section of 1 mm2 are used.
2. Program the control: as indicated in chapter “Commissioning” and “User
interface”;
3. Connect the actuators: the actuators should only be connected after
having programmed the controller. It is recommended to carefully
evaluate the maximum capacities of the relays indicated in table
“Technical specifications”.
4. Connection to the serial network (if present): all controls are fitted with a
serial connector for connection to the supervisory network.
Warnings: avoid installing UltraCella control system in environments with
the following characteristics:
• relative humidity over 90% non-condensing;
• strong vibrations or knocks;
• exposure to continuous jets of water;
• exposure to aggressive and polluting atmospheric agents (e.g.: sulphur
and ammonia gases, saline mist, smoke) to avoid corrosion and/or
oxidation;
• high magnetic and/or radio frequency interference (e.g. near
transmitting antennas);
• exposure of the control system to direct sunlight and atmospheric
agents in general.
The following recommendations must be respected when connecting
the controllers:
Warnings:• incorrect connection of the power supply may seriously damage the
control system;
• use cable ends that are suitable for the terminals. Loosen every screw
and fit the cable end, next tighten the screws and gently pull the cables
to check their tightness. If using an automatic screwdriver, adjust the
torque to a value less than 0.5 N · m;
• separate as much as possible (by at least 3 cm) the probe signal and
digital input cables from inductive loads and power cables, to avoid
any electromagnetic disturbance. Never lay power cables and probe
cables in the same cable conduits (including those for the electrical
panels). Do not install the probe cables in the immediate vicinity of
power devices (contactors, circuit breakers or other). Reduce the
length of the sensor cables as much as possible, and avoid spirals
around power devices;
• only use IP67 guaranteed probes as end defrost probes; place the
probes with the vertical bulb upwards, so as to facilitate drainage of
any condensate. Remember that the thermistor temperature probes
(NTC) have no polarity, so the order of connection of terminals is not
important.
Caution: in order to ensure the safety of the unit in the event of
serious alarms, all the electromechanical safety devices required
to guarantee correct operation must be fitted on the unit.
HACCP - CAUTION
When the temperature measurement is relevant for Food Safety (see
HACCP), will be used only temperature probes suggested by Carel. The
standards in force may require the compilation and preservation of
appropriate documentation, as well as periodic checks on instrumentation
and sensors. If in doubt, consult the person in charge of food safety or the
manager of the plant.
2.11 Connection in supervisoring networkWarnings:
• properly fix the converter to avoid disconnections;
• perform the wiring without power supply;
• keep the cables of the converter CVSTDUMOR0 separate from power
cables (supply and relay outputs).
The RS485 converter allows you to connect to the UltraCella control
network to the monitoring network for complete control and monitoring
of controls connected. The system provides a maximum of 207 units with
a maximum length of 1000 m. For the connection it is requested the
accessory standard (RS485-USB converter cod. CAREL CVSTDUMOR0) and
a terminating resistor of 120 Ω to be placed on the terminals connected
to the last control. Connect RS485 converter to the controls as shown in
the figure. For assigning the serial address see the parameter H0. See the
instruction sheet of the converter for further information.
UltraCella 1
GND
USB-485Converter
CVSTDUMOR0
120 Ω
T+T -
GNDT-T+
USB
UltraCella ...n
to BMSport
GNDT-T + to BMS
port
Fig. 2.t
UltraCella can be connected to both PlantVisor and PlantWatch via BMS
port (RS485).
Starting from 1.5 release software, both CAREL and Modbus protocols are
available from BMS port, selectable by H7 parameter.
- H7 = 0 CAREL protocol
- H7 = 1 Modbus protocol
Starting from software release 1.7, the baud rate, stop bits and parity of
the BMS port can be set using parameters H10, H11 and H12; the data bits
setting on the other hand remains fixed at 8.

19
ENG
UltraCella +0300083EN - rel. 2.2 - 06.02.2018
Par. Description Def Min Max U.M.H10 BMS baud rate bit/s
0 1200 5 384001 2400 6 576002 4800 7 768003 9600 8 1152004 19200 9 375000
4 0 9 -
H11 BMS stop bits
1 1 bit stop2 2 bit stop
2 1 2 -
H12 BMS parity
1 odd2 even
0 0 2 -
Note: To make the change active, switch on and switch off the unit.
2.12 UltraCella Service terminalThe UltraCella Service Terminal has to be connected via a dedicated
connector, that can be accessed after removing the lower frame
Using the “UltraCella Service Terminal” you can:
• during the first commissioning: insert the first configuration parameters
following the guided procedure (wizard);
• during normal operation:
1. display the active loads and the main variables: temperature, humidity;
2. perform the control programming, facilitated by contextual help.
12
12
Fig. 2.u
2.13 Upload/download parameters (USB memory
key)The USB memory key must be placed in the connector accessible after
removing the lower frame. Using the USB memory key you can:
1. download the parameters set (r01...r10): control saves inside the key the
10 parameters set;
2. upload the parameters set (r01...r10): control loads from the key the
10 parameters set);
12
12
USB key
Fig. 2.v
Procedure:
1. remove the lower frame and insert the USB memory key. The red and
green LED beside the key will light up once in sequence to indicate
the recognition by the unity of the USB memory key;
2. bring the control to OFF to upload (to copy the configurations from the
USB key to the controller); to download (to copy the configurations
from the controller to the USB key), the controller can be in ON status;
3. press at the same time Prg and Set for 2 s and access the multifunction
menu: the message “HcP” will appear;
4. press “UP” until reaching the entry “USb”;
5. press “Set”;
6. choose whether you want to DOWNLOAD the parameters (= dnL), to
UPLOAD them (=uPd) or to exit the page (EXt);
7. press “Set”; the green LED will light up and will remain lit to indicate that
the upload / download of parameters occurred; if, for some reason, the
procedure should not be successful, the red LED will turn on;
8. extract the key. The LED turns off. The file is “.txt”type, and it can be
displayed on the computer.
1 21 2 1 21 2
1 2 1 2
1 21 2 1 21 2
Note: the figure refers to the screens on models with single row
display, P/Ns WB000S*. In models with two rows, P/Ns WB000D*,
as well as the message indicated, during navigation the display shows the
scrolling message "recipes in USB device” on the second row.
Note: the download and upload operations, as well as the 10 lists
of parameters, also copy all the other parameters (one value only
for all 10 lists).

20
ENG
UltraCella +0300083EN - rel. 2.2 - 06.02.2018
3. USER INTERFACE
The front panel contains the display and keyboard, made up from 10
or 11 keys (depending on the model), which, pressed individually or
together, allow to perform all of the controller programming operations.
The accessory UltraCella Service terminal, accessory terminal, allows the
commissioning of the control system via a guided procedure (Wizard)
and also programming the parameters with a contextual help that
explains the various functions.
3.1 DisplayOn the LED display is shown the temperature range from -50 °C (-58 °F)
to +150 °C (302 °F). The resolution of the tenth for temperatures in the
range -19,9…99,9. In case of alarm the value of the probe is displayed in
alternance with the codes of the active alarms. During programming, it
displays the codes that identify the parameters and their value.
Note: you can select the standard display by properly configuring
parameter /t1 (/t1 and /t2 for double digit models).
Front panel for single row display models cod. WB000S*
Front panel for double row display models cod. WB000D* UltraCella Service Terminal (accessories)
SETPRG
ESC
MENU
HELP Multifunction menu
HACCP
Fig. 3.a Fig. 3.b Fig. 3.c
Icons table on models with single row display P/Ns WB000S*
Icon FunctionNormal operation
NoteON OFF Flashing
Technical support
Alarms, for example alarm due to EEprom
or probe fault
Serious problem detected. Please contact
technical service
HACCP HACCP function enabled - HACCP alarm saved (HA and/or HF)
Door Door open Door Close Door open and door alarm active
Compressor On Off Waiting for activationBlinks when the activation of the
compressor is delayed by safety times.
Fan On Off Waiting for activationBlinks when the activation of the
compressor is delayed by safety times.
Clock On if a scheduled defrost is
requested
Tab. 3.a

21
ENG
UltraCella +0300083EN - rel. 2.2 - 06.02.2018
Icons table on models with two rows display P/Ns. WB000D*
Icon FunctionNormal operation
NoteON OFF Flashing
Technical support
Alarms, for example alarm due to EEprom
or probe fault
Serious problem detected. Please contact
technical service
HACCP HACCP function enabled - HACCP alarm saved (HA and/or HF)
Door Door open Door Close Door open and door alarm active
Compressor On Off Waiting for activationBlinks when the activation of the
compressor is delayed by safety times.
Fan On Off Waiting for activationBlinks when the activation of the
compressor is delayed by safety times.
Clock On if a scheduled defrost is
requested
Celsius degrees
Temperature visualization in
Celsius degrees- .
Farenheit degrees
Temperature visualization in
Farenheit degrees-
humidity percentage Humidity visualization -
Tab. 3.b
3.2 Keyboard
Key Normal operation BlinkPressing the individual key Combined pressure with other keys
On/Off
• Pressed for 2 s, turns the control OFF
• Pressed for 2 s, turns the control ON
• ESC function, return to higher level
• Pressed for 2 s, enters the programming menu
Prg + Set: if pressed at the same time for 2
s, allow access to the multifunction menu
ALARM
• In case of alarm: mutes the audible alarm (buzzer) and
deactivates the alarm relay
• Pressed for 2 s, reset the manual reset alarms
Available only in case of alarm
• Turns the light on/off
• Turns auxiliary output 1 on/off (*) Flashing for 5 seconds: attempt to activate
auxiliary output 1 from button, yet output
has different configuration
• Turns auxiliary output 2 on/off (*) Flashing for 5 seconds: attempt to activate
auxiliary output 1 from button, yet output
has different configuration
DEF
• Activates/deactivates manual defrost Awaiting activation
• Set point setting
• Value setting
Prg + Set: if pressed at the same time for 2
s, allow access to the multifunction menu
Indicates that the set point is not that
the value set for parameter St but rather
defined by one of the following algorithms:
• Change set point from digital input (St+r4
and/or StH+r5)
• Change set point from time band (St+r4
and/or StH+r5)
• Set point ramps (variable set point)
/UP/DOWN
• Value increase/ decrease (flashing) Light on steady signals that AUX3 and/or
AUX4 outputs are active. See paragraph
6.20 for further information.
Tab. 3.c
(*) To activate outputs AUX1 / AUX2 by button, set H1/H5=2. If parameters
are not set, if AUX1/AUX2 key are pressed, they blink for 5 seconds
22
ENG
UltraCella +0300083EN - rel. 2.2 - 06.02.2018
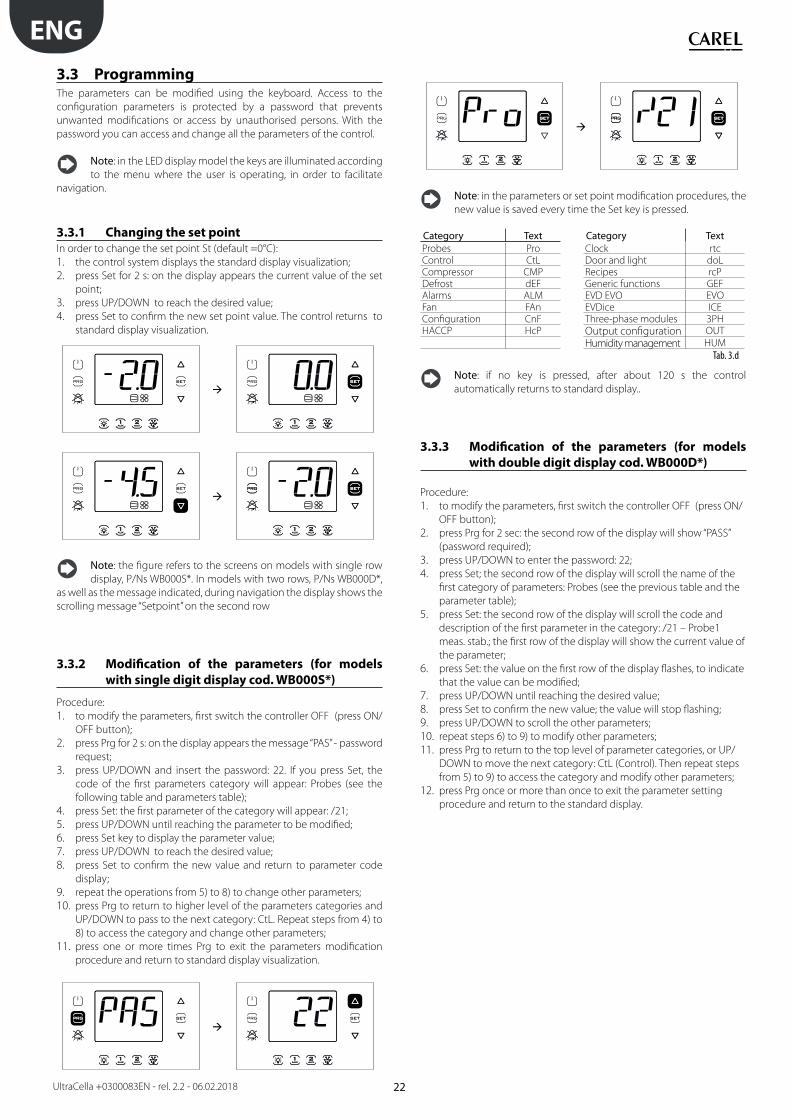
3.3 ProgrammingThe parameters can be modified using the keyboard. Access to the
configuration parameters is protected by a password that prevents
unwanted modifications or access by unauthorised persons. With the
password you can access and change all the parameters of the control.
Note: in the LED display model the keys are illuminated according
to the menu where the user is operating, in order to facilitate
navigation.
3.3.1 Changing the set point
In order to change the set point St (default =0°C):
1. the control system displays the standard display visualization;
2. press Set for 2 s: on the display appears the current value of the set
point;
3. press UP/DOWN to reach the desired value;
4. press Set to confirm the new set point value. The control returns to
standard display visualization.
1 21 2 1 21 2
1 21 2 1 21 2
Note: the figure refers to the screens on models with single row
display, P/Ns WB000S*. In models with two rows, P/Ns WB000D*,
as well as the message indicated, during navigation the display shows the
scrolling message “Setpoint” on the second row
3.3.2 Modification of the parameters (for models
with single digit display cod. WB000S*)
Procedure:
1. to modify the parameters, first switch the controller OFF (press ON/
OFF button);
2. press Prg for 2 s: on the display appears the message “PAS” - password
request;
3. press UP/DOWN and insert the password: 22. If you press Set, the
code of the first parameters category will appear: Probes (see the
following table and parameters table);
4. press Set: the first parameter of the category will appear: /21;
5. press UP/DOWN until reaching the parameter to be modified;
6. press Set key to display the parameter value;
7. press UP/DOWN to reach the desired value;
8. press Set to confirm the new value and return to parameter code
display;
9. repeat the operations from 5) to 8) to change other parameters;
10. press Prg to return to higher level of the parameters categories and
UP/DOWN to pass to the next category: CtL. Repeat steps from 4) to
8) to access the category and change other parameters;
11. press one or more times Prg to exit the parameters modification
procedure and return to standard display visualization.
1 21 2 1 21 2
1 21 2 1 21 2
Note: in the parameters or set point modification procedures, the
new value is saved every time the Set key is pressed.
Category Text Category TextProbes Pro Clock rtcControl CtL Door and light doLCompressor CMP Recipes rcPDefrost dEF Generic functions GEFAlarms ALM EVD EVO EVOFan FAn EVDice ICEConfiguration CnF Three-phase modules 3PHHACCP HcP Output configuration OUT
Humidity management HUM
Tab. 3.d
Note: if no key is pressed, after about 120 s the control
automatically returns to standard display..
3.3.3 Modification of the parameters (for models
with double digit display cod. WB000D*)
Procedure:
1. to modify the parameters, first switch the controller OFF (press ON/
OFF button);
2. press Prg for 2 sec: the second row of the display will show “PASS”
(password required);
3. press UP/DOWN to enter the password: 22;
4. press Set; the second row of the display will scroll the name of the
first category of parameters: Probes (see the previous table and the
parameter table);
5. press Set: the second row of the display will scroll the code and
description of the first parameter in the category: /21 – Probe1
meas. stab.; the first row of the display will show the current value of
the parameter;
6. press Set: the value on the first row of the display flashes, to indicate
that the value can be modified;
7. press UP/DOWN until reaching the desired value;
8. press Set to confirm the new value; the value will stop flashing;
9. press UP/DOWN to scroll the other parameters;
10. repeat steps 6) to 9) to modify other parameters;
11. press Prg to return to the top level of parameter categories, or UP/
DOWN to move the next category: CtL (Control). Then repeat steps
from 5) to 9) to access the category and modify other parameters;
12. press Prg once or more than once to exit the parameter setting
procedure and return to the standard display.
23
ENG
UltraCella +0300083EN - rel. 2.2 - 06.02.2018
Note: in the parameters or set point modification procedures, the
new value is saved every time the Set key is pressed.
Note: if no key is pressed, after about 120 s the control
automatically returns to standard display.
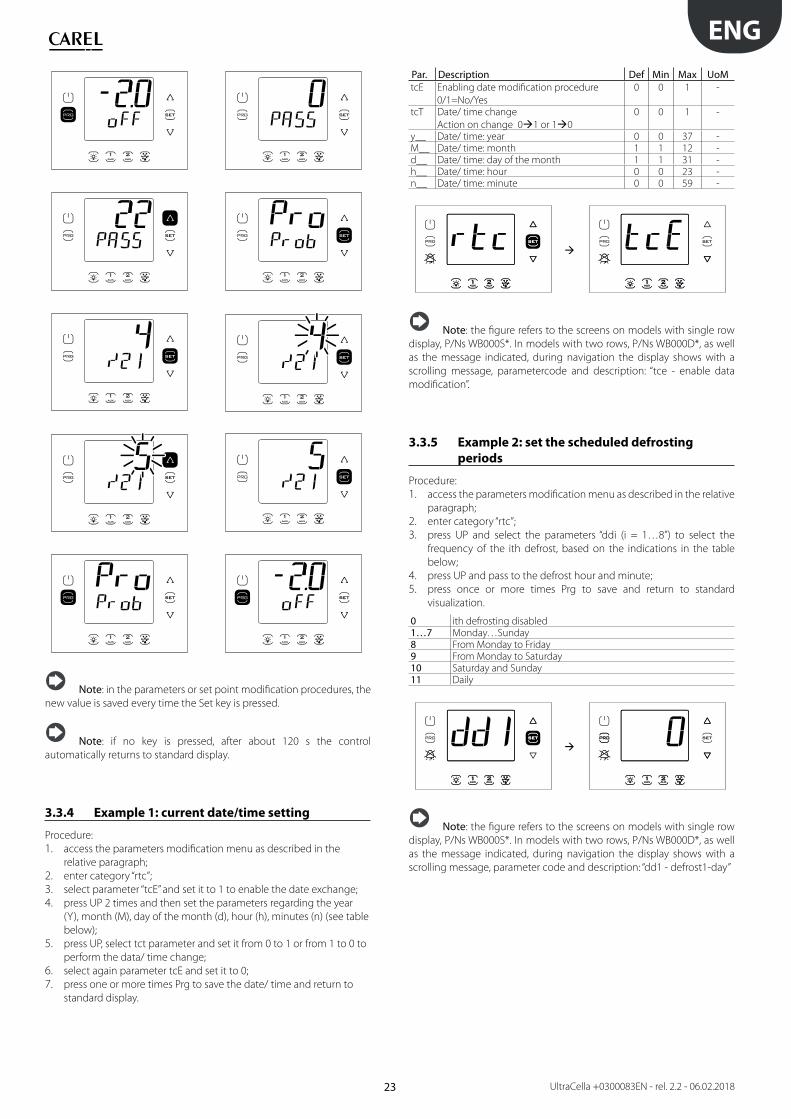
3.3.4 Example 1: current date/time setting
Procedure:
1. access the parameters modification menu as described in the
relative paragraph;
2. enter category “rtc”;
3. select parameter “tcE” and set it to 1 to enable the date exchange;
4. press UP 2 times and then set the parameters regarding the year
(Y), month (M), day of the month (d), hour (h), minutes (n) (see table
below);
5. press UP, select tct parameter and set it from 0 to 1 or from 1 to 0 to
perform the data/ time change;
6. select again parameter tcE and set it to 0;
7. press one or more times Prg to save the date/ time and return to
standard display.
Par. Description Def Min Max UoMtcE Enabling date modification procedure
0/1=No/Yes
0 0 1 -
tcT Date/ time change
Action on change 0 1 or 1 0
0 0 1 -
y__ Date/ time: year 0 0 37 -M__ Date/ time: month 1 1 12 -d__ Date/ time: day of the month 1 1 31 -h__ Date/ time: hour 0 0 23 -n__ Date/ time: minute 0 0 59 -
1 21 2 1 21 2
Note: the figure refers to the screens on models with single row
display, P/Ns WB000S*. In models with two rows, P/Ns WB000D*, as well
as the message indicated, during navigation the display shows with a
scrolling message, parametercode and description: “tce - enable data
modification”.
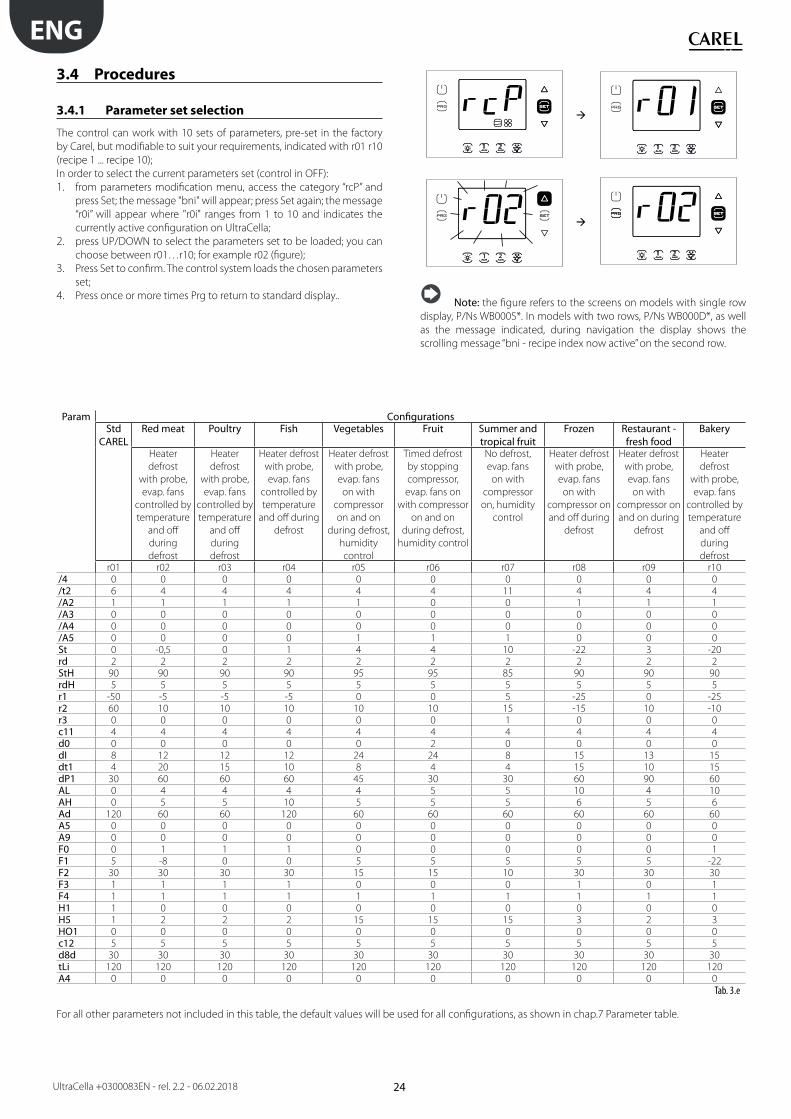
3.3.5 Example 2: set the scheduled defrosting
periods
Procedure:
1. access the parameters modification menu as described in the relative
paragraph;
2. enter category “rtc”;
3. press UP and select the parameters “ddi (i = 1…8”) to select the
frequency of the ith defrost, based on the indications in the table
below;
4. press UP and pass to the defrost hour and minute;
5. press once or more times Prg to save and return to standard
visualization.
0 ith defrosting disabled1…7 Monday…Sunday8 From Monday to Friday9 From Monday to Saturday10 Saturday and Sunday11 Daily
1 21 2 1 21 2
Note: the figure refers to the screens on models with single row
display, P/Ns WB000S*. In models with two rows, P/Ns WB000D*, as well
as the message indicated, during navigation the display shows with a
scrolling message, parameter code and description: “dd1 - defrost1-day”
24
ENG
UltraCella +0300083EN - rel. 2.2 - 06.02.2018
3.4 Procedures
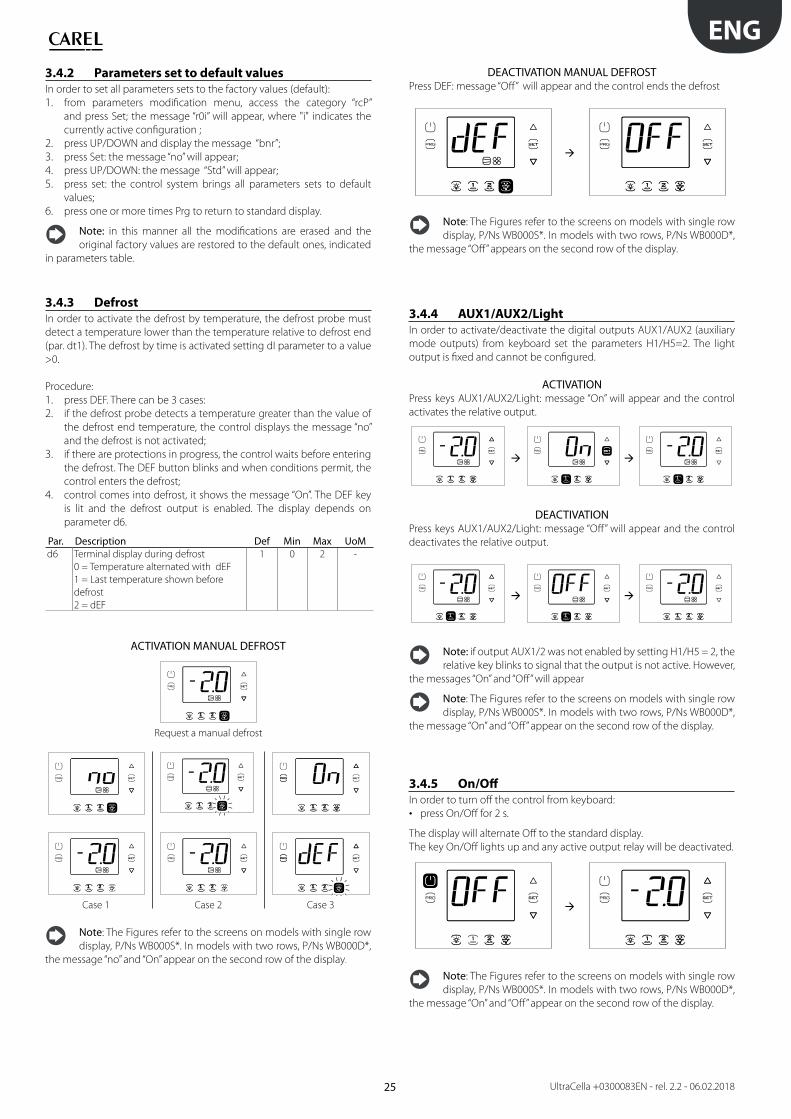
3.4.1 Parameter set selection
The control can work with 10 sets of parameters, pre-set in the factory
by Carel, but modifiable to suit your requirements, indicated with r01 r10
(recipe 1 ... recipe 10);
In order to select the current parameters set (control in OFF):
1. from parameters modification menu, access the category “rcP” and
press Set; the message "bni" will appear; press Set again; the message
“r0i” will appear where "r0i" ranges from 1 to 10 and indicates the
currently active configuration on UltraCella;
2. press UP/DOWN to select the parameters set to be loaded; you can
choose between r01…r10; for example r02 (figure);
3. Press Set to confirm. The control system loads the chosen parameters
set;
4. Press once or more times Prg to return to standard display..
1 21 2 1 21 2
1 2 1 21 2
Note: the figure refers to the screens on models with single row
display, P/Ns WB000S*. In models with two rows, P/Ns WB000D*, as well
as the message indicated, during navigation the display shows the
scrolling message “bni - recipe index now active” on the second row.
Param ConfigurationsStd
CARELRed meat Poultry Fish Vegetables Fruit Summer and
tropical fruitFrozen Restaurant -
fresh foodBakery
Heater
defrost
with probe,
evap. fans
controlled by
temperature
and off
during
defrost
Heater
defrost
with probe,
evap. fans
controlled by
temperature
and off
during
defrost
Heater defrost
with probe,
evap. fans
controlled by
temperature
and off during
defrost
Heater defrost
with probe,
evap. fans
on with
compressor
on and on
during defrost,
humidity
control
Timed defrost
by stopping
compressor,
evap. fans on
with compressor
on and on
during defrost,
humidity control
No defrost,
evap. fans
on with
compressor
on, humidity
control
Heater defrost
with probe,
evap. fans
on with
compressor on
and off during
defrost
Heater defrost
with probe,
evap. fans
on with
compressor on
and on during
defrost
Heater
defrost
with probe,
evap. fans
controlled by
temperature
and off
during
defrostr01 r02 r03 r04 r05 r06 r07 r08 r09 r10
/4 0 0 0 0 0 0 0 0 0 0/t2 6 4 4 4 4 4 11 4 4 4/A2 1 1 1 1 1 0 0 1 1 1/A3 0 0 0 0 0 0 0 0 0 0/A4 0 0 0 0 0 0 0 0 0 0/A5 0 0 0 0 1 1 1 0 0 0St 0 -0,5 0 1 4 4 10 -22 3 -20rd 2 2 2 2 2 2 2 2 2 2StH 90 90 90 90 95 95 85 90 90 90rdH 5 5 5 5 5 5 5 5 5 5r1 -50 -5 -5 -5 0 0 5 -25 0 -25r2 60 10 10 10 10 10 15 -15 10 -10r3 0 0 0 0 0 0 1 0 0 0c11 4 4 4 4 4 4 4 4 4 4d0 0 0 0 0 0 2 0 0 0 0dI 8 12 12 12 24 24 8 15 13 15dt1 4 20 15 10 8 4 4 15 10 15dP1 30 60 60 60 45 30 30 60 90 60AL 0 4 4 4 4 5 5 10 4 10AH 0 5 5 10 5 5 5 6 5 6Ad 120 60 60 120 60 60 60 60 60 60A5 0 0 0 0 0 0 0 0 0 0A9 0 0 0 0 0 0 0 0 0 0F0 0 1 1 1 0 0 0 0 0 1F1 5 -8 0 0 5 5 5 5 5 -22F2 30 30 30 30 15 15 10 30 30 30F3 1 1 1 1 0 0 0 1 0 1F4 1 1 1 1 1 1 1 1 1 1H1 1 0 0 0 0 0 0 0 0 0H5 1 2 2 2 15 15 15 3 2 3HO1 0 0 0 0 0 0 0 0 0 0c12 5 5 5 5 5 5 5 5 5 5d8d 30 30 30 30 30 30 30 30 30 30tLi 120 120 120 120 120 120 120 120 120 120A4 0 0 0 0 0 0 0 0 0 0
Tab. 3.e
For all other parameters not included in this table, the default values will be used for all configurations, as shown in chap.7 Parameter table.
25
ENG
UltraCella +0300083EN - rel. 2.2 - 06.02.2018
DEACTIVATION MANUAL DEFROSTPress DEF: message “Off” will appear and the control ends the defrost
1 21 2 1 21 2
Note: The Figures refer to the screens on models with single row
display, P/Ns WB000S*. In models with two rows, P/Ns WB000D*,
the message “Off” appears on the second row of the display.
3.4.4 AUX1/AUX2/Light
In order to activate/deactivate the digital outputs AUX1/AUX2 (auxiliary
mode outputs) from keyboard set the parameters H1/H5=2. The light
output is fixed and cannot be configured.
ACTIVATIONPress keys AUX1/AUX2/Light: message “On” will appear and the control
activates the relative output.
1 21 2 1 221 1 221
DEACTIVATIONPress keys AUX1/AUX2/Light: message “Off” will appear and the control
deactivates the relative output.
1 21 2 1 221 1 21 2
Note: if output AUX1/2 was not enabled by setting H1/H5 = 2, the
relative key blinks to signal that the output is not active. However,
the messages “On” and “Off” will appear
Note: The Figures refer to the screens on models with single row
display, P/Ns WB000S*. In models with two rows, P/Ns WB000D*,
the message “On” and “Off” appear on the second row of the display.
3.4.5 On/Off
In order to turn off the control from keyboard:
• press On/Off for 2 s.
The display will alternate Off to the standard display.
The key On/Off lights up and any active output relay will be deactivated.
1 221 1 21 2
Note: The Figures refer to the screens on models with single row
display, P/Ns WB000S*. In models with two rows, P/Ns WB000D*,
the message “On” and “Off” appear on the second row of the display.
3.4.2 Parameters set to default values
In order to set all parameters sets to the factory values (default):
1. from parameters modification menu, access the category “rcP”
and press Set; the message “r0i” will appear, where "i" indicates the
currently active configuration ;
2. press UP/DOWN and display the message “bnr”;
3. press Set: the message “no” will appear;
4. press UP/DOWN: the message “Std” will appear;
5. press set: the control system brings all parameters sets to default
values;
6. press one or more times Prg to return to standard display.
Note: in this manner all the modifications are erased and the
original factory values are restored to the default ones, indicated
in parameters table.
3.4.3 Defrost
In order to activate the defrost by temperature, the defrost probe must
detect a temperature lower than the temperature relative to defrost end
(par. dt1). The defrost by time is activated setting dI parameter to a value
>0.
Procedure:
1. press DEF. There can be 3 cases:
2. if the defrost probe detects a temperature greater than the value of
the defrost end temperature, the control displays the message “no”
and the defrost is not activated;
3. if there are protections in progress, the control waits before entering
the defrost. The DEF button blinks and when conditions permit, the
control enters the defrost;
4. control comes into defrost, it shows the message “On”. The DEF key
is lit and the defrost output is enabled. The display depends on
parameter d6.
Par. Description Def Min Max UoMd6 Terminal display during defrost
0 = Temperature alternated with dEF
1 = Last temperature shown before
defrost
2 = dEF
1 0 2 -
ACTIVATION MANUAL DEFROST
1 21 2
Request a manual defrost
1 21 2 1 21 2 1 21 2
1 21 2 1 21 2 1 21 2
Case 1 Case 2 Case 3
Note: The Figures refer to the screens on models with single row
display, P/Ns WB000S*. In models with two rows, P/Ns WB000D*,
the message “no” and “On” appear on the second row of the display.
26
ENG
UltraCella +0300083EN - rel. 2.2 - 06.02.2018
In order to turn on the control from keyboard:
• press On/Off for 2 s.
“On” will appear on the display and then control returns to the standard
display. The output relay will be re-activated.
1 221 1 21 2
Note: The Figures refer to the screens on models with single row
display, P/Ns WB000S*. In models with two rows, P/Ns WB000D*,
the message “On” and “Off” appear on the second row of the display.
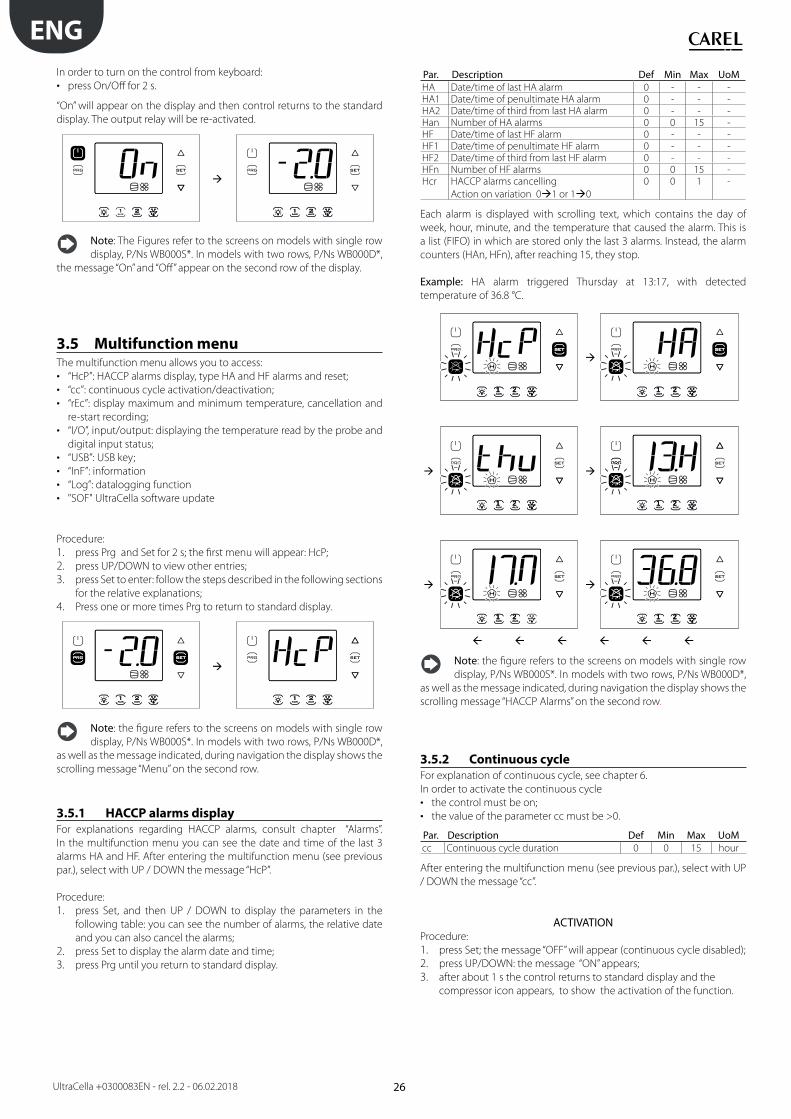
3.5 Multifunction menuThe multifunction menu allows you to access:
• “HcP”: HACCP alarms display, type HA and HF alarms and reset;
• “cc”: continuous cycle activation/deactivation;
• “rEc”: display maximum and minimum temperature, cancellation and
re-start recording;
• “I/O”, input/output: displaying the temperature read by the probe and
digital input status;
• “USB”: USB key;
• “InF”: information
• “Log”: datalogging function
• "SOF" UltraCella software update
Procedure:
1. press Prg and Set for 2 s; the first menu will appear: HcP;
2. press UP/DOWN to view other entries;
3. press Set to enter: follow the steps described in the following sections
for the relative explanations;
4. Press one or more times Prg to return to standard display.
1 21 2 1 21 2
Note: the figure refers to the screens on models with single row
display, P/Ns WB000S*. In models with two rows, P/Ns WB000D*,
as well as the message indicated, during navigation the display shows the
scrolling message “Menu” on the second row.
3.5.1 HACCP alarms display
For explanations regarding HACCP alarms, consult chapter “Alarms”.
In the multifunction menu you can see the date and time of the last 3
alarms HA and HF. After entering the multifunction menu (see previous
par.), select with UP / DOWN the message “HcP”.
Procedure:
1. press Set, and then UP / DOWN to display the parameters in the
following table: you can see the number of alarms, the relative date
and you can also cancel the alarms;
2. press Set to display the alarm date and time;
3. press Prg until you return to standard display.
Par. Description Def Min Max UoMHA Date/time of last HA alarm 0 - - -HA1 Date/time of penultimate HA alarm 0 - - -HA2 Date/time of third from last HA alarm 0 - - -Han Number of HA alarms 0 0 15 -HF Date/time of last HF alarm 0 - - -HF1 Date/time of penultimate HF alarm 0 - - -HF2 Date/time of third from last HF alarm 0 - - -HFn Number of HF alarms 0 0 15 -Hcr HACCP alarms cancelling
Action on variation 0 1 or 1 0
0 0 1 -
Each alarm is displayed with scrolling text, which contains the day of
week, hour, minute, and the temperature that caused the alarm. This is
a list (FIFO) in which are stored only the last 3 alarms. Instead, the alarm
counters (HAn, HFn), after reaching 15, they stop.
Example: HA alarm triggered Thursday at 13:17, with detected
temperature of 36.8 °C.
1 21 2 1 21 2
1 21 2 1 21 2
1 21 2 1 21 2
Note: the figure refers to the screens on models with single row
display, P/Ns WB000S*. In models with two rows, P/Ns WB000D*,
as well as the message indicated, during navigation the display shows the
scrolling message “HACCP Alarms” on the second row.
3.5.2 Continuous cycle
For explanation of continuous cycle, see chapter 6.
In order to activate the continuous cycle
• the control must be on;
• the value of the parameter cc must be >0.
Par. Description Def Min Max UoMcc Continuous cycle duration 0 0 15 hour
After entering the multifunction menu (see previous par.), select with UP
/ DOWN the message “cc”.
ACTIVATIONProcedure:
1. press Set; the message “OFF” will appear (continuous cycle disabled);
2. press UP/DOWN: the message “ON” appears;
3. after about 1 s the control returns to standard display and the
compressor icon appears, to show the activation of the function.
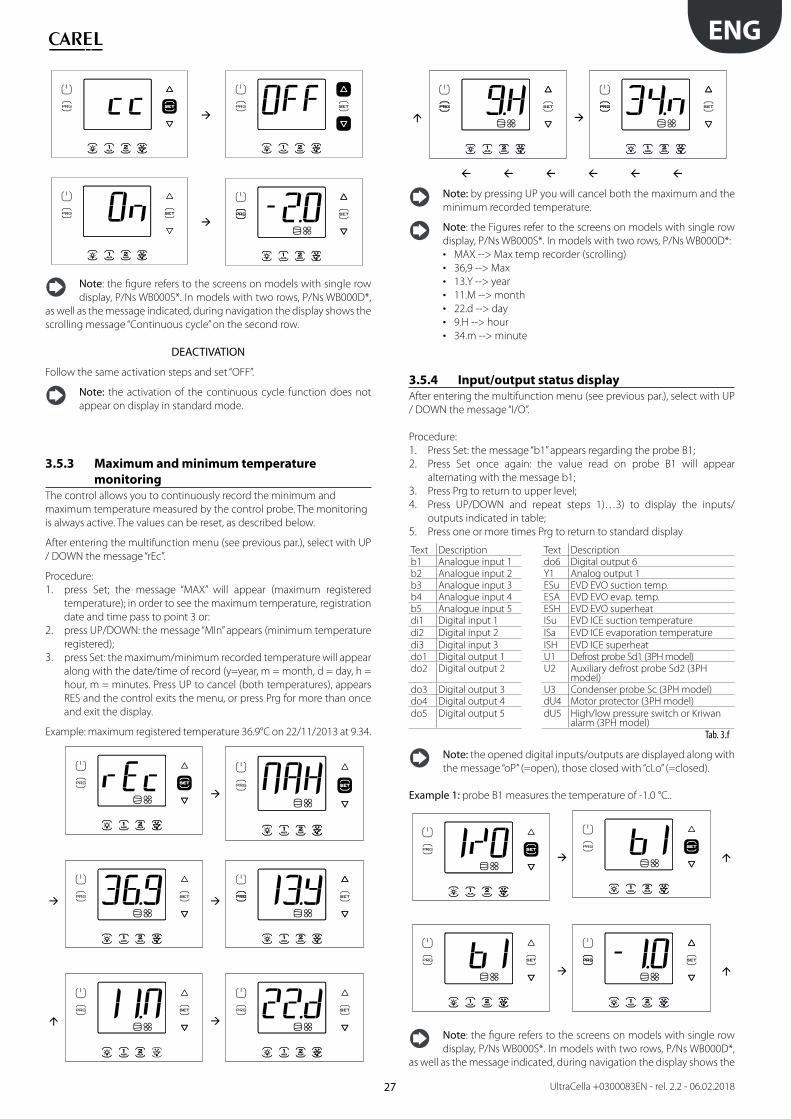
27
ENG
UltraCella +0300083EN - rel. 2.2 - 06.02.2018
1 21 2 1 21 2
1 21 2 1 21 2
Note: the figure refers to the screens on models with single row
display, P/Ns WB000S*. In models with two rows, P/Ns WB000D*,
as well as the message indicated, during navigation the display shows the
scrolling message “Continuous cycle” on the second row.
DEACTIVATION
Follow the same activation steps and set “OFF”.
Note: the activation of the continuous cycle function does not
appear on display in standard mode.
3.5.3 Maximum and minimum temperature
monitoring
The control allows you to continuously record the minimum and
maximum temperature measured by the control probe. The monitoring
is always active. The values can be reset, as described below.
After entering the multifunction menu (see previous par.), select with UP
/ DOWN the message “rEc”.
Procedure:
1. press Set; the message “MAX” will appear (maximum registered
temperature); in order to see the maximum temperature, registration
date and time pass to point 3 or:
2. press UP/DOWN: the message “MIn” appears (minimum temperature
registered);
3. press Set: the maximum/minimum recorded temperature will appear
along with the date/time of record (y=year, m = month, d = day, h =
hour, m = minutes. Press UP to cancel (both temperatures), appears
RES and the control exits the menu, or press Prg for more than once
and exit the display.
Example: maximum registered temperature 36.9°C on 22/11/2013 at 9.34.
1 21 21 21 2
1 21 2 1 21 2
1 21 2 1 21 2
1 21 2 1 21 2
Note: by pressing UP you will cancel both the maximum and the
minimum recorded temperature.
Note: the Figures refer to the screens on models with single row
display, P/Ns WB000S*. In models with two rows, P/Ns WB000D*:
• MAX --> Max temp recorder (scrolling)
• 36,9 --> Max
• 13.Y --> year
• 11.M --> month
• 22.d --> day
• 9.H --> hour
• 34.m --> minute
3.5.4 Input/output status display
After entering the multifunction menu (see previous par.), select with UP
/ DOWN the message “I/O”.
Procedure:
1. Press Set: the message “b1” appears regarding the probe B1;
2. Press Set once again: the value read on probe B1 will appear
alternating with the message b1;
3. Press Prg to return to upper level;
4. Press UP/DOWN and repeat steps 1)…3) to display the inputs/
outputs indicated in table;
5. Press one or more times Prg to return to standard display
Text Description Text Descriptionb1 Analogue input 1 do6 Digital output 6b2 Analogue input 2 Y1 Analog output 1b3 Analogue input 3 ESu EVD EVO suction temp.b4 Analogue input 4 ESA EVD EVO evap. temp.b5 Analogue input 5 ESH EVD EVO superheatdi1 Digital input 1 ISu EVD ICE suction temperature
di2 Digital input 2 ISa EVD ICE evaporation temperature
di3 Digital input 3 ISH EVD ICE superheatdo1 Digital output 1 U1 Defrost probe Sd1 (3PH model)do2 Digital output 2 U2 Auxiliary defrost probe Sd2 (3PH
model)do3 Digital output 3 U3 Condenser probe Sc (3PH model)do4 Digital output 4 dU4 Motor protector (3PH model)
do5 Digital output 5 dU5 High/low pressure switch or Kriwan alarm (3PH model)
Tab. 3.f
Note: the opened digital inputs/outputs are displayed along with
the message “oP” (=open), those closed with “cLo” (=closed).
Example 1: probe B1 measures the temperature of -1.0 °C..
1 21 2 1 21 2
1 21 2 1 21 2
Note: the figure refers to the screens on models with single row
display, P/Ns WB000S*. In models with two rows, P/Ns WB000D*,
as well as the message indicated, during navigation the display shows the

28
ENG
UltraCella +0300083EN - rel. 2.2 - 06.02.2018
scrolling message “Probe1 status” on the second row “.
Example 2: digital input 1 is closed.
1 21 2 1 21 2 1 21 2
Note: the figure refers to the screens on models with single row
display, P/Ns WB000S*. In models with two rows, P/Ns WB000D*,
as well as the message indicated, during navigation the display shows the
scrolling message “Digital input 1 status” on the second row.
3.5.5 USB memory key
Parameters upload/download
Preliminary operations:
1. remove the lower frame and insert the USB memory key;
2. set the control to OFF.
12
12
USB key
Fig. 3.d
After entering the multifunction menu (see previous par.), select with UP
/ DOWN the message “USb”.
Procedure:
Press Set: the following commands will appear by scrolling UP/DOWN:
• rcP: press Set to confirm;
• EXt: press Set to exit;
• dnL: press Set, the control saves inside the key the 10 parameters set:
r01…r10;
• uPd: press Set, the control loads from the key the 10 parameters set:
r01…r10;
Note
• the parameters are saved in a text file type. txt, which can be viewed
on the computer;
• for information regarding the switching of the LEDs, see chapter 2.10.
1 21 2 1 21 2
1 21 2 1 21 2
1 21 2
Note: the figures refer to the screens on models with single row
display, P/Ns WB000S*. In models with two rows, P/Ns WB000D*,
as well as the message indicated, during navigation the display shows the
scrolling message “recipes in USB device” on the second row
Note: the download and upload operations, as well as the 10 lists
of parameters, also copy all the other parameters (one value only
for all 10 lists).
Download saved alarms
Starting from software release 1.5, the last 64 alarms activated and saved
on UltraCella can be downloaded to a USB flash drive, in order from the
most recent to the oldest, in csv format. When the 64th alarm is saved, the
next one will overwrite the oldest.
Alarms that have been saved and are no longer active can only be
displayed on the UltraCella Service terminal, but can be downloaded
both from the terminal and the LED interface.
• Alarm log file name: AlarmLog.csv
1. remove the bottom frame and plug in the USB flash drive. The red
and green LEDs on the side of the key will come on individually in
sequence to indicate that the unit recognises the USB flash drive;
2. press Prg and Set for 2 sec; the first menu is displayed: “HcP”;
3. press UP 4 times until reaching the “USB” menu item;
4. press Set; the first submenu is shown: “rcP”;
5. press UP to access the “ALG” submenu;.
1 2
6. press SET to confirm the download of the saved alarms. The message
“ALG” will flash during the download procedure; at the end, “ALG” will
stop flashing and the green LED next to the USB port will come on,
indicating the end of the procedure; if for some reason the procedure
is not successful, the alarm icon will be shown on the display;
7. unplug the key; to exit the “ALG” menu, press PRG twice.
Note: If for some reason the procedure is not successful, when
exiting the menu, as well as the alarm icon on the display, the
error message “ALM” will be displayed. The error message will be cleared
the next time the alarms are downloaded successfully or when restarting
the controller.
Example: alarms saved starting 2 April 2014 at 10:30:00. The alarm log was
downloaded to the USB flash drive at 16:22:45 on the same day.
Start -> alarm activated
Stop -> alarm reset
TIME ID NAME EVENT VAR1 VAR22014-04-02 T10:30:00+00:00 11 ALARM_Ed1.Active Start2014-04-02 T16:22:45+00:00 11 ALARM_Ed1.Active Stop

29
ENG
UltraCella +0300083EN - rel. 2.2 - 06.02.2018
3.5.6 Information
In the information menu you can view the software release.
After entering the multifunction menu (see chapter 3.4), select with UP /
DOWN the message “InF”.
1 2 1 2 1 2
Fig. 3.e
Procedure:
1. press Set: the message “vEr” appears regarding the software revision;
2. press Set once again: the software revision will appear (e.g. 1.7);
3. press one or more times Prg to return to standard display .
Note: the figure refers to the screens on models with single row
display, P/Ns WB000S*. In models with two rows, P/Ns WB000D*,
as well as the message indicated, during navigation the display shows the
scrolling message “Application version” on the second row
3.5.7 Data logging function
UltraCella introduces the data logging function to cold room control,
offering the possibility to record the temperature or the humidity read
by two probes.
How to download the file with variables recorded by UltraCella:
1. remove the bottom frame and insert the USB flash drive. The red and
green LEDs next to the flash drive will come on once in sequence to
indicate the that unit has recognised the USB flash drive;
2. press Prg and Set for 2 s; the first menu will be displayed: “HcP”
3. press UP or DOWN until reaching the “LoG” menu item;
4. press SET to confirm the download of the recorded variables (log file) to
the USB flash drive. The message “LoG” will flash during downloading;
at the end, “LoG” will stop flashing to indicate that the download has
been completed; if the procedure fails for some reason, the alarm icon
will be shown on the display;
5. remove the flash drive; to exit the “LoG” menu, press PRG and/or SET.
1 2
Note: the figure refers to the screens on models with single row
display, P/Ns WB000S*. In models with two rows, P/Ns WB000D*,
as well as the message indicated, during navigation the display shows the
scrolling message “recorder” on the second row.
Note: if the procedure fails for some reason, when exiting the
menu, as well as the alarm icon the error message “LoG” will
also be shown on the display.
The message error will be cleared after the next correct download or
when restarting the controller.
When the probes to be recorded are suitably configured through the
parameters tr1 and tr2 and the sample time through the parameter trc,
the unit starts recording the variables every trc minutes (sample time) for
a maximum period of 2 years each. After the second year, the controller
overwrites the oldest data saved.
The variables log is available as a csv file via USB flash drive, which can be
analysed in Excel or other widely-available programs.
USB key
Fig. 3.f
To activate the data logging function, the probe/probes to be recorded
must be configured (up to max 2) through the parameters tr1 and tr2.
The sample time (for both the variables) is selectable between 2 and 60
minuts (default 5).
Par. Description Def Min Max UoM
tr1
First temperature to be
recorded selection
0 = no log
1 = Sv
2 = Sm (sonda letta da B1)
3 = Sr
4 = Sd1
5 = Sd2
6 = Sc
7 = SA
8 = Su (humidity probe)
0 0 8 -
tr2 Second temperature to be
recorded selection
0 = no log
1 = Sv
2 = Sm (sonda letta da B1)
3 = Sr
4 = Sd1
5 = Sd2
6 = Sc
7 = SA
8 = Su (humidity probe)
0 0 8 -
trc Sample time temperature
recording
5 2 60 min
• Channels recorded: two probes selected through tr1 and tr2
parameters
• Start logging: as soon as parameter tr1/tr2 is set to a value >0. The
instant the setting is confirmed is recorded in the log under event
name “Start”
• Sample time: trc (minutes) for both the variables
• Data logging duration: depends on the sampling time trc and the
maximum number of samples Nrec that UltraCella can record (209000),
based on the following formula:
Data logging duration = Nrec * trc
Sampling time (trc) Data logging duration2 min 290 days5 min 726 days (around 2 years)10 min 1451 days (around 4 years)30 min 4353 days (around 8 years)60 min 8708 days (around 24 years)
• Data extraction: any USB flash drive available on the market can be
used
• Extracted log file names: Log_UltraCella_1.csv for the first variable
selected through the parameter tr1, Log_UltraCella_2.csv for the
second variable selected through the parameter tr2
• Other events: as well as the “Start” event, the log also records “Stop”
events (tr1=0 or tr2=0) and “Boot” (starting or restarting the controller)
• Log data format: the data is organised in columns: date (in standard
ISO 8601 format) , type of event, value of the variable specify as Src1
(first variable) and Src2 (second variable)

30
ENG
UltraCella +0300083EN - rel. 2.2 - 06.02.2018
Example: recording temperature probe Sv started on 2 April 2014 at
17:19:49. The data were extracted by USB flash drive at 18:10 on the same
day.
TIME EVENT Sv_Probe2014-04-02T17:19:49+00:00 Boot 02014-04-02T17:24:49+00:00 25,22014-04-02T17:29:49+00:00 25,02014-04-02T17:34:49+00:00 24,62014-04-02T17:39:49+00:00 24,12014-04-02T17:44:49+00:00 21,92014-04-02T17:49:49+00:00 18,82014-04-02T17:54:49+00:00 15,12014-04-02T17:59:49+00:00 12,72014-04-02T18:04:49+00:00 10,12014-04-02T18:09:49+00:00 7,3
Tab. 3.g
3.5.8 UltraCella software update from LED display
interface
Starting from software release 1.5, the UltraCella software can also be
updated from the LED interface, as well as from the UltraCella Service
terminal.
The upgrade.ap1 file needed to perform the update from the UltraCella
LED interface must only be supplied by CAREL personnel.
1. Create an “upgrade” folder in the main directory on the USB flash
drive. Copy the upgrade.ap1 file to the new folder;
2. remove the bottom frame and plug in the USB flash drive. The red
and green LEDs on the side of the key will come on individually in
sequence to indicate that the unit recognises the USB flash drive;
3. press Prg and Set for 2 sec; the first menu is displayed: “HcP”;
4. press UP or DOWN until reaching the “SOF” menu item;
5. press SET to confirm the software update. The message “SOF” will
flash during the update; at the end, “SOF” will stop flashing, indicating
the end of the procedure; if for some reason the procedure is not
successful, the alarm icon will be shown on the display;
6. unplug the key; to exit the “SOF” menu, press PRG and/or SET
1 2
Note: The figure refers to navigation on models with single-row
display, WB000S%. On models with double row display, WB000D%, as well
as the message described above, during the update the message
“Software update” also scrolls on the second row.
Note: If for some reason the procedure is not successful, when
exiting the menu, as well as the alarm icon on the display, the error
message “SOF” will be displayed. In this case UltraCella retains the
previously installed software. The error message will be cleared the next
time the software is updated successfully or when restarting the
controller.
3.6 Message language selectionThe only messages that change according to the selected language are
those shown on the UltraCella Service terminal screens (PGDEWB0FZ*).
Selecting the language
1. On the UltraCella Service terminal, access the multifunction menu by
pressing the UP button;
2. The HACCP icon is displayed. Press UP or DOWN until reaching the “i”
icon (information);
3. Press SET to access the language setting;
4. Select the desired language (in software release 1.6, the languages
available are Italian, English, German, French and Spanish) by
pressing UP or DOWN. Press SET to confirm. The change is effective
immediately;
5. Press ESC twice to exit the language selection menu and return to
the main screen
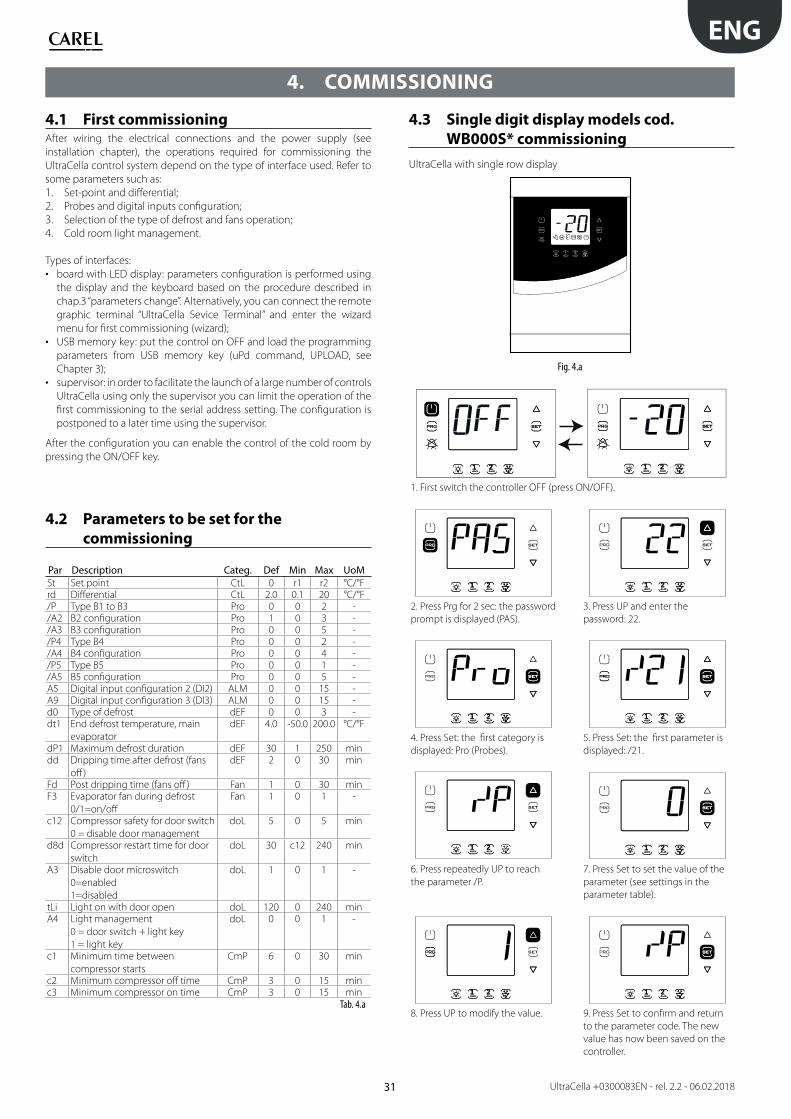
31
ENG
UltraCella +0300083EN - rel. 2.2 - 06.02.2018
4. COMMISSIONING
4.1 First commissioningAfter wiring the electrical connections and the power supply (see
installation chapter), the operations required for commissioning the
UltraCella control system depend on the type of interface used. Refer to
some parameters such as:
1. Set-point and differential;
2. Probes and digital inputs configuration;
3. Selection of the type of defrost and fans operation;
4. Cold room light management.
Types of interfaces:
• board with LED display: parameters configuration is performed using
the display and the keyboard based on the procedure described in
chap.3 “parameters change”. Alternatively, you can connect the remote
graphic terminal “UltraCella Sevice Terminal” and enter the wizard
menu for first commissioning (wizard);
• USB memory key: put the control on OFF and load the programming
parameters from USB memory key (uPd command, UPLOAD, see
Chapter 3);
• supervisor: in order to facilitate the launch of a large number of controls
UltraCella using only the supervisor you can limit the operation of the
first commissioning to the serial address setting. The configuration is
postponed to a later time using the supervisor.
After the configuration you can enable the control of the cold room by
pressing the ON/OFF key.
4.2 Parameters to be set for the
commissioning
Par Description Categ. Def Min Max UoMSt Set point CtL 0 r1 r2 °C/°Frd Differential CtL 2.0 0.1 20 °C/°F/P Type B1 to B3 Pro 0 0 2 -/A2 B2 configuration Pro 1 0 3 -/A3 B3 configuration Pro 0 0 5 -/P4 Type B4 Pro 0 0 2 -/A4 B4 configuration Pro 0 0 4 -/P5 Type B5 Pro 0 0 1 -/A5 B5 configuration Pro 0 0 5 -A5 Digital input configuration 2 (DI2) ALM 0 0 15 -A9 Digital input configuration 3 (DI3) ALM 0 0 15 -d0 Type of defrost dEF 0 0 3 -dt1 End defrost temperature, main
evaporator
dEF 4.0 -50.0 200.0 °C/°F
dP1 Maximum defrost duration dEF 30 1 250 mindd Dripping time after defrost (fans
off )
dEF 2 0 30 min
Fd Post dripping time (fans off ) Fan 1 0 30 minF3 Evaporator fan during defrost
0/1=on/off
Fan 1 0 1 -
c12 Compressor safety for door switch
0 = disable door management
doL 5 0 5 min
d8d Compressor restart time for door
switch
doL 30 c12 240 min
A3 Disable door microswitch
0=enabled
1=disabled
doL 1 0 1 -
tLi Light on with door open doL 120 0 240 minA4 Light management
0 = door switch + light key
1 = light key
doL 0 0 1 -
c1 Minimum time between
compressor starts
CmP 6 0 30 min
c2 Minimum compressor off time CmP 3 0 15 minc3 Minimum compressor on time CmP 3 0 15 min
Tab. 4.a
4.3 Single digit display models cod.
WB000S* commissioning
UltraCella with single row display
Fig. 4.a
1 21 2 1 21 2
1. First switch the controller OFF (press ON/OFF).
1 21 2 1 21 2
2. Press Prg for 2 sec: the password
prompt is displayed (PAS).
3. Press UP and enter the
password: 22.
1 21 2 1 21 2
4. Press Set: the first category is
displayed: Pro (Probes).
5. Press Set: the first parameter is
displayed: /21.
1 21 2 1 21 2
6. Press repeatedly UP to reach
the parameter /P.
7. Press Set to set the value of the
parameter (see settings in the
parameter table).
1 21 2 1 21 2
8. Press UP to modify the value. 9. Press Set to confirm and return
to the parameter code. The new
value has now been saved on the
controller.
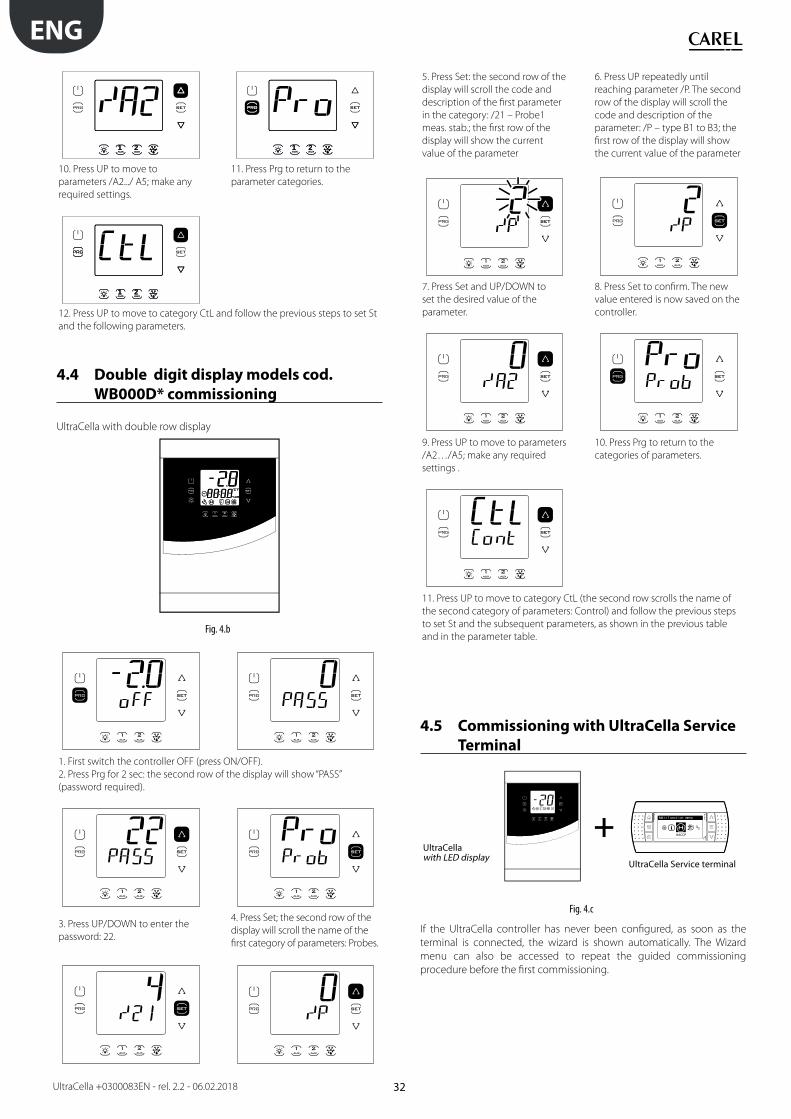
32
ENG
UltraCella +0300083EN - rel. 2.2 - 06.02.2018
1 21 2 1 21 2
10. Press UP to move to
parameters /A2.../ A5; make any
required settings.
11. Press Prg to return to the
parameter categories.
1 21 2
12. Press UP to move to category CtL and follow the previous steps to set St
and the following parameters.
4.4 Double digit display models cod.
WB000D* commissioning
UltraCella with double row display
Fig. 4.b
1. First switch the controller OFF (press ON/OFF).
2. Press Prg for 2 sec: the second row of the display will show “PASS”
(password required).
3. Press UP/DOWN to enter the
password: 22.
4. Press Set; the second row of the
display will scroll the name of the
first category of parameters: Probes.
5. Press Set: the second row of the
display will scroll the code and
description of the first parameter
in the category: /21 – Probe1
meas. stab.; the first row of the
display will show the current
value of the parameter
6. Press UP repeatedly until
reaching parameter /P. The second
row of the display will scroll the
code and description of the
parameter: /P – type B1 to B3; the
first row of the display will show
the current value of the parameter
7. Press Set and UP/DOWN to
set the desired value of the
parameter.
8. Press Set to confirm. The new
value entered is now saved on the
controller.
9. Press UP to move to parameters
/A2…/A5; make any required
settings .
10. Press Prg to return to the
categories of parameters.
11. Press UP to move to category CtL (the second row scrolls the name of
the second category of parameters: Control) and follow the previous steps
to set St and the subsequent parameters, as shown in the previous table
and in the parameter table.
4.5 Commissioning with UltraCella Service
Terminal
+UltraCella Service terminal
SETPRG
ESC
MENU
HELP Multifunction menu
HACCP
UltraCellawith LED display
Fig. 4.c
If the UltraCella controller has never been configured, as soon as the
terminal is connected, the wizard is shown automatically. The Wizard
menu can also be accessed to repeat the guided commissioning
procedure before the first commissioning.
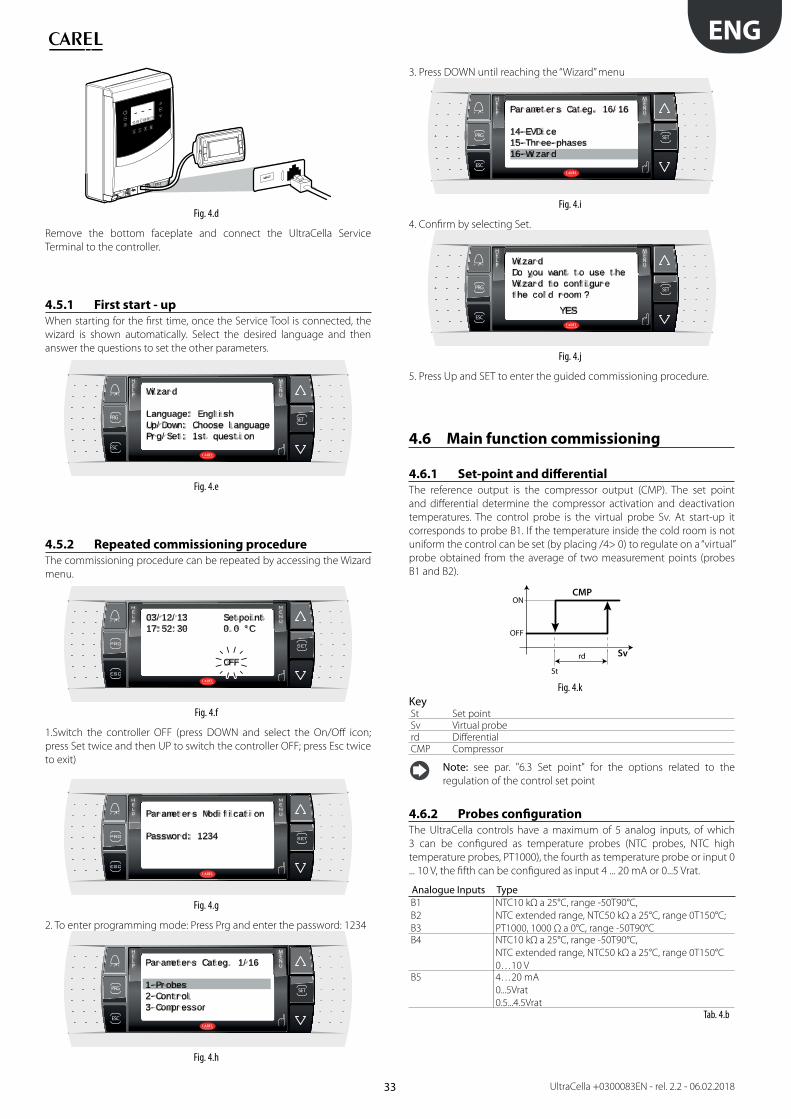
33
ENG
UltraCella +0300083EN - rel. 2.2 - 06.02.2018
12
12
Fig. 4.d
Remove the bottom faceplate and connect the UltraCella Service
Terminal to the controller.
4.5.1 First start - up
When starting for the first time, once the Service Tool is connected, the
wizard is shown automatically. Select the desired language and then
answer the questions to set the other parameters.
SETPRG
ESC
MENU
HELP Wizard
Language: EnglishUp/Down: Choose languagePrg/Set: 1st question
Fig. 4.e
4.5.2 Repeated commissioning procedure
The commissioning procedure can be repeated by accessing the Wizard
menu.
SETPRG
ESC
MENU
HELP 03/12/13 Setpoint
17:52:30 0.0 °C
OFF
Fig. 4.f
1.Switch the controller OFF (press DOWN and select the On/Off icon;
press Set twice and then UP to switch the controller OFF; press Esc twice
to exit)
SETPRG
ESC
MENU
HELP Parameters Modification
Password: 1234
Fig. 4.g
2. To enter programming mode: Press Prg and enter the password: 1234
SETPRG
ESC
MENU
HELP Parameters Categ. 1/16
1-Probes2-Control3-Compressor
Fig. 4.h
3. Press DOWN until reaching the “Wizard” menu
SETPRG
ESC
MENU
HELP Parameters Categ. 16/16
14-EVDice15-Three-phases16-Wizard
Fig. 4.i
4. Confirm by selecting Set.
SETPRG
ESC
MENU
HELP
YES
WizardDo you want to use theWizard to configurethe cold room ?
Fig. 4.j
5. Press Up and SET to enter the guided commissioning procedure.
4.6 Main function commissioning
4.6.1 Set-point and differential
The reference output is the compressor output (CMP). The set point
and differential determine the compressor activation and deactivation
temperatures. The control probe is the virtual probe Sv. At start-up it
corresponds to probe B1. If the temperature inside the cold room is not
uniform the control can be set (by placing /4> 0) to regulate on a “virtual”
probe obtained from the average of two measurement points (probes
B1 and B2).
Sv
CMP
St
rd
OFF
ON
Fig. 4.k
KeySt Set pointSv Virtual proberd DifferentialCMP Compressor
Note: see par. "6.3 Set point" for the options related to the
regulation of the control set point
4.6.2 Probes configuration
The UltraCella controls have a maximum of 5 analog inputs, of which
3 can be configured as temperature probes (NTC probes, NTC high
temperature probes, PT1000), the fourth as temperature probe or input 0
... 10 V, the fifth can be configured as input 4 ... 20 mA or 0...5 Vrat.
Analogue Inputs TypeB1
B2
B3
NTC10 kΩ a 25°C, range -50T90°C,
NTC extended range, NTC50 kΩ a 25°C, range 0T150°C;
PT1000, 1000 Ω a 0°C, range -50T90°CB4 NTC10 kΩ a 25°C, range -50T90°C,
NTC extended range, NTC50 kΩ a 25°C, range 0T150°C
0…10 VB5 4…20 mA
0...5Vrat
0.5...4.5Vrat
Tab. 4.b
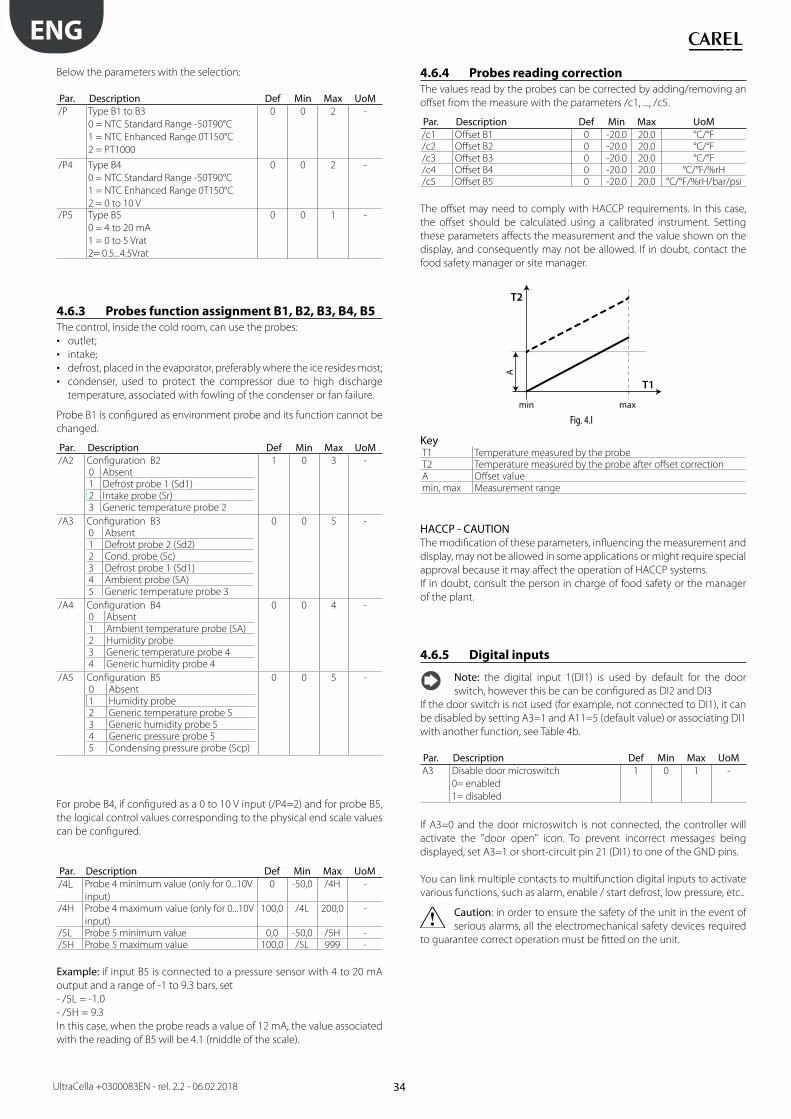
34
ENG
UltraCella +0300083EN - rel. 2.2 - 06.02.2018
Below the parameters with the selection:
Par. Description Def Min Max UoM/P Type B1 to B3
0 = NTC Standard Range -50T90°C
1 = NTC Enhanced Range 0T150°C
2 = PT1000
0 0 2 -
/P4 Type B4
0 = NTC Standard Range -50T90°C
1 = NTC Enhanced Range 0T150°C
2 = 0 to 10 V
0 0 2 -
/P5 Type B5
0 = 4 to 20 mA
1 = 0 to 5 Vrat
2= 0.5...4.5Vrat
0 0 1 -
4.6.3 Probes function assignment B1, B2, B3, B4, B5
The control, inside the cold room, can use the probes:
• outlet;
• intake;
• defrost, placed in the evaporator, preferably where the ice resides most;
• condenser, used to protect the compressor due to high discharge
temperature, associated with fowling of the condenser or fan failure.
Probe B1 is configured as environment probe and its function cannot be
changed.
Par. Description Def Min Max UoM/A2 Configuration B2
0 Absent1 Defrost probe 1 (Sd1)2 Intake probe (Sr)3 Generic temperature probe 2
1 0 3 -
/A3 Configuration B30 Absent1 Defrost probe 2 (Sd2)2 Cond. probe (Sc)3 Defrost probe 1 (Sd1)4 Ambient probe (SA)5 Generic temperature probe 3
0 0 5 -
/A4 Configuration B40 Absent1 Ambient temperature probe (SA)2 Humidity probe3 Generic temperature probe 44 Generic humidity probe 4
0 0 4 -
/A5 Configuration B50 Absent1 Humidity probe2 Generic temperature probe 53 Generic humidity probe 54 Generic pressure probe 55 Condensing pressure probe (Scp)
0 0 5 -
For probe B4, if configured as a 0 to 10 V input (/P4=2) and for probe B5,
the logical control values corresponding to the physical end scale values
can be configured.
Par. Description Def Min Max UoM/4L Probe 4 minimum value (only for 0...10V
input)
0 -50,0 /4H -
/4H Probe 4 maximum value (only for 0...10V
input)
100,0 /4L 200,0 -
/5L Probe 5 minimum value 0,0 -50,0 /5H -/5H Probe 5 maximum value 100,0 /5L 999 -
Example: if input B5 is connected to a pressure sensor with 4 to 20 mA
output and a range of -1 to 9.3 bars, set
- /5L = -1.0
- /5H = 9.3
In this case, when the probe reads a value of 12 mA, the value associated
with the reading of B5 will be 4.1 (middle of the scale).
4.6.4 Probes reading correction
The values read by the probes can be corrected by adding/removing an
offset from the measure with the parameters /c1, ..., /c5.
Par. Description Def Min Max UoM/c1 Offset B1 0 -20.0 20.0 °C/°F/c2 Offset B2 0 -20.0 20.0 °C/°F/c3 Offset B3 0 -20.0 20.0 °C/°F/c4 Offset B4 0 -20.0 20.0 °C/°F/%rH/c5 Offset B5 0 -20.0 20.0 °C/°F/%rH/bar/psi
The offset may need to comply with HACCP requirements. In this case,
the offset should be calculated using a calibrated instrument. Setting
these parameters affects the measurement and the value shown on the
display, and consequently may not be allowed. If in doubt, contact the
food safety manager or site manager.
T1
T2
min max
A
Fig. 4.l
KeyT1 Temperature measured by the probeT2 Temperature measured by the probe after offset correctionA Offset valuemin, max Measurement range
HACCP - CAUTIONThe modification of these parameters, influencing the measurement and
display, may not be allowed in some applications or might require special
approval because it may affect the operation of HACCP systems.
If in doubt, consult the person in charge of food safety or the manager
of the plant.
4.6.5 Digital inputs
Note: the digital input 1(DI1) is used by default for the door
switch, however this be can be configured as DI2 and DI3
If the door switch is not used (for example, not connected to DI1), it can
be disabled by setting A3=1 and A11=5 (default value) or associating DI1
with another function, see Table 4b.
Par. Description Def Min Max UoMA3 Disable door microswitch
0= enabled
1= disabled
1 0 1 -
If A3=0 and the door microswitch is not connected, the controller will
activate the "door open" icon. To prevent incorrect messages being
displayed, set A3=1 or short-circuit pin 21 (DI1) to one of the GND pins.
You can link multiple contacts to multifunction digital inputs to activate
various functions, such as alarm, enable / start defrost, low pressure, etc..
Caution: in order to ensure the safety of the unit in the event of
serious alarms, all the electromechanical safety devices required
to guarantee correct operation must be fitted on the unit.
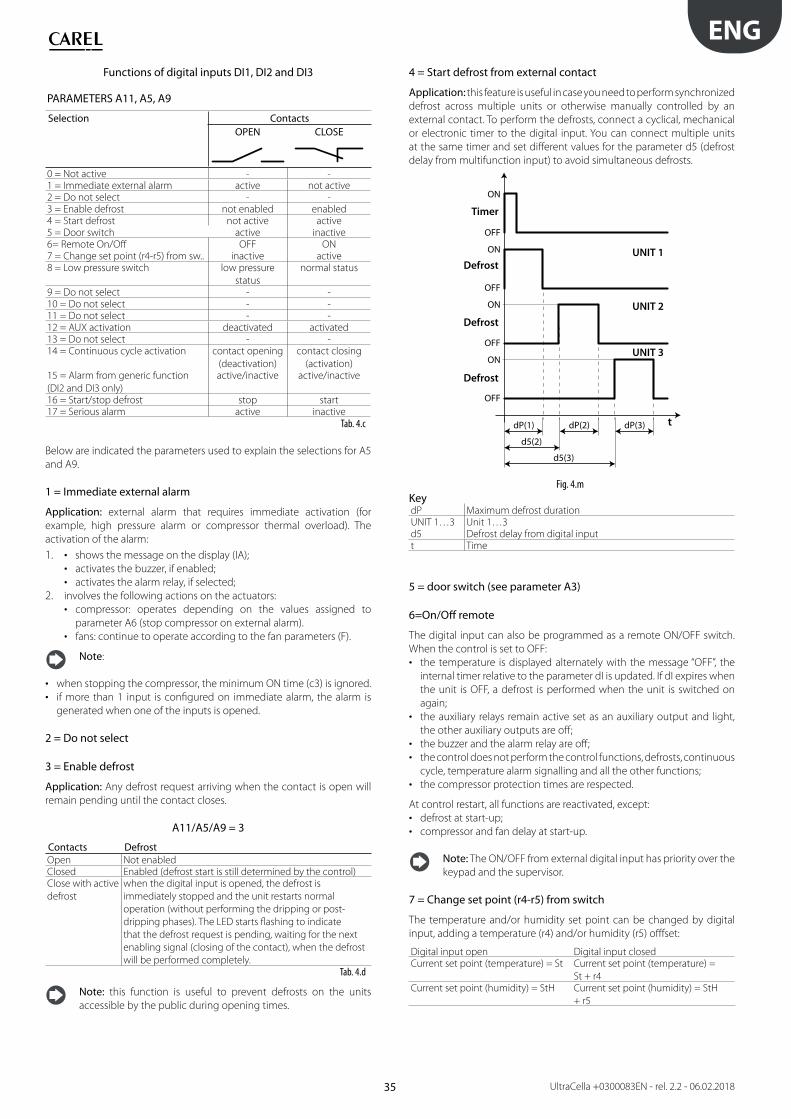
35
ENG
UltraCella +0300083EN - rel. 2.2 - 06.02.2018
Functions of digital inputs DI1, DI2 and DI3
PARAMETERS A11, A5, A9
Selection ContactsOPEN CLOSE
0 = Not active - -1 = Immediate external alarm active not active2 = Do not select - -3 = Enable defrost not enabled enabled4 = Start defrost not active active5 = Door switch active inactive6= Remote On/Off OFF ON7 = Change set point (r4-r5) from sw.. inactive active8 = Low pressure switch low pressure
status
normal status
9 = Do not select - -10 = Do not select - -11 = Do not select - -12 = AUX activation deactivated activated13 = Do not select - -14 = Continuous cycle activation contact opening
(deactivation)
contact closing
(activation)15 = Alarm from generic function
(DI2 and DI3 only)
active/inactive active/inactive
16 = Start/stop defrost stop start17 = Serious alarm active inactive
Tab. 4.c
Below are indicated the parameters used to explain the selections for A5
and A9.
1 = Immediate external alarm
Application: external alarm that requires immediate activation (for
example, high pressure alarm or compressor thermal overload). The
activation of the alarm:
1. • shows the message on the display (IA);
• activates the buzzer, if enabled;
• activates the alarm relay, if selected;
2. involves the following actions on the actuators:
• compressor: operates depending on the values assigned to
parameter A6 (stop compressor on external alarm).
• fans: continue to operate according to the fan parameters (F).
Note:
• when stopping the compressor, the minimum ON time (c3) is ignored.
• if more than 1 input is configured on immediate alarm, the alarm is
generated when one of the inputs is opened.
2 = Do not select
3 = Enable defrost
Application: Any defrost request arriving when the contact is open will
remain pending until the contact closes.
A11/A5/A9 = 3
Contacts DefrostOpen Not enabledClosed Enabled (defrost start is still determined by the control)Close with active
defrost
when the digital input is opened, the defrost is
immediately stopped and the unit restarts normal
operation (without performing the dripping or post-
dripping phases). The LED starts flashing to indicate
that the defrost request is pending, waiting for the next
enabling signal (closing of the contact), when the defrost
will be performed completely.
Tab. 4.d
Note: this function is useful to prevent defrosts on the units
accessible by the public during opening times.
4 = Start defrost from external contact
Application: this feature is useful in case you need to perform synchronized
defrost across multiple units or otherwise manually controlled by an
external contact. To perform the defrosts, connect a cyclical, mechanical
or electronic timer to the digital input. You can connect multiple units
at the same timer and set different values for the parameter d5 (defrost
delay from multifunction input) to avoid simultaneous defrosts.
Timer
Defrost
UNIT 1
UNIT 2
UNIT 3
Defrost
Defrost
tdP(1)
d5(2)
d5(3)
dP(2) dP(3)
OFF
ON
OFF
ON
OFF
ON
OFF
ON
Fig. 4.m
KeydP Maximum defrost durationUNIT 1…3 Unit 1…3d5 Defrost delay from digital inputt Time
5 = door switch (see parameter A3)
6=On/Off remote
The digital input can also be programmed as a remote ON/OFF switch.
When the control is set to OFF:
• the temperature is displayed alternately with the message “OFF”, the
internal timer relative to the parameter dI is updated. If dI expires when
the unit is OFF, a defrost is performed when the unit is switched on
again;
• the auxiliary relays remain active set as an auxiliary output and light,
the other auxiliary outputs are off;
• the buzzer and the alarm relay are off;
• the control does not perform the control functions, defrosts, continuous
cycle, temperature alarm signalling and all the other functions;
• the compressor protection times are respected.
At control restart, all functions are reactivated, except:
• defrost at start-up;
• compressor and fan delay at start-up.
Note: The ON/OFF from external digital input has priority over the
keypad and the supervisor.
7 = Change set point (r4-r5) from switch
The temperature and/or humidity set point can be changed by digital
input, adding a temperature (r4) and/or humidity (r5) offfset:
Digital input open Digital input closedCurrent set point (temperature) = St Current set point (temperature) =
St + r4Current set point (humidity) = StH Current set point (humidity) = StH
+ r5
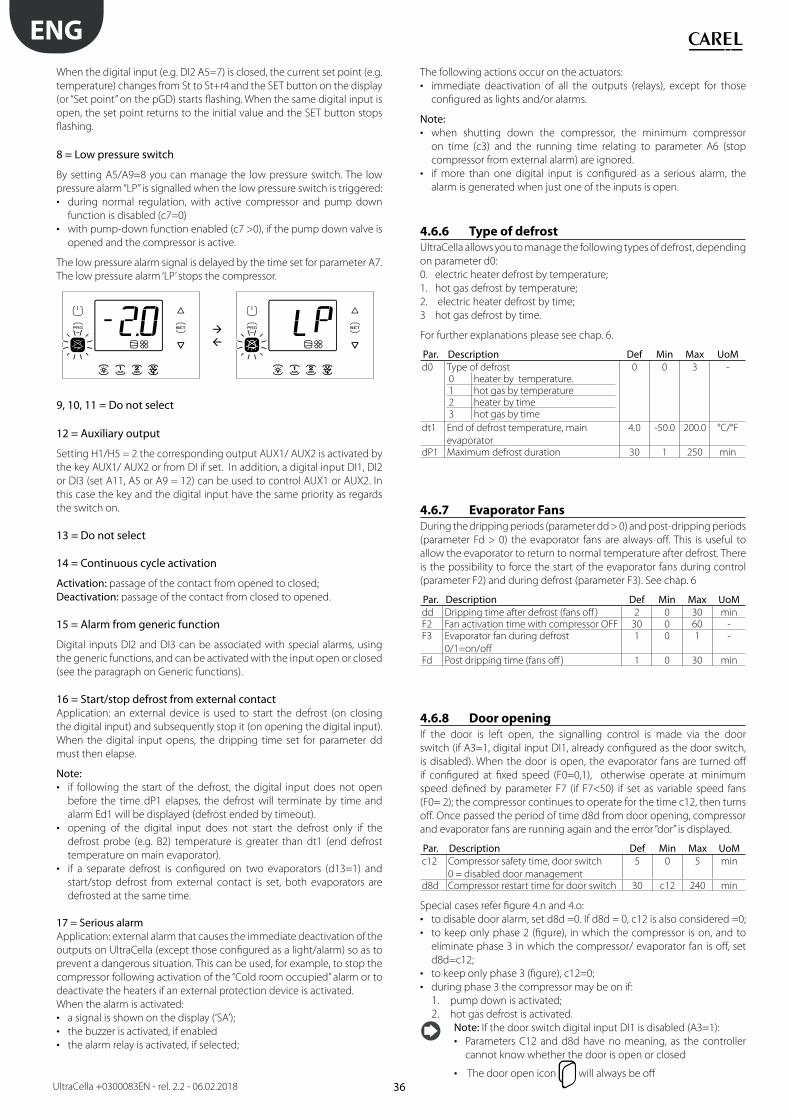
36
ENG
UltraCella +0300083EN - rel. 2.2 - 06.02.2018
When the digital input (e.g. DI2 A5=7) is closed, the current set point (e.g.
temperature) changes from St to St+r4 and the SET button on the display
(or “Set point” on the pGD) starts flashing. When the same digital input is
open, the set point returns to the initial value and the SET button stops
flashing.
8 = Low pressure switch
By setting A5/A9=8 you can manage the low pressure switch. The low
pressure alarm “LP” is signalled when the low pressure switch is triggered:
• during normal regulation, with active compressor and pump down
function is disabled (c7=0)
• with pump-down function enabled (c7 >0), if the pump down valve is
opened and the compressor is active.
The low pressure alarm signal is delayed by the time set for parameter A7.
The low pressure alarm ‘LP’ stops the compressor.
1 21 2 1 21 2
9, 10, 11 = Do not select
12 = Auxiliary output
Setting H1/H5 = 2 the corresponding output AUX1/ AUX2 is activated by
the key AUX1/ AUX2 or from DI if set. In addition, a digital input DI1, DI2
or DI3 (set A11, A5 or A9 = 12) can be used to control AUX1 or AUX2. In
this case the key and the digital input have the same priority as regards
the switch on.
13 = Do not select
14 = Continuous cycle activation
Activation: passage of the contact from opened to closed;
Deactivation: passage of the contact from closed to opened.
15 = Alarm from generic function
Digital inputs DI2 and DI3 can be associated with special alarms, using
the generic functions, and can be activated with the input open or closed
(see the paragraph on Generic functions).
16 = Start/stop defrost from external contactApplication: an external device is used to start the defrost (on closing
the digital input) and subsequently stop it (on opening the digital input).
When the digital input opens, the dripping time set for parameter dd
must then elapse.
Note: • if following the start of the defrost, the digital input does not open
before the time dP1 elapses, the defrost will terminate by time and
alarm Ed1 will be displayed (defrost ended by timeout).
• opening of the digital input does not start the defrost only if the
defrost probe (e.g. B2) temperature is greater than dt1 (end defrost
temperature on main evaporator).
• if a separate defrost is configured on two evaporators (d13=1) and
start/stop defrost from external contact is set, both evaporators are
defrosted at the same time.
17 = Serious alarmApplication: external alarm that causes the immediate deactivation of the
outputs on UltraCella (except those configured as a light/alarm) so as to
prevent a dangerous situation. This can be used, for example, to stop the
compressor following activation of the “Cold room occupied” alarm or to
deactivate the heaters if an external protection device is activated.
When the alarm is activated:
• a signal is shown on the display (‘SA’);
• the buzzer is activated, if enabled
• the alarm relay is activated, if selected;
The following actions occur on the actuators:
• immediate deactivation of all the outputs (relays), except for those
configured as lights and/or alarms.
Note: • when shutting down the compressor, the minimum compressor
on time (c3) and the running time relating to parameter A6 (stop
compressor from external alarm) are ignored.
• if more than one digital input is configured as a serious alarm, the
alarm is generated when just one of the inputs is open.
4.6.6 Type of defrost
UltraCella allows you to manage the following types of defrost, depending
on parameter d0:
0. electric heater defrost by temperature;
1. hot gas defrost by temperature;
2. electric heater defrost by time;
3 hot gas defrost by time.
For further explanations please see chap. 6.
Par. Description Def Min Max UoMd0 Type of defrost
0 heater by temperature.1 hot gas by temperature2 heater by time3 hot gas by time
0 0 3 -
dt1 End of defrost temperature, main
evaporator
4.0 -50.0 200.0 °C/°F
dP1 Maximum defrost duration 30 1 250 min
4.6.7 Evaporator Fans
During the dripping periods (parameter dd > 0) and post-dripping periods
(parameter Fd > 0) the evaporator fans are always off. This is useful to
allow the evaporator to return to normal temperature after defrost. There
is the possibility to force the start of the evaporator fans during control
(parameter F2) and during defrost (parameter F3). See chap. 6
Par. Description Def Min Max UoMdd Dripping time after defrost (fans off ) 2 0 30 minF2 Fan activation time with compressor OFF 30 0 60 -F3 Evaporator fan during defrost
0/1=on/off
1 0 1 -
Fd Post dripping time (fans off ) 1 0 30 min
4.6.8 Door opening
If the door is left open, the signalling control is made via the door
switch (if A3=1, digital input DI1, already configured as the door switch,
is disabled). When the door is open, the evaporator fans are turned off
if configured at fixed speed (F0=0,1), otherwise operate at minimum
speed defined by parameter F7 (if F7<50) if set as variable speed fans
(F0= 2); the compressor continues to operate for the time c12, then turns
off. Once passed the period of time d8d from door opening, compressor
and evaporator fans are running again and the error “dor” is displayed.
Par. Description Def Min Max UoMc12 Compressor safety time, door switch
0 = disabled door management
5 0 5 min
d8d Compressor restart time for door switch 30 c12 240 min
Special cases refer figure 4.n and 4.o:
• to disable door alarm, set d8d =0. If d8d = 0, c12 is also considered =0;
• to keep only phase 2 (figure), in which the compressor is on, and to
eliminate phase 3 in which the compressor/ evaporator fan is off, set
d8d=c12;
• to keep only phase 3 (figure), c12=0;
• during phase 3 the compressor may be on if:
1. pump down is activated;
2. hot gas defrost is activated.
Note: If the door switch digital input DI1 is disabled (A3=1):
• Parameters C12 and d8d have no meaning, as the controller
cannot know whether the door is open or closed
• The door open icon will always be off
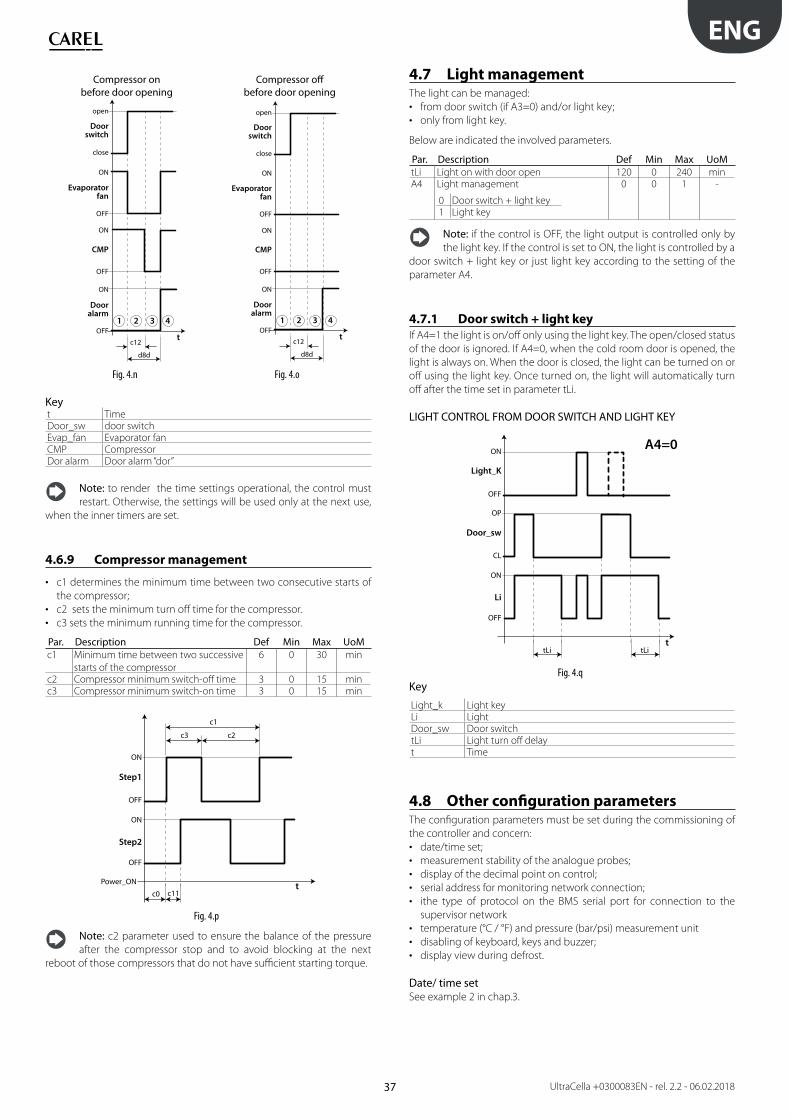
37
ENG
UltraCella +0300083EN - rel. 2.2 - 06.02.2018
Compressor onbefore door opening
Compressor offbefore door opening
1
Doorswitch
Dooralarm
Evaporatorfan
CMP
2 3 4
t
d8d
c12
OFF
ON
OFF
ON
OFF
ON
close
open
1
Doorswitch
Dooralarm
Evaporatorfan
CMP
2 3 4
t
d8d
c12
OFF
ON
OFF
ON
OFF
ON
close
open
Fig. 4.n Fig. 4.o
Keyt TimeDoor_sw door switchEvap_fan Evaporator fanCMP CompressorDor alarm Door alarm “dor”
Note: to render the time settings operational, the control must
restart. Otherwise, the settings will be used only at the next use,
when the inner timers are set.
4.6.9 Compressor management
• c1 determines the minimum time between two consecutive starts of
the compressor;
• c2 sets the minimum turn off time for the compressor.
• c3 sets the minimum running time for the compressor.
Par. Description Def Min Max UoMc1 Minimum time between two successive
starts of the compressor
6 0 30 min
c2 Compressor minimum switch-off time 3 0 15 minc3 Compressor minimum switch-on time 3 0 15 min
Step1
Step2
tc0
c3 c2
c1
c11
OFF
Power_ON
ON
OFF
ON
Fig. 4.p
Note: c2 parameter used to ensure the balance of the pressure
after the compressor stop and to avoid blocking at the next
reboot of those compressors that do not have sufficient starting torque.
4.7 Light managementThe light can be managed:
• from door switch (if A3=0) and/or light key;
• only from light key.
Below are indicated the involved parameters.
Par. Description Def Min Max UoMtLi Light on with door open 120 0 240 minA4 Light management
0 Door switch + light key1 Light key
0 0 1 -
Note: if the control is OFF, the light output is controlled only by
the light key. If the control is set to ON, the light is controlled by a
door switch + light key or just light key according to the setting of the
parameter A4.
4.7.1 Door switch + light key
If A4=1 the light is on/off only using the light key. The open/closed status
of the door is ignored. If A4=0, when the cold room door is opened, the
light is always on. When the door is closed, the light can be turned on or
off using the light key. Once turned on, the light will automatically turn
off after the time set in parameter tLi.
LIGHT CONTROL FROM DOOR SWITCH AND LIGHT KEY
Light_K
Door_sw
Li
t
A4=0
tLi tLi
OFF
ON
OFF
ON
CL
OP
Fig. 4.q
Key
Light_k Light keyLi Light Door_sw Door switchtLi Light turn off delayt Time
4.8 Other configuration parametersThe configuration parameters must be set during the commissioning of
the controller and concern:
• date/time set;
• measurement stability of the analogue probes;
• display of the decimal point on control;
• serial address for monitoring network connection;
• ithe type of protocol on the BMS serial port for connection to the
supervisor network
• temperature (°C / °F) and pressure (bar/psi) measurement unit
• disabling of keyboard, keys and buzzer;
• display view during defrost.
Date/ time setSee example 2 in chap.3.
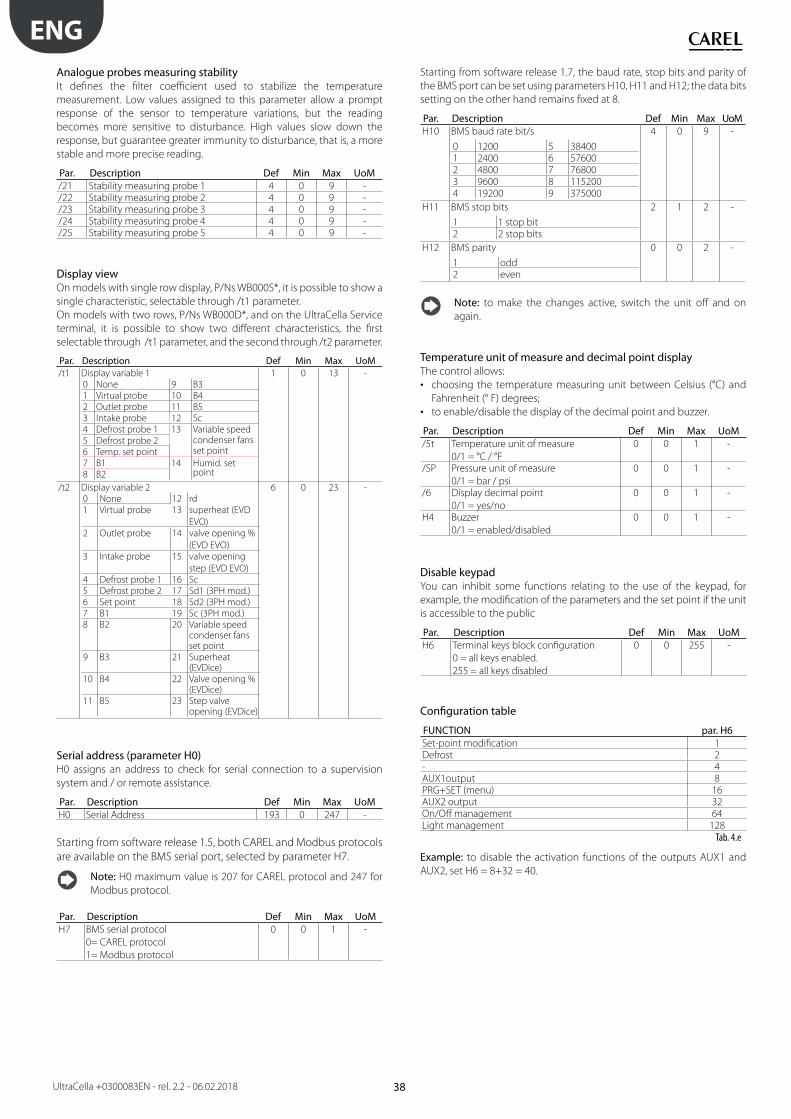
38
ENG
UltraCella +0300083EN - rel. 2.2 - 06.02.2018
Analogue probes measuring stabilityIt defines the filter coefficient used to stabilize the temperature
measurement. Low values assigned to this parameter allow a prompt
response of the sensor to temperature variations, but the reading
becomes more sensitive to disturbance. High values slow down the
response, but guarantee greater immunity to disturbance, that is, a more
stable and more precise reading.
Par. Description Def Min Max UoM/21 Stability measuring probe 1 4 0 9 -/22 Stability measuring probe 2 4 0 9 -/23 Stability measuring probe 3 4 0 9 -/24 Stability measuring probe 4 4 0 9 -/25 Stability measuring probe 5 4 0 9 -
Display viewOn models with single row display, P/Ns WB000S*, it is possible to show a
single characteristic, selectable through /t1 parameter.
On models with two rows, P/Ns WB000D*, and on the UltraCella Service
terminal, it is possible to show two different characteristics, the first
selectable through /t1 parameter, and the second through /t2 parameter.
Par. Description Def Min Max UoM/t1 Display variable 1
0 None 9 B3
1 Virtual probe 10 B4
2 Outlet probe 11 B5
3 Intake probe 12 Sc
4 Defrost probe 1 13 Variable speed condenser fans set point
5 Defrost probe 2
6 Temp. set point
7 B1 14 Humid. set point8 B2
1 0 13 -
/t2 Display variable 2
0 None 12 rd
1 Virtual probe 13 superheat (EVD
EVO)
2 Outlet probe 14 valve opening %
(EVD EVO)
3 Intake probe 15 valve opening
step (EVD EVO)
4 Defrost probe 1 16 Sc
5 Defrost probe 2 17 Sd1 (3PH mod.)
6 Set point 18 Sd2 (3PH mod.)
7 B1 19 Sc (3PH mod.)
8 B2 20 Variable speed condenser fans set point
9 B3 21 Superheat (EVDice)
10 B4 22 Valve opening % (EVDice)
11 B5 23 Step valve opening (EVDice)
6 0 23 -
Serial address (parameter H0)H0 assigns an address to check for serial connection to a supervision
system and / or remote assistance.
Par. Description Def Min Max UoMH0 Serial Address 193 0 247 -
Starting from software release 1.5, both CAREL and Modbus protocols
are available on the BMS serial port, selected by parameter H7.
Note: H0 maximum value is 207 for CAREL protocol and 247 for
Modbus protocol.
Par. Description Def Min Max UoMH7 BMS serial protocol
0= CAREL protocol
1= Modbus protocol
0 0 1 -
Starting from software release 1.7, the baud rate, stop bits and parity of
the BMS port can be set using parameters H10, H11 and H12; the data bits
setting on the other hand remains fixed at 8.
Par. Description Def Min Max UoMH10 BMS baud rate bit/s
0 1200 5 384001 2400 6 576002 4800 7 768003 9600 8 1152004 19200 9 375000
4 0 9 -
H11 BMS stop bits
1 1 stop bit2 2 stop bits
2 1 2 -
H12 BMS parity
1 odd2 even
0 0 2 -
Note: to make the changes active, switch the unit off and on
again.
Temperature unit of measure and decimal point displayThe control allows:
• choosing the temperature measuring unit between Celsius (°C) and
Fahrenheit (° F) degrees;
• to enable/disable the display of the decimal point and buzzer.
Par. Description Def Min Max UoM/5t Temperature unit of measure
0/1 = °C / °F
0 0 1 -
/SP Pressure unit of measure
0/1 = bar / psi
0 0 1 -
/6 Display decimal point
0/1 = yes/no
0 0 1 -
H4 Buzzer
0/1 = enabled/disabled
0 0 1 -
Disable keypadYou can inhibit some functions relating to the use of the keypad, for
example, the modification of the parameters and the set point if the unit
is accessible to the public
Par. Description Def Min Max UoMH6 Terminal keys block configuration
0 = all keys enabled.
255 = all keys disabled
0 0 255 -
Configuration table
FUNCTION par. H6Set-point modification 1Defrost 2- 4AUX1output 8PRG+SET (menu) 16AUX2 output 32On/Off management 64Light management 128
Tab. 4.e
Example: to disable the activation functions of the outputs AUX1 and
AUX2, set H6 = 8+32 = 40.
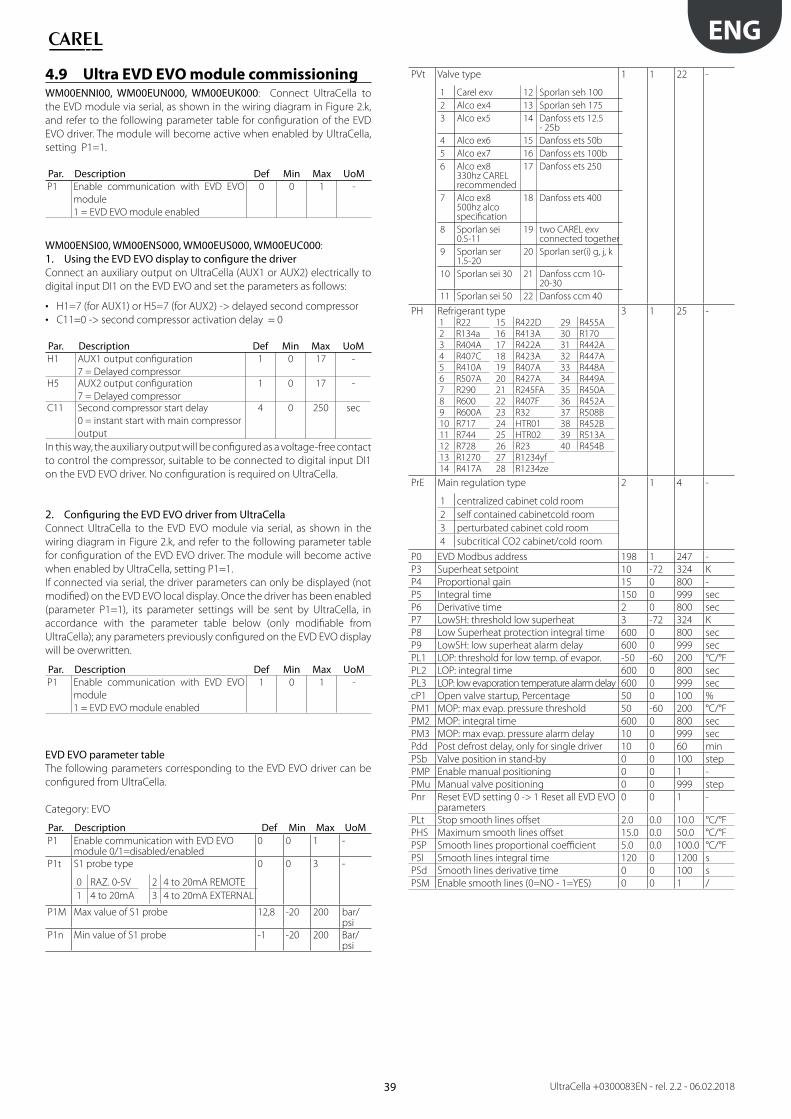
39
ENG
UltraCella +0300083EN - rel. 2.2 - 06.02.2018
4.9 Ultra EVD EVO module commissioningWM00ENNI00, WM00EUN000, WM00EUK000: Connect UltraCella to
the EVD module via serial, as shown in the wiring diagram in Figure 2.k,
and refer to the following parameter table for configuration of the EVD
EVO driver. The module will become active when enabled by UltraCella,
setting P1=1.
Par. Description Def Min Max UoMP1 Enable communication with EVD EVO
module
1 = EVD EVO module enabled
0 0 1 -
WM00ENSI00, WM00ENS000, WM00EUS000, WM00EUC000:
1. Using the EVD EVO display to configure the driverConnect an auxiliary output on UltraCella (AUX1 or AUX2) electrically to
digital input DI1 on the EVD EVO and set the parameters as follows:
• H1=7 (for AUX1) or H5=7 (for AUX2) -> delayed second compressor
• C11=0 -> second compressor activation delay = 0
Par. Description Def Min Max UoMH1 AUX1 output configuration
7 = Delayed compressor
1 0 17 -
H5 AUX2 output configuration
7 = Delayed compressor
1 0 17 -
C11 Second compressor start delay
0 = instant start with main compressor
output
4 0 250 sec
In this way, the auxiliary output will be configured as a voltage-free contact
to control the compressor, suitable to be connected to digital input DI1
on the EVD EVO driver. No configuration is required on UltraCella.
2. Configuring the EVD EVO driver from UltraCellaConnect UltraCella to the EVD EVO module via serial, as shown in the
wiring diagram in Figure 2.k, and refer to the following parameter table
for configuration of the EVD EVO driver. The module will become active
when enabled by UltraCella, setting P1=1.
If connected via serial, the driver parameters can only be displayed (not
modified) on the EVD EVO local display. Once the driver has been enabled
(parameter P1=1), its parameter settings will be sent by UltraCella, in
accordance with the parameter table below (only modifiable from
UltraCella); any parameters previously configured on the EVD EVO display
will be overwritten.
Par. Description Def Min Max UoMP1 Enable communication with EVD EVO
module
1 = EVD EVO module enabled
1 0 1 -
EVD EVO parameter tableThe following parameters corresponding to the EVD EVO driver can be
configured from UltraCella.
Category: EVO
Par. Description Def Min Max UoMP1 Enable communication with EVD EVO
module 0/1=disabled/enabled0 0 1 -
P1t S1 probe type
0 RAZ. 0-5V 2 4 to 20mA REMOTE
1 4 to 20mA 3 4 to 20mA EXTERNAL
0 0 3 -
P1M Max value of S1 probe 12,8 -20 200 bar/psi
P1n Min value of S1 probe -1 -20 200 Bar/psi
PVt Valve type
1 Carel exv 12 Sporlan seh 100
2 Alco ex4 13 Sporlan seh 175
3 Alco ex5 14 Danfoss ets 12.5 - 25b
4 Alco ex6 15 Danfoss ets 50b
5 Alco ex7 16 Danfoss ets 100b
6 Alco ex8 330hz CAREL recommended
17 Danfoss ets 250
7 Alco ex8 500hz alco specification
18 Danfoss ets 400
8 Sporlan sei 0.5-11
19 two CAREL exv connected together
9 Sporlan ser 1.5-20
20 Sporlan ser(i) g, j, k
10 Sporlan sei 30 21 Danfoss ccm 10-20-30
11 Sporlan sei 50 22 Danfoss ccm 40
1 1 22 -
PH Refrigerant type1 R22 15 R422D 29 R455A
2 R134a 16 R413A 30 R170
3 R404A 17 R422A 31 R442A
4 R407C 18 R423A 32 R447A
5 R410A 19 R407A 33 R448A
6 R507A 20 R427A 34 R449A
7 R290 21 R245FA 35 R450A
8 R600 22 R407F 36 R452A
9 R600A 23 R32 37 R508B
10 R717 24 HTR01 38 R452B
11 R744 25 HTR02 39 R513A
12 R728 26 R23 40 R454B
13 R1270 27 R1234yf
14 R417A 28 R1234ze
3 1 25 -
PrE Main regulation type
1 centralized cabinet cold room
2 self contained cabinetcold room
3 perturbated cabinet cold room
4 subcritical CO2 cabinet/cold room
2 1 4 -
P0 EVD Modbus address 198 1 247 -
P3 Superheat setpoint 10 -72 324 K
P4 Proportional gain 15 0 800 -
P5 Integral time 150 0 999 sec
P6 Derivative time 2 0 800 sec
P7 LowSH: threshold low superheat 3 -72 324 K
P8 Low Superheat protection integral time 600 0 800 sec
P9 LowSH: low superheat alarm delay 600 0 999 sec
PL1 LOP: threshold for low temp. of evapor. -50 -60 200 °C/°F
PL2 LOP: integral time 600 0 800 sec
PL3 LOP: low evaporation temperature alarm delay 600 0 999 sec
cP1 Open valve startup, Percentage 50 0 100 %
PM1 MOP: max evap. pressure threshold 50 -60 200 °C/°F
PM2 MOP: integral time 600 0 800 sec
PM3 MOP: max evap. pressure alarm delay 10 0 999 sec
Pdd Post defrost delay, only for single driver 10 0 60 min
PSb Valve position in stand-by 0 0 100 step
PMP Enable manual positioning 0 0 1 -
PMu Manual valve positioning 0 0 999 step
Pnr Reset EVD setting 0 -> 1 Reset all EVD EVO parameters
0 0 1 -
PLt Stop smooth lines offset 2.0 0.0 10.0 °C/°F
PHS Maximum smooth lines offset 15.0 0.0 50.0 °C/°F
PSP Smooth lines proportional coefficient 5.0 0.0 100.0 °C/°F
PSI Smooth lines integral time 120 0 1200 s
PSd Smooth lines derivative time 0 0 100 s
PSM Enable smooth lines (0=NO - 1=YES) 0 0 1 /

40
ENG
UltraCella +0300083EN - rel. 2.2 - 06.02.2018
4.10 EVDice commissioningConnect UltraCella to the EVDice driver via the serial line according to the
wiring diagram shown in Figure 2.o, and refer to the parameter table 4.e
below for configuration of the EVDice driver.
UltraCella software release 1.7 features new EVDice driver management
functions:
• Possibility to configure the EVDice parameters on the UltraCella user
interface (built-in LED display or UltraCella Service terminal) and/or on
the local EVDice LED display user interface.
• EVDice custom configuration protection by signature: as soon as
communication is established, UltraCella “signs” EVDice by writing a
random number between 1 and 65000 to a register on the driver. This
allows unique identification of:
- EVDice drivers that have been previously configured
- “new” EVDice drivers (e.g. replaced due to a fault)
There are three possible cases:
New installation / New system / EVDice installed following installation:
in this case, the signature on UltraCella will initially be 0 -> the active
parameters will be those set on EVDice, and UltraCella will generate a
new signature. Proceed as follows:
1. Confirm that the EVDice is present by setting IPE=1 (communication
with EVDice enabled), or by answering “yes” to a specific question in
the wizard on the UltraCella Service terminal; UltraCella will sign the
EVDice so as to create the controller-driver combination;
2. The IEC (EVDice configuration error) alarm will be activated and the
controller (and the compressor) will stop (UltraCella forces parameter
ICG=0, EVDice not enabled for control). Configure the EVDice
parameters based on the application, either using the wizard, or
parameter-by-parameter on the LED display interface;
3. Once all of the required EVDice parameters have been configured, set
ICG=1 to activate control. Setting ICG=1 also resets the IEC alarm.
Replacing EVDice due to a fault / other causes:
1. UltraCella will have a signature other than 0 (as it has been previously
configured to manage an EVDice driver), while the EVDice will have a
different signature from the one saved on UltraCella (either 0 if new,
or a number other than 0 if originating from another installation). In
this case, the initially active parameters will be those set on UltraCella
(the parameters on UltraCella corresponding to the EVDice driver will
be copied to the EVDice). Proceed as follows:
• The IEM alarm (EVDice error mismatch) is active to warn the user that
an element in the system has been changed. If necessary, modify the
EVDice parameters based on the application, either using the wizard, or
parameter-by-parameter on the LED display interface;
• The controller is will active even when the IEM alarm is active; to
disable the alarm, press on the UltraCella LED display.
2. The signature on UltraCella will be equal to 0 (as it is new or has not
been previously configured to communicate with an EVDice driver),
while EVDice will have a signature (signature other than 0). In this
case, the initially active parameters will be those set on EVDice (the
parameters corresponding to the EVDice driver will be copied to
UltraCella). The case is identical to a new installation / new system:
• Confirm that the EVDice is present by setting IPE=1 (communication
with EVDice enabled), or by answering “yes” to a specific question in the
wizard on the UltraCella Service terminal; UltraCella will sign the EVDice
so as to create the controller-driver combination;
• The IEC (EVDice configuration error) alarm will be activated and the
controller (and the compressor) will stop (UltraCella forces parameter
ICG=0, EVDice not enabled for control). Configure the EVDice parameters
based on the application, either using the wizard, or parameter-by-
parameter on the LED display interface;
• Once all of the required EVDice parameters have been configured, set
ICG=1 to activate control. Setting ICG=1 also resets the IEC alarm.
Replacing UltraCella due to a fault / other causes: The signature on UltraCella will be equal to 0 (as it is new or has not been
previously configured to communicate with an EVDice driver), while
EVDice will have a signature (signature other than 0). In this case, the
initially active parameters will be those set on EVDice (the parameters
corresponding to the EVDice driver will be copied to UltraCella). The case
is identical to a new installation / new system.
Par. Description Def Min Max UoMIPE Enable EVDice communication
0/1 = disabled / enabled
0 0 1 -
ICG Enable EVDice control
0/1 = disabled / enabled
0 0 1 -
Note: when IPE=0 (communication with EVDice disabled), the
only parameters visible on the UltraCella built-in LED display are:
IPE, IrE (EVDice operating mode), IP3 (superheat set point), PH (type of
refrigerant) and In1 (EVDice serial address from UltraCella)
Note: the signature on EVDice can be set to zero using the reset
procedure on the built-in LED interface (see EVDice manual
+0300037EN)
Note: the above are valid for EVDice firmware release 1.4;
UltraCella software release 1.7 in any case maintains compatibility
with EVDice drivers featuring previous firmware releases. In particular, the
IEC and IEM alarms will be always disabled, parameters IPE and ICG will
have always the same value and UltraCella will not generate any signature
Note: in UltraCella software release 1.7, the EVDice firmware
release is read-only when parameter IPE=1 (communication with
EVDice enabled)
EVD ICE parameter tableThe following parameters correspond to the EVD ICE driver, and are
configured on UltraCella.
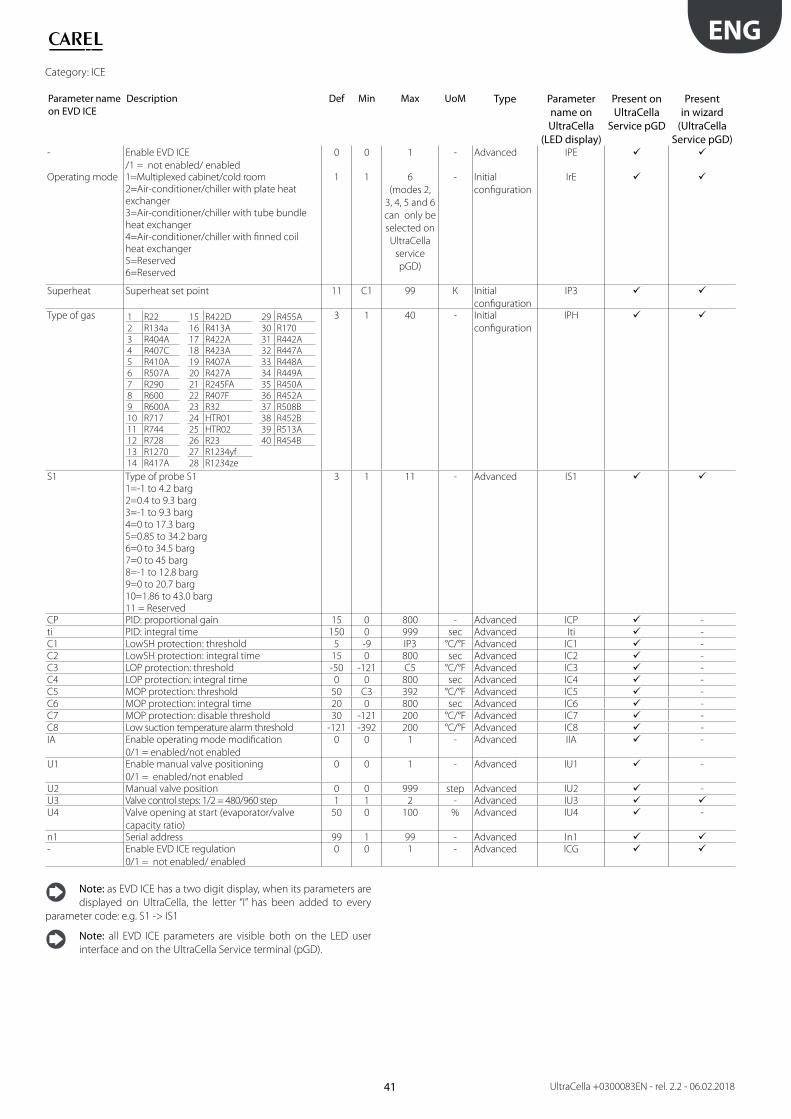
41
ENG
UltraCella +0300083EN - rel. 2.2 - 06.02.2018
Category: ICE
Parameter name on EVD ICE
Description Def Min Max UoM Type Parameter name on UltraCella
(LED display)
Present on UltraCella
Service pGD
Present in wizard
(UltraCella Service pGD)
- Enable EVD ICE
/1 = not enabled/ enabled
0 0 1 - Advanced IPE
Operating mode 1=Multiplexed cabinet/cold room
2=Air-conditioner/chiller with plate heat
exchanger
3=Air-conditioner/chiller with tube bundle
heat exchanger
4=Air-conditioner/chiller with finned coil
heat exchanger
5=Reserved
6=Reserved
1 1 6
(modes 2,
3, 4, 5 and 6
can only be
selected on
UltraCella
service
pGD)
- Initial
configuration
IrE
Superheat Superheat set point 11 C1 99 K Initial
configuration
IP3
Type of gas 1 R22 15 R422D 29 R455A
2 R134a 16 R413A 30 R170
3 R404A 17 R422A 31 R442A
4 R407C 18 R423A 32 R447A
5 R410A 19 R407A 33 R448A
6 R507A 20 R427A 34 R449A
7 R290 21 R245FA 35 R450A
8 R600 22 R407F 36 R452A
9 R600A 23 R32 37 R508B
10 R717 24 HTR01 38 R452B
11 R744 25 HTR02 39 R513A
12 R728 26 R23 40 R454B
13 R1270 27 R1234yf
14 R417A 28 R1234ze
3 1 40 - Initial
configuration
IPH
S1 Type of probe S1
1=-1 to 4.2 barg
2=0.4 to 9.3 barg
3=-1 to 9.3 barg
4=0 to 17.3 barg
5=0.85 to 34.2 barg
6=0 to 34.5 barg
7=0 to 45 barg
8=-1 to 12.8 barg
9=0 to 20.7 barg
10=1.86 to 43.0 barg
11 = Reserved
3 1 11 - Advanced IS1
CP PID: proportional gain 15 0 800 - Advanced ICP -
ti PID: integral time 150 0 999 sec Advanced Iti -
C1 LowSH protection: threshold 5 -9 IP3 °C/°F Advanced IC1 -
C2 LowSH protection: integral time 15 0 800 sec Advanced IC2 -
C3 LOP protection: threshold -50 -121 C5 °C/°F Advanced IC3 -
C4 LOP protection: integral time 0 0 800 sec Advanced IC4 -
C5 MOP protection: threshold 50 C3 392 °C/°F Advanced IC5 -
C6 MOP protection: integral time 20 0 800 sec Advanced IC6 -
C7 MOP protection: disable threshold 30 -121 200 °C/°F Advanced IC7 -
C8 Low suction temperature alarm threshold -121 -392 200 °C/°F Advanced IC8 -
IA Enable operating mode modification
0/1 = enabled/not enabled
0 0 1 - Advanced IIA -
U1 Enable manual valve positioning
0/1 = enabled/not enabled
0 0 1 - Advanced IU1 -
U2 Manual valve position 0 0 999 step Advanced IU2 -
U3 Valve control steps: 1/2 = 480/960 step 1 1 2 - Advanced IU3
U4 Valve opening at start (evaporator/valve
capacity ratio)
50 0 100 % Advanced IU4 -
n1 Serial address 99 1 99 - Advanced In1
- Enable EVD ICE regulation
0/1 = not enabled/ enabled
0 0 1 - Advanced ICG
Note: as EVD ICE has a two digit display, when its parameters are
displayed on UltraCella, the letter “I” has been added to every
parameter code: e.g. S1 -> IS1
Note: all EVD ICE parameters are visible both on the LED user
interface and on the UltraCella Service terminal (pGD).
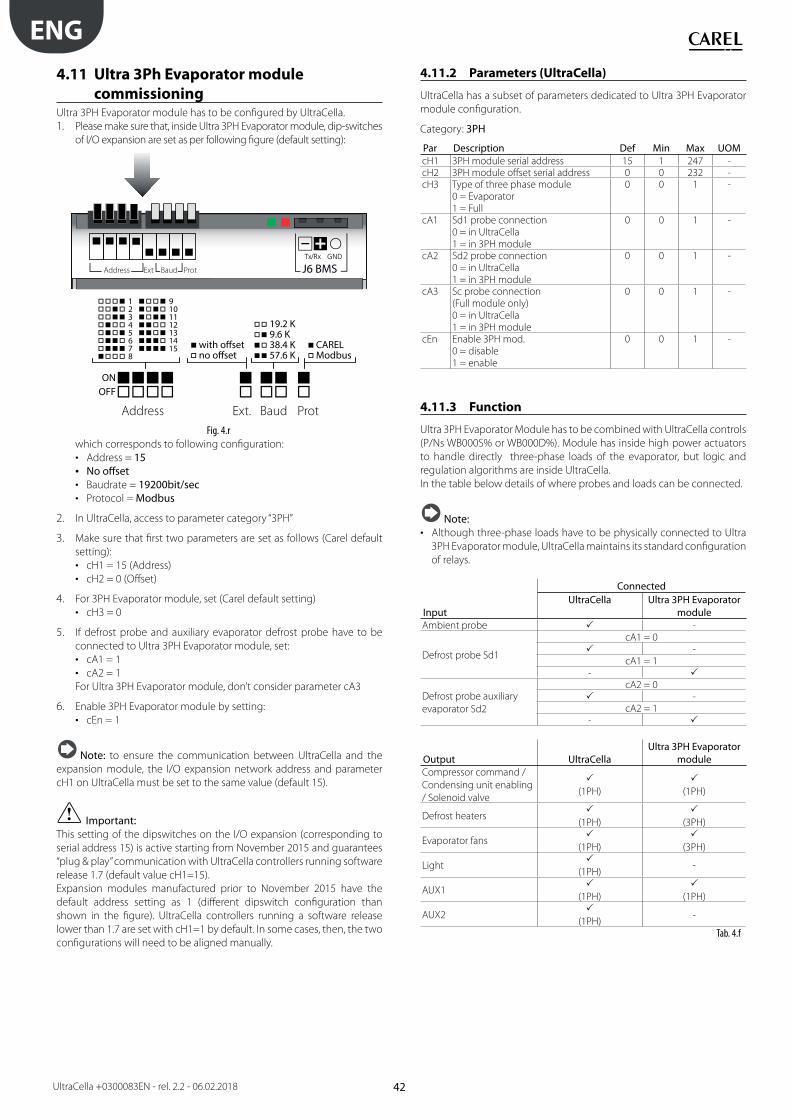
42
ENG
UltraCella +0300083EN - rel. 2.2 - 06.02.2018
4.11 Ultra 3Ph Evaporator module
commissioningUltra 3PH Evaporator module has to be configured by UltraCella.
1. Please make sure that, inside Ultra 3PH Evaporator module, dip-switches
of I/O expansion are set as per following figure (default setting):
12345678
9101112131415 with offset
no offset
19.2 K9.6 K38.4 K57.6 K
CARELModbus
ONOFF
Address Ext. ProtBaud
Address Ext Baud Prot
Fig. 4.r
which corresponds to following configuration:
• Address = 15• No offset• Baudrate = 19200bit/sec• Protocol = Modbus
2. In UltraCella, access to parameter category “3PH”
3. Make sure that first two parameters are set as follows (Carel default
setting):
• cH1 = 15 (Address)
• cH2 = 0 (Offset)
4. For 3PH Evaporator module, set (Carel default setting)
• cH3 = 0
5. If defrost probe and auxiliary evaporator defrost probe have to be
connected to Ultra 3PH Evaporator module, set:
• cA1 = 1
• cA2 = 1
For Ultra 3PH Evaporator module, don’t consider parameter cA3
6. Enable 3PH Evaporator module by setting:
• cEn = 1
Note: to ensure the communication between UltraCella and the
expansion module, the I/O expansion network address and parameter
cH1 on UltraCella must be set to the same value (default 15).
Important:This setting of the dipswitches on the I/O expansion (corresponding to
serial address 15) is active starting from November 2015 and guarantees
“plug & play” communication with UltraCella controllers running software
release 1.7 (default value cH1=15).
Expansion modules manufactured prior to November 2015 have the
default address setting as 1 (different dipswitch configuration than
shown in the figure). UltraCella controllers running a software release
lower than 1.7 are set with cH1=1 by default. In some cases, then, the two
configurations will need to be aligned manually.
4.11.2 Parameters (UltraCella)
UltraCella has a subset of parameters dedicated to Ultra 3PH Evaporator
module configuration.
Category: 3PH
Par Description Def Min Max UOMcH1 3PH module serial address 15 1 247 -cH2 3PH module offset serial address 0 0 232 -cH3 Type of three phase module
0 = Evaporator
1 = Full
0 0 1 -
cA1 Sd1 probe connection
0 = in UltraCella
1 = in 3PH module
0 0 1 -
cA2 Sd2 probe connection
0 = in UltraCella
1 = in 3PH module
0 0 1 -
cA3 Sc probe connection
(Full module only)
0 = in UltraCella
1 = in 3PH module
0 0 1 -
cEn Enable 3PH mod.
0 = disable
1 = enable
0 0 1 -
4.11.3 Function
Ultra 3PH Evaporator Module has to be combined with UltraCella controls
(P/Ns WB000S% or WB000D%). Module has inside high power actuators
to handle directly three-phase loads of the evaporator, but logic and
regulation algorithms are inside UltraCella.
In the table below details of where probes and loads can be connected.
Note:• Although three-phase loads have to be physically connected to Ultra
3PH Evaporator module, UltraCella maintains its standard configuration
of relays.
Input
ConnectedUltraCella Ultra 3PH Evaporator
moduleAmbient probe -
Defrost probe Sd1
cA1 = 0-
cA1 = 1-
Defrost probe auxiliary
evaporator Sd2
cA2 = 0-
cA2 = 1-
Output UltraCellaUltra 3PH Evaporator
moduleCompressor command /
Condensing unit enabling
/ Solenoid valve(1PH) (1PH)
Defrost heaters(1PH) (3PH)
Evaporator fans(1PH) (3PH)
Light (1PH)
-
AUX1(1PH) (1PH)
AUX2(1PH)
-
Tab. 4.f
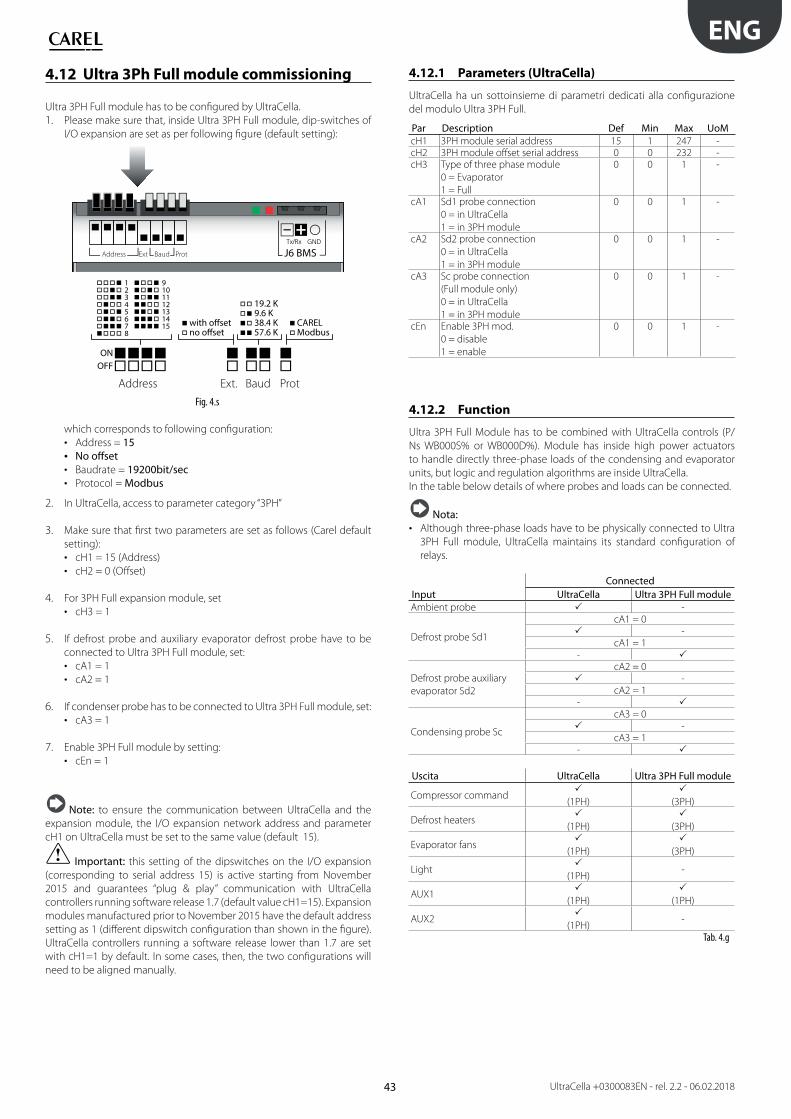
43
ENG
UltraCella +0300083EN - rel. 2.2 - 06.02.2018
4.12 Ultra 3Ph Full module commissioning
Ultra 3PH Full module has to be configured by UltraCella.
1. Please make sure that, inside Ultra 3PH Full module, dip-switches of
I/O expansion are set as per following figure (default setting):
12345678
9101112131415 with offset
no offset
19.2 K9.6 K38.4 K57.6 K
CARELModbus
ONOFF
Address Ext. ProtBaud
Address Ext Baud Prot
Fig. 4.s
which corresponds to following configuration:
• Address = 15• No offset• Baudrate = 19200bit/sec• Protocol = Modbus
2. In UltraCella, access to parameter category “3PH”
3. Make sure that first two parameters are set as follows (Carel default
setting):
• cH1 = 15 (Address)
• cH2 = 0 (Offset)
4. For 3PH Full expansion module, set
• cH3 = 1
5. If defrost probe and auxiliary evaporator defrost probe have to be
connected to Ultra 3PH Full module, set:
• cA1 = 1
• cA2 = 1
6. If condenser probe has to be connected to Ultra 3PH Full module, set:
• cA3 = 1
7. Enable 3PH Full module by setting:
• cEn = 1
Note: to ensure the communication between UltraCella and the
expansion module, the I/O expansion network address and parameter
cH1 on UltraCella must be set to the same value (default 15).
Important: this setting of the dipswitches on the I/O expansion
(corresponding to serial address 15) is active starting from November
2015 and guarantees “plug & play” communication with UltraCella
controllers running software release 1.7 (default value cH1=15). Expansion
modules manufactured prior to November 2015 have the default address
setting as 1 (different dipswitch configuration than shown in the figure).
UltraCella controllers running a software release lower than 1.7 are set
with cH1=1 by default. In some cases, then, the two configurations will
need to be aligned manually.
4.12.1 Parameters (UltraCella)
UltraCella ha un sottoinsieme di parametri dedicati alla configurazione
del modulo Ultra 3PH Full.
Par Description Def Min Max UoMcH1 3PH module serial address 15 1 247 -cH2 3PH module offset serial address 0 0 232 -cH3 Type of three phase module
0 = Evaporator
1 = Full
0 0 1 -
cA1 Sd1 probe connection
0 = in UltraCella
1 = in 3PH module
0 0 1 -
cA2 Sd2 probe connection
0 = in UltraCella
1 = in 3PH module
0 0 1 -
cA3 Sc probe connection
(Full module only)
0 = in UltraCella
1 = in 3PH module
0 0 1 -
cEn Enable 3PH mod.
0 = disable
1 = enable
0 0 1 -
4.12.2 Function
Ultra 3PH Full Module has to be combined with UltraCella controls (P/
Ns WB000S% or WB000D%). Module has inside high power actuators
to handle directly three-phase loads of the condensing and evaporator
units, but logic and regulation algorithms are inside UltraCella.
In the table below details of where probes and loads can be connected.
Nota:• Although three-phase loads have to be physically connected to Ultra
3PH Full module, UltraCella maintains its standard configuration of
relays.
InputConnected
UltraCella Ultra 3PH Full moduleAmbient probe -
Defrost probe Sd1
cA1 = 0-
cA1 = 1-
Defrost probe auxiliary
evaporator Sd2
cA2 = 0-
cA2 = 1-
Condensing probe Sc
cA3 = 0-
cA3 = 1-
Uscita UltraCella Ultra 3PH Full module
Compressor command(1PH) (3PH)
Defrost heaters(1PH) (3PH)
Evaporator fans(1PH) (3PH)
Light (1PH)
-
AUX1(1PH) (1PH)
AUX2(1PH)
-
Tab. 4.g
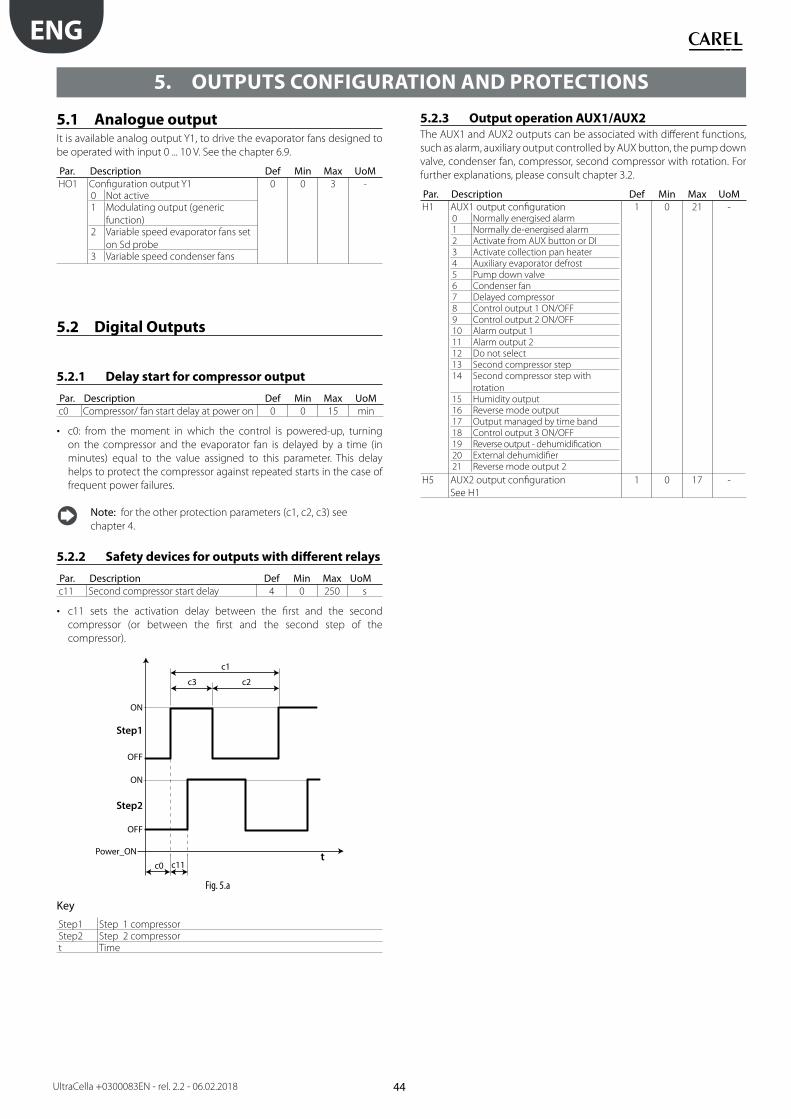
44
ENG
UltraCella +0300083EN - rel. 2.2 - 06.02.2018
5. OUTPUTS CONFIGURATION AND PROTECTIONS
5.1 Analogue outputIt is available analog output Y1, to drive the evaporator fans designed to
be operated with input 0 ... 10 V. See the chapter 6.9.
Par. Description Def Min Max UoMHO1 Configuration output Y1
0 Not active1 Modulating output (generic
function)2 Variable speed evaporator fans set
on Sd probe 3 Variable speed condenser fans
0 0 3 -
5.2 Digital Outputs
5.2.1 Delay start for compressor output
Par. Description Def Min Max UoMc0 Compressor/ fan start delay at power on 0 0 15 min
• c0: from the moment in which the control is powered-up, turning
on the compressor and the evaporator fan is delayed by a time (in
minutes) equal to the value assigned to this parameter. This delay
helps to protect the compressor against repeated starts in the case of
frequent power failures.
Note: for the other protection parameters (c1, c2, c3) see
chapter 4.
5.2.2 Safety devices for outputs with different relays
Par. Description Def Min Max UoMc11 Second compressor start delay 4 0 250 s
• c11 sets the activation delay between the first and the second
compressor (or between the first and the second step of the
compressor).
Step1
Step2
tc0
c3 c2
c1
c11
OFF
Power_ON
ON
OFF
ON
Fig. 5.a
Key
Step1 Step 1 compressorStep2 Step 2 compressort Time
5.2.3 Output operation AUX1/AUX2
The AUX1 and AUX2 outputs can be associated with different functions,
such as alarm, auxiliary output controlled by AUX button, the pump down
valve, condenser fan, compressor, second compressor with rotation. For
further explanations, please consult chapter 3.2.
Par. Description Def Min Max UoMH1 AUX1 output configuration
0 Normally energised alarm
1 Normally de-energised alarm
2 Activate from AUX button or DI
3 Activate collection pan heater
4 Auxiliary evaporator defrost
5 Pump down valve
6 Condenser fan
7 Delayed compressor
8 Control output 1 ON/OFF
9 Control output 2 ON/OFF
10 Alarm output 1
11 Alarm output 2
12 Do not select
13 Second compressor step
14 Second compressor step with
rotation
15 Humidity output
16 Reverse mode output
17 Output managed by time band
18 Control output 3 ON/OFF
19 Reverse output - dehumidification
20 External dehumidifier
21 Reverse mode output 2
1 0 21 -
H5 AUX2 output configuration
See H1
1 0 17 -
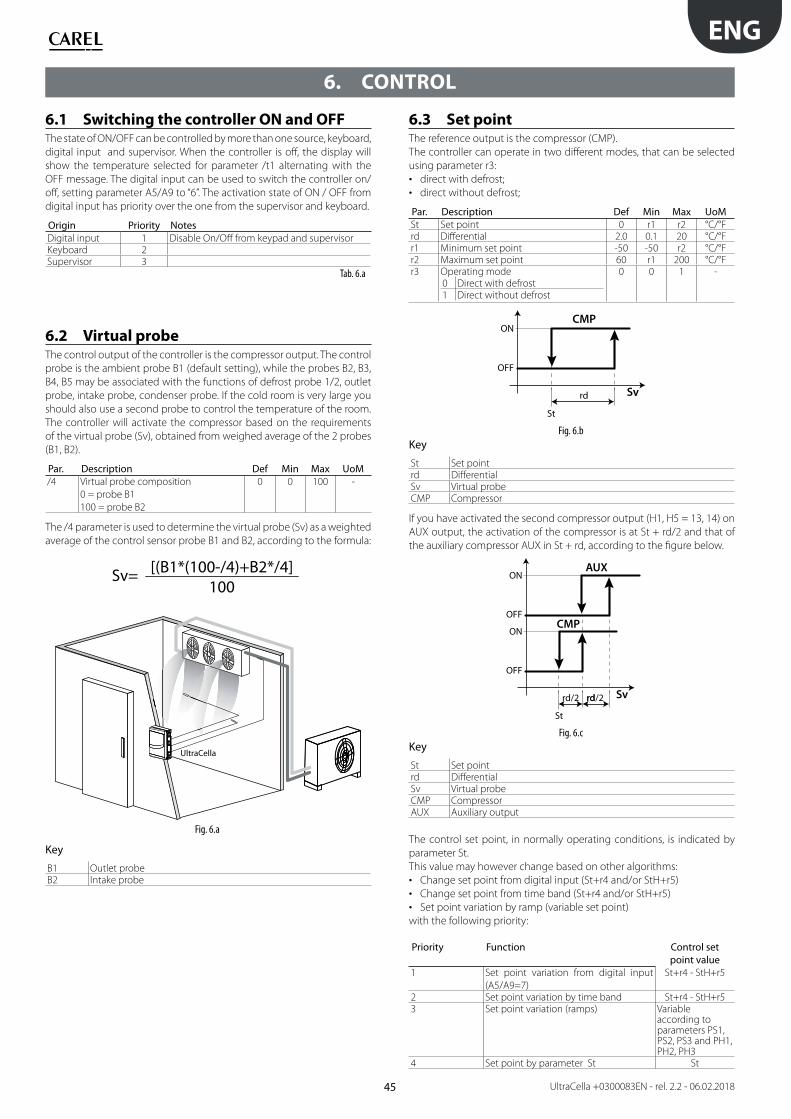
45
ENG
UltraCella +0300083EN - rel. 2.2 - 06.02.2018
6. CONTROL
6.1 Switching the controller ON and OFF The state of ON/OFF can be controlled by more than one source, keyboard,
digital input and supervisor. When the controller is off, the display will
show the temperature selected for parameter /t1 alternating with the
OFF message. The digital input can be used to switch the controller on/
off, setting parameter A5/A9 to “6”. The activation state of ON / OFF from
digital input has priority over the one from the supervisor and keyboard.
Origin Priority NotesDigital input 1 Disable On/Off from keypad and supervisorKeyboard 2Supervisor 3
Tab. 6.a
6.2 Virtual probeThe control output of the controller is the compressor output. The control
probe is the ambient probe B1 (default setting), while the probes B2, B3,
B4, B5 may be associated with the functions of defrost probe 1/2, outlet
probe, intake probe, condenser probe. If the cold room is very large you
should also use a second probe to control the temperature of the room.
The controller will activate the compressor based on the requirements
of the virtual probe (Sv), obtained from weighed average of the 2 probes
(B1, B2).
Par. Description Def Min Max UoM/4 Virtual probe composition
0 = probe B1
100 = probe B2
0 0 100 -
The /4 parameter is used to determine the virtual probe (Sv) as a weighted
average of the control sensor probe B1 and B2, according to the formula:
Sv= [(B1*(100-/4)+B2*/4]100
UltraCella
Fig. 6.a
Key
B1 Outlet probeB2 Intake probe
6.3 Set pointThe reference output is the compressor (CMP).
The controller can operate in two different modes, that can be selected
using parameter r3:
• direct with defrost;
• direct without defrost;
Par. Description Def Min Max UoMSt Set point 0 r1 r2 °C/°Frd Differential 2.0 0.1 20 °C/°Fr1 Minimum set point -50 -50 r2 °C/°Fr2 Maximum set point 60 r1 200 °C/°Fr3 Operating mode
0 Direct with defrost 1 Direct without defrost
0 0 1 -
Sv
CMP
St
rd
OFF
ON
Fig. 6.b
Key
St Set pointrd DifferentialSv Virtual probeCMP Compressor
If you have activated the second compressor output (H1, H5 = 13, 14) on
AUX output, the activation of the compressor is at St + rd/2 and that of
the auxiliary compressor AUX in St + rd, according to the figure below.
Sv
CMP
AUX
St
rd/2 rd/2rd
OFF
ON
OFF
ON
Fig. 6.c
Key
St Set pointrd DifferentialSv Virtual probeCMP CompressorAUX Auxiliary output
The control set point, in normally operating conditions, is indicated by
parameter St.
This value may however change based on other algorithms:
• Change set point from digital input (St+r4 and/or StH+r5)
• Change set point from time band (St+r4 and/or StH+r5)
• Set point variation by ramp (variable set point)
with the following priority:
Priority Function Control set point value
1 Set point variation from digital input
(A5/A9=7)
St+r4 - StH+r5
2 Set point variation by time band St+r4 - StH+r53 Set point variation (ramps) Variable
according to parameters PS1, PS2, PS3 and PH1, PH2, PH3
4 Set point by parameter St St

46
ENG
UltraCella +0300083EN - rel. 2.2 - 06.02.2018
6.3.1 Set point variation from digital input
With UltraCella, the control set point can be changed using digital inputs
DI2 and DI3. This function may be useful in applications where the control
set point can be increased when the store is not open to the public (for
example, at night), thus guaranteeing energy savings and the certainty
that the product is ready for display and sale when needed.
Digital input DI2 is associated with parameter A5, while digital input DI3
is associated with parameter A9. To enable set point variation from digital
input, set A5=7 (for DI2) or A9=7 (for DI3).
Par. Description Def Min Max UoMA5 Configuration of digital input 2 (DI2)
7 = set point variation
0 0 15 -
A9 Configuration of digital input 3 (DI3)
7 = set point variation
0 0 15 -
When the digital input is active (closed), the control set point will be the
sum of the values of parameters St and r4; when the digital input is not
active (open), the control set point will be the value set for parameter St
(normal operation).
• DI2 / DI3 not active (open) -> control set point = St
• DI2 / DI3 active (close) -> control set point = St + r4
Par. Description Def Min Max UoMr4 Set point offset 3.0 -60 60 °C/°Fr5 Humidity set point offset 0.0 -50.0 50.0 %
Note: when change set point is enabled and the current set point
is St+r4 (and/or Sth +r5), the SET button flashes to indicate that
the control set point is not the value indicated by parameter St or StH.
Note: if the second row of the display shows the set point (/t2 =
6, on models where featured), the value displayed will be the
effective control set point (therefore, either St or St + r4, depending on
the status of the digital input)
6.3.2 Set point variation by time band
With UltraCella, the control set point can also be changed based on time
bands, using the RTC fitted on the device. The function is similar to the
one described in the previous paragraph, however this is more useful
when needing to change the set point repeatedly at fixed times.
When the time band is active, the control set point will be the sum of the
values of parameters St and r4.
• Time band not active -> control set point = St or StH
• Time band active -> control set point = St + r4 or StH + r5
Par. Description Def Min Max UoMr4 Set point offset 3.0 -60 60 °C/°Fr5 Humidity set point offset 0.0 -50.0 50.0 %
To activate set point variation by time band, a time band needs to be
enabled by setting the following parameters:
Par. Description Def Min Max UoMdSn Set point variation by time band: day
0 = disable
1, 2, …7 = Sunday, Monday, … Saturday
8 = Monday to Friday
9 = Monday to Saturday
10 = Saturday & Sunday
11 = every day
0 0 11 days
hSn Start set point variation by time band:
hours
0 0 23 hours
MSn Start set point variation by time band:
minutes
0 0 59 min
hSF End set point variation by time band:
hours
0 0 23 hours
MSF End set point variation by time band:
minutes
0 0 59 min
H9 Enable set point variation by time band
0/1=disabled/enabled
0 0 1 -
Example: to have a control set point of 4°C from Monday to Saturday,
08:30 to 18:30, and 9°C at all other times, set:
• St = 4;
• r4 = 5;
• dSn = 9;
• hSn = 8;
• MSn = 30;
• hSF = 18;
• MSF = 30;
• H9 = 1 -> if H9=0 the time band will never be active
Note: when change set point is enabled and the current set point
is St+r4 (and/or Sth +r5), the SET button flashes to indicate that
the control set point is not the value indicated by parameter St or StH.
Note: if the second row of the display shows the set point (/t2 =
6, on models where featured), the value displayed will be the
effective control set point (therefore, either St or St + r4, depending on
whether or not the time band is active).
6.3.3 Set point ramps
Very large cold rooms used to preserve food at below-zero temperatures
(freezers) may, for logistics or constructional reasons, require concrete
floors. Initially, the cold room, and thus its floor, which are initially at
ambient temperature, if cooled to the set point in the shortest possible
time (pull down), cracks may form in the floor, causing significant damage.
For this reason, in these types of cold rooms ramps of variable duration
and intensity are used to bring the cold room to the set point over a time
that is suitable for the concrete floor.
On UltraCella, ramps can be configured that are divided into three phases.
The slope of the ramp depends on the final temperature set point and
the duration of each phase.
Phase 1: typically this is an initial cooling ramp, from ambient temperature
to a final temperature around 0°C, lasting several days (default 6 days).
Phase 2: typically this is a phase in which the temperature reached in
phase 1 is maintained, lasting several days (default 2 days)
Phase 3: this is the second and final cooling ramp to the final temperature
set point for storing the frozen food and, being the most critical phase,
typically lasts longer (default 10 days).
Par. Description Def Min Max UoMPS1 Ramps: final set point, phase 1 0 -50,0 200,0 °C/°FPS2 Ramps: final set point, phase 2 0 -50,0 200,0 °C/°FPS3 Ramps: final set point, phase 3 -30,0 -50,0 200,0 °C/°FPH1 Ramps: duration of phase 1 6 0 10 daysPH2 Ramps: duration of phase 2 2 0 10 daysPH3 Ramps: duration of phase 3 10 0 10 days
Example: ramp starting from an ambient temperature of 30°C, the first
phase reaches 0°C in 6 days (phase 1), maintained at 0°C for 2 days (phase
2) and final cooling ramp to the set point of -30°C over 10 days (phase 3).
-30 °C
-20 °C
-10 °C
0 °C
10 °C
20 °C
30 °C
0 d 00h1 d 00h
2 d 00h3 d 00h
4 d 00h5 d 00h
6 d 00h7 d 00h
8 d 00h9 d 00h
10 d 00h
11 d 00h
12 d 00h
13 d 00h
14 d 00h
15 d 00h
16 d 00h
17 d 00h
18 d 00h
1,5 K /12 h
2,5 K /12 h
48 hours at 0°C
i f f
inte
rnal
tem
pera
ture
REFRIGERATION CURVE FOR COLD ROOMS
Note: when the ramps are active, and throughout their duration,
the control set point is no longer the value indicated by parameter
St, but is automatically recalculated, depending on the values set for
parameters PSi and PHi, every 12 hours.
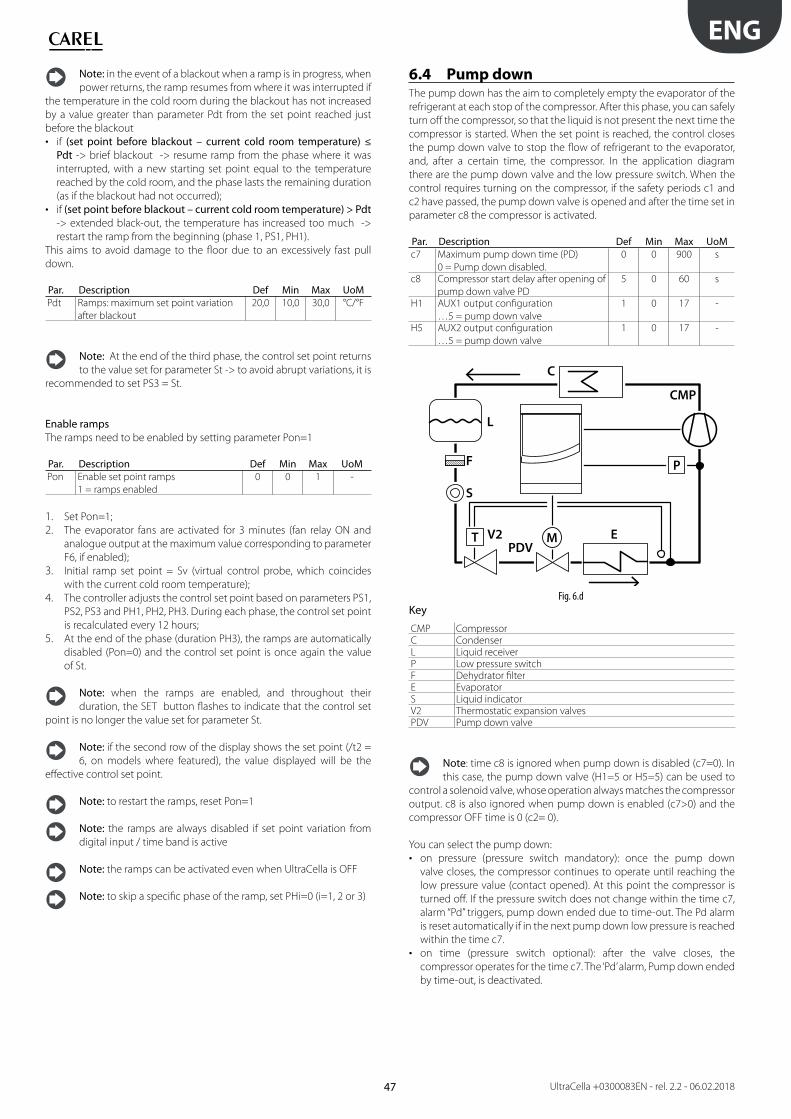
47
ENG
UltraCella +0300083EN - rel. 2.2 - 06.02.2018
Note: in the event of a blackout when a ramp is in progress, when
power returns, the ramp resumes from where it was interrupted if
the temperature in the cold room during the blackout has not increased
by a value greater than parameter Pdt from the set point reached just
before the blackout
• if (set point before blackout – current cold room temperature) ≤ Pdt -> brief blackout -> resume ramp from the phase where it was
interrupted, with a new starting set point equal to the temperature
reached by the cold room, and the phase lasts the remaining duration
(as if the blackout had not occurred);
• if (set point before blackout – current cold room temperature) > Pdt -> extended black-out, the temperature has increased too much ->
restart the ramp from the beginning (phase 1, PS1, PH1).
This aims to avoid damage to the floor due to an excessively fast pull
down.
Par. Description Def Min Max UoMPdt Ramps: maximum set point variation
after blackout
20,0 10,0 30,0 °C/°F
Note: At the end of the third phase, the control set point returns
to the value set for parameter St -> to avoid abrupt variations, it is
recommended to set PS3 = St.
Enable rampsThe ramps need to be enabled by setting parameter Pon=1
Par. Description Def Min Max UoMPon Enable set point ramps
1 = ramps enabled
0 0 1 -
1. Set Pon=1;
2. The evaporator fans are activated for 3 minutes (fan relay ON and
analogue output at the maximum value corresponding to parameter
F6, if enabled);
3. Initial ramp set point = Sv (virtual control probe, which coincides
with the current cold room temperature);
4. The controller adjusts the control set point based on parameters PS1,
PS2, PS3 and PH1, PH2, PH3. During each phase, the control set point
is recalculated every 12 hours;
5. At the end of the phase (duration PH3), the ramps are automatically
disabled (Pon=0) and the control set point is once again the value
of St.
Note: when the ramps are enabled, and throughout their
duration, the SET button flashes to indicate that the control set
point is no longer the value set for parameter St.
Note: if the second row of the display shows the set point (/t2 =
6, on models where featured), the value displayed will be the
effective control set point.
Note: to restart the ramps, reset Pon=1
Note: the ramps are always disabled if set point variation from
digital input / time band is active
Note: the ramps can be activated even when UltraCella is OFF
Note: to skip a specific phase of the ramp, set PHi=0 (i=1, 2 or 3)
6.4 Pump downThe pump down has the aim to completely empty the evaporator of the
refrigerant at each stop of the compressor. After this phase, you can safely
turn off the compressor, so that the liquid is not present the next time the
compressor is started. When the set point is reached, the control closes
the pump down valve to stop the flow of refrigerant to the evaporator,
and, after a certain time, the compressor. In the application diagram
there are the pump down valve and the low pressure switch. When the
control requires turning on the compressor, if the safety periods c1 and
c2 have passed, the pump down valve is opened and after the time set in
parameter c8 the compressor is activated.
Par. Description Def Min Max UoMc7 Maximum pump down time (PD)
0 = Pump down disabled.
0 0 900 s
c8 Compressor start delay after opening of
pump down valve PD
5 0 60 s
H1 AUX1 output configuration
…5 = pump down valve
1 0 17 -
H5 AUX2 output configuration
…5 = pump down valve
1 0 17 -
P
T M E
S
F
L
C
CMP
V2PDV
Fig. 6.d
Key
CMP CompressorC CondenserL Liquid receiverP Low pressure switchF Dehydrator filterE EvaporatorS Liquid indicatorV2 Thermostatic expansion valvesPDV Pump down valve
Note: time c8 is ignored when pump down is disabled (c7=0). In
this case, the pump down valve (H1=5 or H5=5) can be used to
control a solenoid valve, whose operation always matches the compressor
output. c8 is also ignored when pump down is enabled (c7>0) and the
compressor OFF time is 0 (c2= 0).
You can select the pump down:
• on pressure (pressure switch mandatory): once the pump down
valve closes, the compressor continues to operate until reaching the
low pressure value (contact opened). At this point the compressor is
turned off. If the pressure switch does not change within the time c7,
alarm “Pd” triggers, pump down ended due to time-out. The Pd alarm
is reset automatically if in the next pump down low pressure is reached
within the time c7.
• on time (pressure switch optional): after the valve closes, the
compressor operates for the time c7. The ‘Pd’ alarm, Pump down ended
by time-out, is deactivated.
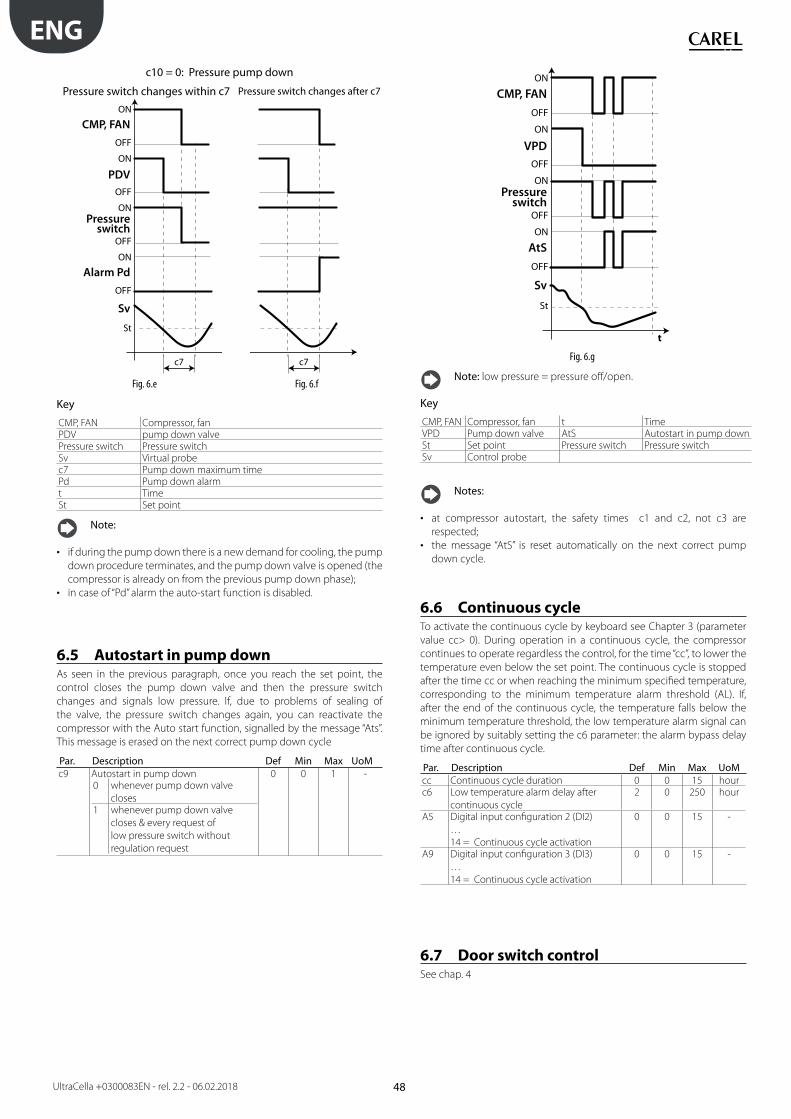
48
ENG
UltraCella +0300083EN - rel. 2.2 - 06.02.2018
c10 = 0: Pressure pump down
Pressure switch changes within c7 Pressure switch changes after c7
Sv
Alarm Pd
Pressureswitch
PDV
CMP, FAN
c7
OFF
St
ON
OFF
ON
OFF
ON
OFF
ON
c7
Fig. 6.e Fig. 6.f
Key
CMP, FAN Compressor, fanPDV pump down valvePressure switch Pressure switchSv Virtual probec7 Pump down maximum timePd Pump down alarmt TimeSt Set point
Note:
• if during the pump down there is a new demand for cooling, the pump
down procedure terminates, and the pump down valve is opened (the
compressor is already on from the previous pump down phase);
• in case of “Pd” alarm the auto-start function is disabled.
6.5 Autostart in pump downAs seen in the previous paragraph, once you reach the set point, the
control closes the pump down valve and then the pressure switch
changes and signals low pressure. If, due to problems of sealing of
the valve, the pressure switch changes again, you can reactivate the
compressor with the Auto start function, signalled by the message “Ats”.
This message is erased on the next correct pump down cycle
Par. Description Def Min Max UoMc9 Autostart in pump down
0 whenever pump down valve
closes1 whenever pump down valve
closes & every request of
low pressure switch without
regulation request
0 0 1 -
Sv
AtS
Pressureswitch
VPD
CMP, FAN
OFF
St
t
ON
OFF
ON
OFF
ON
OFF
ON
Fig. 6.g
Note: low pressure = pressure off/open.
Key
CMP, FAN Compressor, fan t TimeVPD Pump down valve AtS Autostart in pump downSt Set point Pressure switch Pressure switchSv Control probe
Notes:
• at compressor autostart, the safety times c1 and c2, not c3 are
respected;
• the message “AtS” is reset automatically on the next correct pump
down cycle.
6.6 Continuous cycleTo activate the continuous cycle by keyboard see Chapter 3 (parameter
value cc> 0). During operation in a continuous cycle, the compressor
continues to operate regardless the control, for the time “cc”, to lower the
temperature even below the set point. The continuous cycle is stopped
after the time cc or when reaching the minimum specified temperature,
corresponding to the minimum temperature alarm threshold (AL). If,
after the end of the continuous cycle, the temperature falls below the
minimum temperature threshold, the low temperature alarm signal can
be ignored by suitably setting the c6 parameter: the alarm bypass delay
time after continuous cycle.
Par. Description Def Min Max UoMcc Continuous cycle duration 0 0 15 hourc6 Low temperature alarm delay after
continuous cycle
2 0 250 hour
A5 Digital input configuration 2 (DI2)
…
14 = Continuous cycle activation
0 0 15 -
A9 Digital input configuration 3 (DI3)
…
14 = Continuous cycle activation
0 0 15 -
6.7 Door switch controlSee chap. 4

49
ENG
UltraCella +0300083EN - rel. 2.2 - 06.02.2018
6.8 Defrost
IntroductionThese parameters (dd1…dd8) can be used to set up to 8 defrost events
linked to the system clock (RTC)
Par. Description Def Min Max UoMdd1…8 Defrost 1…8: day
0 Disabled1…7 Monday…Sunday8 From Monday to Friday9 From Monday to Saturday10 Saturday and Sunday11 Daily
0 0 11 -
hh1…8 Defrost 1…8: hour 0 0 23 hournn1…8 Defrost 1…8: minute 0 0 59 min.
UltraCella allows you to manage the following types of defrost, depending
on parameter d0:
0. electric heater defrost by temperature (placed near the evaporator);
1. hot gas defrost by temperature.
2. electric heater defrost by time;
3. hot gas defrost by time.
Note: Ed1 and Ed2 indicate that the defrost ended due to time-
out.
Note: Ed1 and Ed2 alarms can be disabled by A8 parameter.
Par. Description Def Min Max UoMA8 Ed1, Ed2 enable
0/1= disabled/enabled
0 0 1 -
The end of the defrost cycle can be by temperature, and in this case it is
necessary to install the defrost probe Sd (to select between B2 and B3) or
by time. In the first case the defrost ends if the probe Sd measures a value
greater than the value of dt1 or dP1 time has elapsed, in the second case
if the defrosting phase exceeds the maximum time dP1. At the end of
the defrost the controller can enter in dripping status (present if dd> 0),
in which the compressor and the fans are turned off, and subsequently in
the state of post-dripping (if present Fd> 0), in which the control resumes
with fans off. You can choose the display on the user terminal during
defrost, using parameter d6.
Par. Description Def Min Max UoMd0 Type of defrost
0 Heater by temperature1 Hot gas by temperature2 Heater by time3 Hot gas by time
0 0 3 -
dt1 End defrost temperature, main
evaporator
4 -50 200 °C/°F
dt2 End defrost temperature, auxiliary
evaporator
4 -50 200 °C/°F
dP1 Maximum defrost duration 30 1 250 mindP2 Maximum defrost duration, auxiliary
evaporator
30 1 250 min
d6 Terminal display during defrost
0 = Temperature alternated with dEF
1 = Last temperature shown before
defrost
2 = dEF
1 0 2 -
Sd
DEF
DEF
t
t
t
OFF
d0=2, 3
d0=0, 1
ON
OFF
ON
dt1
dt1-1
dP1
Fig. 6.h
Key
t Timedt1 End of defrost temperaturedP1 Maximum defrost durationSd Defrost Probed0 Type of defrostDEF Defrost
1. electric heater defrost (d0 = 0, 2): operating cycle.The operating cycle refers to default values of the parameters F2 and F3.
T M B3
E
S
F
L
C
CMP
V2PDV
Fig. 6.i
RES
FAN
PDV
CMP
t
F3=1F0=0
REFRIG PUMPDOWN
DEF(REF)
OFF
ON
OFF
ON
OFF
ON
OFF
ON c8
DRIP(dd)
POST DRIP(Fd)
REFRIG
Fig. 6.j
Key
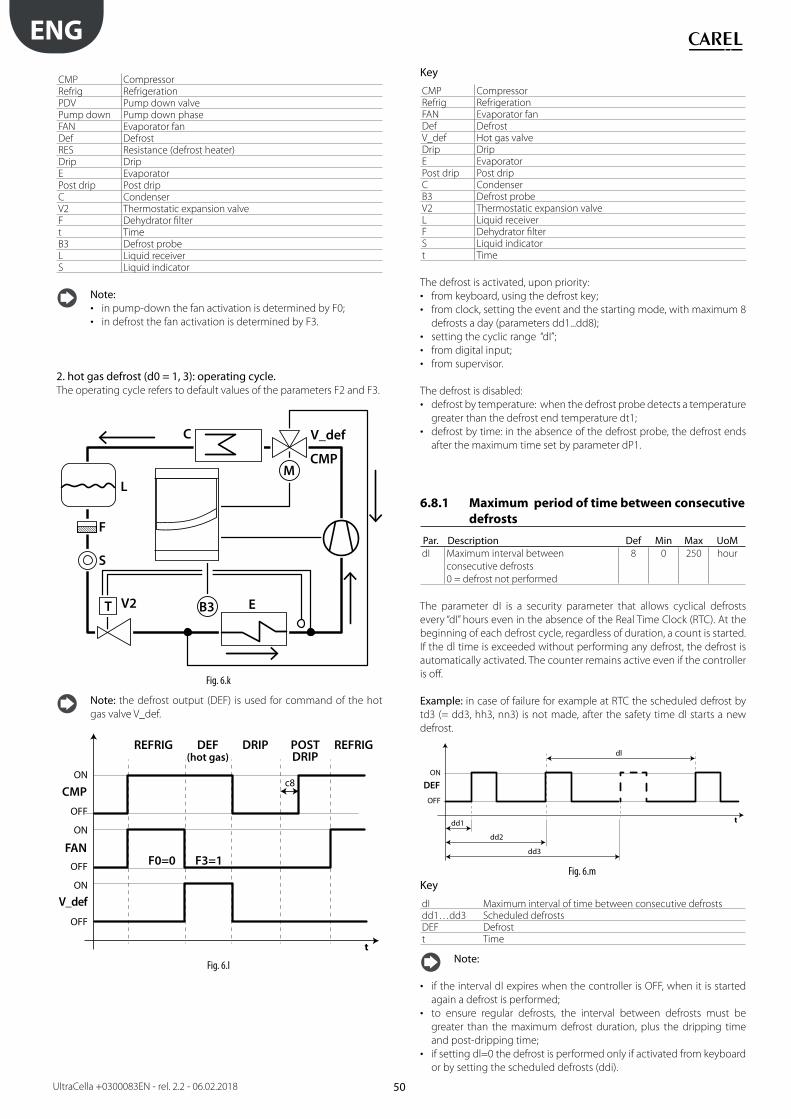
50
ENG
UltraCella +0300083EN - rel. 2.2 - 06.02.2018
CMP CompressorRefrig RefrigerationPDV Pump down valvePump down Pump down phaseFAN Evaporator fanDef DefrostRES Resistance (defrost heater)Drip DripE EvaporatorPost drip Post dripC CondenserV2 Thermostatic expansion valveF Dehydrator filtert TimeB3 Defrost probeL Liquid receiverS Liquid indicator
Note: • in pump-down the fan activation is determined by F0;
• in defrost the fan activation is determined by F3.
2. hot gas defrost (d0 = 1, 3): operating cycle.The operating cycle refers to default values of the parameters F2 and F3.
T B3 E
S
F
L
C
CMP
V2
V_def
M
Fig. 6.k
Note: the defrost output (DEF) is used for command of the hot
gas valve V_def.
V_def
FAN
CMP
t
F3=1F0=0
REFRIG REFRIGDRIP POSTDRIP
DEF(hot gas)
OFF
ON
OFF
ON
OFF
ONc8
Fig. 6.l
Key
CMP CompressorRefrig RefrigerationFAN Evaporator fanDef DefrostV_def Hot gas valveDrip DripE EvaporatorPost drip Post dripC CondenserB3 Defrost probeV2 Thermostatic expansion valveL Liquid receiverF Dehydrator filterS Liquid indicatort Time
The defrost is activated, upon priority:
• from keyboard, using the defrost key;
• from clock, setting the event and the starting mode, with maximum 8
defrosts a day (parameters dd1...dd8);
• setting the cyclic range “dI”;
• from digital input;
• from supervisor.
The defrost is disabled:
• defrost by temperature: when the defrost probe detects a temperature
greater than the defrost end temperature dt1;
• defrost by time: in the absence of the defrost probe, the defrost ends
after the maximum time set by parameter dP1.
6.8.1 Maximum period of time between consecutive
defrosts
Par. Description Def Min Max UoMdI Maximum interval between
consecutive defrosts
0 = defrost not performed
8 0 250 hour
The parameter dI is a security parameter that allows cyclical defrosts
every “dI” hours even in the absence of the Real Time Clock (RTC). At the
beginning of each defrost cycle, regardless of duration, a count is started.
If the dl time is exceeded without performing any defrost, the defrost is
automatically activated. The counter remains active even if the controller
is off.
Example: in case of failure for example at RTC the scheduled defrost by
td3 (= dd3, hh3, nn3) is not made, after the safety time dI starts a new
defrost.
DEF
t
OFF
ON
dl
dd3
dd2
dd1
Fig. 6.m
Key
dI Maximum interval of time between consecutive defrostsdd1…dd3 Scheduled defrostsDEF Defrostt Time
Note:
• if the interval dI expires when the controller is OFF, when it is started
again a defrost is performed;
• to ensure regular defrosts, the interval between defrosts must be
greater than the maximum defrost duration, plus the dripping time
and post-dripping time;
• if setting dl=0 the defrost is performed only if activated from keyboard
or by setting the scheduled defrosts (ddi).
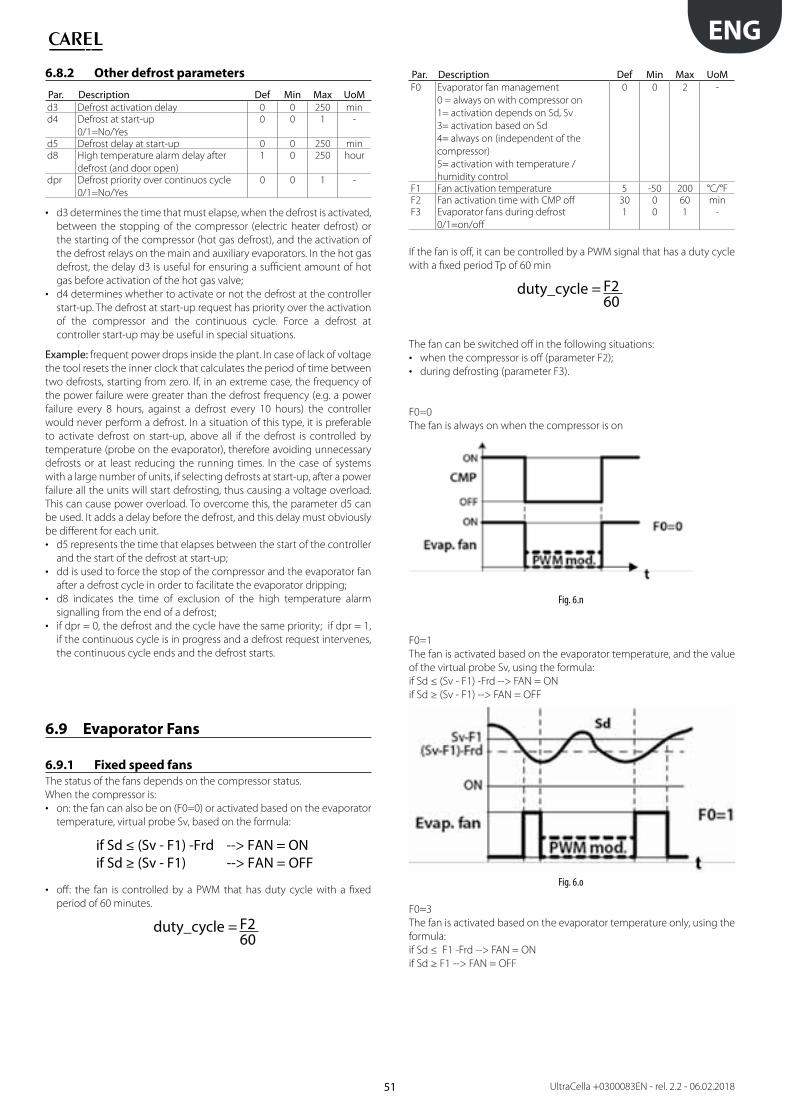
51
ENG
UltraCella +0300083EN - rel. 2.2 - 06.02.2018
6.8.2 Other defrost parameters
Par. Description Def Min Max UoMd3 Defrost activation delay 0 0 250 mind4 Defrost at start-up
0/1=No/Yes
0 0 1 -
d5 Defrost delay at start-up 0 0 250 mind8 High temperature alarm delay after
defrost (and door open)
1 0 250 hour
dpr Defrost priority over continuos cycle
0/1=No/Yes
0 0 1 -
• d3 determines the time that must elapse, when the defrost is activated,
between the stopping of the compressor (electric heater defrost) or
the starting of the compressor (hot gas defrost), and the activation of
the defrost relays on the main and auxiliary evaporators. In the hot gas
defrost, the delay d3 is useful for ensuring a sufficient amount of hot
gas before activation of the hot gas valve;
• d4 determines whether to activate or not the defrost at the controller
start-up. The defrost at start-up request has priority over the activation
of the compressor and the continuous cycle. Force a defrost at
controller start-up may be useful in special situations.
Example: frequent power drops inside the plant. In case of lack of voltage
the tool resets the inner clock that calculates the period of time between
two defrosts, starting from zero. If, in an extreme case, the frequency of
the power failure were greater than the defrost frequency (e.g. a power
failure every 8 hours, against a defrost every 10 hours) the controller
would never perform a defrost. In a situation of this type, it is preferable
to activate defrost on start-up, above all if the defrost is controlled by
temperature (probe on the evaporator), therefore avoiding unnecessary
defrosts or at least reducing the running times. In the case of systems
with a large number of units, if selecting defrosts at start-up, after a power
failure all the units will start defrosting, thus causing a voltage overload.
This can cause power overload. To overcome this, the parameter d5 can
be used. It adds a delay before the defrost, and this delay must obviously
be different for each unit.
• d5 represents the time that elapses between the start of the controller
and the start of the defrost at start-up;
• dd is used to force the stop of the compressor and the evaporator fan
after a defrost cycle in order to facilitate the evaporator dripping;
• d8 indicates the time of exclusion of the high temperature alarm
signalling from the end of a defrost;
• if dpr = 0, the defrost and the cycle have the same priority; if dpr = 1,
if the continuous cycle is in progress and a defrost request intervenes,
the continuous cycle ends and the defrost starts.
6.9 Evaporator Fans
6.9.1 Fixed speed fans
The status of the fans depends on the compressor status.
When the compressor is:
• on: the fan can also be on (F0=0) or activated based on the evaporator
temperature, virtual probe Sv, based on the formula:
if Sd ≤ (Sv - F1) -Frd --> FAN = ONif Sd ≥ (Sv - F1) --> FAN = OFF
• off: the fan is controlled by a PWM that has duty cycle with a fixed
period of 60 minutes.
duty_cycle = 60F2
Par. Description Def Min Max UoMF0 Evaporator fan management
0 = always on with compressor on
1= activation depends on Sd, Sv
3= activation based on Sd
4= always on (independent of the
compressor)
5= activation with temperature /
humidity control
0 0 2 -
F1 Fan activation temperature 5 -50 200 °C/°FF2 Fan activation time with CMP off 30 0 60 minF3 Evaporator fans during defrost
0/1=on/off
1 0 1 -
If the fan is off, it can be controlled by a PWM signal that has a duty cycle
with a fixed period Tp of 60 min
duty_cycle = 60F2
The fan can be switched off in the following situations:
• when the compressor is off (parameter F2);
• during defrosting (parameter F3).
F0=0
The fan is always on when the compressor is on
Fig. 6.n
F0=1
The fan is activated based on the evaporator temperature, and the value
of the virtual probe Sv, using the formula:
if Sd ≤ (Sv - F1) -Frd --> FAN = ON
if Sd ≥ (Sv - F1) --> FAN = OFF
Fig. 6.o
F0=3
The fan is activated based on the evaporator temperature only, using the
formula:
if Sd ≤ F1 -Frd --> FAN = ON
if Sd ≥ F1 --> FAN = OFF

52
ENG
UltraCella +0300083EN - rel. 2.2 - 06.02.2018
Fig. 6.p
F0=4
The fan is always on, irrespective of compressor status.
Fig. 6.q
F0=5
The fan is on if at least one of the following loads (compressor, heaters /
dehumidifier, humidifier) is on
Fig. 6.r
Key
CMP CompressorPWM mod. PWM modulationF1 Fan activation thresholdFrd Fan activation differentialEvap.fan Evaporator fant TimeSv Virtual probeSd Defrost probe
The fan can be stopped:
• when the compressor is off (parameter F2);
• during defrost (parameter F3).
6.9.2 Variable speed fans
The installation of variable speed fans may be useful to optimise energy
consumption. In this case, the fans are powered by the mains, while the
control signal is provided by UltraCella by analogue output Y1 0…10 Vdc.
The maximum and minimum fan speed can be set using F6 and F7
parameters (in percentage respect range 0…10V). If using the fan speed
controller, F5 represents the temperature below which the fans are
activated, with a fix hysteresis of 1°C.
Par. Description Def Min Max UoMF5 Evaporator fans cut-off temperature
(hysteresis 1°C)
15 -50 200 °C/°F
F6 Maximum fans speed 100 F7 100 %F7 Minimum fans speed 0 0 F6 %
To enable the algorithm, it’s necessary to select variable speed fans mode
(F0=2) and set analogue output 0…10 Vdc (HO1=2).
Par. Description Def Min Max UoMF0 Evaporator fan management
…
2 = variable speed fans based on Sd
6 = variable speed fans based on Sd-Sv
7 = variable speed fans based on Sv
0 0 2 -
HO1 Output Y1 0…10 V configuration
…
2 = variable speed fans regulated on Sd
0 0 3 -
Note: the behaviour of modulating fans may be affected not only
by the “cooling” demand and temperature control request, but
also by other control functions (dehumidification, humidification and
heating), if present.
In order of priority, the following are possible
• If at a certain time the dehumidification function is activated, the fans
will run at a fixed speed - configured by parameter F11 – for the entire
duration of the dehumidification function.
• If at a certain time the heating function is activated, the fans will run at
maximum speed for the entire duration of the heating function.
• If at a certain time the humidification function is activated, the fans
will ensure a minimum speed - configured by parameter F12 – even
when the compressor is off. The fan speed may be higher based on
the logic of F0
• During the “cooling” phase, fan operation normally depends on the
logic of parameter F0
Par. Description Def Min Max UoMF11 Fan speed during dehumidification 40 0 100 %F12 Minimum fan speed during humidification 10 0 100 %
F0=2
The fan modulates its speed based on the evaporator temperature only,
increasing speed the further Sd is below F1:
Fig. 6.s
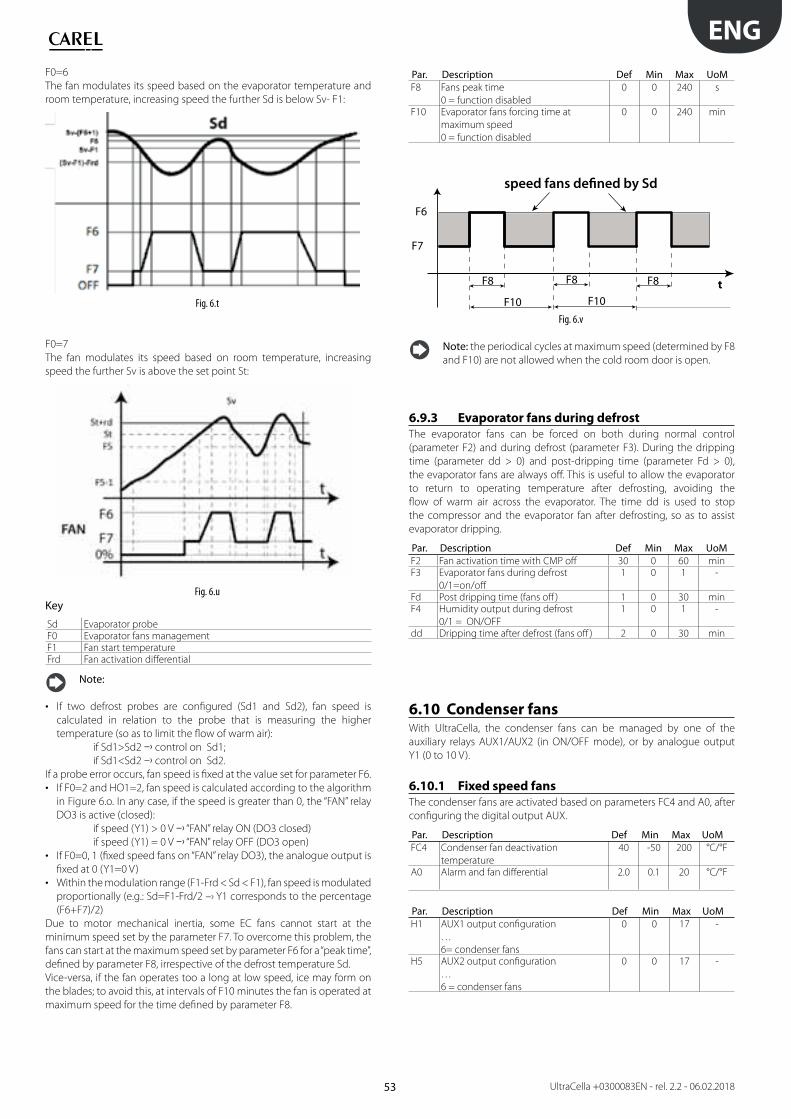
53
ENG
UltraCella +0300083EN - rel. 2.2 - 06.02.2018
F0=6
The fan modulates its speed based on the evaporator temperature and
room temperature, increasing speed the further Sd is below Sv- F1:
Fig. 6.t
F0=7
The fan modulates its speed based on room temperature, increasing
speed the further Sv is above the set point St:
Fig. 6.u
Key
Sd Evaporator probeF0 Evaporator fans managementF1 Fan start temperatureFrd Fan activation differential
Note:
• If two defrost probes are configured (Sd1 and Sd2), fan speed is
calculated in relation to the probe that is measuring the higher
temperature (so as to limit the flow of warm air):
if Sd1>Sd2 –› control on Sd1;
if Sd1<Sd2 –› control on Sd2.
If a probe error occurs, fan speed is fixed at the value set for parameter F6.
• If F0=2 and HO1=2, fan speed is calculated according to the algorithm
in Figure 6.o. In any case, if the speed is greater than 0, the “FAN” relay
DO3 is active (closed):
if speed (Y1) > 0 V –› “FAN” relay ON (DO3 closed)
if speed (Y1) = 0 V –› “FAN” relay OFF (DO3 open)
• If F0=0, 1 (fixed speed fans on “FAN” relay DO3), the analogue output is
fixed at 0 (Y1=0 V)
• Within the modulation range (F1-Frd < Sd < F1), fan speed is modulated
proportionally (e.g.: Sd=F1-Frd/2 –› Y1 corresponds to the percentage
(F6+F7)/2)
Due to motor mechanical inertia, some EC fans cannot start at the
minimum speed set by the parameter F7. To overcome this problem, the
fans can start at the maximum speed set by parameter F6 for a “peak time”,
defined by parameter F8, irrespective of the defrost temperature Sd.
Vice-versa, if the fan operates too a long at low speed, ice may form on
the blades; to avoid this, at intervals of F10 minutes the fan is operated at
maximum speed for the time defined by parameter F8.
Par. Description Def Min Max UoMF8 Fans peak time
0 = function disabled
0 0 240 s
F10 Evaporator fans forcing time at
maximum speed
0 = function disabled
0 0 240 min
t
speed fans defined by Sd
F7
F6
F8 F8 F8
F10 F10
Fig. 6.v
Note: the periodical cycles at maximum speed (determined by F8
and F10) are not allowed when the cold room door is open.
6.9.3 Evaporator fans during defrost
The evaporator fans can be forced on both during normal control
(parameter F2) and during defrost (parameter F3). During the dripping
time (parameter dd > 0) and post-dripping time (parameter Fd > 0),
the evaporator fans are always off. This is useful to allow the evaporator
to return to operating temperature after defrosting, avoiding the
flow of warm air across the evaporator. The time dd is used to stop
the compressor and the evaporator fan after defrosting, so as to assist
evaporator dripping.
Par. Description Def Min Max UoMF2 Fan activation time with CMP off 30 0 60 minF3 Evaporator fans during defrost
0/1=on/off
1 0 1 -
Fd Post dripping time (fans off ) 1 0 30 minF4 Humidity output during defrost
0/1 = ON/OFF
1 0 1 -
dd Dripping time after defrost (fans off ) 2 0 30 min
6.10 Condenser fansWith UltraCella, the condenser fans can be managed by one of the
auxiliary relays AUX1/AUX2 (in ON/OFF mode), or by analogue output
Y1 (0 to 10 V).
6.10.1 Fixed speed fans
The condenser fans are activated based on parameters FC4 and A0, after
configuring the digital output AUX.
Par. Description Def Min Max UoMFC4 Condenser fan deactivation
temperature
40 -50 200 °C/°F
A0 Alarm and fan differential 2.0 0.1 20 °C/°F
Par. Description Def Min Max UoMH1 AUX1 output configuration
…
6= condenser fans
0 0 17 -
H5 AUX2 output configuration
…
6 = condenser fans
0 0 17 -
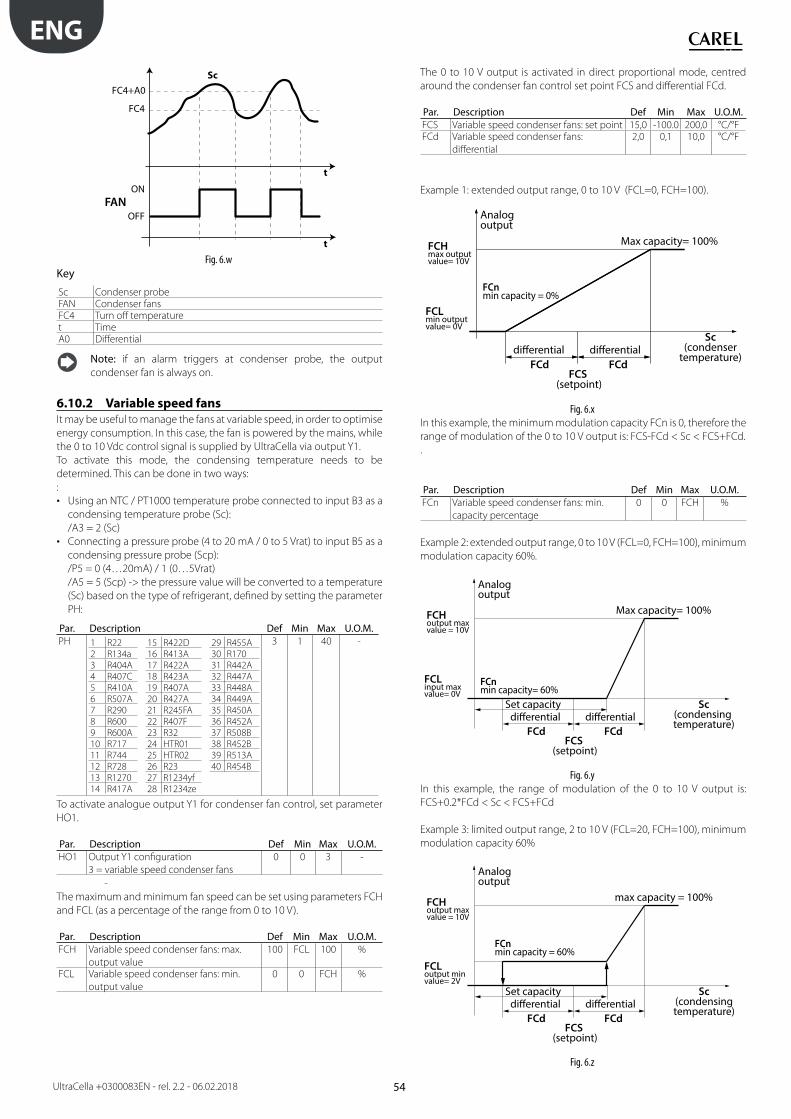
54
ENG
UltraCella +0300083EN - rel. 2.2 - 06.02.2018
FANOFF
ON
FC4
FC4+A0
Sc
t
t
Fig. 6.w
Key
Sc Condenser probeFAN Condenser fansFC4 Turn off temperaturet TimeA0 Differential
Note: if an alarm triggers at condenser probe, the output
condenser fan is always on.
6.10.2 Variable speed fans
It may be useful to manage the fans at variable speed, in order to optimise
energy consumption. In this case, the fan is powered by the mains, while
the 0 to 10 Vdc control signal is supplied by UltraCella via output Y1.
To activate this mode, the condensing temperature needs to be
determined. This can be done in two ways:
:
• Using an NTC / PT1000 temperature probe connected to input B3 as a
condensing temperature probe (Sc):
/A3 = 2 (Sc)
• Connecting a pressure probe (4 to 20 mA / 0 to 5 Vrat) to input B5 as a
condensing pressure probe (Scp):
/P5 = 0 (4…20mA) / 1 (0…5Vrat)
/A5 = 5 (Scp) -> the pressure value will be converted to a temperature
(Sc) based on the type of refrigerant, defined by setting the parameter
PH:
Par. Description Def Min Max U.O.M.PH 1 R22 15 R422D 29 R455A
2 R134a 16 R413A 30 R170
3 R404A 17 R422A 31 R442A
4 R407C 18 R423A 32 R447A
5 R410A 19 R407A 33 R448A
6 R507A 20 R427A 34 R449A
7 R290 21 R245FA 35 R450A
8 R600 22 R407F 36 R452A
9 R600A 23 R32 37 R508B
10 R717 24 HTR01 38 R452B
11 R744 25 HTR02 39 R513A
12 R728 26 R23 40 R454B
13 R1270 27 R1234yf
14 R417A 28 R1234ze
3 1 40 -
To activate analogue output Y1 for condenser fan control, set parameter
HO1.
Par. Description Def Min Max U.O.M.HO1 Output Y1 configuration
3 = variable speed condenser fans
0 0 3 -
-
The maximum and minimum fan speed can be set using parameters FCH
and FCL (as a percentage of the range from 0 to 10 V).
Par. Description Def Min Max U.O.M.FCH Variable speed condenser fans: max.
output value
100 FCL 100 %
FCL Variable speed condenser fans: min.
output value
0 0 FCH %
The 0 to 10 V output is activated in direct proportional mode, centred
around the condenser fan control set point FCS and differential FCd.
Par. Description Def Min Max U.O.M.FCS Variable speed condenser fans: set point 15,0 -100.0 200,0 °C/°FFCd Variable speed condenser fans:
differential
2,0 0,1 10,0 °C/°F
Example 1: extended output range, 0 to 10 V (FCL=0, FCH=100).
differential differentialFCd FCd
FCS (setpoint)
Sc(condenser
temperature)
FCnmin capacity = 0%
Max capacity= 100%
Analogoutput
FCHmax outputvalue= 10V
FCLmin outputvalue= 0V
Fig. 6.x
In this example, the minimum modulation capacity FCn is 0, therefore the
range of modulation of the 0 to 10 V output is: FCS-FCd < Sc < FCS+FCd.
.
Par. Description Def Min Max U.O.M.FCn Variable speed condenser fans: min.
capacity percentage
0 0 FCH %
Example 2: extended output range, 0 to 10 V (FCL=0, FCH=100), minimum
modulation capacity 60%.
differential differentialFCd FCd
FCS (setpoint)
Sc(condensing temperature)
FCnmin capacity= 60%
Max capacity= 100%
Analog output
FCHoutput max value = 10V
FCLinput maxvalue= 0V
Set capacity
Fig. 6.y
In this example, the range of modulation of the 0 to 10 V output is:
FCS+0.2*FCd < Sc < FCS+FCd
Example 3: limited output range, 2 to 10 V (FCL=20, FCH=100), minimum
modulation capacity 60%
differential differentialFCd FCd
FCS (setpoint)
Sc(condensingtemperature)
FCnmin capacity = 60%
max capacity = 100%
Analogoutput
FCHoutput maxvalue = 10V
FCLoutput minvalue= 2V
Set capacity
Fig. 6.z

55
ENG
UltraCella +0300083EN - rel. 2.2 - 06.02.2018
In this example, the range of modulation is still
FCS+0,2*FCd < Sc < FCS+FCd
for starting the fans, and
FCS-FCd < Sc < FCS+FCd
for stopping (the fans stop when the condensing temperature is less than
FCS-FCd.
Note: if a condensing temperature/pressure probe error occurs
(E2 for Sc or E4 for Scp), the analogue output will take the
maximum value indicated by parameter FCH, except in the following
events:
• CHt (high condenser temperature alarm, if configured)
• EPM (motor protector alarm, 3PH module, if present and configured)
• EPU (high/low pressure or Kriwan alarm, 3PH module, if present and
configured)
6.10.3 Floating condensing temperature set point
The control set point for variable speed condenser fans (parameter FCS)
may be either fixed or variable (floating condensing temperature). The
type of set point is selected using parameter FCt.
Par. Description Def Min Max UoMFCt Variable speed condenser fans: fixed or
variable set point
0/1=fixed FCS/floating
0 0 1 -
The purpose of the floating condensing temperature function is to
lower the condensing temperature based on the outside temperature,
so as to preserve correct compressor operation. The floating condensing
temperature set point algorithm requires an outside temperature probe
(SA), usually located near to the condenser, so as calculate the reference
control value, as shown in the following figure:
t
FSL (min)
FSH (max)floating set point
t
FSO(offset)
external temperature
SA
Fig. 6.aa
To activate the floating condensing temperature function, as well as
setting FCt=1, B3 (parameter /A3) or B4 (parameter /A4) needs to be
configured as an outside temperature probe (SA).
Par. Description Def Min Max UoM/A3 Probe 3 configuration
…
4 = out. temp. probe (SA)
0 0 5 -
/A4 Probe 4 configuration
…
1 = out. temp. probe (SA)
0 0 4 -
Note: if the outside temperature probe SA is not configured, or if
the probe has an error (E2 for B3, E3 for B4), the floating condensing
temperature algorithm will be disabled, and the control set point will be
fixed (FCS).
The algorithm allows for the floating condensing temperature set point
to vary between a minimum (parameter FSL) and a maximum (parameter
FSH) and, based on the outside temperature (SA), an offset is added
(parameter FSO). For details on these parameters, see the datasheet for
the condenser used
.
Par. Description Def Min Max UoMFSL Floating condensing temp. set point:
min value
5,0 -100,0 FSH °C/°F
FSH Floating condensing temp. set point:
max value
25,0 FSL 200,0 °C/°F
FSO Floating condensing temp. set point:
offset
5,0 -50,0 50,0 °C/°F
6.11 Duty settingIn the event the alarm “rE” (virtual control probe fault), the parameter c4 is
used to ensure the operation of the compressor until the fault is resolved.
The compressor cannot be activated according to the temperature (due
to the faulty probe), it is activated cyclically with a time of operation (ON)
equal to the value assigned to c4 and a switch-off time (OFF) fixed at 15
minutes .
CMPOFF
ON
tc4 15
Fig. 6.ab
Par. Description Def Min Max UoMc4 Compressor running time in duty
setting
0 0 100 min
6.12 Bowl resistanceThe resistor is used to heat the collection tank after the defrosting phase,
to prevent the ice from blocking the passage of water.
The resistance is activated for 3 minutes before the programmed defrost
or simultaneously with a manual defrost. The resistance is always off after
the defrost phase.
Par. Description Def Min Max UoMH1 AUX1 output configuration
…
3 = bowl resistance activation
1 0 17 -
H5 AUX2 output configuration
…
3 =bowl resistance activation
1 0 17 -
6.13 Defrosting with 2 evaporatorsYou can configure up to 2 defrost probes and up to 2 evaporator outputs.
The control recognizes the configuration based on the following table
(probe 1 is the control probe and cannot be configured)
DEFROST PROBES AND EVAPORATORS OUTPUT CONFIGURATION
Case Defrost probes
Evaporator outputs
Notes
1 B2 Evap. 1 B2 acts on the evap. 12 B2 Evap. 1 and 2 B2 acts on the evap. 13 B2 and B3 Evap. 1 B2 and B3 act on evap. 1 (start
and end of defrost based on the
minimum value probe)4 B2 and B3 Evap. 1 and 2 B2 acts on the evap. 1 and B3 act
on evap. 2
Tab. 6.b
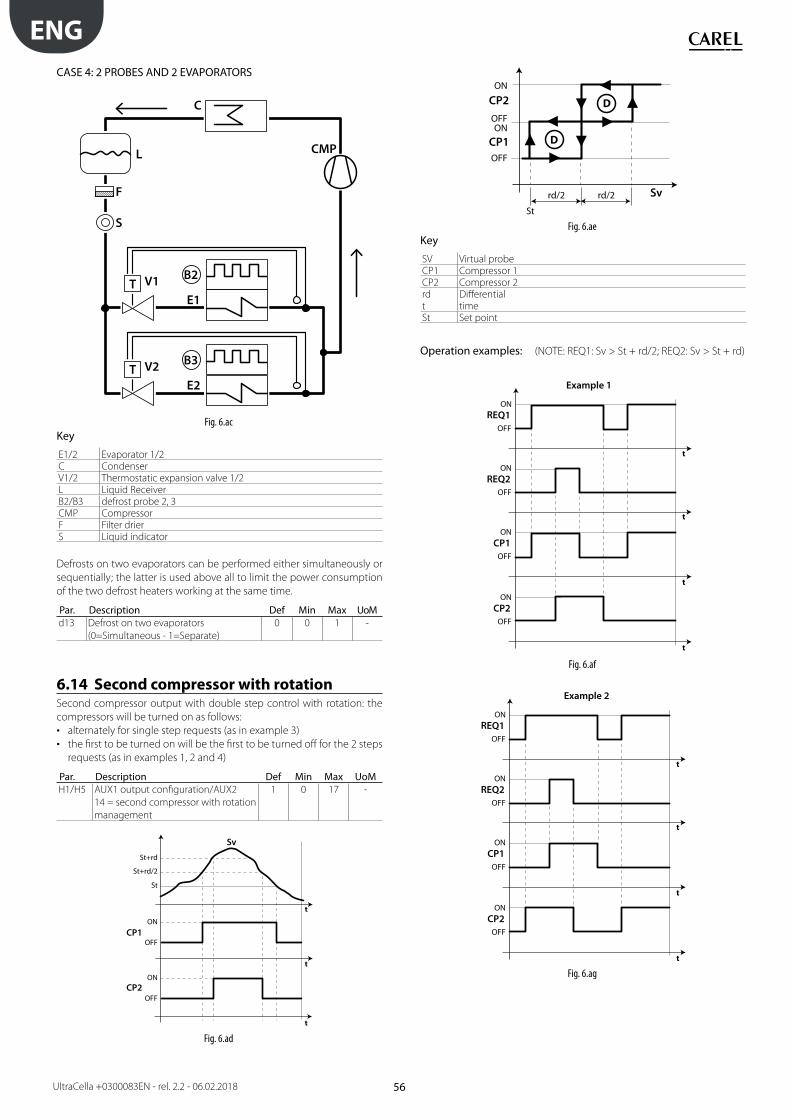
56
ENG
UltraCella +0300083EN - rel. 2.2 - 06.02.2018
CASE 4: 2 PROBES AND 2 EVAPORATORS
TB2
E1
S
F
L
C
CMP
V1
TB3
E2V2
Fig. 6.ac
Key
E1/2 Evaporator 1/2C CondenserV1/2 Thermostatic expansion valve 1/2L Liquid ReceiverB2/B3 defrost probe 2, 3CMP CompressorF Filter drierS Liquid indicator
Defrosts on two evaporators can be performed either simultaneously or
sequentially; the latter is used above all to limit the power consumption
of the two defrost heaters working at the same time.
Par. Description Def Min Max UoMd13 Defrost on two evaporators
(0=Simultaneous - 1=Separate)
0 0 1 -
6.14 Second compressor with rotationSecond compressor output with double step control with rotation: the
compressors will be turned on as follows:
• alternately for single step requests (as in example 3)
• the first to be turned on will be the first to be turned off for the 2 steps
requests (as in examples 1, 2 and 4)
Par. Description Def Min Max UoMH1/H5 AUX1 output configuration/AUX2
14 = second compressor with rotation
management
1 0 17 -
CP2
CP1
OFF
ON
OFF
ON
St+rd
St+rd/2
St
t
t
t
Sv
Fig. 6.ad
D
D
OFF
rd/2
St
Svrd/2
CP1
CP2
ONOFF
ON
Fig. 6.ae
Key
SV Virtual probeCP1 Compressor 1CP2 Compressor 2rd Differentialt timeSt Set point
Operation examples: (NOTE: REQ1: Sv > St + rd/2; REQ2: Sv > St + rd)
t
t
t
t
Example 1
CP2OFF
ON
CP1OFF
ON
REQ2OFF
ON
REQ1OFF
ON
Fig. 6.af
Example 2
t
t
t
t
CP2OFF
ON
CP1OFF
ON
REQ2OFF
ON
REQ1OFF
ON
Fig. 6.ag

57
ENG
UltraCella +0300083EN - rel. 2.2 - 06.02.2018
Example 3
t
t
t
t
CP2OFF
ON
CP1OFF
ON
REQ2OFF
ON
REQ1OFF
ON
Fig. 6.ah
Example 4
t
t
t
t
CP2OFF
ON
CP1OFF
ON
REQ2OFF
ON
REQ1OFF
ON
Fig. 6.ai
Key
REQ1 request 1REQ2 request 2t timeCP1 compressor 1CP2 compressor 2
6.15 Control with dead bandAs well as the control output in direct mode (cooling, compressor), on
UltraCella one of the two auxiliary outputs (AUX1/AUX2) can be selected
in reverse mode (heating, by electric heater / other actuators). This type of
control features an area in which the selected output is not active, called
the dead band (parameter rn). Parameter rr represents the differential for
the output in reverse mode.
Par. Description Def Min Max UoMrn Dead band 0 0 60 °C/°Frr Differential for control with dead band 2,0 0,1 20 °C/°F
To activate heating/cooling control with dead band, set:
• rn > 0
• H1 = 16 (for AUX1) or H5 = 16 (for AUX2)
Par. Description Def Min Max UoMH1 AUX1 output configuration
…
16 = output in reverse mode for
control with dead band
1 0 17 -
H5 AUX2 output configuration
…
16 = output in reverse mode for
control with dead band
1 0 17 -
The figure shown below refers to heating/cooling control with dead
band for a compressor (direct) with one capacity step.
ttttttttttttt
Fig. 6.aj
The following figure, on the other hand, refers to heating/cooling control
with dead band for a compressor with two capacity steps.
Fig. 6.ak
Note: the second compressor step (with or without rotation) and
control with dead band both refer to the auxiliary outputs (AUX1/
AUX2). If both are enabled, configure, for example H1 = 14 (AUX1 second
compressor step) and H5 = 16 (AUX2 output in reverse mode (heating)
with dead band)
In the same way, auxiliary outputs AUX1 / AUX2 can be used for dead band
control with two-step compressor and heaters, in this case configuring:
• H1=16 reverse output with dead band
• H5 = 21 reverse output 2
6.16 AUX output activation by time bandWith UltraCella, auxiliary outputs AUX1/AUX2 can also be activated by
time band, , using the RTC fitted on the device.
When the time band is active, the AUX output (H1 for AUX1, H5 for AUX2)
configured will be active (ON, relay closed).
• Time band not active -> AUX output not active (OFF, relay open)
• Time band active -> AUX output active (ON, relay closed)
Par. Description Def Min Max UoMH1 AUX1 output configuration
…
17 = output managed by time band
1 0 17 -
H5 AUX2 output configuration
…
17 = output managed by time band
1 0 17 -
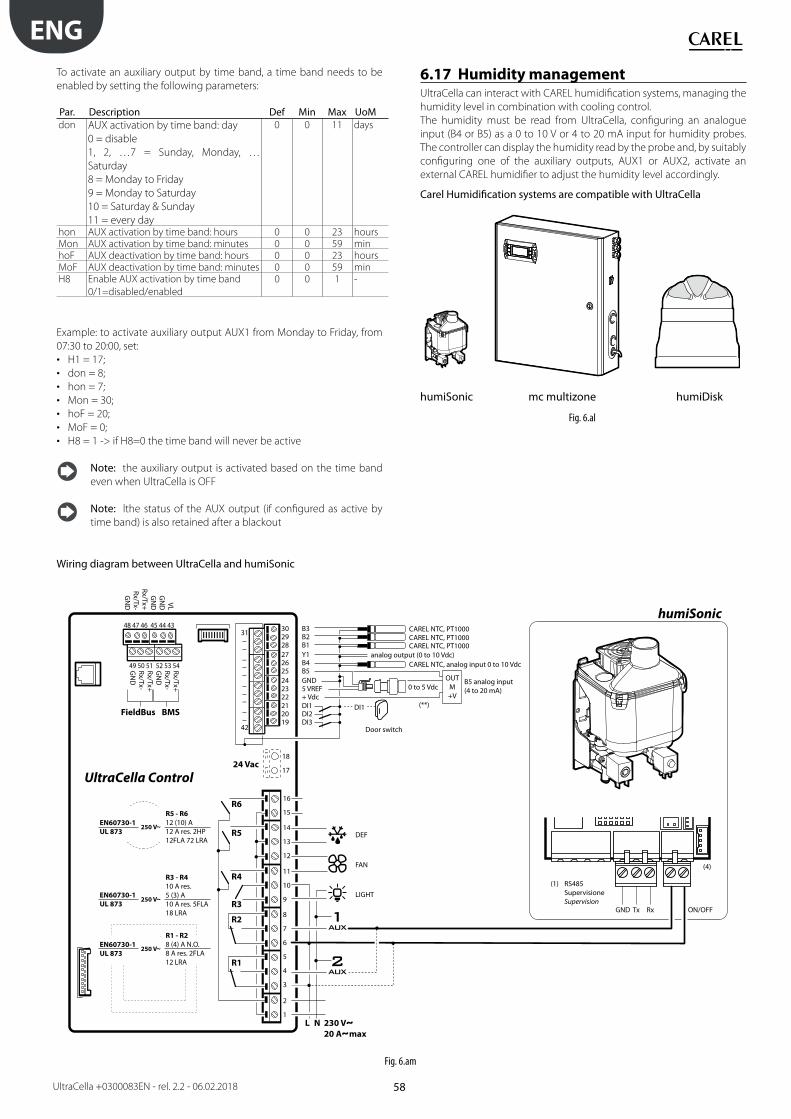
58
ENG
UltraCella +0300083EN - rel. 2.2 - 06.02.2018
To activate an auxiliary output by time band, a time band needs to be
enabled by setting the following parameters:
Par. Description Def Min Max UoMdon AUX activation by time band: day
0 = disable
1, 2, …7 = Sunday, Monday, …
Saturday
8 = Monday to Friday
9 = Monday to Saturday
10 = Saturday & Sunday
11 = every day
0 0 11 days
hon AUX activation by time band: hours 0 0 23 hoursMon AUX activation by time band: minutes 0 0 59 minhoF AUX deactivation by time band: hours 0 0 23 hoursMoF AUX deactivation by time band: minutes 0 0 59 minH8 Enable AUX activation by time band
0/1=disabled/enabled
0 0 1 -
Example: to activate auxiliary output AUX1 from Monday to Friday, from
07:30 to 20:00, set:
• H1 = 17;
• don = 8;
• hon = 7;
• Mon = 30;
• hoF = 20;
• MoF = 0;
• H8 = 1 -> if H8=0 the time band will never be active
Note: the auxiliary output is activated based on the time band
even when UltraCella is OFF
Note: lthe status of the AUX output (if configured as active by
time band) is also retained after a blackout
6.17 Humidity managementUltraCella can interact with CAREL humidification systems, managing the
humidity level in combination with cooling control.
The humidity must be read from UltraCella, configuring an analogue
input (B4 or B5) as a 0 to 10 V or 4 to 20 mA input for humidity probes.
The controller can display the humidity read by the probe and, by suitably
configuring one of the auxiliary outputs, AUX1 or AUX2, activate an
external CAREL humidifier to adjust the humidity level accordingly.
Carel Humidification systems are compatible with UltraCella
humiSonic mc multizone humiDisk
Fig. 6.al
Wiring diagram between UltraCella and humiSonic
FieldBus
24 Vac
BMS
R6
R5
R4
R3
R2
R1
230 V20 A max
EN60730-1UL 873
250 V
R5 - R612 (10) A12 A res. 2HP12FLA 72 LRA
CAREL NTC, PT1000CAREL NTC, PT1000CAREL NTC, PT1000
CAREL NTC, analog input 0 to 10 Vdc
B5 analog input(4 to 20 mA)
OUTM+V
0 to 5 Vdc
DI1 (**)
Door switch
B3B2B1
48 47 46 45 44 43
49 50 51 52 53 54
VLG
ND
GND
Rx/Tx+Rx/Tx-G
ND
Rx/Tx+Rx/Tx-G
ND
Rx/Tx+Rx/Tx-G
ND
Y1B4B5
DI1DI2DI3
GND5 VREF+ Vdc
302928
31
42
272625
212019
18
17
16
15
14
13
12
11
10
9
8
7
6
5
4
3
2
1
242322
analog output (0 to 10 Vdc)
EN60730-1UL 873
250 V
R3 - R410 A res.5 (3) A10 A res. 5FLA18 LRA
EN60730-1UL 873
250 V
R1 - R28 (4) A N.O.8 A res. 2FLA12 LRA
DEF
GND Tx Rx ON/OFF
(4)
(1) RS485SupervisioneSupervision
FAN
LIGHT
UltraCella Control
humiSonic
Fig. 6.am
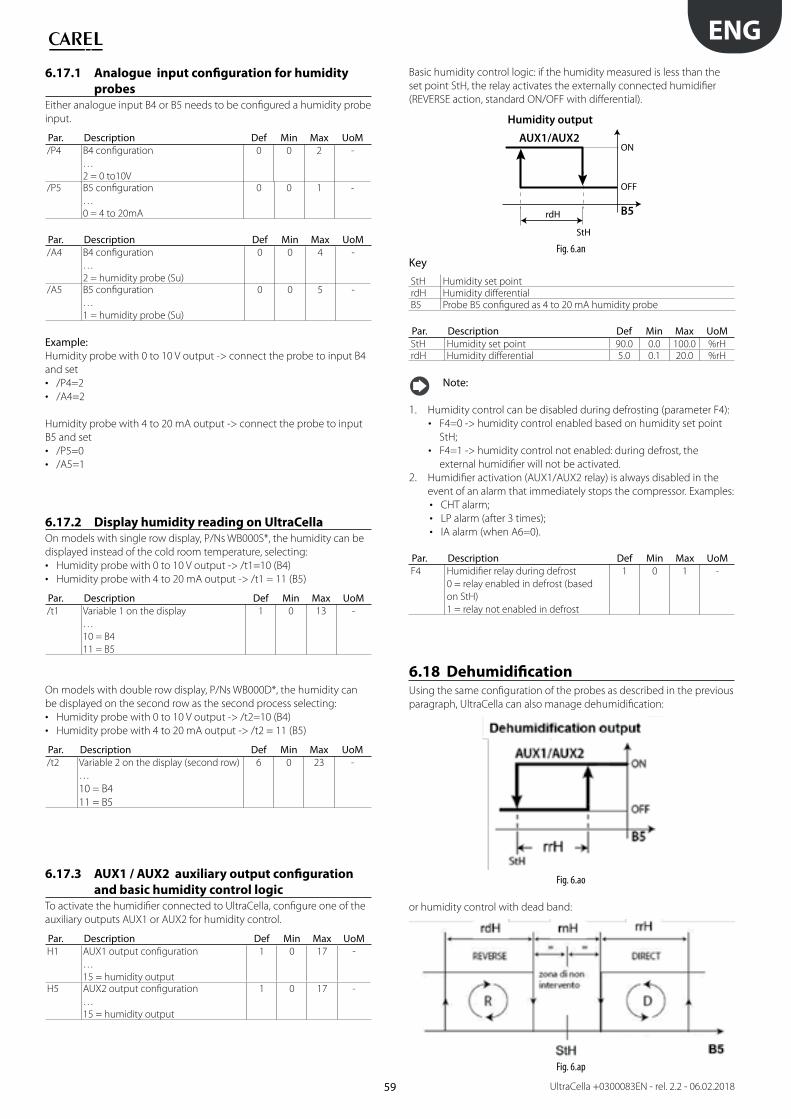
59
ENG
UltraCella +0300083EN - rel. 2.2 - 06.02.2018
6.17.1 Analogue input configuration for humidity
probes
Either analogue input B4 or B5 needs to be configured a humidity probe
input.
Par. Description Def Min Max UoM/P4 B4 configuration
…
2 = 0 to10V
0 0 2 -
/P5 B5 configuration
…
0 = 4 to 20mA
0 0 1 -
Par. Description Def Min Max UoM/A4 B4 configuration
…
2 = humidity probe (Su)
0 0 4 -
/A5 B5 configuration
…
1 = humidity probe (Su)
0 0 5 -
Example:Humidity probe with 0 to 10 V output -> connect the probe to input B4
and set
• /P4=2
• /A4=2
Humidity probe with 4 to 20 mA output -> connect the probe to input
B5 and set
• /P5=0
• /A5=1
6.17.2 Display humidity reading on UltraCella
On models with single row display, P/Ns WB000S*, the humidity can be
displayed instead of the cold room temperature, selecting:
• Humidity probe with 0 to 10 V output -> /t1=10 (B4)
• Humidity probe with 4 to 20 mA output -> /t1 = 11 (B5)
Par. Description Def Min Max UoM/t1 Variable 1 on the display
…
10 = B4
11 = B5
1 0 13 -
On models with double row display, P/Ns WB000D*, the humidity can
be displayed on the second row as the second process selecting:
• Humidity probe with 0 to 10 V output -> /t2=10 (B4)
• Humidity probe with 4 to 20 mA output -> /t2 = 11 (B5)
Par. Description Def Min Max UoM/t2 Variable 2 on the display (second row)
…
10 = B4
11 = B5
6 0 23 -
6.17.3 AUX1 / AUX2 auxiliary output configuration
and basic humidity control logic
To activate the humidifier connected to UltraCella, configure one of the
auxiliary outputs AUX1 or AUX2 for humidity control.
Par. Description Def Min Max UoMH1 AUX1 output configuration
…
15 = humidity output
1 0 17 -
H5 AUX2 output configuration
…
15 = humidity output
1 0 17 -
Basic humidity control logic: if the humidity measured is less than the
set point StH, the relay activates the externally connected humidifier
(REVERSE action, standard ON/OFF with differential).
B5
AUX1/AUX2
Humidity output
StH
rdH
OFF
ON
Fig. 6.an
Key
StH Humidity set pointrdH Humidity differentialB5 Probe B5 configured as 4 to 20 mA humidity probe
Par. Description Def Min Max UoMStH Humidity set point 90.0 0.0 100.0 %rHrdH Humidity differential 5.0 0.1 20.0 %rH
Note:
1. Humidity control can be disabled during defrosting (parameter F4):
• F4=0 -> humidity control enabled based on humidity set point
StH;
• F4=1 -> humidity control not enabled: during defrost, the
external humidifier will not be activated.
2. Humidifier activation (AUX1/AUX2 relay) is always disabled in the
event of an alarm that immediately stops the compressor. Examples:
• CHT alarm;
• LP alarm (after 3 times);
• IA alarm (when A6=0).
Par. Description Def Min Max UoMF4 Humidifier relay during defrost
0 = relay enabled in defrost (based
on StH)
1 = relay not enabled in defrost
1 0 1 -
6.18 DehumidificationUsing the same configuration of the probes as described in the previous
paragraph, UltraCella can also manage dehumidification:
Fig. 6.ao
or humidity control with dead band:
Fig. 6.ap
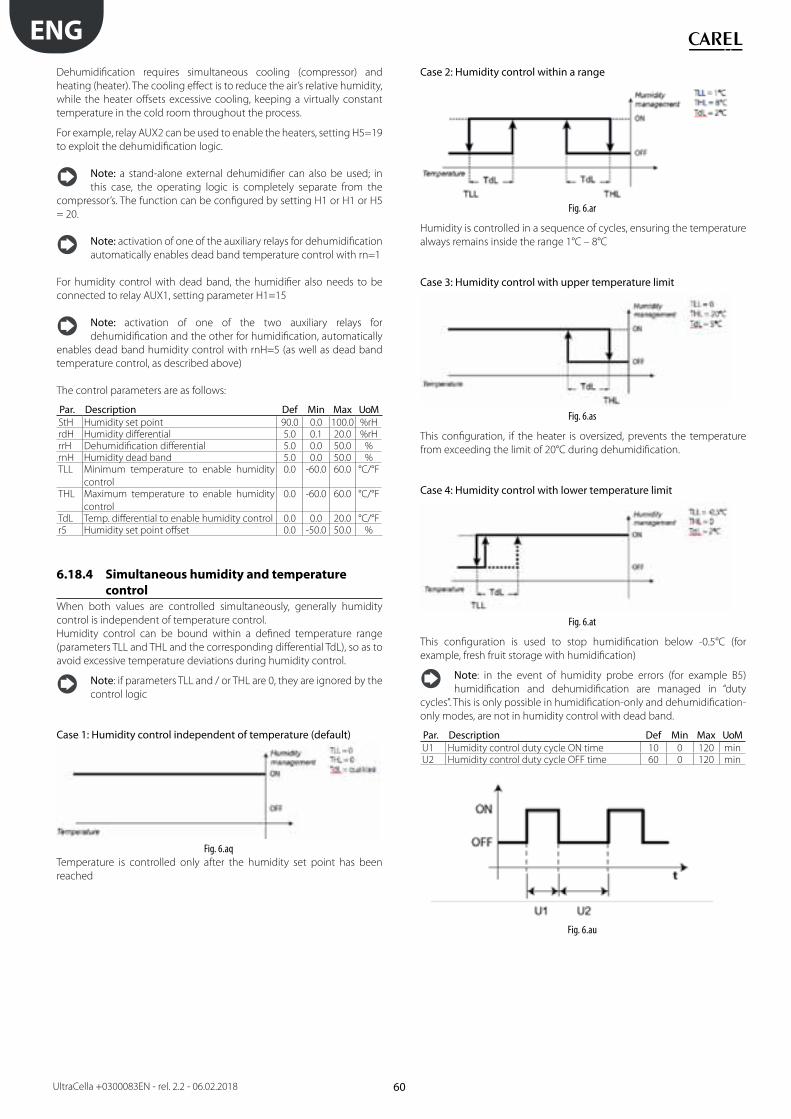
60
ENG
UltraCella +0300083EN - rel. 2.2 - 06.02.2018
Dehumidification requires simultaneous cooling (compressor) and
heating (heater). The cooling effect is to reduce the air’s relative humidity,
while the heater offsets excessive cooling, keeping a virtually constant
temperature in the cold room throughout the process.
For example, relay AUX2 can be used to enable the heaters, setting H5=19
to exploit the dehumidification logic.
Note: a stand-alone external dehumidifier can also be used; in
this case, the operating logic is completely separate from the
compressor’s. The function can be configured by setting H1 or H1 or H5
= 20.
Note: activation of one of the auxiliary relays for dehumidification
automatically enables dead band temperature control with rn=1
For humidity control with dead band, the humidifier also needs to be
connected to relay AUX1, setting parameter H1=15
Note: activation of one of the two auxiliary relays for
dehumidification and the other for humidification, automatically
enables dead band humidity control with rnH=5 (as well as dead band
temperature control, as described above)
The control parameters are as follows:
Par. Description Def Min Max UoMStH Humidity set point 90.0 0.0 100.0 %rHrdH Humidity differential 5.0 0.1 20.0 %rHrrH Dehumidification differential 5.0 0.0 50.0 %rnH Humidity dead band 5.0 0.0 50.0 %TLL Minimum temperature to enable humidity
control
0.0 -60.0 60.0 °C/°F
THL Maximum temperature to enable humidity
control
0.0 -60.0 60.0 °C/°F
TdL Temp. differential to enable humidity control 0.0 0.0 20.0 °C/°Fr5 Humidity set point offset 0.0 -50.0 50.0 %
6.18.4 Simultaneous humidity and temperature
control
When both values are controlled simultaneously, generally humidity
control is independent of temperature control.
Humidity control can be bound within a defined temperature range
(parameters TLL and THL and the corresponding differential TdL), so as to
avoid excessive temperature deviations during humidity control.
Note: if parameters TLL and / or THL are 0, they are ignored by the
control logic
Case 1: Humidity control independent of temperature (default)y
Fig. 6.aq
Temperature is controlled only after the humidity set point has been
reached
Case 2: Humidity control within a range
Fig. 6.ar
Humidity is controlled in a sequence of cycles, ensuring the temperature
always remains inside the range 1°C – 8°C
Case 3: Humidity control with upper temperature limit
Fig. 6.as
This configuration, if the heater is oversized, prevents the temperature
from exceeding the limit of 20°C during dehumidification.
Case 4: Humidity control with lower temperature limit
Fig. 6.at
This configuration is used to stop humidification below -0.5°C (for
example, fresh fruit storage with humidification)
Note: in the event of humidity probe errors (for example B5)
humidification and dehumidification are managed in “duty
cycles”. This is only possible in humidification-only and dehumidification-
only modes, are not in humidity control with dead band.
Par. Description Def Min Max UoMU1 Humidity control duty cycle ON time 10 0 120 minU2 Humidity control duty cycle OFF time 60 0 120 min
Fig. 6.au

61
ENG
UltraCella +0300083EN - rel. 2.2 - 06.02.2018
6.19 Generic functionsWith UltraCella, a number of generic functions can be configured, and
associated with configurable inputs and outputs that have not already
been configured for other uses.
The following functions are available:
• 3 ON/OFF control functions, using outputs AUX1/AUX2 (AUX3 / AUX4
see paragraph 6.20)
• 1 modulating control function, using output Y1 (0 to 10 V)
• 2 alarms, using outputs AUX1/AUX2 (AUX3 / AUX4 see paragraph 6.20)
The generic ON/OFF or 0 to 10 V modulating control functions can be
associated with an input that also has other functions (for example Sv,
control probe, or Su, humidity probe), or to a free input that therefore
needs to be configured specifically.
Par. Description Def Min Max UoM/A2 Probe 2 configuration
3 = generic temperature probe 2
0 0 3 -
/A3 Probe 3 configuration
5 = generic temperature probe 3
0 0 5 -
/A4 Probe 4 configuration
3 = generic temperature probe 4
4 = generic humidity probe 4
0 0 4 -
/A5 Probe 5 configuration
2 = generic temperature probe 5
3 = generic humidity probe 5
4 = generic pressure probe 5
0 0 5 -
The generic alarm functions can be associated with an alarm already
featured on UltraCella (for example CHt, high condenser temperature
alarm, or LP, low pressure alarm), or to digital inputs D12/DI3, which
therefore need to be configured specifically.
Par. Description Def Min Max U.o.MA5 Configuration of digital input DI2
15 = alarm from generic function
0 0 15 -
A9 Configuration of digital input DI3
15 = alarm from generic function
0 0 15 -
6.19.5 ON/OFF control functions
UltraCella can manage 3 ON/OFF control functions in direct or reverse
mode, based on a configurable set point and differential. The control
variable is defined by parameter AS1 (AS2).
Par. Description Def Min Max UoMAS1 ON/OFF control 1: control variable
configuration
0 Sm 8 generic temperature
probe 21 Sd1 9 generic temperature
probe 32 Sr 10 generic temperature
probe 43 Sv 11 generic temperature
probe 54 Sd2 12 generic humidity
probe 45 Sc 13 generic humidity
probe 56 SA 14 generic pressure
probe 57 Su
3 0 14 -
r1S ON/OFF control 1: mode
0/1=direct/reverse
0 0 1 -
SS1 ON/OFF control 1: set point 0,0 -50,0
0,0
-20,0
200,0
100,0
999
°C/°F/
rH%/
bar/
psirS1 ON/OFF control 1: differential 2,0 0,1 20,0 °C/°F/
rH%/
bar/
psi
AS2 ON/OFF control 2: control variable
configuration
0 Sm 8 generic temperature
probe 21 Sd1 9 generic temperature
probe 32 Sr 10 generic temperature
probe 43 Sv 11 generic temperature
probe 54 Sd2 12 generic humidity
probe 45 Sc 13 generic humidity
probe 56 SA 14 generic pressure
probe 57 Su
3 0 14 -
r2S ON/OFF control 2: mode
0/1=direct/reverse
0 0 1 -
SS2 ON/OFF control 2: set point 0,0 -50,0
0,0
-20,0
200,0
100,0
999
°C/°F/
rH%/
bar/
psirS2 ON/OFF control 2: differential 2,0 0,1 20,0 °C/°F/
rH%/
bar/
psi
To enable the function, set AS1/AS2 to a value greater than 0. To use
outputs AUX1/AUX2 for generic ON/OFF functions, set parameters H1/
H5.
Par. Description Def Min Max U.o.MH1 AUX1 output configuration
8 = Generic ON/OFF control function 1
9 = Generic ON/OFF control function 2
0 0 17 -
H5 AUX2 output configuration
8 = Generic ON/OFF control function 1
9 = Generic ON/OFF control function 2
0 0 17 -
Fig. 6.av
For each ON/OFF control function, two alarm absolute thresholds and an
alarm notification delay can be set.
Par. Description Def Min Max U.o.MAL1 ON/OFF control 1: absolute low
alarm threshold
0,0 -50.0
0.0
-20.0
200.0
100.0
999
°C/°F/
rH%/
bar/psiAH1 ON/OFF control 1: absolute high
alarm threshold
0 -50.0
0.0
-20.0
200.0
100.0
999
°C/°F/
rH%/
bar/psiAd1 ON/OFF control 1: alarm delay 0 0 250 min
AL2 ON/OFF control 2: absolute low
alarm threshold
0,0 -50.0
0.0
-20.0
200.0
100.0
999
°C/°F/
rH%/
bar/psi

62
ENG
UltraCella +0300083EN - rel. 2.2 - 06.02.2018
Par. Description Def Min Max U.o.MAH2 ON/OFF control 2: absolute high
alarm threshold
0 -50.0
0.0
-20.0
200.0
100.0
999
°C/°F/
rH%/
bar/psiAd2 ON/OFF control 2: alarm delay 0 0 250 min
The following alarms are generated by the functions:
• GL1,GL2: alarms when exceeding low thresholds AL1, AL2
• GH1, GH2: alarms when exceeding high thresholds AH1, AH2
Example 1: ON/OFF control 1 based on pressure (input B5, 4 to 20 mA)
with direct action via AUX1. Control set point 15 bars, differential 3 bars.
Set:
• /P5 = 0 -> input B5 to 4 to 20 mA
• /A5 = 4 -> generic pressure probe 5
• AS1 = 14 -> generic pressure probe 5
• r1S = 0 -> direct action
• SS1 = 15 -> control set point 15 bars
• rS1 = 3 -> differential 3 bars
• H1 = 8 -> output AUX1 for ON/OFF control 1
Example 2: ON/OFF control 2 based on humidity (input B4, 0 to 10 V) with
reverse action on AUX2. Control set point 75% rH, differential 10% rH.
Set:
• /P4 = 2 -> input B4 to 0 to 10 V
• /A4 = 4 -> generic humidity probe 4
• AS2 = 12 -> generic humidity probe 4
• r2S = 1 -> reverse action
• SS2 = 75 -> control set point 75% rH
• rS2 = 10 -> differential 10% rH
• H5 = 9 -> output AUX2 for ON/OFF control 2
Note: the third generic ON/OFF control function can be
configured by setting parameter AS3 in the same way as for AS1/
AS2 (see the parameter table). If all three generic functions available are
used, outputs AUX3 (parameter H13) and AUX4 (parameter H14) can also
be used, suitably re-configuring the relays on UltraCella (see paragraph
6.20 for further information)
6.19.6 Modulating control
UltraCella can manage a modulating control function using a 0 to 10 V
analogue output with direct or reverse action and settable control set
point and differential. The control variable is defined by parameter AM1,
the control range by parameter rM1.
Par. Description Def Min Max UoMAM1 Modulating control: control variable
configuration
0 Sm 8 generic temperature
probe 21 Sd1 9 generic temperature
probe 32 Sr 10 generic temperature
probe 43 Sv 11 generic temperature
probe 54 Sd2 12 generic humidity
probe 45 Sc 13 generic humidity
probe 56 SA 14 generic pressure
probe 57 Su
3 0 14 -
r1M Modulating control: mode
0/1=direct/reverse
0 0 1 -
SM1 Modulating control: set point 0,0 -50,0
0,0
-20,0
200,0
100,0
999
°C/°F/
rH%/
bar/
psirc1 Modulating control: differential 2,0 0,1 20,0 °C/°F/
rH%/
bar/
psi
Par. Description Def Min Max UoMrM1 Modulating control: modulation range,
between min SL1 and max SH1
2,0 0,1 40,0 °C/°F/
rH%/
bar/
psi
The maximum and minimum values can be set using parameters SH1
and SL1 (cut-off ), as a percentage of the range from 0 to 10 V..
Par. Description Def Min Max UoMSL1 Modulating control: min. modulating
output value (cut-off )
0,0 0,0 SH1 %
SH1 Modulating control: max. modulating
output value
100,0 SL1 100,0 %
To enable the function, set AM1 to a value greater than 0. To use the
0 to 10 V analogue output Y1 for the generic modulating function, set
parameter HO1.
Par. Description Def Min Max UoMHO1 Configuration of output Y1
1 = modulating output 1 (generic
function)
0 0 3 -
rc1 rM1
SH1= MAX
SL1= MIN(cut-off)
regulation variable
direct modulation (r1M= 0)
Fig. 6.aw
SM1
rc1rM1
SH1= MAX
SL1= MIN(cut-off)
regulation variable
reverse modulation (r1M= 1)
Fig. 6.ax
Also for modulating control, two alarm absolute thresholds and an alarm
notification delay can be set.
Par. Description Def Min Max UoMAL3 Modulating control: absolute low
alarm threshold
0,0 -50.0
0.0
-20.0
200.0
100.0
999
°C/°F/
rH%/
bar/psiAH3 Modulating control: absolute
high alarm threshold
0,0 -50.0
0.0
-20.0
200.0
100.0
999
°C/°F/
rH%/
bar/psiAd3 Modulating control: alarm delay 0 0 250 min
The following alarms are generated by the functions:
• GL3: alarm when exceeding low threshold AL3
• GH3: alarm when exceeding high threshold AH3

63
ENG
UltraCella +0300083EN - rel. 2.2 - 06.02.2018
Example: 0 to 10 V modulating control based on pressure (input B5, 4
to 20 mA) with direct action, control set point 10 bars, differential 1 bar,
modulation range 8 bars, minimum output 2 V, maximum output 8 V.
Set:
• /P5 = 0 -> input B5 to 4 to 20 mA
• /A5 = 4 -> generic pressure probe 5
• AM1 = 14 -> generic pressure probe 5
• r1M = 0 -> direct action
• SM1 = 10 -> control set point 10 bars
• rc1 = 1 -> differential 1 bar
• rM1 = 8 -> modulation range 8 bars
• SL1 = 20,0 -> minimum output 2 V
• SH1 = 80,0 -> maximum output 8 V
• HO1 = 1 -> 0 to 10 V output Y1 for generic modulating function
6.19.7 Generic alarms
UltraCella can manage up to two generic alarms, associated with alarms
that are already featured (for example CHt, high condenser temperature
alarm, or LP, low pressure alarm), or to digital inputs D12/DI3, which
therefore need to be specifically configured. The source of the alarm is
defined by parameter AA1 (AA2), the notification delay by parameter Ad4
(Ad5).
If the generic alarm is associated with digital input DI2 (for AA1) or DI3
(for AA2), the operating logic can be selected (normally open/normally
closed):
• r1A (r2A) = 0 -> N.O. logic -> alarm if DI2 (DI3) is closed (active)
• r1A (r2A) = 1 -> N.C.logic -> alarm if DI2 (DI3) is open (not active) Par. Description Def Min Max UoMAA1 Alarm 1: select source
0 DI2 (with A5=15)1 Virtual probe (Sv) fault (rE)2 Probe S1 (Sm) fault (E0)
3 Probe S2 fault (E1)4 Probe S3 fault (E2)5 Probe S4 fault (E3)6 Probe S5 fault (E4)7 Low pressure alarm (LP)8 Immediate external alarm (IA)9 Low temperature alarm (LO)
10 High temperature alarm (HI)11 High condenser temperature
alarm (CHt)
0 0 11 -
r1A Alarm 1: logic
0/1=normally open/normally
closed
0 0 1 -
Ad4 Alarm 1: delay 0 0 250 minAA2 Alarm 2: select source
0 DI3 (with A9=15)1 Virtual probe (Sv) fault (rE)2 Probe S1 (Sm) fault (E0)
3 Probe S2 fault (E1)4 Probe S3 fault (E2)5 Probe S4 fault (E3)6 Probe S5 fault (E4)7 Low pressure alarm (LP)8 Immediate external alarm (IA)9 Low temperature alarm (LO)
10 High temperature alarm (HI)11 High condenser temperature
alarm (CHt)
0 0 11 -
r2A Alarm 2: logic
0/1=normally open/normally
closed
0 0 1 -
Ad5 Alarm 2: delay 0 0 250 min
The following alarms are generated by the functions:
• GA1: alarm relating to function AA1
• GA2: alarm relating to function AA2
To associate the generic alarm to a digital input, DI2 or DI3, set parameter
A5 or A9.
Par. Description Def Min Max UoMA5 Digital input 2 configuration (DI2)
15 = alarm from generic function
0 0 15 -
A9 Digital input 3 configuration (DI3)
15 = alarm from generic function
0 0 15 -
To use outputs AUX1/AUX2 for the generic alarms, set parameters H1/H5.
Par. Description Def Min Max UoMH1 AUX1 output configuration
10 = generic alarm 1 (GA1)
11 = generic alarm 2 (GA2)
0 0 17 -
H5 AUX2 output configuration
10 = generic alarm 1 (GA1)
11 = generic alarm 2 (GA2)
0 0 17 -
Example: AUX1 active for alarm from digital input DI3 with N.C. logic,
delay 15 minutes.
Set:
• AA2 = 0 -> Alarm 2 associated with digital input DI3
• r2A = 1 -> N.C. logic
• Ad5 = 15 -> delay 15 minutes
• A9 = 15 -> DI3 for alarm from generic function
• H1 = 11 -> AUX1 for generic alarm 2
6.20 Output configurationOn UltraCella, the functions associated with the 6 physical outputs (relays)
can be configured so as to adapt to the needs of most installations.
For example, if the cold room light does not need to be managed from
the panel, as it is already managed centrally or by an external control, the
corresponding output (relay) R3 can be used for a different function, for
example to control heaters in the collection pan.
The configuration is performed in two steps:
1. Configure the generic function corresponding to the output (relay)
Par. Description Def Min Max UoMH15 Output R1 configuration
0 compressor1 defrost2 fan
3 light4 AUX15 AUX26 AUX37 AUX4
5 0 7 -
H16 Output R2 configuration - see H15 4 0 7 -
H17 Output R3 configuration - see H15 3 0 7 -
H18 Output R4 configuration - see H15 2 0 7 -
H19 Output R5 configuration - see H15 1 0 7 -
H20 Output R6 configuration - see H15 0 0 7 -
2. Configure the specific function corresponding to the output (AUX1-
AUX4) selected in the previous step
Par. Description Def Min Max UoM
H1 AUX1 output configuration
0 Normally energised alarm1 Normally de-energised alarm2 Activate from AUX button or DI
3 Activate collection pan heater4 Auxiliary evaporator defrost5 Pump down valve6 Condenser fan7 Delayed compressor8 Control output 1 ON/OFF9 Control output 2 ON/OFF
10 Alarm output 111 Alarm output 212 Do not select13 Second compressor step14 Second compressor step with rotation
1 0 21 -
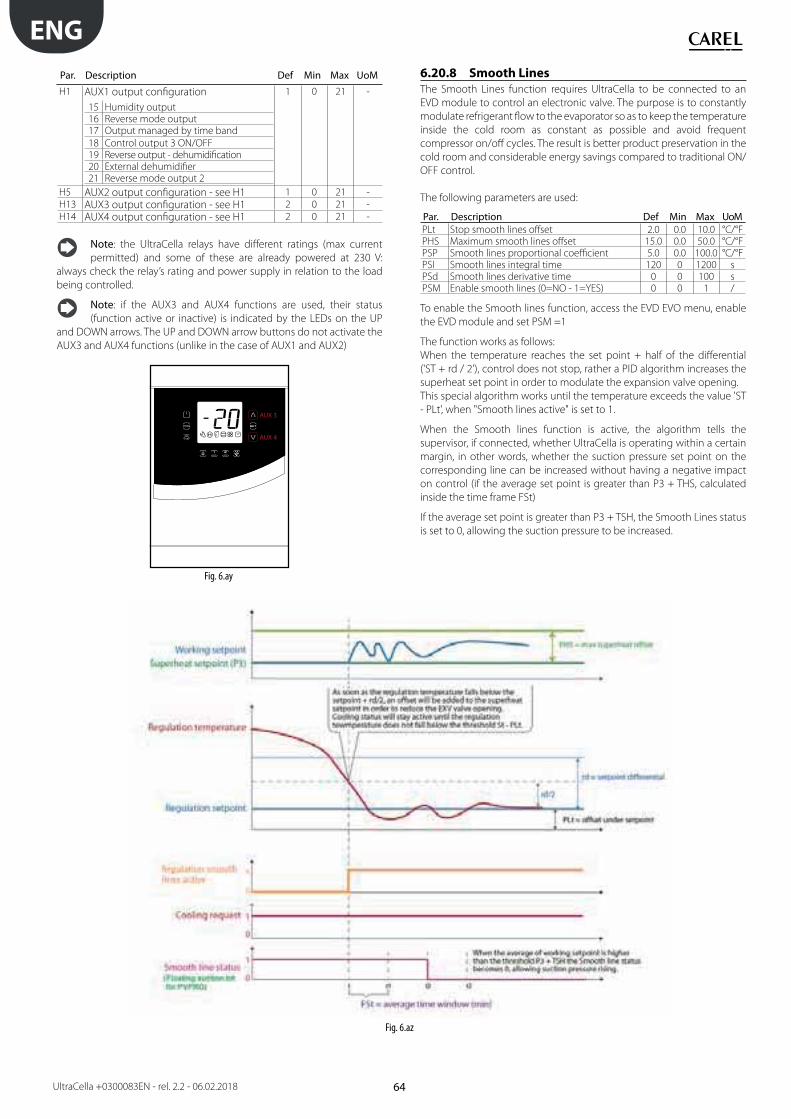
64
ENG
UltraCella +0300083EN - rel. 2.2 - 06.02.2018
Par. Description Def Min Max UoM
H1 AUX1 output configuration
15 Humidity output16 Reverse mode output17 Output managed by time band
18 Control output 3 ON/OFF19 Reverse output - dehumidification20 External dehumidifier21 Reverse mode output 2
1 0 21 -
H5 AUX2 output configuration - see H1 1 0 21 -
H13 AUX3 output configuration - see H1 2 0 21 -
H14 AUX4 output configuration - see H1 2 0 21 -
Note: the UltraCella relays have different ratings (max current
permitted) and some of these are already powered at 230 V:
always check the relay’s rating and power supply in relation to the load
being controlled.
Note: if the AUX3 and AUX4 functions are used, their status
(function active or inactive) is indicated by the LEDs on the UP
and DOWN arrows. The UP and DOWN arrow buttons do not activate the
AUX3 and AUX4 functions (unlike in the case of AUX1 and AUX2)
AUX 3
AUX 4
Fig. 6.ay
6.20.8 Smooth Lines
The Smooth Lines function requires UltraCella to be connected to an
EVD module to control an electronic valve. The purpose is to constantly
modulate refrigerant flow to the evaporator so as to keep the temperature
inside the cold room as constant as possible and avoid frequent
compressor on/off cycles. The result is better product preservation in the
cold room and considerable energy savings compared to traditional ON/
OFF control.
The following parameters are used:
Par. Description Def Min Max UoMPLt Stop smooth lines offset 2.0 0.0 10.0 °C/°FPHS Maximum smooth lines offset 15.0 0.0 50.0 °C/°FPSP Smooth lines proportional coefficient 5.0 0.0 100.0 °C/°FPSI Smooth lines integral time 120 0 1200 sPSd Smooth lines derivative time 0 0 100 sPSM Enable smooth lines (0=NO - 1=YES) 0 0 1 /
To enable the Smooth lines function, access the EVD EVO menu, enable
the EVD module and set PSM =1
The function works as follows:
When the temperature reaches the set point + half of the differential
('ST + rd / 2'), control does not stop, rather a PID algorithm increases the
superheat set point in order to modulate the expansion valve opening.
This special algorithm works until the temperature exceeds the value 'ST
- PLt', when "Smooth lines active" is set to 1.
When the Smooth lines function is active, the algorithm tells the
supervisor, if connected, whether UltraCella is operating within a certain
margin, in other words, whether the suction pressure set point on the
corresponding line can be increased without having a negative impact
on control (if the average set point is greater than P3 + THS, calculated
inside the time frame FSt)
If the average set point is greater than P3 + TSH, the Smooth Lines status
is set to 0, allowing the suction pressure to be increased.
Fig. 6.az
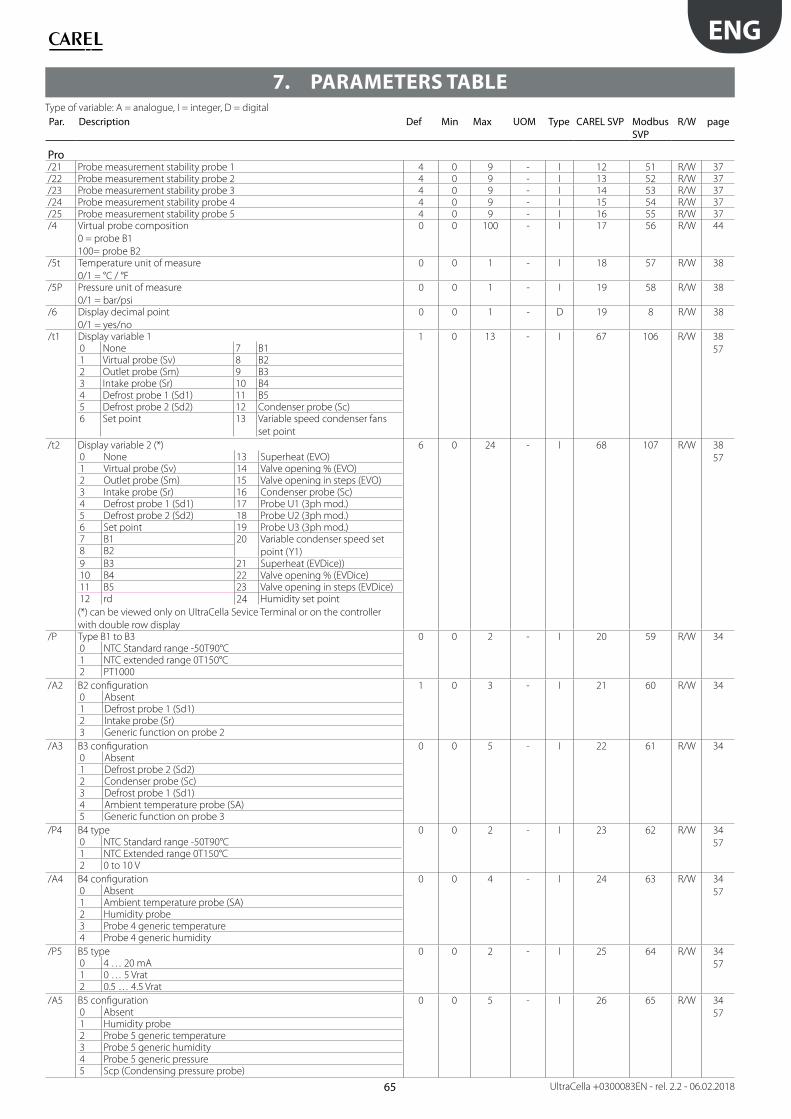
65
ENG
UltraCella +0300083EN - rel. 2.2 - 06.02.2018
7. PARAMETERS TABLE
Par. Description Def Min Max UOM Type CAREL SVP Modbus SVP
R/W page
Pro/21 Probe measurement stability probe 1 4 0 9 - I 12 51 R/W 37/22 Probe measurement stability probe 2 4 0 9 - I 13 52 R/W 37/23 Probe measurement stability probe 3 4 0 9 - I 14 53 R/W 37/24 Probe measurement stability probe 4 4 0 9 - I 15 54 R/W 37/25 Probe measurement stability probe 5 4 0 9 - I 16 55 R/W 37/4 Virtual probe composition
0 = probe B1
100= probe B2
0 0 100 - I 17 56 R/W 44
/5t Temperature unit of measure
0/1 = °C / °F
0 0 1 - I 18 57 R/W 38
/5P Pressure unit of measure
0/1 = bar/psi
0 0 1 - I 19 58 R/W 38
/6 Display decimal point
0/1 = yes/no
0 0 1 - D 19 8 R/W 38
/t1 Display variable 10 None 7 B11 Virtual probe (Sv) 8 B22 Outlet probe (Sm) 9 B33 Intake probe (Sr) 10 B44 Defrost probe 1 (Sd1) 11 B55 Defrost probe 2 (Sd2) 12 Condenser probe (Sc)6 Set point 13 Variable speed condenser fans
set point
1 0 13 - I 67 106 R/W 38
57
/t2 Display variable 2 (*)0 None 13 Superheat (EVO)1 Virtual probe (Sv) 14 Valve opening % (EVO)2 Outlet probe (Sm) 15 Valve opening in steps (EVO)3 Intake probe (Sr) 16 Condenser probe (Sc)4 Defrost probe 1 (Sd1) 17 Probe U1 (3ph mod.)5 Defrost probe 2 (Sd2) 18 Probe U2 (3ph mod.)6 Set point 19 Probe U3 (3ph mod.)7 B1 20 Variable condenser speed set
point (Y1)8 B2
9 B3 21 Superheat (EVDice))10 B4 22 Valve opening % (EVDice)11 B5 23 Valve opening in steps (EVDice)12 rd 24 Humidity set point
(*) can be viewed only on UltraCella Sevice Terminal or on the controller
with double row display
6 0 24 - I 68 107 R/W 38
57
/P Type B1 to B30 NTC Standard range -50T90°C1 NTC extended range 0T150°C2 PT1000
0 0 2 - I 20 59 R/W 34
/A2 B2 configuration0 Absent1 Defrost probe 1 (Sd1)2 Intake probe (Sr)3 Generic function on probe 2
1 0 3 - I 21 60 R/W 34
/A3 B3 configuration0 Absent1 Defrost probe 2 (Sd2)2 Condenser probe (Sc)3 Defrost probe 1 (Sd1)4 Ambient temperature probe (SA)5 Generic function on probe 3
0 0 5 - I 22 61 R/W 34
/P4 B4 type0 NTC Standard range -50T90°C1 NTC Extended range 0T150°C2 0 to 10 V
0 0 2 - I 23 62 R/W 34
57
/A4 B4 configuration0 Absent1 Ambient temperature probe (SA)2 Humidity probe 3 Probe 4 generic temperature4 Probe 4 generic humidity
0 0 4 - I 24 63 R/W 34
57
/P5 B5 type0 4 … 20 mA1 0 … 5 Vrat2 0.5 … 4.5 Vrat
0 0 2 - I 25 64 R/W 34
57
/A5 B5 configuration0 Absent1 Humidity probe 2 Probe 5 generic temperature3 Probe 5 generic humidity4 Probe 5 generic pressure5 Scp (Condensing pressure probe)
0 0 5 - I 26 65 R/W 34
57
Type of variable: A = analogue, I = integer, D = digital
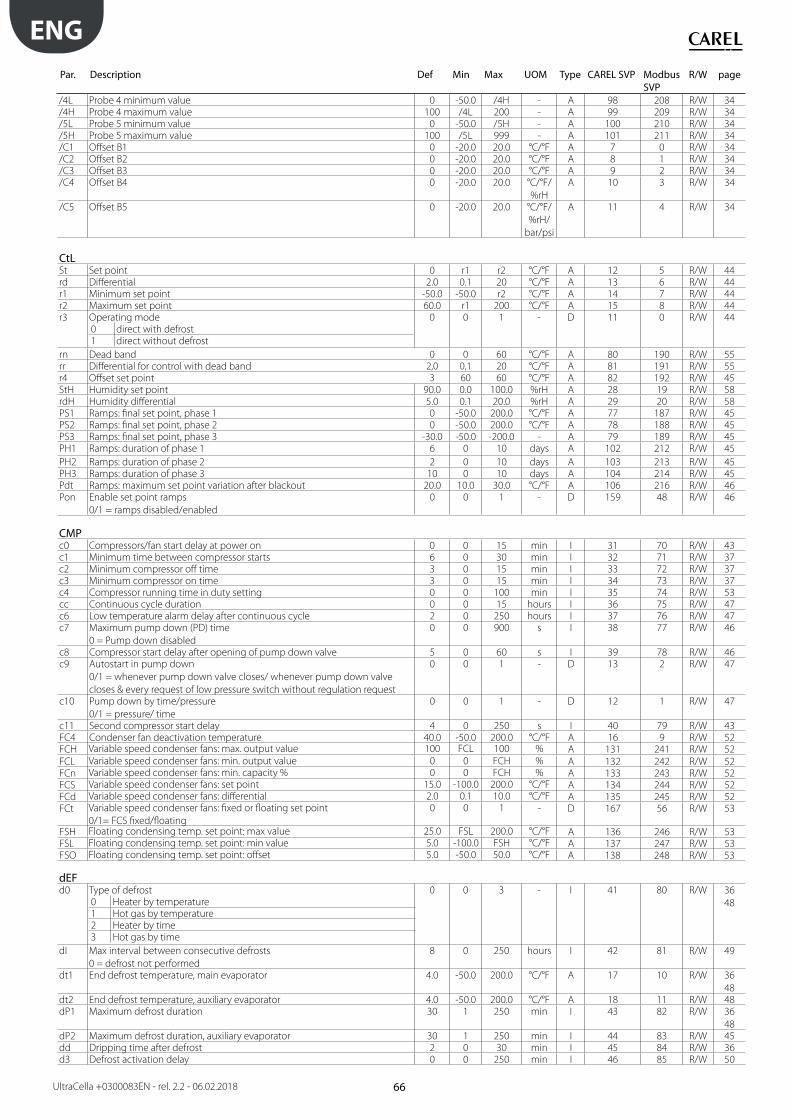
66
ENG
UltraCella +0300083EN - rel. 2.2 - 06.02.2018
Par. Description Def Min Max UOM Type CAREL SVP Modbus SVP
R/W page
/4L Probe 4 minimum value 0 -50.0 /4H - A 98 208 R/W 34/4H Probe 4 maximum value 100 /4L 200 - A 99 209 R/W 34/5L Probe 5 minimum value 0 -50.0 /5H - A 100 210 R/W 34/5H Probe 5 maximum value 100 /5L 999 - A 101 211 R/W 34/C1 Offset B1 0 -20.0 20.0 °C/°F A 7 0 R/W 34/C2 Offset B2 0 -20.0 20.0 °C/°F A 8 1 R/W 34/C3 Offset B3 0 -20.0 20.0 °C/°F A 9 2 R/W 34/C4 Offset B4 0 -20.0 20.0 °C/°F/
%rH
A 10 3 R/W 34
/C5 Offset B5 0 -20.0 20.0 °C/°F/
%rH/
bar/psi
A 11 4 R/W 34
CtLSt Set point 0 r1 r2 °C/°F A 12 5 R/W 44rd Differential 2.0 0.1 20 °C/°F A 13 6 R/W 44r1 Minimum set point -50.0 -50.0 r2 °C/°F A 14 7 R/W 44r2 Maximum set point 60.0 r1 200 °C/°F A 15 8 R/W 44r3 Operating mode
0 direct with defrost1 direct without defrost
0 0 1 - D 11 0 R/W 44
rn Dead band 0 0 60 °C/°F A 80 190 R/W 55rr Differential for control with dead band 2,0 0,1 20 °C/°F A 81 191 R/W 55r4 Offset set point 3 60 60 °C/°F A 82 192 R/W 45StH Humidity set point 90.0 0.0 100.0 %rH A 28 19 R/W 58rdH Humidity differential 5.0 0.1 20.0 %rH A 29 20 R/W 58PS1 Ramps: final set point, phase 1 0 -50.0 200.0 °C/°F A 77 187 R/W 45PS2 Ramps: final set point, phase 2 0 -50.0 200.0 °C/°F A 78 188 R/W 45PS3 Ramps: final set point, phase 3 -30.0 -50.0 -200.0 - A 79 189 R/W 45PH1 Ramps: duration of phase 1 6 0 10 days A 102 212 R/W 45
PH2 Ramps: duration of phase 2 2 0 10 days A 103 213 R/W 45PH3 Ramps: duration of phase 3 10 0 10 days A 104 214 R/W 45Pdt Ramps: maximum set point variation after blackout 20.0 10.0 30.0 °C/°F A 106 216 R/W 46Pon Enable set point ramps
0/1 = ramps disabled/enabled
0 0 1 - D 159 48 R/W 46
CMPc0 Compressors/fan start delay at power on 0 0 15 min I 31 70 R/W 43c1 Minimum time between compressor starts 6 0 30 min I 32 71 R/W 37c2 Minimum compressor off time 3 0 15 min I 33 72 R/W 37c3 Minimum compressor on time 3 0 15 min I 34 73 R/W 37c4 Compressor running time in duty setting 0 0 100 min I 35 74 R/W 53cc Continuous cycle duration 0 0 15 hours I 36 75 R/W 47c6 Low temperature alarm delay after continuous cycle 2 0 250 hours I 37 76 R/W 47c7 Maximum pump down (PD) time
0 = Pump down disabled
0 0 900 s I 38 77 R/W 46
c8 Compressor start delay after opening of pump down valve 5 0 60 s I 39 78 R/W 46c9 Autostart in pump down
0/1 = whenever pump down valve closes/ whenever pump down valve
closes & every request of low pressure switch without regulation request
0 0 1 - D 13 2 R/W 47
c10 Pump down by time/pressure
0/1 = pressure/ time
0 0 1 - D 12 1 R/W 47
c11 Second compressor start delay 4 0 250 s I 40 79 R/W 43FC4 Condenser fan deactivation temperature 40.0 -50.0 200.0 °C/°F A 16 9 R/W 52FCH Variable speed condenser fans: max. output value 100 FCL 100 % A 131 241 R/W 52
FCL Variable speed condenser fans: min. output value 0 0 FCH % A 132 242 R/W 52FCn Variable speed condenser fans: min. capacity % 0 0 FCH % A 133 243 R/W 52FCS Variable speed condenser fans: set point 15.0 -100.0 200.0 °C/°F A 134 244 R/W 52FCd Variable speed condenser fans: differential 2.0 0.1 10.0 °C/°F A 135 245 R/W 52FCt Variable speed condenser fans: fixed or floating set point
0/1= FCS fixed/floating
0 0 1 - D 167 56 R/W 53
FSH Floating condensing temp. set point: max value 25.0 FSL 200.0 °C/°F A 136 246 R/W 53FSL Floating condensing temp. set point: min value 5.0 -100.0 FSH °C/°F A 137 247 R/W 53FSO Floating condensing temp. set point: offset 5.0 -50.0 50.0 °C/°F A 138 248 R/W 53
dEFd0 Type of defrost
0 Heater by temperature1 Hot gas by temperature2 Heater by time3 Hot gas by time
0 0 3 - I 41 80 R/W 36
48
dI Max interval between consecutive defrosts
0 = defrost not performed
8 0 250 hours I 42 81 R/W 49
dt1 End defrost temperature, main evaporator 4.0 -50.0 200.0 °C/°F A 17 10 R/W 36
48dt2 End defrost temperature, auxiliary evaporator 4.0 -50.0 200.0 °C/°F A 18 11 R/W 48dP1 Maximum defrost duration 30 1 250 min I 43 82 R/W 36
48dP2 Maximum defrost duration, auxiliary evaporator 30 1 250 min I 44 83 R/W 45dd Dripping time after defrost 2 0 30 min I 45 84 R/W 36d3 Defrost activation delay 0 0 250 min I 46 85 R/W 50
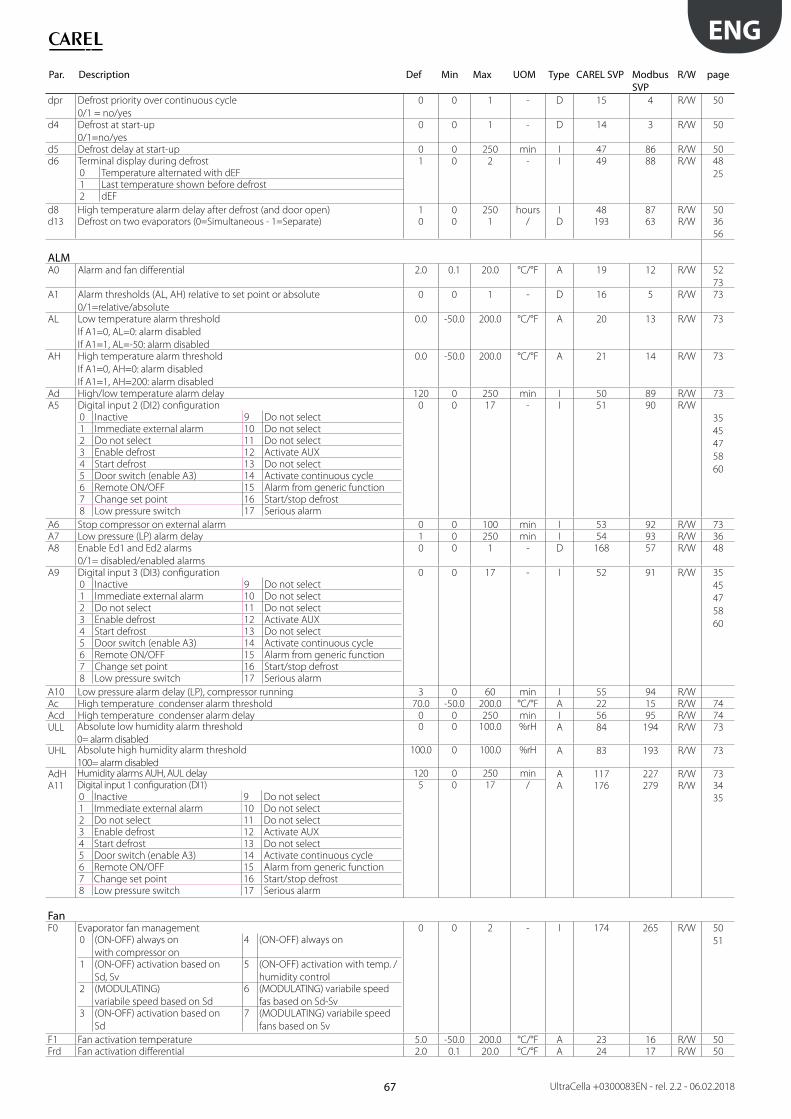
67
ENG
UltraCella +0300083EN - rel. 2.2 - 06.02.2018
Par. Description Def Min Max UOM Type CAREL SVP Modbus SVP
R/W page
dpr Defrost priority over continuous cycle
0/1 = no/yes
0 0 1 - D 15 4 R/W 50
d4 Defrost at start-up
0/1=no/yes
0 0 1 - D 14 3 R/W 50
d5 Defrost delay at start-up 0 0 250 min I 47 86 R/W 50d6 Terminal display during defrost
0 Temperature alternated with dEF1 Last temperature shown before defrost2 dEF
1 0 2 - I 49 88 R/W 48
25
d8 High temperature alarm delay after defrost (and door open) 1 0 250 hours I 48 87 R/W 50d13 Defrost on two evaporators (0=Simultaneous - 1=Separate) 0 0 1 / D 193 63 R/W 36
56
ALMA0 Alarm and fan differential 2.0 0.1 20.0 °C/°F A 19 12 R/W 52
73A1 Alarm thresholds (AL, AH) relative to set point or absolute
0/1=relative/absolute
0 0 1 - D 16 5 R/W 73
AL Low temperature alarm threshold
If A1=0, AL=0: alarm disabled
If A1=1, AL=-50: alarm disabled
0.0 -50.0 200.0 °C/°F A 20 13 R/W 73
AH High temperature alarm threshold
If A1=0, AH=0: alarm disabled
If A1=1, AH=200: alarm disabled
0.0 -50.0 200.0 °C/°F A 21 14 R/W 73
Ad High/low temperature alarm delay 120 0 250 min I 50 89 R/W 73A5 Digital input 2 (DI2) configuration
0 Inactive 9 Do not select1 Immediate external alarm 10 Do not select2 Do not select 11 Do not select3 Enable defrost 12 Activate AUX4 Start defrost 13 Do not select5 Door switch (enable A3) 14 Activate continuous cycle6 Remote ON/OFF 15 Alarm from generic function7 Change set point 16 Start/stop defrost8 Low pressure switch 17 Serious alarm
0 0 17 - I 51 90 R/W
35
45
47
58
60
A6 Stop compressor on external alarm 0 0 100 min I 53 92 R/W 73A7 Low pressure (LP) alarm delay 1 0 250 min I 54 93 R/W 36A8 Enable Ed1 and Ed2 alarms
0/1= disabled/enabled alarms
0 0 1 - D 168 57 R/W 48
A9 Digital input 3 (DI3) configuration0 Inactive 9 Do not select1 Immediate external alarm 10 Do not select2 Do not select 11 Do not select3 Enable defrost 12 Activate AUX4 Start defrost 13 Do not select5 Door switch (enable A3) 14 Activate continuous cycle6 Remote ON/OFF 15 Alarm from generic function7 Change set point 16 Start/stop defrost8 Low pressure switch 17 Serious alarm
0 0 17 - I 52 91 R/W 35
45
47
58
60
A10 Low pressure alarm delay (LP), compressor running 3 0 60 min I 55 94 R/WAc High temperature condenser alarm threshold 70.0 -50.0 200.0 °C/°F A 22 15 R/W 74Acd High temperature condenser alarm delay 0 0 250 min I 56 95 R/W 74ULL Absolute low humidity alarm threshold
0= alarm disabled
0 0 100.0 %rH A 84 194 R/W 73
UHL Absolute high humidity alarm threshold
100= alarm disabled
100.0 0 100.0 %rH A 83 193 R/W 73
AdH Humidity alarms AUH, AUL delay 120 0 250 min A 117 227 R/W 73A11 Digital input 1 configuration (DI1)
0 Inactive 9 Do not select1 Immediate external alarm 10 Do not select2 Do not select 11 Do not select3 Enable defrost 12 Activate AUX4 Start defrost 13 Do not select5 Door switch (enable A3) 14 Activate continuous cycle6 Remote ON/OFF 15 Alarm from generic function7 Change set point 16 Start/stop defrost8 Low pressure switch 17 Serious alarm
5 0 17 / A 176 279 R/W 34
35
FanF0 Evaporator fan management
0 (ON-OFF) always on
with compressor on
4 (ON-OFF) always on
1 (ON-OFF) activation based on
Sd, Sv
5 (ON-OFF) activation with temp. /
humidity control2 (MODULATING)
variabile speed based on Sd
6 (MODULATING) variabile speed
fas based on Sd-Sv3 (ON-OFF) activation based on
Sd
7 (MODULATING) variabile speed
fans based on Sv
0 0 2 - I 174 265 R/W 50
51
F1 Fan activation temperature 5.0 -50.0 200.0 °C/°F A 23 16 R/W 50Frd Fan activation differential 2.0 0.1 20.0 °C/°F A 24 17 R/W 50
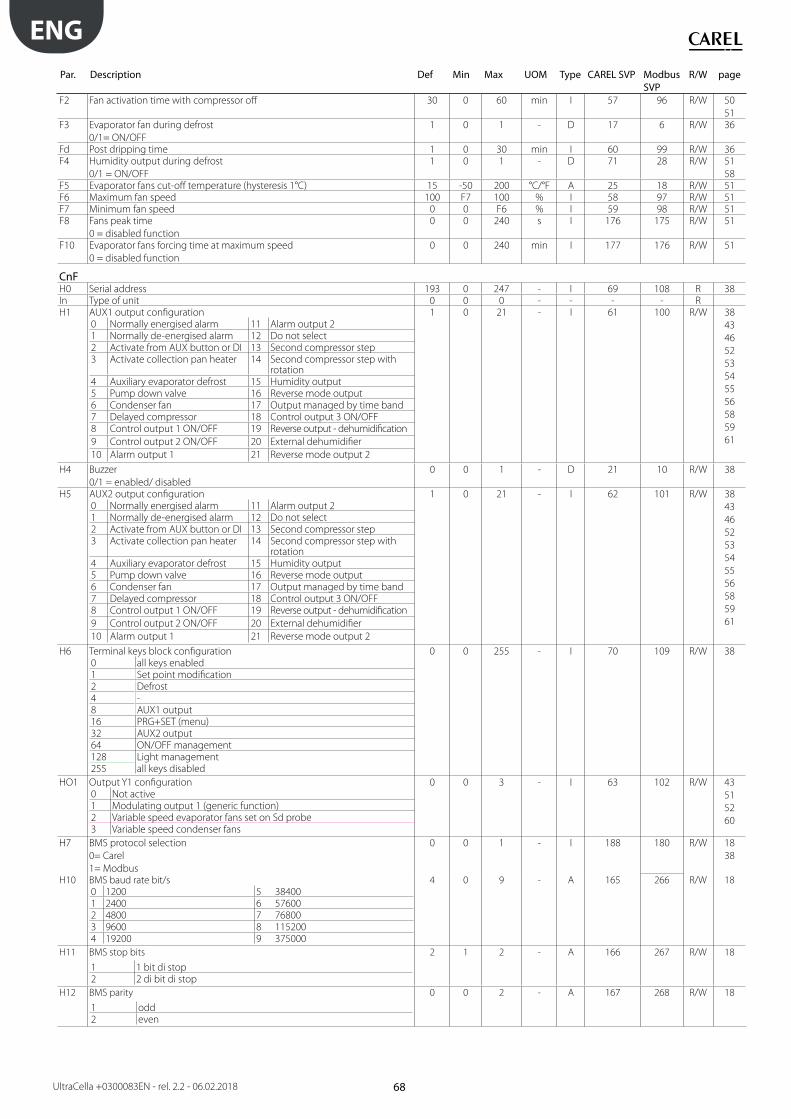
68
ENG
UltraCella +0300083EN - rel. 2.2 - 06.02.2018
Par. Description Def Min Max UOM Type CAREL SVP Modbus SVP
R/W page
F2 Fan activation time with compressor off 30 0 60 min I 57 96 R/W 50
51F3 Evaporator fan during defrost
0/1= ON/OFF
1 0 1 - D 17 6 R/W 36
Fd Post dripping time 1 0 30 min I 60 99 R/W 36F4 Humidity output during defrost
0/1 = ON/OFF
1 0 1 - D 71 28 R/W 51
58F5 Evaporator fans cut-off temperature (hysteresis 1°C) 15 -50 200 °C/°F A 25 18 R/W 51F6 Maximum fan speed 100 F7 100 % I 58 97 R/W 51F7 Minimum fan speed 0 0 F6 % I 59 98 R/W 51F8 Fans peak time
0 = disabled function
0 0 240 s I 176 175 R/W 51
F10 Evaporator fans forcing time at maximum speed
0 = disabled function
0 0 240 min I 177 176 R/W 51
CnFH0 Serial address 193 0 247 - I 69 108 R 38In Type of unit 0 0 0 - - - - RH1 AUX1 output configuration
0 Normally energised alarm 11 Alarm output 21 Normally de-energised alarm 12 Do not select2 Activate from AUX button or DI 13 Second compressor step3 Activate collection pan heater 14 Second compressor step with
rotation4 Auxiliary evaporator defrost 15 Humidity output5 Pump down valve 16 Reverse mode output6 Condenser fan 17 Output managed by time band7 Delayed compressor 18 Control output 3 ON/OFF8 Control output 1 ON/OFF 19 Reverse output - dehumidification
9 Control output 2 ON/OFF 20 External dehumidifier
10 Alarm output 1 21 Reverse mode output 2
1 0 21 - I 61 100 R/W 38
43
46
52
53
54
55
56
58
59
61
H4 Buzzer
0/1 = enabled/ disabled
0 0 1 - D 21 10 R/W 38
H5 AUX2 output configuration0 Normally energised alarm 11 Alarm output 21 Normally de-energised alarm 12 Do not select2 Activate from AUX button or DI 13 Second compressor step3 Activate collection pan heater 14 Second compressor step with
rotation4 Auxiliary evaporator defrost 15 Humidity output5 Pump down valve 16 Reverse mode output6 Condenser fan 17 Output managed by time band7 Delayed compressor 18 Control output 3 ON/OFF8 Control output 1 ON/OFF 19 Reverse output - dehumidification
9 Control output 2 ON/OFF 20 External dehumidifier
10 Alarm output 1 21 Reverse mode output 2
1 0 21 - I 62 101 R/W 38
43
46
52
53
54
55
56
58
59
61
H6 Terminal keys block configuration0 all keys enabled1 Set point modification2 Defrost4 -8 AUX1 output16 PRG+SET (menu)32 AUX2 output64 ON/OFF management128 Light management255 all keys disabled
0 0 255 - I 70 109 R/W 38
HO1 Output Y1 configuration0 Not active1 Modulating output 1 (generic function)2 Variable speed evaporator fans set on Sd probe3 Variable speed condenser fans
0 0 3 - I 63 102 R/W 43
51
52
60
H7 BMS protocol selection
0= Carel
1= Modbus
0 0 1 - I 188 180 R/W 18
38
H10 BMS baud rate bit/s
0 1200 5 384001 2400 6 576002 4800 7 768003 9600 8 1152004 19200 9 375000
4 0 9 - A 165 266 R/W 18
H11 BMS stop bits
1 1 bit di stop2 2 di bit di stop
2 1 2 - A 166 267 R/W 18
H12 BMS parity
1 odd2 even
0 0 2 - A 167 268 R/W 18
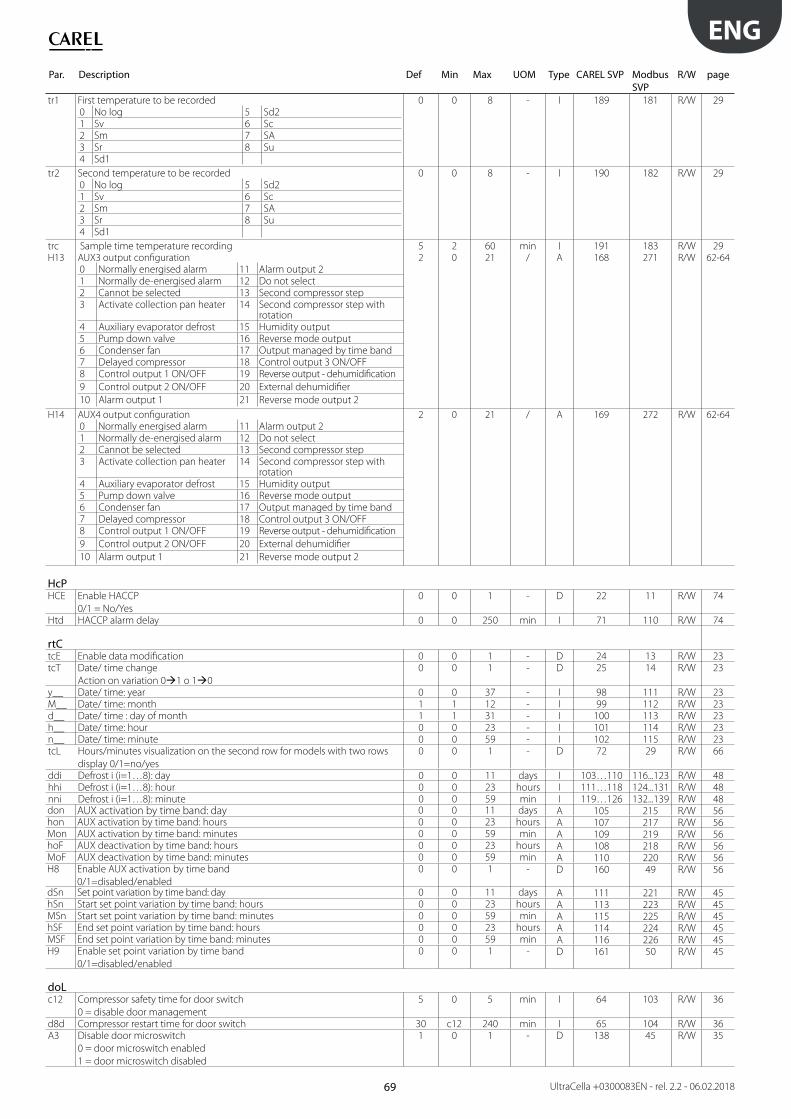
69
ENG
UltraCella +0300083EN - rel. 2.2 - 06.02.2018
Par. Description Def Min Max UOM Type CAREL SVP Modbus SVP
R/W page
tr1 First temperature to be recorded0 No log 5 Sd21 Sv 6 Sc2 Sm 7 SA3 Sr 8 Su4 Sd1
0 0 8 - I 189 181 R/W 29
tr2 Second temperature to be recorded0 No log 5 Sd21 Sv 6 Sc2 Sm 7 SA3 Sr 8 Su4 Sd1
0 0 8 - I 190 182 R/W 29
trc Sample time temperature recording 5 2 60 min I 191 183 R/W 29H13 AUX3 output configuration
0 Normally energised alarm 11 Alarm output 21 Normally de-energised alarm 12 Do not select2 Cannot be selected 13 Second compressor step3 Activate collection pan heater 14 Second compressor step with
rotation4 Auxiliary evaporator defrost 15 Humidity output5 Pump down valve 16 Reverse mode output6 Condenser fan 17 Output managed by time band7 Delayed compressor 18 Control output 3 ON/OFF8 Control output 1 ON/OFF 19 Reverse output - dehumidification
9 Control output 2 ON/OFF 20 External dehumidifier
10 Alarm output 1 21 Reverse mode output 2
2 0 21 / A 168 271 R/W 62-64
H14 AUX4 output configuration
0 Normally energised alarm 11 Alarm output 21 Normally de-energised alarm 12 Do not select2 Cannot be selected 13 Second compressor step3 Activate collection pan heater 14 Second compressor step with
rotation4 Auxiliary evaporator defrost 15 Humidity output5 Pump down valve 16 Reverse mode output6 Condenser fan 17 Output managed by time band7 Delayed compressor 18 Control output 3 ON/OFF8 Control output 1 ON/OFF 19 Reverse output - dehumidification
9 Control output 2 ON/OFF 20 External dehumidifier
10 Alarm output 1 21 Reverse mode output 2
2 0 21 / A 169 272 R/W 62-64
HcPHCE Enable HACCP
0/1 = No/Yes
0 0 1 - D 22 11 R/W 74
Htd HACCP alarm delay 0 0 250 min I 71 110 R/W 74
rtCtcE Enable data modification 0 0 1 - D 24 13 R/W 23tcT Date/ time change
Action on variation 0 1 o 1 0
0 0 1 - D 25 14 R/W 23
y__ Date/ time: year 0 0 37 - I 98 111 R/W 23M__ Date/ time: month 1 1 12 - I 99 112 R/W 23d__ Date/ time : day of month 1 1 31 - I 100 113 R/W 23h__ Date/ time: hour 0 0 23 - I 101 114 R/W 23n__ Date/ time: minute 0 0 59 - I 102 115 R/W 23tcL Hours/minutes visualization on the second row for models with two rows
display 0/1=no/yes
0 0 1 - D 72 29 R/W 66
ddi Defrost i (i=1…8): day 0 0 11 days I 103…110 116...123 R/W 48hhi Defrost i (i=1…8): hour 0 0 23 hours I 111…118 124...131 R/W 48nni Defrost i (i=1…8): minute 0 0 59 min I 119…126 132...139 R/W 48don AUX activation by time band: day 0 0 11 days A 105 215 R/W 56hon AUX activation by time band: hours 0 0 23 hours A 107 217 R/W 56Mon AUX activation by time band: minutes 0 0 59 min A 109 219 R/W 56hoF AUX deactivation by time band: hours 0 0 23 hours A 108 218 R/W 56MoF AUX deactivation by time band: minutes 0 0 59 min A 110 220 R/W 56H8 Enable AUX activation by time band
0/1=disabled/enabled
0 0 1 - D 160 49 R/W 56
dSn Set point variation by time band: day 0 0 11 days A 111 221 R/W 45hSn Start set point variation by time band: hours 0 0 23 hours A 113 223 R/W 45MSn Start set point variation by time band: minutes 0 0 59 min A 115 225 R/W 45hSF End set point variation by time band: hours 0 0 23 hours A 114 224 R/W 45MSF End set point variation by time band: minutes 0 0 59 min A 116 226 R/W 45H9 Enable set point variation by time band
0/1=disabled/enabled
0 0 1 - D 161 50 R/W 45
doLc12 Compressor safety time for door switch
0 = disable door management
5 0 5 min I 64 103 R/W 36
d8d Compressor restart time for door switch 30 c12 240 min I 65 104 R/W 36A3 Disable door microswitch
0 = door microswitch enabled
1 = door microswitch disabled
1 0 1 - D 138 45 R/W 35
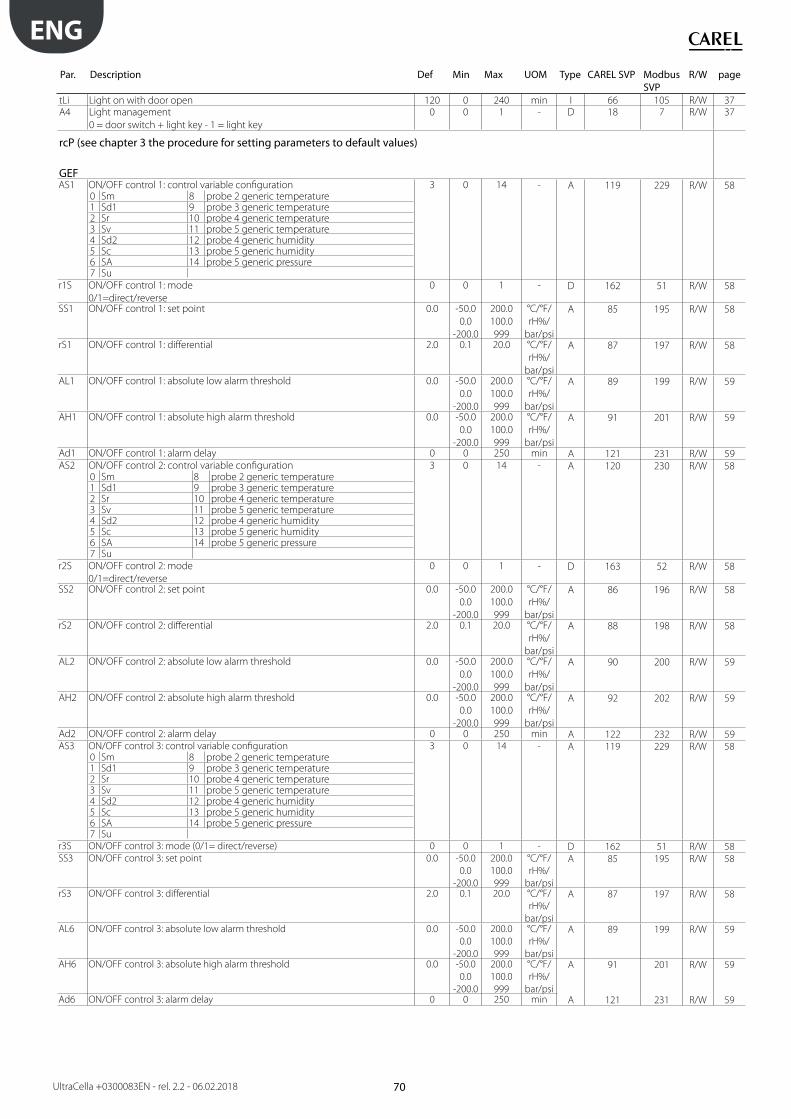
70
ENG
UltraCella +0300083EN - rel. 2.2 - 06.02.2018
Par. Description Def Min Max UOM Type CAREL SVP Modbus SVP
R/W page
tLi Light on with door open 120 0 240 min I 66 105 R/W 37A4 Light management
0 = door switch + light key - 1 = light key
0 0 1 - D 18 7 R/W 37
rcP (see chapter 3 the procedure for setting parameters to default values)
GEFAS1 ON/OFF control 1: control variable configuration
0 Sm 8 probe 2 generic temperature1 Sd1 9 probe 3 generic temperature2 Sr 10 probe 4 generic temperature3 Sv 11 probe 5 generic temperature4 Sd2 12 probe 4 generic humidity5 Sc 13 probe 5 generic humidity6 SA 14 probe 5 generic pressure7 Su
3 0 14 - A 119 229 R/W 58
r1S ON/OFF control 1: mode
0/1=direct/reverse
0 0 1 - D 162 51 R/W 58
SS1 ON/OFF control 1: set point 0.0 -50.0
0.0
-200.0
200.0
100.0
999
°C/°F/
rH%/
bar/psi
A 85 195 R/W 58
rS1 ON/OFF control 1: differential 2.0 0.1 20.0 °C/°F/
rH%/
bar/psi
A 87 197 R/W 58
AL1 ON/OFF control 1: absolute low alarm threshold 0.0 -50.0
0.0
-200.0
200.0
100.0
999
°C/°F/
rH%/
bar/psi
A 89 199 R/W 59
AH1 ON/OFF control 1: absolute high alarm threshold 0.0 -50.0
0.0
-200.0
200.0
100.0
999
°C/°F/
rH%/
bar/psi
A 91 201 R/W 59
Ad1 ON/OFF control 1: alarm delay 0 0 250 min A 121 231 R/W 59AS2 ON/OFF control 2: control variable configuration
0 Sm 8 probe 2 generic temperature1 Sd1 9 probe 3 generic temperature2 Sr 10 probe 4 generic temperature3 Sv 11 probe 5 generic temperature4 Sd2 12 probe 4 generic humidity5 Sc 13 probe 5 generic humidity6 SA 14 probe 5 generic pressure7 Su
3 0 14 - A 120 230 R/W 58
r2S ON/OFF control 2: mode
0/1=direct/reverse
0 0 1 - D 163 52 R/W 58
SS2 ON/OFF control 2: set point 0.0 -50.0
0.0
-200.0
200.0
100.0
999
°C/°F/
rH%/
bar/psi
A 86 196 R/W 58
rS2 ON/OFF control 2: differential 2.0 0.1 20.0 °C/°F/
rH%/
bar/psi
A 88 198 R/W 58
AL2 ON/OFF control 2: absolute low alarm threshold 0.0 -50.0
0.0
-200.0
200.0
100.0
999
°C/°F/
rH%/
bar/psi
A 90 200 R/W 59
AH2 ON/OFF control 2: absolute high alarm threshold 0.0 -50.0
0.0
-200.0
200.0
100.0
999
°C/°F/
rH%/
bar/psi
A 92 202 R/W 59
Ad2 ON/OFF control 2: alarm delay 0 0 250 min A 122 232 R/W 59AS3 ON/OFF control 3: control variable configuration
0 Sm 8 probe 2 generic temperature1 Sd1 9 probe 3 generic temperature2 Sr 10 probe 4 generic temperature3 Sv 11 probe 5 generic temperature4 Sd2 12 probe 4 generic humidity5 Sc 13 probe 5 generic humidity6 SA 14 probe 5 generic pressure7 Su
3 0 14 - A 119 229 R/W 58
r3S ON/OFF control 3: mode (0/1= direct/reverse) 0 0 1 - D 162 51 R/W 58
SS3 ON/OFF control 3: set point 0.0 -50.0
0.0
-200.0
200.0
100.0
999
°C/°F/
rH%/
bar/psi
A 85 195 R/W 58
rS3 ON/OFF control 3: differential 2.0 0.1 20.0 °C/°F/
rH%/
bar/psi
A 87 197 R/W 58
AL6 ON/OFF control 3: absolute low alarm threshold 0.0 -50.0
0.0
-200.0
200.0
100.0
999
°C/°F/
rH%/
bar/psi
A 89 199 R/W 59
AH6 ON/OFF control 3: absolute high alarm threshold 0.0 -50.0
0.0
-200.0
200.0
100.0
999
°C/°F/
rH%/
bar/psi
A 91 201 R/W 59
Ad6 ON/OFF control 3: alarm delay 0 0 250 min A 121 231 R/W 59

71
ENG
UltraCella +0300083EN - rel. 2.2 - 06.02.2018
Par. Description Def Min Max UOM Type CAREL SVP Modbus SVP
R/W page
AM1 Modulating control: control variable configuration0 Sm 8 probe 2 generic temperature1 Sd1 9 probe 3 generic temperature2 Sr 10 probe 4 generic temperature3 Sv 11 probe 5 generic temperature4 Sd2 12 probe 4 generic humidity5 Sc 13 probe 5 generic humidity6 SA 14 probe 5 generic pressure7 Su
3 0 14 - A 123 233 R/W 59
r1M Modulating control: mode
0/1=direct/reverse
0 0 1 - D 164 53 R/W 59
SM1 Modulating control: set point 0.0 -50.0
0.0
-200.0
200.0
100.0
999
°C/°F/
rH%/
bar/psi
A 93 203 R/W 59
rc1 Modulating control: differential 2.0 0.1 20.0 °C/°F/
rH%/
bar/psi
A 94 204 R/W 59
rM1 Modulating control: modulation range, between min SL1 and max SH1 2.0 0.1 40.0 °C/°F/
rH%/
bar/psi
A 95 205 R/W 59
SL1 Modulating control: min. modulating output value (cut-off ) 0.0 0.0 SH1 % A 125 235 R/W 59SH1 Modulating control: max. modulating output value 100.0 SL1 100.0 % A 124 234 R/W 59AL3 Modulating control: absolute low alarm threshold 0.0 -50.0
0.0
-200.0
200.0
100.0
999
°C/°F/
rH%/
bar/psi
A 96 206 R/W 60
AH3 Modulating control: absolute high alarm threshold 0.0 -50.0
0.0
-200.0
200.0
100.0
999
°C/°F/
rH%/
bar/psi
A 97 207 R/W 60
Ad3 Modulating control: alarm delay 0 0 250 min A 126 236 R/W 60AA1 Alarm 1: select source
0 DI2 (with A5=15) 6 Probe S5 fault (E4)1 Virtual probe (Sv) fault (rE) 7 Low pressure alarm (LP)2 Probe S1 (Sm) fault (E0) 8 Immediate external alarm (IA)3 Probe S2 fault (E1) 9 Low temperature alarm (LO)4 Probe S3 fault (E2) 10 High temperature alarm (HI)5 Probe S4 fault (E3) 11 High condenser temperature alarm (CHt)
0 0 11 - A 127 237 R/W 60
r1A Alarm 1: logic
0/1=normally open/normally closed
0 0 1 - D 165 54 R/W 60
Ad4 Alarm 1: delay 0 0 250 min A 129 239 R/W 60AA2 Alarm 2: select source
0 DI3 (with A9=15) 6 Probe S5 fault (E4)1 Virtual probe (Sv) fault (rE) 7 Low pressure alarm (LP)2 Probe S1 (Sm) fault (E0) 8 Immediate external alarm (IA)3 Probe S2 fault (E1) 9 Low temperature alarm (LO)4 Probe S3 fault (E2) 10 High temperature alarm (HI)5 Probe S4 fault (E3) 11 High condenser temperature alarm (CHt)
0 0 11 - A 128 238 R/W 60
r2A Alarm 2: logic
0/1=normally open/normally closed
0 0 1 - D 166 55 R/W 60
Ad5 Alarm 2: delay 0 0 250 min A 130 240 R/W 60
EVOP1 Enable communication with EVD EVO module
0/1=no/yes
0 0 1 - D 70 27 R/W 39
P1t S1 probe type
0 RAZ. 0 to 5 V 2 4 to 20 mA remote
1 4 to 20 mA 3 4 to 20 mA external
0 0 3 - I 139 150 R/W 39
P1M Max value of S1 probe 12.8 -20 200 °C/°F A 31 22 R/W 39P1n Min value of S1 probe -1 -20 200 °C/°F A 30 21 R/W 39PVt Valve type
1 CAREL EXV 12 Sporlan seh 100
2 Alco ex4 13 Sporlan seh 175
3 Alco ex5 14 Danfoss ets 12.5 - 25b
4 Alco ex6 15 Danfoss ets 50b
5 Alco ex7 16 Danfoss ets 100b
6 Alco ex8 330hz CAREL recommended 17 Danfoss ets 250
7 Alco ex8 500hz Alco specification 18 Danfoss ets 400
8 Sporlan sei 0.5-11 19 2 CAREL EXV connected together
9 Sporlan ser 1.5-20 20 Sporlan ser(i) g, j, k
10 Sporlan sei 30 21 Danfoss ccm 10-20-30
11 Sporlan sei 50 22 Danfoss ccm 40
1 1 22 - I 136 147 R/W 39
PH Refrigerant type1 R22 9 R600A 17 R422A 25 HTR02 33 R448A
2 R134a 10 R717 18 R423A 26 R23 34 R449A
3 R404A 11 R744 19 R407A 27 R1234yf 35 R450A
4 R407C 12 R728 20 R427A 28 R1234ze 36 R452A
5 R410A 13 R1270 21 R245FA 29 R455A 37 R508B
6 R507A 14 R417A 22 R407F 30 R170 38 R452B
7 R290 15 R422D 23 R32 31 R442A 39 R513A
8 R600 16 R413A 24 HTR01 32 R447A 40 R454B
3 1 40 - I 135 146 R/W 39
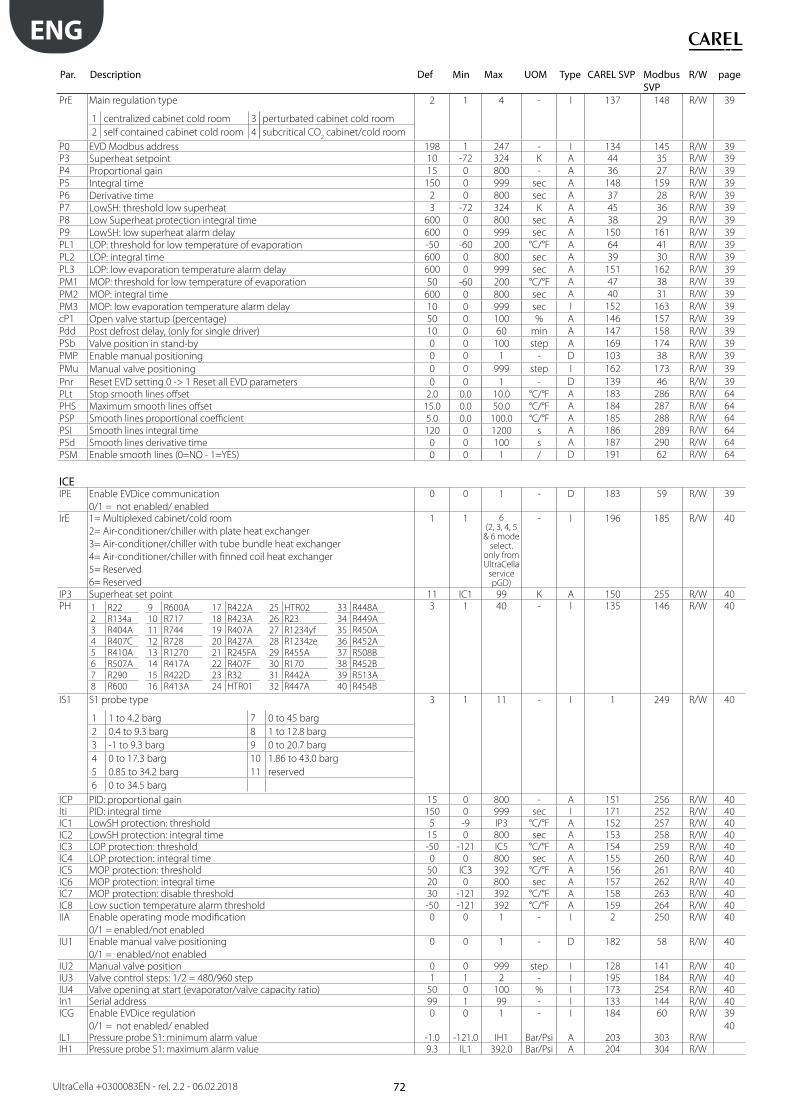
72
ENG
UltraCella +0300083EN - rel. 2.2 - 06.02.2018
Par. Description Def Min Max UOM Type CAREL SVP Modbus SVP
R/W page
PrE Main regulation type
1 centralized cabinet cold room 3 perturbated cabinet cold room
2 self contained cabinet cold room 4 subcritical CO2 cabinet/cold room
2 1 4 - I 137 148 R/W 39
P0 EVD Modbus address 198 1 247 - I 134 145 R/W 39P3 Superheat setpoint 10 -72 324 K A 44 35 R/W 39
P4 Proportional gain 15 0 800 - A 36 27 R/W 39
P5 Integral time 150 0 999 sec A 148 159 R/W 39
P6 Derivative time 2 0 800 sec A 37 28 R/W 39
P7 LowSH: threshold low superheat 3 -72 324 K A 45 36 R/W 39
P8 Low Superheat protection integral time 600 0 800 sec A 38 29 R/W 39
P9 LowSH: low superheat alarm delay 600 0 999 sec A 150 161 R/W 39
PL1 LOP: threshold for low temperature of evaporation -50 -60 200 °C/°F A 64 41 R/W 39
PL2 LOP: integral time 600 0 800 sec A 39 30 R/W 39
PL3 LOP: low evaporation temperature alarm delay 600 0 999 sec A 151 162 R/W 39
PM1 MOP: threshold for low temperature of evaporation 50 -60 200 °C/°F A 47 38 R/W 39
PM2 MOP: integral time 600 0 800 sec A 40 31 R/W 39
PM3 MOP: low evaporation temperature alarm delay 10 0 999 sec I 152 163 R/W 39
cP1 Open valve startup (percentage) 50 0 100 % A 146 157 R/W 39
Pdd Post defrost delay, (only for single driver) 10 0 60 min A 147 158 R/W 39
PSb Valve position in stand-by 0 0 100 step A 169 174 R/W 39
PMP Enable manual positioning 0 0 1 - D 103 38 R/W 39
PMu Manual valve positioning 0 0 999 step I 162 173 R/W 39
Pnr Reset EVD setting 0 -> 1 Reset all EVD parameters 0 0 1 - D 139 46 R/W 39
PLt Stop smooth lines offset 2.0 0.0 10.0 °C/°F A 183 286 R/W 64
PHS Maximum smooth lines offset 15.0 0.0 50.0 °C/°F A 184 287 R/W 64
PSP Smooth lines proportional coefficient 5.0 0.0 100.0 °C/°F A 185 288 R/W 64
PSI Smooth lines integral time 120 0 1200 s A 186 289 R/W 64
PSd Smooth lines derivative time 0 0 100 s A 187 290 R/W 64
PSM Enable smooth lines (0=NO - 1=YES) 0 0 1 / D 191 62 R/W 64
ICEIPE Enable EVDice communication
0/1 = not enabled/ enabled
0 0 1 - D 183 59 R/W 39
IrE 1= Multiplexed cabinet/cold room
2= Air-conditioner/chiller with plate heat exchanger
3= Air-conditioner/chiller with tube bundle heat exchanger
4= Air-conditioner/chiller with finned coil heat exchanger
5= Reserved
6= Reserved
1 1 6(2, 3, 4, 5
& 6 mode select.
only from UltraCella
service pGD)
- I 196 185 R/W 40
IP3 Superheat set point 11 IC1 99 K A 150 255 R/W 40PH 1 R22 9 R600A 17 R422A 25 HTR02 33 R448A
2 R134a 10 R717 18 R423A 26 R23 34 R449A
3 R404A 11 R744 19 R407A 27 R1234yf 35 R450A
4 R407C 12 R728 20 R427A 28 R1234ze 36 R452A
5 R410A 13 R1270 21 R245FA 29 R455A 37 R508B
6 R507A 14 R417A 22 R407F 30 R170 38 R452B
7 R290 15 R422D 23 R32 31 R442A 39 R513A
8 R600 16 R413A 24 HTR01 32 R447A 40 R454B
3 1 40 - I 135 146 R/W 40
IS1 S1 probe type
1 1 to 4.2 barg 7 0 to 45 barg
2 0.4 to 9.3 barg 8 1 to 12.8 barg
3 -1 to 9.3 barg 9 0 to 20.7 barg
4 0 to 17.3 barg 10 1.86 to 43.0 barg
5 0.85 to 34.2 barg 11 reserved
6 0 to 34.5 barg
3 1 11 - I 1 249 R/W 40
ICP PID: proportional gain 15 0 800 - A 151 256 R/W 40Iti PID: integral time 150 0 999 sec I 171 252 R/W 40IC1 LowSH protection: threshold 5 -9 IP3 °C/°F A 152 257 R/W 40IC2 LowSH protection: integral time 15 0 800 sec A 153 258 R/W 40IC3 LOP protection: threshold -50 -121 IC5 °C/°F A 154 259 R/W 40IC4 LOP protection: integral time 0 0 800 sec A 155 260 R/W 40IC5 MOP protection: threshold 50 IC3 392 °C/°F A 156 261 R/W 40IC6 MOP protection: integral time 20 0 800 sec A 157 262 R/W 40IC7 MOP protection: disable threshold 30 -121 392 °C/°F A 158 263 R/W 40IC8 Low suction temperature alarm threshold -50 -121 392 °C/°F A 159 264 R/W 40IIA Enable operating mode modification
0/1 = enabled/not enabled
0 0 1 - I 2 250 R/W 40
IU1 Enable manual valve positioning
0/1 = enabled/not enabled
0 0 1 - D 182 58 R/W 40
IU2 Manual valve position 0 0 999 step I 128 141 R/W 40IU3 Valve control steps: 1/2 = 480/960 step 1 1 2 - I 195 184 R/W 40IU4 Valve opening at start (evaporator/valve capacity ratio) 50 0 100 % I 173 254 R/W 40In1 Serial address 99 1 99 - I 133 144 R/W 40ICG Enable EVDice regulation
0/1 = not enabled/ enabled
0 0 1 - I 184 60 R/W 39
40IL1 Pressure probe S1: minimum alarm value -1.0 -121.0 IH1 Bar/Psi A 203 303 R/WIH1 Pressure probe S1: maximum alarm value 9.3 IL1 392.0 Bar/Psi A 204 304 R/W
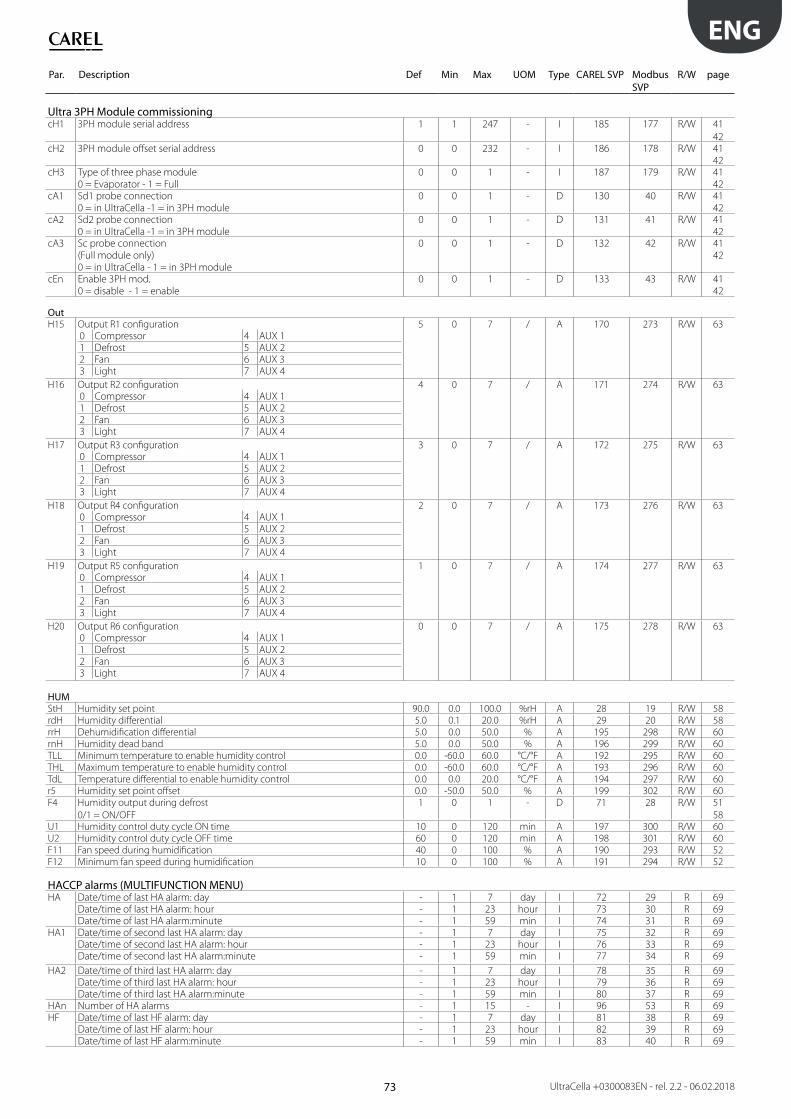
73
ENG
UltraCella +0300083EN - rel. 2.2 - 06.02.2018
Par. Description Def Min Max UOM Type CAREL SVP Modbus SVP
R/W page
Ultra 3PH Module commissioningcH1 3PH module serial address 1 1 247 - I 185 177 R/W 41
42cH2 3PH module offset serial address 0 0 232 - I 186 178 R/W 41
42cH3 Type of three phase module
0 = Evaporator - 1 = Full
0 0 1 - I 187 179 R/W 41
42cA1 Sd1 probe connection
0 = in UltraCella -1 = in 3PH module
0 0 1 - D 130 40 R/W 41
42cA2 Sd2 probe connection
0 = in UltraCella -1 = in 3PH module
0 0 1 - D 131 41 R/W 41
42cA3 Sc probe connection
(Full module only)
0 = in UltraCella - 1 = in 3PH module
0 0 1 - D 132 42 R/W 41
42
cEn Enable 3PH mod.
0 = disable - 1 = enable
0 0 1 - D 133 43 R/W 41
42
OutH15 Output R1 configuration
0 Compressor 4 AUX 11 Defrost 5 AUX 22 Fan 6 AUX 33 Light 7 AUX 4
5 0 7 / A 170 273 R/W 63
H16 Output R2 configuration
0 Compressor 4 AUX 11 Defrost 5 AUX 22 Fan 6 AUX 33 Light 7 AUX 4
4 0 7 / A 171 274 R/W 63
H17 Output R3 configuration
0 Compressor 4 AUX 11 Defrost 5 AUX 22 Fan 6 AUX 33 Light 7 AUX 4
3 0 7 / A 172 275 R/W 63
H18 Output R4 configuration
0 Compressor 4 AUX 11 Defrost 5 AUX 22 Fan 6 AUX 33 Light 7 AUX 4
2 0 7 / A 173 276 R/W 63
H19 Output R5 configuration
0 Compressor 4 AUX 11 Defrost 5 AUX 22 Fan 6 AUX 33 Light 7 AUX 4
1 0 7 / A 174 277 R/W 63
H20 Output R6 configuration
0 Compressor 4 AUX 11 Defrost 5 AUX 22 Fan 6 AUX 33 Light 7 AUX 4
0 0 7 / A 175 278 R/W 63
HUMStH Humidity set point 90.0 0.0 100.0 %rH A 28 19 R/W 58
rdH Humidity differential 5.0 0.1 20.0 %rH A 29 20 R/W 58
rrH Dehumidification differential 5.0 0.0 50.0 % A 195 298 R/W 60
rnH Humidity dead band 5.0 0.0 50.0 % A 196 299 R/W 60
TLL Minimum temperature to enable humidity control 0.0 -60.0 60.0 °C/°F A 192 295 R/W 60
THL Maximum temperature to enable humidity control 0.0 -60.0 60.0 °C/°F A 193 296 R/W 60
TdL Temperature differential to enable humidity control 0.0 0.0 20.0 °C/°F A 194 297 R/W 60
r5 Humidity set point offset 0.0 -50.0 50.0 % A 199 302 R/W 60
F4 Humidity output during defrost
0/1 = ON/OFF
1 0 1 - D 71 28 R/W 51
58U1 Humidity control duty cycle ON time 10 0 120 min A 197 300 R/W 60
U2 Humidity control duty cycle OFF time 60 0 120 min A 198 301 R/W 60
F11 Fan speed during humidification 40 0 100 % A 190 293 R/W 52
F12 Minimum fan speed during humidification 10 0 100 % A 191 294 R/W 52
HACCP alarms (MULTIFUNCTION MENU)HA Date/time of last HA alarm: day - 1 7 day I 72 29 R 69
Date/time of last HA alarm: hour - 1 23 hour I 73 30 R 69Date/time of last HA alarm:minute - 1 59 min I 74 31 R 69
HA1 Date/time of second last HA alarm: day - 1 7 day I 75 32 R 69Date/time of second last HA alarm: hour - 1 23 hour I 76 33 R 69Date/time of second last HA alarm:minute - 1 59 min I 77 34 R 69
HA2 Date/time of third last HA alarm: day - 1 7 day I 78 35 R 69Date/time of third last HA alarm: hour - 1 23 hour I 79 36 R 69Date/time of third last HA alarm:minute - 1 59 min I 80 37 R 69
HAn Number of HA alarms - 1 15 - I 96 53 R 69HF Date/time of last HF alarm: day - 1 7 day I 81 38 R 69
Date/time of last HF alarm: hour - 1 23 hour I 82 39 R 69Date/time of last HF alarm:minute - 1 59 min I 83 40 R 69

74
ENG
UltraCella +0300083EN - rel. 2.2 - 06.02.2018
Par. Description Def Min Max UOM Type CAREL SVP Modbus SVP
R/W page
HF1 Date/time of second last HF alarm: day - 1 7 day I 86 43 R 69Date/time of second last HF alarm: hour - 1 23 hour I 87 44 R 69Date/time of second last HF alarm:minute - 1 59 min I 88 45 R 69
HF2 Date/time of third last HF alarm: day - 1 7 day I 91 48 R 69Date/time of third last HF alarm: hour - 1 23 hour I 92 49 R 69Date/time of third last HF alarm: minute - 1 59 min I 93 50 R 69
HFn Number of HF alarms - 1 15 - I 97 54 R 69Hcr Reset HACCP alarms 0 0 1 - D 23 12 R/W 69
Tab. 7.a
Variables accessible ONLY via serial connectionMessage on the display
Description Type Variable type R/W CAREL address
Modbus Address
rE Virtual probe fault alarm Alarm D R 39 17E0 Probe 1 fault alarm Alarm D R 40 18E1 Probe 2 fault alarm Alarm D R 41 19E2 Probe 3 fault alarm Alarm D R 42 20E3 Probe 4 fault alarm Alarm D R 43 21E4 Probe 5 fault alarm Alarm D R 44 22LO Low temperature alarm Alarm D R 45 23HI High temperature alarm Alarm D R 46 24IA Immediate external alarm Alarm D R 47 25dA Delayed external alarm Alarm D R 48 26Ed1 Defrost timeout alarm, evaporator 1 Alarm D R 50 28Ed2 Defrost timeout alarm, evaporator 2 Alarm D R 51 29Pd Pd alarm active Alarm D R 52 30LP Low pressure alarm Alarm D R 53 31Ats Pump Down autostart alarm Alarm D R 54 32dor Door open for too long alarm Alarm D R 55 33Etc RTC fault alarm Alarm D R 56 34EE Control parameter EEPROM alarm Alarm D R 57 35EF Operating parameter EEPROM alarm Alarm D R 58 36HA Type HA HACCP alarm Alarm D R 59 37HF Type HF HACCP alarm Alarm D R 60 38CHT High condenser temperature alarm Alarm D R 62 40- Active alarms Alarm D R 63 41SHA EVD EVO - Low superheat protection Alarm D R 73 42LOA EVD EVO - LOP protection Alarm D R 75 44MOA EVD EVO - MOP protection Alarm D R 77 46EEA EVD EVO - Valve motor fault Alarm D R 79 48LSA EVD EVO - Low suction temperature alarm Alarm D R 81 50Hit EVD EVO - High cond. temperature protection activated Alarm D R 83 52ES1 EVD EVO - Probe S1 fault Alarm D R 84 53ES2 EVD EVO - Probe S2 fault Alarm D R 85 54ES3 EVD EVO - Probe S3 EVO fault Alarm D R 86 55ES4 EVD EVO - Probe S4 alarm Alarm D R 87 56bAt EVD EVO - Battery discharged or faulty Alarm D R 88 57EEE EVD EVO - Op. and/or parameter EEPROM error Alarm D R 89 58EIC EVD EVO - Valve not closed completely Alarm D R 90 59EEC EVD EVO - Valve closed in emergency Alarm D R 91 60EFU EVD EVO - FW compatibility error (>=5.0) Alarm D R 92 61ECN EVD EVO - Configuration error Alarm D R 93 62ELE EVD EVO offline Alarm D R 94 63dnL Parameter download not successful Alarm D R 115 75uPd Parameter upload not successful Alarm D R 116 76EPE 3PH module offline Alarm D R 119 78EP0 Probe Sd1 fault 3PH module Alarm D R 120 79EP1 Probe Sd2 fault auxiliary evap. 3PH module Alarm D R 121 80EP2 Probe Sc fault 3PH module Alarm D R 122 81EPn 3PH module configuration error Alarm D R 123 82EPM 3PH module motor protector alarm Alarm D R 124 83EPU High/low pressure alarm or Kriwan activated 3PH module Alarm D R 125 84LOG Recorded temperature download not successful Alarm D R 143 94ALM Alarm log download not successful Alarm D R 144 95SOF UltraCella software update not successful Alarm D R 145 96IA1 EVD ICE - Probe S1 fault Alarm D R 169 110IA2 EVD ICE - Probe S2 fault Alarm D R 170 111IE1 EVD ICE - MOP alarm Alarm D R 171 112IE2 EVD ICE - LOP alarm Alarm D R 172 113IE3 EVD ICE - Low superheat alarm Alarm D R 173 114IE4 EVD ICE - Low pressure alarm Alarm D R 174 115IE5 EVD ICE - Valve closed in emergency Alarm D R 175 116IE6 EVD ICE - Control from digital input if offline Alarm D R 176 117IE7 EVD ICE - Ultracap supplied at low voltage or battery low level Alarm D R 177 118IE8 EVD ICE - Valve not closed completely Alarm D R 178 119IEE EVD ICE - Op. and/or parameter EEPROM error Alarm D R 179 120ILE EVD ICE offline Alarm D R 180 121IEC EVD ICE – Configuration error Alarm D R 185 123IEM EVD ICE – Alignment error with UltraCella Alarm D R 186 124Y1 0 to 10 V analogue output Status A R 6 5- Virtual probe Status A R 26 6- Application version Info A R 27 7- EVD ICE - Probe S1 value Status A R 58 16- EVD ICE - Probe S2 value Status A R 59 17
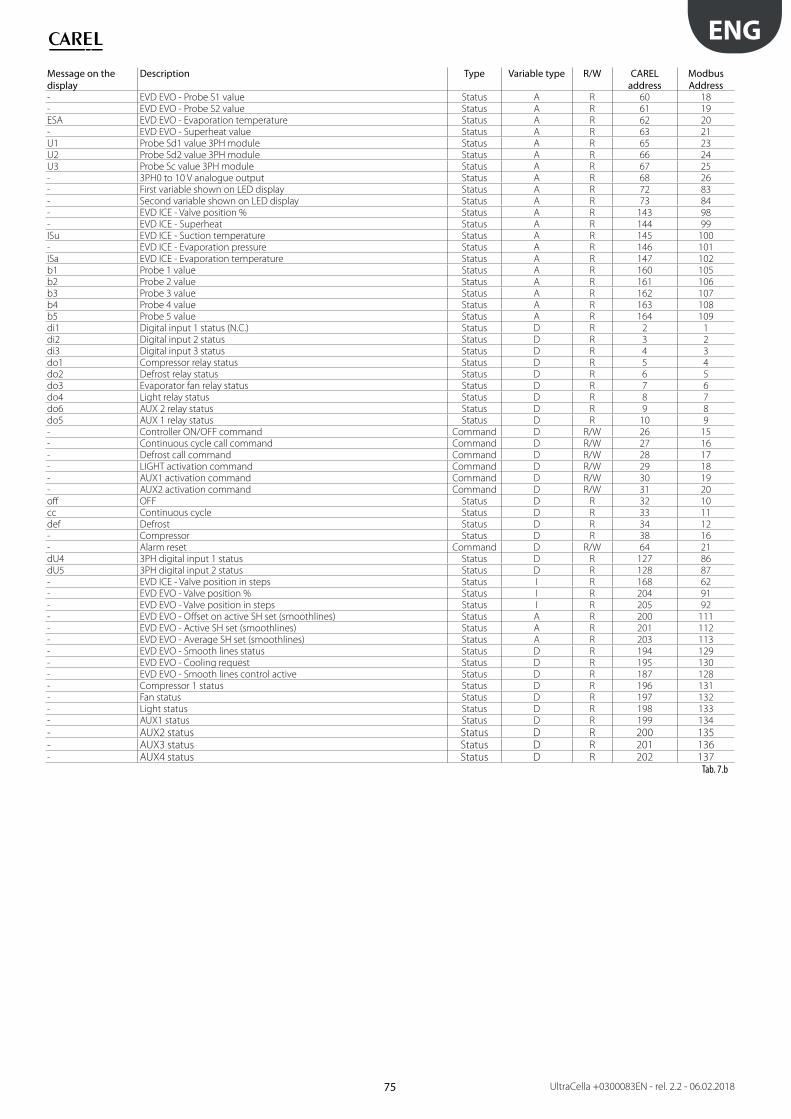
75
ENG
UltraCella +0300083EN - rel. 2.2 - 06.02.2018
Message on the display
Description Type Variable type R/W CAREL address
Modbus Address
- EVD EVO - Probe S1 value Status A R 60 18- EVD EVO - Probe S2 value Status A R 61 19ESA EVD EVO - Evaporation temperature Status A R 62 20- EVD EVO - Superheat value Status A R 63 21U1 Probe Sd1 value 3PH module Status A R 65 23U2 Probe Sd2 value 3PH module Status A R 66 24U3 Probe Sc value 3PH module Status A R 67 25- 3PH0 to 10 V analogue output Status A R 68 26- First variable shown on LED display Status A R 72 83- Second variable shown on LED display Status A R 73 84- EVD ICE - Valve position % Status A R 143 98- EVD ICE - Superheat Status A R 144 99ISu EVD ICE - Suction temperature Status A R 145 100- EVD ICE - Evaporation pressure Status A R 146 101ISa EVD ICE - Evaporation temperature Status A R 147 102b1 Probe 1 value Status A R 160 105b2 Probe 2 value Status A R 161 106b3 Probe 3 value Status A R 162 107b4 Probe 4 value Status A R 163 108b5 Probe 5 value Status A R 164 109di1 Digital input 1 status (N.C.) Status D R 2 1di2 Digital input 2 status Status D R 3 2di3 Digital input 3 status Status D R 4 3do1 Compressor relay status Status D R 5 4do2 Defrost relay status Status D R 6 5do3 Evaporator fan relay status Status D R 7 6do4 Light relay status Status D R 8 7do6 AUX 2 relay status Status D R 9 8do5 AUX 1 relay status Status D R 10 9- Controller ON/OFF command Command D R/W 26 15- Continuous cycle call command Command D R/W 27 16- Defrost call command Command D R/W 28 17- LIGHT activation command Command D R/W 29 18- AUX1 activation command Command D R/W 30 19- AUX2 activation command Command D R/W 31 20off OFF Status D R 32 10cc Continuous cycle Status D R 33 11def Defrost Status D R 34 12- Compressor Status D R 38 16- Alarm reset Command D R/W 64 21dU4 3PH digital input 1 status Status D R 127 86dU5 3PH digital input 2 status Status D R 128 87- EVD ICE - Valve position in steps Status I R 168 62- EVD EVO - Valve position % Status I R 204 91- EVD EVO - Valve position in steps Status I R 205 92- EVD EVO - Offset on active SH set (smoothlines) Status A R 200 111- EVD EVO - Active SH set (smoothlines) Status A R 201 112- EVD EVO - Average SH set (smoothlines) Status A R 203 113- EVD EVO - Smooth lines status Status D R 194 129- EVD EVO - Cooling request Status D R 195 130- EVD EVO - Smooth lines control active Status D R 187 128- Compressor 1 status Status D R 196 131- Fan status Status D R 197 132- Light status Status D R 198 133- AUX1 status Status D R 199 134
- AUX2 status Status D R 200 135- AUX3 status Status D R 201 136- AUX4 status Status D R 202 137
Tab. 7.b

76
ENG
UltraCella +0300083EN - rel. 2.2 - 06.02.2018
Example: display after alarms rE and E0.
1 21 2 1 21 2 1 21 2
Note: in order to deactivate the buzzer and the relay alarm press
the Alarm key
Note: the figures refer to the screens on models with single row
display, P/Ns WB000S*. In models with two rows, P/Ns WB000D*,
the display shows the alarm messages on the second row.
Note: the buzzer is disabled during the wizard on the UltraCella
Service terminal.
8.3 Reset alarmsAlarms with automatic reset automatically reset when the cause that
generated them, for example, after the replacement of a faulty probe,
at the end of the alarm for high temperature, etc. For those with manual
reset it is necessary to first remove the cause that generated them, and
then press the Alarm button for entire restore.
Example: display and manual restore alarm CHt (condenser high
temperature)
1 21 2 1 21 2
1 21 2 1 21 2 1 21 2
Note: the figures refer to the screens on models with single row
display, P/Ns WB000S*. In models with two rows, P/Ns WB000D*,
the display shows the alarm messages on the second row
8.4 HACCP alarms and displayIn order to activate monitoring see par 8.6
(HACCP = Hazard Analysis and Critical Control Point).
HACCP can only be activated on the controllers with the RTC option fitted,
and allows control of the operating temperature and the recording of any
anomalies due to power failures or increases in the operating temperature
due to various causes (breakages, severe operating conditions, operator
errors, etc…). There are two types of HACCP events:
• HA alarms, high temperature during operation;
• HF alarms, high temperature after power black out.
The alarm causes the blinking of HACCP icon, the display of the relative
alarm code on the display, storage of the alarm and activation of the
buzzer.
Example: display after HF error and restore of the alarm condition:
1 21 2 1 21 2
8. SIGNALS AND ALARMS
8.1 SignallingThe signals are messages that appear on the display to notify the user
regarding the performance of control procedures (such as defrost) or
confirmation of controls from keyboard.
Code Description--- It appears at controller start-up--- Probe not enabled
Parameters categoriesPro ProbesCtL ControlCMP CompressordEF DefrostALM AlarmFan FanCnF ConfigurationHcP HACCPrtc ClockdoL Door and lightrcP RecipesGEF Generic functionsEVO EVD EVO moduleICE EVDice3PH Three phases Module 3PH
Messages that appear during navigationPAS PasswordHA HACCP alarm, HA typeHF HACCP alarm, HF typerES Reset alarms with manual reset
Reset HACCP alarms
Reset temperature monitoringcc Continuous cycleEd1 Defrost on evaporator 1 ended by time-outEd2 Defrost on evaporator 2 ended by time-outOn Switch ONOFF Switch OFFAUX Auxiliary output switch on requestrEc Temperature registrationno Operation not executeduPd Parameters uploaddnL Parameters downloadbni Menu parameters set (bn)r01…r10 Recipe 1…10MAX Maximum temperature readMIN Minimum temperature readOp OpencLo ClosedEXT Exit menuHcr Reset HACCP alarmsVEr Software releaseLOG Temperature recorded downloadALG Alarms recorded download
Tab. 8.a
8.2 AlarmsThere are two types of alarms:
• system alarms: e.g. Eeprom alarms, communication (interrupted)
alarms, HACCP, high (HI) and low (LO) temperature alarms, high (AUH)
and low (AUL) humidity;
• control alarms: e.g. pump down ended by time-out (Pd), low pressure
(LP).
The auxiliary digital outputs AUX1, AUX2 can be configured to signal
the alarm status, as normally energised or normally de-energised. See
chapter 5. The control indicates the alarms triggered due to faults in
the control itself, in the probes or in the network communication. You can
also activate an alarm from external contact, immediate type. See chapter
4. On the display the message “IA” appears and at the same time the bell
icon blinks and the buzzer activates. If more errors occur, they will appear
in sequence on the display.

77
ENG
UltraCella +0300083EN - rel. 2.2 - 06.02.2018
1 21 2 1 21 2
Note: the figures refer to the screens on models with single row
display, P/Ns WB000S*. In models with two rows, P/Ns WB000D*,
the display shows the alarm messages on the second row
Display and cancel HACCP alarmsAccess the multifunction menu (see chap. 3) and choose HcP. In the
multifunction menu you can see the date and time of the last 3 alarms HA
and HF. After entering the multifunction menu (see previous par.), select
with UP / DOWN the message “HCP”.
Par. Description Def Min Max UoMHA Date/time of last HA alarm 0 - - -HA1 Date/time of second last HA alarm 0 - - -HA2 Date/time of third last HA alarm 0 - - -HAn Number of HA alarms 0 0 15 -HF Date/time of last HF alarm 0 - - -HF1 Date/time of second last HF alarm 0 - - -HF2 Date/time of third last HF alarm 0 - - -HFn Number of HF alarms 0 0 15 -Hcr HACCP alarms cancelling
Action on variation 0 1 o 1 0
0 0 1 -
Procedure:
1. Press Set and then UP/DOWN to display the parameters of the
following table;
2. Press Set to display the alarm date and time;
3. Press Prg until you return to standard display.
4. To cancel all HACCP alarms, change the value of the parameter Hcr
Each alarm is displayed with scrolling text, which contains the day of
week, hour, minute, and the temperature that caused the alarm. The
buffer in which are saved can contain the data of up to 3 alarms. Once
full, the new alarm will replace the oldest one. Instead, the alarm counters
(HAn, HFn), after reaching 15, they stop.
Example: HA alarm triggered Thursday at 13:17, with detected
temperature of 36.8 °C.
1 21 2 1 21 2
1 21 2 1 21 2
1 21 2 1 21 2
Note: the figure refers to the screens on models with single row
display, P/Ns WB000S*. In models with two rows, P/Ns WB000D*,
as well as the message indicated, during navigation the display shows the
scrolling message “HACCP Alarms” on the second row.
8.5 EVD EVO alarmsIf an Ultra EVD module, P/N WM00E%, is connected by Fieldbus, UltraCella
will be able to signal the following alarms, which only depend on the
status of the EVD EVO controller fitted on the module.
Ala
rm c
ode
on d
ispl
ay
Ala
rm
desc
riptio
n
Butto
n fla
shin
g on
dis
play
Icon
flas
hing
on
dis
play
Ala
rm re
lay
Buzz
er
Rese
t
SHA Low superheat protection - ON ON Automatic
LOA LOP protection - ON ON Automatic
MOA MOP protection - ON ON Automatic
EEA Valve motor fault - ON ON Automatic
LSA Low suction temperature - ON ON Automatic
Hit
High condensing
temperature protection
activated
- ON ON Automatic
ES1Probe S1 fault or range
exceeded alarm- ON ON Automatic
ES2Probe S2 fault or range
exceeded alarm- ON ON Automatic
ES3Probe S3 fault or range
exceeded alarm- ON ON Automatic
ES4Probe S4 fault or range
exceeded alarm- ON ON Automatic
bAt
Battery discharged
or faulty or electrical
connection interrupted
- ON ON Automatic
EEEOperating and/or
parameter EEPROM error- ON ON Automatic
EICValve not closed
completely- ON ON Automatic
EECValve closed in
emergency- ON ON Automatic
EFuFW compatibility error
(>=5.0)- ON ON Automatic
ECn Configuration error - ON ON Automatic
ELE EVD offline - ON ON Automatic
Tab. 8.b
8.6 EVDice alarmsIf an EVDice driver is connected via Fieldbus, UltraCella will be able to
signal the following alarms, which depend solely on the status of the
driver.
Ala
rm c
ode
on d
ispl
ay
Ala
rm
desc
riptio
n
Butto
n fla
shin
g on
dis
play
Icon
flas
hing
on
dis
play
Ala
rm re
lay
Buzz
er
Rese
t
IA1 Probe S1 fault - ON ON Automatic
IA2 Probe S2 fault - ON ON Automatic
IE1 MOP protection - ON ON Automatic
IE2 LOP protection - ON ON Automatic
IE3 Low superheat protection - ON ON Automatic
IE4 Low suction temperature
alarm- ON ON Automatic
IE5 Valve emergency closing
(Ultracap)- ON ON Automatic
IE6 Regulation by digital input in
case of offline- ON ON Automatic
IE7 Ultracap module powered
with low voltage or low
charge level
- ON ON Automatic
IE8 Emergency closure is not
completed- ON ON Automatic
IEE Operating and/or parameter
EEPROM error- ON ON Automatic
ILE EVD ICE offline - ON ON Automatic
IEC Configuration error - ON ON Automatic
IEM Alignment error with
UltraCella- ON ON Manual
Tab. 8.c
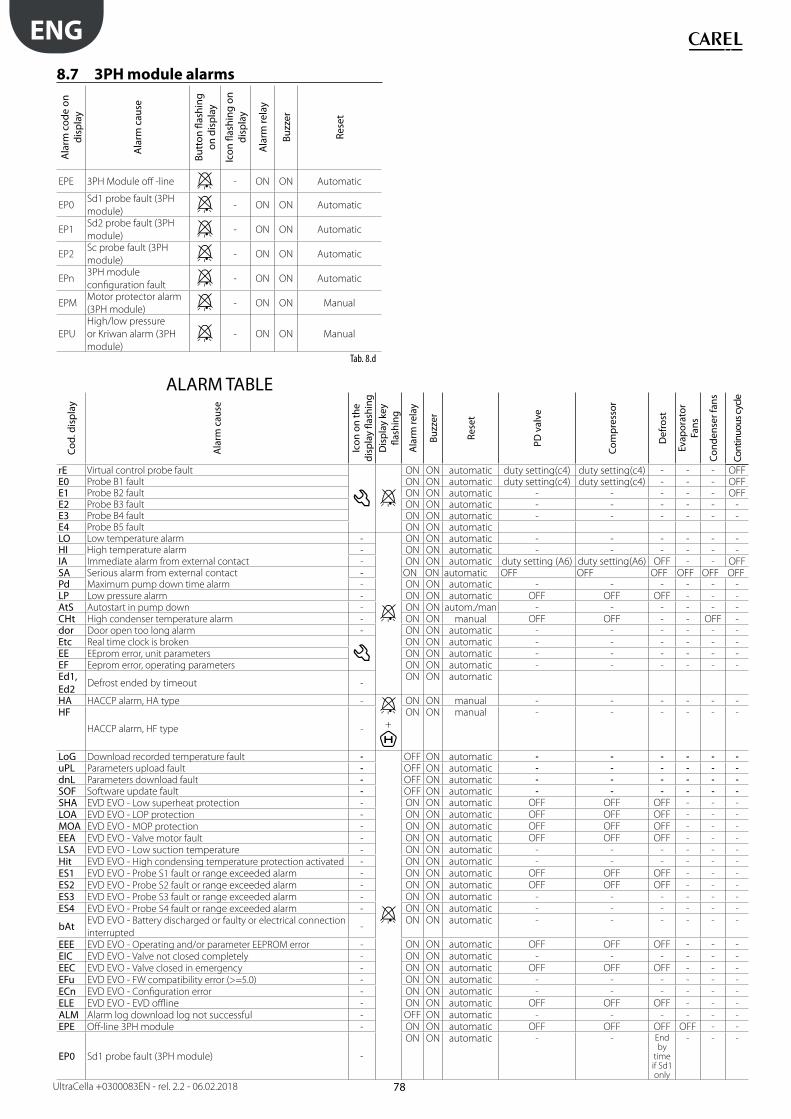
78
ENG
UltraCella +0300083EN - rel. 2.2 - 06.02.2018
ALARM TABLE
Cod.
dis
play
Ala
rm c
ause
Icon
on
the
disp
lay
flash
ing
Dis
play
key
flash
ing
Ala
rm re
lay
Buzz
er
Rese
t
PD v
alve
Com
pres
sor
Def
rost
Evap
orat
or
Fans
Cond
ense
r fan
s
Cont
inuo
us cy
cle
rE Virtual control probe fault ON ON automatic duty setting(c4) duty setting(c4) - - - OFFE0 Probe B1 fault ON ON automatic duty setting(c4) duty setting(c4) - - - OFFE1 Probe B2 fault ON ON automatic - - - - - OFFE2 Probe B3 fault ON ON automatic - - - - - -E3 Probe B4 fault ON ON automatic - - - - - -E4 Probe B5 fault ON ON automaticLO Low temperature alarm - ON ON automatic - - - - - -HI High temperature alarm - ON ON automatic - - - - - -IA Immediate alarm from external contact - ON ON automatic duty setting (A6) duty setting(A6) OFF - - OFFSA Serious alarm from external contact - ON ON automatic OFF OFF OFF OFF OFF OFFPd Maximum pump down time alarm - ON ON automatic - - - - - -LP Low pressure alarm - ON ON automatic OFF OFF OFF - - -AtS Autostart in pump down - ON ON autom./man - - - - - -CHt High condenser temperature alarm - ON ON manual OFF OFF - - OFF -dor Door open too long alarm - ON ON automatic - - - - - -Etc Real time clock is broken ON ON automatic - - - - - -EE EEprom error, unit parameters ON ON automatic - - - - - -EF Eeprom error, operating parameters ON ON automatic - - - - - -Ed1, Ed2 Defrost ended by timeout -
ON ON automatic
HA HACCP alarm, HA type -
+
ON ON manual - - - - - -HF
HACCP alarm, HF type -
ON ON manual - - - - - -
LoG Download recorded temperature fault - OFF ON automatic - - - - - -uPL Parameters upload fault - OFF ON automatic - - - - - -dnL Parameters download fault - OFF ON automatic - - - - - -SOF Software update fault - OFF ON automatic - - - - - -SHA EVD EVO - Low superheat protection - ON ON automatic OFF OFF OFF - - -LOA EVD EVO - LOP protection - ON ON automatic OFF OFF OFF - - -MOA EVD EVO - MOP protection - ON ON automatic OFF OFF OFF - - -EEA EVD EVO - Valve motor fault - ON ON automatic OFF OFF OFF - - -LSA EVD EVO - Low suction temperature - ON ON automatic - - - - - -Hit EVD EVO - High condensing temperature protection activated - ON ON automatic - - - - - -ES1 EVD EVO - Probe S1 fault or range exceeded alarm - ON ON automatic OFF OFF OFF - - -ES2 EVD EVO - Probe S2 fault or range exceeded alarm - ON ON automatic OFF OFF OFF - - -ES3 EVD EVO - Probe S3 fault or range exceeded alarm - ON ON automatic - - - - - -ES4 EVD EVO - Probe S4 fault or range exceeded alarm - ON ON automatic - - - - - -
bAt EVD EVO - Battery discharged or faulty or electrical connection
interrupted-
ON ON automatic - - - - - -
EEE EVD EVO - Operating and/or parameter EEPROM error - ON ON automatic OFF OFF OFF - - -EIC EVD EVO - Valve not closed completely - ON ON automatic - - - - - -EEC EVD EVO - Valve closed in emergency - ON ON automatic OFF OFF OFF - - -EFu EVD EVO - FW compatibility error (>=5.0) - ON ON automatic - - - - - -ECn EVD EVO - Configuration error - ON ON automatic - - - - - -ELE EVD EVO - EVD offline - ON ON automatic OFF OFF OFF - - -ALM Alarm log download log not successful - OFF ON automatic - - - - - -EPE Off-line 3PH module - ON ON automatic OFF OFF OFF OFF - -
EP0 Sd1 probe fault (3PH module) -
ON ON automatic - - End by
time if Sd1 only
- - -
8.7 3PH module alarmsA
larm
cod
e on
di
spla
y
Ala
rm c
ause
Butt
on fl
ashi
ng
on d
ispl
ay
Icon
flas
hing
on
disp
lay
Ala
rm re
lay
Buzz
er
Rese
t
EPE 3PH Module off -line - ON ON Automatic
EP0Sd1 probe fault (3PH
module)- ON ON Automatic
EP1Sd2 probe fault (3PH
module)- ON ON Automatic
EP2Sc probe fault (3PH
module)- ON ON Automatic
EPn3PH module
configuration fault- ON ON Automatic
EPMMotor protector alarm
(3PH module)- ON ON Manual
EPU
High/low pressure
or Kriwan alarm (3PH
module)
- ON ON Manual
Tab. 8.d
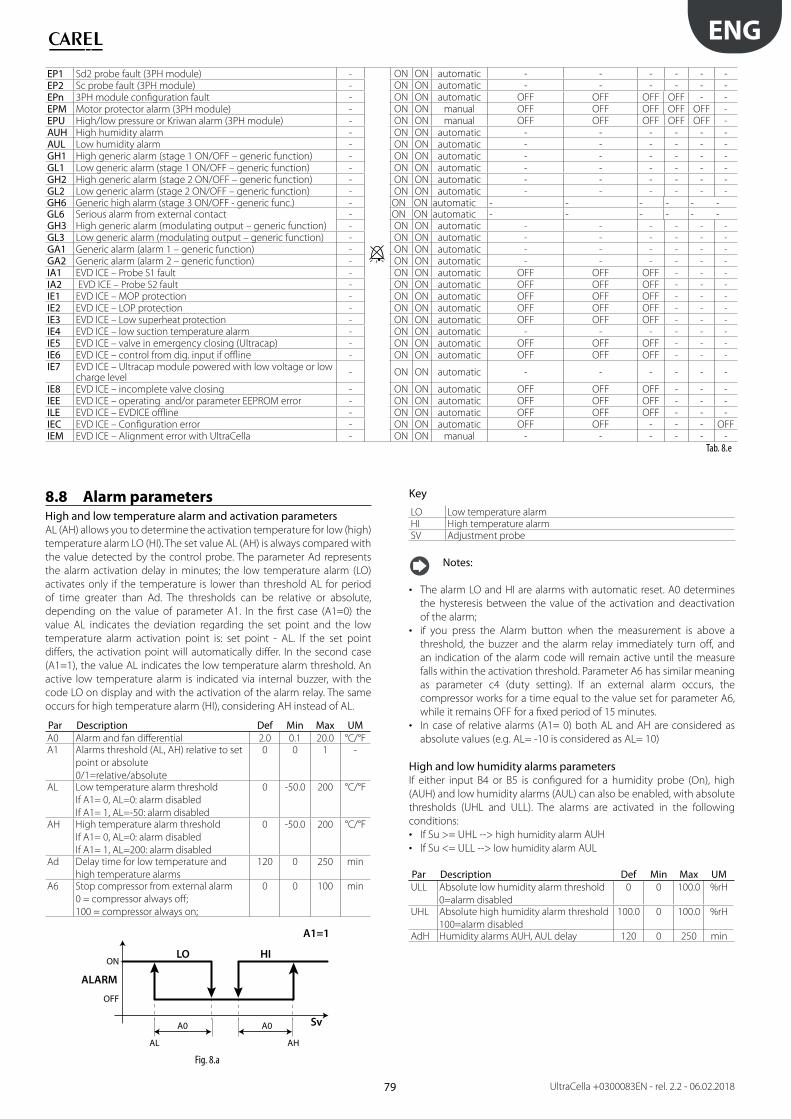
79
ENG
UltraCella +0300083EN - rel. 2.2 - 06.02.2018
EP1 Sd2 probe fault (3PH module) - ON ON automatic - - - - - -EP2 Sc probe fault (3PH module) - ON ON automatic - - - - - -EPn 3PH module configuration fault - ON ON automatic OFF OFF OFF OFF - -EPM Motor protector alarm (3PH module) - ON ON manual OFF OFF OFF OFF OFF -EPU High/low pressure or Kriwan alarm (3PH module) - ON ON manual OFF OFF OFF OFF OFF -AUH High humidity alarm - ON ON automatic - - - - - -AUL Low humidity alarm - ON ON automatic - - - - - -GH1 High generic alarm (stage 1 ON/OFF – generic function) - ON ON automatic - - - - - -GL1 Low generic alarm (stage 1 ON/OFF – generic function) - ON ON automatic - - - - - -GH2 High generic alarm (stage 2 ON/OFF – generic function) - ON ON automatic - - - - - -GL2 Low generic alarm (stage 2 ON/OFF – generic function) - ON ON automatic - - - - - -GH6 Generic high alarm (stage 3 ON/OFF - generic func.) - ON ON automatic - - - - - -GL6 Serious alarm from external contact - ON ON automatic - - - - - -GH3 High generic alarm (modulating output – generic function) - ON ON automatic - - - - - -GL3 Low generic alarm (modulating output – generic function) - ON ON automatic - - - - - -GA1 Generic alarm (alarm 1 – generic function) - ON ON automatic - - - - - -GA2 Generic alarm (alarm 2 – generic function) - ON ON automatic - - - - - -IA1 EVD ICE – Probe S1 fault - ON ON automatic OFF OFF OFF - - -IA2 EVD ICE – Probe S2 fault - ON ON automatic OFF OFF OFF - - -IE1 EVD ICE – MOP protection - ON ON automatic OFF OFF OFF - - -IE2 EVD ICE – LOP protection - ON ON automatic OFF OFF OFF - - -IE3 EVD ICE – Low superheat protection - ON ON automatic OFF OFF OFF - - -IE4 EVD ICE – low suction temperature alarm - ON ON automatic - - - - - -IE5 EVD ICE – valve in emergency closing (Ultracap) - ON ON automatic OFF OFF OFF - - -IE6 EVD ICE – control from dig. input if offline - ON ON automatic OFF OFF OFF - - -IE7 EVD ICE – Ultracap module powered with low voltage or low
charge level- ON ON automatic - - - - - -
IE8 EVD ICE – incomplete valve closing - ON ON automatic OFF OFF OFF - - -IEE EVD ICE – operating and/or parameter EEPROM error - ON ON automatic OFF OFF OFF - - -ILE EVD ICE – EVDICE offline - ON ON automatic OFF OFF OFF - - -IEC EVD ICE – Configuration error - ON ON automatic OFF OFF - - - OFFIEM EVD ICE – Alignment error with UltraCella - ON ON manual - - - - - -
Tab. 8.e
8.8 Alarm parametersHigh and low temperature alarm and activation parametersAL (AH) allows you to determine the activation temperature for low (high)
temperature alarm LO (HI). The set value AL (AH) is always compared with
the value detected by the control probe. The parameter Ad represents
the alarm activation delay in minutes; the low temperature alarm (LO)
activates only if the temperature is lower than threshold AL for period
of time greater than Ad. The thresholds can be relative or absolute,
depending on the value of parameter A1. In the first case (A1=0) the
value AL indicates the deviation regarding the set point and the low
temperature alarm activation point is: set point - AL. If the set point
differs, the activation point will automatically differ. In the second case
(A1=1), the value AL indicates the low temperature alarm threshold. An
active low temperature alarm is indicated via internal buzzer, with the
code LO on display and with the activation of the alarm relay. The same
occurs for high temperature alarm (HI), considering AH instead of AL.
Par Description Def Min Max UMA0 Alarm and fan differential 2.0 0.1 20.0 °C/°FA1 Alarms threshold (AL, AH) relative to set
point or absolute
0/1=relative/absolute
0 0 1 -
AL Low temperature alarm threshold
If A1= 0, AL=0: alarm disabled
If A1= 1, AL=-50: alarm disabled
0 -50.0 200 °C/°F
AH High temperature alarm threshold
If A1= 0, AL=0: alarm disabled
If A1= 1, AL=200: alarm disabled
0 -50.0 200 °C/°F
Ad Delay time for low temperature and
high temperature alarms
120 0 250 min
A6 Stop compressor from external alarm
0 = compressor always off;
100 = compressor always on;
0 0 100 min
Sv
LO HI
AL AH
A0 A0
OFF
ON
ALARM
A1=1
Fig. 8.a
Key
LO Low temperature alarmHI High temperature alarmSV Adjustment probe
Notes:
• The alarm LO and HI are alarms with automatic reset. A0 determines
the hysteresis between the value of the activation and deactivation
of the alarm;
• if you press the Alarm button when the measurement is above a
threshold, the buzzer and the alarm relay immediately turn off, and
an indication of the alarm code will remain active until the measure
falls within the activation threshold. Parameter A6 has similar meaning
as parameter c4 (duty setting). If an external alarm occurs, the
compressor works for a time equal to the value set for parameter A6,
while it remains OFF for a fixed period of 15 minutes.
• In case of relative alarms (A1= 0) both AL and AH are considered as
absolute values (e.g. AL= -10 is considered as AL= 10)
High and low humidity alarms parametersIf either input B4 or B5 is configured for a humidity probe (On), high
(AUH) and low humidity alarms (AUL) can also be enabled, with absolute
thresholds (UHL and ULL). The alarms are activated in the following
conditions:
• If Su >= UHL --> high humidity alarm AUH
• If Su <= ULL --> low humidity alarm AUL
Par Description Def Min Max UMULL Absolute low humidity alarm threshold
0=alarm disabled
0 0 100.0 %rH
UHL Absolute high humidity alarm threshold
100=alarm disabled
100.0 0 100.0 %rH
AdH Humidity alarms AUH, AUL delay 120 0 250 min
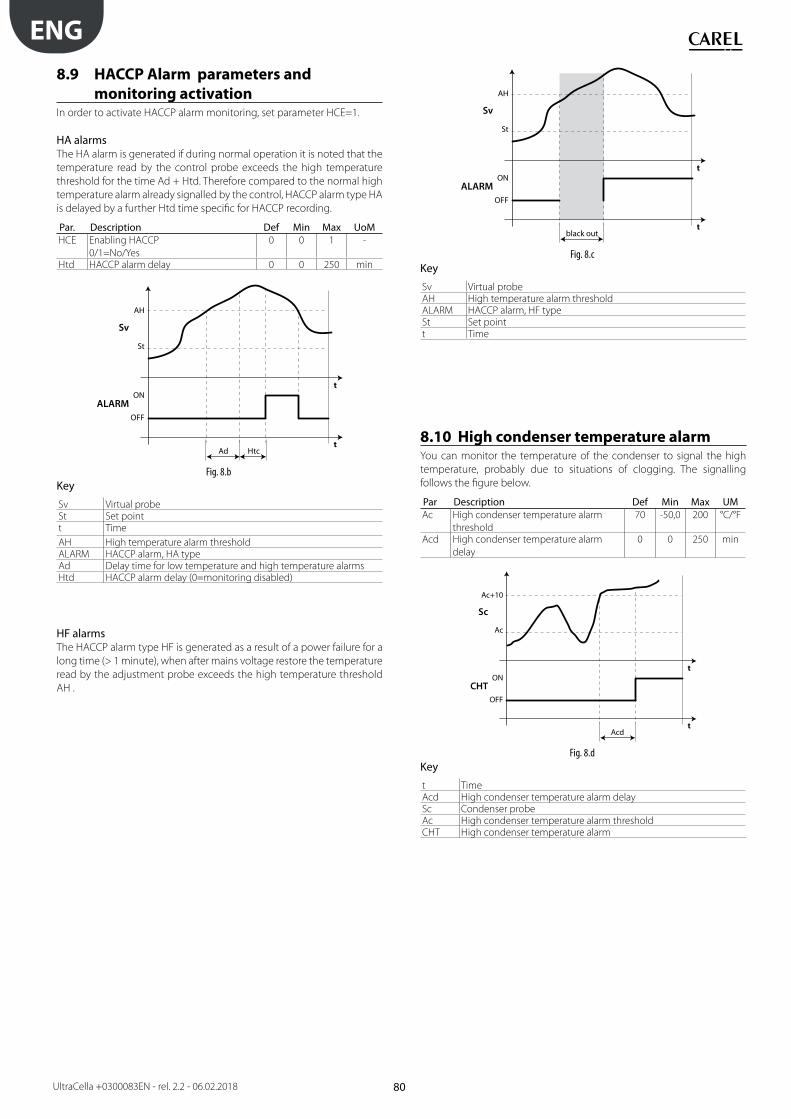
80
ENG
UltraCella +0300083EN - rel. 2.2 - 06.02.2018
t
t
ALARM
Sv
OFF
ON
St
AH
black out
Fig. 8.c
Key
Sv Virtual probeAH High temperature alarm thresholdALARM HACCP alarm, HF typeSt Set pointt Time
8.10 High condenser temperature alarm You can monitor the temperature of the condenser to signal the high
temperature, probably due to situations of clogging. The signalling
follows the figure below.
Par Description Def Min Max UMAc High condenser temperature alarm
threshold
70 -50,0 200 °C/°F
Acd High condenser temperature alarm
delay
0 0 250 min
t
t
CHT
Sc
OFF
ON
Ac
Ac+10
Acd
Fig. 8.d
Key
t TimeAcd High condenser temperature alarm delaySc Condenser probeAc High condenser temperature alarm thresholdCHT High condenser temperature alarm
8.9 HACCP Alarm parameters and
monitoring activation In order to activate HACCP alarm monitoring, set parameter HCE=1.
HA alarmsThe HA alarm is generated if during normal operation it is noted that the
temperature read by the control probe exceeds the high temperature
threshold for the time Ad + Htd. Therefore compared to the normal high
temperature alarm already signalled by the control, HACCP alarm type HA
is delayed by a further Htd time specific for HACCP recording.
Par. Description Def Min Max UoMHCE Enabling HACCP
0/1=No/Yes
0 0 1 -
Htd HACCP alarm delay 0 0 250 min
t
t
ALARM
Sv
OFF
ON
St
AH
HtcAd
Fig. 8.b
Key
Sv Virtual probeSt Set pointt Time
AH High temperature alarm thresholdALARM HACCP alarm, HA typeAd Delay time for low temperature and high temperature alarmsHtd HACCP alarm delay (0=monitoring disabled)
HF alarmsThe HACCP alarm type HF is generated as a result of a power failure for a
long time (> 1 minute), when after mains voltage restore the temperature
read by the adjustment probe exceeds the high temperature threshold
AH .

81
ENG
UltraCella +0300083EN - rel. 2.2 - 06.02.2018
9. TECHNICAL SPECIFICATIONS
9.1 UltraCella technical characteristics
Power Supply Model 230V: Voltage 230 V~ (+10/-15%), 50/60 Hz; Power 18 VA, 100 mA~ max.
Model 24V: Voltage 24 V~ (+10/-15%), 50/60 Hz; Power 18 VA, 1A~ max.Insulation ensured by 230V power supply
Insulation for low voltage: reinforced, 6 mm in air, 8 mm superficial, 3750 V.
Insulation for relay outputs: reinforced, 3 mm in air, 4 mm superficial, 1250 V.Analog inputs B1, B2, B3: NTC, PT1000 (+-3%)
B4: NTC, 0...10Vdc (+-3%)
B5: 0...5Vdc ratiometric (+-3%) , 4...20mA (+-3%)Analog output Y1: 0...10 Vdc (10mA max,+-5%) Note: When installing, keep the supply and loads connections away from the cables of the probes, digital inputs, and monitoring device.Probe Type NTC std. CAREL: 10 kΩ at 25°C, range from -50°C to 90°C;
measuring error: 1°C in range from -50°C to +50°C; 3°C in range from +50°C to +90°C
NTC HT: 50 kΩ at 25°C, range from 0°C to 150°C;
measuring error: 1.5°C in range from 0°C to +115°C; 4°C in range from +115°C to +150°C
PT1000 std. CAREL: 1000 Ω at 0°C, range from –50°C to +90°C;
measuring error 3°C in range from –50°C to 0°C; 5°C in range from 0°C to +90°CProbe power supply +Vdc 12 V+-30%, 25 mA max; 5VREF: 5V+-2%Relay output Applicable ratings based on the relay type
Type of Relay EN60730 -1 (250 V ~) UL 873 (250 V ~)8A (AUX1, AUX2) 8 (4)A on N.O.; 6 (4)A on N.C.; 2 (2)A on N.C. and N.O. (100000
cycles)
8A resistive 2FLA 12LRA, C300 (30000 cycles)
16A,(LIGHT, FAN) 10A resistive, 5 (3)A (100000 cycles) 10A resistive, 5FLA 18LRA (30000 cycles)30A(COMP, DEF) 12 (10)A (100000 cycles) 12A resistive, 2HP, 12FLA 72LRA (30000 cycles)NOTE: The sum of the loads currents COMP, DEF, FAN accessed at the same time should not exceed 20AInsulation for low voltage: reinforced, 6 mm in air, 8 superficial, 3750 V.
Insulation between independent relay outputs: reinforced, 3 mm in air, 4 superficial, 1250 V. Connections Section of conductors for analog inputs and outputs, digital inputs, serial: from 0.5 to 2.5mm2 (from 20 to 13 AWG);
Section of supply and loads cables: from 1.5 to 2.5 mm2 (from 15 to 13 AWG)
Serial connections:use shielded cables
Maximum length of the cables: 10 mContainer Plastic: sizes 200 x 100 X 190 mmAssembly On wall (with plastic container): using fastening screws for front boardDisplay LED display: 3 and 4 digits, display from -99 to 999; operating status indicated by LEDs and icons formed on the polycarbonate
applied to the plasticKeyboard 10 keys on keyboard in polycarbonate membrane applied to the plasticClock with buffer battery Available depending on the model Buzzer Available on all models.Clock Depending on the model installed.
Accuracy: ±100 ppm
Battery: “button” type with lithium code CR2430 voltage: 3Vdc (sizes 24x3 mm)Serial 3 types of available serials: pLAN, BMS, Fieldbus
PLAN : Driver HW RS485, telephone jack (available only on few models) and screw terminals
BMS Driver HW RS485, screw terminals
Fieldbus: Driver HW RS485, screw terminalsUSB Type: Host (A connector); 5Vdc supply, maximum absorption: 100mA (low power devices)
Operating conditions Only board: -10T65°C; <90% U.R. non condensing
With plastic container: -10T50°C, <90% U.R. non condensing
Relay identification, type and maximum resistive current to operating temperature:Relay Associated load Type of Relay Max resistive current applicable
R1 (AUX2) 8A 8AR2 (AUX1) 8A 8AR3 (LIGHT) 16A 10A
R4 (FAN) 16A 10AR5 (DEF) 30A 12AR6 (COMP) 30A 12A
NOTE: The sum of the loads currents COMP, DEF, FAN accessed at the same time should not
exceed 20A.Storage conditions -20T70°C, < 90% U.R. non condensingFront protection rating With plastic container: IP65Environmental pollution 2, normal situationPTI of the isolating materials Printed circuits 250, plastic and insulation materials 175Resistance to fire class: Category DProtection against overcharging class Category II, without PE terminal
Category I, with PE terminalType of action and disconnection Relay contact 1 B (micro-disconnection)Control system manufacture Incorporated, electronic control deviceClassification according to protection against electric shock Class II by means of appropriate incorporationDevice intended to be hand-held or built into equipment designed to be hand held
No
Class and structure of the software Class AControl front cleaning Only use neutral detergents and water
Tab. 9.a
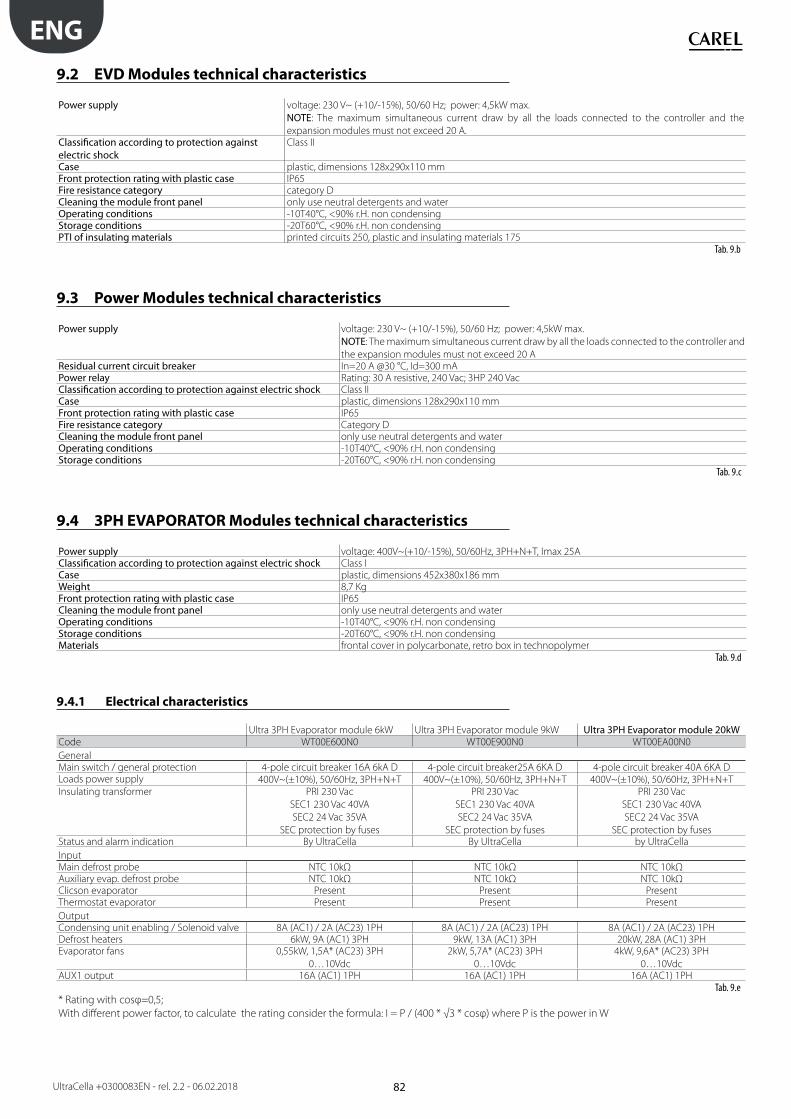
82
ENG
UltraCella +0300083EN - rel. 2.2 - 06.02.2018
9.2 EVD Modules technical characteristics
Power supply voltage: 230 V~ (+10/-15%), 50/60 Hz; power: 4,5kW max.
NOTE: The maximum simultaneous current draw by all the loads connected to the controller and the
expansion modules must not exceed 20 A.Classification according to protection against electric shock
Class II
Case plastic, dimensions 128x290x110 mmFront protection rating with plastic case IP65Fire resistance category category DCleaning the module front panel only use neutral detergents and waterOperating conditions -10T40°C, <90% r.H. non condensingStorage conditions -20T60°C, <90% r.H. non condensingPTI of insulating materials printed circuits 250, plastic and insulating materials 175
Tab. 9.b
9.3 Power Modules technical characteristics
Power supply voltage: 230 V~ (+10/-15%), 50/60 Hz; power: 4,5kW max.
NOTE: The maximum simultaneous current draw by all the loads connected to the controller and
the expansion modules must not exceed 20 AResidual current circuit breaker In=20 A @30 °C, Id=300 mAPower relay Rating: 30 A resistive, 240 Vac; 3HP 240 VacClassification according to protection against electric shock Class IICase plastic, dimensions 128x290x110 mmFront protection rating with plastic case IP65Fire resistance category Category DCleaning the module front panel only use neutral detergents and waterOperating conditions -10T40°C, <90% r.H. non condensingStorage conditions -20T60°C, <90% r.H. non condensing
Tab. 9.c
9.4 3PH EVAPORATOR Modules technical characteristics
Power supply voltage: 400V~(+10/-15%), 50/60Hz, 3PH+N+T, Imax 25AClassification according to protection against electric shock Class ICase plastic, dimensions 452x380x186 mmWeight 8,7 KgFront protection rating with plastic case IP65Cleaning the module front panel only use neutral detergents and waterOperating conditions -10T40°C, <90% r.H. non condensingStorage conditions -20T60°C, <90% r.H. non condensingMaterials frontal cover in polycarbonate, retro box in technopolymer
Tab. 9.d
9.4.1 Electrical characteristics
Ultra 3PH Evaporator module 6kW Ultra 3PH Evaporator module 9kW Ultra 3PH Evaporator module 20kWCode WT00E600N0 WT00E900N0 WT00EA00N0
GeneralMain switch / general protection 4-pole circuit breaker 16A 6kA D 4-pole circuit breaker25A 6KA D 4-pole circuit breaker 40A 6KA DLoads power supply 400V~(±10%), 50/60Hz, 3PH+N+T 400V~(±10%), 50/60Hz, 3PH+N+T 400V~(±10%), 50/60Hz, 3PH+N+T
Insulating transformer PRI 230 Vac
SEC1 230 Vac 40VA
SEC2 24 Vac 35VA
SEC protection by fuses
PRI 230 Vac
SEC1 230 Vac 40VA
SEC2 24 Vac 35VA
SEC protection by fuses
PRI 230 Vac
SEC1 230 Vac 40VA
SEC2 24 Vac 35VA
SEC protection by fusesStatus and alarm indication By UltraCella By UltraCella by UltraCella
InputMain defrost probe NTC 10kΩ NTC 10kΩ NTC 10kΩAuxiliary evap. defrost probe NTC 10kΩ NTC 10kΩ NTC 10kΩClicson evaporator Present Present PresentThermostat evaporator Present Present Present
OutputCondensing unit enabling / Solenoid valve 8A (AC1) / 2A (AC23) 1PH 8A (AC1) / 2A (AC23) 1PH 8A (AC1) / 2A (AC23) 1PHDefrost heaters 6kW, 9A (AC1) 3PH 9kW, 13A (AC1) 3PH 20kW, 28A (AC1) 3PHEvaporator fans 0,55kW, 1,5A* (AC23) 3PH
0…10Vdc
2kW, 5,7A* (AC23) 3PH
0…10Vdc
4kW, 9,6A* (AC23) 3PH
0…10VdcAUX1 output 16A (AC1) 1PH 16A (AC1) 1PH 16A (AC1) 1PH
Tab. 9.e * Rating with cosφ=0,5;
With different power factor, to calculate the rating consider the formula: I = P / (400 * √3 * cosφ) where P is the power in W
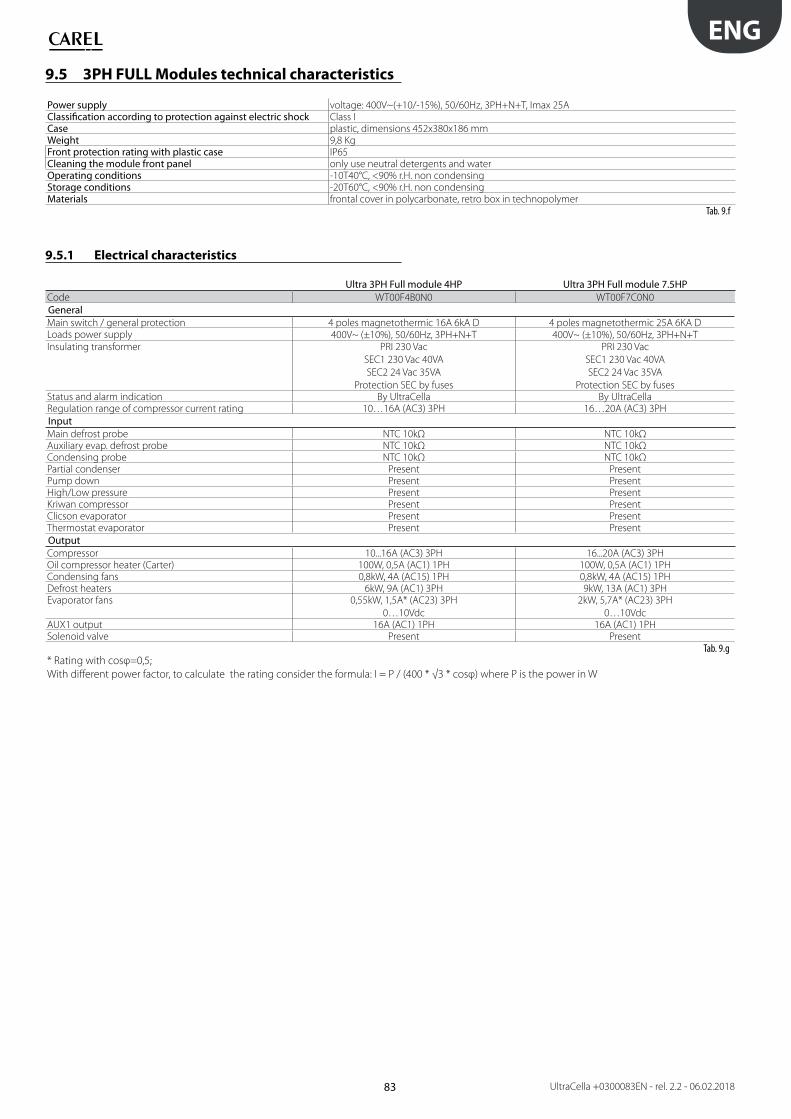
83
ENG
UltraCella +0300083EN - rel. 2.2 - 06.02.2018
9.5 3PH FULL Modules technical characteristics
Power supply voltage: 400V~(+10/-15%), 50/60Hz, 3PH+N+T, Imax 25AClassification according to protection against electric shock Class ICase plastic, dimensions 452x380x186 mmWeight 9,8 KgFront protection rating with plastic case IP65Cleaning the module front panel only use neutral detergents and waterOperating conditions -10T40°C, <90% r.H. non condensingStorage conditions -20T60°C, <90% r.H. non condensingMaterials frontal cover in polycarbonate, retro box in technopolymer
Tab. 9.f
9.5.1 Electrical characteristics
Ultra 3PH Full module 4HP Ultra 3PH Full module 7.5HPCode WT00F4B0N0 WT00F7C0N0
GeneralMain switch / general protection 4 poles magnetothermic 16A 6kA D 4 poles magnetothermic 25A 6KA DLoads power supply 400V~ (±10%), 50/60Hz, 3PH+N+T 400V~ (±10%), 50/60Hz, 3PH+N+T
Insulating transformer PRI 230 Vac
SEC1 230 Vac 40VA
SEC2 24 Vac 35VA
Protection SEC by fuses
PRI 230 Vac
SEC1 230 Vac 40VA
SEC2 24 Vac 35VA
Protection SEC by fusesStatus and alarm indication By UltraCella By UltraCellaRegulation range of compressor current rating 10…16A (AC3) 3PH 16…20A (AC3) 3PH
InputMain defrost probe NTC 10kΩ NTC 10kΩAuxiliary evap. defrost probe NTC 10kΩ NTC 10kΩCondensing probe NTC 10kΩ NTC 10kΩPartial condenser Present PresentPump down Present PresentHigh/Low pressure Present PresentKriwan compressor Present PresentClicson evaporator Present PresentThermostat evaporator Present Present
OutputCompressor 10...16A (AC3) 3PH 16...20A (AC3) 3PHOil compressor heater (Carter) 100W, 0,5A (AC1) 1PH 100W, 0,5A (AC1) 1PHCondensing fans 0,8kW, 4A (AC15) 1PH 0,8kW, 4A (AC15) 1PHDefrost heaters 6kW, 9A (AC1) 3PH 9kW, 13A (AC1) 3PHEvaporator fans 0,55kW, 1,5A* (AC23) 3PH
0…10Vdc
2kW, 5,7A* (AC23) 3PH
0…10VdcAUX1 output 16A (AC1) 1PH 16A (AC1) 1PHSolenoid valve Present Present
Tab. 9.g * Rating with cosφ=0,5;
With different power factor, to calculate the rating consider the formula: I = P / (400 * √3 * cosφ) where P is the power in W

84
ENG
UltraCella +0300083EN - rel. 2.2 - 06.02.2018
10. ELECTRICAL WIRING 3PH MODULES
10.1 Electrical wiring 3PH EVAPORATOR Module
10.1.1 Power circuit
QF1
78
56
34
12
KM1
12
34
56
5/D4KM
2
12
34
56
5/D3
XP1
1
2
3
4
XP1
5
6
7
8
MM
V1
U
V
W
RR1
XP1
PE
14/A1
44/B1
PER UNA CORRETTA INSTALLAZIONE ELETTRICA SI RACCOM
ANDA DI INSTALLARE A M
ONTE DEL SEZIONATORE PRESENTE SUL QUADRO, UNA PROTEZIONE M
AGNETOTERMICA DIFFERENZIALE
FOR THE RIGHT INSTALLATION IS RECOM
MENDED A DIFFERENTIAL
BREAKER SWITCH M
OUNTED UPSTREAM
THE GENERAL ISOLATOR OF THIS PANEL
dI IdI I dd
EVAPORATOR FANSDEFROST HEATERS
L1L2L3N POWER SUPPLY
3P+N+T 400V 50/60HZ
MACHINE LIM
IT
CYAN
BROWN
GRAY
WHITE
BROWN
GRAY
WHITE
CYAN
Fig. 10.a
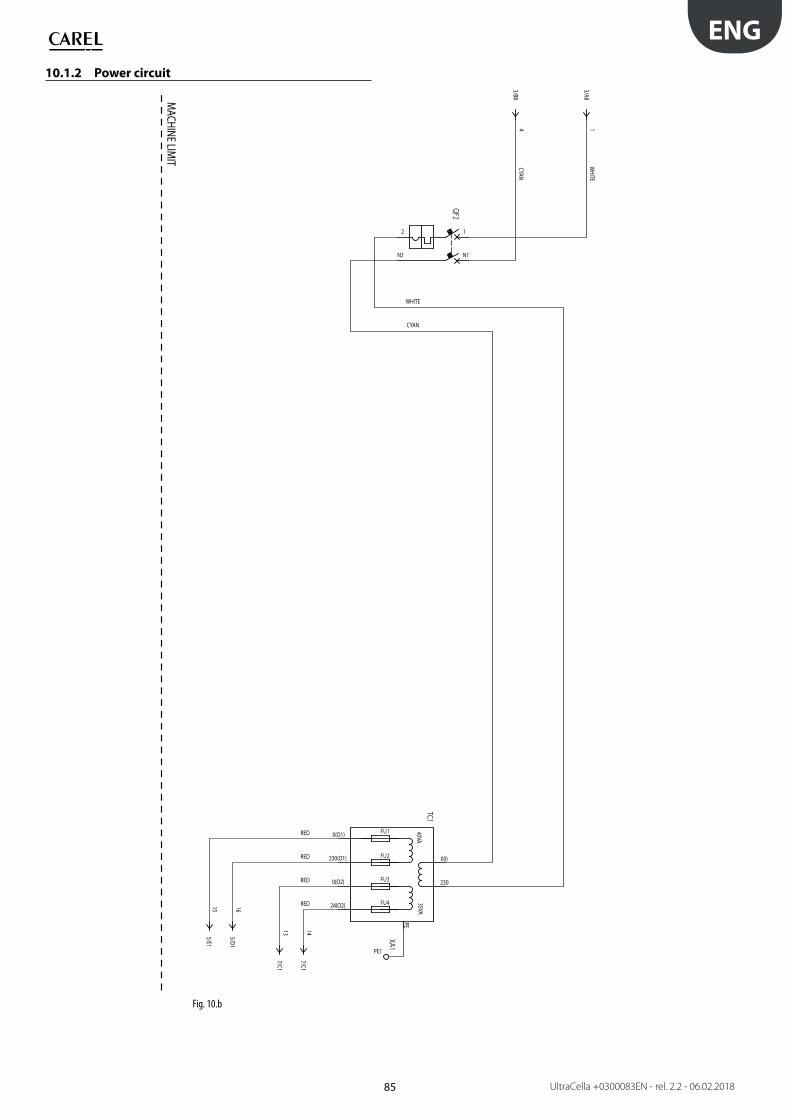
85
ENG
UltraCella +0300083EN - rel. 2.2 - 06.02.2018
10.1.2 Power circuit
13/A8
43/B8
QF2
12
N1N2
XA1
PE1
TC1
0(I)
230
0(O1)
230(O1)
0(O2)
24(O2)
PE
35VA40VA
165/D1
155/E1
147/C1
137/C1
FU1
FU2
FU3
FU4
MACHINE LIM
IT
WHITE
CYAN
RED
RED
RED
RED
WHITE
CYAN
Fig. 10.b

86
ENG
UltraCella +0300083EN - rel. 2.2 - 06.02.2018
10.1.3 Auxiliary circuit
KM1
A1A2
KM2
A1A2
KR3
A1A2
164/D8
154/E8
XA1
117
XA1
119
XA1
128
XA1
129
XA1
109
XA1
110
118
XA1
120
TS1P
SP3
KR2
A1A2
KR2
11
12
14
5/D7
AUX1
1
2
AP3
L
N
J12J11
J10
Ultra 3PH
I/O m
odule
J11/NO3J11/C3/4/5
J11/NO4J11/C3/4/5
J11/NO5J12/NO6
J12/C6J12/NC6
J10/NO2J10/C1/2
J10/NO1
XA1
148
XA1
149
KR3
11
12
14
5/D5
AUX2
1
2
SECURITY THERMOSTAT
EVAPORATOR CLICSON
MACHINE LIM
IT
MAX 16A AC1
ULTRACELLA
CONSENTUNIT
CONDENSING
RED
RED
ORANGE
ORANGE
ORANGE
ORANGE
Fig. 10.c

87
ENG
UltraCella +0300083EN - rel. 2.2 - 06.02.2018
10.1.4 Auxiliary circuit
XA1
140
XA1
142
XA1
143
XA1
141
ST1ST2
J2
Ultra 3PH
I/O m
odule
J2/GNDJ2/U10
J2/U9J2/U8
J2/U7J2/GND
J2/U6J2/U5
J2/U4J2/GND
J2/U3J2/U2
J2/U1
XA1
146
XA1147
TS2
Y
GND
DEFROSTDEFROST AUX
MACHINE LIM
IT
FANS EVAPORATORE 0-10VDC
RED
RED
RED
RED
Fig. 10.d

88
ENG
UltraCella +0300083EN - rel. 2.2 - 06.02.2018
10.1.5 Auxiliary circuit
4/D8
134/D8
XA1
160
161
162
AP
-
+
GND
J9J6
J1
Ultra 3PH
I/O m
oduleAP1
J6/-J6/+
J6/GNDJ9/+5VREF
J9/GNDJ11/+VDC
J1/VBATJ1/G0
J1/G
MACHINE LIM
IT
485 ULTRACELLA
BELDEN
RED
RED
Fig. 10.e
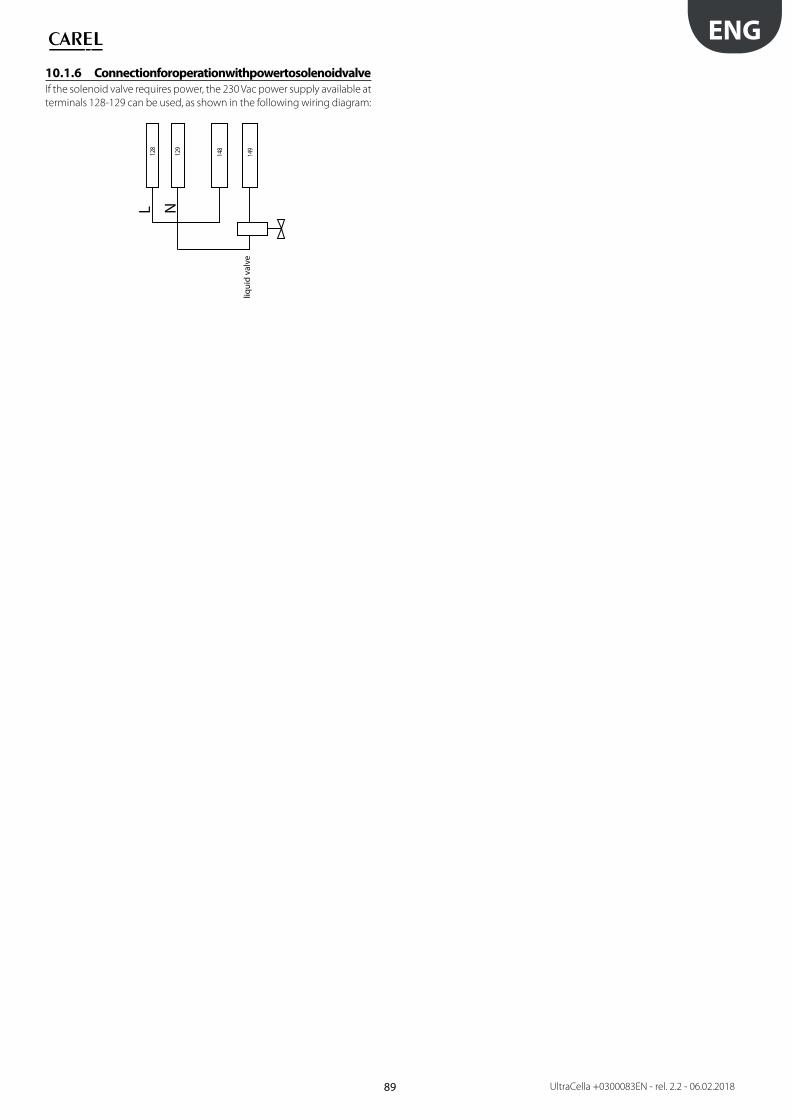
89
ENG
UltraCella +0300083EN - rel. 2.2 - 06.02.2018
10.1.6 Connection for operation with power to solenoid valve
If the solenoid valve requires power, the 230 Vac power supply available at
terminals 128-129 can be used, as shown in the following wiring diagram:
128
148
149
129
L N
liqui
d va
lve
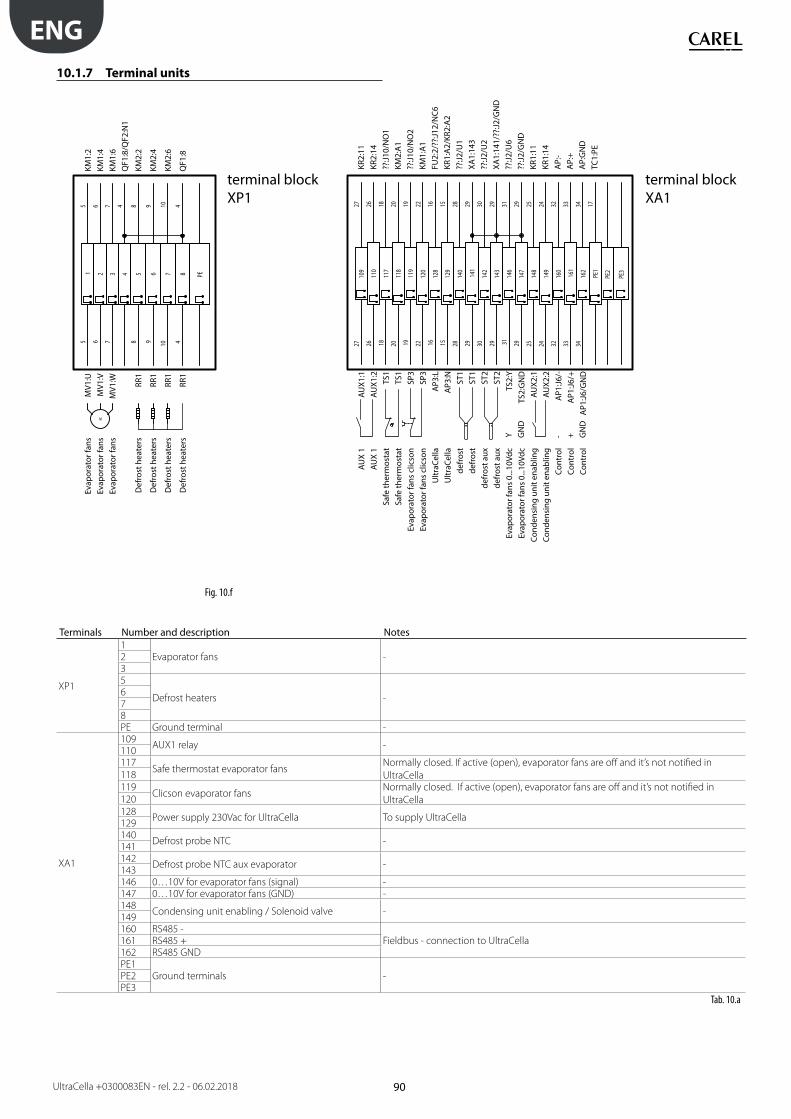
90
ENG
UltraCella +0300083EN - rel. 2.2 - 06.02.2018
10.1.7 Terminal units
- + GN
D
GN
DY
109
2727
110
2626
117
1818
118
2020
119
1919
120
2222
128
1616
129
1515
140
2828
141
2929
142
3030
143
2929
146
3131
147
2929
148
2525
149
2424
160
3232
161
3333
162
3434
PE1
17
PE2
PE3
AUX1
:1AU
X1:2
TS1
TS1
SP3
SP3
AP3
:LA
P3:N
ST1
ST1
ST2
ST2
TS2:
YTS
2:G
ND
AUX2
:1AU
X2:2
AP1
:J6/-
AP1
:J6/+
AP1
:J6/G
ND
M
15
KM1:
25
26
KM1:
46
37
KM1:
67
44
QF1
:8/Q
F2:N
15
8KM
2:2
8
69
KM2:
49
710
KM2:
610
84
QF1
:84
PE
MV1
:UM
V1:V
MV1
:W RR1
RR1
RR1
RR1
KR2:
11KR
2:14
??:J1
0/N
O1
KM2:
A1
??:J1
0/N
O2
KM1:
A1
FU2:
2/??
:J12/
NC6
KR1:
A2/
KR2:
A2
??:J2
/U1
XA1:
143
??:J2
/U2
XA1:
141/
??:J2
/GN
D??
:J2/U
6??
:J2/G
ND
KR1:
11KR
1:14
AP:
-A
P:+
AP:
GN
DTC
1:PE
AUX
1AU
X 1
Safe
ther
mos
tat
Safe
ther
mos
tat
Evap
orat
or fa
ns c
licso
nEv
apor
ator
fans
clic
son
Ultr
aCel
laU
ltraC
ella
defr
ost
defr
ost
defr
ost a
uxde
fros
t aux
Evap
orat
or fa
ns 0
...10
Vdc
Evap
orat
or fa
ns 0
...10
Vdc
Cond
ensi
ng u
nit e
nabl
ing
Cond
ensi
ng u
nit e
nabl
ing
Cont
rol
Cont
rol
Cont
rol
terminal blockXP1
terminal blockXA1
Evap
orat
or fa
nsEv
apor
ator
fans
Evap
orat
or fa
ns
Def
rost
hea
ters
Def
rost
hea
ters
Def
rost
hea
ters
Def
rost
hea
ters
Fig. 10.f
Terminals Number and description Notes
XP1
1Evaporator fans -2
35
Defrost heaters -678PE Ground terminal -
XA1
109AUX1 relay -
110117
Safe thermostat evaporator fansNormally closed. If active (open), evaporator fans are off and it’s not notified in
UltraCella118
119Clicson evaporator fans
Normally closed. If active (open), evaporator fans are off and it’s not notified in
UltraCella120
128Power supply 230Vac for UltraCella To supply UltraCella
129140
Defrost probe NTC -141142
Defrost probe NTC aux evaporator -143146 0…10V for evaporator fans (signal) -147 0…10V for evaporator fans (GND) -148
Condensing unit enabling / Solenoid valve -149160 RS485 -
Fieldbus - connection to UltraCella161 RS485 +162 RS485 GNDPE1
Ground terminals -PE2PE3
Tab. 10.a
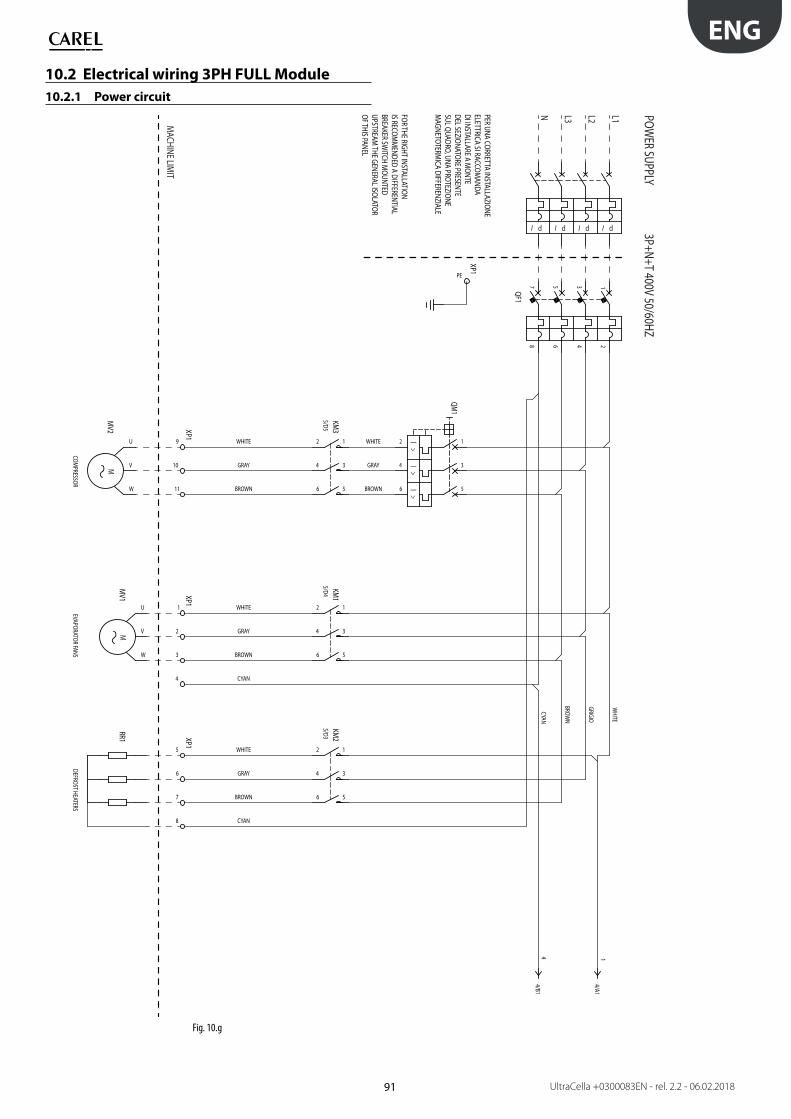
91
ENG
UltraCella +0300083EN - rel. 2.2 - 06.02.2018
10.2 Electrical wiring 3PH FULL Module
10.2.1 Power circuit
QF1
78
56
34
12
KM1
12
34
56
5/D4KM
2
12
34
56
5/D3KM
3
12
34
56
5/D5
>I
>I
>I
QM1
12
34
56
XP11
2
3
4
XP1
5
6
7
8
XP1
9
10
11
MM
V1
U
V
W
RR1M
MV2
U
V
W
XP1
PE
14/A1
44/B1
PER UNA CORRETTA INSTALLAZIONE ELETTRICA SI RACCOM
ANDA DI INSTALLARE A M
ONTE DEL SEZIONATORE PRESENTE SUL QUADRO, UNA PROTEZIONE M
AGNETOTERMICA DIFFERENZIALE
FOR THE RIGHT INSTALLATION IS RECOM
MENDED A DIFFERENTIAL
BREAKER SWITCH M
OUNTED UPSTREAM
THE GENERAL ISOLATOR OF THIS PANEL
dI IdI I dd
EVAPORATOR FANSDEFROST HEATERS
COMPRESSOR
L1L2L3N POWER SUPPLY
3P+N+T 400V 50/60HZ
MACHINE LIM
IT
BROWN
CYAN
GRAY
WHITE
BROWN
GRAY
WHITE
BROWN
GRAY
WHITE
BROWN
GRAY
WHITE
CYAN
BROWN
GRIGIO
WHITE
CYAN
Fig. 10.g
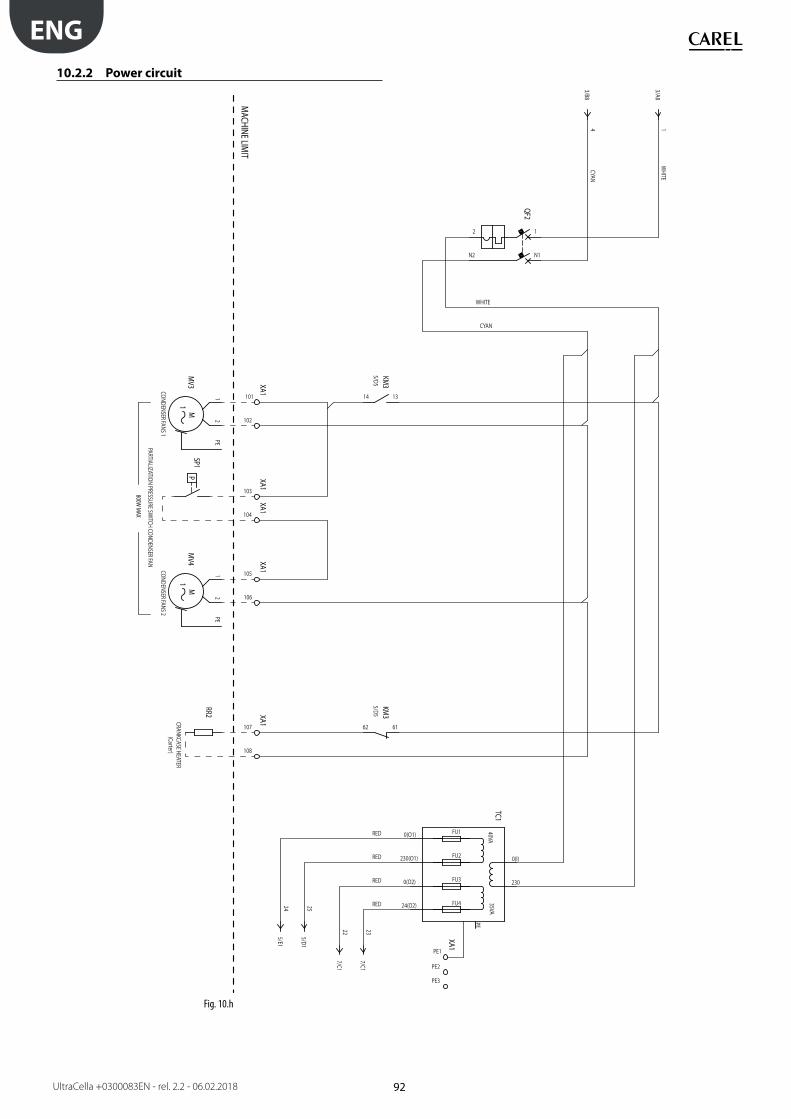
92
ENG
UltraCella +0300083EN - rel. 2.2 - 06.02.2018
10.2.2 Power circuit
13/A8
43/B8
QF2
12
N1N2
KM3
1314
5/D5KM
3
6162
5/D5
XA1
101
102
XA1
105
106
XA1
107
108
XA1
103
XA1
104
PSP1
1M
MV3
12
PE
1M
MV4
12
PERR2
XA1
PE1
255/D1
245/E1
237/C1
227/C1 PE2
PE3
TC1
0(I)
230
0(O1)
230(O1)
0(O2)
24(O2)
PE
35VA40VA
PARTIALIZATION PRESSURE SWITCH CONDENSER FAN
CONDENSER FANS 1CONDENSER FANS 2
CRANKCASE HEATER(Carter)
MACHINE LIM
IT
800W MAX
WHITE
CYAN
WHITE
CYAN
RED
RED
RED
RED
FU1
FU2
FU3
FU4
Fig. 10.h
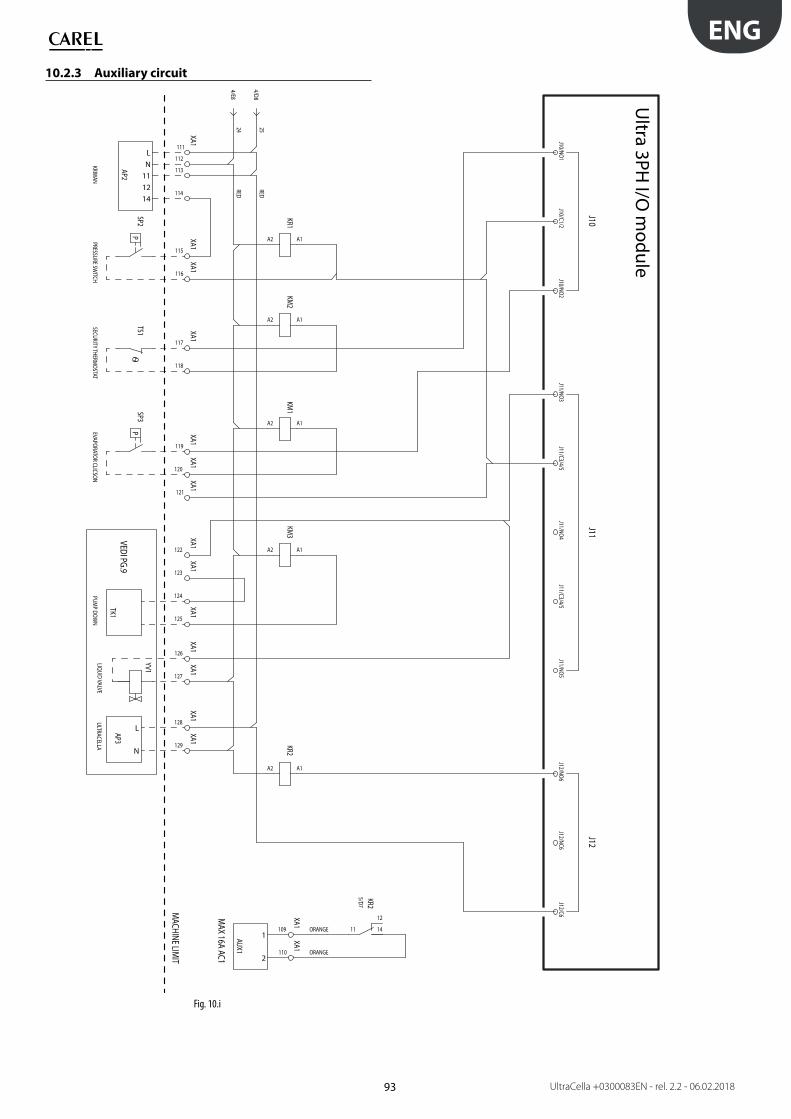
93
ENG
UltraCella +0300083EN - rel. 2.2 - 06.02.2018
10.2.3 Auxiliary circuit
KM1
A1A2
KM2
A1A2
KM3
A1A2
AP2
LN
111214
254/D8
244/E8
XA1
111
112
114
113
XA1
115
XA1
116
PSP2
XA1
117
XA1
121
XA1
119
XA1
126
XA1
127
XA1
128
XA1
129
XA1
109
XA1
110
118
XA1
120
XA1
125
124XA1
123
XA1
122
TS1P
SP3
KR1
A1A2
TK1
KR2
A1A2
KR2
11
12
14
5/D7
AUX1
1
2
AP3
L
N
J12J11
J10
Ultra 3PH
I/O m
odule
J11/NO3J11/C3/4/5
J11/NO4J11/C3/4/5
J11/NO5J12/NO6
J12/C6J12/NC6
J10/NO2J10/C1/2
J10/NO1
YV1
KRIWAN
PRESSURE SWITCH
SECURITY THERMOSTAT
EVAPORATOR CLICSON
MACHINE LIM
IT
PUMP DOW
N
MAX 16A AC1
ULTRACELLALIQUID VALVE
VEDI PG.9
ORANGE
ORANGE
RED
RED
Fig. 10.i
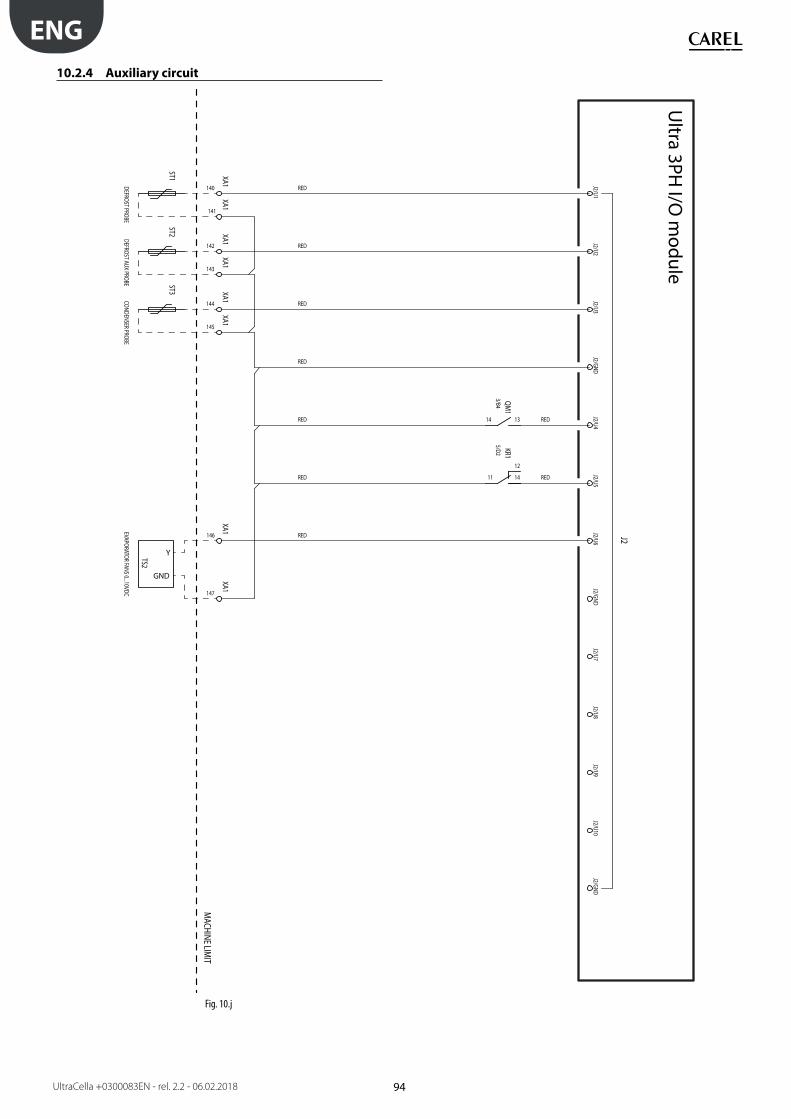
94
ENG
UltraCella +0300083EN - rel. 2.2 - 06.02.2018
10.2.4 Auxiliary circuit
XA1
140
XA1
142
XA1
144
XA1
145
XA1
143
XA1
141
ST1ST2
ST3
J2
J2/GNDJ2/U10
J2/U9J2/U8
J2/U7J2/GND
J2/U6J2/U5
J2/U4J2/GND
J2/U3J2/U2
J2/U1
QM1
1314
3/B4KR1
11
12
14
5/D2
XA1
146
XA1
147
TS2
Y
GND
DEFROST PROBEDEFROST AUX PROBE
CONDENSER PROBE
MACHINE LIM
IT
EVAPORATOR FANS 0...10VDC
RED
RED
RED
RED
RED
RED
RED
RED
RED
Ultra 3PH
I/O m
odule
Fig. 10.j
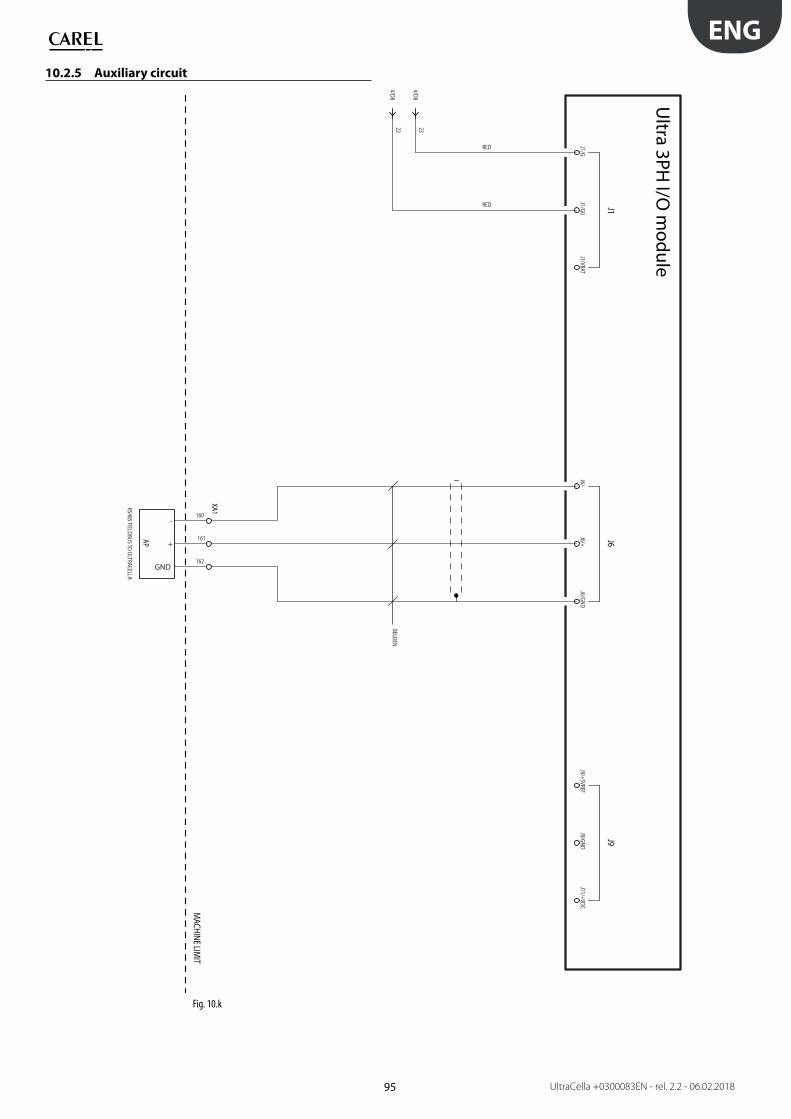
95
ENG
UltraCella +0300083EN - rel. 2.2 - 06.02.2018
10.2.5 Auxiliary circuit
234/D8
224/D8
XA1
160
161
162
AP
-
+
GND
J9J6
J1
J6/-J6/+
J6/GNDJ9/+5VREF
J9/GNDJ11/+VDC
J1/VBATJ1/G0
J1/G
Ultra 3PH
I/O m
odule
MACHINE LIM
IT
RS485 FIELDBUS TO ULTRACELLA
BELDEN
RED
RED
Fig. 10.k

96
ENG
UltraCella +0300083EN - rel. 2.2 - 06.02.2018
Connections for pump down controlled by pressure, with simultaneous activation of the compressor and solenoid valveIf the pump down procedure needs to be performed, controlled by
pressure via a pressure switch connected to the Ultra 3PH Full three-
phase module rather than UltraCella, with simultaneous actvation and
deactivation of the compressor and solenoid valve, the connections are
as shown in the following diagram.
P
122
123
124
125
126
127
pum
p do
wn p
ress
ure s
witc
h
liqui
d va
lve
brid
ge
low
pres
sure
switc
h
Fig. 9.g
With this configuration, when there is no cooling request from UltraCella
(Sv<St), the solenoid valve (terminals 126-127) and the compressor (KM3)
are simultaneously deactivated. In normal operation, when the pressure
switch measures measures the low pressure threshold, the compressor
is shut down.
Fig. 9.h
Nota: Do not enable pump down on UltraCella (set c7=0, H1≠5,
H5≠5).
10.2.6 Connection for Pump Down or thermostat working
Connections for pump down controlled by pressure, with compressor shutdown due to low pressureIf the pump down procedure needs to be performed, controlled by
pressure via a pressure switch connected to the Ultra 3PH Full three-
phase module rather than UltraCella, and the compressor shuts down
due to low pressure, the connections are as shown in the following
diagram.
P
121
123
124
125
126
127
pum
p do
wn p
ress
ure s
witc
h
liqui
d va
lve
brid
ge
low
pres
sure
switc
h
Fig. 9.e
With this configuration, when there is no cooling request from UltraCella
(Sv<St), the solenoid valve (terminals 126-127) opens, while the
compressor (KM3) remains on until the pressure switch measures the low
pressure threshold (TK1, terminals 124-125).
Fig. 9.f
Note: as the pressure switch is connected to the Ultra 3PH Full
three-phase module, do not enable pump down on UltraCella (set c7=0,
H1≠5, H5≠5).
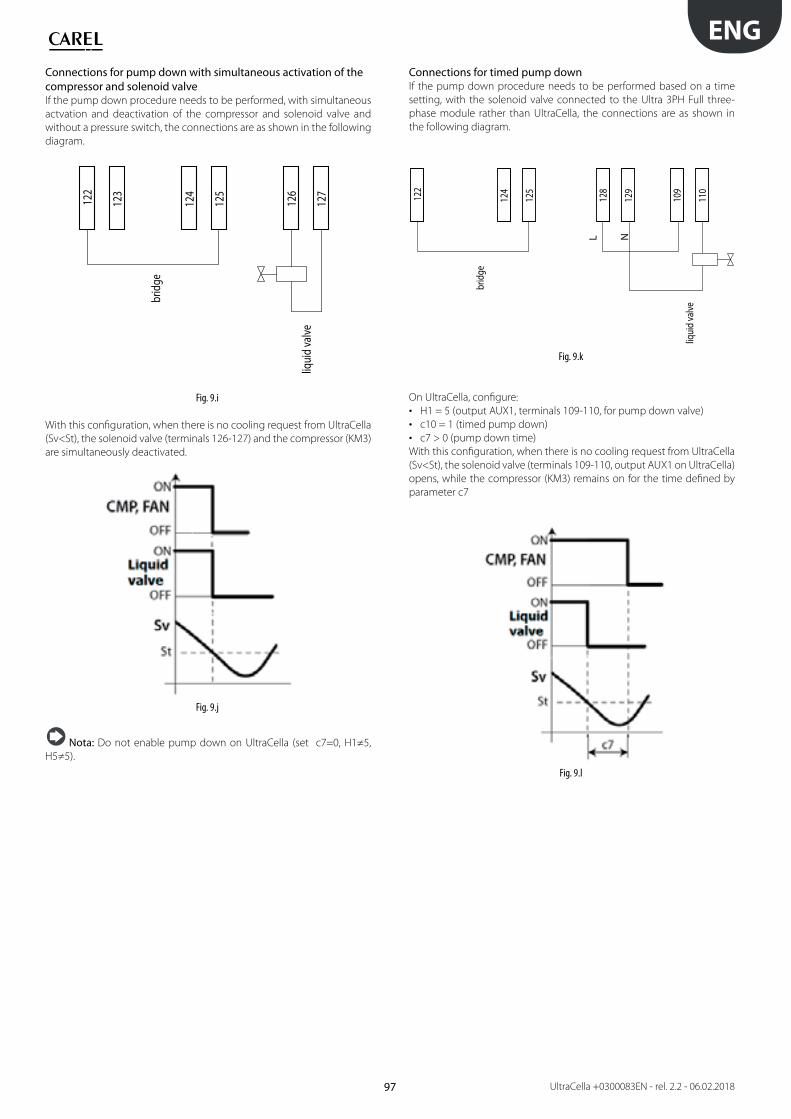
97
ENG
UltraCella +0300083EN - rel. 2.2 - 06.02.2018
Connections for pump down with simultaneous activation of the compressor and solenoid valveIf the pump down procedure needs to be performed, with simultaneous
actvation and deactivation of the compressor and solenoid valve and
without a pressure switch, the connections are as shown in the following
diagram.
122
123
124
125
126
127
liqui
d va
lve
brid
ge
Fig. 9.i
With this configuration, when there is no cooling request from UltraCella
(Sv<St), the solenoid valve (terminals 126-127) and the compressor (KM3)
are simultaneously deactivated.
Fig. 9.j
Nota: Do not enable pump down on UltraCella (set c7=0, H1≠5,
H5≠5).
Connections for timed pump downIf the pump down procedure needs to be performed based on a time
setting, with the solenoid valve connected to the Ultra 3PH Full three-
phase module rather than UltraCella, the connections are as shown in
the following diagram.
122
124
125
109
110
liqui
d va
lve
brid
ge
128
129
L N
Fig. 9.k
On UltraCella, configure:
• H1 = 5 (output AUX1, terminals 109-110, for pump down valve)
• c10 = 1 (timed pump down)
• c7 > 0 (pump down time)
With this configuration, when there is no cooling request from UltraCella
(Sv<St), the solenoid valve (terminals 109-110, output AUX1 on UltraCella)
opens, while the compressor (KM3) remains on for the time defined by
parameter c7
Fig. 9.l
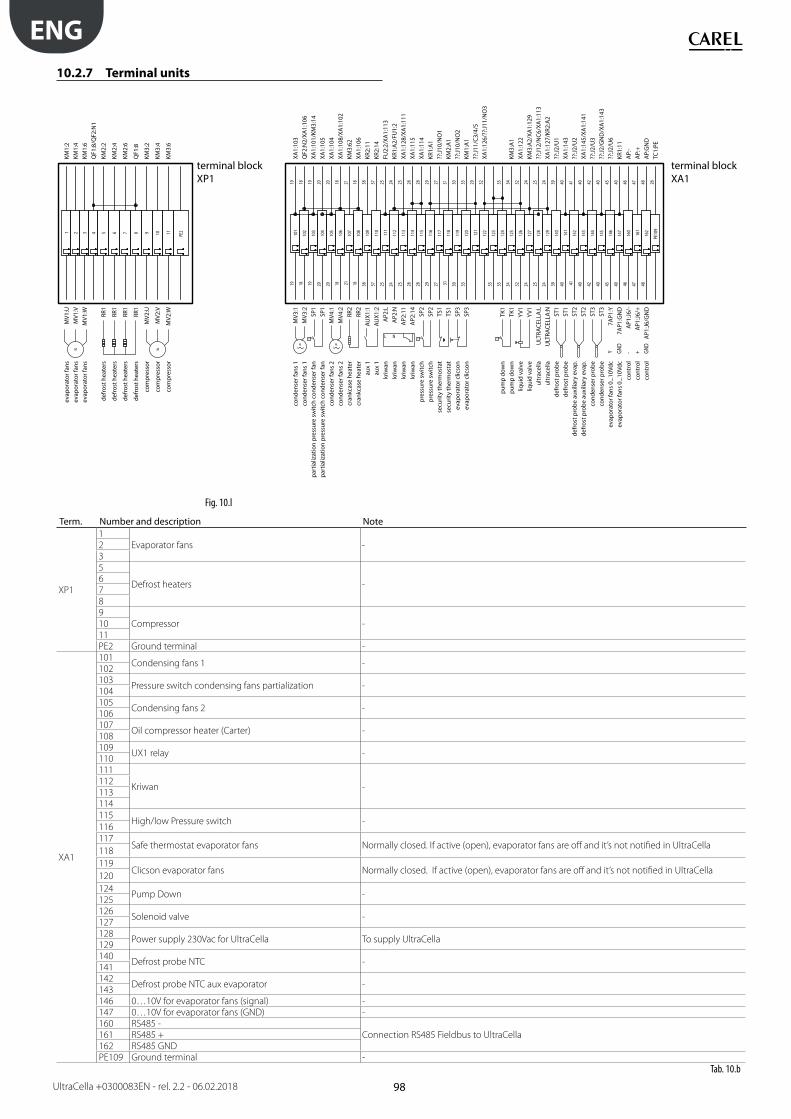
98
ENG
UltraCella +0300083EN - rel. 2.2 - 06.02.2018
10.2.7 Terminal units1
KM1:
22
KM1:
43
KM1:
64
QF1
:8/Q
F2:N
15
KM2:
2
6KM
2:4
7KM
2:6
8Q
F1:8
9KM
3:2
10KM
3:4
11KM
3:6
PE2
MM
101
19XA
1:10
319
102
18Q
F2:N
2/XA
1:10
618
103
19XA
1:10
1/KM
3:14
19
104
20XA
1:10
520
105
20XA
1:10
420
106
18XA
1:10
8/XA
1:10
218
107
21KM
3:62
21
108
18XA
1:10
618
109
38KR
2:11
38
110
37KR
2:14
37
111
25FU
2:2/
XA1:
113
25
112
24KR
1:A
2/FU
1:2
24
113
25XA
1:12
8/XA
1:11
125
114
28XA
1:11
528
115
28XA
1:11
428
116
29KR
1:A
129
117
27??
:J10/
NO
127
118
31KM
2:A
131
119
30??
:J10/
NO
230
120
33KM
1:A
133
121
29??
:J11/
C3/4
/512
232
XA1:
126/
??:J1
1/N
O3
123
35
124
3535
125
34KM
3:A
134
126
32XA
1:12
232
127
24KM
3:A
2/XA
1:12
924
128
25??
:J12/
NC6
/XA
1:11
325
129
24XA
1:12
7/KR
2:A
224
140
39??
:J2/U
139
141
40XA
1:14
340
142
41??
:J2/U
241
143
40XA
1:14
5/XA
1:14
140
144
42??
:J2/U
342
145
40??
:J2/G
ND
/XA
1:14
340
146
45??
:J2/U
645
147
40KR
1:11
40
160
46A
P:-
46
161
47A
P:+
47
162
48A
P:G
ND
48
PE10
926
TC1:
PE
M1
M1
P P PL N
- + GND
GND
Y
MV1
:UM
V1:V
MV1
:W RR1
RR1
RR1
RR1
MV2
:U
MV2
:V
MV2
:W
MV3
:1M
V3:2
SP1
SP1
MV4
:1M
V4:2
RR2
RR2
AUX1
:1AU
X1:2
AP2
:LA
P2:N
AP2
:11
AP2
:14
SP2
SP2
TS1
TS1
SP3
SP3
TK1
TK1
YV1
YV1
ULT
RACE
LLA
:LU
LTRA
CELL
A:N
ST1
ST1
ST2
ST2
ST3
ST3
7AP1
:Y7A
P1:G
ND
AP1
:J6/-
AP1
:J6/+
AP1
:J6/G
ND
terminal blockXA1
terminal blockXP1
evap
orat
or fa
nsev
apor
ator
fans
evap
orat
or fa
ns
defr
ost h
eate
rs
defr
ost h
eate
rs
defr
ost h
eate
rs
defr
ost h
eate
rs
com
pres
sor
com
pres
sor
com
pres
sor
cond
ense
r fan
s 1
cond
ense
r fan
s 1
part
ializ
atio
n pr
essu
re s
witc
h co
nden
ser f
anpa
rtia
lizat
ion
pres
sure
sw
itch
cond
ense
r fan
cond
ense
r fan
s 2
cond
ense
r fan
s 2
cran
kcas
e he
ater
cran
kcas
e he
ater
aux
1au
x 1
kriw
ankr
iwan
kriw
ankr
iwan
pres
sure
sw
itch
pres
sure
sw
itch
secu
rity
ther
mos
tat
secu
rity
ther
mos
tat
evap
orat
or c
licso
nev
apor
ator
clic
son
pum
p do
wn
pum
p do
wn
liqui
d va
lve
liqui
d va
lve
ultr
acel
laul
trac
ella
defr
ost p
robe
defr
ost p
robe
defr
ost p
robe
aux
iliar
y ev
ap.
defr
ost p
robe
aux
iliar
y ev
ap.
cond
ense
r pro
beco
nden
ser p
robe
evap
orat
or fa
ns 0
...10
Vdc
evap
orat
or fa
ns 0
...10
Vdc
cont
rol
cont
rol
cont
rol
Fig. 10.l
Term. Number and description Note
XP1
1
Evaporator fans -2
3
5
Defrost heaters -6
7
8
9
Compressor -10
11
PE2 Ground terminal -
XA1
101Condensing fans 1 -
102
103Pressure switch condensing fans partialization -
104
105Condensing fans 2 -
106
107Oil compressor heater (Carter) -
108
109UX1 relay -
110
111
Kriwan -112
113
114
115High/low Pressure switch -
116
117Safe thermostat evaporator fans Normally closed. If active (open), evaporator fans are off and it’s not notified in UltraCella
118
119Clicson evaporator fans Normally closed. If active (open), evaporator fans are off and it’s not notified in UltraCella
120
124Pump Down -
125
126Solenoid valve -
127
128Power supply 230Vac for UltraCella To supply UltraCella
129
140Defrost probe NTC -
141
142Defrost probe NTC aux evaporator -
143
146 0…10V for evaporator fans (signal) -
147 0…10V for evaporator fans (GND) -
160 RS485 -
Connection RS485 Fieldbus to UltraCella161 RS485 +
162 RS485 GND
PE109 Ground terminal -
Tab. 10.b

99
ENG
UltraCella +0300083EN - rel. 2.2 - 06.02.2018
11. SOFTWARE RELEASE
11.1 Software release table
Manual release
Availability date
Functions UltraCella Software release
Notes
1.1 28/02/2014 Basic cold room management: compressor, defrost, evaporator fans, light,
2xAUX relays
1.1 UltraCella single digit display
Single digit display management
Commissioning UltraCella through both built-in LED display and pGD1
UltraCella Service
Commissioning through wizard on pGD1
Upload/Download parameters via USB key
Defrost schedule by RTC
HACCP alarms
Maximum and minimum temperature recording
Diagnosis: I/O status visualization
Second step compressor with automatic rotation
Evaporator fans in PWM mode (on/off ) with compressor off
Auxiliary evaporator management
Smart light management by door switch
Bowl heater activation
Condenser fan activation by temperature
Pump down management
Humidity probe reading
Pre-charged configurations (recipes)
Software update through pGD1
1.3 30/06/2014 Double digit display management 1.2 UltraCella double digit display (software
release 1.2) availability in production:
11/04/2014Data logging function (one temperature)
Humidity ON/OFF output
Serial connection UltraCella - EVD EVO (only "start command")
Service menu on pGD1 (diagnosis)
Navigation improvements on both LED and pGD1 1.3 UltraCella software 1.3 availability in
production: 30/06/2014Added alarm indication on USB functions (in case of bad working)
Commissioning EVD EVO via UltraCella
Defrost by dI (fixed interval time) enable with RTC defrost set too
Limit and default parameter setting change (H0, /t2, dd, Fd)
0…10V output for variable speed evaporator fans
"Bugfixing:
Input B5 Humidity reading
High/low temp. alarm delay
EVD communication in manual OFF status"
1.4 UltraCella software 1.4 availability in
production: 03/11/2014
1.5 30/01/2015 3PH expansion module management (one to one) 1.5 UltraCella software 1.5 availability in
production: 22/12/2014Data logging: 2 selectable temperatures, variable sampling time
Log of stored alarms
BMS serial line: Modbus / Carel protocols selectable
Software update by built-in LED display
Addition of pGD texts in German and French
New default /A2=1 (defrost probe configured in B2)
New default settings for EVD module (push from UltraCella)
Door switch disabling (new question in wizard and new parameter A3)
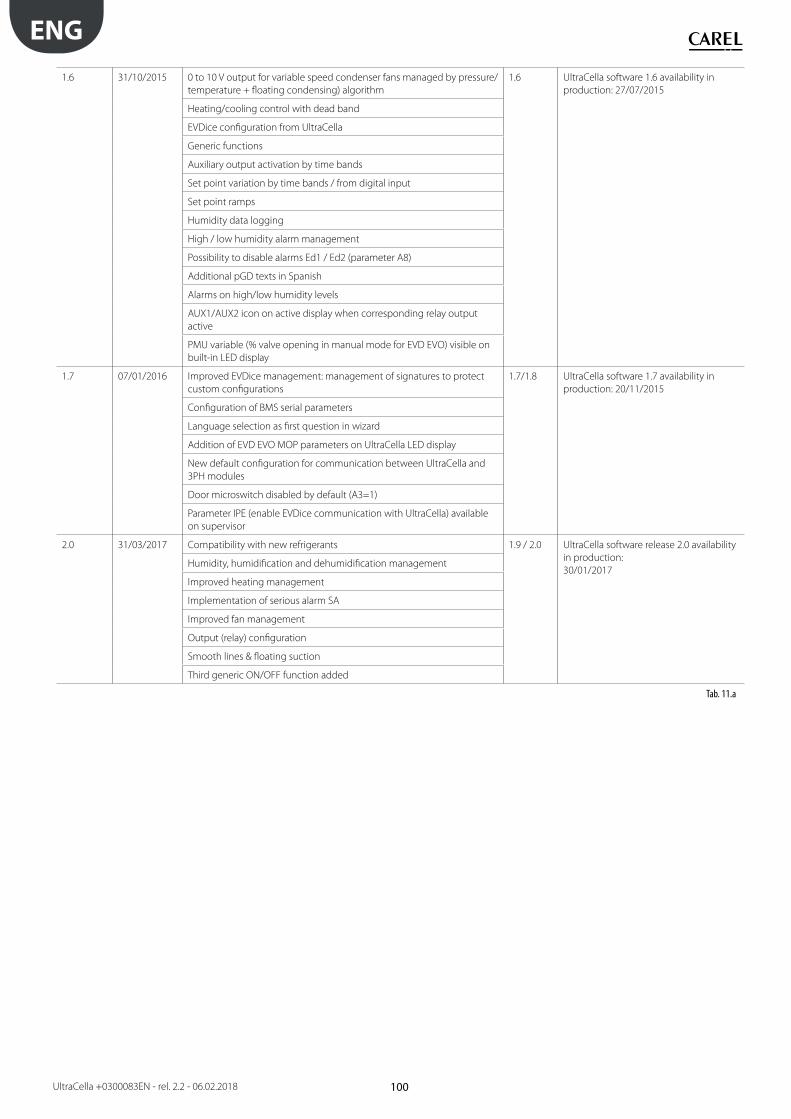
100
ENG
UltraCella +0300083EN - rel. 2.2 - 06.02.2018
1.6 31/10/2015 0 to 10 V output for variable speed condenser fans managed by pressure/
temperature + floating condensing) algorithm
1.6 UltraCella software 1.6 availability in
production: 27/07/2015
Heating/cooling control with dead band
EVDice configuration from UltraCella
Generic functions
Auxiliary output activation by time bands
Set point variation by time bands / from digital input
Set point ramps
Humidity data logging
High / low humidity alarm management
Possibility to disable alarms Ed1 / Ed2 (parameter A8)
Additional pGD texts in Spanish
Alarms on high/low humidity levels
AUX1/AUX2 icon on active display when corresponding relay output
active
PMU variable (% valve opening in manual mode for EVD EVO) visible on
built-in LED display
1.7 07/01/2016 Improved EVDice management: management of signatures to protect
custom configurations
1.7/1.8 UltraCella software 1.7 availability in
production: 20/11/2015
Configuration of BMS serial parameters
Language selection as first question in wizard
Addition of EVD EVO MOP parameters on UltraCella LED display
New default configuration for communication between UltraCella and
3PH modules
Door microswitch disabled by default (A3=1)
Parameter IPE (enable EVDice communication with UltraCella) available
on supervisor
2.0 31/03/2017 Compatibility with new refrigerants 1.9 / 2.0 UltraCella software release 2.0 availability
in production:
30/01/2017Humidity, humidification and dehumidification management
Improved heating management
Implementation of serious alarm SA
Improved fan management
Output (relay) configuration
Smooth lines & floating suction
Third generic ON/OFF function added
Tab. 11.a


CAREL INDUSTRIES S.p.A.Via dell’Industria, 11 - 35020 Brugine - Padova (Italy)Tel. (+39) 049.9716611 - Fax (+39) 049.9716600e-mail: [email protected] - www.carel.com
Agenzia / Agency:
Ult
raC
ella
+0
30
00
83
EN
- r
el.
2.2
- 0
6.0
2.2
01
8