User Manual - Axel Technology
36
USER MANUAL axeltechnology.com XMAM Media Asset Management (Rev. 1.2 ENG)
-
Upload
khangminh22 -
Category
Documents
-
view
2 -
download
0
Transcript of User Manual - Axel Technology

USER MANUAL
axeltechnology.com
XMAM Media Asset Management
(Rev. 1.2 ENG)

ENG
| USERS MANUAL 2
CONTENT
1 USERS MANUAL ....................................................................................................................................................... 4 1.1 OVERVIEW ......................................................................................................................................................... 4
1.1.1 FEATURES ........................................................................................................................................................................4 1.2 HOW TO USE XMAM .......................................................................................................................................... 4
1.2.1 SHARED FOLDERS ..........................................................................................................................................................4 1.2.2 HOW TO ACCESS XMAM WEB .......................................................................................................................................5 1.2.3 FINDING RESOURCES ....................................................................................................................................................6
1.2.3.1 RECENT RESOURCES ...........................................................................................................................................6 1.2.3.2 SIMPLE SEARCH ...................................................................................................................................................6 1.2.3.3 ADVANCED SEARCH ...........................................................................................................................................6 1.2.3.4 THEMES ..................................................................................................................................................................7
1.2.4 WORKING WITH SEARCH RESULTS .............................................................................................................................9 1.2.5 WORKING WITH RESOURCES AND COLLECTIONS ................................................................................................. 10 1.2.6 RESEARCH REQUESTS ................................................................................................................................................. 10 1.2.7 CONTRIBUTING RESOURCES...................................................................................................................................... 10
1.3 RESOURCE MANAGEMENT ............................................................................................................................ 11 1.3.1 METADATA ..................................................................................................................................................................... 11 1.3.2 MANAGING RESOURCES ............................................................................................................................................. 11
1.3.2.1 UPLOADING A RESOURCE................................................................................................................................ 11 1.3.2.2 EDITING RESOURCES ........................................................................................................................................ 12 1.3.2.3 DELETING RESOURCES ..................................................................................................................................... 12 1.3.2.4 EXPORTING RESOURCES .................................................................................................................................. 13
1.3.3 MANAGING THEMES .................................................................................................................................................... 13 1.3.3.1 CREATING A THEME .......................................................................................................................................... 13 1.3.3.2 ADDING RESOURCES TO A THEME ................................................................................................................ 13 1.3.3.3 REMOVING A THEME ........................................................................................................................................ 13 1.3.3.4 CHANGING THE THEME CATEGORY THUMBNAIL ..................................................................................... 13
2 ADMINISTRATORS GUIDE ..................................................................................................................................... 14 2.1 SYSTEM MANAGEMENT ................................................................................................................................. 14
2.1.1 UPLOADING A RESOURCE .......................................................................................................................................... 14 2.1.1.1 UPLOADING A SINGLE RESOURCE................................................................................................................. 14 2.1.1.2 BATCH UPLOAD – IN BROWSER (FLASH and JAVA).................................................................................... 14 2.1.1.3 BATCH UPLOAD – FTP ....................................................................................................................................... 14 2.1.1.4 REPLACE RESOURCE BATCH .......................................................................................................................... 14
2.1.2 MANAGING USERS ........................................................................................................................................................ 15 2.1.2.1 USER ACCOUNTS ................................................................................................................................................ 15 2.1.2.2 LOST PASSWORDS ............................................................................................................................................. 15 2.1.2.3 EDITING USER DETAILS ................................................................................................................................... 15 2.1.2.4 DELETING USERS ............................................................................................................................................... 15 2.1.2.5 USER ACCOUNT REQUESTS ............................................................................................................................. 16
2.1.3 STATISTICS AND REPORTS .......................................................................................................................................... 16 2.1.4 BULK MAIL .................................................................................................................................................................... 16 2.1.5 RESEARCH REQUESTS ................................................................................................................................................. 16 2.1.6 RESOURCE REQUESTS ................................................................................................................................................. 16 2.1.7 RESOURCE PERMISSIONS ........................................................................................................................................... 17
2.1.7.1 ACCESS CONTROL VIA ACCESS MODES ....................................................................................................... 17 2.1.7.2 ACCESS CONTROL VIA METADATA FILTERING ......................................................................................... 17 2.1.7.3 PERMISSIONS RELATING TO EDITING AND DELETING ............................................................................ 17
2.1.8 USER CONTRIBUTED RESOURCES ............................................................................................................................ 17 2.1.8.1 ALTERNATIVE SCENARIOS .............................................................................................................................. 17 2.1.8.2 NOTIFICATIONS .................................................................................................................................................. 18 2.1.8.3 BATCH-APPROVING MULTIPLE SUBMITTED RESOURCES ....................................................................... 18
2.1.9 ARCHIVING .................................................................................................................................................................... 18 2.1.9.1 DIRECTLY SEARCHING THE ARCHIVE .......................................................................................................... 18
2.1.10 USER GROUP MANAGEMENT ................................................................................................................................. 18 2.1.10.1 PERMISSIONS .................................................................................................................................................. 19 2.1.10.2 SEARCH FILTERING ....................................................................................................................................... 20 2.1.10.3 EDIT FILTER .................................................................................................................................................... 21 2.1.10.4 DEFAULT RESOURCE METADATA ............................................................................................................. 21 2.1.10.5 PARENT / CHILDREN GROUPS ..................................................................................................................... 21 2.1.10.6 GROUP SPECIFIC USER INTERFACES ........................................................................................................ 21 2.1.10.7 HOW TO CREATE YOUR OWN THEMES .................................................................................................... 22
2.1.11 CUSTOMIZING TYPES AND FIELDS ....................................................................................................................... 22 2.1.11.1 CUSTOMISING FIELDS .................................................................................................................................. 22 2.1.11.2 FIELD OPTIONS ............................................................................................................................................... 22 2.1.11.3 PREVENTING DROP-DOWN MENUS FROM AUTO-SELECTING THE FIRST AVAILABLE CHOICE 23

ENG
| USERS MANUAL 3
2.1.11.4 CUSTOMIZING THE “EDIT RESOURCES” FORM PER USER GROUP ..................................................... 23 2.1.11.5 ARRANGING FIELDS OVER SEVERAL TABS ON THE VIEW PAGE ...................................................... 24 2.1.11.6 SMART THEMES ............................................................................................................................................. 24
2.1.12 CATEGORY TREE FIELD TYPE ................................................................................................................................ 25 2.1.13 CUSTOMISING SITE DESIGN ................................................................................................................................... 25
2.1.13.1 HOW TO CREATE YOUR OWN THEMES .................................................................................................... 25 2.1.13.2 CSS / GIF FOR TEMPLATE CHANGE ........................................................................................................... 26 2.1.13.3 GROUP SPECIFIC THEMES............................................................................................................................ 26 2.1.13.4 CHANGE INTRO SLIDESHOW ...................................................................................................................... 26 2.1.13.5 CUSTOM HELP SECTIONS ............................................................................................................................ 26
2.1.14 MANAGING PLUGINS ............................................................................................................................................... 26 2.1.14.1 ABOUT PLUGINS ............................................................................................................................................ 26
2.1.15 THE PLUGIN MANAGER .......................................................................................................................................... 26 2.1.15.1 MAIN PLUGINS ............................................................................................................................................... 27
2.1.16 CONFIGURING FOR MULTIPLE CLIENT USE....................................................................................................... 28 2.1.16.1 CUSTOMISE YOUR RESOURCE TYPES/FIELDS ........................................................................................ 28 2.1.16.2 CUSTOMISE YOUR USER GROUPS ............................................................................................................. 28 2.1.16.3 CREATE YOUR USERS ................................................................................................................................... 29 2.1.16.4 FURTHER CUSTOMIZATION ........................................................................................................................ 29
2.1.17 RESOURCE AND COLLECTION REQUESTS / E-COMMERCE .............................................................................. 29 2.2 XMAM PLUGIN MANAGER ............................................................................................................................... 30
2.2.1.1 AVAILABLE PLUGINS ........................................................................................................................................ 30 2.3 SUPPORTED FILE TYPES FOR THUMBNAILS AND PREVIEWS ................................................................... 32
2.3.1 IMAGE / DOCUMENT FORMATS ................................................................................................................................. 32 2.3.2 AUDIO / VIDEO FORMATS ........................................................................................................................................... 33
3 FINAL CONSIDERATION AND AXEL TECHNOLOGY CONTACT ......................................................................... 36

ENG
| USERS MANUAL 4
1 USERS MANUAL
1.1 OVERVIEW
Multimedia Asset Management (or MAM) is the process of acquiring, categorizing, indexing, grouping, archiving, maintaining, monitoring, editing and distributing audio, image, video and/or files containing a mix of multimedia formats. Axel Technology’s XMAM is the completely new and reinvented concept of MAM, it’s the multipurpose solution to archive and manage any kind of media. XMAM gives an high added value to your archive, extends its availability from anywhere and expands your power to share, access, distribute and sell multimedia contents, inside and/or outside of the company. As it has been design to be suitable for several purposes, such as multimedia archive and catalogue, newsroom or NLE, XMAM can be naturally integrated into any kind of existing workflow.
1.1.1 FEATURES
- Web interface. No software installation required - Compatible with any Smartphone and tablet (iPhone, Android devices, etc.) - Access and use through any Web browser (Internet Explorer, Firefox, Safari, Google Chrome, etc.) - Supports all most popular file formats - Content upload from anywhere (Web, Lan, Wan) - Compatible with any Operative System (Windows, Mac, Linux, etc.) - GoogleTM and YouTubeTM style search and preview - Multimedia: Video, Audio, Photo and Document - Content sharing over Internet, LAN, WAN - Workflow integration & customization
1.2 HOW TO USE XMAM
1.2.1 SHARED FOLDERS
Shared folders have a very important role in the daily work with XMAM: they are used to exchange data between external users or applications and XMAM. XMAMIMP Folder used to import data from external sources to XMAM. This folder is in turn divided into sub-folders, the most important is AUTOIMP: data placed in this folder are automatically imported by XMAM Plugin Manager’s Auto import ingester tool and subsequently deleted from the folder. If the files placed in the AUTOIMP folder are arranged in sub folders, they will be imported into XMAM in collections with the name of the respective folder. the AUTOTHEME folder has the same function of AUTOIMP, in this case data placed in this folder are automatically imported by XMAM Plugin Manager’s Auto theme ingester tool and subsequently deleted from
ENG
| USERS MANUAL 5
the folder. The essential difference is that, by organizing the files to be imported into subfolders, these will be imported into XMAM in themes with the name of the respective folder. XMAMEXP Folder used to export data from XMAM to external sources. As for XMAMIMP, this folder is divided into subfolders as well, and the most important is SHARED: This folder is used to provide an access to XMAM’s data from external users or applications.
1.2.2 HOW TO ACCESS XMAM WEB
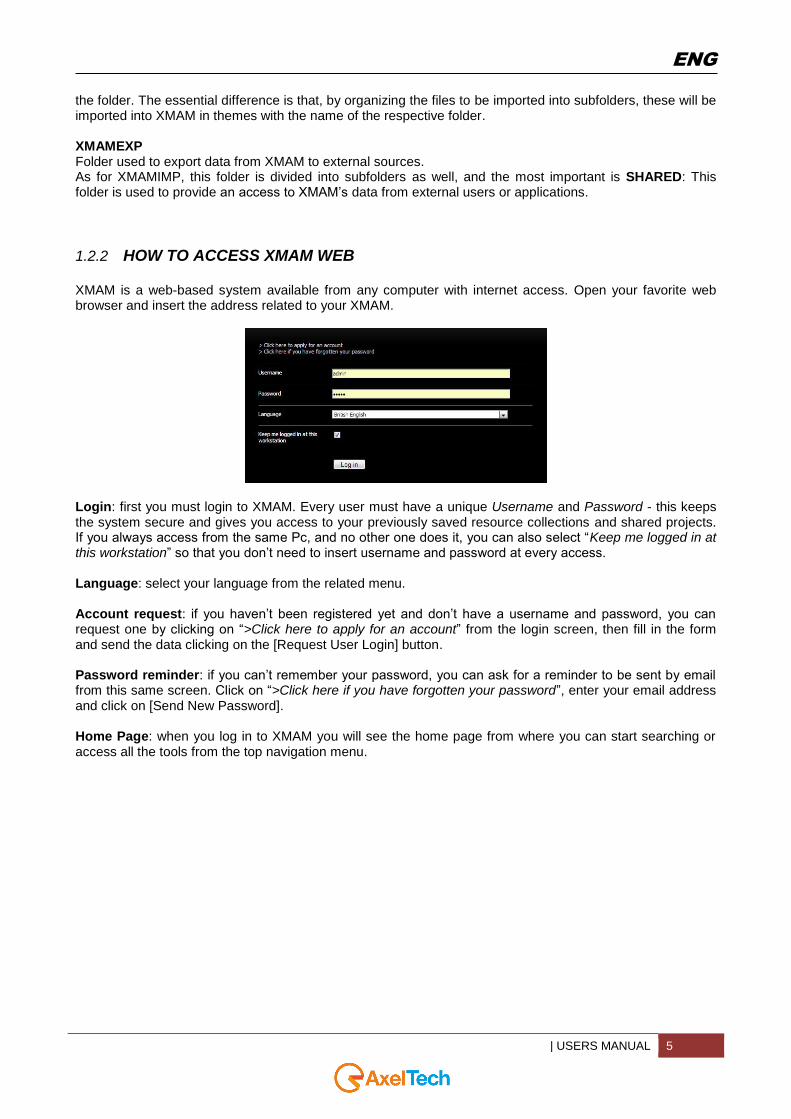
XMAM is a web-based system available from any computer with internet access. Open your favorite web browser and insert the address related to your XMAM.
Login: first you must login to XMAM. Every user must have a unique Username and Password - this keeps the system secure and gives you access to your previously saved resource collections and shared projects. If you always access from the same Pc, and no other one does it, you can also select “Keep me logged in at this workstation” so that you don’t need to insert username and password at every access. Language: select your language from the related menu. Account request: if you haven’t been registered yet and don’t have a username and password, you can request one by clicking on “>Click here to apply for an account” from the login screen, then fill in the form and send the data clicking on the [Request User Login] button. Password reminder: if you can’t remember your password, you can ask for a reminder to be sent by email from this same screen. Click on “>Click here if you have forgotten your password”, enter your email address and click on [Send New Password]. Home Page: when you log in to XMAM you will see the home page from where you can start searching or access all the tools from the top navigation menu.

ENG
| USERS MANUAL 6
Change password: after login, click on your name on the top right of the screen and type the new password twice, then click on [Save]. Logout: When you have finished using the system, don’t forget to logout if others have access to your Pc. Click on Log Out on the top right of the screen.
1.2.3 FINDING RESOURCES
1.2.3.1 RECENT RESOURCES
Click on Recent in the top navigation menu menu to view a list of the resources that have been recently added to your system. 1.2.3.2 SIMPLE SEARCH
The Resource Search panel appears to the right of every screen, giving access to the XMAM search engine. The panel has a text field for quick, free text searching across the whole library along with other search options, such as resource size and date. The Advanced Search page is accessed directly from this panel, giving more options to refine and target your searches. The resources in XMAM have been comprehensively categorised and the search engine is optimised to search through ALL indexed fields attached to each resource. You can type one word or many words to find resources. The search engine will then match ALL your words to the library and return the results that include ALL the words you’ve typed. For example, “Queen Wembley” will return only resources that contain both these words. Choosing the other options, further refine your search and return more accurate results. For example, searching for “Queen” may find over 100 resources, but if you search for “Queen” and select only Video and Year = 1991 you may find around 10 resources. Adding an asterisk to a keyword will enable the wildcard function. For example, searching for "cat*" will
return matches for cat, catch, category, and so on. 1.2.3.3 ADVANCED SEARCH
Access Advanced Search from the bottom of the Search panel.

ENG
| USERS MANUAL 7
Advanced Search allows you to search all the specific categories and data attached to every resource individually. The comprehensive search form includes all the options from the Simple Search panel and many more such as multiple countries, categories, keywords and types. By using this form, it is possible to carry out very detailed searches, targeting the specific data of each resource. Any section of the form that you leave blank or unticked will include ALL those terms in the search. For example, if you leave ALL the Country tick boxes empty, the search engine assumes you don’t wish to target any particular country and leaves it out of the targeted search. The results will then come from ALL countries. If you select just ‘Australia’ then the results will ONLY contain resources linked with ‘Australia’. 1.2.3.4 THEMES
XMAM provides another way to find resources available within the system. Themes are a smart tool for gathering all the public Collections of data belonging to the same category and can be used to highlight the very best resources XMAM offers. Access Themes directly from the menu on the top left of the home page, or click on Themes in the top navigation menu, and the following window will appear:

ENG
| USERS MANUAL 8
Their content can change often and can be a great way to browse resources from a different point of view.

ENG
| USERS MANUAL 9
1.2.4 WORKING WITH SEARCH RESULTS
Search results are displayed as thumbnails, small thumbnails or a list in the main work area, sorted in order of relevance.
Information about this search, sorting and resource browsing are shown across the top of the work area, consisting of:
You found: how many resources have been found matching your search Display: click to change the display style whether thumbnails, small thumbnails or a list Sort Order: click to change the order of resources:
Relevance: XMAM continually ‘learns’ from the way users search for resources by ranking image views per search keyword. Over time resources are ranked against keywords making sure the most appropriate appear first. For example, if users regularly choose the second resource from a search for ‘sky’, eventually this resource will occupy the first position as the search system thinks that this is actually a better, more appropriate result for ‘sky’. This happens not just for single keywords but multiple keywords as well such as ‘sky night’.
Random: random sorting. Popularity: how many times a resource has been viewed irrespective of the keyword. Colour: orders image resources by general hues. Creation Date: creation date of the resource.
Results Display: choose how many items in the result set should appear per search page. Browse: navigates through the pages of results and also shows which page you are currently
viewing.
Additionally, if any of the archives match your search, you can access them directly from a link under the results. It is possible to save the search criteria to your collection panel (>Save search query to collection - useful if you have particular search that you may need again).
Each resource is shown in an individual resource panel in the thumbnails display. The panel shows a preview, title, ‘E-mail resource’ icon, ‘Add to collection’ icon and ‘Full screen preview’ icon.
View resource details and download options: click on the preview or title. E-mail: click on the envelope icon to open a form allowing you to email the resource to another user
- useful for quickly sending resources to colleagues.

ENG
| USERS MANUAL 10
Add to current collection: click on the ‘Add to current collection’ icon to add this resource to the collection shown in the ‘My Collections’ panel.
Full screen preview: opens the preview only.
1.2.5 WORKING WITH RESOURCES AND COLLECTIONS
When you use the 'e-mail a resource' or 'e-mail a collection' function, you enter a list of usernames to send the resource to. The users will receive an e-mail with a link rather than the resource files. They can then choose exactly which size(s) they wish to download. You can also enter an e-mail address instead of a username in the list (the list can contain both usernames and e-mail addresses). This allows resources to be sent to people that are not registered users. If an e-mail address is used, a special key is created that allow that user to access the specified resource, and that resource only - this key is included in the URL sent out. This also works for collections - in this case a key is created for all the resources in the collection. The key given out is actually against resources, not collections: so, if you e-mail a collection then add resources, you will need to e-mail the collection again if any new resources have been added. This is for security reasons, i.e. so an external user isn't suddenly being granted access to new resources, even though they haven't been e-mailed them.
1.2.6 RESEARCH REQUESTS
Research requests provide the ability for users to contact the resource administration team with a specific request for a resource or set of resources. It may be that the user is unable to find suitable resources, or simply wishes to utilize the skills of the administration team in finding better resource matches. The administration team can attach a collection to the request and send it back to the user.
1.2.7 CONTRIBUTING RESOURCES
Users can contribute resources. They must be approved by an administrator before they are made active. First, the users click on My Contributions in the top navigation menu and then on ‘>Contribute New
Resource’ and upload the resources. They can then view the resources at any time by clicking ‘View My Contributions - Pending
Submission’. The resources can now be edited to add appropriate metadata. Once the users have completed editing the resources and are happy with them, they must submit
them for review. They can do this by editing each resource and changing the Status to 'User Contributed - Pending Review' (batch editing can also be used for this to change the status of several resources together).
An administrator must now approve the resources and make them active. See User Contributed Resources for the administration and configuration details.

ENG
| USERS MANUAL 11
1.3 RESOURCE MANAGEMENT
1.3.1 METADATA
Metadata is central to the management and organization of resources using XMAM. Many other DAM systems place resources on a tree type structure, as with a typical file system on a PC. This works to a point, but it only allows each resource to be classified on one way. For example, a resource taken in Africa can be placed in an 'Africa' folder. If this also needs to be classified in a different way, e.g. by subject, emotion, project, size and so on, it cannot simultaneously exist in a different folder. Using metadata as the primary organization method means that resources can be classified in many different ways simultaneously, to the point that a static tree structure becomes obsolete. For example, a Photo resource could be classified as taken in Africa but also that it contains a photo of a boy, who is happy, and is making eye contact (via Subject, Emotion etc. metadata fields). This allows searching via many different possible criteria. Searching is the primary method of finding resources. This way the users will become used to searching first and foremost and will not attempt to find resources on a tree type structure first of all. Collections are not a means of organizing your resources. Assuming that collections are how you organize resources is quite a common mistake that newcomers make. Think of collections more like user bookmarks or favorites. Metadata (i.e. fields) are how you should organize/categorize resources. The exception to this is the "Themes" area which displays collections which have been made public then added to a theme category - this is intended only as a sort of showcase area for your most used and most popular resources and not for organizing all your resources. Crucial to the XMAM approach is the use of fixed list metadata (the dropdown and checkbox list field types), for example using a fixed list of countries, subjects, emotions and so on instead of free text entry where possible. Free text entry should only be used for items that are very specific to the resource and are not widely reused, for example people's names and other proper nouns. This ensures that the same keywords are used when classifying resources as during searching. Add metadata ASAP. It is important to classify resources when uploading, or as soon as possible afterwards. A resource with little or no metadata will be hard to find. A resource's metadata collectively defines its position within your archive, in a similar manner as the x, y and z coordinates of a real world object.
1.3.2 MANAGING RESOURCES
1.3.2.1 UPLOADING A RESOURCE
1. Click on Upload in the top navigation menu. 2. Select the type of the resources you are uploading – Photo, Document, Video or Audio – and fill in
the required fields (fields with * are required). These are the initial values that all uploaded resources will have. So if your batch of photos was all taken in Africa you can tick "Africa" here and it will be set for all resources. You can also set that the resources will go into a particular collection. Then click on [Next].
3. On the next page you can browse for files on your local system. Multiple files can be selected by holding down CTRL (PC) or CMD (Mac).
4. Once the files are uploaded, fill in the details – keywords, captions, etc. and click on [Save] to confirm.
5. The system transfers the files and creates the thumbnails. It's very important not to navigate away from this page until the process is complete. When the files are uploaded, click on >View New

ENG
| USERS MANUAL 12
Material in the Simple Search box or Recent in the top navigation menu to see them. You will need to edit each one individually to add captions or other unique information.
Suggestion: when the process is finished, delete all files from the upload folder or FTP server to prevent them from being accidentally uploaded again.
1.3.2.2 EDITING RESOURCES
When you have located the resource, click on its thumbnail to bring up the full details page.
The Resource Tools box appears to the right of the image. Click on ‘Edit’ into this box to change the resource details. Note that any fields that are left blank will not be displayed on the resource view page. XMAM allows you to edit sets of resources to rapidly insert metadata. Add the resources to a temporary collection (you can make one for the purpose or just use your My Collection). You can then use the ‘>Edit All’ link into the My collections bar to edit all the items in the collection. Select the fields you need to change and enter replacement values or do text search/replaces. To speed up adding items to collections you can do a search then choose >Save search items to collection at the bottom of the results to copy the items to the current collection. So you could, say, search for all items containing 'water' then edit them all to add some more metadata to those results. To relate all resources in a collection, you can edit the collection (choose ‘>Edit’ in the collections bar) then tick ‘Relate all resources in this collection’ and save. 1.3.2.3 DELETING RESOURCES
As above, go to the resource’s full details page. Click on ‘>Delete’ in the Resource Tools box to delete it. You can also batch delete resources by adding them to a collection, editing the collection and ticking 'Delete all resources in this collection'. Note that if your system administrator has enabled a Resource Deletion State, then deleted resources will go into a holding queue for later review.

ENG
| USERS MANUAL 13
1.3.2.4 EXPORTING RESOURCES
You are provided with several tools that allow you to directly exchange data with external users or applications: Share to LAN: available in the Resource Tools box, in My Collections and in Public Collections, it allows you to share the related resource by sending a copy or a direct link to one or more shared folders. When you click on ‘Share to LAN’ a combo box appears, so that you can select in which folders you want to share the resource, and if you want to create a copy or a link. Click on [Share] to send the data, or click again on ‘Share to LAN’ if you want to close the combo box without sending data. Create Playlist: available in My Collections and in Public Collections, it exports, in a shared folder, a playlist format file with the data of the audio and video resources in the collection. This file can be managed by Axel Technology’s YouPlay and XTV playouts to broadcast the resources. E-mail: available in the Resource Tools box, opens a form that allows you to email a direct link to the resource to one or more users. If you are e-mailing to external users, you can set the a level (Open or Restricted) and an expiry date for accessing this resource. Upload to FTP: available in the Resource Tools box, uploads the related resource to a FTP site. the settings for the FTP site are managed by XMAM’s system administrators.
1.3.3 MANAGING THEMES
A Theme is a special grouping of public collections of resources. Themes are NOT intended for organization of resources. Metadata alone should be used for organization/categorization. Themes are intended to be a sort of showcase or portfolio of your best assets, to give users an idea of the quality and range of assets in the system that searching alone may not provide.
1.3.3.1 CREATING A THEME
An existing user collection can be converted into a theme, or a new collection can be created for this purpose. 1. Click on ‘>Manage ‘My Collections’ in My Collections menu. 2. Type the collection name under Create New Collection and click [Create]. 3. Beside ‘Access’ choose ‘Public’ from the dropdown menu. 4. Select the Theme category that the collection belongs to. If there is no appropriate theme category, enter a new theme category name. 5. Click on [Save]. 1.3.3.2 ADDING RESOURCES TO A THEME
1. On the Themes page, choose ‘>Select’ next to the theme you wish to add resources to. 2. The relevant collection will appear in your collections window on the bottom of the screen. You can then start adding items by clicking ‘Add to collection’ in the Resource Tools box. 1.3.3.3 REMOVING A THEME
To remove a theme you need to edit its Collections and deselect their Theme Category. The theme then reverts to being a normal public collection under the control of whoever originally created it. 1.3.3.4 CHANGING THE THEME CATEGORY THUMBNAIL
The theme category thumbnail image displayed above each block of themes is automatically selected based on popularity. However, it is possible to manually select an image or images.
From the Themes page, click "Select" next to the theme containing the image you wish to use as a thumbnail for the theme category. This is now your current collection in the bottom bar.
In the bottom bar click the speech bubble below the image you wish to select. Tick the ‘Use this resource as a theme category thumbnail?’ box and click on [Save].
Repeat for any other images you wish to select.

ENG
| ADMINISTRATORS GUIDE 14
2 ADMINISTRATORS GUIDE
2.1 SYSTEM MANAGEMENT
2.1.1 UPLOADING A RESOURCE
2.1.1.1 UPLOADING A SINGLE RESOURCE
1. Click on Team Centre in the top navigation menu. 2. Go to ‘Manage Resources’, then ‘Add Single Resource’. 3. Select the Resource Type – Photo, Document, Video or Audio – and fill in the required fields
(fields with * are required), then click on [Next]. 4. Click [Browse] to browse to the file’s location on your local server or hard drive, then click on
[Upload] to upload it. 5. Once the file is uploaded, fill in the details – keywords, captions, etc. and click on [Save] to
confirm. 2.1.1.2 BATCH UPLOAD – IN BROWSER (FLASH and JAVA)
1. Click on Team Centre in the top navigation. 2. Go to Manage Resources, then Add Resource Batch - In Browser. 3. You then enter the type of the resources you are uploading and any default values for all the
fields. These are the initial values that all uploaded resources will have. So if your batch of photos was all taken in Africa you can tick "Africa" here and it will be set for all resources. You can also set that the resources will go into a particular collection.
4. On the next page you can browse for files on your local system. Multiple files can be selected by holding down CTRL (PC) or CMD (Mac).
5. The system transfers the files and creates the thumbnails. It's very important not to navigate away from this page until the process is complete.
6. When the files are uploaded, click on >View New Material in the Simple Search box or Recent in the top navigation menu to see them. You will need to edit each one individually to add captions or other unique information.
Suggestion: when the process is finished, delete all files from the upload folder or FTP server to prevent them from being accidentally uploaded again. 2.1.1.3 BATCH UPLOAD – FTP
This function still exists in case a user doesn't support Java or Flash or in scenarios where using FTP might be appropriate. FTP upload works like the in-browser upload in that you are presented with a template form to which you add any default content for the resource set. You then enter details of the remote FTP server you'd like XMAM to connect to. The default FTP details are set in the configuration file but the user can change these to other settings on a one-off basis. XMAM then connects to the remote FTP server and lists available files in the provided directory. The user selects the files they'd like to copy, and the files are transferred and processed. 2.1.1.4 REPLACE RESOURCE BATCH
This feature allows you to replace resources in a batch. Files should be named with their resource numbers (12345.jpg) and then uploaded. For each file, the system finds a matching resource, it will replace the original with the new copy.

ENG
| ADMINISTRATORS GUIDE 15
2.1.2 MANAGING USERS
2.1.2.1 USER ACCOUNTS
When a new user requests an account, you will receive an email notification with their name and email address. To create a new user account:
1. Log in as administrator and go to the Team Centre. 2. Select Manage Users 3. Create a new user. Usernames should use alphanumeric characters only and should be lower
case. 4. Click the [Suggest] button for the password 5. Fill in the persons full name, and select a Group. 6. Fill in their email address. 7. If the person only needs access for a short period of time, you can fill in an expiry date 8. Check the ‘E-mail this user their username and new password’ box and the user will be
automatically notified of their new account. 9. Click on [Save] to complete the account creation.
2.1.2.2 LOST PASSWORDS
If someone contacts you because they have lost their password, direct them to click the ‘>Click here if you have forgotten your password’ link on the site login page. A new password will be automatically generated. 2.1.2.3 EDITING USER DETAILS
1. Log in as administrator and go to the Team Centre. 2. Select Manage Users. You will see a list of all current users. 3. Click ‘Edit’ beside the name of the user you wish to change.
The fields are as follows: Username: The username used to log in to the system. This must be alphanumeric only, i.e. no
spaces or symbols. Password: The user’s password will not be displayed as it is not stored - a one way encrypted hash
is stored instead for security purposes. Therefore you will not be able to tell a user their password if they ask for it - you’ll have to issue a new password. Passwords manually entered must meet the password security requirements (such as minimum length and complexity), and it’s usually easier to click “Suggest” and have the system create a password randomly that will meet the security requirements.
Full Name: This is not essential but if provided it is displayed at the top of the screen when the user is logged in.
Group: Select a user group from the list. This will determine the access that the user will have to the system, including the access to the relevant Asset Libraries.
E-mail address: Used to send the user notifications, for example if someone shares an asset with them, or if the user requests a password reset.
Account Expires: If set, when this date is reached, the account will cease to be operational. This is useful for giving someone temporary access to the system.
IP address restriction: An option list of IP addresses that the user can access the site from. If this is not blank, the IP address the user is connecting from must be within this list. Wildcards can be used, for example 192.168.*.
Comments: Optional, can be used by administrators, for example to add the reason why the account was created.
E-mail this user their username and new password: This is enabled only if you have used the ‘Suggest’ feature to have the system suggest a new password. Check this box to send the user their username and password via e-mail when you click on [Save].
Approved: If user accounts have been requested by completing the user request form, then the accounts will not be approved by default and must be approved manually. Users will only be able to log in if this box is checked.
Tick to delete the user: Tick the box and click on [Save] to remove this user. Log in: Click to log in as this user, so you can check that their account is working correctly.
2.1.2.4 DELETING USERS
1. Log in as administrator and go to the Team Centre. 2. Select Manage Users. You will see a list of all current users. 3. Click ‘edit’ beside the name of the user you wish to delete

ENG
| ADMINISTRATORS GUIDE 16
4. At the base of the user details page, select the box that says ‘Tick to delete this user’ 5. Click on [Save] to delete the account
2.1.2.5 USER ACCOUNT REQUESTS
By default the user account request form simply sends an e-mail to the notification address and the user account must then be manually created. This works as per the default e-mail system, except the e-mail you get requesting the account has a link to click to go straight to the user record so you can approve/edit/delete the account as appropriate. The 'e-mail this user their password' box is ticked by default so they will receive their login details when you approve them. Non-approved accounts can be seen in the user management screen as with approved accounts. You can click the "Approved / Last Active" heading to bring them all to the top.
2.1.3 STATISTICS AND REPORTS
Statistics shows general trends in a graphical format. You can also select particular user groups to view trends for those groups. Reports are more detailed and show actual data relating to the application usage. The reports can be downloaded in CSV format which can be opened in most spreadsheet applications such as OpenOffice Calc, Apple Numbers, Microsoft Excel etc. You can access both Statistics and Reports by the Team Centre.
2.1.4 BULK MAIL
The Bulk Mail tool allows the administrators to mail some or all of the users. Individual users and/or groups can be selected. Access Team Centre and click on ‘Send Bulk Mail’ to use this feature.
2.1.5 RESEARCH REQUESTS
Research requests are requests for help in finding appropriate resources. They appear in Team Centre -> ‘Manage Research Requests’. The response can include a collection, for example a list of suitable resources. The request can be allocated to someone in the team prior to being resolved, to enable distribution of the research request handling among a team of admin staff.
2.1.6 RESOURCE REQUESTS
When users request resources (because they have restricted access), what happens with the request depends on the 'request mode' setting on the user group.
Email Only: an e-mail is sent to the notification address containing the request details. The admin user must respond manually by either transferring the resource files offline or by sending the user an 'external URL' with open access to the resource files.
Managed: an e-mail is sent to the notification address and the admin user can log in to approve or decline the request. Once approved, the user will receive an e-mail automatically and can download the files themselves via XMAM. If an expiry limit is set, the user will lose full download access to the requested resources on the date specified.

ENG
| ADMINISTRATORS GUIDE 17
Managed requests appear in Team Centre -> ‘Manage Requests / Orders’. Approving a request grants the user full download access to the requested resources for the period
you specify and sends the user an e-mail notifying that they have access and for how long. Declining a request sends the user an e-mail and cancels any previously granted access for the
requested resources. Moving a request back to Pending after it has been in the Approved status cancels any previously
granted access for the requested resources but does not send the user a notification e-mail. Deleting the request does not revoke any access granted but removes the request from the system.
You must first 'decline' a request before deleting it if you want to revoke access that was granted as
a result of previous approval of this request.
2.1.7 RESOURCE PERMISSIONS
2.1.7.1 ACCESS CONTROL VIA ACCESS MODES
There are four access modes that can be set on resources: Open: everyone can see and download. Restricted: everyone can see but download is restricted, except admin (specifically, those with the
'v' permission). You can define which image sizes (if any) can be downloaded in System Setup for this access level.
Confidential: nobody can see except admin (specifically, those with the 'v' permission). Custom: you can set any of the above statuses for specific user groups, so different groups have
different levels of access to the resources. Note: in some cases using metadata filtering (below) will be easier to manage.
Note that removing the 'g' permission from a non-admin usergroup will cause users in that group to see 'open' resources as if they are 'restricted'. This provides an easy way to set up blanket restricted access for a specific group. 2.1.7.2 ACCESS CONTROL VIA METADATA FILTERING
It is also possible to use predefined filters, set on the user group record, to determine a group's access based on metadata instead of or in addition to the above access modes. For example, you could set that a given group can only access resources where the country field is set to 'Africa'. Specific metadata fields could be generated purely for access control, if appropriate. 2.1.7.3 PERMISSIONS RELATING TO EDITING AND DELETING
The above 'access' permission controls general availability of the resource and downloadable files, and does not control edit and delete access. Edit access is controlled via user group permissions and optionally the 'edit filter' setting on the user group. See the User Group Management section for more details.
2.1.8 USER CONTRIBUTED RESOURCES
User groups that are permitted to contribute must have the "d", "e-1" and "e-2" permissions. The process is as follows:
A user contributes a resource via the My Contributions link in the top navigation. At this point it is in ‘Pending Submission’
They edit the resource until they are happy with it, and change the Status in ‘Pending Review’ An admin user uses 'Manage Resources -> View User Contributed Resources Pending Review' in
the Team Centre to list resources in this state and move them to the final 'active' state. 2.1.8.1 ALTERNATIVE SCENARIOS
By giving the user only "d" and "e-1" permissions (i.e. excluding "e-2"), the resources will go in to the awaiting review state immediately, skipping the awaiting submission step. By giving the user "d" and "e0" (the ability to edit active resources), users contributed resources will go immediately into the active state. Note: "e0" means that users can edit all active resources, not just those they have contributed.

ENG
| ADMINISTRATORS GUIDE 18
2.1.8.2 NOTIFICATIONS
By default, when resources are moved to the 'pending review' status, a notification is sent. 2.1.8.3 BATCH-APPROVING MULTIPLE SUBMITTED RESOURCES
You can accept multiple pending review items as follows:
Team Centre -> ‘Manage Resources’ -> ‘View User Contributed Resources Pending Review’ In the bottom collections bar, create a new collection or use an empty 'working' collection you
already have (e.g. My Collection). Add the resources to the collection one at a time, or to add them all choose 'save search items to
collection' at the very bottom of the results (you may need to scroll down to see the link). All the resources will appear in the bottom bar.
Click "edit all" in the collection bar Click the "status" tick box in the top form (it's near the bottom) Choose "active" from the drop down box and click on [Save].
2.1.9 ARCHIVING
Resources can be moved to an archive state. In this state, resources will not appear in search results. At the bottom of every search result listing is a link (e.g. '10 matching resources in the archive') that can be used to access archived resources. The default process for archiving resources is a two step workflow and assumes there is a separate archival team, and that this team may wish to carry out additional processing before archiving the resouce. Archival states are as follows: 0 - The resource is active 1 - The resource is pending archive (waiting for the archive team) 2 - The resource has been archived In the default set up the administrators have access to move resources into states 0 and 1 and edit resources that are in those states (permissions e0,e1) and the archival team have access to move resources into states 1 and 2 and edit resources in those states (permissions e1,e2). Thus state 1 acts as a 'handover' state. Archiving therefore works as follows by default: the administrators change the resource Status into ‘Waiting to be archived’ (state 1) and then the archive team (having seen the resource appear in Team Centre->’Manage Archive Resources’->’View Resources Pending Archive’) then perform extra work (such as adding archive metadata or indicating where any hard copy of an offline resource may have been stored) and place the resource into resource Status into ‘Archived’ (state 2). If a simpler process is required without an archival team, simply give the administrators access to all three states (permissions e0,e1,e2) and they can move resources directly to state 2 (Archived). New resources can be created directly in the archive state using the 'Add Single Archived Resource' link in 'Manage Archive Resources'. 2.1.9.1 DIRECTLY SEARCHING THE ARCHIVE
Log in as Super Admin, (normal) Administrator, or Archivist, under Team Centre -> ‘Manage Archive Resources’ -> ‘Search Archived Resources’, and clear all fields to search for all, or use the search form to limit search.
2.1.10 USER GROUP MANAGEMENT
Groups are managed via: Team Centre -> ‘System Setup’ -> ‘Group Management’. The default user groups are:
Administrators: almost everything, except System Setup (aimed at your internal resources team) Archivists: can edit resources in the 'Waiting to be archived' and 'Archived' status only.

ENG
| ADMINISTRATORS GUIDE 19
General Users: search and download Restricted: nothing; they can only see resources they have been e-mailed. Aimed at external users,
i.e. press agencies etc. There are four types of Restricted User: Payment Immediate, Payment Invoice, Requests Emailed, Requests Managed.
Super Admin: everything (aimed at sysadmins) 2.1.10.1 PERMISSIONS
The permissions string set on a user group defines which functions users in that group will have access to. Example of permissions string: r,s,a,t,e0 Functionality to which access can be controlled is as follows: Search
s Can search for resources.
v Can view confidential (admin only) resources, also download 'restricted' resources.
g Without this permission, the users in the group will have 'restricted' access to any 'restricted/open' resources.
q Can make resource requests.
w Show watermarked previews/thumbnails ($watermark must be set in config.php prior to resource upload in order for watermarks to be created).
Metadata Fields / Resource Types
f* Can see all fields.
f? Can see field with reference ? e.g. f1,f2,f3 (applies to editing, advanced search, and viewing resources).
f-? Cannot see the field with reference ? e.g. f*,f-3 means see all fields except field 3.
F? DENY write access to the field. The field will not appear on edit or edit all.
F* DENY write access to all fields.
F-? ALLOW write access to the given field, used with F* to allow write access to specific fields only.
T? DENY access to resources with the given resource type ID, also hide this resource type when editing/searching
X? RESTRICT access to resources with the given resource type ID.
X?_$ RESTRICT access to resources with the given resource type ID AND the given download size ID, for example X1_scr restricts access to the screen size download for photo resources.
Resource creation
c Can create resources / upload files (Team Centre users; resources go directly into usable state).
d Can create resources / upload files (Normal users; resources go into 'pre-check' state).
e? Can edit resources in specific archive state, e.g. e0, e1, e2 (includes deletion).
e0: Not archived (visible in a normal search).
e1: Waiting to be archived (hidden from searches).
e2: Archived (visible in archive searches only) Normally the resource management team will have e0 and e1, and the archive team will have e1 and e2. Further permissions govern access to user contributed resources.
e-2: User contributed, awaiting user submission.
e-1: User contributed, awaiting team review.
i Can manage archive resources.
n Can tag resources using 'Speed Tagging' (must be enabled in config).
Themes / Collections
b Suppress bottom collections frame and all associated collections functionality (not advisable for administrator groups as collections make resource management much easier).

ENG
| ADMINISTRATORS GUIDE 20
h Can publish themes, and edit all collections.
j* Can see all theme categories.
j? Can see theme in category ? (e.g. jCars, jAnimals).
J Can only search for resources that belong to themes (not advisable!).
Restrictive permissions
p Cannot change own password. Useful for shared user accounts.
D Cannot delete resources.
Administration
a Can access administration tree.
t Can see the team centre home.
r Can manage research requests.
R Can manage resource requests / orders.
o Can manage content.
m Can bulk-mail users.
u Can manage users.
k Can manage keywords (add/remove keyword relationships and add/remove/rename checkbox/dropdown list options).
Restrictive group permissions (allows isolated groups to be created)
U (upper case) Can manage users in children groups to the user's group only.
E
(upper case) Can email resources to users in the user's own group, children groups and parent group only. Also when using custom access, can only select groups from own group, children groups and parent group. For user list auto-completion (e.g. when e-mailing a resource) the user will only see users from their own group, children groups and parent group.
2.1.10.2 SEARCH FILTERING
Each user group can have a 'S earch filter' set (via the user group options in ‘System Setup’), which is like some extra search terms (using the Shorthand name) that is always applied, e.g. a user in a user group with this filter set would only see resources from Albania:
country=Albania You can add several fields and it performs an AND match:
country=Albania;emotion=Happy The user can only see happy photos from Albania. This is an extra permissions layer and for some scenarios is preferable to the standard method of setting the 'custom' access mode and managing user group access that way. You can add OR matches using the pipe symbol:
country=Albania|Brazil The user will see resources where the country is Albania OR Brazil. AND and ORs can be combined and in this case the OR is performed first:
country=Albania|Brazil;emotion=Happy The user will see resources where the country is Albania OR Brazil, AND the emotion is Happy. It is also possible to specify that resources should only be visible where the field is NOT set to particular keywords:

ENG
| ADMINISTRATORS GUIDE 21
country!=Albania
With the above, any resources with the country set to Albania would not appear in the user's search results. Multiple keywords can be specified here too using the same pipe syntax. 2.1.10.3 EDIT FILTER
An edit filter can be set for the user group which works like search filter, but instead is used to determine if users in the group can edit resources based on the metadata in the resource. The existing 'e0' (or e1, e2 etc.) permissions must be used first to open up edit access. The edit filter is then used to restrict access to specific resources. The syntax is the same as for search filtering and full AND / OR logic is supported here too in the same way. An additional feature for edit filtering is the ability to restrict editing by resource type. This is done by using 'resource_type' as the field name, for example the following will restrict edit ability to resources of resource type 2 only (by default the 'Document' type):
resource_type=2 This can be used in combination with metadata filters. 2.1.10.4 DEFAULT RESOURCE METADATA
The 'resource defaults' field works in the same way as the search filtering above, except that it sets the default metadata when the users in that group add new content. This can be used with search filtering to segment resources by usergroup; in the example above, if the user can only see photos from Albania, you could set the default resource metadata to:
country=Albania and the resources the user creates will automatically have the country set to Albania. This avoids the situation whereby the user creates resources that they can then not see. If the selection field (country in this case) is hidden from the user the value will still be set. This is a good way to segment the resources completely and, if used with user group specific content and CSS themes can mean each user group the impression that they have their own separate XMAM installation. 2.1.10.5 PARENT / CHILDREN GROUPS
You can define relationships between groups, so for example group A can manage only those users in group B. This is done using the 'parent' field. Adding the "U" permission to a group means that they can only manage users in children groups (they still need the 'u' in lower case which gives access to the user management area). Note that by adding users to the children groups they are in no way related to the parent group in terms of permissions/config - the options are set individually for each group. The only thing that nesting groups inside another group does is to allow users of the parent group to edit users in the child group (if the appropriate permissions are set) - and/or restricting the visible users to the current/parent group. 2.1.10.6 GROUP SPECIFIC USER INTERFACES
Customized user interfaces can be created specifically for a user group or groups, for example if you want to give one of the organizations that use your system their own look and feel, perhaps specific to their organization. On the user group record in System Setup you will see "Fixed Theme".
If this is left blank, the user will be able to select their theme from the two standard themes (white-grey and grey-blue) using the selector at the bottom of the screen, exactly as the system is normally. Any newly created themes will not appear in the selector.

ENG
| ADMINISTRATORS GUIDE 22
If this is set to the name of a theme however (e.g. grey-blue), the users in this group will only see this theme and cannot select another theme. The name of this theme could be a new theme, i.e. not one of the two standard themes normally available in the selector.
This allows you to "lock" certain user groups to a certain theme, allowing quite significant rebranding of the application depending on user group. As you can override existing elements using CSS the design could be radically different - i.e. it is not just the coloring that can be changed. 2.1.10.7 HOW TO CREATE YOUR OWN THEMES
Themes have two parts:
A CSS file in the "css" folder with the name "Col-xxxx.css" where xxxx is the name of your theme. A subfolder of the "gfx" folder. You will see the white-grey and grey-blue folders in there. Copy one
of these to a folder with your new theme name (you will probably want to copy grey-blue). You can then change the appropriate CSS and images to style the new theme. The logo is conveniently part of the theme so you can set a custom logo for each group too.
2.1.11 CUSTOMIZING TYPES AND FIELDS
2.1.11.1 CUSTOMISING FIELDS
Fields can be customised using "System Setup" in the Team Centre. Expand the "Resource types / fields" node. Fields are either global, for archived resources only, or 'per type' (i.e. fields for a video). For example, resources of type 'Photo' will have all the global fields, plus the Photo specific fields. If the resource is then archived it will also have the 'Archived Only' fields. 2.1.11.2 FIELD OPTIONS
When setting up fields in System Setup, the options are as follows:
Field ID: A unique numerical identifier for the field, automatically created and not editable. You need to use this value when configuring permissions using the 'f' permission.
Title: The field title as displayed when viewing and editing resources. Resource Type: This determines the additional fields that the resource will have. Note that there is
no connection between resource type and supported file types. Any file type can be uploaded to a resource regardless of its type.
Field Type: Alter the type of field, for example text entry, drop down box, etc. Field types are fairly self explanatory except for category tree which is more complicated; see the section below for more details.
Options: A comma separated list of options. This is for the drop down and check box types only. Note that removing or altering items on this list after data has been stored against those items will cause orphaned index data. This is fine during initial setup where there is no data, or if you plan to reindex the data manually later.
Required: if set to yes then the field must be completed before the resource is saved. Order By: indicates a numerical order for the fields. When displayed on the view or edit page the
fields will always follow the order indicated by this field. It is best to leave gaps when setting up fields initially, for example 10, 20, 30, 40 - this way fields can be moved easily without needing to renumber the whole set.
Index this field: Set to 'YES' to enable indexing, and therefore searching of this field. This must be set before any data is entered - existing data will not be automatically indexed if you change this to 'YES' after data entry. You can reindex manually if necessary. This must be set to 'YES' in order for fields to appear on the advanced search form.
Enable partial indexing: Set to 'YES' to enable partial word searches on this field. $partial_index_min_word_length by default is 3, which means that searches will include matches of 3 or more consecutive letters.
Shorthand name: when searching via the Simple Search, normally all fields are searched. It is possible however to specify a field to search as follows - "country:spain" which would search the country field only for the value "spain". This option specifies that shorthand name and is usually the same as the title. It must not include spaces and should be alphanumeric only.
Display Field: Set to 'YES' to include this field on the Resource View page.
ENG
| ADMINISTRATORS GUIDE 23
Enable advanced search: set to 'YES' to show this field on the advanced search page. Note this does not work for date types which are not indexed/searchable, with the exception of the default date field which is a special case.
Enable simple search: set to 'YES' to show this field on the simple search page. Checkbox types will appear as dropdown boxes to save space.
Use for find similar searching: The keywords indexed for this field will be used for the 'Find Similar' box below the resource view.
IPTC Equiv: When using the built in PHP IPTC functionality (i.e. when NOT using ExifTool) this defines the mapping of IPTC keywords to this field.
Display template: Allows alternative HTML to be used for the resource view page. See the default 'caption' field for an example. Leave blank to use the normal display for this field.
Value filter: Allows the transformation of $value with a php code snippet, which will modify the display of a field value in search display fields, Resource View, and contact sheet text. Useful for transforming number options into words, rearranging or reducing comma-separated lists, or modifying date format and such.
Tab name: Allows fields to be split over multiple tabs. Leave blank to disable the tab functionality. If you do use tabs you must provide a tab name for EVERY field and the fields must be ordered so that the fields of the same tab are next to each other, otherwise multiple tabs will appear for a given tab name.
Smart theme name: Automatically generate a Smart Theme section on the themes page based on the data stored for this field. "Fixed" metadata types only, so that means checkbox / dropdown / category tree types.
ExifTool field: When using ExifTool, configures the mapping between XMP/IPTC/Exif etc. metadata and this field. Many different metadata formats and file formats are supported.
ExifTool filter: PHP code to modify extracted exiftool $value upon import into the database. You have to be careful about this, since some metadata fields will be looking for specific values upon writeback. It can be used to modify incoming data (changing words, etc.). By default, it is used to translate filesize in the File Size field to bytes, so that that field can be sorted consistently. In the case of filesize, this modified value doesn't actually write back via exiftool since it is simply a property of the file.
Help text: If specified, this text will appear in a box under the field when the field has focus. For checkbox fields and other fields that do not have focus functionality the help box will always appear.
Display as dropdown: Display as a dropdown on Advanced Search. External user access: When sharing using an external share (no login needed, and a '&k=' value in
the shared URL), should this field be displayed? Autocomplete macro: PHP code that is executed to produce a default value. Hide when uploading: Allows the field to be hidden on the resource upload form only, and still be
displayed elsewhere such as the edit and view screens. Hide when restricted: Specifies that the field should be hidden when access to the resource is
'restricted' for the current user. Omit when copying: Specifies that the field should not be copied when using the resource copy
function. Sync with field: The ID of another field. When the field with this ID is updated, the field settings are
copied to this field. This allows for several fields that are the same (e.g. in different resource types) to be kept synchronised. Note that a few options are deliberately not copied - resource type, order by and tab name (to allow independent positioning) and also this sync setting.
2.1.11.3 PREVENTING DROP-DOWN MENUS FROM AUTO-SELECTING THE FIRST AVAILABLE CHOICE
When using drop downs, if someone does not select a choice it picks the first choice. If you start the ‘Options’ list with a comma, you get a blank option first. 2.1.11.4 CUSTOMIZING THE “EDIT RESOURCES” FORM PER USER GROUP
It is possible to customize the "Edit resources" form where keywords etc. are added to resources, so different groups can select from different sets of keywords when adding searchable keywords to resources. The below permissions can be added to groups in System Setup to control this. The Field IDs appear in System Setup when you edit fields. The permissions are: f* Can see all fields f? Can see field with reference ? (e.g. f1,f2,f3 - applies to editing, advanced search, and viewing resources).

ENG
| ADMINISTRATORS GUIDE 24
f-? Cannot see the field with reference ? (e.g. f*,f-1 means see all fields except field 1). 2.1.11.5 ARRANGING FIELDS OVER SEVERAL TABS ON THE VIEW PAGE
You can set a tab name on fields in System Setup and the fields will then be arranged on tabs by matching name. If using the tab feature, all visible fields must have a tab name specified, otherwise the tab functionality will not be activated. You must use 'order by' to make sure the tabs appear together or you'll end up with several tabs with the same name. The first field encountered must have a tab name before the tab code kicks in. The idea is to set tab names for all visible fields. You can't have some tabbed fields and some not tabbed. It's also important that grouped fields appear next to each other when ordered by the order field. E.g. Order Tab Name ----- -------- 10 Tab 1 20 Tab 1 30 Tab 2 40 Tab 2 50 Tab 3 60 Tab 3 70 Tab 3 The field ordering must be such that fields with the same 'Tab Name' appear together. The above would produce the following tabs: Tab 1, Tab 2, Tab 3. An example of how not to do it: Order Tab Name ----- -------- 10 Tab 1 20 Tab 2 30 Tab 1 40 Tab 2 50 Tab 3 60 Tab 3 70 Tab 3 This is incorrect and there will be the following tabs: Tab 1, Tab 2, Tab 1, Tab 2, Tab 3. 2.1.11.6 SMART THEMES
If you would like a different way to categorize resources using themes you should make one or more Global Fields with its own options list as checkboxes. This will make it possible to choose in which of the themes the resource should be represented. The easiest way of understand how this works is by thinking of this as a kind of category. Each newly created global field represent its own theme group, with options as the grouped themes. Requirements: This feature requires version 1.5 or newer. The field names and options in this example is bogus, choose whatever that pleases you. Step 1. Create a new field in Root -> Resource Types / Fields -> Global Fields
- For this guide we just call it 'MainCategory' - Set field type to 'Drop Down List' - Add these options: Nature,Abstract,Architecture,Portrait,Macro,Closeup - Set Shorthand name to: Cat01 - Set Smart theme name (Theme Group displayname) to Main Category - Set 'index this field' to 'yes'

ENG
| ADMINISTRATORS GUIDE 25
Step 2. Upload new, or re-edit existing resources.
- Edit or upload some resources and set 'Main Category' to Abstract,Portrait or similar. - Verify by navigating to the Themes page.
2.1.12 CATEGORY TREE FIELD TYPE
The Category Tree field type is a special type that allows selection of metadata keywords from a large nested tree. If a node is selected then the parent nodes all the way back to the root are selected. This is therefore useful for classification (e.g. taxonomy on library systems such as Dewey Decimal). To set up a category tree, add a new field and set the type to Category Tree. Under 'Options', the nodes are specified in the following format: 1,0,Top Level A 2,0,Top Level B 3,0,Top Level C 4,1,Sub Level A 5,1,Sub Level B 6,4,Deepest Level A 7,4,Deepest Level B 8,3,Sub Level from Top Level C Each node exists on its own line. On each line are three values separated by commas. The first value is the node number, which is sequential. The second value is the number of the parent node for that item, with zero being used for top level items. Finally the third column is the name of the node. In the above example there are three top level nodes, the first of which has two sub level nodes. Of the two sub level nodes, the first node also has two further sub nodes. Finally a sub node has been added to the third top level node. The result is shown in the following picture:
The order of the nodes does not matter and therefore new nodes can be added at the end of the list regardless of it's position within the tree. When a node is selected, all the parent nodes are also selected and these then are also indexed and become searchable. When searching using advanced search, the user is presented with the same tree selection interface and can select nodes and subnodes.
2.1.13 CUSTOMISING SITE DESIGN
2.1.13.1 HOW TO CREATE YOUR OWN THEMES
Themes have three parts:
A CSS file in the "css" folder with the name "Col-xxxx.css" where xxxx is the name of your theme. A subfolder of the "gfx" folder. You will see the whitegry and greyblu folders in there. Copy one of
these to a folder with your new theme name (you will probably want to copy greyblu). You can then

ENG
| ADMINISTRATORS GUIDE 26
change the appropriate CSS and images to style the new theme. The logo is conveniently part of the theme so you can set a custom logo for each group too.
A chip in gfx/interface/XxxxChip.gif You can create themes as plugins. A plugin with a 'style.css' file within a single CSS folder will allow you to override styles. You can also put any extra graphics required in a 'gfx' folder. See the plugins page for more information. 2.1.13.2 CSS / GIF FOR TEMPLATE CHANGE
/xmam/gfx/greyblu/interface is where all the blue theme graphics are, which include gradients and the icons which will also need to be modified accordingly. Suggestion: Open them all up in a graphics program and adjust the hue for each of them with the same hue change for each graphic. This keeps all the color gradients and aliasing properly modified relative to one another. The CSS files are a bit trickier, but once you find the right colors to change, you can pretty much search and replace, for example, to make all dark blues into dark browns, all light blues into light browns, etc. 2.1.13.3 GROUP SPECIFIC THEMES
It's possible to create a theme that will only be used for certain user group(s). 2.1.13.4 CHANGE INTRO SLIDESHOW
The default slides are in /gfx/homeanim/gfx/. Start with 1.jpg and add as many images (sequentially) into "myslides" as you like. It is good to do it this way, since then your custom home images won't conflict with subversion updates. It'd be nice if they weren't fixed (i.e. selectable from actual resources), but due to widely varying aspect ratios in typical photos this isn't possible, at least not without building in some sort of cropping tool. It's probably best to hand-build them anyway so you can tune the filesize. They should ideally be less than 100k each (closer to 50k) so they load quickly. They should be 517x350 pixels. 2.1.13.5 CUSTOM HELP SECTIONS
You can extend the Help Page by setting up extra help sections in Team Centre -> ‘Manage Content’. Click "New Site Text Entry", then in the Page field enter "help" and in the name field name your own help section name, i.e. "Help with Search Features", then enter your help text. Save it, and when you go back to your Help & Advice page, there will be a link to your new section.
2.1.14 MANAGING PLUGINS
2.1.14.1 ABOUT PLUGINS
Plugins are packages that extend or modify XMAM's function and presentation. Because they do this is an architected way, they are easy for third parties to write and easy for site administrators to maintain, even as function and bug fixes are applied to the base code. XMAM comes with a number of plugins ready to be activated in case you need them. If you can't find the plugin you need, you can write a new one or hire a developer to write one for you. You are provided with two tools for managing plugins: the Plugin Manager that you find in Team Centre, and the XMAM Plugin Manager that is running in the same Pc where XMAM is installed.
2.1.15 THE PLUGIN MANAGER
To manage plugins using the Plugin Manager, log in as an administrator and choose Team Centre -> ‘Manage Plugins’ from the main menu.

ENG
| ADMINISTRATORS GUIDE 27
The Plugin Manager page is divided into three parts, "Currently Activated Plugins," "Available Plugins," and "Upload Plugin." The general idea is that uploading a plugin makes it available, and activating it makes it enabled. To upload a new plugin, thus making it available for activation, click the Browse button, navigate to the plugin's .rsp file and select it. Then click on [Upload Plugin]. Once the .rsp file is uploaded, the Plugin Manager validates its contents, decompresses and unpacks the files, and moves them into the proper location. When that has been accomplished, the newly uploaded plugin appears in the Available Plugins section. To activate an available plugin, click on its "Activate" link. Doing so causes it to "go live". The newly activated plugin moves from the Available Plugins section to the Currently Activated Plugins section. Once a plugin is active, it becomes available to all user groups. If you want you can change this, activating the plugin for selected user groups only. Click on "Group Access" for the plugin and choose the user groups for which the plugin should be active. Click on [Save] to save your choices. In addition to group access control, some plugins can be — or must be — configured. An active plugin that supports configuration displays an "Options" link in the plugin manager. Clicking on it takes you to the plugin-specific configuration page. To deactivate a plugin, click on its "Deactivate" link. Deactivating a plugin causes the plugin to no longer be active. If the plugin has stored data associated with it, that data is not removed from the system. Reactivating the plugin puts it back into effect and any data stored from the previous activation is still available. Completely removing data stored by a plugin is a manual process that's beyond the scope of this article. Some available plugins may have additional information associated with them. These have a "More Info" link associated with them. Clicking one takes you to the plugin specific information page the author created for it. In the following section, a list of the most common plugins available in the Plugin Manager, and their features. 2.1.15.1 MAIN PLUGINS
Alternativeon-demand: allows to set for the video resources, under the Original File in the Resource Tools box, an Alternative Files section with one or more rows, each one for generating, only if needed, an alternative file with a different format. The user must click on the [On-Demand] button to generate the file that will be available for the download. XTools: plugin which manages the page showing info and status of all the tools available with the XMAM Plugin Manager. You can access this page by Team Centre ’Plugin Manager’. Playoutexport: associated to the Create playlist feature in the Collections toolbar, it generates a file with a playlist containing all the media of the selected collection. The playlist file is saved in a default folder, then XMAM Plugin Manager’s PlayoutExport tool saves it in a shared folder, with a format that can be read by YouPlay or XTV playouts (see next chapter for more info). Lansharingplus: associated to the Share to LAN feature present in the Resource Tools box and in ‘My Collections’ window, it allows to copy the related resources, or generate a link to them, into one or more shared folders of your network. Click on Options to set name and path of the folders. This plugin works with XMAM Plugin Manager’s Export Link and Lan Folder tools (see next chapter for more info). YouPlay: creates a link with the YouPlay logo for each audio/video resource and collection, you can directly drag and drop it into YouPlay playout to use the related resource/collection. FTPupload: associated to the Upload to FTP feature which creates a link to the related resource in a folder, then XMAM Plugin Manager’s FTP Uploader tool will provide to read this link and upload the resource to a FTP address (see next chapter for more info).

ENG
| ADMINISTRATORS GUIDE 28
2.1.16 CONFIGURING FOR MULTIPLE CLIENT USE
If you are interested in setting up XMAM as an environment where you may have multiple users whose resources should remain private from each other, here is one method of doing so. This would suit a scenario such as if you are a designer who manages multiple clients resources, yet need them to remain exclusive from each other. It is possible to set up restricted access using the standard permissions (i.e. the 'custom' access level when editing resources) to allocate resources manually to groups, but the method outlined below applies the ownership through metadata, which then gives you the power to search through resources using this field, targetting a specific clients material if necessary. 2.1.16.1 CUSTOMISE YOUR RESOURCE TYPES/FIELDS
In 'Resource Types / Fields' create a new Global Field called 'client' so this can be attached to all types of resources.
Under 'Field Type' select 'Drop down list', and fill the options field with values, starting with a comma so that no value is automatically selected (e.g. ',company1,company2,company3').
Under 'Index this field' select Yes. Enter "client" (without the quotes) in the 'Shorthand Name' field as you will reference it in the next
step. You will need to update any resources that belong to your client using this newly created field. When you edit a resource, you will now have the choice of selecting which client it belongs to. For more information on customizing resource types/fields. Note: Instead of making the client field a dropdown, you could alternatively make it a check box list, then you could share the same resource among multiple clients by ticking more than one box. 2.1.16.2 CUSTOMISE YOUR USER GROUPS
For each client you have, create a new user group and name it something like: 'Client User - Company1'.
Enter in the 'search filter' field your short field name from the first step, followed by an equals sign, then your company name from the options list as a value pair (e.g.: 'client=company1'). This will filter all results from your clients search so that only resources that are tagged with their company name in the client field will be shown to them.
Enter in the 'resource defaults' field your short field name from the first step, followed by an equals sign, then your company name from the options list as a value pair (e.g.: 'client=company1'). This will set the field client to be 'company1' for all uploads by that particular client.
Set the permissions for this group (see below). PERMISSIONS Now that you have created a custom 'client' field for each resource, you must also tailor the permissions so this field is not accessible to them, as you (most likely) do not want them to see your client list, or to be able to change the ownership of the resource. Here follows an example of the permissions you may wish to assign to your new user profile:
s,g,d,e0,e1,e2,f1,f8,f18,U,E f - Specifying the f permissions (rather than using 'f*') will mean this user group is only shown the fields you want, and you can exclude the new 'client' field you have created. Note: the specific f numbers you require may be different for your version of XMAM. Please be sure to check which fields you need. d - 'resource creation' permission of each client user group to 'd', rather than 'c' so that you can assign the resource to the client, rather than them doing it themselves. U,E - These last two permissions are also important as they are restrictive group permissions that mean clients can only email users within their group, and assign users within their group.

ENG
| ADMINISTRATORS GUIDE 29
2.1.16.3 CREATE YOUR USERS
For each client user account, you will need to create at least one new user and attach them to the relevant user group you created in the previous step. This way you can still have more than one user for each company. Now when your client logs and does an empty search, instead of seeing all resources in the system, they will only see ones that are tagged as belonging to them. Don't forget to go back and update your resources using the new 'client' field with the appropriate values. Suggested workflow: After you are finished setting things up properly as outlined above, you may need to update existing resources in your clients database with the proper client keyword. To ensure that all resources currently in the client database are carried over, log into a demo/test client account, perform an empty search (returns all resources), then click the 'Add search items to collection' option to add to a new collection. Temporarily disable the E and U permissions for your client account, then edit the Collection, adding yourself (assuming you are an administrator) to the 'attached users'. You may then log back in as an admin and will find the previously created Collection complete in your account. To perform a batch keyword update for the Collection, click the 'Edit all' option in the Collection. The ´Client' keyword field should now be accessible for batch editing. Don't forget to put the E and U permissions back into your client account when finished. 2.1.16.4 FURTHER CUSTOMIZATION
Client Groups You can use the 'parent' field on the groups to allow one group to manage the users in another. You could have two groups per client, one admin and one general, and the admin users can manage the general users. So you could let your client manage their own logins. The admin group needs the U permission. Custom Themes The 'fixed theme' field allows you to set CSS separately for each user group. This means you could replace the logo with your client's logo just for users in that group.
2.1.17 RESOURCE AND COLLECTION REQUESTS / E-COMMERCE
The 'request mode' setting on the user group in System Setup controls the way that resource and collection requests (for restricted resources) are handled.
Email Only: an e-mail is sent to the notification address containing the request details. The admin user must respond manually by either transferring the resource files offline or by sending the user an 'external URL' with open access to the resource files.
Managed Request: an e-mail is sent to the notification address and the admin user can log in to approve or decline the request. Once approved, the user will receive an e-mail automatically and can download the files themselves via XMAM. If an expiry limit is set, the user will lose full download access to the requested resources on the date specified.
Payment - Immediate: takes payment for the resource immediately through the default payment provider (PayPal). The user is granted full access to the resource when the payment is complete.
Payment - Invoice: the user is immediately granted full access to the resource with no payment process. Reports would then be used for monthly billing. The periodic automatic reporting function may be useful here.

ENG
| ADMINISTRATORS GUIDE 30
2.2 XMAM PLUGIN MANAGER
In the main window you find the list of all the available tools: the ones with the green dot are enabled; the ones with the red dot are disabled. Double click on the dot of each tool to enable/disable it. You can also use the [Active all] button to enable all the tools in the list at the same time, or the [Stop all] button to disable them. When a tool is disabled (red dot), you can access its settings by clicking on the related row header on the left. Most of the tools, when enabled, are executed automatically, each one with its time schedule (eg: every 5 minutes), but you can force the execution of a tool by selecting it and clicking on [Run manually]. Info about last time of execution, state, target,… are shown in the rows of each tool. If you want to clear these info, click on [Clear status] ] Click on [Settings] to open XMAM Plugin Manager’s main setup:
Here you will find the paths for the PHP executable file, the PHP Tools page folder, the FFMpeg executable file, the Errors folder, the Temp folder and the History folder. Usually, these parameters do not need to be changed. 2.2.1.1 AVAILABLE PLUGINS
Auto import ingester: One of the most important tools, it manages the import of data from a shared folder in the network. In this way, if someone manually inserts some files into the set folder, this tool automatically imports them to XMAM’s resources. In its setup window, you must set the Watch folder that is the shared folder from where the tool will get the data, and the Static folder that is a temporary folder used for the import process. Usually these folders are already set. In the Ingest timeout you can set how often the tool must perform the automatic import. Enabling Remove root folder allows the tool to delete the subfolders after the import has been performed. Auto theme ingester: works the same way as the above mentioned plugin, but if you divide the files to be imported into folders, this tool will import these file organizing them into themes according to their source folder. In this case it is important to leave the Remove root folder parameter unchecked, so that you can keep the subfolders structure in the shared folder.

ENG
| ADMINISTRATORS GUIDE 31
DigiTVSynch: manages the data synch between a DigiTV archive and XMAM. The tool automatically checks the content of the Watch Folder and copies the related data in the Target Folder, then a PHP Synch Page will move this data into XMAM. DJProSynch: manages the data synch between a DigiTV archive and XMAM. The tool automatically checks the content of the Watch Folder and copies the related data in the Target Folder, then a PHP Synch Page will move this data into XMAM. Any Converter: tool for converting the audio/video files to be imported in the desired format by using FFMPEG. In its settings you can set 5 different strings of conversion. The tool converts the files that are in the Watch Folder and copies the result in the Target Folder. It is used in special occasions such as conversion tests. Convert To Mxf XDCAM: special tool for converting video files into Mxf XDCAM format . The tool converts the files that are in the Watch Folder and copies the result in the Target Folder. ConvertToRemux: performs a remux of the video files copied into the Watch folder and save the result into the Target folder. H264 Converter: converts video files from the Watch folder into H264 format and save them into the Target folder. In the setup you can chose Video bitrate, Audio bitrate and Extension for the conversion. H264 Converter Theme: converts video files from the Watch folder into H264 format and save them into the Output folder and FTP Uploader folder. In the setup you can chose Video bitrate, Audio bitrate and Extension for the conversion. MPEG2 Converter: converts video files from the Watch folder into MPEG2 format and save them into the Target folder. In the setup you can chose Video bitrate, Audio bitrate and Extension for the conversion. Folders Cleaner: checks the content of the selected folders and deletes the files into them that are older than the set days (daily check). FTP Uploader: connected to XMAM Web’s Upload to FTP feature, reads the links in the Watch folder and upload the related resources to the FTP site set. Hit Count: performs a refresh of XMAM Web’s statistics every 6 hours. Export Link: strictly connected to XMAM Web’s Export Link feature, allows to export the resource’s link into the shared folder, so that a user can directly access the resource through it. The tool moves the content from the Watch folder to the Output folder. MP4 Join Alternative File: unites all the MP4 alternative files of a resource into one video file of the selected format (eg: .m4v). The tool reads the content of the Watch folder, unites only the .MP4 files into one file with the Target extension and saves the result into the Output folder. LAN Folder: strictly connected to XMAM Web’s Share to LAN feature, moves data from the Watch folder to the Output folder. P2Zip Render, P2Zip Importer, P2Zip From Structure: special tools for managing the import of contributes from Panasonic P2 cassettes. PHP Page Launcher: automatically runs one or more PHP pages. PlayoutExport: strictly connected to XMAM Web’s Create playlist feature, exports a playlist file that can be read by YouPlay or XTV playouts. The tool moves the content of the Watch folder into the Output folder. StaticSynch: synchronizes (mirror) data from external folders to XMAM. It is possible to assign, for each source, which groups can access the related resources into XMAM Web. Video Processor: tool responsible for the generation of the resources’ previews and alternative files.
ENG
| ADMINISTRATORS GUIDE 32
2.3 SUPPORTED FILE TYPES FOR THUMBNAILS AND PREVIEWS
2.3.1 IMAGE / DOCUMENT FORMATS
JPEG (.jpg, .jpeg) JPEG-2000 (.jp2, .j2k) GIF (.gif) PNG (.png) Adobe PDF (.pdf) InDesign (.indd) OpenDocument (.odt, .ott, .odg, .otg, .odp, .otp, .ods, .ots, .odf, .otf, .odm, .oth) Microsoft OfficeOpenXML (.docx, .xlsx, .pptx, .xps) Blender 3D (.blend) Plain Text (.txt) PFS: 1st Publisher (.art) AVS X image (.avs) Microsoft Windows bitmap (.bmp) Computer Graphics Metafile (.cgm) Kodak Cineon Image Format (.cin) Raw cyan, magenta, yellow, and black samples (.cmyk) Raw cyan, magenta, yellow, black, and alpha samples (.cmyka) Canon Digital Camera Raw Image Format (.cr2, .crw) TIFF image (.tiff, .tif) Microsoft Cursor Icon (.cur) DR Halo (.cut) Digital Imaging and Communications in Medicine (DICOM) image (.dcm) Kodak Digital Camera Raw Image File (.dcr) ZSoft IBM PC multi-page Paintbrush image (.dcx) Microsoft Windows Device Independent Bitmap (.dib) Digital Negative (.dng) Graph Visualization (.dot) SMPTE Digital Moving Picture Exchange 2.0 Microsoft Enhanced Metafile (.emf) Encapsulated Portable Document Format (.epdf) Adobe Encapsulated PostScript Interchange format (.epi) Adobe Encapsulated PostScript (.eps, .eps2, .eps3, .epsf, .epsi, .ept) High dynamic-range (HDR) file format developed by Industrial Light & Magic (.exr) Fax TIFF files (.fax) Flexible Image Transport System (.fits) Raw gray samples (.gray) Microsoft icon (.ico) MATLAB image format (.mat) Magick image file format (.miff) Bi-level bitmap in least-significant-byte first order (.mono) Multiple-image Network Graphics (.mng) Sony (Minolta) Raw Image File (.mrw) MTV Raytracing image format (.mtv) Magick Vector Graphics (.mvg) Nikon Digital SLR Camera Raw Image File (.nef) Olympus Digital Camera Raw Image File (.orf) On-the-air Bitmap (.otb) Xv's Visual Schnauzer thumbnail format (.p7) Palm pixmap (.palm) Common 2-dimensional bitmap format (.pam) Portable bitmap format (black and white) (.pbm) Photo CD (.pcd) Photo CD (.pcds) HP Page Control Language (.pcl) ZSoft IBM PC Paintbrush file (.pcx) Palm Database ImageViewer Format (.pdb)

ENG
| ADMINISTRATORS GUIDE 33
Pentax Electronic File (.pef) Postscript Type 1 font (.pfa, .pfb) Portable float map format (.pfm) Portable graymap format (.pgm) Personal Icon (.picon) Apple Macintosh QuickDraw/PICT file (.pict) Alias/Wavefront RLE image format (.pix) Portable pixmap format (.ppm) Adobe PostScript file (.ps) Adobe Photoshop bitmap file (.psd) Pyramid encoded TIFF (.ptif) Seattle File Works multi-image file (.pwp) Radiance image file (.rad) Fuji CCD-RAW Graphic File (.raf) Raw red, green, and blue samples (.rgb, .rgba) Alias/Wavefront image file (.rla) Utah Run length encoded image file (.rle) Scitex Continuous Tone Picture (.sct) Seattle File Works image (.sfw) Irix RGB image (.sgi) SUN Rasterfile (.sun) Truevision Targa image (.tga) Tagged Image File Format (.tiff) PSX TIM file (.tim) X-Motif UIL table (.uil) Interleaved YUV raw image (.uyvy) VICAR rasterfile format (.vicar) Khoros Visualization Image File Format (.viff) Wireless bitmap (.wbmp) Windows Metafile (.wmf) Word Perfect Graphics File (.wpg) X Windows system bitmap (.xbm) GIMP image (.xcf) X Windows system pixmap (.xmp) X Windows system window (.xwd) Sigma Camera RAW Picture File (.x3f) YUV raw image files (.yuv)
2.3.2 AUDIO / VIDEO FORMATS
3g2 3gp2 format 3gp 3gp format 4xm 4X Technologies format MTV MTV format RoQ Id RoQ format aac ADTS AAC ac3 raw ac3 adts ADTS AAC aiff Audio IFF alaw pcm A law format amr 3gpp amr file format apc CRYO APC format ape Monkey's Audio asf asf format asf_stream asf format au SUN AU Format avi avi format avm2 Flash 9 (AVM2) format avs avs format

ENG
| ADMINISTRATORS GUIDE 34
bethsoftvid Bethesda Softworks 'Daggerfall' VID format c93 Interplay C93 crc crc testing format daud D-Cinema audio format dsicin Delphine Software International CIN format dts raw dts dv DV video format dv1394 dv1394 A/V grab dvd MPEG2 PS format (DVD VOB) dxa dxa ea Electronic Arts Multimedia Format ea_cdata Electronic Arts cdata ffm ffm format film_cpk Sega FILM/CPK format flac raw flac flic FLI/FLC/FLX animation format flv flv format framecrc framecrc testing format gif GIF Animation gxf GXF format h261 raw h261 h263 raw h263 h264 raw H264 video format idcin Id CIN format image2 image2 sequence image2pipe piped image2 sequence ingenient Ingenient MJPEG ipmovie Interplay MVE format lmlm4 lmlm4 raw format m4v raw MPEG4 video format matroska Matroska File Format mjpeg MJPEG video mm American Laser Games MM format mmf mmf format mov mov format mov,mp4,m4a,3gp,3g2,mj2 QuickTime/MPEG4/Motion JPEG 2000 format mp2 MPEG audio layer 2 mp3 MPEG audio layer 3 mp4 mp4 format mpc musepack mpc8 musepack8 mpeg MPEG1 System format mpeg1video MPEG video mpeg2video MPEG2 video mpegts MPEG2 transport stream format mpegtsraw MPEG2 raw transport stream format mpegvideo MPEG video mpjpeg Mime multipart JPEG format mulaw pcm mu law format mxf MXF format nsv NullSoft Video format null null video format nut nut format nuv NuppelVideo format ogg Ogg format oss audio grab and output psp psp mp4 format psxstr Sony Playstation STR format pva pva file and stream format rawvideo raw video format redir Redirector format

ENG
| ADMINISTRATORS GUIDE 35
rm rm format rtp RTP output format rtsp RTSP input format s16be pcm signed 16 bit big endian format s16le pcm signed 16 bit little endian format s8 pcm signed 8 bit format sdp SDP shn raw shorten siff Beam Software SIFF smk Smacker Video sol Sierra SOL Format svcd MPEG2 PS format (VOB) thp THP tiertexseq Tiertex Limited SEQ format tta true-audio txd txd format u16be pcm unsigned 16 bit big endian format u16le pcm unsigned 16 bit little endian format u8 pcm unsigned 8 bit format vc1 raw vc1 vc1test VC1 test bitstream format vcd MPEG1 System format (VCD) video4linux video grab video4linux2 video grab vmd Sierra VMD format vob MPEG2 PS format (VOB) voc Creative Voice File format wav wav format wc3movie Wing Commander III movie format wsaud Westwood Studios audio format wsvqa Westwood Studios VQA format wv WavPack yuv4mpegpipe YUV4MPEG pipe format

ENG
| FINAL CONSIDERATION AND AXEL TECHNOLOGY CONTACT 36
3 FINAL CONSIDERATION AND AXEL TECHNOLOGY CONTACT ________________________________________________________________________________________________________________________________________________________________________________________________ ________________________________________________________________________________________________ ________________________________________________________________________________________________ ________________________________________________________________________________________________________________________________________________________________________________________________ ________________________________________________________________________________________________ ________________________________________________________________________________________________ ________________________________________________________________________________________________ ________________________________________________________________________________________________________________________________________________________________________________________________ ________________________________________________________________________________________________ ________________________________________________________________________________________________ ________________________________________________________________________________________________ ________________________________________________________________________________________________ ________________________________________________________________________________________________ ________________________________________________________________________________________________ ________________________________________________________________________________________________ ________________________________________________________________________________________________ ________________________________________________________________________________________________ ________________________________________________________________________________________________ ________________________________________________________________________________________________ ________________________________________________________________________________________________ ________________________________________________________________________________________________ ________________________________________________________________________________________________ ________________________________________________________________________________________________ ________________________________________________________________________________________________ ________________________________________________________________________________________________ ________________________________________________________________________________________________ ________________________________________________________________________________________________ ________________________________________________________________________________________________ ________________________________________________________________________________________________ ________________________________________________________________________________________________ ________________________________________________________________________________________________ ________________________________________________________________________________________________ ________________________________________________________________________________________________ ________________________________________________________________________________________________ ________________________________________________________________________________________________
Main Office BOLOGNA: Via Caduti Di Sabbiuno 6/F 40011 Anzola Emilia - Bologna - Italy
Tel. +39 051 736555 - Fax. +39 051 736170
For Technical information or support [email protected]
For General information and Sales dept
www.axeltechnology.com