![HP Sprocket App User Guide [EN]](https://static.fdokumen.com/doc/165x107/63252437cedd78c2b50c7179/hp-sprocket-app-user-guide-en.jpg)
User Manual - APP (EN.V1.0) - Ebikemotion
76
User Manual ebikemotion APP ® End User compatible also with Standards bicycles
-
Upload
khangminh22 -
Category
Documents
-
view
3 -
download
0
Transcript of User Manual - APP (EN.V1.0) - Ebikemotion

User Manualebikemotion APP® End User
compatiblealso withStandardsbicycles

bikes

ebikemotion® End User APP
EBIKEMOTION TECHNOLOGIES S. L.C/ Orfebres, 10 – 34004
(Palencia, Spain)
ebikemotion.com
Smartphone and Smartwatch APP
Version 1.0 - January 2017English Version
E B M D O C 0 5 - A 1

Index 4
1.ILUSTRATIONS 7
1.1 Smartphone APP Components Diagram 6
1.2 Smartphone APP Main Diagram 9
1.3 Smartwatch APP Main Diagram 9
1.4 iWoc® Remote Components Diagram 10
2. Safety Warnings - Read Before Start any Operation 12
3. Product Description 13
3.1 Intended of Use APP 13
3.2 Other Compatible Systems 13
iWoc® Remotes 13
iWoc® Standard Remote Components 13
iWoc® One Components 13
iWoc® TRIO Remote Components 14
iWoc® Display 14
ebikemotion® Smart Motor Control Units 14
3.3 APP Main Features 14
3.4 APP, Functionality List 15
4. Main Operation of Bicycles 16
4.1 Conventional bicycle Requirements 16
4.2 eBike Requirements 16
eBike Switched ON 16
eBike Switched OFF 16
5. General Overview 17
5.1 Minimum Smartphone features 17
5.2 APP Installation 17
5.3 APP Language 18
5.4 APP Units and Measurements 18
6. User Registration & Login 19
6.1 Register as new ebikemotion® user 19
6.2 Register and Login with 19
6.3 Register using Facebook® 19
6.4 Recover your password 19
6.5 APP Customization (eBike users) 19
6.6 eBike Activation 20
ebikemotion®
6.7 eBike Owner 20
7. eBike Pairing 21
7.1 Force the BT Connection 21
7.2 Pairing with a new Smartphone 21
7.3 Automatic Starting Process 22
8. iWoc® Standard Integration 23
8.1 Pairing 23
8.2 Remote control using iWoc® 23
8.3 iPhone and Android pairing process 24
8.4 Paring Process with HR Monitor 24
8.5 Remote control of the APP by iWoc® 24
Remove the MAIN MENU 24
Change the Monitor between Main Views 25
Change the Monitor view (Auxiliary Components) 25
Modify the ZOOM level of the Maps 26
Commands if you are listening to music 26
Listening to Voice Command 26
8.6 Smartwatch Integration 26
9. App control by gestures 27
9.1 Changing the Monitor view 27
9.2 Changing the Aux. Components view 27
10. Map License System 28
10.1 Conventional bicycles 28
10.2 Ebikemotion® compatible eBike 28
Free Subscriptions 28
Paid Subscriptions (If free subscription has finished) 28
Process to get new map: 28
11.Monitor 29
11.1 Monitor Alerts: 29
Navigation Alerts 29
System Alerts 29
Customizable Alerts 30
11.2 Monitor Main Content: 31
Speed Information 31
Navigation Information 31
Range Information 32
Bike Permanent Information 32
Auxiliary Information: 32
Index

12. Navigation Monitor 34
13. Range Monitor (eBike users) 35
Automatic Assistance HR-Based 44
14. Last Position info 36
14.1 Tracker – GPS 36
15. Navigation System 37
15.1 Simulate a Navigation Guiding: 38
15.2 Show Compass 38
15.3 Metric bar 39
15.4 Stop the Navigation route 39
15.5 Automatic Route Recalculations 39
15.6 Common Destinations 39
16. Map System 40
16.1 Free Subscriptions (included with some eBikes) 41
16.2 Paid Subscriptions (for all type of bicycles) 41
16.3 Process to get new map: 41
16.4 Deleting Maps 42
16.5 Special MAP licenses (eBikes) 42
17. Settings 43
17.1 Bicycle Settings 43
Pair with new eBike 43
Bicycle kind and Activities 43
STRAVA® Integration and Settings 43
17.2 Health Settings 44
Hearth Rate Monitoring 44
Hearth Rate Monitor Pairing 44
iOS Bluetooth® BLE for HR 44
Android Bluetooth® BLE for HR 44
Override Recommended MHR 44
17.3 Map and Navigation Settings 45
Voice navigation advises 45
Show Compass 45
Map Style 45
Heading Mode 45
Simulate a Navigation Guiding 46
17.4 Behaviour 46
Preferred Orientation 46
Enable Summary Audio Advice 46
Enable Auto Pause 47
Configure Alerts 47
17.5 Help and Support 48
Engineering Mode 48
Tutorial 48
Help 48
Acknowledgements 48
EULA link 48
18. Music 49
19. User Profile 50
19.1 User Picture 50
19.2 Logout 50
20. Activities 51
20.1 Start one Activity and Pause 51
20.2 Stop and Finish one Activity 52
20.3 Visibility of the Activity 52
20.4 Sharing the Activity 52
20.5 The List of Activities 53
20.6 Managing your Activities 53
20.7 Details of the Activity 53
20.7 Level of Difficulty 55
21. Search Engine 56
22. Web Dashboard 57
22.1 Web Dashboard and your brand 57
22.2 APP Customization 58
22.3 Main Dashboard Menu 58
22.4 The user Profile 58
22.5 The Owner of the eBike 59
23. Motor Maps 60
23.1 Maximum power supply 60
23.2 Maximum power supply of each level 60
23.3 Full configuration of Motor Maps 61
23.4 Customer Custom Map 61
23.5 Automatic Maps 61
Index
24. Extended functionality 62
24.1 ebikemotion® APP Widget 62
24.2 iOS, SIRI and Voice Control 62
24.3 Smartwatch Integration 63
Operation with Smart watch 63
™
25. Authorizations and permissions 69
End User License Agreement 70
Error Codes reference 72
Installing APP in Apple Watch 63
Uninstall the APP on your Apple Watch 65
Installing APP in Android Wear 65
24.4 STRAVA™ 66
Login in STRAVA™ 66
Automatic STRAVA™ Uploading 67
Manual STRAVA™ uploading 67
Types of Bicycles in STRAVA 68
25. Maintenance and Service 72
After-sales Service 72
APP Support 72
Terms of Use of Documentation 75
Index
1. ilustrations
1.1 Smartphone APP Components
E HF IG J
A
B
C
D
MONITOR - SPEED VIEW
MONITOR - MAP VIEW (MAP AND RANGE)
COMPONENTS ALWAYS IN THE SAME POSITION DINAMIC COMPONENTS
A 1B 2J
Page 7
00:15:34 125.35 mi
156RPM
22,3AVS
MPH
BatTor
86%
Pwr
00:15:34 125.35 mi
156RPM
22,3AVS
Bat
86%
Bat
86%
153 bmp
1123altitude
Tor
Pwr
MPH
A
ZY
V W
U1
345 w
149 km
COMPONENTS ALWAYS IN THE SAME POSITION
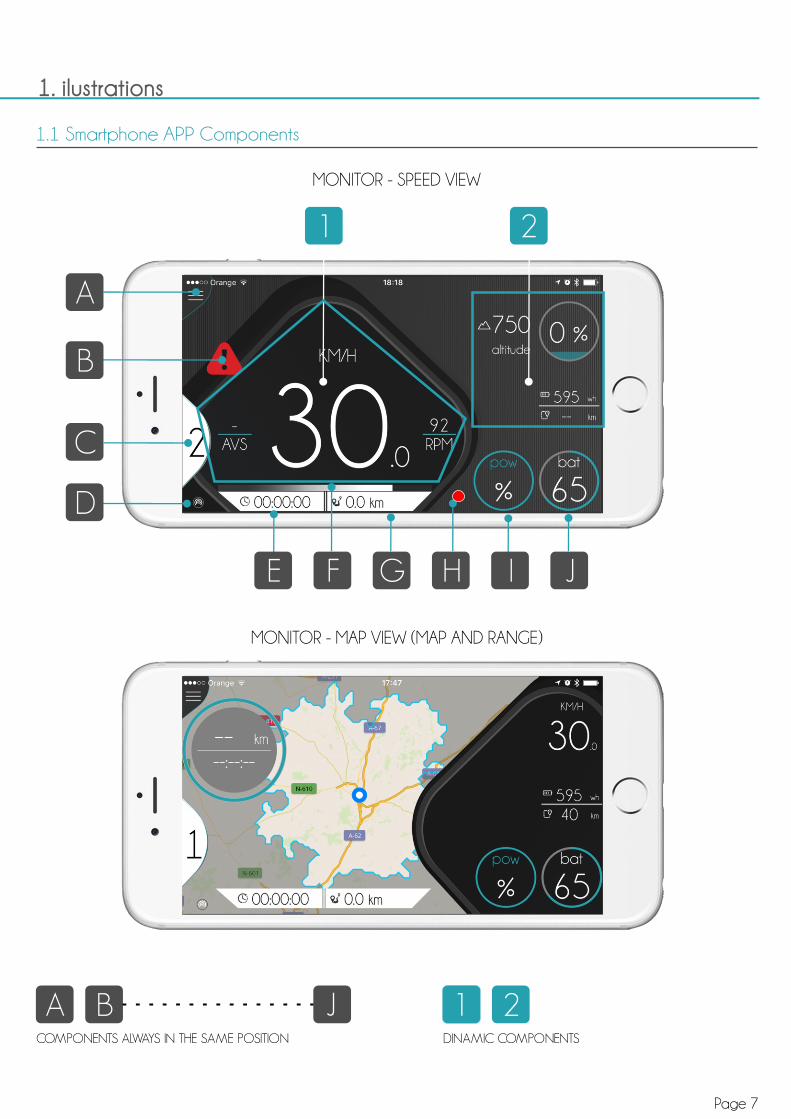
A Main Menu
B Alert avise (Warning)
C Power Assistance Level
D Bluetooth® connection with ebikemotion compatible eBike
E Time of the active workout
F eBike Torque (if available)
G Distance of the active workout
H Status of Recording (No recording, Recording, Pause)
I Motor Power
J Remain Battery
DINAMIC COMPONENTS
1 Main Information Component
- SPEED MONITOR
- MAP MONITOR
- RANGE MONITOR
2 Auxiliary Information Component
- BIKE INFORMATION
- HEALTH INFORMATION (If HRdetected)
- WEATHER INFORMATION
- MUSIC INFORMATION (if Playing)
A 1B 2J
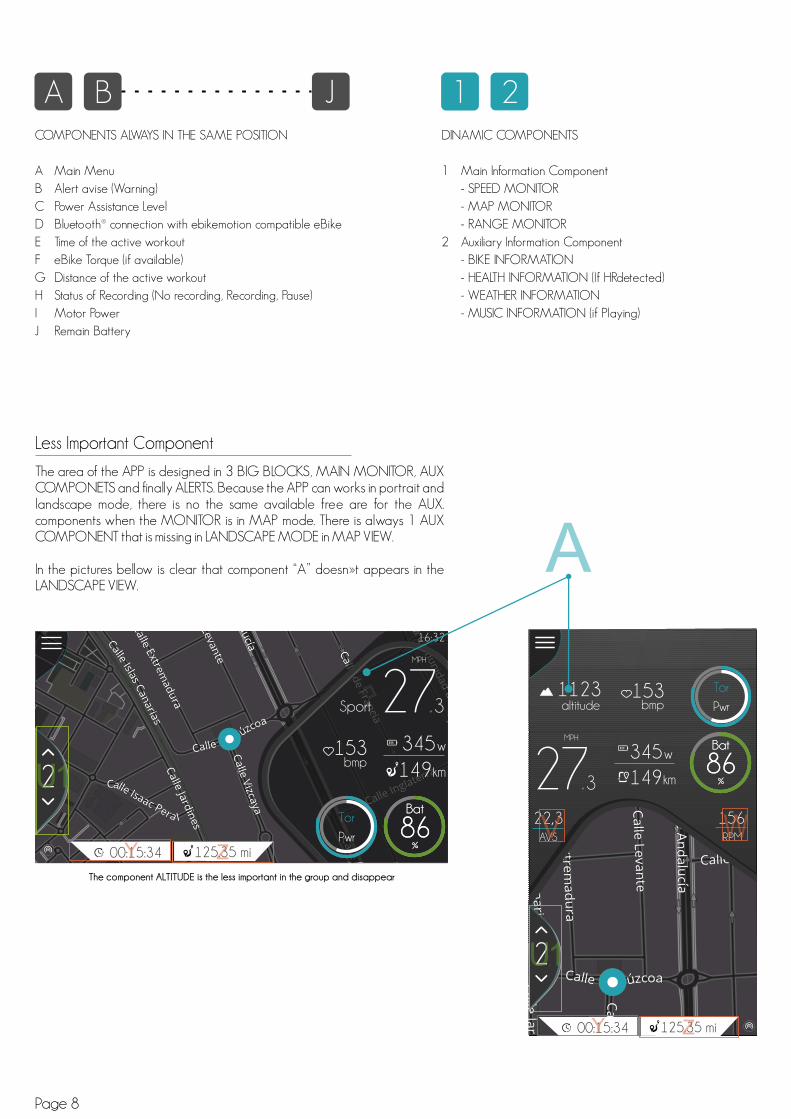
Less Important Component
The area of the APP is designed in 3 BIG BLOCKS, MAIN MONITOR, AUX COMPONETS and finally ALERTS. Because the APP can works in portrait and landscape mode, there is no the same available free are for the AUX. components when the MONITOR is in MAP mode. There is always 1 AUX COMPONENT that is missing in LANDSCAPE MODE in MAP VIEW.
In the pictures bellow is clear that component “A” doesn»t appears in the LANDSCAPE VIEW.
16:32
00:15:34 125.35 mi
MPH
153 bmp
Bat
86%
Bat
86%
Tor
Pwr
345 w
149 kmU1
ZY
Sport
The component ALTITUDE is the less important in the group and disappear
Page 8

Page 9
The screen of the APP is divided in 2 big MAIN areas and 2 secondary ones that we use for show eBike Motor power and Battery Status and Alerts:
1 MAIN MONITOR2 AUX COMPONENTS3 ALERTS4 EBIKE POWER AND BATTERY STATUS
1.2. Smartphone APP Main Diagram
The Smartwath APP is very simple, and thes are the main elements:
W.1 MAIN DATAW.2 STATUS OF RECORDINGW.3 TYPE OF INFORMATIONW.4 AUX DATA
1.3. Smartwatch APP Main Diagram
3
4
W3
W2 W4
W1
Main infomration areas in the MONITOR
Main information areas in the smartwatch
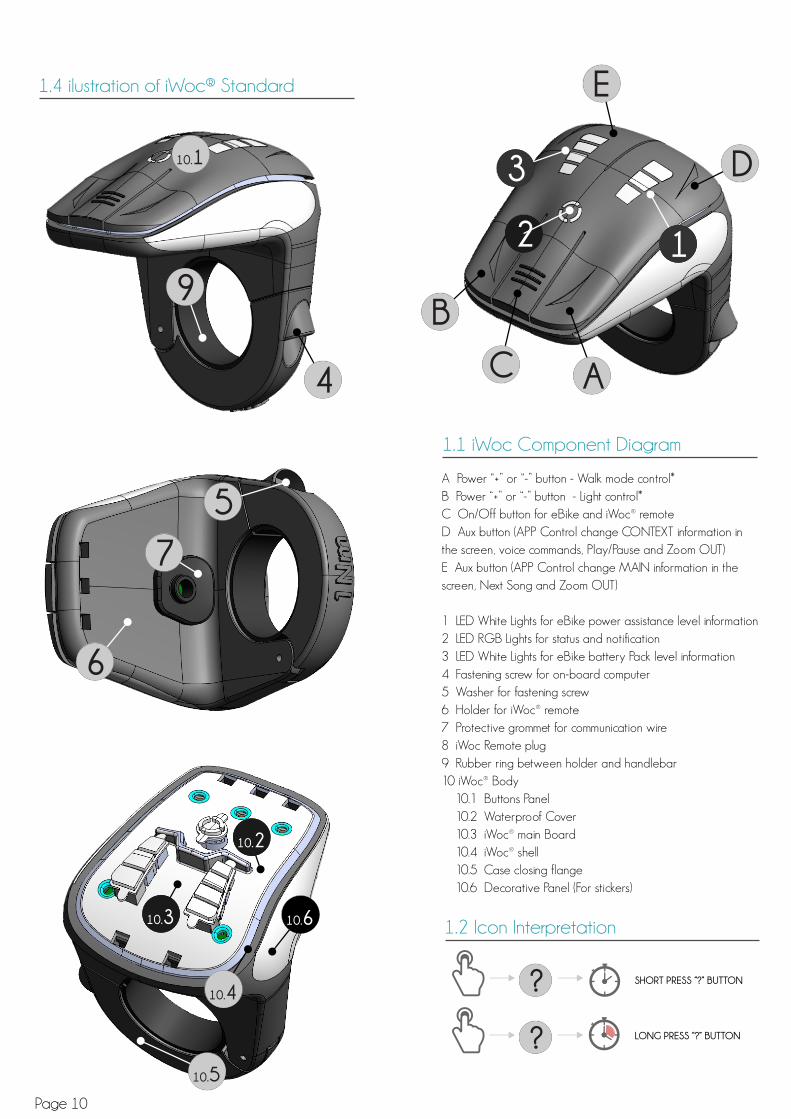
A Power “+” or “-” button - Walk mode control*
B Power “+” or “-” button - Light control*
C On/Off button for eBike and iWoc® remote
D Aux button (APP Control change CONTEXT information in
the screen, voice commands, Play/Pause and Zoom OUT)
E Aux button (APP Control change MAIN information in the
screen, Next Song and Zoom OUT)
1 LED White Lights for eBike power assistance level information
2 LED RGB Lights for status and notification
3 LED White Lights for eBike battery Pack level information
4 Fastening screw for on-board computer
5 Washer for fastening screw
6 Holder for iWoc® remote
7 Protective grommet for communication wire
8 iWoc Remote plug
9 Rubber ring between holder and handlebar
10 iWoc® Body
10.1 Buttons Panel
10.2 Waterproof Cover
10.3 iWoc® main Board
10.4 iWoc® shell
10.5 Case closing flange
10.6 Decorative Panel (For stickers)
2
5
6
E
D3
1
B
C A4
9
10.1
7
10.5
10.2
10.3 10.6
10.4
1.1 iWoc Component Diagram
1.2 Icon Interpretation
?
?
SHORT PRESS “?” BUTTON
LONG PRESS “?” BUTTON
1.4 ilustration of iWoc® Standard
Page 10
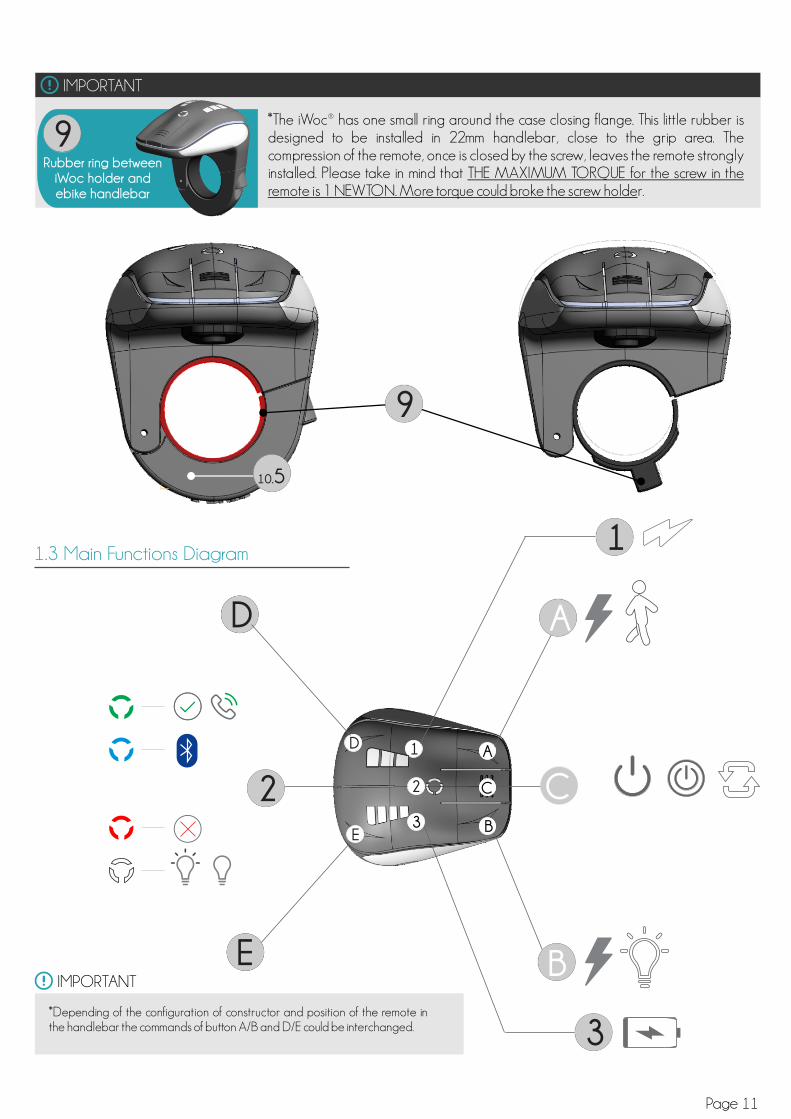
IMPORTANT
Rubber ring betweeniWoc holder andebike handlebar
*The iWoc® has one small ring around the case closing flange. This little rubber is designed to be installed in 22mm handlebar, close to the grip area. The compression of the remote, once is closed by the screw, leaves the remote strongly installed. Please take in mind that THE MAXIMUM TORQUE for the screw in the remote is 1 NEWTON. More torque could broke the screw holder.
D
2
1
3E
A
C
B
DD A
3
1
C
9
D2
DE B
9
10.5
IMPORTANT
*Depending of the configuration of constructor and position of the remote in the handlebar the commands of button A/B and D/E could be interchanged.
1.3 Main Functions Diagram
Page 11
Read before starting any operation Save all safety warnings and instructions for future reference.
- Failure to follow the warnings and instructions may result in electric shock, fire and/or serious injury.
- Save all safety warnings and instructions for future reference.
- The term “battery pack” used in these operating instructions, regardless of model, refers both to standard battery packs (battery packs with holder on the bike frame) and spare-type battery packs (removable battery packs with holder in the rear rack/carrier or on the bike frame).
- Make sure not to be distracted by the display of the on-board computer, remote information and Smartphone. Failure to focus exclusively on surrounding traffic may result in an accident.
- Read and observe the safety warnings and instructions in all operating instructions of the eBike system
- The iWoc® remote is designed to support water splashes and riding in the rain under normal conditions. The design meets IP54 standards for electrical enclosures. The electronic remote also includes additional protection such as conformal coating, and sealed grommets to increase waterproof features.
An eBike is similar to a conventional bike, but there are some components that include critical electronics components, such as the Motor, Battery and HMI (remote and display). There are some basic principles that must be followed to respect the guarantee and extend the life of your eBike electronic component. Check in the next column some of them:
IMPORTANT
- Do not use immerse the electronic components in water (Especially with washing machines). If you are going to use washing machines it is important that you remove the battery and pack the HMI system (iWoc® remote). Do not apply pressurized water to any electronic component.
- Do not leave the eBike parked outside during winter or extreme rain conditions. The remote is designed to prevent water from getting inside, but may be compromised if subjected to these conditions over an extended period of time.
- Do not leave the iWoc® remote in wet climate conditions (rain or snow) for a long period of time
- Remove or protect the remote if you are going to transport your eBike on your car in rainy conditions. The travelling speed of the car combined with the wet weather will increase the risk of breaking the waterproof protection.
- Keep the buttons of the remote clear of the dust and mud. If you break the cover ask to your distributor to replace it. It can be supplied as spare part.
2. Safety Warnings
Page 12

Page 13
ebikemotion® APP it is an smartphone APP that provides an enhanced bike riding experience by using your Smartphone as the interface to your bicycle. It is fully compatible with conventional bicycles, in combination with any ebikemotion® compatible eBike you will get extra information on your eBike as well as on the APP by the Bluetooth® connectivity integrated in the ebikemotion® components if your eBike integrates it.
·If you have a compatible eBike, use the ebikemotion® APP to view information about the eBike system, plan and record activities using the navigation features, have access to maps, statistics and more!
·If you haven't ebikemotion® compatible eBike and you would like to use all the functions of the APP not in relation with eBike features (battery, power, etc.), please install and ride. You will enjoy of one of the most professional and amazing cycling APP of the market BY FREE for the conventional bicycles also.
iWoc® is designed as Human Machine Interface computer to control ebikemotion® propulsion systems (Motor, Battery Pack, etc.) as well as other specific eBike systems that we have made compatible for it.There are different iWoc® remotes. The most important ones are:
- iWoc® Standard (5 buttons)- iWoc® TRIO (3 buttons)- iWoc® ONE (1 buttons)
Trio and Standard are compatible with the remote control of the APP.
At the beginning of the document you can see the main components refers to the illustrations on the graphic pages. Individual illustrations in these operating instructions may differ slightly from the actual circumstances depending on the equipment of your eBike or new generations of the iWoc® Standard version:
· A Power “+” or “-” button - Walk mode control*·B Power “+” or “-” button - Light control*·C On/Off button for eBike and iWoc® remote
At the beginning of the document you can see the main components refers to the illustrations on the graphic pages. Individual illustrations in these operating instructions may differ slightly from the actual circumstances depending on the equipment of your eBike or new generations of the iWoc® ONE version. This remote includes 1 button and 1 RGB LED.
·D Aux button (APP Control change CONTEXT information in the screen, voice commands, Play/Pause and Zoom OUT)
·E Aux button (APP Control change MAIN information in the screen, Next Song and Zoom OUT)
·LED White Lights for eBike power assistance level information
·LED RGB Lights for status and notification·LED White Lights for eBike battery Pack level
information
*Depending of the configuration of constructor and position of the remote in the handlebar the commands of button A/B and D/E could be interchanged.
3. Product Description
3.1 Intended of Use APP
3.2 Other Compatible Systems
iWoc® Remotes
iWoc® Standard Remote Components
iWoc® ONE Components
E
D3
1
B
C A
2
iWoc® ONE
Page 14
COMPATIBILITYebikemotion® APP is full compatible with conventional bicycles. All non-electric bicycle features will be full available for all users. Just download and enjoy. APP is FREEeBikes: Your eBike must be compatible with the ebikemotion Bluetooth® platform, check with your eBike manufacturer if your eBike is compatible with the Platform.
CONTROL THE APP USING THE IWOC REMOTESConnect to your ride in a whole new way! Have full control of your e-bike and the Ebikemotion App with the new iWoc® Remotes right within thumbs' reach. Change the active screen in the monitor, receive voice feedback, and much more!
STAY INFORMEDThe Ebikemotion APP provides more feedback than ever before! The ebikemotion® APP Monitor will display current information about your position on the map, as well as speed, location, weather forecast, music, alerts, e-bike information, etc...
STRAVA® SUPPORTConfigure your STRAVA® account in your user dashboard and you will be able to upload your activities directly to STRAVA® by just using your ebikemotion® APP.
100% OFF-LINE NAVIGATIONGet step by step navigation, map and address searches, and audible directions without using up your precious data! An absolute must for all the adventurous riders.
SMART ROUTE PLANNING (RANGE)(Only for e-bike users). The smart route planner will indicate how much battery is remaining for a potential route, as well as the time and distance covered, and the distance and time that you may achieve with the remaining battery life.
3.3. APP Main Features
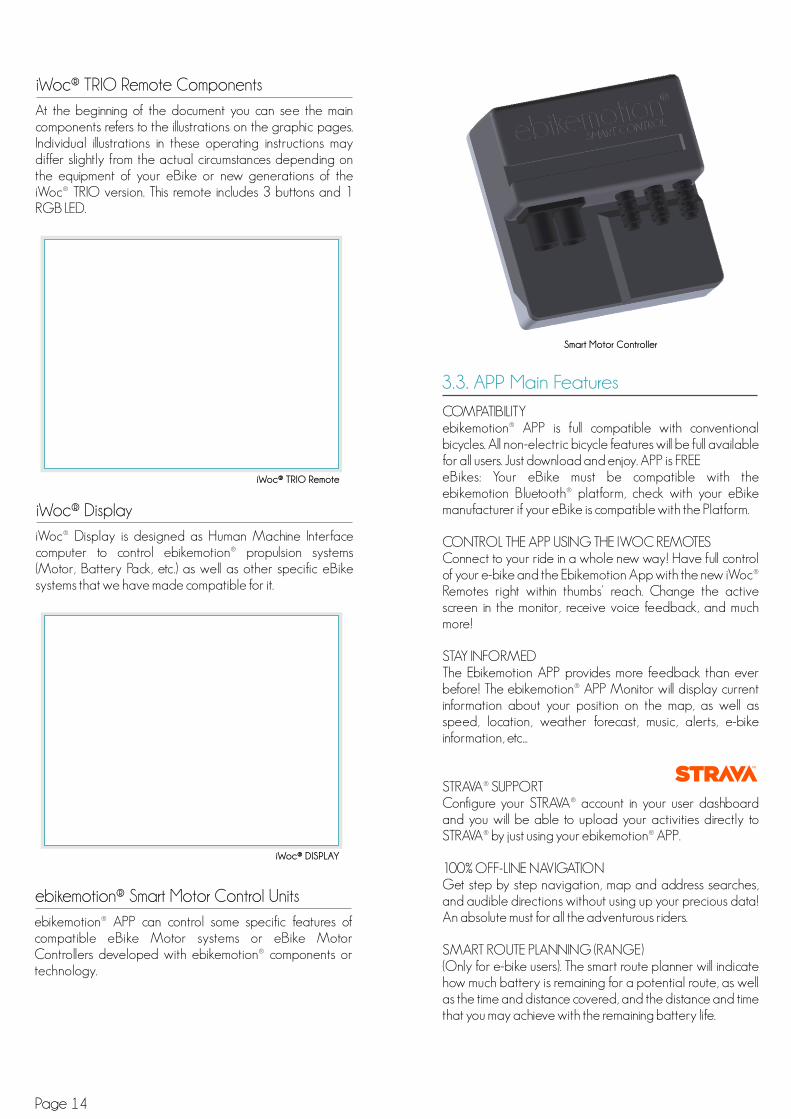
At the beginning of the document you can see the main components refers to the illustrations on the graphic pages. Individual illustrations in these operating instructions may differ slightly from the actual circumstances depending on the equipment of your eBike or new generations of the iWoc® TRIO version. This remote includes 3 buttons and 1 RGB LED.
iWoc® Display is designed as Human Machine Interface computer to control ebikemotion® propulsion systems (Motor, Battery Pack, etc.) as well as other specific eBike systems that we have made compatible for it.
ebikemotion® APP can control some specific features of compatible eBike Motor systems or eBike Motor Controllers developed with ebikemotion® components or technology.
iWoc® TRIO Remote Components
iWoc® Display
ebikemotion® Smart Motor Control Units
iWoc® TRIO Remote
iWoc® DISPLAY
Smart Motor Controller
ADVANCED FUNCTIONALITYAccess unique advanced cycle computer functions such as instant speed, average speed, time and distance, temperature, slope, altitude, motor power, remaining battery, heart rate, as well as a number of helpful alerts to increase your awareness on any expedition.
ACTIVITY LOGView extended information about the recorded activities directly on the App or through a web browser. Intricate charts will show you the power consumed during each part of the trip, speed, motor rpm, power assistance level used, altitude, wind, humidity, temperature, and even heart rate information with a compatible heart rate monitor. Use this information to help you reach your goals and track your progress!
WEB PORTALUse your personal computer, tablet or smartphone to access your ebikemotion® profile and activity, you can login using any web browser.
HELP CENTERA complete library of helpful videos to help you out with the ebikemotion® APP. View step by step instructions for all of the App features and find information on how to reach our friendly technical support team.
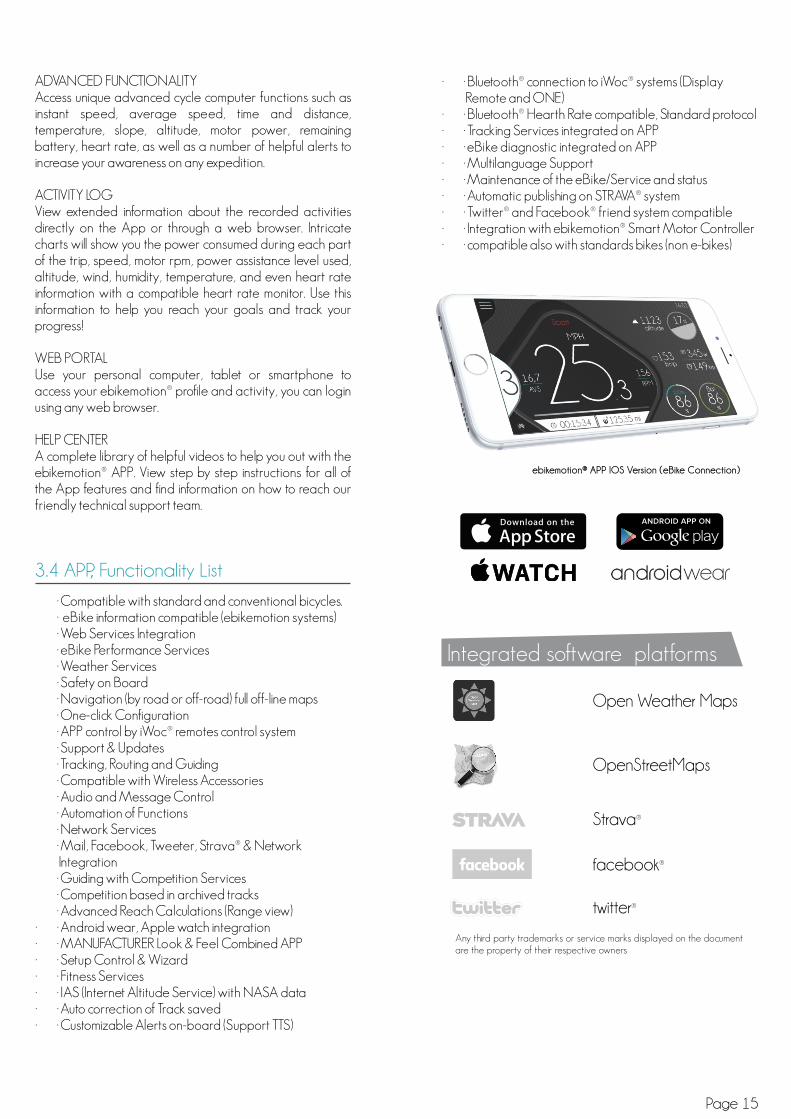
· Bluetooth® connection to iWoc® systems (Display Remote and ONE)
· ·Bluetooth® Hearth Rate compatible, Standard protocol· ·Tracking Services integrated on APP· ·eBike diagnostic integrated on APP· ·Multilanguage Support· ·Maintenance of the eBike/Service and status· ·Automatic publishing on STRAVA® system· ·Twitter® and Facebook® friend system compatible· ·Integration with ebikemotion® Smart Motor Controller· ·compatible also with standards bikes (non e-bikes)
·
·Compatible with standard and conventional bicycles.· eBike information compatible (ebikemotion systems)·Web Services Integration·eBike Performance Services·Weather Services·Safety on Board·Navigation (by road or off-road) full off-line maps·One-click Configuration·APP control by iWoc® remotes control system·Support & Updates·Tracking, Routing and Guiding·Compatible with Wireless Accessories·Audio and Message Control·Automation of Functions·Network Services·Mail, Facebook, Tweeter, Strava® & Network Integration·Guiding with Competition Services·Competition based in archived tracks·Advanced Reach Calculations (Range view)
· ·Android wear, Apple watch integration· ·MANUFACTURER Look & Feel Combined APP· ·Setup Control & Wizard· ·Fitness Services· ·IAS (Internet Altitude Service) with NASA data· ·Auto correction of Track saved· ·Customizable Alerts on-board (Support TTS)
Page 15
3.4 APP, Functionality List
Integrated software platforms
Any third party trademarks or service marks displayed on the documentare the property of their respective owners
Open Weather Maps
OpenStreetMaps
Strava®
facebook®
twitter®
ebikemotion® APP IOS Version (eBike Connection)
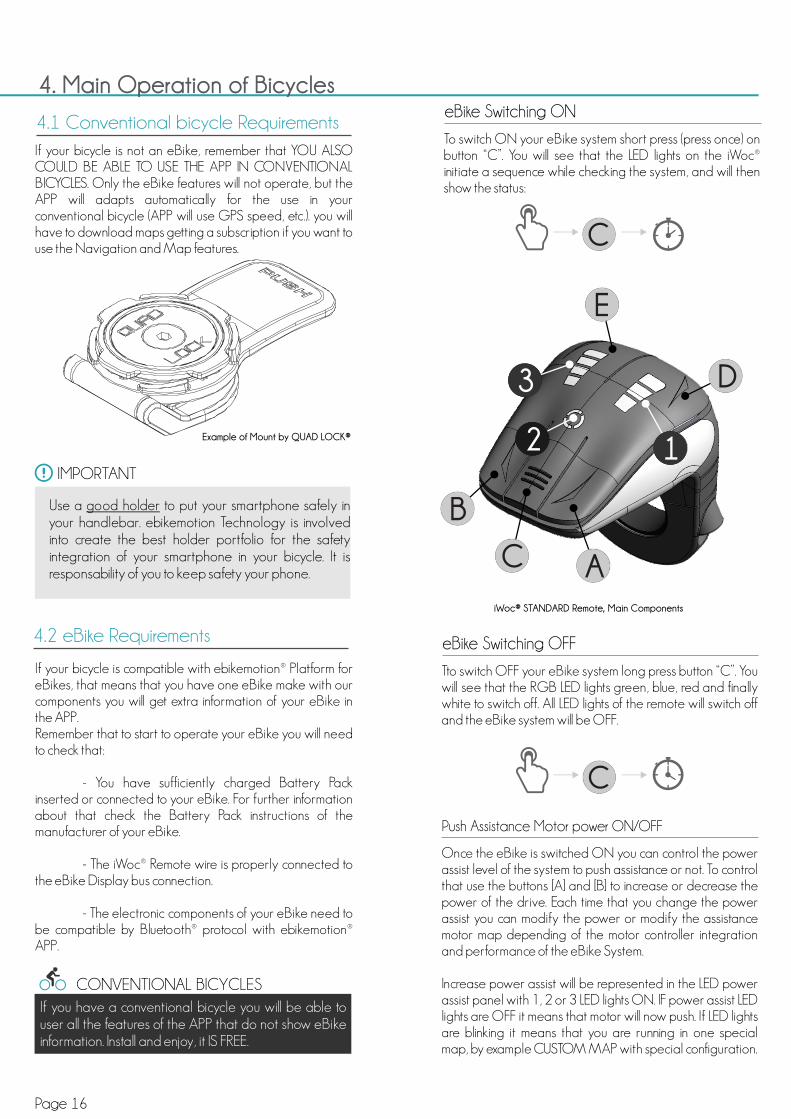
If your bicycle is not an eBike, remember that YOU ALSO COULD BE ABLE TO USE THE APP IN CONVENTIONAL BICYCLES. Only the eBike features will not operate, but the APP will adapts automatically for the use in your conventional bicycle (APP will use GPS speed, etc.). you will have to download maps getting a subscription if you want to use the Navigation and Map features.
If your bicycle is compatible with ebikemotion® Platform for eBikes, that means that you have one eBike make with our components you will get extra information of your eBike in the APP.Remember that to start to operate your eBike you will need to check that:
- You have sufficiently charged Battery Pack inserted or connected to your eBike. For further information about that check the Battery Pack instructions of the manufacturer of your eBike.
- The iWoc® Remote wire is properly connected to the eBike Display bus connection.
- The electronic components of your eBike need to be compatible by Bluetooth® protocol with ebikemotion® APP.
4.2 eBike Requirements
Page 16
4. Main Operation of Bicycles
4.1 Conventional bicycle Requirements
IMPORTANT
Use a good holder to put your smartphone safely in your handlebar. ebikemotion Technology is involved into create the best holder portfolio for the safety integration of your smartphone in your bicycle. It is responsability of you to keep safety your phone.
If you have a conventional bicycle you will be able to user all the features of the APP that do not show eBike information. Install and enjoy, it IS FREE.
Example of Mount by QUAD LOCK®
CONVENTIONAL BICYCLES
Push Assistance Motor power ON/OFF
Tto switch OFF your eBike system long press button “C”. You will see that the RGB LED lights green, blue, red and finally white to switch off. All LED lights of the remote will switch off and the eBike system will be OFF.
To switch ON your eBike system short press (press once) on button “C”. You will see that the LED lights on the iWoc® initiate a sequence while checking the system, and will then show the status:
Once the eBike is switched ON you can control the power assist level of the system to push assistance or not. To control that use the buttons [A] and [B] to increase or decrease the power of the drive. Each time that you change the power assist you can modify the power or modify the assistance motor map depending of the motor controller integration and performance of the eBike System.
Increase power assist will be represented in the LED power assist panel with 1, 2 or 3 LED lights ON. IF power assist LED lights are OFF it means that motor will now push. If LED lights are blinking it means that you are running in one special map, by example CUSTOM MAP with special configuration.
eBike Switching OFF
eBike Switching ON
C
C
E
D3
1
B
C A
2
iWoc® STANDARD Remote, Main Components
Welcome to the ebikemotion® APP manual. ebikemotion® end user APP is an advanced application for bicycles standard and e-bike in the market today.
In combination with ebikemotion® Product Family, it includes off-Line Navigation specially built for cycling, Off-Road Navigation, license system based in the identification of Hardware, Weather information, Advanced Reach information, Automatic Customization depending of OEM Brand, Special user Web Dashboard and Help Center (controlled by Brand), two information areas with different contents controlled by iWoc® RC in independent way.
It is also fully compatible with iWoc® control systems (Remote, Display and ONE) and smart watches to show content of the Smartphone by Remote connection in the screen of the e-bike display
- Minimum 512MB RAM (Recommended 1 GB)- 80 MB free space in the ROM- Recommended 1 GHz Processor or greater- Android 4.3 or upper- Bluetooth® BLE or 4.0- Apple iPhone 4S or greater ( iOS 7.1.2 / 8 or greater)
- Recommended iPhone 5 or 6 updated to the last iOS version
- Recommended Android phones is 1G of RAM
Recommended 3G connection but also can operate off-line (some features will be not available)*Most values are limited by the Bluetooth® BLE electronic components
To install the APP, find ebikemotion® in the Apple Store or in Ti UNES on your iPhone. If you are using an Android compatible smartphone, ebikemotion® can be found in the Google Play Market.
The APP is identified by one GREEN icon with the letter “e” as it appears throughout this HELP Manual. Just press the icon to download the APP.
The APP is free and you can use for any activity or bike brand, but you are using one compatible ebikemotion® electric bicycle, the APP will activates the more functions in relation with eBike system. To successfully complete this installation, you will need a reliable internet connection.
The eBike functions may work with certain other OEM bikes powered by ebikemotion® Technologies that use similar components.
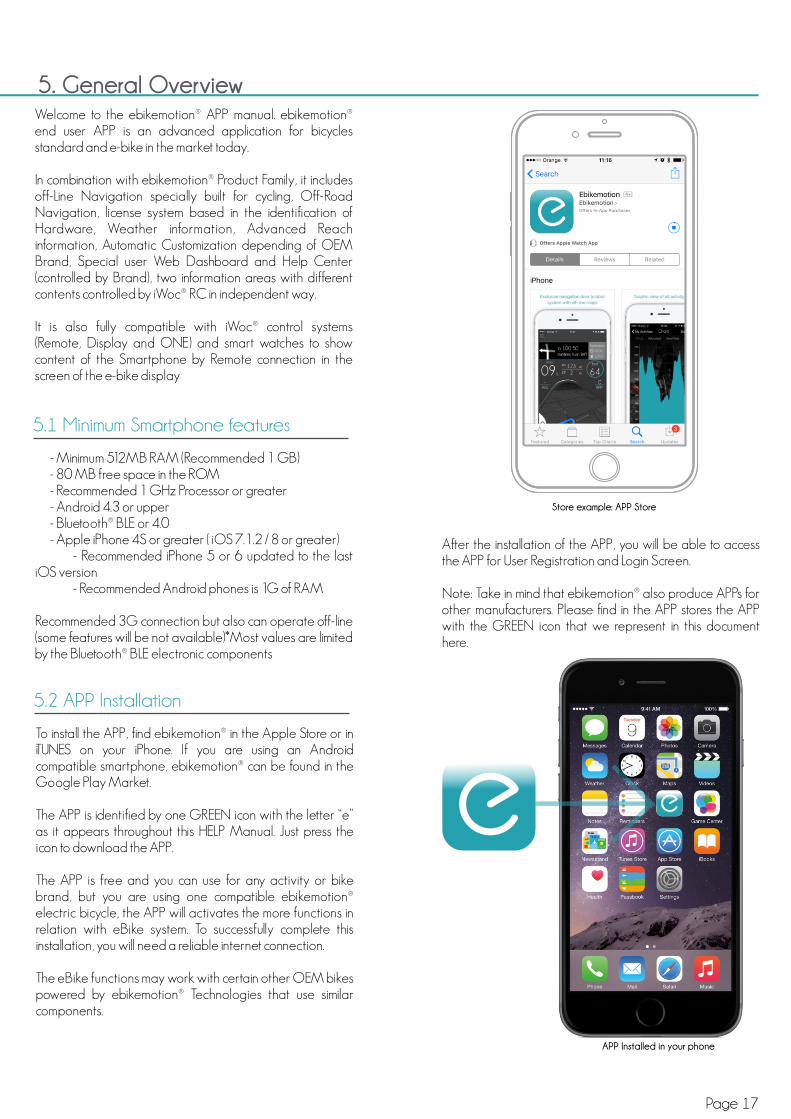
After the installation of the APP, you will be able to access the APP for User Registration and Login Screen.
Note: Take in mind that ebikemotion® also produce APPs for other manufacturers. Please find in the APP stores the APP with the GREEN icon that we represent in this document here.
5.1 Minimum Smartphone features
5.2 APP Installation
5. General Overview
Store example: APP Store
APP Installed in your phone
Page 17

The APP automatically detects the current language configured in your Smartphone and changes the current language of the APP to the same that you have configured in the Smartphone. It is not possible to manually change the language of the APP and you will have to change the language of your smartphone in the General Settings of the phone if you want to do that.
Check in the web the actual supported languages for the APP that are:
- Spanish- German- French- English (by default. If the APP doesn't support the
configured language of your Smartphone we will change to English automatically)
Other languages are on the way
The system of imperial units are metric is full compatible with the ebikemotion® APP. Really it is full compatible with your Smartphone, because it is your smartphone, the system that define the measurement system that the APP will use. Inside the APP there is no option or system to select in the menu the type of unit for the length or weight, etc. Take in mind that when you select in your phone a language and measurement system, it includes a lot of parameters (keyboard, voice, commands and for sure the measurements.).
If you want to change the type of measurement system between METRIC and IMPERIAL, please go to the settings menu of your smartphone to adjust it in the “Language and Region” and come back to the APP.
5.3 APP Language 5.4 APP Units and Measurements
Page 18
iOS Example: Language Selection
iOS Example: Region Selection

When you start the APP you will see the LOGIN user system that will direct you to:
· REGISTER as a new ebikemotion® user· LOGIN if you are a ebikemotion® registered user· REGISTER using your Facebook® user data· RECOVER your password
If you want to use your Facebook® user account you can do this by pressing on the blue icon “Log in with Facebook”. The APP will utilize different processes for iOS and Android.
- With iPhone version, the APP will ask to you in a special window for your Facebook® user and password.
- With Android you must install the Facebook® APP and login on your smartphone, after that when you start the ebikemotion® APP it will log in automatically.
If you are using an ebikemotion® USER LOGIN, you can easily recover your user password. In the user login screen of the ebikemotion® APP, just press on the link “Forgot Password”. You will see a form called “LOST PASSWORD FORM”, enter your email account and you will receive your last active password.
Premium pack is a service for the eBike Manufacturer to modify some elements of the design and shell of the APP. If the pack is activated and your eBike is compatible, the system automatically will updated some graphic elements in the smartphone APP and Web user Dashboard. Each time than the eBike manufacturer updates the Premium Pack, some graphics will be updated in your APP. When the Premium Pack customization is applied and how works the process?
1. Connects the eBike with the APP
2. The APP will sends a request to get the eBike VIN Number (eBike Serial Number)
3. APP gets the answer with the VIN (Vehicle Information Number) that contains the OEM Brand
4. APP sends the OEM Brand to the Server to get the Premium Pack if that exist.
5. Premium Pack is applied to the APP until the VIN of the APP changes
1. Press the text “Register”. The APP will take to you to a form. Complete the form and select the option “Register”.
2. The ebikemotion® Server will generate and send you an email with a link. When you receive the ebikemotion® email, click on the link and it will activate your account.
3.The ebikemotion® Server will confirm that the registration process has been completed.
4. From this point forward, you will use your USERNAME and PASSWORD to login into the APP.
If you do not receive the email, it means there is a problem in ebikemotion® APP Email Server or you have provided an incorrect email, please check again the enroll process or put in contact with our support center.
If you have an active ebikemotion® account you will be able to access the APP. Enter your USER and PASSWORD and press the GREEN LOGIN button. The APP will confirm your data with the ebikemotion® Server and allow access to the APP.
6.3 Register using
6.4 Recover your Lost Password
6.5 APP Customization (eBike users)
Page 19
6. User Registration and Login
6.1 Register as new ebikemotion® user
6.2 Register and Login with

QUESTIONS ABOUT PREMIUM PACK:
- Question: When changes are refreshed in the end user APP when any picture changes in the Premium Pack server side?
- Answer: When the Smartphone refresh the Cache memory.
Note: Cache memory is updated in Android and iOS some minutes after the Premium pack pictures is uploaded in the Server by the OEM
When the eBike arrives to the Dealer Shop it arrives in DEMO status. In this status the eBike will only works during 50 km. So every eBike must be activated in the sale moment when you receive it. This process must be done by the Brand Authorized Service. Usually the point that serves to you the eBike.
Usually once the eBike is activated and sold, you will receive your eBike invoice and you could be able to ride and enjoy.
If your eBike is not activated, the APP will show to you an alert in the APP screen, informing that you must pass this process before.
Once you have your eBike activated at home, you can make owner of it.
eBike owner is a conceptual system that gives to you the possibility to open future operations against your eBike. Every eBike exist in ebikemotion® platform from the moment that the eBike Manufacturer creates it on factory, so we control the tradability of each one in order to support to you.
For making eBike owner you must follow this process:
1. Connects the eBike with the APP
2. The APP will sends a request to get the eBike VIN Number (eBike Serial Number)
3. APP will gets the answer with the VIN
4. The system will wait that you ride and RECORD one activity
5. If Activity is RECORDED:a. APP will sends to the Server (VIN / USER /
PHONE BRAND / IT OPERATOR)b. Server checks if the VIN number is SINGLE
(WITHOUT OWNER)
If VIN is single (no owner), server will sends one email to you to invite to make owner if you want and we will inform about services that you can get.
Production
eBike Factory Dealer Shop End User
DemoStatus
Activation eBikeReady
eBikeowner
6.6 eBike Activation
6.7 eBike Owner
Status for eBike from production to end user
Page 20

The ebikemotion® eBike pairing process is required to use the APP when you are using an ebikemotion® compatible eBike. Before stat prepare the following:
- One ebikemotion® compatible eBike with Bluetooth® connectivity
- A reliable internet connection- Your smartphone with the APP already installed
APP IS FREE but maps are “pay per use” inside APP. If you do not have a FREE subscription to download maps (included from factory with your compatible ebikemotion® eBike), you will need to purchase one if you want to use the Map and Navigation feature.
To facilitate pairing & installation, follow these steps:
1. Install the APP on your smartphone and complete the Registration or Login process
2. Switch on the POWER button of the ebikemotion® (Remote Control)
a) When the APP detects an unpaired ebikemotion® compatible eBike, it will then pair and you will note that the “pairing with ebikemotion® bike” message will then disappear
b) If the ebikemotion® compatible eBike is not paired, perhaps the bike is paired with another Smartphone. In this case check your remote manual to see the Bluetooth® reset process of your remote. (In the section 7.2 you have some information about this process)
When the ebikemotion® eBike is paired you will see a GREEN ALERT in the top of the screen with the message “bike pairing – pairing with the eBike done”. From that moment your ebikemotion® compatible eBike and your Smartphone will be paired and it will not be necessary to pair again. The ebikemotion® compatible eBike will be paired with your last paired smartphone and will not be visible for other Smartphones.
Each time that you switch-off your ebikemotion® compatible eBike, you will receive in the APP a top screen alert with the message: “bike pairing – connection with the bike lost”.
The Remotes and HMI systems can be able to be paired with ONE SMARTPHONE at the same time. Once the eBike is paired with one Smartphone, it is necessary to delete the previous Smartphone to pair a new one. In the ebikemotion HMI systems the deleting process usually is made by the ON/OFF button of the Display or Remote. Take this process as reference but check your HMI / Remote manual for further details
- Switch off the eBike and restart it by long pressing (press and hold) the button [C] to delete any previous smartphone paired.
- RGB light [2] will start to flash in BLUE. If the automatic Bluetooth® pairing process failed, do the process described in point 7.1 Force the BT Connection)
There is one way to try to force the Bluetooth® connection if your APP was connected to other ebike. Please select in the main menu SETTINGS and later in the BIKE options tab on “Pair with a new EBM bike”, the actual Bluetooth® connection will be refused and the system will try to find a free eBike by Bluetooth®.
7.2 Paring with a new Smartphone
Page 21
7. eBike Pairing
7.1 Force the BT Connection
ON/OFF BUTTONOF REMOTE
Force the Bluetooth® pairing
C

Page 22
In light of that restriction, we have an easy solution. First, be sure that your ebikemotion® APP is activated and running; either running in background or on your smartphone with the screen switched off. When you switch on your e-bike you will receive a notification in your smartphone with the message “ebikemotion® – Pairing with the bike done” Open the application to record the ride”. If you press in the ebikemotion® notification the ebikemotion® APP will be opened automatically.
If you switch off the e-bike you will receive a similar message to remember saving your activity.
There is a similar process if your APP is running in the Background and you start your activity. The ebikemotion® APP will log information about the activity and will save temporary in the smartphone. When you switch-off your ebikemotion® compatible eBike, you will receive another notification to inform that your activity has ended and you will have the possibility to delete the data or to save it in the cloud.
At the same time, your last GPS position, times, status of the e-bike and power consumption will be archived to be recovered later in the Main Menu Option “Last Position Info” or in the APP Widget.
Remind to record your workout
Proximity alert in the Smart Watch
This topic only is referred to ebikemotion® compatible eBikes.iOS has some restrictions in relation to automatic wake up of APPs, so the APP will not appear automatically when you are close to your ebikemotion® compatible eBike.
7.3 Automatic Starting Process
Proximity alert in the Smartphone
ebikemotionOpen the application to record your next ride.
15m ago
slide to view
The iWoc® remotes can control some APP functions while simultaneously controlling some of the functions of the ebikemotion® compatible eBike. Some of the iWoc® buttons, including switching the lights, power on/off and to increase/decrease pedal assist levels. Things to note regarding the iWoc® remote control in relation to the APP:
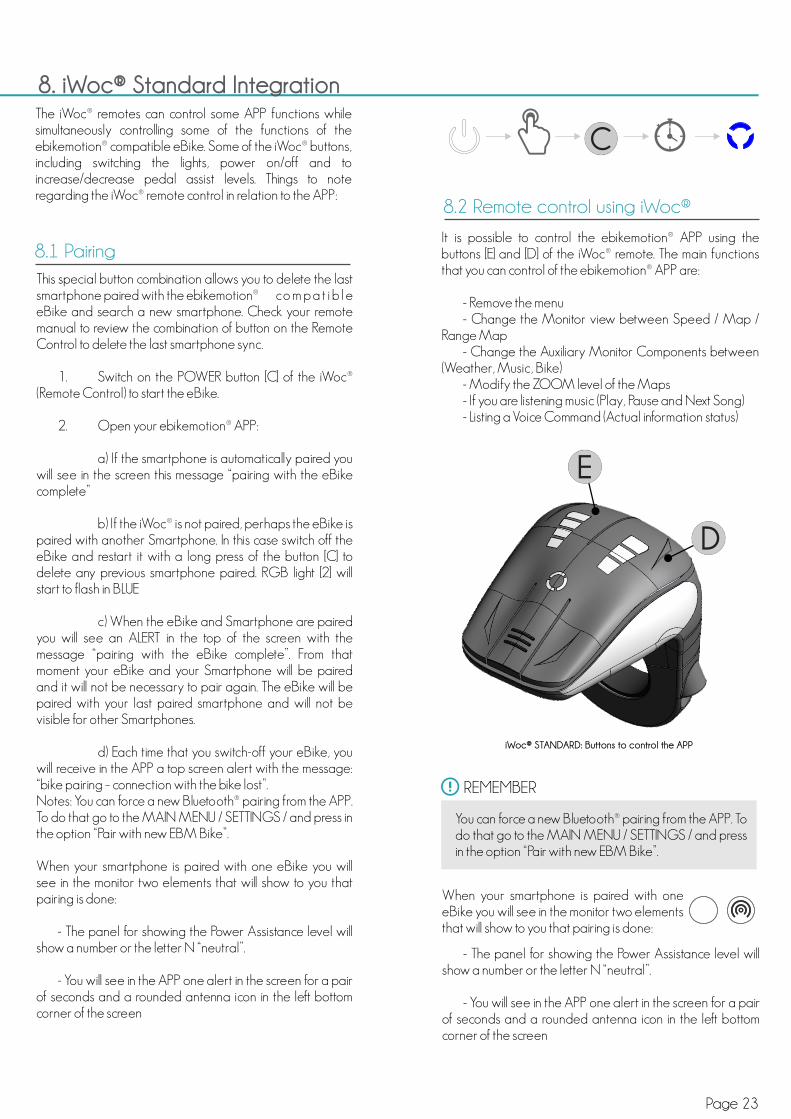
It is possible to control the ebikemotion® APP using the buttons [E] and [D] of the iWoc® remote. The main functions that you can control of the ebikemotion® APP are:
- Remove the menu- Change the Monitor view between Speed / Map /
Range Map- Change the Auxiliary Monitor Components between
(Weather, Music, Bike)- Modify the ZOOM level of the Maps- If you are listening music (Play, Pause and Next Song)- Listing a Voice Command (Actual information status)
8.2 Remote control using iWoc®
Page 23
8. iWoc® Standard Integration
This special button combination allows you to delete the last smartphone paired with the ebikemotion® compa t i b l e eBike and search a new smartphone. Check your remote manual to review the combination of button on the Remote Control to delete the last smartphone sync.
1. Switch on the POWER button [C] of the iWoc® (Remote Control) to start the eBike.
2. Open your ebikemotion® APP:
a) If the smartphone is automatically paired you will see in the screen this message “pairing with the eBike complete”
b) If the iWoc® is not paired, perhaps the eBike is paired with another Smartphone. In this case switch off the eBike and restart it with a long press of the button [C] to delete any previous smartphone paired. RGB light [2] will start to flash in BLUE
c) When the eBike and Smartphone are paired you will see an ALERT in the top of the screen with the message “pairing with the eBike complete”. From that moment your eBike and your Smartphone will be paired and it will not be necessary to pair again. The eBike will be paired with your last paired smartphone and will not be visible for other Smartphones.
d) Each time that you switch-off your eBike, you will receive in the APP a top screen alert with the message: “bike pairing – connection with the bike lost”.Notes: You can force a new Bluetooth® pairing from the APP. To do that go to the MAIN MENU / SETTINGS / and press in the option “Pair with new EBM Bike”.
When your smartphone is paired with one eBike you will see in the monitor two elements that will show to you that pairing is done:
- The panel for showing the Power Assistance level will show a number or the letter N “neutral”.
- You will see in the APP one alert in the screen for a pair of seconds and a rounded antenna icon in the left bottom corner of the screen
8.1 Pairing
When your smartphone is paired with one eBike you will see in the monitor two elements that will show to you that pairing is done:
- The panel for showing the Power Assistance level will show a number or the letter N “neutral”.
- You will see in the APP one alert in the screen for a pair of seconds and a rounded antenna icon in the left bottom corner of the screen
REMEMBER
You can force a new Bluetooth® pairing from the APP. To do that go to the MAIN MENU / SETTINGS / and press in the option “Pair with new EBM Bike”.
E
D
C
iWoc® STANDARD: Buttons to control the APP

The Bluetooth® BLE pairing process in iPhone and Android are totally different.
- IPhone: It is full transparent. You will not need to go to any menu to establish the Bluetooth® link. The ebikemotion® APP will find the closer compatible device that answers to the iWoc® call of pairing.
- Android: In these smartphones you will have to go the SETTINGS and select the option for Bluetooth® pairing process with iWoc®. You will see a list of closer devices and you will need to select one of them.
It is possible to control the ebikemotion® APP using the buttons [E] and [D] of the iWoc® remote. The main functions that you can control of the ebikemotion® APP are:
- Remove the menu- Change the Monitor view between Speed / Map /
Range Map- Change the Auxiliary Monitor Components between
(Weather, Music, Bike)- Modify the ZOOM level of the Maps- If you are listening music (Play, Pause and Next Song)- Listing a Voice Command (Actual information status)
In order to control the ebikemotion® APP you must use the buttons [E] and [D]. You can user long or short press, and the command will be different depending of type of information that you see in the monitor
When the MAIN MENU is deployed, it is possible that the user wants to see the full view of the Monitor without the menu information. To release the menu, simply touch any button of the iWoc® remote.
You can also use Heart Rate Monitors connected to the smartphone. The ebikemotion® APP will use this information to complete the information of your activity and show that in the Monitor APP while you are riding. Even, ebikemotion® APP is able to control automatically the Power Assistance system of your eBike adapting to your beats for keeping under a maximum value using as reference the current beats that supply your Heart Rate monitor.
You will find a full description of ebikemotion® APP configuration and pairing process with Heart Rate monitors in the ebikemotion ® APP User Manual. Please check it.
Take in mind that if you modify manually the Power assist level by the iWoc® remote, when the HR Auto-Assist based system has been activated, you will deactivate the function.
REMEMBER
There are many Bluetooth® HR Monitors in the market. Some manufacturers modify some information in the Bluetooth® BLE Standard protocol to protect the use of the HR monitors only with their devices. Ensure that you are using and HR standard Bluetooth® BLE sensor. ebikemotion® APP it is only compatible with them.
Remove the MAIN MENU
8.3 iPhone and Android pairing process 8.5 Remote control of the APP by iWoc®
8.4 Pairing Process with HR Monitor E
D
ebikemotion® APP IOS Version (Main Menu Openned)
iWoc® STANDARD: Buttons to control the APP
HR Monitor (Belt type)
Page 24

The information that you could be able to see in the AUX component is:
- WeatherWind Speed, Humid, Current Temperature and Weather, Weather forecast for the next hour and 4 hours.
- MusicFunction (Play/Pause), Picture of the song or disk, Name of Disk, Name of song, Remaining time, Progress
The ebikemotion® APP divides the information in 2 big areas:- Monitor- Aux Components
In the monitor area it is possible to see:- Speed Monitor- Map Monitor (Navigation, tracking, guiding or map
location)- Range Map Monitor (Same maps as Map Monitor but
adding Range area and Range information for eBikes)
To change between these monitors short press the [E] button
The AUX components can represent information of Weather, “Music” and Bike. Take in mind that music windows only appears if the smartphone is playing music by its own music player.
To change between monitors short press the [D] button.
Change the Monitor between Main Views
Change the Monitor view (Auxiliary Info)
E
D
D
E
D
Music / MúsicaMusik / Musique
WEA
THER
MU
SIC
SPEE
D
BIC
YC
LE
MA
P
HEA
LTH
REA
CH
Page 25
This view is only available for eBikes

While your Smartphone is running the ebikemotion® APP you can place your phone in different places like handlebar or in your pocket. There is command that calls to the ebikemotion® APP to tell you the current most important information, that can be different attending to the current AUX components that the smartphone is showing.
All the Aux screens in the monitor contains different information.
- Press for a long time button [D] will tell to you the current speed, level of battery, altitude, HR, etc.
ebikemotion APP is full integrated with Android Wear and Apple watch. So after the installation of your APPs remember that you can also activate the APP in your watch. At the end of this manual you have an special chapter f o r s m a r t w a t c h integration.
®
If you are playing music using your native players like Apple Music by example, the ebikemotion® APP will show automatically to you a new screen with AUX components for see information about current song.
While the music is playing it is possible to control some functions of the player by the iWoc® remote control if you are placed in the Music Aux component in the ebikemotion® APP Monitor.
- Press for a long time button [D] will pause the music if it is playing and will playing again if it is in pause mode.
- Press for a long time button [E] will move to you to the next song of the current playing list.
Listening to Voice Command
Commands if you are listening to music
Music Monitor. It appears if music is playing
- BikeCurrent Altitude, Current Slope, Motor PowerCurrent HR if monitor is connected, Watts remainin the Battery, Range estimation in Km, Batterycapacity, Average Speed, Cadence (Pedalling)
- Health information:- Current HR, Medium and Maximum HR, Burnedcalories
When the ebikemotion® APP is showing any map (Navigation or Range) it is possible to control the level of zoom using the iWoc® remote. You can do Zoon IN or OUT operations.
- Press for a long time button [E]. The map will start to make ZOOM IN until you release the button.
- Press for a long time button [D]. The map will start to make ZOOM OUT until you release the button.Level of zoom will be automatically restored when you change the actual monitor view in ebikemotion® APP Monitor
Modify the ZOOM level of the Maps
Zoom OUT
Zoom IN
D
E
Play/Pause D
Next Song E
D
REMEMBER
The voice commands only operates if the user is not in the MUSIC screen (listening music). If the user is placed that that monitor screen the Music Commands will be sent instead of the voice command
8.6 Smartwatch Integration
Page 26
ebikemotion smartwatch APP
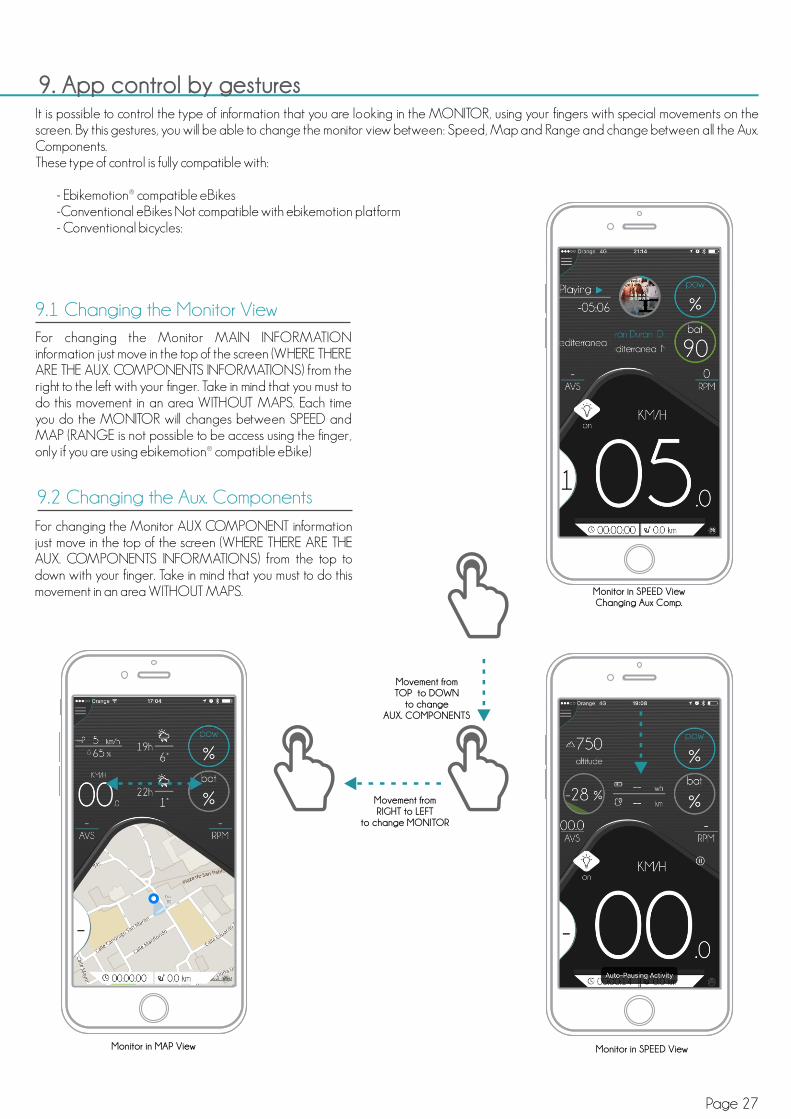
It is possible to control the type of information that you are looking in the MONITOR, using your fingers with special movements on the screen. By this gestures, you will be able to change the monitor view between: Speed, Map and Range and change between all the Aux. Components.These type of control is fully compatible with:
- Ebikemotion® compatible eBikes-Conventional eBikes Not compatible with ebikemotion platform- Conventional bicycles:
For changing the Monitor AUX COMPONENT information just move in the top of the screen (WHERE THERE ARE THE AUX. COMPONENTS INFORMATIONS) from the top to down with your finger. Take in mind that you must to do this movement in an area WITHOUT MAPS.
9.2 Changing the Aux. Components
Page 27
9. App control by gestures
For changing the Monitor MAIN INFORMATION information just move in the top of the screen (WHERE THERE ARE THE AUX. COMPONENTS INFORMATIONS) from the right to the left with your finger. Take in mind that you must to do this movement in an area WITHOUT MAPS. Each time you do the MONITOR will changes between SPEED and MAP (RANGE is not possible to be access using the finger, only if you are using ebikemotion® compatible eBike)
9.1 Changing the Monitor View
Movement fromRIGHT to LEFT
to change MONITOR
Movement fromTOP to DOWN
to changeAUX. COMPONENTS
Monitor in MAP View Monitor in SPEED View
Monitor in SPEED ViewChanging Aux Comp.
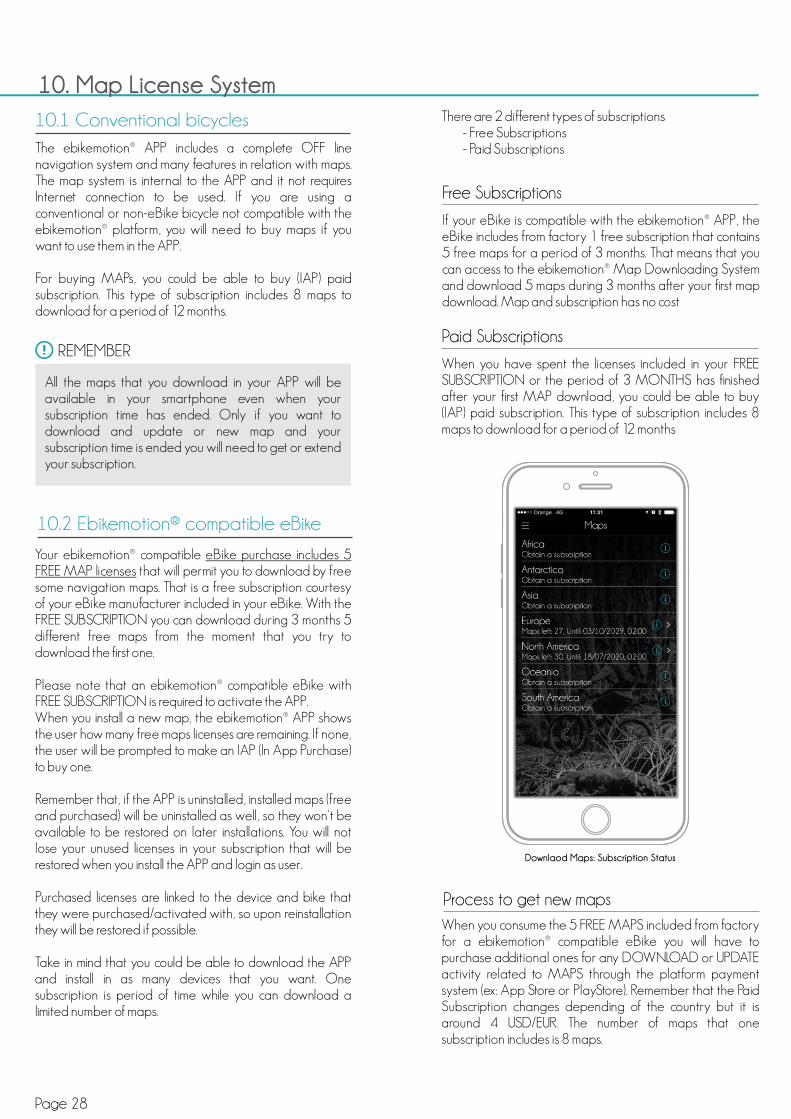
There are 2 different types of subscriptions- Free Subscriptions- Paid Subscriptions
If your eBike is compatible with the ebikemotion® APP, the eBike includes from factory 1 free subscription that contains 5 free maps for a period of 3 months. That means that you can access to the ebikemotion® Map Downloading System and download 5 maps during 3 months after your first map download. Map and subscription has no cost
When you have spent the licenses included in your FREE SUBSCRIPTION or the period of 3 MONTHS has finished after your first MAP download, you could be able to buy (IAP) paid subscription. This type of subscription includes 8 maps to download for a period of 12 months
10. Map License System
The ebikemotion® APP includes a complete OFF line navigation system and many features in relation with maps. The map system is internal to the APP and it not requires Internet connection to be used. If you are using a conventional or non-eBike bicycle not compatible with the ebikemotion® platform, you will need to buy maps if you want to use them in the APP.
For buying MAPs, you could be able to buy (IAP) paid subscription. This type of subscription includes 8 maps to download for a period of 12 months.
10.1 Conventional bicycles
REMEMBER
All the maps that you download in your APP will be available in your smartphone even when your subscription time has ended. Only if you want to download and update or new map and your subscription time is ended you will need to get or extend your subscription.
Your ebikemotion® compatible eBike purchase includes 5 FREE MAP licenses that will permit you to download by free some navigation maps. That is a free subscription courtesy of your eBike manufacturer included in your eBike. With the FREE SUBSCRIPTION you can download during 3 months 5 different free maps from the moment that you try to download the first one.
Please note that an ebikemotion® compatible eBike with FREE SUBSCRIPTION is required to activate the APP.When you install a new map, the ebikemotion® APP shows the user how many free maps licenses are remaining. If none, the user will be prompted to make an IAP (In App Purchase) to buy one.
Remember that, if the APP is uninstalled, installed maps (free and purchased) will be uninstalled as well, so they won't be available to be restored on later installations. You will not lose your unused licenses in your subscription that will be restored when you install the APP and login as user.
Purchased licenses are linked to the device and bike that they were purchased/activated with, so upon reinstallation they will be restored if possible.
Take in mind that you could be able to download the APP and install in as many devices that you want. One subscription is period of time while you can download a limited number of maps.
10.2 Ebikemotion® compatible eBike
Free Subscriptions
Paid Subscriptions
When you consume the 5 FREE MAPS included from factory for a ebikemotion® compatible eBike you will have to purchase additional ones for any DOWNLOAD or UPDATE activity related to MAPS through the platform payment system (ex: App Store or PlayStore). Remember that the Paid Subscription changes depending of the country but it is around 4 USD/EUR. The number of maps that one subscription includes is 8 maps.
Process to get new maps
Downlaod Maps: Subscription Status
Page 28
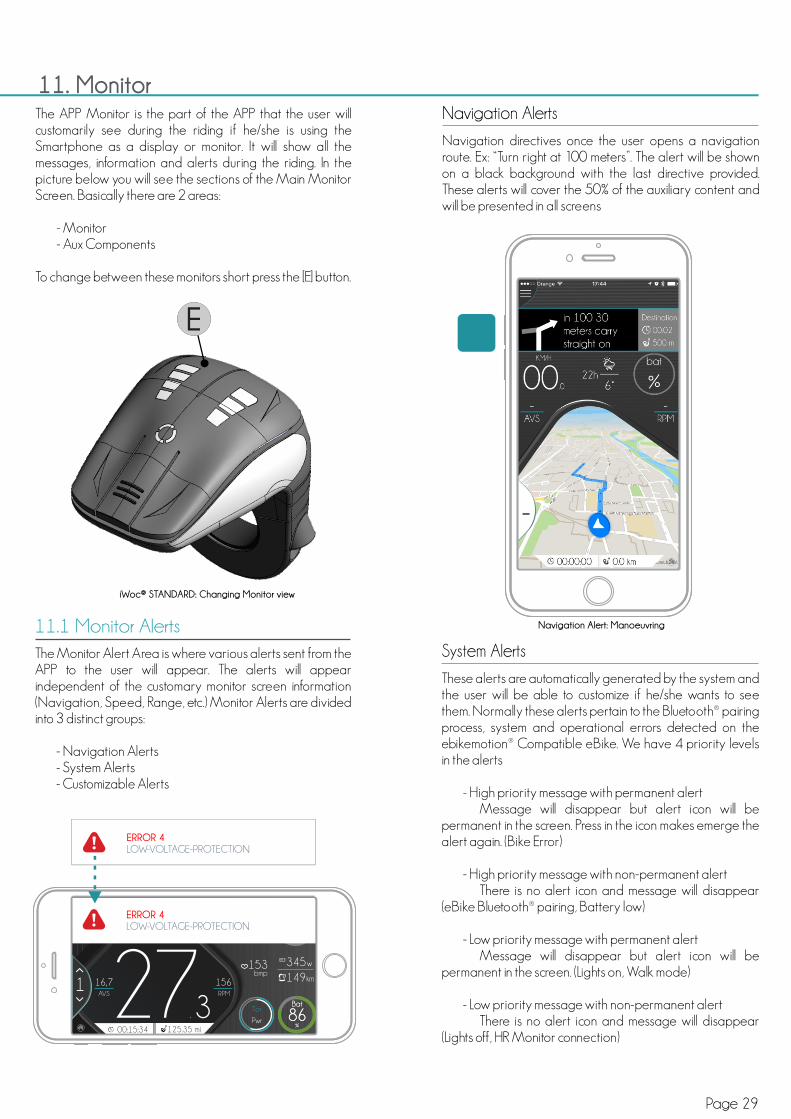
Navigation directives once the user opens a navigation route. Ex: “Turn right at 100 meters”. The alert will be shown on a black background with the last directive provided. These alerts will cover the 50% of the auxiliary content and will be presented in all screens
These alerts are automatically generated by the system and the user will be able to customize if he/she wants to see them. Normally these alerts pertain to the Bluetooth® pairing process, system and operational errors detected on the ebikemotion® Compatible eBike. We have 4 priority levels in the alerts
- High priority message with permanent alertMessage will disappear but alert icon will be
permanent in the screen. Press in the icon makes emerge the alert again. (Bike Error)
- High priority message with non-permanent alertThere is no alert icon and message will disappear
(eBike Bluetooth® pairing, Battery low)
- Low priority message with permanent alertMessage will disappear but alert icon will be
permanent in the screen. (Lights on, Walk mode)
- Low priority message with non-permanent alertThere is no alert icon and message will disappear
(Lights off, HR Monitor connection)
Page 29
11. MonitorThe APP Monitor is the part of the APP that the user will customarily see during the riding if he/she is using the Smartphone as a display or monitor. It will show all the messages, information and alerts during the riding. In the picture below you will see the sections of the Main Monitor Screen. Basically there are 2 areas:
- Monitor- Aux Components
To change between these monitors short press the [E] button.
The Monitor Alert Area is where various alerts sent from the APP to the user will appear. The alerts will appear independent of the customary monitor screen information (Navigation, Speed, Range, etc.) Monitor Alerts are divided into 3 distinct groups:
- Navigation Alerts- System Alerts- Customizable Alerts
Navigation Alerts
System Alerts
E
11.1 Monitor Alerts
ERROR 4LOW-VOLTAGE-PROTECTION
00:15:34 125.35 mi
AVS
00:15:34 125.35 mi
16,7AVS
16:32
1 156RPM
1123 17%altitude
153 bmp
Bat
86%
Bat
86%
MPHSport
345 w
149 km
ERROR 4LOW-VOLTAGE-PROTECTION
Tor
Pwr
Navigation Alert: Manoeuvring
iWoc® STANDARD: Changing Monitor view

To modify all customizable alerts you will have to go to SETTINGS and select the alert to be customized in the BEHAVIOR section to CONFIGURE the ALERTS. You will see a complete list of all configurable alerts.
When you activate one alert, it will show you a parameter to modify such as time, distance, etc. Ex. how many kilometers between Distance Alert and the next one.
- Maximum Pulse alert:The system will alert you if your heart rate exceeds your preset limit.
- Water Scheduler alertThe system will alert and encourage water consumption based on preset intervals. Ex: 20, 40, 60 minutes, etc.
- Food Scheduler alertThe system will alert and encourage food consumption based on preset intervals. Ex: 20, 40, 60 minutes, etc.
- Motor Torque alert:The system will use this value to calculate the amount of torque on the monitor to be represented.
- Ride Distance alertThe system will show one alert when you ride the distance in miles or kilometers that you've selected. (Ex. 5 km means gets an alert at: 5 km, 10 km, 15 km, etc.
- Point of no-return alertThe system will show an alert when the battery is at 55% of the charge you began your ride with.
Page 30
High priority message with permanent alert
Customizable Alerts
This group is used to advise of various conditions or activities. Ex: Poor weather conditions, insufficient battery power to return to the place of origin, heart rate, etc.
00:15:34 125.35 mi
AVS
00:15:34 125.35 mi
16,7AVS
16:32
1 156RPM
1123 17%altitude
153 bmp
Bat
86%
Bat
86%
MPHSport
345 w
149 km
ERROR 4LOW-VOLTAGE-PROTECTION
Tor
Pwr
High priority message with non-permanent alert
Low priority message with non-permanent alert
Low priority message with permanent alert
Settings: Customizable Alerts

This monitor is used to show information about Actual Speed, Actual Torque, & Battery Level as a graphic bar and in percentage. When the ebikemotion® compatible eBike is paired, you will note that the TORQUE BAR under the speed appears in WHITE and at the same time the Battery Level and power assist level will appear with a value. The TORQUE BAR [ F ] will increase from the left to the right to show positive torque. BATTERY BAR [ J ] will show in GREEN, BLUE, ORANGE or RED the remaining capacity (Green = high level, Red = low)
The navigation screen will show to you your position on the MAP. You will be able to ZOOM in on the map and the APP will remember your position. If you have NAVIGATION open and in process, your recommended course will be represented in BLUE, your POSITION will be represented in the middle and the next course maneuver will appear at the top of the screen as an ALERT.
The view in the navigation mode appears in 3D. If you do not have a current course, the view will appear in 2D and your position will appear in the MIDDLE. The MAP will automatically move and orient to the navigated course. The type of map and how it moves is possible to customized by Settings / Maps and Navigation. Options to modify are:
- Voice Navigation Advices
- Show Compass
- Map Style
- Heading Mode
- Simulate Navigation
Page 31
This area of the ebikemotion® APP will show you the general information on the main, active screen. You can change the active screen using [E] of the iWoc® Remote control (check your remote end user manual). There are 3 different types of screens for the Main Monitor Area:
- Speed information- Navigation information- Range information
11.2 Monitor Main Content
Speed Information
Monitor: Speed View
Monitor: Map View
Monitor: Range View
E HF IG J
A
B
C
D
MOTOR POWER BATTERY CAPACITY
Batpow
86%%
Bat
8677%%
JI
Navigation Information
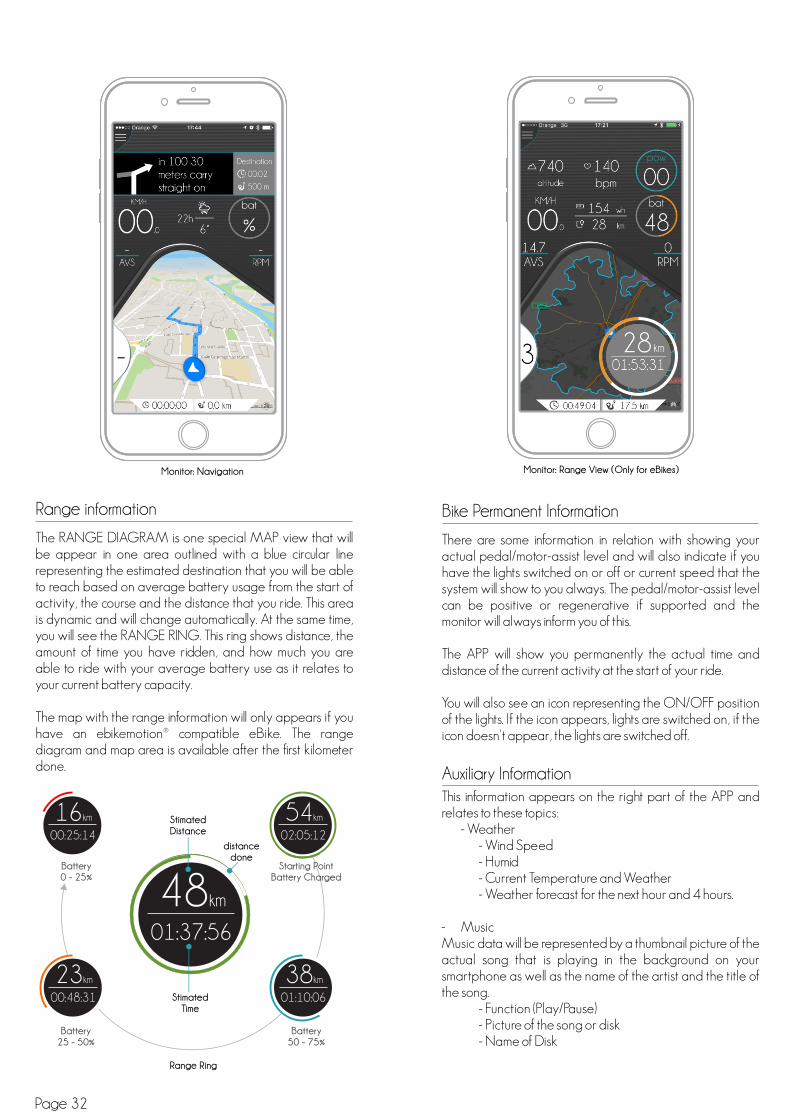
The RANGE DIAGRAM is one special MAP view that will be appear in one area outlined with a blue circular line representing the estimated destination that you will be able to reach based on average battery usage from the start of activity, the course and the distance that you ride. This area is dynamic and will change automatically. At the same time, you will see the RANGE RING. This ring shows distance, the amount of time you have ridden, and how much you are able to ride with your average battery use as it relates to your current battery capacity.
The map with the range information will only appears if you have an ebikemotion® compatible eBike. The range diagram and map area is available after the first kilometer done.
Monitor: Range View (Only for eBikes)
Range information
01:37:56
01:10:06
02:05:12
00:48:31
00:25:14
48km
38km
54km
23km
16km
Starting PointBattery Charged
StimatedDistance
distancedone
StimatedTime
Battery0 - 25%
Battery50 - 75%
Battery25 - 50%
Monitor: Navigation
Range Ring
There are some information in relation with showing your actual pedal/motor-assist level and will also indicate if you have the lights switched on or off or current speed that the system will show to you always. The pedal/motor-assist level can be positive or regenerative if supported and the monitor will always inform you of this.
The APP will show you permanently the actual time and distance of the current activity at the start of your ride.
You will also see an icon representing the ON/OFF position of the lights. If the icon appears, lights are switched on, if the icon doesn't appear, the lights are switched off.
Bike Permanent Information
Auxiliary InformationThis information appears on the right part of the APP and relates to these topics:
- Weather- Wind Speed- Humid- Current Temperature and Weather- Weather forecast for the next hour and 4 hours.
- MusicMusic data will be represented by a thumbnail picture of the actual song that is playing in the background on your smartphone as well as the name of the artist and the title of the song.
- Function (Play/Pause)- Picture of the song or disk- Name of Disk
Page 32

Page 33
- Name of song- Remaining time- Progress
- Bicycle (eBike)- Current Altitude- Current SlopeThis will show you the estimated actual slope, the
maximum altitude and the incline/decline during your ride.- Current HR if monitor is connectedThis will show your current heart rate, the average
and the preset maximum values and time zones. You will need a compatible Heart Rate Monitor (Bluetooth® BLE).
- Watts remain in the Battery- Range estimation in Km- Motor Power- Battery capacity- Average Speed- Cadence (Pedalling)
- Health information:- Current HR- Medium and Maximum HR- Burned calories
Aux. Components: Weather
Aux. Components: Music
Aux. Components: Bicycle (eBike)
Aux. Components: Health
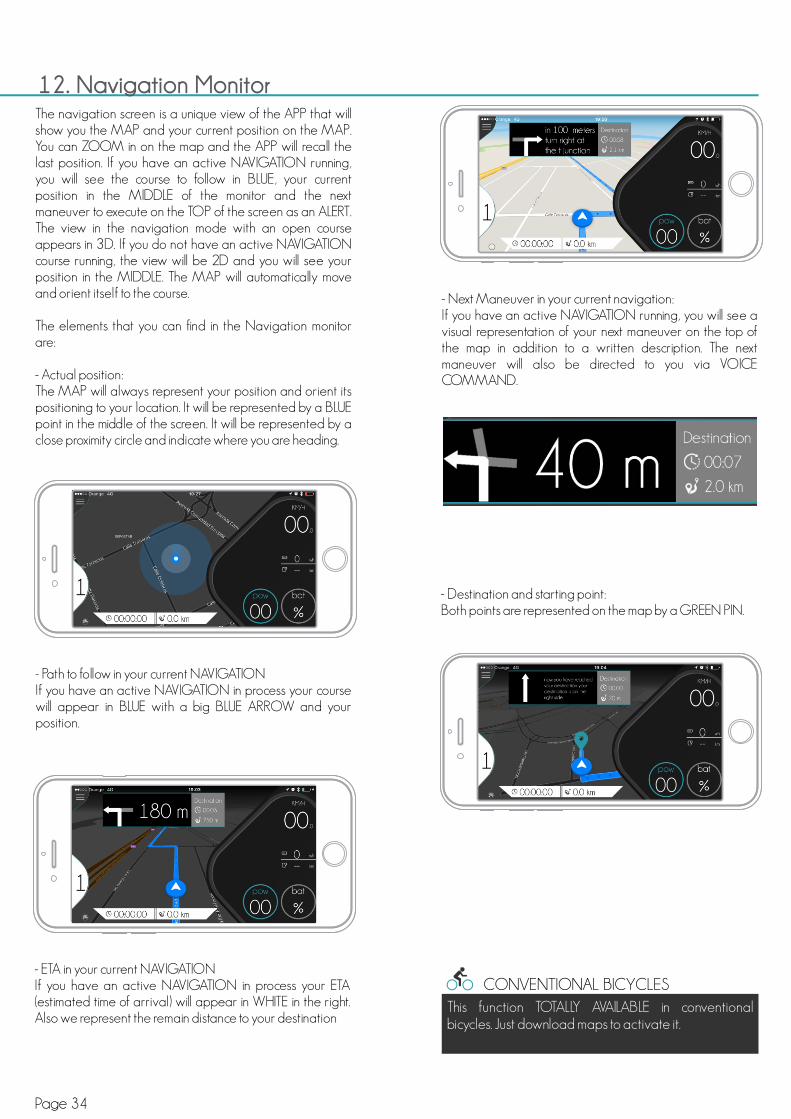
- Path to follow in your current NAVIGATIONIf you have an active NAVIGATION in process your course will appear in BLUE with a big BLUE ARROW and your position.
- Next Maneuver in your current navigation:If you have an active NAVIGATION running, you will see a visual representation of your next maneuver on the top of the map in addition to a written description. The next maneuver will also be directed to you via VOICE COMMAND.
- ETA in your current NAVIGATIONIf you have an active NAVIGATION in process your ETA (estimated time of arrival) will appear in WHITE in the right. Also we represent the remain distance to your destination
- Destination and starting point:Both points are represented on the map by a GREEN PIN.
12. Navigation MonitorThe navigation screen is a unique view of the APP that will show you the MAP and your current position on the MAP. You can ZOOM in on the map and the APP will recall the last position. If you have an active NAVIGATION running, you will see the course to follow in BLUE, your current position in the MIDDLE of the monitor and the next maneuver to execute on the TOP of the screen as an ALERT. The view in the navigation mode with an open course appears in 3D. If you do not have an active NAVIGATION course running, the view will be 2D and you will see your position in the MIDDLE. The MAP will automatically move and orient itself to the course.
The elements that you can find in the Navigation monitor are:
- Actual position:The MAP will always represent your position and orient its positioning to your location. It will be represented by a BLUE point in the middle of the screen. It will be represented by a close proximity circle and indicate where you are heading.
This function TOTALLY AVAILABLE in conventional bicycles. Just download maps to activate it.
CONVENTIONAL BICYCLES
Page 34
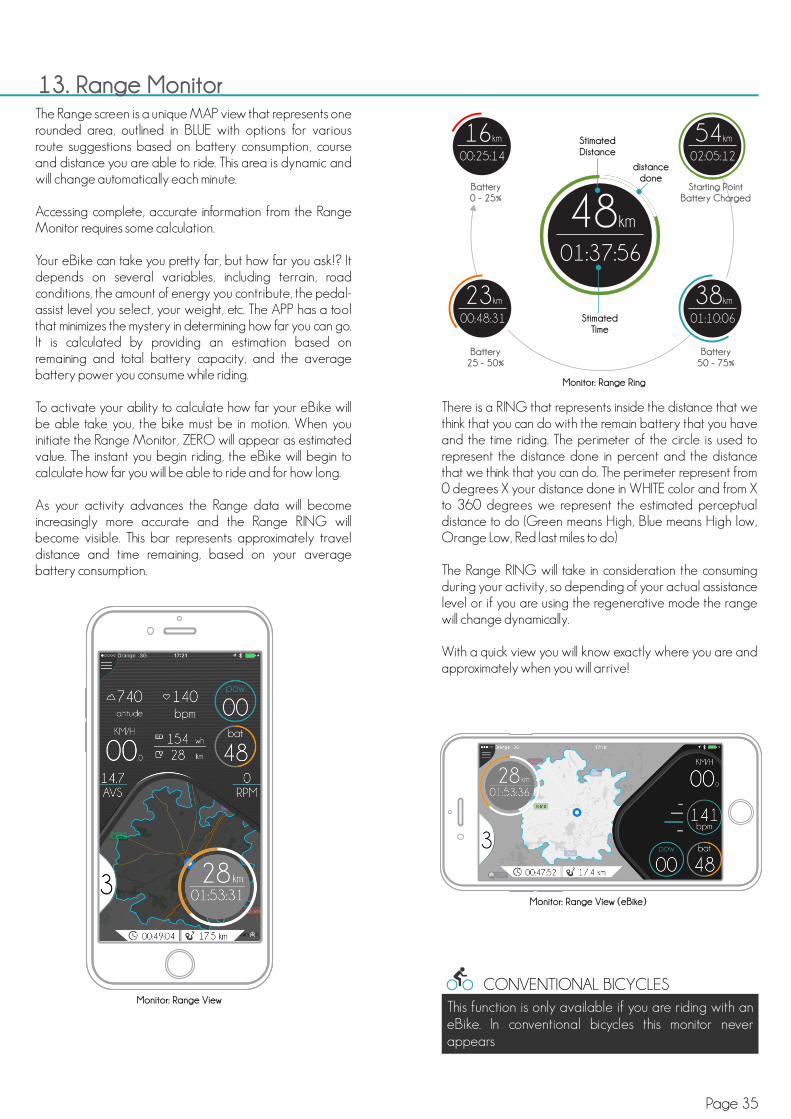
There is a RING that represents inside the distance that we think that you can do with the remain battery that you have and the time riding. The perimeter of the circle is used to represent the distance done in percent and the distance that we think that you can do. The perimeter represent from 0 degrees X your distance done in WHITE color and from X to 360 degrees we represent the estimated perceptual distance to do (Green means High, Blue means High low, Orange Low, Red last miles to do)
The Range RING will take in consideration the consuming during your activity, so depending of your actual assistance level or if you are using the regenerative mode the range will change dynamically.
With a quick view you will know exactly where you are and approximately when you will arrive!
Page 35
13. Range MonitorThe Range screen is a unique MAP view that represents one rounded area, outlined in BLUE with options for various route suggestions based on battery consumption, course and distance you are able to ride. This area is dynamic and will change automatically each minute.
Accessing complete, accurate information from the Range Monitor requires some calculation.
Your eBike can take you pretty far, but how far you ask!? It depends on several variables, including terrain, road conditions, the amount of energy you contribute, the pedal-assist level you select, your weight, etc. The APP has a tool that minimizes the mystery in determining how far you can go. It is calculated by providing an estimation based on remaining and total battery capacity, and the average battery power you consume while riding.
To activate your ability to calculate how far your eBike will be able take you, the bike must be in motion. When you initiate the Range Monitor, ZERO will appear as estimated value. The instant you begin riding, the eBike will begin to calculate how far you will be able to ride and for how long.
As your activity advances the Range data will become increasingly more accurate and the Range RING will become visible. This bar represents approximately travel distance and time remaining, based on your average battery consumption.
Monitor: Range View
Monitor: Range Ring
Monitor: Range View (eBike)
01:37:56
01:10:06
02:05:12
00:48:31
00:25:14
48km
38km
54km
23km
16km
Starting PointBattery Charged
StimatedDistance
distancedone
StimatedTime
Battery0 - 25%
Battery50 - 75%
Battery25 - 50%
This function is only available if you are riding with an eBike. In conventional bicycles this monitor never appears
CONVENTIONAL BICYCLES

Last known position in the MAP of your eBike is there was GPS signal. Also the full address if it is possible to calculate it.
Some ebikes can install from factory the ebikemotion® tracker GPS. This system can gives to you the position of your eBike using and internal GPS module installed into the eBike. For extra information about the Tracker goes to the tracker manual. From the APP you will have a new button if the eBike has a compatible tracker to ask for the actual position of the eBike.
14. Last Position infoLast position info is a helpful feature in referencing and assessing bike use history at a glance! For instance, if you are stationery and cannot recall the current battery level, (Ex. 25% or 45%?) and whether your ebikemotion® compatible eBike requires charging for tomorrow's activities, no worries here, simply access the Last Position Info in the main menu.
This screen will reveal two main groups of eBike data, both when you switch the bike off and when you disconnect the eBike from your phone. The screen shows you the last known position on the MAP and “at a glance” information and history of the last ride including:
First Page:- Last ebike connection information
- Battery remaining- Localization when disconnect APP (Address) - Date and time when disconnect APP
- eBike status (if you press you will see the last error)- Distance ridden- Connection time- Start of the last ride- End of last ride- Battery consumed
Last Position: Last Activity
Last Position: Tracker Request
Last Position: Map
This function is only available if you are riding with an eBike. In conventional bicycles this monitor never appears
CONVENTIONAL BICYCLES
< Back Position and Status
e-bike information
1:01:20
20:16:00
24 Km DISTANCE DONE
CONNECTION TIME
CONNECTION STARTS
25%
21:17:20
BATTERY CONSUMED
CONNECTION ENDS
: OK
6811/08/2016 - 21:17:20%
Bat Status Last e-bike Switch Off
< Back Position and Status
11/08/2016 - 21:17:20
Information of Last e-bike switch off
Paseo del Salón, Palencia, Spain
14.1 Tracker GPS
< Back Position and Status
11/08/2016 - 21:17:20
Information of Last Track Request
Paseo del Salón, Palencia, Spain
LOCK System Status ( )Inactive
Tracker Functions
Update
Page 36
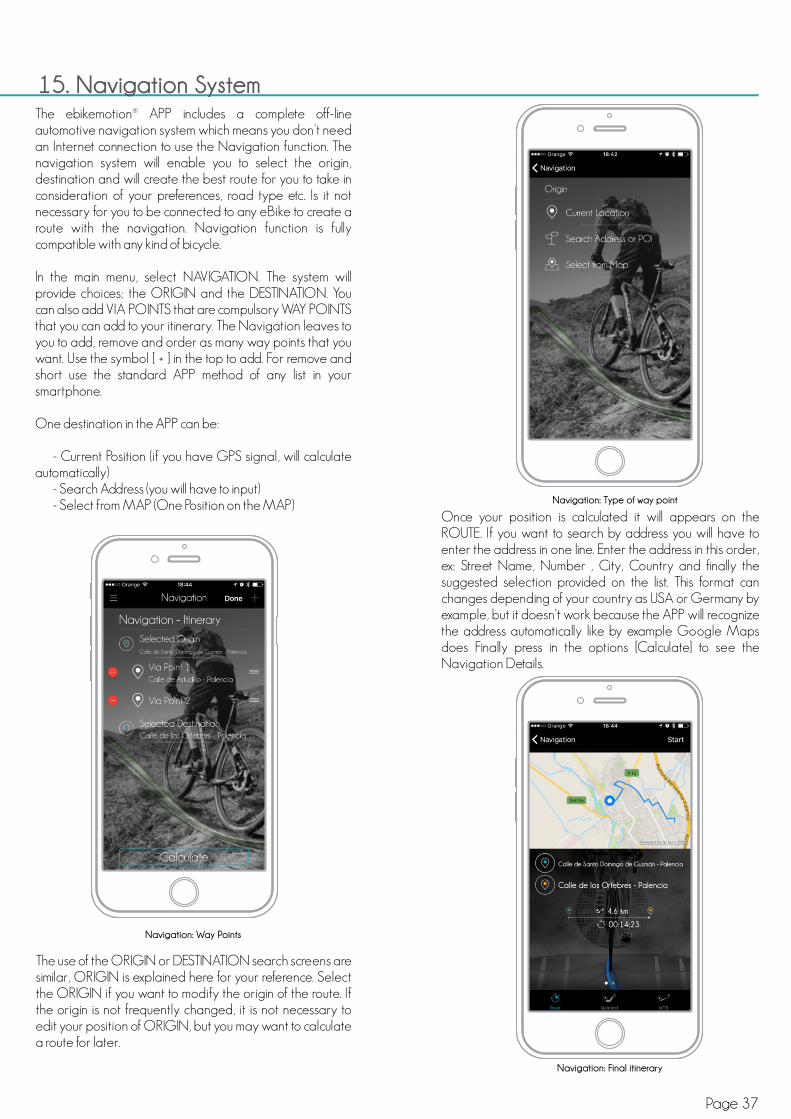
The use of the ORIGIN or DESTINATION search screens are similar, ORIGIN is explained here for your reference. Select the ORIGIN if you want to modify the origin of the route. If the origin is not frequently changed, it is not necessary to edit your position of ORIGIN, but you may want to calculate a route for later.
Once your position is calculated it will appears on the ROUTE. If you want to search by address you will have to enter the address in one line. Enter the address in this order, ex: Street Name, Number , City, Country and finally the suggested selection provided on the list. This format can changes depending of your country as USA or Germany by example, but it doesn't work because the APP will recognize the address automatically like by example Google Maps does Finally press in the options [Calculate] to see the Navigation Details.
Page 37
15. Navigation SystemThe ebikemotion® APP includes a complete off-line automotive navigation system which means you don't need an Internet connection to use the Navigation function. The navigation system will enable you to select the origin, destination and will create the best route for you to take in consideration of your preferences, road type etc. Is it not necessary for you to be connected to any eBike to create a route with the navigation. Navigation function is fully compatible with any kind of bicycle.
In the main menu, select NAVIGATION. The system will provide choices; the ORIGIN and the DESTINATION. You can also add VIA POINTS that are compulsory WAY POINTS that you can add to your itinerary. The Navigation leaves to you to add, remove and order as many way points that you want. Use the symbol [ + ] in the top to add. For remove and short use the standard APP method of any list in your smartphone.
One destination in the APP can be:
- Current Position (if you have GPS signal, will calculate automatically)
- Search Address (you will have to input)- Select from MAP (One Position on the MAP)
Navigation: Way Points
Navigation: Final itinerary
Navigation: Type of way point

You can select three different types of routes:- Road:
Roads will be only possible for road bicycles.- Quietest:
Includes roads that will be possible for bicycles but giving preferences to the least traffic-congested route
It's easy to access and practice the functionality of the NAVIGATION system! Go to the SETTINGS and select in the MAPS & NAVIGATION SETTINGS, Simulate Navigation = ON. When you select PLAY icon this will create your route, the APP will then simulate your ride with all the route directives.
To start the simulated navigation press in the top button Start after you calculated a route.
You may reveal or conceal the compass in the map and like any compass, it will always show a North position for reference. By default, the APP will show you the compass, if you prefer to conceal it, go to SETTINGS and disable the option “Show Compass”.
- MTB:Shortest distance from origin to destination including paths.By default, the system always recommends the Road route. Select your preference and select the top, right icon START to start the route.
The APP will move you to the MONITOR and map NAVIGATION screen, and once you begin riding, it will initiate the navigation and directional functions.To start the real navigation press in the top button [ Start]
The APP will start to calculate the best route, with the understanding that you are riding a bicycle (eBike) vs. an automobile and it will show you all details of the best route. The Navigation Detail screen will show this data in 2 pages:
- Page 1 (The track)- Origin and destination map with the route- Origin and Destination address (even if you have
selected from the Map)- Distance of the route, with the actual guiding
parameters- Duration of the trip, from the origin to destination in
normal conditions
- Page 2 (Estimations)- Battery Consumption, showing the watts consumed
under normal conditions by the eBike to get you there (but you need to be connected to eBike).
- Distance of the route, with the actual guiding parameters
- Duration of the trip, from the origin to destination in normal conditions
- Emissions, # Grams of CO2 you are saving by not using your car.
- Savings, how much money you are saving in gasoline.
Navigation: Consumption
Navigation: in course
15.1 Simulate a Navigation Guiding
15.2 Show Compass
Page 38

Page 39
In all map screens you will see in the top left a map scale that will represent the map scale. When in the zoom view, zoom the map in or out for a few seconds, the metric bar will indicate the distance between the two points to determine the dimensions of the map and estimated distances.
If you want to stop your current navigation route, just select the Main Menu and select the STOP NAVIGATION option. The current navigation route will stop immediately.
If an error occurs during your pre-set navigation route, or if you change the route/take a different route than originally recommended by the navigation, it will automatically re-calculate the route from your actual position to the selected destination taking into consideration the original, recommended route.
Each time you select a destination, the system saves the destination as a COMMON DESTINATION. There is a function in the APP to automatically create the fastest route to a common destination. To activate, just select COMMON DESTINATIONS in the Main Menu. Select one of the COMMON DESTINATIONS presented by the APP and the route to it from your actual position. Your route will automatically be calculated. You will be able to initiate the route by simply pressing on the PLAY icon.
Navigation: Common Destinations Navigation: Common Destinations
15.3 Metric bar (Scale)
15.4 Stop the Navigation route
15.5 Automatic Route Recalculations
15.6 Common Destinations

Take in mind that you could be able to download the APP and install in as many devices that you want. You only need to remember that if you have a NEW EBIKEMOTION COMPATIBLE EBIKE, IT WILL INCLUDES FROM FACTORY A 3 MONTH FREE MAP SUBSCRIPTION to download 5 MAPS.
The APP then is FREE, and you can install in as many bicycles that you want. But if you want to use the navigation function remember that you will need MAPS.
Download Maps are not free forever (just the first 5 maps for ebikemotion® compatible eBikes are free).
For the rest of situations, conventional bicycles, ebikes not compatibles or compatible eBikes that have consumed the Free Subscription we have created a subscription system to download new maps. One subscription is period of time while you can download a limited number of maps. Remember that for Paid Subscriptions you can:
- Purchase a new Subscription- Extend your Subscriptions to recober non used maps
16. Map SystemThe ebikemotion® APP uses an internal navigation system that does not require an Internet connection. It is not necessary to utilize Google or Apple Maps to navigate, determine location or to see the Range Map, position, etc.
The ebikemotion® APP MAPs are private and secure because the Navigation system just works exclusively with APP! Please note that you will need your smartphone connected and functional.
Maps: Continent Subscription
Maps: Options for subscription
IMPORTANT IMPORTANT
The first time that you connect your ebikemotion® APP to your compatible eBike your MAP system will be blank. You will need to select the map that you want to download to see the maps in your ebikemotion® App or to search an address. Go to the Main Menu and select DOWNLOAD MAPS.
For map downloading you must go to the option DOWNLOAD MAPS. You need to select a THE CONTINENT that contains the maps that you want to download pressing the “i” letter. Just in that moment the system will show to you a common dialog box that could be one of these depending of the status of your free license if available:
- FREE optionGetting a free continent subscription will provide a 5 map downloads in a 3 month period.- PURCHASE optionPurchasing a continent subscription will provide a 8 map downloads during a year period- EXTEND optionThis is the option that the system shows to you automatically if the time of your subscription is finished but you have maps pending to download. When you extend a subscription you add the new 8 maps to the old maps pending to download extending also another 12 months the pending maps.
Page 40

Page 41
If your eBike is compatible with the ebikemotion® platform, the eBike might include from factory 1 free subscription that includes 5 free maps for a period of 3 months. That means that you can access to the ebikemotion® Map System and download 5 maps during 3 months after your first map download. Map and subscription has no cost.
When you have spent the licenses included in your FREE SUBSCRIPTION or the period of 3 MONTHS has finished after your first APP connection, you could be able to buy (IAP) paid subscription. This type of subscription includes 8 maps to download for a period of 12 MONTHS.
When you consume the 5 FREE MAPS included from factory for a ebikemotion® compatible eBike or you need new maps, you will have to purchase additional ones for any DOWNLOAD or UPDATE activity related to MAPS through the platform payment system (ex: App Store or Google Play).
Remember that the Paid Subscription changes depending of the country but it is around 4 EUR per annual subscription. The number of maps that one subscription includes is 8 maps.
There is no matter if the size of the map is 10MB or 1GB you can download a limited number of maps during the subscription time. To access to the MAP system remember that you will need Internet connection, recommended WIFI.
If it is your first time open Map Download in the main menu and press in the button [ i ] of the Continent that you want to subscribe. If you have free licenses you will subscribe to the Continent selected. You will see them when expires your subscription and how many maps left. Now select the map of the COUNTRY or REGION or CITY that you want to download and press the BUY or DOWNLOAD button to activate the Map details. It will show a preview of the map, size, cost and will give you the option to buy using the Apple or Google store. You will need your Smartphone account to make this purchase. Remember that payment will be made always to Apple or Google, not to ebikemotion® so the payment transaction has all the guaranties.
16.1 Free Subscriptions
16.2 Paid Subscriptions
16.3 Process to get new maps
IMPORTANT
All the maps that you download in your APP will be available in your smartphone even when your subscription time has ended. Only if you want to download and update or new map and your subscription time is ended you will need to get or extend your subscription.
Maps. Download Center
Maps. Selecting Continent
Maps. Selecting Contry/Region
Maps. info about status
Maps. Starting Purchase
Maps. Starting Download
1
3
5
2
4
6
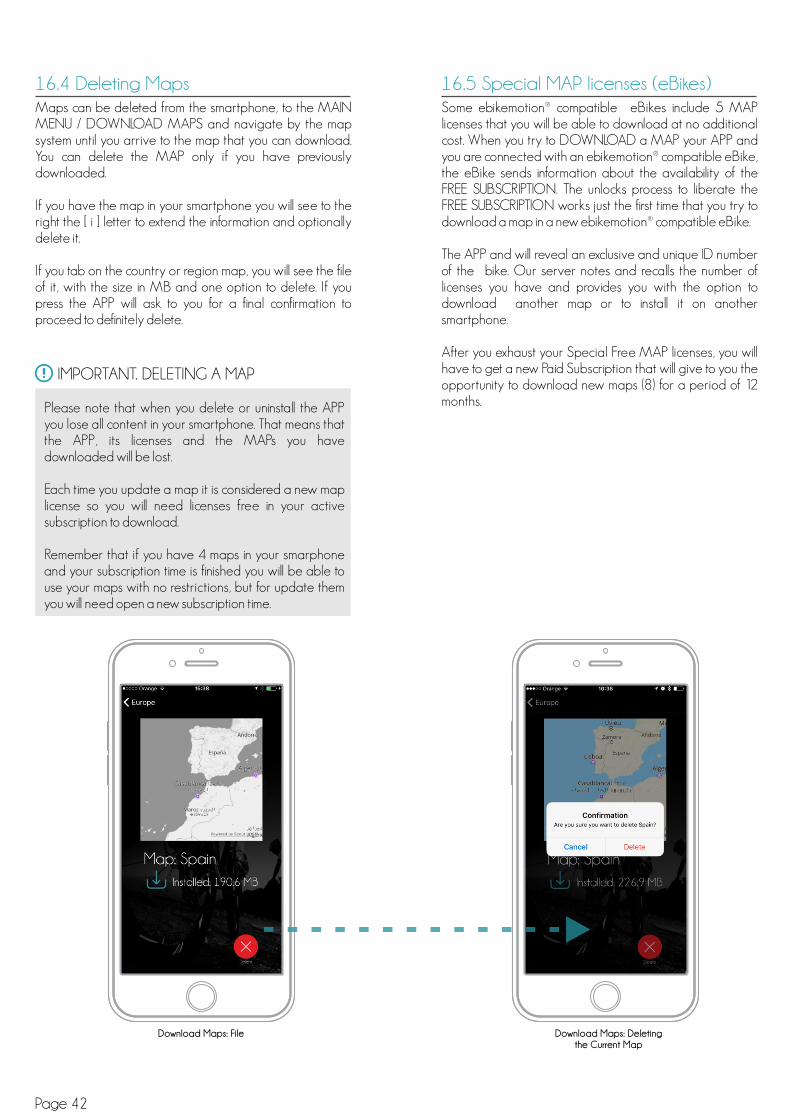
Maps can be deleted from the smartphone, to the MAIN MENU / DOWNLOAD MAPS and navigate by the map system until you arrive to the map that you can download. You can delete the MAP only if you have previously downloaded.
If you have the map in your smartphone you will see to the right the [ i ] letter to extend the information and optionally delete it.
If you tab on the country or region map, you will see the file of it, with the size in MB and one option to delete. If you press the APP will ask to you for a final confirmation to proceed to definitely delete.
Some ebikemotion® compatible eBikes include 5 MAP licenses that you will be able to download at no additional cost. When you try to DOWNLOAD a MAP your APP and you are connected with an ebikemotion® compatible eBike, the eBike sends information about the availability of the FREE SUBSCRIPTION. The unlocks process to liberate the FREE SUBSCRIPTION works just the first time that you try to download a map in a new ebikemotion® compatible eBike.
The APP and will reveal an exclusive and unique ID number of the bike. Our server notes and recalls the number of licenses you have and provides you with the option to download another map or to install it on another smartphone.
After you exhaust your Special Free MAP licenses, you will have to get a new Paid Subscription that will give to you the opportunity to download new maps (8) for a period of 12 months.
16.4 Deleting Maps 16.5 Special MAP licenses (eBikes)
Please note that when you delete or uninstall the APP you lose all content in your smartphone. That means that the APP, its licenses and the MAPs you have downloaded will be lost.
Each time you update a map it is considered a new map license so you will need licenses free in your active subscription to download.
Remember that if you have 4 maps in your smarphone and your subscription time is finished you will be able to use your maps with no restrictions, but for update them you will need open a new subscription time.
Download Maps: File Download Maps: Deletingthe Current Map
Page 42
IMPORTANT. DELETING A MAP
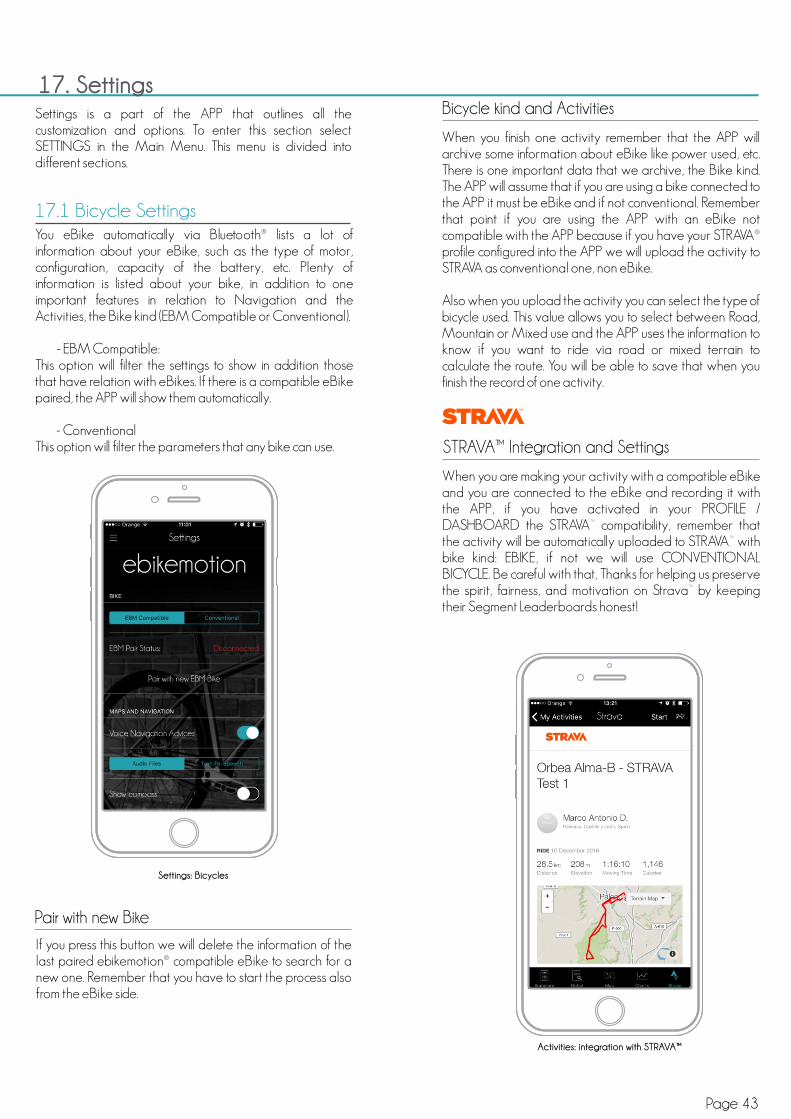
If you press this button we will delete the information of the last paired ebikemotion® compatible eBike to search for a new one. Remember that you have to start the process also from the eBike side.
When you finish one activity remember that the APP will archive some information about eBike like power used, etc. There is one important data that we archive, the Bike kind. The APP will assume that if you are using a bike connected to the APP it must be eBike and if not conventional. Remember that point if you are using the APP with an eBike not compatible with the APP because if you have your STRAVA® profile configured into the APP we will upload the activity to STRAVA as conventional one, non eBike.
Also when you upload the activity you can select the type of bicycle used. This value allows you to select between Road, Mountain or Mixed use and the APP uses the information to know if you want to ride via road or mixed terrain to calculate the route. You will be able to save that when you finish the record of one activity.
When you are making your activity with a compatible eBike and you are connected to the eBike and recording it with the APP, if you have activated in your PROFILE / DASHBOARD the STRAVA™ compatibility, remember that the activity will be automatically uploaded to STRAVA™ with bike kind: EBIKE, if not we will use CONVENTIONAL BICYCLE. Be careful with that, Thanks for helping us preserve the spirit, fairness, and motivation on Strava™ by keeping their Segment Leaderboards honest!
You eBike automatically via Bluetooth® lists a lot of information about your eBike, such as the type of motor, configuration, capacity of the battery, etc. Plenty of information is listed about your bike, in addition to one important features in relation to Navigation and the Activities, the Bike kind (EBM Compatible or Conventional).
- EBM Compatible:This option will filter the settings to show in addition those that have relation with eBikes. If there is a compatible eBike paired, the APP will show them automatically.
- ConventionalThis option will filter the parameters that any bike can use.
Page 43
17. SettingsSettings is a part of the APP that outlines all the customization and options. To enter this section select SETTINGS in the Main Menu. This menu is divided into different sections.
Settings: Bicycles
Activities: integration with STRAVA™
17.1 Bicycle Settings
Pair with new Bike
Bicycle kind and Activities
STRAVA™ Integration and Settings

This process is a little different in the Android APP versus the iOS APP, because of the Bluetooth® BLE pairing process.
- iOS Bluetooth® BLE for HRIn iOS just switch on the option “Enable Heart Monitor Sensor”. When you do that your phone automatically will find the nearest Bluetooth® BLE Heart Rate band and it will pair with it.
- Android Bluetooth® BLE for HRIn Android you will have to go to Settings and open the process to find the Bluetooth® BLE band nearest to you. The APP will try to find the band and you will have to select it to pair.
This function controls the Assistance of the ebikemotion® compatible eBike using your heart rate without the need of constantly adjusting by the iWoc® remote. You can activate this function by selecting a maximum heart rate and the APP will increase and decrease the assistance of the ebikemotion® compatible eBike to keep to you in the exercise zone that you have selected. If you activate this option you will have to establish the “Desired Maximum HR”).
Go to MAIN MENU / SETTINS / HEALTH and TAB into the options Enable Auto-Assist. If your HR sensor is connected the APP automatically will changes the Power Assistance Level increasing and decreasing depending of your HR frequency.
Sensibility: This bar leaves to you to control the accuracy response of the power assistance level changes against the changes of your HR rhythm. Low sensibility will takes more time to change the power assistance level and High sensibility will makes quickly.
If it is activated the APP will show to you an Alert into the MONITOR, when your HR frequency override the maximum value that you establish into the numeric field “Maximum Heart Rate”.
This function shows you the current heart rate in the monitor of the APP. The APP will show your Max. Average and Current Beats
Ebikemotion® APP can control automatically the assist level of your ebikemotion® compatible eBike if you have a Hearth Rate compatible band. There are two functions included in the ebikemotion® APP in relation to Heart Rate
Settings: HR Monitoring
17.2 Health Settings
Hearth Rate Monitor Pairing
Override Recommended MHR
Hearth Rate Monitoring
REMEMBER
REMEMBER
There are many Bluetooth® HR Monitors in the market. Some manufacturers modify some information in the Bluetooth® BLE Standard protocol to protect the use of the HR monitors only with their devices. Ensure that you are using and HR standard Bluetooth® BLE sensor. ebikemotion® APP it is only compatible with them.
The ADVANTAGES of a HRM include its use:- as a motivational tool - like a coach ; brings
objectivity to a training program.- to teach beginners to read their bodies and avoid
anaerobic overtraining.- to aid in doling out energy during time trialing or
climbing, saving some for the final effort.to analyze race efforts and design a personalized training program.
- to spot overtraining (heart rate 10% higher than normal on awakening for several consecutive days)
Automatic Assistance HR-Based
HR Monitor (Belt type)
Page 44

It is also possible to hide or show a compass in the map that always shows the position of NORTH. By default the APP will show you the compass, if you want to hide, go to SETTINGS and disable the option “Show Compass”.
- NightWe use a color combination to reduce the illumination of the screen in the Map view. The main color will be black and road will be shown in color. Recommended for INDOOR USE.
- DayWe will use a color combination to increase illumination of the screen in the Map view. The main color will be white and road will be shown in black
- OutdoorThis is the perfect combination for user the APP in OUTDOOR conditions.
It is possible to change the color combination or layout that we for the maps. The system has 3 color combinations that operates in this way:
- AutomaticThis function is the most recommendable one. The system will change between Outdoor and Night map style depending the sunset and sunrise times of each zone. The APP will now that time automatically depending of your GPS position and the GMT hour of your Smartphone.
This option controls the orientation of the map when we represent it into the screen. There are 4 options:
- NoneMap will not move with any movement of GPS signal, sensors, position of user, etc
Maps' voice navigation is enabled by default, but if you feel compelled to disable your digital co-pilot, the ebikemotion® APP allows you to do that as well. Open the Settings and goes to MAP & Navigation Settings. Select the option Tap the “Voice navigation advises” under Map Navigation Settings to put off the volume and your backseat driver will now been silenced.
There are a pair of functions that you can modify in relation to the Navigation system:
Page 45
Settings: Maps and Navigation
17.3 Maps and Navigation Settings
Show Compass
Map Style
Heading Mode
Voice Navigation Advises
Map Style: Day
Map Style: Night
Settings: Map Style
Map Style: Outdoor

This option leaves you to modify how the APP works. Basically we have introduced these options:
- Preferred Orientation- Enable summary Audio Advice- Enable Auto Pause- Configure Alerts
If you want to see how the navigation system works you can do this easily. Go to the SETTINGS and select in the MAPS & NAVIGATION SETTINGS, Simulate Navigation = ON.
If you do that when you press on the STARS icon after create your route, the APP will simulate your ride with all the maneuvers and you will see how it works.
The APP will automatically adapt to the orientation of the phone or can be locked in one permanent position: Portrait or Landscape as well as Automatic Mode. In this last mode the smartphone changes the orientation of the APP depending of the the information of the sensors in the smartphone.
If it is enabled this function will report to by voice the status of the riding when each time that you ride the distance that you configure in the system (5 km, 10 km, etc.)
- Historic PositionsMap will save the last orientation that you have selected on it.
- Rotating Heading (by default)This is the most recommended option. Map will be automatically oriented to your course in dynamic.
- Rotating MapMap will be automatically oriented to the North.
Settings: Heading Mode
Settings: Behaviour
Simulate a Navigation Guiding
Preferred Orientation
Enable Summary Audio Advice
17.4 Behaviour
Page 46

This section is already explained in the Chapter 11 MONITOR, Monitor Alerts
To modify all customizable alerts you will have to go to SETTINGS and select the alert to be customized in the BEHAVIOR section to CONFIGURE the ALERTS. You will see a complete list of all configurable alerts.
When you activate one alert, it will show you a parameter to modify such as time, distance, etc. Ex. how many kilometers between Distance Alert and the next one.
- Maximum Pulse alert:The system will alert you if your heart rate exceeds your preset limit.
- Water Scheduler alertThe system will alert and encourage water consumption based on preset intervals. Ex: 20, 40, 60 minutes, etc.
- Food Scheduler alertThe system will alert and encourage food consumption based on preset intervals. Ex: 20, 40, 60 minutes, etc.
- Motor Torque alert:The system will use this value to calculate the amount of torque on the monitor to be represented.
- Ride Distance alertThe system will show one alert when you ride the distance in miles or kilometers that you've selected. (Ex. 5 km means gets an alert at: 5 km, 10 km, 15 km, etc.
- Point of no-return alertThe system will show an alert when the battery is at 55% of the charge you began your ride with
If it is enabled, this function will stop the timing and recording each time that detect that you have stopped. The system will start to record immediately when we detect that you are moving by GPS (conventional bicycles) or speed sensor of your eBike. When recording is in Auto Pause system will show a message and the red circle of recording in the monitor will change to pause.
Page 47
Settings: Workout in Pause Mode
Customizable Alerts
Customizable Alerts
Configure Alerts
Enable Auto Pause
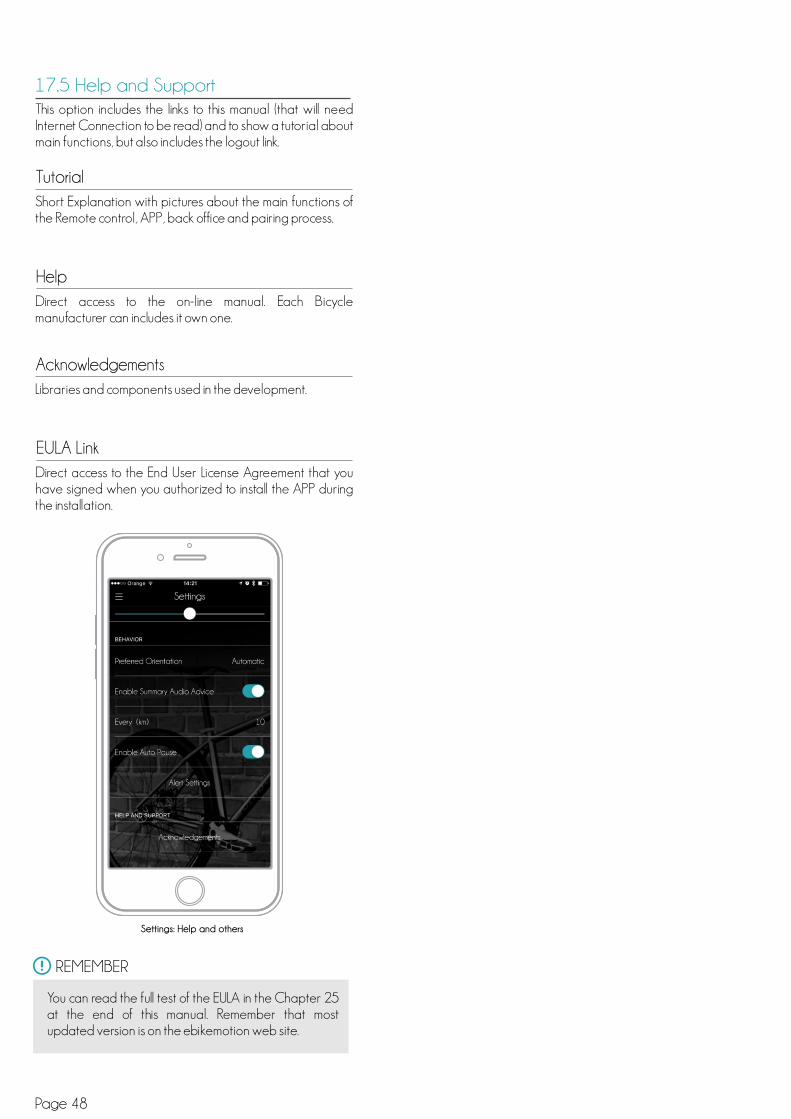
Short Explanation with pictures about the main functions of the Remote control, APP, back office and pairing process.
Direct access to the on-line manual. Each Bicycle manufacturer can includes it own one.
Libraries and components used in the development.
Direct access to the End User License Agreement that you have signed when you authorized to install the APP during the installation.
This option includes the links to this manual (that will need Internet Connection to be read) and to show a tutorial about main functions, but also includes the logout link.
Settings: Help and others
17.5 Help and Support
Tutorial
Help
Acknowledgements
EULA Link
REMEMBER
You can read the full test of the EULA in the Chapter 25 at the end of this manual. Remember that most updated version is on the ebikemotion web site.
Page 48

If you are playing music using your native players like Apple Music by example, the ebikemotion® APP will show automatically to you a new screen with AUX components for see information about current song.
While the music is playing it is possible to control some functions of the player by the iWoc® remote control if you are placed in the Music Aux component in the ebikemotion® APP Monitor.
- Press for a long time button [ D ] will pause the music if it is playing and will playing again if it is in pause mode.
- Press for a long time button [ E] will move to you to the next song of the current playing list.
Page 49
18. MusicIt is possible listen to music while you are riding, using your smartphone as a player. We have designed one special monitor screen to show you information about the active song. In some countries it is possible to use stereo head phones, single or just the speaker of the phone. Please review your local legislation.
To start this function just open the player of your Smartphone and select what you want to listen to, Playlist, Album, etc.
After that, open the ebikemotion® APP. The APP will detect automatically that you are playing music and it will activate an auxiliary Music Screen with all the information about song, player, time, album, etc.
If your eBike has and ebikemotion® compatible remote, sure that you could be able to control the music by your remote. Check the information of your remote to get further information about this topic.
Music
E
D
Music Monitor. It appears if music is playing
Play/Pause D
Next Song E
iWoc® STANDARD: Buttons to control the APP

Keep in mind that your picture can be changed only if you are logged in using our ebikemotion® User System. If you are using Facebook® we will use your Facebook® profile picture and you will have to modify in Facebook® to be changed in the APP.
You can logout the APP and change your user identification if you have several user accounts or you want to introduce a new user. For doing that you will need first logout. If you press the link “LOGOUT” in the profile screen you will logout of the APP and you will need to reintroduce the user. To start to use the APP you will also need one valid user, but you will not lose your license, maps installed will be remained in the APP. This is a good way to share maps with your friends if you have free licenses.
19. User ProfileThe user profile contains information about you. This information is private and is used to make certain calculations like the calories that you consume or to show your profile picture in your shared activities. To modify your personal data, tap on your picture or name on the TOP of the Main Menu.
The system will show you this data to be modified.
- Picture- First Name- Last Name- Gender- Birth Date- Weight- Height
If you update your data it will also be archived in the SERVER, so this is a process that will need Internet Connection.
Settings: User Profile
Profile: Logout or Login
19.1 User Profile
19.2 Logout
Page 50
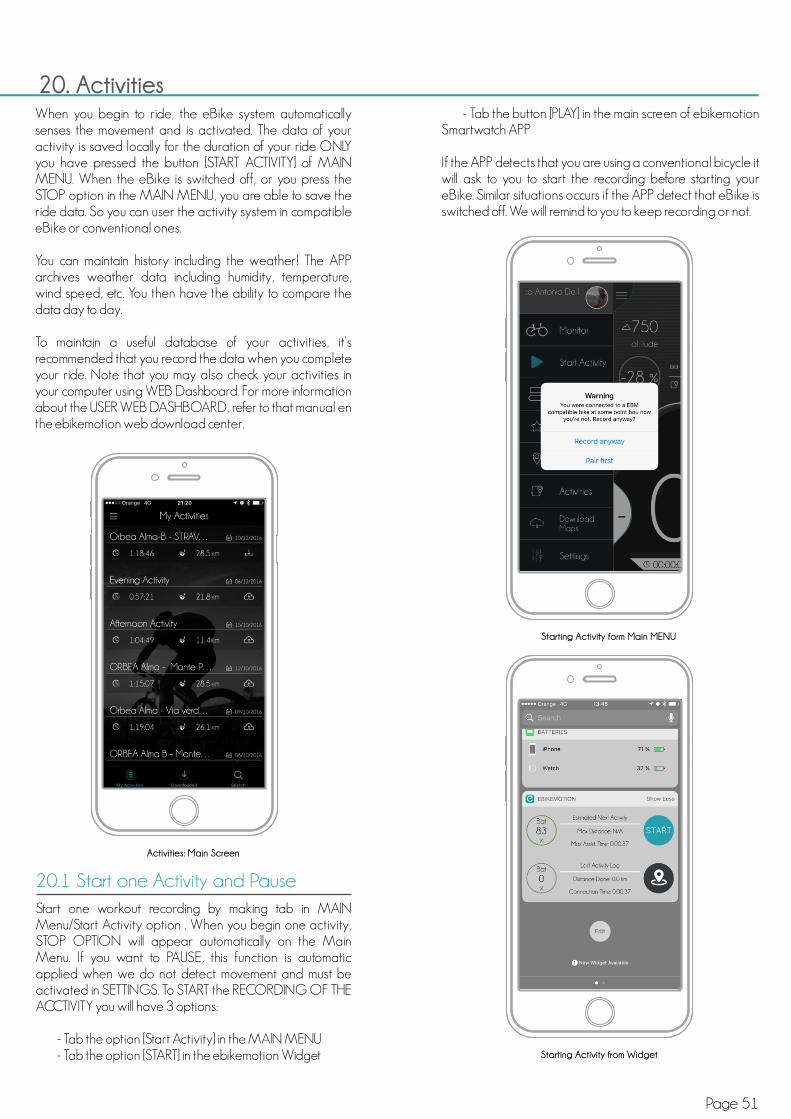
Start one workout recording by making tab in MAIN Menu/Start Activity option . When you begin one activity, STOP OPTION will appear automatically on the Main Menu. If you want to PAUSE, this function is automatic applied when we do not detect movement and must be activated in SETTINGS. To START the RECORDING OF THE ACCTIVITY you will have 3 options:
- Tab the option [Start Activity] in the MAIN MENU- Tab the option [START] in the ebikemotion Widget
Page 51
20. ActivitiesWhen you begin to ride, the eBike system automatically senses the movement and is activated. The data of your activity is saved locally for the duration of your ride ONLY you have pressed the button [START ACTIVITY] of MAIN MENU. When the eBike is switched off, or you press the STOP option in the MAIN MENU, you are able to save the ride data. So you can user the activity system in compatible eBike or conventional ones.
You can maintain history including the weather! The APP archives weather data including humidity, temperature, wind speed, etc. You then have the ability to compare the data day to day.
To maintain a useful database of your activities, it's recommended that you record the data when you complete your ride. Note that you may also check your activities in your computer using WEB Dashboard. For more information about the USER WEB DASHBOARD, refer to that manual en the ebikemotion web download center.
Activities: Main Screen
Starting Activity form Main MENU
Starting Activity from Widget
20.1 Start one Activity and Pause
- Tab the button [PLAY] in the main screen of ebikemotion Smartwatch APP
If the APP detects that you are using a conventional bicycle it will ask to you to start the recording before starting your eBike. Similar situations occurs if the APP detect that eBike is switched off. We will remind to you to keep recording or not.
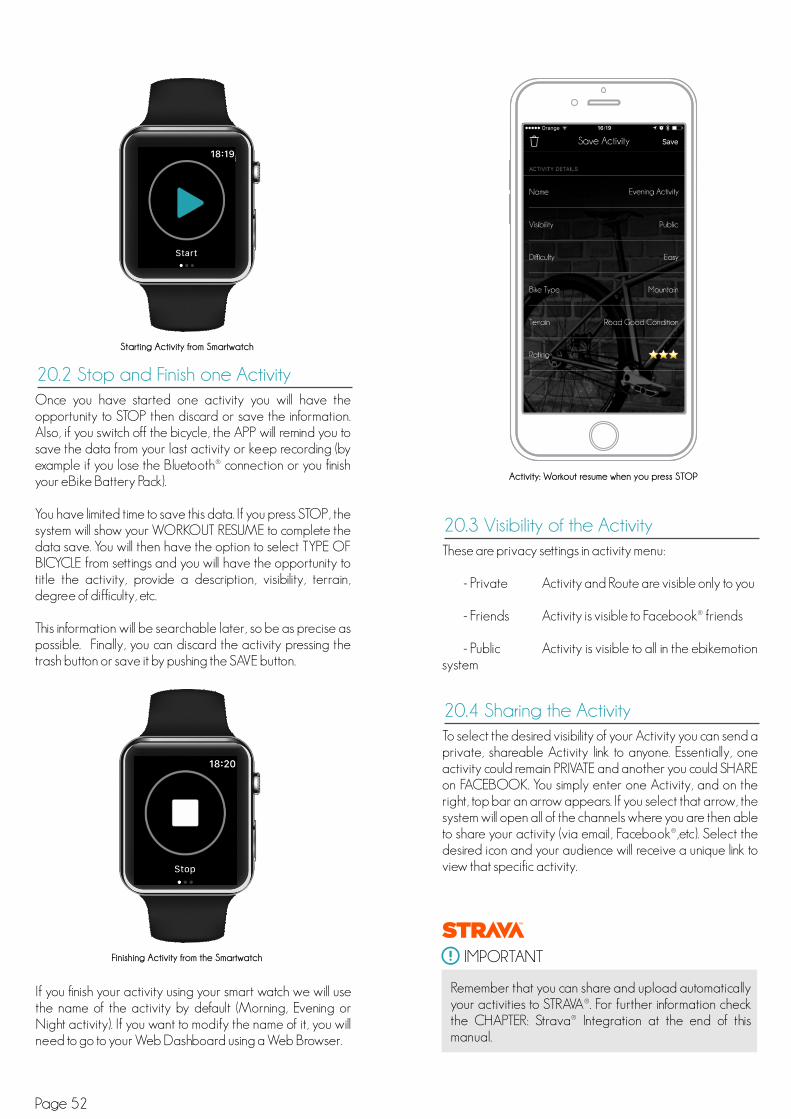
Once you have started one activity you will have the opportunity to STOP then discard or save the information. Also, if you switch off the bicycle, the APP will remind you to save the data from your last activity or keep recording (by example if you lose the Bluetooth® connection or you finish your eBike Battery Pack).
You have limited time to save this data. If you press STOP, the system will show your WORKOUT RESUME to complete the data save. You will then have the option to select TYPE OF BICYCLE from settings and you will have the opportunity to title the activity, provide a description, visibility, terrain, degree of difficulty, etc.
This information will be searchable later, so be as precise as possible. Finally, you can discard the activity pressing the trash button or save it by pushing the SAVE button.
These are privacy settings in activity menu:
- Private Activity and Route are visible only to you
- Friends Activity is visible to Facebook® friends
- Public Activity is visible to all in the ebikemotion system
To select the desired visibility of your Activity you can send a private, shareable Activity link to anyone. Essentially, one activity could remain PRIVATE and another you could SHARE on FACEBOOK. You simply enter one Activity, and on the right, top bar an arrow appears. If you select that arrow, the system will open all of the channels where you are then able to share your activity (via email, Facebook®,etc). Select the desired icon and your audience will receive a unique link to view that specific activity.
If you finish your activity using your smart watch we will use the name of the activity by default (Morning, Evening or Night activity). If you want to modify the name of it, you will need to go to your Web Dashboard using a Web Browser.
Starting Activity from Smartwatch
Finishing Activity from the Smartwatch
20.2 Stop and Finish one Activity
20.3 Visibility of the Activity
20.4 Sharing the Activity
IMPORTANT
Remember that you can share and upload automatically your activities to STRAVA®. For further information check the CHAPTER: Strava® Integration at the end of this manual.
Page 52
Activity: Workout resume when you press STOP
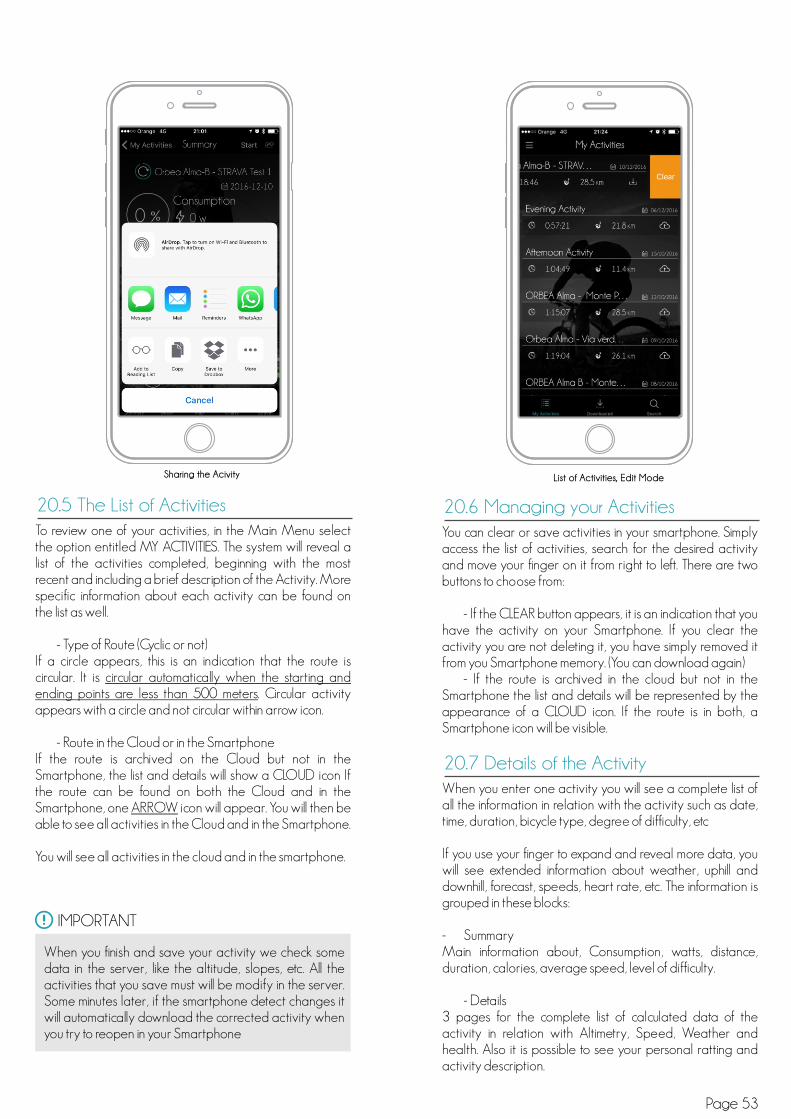
You can clear or save activities in your smartphone. Simply access the list of activities, search for the desired activity and move your finger on it from right to left. There are two buttons to choose from:
- If the CLEAR button appears, it is an indication that you have the activity on your Smartphone. If you clear the activity you are not deleting it, you have simply removed it from you Smartphone memory. (You can download again)
- If the route is archived in the cloud but not in the Smartphone the list and details will be represented by the appearance of a CLOUD icon. If the route is in both, a Smartphone icon will be visible.
To review one of your activities, in the Main Menu select the option entitled MY ACTIVITIES. The system will reveal a list of the activities completed, beginning with the most recent and including a brief description of the Activity. More specific information about each activity can be found on the list as well.
- Type of Route (Cyclic or not)If a circle appears, this is an indication that the route is circular. It is circular automatically when the starting and ending points are less than 500 meters. Circular activity appears with a circle and not circular within arrow icon.
- Route in the Cloud or in the SmartphoneIf the route is archived on the Cloud but not in the Smartphone, the list and details will show a CLOUD icon If the route can be found on both the Cloud and in the Smartphone, one ARROW icon will appear. You will then be able to see all activities in the Cloud and in the Smartphone.
You will see all activities in the cloud and in the smartphone.
When you enter one activity you will see a complete list of all the information in relation with the activity such as date, time, duration, bicycle type, degree of difficulty, etc
If you use your finger to expand and reveal more data, you will see extended information about weather, uphill and downhill, forecast, speeds, heart rate, etc. The information is grouped in these blocks:
- SummaryMain information about, Consumption, watts, distance, duration, calories, average speed, level of difficulty.
- Details3 pages for the complete list of calculated data of the activity in relation with Altimetry, Speed, Weather and health. Also it is possible to see your personal ratting and activity description.
Page 53
List of Activities, Edit Mode
20.6 Managing your Activities20.5 The List of Activities
20.7 Details of the Activity
IMPORTANT
When you finish and save your activity we check some data in the server, like the altitude, slopes, etc. All the activities that you save must will be modify in the server. Some minutes later, if the smartphone detect changes it will automatically download the corrected activity when you try to reopen in your Smartphone
Sharing the Acivity

- MapShows the map with a line between the origin and destination of the Activity
- ChartsThe graph option shows you a dynamic graphic of the main data as speed, heart rate, altitude, pedal-assist level and power if you are using an ebikemotion® compatible eBike.
- Strava®Show the goals, segments and activity into STRAVA®. Activity Map
Activity Graphics: Altitude
Activity Graphics: Speed
Activity Summary
Activity Graphics: Heart Rate
Activity Detail: Altimetry and Speed
Activity Graphics: eBike info (Power Level and Power Supplied)Activity Graphics: Personal rating and comments
Activity Detail: Weather and Health
Page 54

When you access to your workouts, you will see that there are some pictures in the background that could be different, depending of the APP customization that your Brand has made as well as the type of bicycle used (terrain) and the level of difficulty that you had established.
Type of bicycle and level of difficulty is some information that you report each time that you finish a workout. It is very important that you maintain your parameters accurately and regularly, you will find the search engine function very helpful in the future to find your old workouts and recover them.
There are 3 types of bicycles:- Mountain (eBikes included here)- Road- Mixed
There are 3 levels of difficulty:- Easy- Medium- Hard
There are also some important parameters that you can select when you are archiving a workout:
- Visibility (Public, Private, Facebook® Friends)
- Terrain (Road Good Condition, Road Bad Condition, Track good Condition, Track Bad Condition, Mountain)
Page 55
20.8 Level of difficulty
Remember that some pictures as activity use a COLOR CODE to show to the user the level of difficulty (GREEN / Easy, YELLOW / Middle, RED / Hard). Do not use these resource for other objectives in order to keep the consistence of the system. For the first integration ebikemotion will make this job for you. When you take the control your team will have to modify the pictures before upload them
Easy ActivityGREEN Line Middle Activity
YELLOW Line Hard ActivityRED Line
IMPORTANT
Background Example: Activity Mixed Difficulty Easy
Web APP - Activity Mountain Difficulty Hard
Workout Resume: Summary

To introduce your values for the SEARCH. Press the LENS button to start the search.You can always go back and access the ACTIVITY list. When you go back to the last configuration, the parameters are archived and you can then use them as is or further modify them.
You will need an internet connection to download activity from the ebikemotion® server. When you have internet connectivity, activity will be immediately available on your Smartphone accessible to check off-line.
21. Search EngineThe Main Menu includes one access to the Search Engine that utilizes all of the parameters that the ACTIVITY RESUME function requests of you when your ride is complete. This data is used to create a complete database for the rest of the users. This information is accessible by the Smartphone or using the Internet WEB DASHBOARD.
The search engine uses the native controls of the Smartphone, therefore it searches, checks and retrieves information from the server very quickly. If you maintain your parameters accurately and regularly, you will find the search engine function very helpful.
To use the Search Engine you will have to apply each filter and to establish the desired filter comparison. The comparison and value are dynamic and depends on the type of parameter that you are managing. So for a parameter like date values: From to filter, from filter. In distance could be Min distance, Max distance, etc.
Activities: Search Engine
The activities that you have downloaded are archived and accessible in the Main Menu section “Downloaded Activities”. You will see all of them with the Smartphone icon that says the activity is downloaded in the smartphone. You will be able to see off-line all details of it and also it is possible to DELETE, the activity of your Smartphone. When you do this the activity is DELETED only in the Smartphone and the user can download again later.
In order to DELETE any activity that you have downloaded, move your finger on the list of Downloaded Activities from right to left over the activity that you want to remove. The system will show you a button on the right part to delete.
Press on the button and the activity will then be deleted.
IMPORTANT
Remember that you can always keep your activities in the CLOUD and download when you consider. That is a good way to save memory in your smartphone. The activities will be always in the CLOUD if you remove from your smartphone to recover in the future.
List of Activities, Edit Mode
Page 56
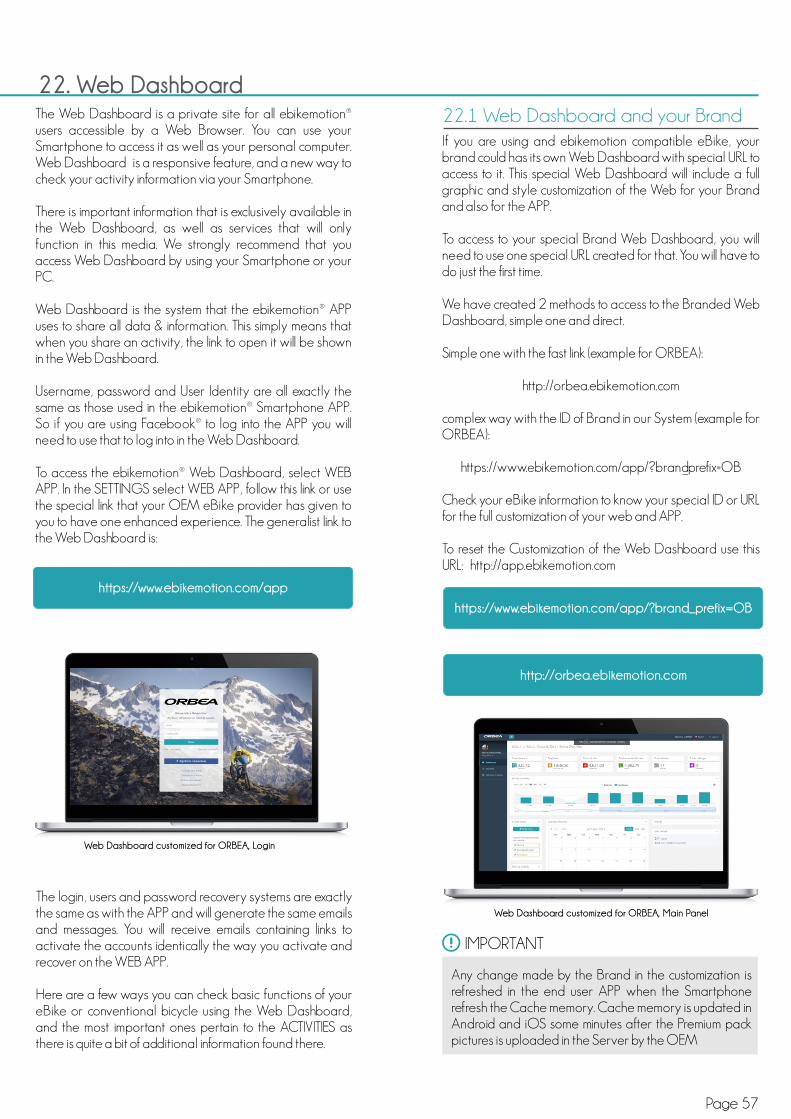
Page 57
22. Web DashboardThe Web Dashboard is a private site for all ebikemotion® users accessible by a Web Browser. You can use your Smartphone to access it as well as your personal computer. Web Dashboard is a responsive feature, and a new way to check your activity information via your Smartphone.
There is important information that is exclusively available in the Web Dashboard, as well as services that will only function in this media. We strongly recommend that you access Web Dashboard by using your Smartphone or your PC.
Web Dashboard is the system that the ebikemotion® APP uses to share all data & information. This simply means that when you share an activity, the link to open it will be shown in the Web Dashboard.
Username, password and User Identity are all exactly the same as those used in the ebikemotion® Smartphone APP. So if you are using Facebook® to log into the APP you will need to use that to log into in the Web Dashboard.
To access the ebikemotion® Web Dashboard, select WEB APP. In the SETTINGS select WEB APP, follow this link or use the special link that your OEM eBike provider has given to you to have one enhanced experience. The generalist link to the Web Dashboard is:
The login, users and password recovery systems are exactly the same as with the APP and will generate the same emails and messages. You will receive emails containing links to activate the accounts identically the way you activate and recover on the WEB APP.
Here are a few ways you can check basic functions of your eBike or conventional bicycle using the Web Dashboard, and the most important ones pertain to the ACTIVITIES as there is quite a bit of additional information found there.
https://www.ebikemotion.com/app
https://www.ebikemotion.com/app/?brand_prefix=OB
http://orbea.ebikemotion.com
Web Dashboard customized for ORBEA, Login
If you are using and ebikemotion compatible eBike, your brand could has its own Web Dashboard with special URL to access to it. This special Web Dashboard will include a full graphic and style customization of the Web for your Brand and also for the APP.
To access to your special Brand Web Dashboard, you will need to use one special URL created for that. You will have to do just the first time.
We have created 2 methods to access to the Branded Web Dashboard, simple one and direct.
Simple one with the fast link (example for ORBEA):
http://orbea.ebikemotion.com
complex way with the ID of Brand in our System (example for ORBEA):
https://www.ebikemotion.com/app/?brand_prefix=OB
Check your eBike information to know your special ID or URL for the full customization of your web and APP.
To reset the Customization of the Web Dashboard use this URL: http://app.ebikemotion.com
22.1 Web Dashboard and your Brand
IMPORTANT
Any change made by the Brand in the customization is refreshed in the end user APP when the Smartphone refresh the Cache memory. Cache memory is updated in Android and iOS some minutes after the Premium pack pictures is uploaded in the Server by the OEM
Web Dashboard customized for ORBEA, Main Panel

The Main Menu shows all the links to the active options. Updates to options will appear here, including promotions, online shop accessories, etc. The elements of the Main Menu are:
- My Profile (with your picture in the top)- Enables you to modify basic profile options- Auxiliary elements (Language and logout)
- Dashboard
- Routes and Tracks
- Calendar of events
The user profile contains information about you. This information is private and is used to calculate things like calorie consumption or to show your profile picture in your shared activities. To modify your personal data, tap on your picture or name on the TOP of the Main Menu.
The system will provide direction as to how to modify this data. You can change your picture if you are logged in using the ebikemotion® user system. If you are using Facebook® the ebikemotion® App will use your Facebook® picture profile and you will have to modify it in Facebook® to change your picture in the APP.
The following information can be edited in your profile:
- Picture- First Name- Last Name- Gender- Birth Date- Weight- Height
This information is exactly the same that you have in your APP, and it is synchronized with the ebikemotion® APP information. If you update your data it will also be archived in the APP.
22.4 The user Profile
22.3 Main Dashboard Menu
IMPORTANT
Any change made by the Brand in the customization is refreshed in the end user APP when the Smartphone refresh the Cache memory. Cache memory is updated in Android and iOS some minutes after the Premium pack pictures is uploaded in the Server by the OEM
If you are using and ebikemotion compatible eBike, your brand could has its own Web Dashboard with it own color style and look and feel. When we detect one eBike compatible with the Premium Pack system, the APP automatically download some graphics and extra information for your eBike, like backgrounds, fonts, help links, etc. To understand how it works check this:
When the Premium Pack customization is applied and how works the process?
1. The user connects the eBike with the APP
2. APP sends a request to get the eBike VIN Number (eBike Serial Number)
3. APP gets the answer with the VIN (that contains the OEM PREFIX, by example RM)
4. APP sends the OEM Prefix to the Server to get the Premium Pack if that exist.
5. Premium Pack is applied to the APP until the VIN of the APP changes
22.2 APP Customization
APP Customized for a BRAND
Web Dashboard customized, Main Panel
Page 58

Page 59
If you are using and ebikemotion compatible eBike, your brand could has its own Web Dashboard with sWeb have created and special system to customize the APP for the brand of your eBike. When we detect one eBike compatible with the Premium Pack system, the APP automatically download some graphics and extra information for your eBike, like backgrounds, fonts, help links, etc. To understand how it works check this:
When the Premium Pack customization is applied and how works the process?
1. The user connects the eBike with the APP
2. APP sends a request to get the eBike VIN Number (eBike Serial Number)
3. APP gets the answer with the VIN
4. System wait that user makes and RECORD one activity
5. If Activity is RECORDED:
a. APP sends to the Server (VIN / USER / PHONE BRAND / IT OPERATOR)
b. Server checks if the VIN number is SINGLE (WITHOUT OWNER)
c. If VIN is single Server sends one email to the user to makes owner if he wants and inform that he can activates the “eBike Protection Service”
22.5 The Owner of the eBike
APPCustomization
IMPORTANT
We have created an special area to control who is the owner of the bicycle. This area is available in the Web Dashboard. It is important that you liberate your eBike is you sell, so the new proprietary could be able to make owner and enjoy of the same services than you.
Web Dashboard, user Profile
User Connectthe APP to eBike
User Connectthe APP to eBike
CustomizationApplied
User makes owner byemail link
Recovering theCustomizaction
Pack
If eBike has notowner - Send Invitation
Getting eBikeVIN Number
Getting eBikeVIN Number
Ask for CustomizationPacket to the Server
Waiting for userworkout
15
5
4
4
2
2
3
3
APP Customizacion Process
Owner of eBike Process
1
Ownerof eBike

23. Motor MapsThe Web Dashboard is a private site for all ebikemotion® users accessible by a Web Browser. You can use your Smartphone to access it as well as your personal computer. Web Dashboard is a responsive feature, and a new way to check your activity information.
The APP includes capabilities to control 3 important topics in relation with the engine power supply:
- Maximum power supply- Maximum power supply of each level- Full configuration of Motor Maps- Configuration of Customer Custom Map
For each function the system support 2 messages (Reading and Writing), that means in some eBike configurations will be only possible to read the values and in other ones read and write new values. The possibility of modify the values will depend of the eBike manufacturer integration and could be not available in all eBikes. Check in the manual or special specifications of your eBike manufacturer.
This function will give to you the possibility to establish a maximum power supply for the system in percent. That means if the system can give to you 250W of maximum power what normally is 36V x 7A (252W), you could be able to limit the max power of the motor to 50%. That will generate a 50% of power reduction on each power assistance level. In this example the maximum power supply of the eBike would be 36V x 3.5A = 126W.
If this feature is supported by the motor controller of your eBike you will see a bar to select the new max percent and the option to save it.
Similar to the previous function this other one will give to you the possibility to establish a maximum power supply for each power assistance level in percent. If your eBike includes by example 3 levels you will see 3 vertical bars. You can see and modify the maximum power assistance of each level by press on each portrait bar and moving the bar that appears in the bottom of the screen.
Remember that you need to press SAVE button to send the changes to the motor. If you go out without press SAVE changes will be not applied. Check that your configuration is made. Some hardware not based in CAN BUS are slow and perhaps the saving process requires more than one try.
23.1 Maximum power supply
23.2 Maximum power of each level
IMPORTANT
These functions are only supported if the eBike includes motor controllers manufactured by ebikemotion® Technologies as well as some special integrations for other motor manufacturers.
Maximum Power Supply Configuration Power Supply Configuration (level by level)
Page 60

Page 61
This map is one special extra map that the eBike could support. It is establish and extra motor map configuration that is linked to one activity. The user can modify the points and the configuration will be archived with the activity for future recovering or for the user of other users. If your eBike support the Custom Map you will have an extra power assistance level in your eBike controlled by your remote.
Also this feature is supported for the special feature of the ebikemotion® platform. The AUTOMATIC CUSTOMIZED MAPS. This feature calculates a motor map depending of your way and style of use of the eBike. Server calculates the best curves for you and sends to your APP automatically a new personalized map to integrate in your eBike. This service is Pay in App service.
This feature is pending of implementations. In further updates it will be included and explained.
23.4 Customer Custom Map
23.5 Automatic Motor Maps
Custom Map: editing a point
If this functions is supported in your eBike the APP will show to you the motor map configuration for each power assistance level and in some integrations will give to you the possibility to make changes in the values.
The motor map system takes as reference 5 speed points at 5, 10, 15, 20 and 25 km/h and shows the power of the motor from 0 to 100% for each speed point. The junction of all point create a “motor map curve”.
When you go this function you will see a number of maps in the top of the screen. Select one of them and the system will show to you the map graphic. If the system leaves to you modify the map you will see an bar in bottom that is activated when you press on each point of the motor map. Move the bar to modify the value. Take in mind that the APP will control some values out of range. So it has no sense that the eBike will give to you full power a 5km/h of speed by example. Be careful with map configuration.
23.3 Full configuration of Motor Maps
Motor Map Representation: Example 1
Motor Map Representation: Example 2
Motor Map Representation: Example 3

24. Extended Functionality
This little function is really interesting to start to use your APP in fast way. As you know iOS, from version 10, includes the Widget functionality and Android some time before. This function leaves to you to configure in one special page of your phone User Interface a little container with some direct functions that operates with the main APP. It is like small view and commander for the main APP.
In ebikemotion® we have included this option to enjoy and improve your user experience. Please go to your Widget configuration menu in your phone. (in the iPhone by example, is into the left of the main app screen). Press edit button modify your widget list to activate the “Ebikemotion” one.
Once you have done the ebikemotion® Widget activation, you will see in the widget screen a little panel for the APP with this information:
- Estimations for Next Activity- Last Activity Log
The estimations for the Next Activity are based in your last workout done that is archived in the system. We will give to you details about the distance that you can ride and time that can use your eBike with remain battery, taking in mind last status. If you press the START button the widget will call to the APP and a new activity will start.
This way to START A NEW ACTIVITY from the WIDGET is very useful, because with a simple movement you can do it.
At the same time the LAST ACTIVITY LOG button will move to you to the APP to see the information of the LAST POSITION AND STATUS. Good and fast way to know where was your eBike and where it is, if you have the GPS Tracking module.
The widget can be expand the information making press in the title (show more and show less). By default we show only the estimation and button to start new activity. You can expand the widget to show all the information by tap into this option.
Siri is a computer program that works as an intelligent personal assistant and knowledge navigator, part of Apple Inc.'s iOS, watchOS, macOS, and tvOS operating systems. The feature uses a natural language user interface to answer questions, make recommendations, and perform actions by delegating requests to a set of Web services. The software, both in its original version and as an iOS feature, adapts to the user's individual language usage and individual searches (preferences) with continuing use, and returns results that are individualized.
We have included some compatibility with this feature, but taking in mind that there are several accent and gender combinations for the voice of Siri that makes little bit difficult the understanding we have limited to a few commands.
The actual supported SIRI commands are in relation with the moment to start, pause or stop the activity a some examples are:- English:
start / pause / stop a workout with Ebikemotion
- Spanish:“Comienza un entrenamiento usando Ebikemotion”
24.2 iOS, SIRI and Voice Control
24.1 ebikemotion APP Widget®
IMPORTANT
Some information of the widget is in relation with eBikes, but you can also use it, if you have a conventional bicycle. The only difference is that you will not see the eBike information.
iPhone: ebikemotion Widget
Page 62

Page 63
This little function is really interesting to start to use your APP in fast way. As you know iOS, from version 10, includes the Widget functionality and Android some time before. This function leaves to you to configure in one special page of your phone User Interface a little container with some direct functions that operates with the main APP. It is like small view and commander for the main APP.
Once the setup is complete you can start, stop, pause and resume recording using the watch or through voice commands like "start a workout", "start a bike ride" and "start a run.” You can start to record one activity directly from your smart watch.
You will be able to see the following metrics and features when using the ebikemotion® APP for Android Wear or Apple Watch:
- Speed- Power assistance Level- Distance done- Time of the Activity- Range and battery level- Last Position
The Smartwatch will give to you the possibility to open the APP in remote without handing the phone, that you can leave safety in your pocket.Depending of the platform (Android or iOS) the installation process is a little bit different and we will describe in the next chapter.
The Smartwath APP is very simple, and these are the main elements:
W.1 MAIN DATAW.2 STATUS OF RECORDINGW.3 TYPE OF INFORMATIONW.4 AUX DATA
Open the App in your Smartwatch. You will see 3 main options:
- START / STOPIf there is not workout running you will be able to start a
new one by the PLAY button that appears in the screen. If you're recording a workout with the APP running you will be able to STOP and SAVE the activity. The name of activity will be saved with the default name. You can rename later the activity using the Web Dashboard.
- MONITORIf you want to view your eBike data without starting a
workout, you can go to the Monitor. Monitor open to you 3 screens with this information:
- EBIKE POWER DATA- Current Speed in number- Current Battery Level in the circle colored
perimeter
- EBIKE RANGE DATA (with current battery)- Estimated remain time- Estimated remain distance- Distance that you have done in your
workout and to do in the circle colored perimeter
- EBIKE RIDE DATA- Time expended in your workout- Distance rided in your workout
- LAST POSITION INFO (only for eBikes)Open a Map with the last position of your eBike
when you switched off.
24.3 Smartwatch Integration
ebikemotion APP in the smart watchs
W3
W2 W4
W1
Operation with Smart watch

When you set up your Apple Watch, you get the choice to install all your apps now or later. If you choose Install All, any apps on your iPhone that are compatible with Apple Watch will sync to your watch, included ebikemotion® APP. And any updates to apps on your iPhone, or any future app purchases, will automatically sync. If you don't want all your app purchases to automatically sync:
1. Open the Apple Watch app on your iPhone and tap the My Watch tab.
2. Tap General, then turn off Automatic App Install.
If you select Choose Later, the apps on your iPhone that are compatible with Apple Watch won't automatically sync. If you want to sync an app that's compatible with your Apple Watch:
3. Open the Apple Watch app on your iPhone and tap the My Watch tab.
4. Scroll to the app that you want to sync, then tap it.5. Turn on Show App on Apple Watch.
If an app doesn't work, try updating to the latest version of watchOS. If you still need help get help in the Apple Help and Support Center.
The information of the activity made with ebikemotion® APP is full compatible with Apple Health and you will see your workouts in the Apple Activity APP.
Ride Data
Power and Speed
Start and Activity
Stop and Record
Last Position Menu
Estimation of Range
Go to the Monitor
Last Position Map
Installing APP in Apple Watch
Apple Watch: Add the APP in the iPhone
Page 64

Page 65
Use these steps to remove an app from your watch:
1. Open the Apple Watch app on your iPhone and tap the My Watch tab.
2. Scroll to the app you want to remove, then tap it.
3. Turn off Show App on Apple Watch.
Open ebikemotion® APP (version 1.0.1 and higher) and you should now be able to see and use ebikemotion® APP on your watch.
If you're the proud owner of a new Android Wear watch, you may be wondering how to install ebikemotion® APP in your Smart watch. Well wonder no more, as we reveal everything you need to know.
a. Automatic Download:Connect it up to your Android phone, and – hey
presto – all your smartphone apps are instantly Android Wear apps too. That is to say, notifications and alerts appear on your wrist automatically, with no extra configuration required.
b. Manual Download,:Start browsing the apps using the Android Wear
app and search ebikemotion. Press the [INSTALL] button to download it.
2. Now you can open the APP in your watch and start to work with it.
1. Download Android Wear for your phone or Apple Watch. To check if your smartwatch is connected to your phone, open the Android Wear app on your phone and make sure that is says Connected below the name of your watch. No you can download in your watch all the APPs compatible with the Android wear that you have installed in your phone or download one by one:
Uninstall the APP on your Apple Watch
Installing APP in Android Wear
Android Wear Setup
Android Wear Settings
Android Wear APP selection

Strava™ is a website and mobile app used to track athletic activity via GPS. Its headquarters are located in San Francisco, California. The most popular activities tracked using the software are cycling and running, in March 2015, there are an estimated 1 million active users and around 200,000 premium users and the volume is growing day by day.
Some people use STRAVA™ because the site software provides a ranking of times on route segments, including top male and female performance. The current top male and female athletes for each section are awarded King of the Mountain (KOM) or Queen of the Mountain (QOM) respectively. There is ability to comment on, and give accolades on, performances. However, activities can be kept private and therefore kept unseen by other members. Depending on map zoom level, the most popular segments will be displayed on geographical search.
Taking in mind that STRAVA™ also supports activities made with conventional bicycles as well as eBikes and also that you could be and STRAVA™ user, we have create a full compatibility and transparent connection between STRAVA and ebikemotion® platform.
There are some important features in relation with STRAVA™ and ebikemotion® APPS that you need to know:
- If you are STRAVA™ user you can login in STRAVA™ from the ebikemotion® WEB Dashboard using your STRAVA™ user account.
- Your activities will be uploaded automatically in STRAVA™ if you want (one by one or all of them automatically when you do it)
- You can see the STRAVA™ segment information in the Activity detail in the ebikemotion® APP and in the ebikemotion® Web Dashboard
- If you have done your activity with an ebikemotion® compatible eBike connected to the APP we will upload to STRAVA™ as eBike activity, if not, it will be uploaded as conventional bicycle.
24.4 STRAVA™ Integration
IMPORTANT
In the manual you can find the STRAVA™ logo, that means that there is a functionality in relation with the STRAVA™ operation.
REMEMBER: you don't need to run STRAVA™ and ebikemotion® APP at the same time. You can record your workout using ebikemotion® APP and we will upload to STRAVA™. You will save a lot of battery in your smartphone.
You must make this process using the Web Dashboard, so first of all create your STRAVA™ account in STRAVA™ web page or Stava® APP or if you are STRAVA™ user, follow these steps:
1. Go the ebikemotion web user Dashboard or the dashboard that your eBike manufacturer has prepared for you. Some examples:
https://ebikemotion.com/app/http://orbea.ebikemotion.comhttps://www.ebikemotion.com/app/?brand_prefix=OB
2. Login with your user account in ebikemotion®
3. Go to the web dashboard option (MY PROFILE in the left top part of the web page.
4. Press the button [Connect with STRAVA™]
5. The web will move to you to the STRAVA™ OFFICIAL WEB PAGE. You will have login in STRAVA™.
6. STRAVA™ will ask to you to Authorize to ebikemotion to connect with your STRAVA® account.
7. Press [ACCEPT].
Login in STRAVA™
Activation of STRAVA™ connection from the User Profile Panel
Confirmation in STRAVA™ to publish
Page 66
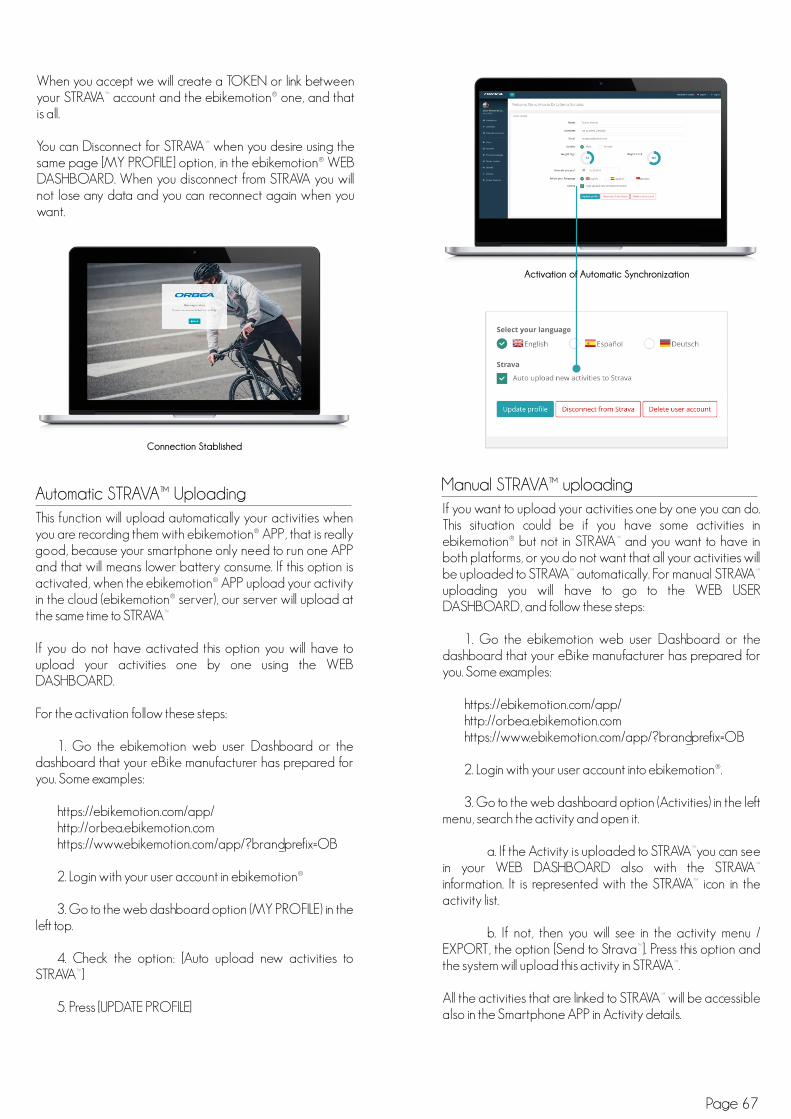
Page 67
This function will upload automatically your activities when you are recording them with ebikemotion® APP, that is really good, because your smartphone only need to run one APP and that will means lower battery consume. If this option is activated, when the ebikemotion® APP upload your activity in the cloud (ebikemotion® server), our server will upload at the same time to STRAVA™
If you do not have activated this option you will have to upload your activities one by one using the WEB DASHBOARD.
For the activation follow these steps:
1. Go the ebikemotion web user Dashboard or the dashboard that your eBike manufacturer has prepared for you. Some examples:
https://ebikemotion.com/app/http://orbea.ebikemotion.comhttps://www.ebikemotion.com/app/?brand_prefix=OB
2. Login with your user account in ebikemotion®
3. Go to the web dashboard option (MY PROFILE) in the left top.
4. Check the option: [Auto upload new activities to STRAVA™]
5. Press [UPDATE PROFILE]
If you want to upload your activities one by one you can do. This situation could be if you have some activities in ebikemotion® but not in STRAVA™ and you want to have in both platforms, or you do not want that all your activities will be uploaded to STRAVA™ automatically. For manual STRAVA™ uploading you will have to go to the WEB USER DASHBOARD, and follow these steps:
1. Go the ebikemotion web user Dashboard or the dashboard that your eBike manufacturer has prepared for you. Some examples:
https://ebikemotion.com/app/http://orbea.ebikemotion.comhttps://www.ebikemotion.com/app/?brand_prefix=OB
2. Login with your user account into ebikemotion®.
3. Go to the web dashboard option (Activities) in the left menu, search the activity and open it.
a. If the Activity is uploaded to STRAVA™you can see in your WEB DASHBOARD also with the STRAVA™ information. It is represented with the STRAVA™ icon in the activity list.
b. If not, then you will see in the activity menu / EXPORT, the option [Send to Strava™]. Press this option and the system will upload this activity in STRAVA™.
All the activities that are linked to STRAVA™ will be accessible also in the Smartphone APP in Activity details.
When you accept we will create a TOKEN or link between your STRAVA™ account and the ebikemotion® one, and that is all.
You can Disconnect for STRAVA™ when you desire using the same page [MY PROFILE] option, in the ebikemotion® WEB DASHBOARD. When you disconnect from STRAVA you will not lose any data and you can reconnect again when you want.
Connection Stablished
Automatic STRAVA™ Uploading Manual STRAVA™ uploading
Activation of Automatic Synchronization
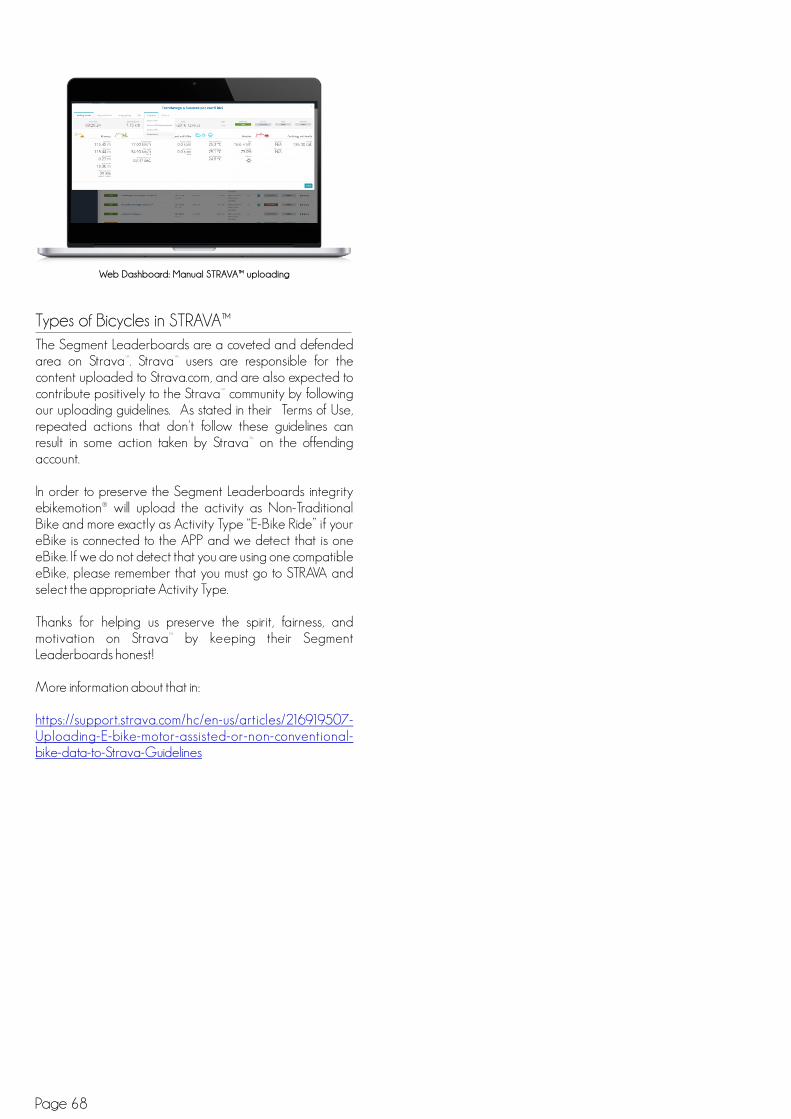
The Segment Leaderboards are a coveted and defended area on Strava™. Strava™ users are responsible for the content uploaded to Strava.com, and are also expected to contribute positively to the Strava™ community by following our uploading guidelines. As stated in their Terms of Use, repeated actions that don't follow these guidelines can result in some action taken by Strava™ on the offending account.
In order to preserve the Segment Leaderboards integrity ebikemotion® will upload the activity as Non-Traditional Bike and more exactly as Activity Type “E-Bike Ride” if your eBike is connected to the APP and we detect that is one eBike. If we do not detect that you are using one compatible eBike, please remember that you must go to STRAVA and select the appropriate Activity Type.
Thanks for helping us preserve the spirit, fairness, and motivation on Strava™ by keeping their Segment Leaderboards honest!
More information about that in:
https://support.strava.com/hc/en-us/articles/216919507-Uploading-E-bike-motor-assisted-or-non-conventional-bike-data-to-Strava-Guidelines
Types of Bicycles in STRAVA™
Web Dashboard: Manual STRAVA™ uploading
Page 68
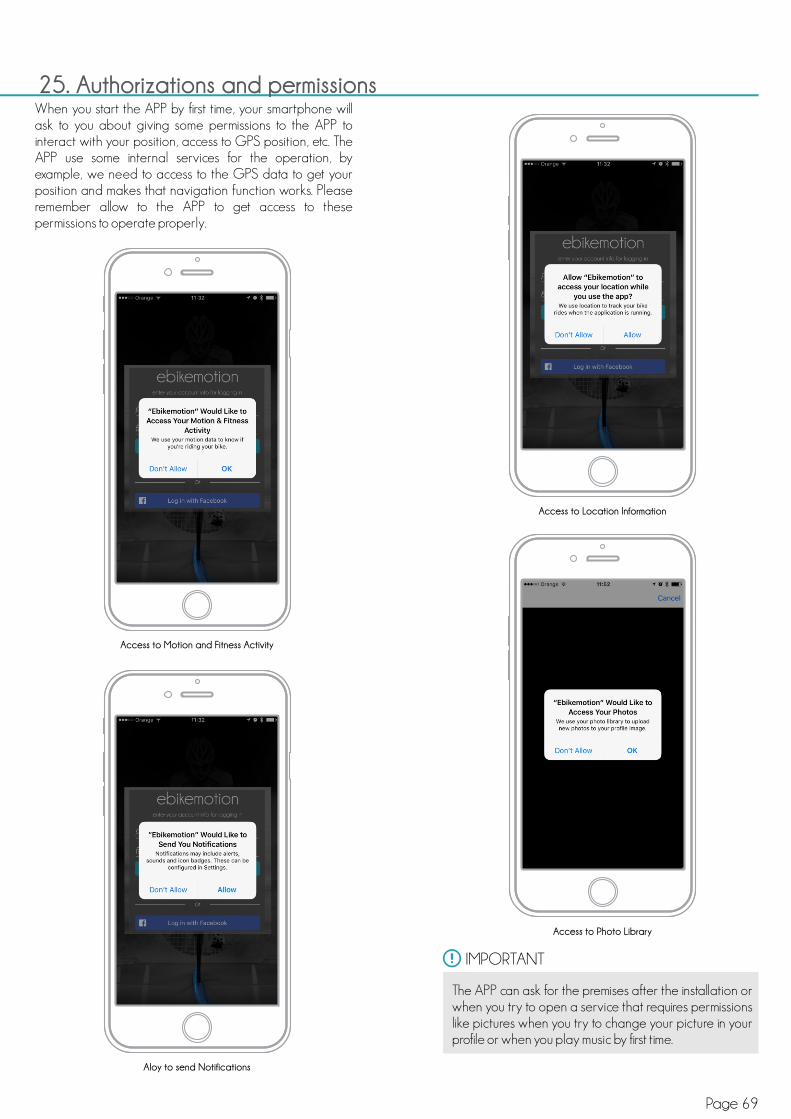
25. Authorizations and permissionsWhen you start the APP by first time, your smartphone will ask to you about giving some permissions to the APP to interact with your position, access to GPS position, etc. The APP use some internal services for the operation, by example, we need to access to the GPS data to get your position and makes that navigation function works. Please remember allow to the APP to get access to these permissions to operate properly.
Access to Motion and Fitness Activity
Aloy to send Notifications
Access to Location Information
Access to Photo Library
IMPORTANT
The APP can ask for the premises after the installation or when you try to open a service that requires permissions like pictures when you try to change your picture in your profile or when you play music by first time.
Page 69

Page 70
Activation of Siri Commands Access to your Music Library
Applications with control to one Functionality
IMPORTANT
Remember that you can also change the APP permissions in your Smartphone settings. By example in iOS go to SETTINGS / PRIVACY
25.2 Privacy Polity
End User License AgreementLast revised on July 1, 2016
This End User License Agreement (the “EULA”) is a binding legal agreement between you, as an individual or entity, and EBIKEMOTION® TECNOLOGIES S.L. (“Ebikemotion”). By downloading, installing, or using this application for Android, iOS or other mobile platform, as applicable (the “Software”), you agree to be bound by the terms of this EULA. If you do not agree to the EULA, do not check the “I accept the terms” box and do not use the Software.
You agree that installation or use of the Software signifies that you have read, understood, and agree to be bound by the EULA.The Software is provided to you under this EULA solely for your private, non-commercial use. Use of the Software or of the Ebikemotion content, information, membership functionality, job search, recruiting, marketing, sales or any other services (“Ebikemotion Service”) within an organization or the use of multiple copies of the Software (except a back-up copy) requires a commercial license for the Software.
- Description of SoftwareThe Software is a downloadable software application that enables you to access Ebikemotion functionality directly from your Android, iPhone, iPad or other mobile device supported by Ebikemotion (“Device”).You may download the Software whether or not you use the Ebikemotion Service, but you must associate it with your Ebikemotion account to enable its full functionality.
- LicenseEbikemotion hereby grants you, subject to the terms and conditions of this Agreement, a non-exclusive, non-transferable personal license to:
Next Page:
End User License Agreement
When you install the APP from the Store (Apple or Google Play) you have full access to the last version of the PRIVACY POLICY. Please refer to it for any doubt. On-line version is always the last updated.
- U.S. Government Restricted RightsThe Software and accompanying documentation are provided with restricted rights. Use, duplication, or disclosure by the U.S. Government is subject to the restrictions as set forth in subparagraph (c)(1)(iii) of DFARS 252.227-7013 (The Rights in Technical Data and Computer Software) or subparagraphs(c)(1) and (2) of 48 CFR 52.227-19 (the Commercial Computer Software – Restricted Rights), as applicable. The manufacturer is Ebikemotion Tecnologies S.L. , Los Orfebres 10, Palencia, Castilla y León, Spain, CP 34004.
- Open SourceThe Software may contain or be provided together with open source software. Each item of open source software is subject to its own applicable l i c e n s e t e r m s , w h i c h c a n b e f o u n d a t https://www.ebikemotion.com/legal/mobile/open-source-mobile-apps and/or in the Software documentation or the applicable help, notices, about or source files. Copyrights to the open source software are held by the respective copyright holders indicated therein.
- IndemnificationBy accepting the EULA, you agree to indemnify and otherwise hold harmless Ebikemotion Tecnologies S.L., its officers, employers, agents, subsidiaries, affiliates and other partners from any direct, indirect, incidental, special, consequential or exemplary damages arising out of, relating to, or resulting from your use of the Software or any other matter relating to the Software.
- Limitation of LiabilityYOU EXPRESSLY UNDERSTAND AND AGREE THAT EBIKEMOTION SHALL NOT BE LIABLE FOR ANY INDIRECT, INCIDENTAL, SPECIAL, CONSEQUENTIAL OR EXEMPLARY DAMAGES, INCLUDING BUT NOT LIMITED TO, DAMAGES FOR LOSS OF PROFITS, GOODWILL, USE, DATA OR OTHER INTANGIBLE LOSSES (EVEN IF EBIKEMOTION HAS BEEN ADVISED OF THE POSSIBILITY OF SUCH DAMAGES). IN NO EVENT WILL EBIKEMOTION’S AGGREGATE LIABILITY TO YOU EXCEED THE AMOUNT OF LICENSING FEES PAID BY YOU TO EBIKEMOTION. THES E L I M ITATIO N S AND EXCLUSIO N S W IL L APPLY NOTWITHSTANDING ANY FAILURE OF ESSENTIAL PURPOSE OF ANY LIMITED REMEDY. SOME JURISDICTIONS DO NOT ALLOW THE LIMITATIONS OF DAMAGES AND/OR EXCLUSIONS OF LIABILITY FOR INCIDENTAL OR CONSEQUENTIAL DAMAGES. ACCORDINGLY, SOME OF THE ABOVE LIMITATIONS MAY NOT APPLY TO YOU.
- Export RestrictionsThis EULA is expressly made subject to any laws, regulations, orders or other restrictions on the export from the European Union of the Software or information about such Software which may be imposed from time to time by the government of Spain. You shall not export the Software or information about the Software without consent of Ebikemotion and compliance with such laws, regulations, orders or other restrictions.
- GeneralThe EULA between you and Ebikemotion Tecnologies S.L. will be governed by and construed in accordance with the laws of Palencia, Castilla y León, España without regard to conflict of laws principles. The exclusive forum for any disputes arising out of or relating to this EULA shall be an appropriate federal court or state court sitting in the County Palencia, Castilla y León España. The EULA constitutes the entire agreement between you and Ebikemotion regarding the Software. If any provision of this EULA is held by a court of competent jurisdiction to be contrary to law, such provision will be changed and interpreted so as to best accomplish the objectives of the original provision to the fullest extent allowed by law and the remaining provisions of this EULA will remain in full force and effect. You may not assign this EULA, and any assignment of this EULA by you will be null and void. Ebikemotion, Ebikemotion (stylized) and other Ebikemotion logos and names are trademarks of Ebikemotion Tecnologies S.L.. You agree not to display or use these trademarks in any manner without Ebikemotion’s prior, written permission. The section titles and numbering of this EULA are displayed for convenience and have no legal effect.
- Use the Software for your own personal use;- Install the Software on only one Device; and- Make one copy of the Software in any machine readable form
solely for back-up purposes, provided you reproduce the Software in its original form and with all proprietary notices on the back-up copy.
For clarity, the foregoing is not intended to prohibit you from installing and backing-up the Software for another Device on which you also agreed to the EULA. Each instance of this EULA that you agree to grants you the aforementioned rights in connection with the installation, use and back-up of one copy of the Software on one Device.
- TitleTitle, ownership and all rights (including without limitation intellectual property rights) in and to the Software shall remain with Ebikemotion. Except for those rights expressly granted in this EULA, no other rights are granted, whether express or implied.
- RestrictionsYou understand and agree that you shall only use the Software in a manner that complies with any and all applicable laws in the jurisdictions in which you use the Software. Your use shall be in accordance with applicable restrictions concerning privacy and intellectual property rights.
You may not:- Create derivative works based on the Software;- Use the software for any purpose other than as described herein;- Copy or reproduce the Software except as described in this EULA;- Sell, assign, license, disclose, distribute or otherwise transfer or
make available the Software or any copies of the Software in any form to any third parties;
- Alter, translate, decompile, reverse assemble or reverse engineer the Software, or attempt to do any of the foregoing, except to the extent this prohibition is not permitted under an applicable law; or
- Remove or alter any proprietary notices or marks on the Software.
- Personal Information and PrivacyWe may ask you to provide certain information about you during the Software downloading process. All personal information that you provide to us will be governed by the Privacy Policy, which is available at https://www.ebikemotion.com/legal/privacy-policy. You may use the Software whether or not you use the Ebikemotion Service. If you use the Ebikemotion Service, the personal information you provide to Ebikemotion will also be governed by the Privacy Policy. By choosing to use the Software and/or the Ebikemotion Service, you indicate your understanding a n d a cce p ta n ce of t h e U s e r Ag re e m e n t ( a v a i l a b l e athttps://www.ebikemotion.com/legal/user-agreement) and the Privacy Policy. You understand and agree that Ebikemotion may disclose information if required to do so by law or in the good faith belief that such disclosure is reasonably necessary to comply with legal process, enforce the terms of this EULA, or protect the rights, property, or safety of Ebikemotion, its users, or the public.
-No WarrantyEBIKEMOTION DOES NOT WARRANT THAT THE FUNCTIONS CONTAINED IN THE SOFTWARE WILL MEET ANY REQUIREMENTS OR NEEDS YOU MAY HAVE, OR THAT THE SOFTWARE WILL OPERATE ERROR FREE, OR IN AN UNINTERRUPTED MANNER, OR THAT ANY DEFECTS OR ERRORS WILL BE CORRECTED, OR THAT THE SOFTWARE IS FULLY COMPATIBLE WITH ANY PARTICULAR PLATFORM. THE SOFTWARE IS OFFERED ON AN “AS-IS” BASIS AND NO WARRANTY, EITHER EXPRESS OR IMPLIED, IS GIVEN. EBIKEMOTION EXPRESSLY DISCLAIMS ALL WARRANTIES OF ANY KIND, WHETHER EXPRESS OR IMPLIED, INCLUDING, BUT NOT LIMITED TO THE IMPLIED WARRANTIES OF MERCHANTABILITY, FITNESS FOR A PARTICULAR PURPOSE AND NON-INFRINGEMENT. SOME JURISDICTIONS DO NOT ALLOW THE WAIVER OR EXCLUSION OF IMPLIED WARRANTIES SO THEY MAY NOT APPLY TO YOU.
- Right to Terminate or Modify SoftwareEbikemotion may modify the Software and this EULA with notice to you either in email or by publishing notice on the Website, including but not limited to charging fees for the Software, or changing the functionality or appearance of the Software. In the event Ebikemotion modifies the Software or the EULA, you may terminate this EULA and cease use of the Software. Ebikemotion may terminate your use of the Software, the EULA or the Ebikemotion Service at any time, with or without notice.
Page 71

26. Maintenance and Service
26.1 After-sales Service
26.2 APP Support
26.3 Error Codes Reference
In case of questions concerning the eBike system and its components, please refer to an authorised centre or to your eBike Manufacturer. Also you can access to the support and download area of the ebikemotion® Web Site. More technical information about system in:
Ebikemotion web site:
YouTube: ebikemotion Channel
https://www.ebikemotion.com
For extra ebikemotion APP® support please refers to the official ebikemotion web site or report any email with your problem by our on-line support center in our web site:
www. ebikemotion.com
APP Help Centre
Page 72
Alert of errorin iWoc®
Alert of errorin the APP
2
REMEMBER
If there is any error, the iWoc® will show you by flashing the RGB LED in RED colour flashing. Please connect your smartphone and open ebikemotion® APP to get a detailed description about the error.
00:15:34 125.35 mi
AVS
00:15:34 125.35 mi
16,7AVS
16:32
1 156RPM
1123 17%altitude
153 bmp
Bat
86%
Bat
86%
MPHSport
345 w
149 km
ERROR 4LOW-VOLTAGE-PROTECTION
Tor
Pwr
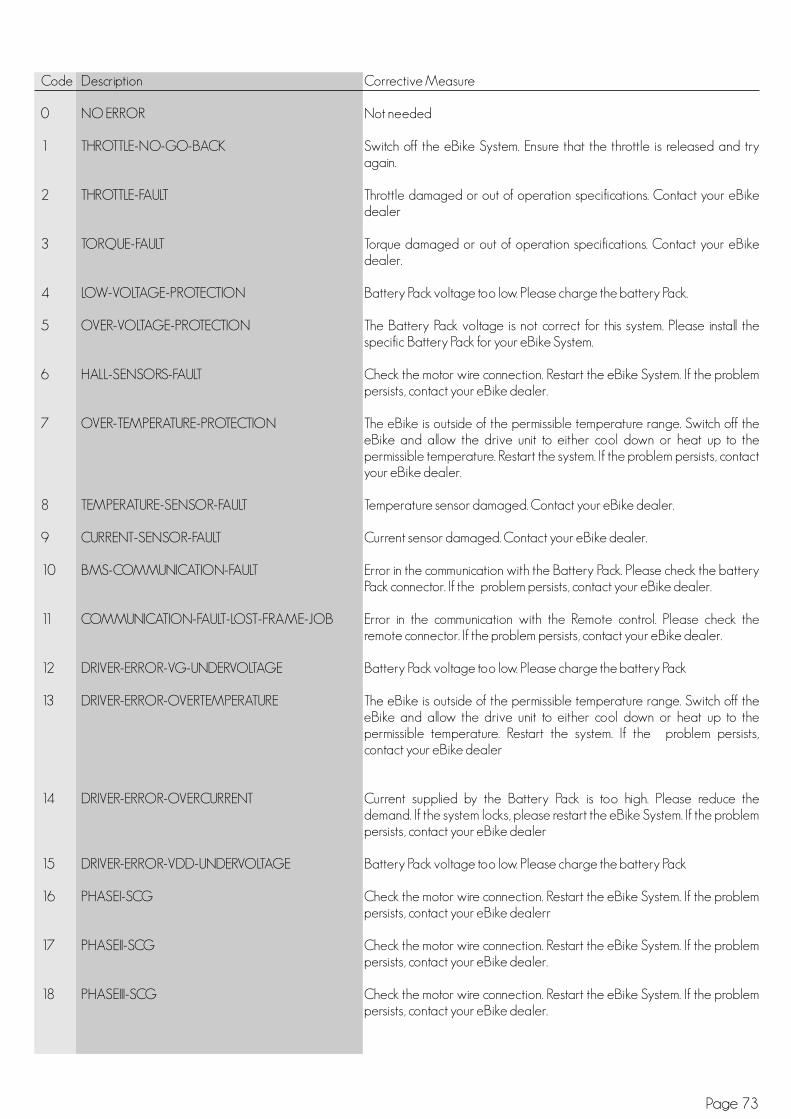
Page 73
Code Description
0 NO ERROR
1 THROTTLE-NO-GO-BACK
2 THROTTLE-FAULT
3 TORQUE-FAULT
4 LOW-VOLTAGE-PROTECTION
5 OVER-VOLTAGE-PROTECTION
6 HALL-SENSORS-FAULT
7 OVER-TEMPERATURE-PROTECTION
8 TEMPERATURE-SENSOR-FAULT
9 CURRENT-SENSOR-FAULT
10 BMS-COMMUNICATION-FAULT
11 COMMUNICATION-FAULT-LOST-FRAME-JOB
12 DRIVER-ERROR-VG-UNDERVOLTAGE
13 DRIVER-ERROR-OVERTEMPERATURE
14 DRIVER-ERROR-OVERCURRENT
15 DRIVER-ERROR-VDD-UNDERVOLTAGE
16 PHASEI-SCG
17 PHASEII-SCG
18 PHASEIII-SCG
Corrective Measure
Not needed
Switch off the eBike System. Ensure that the throttle is released and try again.
Throttle damaged or out of operation specifications. Contact your eBike dealer
Torque damaged or out of operation specifications. Contact your eBike dealer.
Battery Pack voltage too low. Please charge the battery Pack.
The Battery Pack voltage is not correct for this system. Please install the specific Battery Pack for your eBike System.
Check the motor wire connection. Restart the eBike System. If the problem persists, contact your eBike dealer.
The eBike is outside of the permissible temperature range. Switch off the eBike and allow the drive unit to either cool down or heat up to the permissible temperature. Restart the system. If the problem persists, contact your eBike dealer.
Temperature sensor damaged. Contact your eBike dealer.
Current sensor damaged. Contact your eBike dealer.
Error in the communication with the Battery Pack. Please check the battery Pack connector. If the problem persists, contact your eBike dealer.
Error in the communication with the Remote control. Please check the remote connector. If the problem persists, contact your eBike dealer.
Battery Pack voltage too low. Please charge the battery Pack
The eBike is outside of the permissible temperature range. Switch off the eBike and allow the drive unit to either cool down or heat up to the permissible temperature. Restart the system. If the problem persists, contact your eBike dealer
Current supplied by the Battery Pack is too high. Please reduce the demand. If the system locks, please restart the eBike System. If the problem persists, contact your eBike dealer
Battery Pack voltage too low. Please charge the battery Pack
Check the motor wire connection. Restart the eBike System. If the problem persists, contact your eBike dealerr
Check the motor wire connection. Restart the eBike System. If the problem persists, contact your eBike dealer.
Check the motor wire connection. Restart the eBike System. If the problem persists, contact your eBike dealer.

Code Description
19 PHASEI-SCS
20 PHASEII-SCS
21 PHASEIII-SCS
22 PHASEI-CONNECTION-ERROR
23 PHASEII-CONNECTION-ERROR
24 PHASEIII-CONNECTION-ERROR
25 COMPONENT-PROTECTION
26 NVM-ERROR-PARAMS-TO-DEFAULT
27 NVMI-ERROR-SAVED-ERRORS-LOST
28 EMN-ERROR-IMPOSSIBLE-SAVE-ERRORS
29 BATTERY-VOLTAGE-SENSOR-FAULT
30 OVER-CURRENT-PROTECTION
31 PEAK-OVER-CURRENT-PROTECTION
32 COMM-FATAL-ERROR
33 CURRENT-NO-SPEED
34 ACC-VOLTAGE-ERROR
35 SENSORS-4V3-ERROR
36 LIGHTS-V-ERROR
Corrective Measure
Check the motor wire connection. Restart the eBike System. If the problem persists, contact your eBike dealer.
Check the motor wire connection. Restart the eBike System. If the problem persists, contact your eBike dealer.
Check the motor wire connection. Restart the eBike System. If the problem persists, contact your eBike dealer.
Check the motor wire connection. Restart the eBike System. If the problem persists, contact your eBike dealer.
Check the motor wire connection. Restart the eBike System. If the problem persists, contact your eBike dealer.
Check the motor wire connection. Restart the eBike System. If the problem persists, contact your eBike dealer.
New component detected not associated to this eBike system. Please contact your eBike Dealer to activate it.
Default System Parameters established.
Error in the Error Database System. Restart the eBike System. If the problem persists, contact your eBike dealer.
Error Database System full. Restart the eBike System. If the problem persists, contact your eBike dealer.
Battery Pack sensor damaged. Restart the eBike System. If the problem persists, contact your eBike dealer.
Current supplied by the Battery Pack is too high. Please reduce the demand. If the system locks, please restart the eBike System. If the problem persists contact your eBike dealer.
Current supplied by the Battery Pack is too high. Please reduce the demand. If the system locks, please restart the eBike System. If the problem persists, contact your eBike dealer
Fatal Error. Restart the eBike System. If the problem persists, contact your eBike dealer.
Locked Motor. Check that WALK mode works fine. If the problem persists, contact your eBike dealer.
Power supply problem in the HMI bus. If the problem persists, contact your eBike dealer.
Power supply problem in sensors. Check the wires of the pedaling sensor (PAS) and Motor Sensor. If the problem persists, contact your eBike dealer.
Power Output Failure in the lights line. Check wiring and the accessory connected to the light line. If the error persists, disconnect the accessory. Check that with the accessory disconnected there is no error. In this case your accessory exceeds the specifications of our output. If the error persists go to the official service
Page 74

1. Copyright Rights (ebikemotion)All copyrights in the text, images, photographs, graphics, user interface, and other content provided on the ebikemotion Manuals, coordination, and arrangement of such content, are owned by ebikemotion® Technologies or their authors or its licensors or service providers, to the full extent provided under the Spain Copyright laws and all international copyright laws. Under applicable copyright laws, you are prohibited from copying, reproducing, modifying, distributing, displaying, performing or transmitting any of the contents of the Site for any purposes. Nothing stated or implied on the Site confers on you any license or right under any copyright of CLC or any third party. Any reproduction, copying, or redistribution for commercial purposes of any materials or design elements of the Site is strictly prohibited, without the prior written consent of ebikemotion Technologies. Systematic copy of publishing of this document, directly or indirectly, a collection, compilation, database or directory without written permission from ebikemotion Technologies is prohibited.
2. Copyright Rights (Third parties)There are some logotypes or pictures used in this document as examples of the integration the Premium Pack system. All copyrights in the names, brands, text, images, photographs, graphics, are owned property of their authors (Legend eBikes, ORBEA Soc. Coop., STRAVA, Facebook®, Twitter®)
3. ObligationsYou are required to comply with all applicable laws in connection with your use of the documentation, and such further limitations as may be set forth in any written, electronic or on-screen notice from ebikemotion. This documentation is only available for the internal use of ebikemotion OEM and END USER customers that have license to use the APP and Platform in their systems.
4. Copy and PublishingIt is totally forbidden the public publishing, editing of adaptation of this content without the previous authorization of ebikemotion Technologies SL.
TERMS OF USE OF DOCUMENTATION
26.4 Terms of Use of Documentation
Page 75
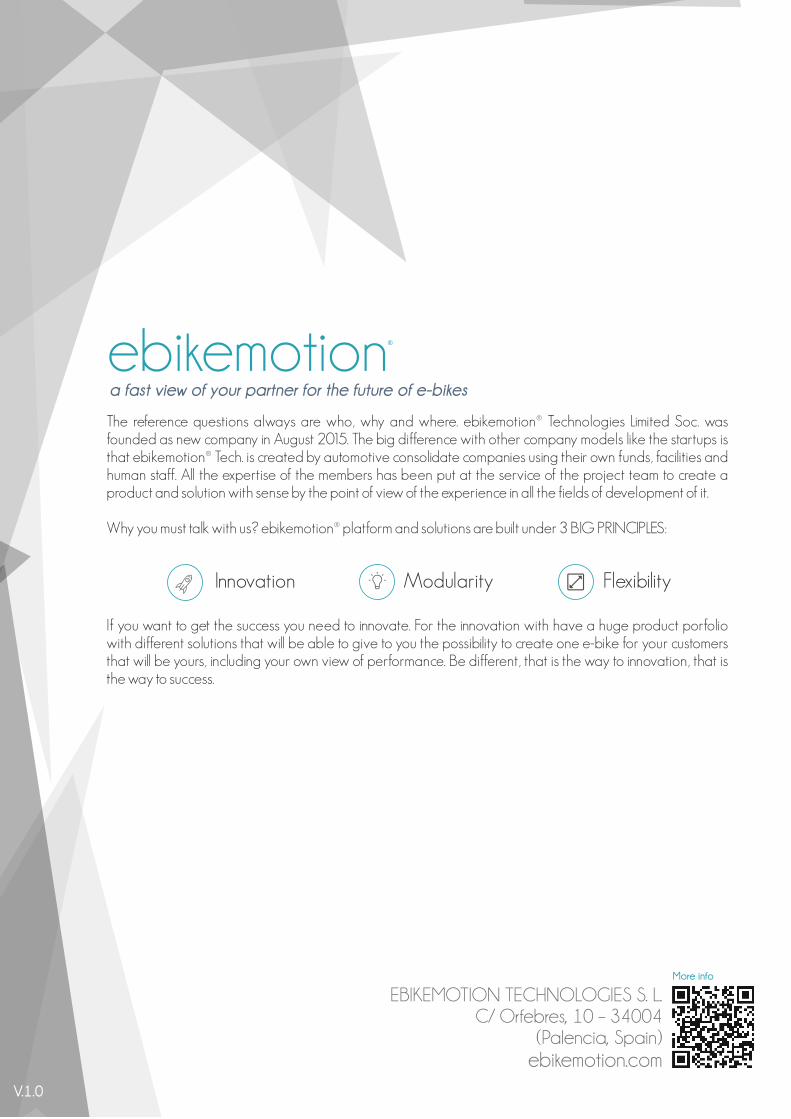
More info
V.1.0
EBIKEMOTION TECHNOLOGIES S. L.C/ Orfebres, 10 – 34004
(Palencia, Spain)ebikemotion.com
The reference questions always are who, why and where. ebikemotion® Technologies Limited Soc. was founded as new company in August 2015. The big difference with other company models like the startups is that ebikemotion® Tech. is created by automotive consolidate companies using their own funds, facilities and human staff. All the expertise of the members has been put at the service of the project team to create a product and solution with sense by the point of view of the experience in all the fields of development of it.
Why you must talk with us? ebikemotion® platform and solutions are built under 3 BIG PRINCIPLES:
a fast view of your partner for the future of e-bikes
Innovation Modularity Flexibility
If you want to get the success you need to innovate. For the innovation with have a huge product porfolio with different solutions that will be able to give to you the possibility to create one e-bike for your customers that will be yours, including your own view of performance. Be different, that is the way to innovation, that is the way to success.