DMSS App - User's Manual - Blick-Store
66
I User’s Manual DMSS App User’s Manual V1.1.0
-
Upload
khangminh22 -
Category
Documents
-
view
3 -
download
0
Transcript of DMSS App - User's Manual - Blick-Store

I
User’s Manual
DMSS App
User’s Manual
V1.1.0

I
Foreword
General
This manual introduces the functions and operations of DMSS App (hereinafter referred to as
"the App").
Safety Instructions
The following categorized signal words with defined meaning might appear in the manual.
Signal Words Meaning
Indicates a potential risk which, if not avoided, could result in property
damage, data loss, lower performance, or unpredictable result.
Provides methods to help you solve a problem or save you time.
Provides additional information as the emphasis and supplement to
the text.
Revision History
Version Revision Content Release Time
V1.1.0
1. Reorganize manual structure.
2. Update and optimize descriptions for all chapters.
3. Update figures.
January 2020
V1.0.0 First release. July 2019
Privacy Protection Notice
As the device user or data controller, you might collect personal data of others such as face,
fingerprints, car plate number, email address, phone number, GPS and so on. You need to be in
compliance with the local privacy protection laws and regulations to protect the legitimate rights
and interests of other people by implementing measures include but not limited to: providing
clear and visible identification to inform data subject the existence of surveillance area and
providing related contact.
About the Manual
The manual is for reference only. If there is inconsistency between the manual and the
actual product, the actual product shall prevail.
We are not liable for any loss caused by the operations that do not comply with the manual.
The manual would be updated according to the latest laws and regulations of related
regions. For detailed information, see the paper manual, CD-ROM, QR code or our official
website. If there is inconsistency between paper manual and the electronic version, the

II
electronic version shall prevail.
All the designs and software are subject to change without prior written notice. The product
updates might cause some differences between the actual product and the manual. Please
contact the customer service for the latest program and supplementary documentation.
There still might be deviation in technical data, functions and operations description, or
errors in print. If there is any doubt or dispute, please refer to our final explanation.
Upgrade the reader software or try other mainstream reader software if the manual (in PDF
format) cannot be opened.
All trademarks, registered trademarks and the company names in the manual are the
properties of their respective owners.
Please visit our website, contact the supplier or customer service if there is any problem
occurred when using the device.
If there is any uncertainty or controversy, please refer to our final explanation.

III
Table of Contents
Foreword .................................................................................................................................................... I
1 Overview ................................................................................................................................................. 1
Introduction ................................................................................................................................... 1 1.1
Features ........................................................................................................................................ 1 1.2
Applicable Mobile Phone Model .................................................................................................... 1 1.3
2 Basic Operations ................................................................................................................................... 2
Login .............................................................................................................................................. 2 2.1
Adding Devices ............................................................................................................................. 4 2.2
2.2.1 Adding Uninitialized Devices .............................................................................................. 4
2.2.2 Adding Initialized Device ..................................................................................................... 6
Managing Devices ........................................................................................................................ 8 2.3
2.3.1 Device Configuration .......................................................................................................... 8
2.3.2 Alarm Subscription .............................................................................................................. 9
2.3.3 Device Channel .................................................................................................................. 9
2.3.4 Stream Setting .................................................................................................................. 10
2.3.5 Remote Configuration ....................................................................................................... 10
2.3.6 Alarm Output ..................................................................................................................... 20
2.3.7 HDD Management ............................................................................................................ 21
2.3.8 Time Zone ......................................................................................................................... 21
2.3.9 Custom Audio and Video Encryption ................................................................................ 21
2.3.10 Sharing Devices .............................................................................................................. 22
2.3.11 Cloud Update .................................................................................................................. 22
2.3.12 Other Parameters ........................................................................................................... 22
2.3.13 Creating Device Card ..................................................................................................... 23
2.3.14 Deleting Device ............................................................................................................... 24
3 Live View .............................................................................................................................................. 25
4 Video Playback .................................................................................................................................... 29
5 Video Call ............................................................................................................................................. 32
6 Alarm Control ....................................................................................................................................... 34
Protection Mode .......................................................................................................................... 34 6.1
Configuring Alarm Devices.......................................................................................................... 36 6.2
7 Access .................................................................................................................................................. 38
8 Cloud Storage ...................................................................................................................................... 41
9 Favorites ............................................................................................................................................... 43
10 File....................................................................................................................................................... 44
11 Message .............................................................................................................................................. 46
Subscribing Alarm Messages .................................................................................................... 46 11.1
Viewing Messages .................................................................................................................... 48 11.2
Marking Alarm Messages .......................................................................................................... 50 11.3
Deleting Alarm Messages ......................................................................................................... 50 11.4
12 System Configuration ....................................................................................................................... 51
Setting ....................................................................................................................................... 51 12.1
General ..................................................................................................................................... 52 12.2

IV
Password Security .................................................................................................................... 53 12.3
Changing Region ...................................................................................................................... 53 12.4
More Service ............................................................................................................................. 53 12.5
Help and Feedback ................................................................................................................... 53 12.6
About ......................................................................................................................................... 53 12.7
13 Account Management ....................................................................................................................... 55
14 FAQ ..................................................................................................................................................... 56
Cybersecurity Recommendations ................................................................................... 59 Appendix 1

1
1 Overview
Introduction 1.1
DMSS App is a mobile monitoring software that is designed for professional security
surveillance. It has functions such as live view, video playback, alarm notification push, and
cloud storage. Various devices can be added and used with cellular data or Wi-Fi, such as
cameras, video recorders, video intercoms, doorbells, access control devices, and alarm
devices.
Features 1.2
Multiple-channel live view (up to 16 windows), and maximum 4-channel playback.
Play back videos by fast, slow, or frame mode.
Snapshot and video recording. Corresponding files are stored locally.
PTZ control by gestures.
Automatically play the last-time played video on live interface.
Video image and bit stream adjustment.
Support voice call.
Alarm message subscription and push.
Device management of remote configuration, alarm output control, password modification,
and more.
Support video intercoms and access control devices.
Detector control and protection mode switch in Alarm function module.
Applicable Mobile Phone Model 1.3
The App can be installed on Android system of 5.0 or later.

2
2 Basic Operations
You can do the operations such as device initialization, live view, video playback, remote
configuration, push notifications, video talk, and more.
You can use the App after logging in or use it without logging in, and the functions and types of
added devices (divided as account devices and local devices) might vary. For example, cloud
storage and cloud upgrade are available only after login. This manual takes operations after
login as an example.
Interfaces might vary with different added devices, and the actual interface shall prevail.
Account Device
Account devices have following features in general:
Added after login.
Have "From ***" below the device name.
Account device Figure 2-1
Bound to the account, cannot be used after logout, and cannot be added by other accounts,
but can be shared with other users.
Local Devices
Local devices have following features in general:
Added without login, or added after login but does not have "From ***" below the device
name.
Can only be used on the current mobile phone, cannot be shared, but can be added on
multiple mobile phones.
Login 2.1
Search for DMSS in Google Play, download, and then install the App. Step 1
On your mobile phone, tap . Step 2

3
Select your region, and then tap Done. Step 3
You can change your region in Me > Change Region.
Read User Service Agreement and Privacy Policy. Step 4
Tap Sign up, enter email address and password, select I have read and agree to check Step 5
box, and then tap Get verification code.
Enter verification code and then tap Log in. Step 6
Tap Home. Step 7
Home Figure 2-2
Table 2-1 Home interface descriptions
No. Function Description
1 Display mode Tap to switch between displaying devices in list mode or
picture mode.
2 Search Tap to search devices or channels with keywords.
3 Add devices Tap to add devices.
4 Function modules Display the main function modules. Tap and drag the icon to
change its place.

4
No. Function Description
5 Devices
Display the added devices.
Tap a thumbnail under the device name to play a single
channel. If a device has several channels, slide thumbnails
to the left to view more.
Tap to play all channels under this device.
Tap to view device details and top the device or move
down.
6 Navigation bar Three tabs: Home, Message, and Me.
Adding Devices 2.2
Before operating on the App, you need to add devices such as cameras, video recorders, video
intercoms, alarm devices, and access control devices.
Before adding devices, make sure that the device is connected to power, and is in the same
LAN as your mobile phone.
Wi-Fi connection: Connect the device to the same Wi-Fi as the mobile phone.
Wired connection: Connect the device to the same network as the mobile phone.
AP configuration: Turn on device hotspot, and connect the mobile phone to the hotspot.
2.2.1 Adding Uninitialized Devices
You need to initialize the device for the first-time use or after it is reset. This section takes
adding an uninitialized wireless camera through Wi-Fi as an example.
Uninitialized devices can only be added through scanning device QR code, or manually
entering device SN.
The on-screen instructions might vary depending on the device you add, and the actual
interface shall prevail.
On the Home interface, tap , and then select SN/Scan. Step 1
Scan device QR code, or manually enter device SN, and then the system will identify Step 2
the device type automatically.
If the device type cannot be identified by the system, you need to select the device
type.
Follow on-screen instructions to connect the device, and then tap Next. Step 3
Enter the Wi-Fi password connected by the mobile phone, and then tap Next. Step 4
Tap at the upper-right corner to switch network configuration by Wi-Fi, wire, or AP.
5
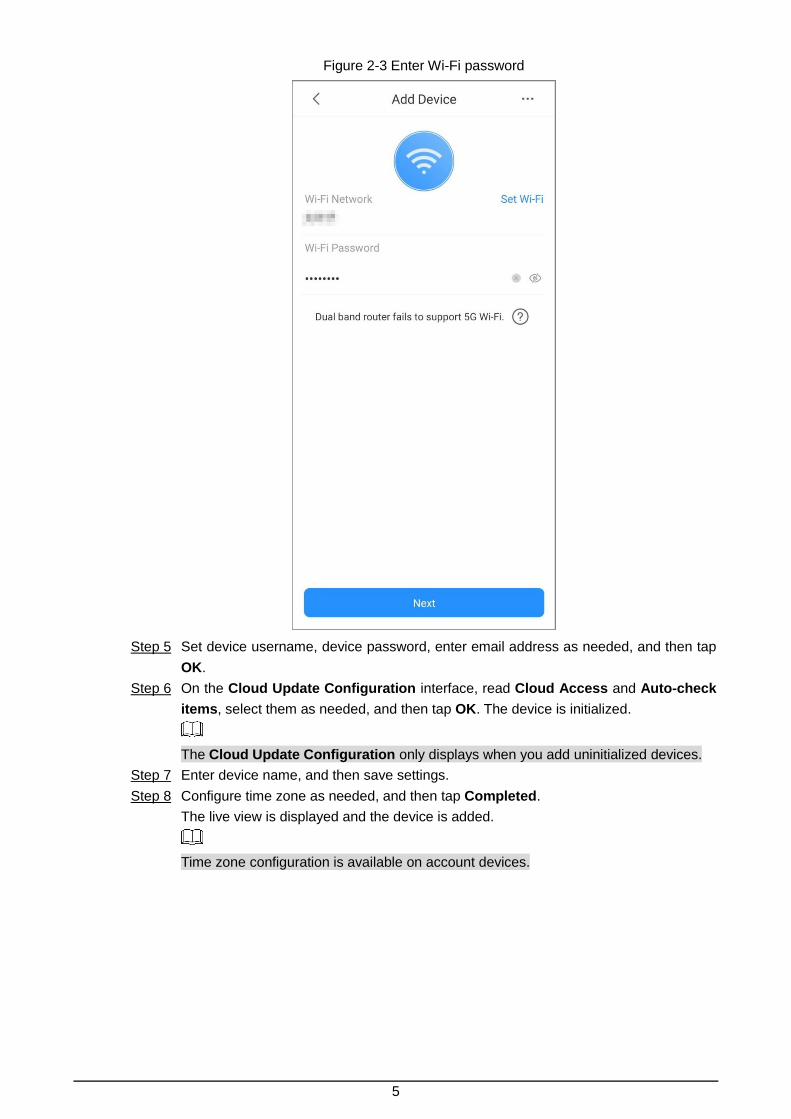
Enter Wi-Fi password Figure 2-3
Set device username, device password, enter email address as needed, and then tap Step 5
OK.
On the Cloud Update Configuration interface, read Cloud Access and Auto-check Step 6
items, select them as needed, and then tap OK. The device is initialized.
The Cloud Update Configuration only displays when you add uninitialized devices.
Enter device name, and then save settings. Step 7
Configure time zone as needed, and then tap Completed. Step 8
The live view is displayed and the device is added.
Time zone configuration is available on account devices.

6
Time zone Figure 2-4
2.2.2 Adding Initialized Devices
You can add initialized devices through scanning device QR code, manually enter device SN,
entering IP/domain, or searching online devices. This section takes adding an initialized
wireless camera as an example.
2.2.2.1 Adding by SN/QR Code
You can add device by scanning device QR code or manually entering device SN.
On the Home interface, tap , and then select SN/Scan. Step 1
Scan device QR code, or manually enter device SN, and then the system will identify Step 2
the device type automatically.
If the device type cannot be automatically identified by the system, you need to select
the device type.
Enter device name, device password, and save settings. Step 3
The live view is displayed and the device is added.
Add initialized device (SN/scan) Figure 2-5

7
2.2.2.2 Adding by IP/Domain
You can add devices by entering IP of the device or specific domain. This section takes
entering device IP as an example.
On the Home interface, tap , and then select IP/Domain. Step 1
Select the device type. Step 2
Enter information as needed, and then save settings. Step 3
The live view is displayed and the device is added.
Add initialized device (IP/domain) Figure 2-6
2.2.2.3 Adding by Search
You can search online devices and add them.
Tap at the upper-right corner, and then select Search online. Step 1
The Select Device interface is displayed. See Figure 2-7.
Select device SN Figure 2-7
Tap the device SN as needed. Step 2
The device type interface is displayed.
Select the device type. Step 3
The Add Device interface is displayed. See Figure 2-8.

8
Add initialized device (search online) Figure 2-8
Enter information as needed, and then save settings. Step 4
The live view is displayed and the device is added.
Managing Devices 2.3
You can configure devices, subscribe alarm messages, configure devices remotely, set video
streams, configure alarm output, and more.
Configurations of different devices might vary, and the actual interface shall prevail.
2.3.1 Device Configuration
You can view device information such as adding mode and SN, modify device information such
as device name, device password, and username.
On the Home interface, tap , and then tap Device Details. Step 1
You can also tap the device or channel, and then tap on the interface to go to
device management interface.
Tap Device Configuration, and then you can view and modify device information. Step 2

9
Device configuration Figure 2-9
Tap Save. Step 3
2.3.2 Alarm Subscription
You need to subscribe alarm messages, and then the alarm notification can be pushed to App
when the alarm is triggered. For details, see "11.1 Subscribing Alarm Messages."
2.3.3 Device Channel
If a device has more than one channel (such as a network video recorder), you can view the
names of those channels under the device.

10
Device channels Figure 2-10
2.3.4 Stream Setting
Select video streams from Sub or Main for live view or video playback.
2.3.5 Remote Configuration
You can remotely configure the device including video detection, alarm setting, camera setting,
storage management, and image adjustment.
2.3.5.1 Video Detection
In case of occurrence of moving object within defined conditions and shielded video image, the
system performs alarm linkage actions.

11
Motion Detection
Alarm linkage action is performed when a moving object appears on the image and its moving
speed reaches the preset sensitivity.
On the Home interface, tap , and then tap Device Details. Step 1
Tap Remote Configuration > Video Detection > Motion Detection. Step 2
Select the device channel you want to configure. Step 3
Enable Advanced Configuration to configure other parameters. Step 4
Advanced configuration (motion detection) Figure 2-11
Table 2-2 Advanced configuration (motion detection)
Function Description
Arm/Disarm
Period
Set arming periods, and the alarm can only be triggered when it occurs
during the defined period.
Tap , select the date, and then set the start time and end time of the
period (up to 6 periods can be set each date). See Figure 2-12.
Tap Copy, select other days as needed, and then the set arming period
will apply to the selected days.

12
Function Description
Anti-dither Set anti-dither period from 0 s to 600 s. Only one motion detection event is
recorded during the period.
Sensitivity Set sensitivity value from 0 to 100. It is more easier to trigger the alarm
with higher sensitivity.
Region Setting
Set motion detection region. The whole video image is the effective
area for motion detection by default. See Figure 2-13.
Tap to set motion detection region.
Tap to clear the zone you have set.
Tap , and then pinch or stretch out with fingers to zoom out or
zoom in the image.
Record By enabling Record, the system record automatically when the alarm is
triggered.
Delay The alarm record keeps for the defined time after the alarm is ended.
Alarm Output By enabling Alarm Output, the connected alarm output device will be
linked when the alarm is triggered.
Delay The alarm keeps output for the defined time after the alarm is ended.
Snapshot By enabling Snapshot, the system automatically captures pictures when
the alarm is triggered.
Arm/Disarm period Figure 2-12

13
Region setting Figure 2-13
Tap Save. Step 5
Video Mask
Alarm is triggered when the monitoring image is shielded and the output video is in single color.
On the Home interface, tap , and then tap Device Details. Step 1
Tap Remote Configuration > Video Detection > Video Mask. Step 2
Select the device channel you want to configure. Step 3
Enable Advanced Configuration to configure other parameters. For details, see Table Step 4
2-2.
Advanced configuration (video mask) Figure 2-14
2.3.5.2 Alarm Setting
When the alarm is triggered, alarm action is linked such as recording, snapshot, and alarm
output.
Alarm types (mainly for network video recorders) include local alarm, network alarm, IPC
external alarm, IPC offline alarm, and PIR alarm.
14
Table 2-3 Alarm setting
Alarm Type Description
Local Alarm Connect the alarm device to the alarm input port of the added device.
When the alarm is triggered, alarm linkage action performs.
Network Alarm Alarm linkage action performs when alarm signal is transmitted to the
device through network.
IPC External
Alarm
Connect the IPC to the alarm input device. When the alarm is
triggered, alarm linkage action performs.
IPC Offline
Alarm
Alarm linkage action performs when the added device and IPC are
disconnected.
PIR Alarm The alarm is triggered when an object is detected by a PIR-based
motion detector.
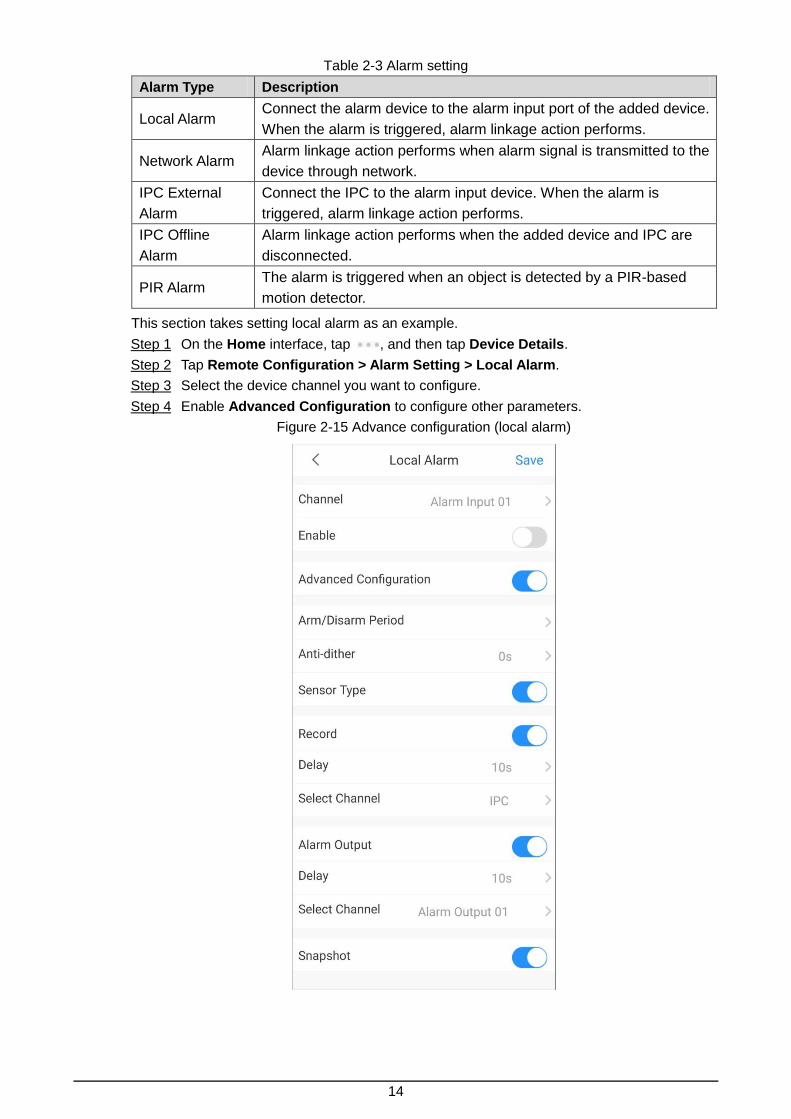
This section takes setting local alarm as an example.
On the Home interface, tap , and then tap Device Details. Step 1
Tap Remote Configuration > Alarm Setting > Local Alarm. Step 2
Select the device channel you want to configure. Step 3
Enable Advanced Configuration to configure other parameters. Step 4
Advance configuration (local alarm) Figure 2-15

15
Table 2-4 Advanced configuration (local alarm)
Function Description
Arm/Disarm Period See Table 2-2.
Anti-dither
Sensor Type Set sensor type as normally open or normally closed.
Record See Table 2-2.
Delay
Select Channel Select the channel to record videos.
Alarm Output See Table 2-2.
Delay
Select channel Select one or multiple channels to output the alarm.
Snapshot See Table 2-2.
Tap Save. Step 5
2.3.5.3 Camera Settings
You can set video stream parameters such us encoding mode, resolution, frame rate, bit rate
type, and bitrate.
On the Home interface, tap , and then tap Device Details. Step 1
Tap Remote Configuration > Camera Setting > Video Stream. Step 2
Select the device channel you want to configure. Step 3
(Optional) Set channel name. Step 4
It is recommended to set a channel name that is easy to be recognized. You can set
according to device installation place.
Select main stream or sub stream. Step 5
Video stream (main) Figure 2-16

16
Table 2-5 Video stream parameters
Function Description
Main/Sub
Main stream: Large bit stream, small compression image, and high
resolution, but also requires large bandwidth.
Sub stream: Smaller bit steam, smoother video, and requires smaller
bandwidth. Used to replace main stream when the bandwidth is
insufficient.
Encode Mode
MJPEG: The image requires high bit rate to ensure clarity. It is
recommended to set the Bitrate value to the biggest for a better
image.
H.264: Main Profile encode mode.
H.264H: High Profile encode mode; use smaller bandwidth than H.264
with the same image quality.
Video This parameter can be set only when you select sub stream. By
enabling Video, the video stream type is sub stream.
Audio Set the audio stream type as main stream or sub stream.
Resolution
Set video stream resolution. The higher the resolution is, the better the
video quality, but the bigger the bandwidth will be.
Resolutions supported by the device might vary, and the actual interface
shall prevail.
Frame rate Set frame rate from 1 to 30. The higher the frame rate is, the more vivid
and fluent the video, but the bigger the bandwidth will be.
Bitrate Type
CBR (Constant Bit Rate): The bit rate changes little and keeps close to
the defined bit rate value. When the scene is complicated, the image
might not be clear; when the scene is simple, the bandwidth might be
wasted.
VBR (Variable Bit Rate): The bit rate changes along with monitoring
scene, so as to make image clear under complicated scene and the
bandwidth is small under simple scene.
Quality This parameter can be configured only when the Bitrate Type is set as
VBR. The better the quality is, the larger the bandwidth will be.
Bitrate Set video bitrate. The higher the bitrate is, the faster the data is
transmitted.
Tap Save. Step 6
2.3.5.4 Storage Manager
Configure the device recording period and recording type.
On the Home interface, tap , and then tap Device Details. Step 1
Tap Remote Configuration > Storage Manager > Schedule. Step 2
Select the device channel you want to configure. Step 3
Different recording types have different colors.
Green: Normal video recordings.
Orange: Record when motion detection alarm is triggered.

17
Red: Alarm recording. Record when alarm is triggered.
Schedule Figure 2-17
Tap , select the date, and then set the start time and end time of the period (up to 6 Step 4
periods can be set for each day).
Tap Copy, select other days as needed, and then the set arming period will apply to the
selected days.

18
Set recording Figure 2-18
Tap Save. Step 5
2.3.5.5 Image Adjustment
Adjust live video image such as focus, zoom, brightness, contrast, and image quality.
On the Home interface, tap , and then tap Device Details. Step 1
Tap Remote Configuration > Image Adjustment. Step 2
Select the device channel you want to configure, and then the system goes to live Step 3
interface.

19
Image adjustment Figure 2-19
Table 2-6 Function icon descriptions
Function Description
Focus/Zoom
Tap , and then you can:
Tap to adjust focus to make the image clearer.
Tap to zoom out or zoom in the image.
Tap + or – on the image to adjust focus or zoom effect.
Rotate/Flip
Tap to rotate or flip the image.
Tap to flip horizontally.
Tap to flip vertically.
Tap to rotate 90° anticlockwise.
Tap to rotate 90° clockwise.

20
Function Description
Tap to rotate 180°.
Image effect
Tap to adjust image effect.
Tap to adjust brightness.
Tap to adjust contrast.
Tap to adjust hue.
Tap to adjust saturation.
Tap to restore to default.
Video quality
Tap to adjust live video quality.
Tap to switch to real-time mode.
Tap to switch to fluent mode.
Tap to switch to auto mode.
2.3.6 Alarm Output
You can set alarm output mode as close, manual, or automatic. When the added device has
connected to alarm output device, and Alarm Output is enabled in Video Detection or Alarm
Setting, you need to set alarm output mode to make alarm linkage actions work.
On the Home interface, tap , and then tap Device Details. Step 1
Tap Alarm Output. Step 2
Set alarm output mode. Step 3
Automatic: Alarm is triggered only when the alarm event occurs.
Manual: Alarm is always on.
Close: Alarm is disabled.
Alarm output Figure 2-20

21
2.3.7 HDD Management
You can view HDD name, status, and capacity.
On the Home interface, tap , and then tap Device Details. Step 1
Tap HDD Manager. Step 2
Hardware management Figure 2-21
2.3.8 Time Zone
When your region has Daylight Saving Time (DST), you can select the time zone and set DST.
The function is available on account devices.
On the Home interface, tap , and then tap Device Details. Step 1
Tap Time Zone. Step 2
Select the time zone that the device is at. Step 3
(Optional) Enable DST, and then set start time and end time of the DST. Step 4
Time zone Figure 2-22
2.3.9 Custom Audio and Video Encryption
After enabling Custom Audio and Video Encryption, you need to enter password for live view
and playback (cloud videos included).

22
The function is available on account devices.
On the Home interface, tap , and then tap Device Details. Step 1
Tap Custom Audio and Video Encryption. Step 2
Enable the function and set password. Step 3
2.3.10 Sharing Devices
You can share devices with up to 6 DMSS users.
The function is available on account devices.
On the Home interface, tap , and then tap Device Details. Step 1
Tap Device Sharing. Step 2
Tap , and then enter DMSS account to be shared with. Step 3
2.3.11 Cloud Update
You can view the current device version and upgrade the device when a new version is
discovered by the system.
The function is available on account devices.
On the Home interface, tap , and then tap Device Details. Step 1
Tap Cloud Update, and then follow on-screen instructions to upgrade the device. Step 2
2.3.12 Other Parameters
You can view the information of the connected solar power system, such as its electricity
generation power, status of the solar power panel, the battery, the load, and the controller.
On the Home interface, tap , and then tap Device Details. Step 1
Tap Other Parameters. Step 2
Tap the solar power system you want to view. Step 3
Tap Real-time or Analysis to view real-time or history data of the solar power system. Step 4

23
Solar power system Figure 2-23
2.3.13 Creating Device Card
You can quickly add devices by scanning the device card.
On the Home interface, tap to display devices in list mode. Step 1
Tap , select devices (up to 10), and then tap Create Device Card. Step 2
You cannot create device card for account devices.

24
Create device card Figure 2-24
(Optional) Enter password, and then tap OK. Step 3
You need to enter the password when you import devices by scanning the device card.
Save the QR code of the device card to your album. Step 4
2.3.14 Deleting Device
You can delete added devices as needed.
On the Home interface, tap , and then tap Device Details. Step 1
Tap Delete. Step 2

25
3 Live View
You can view the monitoring channels and do the operations such as taking snapshots,
recording videos, and adding channels to favorites.
On the Home interface, tap . Step 1
On the Home interface, tap a thumbnail under the device to play the selected channel.
Live Figure 3-1
Play a channel or multiple channels. Step 2
Play a channel: Tap in the window, and then select a channel in the device list
to be played.
Play multiple channels: Tap , select channels in the device list as needed.
When displayed channels exceed the maximum number of displaying window you set,
swipe left or right to view other live videos.

26
Live view of a single channel Figure 3-2
Tap More Functions at the bottom to display the hide functions.
Table 3-1 Live view function icons
Function Description
Device details
Tap to go to the device details interface, and then you can
configure your device. For details, see "2.3 Managing Devices."
You can also tap of a device on the Home to view its details.
Play/Pause Tap to pause playing and tap to play.
Video stream Tap to swich between SD and HD video quality.
Mute/Unmute Tap to mute the video. Tap to unmute.
Window split Tap to change window split modes. You can display in 1, 4, 9, or 16
windows.

27
Function Description
Favorites Tap to create a favorites group and add the selected channel to
the Favorites or to the existing favorites group. See "9 Favorites."
Recording
playback Tap to go to video playback interface and today’s recording will
be automatically played if it exists.
Snapshot
Select a video, and then tap to take snapshot.
You can configure the capture mode in Me > Setting. For more
details, see "12.1 Setting."
Snapshots are saved in the File. You can also tap the captured
image at the lower-left corner on Live interface to go to File. For
more details, see "10 File."
Video recording
Select a video, and then tap to start recording. Tap the icon
again to stop recording.
Recorded videos are saved in the File. You can also tap the video at the
lower-left corner on Live interface to go to File. For more details, see "10
File."
Voice call
Select a video, and then tap to enable two-way voice call if the
function is supported.
Tap and hold the icon till the Voice Call interface is displayed. Tap
the device to which the channel belongs to enable device talk if the
function is supported.
If a device has many channels, tap on Live interface is talking to the
played channel, and device talk means directly talking to the device.
Memory
play/Close
videos
Memory play: Tap (a tick in the center) to play the channels that
have been played last time.
Close videos: Tap (a cross in the center) to close all the played
videos.
PTZ control
Select a video, tap More Functions, and then tap to control
PTZ.
Tap to zoom in or zoom out the image.
Tap to adjust the brightness of the video.
Tap , select the preset point, and then tap to turn the PTZ to
the monitoring target.

28
Function Description
Use to control PTZ directions: Left, right, up, down, upper-left,
upper-right, lower-left, and lower-right are supported.
You can also use gestures to control PTZ.
Swipe on the screen to control the PTZ direction.
Pinch or stretch out with fingers on the screen to zoom out or zoom
in.
Only one window is displayed during PTZ control.
PTZ function is available on select models.
Fisheye
Select a video, tap More Functions, and then tap to enable
fisheye. Swipe on the screen to adjust the display effect of video
image.
The function is is available on select models.
Wiper
Select a video, tap More Functions, tap , and then the wiper
control interface is displayed.
Tap Single, the wiper works one time, and then stop.
Tap Enable, then configure time interval, the wiper works after each
time interval.
Tap Stop, the wiper stops working.
The function is available on select models.
Spotlight/Buzzer
Tap , and then select to enable white light; select to
enable buzzer.
The function is available on select models.
Full screen Turn off the portrait orientation lock. Hold your mobile phone
horizontally, and then the video is displayed in full screen.
Change video
place Tap and hold a video, and then you can move it to the target window.
Enlarge window Double tap the window to enlarge it. Double tap again to restore.
Help If the video is not properly played, tap Help in the window to solve the
problem.
Delete video Tap and hold a video till the trash bin appears at the top of the interface.
Drag the video to the trash bin, and then release.

29
4 Video Playback
You can search and play back videos according to time, video type, and channels.
Before playing back videos, you need to set alarm rules and record plan of the channel.
On Home interface, tap . Step 1
Tap or to select a channel or multiple channels. Step 2
Today’s video will be played back if it is recorded.
Video playback Figure 4-1
Tap to change date and record type. The date with a blue dot Step 3
means it has videos.

30
Playback conditions Figure 4-2
Record types are as follows.
All (grey): Play all types of records by default.
Regular (green): Normal recordings.
Alarm (red): Record when alarm is triggered, such as audio alarm and local alarm.
Motion Detection (orange): Record when motion detection alarm is triggered.
Smart Recording (yellow): Record when smart event alarm is triggered such as
face detection and recognition, IVS, video metadata, and more.
Table 4-1 Video playback function icons
Function Description
Play back
videos
Select a video, and then you can:
: Pause playing; : Continue playing
: Play slowly; : Play fast; : Play by frame
: Mute the video; : Unmute the video.
31
Function Description
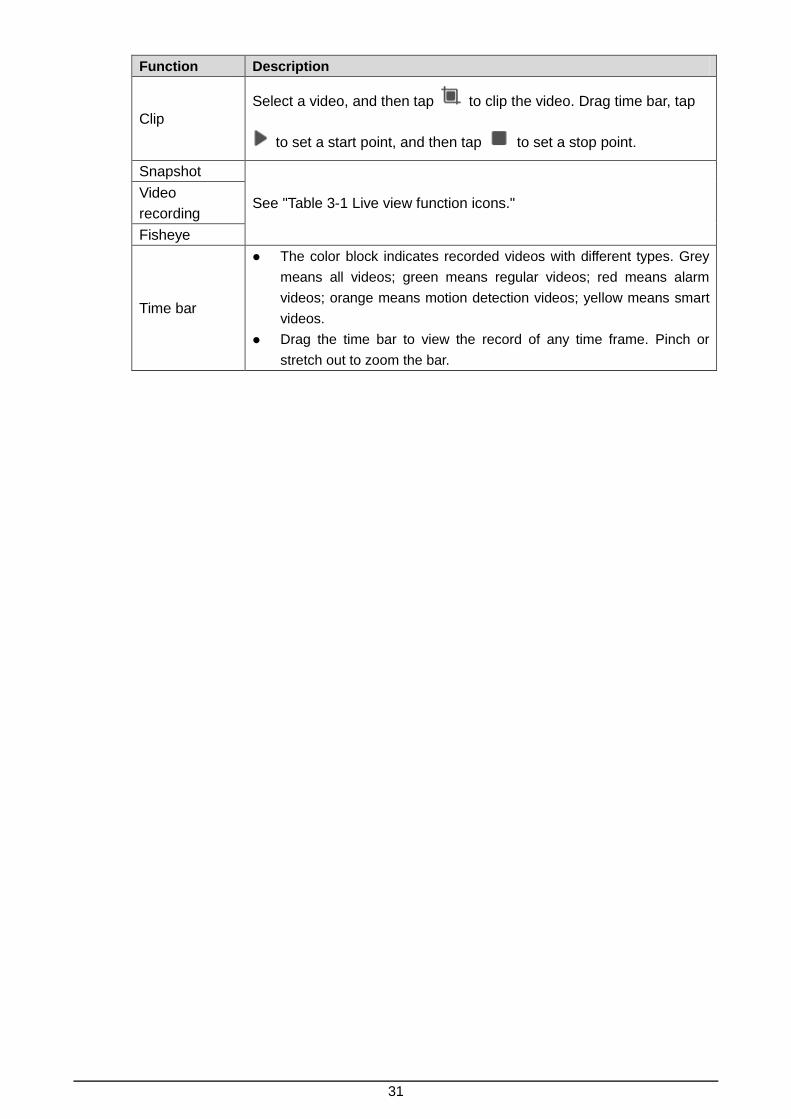
Clip
Select a video, and then tap to clip the video. Drag time bar, tap
to set a start point, and then tap to set a stop point.
Snapshot
See "Table 3-1 Live view function icons." Video
recording
Fisheye
Time bar
The color block indicates recorded videos with different types. Grey
means all videos; green means regular videos; red means alarm
videos; orange means motion detection videos; yellow means smart
videos.
Drag the time bar to view the record of any time frame. Pinch or
stretch out to zoom the bar.

32
5 Video Call
You can view the live video of the added video intercoms, realize video call between the device
and App, lock/unlock the door, and more.
On the Home interface, tap . Step 1
Tap or to select a channel. Step 2
Door Figure 5-1
Table 5-1 Video call function icons
Function Description
Snapshot See "Table 3-1 Live view function icons."
Video stream Tap to swich between SD and HD video quality.
Two-way adio During talk, tap to disable two-way audio.
Favorites Tap to create a favorites group and add the selected channel to the
Favorites or to the existing favorites group. See "9 Favorites."
Record See "Table 3-1 Live view function icons."

33
Function Description
Answer/End
the call
Enable Alarm Subscription of the VTO, and then you can answer the call
on App when VTO is called.
App calls VTO: Tap to call the TVO; tap to hang up the call.
App answers the call from VTO: Tap to answer the call; tap to
decline or hang up the call.
Unlock
Tap to unlock the door.
VTO that has two locks can be added to the App. Tap , and then select
or to unlock the door.

34
6 Alarm Control
You can manage the added alarm hub and its detectors such as switching protection mode,
setting arm or disarm, and deleting devices.
Protection Mode 6.1
On the Home interface, tap .
Alarm control Figure 6-1
Tap to select another alarm device.
Tap the protection mode icon, and then you can switch modes.

35
Switch protection mode Figure 6-2
: Disarm mode. All detectors are disabled by default and you can set as needed.
: Stay mode. All detectors are disabled by default and you can set as needed.
: Away mode. All detectors are disabled by default and you can set as needed.
: Custom mode. Set as needed.
Tap the protection mode icon, tap , and then you can enable or disable detectors under
different protection modes.
Mode setting Figure 6-3

36
Configuring Alarm Devices 6.2
Configuration interfaces might vary with different devices, and the actual interface shall prevail.
Configuring Alarm Hubs
You can view and modify device configuration, enable alarm subscription, and set alarm
volume and arm/disarm period.
On the Home interface, tap of the alarm hub, and then tap Device Details.
You can also tap the alarm detector under an alarm hub on the Home interface, and then tap
to go to device details interface.
Configure the alarm hub Figure 6-4
Configuring Alarm Detectors
On the Home interface, tap the alarm detector under an alarm hub, and then tap the detector.

37
Select a linked channel, and then tap Live View of Linked Channel, you can view live
video of that channel.
By enabling the siren, it will give a sound when the alarm is triggered.
Configure the alarm detector Figure 6-5

38
7 Access
You can view door status, unlock records, remotely unlock the door, watch live video of the
access control device, and more.
On the Home interface, tap .
Access control device Figure 7-1
Table 7-1 Function icon description
Function Description
Switch device Tap to select another access control device.
Device details
Tap to go to device details interface, and then you can view device
configuration, and view unlock records within 7 days.
You can also tap of the access control device on the Home interface,
and then tap Device Details.
39
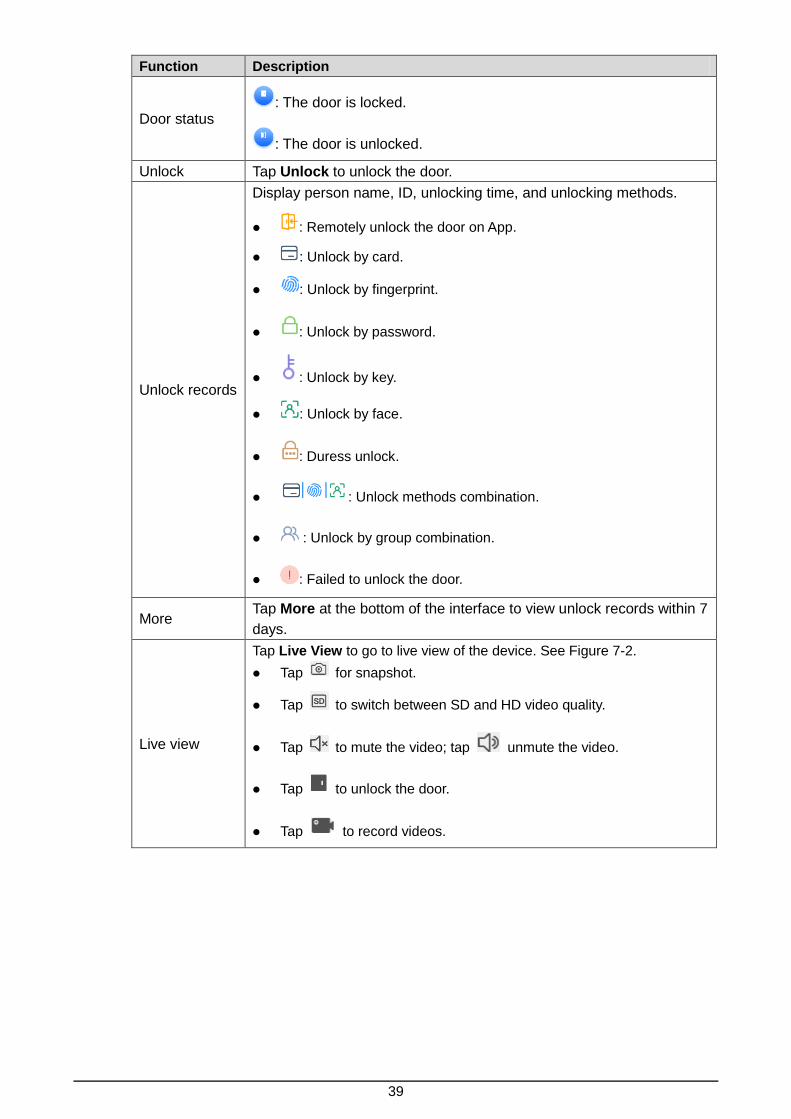
Function Description
Door status : The door is locked.
: The door is unlocked.
Unlock Tap Unlock to unlock the door.
Unlock records
Display person name, ID, unlocking time, and unlocking methods.
: Remotely unlock the door on App.
: Unlock by card.
: Unlock by fingerprint.
: Unlock by password.
: Unlock by key.
: Unlock by face.
: Duress unlock.
: Unlock methods combination.
: Unlock by group combination.
: Failed to unlock the door.
More Tap More at the bottom of the interface to view unlock records within 7
days.
Live view
Tap Live View to go to live view of the device. See Figure 7-2.
Tap for snapshot.
Tap to switch between SD and HD video quality.
Tap to mute the video; tap unmute the video.
Tap to unlock the door.
Tap to record videos.

40
Access (live) Figure 7-2

41
8 Cloud Storage
Recorded videos and snapshots of account devices are stored in Cloud Storage, and you can
view them on different mobile clients.
The function is available on devices supporting cloud storage.
On Home interface, tap . Step 1
Cloud storage Figure 8-1
Tap , and then you can view information about your cloud storage plan such as
paid, cancelled, and unpaid orders.
Tap search bar, and then you can enter keywords to search the device.
Tap Purchase Cloud Storage to purchase cloud storage.
Tap of a device to view its cloud storage details.
Tap the video files of a device in the list. Step 2
Tap one video to play back. Step 3

42
Tap to select the date on the calendar. The date with a blue dot means it has cloud
record.
43
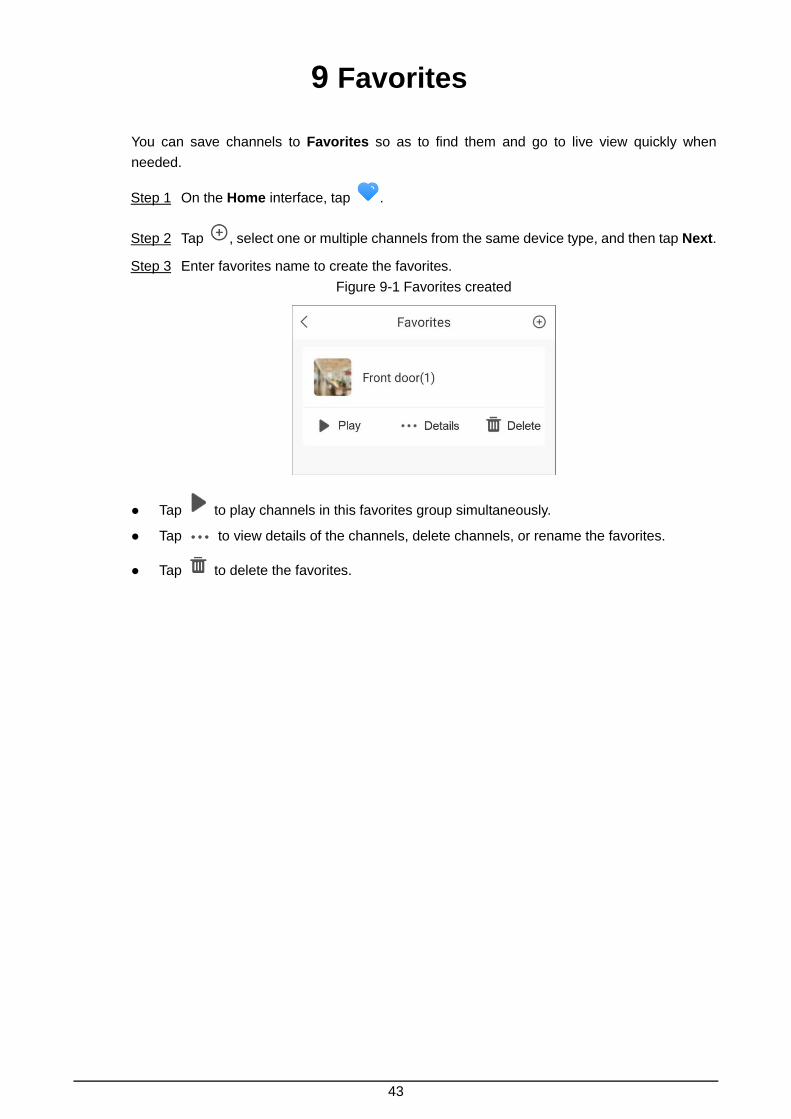
9 Favorites
You can save channels to Favorites so as to find them and go to live view quickly when
needed.
On the Home interface, tap . Step 1
Tap , select one or multiple channels from the same device type, and then tap Next. Step 2
Enter favorites name to create the favorites. Step 3
Favorites created Figure 9-1
Tap to play channels in this favorites group simultaneously.
Tap to view details of the channels, delete channels, or rename the favorites.
Tap to delete the favorites.
44
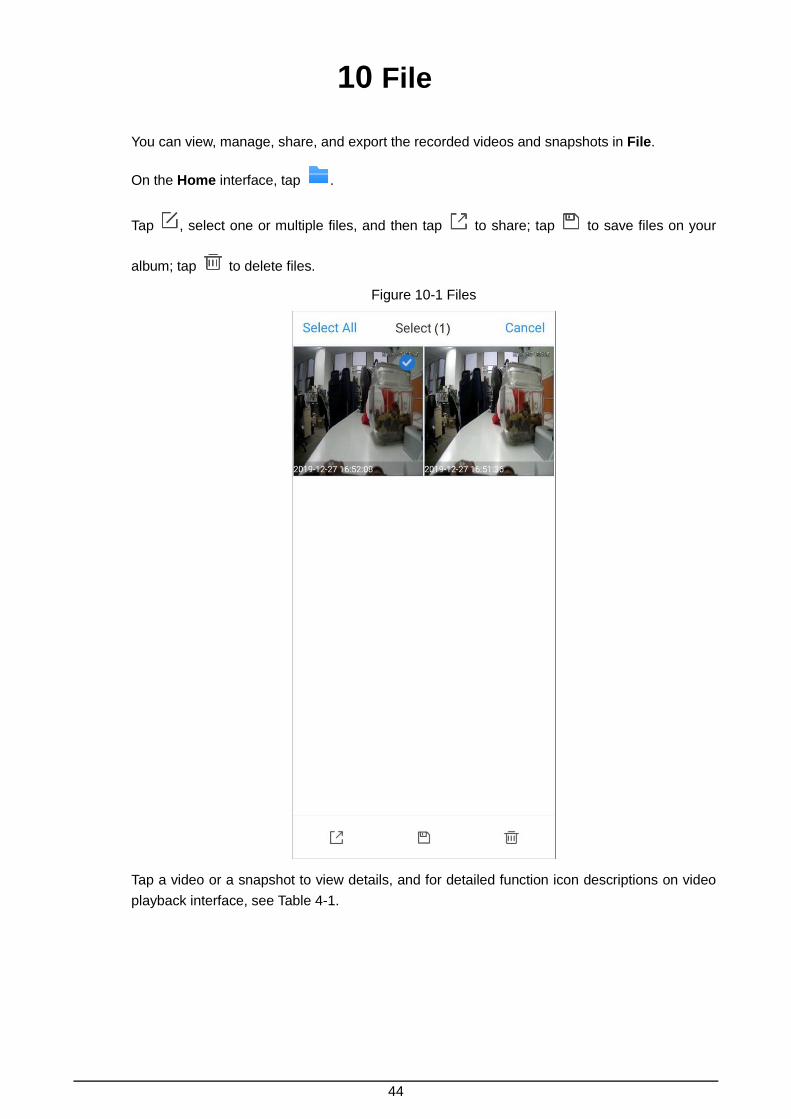
10 File
You can view, manage, share, and export the recorded videos and snapshots in File.
On the Home interface, tap .
Tap , select one or multiple files, and then tap to share; tap to save files on your
album; tap to delete files.
Files Figure 10-1
Tap a video or a snapshot to view details, and for detailed function icon descriptions on video
playback interface, see Table 4-1.

45
Recorded videos Figure 10-2

46
11 Message
Alarm messages generated by added devices can be pushed to the App. You can view
recorded videos, live video, and picture playback of alarm events.
You need to set alarm rules and enable alarm function of the device or channel.
Subscribing Alarm Messages 11.1
You need to subscribe alarm messages, and then the alarm notification can be pushed to App
when the alarm is triggered.
On the Home interface, tap , and then tap Device Details. Step 1
Tap Alarm Subscription, and then enable the alarm subscription. Step 2
Enable alarm subscription Figure 11-1
Set Prompt Type and alarm types as needed. Multiple alarm types can be selected Step 3
simultaneously.

47
Table 11-1 Configure alarm subscription
Name Description
Prompt type
Live: Live video is pushed when the alarm is triggered.
Video: The recorded alarm video will be pushed when the alarm is
triggered.
You need to install storage device and configure video plan of the device
first.
Alarm type
Select alarm types and its specific alarm event, and then alarm notification
will be pushed when the alarm events happened.
AI analysis: The alarm is triggered when the set rules are broken such
as Tripwire, Intrusion, Abandoned Object, and Scene Changing.
Stereo Vision: Defined behaviors will be detected and alarmed such as
Fall Detection, People Approaching, and People Stay.
Thermal Alarm: The alarm is triggered when there is abnormal
temperature change in the image such as Fire Alarm, Temperature
Contrast Alarm, Hot Spot Alarm, and Smoking Alarm.
Thermal imaging alarm is supported by thermal cameras.
Motion Detect: The alarm is triggered when there is abnormal moving
object in the image.
Cam Masking: The alarm is triggered when the camera is covered
abnormally.
Defocus: The alarm is triggered when the camera cannot focus on the
target or has softened or blurred image.
Face Alarm: The alarm is triggered when human faces are detected in
the image and alarm is triggered under defined conditions including face
detection and face recognition.
Audio Alarm: Sound in the video is detected and alarm is triggered
under conditions such as abnormal audio output and intensity change.
HDD Alarm: The alarm is triggered when no disk, low space or disk
error occur.
Voltage Test: The alarm is triggered when the device voltage is too low
or too high.
Network Alarm Type: Notification is pushed when network alarm, and
IPC offline alarm occur.
Sensor Alarm: The alarm is triggered when there is alarm information
from the connected sensors such as IPC External Alarm, and
Accessory Alarm.
Battery Alarm: The alarm is triggered with low battery or low solar
energy.
Save settings. Step 4

48
Viewing Messages 11.2
Tap Message at the bottom of the interface.
Message Figure 11-2
Function Description
Personal
message
Display messages such as sharing
devices, and deleting devices.
Personal and system messages
can only be viewed after login. System
message
Display messages such as system
maintenance and declaration.
Alarm
message
Display messages when alarm events happened.
Tap at the upper-right corner to select alarm message sources from
cameras, video intercoms, alarm devices, or all devices.
On the Message interface, tap an alarm event to view its alarm messages. Step 1
Tap to stop the alarm sound from detectors.
49
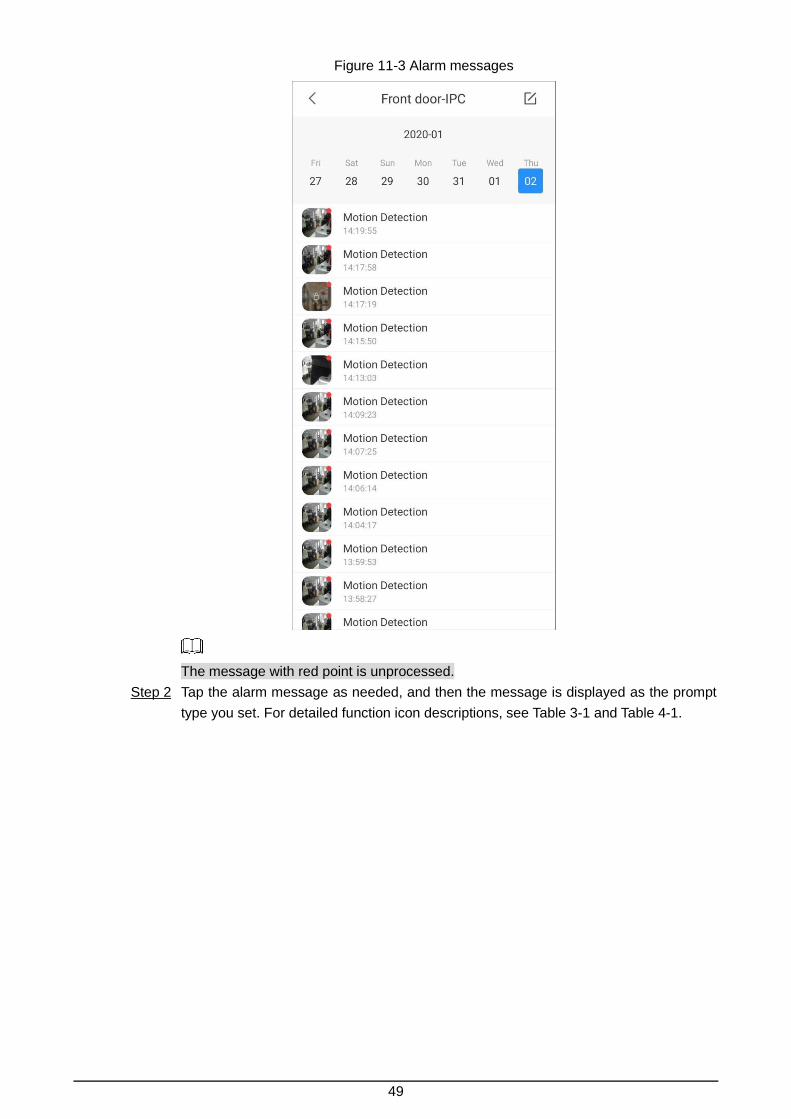
Alarm messages Figure 11-3
The message with red point is unprocessed.
Tap the alarm message as needed, and then the message is displayed as the prompt Step 2
type you set. For detailed function icon descriptions, see Table 3-1 and Table 4-1.

50
Display the alarm message Figure 11-4
Marking Alarm Messages 11.3
Tap Message at the bottom of the interface. Step 1
Tap an alarm event to view its alarm messages. Step 2
Tap , select one or multiple messages with red dot, and then tap Mark as read to Step 3
mark the selected messages as read.
Deleting Alarm Messages 11.4
Tap Message at the bottom of the interface. Step 1
Tap an alarm event to view its alarm messages. Step 2
Tap , select one or multiple messages, and then tap Delete. Step 3

51
12 System Configuration
On Me interface, you can set PTZ speed, snapshot capturing mode, enable password
protection, view help files, and more.
Tap Me at the bottom of the interface.
Me Figure 12-1
Setting 12.1
On Me interface, tap Setting.

52
Setting Figure 12-2
Table 12-1 Setting introduction
Function Description
PTZ Speed
Select the speed for PTZ camera from 1 to 8. The higher the value
is, the faster the PTZ moves.
The function is available on cameras supporting PTZ.
Capture Mode Set quantity of manual snapshot for a single time.
NR Setting The higher the NR level is, the better the noise reduction will be.
Hard Decoding By enabling Hard Decoding, the performance of video stream is
improved.
Pushed Video Delay
Set delay of pushed recordings.
Total pushed video duration=10 s before recording started +
recording duration + delay time you set
General 12.2
On Me interface, tap General Settings.
General Figure 12-3
By enabling Auto Play When Not in a Wi-Fi Network, videos can be automatically played
with other network such as cellular data.
By enabling Notification and set push period, notifications can only be pushed within the
defined period. Period setting is only supported by account devices.

53
Password Security 12.3
On Me interface, tap Password Security.
Password security Figure 12-4
By enabling Password Protection, set password, and then you need to enter password
every time you log in to the App or return to App from any interruption.
Modify Password: The function appears after you enable Password Protection, and you
can modify the protection password.
Reset Device Password: Follow on-screen instructions to scan the QR code and reset
device password as needed.
Changing Region 12.4
On Me interface, tap Change Region, and then you can reselect your region.
More Service 12.5
You can connect to Alexa and Google Home assistant to DMSS App, and control devices on
the DMSS with Alexa or Google assistant. Follow on-screen instructions to finish configuration.
Help and Feedback 12.6
On Me interface, tap Help and Feedback.
Help: You can view brief function introduction and operation instructions with Help files.
Feedback: You can send your feedback to us.
About 12.7
On Me interface, tap About.

54
You can view information about the App such as the version, privacy policy, user agreement,
declaration, and user data protection guideline, and join user experience plan.
55
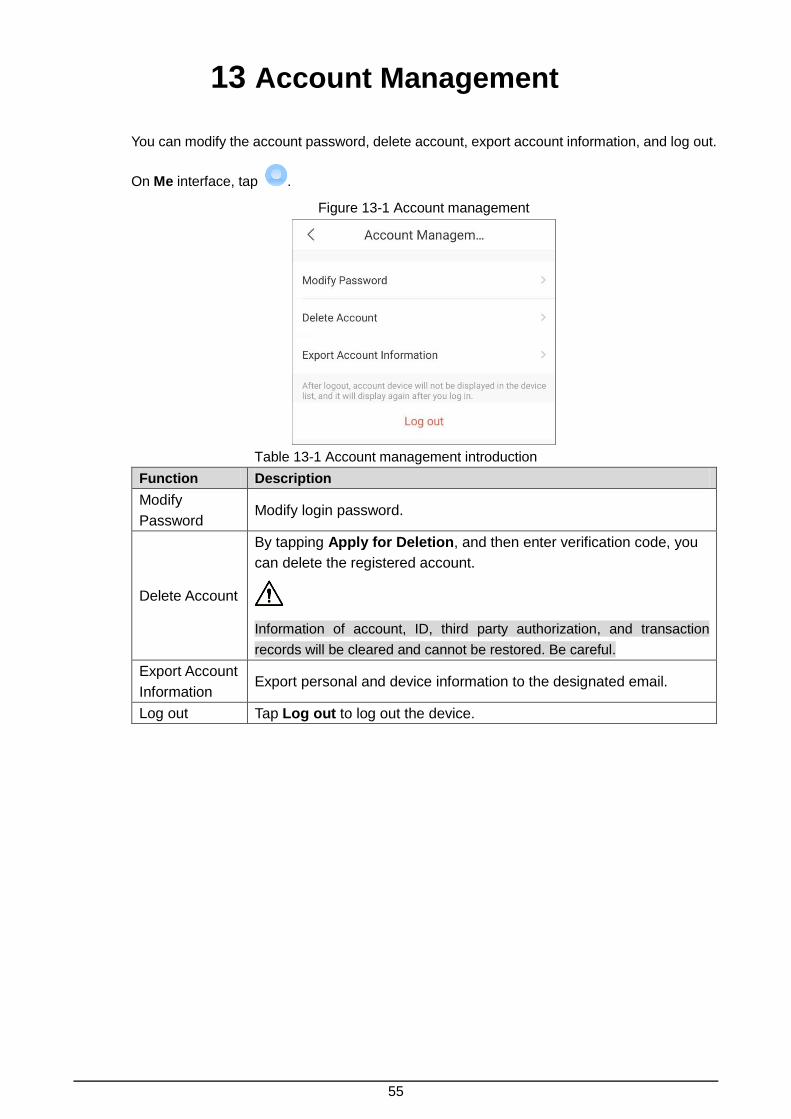
13 Account Management
You can modify the account password, delete account, export account information, and log out.
On Me interface, tap .
Account management Figure 13-1
Table 13-1 Account management introduction
Function Description
Modify
Password Modify login password.
Delete Account
By tapping Apply for Deletion, and then enter verification code, you
can delete the registered account.
Information of account, ID, third party authorization, and transaction
records will be cleared and cannot be restored. Be careful.
Export Account
Information Export personal and device information to the designated email.
Log out Tap Log out to log out the device.

56
14 FAQ
1. Invalid username/Incorrect password/Forgot password
Please confirm the username and password. If you forget the password, reset the device,
and then log in to the App again.
2. Locked account
Account is locked due to multiple times of incorrect input. Please wait until lock period ends
or you can reboot the device to unlock.
Make sure that the password is correct or enter it again. If you forget the password, reset
the device, and then log in to the App again.
3. Device connection failed/Login timeout
Make sure that the device has connected to the network.
Make sure that the port and IP are correct. Default IP/domain port is 37777.
Use another device port in case that it is shielded by the Internet carrier or used by other
device in the same LAN.
Use another network or Internet carrier in case of network problem.
4. Over max user connections
The prompt means that current device has reached max user limitation. If you want to add
this device to your App, please reduce users connected to this device.
5. Out of resource. The system is currently busy.
Please restart the device or reduce users connected to the device.
6. Alarm notification cannot be received
If the device does not support alarm notification push, then your mobile phone cannot
receive alarm notification.
Make sure that the device connects to network correctly and live view is available.
Make sure that the device or channel has subscribed alarm notification.
If all of the above operations are proper, make sure that device port mapping is correct.
Otherwise, you can change http port for mapping.
7. Alarm message cannot be subscribed
The device does not support alarm notification subscription.
Make sure that the device connects to network correctly and live view is available.
Change device http port, and then map again to prevent port conflict or occupation,
otherwise improper device might be connected, which do not support alarm notification
subscription.
8. The device can be connected to App in a Wi-Fi network not in a cellular network
The device can be connected to App through Wi-Fi but not cellular data
When the device can be used in a Wi-Fi network, its configuration is correct. If you need to
play with cellular data, you need to:
Add a fixed Internet IP to your device.
Connect the device to a router with an Internet IP, and map http port.
Connect the device to an Internet network. If the device supports P2P and can be
registered through P2P, you can add the device through P2P.
9. Failed to play back videos and snapshots
57
Enable recording/snapshot plan for the device.
If the problem still exists, check if device storage component is loose, or disk is damaged.
10. Live view lagged
Change main stream to sub stream.
Network bandwidth is insufficient. We recommend you to use a better network.
Mobile phone decoding capacity is limited. You can play live video in one window, or adjust
definition from HD to SD or auto.
11. Wi-Fi configuration failed
Make sure that the mobile phone has connected to Wi-Fi network and check Wi-Fi
password during network configuration.
Do not use dual band router with 5G frequency.
During network configuration, keep your mobile phone close to the device (max distance
30 cm).
If you have configured the network for the device, you need to reset the device, and then
configure other network.
If the problem still exists, please reset the device.
12. Device initialization failed
Make sure that the device has connected to the network.
Make sure that the mobile phone and the device are in the same LAN with either Wi-Fi
connection or wired connection.
If the problem still exists, please reset the device.
13. How to view multiple channels simultaneously
Make sure the function is support by the App. Tap on live view interface, select
channels you want to view, and then tap Start Live View.
14. How to control PTZ directions and PTZ zoom
Select a video, and then tap to control PTZ. You can use icons or gestures to control
PTZ. Swipe on the screen to control the PTZ direction. Pinch or stretch out with two fingers
to zoom in or zoom out.
15. How to make a blurred video clear
Select a video, and then tap to switch the stream from SD and HD.
On Live interface, tap , select Remote Configuration > Image Adjustment, select the
device channel, and then tap to switch video quality. Tap to switch to real-time
mode. Tap to switch to fluent mode. Tap to switch to auto mode.
You can also customize coding parameters to adapt to your network environment. On Live
interface, tap , select Remote Configuration > Camera Setting > Video Stream. If
your mobile phone performance and network environment are both good, select main
stream, and then customize resolution, frame rate, and bitrate.
16. How to close a playing video
58
Tap and hold the video, drag it to the trash bin appeared on the top of the interface, and
then release.
17. How to close video during playback
Tap and hold the video, drag it to the trash bin appeared on the top of the interface, and
then release.
You can also tap (a cross in the center) to close all the played videos.
18. Videos cannot be viewed
Make sure that the information such as IP address and port (37777 by default) is Step 1
correct when you add the device.
Deal with the problem according to the on-screen instructions when you failed to log in. Step 2
If the problem still exists, check whether the device is online. Step 3
19. Where are Remote Configuration, HDD, and Alarm Output
On the Home interface, tap , and then tap Device Details.
You can also tap the device or channel, and then tap on the interface to go to device
management interface.
20. What are the differences between the following device adding methods
P2P type: P2P function is supported by the device. You can add the device by scanning or
manually enter QR code.
IP/Domain: Generally, devices can be added by entering their IP. You can also add
devices if you have domain address from the third party.
21. How to share snapshots with my friend
You can share recorded videos or snapshots in File.
22. Why storage device is needed for local devices if you want to view videos after
alarm message is pushed
Videos cannot be stored on Android system. They are acquired from the added device.
23. Where to get the App
Search DMSS in Google Play.

59
Cybersecurity Recommendations Appendix 1
Cybersecurity is more than just a buzzword: it’s something that pertains to every device that is
connected to the internet. IP video surveillance is not immune to cyber risks, but taking basic
steps toward protecting and strengthening networks and networked appliances will make them
less susceptible to attacks. Below are some tips and recommendations on how to create a
more secured security system.
Mandatory actions to be taken for basic equipment network security:
1. Use Strong Passwords
Please refer to the following suggestions to set passwords:
The length should not be less than 8 characters;
Include at least two types of characters; character types include upper and lower case
letters, numbers and symbols;
Do not contain the account name or the account name in reverse order;
Do not use continuous characters, such as 123, abc, etc.;
Do not use overlapped characters, such as 111, aaa, etc.;
2. Update Firmware and Client Software in Time
According to the standard procedure in Tech-industry, we recommend to keep your
equipment (such as NVR, DVR, IP camera, etc.) firmware up-to-date to ensure the
system is equipped with the latest security patches and fixes. When the equipment is
connected to the public network, it is recommended to enable the “auto-check for
updates” function to obtain timely information of firmware updates released by the
manufacturer.
We suggest that you download and use the latest version of client software.
"Nice to have" recommendations to improve your equipment network security:
1. Physical Protection
We suggest that you perform physical protection to equipment, especially storage devices.
For example, place the equipment in a special computer room and cabinet, and implement
well-done access control permission and key management to prevent unauthorized
personnel from carrying out physical contacts such as damaging hardware, unauthorized
connection of removable equipment (such as USB flash disk, serial port), etc.
2. Change Passwords Regularly
We suggest that you change passwords regularly to reduce the risk of being guessed or
cracked.
3. Set and Update Passwords Reset Information Timely
The equipment supports password reset function. Please set up related information for
password reset in time, including the end user’s mailbox and password protection
questions. If the information changes, please modify it in time. When setting password
protection questions, it is suggested not to use those that can be easily guessed.
4. Enable Account Lock
The account lock feature is enabled by default, and we recommend you to keep it on to
guarantee the account security. If an attacker attempts to log in with the wrong password
several times, the corresponding account and the source IP address will be locked.
5. Change Default HTTP and Other Service Ports

60
We suggest you to change default HTTP and other service ports into any set of numbers
between 1024~65535, reducing the risk of outsiders being able to guess which ports you
are using.
6. Enable HTTPS
We suggest you to enable HTTPS, so that you visit Web service through a secure
communication channel.
7. Enable Whitelist
We suggest you to enable whitelist function to prevent everyone, except those with
specified IP addresses, from accessing the system. Therefore, please be sure to add your
computer’s IP address and the accompanying equipment’s IP address to the whitelist.
8. MAC Address Binding
We recommend you to bind the IP and MAC address of the gateway to the equipment,
thus reducing the risk of ARP spoofing.
9. Assign Accounts and Privileges Reasonably
According to business and management requirements, reasonably add users and assign a
minimum set of permissions to them.
10. Disable Unnecessary Services and Choose Secure Modes
If not needed, it is recommended to turn off some services such as SNMP, SMTP, UPnP,
etc., to reduce risks.
If necessary, it is highly recommended that you use safe modes, including but not limited to
the following services:
SNMP: Choose SNMP v3, and set up strong encryption passwords and authentication
passwords.
SMTP: Choose TLS to access mailbox server.
FTP: Choose SFTP, and set up strong passwords.
AP hotspot: Choose WPA2-PSK encryption mode, and set up strong passwords.
11. Audio and Video Encrypted Transmission
If your audio and video data contents are very important or sensitive, we recommend that
you use encrypted transmission function, to reduce the risk of audio and video data being
stolen during transmission.
Reminder: encrypted transmission will cause some loss in transmission efficiency.
12. Secure Auditing
Check online users: we suggest that you check online users regularly to see if the
device is logged in without authorization.
Check equipment log: By viewing the logs, you can know the IP addresses that were
used to log in to your devices and their key operations.
13. Network Log
Due to the limited storage capacity of the equipment, the stored log is limited. If you need
to save the log for a long time, it is recommended that you enable the network log function
to ensure that the critical logs are synchronized to the network log server for tracing.
14. Construct a Safe Network Environment
In order to better ensure the safety of equipment and reduce potential cyber risks, we
recommend:
Disable the port mapping function of the router to avoid direct access to the intranet
devices from external network.
The network should be partitioned and isolated according to the actual network needs.
If there are no communication requirements between two sub networks, it is

61
suggested to use VLAN, network GAP and other technologies to partition the network,
so as to achieve the network isolation effect.
Establish the 802.1x access authentication system to reduce the risk of unauthorized
access to private networks.