Unit-5 Shell Variables
38
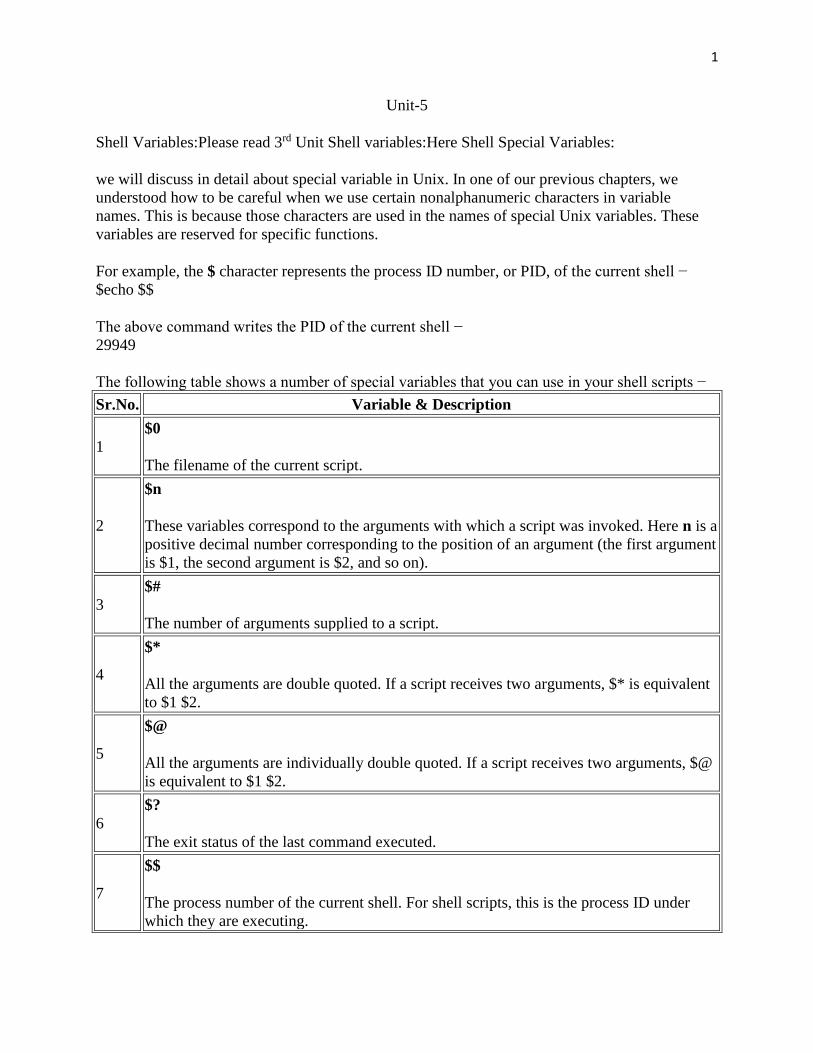
1 Unit-5 Shell Variables:Please read 3 rd Unit Shell variables:Here Shell Special Variables: we will discuss in detail about special variable in Unix. In one of our previous chapters, we understood how to be careful when we use certain nonalphanumeric characters in variable names. This is because those characters are used in the names of special Unix variables. These variables are reserved for specific functions. For example, the $ character represents the process ID number, or PID, of the current shell − $echo $$ The above command writes the PID of the current shell − 29949 The following table shows a number of special variables that you can use in your shell scripts − Sr.No. Variable & Description 1 $0 The filename of the current script. 2 $n These variables correspond to the arguments with which a script was invoked. Here n is a positive decimal number corresponding to the position of an argument (the first argument is $1, the second argument is $2, and so on). 3 $# The number of arguments supplied to a script. 4 $* All the arguments are double quoted. If a script receives two arguments, $* is equivalent to $1 $2. 5 $@ All the arguments are individually double quoted. If a script receives two arguments, $@ is equivalent to $1 $2. 6 $? The exit status of the last command executed. 7 $$ The process number of the current shell. For shell scripts, this is the process ID under which they are executing.
-
Upload
khangminh22 -
Category
Documents
-
view
4 -
download
0
Transcript of Unit-5 Shell Variables
1
Unit-5
Shell Variables:Please read 3rd Unit Shell variables:Here Shell Special Variables:
we will discuss in detail about special variable in Unix. In one of our previous chapters, we
understood how to be careful when we use certain nonalphanumeric characters in variable
names. This is because those characters are used in the names of special Unix variables. These
variables are reserved for specific functions.
For example, the $ character represents the process ID number, or PID, of the current shell −
$echo $$
The above command writes the PID of the current shell −
29949
The following table shows a number of special variables that you can use in your shell scripts −
Sr.No. Variable & Description
1
$0
The filename of the current script.
2
$n
These variables correspond to the arguments with which a script was invoked. Here n is a
positive decimal number corresponding to the position of an argument (the first argument
is $1, the second argument is $2, and so on).
3
$#
The number of arguments supplied to a script.
4
$*
All the arguments are double quoted. If a script receives two arguments, $* is equivalent
to $1 $2.
5
$@
All the arguments are individually double quoted. If a script receives two arguments, $@
is equivalent to $1 $2.
6
$?
The exit status of the last command executed.
7
$$
The process number of the current shell. For shell scripts, this is the process ID under
which they are executing.
2
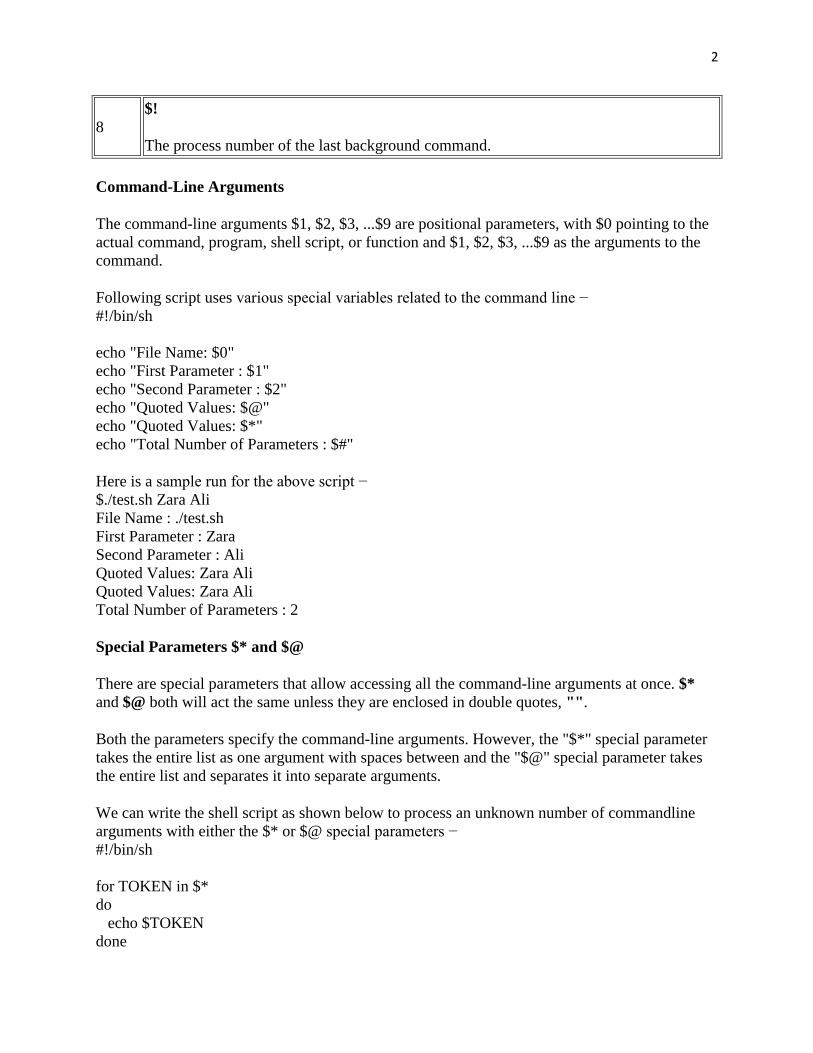
8
$!
The process number of the last background command.
Command-Line Arguments
The command-line arguments $1, $2, $3, ...$9 are positional parameters, with $0 pointing to the
actual command, program, shell script, or function and $1, $2, $3, ...$9 as the arguments to the
command.
Following script uses various special variables related to the command line −
#!/bin/sh
echo "File Name: $0"
echo "First Parameter : $1"
echo "Second Parameter : $2"
echo "Quoted Values: $@"
echo "Quoted Values: $*"
echo "Total Number of Parameters : $#"
Here is a sample run for the above script −
$./test.sh Zara Ali
File Name : ./test.sh
First Parameter : Zara
Second Parameter : Ali
Quoted Values: Zara Ali
Quoted Values: Zara Ali
Total Number of Parameters : 2
Special Parameters $* and $@
There are special parameters that allow accessing all the command-line arguments at once. $*
and $@ both will act the same unless they are enclosed in double quotes, "".
Both the parameters specify the command-line arguments. However, the "$*" special parameter
takes the entire list as one argument with spaces between and the "$@" special parameter takes
the entire list and separates it into separate arguments.
We can write the shell script as shown below to process an unknown number of commandline
arguments with either the $* or $@ special parameters −
#!/bin/sh
for TOKEN in $*
do
echo $TOKEN
done

3
Here is a sample run for the above script −
$./test.sh Zara Ali 10 Years Old
Zara
Ali
10
Years
Old
Note − Here do...done is a kind of loop that will be covered in a subsequent tutorial.
Exit Status
The $? variable represents the exit status of the previous command.
Exit status is a numerical value returned by every command upon its completion. As a rule, most
commands return an exit status of 0 if they were successful, and 1 if they were unsuccessful.
Some commands return additional exit statuses for particular reasons. For example, some
commands differentiate between kinds of errors and will return various exit values depending on
the specific type of failure.
Following is the example of successful command −
$./test.sh Zara Ali
File Name : ./test.sh
First Parameter : Zara
Second Parameter : Ali
Quoted Values: Zara Ali
Quoted Values: Zara Ali
Total Number of Parameters : 2
$echo $?
0
$
Export Command:
export - Set export attribute for shell variables.
export [-fn] [name[=value] ...] or export -p
DESCRIPTION
export- command is one of the bash shell BUILTINS commands, which means it is part of your
shell. The export command is fairly simple to use as it has straightforward syntax with only three
available command options. In general, the export command marks an environment variable to
be exported with any newly forked child processes and thus it allows a child process to inherit all
marked variables.
Options
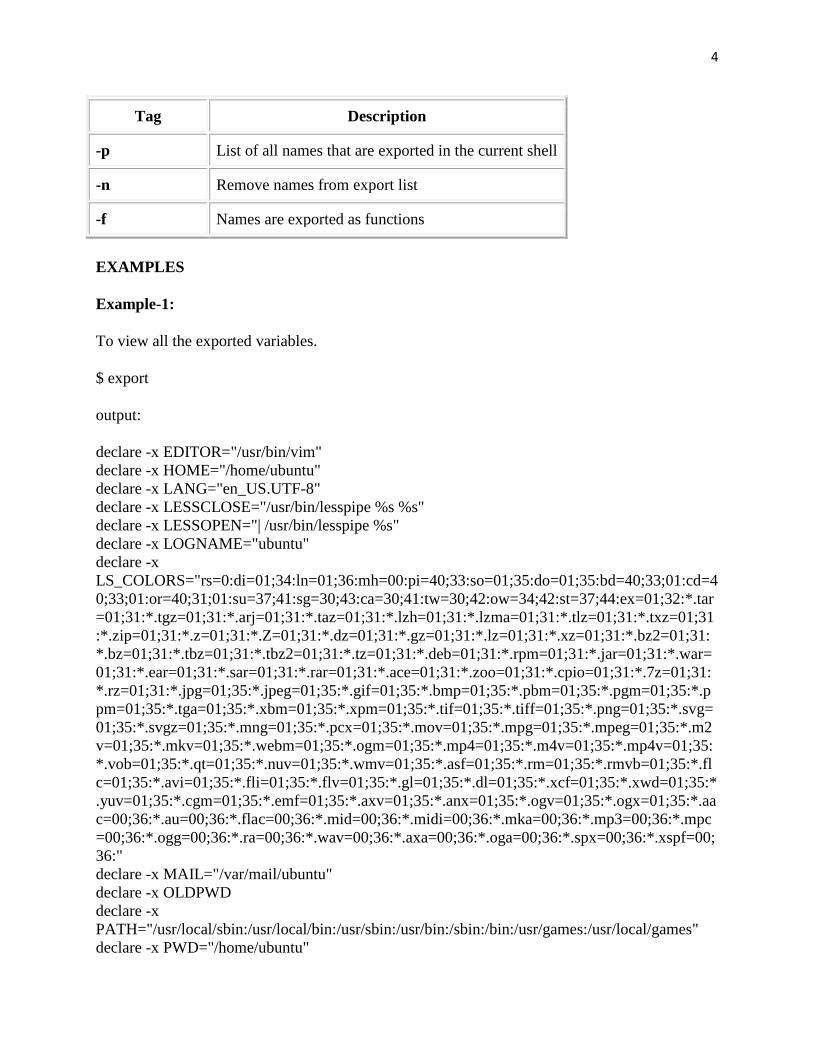
4
Tag Description
-p List of all names that are exported in the current shell
-n Remove names from export list
-f Names are exported as functions
EXAMPLES
Example-1:
To view all the exported variables.
$ export
output:
declare -x EDITOR="/usr/bin/vim"
declare -x HOME="/home/ubuntu"
declare -x LANG="en_US.UTF-8"
declare -x LESSCLOSE="/usr/bin/lesspipe %s %s"
declare -x LESSOPEN="| /usr/bin/lesspipe %s"
declare -x LOGNAME="ubuntu"
declare -x
LS_COLORS="rs=0:di=01;34:ln=01;36:mh=00:pi=40;33:so=01;35:do=01;35:bd=40;33;01:cd=4
0;33;01:or=40;31;01:su=37;41:sg=30;43:ca=30;41:tw=30;42:ow=34;42:st=37;44:ex=01;32:*.tar
=01;31:*.tgz=01;31:*.arj=01;31:*.taz=01;31:*.lzh=01;31:*.lzma=01;31:*.tlz=01;31:*.txz=01;31
:*.zip=01;31:*.z=01;31:*.Z=01;31:*.dz=01;31:*.gz=01;31:*.lz=01;31:*.xz=01;31:*.bz2=01;31:
*.bz=01;31:*.tbz=01;31:*.tbz2=01;31:*.tz=01;31:*.deb=01;31:*.rpm=01;31:*.jar=01;31:*.war=
01;31:*.ear=01;31:*.sar=01;31:*.rar=01;31:*.ace=01;31:*.zoo=01;31:*.cpio=01;31:*.7z=01;31:
*.rz=01;31:*.jpg=01;35:*.jpeg=01;35:*.gif=01;35:*.bmp=01;35:*.pbm=01;35:*.pgm=01;35:*.p
pm=01;35:*.tga=01;35:*.xbm=01;35:*.xpm=01;35:*.tif=01;35:*.tiff=01;35:*.png=01;35:*.svg=
01;35:*.svgz=01;35:*.mng=01;35:*.pcx=01;35:*.mov=01;35:*.mpg=01;35:*.mpeg=01;35:*.m2
v=01;35:*.mkv=01;35:*.webm=01;35:*.ogm=01;35:*.mp4=01;35:*.m4v=01;35:*.mp4v=01;35:
*.vob=01;35:*.qt=01;35:*.nuv=01;35:*.wmv=01;35:*.asf=01;35:*.rm=01;35:*.rmvb=01;35:*.fl
c=01;35:*.avi=01;35:*.fli=01;35:*.flv=01;35:*.gl=01;35:*.dl=01;35:*.xcf=01;35:*.xwd=01;35:*
.yuv=01;35:*.cgm=01;35:*.emf=01;35:*.axv=01;35:*.anx=01;35:*.ogv=01;35:*.ogx=01;35:*.aa
c=00;36:*.au=00;36:*.flac=00;36:*.mid=00;36:*.midi=00;36:*.mka=00;36:*.mp3=00;36:*.mpc
=00;36:*.ogg=00;36:*.ra=00;36:*.wav=00;36:*.axa=00;36:*.oga=00;36:*.spx=00;36:*.xspf=00;
36:"
declare -x MAIL="/var/mail/ubuntu"
declare -x OLDPWD
declare -x
PATH="/usr/local/sbin:/usr/local/bin:/usr/sbin:/usr/bin:/sbin:/bin:/usr/games:/usr/local/games"
declare -x PWD="/home/ubuntu"
5
declare -x SHELL="/bin/bash"
declare -x SHLVL="1"
declare -x SSH_CLIENT="192.168.134.1 56073 22"
declare -x SSH_CONNECTION="192.168.134.1 56073 192.168.134.128 22"
declare -x SSH_TTY="/dev/pts/0"
declare -x TERM="xterm"
declare -x USER="ubuntu"
declare -x XDG_RUNTIME_DIR="/run/user/1000"
declare -x XDG_SESSION_ID="1"
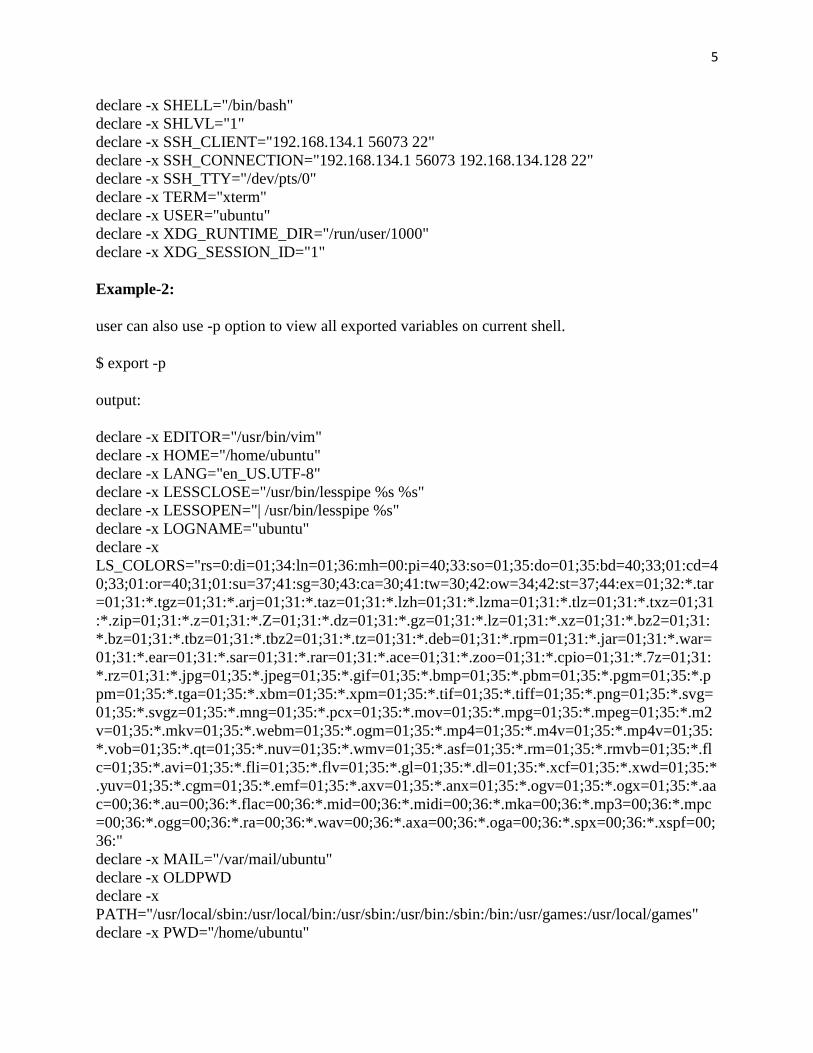
Example-2:
user can also use -p option to view all exported variables on current shell.
$ export -p
output:
declare -x EDITOR="/usr/bin/vim"
declare -x HOME="/home/ubuntu"
declare -x LANG="en_US.UTF-8"
declare -x LESSCLOSE="/usr/bin/lesspipe %s %s"
declare -x LESSOPEN="| /usr/bin/lesspipe %s"
declare -x LOGNAME="ubuntu"
declare -x
LS_COLORS="rs=0:di=01;34:ln=01;36:mh=00:pi=40;33:so=01;35:do=01;35:bd=40;33;01:cd=4
0;33;01:or=40;31;01:su=37;41:sg=30;43:ca=30;41:tw=30;42:ow=34;42:st=37;44:ex=01;32:*.tar
=01;31:*.tgz=01;31:*.arj=01;31:*.taz=01;31:*.lzh=01;31:*.lzma=01;31:*.tlz=01;31:*.txz=01;31
:*.zip=01;31:*.z=01;31:*.Z=01;31:*.dz=01;31:*.gz=01;31:*.lz=01;31:*.xz=01;31:*.bz2=01;31:
*.bz=01;31:*.tbz=01;31:*.tbz2=01;31:*.tz=01;31:*.deb=01;31:*.rpm=01;31:*.jar=01;31:*.war=
01;31:*.ear=01;31:*.sar=01;31:*.rar=01;31:*.ace=01;31:*.zoo=01;31:*.cpio=01;31:*.7z=01;31:
*.rz=01;31:*.jpg=01;35:*.jpeg=01;35:*.gif=01;35:*.bmp=01;35:*.pbm=01;35:*.pgm=01;35:*.p
pm=01;35:*.tga=01;35:*.xbm=01;35:*.xpm=01;35:*.tif=01;35:*.tiff=01;35:*.png=01;35:*.svg=
01;35:*.svgz=01;35:*.mng=01;35:*.pcx=01;35:*.mov=01;35:*.mpg=01;35:*.mpeg=01;35:*.m2
v=01;35:*.mkv=01;35:*.webm=01;35:*.ogm=01;35:*.mp4=01;35:*.m4v=01;35:*.mp4v=01;35:
*.vob=01;35:*.qt=01;35:*.nuv=01;35:*.wmv=01;35:*.asf=01;35:*.rm=01;35:*.rmvb=01;35:*.fl
c=01;35:*.avi=01;35:*.fli=01;35:*.flv=01;35:*.gl=01;35:*.dl=01;35:*.xcf=01;35:*.xwd=01;35:*
.yuv=01;35:*.cgm=01;35:*.emf=01;35:*.axv=01;35:*.anx=01;35:*.ogv=01;35:*.ogx=01;35:*.aa
c=00;36:*.au=00;36:*.flac=00;36:*.mid=00;36:*.midi=00;36:*.mka=00;36:*.mp3=00;36:*.mpc
=00;36:*.ogg=00;36:*.ra=00;36:*.wav=00;36:*.axa=00;36:*.oga=00;36:*.spx=00;36:*.xspf=00;
36:"
declare -x MAIL="/var/mail/ubuntu"
declare -x OLDPWD
declare -x
PATH="/usr/local/sbin:/usr/local/bin:/usr/sbin:/usr/bin:/sbin:/bin:/usr/games:/usr/local/games"
declare -x PWD="/home/ubuntu"
6
declare -x SHELL="/bin/bash"
declare -x SHLVL="1"
declare -x SSH_CLIENT="192.168.134.1 56073 22"
declare -x SSH_CONNECTION="192.168.134.1 56073 192.168.134.128 22"
declare -x SSH_TTY="/dev/pts/0"
declare -x TERM="xterm"
declare -x USER="ubuntu"
declare -x XDG_RUNTIME_DIR="/run/user/1000"
declare -x XDG_SESSION_ID="1"
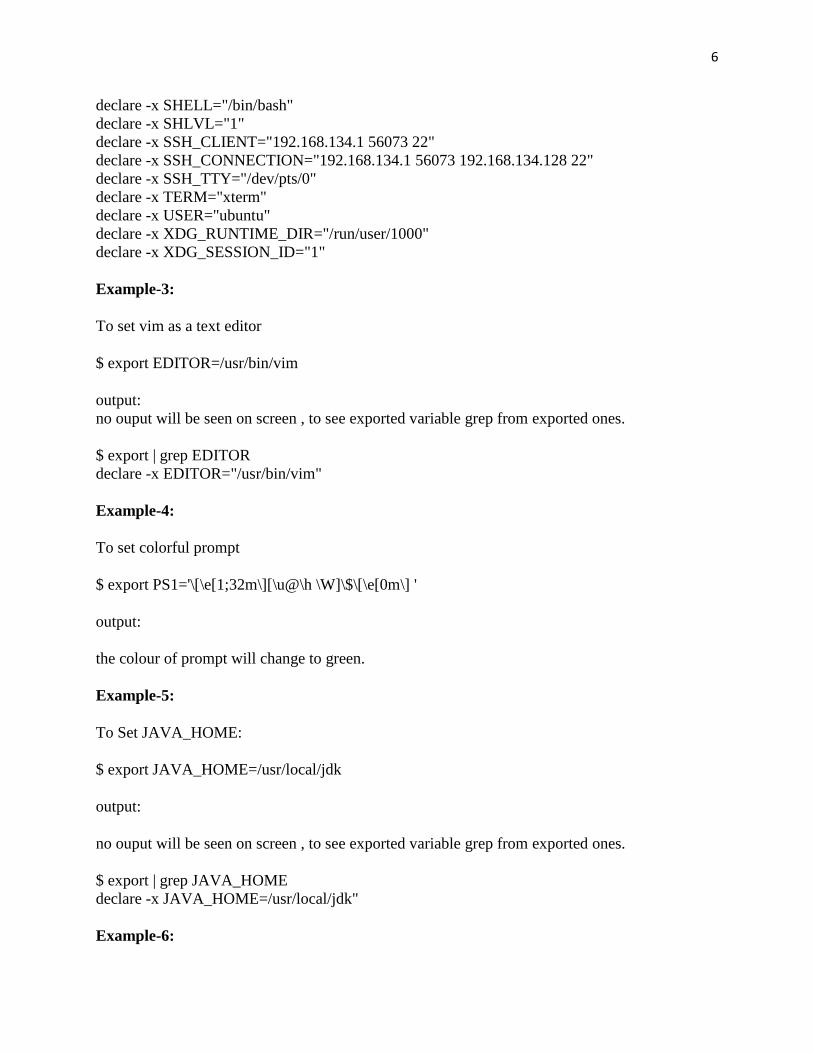
Example-3:
To set vim as a text editor
$ export EDITOR=/usr/bin/vim
output:
no ouput will be seen on screen , to see exported variable grep from exported ones.
$ export | grep EDITOR
declare -x EDITOR="/usr/bin/vim"
Example-4:
To set colorful prompt
$ export PS1='\[\e[1;32m\][\u@\h \W]\$\[\e[0m\] '
output:
the colour of prompt will change to green.
Example-5:
To Set JAVA_HOME:
$ export JAVA_HOME=/usr/local/jdk
output:
no ouput will be seen on screen , to see exported variable grep from exported ones.
$ export | grep JAVA_HOME
declare -x JAVA_HOME=/usr/local/jdk"
Example-6:
7
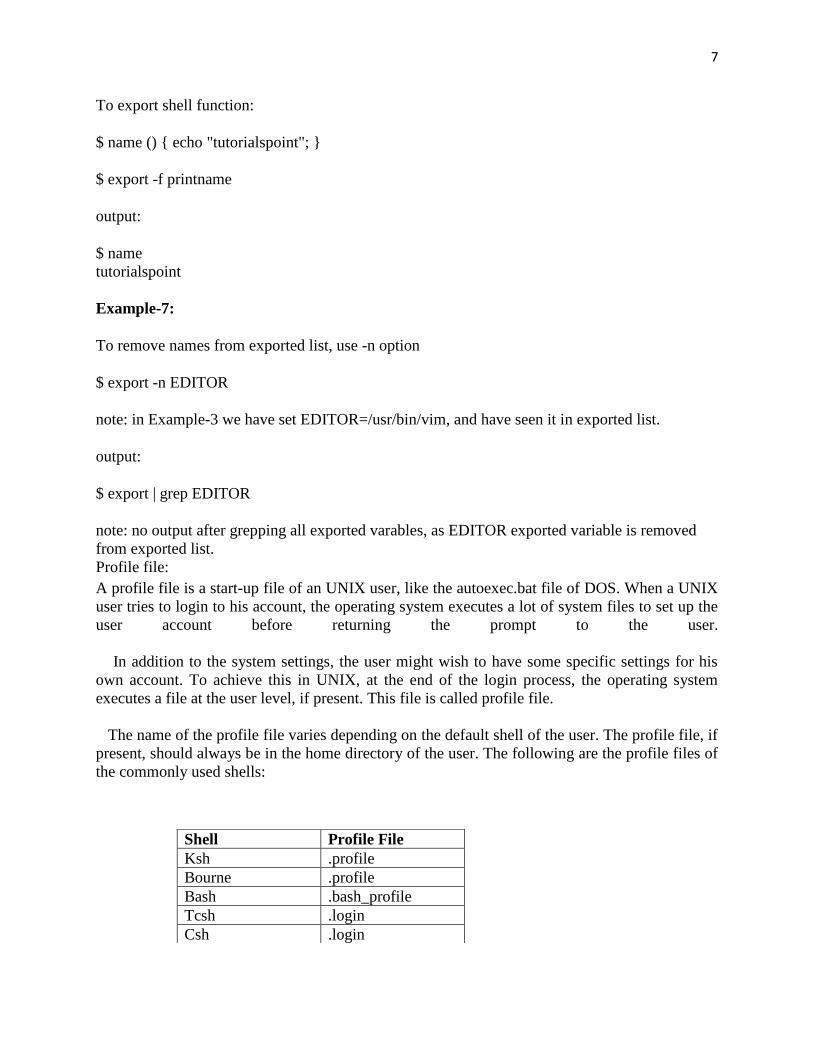
To export shell function:
$ name () { echo "tutorialspoint"; }
$ export -f printname
output:
$ name
tutorialspoint
Example-7:
To remove names from exported list, use -n option
$ export -n EDITOR
note: in Example-3 we have set EDITOR=/usr/bin/vim, and have seen it in exported list.
output:
$ export | grep EDITOR
note: no output after grepping all exported varables, as EDITOR exported variable is removed
from exported list.
Profile file:
A profile file is a start-up file of an UNIX user, like the autoexec.bat file of DOS. When a UNIX
user tries to login to his account, the operating system executes a lot of system files to set up the
user account before returning the prompt to the user.
In addition to the system settings, the user might wish to have some specific settings for his
own account. To achieve this in UNIX, at the end of the login process, the operating system
executes a file at the user level, if present. This file is called profile file.
The name of the profile file varies depending on the default shell of the user. The profile file, if
present, should always be in the home directory of the user. The following are the profile files of
the commonly used shells:
Shell Profile File
Ksh .profile
Bourne .profile
Bash .bash_profile
Tcsh .login
Csh .login
8
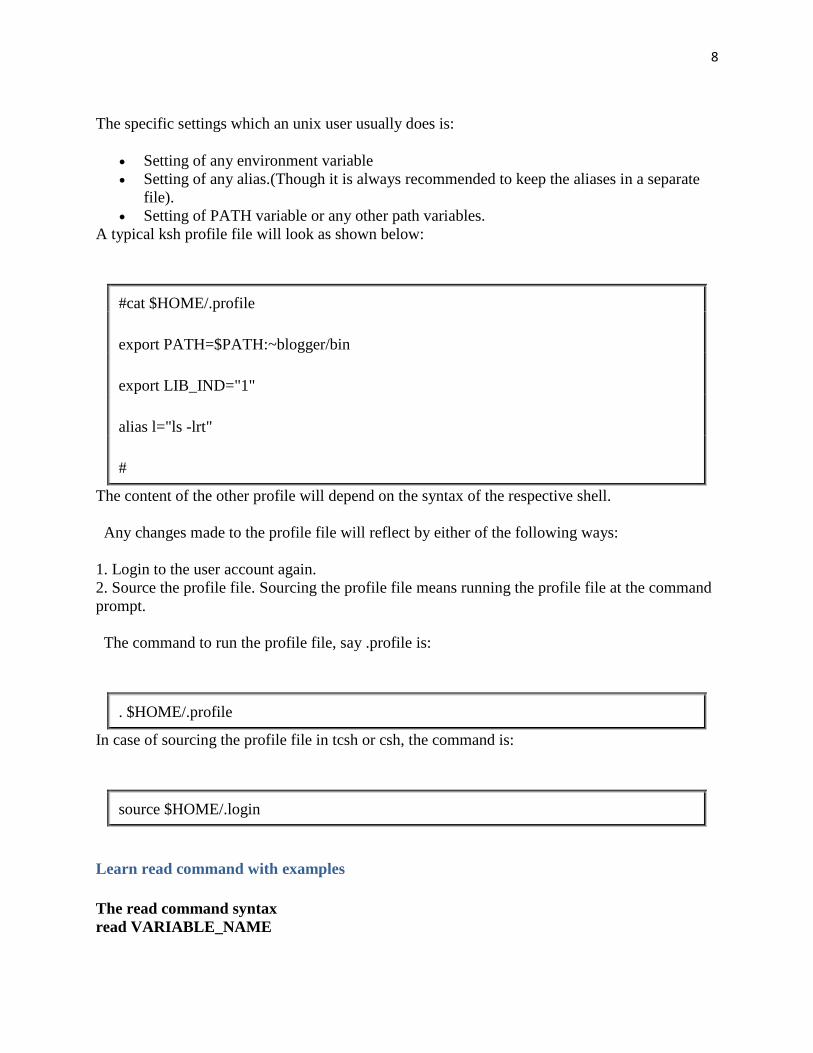
The specific settings which an unix user usually does is:
• Setting of any environment variable
• Setting of any alias.(Though it is always recommended to keep the aliases in a separate
file).
• Setting of PATH variable or any other path variables.
A typical ksh profile file will look as shown below:
#cat $HOME/.profile
export PATH=$PATH:~blogger/bin
export LIB_IND="1"
alias l="ls -lrt"
#
The content of the other profile will depend on the syntax of the respective shell.
Any changes made to the profile file will reflect by either of the following ways:
1. Login to the user account again.
2. Source the profile file. Sourcing the profile file means running the profile file at the command
prompt.
The command to run the profile file, say .profile is:
. $HOME/.profile
In case of sourcing the profile file in tcsh or csh, the command is:
source $HOME/.login
Learn read command with examples
The read command syntax
read VARIABLE_NAME
9
To access the above variable we use “$” or use echo if you want to print it.
echo "My variable is $VARIABLE_NAME"
Some frequently used read command examples
Example1: Read a value from user input. To display this value, we have to use echo command
as mention earlier.
read VAR1
echo $VAR1
Output:
surendra@sanne-taggle:~$ read VAR1
surendra
surendra@sanne-taggle:~$ echo $VAR1
surendra
Example2: The read command is an excellent command which can read two or more
words/variable/values at a time.
read VAR1 VAR2
Output:
surendra@sanne-taggle:~$ read VAR1 VAR2
surendra kumar
surendra@sanne-taggle:~$ echo $VAR1
surendra
surendra@sanne-taggle:~$ echo $VAR2
kumar
Example3: We can use read command to read elements of an array. Make sure that you separate
each item with space. As by default arrays uses spaces to separate items in the shell.
read ELEMENTS1
ARR1=($ELEMENTS1)
To display first value in array use below command
echo ${ARR1[0]}
Output:
surendra@sanne-taggle:~$ read ELEMENTS1
surendra kumar anne
surendra@sanne-taggle:~$ ARR1=($ELEMENTS1)
surendra@sanne-taggle:~$ echo ${ARR1[0]}
surendra
surendra@sanne-taggle:~$ echo ${ARR1[1]}
kumar
surendra@sanne-taggle:~$ echo ${ARR1[2]}
anne
10
Example4: We can read multiple values from a command
read VAR1 VAR2 VAR3 << ( echo surendra kumar anne )
echo "Enter values are $VAR1 $VAR2 $VAR3"
Example 5: Till this point, we saw just entering some data for a given variable. But if we can
provide some meaningful data for the user when entering data that will be great. This can be
achieved by using echo and read commands
Example:
echo "Please enter your name"
read NAME1
Output:
surendra@sanne-taggle:~$ echo "Please enter your name: "
Please enter your name:
surendra@sanne-taggle:~$ read NAME1
surendra
surendra@sanne-taggle:~$ echo $NAME1
surendra
Example 6: This is not that meaningful right? We can club echo and read command from above
example with -p option of reading. This option prints some useful message for the user.
surendra@sanne-taggle:~$ read -p "Please enter your name: " NAME1
Please enter your name: Surendra
surendra@sanne-taggle:~$ echo "My name is $NAME1"
My name is Surendra
Other examples which we have seen until this point with -p option
Output:
surendra@sanne-taggle:~$ read -p "Please enter your name: " NAME1
Please enter your name: Surendra
surendra@sanne-taggle:~$ echo "My name is $NAME1"
My name is Surendra
surendra@sanne-taggle:~$ read -p "Give your first and last names: " FNAME1 LNAME1
Give your first and last names: Surendra Anne
surendra@sanne-taggle:~$ echo "My first name is $FNAME1, and my last name is
$LNAME1"
My first name is Surendra, and my last name is Anne
surendra@sanne-taggle:~$ read -p "Give your first, middle and the last names: " NAME1
Give your first, middle and the last names: Surendra Kumar Anne
surendra@sanne-taggle:~$ ANAME1=($NAME1)
surendra@sanne-taggle:~$ echo "My first name is ${ANAME1[0]}, middle name is
${ANAME1[1]}, and last name is ${ANAME1[2]}"
11
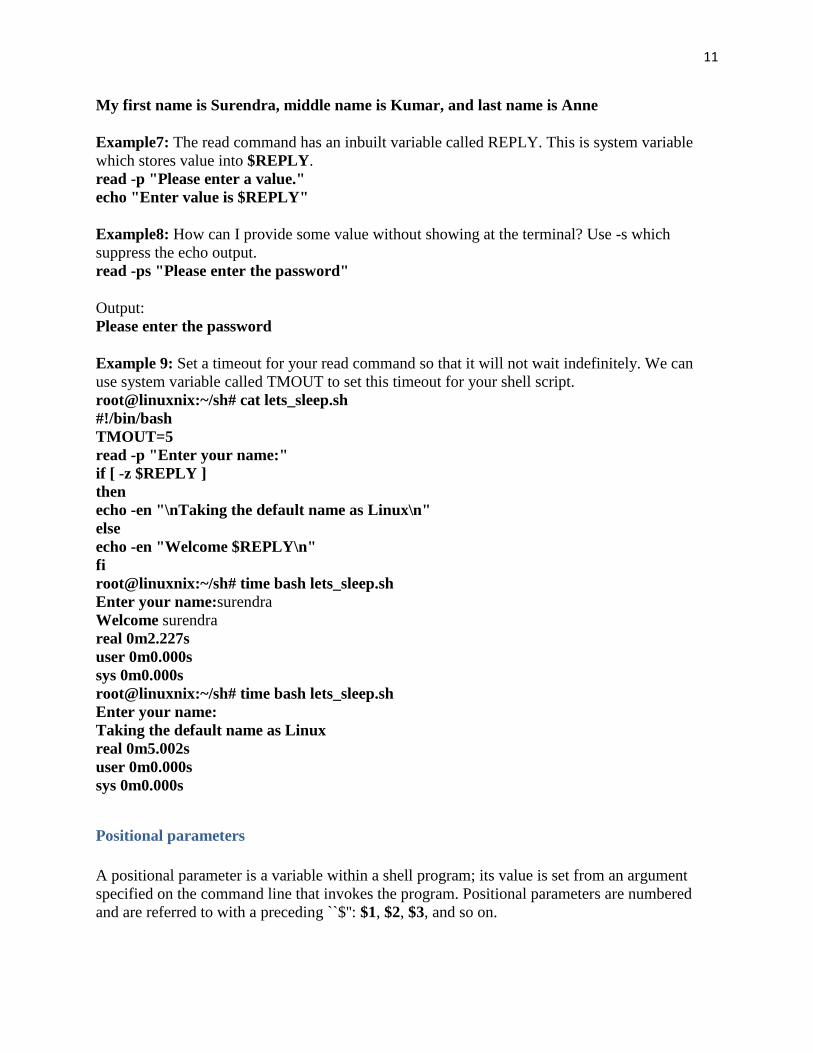
My first name is Surendra, middle name is Kumar, and last name is Anne
Example7: The read command has an inbuilt variable called REPLY. This is system variable
which stores value into $REPLY.
read -p "Please enter a value."
echo "Enter value is $REPLY"
Example8: How can I provide some value without showing at the terminal? Use -s which
suppress the echo output.
read -ps "Please enter the password"
Output:
Please enter the password
Example 9: Set a timeout for your read command so that it will not wait indefinitely. We can
use system variable called TMOUT to set this timeout for your shell script.
root@linuxnix:~/sh# cat lets_sleep.sh
#!/bin/bash
TMOUT=5
read -p "Enter your name:"
if [ -z $REPLY ]
then
echo -en "\nTaking the default name as Linux\n"
else
echo -en "Welcome $REPLY\n"
fi
root@linuxnix:~/sh# time bash lets_sleep.sh
Enter your name:surendra
Welcome surendra
real 0m2.227s
user 0m0.000s
sys 0m0.000s
root@linuxnix:~/sh# time bash lets_sleep.sh
Enter your name:
Taking the default name as Linux
real 0m5.002s
user 0m0.000s
sys 0m0.000s
Positional parameters
A positional parameter is a variable within a shell program; its value is set from an argument
specified on the command line that invokes the program. Positional parameters are numbered
and are referred to with a preceding ``$'': $1, $2, $3, and so on.
12
A shell program may reference up to nine positional parameters. If a shell program is invoked
with a command line that appears like this:
shell.prog pp1 pp2 pp3 pp4 pp5 pp6 pp7 pp8 pp9
then positional parameter $1 within the program is assigned the value pp1, positional parameter
$2 within the program is assigned the value pp2, and so on, at the time the shell program is
invoked.
To practice positional parameter substitution, create a file called pp (short for positional
parameters). (Remember, the directory in which these example files reside must be in $PATH.)
Then enter the echo commands shown in the following screen. Enter the command lines so that
running the cat command on your completed file will produce the following output:
$ cat pp
echo The first positional parameter is: $1
echo The second positional parameter is: $2
echo The third positional parameter is: $3
echo The fourth positional parameter is: $4
$
If you execute this shell program with the arguments one, two, three, and four, you will obtain
the following results (but first you must make the shell program pp executable using the chmod
command):
$ chmod u+x pp
$
$ pp one two three four
The first positional parameter is: one
The second positional parameter is: two
The third positional parameter is: three
The fourth positional parameter is: four
$
Another example of a shell program is bbday, which mails a greeting to the login entered in the
command line. The bbday program contains one line:
banner happy birthday | mail $1
Try sending yourself a birthday greeting. If your login name is sue, your command line will be:
bbday sue
The who command lists all users currently logged in on the system. How can you make a simple
shell program called whoson, that will tell you if the owner of a particular login is currently
working on the system?
Type the following command line into a file called whoson:
who | grep $1
The who command lists all current system users, and grep searches that output for a line with the
string contained as a value in the positional parameter $1.
13
Now try using your login as the argument for the new program whoson. For example, suppose
your login is sue. When you issue the whoson command, the shell program substitutes sue for
the parameter $1 in your program and executes as if it were:
who | grep sue
The output appears on your screen as follows:
$ whoson sue
sue tty26 Jan 24 13:35
$
If the owner of the specified login is not currently working on the system, grep fails and the
whoson prints no output.
The shell allows a command line to contain at least 128 arguments; however, a shell program is
restricted to referencing only nine positional parameters, $1 through $9, at a given time. You can
work around this restriction by using the shift command. See sh(C) for details. The special
parameter ``$*'' (described in the next section) can also be used to access the values of all
command line arguments.
Command exit status – variable $?
1 Command Exit Status – 0 to 255Index
When a Unix/Linux command (process) terminates it can set a numeric exit status (also called
exit code or return value) between 0 and 255 that is available to the parent process that started
(forked) the command.
Normally your shell doesn’t tell you the exit status of commands that it runs, but the shell keeps
the exit status of the previous command available in the shell variable named $?, and you can
make the exit status visible using echo $? right after you run the command:
$ date
Thu Nov 19 11:08:05 EST 2015
$ echo "The exit status was $?"
The exit status was 0
An exit status of 0 (zero) normally means “success” – the command worked.
A non-zero exit status normally means something failed or went wrong:
$ rm nosuchfile
rm: cannot remove ‘nosuchfile’: No such file or directory
$ echo "The exit status was $?"
The exit status was 1
$ nosuchcommand
14
nosuchcommand: command not found
$ echo "The exit status was $?"
The exit status was 127
A non-zero exit status usually means “the command failed”.
2 No standard set of failure codes for all commandsIndex
The meaning of a particular non-zero exit code varies from command to command; there is no
standard set of non-zero exit codes that apply across all commands. See the man pages for each
command for details.
The only universal standard for command exit codes is that “a zero exit code means success”.
Think of exit status as “there is only one way to succeed (only one zero); there are many ways to
fail (many non-zero)”.
Some badly-written commands fail but still return zero. Sorry!
Programmers used to other programming languages may find that a command return code of
zero meaning “success” and a non-zero exit status meaning “failure” backwards from what they
are used to in evaluating arithmetic expressions, where zero means FALSE and anything non-
zero means TRUE. Yes; this backwards. Think of command exit status as “there is only one way
to succeed (only one zero); there are many ways to fail (many non-zero)”. Don’t get “running
commands” confused with “evaluating Boolean expressions”. Shells run commands and check
exit statuses; they don’t do math.
3 Checking Exit status using variable $?Index
On the command line or inside a shell script, after running a command we can use the value of
the shell $? variable immediately after a command runs to check the exit status of that command:
$ fgrep "no such text" /etc/passwd
$ echo "The exit status was $?"
The exit status was 1
$ echo "The exit status was $?"
The exit status was 0
The exit status is set after every command, including shell built-in commands. The second use of
$? above refers to the successful (zero) exit status of the preceding echo command. If you need
to use the exit status of a command more than once, save it in a variable:
$ fgrep "no such text" /etc/passwd
$ status=$?
$ echo "The exit status was $status"
The exit status was 1
$ echo "The exit status was $status"
The exit status was 1
15
4 Exit status of grep and fgrepIndex
Notable exceptions to this zero-is-success and non-zero-is-failure rule are the searching
commands grep and fgrep that return different types of failure:
• 0 (“success”) if the search pattern was found in the input
• 1 if the search pattern was not found in the input
• 2 if there was an error in the pattern or error opening the file
Examples of success and both types of failure:
$ fgrep "root:" /etc/passwd >/dev/null
$ echo $?
0
$ fgrep "no such text" /etc/passwd
$ echo $?
1
$ fgrep "anything" nosuchfile
grep: nosuchfile: No such file or directory
$ echo $?
2
5 Setting an exit status in a scriptIndex
A shell script is run by a shell process, and that shell process has its own exit status when it
finishes reading your script. Normally, a shell script exits with the status of the last command run
inside the script:
$ cat test.sh
#!/bin/sh -u
fgrep 'no such text' /etc/passwd
$ ./test.sh
$ echo "The exit status of the script is $?"
The exit status of the script is 1
You can exit a shell script and set the exit status of its shell process using an explicit exit
statement with a number argument between 0 and 255:
$ cat test.sh
#!/bin/sh -u
exit 99
$ ./test.sh
$ echo "The exit status of the script is $?"
The exit status of the script is 99
16
An exit statement inside a shell script causes the script to stop running and the shell process
running it to terminate.
6 The true and false commandsIndex
• The command true does nothing except return a good (zero) exit status.
• The command false does nothing except return a bad (non-zero) exit status.
$ true ; echo $? 0 $ false ; echo $? 1
These commands are often built in to your shell, but they are also separate executable programs
with their own man pages, and sometimes the commands even have options. Both commands
usually ignore most arguments, but the built-in versions may not handle options exactly the same
way as the external versions:
bash$ type true
true is a shell builtin
bash$ true --help # built-in version has no options
bash$ which true
/bin/true
bash$ /bin/true --help # external version has output from options
Usage: /bin/true [ignored command line arguments]
or: /bin/true OPTION
[... more help output ...]
These commands are never used interactively; they are most useful in shell scripts.
7 Using script logic to check exit statusIndex
You need to understand shell script control flow for this section.
Scripts can use control flow statements to check the exit status of commands to know whether
the commands worked and whether the script should continue processing or issue an error
message and stop:
#!/bin/sh -u
fgrep "$1" /etc/passwd # look for argument in passwd
status=$? # save the status for later
if [ "$status" = 0 ] ; then
echo 1>&2 "$0: Success status $status - found the string '$1' in passwd"
exit "$status"
fi
if [ "$status" = 1 ] ; then
echo 1>&2 "$0: Not found status $status - did not find '$1' in passwd"
exit "$status"
fi
17
if [ "$status" = 2 ] ; then
echo 1>&2 "$0: File error status $status - unknown error with passwd"
exit "$status"
fi
The above script uses some conditional logic if statements to test the exit status saved in the
$status variable. The script checks the saved exit status three times. It issues different messages
on stderr depending on whether the saved exit status of the fgrep command was 0, 1, or 2. The
script itself uses an exit statement with a $status number argument to cause the shell process to
exit with exactly the same exit status as the fgrep command.
Exit command:
exit-The exit command terminates a script, just as in a C program. It can also return a value,
which is available to the script's parent process.
SYNOPSIS
exit
DESCRIPTION
exit-Issuing the exit command at the shell prompt will cause the shell to exit.
In some cases, if you have jobs running in the background, the shell will remind you that they are
running and simply return you to the command prompt. In this case, issuing exit again will
terminate those jobs and exit the shell. Common aliases for exit include "bye", "logout", and
"lo".Every command returns an exit status (sometimes referred to as a return status or exit code).
A successful command returns a 0, while an unsuccessful one returns a non-zero value that
usually can be interpreted as an error code. Well-behaved UNIX commands, programs, and
utilities return a 0 exit code upon successful completion, though there are some exceptions.
Likewise, functions within a script and the script itself return an exit status. The last command
executed in the function or script determines the exit status. Within a script, an exit nnn
command may be used to deliver an nnn exit status to the shell (nnn must be an integer in the 0 -
255 range).
EXAMPLES
EXAMPLE-1:
To exit from shell:
$ exit
output:
# su ubuntu
18
ubuntu@ubuntu:~$ exit
exit
root@ubuntu:/home/ubuntu#
EXAMPLE-2:
exit command is used to return the succsess/failure of functionality in script.
# cat test.sh
#!/bin/bash
echo "This is a test."
# Terminate our shell script with success message
exit 0
Branching control structures:
we will understand shell decision-making in Unix. While writing a shell script, there may be a
situation when you need to adopt one path out of the given two paths. So you need to make use
of conditional statements that allow your program to make correct decisions and perform the
right actions.
Unix Shell supports conditional statements which are used to perform different actions based on
different conditions. We will now understand two decision-making statements here −
• The if...else statement
• The case...esac statement
The if...else statements
If else statements are useful decision-making statements which can be used to select an option
from a given set of options.
Unix Shell supports following forms of if…else statement −
The if...fi statement is the fundamental control statement that allows Shell to make decisions and
execute statements conditionally.
Syntax
if [ expression ]
then
Statement(s) to be executed if expression is true
fi
19
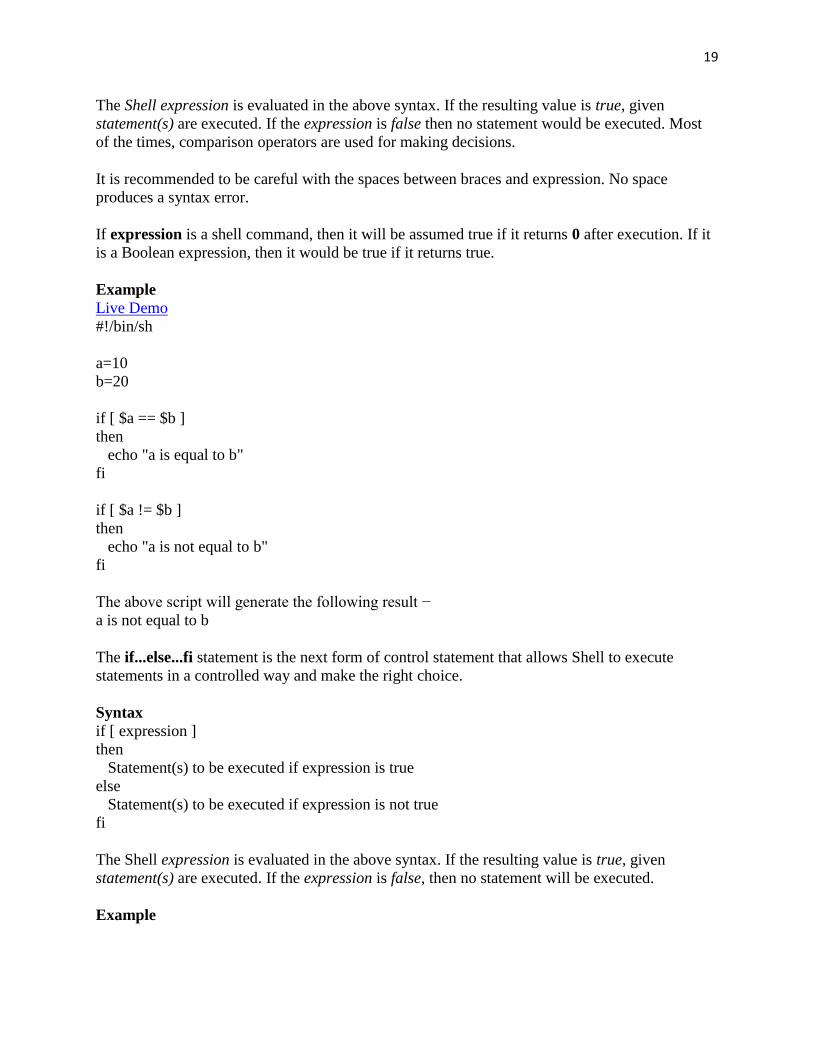
The Shell expression is evaluated in the above syntax. If the resulting value is true, given
statement(s) are executed. If the expression is false then no statement would be executed. Most
of the times, comparison operators are used for making decisions.
It is recommended to be careful with the spaces between braces and expression. No space
produces a syntax error.
If expression is a shell command, then it will be assumed true if it returns 0 after execution. If it
is a Boolean expression, then it would be true if it returns true.
Example
Live Demo
#!/bin/sh
a=10
b=20
if [ $a == $b ]
then
echo "a is equal to b"
fi
if [ $a != $b ]
then
echo "a is not equal to b"
fi
The above script will generate the following result −
a is not equal to b
The if...else...fi statement is the next form of control statement that allows Shell to execute
statements in a controlled way and make the right choice.
Syntax
if [ expression ]
then
Statement(s) to be executed if expression is true
else
Statement(s) to be executed if expression is not true
fi
The Shell expression is evaluated in the above syntax. If the resulting value is true, given
statement(s) are executed. If the expression is false, then no statement will be executed.
Example
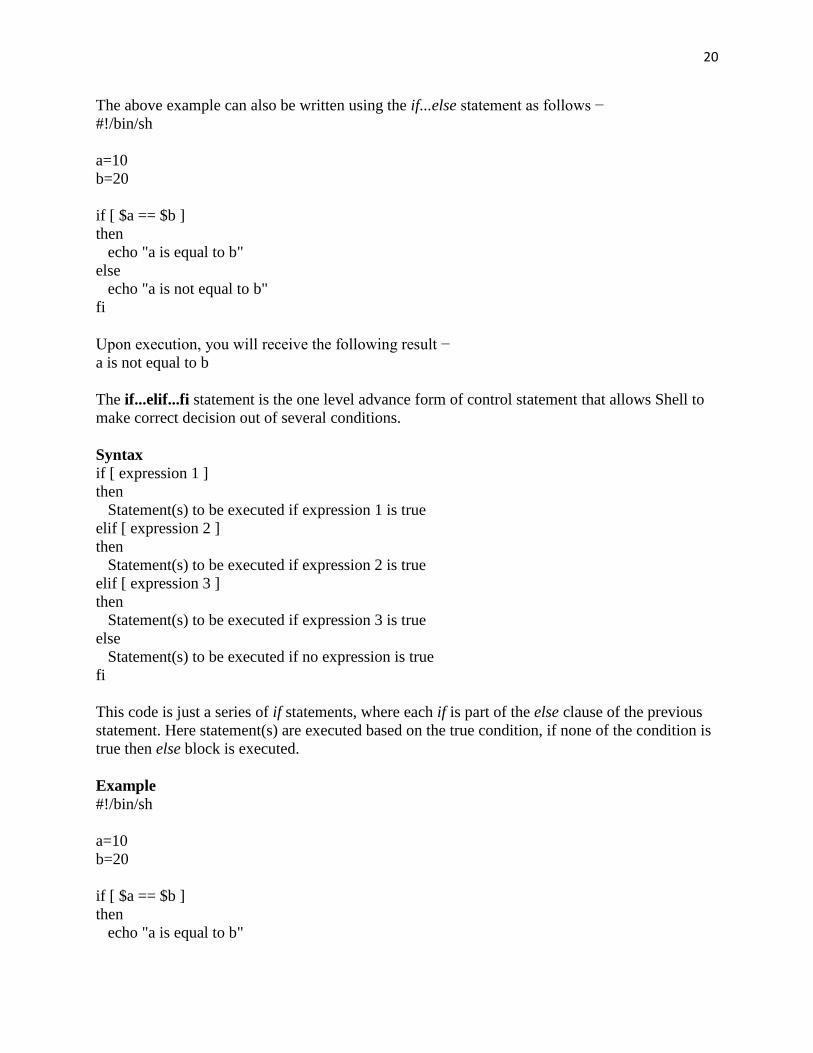
20
The above example can also be written using the if...else statement as follows −
#!/bin/sh
a=10
b=20
if [ $a == $b ]
then
echo "a is equal to b"
else
echo "a is not equal to b"
fi
Upon execution, you will receive the following result −
a is not equal to b
The if...elif...fi statement is the one level advance form of control statement that allows Shell to
make correct decision out of several conditions.
Syntax
if [ expression 1 ]
then
Statement(s) to be executed if expression 1 is true
elif [ expression 2 ]
then
Statement(s) to be executed if expression 2 is true
elif [ expression 3 ]
then
Statement(s) to be executed if expression 3 is true
else
Statement(s) to be executed if no expression is true
fi
This code is just a series of if statements, where each if is part of the else clause of the previous
statement. Here statement(s) are executed based on the true condition, if none of the condition is
true then else block is executed.
Example
#!/bin/sh
a=10
b=20
if [ $a == $b ]
then
echo "a is equal to b"
21
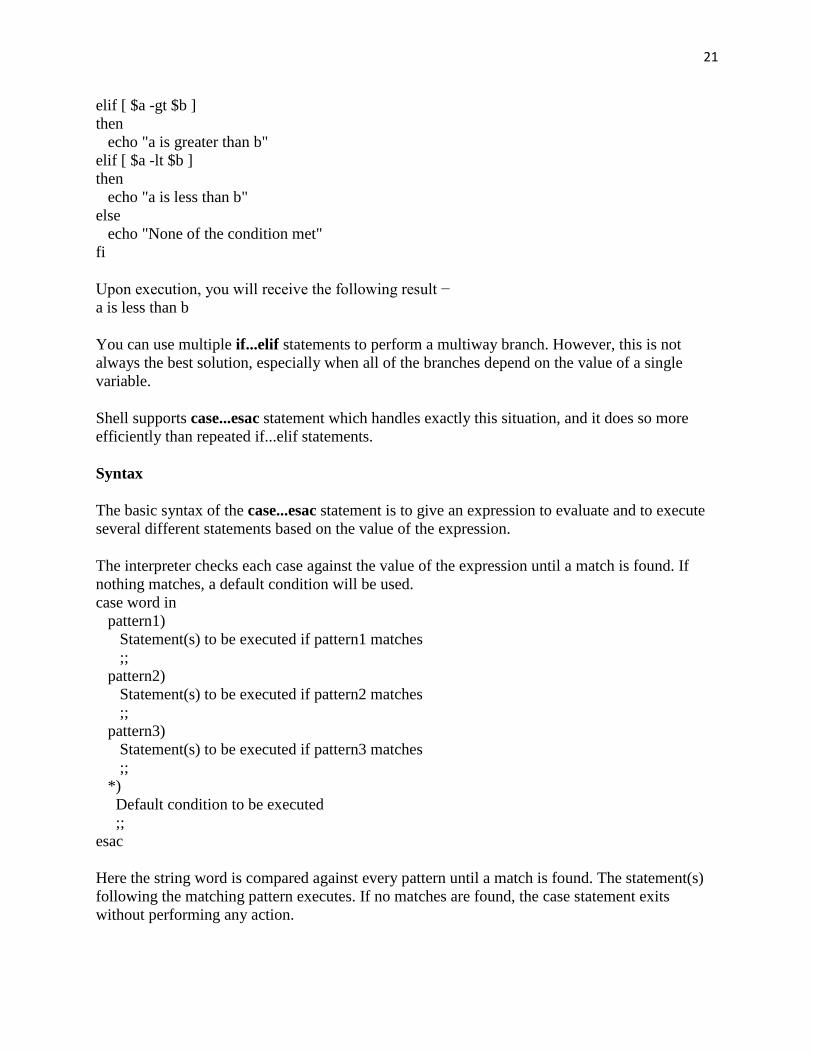
elif [ $a -gt $b ]
then
echo "a is greater than b"
elif [ $a -lt $b ]
then
echo "a is less than b"
else
echo "None of the condition met"
fi
Upon execution, you will receive the following result −
a is less than b
You can use multiple if...elif statements to perform a multiway branch. However, this is not
always the best solution, especially when all of the branches depend on the value of a single
variable.
Shell supports case...esac statement which handles exactly this situation, and it does so more
efficiently than repeated if...elif statements.
Syntax
The basic syntax of the case...esac statement is to give an expression to evaluate and to execute
several different statements based on the value of the expression.
The interpreter checks each case against the value of the expression until a match is found. If
nothing matches, a default condition will be used.
case word in
pattern1)
Statement(s) to be executed if pattern1 matches
;;
pattern2)
Statement(s) to be executed if pattern2 matches
;;
pattern3)
Statement(s) to be executed if pattern3 matches
;;
*)
Default condition to be executed
;;
esac
Here the string word is compared against every pattern until a match is found. The statement(s)
following the matching pattern executes. If no matches are found, the case statement exits
without performing any action.
22
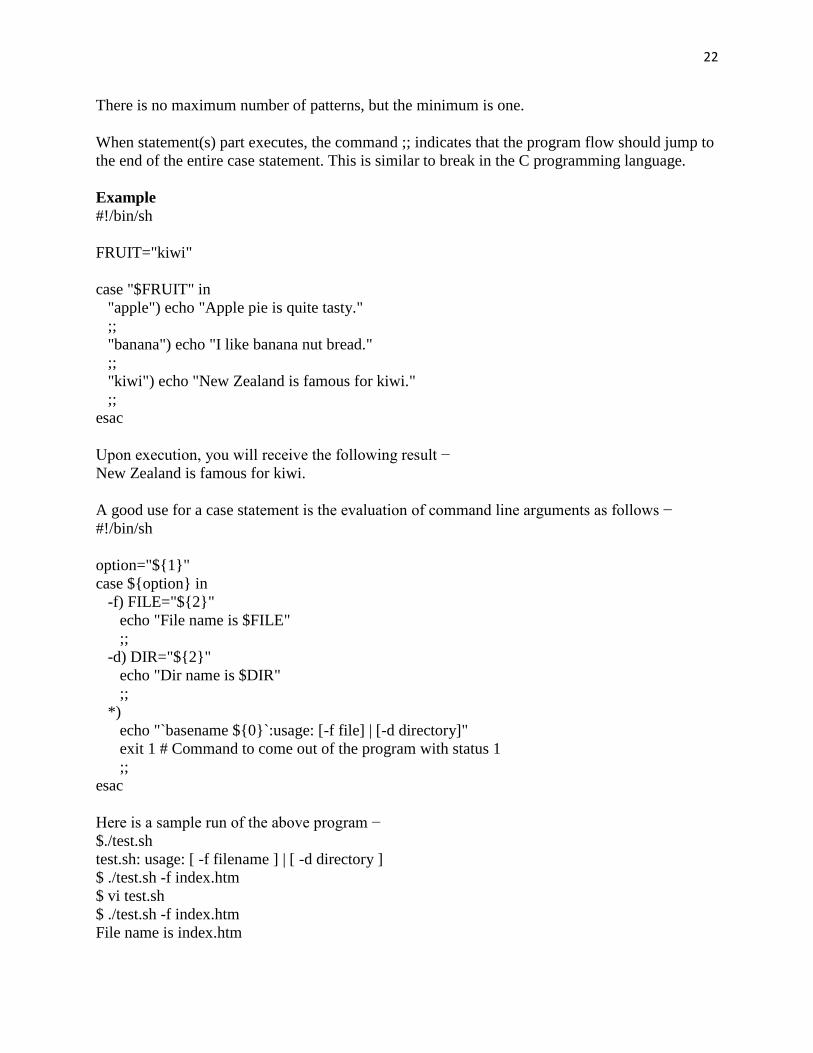
There is no maximum number of patterns, but the minimum is one.
When statement(s) part executes, the command ;; indicates that the program flow should jump to
the end of the entire case statement. This is similar to break in the C programming language.
Example
#!/bin/sh
FRUIT="kiwi"
case "$FRUIT" in
"apple") echo "Apple pie is quite tasty."
;;
"banana") echo "I like banana nut bread."
;;
"kiwi") echo "New Zealand is famous for kiwi."
;;
esac
Upon execution, you will receive the following result −
New Zealand is famous for kiwi.
A good use for a case statement is the evaluation of command line arguments as follows −
#!/bin/sh
option="${1}"
case ${option} in
-f) FILE="${2}"
echo "File name is $FILE"
;;
-d) DIR="${2}"
echo "Dir name is $DIR"
;;
*)
echo "`basename ${0}`:usage: [-f file] | [-d directory]"
exit 1 # Command to come out of the program with status 1
;;
esac
Here is a sample run of the above program −
$./test.sh
test.sh: usage: [ -f filename ] | [ -d directory ]
$ ./test.sh -f index.htm
$ vi test.sh
$ ./test.sh -f index.htm
File name is index.htm
23
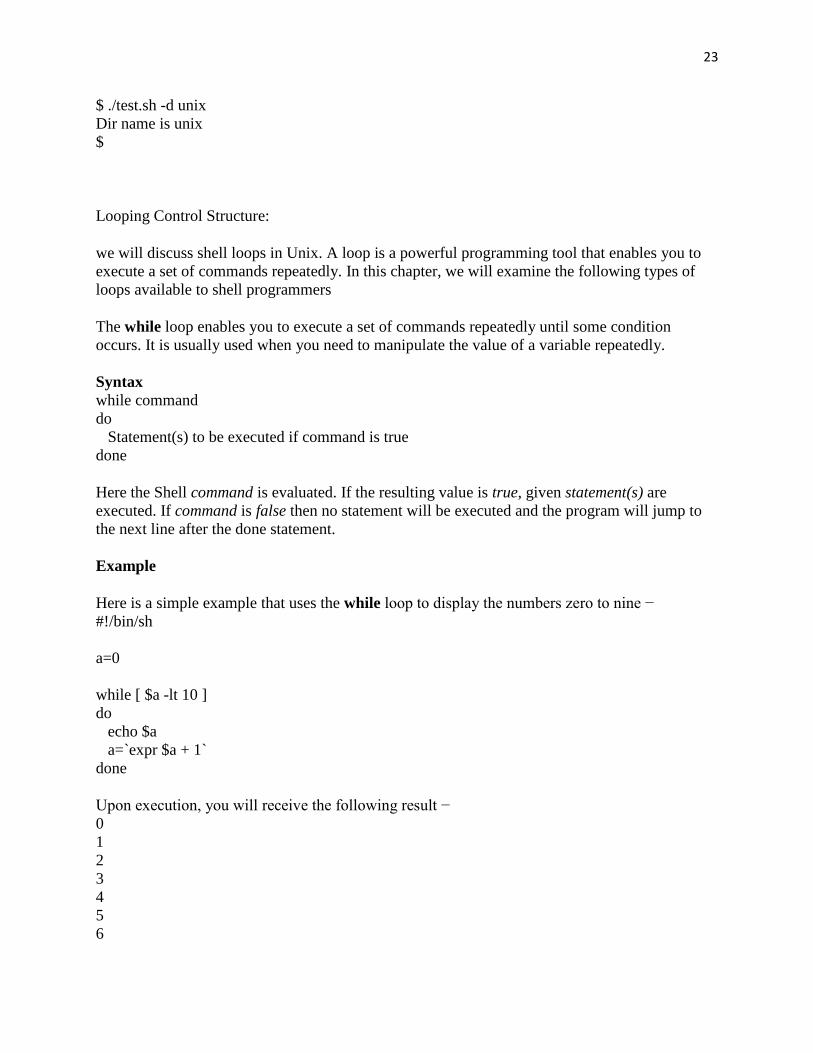
$ ./test.sh -d unix
Dir name is unix
$
Looping Control Structure:
we will discuss shell loops in Unix. A loop is a powerful programming tool that enables you to
execute a set of commands repeatedly. In this chapter, we will examine the following types of
loops available to shell programmers
The while loop enables you to execute a set of commands repeatedly until some condition
occurs. It is usually used when you need to manipulate the value of a variable repeatedly.
Syntax
while command
do
Statement(s) to be executed if command is true
done
Here the Shell command is evaluated. If the resulting value is true, given statement(s) are
executed. If command is false then no statement will be executed and the program will jump to
the next line after the done statement.
Example
Here is a simple example that uses the while loop to display the numbers zero to nine −
#!/bin/sh
a=0
while [ $a -lt 10 ]
do
echo $a
a=`expr $a + 1`
done
Upon execution, you will receive the following result −
0
1
2
3
4
5
6
24
7
8
9
Each time this loop executes, the variable a is checked to see whether it has a value that is less
than 10. If the value of a is less than 10, this test condition has an exit status of 0. In this case, the
current value of a is displayed and later a is incremented by 1
The for loop operates on lists of items. It repeats a set of commands for every item in a list.
Syntax
for var in word1 word2 ... wordN
do
Statement(s) to be executed for every word.
done
Here var is the name of a variable and word1 to wordN are sequences of characters separated by
spaces (words). Each time the for loop executes, the value of the variable var is set to the next
word in the list of words, word1 to wordN.
Example
Here is a simple example that uses the for loop to span through the given list of numbers −
#!/bin/sh
for var in 0 1 2 3 4 5 6 7 8 9
do
echo $var
done
Upon execution, you will receive the following result −
0
1
2
3
4
5
6
7
8
9
Following is the example to display all the files starting with .bash and available in your home.
We will execute this script from my root −
#!/bin/sh
25
for FILE in $HOME/.bash*
do
echo $FILE
done
The above script will produce the following result −
/root/.bash_history
/root/.bash_logout
/root/.bash_profile
/root/.bashrc
The while loop is perfect for a situation where you need to execute a set of commands while
some condition is true. Sometimes you need to execute a set of commands until a condition is
true.
Syntax
until command
do
Statement(s) to be executed until command is true
done
Here the Shell command is evaluated. If the resulting value is false, given statement(s) are
executed. If the command is true then no statement will be executed and the program jumps to
the next line after the done statement.
Example
Here is a simple example that uses the until loop to display the numbers zero to nine −
#!/bin/sh
a=0
until [ ! $a -lt 10 ]
do
echo $a
a=`expr $a + 1`
done
Upon execution, you will receive the following result −
0
1
2
3
4
5
6
26
7
8
9
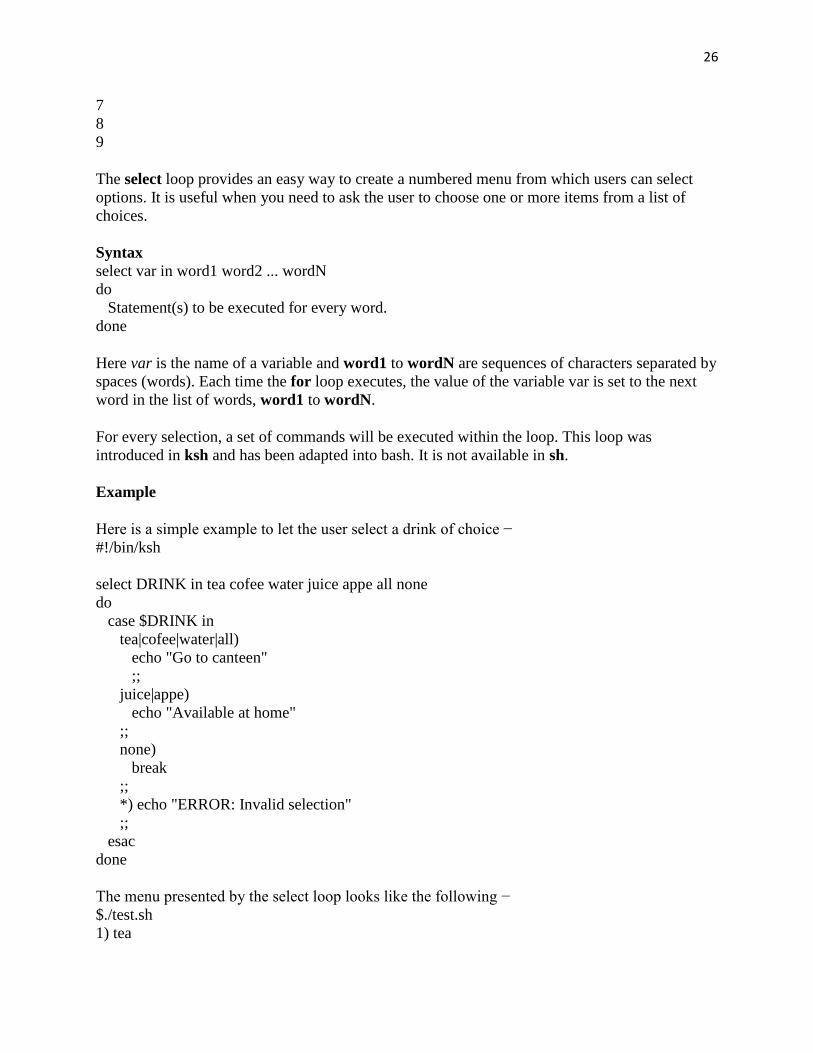
The select loop provides an easy way to create a numbered menu from which users can select
options. It is useful when you need to ask the user to choose one or more items from a list of
choices.
Syntax
select var in word1 word2 ... wordN
do
Statement(s) to be executed for every word.
done
Here var is the name of a variable and word1 to wordN are sequences of characters separated by
spaces (words). Each time the for loop executes, the value of the variable var is set to the next
word in the list of words, word1 to wordN.
For every selection, a set of commands will be executed within the loop. This loop was
introduced in ksh and has been adapted into bash. It is not available in sh.
Example
Here is a simple example to let the user select a drink of choice −
#!/bin/ksh
select DRINK in tea cofee water juice appe all none
do
case $DRINK in
tea|cofee|water|all)
echo "Go to canteen"
;;
juice|appe)
echo "Available at home"
;;
none)
break
;;
*) echo "ERROR: Invalid selection"
;;
esac
done
The menu presented by the select loop looks like the following −
$./test.sh
1) tea
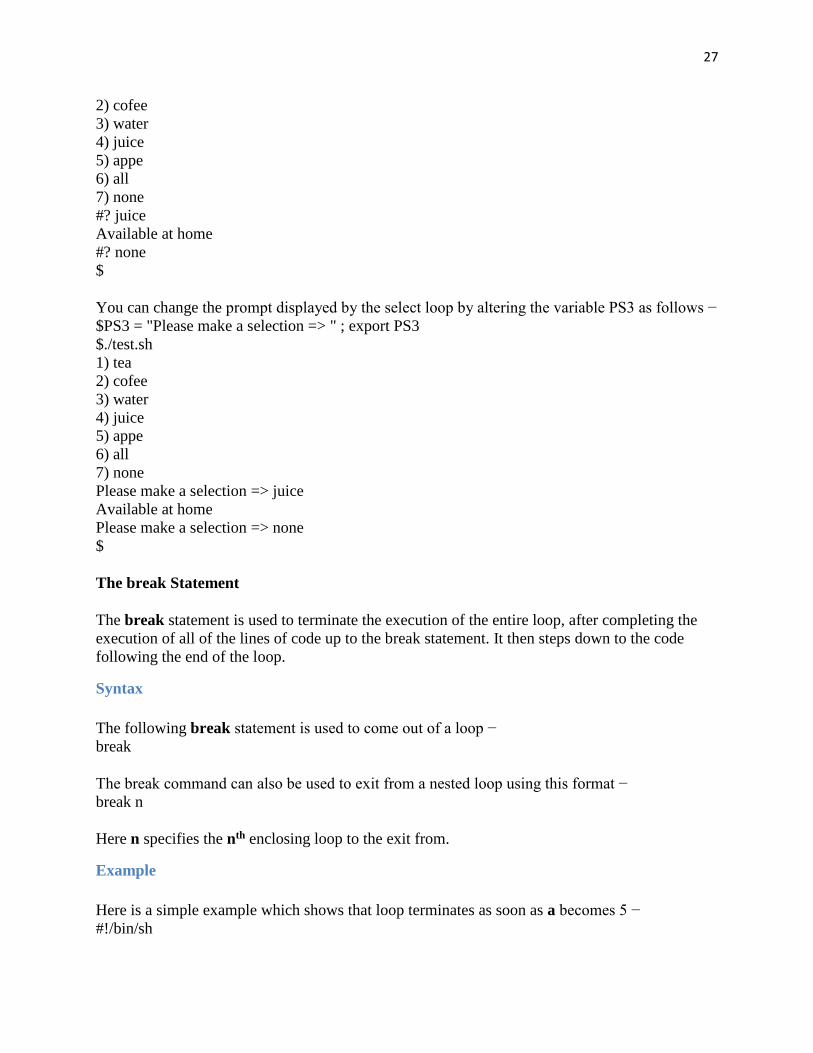
27
2) cofee
3) water
4) juice
5) appe
6) all
7) none
#? juice
Available at home
#? none
$
You can change the prompt displayed by the select loop by altering the variable PS3 as follows −
$PS3 = "Please make a selection => " ; export PS3
$./test.sh
1) tea
2) cofee
3) water
4) juice
5) appe
6) all
7) none
Please make a selection => juice
Available at home
Please make a selection => none
$
The break Statement
The break statement is used to terminate the execution of the entire loop, after completing the
execution of all of the lines of code up to the break statement. It then steps down to the code
following the end of the loop.
Syntax
The following break statement is used to come out of a loop −
break
The break command can also be used to exit from a nested loop using this format −
break n
Here n specifies the nth enclosing loop to the exit from.
Example
Here is a simple example which shows that loop terminates as soon as a becomes 5 −
#!/bin/sh
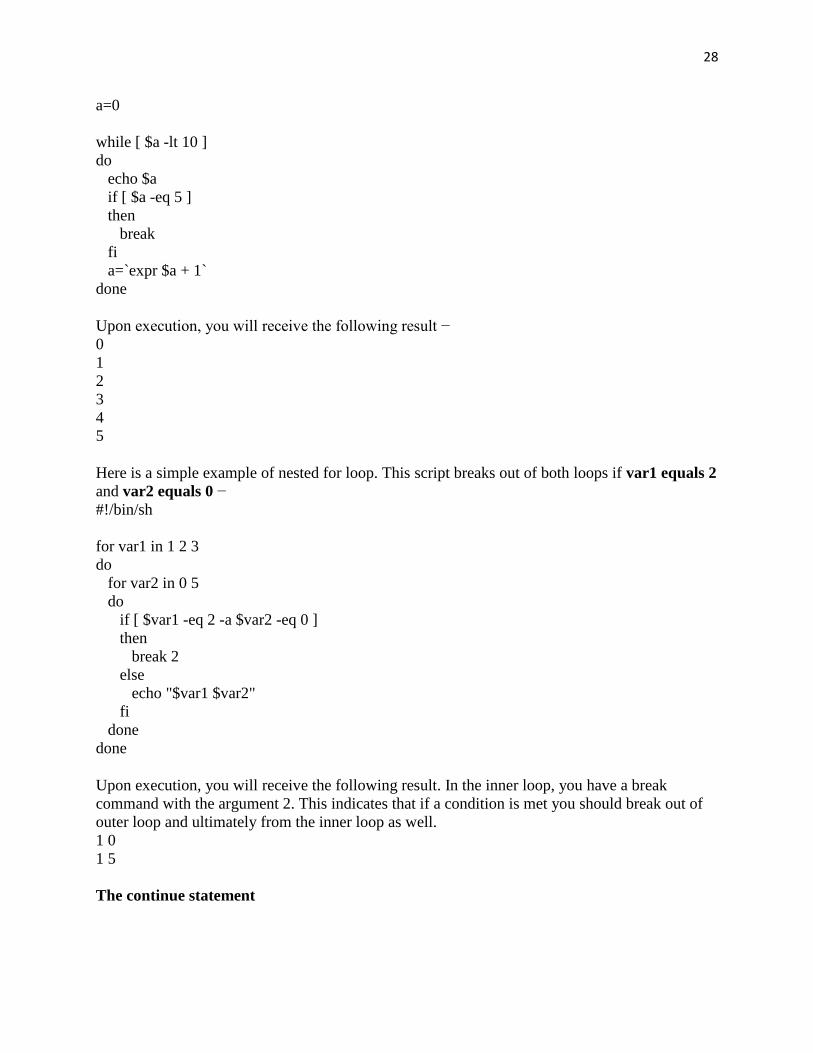
28
a=0
while [ $a -lt 10 ]
do
echo $a
if [ $a -eq 5 ]
then
break
fi
a=`expr $a + 1`
done
Upon execution, you will receive the following result −
0
1
2
3
4
5
Here is a simple example of nested for loop. This script breaks out of both loops if var1 equals 2
and var2 equals 0 −
#!/bin/sh
for var1 in 1 2 3
do
for var2 in 0 5
do
if [ $var1 -eq 2 -a $var2 -eq 0 ]
then
break 2
else
echo "$var1 $var2"
fi
done
done
Upon execution, you will receive the following result. In the inner loop, you have a break
command with the argument 2. This indicates that if a condition is met you should break out of
outer loop and ultimately from the inner loop as well.
1 0
1 5
The continue statement
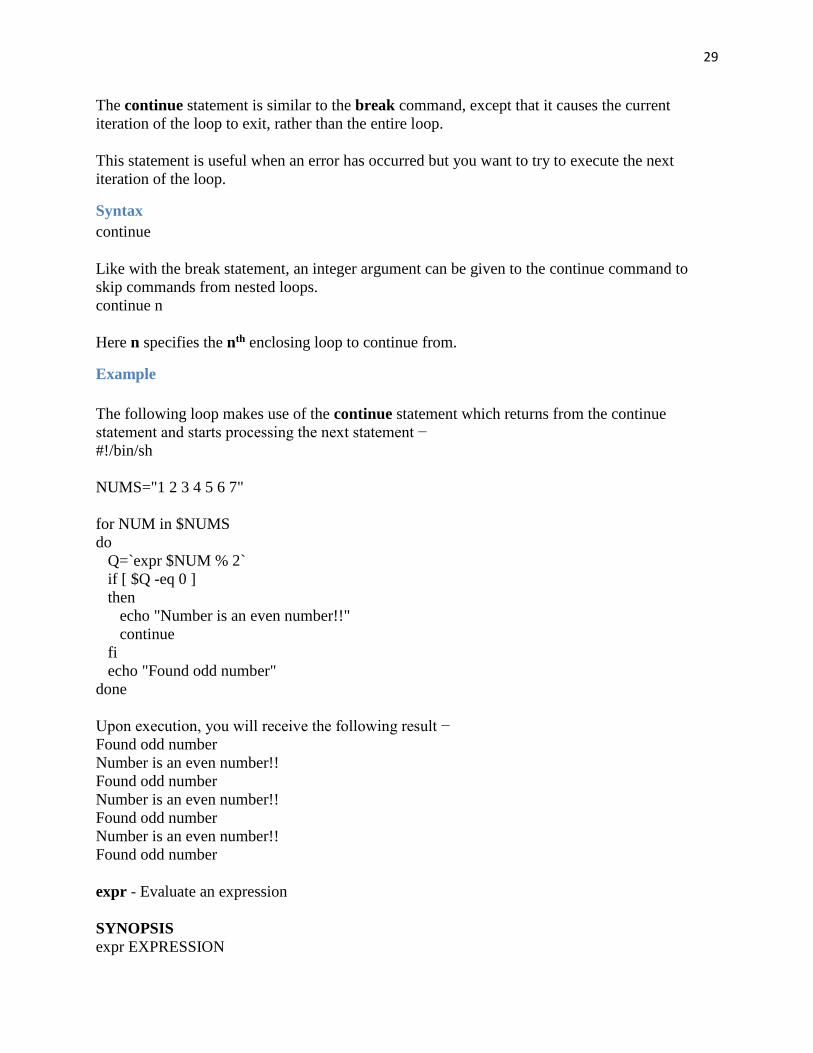
29
The continue statement is similar to the break command, except that it causes the current
iteration of the loop to exit, rather than the entire loop.
This statement is useful when an error has occurred but you want to try to execute the next
iteration of the loop.
Syntax
continue
Like with the break statement, an integer argument can be given to the continue command to
skip commands from nested loops.
continue n
Here n specifies the nth enclosing loop to continue from.
Example
The following loop makes use of the continue statement which returns from the continue
statement and starts processing the next statement −
#!/bin/sh
NUMS="1 2 3 4 5 6 7"
for NUM in $NUMS
do
Q=`expr $NUM % 2`
if [ $Q -eq 0 ]
then
echo "Number is an even number!!"
continue
fi
echo "Found odd number"
done
Upon execution, you will receive the following result −
Found odd number
Number is an even number!!
Found odd number
Number is an even number!!
Found odd number
Number is an even number!!
Found odd number
expr - Evaluate an expression
SYNOPSIS
expr EXPRESSION
30
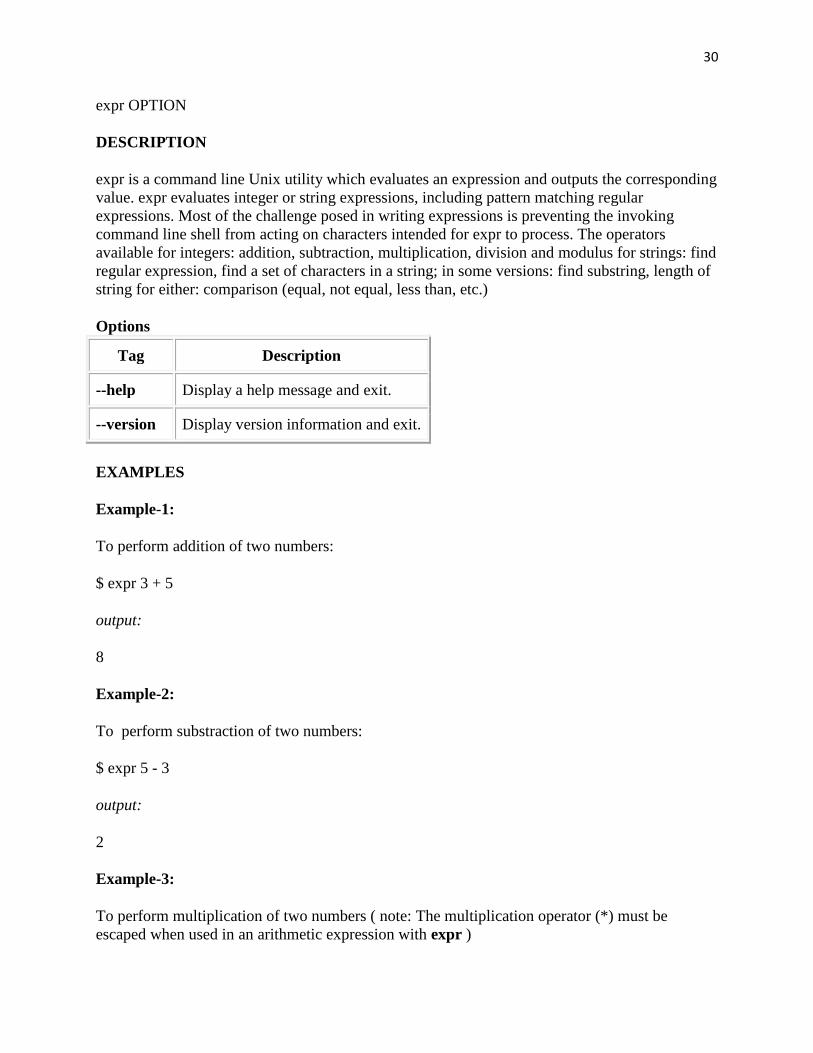
expr OPTION
DESCRIPTION
expr is a command line Unix utility which evaluates an expression and outputs the corresponding
value. expr evaluates integer or string expressions, including pattern matching regular
expressions. Most of the challenge posed in writing expressions is preventing the invoking
command line shell from acting on characters intended for expr to process. The operators
available for integers: addition, subtraction, multiplication, division and modulus for strings: find
regular expression, find a set of characters in a string; in some versions: find substring, length of
string for either: comparison (equal, not equal, less than, etc.)
Options
Tag Description
--help Display a help message and exit.
--version Display version information and exit.
EXAMPLES
Example-1:
To perform addition of two numbers:
$ expr 3 + 5
output:
8
Example-2:
To perform substraction of two numbers:
$ expr 5 - 3
output:
2
Example-3:
To perform multiplication of two numbers ( note: The multiplication operator (*) must be
escaped when used in an arithmetic expression with expr )
31
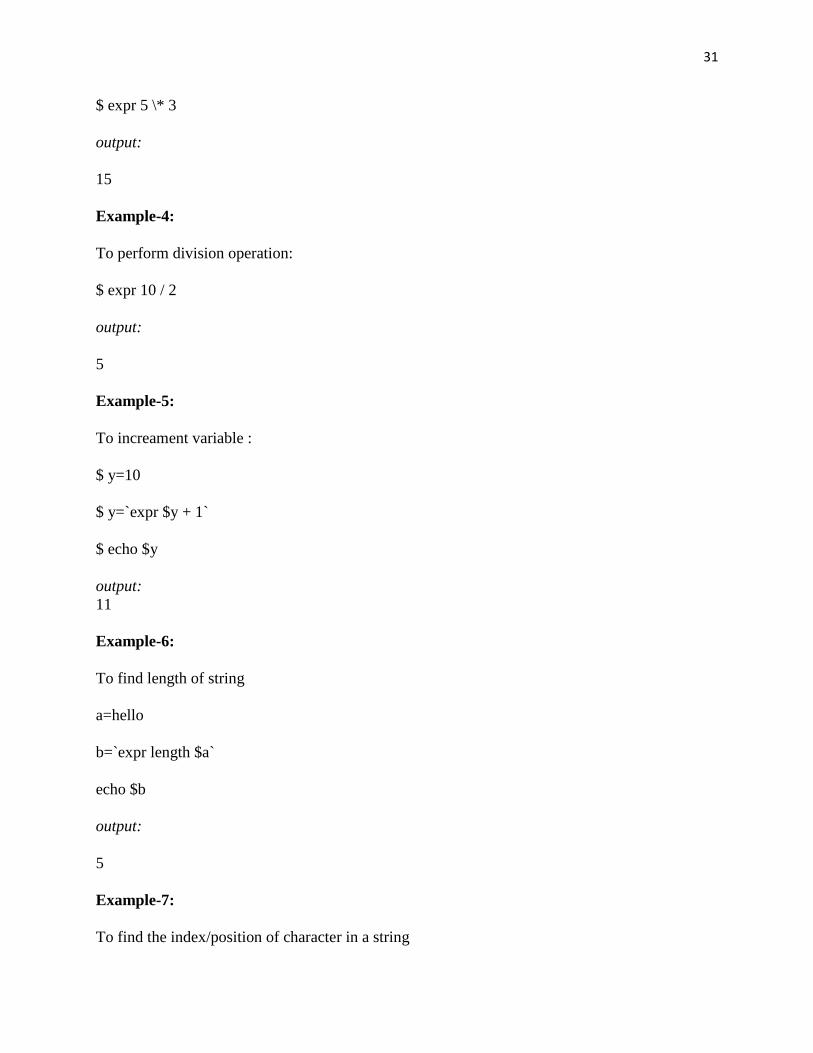
$ expr 5 \* 3
output:
15
Example-4:
To perform division operation:
$ expr 10 / 2
output:
5
Example-5:
To increament variable :
$ y=10
$ y=`expr $y + 1`
$ echo $y
output:
11
Example-6:
To find length of string
a=hello
b=`expr length $a`
echo $b
output:
5
Example-7:
To find the index/position of character in a string
32
a=hello
b=`expr index $a l`
echo $b
output:
3 ( as letter l is at position 3.)
Example-8:
To find substring of string:
a=hello
b=`expr substr $a 2 3` ( where 2 is position and 3 is length, command is to get substring from
position 2 of length 3 characters)
echo $b
output:
ell
Example-9:
The following is an example involving boolean expressions ( |- or operator ):
$ expr length "abcdef" "<" 5 "|" 15 - 4 ">" 8
output:
1
Example-10:
The following is an example involving boolean expressions ( & - and operator ):
$ expr length "abcdef" "<" 5 "&" 15 - 4 ">" 8
output:
0
A here document, or heredoc, is one way to get text input into a script without feeding it from a
separate file. If the data or script is complicated, however, keeping the two separate is generally a
better idea.
The basic version of this in bash looks like this:
#!/bin/bash
33
cat << EOF
several lines of
my data
listed here
EOF
which will output
several lines of
my data
listed here
You can use any label (although EOF is standard) — just make sure it matches at both start and
end.
There are a couple of useful variations on this format. Just using a plain label, as above, means
the shell will interpret any special characters. This would substitute your current directory for
$PWD:
#!/bin/bash
cat << EOF
current directory is:
$PWD
EOF
However, with some data sets this can cause problems, especially if you don't remember that it
happens! To disable interpretation, use single or double quotes:
#!/bin/bash
cat << 'EOF'
current directory variable is:
$PWD
EOF
This will output $PWD verbatim:
current directory variable is:
$PWD
By and large, it's best to disable shell interpretation by default and to take the quotes out if your
data definitely requires it.
Another useful trick is to use a minus sign after the <<. This will ignore tab characters (Note: not
all whitespace!) at the start of a line, so you can indent your data to increase the readability of
your script:
#!/bin/bash
cat <<- 'EOF'
lots of my
34
data will be printed
out without tabs!
EOF
You can also use heredocs in other programming languages, including Perl, PHP and Python. Be
aware, however, that quotes may affect escaping of special characters in different ways in
different languages.
About sleep
The sleep command is used to delay for a specified amount of time.
Description
The sleep command pauses for an amount of time defined by NUMBER.
SUFFIX may be "s" for seconds (the default), "m" for minutes, "h" for hours, or "d" for days.
Some implementations require that NUMBER be an integer, but modern Linux implementations
allow NUMBER to also be a floating-point value.
If more than one NUMBER is specified, sleep delays for the sum of their values.
sleep syntax
sleep NUMBER[SUFFIX]...
sleep OPTION
Options
--help Display a help message, and exit.
--version Display version information, and exit.
sleep examples
sleep 10
Delays for 10 seconds.
Debugging Shell Scripts in Linux
In most of the programming languages debugger tool is available for debugging. A debugger is
a tool that can run a program or script that enables you to examine the internals of the script or
program as it runs. In the shell scripting we don”t have any debugger tool but with the help of
command line options (-n, -v and -x ) we can do the debugging.
35
Disabling the Shell ( -n option)
The -n option, shot for noexec ( as in no execution), tells the shell to not run the commands.
Instead, the shell just checks for syntax errors. This option will not convince the shell to perform
any more checks. Instead the shell just performs the normal syntax check. With -n option, the
shell doesn’t execute your commands, so you have a safe way to test your scripts if they contain
syntax error.
The follow example shows how to use -n option.
Displaying the Scripts Commands ( -v option )
The -v option tells the shell to run in verbose mode. In practice , this means that shell will echo
each command prior to execute the command. This is very useful in that it can often help to find
the errors.
Let us create a shell script with the name “listusers.sh” with below contents
linuxtechi@localhost:~$ cat listusers.sh
#!/bin/bash
cut -d : -f1,5,7 /etc/passwd | grep -v sbin | grep sh | sort > /tmp/users.txt
awk -F':' ' { printf ( "%-12s %-40s\n", $1, $2 ) } ' /tmp/users.txt
#Clean up the temporary file.
/bin/rm -f /tmp/users.txt
Now execute the script with -v option
linuxtechi@localhost:~$ sh -v listusers.sh
#!/bin/bash
cut -d : -f1,5,7 /etc/passwd | grep -v sbin | grep sh | sort > /tmp/users.txt
awk -F':' ' { printf ( "%-12s %-40s\n", $1, $2 ) } ' /tmp/users.txt
guest-k9ghtA Guest,,,
guest-kqEkQ8 Guest,,,
guest-llnzfx Guest,,,
pradeep pradeep,,,
mail admin Mail Admin,,,
#Clean up the temporary file.
/bin/rm -f /tmp/users.txt
linuxtechi@localhost:~$
36
In the above output , script output gets mixed with commands of the scripts. But however , with -
v option , at least you get a better view of what the shell is doing as it runs your script.
Combining the -n & -v Options
We can combine the command line options ( -n & -v ). This makes a good combination because
we can check the syntax of a script while seeing the script output.
Let us consider a previously used script “debug_quotes.sh”
linuxtechi@localhost:~$ sh -nv debug_quotes.sh
#!/bin/bash
#shows an error.
echo "USER=$USER
echo "HOME=$HOME"
echo "OSNAME=$OSNAME"
debug_quotes: 8: debug_quotes: Syntax error: Unterminated quoted string
linuxtechi@localhost:~$
Tracing Script Execution ( -x option )
The -x option, short for xtrace or execution trace, tells the shell to echo each command after
performing the substitution steps. Thus , we can see the values of variables and commands.
Often, this option alone will help to diagnose a problem.
In most cases, the -x option provides the most useful information about a script, but it can lead to
a lot of output. The following example show this option in action.
linuxtechi@localhost:~$ sh -x listusers.sh
+ cut -d :+ -f1,5,7 /etc/passwd
grep -v sbin
+ sort
+ grep sh
+ awk -F: { printf ( "%-12s %-40s\n", $1, $2 ) } /tmp/users.txt
guest-k9ghtA Guest,,,
guest-kqEkQ8 Guest,,,
guest-llnzfx Guest,,,
pradeep pradeep,,,
mail admin Mail Admin,,,
+ /bin/rm -f /tmp/users.txt
linuxtechi@localhost:~$
37
Script Command:
Script makes a typescript of everything printed on your terminal. It is useful for students who
need a hardcopy record of an interactive session as proof of an assignment, as the typescript file
can be printed out later with lpr(1).
If the argument file is given, script saves all dialogue in file. If no file name is given, the
typescript is saved in the file typescript.
Eval command
eval - Eval is a built in linux or unix command.
SYNOPSIS
eval [arg ..]
DESCRIPTION
eval is a built in linux or unix command. The eval command is used to execute the arguments as
a shell command on unix or linux system. Eval command comes in handy when you have a unix
or linux command stored in a variable and you want to execute that command stored in the
string. The eval command first evaluates the argument and then runs the command stored in the
argument.
EXAMPLES
Example-1:
To execute that command stored in the string:
$ COMMAND="ls -lrt"
$ eval $COMMAND
output:
total 16
-rw-rw-r-- 1 user group 11 Oct 4 01:06 sample.sh
-rw-rw-r-- 1 user group 0 Oct 4 01:06 test.bat
-rw-rw-r-- 1 user group 0 Oct 4 01:06 xyz_ip
Example-2:
To print the value of variable which is again variable with value assigned to it
$ a=10
$ b=a
38
$ c='$'$b ( note: The dollar sign must be escaped with '$')
$ echo $c
output:
$a
$ eval c='$'$b
$ echo $c
output:
10
Exec command:
The exec command is one of very little know and underutilized Unix command. The name of the
command is identical to the name of a Unix system call which provides semantic of this
command.
The exec command replaces the current shell process with the specified command. Normally,
when you run a command a new process is spawned (forked). The exec command does not
spawn a new process. Instead, the current process is overlaid with the new command. In other
words the exec command is executed in place of the current shell without creating a new
process. The command implements Unix exec system call. It is a part of process control API,
the group that also includes fork system call. See Fork and Exec Unix Model (PowerPoint).
Note: this is completely different command then Find command option -exec which
permits execution of commands using found file as argument. Xargs is another command
that provides means to build and execute command lines from standard input.
Syntax
exec [ command ] [ arg ... ]
exec fd<file
exec fd>file