UNISYS Relational Concepts and SQL Programming
326
UNISYS Relational Concepts and SQL Programming Student Guide Copyright® MCMXCIII Unisys Corporation. All rights reserved. Unisys is a registered trademark of Unisys Corporation. Unisys Institute of Technology (UIT) North American Education Printed in U S America EL3605 SG 3605
-
Upload
khangminh22 -
Category
Documents
-
view
1 -
download
0
Transcript of UNISYS Relational Concepts and SQL Programming

UNISYS Relational Concepts and SQL Programming Student Guide
Copyright® MCMXCIII Unisys Corporation. All rights reserved. Unisys is a registered trademark of Unisys Corporation.
Unisys Institute of Technology (UIT)
North American Education Printed in U S America
EL3605
SG 3605

Relational Concepts and SQL Programming
Contents
Course Description xv
About This Course xvi How to Use This Document xvi Learning Environment xvi Trademark Information xvi
Reference Documents xvii
Agenda xviii
Module 1: Introduction
Module Objectives 1-3
Benefit Statement 1-3
Materials 1-3
Relational Database 1-4
Operations on Tables 1-5 RESTRICT Operation 1-6 PROJECT Operation 1-7 JOIN Operation 1-8
Advantages of the Relational Model 1-9
What is RDMS 1100? 1-10
Interfaces to RDMS 1-11
Interfaces to RDMS 1-12
The Structured Query Language (SQL) 1-13
Exercise 1-1 1-14
Module 2: Retrieving Data with the SELECT Statement
Module Objectives 2-3
Benefit Statement 2-3
SG 3605 iii

Relational Concepts and SQL Programming
Materials 2-3
SQL Queries 2-4
Sample Tables for Examples and Exercises 2-5
SELECT Command 2-6 Selecting Columns 2-7 DISTINCT Values 2-8 The WHERE Clause 2-9 WHERE Clause Operators 2-10 WHERE Clause Usage 2-11 The ORDER BY Clause 2-12 Arithmetic Expressions 2-13 Order of Precedence 2-14
Exercise 2-1 2-15
Module 3: Using SQL in Application Programs
Module Objectives 3-3
Benefit Statement 3-3
Materials 3-3
Using SQL Commands in 3GL Programs 3-4 Accessing RDMS 1100 Data 3-4 3GL Interfaces 3-4 UDS Environment Commands 3-4
SQL and Unisys Extensions 3-5
Summary of Selected SQL Commands 3-6
Comparing Embedded and Interpretive SQL 3-8 Source 3-9 Compilation 3-9 Collection or Link 3-9 Execution 3-9
SQL Commands in COBOL Programs 3-10
Interpretive SQL 3-10 Embedded SQL 3-12
Command Building Blocks 3-15 Constants 3-15 Naming Database Objects 3-15
iv SG 3605

Relational Concepts and SQL Programming
RDMS 1100/2200 Data Types 3-16 Character Data Types 3-16 Numerical Data Types 3-16 RDMS and 3GL Data Type Equivalencies 3-18
RDMS 1100/2200 Terminology 3-19 Cursor 3-19 Currency 3-19
Application Group 3-19 Thread 3-19
Program Flow 3-19
BEGIN THREAD Command 3-21
DECLARE CURSOR Command 3-22
OPEN CURSOR Command 3-23
FETCH Command 3-24
Passing Information Between a Program and RDMS 3-25 Host Program Variables 3-25 Placeholder Variables in ISQL 3-25 Embedded Variables in ESQL 3-25 Parameter Passing Limitations 3-25
ISQL - Placeholder and Host Program Variables 3-26
END THREAD Command 3-27
USE DEFAULT QUALIFIER Command 3-28
Exercise 3-1 3-29
Lab 3-1 3-31
Error Handling Choices 3-33 RDMS Error Handling 3-34 GETERROR Command 3-35 Example Using GETERROR (ACOB) 3-36 ESQL Error Handling 3-37
Data and Commands for ESQL Error Handling 3-38 WHENEVER Command 3-39 ESQL Data Area Declarations 3-40 Example Using GETERROR (UCOB) 3-41
Lab 3-2 3-42
SG 3605

Relational Concepts and SQL Programming
Module 4: More WHERE Clause Operators
Module Objectives 4-3
Benefit Statement 4-3
Materials 4-3
Testing Conditions 4-4 Multiple Conditions 4-4
NULL Values 4-5
Testing NULL Values 4-6
Logical Operators 4-7
Truth Tables for Three-Valued Logic 4-8 AND 4-8 OR 4-8 NOT 4-8
BETWEEN Operator 4-9
Order of Precedence of Operators 4-10
LIKE Operator 4-11
LIKE Examples 4-12
Exercise 4-1 4-13
Lab 4-1 4-15
Module 5: The IPF SOL Interface
Module Objectives 5-3
Benefit Statement 5-3
Materials 5-3
The IPF SQL Interface to RDMS 1100 5-4
Using IPF SQL 5-5
Invoking IPF 5-5
vi SG 3605

Relational Concepts and SQL Programming
Sample IPF SQL Session 5-7
Creating an SQL File 5-8
Sample IPF SQL File 5-9
Executing an SQL File 5-9
Saving Query Results in a File 5-10
Lab 5-1 5-11
Module 6: The MAPPER Relational Interface
Module Objectives 6-3
Benefit Statement 6-3
Materials 6-3
MAPPER Relational Interface (MRI) 6-4
Invoking RDI 6-6
RDI Menu Selections 6-7
Environment Menu Selections 6-8
Selection Example 1 - Menu Access 6-9
Selection Example 2 - Freeform Entry 6-11
Exiting MAPPER 6-13
Embedding Commands in MAPPER Runs 6-14
MAPPER Run Example Using FCH 6-15
Lab 6-1 6-16
Lab 6-2. 6-17
Module 7: Grouping Functions
Module Objectives 7-3
Benefit Statement 7-3
SG 3605 vii

Relational Concepts and SQL Programming
Materials 7-3
Grouping Functions 7-4
AS Clause 7-5
Function Examples 7-6
Grouping Functions Usage 7-7
COUNT Function 7-8
GROUP BY Clause Usage 7-9
Grouping on More Than One Column 7-10
WHERE and GROUP BY Clauses Together 7-11
HAVING Clause 7-12
Full Query Specification 7-13
Exercise 7-1 7-14
Module 8: Joining Tables
Module Objectives 8-3
Benefit Statement 8-3
Materials 8-3
Equijoins 8-4
Join Guidelines 8-6
Multi-Table Joins 8-7
Self-Joins 8-10
Self-Join Guidelines 8-11
How RDMS Joins Tables 8-13
Exercise 8-1 8-14
viii SG 3605

Relational Concepts and SQL Programming
Module 9: More Retrieval Considerations
Module Objectives 9-3
Benefit Statement 9-3
Materials 9-3
Data Access Considerations 9-4 Indicator Variables 94
Indicator Variable Examples 9-5 Handling Tables with More Than 28 Columns (ACOB) 9-6
Reusing Cursors 9-7 Cursor Review 9-7 Describe Reusable 9-7 Host Program Variables in Cursors 9-7 Program Flow for Reusing Cursors 9-8 CLOSE Command 9-9 DROP CURSOR Command 9-10
OPEN ... USING Command 9-11 Example of Host Variables in Cursor 9-11
Lab 9-1 9-13
Sequential and Random Processing on a Cursor 9-14 Currency and Fetching 9-14 FETCH [ option ] Command 9-15 Introduction to Random Processing on a Cursor 9-16 DECLARE CURSOR Command 9-17 LOCATE Command 9-17 FETCH Command 9-18 Random Processing Example 9-19
Lab 9-2 9-20
Retrieval Efficiency Considerations 9-21 Singleton SELECT Command 9-21 Singleton SELECT Example 9-22 FETCH NEXT n Command 9-23 FETCH NEXT n Example 9-24 How RDMS Retrieves Data 9-25 Retrieval Using No Key 9-26 Retrieval Using A Secondary Key 9-27 Secondary Keys 9-28 Accessing Data Using Keys 9-29
Exercise 9-1 9-30
SG 3605 ix

Relational Concepts and SQL Programming
Module 10: Data Manipulation
Module Objectives 10-3
Benefit Statement 10-3
Materials 10-3
Data Manipulation 10-4
BEGIN THREAD Command Revisited 10-5
ROLLBACK Command 10-6
Inserting Rows into Tables 10-7 Introduction to INSERT 10-7
INSERT Command 10-8
Changing Existing Data 10-9
Introduction to UPDATE 10-9
UPDATE Positioned Command 10-10 UPDATE Searched Command 10-11 Sample COBOL Update Program 10-12
Deleting Rows from Tables 10-16 DELETE Command 10-16 — DELETE Examples 10-17 Sample COBOL Delete Program 10-18
Cursor Requirements for Commands 10-21
Exercise 10-1 10-22
Lab 10-1 10-23
Module 11: Keys and Updating
Module Objectives 11-3
Benefit Statement 11-3
Materials 11-3
Primary Keys 11-4
Update Anomalies 11-5
x SG 3605

Relational Concepts and SQL Programming
Foreign Keys 11-6 Introduction 11-6 Parent Table / Child Table Relationships 11-6 Foreign Key Considerations 11-7 Foreign Keys and INSERT 11-8 Foreign Keys and DELETE 11-9 Foreign Keys and UPDATE 11-10 Rules for Parent - Child Relationships 11-11
Lab 11-1 11-12
Module 12: Obtaining Table Definition Information
Module Objectives 12-3
Benefit Statement 12-3
Materials 12-3
MAPPER RDI Access 12-4
Unisys Repository Manager (UREP 1100) 12-6 Introduction 12-6 Calling the Repository Manager 12-7 UREP Example 12-8
Lab 12-1 12-10
Module 13: Views
Module Objectives 13-3
Benefit Statement 13-3
Materials 13-3
Views 13-4 Basic Definition 13-4 What is a View? 13-5 Purpose of Views 13-6
CREATE VIEW Command 13-7 View Example 13-8 Columns in Views 13-9 Data Checking 13-10 Security 13-10
SG 3605
xi

Relational Concepts and SQL Programming
Updating Views 13-11
DROP VIEW Command 13-12
Exercise 13-1 13-13
Lab 13-1 13-14
Module 14: More About Threads and UDS
Module Objectives 14-3
Benefit Statement 14-3
Materials 14-3
Threads 14-4
Threads and Steps 14-5
Thread Control Commands 14-6
Recovery and Thread Control 14-7
BEGIN THREAD Command Revisited 14-8 Application Groups 14-9 Recovery Options 14-10
COMMIT Command 14-11
Message Recovery on COMMIT/END THREAD 14-12
Message Recovery on ROLLBACK 14-13
Locking 14-14
Concurrent Access 14-14 Locking 14-14
Types of Locks 14-15
LOCK Command 14-16
Implicit RDMS Row Locks 14-17
Locking Conflicts 14-18
Deadlock 14-19
Resolving Deadlock 14-20
xii SG 3605

Relational Concepts and SQL Programming
UNLOCK Command 14-21
Program Flow with Locks 14-22
Exercise 14-1 14-23
Module 15: Getting Physical - Tables and Storage Areas
Module Objectives 15-3
Benefit Statement 15-3
Materials 15-3
Creating a Database 15-4
Schema 15-6
Storage-Areas 15-7
Storage-Areas, Files, and Tables 15-8
Logical Tables and Physical Files 15-9
Table Versions 15-10
Fully Qualified Table-Name 15-11
USE DEFAULT 15-12
How RDMS 1100 Locates Data 15-14
How RDMS 1100 Resolves Table References 15-15
Creating Versions Example 15-16 Exercise 15-1. 15-17
Appendix A: System Usage Information
System Essentials A-3
Demand Session and Instructions A-5
MAPPER Session and Instructions A-6
Obtaining Printout A-8
SG 3605 xiii

Relational Concepts and SQL Programming
Compiling and Executing a Program in IPF A-9
Compiling and Executing a Program using ECL A-10 Use Runstreams A-10 ACOB program A-10 UCOB program A-10
Saving and Printing Compiler Listings A-11
Basic IPF Commands A-12 Command Line Commands A-12 Text Line Commands A-12
Appendix B: FORTRAN Examples
SQL Commands in ASCII FORTRAN B-3
Sample ASCII FORTRAN Retrieval Program B-4
Example With GETERROR (FTN) B-6
Appendix C: ACOB Skeleton
Appendix D: ACOB Examples
Appendix E: UCOB Skeleton
Appendix F: UCOB Examples
xiv SG 3605

Relational Concepts and SQL Programming
Course Description
Relational Concepts and SQL Programming
Objectives:
To prepare the student to write, test, and debug SQL programs.
Audience:
Application programmers, systems analysts, systems designers, and support personnel
Prerequisites:
Extensive COBOL programming experience in the 1100/2200 environment
Key Topics:
• Introduction to RDMS • SQL command set • Embedding SQL in programs • Error handling and debugging • IPF SQL • MAPPER Relational Interface (MRI)
Relational Concepts and SQL Programming
EL3605 5 DAYS
SG 3605
XV

Relational Concepts and SQL Programming
About This Course
How to Use This Document
This student guide supports the material the instructor presents. A complete listing of referenced product information is provided under the Referenced Product Information heading.
There are written and/or laboratory practices at the end of most modules to help you understand the material presented. Two modules, modules 3 and 9, contain laboratory exercises in the middle of the module.
Learning Environment
This course is designed to provide you with the background and skills to manipulate an RDMS 1100 database. The concepts of relational database are introduced from a programming viewpoint. The SQL command set is used to enable you to access and manipulate relational data through COBOL host language programs. The IPF SQL and MAPPER Relational Interface are introduced as other ways to access RDMS 1100 databases. Lab exercises provide you with the opportunity to practice coding skills in relational data creation, retrieval, and updating, and use of alternative interfaces to RDMS 1100.
Trademark Information
• MAPPER is a registered trademark of Unisys Corporation
• LINC and ALLY are registered trademarks of Unisys Corporation
xvi SG 3605

Relational Concepts and SQL Programming
Referenced Product Information
OS 1100 UDS Relational Data Management System (UDS RDMS 1100) and IPF SQL Interface End Use Guide 7831 0778-000
OS 1100 UDS Relational Data Management System (UDS RDMS 1100) SQL Programming Reference Manual 7830 8160-002
OS 1100 UDS Relational Data Management System (UDS RDMS 1100) Administration Guide 7831 0760-002
OS 1100 Universal Compiling System (UCS) COBOL Programming Reference Manual Volume 2: Compiler and System Interface 7831 0455-000
OS 1100 Universal Compiling System (UCS) Application Development Programming Guide, Volume 1 7831 4077-001
MAPPER Relational Interface (MRI) Relational Database Interface (RDI) Operations Guide 7831 9795-000
Note: Consult the Series 1100 and 2200 Systems Product Information Library Directory, if needed, for specific levels of these documents and other Unisys documentation. The proper level of a document is needed to match release of installed software for your system.
SG 3605
xvii

Relational Concepts and SQL Programming
Agenda
Day 1
Introduction
Retrieving Data with the SELECT Statement
Using SQL in Application Programs
Day 2
More WHERE Clause Operators
The IPF SQL Interface
The MAPPER Relational Interface
Day 3
Grouping Functions
Joining Tables
More Retrieval Considerations
Day 4
Data Manipulation
Keys and Updating
Obtaining Table Definition Information
Day 5
Views
More About Threads and UDS
Getting Physical - Tables and Storage Areas
xviii
SG 3605

1 Introduction

Introduction
Module 1 Introduction
Module Objectives 1-3
Benefit Statement 1-3
Materials 1-3
Relational Database 1-4
Operations on Tables 1-5 RESTRICT Operation 1-6 PROJECT Operation 1-7 JOIN Operation 1-8
Advantages of the Relational Model 1-9
What is RDMS 11007 1-10
Interfaces to RDMS I 1-11
Interfaces to RDMS II 1-12
The Structured Query Language (SQL) 1-13
Exercise 1-1 1-14
SG 3605 1-1

Introduction
Module Objectives
Upon completion of this module, you should be able to
• Identify some of the basic features of a relational database management system.
- Describe the uses and advantages.
- Correctly use the terms to describe a table, primary keys, tuples, and the operations that can be performed on tables.
- Identify three interfaces into RDMS databases.
Benefit Statement
It is important that you have a few, fundamental concepts and terms in order to visualize and work with a relational database. You will realize the several options you have for accessing the database and understand how these options are implemented.
Materials
• OS 1100 UDS Relational Data Management System (UDS RDMS 1100) and IPF SQL Interface End Use Guide
SG 3605 1-3

1-4
• Relational database terms
Schema
- Entity
- Table (relation)
Column (attribute)
- Row (tuple)
- Primary key
Data value
Secondary key
Introduction
Relational Database
A database in which all the data is represented by tables. Table 1-1 illustrates a table.
Table 1-1. National League Winners
YEAR CLUB WON LOST MANAGER
1876 CHICAGO 52 14 SPAULDING, ALBERT
1877 BOSTON 31 17 WRIGHT, HARRY
1878 BOSTON 41 19 WRIGHT, HARRY
1879 PROVIDENCE 55 23 WRIGHT, GEORGE
1880 CHICAGO 67 17 ANSON, ADRIAN
1881 CHICAGO 56 28 ANSON, ADRIAN
1882 CHICAGO 55 29 ANSON, ADRIAN
1883 BOSTON 63 35 MORRILL, JOHN
1884 PROVIDENCE 84 28 BANCROFT, FRANK
1885 CHICAGO 87 25 ANSON, ADRIAN
1886 CHICAGO 90 Si— ANSON, ADRIAN
SG 3605

Introduction
Operations on Tables
There are three basic types of operations that can be performed on tables:
• RESTRICT - Choose rows from a table
• PROJECT - Choose columns from a table
• JOIN Combine two or more tables that have a cobimn in common
These are the formal names for operations in the database literature. They are not the commands used in SQL to perform the operations, but are listed to illustrate the kind of processing that is possible.
The result of any of the above operations is always a conceptual table.
These three operations may be combined to produce the exact data desired.
SG 3605 1-5

Introduction
RESTRICT Operation
The RESTRICT operation extracts a subset of the rows of an existing table. The desired rows are selected by stating the conditions that the data values in specified columns must satisfy. RESTRICT creates a horizontal subset of the existing table. From Table 1-2 we extract only the winners from 1880 to 1885 creating Table 1-3.
Table 1-2. National League Winners
YEAR CLUB WON LOST MANAGER
1876 CHICAGO 52 14 SPAULDING, ALBERT
1877 BOSTON 31 17 WRIGHT, HARRY
1878 BOSTON 41 19 WRIGHT, HARRY
1879 PROVIDENCE 55 23 WRIGHT, GEORGE
1880 CHICAGO 67 17 ANSON, ADRIAN
1881 CHICAGO 56 28 ANSON, ADRIAN
1882 CHICAGO 55 29 ANSON, ADRIAN
1883 BOSTON 63 35 MORRILL, JOHN
1884 PROVIDENCE 84 28 BANCROFT, FRANK
1885 CHICAGO 87 25 ANSON, ADRIAN
1886 CHICAGO 90 34 ANSON, ADRIAN
Table 1-3. Winners from 1880 to 1885.
YEAR CLUB WON LOST MANAGER
1880 CHICAGO 67 17 ANSON, ADRIAN
1881 CHICAGO 56 28 ANSON, ADRIAN
1882 CHICAGO 55 29 ANSON, ADRIAN
1883 BOSTON 63 35 MORRILL, JOHN
1884 PROVIDENCE 84 28 BANCROFT, FRANK
1885 CHICAGO 87 25 ANSON, ADRIAN
1-6 SG 3605

Introduction
PROJECT Operation
The PROJECT operation extracts a subset of the columns of an existing table. The desired columns are selected by stating the column names.
PROJECT creates a vertical subset of the existing table. Table 1-5 is produced from Table 1-4 by projecting the YEAR, CLUB and MANAGER columns.
Table 1-4. National League Winners
YEAR CLUB WON LOST MANAGER
1880 CHICAGO 67 17 ANSON, ADRIAN
1881 CHICAGO 56 28 ANSON, ADRIAN
1882 CHICAGO 55 29 ANSON, ADRIAN
1883 BOSTON 63 35 MORRILL, JOHN
1884 84 28 BANCROFT, FRANK PROVIDENCE
1885 CHICAGO 87 25 ANSON, ADRIAN
1886 CHICAGO 90 34 ANSON, ADRIAN
Table 1-5. Projected Columns
YEAR CLUB MANAGER
1880 CHICAGO ANSON, ADRIAN
1881 CHICAGO ANSON, ADRIAN
1882 CHICAGO ANSON, ADRIAN
1883 BOSTON MORRILL, JOHN
1884 PROVIDENCE BANCROFT, FRANK
1885 CHICAGO ANSON, ADRIAN
1886 CHICAGO ANSON, ADRIAN
SG 3605 1-7

Table 1-7. Team Names
CLUB NICKNAME
CHICAGO WHITE STOCKINGS
BOSTON RED STOCKINGS
PROVIDENCE GRAYS
Introduction
JOIN Operation =
The JOIN operation creates a virtual table by combining the columns from two or more tables. The tables must each have a column the values of which come from the same domain (have the same data type). The user specifies which columns to use for the JOIN and how to compare them.
Table 1-6. Club Winners
YEAR CLUB WINNER
1880 CHICAGO
1881 CHICAGO
1882 CHICAGO
1883 BOSTON
1884 PROVIDENCE
1885 CHICAGO
1886 CHICAGO
Tables 1-6 and 1-7 are joined to display for each year the year, club, and nickname in Table 1-8.
Table 1-8. Team Winners for 1880 - 1886
YEAR CLUB NICKNAME
1880 CHICAGO WHITE STOCKINGS
1881 CHICAGO WHITE STOCKINGS
1882 CHICAGO WHITE STOCKINGS
1883 BOSTON RED STOCKINGS
1884 PROVIDENCE GRAYS
1885 CHICAGO WHITE STOCKINGS
1886 CHICAGO WHITE STOCKINGS
1-8 SG 3605

Introduction
Advantages of the Relational Model
• All data is viewed as two-dimensional tables
- Simplicity: easily understood by users with no programming experience
- Uniformity: all data is stored in tables and output is in table format
• No need to know how the data is stored
- Access is through data values
- Query language (SQL) is simple
• Relationships are implicit in the data
- Allows easy handling of unanticipated uses of the data or ad hoc queries
- Enables addition or modification of related data
SG 3605 1-9

Universal Data System
RDMS
UREP )1. LIDS Control
Introduction
What is RDMS 1100?
User Intertecs
Figure 1-1. RDMS 1100
Relational Data Management System (RDMS)
The database manager for relational data.
Unisys Repository Manager (UREP)
The Unisys database management software that organizes data for user applications in an integrated information management system and in individual files. UREP also maintains the repository.
Universal Data System (UDS) Control
On-line data manager for all three UDS data models. Provides control for common functions such as 1/0, locking, queuing, memory management, and recovery.
Universal Data System (UDS)
A suite of Unisys software products for database management, data processing, and database application development. Together with other software components and database software products, UDS provides an integrated environment for control, maintenance, and recovery of user databases.
1-10 SG 3605

Introduction
Interfaces to RDMS I
IPF COBOL FORTRAN MRI SQL Program Program Run
RDMS
Figure 1-2. RDMS Interfaces
• Figure 1-2 describes the interfaces discussed and illustrated in this course.
• RDMS also provides these other interfaces:
- Pascal and C programs from the Universal Compiling System (UCS)
- Query Language Processor (QLP)
- Logic and Information Network Compiler II (UNC II)
- ALLY Software
- SQL*Plus 1100
- SQL*Report 1100
- SQL*OCI 1100
SG 3605 1-11

Introduction
Interfaces to RDMS II
Application programs
— SQL commands can be placed in ASCII COBOL and ASCII FORTRAN programs
— SQL commands can be placed in Universal Compiling System (UCS) programs written in COBOL, FORTRAN, C and Pascal
• IPF SQL
— Interactive access to RDMS databases using SQL commands
— SQL files can be created and run in IPF to execute a series of SQL commands
• MAPPER Relational Interface (MRI)
- Interactive menu-driven interface to construct SQL commands
- Data selected is returned as a MAPPER report
- Report can be further manipulated with MAPPER functions
- Run statements also available for embedding in MAPPER runs
1-12 SG 3605

Introduction
The Structured Query Language (SQL)
• Industry standard relational programming language
"English-like" non-procedural language
- Users do not specify how to access the data
• SQL can be interactive or programmatic
— Embedded in COBOL, FORTRAN, Pascal, or C programs, or MAPPER runs
— Ad hoc queries through IPF SQL or MAPPER MRI
• Language statements in four categories
- Queries = SELECT...FROM...
- Data Manipulation = DELETE, INSERT, UPDATE
Data Definition = CREATE, ALTER, DROP
- Data Control = GRANT, REVOKE
SG 3605 1-13

Introduction
Exercise 1-1
Provide answers or definitions as requested.
1. List at least three advantages of using a relational database management system.
2. Identify three interfaces to RDMS 1100 data.
3. Define the following relational database terms:
a. relation
b. tuple
c. attribute
d. primary key
)
1-14 SG 3605

2 Retrieving Data with the SELECT Statement

Retrieving Data with the SELECT Statement
Module 2 Retrieving Data with the SELECT Statement
Module Objectives 2-3
Benefit Statement 2-3
Materials 2-3
SQL Queries 2-4
Sample Tables for Examples and Exercises 2-5
SELECT Command 2-6
Selecting Columns 2-7
DISTINCT Values 2-8
The WHERE Clause 2-9
WHERE Clause Operators 2-10
WHERE Clause Usage 2-11
The ORDER BY Clause 2-12
Arithmetic Expressions 2-13
Order of Precedence 2-14
Exercise 2-1 2-15
SG 3605 2-1

Retrieving Data with the SELECT Statement
Module Objectives
Upon completion of this module, you should be able to
• Formulate simple SELECT statements to retrieve data from a database.
- Including basic use of the WHERE clause.
- Using arithmetic operators to retrieve data derived from numeric columns of a table.
Benefit Statement
The most basic SQL command is the SELECT query specification. You will need this command to retrieve information from your database. It will be used alone or in combination with other commands. A few simple SELECT command clauses will give you a great deal of power for your database accesses.
Materials
• OS 1100 UDS Relational Data Management System (UDS RDMS 1100) and IPF SQL Interface End Use Guide
• OS 1100 UDS Relational Data Management System (UDS RDMS 1100) SQL Programming Reference Manual
SG 3605 2-3

Retrieving Data with the SELECT Statement
SQL Queries
The SELECT statement is used to retrieve data from a table in the database.
• Variations of the SELECT statement are used to perform all table operations
- Restrict
- Project
Join
• Can SELECT
- Entire table
Some columns
Some rows
• Can display columns in any order desired
• Order of rows displayed is not (logically) significant
2-4 SG 3605

GRADE LOSAL HISAL
1 800 1599 2 1600 2199 3 2200 2799 4 2800 3699 5 3700 5999
Retrieving Data with the SELECT Statement
Sample Tables for Examples and Exercises
Table 2-1. EMP
EMPNO ENAME JOB MGR DNO HIREDATE SAL COMM 5010 FOSTER SALESREP 5234 200 860714 2700 400 5146 BROWN CLERK 5234 200 871011 1000 5234 WOODWORTH MANAGER 5784 200 790219 3250 5237 ROCKWELL ACCOUNTANT 5743 100 840618 2175 5437 MART IN SALESREP 5234 200 870326 2500 300 5469 ADAMS SALESREP 5234 200 811102 2250 500 5630 GLASS ACCOUNTANT 5743 100 871220 1850 5702 TURNER CLERK 5743 100 890515 900 5743 LAWSON MANAGER 5784 100 830510 3400 5765 JOHNSON CLERK 5984 400 891221 975 5784 WILLIAMS PRESIDENT 300 781015 5200 5896 SMITH CLERK 5984 400 880913 1050 5942 FORD SALESREP 5234 200 890316 2375 0 5984 HYDE MANAGER 5784 400 850901 2900
Table 2-2. DEPT Table 2-3. SAL GRADE
DNO DNAME LOC
100 ACCOUNTING ATLANTA 200 SALES NEW YORK 300 MARKETING DETROIT 400 DISTRIBUTION PRINCETON
Table 2-4. AUX_EMP
EMPNO GRADE SEX MAR STAT DEPENDENTS
5010 3 F S 0 5146 1 M M 2 5234 4 M S 0 5237 2 m S 0 5437 3 F M 1 5469 3 M M 2 5630 2 M M 3 5702 1 F M 0 5743 4 M M 3 5765 1 M S 0 5784 5 F S 0 5896 1 M S 0 5942 3 F M 2 5984 4 F S 0
SG 3605
2-5

Retrieving Data with the SELECT Statement
SELECT Command
SELECT [ DISTINCT ] column1, column2, column3 FROM tablename
• Select-list lists columns to return in desired order
• To display all columns replace select-list with *
Example:
SELECT * FROM DEPT
DNO DNAME LOC
100 ACCOUNTING ATLANTA 200 SALES NEW YORK 300 MARKETING DETROIT 400 DISTRIBUTION PRINCETON
2-6 SG 3605

Retrieving Data with the SELECT Statement
Selecting Columns
• Collin-ma are displayed in the order requested in the select-list
Example: Display the department name, location, and department number, in that order, of all departments in the DEPT table.
SELECT DNAME, LOC, DNO FROM DEPT
DNAME
LOC DNO
ACCOUNT ING
ATLANTA " 100 SALES
NEW YORK 200 MARKET ING
DETROIT 300 DISTRIBUTION PRINCETON 400
• Not all columns need be displayed
Example: Display the department name and department number columns from the DEPT table.
SELECT DNAME, DNO FROM DEPT
DNAME DNO
ACCOUNTING 100 SALES 200 MARKETING 300 DISTRIBUTION 400
SG 3605 2-7

Retrieving Data with the SELECT Statement
DISTINCT Values CTS
• The DISTINCT keyword is used to suppress duplicate values in a column selected for output.
Example: Display the different types of jobs in all the departments without repetition.
SELECT DISTINCT JOB FROM EMP
JOB
ACCOUNTANT CLERK MANAGER PRESIDENT SALESREP
• If more than one column is selected, DISTINCT selects unique combinations of values in those columns
Example: Display all different jobs existing in each department
SELECT DISTINCT DNO, JOB FROM EMP
DNO JOB
100 ACCOUNTANT 100 CLERK 100 MANAGER 200 CLERK 200 MANAGER 200 SALESREP 300 PRESIDENT 400 CLERK 400 MANAGER
2-8 SG 3605

Retrieving Data with the SELECT Statement
The WHERE Clause
SELECT select-list FROM tablename WH ERE condition
• Used to specify which rows to retrieve
• Specifies condition(s) which the column value must satisfy
Example: Display the employee information for all employees named Hyde.
SELECT * FROM EMP WHERE ENAME = 'HYDE'
EMP NO ENAME
5984 HYDE
JOB MGR DNO HIREDATE SAL COMM
MANAGER 5784 400 850901 2900
Example: Display the name and position of everyone in Department 200.
SELECT ENAME, JOB FROM EMP WHERE DNO = 200
ENAME JOB
FOSTER SALESREP BROWN CLERK WOODWORTH MANAGER MARTIN SALESREP ADAMS SALE SREP FORD SALESREP
SG 3605 2-9

Retrieving Data with the SELECT Statement
WHERE Clause Operators
These binary operators are used to compare two values, either numeric or literal.
• = Equal
— WHERE JOB = 'MANAGER'
• <> Not equal
— WHERE DNO <> 400
• > Greater than
— WHERE COMM > SAL
• < Less than
— WHERE COMM < SAL
• >= Greater than or equal to
— WHERE HIREDATE >= 820101
• <= Less than or equal to
— WHERE HIREDATE <= 850331
2-10 SG 3605

Retrieving Data with the SELECT Statement
WHERE Clause Usage
Columns named in the WHERE clause must belong to the table named in the FROM clause.
• Columns named in the WHERE clause need not be in the select-list
— The values tested in the condition do not need to be displayed in the resulting table
• Character string data must be enclosed in single quotes or apostrophes
• Case is significant in character strings.
— 'HYDE' is not equal to 'Hyde'
SG 3605 2-11

Retrieving Data with the SELECT Statement
The ORDER BY Clause
SELECT select-list FROM tablename WHERE condition ORDER BY sort-specification-list
• Controls how rows returned are displayed
• Sort specification format
[ unsigned-integer I column-name ] [ ASC I DESC
• Integer refers to position in the select-list
• Default order is ascending ASC
Example: Display the employee information for department 400 in alphabetical order by employee name
SELECT EMPNO, ENAME, JOB, MGR, DNO, HIREDATE, SAL FROM EMP WHERE DNO = 400 ORDER BY ENAME ASC
EMPNO ENAME JOB MGR DNO HIREDATE SAL ----
5984 HYDE MANAGER 5784 400 850901 2900 5765 JOHNSON CLERK 5984 400 891221 975 5896 SMITH CLERK 5984 400 880913 1050
2-12 SG 3605

Retrieving Data with the SELECT Statement
Arithmetic Expressions
Arithmetic expressions can be used to display data that is derived from values in columns of the select-list. An expression is composed of column names and constant numeric values connected by an arithmetic operator.
Table 2-5. Arithmetic Operators
+ ADD - SUBTRACT * MULTIPLY / DIVIDE
Example: Display the names and yearly salaries of all employees in Department 400.
SELECT ENAME, SAL * 12 FROM EMP WHERE DNO = 400
ENAME
JOHNSON 11700 SMITH 12600 HYDE 34800
SG 3605 2-13

Retrieving Data with the SELECT Statement
Order of Precedence
In evaluating expressions, the order of precedence of operators is as follows:
Unary operators positive (+) and negative (-)
• Multiplication (*) and division
▪ Addition (+) and subtraction (-)
Equal precedence operations, like addition and subtraction, are performed in order, left to right as encountered.
Parentheses are used to clarify or change the order of operations. Nested parentheses are evaluated beginning with the innermost and working outward.
Example:
SAL + COMM * 12 - 200 is evaluated as
SAL + COMM * 12 - 200. 1---
2 3-
Parentheses can change the order in which expressions are evaluated.
(SAL + COMM) * 12 - 200 is evaluated as
(SAL + COMM) * 12 - 200. 1
2--- 3
2-14 SG 3605

Retrieving Data with the SELECT Statement
Exercise 2-1
Write the SQL statement necessary to access either the EMP or DEPT table to retrieve the following information. Indicate which records will be displayed.
1. Display the department name and department number for the department in Atlanta.
CAI)
2. Display the names of all employees whose total compensation is more than $2600 per month.
„„•
3. Display the name, monthly salary, daily salary, and hourly salary for all employees. Assume the SAL column is monthly salary and that there are 22 working days in a month and 8 hours in a working day.
4. Display the names and total compensation of all employees whose commissions are more than 20% of their salaries. Have the names displayed in order by within the departments.
•
SG 3605 2-15

3 Using SQL in Application Programs

Using SQL in Application Programs
Module 3 Using SQL in Application Programs
Module Objectives 3-3
Benefit Statement 3-3
Materials 3-3
Using SQL Commands in 3GL Programs 3-4 Accessing RDMS 1100 Data 3-4 3GL Interfaces 3-4 UDS Environment Commands 3-4
SQL and Unisys Extensions 3-5
Summary of Selected SQL Commands 3-6
Comparing Embedded and Interpretive SQL 3-8 Source 3-9 Compilation 3-9 Collection or Link 3-9 Execution 3-9
SQL Commands in COBOL Programs 3-10 Interpretive SQL 3-10 Embedded SQL 3-12
Command Building Blocks 3-15 Constants 3-15 Naming Database Objects 3-15
RDMS 1100/2200 Data Types 3-16 Character Data Types 3-16 Numerical Data Types 3-16 RDMS and 3GL Data Type Equivalencies 3-18
RDMS 1100/2200 Terminology 3-19 Cursor 3-19 Currency 3-19 Application Group 3-19 Thread 3-19
Program Flow 3-19
BEGIN THREAD Command 3-21
SG 3605 3-1

Using SQL in Application Programs
DECLARE CURSOR Command 3-22
OPEN CURSOR Command 3-23
FETCH Command 3-24
Passing Information Between a Program and RDMS 3-25 3-25 Host Program Variables
Placeholder Variables in ISQL 3-25 Embedded Variables in ESQL 3-25 Parameter Passing Limitations 3-25 ISQL - Placeholder and Host Program Variables 3-26
END THREAD Command 3-27
USE DEFAULT QUALIFIER Command 3-28
Exercise 3-1 3-29
Lab 3-1 3-31
Error Handling Choices 3-33 RDMS Error Handling 3-34 GETERROR Command 3-35 Example Using GETERROR (ACOS) 3-36 ESQL Error Handling 3-37
Data and Commands for ESQL Error Handling 3-38 WHENEVER Command 3-39 ESQL Data Area Declarations 3-40 Example Using GETERROR (UCOB) 3-41
Lab 3-2 3-42
3-2 SG 3605

Using SQL in Application Programs
Module Objectives
Upon completion of this module, you should be able to
• Incorporate SQL commands in a host programming language.
- Describe the flow of processing in a host program that accesses RDMS 1100.
- Use the BEGIN THREAD and END THREAD commands to establish and terminate a thread with UDS Control.
- Use SQL commands in a program to retrieve data from an RDMS database.
- Use host or embedded (ESQL) variables to pass parameters between RDMS and host programs.
- Include error code in a host program to handle RDMS errors.
- Compile and run a program containing SQL commands.
Benefit Statement The SELECT command you have already seen is standard SQL. If you use an interactive interface like IPF SQL, you would enter the command just as you have seen it.
However, if you are not performing ad hoc queries and need to further manipulate the .data after it has been retrieved, your SQL commands must be embedded in a third-generation language (3GL) program. This module tells you how to incorporate SQL into COBOL or FORTRAN programs in the 1100/2200 environment. As a programmer, you need to be familiar with the interfaces between RDMS and UDS and your 3GL program.
Materials
• OS 1100 Universal Compiling System (UCS) COBOL Programming Reference Manual Volume 2: Compiler and System Interface
• OS 1100 Universal Compiling System (UCS) Application Development Programming Guide, Volume 1
• OS 1100 UDS Relational Data Management System (UDS RDMS 1100) SQL Programming Reference Manual
SG 3605 3-3

Using SQL in Application Programs
Using SQL Commands in 3GL Programs
Accessing RDMS 1100 Data
RDMS 1100 data can be accessed using standard SQL syntax in your program. RDMS 1100 also supports some SQL extensions and alternative formats that are not part of the ANSI standard. The syntax and commands that are nonstandard will be made clear to you in the text. If you are concerned about portability of your program, use only the standard syntax.
You have seen that a SELECT command returns a whole table or a subset of a table. A third-generation language (3GL) program typically deals with only one record or row of the returned table at a time. How to transfer one record of the returned table to the program, and how to code program variables that reference them are important issues.
3GL Interfaces
Unisys provides two interfaces for 3GL programming languages - an interpretive SQL and embedded SQL or ESQL.
Interpretive SQL incorporates the SQL statement as a string literal passed as an argument to RDMS on a procedure call. This interface was originally available from ASCII COBOL and ASCII FORTRAN, and made available to the languages in the Universal Compiling System (UCS), namely UCS COBOL, UCS FORTRAN, UCS C, and UCS Pascal. RDMS must interpret each SQL statement each time it is encountered during program execution. Interpretive SQL will be abbreviated ISQL in this student guide whenever an ISQL - ESQL distinction is important.
The Embedded SQL interface, which is only available from UCS COBOL, fully conforms to the SQL standard and provides some extensions as well. Each SQL command begins with an embedded SQL prefix, EXEC SQL, and ends with an embedded SQL terminator, END-EXEC. The embedded SQL commands are fully compiled along with the host program. Execution of ESQL commands will be significantly faster than their interpreted counterparts. This is particularly noticeable in program loops. Interpretive and embedded SQL commands can be used in the same program.
Several other differences exist between the two implementations. ASCII COBOL and UCS COBOL will be used to illustrate these differences.
UDS Environment Commands
Another important issue is how to incorporate your program into the UDS environment so that it takes advantage of the UDS recovery and locking features. Specific commands needed to accomplish this are also shown.
3-4 SG 3605

Using SQL in Application Programs
SQL and Unisys Extensions
• Accessing RDMS 1100 data
- ANSI standard SQL
- Unisys extensions
- One record at a time
• 3GL interfaces
- Interpretive SQL
Embedded SQL
• UDS environment commands
- Provide recovery
- Set up UDS environment
- Use Unisys extensions
SG 3605 3-5

Using SQL in Application Programs
Summary of Selected SQL Commands
Table 3-1 groups the standard SQL commands that will be covered in this course. Unless noted by the asterisk in Table 3-1, RDMS supports the SQL 89 form of the command and, in many cases, offers one or more extensions to it. Table 3-1 is derived from the SB4R4 system release, which is release 5R3 of RDMS.
Refer to the OS 1100 UDS Relational Data Management System (UDS RDMS 1100) SQL Programming Reference Manual for more the details on the supported extensions for the above commands.
Table 3-1. Standard SQL Commands
Function Command
Data Definition CREATE TABLE *
Data Retrieval DECLARE CURSOR
OPEN
CLOSE
FETCH
SELECT Single Row
Data Creation/ INSERT
Manipulation DELETE
COMMIT
ROLLBACK
BEGIN DECLARE (ESQL)
END DECLARE (ESQL)
UPDATE Searched
UPDATE Positioned
Miscellaneous GRANT
WHENEVER (ESQL) *
* RDMS does not support the SQL 89 form of this command and offers no extensions to it
3-6 SG 3605

Using SQL in Application Programs
Table 3-2 lists the SQL extensions available from Unisys that will be covered in this course.
Table 3-2. Common Unisys Extensions for the 1100/2200 Environment
Function Command
Data Definition ALTER TABLE
DROP TABLE
CREATE INDEX
DROP INDEX
CREATE VIEW
DROP VIEW
Data Retrieval DROP CURSOR **
FETCH (next/prior/first/last/current)
FETCH NEXT n
LOCATE
Data Locking LOCK
UNLOCK
Thread Control BEGIN THREAD
END THREAD
Miscellaneous GETERROR
USE DEFAULT
** Not allowed in embedded SQL (ESQL)
SG 3605 3-7

@XQT
Using SQL in Application Programs
Comparing Embedded and Interpretive SQL
ESQL
Source: UCS COBOL
EXEC SOL
END-OlEcemmand
@UCOB
Dynamic/ Static Linking
@XQT
ISQL
Source: ASCII COBOL
ENTER MASM 'ACOB$RDMR` USING 'sql command' Orr-Stat aux-info
@ACOB
@MAP
RDMS
Figure 3-1. ESQL/ISQL Comparison
3-8 SG 3605

Using SQL in Application Programs
Source
- Place embedded UCOB SQL (ESQL) commands in packets delimited by EXEC SQL and END-EXEC.
- Format interpretive SQL commands (ISQL) according to the host language conventions
- ASCII or UCS COBOL - ENTER MASM 'ACOB$RDMR' commands
- ASCII or UCS FORTRAN - CALL F$RDMR commands
UCS Pascal - procedure call statement to F$RDMR
- UCS C - include the system header file rsa.h, then call the rsa function
Compilation
- Embedded commands are fully compiled
- Analyze SQL syntax
- Create an internal form of the command
- Resolve table and column names (tables must be already created)
- Optimize access path
- Interpreted commands are not compiled (no prior creation of tables needed)
Collection or Link
- Resolve references between user elements and support libraries
- Create an executable program structure
Execution
- Embedded SQL commands executed to access database
- Interpretive SQL commands are compiled, then executed if no syntax errors exist
SG 3605 3-9

Using SQL in Application Programs
SQL Commands in COBOL Programs
Interpretive SQL
Format 1
ENTER MASM 'ACOB$RDMR' USING 'SQL-COMMAND • ' I I
err-stat, aux-info.
Format 2
MOVE sql-corn-string-variable TO rcom. ENTER MASM 'ACOB$RDMR' USING rcom, err-stat, aux-info.
Syntax Notes
• The SQL command or the contents of SQL-COM-STRING-VARIABLE must end with semicolon (;).
• The item err-stat defines an error status returned by RDMS for an SQL command; normal completion is 0000.
• The item aux-info contains useful information about the error status.
3-10 SG 3605

Using SQL in Application Programs
ISM Example
DATA DIVISION. WORKING-STORAGE SECTION:
01 rcom.
05 rlin PIC X(40) OCCURS 10 TIMES.
01 err-stat PIC 9(4).
01 aux-info PIC S1(36).
•
PROCEDURE DIVISION.
ENTER MASM 'ACOB$RDMR' USING 'BEGIN THREAD FOR udssrc READ
err-stat, aux-info.
MOVE 'DECLARE employee CURSOR SELECT * FROM emp TO rcom.
ENTER MASM 'ACOB$RDMR' USING rcom, err-stat, aux-info.
SG 3605 3-11

Using SQL in Application Programs
Embedded SQL
Format 1
EXEC SQL SQL-COMMAND
END-EXEC.
Format 2
SQL-COMMAND.
Syntax Notes
• Format 1
- Required by SQL standard
- Delimit packets for the compiler with EXEC SQL and END-EXEC
- Insert only one SQL command into a packet
• Format 2
- For five commands that do not require the packet delimiters (packet is optional)
- BEGIN THREAD
- END THREAD
- COMMIT
- ROLLBACK
- GETERROR
- Command must end with a period
- Command cannot be part of a larger command structure, for example an IF statement
3-12 SG 3605

Using SQL in Application Programs
ESQL Command Scoping
• Five commands are acted upon during compilation
- DECLARE CURSOR
USE DEFAULT
- WHENEVER
- DEBUG (static format only)
- SET STATISTICS
• Must be placed physically ahead of other commands they affect in the source program
Note: This course will address static ESQL only. Dynamic ESQL provides a subset of SQL commands, typically involving a database update, that are not processed at compile time, but at execution time. Dynamic ESQL is the functional equivalent of the ENTER MASM interpretive interface for COBOL. A program can contain a mixture of both static ESQL and interpretive SQL; this fact may be important in a migration to ESQL from ISQL.
SG 3605 3-13

Using SQL in Application Programs
ESQL Example
Notice the SQL commands in the Procedure Division illustrated below that do or do not require ESQL packets. Part of required Data Division is illustrated; it will be more fully discussed with error handling in this module.
DATA DIVISION. WORKING-STORAGE SECTION.
01 SQLCODE EXEC SQL.
01 RDMCA. 05 ERROR-STATUS 05 AUX-INFO EXEC SQL
PIC S9(9) USAGE BINARY. BEGIN DECLARE SECTION END-EXEC.
PIC 9(4). PIC S9(9) USAGE BINARY. END DECLARE SECTION END-EXEC.
PROCEDURE DIVISION.
EXEC SQL WHENEVER SQLERROR GO TO :rdms-err-para
END-EXEC.
BEGIN THREAD FOR udssrc READ.
EXEC SQL DECLARE employee CURSOR SELECT * FROM emp
END-EXEC.
rdms-err-para.
3-14 SG 3605

Using SQL in Application Programs
Command Building Blocks
Constants
String Literals
A string literal is a character sequence surrounded by string delimiters. Single quotes (apostrophes) are string delimiters.
ENTER MASM 'ACOB$RDMR' USING 'SQL Command' ... uses a string literal to pass the command to RDMS.
Numeric Literals
Numeric literals are either integers or real numbers. Real numbers contain a decimal point, but integers do not. You can write them with or without the leading sign. Numeric literals cannot be longer than 21 digits. This limit does not include either the sign or the decimal point.
NULL Values
A data item that has no assigned value has a NULL value. NULL values are distinct from zero values or spaces. NULLs are used instead of inserting dummy values that may be mistaken for assigned values. NULL values may not be used in arithmetic or Boolean expressions. There are special functions that test for NULL values.
Naming Database Objects
1. Names may contain from 1 to 30 characters.
2. Names may use characters A-Z, a-z, 0-9, and _(underscore).
3. Names must begin with a letter, and cannot end with an underscore.
4. Names are not case sensitive.
5. The name may not be a reserved word.
6. The above rules can be ignored if the name is enclosed in double quotes.
Table 3-3 illustrates several valid and invalid names for database objects.
SG 3605 3-15

Using SQL in Application Programs
Table 3-3. Examples of Database Object Names
Valid Invalid
sales_reps sales-reps
PURCHASE_PRICE PURCHASE*PRICE
"TABLE" TABLE
RDMS 1100/2200 Data Types
Every literal or variable has a data type. A data type associates a fixed set of properties with a value. It also restricts the values the data item may contain
A value in the database takes on the data type of the column to which it belongs. When a table is created or modified, the column is assigned a data type. When a query is executed and values are returned to your program, the program variables into which the values will go must correspond to the data type of the database item.
RDMS supports two character and seven numerical data types.
Character Data Types
The character data types and their definition formats are
CHARACTER (size)
NCHARACTER (size)
CHARACTER data types contain ASCII or any other 9-bit data. Character(5) specifies a five-position character string. A corresponding COBOL program variable should be defined as PIC X(5).
NCHARACTER contains 16-bit data, such as Kanji characters.
Numerical Data Types
There are several data types that hold numerical information. Numerical data types can be either exact or approximate.
3-16 SG 3605

Using SQL in Application Programs
Exact Numerical Data Types
The exact numerical data types and their definition formats are:
DECIMAL [(sign-and-digits-precisionLscaleN
NUMERIC [digits-precisionkscale)]
INTEGER
SMALLINT
The value of sign-and-digits-precision specifies the total number of digits in the column including the leading sign. This must be an integer between 2 and 22, inclusive. For example, DECIMAL(6.2) allows 6 positions, 2 of which are decimal. A corresponding COBOL program variable would be defined as PIC S999V99. Decimal(4) should be declared as PIC S9(3).
The digits-precision is the number of digits in the column and must be no larger than 11.
The scale is a non-negative integer that indicates the number of digits for the fractional portion of the column This can be no larger than digits precision - 1 for NUMERIC and no larger than sign-and-digits-precision -1 for DECIMAL.
A period can be used instead of a comma between digits precision and scale.
Approximate Numerical Data Types
The approximate numerical data types and their formats are:
REAL
FLOAT [(binary-precision)]
DOUBLE PRECISION
The value of binary precision must be a positive integer less than 60. It defines the minimum binary precision in bits.
Consult the OS 1100 UDS Relational Data Management System (UDS RDMS 1100) SQL Programming Reference Manual for more information on the numerical data types.
SG 3605 3-17

Using SQL in Application Programs
RDMS and 3GL Data Type Equivalencies
Both RDMS and your host language define data types. You should use equivalent data types for corresponding data items in order to avoid unnecessary conversions, as illustrated in Table 3-4.
Table 3-4. RDMS Data Types and Equivalent Language Definitions
RDMS 1100 Column Definition
UCS COBOL Data Definition
ASCII COBOL Data Definition
ASCII FORTRAN or UCS FORTRAN
CHARACTER(n) X(n) A(n)
X(n) A(n)
CHARACTER*n
NCHARACTER(n) X(n) usage disp-2
(no equivalent) NCHARACTER*n
DECIMAL(d,$) S9(d-s-1)v9(s) sign leading separate
S9(d-s-1)v9(s) sign leading separate
INTEGER REAL DOUBLE PRECISION
NUMERIC(d,$) S9(d-s)v9(s) usage binary
S9(d-s)v9(s) usage comp
INTEGER REAL DOUBLE PRECISION
INTEGER S9(10) usage binary S1(36) usage binary-1
S9(10) usage comp S1(36)
INTEGER
SMALLINT S9(5) usage binary S1(18) usage binary-1
S9(5) usage comp S1(18)
INTEGER
REAL usage comp-1 usage comp-1 REAL
DOUBLE PRECISION
usage comp-2 usage comp-2 DOUBLE PRECISION
FLOAT(p) usage comp-1 usage comp-2
usage comp-1 usage comp-2
REAL DOUBLE PRECISION
3-18 SG 3605

Using SQL in Application Programs
RDMS 1100/2200 Terminology
Before you can write a program that incorporates SQL commands in the 1100/2200 environment, there are a few more terms that must be defined. They relate your program to its environment.
Cursor
The definition of the data to retrieve. Used only to return results to a program.
Currency
Currency indicates which row of the cursor is being accessed. This pointer is needed as a way to keep track of the rows being returned to a COBOL or FORTRAN program, one at a time.
Application Group
A software partition that acts as an independent database system and has its own system and data files and its own recovery environment. Applications groups do not share data with other application groups and there is no coordinated locking or recovery between application groups. As a programmer, you need to know the name or alias of the application group to which your program belongs.
Thread
A thread is a work session established with UDS. It defines your UDS environment. Each thread exists in one and only one application group.
Program Flow
Figure 3-2 illustrates the typical program flow of control and some of the SQL commands that are involved.
SG 3605 3-19

Loop
Start
BEGIN THREAD
DECLARE CURSOR SELECT
OPEN CURSOR
FETCH
Process Record
END THREAD
End Program
Using SQL in Application Programs
Thread Under UDS Control
Figure 3-2. Program Flow with SQL Commands
3-20 SG 3605

Using SQL in Application Programs
BEGIN THREAD Command
BEGIN THREAD [thread-name] FOR [APPLICATION] application-name [options]
• Unisys extension to register thread with UDS 1100
- Sets up working storage and environment for subsequent SQL commands
- Specifies application group or alias name for application group to which thread belongs
- Specifies what type of recovery to use during updates
• Retrieval options
— READ/RETRIEVE
Database access is read only
— Attempt to update data generates an error
• Message options
— UDSMSG or UDSMESSAGE or UDSMESSAGES
— Messages from UDS 1100 are returned immediately
Examples:
BEGIN THREAD mythread FOR app1
BEGIN THREAD FOR UDSSRC READ
BEGIN THREAD t1 FOR UDSSRC READ UDSMSG
BEGIN THREAD FOR app2 RETRIEVE UDSMESSAGE
SG 3605 3-21

Using SQL in Application Programs
DECLARE CURSOR Command
DECLARE cursor-name CURSOR [FOR] select-clause [ORDER BY sort-specification]
• Associates a named data area with a particular query
- Defines a conceptual table containing the rows returned before they are passed to the program, one row at a time
- A single program may have multiple declared cursors
- A cursor must be declared before any other references can be made to it
• SELECT clause specifies which data to return
• ORDER BY clause controls how result is displayed
Examples
DECLARE empl CURSOR SELECT * FROM emp
DECLARE ci CURSOR SELECT dname, dno FROM dept ORDER BY dno
DECLARE sal_cursor CURSOR SELECT ename, sal FROM emp WHERE dno = 200 ORDER BY 2 DESC
3-22 SG 3605

Using SQL in Application Programs
OPEN CURSOR Command
OPEN cursor-name
• Opening the cursor evaluates the query in the DECLARE CURSOR command
- Sets the cursor's currency pointer to just prior to the first row
- Sorts the rows if DECLARE CURSOR had ORDER BY clause
• Performed implicitly by first FETCH for ISQL
• Required for static ESQL
Example:
OPEN SAL CURSOR
SG 3605 3-23

Using SQL in Application Programs
FETCH Command
FETCH cursor-name INTO variable-specification-list
FETCH retrieves the next row of the cursor relative to the currency pointer
— First FETCH retrieves the first row returned based on the cursor definition
- Usually used in a program loop to read all the rows
• Where variable-specification-list is
A list of placeholder variables, one for each column in the cursor (ISQL)
— A set of embedded variables, one for each column in the cursor (ESQL)
ISQL Example:
ENTER MASM 'ACOB$RDMR' USING 'FETCH dept_cursor INTO $p1, $p2, $p3 ;', err-stat, aux-info, rr-dno, rr-dname, rr-loc
ESQL Example:
EXEC SQL FETCH dept_cursor INTO :rr-dno, :rr-dname, :rr-loc
END-EXEC.
3-24 SG 3605

Using SQL in Application Programs
Passing Information Between a Program and RDMS
Figure 3-3 illustrates how data is passed between a program and RDMS.
Note: Only interpretive SQL requires the placeholder variables, $P1, $P2,and $P3.
Host Program Variables
Database applications that use third-generation programming languages will need program variables declared in the host program. Host program variables are used to pass information between your program and RDMS.
The host program variable's size and data type is determined from the RDMS column it corresponds to. You can find this information in the table definition. The size and data type of your host program variables must match the size and data type of the table declarations .
You need a host program variable for each column you are inserting values into, retrieving values from, or comparing values against.
Placeholder Variables in ISQL
ISQL statements cannot directly reference program variables, so placeholders are the means of passing values between RDMS 1100 and your program. Placeholder variables are named according to their position in the SQL string in which they are passed; three placeholder variables would be named $P1, $P2, and $P3. Your call to RDMS must have a host, program variable for each placeholder variable passed as an additional parameters.
Embedded Variables in ESQL
ESQL allows direct references to host program variables, known as embedded variables. According to the SQL standard, you must prefix the host program variable name with a colon (:) and embed it in the command string.
Parameter Passing Limitations
The ASCII COBOL (ACOB) compiler limits the number of parameters passed on an ENTER MASM call to 31.
The UCS COBOL (UCOB) compiler limits the number of parameters passed to 250.
SG 3605 3-25

ISQL Requires
Placeholder Variables
Host Program Variables
$P2 $P3 $P1
rr-dno rr-dname
Using SQL in Application Programs
ISQL - Placeholder and Host Program Variables
DECLARE dept_cursor CURSOR SELECT dno, FROM dept
dname, loc
DNO DNAME LOC Decimal(4) Character(12) Character(10)
100 ACCOUNTING ATLANTA Table 200 SALES NEW YORK Data 300 MARKETING DETROIT
400 DISTRIBUTION PRINCETON
WORKING STORAGE. 01 record-retrieved.
05 rr-dno PIC 9(4). 05 rr-dname PIC X(12). 05 rr-loc PIC X(10).
ENTER MASM 'ACOB$RDMR' USING 'FETCH dept_cursor INTO $P1, $P2, $P3 err-stat, aux-info, rr-dno, rr-dname, rr-loc
Figure 3-3. Cursor-Program Variable Interaction
3-26 SG 3605

Using SQL in Application Programs
END THREAD Command
END THREAD
• Disconnects thread from UDS Control
• A Unisys extension command needed to end a work session
• Working storage and environment discarded
• Commits database changes if in update mode
SG 3605 3-27

Using SQL in Application Programs
USE DEFAULT QUALIFIER Command
USE DEFAULT QUALIFIER qualifier-name
• Unisys SQL extension
• Establishes a new default table qualifier
- Used for duration of thread or until another default is specified
- System default qualifier is RDMS for all tables referenced
• Table specification
- Format is: [qualifier.]table-name[:version-name]
- Table acquires qualifier when created
• Useful when referencing
- Multiple tables with same qualifier
- Table-names with long qualifiers
Examples:
USE DEFAULT QUALIFIER VJP A subsequent reference to table EMP references VJP.EMP
EMP Refers implicitly to RDMS.EMP
VJP.EMP Refers explicitly to VJP.EMP
3-28 SG 3605

Using SQL in Application Programs
Exercise 3-1
1. Identify which variable names are valid and which are invalid in RDMS.
MY-TABLE
EMPCURSOR
Table*2
Another Cursor
2. If the following columns were defined in a table called CAR SALES, how would the program variables into which they were to be retrieved be declared?
REG_NUMBER DECIMAL(8)
MAKE_AND_MODEL CHARACTER(10)
DATE_PURCH DECIMAL(7)
SALE_PRICE DECIMAL(6)
REP_CODE SMALLINT
COMMISSION NUMERIC(7,2)
3. Put a number before each command below to indicate the order in which they would appear in an application program.
OPEN CURSOR
END THREAD
DECLARE CURSOR
BEGIN THREAD
FETCH
SG 3605 3-29

Using SQL in Application Programs
4. Code the complete ESQL or ISQL command to define a cursor that selects the employee number, employee name, and total compensation from the EMP table.
5. Code the ESQL or ISQL call to fetch the rows retrieved in item 4 above. What assumptions must you make about the WORKING-STORAGE section of your program?
3-30 SG 3605

Using SQL in Application Programs
Lab 3-1
Your instructor will discuss your particular lab set-up and requirements with you. Appendix A is provided to keep track of necessary system usage information.
Using the ACOB or UCOB skeleton provided, write a program to display the employee number, name, position, and hire date of all employees in Department 200. You must complete the working storage section and the appropriate ISQL or ESQL commands.
A hard copy of the ACOB skeleton for the interpretive SQL interface (ISQL) is in Appendix C of this student guide. The ACOB program example in Appendix D should help you decide what work needs to be done.
Similarly, a hard copy of the UCOB skeleton for working with embedded SQL (ESQL) is in Appendix E, and is followed by a complete program in appendix F.
In lab you will edit the on-line skeleton program, compile, and execute the program. The on-line program skeleton names are ACOBSKEL and UCOBSKEL. Information on compiling, collecting or linking, and executing your program can be found in Appendix A.
The flow chart in Figure 3-4 illustrates the basic steps for the examples in the appendixes which read and display all of the records in the employee table EMP. Your program logic will be very similar.
SG 3605 3-31

Using SQL in Application Programs
Start
BEGIN THREAD
•
DECLARE CURSOR
OPEN CURSOR
END THREAD
Figure 3-4. Flow Chart of an SQL Retrieval Program
3-32 SG 3605

Using SQL in Application Programs
Error Handling Choices
• RDMS error handling
- Each SQL call returns an error status to a 4 character field
- Normal completion = 0000
— End-of-cursor = 6001
- Any other value is error
• Automatic error printing
BEGIN THREAD option of UDSMSGTUDSHESSAGE
- Immediately prints an error message to output device
- No other code necessary
- Prints messages from UDS, UREP, and RDMS
• Programmer-controlled error handling
- Check error status after each SQL command
— If error, use GETERROR command to retrieve error text
- Retrieves messages detected by RDMS, UREP, and UDS Control
- Print messages when and where you want
• ESQL provides new error handling features
- Variable SQLCODE for status information
- BEGIN DECLARE command for ESQL variables
- Global WHENEVER command for execution errors
SG 3605 3-33

Using SQL in Application Programs
RDMS Error Handling
Every RDMS call, except an SQL GETERROR call, returns an error status code and auxiliary information about the completion of the call. The error-status item is a 4 digit variable in the data declarations of the host program. The auxiliary-information item in COBOL is declared as a multipurpose, one-word, numeric item.
You can test the value of error-status variable then decide how to handle the error. A status equal to 6001 indicates a no-find or an end-of-data condition. After fetching from a cursor, this is not an error. Continue to the next processing step.
The auxiliary information variable returns additional information about the error status. When the error status is not between 6000 and 6999, it returns the column number in the command where the syntax error was located. When the error status is between 6000 and 6999, auxiliary information contains other command status and rollback information.
ISQL COBOL Example:
MOVE 'Command string ;' TO ROOM ENTER MASM 'ACOB$RDMR' USING ROOM, ERR-STAT, AUX-INFO IF ERR-STAT NOT = 0000 PERFORM ERROR-PRINT
ERROR-PRINT DISPLAY 'RDML COMMAND = ' ROOM DISPLAY 'ERROR STATUS = ERR-STAT DISPLAY 'ERROR COLUMN = ' AUX-INFO
FORTRAN Example:
rcom = command-string CALL F$RDMR (rcom, erstat, auxinf) IF (erstat .NE. '0000') THEN
PRINT '(1X,A)', 'RDMS command: ',rcom PRINT '(A26,I3)', 'Error Found at Column ', auxinf PRINT '(A16,A4)', 'Error Status: ', erstat
ENDIF
3-34 SG 3605

Using SQL in Application Programs
GETERROR Command
GETERROR INTO variable-list
• Retrieves the error message from an SQL command
• Unisys extension
• Details on variable-list
- Provides a list of variables separated by commas
- Each variable must correspond to a host program variable
- Each host program variable must hold at least 132 ASCII characters
Five host program variables usually retrieve entire message
• Retrieved message must be printed or moved before executing the next SQL command
ESQL Example:
GETERROR INTO :err(1), :err(2), :err(3), :err(4), :err(5).
SG 3605 3-35

Using SQL in Application Programs
Example Using GETERROR (ACOB)
WORKING-STORAGE SECTION.
01 err-stat PIC 9999. 01 aux-info PIC S9(18). 01 error-text.
05 err-s PIC X(132) OCCURS 5 TIMES. 01 i PIC 9999. 01 err-end-flag PIC 9999.
PROCEDURE DIVISION.
MOVE 'BEGIN THREAD T1 FOR udssrc READ ;' TO rcom. ENTER MASM 'acob$rdmr' USING rcom, err-stat, aux-info. IF err-stat NOT = 0 GO TO error-para.
error-para. MOVE 0 TO err-end-flag. PERFORM do-geterror UNTIL err-end-flag NOT = 0. ENTER MASM 'acob$rdmr' USING 'END THREAD ;',
error-stat, aux-info. DISPLAY "Abnormal end of program." UPON PRINTER. STOP RUN.
do-geterror. MOVE 'GETERROR INTO $P1, $P2, $P3, $P4, $P5;' TO rcom. ENTER MASM 'ACOB$RDMR' USING rcom, err-stat,
aux-info, err-s(1), err-s(2), err-s(3), err-s(4), err-s(5). PERFORM print-error VARYING i FROM 1 BY 1 UNTIL i > 5 .
print-error. If err-s(i) NOT = SPACE
DISPLAY err-s(i) UPON PRINTER ELSE
MOVE i MOVE 1 TO err-end-flag.
3-36 SG 3605

Using SQL in Application Programs
ESQL Error Handling
If your ESQL error handling must conform to the current standard, you must define the variable SQLCODE, use the global WHENEVER command, and define a new data section with the BEGIN DECLARE command.
The variable SQLCODE must be declared by that name in the Data Division of your program. It holds the completion status of each executed SQL command. A value of 0 indicates normal completion, +100 means no data or no more data, and a negative value indicates an error has occurred.
You will use the WHENEVER command to transfer control to a particular paragraph should a no-find or error condition occur when executing an SQL command.
A new section must define variables you use in ESQL statements. This section, also a part of the SQL standard, is written in the Working-Storage Section as an embedded command. It is defined with the Begin Declare command.
A UCOB compiler option, LEVEL/SQL, can be used on the compiler call to flag nonstandard commands. You can enter this keyword option as you would any other, for example:
@UCOB,ES SQL.LAB3-1/UCOBSKEL,TPKUCOB„,NARROW,LEVEUSQL
If portability is not a concern, the variables ERROR-STATUS and AUX-INFO in the structure RDMCA group item can be used to obtain the command status and auxiliary information returned by RDMS. You must code the variable names and structure name in a precise way in the Declare Section in the Working-Storage Section. You will use the two variables along with the GETERROR command just as you would have in ISQL, but you do not pass them to RDMS with each SQL command.
SG 3605 3-37

Using SQL in Application Programs
Data and Commands for ESQL Error Handling
• SQLCODE contains completion status for each executed SQL command
• WHENEVER command
- Branch on detected SQL execution error
- Branch on no-find condition
• BEGIN DECLARE command for variables used in SQL commands
• LEVEL/SQL flags nonstandard SQL
• RDMCA group item
— Contains variables ERROR-STATUS and AUX-INFO
— Placed in Declare Section
3-38 SG 3605

Using SQL in Application Programs
WHENEVER Command
WHENEVER { SQLERROR I NOT FOUND }. { CONTINUE I { GOTO I GO TO } paragraph-name }
• Detected conditions
— SQLERROR means SQLCODE is negative, an abnormal error status is returned by RDMS
— NOT FOUND means SQLCODE = +100, a "not found" status returned by RDMS
• Action to take
- CONTINUE means to execute the next program statement
- GO TO/GOTO paragraph-name specifies a paragraph to branch to for the detected condition
• A WHENEVER command affects all ESQL commands that follow it, until another WHENEVER command for the detected condition
• To avoid an infinite loop in the error handling paragraph, execute a WHENEVER SQLERROR, CONTINUE
Examples:
EXEC SQL WHENEVER SQLERROR CONTINUE END-EXEC.
EXEC SQL WHENEVER SQLERROR GO TO rdms-error-para
END-EXEC.
SG 3605 3-39

Using SQL in Application Programs
ESQL Data Area Declarations
Variable SQLCODE
• Returns the status of each executed embedded SQL command
0 = Successful completion
+100 No data, no more data
- Negative = error
• Does not return a status for GETERROR
BEGIN DECLARE Command
EXEC SQL BEGIN DECLARE SECTION END-EXEC
• Marks a data area for variables used in SQL commands in the COBOL Working-Storage Section
• Required by SQL standard, not by RDMS
RDMCA with Variables ERROR-STATUS and AUX-INFO
• RDMS uses variables automatically to return status information for each SQL command, except GETERROR
• Must be defined in a prescribed way
3-40 SG 3605

•
EXEC SQL BEGIN DECLARE SECTION END-EXEC. PIC S9(9) USAGE BINARY.,
PIC 9(4). CO, PIC S9(9) USAGE BINARY.,
EXEC-SQL END DECLARE SECTION END-EXEC.
01 SQLCODE 01 RDMCA.
05 ERROR-STATUS 05 AUX-INFO
Using SQL in Application Programs
Example Using GETERROR (UCOB)
WORKING-STORAGE SECTION.
01 error-text. 05 err-s PIC X(132) OCCURS 5 TIMES.
01 err-index PIC 9.
PROCEDURE DIVISION.
EXEC SQL WHENEVER SQLERROR GO TO rdms-error-para
END-EXEC.
rdms-error-para. EXEC SQL WHENEVER SQLERROR CONTINUE END-EXEC. DISPLAY '***SQLCODE = ' SQLCODE UPON PRINTER. DISPLAY '***AUXILIARY INFO = ' AUX-INFO UPON PRINTER. DISPLAY '***ERROR STATUS = ' ERROR-STATUS UPON PRINTER. GETERROR INTO :err-s(1), :err-s(2), :err-s(3),
:err-s(4), :err-s(5). PERFORM VARYING err-index FROM 1 BY 1 UNTIL err-index = 6 DISPLAY err-s(err-index) UPON PRINTER END-PERFORM. PERFORM end-thread-to-uds. PERFORM termination-para.
SG 3605 3-41

Using SQL in Application Programs
Lab 3-2
Edit, recompile, and rerun the program from Lab 3-1:
a. With and without UDSMSG on.
b. With and without GETERROR as part of the ERROR-PRINT paragraph.
Insert errors, such as too few program variables or inconsistent data types for program variables to receive query results. Then execute the program to see the types of error messages returned.
Of course, if you are working in ESQL most of your errors are detected and flagged at compilation time. You should force several compile time errors in order to become familiar with the error messages.
3-42 SG 3605

4 More WHERE Clause Operators

More WHERE Clause Operators
Module 4 More WHERE Clause Operators
Module Objectives 4-3
Benefit Statement 4-3
Materials 4-3
Testing Conditions 4-4 Multiple Conditions 44
NULL Values 4-5
Testing NULL Values 4-6
Logical Operators 4-7
Truth Tables for Three-Valued Logic 4-8 AND 4-8 OR 4-8 NOT 4-8
BETWEEN Operator 4-9
Order of Precedence of Operators 4-10
LIKE Operator 4-11
LIKE Examples 4-12
Exercise 4-1 4-13
Lab 4-1 4-15
SG 3605 4-1

More WHERE Clause Operators
Module Objectives
Upon completion of this module, you should be able to
• Formulate queries that fully exploit the WHERE clause.
- Using multiple conditions.
- Using the logical operators AND, OR, and NOT.
Using NULL values.
- Using the BETWEEN...AND, LIKE, and IS NULL operators.
Benefit Statement
In Module 2 you learned the elements of simple queries. This module builds upon that module with extensions to the WHERE clause. You will now be able to construct WHERE clauses that contain multiple conditions, test for NULL values, and use pattern matching.
Materials
• OS 1100 UDS Relational Data Management System (UDS RDMS 1100) and IPF SQL Interface End Use Guide
• OS 1100 UDS Relational Data Management System (UDS RDMS 1100) SQL Programming Reference Manual
SG 3605 4-3

More WHERE Clause Operators
Testing Conditions
A condition is an expression that evaluates to TRUE, FALSE, or NULL (unknown). SQL queries return those rows of a table for which the data make the conditions in the WHERE clause evaluate to TRUE.
Multiple Conditions
You have already written simple queries using a single condition in Module 2. But in real life, you must be able to express more complex sets of conditions. In SQL you can construct a query that is as complex as you require by combining conditions with logical operators.
• You can create conditions using the following operators:
— AND
- OR
NOT
— BETWEEN ... AND
- IS [NOT] NULL
- [NOT] LIKE
• You can control the appearance of the output using ORDER BY.
4-4 SG 3605

More WHERE Clause Operators
NULL Values
• Use when actual value for a column is unknown
• Use NULL instead of inserting dummy values
• NULL values are not equivalent to zero or spaces
• Expressions with NULL will evaluate to NULL
10 * NULL is NULL
• There are special ways to handle displaying NULL values using indicator variables
SG 3605 4-5

More WHERE Clause Operators
Testing NULL Values
IS [ NOT ] NULL
• Tests whether column data value is known
• Allows different handling of result when no value is present
— Print "Not applicable" instead of NULL in report
• Any arithmetic comparison with NULL is unknown
Example 1. List all employees who do not have a manager.
SELECT * FROM EMP WHERE MGR IS NULL
Example 2. List all employees who are eligible for commissions.
SELECT * FROM EMP WHERE COMM IS NOT NULL
Example 3. Why is the above query different from the following?
SELECT * FROM EMP WHERE NOT COMM = 0
4-6 SG 3605

More WHERE Clause Operators
Logical Operators
• AND - Both conditions are true
WHERE SAL > 1200 AND DNO = 200
• OR - Either or both conditions are true.
WHERE SAL > 1200 OR DNO = 200
• NOT - Reverses the truth value of an expression
- NOT must precede the entire condition
- It is not used to negate the operator
- Valid
WHERE NOT JOB = 'CLERK'
- Invalid
WHERE JOB NOT = 'CLERK'
• The word WHERE appears only once, no matter how many conditions are used
SG 3605 4-7

More WHERE Clause Operators
Truth Tables for Three-Valued Logic
AND
Table 4-1. AND Truth Table
AND TRUE FALSE NULL
TRUE TRUE FALSE NULL
FALSE FALSE FALSE FALSE
NULL NULL FALSE NULL
OR
Table 4-2. OR Truth Table
OR TRUE FALSE NULL
TRUE TRUE TRUE TRUE
FALSE TRUE FALSE NULL
NULL TRUE NULL NULL
NOT
Table 4-3. NOT Effect
NOT
TRUE FALSE
FALSE TRUE
NULL NULL
4-8 SG 3605

More WHERE Clause Operators
BETWEEN Operator
WHERE x BETWEEN a AND b
• Is a comparison operator, not a logical operator
• Logical equivalent of
x >. a AND x <= b
Example:
SELECT * FROM EMP WHERE HIREDATE BETWEEN 850101 AND 900101
SG 3605 4-9

More WHERE Clause Operators
Order of Precedence of Operators
Table 4-4. Operators and Order of Precedence
Operator Symbol Order
Arithmetic Unary + - 1 *1 2
+- 3
Comparison <> (not equal) 4
< 4
> 4
<= 4
>= 4
= 4
IS [ NOT ] NULL 4
[ NOT ] LIKE 4
Boolean NOT 5
AND 6
OR 7
Table 4-4 shows the operators RDMS accepts and the order of precedence each has been assigned. You can use parentheses to change the order of precedence as needed.
4-10 SG 3605

More WHERE Clause Operators
LIKE Operator
column-spec [ NOT ] LIKE { string-1 I variable-spec-1 } [ { ESCAPE string-2 I variable-spec-2 } ]
column-spec A character or ncharacter column containing the data
string-1
A pattern enclosed in apostrophes string-2
variable-spec-1
A data variable, either an embedded variable or placeholder variable-spec-2 variable, that contains a pattern
• Performs character string pattern matching in a WHERE clause
— Case-sensitivity is significant
If column is NULL it evaluates as false
• Exact match search should use "=" operator
• Partial string search should use LIKE
Table 4-5. Wild Cards
Wildcard Character Matches
_ (underscore) Any single character
% (percent) Any combination of 0 or more characters
• Two characters, "%" and "_ , behave as "wild cards" for the LIKE operator
• Search string may not contain consecutive "%"
• Search for strings that include "%" or "_" by preceding them with escape character specified
SG 3605 4-11

More WHERE Clause Operators
LIKE Examples
Example 1. List the employee information from the EMP table for employees whose names have five characters..
SELECT * FROM EMP WHERE ENAME LIKE '
Example 2. List the employee information from the EMP table for all employees whose last names begin with "W'.
SELECT * FROM EMP WHERE ENAME LIKE 'W%'
Example 3. List employees from EMP whose names have an "A" as the third from last character.
SELECT * FROM EMP WHERE ENAME LIKE '%A'
Example 4. List employee information from the EMP table for employees whose names have an "A" followed by an "S".
SELECT * FROM EMP WHERE ENAME LIKE "Y0A%S%
Example 5. From a real estate system, search for a house with a "9% assumable" in the description column.
SELECT * FROM HOUSES WHERE DESC LIKE '9#% assumable' ESCAPE '#'
4-12 SG 3605

More WHERE Clause Operators
Exercise 4-1
Indicate whether the following queries have valid or invalid syntax. If invalid, correct the query so that it has valid syntax.
1. SELECT * FROM EMP WHERE MGR = NULL
2. SELECT * FROM DEPT WHERE DNO = 200 OR WHERE DNO = 400
3. SELECT * FROM EMP WHERE NOT ENAME LIKE 'F%' AND HIREDATE BETWEEN 850101 AND 870631
4. SELECT * FROM EMP WHERE EMPNO > 5200 AND JOB NOT = 'CLERK'
5. SELECT SELECT * FROM DEPT WHERE LOC = 'ATLANTA' OR 'DETROIT'
SG 3605 4-13

f;- .3,- • •
More WHERE Clause Operators
Write queries to display all the employee information for employees who satisfy the following conditions:
6. All clerks in either department 200 or 400. r
373
7. All employees hired after Jan 1, 1986 whose total compensation per month is more than $2500.
8. All sales reps and accountants who earn less than $2300 and more than $2000.
( (- 1'/-••
9. All employees whose name have four or fewer letters.
ttk
10. All employees not in department 100 holding any job but president or clerk. /„..c
4-14 SG 3605

More WHERE Clause Operators
Lab 4-1
For this lab you will begin with the program as you completed it from Lab 3-1.
You will modify it so that it now uses a more complex query. The two queries that you wrote as answers to questions 7 or 8 in Exercise 4-1 are good candidates for the requested "complex query" for this exercise.
SG 3605 4-15

5 The IPF SQL Interface

The IPF SQL Interface
Module 5 The IPF SQL Interface
Module Objectives 5-3
Benefit Statement 5-3
Materials 5-3
The IPF SQL Interface to RDMS 1100 5-4
Using IPF SQL 5-5
Invoking IPF 5-5
Sample IPF SQL Session 5-7
Creating an SQL File 5-8
Sample IPF SQL File 5-9
Executing an SQL File 5-9
Saving Query Results in a File 5-10
Lab 5-1 5-11
SG 3605 5-1

The IPF SQL Interface
Module Objectives
Upon completion of this module, you should be able to
• Invoke and use the IPF SQL interface to RDMS for simple queries.
- Toggle between line and fullscreen mode.
- Interactively submit SQL commands.
- Create, save and run IPF SQL files.
Benefit Statement
The IPF SQL interface is easy to learn and use; it will greatly enhance your mastery of the SQL syntax. You will use this interface for ad hoc queries as well as for prototyping applications being developed.
Materials
OS 1100 UDS Relational Data Management System (UDS RDMS 1100) and IPF SQL Interface End Use Guide
SG 3605 5-3

The IPF SQL Interface
The IPF SQL Interface to RDMS 1100
• IPF SQL provides online access to RDMS data
• Interactive query and update of tables
• Interfaces with RDMS to parse and execute SQL
• Has online help facility to provide information on commands
— Type "SQL?" to obtain general information on SQL
Type "SQL command ?" to obtain command information, where the command is represented by the first one or two keywords
— Type "?" to obtain more information until you receive the end of message notice
5-4 SG 3605

The IPF SQL Interface
Using IPF SQL
SQL commands can be used with IPF commands in an .IPF session. You can:
• Intersperse SQL and IPF commands when working interactively at a terminal.
• Store SQL commands in a file and execute them all at once
- The file can be saved, edited, and re-executed at any time
- Only SQL commands may be included in the file
- All commands must be preceded by SQL to tell IPF they are SQL commands
• Continue a command to the next line by using the IPF continuation character.
- It is the ampersand (&) unless you change it.
- System variable $CONTCHAR sets the continuation character.
• Omit the SQL command termination character (;) in IPF
Invoking IPF
• Invoked by typing "@IPF" after the SOE.
• In IPF you have a choice of two screen modes:
- Line mode
- Full-screen mode
• Any IPF or SQL command may be entered following the >-C-> prompt.
• Figure 5-1 illustrates the sequence of commands executed in a typical IPF SQL session.
SG 3605 5-5

Invoke IPF
Set Datamanager
BEGIN THREAD
Other SQL Commands
END THREAD
Exit IPF
The IPF SQL Interface
Figure 5.1. Flow of an IPF SQL Session
5-6 SG 3605

The IPF SQL Interface
Sample IPF SQL Session
>@IPF TPF$.
>IPF 1100 5R1 02/19/93 09:26:11
>-C->$DATAMANAGER := RDMS
>-C->SQL BEGIN THREAD Ti FOR UDSSRC READ
>-C-->SQL USE DEFAULT QUALIFIER ROSVSCHEMA1
>The USE command completed successfully.
>-C->SQL SELECT * FROM DEPT WHERE DNO >= 200
>-DNO- ---dname---- ---loc----
> 200 SALES NEW YORK
> 300 MARKETING DETROIT
> 400 DISTRIBUTION PRINCETON
>3 records were selected.
>-C->SQL SELECT ENAME, HIREDATE, SAL * 12 FROM EMP &
>-C--&>WHERE HIREDATE BETWEEN 890101 AND 900101
>--ename--- hiredate
>TURNER 890515 10800
>JOHNSON 891221 11700
>FORD 890316 28500
>3 records were selected.
>-C->SQL END THREAD
>-C->logoff
>END IPF
• Start of entry (SOE) character is represented by the greater than symbol (>) above
• $DATAMANAGER can be abbreviated to $DATA
SG 3605 5-7

The IPF SQL Interface
Creating an SQL File
• What is an SQL file?
- A place to edit, save, and execute SQL commands
Typically a symbolic element containing SQL command only
- It may not contain a mixture of IPF and SQL commands
• How is it created?
With the IPF editor in either line or fullscreen mode
For fullscreen edit mode, type "MODE SCREEN"
Return to line mode by typing "MODE LINE"
Screen mode is recommended for entering and editing text, and line mode for executing the file or interactive SQL commands
• How do I get started?
- Begin a new file by typing "NEW filename" on the command line at the top
The file is opened and is in input mode
Enter text into the editor
Save the file by entering "SAVE" on the command line
- If the file has already been saved, then you must use the "REPLACE" (REPL) command to save it
5-8 SG 3605

The IPF SQL Interface
Sample IPF SQL File
SQL BEGIN THREAD FOR UDSSRC READ
SQL USE DEFAULT QUALIFIER ROSVSCHEMA1
SQL SELECT ENAME, DNO, MGR, SAL * 12 FROM EMP &
WHERE DNO = 200
OR DNO = 400
SQL SELECT * FROM EMP
WHERE HIREDATE > 870101
AND SAL > 2000
SQL END THREAD
Executing an SQL File
To execute a file, type "SQL FTLE filename" on the command line. When you submit a FILE command, IPF SQL accesses the file or element specified, then reads and executes the SQL commands. It executes all the commands even if it detects errors as it proceeds. IPF returns error messages interspersed with the results of the commands it executes.
Files are better executed in line mode since the screen otherwise returns to the previous edit screen, overlaying the query results. To enter line mode, type "MODE LINE" on the command line.
SG 3605 5-9

The IPF SQL Interface
Saving Query Results in a File
>-C->CREATE FILE=OUTFILE. ACCESS=PUBLIC
>-C->OUT FILE=OUTFILE.
>-C->SQL SELECT * FROM EMP
>-C-->OUT FILE=TERMINAL.
>-C->OLD FILE=OUTFILE.
• Steps illustrated above
First command creates a data file to receive the output
- Second command directs output to the file
- Third command returns results to the output file
- Fourth command redirects the output the terminal
Fifth command copies the contents of the output file to the IPF workspace for viewing
• Output file can be directed to a printer for a hard copy
5-10 SG 3605

The IPF SQL Interface
Lab 5-1
1. Invoke the on-line help facility to obtain information on SQL in general (SQL ?) and SQL commands (SQL command-name ?) in particular.
2. Enter a SELECT command before a BEGIN THREAD to see the kind of error messages that are returned.
3. Use interactive IPF SQL to perform the following queries:
a. Display all information about all employees in the EMP table.
b. List all information about the departments in the DEPT table.
c. Display the employee number, name, position, and hire date of all employees in department 200.
d. Display the name, salary, and employee number of all clerks.
4. Create, save, and execute an IPF SQL file that includes any two queries from Exercise 4-1.
SG 3605 5-11

6 The MAPPER Relational Interface

The MAPPER Relational Interface
Module 6 The MAPPER Relational Interface
Module Objectives 6-3
Benefit Statement 6-3
Materials 6-3
MAPPER Relational Interface (MRI) 6-4
Invoking RDI 6-6
RDI Menu Selections 6-7
Environment Menu Selections 6-8
Selection Example 1 - Menu Access 6-9
Selection Example 2 - Freeform Entry 6-11
Exiting MAPPER 6-13
Embedding Commands in MAPPER Runs 6-14
MAPPER Run Example Using FCH 6-15
Lab 6-1 6-16
Lab 6-2 6-17
SG 3605 6-1

The MAPPER Relational Interface
Module Objectives
Upon completion of this module, you should be able to
• Invoke the MRI run to retrieve and manipulate data from an RDMS database.
Benefit Statement
An alternative to the IPF interface is the MAPPER Relational Interface (MRI). You will find this interface even easier to use to obtain ad hoc reports, with its menu-driven approach. Of course, MRI supports more sophisticated database accesses as well, and you will be introduced to SQL in MAPPER runs as well.
Materials
• MAPPER Relational Interface (MRI) Relational Database Interface (RDI) Operations Guide
• MAPPER System Run Design Operations Reference Manual
SG 3605 6-3

The MAPPER Relational Interface
MAPPER Relational Interface (MRI)
Provides connectivity to relational databases on various architectures
Released as a separate product
- Uses same menus, regardless of architectural platform
• Consists of seven run statements
- Allows access to relational data
Generates code in SQL
— Performs full range of relational operations
• Provides menu-based interface (RDI run) for ease of use
Submits SQL statements in an easy-to-use format
Displays table data as a MAPPER result
Provides on-line help at all menu levels
• Supplies RDMS information for further manipulation by MAPPER
- Data reduction
- Graphics
- Display/store of data
6-4 SG 3605

MAPPER
Request Manager
MRI Execution
SYBASE
DMSII
DB2
Remote
INFORMIX
Oracle
The MAPPER Relational Interface
Figure 6-1. MRI Access to Data Managers
SG 3605 6-5

The MAPPER Relational Interface
Invoking RDI
Sign-on to MAPPER
• Type RDI on the control line
— Displays the RDI menu
— Allows you to select the SQL command to perform
Figure 6-2 shows RDI entered on the top line, the control line.
rdi
Unisys MAPPER System • EDMAP 35R1 EA18 *
Station: 8417 System: 1 User-id: DAA Cabinet: 8
1Report 214eyHlp 3Runs 4 5 6Tasks ?Remote 8Help 9 lagnOff
Figure 6-2. Invoking RDI
6-6 SG 3605

The MAPPER Relational Interface
RDI Menu Selections
• Pictured in Figure 6-3 is the RDI Menu
• Selection choices
- Top five correspond to SQL commands
- SQL allows you to submit SQL syntax directly to RDMS
Utilities menu allows you to change the design, restrict table access, delete tables, or work with views
- Detailed help is last selection
• Function keys appear along bottom
— F6 (DBMS) changes the database manager (Default is RDMS)
F7 (Envmnt) changes the RDI environment
— F8 (Help) is the help key
— F10 exits the RDI run
RDI
Tab to your choice and press MIT
Select ► Join 0-
Insert ► Delete 0-Update II. Create 0-
SQL ► Utilities menu 10-Detailed help ►
Rev. Level 3R3
1 2 3 4 5 6DBMS Unumnt BHelp 16Qui t
Figure 6-3. RDI Menu
SG 3605
6-7

The MAPPER Relational Interface
Environment Menu Selections
Pictured in Figure 6-4 is the Environment Menu
• Selection choices
- Results are stored by default to cabinet drawer OA
- Tracking of SQL syntax to a report can be disabled
- ROSVSCHEMA1 is the default qualifier entered for future table references
- Default version, PRODUCTION, has been cleared
• F4 (Return) takes you back to the RDI menu
RDI Environment menu_
Enter cabinet number for results -> 8 Drawer -> a
Generate SQL syntax on updates? -> y
New default qualifier -> ROSUSCHENA1
New default version -)
Place cursor here and press XNIT ->
1 2 3 4Return 5 6 7 BHelp 9 18Quit
Figure 6-4. Environment Menu
6-8
SG 3605

Select menu Retrieve rows from a single relational table.
Table name ->
Column names -> *
Where clause -)
Retrieve all rows? -> y
Number of rows to skip -> 8
Extra options? -> n
Place cursor here and press XMIT -> Press XMIT from here for detailed help ->
If no, how many? -> 1
Null Symbol -) *
1 2 3 4RDIMnu 5 6Specl ? SHelp 9 10Quit
RDI
The MAPPER Relational Interface
Selection Example 1 - Menu Access
On Figure 6-5 the cursor was positioned to Select and transmitted.
RDI RDI menu
Tab to your choice and press XMIT
Select ► Join ►
Insert 00 Delete 00 Update P Create ►
SQL ► Utilities menu P Detailed help ►
Rev. Level 3R3
1 2 3 4 5 6DBMS ?Envmnt SHelp 9 10Quit
Figure 6-5. Selecting SELECT
On the Select Menu pictured in Figure 6-6, the table name EMP was entered and all columns selected with the *. The cursor was transmitted from the XMIT position.
Figure 6-6. Entering the Selection Criteria
SG 3605
6-9

Line! 5 Ro1110. - RESULT .DATE 18:26:13 RID 19 FEB 93 DAA * . .HIREDAT. *EMPNO.. ENAME :JOB :MGR DNO .E .SAL :COMM . 34.7. • • • 5010 FOSTER SALESREP 5234 200 860714 2700 400 5146 BROWN CLERK 5234 200 871011 1000 5234 WOODWORTH MANAGER 5784 200 790219 3250 5237 ROCKWELL ACCOUNTANT 5743 100 840618 2175 5437 MARTIN SALESREP 5234 200 870326 2500 300 5469 ADAMS SALESREP 5234 200 811102 2250 500 5630 GLASS ACCOUNTANT 5743 100 871220 1850 5702 TURNER CLERK 5743 100 890515 900 5743 LAWSON 5765 JOHNSON
MANAGER 5784 100 CLERK 5984 480
830510 891221
3400975
5784 WILLIAMS PRESIDENT 300 781015 5200 5896 SMITH CLERK 5984 400 880913 1058 5942 FORD SALESREP 5234 208 890316 2375 0 5984 HYDE MANAGER 5784 400 850901 2980
1SelMnu 2
3ShwSQL 4Return 5
6Tasks ?View 8 9 10Quit
END REPORT
The MAPPER Relational Interface
The results are shown in Figure 6-7 from the generated SQL command.
Figure 6-7. Viewing the Results from the Select
Pressing F3 (ShwSQL) on the previous menu produces the SQL shown in Figure 6-8. Pressing F3 (SveSQL) from this menu allows you to save the generated SQL in a report for future use. This was not done in this example.
4 - RESULT .DATE 19 FEB 93 18:26:12 REPORT GENERATION DAA
- RDI Select, SQL request
SELECT
FROM EMP
END REPORT
1Se 1Mnu 2
3SueSQL 4Return 5
6 7 8
9 lOQui t
Figure 6-8. Using F3 to Show SQL
6-10
SG 3605

RDI menu
Tab to your choice and press XMIT
Select ► Join
Insert ► Delete Update ► Create ►
SQL ► Utilities menu Detailed help
Rev. Level 3R3
6DBMS 7Envmnt 8Help 9 18Quit 1
RDI
The MAPPER Relational Interface
Selection Example 2 - Freeform Entry
In order to enter your SQL syntax directly, first position to SQL on the RDI menu as pictured in Figure 6-9 and transmit.
Figure 6-9. Selecting SQL from RDI Menu
On the SQL Menu, merely position the cursor to the XMIT and transmit.
RDI - SQL menu .
You nag enter a report number, an SQL request name, or leave both fields blank for freeform entry.
Report ->
SQL request -)
Process request immediately? -> n
Place cursor here and press XMIT -> Press XMIT from here for detailed help ->
1 2 3 4RDIMnu 5 6 7 8Help 10Qui t
Figure 6-10. SQL Menu
SG 3605
6-11

Line0. 6 Ro110- - .DATE 19 FEB 93 18:38:51 REPORT GENERATION . Enter a new SQL statement or make any changes to . Press XMIT at the end of the statement to accept . Resume key to continue. 0.- *- SELECT * FROM EMP WHERE DNO = 200 ;
RESULT DAA an existing statement. it. Press the
END REPORT
1Resume 2Paint 3 4Return 5 6LineCh 7 8 9 10Quit
5 .DATE * *EMPNO.
• ENAME
- 18:41:04
:JOB
RESULT RID 19 FEB 93 DAA
. .HIREDAT. .MGR .DNO .E .SAL .COMM
*- . 5010 FOSTER SALESREP 5234 200 860714' 2700. 400 5146 BROWN CLERK 5234 208 871011 1000 5234 WOODWORTH MANAGER 5784 200 790219 3258 5437 MARTIN SALESREP 5234 200 870326 2500 300 5469 ADAMS SALESREP 5234 200 811102 2258 500 5942 FORD SALESREP 5234 280 890316 2375
1SQLMnu 2
3ShwSQL 4Return 5
6Tasks ?View 8 9 10Quit
END REPORT
The MAPPER Relational Interface
On the free form report, enter your SQL statement as you would normally, ending it with — a semicolon. Press XMIT to have the command processed and then Fl to continue. Figure 6-11 illustrates a SELECT command to be submitted.
Figure 6-11. Selection Statement Entered
Figure 6-12 shows the results of the submitted SELECT.
Figure 6-12. Result from Previous SELECT
6-12
SG 3605

The MAPPER Relational Interface
Exiting MAPPER
Place an X on the control line to exit MAPPER. Figure 6-13 shows the exit from the RDI menu screen.
X RDI RDI menu
Tab to your choice and press XMIT
Select 0- Join 0-
Insert ► Delete 0- Update 0. Create 0-
SQL ► Utilities menu Detailed help help 0-
Rev. Level 3R3
1 2 3 4 5 6DBMS 7Envmnt 8Help 9 Inuit
Figure 6-13. Exiting MAPPER
SG 3605 6-13

The MAPPER Relational Interface
Embedding Commands in MAPPER Runs
• LGN Log On to Relational Database
Use to initiate a session on the relational database
• SQL Submit SQL
Use to pass SQL syntax to the relational database and retrieve data in MAPPER variables
• FCH Relational Aggregate Fetch
Use to retrieve columns and rows from a relational table
• TRC Trace Relational Syntax
Use to save the SQL syntax generated by run statements
• RAM Relational Aggregate Modify
Use to create tables, insert rows, or update a table
• DDI Data Definition Information
Use to retrieve a table description from a relational database
• LGF Log Off Relational Database
Use to end a session on a relational database
For more information, refer to the MAPPER System Run Design Operation Reference Manual.
6-14 SG 3605

LINE! 1 FMTOP RD- - SHFTO, HLD CHRSR HLD LNO- UNDO- 11124 11. .DATE 23 FEB 93 88:54:44 RID II 19 AUG 92 DAA .RBN81 1881760
@LGN,I,Y,8,AJDMS READ @FCH,8,A,ILREADyI RDMS \ 'C * RoSyScHEMAl.DEPT' 8DSP,-0 @LGF,1RDMS @GTO END . @I:DSP,-0 END REPORT
The MAPPER Relational Interlace
MAPPER Run Example Using FCH
Figure 6-14 shows an example of a MAPPER run that will perform a simple fetch.
Figure 6-14. Fetch All Rows in DEPT
Entering the name of the run on the command line produces the result shown in Figure 6-15.
linen 1 fmtIP rlOP - shft0 hld chr0 hld 10 OP RESULT IP .DATE 88:57:16 RID 23 FEB 93 DAA *DNO .DNANE .LOC ie . *D4.8 C12 C18 *P * NULL 188 ACCOUNTING ATLANTA 288 SALES NEW YORE 389 MARKETING DETROIT 488 DISTRIBUTION PRINCETON END REPORT
Figure 6-15. Result from Run
SG 3605
6-15

The MAPPER Relational Interface
Lab 6-1
Use the following steps to test the basic RDI functionality.
1. Log on to MAPPER following directions provided by your instructor.
2. Invoke the MRI RDI run by typing RDI at the SOE.
3. Move cursor to SELECT and transmit.
4. Complete the SELECT menu as follows:
Table name -> Yourqualifier.EMP Column Names -> ? Move cursor to transmit field and press XMIT.
The help screen showing the list of columns is displayed.
5. Select columns to display by typing a number in the first field, indicating the order in which they should be displayed.
Press XMIT to send the selected columns then press Fl.
6 Press F4 to return to the SELECT menu.
7. Delete the ? from the column name field. Tab to the WHERE field. Enter a ? and transmit.
The WHERE assistance screen is displayed.
8. Read the information provided.
Press F3 to re-display the list of column names in a corner of the screen for reference. Press Fl to continue.
9. Type the following in the WHERE field at the bottom of the screen.
WHERE hiredate between 800101 and 891031.
10. Press XMIT then Fl to execute the query. The result is displayed.
6-16 SG 3605

The MAPPER Relational Interface
Lab 6-2.
Use the MRI interface to display the EMPNO, ENAME, and MGR columns of EMP where the manager's empno is greater than the employee's empno.
SG 3605 6-17

7 Grouping Functions

Grouping Functions
Module 7 Grouping Functions
Module Objectives 7-3
Benefit Statement 7-3
Materials 7-3
Grouping Functions 7-4
AS Clause 7-5
Function Examples 7-6
Grouping Functions Usage 7-7
COUNT Function 7-8
GROUP BY Clause Usage 7-9
Grouping on More Than One Column 7-10
WHERE and GROUP BY Clauses Together 7-11
HAVING Clause 7-12
Full Query Specification 7-13
Exercise 7-1 7-14
SG 3605 7-1

Grouping Functions
Module Objectives
Upon completion of this module, you should be able to
• Formulate queries that group or summarize data retrieved from a table.
- Identify the summarizing functions that can be embedded in SQL commands.
- Rename column output with the AS clause.
— Use the GROUP BY clause.
— Use the HAVING clause.
Benefit Statement
The grouping functions in this module help answer the question, "What is the bottom line here?" The GROUP BY clause lets you obtain summarized information, and its companion HAVING clause refines the information you obtain. The AS clause provides your report with a meaningful name. So what is the bottom line here? More power for querying your database!
Materials
• OS 1100 UDS Relational Data Management System (UDS RDMS 1100) SQL Programming Reference Manual
• OS 1100 UDS Relational Data Management System (UDS RDMS 1100) and IPF SQL Interface End Use Guide
SG 3605 7-3

Grouping Functions
Grouping Functions
Grouping functions operate on a group or set of rows and return one row of summary information for each group. The default group is the entire table, but other groups may be specified.
The grouping functions are:
- SUM Computes the total value of the group
- AVG Computes the average value of the group
MIN Computes the minimum value of the group
- MAX Computes the maximun value of the group
- COUNT Counts the number of values in the group
- COUNT(*) Counts the number of rows in the table, including duplicates and NULLS
Note: COUNT and COUNT(*) are discussed separately in this module.
• Syntax for AVG, MAX, MIN, SUM
SELECT group function( [ ALL] { column-spec I arithmetic-expression } ) FROM table-name
SELECT group function( DISTINCT column-spec) FROM table-name
Note: An arithmetic-expression must include a column specification.
7-4 SG 3605

Grouping Functions
AS Clause
select-expression AS title-name
• Use the AS clause to name or rename an item in the select list
Provides a meaningful title for a report
Simplifies sort descriptions in the ORDER BY clause
• Provide a title-name for:
— A column name
- A result of an arithmetic expression
— A constant
A result of a function
Example: Display the names and yearly salaries of all employees in Department 400.
SELECT ENAME, SAL * 12 AS NEWSAL FROM EMP WHERE DNO = 400
ENAME NEWSAL
JOHNSON 11700 SMITH 12600 HYDE 34800
SG 3605 7-5

Grouping Functions
Function Examples
Example 1. Compute the total salary for all employees.
SELECT sum(sal) AS "total emp sal" FROM EMP
total emp sal 32,525
Example 2. Compute the average salary for all employees in the company.
SELECT avg(sal) AS sal_avg FROM EMP
sal_avg 323.21428571428571429
Example 3. Compute the minimum and maximum salaries paid in the company.
SELECT MIN(SAL) AS minsal, MAX(SAL) AS maxsal FROM EMP
minsal maxsal 900 5200
Example 4. What is the earliest date on which someone was hired and what was the most recent date on which someone was hired?
SELECT MIN(HIREDATE), MAX(HIREDATE) FROM EMP
781015 891221
7-6 SG 3605

Grouping Functions
Grouping Functions Usage
• There are various names for these functions:
Grouping (or group by) functions
Summarizing functions
Aggregate functions
- Set functions
• Use functions only in a SELECT list or in a HAVING clause
• Functions which apply to a group of records return a single value for the group.
• The DISTINCT keyword used within a grouping function makes the function consider only distinct values of the expression.
Use the ALL keyword to consider all values including duplicates.
Do not specify DISTINCT or ALL for AVG and SUM functions, since ALL is assumed.
• Any of the functions may be used with numeric columns
Only MIN, MAX, and COUNT may be used with character columns
You cannot pass a column specification in a variable.
• MIN/MAX functions use the ASCII collating sequence to order and select
• NULL values are ignored in the evaluation of SUM, AVG, MAX and MIN.
SG 3605 7-7

Grouping Functions
COUNT Function
SELECT COUNT { ( * I DISTINCT column-specification ) FROM table-name
• Counts the number of rows returned by a query
• NULL values are ignored
• Asterisk may be used to refer to all columns since all have the same number of rows
Example 1. Display the total number of employees in the EMP table.
SELECT COUNT(*) FROM EMP
14
Example 2. Count the number of different job titles in the EMP table.
SELECT COUNT(DISTINCT JOB) FROM EMP
5
Example 3. Count the number of people who work in department 400.
SELECT COUNT(*) FROM EMP WHERE DNO = 400
3
7-8 SG 3605

Grouping Functions
GROUP BY Clause Usage
• The GROUP BY clause is used to cluster rows into groups.
A group is a set of records that have the same value in one or more columns.
The column(s) used to define the group must be identified in the GROUP BY clause
- The grouping function in the SELECT clause then returns one row for each group instead of one row for the whole table.
For example, grouping by department number causes a row of summary information to be returned for each department (100, 200, 300, and 400), since those are the distinct values in the DNO column
• Parameters in the select-list must either be:
- The column(s) used to define the group in the GROUP BY clause, or
- Grouping functions.
— Literals
Valid Example
SELECT COUNT(`), AVG(SAL), DNO FROM EMP GROUP BY DNO‘
Invalid Example
SELECT ENAME, AVG(SAL), DNO FROM EMP GROUP BY DNO
Note: ENAME is not a grouping function and is not a column-name in the GROUP BY clause and therefore returns an error.
SG 3605 7-9

Grouping Functions
Grouping on More Than One Column
SELECT group-by-columns or functions FROM table-name GROUP BY column1, column2,
• One group is formed for each unique combination of values in the GROUP BY columns.
• Each row contains summary information for that group.
Example Count the number of people who hold each type of job in each department.
SELECT DNO, JOB, COUNT(*) FROM EMP GROUP BY DNO, JOB
--dno-- ---job 300 PRESIDENT 1 200 SALESREP 4 100 CLERK 1 200 CLERK 1 400 CLERK 2 100 MANAGER 1 200 MANAGER 1 400 MANAGER 1 100 ACCOUNTANT 2
7-10 SG 3605

Grouping Functions
WHERE and GROUP BY Clauses Together
The WHERE clause can be used in conjunction with GROUP BY, to select rows from a table upon which the grouping functions will be performed.
SELECT group-by-columns or functions FROM table-name WHERE conditions GROUP BY column1, column2,
Example: Determine the average salary for accountants and sales representatives and the number of each in each department.
SELECT DNO, AVG(SAL), COUNT(*) FROM EMP WHERE JOB = 'ACCOUNTANT' OR JOB = 'SALESREP' GROUP BY DNO
--dno
100 2012.50 2
200 2456.25 4
Note: The average salary in this example was truncated to two decimal places.
SG 3605 7-11

1
:••••
Grouping Functions
HAVING Clause
SELECT group-by-columns or functions FROM table-name GROUP BY column1, column2, HAVING group-conditions
• Specifies which groups should be returned, after the grouping functions have been computed
• Similar to a WHERE clause
— It states conditions that the results must satisfy
— But refers to group values, not data-item values
• HAVING clause conditions may refer to:
— A column in the GROUP BY clause
— A built-in function for a selected column
Example:
SELECT DNO, JOB, COUNT(*) AS TOTAL FROM EMP GROUP BY DNO, JOB HAVING COUNT(*) >= 2
-dno- - - -job 200 SALESREP 400 CLERK 100 ACCOUNTANT
total----4 2 2
(
7-12
SG 3605

Grouping Functions
Full Query Specification
SELECT [ ALL I DISTINCT ] { * I select-list) FROM table-specification-list [ WHERE Boolean-expression ] [ GROUP BY column-specification-list] [ HAVING Boolean-expression ] [ ORDER BY sort-specification-list
• SELECT statements may contain WHERE, GROUP BY, and HAVING clauses
— SELECT clause identifies columns
— FROM, WHERE, GROUP BY, and HAVING clauses identify the tables and rows
- WHERE clause can improve performance
• Order of execution
1. The FROM clause creates a conceptual table from the tables to be used.
2. If there is a WHERE clause, rows not meeting its requirements are discarded from the conceptual table made in step 1.
3. If there is a GROUP BY clause, a conceptual grouped table is formed from the previously derived rows.
4. If there is a HAVING clause, rows not meeting its requirements are discarded from the grouped table made in step 3.
5. The SELECT clause is executed to determine which columns of the remaining rows are to be used.
Example:
SELECT DNO FROM EMP WHERE JOB = 'CLERK' GROUP BY DNO HAVING COUNT(*) >= 2
-dno- 400
SG 3605 7-13

Grouping Functions
Exercise 7-1
Using the functionality you have learned so far, write and execute the SQL statements that will retrieve the requested data from the EMP and DEPT tables.
1. What is the average annual salary per job in each department? Recall the SAL column is monthly salary.
V C- -„3-0 fl-c)
0
2. Display the department number and number of employees, who receive salaries only in the entire company.
L'”
-t' '
0 tj
7-14 SG 3605

Grouping Functions
3. Compute the average, minimum, and maximum salaries of those employees who are clerks or managers. Display the job titles and results.
4. Display the department number of departments that have more than one clerk.
JV i L
SG 3605 7-15

8 Joining Tables

Joining Tables
Module 8 Joining Tables
Module Objectives 8-3
Benefit Statement 8-3
Materials 8-3
Equijoins 8-4
Join Guidelines 8-6
Multi-Table Joins 8-7
Self-Joins 8-10
Self-Join Guidelines 8-11
How RDMS Joins Tables 8-13
Exercise 8-1 8-14
SG 3605 8-1

Joining Tables
Module Objectives
Upon completion of this module, you should be able to
• Formulate queries to join data from one or more tables.
Benefit Statement
Thus far the queries you have created have dealt with one table. This module expands your capabilities to involve more than one table. The data that you will need to access will frequently be in more than one table.
Materials
• OS 1100 UDS Relational Data Management System (UDS RDMS 1100) and IPF SQL Interface End Use Guide
• OS 1100 UDS Relational Data Management System (UDS RDMS 1100) SQL Programming Reference Manual
SG 3605 8-3

Joining Tables
Joins
• A join combines some or all columns and rows from two or more tables
• Types of joins
- Equijoins
- Cartesian joins
Self joins
— Non-equijoins
Equijoins
SELECT columns-from-tables-in-from-clause FROM table 1, table2, WHERE table l.column = table2.column
AND other-conditions
• An equijoin links rows from tables based on the equality of a common attribute (column)
- The columns on which the tables are joined must have the same data type
- If column names are the same, they must be unambiguously referenced as table.column
• Figure 8-1 illustrates joining two tables based on the department number field (DNO)
EMP DEPT
EMPNO ENAME
DNO
DNAME LOC
Figure 8-1. Joining EMP and DEPT Tables
8-4 SG 3605

Joining Tables
Equijoin Examples
Example 1. For each employee display the employee name, department number, name, and location.
SELECT ENAME, JOB, EMP.DNO, DNAME, LOC FROM EMP, DEPT WHERE EMP.DNO = DEPT.DNO
FOSTER SALESREP 200 SALES NEW YORK BROWN CLERK 200 SALES NEW YORK WOODWORTH MANAGER 200 SALES NEW YORK ROCKWELL ACCOUNTANT 100 ACCOUNT ING ATLANTA MART IN SALES REP 200 SALES NEW YORK ADAMS SALESREP 200 SALES NEW YORK GLASS ACCOUNTANT 100 ACCOUNT ING ATLANTA TURNER CLERK 100 ACCOUNT ING ATLANTA LAWSON MANAGER 100 ACCOUNTING ATLANTA JOHNSON CLERK 400 DISTRIBUTION PRINCETON WILLIAMS PRESIDENT 300 MARKETING DETROIT SMITH CLERK 400 DISTRIBUTION PRINCETON FORD SALES REP 200 SALES NEW YORK HYDE MANAGER 400 DISTRIBUTION PRINCETON
Example 2.
SELECT ENAME, JOB, EMP.DNO, DNAME, LOC FROM DEPT, EMP WHERE EMP.DNO = DEPT.DNO
Note: The second example will produce the same results as the first.
SG 3605 8-5

Joining Tables
Join Guidelines
• The tables to be joined are specified in the FROM clause
• The WHERE clause specifies how to join the tables as well as any other selection conditions as in single table queries.
• The "matching criteria" for the tables are called the join criteria
• More than one pair of columns may be used to specify the join condition between any two tables
• Columns from either table may be named in the SELECT list
• Table.* is used to select all columns of the table specified
• If a column has the same name in both tables, it must be unambiguously referenced as table-name.column-name in the SELECT or WHERE clause.
• The join is more efficient if the columns used to perform the join are indexed
• As many tables as desired may be joined together, although more than three may cause performance slowdown
• If the WHERE clause does not use primary or secondary keys, the order of the tables in the FROM list is 4xot important.
- Think of RDMS 1100/2200 as scanning the list from left to right
- Only the records "found" in the first table need to be joined with records in the second and subsequent tables
Specify as the first table the one with the fewest expected "hits"
8-6 SG 3605

Joining Tables
Multi-Table Joins 1 11
• If joining more than two tables, specify a join criterion for each pair of tables being joined.
• For joining n tables, there should be n-1 join criteria in the WHERE clause.
Example Assume there is a third table named AUX_EMP that contains personnel information on each employee, such as GRADE, and having a primary key of EMPNO. If you want to display the employee's name, grade, position, department number, and location, the information can be collected from EMP, DEPT, and AUX EMP. The three tables could be joined with a query such as the following:
SELECT ENAME, GRADE, JOB, EMP.DNO, DNAME, LOC FROM EMP, AUX EMP, DEPT WHERE EMP.DNO = DEPT.DNO AND EMP.EMPNO = AUX EMP.EMPNO
ENAME GRADE JOB DNO DNAME LOC
HYDE 4 MANAGER 400 DISTRIBUTION PRINCETON ADAMS 3 SALESREP 200 SALES NEW YORK LAWSON 4 MANAGER 100 ACCOUNTING ATLANTA
Note: The WHERE clause specifies the join conditions. Only a part of the resulting table is shown for the above SELECT.
SG 3605 8-7

Joining Tables
Cartesian Joins
If you do not specify a join criterion, then RDMS does not know how you want the rows of one table matched with the rows of the second table. The table that results is a Cartesian product; every row of the first table is matched with every row of the second. This produces a large table and is usually not what was wanted.
Cartesian joins exist for operational completeness, but when you get one, it is usually an accident. You probably forgot to specify the desired join condition. The resulting table has as many rows as the product of the number of rows in each table.
Example: Modify the previous equijoin example, omitting the WHERE clause and displaying both department number fields. The query would be:
SELECT ENAME, JOB, EMP.DNO AS E_DNO, DEPT.DNO AS D_DNO, DNAME, LOC FROM EMP, DEPT
The table answering that query would have 14 x 4 or 56 rows. The top of the table would appear as follows:
--ENAME--- ---JOB--- E_DN0 D_DNO ---DNAME--- ---LOC---- FOSTER SALESREP 200 100 ACCOUNTING ATLANTA FOSTER SALESREP 200 200 SALES NEW YORK FOSTER SALESREP 200 300 MARKETING DETROIT FOSTER SALESREP 200 400 DISTRIBUTION PRINCETON BROWN CLERK 200 100 ACCOUNTING ATLANTA BROWN CLERK 200 200 SALES NEW YORK BROWN CLERK 200 300 MARKETING DETROIT BROWN CLERK 200 400 DISTRIBUTION PRINCETON WOODWORTH MANAGER 200 100 ACCOUNTING ATLANTA WOODWORTH MANAGER 200 200 SALES NEW YORK WOODWORTH MANAGER 200 300 MARKETING DETROIT WOODWORTH MANAGER 200 400 DISTRIBUTION PRINCETON ROCKWELL ACCOUNTANT 100 100 ACCOUNTING ATLANTA
Note: There are four entries for each employee; one for each row of possible values from the DEPT table.
8-8 SG 3605

Joining Tables
Table Aliases
FROM table1 Wiest table2 alias2,
• Any table may be given another name or table alias
• Long, descriptive names can be shortened
• When joining a table with itself, it must be given aliases to clarify the column references
Example 1
FROM customer_info ci, houses_available ha WHERE ci.price > ha.price
Example 2
FROM EMP WORKER, EMP MANAGER WHERE WORKER.MGR = MANAGER.EMPNO
EMP (WORKER)
EMP (MANAGER)
EMPNO ENAME JOB MGR 5010 FOSTER SALESREP 5234 5146 BROWN CLERK 5234 5234 WOODWORTH MANAGER 5784 5237 ROCKWELL ACCOUNTANT 5743 5437 MARTIN SALESREP 5234 5469 ADAMS SALESREP 5234 5630 GLASS ACCOUNTANT 5743 5702 TURNER CLERK 5743 5743 LAWSON MANAGER 5784 5765 JOHNSON CLERK 5984 5784 WILLIAMS PRESIDENT 5896 SMITH CLERK 5984 5942 FORD SALESREP 5234 5984 HYDE MANAGER 5784
EMPNO ENAME JOB MGR 5010 FOSTER SALESREP 5234 5146 BROWN CLERK 5234 5234 WOODWORTH MANAGER 5784 5237 ROCKWELL ACCOUNTANT 5743 5437 MARTIN SALESREP 5234 5469 ADAMS SALESREP 5234 5630 GLASS ACCOUNTANT 5743 5702 TURNER CLERK 5743 5743 LAWSON MANAGER 5784 5765 JOHNSON CLERK 5984 5784 WILLIAMS PRESIDENT 5896 SMITH CLERK 5984 5942 FORD SALESREP 5234 5984 HYDE MANAGER 5784
SG 3605
8-9

Joining Tables
Self-Joins
SELECT allasi.column, alias2.column, FROM table aliasi, table alias2 WHERE aliasl.column = alias2.column AND other-conditions
Joins a table to itself, comparing values in two different columns with the same data type.
• The column names in the select-list must be qualified with the alias to distinguish which to display since the column names in the tables are identical.
Example: Display the number, name, and job of each employee, and the number, name, and job of the employee's manager.
SELECT WORKER.EMPNO, WORKER.ENAME, WORKER.JOB, WORKER.MGR, MANAGER.EMPNO, MANAGER.ENAME, MANAGER.JOB FROM EMP WORKER, EMP MANAGER WHERE WORKER.MGR = MANAGER.EMPNO
EMPNO ENAME JOB MGR MGR EMPNO
MGR ENAME
MGR JOB
5010 FOSTER SALESREP 5234 5234 WOODWORTH MANAGER 5146 BROWN CLERK 5234 5234 WOODWORTH MANAGER 5234 WOODWORTH MANAGER 5784 5784 WILLIAMS PRESIDENT 5237 ROCKWELL ACCOUNTANT 5743 5743 LAWSON MANAGER 5437 MARTIN SALESREP 5234 5234 WOODWORTH MANAGER 5469 ADAMS SALESREP 5234 5234 WOODWORTH MANAGER 5630 GLASS ACCOUNTANT 5743 5743 LAWSON MANAGER 5702 TURNER CLERK 5743 5743 LAWSON MANAGER 5743 LAWSON MANAGER 5784 5784 WILLIAMS PRESIDENT 5765 JOHNSON CLERK 5984 5984 HYDE MANAGER 5896 SMITH CLERK 5984 5984 HYDE MANAGER 5942 FORD SALESREP 5234 5234 WOODWORTH MANAGER 5984 HYDE MANAGER 5784 5784 WILLIAMS PRESIDENT
Note: The WORKER.MGR and MANAGER.EMPNO columns are displayed for illustration of the matching column references.
8-10 SG 3605

I
Joining Tables
Self-Join Guidelines
• A table can be joined with itself as if joining two separate tables
• Self-join is used to join one row in a table with another in the same table
• The columns specified in the join criterion must have the same data type
• The table must be given two aliases to identify which columns are coming from which copy of the table
• In the previous example, note the following:
- Both the EMPNO and MGR columns contain the same type of information, employee numbers as four numeric digits
- For each row in the EMP table, EMPNO is the employee number of the employee named in the row
- For each row in the EMP table, MGR is the employee number of the employee's manager
- To obtain the name of the employee's manager, the EMP table must be joined with itself on the MGR column, comparing that to the EMPNO column, then locating the ENAME associated with that employee number
SG 3605 8-11

Joining Tables
Non-Equijoins
• Most joins are based on the equality of values in the joined column; therefore they are called equijoins.
• Non-equijoins are based on other comparison operators:
— <>
<=
- >=
- BETWEEN ... AND
Example: List the salary grade, name, salary, and job title of each employee. Order by grade, and within grade by salary.
SELECT GRADE, ENAME, SAL, JOB FROM EMP, SAL GRADE WHERE SAL BETWEEN LOSAL AND HISAL ORDER BY GRADE, SAL
GRADE ENAME SAL JOB
1 TURNER 900 CLERK 1 JOHNSON 975 CLERK 1 BROWN 1000 CLERK 1 SMITH 1050 CLERK 2 GLASS 1850 ACCOUNTANT 2 ROCKWELL 2175 ACCOUNTANT 3 ADAMS 2250 SALESREP 3 FORD 2375 SALESREP 3 MARTIN 2500 SALESREP 3 FOSTER 2700 SALESREP 4 HYDE 2900 MANAGER 4 WOODWORTH 3250 MANAGER 4 LAWSON 3400 MANAGER 5 WILLIAMS 5200 PRESIDENT
8-12 SG 3605

Joining Tables
How RDMS Joins Tables
• Determine the cross product of the tables listed in the FROM clause
- Produces a conceptual table, the cross-product table
Contains all the columns from all the joined tables
Number of rows is the product of the number of rows in each table
- Three tables with 4 rows each means 4 X 4 X 4 = 64 rows
If one table is empty, resulting cross-product table is empty
• Apply the conditions of the WHERE clause to every row in the cross-product table
- Produces the reduced cross-product table
- Number of columns remains the same
- Number of rows is reduced
• Apply the query specification clause to the reduced cross-product table
— Use the conditions in the SELECT clause
— Report only columns requested
Note: If the query has multiple WHERE conditions, they are typically AND'ed together. A common mistake is to OR the conditions, selecting far too many rows.
SG 3605 8-13

Joining Tables
Exercise 8-1
Using the functionality you have learned so far, write and execute SQL statements that will retrieve data from the EMP and DEPT tables to answer the following questions.
1. Which employees work in Atlanta? Pirvl
- t;f• C., rC) cr) Dr.10
i.4-•f \I 0 I, 0 c Pi;.4.77,,, A
2. How many employees work in New York?
(4.' f4A 0
3. List the employees' names and the cities in which they work. Order the list by city.
4,•`'"
4. Retrieve the name and salary of employees who earn more than their managers. 47, 7- a
'tl*:D , .
5. List the department number, location, and number of employees for every location.
(-1.f2-4117.: TA-;;cfr 1..jtV3
O (--;,(2. • ) )
8-14 SG 3605

9 More Retrieval Considerations

More Retrieval Considerations
Module 9 More Retrieval Considerations
Module Objectives 9-3
Benefit Statement 9-3
Materials 9-3
Data Access Considerations 9-4 Indicator Variables 9-4 Indicator Variable Examples 9-5 Handling Tables with More Than 28 Columns (ACOB) 9-6
Reusing Cursors 9-7 Cursor Review 9-7 Describe Reusable 9-7 Host Program Variables in Cursors 9-7 Program Flow for Reusing Cursors 9-8 CLOSE Command 9-9 DROP CURSOR Command 9-10 OPEN ... USING Command 9-11 Example of Host Variables in Cursor 9-11
Lab 9-1 9-13
Sequential and Random Processing on a Cursor 9-14 Currency and Fetching 9-14 FETCH [ option ] Command 9-15 Introduction to Random Processing on a Cursor 9-16 DECLARE CURSOR Command 9-17 LOCATE Command 9-17 FETCH Command 9-18 Random Processing Example 9-19
Lab 9-2 9-20
Retrieval Efficiency Considerations 9-21 Singleton SELECT Command 9-21 Singleton SELECT Example 9-22 FETCH NEXT n Command 9-23 FETCH NEXT n Example 9-24 How RDMS Retrieves Data 9-25 Retrieval Using No Key 9-26 Retrieval Using A Secondary Key 9-27 Secondary Keys 9-28
SG 3605 9-1

More Retrieval Considerations
Accessing Data Using Keys 9-29
Exercise 9-1 9-30
9-2
SG 3605

More Retrieval Considerations
Module Objectives
Upon completion of this module, you should be able to
• Describe and use any of the various programming or processing features that will help solve retrieval problems, including:
Using indicator variables
Passing more than 28 values in an ACOB SQL command
- Processing forward or backward through a cursor
Random access of the database
- Reusable cursors
- Retrieving a single record
Retrieving multiple records from a single fetch
Efficiently accessing the database using primary or secondary keys
Benefit Statement
This module equips you with skills needed to solve retrieval problems. In addition, many of the considerations covered will give you insights into how to make your retrieval programs more efficient.
Note: This modules contains a large number of Unisys extensions to SQL '89. If your code must be portable, you will avoid using the extensions.
Materials
• OS 1100 UDS Relational Data Management System (UDS RDMS 1100) SQL Programming Reference Manual
• OS 1100 UDS Relational Data Management System (UDS RDMS 1100) Administration Guide
SG 3605 9-3

More Retrieval Considerations
Data Access Considerations
Indicator Variables
host-varl [ INDICATOR ] ind-varl, host-var2 [ INDICATOR J ind-var2, . . .
• Use to determine two different conditions
— Tell whether or not the retrieved data value is NULL
— Tell if a retrieved CHARACTER data column has been truncated
Table 9-1. Indicator Variable Values
Value Meaning
Negative NULL data value
0 Data value is non-NULL and fits into receiving field
Positive True length of truncated data value
• Anywhere that a placeholder variable ($P) or embedded variable refers to a NULLS ALLOWED column, an indicator variable must follow it.
— Indicator variables are required in a program accessing that column
— Indicator variables provide programmer control over handling NULL values.
• Declare the host program variable corresponding to an indicator placeholder variable or the embedded variable that serves as the indicator variable as signed numeric
• COBOL picture clause
PIC S9(4) SIGN LEADING SEPARATE
9-4 SG 3605

More Retrieval Considerations
Indicator Variable Examples
Requirement: To compute total compensation
ACOB ISQL Example
WORKING-STORAGE SECTION. 01 SAL-IND PIC S9(4) 01 COMM-IND PIC S9(4)
PROCEDURE DIVISION.
•ENTER MASM 'ACOB$RDMR' USING 'FETCH all_comp INTO $P1, ERR-STAT, AUX-INFO, EMPNO-OUT, SAL-OUT, SAL-IND, < COMM-OUT, COMM-IND. <
SIGN LEADING SEPARATE. SIGN LEADING SEPARATE.
$P2 $P3, $P4 $P5
IF COMM-IND < 0 MOVE 0 TO COMM-OUT. COMPUTE TOTAL-COMP = SAL-OUT + COMM-OUT.
UCOB ESQL Example
WORKING-STORAGE SECTION.
EXEC SQL BEGIN DECLARE SECTION END-EXEC. 01 SAL-IND PIC S9(4) SIGN LEADING SEPARATE. 01 COMM-IND PIC S9(4) SIGN LEADING SEPARATE.
EXEC SQL END DECLARE SECTION END-EXEC.
PROCEDURE DIVISION.
EXEC SQL FETCH all comp INTO :EMPNO-OUT, :SAL-OUT :SAL-IND,
Z :COMM-UT :COMM-IND END-EXEC.
IF COMM-IND < 0 MOVE 0 TO COMM-OUT COMPUTE TOTAL-COMP = SAL-OUT + COMM-OUT
SG 3605 9-5

More Retrieval Considerations
Handling Tables with More Than 28 Columns (ACOB)
ENTER MASM 'RSA$PARAM' USING list-of-program-variables
• ACOB limits the number of parameters on any ENTER MASM call to 31.
• RDMS uses the first three parameters for:
- The SQL command
Error status code
i1iary information
• This leaves 28 data and indicator parameters on any call to ACOB$RDMR.
• If a table has more than 28 columns, use the subroutine RSA$PARAM
— Build a parameter list
— Then call ACOB$RDMR, to execute the command
• Pass the program variables in the same order as the corresponding host variables in the SQL command.
Example:
ENTER MASM 'RSA$PARAM' USING PV1, PV2, PV31. ENTER MASM 'RSA$PARAM' USING PV32, PV33,.. PV62. STRING 'FETCH NEXT MY-CURSOR INTO ', '($Pl, $P2, ' $P61, $P62);' DELIMITED BY SIZE INTO RCOM.
ENTER MASM 'ACOB$RDMR' USING RCOM, ERR-STAT, AUX-INFO.
9-6 SG 3605

More Retrieval Considerations
Reusing Cursors
Cursor Review
You may recall that cursors provide a way to deliver rows extracted from a table to your program. The FETCH command already discussed retrieves one row of the cursor and correlates the values with your program variables.
The cursor defined in the DECLARE CURSOR command remains in existence until the end of the thread or until it is dropped. A cursor uses system resources - space in RDMS's internal tables - so it helps to free this space as soon as possible.
Describe Reusable
Suppose you were writing a program that would first print all the employees in Department 100, then all the employees in Department 200, and so on. There are two ways you could do this:
- Declare a separate cursor for each department, and have multiple open cursors in your program, or
— Declare a single cursor and reuse it, re-evaluating the query for each different value of DNO
Declaring one cursor saves system resources and is more efficient. RDMS supports multiple open cursors in a program, but you should save them for the occasions when they are necessary.
Host Program Variables in Cursors
In the above example, it is possible to declare a cursor for the first department, print the department information, then drop the cursor. You would have to re-declare the cursor for each department. At least the departments to specify are already known.
But what if you needed to accept the desired department as input from a user? How is that information passed to the cursor?
Host Program Variables!
Just as host program variables were used to pass retrieved information back to your program in a FETCH, they can be used to pass information from your program to an SQL command, such as OPEN CURSOR.
This capability is possible from ISQL, not ESQL. The ENTER MASM call makes the correspondence between the placeholder variables and your host program variables.
SG 3605 9-7

Y
END CONDITION?
DECLARE CURSOR
ACCEPT INPUT/ INITIALIZE PROG VAR.
OPEN CURSOR
FETCH
OTHER PROCESSING
CLOSE CURSOR (OPT)
DROP CURSOR (ISQL)
More Retrieval Considerations
Program Flow for Reusing Cursors
Figure 9-1 illustrates the typical program flow of a program that reuses cursors.
Figure 9-1. Program Flow for Reusing Cursors
9-8 SG 3605

More Retrieval Considerations
CLOSE Command
CLOSE cursor-name
• Closes a previously opened cursor.
• Releases system space associated with the evaluation of the corresponding query with current parameters
• Allows query to be re-evaluated with new parameters on next OPEN command
• Embedded (ESQL) - Interpreter (ISQL) interface differences
- CLOSE is optional for ISQL
- Consecutive OPENs invoke an implicit CLOSE for ISQL
In ESQL, an attempt to open an opened cursor results in an error
• RDMS automatically closes cursors if you execute a thread control command, END THREAD for example, or if you encounter a rollback error
Example:
CLOSE HI_LO_SAL
SG 3605 9-9

More Retrieval Considerations
DROP CURSOR Command
DROP CURSOR cursor-name
• Unisys SQL extension for the interpreter interface (ISQL), not for ESQL
• Undoes the DECLARE CURSOR command
• Frees the system space used to define the cursor and its associated query
• References to a dropped cursor generate an error
Examples:
DROP CURSOR HI_LO_SAL
DROP CURSOR DEPT200
9-10 SG 3605

More Retrieval Considerations
OPEN ... USING Command
OPEN cursor-name USING host-variable-list
• Unisys extension to for ISQL, the interpreter interface, not for ESQL
• Host variables used must correspond to those in DECLARE CURSOR
- $P1 in the DECLARE CURSOR must correspond to the $P1 in the OPEN
- DECLARE may use same variable more than once in WHERE clause
— OPEN references variable just once
— Order of host variables should be same as in DECLARE CURSOR for clarity
• Variables must be initialized (in working-storage or as input) before OPEN refers to them
Query in DECLARE CURSOR is evaluated with values from OPEN call to determine result
Open examples:
OPEN dept cursor USING $P1
OPEN hi_lo_sal USING $P1, $P2
Example of Host Variables in Cursor
Requirement: To read and display the name and employee number of employees who fall in the salary range between hi-sal-in and lo-sal-in which are input by a user.
The following example illustrates the interpreter interface in a UCS COBOL program. Recall that UCS COBOL supports both the interpreter interface (ISQL) as well as the embedded interface (ESQL).
SG 3605 9-11

More Retrieval Considerations
WORKING-STORAGE SECTION.
01 HI-SAL-IN 01 LO-SAL-IN 01 RECORD-RETRIEVED
05 ENAME-OUT 05 EMPNO-OUT
PIC.9(4) PIC 9(4)
PIC X(10) PIC 9(4)
VALUE ZEROS. VALUE ZEROS.
VALUE SPACES. VALUE ZEROS.
PROCEDURE DIVISION.
MOVE 'DECLARE HI_LO_SAL CURSOR ' TO RCOM MOVE ' SELECT ENAME, EMPNO FROM EMP TO RLIN(2) MOVE ' WHERE SAL BETWEEN $P1 AND $P2 ;' TO RLIN(3) ENTER MASM 'ACOB$RDMR' USING RCOM, ERR-STAT,
AUX-INFO, LO-SAL-IN, HI-SAL-IN
ACCEPT LO-SAL-IN ACCEPT HI-SAL-IN
MOVE 'OPEN HI_L0 SAL USING $P1, $P2 ;' TO RCOM ENTER MASM 'ACOB$RDMR' USING RCOM, ERR-STAT,
AUX-INFO, LO-SAL-IN, HI-SAL-IN
P▪ ERFORM UNTIL ERR-STAT = 6001 MOVE 'FETCH HI LO SAL INTO $P1, $P2 ;' TO RCOM ENTER MASM 'ACOB$RDMR' USING RCOM, ERR-STAT,
'AUX-INFO, ENAME-OUT, EMPNO-OUT DISPLAY RECORD-RETRIEVED
END-PERFORM
M▪ OVE 'CLOSE HI LO SAL ;' TO RCOM ENTER MASM 'ACOB$RDMR' USING RCOM, ERR-STAT, AUX-INFO
M▪ OVE 'DROP CURSOR HI_ LO SAL ;' TO RCOM ENTER MASM 'ACOB$RDMR' UING RCOM, ERR-STAT, AUX-INFO
9-12 SG 3605

More Retrieval Considerations
Lab 9-1
Reusing Cursors
Write and execute a COBOL program that uses only one cursor to do the following:
Retrieve and display the employee number," name, department number, and commission of all employees except those in a specified department. If the commission is NULL, display the word "NONE" in the commission column Accept the department as input and repeat the display until a dummy department number of 999 is keyed in.
SG 3605 9-13

EMPNO ENAME
>5984 HYDE
5469 ADAMS
5743 LAWSON
5765 JOHNSON
>5630 GLASS
>5437 MARTIN
5784 WILLIAMS
5942 FORD
5702 TURNER
5234 WOODWORTH
5237 ROCKWELL
5010 FOSTER
5896 SMITH >5146 BROWN
More Retrieval Considerations
Sequential and Random Processing on a Cursor
Currency and Fetching
• A cursor associates a named data area with a query
- Think of it as a "virtual table" that has currency
- Opening the cursor sets the pointer to just prior to the first row of the virtual table.
• Currency allows processing through the cursor using different FETCH commands.
— FETCH FIRST
— FETCH [NEXT]
FETCH LAST
FETCH PRIOR
FETCH CURRENT
First
Prior Next
Last
Currency pointer
Figure 9-2. FETCH Options
9-14 SG 3605

More Retrieval Considerations
FETCH [ option ] Command
FETCH [ option ] cursor-name INTO variable-specification-list
• Unisys SQL extension
• Where option may be FIRST, NEXT, LAST, PRIOR
- NEXT is default
- Cannot fetch LAST or PRIOR from a cursor declared with a GROUP BY, HAVING, or ORDER BY clause
• The variable-specification-list is a list separated by commas consisting of:
— Placeholder variables for ISQL
— Embedded variables for ESQL
• Retrieves one row from the cursor relative to the current pointer position
• If the cursor is positioned after the last row and you execute a FETCH or FETCH NEXT, or if you execute a FETCH PRIOR from before the first row of the cursor, an end-of-cursor status is returned to you.
SG 3605 9-15

FOSTER BROWN WOODWORTH ROCKWELL MARTIN ADAMS GLASS TURNER LAWSON JOHNSON WILLIAMS SMITH FORD HYDE
SALESREP CLERK MANAGER ACCOUNTANT SALESREP SALESREP ACCOUNTANT CLERK MANAGER CLERK PRESIDENT CLERK SALESREP MANAGER
5010 5146 5234 5237 5437 5469 5630 5702 5743 5765 5784 5896 5942 5984
More Retrieval Considerations
Introduction to Random Processing on a Cursor
Unisys SQL extensions allow you to perform random processing on a cursor. The commands that support this are not part of the ANSI standard SQL. Be aware of this if you have concerns about the portability of your program.
Suppose you want to process different parts of a cursor separately. For example, from the EMP table, display first the two rows starting with 5010, then the next two starting with 5784, then three more starting with 5469.
START 1
3
2
Figure 9-3. Random Processing
• To perform this type of random processing the steps are:
- DECLARE a cursor for random access
Set the currency pointer with a LOCATE command
FETCH the current row
- FETCH NEXT or PRIOR as desired
Loop back to the LOCATE command
9-16 SG 3605

More Retrieval Considerations
DECLARE CURSOR Command
DECLARE cursor-name CURSOR FOR RANDOM [ ACCESS ] SELECT select-list FROM table-name [ WHERE condition(s)]
• Unisys extension to SQL
• SEQUENTIAL is the default
• A RANDOM ACCESS cursor can refer to only one table in the FROM clause
- Cannot contain FOR UPDATE, GROUP BY, or ORDER BY clauses
Cannot refer to a view or built-in function
- Cannot include the DISTINCT keyword
LOCATE Command
LOCATE cursor-name ON table-name USING VALUES ( primary-key-value )
• Unisys extension to SQL
• LOCATE uses the index of the primary key to position the currency pointer
- Is allowed on random access cursor only
Does not retrieve any data
SG 3605 9-17

More Retrieval Considerations
• The primary-key-value
- Is a list of values (separated by commas) of the column or cohimns of the table's primary key
- Must be the same as when the table was created
If primary-key-value from LOCATE does not exist in table:
Auxiliary information variable is set to 1 (0 if it does exist)
Currency pointer is positioned to where key would be located if it existed, but cursor does not have a current row
- FETCH CURRENT returns 6001 end-of-cursor status
FETCH NEXT returns next record after currency pointer
FETCH Command
FETCH CURRENT cursor-name INTO host-variable-list
• Unisys extension to SQL
• FETCH CURRENT returns row to which currency pointer is set
9-18 SG 3605

More Retrieval Considerations
Random Processing Example
Processing requirement:
From the EMP table, display first the two rows starting with 5010, then the next two starting with 5784, then three more starting with 5469.
MOVE 'OPEN EMPS ENTER MASM 'ACOB$RDMR' USING RCOM,
MOVE 'LOCATE EMPS ON EMP MOVE ' USING VALUES (5010) ENTER MASM 'ACOB$RDMR' USING RCOM,
MOVE 'FETCH CURRENT EMPS INTO $P1, ENTER MASM 'ACOB$RDMR' USING RCOM,
EMPNO-OUT, ENAME-OUT DISPLAY RECORD-RETRIEVED PERFORM FORWARD-READ
MOVE 'LOCATE EMPS ON EMP MOVE ' USING VALUES (5784) ENTER MASM 'ACOB$RDMR' USING RCOM,
MOVE 'FETCH CURRENT EMPS INTO $P1, ENTER MASM 'ACOB$RDMR' USING RCOM,
EMPNO-OUT, ENAME-OUT DISPLAY RECORD-RETRIEVED PERFORM FORWARD-READ
MOVE 'LOCATE EMPS ON EMP MOVE ' USING VALUES (5469) ENTER MASM 'ACOB$RDMR' USING RCOM,
MOVE 'FETCH CURRENT EMPS INTO $P1, ENTER MASM 'ACOB$RDMR' USING RCOM,
EMPNO-OUT, ENAME-OUT DISPLAY RECORD-RETRIEVED PERFORM FORWARD-READ 2 TIMES
; ' TO RCOM ERR-STAT, AUX-INFO
' TO RCOM ;' TO RLIN(2)
ERR-STAT, AUX-INFO
$P2 ;' TO RCOM ERR-STAT, AUX-INFO,
' TO RCOM ;' TO RLIN(2)
ERR-STAT, AUX-INFO
$P2 ;' TO RCOM ERR-STAT, AUX-INFO,
' TO RCOM ;' TO RLIN(2)
ERR-STAT, AUX-INFO
$P2 ;' TO RCOM. ERR-STAT, AUX-INFO,
FORWARD-READ. MOVE 'FETCH NEXT EMPS INTO $P1, $P2 ;' TO RCOM ENTER MASM 'ACOB$RDMR' USING RCOM, ERR-STAT, AUX-INFO,
EMPNO-OUT, ENAME-OUT DISPLAY RECORD-RETRIEVED.
SG 3605 9-19

More Retrieval Considerations
Lab 9-2
Write the PROCEDURE DIVISION that would read and display the rows of the DEPT table in reverse DNO order.
9-20 SG 3605

More Retrieval Considerations
Retrieval Efficiency Considerations
Singleton SELECT Command
SELECT [ ALL I DISTINCT ] { * I select-list } INTO variable-specification-list --: - FROM table-specification-list [ WHERE Boolean-expression ]
[ GROUP BY column-specification-list ] [ HAVING Boolean-expression ]
• Replaces DECLARE, OPEN, FETCH, and DROP with one command
- SELECT, FROM, WHERE, GROUP BY, and HAVING clauses are the same as for the query specification
INTO clause is the same as for the FETCH command
• Returns one row from a table or tables to a program, typically using the primary key value to guarantee only one row will be returned
• ISQL/ESQL differences
- For ISQL, if the WHERE clause does not identify a single row, the row retrieved is the first one found
For ESQL, the singleton SELECT must result in 0 or 1 rows being selected, or RDMS returns an error
SG 3605 9-21

More Retrieval Considerations
Singleton SELECT Example
Singleton SELECT:
ENTER MASM 'ACOB$RDMR' USING 'SELECT ename, sal
INTO $P1, $P2 FROM emp WHERE empno = 5237 , , err-stat, aux-info, ename-out, sal-out
Replaces:
ENTER MASM 'ACOB$RDMR' USING 'DECLARE CURSOR my_cursor
SELECT ename, sal FROM emp WHERE empno = 5237 ;', err-stat, aux-info
ENTER MASM 'ACOB$RDMR' USING 'OPEN my_cursor
err-stat, aux-info
ENTER MASM 'ACOB$RDMR' USING 'FETCH my_cursor INTO $P1, $P2 ;',
err-stat, aux-info, ename-out, sal-out
9-22 SG 3605

More Retrieval Considerations
FETCH NEXT n Command
FETCH NEXT number-of-rows [ FROM ] cursor-name INTO variable-specification-list
• Use to fetch multiple rows from a cursor
• Available through the embedded interface (ESQL), not ISQL
• This command is not available in SQL 89
• The number-of-rows must be a positive integer constant
• The variable-specification-list is a list of embedded variables
- Each is a one-dimensional array, declared as an elementary item
Array size is determined by number-of-rows
• Status information returned by RDMS
— Auxiliary information is the number of rows returned
— Auxiliary information should always be checked after a FETCH NEXT n
— If fewer than n rows are fetched, error status = 6001 and SQLCODE = +100
SG 3605 9-23

More Retrieval Considerations
FETCH NEXT n Example
This example illustrates the PROCEDURE DIVISION and corresponding DATA DIVISION items in a UCS COBOL program for fetching 5 rows of the employee table at a time into an array. Only the column corresponding to RR-COMM allowed NULLs.
01 REC-RETRIEVED. 05 RR-EMPNO OCCURS 5 PIC 9(5). 05 RR-ENAME OCCURS 5 PIC X(10). 05 RR-JOB OCCURS 5 PIC X(10). 05 RR-MGR OCCURS 5 PIC 9(5). 05 RR-DNO OCCURS 5 PIC 9(4). 05 RR-HIREDATE OCCURS 5 PIC 9(7). 05 RR-SAL OCCURS 5 PIC 9(5). 05 RR-COMM OCCURS 5 PIC 9(5).
01 REC-COMM-IND. 05 RR-COMM-IND OCCURS 5 PIC S9(4)
SIGN LEADING SEPARATE.
EXEC SQL DECLARE Cl CURSOR SELECT * FROM EMP
END-EXEC.
EXEC SQL OPEN CURSOR Cl
END-EXEC.
EXEC SQL FETCH NEXT 5 FROM Cl INTO :RR-EMPNO, :RR-ENAME,
:RR-JOB, :RR-MGR, :RR-DNO, :RR-HIREDATE, :RR-SAL, :RR-COMM :RR-COMM-IND
END-EXEC.
9-24 SG 3605

More Retrieval Considerations
How RDMS Retrieves Data
When programming for better performance, it helps to know how RDMS works and to take advantage of its features. It is easy to write SQL queries and RDMS will eventually return the rows requested no matter how inefficiently the query is written. But, there are steps you can take to make it easier and more efficient to find the data. To be able to write better queries, you need to know how RDMS locates the data you request.
Retrieval Using the Primary Key
This is the most efficient type of access. Tables are stored in primary key order and RDMS can go directly to the page on which a row identified by primary key value is located.
SELECT EMPNO, ENAME, DNO FROM EMP WHERE EMPNO = 5743
Primary Index Page 1
Data Page 2 Page 3
5437 1 5010 . . . 5469 ... 5784 ... -> 5765 2 5146 . . . 5630 ... 5896 ...
5984 3 5234 5702 ... 5942 ... 5237 5743 ... 5984 ... 5437 ... 5765 ...
SALESREP 5234 200 • • 5010 FOS TER 5146 BROWN CLERK 5234 200 . . 5234 WOODWORT H MANAGER 5784 200 • •
5237 ROCKWELL ACCOUNTANT 5743 100 . . 5437 MART IN SALESREP 5234 200 • •
5469 ADAMS SALE SREP 5234 200 . . 5630 GLASS ACCOUNTANT 5743 100 . . 5702 TURNER CLERK 5743 100 . .
> 5743 LAWSON MANAGER 5784 100 . . 5765 JOHNSON CLERK 5984 400 . . 5784 WILLIAMS PRES IDENT 300 • •
5896 SMITH CLERK 5984 400 . . 5942 FORD SALESREP 5234 200 • •
5984 HYDE MANAGER 5784 400 . .
Figure 9-4. Primary Key Usage
SG 3605 9-25

More Retrieval Considerations
Retrieval Using No Key
This is the slowest type of access. RDMS must walk the entire table, "looking at" each row, and evaluating whether it satisfies the conditions of the query.
DNO has not been specified as a secondary key.
SELECT EMPNO, ENAME, DNO FROM EMP WHERE DNO = 100
>5010 FOSTER SALESREP 5234 200 • •
>5146 BROWN CLERK 5234 200 • •
WOODWORTH MANAGER 5784 200 • • >5234 ROCKWELL ACCOUNTANT 5743 100 • • • Satisfies >5237 MARTIN SALE SREP 5234 200 • • >5437 ADAMS SALE SREP 5234 200 • >5469 GLASS ACCOUNTANT 5743 100 • • Satisfies >5630 TURNER CLERK 5743 100 • • Satisfies >5702 LAWSON MANAGER 5784 100 • • • Satisfies >5743 JOHNSON CLERK 5984 400 • • >5765 WILLIAMS PRESIDENT 300 • >2784 SMITH CLERK 5984 400 • • >5896 FORD SALESREP 5234 200 >5942
>5984 HYDE MANAGER 5784 400 • •
Figure 9-5. No Key Usage
9-26 SG 3605

More Retrieval Considerations
Retrieval Using A Secondary Key
This is a fast type of access. RDMS has an index that lists the secondary key values and the corresponding primary key. RDMS can then index into the data using the primary key. If a column is used very frequently for access but is not the primary key, and the processing requires fast response, the database designer may implement it as a secondary key.
DNO has been specified as a secondary key.
SELECT EMPNO, ENAME, DNO FROM EMP WHERE DNO = 100
Secondary Index
Primary Index Page 2
Data Page 3 Page 4
—> 100 5237 -> 5437 2 5010 ... 5469 ... 5784 ... —> 100 5630 -> 5765 3 5146 ... 5630 ... 5896 ... —> 100 5702 -> 5984 5234 ... 5702 ... 5942 ... —> 100 5743 -> 5237 ... 5743... 5984 ...
200 5010 5437 5765 ... 200 5146 200 5234 200 5437 200 5469 200 5942 300 5784 400 5765 400 5896 400 5984
Figure 9-6. Secondary Key Usage
SG 3605 9-27

More Retrieval Considerations
Secondary Keys
• A secondary key is a set of one or more columns for which RDMS creates an index that provides fast access to those columns
• A secondary index should be created when:
- Rows are frequently accessed using those columns
- The table has many rows
• If the EMP table were often queried using DNO and ENAME, an index for each should be declared
DNO INDEX ENAME INDEX
DNO EMPNO ENAME EMPNO
100 5237 ADAMS 5469 100 5630 BROWN 5146 100 5702 FORD 5942 100 5743 FOSTER 5010 200 5010 GLASS 5630 200 5146 HYDE 5984 200 5234 JOHNSON 5765 200 5437 LAWSON 5743 200 5469 MART IN 5437 200 5942 ROCKWELL 5237 300 5784 SMITH 5896 400 5765 TURNER 5702 400 5896 WILLIAMS 5784 400 5984 WOODWORT H 5234
Figure 9-7. DNO and ENAME Indexes
9-28 SG 3605

More Retrieval Considerations
Accessing Data Using Keys
• Performance is improved when the columns selected by your query are all part of the primary or secondary key
Example:
SELECT ENAME, DNO FROM EMP WHERE DNO = 200
• When multiple secondary indices exist, RDMS uses the one declared first in the CREATE TABLE command (other factors being equal)
Example:
SELECT ENAME, SAL FROM EMP WHERE DNO = 200
AND ENAME = 'FORD'
• If the key is multi-column, the index is used only if the WHERE clause uses the leading column(s) of the index
SG 3605 9-29

More Retrieval Considerations
Exercise 9-1
Describe the programming or processing features that might help solve the following retrieval problems.
1. Nothing returned when two fields were added together.
2. Trying to fetch 40 columns of information on a given fetch.
3. Problems encountered when multiple cursors were operative.
r r t j t.,C1
4. Ability to easily retrieve employee records given their social security number.
9-30 SG 3605

More Retrieval Considerations
5. An ability to retrieve a single employee record quickly.
6. Database programs that need to run much faster.
SG 3605 9-31

10 Data Manipulation

Data Manipulation
Module 10 Data Manipulation
Module Objectives 10-3
Benefit Statement 10-3
Materials 10-3
Data Manipulation 10-4
BEGIN THREAD Command Revisited 10-5
ROLLBACK Command 10-6
Inserting Rows into Tables 10-7 Introduction to INSERT 10-7 INSERT Command 10-8
Changing Existing Data 10-9 Introduction to UPDATE 10-9 UPDATE Positioned Command 10-10
10-11 UPDATE Searched Command Sample COBOL Update Program 10-12
Deleting Rows from Tables 10-16 DELETE Command 10-16 DELETE Examples 10-17 Sample COBOL Delete Program 10-18
Cursor Requirements for Commands 10-21
Exercise 10-1 10-22
Lab 10-1 10-23
SG 3605 10-1

Data Manipulation
Module Objectives
• Change the data in your tables.
- Open a thread for update.
- Use the UPDATE, INSERT, and DELETE commands to modify data.
- Use the ROLLBACK command to reverse the effects of data changes.
Benefit Statement
You will see in this module how easy it is to modify your database with a few SQL commands. You probably realize, having said that it is easy to change, that you will need to deploy safeguards to guarantee the integrity of your database. A few of the integrity capabilities are touched on here as well, but more on that later.
Note: There are several Unisys extensions for the UPDATE command and one for the INSERT command. Those syntax extensions are not discussed in this module, only the SQL 89 formats are presented. If you are maintaining or migrating SQL code, consult the PRM listed below for the details on the extensions.
Materials
• OS 1100 UDS Relational Data Management System (UDS RDMS 1100) and IPF SQL Interface End Use Guide
• OS 1100 UDS Relational Data Management System (UDS RDMS 1100) SQL Programming Reference Manual
SG 3605 10-3

Data Manipulation
Data Manipulation
• Data manipulation commands change the data residing in the data tables
- INSERT - Add new rows to a table
- UPDATE - Change values of columns of existing rows
DELETE - Remove rows from a table
• Query commands are often used to check the results of changes
Update command structure similar to query structure
If issued from an application program, DECLARE CURSOR is not always required
Just MOVE update command to RCOM
Typically, you should use the BEGIN THREAD command
— Notify RDMS 1100 that you will update, not just read data
— Specify type of recovery desired
10-4 SG 3605

Data Manipulation
BEGIN THREAD Command Revisited
BEGIN THREAD [ thread-name ] FOR [ APPLICATION ] alias-name [ options]
• This is a Unisys extension
• For retrieval, the options discussed were:
[ READ I RETRIEVE ] [ UDSMSG UDSMESSAGE UDSMESSAGES
• For insertion, deletion, or update, the options are:
UPDATE( recovery-option) [ UDSMSG I UDSMESSAGE I UDSMESSAGES
• Choices for recovery-option are:
COMMANDLOOKS \ P
- DEFERRED (the default)
- QUICKLOOKS
- NONE
Examples:
BEGIN THREAD FOR UDSSRC UPDATE(DEFERRED) UDSMSG
BEGIN THREAD T1 FOR APP1 UPDATE(QUICKLOOKS)
BEGIN THREAD FOR TEST1 UPDATE(DEFERRED) UDSMESSAGE
SG 3605 10-5

Data Manipulation
ROLLBACK Command
ROLLBACK WORK
• Before making any changes, it is important to know how to "undo" any modifications in case of error
• ROLLBACK command discards any changes made to the database since the last thread control command or rollback
• ROLLBACK will also
- Close all open cursors
Release all implicit locks on data or tables that were changed
• ROLLBACK is useful in application programs
When several updates are to be performed, but only if all of them can be performed
- To do temporary updates to generate "what if' reports
10-6 SG 3605

Data Manipulation
Inserting Rows into Tables
Introduction to INSERT
• Before inserting data into a table:
— The table must exist
— Data must satisfy any key and NULL value constraints
• Table need not initially contain any data
• INSERT command is used for interactive or small-scale row insertions
• Large-scale, initial load process is performed differently
Examples. Insert two new departments into the DEPT table as illustrated in Figure 10-1.
INSERT INTO DEPT VALUES (500, 'RESEARCH', 'BOSTON')
INSERT INTO DEPT (DNAME, DNO, LOC) VALUES ('OPERATIONS', 600, 'SALT LAKE')
DNO DNAME LOC
100 200 300 400
ACCOUNTING SALES MARKETING DISTRIBUTION
ATLANTA NEW YORK DETROIT PRINCETON
500 RESEARCH BOSTON
600 OPERATIONS SALT LAKE
Figure 10-1. Inserting New Departments
SG 3605 10-7

Data Manipulation
INSERT Command
INSERT INTO table-specification [ ( column-name-list) { VALUES ( value-list) query-specification
• Adds one or more rows to a new or existing table or view
- "Position" in table is determined by primary key value
- Duplicate primary key entry generates error message
• The column-name-list is used when:
- Inserting fewer columns than exist in the table definition
- Entering values in a sequence different than the table definition
If omitted, the value-list must correspond to the way the table was created, both by order and number of columns
• The value-list provides values separated by commas supplied as
- Numeric constants or string literals
Host program variables ($Pn or embedded variables)
- Arithmetic expressions to be evaluated
- The keywords NULL or USER
• The query-specification inserts rows by selecting values from other tables
- Items in the SELECT list must correspond one to one, in order, with the column-name-list
If the column-name-list is omitted, the items in the SELECT list must correspond to the way the table was created, both by order and number of columns
INSERT INTO ROSVSCHEMM.DEPT SELECT * FROM ROSVSCHEMA2.DEPT
WHERE DNO > 400
10-8 SG 3605

Data Manipulation
Changing Existing Data
Introduction to UPDATE
• As long as primary key and foreign key constraints are obeyed, any data value in any column or row can be changed.
- Change a primary key to another valid key value
- Change all the values in an entire column
Change a value in rows selected by a WHERE clause
• SQL 89 supports two forms of the UPDATE command
— Single row update
— Multiple row update
Note: Both forms of the command rely upon a WHERE clause to restrict the scope of the update. If you omit the WHERE clause, all rows will be updated!
DNO DNAME LOC
100 ACCOUNTING ATLANTA 200 SALES NEW YORK 300 MARKETING DETROIT 400 DISTRIBUTION PRINCETON
Replace 500 RESEARCH BOSTON single
value data
600 OPERATIONS SALT LAKE SEATTLE
row > Replace entire
700 PERSONNEL DENVER
Figure 10-2. Possible Updates
SG 3605 10-9

Data Manipulation
UPDATE Positioned Command
UPDATE table-specification SET change-specification WHERE CURRENT OF cursor-name
• Use to change the content of columns within the current row of the cursor
• The change-specification is a list of column names and values
- Form: column-name = value-specification [ ,column-name = value-specification ]
- Where value-specification may be a numeric constant, string literal, an arithmetic expression, the keyword NULL, the keyword USER, or a variable specification
• Rules for referencing the cursor
- Cursor must be declared with the FOR UPDATE OF clause, a Unisys extension
- Only columns named in the FOR UPDATE OF clause can be updated
- Table names for DECLARE and UPDATE commands must match
- A successful FETCH must immediately precede the UPDATE
Example. Change Smith's job description from clerk to administrative assistant.
DECLARE UPDAT CURSOR SELECT EMPNO, ENAME, JOB FROM EMP WHERE EMPNO = 5896 FOR UPDATE OF JOB
FETCH UPDAT INTO :RR-EMPNO, :RR-ENAME, :RR-JOB UPDATE EMP
SET JOB = 'ADMN ASST' WHERE CURRENT OF UPDAT
SELECT * FROM EMP WHERE EMPNO = 5896
EMPNO ENAME JOB MGR DNO HIREDATE SAL COMM
5896 SMITH ADMN ASST 5984 400 880913 1050
10-10 SG 3605

Data Manipulation
UPDATE Searched Command
UPDATE table-specification SET column-change-specification [ WHERE Boolean-expression ]
• Change the content of columns within a subset of the existing rows of a table
• The change-specification is a list of column names and values
- Form: column-name = value-specification [ ,column-name = value-specification
Where value-specification may be a numeric constant, string literal, an arithmetic expression, the keyword NULL, the keyword USER, or a variable specification
• The Boolean-expression specifies the rows to be updated
Example: Give all people in Department 200 who do not receive a commission a 7 percent increase in salary and a commission that is 10 percent of their original salary.
UPDATE EMP SET SAL = SAL * 1.07,
COMM = SAL * .10 WHERE DNO = 200
AND COMM IS NULL
SELECT * FROM EMP WHERE DNO = 200
EMPNO ENAME JOB MGR DNO HIREDATE SAL COMM
5010 FOSTER SALESREP 5234 200 860714 2700 550 5146 BROWN CLERK 5234 200 871011 1070 100 5234 WOODWORTH MANAGER 5784 200 790219 3478 325 5437 MART IN SALESREP 5234 200 870326 2500 300 5469 ADAMS SALESREP 5234 200 811102 2250 500 5942 FORD SALESREP 5234 200 890316 2375 0
SG 3605 10-11

Data Manipulation
Sample COBOL Update Program
Requirement: Prompt and read data from a user to update an entire row in the EMP table. Program is written in ISQL for UCS COBOL.
@UCOB'S DEV.MOD1O/UCOBUPDT,TPF$.UPDT,,,NO-OPTIONS,NARROW UCOB- 5R2(910816) LSS- 6R1A(910814) 930419 13:37:59 1 IDENTIFICATION DIVISION. 2 PROGRAM-ID. update-emp. 3 ENVIRONMENT DIVISION. 4 CONFIGURATION SECTION. 5 SOURCE-COMPUTER. UNISYS-2200. 6 OBJECT-COMPUTER. UNISYS-2200. 7 8 DATA DIVISION. 9 WORKING-STORAGE SECTION. 10 11 01 thread-flag PIC 9 VALUE ZERO. 12 88 thread-has-begun VALUE 1. 13 01 err-end-flag PIC 9 VALUE ZERO. 14 88 no-more-msgs VALUE 1. 15 16 EXEC SQL BEGIN DECLARE SECTION END-EXEC. 17 18 01 update-record. 19 05 up-empno PIC 9(4). 20 05 up-ename PIC X(10). 21 05 up-job PIC X(10). 22 05 up-mgr PIC 9(4). 23 05 up-dno PIC 9(3). 24 05 up-hiredate PIC 9(6). 25 05 up-sal PIC 9(4). 26 05 up-comm PIC 9(4). 27 01 record-out. 28 05 empno-out PIC 9(4). 29 05 PIC X(2) VALUE SPACES. 30 05 ename-out PIC X(10). 31 05 PIC X(2) VALUE SPACES. 32 05 job-out PIC X(10). 33 05 PIC X(2) VALUE SPACES. 34 05 mgr-out PIC 9(4). 35 05 PIC X(2) VALUE SPACES. 36 05 dno-out PIC 9(3). 37 05 PIC X(2) VALUE SPACES. 38 05 hiredate-out PIC 9(6). 39 05 PIC X(2) VALUE SPACES. 40 05 sal-out PIC 9(4). 41 05 PIC X(2) VALUE SPACES. 42 05 comm-out PIC 9(4). 43
10-12 SG 3605

Data Manipulation
44 01 SQLCODE PIC S9(9) USAGE BINARY. 45 46 01 RDMCA. 47 05 ERROR-STATUS PIC 9(4). 48 05 AUX-INFO PIC S9(9) USAGE BINARY. 49 50 01 err-text. 51 05 err-s PIC X(132) OCCURS 4 TIMES. 52 53 01 err-s-index PIC 9. 54 EXEC SQL END DECLARE SECTION END-EXEC. 55 56 57 PROCEDURE DIVISION. 58 000-main. 59 60 *********************************************************** 61 Begin thread 62 *********************************************************** 63 64 EXEC SQL 65 WHENEVER NOT FOUND GO TO 400-done 66 END-EXEC. 67 68 EXEC SQL 69 WHENEVER SQLERROR GO TO 900-rdms-error 70 END-EXEC. 71 72 BEGIN THREAD FOR UDSSRC UPDATE(DEFERRED). 73 74 *********************************************************** 75 Prompt and read input 76 *********************************************************** 77 78 DISPLAY 'Enter the current 4 digit employee number' 79 ACCEPT up-empno 80 DISPLAY 'Enter employee last name' 81 ACCEPT up-ename 82 DISPLAY 'Enter job title' 83 ACCEPT up-job 84 DISPLAY 'Enter employee number of manager' 85 ACCEPT up-mgr 86 DISPLAY 'Enter department number' 87 ACCEPT up-dno 88 DISPLAY 'Enter hiredate' 89 ACCEPT up-hiredate 90 DISPLAY 'Enter employee monthly salary' 91 ACCEPT up-sal 92 DISPLAY 'Enter commission, or NULL if not applicable' 93 ACCEPT up-comm 94
SG 3605 10-13

Data Manipulation
95 *********************************************************** 96 • Update row 97 *********************************************************** 98 99 EXEC SQL 100 UPDATE rosyschema2.emp 101 SET empno = :up-empno, ename = :up-ename, job = :up-job, 102 mgr = :up-mgr, dno = :up-dno, hiredate = :up-hiredate, 103 sal = :up-sal, comm = :up-comm 104 WHERE empno = :up-empno 105 END-EXEC. 106 107 DISPLAY 'Update Performed'. 108 109 *********************************************************** 110 • Display updated row 111 *********************************************************** 112 113 EXEC SQL 114 SELECT * INTO :empno-out, :ename-out, :job-out, 115 :mgr-out, :dno-out, :hiredate-out, :sal-out, 116 :comm-out FROM rosyschema2.emp 117 WHERE empno = :up-empno 118 END-EXEC. 119 120 DISPLAY 'The record was changed to: 121 DISPLAY record-out. 122 123 *********************************************************** 124 • End thread 125 *********************************************************** 126 127 400-done. 128 129 END THREAD. 130 MOVE 0 TO thread-flag. 131 132 DISPLAY 'Program has completed'. 133 STOP RUN. 134 ********************************************************** 135 ** Do the RDMS error handling - display codes & messages 136 ********************************************************** 137 138 *** Come here when RDMS errors are detected 139 140 900-rdms-error. 141 142 *** Turn off error handling, print error status variables 143 144 EXEC SQL WHENEVER SQLERROR CONTINUE END-EXEC. 145 146 DISPLAY '***SQL Code = ' SQLCODE. 147 DISPLAY '***Error Code = ' ERROR-STATUS. 148 DISPLAY '***Auxiliary Info = ' AUX-INFO. 149 150 *** Issue the error messages, end the thread, and exit 151 152 MOVE 0 TO err-end-flag. 153 PERFORM 940-geterror UNTIL no-more-msgs. 154 DISPLAY 'Error termination'. 155 END THREAD. 156 STOP RUN.
10-14 SG 3605

Data Manipulation
157 158 *** Fill the error buffers using GETERROR 159 160 940-geterror. 161 GETERROR INTO :err-s(1), :err-s(2), :err-s(3), :err-s(4). 162 PERFORM 980-print-error 163 VARYING err-s-index FROM 1 BY 1 UNTIL err-s-index > 4. 164 165 *** Display the error buffers 166 167 980-print-error. 168 IF err-s(err-s-index) NOT = SPACE 169 DISPLAY err-s(err-s-index) 170 ELSE 171 MOVE 5 to err-s-index 172 MOVE 1 TO err-end-flag. SIZES: CODE(EM4): 624 DATA: 1674 END UCOB- 0 ERRORS(MAJOR) 0 ERRORS(MINOR) @XQT
Enter the current 4 digit employee number
Enter employee last name
Enter job title
Enter employee number of manager
Enter department number
Enter hiredate
Enter employee monthly salary
Enter commission, or NULL if not applicable
Update Performed
The record was changed to:
5469 ADAMS SALESREP 5234 200 870326 4000 1000
Program has completed
@BRKPT PRINTS
SG 3605 10-15

Data Manipulation
Deleting Rows from Tables
DELETE Command
DELETE FROM table-name [ WHERE { Boolean-expression CURRENT OF cursor-name ]
• Deletes all rows satisfying the WHERE condition
- Boolean-expression specifies the row or rows to delete
CURRENT OF deletes the row where the cursor pointer is currently positioned
— All rows are deleted if there is no WHERE clause
• Rules for referencing the cursor
— Cursor cannot be read-only or for RANDOM ACCESS
— Table names must match for the DECLARE and DELETE commands
— A successful FETCH must immediately precede the DELETE command
— Cursor does not need to be declared with the FOR UPDATE OF clause
• RUMS returns the number of rows deleted through the auxiliary information parameter
10-16 SG 3605

Data Manipulation
DELETE Examples
Example 1. Remove the department where DNO = 200
DELETE FROM DEPT WHERE DNO = 200
Example 2. Remove all employees in Department 200
DELETE FROM EMP WHERE DNO = 200
Example 3. Empty the DEPT table
DELETE FROM DEPT
Example 4. Remove all employees named Smith
DELETE FROM EMP WHERE ENAME = 'SMITH'
SG 3605 10-17

Data Manipulation
Sample COBOL Delete Program
Requirement: Prompt and read an employee number from a user and delete that row. Continue prompting and deleting rows until a dummy value of 9999 is read.
@ACOB,SE DEV.ACOBDELT,TPFS.REL ACOB 7R1A R 75R3n 03/05/93 18:15:43 (0) 1100 ASCII COBOL 08/12/91 10:02
1100 ASCII COBOL SOURCE LISTING
IDENTIFICATION DIVISION. PROGRAM-ID. TERMINATOR. ENVIRONMENT DIVISION. CONFIGURATION SECTION. SOURCE-COMPUTER. UNISYS-2200. OBJECT-COMPUTER. UNISYS-2200.
DATA DIVISION. WORKING-STORAGE SECTION. 01 RCOM.
05 RLIN
PIC X(40) OCCURS 12 TIMES. 01 ERR-STAT
PIC 9(4). 01 AUX-INFO
PIC S1(36). 01 ERROR-TEXT.
05 ERR-S
PIC X(132) OCCURS 4 TIMES. 01 THREAD-FLAG
PIC 9 VALUE ZERO. 88 THREAD-HAS-BEGUN
VALUE 1. 01 D-EMPNO
PIC 9(4). * PROCEDURE DIVISION. ***************************************************************
Main Control Paragraph *************************************************************** 000-MAIN.
PERFORM 200-INIT THRU 299-INIT-EX. PERFORM 400-LOOP THRU 499-LOOP-EX
UNTIL D-EMPNO = 9999. PERFORM 600 FIN THRU 699-FIN-EX. STOP RUN.
*************************************************************** Begin thread, read an employee number
*************************************************************** 200-INIT.
MOVE 'BEGIN THREAD FOR UDSSRC ' TO RCOM. MOVE ' UPDATE (DEFERRED) • ' TO RLIN(2). ENTER MASH 'acob$rdmr' USING RCOM, ERR-STAT, AUX-INFO. IF ERR-STAT NOT = 0 GO TO 900-ERROR-PRINT. MOVE SPACES TO RCOM. MOVE 1 TO THREAD-FLAG. DISPLAY 'Enter 4 digit employee number' UPON PRINTER. ACCEPT D-EMPNO.
299-INIT-EX. EXIT.
1 2 3 4 5 6 7 8 9 10 11 12 13 14 15 16 17 18 19 20 21 22 23 24 25 26 27 28 29 30 31 32 33 34 35 36 37 38 39 40 41 42 43 44
10-18 SG 3605

Data Manipulation
45 ************************************************************** 46 * Delete a row, solicit another 47 ************************************************************** 48 400-LOOP. 49 MOVE 'DELETE FROM ROSVSCBEMA2.EMP ' TO RCOM. 50 MOVE 'WHERE EMPNO = $P1 ;' TO RLIN(2). 51 ENTER MASM 'ACOB$RDMR' USING RCOM, ERR-STAT, 52 AUX-INFO, D-EMPNO. 53 IF ERR-STAT NOT = 0 GO TO 900-ERROR-PRINT. 54 DISPLAY 'Record deleted' UPON PRINTER. 55 DISPLAY 'Enter 4 digit employee number' UPON PRINTER. 56 ACCEPT D-ENPNO. 57 499-LOOP-EX. 58 EXIT. 59 ************************************************************** 60 • End the thread, issue all done 61 ************************************************************** 62 600-FIN. 63 MOVE 'END THREAD;' TO RCOM. 64 ENTER MASK 'ACOB$RDMR' USING RCOM, ERR-STAT, AUX-INFO. 65 IF ERR-STAT NOT = 0000 PERFORM 900-ERROR-PRINT. 66 DISPLAY 'ALL DONE.' UPON PRINTER. 67 MOVE SPACES TO RCOM. 68 699-FIN-EX. 69 EXIT. 70 ************************************************************** 71 • Print the error message, end the thread, shut it down * 72 ************************************************************** 73 900-ERROR-PRINT. 74 DISPLAY 'RDML COMMAND = ' RCOM. 75 DISPLAY 'ERROR STATUS = ' ERR-STAT. 76 DISPLAY 'ERROR COLUMN = ' ADX-INFO. 77 78 MOVE 'GETERROR INTO $P1, $P2, $P3, $P4 ;' TO RCOM. 79 ENTER MASM 'ACOB$RDMR' USING RCOM, ERR-STAT, AUX-INFO, 80 ERR-S(1), ERR-S(2), ERR-S(3), ERR-S(4). 81 DISPLAY ERR-S(1) UPON PRINTER. 82 DISPLAY ERR-S(2) UPON PRINTER. 83 DISPLAY ERR-S(3) UPON PRINTER. 84 DISPLAY ERR-S(4) UPON PRINTER. 85 86 IF TBNEAD-BAS-BEGUN 87 MOVE 'END THREAD ;' TO RCOM 88 ENTER MASM 'ACOB$RDMR' USING RCOM, 89 ERR-STAT, ADX-INFO. 90 91 DISPLAY 'ERROR END' UPON PRINTER. 92 STOP RUN.
END ACOB DIAGNOSTIC TOTALS 0 WARNING 0 MINOR 0 SERIOUS 0 FATAL 0 LEVELING COMPILE TIME IS 4 33 SECONDS CORE: MIN= 63601 / 64000 MAX* 66560 WORDS
SG 3605 10-19

001000 001005
040000 040005
MEM$ERR 040006 040014
040015 040027
03
26
21
26
040030 040032 $(0) 040033 040730
25
$(012) MEM$ERR $(0) 040731 041030 12
12
05 001006 001350
001351 001355
041031 041431
041432 041567 041570 041606 041607 041746
Data Manipulation
@MAP,S ,TPF$.ABS Collector 33R1A (910808 1521:53)
1. NOT 2. IN 3. IN 4. IN 5. END
1993 Mar 05 Fri 1815:44 TPF$. TPFS.REL SYS$LIBS*FtSA.CBEP$$RSA SYS$LIB$*RSA.RDI/R-ACOBDAT
AFCM status of output element is SETAFCM Quarter-word sensitive
ADDRESS LIMITS 001000 001726
471 IBANK WORDS DECIMAL 040000 061623
9108 DBANK WORDS DECIMAL STARTING ADDRESS 001336
SEGMENT $MAIN$
001000 001726
040000 061623
ERWRLIBT12 MAY 90 10:37:08 M$PKT$ AUG 90 16:10:55
C$NPADS AUG 90 19:05:18 C$S400 DEC 90 13:37:46 C$RETO AUG 90 18:58:21 MEWERR(COMMONBLOCK) C$5300 JAN 91 11:32:50
C$PCRLOG AUG 91 09:47:08 CEEP$$ACOB/PART-LIB-CB AUG 91 10:13:59 REL $(1) MAR 93 18:15:44
$ (3)
24
CBEP$$RSA
24 AUG 91 01:01:32 RDMR-ACOBDAT
001356 001726 $(0) 041747 061622
10 JAN 92 13:23:24
$(2) 061623 061623
Common Banks referenced ----------
C$S30S 0400103
C$S115 0400105 RDMR$FTNCONT 0401074
END MAP. ERRORS: 0 TIME: 23.502 @XQT Enter 4 digit employee number Record deleted Enter 4 digit employee number ALL DONE.
STORAGE: 016412/015204/016170/0/0130076
10-20 SG 3605

Data Manipulation
Cursor Requirements for Commands
Table 10-1. Command Summary
Command Cursor Requirements
INSERT None required
UPDATE Positioned
DECLARE of cursor must be with the FOR UPDATE OF clause
Only columns named in the FOR UPDATE OF clause can be updated
Cursor cannot be declared read-only or for RANDOM ACCESS
Successful FETCH must immediately precede the UPDATE
UPDATE Searched
None required
DELETE Cursor cannot be declared read-only or for RANDOM ACCESS
Successful FETCH must immediately precede the DELETE
Cursor does not need to be declared with the FOR UPDATE clause
SG 3605 10-21

Data Manipulation
Exercise 10-1
Write the SQL code to perform the following data manipulation.
1. Change the salary for the employee with EMPNO = 5146 to 1250.
2. Change the commission for each salesman to 500.
Q Vc•-..1.
_
3. Change EMPNO 5437 to 5620.
flo
4. Give all managers a 12 percent raise.
10-22 SG 3605

Data Manipulation
Lab 10-1
Write and execute a COBOL program that reads values for a row of the DEPT table and insert the row into the table. Have the program display the inserted row.
Extension: Continue to read and insert rows until a dummy value of 999 is entered for DNO.
SG 3605 10-23

11 Keys and Updating

Keys and Updating
Module 11 Keys and Updating
Module Objectives 11-3
Benefit Statement 11-3
Materials 11-3
Primary Keys 11-4
Update Anomalies 11-5
Foreign Keys 11-6 Introduction 11-6 Parent Table / Child Table Relationships 11-6 Foreign Key Considerations 11-7 Foreign Keys and INSERT 11-8 Foreign Keys and DELETE 11-9 Foreign Keys and UPDATE 11-10 Rules for Parent - Child Relationships 11-11
Lab 11-1 11-12
SG 3605 11-1

Keys and Updating
Module Objectives
Upon completion of this module, you should be able to
• Update tables containing foreign keys.
— Define primary keys and foreign keys.
— Describe possible update anomalies and a method of maintaining referential integrity.
— List the effects of foreign keys on deletions and updates.
Benefit Statement
How can you maintain consistency between tables? This is the main question answered in this module. And once you establish the mechanisms to maintain consistency, how do you update your database?
Materials
• OS 1100 UDS Relational Data Management System (UDS RDMS 1100) Administration Guide
SG 3605 11-3

Keys and Updating
Primary Keys
• Unique identifier of each row
— One column or combination of columns
— Multi-column key called "composite key"
• Primary keys are specified when table is created
- Table is indexed on primary key
- Columns must be defined as NOT NULL
• Other columns may be specified as secondary indexes
- Advantage = Speeds up retrieval
Disadvantage = Adds overhead on updates
DNO DNAME LOC
100 ACCOUNT ING ATLANTA 200 SALES NEW YORK 300 MARKETING DETROIT 400 DISTRIBUTION PRINCETON
INDEX
100 200 300 400
Figure 11-1. Primary Keys Illustrated
11-4 SG 3605

Keys and Updating
Update Anomalies
• Anomaly - Deviation from the expected
• What would happen to the EMP table below if you executed the following updates?
UPDATE DEPT SET DNO = 500 WHERE DNO = 200
INSERT INTO EMP VALUES (5999,'GOOVSALESREP',523000,900701,2300,NULL)
• DNO is primary key of DEPT, but is also a column of EMP
• Possibility of update anomalies can be reduced by good database design
• RDMS can perform some integrity checking for you ES
Table 11-1. EMP
EMP NO ENAME JOB MGR I DNO I HIREDATE I SAL COMM
5010 FOSTER SALESREP 5234 200 860714 2700 400 5146 BROWN CLERK 5234 200 871011 1000 5234 WOODWORTH MANAGER 5784 200 790219 3250 5237 ROCKWELL ACCOUNTANT 5743 100 840618 2175 5437 MARTIN SALESREP 5234 200 870326 2500 300 5469 ADAMS SALESREP 5234 200 811102 2250 500 5630 GLASS ACCOUNTANT 5743 100 871220 1850 5702 TURNER CLERK 5743 100 890515 900 5743 LAWSON MANAGER 5784 100 830510 3400
5765 JOHNSON CLERK 5984 400 891221 975
5784 WILLIAMS PRESIDENT 300 781015 5200 5896 SMITH CLERK 5984 400 880913 1050
5942 FORD SALESREP 5234 200 890316 2375 0
5984 HYDE MANAGER 5784 400 850901 2900
SG 3605
11-5

Keys and Updating
Foreign Keys
Introduction
• A foreign key is a column in a table that is a primary key in another table
• Used to maintain data consistency between tables
• Defines a relationship between tables
• Causes data checking when tables are updated
• May be declared in CREATE TABLE command by DBA or added later
CREATE TABLE EMP IN MY AREA COLUMNS ARE EMPNO : DECIMAL(4),
ENAME : CHARACTER(1 0), ... PRIMARY KEY KEY1 IS EMPNO ASCENDING FOREIGN KEY KEY2 IS DNO
REFERS TO DNO OF DEPT
Parent Table I Child Table Relationships
• Table in which column is primary key is parent table
• Table in which column is foreign key is child table
• Figure 11-2 illustrates the parent - child relationship.
11-6 SG 3605

CHILD EMP
EMPNO ENAME JOB MGR DNO HIREDATE SAL COMM
5437 MART IN SALESREP 5234 200 870326 2500 300 5469 ADAMS SALESREP 5234 200 811102 2250 500 5630 GLASS ACCOUNTANT 5743 100 871220 1850 5743 LAWSON MANAGER 5784 100 830510 3400 5765 JOHNSON CLERK 5984 400 891221 975 5784 WILLIAMS PRES IDENT 300 781015 5200 5942 FORD SALESREP 5234 200 890316 2375 0 5984 HYDE MANAGER 5784 400 850901 2900
Keys and Updating
PARENT DEPT DNO DNAME LOC
100 ACCOUNTING ATLANTA 200 SALES NEW YORK 300 MARKETING DETROIT 400 DISTRIBUTION PRINCETON
Figure 11-2. DNO in the Parent and Child Tables
Foreign Key Considerations
• One table can be parent of up to 50 children
• One table can be child of up to 25 parents
• A table may be parent of one foreign key and child of another
• Column-names of foreign key-primary key may be different, but datatypes of the columns must be the same
• If foreign key relationship is added after tables have data, RDMS does not check retroactively if data satisfy integrity constraints
SG 3605 11-7

Keys and Updating
Foreign Keys and INSERT
• Insert a row into child table
- Parent table must have a row with the primary key value corresponding to the foreign key
- Then insert row in child table
• Sample problem
— If foreign key DNO is defined as a foreign key, as shown in Figure 11-2, and the following INSERT is executed:
INSERT INTO EMP VALUES (5999:GOOD',ZALESREP',5234,600,900701,2300)
— An error message is generated, since there is no DNO = 600
• Problem solution: Add the corresponding department to the DEPT table, then insert the row in EMP
11-8 SG 3605

Keys and Updating
Foreign Keys and DELETE
• Delete row in parent table
- There must be no rows in child table having primary key value from parent as the foreign key
- Change rows in child table so foreign key is a valid primary key value
- Or, delete rows in child table
• Sample problem
— Attempt to delete a row in the DEPT table
DELETE FROM DEPT WHERE DNO = 200
— Generates an error message since all the rows in EMP having DNO = 200 will be stranded
• Solution to problem
— Delete all rows in EMP with DNO = 200
— Then delete row from DEPT where DNO = 200
SG 3605 11-9

Keys and Updating
Foreign Keys and UPDATE
• Update primary key value in parent table
There must be no rows in child table having old primary key value from parent as the foreign key
- Change rows in hild table so foreign key is a valid primary key value
- Or, delete rows in child table
• Sample Problem: The following UPDATE generates an error message since all the rows in EMP having DNO = 200 will be stranded
UPDATE DEPT SET DNO = 500 WHERE DNO = 200
• Solution to above problem
- Insert a row in DEPT with DNO = 500
- Update the DNO of employees to 500 where DNO = 200
- Delete row from DEPT where DNO = 200
• Update foreign key value in child table
— May be changed to any other primary key value from parent table
Example: Transfers Brown from Department 200, Sales, to 400, Distribution
UPDATE EMP SET DNO = 400 WHERE EMPNO = 5146
11-10 SG 3605

Keys and Updating
Rules for Parent - Child Relationships
C
Cannot create children without parents
Cannot leave an orphan
Figure 11-3. Summary of Rules
SG 3605 11-11

Keys and Updating
Lab 11-1
Use IPF SQL or MAPPER to perform the following updates.
The tables you have been working with have a foreign key. The column DNO in EMP is declared as a foreign key referring to DNO in DEPT. You will not use these tables again after this exercise. You may commit or rollback the changes you make.
1. Try to insert a row with a non-existent DNO into EMP_
2. Perform the correct procedure for inserting the same row as above into EMP.
3. Try to delete a row directly from DEPT whose primary key is associated with one or more rows in EMP,' '
4. Perform the procedure described in number 3 correctly.
5. Try to update a row in EMP, changing the DNO to a currently non-existent value.
6. Update a row as above, changing DNO from one its current value to another valid value.
7. Try to change a DNO in DEPT which has a corresponding foreign key value in EMP.
8. Perform the steps necessary to accomplish number 7 correctly.
11-12 SG 3605

12 Obtaining Table Definition Information

Obtaining Table Definition Information
Module 12 Obtaining Table Definition Information
Module Objectives 12-3
Benefit Statement 12-3
Materials 12-3
MAPPER RDI Access 12-4
Unisys Repository Manager (UREP 1100) 12-6 Introduction 12-6 Calling the Repository Manager 12-7 UREP Example 12-8
Lab 12-1 12-10
SG 3605 12-1

Obtaining Table Definition Information
Module Objectives
Upon completion of this module, you should be able to
• Obtain table definition information in one of two ways:
- Using the MAPPER MRI interface
Using UREP
Benefit Statement
You will need to obtain table information to discover the data types and sizes for the columns in tables. This information is needed for writing host program variables. The table information provided by UREP will also tell you about primary, secondary, and foreign keys that exist for your tables.
Materials
• MAPPER Relational Interface (MRI) Relational Database Interface (RDI) Operations Guide
• OS 1100 UDS Unisys Repository Manager (UDS UREP) Programming Reference Manual
SG 3605 12-3

RN Select menu
Retrieve rows from a single relational table.
Table name rosyschemai.emp
Column names -> ? Where clause ->
Retrieve all rows? -> y If no, how many? -> 1
Number of rows to skip ->
Extra options? -> n
Place cursor here and press XMIT -> Press XMIT from here for detailed help ->
Null Symbol -> *
1 2 3 4RDIMnu 5 6Specl 7 8Help 9 18Quit
Obtaining Table Definition Information
MAPPER RDI Access
How to obtain table column information using the MAPPER RDI interface.
Step 1. On the RDI Menu, transmit from the Select entry as shown in Figure 12-1.
RDI RDI menu
Tab to your choice and press XMIT
Select Join
Insert ► Delete ► Update ► Create ►
SQL ► Utilities menu Detailed help ►
Rev. Level 3R3
3 4 5 6DBMS 7Envmnt 8Help 9 18Quit
Figure 12-1. RDI Menu
Step 2. On the Select menu, enter the table name and a question mark in the Column names field. Notice that the table name is qualified by the name ROSVSCREMAL
Figure 12-2. Select Menu
12-4
SG 3605

Obtaining Table Definition Information
Step 3. The RESULT displayed contains the column information for the EMP table, as shown in Figure 12-3.
Line, 8 Roll, - RESULT .DATE 83 MAR 93 09:38:39 REPORT GENERATION DAA . Table 1 - rosyschemal.emp . To select column names, enter the numbers 1-126 in the first field tit) . and press XMIT. The columns will be displayed from left to right . In the order you specify. Press the Resume key to continue. , * it .TAB. COLUMN NAME . TYPE .SIZE .DECPT.NF.PH to=
1 EMPNO DECIMAL 5. ONY 1 ENAME CHARACTER 18 N N 1 JOB CHARACTER 10 V N 1 MGR DECIMAL 5 OYN 1 DNO DECIMAL 4 0 Y N 1 HIREDATE DECIMAL 7 0 Y N 1 SAL DECIMAL 5 8 V Pi 1 COMM DECIMAL 5 8 V N
. SIZE = size of column indicated by COLUMN NAME
. DECPT = number of decimal places if TYPE = decimal
. NF = null flag. N = nulls not allowed, Y = nulls allowed
. PH = primary key. Y =_EPriREPORTmary , key, N = not primary key
1Resume Mint 3 4RetDurn 5 6LineCh 7 8 10Quit
Figure 12-3. Result with Table Column Information
• Column information includes:
Column number
Number of the table being displayed
Column name
- Data type of the column
- Number of characters or size
Number of decimal places, if allowed
- If nulls area allowed
If the column is the primary key or a part of the primary key
SG 3605 12-5

Obtaining Table Definition Information
Unisys Repository Manager (UREP 1100)
Introduction
• Provides a focal point for management of corporate information resources
• UREP manages the repository, a meta-database, a relational database
• Benefits
— Locate information
- Identify how information is used
— Identify who uses information
- See how changes affect other related information
• When tables or views are created, information is written to the database
- Column names, data types, and sizes
- Keynames and composition
- Foreign key relationships
• Reports are available to provide information on how the tables and views are defined
12-6 SG 3605

Obtaining Table Definition Information
Calling the Repository Manager
@DD,option source-input-element,source-output-element,application-group
• Some of the processor options include:
E echoing the incoming processor commands; they are not printed otherwise
D demand execution
B batch execution
X terminating UREP in error mode if executing in batch and an error is encountered
• The source-input-element optionally specifies UREP commands
• The source-output-element optionally contains the output
• The application-group specifies the application group containing your tables
— If omitted, the default UDS Control application is used
— The UREP standard release default is UDSSRC
• Commands are written in the Data Dictionary System (DDS) command language
Note: Consult OS 1100 UDS Unisys Repository Manager (UDS UREP) Programming Reference Manual for details on the commands.
SG 3605 12-7

ACTIVE 1 13 8 8 0 0 RANDOM FALSE 0 TRUE COLUMNAR
Code Type
1 DECIMAL
2 CHARACTER
3 CHARACTER
4 DECIMAL
5 DECIMAL
6 DECIMAL
7 DECIMAL
8 DECIMAL
Size Scale / Precision
5 0
10 0
10 0
0
4 0
7 0
5 0
5 0
ENO
Obtaining Table Definition Information
UREP Example
The following example illustrates the commands to obtain table information for the EMP and DEPT tables.
@DD,E UREP 1R2 (08/16/91 11:09:26) 03/26/93 15:48:14 *REMARK* UREP7403 The default UDS application ( UDSSRC ) will be used.
1 process table emp for schema rosyschemal report
** Report for Table EMP for Schema ROSVSCHEMA1 ***
Logical Filename: EMPLOYEE for Schema ROSVSCHEMA1
Preamble Length : 14
Rdt Length :
52 Total Length :
66
Owner Userid : Data Access Control : Base Relation Code : Record Size(words) : Number of Non-deleted Items : Last Non-deleted Item : Number of Foreign Keys : Number of Member Relations : Loading Order : Item Mod Flag : Current Number Indexes : Matching Order Flag : Screen Type :
Columns : Name Nulls EMPNO NOT-ALLOWED ENAME NOT-ALLOWED JOB ALLOWED MGR ALLOWED DNO ALLOWED HIREDATE ALLOWED SAL ALLOWED COMM ALLOWED
Primary Key : Column, Direction
EMPNO, ASCENDING
12-8 SG 3605

ACTIVE 1 7 3 3 0 1 RANDOM FALSE 0 TRUE COLUMNAR
Code Type
1 DECIMAL
2 CHARACTER
3 CHARACTER
Scale / Size Precision
4 0
12 0
10
0
Obtaining Table Definition Information
2 process table dept for schema rosyschemal report
*** Report for Table DEPT for Schema ROSVSCHEMA1 ***
Logical Filename: DEPARTMENT for Schema ROSVSCHEMA1
Preamble Length : 14 Rdt Length :
41 Total Length :
55
Owner Userid : Data Access Control : Base Relation Code : Record Size (words) : Number of Non-deleted Items : Last Non-deleted Item : Number of Foreign Keys : Number of Member Relations : Loading Order : Item Mod Flag : Current Number Indexes : Matching Order Flag : Screen Type :
Columns : Name Nulls DNO NOT-ALLOWED DNAME NOT-ALLOWED LOC ALLOWED
Primary Key : K1 Column, Direction
DNO, ASCENDING
Member Relations (foreign key #) ROSVSCHEMAl. EMP FOR KEY( 1)
END UREP ( 0 )FATALS ( 0 }ERRORS ( 0 }WARNINGS ( 1 )REMARKS .
SG 3605 12-9

Obtaining Table Definition Information
Lab 12-1
Use the MAPPER MRI interface or UREP directly to obtain table information for the EMP table you are working with. How does the information received compare to the information contained in this module?
12-10 SG 3605

13 Views

Views
Module 13 Views
Module Objectives 13-3
Benefit Statement 13-3
Materials 13-3
Views 13-4 Basic Definition 13-4 What is a View? 13-5 Purpose of Views 13-6
CREATE VIEW Command 13-7 View Example 13-8 Columns in Views 13-9 Data Checking 13-10 Security 13-10
Updating Views 13-11
DROP VIEW Command 13-12
Exercise 13-1 13-13
Lab 13-1 13-14
SG 3605 13-1

Views
Module Objectives
Upon completion of this module, you should be able to
• Create and use views
- Define a view and identify the advantages of views
- Identify the limitations of updates allowed on views
- Drop views
Benefit Statement
By working with views you will be able to solve several database problems. You will see how to limit the information that is viewed or that can be updated by users. You also will be able to safeguard your table from updates with "unrealistic" values.
Materials
• OS 1100 UDS Relational Data Management System (UDS RDMS 1100) and IPF SQL Interface End Use Guide
• OS 1100 UDS Relational Data Management System (UDS RDMS 1100) SQL Programming Reference Manual
SG 3605 13-3

Views
Views
Basic Definition
A view is a window into the data. Views provide multiple perspectives of the same underlying tables.
Figure 13-1 shows three columns and a few rows that comprise the EMPMGR view.
EMPMGR View
EMPNO ENAME JOB EMP Table
5010 FOSTER SALESREPT 5146 BROWN CLERK MGR DNO HIREDATE SAL COMM 5234 WOODWORTH MANAGER 5237 ROCKWELL ACCOUNTANT 5234 200 860714 2700 550
5234 200 871011 1000 5784 200 790219 3250 5743 100 840618 2175
5437 MARTIN SALESREP 5234 200 870326 2500 300 5469 ADAMS SALESREP 523 4 200 811102 2250 500 5630 GLASS ACCOUNTANT 5743 100 871220 1850 5702 TURNER CLERK 5743 100 890515 900 5743 LAWSON MANAGER 5784 100 830510 3400 5765 JOHNSON CLERK 5984 400 891221 975 5784 WILLIAMS PRESIDENT 300 781015 5200 5896 SMITH CLERK 5984 400 880913 1050 5942 FORD SALESREP 5234 200 890316 2375 0 5986 HYDE MANAGER 5784 400 850901 2900
Figure 13-1. Picturing a View
13-4 SG 3605

Views
What is a View?
• A view is:
- A virtual table derived from underlying base tables
- Defined with a query specification (SELECT statement)
- Stored in the repository
- A direct window to the data in the tables
Referenced in the same way as a table
Qualifier. View-name. Column-name
• A view can present:
- A subset of the data in a table
- Some of the columns
Some of the rows
- A join of several tables
• A view is based on logical, not physical tables
• A view does not have its own data storage
SG 3605 13-5

Views
Purpose of Views
• Hides underlying database structure
• Simplifies data access (SELECT clause)
— Pre-selects columns
— Joins tables
• Masks unnecessary data
• Restricts access to confidential information
• Prevents users from inserting bad data
13-6 SG 3605

Views
CREATE VIEW Command
CREATE VIEW [ Qualifier. ]view-name [ ( column1, column2, column3... )] AS query-specification - - [WITH CHECK OPTION ] [ WITH ACCESS CONTROL ]
• Unisys supports the SQL 89 form of this commmand; the WITH ACCESS CONTROL clause is a Unisys extension to the standard command
• Qualifier defaults to RDMS or name in USE QUALIFIER
• Version-names not allowed with view-names
• Column names default to names from SELECT list
• Definition of view is stored in repository
• Owner of a view is the user-id that created it; you cannot transfer ownership
• The query-specification cannot have an aggregate operation if you specify a view in the FROM clause that had an aggregate operation in its query specification; aggregate operations include:
- DISTINCT keyword in the select list
- GROUP BY clause
HAVING clause
- Built-in functions: SUM, AVG, MAX, MIN, COUNT
SG 3605 13-7

Views
View Example
CREATE VIEW EMP_LOC (NAME, LOCATION) AS SELECT ENAME, LOC FROM EMP, DEPT WHERE EMP.DNO = DEPT.DNO
Defines the virtual table:
--Name---FOSTER BROWN WOODWORTH ROCKWELL MARTIN ADAMS GLASS TURNER LAWSON JOHNSON WILLIAMS SMITH FORD HYDE
-Location-NEW YORK NEW YORK NEW YORK ATLANTA NEW YORK NEW YORK ATLANTA PRINCETON ATLANTA PRINCETON DETROIT PRINCETON NEW YORK PRINCETON
A view can be queried just like a base table.
SELECT DISTINCT LOCATION FROM EMP_LOC
-Location- PRINCETON ATLANTA NEW YORK DETROIT
13-8 SG 3605

Views
Columns in Views
• Columns can be renamed
• Number of columns must equal number of items in SELECT list
• Order of column names corresponds to order of items in SELECT list
• Columns can be derived values using:
- Functions
Arithmetic expressions
- Constants
• Column name list is mandatory when SELECT list contains:
Duplicate column names
- Calculations (arithmetic expressions/functions)
- Constants
Example:
CREATE VIEW BONUS (EMPNO, NAME, SALARY, COMM, BONUS) AS SELECT EMPNO, ENAME, SAL, COMM, SAL*.10 FROM EMP
SG 3605 13-9

Views
Data Checking
WITH CHECK OPTION
• Used to create domain constraints on column values
• UPDATE and INSERT commands have values checked against WHERE clause of the definition of the view
Example:
CREATE VIEW CHECKED VIEW AS SELECT * FROM EMP WHERE HIREDATE > 900101 WITH CHECK OPTION
Security
WITH ACCESS CONTROL
• Controls who can access the view
• Owner of view is user who creates it
• Owner can use GRANT and REVOKE commands for privileges on view
• Owner inherits privileges from base tables on which view is defined
Example:
CREATE VIEW PRIVATE_VIEW AS SELECT EMPNO, SAL FROM EMP WITH ACCESS CONTROL
13-10 SG 3605

Views
Updating Views
• All changes to a view are reflected in the base table and vice versa
• Views are either read-only or updatable
View is read-only if the CREATE VIEW command includes any of the following
- DISTINCT keyword
- An entry in the select list other than a column specification or *
- A column specification that appears more than once in the select list
- A GROUP BY clause
- A HAVING clause
A FROM clause that references more than one table or view
- A FROM clause that identifies a read-only view
• INSERT and DELETE restrictions
- View must meet all UPDATE conditions
- View must select all columns in base table
SG 3605 13-11

Views
DROP VIEW Command
DROP VIEW [ qualifier. ]view-name
• This command is not available in SQL 89
• Removes a view definition from the repository
• Only owner can drop a view
• Views are dropped automatically when:
- Column in base table is changed or dropped
- Base table or view is dropped
- Owner's access to base table is removed
— Access control is activated for a different owner for an underlying base table
Example:
DROP TABLE QUAL1.TABLE1, TABLE2, QUAL2.TABLE3
13-12 SG 3605

Views
Exercise 13-1
Views
1. What is a view?
2. List four advantages of using views.
3. What must be true to be able to perform updates on a view?
4. What must be true to be able to perform inserts or deletes on a view?
SG 3605 13-13

Views
Lab 13-1
Use the IPF SQL to perform the following exercise.
1. Create a view based on EMP and DEPT, and another view based on EMP alone. Incorporate renaming some columns and use of functions and/or arithmetic expressions.
- Use the IPF File capability to create the views.
- Start your commands with a BEGIN THREAD command and end with an END THREAD command.
2. Attempt to update the first view.
3. Attempt to delete a row from the first view; from the second view.
4. Create a third view that will be updatable.
5. Perform an INSERT, UPDATE, and DELETE on the third view.
13-14 SG 3605

14 More About Threads and UDS

More About Threads and UDS
Module 14 More About Threads and UDS
Module Objectives 14-3
Benefit Statement 14-3
Materials 14-3
Threads 14-4
Threads and Steps 14-5
Thread Control Commands 14-6
Recovery and Thread Control 14-7
BEGIN THREAD Command Revisited 14-8 Application Groups 14-9 Recovery Options 14-10
COMMIT Command 14-11
Message Recovery on COMMIT/END THREAD 14-12
Message Recovery on ROLLBACK 14-13
Locking 14-14 Concurrent Access 14-14 Locking 14-14 Types of Locks 14-15
LOCK Command 14-16
Implicit RDMS Row Locks 14-17
Locking Conflicts 14-18
Deadlock 14-19
Resolving Deadlock 14-20
UNLOCK Command 14-21
Program Flow with Locks 14-22
Exercise 14-1 14-23
SG 3605 14-1

More About Threads and UDS
Module Objectives
Upon completion of this module, you should be able to
• Select recovery options for recoverable steps.
Describe or use the locking mechanisms:
- Describe the implicit locking by UDS.
- Use the explicit locking commands.
Benefit Statement
Two large issues related to database integrity center around disruption of the computer itself and multiple users accessing the data. In this module you will realize the choices you have at your disposal in regard to these issues, as well as the automatic coverage provided by UDS Control and the Integrated Recovery Utility.
Materials
• OS 1100 UDS Relational Data Management System (UDS RDMS 1100) and IPF SQL Interface End Use Guide
• OS 1100 UDS Relational Data Management System (UDS RDMS 1100) SQL Programming Reference Manual
• OS 1100 UDS Relational Data Management System (UDS RDMS 1100) Administration Guide
• OS 1100 Universal Compiling System (UCS) Application Development Programming Guide, Volume 1
SG 3605 14-3

More About Threads and UDS
Threads
• A thread is a work session with UDS Control
- Each thread belongs to one user
- Each thread exists in one application group
- Several threads may be active at one time
• UDS Control establishes your database session environment
Thread control
- Application groups
- Error message handling
Recovery options
- Concurrency control
• Thread control commands are processed directly by UDS Control, without invoking RDMS
14-4 SG 3605

More About Threads and UDS
Threads and Steps
step step step step step
>< >< >< ><
0 0 0 0 >
Start BEGIN COMMIT COMMIT COMMIT ROLLBACK END End Program THREAD THREAD Program
Figure 14-1. Step - Thread Control Relationships
• A thread's session with UDS 1100 can be subdivided into steps
• A step is logical unit of work
- Sequence of commands that belong together
- All changes are made permanent or
- All changes are undone
Smallest recoverable unit of a thread
• Integrated Recovery Utility (IRU) recovers to the previous step
• Each step begins and ends with a thread control command
<
SG 3605 14-5

More About Threads and UDS
Thread Control Commands
BEGIN THREAD
— Establishes a new session with UDS
• COMMIT WORK
— Ends a step
— Updates since last thread control command are written to database
• ROLLBACK
— Ends a step
- Updates since last thread control command are discarded
• END THREAD
- Ends thread and commits changes
- Program must BEGIN THREAD again before issuing more SQL commands
14-6 SG 3605

More About Threads and UDS
Recovery and Thread Control
• Recovery is the process of returning the database to a consistent state
- Follows a user error or a hardware/software failure
- Recovery is a function of UDS Control
- Integrated Recovery recovers to beginning of step
• The type of recovery performed depends on:
— Creating table storage-area as recoverable
— BEGIN THREAD command recovery-option
• As a programmer, it is important to know if the file is recoverable
• BEGIN THREAD command declares the type of recovery to use
If thread is recoverable, ROLLBACK and COMMIT commands may break it into smaller units of processing (steps)
• At end of ROLLBACK or COMMIT, the data is in a consistent state
— All changes are discarded (ROLLBACK)
— All changes are written (COMMIT)
SG 3605 14-7

More About Threads and UDS
BEGIN THREAD Command Revisited
BEGIN THREAD [ thread-name ] FOR [ APPLICATION ] application-name [ options ]
• Unisys implementation
• Where application-name may be an alias or application group to use
- Application names are limited to 6 characters
- Alias names are limited to 12 characters
• The UPDATE option has the format:
UPDATE ( recovery-option ) [ UDSMSG UDSMESSAGE UDSMESSAGES ]
• Where recovery-option may be:
COMMANDLOOKS
- DEFERRED
- QUICKLOOKS
- NONE
Example
BEGIN THREAD t1 FOR APPSVN UPDATE (DEFERRED)
14-8 SG 3605

More About Threads and UDS
Application Groups
• An OS 1100 software partition
- Purpose is to create multiple working environments
- Each environment acts as an independent, recoverable system
- Up to nine application groups supported on a system
- Each has its own common banks, database files, audit files, repository, and other support components
- Default application group name is UDSSRC
• BEGIN THREAD determines application group for rest of program execution
• ACOB program with SQL must be collected with proper application group elements
- Two elements are CBEP$$RSA and RDMR-ACOBDAT
- Typical default application group file name is SYS$LIB$*RSA
- DBA must be consulted for filename for other application groups
• UCOB program with SQL must be linked to proper application group elements
- Linking to the UDSSRC requires nothing by user
- ESQL program uses keyword option APPLICATION/application-name at compile time for, alternate application group (not UDSSRC)
- ESQL or ISQL dynamically links to alternate application groups with proper @USE before execution
Example: Compile and execute a UCOB ESQL program that will use application group seven
@UCOB,se sql.prog 1,tpf$.prog 1„,APPLICATION/AP PSVN
@USE LINK$PF,SYS$LIB$*APP$7. @XQT tpf$.progl
SG 3605 14-9

More About Threads and UDS
Recovery Options
• QUICKLOOKS
- Snapshot of page is taken before first update of page in a step
- Database is recoverable to the before-image taken
- Recommended for large number of updates
• DEFERRED
- No updates written to database until COMMIT or END THREAD issued
- Changes saved in temporary file
- Database has only most recent updated copy of each page
- Recommended for few updates or intentional ROLLBACKS
Default recovery option (New with RDMS 5R1)
• COIVIMANDLOOKS
- Snapshot of page is taken before every update command
- The first before-image is saved until the end of the step
- If an update command succeeds, the previous commandlook is discarded
- If update fails, database is restored to before-image state
- Similar to Quicklooks, but more overhead
- Recommended for interactive programs where SQL command depends on user input
• NONE
- No recovery is possible, not a recommended option
- Use only on storage-areas defined as non-recoverable
14-10 SG 3605

More About Threads and UDS
COMMIT Command
COMMIT WORK
• Writes all updates to database since beginning of step
• Thread remains registered with UDS
• ROLLBACK can only recover to previous COMMIT (end of last step)
• Releases all implicit locks set by RDMS
Example:
COMMIT WORK
SG 3605 14-11

More About Threads and UDS
Message Recovery on COMMIT/END THREAD
COMMIT [ WORK I THREAD ] [ step-control-option ]
END THREAD [ step-control-option ]
SQL extension for COMMIT
• Where step-control-option may be:
— ADVANCE
— TERMINATE
• Message options apply to Integrated Recovery only
• ADVANCE
— Terminates current step
— Begins new step
— Input message retained
• TERMINATE
- Terminates current step
- Releases input message to Message Control Bank (MCB)
14-12 SG 3605

More About Threads and UDS
Message Recovery on ROLLBACK
ROLLBACK [ WORK ] [ step-control-option ]
• SQL extension
Where the step-control-option specifies what to do with the message in Integrated Recovery environment
Note: Unless you are using TIP with MCB, it may not be relevant to specify this option.
• Not specified
— Use the default step-control option
• KEEP
— Resumes current step
— Input message is still associated with active step
• DISCARD
- Terminates current step
- Releases any deferred messages
- If input message is recoverable, queue it to a system error program
- If input message is not recoverable, release it
• RE QUEUE
- Terminates current step
- Message must be recoverable, so requeue for reprocessing of same step
SG 3605 14-13

More About Threads and UDS
Locking
Concurrent Access
In a normal database environment, many users will access the same table, maybe even the same rows, simultaneously. If everyone is just looking at the data, there is no problem with concurrent access. The problem occurs when two users want to update, or one user wants to update and another look at the same information. In this case, the database management system software must control who can read and who can update the data.
To ensure that no user is looking at information that is currently being changed, RDMS 1100 places contention locks on the data. Two rules apply:
1. At any given time, only one user can update a row.
2. While a user is updating a row, no one else may read it.
Locking
UDS Control and RDMS 1100 provide a system of locking that gives basic protections to users. You can let RDMS automatically do the locking for you. This is implicit locking. For more efficient processing and specific locking, you can incorporate LOCK commands explicitly in a program.
14-14 SG 3605

More About Threads and UDS
Types of Locks
• Specified by a combination of mode and usage
- The mode establishes how strong the lock is and is optional
- The usage establishes whether you are retrieving or updating data
Allowed for mode: EXCLUSIVE, PROTECTED, SHARED, not-specified
- Allowed for usage: RETRIEVAL, UPDATE
• RETRIEVAL (R)
— Thread will only read data
• UPDATE (U)
— Thread may alter data or table definitions
• SHARED (S)
- Other threads may concurrently access the table
- Row locks kept even when row is no longer current
- Prevents others from viewing updated but not yet committed data
• PROTECTED (P)
— No other thread may alter the table while the lock is on
• EXCLUSIVE (X)
— No other thread can access the table while the lock is on
- Strongest lock
• Eight types of locks are allowed by RDMS: R, SR, U, SU, PR, PU, XR, and XU
SG 3605
14-15

More About Threads and UDS
LOCK Command
LOCK [ TABLE ] table-specification-list [ IN lock-specification [ MODE ] ] [ ON CONFLICT conflict-option ]
• Unisys implementation
• Where table-specification-list may specify a list of tables separated by commas
- A view cannot be locked
- A separate LOCK command should be used for each table
- An error could occur for the command
- Some tables could be locked or others not, or queuing could take place for some but not all tables
• The lock-specification is in the format [ mode ] [ usage ], default RETRIEVAL
• The conflict-option specifies how to handle conflicts, default QUEUE
— RETURN means RDMS issues an error and control returns to your program - , ,
— QUEUE means I MS queues your program until the locking conflict is resolved
• Usage guidelines
— LOCK command precedes OPEN command execution
— Lock remains until table is explicitly unlocked or thread is ended
Examples:
LOCK EMP IN UPDATE MODE
LOCK EMP IN EXCLUSIVE RETRIEVAL MODE ON CONFLICT RETURN
14-16 SG 3605

More About Threads and UDS
Implicit RDMS Row Locks
RDMS implicitly locks rows of a table as they are read or updated. The type and duration of implicit lock depends on the type of explicit table-level lock used. Table 14-1 shows the implicit locks set by RDMS.
Table 14-1. Implicit Row-Level Locks Set by RDMS
Table Lock Specified
RDMS Sets This Implicit Row-level Lock on
Retrieved Rows
RDMS Sets This Implicit Row-level
Lock on Updated Rows
No lock specified Command-duration retrieval lock on each
retrieved row *
Step-duration exclusive update lock on each
updated row
Retrieval Command-duration retrieval lock on each
retrieved row *
Updated not allowed
Shared update Step-duration protected update lock on each
retrieved row
Step-duration exclusive update lock on each
updated row
Update Command-duration retrieval lock on each
retrieved row *
Step-duration exclusive update lock on each
updated row
Shared retrieval Step-duration retrieval lock on each retrieved row
Updates not allowed
Protected retrieval No lock on retrieved rows Updates not allowed
Protected update No lock on retrieved rows Step-duration exclusive update lock on each
updated row
Exclusive retrieval No lock on retrieved rows Updates not allowed
Exclusive update No lock on retrieved rows No locks on updated rows
For a cursor declared with the FOR UPDATE clause, RDMS places a retrieval lock on each row as it is fetched, releasing the lock only when you alter the currency of the cursor by fetching a different row from the cursor, closing the cursor, dropping the cursor, or ending the step.
SG 3605
14-17

More About Threads and UDS
Locking Conflicts
A locking conflict occurs if two users try to lock the same table at the same time. Table 14-2 summarizes the conditions in which locks from different runs conflict. An * indicates a conflict.
Conflicts apply to both table and row level locks, but table-level locks can only conflict with table-level locks, and row-level locks with row-level locks
Table 14-2. Locking Conflicts
Current Lock -3 New Usage i
R SR U SU PR PU XR XU
Retrieval * *
Shared Retrieval * *
Update * * * *
Shared Update * * * *
Protected Retrieval * * * * *
Protected Update * * * * * *
Exclusive Retrieval * * * * * * * *
Exclusive Update * * * * * * * *
• Horizontal axis represents the type of lock currently in place
• Vertical axis represents the type of lock requested by another run
L D cr-
14-18
SG 3605

More About Threads and UDS
Deadlock
Deadlock occurs when two or more runs are queued on locks held by each other so that none of the runs can resume execution.
Table 1
Table 2
---).Lock held
Lock attempted
Figure 14-2. Illustrating Deadlock
SG 3605 14-19

More About Threads and UDS
Resolving Deadlock
• Reduce probability of deadlock by using "strong", explicit locks
• Tradeoff - Strong locks reduce concurrent access
• RDMS returns deadlock status
— ERR-STAT = 6010
— Test in program
• Suggested resolution
— Wait from 1/10 to 1 second
Repeat all OPEN, INSERT, DELETE, and UPDATE commands in step rolled back
- Include in loop
- Use randomly generated wait times if several threads are doing this
'-;„ • " • -
• On conflict, the RETURN option of the LOCK command returns:
— ERR-STAT = 6004 when locking conflict occurs . - .
— RDMS performs END THREAD/ROLLBACK
14-20 SG 3605

More About Threads and UDS
UNLOCK Command
UNLOCK table-specification-list
• Unisys implementation
• Removes lock from table(s)
• Retrieval locks are dropped immediately
• Update locks are dropped at end of step
— COMMIT
- END THREAD
• If table is being used by an active cursor, UNLOCK generates an error
• UNLOCK is required to change lock mode on a table
Example:
UNLOCK EMP, DEPT
SG 3605 14-21

More About Threads and UDS
Program Flow with Locks
BEGIN THREAD
DECLARE CURSOR
LOCK
DROP CURSOR
V UNLOCK
END THREAD
Figure 14-3. Program Flow with Locks
14-22 SG 3605

More About Threads and UDS
Exercise 14-1
1. What is a step? What is the purpose of breaking a program into steps?
2. What occurs when a step is committed?
3. What occurs when a step is rolled back?
!-•
4. Why does RDMS lock tables?
SG 3605 14-23

15 Getting Physical -Tables and Storage Areas

Getting Physical - Tables and Storage Areas
Module 15 Getting Physical - Tables and Storage Areas
Module Objectives 15-3
Benefit Statement 15-3
Materials 15-3
Creating a Database 15-4
Schema 15-5
Storage-Areas 15-6
Storage-Areas, Files, and Tables 15-7
Logical Tables and Physical Files 15-8
Table Versions 15-9
Fully Qualified Table-Name 15-10
USE DEFAULT Command 15-11
How RDMS 1100 Locates Data 15-12
How RDMS 1100 Resolves Table References 15-13
Creating Versions Example 15-14
Exercise 15-1 15-15
SG 3605 15-1

Getting Physical - Tables and Storage Areas
Module Objectives
Upon completion of this module, you should be able to
• Describe the process of creating tables
- Identify the components of a fully qualified table name
Set a default table version using the SET DEFAULT VERSION command
— Describe the difference between a logical and physical table
- Describe the relationship between physical tables and storage areas
Benefit Statement
Access and manipulating tables have been the main topic for this course, but what if you are responsible for setting up the database. A few insights into creating the tables and how they relate to the database physical attributes are presented here. Your next step may be database administration!
Materials
• OS 1100 UDS Relational Data Management System (UDS RDMS 1100) Administration Guide
• OS 1100 UDS Relational Data Management System (UDS RDMS 1100) SQL Programming Reference Manual
SG 3605 15-3

Getting Physical - Tables and Storage Areas
Creating a Database
Catalog files for Storage - Area(s)
Create Schema Description
Create Storage - Area Description
Add Storage - Area Attributes
Process Storage - Area Check/Install
Create tables
Load data into tables
ECL
UREP
UREP
UREP
UREP
SQL
SQL
Figure 15-1. Steps to Creating a Database
15-4 SG 3605

Schema
Storage-Area Table Descriptions Descriptions
Getting Physical - Tables and Storage Areas
Schema
• Definition
Database definition that describes units of data, such as record types and relations
A name that identifies an arbitrary group of storage area definitions and table definitions in repository
Figure 15-2. Schema Function
SG 3605 15-5

Getting Physical - Tables and Storage Areas
Storage-Areas
• Storage-Areas are defined by the Database Administrator
• Definition contains:
Storage-Area Name
- Schema with which it is associated
Exec file name or TIP file number
— Version-name
• Each storage-area is associated with exactly one file
- Name of storage-area and file may be different
- Version-name of storage-area is same as that of table which will be stored in it
• Storage-area must be defined before corresponding table
• As programmer, need to know version-name for reference
15-6 SG 3605

Getting Physical - Tables and Storage Areas
Storage-Areas, Files, and Tables
Create Storage-Area
.41(
Company.Emp:Prod
Company.Emp:Tpst
Associate with File
PROD • EMP
TEST " EMP
Create Table
and Enter Data
Company.Emp:Prod
Compeny.Emp:Test
Figure 15-3. Connecting the Pieces
SG 3605 15-7

Getting Physical - Tables and Storage Areas
Logical Tables and Physical Files
• Logical table defines:
Column layout
- Datatypes
- Primary key(s)
- Secondary key(s)
- Foreign key(s)
• Versions permit spreading data across multiple physical files
• File-name is specified by storage-area version
• Characteristics of each file may be different
Audited/Not audited
Recoverable/Not recoverable
Pages allocated
15-8 SG 3605

Getting Physical - Tables and Storage Areas
Table Versions
• Versions of a table use the same table definition
• Versions of the table are created when different data is loaded in the specified table versions
• Versions can be used to divide a large table into tables with fewer rows
EMP :
EMP :
EI4P : DIVA
DIVE
DIVC
Figure 15-4. Table Versions
SG 3605 15-9

Getting Physical - Tables and Storage Areas
Fully Qualified Table-Name
schema-name. table-name:
• The schema-name is used as qualifier for table name
• Default qualifier is RDMS
• Default version
For RDMS is PRODUCTION
- For UREP is blank
These two are equivalent
• Table qualifier has nothing to do with EXEC file qualifiers
• Fully qualified table name may be used anywhere table name must be coded
• Can set up own defaults for qualifier/version so only table name is needed
Examples:
Company. Payroll:Production
Company.Payroll:Test
15-10 SG 3605

Getting Physical - Tables and Storage Areas
USE DEFAULT Command
USE DEFAULT[ QUALIFIERuse-name I VERSION version-name]
• Unisys implementation
The use-name may be:
- Schema-name
- Variable containing string to use of 30 or fewer characters
• Remains in effect until next USE command
• The version-name may be
— Name or string
— Variable containing version-name
Generalized programs
- Accept input of qualifier-name or version-name into program variables
- Then USE DEFAULT to access desired table
Examples:
USE DEFAULT QUALIFIER SALES_DEPT
USE DEFAULT QUALIFIER 'R & D'
USE DEFAULT VERSION TEST
USE DEFAULT VERSION $P1
. SG 3605
15-11

Getting Physical - Tables and Storage Areas
How RDMS 1100 Locates Data
Table name you give to RDMS:
Payroll
jr RDMS assumes this fully qualified name
1
RDMS.PAYROLL•PRODUCTION
vir
Items in RDT 2
Table name Qualifier Storage-Area name Column names Primary key Foreign key Indexes
Items in FDT V
Storage-Area name Schema name Version name File name Other attributes
Mass-storage file IL 4
Data associated with this
storage-area c_
Figure 15-5. RDMS Locating Data
15-12 SG 3605

Getting Physical - Tables and Storage Areas
How RDMS 1100 Resolves Table References
1. When you give RDMS a table name, it must first determine the full form of the name in the format schema.table:version.
If you do not specify the schema or version, RDMS uses the current default values.
Unless a USE command was entered, the default schema is RDMS, and the default version is PRODUCTION.
2. RDMS uses the schema and table names together to find the encoded form of the table description (Relational Table Description or RDT) in the RDT$FILE.
3. RDMS gets the storage-area name from the RDT, and combines it with the version name to identify the File Description Table (FDT) in FDT$FILE.
The FDT is the encoded form of the Storage-Area Definition.
This contains the name of the file in which the table data is physically stored.
4. RDMS gets the EXEC file name or TIP file number from the FDT. It then goes to the file and locates the table.
SG 3605 15-13
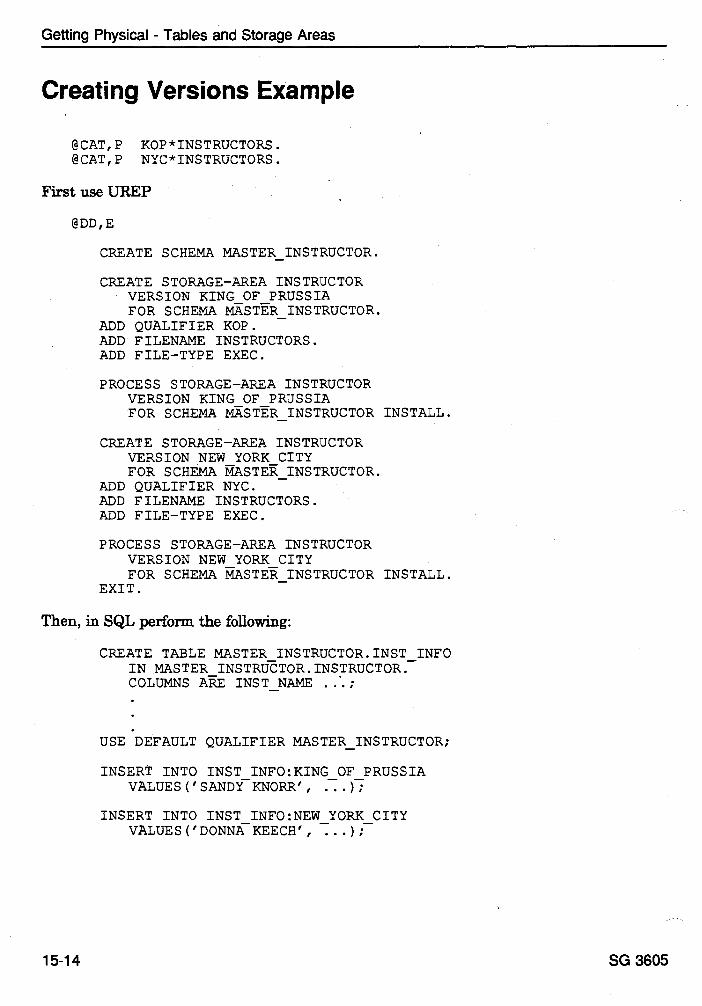
Getting Physical - Tables and Storage Areas
Creating Versions Example
@CAT,P KOP*INSTRUCTORS. @OAT,P NYC*INSTRUCTORS.
First use UREP
@DD,E
CREATE SCHEMA MASTER INSTRUCTOR.
CREATE STORAGE-AREA INSTRUCTOR VERSION KING_ OF PRUSSIA FOR SCHEMA MASTER_ INSTRUCTOR.
ADD QUALIFIER KOP. - ADD FILENAME INSTRUCTORS. ADD FILE-TYPE EXEC.
PROCESS STORAGE-AREA INSTRUCTOR VERSION KING_ OF PRUSSIA FOR SCHEMA MASTER INSTRUCTOR INSTALL.
CREATE STORAGE-AREA INSTRUCTOR VERSION NEW YORK CITY FOR SCHEMA MASTER_ INSTRUCTOR.
ADD QUALIFIER NYC. ADD FILENAME INSTRUCTORS. ADD FILE-TYPE EXEC.
PROCESS STORAGE-AREA INSTRUCTOR VERSION NEW YORK CITY FOR SCHEMA RASTE INSTRUCTOR INSTALL.
EXIT.
Then, in SQL perform the following:
CREATE TABLE MASTER INSTRUCTOR.INST INFO IN MASTER INSTRUCTOR.INSTRUCTOR. COLUMNS ARE INST NAME •
•
USE DEFAULT QUALIFIER MASTER INSTRUCTOR;
INSERT INTO INST_ INFO:KING_OFPRUSSIA VALUES('SANDY KNORR', ...);
INSERT INTO INST_ INFO:NEW_YORKCITY VALUES('DONNA KEECH', ...);
15-14 SG 3605

Getting Physical - Tables and Storage Areas
Exercise 15-1
1. What is a schema? How is it used by RDMS?
2. List three differences between a logical and a physical table. (7"
3. Write the commands needed to make the table-name EMP resolve to US.EMP:DIV1.
(`j
SG 3605 15-15

A System Usage Information
System Usage Information
Appendix A System Usage Information
System Essentials A-3
Demand Session and Instructions A-5
MAPPER Session and Instructions A-6
Obtaining Printout A-8
Compiling and Executing a Program in IPF A-9
Compiling and Executing a Program using ECL A-10
Use Runstreams A-10 ACOB program A-10 UCOB program A-10
Saving and Printing Compiler Listings A-11
Basic IPF Commands A-12
Command Line Commands A-12 Text Line Commands A-12
SG 3605 A-1

System Usage Information
System Essentials
Your instructor will assist you in filling out the information needed for this class.
• Demand Login
— $$open-ID
— User-ID/Password
— Run-ID
— Account
— Project-ID
• MAPPER Login
$$OPEN-ID
— MAPPER-ID
- User-ID
Password
— Department-#
• Printer information
Printer-ID
Printer location
Other
• Database information
- Qualifier/Schema-name
- Table Names
- Application group
SG 3605 A-3

System Usage Information
Demand Session and Instructions
You may need to note changes required by your site for the following "typical" session.
Note: The greater than sign ">" is used instead of the standard start of entry (SOE) character below.
>$$OPEN DMEA10
>USER-ID/PASSWORD
>Project-ID: STU . System either solicits project... or
>@RUN run-ID,account,stu ... or requires run statement
Note: You will need a couple of files for this class, a program file for your programs and a data file for your printout. The suggested names of the files will both have your STU number as the qualifier. The program file should be named SQL and the printfile named PRFIL. These are the names you will find in the provided runstreams. Change them if you wish, but don't step on someone else's files!
>@CAT,P SQL. . Use your STU## as the default qualifier
>@CAT,P PRFIL. . Catalog your files once and assign them at the
>@ASG,A SQL. beginning of each demand session
>@ASG,A PRFIL.
>@ASG,A AL3644*SQL. Contains program skeletons and addstreams
>@COPY,P AL3644*SQL.,STU *SQL. _
>@PRT,T SQL.
Note: The above command lists the elements provided for this class. When an element name has two parts divided by the "/", the first part tells you where this element is used and the second part tells you what it is used for. For example, the element LAB3-1 I UCOBSKEL is the element for Lab 3-1 and is a UCS COBOL skeleton. Other elements will be described by your instructor.
A-4 SG 3605

System Usage Information
Demand session stuff: @IPF, Compile, Execute, etc.
>
>@FIN
>$$CLOSE . Please close the session when done!
Additional Demand Notes:
MAPPER Session and Instructions
You may need to note changes required by your site for the following "typical" session.
>$$OPEN T4EA10
>EDMAP . Select a specific MAPPER
Enter userid,dept#,password on Menu or on the control line after ")"
>RDI . Entered from control line
. Other MAPPER session commands
>x . Entered from control line ▪ Exit from MAPPER
>$$CLOSE . Close the session
Additional MAPPER Notes
SG 3605 A-5

System Usage Information
Obtaining Printout
Note: This information is site dependent. You may have an on-site printer, a local attached printer, a remote printer, or no printer available! And how you access the printer will require specific instructions. Please make your notes below.
Some of the commands that obtain printout include:
>@SYM, U PRFIL„printer-id„print-banner . Queue to onsite printer
>@add,l sql.spool
DDP and Queue the file to a remote printer
>-C->site printer-ID IPF command for on-site printer
>aux MAPPER uses local printer attached to terminal. Menu .
>pr MAPPER queues output to site printer
Printer Notes
A-6 SG 3605

System Usage Information
Compiling and Executing a Program in IPF
• Login to IPF
>@IPF filename
• Retrieve program file into work space
>-C-->old Qual*filename.elt
• Set datamanager
>-C->Set $data := rdms
• Run program
›-C->run filename.elt, compiler, library-list
>-C-->run sql.lab3-1/ucobskel, ucob
IPF automatically compiles, Jinks, and executes element
— Defaults
— Executes work space
— Compiler corresponds to file type
— System library
>-C-->run ,ucob
Compiles and executes work space using ucob compiler and system library
• Print the program in the work space
>-C->Site printer-ID
SG 3605 A-7

System Usage Information
Compiling and Executing a Program using ECL
Use Runstreams
Note: Runstreams are provided in your student file to automate this process. Please modify them for your use during this class. If the version name of the element contains "r-u-n" it is likely to be a runstream. Example of using one:
>@ADD,L sql.lab3-1/runucobskel
ACOB program
The following pieces are intended to operate together in a demand session.
• Compile source program
>@ACOB,ES sql.lab3-1/acobskel,rel Relocatable output to TPF$
• Collect the program
>@ADD sql.map . Element map is in your work file
• Execute absolute
>@xqt abs . MAP output was to TPF$.abs
UCOB program
• Compile source program
>@UCOB,res sql.lab3-1/ucobskel,om . Output to TPF$.om
• Execute object module
>@xiqt. om . Invokes dynamic linking to libraries
A-8 SG 3605

System Usage Information
Saving and Printing Compiler Listings
Using and modifying the provided runstreams automates the process of using the standard ECL. You can save your printfile information in your program file with an ECL copy:
>@copy,i prfil.,sql.lab3-1/ranucobskel . Note the "ran" versus "run" name
A popular, but unsupported, pair of processors can be found at most sites: @BK1 and @BK2.
• Execute a breakpoint: @BK1
• Perform interim commands
• End breakpoint and view output in editor: @BK2,opts
- E for ED, C for CTS, I for IPF
• End breakpoint and queue output to printer: @BK2 printer-ID
Example 1
>@BK1
>@UCOB,res sql.lab3-1/ucobskel,om
>@BK2,I
Example 2
>@BK1
>@ACOB,se sql.lab3-1/acobskel,rel
>@EOF
>@ADD sql.map
>@BK2 prinl
SG 3605
A-9

System Usage Information
Basic IPF Commands
Command Line Commands
new Start a new file old Retrieve text of filename into work space save Save contents of work space (a new file) repl Save contents of work space (existing file) top Go to the top of the file bottom Go to the bottom of the file go Go to the given line number
Text Line Commands
In Insert n lines after this line IBn Insert n lines before this line G-i-n Go to n lines past this line G-n Go to n lines before this line Dn Delete n lines DS Delete start - Start of text to delete DE Delete end - End of text to delete Cn Copy n lines CS Copy start - Start of text to copy CE Copy end - End of text to copy CB Copy the marked text before this line CA Copy the marked text after this line Mn Move n lines MS Move start - Start of text to move ME Move end - End of text to move MB Move the marked text before this line MA Move the marked text after this line
A-10 SG 3605

B FORTRAN Examples

FORTRAN Examples
Appendix B FORTRAN Examples
SQL Commands in ASCII FORTRAN B-3
Sample ASCII FORTRAN Retrieval Program B-4
Example With GETERROR (FTN) B-6
SG 3605 B-1

FORTRAN Examples
SQL Commands in ASCII FORTRAN
Format 1
CALL F$RDMR ('SQL-COMMAND' ,
ERSTAT , AUXINF )
Format 2
CALL F$RDMR (SQL-COM-STRING-VARIABLE , ERSTAT
AUXINF )
The SQL command or the contents of SQL-COM-STRING-VARIABLE must end with a semicolon (;).
• ERROR-STATUS - A CHARACTER*4 item that contains a status code when RSA detects an error. Normal completion has status 0000.
• AUXILIARY-INFORMATION - An INTEGER item that contains the column position within the source command where RSA detects an error. If there is no error, the contents are meaningless.
Example
CHARACTER*132 RCOM CHARACTER*4 ERSTAT INTEGER AUXINF
CALL F$RDMR * ( 'BEGIN THREAD FOR UDSSRC READ
ERSTAT, AUXINF )
RCOM = 'DECLARE EMPLOYEE CURSOR SELECT * FROM EMP;' CALL F$RDMR ( RCOM, ERSTAT, AUXINF )
SG 3605 B-3

FORTRAN Examples
Sample ASCII FORTRAN Retrieval Program
If FORTRAN is your programming language, here is a complete program in ASCII FORTRAN.
(At this stage, you don't need to be concerned about the syntax and layout of the commands. This is explained in the modules. For now, look at the way the RDMS commands are embedded in the 'CALL F$R.DMR...' commands.)
Requirement: Read and display all the rows of the EMP table, showing all the columns
C c**************************************************************** C * MAIN PROGRAM TO PRINT CONTENTS OF THE "SALESMEN" TABLE c****************************************************************
CHARACTER*511 rcom CHARACTER*4 erstat INTEGER auxinf INTEGER rempno CHARACTER*10 rename CHARACTER*10 rjob INTEGER rmgr INTEGER rdno INTEGER rhirdt INTEGER rsal INTEGER rcomm
C c**************************************************************** C * CONNECT TO UDS *****************************************************************
RCOM = 'BEGIN THREAD FOR UDSSRC READ UDSMSG ;' CALL F$RDMR(RCOM, ERSTAT, AUXINF) CALL errchk(erstat, auxinf, ", *90, *90)
C C c**************************************************************** C DECLARE THE CURSOR c****************************************************************
PRINT '('Retrieves entire relation EMP', ///)' RCOM = 'DECLARE EMPLOYEE CURSOR SELECT * FROM EMP;' CALL F$RDMR(RCOM, ERSTAT, AUXINF) CALL errchk(erstat, auxinf, ' ', *90, *90)
B-4 SG 3605

FORTRAN Examples
C C**************************************** C LOOP TO READ TABLE AND PRINT ROW C**************************************** 10 CONTINUE
RCOM = 'FETCH NEXT EMPLOYEE INTO $P * $P6,$P7,$P8 ;' CALL F$RDMR(RCOM, ERSTAT, AUXINF, * REMPNO, RENAME, RJOB, RMGR, RDNO, CALL errchk(erstat, auxinf, '6001',
C
************************
* ************************
1, $P2, $P3, $P4, $P5,
RHIRDT, RSAL, RCOMM) *90, *80)
PRINT ' (1X, I4,1X,A, I3,1X, I6, 1X, I4,1X, I4) ' , * REMPNO, RENAME, RJOB, RMGR, RDNO, RHIRDT, RSAL, RCOMM) GO TO 10
C C 80
CONTINUE PRINT 'End of relation EMP.' CALL F$RDMR('END THREAD;', ERSTAT, AUXINF) CALL errchk(erstat, auxinf, ", *90, *90) PRINT '(23HONormal end of program.)' STOP
C 90 CONTINUE
PRINT '(40H0***** Error status program termination.)' CALL F$RDMR('END THREAD;', ERSTAT, AUXINF) STOP END
C C * C CC
C
C
C
SUBROUTINE TO TEST ERROR STATUS
SUBROUTINE errchk (erstat, auxinf, accept, *, *)
CHARACTER*4 accept @ Acceptable status for RETURN 2 INTEGER auxinf CHARACTER*4 erstat
IF (erstat .EQ. '0000') RETURN IF (erstat .EQ. accept) RETURN 2
PRINT '(29H0**** Unexpected error status ,A,11H at column,I3)', erstat, auxinf
RETURN 1
SG 3605 B-5

FORTRAN Examples
Example With GETERROR (FTN)
CHARACTER*132 El, E2, E3, E4, E5
ROOM = 'BEGIN THREAD T1 READ ;' CALL F$RDMR(RCOM, ERSTAT, AUXINF) IF ERRCOD .EQ. '0000' THEN (SKIP ROUND ERROR ROUTINE)
CALL F$RDMR ('GETERROR INTO $P1, $P2, $P3, $P4, $P5 ; * ERSTAT, AUXINF, El, E2, E3, E4, E5)
PRINT "(A132)', El PRINT '(A132)', E2 PRINT '(A132)', E3 PRINT '(A132)', E4 PRINT '(A132)', E5
B-6 SG 3605

C ACOB Skeleton

ACOB Skeleton
@PRT,S AL3644*SQL.LAB3-1/RUNACOB FURPUR 30R2A (910822 1304:40) 1993 Mar 17 Wed 1510:31 AL3644*SQL(1).LAB3-1/RUNACOB(0) • 1 @BRNPT PRINT$,prfil. 2 @PRT,S sql.lab3-1/runacob
3 @ACOB,SE sql.lab3-1/acobskel,TPF$.acobakM1 4 @MAP,S ,TPF$ABS
5 NOT TPF$.
6 IN TPF$.acobskel
7 IN SYS$LIB$*RSA.CBEP$$RSA
8 IN SYS$LIBPRSA.RDMR-ACOBBIAT
9 END
10 @XQT 11 @NWT PRINT$
12 @IPF TPF$.
13 OLD prfil.
14 L END,A,A,NUM
15 MOD SCR @PRT,S AL3644*SQL.LAB3-1/ACOBSKEL AL3644*SQL(1).LAB3-1/ACORSKEL(0)
1 IDENTIFICATION DIVISION. PROGRAM-ID. acobskel. ENVIRONMENT DIVISION. CONFIGURATION SECTION. SOURCE-COMPUTER. UNISYS-2200. OBJECT-COMPUTER. UNISYS-2200. * ********************************************************** *** This program uses interpretive SQL and ACOB to *** solve the lab3-1 assignment for SQL Programming ********************************************************** * DATA DIVISION. WORKING-STORAGE SECTION. * ********************************************************** *** Establish RDMS command error buffers and data ********************************************************** * *** * 01 room.
05 rlin
PIC X(40) OCCURS 12 TIMES. 01 err-stat
PIC 9(4). 01 aux-info
PIC S1(36). 01 error-text.
05 err-s
PIC X(132) OCCURS 4 TIMES. 01 err-s-index
PIC 9(4). 01 thread-flag
PIC 9 VALDE ZERO. 88 thread-has-begun
VALUE 1. 01 cursor-flag PIC 9 VALUE ZERO.
88 end-of-cursor
VALUE 1. 01 err-end-flag PIC 9 VALUE ZERO.
88 no-more-mage
VALUE 1. * *** Place for the retrieved record, * set up for printing
01 record-retrieved. 05 05
2 3 4 5 6 7 8 9 10 11 12 13 14 15 16 17 18 19 20 21 22 23 24 25 26 27 28 29 30 31 32 33 34 35 36 37 38 39 40
Error handling variables and message buffers
SG 3605 C-1

ACOB Skeleton
41 ************************************************************
42 *** BEGIN the thread, do the USE, clear the SQL buffer
43 ************************************************************ 44
45 *** Start the thread 46
47 PROCEDURE DIVISION.
48 000-main.
49 MOVE ' ;' TO room.
50 ENTER MASK 'acob$rdmr' USING room, err-stat, aux-info.
51 IF err-stat NOT = 0 GO TO 900-error-print. 52
53 *** Set table qualifier, clear buffer, set thread flag 54
55 MOVE ' ;' TO room.
56 ENTER MASK 'acob$rdmr' USING room, err-stat, aux-info.
57 GO TO 900-error-print. 58
59 MOVE 1 TO thread-flag. 60
61 ***********************************************************
62 *** Access RDMS - DECLARE and OPEN the cursor
63 *********************************************************** 64
65 *** Declare the cursor 66
67 MOVE ' ' TO room.
68 MOVE ' ' TO rlin(2).
69 MOVE ' ;' TO rlin(3).
70 ENTER MASK 'acob$rdmr' USING room, err-stat, aux-info.
71 IF err-stat NOT = 0 GO TO 900-error-print. 72
73 *** Open the cursor 74
75 MOVE ' ;' TO room.
76 ENTER MASK USING room, err-stat, aux-info.
77 IF err-stat NOT = 0 GO TO 900-error-print. 78
79 **********************************************************
80 ** Loop thru the rows, end the thread, then do cleanup
81 ********************************************************** 82
83 *** Loop to fetch a row and display it 84
85 200-loop.
86 MOVE ' ' TO room.
87 MOVE ' ;' TO rlin(2).
88 ENTER MASK 'acob$rdmr' USING room, err-stat, aux-info 89
90 IF err-stat = 6001 GO TO 400-drop-cursor.
91 IF err-stat NOT = 0 GO TO 900-error-print. 92
93 DISPLAY record-retrieved UPON PRINTER.
94 GO TO 200-loop. 95
96 400-drop-cursor.
97 DISPLAY 'No more data on fetch' UPON PRINTER.
98 MOVE 'DROP CURSOR employee •' TO room.
99 ENTER MASK 'acob$rdmr' USING room, err-stat, aux-info.
100 IF err-stat NOT = 0 GO TO 900-error-print. 101
102 MOVE SPACES TO room. 103
C-2 SG 3605

ACOB Skeleton
104 ************************************************************ 105 *** End the thread, shut down the program 106 ************************************************************ 107 * 108 *** Issue the end of the thread 109 * 110 MOVE ' :' TO room. 111 ENTER MASM 'acob$rdmr' USING room, err-stat, aux-info. 112 IF err-stat NOT = 0 GO TO 900-error-print. 113 * 114 *** Stop the program 115 * 116 DISPLAY 'Program has completed' UPON PRINTER. 117 STOP RON. 118 * 119 ********************************************************** 120 ** Do the RDMS error handling - display codes, messages 121 ********************************************************** 122 * 123 900-error-print. 124 * 125 *** Print errant command and error status variables 126 * 127 DISPLAY 'RDMS Command = ' room UPON PRINTER. 128 DISPLAY 'Error Status = ' err-stat UPON PRINTER. 129 DISPLAY 'Auxiliary•Info = ' aux-info UPON PRINTER. 130 * 131 *** Issue the error messages, end the thread, and exit 132 * 133 MOVE 0 TO err-end-flag. 134 PERFORM 940-geterror UNTIL no-more-msgs. 135 DISPLAY 'Error termination' UPON PRINTER. 136 IF thread-has-begun 137 MOVE ' END THREAD ;' TO room 138 ENTER MASH 'acob$rdmr' USING room, err-stat, aux-info. 139 STOP RUN. 140 * 141 *** Fill the error buffers using GETERROR 142 * 143 940-geterror. 144 MOVE ' ;' TO room. 145 ENTER MASK 'acob$rdmr' USING 146 147 PERFORM 980-print-error 148 VARYING err-s-index FROM 1 BY 1 UNTIL err-s-index > 4. 149 * 150 *** Display the error buffers 151 * 152 980-print-error. 153 IF err-s(err-s-index) NOT = SPACE 154 DISPLAY err-s(err-s-index) UPON PRINTER 155 ELSE 156 MOVE 5 to err-s-index 157 MOVE 1 TO err-end-flag.
SG 3605 C-3

D ACOB Examples

ACOB Examples
@PRT,S DEV.APPD/RUNACOBPROG1 FURPUR 30R2A (910822 1304:40) 1993 War 17 Wed 1210:56 ANDREWAL3644(1).APPD/RUNACOSPROG1(0)
1 @BREPT PRINT$,PRFIL. 2 @PRT,S DEV.APPD/RUNACOBPROG1
3 @ACON,SE DEV.APPD/ACOSPROG1,TPF$.ACOBPROG1
4 @MAP,S ,TPF$.ABS
5 NOT TPF$.
6 IN TPF$.ACCBPROG1
7 IN SYS$LIBPRSA.CBEP$$RSA
8 IN SYS$LISS*RSA.RDMR-ACOBDAT
9 END
10 @XQT 11 @BRITT PRINT$
12 @IPF TPF$.
13 OLD PRFIL.
14 L END,A,A,NUM
15 MOD SCR @ACOB, SE DEV . APPD/ACOSPROG1, TPF$ .ACOBPROG1
ACOS 7R1A R 75R3J4Q 03/17/93 12:10:57 (0) 1100 ASCII COBOL 08/12/91 10:02 1100 ASCII COBOL SOURCE LISTING
1 IDENTIFICATION DIVISION.
2 PROGRAM-ID. acobprogi.
3 ENVIRONMENT DIVISION.
4 CONFIGURATION SECTION.
5 SOURCE-COMPUTER. UNISYS-2200.
6 OBJECT-COMPUTER. UNISYS-2200.
7 *
8 **********************************************************
9 *** This program uses interpretive SQL and ACOB to
10 *** illustrate simple fetches and displays from a table
11 **********************************************************
12 *
13 DATA DIVISION.
14 WORKING-STORAGE SECTION.
15 *
16 **********************************************************
17 *** Establish RDMS command error buffers and data
18 **********************************************************
19 *
20 *** Error handling variables and message buffers
21 *
22 01 room.
23 05 rlin PIC X(40) OCCURS 12 TIMES.
24 01 err-stat PIC 9(4).
25 01 aux-info PIC S1(36).
26 01 error-text.
27 05 err-s PIC X(132) OCCURS 4 TIMES.
28 01 err-s-index PIC 9(4).
29 01 thread-flag PIC 9 VALUE ZERO.
30 88 thread-has-begun VALUE 1.
31 01 cursor-flag PIC 9 VALUE ZERO.
32 88 end-of-cursor VALUE 1.
33 01 err-end-flag PIC 9 VALUE ZERO.
34 88 no-more-msgs VALUE 1.
SG 3605 D-1

ACOB Examples
35 36 *** Place for the retrieved record, set up for printing 37 38 01 record-retrieved. 39 05 rr-empno PIC 9(5). 40 05 FILLER PIC X(2) VALUE SPACES. 41 05 rr-ename PIC X(12). 42 05 FILLER PIC X(2) VALUE SPACES. 43 05 rr-job PIC X(10). 44 05 FILLER PIC X(2) VALUE SPACES. 45 05 rr-dno PIC 9(3). 46 05 FILLER PIC X(2) VALUE SPACES. 47 05 rr-hiredate PIC 9(6). 48 49 ************************************************************ 50 *** BEGIN the thread, do the USE, clear the SQL buffer 51 ************************************************************ 52 53 *** Start the thread 54 55 PROCEDURE DIVISION. 56 000-main. 57 MOVE 'BEGIN THREAD FOR udssrc READ TO room. 58 ENTER MASK 'acob$rdmr' USING room, err-stat, aux-info. 59 IF err-stat NOT = 0 GO TO 900-error-print. 60 61 *** Set table qualifier, clear buffer, set thread flag 62 63 MOVE 'USE DEFAULT QUALIFIER rosyschemal TO room. 64 ENTER MASK 'acob$rdmr'USING room, err-stat, aux-info. 65 IF err-stat NOT = 0 GO TO 900-error-print. 66 67 MOVE 1 TO thread-flag. 68 69 *********************************************************** 70 *** Access RDMS - DECLARE and OPEN the cursor 71 *********************************************************** 72 73 *** Declare the cursor 74 75 MOVE 'DECLARE employee CURSOR ' TO room. 76 MOVE ' SELECT empno, ename, job, hiredate, ' TO rlin(2). 77 MOVE ' dno FROM amp ;' To rlin(3). 78 ENTER MASK 'acob$rdmr' USING room, err-stat, aux-info. 79 IF err-stat NOT = 0 GO TO 900-error-print. 80 81 *** Open the cursor 82 83 MOVE 'OPEN employee TO room. 84 ENTER MASK 'acob$rdmr' USING room, err-stat, aux-info. 85 IF err-stat NOT = 0 GO TO 900-error-print. 86 87 ********************************************************** 88 ** Loop thru the rows, end the thread, then do cleanup 89 ********************************************************** 90 91 *** Loop to fetch a row and display it 92 93 200-loop. 94 MOVE 'FETCH employee INTO $P1, $P2, $P3, ' TO room. 95 MOVE ' $P4, $P5 ;' TO rlin(2). 96 ENTER MASK 'acob$rdmr' USING room, err-stat, aux-info, 97 rr-empno, rr-ename, rr-job, rr-hiredate, rr-dno. 98 IF err-stat = 6001 GO TO 400-drop-cursor. 99 IF err-stat NOT = 0 GO TO 900-error-print.
100
D-2 SG 3605

ACOB Examples
101 DISPLAY record-retrieved UPON PRINTER. 102 GO TO 200-loop. 103 * 104 400-drop-cursor. 105 DISPLAY 'No more data on fetch' UPON PRINTER. 106 MOVE 'DROP CURSOR employee •' TO rcom. 107 ENTER MASM 'acob$rdmr' USING rcom, err-stat, aux-info. 108 IF err-stat NOT = 0 GO TO 900-error-print. 109 * 110 MOVE SPACES TO rcom. 111 * 112 ************************************************************ 113 *** End the thread, shut down the program 114 ************************************************************ 115 * 116 *** Issue the end of the thread 117 * 118 MOVE 'END THREAD •' TO rcom: 119 ENTER MASK 'acob$rdmr' USING rcom, err-stat, aux-info. 120 IF err-stat NOT = 0 GO TO 900-error-print. 121 * 122 *** Stop the program 123 * 124 DISPLAY 'Program has completed' UPON PRINTER. 125 STOP RUN. 126 * 127 ********************************************************** 128 ** Do the RDMS error handling - display codes, messages 129 ********************************************************** 130 * 131 900-error-print. 132 * 133 *** Print errant command and error status variables 134 * 135 DISPLAY 'RDMS Command = ' rcom UPON PRINTER. 136 DISPLAY 'Error Status = ' err-stat UPON PRINTER. 137 DISPLAY 'Auxiliary Info = ' aux-info UPON PRINTER. 138 * 139 *** Issue the error messages, end the thread, and exit 140 * 141 MOVE 0 TO err-end-flag. 142 PERFORM 940-geterror UNTIL no-more-msgs. 143 DISPLAY 'Error termination' UPON PRINTER. 144 IF thread-has-begun 145 MOVE ' END THREAD ;' TO rcom 146 ENTER MASM 'acob$rdmr' USING room, err-stat, aux-info. 147 STOP RUN. 148 * 149 *** Fill the error buffers using GETERROR 150 * 151 940-geterror. 152 MOVE 'GETERROR INTO $P1, $P2, $P3, $P4 •' TO rcom. 153 ENTER MASM 'acob$rdmr' USING rcom, err-stat, aux-info, 154 err-s(1), err-s(2), err-s(3), err-s(4). 155 PERFORM 980-print-error 156 VARYING err-s-index FROM 1 BY 1 UNTIL err-s-index > 4. 157 * 158 *** Display the error buffers 159 * 160 980-print-error. 161 IF err-s(err-s-index) NOT = SPACE 162 DISPLAY err-s(err-s-index) UPON PRINTER 163 ELSE 164 MOVE 5 to err-s-index 165 MOVE 1 TO err-end-flag.
END ACOB DIAGNOSTIC TOTALS 0 WARNING 0 MINOR 0 SERIOUS 0 FATAL 0 LEVELING COMPILE TIME IS 3.94 SECONDS CORE: MIN= 63601 / 64000 MAX= 66560 WORDS
SG 3605 D-3

24 ERU$/RLIBT12 MAY 90 10:37:08 m$PKT$ AUG 90 16:10:55
03
26
21
26
26
001000 001005
001006 001270
25
12
12
17 001271 001743
001744 001753
040000 040005
MEM$ERR 040006 040014
040015 040027
040030 040032 $(0) 040033 040730
$(012) MEWERR $(0) 040731 041030
041031 041446
041447 041704 041705 041723 041724 042110 .
C$NPADS AUG 90 19:05:18 C$S400 DEC 90 13:37:46 C$RETO AUG 90 18:58:21 C$DJ13 AUG 90 18:57:50 mcmgcm(commormomo C$S300 JAN 91 11:32:50
C$PCRLOG AUG 91 09:47:08 CBM$$ACOB/PART-LIB-CB AUG 91 10:13:59 ACOBPROG1 $(1) MAR 93 12:11:01
$(3)
ACOB Examples
@MAP,S Collector
,TPF$.ABS 33R1A (910808 1. 2. 3. 4. 5.
1521:53) 1993 Mar 17 Wed 1211:02 NOT TPF$. IN TPF$.ACOBPROG1 IN syssiaNsmsN.cupssNak IN SYS$LIBPRSA.RDMR-ACOBDAT END
AFCM status of output element is SETAFCM Quarter-word sensitive
ADDRESS LIMITS 001000 002324
725 IBANK WORDS DECIMAL 040000 061765
9206 DRANK WORDS DECIMAL STARTING ADDRESS 001731
SEGMENT $MAIN$
001000 002324
040000 061765
CBEP$$RSA
24 AUG 91 01:01:32 RDMR-ACOBDAT
001754 002324 $(0) 042111 061764
10 JAN 92 13:23:24
$(2) 061765 061765
Common Banks referenced ----------
C$330S 0400103
C$S116 0400105 RDMR$FTNCONT 0401074
END MAP. ERRORS: 0 TIME: 23.552 STORAGE: 016417/015211/016365/0/0130076
D-4 SG 3605

ACOB Examples
@XQT 05010 FOSTER SALESREP 200 860714 05146 BROWN CLERK 200 871011 05234 WOODWORTH MANAGER 200 790219 05237 ROCKWELL ACCOUNTANT 100 840618 05437 MARTIN SALESREP 200 870326 05469 ADAMS SALESREP 200 811102 05630 GLASS ACCOUNTANT 100 871220 05702 TURNER CLERK 100 890515 05743 LAWSON MANAGER 100 830510 05765 JOHNSON CLERK 400 891221 05784 WILLIAMS PRESIDENT 300 781015 05896 SMITH CLERK 400 880913 05942 FORD SALESREP 200 890316 05984 HYDE MANAGER 400 850901 No more data on Patch Program has completed @BRKPT PRINT$
SG 3605 D-5

E UCOB Skeleton

UCOB Skeleton
@PRT,S AL3644*SQL.LAB3-1/RUNUCOB FURPUR 30R2A (910822 1304:40) 1993 Mar 17 Wed 1514:48 AL3644*SQL(1).LAB3-1/RUNUCOB(0)
1 @BRKPT PRINT$,prfil.
2 @PRT,S sql.lab3-1/runucob
3 @UCOB,ES sql.lab3-1/ucobskel,tpf$.ucobskel„,no-options,narrow
4 @XQT
5 @BRKPT PRINT$
6 @IPF tpf$.
7 OLD prfil.
8 1 "END",e,e,numb
9 mod scr @PRT,S AL3644*SQL.LAB3-1/UCOBSKEL AL3644*SQL(1).LAB3-1/UCOBSKEL(0)
1 IDENTIFICATION DIVISION.
2 PROGRAM-ID. ucobskel.
3 ENVIRONMENT DIVISION.
4 CONFIGURATION SECTION.
5 SPECIAL-NAMES. PRINTER IS printer. 6
7 **********************************************************
8 *** This program uses embedded SQL and UCOB to
9 *** solve lab 3-1 assignment for SQL Programming
10 ********************************************************** 11
12 DATA DIVISION.
13 WORKING-STORAGE SECTION. 14
15 01 thread-flag PIC 9 VALUE ZERO.
16 01 err-end-flag PIC 9 VALUE ZERO.
17 88 no-more-msgs VALUE 1. 18
19 **********************************************************
20 *** Establish RDMS command error buffers and data
21 ********************************************************** 22
23 EXEC SQL BEGIN DECLARE SECTION END-EXEC. 24
25 *** Place for the retrieved record, set up for printing 26
27 01 record-retrieved.
28 05
29 05 30
31 *** Error handling variables and message buffers 32
33 01 sqlcode PIC S9(9) USAGE COMP. 34
35 01 rdmca.
36 05 error-status PIC 9(4).
37 05 aux-info PIC S9(9) USAGE BINARY. 38
39 01 err-text.
40 05 err-s PIC X(132) OCCURS 4 TIMES. 41
42 01 err-s-index PIC 9.
43 EXEC SQL END DECLARE SECTION END-EXEC. 44
SG 3605 E-1

UCOB Skeleton
45 46 47 48 49 50 51 52 53 54 55 56 57 58 59 60 61 62 63 64 65 66 67 68 69 70 71 72 73 74 75 76 77 78 79 80 81 82 83 84 85 86 87 88 89 90 91 92 93 94 95 96 97 98 99
********************************************************** *** Start by setting up error handling and BEGIN thread **********************************************************
PROCEDURE DIVISION. 000-main.
* * * What to do on no-find
EXEC SQL
END-EXEC.
* * * What to do if an SQL error is encountered
EXEC SQL
END-EXEC.
* * * Start the thread
MOVE 1 TO thread-flag.
********************************************************** ** Access RDMS - USE, DECLARE, OPEN and initial FETCH **********************************************************
* * * Set up the table qualifier
EXEC SQL
END-EXEC.
* * * Declare the cursor
EXEC SQL
END-EXEC.
* * * Open the cursor
EXEC SQL
END-EXEC.
* * * Do an initial fetch of a row
EXEC SQL
END-EXEC.
E-2 SG 3605

UCOB Skeleton
100 ********************************************************** 101 ** Loop thru the rows, end the thread, then do cleanup 102 ********************************************************** 103 104 *** Loop to display a row and get another 105 106 PERFORM UNTIL sqlcode = 100 107 DISPLAY record-retrieved 108 EXEC SQL 109 FETCH 110 111 END-EXEC 112 END-PERFORM. 113 114 ********************************************************** 115 *** Handle a no-find, end thread, and terminate program 116 ********************************************************** 117 118 *** Come here when a no find condition exists 119 120 400-no-find. 121 122 *** Issue the end of the thread 123 124 125 MOVE 0 TO thread-flag. 126 127 *** Stop the program 128 129 DISPLAY 'Program has completed' UPON PRINTER. 130 STOP RUN. 131
SG 3605 E-3

UCOB Skeleton
132 ********************************************************** 133 ** Do the RDMS error handling - display codes & messages 134 ********************************************************** 135 136 *** Come here when RDMS errors are detected 137 138 900-rdms-error. 139 140 *** Turn off error handling, print error status variables 141 142 EXEC SQL WHENEVER SQLERROR CONTINUE END-EXEC. 143 144 DISPLAY '***SQL Code = ' sqlcode UPON PRINTER. 145 DISPLAY '***Error Code = ' error-status UPON PRINTER. 146 DISPLAY '***Auxiliary Info = ' aux-info UPON PRINTER. 147 148 *** Issue the error messages, end the thread, and exit 149 150 MOVE 0 TO err-end-flag. 151 PERFORM 940-geterror UNTIL no-more-msgs. 152 DISPLAY 'Error termination' UPON PRINTER. 153 END THREAD. 154 STOP RUN. 155 156 *** Fill the error buffers using GETERROR 157 158 940-geterror. 159 160 PERFORM 980-print-error 161 VARYING err-s-index FROM 1 BY 1 UNTIL err-s-index > 4. 162 163 *** Display the error buffers 164 165 980-print-error. 166 IF err-s(err-s-index) NOT = SPACE 167 DISPLAY err-s(err-s-index) UPON PRINTER 168 ELSE 169 MOVE 5 to err-s-index 170 MOVE 1 TO err-end-flag.
@BRXPT PRINT$
E-4 SG 3605

F UCOB Examples

UCOB Examples
@PRT,S DEV.APPF/RUNUCOBPROG1 FURPUR 30R2A (910822 1304:40) 1993 Mar 17 Wed 1312:51 ANDREW*AL3644(1).APPF/RUNUCOBPROG1(0)
1 @BRKPT PRINT$,prfil. 2 @PRT,S dev.appf/runucobprogl 3 @UCOB,ES dev.appf/ucobprogl,tpf$.ucobprogl,,,no-options,narrow 4 @XQT 5 @BRKPT PR/NT$ 6 @IPF tpf$. 7 OLD prfil. 8 1 "END",a,a,numb 9 mod scr
@UCOB,ES DEV.APPF/UCOBPROG1,TPF$.UCOBPROG1„,NO-OPTIONS,NARROW *REMARK(CLARIFICATION) LSS-CSIM20389: Option REMARK has been previously set
UCOB- 5R2(910816) LSS- 6R1A(910814) 930317 13:12:52 1 IDENTIFICATION DIVISION. 2 PROGRAM-ID. ucobprogl. 3 ENVIRONMENT DIVISION. 4 CONFIGURATION SECTION. 5 SPECIAL-NAMES. PRINTER IS printer. 6 7 ********************************************************** 8 *** This program uses embedded SQL and UCOB to 9 *** solve lab exercise 3-1 for AL 3644. 10 ********************************************************** 11 12 DATA DIVISION. 13 WORKING-STORAGE SECTION. 14 15 01 thread-flag PIC 9 VALUE ZERO. 16 01 err-end-flag PIC 9 VALUE ZERO. 17 88 no-more-msgs VALUE 1. 18 19 ********************************************************** 20 *** Establish RDMS command error buffers and data 21 ********************************************************** 22 23 EXEC SQL BEGIN DECLARE SECTION END-EXEC. 24 25 *** Place for the retrieved record, set up for printing 26 27 01 record-retrieved. 28 29 30 31 32 33 34 35 36 37 38
05 rr-empno PIC 9(5) VALUE ZEROS. 05 PIC X(2) VALUE SPACES. 05 rr-ename PIC X(12) VALUE SPACES. 05 PIC X(2) VALUE SPACES. 05 rr-job PIC X(10) VALUE SPACES. 05 PIC X(2) VALUE SPACES. 05 rr-dno PIC 9(3) VALUE ZEROS. 05 PIC X(2) VALUE SPACES. 05 rr-hiredate PIC 9(6) VALUE ZEROS. 05 PIC X(2) VALUE SPACES.
SG 3605 F-1

UCOB Examples
39 *** Error handling variables and message buffers 40 41 01 sqlcode PIC S9(9) USAGE COMP. 42 43 01 rdmca. 44 05 error-status PIC 9(4). 45 05 aux-info PIC S9(9) USAGE BINARY. 46 47 01 err-text. 48 05 err-s PIC X(132) OCCURS 4 TIMES. 49 50 01 err-s-index PIC 9. 51 EXEC SQL END DECLARE SECTION END-EXEC. 52 53 ********************************************************** 54 *** Start by setting up error handling and BEGIN thread 55 ********************************************************** 56 57 PROCEDURE DIVISION. 58 000-main. 59 60 *** What to do on no-find 61 62 EXEC SQL 63 WHENEVER NOT FOUND GO TO 400-no-find 64 END-EXEC. 65 66 *** What to do if an SQL error is encountered 67 68 EXEC SQL 69 WHENEVER SQLERROR GO TO 900-rdm3-error 70 END-EXEC. 71 72 *** Start the thread 73 74 BEGIN THREAD FOR udssrc READ. 75 MOVE 1 TO thread-flag. 76 77 ********************************************************** 78 ** Access RDMS - USE, DECLARE, OPEN and initial FETCH 79 ********************************************************** 80 81 *** Set up the table qualifier 82 83 EXEC SQL 84 USE DEFAULT QUALIFIER rosyschemal 85 END-EXEC. 86 87 *** Declare the cursor 88 89 EXEC SQL 90 DECLARE emp CURSOR 91 SELECT empno, ename, job, hiredate, dno 92 FROM emp 93 END-EXEC. 94 95 *** Open the cursor 96 97 EXEC SQL 98 OPEN emp 99 END-EXEC.
F-2
SG 3605

UCOB Examples
100 101 *** Do an initial fetch of a row 102 103 EXEC SQL 104 FETCH emp INTO :rr-empno, :rr-ename, 105 :rr-job, :rr-hiredate, :rr-dno 106 END-EXEC. 107 108 ********************************************************** 109 ** Loop thru the rows, end the thread, then do cleanup 110 ********************************************************** 111 112 *** Loop to display a row and get another 113 114 PERFORM UNTIL sqlcode = 100 115 DISPLAY record-retrieved 116 EXEC SQL 117 FETCH emp INTO :rr-empno, :rr-ename, 118 :rr-job, :rr-hiredate, :rr-dno 119 END-EXEC 120 END-PERFORM. 121 122 ********************************************************** 123 *** Handle a no-find, end thread, and terminate program 124 ********************************************************** 125 126 *** Come here when a no find condition exists 127 128 400-no-find. 129 130 *** Issue the end of the thread 131 132 END THREAD. 133 MOVE 0 TO thread-flag. 134 135 *** Stop the program 136 137 DISPLAY 'Program has completed' UPON PRINTER. 138 STOP RUN. 139 140 ********************************************************** 141 ** Do the RDMS error handling - display codes & messages 142 ********************************************************** 143 144 *** C mo here when RDMS errors are detected 145 146 900-rdms-error. 147 148 *** Turn off error handling, print error status variables 149 150 EXEC SQL WHENEVER SQLERROR CONTINUE END-EXEC. 151 152 DISPLAY '***SQL Code = ' sqlcode UPON PRINTER. 153 DISPLAY '***Error Code = ' error-status UPON PRINTER. 154 DISPLAY '***Auxiliary Info = ' aux-info UPON PRINTER.
SG 3605 F-3

UCOB Examples
155 * 156 *** Issue the error messages, end the thread, and exit 157 * 158 MOVE 0 TO err-end-flag. 159 PERFORM 940-geterror UNTIL no-more-msgs. 160 DISPLAY 'Error termination' UPON PRINTER. 1.61 END THREAD. 162 STOP RUN. 163 * 164 *** Fill the error buffers using GETERROR 165 * 166 940-geterror. 167 GETERROR INTO :err-s(1), :err-s(2), :err-s(3), :err-s(4). 168 PERFORM 980-print-error 169 VARYING err-s-index FROM 1 BY 1 UNTIL err-s-index > 4. 170 * 171 *** Display the error buffers 172 173 980-print-error. 174 IF err-s(err-s-index) NOT = SPACE 175 DISPLAY err-s(err-s-index) UPON PRINTER 176 ELSE 177 MOVE 5 to err-s-index 178 MOVE 1 TO err-end-flag. SIZES: CODE(EM4): 448 DATA: 1193 END UCOB- 0 ERRORS(MAJOR) 0 ERRORS(MINOR) 1 REMARK(CLARIFICATION) @XQT
5010 FOSTER SALESREP 200 860714
5146 BROWN CLERK 200 871011
5234 WOODWORTH MANAGER 200 790219
5237 ROCKWELL ACCOUNTANT 100 840618
5437 MARTIN SALESREP 200 870326
5469 ADAMS SALESREP 200 811102
5630 GLASS ACCOUNTANT 100 871220
5702 TURNER CLERK 100 890515
5743 LAWSON MANAGER 100 830510
5765 JOHNSON CLERK 400 891221
5784 WILLIAMS PRESIDENT 300 781015
5896 SMITH CLERK 400 880913
5942 FORD SALESREP 200 890316
5984 HYDE MANAGER 400 850901
Program has completed
@BRKPT PRINT$
F-4 SG 3605