Transition to BIM 360, Maximize the Benefits, and Implement ...
32
Page 1 AS468660 Transition to BIM 360, Maximize the Benefits, and Implement Firm Wide Kinjal Ajmera HNTB Corporation Description Whether you’re part of a small company or a large firm with multiple offices, there’s a great deal of benefit in transitioning to the BIM 360 cloud-based platform to enable flexibility and avoid slowdowns associated with VPN. If you’ve already transitioned, the focus shifts to developing workflows and best practices to maximize the benefits of BIM 360 while maintaining consistency project to project, or even office to office. This class will apply to multiple levels of expertise, discussing how to set up BIM 360 projects, assign appropriate levels of permissions, set up teams, and schedule automatic publishing. We’ll even touch on the less commonly used BIM 360 Model Coordination module and BIM 360 Field software. Diving a little deeper, we will also discuss creating BIM 360 templates, documenting workflows, and providing trainings for wide- scale implementation. We will use Allegiant Stadium in Nevada as an example of the benefits and challenges that result from placing the design team and construction team in the same BIM360 hub. Learning Objectives • Learn how to transition to a cloud-based platform to enable live coordination across disciplines and increased efficiency. • Learn how to set up BIM 360 projects and navigate through multiple modules (Design, BIM 360 Docs, Coordinate). • Learn how to effectively create BIM 360 templates for wide-scale implementation. • Evaluate the benefits and complexities of sharing the project hub with the construction team.
-
Upload
khangminh22 -
Category
Documents
-
view
4 -
download
0
Transcript of Transition to BIM 360, Maximize the Benefits, and Implement ...

Page 1
AS468660
Transition to BIM 360, Maximize the Benefits, and Implement Firm Wide Kinjal Ajmera HNTB Corporation
Description
Whether you’re part of a small company or a large firm with multiple offices, there’s a great deal of benefit in transitioning to the BIM 360 cloud-based platform to enable flexibility and avoid slowdowns associated with VPN. If you’ve already transitioned, the focus shifts to developing workflows and best practices to maximize the benefits of BIM 360 while maintaining consistency project to project, or even office to office. This class will apply to multiple levels of expertise, discussing how to set up BIM 360 projects, assign appropriate levels of permissions, set up teams, and schedule automatic publishing. We’ll even touch on the less commonly used BIM 360 Model Coordination module and BIM 360 Field software. Diving a little deeper, we will also discuss creating BIM 360 templates, documenting workflows, and providing trainings for wide-scale implementation. We will use Allegiant Stadium in Nevada as an example of the benefits and challenges that result from placing the design team and construction team in the same BIM360 hub.
Learning Objectives
• Learn how to transition to a cloud-based platform to enable live coordination across disciplines and increased efficiency.
• Learn how to set up BIM 360 projects and navigate through multiple modules (Design, BIM 360 Docs, Coordinate).
• Learn how to effectively create BIM 360 templates for wide-scale implementation.
• Evaluate the benefits and complexities of sharing the project hub with the construction team.

Page 2
Speaker
Kinjal Ajmera is a licensed architect and currently a BIM Manager at HNTB, pursuing her passion for learning the latest innovative workflows that allow successful deliveries of large projects with complex geometry and schedules. Since graduating from University of California, Berkeley with a bachelor’s degree in Architecture, she has worked on multiple sports, aviation, and transit projects including Allegiant Stadium (home of the Las Vegas Raiders), Automated People Mover at LAX, and Sacramento MLS Stadium. Kinjal’s expertise is in Building Information Modeling and she is responsible for evaluating and implementing strategies that allow for successful project execution. She also enjoys participating in user groups to share her knowledge and learn from other AEC industry leaders. Kinjal has presented at the Los Angeles and New York Bluebeam User Groups previously and this is her first time speaking at Autodesk University.

Page 3
Table of Contents
Learning Objectives ................................................................................................................... 1
Description ................................................................................................................................. 1
Speaker ..................................................................................................................................... 2
Table of Contents ....................................................................................................................... 3
Prior to BIM360 .......................................................................................................................... 4
What is BIM360? ........................................................................................................................ 4
BIM360 Design and Docs .......................................................................................................... 5
Creating a Project and Activating Services (Video Link) ...................................................... 5
Setting-up Folder Structure ................................................................................................. 8
Setting-up Teams (Video Link) ...........................................................................................10
Collaborating the Revit Model and Scheduling Publishes (Video Link) ...............................13
Adding Project Members (Video Link) ................................................................................16
Permissions .......................................................................................................................18
Assigning Permissions (Video Link) ...................................................................................19
BIM360 Coordinate ...................................................................................................................23
Activating Modules (Video Link) .........................................................................................23
Creating Coordination Space (Video Link) .........................................................................24
BIM360 Build ............................................................................................................................27
Maximizing Benefits ..................................................................................................................32
Templates ..........................................................................................................................32
Combining Hubs ................................................................................................................32

Page 4
Prior to BIM360
Prior to BIM360, our team would suffer significant lag times when the team is across multiple offices and using VPN. It was common to repetitively receive the error below. This led to creating strict protocols on when certain users can sync and how often. While those protocols worked for the time being, it caused considerable wait times and inefficiencies.
Having gone through that, when BIM360 first came out, we were eager to try it and transition our projects to the cloud. At the time in 2015, it was known as A360 which then became BIM360 Team which is now the “new” BIM360.
What is BIM360?
BIM360 is a cloud-based unified platform that connects project teams and data in real-time, from design through construction. BIM360 has multiple modules with BIM360 Docs being the base for others. The various products are:
• BIM360 Docs
• BIM360 Design
• BIM360 Coordinate
• BIM360 Build
• BIM360 Ops
• BIM360 Layout
• BIM360 Plan For this session, we will focus on the first four.

Page 5
BIM360 Design and Docs
Creating a Project and Activating Services (Video Link) To start a new project, go to https://admin.b360.autodesk.com/ and sign into your account. Note: you will need to be an account admin to have this module
1. Go to “Account Admin” module Add

Page 6
2. In the dialog box, you will need to create the project’s profile. The fields with * are required while others are optional. Fill out as much of the information as possible and click “Save & continue”
While your project’s profile is now created, the project will NOT be activated until you activate at least one service in the next step

Page 7
3. These are all the services currently offered by Autodesk. For now, we will only activate Document Management and Design Collaboration.
Page 8
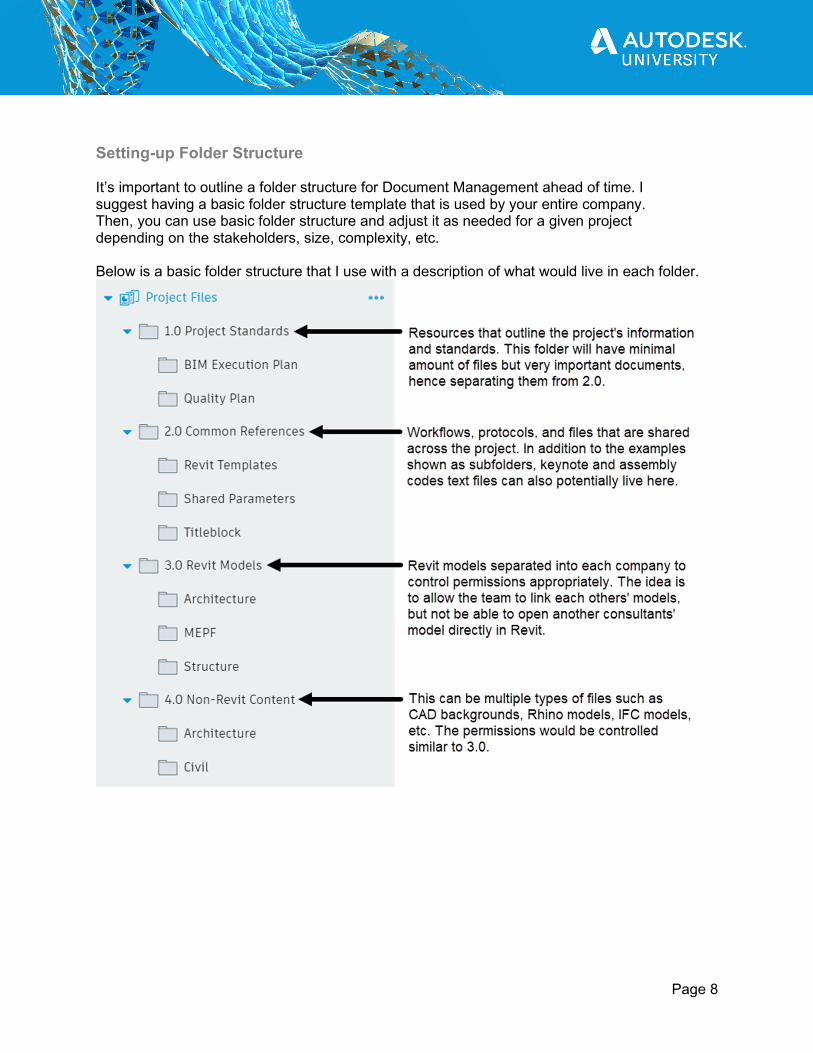
Setting-up Folder Structure It’s important to outline a folder structure for Document Management ahead of time. I suggest having a basic folder structure template that is used by your entire company. Then, you can use basic folder structure and adjust it as needed for a given project depending on the stakeholders, size, complexity, etc. Below is a basic folder structure that I use with a description of what would live in each folder.

Page 9
Once you have the folder structure outlined, you can create those folders by going to Document Management … Add subfolder

Page 10
Setting-up Teams (Video Link) After creating the folders, it’s time to set-up teams. Teams allow you to schedule publishes and share packages. It also creates the “shared” and “consumed” folders, which allow you to link in other disciplines’ published models rather than the live models. This will give you more control over which updates you see. Go to “Project Admin” module services Design Collaboration. If it’s your first time creating a team for the project, you will have the option to choose where the “shared” folder is created. By default, it will be created under “Project Files”.

Page 11
Since you already created the folder to represent your team (3.0 Revit Model in this example), make sure to change the path when adding a team.

Page 12
Notice that a “shared” and “consumed” folders are created once the team is added. An additional benefit of having the 3.0 Revit model with consultants as subfolders is being able to create a team that includes all Revit models. The alternative would be to create a team for each discipline, which would mean a “consumed” folder in each discipline folder.

Page 13
Collaborating the Revit Model and Scheduling Publishes (Video Link) In order to schedule publishes, you need to have at least one Revit model collaborated to the cloud. To collaborate your Revit model to the cloud, save your model locally or on the server. Then go to Collaborate tab Collaborate in cloud.
In the pop-up dialog, browse to the appropriate folder and click Initiate

Page 14
You will see the following dialog once the process is complete
Once the model is collaborated you will see a new column “Schedule Publish” for the Team. Select the Team Schedule publish. In the pop-up dialog box, select the day, time and turn on the publish. The publish time can vary project to project. I recommend setting the publish time so that Monday morning when the work week starts, the team has the most up-to-date models available on BIM360. Therefore, setting it for late Friday night or the weekend will be most beneficial. Note: The publish time is GMT time zone, so make sure to take that into account.

Page 15
You can verify and change the publish time in Design Collaboration anytime.

Page 16
Adding Project Members (Video Link) When it’s time to add team members, go to Project Admin module Add type in email addresses (press enter after each email address) Select
Fill out Company and Role. Note that Company can be created as I have below, however, Role must be selected from the given Autodesk list. Keep in mind that both Company and Roles can be used to set permissions, so consistency is important.

Page 17
To enable/disable permission for each module, you can toggle the symbols on the right. Enabling Project Admin will automatically enable all modules and they will be distinguished in yellow.
Once you’re done, click Add to Project.

Page 18
Note: Adding members to a project is only PART of the process. You must assign permissions to the folders in Document Management in order for the team members to be able to access the files.
Permissions Below are the available permissions with a description of when they should be used.
Keep in mind that subfolders inherit permissions from the parent folder. For example, if you assign “View+Download+Upload” permission to a folder, the subfolders under that folder cannot have lesser tier permission, only same tier or higher. Additionally, permissions can be assigned based on Company, Role, or Individually. I recommend using Company as it captures everyone in that company, doesn’t require repetitive need to add individual permissions, and is very clear/organized. When you have a company that will be responsible for more than one discipline, permissions by Role will be useful. For example at HNTB, we provide both architectural and structural services, however, I wouldn’t want the architectural team to open the structural team’s live model and vice versa. For such cases, I use Role so only “architects” have edit permission to architecture folder and only “structural engineers” have edit permission to structure folder. Note: As I mentioned previously, when controlling permissions by Company and Role, it is critical to have consistency when you add members to the project.

Page 19
Assigning Permissions (Video Link) To assign permissions, hover over the appropriate folder … Permissions Add type and select the appropriate Company, Role, or Individuals Add. For Project Files folder, assign the lowest tier permission that is acceptable for all team members since all the subfolders will inherit it.

Page 20

Page 21
Notice that you can view which members are captured under each company by expanding the company name:
Now go to the folders that require high tier permissions for certain team members and update. In the example below, I have increased HNTB’s permission to “View+Download+Upload+Edit” for Architecture folder since that team will be working in the live cloud shared architecture model(s). Note: The other companies show as inherited because I have maintained the same permission for them as Project Files folder that I assigned above.

Page 22
You’re all set! Your team members can start collaborating in the models. Once you sync to central, disciplines that have linked your model directly can simply reload and see your changes.

Page 23
BIM360 Coordinate
Activating Modules (Video Link) To activate additional services, go to Project Admin module Services Overview. In this case, activate Model Coordination

Page 24
When you activate an additional service, it is disabled for all project members by default except for project admins. Therefore, if you know you’ll be using certain services, it’s best to activate them at the beginning of the project. For this example, since we activated it after, go to Members and enable Model Coordination for the appropriate members.
Creating Coordination Space (Video Link) Before you can use Model Coordination module, you need to create at least one coordination space. This will be the folder with Revit models that BIM360 uses to analyze and provide clash data. It can be one of your existing folders in Document Management or you can create a new folder specifically for clash detection if you’d like.

Page 25
Once your coordination space is created, you can go to Model Coordination where models will be listed on the left along with the clashes on the right. If you have multiple coordination spaces, you can use the pull-down list:
The clashes tab will have the break-down of the clashes within each model. The darker colors represent higher number of clashes.

Page 26
If you click on one of these counts above, it will take you to the list of clashes where you select a group of clashes and can mark them as “not an issue” or create an additional “issue”.
You can view all the issues in the third icon. By default, closed issues will be hidden. To see those, click on Filter adjust status to show Closed issues.

Page 27
BIM360 Build
BIM360 Field is a construction management platform that combines mobile technologies at the point of construction with cloud-based collaboration and reporting. It can be used for punchlists, commissioning, checklists, and more. Access BIM360 Field from the module selector and it will open in a new browser tab.

Page 28
You can set-up BIM360 Field by going to your account project admin. In there, you can add members and companies, set-up locations, manage permissions, etc.

Page 29
On the overview page, you can get a quick glimpse of the project’s open, completed, ready to inspect, and closed issues. It will also show visual graphics for companies with the most unresolved issues, average time to close issues, etc.
The issues tab will show a list of all the issues and this is also where you add additional issues.

Page 30
Issues can have multiple properties including the ability to assign to a company, tag a location, add a due date, attach photos, etc.

Page 31
Multiple types of reports can also be generated on-the-spot or be scheduled. If you have a weekly coordination meeting for example, you can schedule the reports to be emailed to participants the day before. Reports can be generated in both PDF and Excel formats.

Page 32
Maximizing Benefits
Templates Once you have come up with standards for folder structure, design collaboration, etc., you can use them as a template next time you create a project. This will expedite the set-up process by activating services, creating the folders in Document Management, assigning role-based permissions, and more.
Combining Hubs The next step is to start thinking about how you can leverage this beyond the design team. When you have the right project, I recommend using the BIM360 platform to combine both design and construction team into one hub. This will require setting-up protocols, strictly following them, and building trust across teams. We did this recently for the Allegiant Stadium project and it was so valuable for both teams to have the information and updated models/files right in front of them whenever needed. The AEC industry is evolving in that projects are becoming more and more complex and schedules are getting tighter, so it is important to look at the new tools we have and think about what can we change to help the industry as a whole? How can we meet the demands of time and money using technology?