Training Guide - Salons by JC
10
Training Guide khushboo mehta
-
Upload
khangminh22 -
Category
Documents
-
view
0 -
download
0
Transcript of Training Guide - Salons by JC

Training Guide
khushboo mehta

1 | P a g e
System Access
Once the user is created in the system, you should receive the below email from
Salesforce.
Click on the link and enter the username and create your password.
Please make sure you save your password in a safe place for future use.
Below are the login details for future references:
Login url: www.login.salesforce.com
Username: This is your email address
Password: Password of your choice
Home Page:
Once you login to Salesforce you will see the Home Page screen. Make sure you are in
the Sales app. Click on the 9 dots on the upper left side and select Sales from the
dropdown menu (see image on next page).

2 | P a g e
You will see different tabs at the top of your screen which will provide access to different
information in the application.
Lead:
To view lead information, click on the Lead tab. By default, it will take you to Recently
Viewed leads. You will not see any leads yet as you haven’t viewed any recently.
If you click on the dropdown arrow next to Recently Viewed different lists will appear.

3 | P a g e
You can at any time pin your Favorite View by clicking on Pin Icon at the top next to
the dropdown arrow.
To view the details of the lead, click on the name of the record.
You can create a New Lead by clicking on the New Button located at the top right of
the screen.

4 | P a g e
All fields with a red asterisk* are mandatory fields. Once you complete filling out the
information click Save.
Inside the lead you will see the Lead Status marked as New on the top navigation bar.
Once you start following the lead you can move the lead to Nurture by clicking on
nurture and select Mark as Complete.
You can capture all the details regarding the lead under the Details tab.

5 | P a g e
Once the lead decides to schedule a tour, select the status as Schedule a Tour and
click on Mark as Current Status.
To enter information about the tour, under the Tour Details section click on the pencil
icon against each field for a quick edit.

6 | P a g e
If the Salon Suite prospect does not show up for the tour, you can select the No Show
status and select Mark Status as Complete to save your information.
If the Salon Suite prospect completes the tour, you can select Tour Completed and
select Mark Status as Complete to save your information.
You can capture all the activities for that Lead under the Activity Tab.
7 | P a g e
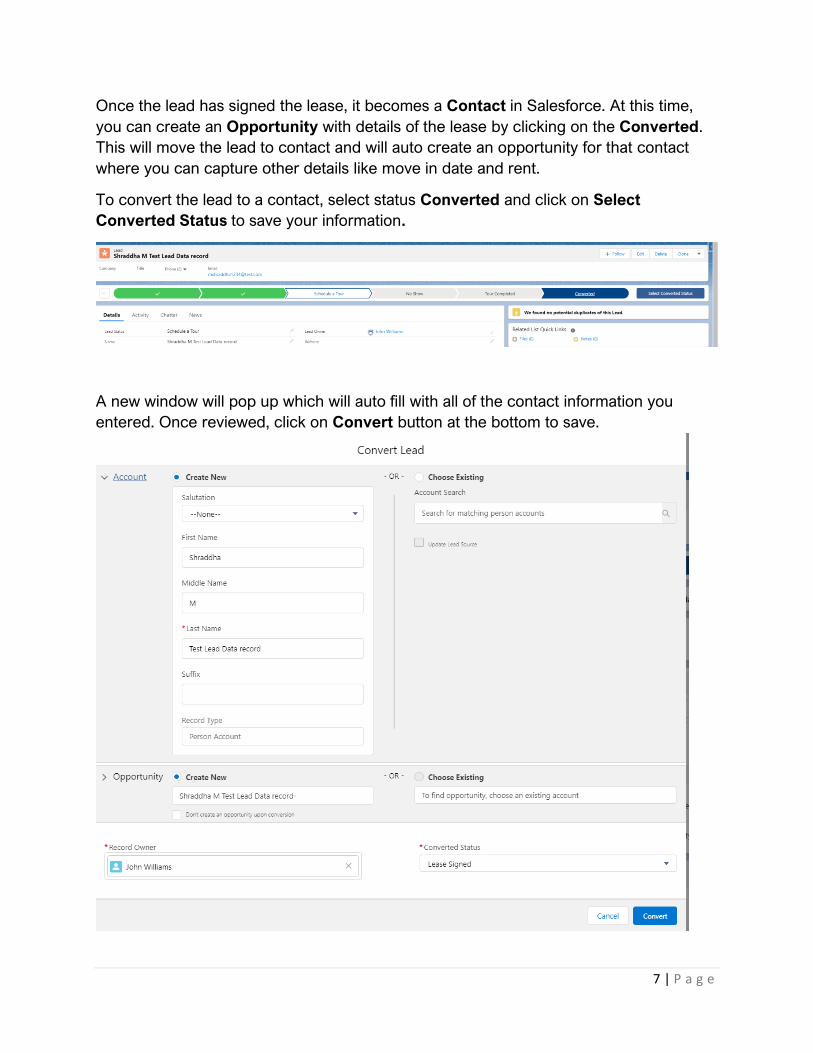
Once the lead has signed the lease, it becomes a Contact in Salesforce. At this time,
you can create an Opportunity with details of the lease by clicking on the Converted.
This will move the lead to contact and will auto create an opportunity for that contact
where you can capture other details like move in date and rent.
To convert the lead to a contact, select status Converted and click on Select
Converted Status to save your information.
A new window will pop up which will auto fill with all of the contact information you
entered. Once reviewed, click on Convert button at the bottom to save.

8 | P a g e
Once you click on Convert you will see the following message saying a Person
Account (Contact) and an Opportunity is created.
Opportunity:
If you click on the Opportunity, you should be able to capture all the details regarding
your tenant (salon suite owner).

9 | P a g e
On the Opportunity page, you will be able to see Opportunity Stages on the
navigation bar. If you click on the arrow next to it, you will see the customer guidance for
success that will list all the key fields that need to be filled out.
You can fill out the suite, lease start date/end date, etc. from the tenant.
Suites:
You will be able to see all of your location’s suite information under the Suites tab.
The list view will show all Suite Number, Square ft, and if the suite is occupied or vacant.