Training Analysis User Guide - BNH Expert Software
118
BNH Expert Software __________________________________________________________________________________________ i | Page www.bnhexpertsoft.com Copyright © BNH Expert Software Inc. Training Analysis User Guide
-
Upload
khangminh22 -
Category
Documents
-
view
1 -
download
0
Transcript of Training Analysis User Guide - BNH Expert Software

BNH Expert Software __________________________________________________________________________________________
i | P a g e www.bnhexpertsoft.com
Copyright © BNH Expert Software Inc.
Training Analysis User Guide

BNH Expert Software _______________________________________________________________________________________
____________________________________________________________________________________________________________
ii | P a g e www.bnhexpertsoft.com
Copyright © BNH Expert Software Inc.
ADVISOR Enterprise User's Guide © Copyright 1995 to 2018 BNH Expert Software Inc. Latest Update: September 05, 2018 All rights reserved. No part of this publication and/or software may be reproduced, stored in a retrieval system or transmitted in any form or by any means, electronic, mechanical, photocopying, recording, or otherwise without the prior written permission of BNH Expert Software Inc., 4000 Steinberg Street, Saint Laurent, Quebec, Canada, H4R 2G7. Printed in Canada
BNH Expert Software _______________________________________________________________________________________
____________________________________________________________________________________________________________
iii | P a g e www.bnhexpertsoft.com
Copyright © BNH Expert Software Inc.
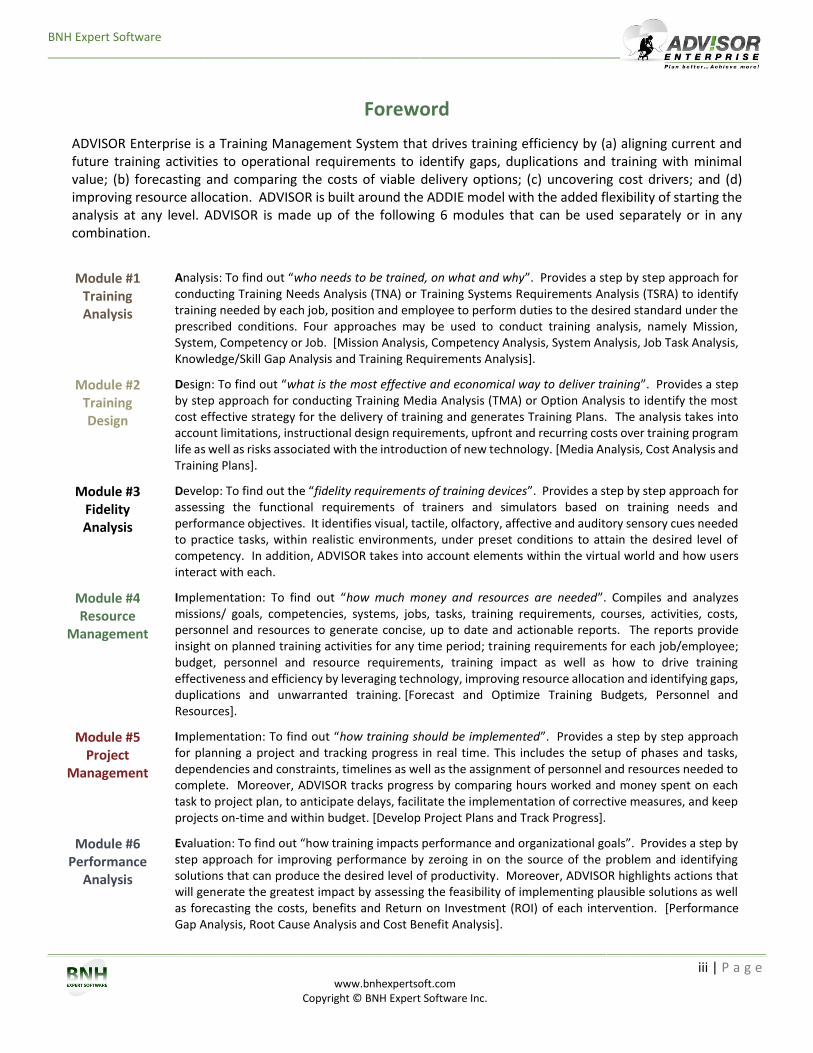
Foreword
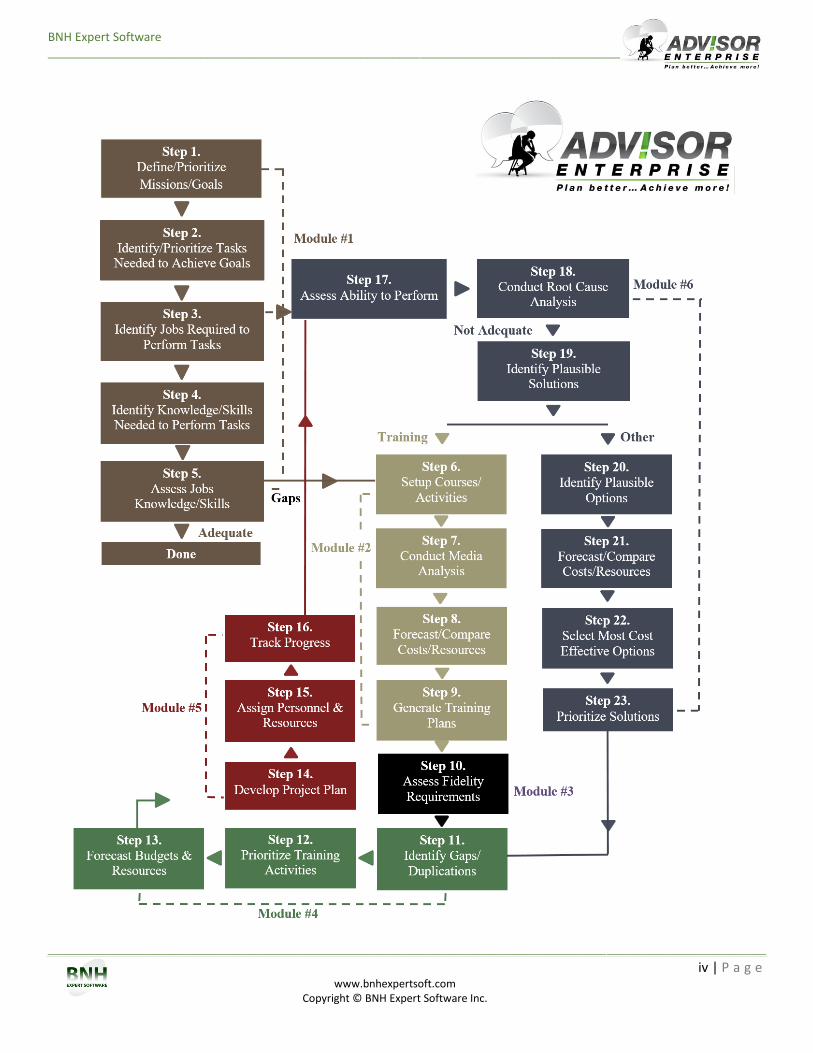
ADVISOR Enterprise is a Training Management System that drives training efficiency by (a) aligning current and future training activities to operational requirements to identify gaps, duplications and training with minimal value; (b) forecasting and comparing the costs of viable delivery options; (c) uncovering cost drivers; and (d) improving resource allocation. ADVISOR is built around the ADDIE model with the added flexibility of starting the analysis at any level. ADVISOR is made up of the following 6 modules that can be used separately or in any combination.
Module #1 Training Analysis
Analysis: To find out “who needs to be trained, on what and why”. Provides a step by step approach for conducting Training Needs Analysis (TNA) or Training Systems Requirements Analysis (TSRA) to identify training needed by each job, position and employee to perform duties to the desired standard under the prescribed conditions. Four approaches may be used to conduct training analysis, namely Mission, System, Competency or Job. [Mission Analysis, Competency Analysis, System Analysis, Job Task Analysis, Knowledge/Skill Gap Analysis and Training Requirements Analysis].
Module #2 Training Design
Design: To find out “what is the most effective and economical way to deliver training”. Provides a step by step approach for conducting Training Media Analysis (TMA) or Option Analysis to identify the most cost effective strategy for the delivery of training and generates Training Plans. The analysis takes into account limitations, instructional design requirements, upfront and recurring costs over training program life as well as risks associated with the introduction of new technology. [Media Analysis, Cost Analysis and Training Plans].
Module #3 Fidelity Analysis
Develop: To find out the “fidelity requirements of training devices”. Provides a step by step approach for assessing the functional requirements of trainers and simulators based on training needs and performance objectives. It identifies visual, tactile, olfactory, affective and auditory sensory cues needed to practice tasks, within realistic environments, under preset conditions to attain the desired level of competency. In addition, ADVISOR takes into account elements within the virtual world and how users interact with each.
Module #4 Resource
Management
Implementation: To find out “how much money and resources are needed”. Compiles and analyzes missions/ goals, competencies, systems, jobs, tasks, training requirements, courses, activities, costs, personnel and resources to generate concise, up to date and actionable reports. The reports provide insight on planned training activities for any time period; training requirements for each job/employee; budget, personnel and resource requirements, training impact as well as how to drive training effectiveness and efficiency by leveraging technology, improving resource allocation and identifying gaps, duplications and unwarranted training. [Forecast and Optimize Training Budgets, Personnel and Resources].
Module #5 Project
Management
Implementation: To find out “how training should be implemented”. Provides a step by step approach for planning a project and tracking progress in real time. This includes the setup of phases and tasks, dependencies and constraints, timelines as well as the assignment of personnel and resources needed to complete. Moreover, ADVISOR tracks progress by comparing hours worked and money spent on each task to project plan, to anticipate delays, facilitate the implementation of corrective measures, and keep projects on-time and within budget. [Develop Project Plans and Track Progress].
Module #6 Performance
Analysis
Evaluation: To find out “how training impacts performance and organizational goals”. Provides a step by step approach for improving performance by zeroing in on the source of the problem and identifying solutions that can produce the desired level of productivity. Moreover, ADVISOR highlights actions that will generate the greatest impact by assessing the feasibility of implementing plausible solutions as well as forecasting the costs, benefits and Return on Investment (ROI) of each intervention. [Performance Gap Analysis, Root Cause Analysis and Cost Benefit Analysis].
BNH Expert Software _______________________________________________________________________________________
____________________________________________________________________________________________________________
iv | P a g e www.bnhexpertsoft.com
Copyright © BNH Expert Software Inc.
BNH Expert Software __________________________________________________________________________________________
v | P a g e www.bnhexpertsoft.com
Copyright © BNH Expert Software Inc.
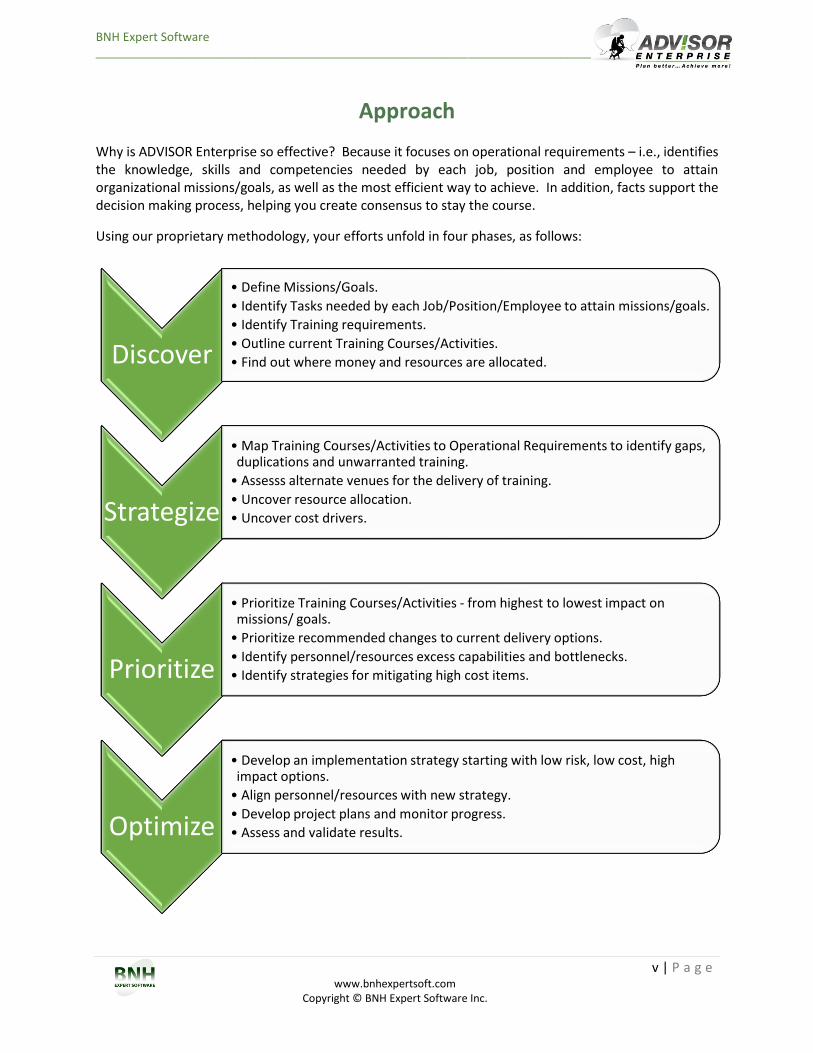
Approach Why is ADVISOR Enterprise so effective? Because it focuses on operational requirements – i.e., identifies the knowledge, skills and competencies needed by each job, position and employee to attain organizational missions/goals, as well as the most efficient way to achieve. In addition, facts support the decision making process, helping you create consensus to stay the course.
Using our proprietary methodology, your efforts unfold in four phases, as follows:
Discover
• Define Missions/Goals.
• Identify Tasks needed by each Job/Position/Employee to attain missions/goals.
• Identify Training requirements.
• Outline current Training Courses/Activities.
• Find out where money and resources are allocated.
Strategize
• Map Training Courses/Activities to Operational Requirements to identify gaps, duplications and unwarranted training.
• Assesss alternate venues for the delivery of training.
• Uncover resource allocation.
• Uncover cost drivers.
Prioritize
• Prioritize Training Courses/Activities - from highest to lowest impact on missions/ goals.
• Prioritize recommended changes to current delivery options.
• Identify personnel/resources excess capabilities and bottlenecks.
• Identify strategies for mitigating high cost items.
Optimize
• Develop an implementation strategy starting with low risk, low cost, high impact options.
• Align personnel/resources with new strategy.
• Develop project plans and monitor progress.
• Assess and validate results.

BNH Expert Software _____________________________________________________________________________
_____________________________________________________________________________________________
vi | P a g e www.bnhexpertsoft.com
Copyright © BNH Expert Software Inc.
BNH Expert Software _____________________________________________________________________________
_____________________________________________________________________________________________
vii | P a g e www.bnhexpertsoft.com
Copyright © BNH Expert Software Inc.
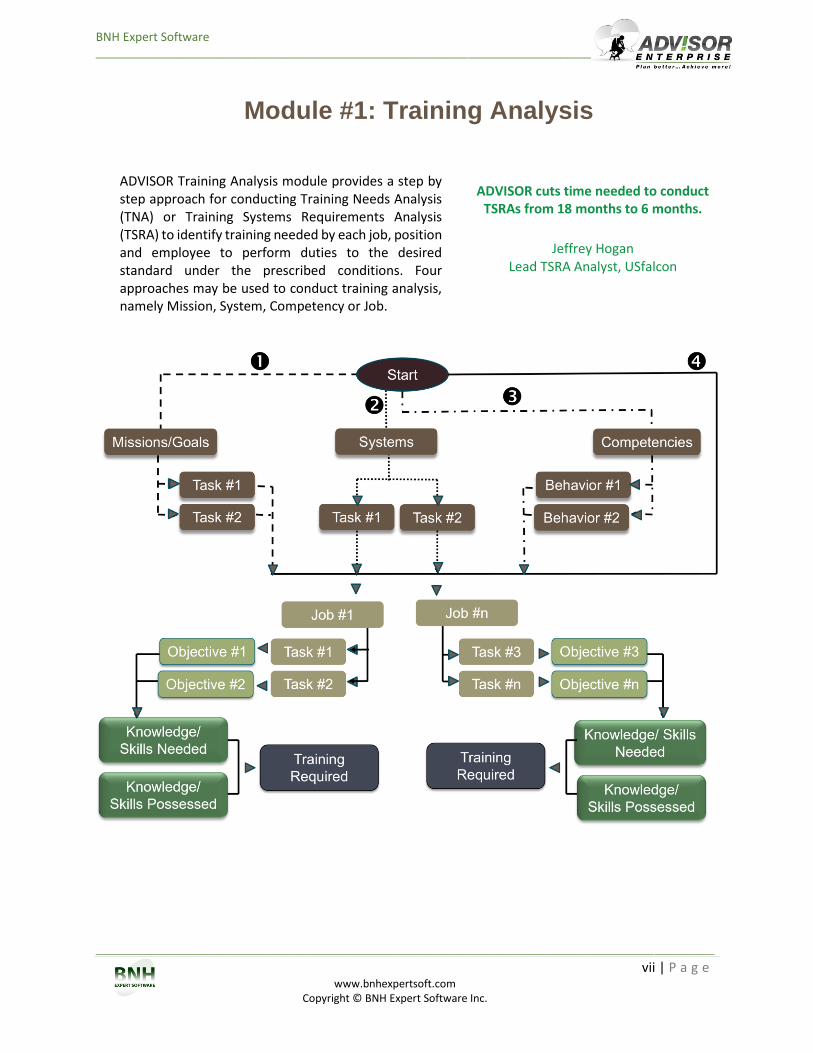
Module #1: Training Analysis
ADVISOR Training Analysis module provides a step by step approach for conducting Training Needs Analysis (TNA) or Training Systems Requirements Analysis (TSRA) to identify training needed by each job, position and employee to perform duties to the desired standard under the prescribed conditions. Four approaches may be used to conduct training analysis, namely Mission, System, Competency or Job.
ADVISOR cuts time needed to conduct TSRAs from 18 months to 6 months.
Jeffrey Hogan Lead TSRA Analyst, USfalcon
BNH Expert Software _____________________________________________________________________________
_____________________________________________________________________________________________
viii | P a g e www.bnhexpertsoft.com
Copyright © BNH Expert Software Inc.
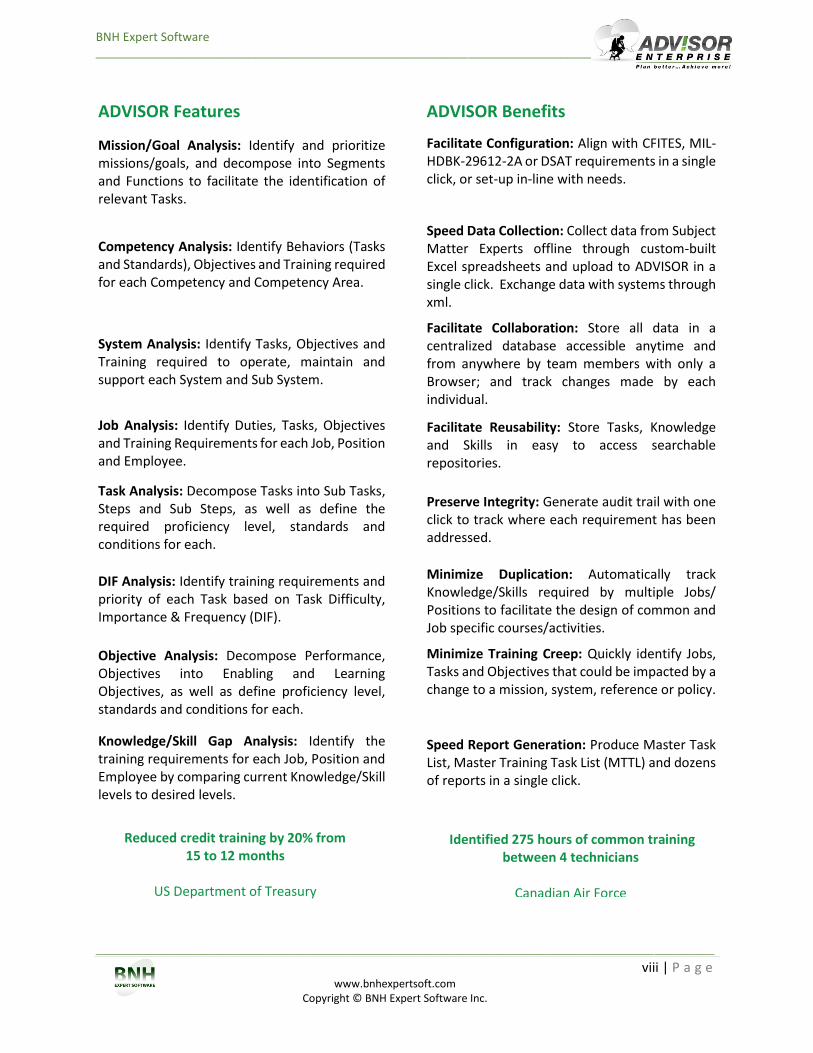
ADVISOR Features ADVISOR Benefits
Mission/Goal Analysis: Identify and prioritize missions/goals, and decompose into Segments and Functions to facilitate the identification of relevant Tasks.
Facilitate Configuration: Align with CFITES, MIL-HDBK-29612-2A or DSAT requirements in a single click, or set-up in-line with needs.
Competency Analysis: Identify Behaviors (Tasks and Standards), Objectives and Training required for each Competency and Competency Area.
Speed Data Collection: Collect data from Subject Matter Experts offline through custom-built Excel spreadsheets and upload to ADVISOR in a single click. Exchange data with systems through xml.
System Analysis: Identify Tasks, Objectives and Training required to operate, maintain and support each System and Sub System.
Facilitate Collaboration: Store all data in a centralized database accessible anytime and from anywhere by team members with only a Browser; and track changes made by each individual.
Job Analysis: Identify Duties, Tasks, Objectives and Training Requirements for each Job, Position and Employee.
Facilitate Reusability: Store Tasks, Knowledge and Skills in easy to access searchable repositories.
Task Analysis: Decompose Tasks into Sub Tasks, Steps and Sub Steps, as well as define the required proficiency level, standards and conditions for each.
Preserve Integrity: Generate audit trail with one click to track where each requirement has been addressed.
DIF Analysis: Identify training requirements and priority of each Task based on Task Difficulty, Importance & Frequency (DIF).
Minimize Duplication: Automatically track Knowledge/Skills required by multiple Jobs/ Positions to facilitate the design of common and Job specific courses/activities.
Objective Analysis: Decompose Performance, Objectives into Enabling and Learning Objectives, as well as define proficiency level, standards and conditions for each.
Minimize Training Creep: Quickly identify Jobs, Tasks and Objectives that could be impacted by a change to a mission, system, reference or policy.
Knowledge/Skill Gap Analysis: Identify the training requirements for each Job, Position and Employee by comparing current Knowledge/Skill levels to desired levels.
Speed Report Generation: Produce Master Task List, Master Training Task List (MTTL) and dozens of reports in a single click.
Identified 275 hours of common training between 4 technicians
Canadian Air Force
Reduced credit training by 20% from 15 to 12 months
US Department of Treasury
BNH Expert Software _____________________________________________________________________________
_____________________________________________________________________________________________
ix | P a g e www.bnhexpertsoft.com
Copyright © BNH Expert Software Inc.
Acknowledgement
ADVISOR Enterprise is the result of over twenty years of research and development. Dozens of organizations and hundreds of individuals have contributed to the development and evolution of ADVISOR and for this we are very appreciative. Our primary objective is to develop a practical, reliable and robust tool that simplifies and speeds training analysis, forecasts and optimizes training resources, improves resource allocation, generates audit trail to support recommendations, facilitates collaboration and sharing of data among team members, minimizes duplication as well as facilitates the upkeep of analysis over time to keep training programs effective, efficient and relevant. We believe that with the assistance and contribution of the following organizations and individuals, we have been able to accomplish this goal.
CAE
Canadian National Defence
Federal Deposit Insurance Agency
Lockheed Martin
National Security Agency
Merck Company
Nortel Networks
Pearson TQ
Raytheon Systems Company
Southern Steel Company
UK Ministry of Defence
United States Air Force
United States Army
United States Coast Guard
United States Marine Corps
United States Navy
Lisa Abramson – Merck & Company Larry Alberter – National Security Agency Cathi Billings – Sheppard AFB Ferrell Briggs – Naval Aviation Maintenance Training Group Tim Bothell – Franklin Covey Company Greg Campbell – Canadian National Defence Bruce Castle – Lockheed Martin Bryan Chapman – Brandon-Hall.com Rick Cheek – Keesler AFB Dr. Ed Chenette – Chief of Naval Education and Training Dr. Adelaide Cherry – Maxwell AFB Alex Cohoon – US Navy, Virginia Beach FCTCLANT Beverly Condon – Goodfellow AFB Dr. Dennis Duke – US Navy Naval Air Systems Command Dr. Bruce Eddy – Lockheed Martin Russell Edmonds – UK MoD, Training and Simulation Systems Programme (TSSP) Frederick Glover – Naval Aviation Maintenance Training Group
BNH Expert Software _____________________________________________________________________________
_____________________________________________________________________________________________
x | P a g e www.bnhexpertsoft.com
Copyright © BNH Expert Software Inc.
Dr. Robert Guptill – Dynamic Research Corporation Richard Grahlman – Naval Postgraduate School Dr. Jo Ann Graves – Expeditionary Warfare Training Group, Pacific Dr. Anthony Head – UK MoD, HQ Land Forces Janet Heins – Merck & Company Peter Hope – Canadian National Defence Betty Sue Jones – Maxwell AFB James Kalivoda – Naval Education and Training Professional David M Lorage – US Coast Guard Dr. Fred Madsen – Lockheed Martin Dr. Tim McLaughlin – Raytheon Professional Services Dr. Bill Melton, US Army – TRADOC Jesse Martinez – US Marine Corps Dr. Arlen Michaels – Nortel Networks Hector Moya – Goodfellow AFB Vangie Nix – Maxwell AFB Stephane Ouellet - CAE Arlene Parker – Keesler AFB Dr. Albert Pruett – Naval Aviation Maintenance Training Group Peter Sabiston – Canadian National Defence Mike Sazma – Great Lakes Naval Training Center Fred Roberts – Federal Deposit Insurance Corporation Roger St. Pierre – Canadian National Defence William Schafer – Trident Training Facility Bangor Dr. Bill Shook – Boeing Company Robert Simmon – Naval Technical Training Center John Stacy – Kraft Foods Karl Stradley – Raytheon Professional Services Gary Troy – Goodfellow AFB Dr. Steve Ulosevich – Southern Steel Company Chris Winters – Raytheon Systems Company Pete Willey – Pearson TQ Dr. Kenneth Woolman – Lockheed Martin
Thank you. J. Bahlis, Ph.D., P.Eng. President BNH Expert Software Inc.
BNH Expert Software _____________________________________________________________________________
_____________________________________________________________________________________________
xi | P a g e www.bnhexpertsoft.com
Copyright © BNH Expert Software Inc.
TABLE OF CONTENTS 1. Getting Started ....................................................................... 1
1.1 Introduction ...................................................................................... 1 1.2 How Can ADVISOR Help You? ........................................................... 2 1.3 System Requirements ....................................................................... 3 1.4 Selecting the Best Approach/Strategy .............................................. 4 1.5 Getting Started .................................................................................. 7 1.6 How is ADVISOR Organized? ............................................................. 8 1.7 Basic ADVISOR Functions .................................................................. 9 Add ................................................................................................... 9 Edit ................................................................................................... 9 Delete ............................................................................................... 10 Track Changes .................................................................................. 10 Edit Multiple Records ....................................................................... 11 Modify Hierarchy ............................................................................. 12 Search and Copy .............................................................................. 13 Import Data .................................................................................... 14 Setup and Assign Meta Tags ........................................................... 15 Specify Items per Page ................................................................... 16 Limit Access to Data/Analysis ......................................................... 17 Collaborate with Team ................................................................... 17 Add Notes ....................................................................................... 18 1.8 Learning ADVISOR ............................................................................. 19 1.9 References ......................................................................................... 20
2. Setup Projects ....................................................................... 21
2.1 Introduction ...................................................................................... 21 2.2 Setup New Projects ........................................................................... 21 2.3 Configure Projects ............................................................................. 23 2.4 Setup Project Segments .................................................................... 25
3. Mission/Goal Analysis ....................................................................... 27 3.1 Setup Missions & Goals ..................................................................... 27 3.2 Divide Mission/Goals into Segments & Functions ............................ 29 3.3 Create/Manage Mission Tasks .......................................................... 30 3.4 Determine Tasks Training Requirements/DIF Models ...................... 33 3.5 Create/Manage Knowledge, Skills and Attitudes .............................. 38 3.6 Merge Duplicate Knowledge, Skills and Attitudes ............................ 40 3.7 Create/Manage Job Aids, Policies and Tools .................................... 41 3.8 Merge Duplicate Job Aids, Policies and Tools ................................... 43 3.9 Import Project Tasks and KSAs .......................................................... 43 3.10 References ......................................................................................... 44
BNH Expert Software _____________________________________________________________________________
_____________________________________________________________________________________________
xii | P a g e www.bnhexpertsoft.com
Copyright © BNH Expert Software Inc.
4. System/Competency Analysis ............................................................... 45 4.1 Setup Systems/Competencies........................................................... 45 4.2 Create/Manage System/Competency Tasks/Behaviors ................... 48 4.3 Create/Manage Knowledge, Skills and Attitudes (KSAs)................... 50 4.4 Merge Duplicate Knowledge, Skills and Attitudes (KSAs) ................. 52 4.5 Create/Manage Job Aids, Policies and Tools .................................... 53 4.6 Merge Duplicate Job Aids, Policies and Tools .................................. 55 4.7 Create/Manage Performance and Enabling Objectives .................... 56 4.8 Uncover Training Requirements ...................................................... 58 4.9 Import System/Competency Tasks, Objectives &KSAs .................... 61 4.10 Generate System/Competency Reports .......................................... 61
Tasks Report ..................................................................................... 61 Performance Objectives Report ....................................................... 62 Training Requirements Analysis Report ........................................... 63 Align Tasks with Learning Objectives Report ................................... 63 System/Competency Tasks or Objectives Scalars ........................... 64 System/Competency Analysis Report .............................................. 64 5. Job Analysis ................................................................ 65
5.1 Setup Jobs ......................................................................................... 65 5.2 Assign Competencies to Jobs ............................................................ 67 5.3 Create/Manage Setup Job Tasks ....................................................... 68 5.4 Create/Manage Knowledge, Skills and Attitudes (KSAs)................... 70 5.5 Merge Duplicate Knowledge, Skills and Attitudes (KSAs) ................. 72 5.6 Create/Manage Job Aids, Policies and Tools .................................... 73 5.7 Merge Duplicate Job Aids, Policies and Tools .................................. 75 5.8 Create/Manage Performance and Enabling Objectives .................... 76 5.9 Define POs/EOs Steps, Cues and Measures ...................................... 79 5.10 Uncover Training Requirements ....................................................... 80 5.11 Merge Performance/Enabling Objectives ........................................ 83 5.12 Merge Jobs ....................................................................................... 84 5.13 Import Job Tasks, Objectives & KSAs ............................................... 84 5.14 Generate Job Reports ....................................................................... 85 Job Task Report ................................................................................ 85 Job Training Task Report ................................................................... 86 Training Requirements Analysis Report ........................................... 86 Align Tasks with Learning Objectives Report .................................... 87
Job Tasks or Objectives Scalars ....................................................... 87 Job Analysis Report .......................................................................... 88 Job Task Analysis Report (JTAR) ........................................................ 88 Job Specification Report .................................................................... 89 Formal, Workplace or Residual Training Statement Reports ............ 89 Assessment Specification Report ...................................................... 89 Training Plan (TP) or Qualification Standard and Plan (QSP) Reports 90
BNH Expert Software _____________________________________________________________________________
_____________________________________________________________________________________________
xiii | P a g e www.bnhexpertsoft.com
Copyright © BNH Expert Software Inc.
6. Setup Meta Tags and References .............................................................. 91 6.1 Introduction ..................................................................................... 91 6.2 Master Attributes List ...................................................................... 91 6.3 Master Reference List ...................................................................... 94 7. Generate Project Reports ................................................................ 95
Master Task List Report ............................................................................. 95 Master Training Task List Report ................................................................ 96 Common KSA Report................................................................................... 96 Training Needs Analysis Report ................................................................. 97 Goals Top Down View & Goals Bottom Up View Reports ......................... 98 Systems/Competency Report ..................................................................... 99 Job System/Competency Report ................................................................ 100
Annex A: Job Aid for Selecting Action Verbs .......................................................... 101

BNH Expert Software _____________________________________________________________________________
_____________________________________________________________________________________________
xiv | P a g e www.bnhexpertsoft.com
Copyright © BNH Expert Software Inc.
Chapter 1 - Getting Started ____________________________________________________________________________________________
1 | P a g e www.bnhexpertsoft.com
Copyright © BNH Expert Software Inc.
Chapter 1: Getting Started
1.1 Introduction
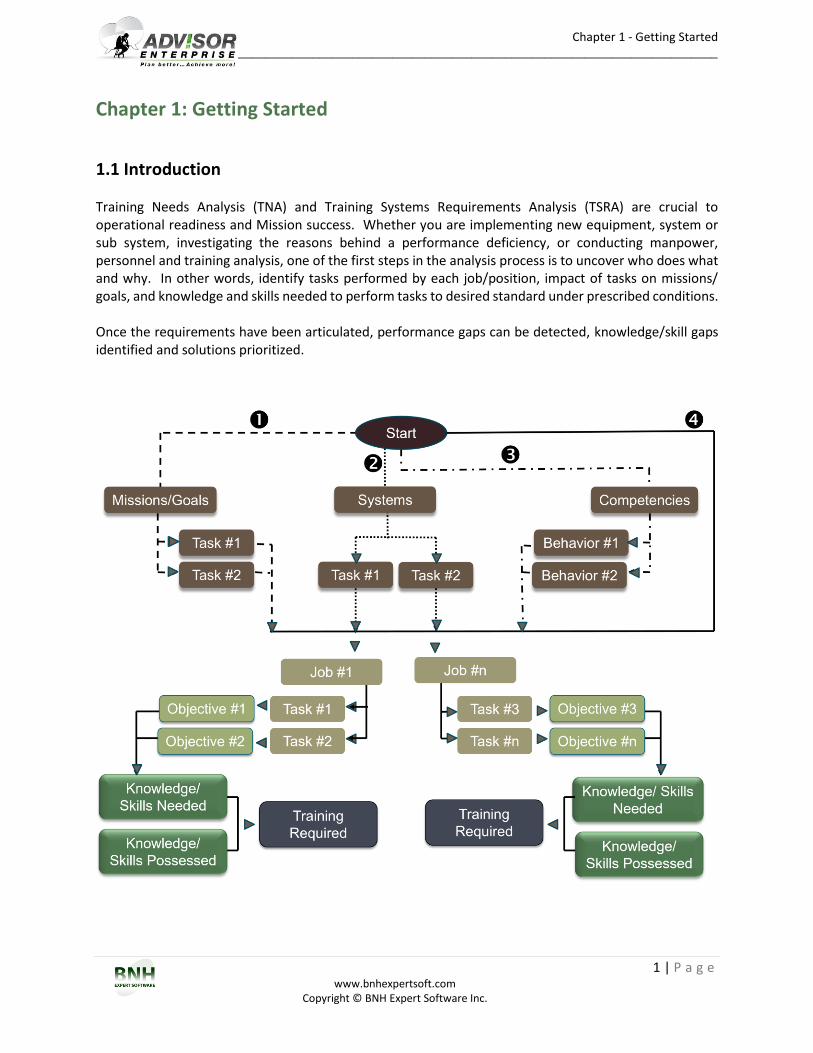
Training Needs Analysis (TNA) and Training Systems Requirements Analysis (TSRA) are crucial to operational readiness and Mission success. Whether you are implementing new equipment, system or sub system, investigating the reasons behind a performance deficiency, or conducting manpower, personnel and training analysis, one of the first steps in the analysis process is to uncover who does what and why. In other words, identify tasks performed by each job/position, impact of tasks on missions/ goals, and knowledge and skills needed to perform tasks to desired standard under prescribed conditions. Once the requirements have been articulated, performance gaps can be detected, knowledge/skill gaps identified and solutions prioritized.
Chapter 1 - Getting Started ____________________________________________________________________________________________
2 | P a g e www.bnhexpertsoft.com
Copyright © BNH Expert Software Inc.
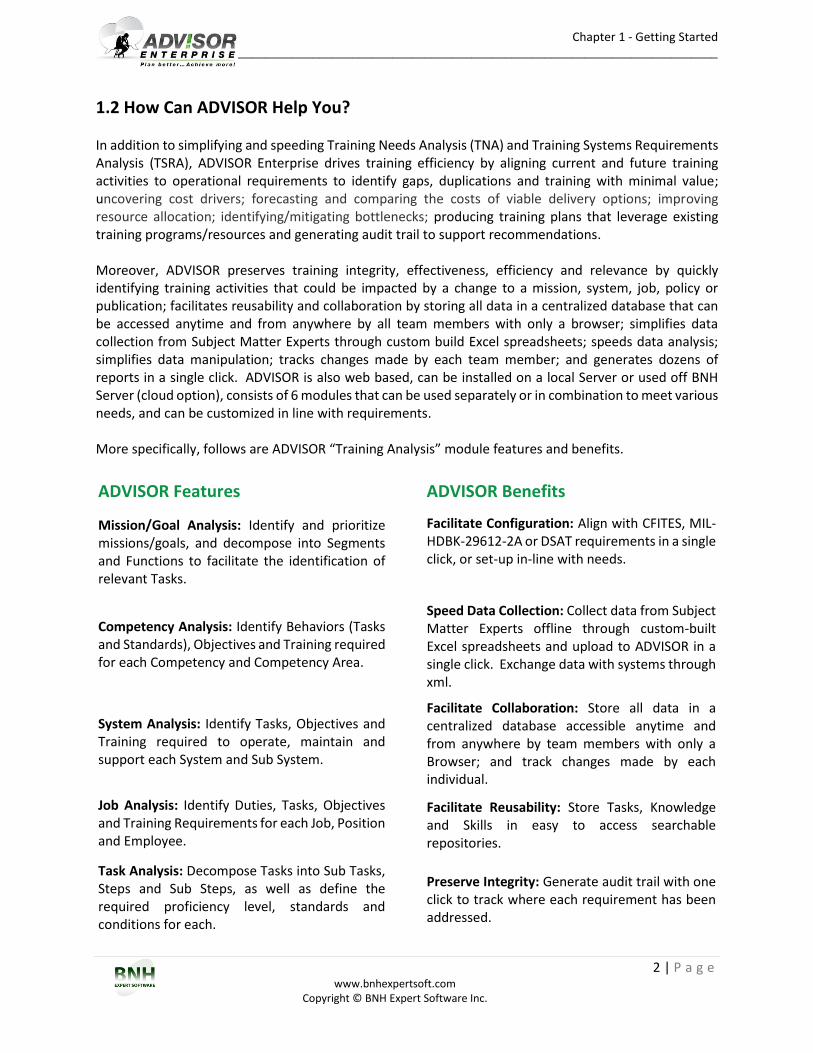
1.2 How Can ADVISOR Help You? In addition to simplifying and speeding Training Needs Analysis (TNA) and Training Systems Requirements Analysis (TSRA), ADVISOR Enterprise drives training efficiency by aligning current and future training activities to operational requirements to identify gaps, duplications and training with minimal value; uncovering cost drivers; forecasting and comparing the costs of viable delivery options; improving resource allocation; identifying/mitigating bottlenecks; producing training plans that leverage existing training programs/resources and generating audit trail to support recommendations. Moreover, ADVISOR preserves training integrity, effectiveness, efficiency and relevance by quickly identifying training activities that could be impacted by a change to a mission, system, job, policy or publication; facilitates reusability and collaboration by storing all data in a centralized database that can be accessed anytime and from anywhere by all team members with only a browser; simplifies data collection from Subject Matter Experts through custom build Excel spreadsheets; speeds data analysis; simplifies data manipulation; tracks changes made by each team member; and generates dozens of reports in a single click. ADVISOR is also web based, can be installed on a local Server or used off BNH Server (cloud option), consists of 6 modules that can be used separately or in combination to meet various needs, and can be customized in line with requirements. More specifically, follows are ADVISOR “Training Analysis” module features and benefits.
ADVISOR Features ADVISOR Benefits
Mission/Goal Analysis: Identify and prioritize missions/goals, and decompose into Segments and Functions to facilitate the identification of relevant Tasks.
Facilitate Configuration: Align with CFITES, MIL-HDBK-29612-2A or DSAT requirements in a single click, or set-up in-line with needs.
Competency Analysis: Identify Behaviors (Tasks and Standards), Objectives and Training required for each Competency and Competency Area.
Speed Data Collection: Collect data from Subject Matter Experts offline through custom-built Excel spreadsheets and upload to ADVISOR in a single click. Exchange data with systems through xml.
System Analysis: Identify Tasks, Objectives and Training required to operate, maintain and support each System and Sub System.
Facilitate Collaboration: Store all data in a centralized database accessible anytime and from anywhere by team members with only a Browser; and track changes made by each individual.
Job Analysis: Identify Duties, Tasks, Objectives and Training Requirements for each Job, Position and Employee.
Facilitate Reusability: Store Tasks, Knowledge and Skills in easy to access searchable repositories.
Task Analysis: Decompose Tasks into Sub Tasks, Steps and Sub Steps, as well as define the required proficiency level, standards and conditions for each.
Preserve Integrity: Generate audit trail with one click to track where each requirement has been addressed.
Chapter 1 - Getting Started ____________________________________________________________________________________________
3 | P a g e www.bnhexpertsoft.com
Copyright © BNH Expert Software Inc.
DIF Analysis: Identify training requirements and priority of each Task based on Task Difficulty, Importance & Frequency (DIF).
Minimize Duplication: Automatically track Knowledge/Skills required by multiple Jobs/ Positions to facilitate the design of common and Job specific courses/activities.
Objective Analysis: Decompose Performance, Objectives into Enabling and Learning Objectives, as well as define proficiency level, standards and conditions for each.
Minimize Training Creep: Quickly identify Jobs, Tasks and Objectives that could be impacted by a change to a mission, system, reference or policy.
Knowledge/Skill Gap Analysis: Identify the training requirements for each Job, Position and Employee by comparing current Knowledge/Skill levels to desired levels.
Speed Report Generation: Produce Master Task List, Master Training Task List (MTTL) and dozens of reports in a single click.
1.3 System Requirements
Database/Server Minimum Requirements
2 CPU Processor with 4GB of RAM 5 GB of free Hard Disk Space Windows 2000, 2003, 2008, 2012, 7, 8, 10, NT, or Sun Solaris 9.0 or higher, or Linux Red Hat 6.0 or
higher Web Server that supports Java Virtual Machine and can run Java Servlet. Supported products include:
Tomcat 4.0 or higher, IBM WebSphere 4.0 or higher, Resin, Oracle Application Server, Jserv and others…
Oracle version 9i, 10g, 11g or 12c
Workstation/Desktop Minimum Requirements
Pentium IV with 512 MB RAM 200 MB of free Hard Disk Space Windows 98, ME, XP, VISTA, 7, 8, 10, NT, 2000, 2003, 2008 or Sun Solaris 8.0 or higher Internet Explorer 6.0 or higher, Mozilla Firefox 3.0 or higher, Google Chrome, or Safari
Identified 275 hours of common training between 4 technicians
Canadian Air Force
Reduced credit training by 20% from 15 to 12 months
US Department of Treasury
Chapter 1 - Getting Started ____________________________________________________________________________________________
4 | P a g e www.bnhexpertsoft.com
Copyright © BNH Expert Software Inc.
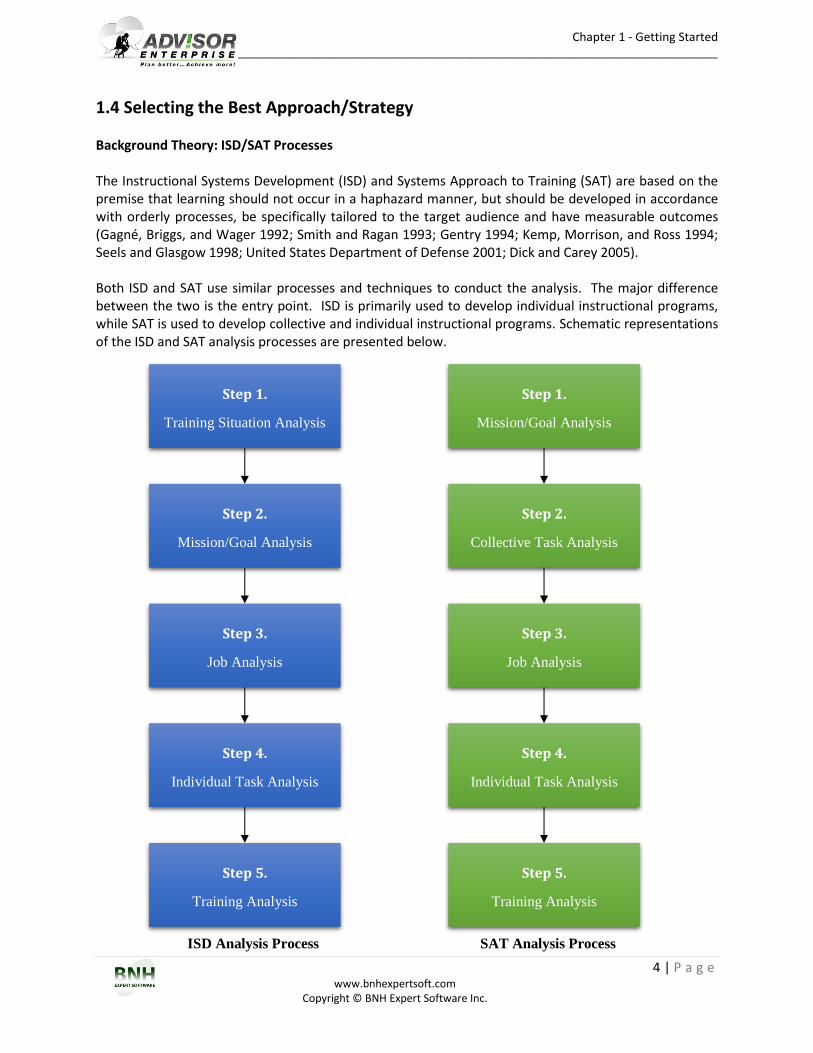
1.4 Selecting the Best Approach/Strategy Background Theory: ISD/SAT Processes The Instructional Systems Development (ISD) and Systems Approach to Training (SAT) are based on the premise that learning should not occur in a haphazard manner, but should be developed in accordance with orderly processes, be specifically tailored to the target audience and have measurable outcomes (Gagné, Briggs, and Wager 1992; Smith and Ragan 1993; Gentry 1994; Kemp, Morrison, and Ross 1994; Seels and Glasgow 1998; United States Department of Defense 2001; Dick and Carey 2005). Both ISD and SAT use similar processes and techniques to conduct the analysis. The major difference between the two is the entry point. ISD is primarily used to develop individual instructional programs, while SAT is used to develop collective and individual instructional programs. Schematic representations of the ISD and SAT analysis processes are presented below.
ISD Analysis Process SAT Analysis Process
Step 1.
Training Situation Analysis
Step 3.
Job Analysis
Step 4.
Individual Task Analysis
Step 5.
Training Analysis
Step 2.
Mission/Goal Analysis
Step 1.
Mission/Goal Analysis
Step 2.
Collective Task Analysis
Step 3.
Job Analysis
Step 4.
Individual Task Analysis
Step 5.
Training Analysis
Chapter 1 - Getting Started ____________________________________________________________________________________________
5 | P a g e www.bnhexpertsoft.com
Copyright © BNH Expert Software Inc.
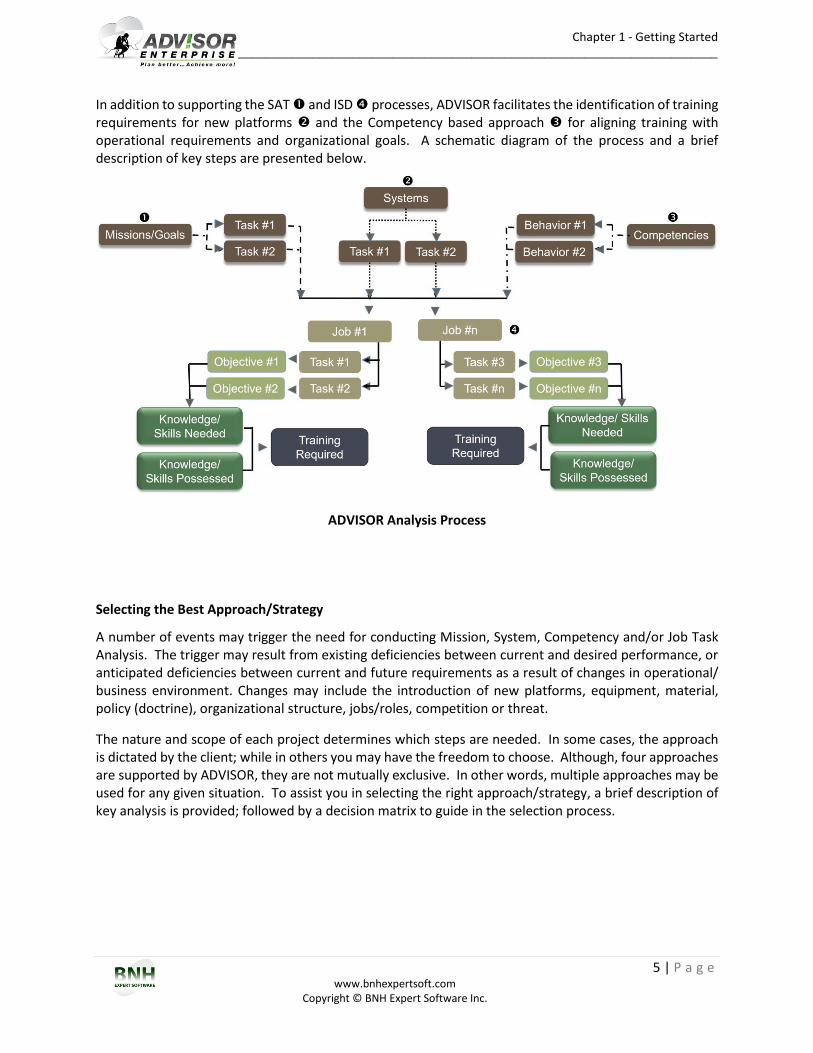
In addition to supporting the SAT and ISD processes, ADVISOR facilitates the identification of training requirements for new platforms and the Competency based approach for aligning training with operational requirements and organizational goals. A schematic diagram of the process and a brief description of key steps are presented below.
ADVISOR Analysis Process Selecting the Best Approach/Strategy
A number of events may trigger the need for conducting Mission, System, Competency and/or Job Task Analysis. The trigger may result from existing deficiencies between current and desired performance, or anticipated deficiencies between current and future requirements as a result of changes in operational/ business environment. Changes may include the introduction of new platforms, equipment, material, policy (doctrine), organizational structure, jobs/roles, competition or threat.
The nature and scope of each project determines which steps are needed. In some cases, the approach is dictated by the client; while in others you may have the freedom to choose. Although, four approaches are supported by ADVISOR, they are not mutually exclusive. In other words, multiple approaches may be used for any given situation. To assist you in selecting the right approach/strategy, a brief description of key analysis is provided; followed by a decision matrix to guide in the selection process.
Chapter 1 - Getting Started ____________________________________________________________________________________________
6 | P a g e www.bnhexpertsoft.com
Copyright © BNH Expert Software Inc.
Mission/Goal Analysis
The primary objective of this analysis is to identify and prioritize the Missions/Goals of the project under investigation; as well as the Collective and Individual Tasks needed to achieve those Missions/Goals. Collective Task is defined as the one that requires contributions from more than one individual with each individual performing a discrete part. Complex Missions/Goals can be divided into Segments, Sub Segments and Function to facilitate the identification of Collective and Individual Tasks. Mission/Goal Analysis should be conducted when training is required to meet specific Missions/Goals or to assess the impact of training on organizational Missions/Goals. System Analysis
Job requirements in many cases are directly related to the Systems that individuals operate and maintain. For example, the Tasks, as well as Knowledge/Skill requirements for heavy equipment, truck or forklift drivers and technicians, are highly dependent on those vehicles. The same is true for aircraft pilots and technicians, crew onboard ships, and so forth. If multiple jobs operate the same Communication System, for example, we can preserve consistency, drive efficiency and maintain alignment with future system updates by defining the Tasks and Knowledge/Skill requirements once (under the Communication System) and assign them to relevant Jobs. In other words, if Job performance is highly dependent on Systems or Sub Systems, and multiple Jobs operate or maintain the same System or Sub System, then the System based analysis approach will yield the best results. Competency Analysis
Competencies are defined as the ability to perform a particular function successfully. Competencies can be core/behavioral (such as, dependability, reliability, team work or problem solving, etc.); or technical – i.e., domain specific. Technical competencies for project managers, may include Time Management, Cost Management, Oral/Written Communication, and so forth. Each technical competency can be further divided into observable/measurable behaviors (indicators of competence), and each Job will be expected to demonstrate a specific competence level. Since multiple jobs within an organization will most likely require similar competencies, we can preserve consistency, drive efficiency and quickly identify competencies needed to advance to the next level or change jobs by defining indicators of competence (equivalent to Tasks with Standards) once (under each competency) and assign them to relevant Jobs. Job Analysis
The primary objective of this analysis is to identify Jobs (Roles/Occupations/Positions) needed to achieve Missions/Goals and/or their primary duties. Tasks performed by each Job (Line Managers, Account Managers, Customer Service Reps, Technicians, Engineers, Pilots, etc.), including standards, conditions, difficulty, importance and frequency are also defined under Job Analysis. The Tasks for each Job can be allocated from Mission/Goals Analysis, System Analysis and Competency Analysis or defined directly under each Job. Training Analysis
Training Analysis can be conducted for each System, Competency and/or Job by identifying Knowledge, Skills and Attitudes (KSAs) as well as Job Aids, Policies and Tools needed to perform each Task to the desired standard. By comparing current Knowledge/Skills levels to desired levels, Knowledge/Skill Gaps and in-turn Training Requirements can be revealed. Moreover, the analysis can also reveal whether new/improved Job-Aids, Policies, Procedures and/or Tools can improve performance and productivity.
Chapter 1 - Getting Started ____________________________________________________________________________________________
7 | P a g e www.bnhexpertsoft.com
Copyright © BNH Expert Software Inc.
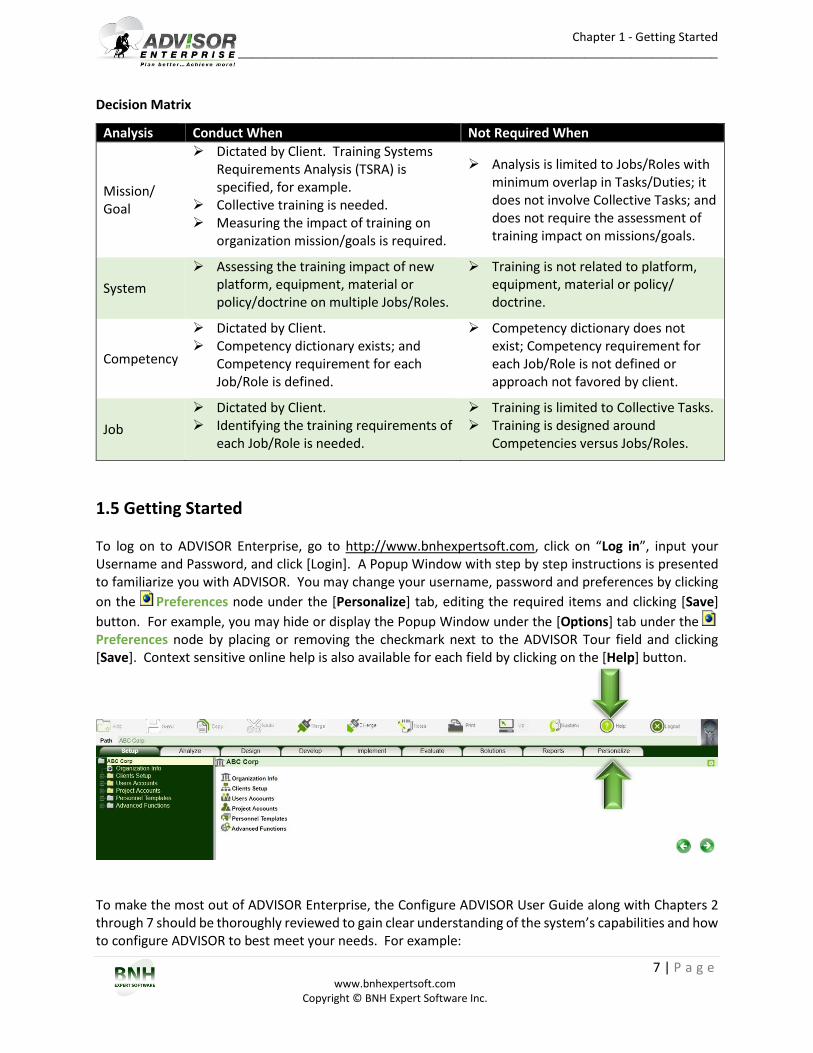
Decision Matrix
Analysis Conduct When Not Required When
Mission/ Goal
Dictated by Client. Training Systems Requirements Analysis (TSRA) is specified, for example.
Collective training is needed. Measuring the impact of training on
organization mission/goals is required.
Analysis is limited to Jobs/Roles with minimum overlap in Tasks/Duties; it does not involve Collective Tasks; and does not require the assessment of training impact on missions/goals.
System
Assessing the training impact of new platform, equipment, material or policy/doctrine on multiple Jobs/Roles.
Training is not related to platform, equipment, material or policy/ doctrine.
Competency
Dictated by Client. Competency dictionary exists; and
Competency requirement for each Job/Role is defined.
Competency dictionary does not exist; Competency requirement for each Job/Role is not defined or approach not favored by client.
Job
Dictated by Client. Identifying the training requirements of
each Job/Role is needed.
Training is limited to Collective Tasks. Training is designed around
Competencies versus Jobs/Roles.
1.5 Getting Started To log on to ADVISOR Enterprise, go to http://www.bnhexpertsoft.com, click on “Log in”, input your Username and Password, and click [Login]. A Popup Window with step by step instructions is presented to familiarize you with ADVISOR. You may change your username, password and preferences by clicking
on the Preferences node under the [Personalize] tab, editing the required items and clicking [Save]
button. For example, you may hide or display the Popup Window under the [Options] tab under the Preferences node by placing or removing the checkmark next to the ADVISOR Tour field and clicking [Save]. Context sensitive online help is also available for each field by clicking on the [Help] button.
To make the most out of ADVISOR Enterprise, the Configure ADVISOR User Guide along with Chapters 2 through 7 should be thoroughly reviewed to gain clear understanding of the system’s capabilities and how to configure ADVISOR to best meet your needs. For example:
Chapter 1 - Getting Started ____________________________________________________________________________________________
8 | P a g e www.bnhexpertsoft.com
Copyright © BNH Expert Software Inc.
What are the desired outcomes? In other words, results needed and how should they be presented. How to setup/configure Clients in line with project’s needs; i.e., data to be collected, analysis to be
conducted and delivery options to be considered? How to setup User Accounts and assign privileges? How quality and consistency should be controlled?
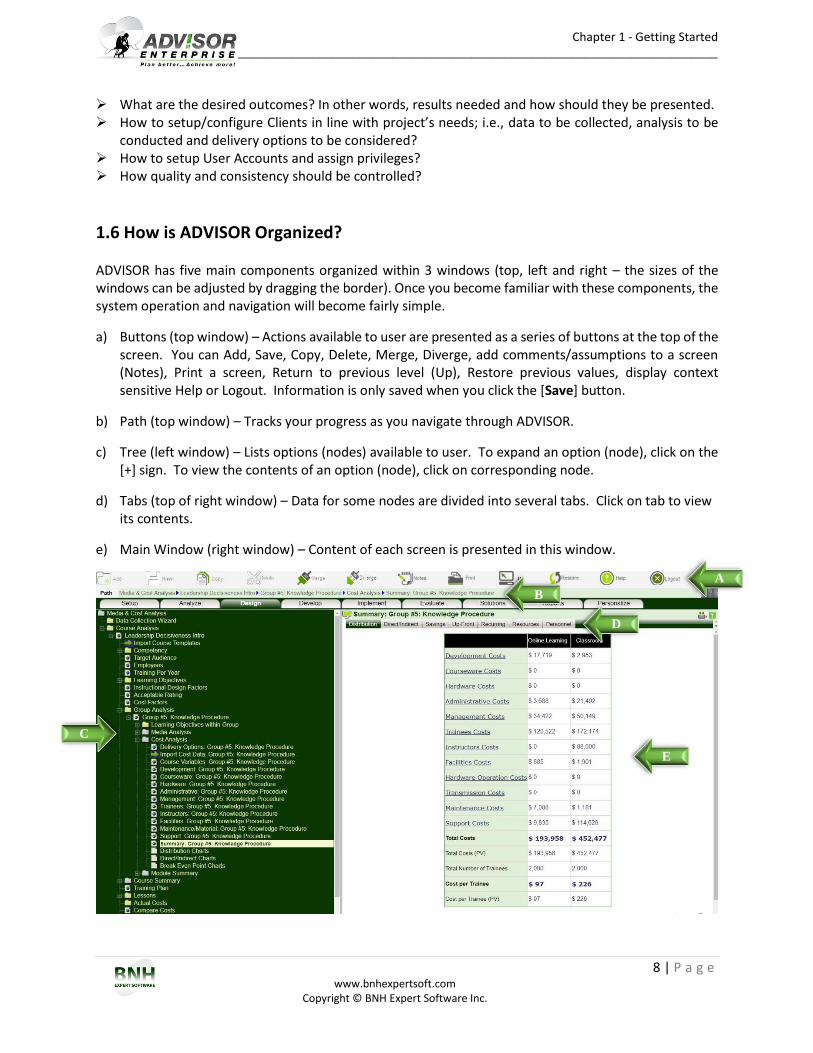
1.6 How is ADVISOR Organized? ADVISOR has five main components organized within 3 windows (top, left and right – the sizes of the windows can be adjusted by dragging the border). Once you become familiar with these components, the system operation and navigation will become fairly simple.
a) Buttons (top window) – Actions available to user are presented as a series of buttons at the top of the screen. You can Add, Save, Copy, Delete, Merge, Diverge, add comments/assumptions to a screen (Notes), Print a screen, Return to previous level (Up), Restore previous values, display context sensitive Help or Logout. Information is only saved when you click the [Save] button.
b) Path (top window) – Tracks your progress as you navigate through ADVISOR.
c) Tree (left window) – Lists options (nodes) available to user. To expand an option (node), click on the [+] sign. To view the contents of an option (node), click on corresponding node.
d) Tabs (top of right window) – Data for some nodes are divided into several tabs. Click on tab to view its contents.
e) Main Window (right window) – Content of each screen is presented in this window.
C
E
A
D
B
Chapter 1 - Getting Started ____________________________________________________________________________________________
9 | P a g e www.bnhexpertsoft.com
Copyright © BNH Expert Software Inc.
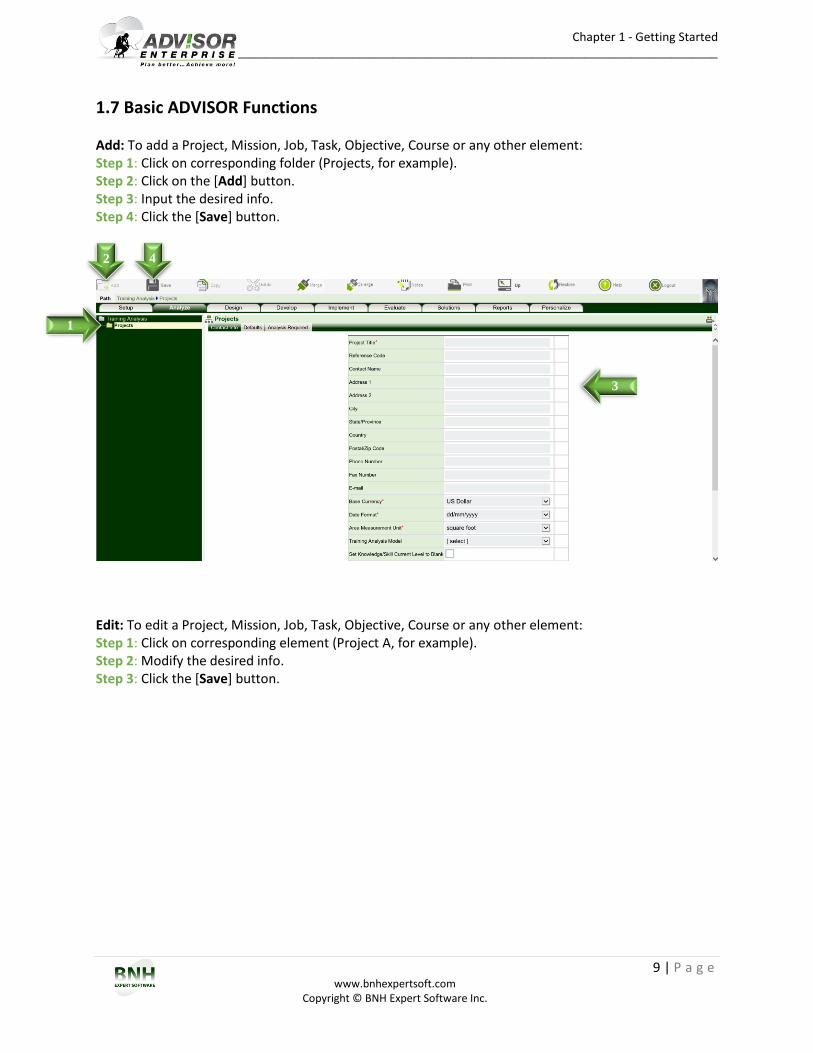
1.7 Basic ADVISOR Functions Add: To add a Project, Mission, Job, Task, Objective, Course or any other element: Step 1: Click on corresponding folder (Projects, for example). Step 2: Click on the [Add] button. Step 3: Input the desired info. Step 4: Click the [Save] button.
Edit: To edit a Project, Mission, Job, Task, Objective, Course or any other element: Step 1: Click on corresponding element (Project A, for example). Step 2: Modify the desired info. Step 3: Click the [Save] button.
1
2 4
3
Chapter 1 - Getting Started ____________________________________________________________________________________________
10 | P a g e www.bnhexpertsoft.com
Copyright © BNH Expert Software Inc.
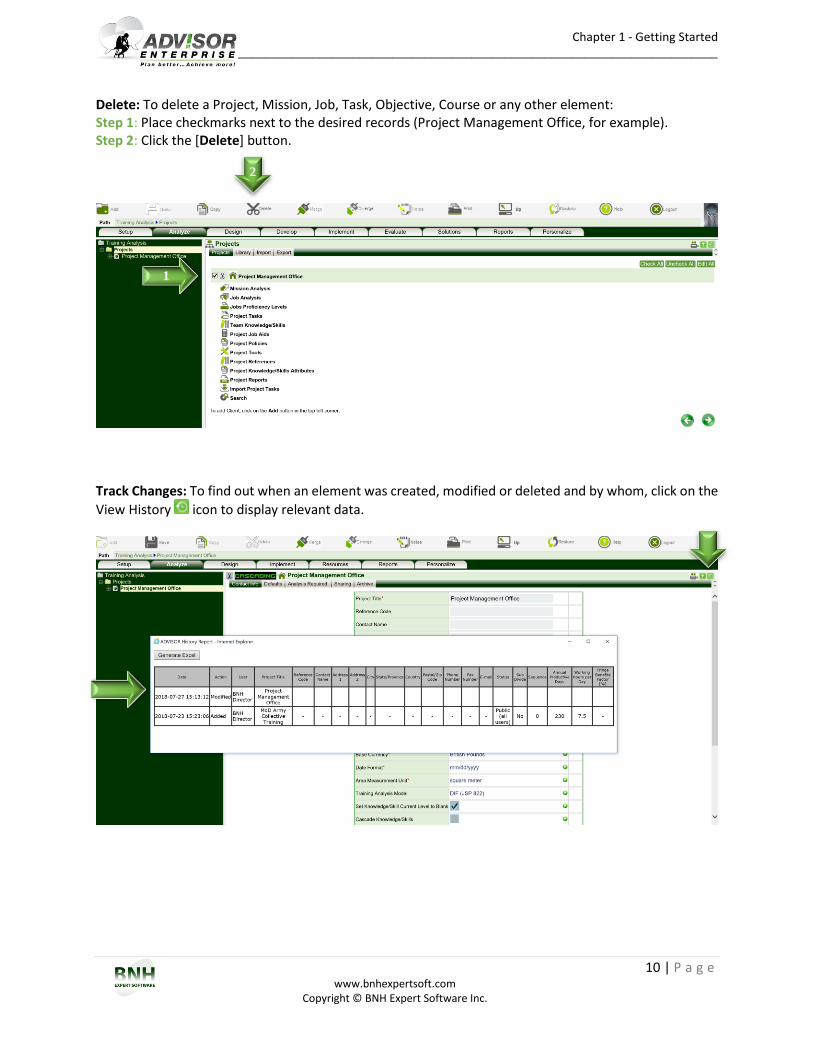
Delete: To delete a Project, Mission, Job, Task, Objective, Course or any other element: Step 1: Place checkmarks next to the desired records (Project Management Office, for example). Step 2: Click the [Delete] button.
Track Changes: To find out when an element was created, modified or deleted and by whom, click on the
View History icon to display relevant data.
1
2
Chapter 1 - Getting Started ____________________________________________________________________________________________
11 | P a g e www.bnhexpertsoft.com
Copyright © BNH Expert Software Inc.
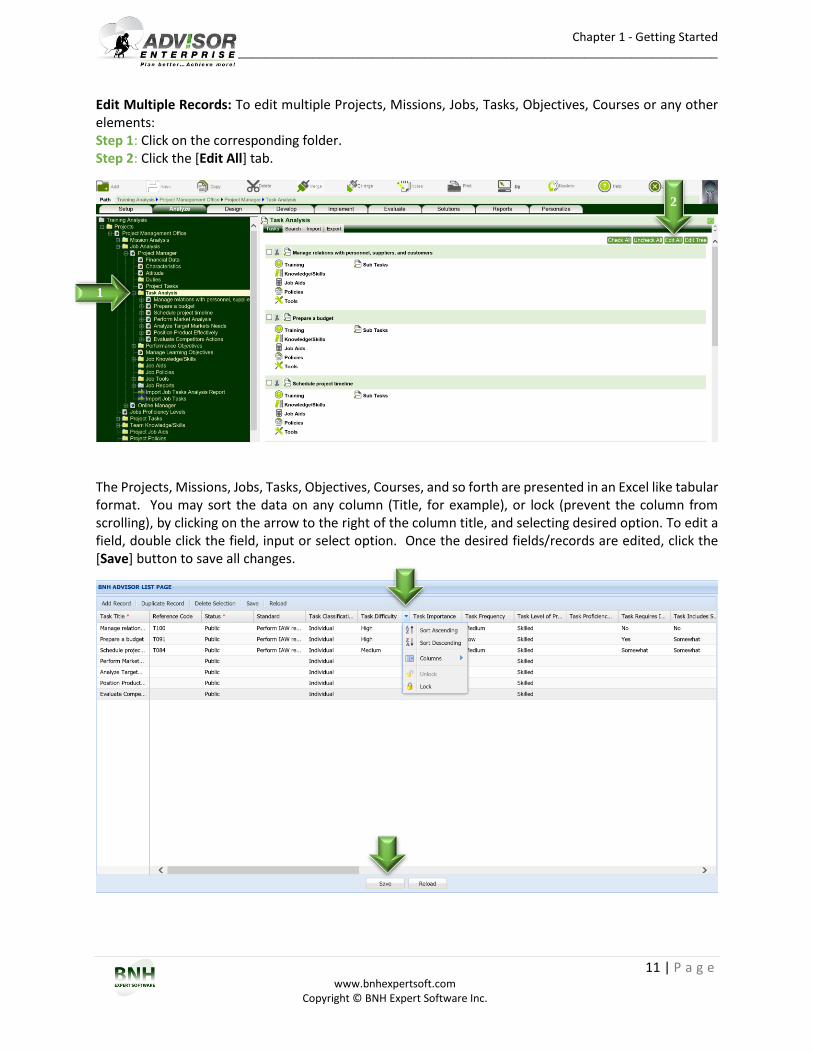
Edit Multiple Records: To edit multiple Projects, Missions, Jobs, Tasks, Objectives, Courses or any other elements: Step 1: Click on the corresponding folder. Step 2: Click the [Edit All] tab.
The Projects, Missions, Jobs, Tasks, Objectives, Courses, and so forth are presented in an Excel like tabular format. You may sort the data on any column (Title, for example), or lock (prevent the column from scrolling), by clicking on the arrow to the right of the column title, and selecting desired option. To edit a field, double click the field, input or select option. Once the desired fields/records are edited, click the [Save] button to save all changes.
1
2
Chapter 1 - Getting Started ____________________________________________________________________________________________
12 | P a g e www.bnhexpertsoft.com
Copyright © BNH Expert Software Inc.
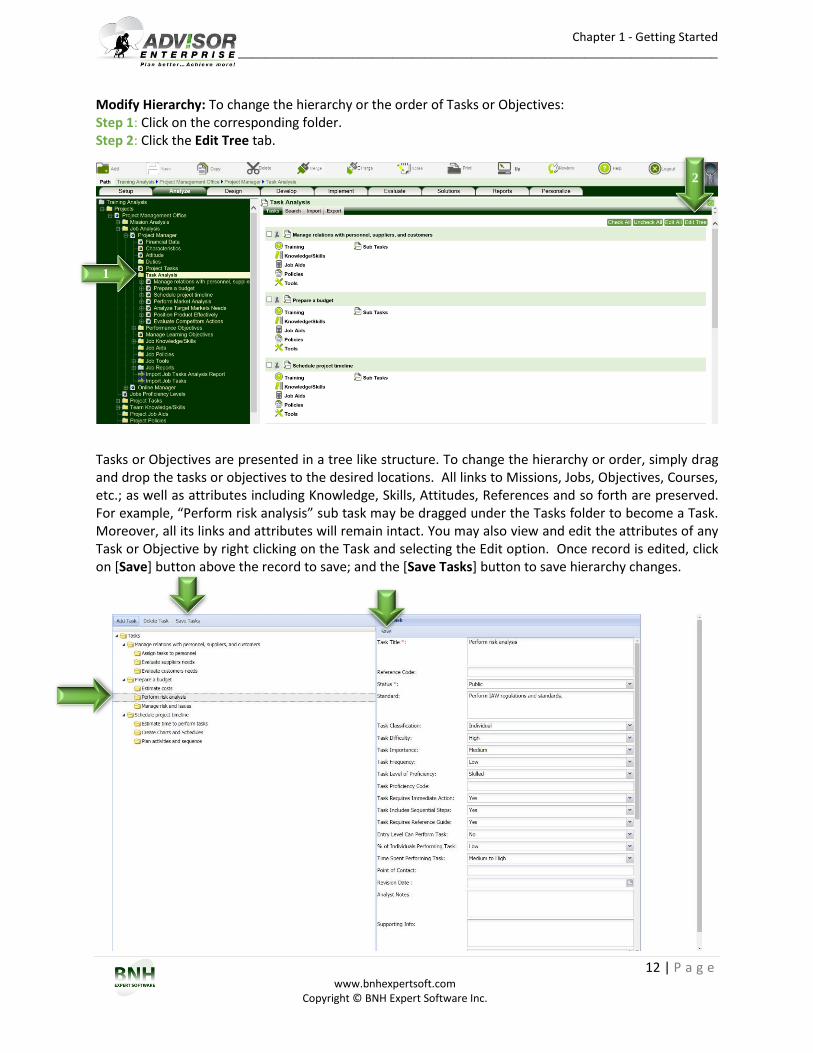
Modify Hierarchy: To change the hierarchy or the order of Tasks or Objectives: Step 1: Click on the corresponding folder. Step 2: Click the Edit Tree tab.
Tasks or Objectives are presented in a tree like structure. To change the hierarchy or order, simply drag and drop the tasks or objectives to the desired locations. All links to Missions, Jobs, Objectives, Courses, etc.; as well as attributes including Knowledge, Skills, Attitudes, References and so forth are preserved. For example, “Perform risk analysis” sub task may be dragged under the Tasks folder to become a Task. Moreover, all its links and attributes will remain intact. You may also view and edit the attributes of any Task or Objective by right clicking on the Task and selecting the Edit option. Once record is edited, click on [Save] button above the record to save; and the [Save Tasks] button to save hierarchy changes.
1
2
Chapter 1 - Getting Started ____________________________________________________________________________________________
13 | P a g e www.bnhexpertsoft.com
Copyright © BNH Expert Software Inc.
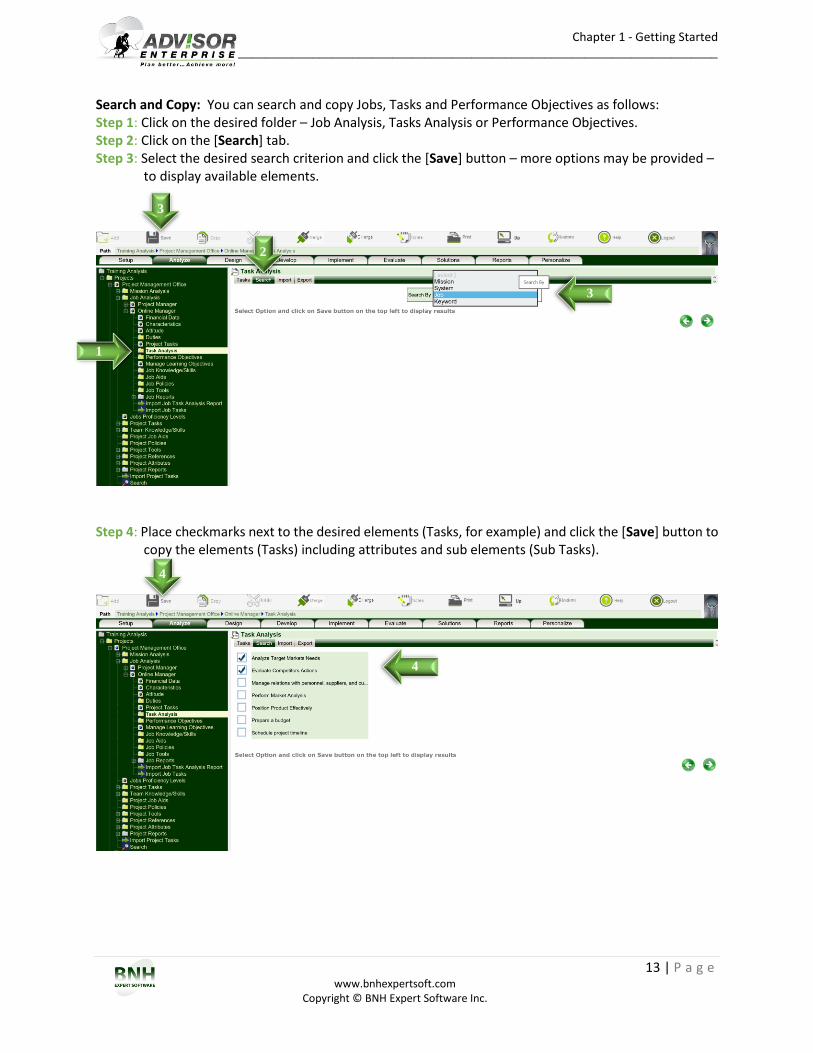
Search and Copy: You can search and copy Jobs, Tasks and Performance Objectives as follows: Step 1: Click on the desired folder – Job Analysis, Tasks Analysis or Performance Objectives. Step 2: Click on the [Search] tab. Step 3: Select the desired search criterion and click the [Save] button – more options may be provided –
to display available elements.
Step 4: Place checkmarks next to the desired elements (Tasks, for example) and click the [Save] button to
copy the elements (Tasks) including attributes and sub elements (Sub Tasks).
1
2
3
4
3
4
Chapter 1 - Getting Started ____________________________________________________________________________________________
14 | P a g e www.bnhexpertsoft.com
Copyright © BNH Expert Software Inc.
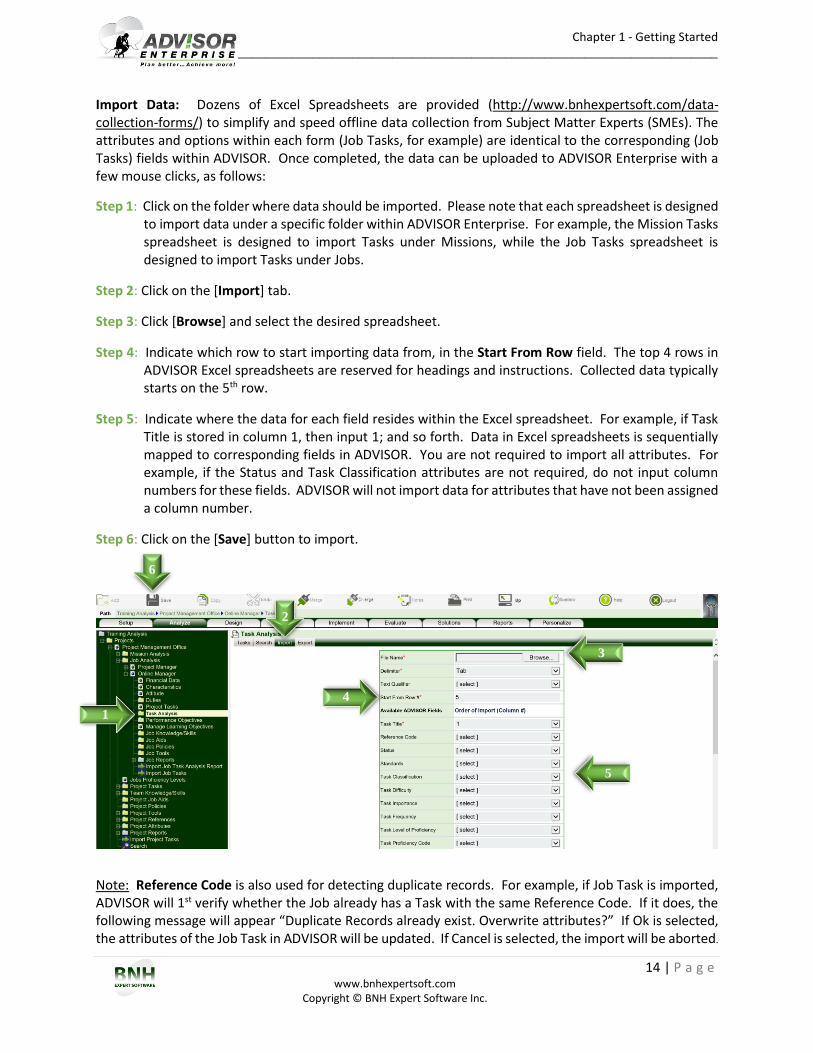
Import Data: Dozens of Excel Spreadsheets are provided (http://www.bnhexpertsoft.com/data-collection-forms/) to simplify and speed offline data collection from Subject Matter Experts (SMEs). The attributes and options within each form (Job Tasks, for example) are identical to the corresponding (Job Tasks) fields within ADVISOR. Once completed, the data can be uploaded to ADVISOR Enterprise with a few mouse clicks, as follows:
Step 1: Click on the folder where data should be imported. Please note that each spreadsheet is designed to import data under a specific folder within ADVISOR Enterprise. For example, the Mission Tasks spreadsheet is designed to import Tasks under Missions, while the Job Tasks spreadsheet is designed to import Tasks under Jobs.
Step 2: Click on the [Import] tab.
Step 3: Click [Browse] and select the desired spreadsheet.
Step 4: Indicate which row to start importing data from, in the Start From Row field. The top 4 rows in ADVISOR Excel spreadsheets are reserved for headings and instructions. Collected data typically starts on the 5th row.
Step 5: Indicate where the data for each field resides within the Excel spreadsheet. For example, if Task Title is stored in column 1, then input 1; and so forth. Data in Excel spreadsheets is sequentially mapped to corresponding fields in ADVISOR. You are not required to import all attributes. For example, if the Status and Task Classification attributes are not required, do not input column numbers for these fields. ADVISOR will not import data for attributes that have not been assigned a column number.
Step 6: Click on the [Save] button to import.
Note: Reference Code is also used for detecting duplicate records. For example, if Job Task is imported, ADVISOR will 1st verify whether the Job already has a Task with the same Reference Code. If it does, the following message will appear “Duplicate Records already exist. Overwrite attributes?” If Ok is selected, the attributes of the Job Task in ADVISOR will be updated. If Cancel is selected, the import will be aborted.
1
2
4
5
6
3
Chapter 1 - Getting Started ____________________________________________________________________________________________
15 | P a g e www.bnhexpertsoft.com
Copyright © BNH Expert Software Inc.
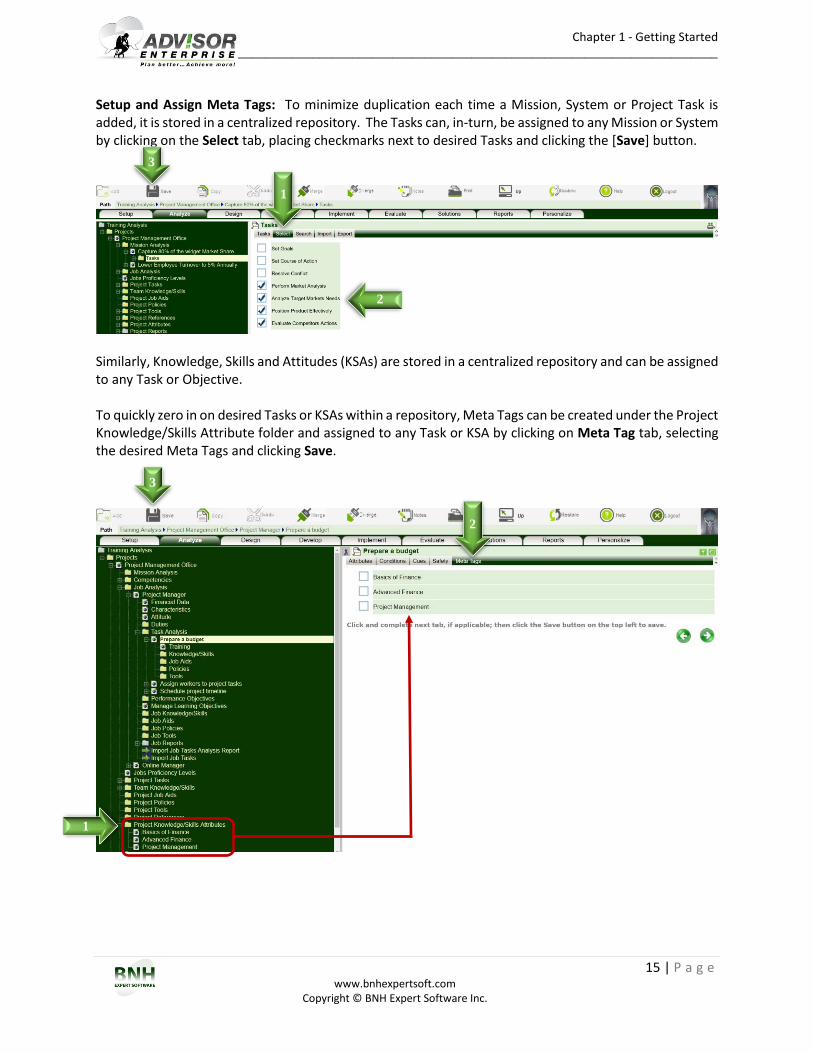
Setup and Assign Meta Tags: To minimize duplication each time a Mission, System or Project Task is added, it is stored in a centralized repository. The Tasks can, in-turn, be assigned to any Mission or System by clicking on the Select tab, placing checkmarks next to desired Tasks and clicking the [Save] button.
Similarly, Knowledge, Skills and Attitudes (KSAs) are stored in a centralized repository and can be assigned to any Task or Objective. To quickly zero in on desired Tasks or KSAs within a repository, Meta Tags can be created under the Project Knowledge/Skills Attribute folder and assigned to any Task or KSA by clicking on Meta Tag tab, selecting the desired Meta Tags and clicking Save.
1
2
3
1
2
3
Chapter 1 - Getting Started ____________________________________________________________________________________________
16 | P a g e www.bnhexpertsoft.com
Copyright © BNH Expert Software Inc.
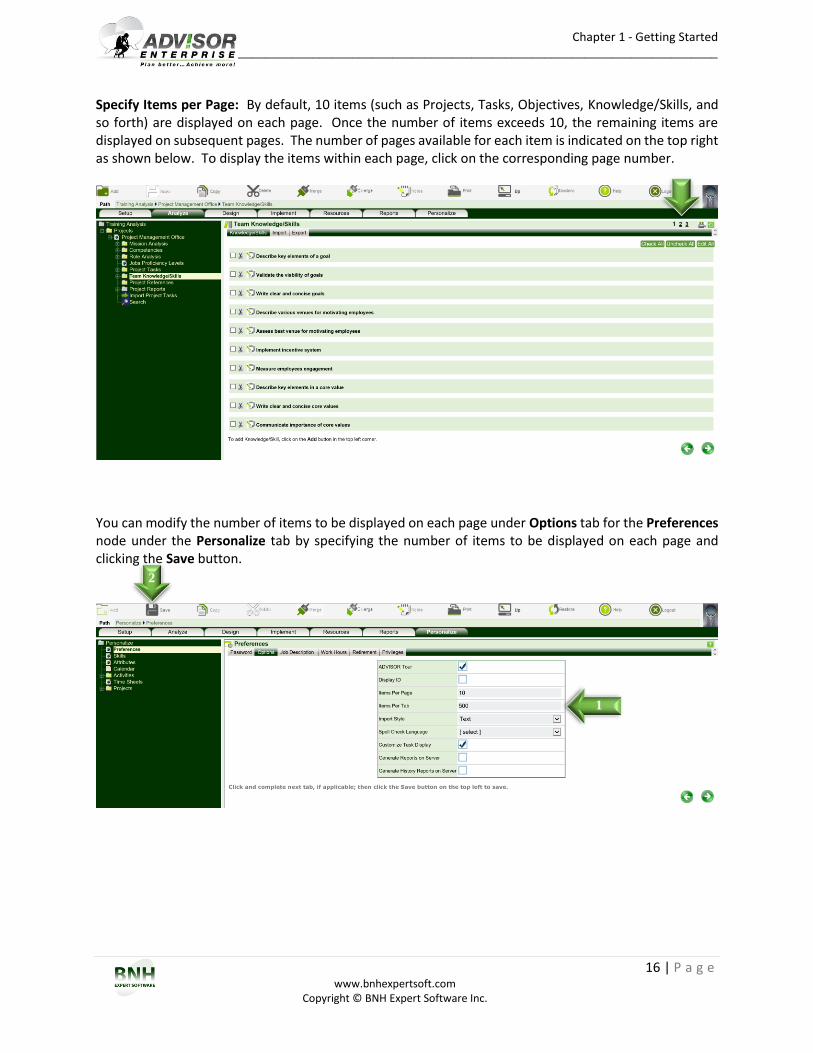
Specify Items per Page: By default, 10 items (such as Projects, Tasks, Objectives, Knowledge/Skills, and so forth) are displayed on each page. Once the number of items exceeds 10, the remaining items are displayed on subsequent pages. The number of pages available for each item is indicated on the top right as shown below. To display the items within each page, click on the corresponding page number.
You can modify the number of items to be displayed on each page under Options tab for the Preferences node under the Personalize tab by specifying the number of items to be displayed on each page and clicking the Save button.
2
1
Chapter 1 - Getting Started ____________________________________________________________________________________________
17 | P a g e www.bnhexpertsoft.com
Copyright © BNH Expert Software Inc.
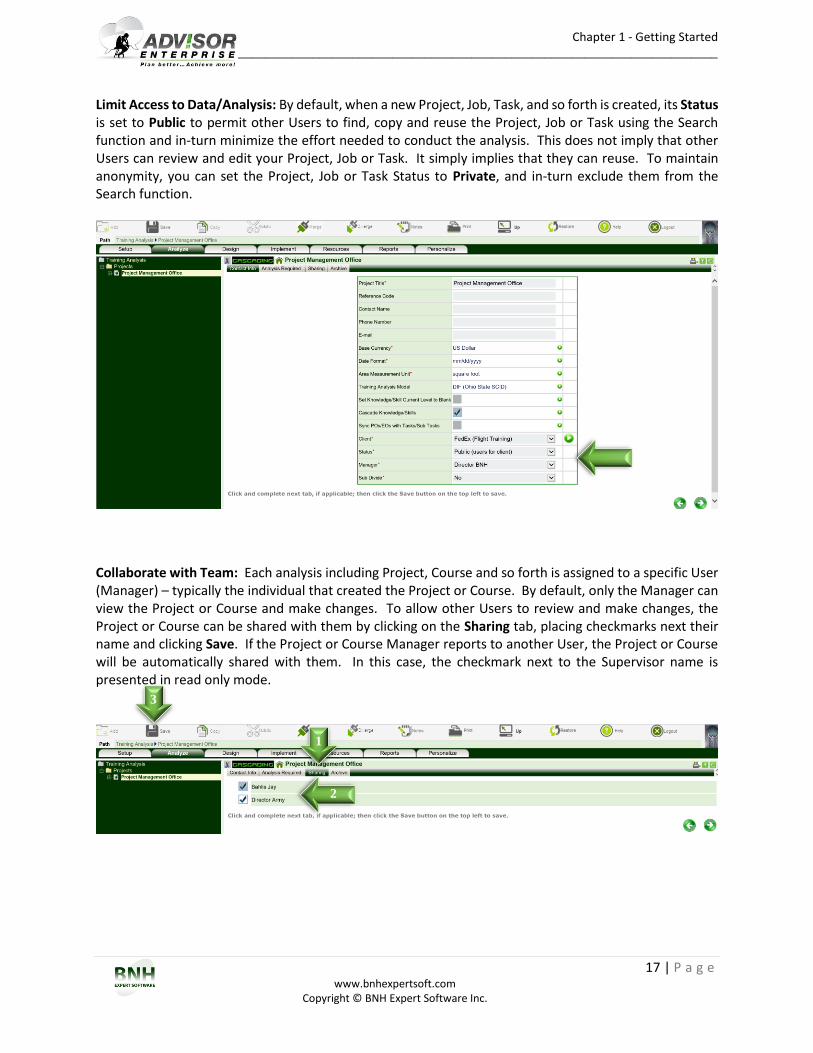
Limit Access to Data/Analysis: By default, when a new Project, Job, Task, and so forth is created, its Status is set to Public to permit other Users to find, copy and reuse the Project, Job or Task using the Search function and in-turn minimize the effort needed to conduct the analysis. This does not imply that other Users can review and edit your Project, Job or Task. It simply implies that they can reuse. To maintain anonymity, you can set the Project, Job or Task Status to Private, and in-turn exclude them from the Search function.
Collaborate with Team: Each analysis including Project, Course and so forth is assigned to a specific User (Manager) – typically the individual that created the Project or Course. By default, only the Manager can view the Project or Course and make changes. To allow other Users to review and make changes, the Project or Course can be shared with them by clicking on the Sharing tab, placing checkmarks next their name and clicking Save. If the Project or Course Manager reports to another User, the Project or Course will be automatically shared with them. In this case, the checkmark next to the Supervisor name is presented in read only mode.
1
2
3
Chapter 1 - Getting Started ____________________________________________________________________________________________
18 | P a g e www.bnhexpertsoft.com
Copyright © BNH Expert Software Inc.
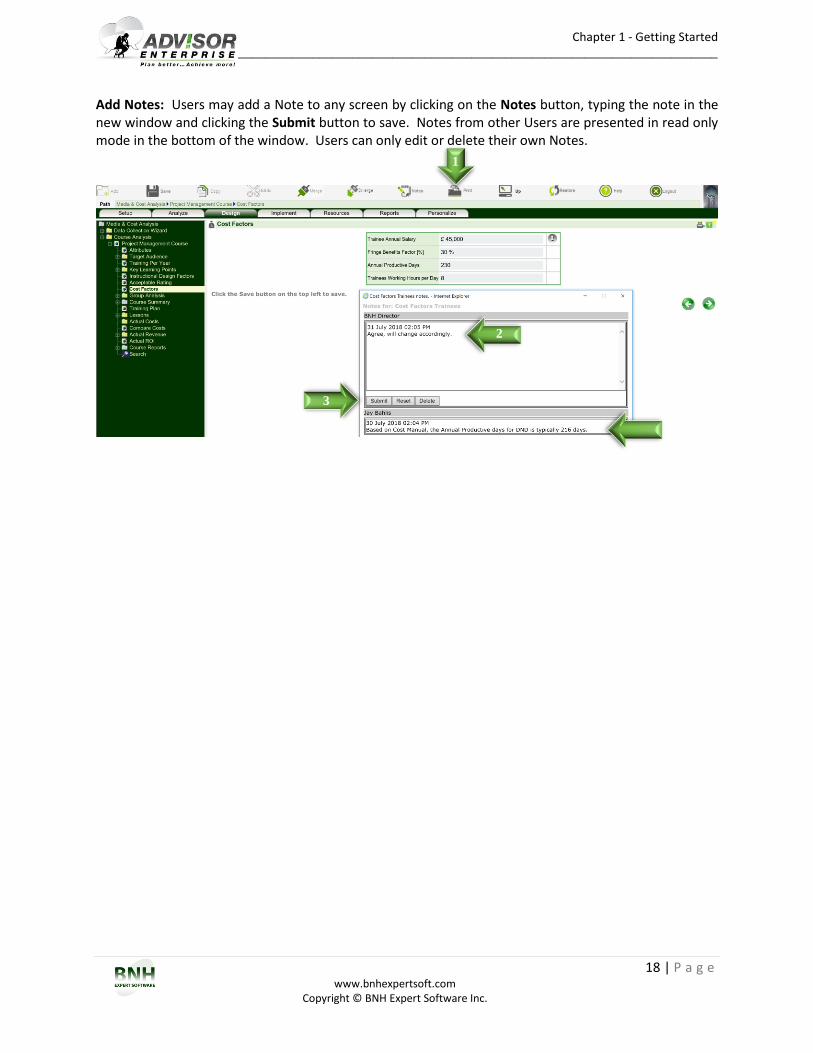
Add Notes: Users may add a Note to any screen by clicking on the Notes button, typing the note in the new window and clicking the Submit button to save. Notes from other Users are presented in read only mode in the bottom of the window. Users can only edit or delete their own Notes.
1
2
3
Chapter 1 - Getting Started ____________________________________________________________________________________________
19 | P a g e www.bnhexpertsoft.com
Copyright © BNH Expert Software Inc.
1.8 Learning ADVISOR To use ADVISOR, you should know how to perform basic computer, Windows and Browser operations. For example, how to start and quit applications, selecting commands and dialog box options. To facilitate the learning process, ADVISOR comes with its own set of online tools. These include: Online Tour: a slide show that highlights ADVISOR’s main features. It is presented after User logs on
ADVISOR. You can hide and redisplay by unchecking or rechecking the ADVISOR Tour field under the Options tab, under the Preferences node under the Personalize tab and clicking Save.
Video Clips to gain a better understanding of ADVISOR's main functions and features. To view, please visit the following: http://www.bnhexpertsoft.com/how-to-video-overview/ .
Step-by-Step Guides for configuring ADVISOR, as well as conducting mission analysis, system analysis, competency analysis, job task analysis, media analysis, cost analysis, fidelity analysis, performance analysis, etc. To view and download, please visit the following: http://www.bnhexpertsoft.com/user-guides/,
Answers to Frequently Asked Questions are available online at: http://www.bnhexpertsoft.com/faq-1-install/.
Context Sensitive Online Help can be displayed for each screen by clicking on Help button. Context sensitive video clips are also embedded throughout ADVISOR and can be viewed by clicking
on the video icon.
Basic Excel Data Collection Forms for various ADVISOR data elements along with data import instructions are available online at: http://www.bnhexpertsoft.com/data-collection-forms/.
Detailed Excel Data Collection Forms for Project Tasks, System/Competency Tasks and Job Tasks along with data import instructions are available online at: http://www.bnhexpertsoft.com/import-detailed-analysis/.
Sample Reports from each module are available online at: http://www.bnhexpertsoft.com/reports/.
Technical Support: Available 8:00 am to 6:00 pm EST by calling 1 (514) 745-4010. You may also fax your questions to 1 (514) 745-4011 or E-mail to [email protected].
Chapter 1 - Getting Started ____________________________________________________________________________________________
20 | P a g e www.bnhexpertsoft.com
Copyright © BNH Expert Software Inc.
1.9 References Gagné, R. M., Briggs, L. J., and Wager, W. W. (1992). Principles of Instructional Design, Fourth Edition, Fort Worth, Texas, Harcourt, Brace Jovanovich College Publishers. Dick, Walter, Carey Lou, and Carey James O. (2005). The Systematic Design of Instruction, Sixth Edition, Allyn and Bacon. Gentry, C. G. (1994). Introduction to Instructional Development: Process and Technique. Belmont, California, Wadsworth Publishing Company. Kemp, J. E. Morrison, G. R. and Ross, S. M. (1994). Designing Effective Instruction, New York, Macmillan Publishing Company. Seels, B. and Glasgow, Z. (1998). Making Instructional Design Decisions, Second Edition, Upper Saddle River, New Jersey, Prentice-Hall, Inc. Smith P. L. and Ragan, T. J. (1993). Instructional Design, New York, Merrill/Macmillan College Publishing. United States, Department of Defense (2001), Instructional Systems Development/Systems Approach to Training and Education, Part 2 of 5, MIL-HDBK-29612-2A.
Chapter 2 – Setup Projects ____________________________________________________________________________________________
21 | P a g e www.bnhexpertsoft.com
Copyright © BNH Expert Software Inc.
Chapter 2: Setup Projects
2.1 Introduction ADVISOR is highly flexible. Based on project requirements, the analysis may start by examining Missions/ Goals, Systems, Competencies, Jobs or combinations. Guidance for selecting the best approach strategy is provided under Section 1.4. The current guide presents a step-by-step process to assist analysts in conducting Mission/Goal Analysis, System/Competency Analysis, Job Analysis and Task Analysis to identify training requirements. Separate Step-by-Step Guides are also available for conducting Mission/Goal Analysis, Competency/System Analysis and Job Analysis. For details on basic functionality and how to configure ADVISOR in line with needs, please refer to the Configure ADVISOR Step by Step or User Guide. Remember that context sensitive help for each screen is also available by clicking on the [Help] button.
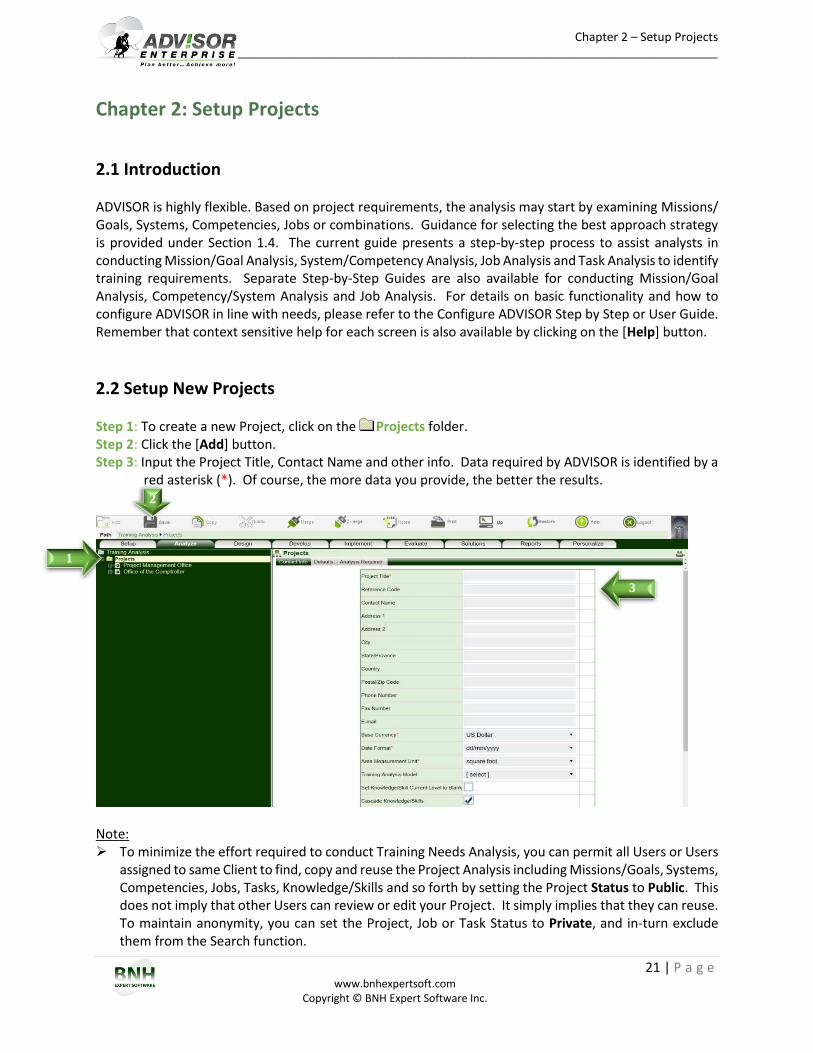
2.2 Setup New Projects Step 1: To create a new Project, click on the Projects folder. Step 2: Click the [Add] button. Step 3: Input the Project Title, Contact Name and other info. Data required by ADVISOR is identified by a
red asterisk (*). Of course, the more data you provide, the better the results.
Note: To minimize the effort required to conduct Training Needs Analysis, you can permit all Users or Users
assigned to same Client to find, copy and reuse the Project Analysis including Missions/Goals, Systems, Competencies, Jobs, Tasks, Knowledge/Skills and so forth by setting the Project Status to Public. This does not imply that other Users can review or edit your Project. It simply implies that they can reuse. To maintain anonymity, you can set the Project, Job or Task Status to Private, and in-turn exclude them from the Search function.
1
2
3
Chapter 2 – Setup Projects ____________________________________________________________________________________________
22 | P a g e www.bnhexpertsoft.com
Copyright © BNH Expert Software Inc.
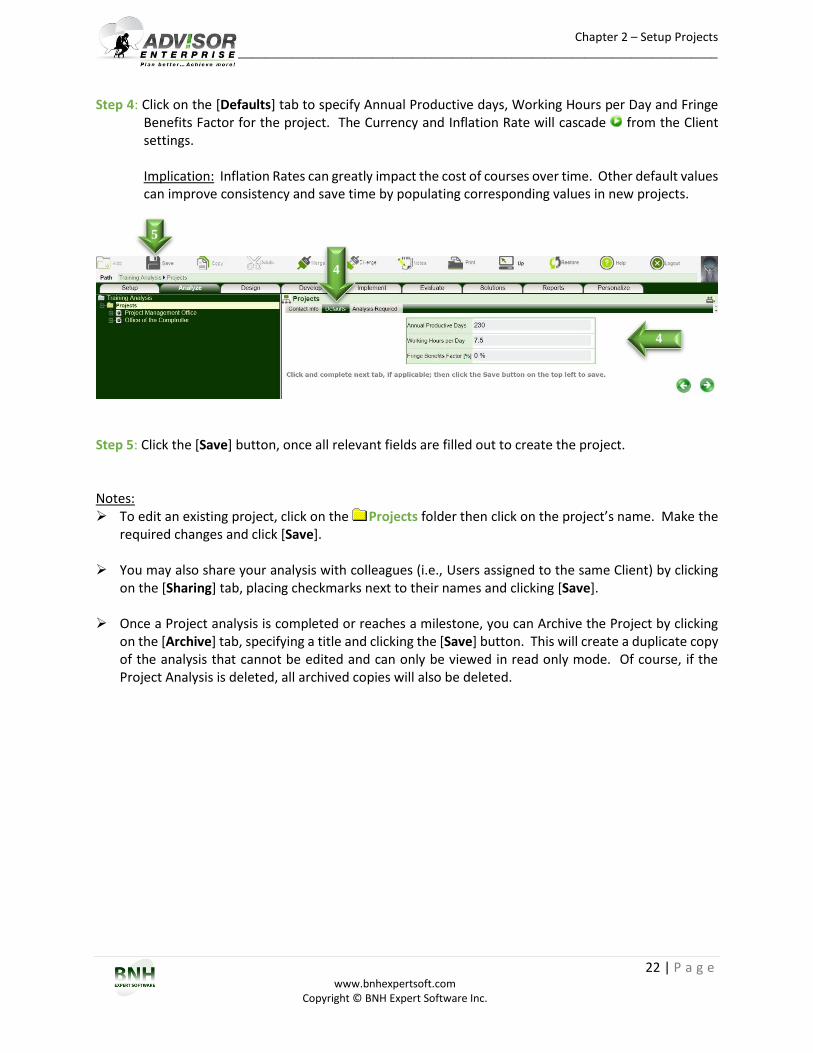
Step 4: Click on the [Defaults] tab to specify Annual Productive days, Working Hours per Day and Fringe Benefits Factor for the project. The Currency and Inflation Rate will cascade from the Client settings.
Implication: Inflation Rates can greatly impact the cost of courses over time. Other default values can improve consistency and save time by populating corresponding values in new projects.
Step 5: Click the [Save] button, once all relevant fields are filled out to create the project. Notes: To edit an existing project, click on the Projects folder then click on the project’s name. Make the
required changes and click [Save].
You may also share your analysis with colleagues (i.e., Users assigned to the same Client) by clicking on the [Sharing] tab, placing checkmarks next to their names and clicking [Save].
Once a Project analysis is completed or reaches a milestone, you can Archive the Project by clicking
on the [Archive] tab, specifying a title and clicking the [Save] button. This will create a duplicate copy of the analysis that cannot be edited and can only be viewed in read only mode. Of course, if the Project Analysis is deleted, all archived copies will also be deleted.
4
4
5

Chapter 2 – Setup Projects ____________________________________________________________________________________________
23 | P a g e www.bnhexpertsoft.com
Copyright © BNH Expert Software Inc.
2.3 Configure Projects To preserve consistency, all configurations including data to be collected, analysis to be conducted, and reports to be generated cascade from Client’s Setup (See Configure ADVISOR User Guide). Step 1: Should you have the need to modify the configuration for a specific project, click on the icon to
turn the cascade off .
1
Chapter 2 – Setup Projects ____________________________________________________________________________________________
24 | P a g e www.bnhexpertsoft.com
Copyright © BNH Expert Software Inc.
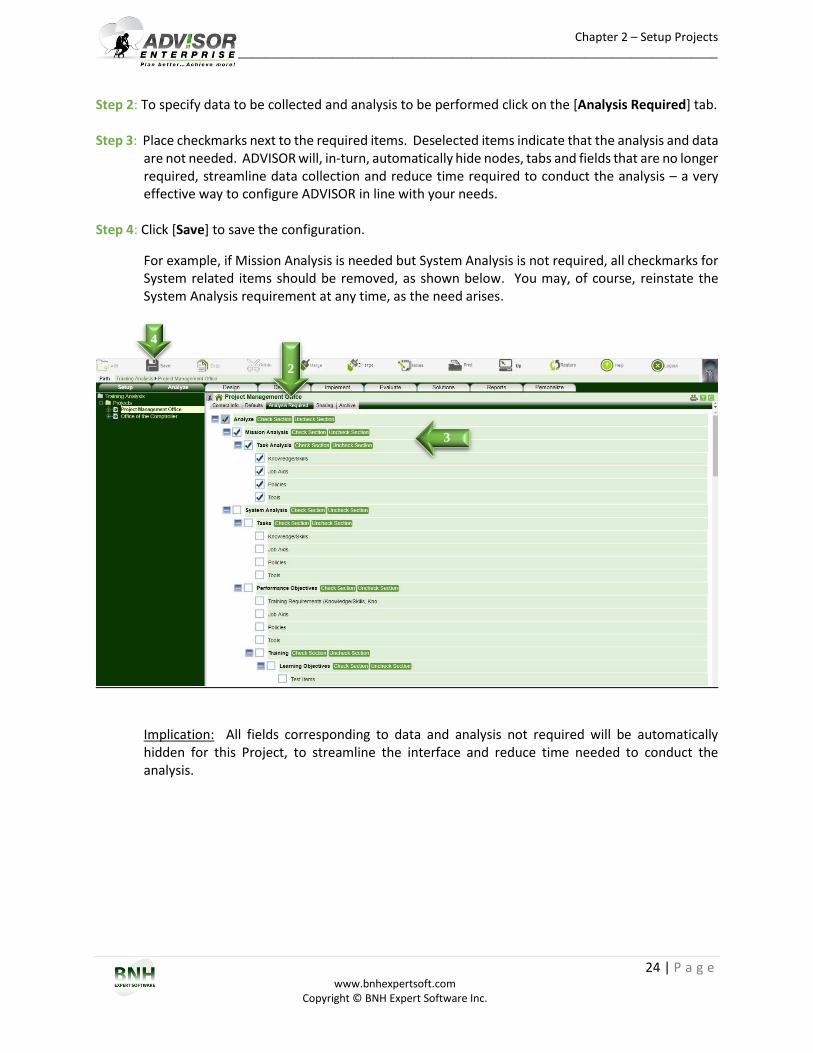
Step 2: To specify data to be collected and analysis to be performed click on the [Analysis Required] tab. Step 3: Place checkmarks next to the required items. Deselected items indicate that the analysis and data
are not needed. ADVISOR will, in-turn, automatically hide nodes, tabs and fields that are no longer required, streamline data collection and reduce time required to conduct the analysis – a very effective way to configure ADVISOR in line with your needs.
Step 4: Click [Save] to save the configuration.
For example, if Mission Analysis is needed but System Analysis is not required, all checkmarks for System related items should be removed, as shown below. You may, of course, reinstate the System Analysis requirement at any time, as the need arises.
Implication: All fields corresponding to data and analysis not required will be automatically hidden for this Project, to streamline the interface and reduce time needed to conduct the analysis.
2
3
4
Chapter 2 – Setup Projects ____________________________________________________________________________________________
25 | P a g e www.bnhexpertsoft.com
Copyright © BNH Expert Software Inc.
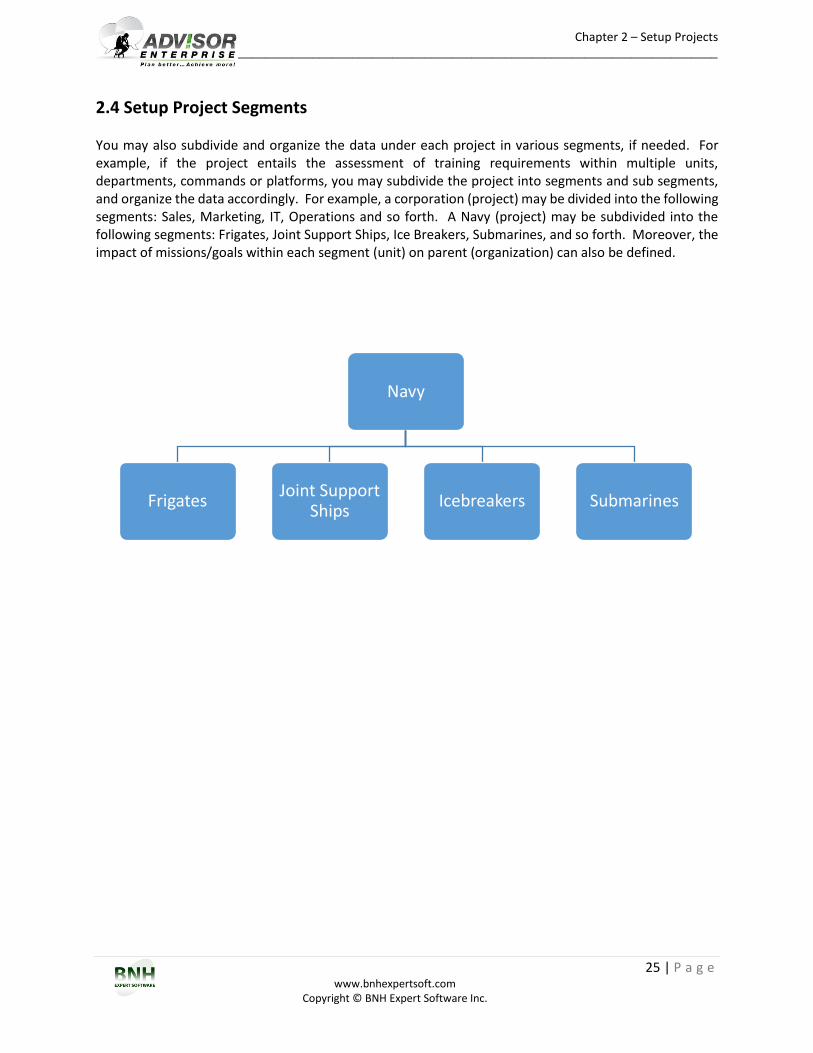
2.4 Setup Project Segments You may also subdivide and organize the data under each project in various segments, if needed. For example, if the project entails the assessment of training requirements within multiple units, departments, commands or platforms, you may subdivide the project into segments and sub segments, and organize the data accordingly. For example, a corporation (project) may be divided into the following segments: Sales, Marketing, IT, Operations and so forth. A Navy (project) may be subdivided into the following segments: Frigates, Joint Support Ships, Ice Breakers, Submarines, and so forth. Moreover, the impact of missions/goals within each segment (unit) on parent (organization) can also be defined.
Navy
FrigatesJoint Support
ShipsIcebreakers Submarines

Chapter 2 – Setup Projects ____________________________________________________________________________________________
26 | P a g e www.bnhexpertsoft.com
Copyright © BNH Expert Software Inc.
Step 1: To set-up a Segment for a Project, click on the Segments folder under the Projects folder. Step 2: Click [Add]. Step 3: Input the Project (Segment) Title, Contact Name and other information. Step 4: Click [Save] to create the Segment.
1
3
2 4
Chapter 3 – Setup Missions & Goals ____________________________________________________________________________________________
27 | P a g e www.bnhexpertsoft.com
Copyright © BNH Expert Software Inc.
Chapter 3: Mission/Goal Analysis
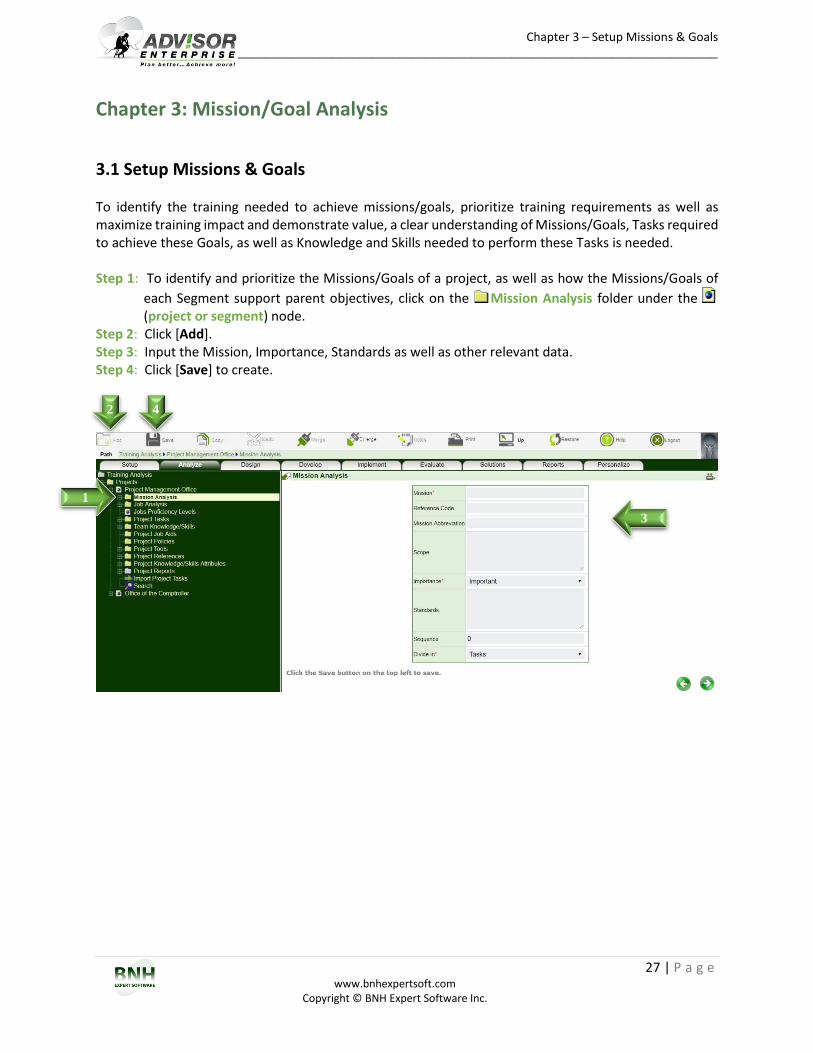
3.1 Setup Missions & Goals To identify the training needed to achieve missions/goals, prioritize training requirements as well as maximize training impact and demonstrate value, a clear understanding of Missions/Goals, Tasks required to achieve these Goals, as well as Knowledge and Skills needed to perform these Tasks is needed. Step 1: To identify and prioritize the Missions/Goals of a project, as well as how the Missions/Goals of
each Segment support parent objectives, click on the Mission Analysis folder under the (project or segment) node.
Step 2: Click [Add]. Step 3: Input the Mission, Importance, Standards as well as other relevant data. Step 4: Click [Save] to create.
2 4
1
3
Chapter 3 – Setup Missions & Goals ____________________________________________________________________________________________
28 | P a g e www.bnhexpertsoft.com
Copyright © BNH Expert Software Inc.
Notes:
To edit an existing Mission/Goal, click on the Mission Analysis folder then click on the Mission/ Goal. Make the required changes and click [Save].
The significance of each Mission/Goal is indicated in the Importance field. The relative weight of each Mission/Goal is set as follows: critical=4, very important=3, important=2 and somewhat important=1; and can be used to identify the most critical Tasks, Knowledge/Skills and in-turn Training Priorities.
ADVISOR uses these weights to compute the relative impact of each Task and in-turn the relative impact of each intervention including training as follows:
If the importance of a Project Mission/Goal is critical (4), and the Mission/Goal is supported by two Tasks A and B, then the relative impact of each Task is computed as follows:
Task A = 4 x Impact of Task A / (Impact of Task A + Impact of Task B)
For illustration, if the impact of Task A on the Project Mission/Goal is critical (4) and the impact of Task B on the Project Mission/Goal is somewhat important (1), then the relative impact of each Task on the Project Mission/Goal is computed as follows:
Task A = 4 x 4 / (4 + 1) = 3.2
Task B = 4 x 1 / (4 + 1) = 0.8
In other words, Task A is 4 times more important than Task B; and in-turn training courses/ activities for Task A would be 4 times more important than training courses/activities for Task B.
The performance criterion for assessing whether Mission/Goal is successfully achieved is specified in
the Standards field. The statement should: Indicate how well the Mission/Goal must be performed. Include sufficient details to accurately communicate the requirement. Be objective, observable and measurable. Describe an acceptable product, process or both. Product standards are described in terms
of quantity, accuracy, tolerances, completeness, format, errors and clarity. Process standards are described in terms of sequence, completeness, accuracy and speed of performance.
The impact of Segments’ Missions/Goals on Project Missions/Goals is indicated under the [Mission Impact] tab for each Mission/Goal under a Segment.
Chapter 3 – Setup Missions & Goals ____________________________________________________________________________________________
29 | P a g e www.bnhexpertsoft.com
Copyright © BNH Expert Software Inc.
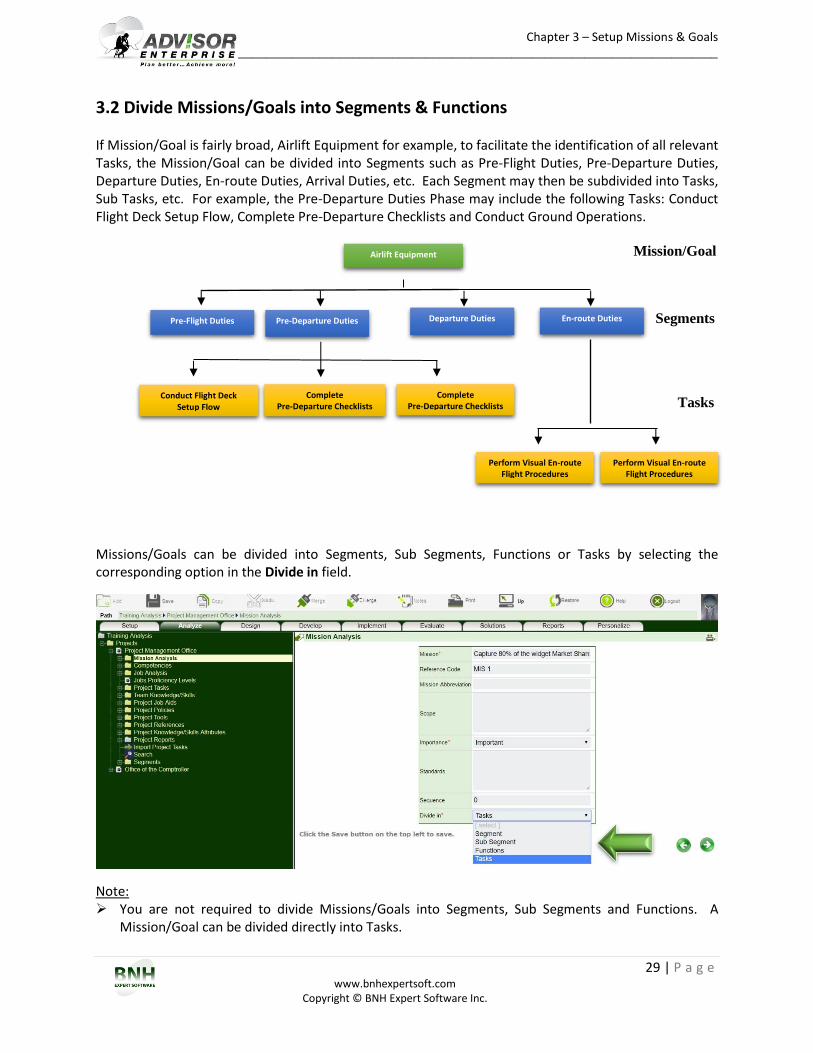
3.2 Divide Missions/Goals into Segments & Functions If Mission/Goal is fairly broad, Airlift Equipment for example, to facilitate the identification of all relevant Tasks, the Mission/Goal can be divided into Segments such as Pre-Flight Duties, Pre-Departure Duties, Departure Duties, En-route Duties, Arrival Duties, etc. Each Segment may then be subdivided into Tasks, Sub Tasks, etc. For example, the Pre-Departure Duties Phase may include the following Tasks: Conduct Flight Deck Setup Flow, Complete Pre-Departure Checklists and Conduct Ground Operations.
Mission/Goal
Segments
Tasks
Missions/Goals can be divided into Segments, Sub Segments, Functions or Tasks by selecting the corresponding option in the Divide in field.
Note: You are not required to divide Missions/Goals into Segments, Sub Segments and Functions. A
Mission/Goal can be divided directly into Tasks.
Airlift Equipment
Pre-Flight Duties
Departure Duties
Conduct Flight Deck Setup Flow
Pre-Departure Duties En-route Duties
Complete Pre-Departure Checklists
Complete Pre-Departure Checklists
Perform Visual En-route Flight Procedures
Perform Visual En-route Flight Procedures
Chapter 3 – Setup Missions & Goals ____________________________________________________________________________________________
30 | P a g e www.bnhexpertsoft.com
Copyright © BNH Expert Software Inc.
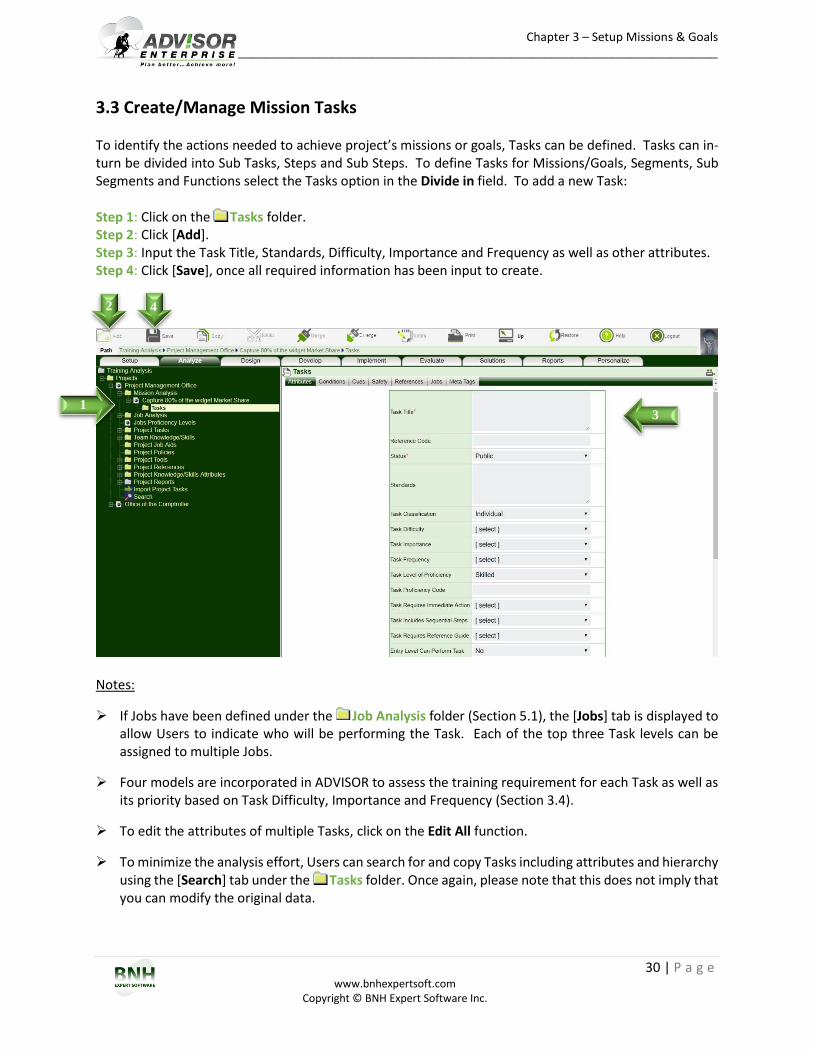
3.3 Create/Manage Mission Tasks To identify the actions needed to achieve project’s missions or goals, Tasks can be defined. Tasks can in-turn be divided into Sub Tasks, Steps and Sub Steps. To define Tasks for Missions/Goals, Segments, Sub Segments and Functions select the Tasks option in the Divide in field. To add a new Task: Step 1: Click on the Tasks folder. Step 2: Click [Add]. Step 3: Input the Task Title, Standards, Difficulty, Importance and Frequency as well as other attributes. Step 4: Click [Save], once all required information has been input to create.
Notes:
If Jobs have been defined under the Job Analysis folder (Section 5.1), the [Jobs] tab is displayed to allow Users to indicate who will be performing the Task. Each of the top three Task levels can be assigned to multiple Jobs.
Four models are incorporated in ADVISOR to assess the training requirement for each Task as well as its priority based on Task Difficulty, Importance and Frequency (Section 3.4).
To edit the attributes of multiple Tasks, click on the Edit All function.
To minimize the analysis effort, Users can search for and copy Tasks including attributes and hierarchy using the [Search] tab under the Tasks folder. Once again, please note that this does not imply that you can modify the original data.
4 2
1 3
Chapter 3 – Setup Missions & Goals ____________________________________________________________________________________________
31 | P a g e www.bnhexpertsoft.com
Copyright © BNH Expert Software Inc.
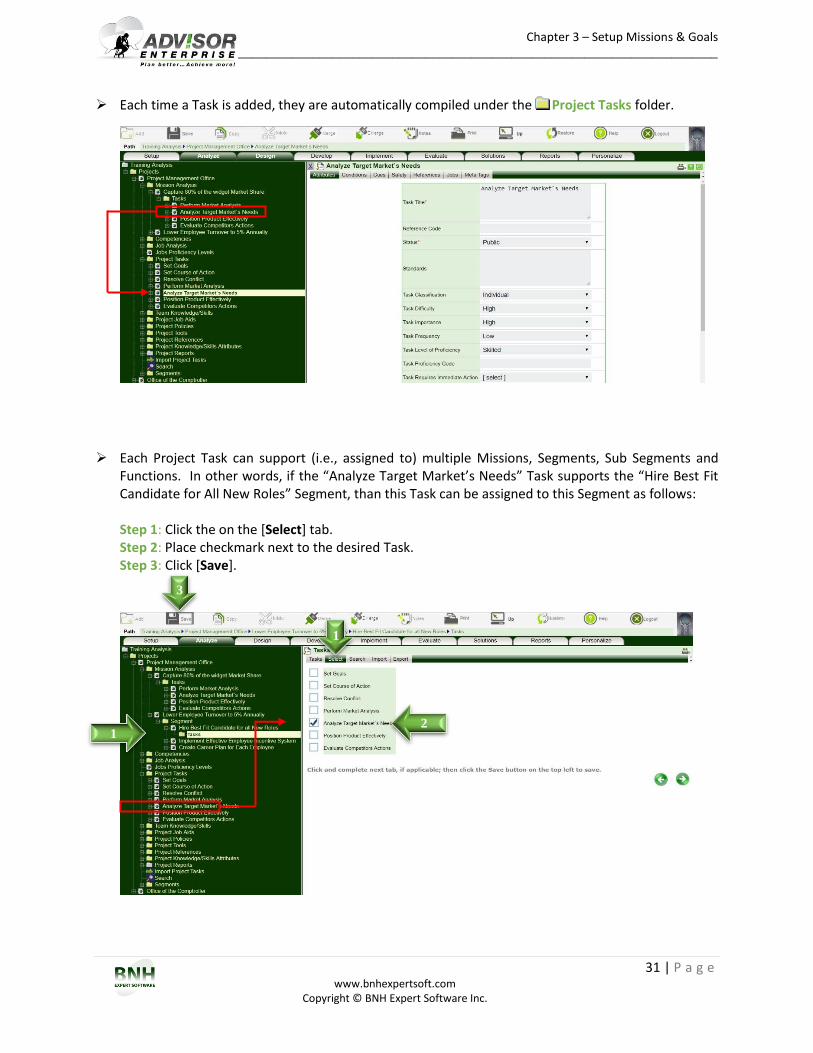
Each time a Task is added, they are automatically compiled under the Project Tasks folder.
Each Project Task can support (i.e., assigned to) multiple Missions, Segments, Sub Segments and Functions. In other words, if the “Analyze Target Market’s Needs” Task supports the “Hire Best Fit Candidate for All New Roles” Segment, than this Task can be assigned to this Segment as follows: Step 1: Click the on the [Select] tab. Step 2: Place checkmark next to the desired Task. Step 3: Click [Save].
1
2
3
1
Chapter 3 – Setup Missions & Goals ____________________________________________________________________________________________
32 | P a g e www.bnhexpertsoft.com
Copyright © BNH Expert Software Inc.
Notes:
Linking a Project Task to multiple Missions/Goals, Functions and Steps does not duplicate the Project Task, it simply displays the same Project Task where needed; and in-turn preserve consistency and minimize duplication. In other words, if the attributes or the structure of a Project Task is modified under a specific Mission/Goal, it is automatically modified under all Missions/ Goals, Functions and Steps that the Task is linked to.
Only Primary Project Tasks can be linked to multiple Missions/Goals, Functions and Steps. In other words, if the “Develop marketing strategy” Task is divided into “Forecast market needs”, and “Assess Strengths, Weaknesses, Opportunities and Threats”, only the “Develop marketing strategy” Task can be linked to multiple Missions/Goals, Functions and Steps. The children automatically follow the parent and cannot be assigned separately to other Missions/Goals, Functions and Steps.
Tasks including attributes can be exported by clicking on [Export] tab, selecting desired attributes and clicking [Save]. Similarly, Tasks including attributes can be imported using the [Import] tab.
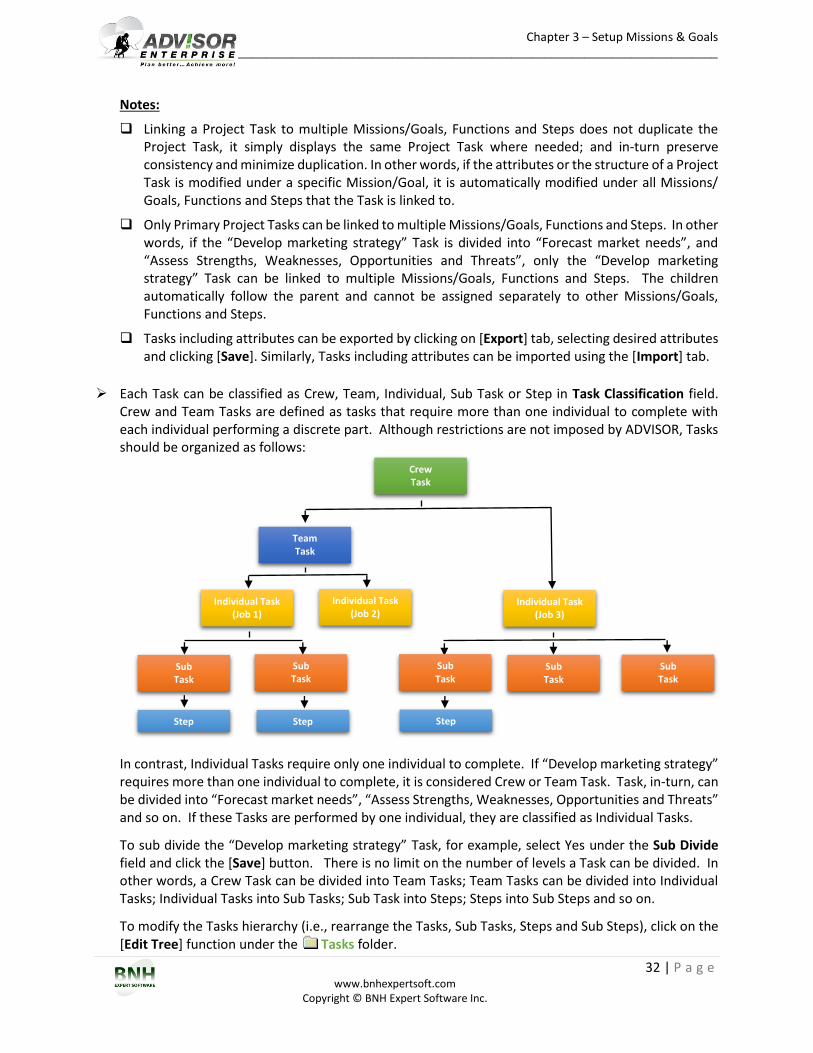
Each Task can be classified as Crew, Team, Individual, Sub Task or Step in Task Classification field. Crew and Team Tasks are defined as tasks that require more than one individual to complete with each individual performing a discrete part. Although restrictions are not imposed by ADVISOR, Tasks should be organized as follows:
In contrast, Individual Tasks require only one individual to complete. If “Develop marketing strategy” requires more than one individual to complete, it is considered Crew or Team Task. Task, in-turn, can be divided into “Forecast market needs”, “Assess Strengths, Weaknesses, Opportunities and Threats” and so on. If these Tasks are performed by one individual, they are classified as Individual Tasks.
To sub divide the “Develop marketing strategy” Task, for example, select Yes under the Sub Divide field and click the [Save] button. There is no limit on the number of levels a Task can be divided. In other words, a Crew Task can be divided into Team Tasks; Team Tasks can be divided into Individual Tasks; Individual Tasks into Sub Tasks; Sub Task into Steps; Steps into Sub Steps and so on.
To modify the Tasks hierarchy (i.e., rearrange the Tasks, Sub Tasks, Steps and Sub Steps), click on the [Edit Tree] function under the Tasks folder.
Individual Task (Job 3)
Crew Task
Team Task
Individual Task (Job 1)
Individual Task (Job 2)
Sub Task
Sub Task
Sub Task
Sub Task
Sub Task
Step Step Step
Chapter 3 – Setup Missions & Goals ____________________________________________________________________________________________
33 | P a g e www.bnhexpertsoft.com
Copyright © BNH Expert Software Inc.
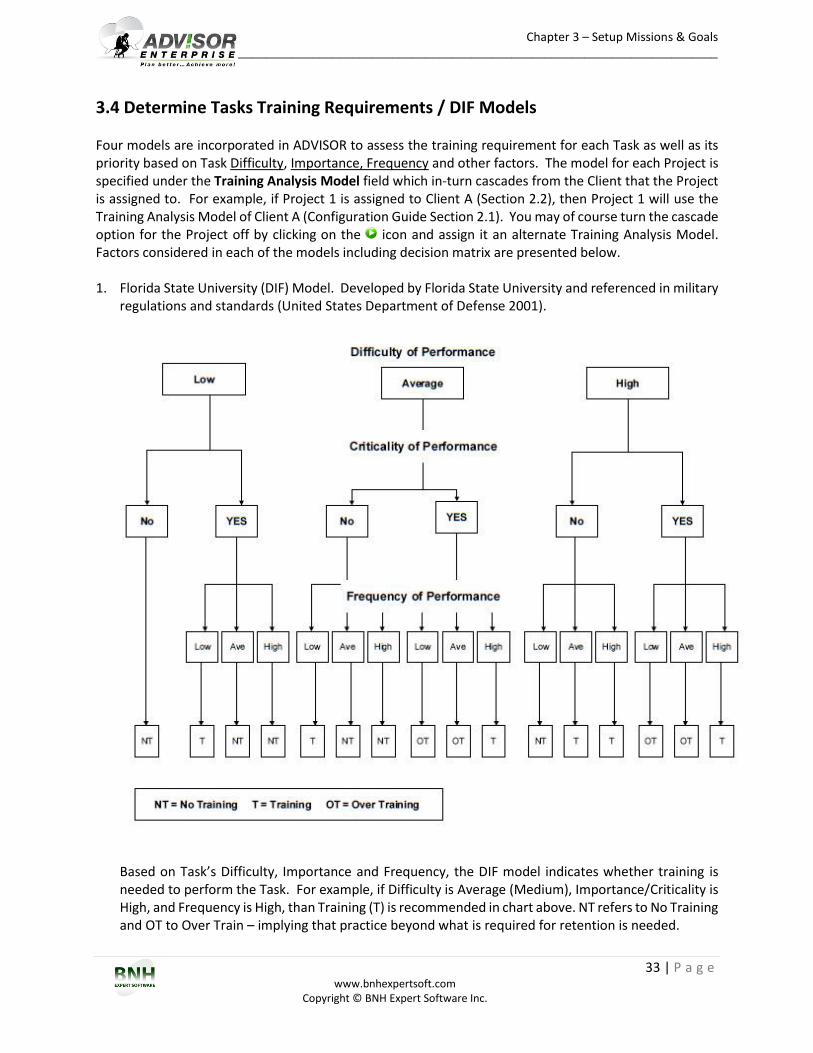
3.4 Determine Tasks Training Requirements / DIF Models Four models are incorporated in ADVISOR to assess the training requirement for each Task as well as its priority based on Task Difficulty, Importance, Frequency and other factors. The model for each Project is specified under the Training Analysis Model field which in-turn cascades from the Client that the Project is assigned to. For example, if Project 1 is assigned to Client A (Section 2.2), then Project 1 will use the Training Analysis Model of Client A (Configuration Guide Section 2.1). You may of course turn the cascade option for the Project off by clicking on the icon and assign it an alternate Training Analysis Model. Factors considered in each of the models including decision matrix are presented below. 1. Florida State University (DIF) Model. Developed by Florida State University and referenced in military
regulations and standards (United States Department of Defense 2001).
Based on Task’s Difficulty, Importance and Frequency, the DIF model indicates whether training is needed to perform the Task. For example, if Difficulty is Average (Medium), Importance/Criticality is High, and Frequency is High, than Training (T) is recommended in chart above. NT refers to No Training and OT to Over Train – implying that practice beyond what is required for retention is needed.
Chapter 3 – Setup Missions & Goals ____________________________________________________________________________________________
34 | P a g e www.bnhexpertsoft.com
Copyright © BNH Expert Software Inc.
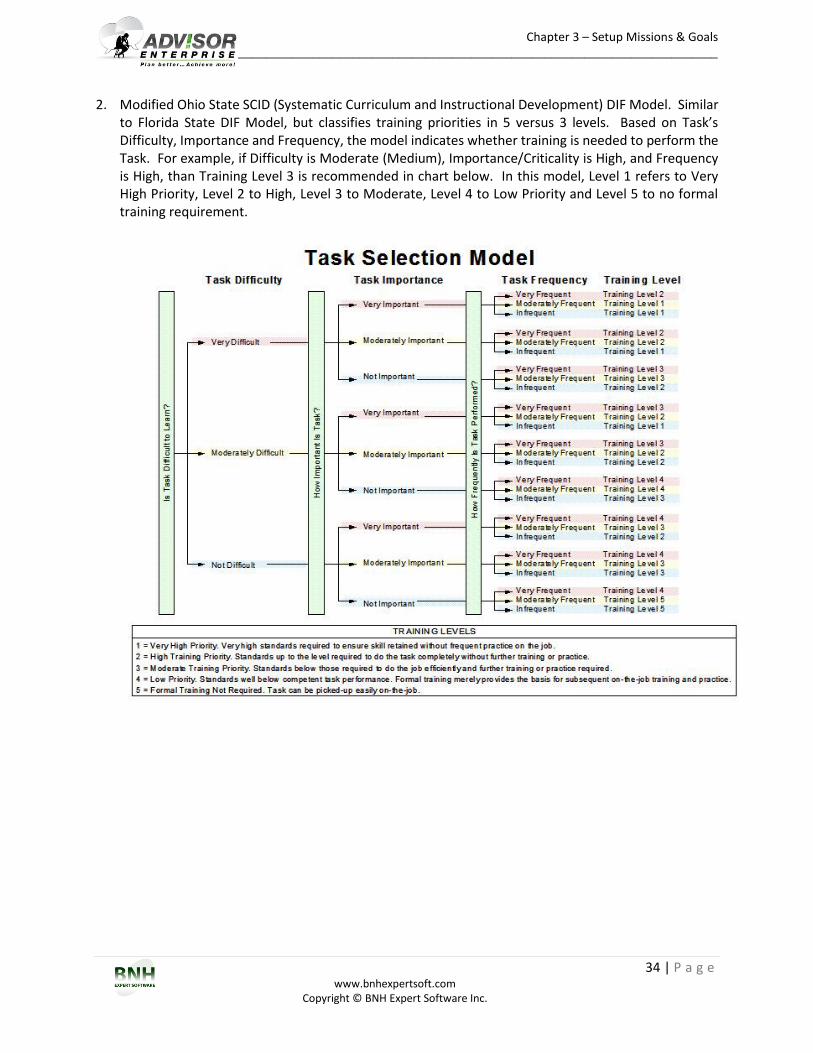
2. Modified Ohio State SCID (Systematic Curriculum and Instructional Development) DIF Model. Similar to Florida State DIF Model, but classifies training priorities in 5 versus 3 levels. Based on Task’s Difficulty, Importance and Frequency, the model indicates whether training is needed to perform the Task. For example, if Difficulty is Moderate (Medium), Importance/Criticality is High, and Frequency is High, than Training Level 3 is recommended in chart below. In this model, Level 1 refers to Very High Priority, Level 2 to High, Level 3 to Moderate, Level 4 to Low Priority and Level 5 to no formal training requirement.
Chapter 3 – Setup Missions & Goals ____________________________________________________________________________________________
35 | P a g e www.bnhexpertsoft.com
Copyright © BNH Expert Software Inc.
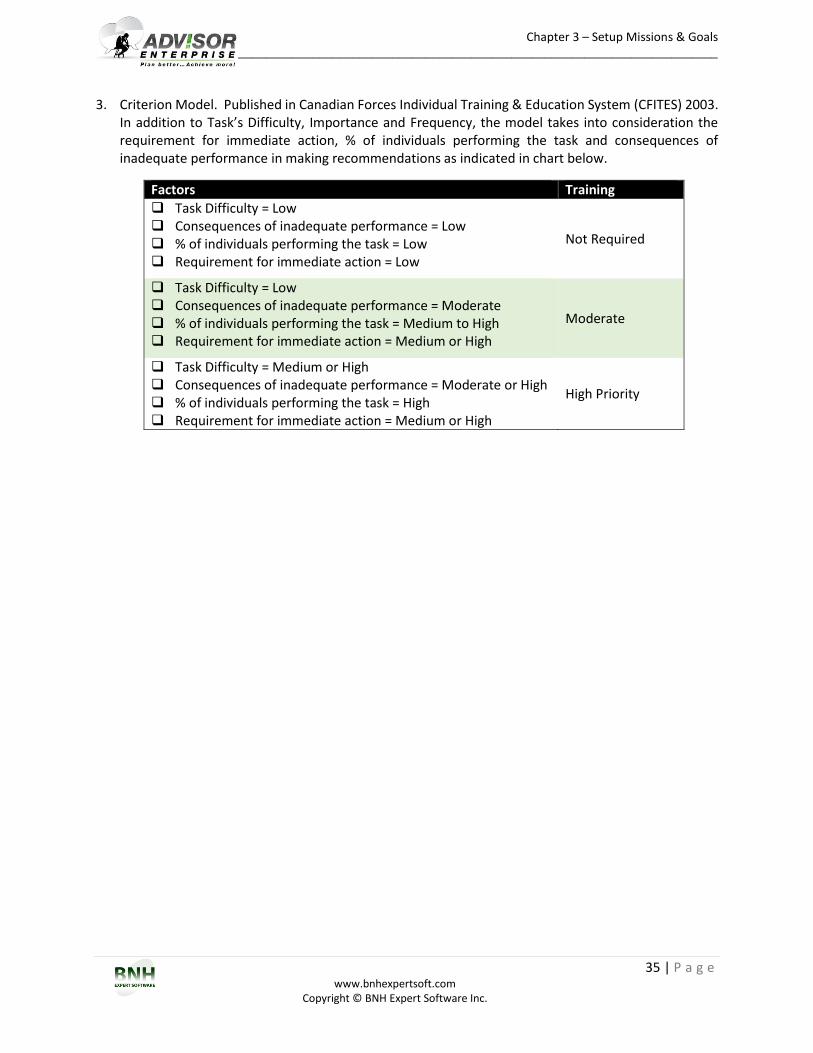
3. Criterion Model. Published in Canadian Forces Individual Training & Education System (CFITES) 2003. In addition to Task’s Difficulty, Importance and Frequency, the model takes into consideration the requirement for immediate action, % of individuals performing the task and consequences of inadequate performance in making recommendations as indicated in chart below.
Factors Training
Task Difficulty = Low Consequences of inadequate performance = Low % of individuals performing the task = Low Requirement for immediate action = Low
Not Required
Task Difficulty = Low Consequences of inadequate performance = Moderate % of individuals performing the task = Medium to High Requirement for immediate action = Medium or High
Moderate
Task Difficulty = Medium or High Consequences of inadequate performance = Moderate or High % of individuals performing the task = High Requirement for immediate action = Medium or High
High Priority
Chapter 3 – Setup Missions & Goals ____________________________________________________________________________________________
36 | P a g e www.bnhexpertsoft.com
Copyright © BNH Expert Software Inc.
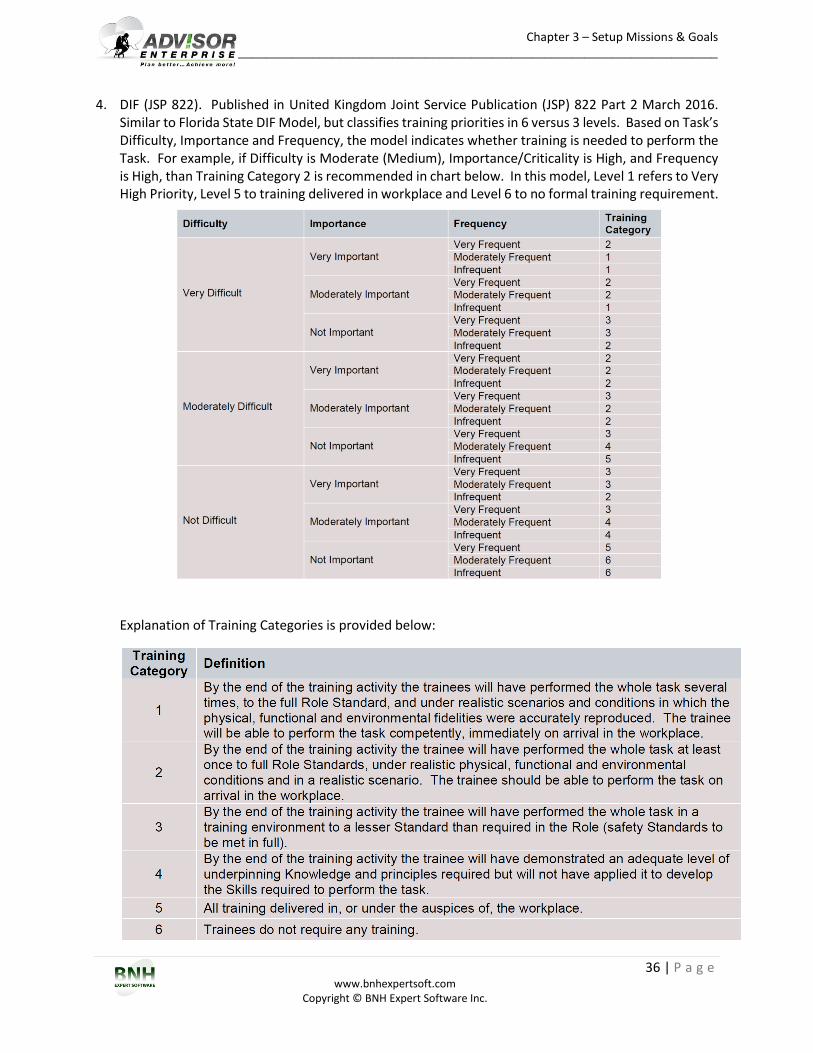
4. DIF (JSP 822). Published in United Kingdom Joint Service Publication (JSP) 822 Part 2 March 2016. Similar to Florida State DIF Model, but classifies training priorities in 6 versus 3 levels. Based on Task’s Difficulty, Importance and Frequency, the model indicates whether training is needed to perform the Task. For example, if Difficulty is Moderate (Medium), Importance/Criticality is High, and Frequency is High, than Training Category 2 is recommended in chart below. In this model, Level 1 refers to Very High Priority, Level 5 to training delivered in workplace and Level 6 to no formal training requirement.
Explanation of Training Categories is provided below:
Chapter 3 – Setup Missions & Goals ____________________________________________________________________________________________
37 | P a g e www.bnhexpertsoft.com
Copyright © BNH Expert Software Inc.
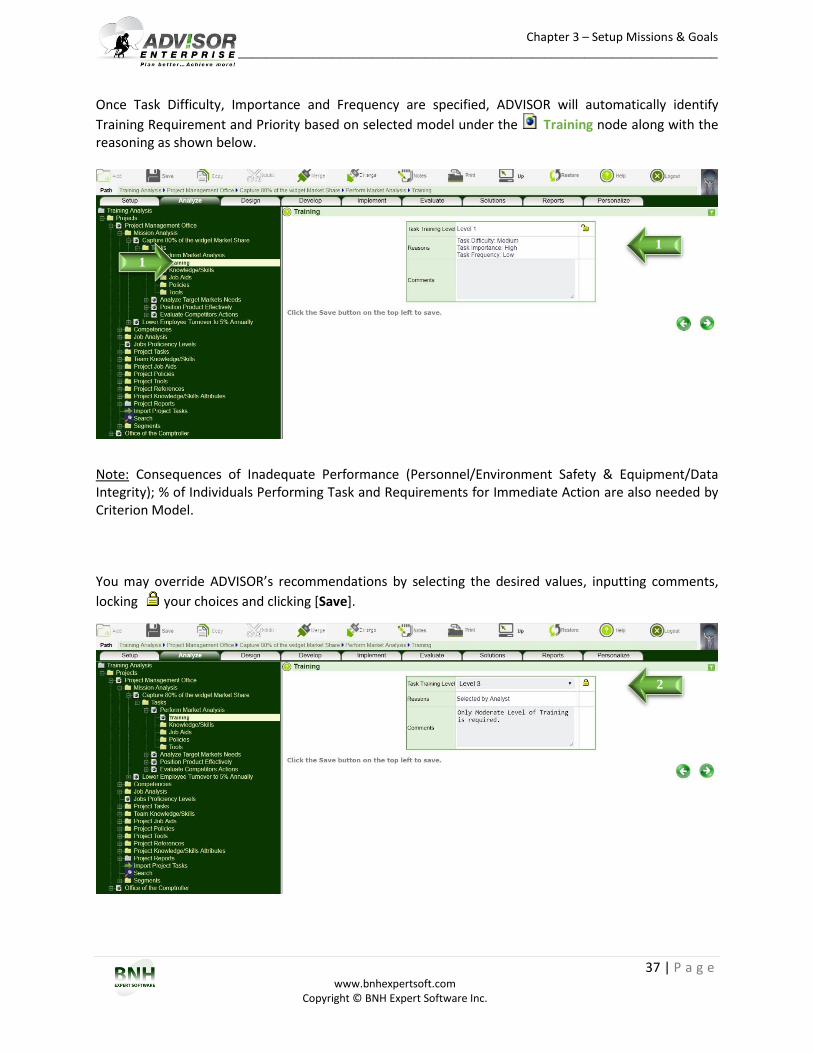
Once Task Difficulty, Importance and Frequency are specified, ADVISOR will automatically identify
Training Requirement and Priority based on selected model under the Training node along with the reasoning as shown below.
Note: Consequences of Inadequate Performance (Personnel/Environment Safety & Equipment/Data Integrity); % of Individuals Performing Task and Requirements for Immediate Action are also needed by Criterion Model. You may override ADVISOR’s recommendations by selecting the desired values, inputting comments,
locking your choices and clicking [Save].
1
1
2
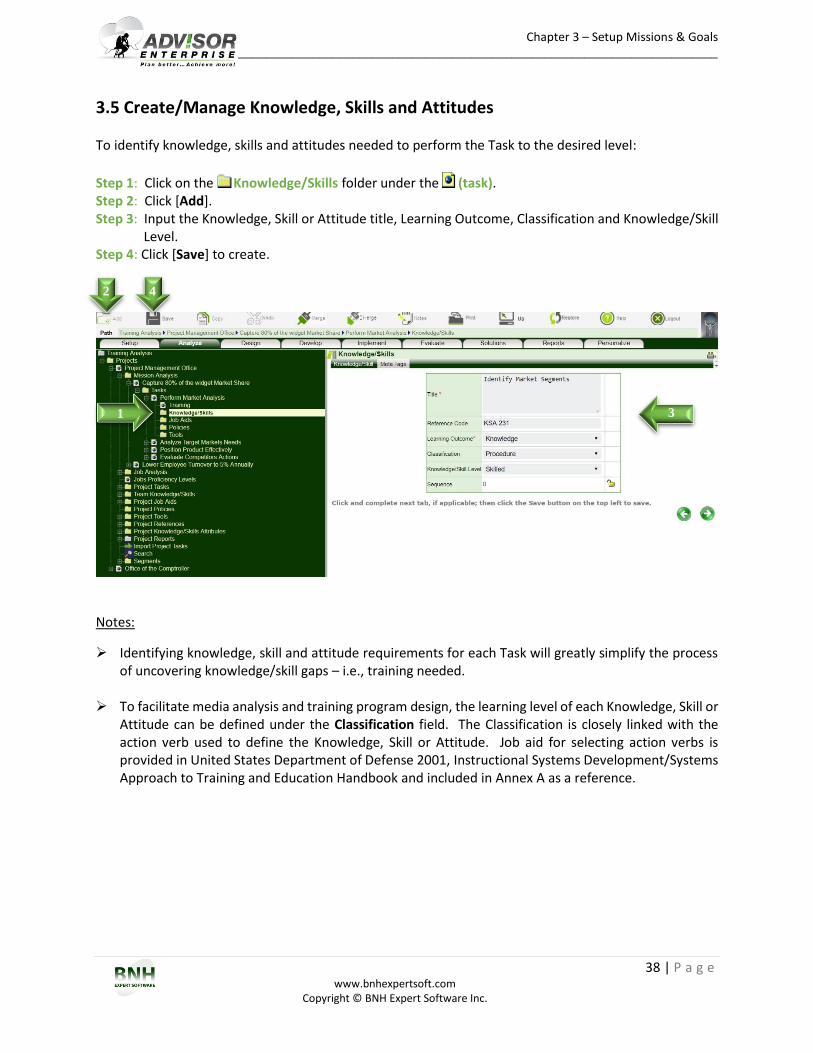
Chapter 3 – Setup Missions & Goals ____________________________________________________________________________________________
38 | P a g e www.bnhexpertsoft.com
Copyright © BNH Expert Software Inc.
3.5 Create/Manage Knowledge, Skills and Attitudes To identify knowledge, skills and attitudes needed to perform the Task to the desired level:
Step 1: Click on the Knowledge/Skills folder under the (task). Step 2: Click [Add]. Step 3: Input the Knowledge, Skill or Attitude title, Learning Outcome, Classification and Knowledge/Skill
Level. Step 4: Click [Save] to create.
Notes:
Identifying knowledge, skill and attitude requirements for each Task will greatly simplify the process of uncovering knowledge/skill gaps – i.e., training needed.
To facilitate media analysis and training program design, the learning level of each Knowledge, Skill or Attitude can be defined under the Classification field. The Classification is closely linked with the action verb used to define the Knowledge, Skill or Attitude. Job aid for selecting action verbs is provided in United States Department of Defense 2001, Instructional Systems Development/Systems Approach to Training and Education Handbook and included in Annex A as a reference.
1
2 4
3
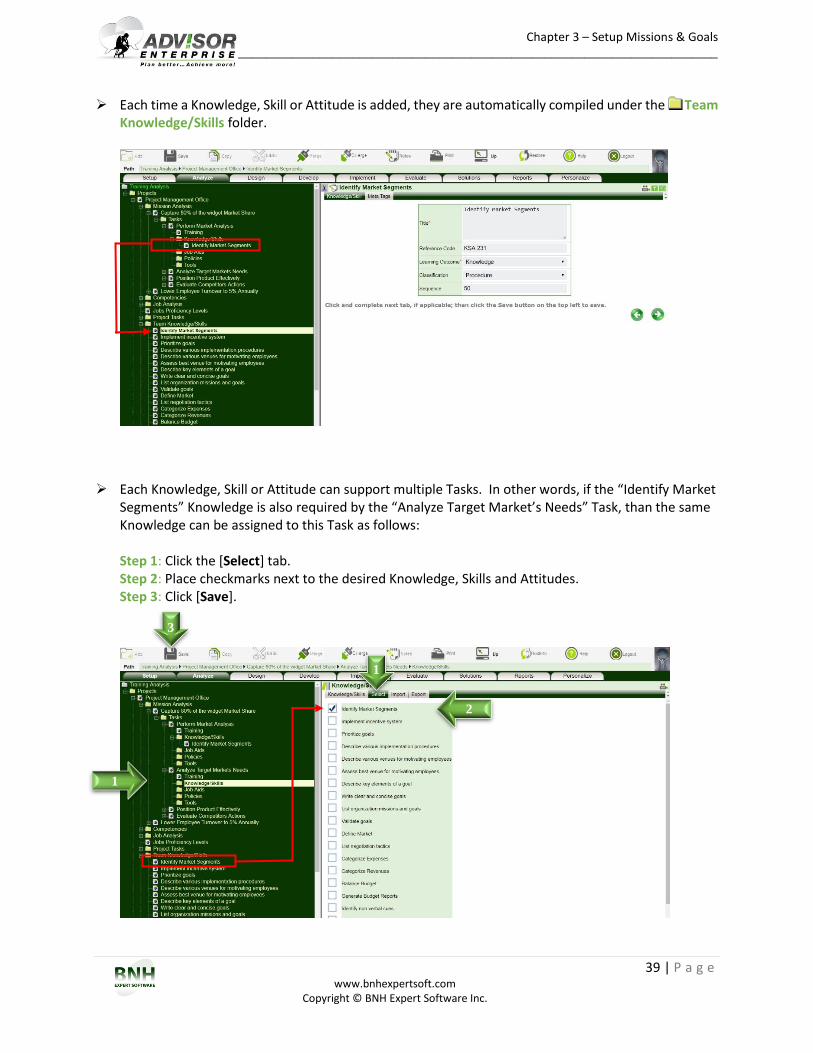
Chapter 3 – Setup Missions & Goals ____________________________________________________________________________________________
39 | P a g e www.bnhexpertsoft.com
Copyright © BNH Expert Software Inc.
Each time a Knowledge, Skill or Attitude is added, they are automatically compiled under the Team Knowledge/Skills folder.
Each Knowledge, Skill or Attitude can support multiple Tasks. In other words, if the “Identify Market
Segments” Knowledge is also required by the “Analyze Target Market’s Needs” Task, than the same Knowledge can be assigned to this Task as follows: Step 1: Click the [Select] tab. Step 2: Place checkmarks next to the desired Knowledge, Skills and Attitudes. Step 3: Click [Save].
1
2
3
1
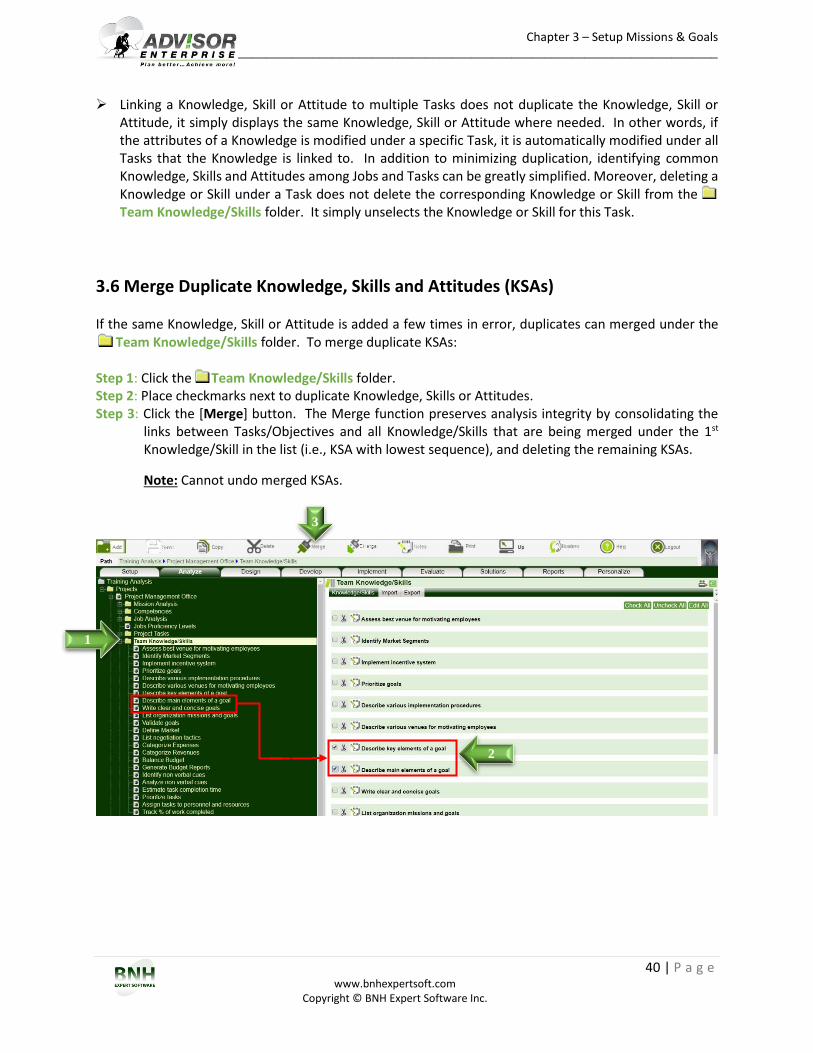
Chapter 3 – Setup Missions & Goals ____________________________________________________________________________________________
40 | P a g e www.bnhexpertsoft.com
Copyright © BNH Expert Software Inc.
Linking a Knowledge, Skill or Attitude to multiple Tasks does not duplicate the Knowledge, Skill or Attitude, it simply displays the same Knowledge, Skill or Attitude where needed. In other words, if the attributes of a Knowledge is modified under a specific Task, it is automatically modified under all Tasks that the Knowledge is linked to. In addition to minimizing duplication, identifying common Knowledge, Skills and Attitudes among Jobs and Tasks can be greatly simplified. Moreover, deleting a Knowledge or Skill under a Task does not delete the corresponding Knowledge or Skill from the Team Knowledge/Skills folder. It simply unselects the Knowledge or Skill for this Task.
3.6 Merge Duplicate Knowledge, Skills and Attitudes (KSAs) If the same Knowledge, Skill or Attitude is added a few times in error, duplicates can merged under the
Team Knowledge/Skills folder. To merge duplicate KSAs: Step 1: Click the Team Knowledge/Skills folder. Step 2: Place checkmarks next to duplicate Knowledge, Skills or Attitudes. Step 3: Click the [Merge] button. The Merge function preserves analysis integrity by consolidating the
links between Tasks/Objectives and all Knowledge/Skills that are being merged under the 1st Knowledge/Skill in the list (i.e., KSA with lowest sequence), and deleting the remaining KSAs.
Note: Cannot undo merged KSAs.
1
2
3
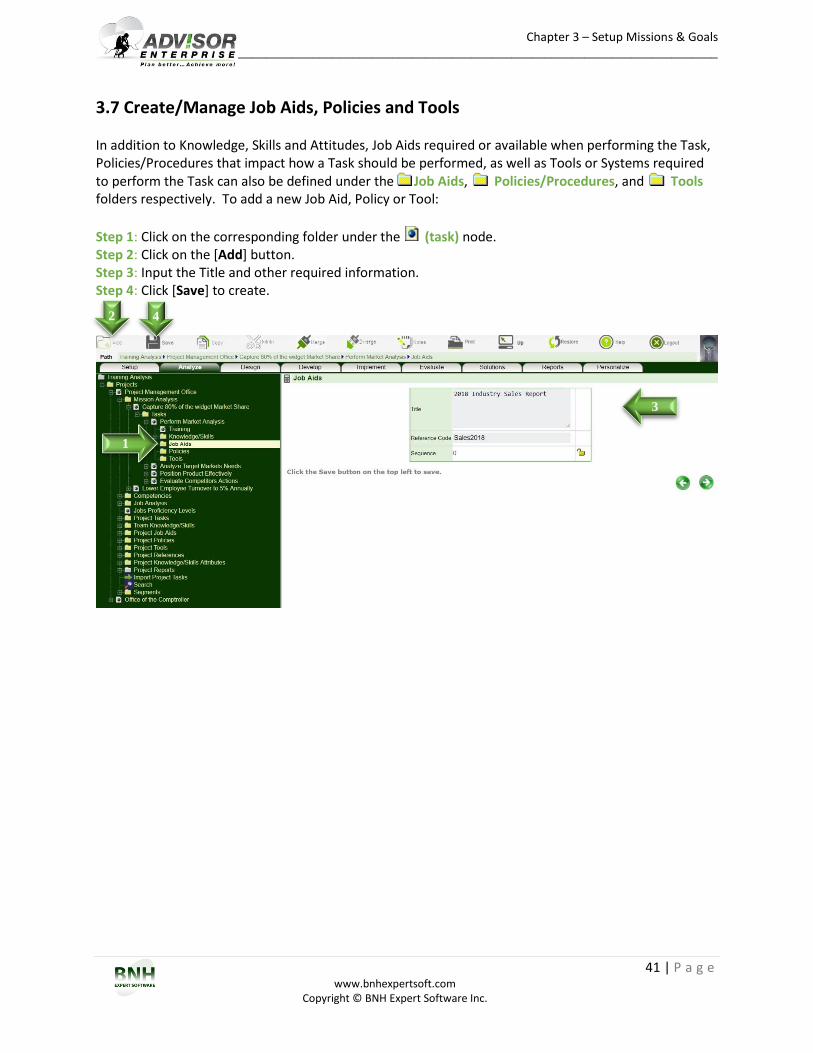
Chapter 3 – Setup Missions & Goals ____________________________________________________________________________________________
41 | P a g e www.bnhexpertsoft.com
Copyright © BNH Expert Software Inc.
3.7 Create/Manage Job Aids, Policies and Tools In addition to Knowledge, Skills and Attitudes, Job Aids required or available when performing the Task, Policies/Procedures that impact how a Task should be performed, as well as Tools or Systems required to perform the Task can also be defined under the Job Aids, Policies/Procedures, and Tools folders respectively. To add a new Job Aid, Policy or Tool:
Step 1: Click on the corresponding folder under the (task) node. Step 2: Click on the [Add] button. Step 3: Input the Title and other required information. Step 4: Click [Save] to create.
1
2 4
3
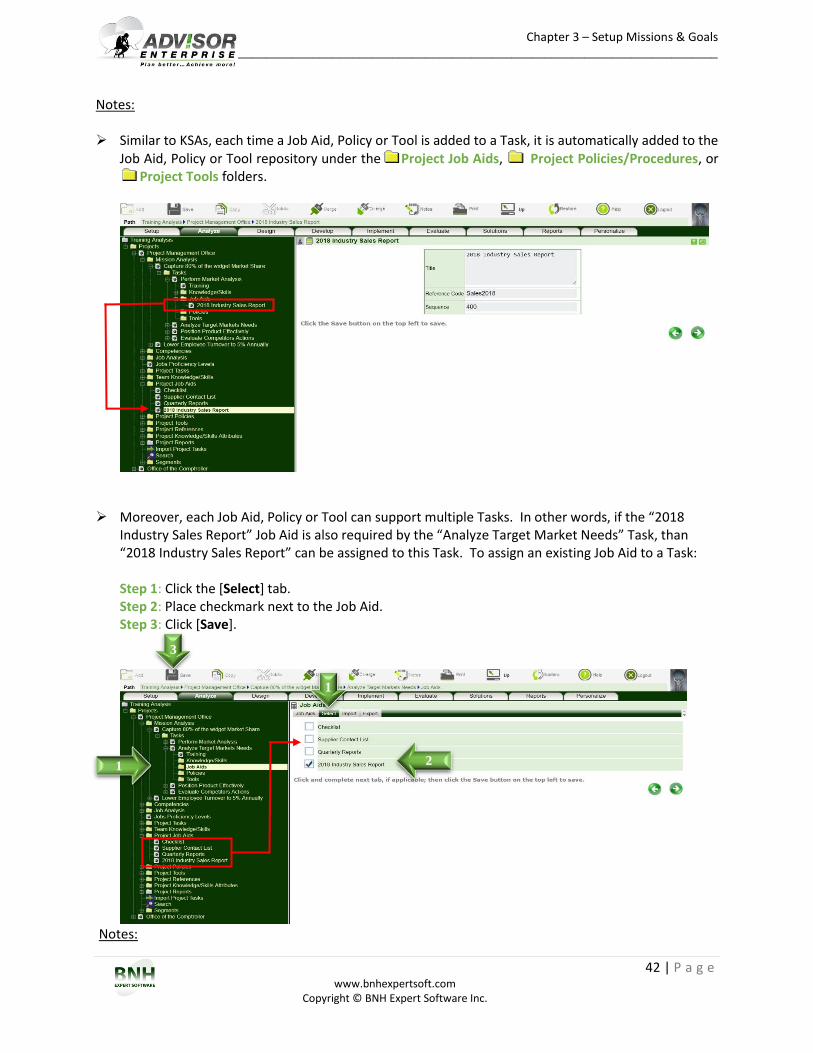
Chapter 3 – Setup Missions & Goals ____________________________________________________________________________________________
42 | P a g e www.bnhexpertsoft.com
Copyright © BNH Expert Software Inc.
Notes: Similar to KSAs, each time a Job Aid, Policy or Tool is added to a Task, it is automatically added to the
Job Aid, Policy or Tool repository under the Project Job Aids, Project Policies/Procedures, or Project Tools folders.
Moreover, each Job Aid, Policy or Tool can support multiple Tasks. In other words, if the “2018
Industry Sales Report” Job Aid is also required by the “Analyze Target Market Needs” Task, than “2018 Industry Sales Report” can be assigned to this Task. To assign an existing Job Aid to a Task: Step 1: Click the [Select] tab. Step 2: Place checkmark next to the Job Aid. Step 3: Click [Save].
Notes:
1
1
3
2
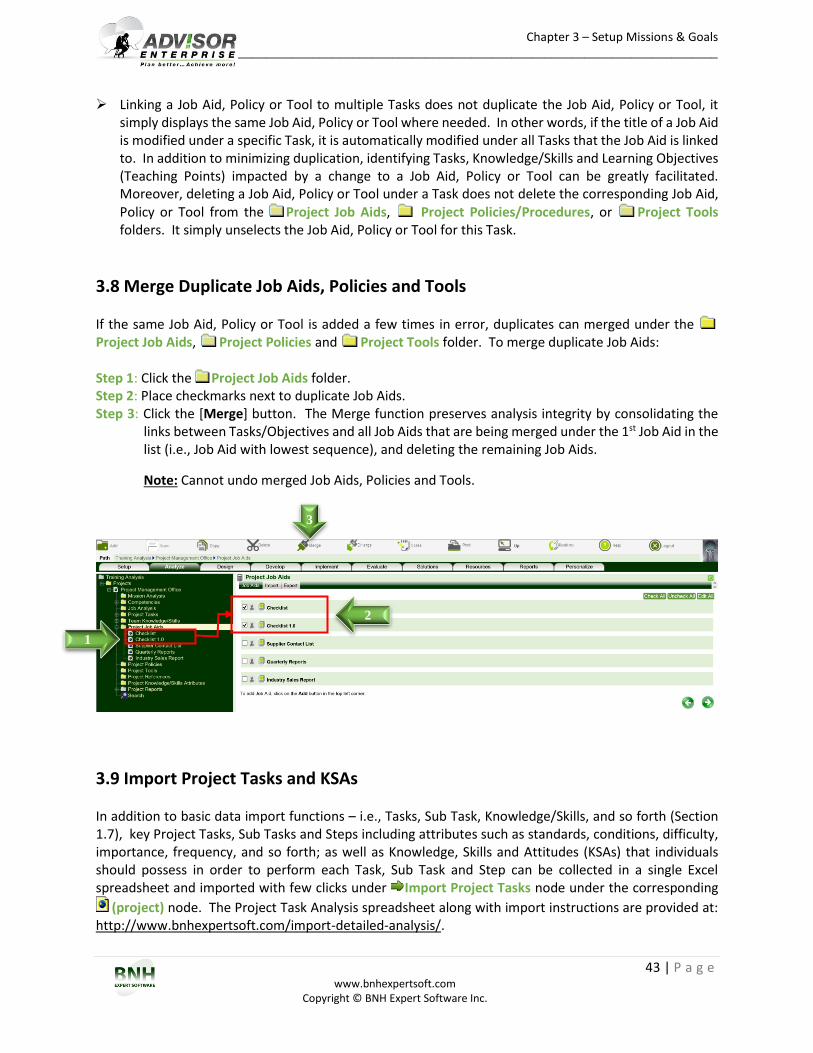
Chapter 3 – Setup Missions & Goals ____________________________________________________________________________________________
43 | P a g e www.bnhexpertsoft.com
Copyright © BNH Expert Software Inc.
Linking a Job Aid, Policy or Tool to multiple Tasks does not duplicate the Job Aid, Policy or Tool, it simply displays the same Job Aid, Policy or Tool where needed. In other words, if the title of a Job Aid is modified under a specific Task, it is automatically modified under all Tasks that the Job Aid is linked to. In addition to minimizing duplication, identifying Tasks, Knowledge/Skills and Learning Objectives (Teaching Points) impacted by a change to a Job Aid, Policy or Tool can be greatly facilitated. Moreover, deleting a Job Aid, Policy or Tool under a Task does not delete the corresponding Job Aid, Policy or Tool from the Project Job Aids, Project Policies/Procedures, or Project Tools folders. It simply unselects the Job Aid, Policy or Tool for this Task.
3.8 Merge Duplicate Job Aids, Policies and Tools If the same Job Aid, Policy or Tool is added a few times in error, duplicates can merged under the Project Job Aids, Project Policies and Project Tools folder. To merge duplicate Job Aids: Step 1: Click the Project Job Aids folder. Step 2: Place checkmarks next to duplicate Job Aids. Step 3: Click the [Merge] button. The Merge function preserves analysis integrity by consolidating the
links between Tasks/Objectives and all Job Aids that are being merged under the 1st Job Aid in the list (i.e., Job Aid with lowest sequence), and deleting the remaining Job Aids.
Note: Cannot undo merged Job Aids, Policies and Tools.
3.9 Import Project Tasks and KSAs In addition to basic data import functions – i.e., Tasks, Sub Task, Knowledge/Skills, and so forth (Section 1.7), key Project Tasks, Sub Tasks and Steps including attributes such as standards, conditions, difficulty, importance, frequency, and so forth; as well as Knowledge, Skills and Attitudes (KSAs) that individuals should possess in order to perform each Task, Sub Task and Step can be collected in a single Excel spreadsheet and imported with few clicks under Import Project Tasks node under the corresponding
(project) node. The Project Task Analysis spreadsheet along with import instructions are provided at: http://www.bnhexpertsoft.com/import-detailed-analysis/.
1
2
3
Chapter 3 – Setup Missions & Goals ____________________________________________________________________________________________
44 | P a g e www.bnhexpertsoft.com
Copyright © BNH Expert Software Inc.
3.10 References Canadian Forces Individual Training & Education System (2003), Analysis of Instructional Requirements, Volume 3 of 13, CFITES. Ministry of Defence, Joint Service Publication (JSP) 822 (March 2016), Defence Systems Approach to Training – Direction and Guidance for Individual and Collective Training, Part 2: Guidance. United States, Department of Defense (2001), Instructional Systems Development/Systems Approach to Training and Education, Part 2 of 5, MIL-HDBK-29612-2A.
Chapter 4 – System/Competency Analysis ____________________________________________________________________________________________
45 | P a g e www.bnhexpertsoft.com
Copyright © BNH Expert Software Inc.
Chapter 4: System/Competency Analysis
4.1 Setup Systems/Competencies Systems Overview Job requirements in many cases are directly related to the Systems that individuals operate and maintain. For example, the Tasks, as well as Knowledge/Skill requirements for heavy equipment, truck and forklift drivers and technicians, are highly dependent on those vehicles. The same is true for aircraft pilots and technicians, crew onboard ships, and so forth. If multiple jobs operate the same Communication System, for example, we can preserve consistency, drive efficiency and maintain alignment with future system updates by defining the Tasks and Knowledge/Skill requirements once (under the Communication System) and assign them to relevant Jobs. In other words, if Job performance is highly dependent on Systems or Sub Systems, and multiple Jobs operate or maintain the same System or Sub System, then the Systems based analysis approach will yield the best results. Competencies Overview Competencies are defined as the ability to perform a particular function successfully. Competencies can be core/behavioral (such as, dependability, reliability, team work or problem solving, etc.); or technical – i.e., domain specific. Technical competencies for project managers, may include Time Management, Cost Management, Oral/Written Communication, and so forth. Each technical competency can be further divided into observable/measurable behaviors (indicators of competence), and each Job level will be expected to demonstrate a specific competence level. Since multiple jobs within an organization will most likely require similar competencies, we can preserve consistency, drive efficiency and quickly identify competencies needed to advance to the next level or change jobs by defining the behaviors/indicators of competence (equivalent to Tasks with Standards) once (under each competency) and assign them to relevant Jobs.
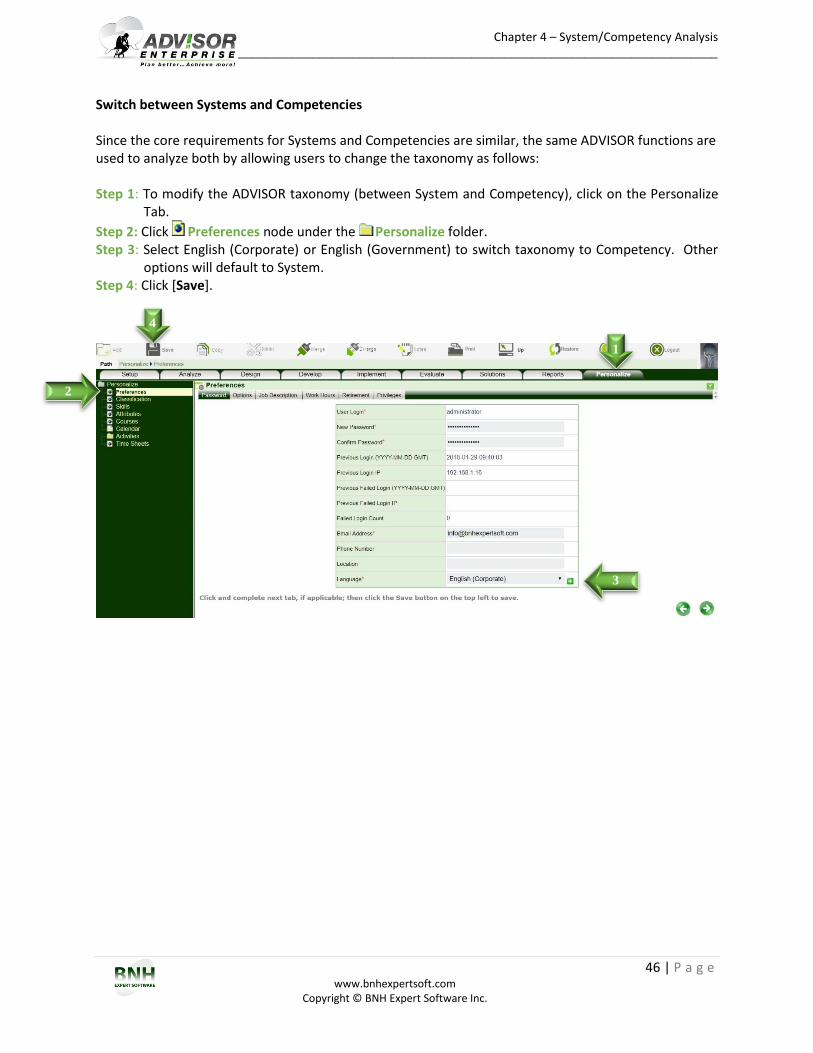
Chapter 4 – System/Competency Analysis ____________________________________________________________________________________________
46 | P a g e www.bnhexpertsoft.com
Copyright © BNH Expert Software Inc.
Switch between Systems and Competencies Since the core requirements for Systems and Competencies are similar, the same ADVISOR functions are used to analyze both by allowing users to change the taxonomy as follows: Step 1: To modify the ADVISOR taxonomy (between System and Competency), click on the Personalize
Tab.
Step 2: Click Preferences node under the Personalize folder. Step 3: Select English (Corporate) or English (Government) to switch taxonomy to Competency. Other
options will default to System. Step 4: Click [Save].
2
1
3
4
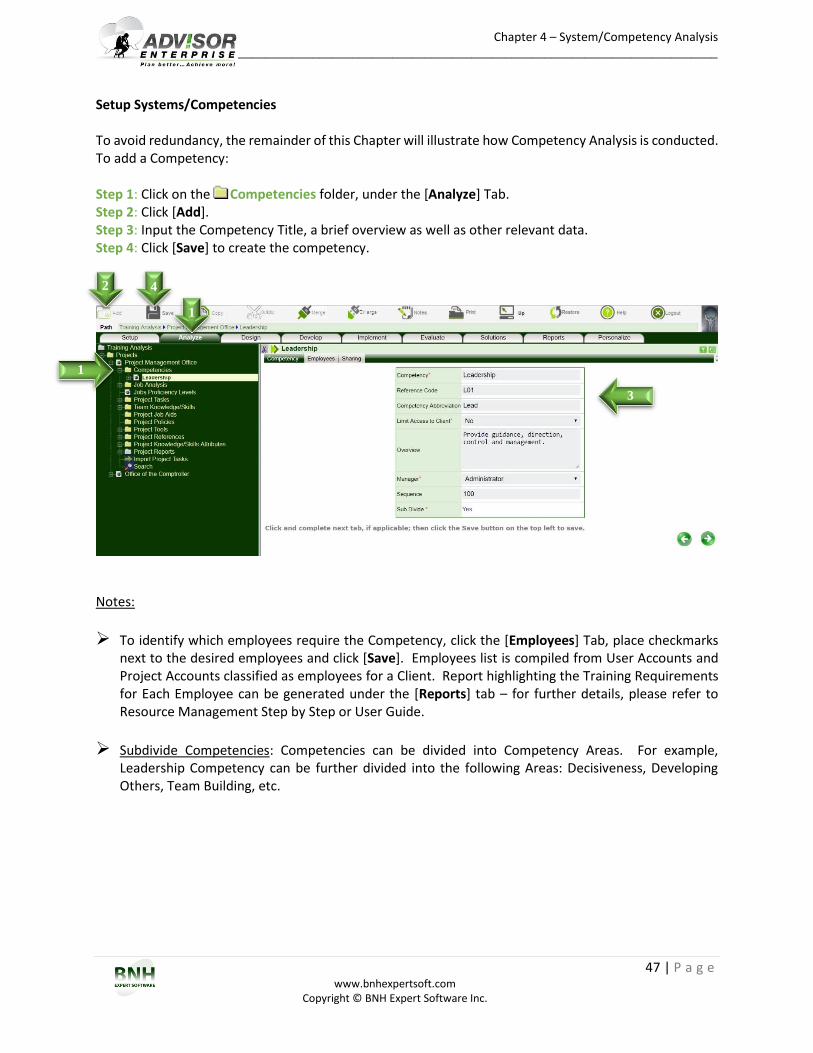
Chapter 4 – System/Competency Analysis ____________________________________________________________________________________________
47 | P a g e www.bnhexpertsoft.com
Copyright © BNH Expert Software Inc.
Setup Systems/Competencies To avoid redundancy, the remainder of this Chapter will illustrate how Competency Analysis is conducted. To add a Competency: Step 1: Click on the Competencies folder, under the [Analyze] Tab. Step 2: Click [Add]. Step 3: Input the Competency Title, a brief overview as well as other relevant data. Step 4: Click [Save] to create the competency.
Notes:
To identify which employees require the Competency, click the [Employees] Tab, place checkmarks next to the desired employees and click [Save]. Employees list is compiled from User Accounts and Project Accounts classified as employees for a Client. Report highlighting the Training Requirements for Each Employee can be generated under the [Reports] tab – for further details, please refer to Resource Management Step by Step or User Guide.
Subdivide Competencies: Competencies can be divided into Competency Areas. For example, Leadership Competency can be further divided into the following Areas: Decisiveness, Developing Others, Team Building, etc.
1
1
2 4
3

Chapter 4 – System/Competency Analysis ____________________________________________________________________________________________
48 | P a g e www.bnhexpertsoft.com
Copyright © BNH Expert Software Inc.
4.2 Create/Manage System/Competency Tasks/Behaviors
To add a new Task/Behavior (Indicator of Competence):
Step 1: Click on the Tasks folder under the (competency) node or (competency area) node. Step 2: Click [Add]. Step 3: Input Task Title, Standard, Difficulty, Importance, Frequency, Proficiency and other attributes. Step 4: Click on the [Conditions], [Cues] and [Safety] tabs and complete. Step 5: Click [Save] to create the task/behavior (indicator of competence).
Notes:
Based on Task’s Difficulty, Importance and Frequency (DIF), Task Priority and Training Requirements
are determined and presented under the Training node under each (task). Four models are supported by ADVISOR (Section 3.4). You may of course, override system's recommendations.
Sub Divide Tasks: A Task can also be divided into Sub Tasks, Steps and Sub Steps. Only Primary Project Tasks can be assigned a single unit (including all Sub Tasks) to multiple Competencies or Competency Areas. In other words, if a Task is divided into Sub Task A and Sub Task B, you cannot assign Sub Task A to Leadership Competency for example, and Sub Task B to General Competency.
Search. To minimize the analysis effort, a [Search] tab is presented on the Tasks folder. You can search for Tasks by Mission, System, Competency, Job or Keyword. To copy, place checkmarks next to the desired Tasks and click [Save]. All Sub Tasks as well as Knowledge and Skills associated with the selected Task are also copied.
If References have been defined under the Project References folder (Section 6.3), a [Reference] tab will also appear after the [Safety] tab. Click the [References] Tab, select relevant References and click [Save] to link Tasks to specific mandate, requirement, manual, etc., and in-turn document the reasoning behind the Task.
2 5
1 3
4
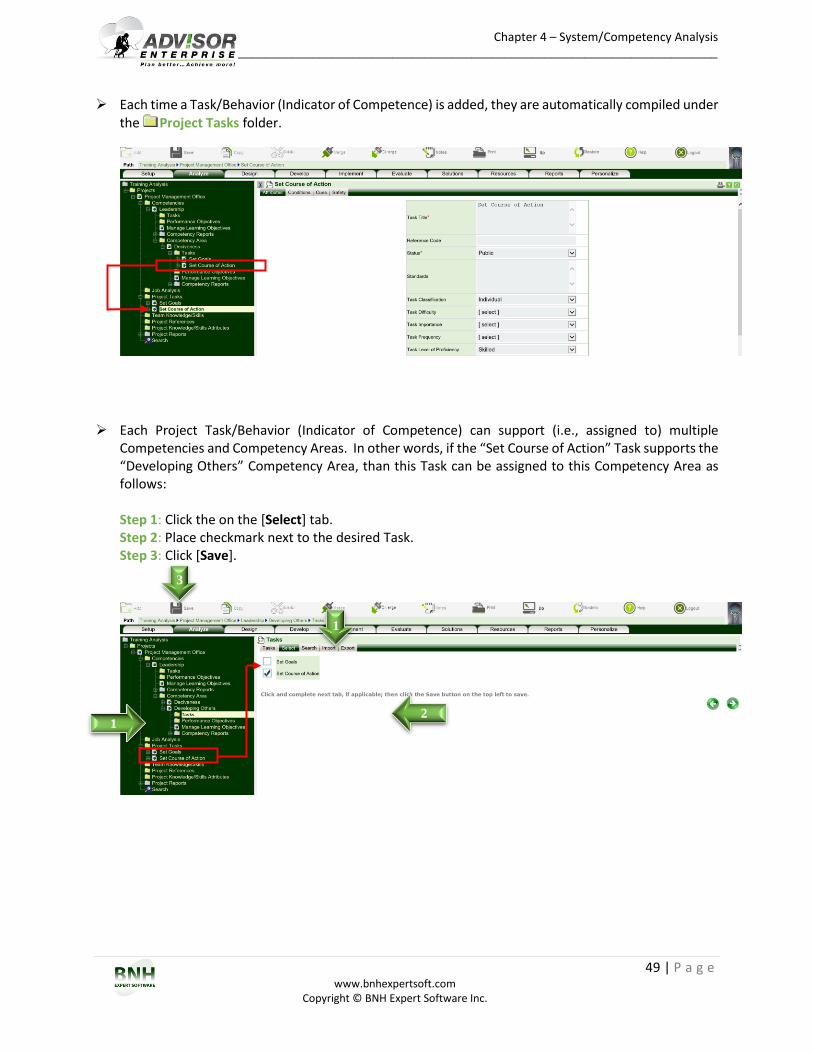
Chapter 4 – System/Competency Analysis ____________________________________________________________________________________________
49 | P a g e www.bnhexpertsoft.com
Copyright © BNH Expert Software Inc.
Each time a Task/Behavior (Indicator of Competence) is added, they are automatically compiled under the Project Tasks folder.
Each Project Task/Behavior (Indicator of Competence) can support (i.e., assigned to) multiple Competencies and Competency Areas. In other words, if the “Set Course of Action” Task supports the “Developing Others” Competency Area, than this Task can be assigned to this Competency Area as follows: Step 1: Click the on the [Select] tab. Step 2: Place checkmark next to the desired Task. Step 3: Click [Save].
1
2
3
1
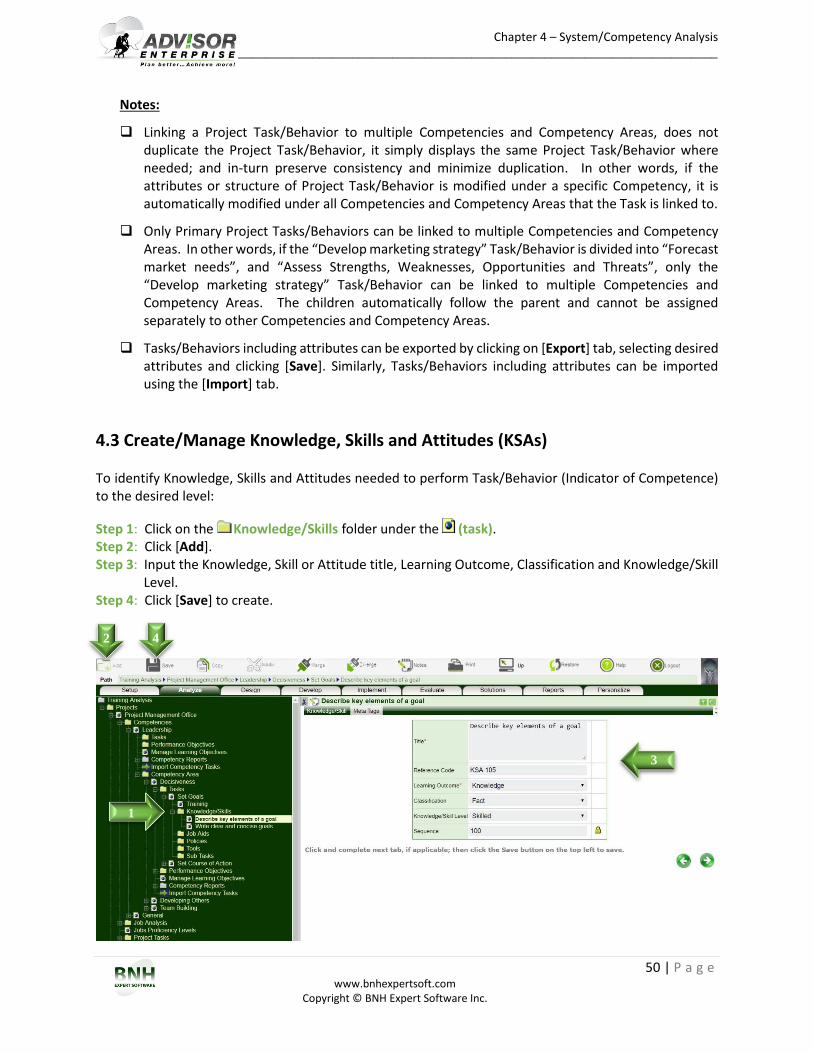
Chapter 4 – System/Competency Analysis ____________________________________________________________________________________________
50 | P a g e www.bnhexpertsoft.com
Copyright © BNH Expert Software Inc.
Notes:
Linking a Project Task/Behavior to multiple Competencies and Competency Areas, does not duplicate the Project Task/Behavior, it simply displays the same Project Task/Behavior where needed; and in-turn preserve consistency and minimize duplication. In other words, if the attributes or structure of Project Task/Behavior is modified under a specific Competency, it is automatically modified under all Competencies and Competency Areas that the Task is linked to.
Only Primary Project Tasks/Behaviors can be linked to multiple Competencies and Competency Areas. In other words, if the “Develop marketing strategy” Task/Behavior is divided into “Forecast market needs”, and “Assess Strengths, Weaknesses, Opportunities and Threats”, only the “Develop marketing strategy” Task/Behavior can be linked to multiple Competencies and Competency Areas. The children automatically follow the parent and cannot be assigned separately to other Competencies and Competency Areas.
Tasks/Behaviors including attributes can be exported by clicking on [Export] tab, selecting desired attributes and clicking [Save]. Similarly, Tasks/Behaviors including attributes can be imported using the [Import] tab.
4.3 Create/Manage Knowledge, Skills and Attitudes (KSAs) To identify Knowledge, Skills and Attitudes needed to perform Task/Behavior (Indicator of Competence) to the desired level:
Step 1: Click on the Knowledge/Skills folder under the (task). Step 2: Click [Add]. Step 3: Input the Knowledge, Skill or Attitude title, Learning Outcome, Classification and Knowledge/Skill
Level. Step 4: Click [Save] to create.
2 4
1
3
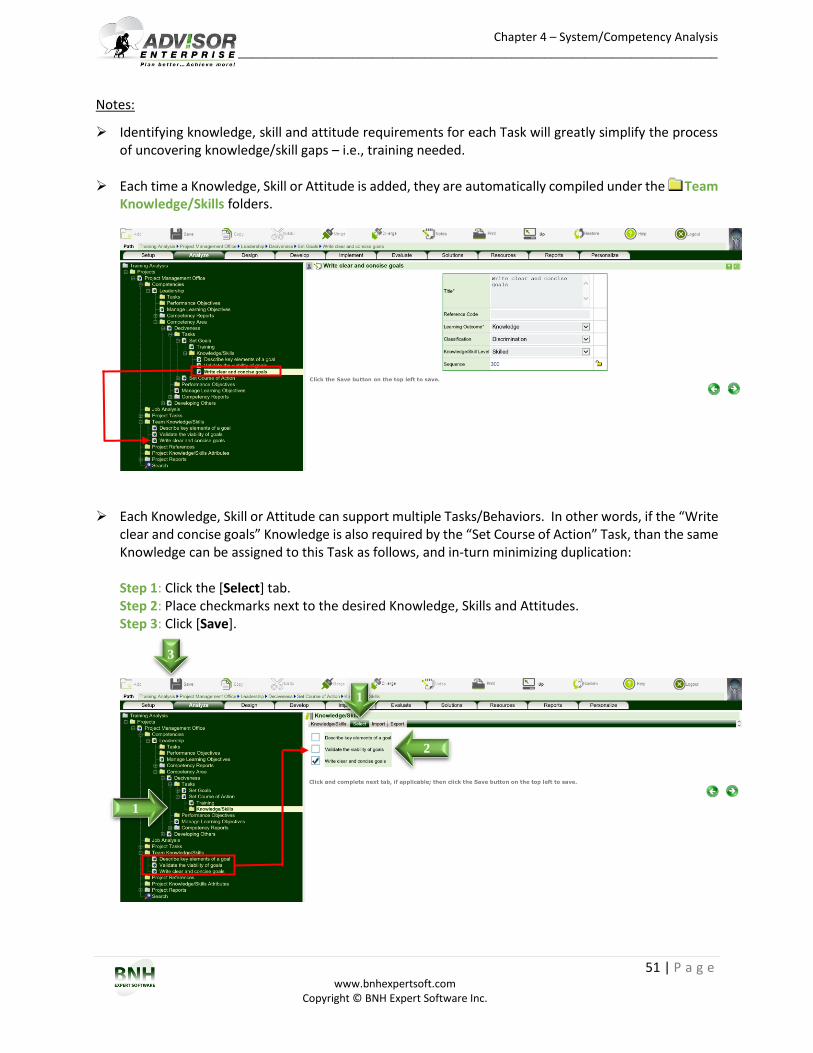
Chapter 4 – System/Competency Analysis ____________________________________________________________________________________________
51 | P a g e www.bnhexpertsoft.com
Copyright © BNH Expert Software Inc.
Notes:
Identifying knowledge, skill and attitude requirements for each Task will greatly simplify the process of uncovering knowledge/skill gaps – i.e., training needed.
Each time a Knowledge, Skill or Attitude is added, they are automatically compiled under the Team Knowledge/Skills folders.
Each Knowledge, Skill or Attitude can support multiple Tasks/Behaviors. In other words, if the “Write clear and concise goals” Knowledge is also required by the “Set Course of Action” Task, than the same Knowledge can be assigned to this Task as follows, and in-turn minimizing duplication: Step 1: Click the [Select] tab. Step 2: Place checkmarks next to the desired Knowledge, Skills and Attitudes. Step 3: Click [Save].
1
2
3
1

Chapter 4 – System/Competency Analysis ____________________________________________________________________________________________
52 | P a g e www.bnhexpertsoft.com
Copyright © BNH Expert Software Inc.
Linking a Knowledge, Skill or Attitude to multiple Tasks does not duplicate the Knowledge, Skill or Attitude, it simply displays the same Knowledge, Skill or Attitude where needed. In other words, if the attributes of a Knowledge is modified under a specific Task, it is automatically modified under all Tasks that the Knowledge is linked to. In addition to minimizing duplication, identifying common Knowledge, Skills and Attitudes among Jobs and Tasks can be greatly simplified. Moreover, deleting a Knowledge or Skill under a Task does not delete the corresponding Knowledge or Skill from the Team Knowledge/Skills folder. It simply unselects the Knowledge or Skill for this Task.
4.4 Merge Duplicate Knowledge, Skills and Attitudes (KSAs) If the same Knowledge, Skill or Attitude is added a few times in error, duplicates can merged under the
Team Knowledge/Skills folder. To merge duplicate KSAs: Step 1: Click the Team Knowledge/Skills folder. Step 2: Place checkmarks next to duplicate Knowledge, Skills or Attitudes. Step 3: Click the [Merge] button. The Merge function preserves analysis integrity by consolidating the
links between Tasks/Objectives and all Knowledge/Skill that are being merged under the 1st Knowledge/Skill in the list (i.e., KSA with lowest sequence), and deleting the remaining KSAs.
Note: Cannot undo merged KSAs.
1
2
3
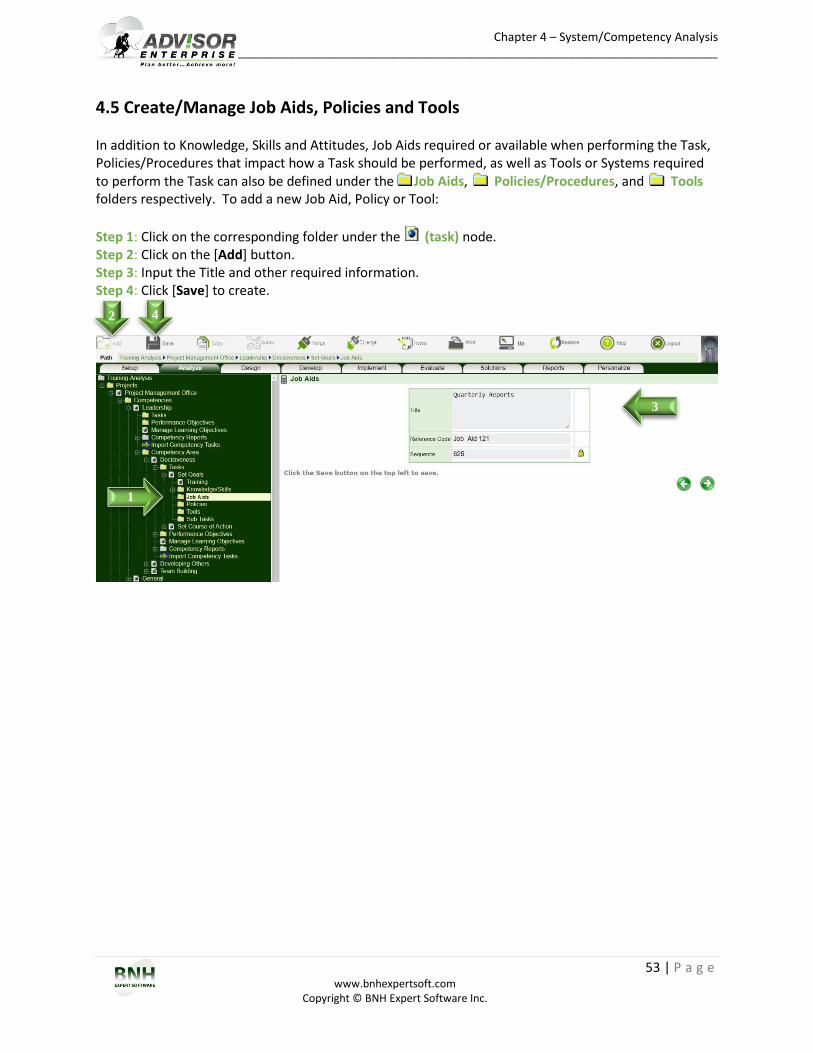
Chapter 4 – System/Competency Analysis ____________________________________________________________________________________________
53 | P a g e www.bnhexpertsoft.com
Copyright © BNH Expert Software Inc.
4.5 Create/Manage Job Aids, Policies and Tools In addition to Knowledge, Skills and Attitudes, Job Aids required or available when performing the Task, Policies/Procedures that impact how a Task should be performed, as well as Tools or Systems required to perform the Task can also be defined under the Job Aids, Policies/Procedures, and Tools folders respectively. To add a new Job Aid, Policy or Tool:
Step 1: Click on the corresponding folder under the (task) node. Step 2: Click on the [Add] button. Step 3: Input the Title and other required information. Step 4: Click [Save] to create.
1
2 4
3
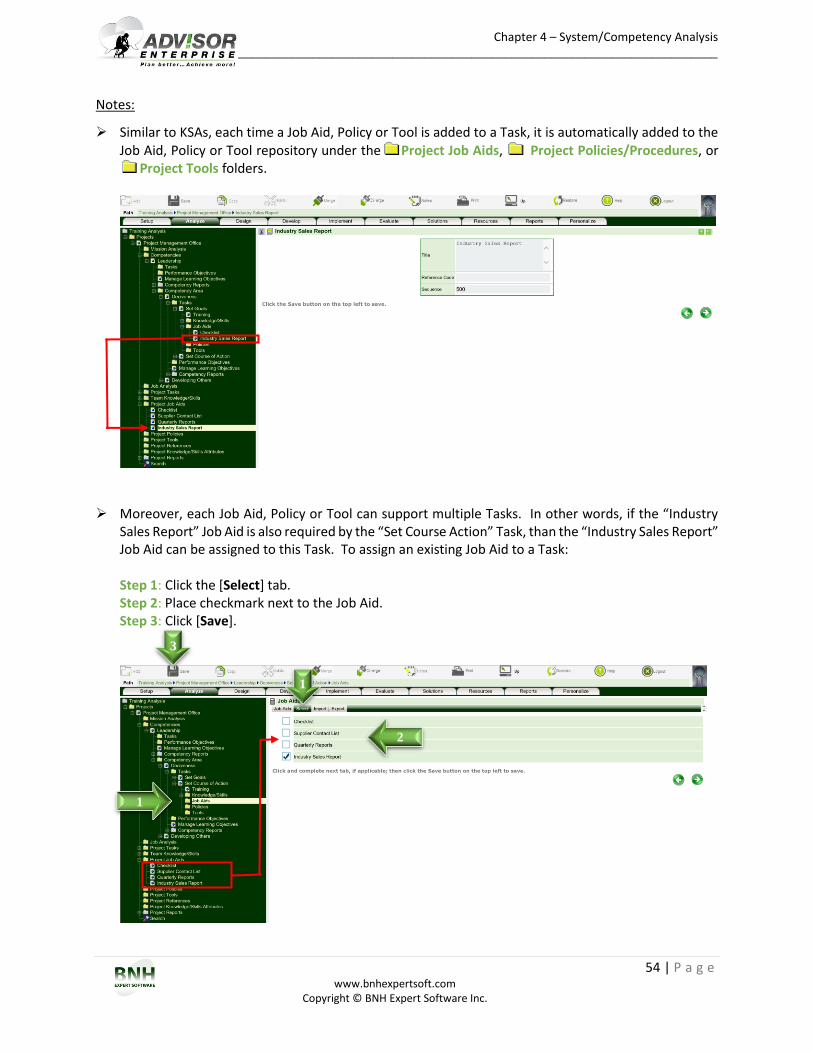
Chapter 4 – System/Competency Analysis ____________________________________________________________________________________________
54 | P a g e www.bnhexpertsoft.com
Copyright © BNH Expert Software Inc.
Notes:
Similar to KSAs, each time a Job Aid, Policy or Tool is added to a Task, it is automatically added to the Job Aid, Policy or Tool repository under the Project Job Aids, Project Policies/Procedures, or
Project Tools folders.
Moreover, each Job Aid, Policy or Tool can support multiple Tasks. In other words, if the “Industry
Sales Report” Job Aid is also required by the “Set Course Action” Task, than the “Industry Sales Report” Job Aid can be assigned to this Task. To assign an existing Job Aid to a Task: Step 1: Click the [Select] tab. Step 2: Place checkmark next to the Job Aid. Step 3: Click [Save].
1
1
3
2
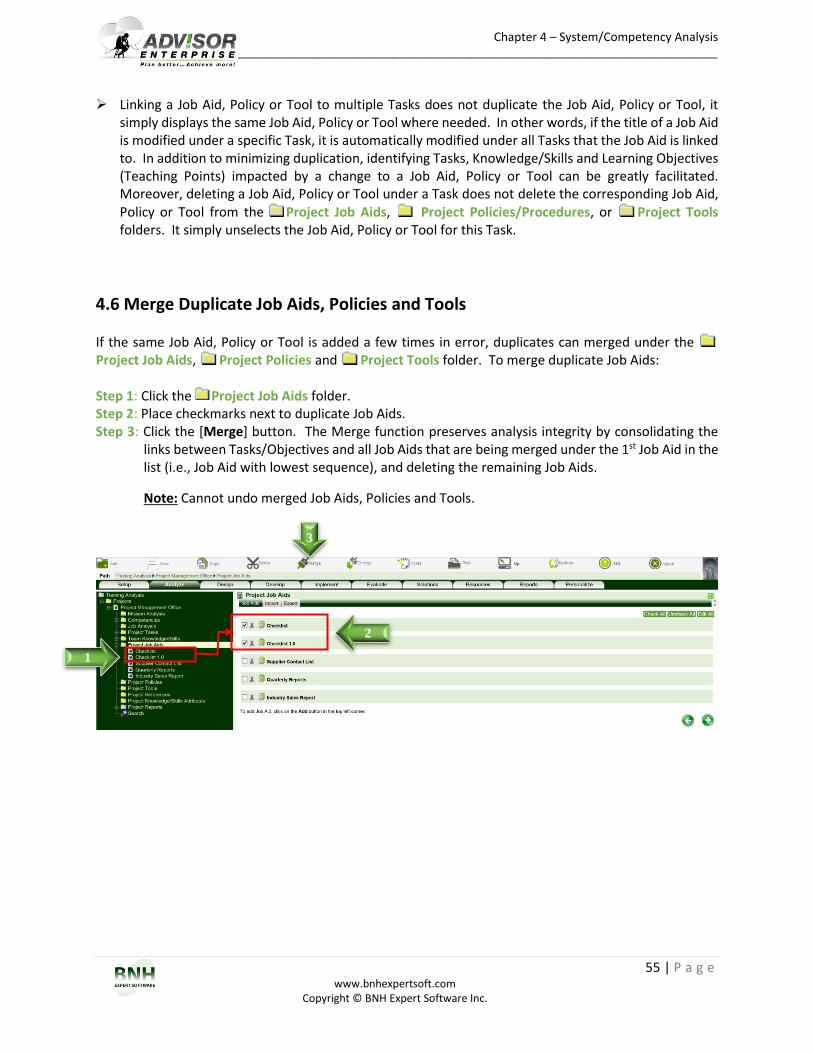
Chapter 4 – System/Competency Analysis ____________________________________________________________________________________________
55 | P a g e www.bnhexpertsoft.com
Copyright © BNH Expert Software Inc.
Linking a Job Aid, Policy or Tool to multiple Tasks does not duplicate the Job Aid, Policy or Tool, it simply displays the same Job Aid, Policy or Tool where needed. In other words, if the title of a Job Aid is modified under a specific Task, it is automatically modified under all Tasks that the Job Aid is linked to. In addition to minimizing duplication, identifying Tasks, Knowledge/Skills and Learning Objectives (Teaching Points) impacted by a change to a Job Aid, Policy or Tool can be greatly facilitated. Moreover, deleting a Job Aid, Policy or Tool under a Task does not delete the corresponding Job Aid, Policy or Tool from the Project Job Aids, Project Policies/Procedures, or Project Tools folders. It simply unselects the Job Aid, Policy or Tool for this Task.
4.6 Merge Duplicate Job Aids, Policies and Tools If the same Job Aid, Policy or Tool is added a few times in error, duplicates can merged under the Project Job Aids, Project Policies and Project Tools folder. To merge duplicate Job Aids: Step 1: Click the Project Job Aids folder. Step 2: Place checkmarks next to duplicate Job Aids. Step 3: Click the [Merge] button. The Merge function preserves analysis integrity by consolidating the
links between Tasks/Objectives and all Job Aids that are being merged under the 1st Job Aid in the list (i.e., Job Aid with lowest sequence), and deleting the remaining Job Aids.
Note: Cannot undo merged Job Aids, Policies and Tools.
1
2
3
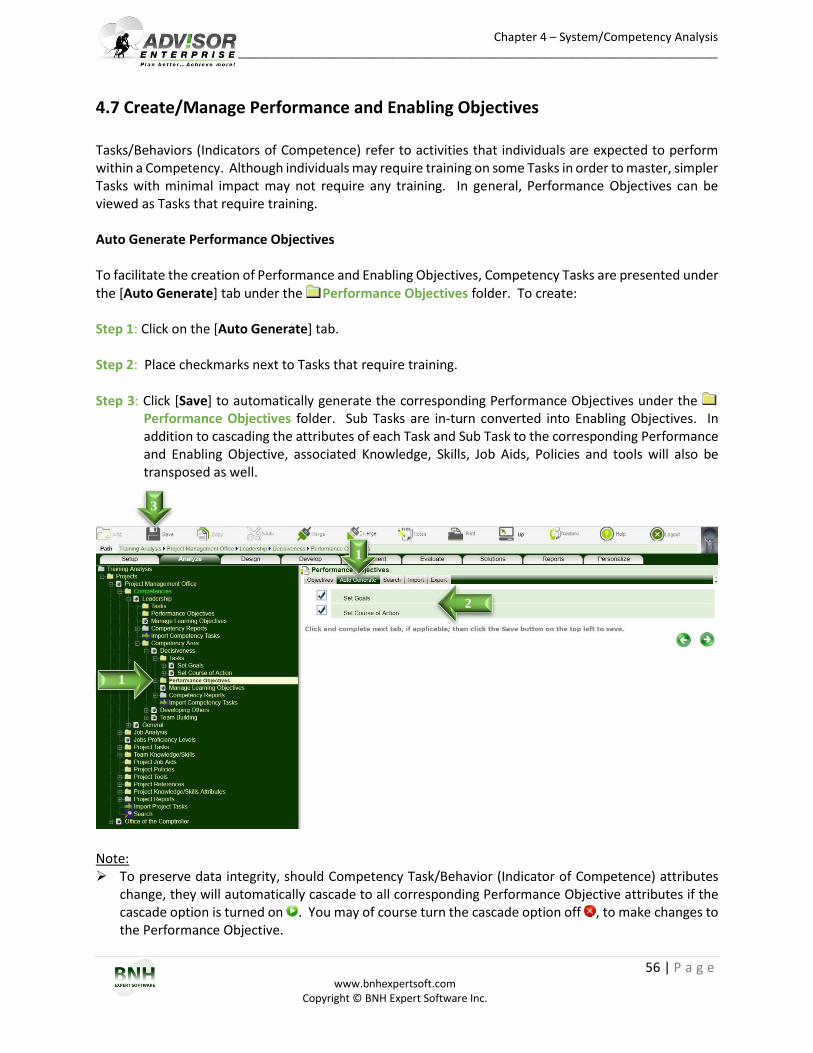
Chapter 4 – System/Competency Analysis ____________________________________________________________________________________________
56 | P a g e www.bnhexpertsoft.com
Copyright © BNH Expert Software Inc.
4.7 Create/Manage Performance and Enabling Objectives Tasks/Behaviors (Indicators of Competence) refer to activities that individuals are expected to perform within a Competency. Although individuals may require training on some Tasks in order to master, simpler Tasks with minimal impact may not require any training. In general, Performance Objectives can be viewed as Tasks that require training. Auto Generate Performance Objectives To facilitate the creation of Performance and Enabling Objectives, Competency Tasks are presented under the [Auto Generate] tab under the Performance Objectives folder. To create: Step 1: Click on the [Auto Generate] tab. Step 2: Place checkmarks next to Tasks that require training. Step 3: Click [Save] to automatically generate the corresponding Performance Objectives under the
Performance Objectives folder. Sub Tasks are in-turn converted into Enabling Objectives. In addition to cascading the attributes of each Task and Sub Task to the corresponding Performance and Enabling Objective, associated Knowledge, Skills, Job Aids, Policies and tools will also be transposed as well.
Note: To preserve data integrity, should Competency Task/Behavior (Indicator of Competence) attributes
change, they will automatically cascade to all corresponding Performance Objective attributes if the cascade option is turned on . You may of course turn the cascade option off , to make changes to the Performance Objective.
1
3
1
2
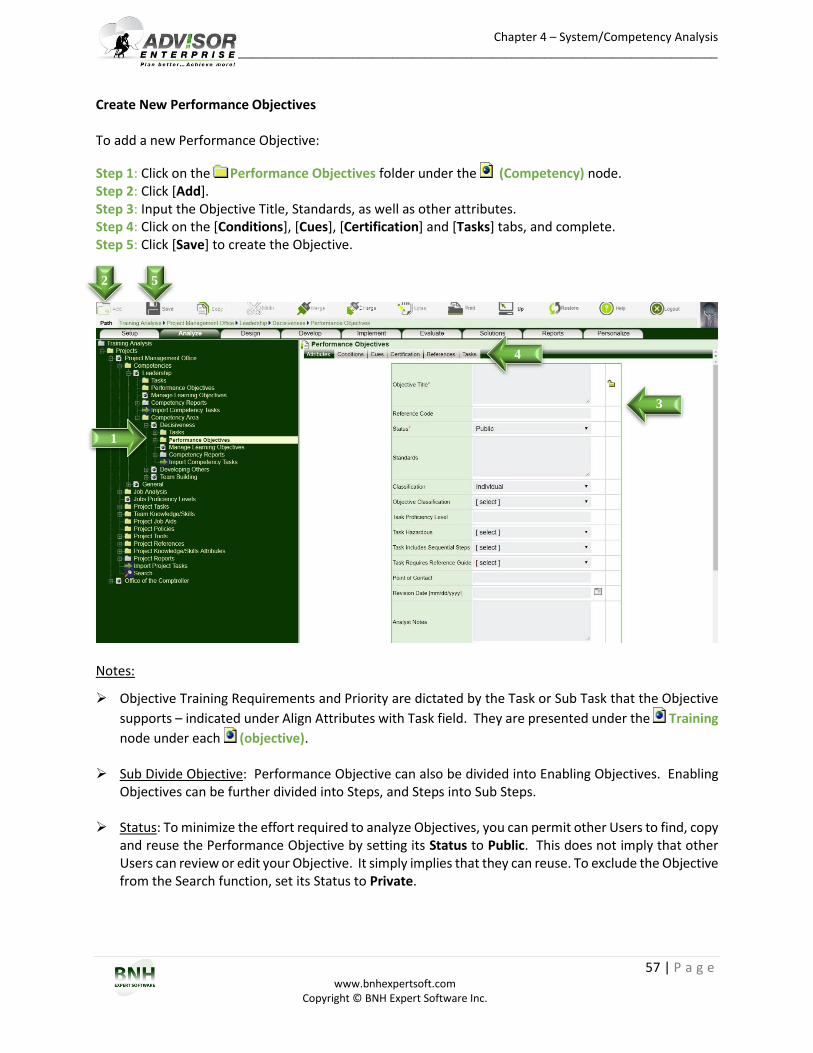
Chapter 4 – System/Competency Analysis ____________________________________________________________________________________________
57 | P a g e www.bnhexpertsoft.com
Copyright © BNH Expert Software Inc.
Create New Performance Objectives To add a new Performance Objective:
Step 1: Click on the Performance Objectives folder under the (Competency) node. Step 2: Click [Add]. Step 3: Input the Objective Title, Standards, as well as other attributes. Step 4: Click on the [Conditions], [Cues], [Certification] and [Tasks] tabs, and complete. Step 5: Click [Save] to create the Objective.
Notes:
Objective Training Requirements and Priority are dictated by the Task or Sub Task that the Objective
supports – indicated under Align Attributes with Task field. They are presented under the Training
node under each (objective).
Sub Divide Objective: Performance Objective can also be divided into Enabling Objectives. Enabling Objectives can be further divided into Steps, and Steps into Sub Steps.
Status: To minimize the effort required to analyze Objectives, you can permit other Users to find, copy and reuse the Performance Objective by setting its Status to Public. This does not imply that other Users can review or edit your Objective. It simply implies that they can reuse. To exclude the Objective from the Search function, set its Status to Private.
1
2 5
3
4
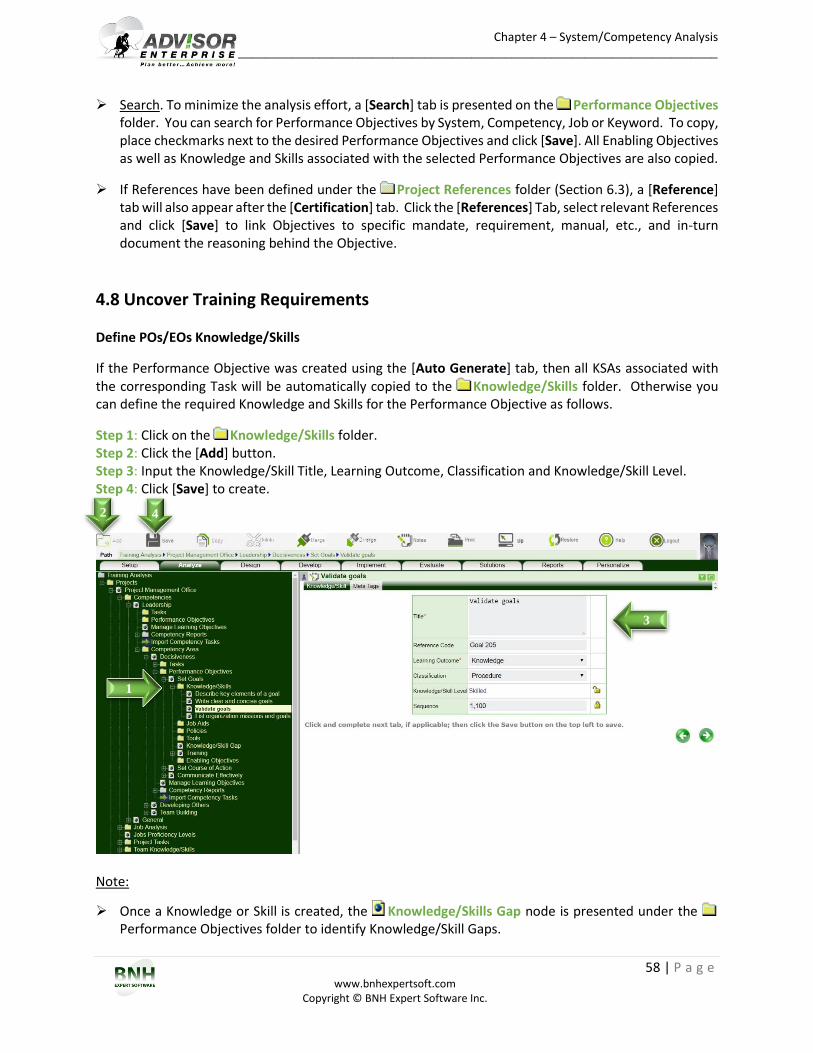
Chapter 4 – System/Competency Analysis ____________________________________________________________________________________________
58 | P a g e www.bnhexpertsoft.com
Copyright © BNH Expert Software Inc.
Search. To minimize the analysis effort, a [Search] tab is presented on the Performance Objectives folder. You can search for Performance Objectives by System, Competency, Job or Keyword. To copy, place checkmarks next to the desired Performance Objectives and click [Save]. All Enabling Objectives as well as Knowledge and Skills associated with the selected Performance Objectives are also copied.
If References have been defined under the Project References folder (Section 6.3), a [Reference] tab will also appear after the [Certification] tab. Click the [References] Tab, select relevant References and click [Save] to link Objectives to specific mandate, requirement, manual, etc., and in-turn document the reasoning behind the Objective.
4.8 Uncover Training Requirements
Define POs/EOs Knowledge/Skills
If the Performance Objective was created using the [Auto Generate] tab, then all KSAs associated with the corresponding Task will be automatically copied to the Knowledge/Skills folder. Otherwise you can define the required Knowledge and Skills for the Performance Objective as follows.
Step 1: Click on the Knowledge/Skills folder. Step 2: Click the [Add] button. Step 3: Input the Knowledge/Skill Title, Learning Outcome, Classification and Knowledge/Skill Level. Step 4: Click [Save] to create.
Note:
Once a Knowledge or Skill is created, the Knowledge/Skills Gap node is presented under the Performance Objectives folder to identify Knowledge/Skill Gaps.
2
1
4
3
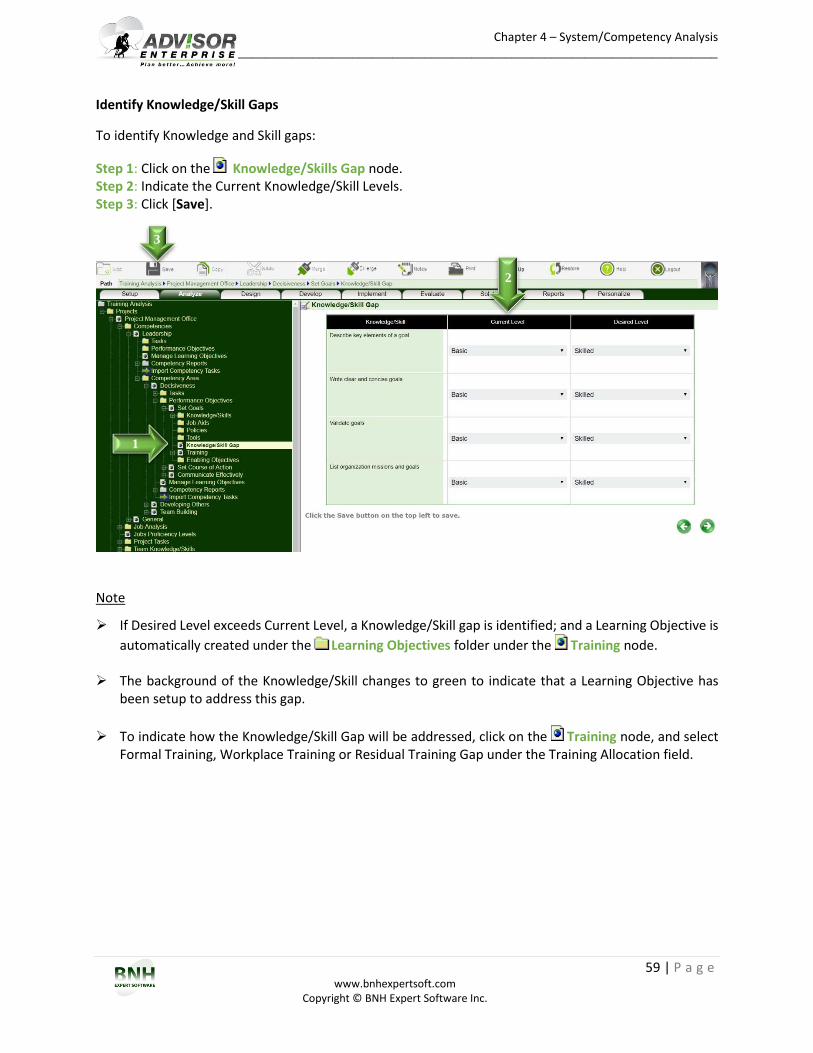
Chapter 4 – System/Competency Analysis ____________________________________________________________________________________________
59 | P a g e www.bnhexpertsoft.com
Copyright © BNH Expert Software Inc.
Identify Knowledge/Skill Gaps
To identify Knowledge and Skill gaps:
Step 1: Click on the Knowledge/Skills Gap node. Step 2: Indicate the Current Knowledge/Skill Levels. Step 3: Click [Save].
Note
If Desired Level exceeds Current Level, a Knowledge/Skill gap is identified; and a Learning Objective is
automatically created under the Learning Objectives folder under the Training node.
The background of the Knowledge/Skill changes to green to indicate that a Learning Objective has been setup to address this gap.
To indicate how the Knowledge/Skill Gap will be addressed, click on the Training node, and select Formal Training, Workplace Training or Residual Training Gap under the Training Allocation field.
3
1
2
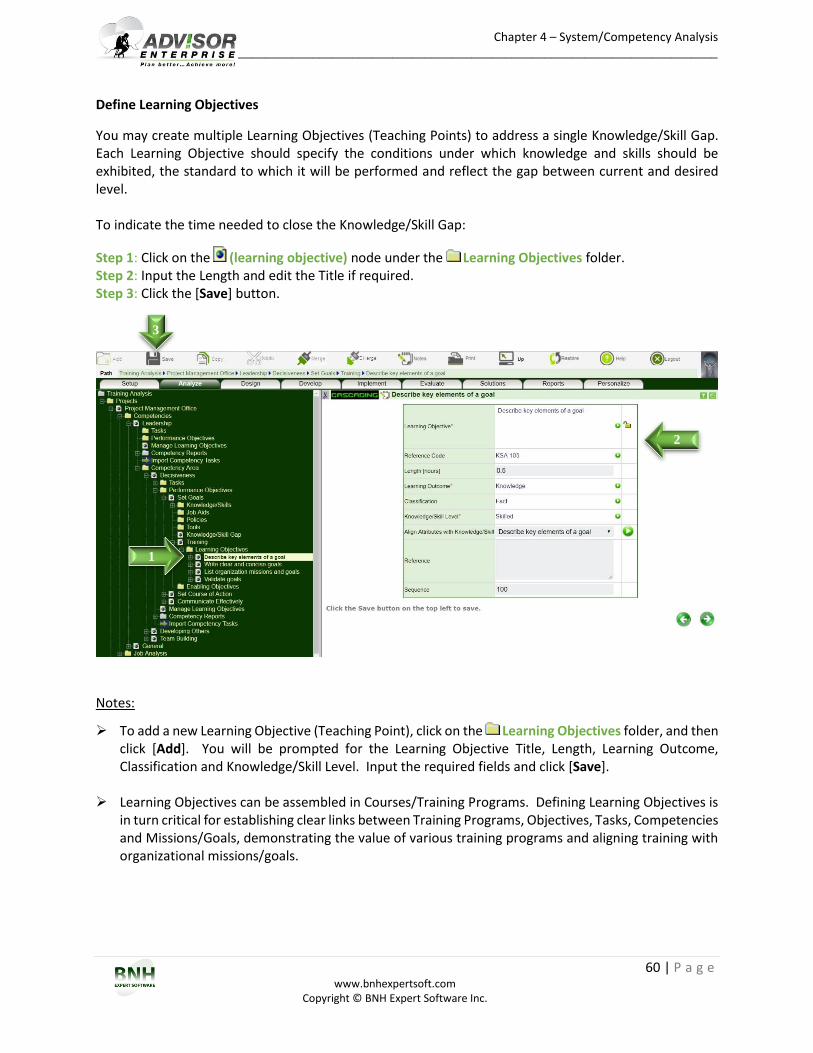
Chapter 4 – System/Competency Analysis ____________________________________________________________________________________________
60 | P a g e www.bnhexpertsoft.com
Copyright © BNH Expert Software Inc.
Define Learning Objectives
You may create multiple Learning Objectives (Teaching Points) to address a single Knowledge/Skill Gap. Each Learning Objective should specify the conditions under which knowledge and skills should be exhibited, the standard to which it will be performed and reflect the gap between current and desired level. To indicate the time needed to close the Knowledge/Skill Gap:
Step 1: Click on the (learning objective) node under the Learning Objectives folder. Step 2: Input the Length and edit the Title if required. Step 3: Click the [Save] button.
Notes:
To add a new Learning Objective (Teaching Point), click on the Learning Objectives folder, and then click [Add]. You will be prompted for the Learning Objective Title, Length, Learning Outcome, Classification and Knowledge/Skill Level. Input the required fields and click [Save].
Learning Objectives can be assembled in Courses/Training Programs. Defining Learning Objectives is in turn critical for establishing clear links between Training Programs, Objectives, Tasks, Competencies and Missions/Goals, demonstrating the value of various training programs and aligning training with organizational missions/goals.
1
2
3

Chapter 4 – System/Competency Analysis ____________________________________________________________________________________________
61 | P a g e www.bnhexpertsoft.com
Copyright © BNH Expert Software Inc.
4.9 Import System/Competency Tasks, Objectives and KSAs In addition to basic data import functions – i.e., Tasks, Sub Task, Objectives, Knowledge/Skills, and so forth (Section 1.7), key System or Competency elements such as Tasks, Sub Tasks and Steps including attributes such as standards, conditions, difficulty, importance, frequency, and so forth; corresponding Performance and Enabling Objectives; Knowledge, Skills and Attitudes (KSAs) that individuals should possess in order to perform each Task, Sub Task and Step; as well as Learning Objectives can be collected in a single Excel spreadsheet and imported with few clicks under the Import Competency Tasks node under the
corresponding (system/competency) node. The System/Competency Task Analysis spreadsheet along with import instructions are provided at http://www.bnhexpertsoft.com/import-detailed-analysis/.
4.10 Generate System/Competency Reports One of ADVISOR’s key benefits is the ease and speed in which various types of reports can be generated. Several types of reports can be created for Systems/Competencies under the System/Competency Reports folder. A brief description of each is presented below. Samples can be viewed/downloaded from: http://www.bnhexpertsoft.com/reports/. Tasks Report
Also referred to as System Master Task List (MTL), or Competency Behavior (Indicators of Competence) Report. Generates a concise list of Tasks/Behaviors and Sub Tasks for System/Competency – including training requirement and priority; as well as Knowledge, Skills and Attitudes (KSA) needed to perform Tasks/Behaviors to desired standard. To generate Tasks Report:
Step 1: Click on the Tasks Report node under the Competency Reports folder.
1
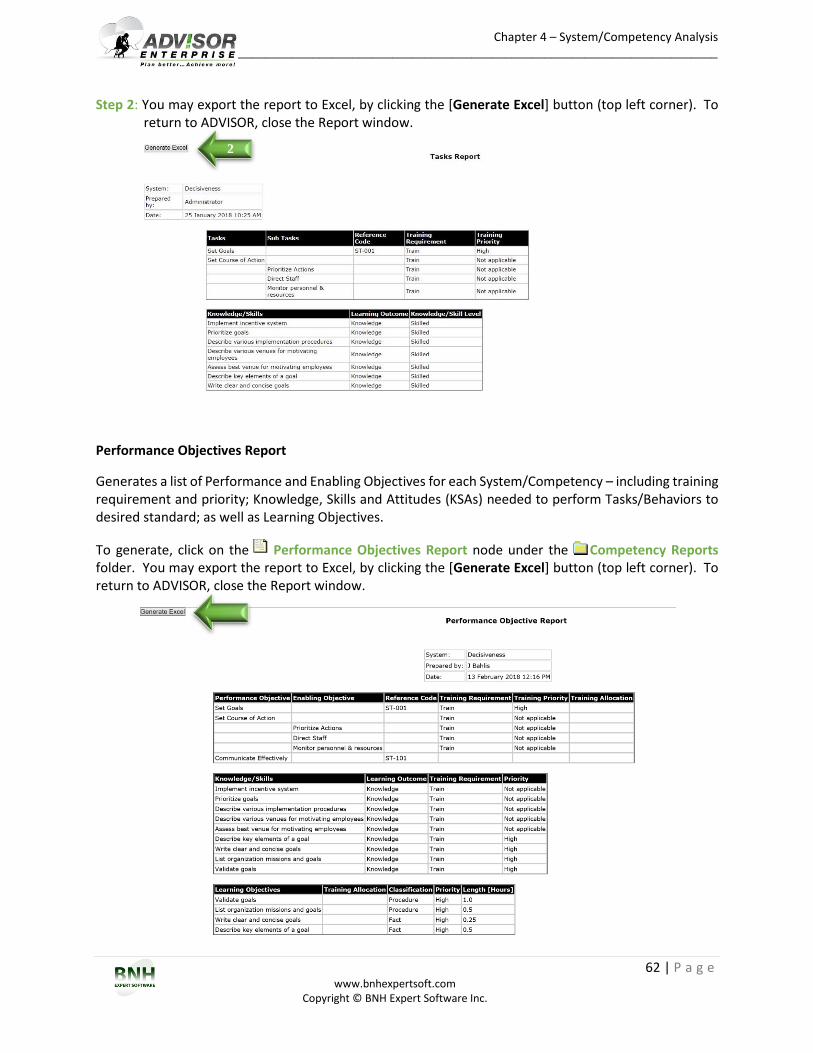
Chapter 4 – System/Competency Analysis ____________________________________________________________________________________________
62 | P a g e www.bnhexpertsoft.com
Copyright © BNH Expert Software Inc.
Step 2: You may export the report to Excel, by clicking the [Generate Excel] button (top left corner). To return to ADVISOR, close the Report window.
Performance Objectives Report
Generates a list of Performance and Enabling Objectives for each System/Competency – including training requirement and priority; Knowledge, Skills and Attitudes (KSAs) needed to perform Tasks/Behaviors to desired standard; as well as Learning Objectives.
To generate, click on the Performance Objectives Report node under the Competency Reports folder. You may export the report to Excel, by clicking the [Generate Excel] button (top left corner). To return to ADVISOR, close the Report window.
2
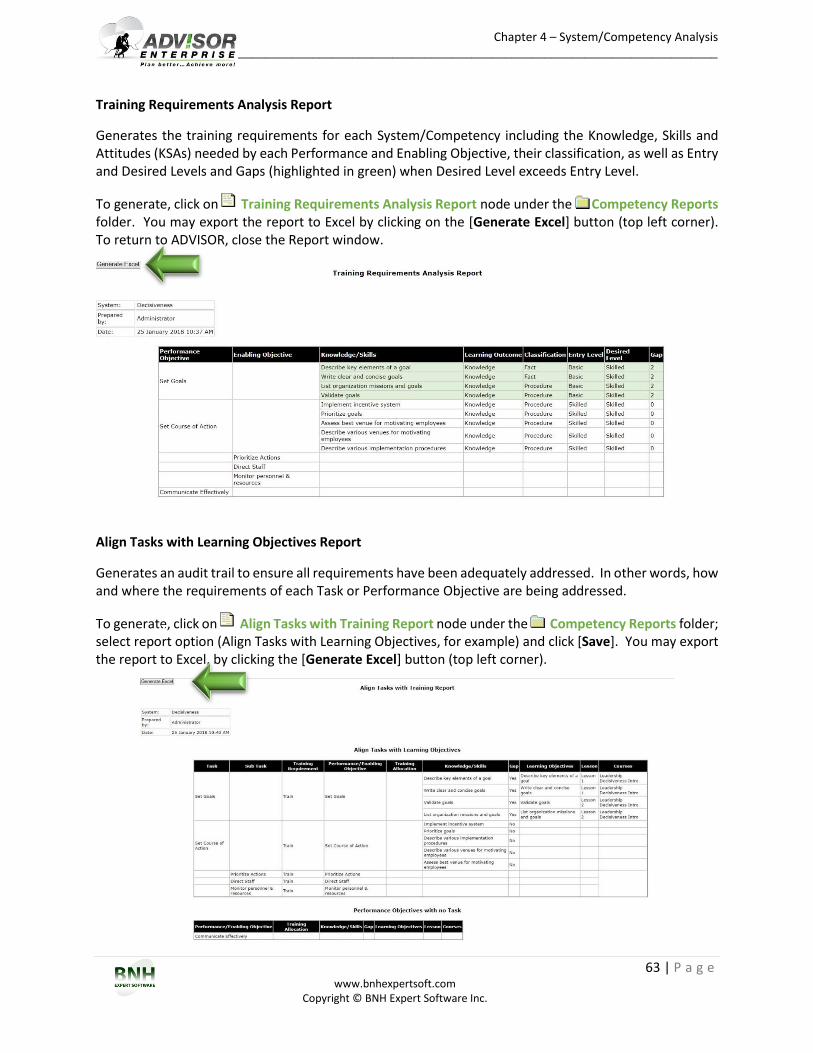
Chapter 4 – System/Competency Analysis ____________________________________________________________________________________________
63 | P a g e www.bnhexpertsoft.com
Copyright © BNH Expert Software Inc.
Training Requirements Analysis Report
Generates the training requirements for each System/Competency including the Knowledge, Skills and Attitudes (KSAs) needed by each Performance and Enabling Objective, their classification, as well as Entry and Desired Levels and Gaps (highlighted in green) when Desired Level exceeds Entry Level.
To generate, click on Training Requirements Analysis Report node under the Competency Reports folder. You may export the report to Excel by clicking on the [Generate Excel] button (top left corner). To return to ADVISOR, close the Report window.
Align Tasks with Learning Objectives Report
Generates an audit trail to ensure all requirements have been adequately addressed. In other words, how and where the requirements of each Task or Performance Objective are being addressed.
To generate, click on Align Tasks with Training Report node under the Competency Reports folder; select report option (Align Tasks with Learning Objectives, for example) and click [Save]. You may export the report to Excel, by clicking the [Generate Excel] button (top left corner).
1
3
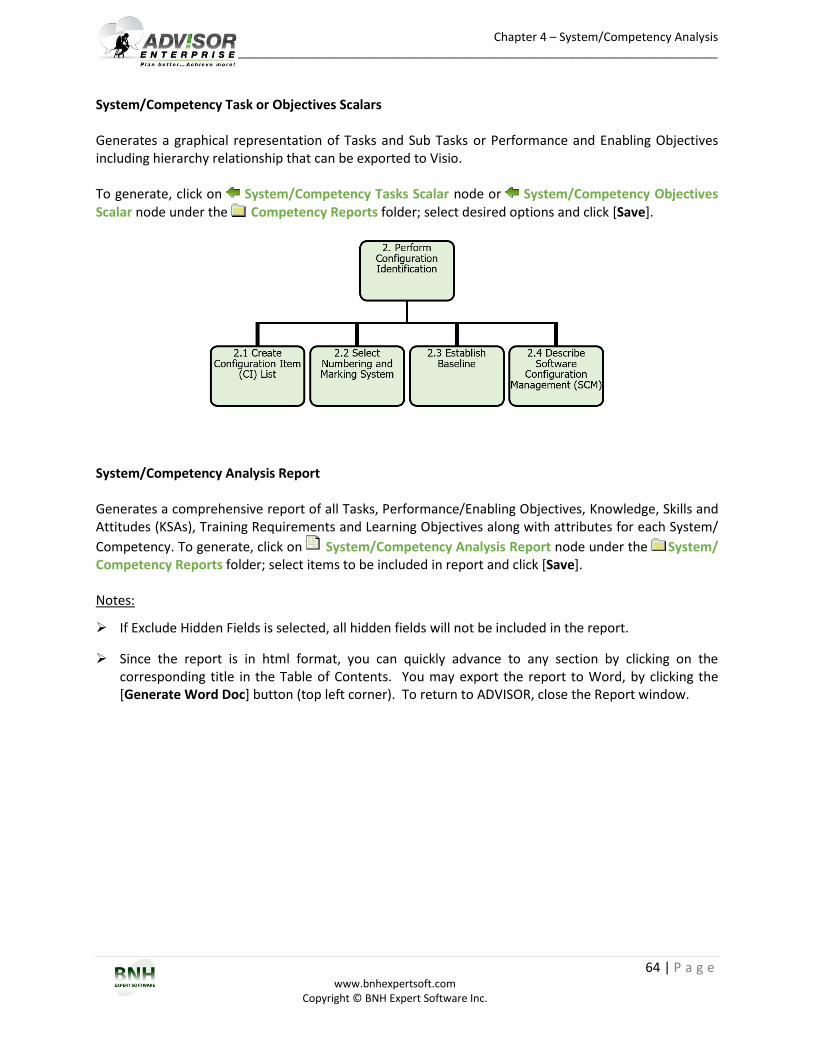
Chapter 4 – System/Competency Analysis ____________________________________________________________________________________________
64 | P a g e www.bnhexpertsoft.com
Copyright © BNH Expert Software Inc.
System/Competency Task or Objectives Scalars Generates a graphical representation of Tasks and Sub Tasks or Performance and Enabling Objectives including hierarchy relationship that can be exported to Visio. To generate, click on System/Competency Tasks Scalar node or System/Competency Objectives Scalar node under the Competency Reports folder; select desired options and click [Save].
System/Competency Analysis Report Generates a comprehensive report of all Tasks, Performance/Enabling Objectives, Knowledge, Skills and Attitudes (KSAs), Training Requirements and Learning Objectives along with attributes for each System/
Competency. To generate, click on System/Competency Analysis Report node under the System/ Competency Reports folder; select items to be included in report and click [Save]. Notes:
If Exclude Hidden Fields is selected, all hidden fields will not be included in the report.
Since the report is in html format, you can quickly advance to any section by clicking on the corresponding title in the Table of Contents. You may export the report to Word, by clicking the [Generate Word Doc] button (top left corner). To return to ADVISOR, close the Report window.
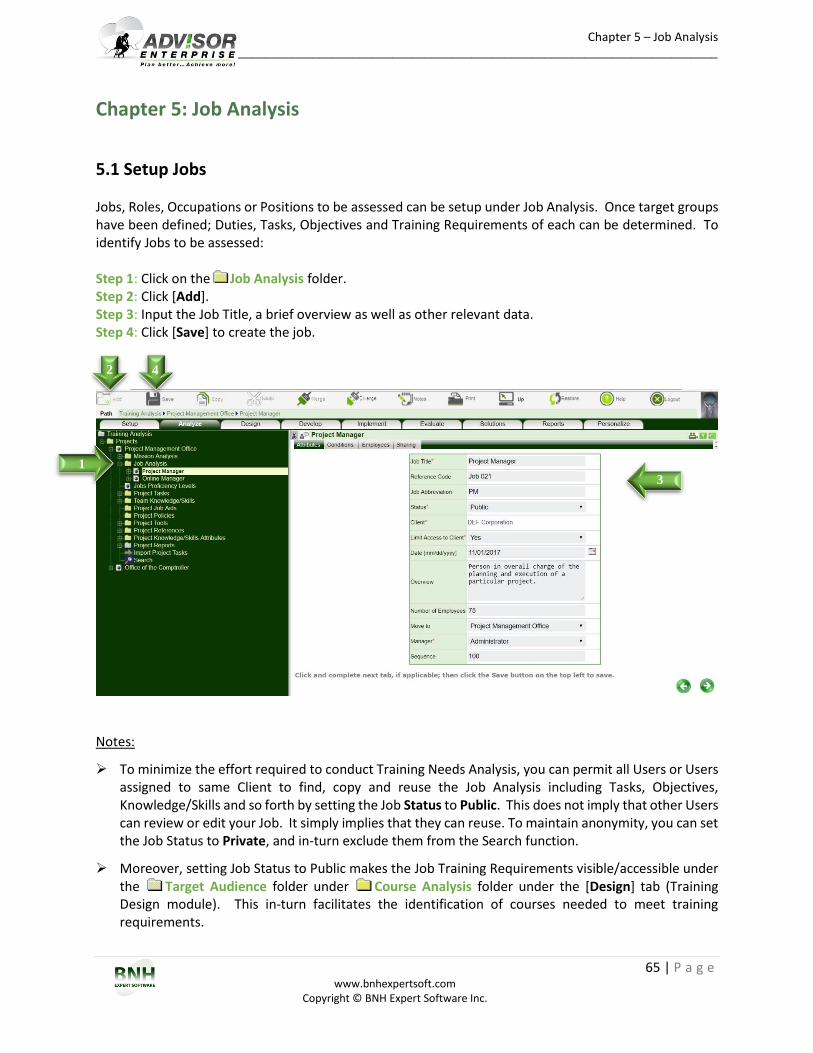
Chapter 5 – Job Analysis ____________________________________________________________________________________________
65 | P a g e www.bnhexpertsoft.com
Copyright © BNH Expert Software Inc.
Chapter 5: Job Analysis
5.1 Setup Jobs Jobs, Roles, Occupations or Positions to be assessed can be setup under Job Analysis. Once target groups have been defined; Duties, Tasks, Objectives and Training Requirements of each can be determined. To identify Jobs to be assessed: Step 1: Click on the Job Analysis folder. Step 2: Click [Add]. Step 3: Input the Job Title, a brief overview as well as other relevant data. Step 4: Click [Save] to create the job.
Notes:
To minimize the effort required to conduct Training Needs Analysis, you can permit all Users or Users assigned to same Client to find, copy and reuse the Job Analysis including Tasks, Objectives, Knowledge/Skills and so forth by setting the Job Status to Public. This does not imply that other Users can review or edit your Job. It simply implies that they can reuse. To maintain anonymity, you can set the Job Status to Private, and in-turn exclude them from the Search function.
Moreover, setting Job Status to Public makes the Job Training Requirements visible/accessible under the Target Audience folder under Course Analysis folder under the [Design] tab (Training Design module). This in-turn facilitates the identification of courses needed to meet training requirements.
4 2
1
3
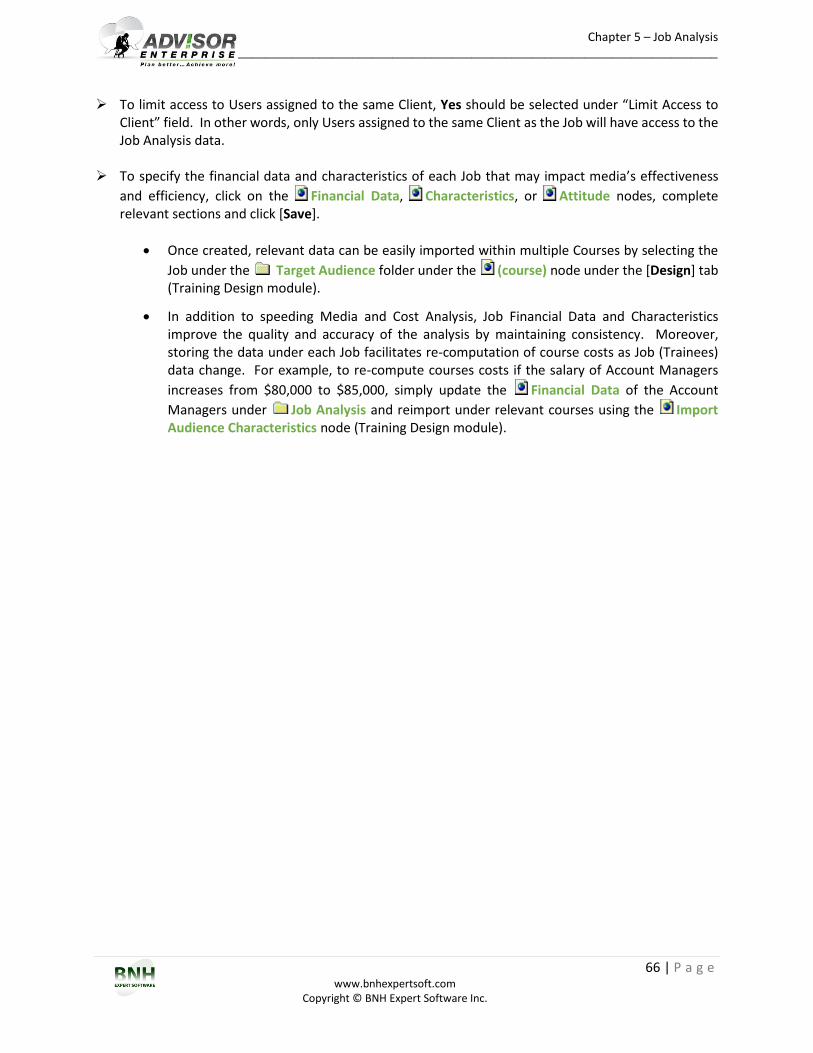
Chapter 5 – Job Analysis ____________________________________________________________________________________________
66 | P a g e www.bnhexpertsoft.com
Copyright © BNH Expert Software Inc.
To limit access to Users assigned to the same Client, Yes should be selected under “Limit Access to Client” field. In other words, only Users assigned to the same Client as the Job will have access to the Job Analysis data.
To specify the financial data and characteristics of each Job that may impact media’s effectiveness
and efficiency, click on the Financial Data, Characteristics, or Attitude nodes, complete relevant sections and click [Save].
Once created, relevant data can be easily imported within multiple Courses by selecting the
Job under the Target Audience folder under the (course) node under the [Design] tab (Training Design module).
In addition to speeding Media and Cost Analysis, Job Financial Data and Characteristics improve the quality and accuracy of the analysis by maintaining consistency. Moreover, storing the data under each Job facilitates re-computation of course costs as Job (Trainees) data change. For example, to re-compute courses costs if the salary of Account Managers
increases from $80,000 to $85,000, simply update the Financial Data of the Account
Managers under Job Analysis and reimport under relevant courses using the Import Audience Characteristics node (Training Design module).
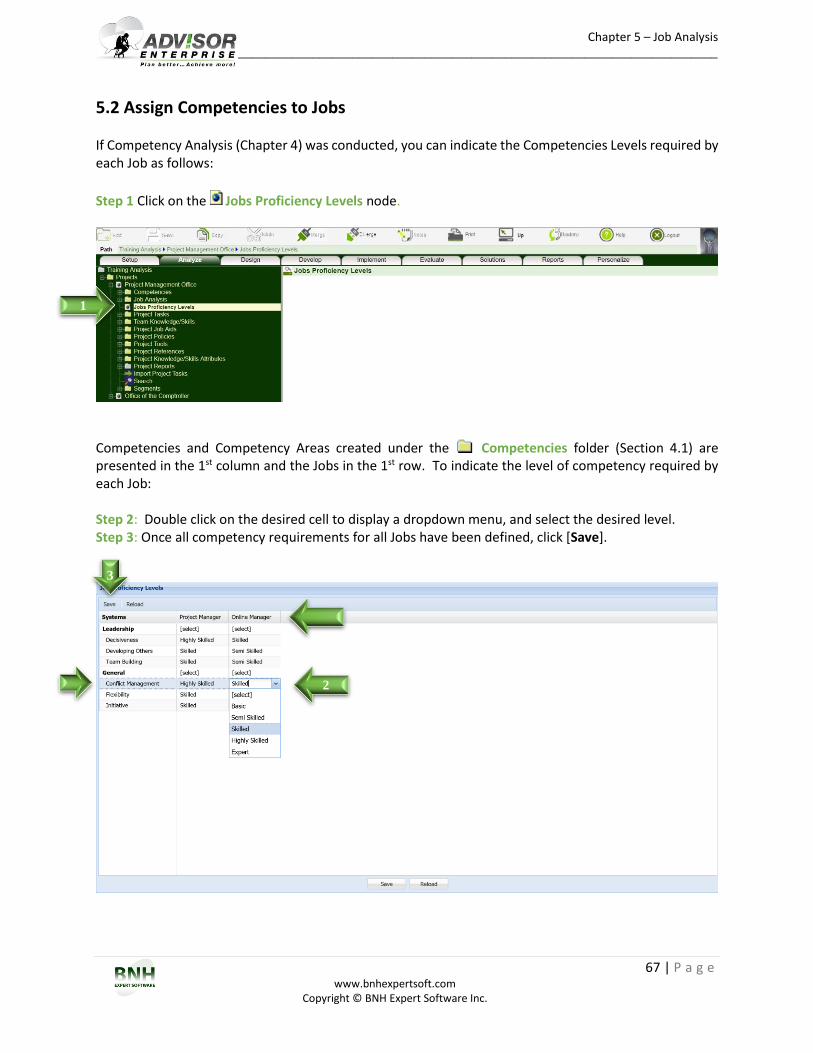
Chapter 5 – Job Analysis ____________________________________________________________________________________________
67 | P a g e www.bnhexpertsoft.com
Copyright © BNH Expert Software Inc.
5.2 Assign Competencies to Jobs If Competency Analysis (Chapter 4) was conducted, you can indicate the Competencies Levels required by each Job as follows:
Step 1 Click on the Jobs Proficiency Levels node.
Competencies and Competency Areas created under the Competencies folder (Section 4.1) are presented in the 1st column and the Jobs in the 1st row. To indicate the level of competency required by each Job: Step 2: Double click on the desired cell to display a dropdown menu, and select the desired level. Step 3: Once all competency requirements for all Jobs have been defined, click [Save].
1
2
3
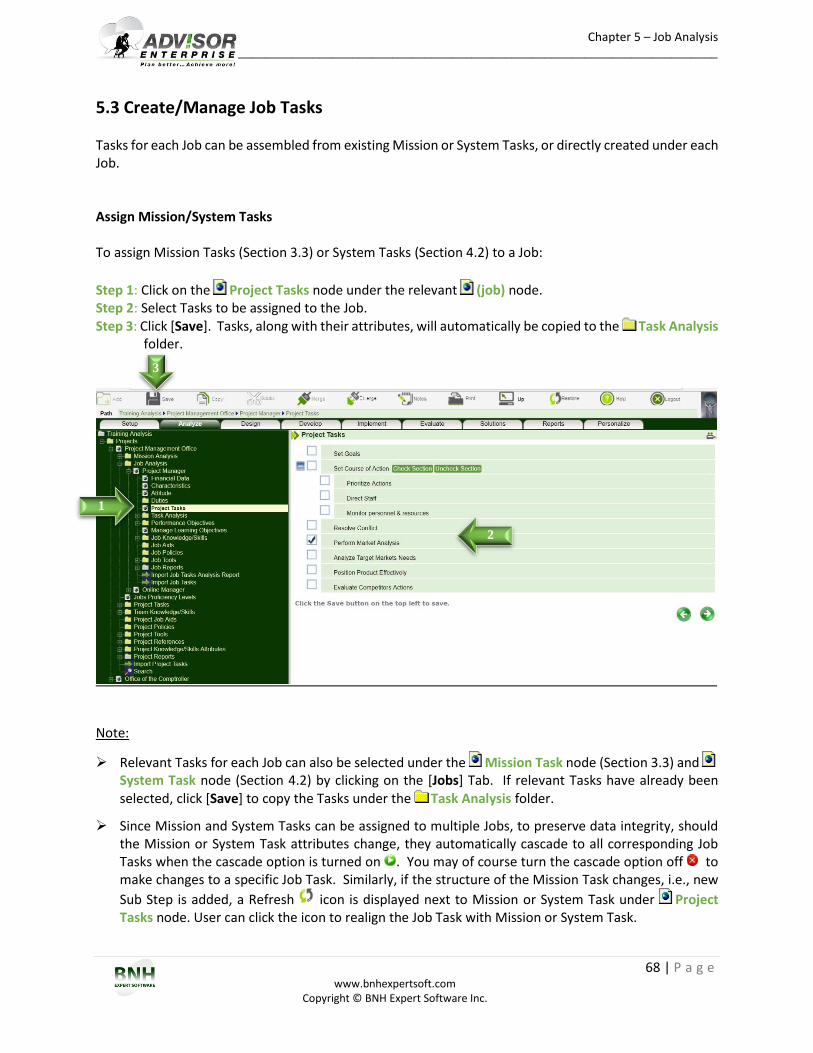
Chapter 5 – Job Analysis ____________________________________________________________________________________________
68 | P a g e www.bnhexpertsoft.com
Copyright © BNH Expert Software Inc.
5.3 Create/Manage Job Tasks Tasks for each Job can be assembled from existing Mission or System Tasks, or directly created under each Job. Assign Mission/System Tasks To assign Mission Tasks (Section 3.3) or System Tasks (Section 4.2) to a Job:
Step 1: Click on the Project Tasks node under the relevant (job) node. Step 2: Select Tasks to be assigned to the Job. Step 3: Click [Save]. Tasks, along with their attributes, will automatically be copied to the Task Analysis
folder.
Note:
Relevant Tasks for each Job can also be selected under the Mission Task node (Section 3.3) and System Task node (Section 4.2) by clicking on the [Jobs] Tab. If relevant Tasks have already been selected, click [Save] to copy the Tasks under the Task Analysis folder.
Since Mission and System Tasks can be assigned to multiple Jobs, to preserve data integrity, should the Mission or System Task attributes change, they automatically cascade to all corresponding Job Tasks when the cascade option is turned on . You may of course turn the cascade option off to make changes to a specific Job Task. Similarly, if the structure of the Mission Task changes, i.e., new
Sub Step is added, a Refresh icon is displayed next to Mission or System Task under Project Tasks node. User can click the icon to realign the Job Task with Mission or System Task.
1
2
3

Chapter 5 – Job Analysis ____________________________________________________________________________________________
69 | P a g e www.bnhexpertsoft.com
Copyright © BNH Expert Software Inc.
Create New Job Tasks To create a new Job Task:
Step 1: Click on the Task Analysis folder under the (job) node. Step 2: Click [Add]. Step 3: Input the Task Title, Difficulty, Importance, Frequency as well as other attributes. Step 4: Click on the [Conditions], [Cues] and [Safety] tabs and complete. Step 5: Click [Save] to create Task.
Notes:
Based on Task’s Difficulty, Importance and Frequency (DIF), Task Priority and Training Requirements
are determined and presented under the Training node under each (task). You may of course, override system's recommendations.
Sub Divide Tasks: A Task can also be divided into Sub Tasks, Steps and Sub Steps. Only Primary Job Tasks can be assigned a single unit (including all Sub Tasks) to a Job. In other words, if a Task is divided into Sub Task A and Sub Task B, you cannot assign Sub Task A to Pilots for example, and Sub Task B to Co-Pilots.
Search. To minimize the analysis effort, a [Search] tab is presented on the Task Analysis folder. You can search for Tasks by Mission, System, Competency, Job or Keyword. To copy, place checkmarks next to the desired Tasks and click [Save]. All Sub Tasks as well as Knowledge and Skills associated with the selected Task are also copied.
If References have been defined under the Project References folder (Section 6.3), a [Reference] tab will also appear after the [Safety] tab. Click the [References] Tab, select relevant References and click [Save] to link Tasks to specific mandate, requirement, manual, etc., and in-turn document the reasoning behind the Task.
1
2 5
4
3
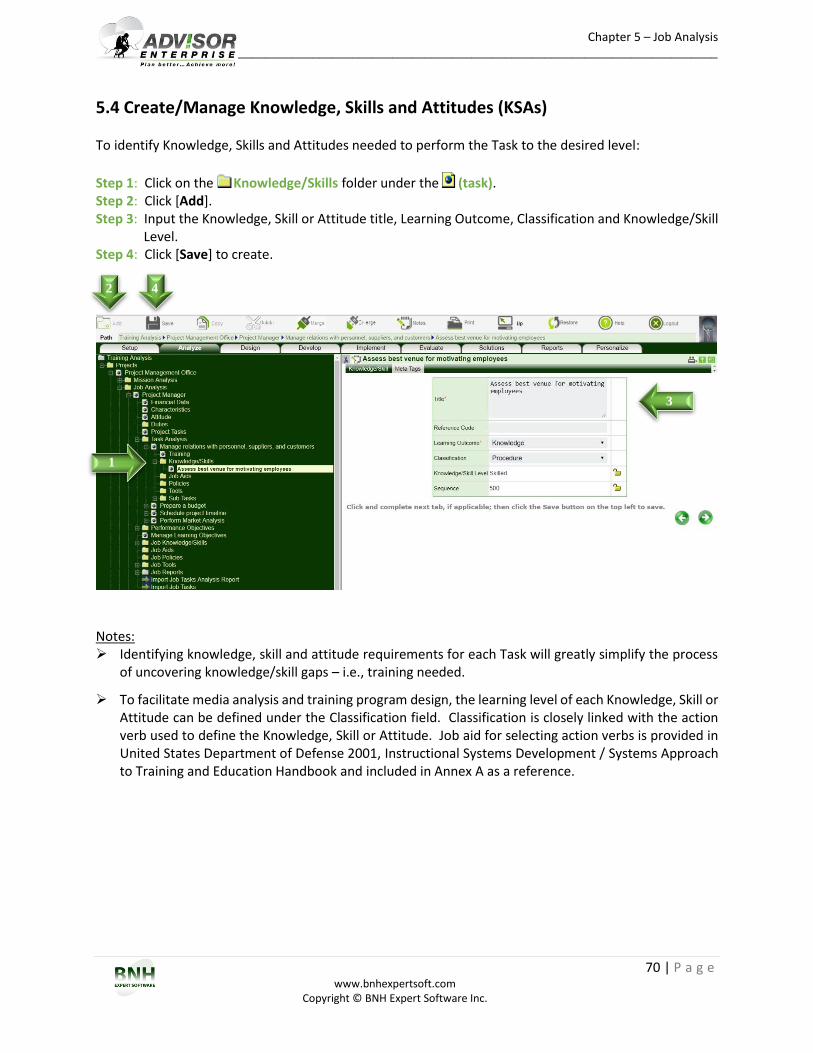
Chapter 5 – Job Analysis ____________________________________________________________________________________________
70 | P a g e www.bnhexpertsoft.com
Copyright © BNH Expert Software Inc.
5.4 Create/Manage Knowledge, Skills and Attitudes (KSAs) To identify Knowledge, Skills and Attitudes needed to perform the Task to the desired level:
Step 1: Click on the Knowledge/Skills folder under the (task). Step 2: Click [Add]. Step 3: Input the Knowledge, Skill or Attitude title, Learning Outcome, Classification and Knowledge/Skill
Level. Step 4: Click [Save] to create.
Notes: Identifying knowledge, skill and attitude requirements for each Task will greatly simplify the process
of uncovering knowledge/skill gaps – i.e., training needed.
To facilitate media analysis and training program design, the learning level of each Knowledge, Skill or Attitude can be defined under the Classification field. Classification is closely linked with the action verb used to define the Knowledge, Skill or Attitude. Job aid for selecting action verbs is provided in United States Department of Defense 2001, Instructional Systems Development / Systems Approach to Training and Education Handbook and included in Annex A as a reference.
1
2 4
3
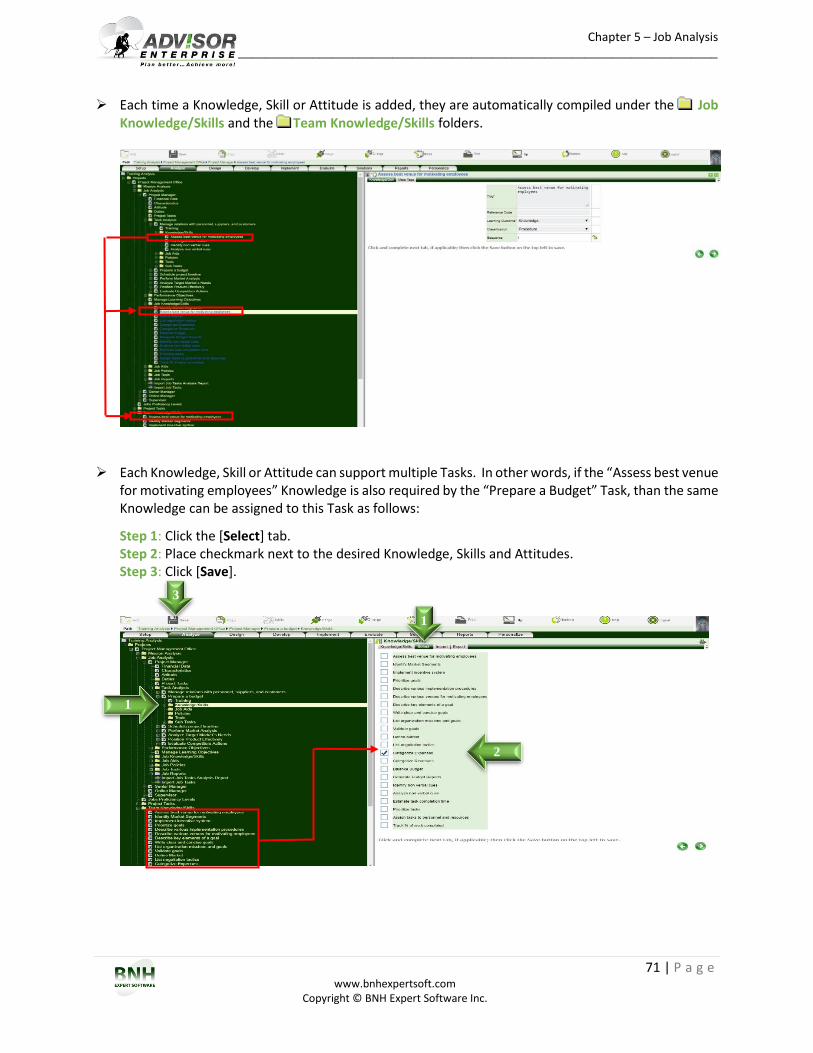
Chapter 5 – Job Analysis ____________________________________________________________________________________________
71 | P a g e www.bnhexpertsoft.com
Copyright © BNH Expert Software Inc.
Each time a Knowledge, Skill or Attitude is added, they are automatically compiled under the Job Knowledge/Skills and the Team Knowledge/Skills folders.
Each Knowledge, Skill or Attitude can support multiple Tasks. In other words, if the “Assess best venue
for motivating employees” Knowledge is also required by the “Prepare a Budget” Task, than the same Knowledge can be assigned to this Task as follows:
Step 1: Click the [Select] tab. Step 2: Place checkmark next to the desired Knowledge, Skills and Attitudes. Step 3: Click [Save].
1
1
3
2
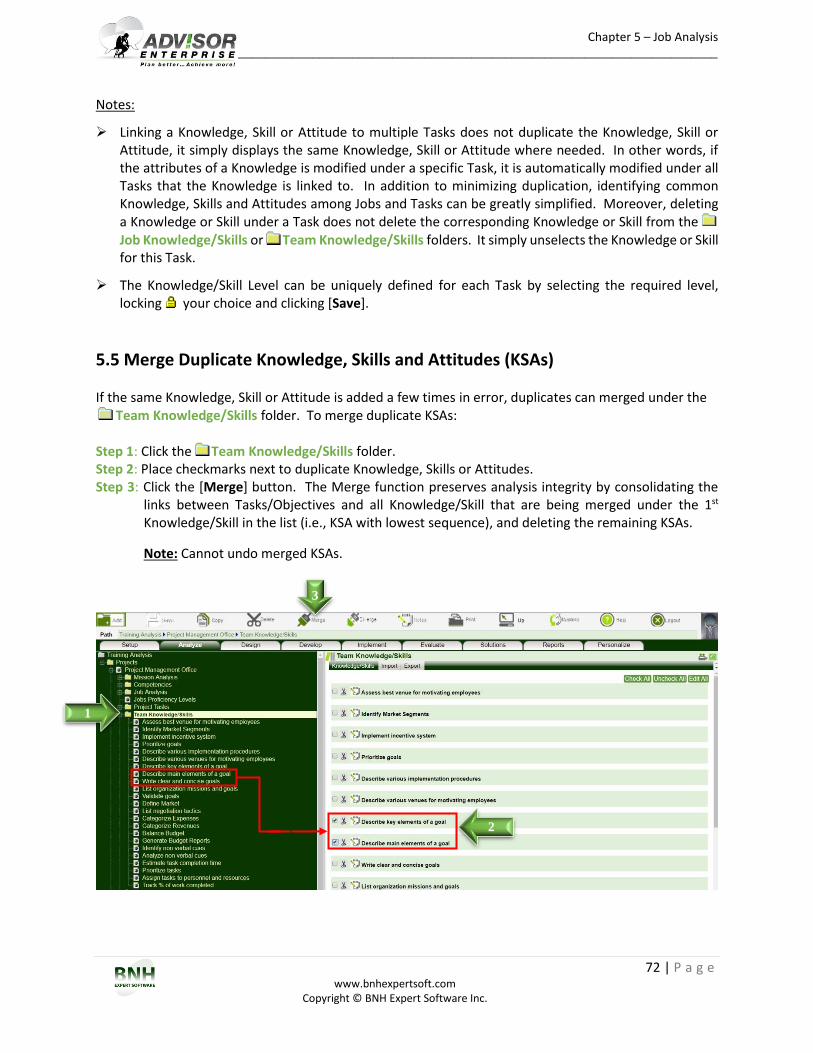
Chapter 5 – Job Analysis ____________________________________________________________________________________________
72 | P a g e www.bnhexpertsoft.com
Copyright © BNH Expert Software Inc.
Notes:
Linking a Knowledge, Skill or Attitude to multiple Tasks does not duplicate the Knowledge, Skill or Attitude, it simply displays the same Knowledge, Skill or Attitude where needed. In other words, if the attributes of a Knowledge is modified under a specific Task, it is automatically modified under all Tasks that the Knowledge is linked to. In addition to minimizing duplication, identifying common Knowledge, Skills and Attitudes among Jobs and Tasks can be greatly simplified. Moreover, deleting a Knowledge or Skill under a Task does not delete the corresponding Knowledge or Skill from the Job Knowledge/Skills or Team Knowledge/Skills folders. It simply unselects the Knowledge or Skill for this Task.
The Knowledge/Skill Level can be uniquely defined for each Task by selecting the required level, locking your choice and clicking [Save].
5.5 Merge Duplicate Knowledge, Skills and Attitudes (KSAs) If the same Knowledge, Skill or Attitude is added a few times in error, duplicates can merged under the
Team Knowledge/Skills folder. To merge duplicate KSAs: Step 1: Click the Team Knowledge/Skills folder. Step 2: Place checkmarks next to duplicate Knowledge, Skills or Attitudes. Step 3: Click the [Merge] button. The Merge function preserves analysis integrity by consolidating the
links between Tasks/Objectives and all Knowledge/Skill that are being merged under the 1st Knowledge/Skill in the list (i.e., KSA with lowest sequence), and deleting the remaining KSAs.
Note: Cannot undo merged KSAs.
1
2
3

Chapter 5 – Job Analysis ____________________________________________________________________________________________
73 | P a g e www.bnhexpertsoft.com
Copyright © BNH Expert Software Inc.
5.6 Create/Manage Job Aids, Policies and Tools In addition to Knowledge, Skills and Attitudes, Job Aids required or available when performing the Task, Policies/Procedures that impact how a Task should be performed, as well as Tools or Systems required to perform the Task can also be defined under the Job Aids, Policies/Procedures, and Tools folders respectively. To add a new Job Aid, Policy or Tool:
Step 1: Click on the corresponding folder under the (task) node. Step 2: Click on the [Add] button. Step 3: Input the Title and other required information. Step 4: Click [Save] to create.
1
2 4
3
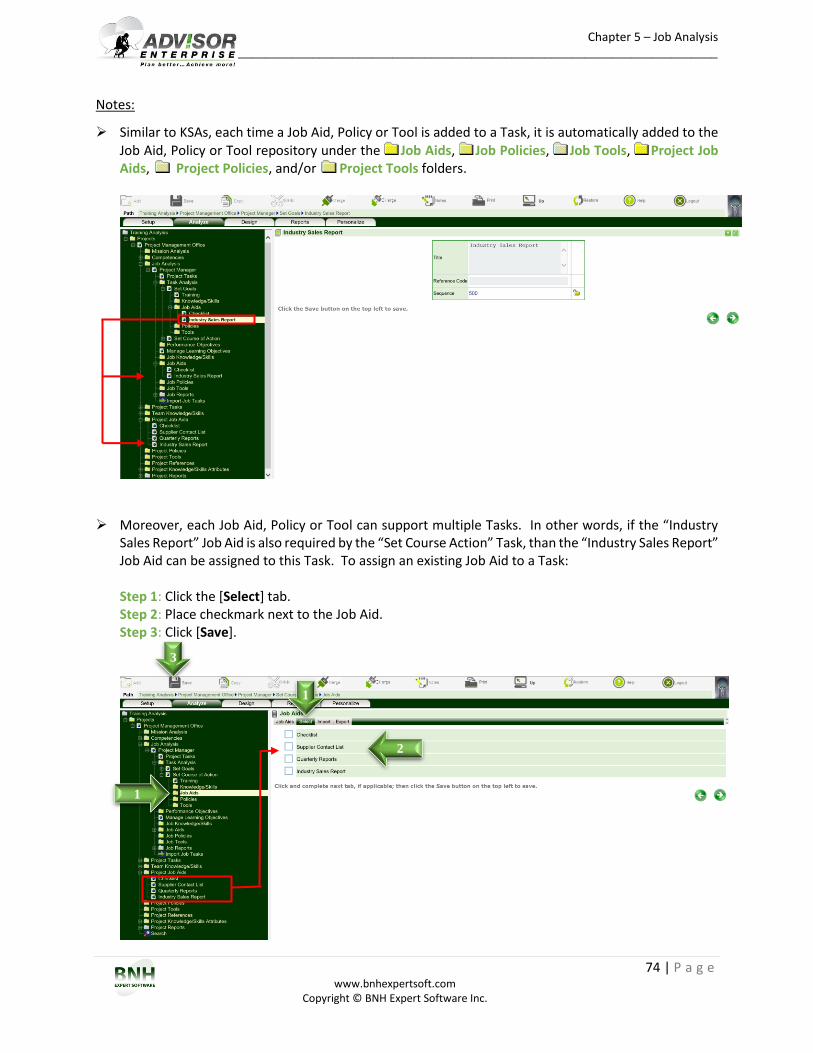
Chapter 5 – Job Analysis ____________________________________________________________________________________________
74 | P a g e www.bnhexpertsoft.com
Copyright © BNH Expert Software Inc.
Notes:
Similar to KSAs, each time a Job Aid, Policy or Tool is added to a Task, it is automatically added to the Job Aid, Policy or Tool repository under the Job Aids, Job Policies, Job Tools, Project Job Aids, Project Policies, and/or Project Tools folders.
Moreover, each Job Aid, Policy or Tool can support multiple Tasks. In other words, if the “Industry
Sales Report” Job Aid is also required by the “Set Course Action” Task, than the “Industry Sales Report” Job Aid can be assigned to this Task. To assign an existing Job Aid to a Task: Step 1: Click the [Select] tab. Step 2: Place checkmark next to the Job Aid. Step 3: Click [Save].
1
1
3
2

Chapter 5 – Job Analysis ____________________________________________________________________________________________
75 | P a g e www.bnhexpertsoft.com
Copyright © BNH Expert Software Inc.
Linking a Job Aid, Policy or Tool to multiple Tasks does not duplicate the Job Aid, Policy or Tool, it simply displays the same Job Aid, Policy or Tool where needed. In other words, if the title of a Job Aid is modified under a specific Task, it is automatically modified under all Tasks that the Job Aid is linked to. In addition to minimizing duplication, identifying Tasks, Knowledge/Skills and Learning Objectives (Teaching Points) impacted by a change to a Job Aid, Policy or Tool can be greatly facilitated. Moreover, deleting a Job Aid, Policy or Tool under a Task does not delete the corresponding Job Aid, Policy or Tool from the Project Job Aids, Project Policies/Procedures, or Project Tools folders. It simply unselects the Job Aid, Policy or Tool for this Task.
5.7 Merge Duplicate Job Aids, Policies and Tools If the same Job Aid, Policy or Tool is added a few times in error, duplicates can merged under the Project Job Aids, Project Policies and Project Tools folder. To merge duplicate Job Aids: Step 1: Click the Project Job Aids folder. Step 2: Place checkmarks next to duplicate Job Aids. Step 3: Click the [Merge] button. The Merge function preserves analysis integrity by consolidating the
links between Tasks/Objectives and all Job Aids that are being merged under the 1st Job Aid in the list (i.e., Job Aid with lowest sequence), and deleting the remaining Job Aids.
Note: Cannot undo merged Job Aids, Policies and Tools.
1
2
3
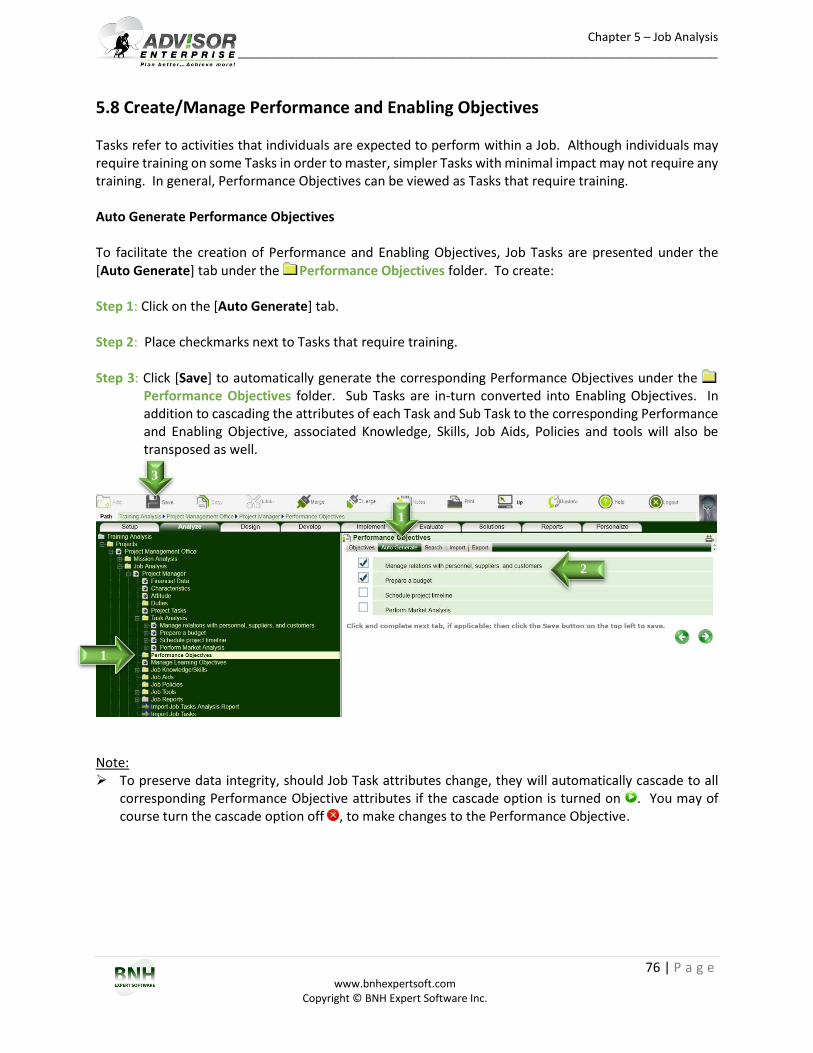
Chapter 5 – Job Analysis ____________________________________________________________________________________________
76 | P a g e www.bnhexpertsoft.com
Copyright © BNH Expert Software Inc.
5.8 Create/Manage Performance and Enabling Objectives Tasks refer to activities that individuals are expected to perform within a Job. Although individuals may require training on some Tasks in order to master, simpler Tasks with minimal impact may not require any training. In general, Performance Objectives can be viewed as Tasks that require training. Auto Generate Performance Objectives To facilitate the creation of Performance and Enabling Objectives, Job Tasks are presented under the [Auto Generate] tab under the Performance Objectives folder. To create: Step 1: Click on the [Auto Generate] tab. Step 2: Place checkmarks next to Tasks that require training. Step 3: Click [Save] to automatically generate the corresponding Performance Objectives under the
Performance Objectives folder. Sub Tasks are in-turn converted into Enabling Objectives. In addition to cascading the attributes of each Task and Sub Task to the corresponding Performance and Enabling Objective, associated Knowledge, Skills, Job Aids, Policies and tools will also be transposed as well.
Note: To preserve data integrity, should Job Task attributes change, they will automatically cascade to all
corresponding Performance Objective attributes if the cascade option is turned on . You may of course turn the cascade option off , to make changes to the Performance Objective.
1
2
3
1
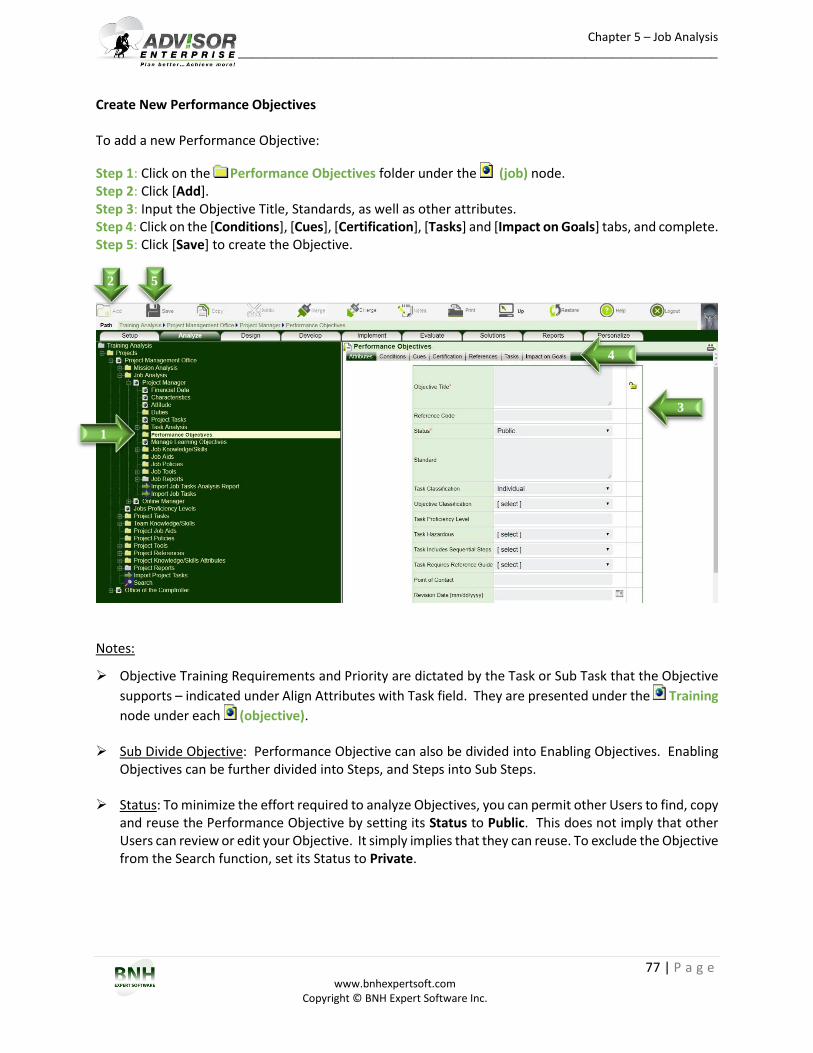
Chapter 5 – Job Analysis ____________________________________________________________________________________________
77 | P a g e www.bnhexpertsoft.com
Copyright © BNH Expert Software Inc.
Create New Performance Objectives To add a new Performance Objective:
Step 1: Click on the Performance Objectives folder under the (job) node. Step 2: Click [Add]. Step 3: Input the Objective Title, Standards, as well as other attributes. Step 4: Click on the [Conditions], [Cues], [Certification], [Tasks] and [Impact on Goals] tabs, and complete. Step 5: Click [Save] to create the Objective.
Notes:
Objective Training Requirements and Priority are dictated by the Task or Sub Task that the Objective
supports – indicated under Align Attributes with Task field. They are presented under the Training
node under each (objective).
Sub Divide Objective: Performance Objective can also be divided into Enabling Objectives. Enabling Objectives can be further divided into Steps, and Steps into Sub Steps.
Status: To minimize the effort required to analyze Objectives, you can permit other Users to find, copy and reuse the Performance Objective by setting its Status to Public. This does not imply that other Users can review or edit your Objective. It simply implies that they can reuse. To exclude the Objective from the Search function, set its Status to Private.
1
2 5
4
3
Chapter 5 – Job Analysis ____________________________________________________________________________________________
78 | P a g e www.bnhexpertsoft.com
Copyright © BNH Expert Software Inc.
Search. To minimize the analysis effort, a [Search] tab is presented on the Performance Objectives folder. You can search for Performance Objectives by System, Competency, Job or Keyword. To copy, place checkmarks next to the desired Performance Objectives and click [Save]. All Enabling Objectives as well as Knowledge and Skills associated with the selected Performance Objectives are also copied.
If References have been defined under the Project References folder (Section 6.3), a [Reference] tab will also appear after the [Certification] tab. Click the [References] Tab, select relevant References and click [Save] to link Objectives to specific mandate, requirement, manual, etc., and in-turn document the reasoning behind the Objective.
Impact on Goals fields indicate the significance of each Objective. The relative weight of each objective is assigned as follows: critical=4, very important=3, important=2 and somewhat important=1. Based on Missions/Goals and Objectives weights, the relative impact of each Objective and in-turn Knowledge and Skill is computed as follows:
If a Mission/Goal is very important (3), and two Performance Objectives impact the outcome of this Mission/Goal, then the impact of each Objective is computed as follows:
Objective A = 3 x Weight of Objective A/ (Weight of Objective A + Weight of Objective B)
For example, if the impact of Performance Objective A on the Mission/Goal is very important (3) and the impact of Performance Objective B on the Mission/Goal is somewhat important (1), then the relative impacts of Performance Objectives A and B are computed as follows:
Performance Objective A = 3 x 3 / (3 + 1) = 2.25
Performance Objective B = 3 x 1 / (3 + 1) = 0.75
In other words, Performance Objective A is 3 times more critical than Performance Objective B.
If Performance and Enabling Objectives directly map to Tasks and Sub Tasks, then the analysis can
be greatly simplified by checking the Sync POs/EOs with Tasks/Sub Tasks field under the Project node and clicking [Save]. This function will automatically create POs/EOS from Tasks and Sub Tasks and sync their attributes.
If Performance and Enabling Objectives do not map to Tasks and Sub Tasks, the [Edit Tree] function under the Performance Objectives folder may be used to rearrange POs and EOs.
Job Aids required or available when performing the Task, Policies/Procedures that impact how a Task should be performed, as well as Tools or Systems required to perform the Task can also be defined under the Job Aids, Policies, and Tools folders respectively. (Section 5.6)

Chapter 5 – Job Analysis ____________________________________________________________________________________________
79 | P a g e www.bnhexpertsoft.com
Copyright © BNH Expert Software Inc.
5.9 Define POs/EOs Steps, Cues and Measures For each Performance and Enabling Objective, Steps required to perform each Objective can be specified under the Steps folder, events that prompt the need to perform can be specified under the Cues folder as well as observable behaviors and characteristics that indicate whether it is being correctly performed can be listed under Measures folder. To add a new Step, Cue or Measure for an Objective: Step 1: Click on the corresponding folder, Steps for example. Step 2: Click on the [Add] button. Step 3: Input the required fields. Step 4: Click the [Save] button.
1
2 4
3
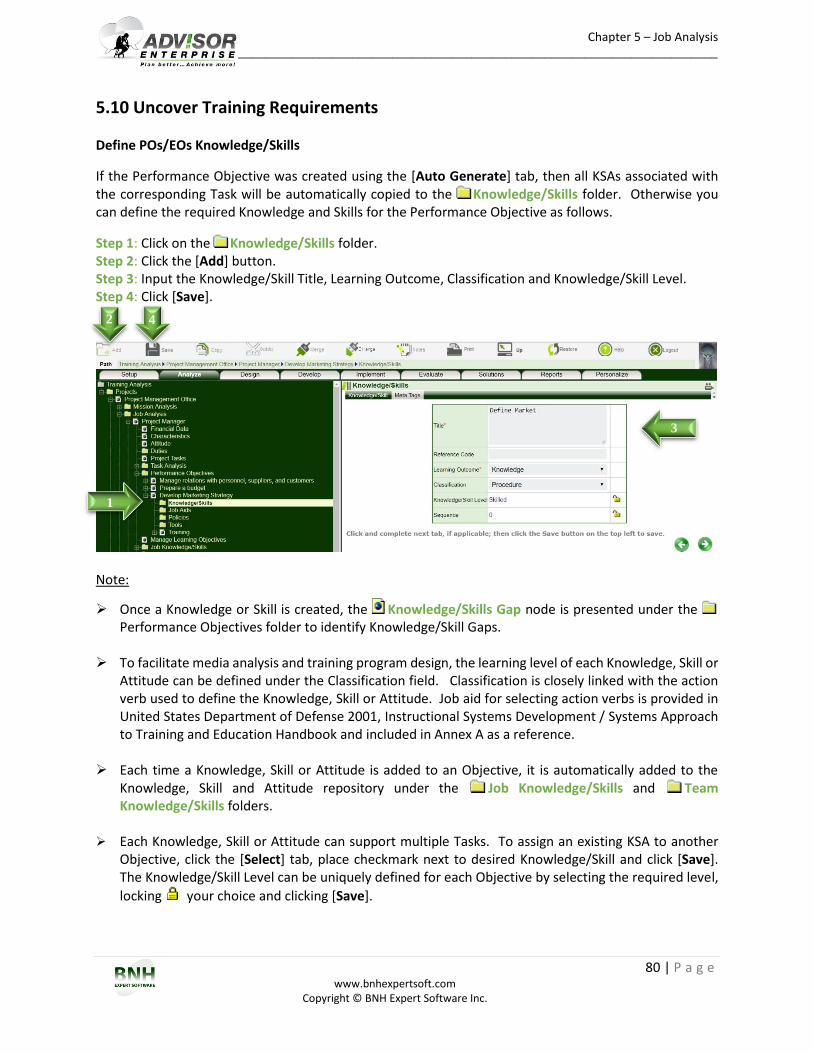
Chapter 5 – Job Analysis ____________________________________________________________________________________________
80 | P a g e www.bnhexpertsoft.com
Copyright © BNH Expert Software Inc.
5.10 Uncover Training Requirements Define POs/EOs Knowledge/Skills
If the Performance Objective was created using the [Auto Generate] tab, then all KSAs associated with the corresponding Task will be automatically copied to the Knowledge/Skills folder. Otherwise you can define the required Knowledge and Skills for the Performance Objective as follows.
Step 1: Click on the Knowledge/Skills folder. Step 2: Click the [Add] button. Step 3: Input the Knowledge/Skill Title, Learning Outcome, Classification and Knowledge/Skill Level. Step 4: Click [Save].
Note:
Once a Knowledge or Skill is created, the Knowledge/Skills Gap node is presented under the Performance Objectives folder to identify Knowledge/Skill Gaps.
To facilitate media analysis and training program design, the learning level of each Knowledge, Skill or Attitude can be defined under the Classification field. Classification is closely linked with the action verb used to define the Knowledge, Skill or Attitude. Job aid for selecting action verbs is provided in United States Department of Defense 2001, Instructional Systems Development / Systems Approach to Training and Education Handbook and included in Annex A as a reference.
Each time a Knowledge, Skill or Attitude is added to an Objective, it is automatically added to the
Knowledge, Skill and Attitude repository under the Job Knowledge/Skills and Team Knowledge/Skills folders.
Each Knowledge, Skill or Attitude can support multiple Tasks. To assign an existing KSA to another
Objective, click the [Select] tab, place checkmark next to desired Knowledge/Skill and click [Save]. The Knowledge/Skill Level can be uniquely defined for each Objective by selecting the required level,
locking your choice and clicking [Save].
1
2 4
3
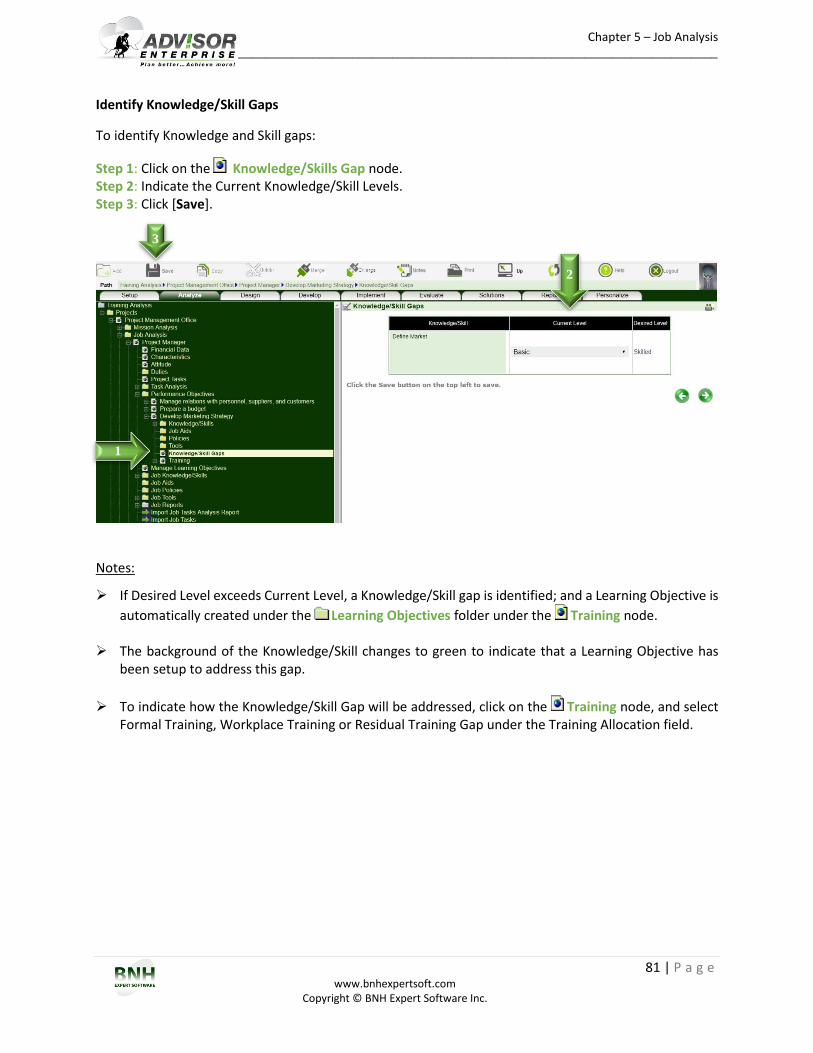
Chapter 5 – Job Analysis ____________________________________________________________________________________________
81 | P a g e www.bnhexpertsoft.com
Copyright © BNH Expert Software Inc.
Identify Knowledge/Skill Gaps
To identify Knowledge and Skill gaps:
Step 1: Click on the Knowledge/Skills Gap node. Step 2: Indicate the Current Knowledge/Skill Levels. Step 3: Click [Save].
Notes:
If Desired Level exceeds Current Level, a Knowledge/Skill gap is identified; and a Learning Objective is
automatically created under the Learning Objectives folder under the Training node.
The background of the Knowledge/Skill changes to green to indicate that a Learning Objective has been setup to address this gap.
To indicate how the Knowledge/Skill Gap will be addressed, click on the Training node, and select Formal Training, Workplace Training or Residual Training Gap under the Training Allocation field.
1
3
2
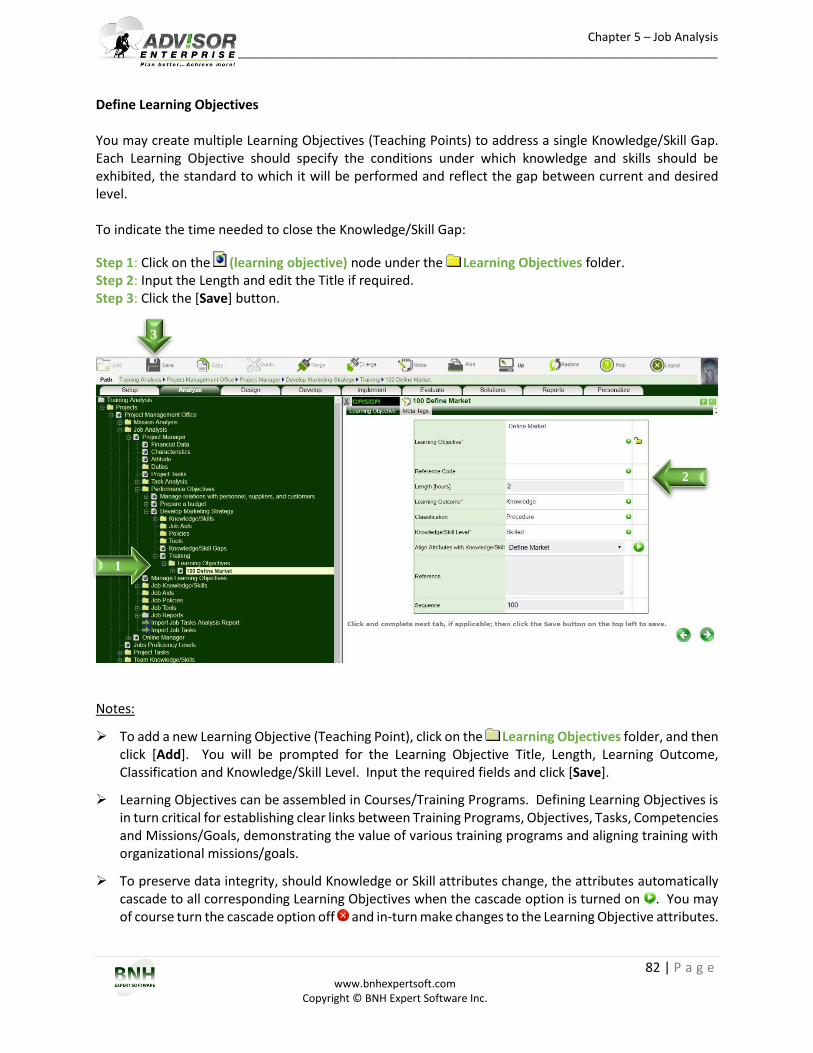
Chapter 5 – Job Analysis ____________________________________________________________________________________________
82 | P a g e www.bnhexpertsoft.com
Copyright © BNH Expert Software Inc.
Define Learning Objectives You may create multiple Learning Objectives (Teaching Points) to address a single Knowledge/Skill Gap. Each Learning Objective should specify the conditions under which knowledge and skills should be exhibited, the standard to which it will be performed and reflect the gap between current and desired level. To indicate the time needed to close the Knowledge/Skill Gap:
Step 1: Click on the (learning objective) node under the Learning Objectives folder. Step 2: Input the Length and edit the Title if required. Step 3: Click the [Save] button.
Notes:
To add a new Learning Objective (Teaching Point), click on the Learning Objectives folder, and then click [Add]. You will be prompted for the Learning Objective Title, Length, Learning Outcome, Classification and Knowledge/Skill Level. Input the required fields and click [Save].
Learning Objectives can be assembled in Courses/Training Programs. Defining Learning Objectives is in turn critical for establishing clear links between Training Programs, Objectives, Tasks, Competencies and Missions/Goals, demonstrating the value of various training programs and aligning training with organizational missions/goals.
To preserve data integrity, should Knowledge or Skill attributes change, the attributes automatically cascade to all corresponding Learning Objectives when the cascade option is turned on . You may of course turn the cascade option off and in-turn make changes to the Learning Objective attributes.
1
2
3
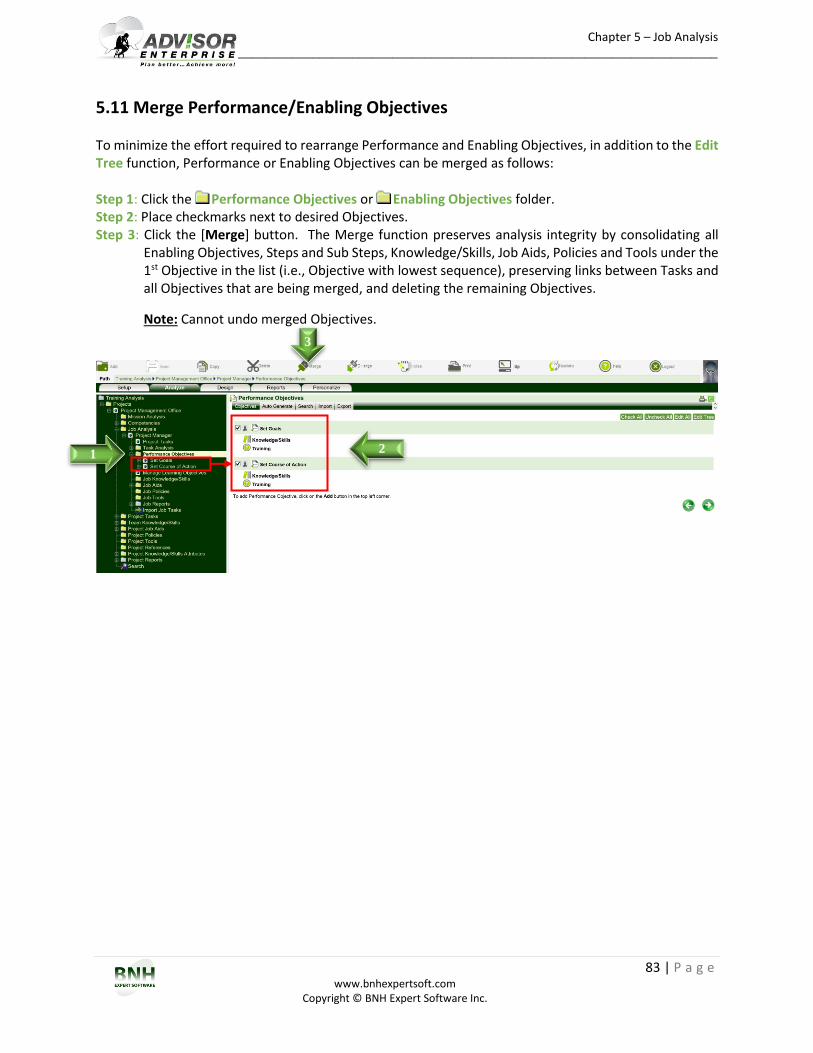
Chapter 5 – Job Analysis ____________________________________________________________________________________________
83 | P a g e www.bnhexpertsoft.com
Copyright © BNH Expert Software Inc.
5.11 Merge Performance/Enabling Objectives To minimize the effort required to rearrange Performance and Enabling Objectives, in addition to the Edit Tree function, Performance or Enabling Objectives can be merged as follows: Step 1: Click the Performance Objectives or Enabling Objectives folder. Step 2: Place checkmarks next to desired Objectives. Step 3: Click the [Merge] button. The Merge function preserves analysis integrity by consolidating all
Enabling Objectives, Steps and Sub Steps, Knowledge/Skills, Job Aids, Policies and Tools under the 1st Objective in the list (i.e., Objective with lowest sequence), preserving links between Tasks and all Objectives that are being merged, and deleting the remaining Objectives.
Note: Cannot undo merged Objectives.
1 2
3
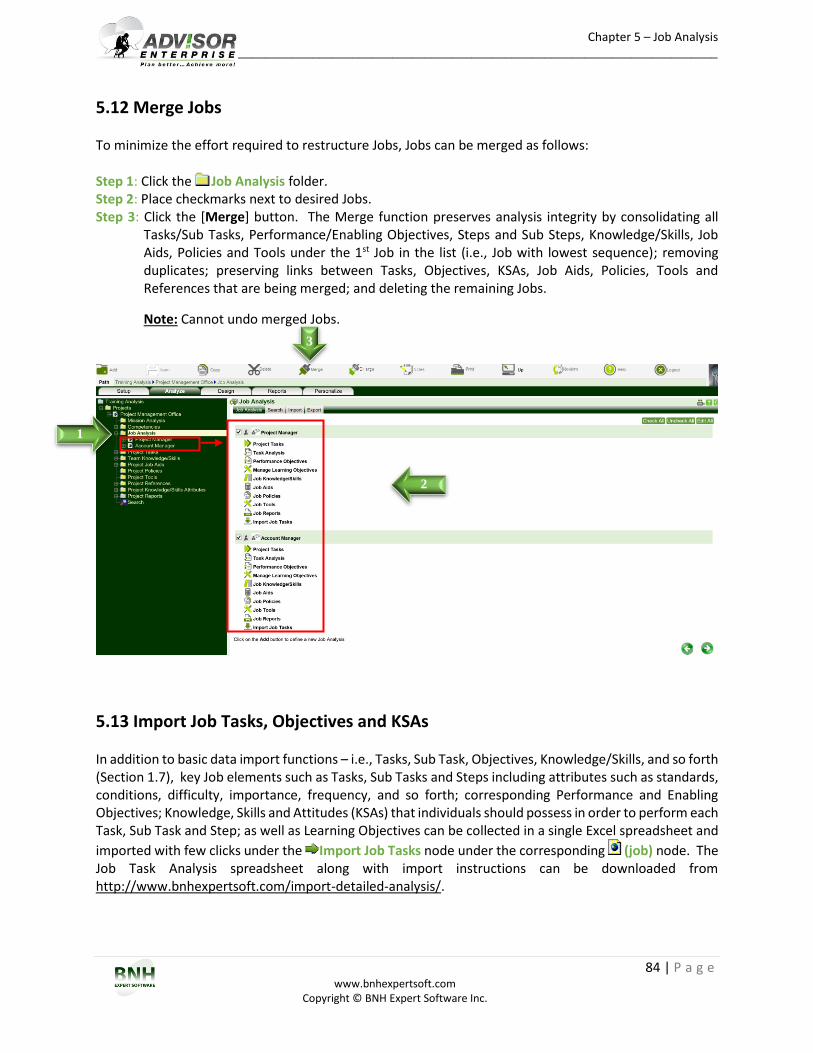
Chapter 5 – Job Analysis ____________________________________________________________________________________________
84 | P a g e www.bnhexpertsoft.com
Copyright © BNH Expert Software Inc.
5.12 Merge Jobs To minimize the effort required to restructure Jobs, Jobs can be merged as follows: Step 1: Click the Job Analysis folder. Step 2: Place checkmarks next to desired Jobs. Step 3: Click the [Merge] button. The Merge function preserves analysis integrity by consolidating all
Tasks/Sub Tasks, Performance/Enabling Objectives, Steps and Sub Steps, Knowledge/Skills, Job Aids, Policies and Tools under the 1st Job in the list (i.e., Job with lowest sequence); removing duplicates; preserving links between Tasks, Objectives, KSAs, Job Aids, Policies, Tools and References that are being merged; and deleting the remaining Jobs.
Note: Cannot undo merged Jobs.
5.13 Import Job Tasks, Objectives and KSAs In addition to basic data import functions – i.e., Tasks, Sub Task, Objectives, Knowledge/Skills, and so forth (Section 1.7), key Job elements such as Tasks, Sub Tasks and Steps including attributes such as standards, conditions, difficulty, importance, frequency, and so forth; corresponding Performance and Enabling Objectives; Knowledge, Skills and Attitudes (KSAs) that individuals should possess in order to perform each Task, Sub Task and Step; as well as Learning Objectives can be collected in a single Excel spreadsheet and
imported with few clicks under the Import Job Tasks node under the corresponding (job) node. The Job Task Analysis spreadsheet along with import instructions can be downloaded from http://www.bnhexpertsoft.com/import-detailed-analysis/.
1
2
3
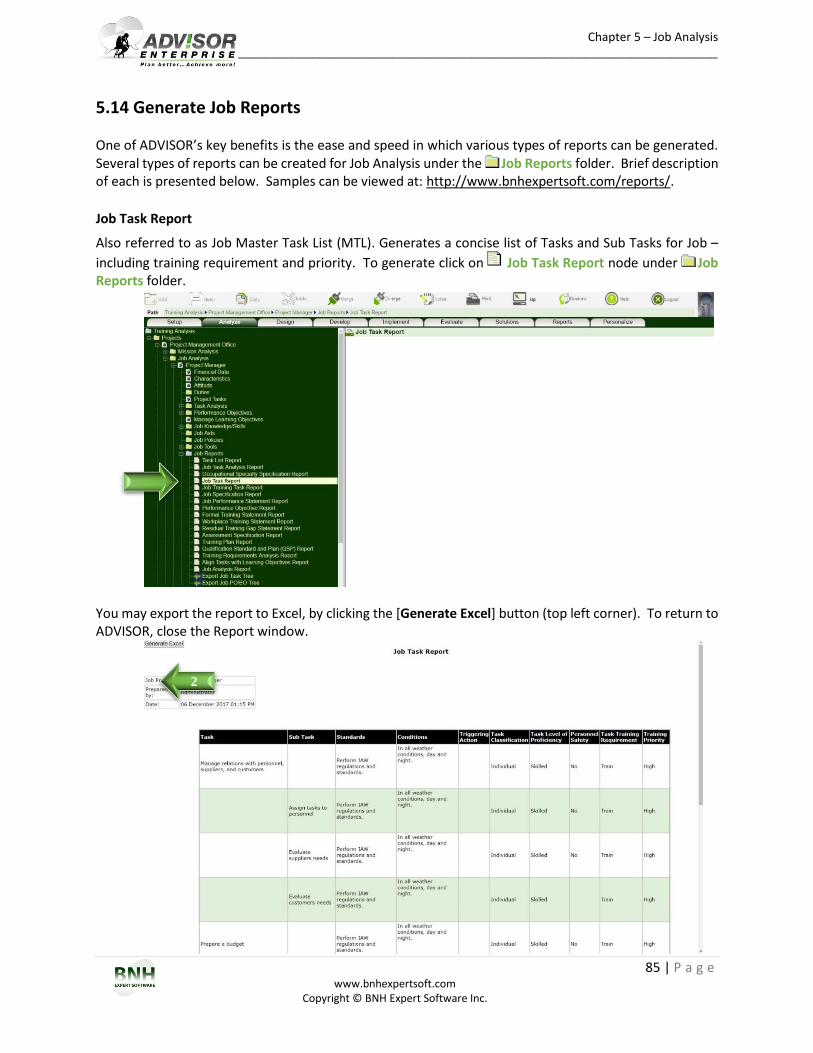
Chapter 5 – Job Analysis ____________________________________________________________________________________________
85 | P a g e www.bnhexpertsoft.com
Copyright © BNH Expert Software Inc.
5.14 Generate Job Reports One of ADVISOR’s key benefits is the ease and speed in which various types of reports can be generated. Several types of reports can be created for Job Analysis under the Job Reports folder. Brief description of each is presented below. Samples can be viewed at: http://www.bnhexpertsoft.com/reports/.
Job Task Report
Also referred to as Job Master Task List (MTL). Generates a concise list of Tasks and Sub Tasks for Job –
including training requirement and priority. To generate click on Job Task Report node under Job Reports folder.
You may export the report to Excel, by clicking the [Generate Excel] button (top left corner). To return to ADVISOR, close the Report window.
2
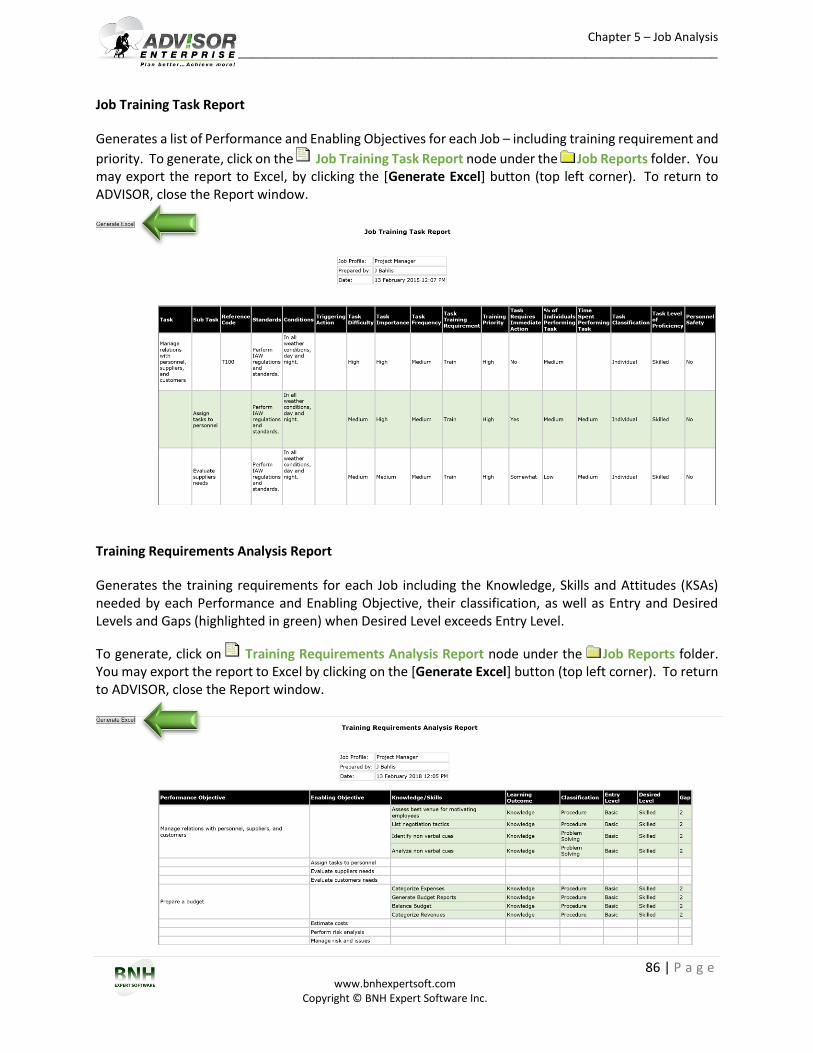
Chapter 5 – Job Analysis ____________________________________________________________________________________________
86 | P a g e www.bnhexpertsoft.com
Copyright © BNH Expert Software Inc.
Job Training Task Report
Generates a list of Performance and Enabling Objectives for each Job – including training requirement and
priority. To generate, click on the Job Training Task Report node under the Job Reports folder. You may export the report to Excel, by clicking the [Generate Excel] button (top left corner). To return to ADVISOR, close the Report window.
Training Requirements Analysis Report
Generates the training requirements for each Job including the Knowledge, Skills and Attitudes (KSAs) needed by each Performance and Enabling Objective, their classification, as well as Entry and Desired Levels and Gaps (highlighted in green) when Desired Level exceeds Entry Level.
To generate, click on Training Requirements Analysis Report node under the Job Reports folder. You may export the report to Excel by clicking on the [Generate Excel] button (top left corner). To return to ADVISOR, close the Report window.
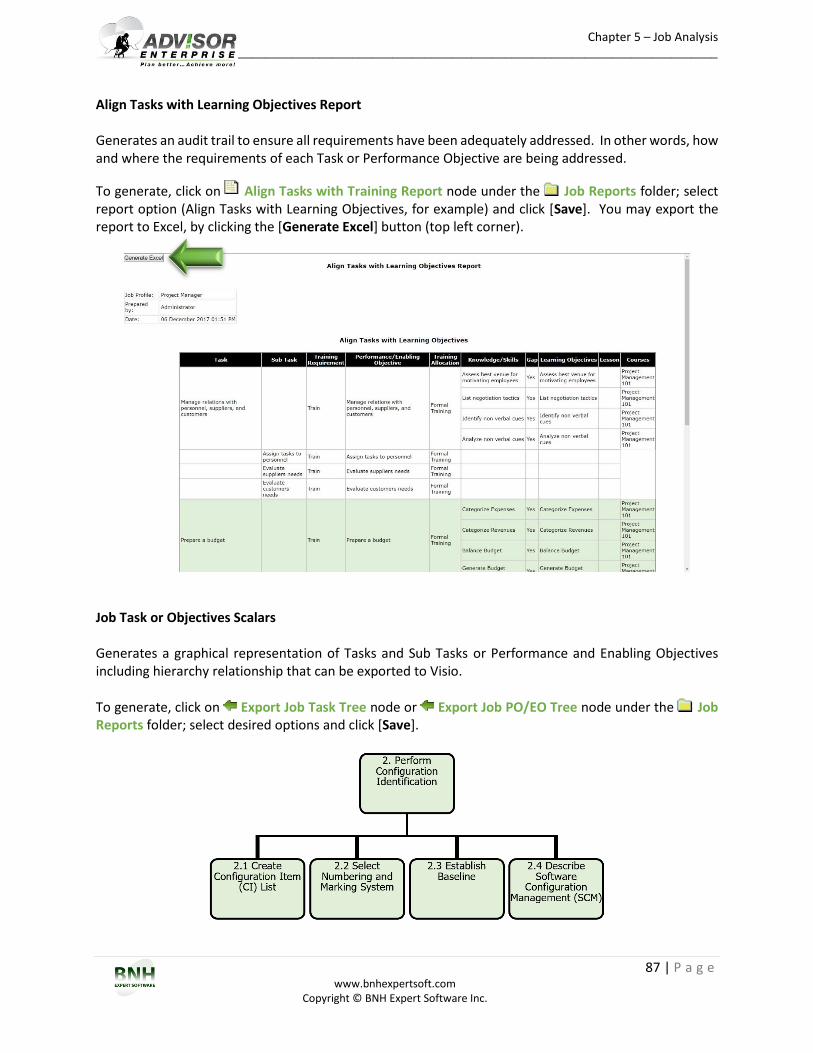
Chapter 5 – Job Analysis ____________________________________________________________________________________________
87 | P a g e www.bnhexpertsoft.com
Copyright © BNH Expert Software Inc.
Align Tasks with Learning Objectives Report Generates an audit trail to ensure all requirements have been adequately addressed. In other words, how and where the requirements of each Task or Performance Objective are being addressed.
To generate, click on Align Tasks with Training Report node under the Job Reports folder; select report option (Align Tasks with Learning Objectives, for example) and click [Save]. You may export the report to Excel, by clicking the [Generate Excel] button (top left corner).
Job Task or Objectives Scalars Generates a graphical representation of Tasks and Sub Tasks or Performance and Enabling Objectives including hierarchy relationship that can be exported to Visio. To generate, click on Export Job Task Tree node or Export Job PO/EO Tree node under the Job Reports folder; select desired options and click [Save].

Chapter 5 – Job Analysis ____________________________________________________________________________________________
88 | P a g e www.bnhexpertsoft.com
Copyright © BNH Expert Software Inc.
Job Analysis Report Generates a comprehensive report of all Tasks, Performance/Enabling Objectives, Knowledge, Skills and Attitudes (KSAs), Training Requirements and Learning Objectives along with attributes for each Job. To
generate, click on Job Analysis Report node under the Job Reports folder; select items to be included in report and click [Save]. Notes:
If Exclude Hidden Fields is selected, all hidden fields will not be included in the report.
Since the report is in html format, you can quickly advance to any section by clicking on the corresponding title in the Table of Contents. You may export the report to Word, by clicking the [Generate Word Doc] button (top left corner). To return to ADVISOR, close the Report window.
Job Task Analysis Report (JTAR) Typically requested by the Royal Canadian Air Force. For each Job (Occupation), generates a concise list of Knowledge, Skills and Attitudes (KSAs) needed to support each Task and Sub Task including Tasks, Sub Tasks and KSAs required mastery skill level (i.e., Basic, Semi-Skilled, Skilled, Highly Skilled or Expert). To
generate, click on Job Task Analysis Report node under the Job Reports folder. You may export the report to Excel, by clicking the [Generate Excel] button (top left corner).
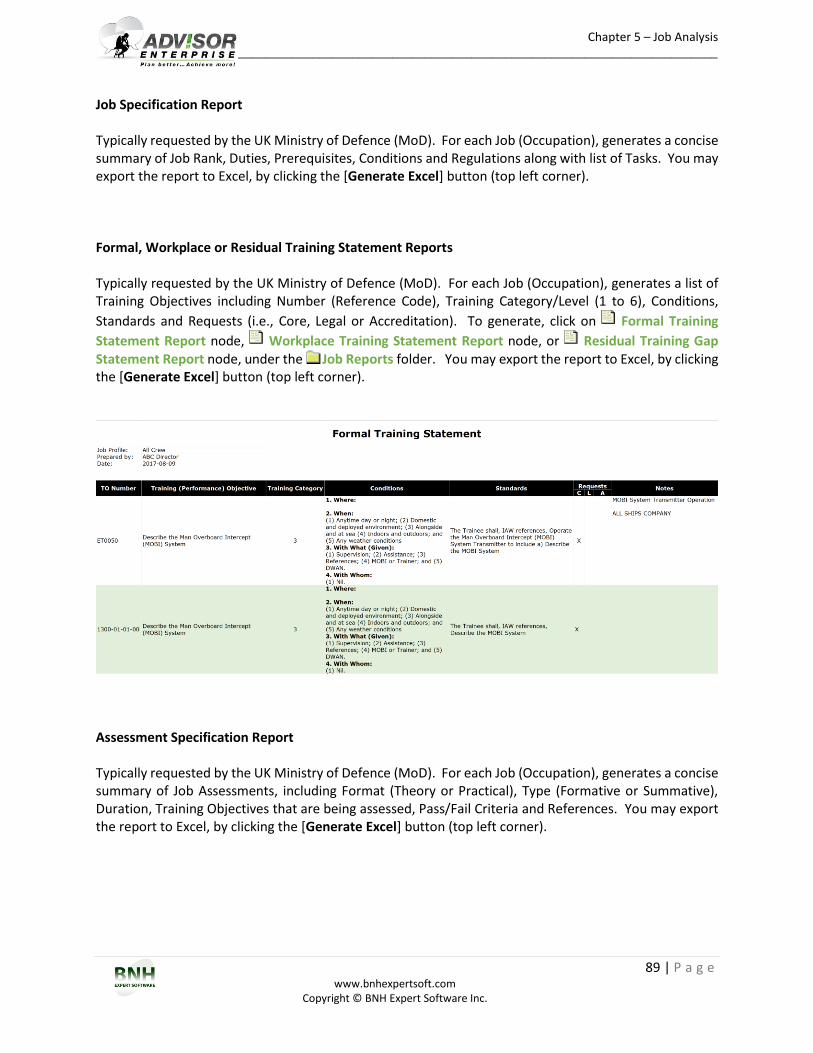
Chapter 5 – Job Analysis ____________________________________________________________________________________________
89 | P a g e www.bnhexpertsoft.com
Copyright © BNH Expert Software Inc.
Job Specification Report Typically requested by the UK Ministry of Defence (MoD). For each Job (Occupation), generates a concise summary of Job Rank, Duties, Prerequisites, Conditions and Regulations along with list of Tasks. You may export the report to Excel, by clicking the [Generate Excel] button (top left corner). Formal, Workplace or Residual Training Statement Reports Typically requested by the UK Ministry of Defence (MoD). For each Job (Occupation), generates a list of Training Objectives including Number (Reference Code), Training Category/Level (1 to 6), Conditions,
Standards and Requests (i.e., Core, Legal or Accreditation). To generate, click on Formal Training
Statement Report node, Workplace Training Statement Report node, or Residual Training Gap Statement Report node, under the Job Reports folder. You may export the report to Excel, by clicking the [Generate Excel] button (top left corner).
Assessment Specification Report Typically requested by the UK Ministry of Defence (MoD). For each Job (Occupation), generates a concise summary of Job Assessments, including Format (Theory or Practical), Type (Formative or Summative), Duration, Training Objectives that are being assessed, Pass/Fail Criteria and References. You may export the report to Excel, by clicking the [Generate Excel] button (top left corner).

Chapter 5 – Job Analysis ____________________________________________________________________________________________
90 | P a g e www.bnhexpertsoft.com
Copyright © BNH Expert Software Inc.
Training Plan (TP) or Qualification Standard and Plan (QSP) Reports Typically requested by the Royal Canadian Air Force, Army or Navy. For each Job (Occupation), generates a detailed report of Performance and Enabling Objectives including standards and conditions as well as
Teaching Points, length, media and References. To generate, click on Training Plan Report node or
Qualification Standard and Plan (QSP) Report node under the Job Reports folder. You may export the report to Word, by clicking the [Generate Word Doc] button (top left corner).
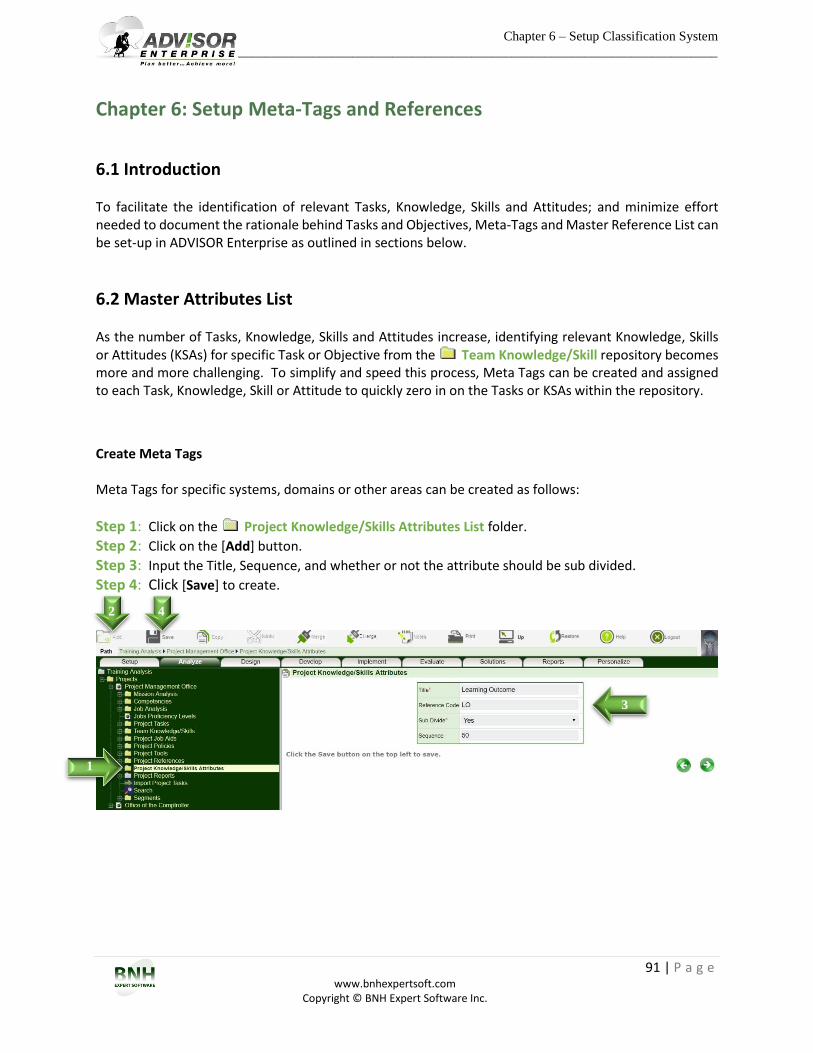
Chapter 6 – Setup Classification System
____________________________________________________________________________________________
91 | P a g e www.bnhexpertsoft.com
Copyright © BNH Expert Software Inc.
Chapter 6: Setup Meta-Tags and References
6.1 Introduction To facilitate the identification of relevant Tasks, Knowledge, Skills and Attitudes; and minimize effort needed to document the rationale behind Tasks and Objectives, Meta-Tags and Master Reference List can be set-up in ADVISOR Enterprise as outlined in sections below.
6.2 Master Attributes List As the number of Tasks, Knowledge, Skills and Attitudes increase, identifying relevant Knowledge, Skills or Attitudes (KSAs) for specific Task or Objective from the Team Knowledge/Skill repository becomes more and more challenging. To simplify and speed this process, Meta Tags can be created and assigned to each Task, Knowledge, Skill or Attitude to quickly zero in on the Tasks or KSAs within the repository.
Create Meta Tags Meta Tags for specific systems, domains or other areas can be created as follows:
Step 1: Click on the Project Knowledge/Skills Attributes List folder.
Step 2: Click on the [Add] button.
Step 3: Input the Title, Sequence, and whether or not the attribute should be sub divided.
Step 4: Click [Save] to create.
1
2 4
3
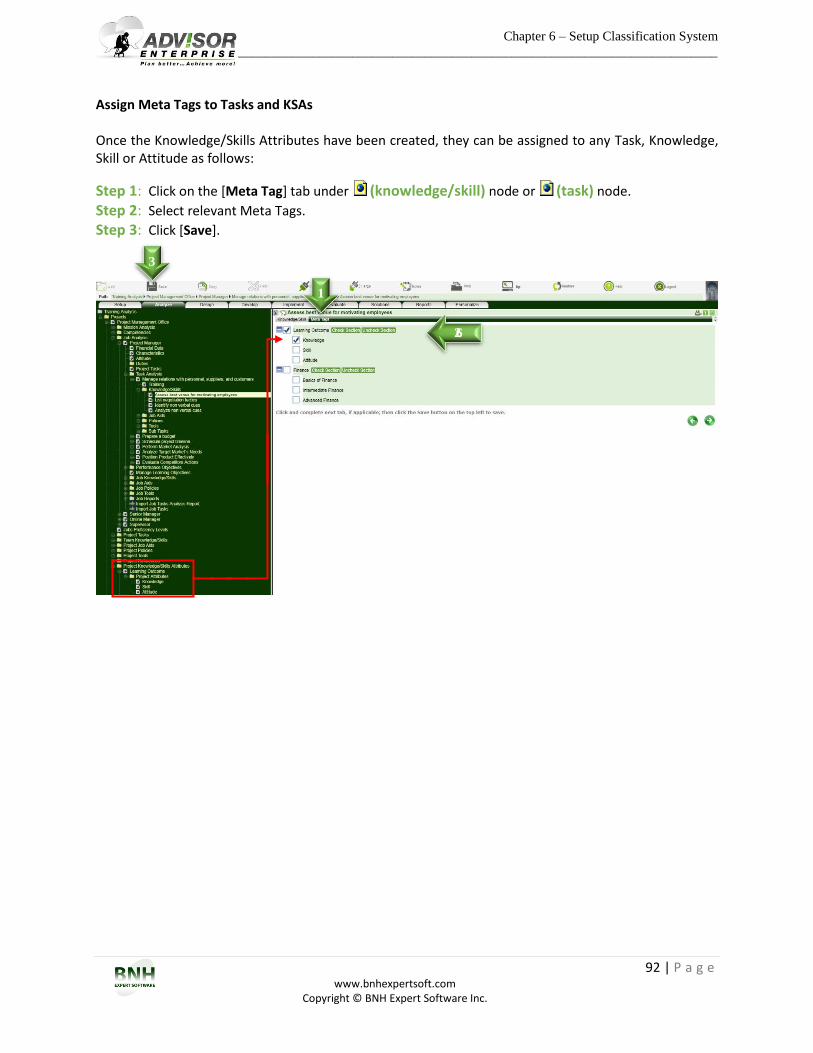
Chapter 6 – Setup Classification System
____________________________________________________________________________________________
92 | P a g e www.bnhexpertsoft.com
Copyright © BNH Expert Software Inc.
Assign Meta Tags to Tasks and KSAs Once the Knowledge/Skills Attributes have been created, they can be assigned to any Task, Knowledge, Skill or Attitude as follows:
Step 1: Click on the [Meta Tag] tab under (knowledge/skill) node or (task) node.
Step 2: Select relevant Meta Tags.
Step 3: Click [Save].
1
6
3
2
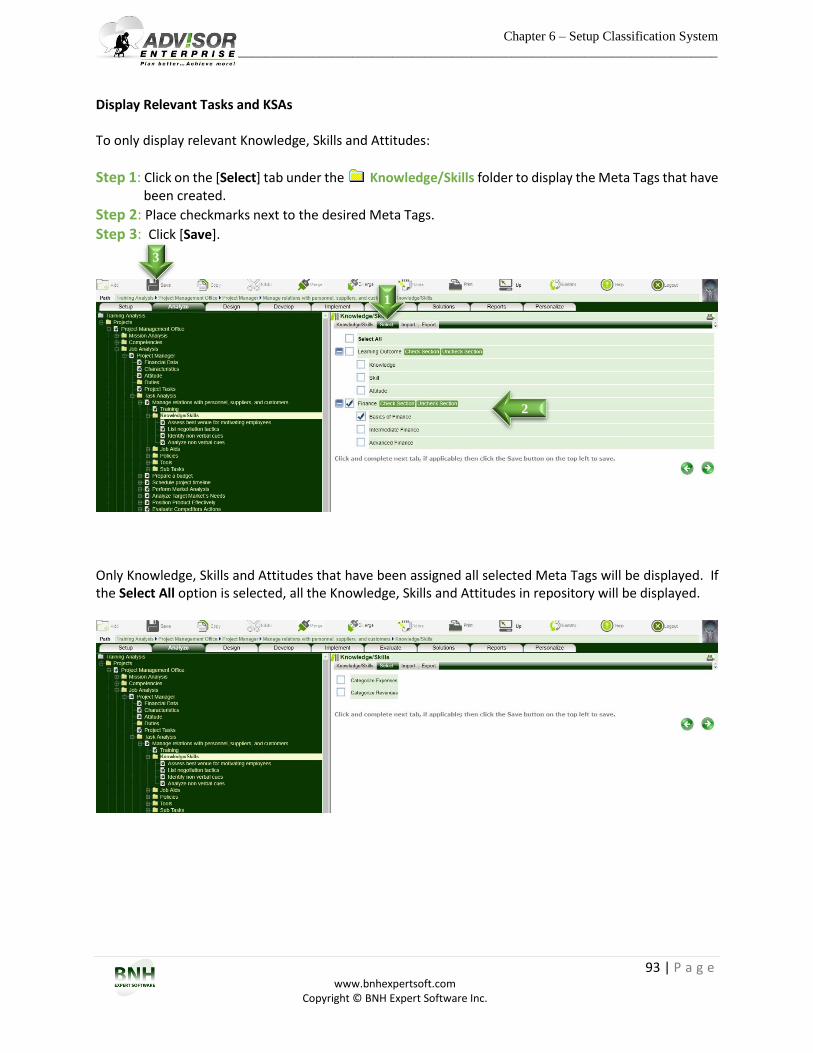
Chapter 6 – Setup Classification System
____________________________________________________________________________________________
93 | P a g e www.bnhexpertsoft.com
Copyright © BNH Expert Software Inc.
Display Relevant Tasks and KSAs To only display relevant Knowledge, Skills and Attitudes:
Step 1: Click on the [Select] tab under the Knowledge/Skills folder to display the Meta Tags that have been created.
Step 2: Place checkmarks next to the desired Meta Tags.
Step 3: Click [Save].
Only Knowledge, Skills and Attitudes that have been assigned all selected Meta Tags will be displayed. If the Select All option is selected, all the Knowledge, Skills and Attitudes in repository will be displayed.
1
2
3
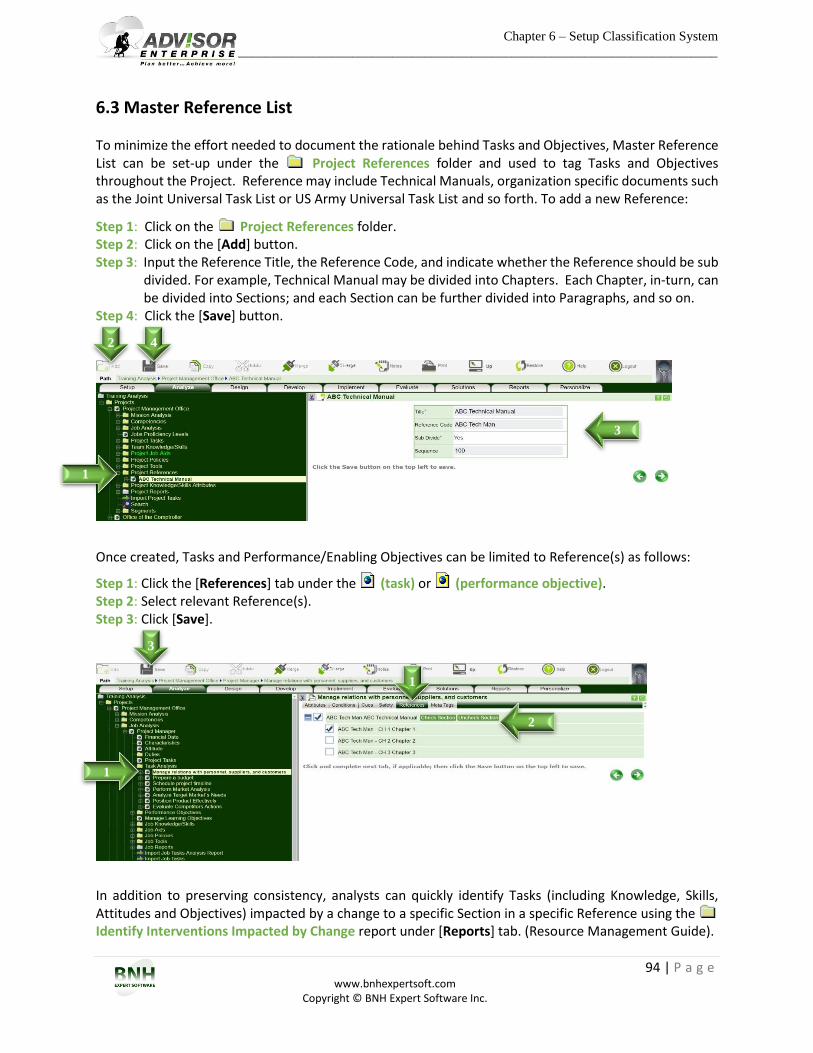
Chapter 6 – Setup Classification System
____________________________________________________________________________________________
94 | P a g e www.bnhexpertsoft.com
Copyright © BNH Expert Software Inc.
6.3 Master Reference List To minimize the effort needed to document the rationale behind Tasks and Objectives, Master Reference List can be set-up under the Project References folder and used to tag Tasks and Objectives throughout the Project. Reference may include Technical Manuals, organization specific documents such as the Joint Universal Task List or US Army Universal Task List and so forth. To add a new Reference:
Step 1: Click on the Project References folder. Step 2: Click on the [Add] button. Step 3: Input the Reference Title, the Reference Code, and indicate whether the Reference should be sub
divided. For example, Technical Manual may be divided into Chapters. Each Chapter, in-turn, can be divided into Sections; and each Section can be further divided into Paragraphs, and so on.
Step 4: Click the [Save] button.
Once created, Tasks and Performance/Enabling Objectives can be limited to Reference(s) as follows:
Step 1: Click the [References] tab under the (task) or (performance objective). Step 2: Select relevant Reference(s). Step 3: Click [Save].
In addition to preserving consistency, analysts can quickly identify Tasks (including Knowledge, Skills, Attitudes and Objectives) impacted by a change to a specific Section in a specific Reference using the Identify Interventions Impacted by Change report under [Reports] tab. (Resource Management Guide).
1
2 4
3
3
1
2
1
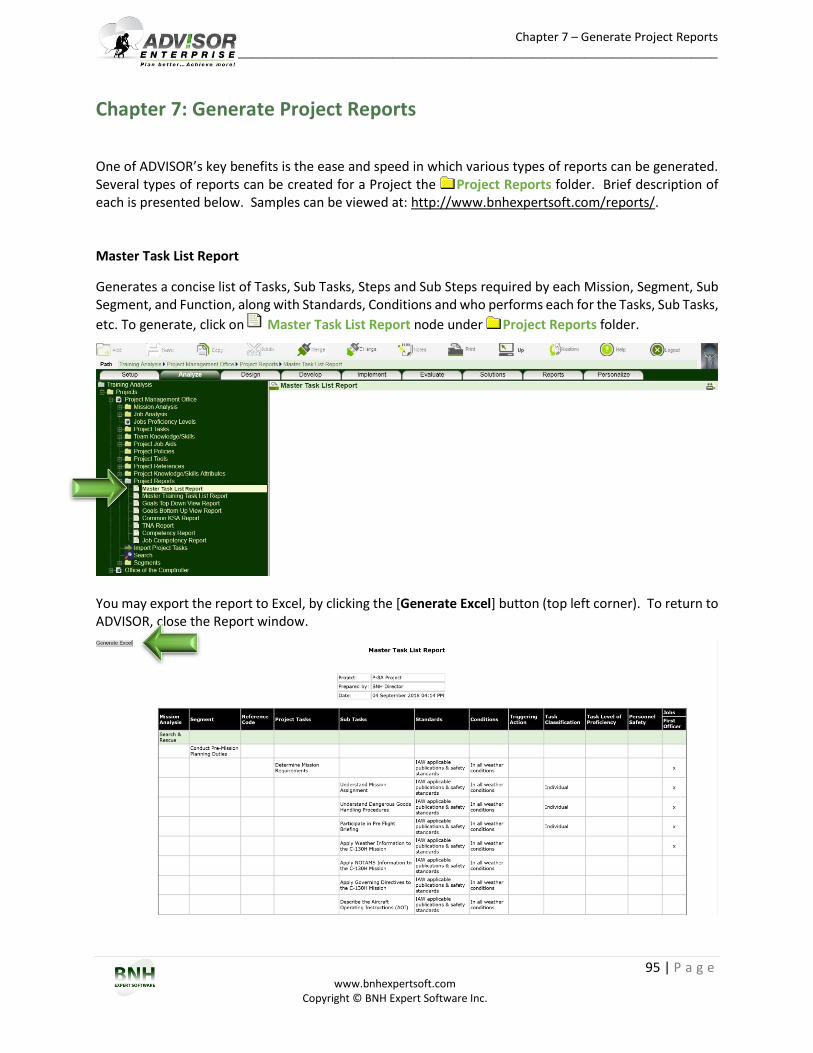
Chapter 7 – Generate Project Reports ____________________________________________________________________________________________
95 | P a g e www.bnhexpertsoft.com
Copyright © BNH Expert Software Inc.
Chapter 7: Generate Project Reports One of ADVISOR’s key benefits is the ease and speed in which various types of reports can be generated. Several types of reports can be created for a Project the Project Reports folder. Brief description of each is presented below. Samples can be viewed at: http://www.bnhexpertsoft.com/reports/. Master Task List Report
Generates a concise list of Tasks, Sub Tasks, Steps and Sub Steps required by each Mission, Segment, Sub Segment, and Function, along with Standards, Conditions and who performs each for the Tasks, Sub Tasks,
etc. To generate, click on Master Task List Report node under Project Reports folder.
You may export the report to Excel, by clicking the [Generate Excel] button (top left corner). To return to ADVISOR, close the Report window.
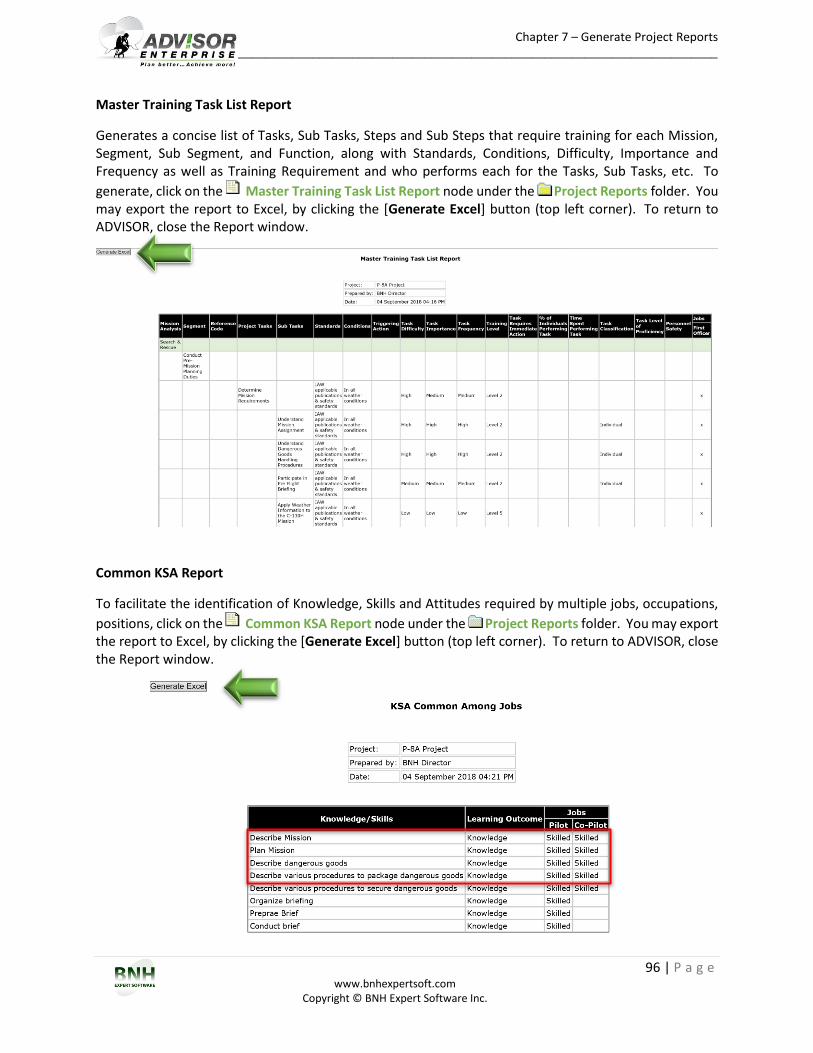
Chapter 7 – Generate Project Reports ____________________________________________________________________________________________
96 | P a g e www.bnhexpertsoft.com
Copyright © BNH Expert Software Inc.
Master Training Task List Report
Generates a concise list of Tasks, Sub Tasks, Steps and Sub Steps that require training for each Mission, Segment, Sub Segment, and Function, along with Standards, Conditions, Difficulty, Importance and Frequency as well as Training Requirement and who performs each for the Tasks, Sub Tasks, etc. To
generate, click on the Master Training Task List Report node under the Project Reports folder. You may export the report to Excel, by clicking the [Generate Excel] button (top left corner). To return to ADVISOR, close the Report window.
Common KSA Report
To facilitate the identification of Knowledge, Skills and Attitudes required by multiple jobs, occupations,
positions, click on the Common KSA Report node under the Project Reports folder. You may export the report to Excel, by clicking the [Generate Excel] button (top left corner). To return to ADVISOR, close the Report window.
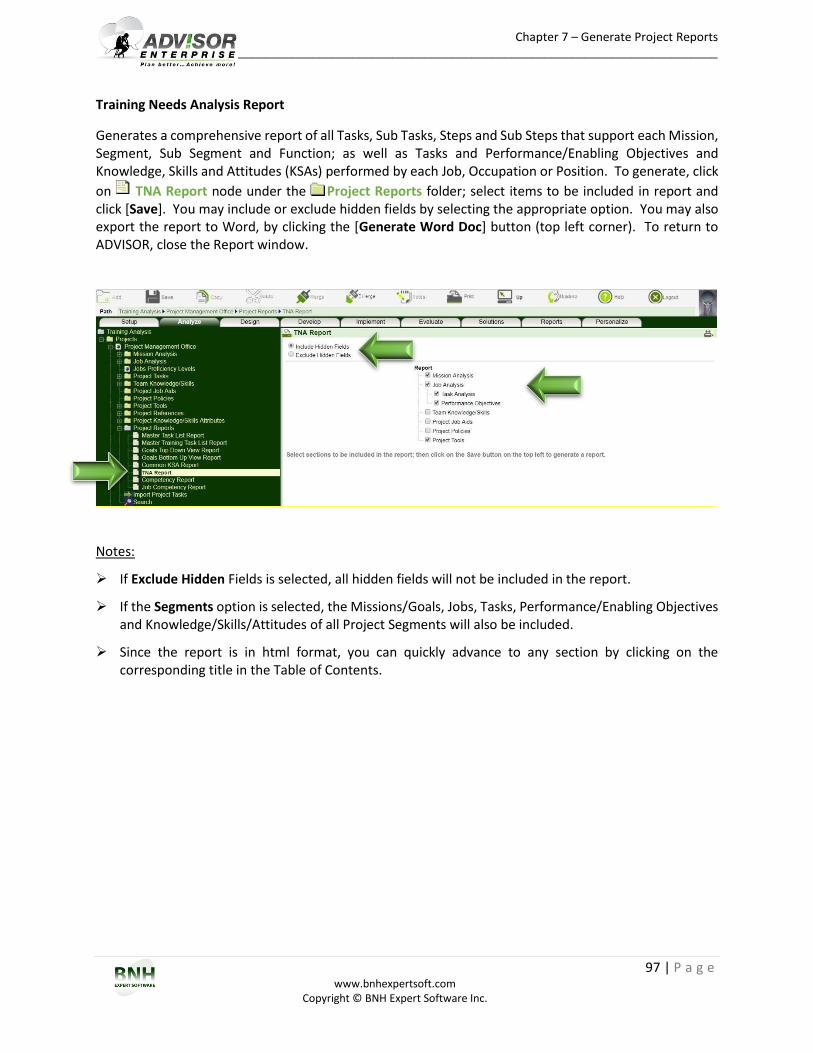
Chapter 7 – Generate Project Reports ____________________________________________________________________________________________
97 | P a g e www.bnhexpertsoft.com
Copyright © BNH Expert Software Inc.
Training Needs Analysis Report
Generates a comprehensive report of all Tasks, Sub Tasks, Steps and Sub Steps that support each Mission, Segment, Sub Segment and Function; as well as Tasks and Performance/Enabling Objectives and Knowledge, Skills and Attitudes (KSAs) performed by each Job, Occupation or Position. To generate, click
on TNA Report node under the Project Reports folder; select items to be included in report and click [Save]. You may include or exclude hidden fields by selecting the appropriate option. You may also export the report to Word, by clicking the [Generate Word Doc] button (top left corner). To return to ADVISOR, close the Report window.
Notes:
If Exclude Hidden Fields is selected, all hidden fields will not be included in the report.
If the Segments option is selected, the Missions/Goals, Jobs, Tasks, Performance/Enabling Objectives and Knowledge/Skills/Attitudes of all Project Segments will also be included.
Since the report is in html format, you can quickly advance to any section by clicking on the corresponding title in the Table of Contents.
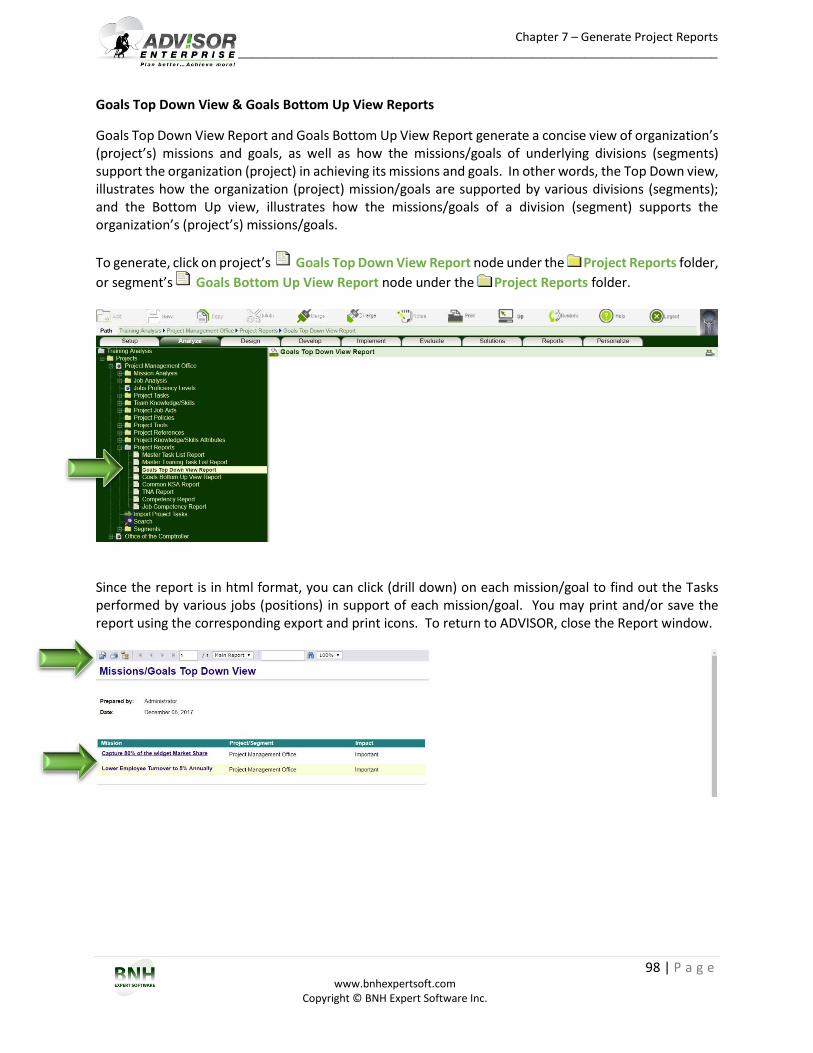
Chapter 7 – Generate Project Reports ____________________________________________________________________________________________
98 | P a g e www.bnhexpertsoft.com
Copyright © BNH Expert Software Inc.
Goals Top Down View & Goals Bottom Up View Reports
Goals Top Down View Report and Goals Bottom Up View Report generate a concise view of organization’s (project’s) missions and goals, as well as how the missions/goals of underlying divisions (segments) support the organization (project) in achieving its missions and goals. In other words, the Top Down view, illustrates how the organization (project) mission/goals are supported by various divisions (segments); and the Bottom Up view, illustrates how the missions/goals of a division (segment) supports the organization’s (project’s) missions/goals.
To generate, click on project’s Goals Top Down View Report node under the Project Reports folder,
or segment’s Goals Bottom Up View Report node under the Project Reports folder.
Since the report is in html format, you can click (drill down) on each mission/goal to find out the Tasks performed by various jobs (positions) in support of each mission/goal. You may print and/or save the report using the corresponding export and print icons. To return to ADVISOR, close the Report window.
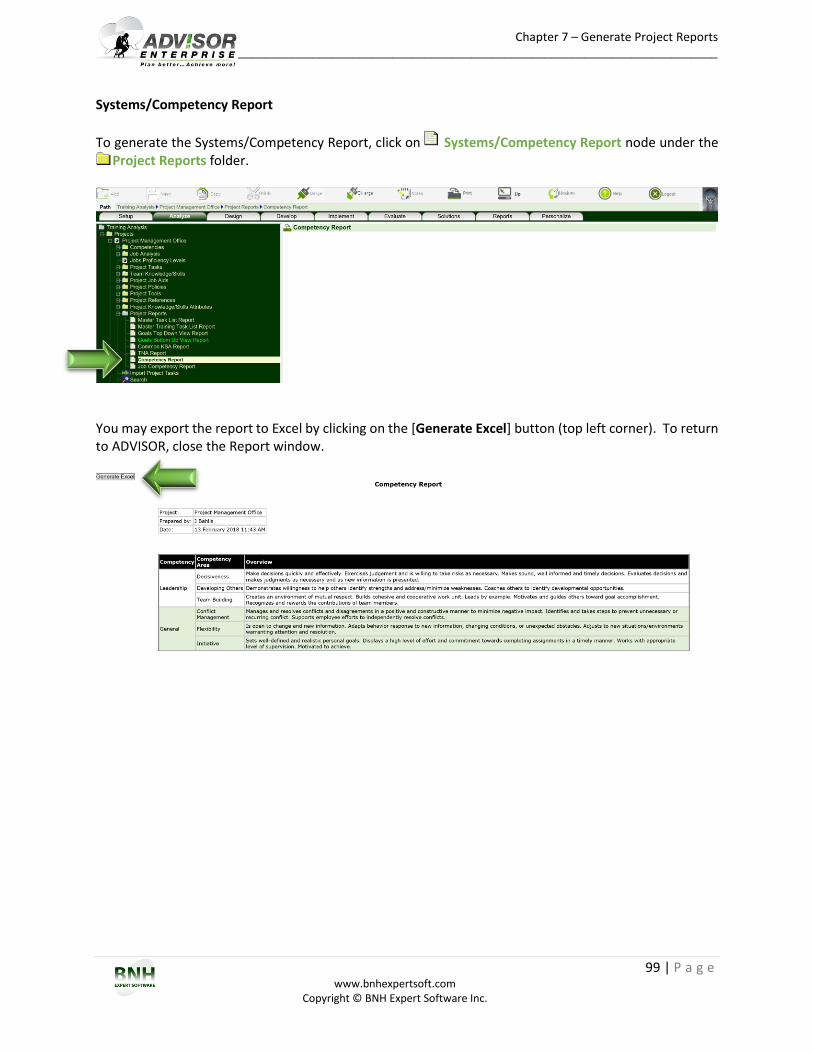
Chapter 7 – Generate Project Reports ____________________________________________________________________________________________
99 | P a g e www.bnhexpertsoft.com
Copyright © BNH Expert Software Inc.
Systems/Competency Report
To generate the Systems/Competency Report, click on Systems/Competency Report node under the Project Reports folder.
You may export the report to Excel by clicking on the [Generate Excel] button (top left corner). To return to ADVISOR, close the Report window.
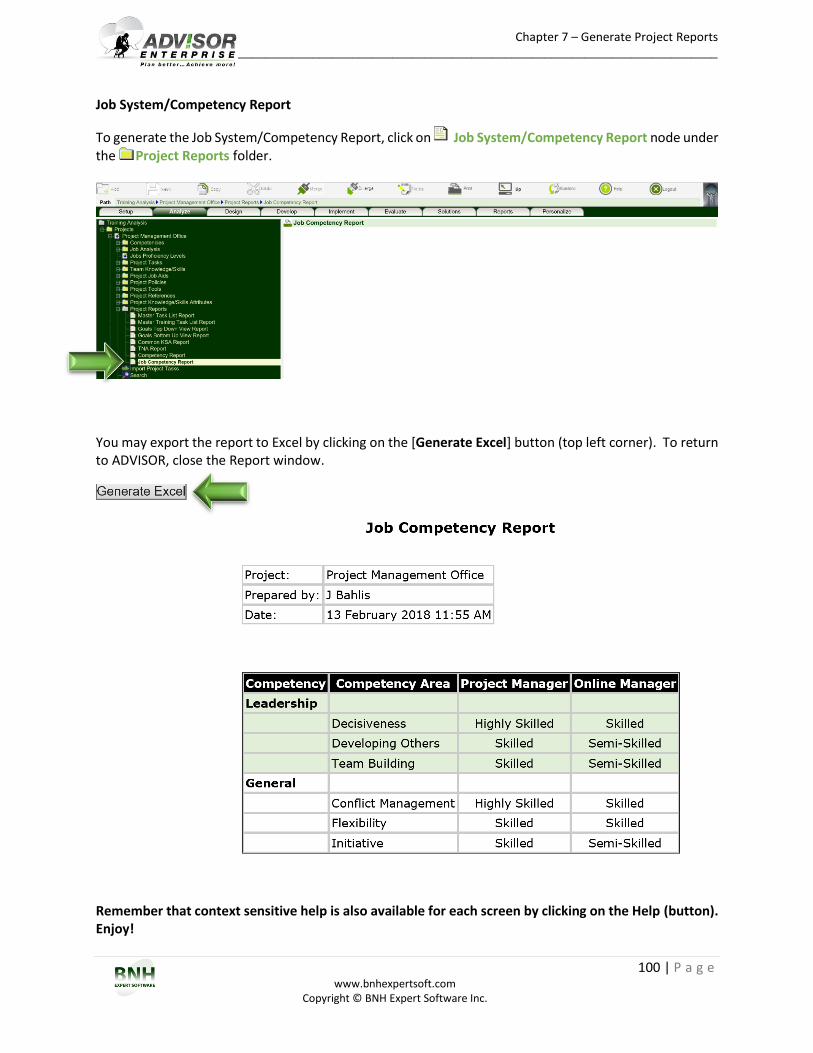
Chapter 7 – Generate Project Reports ____________________________________________________________________________________________
100 | P a g e www.bnhexpertsoft.com
Copyright © BNH Expert Software Inc.
Job System/Competency Report
To generate the Job System/Competency Report, click on Job System/Competency Report node under the Project Reports folder.
You may export the report to Excel by clicking on the [Generate Excel] button (top left corner). To return to ADVISOR, close the Report window.
Remember that context sensitive help is also available for each screen by clicking on the Help (button). Enjoy!
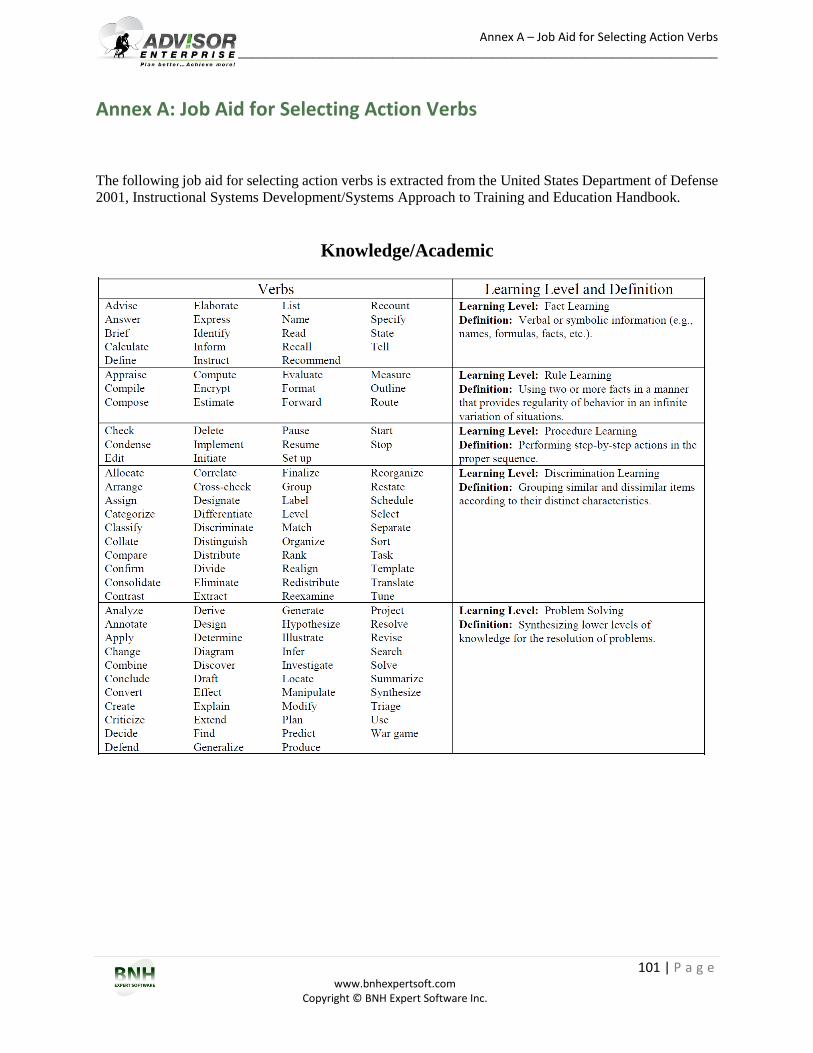
Annex A – Job Aid for Selecting Action Verbs ____________________________________________________________________________________________
101 | P a g e www.bnhexpertsoft.com
Copyright © BNH Expert Software Inc.
Annex A: Job Aid for Selecting Action Verbs
The following job aid for selecting action verbs is extracted from the United States Department of Defense
2001, Instructional Systems Development/Systems Approach to Training and Education Handbook.
Knowledge/Academic
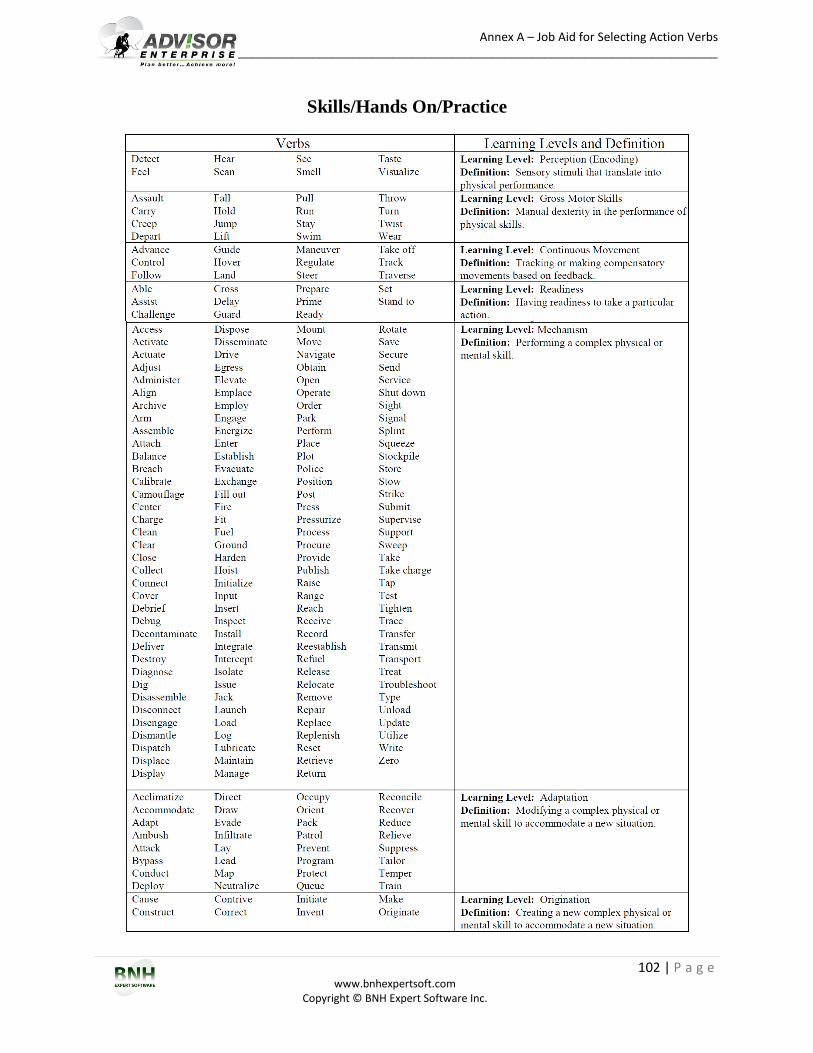
Annex A – Job Aid for Selecting Action Verbs ____________________________________________________________________________________________
102 | P a g e www.bnhexpertsoft.com
Copyright © BNH Expert Software Inc.
Skills/Hands On/Practice
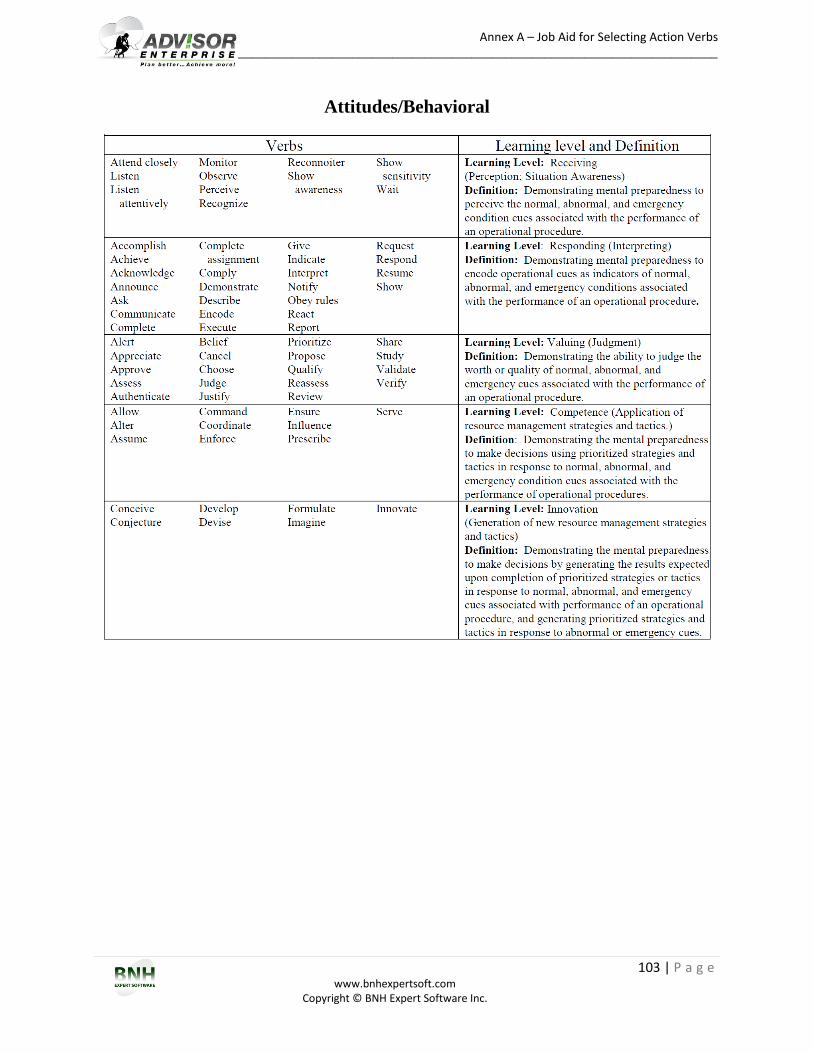
Annex A – Job Aid for Selecting Action Verbs ____________________________________________________________________________________________
103 | P a g e www.bnhexpertsoft.com
Copyright © BNH Expert Software Inc.
Attitudes/Behavioral

Annex A – Job Aid for Selecting Action Verbs ____________________________________________________________________________________________
104 | P a g e www.bnhexpertsoft.com
Copyright © BNH Expert Software Inc.