TR EN DE - image
349
TR EN DE KOLAY KULLANIM KILAVUZU
-
Upload
khangminh22 -
Category
Documents
-
view
1 -
download
0
Transcript of TR EN DE - image

TR EN DE
KOLAY KULLANIM KILAVUZU

2 / 117 TRTelevizyon / Kullanma Kılavuzu
İÇİNDEKİLER----------------------------------------------------------------------------------------------------------
5- KURULUM-VE-GÜVENLİK-
7- GENEL-BİLGİLER-7 Televizyon setinizin benzersiz özellikleri8 Dijital kanalları alma8 SCR Sistemi8 Enerji tasarrufu ile ilgili yapılması gereken-
ler8 Durağan resimler ile ilgili notlar
9- PAKETİN-İÇİNDEKİLER-9 Standart aksesuarlar9 Opsiyonel aksesuarlar
10- BAĞLANTI/HAZIRLIK-10 Anteni ve elektrik kablosunu bağlama11 Kurulum veya asma12 Uzaktan Kumandaya Pil Takma
13- GENEL-BAKIŞ-13 Televizyon cihazının bağlantıları15 Uzaktan kumanda - ana fonksiyonlar16 Uzaktan kumanda - tüm fonksiyonlar17 Uzaktan kumanda (*)
18- AYARLAR-18 Ev ağına bağlanma ayarları18 Televizyon kanallarının ayarlanması19 İlk kurulum – genel bakış20 İlk kurulumun yapılması24 Dijital kanallar için Kanal Düzenleyicisi
28- GÖRÜNTÜ-/-SES-AYARLARI-28 Görüntü ayarları 30 Ses ayarları
32- TV’NİN-ÇALIŞMASI---TEMEL-FONK-
SİYONLARI-32 Açma ve kapatma32 Kanalları seçme32 Favori listesi seçme32 Sinyal kaynağı seçme32 Ses seviyesini ayarlama32 Sesi kapatma32 Bilgileri görüntüleme33 Ses dili33 Altyazılar33 Zap fonksiyonu34 Uyku zamanlayıcısı34 Zoom fonksiyonu34 Görüntü formatını değiştirme
34- TV’NİN-ÇALIŞMASI---EK-FONKSİ-
YONLAR-35 Ses ayarları35 Görüntü ayarları
36- ELEKTRONİK-TV-REHBERİ-
37- HBBTV-MODU-37 HbbTV nedir?38 HbbTV'nin devre dışı bırakılması ve etkin-
leştirilmesi38 Dijital teletekstin devre dışı bırakılması ve
etkinleştirilmesi38 HbbTV’nin kullanımı38 Video dizinleri için ek fonksiyonlar
39- TELETEKST-MODU-39 TOP text veya FLOF text modu39 Normal text modu39 Ek fonksiyonlar

Televizyon / Kullanma Kılavuzu3 / 117 TR
İÇİNDEKİLER----------------------------------------------------------------------------------------------------------
40- USB-KAYIT-40 Televizyon programlarının kaydedilmesi
ve oynatılmasıyla ilgili bilgiler40 Harici veri ortamı kullanımında muhtemel
kısıtlamalar41 Harici veri ortamının bağlanması42 USB kayıt ayarları43 Zaman kaydırma programlarının "durakla-
tılması"44 Programları Kaydetme45 Kayıt için program ayarı46 Zamanlayıcının düzenlenmesi46 Zamanlayıcının silinmesi46 Oynatma47 Kaydedilmiş dosyalar menüsünden yayın-
ların silinmesi
48- USB-İŞLEMİ-48 Dosya formatları49 Harici veri ortamının bağlanması49 Harici veri ortamını çıkarmadan önce veri
ortamının bağlantısını kesin.50 Dosya tarayıcı 50 USB kurulum menüsündeki ayarlar51 Oynatma/Çalma temel fonksiyonlar 52 İlave oynatma fonksiyonları
54- MULTIMEDIA-AĞ-MODU-54 Ev ağı bağlantısı ile video, müzik ve fotoğ-
raf dosyalarını oynatma54 Dijital medya sunucusunun seçilmesi55 Oynatma55 Diğer oynatma seçenekleri
56- UYGULAMA-MERKEZİ-56 Şartlar & Koşullar ve Gizlilik Sözleşmeleri56 İlk gösterim ve işlemler56 Kullanıcının onayladığı Şartlar & Koşullar
ve Gizlilik içeriklerini görüntülemesi ve onayını geri çekmesi
57 SMART inter@ctive TV internet uygulama-ları
57 USB klavye ve fare57 Smart İnter@ctive TV'ye Başlarken59 Uygulama Portalı Giriş Ekranı59 Uygulama portalı giriş ekranında gezin-
me
60- WEB-TARAYICISI-60 Web tarayıcısı menüsü60 Web tarayıcısı uygulaması
61- DİL-AYARLARI-61 Menü dilinin değiştirilmesi61 Ses dilinin değiştirilmesi61 Altyazı dilinin değiştirilmesi61 Klavye dilinin değiştirilmesi
62- ERİŞİLEBİLİRLİK-FONKSİYONLA-
RI-62 Altyazı Modu62 Sesli anlatım (sesli altyazılar)
63- GELİŞMİŞ-AYARLAR-63 Otomatik kapanma63 Mağaza logosu görünümü 63 Güç LED’i parlaklığı 64 Güç koruma modu 64 Hava Durumu Gösterimi 64 Yardım
65- ZAMANLAYICI-FONKSİYONLARI65 Uyku zamanlayıcı65 Açılma zamanlayıcısı66 Kapanma zamanlayıcısı
67- EBEVEYN-AYARLARI-67 Ebeveyn Kontrolü67 Menü kilitleme68 Çoklu fonksiyon düğmesinin bloke edilme-
si68 PIN kodunu değiştirme68 Bir televizyon kanalını engelleme 69 Engellenmiş bir televizyon kanalını izleme69 PIN kodunun sıfırlanması
70- TARİH-VE-SAAT-AYARI-70 Otomatik ayar70 Manuel ayar
71- CİHAZIN-YAZILIMI-71 Ürün bilgisi71 Yazılımı güncelleme (OAD)71 Yazılımı güncelleme (Internet)71 Yazılımı güncelleme (USB)

4 / 117 TRTelevizyon / Kullanma Kılavuzu
İÇİNDEKİLER----------------------------------------------------------------------------------------------------------
72- AKSESUARLAR-72 Aksesuarlar
73- SIFIRLAMA-FONKSİYONU-73 Televizyonu en baştaki durumuna sıfırla-
ma73 Kanal geçmişinin silinmesi73 Kullanım koşulları ve gizlilik sözleşlesi74 Ayarları Yedekleme
75- HARİCİ-CİHAZ-KULLANMA-75 DIGI LINK75 Televizyonun Digi Link bağlantısı fonksi-
yonları76 Cihaz Kontrolü77 Yüksek çözünürlük77 Bağlantı seçenekleri78 Harici cihaz bağlama79 DVD kayıt cihazı, DVD oynatıcı, video
kayıt cihazı veya set üst kutusu kullanımı79 Hi-fi sistemi
81- KABLOSUZ-EKRAN-PAYLAŞIMI-
(LIVESHARE)-81 LIVESHARE nedir?81 Liveshare bağlantısı ile ekran paylaşımı
82- ORTAK-ARAYÜZLE-ÇALIŞTIRMA82 Ortak arayüz nedir?82 CA modülünü takma82 CA modülü ve akıllı kartlar için erişim
kontrolü
83- AĞ-KURULUMU-83 Ağ bağlantısı83 Kablolu ağ84 Kablolu ağ ayarları86 Kablosuz ağ86 Kablosuz ağ ayarları90 "Gizli" bir ağa televizyonun bağlanması91 TV Adının Değiştirilmesi
92- DETAYLI-KANAL-AYARLARI-92 Uydu bağlantılı tüm dijital televizyon
istasyonlarının otomatik olarak aranması93 Uydu bağlantılı dijital televizyon istasyon-
larının manuel aranması94 Dijital uydu kanalları için anten ayarları
ve kanalların otomatik aranması95 Dijital uydu kanalları için anten ayarları
ve SCR sistemi ile kanalların otomatik aranması
96 Dijital uydu kanalları için anten ayarları ve DiSEqC 1.0/1.1 ile kanalların otomatik aranması
98 Motorlu anten ayarları (DiSEqC 1.2)
99 Kablo sağlayıcısından televizyon kanalla-rının otomatik olarak aranması
100 Kablo sağlayıcısından televizyon kanalla-rının manuel olarak aranması
100 Dijital karasal TV kanallarının otomatik olarak aranması
101 Dijital karasal TV kanallarının manuel olarak aranması
102 Otomatik servis güncelleme 102 Analog televizyon kanallarını
ayarlama104 Kayıtlı analog kanalların
değiştirilmesi105 Sinyal bilgilerini görüntüleme106 Yetkili satıcılar için servis bilgileri106 Kablosuz (WLAN) bağlantı için notlar107 Ambalajın imha edilmesi107 Çevre uyarısı108 Sorun giderme
110- SÖZLÜK-
114- İNDEKS-

Televizyon / Kullanma Kılavuzu5 / 117 TR
KURULUM-VE-GÜVENLİK---------------------------------------------------------------------
Televizyonunuz-hakkında7 Televizyonunuzla, dijital TV programlarını
DVB-S, DVB-T ve DVB-C yayınlarına ek olarak analog TV yayınlarını da izleyebilirsiniz.
7 Televizyonun özelliklerinin pek çoğu, İnternet bağlantısı gerektirir. Televizyon, WLAN özelli-ğine ve bir LAN portuna sahiptir.
7 Bu televizyon, program kaydı yapabilir. Bu özellik için, harici sabit disk gibi USB ile bağ-lanılabilen bir depolama cihazına ihtiyacınız vardır (birlikte verilmez). Kaydedilen prog-ramlar, sadece kaydın yapıldığı televizyonda izlenebilir. Televizyon tamir edildikten sonra, önceden kaydedilmiş olan programlar artık izlenemeyebilir.
Kullanım-amacı7 Televizyon seti kuru odalarda kullanım ama-
cıyla tasarlanmıştır. 7 Televizyonu, birlikte verilen ayak ile veya uy-
gun bir VESA montaj kiti ile kullanın. 7 Televizyon, öncelikle televizyon programları-
nın, içerik akışlarının izlenmesi ve harici cihaz-lardaki müzik/video içeriklerinin dinlenmesi/izlenmesi için tasarlanmıştır. Başka türlü bir kullanım kesinlikle yasaktır.
Bir bilgi ekranı veya esasen bir bilgisayar monitörü gibi kullanımlar için tasarlanmamıştır. Eğer uzun süre boyunca sabit bir görüntü ya da tam olmayan formatta bir görüntü ekranda kalırsa, ekranda kalıcı izler belirebilir.
Bu, bir garanti talebinde kullanılabilecek bir kusur değildir.
Arayüz-kriterleriBu ürün Türk Telekominikasyon şebekelerinde kullanıma uygun olarak üretilmiştir.
GüvenlikUYARI
Elektrik-kazası-riski7 Televizyonun içini açmayın. Açılması durumun-
da güvenlik riski oluşabilir ve ayrıca ürününüz garanti kapsamından çıkar.
7 Televizyon, yalnızca birlikte verilen elektrik kablosu ya da AC/DC adaptör ile çalıştırıla-bilir.
7 Televizyonu, hasar görmüş bir elektrik kablo-suyla ya da AC/DC adaptörüyle (eğer birlikte verilmişse) kullanmayın.
7 Eğer televizyonun fişi bir topraklama kontağı-na sahipse, fişi sadece bir topraklama kontağı-na sahip bir prize takmanız gerekir.
7 Televizyonunuzu elektrik prizine, yalnızca ha-rici cihazları ve anteni bağladıktan sonra takın.
7 Televizyonunuzu nemden koruyun. Televiz-yonun üzerine su dolu kaplar (vazolar gibi) koymayın.
Yangın-tehlikesi7 Yangın çıkmasını önlemek için,
mumları veya diğer açık alev kaynaklarını her zaman bu ürün-den uzak tutun.
7 Televizyonun üzerindeki havalandırma açıklık-larını kapatmayın.
7 Şimşekli ve fırtınalı havalarda, elektrik fişini ve anten fişini mutlaka çekin.
7 Mumları ya da diğer açık alevleri televizyon-dan uzak tutun.
7 Pilleri doğrudan güneş ışığı, ateş vb. aşırı ısı kaynaklarına maruz bırakmayın.
7 Sadece aynı türden (marka, ebat, özellik) pilleri kullanın. Kullanılmış ve yeni pilleri birlikte kullanmayın.

6 / 117 TRTelevizyon / Kullanma Kılavuzu
KURULUM-VE-GÜVENLİK---------------------------------------------------------------------
UYARITelevizyonun-düşmesinden-kaynakla-nan-yaralanmalarTelevizyonunuzu asla sağlam olmayan yerlere kurmayınız. Aksi durumda televizyon devrilebilir, yaralanma ve ölüme yol açabilir. Özellikle ço-cukların bu tip olumsuzluklardan etkilenmemesi için aşağıdaki önlemleri alınız;7 Televizyonu, üzerine koyacağınız sehpa vb
mobilyaların televizyonu taşıyabilecek sağ-lamlıkta olduğundan emin olun.
7 Televizyonun kenarları üzerine koyduğunuz sehpa vb mobilyalardan taşmamış olmalıdır.
7 Televizyonu yüksek ve devrilme tehlikesi olan dolap, büfe, kitaplık gibi mobilyaların üzerine koymayın. Zorunlu hallerde bu tip taşıyıcılar ve televizyonun devrilmemesi için duvar vb. yapılara sabitlenmelidir.
7 Televizyon ile üzerine koyduğunuz sehpa/mobilya arasında örtü, dantel, bez, tül yada benzer eşyalar olmamalıdır.
7 Çocuklarınızı televizyonun üzerine konulduğu sehpa/mobilya ya tırmanma ve televizyona ulaşma tehlikeleri konusunda uyarınız.
7 Televizyonun her yer değişiminde yukarıda yazılı uyarıları göz önünde bulundurunuz.DİKKAT
Yüksek-çalışma-sıcaklığı-nedeniyle-kul-lanım-ömrünün-kısalması7 Cihazı ısıtıcıların yakınına ya da doğrudan
güneş ışığına maruz kalacağı yerlere yerleş-tirmeyin.
7 Yeterli havalandırma sağlamak için, televizyo-nun etrafında en az 10 cm boşluk bırakın.
Lastik-ayak-nedeniyle-mobilyada-renk-değişimi7 Bazı mobilya yüzeylerinde, lastik ile temas
halinde renk bozulması olabilir. Mobilyalarını-zı korumak için, ayağın altında camdan veya plastikten yapılmış bir levha kullanabilirsiniz. Kumaş veya paspas benzeri altlıklar kullan-mayın.
Çevreyle-ilgili-bilgiler7 Pilleri, evsel atıklarla birlikte
atmayın. Kullanılmış piller, pera-kende mağazalarına veya genel
toplama noktalarına teslim edilmelidir. Böyle-ce çevrenin korunmasına yardımcı olabilirsi-niz.
7 Ürününüzün ambalaj malzemelerini, çevre açı-sından güvenli bir şekilde geri dönüşüme tabi tutulmaları için yerel yetkililerin talimatlarına göre ayrı olarak atın.
7 Eğer televizyonunuzu bir süre kullanmaya-caksanız, bekleme moduna alın. Bekleme modunda, televizyon çok az enerji kullanır (≤ 0,5 W). Eğer televizyonunuzu uzun bir süre boyunca kullanmayacaksanız, güç düğmesinden kapa-tın ya da fişini prizden çekin. Eğer cihazınızı kapatırsanız ya da elektrik bağlantısını keser-seniz, açılma zamanlayıcısı ve programlanmış kayıtlar çalışmayacaktır.
7 Televizyonunuz için, güneş ışığının ekrana yansımayacağı bir yer seçin. Böylece daha düşük bir arka ışık seçilebilir ve enerji tasarru-fu sağlanır.
7 Ürünü, kullanım ömrünün sonuna geldiğinde, normal ev atıklarıyla birlikte atmayın. Elektrikli ve elektronik donanımların geri
dönüşümü için bir geri dönüşüm merkezine götürün.

Televizyon / Kullanma Kılavuzu7 / 117 TR
Televizyon-setinizin-benzersiz-özellikleri7 Televizyonunuz, Yüksek Çözünürlüklü (HD)
olanlar da dahil dijital istasyonları (DVB-S, DVB-T ve DVB-C üzerinden) alıp izlemenize olanak tanır. Şu anda, Yüksek Çözünürlüklü dijital televizyon kanalları birçok ülkede izle-nebilmektedir.
7 Her ne kadar bu televizyon Ağustos 2012‘den bu yana mevcut DVB-S, DVB-T ve DVB-C standartlarını karşılıyor olsa da, gele-cekteki DVB-S dijital uydu yayınları, DVB-T di-jital karasal yayınları ve DVB-C dijital kablolu yayınlarıyla uyumluluğu garanti edilmemiştir.
7 Bu televizyon tüm analog ve şifresiz dijital is-tasyonları alıp işleyebilir. Bu televizyon setinde tümleşik dijital ve analog alıcı bulunmaktadır. Dijital alıcı birimi, dijital istasyonlardan aldığı sinyalleri üstün bir ses ve görüntü kalitesi sağ-layacak şekilde dönüştürür.
7 TV rehberi (yalnızca dijital istasyonlar için) her türlü program değişikliğini size hemen gösterir ve sonraki birkaç güne ait tüm kanal programlarını gözden geçirmenizi sağlar.
7 Örneğin harici sabit disk, USB bellek çubuğu ya da dijital fotoğraf makinesi gibi çeşitli veri ortamlarını USB bağlantı noktasına bağlaya-bilirsiniz. Dosya tarayıcıyı kullanarak, istediği-niz dosya biçimlerini (örneğin, MP4, MP3 ya da JPEG verileri) seçip oynatabilirsiniz.
7 Televizyonunuzun Web tarayıcısında kablo-suz USB klavye ve mouse desteği ile kullanı-cıya internet sayfalarında gezinirken kolaylık sağlamaktadır.
GENEL-BİLGİLER------------------------------------------------------------------------------------------------
7 Zaman kaydırma fonksiyonunu kullanarak bir programı, hızlı ve kolay bir şekilde uzaktan kumanda ile durdurabilir ve daha sonra tekrar devam ettirebilirsiniz. Program harici veri orta-mına kaydedilir.
7 Seçtiğiniz herhangi bir dijital TV kanalını eğer yayıncı tarafından kısıtlama yok ise kaydede-bilirsiniz.
TV kanalı televizyon tarafından dönüştürülür ve USB harici veri ortamına kaydedilir.
Kaydedilen programlar arşivden çağırılıp oynatılabilir.
Bir kayıt işlemi sırasında, arşivden başka bir kaydı seçebilir ve izleyebilirsiniz.
TV programlarının kaydedilmesi ve oynatılması ile ilgili detaylı bilgi için bakınız sayfa 40.
7 SMART inter@ctive TV özelliği televizyonunuz internete bağlı iken televizyonunuza İnternet uygulamaları sağlar.
7 DLNA özelliği ile günlük yaşamda kullandı-ğımız, DLNA uyumlu DMS (Digital Media Server) olarak çalışan PC, Cep Telefonu veya NAS (Network attached storage) gibi cihazlara kaydedilen içeriklere Kablolu veya kablosuz (Kablosuz USB Ağ aygıtı ile) olarak yerel ağ bağlantısı ile erişebilirsiniz.
7 Televizyonunuzun DMR özelliğini kullanarak, başka bir mobil cihaz ya da bilgisayar üzerin-den içerik oynatmayı başlatabilir ve kontrolleri TV yerine bu cihazlardan yapabilirsiniz. Bunun için cihazlarınızın DMC (Digital Media Controller) cihazlar olması gerekir. Bu sayede DMC destekli uygulamalar ile TV'nizde DLNA uygulamasını başlatarak ya da başlatmaya gerek kalmadan içeriği mobil cihazlarınızdan ya da bilgisayarınızdan başlatabilir ve kontrol edebilirsiniz.

8 / 117 TRTelevizyon / Kullanma Kılavuzu
GENEL-BİLGİLER------------------------------------------------------------------------------------------------
Enerji-tasarrufu-ile-ilgili-yapılma-sı-gerekenlerAşağıda anlatılan işlemler sayesinde, doğal kaynakların tüketimini azaltabilir ve elektrik fatu-ralarınızı düşürerek para tasarrufu yapabilirsiniz.7 Televizyonunuzu birkaç gün boyunca kul-
lanmayacaksanız, çevre ve güvenlikle ilgili gerekliliklerden dolayı fişini prizden çekin. Televizyonunuz bu durumda elektrik harcama-yacaktır.
7 Televizyonun üzerinde açma kapama düğ-mesi varsa, bu düğmeyi kullanarak cihazı kapatmanız da yeterli olacaktır. Böylece tele-vizyonunuzun elektrik tüketimi hemen hemen Sıfır Watt’a inecektir.
7 Televizyonunuz standby modundayken daha az enerji tüketir. Ancak, bazı televizyonlarda, cihazın doğru çalışabilmesi için standby mo-dunda bırakılmasını gerektiren açılma zaman-layıcısı gibi bazı özellikler vardır.
7 Cihazınız, parlaklık ayarı azaltıldığında daha az enerji harcayacaktır.
Durağan-resimler-ile-ilgili-notlarEkranda uzun süreli aynı görüntünün izlenmesi, sabit resmin arka planda zayıf olarak belirme-sine neden olabilir. Arka planda belirebilecek zayıf resim(ler), LCD/LED teknolojisi kaynaklıdır ve garanti kapsamında müdahale gerektirmez. Bu durumlar ile karşılaşmamak ve/veya etkiyi en aza indirmek için aşağıdaki önerileri uygulaya-bilirsiniz.7 Aynı TV kanalının çok uzun süreli ekranda
olmasını engelleyiniz. Kanal logoları bu etkiyi gösterebilir.
7 Tam ekran olmayan görüntülerin sürekli ekran-da kalmasını engelleyiniz; yayıncı tarafından tam ekran yollanmayan içerikleri görüntü formatlarını değiştirerek tam ekran haline getirebilirsiniz.
7 TV’nizi yüksek parlaklık ve/veya kontrast değerleri ile izlemeniz, bu etkinin daha hızlı belirmesine neden olacağından, TV’nizi mem-nun olacağınız en düşük parlaklık ve kontrast seviyesinde izlemeniz önerilir.
Dijital-kanalları-alma7 Dijital uydu kanalları (DVB-S) alabilmek için
uydu antenine ihtiyacınız vardır.7 Dijital kanalları (DVB-T) alabilmek için çatı
ya da iç mekan antenine (kendi güç kaynağı bulunan pasif ya da aktif iç mekan anteni) ihtiyacınız vardır.
7 DVB-C yayınlarını alabilmek için DVB-C’de yayın yapan kablolu yayın ağı anten kablosu, TV’ye bağlanmalıdır.
7 Analog yayınların aksine, her kanalın kendi yayın frekansı yoktur. Bunun yerine, birkaç kanal bölgesel ya da ulusal düzeyde demetler olarak bilinen gruplar halinde birleştirilir.
7 Çeşitli kanallardan alınan teleteks yayınında mevcut yayın bilgilerini bulabilir ya da TV rehberine veya internete göz atabilirsiniz.
7 Özel yayın şirketlerine ait çeşitli dijital tele-vizyon istasyonları şifrelidir (DVB-S, DVB-T ve DVB-C). Bu istasyonların seyredilmesinin yanı sıra kayıt ve kayıttan oynatma fonksiyonları yalnızca ilgili CI modülü ve SmartCard ile birlikte kullanılabilir. Özel ürünler satan mağa-zanıza danışın.
SCR-SistemiTelevizyonunuz, SCR sistemi (Tek kanal Yön-lendirici) özelliğini desteklemektedir. SCR uydu sistemi kullanarak aynı anda birden fazla kul-lanıcı bağımsız olarak uydudaki tüm sinyalleri alabilirler.

Televizyon / Kullanma Kılavuzu9 / 117 TR
PAKETİN-İÇİNDEKİLER------------------------------------------------------------------------------
1
4 5
6
Manual
23
Standart-aksesuarlar1- Televizyon
2- Ayak
3- Uzaktan kumanda
4- Uzaktan kumanda için pil
5- Ayak için vidalar ve montaj talimatları
6- Kullanım kılavuzu
Opsiyonel-aksesuarlarKullanımı Kolay Uzaktan KumandaKullanımı Kolay Uzaktan Kumanda pilTemizleme bezi

10 / 117 TRTelevizyon / Kullanma Kılavuzu
BAĞLANTI/HAZIRLIK--------------------------------------------------------------------------------
Anteni-ve-elektrik-kablosunu-bağlama
1- Dijital uydu kanalları (DVB-S) için uydu ante-ni kablosunu televizyon seti üzerindeki SATELLITE anten girişine takın;
ve / veya
2a Karasal dijital istasyonları (DVB-T) için çatı ya da iç mekan antenini (kendi güç kaynağı bulunan pasif ya da aktif iç mekan anteni) televizyon setinin üzerindeki ANT-IN anten girişine takın;
veya
2b Kablolu TV ağının (DVB-C) dijital istasyon-ları için anten kablosunu televizyon seti üzerindeki ANT-IN anten girişine takın;
veya
2c Analog istasyonlar için anten kablosunu televizyon seti üzerindeki ANT-IN girişine takın.
Not:7 İç mekan antenini bağlarken, yayını en iyi
şekilde alana kadar anteni farklı konumlar-da denemeniz gerekebilir.
3 Elektrik kablosunu duvardaki prize takın.
Not:7 Cihazı elektrik prizine yalnızca harici cihaz-
ları ve anteni bağladıktan sonra takın.7 Yürürlükteki güvenlik standartlarını karşıla-
mayan adaptör fişi ya da uzatma kablosu kullanmayın. Elektrik kablosunun üzerinde değişiklik yapmayın.
1 23

Televizyon / Kullanma Kılavuzu11 / 117 TR
BAĞLANTI/HAZIRLIK--------------------------------------------------------------------------------
Kurulum-veya-asma7 Ekrana direkt güneş ışığının yansımayacağı bir
yer seçin.
Ayaklı-kurulum7 Ayağı monte etmek için, birlikte verilen montaj
talimatlarına bakın. 7 Televizyonu, sert ve dengeli bir yüzeye yer-
leştirin.
VESA-montaj-kitine-montaj-hazırlığıMontaj kiti satınalma bilgisi için yetkili bayii ile görüşün.Şunlara ihtiyacınız olacaktır: 7 Bir makas,7 Bir yıldız başlı tornavida. VESA montaj kiti için montaj talimatlarını izleyin.1- Televizyonu, üzerindeki filmi çıkartmadan,
ekran altta kalacak şekilde düzgün bir yüzeye koyun.
2- Makasları kullanarak arka taraftaki filmi keserek açın.
3- Gerekli kabloları televizyonun konektörle-rine bağlayın. Bu kılavuzdaki "Bağlantılar" bölümüne bakın.
4- Kabloları, yere doğru asılı kalmayacakları şekilde bağlayın.
5- VESA montaj kitini televizyona vidalayın ve montaj talimatlarına göre monte edin.
VESA
12 / 117 TRTelevizyon / Kullanma Kılavuzu
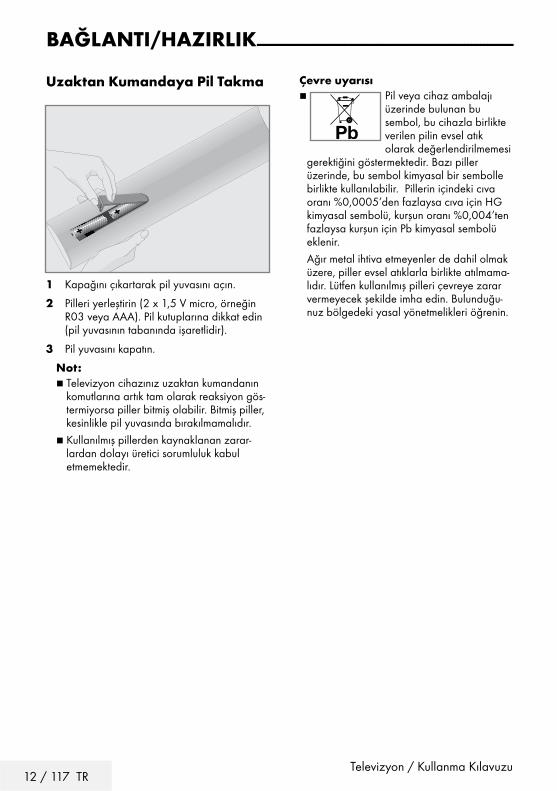
Uzaktan-Kumandaya-Pil-Takma
BAĞLANTI/HAZIRLIK--------------------------------------------------------------------------------
1- Kapağını çıkartarak pil yuvasını açın.
2- Pilleri yerleştirin (2 x 1,5 V micro, örneğin R03 veya AAA). Pil kutuplarına dikkat edin (pil yuvasının tabanında işaretlidir).
3- Pil yuvasını kapatın.
Not:-7 Televizyon cihazınız uzaktan kumandanın
komutlarına artık tam olarak reaksiyon gös-termiyorsa piller bitmiş olabilir. Bitmiş piller, kesinlikle pil yuvasında bırakılmamalıdır.
7 Kullanılmış pillerden kaynaklanan zarar-lardan dolayı üretici sorumluluk kabul etmemektedir.
Çevre-uyarısı7 Pil veya cihaz ambalajı
üzerinde bulunan bu sembol, bu cihazla birlikte verilen pilin evsel atık olarak değerlendirilmemesi
gerektiğini göstermektedir. Bazı piller üzerinde, bu sembol kimyasal bir sembolle birlikte kullanılabilir. Pillerin içindeki cıva oranı %0,0005’den fazlaysa cıva için HG kimyasal sembolü, kurşun oranı %0,004’ten fazlaysa kurşun için Pb kimyasal sembolü eklenir.
Ağır metal ihtiva etmeyenler de dahil olmak üzere, piller evsel atıklarla birlikte atılmama-lıdır. Lütfen kullanılmış pilleri çevreye zarar vermeyecek şekilde imha edin. Bulunduğu-nuz bölgedeki yasal yönetmelikleri öğrenin.

Televizyon / Kullanma Kılavuzu13 / 117 TR
GENEL-BAKIŞ--------------------------------------------------------------------------------------------------------
Televizyon-cihazının-bağlantıları
VGA IN
SERVICE LAN Optic Out USB (HDD) HDMI2 EARPHONESATELLITE
13/18Vmax. 25 0 mA
ANT-IN5V
max. 50 mA
SCA
RT
HD
MI 1
(AR
C)
7 SERVICE: Servis amaçlıdır. 7 -LAN: Ağ bağlantısı.7 -SATELLITE:-Uydu anteni sinyal girişi. Tek
kablolu SCR sistemi için uygundur.7 -ANT-IN: Anten kablosu girişi (karasal
anten veya kablo bağlantısı).7 -Optic-Out: optik ses çıkışı.7 -USB(HDD): Programları kaydetmek için
harici bir sabit disk gibi veri medyaları buraya bağlanır.
7 -HDMI2:-Dijital ses ve görüntü verileri için giriş.
7 U: Adaptörlü kulaklık jakı veya harici ses çıkışı.
7 SCART-/-S-VHS-/-COMPONENT: SCART, ses/video girişi ve çıkışı. S-VHS, ses/video girişi ve çıkışı (Scart -
S-VHS dönüştürücü kablo ile). Component, ses/video girişi ve çıkışı
(Scart - YPbPr dönüştürücü kablo ile).
7 -HDMI1-(ARC):-Ses dönüş kanallı dijital ses ve video verileri için giriş. AV alıcısını buraya bağlayın.
7 -CI: şifreli kanalları alma amaçlı CA mo-dülleri için

14 / 117 TRTelevizyon / Kullanma Kılavuzu
GENEL-BAKIŞ--------------------------------------------------------------------------------------------------------
Kumanda-düğmeleri
7 +-VOL: Ses seviyesi arttırma.7 VOL-: Ses seviyesi azaltma.7 +-CH: Kanal arttırma.7 CH-: Kanal azaltma.7 SOURCE: Kaynak menüsü.7 MENU: Ana menüyü açar.7 8: Televizyonu stand-by konumundan
açar ve stand-bay konumuna alır.

Televizyon / Kullanma Kılavuzu15 / 117 TR
GENEL-BAKIŞ--------------------------------------------------------------------------------------------------------
Uzaktan-kumanda---ana-fonksiyonlar
İmleç-Kontrolİmleci menülerde yukarı ve aşağı kaydırır.imleci menülerde sola/sağa hareket ettirir.K a n a l l i s t e s i n i a ç a r ; çeşitli fonksiyonları etkinleştirir.
Televizyonu açar ve kapatır (stand-by)
Sinyal kaynağı
Sesi açar/kapatır (mute)
-Zap fonksiyonu; menüleri bir se-viye geri götürürMenüyü açar
Araçlar menüsünü açar
Teletekst modu ile TV modu ara-sında geçiş yapar
Uygulama Portalını açar
Stand-by konumundan açar; istasyonları adım adım seçer
Ses seviyesini ayarlar
Bilgi görüntüler
Menü ve uygulamalardan çıkar
Kanal listesini açarElektronik TV rehberini açar
Televizyonu standby konu-mundan açar; kanalları doğ-
rudan seçer
Kanal listesini seçer (»TÜM«, »FAV 1« ila
»FAV 4«)
Kaydetme, oynatma, duraklatma veya
durdurma.(sadece dijital televizyon kanalları)
Ekran Paylaşımını açar
Bu tuş işlevsizdir
HbbTV fonksiyonları yardım ek-ranı
Media Oynatıcı menüsünü açar
Altyazı seçer
Ses kanalı seçer
Önceki, Sonraki, İleri, Geri; Teletext modunda Çift karakter, Güncelleme, Durdurma, Cevaplar

16 / 117 TRTelevizyon / Kullanma Kılavuzu
GENEL-BAKIŞ--------------------------------------------------------------------------------------------------------
Uzaktan-kumanda---tüm-fonksi-yonlar-(kırmızı)- Teletekst modunda sayfa seçer; (yeşil) menülerde çeşitli fonksiyonları seçer/ (sarı) etkinleştirir. (mavi)5 Teletekst modunda çift karakter bo-
yutuna geçer; dosya tarayıcısında önceki parça/önceki görüntü fonksiyonunu seçer.
6 Teletekst modunda sayfayı güncelleş-tirir. dosya tarayıcısında sonraki parça/sonraki görüntüyü seçer.
3 Teletekst modunda sayfa durdurma; dosya tarayıcısında geriye doğru görüntü aramayı başlatır.
4 Teletekst modunda cevapları göste-rir; dosya tarayıcısında ileriye doğru görüntü aramayı başlatır.
Kaydı başlatır (dijital TV modunda kayıt yalnızca harici veri ortamı üzerindendir).
8 Dosya tarayıcısında oynatmayı baş-latır; DLNA menüsünde oynatmayı baş-latır.
! Durdurma; Canlı sinyal sırasında zaman kaydır-ması (dijital TV modunda yalnızca harici veri ortamı üzerinden); DLNA menüsünde oynatılan dosyayı duraklatır.
7 Teletekst modunda ekran bölme fonksiyonunu seçer; dosya tarayıcısında oynatmayı son-landırır; PVR modunda kaydı veya oynatmayı sonlandırır; DLNA menüsünde oynatmayı son-landırır.
Farklı ses dilini seçer (dijital TV mo-dunda).
Farklı altyazılar seçer (dijital TV modunda).
Not:-7 Televizyonunuz Apple iPhone, ve Android
tabanlı telefonlar için kumanda özelliğini desteklemektedir. Telefonunuzun özelliğine bağlı olarak Apple App Store’dan veya Google Play (Android Market)’ten »Grun-dig TV Remote« uygulamasını telefonunuza ücretsiz indirerek telefonunuz ile televizyo-nunuzu kumanda edebilirsiniz.

Televizyon / Kullanma Kılavuzu17 / 117 TR
GENEL-BAKIŞ--------------------------------------------------------------------------------------------------------
Uzaktan-kumandaya-pil-takma1- Kapağını çıkartarak pil yuvasını açın.
2- Pilleri yerleştirin (2 x 1,5 V micro, örneğin R03 veya AAA). Pil kutuplarına dikkat edin (pil yuvasının tabanında işaretlidir).
3- Pil yuvasını kapatın.
Not:-7 Televizyon cihazınız uzaktan kumandanın
komutlarına artık tam olarak reaksiyon gös-termiyorsa piller bitmiş olabilir. Bitmiş piller, kesinlikle pil yuvasında bırakılmamalıdır.
7 Kullanılmış pillerden kaynaklanan zararlardan dolayı üretici sorumluluk kabul etmemektedir.
Çevre-ile-ilgili-not7 Bitmiş pilleri, yerel kanun ve yönetmeliklere
uygun şekilde atılmasını sağlayın. Pil ve ambalajın üzerindeki sembol, ürünle birlikte tes-lim edilen pilin evsel atık olarak değerlendirilmeme-
si gerektiğini belirtmektedir. Bazı yerlerde sembol, kimyasal bir sembol ile birleştirilerek kullanılmış olabilir. Piller % 0,0005’den fazla civa veya % 0,004’den fazla kurşun içeriyorsa, civa için Hg, kurşun için Pb kim-yasal sembolü işaretin altına eklenir. Pillerin doğru şekilde atılmasını sağlayarak, pillerin uygun olmayan şekilde atılması neticesinde çevre ve insan sağlığında meydana gelebi-lecek potansiyel zararların engellenmesine katkıda bulunmuş olacaksınız.
Uzaktan-kumanda-(*) Uzaktan-kumanda---tüm-fonksiyonlar
a Sesi açar/kapatır (mute).8 Televizyonu açar ve kapatır (stand-
by).MENU- Menüye giriş ve çıkış tuşu.+--–- -Ses seviyesini ayarlar.
imleci sola/sağa hareket ettirir.V-Λ- -İstasyonları adım adım seçer.
İmleci menülerde yukarı ve aşağı kaydırır.
OK- -Kanal listesini açar; çeşitli fonksiyonları etkinleştirir.
Z-- -Zap fonksiyonu;
TV-G- Elektronik TV rehberini açar.
AV AV kanalları için ön seçim menüsünü açar. Ardından »V« veya »Λ« düğmesi ile seçim yapılır.
(*) Bu kumanda opsiyoneldir ve her modelde bulunmamaktadır.

18 / 117 TRTelevizyon / Kullanma Kılavuzu
AYARLAR--------------------------------------------------------------------------------------------------------------------
Televizyonda, temel ayarlamaları yaparak adım adım size yardımcı olmak üzere bir "kurulum yardımcısı" bulunmaktadır.Kullanıcı, ekran diyalog penceresini kullanarak karmaşık gibi görünen ayarlamaları ve veri gi-rişlerini basitçe ve herkes tarafından anlaşılacak şekilde yapabilir.Sayfalar ve diyalog öğeleri ekranda görünür, burada da ileriki ve muhtemel işlem adımları tanımlanır.Bunu desteklemek için ayrıca uzaktan kumanda-nın gerekli olan düğme simgelerini göreceksiniz. Detaylı temel ayarlar:– dil seçimi– ülke seçimi;– kullanıcı modu seçimi;– ağ ayarları (istenirse);– İstasyon ayarları (DVB-S, DVB-T, DVB-C ve
analog kanallar).Ayrıntılı ayarlar, 20 ve 23. sayfalarda buluna-bilir.
Ev-ağına-bağlanma-ayarlarıEv ağı bağlantısına bağlı olarak televizyonunu-zu ev ağına bağlayınız:– Bir LAN bağlantısı ile veya – WLAN ile kablo olmadan LAN bağlantılı iki seçenek vardır:
Otomatik-bağlantı, tüm bağlantı ayarları (»IP Adresi«, »Netmask«,
»Gateway« ve »DNS«) bilgileri modemden otomatik olarak alınır.
Manuel-bağlantı, tüm bağlantı ayarları (»IP Adresi«, »Netmask«,
»Gateway« ve »DNS«) bilgileri manuel olarak yapılandırılması gerekir.
WLAN kullanılırken pek çok seçenek vardır:
Otomatik-bağlantı, tüm bağlantı ayarları (»IP Adresi«, »Netmask«,
»Gateway« ve »DNS«) bilgileri modemden otomatik olarak alınır.
Yönlendiriciye bağlı olarak aşağıdaki seçe-nekleri kullanabilirsiniz:
– Seçenek “WPS-PBC” (Basmalı Düğme Yapı-landırması);
– Bir WPS PIN ile bağlantı; – Ağ şifresini girerek bağlanmak.
Manuel-bağlantı, tüm bağlantı ayarları (»IP Adresi«, »Netmask«,
»Gateway« ve »DNS«) bilgileri manuel olarak yapılandırılması gerekir.
Televizyon-kanallarının-ayarlan-masıBağlı olan anten türüne bağlı olarak hangi televizyon kanallarını aramak istediğinize karar verebilirsiniz.DVB-S – Sayfa 22'den uydudan dijital televizyon kanallarını ayarlar. Bu arama için iki seçeneğiniz vardır: – Standart bir seçimi önceden ayarlayan
temel kurulum, örn. Astra uydusu 19.2° Doğu; sadece aramayı başlatmanız gerek-mektedir;
– alıcınızın sistemi için gerekli tüm ayarlama-ları yapmanızı ve parametreleri ayarlama-nızı sağlayan profesyonel kurulum.
DVB-C – Dijital kablolu televizyon kanallarının ayarlanması için bakınız sayfa 22.DVB-T – Dijital karasal televizyon kanallarının ayarlanması için bakınız sayfa 23.Analog televizyon kanallarını aramak için sayfa 92'den başlayan "Detaylı Kanal Ayarları" bölümüne bakın.
Not:-7 Dijital televizyon kanal ayarları hakkında
daha fazla bilgi için 92. sayfadan başlayan “Detaylı Kanal Ayarları” bölümüne bakın.

Televizyon / Kullanma Kılavuzu19 / 117 TR
Dili-seçin-(sayfa 20, adım 3)
AYARLAR--------------------------------------------------------------------------------------------------------------------
İlk-kurulum-–-genel-bakış
Ülkeyi-seçin-(sayfa 20, adım 5)
Modu-seçin-(sayfa 20, adım 6)
Ağı-seçin-(sayfa 20, adım 11)
Kablolu-(sayfa 21, adım 12)
Kablosuz-(sayfa 21, adım 16)
Kablosuz-WPS-(bölüm sayfa 87)
Oto.
(sayfa 21, adım 12)
Manuel(Bölüm sayfa 85)
Oto.
(sayfa 21, adım 16)
Manuel(Bölüm sayfa 89)
Düğme(Bölüm sayfa 87)
PIN(Bölüm sayfa 87)
Kanal-Düzenleyici-(sayfa 24)
TV-kanalları-ayarı-(sayfa 22, adım 24)
DVB-T-(sayfa 23., adım 34)
DVB-C-(sayfa 22., adım 29)
DVB-S-(sayfa 22, adım 24)
Oto.(sayfa 22, adım 29)
Manuel(bölüm sayfa 100)
Oto.(sayfa 22, adım 24)
Manuel(bölüm sayfa 93)
Oto.(sayfa 23, adım 34)
Manuel(bölüm sayfa 101)

20 / 117 TRTelevizyon / Kullanma Kılavuzu
İlk-kurulumun-yapılması1- Televizyonu O/I güç düğmesiyle standby
moduna getirin.
2- »8«, »1…0«, »P+« veya »P–« ile televizyo-nu standby modundan açın.
– Televizyon ilk kez açıldığında Menü Dili seçim menüsü görünür.
Ultra Logic
Seç
Menü Dili
Lütfen dil seçimini yapınız.
Česky Dansk Deutsch English Espanol Eλληvıκά Français
Hrvatski Italiano Magyar Nederlands Norsk Polski Português
Pyccкий Româneşte Slovenščina Eesti Suomi Svenska Бългaрски
Slovenčina Lietuviu Türkçe
Alanı Değiştir
Yardım:-7 »Temel Kurulum« menüsü ekranda
görünmezse, ayarı, 73. sayfada bulunan televizyonu fabrika ayarlarına döndürme hakkındaki talimatları izleyerek yapın.
3- »<«, »>«, »V« veya »Λ« düğmesiyle menü dilini seçin ve »OK« düğmesiyle onaylayın.
– »Hoş geldiniz« menüsü görünür.
4- Aşamalı kurulum, televizyonu kullanabilmek için yapılacaktır. Kuruluma başlamak için »OK« düğmesine basın.
5- »<«, »>«, »V« veya »Λ« düğmesiyle tele-vizyonun kullanılacağı ülkeyi seçin ve »OK« düğmesiyle onaylayın.
– »Kullanıcı Modu« görününce, »Ev Modu« seçeneğini seçin.
6- »Ev Modu« seçeneğini »OK« düğmesiyle onaylayın;
veya
»V« veya »Λ« düğmesiyle »Arttırılmış« seçeneğini seçin ve »OK« düğmesiyle onay-layın.
– »Ev Modu« EUP'ye uygun ve önceden ayarlı enerji tasarrufu sağlayan TV ayarla-rını barındırmaktadır.
AYARLAR--------------------------------------------------------------------------------------------------------------------
– »Arttırılmış« – eğer televizyonunuzu bir demo gösterimi amacı ile kullanacaksanız bu modda arttırılmış görüntü ve ses ayar-ları kullanılır. Arttırılmış modda daha fazla enerji tüketilir.
7- »V« veya »Λ« düğmesiyle »Ayakta« veya »Duvara asılı« seçeneğini seçin.
Not:-7 Televizyonun konumunu seçmek ses ayarı
için önemlidir.8- »Sonraki« seçeneğini onaylamak için »OK«
düğmesine basın. – »Özet« menüsü görüntülenir.
9- Bir sonraki adıma geçmek için »« (mavi) düğmesine basın.
– »Aksesuarlar« menüsü görüntülenir.
10- Televizyona için kullanılan bir aksesuar televizyona bağlanmış ise bu menüden ayarlarını yapın.
»V« veya »Λ« düğmesiyle aksesuarı seçip »<«, »>« ayarlayın.
11- Bir sonraki adıma geçmek için »« (mavi) düğmesine basın.
Notlar:-7 Televizyonunuzu ev ağına bağlamak
isterseniz, – otomatik LAN bağlantısı için 11. madde-
den devam edin, veya – otomatik WLAN bağlantısı için 15. mad-
deden devam edin.Not:-7 Bir ev ağına bağlanmak gerekli değilse
»« (mavi) kullanım ayarını atlayın. 23 28 veya 33 maddeden ayarlara devam edin.
Televizyon / Kullanma Kılavuzu21 / 117 TR
Bir-LAN-kablosuyla-ev-ağına-bağlanma12- »V« veya »Λ« düğmesiyle »Kablolu«
seçeneğini seçin ve »OK« düğmesiyle onaylayın.
Not:-7 Manuel LAN bağlantısı ayarları, 85. sayfa-
da bulunmaktadır.13- »« (Kırmızı) düğmesi ile »Bağlan« seçeneği-
ni seçip modem bağlantısını kurun. – »Bağlantı kuruluyor ... Lütfen bekleyin«
mesajı görüntülenir ve bağlantı başarılı ise »Gateway Bağlantısı: Başarılı«, »İnternet Bağlantısı: Başarılı« mesajı görüntülenir.
14- »« (yeşil) düğmesine basarak yapılan ayarlar ile yerel ağ ve internet bağlantısının gerçekleştiğini kontrol edin.
– »Test ediliyor ... Lütfen bekleyin« mesajı görüntülenir ve bağlantı başarılı ise »Gateway Bağlantısı: Başarılı«, »İnternet Bağlantısı: Başarılı« mesajı görüntülenir.
15- »Kaynak Ayarları« menüsüne geçmek için »« (mavi) düğmesine basın.
Not:-7 Aşağıdakiler için TV kanallarını gösterildiği
şekilde aramaya devam edin: – DVB-S alımı için madde 23; – DVB-C alımı için madde 28; – DVB-T alımı için madde 33;
Ağ-şifresini-girerek-otomatik-bağlan-mak16- »V« veya »Λ« düğmesiyle »Kablosuz«
seçeneğini seçin ve »OK« düğmesiyle onaylayın.
17- »Wi-Fi'ı açmak istiyor musunuz?« mesajını »<« veya »>« düğmesiyle »Evet« seçip »OK« düğmesiyle onaylayın.
18- »V« veya »Λ« düğmesiyle »Erişim Noktası Seç« satırını seçin ve »OK« düğmesiyle onaylayın.
– »Erişim Noktası Seç« menüsü görüntülenir ve mevcut kablosuz ağlar taranarak menü-de görüntülenir.
19- »V« veya »Λ« düğmesi ile bağlanmak iste-diğiniz ağı seçip »OK« düğmesine basarak onaylayın.
– Kablosuz bağlantı şifre ekranı görüntüle-nir.
20- »<«, »>«, »V« veya »Λ« düğmesiyle gereken karakteri seçip »OK« düğmesiyle bir sonraki karaktere geçin.
– »Shift« ➡ »OK« tuşlarını kullanarak büyük harfler / sayılar ve küçük harfler / özel karakterler arasında geçiş yapabilirsiniz.
– Girilen karakteri silmek için »Del« düğme-sini seçip »OK« düğmesiyle onaylayın.
21- »« (yeşil) ile şifreyi onaylayın. – »Bağlantı kuruluyor ... Lütfen bekleyin«
mesajı görüntülenir ve bağlantı başarılı ise »Gateway Bağlantısı: Başarılı« mesajı görüntülenir.
22- »« (yeşil) düğmesine basarak yapılan ayarlar ile yerel ağ ve internet bağlantısının gerçekleştiğini kontrol edin.
– »Test ediliyor ... Lütfen bekleyin« mesajı görüntülenir ve bağlantı başarılı ise »Gateway Bağlantısı: Başarılı«, »İnternet Bağlantısı: Başarılı« mesajı görüntülenir.
23- »Kaynak Ayarları« menüsüne geçmek için »« (mavi) düğmesine basın.
Not:-7 Aşağıdakiler için TV kanallarını gösterildiği
şekilde aramaya devam edin: – DVB-S alımı için madde 23; – DVB-C alımı için madde 28; – DVB-T alımı için madde 33;
AYARLAR--------------------------------------------------------------------------------------------------------------------

22 / 117 TRTelevizyon / Kullanma Kılavuzu
AYARLAR--------------------------------------------------------------------------------------------------------------------
Uydu-sinyali-ile-televizyon-kanallarının-aranması-(DVB-S/S2)24-»V« veya »Λ« düğmesiyle »Uydu« seçene-
ğini seçin ve »OK« düğmesiyle onaylayın. – Türksat Uydusu 42 ° Doğuya önceden
ayarlıdır.
25-»V« veya »Λ« düğmesiyle »Standart Mod« seçeneğini seçin ve »OK« düğmesiy-le onaylayın.
26-Sonraki sayfa için »« (mavi) düğmesine basın.
Notlar:7 »Kanal Tipi«'ni seçin. Yalnızca dijital kanallarını mı (Dijital), yoksa
yalnızca radyo mu (Radyo) ya da ikisini birden mi (Dijital+Radyo) aramak istediğinizi belirlemek için »V« veya »Λ« düğmesiyle »Dijital« ve/veya »Radyo« öğelerini seçip işaretlemek ya da işareti kaldırmak için »OK« düğmesine basın.
7 Tarama Modunu seçin. Yalnızca ücretsiz dijital televizyon kanallarını
mı (Ücretsiz), yoksa yalnızca şifreli dijital televizyon kanallarını mı (Şifreli) ya da ikisini birden mi (Ücretsiz+Şifreli) aramak istediğinizi belirlemek için »V« veya »Λ« düğmesiyle »Ücretsiz« ve/veya »Şifreli« öğelerini seçip işaretlemek ya da seçimi kaldırmak için »OK« düğmesine basın.
27- Aramaya başlamak için »« (Kırmızı) düğ-mesine basın.
– »Otomatik Kanal Arama« menüsü görünür ve televizyonun aranmasına başlanır.
– »Arama tamamlandı!« mesajı göründü-ğünde tarama tamamlanır.
28-»OK« düğmesiyle »Kanal Düzenleyici«'yi seçin.
Kablolu-dijital-televizyon-kanallarının-ayarlanması-(DVB-C)29- »V« veya »Λ« düğmesiyle »Kablo«
seçeneğini seçin ve »OK« düğmesiyle onaylayın.
30- »V« veya »Λ« düğmesiyle »Tarama Tipi« satırını seçin.
»<« veya »>« düğmesiyle »Hızlı« veya »Tam« seçeneğini seçin.
– »Hızlı« tarama fonksiyonu, kanalları, ya-yın sinyalindeki kablo operatörü bilgisine göre ayarlar.
– »Tam« tarama fonksiyonu, seçili tüm fre-kans aralığını tarar. Bu arama seçeneği ile arama işlemi uzun sürebilir. Bu tarama tipi önerilir. Bazı kablo sağlayıcıları »Hızlı« tarama seçeneğini desteklemez.
Not:7 Aramayı hızlandırabilirsiniz. Bunun için fre-
kans ve ağ kimliği bilgileri gereklidir. Kablo operatörünüzden bu veriyi alabilir veya Internet’teki forumlardan bulabilirsiniz.
31- Sonraki sayfa için »« (mavi) düğmesine basın.
Not:7 Kanal Tipi seçimini yapın. Yalnızca dijital
televizyon kanallarını (Dijital), yalnızca Analog kanallarını mı (Analog) yoksa ikisini de birden mi (Dijital+Analog) aramak istediğinizi belirlemek için »V« veya »Λ« düğmesiyle »Dijital« ve »Analog« öğelerini seçip işaretlemek veya işareti kaldırmak için »OK« düğmesine basın.
32- Aramaya başlamak için »« (Kırmızı) düğ-mesine basın.
– »Otomatik Kanal Arama« menüsü görünür ve televizyonun aranmasına başlanır.
– »Arama tamamlandı!« mesajı göründü-ğünde tarama tamamlanır.
33- »OK« düğmesiyle »Kanal Düzenleyici«'yi seçin.

Televizyon / Kullanma Kılavuzu23 / 117 TR
AYARLAR--------------------------------------------------------------------------------------------------------------------
Karasal-dijital-televizyon-kanallarının-ayarlanması-(DVB-T/T2)34-»V« veya »Λ« düğmesiyle »Anten« seçene-
ğini seçin ve »OK« düğmesiyle onaylayın.
Önemli:7 Anten güç kaynağı (5V ), yalnızca anten
sinyal amplifikatörü bulunan bir iç mekan anteniyse ve şebekeye bağlı bir prizden (ya da benzer bir kaynaktan) beslenmiyorsa açılabilir. Aksi takdirde, kısa devreye yol açıp anteninize onarılamaz hasarlar verebilirsiniz.
35- »V« veya »Λ« düğmesiyle »Aktif Anten« satırını seçin.
»<« veya »>« (»Açık«) ile anten için anten güç kaynağını açın.
36- »V« veya »Λ« düğmesiyle »Sonraki Sayfa« satırını seçin ve »OK« düğmesiyle onaylayın.
Not:7 Kanal Tipi seçimini yapın. Yalnızca dijital
televizyon kanallarını (Dijital), yalnızca Analog kanallarını mı (Analog) yoksa ikisini de birden mi (Dijital+Analog) aramak istediğinizi belirlemek için »<« veya »>« düğmesiyle »Dijital« ve »Analog« öğelerini seçip işaretlemek veya işareti kaldırmak için »OK« düğmesine basın.
37- Aramaya başlamak için »« (Kırmızı) düğ-mesine basın.
– »Otomatik Kanal Arama« menüsü görünür ve televizyonun aranmasına başlanır.
– »Arama tamamlandı!« mesajı göründü-ğünde tarama tamamlanır.
38-»OK« düğmesiyle »Kanal Düzenleyici«'yi seçin.

24 / 117 TRTelevizyon / Kullanma Kılavuzu
Dijital-kanallar-için-Kanal-Düzen-leyicisiArama sonunda bulunan kanallar »Kanal Düzenleyici«‘ye kaydedilir.Program tablosundan gerekli olmayan kanalları silebilirsiniz, program tablosundaki kanalların sıralamasını değiştirebilirsiniz ve her bir kanalı kilitleyebilirsiniz (Ebeveyn Kontrolü).Ayrıca favoriler listenize kanal ekleyebilirsiniz ve favoriler listesindeki kanalların sıralamasını değiştirebilirsiniz.Kanal Düzenleyicide kanal listesini sonraki say-faya geçirmek için »P-« düğmesine, önceki say-faya geçirmek için ise »P+« düğmesine basın.Kanal Düzenleyici menüsünde Kanal ismine göre arama yapmak için »« (Kırmızı) düğmesi-ne basın.
AYARLAR--------------------------------------------------------------------------------------------------------------------
Program-Tablosunu-açma1- »MENU« düğmesiyle menüyü açın.
2- »<«, »>«, »V« veya »Λ« düğmesiyle »Ayarlar« menüsünü »OK« ile onaylayın.
3- »<« veya »>« düğmesiyle »Kaynak« öğesini seçip »V« veya »Λ« düğmesiyle »Kanal Düzenleyici« satırını seçin ve »OK« düğme-siyle onaylayın.
– »Kanal Düzenleyici« menüsü görüntülenir.
Önemli:7 Tüm kaynaklar için (uydu, kablo ve anten)
program tablosu ve favori listeleri ayrı ayrı saklanmaktadır.
7 Program tablosu seçildiğinde bulunduğunuz kaynağın program tablosu görüntülenir.
Notlar:7 Program Tablosunda bir kanal isminin yanın-
da » « işareti varsa kanalı izlemek için bir CI modülü ve akıllı kart gerekir.
7 Kaydedilen veri kanalları kanal listesin-de gösterilmediğinden, Kanal listesinde 6000’den az kanal görüntülenebilir
XXXXXX XXX XXXX1 Das Erste
Kanallarda Arama Yer Değiştir Araçlar Kanala Geç Seç
Uydu TümüKanal Düzenleyici1 Das Erste
DTV
11 HD1DTV
6 24DTV
16 TV SportDTV
3 SAT1DTV
13 FilmDTV
8 HD TestDTV
18 SKYDTV
2 ZDFDTV
12 LifeDTV
7 HD SportsDTV
17 SAT8DTV
4 N24DTV
12 PromoDTV
8 SATDTV
19 TV6DTV
5 SAT3DTV
15 Sport1DTV
10 RTLDTV
20 TV5DTV

Televizyon / Kullanma Kılavuzu25 / 117 TR
AYARLAR--------------------------------------------------------------------------------------------------------------------
Kanal-düzenleyicide-ada-göre-kanal-aramaKanal düzenleyicide kanalları düzenlerken, kanal adını ilk iki karakterine göre arattırabilir ve kanalları seçebilirsiniz.1- »Kanal Düzenleyici» menüsünde »«
(kırmızı) düğmesine basarak arama modunu seçin.
2- Aramak istediğiniz kanalın ilk karakterini »<«, »>«, »V« veya »Λ« ile seçin ve »OK« düğmesine basarak onaylayın.
Sonraki karakterler için girişi tekrarlayın. – Bulunan kanallar ekranın sağ tarafında
sıralanacaktır.
3- »>« düğmesiyle sonuçlar bölümüne geçip arattığınız kanalı »V« veya »Λ«, seçip »OK« düğmesiyle vurgulayabilirsiniz.
Not:7 Kanalların yerinin değiştirilmesi, silinmesi ve
favori listelerine eklenmesi için ilgili bölümü okumaya devam edin.
4- Önceki menüye dönmek için »BACK <« düğmesine basın.
5- »Kanal Düzenleyici« menüsünden çıkmak için »EXIT« düğmesine basın.
Kanal-düzenleyicide-kanalların-silinmesi1- »Kanal Düzenleyici« menüsünde silmek
istediğiniz kanal veya kanalları »<«, »>«, »V« veya »Λ« düğmesiyle seçip »OK« düğmesine basarak televizyon kanalını vurgulayın.
–Kanal »✔« ile işaretlenir.
2- »« (sarı) düğmesine basın. – »Araçlar« menüsü görüntülenir.
3- »V« veya »Λ« ile »Sil« satırını seçin ve »OK« düğmesiyle onaylayın.
4- Silme işlemini onaylamak için »<« veya »>« düğmesiyle »OK« seçeneğini seçip »OK« düğmesine basın;
veya
iptal etmek için »İptal« seçeneğini seçip »OK« düğmesine basın.
5- »Kanal Düzenleyici« menüsünden çıkmak için »EXIT« düğmesine basın.
Kanal-düzenleyicide-kanalları-farklı-kanal-konumlara-taşıma1- »Kanal Düzenleyici« menüsünde taşımak
istediğiniz kanal veya kanalları »<«, »>«, »V« veya »Λ« düğmesiyle seçip »OK« düğmesine basarak televizyon kanalını vurgulayın.
–Kanal »✔« ile işaretlenir.
2- »« (yeşil) düğmesine basın.
Notlar:7 Kanal sırasını değiştirmeniz halinde, ya-
yıncının yollamış olduğu kanal numaraları değişecektir.
7 Taşıma için birden fazla kanal seçilmişse, taşıma işlemi kanalların seçim sırasına göre birbirini takip edecektir.
3- Kanalın yeni yerini »<«, »>«, »V« veya »Λ« düğmesiyle seçip »OK« düğmesine basarak onaylayın.
4- »Kanal Düzenleyici« menüsünden çıkmak için »EXIT« düğmesine basın.
Kanal-düzenleyicide-kanalların-anten-tipine-göre-görüntülemesiBirden fazla anten sisteminiz varsa kanal düzen-leyicide kanalları anten tipine göre görüntüleye-bilirsiniz.1- »Kanal Düzenleyici« menüsünde kanalları
anten tipine göre görüntülemek için »« (sarı) düğmesine basın.
– »Araçlar« menüsü görüntülenir.
2- »Anten Tipi« seçeneğini »OK«-düğmesine basarak onaylayın.
3- »Anten«, »Kablo« veya »Uydu« seçeneğini »V« veya »Λ« ile seçin ve »OK«-düğmesi-ne basarak onaylayın.
– Televizyon seçtiğiniz anten sistemine geçer ve kanallar görüntülenir.
4- »Kanal Düzenleyici« menüsünden çıkmak için »EXIT« düğmesine basın.

26 / 117 TRTelevizyon / Kullanma Kılavuzu
Kanal-düzenleyicide-kanalların-sıralan-masıKanal düzenleyicide kanalları farklı kriterlere göre örneğin TV, radyo, veya şifreli / şifresiz olarak sıralayabilirsiniz.1- »Kanal Düzenleyici« menüsünde kanalları
farklı kriterlere göre sıralamak için »« (sarı) düğmesine basın.
2- İstediğiniz sıralama kriterini »V« veya »Λ«-düğmesi ile seçip »OK« düğmesine basarak onaylayın.
– Kanallar seçtiğiniz kritere göre kanal düzenleyici menüsünde görüntülenir.
3- »Kanal Düzenleyici« menüsünden çıkmak için »EXIT« düğmesine basın.
Favoriler-listesi-oluşturmaFavori kanallarınızı seçebilir ve bunları dört liste halinde kaydedebilirsiniz (FAV1 ila FAV4).
Not:7 Tüm kaynaklar için (uydu, kablo ve anten)
favori listeleri ayrı ayrı oluşturulmalıdır.7 Favoriler listesini seçmek için »FAV« düğme-
sine basın.1- »Kanal Düzenleyici« menüsünde favori liste-
sine eklemek istediğiniz kanal veya kanalları »<«, »>«, »V« veya »Λ« düğmesiyle seçip »OK« düğmesine basarak televizyon kanalını vurgulayın.
–Kanal »✔« ile işaretlenir.
2- »« (sarı) düğmesine basın. – »Araçlar« menüsü görüntülenir.
3- »V« veya »Λ« ile »Favori Ekle« satırını seçin ve »OK« düğmesiyle onaylayın.
– »Favori Ekle« menüsü görüntülenir.
4- »V« veya »Λ« düğmesiyle seçili kanallara eklemek istediğini favoriler listesini seçin ve »OK« düğmesiyle kaydedin.
– Kanallar, Kanal Düzenleyici'de »❶«, »❷«, »❸« veya »❹« ile işaretlidir.
– Aynı kanalı birden fazla favori listesine ekleyebilirsiniz.
– Her favori listesine en fazla 250 kanal eklenebilir.
AYARLAR--------------------------------------------------------------------------------------------------------------------
Notlar:7 Favori listesinden kanal silebilirsiniz. »«
(sarı) düğmesine basın, kanalın bulunduğu favoriler listesini »V« veya »Λ« ile seçin ve »OK« düğmesine basarak onaylayın. Silmek istediğiniz kanalı veya kanalları »<«, »>«, »V« veya »Λ« tuşlarıyla seçin ve kanalı »OK« tuşuna basarak vurgulayın.
»« (sarı) tuşuna basın ve »Favori Sil« satırını »V«, »Λ« ile seçin ve »OK« ile onaylayın. Seçtiğiniz kanal artık favoriler listesinden silinir.
7 Favori kanal listesine kaydedilmiş bir kanal silindiğinde favori listesindeki kanal sırala-ması güncellenir.
5- »Kanal Düzenleyici« menüsünden çıkmak için »EXIT« düğmesine basın.
Favori-listesinde-kanalların-sıralanmasıFavori listesinde kanal sıralamasını değiştirebi-lirsiniz.1- »Kanal Düzenleyici« menüsünde favori
listesini seçmek için »« (sarı) düğmesine basın.
2- İstediğiniz sıralama kriterini »V« veya »Λ« düğmesi ile seçin ve »OK« düğmesine basarak onaylayın.
– Seçilen favori listesi kanalları görüntülenir.
3- Taşımak istediğiniz kanal veya kanalları »<«, »>«, »V« veya »Λ« düğmesiyle seçip »OK« düğmesine basarak televizyon kanalını vurgulayın.
–Kanal »✔« ile işaretlenir.
4- »« (sarı) düğmesine basın. – »Araçlar« menüsü görüntülenir.
5- »V« veya »Λ« ile »Yer Değiştir« satırını seçin ve »OK« düğmesiyle onaylayın.
Not:7 Taşıma için birden fazla kanal seçilmişse,
taşıma işlemi kanalların seçim sırasına göre birbirini takip edecektir.
6- Kanalın yeni yerini »<«, »>«, »V« veya »Λ« düğmesiyle seçip »OK« düğmesine basarak onaylayın.
7- »Kanal Düzenleyici« menüsünden çıkmak için »EXIT« düğmesine basın.

Televizyon / Kullanma Kılavuzu27 / 117 TR
AYARLAR--------------------------------------------------------------------------------------------------------------------
Favori-listeleri-için-kendi-verdiğiniz-adları-girinTüm favori listelerini yeniden adlandırabilirsiniz.1- Ekranda hiç bir menü açık değilken favori
listesi menüsünü çağırmak için »FAV« düğ-mesine basın.
2- Adını değiştirmek istediğiniz favori listesini »V« veya »Λ« düğmesiyle seçip »« (mavi) düğmesine basın.
– Sanal klavye görüntülenir.
3- Mevcut adı silmek için aşamalı olarak »« (Kırmızı) düğmesine basın.
4- »<«, »>«, »V« veya »Λ« düğmesiyle karakteri/sayıyı seçip »OK« düğmesiyle bir sonraki karaktere geçin.
Aynı işlemi tüm karakter/rakamlar için uygu-layın.
Not:7 »Shift« ➡ »OK« tuşlarını kullanarak büyük
harfler / sayılar ve küçük harfler / özel karakterler arasında geçiş yapabilirsiniz.
5- Yeni adı kaydetmek için »« (yeşil) düğme-sine basın.
6- Ayarı sonlandırmak için »EXIT« düğmesine basın.
AV-kanallarının-yeniden-adlandırılmasıAV kaynakları bağladığınız cihaza göre yeni-den adlandırabilirsiniz. Örneğin TV’nin HDMI1 kaynağına HDMI kablosuyla bağladığınız bir bilgisayar için kaynak ismini PC yapabilirsiniz.1- »Giriş Kaynağı« menüsünü » « ile açın.
2- Adını değiştireceğiniz AV kaynağını »<« veya »>« ile seçin ve »« (mavi) düğme-sine basın.
– Yeni İsim menüsü görüntülenir.
3- »OK« düğmesine basın ve "eski" ismi kade-meli olarak »« (Kırmızı) ile silin.
4- »<«, »>«, »V« veya »Λ« düğmesiyle karakteri/sayıyı seçip »OK« düğmesiyle bir sonraki karaktere geçin.
Aynı işlemi tüm karakter/rakamlar için uygu-layın.
Not:7 »Shift« ➡ »OK« tuşlarını kullanarak büyük
harfler / sayılar ve küçük harfler / özel karakterler arasında geçiş yapabilirsiniz.
5- Yeni adı kaydetmek için »« (yeşil) düğme-sine basın.
6- Cihaz tipi için uygun olan simgeyi »<« veya »>« düğmesiyle seçin ve »OK« düğmesine basarak onaylayın.
7- Ayarı kaydetmek için »« (mavi) düğme-sine basın.
– Kaynak ismi ve simgesi değişecektir.
8- Ayarı sonlandırmak için »EXIT« düğmesine basın.

28 / 117 TRTelevizyon / Kullanma Kılavuzu
GÖRÜNTÜ-/-SES-AYARLARI--------------------------------------------------------------
Görüntü-ayarları-1- »MENU« düğmesiyle menüyü açın.
2- »<«, »>«, »V« veya »Λ« düğmesiyle »Ayarlar« menüsünü »OK« ile onaylayın.
3- »Görüntü« menü öğesini »V« düğmesiyle onaylayın.
– »Görüntü« menüsü etkindir.
Resim Formatı 16:9
Resim Modu Doğal
Arka Işık Ekonomik
Manuel Ekran Işığı 100
Gelişmiş
Öntanımlı Görüntü Ayarlarına Dön
Görüntü
PerXX XXX XXXX
Yayın ZamanlayıcıSes AğTV Ebeveyn
Ayarlar > Görüntü
Alanı Değiştir Seç ÇıkışGeriBACK EXIT
4- »V« veya »Λ« ile istenilen satırı/işlevi seçin ve »OK« düğmesiyle onaylayın.
»<« veya »>« düğmesiyle seçeneği seçip »Görüntü Ayarları« menüsüne dönmek için »BACK <« düğmesine basın.
Not:7 Diğer ayarlar »Gelişmiş« öğesi altında yer
almaktadır.5- »V« ile »Gelişmiş« satırını seçin ve »OK«
düğmesiyle onaylayın.
6- »V« veya »Λ« ile istenilen satırı/işlevi seçin ve »OK« düğmesiyle onaylayın.
»<« veya »>« düğmesiyle değeri/seçeneği seçin ve »OK« düğmesiyle onaylayın.
»Görüntü Ayarları« menüsüne dönmek için »BACK <« düğmesine basın.
7- Ayarı sonlandırmak için »EXIT« düğmesine basın.
Arttırılmış-görüntü-ayarları-“Arttırılmış görüntü ayarları” birincil dijital görün-tü geliştirmelerinde bulunmaktadır ancak bunla-rın sadece görüntü kalitesi ve aktarım kusursuz olduğunda gerektiğinde kullanılması gerekmek-tedir. Bunlar aynı zamanda zayıf malzemeli görüntüyü geliştirebilir ancak aktarım ve görüntü kalitesinin kusursuz olduğu görüntüyü olumsuz olarak etkileyebilir.
7 »Canlı Renk« – Renk kontrastını ve kontrast ayarını arttırır. Bu ayar çoğunlukla normal resimlerle kullanım için çok güçlüdür ve sadece gerekli olursa kullanılmalıdır (düşük veya kapalı) aksi halde görüntüdeki ince ayrıntılar yok edilebilir.
7 »Gama« – Bu ayar, hangi dijital aktarım değeri için hangi parlaklık değerinin gösterileceğini belirler. Çoğu kayıtlar 2,2’lik gama değeriyle aktarılır (tüm Windows bilgisayarları ve MAC işlem sistemli daha yeni bilgisayarlar bununla çalışır, daha eski MAC sistemleri ve renk profilsiz aktarımlar çoğunlukla 1,8’lik bir gama değeriyle çalışır).
7 »Dinamik Kontrast« – Bu fonksiyon, görüntü-leri analiz ederek ve ardından kontrasttaki değişime bağlı olarak bunu değiştirerek ilgili resim içeriğinin kontrastını dinamik ve optimal olarak ayarlar. Kontrasttaki bu artış aynı zamanda resimdeki görünebilir parlaklık düzeylerini de düşürebilir.
7 »Mükemmel Netlik« – Hafif bir mavi renk tonuyla genel görüntüyü geliştirir (daha iyi bir keskinlik sağlayarak) ve bunu tamamen özel bir siyah tonundan tamamen siyah renge ayarlayarak siyah seviyesini arttırır. Bu sayede resmin karanlık bölgelerindeki görünen gri değerleri düşürülür.
7 »Film modu«, tüm kanal kaynakları için uzun filmleri tespit eder ve işler. Yani daima en uygun resmi alırsınız.
Bu, TV oynatımında 480i, 576i ve 1080i modlarında ve diğer kanal kaynakları için çalışır.
»Film modu«, uzun film sinyali olmayan programlar için açılır ve donuk görüntü, hatalı altyazılar veya resimdeki ince çizgiler gibi önemsiz sorunlar oluşabilir.

Televizyon / Kullanma Kılavuzu29 / 117 TR
GÖRÜNTÜ-/-SES-AYARLARI--------------------------------------------------------------
7 »Netlik« – Belli bir sahnede bulanık bir görüntünün daha net gösterilmesini sağlar.
7 »Gürültü Azaltımı« – Resmi bir miktar daha keskin göstererek ve hafif bulandırma oluşturarak görünen “karlı” bölgeleri azaltır. Dolayısıyla iyi resim malzemesi olduğunda en az düzeyde kullanılmalıdır.
7 »Dijital Gürültü Azaltımı« – Bu fonksiyon yalnızca dijital alım kaynaklarıyla ve AV ön ayarlarıyla seçilebilmektedir. MPEG sıkış-tırmasından kaynaklanan dijital program-lardan gelen (DVB-T alıcılarından ve düşük aktarım oranlarından ya da DVD oynatı-cılardan gelenler gibi) kusurlardan (piksel blokları) kaynaklı paraziti azaltır.
Fabrika-ayarlarına-dönüş1- »Görüntü« menüsünde »V« ile »Öntanımlı
Görüntü Ayarlarına Dön« öğesini seçin ve »OK« düğmesiyle onaylayın.
2- Güvenlik sorusunu onaylamak için »Evet« seçeneğini seçin;
veya
iptal etmek için »Hayır« seçeneğini seçip »OK« düğmesine basın.
3- Ayarı sonlandırmak için »EXIT« düğmesine basın.
Ayarları-sonlandırma1- Ayarı işlemini sonlandırıp menüden çıkmak
için »EXIT« düğmesine basın.

30 / 117 TRTelevizyon / Kullanma Kılavuzu
GÖRÜNTÜ-/-SES-AYARLARI--------------------------------------------------------------
Ses-ayarları-1- »MENU« düğmesiyle menüyü açın.
2- »<«, »>«, »V« veya »Λ« düğmesiyle »Ayarlar« menüsünü »OK« ile onaylayın.
3- »>« veya »<« ile »Ses« menü öğesini seçip »V« düğmesiyle onaylayın.
– »Ses« menüsü etkindir.
Ses Modu Doğal
Bluetooth Kapalı
Bluetooth Cihazı Seç - - - -
Gelişmiş
Öntanımlı Görüntü Ayarlarına Dön
Görüntü
PerXX XXX XXXX
Yayın ZamanlayıcıSes AğTV Ebeveyn
Ayarlar > Ses
Alanı Değiştir Seç ÇıkışGeriBACK EXIT
Not:7 İlave işlemler aşağıdaki bölümlerde açık-
lanmıştır.
Ses-Modu1- »V« veya »Λ« düğmesiyle »Ses Modu«
satırını seçin.
2- »Standart Mod«, veya »Kullanıcı« seçene-ğini seçmek için »<« veya »>« düğmesine basın.
Magic-FidelityMagic Fidelity televizyon setine entegre olarak kurulmuş ve Surround Sound etkisi yaratmak için yalnızca cihaz içi hoparlörlere gereksinimi olan bir ses teknolojisidir.1- »V« veya »Λ« düğmesiyle »Ses Modu«
satırını seçin.
2- »<« veya »>« düğmesiyle »Film« »Doğal«, »Konuşma« veya »Müzik« seçeneğini seçin.
TV-konumuBu özellik ile televizyonun konumunu seçmek ses ayarı için önemlidir.1- »V« veya »Λ« ile »Gelişmiş« satırını seçin
ve »OK« düğmesiyle onaylayın.
2- »V« veya »Λ« düğmesiyle »TV Konumu« satırını seçin.
3- »<« veya »>« düğmesiyle »Ayakta« veya »Duvara Asılı« seçeneğini seçin.
Stereo/dual-kanalCihaz, örneğin, ses kanalı B’de orijinal sesli film (ekran: »Dual II«) ve ses kanalı A’da dublajlı ver-siyon (ekran: »Dual I«) gibi iki kanallı programla-rı alıyorsa, istediğiniz ses kanalını seçebilirsiniz.1- »V« veya »Λ« ile »Gelişmiş« satırını seçin
ve »OK« düğmesiyle onaylayın.
2- »V« veya »Λ« düğmesiyle »Ses Tipi« satırını seçin ve »<« veya »>« düğmesiyle ayarlayın.
EkolayzerEkolayzer, kendiniz oluşturabileceğiniz bir ses ayarı sunmaktadır.Ekolayzer öğesi, »Ses Modu«, »Kullanıcı« seçil-diğinde menüde aktiftir.1- »V« veya »Λ« ile »Gelişmiş« satırını seçin
ve »OK« düğmesiyle onaylayın.
2- »V « veya »Λ« ile »Ekolayzer« satırını seçin ve »OK« düğmesiyle onaylayın.
– »Ekolayzer« menüsü açılır.
3- »120Hz« frekans bandını etkindir. »<« veya »>« düğmesiyle tercih edilen
değeri ayarlayın.
4- Sonraki frekans bandını »V« veya »Λ« düğmesiyle seçip ayar işlemini tekrarlayın.
5- Ayarı kaydetmek için »BACK <« düğme-sine basın.

Televizyon / Kullanma Kılavuzu31 / 117 TR
GÖRÜNTÜ-/-SES-AYARLARI--------------------------------------------------------------
Otomatik-sesTelevizyon kanalları farklı ses seviyelerinde yayınlanır. Otomatik Ses Seviyesi Sınırlandırma (AVL) fonksiyonu, kanal değiştirdiğinizde sesin aynı seviyede korunmasını sağlar.1- Ses menüsünden »V« veya »Λ« ile »Ge-
lişmiş« satırını seçin ve »OK« düğmesiyle onaylayın.
2- »V« veya »Λ« düğmesiyle »AVL« satırını seçin ve ardından »<« veya »>« düğmesiy-le »Açık« öğesini seçin.
Not:7 AVL öğesi, »Ses Modu«, »Kullanıcı« veya
»Standart Mod« olarak seçildiğinde menü-de aktiftir.
Fabrika-ayarlarına-dönüş1- »Ses« menüsünde »V« ile »Öntanımlı Ses
Ayarlarına Dön« öğesini seçin ve »OK« düğmesiyle onaylayın.
2- Güvenlik sorusunu onaylamak için »Evet« seçeneğini seçin;
veya
iptal etmek için »Hayır« seçeneğini seçip »OK« düğmesine basın.
3- Ayarı sonlandırmak için »EXIT« düğmesine basın.
Ayarları-sonlandırma1- Ayar işlemini sonlandırıp menüden çıkmak
için »EXIT« düğmesine basın.

32 / 117 TRTelevizyon / Kullanma Kılavuzu
TV’NİN-ÇALIŞMASI---TEMEL-FONKSİYONLARI--------
Açma-ve-kapatma1- Televizyonu »ON-•-OFF« güç düğmesiyle
standby moduna getirin.
2- Televizyonu bekleme modundayken açmak için »8«, »1…0« veya »P+« veya »P-« düğmesine basın.
3- Televizyonu standby moduna geçirmek için »8« düğmesine basın.
4- Televizyonu »ON-•-OFF« güç düğmesiyle standby moduna getirin.
Kanalları-seçme1- Kanalları doğrudan seçmek için »1…0«
düğmelerini kullanın.
2- »P+« ya da »P-« düğmeleriyle adım adım televizyon kanallarını seçin.
3- »OK« düğmesine basarak kanal listesini açın, »<« veya »>« düğmesiyle kanal listesini seçin ve »OK« düğmesiyle kanalı teyit edip, »EXIT« düğmesiyle kanal listesini kapatın.
Notlar:7 Sonraki programlar için program bilgisi
»Λ« düğmesiyle getirilebilir.7 »OK« düğmesiyle kanal listesini getirerek
radyo kanallarına geçiş yapın, »Radyo« seçeneğini seçmek için »« (mavi) tuşuna basın, »<« veya »>« düğmelerini kullanın. Radyo kanallarını »<« veya »>« düğmesiyle seçip »OK« düğmesiyle onaylayın.
7 Tekrar »OK« düğmesiyle kanal listesini getirerek TV kanal listesine geçiş yapın, »Dijital« seçeneğini seçmek için »<« veya »>« düğmelerini kullanarak »« (mavi) düğmesine basın ve »OK« düğmesiyle onaylayın.
7 Enerji tasarrufu için "Radyo modunda" ekranı kapatabilirsiniz (70. sayfadaki "KONFOR FONKSİYONLARI" bölümüne bakın).
Favori-listesi-seçmeÇeşitli listelerden kanal seçebilirsiniz (örneğin TÜMÜ, FAV1-FAV4).1- Favori listesi menüsünü çağırmak için »FAV«
düğmesine basın. – »Favoriler« menüsü görüntülenir.
2- »V« veya »Λ« düğmesiyle kanal listesini seçin ve »OK« düğmesiyle onaylayın.
3- »<« veya »>« düğmesiyle kanalı seçin ve »OK« düğmesiyle onaylayın.
4- »EXIT« düğmesine basarak kanal listesin-den çıkın.
Sinyal-kaynağı-seçme1- » « düğmesiyle »Kaynak Seçin« menü-
sünü açın.
2- »<« veya »>« düğmesiyle istediğiniz AV sinyal kaynağını seçin ve »OK« düğmesiyle onaylayın.
Not:7 AV sinyal kaynaklarını yeniden adlandırı-
labilir. 27. sayfadaki "Ayarlar" bölümüne bakın.
Ses-seviyesini-ayarlama1- »– o +« düğmesiyle ses seviyesini ayar-
layın.
Sesi-kapatma1- Sesi kapatıp (mute) yeniden açmak için
»p« düğmesini kullanın.
Bilgileri-görüntüleme1- »?« düğmesine basarak bilgileri görüntüle-
yin. – Kısa bir süre sonra ekrandaki menü
otomatik olarak kaybolur.
2- Detaylı bilgi görüntülemek için »?« düğmesi-ne iki kez basın.

Televizyon / Kullanma Kılavuzu33 / 117 TR
Ses-diliDijital kanalları seyrederken çeşitli dilleri seçebi-lirsiniz. Bu, yayınlanan programa bağlıdır.1- » « düğmesine basarak seçim menüsünü
açın.
2- »V« veya »Λ« düğmesi ile dili seçin ve »OK« düğmesiyle onaylayın.
3- Ayarları sonlandırmak için »EXIT« düğme-sine basın.
AltyazılarDijital kanalları seyrederken çeşitli altyazıları seçebilirsiniz. Bu, yayınlanan programa bağlıdır.1- » « düğmesine basarak seçim menüsünü
açın.
2- »V« veya »Λ« düğmesi ile dili seçin ve »OK« düğmesiyle onaylayın.
3- Ayarları sonlandırmak için »EXIT« düğme-sine basın.
Zap-fonksiyonuBu fonksiyonu, izlemekte olduğunuz televizyon kanalını kaydetmenize ve başka kanallara geç-menize (zap yapma) olanak tanır.1- »1…0« veya »P+«, »P–« düğmeleriyle
zap hafızasına kaydetmek istediğiniz kanalı (örneğin, kanal 1, BBC 1) seçin ve »BACK <« düğmesiyle kaydedin.
2- »1…0« veya »Λ«-»V« düğmeleriyle kanal-ları değiştirin.
3- Bu durumda, »BACK <« düğmesini kullanarak kayıtlı kanal (örnekteki kanal BBC1’dir) ile daha önce izlemekte olduğu-nuz kanal arasında geçiş yapabilirsiniz.
4- Zap fonksiyonundan çıkmak için »EXIT« düğmesine basın.
TV’NİN-ÇALIŞMASI---TEMEL-FONKSİYONLAR----------

34 / 117 TRTelevizyon / Kullanma Kılavuzu
TV’NİN-ÇALIŞMASI---EK-FONKSİYONLAR---------------------
»Tools« menüsünde aşağıdaki özellikleri bula-bilirsiniz.
Uyku-zamanlayıcısı»Uyku Zamanlayıcısı«, televizyon için bir kapan-ma zamanı girebilirsiniz. Bu süre sona erdikten sonra televizyon stand-by moduna geçer.1- »TOOLS« düğmesi ile Araçlar menüsünü
açın.
2- »V« veya »Λ« düğmesiyle »Uyku Zaman-layıcısı« satırını seçin.
3- »<« veya »>« düğmesiyle kapanma zama-nını seçin.
Not:7 Fonksiyonu »<« veya »>« düğmesiyle »Ka-
palı« konumuna ayarlayarak kapatın.4- Ayarları sonlandırmak için »EXIT« düğme-
sine basın.
Zoom-fonksiyonuBu fonksiyon sayesinde, televizyondaki görüntü-yü büyütebilirsiniz.1- »TOOLS« düğmesi ile Araçlar menüsünü
açın.
2- »V« veya »Λ« düğmesiyle »Zoom« satırını seçin.
3- »<« veya »>« düğmesiyle zoom ayarını seçip »OK« düğmesiyle onaylayın.
– Görüntü merkez odaklı büyütülür.
4- Büyütülen görüntü içerisinde gezinmek için »« (kırmızı) düğmesine basıp »<«, »>«, »V« veya »Λ« düğmeleriyle ekranı hareket ettirin.
5- Zoom menüsüne geri dönmek için »BACK <« düğmesine basın.
6- Ayarları sonlandırmak için »EXIT« düğme-sine basın.
Görüntü-formatını-değiştirmeSkart soketi üzerinden 16:9 formatı tespit edil-mesi halinde televizyon otomatik olarak bu formata geçer.1- »TOOLS« düğmesi ile Araçlar menüsünü
açın.
2- »V« veya »Λ« düğmesiyle »Resim Formatı« satırını seçin.
3- »<« veya »>« düğmesiyle resim formatını seçin ve »OK« düğmesiyle onaylayın.
4- Ayarları sonlandırmak için »EXIT« düğme-sine basın.
Not:7Aşağıdaki görüntü formatlarından birini
seçebilirsiniz.
»Otomatik«-formatGörüntü formatı, 16:9 formatındaki programlar için otomatik olarak »16:9« ayarına geçirilir.Görüntü formatı, 4:3 formatındaki programlar için otomatik olarak »4:3« ayarına geçirilir.
»16:9«-ve-»14:9«-formatları4:3 formatındaki programlar sırasında, »16:9« veya »14:9« seçilmesi halinde görüntü yatay olarak gerilir.Görüntü geometrisi yatay olarak gerilir.Gerçek 16:9 sinyal kaynaklarında (uydu alıcı-sından veya Euro-AV soketinde), görüntü doğru geometriye sahip olacak şekilde ekranı tümüyle doldurur.
»4:3«-formatıGörüntü 4:3 formatında gösterilir.
»LetterBox«-formatı-Letterbox ayarı, özellikle 16:9 formatındaki programlar için uygundur.Genellikle ekranın üst ve altında bulunan siyah kenarlıklar ortadan kaldırılır; 4:3 görüntü ekranı doldurur.İletilen görüntüler büyütülür ancak üst ve alttan biraz kırpılır. Görüntü geometrisi değişmeden kalır.

Televizyon / Kullanma Kılavuzu35 / 117 TR
TV’NİN-ÇALIŞMASI---EK-FONKSİYONLAR---------------------
»Altyazı«-formatıEkranın alt kısmında görünen altyazıları okuya-mazsanız, »Altyazı« öğesini seçin.
»Panorama«-formatı-Bu ayar, büyük genişlik/yükseklik oranına sahip filmler için uygundur.4:3 formatındaki programlar sırasında, »Pano-rama« fonksiyonunun seçilmesi halinde görüntü yatay olarak gerilir. Görüntü geometrisi yatay olarak gerilir.
»Tam-Ekran«-(Overscan-off)-formatıBu mod seçili olduğunda HDMI ve Component girişlerinden gelen yüksek çözünürlüklü görüntü kırpılmadan orijinal boyutları ile ekrana gelir. Bu mod sadece HDMI modu, 720p ve üzeri çözü-nürlüklerde aktif olur.
Ses-ayarları1- »TOOLS« düğmesi ile Araçlar menüsünü
açın.
2- »V« veya »Λ« düğmesiyle »Ses Önayarı« satırını seçin.
3- »<« veya »>« düğmesine basarak ses ayarını seçin.
– »Kullanıcı« ses ayarını değiştirebilirsiniz; sayfa 30’deki "Ekolayzer" bölümüne bakın.
4- Ayarları sonlandırmak için »EXIT« düğme-sine basın.
Görüntü-ayarları1- »TOOLS« düğmesi ile Araçlar menüsünü
açın.
2- »V« veya »Λ« düğmesiyle »Resim Modu« satırını seçin.
3- »<« veya »>« düğmesine basarak görüntü ayarını seçin.
Not:7 "Oyun" resim ayarı sadece »HDMI«, »Com-
ponent« ve »PC« modlarında seçilebilir.4- Ayarları sonlandırmak için »EXIT« düğme-
sine basın.
36 / 117 TRTelevizyon / Kullanma Kılavuzu
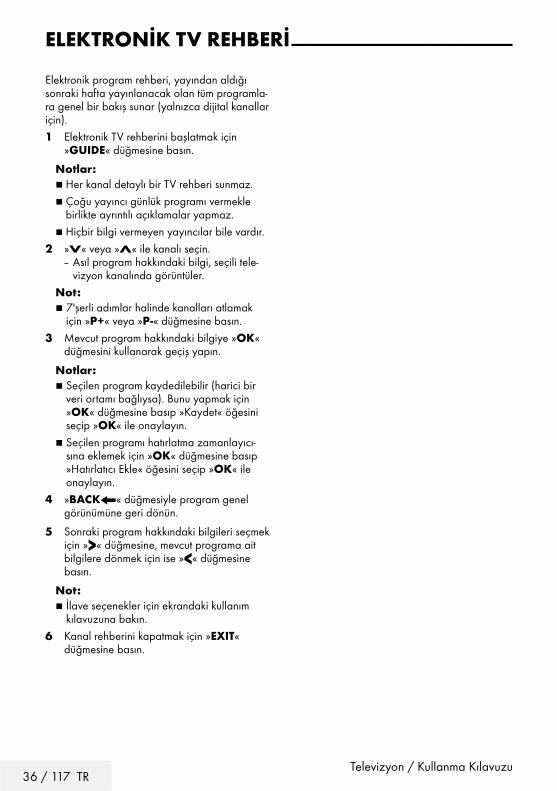
ELEKTRONİK-TV-REHBERİ---------------------------------------------------------------------
Elektronik program rehberi, yayından aldığı sonraki hafta yayınlanacak olan tüm programla-ra genel bir bakış sunar (yalnızca dijital kanallar için).1- Elektronik TV rehberini başlatmak için
»GUIDE« düğmesine basın.
Notlar:7 Her kanal detaylı bir TV rehberi sunmaz.7 Çoğu yayıncı günlük programı vermekle
birlikte ayrıntılı açıklamalar yapmaz.7 Hiçbir bilgi vermeyen yayıncılar bile vardır.
2- »V« veya »Λ« ile kanalı seçin. – Asıl program hakkındaki bilgi, seçili tele-
vizyon kanalında görüntüler.Not:7 7'şerli adımlar halinde kanalları atlamak
için »P+« veya »P-« düğmesine basın.3- Mevcut program hakkındaki bilgiye »OK«
düğmesini kullanarak geçiş yapın.
Notlar:7 Seçilen program kaydedilebilir (harici bir
veri ortamı bağlıysa). Bunu yapmak için »OK« düğmesine basıp »Kaydet« öğesini seçip »OK« ile onaylayın.
7 Seçilen programı hatırlatma zamanlayıcı-sına eklemek için »OK« düğmesine basıp »Hatırlatıcı Ekle« öğesini seçip »OK« ile onaylayın.
4- »BACK<« düğmesiyle program genel görünümüne geri dönün.
5- Sonraki program hakkındaki bilgileri seçmek için »>« düğmesine, mevcut programa ait bilgilere dönmek için ise »<« düğmesine basın.
Not:7 İlave seçenekler için ekrandaki kullanım
kılavuzuna bakın. 6- Kanal rehberini kapatmak için »EXIT«
düğmesine basın.

Televizyon / Kullanma Kılavuzu37 / 117 TR
HBBTV-MODU-----------------------------------------------------------------------------------------------------
HbbTV-nedir?HbbTV, modern yapısı, içeriği ve yüksek çözü-nürlüklü (HD) görüntü ve videolarıyla gelecek nesil interaktif teletekst yayını sunmaktadır.HbbTV yayını almak için televizyon Internet’e bağlı olması gerekir.HbbTV hizmeti sunan bir TV kanalına geçilince, ilgili mesaj görüntülenir.

38 / 117 TRTelevizyon / Kullanma Kılavuzu
HBBTV-MODU-----------------------------------------------------------------------------------------------------
HbbTV’nin-kullanımıHbbTV’yi destekleyen bir TV programına geçiş yaptığınızda, HbbTV yayın mevcut ise bir bilgi mesajı görüntülenir.1- »« (kırmızı) düğmesi ile HbbTV’yi açın. – Hizmet hakkındaki bilgiler ekranda
görüntülenir. Buna ek olarak, menülerde gezinme için gerekli olan renkli düğmeler de görüntülenir.
Not:7 Konu alanlarının aralığı ve bireysel konu
alanlarının seçimi her bir programın kendi sağlayıcısına bağlıdır.
7 »1« ila »0« arasındaki rakam düğmeleri ek fonksiyonlar için kullanılır.
2- İstenen konu alanını »« (yeşil), »« (sarı) veya »« (mavi) düğmelerle seçin.
3- Seçtiğiniz konu alanında, »V«, »Λ«, »<« veya »>« düğmelerini kullanarak istediği-niz seçeneği seçin ve »OK« düğmesiyle onaylayın.
4- »« (kırmızı) düğmesi ile HbbTV’yi kapatın.
Not:7 HbbTV modunda navigasyon çalışmazsa
»EXIT« düğmesine basarak fonksiyondan çıkabilirsiniz.
Video-dizinleri-için-ek-fonksiyon-lar1- Oynatmaya başlamak için »8« düğmesine
basın.
2- »!« düğmesi ile oynatma işlemini durak-latın .
3- »8« düğmesi ile oynatma işlemine devam edin.
4- »3« düğmesiyle ile geri, »4« düğmesiyle ise ileri sarın.
5- »7« düğmesiyle oynatma işlemini durdu-run.
HbbTV'nin-devre-dışı-bırakılması-ve-etkinleştirilmesiBu özellik ile HbbTV’yi kapatabilir böylece HbbTV yayını yapan kanallarda HbbTV uyarıla-rı görüntülenmez.1- »MENU« düğmesiyle menüyü açın.
2- »<«, »>« ve »V«, »Λ« düğmesi ile »Ayar-lar« öğesini »OK« ile onaylayın.
3- »>« veya »<« ile »Yayın« öğesini seçip »V« düğmesiyle onaylayın.
– »Yayın« menüsü etkindir.
4- »V« veya »Λ« ile »Gelişmiş« öğesini seçin ve »OK« düğmesiyle onaylayın.
5- »Hbb TV« menü öğesini »V« veya »Λ« düğmesiyle seçin.
6- »<« veya »>« düğmesiyle (»Kapalı«) seçin.
Not:7 HbbTV özelliğini tekrar açmak için, 6.
adımda »Açık« seçimini yapın.7- Ayarları sonlandırmak için »EXIT« düğme-
sine basın.
Dijital-teletekstin-devre-dışı-bıra-kılması-ve-etkinleştirilmesiDijital video metnini devre dışı bırakırsanız sade-ce normal video metni seçilebilir ancak interaktif HbbTV servisinin diğer fonksiyonları yine de kullanılabilir.1- »MENU« düğmesiyle menüyü açın.
2- »<«, »>« ve »V«, »Λ« düğmesi ile »Ayar-lar« öğesini »OK« ile onaylayın.
3- »>« veya »<« ile »Yayın« öğesini seçip »V« düğmesiyle onaylayın.
– »Yayın« menüsü etkindir.
4- »V« veya »Λ« ile »Gelişmiş« öğesini seçin ve »OK« düğmesiyle onaylayın.
5- »Dijital Teletext« menü öğesini »V« veya »Λ« düğmesiyle seçin.
6- »<« veya »>«düğmesiyle (»Kapalı«) seçin.
Not:7 Dijital teleteksti tekrar etkinleştirmek için 6.-
adımda »Açık« seçeneğini seçin.7 Ayarı sonlandırmak için »EXIT« düğmesine
basın.

Televizyon / Kullanma Kılavuzu39 / 117 TR
Not:7 Sadece bu "normal" video metnini kullan-
mak isterseniz, dijital video metnini devre dışı bırakın, bkz. sayfa 95.
TOP-text-veya-FLOF-text-modu1- Teletekst moduna geçmek için »TXT« tuşuna
basın.
2- Teletekst sayfalarını doğrudan »1...0« tuş-ları ile veya aşamalı olarak »V« veya »Λ« tuşları ile seçebilirsiniz.
Sayfa 100‘e dönmek için »?« tuşuna basın.
Not:7 Ekranın alt kısmında, kırmızı, yeşil ve ayrıca
kanala bağlı olarak sarı ve mavi metin alan-larından oluşan bir bilgi satırı görüntülenir. Uzaktan kumandanızda bunlara karşılık gelen düğmeler bulunmaktadır.
3- Bir sayfa geri gitmek için »« (kırmızı) tuşa basın.
4- Bir sayfa ileri gitmek için »« (yeşil) tuşa basın.
5- Bölüm seçmek için »« (sarı) tuşa basın.
6- Konu seçmek için »« (mavi) tuşa basın.
7- Teletekst modundan çıkmak için »TXT« tuşuna basın.
Normal-text-modu1- Teletekst moduna geçmek için »TXT« tuşuna
basın.
2- Teletekst sayfalarını doğrudan »1...0« tuşları ile seçebilirsiniz.
Sayfa 100‘e dönmek için »?« tuşuna basın.
3- Bir sayfa geri gitmek için »P-« tuşa basın.
4- Bir sayfa ileri gitmek için »P+« tuşa basın.
5- Teletekst modundan çıkmak için »TXT« tuşuna basın.
Ek-fonksiyonlar
Bekleme-süresini-atlamaBir sayfa aranırken, televizyon kanalına geçe-bilirsiniz.1- »1…0« düğmelerini kullanarak teletekst
sayfa numarasını girin ve ardından »6« düğmesine basın. Sayfa bulunduğunda, sayfa numarası görüntülenir.
2- Teletekst sayfasına geçmek için »6« düğme-
sine basın.
Karakter-boyutunu-büyütmeEkrandaki metni okumakta zorlanıyorsanız, karakter boyutunu iki katına çıkartabilirsiniz.1- Teletekst sayfasının boyutunu büyütmek için
»5« düğmesine art arda basın.
Sayfa-durdurmaBirden çok sayfada, yayını yapan istasyon tara-fından otomatik olarak kaydırılan birden çok alt sayfa bulunabilir.1- Alt sayfaları »3« düğmesiyle durdurun.
2- Fonksiyondan çıkmak için »3« düğmesine basın.
Bir-alt-sayfayı-doğrudan-çağırmaSeçilen teletekst sayfasında alt sayfalar varsa, seçilmiş olan alt sayfanın numarası ve toplam sayfa sayısı görüntülenir.1- » « düğmesiyle alt sayfayı çağırın.
2- Alt sayfa seçmek için »« (kırmızı) veya »« (yeşil) düğmesine basın.
3- Fonksiyondan çıkmak için » « düğmesine basın.
Cevabı-gösterBelirli teletekst sayfaları, çağrılabilen “gizli ce-vaplar” veya bilgiler içerir.1- »4« düğmesiyle bilgileri görüntüleyin.
2- »4« düğmesiyle bilgileri gizleyin.
Ekranı-bölmeBu fonksiyonla, televizyon kanalını sol tarafta, teletekst sayfasını ise sağ tarafta izleyebilirsiniz.1- Ekranı bölme fonksiyonunu etkinleştirmek
için »7« düğmesine basın. – Televizyon kanalı ve teletekst sayfası,
ekranda yan yana görünür.
2- Ekranı bölme fonksiyonunu devre dışı bırak-mak için »7« düğmesine basın.
TELETEKST-MODU--------------------------------------------------------------------------------------------

40 / 117 TRTelevizyon / Kullanma Kılavuzu
USB-KAYIT----------------------------------------------------------------------------------------------------------------
Televizyon-programlarının-kay-dedilmesi-ve-oynatılmasıyla-ilgi-li-bilgiler
7 Programların kaydedilmesi ve sonradan izlenmesi yalnızca dijital televizyon istas-yonlarında gerçekleştirilebilir (DVB-S, DVB-T ve DVB-C).
7 Dijital televizyon istasyonlarını (DVB-S, DVB-T ve DVB-C) yayını yapan istasyona bağlı olarak kaydedebilir ve kayıttan oyna-tabilirsiniz.
7 Programların kaydedilmesi ve sonradan izlenmesinin yanı sıra Zaman Kaydırma fonksiyonu yalnızca harici bir veri ortamı kullanılarak gerçekleştirilebilir (sabit disk veya USB çubuğu).
7 Kayıt işlemleri, piyasadaki pek çok veri orta-mıyla gerçekleştirilebilir. Bununla birlikte, tüm veri ortamlarıyla çalışacağını garanti edemeyiz.
7 Bir programı harici bir veri ortamına kaydet-meniz halinde, bunu yalnızca televizyonu-nuzda izleyebilirsiniz.
Bu programı başka herhangi bir cihazda izleyemezsiniz.
7 Televizyonunuzu onarıma göndermeniz ve donanım bileşenlerinin değiştirilmesi gerek-tiğinde, kayıtlarınızı onarılan televizyonda izleyemeyebilirsiniz.
7 Grundig harici depolama aygıtı üzerinde depolanan veri kaybından sorumlu değildir.
7 DTV kaynağında kaydettiğiniz dosyaları PVR medya oynatıcı ile oynatmanız önerilir. Bazı kayıt dosyaları USB Media Player ile düzgün oynatılmayabilir.
Harici-veri-ortamı-kullanımında-muhtemel-kısıtlamalarYayını yapan istasyona bağlı olarak, bazı tele-vizyon istasyonlarının çeşitli kısıtlamalar uygula-dığını görebilirsiniz.
GRUNDIG’in-bu-kısıtlamalar-üzerinde-herhangi-bir-etkisi-yoktur.
7 Bir programın harici veri ortamına kayde-dilmesi yayıncı kuruluş tarafından engelle-nebilir.
»URI* korumalı! PVR fonksiyonu engellendi« görünürse, kayıt veya zaman kaydırma özel-liği yayıncı tarafından sınırlandırılmıştır (bir kayıt mümkündür) veya devre dışı bırakılmış-tır (kayıt mümkün değildir).
*URI = kullanıcı hakları bilgisi.7 Bir programı harici veri ortamının arşivine
kaydederseniz kayıttan oynatma kısıtlanmış olabilir.
Yayıncı kuruluş, bu programı bir veya daha fazla kez izlemenize izin verebileceği gibi sadece belirli bir süre için izlenmesine de olanak tanıyabilir.
7 Çocuklara karşı koruma içeren istasyonlar için kayıt başlamadan önce hemen bir PIN girilmesi gerekir. Bu yetkinin verilmemesi halinde kayıt başlamayabilir.
7 Bir programın »AV1/S-VHS« soketi (ana-log ses/görüntü sinyali) aracılığıyla dijital televizyon istasyonundan bir video veya DVD kaydediciye kopyalanması yayıncı kuruluş tarafından kısıtlanmış olabilir. Bunun yapılabilmesi için cihazınızı kopyalama fonksiyonunu desteklemesi gerekir.

Televizyon / Kullanma Kılavuzu41 / 117 TR
USB-KAYIT----------------------------------------------------------------------------------------------------------------
Harici-veri-ortamının-bağlanma-sı
Notlar:7 Harici Veri ortamını bağlamadan önce,
televizyonu bekleme (stand-by) moduna almanız tavsiye edilir.
7 Harici veri ortamının bağlantısını kesmeden önce, televizyon bekleme (stand-by) mo-duna getirilmelidir; aksi takdirde, dosyalar zarar görebilir.
1- Harici sabit diski veya bellek çubuğunu tele-vizyonun USB(HDD)-USB arayüzüne takın.
Notlar:7 USB(HDD) USB arayüzüne bağlanılan
harici sabit disk ile beraber güç kablosu kullanıldığı durumlarda TV kapatıldığında harici hard diskin de güç kablosu çekilme-lidir.
7 USB Aygıtından herhangi bir dosya oku-nurken USB Aygıtının TV’den çıkarılmaması gerekmektedir.

42 / 117 TRTelevizyon / Kullanma Kılavuzu
USB-kayıt-ayarları
Menüyü-seçme1- »MENU« düğmesiyle menüyü açın.
2- »V«, »Λ«, »<« veya »>« ile »Kaydedilen-ler« menü öğesini seçip »OK« düğmesiyle onaylayın.
– »Medya Oynatıcı« menüsü görüntülenir.
3- »V« veya »Λ« ile »PVR« seçeneğini seçip »OK« düğmesiyle onaylayın.
– İçerik görüntülenir.
4- »TOOLS« düğmesine basın. – »Medya Ayarları« menüsü görüntülenir.
Medya Oynatıcı > PVR
Channel_1_201548_154649.ts
PerXX XXX XXXX
GeriBACK
İzleme Modu Otomatik Sığdır
Otomatik Önizleme Açık
Slayt Gösterisi Aralığı 5
Disk Yönetimi
Medya Ayarları
Not:7 İlave işlemler aşağıdaki bölümlerde açık-
lanmıştır.
Harici-veri-ortamının-çıkartılması1- »Disk Yönetimi« menüsünde »V« veya »Λ«
ile »Diski Güvenli Kaldır« satırını seçin ve »OK« düğmesine basarak onaylayın.
Not:7 Disk şimdi soketten güvenli bir şekilde
çıkarılabilir.
USB-KAYIT----------------------------------------------------------------------------------------------------------------
Harici-veri-ortamının-seçilmesiBirden fazla Harici veri ortamı televizyona takıl-mış ise birini seçin.1- »Disk Yönetimi« menüsünde »V« veya »Λ«
ile »Disk« satırını seçin ve »OK« düğmesine basarak onaylayın.
2- »V« veya »Λ« düğmesi ile harici veri ortamını seçin »OK« düğmesine basarak onaylayın.
3- »BACK <« düğmesi ile geri dönün veya ayarları sonlandırmak için »EXIT« düğme-sine basın.
Harici-veri-ortamında-bölüm-seçmeHarici veri ortamında birkaç bölüm varsa birini seçin.1- »Disk Yönetimi« menüsünde »V« veya »Λ«
ile »Bölüm« satırını seçin ve »OK« düğmesi-ne basarak onaylayın.
2- »V« veya »Λ« düğmesi ile istediğiniz bölümün seçimini yapıp »OK« düğmesine basarak onaylayın.
3- »BACK <« düğmesi ile geri dönün veya ayarları sonlandırmak için »EXIT« düğme-sine basın.
Harici-veri-ortamının-testiHarici veri ortamının işlevler için uygun olup olmadığını sınayabilirsiniz.1- »Disk Yönetimi« menüsünde »V« veya »Λ«
ile »Disk« satırını seçin. Birden fazla harici veri ortamı varsa »V« veya »Λ« düğmesi ile istediğiniz veri ortamını seçin.
2- »V« veya »Λ« düğmesiyle »Bölüm« satırını seçin. Birden fazla bölüm varsa »V« veya »Λ« düğmesi ile bölüm seçimini yapın.
3- »V« veya »Λ« ile »Diski Kontrol Et« satırını seçin ve »OK« düğmesiyle onaylayın.
– Disk ile ilgili bilgiler görüntülenir.
4- »BACK <« düğmesi ile geri dönün veya ayarları sonlandırmak için »EXIT« düğme-sine basın.
OSD191
Televizyon / Kullanma Kılavuzu43 / 117 TR
USB-KAYIT----------------------------------------------------------------------------------------------------------------
Bölümün-formatlanması1- »Disk Yönetimi« menüsünde »V« veya
»Λ« ile »Bölümü Formatla« satırını seçin ve »OK« düğmesine basarak onaylayın.
2- Silme işlemini onaylamak için »<« veya »>« düğmesiyle »Evet« seçeneğini seçin;
veya
iptal etmek için »Hayır« seçeneğini seçip »OK« düğmesiyle onaylayın.
3- »BACK <« düğmesi ile geri dönün veya ayarı sonlandırmak için »EXIT« düğmesine basın.
Zaman-kaydırma-programları-nın-"duraklatılması"İzlediğiniz bir programı duraklatabilirsiniz. Bu kullanışlı bir işlevdir. Örneğin bir film seyreder-ken telefon çaldı filmi durdurup hiçbir şey kaçır-madan kaldığınız yerden devam edebilirsiniz.Son sahne freeze-frame görüntüsü ekranda görüntülenir ve zaman kaydırma harici veri ortamına kaydedilir.Zaman kaydırma modunda harici veri ortamın-da bulunan boş hafıza kadar kayıt yapılabilir.Mevcut yayında yaklaşık 60 dakika kayıt yapa-bilirsiniz.
Not:7 Kesintisiz bir "Kalıcı Zaman Kaydırma" için
harici USB hard disk kullanın.1- Yayın sırasında »!« düğmesine basın. – Televizyon görüntüsü durdurulur ve gecik-
me süresi görüntülenir.
2- Yayına kaldığı yerden devam etmek için »8« düğmesine basın.
– Siz yayını izlerken, sistem de bunu kaydet-meye devam eder.
Not:7 Aşağıdaki işlevleri zaman kaydırma modun-
da kullanılabilir. – Hızlı geri sarma, istenilen hız için »3«
düğmesine bir kaç kez basın; – Hızlı ileri sarma, istenilen hız için »4«
düğmesine bir kaç kez basın; – Duraklatmak için »!« düğmesine basın.
3- Zaman kaydırma işleminden çıkmak için »7« düğmesine basın.
– »Canlı Yayın« mesajı görünür. – "Zaman kaydırma belleği"ndeki görüntü-
ler silinir.
44 / 117 TRTelevizyon / Kullanma Kılavuzu
Programları-KaydetmeProgramları kaydedebilirsiniz. Bu programlar için veri harici veri ortamına kaydedilir ve bu arşiv televizyon aracılığıyla yönetilir.Minimum 1 dakikalık kayıt süresi için 44MB ila 110 MB'lık hafıza gereklidir. Kayıt sırasında arşivden başka bir kayıt izlene-bilir.Kayıt esnasında aynı frekansta bulunan (DVB-T), aynı frekansta bulunan (DVB-C) veya aynı trans-ponder üzerinde bulunan (DVB-S) şifresiz kana-lar arasında kanal değiştirmek mümkündür.
Tek-dokunuşla-programları-kaydetme1- Kaydı başlatmak için »1…0« veya »P+«,
»P–« düğmesiyle kanalı seçin ve » « düğmesine basın.
– Kayıt bilgisi görüntülenir: Kayıt sembolü, kanal adı, program ve kayıt süresi.
– Bu bilgiler kısa süre sonra kaybolur.
2- Kaydı sona erdirmek için »7« düğmesine basın.
3- »<« veya »>« düğmesiyle »Evet« seçeneğini seçin;
veya
iptal etmek için »Hayır« seçeneğini seçip »OK« düğmesiyle onaylayın.
Notlar:7 Kaydı bitirdiğiniz zaman, otomatik olarak
harici veri ortam üzerine depolanır.7 Harici veri ortamı kayıt esnasında çıkarıl-
ması durumunda kayıt otomatik olarak iptal edilir ve harici veri ortamına kaydedilemez.
Kanal-listesinden-bir-programı-kaydet-me1- »OK« düğmesine basarak kanal listesini
açın.
2- »<« veya »>« düğmesiyle bir kanal seçin ve »OK« düğmesiyle onaylayın.
3- »EXIT« düğmesine basarak kanal listesin-den çıkın.
4- Kayda başlamak için » « düğmesine basın.
– Kayıt bilgisi görüntülenir: Kayıt sembolü, kanal adı, program ve kayıt süresi.
– Bu bilgiler kısa bir süre sonra kaybolur. Ekranın sağ alt köşesinde kayıt sembolü ve kayıt süresi görüntülenir.
5- Kaydı sona erdirmek için »7« düğmesine basın.
6- »<« veya »>« düğmesiyle »Evet« seçeneğini seçin;
veya
iptal etmek için »Hayır« seçeneğini seçip »OK« düğmesiyle onaylayın.
USB-KAYIT----------------------------------------------------------------------------------------------------------------

Televizyon / Kullanma Kılavuzu45 / 117 TR
USB-KAYIT----------------------------------------------------------------------------------------------------------------
Kayıt-için-program-ayarı
...-elektronik-program-rehberini-kulla-narakKayıt için elektronik program rehberi bilgileri kullanılabilir.Toplam 25 EPG hatırlatıcısı ve/veya kaydedicisi ayarlanabilir.1- Elektronik program rehberini açmak için
»GUIDE« düğmesine basın.
2- »V« veya »Λ« düğmeleriyle istediğiniz televizyon kanalını seçin.
– Asıl televizyon programı hakkındaki bilgi görüntüler.
3- Kaydetmek istediğiniz programını seçmek için »<« veya »>« düğmesine basın.
4- Yayınları zamanlayıcıya eklemek için »OK« düğmesine basın.
– Kayıt edilecek televizyon programı bilgisi görüntülenir.
5- »>« ile »Kaydet« satırını seçin ve »OK« düğmesiyle onaylayın.
– Kayıt verisi aralığı görüntülenir.
6- Onaylamak için »OK« düğmesine basın.
7- Ayarları sonlandırmak için »EXIT« düğme-sine basın.
Notlar:7 Kayıt verisi değiştirilecekse menüyü
»MENU« düğmesiyle açın. »V«, »Λ«, »<« veya »>« ile »Plan Listesi« menü öğesini seçin ve »OK« ile onaylayın. »« (yeşil) düğmesine basın, veriyi değiştirin ve »« (mavi) düğmesiyle kaydedin.
7 Zamanlayıcı kaydı başlamadan önce bir uyarı iletisi görüntülenir ve 10 saniye geriye sayarak kanala geçmek için fırsat verir. 10 saniye sonunda kaydedilecek olan kanal otomatik olarak açılır.
7 Zamanlayıcı kaydı, kayıttan yürütme sıra-sında başlarsa, kayıttan yürütme durdurulur. Uyarı ekranında »Evet« seçeneği seçilmediği taktirde geri sayım tamamlandığında kayıt otomatik olarak başlar.
7 Sadece UPC müşterileri için Not: Bir program kaydedilirken, muhtemel Program Kılavuzu hataları dolayısıyla önceki veya sonraki programın bir kısmının kayda dahil edilmesi söz konusu olabilir. Böyle bir durumda, bu programlardan biri veya daha fazlasında aile koruma derecelendirmesi varsa, tüm kayıt için en yüksek seviyedeki aile koruma derecesinin geçerli olacağını göz önünde bulundurun.
Gecikme/takip-süresini-ayarlamaBu fonksiyon ile elektronik TV rehberiyle ayarla-nan kayıt süresini değiştirebilirsiniz. Bir programın birkaç dakika erkenden başlaya-cağını veya birkaç dakika geç biteceğini düşü-nüyorsanız bu süreye 60 dakika ekleyebilirsiniz.1- »MENU« düğmesiyle menüyü açın.
2- »V«, »Λ«, »<« veya »>« ile »Plan Listesi« menü öğesini seçip »OK« düğmesiyle onaylayın.
3- »« (mavi) düğmesiyle »Ek Zaman« menüsünü onaylayın.
4- »<« veya »>« düğmesiyle başlama zamanı-nı değiştirin.
5- »Son« satırına geçiş yapmak için »V« düğmesini kullanın ve bitiş süresini »<« veya »>« ile değiştirin.
6- »V« düğmesi ile »Kaydet« düğmesine basarak ayarı kaydedin.
7- Ayarları sonlandırmak için »EXIT« düğme-sine basın.

46 / 117 TRTelevizyon / Kullanma Kılavuzu
Zamanlayıcının-düzenlenmesiProgramlanmış zamanlayıcıları düzenleyebilir-siniz.1- »MENU« düğmesiyle menüyü açın.
2- »V«, »Λ«, »<« veya »>« ile »Plan Listesi« menü öğesini seçip »OK« düğmesiyle onaylayın.
– »Plan Listesi« menüsü görüntülenir.
3- Değişiklik yapılacak program başlığını »V« veya »Λ« düğmesiyle seçin ve başlığı dü-zenlemek için »« (yeşil) düğmesine basın.
4- Düzenlemek istediğiniz öğeleri »V« veya »Λ« düğmesi ile seçip »1…0« ve »<« veya »>« düğmesiyle değiştirin.
5- Değişikliği kaydetmek için »« (mavi) düğmesine basın.
– Zamanlayıcı değiştirilir.
6- Ayarı sonlandırmak için »EXIT« düğmesine basın.
Zamanlayıcının-silinmesiProgramlanmış zamanlayıcıları silebilirsiniz.1- »MENU« düğmesiyle menüyü açın.
2- »V«, »Λ«, »<« veya »>« ile »Plan Listesi« menü öğesini seçip »OK« düğmesiyle onaylayın.
– »Plan Listesi« menüsü görüntülenir.
3- Silinecek programın başlığını »V« veya »Λ« ile seçin ve zamanlayıcıyı »« (sarı) düğmesi ile silin.
– Zamanlayıcı silinmiştir.
4- Silme işlemini onaylamak için »<« veya »>« düğmesiyle »Evet« seçeneğini seçin;
veya
iptal etmek için »Hayır« seçeneğini seçip »OK« düğmesiyle onaylayın.
5- Ayarı sonlandırmak için »EXIT« düğmesine basın.
USB-KAYIT----------------------------------------------------------------------------------------------------------------
OynatmaKaydedilen programlar - ister elle başlatılmış olsun ister zamanlayıcı fonksiyonunu kullanarak tamamı harici veri ortamında saklanır. Harici veri ortamındaki arşivi »Medya Oynatıcı« menü-sünden görüntüleyebilirsiniz.
Kayıtlı-dosyalar-listesinden-bir-yayın-seçme1- »MENU« düğmesiyle menüyü açın.
2- »V«, »Λ«, »<« veya »>« ile »Kaydedilen-ler« menü öğesini seçip »OK« düğmesiyle onaylayın.
– »Medya Oynatıcı« menüsü görüntülenir.
3- »V« veya Λ« ile »PVR« seçeneğini seçip »OK« düğmesiyle onaylayın.
– Kayıtlı dosyalar görüntülenir.
4- »V« veya »Λ« düğmesiyle oynatmak istediğiniz yayını seçin ve »8« düğmesiyle oynatmayı başlatın.
5- Oynatmayı sona erdirmek için »7« düğme-sine basın.
– Televizyon medya oynatıcı menüsüne döner.
İleri/geri-görüntü-arama1- Oynatma hızını (2x, 4x, 8x, 16x veya 32x)
seçmek için oynatma sırasında devamlı olarak »4« düğmesine basın.
veya
oynatma hızını (2x, 4x, 8x, 16x veya 32x) seçmek için devamlı olarak »3« düğmesine basın.
Televizyon / Kullanma Kılavuzu47 / 117 TR
USB-KAYIT----------------------------------------------------------------------------------------------------------------
Kayıt-sırasında-oynatmaKayıt işlemi gerçekleştirilirken, kaydedilmekte olan mevcut yayını veya daha önce kaydedilmiş olan bir yayını izleyebilirsiniz.1- Kaydı başlatmak için »1…0« veya »P+«,-
»P–« düğmesiyle kanalı seçin ve » « düğmesine basın.
2- PVR içeriğini görüntülemek için »« (kırmızı) düğmesine basın.
3- »V« veya »Λ« düğmesiyle izlemek istedi-ğiniz programı seçin ve »8« düğmesiyle oynatmayı başlatın.
4- Oynatmayı sonlandırmak için »7« düğme-sine basın.
5- Kaydı sonlandırmak için »7« düğmesine basın.
6- İşlemi onaylamak için »<« veya »>« düğme-siyle »Evet« seçeneğini seçin;
veya
iptal etmek için »Hayır« seçeneğini seçip »OK« düğmesiyle onaylayın.
Kaydedilmiş-dosyalar-menüsün-den-yayınların-silinmesiKaydedilmiş yayınları Kayıtlı Dosyalar listesin-den silebilirsiniz.1- »MENU« düğmesiyle menüyü açın.
2- »V«, »Λ«, »<« veya »>« ile »Kaydedilen-ler« menü öğesini seçip »OK« düğmesiyle onaylayın.
– »Medya Oynatıcı« menüsü görüntülenir.
3- »V« veya Λ« ile »PVR« seçeneğini seçip »OK« düğmesiyle onaylayın.
– Kayıtlı dosyalar görüntülenir.
4- »V« veya »Λ« düğmesiyle silinecek yayın-ları seçin.
5- »Yayını silmek için »« (kırmızı) düğmesine basın.
6- İşlemi onaylamak için »<« veya »>« düğmesiyle »OK« seçeneğini seçip »OK« düğmesiyle onaylayın.
7- Ayarları sonlandırmak için »EXIT« düğme-sine basın.

48 / 117 TRTelevizyon / Kullanma Kılavuzu
USB-İŞLEMİ--------------------------------------------------------------------------------------------------------------
Dosya-formatlarıTelevizyonunuzu aşağıdaki dosya formatlarıyla USB girişi üzerinden kullanabilirsiniz:
Video-verileriVideo sıkıştırma / çözme (codec) işlemi, depo-lama alanını azaltmak ve görüntü kalitesinden ödün vermemek üzere tasarlanmıştır. Televizyonunuz XVID, H.264/MPEG-4 AVC(L4.1, Ref. Frames:4), MPEG-4, MPEG-2, MPEG-1, MJPEG, MOV standartları ile sıkıştırıl-mış video verilerinin oynatabilmesini sağlar.Cihazın desteklediği dosya uzantıları: “.avi”, “mkv”, “.mp4”, “.ts”, “.mov”, “.mpg”, “.dat”, “.vob”,”.divx” Bu dosyalarda video verisinin yanında MP3, AAC veya Dolby Digital kulla-nılarak sıkıştırılmış ve “paketlenmiş” ses verileri vardır.Format (codec) bilgisi dosya içeriğinde saklı olup, dosya uzantısı ile farklılık gösterebilir. İçeriğinde divx codec’i barındıran “.avi”,”.mkv” ve “.divx” uzantılı dosyalar oynatılmamaktadır.
Ses-verileriTelevizyonunuz MP3, AAC standartları ile kod-lanmış ses verilerinin oynatılabilmesini sağlar. MP3, MPEG-1 Ses Düzeyi 3’ü belirtir ve MPEG (Motion Picture Expert Group) tarafından gelişti-rilen MPEG-1 standardına göredir.AAC İleri Ses Kodlaması’nı belirtir (Advanced Audio Coding) ve MPEG tarafından geliştirilmiş-tir. AAC aynı veri-oranında (bitrate) daha yüksek ses kalitesi sunar.WMA (Windows Media Audio) ise, Microsoft tarafından geliştirilen ses verileri için bir sıkıştır-ma standardıdır.Bu formatlar ses dosyalarının CD ses kalitesine benzer kalitede depolama cihazlarına kaydedil-mesini sağlar.Cihazın desteklediği dosya uzantıları: “.mp3”, “.mp2”, “.wma”, “.m4a”, “.aac”, “.wav”MP3 dosyaları bilgisayardaki klasör ve alt kla-sörlere benzer şekilde düzenlenebilir.
Görüntü-verisiTelevizyonunuz JPEG, PNG, BMP türündeki resim verilerini gösterilebilmesini sağlar.JPEG, Joint Picture Experts Group’un kısaltması-dır. Bu işlem resim dosyalarını sıkıştırmak ama-cıyla tasarlanmıştır.PNG ve BMP standartları resim verilerini kayıp-sız olarak sıkıştırmak için tasarlanmıştır.Resim dosyaları, diğer dosya türleri ile birlikte bir veri ortamına kaydedilebilir.Bu dosyalar klasör ve alt klasörler şeklinde dü-zenlenebilir.
DTS patentleri için bkz. http://patents.dts. com. DTS Licensing Limited’in lisansı altında üretilmiştir. DTS, Sem-bol ve ayrıca beraber kullanılan DTS ve Sembol, tescilli ticari markalardır, DTS 2.0+Digital Out ise DTS, Inc.’nin ticari bir markasıdır. © DTS, Inc. Her hakkı saklıdır.

Televizyon / Kullanma Kılavuzu49 / 117 TR
USB-İŞLEMİ--------------------------------------------------------------------------------------------------------------
Harici-veri-ortamının-bağlanma-sıHarici Veri ortamını bağlamadan önce, tele-vizyonu bekleme (stand-by) moduna almanız tavsiye edilir. Cihazın bağlantısını yapın ve tele-vizyonu yeniden açık duruma getirin. Veri ortamının bağlantısını kesmeden önce, televizyon bekleme (stand-by) moduna getirilme-lidir; aksi takdirde, dosyalar zarar görebilir.
Notlar:7 USB Aygıtından herhangi bir dosya oku-
nurken USB Aygıtının TV’den çıkarılmaması gerekmektedir.
7 ITE (Bilgi Teknolojisi Donanımları) cihazları için EN 55022/EN 55024’te tanımlan-dığı üzere, iki yönlü veri aktarımı mümkün değildir.
7 USB üzerinden aktarım, kendi başına bir çalışma modu değildir. Bu, yalnızca ek bir fonksiyondur.
1- Televizyonun üzerindeki USB(HDD) USB arayüzü ile harici cihazın üzerindeki ilgili veri çıkışını (harici sabit disk, dijital kamera, kart okuyucu, bellek çubuğu veya MP3 oynatıcı) bir USB kablosu ile bağlayın;
Harici-veri-ortamının-çıkartılması
Harici veri ortamını çıkarmadan önce veri orta-mının bağlantısını kesin.1- »MENU« düğmesiyle menüyü açın.
2- »V«, »Λ«, »<« veya »>« ile »Medya Mer-kezi« menü öğesini seçip »OK« düğmesiyle onaylayın.
3- »« (kırmızı) düğmesi ile »Diski güvenli kaldır« öğesini seçin.
4- Veri ortamını soketten çıkartın.

50 / 117 TRTelevizyon / Kullanma Kılavuzu
Dosya-tarayıcı-Dosya tarayıcı, harici veri ortamının gönderdiği video, ses ve resim verilerini gösterir.Bir veri ortamı farklı dosya formatlarını içeriyor-sa, filtre fonksiyonu kullandığınızda çalmak/oynatmak için ihtiyaç duymayacağınız verileri (Video dosyası, Ses dosyası, Resim dosyası) dev-reden çıkarabilirsiniz.
Dosya-tarayıcısı-ana-menüsü
Medya Oynatıcı > DISK1
Film
Müzik
Fotoğraf
Film.avi
Film.str
Müzik.mp3
Fotoğraf.jpg
PerXX XXX XXXX
GeriBACKTOOLS
Tümü Film Müzik Fotoğraf
Tümnü Seç + Çalma Listesi Medya Ayarları Filtre TipiÖğeler Arasında GezinOynat
4 5
123
1- Ön izleme.
2- Veri tipi.
3- Veri ortamı adı.
4- Veri ortamındaki klasörler.
5- Menü içinde gezinme.
USB-İŞLEMİ--------------------------------------------------------------------------------------------------------------
USB-kurulum-menüsündeki-ayarlar
Menüyü-seçme1- »MENU« düğmesiyle menüyü açın.
2- »V«, »Λ«, »<« veya »>« ile »Medya Mer-kezi« menü öğesini seçip »OK« düğmesiyle onaylayın.
3- »V« veya »Λ« düğmesiyle harici veri orta-mını seçin ve »OK« düğmesiyle onaylayın.
4- »Medya Ayarları« öğesini »TOOLS« ile seçin.
Not:7 İlave işlemler aşağıdaki bölümlerde açık-
lanmıştır.
Ekran-modunun-seçilmesi1- »V« veya »Λ« ile »İzleme Modu« satırını
seçin.
2- Fonksiyonu seçmek için »<« ya da »>« düğmesine basın.
3- Ayarı sonlandırmak için »EXIT« düğmesine basın.
Otomatik-ön-izlemeye-geçişOtomatik ön izleme açıksa, seçili dosyanın görüntüsünü dosya tarayıcısı ana menüsünden izleyebilirsiniz.1- »V« veya »Λ« düğmesiyle »Otomatik
Önizleme« satırını seçin.
2- Fonksiyonu »Açık« konumuna getirmek için »<« veya »>« düğmesine basın.
3- Ayarı sonlandırmak için »EXIT« düğmesine basın.

Televizyon / Kullanma Kılavuzu51 / 117 TR
USB-İŞLEMİ--------------------------------------------------------------------------------------------------------------
Slayt-gösteriminin-ekrana-getirileceği-sürenin-seçilmesi1- »V« veya »Λ« düğmesiyle »Slayt Gösterisi
Aralığı« satırını seçin.
2- »<« veya »>« düğmesiyle süreyi (3, 5, 10 saniye) seçin.
3- Ayarı sonlandırmak için »EXIT« düğmesine basın.
Altyazı-ayarlarıİzlediğiniz filmin harici alt yazısı varsa bu altya-zıyı açıp kapayabilir, boyut, rengini değiştirebi-lirsiniz.1- »Medya Ayarları« menüsünden »V« veya
»Λ« düğmesiyle »Oto Altyazı Seçimi«, »Altyazı Boyutu« veya »Altyazı Rengi« öğelerini seçin.
2- »<« veya »>« düğmesi ile ayarlayın.
3- Ayarı sonlandırmak için »EXIT« düğmesine basın.
Not:7 Bu ayarlar sadece harici altyazı dosyaları
için yapılabilmektedir. Film ile birleştirilmiş altyazılarda bu ayarlar yapılamamaktadır.
Oynatma/Çalma-temel-fonksi-yonlar-1- »MENU« düğmesiyle menüyü açın.
2- »V«, »Λ«, »<« veya »>« ile »Medya Oy-natıcı« menü öğesini seçip »OK« düğmesiy-le onaylayın.
– »Medya Oynatıcı« menüsü görüntülenir.
3- »V« veya »Λ« düğmesiyle harici veri orta-mını seçin ve »OK« düğmesiyle onaylayın.
– Seçtiğiniz harici veri ortamının Medya Oynatıcı menüsü görüntülenir.
Not:7 Harici veri ortamının içeriği görüntülenmi-
yorsa, yenilemek için »« (sarı) düğmesi-ne basın.
4- »<« veya »>« düğmesiyle istediğiniz filtre ti-pini (Tümü, Film, Müzik veya Fotoğraf) seçin.
5- »V« veya »Λ« düğmesi ile klasörü seçin ve »OK« düğmesiyle onaylayın.
– Alt dizin listesi ekrana gelir.
Not:7 »BACK <« düğmesiyle bir önceki klasöre
geri dönün.6- »V« veya »Λ« düğmesiyle müzik ya da
resmi seçip »8« düğmesine basarak oynat-ma işlemini başlatın.
Notlar:7 Görüntü verilerini oynatırken, çözünürlük
ve boyutla ilgili bilgileri »?« düğmesine basarak izleyebilirsiniz.
7 MP3 ya da WMA verilerini çalarken, albüm bilgileri, şarkı, şarkıcı ve resim varsa ekranda görüntülenir.
7 Görüntü verilerini oynatırken, kontrol paneli-ni açmak için »?« düğmesine basın.
7- Oynatmayı duraklatmak için »!« düğme-sine basın.
8- Oynatmaya devam etmek için »8« düğme-sine basın.
9- Oynatmayı sona erdirmek için »7« düğme-sine basın.
– Dosya tarayıcı görünür.

52 / 117 TRTelevizyon / Kullanma Kılavuzu
Notlar:7 En son dosyaya geri dönmek istediğinizde
»Üst Klasör« öğesini seçmek için »Λ« düğmesini kullanın.
7 USB modunda desteklenen bazı dosya for-matları, desteklenen dosya uzantısına sahip olmasına rağmen, bu dosyaların oluşturma (sıkıştırma) biçimlerini bağlı olarak oluşabi-lecek problemlerden dolayı çalışmayabilir.
7 Oynatılan video dosyaları içinde birden fazla ses kaynağı (audio stream) varsa dosya tam ekran oynatılırken » « tuşu ile ses kaynakları arasında geçiş yapılabilir.
7 Film dosyasından izleyeceğiniz filmler sadece .srt, .sub, .ass, .ssa, .smi formatında-ki altyazıları desteklemektedir. Altyazı ile film dosyasının isimleri aynı olmalıdır. Aksi taktirde alt yazı görüntülenmez.
USB-İŞLEMİ--------------------------------------------------------------------------------------------------------------
İlave-oynatma-fonksiyonlarıKullanılan dosya biçimlerine bağlı olarak, aşağı-daki ilave fonksiyonları kullanmak mümkündür.
Dosyalarda-bölüm-seçimi(yalnızca desteklenen video dosyaları)1- Oynatma sırasında, sonraki bölümü »>«
düğmesi ile seçin.
2- Oynatma sırasında, önceki bölümü »<« düğmesi ile seçin.
Dosyalarda-başlık-seçimi(yalnızca desteklenen video dosyaları)1- Oynatma sırasında, sonraki başlığı »Λ«
düğmesi ile seçin.
2- Oynatma sırasında, önceki başlığı »V« düğmesi ile seçin.
Seçilen-şarkıları-çalmaYalnızca işaretli şarkıları çalar.1- »V« veya »Λ« düğmesiyle istediğiniz mü-
zik parçasını seçin ve »« (sarı) düğmesiy-le vurgulayın.
2- »V« veya »Λ« düğmesiyle istediğiniz diğer müzik parçasını seçin ve »« (sarı) düğme-siyle vurgulayın.
3- Çalmaya başlamak için »8« düğmesine basın.
4- Oynatmayı sona erdirmek için »7« düğme-sine basın.
Not:7 Vurguyu kaldırmak için, »V« veya »Λ«
düğmesiyle şarkıyı seçip »« (sarı) düğ-mesiyle işareti kaldırın.
Bir-şarkıyı-ya-da-görüntüyü-adım-adım-seçme-(ATLAMA)1- Oynatma sırasında, bir sonraki istediğiniz
şarkıyı/görüntüyü »6« düğmesi ile seçin.
2- Önceki şarkıyı/görüntüyü »5« düğmesi ile seçin.
– Oynatma, seçtiğiniz şarkı ya da görüntü ile başlar.

Televizyon / Kullanma Kılavuzu53 / 117 TR
Video-dosyalarında-istenilen-süreye-gitme1- Oynatma esnasında »OK« düğmesine
basın.
2- »1...0« düğmeleriyle gidilmesi istenen süre-yi girip »OK« düğmesiyle onaylayın.
Ses-dosyalarında-istenilen-süreye-gitme1- Oynatma esnasında »« (sarı) düğmesine
basın.
2- »1...0« düğmeleriyle gidilmesi istenen süre-yi girip »OK« düğmesiyle onaylayın.
İleriye-doğru-arama(yalnızca video ve ses dosyaları)Farklı hızları seçebilirsiniz (ileriye ya da geriye doğru 2 kat, 4 kat, 8 kat, 16 kat ve 32 kat hızlı).1- Oynatma esnasında oynatma/çalma
hızını »3« veya »4« düğmelerine basarak seçebilirsiniz.
2- Oynatmaya devam etmek için »8« düğme-sine basın.
Resim-görüntüsünü-döndürme-(yalnızca resim dosyaları)Resimler 90° döndürülebilir.1- Oynatma/çalma esnasında kontrol panelini
»OK« düğmesiyle açın.
2- » « seçimi için »<« veya »>« düğmesiyle »OK« seçeneğini seçin.
– Resim, 90° saat yönünde döner.
USB-İŞLEMİ--------------------------------------------------------------------------------------------------------------
Tekrarlama-fonksiyonları Seçenekler: – »Bir«, seçili parça yalnızca bir kez tekrar-
lanır; – »Sıralı«, seçili parçalar sıralı tekrarlanır; – »Rastgele«, seçili parçalar karışık tekrarla-
nır; – »Yok«, tekrar kapalı.
1- Oynatmayı başlatmak için »8« düğmesine basın.
2- Oynatma/çalma esnasında kontrol panelini »OK« düğmesiyle açın.
3- » « seçimi için »<« veya »>« düğmesine basın ve »OK« düğmesiyle onaylayın.
– Tekrarlama işlevi değişir.

54 / 117 TRTelevizyon / Kullanma Kılavuzu
MULTIMEDIA-AĞ-MODU------------------------------------------------------------------------
Ev-ağı-bağlantısı-ile-video,-mü-zik-ve-fotoğraf-dosyalarını-oy-natmaTelevizyonunuzun DLNA menüsünü ile sunucu-daki Video, müzik veya fotoğraf dosyalarına ko-layca erişebilir ve DMR özelliği sayesinde DMC özellikli cihazlarla medya oynatmayı otomatik olarak başlatıp durdurabilirsiniz.
Notlar:7 Video, müzik veya fotoğraflarınızı DLNA
uyumlu DMS (Digital Media Server) olarak çalışan PC, Cep Telefonu veya NAS (Network attached Storage) gibi cihazlar üzerinden paylaşabilirsiniz.
7 DMS aygıtı ve televizyon aynı anda kablo-suz olarak ağa bağlıysa video oynatmada takılmalar yada donmalar yaşanabilir.
7 Televizyon, Bilgisayara kurulabilen DMS yazılımları ile de çalışabilir ancak DMS ser-tifikası olmayan yazılımlarla tam uyumluluk içinde çalışması garanti edilmemektedir.
7 Örnek DMS kurulumu yapmak için aşağıda-ki adımları takip ediniz.
Windows işletim sistemi yüklü olan bir bilgi-sayarda Windows Media Player 11’i açın. »Library« sekmesinden »Media Sharing« se-çeneğini seçin ve Ekrana gelen pencereden »Share my media« seçeneğini işaretleyip »OK« seçeneğini seçin. Açılan pencerede bağlı olan cihazların IP numarası görüntüle-nir. Bilgisayarın, Televizyon tarafından görü-nebilmesi için televizyonun IP’si seçilmelidir. IP’nin pencerede görünmemesi durumunda »Media Sharing« menüsünden »Settings« seçeneğini seçip açılan menüden »Allow new devices and computers automatically« seçeneği seçebilirsiniz. Bu işlemler tamam-landıktan sonra televizyon Library bulunan dosyalardan sadece desteklediği formatları görüntüleyebilir.
Medya paylaşımında sorun yaşamamak için modem ve bilgisayarınızdaki güvenlik duvarı (Firewall) ayarlarını kontrol ediniz.
Dijital-medya-sunucusunun-seçil-mesi1- »MENU« düğmesiyle menüyü açın.
2- »V«, »Λ«, »<« veya »>« ile »Medya Mer-kezi« menü öğesini seçip »OK« düğmesiyle onaylayın.
Not:7 DMS aygıtı görüntülenmiyorsa ağ bağlantı-
sını kontrol edin. Bkz. sayfa 83 veya 86.3- »V« veya »Λ« düğmesiyle istediğiniz DMS
aygıtını seçip »OK« düğmesiyle onaylayın. – DMS aygıtı içeriği görüntülenir.
Medya Oynatıcı > PC1
Film
Müzik
Fotoğraf
Film.avi
Film.str
Müzik.mp3
Fotoğraf.jpg
PerXX XXX XXXX
GeriBACKTOOLS
Tümü Film Müzik Fotoğraf
Tümnü Seç + Çalma Listesi Medya Ayarları Filtre TipiÖğeler Arasında GezinOynat
Notlar:7 DMS aygıtının menüdeki dosya, klasör sı-
ralaması kullanılan Dijital Medya Sunucusu programına göre değişiklik gösterebilir.
7 DMS aygıtından oynatılan video dosyala-rında alt yazı desteklenmez.
7 DMS aygıtından oynatılan video dosyala-rında (»MPEG_PS_NTSC«, »MPEG_PS_PAL«, »MPEG_TS_SD_EU« ve »MPEG_TS_EU_ISO«) DLNA sertifikası almış bu formatlar desteklenmektedir.
7 Yüksek hızlı (bitrate’li) videolarda takılma problemi yaşanabilir.
7 DLNA uygulamasında bilinmeyen olarak gösterilen klasörler TV tarafından oyna-tılamaz. Bilgisayarınıza codec yazılımı yüklemek bu sorunu çözebilir.

Televizyon / Kullanma Kılavuzu55 / 117 TR
7 DMS aygıtından oynatılan ses dosyalarında (»AAC_ADTS_320«, »LPCM«, »MP3«, »WMABASE« ve »WMAFULL«) DLNA serti-fikası almış formatlar desteklenmektedir.
7 DMS aygıtından oynatılan resim dosya-larında (»JPEG_LRG«, »JPEG_MED« ve »JPEG_SM«) DLNA sertifikası almış format-lar desteklenmektedir.
MULTIMEDIA-AĞ-MODU------------------------------------------------------------------------
Oynatma1- DMS aygıtında »V« veya »Λ« düğmesiyle
içerik klasörünü seçin ve »OK« düğmesine basın.
– Tüm başlıklar görüntülenir.
2- İstediğiniz başlığı »V« veya »Λ« düğme-siyle seçin.
3- Oynatmayı başlatmak için »8« düğmesine basın.
Diğer-oynatma-seçenekleri1- Oynatmayı duraklatmak için »!« düğme-
sine basın.
2- Oynatmaya devam etmek için »8« düğme-sine basın.
3- İstediğiniz dosyaya ulaşana kadar »5« veya »6« düğmesine basın.
4- Oynatmayı sonlandırmak için »7« düğme-sine basın.
5- »BACK <« düğmesiyle içeriğe geri dönün.
6- DLNA özelliğinden çıkmak için »EXIT« düğmesine basın.
7- Güvenlik sorusunu onaylamak için »Evet« seçeneğini seçin;
veya
iptal etmek için »Hayır« seçeneğini seçip »OK« düğmesine basın.
Not:7 Ayrıca bu oynatma fonksiyonlarını da menü-
den seçebilirsiniz: – » « tekrarlama fonksiyonlarını seçer; – »5« önceki başlığı seçer; – »3« öncekiresmi arar; – »8« oynatmayı başlatır; – »!« oynatmayı duraklatır; – »7« oynatmayı sonlandırır; – »4« sonrakiresmi arar; – »6« sonraki başlığı seçer.

56 / 117 TRTelevizyon / Kullanma Kılavuzu
UYGULAMA-MERKEZİ------------------------------------------------------------------------------
Şartlar-&-Koşullar-ve-Gizli-lik
Şartlar-&-Koşullar-ve-Gizlilik-SözleşmeleriŞartlar & Koşullar ve Gizlilik Sözleşmeleri, Smart Inter@ctive özelliklerini eksiksiz kullanmak için kabul etmeniz gereken sözleşmelerdir.Şartlar & Koşullar ve Gizlilik sözleşmeleri kabul edilirse tüm Smart Inter@ctive özelliklerini kul-lanabilir ve TV kullanımı ile ilgili gerekli veriler toplanır.Şartlar & Koşullar ve Gizlilik sözleşmeleri kabul edilmediği durumda Smart Inter@ctive özellik-lerinden, Uygulama Portalı, Internet Üzerinden Yazılım Güncelleme, Uygulamalar ve Web Tarayıcı’ya erişilemez ve bu özellikler kullanıla-maz; TV kullanımı ile ilgili hiçbir veri toplanmaz; DLNA ve LiveShare özellikleri ise kullanılabilir.
İlk-gösterim-ve-işlemlerTV’nin açılışında ilk internete bağlandığı anda, “Bilgilendirme” sayfası gösterilir. Bu sayfada Smart Inter@ctive özelliklerini kullanabilmek için Şartlar & Koşullar ve Gizlilik içeriklerinin okun-ması ve kabul edilmesi gerektiği belirtilir; burada kullanıcının İleri’yi seçmesi beklenir. 7 Kullanıcı bu sayfadan İleri seçeneğini seçme-
den çıkış yaparsa (Kumandanın Çıkış tuşuyla ya da TV’yi kapatarak) Şartlar & Koşullar ve Gizlilik sözleşmeleri okunmadığı ve kabul edilmediği için; TV’nin bir sonraki açılışı ve internete bağlanışında “Bilgilendirme sayfası” tekrar gösterilir ve takip eden adımlar işler.
7 Kullanıcı İleri’yi seçerse Şartlar & Koşullar ve Gizlilik içeriğini okuyabileceği sayfaya yön-lendirilir.
7 Kullanıcının tüm Şartlar&Koşullar ve Gizlilik içeriğini görmesi sağlandıktan sonra her iki içeriği de “Kabul” veya “Reddet” seçeneği vardır. Ayrı ayrı ret ya da kabul işlemi yapa-maz.7 Kullanıcı “Kabul” seçeneğini seçerse TV
kullanımına devam eder.7 Kullanıcı “Reddet” seçeneğini seçerse: 7 TV’nin bir sonraki açılışı ve internete
bağlanışında “Bilgilendirme” sayfası tekrar gösterilir ve takip eden adımlar işler.
Eğer Şartlar & Koşullar ve Gizlilik içeriğinde bir güncelleme olursa, bu güncellemeden son-raki ilk TV açılışındaki ilk internete bağlanıldığı anda, “Bilgilendirme” Sayfası gösterilir. Bu sayfada Şartlar & Koşullar ve Gizlilik içeriğinin güncellendiğine dair bilgi verilir. Yeni Şartlar & Koşullar ve Gizlilik içeriğinin okunması ve kabul edilmesi gerektiği belirtilir; burada kullanıcının İleri seçeneğini seçmesi beklenir ve sonraki akış yukarıda belirtildiği gibi sürer.
Kullanıcının-onayladığı-Şartlar-&-Koşullar-ve-Gizlilik-içeriklerini-görüntülemesi-ve-onayını-geri-çekmesiKullanıcı isterse onay verdiği Şartlar & Koşullar ve Gizlilik dokümanlarını tekrar okuyabilir ve hatta onayını geri alabilir. Bunun için: 7 Kullanıcı Uygulama Portal’ının Ayarlar say-
fasından veya TV menüsünün Ayarlar’ından, kabul ettiği Şartlar & Koşullar ve Gizlilik söz-leşmelerine erişir.
7 Burada onaylanmış en güncel Şartlar & Koşul-lar ve Gizlilik sürümleri gösterilir.
7 Kullanıcı onayladığı son Şartlar & Koşullar ve Gizlilik içeriklerini okuyup; “Onaydan Vaz-geç” seçeneğini görür. Kullanıcı “Onaydan Vazgeç” seçeneğini seçerse:7 TV’nin bir sonraki açılışı ve internete bağlanı-
şında “Bilgilendirme sayfası” tekrar gösterilir ve takip eden adımlar işler.

Televizyon / Kullanma Kılavuzu57 / 117 TR
UYGULAMA-MERKEZİ------------------------------------------------------------------------------
SMART-inter@ctive-TV-internet-uygulamalarıSMART inter@ctive TV interaktif uygulamaları televizyonunuza internet hizmetleri ve sayfaları sağlar. Bu uygulamalar televizyonunuza göre tasarlan-mıştır.SMART inter@ctive TV özelliği ile lokal ve glo-bal birçok internet uygulamasını çalıştırabilirsi-niz. Bu uygulamalar, video, resim, müzik, oyun, sosyal paylaşım uygulamaları, haber ve spor uygulamaları, hava durumu uygulaması gibi çeşitli uygulamalardır.
Notlar:7 SMART inter@ctive TV, inter@ctive uygula-
malarının kullanılabilirliği ülkeden ülkeye değişebilir.
7 SMART inter@ctive TV kalıcı olarak dosya indirip kaydedemez, başka bir siteye bir dosya yükleyemez, ve bazı uygulamala-rın Giriş (login) sayfaları dışında eklenti kuramaz.
7 Grundig içerik servis sağlayıcıları tarafın-dan sağlanan içerikle ve içeriğin kalitesiyle ilgili hiçbir şekilde sorumlu değildir.
7 SMART inter@ctive TV sağlanan yerel ve evrensel internet uygulamaları, uygula-ma sahipleri ile yapılan sınırlı süreli özel anlaşmalar çerçevesinde TV’niz ile birlikte sağlanmaktadır. Uygulama sahipleri, bu uygulamaları kendi kararları doğrultusunda, güncelleyebilir, değiştirebilir, kısıtlayabilir veya tamamen kullanımdan kaldırabilir. Bu değişikliklerden dolayı Grundig sorumlu tutulamaz.
7 Grundig, SMART inter@ctive TV ile sağ-lanan internet uygulamalarında değişiklik yapma, sınırlama, genişletme, yer değiştir-me, kullanımdan kaldırma gibi tüm değişik-likleri yapma hakkını saklı tutar.
7 Bazı uygulamaların Login işlemleri sırasında o uygulamanın gerçek web sayfasına bağlantı kurmak gerekebilir. Bağlanılan bu sayfalarda uygulamaya Login için gerek-meyen linkler gösterilebilir. Bu linklere bağ-lanma sırasında TV açık web’e ulaşabilir ve burada TV’nizin desteklemediği içerikler görüntülenebilir. Açık web’de olduğunuz için TV’nizin desteklenmeyen bu içerikler hakkında kontrolü ya da sorumluluğu bulun-mamaktadır.
USB-klavye-ve-fareWeb tarayıcısında kullanmak için hem USB-(HDD) soketine fare veya klavye bağlayabilirsi-niz. Özel sürücü gerektiren gerektiren klavye ve fareler desteklenmez
Smart-İnter@ctive-TV'ye-Başlar-ken1- »MENU« düğmesiyle menüyü açın.
2- »<« veya »>« düğmesiyle »Uygulama Merkezi« menü öğesini seçin ve »OK« düğmesiyle onaylayın.
– »Uygulama Portalı« menüsü görüntülenir.
Notlar:7 Ekranda hiç bir menü açık değilken »@«
düğmesine basarak »Uygulama Portalı« menüsüne ulaşabilirsiniz.
7 Kablo olmadan veya kablosuz adaptör takılı değilken İnter@ctive uygulamaları başlatmaya çalıştığınızda ilgi uyarı ekranda görüntülenir. Kablo veya Kablosuz adaptör takıl ama IP alamadıysanız ya da internete çıkışınız yoksa İnter@ctive Uygulamalar başlatılamaz. Bu durumda Ağ bağlantı ayarlarını kontrol ediniz.

58 / 117 TRTelevizyon / Kullanma Kılavuzu
UYGULAMA-MERKEZİ------------------------------------------------------------------------------
İnternet-uygulamalarını-seçme1- Menüden »Uygulama Dükkanı'nı« seçin
veya »@« düğmesine basın. – Uygulama Portalı görüntülenir.
Smart Inter@ctive TV
Navigasyon Seçin Ayarlar Çıkış
Öne Çıkanlar
En Popüler
Yeni Uygulamalar
abc...
abc...
abc...
abc...
abc...
abc...
abc...
abc...
abc...
abc...
abc...
abc...
abc...
abc...
abc...
abc...
abc...
abc...
abc...
abc...
abc...
abc...
abc...
abc...
Arama Anahtarını girin Tüm uygulamalarFavoriler
2- »V«, »Λ«, »<« veya »>« düğmesi ile gerekli uygulamayı seçip »OK« düğmesine basarak onaylayın.
– Kısa bir süre sonunda uygulamanın ana menüsü görüntülenir.
Notlar:7 Kablo takılı değil veya kablosuz bir ağ
bağlantısı yoksa herhangi bir uygulamayı başlatmaya çalıştığınızda ilgili uyarı ekran-da görüntülenir.
7 Kablo takılı veya Kablosuz bir ağa bağlı olduğunuz halde IP alamadıysanız yada internete çıkışınız yoksa uygulamalar başla-tılamaz. Bu durumda Ağ bağlantı ayarlarını kontrol edin.
Tüm-uygulamaların-görüntülenmesiSMART inter@ctive TV anasayfasında gösterilen uygulamar televizyonda çalışacak uygulamar-dan sadece bir kaç tanesidir. Diğer uygulama-ları »Tüm Uygulamalar«'dan görüntüleyebilir ve seçebilirsiniz.1- Menüden »Uygulama Dükkanı'nı« seçin
veya »@« düğmesine basın. – Uygulama Portalı görüntülenir.
2- »Tüm Uygulamalar«'a giriş yapmak için »Tüm uygulamalar« düğmesini »V«, »Λ«, »<« veya »>« ile seçin ve »OK« ile onay-layın.
– »Tüm Uygulamalar« menüsü görüntülenir.
Uygulamaların-favorilere-eklenmesiSık kullandığınız internet uygulamalarını favori-lere ekleyerek »Favoriler« başlığında toplayabi-lirsiniz.1- »Uygulama Portalında« favorilere eklemek
istediğiniz uygulamayı »V«, »Λ«, »<« veya »>« ile seçin »FAV« düğmesine basın.
– Seçtiğiniz uygulama favorilere eklenir.
Not:7 Favorilerde bulanan bir uygulamayı çıkart-
mak için »FAV« düğmesine basın.
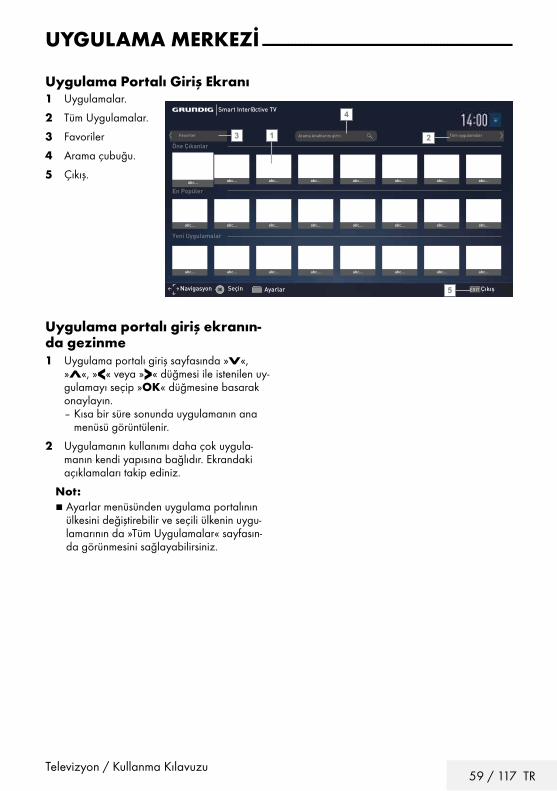
Televizyon / Kullanma Kılavuzu59 / 117 TR
UYGULAMA-MERKEZİ------------------------------------------------------------------------------
Uygulama-Portalı-Giriş-Ekranı1- Uygulamalar.
2- Tüm Uygulamalar.
3- Favoriler
4- Arama çubuğu.
5- Çıkış.
Uygulama-portalı-giriş-ekranın-da-gezinme1- Uygulama portalı giriş sayfasında »V«,
»Λ«, »<« veya »>« düğmesi ile istenilen uy-gulamayı seçip »OK« düğmesine basarak onaylayın.
– Kısa bir süre sonunda uygulamanın ana menüsü görüntülenir.
2- Uygulamanın kullanımı daha çok uygula-manın kendi yapısına bağlıdır. Ekrandaki açıklamaları takip ediniz.
Not:7 Ayarlar menüsünden uygulama portalının
ülkesini değiştirebilir ve seçili ülkenin uygu-lamarının da »Tüm Uygulamalar« sayfasın-da görünmesini sağlayabilirsiniz.
Smart Inter@ctive TV
Navigasyon Seçin Ayarlar Çıkış
Öne Çıkanlar
En Popüler
Yeni Uygulamalar
abc...
abc...
abc...
abc...
abc...
abc...
abc...
abc...
abc...
abc...
abc...
abc...
abc...
abc...
abc...
abc...
abc...
abc...
abc...
abc...
abc...
abc...
abc...
abc...
Arama Anahtarını girin Tüm uygulamalarFavoriler 1 23
4
5

60 / 117 TRTelevizyon / Kullanma Kılavuzu
WEB-TARAYICISI-----------------------------------------------------------------------------------------------
Web-tarayıcısı-menüsü
1- Menü kontrolleri.
2- Aktif sekme.
3- Önceki sayfa.
4- Sonraki sayfa.
5- Yenile.
6- Yeni sekme.
7- Adres çubuğu.
8- Site içi arama.
9- Sık kullanılanlar.
10- Başlangıç sayfası.
11- Ayarlar.
12- Geçmiş.
13- Web'de arama.
14- Zoom.
15- Web tarayıcısını kapat.
16- Sekmeyi kapat.
Zoom Out Zoom In Page Down Gezinim İşlem Menüsü Araç Çubuğu
2
1
3 4 5 7 8 9 10 11 12 13 14 156
16
Web-tarayıcısı-uygulamasıWeb tarayıcısı internette gezinebilmenizi sağlar.1- »MENU« düğmesiyle menüyü açın.
2- »V«, »Λ«, »<« veya »>« ile »Web Tara-yıcı« menü öğesini seçip »OK« düğmesiyle onaylayın.
– Web Tarayıcı görüntülenir.
3- »Λ« veya »V« düğmesiyle URL giriş alanını seçin ve »OK« düğmesiyle onaylayın.
– Sanal klavye görüntülenir.
4- Adresi girip »Enter« düğmesini seçip »OK« düğmesi ile onaylayın.
Notlar:7 Diğer fonksiyonlar ekranda açıklanmakta-
dır.7 Web tarayıcısında kullanmak için hem
USB(HDD)-soketine fare veya klavye bağlayabilirsiniz. Özel sürücü gerektiren gerektiren klavyeler desteklenmez.

Televizyon / Kullanma Kılavuzu61 / 117 TR
DİL-AYARLARI------------------------------------------------------------------------------------------------------
1- »MENU« düğmesiyle menüyü açın.
2- »V«, »Λ«, »<« veya »>« düğmesiyle »Ayarlar« menü öğesini »OK« ile onayla-yın.
3- »>« veya »<« ile »TV« menü öğesini seçip »V« düğmesiyle onaylayın.
Dil & Klavye
Erişilebirlik Ayarları
Aksesuarlar
Gelişmiş
Hakkında
Görüntü
PerXX XXX XXXX
Yayın ZamanlayıcıSes AğTV Ebeveyn
Ayarlar > TV
Alanı Değiştir Seç ÇıkışGeriBACK EXIT
Not:7 İlave işlemler aşağıdaki bölümlerde açık-
lanmıştır.
Menü-dilinin-değiştirilmesi1- »V« veya »Λ« ile »Dil ve Klavye« satırını
seçin ve »OK« düğmesiyle onaylayın.
2- »V« veya »Λ« düğmesi ile »Menü Dili« sa-tırını seçin ve »OK« düğmesiyle onaylayın.
3- »V« veya »Λ« düğmesi ile menü dilini seçip »OK« düğmesine basarak onaylayın.
4- Bir menü seviyesi geri gitmek için »BACK <« düğmesine basın veya ayarı sonlandır-mak için »EXIT« düğmesine basın.
Ses-dilinin-değiştirilmesi(yalnızca dijital televizyon kanalları için)Birincil ve ikincil bir ses dili tanımlayabilirsiniz.1- »V« veya »Λ« ile »Dil ve Klavye« satırını
seçin ve »OK« düğmesiyle onaylayın.
2- »V« veya »Λ« düğmesi ile »Ses Dili« satırı-nı seçin ve »OK« düğmesiyle onaylayın.
3- »V« veya »Λ« düğmesiyle ses dilini seçip birincil ses dili olarak ayarlamak için »« (kırmızı), ikincil ses dili olarak ayarlamak için »« (yeşil) düğmesine basın.
– Menüde birincil ve ikincil olarak ayarla-nan diller görüntülenir.
4- Bir menü seviyesi geri gitmek için »BACK <« düğmesine basın veya ayarı sonlandır-mak için »EXIT« düğmesine basın.
Altyazı-dilinin-değiştirilmesi(yalnızca dijital televizyon kanalları için)Altyazıları devre dışı bırakabilir, altyazı dilini seçebilir, ikinci bir altyazı dili seçilebilir.1- »V« veya »Λ« ile »Dil ve Klavye« satırını
seçin ve »OK« düğmesiyle onaylayın.
2- »V« veya »Λ« düğmesi ile »Altyazı Dili« satırını seçin ve »OK« düğmesiyle onayla-yın.
3- »V« veya »Λ« düğmesiyle altyazı dilini seçip, seçilen dili birincil altyazı dili olarak ayarlamak için »« (kırmızı), ikincil altyazı dili olarak ayarlamak için »« (yeşil) düğ-mesine basın.
– Menüde birincil ve ikincil olarak ayarla-nan diller görüntülenir.
4- Bir menü seviyesi geri gitmek için »BACK <« düğmesine basın veya ayarı sonlandır-mak için »EXIT« düğmesine basın.
Klavye-dilinin-değiştirilmesiTelevizyona bağlayabileceğiniz USB klavyenin dilini seçebilirsiniz.1- »V« veya »Λ« ile »Dil ve Klavye« satırını
seçin ve »OK« düğmesiyle onaylayın.
2- »V« veya »Λ« düğmesi ile »Klavye Dili« satırını seçin ve »OK« düğmesiyle onayla-yın.
3- »V« veya »Λ« düğmesi ile klavye dilini seçip »OK« düğmesine basarak onaylayın.
4- Bir menü seviyesi geri gitmek için »BACK <« düğmesine basın veya ayarı sonlandır-mak için »EXIT« düğmesine basın.

62 / 117 TRTelevizyon / Kullanma Kılavuzu
ERİŞİLEBİLİRLİK-FONKSİYONLARI-------------------------------------------
1- »MENU« düğmesiyle menüyü açın.
2- »V«, »Λ«, »<« veya »>« düğmesiyle »Ayarlar« menü öğesini »OK« ile onayla-yın.
3- »>« veya »<« ile »TV« menü öğesini seçip »V« düğmesiyle onaylayın.
– »TV Ayarları« görüntülenir.
4- »V« veya »Λ« ile »Erişilebilirlik Ayarları« satırını seçip »OK« düğmesiyle onaylayın.
– »Erişilebilirlik Ayarları« görüntülenir.
Altyazı Modu Kapalı
Sesli Anlartım Karışık
Sesli Anlartım Sesi 20
Görüntü
PerXX XXX XXXX
Yayın ZamanlayıcıSes AğTV Ebeveyn
Ayarlar > TV > Erişilebilirlik Ayarları
Alanı Değiştir Seç ÇıkışGeriBACK EXIT
Not:7 İlave işlemler aşağıdaki bölümlerde açık-
lanmıştır.
Altyazı-Modu(yalnızca dijital televizyon kanalları için)İşitme engelli veya işitme zorluğu çeken kişiler için altyazılar açılıp kapatılabilir.1- »Erişilebilirlik Ayarları« menüsünden »V«
veya »Λ« düğmesiyle »Altyazı Modu« öğesini seçin.
2- »<« veya »>« düğmesiyle »Kapalı«, »İşitme engelliler« veya »Temel« öğesini seçin.
3- Önceki menüye dönmek için »BACK <« düğmesine basın veya ayarı sonlandırmak için »EXIT« düğmesine basın.
Sesli-anlatım-(sesli-altyazılar)Sesli anlatım, görme engelliler için ek bir ses kanalıdır. Aktörlerin aktiviteleri, etraflarında bu-lunanlar, sahne değişiklikleri, görünüşleri, jestleri ve mimikleri anlatılır. Bu ses, dijital televizyon istasyonlarında normal sesle aynı anda iletilir. Bu, yayınlanan programa bağlıdır.1 »Erişilebilirlik Ayarları« menüsünden »V«
veya »Λ« düğmesiyle »Sesli Anlatım« satırı-nı seçin.
2 »<« veya »>« düğmesiyle »Karışık« veya »Kulaklık« öğesini seçin.
Not:7 »Sesli Anlatım Sesi« öğesi sadece »Sesli An-
latım« öğesi »Kaışık« seçildiğinde etkindir. 3 »V« veya »Λ« düğmesiyle »Sesli Anlatım
Sesi« satırını seçin ve »<« veya »>« düğme-siyle ses seviyesini ayarlayın.
4 Önceki menüye dönmek için »BACK <« düğmesine basın veya ayarı sonlandırmak için »EXIT« düğmesine basın.

Televizyon / Kullanma Kılavuzu63 / 117 TR
GELİŞMİŞ-AYARLAR-------------------------------------------------------------------------------------
1- »MENU« düğmesiyle menüyü açın.
2- »V«, »Λ«, »<« veya »>« düğmesiyle »Ayarlar« menü öğesini »OK« ile onayla-yın.
3- »>« veya »<« ile »TV« menü öğesini seçip »V« düğmesiyle onaylayın.
– »TV Ayarları« görüntülenir.
4- »V« veya »Λ« ile »Gelişmiş« satırını seçip »OK« düğmesiyle onaylayın.
– »Gelişmiş« görüntülenir.
Otomatik Kapanma 4 Saat
Mağaza Logosu Görünümü Hayır
Güç LED'i Parlaklığı Orta
Güç Koruma Modu Kapalı
Hava Durumu Gösterimi Açık
Yardım Açık
Görüntü
PerXX XXX XXXX
Yayın ZamanlayıcıSes AğTV Ebeveyn
Ayarlar > TV > Gelişmiş Ayarlar
Alanı Değiştir Seç ÇıkışGeriBACK EXIT
Not:7 İlave işlemler aşağıdaki bölümlerde açık-
lanmıştır.
Otomatik-kapanmaBu fonksiyon, televizyona 5 dakika süreyle herhangi bir görüntü sinyali gönderilmediğinde veya Avrupa düzenlemeleri gereğince televizyo-nun tuş takımı ve kumandadaki herhangi bir tuşa basılmadığı sürece kurulumunuza bağlı olarak televizyonu 2, 4, 6 veya 8 saat içinde stand-by moduna geçirir.1- »Gelişmiş« menüsünden »V« veya »Λ«
düğmesiyle »Otomatik Kapanma« satırını seçin.
2- »<« veya »>« düğmesiyle kapanma zama-nını seçin.
Not:7 Fonksiyonu »<« veya »>« düğmesiyle »Ka-
palı« konumuna ayarlayarak kapatın.3- Bir menü seviyesi geri gitmek için »BACK
<« düğmesine basın veya ayarı sonlandır-mak için »EXIT« düğmesine basın.
Mağaza-logosu-görünümü-Bu fonksiyon, mağazada özellik tanıtımı amaç-lıdır. »Açık« olarak seçildiğinde ekranda özellik logoları görüntülenmektedir.1- »Gelişmiş« menüsünden »V« veya »Λ«
düğmesiyle »Mağaza Logosu Görünümü« satırını seçin.
2- »<« veya »>« düğmesiyle »Evet« öğesini seçin.
Not:7 Fonksiyonu »<« veya »>« düğmesiyle »Ka-
palı« konumuna ayarlayarak kapatın.3- Önceki menüye dönmek için »BACK <«
düğmesine basın veya ayarı sonlandırmak için »EXIT« düğmesine basın.
Güç-LED’i-parlaklığı-Televizyonun çalışma modunda güç (stand-by) LED’i parlaklığını ayarlayabilirsiniz.1- »Gelişmiş« menüsünden »V« veya »Λ«
düğmesiyle »Güç LED'i Parlaklığı« satırını seçin.
2- »<« veya »>« düğmesine basarak parlak-lığı »Yüksek« »Orta« veya »Düşük« olarak ayarlayın.
3- Bir menü seviyesi geri gitmek için »BACK <« düğmesine basın veya ayarı sonlandır-mak için »EXIT« düğmesine basın.

64 / 117 TRTelevizyon / Kullanma Kılavuzu
GELİŞMİŞ-AYARLAR-------------------------------------------------------------------------------------
Güç-koruma-modu-Anten, Kablo, Uydu radyo kanallarında ve USB modunda ses dosyası oynatırken ekranın kapan-masını sağlar.1- »Gelişmiş« menüsünden »V« veya »Λ«
düğmesiyle »Güç Koruma Modu« satırını seçin.
2- Ekranın kapanma zamanını »<« veya »>« düğmesine basarak »10 Saniye«, »30 Sani-ye«, »60 Saniye« olarak seçin.
3- Önceki menüye dönmek için »BACK <« düğmesine basın veya ayarı sonlandırmak için »EXIT« düğmesine basın.
Not:7 USB modunda müzik dinlerken ekran
kapanıyorsa »MENU« düğmesine basıp bu özelliği kapatmak için »<« veya »>« »Kapalı« seçeneğini seçin.
Hava-Durumu-Gösterimi-Televizyonunuz bulunduğunuz yere göre internet üzerinden hava durumu bilgisini alıp menünün şağ üst köşesinde görüntüler. Bu bildirimi açıp/kapatabilirsiniz.1- »Gelişmiş« menüsünden »V« veya »Λ«
düğmesiyle »Hava Durumu Gösterimi« satırını seçin.
2- »<« veya »>« düğmesine basarak »Açık« veya »Kapalı« olarak ayarlayın.
3- Bir menü seviyesi geri gitmek için »BACK <« düğmesine basın veya ayarı sonlandır-mak için »EXIT« düğmesine basın.
Yardım--Menülerdeki seçeneklerin birini seçip bir süre beklendiğinde özellik hakkında yardım bilgisi görüntülenir. Bu bildirimi açıp/kaparabilirsiniz.1- »Gelişmiş« menüsünden »V« veya »Λ«
düğmesiyle »Yardım« satırını seçin.
2- »<« veya »>« düğmesine basarak »Açık« veya »Kapalı« olarak ayarlayın.
3- Bir menü seviyesi geri gitmek için »BACK <« düğmesine basın veya ayarı sonlandır-mak için »EXIT« düğmesine basın.

Televizyon / Kullanma Kılavuzu65 / 117 TR
ZAMANLAYICI-FONKSİYONLARI----------------------------------------------
1- »MENU« düğmesiyle menüyü açın.
2- »V«, »Λ«, »<« veya »>« düğmesiyle »Ayarlar« menü öğesini »OK« ile onayla-yın.
3- »<« veya »>« ile »Zamanlayıcı« satırını seçip »V« düğmesiyle onaylayın.
– »Zamanlayıcı« menüsü görüntülenir.
Uyku Zamanlayıcı Kapalı
Açılma Zamanlayıcısı
Kapanma Zamanlayıcısı
Gelişmiş
Görüntü
PerXX XXX XXXX
Yayın ZamanlayıcıSes AğTV Ebeveyn
Ayarlar > Zamanlayıcı
Alanı Değiştir Seç ÇıkışGeriBACK EXIT
Not:7 İlave işlemler aşağıdaki bölümlerde açık-
lanmıştır.
Uyku-zamanlayıcı»Uyku Zamanlayıcı«, televizyon için bir kapan-ma zamanı girebilirsiniz. Bu süre sona erdikten sonra televizyon stand-by moduna geçer.1- »V« veya »Λ« düğmesiyle »Uyku Zaman-
layıcı« satırını seçin.
2- »<« veya »>« düğmesiyle kapanma zama-nını seçin.
Not:7 Fonksiyonu »<« veya »>« düğmesiyle »Ka-
palı« konumuna ayarlayarak kapatın.3- Önceki menüye dönmek için »BACK <«
düğmesine basın veya ayarı sonlandırmak için »EXIT« düğmesine basın.
Açılma-zamanlayıcısıAçılma zamanlayıcısı menüsünde, televizyon için açılış zamanı girebilirsiniz.Televizyon bekleme modundaki ayarlı süre geç-tikten sonra önceden ayarlanmış ses ve istenen kanalla açılır.1- »V« veya »Λ« ile »Açılma Zamanlayıcısı«
satırını seçin ve »OK« düğmesiyle onayla-yın.
2- »V« veya »Λ« düğmesiyle »Mod« satırını seçin ve televizyonun ne zaman açılması gerektiğini belirlemek için »<« veya »>« düğmesini kullanın.
3- »V« veya »Λ« düğmesiyle »Sinyal Kayna-ğı« satırını seçin ve »<« veya »>« düğmesiy-le giriş kaynağını seçin.
4- »V« veya »Λ« düğmesiyle »Servis Tipi« satırını seçin ve »<« veya »>« düğmesiyle tercih edilen seçeneği (ATV, DTV veya Radyo) seçin.
5- »V« veya »Λ« düğmesiyle »Kanal« satırını seçin ve »<« veya »>« düğmesiyle tercih edilen kanalı seçin.
Not:7 »Kanal« satırı yalnızca kullanımda olan giriş
sinyali ayarlandığında aktif olur. Hiçbir giriş yapılmamışsa seçilen giriş kaynağının ilk kanalı kullanılır.
6- »V« veya »Λ« düğmesiyle »Ses Ayarı« satırını seçin ve »<« veya »>« düğmesiyle ses seviyesini ayarlayın.
7- »V« veya »Λ« düğmesiyle »Saat Ayar-la« satırını seçin ve »1…0« düğmeleriyle zamanı girin.
8- Ayarı kaydetmek için »« (mavi) düğme-sine basın.
9- Önceki menüye dönmek için »BACK <« düğmesine basın veya ayarı sonlandırmak için »EXIT« düğmesine basın.

66 / 117 TRTelevizyon / Kullanma Kılavuzu
ZAMANLAYICI-FONKSİYONLARI----------------------------------------------
Kapanma-zamanlayıcısı»Kapanma Zamanlayıcısı« menüsünde, te-levizyon için kapanma zamanı girebilirsiniz. Televizyon, girilen süre geçtikten sonra bekleme moduna geçer.1- »V« veya »Λ« ile »Kapanma Zamanla-
yıcısı« satırını seçin ve »OK« düğmesiyle onaylayın.
2- »V« veya »Λ« düğmesiyle »Mod« satırını seçin ve televizyonun ne zaman kapanması gerektiğini belirlemek için »<« veya »>« düğmesini kullanın.
3- »V« veya »Λ« düğmesiyle »Saati Ayarla« satırını seçin ve »1…0« düğmeleriyle zamanı girin.
4- Ayarı kaydetmek için »« (mavi) düğme-sine basın.
5- Bir menü seviyesi geri gitmek için »BACK <« düğmesine basın veya ayarı sonlandır-mak için »EXIT« düğmesine basın.
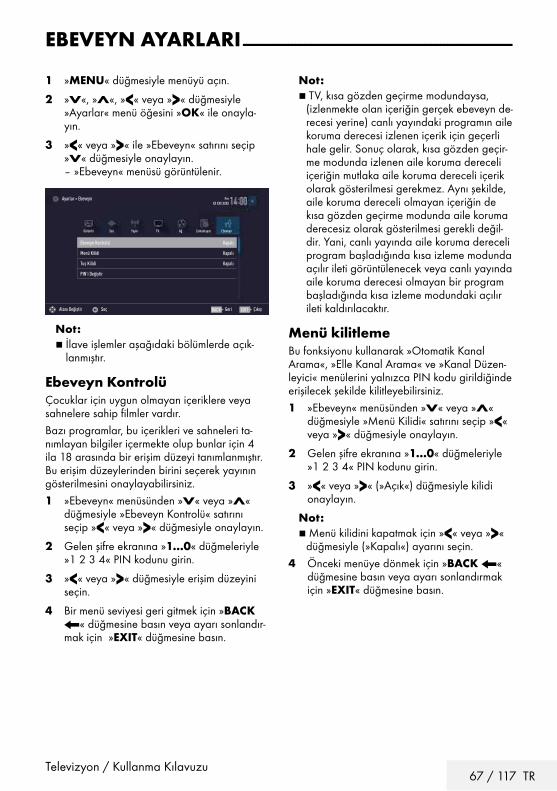
Televizyon / Kullanma Kılavuzu67 / 117 TR
EBEVEYN-AYARLARI------------------------------------------------------------------------------------
1- »MENU« düğmesiyle menüyü açın.
2- »V«, »Λ«, »<« veya »>« düğmesiyle »Ayarlar« menü öğesini »OK« ile onayla-yın.
3- »<« veya »>« ile »Ebeveyn« satırını seçip »V« düğmesiyle onaylayın.
– »Ebeveyn« menüsü görüntülenir.
Ebeveyn Kontrolü Kapalı
Menü Kilidi Kapalı
Tuş Kilidi Kapalı
PIN'i Değiştir
Görüntü
PerXX XXX XXXX
Yayın ZamanlayıcıSes AğTV Ebeveyn
Ayarlar > Ebeveyn
Alanı Değiştir Seç ÇıkışGeriBACK EXIT
Not:7 İlave işlemler aşağıdaki bölümlerde açık-
lanmıştır.
Ebeveyn-KontrolüÇocuklar için uygun olmayan içeriklere veya sahnelere sahip filmler vardır. Bazı programlar, bu içerikleri ve sahneleri ta-nımlayan bilgiler içermekte olup bunlar için 4 ila 18 arasında bir erişim düzeyi tanımlanmıştır. Bu erişim düzeylerinden birini seçerek yayının gösterilmesini onaylayabilirsiniz.1- »Ebeveyn« menüsünden »V« veya »Λ«
düğmesiyle »Ebeveyn Kontrolü« satırını seçip »<« veya »>« düğmesiyle onaylayın.
2- Gelen şifre ekranına »1...0« düğmeleriyle »1 2 3 4« PIN kodunu girin.
3- »<« veya »>« düğmesiyle erişim düzeyini seçin.
4- Bir menü seviyesi geri gitmek için »BACK <« düğmesine basın veya ayarı sonlandır-mak için »EXIT« düğmesine basın.
Not:7 TV, kısa gözden geçirme modundaysa,
(izlenmekte olan içeriğin gerçek ebeveyn de-recesi yerine) canlı yayındaki programın aile koruma derecesi izlenen içerik için geçerli hale gelir. Sonuç olarak, kısa gözden geçir-me modunda izlenen aile koruma dereceli içeriğin mutlaka aile koruma dereceli içerik olarak gösterilmesi gerekmez. Aynı şekilde, aile koruma dereceli olmayan içeriğin de kısa gözden geçirme modunda aile koruma derecesiz olarak gösterilmesi gerekli değil-dir. Yani, canlı yayında aile koruma dereceli program başladığında kısa izleme modunda açılır ileti görüntülenecek veya canlı yayında aile koruma derecesi olmayan bir program başladığında kısa izleme modundaki açılır ileti kaldırılacaktır.
Menü-kilitlemeBu fonksiyonu kullanarak »Otomatik Kanal Arama«, »Elle Kanal Arama« ve »Kanal Düzen-leyici« menülerini yalnızca PIN kodu girildiğinde erişilecek şekilde kilitleyebilirsiniz.1- »Ebeveyn« menüsünden »V« veya »Λ«
düğmesiyle »Menü Kilidi« satırını seçip »<« veya »>« düğmesiyle onaylayın.
2- Gelen şifre ekranına »1...0« düğmeleriyle »1 2 3 4« PIN kodunu girin.
3- »<« veya »>« (»Açık«) düğmesiyle kilidi onaylayın.
Not:7 Menü kilidini kapatmak için »<« veya »>«
düğmesiyle (»Kapalı«) ayarını seçin.4- Önceki menüye dönmek için »BACK <«
düğmesine basın veya ayarı sonlandırmak için »EXIT« düğmesine basın.

68 / 117 TRTelevizyon / Kullanma Kılavuzu
Çoklu-fonksiyon-düğmesinin-blo-ke-edilmesiTuş kilidi devredeyken televizyondaki çoklu fonksiyon düğmesi çalışmaz.1- »Ebeveyn« menüsünden »V« veya »Λ«
düğmesiyle »Tuş Kilidi« satırını seçip »<« veya »>« düğmesiyle onaylayın.
2- Gelen şifre ekranına »1...0« düğmeleriyle »1 2 3 4« PIN kodunu girin.
3- »<« veya »>« düğmesiyle panel kilidini onaylayın (Açık) veya devre dışı bırakın (Kapalı).
4- Bir menü seviyesi geri gitmek için »BACK <« düğmesine basın veya ayarı sonlandır-mak için »EXIT« düğmesine basın.
PIN-kodunu-değiştirmeVarsayılan kod olan »1234« yerine kişisel bir kod girebilirsiniz.Lütfen kişisel kodunuzu not edin.1- »Ebeveyn Kontrolü« menüsünden »V« veya
»Λ« düğmesiyle »PIN'i Değiştir« satırını seçip »<« veya »>« düğmesiyle onaylayın.
2- »1...0« düğmeleriyle mevcut »1 2 3 4« PIN kodunu girin.
3- »1...0« düğmeleriyle dört haneli yeni kişisel PIN kodunuzu girin.
4- »1...0« düğmeleriyle kişisel PIN kodunuzu yeniden girin.
5- Önceki menüye dönmek için »BACK <« düğmesine basın veya ayarı sonlandırmak için »EXIT« düğmesine basın.
EBEVEYN-AYARLARI------------------------------------------------------------------------------------
Bir-televizyon-kanalını-engelle-me-Çocuklar için uygun olmayan televizyon kanal-larını kişisel PIN kodunu kullanarak ayrı ayrı engelleyebilirsiniz.1- »MENU« düğmesiyle menüyü açın.
2- »Ayarlar« menü öğesini »OK« ile onayla-yın.
3- »>« veya »<« ile »Kaynak« menü öğesini seçip »V« düğmesiyle onaylayın.
4- »V« veya »Λ« düğmesiyle »Kanal Düzen-leyici« satırını seçin ve »OK« düğmesiyle onaylayın.
5- »V«, »Λ«, »<« veya »>« düğmeleriyle engellemek istenilen kanalı seçip »OK« düğmesiyle vurgulayın.
–Kanal »✔« ile işaretlenir.
6- »« (sarı) düğmesiyle »Araçlar« menüsünü onaylayın.
7- »V« veya »Λ« düğmesiyle »Kanal Kilidi« satırını seçin ve »OK« düğmesiyle onayla-yın.
8- Gelen şifre ekranına »1...0« düğmeleriyle »1 2 3 4« PIN kodunu girin.
9- Girişi »OK« düğmesiyle onaylayın. –Kanal » « ile işaretlenir.
Not:7 Kilidi açmak için kanalı tekrar »V«, »Λ«,
»<« veya »>« ile seçin, »« (sarı) menü-süyle »Araçlar« menüsünü onaylayın, »V« veya »Λ« düğmesiyle »Kanal kilidini aç« satırını seçin ve »OK« düğmesiyle onayla-yın.
10- Ayarı sonlandırmak için »EXIT« düğmesine basın.

Televizyon / Kullanma Kılavuzu69 / 117 TR
EBEVEYN-AYARLARI------------------------------------------------------------------------------------
Engellenmiş-bir-televizyon-kana-lını-izlemePIN kodu ile engellenmiş bir kanalı izlemek için engellenmiş televizyon kanalını seçip PIN kodu girerek izleyebilirsiniz.1- Engellenmiş kanalı »1…0« veya »P+«,
»P–« düğmeleriyle seçin.
2- Gelen şifre ekranına »1...0« düğmeleriyle »1 2 3 4« PIN kodunu girin.
– Engellenmiş kanal görüntülenir.
Not:7 Kanal değiştirildiğinde kanal tekrar engel-
lenecektir.
PIN-kodunun-sıfırlanmasıPIN kodunuzu unutursanız bu işlevi kullanın.1- »Ebeveyn Kontrolü« menüsünden »V« veya
»Λ« düğmesiyle »PIN'i Değiştir« satırını seçip »<« veya »>« düğmesiyle onaylayın.
2- Gelen şifre ekranına »1...0« düğmeleriyle »2 3 5 6« PIN kodunu girin.
3- »1...0« düğmeleriyle dört haneli yeni kişisel PIN kodunuzu girin.
4- »1...0« düğmeleriyle kişisel PIN kodunuzu yeniden girin.
5- Önceki menüye dönmek için »BACK <« düğmesine basın veya ayarı sonlandırmak için »EXIT« düğmesine basın.

70 / 117 TRTelevizyon / Kullanma Kılavuzu
TARİH-VE-SAAT-AYARI------------------------------------------------------------------------------
1- »MENU« düğmesiyle menüyü açın.
2- »V«, »Λ«, »<« veya »>« düğmesiyle »Ayarlar« menü öğesini »OK« ile onayla-yın.
3- »<« veya »>« ile »Zamanlayıcı« satırını seçip »V« düğmesiyle onaylayın.
– »Zamanlayıcı« menüsü görüntülenir.
4- »V« veya »Λ« ile »Gelişmiş« satırını seçin ve »OK« düğmesiyle onaylayın.
Kapanma Zamanlayıcısı KapalıTarih & Saat Ayarı
Tarih & Saat Ayarı
Zaman Ayarı Manuel
Saat Dilimi GMT +2
Günışığı Tassarrufu Otomatik
Görüntü
PerXX XXX XXXX
Yayın ZamanlayıcıSes AğTV Ebeveyn
Ayarlar > Zamanlayıcı
Alanı Değiştir Seç ÇıkışGeriBACK EXIT
Not:7 İlave işlemler aşağıdaki bölümlerde açık-
lanmıştır.
Otomatik-ayarTelevizyon, Greenwich Ortalama Zamanı ile aradaki farkı otomatik olarak tespit eder (seçilen kanal bir zaman sinyali gönderir).1- »Gelişmiş« menüsünden »V« veya »Λ«
düğmesiyle »Tarih ve Saat Ayarı« satırını seçip »OK« düğmesiyle onaylayın.
2- »V« düğmesiyle »Mod« satırını seçin ve »<« veya »>« düğmesiyle »Otomatik« seçeneğini seçin.
– Tarih ve saat otomatik olarak güncellenir.
3- Önceki menüye dönmek için »BACK <« düğmesine basın veya ayarı sonlandırmak için »EXIT« düğmesine basın.
Manuel-ayarZamanın tespit edilememesi veya sizin yerel sa-atinizle aynı olmaması halinde yerel saat farkını kendiniz de ayarlayabilirsiniz.1- »Gelişmiş« menüsünden »V« veya »Λ«
düğmesiyle »Zaman Ayarı« satırını seçip »<« veya »>« düğmesiyle »Manuel« seçe-neğini seçin.
– »Saat Dilimi« ve »Günışığı Tasarrufu« öğeleri etkindir.
2- »V« veya »Λ« ile »Saat Dilimi« satırını seçin ve »OK« düğmesiyle onaylayın.
– Saat dilimi seçim menüsü görüntülenir.
3- »V« veya »Λ« ile saat dilimini ayarlayın ve »OK« düğmesiyle onaylayın.
4- »V« veya »Λ« düğmesiyle »Günışığı Ta-sarrufu« satırını seçin ve ardından »<« veya »>« düğmesiyle »Otomatik«, »Kapalı« veya »Açık« seçeneğini seçin.
5- Bir menü seviyesi geri gitmek için »BACK <« düğmesine basın veya ayarı sonlandır-mak için »EXIT« düğmesine basın.
Not:7 »Zaman Ayarı« satırında »Otomatik«
seçeneği seçilirse televizyon seti zamanı otomatik olarak ilgili yayıncının zaman sinyaline adapte eder. Ancak farklı kanallar da (örneğin yabancı yayıncılar) kendi ülkenizden farklı saatleri kullanabilir. Bu gibi durumlarda hatırlatmalar ve planlanan kayıtlar saat farkından dolayı iptal edilebilir.

Televizyon / Kullanma Kılavuzu71 / 117 TR
CİHAZIN-YAZILIMI----------------------------------------------------------------------------------------
1- »MENU« düğmesiyle menüyü açın.
2- »V«, »Λ«, »<« veya »>« düğmesiyle »Ayarlar« menü öğesini »OK« ile onayla-yın.
3- »<« veya »>« ile »TV« satırını seçip »V« düğmesiyle onaylayın.
– »TV« menüsü görüntülenir.
4- »V« veya »Λ« ile »Hakkında« satırını seçin ve »OK« düğmesiyle onaylayın.
Ürün Bilgisi
TV Adı Ultralogic FHD
Yazılım Güncellemeleri
Fabrika Ayarlarına Dönüş
Kanal Geçmişini Temizle
Ülke Turkiye
Görüntü
PerXX XXX XXXX
Yayın ZamanlayıcıSes AğTV Ebeveyn
Ayarlar > TV > Hakkında
Alanı Değiştir Seç ÇıkışGeriBACK EXIT
Not:7 İlave işlemler aşağıdaki bölümlerde açık-
lanmıştır.
Ürün-bilgisi1- »Hakkında« menüsünden »V« veya »Λ«
düğmesiyle »Ürün Bilgisi« satırını seçip »OK« düğmesiyle onaylayın.
– Ürünün yazılım sürüm bilgileri görüntüle-nir.
2- Bir menü seviyesi geri gitmek için »BACK <« düğmesine basın veya ayarı sonlandır-mak için »EXIT« düğmesine basın.
Yazılımı-güncelleme-(OAD)(yalnızca dijital televizyon kanalları için)1- »Hakkında« menüsünden »V« veya »Λ«
düğmesiyle »Yazılım Güncellemeleri« satırını seçip »OK« düğmesiyle onaylayın.
2- »V« veya »Λ« düğmesiyle »OAD« seçene-ğini seçin ve »OK« düğmesiyle onaylayın.
– Yeni yazılım araması yapılır.
Not:7 Herhangi bir yazılım yoksa menü otomatik
olarak kapanır.3- Yeni yazılım varsa, bu yazılımı »« (yeşil)
düğmesine basarak yükleyin. – Yeni yazılım yüklenecek.
Uyarı:7 Güncelleme sonrasında televizyon kapanıp
açılacaktır. Güncelleme sırasında televizyo-nun elektriğini kesmeyin.
Not:7 Otomatik yazılım güncelleme kontrolü için
»V« veya »Λ« ile »Kaynak« menüsünden »Gelişmiş « ile »OAD« satırını seçin. »<« veya »>« düğmesiyle »Açık« seçeneğini seçin.
Yazılımı-güncelleme-(Internet)(yalnızca dijital televizyon kanalları için)1- »Hakkında« menüsünden »V« veya »Λ«
düğmesiyle »Yazılım Güncellemeleri« satırını seçip »OK« düğmesiyle onaylayın.
2- »V« veya »Λ« düğmesiyle »Internet« seçeneğini seçin ve »OK« düğmesiyle onaylayın.
– Yeni yazılım araması yapılır.
Not:7 Herhangi bir yazılım yoksa menü otomatik
olarak kapanır.3- Yeni yazılım varsa, bu yazılımı »« (yeşil)
düğmesine basarak yükleyin. – Yeni yazılım yüklenecek.
Uyarı:7 Güncelleme sonrasında televizyon kapanıp
açılacaktır. Güncelleme sırasında televizyo-nun elektriğini kesmeyin.
Yazılımı-güncelleme-(USB)1- Bellek çubuğunu televizyonun USB soketine
takın.
2- »Hakkında« menüsünden »V« veya »Λ« düğmesiyle »Yazılım Güncellemeleri« satırını seçip »OK« düğmesiyle onaylayın.
3- »V« veya »Λ« düğmesiyle »USB« seçene-ğini seçin ve »OK« düğmesiyle onaylayın.
– USB bellekteki yazılım kurulur.

72 / 117 TRTelevizyon / Kullanma Kılavuzu
AksesuarlarTelevizyonunuza çeşitli aksesuarlar bağlayarak görüntülü görüşme, sesle kontrol, hareketle kontrol veya web tarayıcınızda kullanmak için klavye ve mouse bağlayabilirsiniz. Bu menüden bağladığınız aksesuarın durumun görüntüleyip çeşitli ayarlar yapabilirsiniz.1- »MENU« düğmesiyle menüyü açın.
2- »V«, »Λ«, »<« veya »>« düğmesiyle »Ayarlar« menü öğesini »OK« ile onayla-yın.
3- »<« veya »>« ile »TV« satırını seçip »V« düğmesiyle onaylayın.
– »TV« menüsü görüntülenir.
4- »V« veya »Λ« ile »Aksesuarlar« satırını seçin ve »OK« düğmesiyle onaylayın.
5- »V« veya »Λ« düğmesiyle istediğiniz satırı seçin ve »OK« düğmesiyle onaylayın.
»<« veya »>« düğmesiyle gerekli fonksiyo-nu seçin.
6- Önceki menüye dönmek için »BACK <« düğmesine basın veya ayarı sonlandırmak için »EXIT« düğmesine basın.
Not:7 Aksesuarlar ayrı olarak satılmaktadır.
Televizyon ile birlikte verilmemektedir. Daha ayrıntılı satın alma bilgisi için televizyonu sa-tın almış olduğunuz bayi ile iletişime geçin.
AKSESUARLAR---------------------------------------------------------------------------------------------------

Televizyon / Kullanma Kılavuzu73 / 117 TR
SIFIRLAMA-FONKSİYONU------------------------------------------------------------------
1- »MENU« düğmesiyle menüyü açın.
2- »V«, »Λ«, »<« veya »>« düğmesiyle »Ayarlar« menü öğesini »OK« ile onayla-yın.
3- »<« veya »>« ile »TV« satırını seçip »V« düğmesiyle onaylayın.
– »TV« menüsü görüntülenir.
4- »V« veya »Λ« ile »Hakkında« satırını seçin ve »OK« düğmesiyle onaylayın.
Ürün Bilgisi
TV Adı Ultralogic FHD
Yazılım Güncellemeleri
Fabrika Ayarlarına Dönüş
Kanal Geçmişini Temizle
Kullanım Koşulları ve Gizlilik Sözleşmesi
Görüntü
PerXX XXX XXXX
Yayın ZamanlayıcıSes AğTV Ebeveyn
Ayarlar > TV > Hakkında
Alanı Değiştir Seç ÇıkışGeriBACK EXIT
Not:7 İlave işlemler aşağıdaki bölümlerde açık-
lanmıştır.
Televizyonu-en-baştaki-durumu-na-sıfırlamaBu fonksiyon, kanal listelerini ve özel ayarları silmenize olanak tanır.1- »Hakkında« menüsünden »V« veya »Λ«
düğmesiyle »Fabrika Ayarlarına Dönüş« satırını seçip »OK« düğmesiyle onaylayın.
– Uyarı ekranı görüntülenir.
Not:7 Ayrıca yüklü uygulamalar silinecekse »Λ«
düğmesine basarak »Yüklü uygulamalar korunsun« satırını seçin ve »OK« düğmesi ile küçük onay işaretini kaldırın.
2- Güvenlik sorusunu onaylamak için »Evet« seçeneğini seçin;
veya
iptal etmek için »Hayır« seçeneğini seçip »OK« düğmesine basın.
– Kısa bir süre sonra »Kurulum Rehberi« menüsü görüntülenir.
3- Sayfa 20’de televizyonun ilk kurulumu ve kanalların aranması bölümdeki ayarlarla devam edin.
Kanal-geçmişinin-silinmesiBu fonksiyon, Ana menüde bulunan kanal geç-mişini silmeniz sağlamaktadır.1- »Hakkında« menüsünden »V« veya »Λ«
düğmesiyle »Kanal Geçmişini Temizle« satı-rını seçip »OK« düğmesiyle onaylayın.
– Güvenlik sorusu görüntülenir.
2- Güvenlik sorusunu onaylamak için »Evet« seçeneğini seçin;
veya
iptal etmek için »Hayır« seçeneğini seçip »OK« düğmesine basın.
– Ana menüde görüntülerin ön izlenmesi silinir
3- Önceki menüye dönmek için »BACK <« düğmesine basın veya ayarı sonlandırmak için »EXIT« düğmesine basın.
Kullanım-koşulları-ve-gizlilik-söz-leşmesiKullanım koşulları ve gizlilik sözleşmesini görün-tüleyebilirsiniz.1- »Hakkında« menüsünden »V« veya »Λ«
düğmesiyle »Kullanım Koşulları ve Gizlilik Sözleşmesi« satırını seçip »OK« düğmesiyle onaylayın.

74 / 117 TRTelevizyon / Kullanma Kılavuzu
SIFIRLAMA-FONKSİYONU------------------------------------------------------------------
Ayarları-YedeklemeBu fonksiyon ile televizyonun ayarlarını yedekle-yebilir veya daha önce almış olduğunuz yedeği geri yükleyebilirsiniz.1- »Hakkında« menüsünden »V« veya »Λ«
düğmesiyle »Ayar Yedekleme« satırını seçip »OK« düğmesiyle onaylayın.
2- »V« veya »Λ« düğmesiyle »Ayarların yedeğini al« satırını seçip »OK« düğmesiyle onaylayın.
veya
daha önce alınmış bir yedeği yüklemek için »V« veya »Λ« düğmesiyle »Ayarları yedekten geri yükle« satırını seçip »OK« düğmesiyle onaylayın.
– Uyarı ekranı görüntülenir.
3- Güvenlik sorusunu onaylamak için »Evet« seçeneğini seçin;
veya
iptal etmek için »Hayır« seçeneğini seçip »OK« düğmesine basın.

Televizyon / Kullanma Kılavuzu75 / 117 TR
DIGI-LINKTelevizyonunuzda DIGI LINK özelliği bulunmaktadır. Bu özel-lik CEC (Tüketici Elektronik Kont-rolü) protokolünü kullanır. CEC özelliği televizyonunuz ile DVD
oynatıcı STB veya video kaydedicinizi HDMI bağlantısı yaparak televizyon uzaktan kumanda ile kontrol edilmesini sağlar. Bu özelliği bağlaya-cağınız cihaz da desteklemelidir.Televizyonunuz aşağıdaki fonksiyonları des-tekler. Özellik hakkında detaylı bilgi için harici cihazınızın kullanma kılavuzunu okuyun.
Televizyonun-Digi-Link-bağlantı-sı-fonksiyonları
Harici-cihazın-standby-modundan-açılmasıHarici cihazınızı (örneğin DVD oynatıcı) standby modundan açtığınızda, televizyonunuzda standby modundan açılarak harici cihazın bağlı olduğu HDMI kaynağına geçecektir.Harici cihazın özelliklerine bağlı olarak, (örn. AV alıcı) açılabilir ve televizyon standby modun-da kalabilir.
Televizyondan-HDMI-kaynağının-seçil-mesiHarici cihazınızı (örneğin DVD oynatıcı) açtığı-nızda, televizyonunuz harici cihazın bağlı oldu-ğu HDMI kaynağına geçecektir. (televizyonunuz açık olması gerekir).
Menü-dilinin-seçilmesiTelevizyonunuzdan menü dilini seçtiğinizde ha-rici cihazınızın da menü dili değişecektir. (DVD oynatıcınız destekliyorsa).
HARİCİ-CİHAZ-KULLANMA----------------------------------------------------------------
Harici-cihazın-standby-modundan-kapa-tılmasıTelevizyonunuz bekleme konumuna (standby) aldıktan sonra, harici cihaz açıksa (örneğin DVD oynatıcı) harici cihazınız bekleme konumuna geçecektir.DIGI LINK özelliği televizyonunuzda sürekli etkindir.Harici cihazınızda bu özelliğin nasıl aktif edildi-ğini öğrenmek için cihazın kullanım kılavuzuna bakınız.
Etkin-harici-cihaz-arama-ve-seçimiBu televizyona Digi Link özelliğini destekleyen 11 cihaz bağlayabilirsiniz.1- »TOOLS« düğmesi ile Araçlar menüsünü
açın.
2- »V« veya »Λ« ile »Digi Link« satırını seçin ve »OK« düğmesiyle onaylayın.
– Bağlı olan cihazlar »Aygıt Listesi« menü-sünde görüntülenir.
3- Cihaz arama işlemine başlamak için düğ-mesine basın.
4- Kontrol etmek istediğiniz cihazı »V« veya »Λ« düğmeleri ile seçip »OK« düğmesi ile işaretleyin.
– Seçilen cihaz mevcut kaynaktan farklı bir kaynağa bağlı ise cihazın bağlı olduğu kaynağa otomatik olarak geçiş yapılır.

76 / 117 TRTelevizyon / Kullanma Kılavuzu
HARİCİ-CİHAZLARI-KULLANMA--------------------------------------------------
Cihaz-KontrolüTelevizyon kumandasının harici cihazı nasıl kontrol edeceğini ayarlayabilirsiniz.1- » « düğmesine basıp »<« veya »>«
düğmesiyle »HDMI1« ila »HDMI3« seçe-neklerinden birini seçip »OK« düğmesiyle onaylayın.
2- »MENU« düğmesiyle menüyü açın.
3- »V«, »Λ«, »<« veya »>« düğmesiyle »Ayarlar« menü öğesini »OK« ile onayla-yın.
4- »>« veya »<« ile »TV« menü öğesini seçip »V« düğmesiyle onaylayın.
– »Kaynak Ayarları« menüsü görüntülenir.
Aygıt - - - -
Kumanda Davranışı Yok
Aygıtı Beklemeye Al
Görüntü
PerXX XXX XXXX
Kaynak ZamanlayıcıSes AğTV Ebeveyn
Ayarlar > Kaynak
Alanı Değiştir Seç GeriBACK
5- »V« veya »Λ« düğmesiyle »Kumanda Davranışı« satırını seçin.
6- »<« veya »>« düğmesi ile kontrol tipini (»Düz Geçiş«, »Deck« veya »Zap«) seçin.
Notlar:7 »Düz Geçiş« her cihaz tipinde seçilebilir
bir seçenek olarak menüde yer alır »Deck« ve »Tuner Control« seçenekleri bağlı olan harici cihaza göre menüde değişir.
7 Seçilen kontrol tipinde kumanda düğmeleri hangi işlevi yaptığını deneyerek kontrol ediniz.
7 Digi Link uyumlu harici cihaz fonksiyonları için cihazın kullanma kılavuzuna bakın.
7- Ayarı sonlandırmak için »EXIT« düğmesine basın.
Cihazı-bekleme-konumuna-almaBu seçenek ile bağlı olan harici cihaz bekleme (stand-by) konumuna alınır..1- » « düğmesine basıp »<« veya »>«
düğmesiyle »HDMI1« ila »HDMI3« seçe-neklerinden birini seçip »OK« düğmesiyle onaylayın.
2- »MENU« düğmesiyle menüyü açın.
3- »V«, »Λ«, »<« veya »>« düğmesiyle »Ayarlar« menü öğesini »OK« ile onayla-yın.
4- »>« veya »<« ile »Kaynak« menü öğesini seçip »V« düğmesiyle onaylayın.
– »Kaynak« menüsü görüntülenir.
5- »V« veya »Λ« ile »Aygıtı Beklemeye Al« satırını seçin ve »OK« düğmesiyle onayla-yın.
– Bağlı olan harici cihaz kapanır.

Televizyon / Kullanma Kılavuzu77 / 117 TR
HARİCİ-CİHAZLARI-KULLANMA--------------------------------------------------
Yüksek-çözünürlük
HDMI, the HDMI logo and High-Definition Mul-timedia Interface are trademarks or registered trademarks of HDMI Licensing LLCTelevizyonunuz yüksek çözünürlüklü televizyon sinyallerini (HDTV) oynatabilir.Giriş kaynaklarını (HDTV uydu alıcısı veya Yük-sek Çözünürlüklü DVD oynatıcı) »HDMI« soketi-ne (dijital HDTV sinyali) bağlayabilirsiniz.Bu, kopya korumalı (HDCP Yüksek Bant Genişlikli Dijital İçerik Koruması) olsalar bile dijital HDTV programlarını izleyebilmenizi sağlar.
Bağlantı-seçenekleri7 Harici cihazlarınızı bağladığınız televizyon
soket(ler)i, harici cihaz da bulunan soketlere ve kullanılabilir sinyallere bağlıdır.
7 Çoğu harici cihaz da, görüntü sinyalinin çözünürlüğü televizyondaki giriş soketleri-ne uyarlanmalıdır (harici cihazın kullanım kılavuzuna bakın). Bağlantı seçenekleriyle ilgili bölümdeki yönergelere bakarak hangi değerleri ayarlamanız gerektiğini öğrene-bilirsiniz.
7 Cihaz çalışırken başka cihazları bağlama-yın. Bağlamadan önce diğer cihazları da kapatın.
7 Cihazı elektrik prizine yalnızca harici cihazı bağladıktan sonra takın.
VGA IN
SERVICE LAN Optic Out USB (HDD) HDMI2 EARPHONESATELLITE
13/18Vmax. 25 0 mA
ANT-IN5V
max. 50 mA
SCA
RT
HD
MI 1
(AR
C)

78 / 117 TRTelevizyon / Kullanma Kılavuzu
Harici-cihaz-bağlama
Dijital-ses/görüntü-sinyaliyle7 Uygun cihazlar: Dijital uydu alıcısı, oyun kon-
solu, BluRay oynatıcı, DVD oynatıcı/kaydedi-ci, alıcı cihaz, diz üstü bilgisayar, PC.
7 Video sinyali: dijital görüntü; çözünürlük: stan-dart 576p; HDTV 720p, 1080i, 1080p.
7 Ses sinyali: dijital ses (stereo, çok kanallı sıkış-tırma, sıkıştırılmamış).
7 »HDMI1«, »HDMI2« kanal pozisyonu.1- Televizyon üzerindeki HDMI1, HDMI2 so-
ketiyle harici cihazın üzerindeki ilgili HDMI soketini standart bir HDMI kablosu (dijital görüntü ve ses sinyali) kullanarak bağlayın.
Analog-video-sinyaliyle-(progresif)7 Uygun cihazlar: DVD oynatıcı/kaydedici,
oyun konsolu.7 Video sinyali: YUV; çözünürlük: standart
576p; HDTV 720p, 1080i, 1080p.7 Ses sinyali: stereo, analog.7 Kanal pozisyonu »SCART«.1- Televizyonun üzerindeki SCART soketleriy-
le harici cihazın üzerindeki ilgili soketleri, SCART - COMPONENT çevirici kablo (görüntü ve ses sinyali) kullanarak bağlayın.
Euro/AV-girişini-kullanma7 Uygun cihazlar: Dijital uydu alıcısı, DVD oyna-
tıcı/kaydedici, set üstü kutusu, oyun konsolu, video kaydedici, dekoder.
7 Video sinyali: CVBS/RGB.7 Ses sinyali: stereo, analog.7 Kanal pozisyonu »SCART«.1- Televizyonun üzerindeki SCART girişiyle
harici cihazın üzerindeki ilgili çıkışı, EURO/AV kablosu (video ve ses sinyali) kullanarak bağlayın.
HARİCİ-CİHAZLARI-KULLANMA--------------------------------------------------
Scart-ses-ayarını-seçme1- »MENU« düğmesiyle menüyü açın.
2- »V«, »Λ«, »<« veya »>« düğmesiyle »Ayarlar« menü öğesini »OK« ile onayla-yın.
3- »>« veya »<« ile »Ses« menü öğesini seçip »V« düğmesiyle onaylayın.
– »Ses« menüsü görüntülenir.
4- »V« veya »Λ« ile »Gelişmiş« satırını seçin ve »OK« düğmesiyle onaylayın.
5- »V« veya »Λ« düğmesiyle »Scart Çıkışı« satırını seçin.
6- »<« veya »>« düğmesiyle »Sabit« veya »Ayarlanabilir« seçeneğini seçin.
Not:7 »Scart Ses Seviyesi«, menüde »Ayarlanabi-
lir« seçildiğinde etkinleşir.7- »V« veya »Λ« düğmesiyle »Scart Ses
Seviyesi« satırını seçin ve »<« veya »>« düğmesiyle ses seviyesini ayarlayın.
8- Ayarı sonlandırmak için »EXIT« düğmesine basın.
S-Video-sinyalinde7 Uygun cihazlar: DVD oynatıcı/kaydedici,
video kaydedici, kamera, diz üstü bilgisayar, PC.
7 Video sinyali: Y/C.7 Ses sinyali: stereo, analog.7 Kanal pozisyonu »SCART«.1- Televizyonun üzerindeki SCART soketiyle
harici cihazın üzerindeki ilgili soketi, EURO/AV kablosunu (video ve ses sinyali) kullana-rak bağlayın.

Televizyon / Kullanma Kılavuzu79 / 117 TR
HARİCİ-CİHAZLARI-KULLANMA--------------------------------------------------
DVD-kayıt-cihazı,-DVD-oynatıcı,-video-kayıt-cihazı-veya-set-üst-kutusu-kullanımı1- Video kayıt cihazını, DVD oynatıcıyı veya
set üstü kutusunu açıp kullanmak istediğiniz fonksiyonu seçin.
2- » « düğmesine basın, »<« veya »>« düğmesiyle giriş sinyalini seçin (»SCART«, »HDMI1«, »HDMI2«) ve »OK« düğmesiyle onaylayın.
Hi-fi-sistemi
Dijital-çok-kanallı-amplifikatör-/-AV-alıcısı-bağlama1- Televizyonun üzerindeki HDMI1-(ARC)
(HDMI 1.4 Ses Dönüş Kanalı) soketini HDMI ARC uyumlu Dijital çok kanallı ampli-fikatör / AV alıcısı üzerindeki ilgili sokete bir standart HDMI kablosu kullanarak bağlayın (dijital ses sinyali);
veya
2- Televizyonun üzerindeki Optic-Out soketini AV alıcısı üzerindeki ilgili sokete bir standart optik dijital kablo kullanarak bağlayın (dijital ses sinyali).
Önemli:7 HDMI ARC bağlantısında 5 metreden daha
uzun bir HDMI kablosu kullanmayın.
Aygıta-HDMI-ARC-özelliğini-uygulayın-ve-HDMI-ARC-özelliğini-onaylayın1- Çoklu fonksiyon amplifikatörünü veya
AV alıcısını açın. AV alıcısına bir Blu-ray Oynatıcı bağlanırsa oynatıcının da açılması gerekmektedir.
2- »TOOLS« düğmesi ile araçlar menüsünü açın.
3- »V« veya »Λ« ile »Digi Link« satırını seçin ve »OK« düğmesiyle onaylayın.
– »Aygıt Listesi« menüsünde »HDMI3 (ARC)« kaynağına bağlı olan ses sistemi listede görüntülenecektir.
4- »« (mavi) düğmeyle cihaz aramaya başlayın.
– HDMI1-(ARC) kaynağına bağlı olan ses sistemi, listede görüntülenecektir.
5- »V« veya »Λ« düğmesi ile aygıtı seçin ve »OK« düğmesiyle onaylayın.

80 / 117 TRTelevizyon / Kullanma Kılavuzu
Notlar:7 Eğer ses sistemi aynı zamanda oynatıcı
(Örneğin; DVD oynatıcı işlevi dahil Ev sine-ma sistemi) özelliğine sahip ise HDMI CEC listesinde iki farklı cihaz listelenir. Birincisi, oynatıcı ikincisi ise ses oynatıcı cihazdır.
7 AV alıcısına bir Blu-ray Oynatıcı bağlanırsa kayıt sırasında lütfen Diski Oynatıcıdan çıkarın.
6- »MENU« düğmesiyle menüyü açın.
7- »V«, »Λ«, »<« veya »>« düğmesiyle »Ayarlar« menü öğesini »OK« ile onayla-yın.
8- »>« veya »<« ile »Ses« menü öğesini seçip »V« düğmesiyle onaylayın.
– »Ses« menüsü görüntülenir.
9- »V« veya »Λ« ile »Gelişmiş« satırını seçin ve »OK« düğmesiyle onaylayın.
10- »V« veya »Λ« düğmesiyle »ARC« satırını seçin.
11- »Açık« öğesini seçmek için »<« veya »>« düğmesine basın.
Notlar:7 Televizyonun dahili hoparlörleri, otomatik
olarak kapanır.7 AV alıcısının ses seviyesini televizyonun
uzaktan kumandasıyla ayarlayabilirsiniz.7 HDMI ARC özelliğini kapatmak için »<«
veya »>« ile »Kapalı« seçeneğini seçin.7 Televizyon kapatılırken ARC fonksiyonu
devre dışı kalır ve dahili hoparlörler tekrar aktif hale gelir.
12- Ayarı sonlandırmak için »EXIT« düğmesine basın.
HARİCİ-CİHAZLARI-KULLANMA--------------------------------------------------
Dolby, Dolby Audio çif t D sembolü, Dolby Laboratories’in ticari markalarıdır.
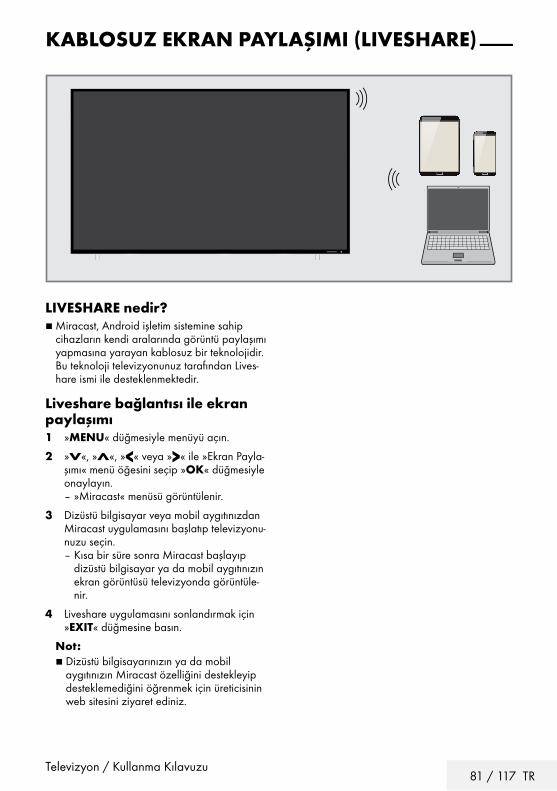
Televizyon / Kullanma Kılavuzu81 / 117 TR
KABLOSUZ-EKRAN-PAYLAŞIMI-(LIVESHARE)-----------
LIVESHARE-nedir?7 Miracast, Android işletim sistemine sahip
cihazların kendi aralarında görüntü paylaşımı yapmasına yarayan kablosuz bir teknolojidir. Bu teknoloji televizyonunuz tarafından Lives-hare ismi ile desteklenmektedir.
Liveshare-bağlantısı-ile-ekran-paylaşımı1- »MENU« düğmesiyle menüyü açın.
2- »V«, »Λ«, »<« veya »>« ile »Ekran Payla-şımı« menü öğesini seçip »OK« düğmesiyle onaylayın.
– »Miracast« menüsü görüntülenir.
3- Dizüstü bilgisayar veya mobil aygıtınızdan Miracast uygulamasını başlatıp televizyonu-nuzu seçin.
– Kısa bir süre sonra Miracast başlayıp dizüstü bilgisayar ya da mobil aygıtınızın ekran görüntüsü televizyonda görüntüle-nir.
4- Liveshare uygulamasını sonlandırmak için »EXIT« düğmesine basın.
Not:7 Dizüstü bilgisayarınızın ya da mobil
aygıtınızın Miracast özelliğini destekleyip desteklemediğini öğrenmek için üreticisinin web sitesini ziyaret ediniz.

82 / 117 TRTelevizyon / Kullanma Kılavuzu
ORTAK-ARAYÜZLE-ÇALIŞTIRMA--------------------------------------------------
Ortak-arayüz-nedir?7 Ortak Arayüz (CI) DVB alıcılarında kullanılan
bir arayüzdür.7 Şifreli kanallar, yalnızca şifreleme sistemine
ve ilgili akıllı karta uygun bir CA modülüyle izlenebilir.
7 Televizyon seti çeşitli hizmet sağlayıcılardan alınan CA modüllerinin takılabildiği bir Ortak Arayüz yuvasıyla donatılmıştır.
7 İzlemek istediğiniz şifreli kanalları etkinleştir-mek için hizmet sağlayıcının akıllı kartını CA modülüne takabilirsiniz.
CA-modülünü-takmaNot:7 CA modülünü CI yuvasına takmadan önce
cihazı kapatın.1- Akıllı kartı CA modülüne takın.
2- CA modülünü akıllı kartla birlikte televizyon-daki CI yuvasına takın.
Not:7 Ortak Arayüz yuvasında hangi CA
modülünün bulunduğunu görmek için »CA - Modülü« alt menüsüne gidin.
7 Televizyonunuzdaki CI yuvasına ilk kez bir CA modülü takarken televizyon CA modülü-nü kaydedene kadar kısa bir süre bekleyin.
CA-modülü-ve-akıllı-kartlar-için-erişim-kontrolü1- »MENU« düğmesiyle menüyü açın.
2- »V«, »Λ«, »<« veya »>« düğmesiyle »Ayarlar« menü öğesini »OK« ile onayla-yın.
3- »>« veya »<« ile »Kaynak« menü öğesini seçip »V« düğmesiyle onaylayın.
– »Kaynak« menüsü görüntülenir.
4- »V« düğmesiyle »Gelişmiş« satırını seçin ve »OK« düğmesiyle onaylayın.
5- »Λ« veya »V« düğmesiyle »CA - Modülü« satırını seçin ve »OK« düğmesiyle onayla-yın.
Notlar:7 Bu menüde, kullanma talimatları sunulur
ve PIN kodunuzu girdikten sonra Ücretli TV yayını sağlayıcısının kanallarına erişim sağlanır.
7 Diğer ayarlar, CA modülünüz ve akıllı kartı-nıza ait kılavuzlarda açıklanmaktadır.
7 CA, bazı ülkelerde ve bölgelerde desteklen-memektedir. Lütfen yetkili satıcınıza danışın.
6- Ayarı sonlandırmak için »EXIT« düğmesine basın.

Televizyon / Kullanma Kılavuzu83 / 117 TR
AĞ-KURULUMU------------------------------------------------------------------------------------------------
SMART inter@ctive özelliklerini kullanmak için televizyonunuzu, internet erişimi olan ev ağınıza bağlayıp giriş yapmalısınız.Grundig Uygulamam Portal'ında birçok uygu-lama başlatabilirsiniz. Bu uygulamalar, video, resim, müzik, oyun sosyal paylaşım uygulama-ları, haber ve spor uygulamaları, hava durumu uygulamaları gibi çeşitli uygulamalardır. Televizyonunuz Apple iPhone ve Android tele-fonlar için kumanda özelliğini desteklemektedir. Telefonunuzun özelliklerine bağlı olarak Apple App Store’dan veya Google Play (Android Market)’ten »Grundig TV Remote« uygulamasını telefonunuza ücretsiz indirerek telefonunuz ile televizyonunuzu kumanda edebilirsiniz.
Ağ-bağlantısıTelevizyonunuzu kablolu veya kablosuz olarak yerel ağa bağlayabilirsiniz.Kablolu ağ bağlantısı kullanmak istiyorsanız bu sayfadaki yönergeler ile başlayınız;Kablosuz ağ bağlantısı kullanıyorsanız sayfa 86 “Kablosuz ağ bağlantısı” bölümündeki yönerge-leri takip edin.
Not:7 Aşağıdaki bölüm, "ilk kurulum" esnasında
gerçekleştirmediyseniz ev ağına nasıl bağ-lanılacağını anlatmaktadır.
Kablolu-ağ
Kablolu-ağ-bağlantısı1- Harici modemin çıkışını LAN soketine Cat 5
kablo ile bağlayın.
Not:7 Bağlantı kabloları ürün ile birlikte verilmez.

84 / 117 TRTelevizyon / Kullanma Kılavuzu
Kablolu-ağ-ayarlarıKablolu ağ ayarlarını yapmak için iki yol vardır.A Otomatik bağlantı, tüm bağlantı ayarları (»IP Adresi«, »Net-
mask«, »Gateway« ve »DNS«) bilgileri modemden otomatik olarak alınır.
B Manuel bağlantı, tüm bağlantı ayarları (»IP Adresi«, »Net-
mask«, »Gateway« ve »DNS«) bilgileri manuel olarak yapılandırılması gerekir.
Otomatik-bağlantıBir çok ev ağı Dinamik Ağdır. Dinamik bir ağa sahipseniz, DHCP destekleyen bir DSL modem kullanmalısınız. DHCP’yi destekleyen modemler ve IP paylaştırıcılar, »IP Adresi«, »Netmask«, »Gateway« ve internet erişimi için gereksinim duyulan »DNS« değerlerini otomatik olarak alırlar, böylece bu değerleri manuel girmeniz gerekmez.1- »MENU« düğmesiyle menüyü açın.
2- »V«, »Λ«, »<« veya »>« düğmesiyle »Ayarlar« menü öğesini »OK« ile onayla-yın.
3- »>« veya »<« ile »Ağ« menü öğesini seçip »V« düğmesiyle onaylayın.
Bağlantı Tipini Değiştir Kablolu
Ağ Ayarları Otomatik
Wake-on-LAN Kapalı
Gelişmiş
Görüntü
PerXX XXX XXXX
Kaynak ZamanlayıcıSes AğTV Ebeveyn
Ayarlar > Ağ
Alanı DeğiştirBağlan Bağlantı Testi Seç GeriBACK
4- »Bağlantı Tipini Değiştir« satırını »OK« düğmesiyle onaylayın.
5- »V« veya »Λ« düğmesiyle »Kablolu« seçeneğini seçin ve »OK« düğmesiyle onaylayın.
AĞ-KURULUMU------------------------------------------------------------------------------------------------
6- »V« veya »Λ« düğmesiyle »Ağ Ayarları« satırını seçin ve »<« veya »>« düğmesiyle »Otomatik« seçeneğini seçin.
7- »« (kırmızı) düğmesi ile »Bağlan« seçeneği-ni seçip modem bağlantısını kurun.
– »Bağlantı kuruluyor ... Lütfen bekleyin« mesajı görüntülenir ve bağlantı başarılı ise »Gateway Bağlantısı: Başarılı« mesajı görüntülenir.
8- »« (yeşil) düğmesine basarak yapılan ayarlar ile yerel ağ ve internet bağlantısının gerçekleştiğini kontrol edin.
– »Test ediliyor ... Lütfen bekleyin« mesajı görüntülenir ve bağlantı başarılı ise »Gateway Bağlantısı: Başarılı«, »İnternet Bağlantısı: Başarılı« mesajı görüntülenir.
9- Ayarları sonlandırmak için »EXIT« düğme-sine basın.
Not:7 Dinamik bir ağa sahip değilseniz manuel
bağlantı bölümündeki adımları takip edin.
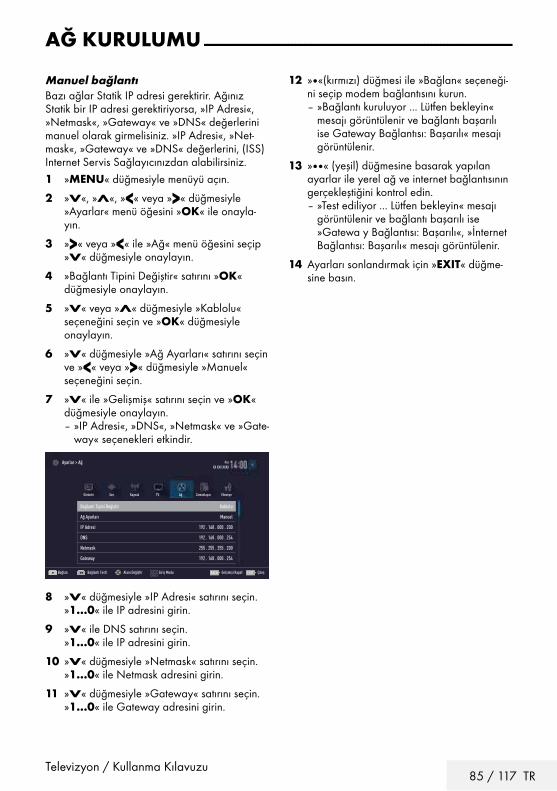
Televizyon / Kullanma Kılavuzu85 / 117 TR
AĞ-KURULUMU------------------------------------------------------------------------------------------------
Manuel-bağlantıBazı ağlar Statik IP adresi gerektirir. Ağınız Statik bir IP adresi gerektiriyorsa, »IP Adresi«, »Netmask«, »Gateway« ve »DNS« değerlerini manuel olarak girmelisiniz. »IP Adresi«, »Net-mask«, »Gateway« ve »DNS« değerlerini, (ISS) Internet Servis Sağlayıcınızdan alabilirsiniz.1- »MENU« düğmesiyle menüyü açın.
2- »V«, »Λ«, »<« veya »>« düğmesiyle »Ayarlar« menü öğesini »OK« ile onayla-yın.
3- »>« veya »<« ile »Ağ« menü öğesini seçip »V« düğmesiyle onaylayın.
4- »Bağlantı Tipini Değiştir« satırını »OK« düğmesiyle onaylayın.
5- »V« veya »Λ« düğmesiyle »Kablolu« seçeneğini seçin ve »OK« düğmesiyle onaylayın.
6- »V« düğmesiyle »Ağ Ayarları« satırını seçin ve »<« veya »>« düğmesiyle »Manuel« seçeneğini seçin.
7- »V« ile »Gelişmiş« satırını seçin ve »OK« düğmesiyle onaylayın.
– »IP Adresi«, »DNS«, »Netmask« ve »Gate-way« seçenekleri etkindir.
Bağlantı Tipini Değiştir Kablolu
Ağ Ayarları Manuel
IP Adresi 192 . 168 . 000 . 200
DNS 192 . 168 . 000 . 254
Netmask 255 . 255 . 255 . 200
Gateway 192 . 168 . 000 . 254
Görüntü
PerXX XXX XXXX
Kaynak ZamanlayıcıSes AğTV Ebeveyn
Ayarlar > Ağ
Alanı DeğiştirBağlan Bağlantı Testi Giriş Modu ÇıkışGelşmişi Kapat EXITBACK
8- »V« düğmesiyle »IP Adresi« satırını seçin. »1…0« ile IP adresini girin.
9- »V« ile DNS satırını seçin. »1…0« ile IP adresini girin.
10- »V« düğmesiyle »Netmask« satırını seçin. »1…0« ile Netmask adresini girin.
11- »V« düğmesiyle »Gateway« satırını seçin. »1…0« ile Gateway adresini girin.
12- »«(kırmızı) düğmesi ile »Bağlan« seçeneği-ni seçip modem bağlantısını kurun.
– »Bağlantı kuruluyor ... Lütfen bekleyin« mesajı görüntülenir ve bağlantı başarılı ise Gateway Bağlantısı: Başarılı« mesajı görüntülenir.
13- »« (yeşil) düğmesine basarak yapılan ayarlar ile yerel ağ ve internet bağlantısının gerçekleştiğini kontrol edin.
– »Test ediliyor ... Lütfen bekleyin« mesajı görüntülenir ve bağlantı başarılı ise »Gatewa y Bağlantısı: Başarılı«, »İnternet Bağlantısı: Başarılı« mesajı görüntülenir.
14- Ayarları sonlandırmak için »EXIT« düğme-sine basın.
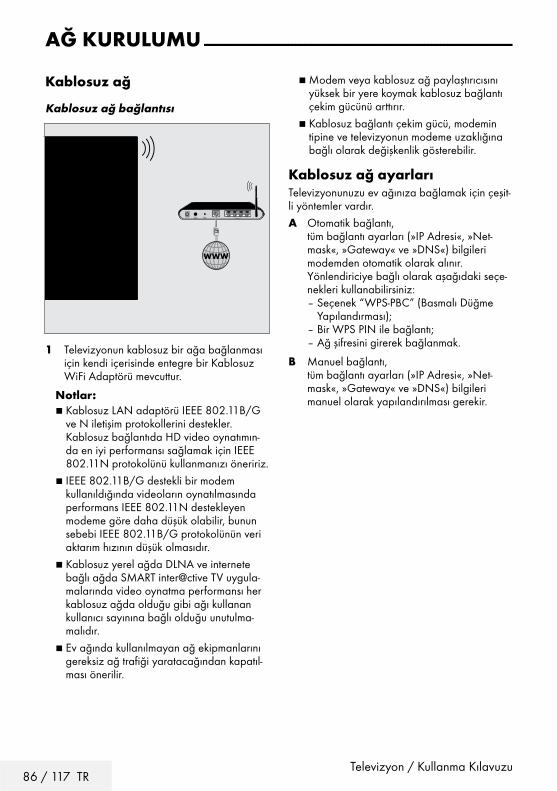
86 / 117 TRTelevizyon / Kullanma Kılavuzu
Kablosuz-ağ
Kablosuz-ağ-bağlantısı
1- Televizyonun kablosuz bir ağa bağlanması için kendi içerisinde entegre bir Kablosuz WiFi Adaptörü mevcuttur.
Notlar:7 Kablosuz LAN adaptörü IEEE 802.11B/G
ve N iletişim protokollerini destekler. Kablosuz bağlantıda HD video oynatımın-da en iyi performansı sağlamak için IEEE 802.11N protokolünü kullanmanızı öneririz.
7 IEEE 802.11B/G destekli bir modem kullanıldığında videoların oynatılmasında performans IEEE 802.11N destekleyen modeme göre daha düşük olabilir, bunun sebebi IEEE 802.11B/G protokolünün veri aktarım hızının düşük olmasıdır.
7 Kablosuz yerel ağda DLNA ve internete bağlı ağda SMART inter@ctive TV uygula-malarında video oynatma performansı her kablosuz ağda olduğu gibi ağı kullanan kullanıcı sayınına bağlı olduğu unutulma-malıdır.
7 Ev ağında kullanılmayan ağ ekipmanlarını gereksiz ağ trafiği yaratacağından kapatıl-ması önerilir.
AĞ-KURULUMU------------------------------------------------------------------------------------------------
7 Modem veya kablosuz ağ paylaştırıcısını yüksek bir yere koymak kablosuz bağlantı çekim gücünü arttırır.
7 Kablosuz bağlantı çekim gücü, modemin tipine ve televizyonun modeme uzaklığına bağlı olarak değişkenlik gösterebilir.
Kablosuz-ağ-ayarlarıTelevizyonunuzu ev ağınıza bağlamak için çeşit-li yöntemler vardır.A Otomatik bağlantı, tüm bağlantı ayarları (»IP Adresi«, »Net-
mask«, »Gateway« ve »DNS«) bilgileri modemden otomatik olarak alınır.
Yönlendiriciye bağlı olarak aşağıdaki seçe-nekleri kullanabilirsiniz:
– Seçenek “WPS-PBC” (Basmalı Düğme Yapılandırması);
– Bir WPS PIN ile bağlantı; – Ağ şifresini girerek bağlanmak.
B Manuel bağlantı, tüm bağlantı ayarları (»IP Adresi«, »Net-
mask«, »Gateway« ve »DNS«) bilgileri manuel olarak yapılandırılması gerekir.

Televizyon / Kullanma Kılavuzu87 / 117 TR
AĞ-KURULUMU------------------------------------------------------------------------------------------------
Teknik-gereklilikler-Bir çok ev ağı Dinamik Ağdır. Dinamik bir ağa sahipseniz, DHCP destekleyen bir DSL modem kullanmalısınız. DHCP’yi destekleyen modemler ve IP paylaştırıcılar, »IP Adresi«, »Netmask«, »Gateway« ve internet erişimi için gereksinim duyulan »DNS« değerlerini otomatik olarak alırlar, böylece bu değerleri manuel girmeniz gerekmez.
Bir-düğmeye-basarak-kablosuz-WPS-ağ-bağlantısı1- »MENU« düğmesiyle menüyü açın.
2- »V«, »Λ«, »<« veya »>« düğmesiyle »Ayarlar« menü öğesini »OK« ile onayla-yın.
3- »>« veya »<« ile »Ağ« menü öğesini seçip »V« düğmesiyle onaylayın.
– »Ağ ayarları« menüsü görüntülenir.
4- »Bağlantı Tipini Değiştir« satırını »OK« düğmesiyle onaylayın.
5- »V« veya »Λ« düğmesiyle »Kablosuz WPS« seçeneğini seçin ve »OK« düğmesiy-le onaylayın.
– WiFi uyarı ekranı görüntülenir.
6- »<« veya »>« ile »Evet« seçeneğini seçip »OK« düğmesiyle WiFi'ı onaylayın.
7- »V« düğmesiyle »WPS Tipi« satırını seçin ve »<« veya »>« düğmesiyle »Tuş Basma« seçeneğini seçin.
Bağlantı Tipini Değiştir Kablosuz WPS
WiFi Açık
WPS Tipi Tuşa Basma
Erişim Noktası Seç N/A
Ağ Ayarları Otomatik
Gelişmiş
Görüntü
PerXX XXX XXXX
Kaynak ZamanlayıcıSes AğTV Ebeveyn
Ayarlar > Ağ
Alanı DeğiştirBağlan Bağlantı Testi Giriş Modu ÇıkışGeri EXITBACK
8- »« (kırmızı) düğmesi ile »Bağlan« seçeneği-ni seçip modem bağlantısını kurun.
– »Erişim Noktası üzerindeki WPS tuşuna basın« mesajı görüntülenir.
9- Router üzerindeki WPS tuşuna basınız.
10- Erişim noktası üzerinden WPS düğmesine bastıktan sonra devam etmek için »<« veya »>« düğmesi ile »Devam« seçeneğini seçin ve »OK« düğmesiyle onaylayın.
– "Gateway Bağlantısı: Başarılı" mesajı görüntülenir.
11- »« (yeşil) düğmesine basarak yapılan ayarlar ile ağ bağlantısının gerçekleştiğini kontrol edin.
– »Test ediliyor ... Lütfen bekleyin« mesajı görüntülenir ve bağlantı başarılı ise »Gateway Bağlantısı: Başarılı«, »İnternet Bağlantısı: Başarılı« mesajı görüntülenir.
12- Ayarı sonlandırmak için »EXIT« düğmesine basın.
PIN-ile-kablosuz-WPS-ağ-bağlantısı1- »MENU« düğmesiyle menüyü açın.
2- »V«, »Λ«, »<« veya »>« düğmesiyle »Ayarlar« menü öğesini »OK« ile onayla-yın.
3- »>« veya »<« ile »Ağ« menü öğesini seçip »V« düğmesiyle onaylayın.
– »Ağ ayarları« menüsü görüntülenir.
4- »Bağlantı Tipini Değiştir« satırını »OK« düğmesiyle onaylayın.
5- »V« veya »Λ« düğmesiyle »Kablosuz WPS« seçeneğini seçin ve »OK« düğmesiy-le onaylayın.
– WiFi uyarı ekranı görüntülenir.
6- »<« veya »>« ile »Evet« seçeneğini seçip »OK« düğmesiyle WiFi'ı onaylayın.
7- »V« düğmesiyle »WPS Tipi« satırını seçin ve »<« veya »>« düğmesiyle »Tuş Basma« seçeneğini seçin.
Bağlantı Tipini Değiştir Kablosuz WPS
WiFi Açık
WPS Tipi PIN
Erişim Noktası Seç N/A
Ağ Ayarları Otomatik
Gelişmiş
Görüntü
PerXX XXX XXXX
Kaynak ZamanlayıcıSes AğTV Ebeveyn
Ayarlar > Ağ
Alanı DeğiştirBağlan Bağlantı Testi Giriş Modu ÇıkışGeri EXITBACK
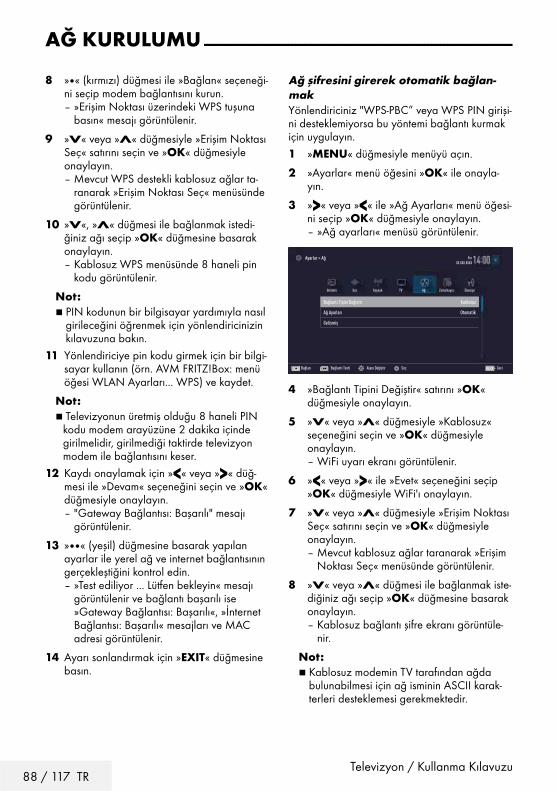
88 / 117 TRTelevizyon / Kullanma Kılavuzu
8- »« (kırmızı) düğmesi ile »Bağlan« seçeneği-ni seçip modem bağlantısını kurun.
– »Erişim Noktası üzerindeki WPS tuşuna basın« mesajı görüntülenir.
9- »V« veya »Λ« düğmesiyle »Erişim Noktası Seç« satırını seçin ve »OK« düğmesiyle onaylayın.
– Mevcut WPS destekli kablosuz ağlar ta-ranarak »Erişim Noktası Seç« menüsünde görüntülenir.
10- »V«, »Λ« düğmesi ile bağlanmak istedi-ğiniz ağı seçip »OK« düğmesine basarak onaylayın.
– Kablosuz WPS menüsünde 8 haneli pin kodu görüntülenir.
Not:7 PIN kodunun bir bilgisayar yardımıyla nasıl
girileceğini öğrenmek için yönlendiricinizin kılavuzuna bakın.
11- Yönlendiriciye pin kodu girmek için bir bilgi-sayar kullanın (örn. AVM FRITZ!Box: menü öğesi WLAN Ayarları... WPS) ve kaydet.
Not:7 Televizyonun üretmiş olduğu 8 haneli PIN
kodu modem arayüzüne 2 dakika içinde girilmelidir, girilmediği taktirde televizyon modem ile bağlantısını keser.
12- Kaydı onaylamak için »<« veya »>« düğ-mesi ile »Devam« seçeneğini seçin ve »OK« düğmesiyle onaylayın.
– "Gateway Bağlantısı: Başarılı" mesajı görüntülenir.
13- »« (yeşil) düğmesine basarak yapılan ayarlar ile yerel ağ ve internet bağlantısının gerçekleştiğini kontrol edin.
– »Test ediliyor ... Lütfen bekleyin« mesajı görüntülenir ve bağlantı başarılı ise »Gateway Bağlantısı: Başarılı«, »İnternet Bağlantısı: Başarılı« mesajları ve MAC adresi görüntülenir.
14- Ayarı sonlandırmak için »EXIT« düğmesine basın.
Ağ-şifresini-girerek-otomatik-bağlan-makYönlendiriciniz "WPS-PBC” veya WPS PIN girişi-ni desteklemiyorsa bu yöntemi bağlantı kurmak için uygulayın.1- »MENU« düğmesiyle menüyü açın.
2- »Ayarlar« menü öğesini »OK« ile onayla-yın.
3- »>« veya »<« ile »Ağ Ayarları« menü öğesi-ni seçip »OK« düğmesiyle onaylayın.
– »Ağ ayarları« menüsü görüntülenir.
Bağlantı Tipini Değiştir Kablosuz
Ağ Ayarları Otomatik
Gelişmiş
Görüntü
PerXX XXX XXXX
Kaynak ZamanlayıcıSes AğTV Ebeveyn
Ayarlar > Ağ
Alanı DeğiştirBağlan Bağlantı Testi Seç GeriBACK
4- »Bağlantı Tipini Değiştir« satırını »OK« düğmesiyle onaylayın.
5- »V« veya »Λ« düğmesiyle »Kablosuz« seçeneğini seçin ve »OK« düğmesiyle onaylayın.
– WiFi uyarı ekranı görüntülenir.
6- »<« veya »>« ile »Evet« seçeneğini seçip »OK« düğmesiyle WiFi'ı onaylayın.
7- »V« veya »Λ« düğmesiyle »Erişim Noktası Seç« satırını seçin ve »OK« düğmesiyle onaylayın.
– Mevcut kablosuz ağlar taranarak »Erişim Noktası Seç« menüsünde görüntülenir.
8- »V« veya »Λ« düğmesi ile bağlanmak iste-diğiniz ağı seçip »OK« düğmesine basarak onaylayın.
– Kablosuz bağlantı şifre ekranı görüntüle-nir.
Not:7 Kablosuz modemin TV tarafından ağda
bulunabilmesi için ağ isminin ASCII karak-terleri desteklemesi gerekmektedir.
AĞ-KURULUMU------------------------------------------------------------------------------------------------

Televizyon / Kullanma Kılavuzu89 / 117 TR
AĞ-KURULUMU------------------------------------------------------------------------------------------------
9- »V«, »Λ«, »<« veya »>« düğmesiyle gereken karakteri seçip »OK« düğmesiyle bir sonraki karaktere geçin.
– »Shift« ➡ »OK« tuşlarını kullanarak büyük harfler / sayılar ve küçük harfler / özel karakterler arasında geçiş yapabilir-siniz.
Girilen karakteri silmek için »Del« düğmesi-ni seçip »OK« düğmesiyle onaylayın.
10- »« (yeşil) ile şifreyi onaylayın. – »Bağlantı kuruluyor ... Lütfen bekleyin«
mesajı görüntülenir ve bağlantı başarılı ise »Gateway Bağlantısı: Başarılı« mesajı görüntülenir.
11- »« (yeşil) düğmesine basarak yapılan ayarlar ile yerel ağ ve internet bağlantısının gerçekleştiğini kontrol edin.
– »Test ediliyor ... Lütfen bekleyin« mesajı görüntülenir ve bağlantı başarılı ise »Gateway Bağlantısı: Başarılı«, »İnternet Bağlantısı: Başarılı« mesajı görüntülenir.
12- Ayarı sonlandırmak için »EXIT« düğmesine basın.
Not:7 Dinamik bir ağa sahip değilseniz manuel
bağlantı bölümündeki adımları takip edin.
Manuel-bağlantıBazı ağlar Statik IP adresi gerektirir. Ağınız Statik bir IP adresi gerektiriyorsa, »IP Adresi«, »Netmask«, »Gateway« ve »DNS« değerlerini manuel olarak girmelisiniz. »IP Adresi«, »Net-mask«, »Gateway« ve »DNS« değerlerini, (ISS) Internet Servis Sağlayıcınızdan alabilirsiniz.1- »MENU« düğmesiyle menüyü açın.
2- »V«, »Λ«, »<« veya »>« düğmesiyle »Ayarlar« menü öğesini »OK« ile onayla-yın.
3- »>« veya »<« ile »Ağ« menü öğesini seçip »V« düğmesiyle onaylayın.
– »Ağ ayarları« menüsü görüntülenir.
4- »Bağlantı Tipini Değiştir« satırını »OK« düğmesiyle onaylayın.
5- »V« veya »Λ« düğmesiyle »Kablosuz« seçeneğini seçin ve »OK« düğmesiyle onaylayın.
– WiFi uyarı ekranı görüntülenir.
6- »<« veya »>« ile »Evet« seçeneğini seçip »OK« düğmesiyle WiFi'ı onaylayın.
7- »V« veya »Λ« düğmesiyle »Ağ Ayarları« satırını seçin ve »<« veya »>« düğmesiyle »Manuel« seçeneğini seçin.
– »IP Adresi«, »DNS«, »Netmask« ve »Gate-way« seçenekleri etkindir.
Bağlantı Tipini Değiştir Kablosuz
WiFi Manuel
Erişim Noktaı Seç N/A
Ağ Ayarları Manuel
IP Adresi 000 . 000 . 000 . 000
DNS 000 . 000 . 000 . 000
Görüntü
PerXX XXX XXXX
Kaynak ZamanlayıcıSes AğTV Ebeveyn
Ayarlar > Ağ
Alanı DeğiştirBağlan Bağlantı Testi Giriş Modu ÇıkışGelşmişi Kapat EXITBACK
8- »V« düğmesiyle »IP Adresi« satırını seçin. »1…0« ile IP adresini girin.
9- »V« ile »DNS« satırını seçin. »1…0« ile DNS adresini girin.
90 / 117 TRTelevizyon / Kullanma Kılavuzu
"Gizli"-bir-ağa-televizyonun-bağ-lanmasıYönlendiricinin SSID (Servis Seti Tanımlayıcı)'si görünmese bile televizyonunuzu bu ağa bağla-yabilirsiniz.1- »MENU« düğmesiyle menüyü açın.
2- »V«, »Λ«, »<« veya »>« düğmesiyle »Ayarlar« menü öğesini »OK« ile onayla-yın.
3- »>« veya »<« ile »Ağ« menü öğesini seçip »V« düğmesiyle onaylayın.
– »Ağ ayarları« menüsü görüntülenir.
4- »V« veya »Λ« düğmesiyle »Erişim Noktası Seç« satırını seçin ve »OK« düğmesiyle onaylayın.
– »Erişim Noktası Seç« menüsü görüntüle-nir ve mevcut kablosuz ağlar taranarak menüde görüntülenir.
5- »« (kırmızı) düğmesine basın. – »Ağ Ekle« menüsü görünür.
6- »V« veya »Λ« ile »Erişim Noktası Adı« satı-rını seçin ve »OK« düğmesiyle onaylayın.
– SSID girişi için bir menü görüntülenir.
Not:7 Kablosuz modemin TV tarafından ağda
bulunabilmesi için ağ isminin ASCII karak-terleri desteklemesi gerekmektedir.
7- »V«, »Λ«, »<« veya »>« düğmesiyle gerekli karakteri seçip »OK« düğmesiyle bir sonraki karaktere geçin.
– »Shift« ➡ »OK« tuşlarını kullanarak büyük harfler / sayılar ve küçük harfler / özel karakterler arasında geçiş yapabilir-siniz.
– Girilen karakteri silmek için »Del« düğme-sini seçip »OK« düğmesiyle onaylayın.
8- SSID'yi »« (yeşil) düğmesine basarak onaylayın.
9- »V« düğmesiyle »Güvenlik tipi« satırını seçin ve »<« veya »>« düğmesiyle gereken seçeneği »WPA2« seçin.
AĞ-KURULUMU------------------------------------------------------------------------------------------------
10- »V« düğmesiyle »Netmask« satırını seçin. »1…0« ile Netmask adresini girin.
11- »V« düğmesiyle »Gateway« satırını seçin. »1…0« ile Gateway adresini girin.
12- »V« veya »Λ« düğmesiyle »Erişim Noktası Seç« satırını seçin ve »OK« düğmesiyle onaylayın.
– Mevcut kablosuz ağlar taranarak »Erişim Noktası Seç« menüsünde görüntülenir.
13- »V« veya »Λ« düğmesiyle bağlanmak istediğiniz ağı seçip »OK« düğmesiyle onaylayın.
– Kablosuz bağlantı şifre ekranı görüntüle-nir.
Not:7 Kablosuz modemin TV tarafından ağda
bulunabilmesi için ağ isminin ASCII karak-terleri desteklemesi gerekmektedir.
14- »V«, »Λ«, »<« veya »>« düğmesiyle gereken karakteri seçip »OK« düğmesiyle bir sonraki karaktere geçin.
– »Shift« ➡ »OK« tuşlarını kullanarak büyük harfler / sayılar ve küçük harfler / özel karakterler arasında geçiş yapabilir-siniz.
– Girilen karakteri silmek için »Del« düğme-sini seçip »OK« düğmesiyle onaylayın.
15- »« (yeşil) ile şifreyi onaylayın. – »Bağlantı kuruluyor ... Lütfen bekleyin«
mesajı görüntülenir ve bağlantı başarılı ise »Gateway Bağlantısı: Başarılı« mesajı görüntülenir.
16- »« (yeşil) düğmesine basarak yapılan ayarlar ile yerel ağ ve internet bağlantısının gerçekleştiğini kontrol edin.
– »Test ediliyor ... Lütfen bekleyin« mesajı görüntülenir ve bağlantı başarılı ise »Gateway Bağlantısı: Başarılı«, »İnternet Bağlantısı: Başarılı« mesajı görüntülenir.
17- Ayarı sonlandırmak için »EXIT« düğmesine basın.

Televizyon / Kullanma Kılavuzu91 / 117 TR
AĞ-KURULUMU------------------------------------------------------------------------------------------------
10- »« (kırmızı) ile ayarı onaylayın. – Ağ artık »Erişim Noktası Seç« menüsünde-
dir.
11- »V« veya »Λ« düğmesi ile ağı seçip »OK« düğmesine basarak onaylayın.
– Kablosuz bağlantı şifre ekranı görüntüle-nir.
12- »V«, »Λ«, »<« veya »>« düğmesiyle gereken karakteri seçip »OK« düğmesiyle bir sonraki karaktere geçin.
– »Shift« ➡ »OK« tuşlarını kullanarak büyük harfler / sayılar ve küçük harfler / özel karakterler arasında geçiş yapabilir-siniz.
– Girilen karakteri silmek için »Del« düğme-sini seçip »OK« düğmesiyle onaylayın.
13- »« (yeşil) düğmesine basarak şifreyi onaylayın.
– »Bağlantı kuruluyor ... Lütfen bekleyin« mesajı görüntülenir.
14- »« (yeşil) düğmesine basarak yapılan ayarlar ile ağ bağlantısının gerçekleştiğini kontrol edin.
– »Test ediliyor ... Lütfen bekleyin« mesajı görüntülenir ve bağlantı başarılı ise »Gateway Bağlantısı: Başarılı«, »İnternet Bağlantısı: Başarılı«, mesajları ve MAC adresi görüntülenir.
15- Ayarı sonlandırmak için »EXIT« düğmesine basın.
TV-Adının-DeğiştirilmesiTelevizyonunuzun ağda tanımlanmasını sağla-mak için “Ultralogic FHD” adı, fabrikada atan-maktadır. Adı değiştirebilirsiniz.1- »MENU« düğmesiyle menüyü açın.
2- »V«, »Λ«, »<« veya »>« düğmesiyle »Ayarlar« menü öğesini »OK« ile onayla-yın.
3- »<« veya »>« düğmesi ile »TV« menü öğesi-ni seçin ve »OK« düğmesiyle onaylayın.
4- »V« ile »Hakkında« satırını seçin ve »OK« düğmesiyle onaylayın.
5- »V« ile »TV Adı« satırını seçin ve »OK« düğmesiyle onaylayın.
6- Mevcut ismi adım adım silmek için »« (kırmızı) düğmesine basın.
7- »V«, »Λ«, »<« veya »>« düğmesiyle gerekli karakteri seçip »OK« düğmesiyle bir sonraki karaktere geçin.
– »Shift« ➡ »OK« tuşlarını kullanarak büyük harfler / sayılar ve küçük harfler / özel karakterler arasında geçiş yapabilir-siniz.
– Girilen karakteri silmek için »Del« düğme-sini seçip »OK« düğmesiyle onaylayın.
8- Yeni adı »« (yeşil) düğmesine basarak onaylayın.
9- Ayarı sonlandırmak için »EXIT« düğmesine basın.

92 / 117 TRTelevizyon / Kullanma Kılavuzu
DETAYLI-KANAL-AYARLARI----------------------------------------------------------------
Uydu-bağlantılı-tüm-dijital-tele-vizyon-istasyonlarının-otomatik-olarak-aranmasıYeni uydu kanalları sık sık eklenir ya da uydu verileri değiştirilir. Bu nedenle, otomatik arama fonksiyonu zaman zaman başlatmanız önerilir.Tüm transponderlar taranarak yeni kanallar aranır.1- »MENU« düğmesiyle menüyü açın.
2- »V«, »Λ«, »<« veya »>« düğmesiyle »Ayarlar« menü öğesini »OK« ile onayla-yın.
3- »>« veya »<« ile »Kaynak« menü öğesini seçip »V« düğmesiyle onaylayın.
– »Kaynak« menüsü görüntülenir.
Otomatik Kanal Arama
Elle Kanal Arama
Kanal Düzenleyici
Gelişmiş
Görüntü
PerXX XXX XXXX
Kaynak ZamanlayıcıSes AğTV Ebeveyn
Ayarlar > Kaynak
Alanı Değiştir Giriş Modu ÇıkışGeri EXITBACK
4- »V« veya »Λ« ile »Otomatik Kanal Arama« satırını seçin ve »OK« düğmesiyle onaylayın.
– Menü görüntülenir.
5- »V« veya »Λ« düğmesiyle »Uydu« seçene-ğini seçin ve »OK« düğmesiyle onaylayın.
6- »V« veya »Λ« düğmesiyle operatör seçimi-ni yapıp »OK« düğmesiyle onaylayın.
7- »« (mavi) düğmesi ile »Devam« seçene-ğini seçin.
8- Kanal Tipini seçin. Yalnızca dijital kanallarını mı (Dijital), yoksa
yalnızca radyo mu (Radyo) ya da ikisini bir-den mi (Dijital+Radyo) aramak istediğinizi belirlemek için »V« veya »Λ« düğmesiyle »Dijital« ve/veya »Radyo« öğelerini seçip işaretlemek ya da işareti kaldırmak için »OK« düğmesine basın.
9- Tarama Modunu seçin. Yalnızca ücretsiz dijital televizyon kanal-
larını mı (Ücretsiz), yoksa yalnızca şifreli dijital televizyon kanallarını mı (Şifreli) ya da ikisini birden mi (Ücretsiz+Şifreli) aramak istediğinizi belirlemek için »V« veya »Λ« düğmesiyle »Ücretsiz« ve/veya »Şifreli« öğelerini seçip işaretlemek ya da işareti için »OK« düğmesine basın.
10- Aramaya başlamak için »« kırmızı düğme-sine basın.
Notlar:7 Aynı uydular vasıtasıyla güncellerken
arama başlangıcında bir güvenlik sorusu görüntülenir.
7 Önceden kaydedilen kanallar kanal listesin-de saklanması için »<« veya »>« düğmesiy-le »Evet« öğesini seçin;
veya
kanalları silmek için »Hayır« öğesini seçip »OK« düğmesiyle onaylayın.
– »Dijital Arama« menüsü görünür ve televiz-yonun aranmasına başlanır.
– »Arama tamamlandı!« mesajı göründü-ğünde arama tamamlanır.
Not:7 Arama işlemi, »EXIT« düğmesiyle sona
erdirilebilir.11- »« (sarı) ile kanal Düzenleyicisine geçin;
veya
Ayarı sonlandırmak için »EXIT« düğmesine basın.

Televizyon / Kullanma Kılavuzu93 / 117 TR
DETAYLI-KANAL-AYARLARI----------------------------------------------------------------
Uydu-bağlantılı-dijital-televizyon-istasyonlarının-manuel-aranma-sıOtomatik arama ile belirli bir istasyon buluna-mazsa manuel arama fonksiyonunu kullanarak arama yapabilirsiniz. Bunun için istasyonun tüm parametreleri doğru girilmelidir. Geçerli trans-ponder bilgilerini teletekst sayfasından, uydu TV dergi yayınları veya internetten öğrenebilirsiniz.1- »MENU« düğmesiyle menüyü açın.
2- »V«, »Λ«, »<« veya »>« düğmesiyle »Ayarlar« menü öğesini »OK« ile onayla-yın.
3- »>« veya »<« ile »Kaynak« menü öğesini seçip »V« düğmesiyle onaylayın.
– »Kaynak Ayarları« menüsü görüntülenir.
4- »V« ile »Elle Kanal Arama« satırını seçin ve »OK« düğmesiyle onaylayın.
5- »V« veya »Λ« düğmesiyle »Uydu« seçene-ğini seçin ve »OK« düğmesiyle onaylayın.
6- Gerekli öğeleri »V« veya »Λ« düğmesiyle seçin.
Servis-Tipi Yalnızca televizyon kanallarını mı (DTV), yoksa yalnızca radyo mu (Radyo) ya da ikisini birden mi (Radyo+TV) aramak istediğinizi belirlemek için »<« veya »>« düğmesine basın.
Tarama-Tipi Yalnızca ücretsiz dijital televizyon kanal-larını mı (Ücretsiz), yoksa yalnızca şifreli dijital televizyon kanallarını mı (Şifreli) ya da ikisini birden mi (Ücretsiz + Şifreli) aramak istediğinizi belirlemek için »<« veya »>« düğmesine basın.
Transponder Kanal frekansını »1...0« düğmeleriyle 5 basamaklı olarak girin.
Sembol-Oranı Kanal sembol oranını »1...0« düğmeleriyle 5 basamaklı olarak girin.
Polarizasyon Kanal polarizasyonunu »<« veya »>« düğ-mesiyle »Yatay« veya »Dikey« seçin.
Ağ-Arama Ağ aramasını »<« veya »>« düğmesiyle »Açık« veya »Kapalı« seçin.
7- Aramaya başlamak için »« (kırmızı) düğme-sine basın.
– »Dijital Arama« menüsü görünür ve tele-vizyonun aranmasına başlanır.
Not:7 Arama işlemi, »EXIT« düğmesiyle sona
erdirilebilir.8- Ayarı sonlandırmak için »EXIT« düğmesine
basın.

94 / 117 TRTelevizyon / Kullanma Kılavuzu
Dijital-uydu-kanalları-için-anten-ayarları-ve-kanalların-otomatik-aranması
Notlar:7 LNB ayarları hakkındaki aşağıdaki açık-
lama, uydu sistemleriyle ilgili önemli bir bilgi teşkil etmektedir. Özel ürünler satan mağazanıza danışın.
1- »MENU« düğmesiyle menüyü açın.
2- »V«, »Λ«, »<« veya »>« düğmesiyle »Ayarlar« menü öğesini »OK« ile onayla-yın.
3- »>« veya »<« ile »Kaynak« menü öğesini seçip »V« düğmesiyle onaylayın.
– »Kaynak Ayarları« menüsü etkindir.
4- »V« veya »Λ« ile »Otomatik Kanal Arama« satırını seçin ve »OK« düğmesiyle onaylayın.
5- »V« veya »Λ« düğmesiyle »Uydu« seçene-ğini seçin ve »OK« düğmesiyle onaylayın.
6- »V« veya »Λ« düğmesiyle »Standart Mod« seçeneğini seçin ve »OK« düğmesiy-le onaylayın.
7- »V« veya »Λ« düğmesiyle »Anten Ayar-ları« seçeneğini seçin ve »OK« düğmesiyle onaylayın.
– »Anten Ayarları« menüsü görüntülenir.
8- Gerekli öğeleri »V«, »Λ« düğmesiyle seçin.
Uydu »OK« düğmesine basın ve dijital istasyon-ları almak istediğiniz uyduyu »V« veya »Λ« düğmesiyle seçip »OK« düğmesiyle onaylayın.
- LNB-Tipi-»OK« düğmesine basın ve uydu sistemin-de kullanılan LNB tipini »<« veya »>« düğmesine basın ve »« (yeşil) düğmesine basarak onaylayın.
- LNB-Gücü-LNB gücünü »Kapalı« olarak ayarlayın veya LNB tipine göre »13/18V«, »14/19V« ayarı-nı »<« veya »>« düğmesiyle seçin.
DETAYLI-KANAL-AYARLARI----------------------------------------------------------------
- LNB-seçimi-Sadece gerekli olan »DiSEqC 1.0« veya »DiSEqC 1.1« seçimini yapın.
9- Arama işlemine devam etmek için »« (mavi) düğmesine basın.
10- Kanal Tipini seçin. Yalnızca dijital kanallarını mı (Dijital), yoksa
yalnızca radyo mu (Radyo) ya da ikisini bir-den mi (Dijital+Radyo) aramak istediğinizi belirlemek için »V« veya »Λ« düğmesiyle »Dijital« ve/veya »Radyo« öğelerini seçip işaretlemek ya da işareti kaldırmak için »OK« düğmesine basın.
11- Tarama Modunu seçin. Yalnızca ücretsiz dijital televizyon kanal-
larını mı (Ücretsiz), yoksa yalnızca şifreli dijital televizyon kanallarını mı (Şifreli) ya da ikisini birden mi (Ücretsiz+Şifreli) aramak istediğinizi belirlemek için »V« veya »Λ« düğmesiyle »Ücretsiz« ve/veya »Şifreli« öğelerini seçip işaretlemek ya da işareti için »OK« düğmesine basın.
12- Aramaya başlamak için »« kırmızı düğme-sine basın.
Notlar:7 Aynı uydular vasıtasıyla güncellerken
arama başlangıcında bir güvenlik sorusu görüntülenir.
7 Önceden kaydedilen kanallar kanal listesin-de saklanması için »<« veya »>« düğmesiy-le »Evet« öğesini seçin;
veya
kanalları silmek için »Hayır« öğesini seçip »OK« düğmesiyle onaylayın.
– »Dijital Arama« menüsü görünür ve televiz-yonun aranmasına başlanır.
– »Arama tamamlandı!« mesajı göründü-ğünde arama tamamlanır.
Not:7 Arama işlemi, »EXIT« düğmesiyle sona
erdirilebilir.13- »« (sarı) ile kanal Düzenleyicisine geçin;
veya
Ayarı sonlandırmak için »EXIT« düğmesine basın.

Televizyon / Kullanma Kılavuzu95 / 117 TR
Dijital-uydu-kanalları-için-anten-ayarları-ve-SCR-sistemi-ile-kanal-ların-otomatik-aranması
Notlar:7 Televizyonunuz SCR sistemini desteklemek-
tedir. (Single Channel Router – Tek Kanal Yönlendirici - EN 50494).
7 Aşağıdaki bölümde anlatılan LNB ayarları uydu sistemleri hakkında önemli bir uzman-lık gerektirmektedir. Konu ile ilgili yetkili satıcınız ile görüşün.
1- »MENU« düğmesiyle menüyü açın.
2- »V«, »Λ«, »<« veya »>« düğmesiyle »Ayarlar« menü öğesini »OK« ile onayla-yın.
3- »>« veya »<« ile »Kaynak« menü öğesini seçip »V« düğmesiyle onaylayın.
– »Kaynak Ayarları« menüsü görüntülenir.
4- »V« ile »Otomatik kanal arama« satırını seçin ve »OK« düğmesiyle onaylayın.
5- »V« veya »Λ« düğmesiyle »Uydu« seçene-ğini seçin ve »OK« düğmesiyle onaylayın.
6- »V« veya »Λ« düğmesiyle »Standart Mod« seçeneğini seçin ve »OK« düğmesiy-le onaylayın.
7- »V« veya »Λ« düğmesiyle »Anten Ayar-ları« seçeneğini seçin ve »OK« düğmesiyle onaylayın.
– »Anten Ayarları« menüsü görüntülenir.
8- Gerekli öğeleri »V«, »Λ« düğmesiyle seçin.
Uydu »OK« düğmesine basın ve dijital istasyon-ları almak istediğiniz uyduyu »<«, »>«, »V« veya »Λ« düğmesiyle seçip »OK« düğmesiyle onaylayın.
LNB-tipi Anten sisteminiz tek kablo yönlendirici çoklu anahtar (multiswitch) varsa »SCR« seçene-ğini kullanın. »OK« düğmesine basın, »<« veya »>« düğmesiyle »SCR« seçeneğini seçin. »V« düğmesiyle »LNB-Frekansı Yüksek« seçeneğini seçip frekansı »1...0« düğmesi ile beş hane olarak girin.
DETAYLI-KANAL-AYARLARI----------------------------------------------------------------
»V« düğmesiyle »LNB-Frekansı Düşük« seçeneğini seçip frekansı »1...0« düğmesi ile beş hane olarak girin. Seçimi onaylamak için »« (yeşil) düğme-sine basın.
- LNB-seçimi-Sadece gerekli olan »DiSEqC 1.0« veya »DiSEqC 1.1« seçimini yapın
LNB-Seçimi LNB sayısına bağlı olarak »<« veya »>« düğmesiyle seçiminizi yapın. Sadece 1 LNB kullanıldığında »1/2« iki LNB kullanılması durumunda gerekli seçimi yapın (»1/2« veya »2/2«).
Kullanıcı-Bandı »<« veya »>« düğmesiyle kullanılan anten soketini seçin.
KB-Frekansı-(MHz) »1...0« düğmesiyle ile seçilen anten soketi için gerekli frekans girin.
Notlar:7 SCR Switchinizin desteklediği / önerdiği
kurulum ekipmanlarını kullanınız.7 Kurulum sırasında belirtilen kullanıcı bandı
numarasının ve frekansının değiştirilmesi durumunda sisteme bağlı diğer kullanıcıları / alıcıları etkileyebilir.
7 Kullanıcı bandı ve Kullanıcı bandı fre-kansı kullanılan SCR switch üzerinde yer almaktadır ve her kullanıcı / alıcı belli bir kullanıcı bandı ve kullanıcı bandı frekansı seçilmelidir.
7 SCR uydu sistemlerinde birden fazla kulla-nıcı / alıcının aynı anda otomatik arama yapması sorunlara sebep olabilir.
9- Anten ayarlarından çıkmak için »« (mavi) düğmesine basın.
10- Kanal Tipini seçin. Yalnızca dijital kanallarını mı (Dijital), yoksa
yalnızca radyo mu (Radyo) ya da ikisini bir-den mi (Dijital+Radyo) aramak istediğinizi belirlemek için »V« veya »Λ« düğmesiyle »Dijital« ve/veya »Radyo« öğelerini seçip işaretlemek ya da işareti kaldırmak için »OK« düğmesine basın.

96 / 117 TRTelevizyon / Kullanma Kılavuzu
DETAYLI-KANAL-AYARLARI----------------------------------------------------------------
11- Tarama Modunu seçin. Yalnızca ücretsiz dijital televizyon kanal-
larını mı (Ücretsiz), yoksa yalnızca şifreli dijital televizyon kanallarını mı (Şifreli) ya da ikisini birden mi (Ücretsiz+Şifreli) aramak istediğinizi belirlemek için »V« veya »Λ« düğmesiyle »Ücretsiz« ve/veya »Şifreli« öğelerini seçip işaretlemek ya da işareti için »OK« düğmesine basın.
12- Aramaya başlamak için »« kırmızı düğme-sine basın.
Notlar:7 Aynı uydular vasıtasıyla güncellerken
arama başlangıcında bir güvenlik sorusu görüntülenir.
7 Önceden kaydedilen kanallar kanal listesin-de saklanması için »<« veya »>« düğmesiy-le »Evet« öğesini seçin;
veya
kanalları silmek için »Hayır« öğesini seçip »OK« düğmesiyle onaylayın.
– »Dijital Arama« menüsü görünür ve televiz-yonun aranmasına başlanır.
– »Arama tamamlandı!« mesajı göründü-ğünde arama tamamlanır.
Not:7 Arama işlemi, »EXIT« düğmesiyle sona
erdirilebilir.13- »« (sarı) ile kanal Düzenleyicisine geçin;
veya
Ayarı sonlandırmak için »EXIT« düğmesine basın.
Dijital-uydu-kanalları-için-anten-ayarları-ve-DiSEqC-1.0/1.1-ile-kanalların-otomatik-aranması
Not:7 Aşağıdaki bölümde anlatılan LNB ayarları
uydu sistemleri hakkında önemli bir uzman-lık gerektirmektedir. Konu ile ilgili yetkili satıcınız ile görüşün.
1- »MENU« düğmesiyle menüyü açın.
2- »V«, »Λ«, »<« veya »>« düğmesiyle »Ayarlar« menü öğesini »OK« ile onayla-yın.
3- »>« veya »<« ile »Kaynak« menü öğesini seçip »V« düğmesiyle onaylayın.
– »Kaynak Ayarları« menüsü görüntülenir.
4- »V« ile »Otomatik kanal arama« satırını seçin ve »OK« düğmesiyle onaylayın.
5- »V« veya »Λ« düğmesiyle »Uydu« seçene-ğini seçin ve »OK« düğmesiyle onaylayın.
6- »V« veya »Λ« düğmesiyle »Standart Mod« seçeneğini seçin ve »OK« düğmesiy-le onaylayın.
7- »V« veya »Λ« düğmesiyle »Anten Ayar-ları« seçeneğini seçin ve »OK« düğmesiyle onaylayın.
– »Anten Ayarları« menüsü görüntülenir.
8- Gerekli öğeleri »V«, »Λ« düğmesiyle seçin.
Uydu »OK« düğmesine basın ve dijital istasyon-ları almak istediğiniz uyduyu »<«, »>«, »V« veya »Λ« düğmesiyle seçip »OK« düğmesiyle onaylayın.
- LNB-Tipi-»OK« düğmesine basın ve uydu sistemin-de kullanılan LNB tipini »<« veya »>« düğmesine basın ve »« (yeşil) düğmesine basarak onaylayın.
- LNB-Gücü-LNB gücünü »Kapalı« olarak ayarlayın veya LNB tipine göre »13/18V«, »14/19V« ayarı-nı »<« veya »>« düğmesiyle seçin.

Televizyon / Kullanma Kılavuzu97 / 117 TR
DETAYLI-KANAL-AYARLARI----------------------------------------------------------------
- LNB-seçimi-DiSEqC moduna bakın.
DISEqC-Modu Mevcut uydu sistemi adedine göre »Kapalı« »DiSEqC 1.0« veya »DiSEqC 1.1« seçimini »<« veya »>« düğmesiyle yapın.
– »Kapalı«: Tek antenli uydu sistemleri için. – »DiSEqC 1.0« switch kullanarak, en fazla
dört uydudan aynı anda alınabilir. »LNB seçimi« öğesinden »<« veya
»>« düğmesiyle ilgili DiSEqC po-zisyonlarına karşılık gelen uydu için »1/4«, »2/4«, »3/4« veya »4/4« seçimini yapın.
– » DiSEqC 1.1« switch kullanarak, en fazla on altı uydudan aynı anda alınabilir
»LNB seçimi« öğesinden »<« veya »>« düğmesiyle ilgili DiSEqC po-zisyonlarına karşılık gelen uydu için »1/16« ve »16/16« arasında seçim yapın.
9- Anten ayarlarından çıkmak için »« (mavi) düğmesine basın.
10- Kanal Tipini seçin. Yalnızca dijital kanallarını mı (Dijital), yoksa
yalnızca radyo mu (Radyo) ya da ikisini bir-den mi (Dijital+Radyo) aramak istediğinizi belirlemek için »V« veya »Λ« düğmesiyle »Dijital« ve/veya »Radyo« öğelerini seçip işaretlemek ya da işareti kaldırmak için »OK« düğmesine basın.
11- Tarama Modunu seçin. Yalnızca ücretsiz dijital televizyon kanal-
larını mı (Ücretsiz), yoksa yalnızca şifreli dijital televizyon kanallarını mı (Şifreli) ya da ikisini birden mi (Ücretsiz+Şifreli) aramak istediğinizi belirlemek için »V« veya »Λ« düğmesiyle »Ücretsiz« ve/veya »Şifreli« öğelerini seçip işaretlemek ya da işareti için »OK« düğmesine basın.
12- Aramaya başlamak için »« kırmızı düğme-sine basın.
Notlar:7 Aynı uydular vasıtasıyla güncellerken
arama başlangıcında bir güvenlik sorusu görüntülenir.
7 Önceden kaydedilen kanallar kanal listesin-de saklanması için »<« veya »>« düğmesiy-le »Evet« öğesini seçin;
veya
kanalları silmek için »Hayır« öğesini seçip »OK« düğmesiyle onaylayın.
– »Dijital Arama« menüsü görünür ve televiz-yonun aranmasına başlanır.
– »Arama tamamlandı!« mesajı göründü-ğünde arama tamamlanır.
Not:7 Arama işlemi, »EXIT« düğmesiyle sona
erdirilebilir.13- »« (sarı) ile kanal Düzenleyicisine geçin;
veya
Ayarı sonlandırmak için »EXIT« düğmesine basın.
98 / 117 TRTelevizyon / Kullanma Kılavuzu
DETAYLI-KANAL-AYARLARI----------------------------------------------------------------
Motorlu-anten-ayarları--(DiSEqC-1.2)
Not:7 Aşağıdaki bölümde anlatılan LNB ayarları
uydu sistemleri hakkında önemli bir uzman-lık gerektirmektedir. Konu ile ilgili yetkili satıcınız ile görüşün.
Televizyonunuz DiSEqC 1.2 motorlu uydu sis-temlerini desteklemektedir. Bu özellik ile uyduyu televizyonunuz üzerinden kontrol edebilirsiniz.Her uyduya göre uydu anten pozisyonunu ayar-layın. Bu ayarlar saklanarak ihtiyaç duyuldu-ğunda anten önceden kaydedilmiş bir konuma taşınabilir.1- »MENU« düğmesiyle menüyü açın.
2- »V«, »Λ«, »<« veya »>« düğmesiyle »Ayarlar« menü öğesini »OK« ile onayla-yın.
3- »>« veya »<« ile »Kaynak« menü öğesini seçip »V« düğmesiyle onaylayın.
– »Kaynak« menüsü görüntülenir.
4- »V« veya »Λ« ile »Elle Kanal Arama« satı-rını seçin ve »OK« düğmesiyle onaylayın.
5- »V« veya »Λ« düğmesiyle »Uydu« seçene-ğini seçin ve »OK« düğmesiyle onaylayın.
6- »« (mavi) düğmesiyle »Anten Ayarları« seçeneğini onaylayın.
– »Anten Ayarları« menüsü görüntülenir.
7- »V« veya »Λ« düğmesiyle »DiSEqC Modu« satırını seçin ve »<« veya »>« düğ-mesiyle »DiSEqC1.2« seçimini yapın.
– »DiSEqC 1.2 AYARLARI« satırı etkindir.
8- »V« veya »Λ« ile »DiSEqC 1.2 AYARLARI« satırını seçip »OK« düğmesiyle onaylayın.
– »DiSEqC 1.2 AYARLARI« menüsü görüntü-lenir.
9- Gerekli öğeleri »V«, »Λ« düğmesiyle seçin.
Hareket-Modu Hareket modunu »<« veya »>« düğmesiyle »Ayrık« veya »Sürekli« seçin.
– »Ayrık«: Anteni batı veya doğu yönünde belirlenen adım boyutu kadar hareket ettirir.
– »Sürekli«: Anteni batı veya doğu yönünde sürekli hareket ettirir.
Adım-Boyutu Antenin kaç adım dönmesi gerektiğini »<« veya »>« düğmesiyle seçin. »Adım Boyutu« öğesi »Hareket Modu« öğesi »Ayrık« olarak seçildiğinde etkindir.
Motoru-Döndür Anteni seçilen uydu için ayarlar. Anteni »<« düğmesiyle »Batı« yönünde »>« düğmesiyle »Doğu« yönünde ayarlayın.
– »Pozisyonu Kaydet«: Antenin mevcut konu-munu kaydeder. Maksimum 50 pozisyon kaydedilebilir. »« (kırmızı) düğmesiyle ayarı seçip »<« veya »>« düğmesiyle kayıt pozisyonunu seçip »« (yeşil) düğ-mesiyle onaylayın.
– »Kayıtlı Pozisyona Git«: Antenin önceden kaydedilmiş uydu pozisyonuna çevirir. »« (yeşil) düğmesiyle ayarı seçip »<« veya »>« düğmesiyle önceden ayar-lanmış pozisyonu seçin ve »« (yeşil) düğmesiyle onaylayın. Anten kaydedilmiş konuma dönecektir.
Limit-Poz. Antenin en fazla dönebileceği limit pozis-yonu ayarlar ve anteni belirlenen limitler içerisinde hareket etmesini sağlar. »<« düğmesiyle »Batı« yönündeki, »>« düğme-siyle »Doğu« yönündeki limit pozisyonunu belirleyin.
DiSEqC-1.2-Limit-Sıfırla Anten için ayarlanmış limit pozisyonlarını sıfırlar.
10- Ayarı sonlandırmak için »EXIT« düğmesine basın.
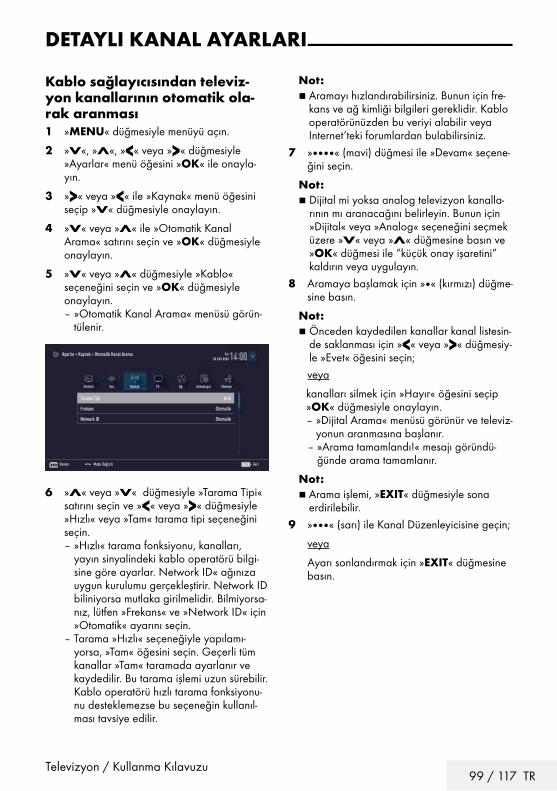
Televizyon / Kullanma Kılavuzu99 / 117 TR
Kablo-sağlayıcısından-televiz-yon-kanallarının-otomatik-ola-rak-aranması1- »MENU« düğmesiyle menüyü açın.
2- »V«, »Λ«, »<« veya »>« düğmesiyle »Ayarlar« menü öğesini »OK« ile onayla-yın.
3- »>« veya »<« ile »Kaynak« menü öğesini seçip »V« düğmesiyle onaylayın.
4- »V« veya »Λ« ile »Otomatik Kanal Arama« satırını seçin ve »OK« düğmesiyle onaylayın.
5- »V« veya »Λ« düğmesiyle »Kablo« seçeneğini seçin ve »OK« düğmesiyle onaylayın.
– »Otomatik Kanal Arama« menüsü görün-tülenir.
Tarama Tipi Hızlı
Frekans Otomatik
Network ID Otomatik
Görüntü
PerXX XXX XXXX
Kaynak ZamanlayıcıSes AğTV Ebeveyn
Ayarlar > Kaynak > Otomatik Kanal Arama
Devam Modu Değiştir GeriBACK
6- »Λ« veya »V« düğmesiyle »Tarama Tipi« satırını seçin ve »<« veya »>« düğmesiyle »Hızlı« veya »Tam« tarama tipi seçeneğini seçin.
– »Hızlı« tarama fonksiyonu, kanalları, yayın sinyalindeki kablo operatörü bilgi-sine göre ayarlar. Network ID« ağınıza uygun kurulumu gerçekleştirir. Network ID biliniyorsa mutlaka girilmelidir. Bilmiyorsa-nız, lütfen »Frekans« ve »Network ID« için »Otomatik« ayarını seçin.
– Tarama »Hızlı« seçeneğiyle yapılamı-yorsa, »Tam« öğesini seçin. Geçerli tüm kanallar »Tam« taramada ayarlanır ve kaydedilir. Bu tarama işlemi uzun sürebilir. Kablo operatörü hızlı tarama fonksiyonu-nu desteklemezse bu seçeneğin kullanıl-ması tavsiye edilir.
Not:7 Aramayı hızlandırabilirsiniz. Bunun için fre-
kans ve ağ kimliği bilgileri gereklidir. Kablo operatörünüzden bu veriyi alabilir veya Internet’teki forumlardan bulabilirsiniz.
7- »« (mavi) düğmesi ile »Devam« seçene-ğini seçin.
Not:7 Dijital mi yoksa analog televizyon kanalla-
rının mı aranacağını belirleyin. Bunun için »Dijital« veya »Analog« seçeneğini seçmek üzere »V« veya »Λ« düğmesine basın ve »OK« düğmesi ile “küçük onay işaretini” kaldırın veya uygulayın.
8- Aramaya başlamak için »« (kırmızı) düğme-sine basın.
Not:7 Önceden kaydedilen kanallar kanal listesin-
de saklanması için »<« veya »>« düğmesiy-le »Evet« öğesini seçin;
veya
kanalları silmek için »Hayır« öğesini seçip »OK« düğmesiyle onaylayın.
– »Dijital Arama« menüsü görünür ve televiz-yonun aranmasına başlanır.
– »Arama tamamlandı!« mesajı göründü-ğünde arama tamamlanır.
Not:7 Arama işlemi, »EXIT« düğmesiyle sona
erdirilebilir.9- »« (sarı) ile Kanal Düzenleyicisine geçin;
veya
Ayarı sonlandırmak için »EXIT« düğmesine basın.
DETAYLI-KANAL-AYARLARI----------------------------------------------------------------

100 / 117 TRTelevizyon / Kullanma Kılavuzu
Kablo-sağlayıcısından-televiz-yon-kanallarının-manuel-olarak-aranması1- »MENU« düğmesiyle menüyü açın.
2- »V«, »Λ«, »<« veya »>« düğmesiyle »Ayarlar« menü öğesini »OK« ile onayla-yın.
3- »>« veya »<« ile »Kaynak« menü öğesini seçip »V« düğmesiyle onaylayın.
4- »V« veya »Λ« ile »Elle Kanal Arama« satı-rını seçin ve »OK« düğmesiyle onaylayın.
5- »V« veya »Λ« düğmesiyle »Kablo« seçeneğini seçin ve »OK« düğmesiyle onaylayın.
6- Dijital mi yoksa analog televizyon kanalları-nın mı aranacağını belirleyin.
Bunun için »Dijital« veya »Analog« seçene-ğini seçmek üzere »V« veya »Λ« düğmesi-ne basın ve »OK« düğmesi ile onaylayın.
7- »Frekans (MHz)« öğesinden frekansı (4 basamaklı) doğrudan »1...0« düğmeleriyle girin, ardından arama başlayacaktır.
– Bulunan kanallar listede göründüğünde arama işlemi tamamlanmış olur.
8- Ayarı sonlandırmak için »EXIT« düğmesine basın.
DETAYLI-KANAL-AYARLARI----------------------------------------------------------------
Dijital-karasal-TV-kanallarının-otomatik-olarak-aranması1- »MENU« düğmesiyle menüyü açın.
2- »V«, »Λ«, »<« veya »>« düğmesiyle »Ayarlar« menü öğesini »OK« ile onayla-yın.
3- »>« veya »<« ile »Kaynak« menü öğesini seçip »V« düğmesiyle onaylayın.
4- »V« ile »Gelişmiş« satırını seçin ve »OK« düğmesiyle onaylayın.
5- »V« düğmesiyle »Aktif Anten« satırını seçin. »<« veya »>« (»Açık«) ile anten için anten
güç kaynağını açın.
Önemli:7 Anten güç kaynağı (5V), yalnızca anten
sinyal amplifikatörü bulunan bir iç mekan anteniyse ve şebekeye bağlı bir prizden (ya da benzer bir kaynaktan) beslenmiyor-sa açılabilir. Aksi takdirde, kısa devreye yol açıp anteninize onarılamaz hasarlar verebilirsiniz.
6- »Λ« ile »Otomatik Kanal Arama« satırını seçin ve »OK« düğmesiyle onaylayın.
7- »V« veya »Λ« düğmesiyle »Anten« seçene-ğini seçin ve »OK« düğmesiyle onaylayın.
8- Dijital mi yoksa analog televizyon kanalları-nın mı aranacağını belirleyin.
Bunun için »Dijital« veya »Analog« seçene-ğini seçmek üzere »V« veya »Λ« düğmesi-ne basın ve »OK« düğmesi ile “küçük onay işaretini” kaldırın veya uygulayın.

Televizyon / Kullanma Kılavuzu101 / 117 TR
DETAYLI-KANAL-AYARLARI----------------------------------------------------------------
9- Aramaya başlamak için »« (kırmızı) düğme-sine basın.
Not:7 Önceden kaydedilen kanallar kanal listesin-
de saklanması için »<« veya »>« düğmesiy-le »Evet« öğesini seçin;
veya
kanalları silmek için »Hayır« öğesini seçip »OK« düğmesiyle onaylayın.
– »Dijital Arama« menüsü görünür ve televiz-yonun aranmasına başlanır.
– »Arama tamamlandı!« mesajı göründü-ğünde arama tamamlanır.
Not:7 Arama işlemi, »EXIT« düğmesiyle sona
erdirilebilir.10- »« (sarı) ile Kanal Düzenleyicisine geçin;
veya
Ayarı sonlandırmak için »EXIT« düğmesine basın.
Dijital-karasal-TV-kanallarının-manuel-olarak-aranması1- »MENU« düğmesiyle menüyü açın.
2- »V«, »Λ«, »<« veya »>« düğmesiyle »Ayarlar« menü öğesini »OK« ile onayla-yın.
3- »>« veya »<« ile »Kaynak« menü öğesini seçip »V« düğmesiyle onaylayın.
4- »V« ile »Gelişmiş« satırını seçin ve »OK« düğmesiyle onaylayın.
5- »V« düğmesiyle »Aktif Anten« satırını seçin. »<« veya »>« (»Açık«) ile anten için anten
güç kaynağını açın.
Önemli:7 Anten güç kaynağı (5V), yalnızca anten
sinyal amplifikatörü bulunan bir iç mekan anteniyse ve şebekeye bağlı bir prizden (ya da benzer bir kaynaktan) beslenmiyor-sa açılabilir. Aksi takdirde, kısa devreye yol açıp anteninize onarılamaz hasarlar verebilirsiniz.
6- »Λ« ile »Elle Kanal Arama« satırını seçin ve »OK« düğmesiyle onaylayın.
7- »V« veya »Λ« düğmesiyle »Anten« seçene-ğini seçin ve »OK« düğmesiyle onaylayın.
8- Dijital mi yoksa analog televizyon kanalları-nın mı aranacağını belirleyin.
Bunun için »Dijital« veya »Analog« seçene-ğini seçmek üzere »V« veya »Λ« düğmesi-ne basın ve »OK« düğmesi ile onaylayın.
– »Elle Kanal Arama« menüsü görüntülenir.
9- VHF veya UFH kanal numarasını doğrudan »1...0« düğmeleriyle girin ve »OK« düğme-siyle onaylayın.
– Arama başlar. – Bulunan kanallar listede göründüğünde
arama işlemi tamamlanmış olur.
10- Ayarı sonlandırmak için »EXIT« düğmesine basın.

102 / 117 TRTelevizyon / Kullanma Kılavuzu
DETAYLI-KANAL-AYARLARI----------------------------------------------------------------
Otomatik-servis-güncelleme-Bu işlevi etkinleştirildiğinde, ağ operatörlerinin olası değişiklikleri otomatik olarak güncellenir.Televizyon, bekleme (stand-by) modunda olma-lıdır.Bu güncelleme, her tür alımı - karasal, kablolu ve uydu - etkiler.1- »MENU« düğmesiyle menüyü açın.
2- »V«, »Λ«, »<« veya »>« düğmesiyle »Ayarlar« menü öğesini »OK« ile onayla-yın.
3- »>« veya »<« ile »Kaynak« menü öğesini seçip »V« düğmesiyle onaylayın.
– »Kaynak Ayarları« menüsü görüntülenir.
4- »V« veya »Λ« ile »Gelişmiş« satırını seçin ve »OK« düğmesiyle onaylayın.
5- »V« veya »Λ« düğmesiyle »Oto. Servis Güncelleme« satırını seçin ve »<« veya »>« düğmesiyle (»Açık«) otomatik güncellemeyi seçin.
6- Ayarı sonlandırmak için »EXIT« düğmesine basın.
Analog-televizyon-kanallarını--ayarlamaBu ayar, yalnızca herhangi bir dijital kanalı alamadığınızda ve ilk kurulum sırasında analog bir arama yapmamış olduğunuzda gereklidir.Televizyon kanalı, arama fonksiyonunu kullana-rak doğrudan ayarlanabilir.
Tüm-analog-televizyon-kanallarını-ayarlamaAnalog televizyon kanalları, kanal listesinde diji-tal televizyon kanallarından sonra görüntülenir.
Not:7 Çatı anteninin kablosunu (analog televizyon
istasyonları için) televizyonun üzerindeki ANT-IN girişine takın.
1- »MENU« düğmesiyle menüyü açın.
2- »V«, »Λ«, »<« veya »>« düğmesiyle »Ayarlar« menü öğesini »OK« ile onayla-yın.
3- »>« veya »<« ile »Kaynak« menü öğesini seçip »V« düğmesiyle onaylayın.
– »Kaynak Ayarları« menüsü görüntülenir.
4- »V« veya »Λ« ile »Otomatik Kanal Arama« satırını seçin ve »OK« düğmesiyle onaylayın.
5- Analog yayını aldığınız kaynağı »V« veya »Λ« düğmesiyle »Anten« veya »Kablo« se-çeneğini seçip »OK« düğmesiyle onaylayın.
6- »V« veya »Λ« düğmesiyle »Dijital« seçene-ğini seçin ve »OK« düğmesiyle küçük onay işaretini kaldırın.
7- Aramaya başlamak için »« (kırmızı) düğme-sine basın.

Televizyon / Kullanma Kılavuzu103 / 117 TR
DETAYLI-KANAL-AYARLARI----------------------------------------------------------------
Notlar:7 Tarama başladıktan sonra bir güvenlik so-
rusu görünür. »Evet« seçeneğini onaylamak için »OK« düğmesine basın.
– Kanal listesindeki tüm kanal ve favori listeleriniz, silinip yeniden derlenecektir.
– »Analog Arama« menüsü görünür ve televizyonun aranmasına başlanır. Alınan televizyon kanalı sayısına bağlı olarak bu sadece birkaç dakika sürebilir.
– »Arama tamamlandı!« mesajı göründü-ğünde arama tamamlanır.
Not:7 Arama işlemi, bitmeden önce »EXIT« düğ-
mesiyle sona erdirilebilir.8- »« (sarı) ile Kanal Düzenleyicisine geçin;
veya
Ayarı sonlandırmak için »EXIT« düğmesine basın.
Kanal-numaralarını-girerek-analog-televizyon-kanallarını-ayarlama1- »MENU« düğmesiyle menüyü açın.
2- »V«, »Λ«, »<« veya »>« düğmesiyle »Ayarlar« menü öğesini »OK« ile onayla-yın.
3- »>« veya »<« ile »Kaynak« menü öğesini seçip »V« düğmesiyle onaylayın.
– »Kaynak Ayarları« menüsü görüntülenir.
4- »V« veya »Λ« ile »Elle Kanal Arama« satı-rını seçin ve »OK« düğmesiyle onaylayın.
5- Analog yayını aldığınız kaynağı »V« veya »Λ« düğmesiyle »Anten« veya »Kablo« se-çeneğini seçip »OK« düğmesiyle onaylayın.
6- »V« veya »Λ« düğmesiyle »Analog« seçeneğini seçin ve »OK« düğmesiyle onaylayın.
– Menü görüntülenir.
7- »V« veya »Λ« düğmesiyle »Program No« satırını seçip ön ayarı seçmek için »<«, »>« veya »1…0« düğmesine basın.
8- »V« veya »Λ« düğmesiyle »Bant« satırını seçin. »S« (özel kanal) ya da »C« (kanal) seçeneklerinden birini seçmek için »<« veya »>« düğmesine basın.
9- »V« veya »Λ« düğmeleriyle kanalı seçin. Kanal numarasını adım adım girmek için »<« veya »>« düğmesine, doğrudan girmek için »1…0« düğmelerine basın veya
»« (yeşil) veya »« (sarı) düğmesine basarak otomatik taramayı başlatın.
Notlar:7 »Sistem« satırında geçerli sistem görüntü-
lenir. Renk ve görüntü açısından sorunlar varsa, »V« veya »Λ düğmesiyle "Sistem" öğesini seçin. »<« veya »>« düğmesiyle gerekli ayarı seçin.
7 Hassas ayar gerektiği durumlarda »V« veya »Λ« düğmesiyle »İnce Ayarlama« öğesini seçip »<« veya »>« düğmesiyle ayarlayın.
10- Ayarı kaydetmek için »« (mavi) düğme-sine basın.
Not:7 Diğer televizyon kanallarını ayarlamak için,
7 ila 10 arasındaki adımları tekrarlayın.11- Ayarı sonlandırmak için »EXIT« düğmesine
basın.

104 / 117 TRTelevizyon / Kullanma Kılavuzu
Kayıtlı-analog-kanalların--değiştirilmesiTelevizyon kanallarının ayarlanması sırasında otomatik kanal arama fonksiyonuyla kaydedil-miş olan kanallar varsa, bunları silebilirsiniz. Ayrıca, bir kanalın adını değiştirebilir veya gire-bilir ve kanal atlayabilirsiniz.
Kanal-listelerini-seçme1- »MENU« düğmesiyle menüyü açın.
2- »V«, »Λ«, »<« veya »>« düğmesiyle »Ayarlar« menü öğesini »OK« ile onayla-yın.
3- »>« veya »<« ile »Kaynak« menü öğesini seçip »V« düğmesiyle onaylayın.
4- »V« veya »Λ«-düğmesiyle »Kanal Düzen-leyici« satırını seçin ve »OK« düğmesiyle onaylayın.
– »Kanal Düzenleyici« menüsü görüntülenir.
Not:7 İlave işlemler aşağıdaki bölümlerde açık-
lanmıştır.
Kanalları-silme1- »Kanal Düzenleyici« menüsünde silmek iste-
diğiniz kanal veya kanalları »V«, »Λ«, »<« veya »>« düğmesiyle seçip »OK« düğmesi-ne basarak televizyon kanalını vurgulayın.
–Kanal »✔« ile işaretlenir.
Not:7 Birkaç televizyon kanalı silinecekse, V «,
»Λ«, »<« veya »>« düğmesiyle bunları seçip her birini »OK« ile işaretleyin.
2- »« (sarı) düğmesiyle »Araçlar« menüsünü onaylayın.
3- »V« veya »Λ« ile »Sil« satırını seçin ve »OK« düğmesiyle onaylayın.
4- Silme işlemini onaylamak için »<« veya »>« düğmesiyle »Evet« öğesini seçin;
veya
iptal etmek için »Hayır« öğesini seçip »OK« düğmesiyle onaylayın.
5- Menüyü kapatmak için »EXIT« tuşuna basın.
DETAYLI-KANAL-AYARLARI----------------------------------------------------------------
Analog-kanal-isimlerini-girme-(maksi-mum-8-karakter)1- »Kanal Düzenleyici« menüsünde yeniden
adlandırmak istediğiniz kanalı »V«, »Λ«, »<« veya »>« düğmesiyle seçip »OK« düğmesine basarak vurgulayın.
–Kanal »✔« ile işaretlenir.
2- »« (sarı) düğmesiyle »Araçlar« menüsünü onaylayın.
3- »V« veya »Λ« ile »Yeni İsim« satırını seçin ve »OK« düğmesiyle onaylayın.
4- Mevcut kanal adını silmek için »« (kırmızı) düğmesine basın.
5- »V«, »Λ«, »<« veya »>« düğmesiyle gerekli karakteri seçip »OK« düğmesiyle bir sonraki karaktere geçin.
– »Shift« ➡ »OK« tuşlarını kullanarak büyük harfler / sayılar ve küçük harfler / özel karakterler arasında geçiş yapabilir-siniz.
– Girilen karakteri silmek için »Del« düğme-sini seçip »OK« düğmesiyle onaylayın.
6- »« (yeşil) ile onaylayın.
Not:7 Diğer kanal adlarını da girmek için 1-ila 6-
arasındaki adımları tekrarlayın.

Televizyon / Kullanma Kılavuzu105 / 117 TR
DETAYLI-KANAL-AYARLARI----------------------------------------------------------------
Favoriler-listesi-oluşturma-analog-kanallarFavori kanallarınızı seçebilir ve bunları dört liste halinde kaydedebilirsiniz (FAV1 ila FAV4).1- »Kanal Düzenleyici« menüsünde favori liste-
sine eklemek istediğiniz kanal veya kanalları »V«, »Λ«, »<« veya »>« düğmesiyle seçip »OK« düğmesine basarak televizyon kanalını vurgulayın.
–Kanal »✔« ile işaretlenir.
2- »« (sarı) düğmesiyle »Araçlar« menüsünü onaylayın.
3- »V« veya »Λ« ile »Favori Ekle« satırını seçin ve »OK« düğmesiyle onaylayın.
– »Favori Ekle« menüsü görüntülenir.
4- »V « veya »Λ« düğmesiyle seçili kanallara eklemek istediğini favoriler listesini seçin ve »OK« düğmesiyle kaydedin.
– Kanallar, Kanal Düzenleyici'de »❶«, »❷«, »❸« veya »❹« ile işaretlidir.
– Aynı kanalı birden fazla favori listesine ekleyebilirsiniz.
– Her favori listesine en fazla 250 kanal eklenebilir.
Notlar:7 Favori listesinden kanal silebilirsiniz. »«
(sarı) düğmesine basın, kanalın bulunduğu favoriler listesini »V« veya »Λ« ile seçin ve »OK« düğmesine basarak onaylayın. Sil-mek istediğiniz kanalı veya kanalları »V«, »Λ«, »<« veya »>« tuşlarıyla seçin ve kanalı »OK« tuşuna basarak vurgulayın.
»« (sarı) tuşuna basın ve »Favori Sil« satırını »V« veya »Λ« ile seçin ve »OK« ile onaylayın. Seçtiğiniz kanal artık favoriler listesinden silinir.
7 Favori kanal listesine kaydedilmiş bir kanal silindiğinde favori listesindeki kanal sırala-ması güncellenir.
5- Menüyü kapatmak için »EXIT« tuşuna basın.
Sinyal-bilgilerini-görüntüleme(yalnızca dijital televizyon kanalları için)1- »MENU« düğmesiyle menüyü açın.
2- »V«, »Λ«, »<« veya »>« düğmesiyle »Ayarlar« menü öğesini »OK« ile onayla-yın.
3- »>« veya »<« ile »Kaynak« menü öğesini seçip »V« düğmesiyle onaylayın.
– »Kaynak Ayarları« menüsü görüntülenir.
4- »V« veya »Λ« ile »Gelişmiş« satırını seçin ve »OK« düğmesiyle onaylayın.
5- »V« veya »Λ« ile »Sinyal Bilgileri« satırını seçin ve »OK« düğmesiyle onaylayın.
– »Sinyal Bilgileri« menüsü görüntülenir.
Notlar:7 Bulunduğunuz kaynağa göre sinyal bilgileri
değişmektedir.7 Menünün alt kısmında sinyal özellikleri
görüntülenir. »Sinyal Gücü« ve »Kalite« çubuğu sağa doğru ne kadar uzarsa alınan sinyali de o kadar iyidir.
7 Sinyal düzeyi yalnızca alıcı sisteminizde değil, halihazırda aktif olan kanala da bağlıdır. Sinyal düzeyi ekranını kullanarak anteninizi ayarlarken bunu unutmayın.
6- Menüyü kapatmak için »EXIT« tuşuna basın.

106 / 117 TRTelevizyon / Kullanma Kılavuzu
BİLGİLER----------------------------------------------------------------------------------------------------------------------
Kablosuz-LAN-Modülü-Spesifikasyonu(Wi-Fi-modülü-varsa)- Standart: IEEE802.11b/g/n Frekans Aralığı: Çıkış Gücü (Maksimum) 2400 MHz - 2483,5 MHz: <20dBmKablosuz-LAN-Modülü-Spesifikasyonu(Wi-Fi-modülü-varsa)- Standart: IEEE802.11a/n/ac Frekans Aralığı: Çıkış Gücü (Maksimum) 5150 MHz - 5250 MHz: <23dBm 5250 MHz - 5350 MHz: <23dBm 5725 MHz - 5850 MHz: <23dBmBluetooth-Modülü-Spesifikasyonu(Bluetooth-modülü-varsa) Frekans Aralığı: Çıkış Gücü (Maksimum) 2400 MHz - 2483,5 MHz: <20dBm
Yetkili-satıcılar-için-servis-bilgi-leri
Bu ürün aşağıdaki Avrupa birli-ği direktifleri ve regülasyonları-na uygundur:2014/53/AB sayılı Telsiz
Ekipmanları Direktifi2009/125/EC: Enerji kullanan ürünler için eko-tasarım ile ilgili direktif ve aşağıdaki alt direktifler;278/2009: Harici güç kaynaklarının yüksüz du-rumdaki enerji tüketimi ve ortalama aktif verimi ile ilgili çevreye duyarlı tasarım gerekliliklerine dair regülasyon (AC/DC adaptörlü modeller için);642/2009: Televizyonlar ile ilgili çevreye duyarlı tasarım tasarım gerekliliklerine dair re-gülasyon.801/2013 Televizyonlar ile ilgli çevreye duyarlı tasarım gereklilikleri ile ilgili değişiklik regülas-yonu. 2010/30/EU: Enerji İle İlgili Ürünlerin Enerji Etiketlemesi direktifi ve aşağıdaki alt direktifler; 1062/2010: Televizyonların enerji etiketlemesi-ne dair regülasyon.
2011/65/EU: Elektrik, elektronik ev ve ofis ekipmanları belirli tehlikeli maddelerin kullanıl-masının kısıtlanması direktifi.Uygunluk beyanının (DoC) bir kopyasını elde etmek için; http://www.grundig.com.tr adresini ziyaret edi-niz. Ürün modelinden arama kısmına kullanma kılavuzu kapağında belirtilen model numarasını yazarak televizyon modelini aratıp uygunluk beyanına ulaşabilirsiniz.
Kablosuz-(WLAN)-bağlantı-için-notlarMüşteriler için not: Aşağıdaki bilgiler sadece Avrupa Birliği yönetmeliklerini uygulayan ülke-lerde satılan cihazlar için geçerlidir. Televizyonun kablosuz sistemi sadece aşağıdaki tabloda verilen ülkelerde kullanılabilir.
AT BE BG CH CY CZ DE DKEE ES FI FR GB GR HU IEIS IT LI LT LU LV MT NL
NO PL PT RO SE SI SK TRBu cihaz Avrupa harici ülkelerde de çalıştırıla-bilir.
İtalya’daki-müşteriler-için;Halka açık kullanım için, servis sağlayıcısının iznine bağlıdır.
Norveç’teki-müşteriler-için;Radyo donanımı kullanımına, Ny-Alesund, Svalbord’ın merkezinden 20 km’lik bir yarıçap içerisindeki coğrafik alanda izin verilmemekte-dir.
Türkiye’deki-müşteriler-için;Bu Cihazın WLAN (Wifi) özelliği sadece bina içersinde kullanılır. Türkiye’de bina dışında kul-lanımı yasaktır. Bina dışı kullanımında WLAN (Wifi) özelliğinin kapalı olduğundan emin olunuz.

Televizyon / Kullanma Kılavuzu107 / 117 TR
BİLGİLER----------------------------------------------------------------------------------------------------------------------
Ambalajın-imha-edilmesiAmbalaj malzemeleri çocuklar için tehlikelidir. Ambalaj malzemelerini çocukların ulaşamaya-cakları bir yerde muhafaza edin. Ürünün ambalajı geri dönüşümlü malzemeler-den üretilmiştir. Atık talimatlarına uygun bir şekil-de tasnif ederek çöpe atın. Normal ev çöpüyle birlikte atmayın.
Çevre-uyarısıBu ürün, yeniden kullanılabilen ve geri dönüşü-me sokulabilen yüksek kaliteli parça ve malze-melerden üretilmiştir.Bu nedenle, ürünü kullanım ömrünün sonunda
normal ev atıklarıyla birlikte atmayın. Elektrikli ve elektronik cihazların geri dönüşümü için bir toplama noktasına götürün. Bu, ürünün üzerinde, kullanım
kılavuzunda ve ambalajdaki bu semboller gös-terilir.Lütfen bölgenizdeki yerel makamlarca işletilen toplama noktalarını öğrenin.Kullanılmış ürünleri geri dönüşüme vererek çev-reyi korumaya yardımcı olun.
AEEE-Yönetmeliğine-Uyum-ve-Atık-Ürü-nün-Elden-ÇıkarılmasıBu ürün, T.C. Çevre ve Şehircilik Bakanlığı tara-fından yayımlanan “Atık Elektrikli ve Elektronik Eşyaların Kontrolü Yönetmeliği”nde belirtilen zararlı ve yasaklı maddeleri içermez. AEEE Yö-netmeliğine uygundur. Bu ürün, geri dönüşümlü ve tekrar kullanılabilir nitelikteki yüksek kaliteli parça ve malzemelerden üretilmiştir. Bu nedenle, ürünü, hizmet ömrünün sonunda evsel veya diğer atıklarla birlikte atmayın. Elektrikli ve elektronik cihazların geri dönüşümü için bir toplama noktası-na götürün. Bu toplama noktalarını bölgenizdeki yerel yönetime sorun. Kullanılmış ürünleri geri kazanıma vererek çevrenin ve doğal kaynakların korunmasına yardımcı olun. Ürünü atmadan önce çocukların güvenliği için elektrik fişini kesin.
PCB-Uygunluğu:“PCB (Poliklorlubifenil ) içermez.”
Rusya’daki-müşteriler-için;FHSS Modülasyonlu Kısa Menzilli Cihaz Uygu-lamaları.Maksimum 2.5 mW e.i.r.p.Yalnızca otomatik izleme ve kaynak hesaplama sistemleri için telemetri bilgilerinin derlenmesi amacı doğrultusunda, kurulum yüksekliğinde herhangi bir sınırlama olmaksızın açık hava uygulamaları için kullanımına izin verilen maksimum kısa menzilli cihaz yoğunluk değeri 100mW e.i.r.p'dir. Diğer amaçlar doğrultusunda bu değer yükleme yüksekliğinin yerden 10m’yi aşmadığı hava uygulamaları için geçerlidir.İç mekan uygulamaları için kısa menzilli cihaz yoğunluk değeri maksimum 100mW e.i.r.p'dir.DSSS’li ve FHSS dışındaki geniş bant modülas-yonlu kısa menzil cihaz uygulamaları.DSSS’li ve FHSS dışındaki geniş bant modülas-yonlu kısa menzil cihazların maksimum ortalama yoğunluk değeri 2 mW/MHz veya 100mW e.i.r.p dir.Yalnızca otomatik izleme ve kaynak hesaplama sistemleri için telemetri bilgilerinin derlenmesi amacı doğrultusunda, açık hava uygulamaları için kullanıma izin verilen maksimum kısa men-zilli cihazların yoğunluk değeri 20 mW/MHz veya 100 mW e.i.r.p'dir.İç mekan uygulamaları için kısa menzilli cihazlar maksimum yoğunluk değeri 10mW/MHz veya 100 mW e.i.r.p dir.
Ukrayna’daki-müşteriler-için;İç mekan uygulamaları için, 6 dBi amplifikasyon faktörüne sahip dahili antenle birlikte maksimum kısa menzilli cihazlar yoğunluk değeri 100 mW e.i.r.p dir.

108 / 117 TRTelevizyon / Kullanma Kılavuzu
BİLGİLER----------------------------------------------------------------------------------------------------------------------
Sorun-gidermeAşağıdaki belirtilen çözümler işe yaramazsa, lütfen yetkili sevis ile iletişim kurun. Arızalara video kayıt cihazları veya uydu alıcıları gibi harici cihazların da neden olabileceğini unutmayın.
Sorun Olası-neden Çözümü
Ekran açık (karlı), ama kanal yok
Anten kablosu Anten kablosu takılı mı?
Programlanmış TV kanalı yok Kanal aramasını başlatın
Düşük görüntü kontrastı Görüntü ayarları yanlış ayar-lanmış
Parlaklık, kontrast veya renk aya-rını yapın
Kanalda sorun var Farklı bir kanalla test edin
Görüntü ve/veya seste parazit
Diğer cihazlardan parazit Cihazın pozisyonunu değiştir
Gölge, yansıma Kanal ayarı Otomatik veya manuel kanal ayarı/ince ayar
Anten Anten kablosunu veya sistemi kontrol ettirin
Renk yok Renk yoğunluğu maksimumda Rengi açın
TV standart ayarı (ayar seçeneği varsa)
Doğru renk standardını seçin
Kanalda sorun var Başka bir kanalla test edin
Görüntü var ses yok Ses minimuma ayarlanmıştır Sesi açın
Teletekst yok veya hatalı Kanalda sorun var Başka bir kanalla test edin
Televizyon istasyonu (teletekst yok) veya anten sistemi
ince ayar ve gölgeler için başka bir kanalı test edin
İstasyon sinyali çok zayıf Anten sistemini kontrol edin
Uzaktan kumanda çalış-mıyor
Optik bağlantı yok Uzaktan kumandayı televizyon setine doğru tutun
Uzaktan kumanda pilleri Pilleri kontrol edin, gerekirse de-ğiştirin
Çalışma koşulu tanımsız Ana güç düğmesine basarak tele-vizyonu yaklaşık 2 dakika kapatın
Görüntü bilgisayar mo-dunda koyu
Bilgisayardaki görüntü çözünür-lüğü ve görüntü frekansı yanlış
Bilgisayardaki ayarı değiştirin (ör-neğin görüntü çözünürlüğü 1280 x 768, görüntü frekansı 60Hz).
DMS aygıtı bulunamıyor DMS cihazı açık değil yada baş-latılmamış
DMS aygıtının açık ve çalışır du-rumda olduğuna emin olun.
Ağ bağlantı ayarları yapılmamış. Ağ ayarlarını kontrol edin

Televizyon / Kullanma Kılavuzu109 / 117 TR
Not:7 Bu, Sınıf A kapsamında bir üründür. Çalışma sırasında, cihaz radyo parazitine neden olabilir. Bu
durumda, kullanıcının bunu düzeltmesi gerekebilir. Lütfen uzman yetkili satıcınızla iletişim kurun.
WLAN modunda düşük görüntü (piksel) kalitesi
DMS (örneğin PC) kablosuz ağa bağlı ve modemden uzakta
DMS‘inizi modeme yaklaştırın
Ekrandaki bağlantı sorun-ları ile ilgili uyarılar
Ağ Kablosu veya kablosuz USB ağ aygıtı takılı olmayabilir
Ağ kablosu veya kablosuz USB ağ aygıtını kontrol edin
Modem internet bağlantısı olma-yabilir ya da sorunlu olabilir
Modeminiz internete çıktığında emin olun
Kablosuz bağlantıda video uygulamalarında videolar takılarak oynuyor
Internet Bağlantı hızı düşük. İnternet Bağlantı hızı düşüklüğü abone olduğunuz paketteki hızı-nızla ya da internet altyapısındaki bir sorunla ilgilidir. Servis sağlayı-cınızla (İSS) ile iletişime geçin.
Kablolu bağlantıda video uygulamalarında videolar takılıyor
Internet Bağlantı hızı düşük. İnternet Bağlantı hızı düşüklüğü abone olduğunuz paketteki hızı-nızla ya da internet altyapısındaki bir sorunla ilgilidir. Servis sağlayı-cınızla (İSS) ile iletişime geçin.
Inter@ctive uygulamala-rında bağlantı sorunları var.
Bu uygulamaların sunucuların-daki geçici sorunlar
Uygulamalara yeniden bağlan-maya çalışın
BİLGİLER----------------------------------------------------------------------------------------------------------------------
Televizyonunuzun-arka-kapağında-bulunabilecek-işaretlerin-anlamları
Çift izolasyon işareti. Topraklama gerekliliği olmayan ürün olduğunu belirtir.
Alternatif akım işareti. Şebeke voltajı ile çalıştığını belirtir.
Doğru akım işareti. Sadece ürünle birlikte verilen AC/DC adaptörle çalıştığını belirtir.

110 / 117 TRTelevizyon / Kullanma Kılavuzu
SÖZLÜK-----------------------------------------------------------------------------------------------------------------------
Televizyon modeline bağlıdır.
ARCARC (Ses Dönüş Kanalı) ile televizyon progra-mının ses sinyali HDMI kablosu veya çok kanallı yükselticiye sahip optik kablo ile çalınabilir.
Arka-ışıkArka aydınlatma için manuel ayar (sadece dina-mik arka aydınlatma "KAPALI" olarak seçiliyse aktiftir). Bu ayar ayrıca güç tüketimini doğrudan etkiler.
Blok-Parazit-AzaltmaBu fonksiyon yalnızca dijital alım kaynaklarıyla ve AV ön ayarlarıyla seçilebilmektedir. MPEG sıkıştırmasından kaynaklanan dijital programlar-dan gelen (DVB-T alıcılarından ve düşük aktarım oranlarından ya da DVD oynatıcılardan gelen-ler gibi) kusurlardan (piksel blokları) kaynaklı paraziti azaltır.
Ortak-ArayüzDVB alıcılarında kullanılan bir arayüzdür. Şifreli kanallar, yalnızca şifreleme sistemine ve ilgili akıllı karta uygun bir CA modülüyle izlenebilir.
Digi-LinkBu özellik CEC (Tüketici Elektronik Kontrolü) protokolünü kullanır. CEC, HDMI kablosu ile HDMI soketine bağlı harici cihazların uzaktan kumanda ile kontrol edilmesini sağlar.
DiSEqCDiSEqC (Dijital Uydu Cihazı Kumandası) motor-lu veya çoklu LNB'li kompleks uydu sistemlerinin kontrolünü sağlayan bir dijital sistemdir. DiSEqC'e iki veya daha fazla uydu konumunun kontrol edilmesi gerektiğinde ihtiyaç duyulur.
DLNADigital Living Network Alliance (Sayısal Akışlı Ağ Uyuşması) tüketici elektronik cihazları, IT donanımı ve mobil telefon üreticileri arasındaki bir uluslararası anlaşmadır. Bu anlaşma evdeki IT cihazları ve kişisel kullanım sektörü arasında sorunsuz bir iletişim sunmayı amaçlar. Bu sa-yede Grundig LED TV uzaktan kumandası ile ağınızdaki verilere kolayca erişebilir ve zahmetli USB cihazı bağlama veya DVD oluşturma işlem-lerine gerek kalmadan TV'nizde oynatabilirsiniz.
Alan-adı-sistemiAlan adı sistemi (DNS) İnternet'teki en önemli hizmetlerden biridir. Ana fonksiyonu İnternet ad-resini, karşılık gelen IP Adresine dönüştürmektir.
DVB-CDVB-C (Dijital Video Yayını – Kablo) kablo bağ-lantısı ile dijital radyo ve televizyon sinyallerinin iletimi için kullanılan bir DVB türüdür.
DVB-S/S2DVB-S/S2 (Dijital Video Yayını – Uydu) DVB sin-yallerinin uydu üzerinden yayınlanması içindir.
DVB-T/T2DVB-T/T2 (Dijital Video Yayını – Karasal) kara-sal kanallarla dijital radyo ve televizyon sinyalle-rinin iletimi için kullanılan bir DVB türüdür.
Televizyon / Kullanma Kılavuzu111 / 117 TR
SÖZLÜK-----------------------------------------------------------------------------------------------------------------------
Dinamik-KontrastBu fonksiyon, görüntüleri analiz ederek ve ardından kontrasttaki değişime bağlı olarak bunu değiştirerek ilgili resim içeriğinin kontrastını dinamik ve optimal olarak ayarlar. Kontrasttaki bu artış aynı zamanda resimdeki görünebilir parlaklık düzeylerini de düşürebilir.
Film-moduTüm kanal kaynaklarındaki uzun metrajlı filmleri tespit eder ve işler. Yani daima en uygun görün-tüyü alırsınız.Bu, TV oynatımında 480i, 576i ve 1080i modla-rında ve diğer kanal kaynakları için çalışır. "Film modu", uzun metrajlı film sinyali olmayan programlar için açılırsa donuk görüntü, hatalı altyazılar veya resimdeki ince çizgiler gibi önemsiz sorunlar oluşabilir.
Donanım-yazılım-versiyonuDonanım yazılımı (Firmware), programlanan bir çipe (mikrokumanda) gömülü yazılıma verilen addır. EPROM veya EEPROM olmak üzere genellikle bir flash bellekte depolanır. Donanım yazılımında cihazı kontrol etmek için fonksiyon-lar bulunur.
GamaBu ayar, hangi dijital aktarım değeri için hangi parlaklık değerinin gösterileceğini belirler. Çoğu kayıtlar 2,2'lik gama değeriyle aktarılır (tüm Windows bilgisayarları ve MAC işlem sistemli daha yeni bilgisayarlar bununla çalışır, daha eski MAC sistemleri ve renk profili bulunmayan aktarımlar çoğunlukla 1,8'lik bir gama değeriyle çalışır).
Ağ-geçidiAğ geçidi tamamen farklı protokollere bağlı olabilecek ağların birbirleri ile iletişim kurması-na olanak sağlar. Ev ortamında router ve DSL modem kombinasyonu bir İnternet Ağ Geçidi olarak kullanılır.
Donanım-versiyonuBu bağlamda donanım, cihazı ifade eder. Buna işlemci, ekran, vs. tüm parçalar dahildir.
HbbTVHbbTV video tekstin interaktif ardılı olup modern tasarımlı içeriğe, yüksek çözünürlükte görüntü-ye ve video dizini ile medya kütüphanelerine sahiptir. HbbTV'nin tam işlevsel olabilmesi için, televiz-yon İnternete bağlı olmalıdır.
HD/Full-HD/UHDYüksek Çözünürlüklü (HD) Televizyon Arttırılmış dikey, yatay ve zamansal çözünürlüğe sahip bir televizyon standardına verilen genel addır.Full HD, 1920x1080 piksel HD çözünürlük verebilen veya kaydedebilen HDTV özellikli cihazların bir özelliğidir.UHD için HD çözünürlük 3840 x 2160'tır.
IP-AdresiIP Adresi (İnternet Protokolü Adresi) bir IP ağın-daki bilgisayarlar ve diğer cihazların adreslerini benzersiz olarak belirlemek için kullanılır. IP adreslerinin kullanıldığı en bilindik ağ İnternettir. Burada örneğin web sunucuları IP Adresi kul-lanılarak adreslenir. IP Adresi router tarafından otomatik olarak verilebilir (otomatik adres) veya routerdan manüel olarak girilebilir (sabit adres). Manüel olarak girildiğinde bu adres TV'ye giril-melidir.
JPEGJPEG, Joint Picture Experts Group’un kısaltması-dır. Görüntü verilerinin sıkıştırılması işlemidir.

112 / 117 TRTelevizyon / Kullanma Kılavuzu
SÖZLÜK-----------------------------------------------------------------------------------------------------------------------
LIVE-SHARELive Share ile Widi™/Miracast™ sertifikalı mobil cihazlar (akıllı telefon veya tablet) ile PC ve Televizyon arasında tüm içerikler WiFi ile akta-rılabilir. HD içerikler de televizyona kolaylıkla aktarılabilir ve TV içerikleri de mobil cihazlara/PC'ye aktarılabilir.
LNBAlçak Parazit Bloğu parabolik antenin merkezin-de bulunur.Örn. 10.7–11.75 veya 11.8–12.75 GHz arası uydu frekanslarını 950–2150 MHz aralığında uygular ve koaksiyel kablo (ayrıca son zaman-larda fiberoptik kablolarla) kablo iletimini ve uydu alıcı ile alımını sağlar.
MEMCAra resimlerin ek olarak hesaplanmasıyla hare-ket içeren görüntüleri iyileştirir ve yalnızca 32 inçten itibaren başlayan cihazlar için kullanılabi-lir. PPR (Resim Mükemmellik Oranı) ile görüntüle-nir. Ayar değeri çok yüksek olduğu takdirde, bu durum ara resimlerin hatalı olarak hesaplanma-sına bağlı olarak kötü aktarımlı gölgelenmeye neden olabilir.
MP3Sıkıştırılmış ses dosyası formatı.
NAS-(Ağa-Bağlı-Depolama)NAS kısaltması bir sabit sürücüden ağa veri gönderen cihazlar için kullanılır.
Ağ-maskesiAğ maskesi veya alt ağ maskesi olarak bilinen maske bir IP Adresini ağ bölümüne ve cihaz/host bölümüne ayıran bir bit maskesidir. Yönlen-dirme kararları almak için IP ağlarında kullanılır.
Ağ-adı-(SSID)-Ağ adı (SSID - servis seti tanımlayıcısı) IEEE 802,11 tabanlı bir kablosuz ağın tanımlanması için kullanılan bir terimdir. Her bir kablosuz LAN'da kablosuz ağı benzersiz olarak tanım-layan bir yapılandırılabilir SSID bulunur. Ağ adının karakter sırası 64 karakter uzunluğa kadar çıkabilir. Bir kablosuz LAN'ın taban istas-yonunda (erişim noktası) yapılandırılır ve erişen tüm istemcilere ayarlanır.
Parazit-AzaltmaResmi bir miktar daha keskin göstererek ve hafif bulandırma oluşturarak görünen "karlı" bölgeleri azaltır. Dolayısıyla iyi resim malzemesi olduğun-da en az düzeyde kullanılmalıdır.
Mükemmel-NetlikHafif bir mavi renk tonuyla genel görüntüyü geliştirir (daha iyi bir keskinlik sağlayarak) ve bunu tamamen özel bir siyah tonundan tama-men siyah renge ayarlayarak siyah seviyesini arttırır. Bu sayede resmin karanlık bölgelerindeki görünen gri değerleri düşürülür.
Özel-IP-AdresiÖzel IP Adresleri İnternete bağlı olmayan özel IP adreslerine aittir. LAN gibi özel ağlar için herkes tarafından kullanılabilir. Çoğu bilgisayar ağı, IP seviyesinde tam bağlantı ancak İnternete sınırlı bağlantı gerektirir. Bu tür bir bilgisayar ağında özel IP Adresi dizisi varsa, İnternet rou-terları özel adres dizilerini yok saydığı için İnter-netten erişilemeyen bir intranet ağı oluşturur. Bu özel ağa bağlanan ve özel IP Adresi ile birlikte İnternette açık adresleri bulunan bir Ağ geçidi veya router İnternete bağlantıyı sağlar. Bu bir vekil sunucu veya NAT/PAT/gizlenme kullanıla-rak yapılabilir. Adres dizisi sadece özel ağdan görüntülenebildiği için aynı dizi diğer özel ağlarda da kullanılabilir. İnternet protokolünün gerektirdiği IP Adreslerinin benzersiz özelliği bu kısıtlı görünürlük ile sağlanır.

Televizyon / Kullanma Kılavuzu113 / 117 TR
SÖZLÜK-----------------------------------------------------------------------------------------------------------------------
Vekil-sunucuVekil veya Vekil sunucu, bilgisayar ağları için veri transferini yöneten bir servis programıdır. Veri transferini daha hızlı hale getirir ve ayrıca erişim kontrolü mekanizmalarını uygulayarak güvenliği de artırabilir. Aktarım, bir bilgisayar ağındaki bilgisayarlar veya programlar ara-sında gerçekleşir. Sunucu tarafında, vekil bir istemci görevi görür, istemci tarafında ise sunucu görevi görür.
RouterRouter birçok bilgisayar ağını birbirine bağ-layan bir ağ bileşenidir. Router (3. Katman bilgilerine dayanarak) aldığı bir protokolün ağ paketlerini analiz eder ve bunu amaçlanan bir hedef ağına iletir. Normal routerlar uygulama katmanının 3. katmanında çalışır. Bir routerda bağı olan her ağ için bir arayüz bulunur. Veri alındığında, router, hedefe giden doğru yolu ve bu sayede verinin aktarılabileceği uygun arayüzü belirler. Bunun için belli bir ağa hangi router ile erişilebileceğini belirleyen lokal olarak mevcut yönlendirme tablosunu kullanır.
SCR-(Tek-Kanallı-Router)Tek Kablo Sistemi EN 50494. Anten sisteminizde çok anahtarlı tek kablo sistemi bulunuyorsa, bu anten sistemine bağlı televizyonlar programları birbirinden bağımsız olarak alabilir.
Güvenlik-(WEP/WPA)WEP (kablolu eşdeğer gizlilik), WLAN için stan-dart şifreleme algoritmasıdır. Hem ağa erişimi kontrol eder hem de verilerin gizliliği ve bütün-lüğünü sağlar. Bu işlem bu günlerde güvensiz olarak görülmektedir. Bu nedenle, yeni WLAN sistemlerinde daha güvenli olan WPA şifreleme kullanılmalıdır.
Sembol-oranıDijital iletim teknolojisinde birim zamanda ileti-len sembollerin miktarıdır.
Zaman-Kaydırmaİzlediğiniz bir programı duraklatabilirsiniz. Bu kullanışlı bir işlevdir. Örneğin bir film izlerken telefon çaldığında artık filmi kaçırmayacaksınız. Program, harici veri ortamının Zaman Kaydırma hafızasına kaydedilir.Zaman Kaydırma hafızasına devam eden prog-ramın maksimum 60 dakikası kaydedilebilir.
TransponderBir frekansta çeşitli vericilerin toplanması.
USB-kaydıDijital televizyon programlarının kaydedilmesi ve oynatılmasını sağlar (DVB-S, DVB-T ve DVB-C). Bu özellik ilgili program sağlayıcısına bağlıdır.Programlar, sadece bir harici veri ortamı (sabit disk veya USB bellek) kullanılarak kaydedilebilir ve oynatılabilir.
Canlı-RenkRenk kontrastını ve kontrast ayarını arttırır. Bu ayar çoğunlukla normal görüntülerle kullanım için çok güçlüdür ve sadece gerekli olursa kulla-nılmalıdır (düşük veya kapalı) aksi halde görün-tüdeki ince ayrıntılar baskılanabilir.
Wi-FiInternet ve Intranet paketlerinin kablosuz iletimi.
WMABu formatlar CD kalitesinde olmasına rağmen çok küçük bir alan kaplayan ses dosyalarının kaydedilmesine ve oynatılmasına olanak sağlar.

114 / 117 TRTelevizyon / Kullanma Kılavuzu
İNDEKS-------------------------------------------------------------------------------------------------------------------------
A
Açılma zamanlayıcısı.....65Açma ve kapatma.....32Ağ bağlantısı.....83Ağ Kurulumu.....83Ağ şifresini girerek otomatik bağlanmak.....21, 88Aksesuarlar.....72Altyazı ayarları.....51Altyazı dilinin değiştirilmesi.....61Altyazılar.....33Altyazı Modu.....62Ambalajın imha edilmesi.....107Analog kanal isimlerini girme (maksimum 8 karakter).....104Analog televizyon kanallarını ayarlama.....102Ana menüde gezinme.....59Anteni ve elektrik kablosunu bağlama.....10Artırılmış görüntü ayarları.....28AV kanallarının yeniden adlandırılması.....27Ayaklı kurulum.....11AYARLAR.....18Ayarları sonlandırıma.....29, 31Aygıta HDMI ARC özelliğini uygulayın ve HDMI ARC özelliğini etkinleştirin.....79
B
Bağlantı seçenekleri.....77Bekleme süresini atlama.....39Bilgileri görüntüleme.....32Bir alt sayfayı doğrudan çağırma.....39Bir düğmeye basarak kablosuz WPS ağ bağlan-tısı.....87Bir LAN kablosuyla ev ağına bağlanma.....21Bir şarkıyı ya da görüntüyü adım adım seçme (ATLAMA).....52Bir televizyon kanalını engelleme.....68Bölümün formatlanması.....43
C
CA modülünü takma.....82CA modülü ve akıllı kartlar için erişim kontro-lü.....82Cevabı göster.....39Çevre uyarısı.....107
Cihazı bekleme konumuna alma.....76Cihaz Kontrolü.....76Çoklu fonksiyon düğmesinin bloke edilme-si.....68
D
Detaylı Kanal Ayarları.....92Diğer oynatma seçenekleri.....55DIGI LINK.....75Dijital çok kanallı amplifikatör / AV alıcısı bağlama.....79Dijital kanallar için Kanal Düzenleyicinin değiş-tirilmesi.....24Dijital kanalları alma.....8Dijital karasal TV kanallarının manuel olarak aranması.....101Dijital karasal TV kanallarının otomatik olarak aranması.....100Dijital medya sunucusunun seçilmesi.....54Dijital teletekstin devre dışı bırakılması ve etkin-leştirilmesi.....38Dijital uydu kanalları için anten ayarları ve DiSEqC 1.0/1.1 ile kanalların otomatik aranma-sı.....96Dijital uydu kanalları için anten ayarları ve kanalların otomatik aranması.....94Dijital uydu kanalları için anten ayarları ve SCR sistemi ile kanalların otomatik aranması.....95Dil Ayarları.....61Dosya formatları.....48Dosyalarda başlık seçimi.....52Dosyalarda bölüm seçimi.....52Dosya tarayıcı.....50Dosya tarayıcısı ana menüsü.....50Durağan resimler ile ilgili notlar.....8DVD kayıt cihazı, DVD oynatıcı, video kayıt cihazı veya set üst kutusu kullanımı.....79
E
Ebeveyn Ayarları.....67Ebeveyn Kontrolü.....67Ek fonksiyonlar.....39Ekolayzer.....30Ekranı bölme.....39Ekran modunun seçilmesi.....50ELEKTRONİK TV REHBERİ.....36
Televizyon / Kullanma Kılavuzu115 / 117 TR
İNDEKS-------------------------------------------------------------------------------------------------------------------------
Enerji tasarrufu ile ilgili yapılması gerekenler.....8Engellenmiş bir televizyon kanalını izleme.....69ERİŞİLEBİLİRLİK FONKSİYONLARI.....62Etkin harici cihaz arama ve seçimi.....75Ev ağı bağlantısı ile video, müzik ve fotoğraf dosyalarını oynatma.....54Ev ağına bağlanma ayarları.....18
F
Fabrika ayarlarına dönüş.....29, 31Favoriler listesi oluşturma.....26Favoriler listesi oluşturma analog kanallar.....105Favori listeleri için kendi verdiğiniz adları girin (maks. 7 karakter).....27Favori listesinde kanalların sıralanması.....26
G
Gecikme/takip süresini ayarlama.....45Genel Bakış.....13Genel Bilgiler.....7“Gizli” bir ağa televizyonun bağlanması.....90Görüntü ayarları.....28, 35Görüntü formatını değiştirme.....34Görüntü / Ses ayarları.....28Görüntü verisi.....48SCR Sistemi.....8Güç koruma modu.....64Güç LED’i parlaklığı.....63
H
Harici cihaz bağlama.....78Harici cihazın standby modundan açılması.....75Harici cihazın standby modundan kapatılma-sı.....75Harici veri ortamı kullanımında muhtemel kısıtla-malar.....40Harici veri ortamında bölüm seçme.....42Harici veri ortamının bağlanması.....41, 49Harici veri ortamının çıkartılması.....42, 49Harici veri ortamının seçilmesi.....42Harici veri ortamının testi.....42HbbTV Modu.....37HbbTV nedir?.....37HbbTV’nin devre dışı bırakılması ve etkinleştiril-mesi.....38HbbTV’nin kullanımı.....38Hi-fi sistemi.....79
I
İlave oynatma fonksiyonları.....52İleri/geri görüntü arama.....46İleriye doğru arama.....53İlk kurulumun yapılması.....20İnternet uygulamalarını seçme.....58İstenilen süreye gitme.....53
K
Kablolu ağ.....83Kablolu ağ ayarları.....84Kablolu ağ bağlantısı.....83Kablolu dijital televizyon kanallarının ayarlan-ması (DVB-C).....22Kablo sağlayıcısından televizyon kanallarının manuel olarak aranması.....100Kablo sağlayıcısından televizyon kanallarının otomatik olarak aranması.....99Kablosuz ağ.....86Kablosuz ağ ayarları.....86Kablosuz ağ bağlantısı.....86Kablosuz Ekran Paylaşımı (LIVESHARE).....81Kablosuz (WLAN) bağlantı için notlar.....106Kanal düzenleyicide ada göre kanal ara-ma.....25Kanal düzenleyicide kanalları farklı kanal konumlara taşıma.....25Kanal düzenleyicide kanalların anten tipine göre görüntülemesi.....25Kanal düzenleyicide kanalların silinmesi.....25Kanal düzenleyicide kanalların sıralanma-sı.....26Kanal geçmişinin silinmesi.....73Kanalları silme.....104Kanal listelerini seçme.....104Kanal listesinden bir programı kaydetme.....44Kanal numaralarını girerek analog televizyon kanallarını ayarlama.....103Kapanma zamanlayıcısı.....66Karakter boyutunu büyütme.....39Karasal dijital televizyon kanallarının ayarlan-ması (DVB-T).....23Kaydedilmiş dosyalar menüsünden yayınların silinmesi.....47Kayıt için program ayarı.....45Kayıtlı analog kanalların değiştirilmesi.....104

116 / 117 TRTelevizyon / Kullanma Kılavuzu
İNDEKS-------------------------------------------------------------------------------------------------------------------------
Kayıtlı dosyalar listesinden bir yayın seç-me.....46Kayıt sırasında oynatma.....47Klavye dilinin değiştirilmesi.....61Kurulum ve Güvenlik.....5Kurulum veya asma.....11
L
LIVESHARE nedir?.....81Liveshare bağlantısı ile ekran paylaşımı.....81LNB ayarları.....93
M
Magic Fidelity.....30Mağaza logosu görünümü.....63Manuel ayar.....70Manuel bağlantı.....85, 89Menü dilinin değiştirilmesi.....61Menü dilinin seçilmesi.....75Menü kilitleme.....67Menüyü seçme.....42, 50Motorlu anten ayarları (DiSEqC 1.2).....98Multimedya Sunucu Modu.....54
N
Normal text modu.....39
O
Ortak Arayüzle Çalıştırma.....82Ortak arayüz nedir?.....82Otomatik ayar.....70Otomatik bağlantı.....84Otomatik kapanma.....63Otomatik ön izlemeye geçiş.....50Otomatik servis güncelleme.....102Otomatik ses.....31Oynatma.....46, 55Oynatma/Çalma temel fonksiyonlar.....51
P
Paketin içindekiler.....9PIN ile kablosuz WPS ağ bağlantısı.....87PIN kodunu değiştirme.....68PIN kodunun sıfırlanması.....69Programları Kaydetme.....44Program Tablosunu açma.....24
R
Resim görüntüsünü döndürme.....53
S
Sayfa durdurma.....39Seçilen şarkıları çalma.....52Ses ayarları.....30, 35Ses dili.....33Ses dilinin değiştirilmesi.....61Sesi kapatma.....32Sesli anlatım (sesli altyazılar).....62Ses Modu.....30Ses seviyesini ayarlama.....32Ses verileri.....48Sıfırlama Fonksiyonu.....73Sinyal bilgilerini görüntüleme.....105Slayt gösteriminin ekrana getirileceği sürenin seçilmesi.....51SMART Inter@ctive TV 4.0 internet uygulamala-rı.....57Smart İnter@ctive TV’ye Başlarken.....57Sorun giderme.....108Stereo/dual kanal.....30
T
Tarih ve saat ayarı.....70Tek dokunuşla programları kaydetme.....44Tekrarlama fonksiyonları.....53Teletekst modu.....39Televizyon cihazının bağlantıları.....13Televizyondan HDMI kaynağının seçilmesi.....75Televizyon kanallarının ayarlanması.....18Televizyon programlarının kaydedilmesi ve oynatılmasıyla ilgili bilgiler.....40Televizyon setinizin benzersiz özellikleri.....7Televizyonu en baştaki durumuna sıfırlama.....73Televizyonun Digi Link bağlantısı fonksiyonla-rı.....75TOP text veya FLOF text modu.....39Tüm analog televizyon kanallarını ayarla-ma.....102Tüm uygulamaların görüntülenmesi.....58TV Adının Değiştirilmesi.....91TV konumu.....30TV’nin çalışması - Temel Fonksiyonlar.....32
U

Televizyon / Kullanma Kılavuzu117 / 117 TR
İNDEKS-------------------------------------------------------------------------------------------------------------------------
USB İşlemi.....48USB Kaydı.....40USB klavye ve fare.....57Ürün bilgisi.....71USB kayıt ayarları.....42USB kurulum menüsündeki ayarlar.....50Uydu bağlantılı dijital televizyon istasyonlarının manuel aranması.....93Uydu bağlantılı tüm dijital televizyon istasyonla-rının otomatik olarak aranması.....92Uydu sinyali ile televizyon kanallarının aranması (DVB-S).....22Uyku zamanlayıcısı.....34, 65Uzaktan kumanda - ana fonksiyonlar.....15Uzaktan kumanda - tüm fonksiyonlar.....16Uzaktan Kumandaya Pil Takma.....12
V
VESA montaj kitine montaj hazırlığı.....11Video dizinleri için ek fonksiyonlar.....38Video verileri.....48
W
WEB Tarayıcısı.....60Web tarayıcısı menüsü.....60Web tarayıcısı uygulaması.....60
Y
Yazılımı güncelleme (Internet).....71Yazılımı güncelleme (OAD).....71Yazılımı güncelleme (USB).....71Yetkili satıcılar için servis bilgileri.....106Yüksek çözünürlük – HD ready.....77
Z
Zaman kaydırma programlarının “duraklatılma-sı”.....43Zamanlayıcı Fonksiyonları.....65Zamanlayıcının düzenlenmesi.....46Zamanlayıcının silinmesi.....46Zap fonksiyonu.....33Zoom fonksiyonu.....34

2 / 116 TRTelevision / User Manual
TABLE OF CONTENTS ---------------------------------------------------------------------------------
5 SET-UP AND SAFETY
7 GENERAL INFORMATION 7 Special features of your television set8 Receiving digital stations8 SCR System8 Important notes on environmental protec-
tion8 Notes on still images
9 PACKING CONTENTS 9 Standart accessory9 Optional accessory
10 CONNECTION/PREPARA-
TION 10 Connecting the antenna and power cord11 Setting up or hanging12 Inserting batteries in the remote control
13 OVERVIEW 13 Connections on the television set14 Control elements15 Remote control - main functions16 Remote control - all functions
17 INITIAL SET-UP 17 Settings for connecting to the home net-
work17 Tuning channels18 Initial set-up – overview19 Arrange Initial set-up23 Changing the Channel Editor for the
digital channels
27 PICTURE /SOUND SETTINGS 27 Picture settings28 Restore default settings28 Concluding the settings29 Sound settings 30 Restore default settings30 Concluding the settings
31 TV OPERATION –
BASIC FUNCTIONS 31 Switching on and off31 Selecting the operating mode31 Selecting channels31 Selecting stations from lists31 Selecting AV channels31 Adjusting the volume31 Muting31 Displaying information32 Audio language32 Subtitles32 Zap function
33 TV OPERATION – ADDITIONAL
FUNCTIONS 33 Sleep timer33 Zoom function33 Changing the picture format34 Audio settings34 Picture settings
35 ELECTRONIC TV GUIDE 35 Changing the font size of the channel
guide
36 HBBTV MODE 36 What is HbbTV?37 Using HbbTV37 Additional functions for video indexes37 Deactivate and activate HbbTV37 Deactivate and activate digital teletext
38 TELETEXT MODE 38 TOP text or FLOF text mode38 Normal text mode38 Additional functions
39 USB RECORDING 39 Information on recording and playing
television programmes39 Possible limitations when using an exter-
nal data medium40 Connecting external data media41 USB recording settings42 Time shift – ″ Pausing” programmes

Television / User Manual3 / 116 TR
TABLE OF CONTENTS ---------------------------------------------------------------------------------
43 Recording programmes43 One-touch programme recording43 Recording a programme from the channel
list44 Programme setting for recording45 Editing the timer45 Deleting a timer46 Playback46 Deleting programmes from the recorded
files menu
47 USB OPERATION 47 File formats for USB operating48 Connecting external data media48 Removing the external data
media49 The file browser 49 Settings in the USB setup menu51 Playback basic functions 52 Additional playback functions53 Playing the video, music and image files
with home network connection53 Selecting the digital media server54 Playback54 Other playback options
55 APLICATION CENTER 55 Agreements of Terms & Conditions and
Confidentiality55 First run and operations55 Displaying the Terms & Conditions and
Confidentiality content accepted by the user and removing the acceptance
56 SMART inter@ctive TV internet applica-tions
56 USB keyboard and mouse56 Getting Started with Smart Inter@ctive TV58 Navigation on the application portal
main screen58 Application Portal Main Screen
59 WEB BROWSER 59 Web browser menu59 Web browser applications
60 LANGUAGE SETTINGS 60 Changing the menu language60 Changing the audio language60 Changing the subtitle language60 Changing the keyboard
language
61 ACCESSIBLE FUNCTIONS 61 Subtitle Mode61 Audio description (audio subtitles)
62 ADVANCED SETTINGS 62 Auto sleep62 Store logo view 62 Power LED brightness 62 Power save mode 63 Switching on/off weather information63 Switching on/off help information
64 TIMER FUNCTIONS 64 Sleep timer64 On timer (Auto On)65 Off timer (Auto Off)
66 PARENTAL SETTINGS 66 Parental Guidance66 Locking the menus67 Blocking the multifunction switch67 Changing the PIN code67 Blocking a television channel 68 Watching a blocked television channel68 Resetting PIN code
69 DATE AND TIME SETTINGS 69 Auto tuning69 Manual tuning
70 SOFTWARE OF THE DEVICE 70 Product information70 Software update (OAD)70 Software update (Internet)70 Software update (USB)
71 ACCESSORIES

4 / 116 TRTelevision / User Manual
TABLE OF CONTENTS ---------------------------------------------------------------------------------
72 RESET FUNCTIONS 72 Resetting the television to its original state72 Deleting channel history72 Settings recovery
73 USING EXTERNAL DEVICES 73 DIGI LINK73 The Digi Link functions of the television74 Device Control74 Switching the device to standby75 High definition75 Connection options76 Connecting an external device77 Using a DVD recorder, DVD player, video
recorder or set-top box77 Hi-fi system79 Wireless screen share (Liveshare)79 What is LIVESHARE?79 Screen share with Liveshare connection
80 OPERATION WITH COMMON
INTERFACE 80 What is common interface?80 Inserting the CA module80 Access control for CA module and smart
cards
81 NETWORK SETUP 81 Network connection81 Wired network82 Wired network settings84 Wireless network84 Wireless network settings88 Change TV Name89 Connecting the TV to a “hidden” network
90 SETTING FURTHER CHANNELS90 Searching for all digital channels from a
satellite automatically91 Searching for digital channels from a
satellite manually on a transponder92 Antenna settings and searching for digital
channels from a satellite automatically93 Antenna settings, SCR system and search-
ing for digital channels from a satellite automatically
94 Antenna settings for DiSEqC 1.0/1.1 and searching digital channels from a satellite automatically
96 Motor antenna setup (DiSEqC 1.2)97 Searching for digital channels from the
cable provider automatically98 Searching for digital channels from the
cable provider manually98 Searching for digital terrestrial TV chan-
nels automatically99 Searching for digital terrestrial TV chan-
nels manually100 Automatic service update 100 Tuning analogue television
channels102 Changing stored analogue
channels103 Displaying signal information104 Service information for dealers104 Notes for WLAN reception105 Network interfaces105 Disposing of the packaging105 Environmental note105 Explanation of the symbols which may be
present on back side of the television set106 Troubleshooting
108 GLOSSARY
113 INDEX
Television / User Manual5 / 116 TR
SET-UP AND SAFETY -----------------------------------------------------------------------------------
About your TV set7 With your TV set, you can receive and watch
digital TV programmes over DVB-S, DVB-T and DVB-C, along with analogue TV.
7 Many features of the TV set require an Inter-net connection. The TV set is equipped with WLAN and a LAN port.
7 The TV set can record programmes. For this feature you need a USB storage device, such as an external hard drive (not included). Re-corded programmes can only be played on the same TV set. After the TV st is repaired, it is possible that recorded programmes may no longer be able to be played back.
Intended use7 The TV set is designed for use in dry rooms. 7 Use the TV set with the supplied stand or
a suitable VESA bracket. 7 The TV set is primarily intended for the play-
back of TV programmes, streaming content and audio/video material from external de-vices. Any other use is strictly prohibited.
It is not intended as an information display or for predominant use as a computer monitor. If a still image or a non-full-format image is dis-played for an extended period, visible traces may remain on the screen for some time.
This is not a defect that can be used as the basis for a warranty claim.
SafetyWARNING
Risk of electrical accident7 Do not open the TV set. Safety risk may arise
and also the guarantee of the product can be void if the television set is opened.
7 The TV set can only be operated with the power cable or the AC/DC adapter supplied with the product.
7 Do not operate the TV set with a damaged power cord/AC/DC adaptor (if supplied).
7 If the plug on the TV set has an earthing con-tact, only insert the plug into a socket with an earthing contact.
7 Plug the TV set into the mains socket only after you have connected the external devices and the antenna.
7 Protect the TV set from moisture. Do not place any vessels filled with water (such as vases) on the TV.
Fire hazard7 To prevent the spread of fire,
keep candles or other open flames away from this product at all times.
7 Do not cover the ventilation slots on the TV set.
7 Always unplug the power plug and antenna plug during a thunderstorm.
7 Keep candles or other open flames away from the TV set.
7 Do not expose the batteries to extreme heat such as sunshine, fire or the like.
7 Only use batteries of the same type (brand, size, properties). Do not use used and new batteries together.

6 / 116 TRTelevision / User Manual
SET-UP AND SAFETY -----------------------------------------------------------------------------------
WARNINGInjuries caused by falling TV setNever place the TV set on an unstable surface. The TV set may fall, causing serious injury, pos-sibly leading to death in isolated cases. Observe the following precautions: 7 Only use the manufacturer’s recommended
cabinets or stands.7 Only use furniture that can safely support the
TV set.7 Make sure that the TV set does not protrude
beyond the dimensions of the furniture on which it is resting.
7 Do not place the TV set on tall furniture (such as kitchen cabinets, bookshelves) without securely anchoring the furniture and TV set.
7 Do not place the TV set on fabric or other materials located between the TV set and furniture.
7 Instruct children that there is danger associ-ated with climbing on furniture when the TV set is to be reached.
NOTICEShortened service life due to high oper-ating temperature7 Do not place the TV set next to heating units
or in direct sunlight. 7 To ensure adequate ventilation, maintain
clearance of at least 10 cm around the TV set.
Discolouration of furniture due to rub-ber feet7 Some furniture surfaces may discolour when
they come in contact with rubber. To protect furniture, you can place a sheet made of glass or plastic under the stand. Do not use textile underlays or mats such as doilies.
Environmental information7 Do not dispose of batteries in
the household waste. Used bat-teries must be returned to retail
stores or public collection points. You help to protect the environment in this way.
7 Be sure to dispose of packaging materials for your product separately according to the guidelines of local authorities so that they can be recycled in an environmentally safe manner.
7 If you are not using your TV set for a while, turn it to standby mode. In standby mode, the TV set uses very little energy (≤ 0.5 W). If you do not use the TV set for an extended period, turn it off with the power switch or unplug the power cord from the socket. If you turn off the device or disconnect it from the power supply, the switch-on timer and pro-grammed recordings will not work.
7 Select a location for the TV set so that no direct sunlight falls on the screen. This allows a lower backlight to be selected, which saves energy.
7 Do not dispose of the product along with normal household waste at the end of its service life. Take it to a recycling centre
for electrical and electronic equipment.

Television / User Manual7 / 116 TR
Special features of your television set7 Your television set enables you to receive and
watch digital stations (via DVB-S, DVB-T and DVB-C), including the High Definition (HD) ones. At present, reception for these digital television stations in High Definition is only possible in some countries in Europe.
7 Although this television meets the current DVB-S, DVB-T and DVB-C standards as of August 2012, its compatibility with future DVB-S digital satellite broadcasts, DVB-T digital ter-restrial broadcasts and DVB-C digital cable broadcasts is not guaranteed.
7 This television can receive and process all analogue and all unencrypted digital stations. This television set has an integrated digital and analogue receiver. The digital receiver unit converts the signals from digital stations to provide outstanding audio and picture quality.
7 The TV guide (only for digital stations) tells you of any schedule changes at short notice, and provides an overview of all the stations’ schedules for the next few days.
7 You can connect various data media, for example, an external hard drive, a USB memory stick or a digital camera to the USB sockets. Using the file browser, you can then select and play the file formats you want (for example, MP4, MP3 or JPEG data).
7 With the Time Shift function, you can eas-ily stop and resume a programme with the remote control in a fast and simple way. Programme is recorded to the external data medium.
GENERAL INFORMATION -------------------------------------------------------------------
7 You can record any digital TV channel you have chosen, if no limitation has been im-posed by the broadcaster.
TV channel is transformed by your television and saved to a USB external data medium.
You can recall and play saved programs from the archive.
While a recording is in progress, you can select and watch another recording from the archive.
For detailed information about saving and playing TV programs, please see page 39.
7 SMART inter@ctive TV provides your TV with Internet applications when your TV is con-nected to Internet.
7 Wireless USB keyboard and mouse support in the Web browsing of your television facilitates surfing through the internet pages for the user.
7 DLNA feature allows you to use a wired or wireless (with wireless USN network device) local network to access your content that were recorded with DLNA compatible devices we use at our daily lives such as a PC, mobile phone or NAS (Network Attached Storage) which are operated as DMS (Digital Medial Server). While watching TV, you can play any content you like at any time by using DMC applications on your mobile device or PC without starting DLNA application.
7 A DLNA compatible device such as a PC, mobile phone, NAS or a NAS-like (Network attached storage) device which operates as a DMS (Digital Media Server) is required in order to use home network.

8 / 116 TRTelevision / User Manual
GENERAL INFORMATION -------------------------------------------------------------------
Important notes on environmen-tal protectionThose items mentioned below will help you reduce the consumption of natural resources as well as save your money by reducing electricity bills.7 If you will not be using the TV set for several
days, it should be disconnected from the mains for environmental and safety reasons. TV will not consume energy in this condition.
7 If the TV set has main switch, it will be enough to turn the TV off via main switch. TV will reduce energy consumption almost to Zero Watt.
7 TV consumes less energy on stand by mode. However, some TV sets may have features such as on timer, that require the TV set to be left in standby to work correctly.
7 TV consumes less energy when brightness is reduced.
Notes on still imagesWatching the same image for a long time on the screen may cause a still image remain feebly on the background. Feeble image(s) on the back-ground is originated from LCD/LED technology and does not require any action under guaran-tee. To avoid such cases and/or minimize the impact, you may observe the tips below.7 Do not allow the same TV channel to stay on
the screen for a very long time. Channel logos may cause this situation.
7 Do not allow the images, which are not full screen, to constantly stay on the screen; if not streamed in full screen format by the broad-caster, you can convert the images to full screen by changing picture formats.
7 Higher brightness and/or contrast values will lead this impact to appear faster; therefore, you are recommended to watch your TV in the lowest brightness and contrast levels.
Receiving digital stations7 To receive digital satellite stations (DVB-S) you
need a satellite antenna.7 To receive digital stations (DVB-T) you need
a digital rooftop or indoor antenna (passive or active indoor antenna with its own power supply).
7 The antenna cable of the cable TV network that broadcast in DVB-C must be plugged into TV in order to receive the DVB-C broadcasts.
7 Unlike analogue broadcasting, not every station has its own transmission frequency. Instead, several stations are grouped into what are known as bouquets on a regional or national level.
7 You can find the current transmission informa-tion on teletext from various broadcasters, or look in a TV guide or on the Internet.
7 Various digital television stations from private broadcasters are encrypted (DVB-S, DVB-T and DVB-C). Watching these stations and the recording and playback functions are only possible with the appropriate CI module and a SmartCard. Ask your specialist dealer.
SCR SystemYour TV supports SCR system (Single Channel Router). With SCR satellite system, several us-ers can individually receive all signals from the satellite simultaneously.

Television / User Manual9 / 116 TR
PACKING CONTENTS -------------------------------------------------------------------------------
Standart accessory1 TV
2 Stand
3 Remote control
4 Batteries for remote controls
5 Screws and mounting instructions for stand
6 Brief Instruction
Optional accessoryEasy-Use Remote ControlBatteries for Easy-Use remote controlsCleaning clothScrews for VESA bracket
1
4 5
6
Manual
23

10 / 116 TRTelevision / User Manual
CONNECTION/PREPARATION -----------------------------------------------------
Connecting the antenna and power cord
1 To receive digital satellite channels (DVB-S), connect the satellite antenna cable to the antenna socket SATELLITE on the television set;
and / or
2a To receive terrestrial digital broadcasters (DVB-T) connect the cable for the rooftop or indoor antenna (passive or active indoor antenna with its own power supply) to the antenna socket ANT IN on the television set;
or
2b To receive digital cable channels (DVB-C) connect the cable for the rooftop antenna to the antenna socket ANT IN on the televi-sion set;
or
2c To receive analogue TV channels, connect the cable for the rooftop antenna to the antenna socket ANT IN on the television set.
Note:7 When connecting an indoor antenna you
may have to try it out at different positions until you get the best reception.
3 Plug the power cord into the wall socket.
Note:7 Only plug the device into the mains socket
after you have connected the external devices and the antenna.
7 Do not use an adapter plug or extension cable which does not meet the applicable safety standards. Do not make changes on the power cord.
1 23

Television / User Manual11 / 116 TR
CONNECTION/PREPARATION -----------------------------------------------------
Setting up or hanging7 Select a location so that no direct sunlight falls
on the screen.
Setting up with stand7 To mount the stand, refer to the installation
instructions included.7 Place the television set on a hard, level sur-
face.
Preparing for mounting on the VESA bracketYou will need: 7 A pair of scissors,7 A crosstip screwdriver.Follow the installation instructions for the VESA bracket.Place the television set in the film on a smooth surface with the screen facing down.1 Cut open the film on the back side using the
scissors.
2 Connect the required cables to the connec-tors on the television set. See the “Connec-tion/Preparation” section in this manual.
3 Tie the cables so they do not hang down onto the floor.
4 Screw the VESA bracket onto the television set and mount it according to its installation instructions.
VESA
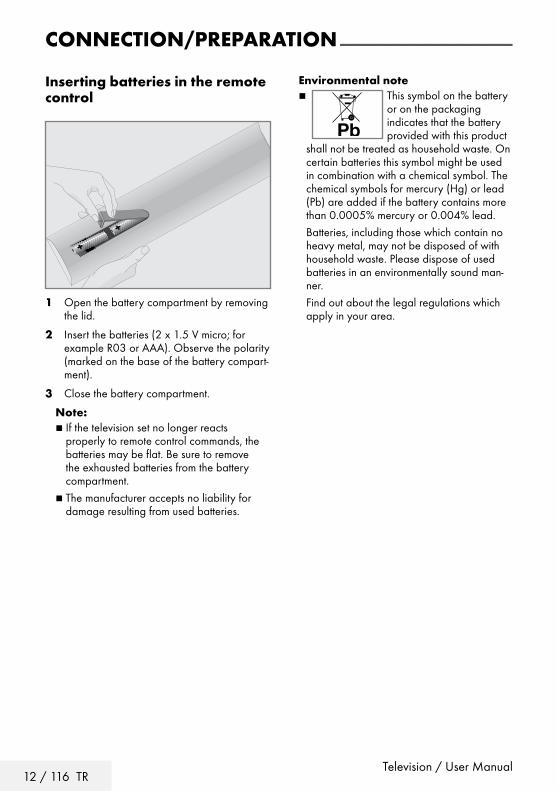
12 / 116 TRTelevision / User Manual
Inserting batteries in the remote control
CONNECTION/PREPARATION -----------------------------------------------------
1 Open the battery compartment by removing the lid.
2 Insert the batteries (2 x 1.5 V micro; for example R03 or AAA). Observe the polarity (marked on the base of the battery compart-ment).
3 Close the battery compartment.
Note: 7 If the television set no longer reacts
properly to remote control commands, the batteries may be flat. Be sure to remove the exhausted batteries from the battery compartment.
7 The manufacturer accepts no liability for damage resulting from used batteries.
Environmental note7 This symbol on the battery
or on the packaging indicates that the battery provided with this product
shall not be treated as household waste. On certain batteries this symbol might be used in combination with a chemical symbol. The chemical symbols for mercury (Hg) or lead (Pb) are added if the battery contains more than 0.0005% mercury or 0.004% lead.
Batteries, including those which contain no heavy metal, may not be disposed of with household waste. Please dispose of used batteries in an environmentally sound man-ner.
Find out about the legal regulations which apply in your area.

Television / User Manual13 / 116 TR
OVERVIEW --------------------------------------------------------------------------------------------------------------
Connections on the television set
VGA IN
SERVICE LAN Optic Out USB (HDD) HDMI2 EARPHONESATELLITE
13/18Vmax. 25 0 mA
ANT-IN5V
max. 50 mA
SCA
RT
HD
MI 1
(AR
C)
7 SERVICE: Service only.7 LAN: Network connection 7 SATELLITE: for satellite antenna. Suit-
able for single-cable GSCR system.7 ANT IN: for antenna cable (terrestrial
antenna or cable connection).7 Optic Out: optical audio output 7 USB(HDD): connect data media for re-
cording programmes, such as an external hard disk.
7 HDMI2: Input for digital audio and im-age data.
7 U: Headphone jack or line output via adapter.
7 SCART / S-VHS / COMPONENT: SCART socket, audio/video input and
output S-VHS socket, audio/video input for
S-Video camera using a SCART-S-VHS adapter cable.
Component socket, audio/video input (YUV signal) using a SCART-YPbPr adapter cable.
7 HDMI1 (ARC): Input for digital audio and video data with audio return chan-nel.
7 CI: for CA modules for receiving en-crypted stations.

14 / 116 TRTelevision / User Manual
OVERVIEW --------------------------------------------------------------------------------------------------------------
Control elements
7 + VOL: Volume up.7 VOL-: Volume down.7 + CH: Channel up.7 CH -: Channel down.7 SOURCE: Source menu.7 MENU: Opens the main menu.7 8: Turns on the television in the stand-
by mode and switches it to the stand-by mode.
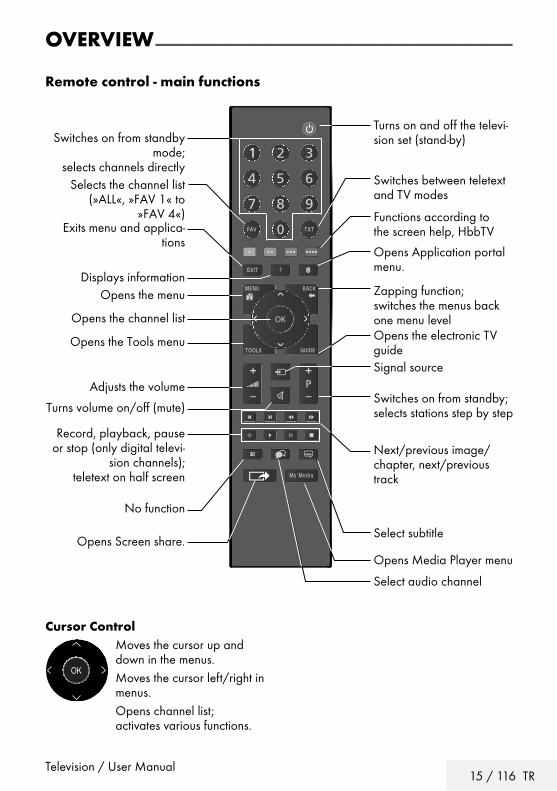
Television / User Manual15 / 116 TR
OVERVIEW --------------------------------------------------------------------------------------------------------------
Remote control - main functions
Cursor ControlMoves the cursor up and down in the menus.Moves the cursor left/right in menus.Opens channel list; activates various functions.
Turns on and off the televi-sion set (stand-by)
Signal source
Turns volume on/off (mute)
Zapping function; switches the menus back one menu level
Opens the menu
Opens the Tools menu
Switches between teletext and TV modes
Opens Application portal menu.
Switches on from standby; selects stations step by step
Adjusts the volume
Displays information
Exits menu and applica-tions
Opens the channel listOpens the electronic TV guide
Switches on from standby mode;
selects channels directlySelects the channel list
(»ALL«, »FAV 1« to »FAV 4«)
Record, playback, pause or stop (only digital televi-
sion channels); teletext on half screen
Opens Screen share.
No function
Functions according to the screen help, HbbTV
Opens Media Player menu
Select subtitle
Select audio channel
Next/previous image/ chapter, next/previous track

16 / 116 TRTelevision / User Manual
OVERVIEW --------------------------------------------------------------------------------------------------------------
Remote control - all functions (red) Selects a page in teletext mode; (green) selects/activates various functions (yellow) in menus. (blue)5 Switches to double character size
in teletext mode; selects the previous track/previous picture in the Media Player.
6 Updates a page in teletext mode; selects the next track/next picture in the Media Player.
3 Page hold in teletext mode; starts the reverse picture search in the Media Player.
4 Show answers in teletext mode; starts the forward picture search in the Media Player.
Starts recording (in digital TV op-eration, recording only via external data media).
8 Starts playback in the external data media; Starts playback in the DLNA menu.
! Time shift during live signal (in digi-tal TV operation, only via external data media); pauses the file executed on the external data media; pauses the file executed on the DLNA menu.
7 Selects the split screen function in teletext mode; ends playback in the file browser; ends recording or playback in the PVR mode; stops the file executed on the DLNA menu.
Selects different audio language (in digital TV operation).
Selects different subtitles (in digital TV operation).
Note: 7 Your TV supports remote control feature for
Apple iPhones, Windows mobile phones and Android phones.
Depending on the features of your TV, you may control your TV by your phone after downloading the free »Grundig TV Remote« application from Apple App. Store or Google Play (Android Market).

Television / User Manual17 / 116 TR
INITIAL SET-UP ---------------------------------------------------------------------------------------------------
The television set is fitted with an “installation as-sistant”, which guides you step by step through the basic settings.Using the screen dialogue, the user guide enables supposedly complex settings and data entries to be presented simply and clearly for everybody.Pages and dialogue items appear on the screen, which identify the subsequent and likely operat-ing steps.To support this, you will also see the required button symbols of the remote control. The basic settings in detail:– language selection– country selection;– choice of user mode;– location selection;– accessories selection;– network settings (if desired);– Station settings (DVB-S, DVB-T, DVB-C and
analogue channels).The detailed settings can be found on pages 19 and 22.
Settings for connecting to the home networkDepending on the connection to the home net-work, you connect your television to the home network:– via a LAN connection or – without cable via WLAN There are two options with the LAN-connection:
Automatic connection all data regarding connection settings (»IP Ad-
dress«, »Netmask«, »Gateway« and »DNS«) are obtained from modem automatically.
Manual connection all data regarding connection settings (»IP Ad-
dress«, »Netmask«, »Gateway« and »DNS«) must be configured manually.
There are various options when using WLAN:
Automatic connection all data regarding connection settings (»IP Ad-
dress«, »Netmask«, »Gateway« and »DNS«) are obtained from modem automatically.
Depending on the router, you can use the fol-lowing options:
– Option “WPS-PBC” (Push Button Configura-tion);
– Connecting with a WPS PIN; – Connecting by entering the network pass-
word.
Manual connection all data regarding connection settings (»IP Ad-
dress«, »Netmask«, »Gateway« and »DNS«) must be configured manually.
Tuning channelsDepending on the type of antenna connected, you can decide which channels you would like the television to search for.DVB-S – Tunes digital channels from the satellite, from page 21. You have two options for this search: – the basic installation which presets a stan-
dard selection, e.g. the satellite Astra 19.2° East; you need only start the search;
– the professional installation, which allows you to make all required settings and set parameters for your receiver system.
DVB-C – For setting up digital cable channels see page 21.DVB-T – For setting up digital terrestrial channels see page 22.Searching for Analog television channels, see "Setting further channels" section on page
100 .Note: 7 See “Setting further channels”" section start-
ing from page 90 for more information on digital television channel settings.

18 / 116 TRTelevision / User Manual
Select language (page 19, step 3)
INITIAL SET-UP ---------------------------------------------------------------------------------------------------
Initial set-up – overview
Network setup (page 20, step 12)
Wired(page 20, step 12)
Wireless(page 20, step 17)
Wireless WPS(chapter page 85)
Auto(page 20, step 12)
Manually(chapter page 83)
Auto(page 20, step 17)
Manually(Chapter page 87)
Button(Chapter page 85)
PIN(Chapter page 85)
Channel Editor (page 23)
Setting TV channels (page 21, step 26)
DVB-T(page 22, step 34)
DVB-C(page 21, step 29)
DVB-S(page 21, step 25)
Auto(page 21, step 29)
Manually(chapter page 98)
Auto(page 22 step 25)
Manually(chapter page 91)
Auto(page 22, step 34)
Manually(chapter page 99)
Select country (page 19, step 5)
Select mode (page 19, step 6)
Select location and accessories (page 19, step 7 - 10)

Television / User Manual19 / 116 TR
Arrange Initial set-up1 Switch on the television set from standby
with »8«, »1…0«, »P+« or »P–«. – Menu Language menu appears when the
device is switched on for the first time.
Smart Inter@ctive 4.0
Select
Menu Language
Please select your desired language
Česky Dansk Deutsch English Espanol Eλληvıκά Français
Hrvatski Italiano Magyar Nederlands Norsk Polski Português
Pyccкий Româneşte Slovenščina Eesti Suomi Svenska Бългaрски
Slovenčina Lietuviu Türkçe
Navigation Between Items
English
Help: 7 If the »Menu Language« menu does not
appear on the screen, make the setting by following the instructions on returning the television to its factory settings on page 72.
2 Select the menu language with »<«, »>«, »V« or »Λ« and press »OK« to confirm.
– »Welcome« menu appears.
3 Step-by-step installation will be made to be able to use the television. Press »OK« to start the installation.
4 Select the country in which the television set is operated with »<«, »>«, »V« or »Λ« and press »OK« to confirm.
– »User Mode« menu appears, the option »Home Mode« is selected.
5 Confirm the option »Home Mode« with »OK«;
or
select the option »Enhanced« with »V« or »Λ« and press »OK« to confirm.
– »Home Mode« contains preconfigured TV settings that provide energy savings conforming EUP.
– »Enhanced« – if you will use the television for a demo presentation, increased image and volume settings are used in this mode. Increased mode consumes more energy.
INITIAL SET-UP ---------------------------------------------------------------------------------------------------
6 Select the required option »Stand« or »Wall-mounted« with »V« or »Λ«.
Note: 7 The information how to place the television
set is important for the automatic audio settings.
7 Confirm setting with »OK«. – The »Summary« menu will be displayed.
8 Select the next operating step with »« (blue).
– The »Accessories« menu will be dis-played.
9 If an accessory is used for the television and it has already been connected, carry out the required settings in this menu.
Select accessory with »V« or »Λ« and select setting with »<« or »>«.
10 Select the next operating step with »« (blue).
Note: 7 If you want to connect your television to the
home network, – continue at point 12 for an automatic
LAN connection, or – continue at point 17 for an automatic
WLAN connection.Note: 7 If connecting to a home network is not nec-
essary, skip the setting using »« (blue). Continue settings at point. 25, 29 or 34.
20 / 116 TRTelevision / User Manual
Connecting to a home network with a LAN cable11 Confirm »Change Connection Type« with
»OK«.
12 Select the option »Wired« with »V« or »Λ« and press »OK« to confirm.
Note: 7 The settings for a manual LAN connection
are on page 83.13 Press »« (red) to select »Connect« option to
establish modem connection. – »Connecting ... Please wait« message
will be displayed, and if the connection is established »Connection To Gateway: Success« messages will be displayed.
14 Press »« (green) to check the performed settings and also if the local network and internet connection has been established.
– »Testing ... Please wait« message will be displayed, and if the connection is established »Connection To Gateway: Success«, »Internet Connection: Success« messages will be displayed.
15 To switch to »Source« menu press »« (blue).
Note: 7 Continue searching for TV channels with: – point 25 for DVB-S reception; – point 29 for DVB-C reception; – point 34 for DVB-T reception.
Connecting automatically by entering the network password16 Confirm »Change Connection Type« with
»OK«.
17 Select the option »Wireless« with »V« or »Λ« and press »OK« to confirm.
18 Confirm the message »Do you want to turn on Wi-Fi?« select »Yes« with »<« or »>« and press »OK« to confirm.
19 Select the line »Select Access Point« with »V« or »Λ« and press »OK« to confirm.
– »Select Access Point« menu appears and available wireless networks are scanned and displayed in the menu.
20 Select the network that you want to con-nect with »V« or »Λ« and press »OK« to confirm.
– Wireless connection password screen is displayed.
21 Select the required character with »V«, »Λ«, »<« or »>« and move to the next character with »OK«.
– Using »Shift« ➡ »OK«, you can switch between uppercase letters / numbers and lowercase letters / special characters.
– Select »Del« to delete the character entered and press »OK« to confirm.
22 Confirm the password with »« (green). – »Connecting ... Please wait« message
will be displayed, and if the connection is established »Connection To Gateway: Success« messages will be displayed.
23 Press »« (green) to check the performed settings and also if the local network and internet connection has been established.
– »Testing ... Please wait« message will be displayed, and if the connection is established »Connection To Gateway: Success«, »Internet Connection: Success« messages will be displayed.
24 To switch to »Source Setup« menu press »« (blue).
Note: 7 Continue searching for TV channels with: – point 25 for DVB-S reception; – point 29 for DVB-C reception; – point 34 for DVB-T reception.
INITIAL SET-UP ---------------------------------------------------------------------------------------------------

Television / User Manual21 / 116 TR
INITIAL SET-UP ---------------------------------------------------------------------------------------------------
Searching television channels with sat-ellite signal (DVB-S)25 Select the option »Satellite (DVB-S/S2)«
with »V« or »Λ« and press »OK« to confirm.
– The satellite Astra 19.2° East is preset.
26 Confirm the push button »Continue« with »« (blue).
Notes:7 Select the Channel Type. Press »V« or »Λ« to select whether you
want to search for only digital channels (Digital) or only radio channels (Radio) or both (Digital + Radio) and press »OK« to select and mark or unmark the »Digital« and/or »Radio« items.
7 Select Scan Mode. To select whether you want to search for
only free digital television channels (Free), only scrambled digital television channels (Scrambled) or both (Free + Scrambled), press »V« or »Λ« and press »OK« to select and mark or unmark the »Free« and/or »Scrambled« items.
27 Press »« (red) to start searching. – »Digital Searching« menu appears and
the scan for TV channels begins. – The scan is complete as soon as the mes-
sage »Search is completed!« appears.
28 Select the »Channel Editor« with »OK«.
Tuning cable digital television channels (DVB-C)29 Select the option »Cable (DVB-C)« with
»V« or »Λ« and press »OK« to confirm.
30 Select the line »Scan Type« with »V« or »Λ«.
Select the option »Quick« or »Full« with »<« or »>«.
– »Quick« scanning function sets the chan-nels according to the cable operator information in the broadcasting signal.
– »Full« scan function scans the entire fre-quency range selected. With this search option, search can take a long time. This search type is recommended. Some cable providers do not support »Quick« scan.
Note:7 You can speed up the search. To do this,
frequency and network ID information are required. You may get this data from your cable operator or find it in the Internet forums.
31 Confirm the push button »Continue« with »« (blue).
Note:7 Perform Channel Type selection. Press
»V« or »Λ« to select whether you want to search for only digital channels (Digital), only Analog channels (Analog) or both (Digital + Analog) and press »OK« to se-lect and mark or unmark the »Digital« and »Analog« items.
32 Press »« (red) to start searching. – The »Digital or Analog Searching« menu
appears, and the search for TV channels begins.
– The scan is complete as soon as the »Search is completed!« appears.
33 Select the »Channel Editor« with »OK«.

22 / 116 TRTelevision / User Manual
INITIAL SET-UP ---------------------------------------------------------------------------------------------------
Tuning terrestrial digital television channels (DVB-T)34 Select the option »Air (DVB-T/T2)« with
»V« or »Λ« and press »OK« to confirm.
Important:7 The antenna power supply (5V ) may
only be switched on if the antenna is an active indoor antenna with a signal amplifier and it is not already supplied with a voltage via a mains plug (or similar supply). Otherwise you may cause a short circuit and irreparably damage your antenna.
35 Select the line »Active Antenna Power« with »V« or »Λ«.
Switch on the antenna power supply for the antenna with »<« or »>« (»On«).
36 Select the line »Next Page« with »V« or »Λ« and press »OK« to confirm.
Note:7 Perform Channel Type selection. Press
»V« or »Λ« to select whether you want to search for only digital channels (Digital), only Analog channels (Analog) or both (Digital + Analog) and press »OK« to se-lect and mark or unmark the »Digital« and »Analog« items.
37 Press »« (red) to start searching. – The »Digital or Analog Searching« menu
appears, and the search for TV channels begins.
– The scan is complete as soon as the »Search is completed!« appears.
38 Select the »Channel Editor« with »OK«.
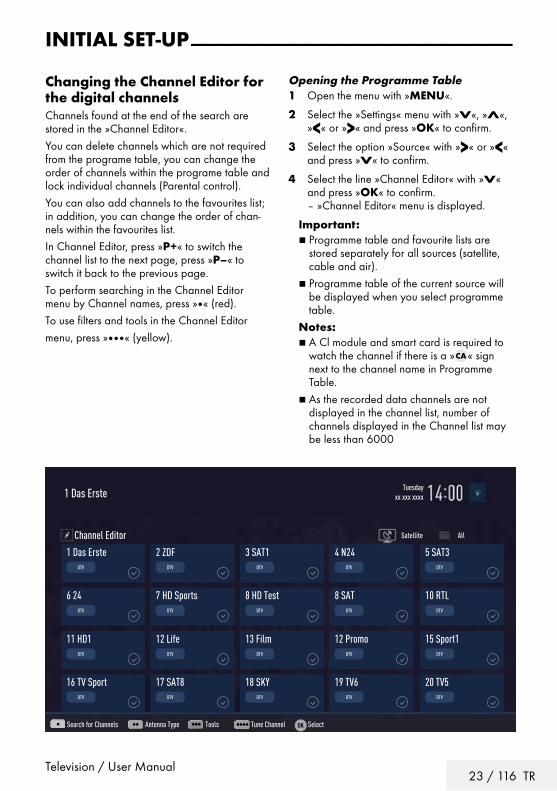
Television / User Manual23 / 116 TR
Changing the Channel Editor for the digital channelsChannels found at the end of the search are stored in the »Channel Editor«.You can delete channels which are not required from the programe table, you can change the order of channels within the programe table and lock individual channels (Parental control).You can also add channels to the favourites list; in addition, you can change the order of chan-nels within the favourites list.In Channel Editor, press »P+« to switch the channel list to the next page, press »P–« to switch it back to the previous page.To perform searching in the Channel Editor menu by Channel names, press »« (red).To use filters and tools in the Channel Editormenu, press »« (yellow).
INITIAL SET-UP ---------------------------------------------------------------------------------------------------
Opening the Programme Table1 Open the menu with »MENU«.
2 Select the »Settings« menu with »V«, »Λ«, »<« or »>« and press »OK« to confirm.
3 Select the option »Source« with »>« or »<« and press »V« to confirm.
4 Select the line »Channel Editor« with »V« and press »OK« to confirm.
– »Channel Editor« menu is displayed.
Important:7 Programme table and favourite lists are
stored separately for all sources (satellite, cable and air).
7 Programme table of the current source will be displayed when you select programme table.
Notes:7 A Cl module and smart card is required to
watch the channel if there is a » « sign next to the channel name in Programme Table.
7 As the recorded data channels are not displayed in the channel list, number of channels displayed in the Channel list may be less than 6000
Tuesdayxx xxx xxxx1 Das Erste
Search for Channels Antenna Type Tools Tune Channel Select
Satellite AllChannel Editor1 Das Erste
DTV
11 HD1DTV
6 24DTV
16 TV SportDTV
3 SAT1DTV
13 FilmDTV
8 HD TestDTV
18 SKYDTV
2 ZDFDTV
12 LifeDTV
7 HD SportsDTV
17 SAT8DTV
4 N24DTV
12 PromoDTV
8 SATDTV
19 TV6DTV
5 SAT3DTV
15 Sport1DTV
10 RTLDTV
20 TV5DTV

24 / 116 TRTelevision / User Manual
INITIAL SET-UP ---------------------------------------------------------------------------------------------------
Searching channels by name in the Channel EditorWhile arranging the channels in the Channel Editor, you can search and select the channel name by the first three characters.1 In the »Channel Editor« menu, select the
search mode by pressing »« (red).
2 Select the first character of the channel name you want to search with »V«, »Λ«, »<« or »>« and press »OK« to confirm.
Repeat the entry for the next characters. – Channels found will be listed on the right
side of the screen.
3 With »>« switch to result section, select the channel you are searching with »V« or »Λ«, and highlight this with »OK«.
Note:7 To change the place of, delete or add the
channels to favorites lists, continue reading the relevant section.
4 To return to the previous menu, press »BACK <«.
5 To exit the »Channel Editor« menu, press »EXIT«.
Deleting channels in the Channel Editor1 In the »Channel Editor« menu, select the
channel(s) you want to delete with »V«, »Λ«, »<« or »>«, and highlight the channel by pressing »OK«.
– Channel is marked with »✔«.
2 Press »« (yellow). – »Tools« menu is displayed.
3 Select the line »Delete« with »V « or »Λ« and press »OK« to confirm.
4 To confirm deletion process, select the op-tion »OK« with »<« or »>«;
or
to cancel deletion process, select the option »No« with »<« or »>« and press »OK« to confirm.
5 To exit the »Channel Editor« menu, press »EXIT«.
Moving the channels in the channel or-ganizer to different channel positions1 In the »Channel Editor« menu, select the
channel(s) you want to move with »V«, »Λ«, »<« or »>«, and highlight the televi-sion channel by pressing »OK«.
– Channel is marked with »✔«.
2 Press »« (green).
Notes:7 In case of changing the order of the chan-
nels, channel numbers sent by the broad-caster will be changed.
7 If more than one channel is selected for moving, channels will be moved one after the other according to the selection order of channels.
3 Select the new place of the channel with »V«, »Λ«, »<« or »>« and press »OK« to confirm.
4 To exit the »Channel Editor« menu, press »EXIT«.
Displaying channels in the Channel Editor by antenna typeIf you have more than one antenna type, you can display channels in the Channel Editor by antenna type.1 To display the channels in the »Channel
Editor« menu by antenna type, press »« (yellow).
2 Confirm »Antenna Type« with »OK«.
3 Select »Air«, »Cable« or »Satellite« with »V« or »Λ« and press »OK«.
– Television will switch to the antenna sys-tem you have selected and channels will be displayed.
4 To exit the »Channel Editor« menu, press »EXIT«.

Television / User Manual25 / 116 TR
Sequencing channels in the Channel EditorYou can sequence the channels in the Channel Editor according to different criteria such as TV, radio or scrambled / unscrambled.1 To sequence the channels according to dif-
ferent criteria in the »Channel Editor« menu, press »« (yellow).
2 Select the sequencing criteria you want with »V« or »Λ« and press »OK« to confirm.
– Channels will be displayed in the »Chan-nel Editor« menu by the criteria you have selected.
3 To exit the »Channel Editor« menu, press »EXIT«.
Creating a list of favouritesYou can select your favourite channels and save them in up to four lists (FAV1 to FAV4).
Note:7 Favourite lists must be created separately
for all sources (satellite, cable and air).7 After created the favourite list, press »FAV«
to select the favorite list.1 In the »Channel Editor« menu, select the
channel(s) you want to add in the favor-ites list with »V«, »Λ«, »<« or »>«, and highlight the television channel by pressing »OK«.
– Channel is marked with »✔«.
2 Press »« (yellow). – »Tools« menu is displayed.
3 Select the line »Add to Fav.« with »V « or »Λ« and press »OK« to confirm.
–»Add to Fav.« menu is displayed.
4 Select the favorite list you want to add the selected channels with »V « or »Λ« and store with »OK«.
– The channels are marked in the Channel Editor with »❶«, »❷«, »❸« or »❹«.
– You can add the same channel in more than one favourites list.
– Each favourite list can contain maximum 255 channels.
INITIAL SET-UP ---------------------------------------------------------------------------------------------------
Notes:7 You can delete channels from the favourites
list. Press »« (yellow), select the favorites list the channel is in with »V« or »Λ« and press »OK« to confirm. Select the channel(s) you want to delete with »V«, »Λ«, »<« or »>«, and highlight the channel by pressing »OK«. Press »« (yellow) and select the line »Remove from Fav.« with »V«, »Λ« and confirm with »OK«.
7 When a channel stored in the favourite channel list is deleted channel order in the favourite list is updated.
5 To exit the »Channel Editor« menu, press »EXIT«.
Sorting channels in the favorites listYou can change the channel sorting in the favorites list.1 To select favorites list in the »Channel Edi-
tor« press »« (yellow).
2 Select the favorites list you want to sort with »V« or »Λ« and press »OK« to confirm.
3 Select the channel(s) you want to move with »V«, »Λ«, »<« or »>«, and highlight the television channel by pressing »OK«.
– Channel is marked with »✔«.
4 Press »« (green).
Note:7 If more than one channel is selected for
moving, channels will be moved one after the other according to the selection order of channels.
5 Select the new place of the channel with »V«, »Λ«, »<« or »>« and press »OK« to confirm.
6 To exit the »Channel Editor« menu, press »EXIT«.

26 / 116 TRTelevision / User Manual
INITIAL SET-UP ---------------------------------------------------------------------------------------------------
Enter own names for the favourites lists (max. 6 characters)You can rename all favorites lists.
1 To recall favorites list menu when no menu is opened on the screen, press »FAV«.
2 Select the favorites list you want to rename with »V« or »Λ« and press »« (blue) button.
– Virtual keyboard will be displayed.
3 To delete the current name step by step, press »« (red).
4 Select the required character/number with »V«, »Λ«, »<« or »>« and move to the next character with »OK«.
Repeat the same process for all characters/numbers.
Note:7 Using »Shift« ➡ »OK«, you can switch
between uppercase letters / numbers and lowercase letters / special characters.
5 To save the new name with »« (green).
6 Press »EXIT« to end the setting.
Renaming AV channelsYou can rename AV channels according to the device you have connected. For example, for a PC which you have connected to HDMI1 source of TV with HDMI cable, you can name the source as PC.
1 Open »Input Source« menu with » «.
2 Select the AV source you will rename with »<« or »>« and press »« (blue).
– Rename menu is displayed.
3 Press »OK« and delete the “old” name step by step with »« (red).
4 Select the required character/number with »V«, »Λ«, »<« or »>« and move to the next character with »OK«.
Repeat the same process for all characters/numbers.
Note:7 Using »Shift« ➡ »OK«, you can switch
between uppercase letters / numbers and lowercase letters / special characters.
5 To save the new name with »« (green).
6 Select the icon appropriate for the device type with »<« or »>« and press »OK« to confirm
7 To save the setting, press »« (blue). – Source name and icon will change.
8 Press »EXIT« to end the setting.
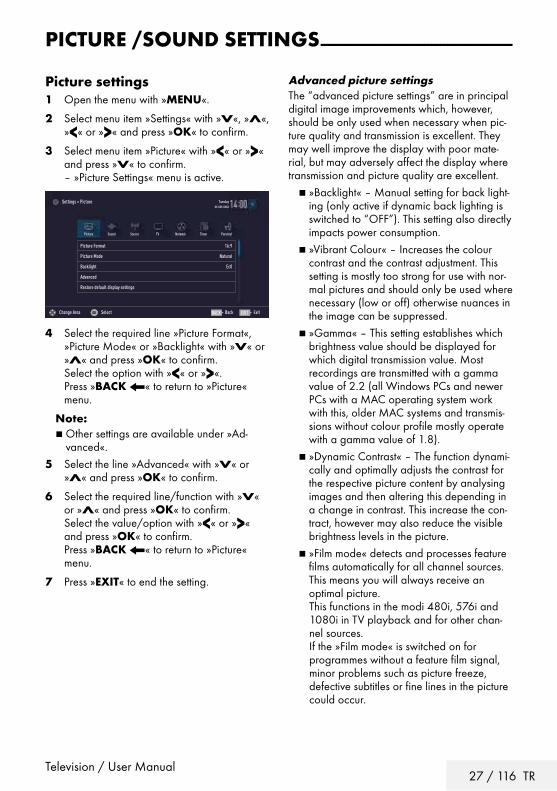
Television / User Manual27 / 116 TR
PICTURE /SOUND SETTINGS -----------------------------------------------------------
Picture settings1 Open the menu with »MENU«.
2 Select menu item »Settings« with »V«, »Λ«, »<« or »>« and press »OK« to confirm.
3 Select menu item »Picture« with »<« or »>« and press »V« to confirm.
– »Picture Settings« menu is active.
Picture Format 16:9
Picture Mode Natural
Backlight Ec0
Advanced
Restore default display settings
Picture
Tuesdayxx xxx xxxx
Source TimerSound NetworkTV Parental
Settings > Picture
Change Area Select ExitBackBACK EXIT
4 Select the required line »Picture Format«, »Picture Mode« or »Backlight« with »V« or »Λ« and press »OK« to confirm.
Select the option with »<« or »>«. Press »BACK <« to return to »Picture«
menu.
Note:7 Other settings are available under »Ad-
vanced«.5 Select the line »Advanced« with »V« or
»Λ« and press »OK« to confirm.
6 Select the required line/function with »V« or »Λ« and press »OK« to confirm.
Select the value/option with »<« or »>« and press »OK« to confirm.
Press »BACK <« to return to »Picture« menu.
7 Press »EXIT« to end the setting.
Advanced picture settings The “advanced picture settings” are in principal digital image improvements which, however, should be only used when necessary when pic-ture quality and transmission is excellent. They may well improve the display with poor mate-rial, but may adversely affect the display where transmission and picture quality are excellent.
7 »Backlight« – Manual setting for back light-ing (only active if dynamic back lighting is switched to “OFF”). This setting also directly impacts power consumption.
7 »Vibrant Colour« – Increases the colour contrast and the contrast adjustment. This setting is mostly too strong for use with nor-mal pictures and should only be used where necessary (low or off) otherwise nuances in the image can be suppressed.
7 »Gamma« – This setting establishes which brightness value should be displayed for which digital transmission value. Most recordings are transmitted with a gamma value of 2.2 (all Windows PCs and newer PCs with a MAC operating system work with this, older MAC systems and transmis-sions without colour profile mostly operate with a gamma value of 1.8).
7 »Dynamic Contrast« – The function dynami-cally and optimally adjusts the contrast for the respective picture content by analysing images and then altering this depending in a change in contrast. This increase the con-tract, however may also reduce the visible brightness levels in the picture.
7 »Film mode« detects and processes feature films automatically for all channel sources. This means you will always receive an optimal picture.
This functions in the modi 480i, 576i and 1080i in TV playback and for other chan-nel sources.
If the »Film mode« is switched on for programmes without a feature film signal, minor problems such as picture freeze, defective subtitles or fine lines in the picture could occur.

28 / 116 TRTelevision / User Manual
PICTURE /SOUND SETTINGS -----------------------------------------------------------
7 »Perfect Clear« – Improves the general im-age by means of a gentle blue hue (giving the appearance of greater sharpness) and improves the black level by setting this en-tirely to black from specific shade of back.This reduces the visible grey values in the dark areas of the picture.
7 »Nois Reduction« – Reduces the visible snow by displaying the picture a little less sharply and creating a slight blurring. Should therefore be used minimally with good picture material.
7 »Block Noise Reduction« – This function can only be selected with digital reception sources and AV presets. It reduces any in-terference from artefacts (pixel blocks) from digital programmes due to MPEG compres-sion (such as from DVB-T receivers and lower transmission rates or DVD players).
Restore default settings1 In the menu »Picture« select the line »Restore
default display settings« with »V« or »Λ« and press »OK« to confirm.
2 Select push button »Yes« with »<« or »>« to confirm the security query;
or
select push button »No« with »<« or »>« to to cancel the function.
3 Press »EXIT« to end the setting.
Concluding the settings1 Press »EXIT« to end the setting.

Television / User Manual29 / 116 TR
PICTURE /SOUND SETTINGS -----------------------------------------------------------
Sound settings 1 Open the menu with »MENU«.
2 Select menu item »Settings« with »V«, »Λ«, »<« or »>« and press »OK« to confirm.
3 Select menu item »Sound« with »<« or »>« and press »V« to confirm.
– »Sound« menu is active.
Sound Mode User
Advanced
Restore Default Sound Settings
Picture
Tuesdayxx xxx xxxx
Source TimerSound NetworkTV Parental
Settings > Sound
Change Area ExitBackBACK EXIT
Note:7 Additional operations are explained in the
following sections.
Sound Mode1 Select the line »Sound Mode« with »V« or
»Λ«.
2 Press »<« or »>« to select the desired op-tion.
Magic FidelityMagic Fidelity is a patented audio technology which is integrated into the television set and only requires the built-in speakers to generate a Surround Sound effect.
1 Select the line »Sound Mode« with »V« or »Λ«.
2 Select the option »Movie«, »Natural«, »Speech« or »Music« with »<« or »>«.
Location selectionThe function how to place the television set is important for the automatic audio settings.
1 Select the line »Advanced« from the Sound menu with »V« or »Λ« and press »OK« to confirm.
2 Select the line »TV Location« with »V« or »Λ«.
3 Select the required option »Stand« or »Wall-mounted« with »<« or »>«.
Stereo/dual channelIf the device receives two channel programmes, e.g. a film with the original sound on sound channel B (display: »Dual II«) and the dubbed version on sound channel A (display: »Dual I«), you can select the desired sound channel.1 Select the line »Advanced« from the Sound
menu with »V« or »Λ« and press »OK« to confirm.
2 Select the line »Sound Type« with »V« or »Λ« and adjust the setting with »<« or »>«.
EqualizerEqualizer offers a sound setting that you can create.Equaliser is active in the menu when »Sound Mode« is selected as »User«.
1 Select the line »Advanced« from the Sound menu with »V« or »Λ« and press »OK« to confirm.
2 Select the line »Equalizer« with »V« or »Λ« and press »OK« to confirm.
– »Equalizer« menu opens.
3 It is active in »120Hz« frequency band. Adjust the preferred value by using »<« or
»>«.
4 Select the next frequency band with »V« or »Λ« to repeat the adjustment procedure.
5 To save adjustment, press »BACK <«.

30 / 116 TRTelevision / User Manual
PICTURE /SOUND SETTINGS -----------------------------------------------------------
Automatic volumeThe television channels broadcast at different volumes. The automatic volume limiting (AVL) function means the volume is kept the same when you switch between channels.1 Select the line »Advanced« from the Sound
menu with »V« or »Λ« and press »OK« to confirm.
2 Select the line »AVL« with »V« or »Λ« and then select »On« with »<« or »>«.
Note:7 AVL item is active in the menu when »Sound
Mode« is selected as »User« or »Standard Mode«.
Restore default settings1 In the menu »Sound« select the line »Restore
Default Sound Settings« with »V« or »Λ« and press »OK« to confirm.
2 Select push button »Yes« with »<« or »>« to confirm the security query;
or
select push button »No« with »<« or »>« to to cancel the function.
3 Press »EXIT« to end the setting.
Concluding the settings1 Press »EXIT« to end the setting.

Television / User Manual31 / 116 TR
TV OPERATION – BASIC FUNCTIONS ---------------------------------
Switching on and off1 Press »8«, »1…0« or »P+« or »P-« to
switch on the television from standby mode.
2 Press »8« to switch the television to standby.
Selecting the operating modeYou can select the menu operating mode of your television. »Advanced Mode« contains all setting whereas »Simple Mode« is an abridged version that allows you to make quick settings.1 Press »MENU« button.
2 Press »« (blue) button to change the operating mode.
Selecting channels1 Use »1…0« to select channels directly.
2 Select channels step by step with »P+« or »P-«.
3 Open the channel list by pressing »OK«, select the channel list by pressing »<« or »>« and confirm with »OK«, then close the channel list with »EXIT«.
Notes:7 Programme information for the following
days an be called up with »Λ«.7 Switch to radio channels by calling up
the channel list with »OK«, press »« (blue), use »V« or »Λ« to select the option »Radio«. Select radio channels with »<« or »>« and confirm with »OK«.
7 Switch back to TV channel lists by calling up the channel lists again with »OK« , press »« (blue), using »V« or »Λ« to select the option »Digital« and confirm with »OK«.
7 To save energy, you can turn off the screen in “Radio mode” (see “ADVANCED SET-TINGS” on page 67).
Selecting stations from listsYou can select stations from various lists, (e.g. ALL, FAV1 - FAV4).1 Press »FAV« to recall the favorite list menu. – »Favorite« menu is displayed.
2 Select the favorite list with »V« or »Λ« and open it with »OK«
3 Select the channel with »<« or »>« and press »OK« to confirm.
4 Press »EXIT« to exit the channel list.
Selecting AV channels1 Open »Input Source« menu with » «.
2 Select the desired AV channel position with »<« or »>« and confirm with »OK«.
3 Use »1…0« to switch back to the television channel.
Note:7 The AV preset descriptions can be changed.
See “Settings” section on page 26.
Adjusting the volume1 Adjust the volume with »– o +«.
Muting1 Use »p« to switch the sound off (mute) and
to switch it on again.
Displaying informationInformation about each television program is shown automatically at every change of chan-nel.1 Display information, press »?« repeatedly. – The display disappears automatically
after a short while.
32 / 116 TRTelevision / User Manual
Audio languageYou can select various languages when watch-ing digital channels. This depends on the pro-gramme being broadcast.1 Press » « to open the selection menu.
2 Select the language with »V« or »Λ« and press »OK« to confirm.
3 Press »EXIT« to end the settings.
SubtitlesYou can select various subtitles when watch-ing digital channels. This depends on the pro-gramme being broadcast.1 Press » « to open the selection menu.
2 Select the language with »V« or »Λ« and press »OK« to confirm.
3 Press »EXIT« to end the settings.
Zap functionThis function allows you to save the television channel which you are currently watching and switch to other channels (zapping).1 Select the channel you want to save in the
zap memory with »1…0« or »P+«, »P-« (for example, channel 1, BBC 1) and save with »BACK <«.
2 Change channels with »1…0« or »Λ« »V«.
3 You can now use »BACK <« to switch between the saved channel (in the example, BBC1) and the channel you were watching before.
4 Press »EXIT« to quit the zap function.
TV OPERATION – BASIC FUNCTIONS ---------------------------------

Television / User Manual33 / 116 TR
TV OPERATION – ADDITIONAL FUNCTIONS ------------
You can find the following settings in the »Tools« menu.
Sleep timerIn the »Sleep Timer« menu you can enter a time for the television to switch off. After this time has elapsed, the television switches to standby mode.1 Open the Tools menu with »TOOLS«.
2 Select the line »Sleep Timer« with »V« or »Λ«.
3 Select the switch-off time with »<« or »>«.
Note:7 Set the function to »Off« with »<« or »>« to
switch it off.4 Press »EXIT« to end the settings.
Zoom functionWith this function, you can enlarge the picture on the television.1 Open the Tools menu with »TOOLS«.
2 Select the line »Zoom« with »V« or »Λ«.
3 Select zoom setting with »<« or »>« and press »OK« to confirm.
– Image is enlarged as center-focused.
4 To navigate in the enlarged picture, press »« (red) and move the screen with »<«, »>«, »V« or »Λ«.
5 To return to the zoom menu, press »BACK <«.
6 Press »EXIT« to end the settings.
Changing the picture formatThe television automatically switches to the 16:9 format if this format is detected via the Euro-AV socket.1 Open the Tools menu with »TOOLS«.
2 Select the line »Picture Format« with »V« or »Λ«.
3 Select the picture format with »<« or »>« and press »OK« to confirm.
4 Press »EXIT« to end the settings.
Note:7 You can choose between the following
picture formats.
»Auto« formatThe picture format is automatically switched to »16:9« for 16:9 programmes.The picture format is automatically switched to »4:3« for 4:3 programmes.
»16:9« and »14:9« formatsDuring programmes in 4:3 format, the picture is stretched horizontally if »16:9« or »14:9« is selected.The picture geometry is stretched horizontally.With actual 16:9 signal sources (from a set-top box on the Euro-AV socket) the picture fills the screen completely and with the correct geometry.
»4:3« formatThe picture is shown in 4:3 format.
»LetterBox« format The letterbox setting is especially suitable for programmes in 16:9.The black borders which are usually at the top and bottom of the screen are eliminated, 4:3 pictures fill the screen.The transmitted pictures are enlarged, but are slightly cropped at the top and bottom. The picture geometry remains unchanged.

34 / 116 TRTelevision / User Manual
TV OPERATION – ADDITIONAL FUNCTIONS ------------
»Subtitle« formatIf you cannot read the subtitles which appear on the bottom of the screen, then select »Subtitle«.
»Panorama« format This setting is suited to films with a large width/height ratio.During programmes in 4:3 format the picture is stretched horizontally if the »Panorama« function is selected. The picture geometry is stretched horizontally.
»Overscan« formatWhen this mode is selected, high defined picture from HDMI and Component inputs is not cropped and it is displayed in its original size.This is only active in HDMI mode and for resolu-tions at or above 720p.
Audio settings1 Open the Tools menu with »TOOLS«.
2 Select the line »Sound Preset« with »V« or »Λ«.
3 Select the audio setting by pressing »<« or »>«.
– You can change the »User« audio setting; see “Equalizer” on page 29.
4 Press »EXIT« to end the settings.
Picture settings1 Open the Tools menu with »TOOLS«.
2 Select the line »Picture Mode« with »V« or »Λ«.
3 Select the picture setting by pressing »<« or »>«.
4 Press »EXIT« to end the settings.

Television / User Manual35 / 116 TR
ELECTRONIC TV GUIDE ---------------------------------------------------------------------------
The electronic programme guide offers an over-view of all programmes that will be broadcast in the next week (for digital stations only).1 Press »GUIDE« to start Electronic TV guide. – A message is displayed.
Notes:7 Not all channels provide a detailed TV
guide.7 Many broadcasters supply the daily pro-
gramme but no detailed descriptions.7 There are broadcasters which do not pro-
vide any information at all.2 Select the push button »Continue« with »V«
and press »OK« to confirm.
– The programmes of the first 5 channels (in the order of the Channel Editor) are displayed.
3 Select the channel with »V« or »Λ«. – Information about the actuel programme is
displayed in the selected television chan-nel.
Note:7 Press »P+« or »P-« to switch between the
channels in increments of 5n.4 Switch to the information about the current
programme using »OK«.
Notes:7 The programme selected can be recorded
(if an external data medium is connected). To do this push »OK« select »Record«. Confirm the display with »OK«.
7 To add the programme selected to the reminder timer push »OK« select the »Set Reminder«. Confirm the display with »OK«.
5 Return to the programme overview with »BACK <«.
6 Press »>« to select information on the next programme and »<« to return to the infor-mation for the current programme.
Note:7 For additional options, refer to the user
guide on the screen. 7 Press »EXIT« to close the channel guide.
Changing the font size of the channel guide 1 To switch to the overview, press »<«, then
press »V« to select »Settings« and confirm with »OK«.
2 Select »Profiles« with »V« or »Λ« and confirm with »OK«.
3 Select »Accessibility« with »V« or »Λ« and press »OK« to confirm.
4 Select the required size with »V« or »Λ« and press »OK« to confirm.
5 Exit the setting by pressing »BACK <« twice.
6 Return to the “programme overview“ by pressing »Λ« to select »TV Listings« and press »OK« to confirm.

36 / 116 TRTelevision / User Manual
HBBTV MODE ------------------------------------------------------------------------------------------------------
What is HbbTV?HbbTV provides next generation interactive tele-text broadcast with its modern structure, content and high definition (HD) image and videos.To receive HbbTV broadcast, your television must be connected to the Internet.This feature is only available in countries where the service is provided.After you switch to a TV station that offers HbbTV, a corresponding message appears.

Television / User Manual37 / 116 TR
Using HbbTVWhen you switch to a TV program that supports HbbTV, an info message will appear stating that HbbTV broadcast is available.1 Press »« (red) to open HbbTV. – Information regarding the services will ap-
pear on the screen. Additionally, colored buttons necessary for browsing the menus will also appear.
Notes:7 The range of subjects and selection of indi-
vidual subjects depend on the programme provider.
7 Numeric buttons »1« through »0« are used for additional functions.
2 Press »« (green), »« (yellow) or »« (blue) or »V«, »Λ«, »<« or »>« and confirm with »OK« to select the desired topic field.
3 Select the option you want with »V«, »Λ«, »<« or »>« in the selected topic field and confirm with »OK«.
4 Press »« (red) to close HbbTV.
Note:7 If the navigation in HbbTV mode does not
work, you can exit the function by pressing »EXIT«.
Additional functions for video indexes1 Start playback with »8«.
2 Pause playback with »!«.
3 Resume playback with »8«.
4 Rewind by »3« forward by »4«.
5 Stop playback with »7«.
HBBTV MODE ------------------------------------------------------------------------------------------------------
Deactivate and activate HbbTVThis option allows turning off Hbb TV feature, thus warnings shall not be displayed on chan-nels with Hbb TV feature.1 Open the menu with »MENU«.
2 Select menu item »Settings« with »V«, »Λ«, »<« or »>« and press »OK« to confirm.
3 Select the menu item »Source« with »>« or »<« and press »V« to confirm.
– »Source« menu is active.
4 Select the line »Advanced« with »V« or »Λ« and press »OK« to confirm.
5 Select the line »Hbb TV« with »V« or »Λ«.
6 Select the option »Off« with »<« or »>«.
Note:7 To activate HbbTV again, select in step. 6
the option »On«.7 Press »EXIT« to end the setting.
Deactivate and activate digital teletextIf you deactivate digital video text, only normal video text can be selected, however the other functions of the interactive service HbbTV are still available.1 Open the menu with »MENU«.
2 Select menu item »Settings« with »V«, »Λ«, »<« or »>« and press »OK« to confirm.
3 Select the menu item »Source« with »>« or »<« and press »V« to confirm.
– »Source« menu is active.
4 Select the line »Advanced« with »V« or »Λ« and press »OK« to confirm.
5 Select the line »Digital Teletext« with »V« or »Λ«.
6 Select the option »Off« with »<« or »>«.
Note:7 To reactivate digital teletext, select »On« in
step 6.7 Press »EXIT« to end the setting.
38 / 116 TRTelevision / User Manual
TOP text or FLOF text modeNote:7 If you only want to use this “normal” video
text, disable the digital video text, see page 37.
1 Press »TXT« to switch to the Teletext mode.
2 You can select teletext pages directly with »1...0« or step by step with »V« or »Λ«.
To return to page 100, press »?«.
Note:7 At the bottom of the screen, you will see an
information line consisting of a red, green and, depending on the channel, yellow and blue text field. Your remote control has but-tons with the corresponding colours.
3 Press »« (red) to scroll one page back.
4 Press »« (green) to scroll one page forward.
5 Press »« (yellow) to select section.
6 Press »« (blue) to select topic.
7 Press »TXT« to exit the Teletext mode.
Normal text mode1 Press »TXT« to switch to the Teletext mode.
2 You can select teletext pages directly with »1...0«.
To return to page 100, press »?«.
3 Press »P-« to scroll one page back.
4 Press »P+« to scroll one page forward.
5 Press »TXT« to exit the Teletext mode.
Additional functionsSkipping the waiting timeWhile a page is being searched for, you can switch to the television channel.
1 Enter the teletext page number with »1…0« and then press »6«.
– As soon as the page is found, the page number is displayed.
2 Press »6« to switch to the teletext page.
Increasing character size1 To enlarge the character size of a teletext
page, press »5« repeatedly.
Page stopA multiple page may contain several sub-pages, which are automatically scrolled by the transmit-ting station.
1 Stop the sub-pages with »3«.
2 Press »3« to quit the function.
Calling up a sub-page directlyIf the selected teletext page contains further pages, the number of the current sub-page as well as the total number of pages is displayed.
1 Call up the sub-page with » «.
2 Press »« (red) or »« (green) to select a sub-page.
3 Press » « to quit the function.
Reveal answerCertain teletext pages contain ”hidden answers” or information which can be called up.1 Display information with »4«.
2 Conceal the information with »4«.
Splitting the screen (Split Screen)With this function you can see the television channel on the left and the teletext page on the right.
1 To activate the split screen function, press »7«.
– Television channel and teletext page ap-pear side by side on the screen.
2 To deactivate the function, press »7«.
TELETEXT MODE ------------------------------------------------------------------------------------------------

Television / User Manual39 / 116 TR
USB RECORDING -------------------------------------------------------------------------------------------
Information on recording and playing television programmes
7 Recording and reproducing programmes, this can only be done with digital television stations (DVB-S, DVB-T and DVB-C).
7 The digital television stations (DVB-S, DVB-T and DVB-C) you are able to record and playback also depend on the broadcasting station.
7 Recording and reproducing programmes, as well as the Time Shift function can only be carried out using an external data medium (hard drive or USB stick).
7 Recordings can be made with most data mediums on the market. However, we can-not guarantee operation for all data media.
7 If you record a programme on an external data medium, you can only watch it on your television.
You cannot watch this programme on any other device.
7 If you send your television to be repaired and hardware components need to be replaced, you might not be able to play the recordings again on the repaired television.
7 Grundig isn't responsible for any loss of data stored on any external storage device.
7 It is recommended to play the files saved on DTV by PVR player. Some recorded files may not play correctly on USB Media Player.
Possible limitations when using an external data mediumDepending on the broadcasting station, you may experience various restrictions on some functions from some television stations.GRUNDIG has no influence on these restrictions.
7 Recording a programme on the external data medium can be disabled by the broadcaster.
If »URI* protected! PVR function blocked« is displayed, then recording or time shift is restricted (one recording possible) or disabled (recording not possible) by the broadcaster.
*URI = user rights information.7 If you record and save a programme on
the archive of an external data medium, playback can be restricted.
The broadcaster can allow you to see this programme one or more times but could also just make it available for a certain period of time.
7 Stations from which children are protected, immediately require a PIN number before recording starts. If this authorisation is not given, the recording may not start.
7 Copying a programme from a digital televi-sion station onto a video or DVD recorder using the SCART/S-VHS/COMPONENT socket (analog audio/video signal) can also be restricted by the broadcaster. In order to do this, your device must support the copying function.

40 / 116 TRTelevision / User Manual
USB RECORDING -------------------------------------------------------------------------------------------
Connecting external data mediaNotes:7 It is advised to put the television on stand-by
mode before connecting the Skype camera. 7 Before disconnecting the external data me-
dium, the television must first be switched to standby, otherwise files can be damaged.
1 Plug the external hard disk to the USB(HDD) USB interface of the television;
Notes:7 If you are using a power cable for the
external hard disk that you have connected to the USB(HDD) USB interface, then the power cable of the external hard disk must also be unplugged when the TV is turned off.
7 You must not disconnect the USB Device from the TV while a file on the USB Device is being read by the TV.

Television / User Manual41 / 116 TR
USB recording settings
Selecting the menu1 Open the menu with »MENU«.
2 Select the menu item »Records« with »V«, »Λ«, »<« or »>« and press »OK« to confirm.
– »Media Player« menu is displayed.
3 Select the line »PVR« with »V« or »Λ« and press »OK« to confirm.
– The content is displayed.
4 Open the Media Options menu with press »TOOLS«.
Media Player > PVR
Channel_1_201548_154649.ts
Tuesdayxx xxx xxxx
BackBACK
View Mode Auto Fit
Auto Preview On
Slide Show Interval 5
Disk Management
Media Options
5 Select the line »Disk Management« with »V« or »Λ« and press »OK« to confirm.
Note:7 Additional operations are explained in the
following sections.
Disconnecting external data media1 In the »Disk Management« menu select
the line »Safely Remove Disk« with »V« or »Λ« and press »OK« to confirm.
Note:7 Disk can be safely removed from the socket
now.
USB RECORDING -------------------------------------------------------------------------------------------
Selecting external data mediaIf there are more than one external data media connected to the television, then select one of them.
1 In the »Disk Management« menu select the line »Disk« with »V« or »Λ« and press »OK« to confirm.
2 Select the external data media with »V« or »Λ«.
3 Switch back with »BACK <« or press »EXIT« to end the setting.
Selecting a partition on the external mediaIf there are more than one partitions on the external data media, select one of them.
1 In the »Disk Management« menu select the line »Partition« with »V« or »Λ« and press »OK« to confirm.
2 Select the desired partition with »V« or »Λ«.
3 Switch back with »BACK <« or press »EXIT« to end the setting.
Testing external data mediaYou can test the external data media to see if it is suitable for the required functions.
1 In the »Disk Management« menu select the line »Disk« with »V« or »Λ«. If there are more then one external data media, select the desired data media with »V« or »Λ«.
2 Select the line »Partition« with »V« or »Λ«. If there are more then one partitions, select the desired partition with »V« or »Λ«.
3 Select the line »Check Disk« with »V« or »Λ« and press »OK« to confirm
– Disk information is displayed.
4 Switch back with »BACK <« or press »EXIT« to end the setting.
42 / 116 TRTelevision / User Manual
USB RECORDING -------------------------------------------------------------------------------------------
Formatting the partition1 In the »Disk Management« menu select the
line »Format Partition« with »V« or »Λ« and press »OK« to confirm.
2 Select push button »Yes« with »<« or »>« to confirm the security query;
or
select push button »No« with »<« or »>« to to cancel the function.
3 Switch back with »BACK <« press »EXIT« to end the setting.
Time shift – ″ Pausing” programmesYou can pause any program you are watch-ing. This is a useful function. For instance, if the phone rings when you are watching a movie, you can pause the movie and resume it after the call without missing nothing.The last scene that was frozen is displayed and time shift is recorded into the external data media.In Time Shift mode, you can only record as much as the free memory space on the external data media.You can record current broadcast for approxi-mately 60 minutes.
Note:7 For undisturbed “Permanent Timeshift” use
an external USB hard disk.1 Press »!« during the broadcast. – Television picture is paused and delay
time is displayed.
2 To resume the broadcast, press »8«. – The system continues recording the broad-
cast while you are watching it.
Note:7 Following functions can be used in time shift
mode. – Fast rewind, press »3« several times for
the desired speed; – Fast forward, press »4« several times for
the desired speed; – To pause press »!«.
3 Press »7« to exit the Time Shift function. – The message »Live Broadcast« appears. – The scenes in the “time shift memory” are
deleted.
Television / User Manual43 / 116 TR
Recording programmesYou can record the programmes. Programmes are recorded onto the external data media and the archive is managed via television.A memory of 44 MB up to 110 MB is required for a 1 minute record. Other recordings in the archive can be watched while a programme is being recorded.It is possible to shift channels during recording between unscrambled channels on the same frequency (DVB-T/C) or on the same transpon-der (DVB-S).When switched to channels other than (Terres-trial, Cable, Satellite and USB) during record-ing, the recording process is stopped.
One-touch programme record-ing1 Select the channel with »1…0« or »P+«,
»P–« and press » « to start the record-ing.
– Recording information is displayed: Recording symbol, channel name, pro-gramme time and recording time.
– This information will disappear shortly.
2 To end the recording, press »7«.
3 Select push button »Yes« with »<« or »>« to confirm the security query;
or
select push button »No« with »<« or »>« to to continue the recording.
Notes:7 When recording is complete, it will auto-
matically be stored on the external data media.
7 If you remove the external data media during recording, then the recording is cancelled automatically and no data is recorded onto the external data media.
Recording a programme from the channel list1 Press »OK« to open the channel list.
2 Select a channel with »<« or »>« and press »OK« to confirm.
3 Press »EXIT« to exit from the channel list.
4 Press » « to start recording. – Recording information is displayed:
Recording symbol, channel name, pro-gramme time and recording time.
– These information will disappear after a short while. Recording symbol and record-ing time will appear on the lower right corner of the screen.
5 To end the recording, press »7«.
6 Select push button »Yes« with »<« or »>« to confirm the security query;
or
select push button »No« with »<« or »>« to continue the recording.
USB RECORDING -------------------------------------------------------------------------------------------

44 / 116 TRTelevision / User Manual
USB RECORDING -------------------------------------------------------------------------------------------
Programme setting for record-ing... with electronic programme guideElectronic programme guide data can be used for recording.25 EPG reminder and/or recorder can be set in total.
1 Press »GUIDE« to open the electronic programme guide.
2 Select the preferred TV program with »V« or »Λ«.
– Information about the actual TV program is displayed.
3 Press »<« or »>« to select the TV program you want to record.
4 To add broadcasts to the timer press »OK«. – Information for the TV program to be
recorded will be displayed.
5 Select the line »Record« with »>« and press »OK« to confirm.
– Recording data range appears.
6 Press »OK« to confirm.
7 Press »EXIT« to end the menu.
Note:7 If the data for the recording is to be
changed, open menu with »MENU«. Select the menu item »Schedule List« with »V«, »Λ«, »<« or »>« and confirm with »OK«. Press »« (green), change the data and and save it with »« (blue).
Notes:7 A warning is displayed before the timer
recording starts and counts down for 10 sec-onds to allow you to switch to the channel. At the end of 10 seconds, the channel to be recorded appears automatically.
7 If the timer recording starts during play-back, playback stops. If you do not select »Yes« in the warning prompt, recording will start automatically at the end of the countdown.
7 Only for UPC customers Note: Parts of previous or next files can be included into the record while the programme is being recorded resulting from possible Programme Guide errors. In such cases, keep in mind that the highest family protection level will apply for the whole recording if one or more of those programmes have any level of fam-ily protection.
Set the lead/follow-up timeWith this function you can change the recording time set by the electronic TV guide.If you think that a program will start a few min-utes earlier or will end several minutes later, you can „add“ up to 60 minutes to this time1 Open the menu with »MENU«.
2 Select the menu item »Schedule List« with »V«, »Λ«, »<« or »>« and press »OK« to confirm.
3 Activade the »Padding Time« menu with »« (blue).
4 Change the start time with »<« or »>«.
5 Use »V« to switch to the line »End« and change the end time with »<« or »>«.
6 Select push button »Save« with »V« and press »OK« to confirm.
7 Press »EXIT« to end the menu.
Television / User Manual45 / 116 TR
... by entering the information manu-ally25 TV programmes can be preset for the timer recording or as a reminder.1 Press »GUIDE« to open the electronic
programme guide.
2 Press »<« to display the top menu. – »TV Listing« option is marked.
3 Select the line »Set Recording« with »V« or »Λ« and press »OK« to confirm.
– »Set Recording« menu is displayed, »Channel« is marked.
Note:7 If you want to use the reminder function,
select the line »Set Reminder«.4 Press »OK«, select the channel you want to
record with »V« or »Λ« and press »OK« to confirm. To pass to the next item press »V«.
5 Press »OK«, select the date you want to record with »V« or »Λ« and press »OK« to confirm. To pass to the next item press »V«.
6 Press »OK«, enter starting time with »V« or »Λ« and press »OK« to confirm. To pass to the next item press »>«.
7 Press »OK«, enter starting time with »V« or »Λ« and press »OK« to confirm. To pass to the next item press »V«.
8 Press »OK«, select »Mode« (»Once«, »Ev-ery Day« or »Weekly«) with »V« or »Λ« and press »OK« to confirm.
9 Select »Save Recording« with »V« and confirm with »OK«.
– Recording time range appears.
10 Press »OK« to confirm. – Recording timer is programmed.
11 Press »EXIT« to end the menu.
USB RECORDING -------------------------------------------------------------------------------------------
Notes:7 A warning is displayed before the timer
recording starts and counts down for 10 sec-onds to allow you to switch to the channel. At the end of 10 seconds, the channel to be recorded appears automatically.
7 If the timer recording starts during play-back, playback stops. If you do not select »Yes« in the warning prompt, recording will start automatically at the end of the countdown.
Editing the timer1 Open the menu with »MENU«.
2 Select the menu item »Schedule List« with »V«, »Λ«, »<« or »>« and press »OK« to confirm.
3 Select the title of the programme to be changed with »V« or »Λ« and press »« (green) to edit the title.
4 With »V« or »Λ« select the items you want to edit and modify them with »1…0« and »<« or »>«.
5 To save the modification, press »« (blue).
– Timer is changed.
6 Press »EXIT« to end the setting.
Deleting a timer1 Open the menu with »MENU«.
2 Select the menu item »Schedule List« with »V«, »Λ«, »<« or »>« and press »OK« to confirm.
3 Select the title of the programme to be deleted with »V« or »Λ« and and delete the timer with »« (yellow).
4 Select push button »Yes« with »<« or »>« to confirm the security query;
or
select push button »Cancel« with »<« or »>« to cancel deletion process.
5 Press »EXIT« to end the setting.

46 / 116 TRTelevision / User Manual
USB RECORDING -------------------------------------------------------------------------------------------
PlaybackEither started manually or with the timer func-tion, the recorded programmes are all stored in the external data media. You can display an ar-chive on an external data media from »Records« – »Media Player« menu.
Selecting a broadcast from the recorded files list1 Open the menu with »MENU«.
2 Select the menu item »Records« with »V«, »Λ«, »<« or »>« and press »OK« to confirm.
– »Media Player« menu is displayed.
3 Select the option »PVR« with »V« or »Λ« and press »OK« to confirm.
– Recorded files are displayed.
4 Select the broadcast you want to play with »V« or »Λ« and start playback with »8«.
5 Press »7« to end playback. – TV returns to media player menu.
Forward/reverse picture search1 Press »4« repeatedly to select the playback
speed (2x, 4x, 8x, 16x or 32x);
or
press »3« repeatedly to select the play-back speed (2x, 4x, 8x, 16x or 32x).
Playback during a recordingYou can either watch the current programme that is being recorded or a previously recorded programme while recording takes place.1 Select the channel with »1…0« or »P+«,
»P–« and press » « to start the record-ing.
2 To display PVR content press »« (red) button.
3 Select the programme you want to watch with »V« or »Λ« and start playback with »8«.
4 Press »7« to stop playback.
5 Press »7« to stop recording.
6 Select push button »OK« with »<« or »>« to confirm the security query;
or
select push button »Cancel« with »<« or »>« to cancel deletion process.
Deleting programmes from the recorded files menuYou can delete recorded programmes from the Recorded Files list.1 Open the menu with »MENU«.
2 Select the menu item »Records« with »V«, »Λ«, »<« or »>« and press »OK« to confirm.
– »Media Player« menu is displayed.
3 Select the option »PVR« with »V« or »Λ« and press »OK« to confirm.
– Recorded files are displayed.
4 Select the broadcasts to be deleted with »<« or »>«.
5 »To delete the broadcast, press »« (red).
6 Select push button »OK« with »<« or »>« to confirm the security query;
or
select push button »Cancel« with »<« or »>« to cancel deletion process.
Note:7 Files that are being recorded or played
back can not be deleted from the »Record-ed Files« menu.
7 Press »EXIT« to end the menu.

Television / User Manual47 / 116 TR
USB OPERATION --------------------------------------------------------------------------------------------
File formats for USB operatingYour television can be operated via the USB input with the following file formats:
Video dataSpecial codecs for video compression and decompression provide more memory space without compromising the picture quality exces-sively.Your television plays video files in the formats XVID, H.264/MPEG-4 AVC (L4.1, 4 reference pictures), MPEG-4, MPEG-2, MPEG-1, MJPEG and MOV.The following file name extensions are also supported: “.avi”, “mkv”, “.mp4”, “.ts”, “.mov”, “.mpg”, “.dat”, “.vob”,”.divx”. In addition to video data, these files also contain audio data compressed and "packaged" by using MP3, AAC or Dolby Digital.Format (codec) information is embedded within the file content and may differ depending on the file extension. “.avi”, “.mkv” or “.divx” files con-taining divx codec within are not playbacked.
Image dataYour television can display picture data in JPEG, PNG and BMP formats.JPEG stands for Joint Picture Experts Group. This process is intended to compress picture files.PNG and BMP standards are intended to com-press picture data without loss.Picture files can be saved in a data storage medium together with other file types.Such files can be organized as folders and subfolders.
Audio dataYour television can play audio data coded with MP3, AAC standards. MP3 stands for MPEG-1 Volume Level 3 and is based on the MPEG-1 standard developed by MPEG (Motion Picture Expert Group).AAC indicates the Advanced Audio Coding and is developed by MPEG. AAC provides higher audio quality with the same data rate (bit rate).WMA (Windows Media Audio) is a compres-sion standard developed by Microsoft for audio data.These formats enable audio files to be saved on storage devices with a sound quality similar to that of a CD.File extensions supported by your device: “.mp3”, “.mp2”, “.wma”, “.m4a”, “.aac”, ".wav"MP3 files can be organised into folders and subfolders similar to the files on a computer.
For DTS patents, see http://patents.dts.com. Manufac-tured under license from DTS Licensing Limited. DTS, the Symbol, & DTS and the Symbol together are registered trademarks, and DTS 2.0+Digital Out is a trademark of DTS, Inc. © DTS, Inc. All Rights Reserved.

48 / 116 TRTelevision / User Manual
USB OPERATION --------------------------------------------------------------------------------------------
Connecting external data mediaIt is advised to put the television on stand-by mode with »8« before connecting the external data medium. Connect the device and then switch the television on again. Before disconnecting the data medium, the television must first be switched to standby, otherwise files can be damaged.
Notes:7 You must not disconnect the USB Device
from the TV while a file on the USB Device is being read by the TV.
7 A bi-directional data transfer as defined for ITE (Information Technology Equipment) devices in EN 55022/EN 55024 is not possible.
7 USB transfer is not an operating mode in itself. It is only an additional function.
1 Connect the USB(HDD) USB interface on the television and the related data output on the external device (external hard disk, digital camera, card reader or MP3 player) with a USB cable;
Removing the external data mediaBefore removing the external data medium, log off the data medium.1 Open the menu with »MENU«.
2 Select the menu item »Media Center« with »V«, »Λ«, »<« or »>« and press »OK« to confirm.
– »Media Player« menu is displayed.
3 Select the name of the data medium with »V« or »Λ« and press »OK« to confirm.
4 Select the »Media Options« with »TOOLS«.
5 Select the line »Disk Management« with »V« or »Λ« and press »OK« to confirm.
6 Select the line »Safely Remove Disk« with »V« or »Λ« and press »OK« to confirm.
7 Remove the data medium from the socket.
8 Press »EXIT« to end the setting.

Television / User Manual49 / 116 TR
The file browser The file browser displays the video, audio and picture data that the external data medium provides.If a data medium contains different file formats, you can deactivate data (Video file, Audio file, Picture file) you do not need for the playback using a filter function.
The main menu of the file browser
Media Player > DISK1
Moive
Music
Photo
Moive.avi
Movie.str
Music.mp3
Picture.jpg
Tuesdayxx xxx xxxx
BackBACKTOOLS
All Movie Music Photo
Select All Media Options Filter TypeNavigation Between ItemsPlay
4 5
123
1 Preview.
2 Data type.
3 Name of the data medium.
4 Folders on the data medium.
5 Menu navigation.
USB OPERATION --------------------------------------------------------------------------------------------
Settings in the USB setup menuSelecting the menu1 Open the menu with »MENU«.
2 Select the menu item »Media Center« with »V«, »Λ«, »<« or »>« and press »OK« to confirm.
3 Select the name of the data medium with »V« or »Λ« and press »OK« to confirm.
4 Select the »Media Options« with »TOOLS«.
Note:7 Additional operations are explained in the
following sections.
Selecting the display mode1 Select the line »View Mode« with »V« or
»Λ«.
2 Press »<« or »>« to select the function.
3 Press »EXIT« to end the setting.
Switching to automatic previewIf the automatic preview is switched on, you can see the selected file in the main menu of the file browser.1 Select the line »Auto Preview« with »V« or
»Λ«.
2 Press »<« or »>« to switch the function »On«.
3 Press »EXIT« to end the setting.

50 / 116 TRTelevision / User Manual
USB OPERATION --------------------------------------------------------------------------------------------
Selecting the display duration of the slide show1 Select the line »Slide Show Interval« with
»V« or »Λ«.
2 Select the time (3, 5, 10 seconds) with »<« or »>«.
3 Press »EXIT« to end the setting.
Subtitle settingsIf the film has subtitles, you can turn on and off this subtitle, change its size or colour.1 Use »V« or »Λ« to select »Subtitle Auto Se-
lection«, »Subtitle Size« or »Subtitle Color«.
2 Adjust with »<« or »>«.
3 Press »EXIT« to end the setting.
Note:7 These adjustments can only be made for
external subtitle files. These adjustments cannot be made in subtitles combined with the movie.

Television / User Manual51 / 116 TR
Playback basic functions 1 Open the menu with »MENU«.
2 Select the menu item »Media Center« with »V«, »Λ«, »<« or »>« and press »OK« to confirm.
– »Media Player« menu is displayed.
Note:7 If the content of the external data medium
is not displayed, press »« (yellow) to refresh.
3 Select the name of the data medium »V« or »Λ« and press »OK« to confirm.
– Media Player menu of the selected exter-nal data medium is displayed.
4 Select the desired type (All, Movie, Music or Photo) with »<« or »>« and press »OK« to confirm.
5 Select the folder with »V« or »Λ« and press »OK« to open it.
– A list of sub-directories appears.
Note:7 Go back to the previous folder with
»BACK <«.6 Select the track or picture with »V« or »Λ«,
and press »8« to start playing.
Notes:7 When playing picture data, press »?« to
view information about the resolution and the size.
7 For playing MP3 or WMA data, informa-tion on the album, track and singer is displayed at the left of the menu.
7 When playing picture data, press »?« to switch on a control panel.
7 Press »!« to pause playback.
8 To resume playback press »8«.
9 Press »7« to end playback. – The file browser appears.
USB OPERATION --------------------------------------------------------------------------------------------
Notes:7 Use »BACK <« when you would like to
return to the last folder. 7 It is possible that some files that are sup-
ported in USB mode do not operate due to some problems that may arise depending on how such files are created (compression) although they contain the supported file extension.
7 If there are more then one audio sources (audio stream) in the video files that are being played, then you can switch between the audio sources with the » « while the file is played in full screen mode.
7 Movies you will be watching from the movie file only supports subtitles with .srt, .sub, .ass, .ssa, .smi format. Names of the subtitle and movie files must be the same. Other-wise, subtitle can not be displayed.

52 / 116 TRTelevision / User Manual
Additional playback functionsDepending on the file formats used, the follow-ing additional functions are possible.
Selecting partition on HD files(only supported video files)1 During playback, select the next chapter
with »>«.
2 During playback, select the previous chap-ter with »<«.
Selecting titles on HD files(only supported video files)1 During playback, select the next title with
»Λ«.
2 During playback, select the previous title with »V«.
Playing selected tracksOnly play the marked tracks.1 Select the track you want with »V« or »Λ«
and highlight with »« (yellow).
2 Select the track you want with »V« or »Λ« and highlight with »« (yellow).
3 Start playback with »8«.
4 Press »7« to end playback.
Note:7 To remove the highlighting, select the track
with »V« or »Λ« and remove the marking with »« (yellow).
Selecting a track or picture in steps (SKIP)1 During playback, select the next track/pic-
ture you want with »6«.
2 Select the previous track/picture with »5«. – Playback begins with the track or picture
you selected.
USB OPERATION --------------------------------------------------------------------------------------------
Move to desired time(only video files)1 Press »OK« during playback.
2 Enter the time that you want to move to with »1...0« and confirm with »OK«.
Searching forward(only video and audio files)You can select different speeds (2-fold, 4-fold, 8-fold, 16-fold and 32-fold forwards and back-wards).1 During playback you can select playback
speed by pressing »3« or »4«.
2 To resume playback press »8«.
Turn the picture display (only picture files)The pictures can be rotated by 90°.1 During playback, switch on the control
panel with »OK«.
2 Use »<« or »>« to select » « and press »OK«.
– The picture rotates 90° clockwise.
Repeat functions Options: – »One«, the selected track is repeated
once; – »Sequence«, selected tracks are repeated
consecutively; – »Random«, selected tracks are repeated
in a mixed order; – »None«, repetition off.
1 Press »8« to start playback.
2 During playback, switch on the control panel with »OK«.
3 Select » « with »<« or »>« and press »OK« repeatedly.
– The repeat function will change.
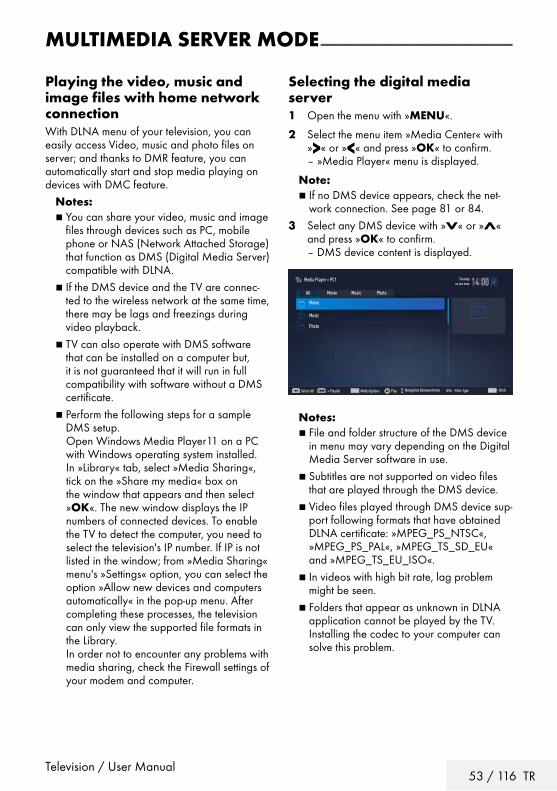
Television / User Manual53 / 116 TR
MULTIMEDIA SERVER MODE -----------------------------------------------------------
Playing the video, music and image files with home network connectionWith DLNA menu of your television, you can easily access Video, music and photo files on server; and thanks to DMR feature, you can automatically start and stop media playing on devices with DMC feature.
Notes:7 You can share your video, music and image
files through devices such as PC, mobile phone or NAS (Network Attached Storage) that function as DMS (Digital Media Server) compatible with DLNA.
7 If the DMS device and the TV are connec-ted to the wireless network at the same time, there may be lags and freezings during video playback.
7 TV can also operate with DMS software that can be installed on a computer but, it is not guaranteed that it will run in full compatibility with software without a DMS certificate.
7 Perform the following steps for a sample DMS setup.
Open Windows Media Player11 on a PC with Windows operating system installed. In »Library« tab, select »Media Sharing«, tick on the »Share my media« box on the window that appears and then select »OK«. The new window displays the IP numbers of connected devices. To enable the TV to detect the computer, you need to select the television's IP number. If IP is not listed in the window; from »Media Sharing« menu's »Settings« option, you can select the option »Allow new devices and computers automatically« in the pop-up menu. After completing these processes, the television can only view the supported file formats in the Library.
In order not to encounter any problems with media sharing, check the Firewall settings of your modem and computer.
Selecting the digital media server1 Open the menu with »MENU«.
2 Select the menu item »Media Center« with »>« or »<« and press »OK« to confirm.
– »Media Player« menu is displayed.
Note:7 If no DMS device appears, check the net-
work connection. See page 81 or 84.3 Select any DMS device with »V« or »Λ«
and press »OK« to confirm. – DMS device content is displayed.
Media Player > PC1
Moive
Music
Photo
Tuesdayxx xxx xxxx
BackBACKTOOLS
All Movie Music Photo
Select All + Playlist Media Options Filter TypeNavigation Between ItemsPlay
Notes:7 File and folder structure of the DMS device
in menu may vary depending on the Digital Media Server software in use.
7 Subtitles are not supported on video files that are played through the DMS device.
7 Video files played through DMS device sup-port following formats that have obtained DLNA certificate: »MPEG_PS_NTSC«, »MPEG_PS_PAL«, »MPEG_TS_SD_EU« and »MPEG_TS_EU_ISO«.
7 In videos with high bit rate, lag problem might be seen.
7 Folders that appear as unknown in DLNA application cannot be played by the TV. Installing the codec to your computer can solve this problem.

54 / 116 TRTelevision / User Manual
7 Audio files played through DMS device sup-port following formats that have obtained DLNA certificate: »AAC_ADTS_320«, »LPCM«, »MP3«, »WMABASE« and »WMAFULL«.
7 Image files played through DMS device support following formats that have obtained DLNA certificate: »JPEG_LRG«, »JPEG_MED« and »JPEG_SM«.
MULTIMEDIA SERVER MODE -----------------------------------------------------------
Playback1 Select the content folder on DMS device
with »V« or »Λ« and press »OK«. – All titles are displayed. to confirm.
2 Select the desired title with »V« or »Λ«.
3 Press »8« to start playback.
Other playback options1 Press »!« to pause playback.
2 To resume playback press »8«.
3 Press »5« or »6« until you reach the desired file.
4 Press »7« to stop playback.
5 Switch back to the content with »BACK <«.
6 To exit DLNA feature press »EXIT«.
7 Select push button »Yes« with »<« or »>« to confirm the security query;
or
select push button »No« with »<« or »>« to cancel deletion process.
Note:7 Also, you can select following playing func-
tions from the menu: – » « select repeat functions; – »5« select previous title; – »3« picture searche previous; – »8« starts playing; – »!« pauses playing; – »7« stops playing; – »4« picture searche next; – »6« select next title.

Television / User Manual55 / 116 TR
APLICATION CENTER ---------------------------------------------------------------------------------
Terms & Conditions and Confidentiality
Agreements of Terms & Condi-tions and ConfidentialityAgreements of Terms & Conditions and Confi-dentiality are agreements you must accept to use all functions of Smart [email protected] Agreements of Terms & Conditions and Con-fidentiality are accepted, all functions of Smart Inter@ctive can be used and the necessary data about the use of TV are collected.If Agreements of Terms & Conditions and Confi-dentiality are not accepted, Application Portal, Software Update via Internet, Applications and Web Browser of Smart Inter@ctive cannot be accessed; no data about the use of TV are col-lected; DLNA and LiveShare functions can be used.
First run and operationsAfter you have turned the TV on, “Information” page will be displayed when the TV has con-nected to the internet for the first time. On this page, you will be informed that you need to read and accept the Terms & Conditions and Confidentiality content to use Smart Inter@active functions. Here, you must select “Next”. 7 If you exit this page (with the Exit button on
the remote controller of by turning the TV off) without selecting “Next”, the “Information Page” will be displayed again when the TV is turned on and connected to the internet the next time. The reason is that the Agreements of Terms & Conditions and Confidentiality have not been read and accepted.
7 If you select Next, you will be directed to a page where you can read the Terms & Condi-tions and Confidentiality content.
7 The user can see the content of Terms & Conditions and Confidentiality. There are two options for both contents: “Accept” and “Decline”. You cannot accept or decline indi-vidually.
7 If you select “Accept” you can continue to use the TV.
7 If you select “Decline”: 7 The “Information Page” will be displayed
again when the TV is turned on and con-nected to the internet the next time and the same steps will apply.
If the content of the Terms & Conditions and Confidentiality has been updated, the “Informa-tion” page will be displayed when the TV has been turned on and connected to the internet for the first time after this update. On this page, you will be informed that the content of the Terms & Conditions and Confidentiality has been updated. Additionally, you will be expected to read and accept the content of the new Terms & Conditions and Confidentiality. Here, you need to select Next, and the next steps will be as men-tioned above.
Displaying the Terms & Condi-tions and Confidentiality content accepted by the user and remov-ing the acceptanceYou can reread the Terms & Conditions and Confidentiality content you have already ac-cepted and you can even remove your accep-tance. To do this: 7 Go to the Settings page of the Application
Portal or to the Settings of the TV menu to ac-cess the Terms & Conditions and Confidential-ity agreements you have accepted.
7 Here, the most recent accepted versions of the Terms & Conditions and Confidentiality are displayed.
7 You can read the latest version of the Terms & Conditions and Confidentiality content you have accepted and see “Remove Ac-ceptance” option. If you select “Remove Ac-ceptance”:7 The “Information Page” will be displayed
again when the TV is turned on and con-nected to the internet the next time and the same steps will apply.

56 / 116 TRTelevision / User Manual
APLICATION CENTER ---------------------------------------------------------------------------------
SMART inter@ctive TV internet applicationsSMART Inter@ctive TV interactive applications provide your television with Internet services and pages. These applications are designed according to your television.With SMART inter@ctive TV, you can run many local and global internet applications. These ap-plications include various types such as video, picture, music, game, social networking applica-tions, news and sports applications, weather forecast applications.
Notes:7 Availability of SMART inter@ctive TV inter@
ctive applications may vary depending on the country.
7 SMART inter@ctive TV cannot download or save files permanently, cannot upload files to a website or cannot install add-ins except Login pages of some applications.
7 Grundig is not responsible for the content and the quality of content offered by con-tent providers.
7 Local and global internet applications pro-vided through your SMART Inter@ctive TV come with your TV within the framework of special limited duration agreements entered into with the application owners. Applica-tion owners may update, modify, restrict or entirely remove those applications with their own decision. Grundig cannot be held responsible for such changes.
7 Grundig reserves the right to make all changes such as modifications, restric-tions, extensions, transfers and removals on internet applications provided through your SMART inter@ctive TV.
7 In Login process of some applications, it may be required to connect to the web page of the related application. Subject web pages may contain links not related to Login process. When connecting those links, TV may access open web and view contents that are not supported by your TV. As you are on open web, your TV cannot control those unsupported contents or can-not be held responsible for them.
USB keyboard and mouseYou may connect a keyboard or mouse to both sockets USB(HDD) to use in the Web browser. Keyboards and mice requiring special drive are not supported
Getting Started with Smart In-ter@ctive TV1 Open the menu with »MENU«.
2 Select menu item »Applications Center« with »<« or »>« and press »OK« to confirm.
– »Application Portal« menu will be dis-played.
Notes:7 If you press »@« when no menu is open,
you can access »Application Portal« menu.7 If you attempt to start Inter@ctive applica-
tions without a cable or wireless adapter connected, the related warning is displayed on the screen. If your cable or wireless adapter is connected but you cannot receive IP or internet is not connected, the Inter@ctive applications cannot be started. In this case, check Network connection set-tings. See page 87 or 90.

Television / User Manual57 / 116 TR
APLICATION CENTER ---------------------------------------------------------------------------------
Selecting internet applications1 Select »Application Store« from the menu or
press »@«. – Application Portal will be displayed.
Smart Inter@ctive TV
Navigation Select Settings Exit
Featured
Most Popular
New Applications
abc...
abc...
abc...
abc...
abc...
abc...
abc...
abc...
abc...
abc...
abc...
abc...
abc...
abc...
abc...
abc...
abc...
abc...
abc...
abc...
abc...
abc...
abc...
abc...
Enter search key All ApplicationsFavorites
2 Select the required application with »V«, »Λ«, »<« and »>« and press »OK« to confirm.
– Main menu of the application will be displayed after a short while.
Notes:7 When you attempt to start any application
without a cable or wireless network connec-tion, the related warning is displayed on the screen.
7 Applications will not start if you do not have internet access or cannot obtain IP even if your cable is connected to TV or you are connected to a wireless network. In this case, check Network connection settings. See page 87 or 90.
Displaying all applicationsApplications displayed on SMART inter@ctive TV home page are just a few of the application that can run on the television. You can display and select other applications in »All Applica-tions«.1 Select »Application Store« from the menu or
press »@«. – Application Portal will be displayed.
2 Select »All Applications« with »V«, »Λ«, »<« or »>« and press »OK« to confirm.
– »All Applications« menu will be displayed.
Adding applications to favoritesYou can add frequently used applications to your favorites and collect these under »Favor-ites«.1 Use »V«, »Λ«, »<« or »>« to select the ap-
plication you want to add to your favorites and press »FAV«.
– The application you have selected will be added to your favorites.
Note:7 To remove an application from favorites,
press »FAV«.

58 / 116 TRTelevision / User Manual
APLICATION CENTER ---------------------------------------------------------------------------------
Application Portal Main Screen1 Applications.
2 All Applications.
3 Favorites
4 Search bar.
5 Exit.
Navigation on the application portal main screen1 On the application portal’s home page,
select the required application with »V«, »Λ«, »<« and »>« and press »OK« to confirm.
– Main menu of the application will be displayed after a short while.
2 Usage of application mostly depends on application’s own structure. Follow the notes on the screen.
Note:7 On the Settings menu, you can change the
country of the application portal and make the applications of the selected country ap-pear on »All Applications« page
Smart Inter@ctive TV
Navigation Select Settings Exit
Featured
Most Popular
New Applications
abc...
abc...
abc...
abc...
abc...
abc...
abc...
abc...
abc...
abc...
abc...
abc...
abc...
abc...
abc...
abc...
abc...
abc...
abc...
abc...
abc...
abc...
abc...
abc...
Enter search key All ApplicationsFavorites 1 2
5
3 4

Television / User Manual59 / 116 TR
WEB BROWSER -------------------------------------------------------------------------------------------------
Web browser menu
1 Menu controls.
2 Active tab.
3 Previous page.
4 Next page.
5 Refresh.
6 New tab.
7 Address bar.
8 Search in site.
9 Favorites.
10 Home page
11 Settings
12 History.
13 Search in Web.
14 Zoom.
15 Close Web browser.
16 Close tab.
Zoom Out Zoom In Page Up Page Down Navigation Process Menu Tool Bar
2
1
3 4 5 7 8 9 10 11 12 13 14 156
16
Web browser applicationsWeb browser allows you to navigate in the Internet.1 Open the menu with »MENU«.
2 Select the menu item »Web Browser« with »V«, »Λ«, »<« or »>« and press »OK« to confirm.
– Web Browser is displayed.
3 Select URL entry area with »Λ« or »V« and press »OK« to confirm.
– Virtual keyboard will be displayed.
4 Enter the address and confirm with »OK«.
Notes:7 Other functions are explained on the
screen.7 You may connect a keyboard or mouse
to sockets USB(HDD) to use in the Web browser. Keyboards requiring special driver are not supported.
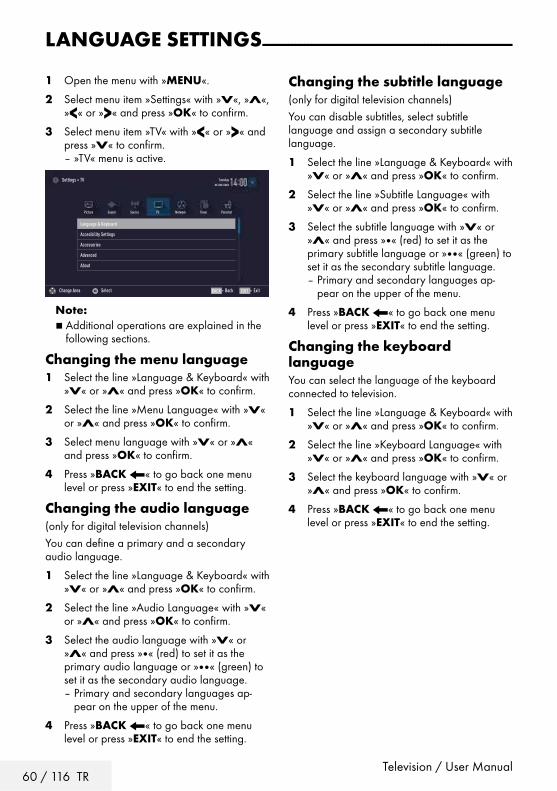
60 / 116 TRTelevision / User Manual
LANGUAGE SETTINGS -----------------------------------------------------------------------------
1 Open the menu with »MENU«.
2 Select menu item »Settings« with »V«, »Λ«, »<« or »>« and press »OK« to confirm.
3 Select menu item »TV« with »<« or »>« and press »V« to confirm.
– »TV« menu is active.
Language & Keyboard
Accesibility Settings
Accessories
Advanced
About
Picture
Tuesdayxx xxx xxxx
Source TimerSound NetworkTV Parental
Settings > TV
Change Area Select ExitBackBACK EXIT
Note:7 Additional operations are explained in the
following sections.
Changing the menu language1 Select the line »Language & Keyboard« with
»V« or »Λ« and press »OK« to confirm.
2 Select the line »Menu Language« with »V« or »Λ« and press »OK« to confirm.
3 Select menu language with »V« or »Λ« and press »OK« to confirm.
4 Press »BACK <« to go back one menu level or press »EXIT« to end the setting.
Changing the audio language(only for digital television channels)You can define a primary and a secondary audio language.
1 Select the line »Language & Keyboard« with »V« or »Λ« and press »OK« to confirm.
2 Select the line »Audio Language« with »V« or »Λ« and press »OK« to confirm.
3 Select the audio language with »V« or »Λ« and press »« (red) to set it as the primary audio language or »« (green) to set it as the secondary audio language.
– Primary and secondary languages ap-pear on the upper of the menu.
4 Press »BACK <« to go back one menu level or press »EXIT« to end the setting.
Changing the subtitle language(only for digital television channels)You can disable subtitles, select subtitle language and assign a secondary subtitle language.
1 Select the line »Language & Keyboard« with »V« or »Λ« and press »OK« to confirm.
2 Select the line »Subtitle Language« with »V« or »Λ« and press »OK« to confirm.
3 Select the subtitle language with »V« or »Λ« and press »« (red) to set it as the primary subtitle language or »« (green) to set it as the secondary subtitle language.
– Primary and secondary languages ap-pear on the upper of the menu.
4 Press »BACK <« to go back one menu level or press »EXIT« to end the setting.
Changing the keyboard languageYou can select the language of the keyboard connected to television.
1 Select the line »Language & Keyboard« with »V« or »Λ« and press »OK« to confirm.
2 Select the line »Keyboard Language« with »V« or »Λ« and press »OK« to confirm.
3 Select the keyboard language with »V« or »Λ« and press »OK« to confirm.
4 Press »BACK <« to go back one menu level or press »EXIT« to end the setting.

Television / User Manual61 / 116 TR
ACCESSIBLE FUNCTIONS ----------------------------------------------------------------------
1 Open the menu with »MENU«.
2 Select menu item »Settings« with »V«, »Λ«, »<« or »>« and press »OK« to confirm.
3 Select menu item »TV« with »<« or »>« and press »V« to confirm.
– »TV« menu is active.
4 Select the line »Accessibility Settings« with »V« or »Λ« and press »OK« to confirm.
Subtitle Mode Off
Audio Description Mixed
Audio Description Volume 20
Picture
Per19 Mar 2015
Source TimerSound NetworkTV Parental
Settings > TV > Accessibility Settings
Change Area Select ExitBackBACK EXIT
Note:7 Additional operations are explained in the
following sections.
Subtitle Mode(only for digital television channels)Subtitles for the deaf and hard of hearing can be switched on and off.
1 From the »Accessibility Settings« menu use »V« or »Λ« to select the line »Subtitle Mode«.
2 Set the preferred option »Off«, »Hard of Hearing« or »Basic« with »<« or »>«.
3 Press »BACK <« to go back one menu level or press »EXIT« to end the setting.
Audio description (audio sub-titles)Audio description is an additional audio chan-nel for people who are visually handicapped. The activities, surroundings, scene changes or the appearance, the gestures and facial expres-sions of the actors are described. This sound is transmitted at the same time as the normal sound with digital television stations. This depends on the programme being broadcast.
1 From the »Accessibility Settings« menu use »V« or »Λ« to select the line »Audio Description«.
2 Select »Mixed« or »Headphone« with »<« or »>«.
3 Select the line »Audio Description Volume« with »V« or »Λ« and use »<« or »>« to adjust volume.
4 Press »BACK <« to go back one menu level or press »EXIT« to end the setting.

62 / 116 TRTelevision / User Manual
ADVANCED SETTINGS ------------------------------------------------------------------------------
1 Open menu with »MENU« button.
2 Select menu item »Settings« with »V«, »Λ«, »<« or »>« and press »OK« to confirm.
3 Select menu item »TV« with »<« or »>« and press »V« to confirm.
– »TV« menu is active.
4 Select the line »Advanced« with »V« or »Λ« and press »OK« to confirm.
Auto Sleep 4 Hours
Show Logo Display No
Power LED Backlight Medium
Power Saving Mode Off
Permanent Timeshift Off
Picture
Tuesdayxx xxx xxxx
Source TimerSound NetworkTV Parental
Settings > TV > Advanced
Change Area ExitBackBACK EXITChange Mode
Note:7 Additional operations are explained in the
following sections.
Auto sleepThis function will turn the television to stand-by mode in 4 hours depending on your setup, un-less the television receives any signal, or keys or, according to European regulations, the remote remains untouched for 5 minutes.1 From the »Advanced« menu use »V« or
»Λ« to select the line »Auto Sleep«.
2 Select the switch-off time with »<« or »>«.
Note:7 Set the function to »Off« with »<« or »>« to
switch off.3 Press »BACK <« to go back one menu
level or press »EXIT« to end the setting.
Store logo view This function is intended for feature introduction at stores. When »On« is selected, feature logos are displayed.1 From the »Advanced« menu use »V« or
»Λ« to select the line »Shop Logo Display«.
2 Select »Yes« with »<« or »>«.
Note:7 Set the function to »No« with »<« or »>« to
switch off.3 Press »BACK <« to go back one menu
level or press »EXIT« to end the setting.
Power LED brightness You can adjust power (stand-by) LED brightness in operation mode of television.1 From the »Advanced« menu use »V« or
»Λ« to select the line »Power LED Bright-ness«.
2 Use »<« or »>« to set the brightness to »High«, »Medium« or »Low«.
3 Press »BACK <« to go back one menu level or press »EXIT« to end the setting.
Power save mode It ensures automatic shut off of screen in An-tenna, Cable, Satellite and radio channels and USB mode when playing audio files.1 From the »Advanced« menu use »V«
or »Λ« to select the line »Power Saving Mode«.
2 Press »<« or »>« to set shut off time of display as »10 Seconds«, »30 Seconds«, »60 Seconds«.
3 Press »BACK <« to go back one menu level or press »EXIT« to end the setting.
Note:7 If the screen closes while listening to music
in USB mode, press »MENU« and select »Off« with »<« or »>« to close the feature.

Television / User Manual63 / 116 TR
ADVANCED SETTINGS ------------------------------------------------------------------------------
Switching on/off weather infor-mationIf this function is activated, a weather logo and the local temperature is displayed.
1 From the »Advanced« menu use »V« or »Λ« to select the line »Weather Widget«.
2 Press »<« or »>« to turn to »On« position.
3 Press »EXIT« to end the setting.
Switching on/off help informa-tionHelp information about the relevant feature will be displayed if you select one of the options in the menu and wait for a while. This notification can be enabled or disabled.1 Select »Help« in »Advanced« menu with
»V« or »Λ«.
2 Press »<« or »>« to turn to »On« position.
3 Press »EXIT« to end the setting.

64 / 116 TRTelevision / User Manual
TIMER FUNCTIONS ---------------------------------------------------------------------------------------
1 Open menu with »MENU« button.
2 Select menu item »Settings« with »V«, »Λ«, »<« or »>« and press »OK« to confirm.
3 Select menu item »Timer« with »<« or »>« and press »V« to confirm.
– »Timer« menu is active.
Sleep Timer Off
Auto On
Auto Off
Advenced
Picture
Tuesdayxx xxx xxxx
Source TimerSound NetworkTV Parental
Settings > Timer
Change Area ExitBackBACK EXITChange Mode
Note:7 Additional operations are explained in the
following sections.
Sleep timerIn the »Sleep Timer« menu you can enter a time for the television to switch off. After this time has elapsed, the television switches to standby mode.
1 Select the line »Sleep Timer« with »V« or »Λ«.
2 Select the switch-off time with »<« or »>«.
Note:7 To switch off the function, use »<« or »>« to
set the switch-off time to »Off«.
3 Press »BACK <« to go back one menu level or press »EXIT« to end the setting.
On timer (Auto On)In the On Timer menu, you can enter a switch-on time for the television.The television switches on with the preset volume and the desired channel after the set time in stand-by mode has elapsed.
1 Select the line »Auto On« with »V« or »Λ« and press »OK« to confirm.
2 Select the line »Mode« with »V« or »Λ« and use »<« or »>« to select when the television should switch on.
3 Select the line »Input Source« with »V« or »Λ« and use »<« or »>« to select the input source.
4 Select the line »Service Type« with »V« or »Λ« and use »<« or »>« to select the preferred option (ATV, DTV or Radio).
5 Select the line »Channel« with »V« or »Λ« and use »<« or »>« to select the preferred channel.
Note:7 The line »Channel« is only active when the
input signal currently in use has been set. If no entry has been made, then the first chan-nel of the selected input source will be used.
6 Select the line »Volume« with »V« or »Λ« and use »<« or »>« to set the volume.
7 Select the line »Set Hour« with »V« or »Λ« and enter the time with »1…0«.
8 Press »« (blue) to save the setting.
9 Press »BACK <« to go back one menu level or press »EXIT« to end the setting.

Television / User Manual65 / 116 TR
Off timer (Auto Off)In the »Auto Off« menu, you can enter a switch-off time for the television. The television switches to stand-by after the entered time has elapsed.
1 Select the line »Auto Off« with »V« or »Λ« and press »OK« to confirm.
2 Select the line »Mode« with »V« or »Λ« and use »<« or »>« to select when the television should switch off.
3 Select the line »Set Hour« with »V« or »Λ« and enter the time with »1…0«.
4 Press »« (blue) to save the setting.
5 Press »BACK <« to go back one menu level or press »EXIT« to end the setting.
TIMER FUNCTIONS ---------------------------------------------------------------------------------------

66 / 116 TRTelevision / User Manual
PARENTAL SETTINGS ---------------------------------------------------------------------------------
1 Open menu with »MENU« button.
2 Select menu item »Settings« with »V«, »Λ«, »<« or »>« and press »OK« to confirm.
3 Select the menu item »Parental« with »>« or »<« and press »OK« to confirm.
– »Parental« menu is displayed.
Parental Guidance Off
Menu Lock Off
Keypad Lock Off
Change PIN
Picture
Tuesdayxx xxx xxxx
Source TimerSoiund NetworkTV Parental
Settings > Parental
Change Area Change Mode ExitBackBACK EXIT
Note:7 Additional operations are explained in the
following sections.
Parental GuidanceThere are movies with content or scenes which are not suitable for children. Certain programmes contain information which identifies such content or scenes and have been given an access level from 4 to 18. You can se-lect one of the access levels and thus authorise the playback.
1 From the »Parental« menu use »V« or »Λ« to select the line »Parental Guidance« and press »<« or »>« to confirm.
2 Enter the PIN code »1234« with »1...0« in the password prompt.
3 Select the access level with »<« or »>«.
4 Press »BACK <« to go back one menu level or press »EXIT« to end the setting.
Note:7 When the TV is in review buffer mode, the
parental rating of the program in the live broadcast is applied on the content being watched (rather than the actual parental rating of the content being watched). As a result, a parental rated content being watched in the review buffer mode will not necessarily show as parental rated and vice versa. This means that if parental rated program starts in live broadcast the PIN-pop up message will appear in review buffer, or the PIN-pop up message will be dismissed in review buffer as soon as a program without parental rating starts in live broadcast.”
Locking the menusBy using this function, you can lock »Automatic Channel Search«, »Manual Channel Search« and »Channel Editor« menus as to be accessed only when the PIN code is entered.
1 From the »Parental« menu use »V« or »Λ« to select the line »Menu Lock« and press »<« or »>« to confirm.
2 Enter the PIN code »1234« with »1...0« in the password prompt.
3 Activate the lock with »<« or »>« (»On«).
Note:7 To switch off the menu lock, use »<« or »>«
to select the setting (»Off«).
4 Press »BACK <« to go back one menu level or press »EXIT« to end the setting.

Television / User Manual67 / 116 TR
PARENTAL SETTINGS ---------------------------------------------------------------------------------
Blocking the multifunction switchWhen the key lock is activated, the multi function switch on the television does not function.
1 From the »Parental« menu use »V« or »Λ« to select the line »Keypad Lock« and press »<« or »>« to confirm.
2 Enter the PIN code »1234« with »1...0« in the password prompt.
3 Activate (On) or deactivate (Off) the panel lock with »<« or »>«.
4 Press »BACK <« to go back one menu level or press »EXIT« to end the setting.
Changing the PIN codeInstead of the default code »1234«, you can enter a personal code.Please take note of your personal code.1 From the »Parental« menu use »V« or »Λ«
to select the line »Change PIN« and press »OK« to confirm.
2 Enter the current PIN code »1234« with »1...0«.
3 Enter your new four-digit personal PIN code with »1...0«.
4 Reenter your personal PIN code with »1...0«.
5 Press »BACK <« to go back one menu level or press »EXIT« to end the setting.
Blocking a television channel You can block individual television channels which are not suitable for children using a personal PIN code.
1 Open menu with »MENU« button.
2 Select menu item »Settings« with »V«, »Λ«, »<« or »>« and press »OK« to confirm.
3 Select the menu item »Source« with »>« or »<« and press »OK« to confirm.
4 Select the line »Channel Editor« with »V« or »Λ« and press »OK« to confirm.
5 Select the channel to be blocked with »V«, »Λ«, »<« or »>« and highlight with »OK«.
–Channel is marked with »✔«.
6 Activade the »Tools« menu with »« (yel-low).
7 Select the line »Channel Lock« with »V« or »Λ« and press »OK« to confirm.
8 Enter the PIN code »1234« with »1...0« in the password prompt.
9 Confirm the entry with »OK«. –Channel is marked with » «.
Note:7 To remove the lock, select the channel
again with »V«, »Λ«, »<« or »>«, acti-vade the »Tools« menu with »« (yellow), select the line »Unlock Channel« with »V« or »Λ« and press »OK« to confirm
10 Press »EXIT« to end the setting.

68 / 116 TRTelevision / User Manual
PARENTAL SETTINGS ---------------------------------------------------------------------------------
Watching a blocked television channelYou can watch a TV channel blocked with PIN code by selecting the TV channel and entering the PIN code.
1 Select the blocked channel with »1…0« or »P+«, »P–«.
2 Enter the PIN code »1234« with »1...0« in the password prompt.
– Blocked channel can be viewed.
Note:7 Channel will be blocked again when you
change the channel.
Resetting PIN codeUse this function if you forget the PIN code.
1 From the »Parental« menu use »V« or »Λ« to select the line »Change PIN« and press »OK« to confirm.
2 Enter the PIN code »2 3 5 6« with »1...0«.
3 Enter your new four-digit personal PIN code with »1...0«.
4 Reenter your personal PIN code with »1...0«.
5 Press »BACK <« to go back one menu level or press »EXIT« to end the setting.

Television / User Manual69 / 116 TR
DATE AND TIME SETTINGS -----------------------------------------------------------------
1 Open menu with »MENU« button.
2 Select menu item »Settings« with »V«, »Λ«, »<« or »>« and press »OK« to confirm.
3 Select the menu item »Timer« with »>« or »<« and press »OK« to confirm.
– »Timer« menu is displayed.
4 Select the line »Advanced« with »V« or »Λ« and press »OK« to confirm.
Sleep Timer Off
Auto On
Auto Off
Date & Time
Date & Time Set.
Time Adjustment AUTO
Picture
Tuesdayxx xxx xxxx
Source TimerSound NetworkTV Parental
Settings > Timer
Change Area Select ExitBackBACK EXIT
Note:7 Additional operations are explained in the
following sections.
Auto tuningThe television automatically detects the local dif-ference to Greenwich Mean Time (the selected channel provides a time signal).
1 From the »Advanced« menu use »V« or »Λ« to select the line »Date & Time Set.« and press »OK« to confirm.
2 Select the line »Mode« with »V« and then select the option »AUTO« with »<« or »>«.
– Date and time are automatically updated;
3 Press »BACK <« to go back one menu level or press »EXIT« to end the setting.
Manual tuningYou can set the local time difference yourself if the time is not detected or is not the same as your local time.
1 From the »Advanced« menu use »V« or »Λ« to select the line »Time Adjustment«.
2 Select the option »Manual« with »<« or »>«.
– »Time Zone« and »Daylight Saving« are active.
3 Select the line »Time Zone« with »V« or »Λ« and press »OK« to confirm.
– The Time zone selection menu is dis-played.
4 Adjust the time zone with »V« or »Λ« and press »OK« to confirm.
5 Select the line »Daylight Saving« with »V« or »Λ« and then select the option »AUTO«, »Off« or »On« with »<« or »>«.
6 Press »BACK <« to go back one menu level or press »EXIT« to end the setting.
Note:7 If the option »AUTO« is selected in the line
»Time Adjustment«, the television set auto-matically adapts the time to the time signal from the respective broadcaster. However, different channels may also use time bases which are different to those of your country e.g. foreign broadcasters. In these cases, reminders and planned recordings may be annulled due to the time difference.

70 / 116 TRTelevision / User Manual
SOFTWARE OF THE DEVICE ---------------------------------------------------------------
1 Open menu with »MENU« button.
2 Select menu item »Settings« with »V«, »Λ«, »<« or »>« and press »OK« to confirm.
3 Select the menu item »TV « with »>« or »<« and press »OK« to confirm.
4 Select the line »About« with »V« or »Λ« and press »OK« to confirm.
Product Info
TV Name Smart Inter@ctive 4...
Software Updates
Restore Factory Defaults
Reset Chanel History
Country Other
Picture
Tuesdayxx xxx xxxx
Source TimerSound NetworkTV Parental
Settings > TV > Advanced
Change Area Select ExitBackBACK EXIT
Note:7 Additional operations are explained in the
following sections.
Product information1 From the »About« menu use »V« or »Λ«
to select the line »Product Info« and press »OK« to confirm.
– Software version information of the pro-duct is displayed.
2 Press »BACK <« to go back one menu level or press »EXIT« to end the setting.
Software update (OAD)(only for digital television channels)
1 From the »About« menu use »V« or »Λ« to select the line »Software Updates« and press »OK« to confirm.
2 Select the option »OAD« with »V« or »Λ« and press »OK« to confirm.
– The search for new software is being car-ried out.
Note:7 If no new software is available the menu
automatically switches off.3 If new software is available, press »«
(green) to install the software. – The new software will be loaded.
Warning:7 Television will restart after update. Do
not turn your television’s power off during updates.
Note:7 For automatic checking of software update,
select from »Source« menu ➡ »Advanced« the line »OAD« with »V« or »Λ«. Use »<« or »>« to select »On«.
Software update (Internet)(only for digital television channels)
1 From the »About« menu use »V« or »Λ« to select the line »Software Updates« and press »OK« to confirm.
2 Select the option »Internet« with »V« or »Λ« and press »OK« to confirm.
– The search for new software is being car-ried out.
Note:7 If no new software is available the menu
automatically switches off.3 If new software is available, press »«
(green) to install the software. – The new software will be loaded.
Warning:7 Television will restart after update. Do
not turn your television’s power off during updates.
Software update (USB)1 Plug the memory stick in the USB sockets at
the side of the television.
2 From the »About« menu use »V« or »Λ« to select the line »Software Updates« and press »OK« to confirm.
3 Select the option »USB« with »V« or »Λ« and press »OK« to confirm.
– The software on the USB memory stick is installed.

Television / User Manual71 / 116 TR
ACCESSORIES ------------------------------------------------------------------------------------------------------
You can connect various accessories to your television to use with video talk, volume control, motion control or a keyboard and mouse to use in your web browser. Display the status of the connected accessory from this menu to perform various adjustments.
1 Open menu with »MENU« button.
2 Select menu item »Settings« with »V«, »Λ«, »<« or »>« and press »OK« to confirm.
3 Select the menu item »TV « with »>« or »<« and press »V« to confirm.
4 Select the line »Accessories« with »V« or »Λ« and press »OK« to confirm.
5 Select the needful line with »V« or »Λ« and press »OK« to confirm.
Select the needful function with »<« or »>«.
6 Press »BACK <« to go back one menu level or press »EXIT« to end the setting.
Notes:7 Accessories are sold individually. They
are not provided with your TV. Please contact your dealer from where you have purchased your TV in order to obtain more information about purchasing.
7 The displays for the status and the settings depend on the accessories used.

72 / 116 TRTelevision / User Manual
RESET FUNCTIONS ----------------------------------------------------------------------------------------
1 Open menu with »MENU« button.
2 Select menu item »Settings« with »V«, »Λ«, »<« or »>« and press »OK« to confirm.
3 Select the menu item »TV« with »>« or »<« and press »OK« to confirm.
4 Select the line »About« with »V« or »Λ« and press »OK« to confirm.
Product Info
TV Name Smart Inter@ctive 4...
Software Updates
Restore Factory Defaults
Reset Chanel History
Country Other
Picture
Tuesdayxx xxx xxxx
Source TimerSound NetworkTV Parental
Settings > TV > About
Change Area Select ExitBackBACK EXIT
Note:7 Additional operations are explained in the
following sections.
Resetting the television to its original stateThis function enables you to delete the station lists and all custom settings.
1 From the »About« menu use »V« or »Λ« to select the line »Restore Factory Defaults« and press »OK« to confirm.
– Warning screen will be displayed.
Note:7 If the loaded applications are also to be
deleted, select the line »Save installed applications« by pressing »Λ« and remove the small tick with »OK«.
2 Select push button »Yes« with »<« or »>« to confirm the security query;
or
select push button »No« with »<« or »>« to cancel deletion process.
– In a short while »Installation Guide« is displayed.
3 Continue the settings as described in the chapter on first installation and searching for channels on page 20.
Deleting channel historyThis function allows you to delete channel his-tory stored in the Main menu.
1 From the »About« menu use »V« or »Λ« to select the line »Reset Channel History« and press »OK« to confirm.
– Warning screen will be displayed.
2 Select push button »Yes« with »<« or »>« to confirm the security query;
or
select push button »No« with »<« or »>« to to cancel the function.
3 Press »BACK <« to go back one menu level or press »EXIT« to end the setting.
Settings recoveryThis function allows you to back up all of your settings and then recover them using the backup.1 Under the »About« menu, use »V« or »Λ«
to select »Settings Recovery« and confirm with »OK«.
2 Confirm »Create a restore point« using »OK«.
3 Select »Yes« to confirm the security question;
or
select »No« and press »OK« to cancel.
4 Press »BACK <« to return to the previous menu or press »EXIT« to end the setting.

Television / User Manual73 / 116 TR
DIGI LINKYour television is equipped with DIGI LINK feature. This feature utilizes CEC (Consumer Elec-tronics Control) protocol. CEC allows you to make an HDMI
connection on sockets HDMI between your TV and DVD player, STB or video recorder and control such equipments with the remote control of the television. This feature must also be supported by the device you will connect.You television supports the following functions. For detailed information about this function, read user manual of the external device.
The Digi Link functions of the televisionTurning on external device from standby modeWhen you switch on your external device (e.g. DVD player) from standby mode, your television will be turned on from standby mode as well and it will switch to the HDMI source that the external device is connected to.Depending on the features of the external device (e.g. AV receiver) can start and your television can stay on stand-by mode.
Selecting the HDMI source from the televisionWhen you switch on your external device (e.g. DVD player), your television will switch to the HDMI source that the external device is con-nected to your TV should be open.
Selecting the menu languageWhen you select menu language on your TV, menu language of the external device will change as well (if your DVD player supports).
USING EXTERNAL DEVICES ---------------------------------------------------------------
Switching off the external device from standby modeAfter switching your television to standby, your external device (e.g. DVD player) will also switch to standby if it is switched on.DIGI LINK is always active on your television.Refer to the user manual of your external device to learn how to activate this feature on it.
Searching and selecting the active ex-ternal deviceYou can connect up to 11 devices that support DIGILINK to this television.1 Open the Tools menu with »TOOLS«.
2 Select the line »Digilink« with »V« or »Λ« and press »OK« to confirm.
– Connected devices are searched and the ones that are found are displayed on the »Device List« menu.
3 Start device search with »« (blue). – The devices found are shown in the menu.
4 Select the device that you want to control with »V« or »Λ« and mark it with »OK«.
– If the selected device is connected to a different source than the current one, you will automatically switch to the source to which the device is connected.
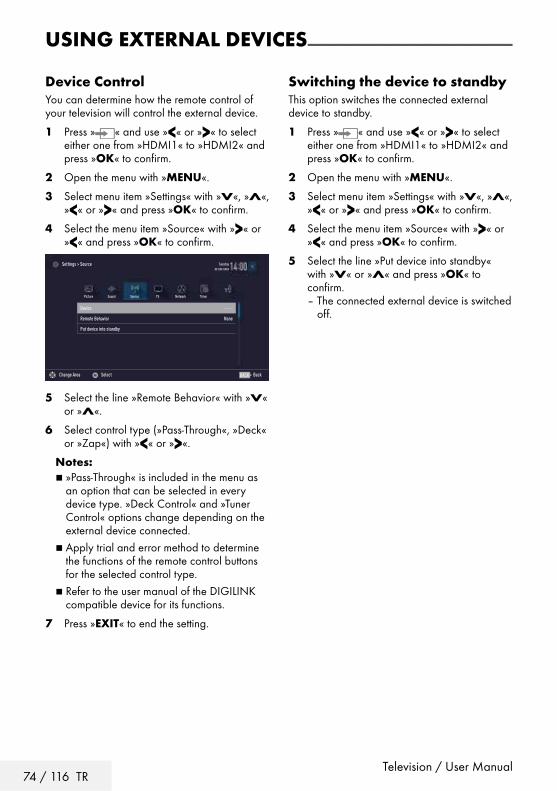
74 / 116 TRTelevision / User Manual
USING EXTERNAL DEVICES ---------------------------------------------------------------
Device ControlYou can determine how the remote control of your television will control the external device.
1 Press » « and use »<« or »>« to select either one from »HDMI1« to »HDMI2« and press »OK« to confirm.
2 Open the menu with »MENU«.
3 Select menu item »Settings« with »V«, »Λ«, »<« or »>« and press »OK« to confirm.
4 Select the menu item »Source« with »>« or »<« and press »OK« to confirm.
Device - - - -
Remote Behavior None
Put device into standby
Picture
Tuesdayxx xxx xxxx
Source TimerSound NetworkTV
Settings > Source
Change Area Select BackBACK
5 Select the line »Remote Behavior« with »V« or »Λ«.
6 Select control type (»Pass-Through«, »Deck« or »Zap«) with »<« or »>«.
Notes:7 »Pass-Through« is included in the menu as
an option that can be selected in every device type. »Deck Control« and »Tuner Control« options change depending on the external device connected.
7 Apply trial and error method to determine the functions of the remote control buttons for the selected control type.
7 Refer to the user manual of the DIGILINK compatible device for its functions.
7 Press »EXIT« to end the setting.
Switching the device to standbyThis option switches the connected external device to standby.
1 Press » « and use »<« or »>« to select either one from »HDMI1« to »HDMI2« and press »OK« to confirm.
2 Open the menu with »MENU«.
3 Select menu item »Settings« with »V«, »Λ«, »<« or »>« and press »OK« to confirm.
4 Select the menu item »Source« with »>« or »<« and press »OK« to confirm.
5 Select the line »Put device into standby« with »V« or »Λ« and press »OK« to confirm.
– The connected external device is switched off.

Television / User Manual75 / 116 TR
USING EXTERNAL DEVICES ---------------------------------------------------------------
HDMI, the HDMI logo and High-Definition Mul-timedia Interface are trademarks or registered trademarks of HDMI Licensing LLC.
High definitionYour television can playback high-definition television signals (HDTV).You can connect the input sources (HDTV set-top box or High Definition DVD player) to the HDMI socket (digital HDTV signal).This ensures that you can view digital HDTV programmes, even if they are copy-protected (HDCP High Bandwidth Digital Content Protec-tion).
Connection options7 Which television socket(s) you connect your
external devices to depends on the sockets the external device is equipped with and the signals which are available.
7 Note that with many external devices the resolution of the video signal must be adapted to the input sockets on the televi-sion (check the external device’s instruction manual). You can find out which values you need to set by referring to the guidelines in the section about connection options.
7 Do not connect any other equipment while the device is switched on. Switch off the other equipment as well before connecting it.
7 Only plug the device into the mains socket after you have connected the external device.
VGA IN
SERVICE LAN Optic Out USB (HDD) HDMI2 EARPHONESATELLITE
13/18Vmax. 25 0 mA
ANT-IN5V
max. 50 mA
SCA
RT
HD
MI 1
(AR
C)

76 / 116 TRTelevision / User Manual
Connecting an external deviceWith a digital audio/video signal7 Suitable devices: Digital satellite receiver,
game console, BluRay player, DVD player/recorder, set-top box, notebook, PC.
7 Video signal: digital image; definition: stan-dard 576p; HDTV 720p, 1080i, 1080p.
7 Audio signal: digital sound (stereo, multichan-nel compression, uncompressed).
7 Channel position »HDMI1«, »HDMI2«
1 Connect the HDMI1or HDMI2 socket on the television and the corresponding HDMI socket on the external device using a standard HDMI cable (digital video and audio signal).
With an analogue video signal (pro-gressive)7 Suitable devices: DVD player/recorder, game
console.7 Video signal: YUV; definition: standard 576p;
HDTV 720p, 1080i, 1080p.7 Audio signal: stereo, analog.7 Channel position »SCART«.
1 Connect the SCART sockets on the televi-sion and the corresponding sockets on the external device using Scart-YUV converter (video and audio signal).
Using the Euro/AV socket7 Suitable devices: Digital satellite receiver,
DVD player/recorder, set-top box, game console, video recorder, decoder.
7 Video signal: CVBS/RGB.7 Audio signal: stereo, analog.7 Channel position »SCART«.
1 Connect the SCART input on the television to the corresponding socket on the external device using EURO/AV cable (video and audio signal).
USING EXTERNAL DEVICES ---------------------------------------------------------------
Selecting Scart volume adjustment1 Open the menu with »MENU«.
2 Select menu item »Settings« with »V«, »Λ«, »<« or »>« and press »OK« to confirm.
3 Select the menu item »Sound« with »>« or »<« and press »V« to confirm.
4 Select the line »Advanced« with »V« or »Λ« and press »OK« to confirm.
5 Select the line »Scart Output« with »V« or »Λ«.
6 Select the option »Fixed« or »Adjustable« with »<« or »>«.
Note:7 »Scart Volume« becomes active when »Ad-
justable« is selected in the menu.7 Select the line »Scart Volume« with »V« or
»Λ« and adjust the volume by using »<« or »>«.
8 Press »EXIT« to end the setting.
With S-Video signal7 Suitable devices: DVD player/recorder, video
recorder, camera recorder, notebook, PCs.7 Video signal: Y/C.7 Audio signal: stereo, analog.7 Channel position »SCART«.
1 Connect the SCART socket on the television to the corresponding socket on the external device using EURO/AV cable (video and audio signal).

Television / User Manual77 / 116 TR
USING EXTERNAL DEVICES ---------------------------------------------------------------
Using a DVD recorder, DVD player, video recorder or set-top box1 Switch on the video recorder, DVD player
or set-top box and select the function you wish to use.
2 Press » « and use »<« or »>« to select in-put signal (»SCART«, »HDMI1«, »HDMI2«) and press »OK« to confirm.
Hi-fi systemConnecting digital multi-channel ampli-fier/AV receiver1 Connect the HDMI1 (ARC) (HDMI 1.4
Audio Return Channel) socket to the relevant socket on the HDMI ARC compliant Digital multichannel amplifier / AV receiver with a standard HDMI cable (digital audio signal);
or
2 Connect the Optic Out socket on the televi-sion to the corresponding socket on the AV receiver using a standard optic digital cable (digital audio signal).
Important:7 Do not use a HDMI cable longer than 5 m
for HDMI ARC connection.
Apply the device with HDMI ARC func-tion and activate HDMI ARC1 Switch on the the multi-channel amplifier or
the AV receiver. If a Blu-ray Player is con-nected on the AV receiver, the player must be switched on, too.
2 Open the tools menu with »TOOLS«.
3 Select the line »Digilink« with »V« or »Λ« and press »OK« to confirm.
– Audio device connected to the HDMI1 (ARC) source in the »Device List« menu shall be displayed in the list.
4 Start device search with »« (blue). – Audio device connected to the HDMI1
(ARC) source shall be displayed in the list.
5 Select the device with »V« or »Λ« and press »OK« to confirm.

78 / 116 TRTelevision / User Manual
Notes:7 If the audio system also has a playing func-
tion (e.g. Home theater system including DVD player function), two devices will be listed on the HDMI CEC list. The first one is the player, and the second one is the audio playback.
7 If a Blu-ray Player is connected to the AV receiver, please remove the Disc from the Player during the registration.
6 Open the menu with »MENU«.
7 Select menu item »Settings« with »V«, »Λ«, »<« or »>« and press »OK« to confirm.
8 Select the menu item »Sound« with »>« or »<« and press »V« to confirm.
9 Select the line »Advanced« with »V« or »Λ« and press »OK« to confirm.
10 Select the line »ARC« with »V« or »Λ«.
11 Press »<« or »>« to select »On«.
Notes:7 The internal speakers of the television are
switching off automaticaly.7 The volume of the AV receiver you can ad-
just with the remote control of the television.7 For switching off the HDMI ARC function
select »Off« with »<« or »>«.7 The ARC function will be deactivated while
switching off the television and the internal speakers are active again.
12 Press »EXIT« to end the setting.
USING EXTERNAL DEVICES ---------------------------------------------------------------
Dolby, Dolby Audio, and the double-D symbol are trademarks of Dolby Laboratories.

Television / User Manual79 / 116 TR
USING EXTERNAL DEVICES ---------------------------------------------------------------
What is LIVESHARE?7 Miracast is a wireless technology that allows
Android devices share images with each other. This technology is supported by your TV under the name Liveshare.
Screen share with Liveshare con-nection1 Open the menu with »MENU«.
2 Use »V«, »Λ«, »<« or »>« to select »Screen Share« and press »OK« to confirm.
– »Miracast« menu will be displayed.
3 Using your laptop or mobile device, launch the Miracast application and select your TV.
– Miracast will start soon and the screen im-age of your laptop or mobile device will be displayed on the TV.
4 Press »EXIT« to end the Liveshare applica-tion.
Note:7 Please visit the website of the manufacturer
of your laptop/mobile device to see if it supports Miracast.
Wireless screen share (Liveshare)

80 / 116 TRTelevision / User Manual
OPERATION WITH COMMON INTERFACE ---------------------
What is common interface?7 Common Interface (CI) is an interface for DVB
receivers.7 Encrypted channels can only be viewed with
a CA module suitable for the encryption system and the corresponding smart card.
7 The television set is equipped with a Common Interface slot into which CA modules from various providers can be inserted.
7 You can insert the provider’s smart card into the CA module in order to enable the encrypted channels you want to see.
Inserting the CA moduleNote:7 Switch off the device before inserting the
CA module in the CI slot.1 Insert the smart card into the CA module.
2 Insert the CA module with the smart card into the CI slot on the television.
Notes:7 To see which CA module is in the Common
Interface slot, go to the »CA - Module« submenu.
7 When you insert a CA module into the CI slot on the television for the first time, wait a few moments until the television has regis-tered the CA module.
Access control for CA module and smart cards1 Open the menu with »MENU«.
2 Select menu item »Settings« with »V«, »Λ«, »<« or »>« and press »OK« to confirm.
3 Select the menu item »Source« with »>« or »<« and press »V« to confirm.
4 Select the line »Advanced« with »V« or »Λ« and press »OK« to confirm.
5 Select the line »CA–Module« with »V« or »Λ« and press »OK« to confirm.
Notes:7 This menu provides operating instructions
and – after you enter your PIN code – ac-cess to channels of the PAY-TV provider.
7 The remaining settings are described in the manuals for your CA module and smart card.
7 The CA modul is not supported in some countries and regions. Please consult your authorised dealer.
6 Press »EXIT« to end the setting.

Television / User Manual81 / 116 TR
NETWORK SETUP -------------------------------------------------------------------------------------------
To use the functions of SMART inter@ctive, you must connect the TV to your home network with internet access and log in.You can launch various applications on Grundig My Apps Portal. These applications include vari-ous types such as video, picture, music, game, social networking applications, news and sports applications, weather forecast applications. Your TV supports remote control feature for Apple iPhones and Android based phones. De-pending on the features of your phone, you may control your TV by your phone after download-ing the free »Grundig TV Remote« application from Apple App Store or Google Play (Android Market).
Network connectionYou can establish a wired or wireless connection between your television and the local network.If you want to use a wired network connection, please start with the instructions here:If you use a wireless network connection, please follow the instructions in the "Wireless network connection" section on page 84.
Note:7 The following section describes connecting
to the home network if you did not carry this out during the “initial set-up”.
Wired networkWired network connection1 Connect the output of external modem to
LAN socket with Cat 5 cable.
Note:7 Connection cables are not supplied.

82 / 116 TRTelevision / User Manual
Wired network settingsThere are two ways of making the wired net-work settings.A Automatic connection, All data regarding connection settings (»IP
Address«, »Netmask«, »Gateway« and »DNS«) are obtained from modem auto-matically.
B Manual connection, all data regarding connection settings (»IP
Address«, »Netmask«, »Gateway« and »DNS«) must be configured manually.
Automatic connectionMost of the home networks are Dynamic. If you have a dynamic network, you must use a DSL modem that supports DHCP. Modems and IP sharers that support DHCP obtain the »IP Address«, »Netmask«, »Gateway« and »DNS« values required for internet access automatical-ly, and thus you are not required to enter those values manually.
1 Open the menu with »MENU«.
2 Select menu item »Settings« with »V«, »Λ«, »<« or »>« and press »OK« to confirm.
3 Select the menu item »Network« with »>« or »<« and press »V« to confirm.
– »Network« menu is active.
Picture
Tuesdayxx xxx xxxx
Source TimerSound NetworkTV Parental
Settings > Network
Change AreaConnect Test Connection Select ZurückBACK
Change Connection Type Wired
Network Configuration AUTO
Wake-on-LAN Off
Advanced
4 Select the line »Change Connection Type« »V« or »Λ« and press »OK« to confirm.
5 Select the option »Wired« with »V« or »Λ« and press »OK« to confirm.
NETWORK SETUP -------------------------------------------------------------------------------------------
6 Select the line »Network Configuration« with »V« or »Λ« and use »<« or »>« to select »AUTO«.
7 With »« (red) select »Connect« to establish modem connection.
– »Connecting ... Please wait« message will be displayed, and if the connection is established »Connection To Gateway: Success« message will be displayed.
8 Press »« (green) to check the performed settings and also if the local network and internet connection has been established.
– »Testing ... Please wait« message will be displayed, and if the connection is established »Connection To Gateway: Success«, »Internet Connection: Success« message will be displayed.
9 Press »EXIT« to end the settings.
Note:7 If you do not have a dynamic network,
follow the instructions in manual connection section.

Television / User Manual83 / 116 TR
NETWORK SETUP -------------------------------------------------------------------------------------------
Manual connectionCertain networks require Static IP address. If your network requires a Static IP address, you must enter the »IP Address«, »Netmask«, »Gate-way« and »DNS« values manually. You can get »IP Adress«, »Netmask«, »Gateway« and »DNS« values (IPS) from your Internet Service Provider.
1 Open the menu with »MENU«.
2 Select menu item »Settings« with »V«, »Λ«, »<« or »>« and press »OK« to confirm.
3 Select the menu item »Network« with »>« or »<« and press »V« to confirm.
– »Network« menu is active.
4 Select the line »Change Connection Type« »V« or »Λ« and press »OK« to confirm.
5 Select the option »Wired« with »V« or »Λ« and press »OK« to confirm.
6 Select the line »Network Configuration« with »V« or »Λ« sand use »<« or »>« to select »Manual«.
– »IP Address«, »DNS«, »Netmask« and »Gateway« options are active.
Change Connection Type Wired
Network Configuration Manual
Wake-on-LAN Off
IP Address 192 . 168 . 000 . 200
DNS 192 . 168 . 000 . 254
Netmask 255 . 255 . 255 . 200
Picture
Tuesdayxx xxx xxxx
Source TimerSound NetworkTV
Settings > Network
Change AreaConnect Test Connection Input Mode ExitBack EXITBACK
7 Select the line »IP Address« with »V«. Enter IP address with »1…0«.
8 Select the line »DNS« with »V«. Enter IP address with »1…0«.
9 Select the line »Netmask« with »V« Enter Netmask address with »1…0«.
10 Select the line »Gateway« with »V«. Enter Gateway address with »1…0«.
11 With »« (red) select »Connect« option to establish modem connection.
– »Connecting... Please wait« message will be displayed, and if the connection is successful, Connection to Gateway: Suc-cessful« message will be displayed.
12 Press »« (green) to check the performed settings and also if the local network and internet connection has been established.
– »Testing ... Please wait« message will be displayed, and if the connection is established »Connection To Gateway: Success«, »Internet Connection: Success-ful« message will be displayed.
13 Press »EXIT« to end the settings.

84 / 116 TRTelevision / User Manual
Wireless networkWireless network connection
1 Television includes a built-in Wireless WiFi Adapter to connect it to wireless network.
Notes:7 Wireless LAN adapter supports IEEE
802.11B/G and N communication protocols. We recommend you to use IEEE 802.11N protocol to obtain the best perfor-mance in wireless HD video playback.
7 If you use a modem that supports IEEE 802.11B/G, video playback performance may be poor when compared to a modem that sup-ports IEEE 802.11N since the data transfer rate of IEEE 802.11B/G protocol is lower.
7 Please note that video playback perfor-mance in a DLNA application on a wireless local network and in a SMART inter@ctive TV application on a network with internet connection depends on the number of users on the network as it is the case in every wireless network.
7 It is recommended to switch off the equip-ment that are not in use in home network in order to avoid unnecessary network traffic.
7 Placing the modem or wireless network sharer on an elevated location will increase the wireless connection reception strength.
7 Wireless connection reception strength may vary depending on the type of the modem and the distance between the modem and television.
NETWORK SETUP -------------------------------------------------------------------------------------------
Wireless network settingsYou have several ways to connect your TV to your home network.A Automatic connection, all data regarding connection settings (»IP
Address«, »Netmask«, »Gateway« and »DNS«) are obtained from modem auto-matically.
Depending on the router, you can use the following options:
– Option “WPS-PBC” (Push Button Configu-ration);
– Connecting with a WPS PIN; – Connecting by entering the network pass-
word.
B Manual connection, all data regarding connection settings (»IP
Address«, »Netmask«, »Gateway« and »DNS«) must be configured manually.

Television / User Manual85 / 116 TR
NETWORK SETUP -------------------------------------------------------------------------------------------
Technical requirements Most of the home networks are Dynamic. If you have a dynamic network, you must use a DSL modem that supports DHCP. Modems and IP sharers that support DHCP obtain the »IP Address«, »Netmask«, »Gateway« and »DNS« values required for internet access automatical-ly, and thus you are not required to enter those values manually.
Wireless WPS network connection through by pressing a button1 Open the menu with »MENU«.
2 Select menu item »Settings« with »V«, »Λ«, »<« or »>« and press »OK« to confirm.
3 Select the menu item »Network« with »>« or »<« and press »V« to confirm.
– »Network« menu is active.
4 Select the line »Change Connection Type« with »V« or »Λ« and press »OK« to confirm.
5 Select the option »Wireless WPS« with »V« or »Λ« and press »OK« to confirm.
– WiFi warning message will be displayed.
6 Confirm the message »Do you want to turn on Wi-Fi?« select »Yes« with »<« or »>« and press »OK« to confirm.
7 Select the line »WPS Type« with »V« or »Λ« and select the option »Push Button« with »<« or »>«.
Çhange Connection Type Wireless WPS
WiFi On
WPS Type Push Button
Select Access Point N/A
Network Configuration Auto
Wake-on-LAN Off
Picture
Tuesdayxx xxx xxxx
Source TimerSound NetworkTV Parental
Settings > Network
Change AreaConnect Test Connection Input Mode ExitBack EXITBACK
8 With »« (red) select »Connect« to establish modem connection.
– »Push the WPS button on your Access Point« message is displayed.
9 Press the WPS button on the router.
10 To continue after pressing the WPS button on the access point, select the option »Con-tinue« with »<« or »> «and press »OK« to confirm.
– The “Connection to Gateway: Success” message will be displayed.
11 Press »« (green) to make sure that the network connection is established with the current settings.
– »Testing ... Please wait« message will be displayed, and if the connection is established »Connection To Gateway: Success«, »Internet Connection: Success« messages will be displayed.
12 Press »EXIT« to end the setting.
Wireless WPS network connection with PIN1 Open the menu with »MENU«.
2 Select menu item »Settings« with »V«, »Λ«, »<« or »>« and press »OK« to confirm.
3 Select the menu item »Network« with »>« or »<« and press »V« to confirm.
– »Network« menu is active.
4 Select the line »Change Connection Type« with »V« or »Λ« and press »OK« to confirm.
5 Select the option »Wireless WPS« with »<« or »>« and press »OK« to confirm.
– WiFi warning screen will be displayed.
6 Confirm the message »Do you want to turn on Wi-Fi?« select »Yes« with »<« or »>« and press »OK« to confirm.
7 Select the line »WPS Type« with »V« or »Λ« and select the option »PIN« with »<« or »>«.
Çhange Connection Type Wireless WPS
WiFi On
WPS Type PIN
Select Access Point N/A
Network Configuration Auto
Wake-on-LAN Off
Picture
Tuesdayxx xxx xxxx
Source TimerSound NetworkTV Parental
Settings > Network
ExitBack EXITBACKChange Area Change Mode

86 / 116 TRTelevision / User Manual
8 Select the line »Select Access Point« with »V« or »Λ« and press »OK« to confirm.
– Present WPS-supported wireless networks are scanned to display in the »Select Ac-cess Point« menu.
9 Select the network that you want to connect with »V« or, »Λ« and press »OK« to confirm.
– 8-digit pin code is displayed in the wire-less WPS menu.
Note:7 Refer to the manual of your router to find
out how the PIN is entered via a PC.
10 Use a PC to enter the pin on the router (e.g. AVM FRITZ!Box: menu item WLAN Set-tings... WPS) and save.
Note:7 The 8-digit PIN code must be entered in the
modem interface in 2 minutes; otherwise, connection of television with the modem is cut.
11 Press »« (green) to confirm the registra-tion.
– The message “Connection to Gateway: Success” appears.
12 Press »« (green) to check the performed settings and also if the local network and internet connection has been established.
– »Testing ... Please wait« message will be displayed, and if the connection is established »Connection To Gateway: Successfull«, »Internet Connection: Suc-cessfull« messages and MAC address will be displayed.
13 Press »EXIT« to end the setting.
Connecting automatically by entering the network passwordUse this method for establishing a connection if your router does not support “WPS-PBC” or WPS PIN entry.1 Open the menu with »MENU«.
2 Select menu item »Settings« with »V«, »Λ«, »<« or »>« and press »OK« to confirm.
3 Select the menu item »Network« with »>« or »<« and press »V« to confirm.
– »Network« menu is active.
Change Connection Type Wired
Network Configuration AUTO
Wake-on-LAN Off
Advanced
Picture
Tuesdayxx xxx xxxx
Source TimerSound NetworkTV Parental
Settings > Network
Change AreaConnec Test Connection Select BackBACK
4 Select the line »Change Connection Type« with »V« or »Λ« and press »OK« to confirm.
5 Select the option »Wireless« with »V« or »Λ« and press »OK« to confirm.
– WiFi warning message will be displayed.
6 Confirm the message »Do you want to turn on Wi-Fi?« select »Yes« with »<« or »>« and press »OK« to confirm.
7 Select the line »Network Configuration« with »V« or »Λ« and select the option »AUTO« with »<« or »>«.
8 Select the line »Select Access Point« with »V« or »Λ« and press »OK« to confirm.
– »Select Access Point« menu is displayed by scanning available wireless networks.
9 Select the network that you want to con-nect with »V« or »Λ« and press »OK« to confirm.
– Wireless connection password screen is displayed.
NETWORK SETUP -------------------------------------------------------------------------------------------

Television / User Manual87 / 116 TR
NETWORK SETUP -------------------------------------------------------------------------------------------
Note:7 For device to discover the wireless modem
on the network, the network name should support ASCII characters.
10 Select the required character with »V«, »Λ«, »<« or »>« and move to the next character with »OK«.
– Using »Shift« ➡ »OK«, you can switch between uppercase letters / numbers and lowercase letters / special characters.
– Select »Del« to delete the character entered and press »OK« to confirm.
11 Confirm the password with »« (green). – »Connecting ... Please wait« message
will be displayed, and if the connection is established »Connection To Gateway: Success« messages will be displayed.
12 Press »« (green) to check the performed settings and also if the local network and internet connection has been established.
– »Testing ... Please wait« message will be displayed, and if the connection is established »Connection To Gateway: Success«, »Internet Connection: Success« messages will be displayed.
13 Press »EXIT« to end the setting.
Note:7 If you do not have a dynamic network,
follow the instructions in manual connection section.
Manual connectionCertain networks require Static IP address. If your network requires a Static IP address, you must enter the »IP Address«, »Netmask«, »Gate-way« and »DNS« values manually. You can get »IP Address«, »Netmask«, »Gateway« and »DNS« values (IPS) from your Internet Service Provider.
1 Open the menu with »MENU«.
2 Select menu item »Settings« with »V«, »Λ«, »<« or »>« and press »OK« to confirm.
3 Select the menu item »Network« with »>« or »<« and press »V« to confirm.
– »Network« menu is active.
4 Select the line »Change Connection Type« with »V« or »Λ« and press »OK« to confirm.
5 Select the option »Wireless« with »<« or »>« and press »OK« to confirm.
– WiFi warning screen will be displayed.
6 Confirm the message »Do you want to turn on Wi-Fi?« select »Yes« with »<« or »>« and press »OK« to confirm.
7 Select the line »Network Configuration« with »V« or »Λ« and select the option »Manual« with »<« or »>«.
– »IP Address«, »DNS«, »Netmask« and »Gateway« options are active.
Change Connection Type Wired
WiFi On
Select Access Point N/A
Network Configuration Manual
Wake-on-LAN Off
IP Address 192 . 168 . 000 . 200
Picture
Tuesdayxx xxx xxxx
Source TimerSound NetworkTV
Settings > Network
Change AreaConnect Test Connection Input Mode ExitBack EXITBACK
8 Select the line »IP Address« with »V«. Enter IP address with »1…0«.
9 Select the line »DNS« with »V«. Enter DNS address with »1…0«.
10 Select the line »Netmask« with »V«. Enter Netmask address with »1…0«.
88 / 116 TRTelevision / User Manual
Change TV NameTo make it possible to identify your TV in the network, the name “Inter@ctive TV” is assigned at the factory. You can change the name.
1 Open the menu with »MENU«.
2 Select menu item »Settings« with »V«, »Λ«, »<« or »>« and press »OK« to confirm.
3 Select the menu item »TV« with »V« or »Λ« and press »V« to confirm.
– »TV« menu is active.
4 Select the line »About« with »V« or »Λ« and press »OK« to confirm.
5 Select the line »TV Name« with »V« or »Λ« and press »OK« to confirm
6 Delete the current name step-by-step with »« (red).
7 Select the required character with »V«, »Λ«, »<« or »>« and move to the next character with »OK«.
– Using »Shift« ➡ »OK«, you can switch between uppercase letters / numbers and lowercase letters / special characters.
– Select »Del« to delete the character entered and press »OK« to confirm.
8 Confirm the new name by pressing »« (green).
9 Press »EXIT« to end the setting.
NETWORK SETUP -------------------------------------------------------------------------------------------
11 Select the line »Gateway« with »V«. Enter Gateway address with »1…0«.
12 Select the line »Select Access Point« with »Λ« or »V« and press »OK« to confirm.
– »Select Access Point« menu is displayed by scanning available wireless networks.
13 Select the network that you want to connect with »V« or »Λ« and confirm with »OK«.
– Wireless connection password screen is displayed.
Note:7 For device to discover the wireless modem
on the network, the network name should support ASCII characters.
14 Select the required character with »V«, »Λ«, »<« or »>« and move to the next character with »OK«.
– Using »Shift« ➡ »OK«, you can switch between uppercase letters / numbers and lowercase letters / special characters.
– Select »Del« to delete the character entered and press »OK« to confirm.
15 Confirm the password with »« (green). – »Connecting ... Please wait« message
will be displayed, and if the connection is established »Connection To Gateway: Success« messages will be displayed.
16 Press »« (green) to check the performed settings and also if the local network and internet connection has been established.
– »Testing ... Please wait« message will be displayed, and if the connection is established »Connection To Gateway: Success«, »Internet Connection: Success« messages will be displayed.
17 Press »EXIT« to end the setting.

Television / User Manual89 / 116 TR
NETWORK SETUP -------------------------------------------------------------------------------------------
Connecting the TV to a “hidden” networkEven if the SSID (Service Set Identifier) of the router is not visible, you can connect your TV to this network.1 Open the menu with »MENU«.
2 Select menu item »Settings« with »V«, »Λ«, »<« or »>« and press »OK« to confrim.
3 Select the menu item »Network« with »>« or »<« and press »V« to confirm.
– »Network« menu is active.
4 Select the line »Select Access Point« with »V« or »Λ« and press »OK« to confirm.
– »Select Access Point« menu appears and available wireless networks are scanned and displayed in the menu.
5 Press »« (red). – »Add Network« menu appears.
6 Select the line »Access Point Name« with »V« or »Λ« and press »OK« to confirm.
– A menu for entering the SSID will be displayed.
Note:7 For device to discover the wireless modem
on the network, the network name should support ASCII characters.
7 Select the required character with »V«, »Λ«, »<« or »>« and move to the next character with »OK«.
– Using »Shift« ➡ »OK«, you can switch between uppercase letters / numbers and lowercase letters / special characters.
– Select »Del« to delete the character entered and press »OK« to confirm.
8 Confirm the SSID by pressing »« (green).
9 Select the line »Security Type« with »V« or »Λ« and select the required option (WPA2) with »<« or »>«.
10 Confirm the setting with »« (red). – The network is now in the »Select Access
Point« menu.
11 Select the network with »V« or »Λ« and press »OK« to confirm.
– Wireless connection password screen is displayed.
12 Select the required character with »V«, »Λ«, »<« or »>« and move to the next character with »OK«.
– Using »Shift« ➡ »OK«, you can switch between uppercase letters / numbers and lowercase letters / special characters.
– Select »Del« to delete the character entered and press »OK« to confirm.
13 Confirm the password by pressing »« (green).
– »Connecting ... Please wait« message will be displayed.
14 Press »« (green) to make sure that the network connection is established with the current settings.
– »Testing ... Please wait« message will be displayed, and if the connection is established »Connection To Gateway: Success«, »Internet Connection: Success« messages and MAC address will be displayed.
15 Press »EXIT« to end the setting.

90 / 116 TRTelevision / User Manual
SETTING FURTHER CHANNELS -----------------------------------------------------
Searching for all digital channels from a satellite automaticallyNew satellite channels are added or satellite data is changed frequently. Therefore, we rec-ommend you to run auto search function from time to time.All transponders are scanned for new channels.
1 Open the menu with »MENU«.
2 Select menu item »Settings« with »V«, »Λ«, »<« or »>« and press »OK« to confirm.
3 Select the menu item »Source« with »>« or »<« and press »V« to confirm.
– »Source« menu is active.
Automatic Channel Search
Manual Channel Search
Channel Editor
Advanced
Picture
Tuesdayxx xxx xxxx
Source TimerSound NetworkTV Parental
Settings > Source
Change Area Select ExitBack EXITBACK
4 Select the line »Automatic Channel Search« with »V« or »Λ« and press »OK« to confirm.
– Menu is displayed.
5 Select the option »Satellite (DVB-S/S2)« with »V« or »Λ« and press »OK« to confirm.
6 Confirm the push button »Continue« with »« (blue).
7 Select the Channel Type. Press »V« or »Λ« to select whether you
want to search for only digital channels (Digital) or only radio channels (Radio) or both (Digital + Radio) and press »OK« to select and mark or unmark the »Digital« and/or »Radio« items.
8 Select Scan Mode. To select whether you want to search for
only free digital television channels (Free), only scrambled digital television channels (Scrambled) or both (Free + Scrambled), press »V« or »Λ« and press OK« to select and mark or unmark the »Free« and/or »Scrambled« items.
9 Press »« (red) to start searching.
Notes:7 When updating via the same satellites a
security query is displayed at the start of a search.
7 If the previously stored channels should be retained in the channel list and the new channels found be added to it, then press »« (green).
7 If »« (red) is pressed, the saved channels will be deleted from the current channel list.
– The »Digital Searching« menu appears, and the scan for TV channels begins.
– The search is complete as soon as the message »Search is completed!« appears.
Note:7 The search can be aborted with »EXIT«.
10 Switch to the Channel Editor with »« (yellow);
or
press »EXIT« to end the setting.

Television / User Manual91 / 116 TR
SETTING FURTHER CHANNELS -----------------------------------------------------
Searching for digital chan-nels from a satellite manually on a transponderIf a certain channel cannot be found with automatic search, you can search it manually by manual search function. You must enter all parameters of the channel correctly. You can obtain the current transponder information from teletext page, satellite TV magazines or internet.
1 Open the menu with »MENU«.
2 Select menu item »Settings« with »V«, »Λ«, »<« or »>« and press »OK« to confirm.
3 Select the menu item »Source« with »>« or »<« and press »V« to confirm.
– »Source« menu is active.
4 Select the line »Manual Channel Search« with »V« or »Λ« and press »OK« to confirm.
5 Select the option »Satellite (DVB-S/S2)« with »V« or »Λ« and press »OK« to confirm.
6 Select the required option for manually adjusting with »V« or »Λ«:
Service Type Press »<« or »>« to select whether you want to search for only television channels (DTV), only radio channels (Radio) or both (Radio+TV).
Scan Type Press »<« or »>« to select whether you want to search for only free digital television channels (Free), only scrambled digital television channels (Scrambled) or both (Free + Scrambled).
Transponder Enter the transponder frequency with »1...0« in five digits.
Symbol Rate Enter the transponder symbol rate with »1...0« in five digits.
Polarization Set the polarisation for the transponder to »Horizontal« or »Vertical« using »<« or »>«.
Network Search Select the network search with »<« or »>« as »On« or »Off«.
7 Press »« (red) to start searching. – The »Digital Searching« menu appears,
and the scan for TV channels begins. – All channels found on the transponder are
shown. The new channels will be added to the bottom of the channel table.
Note:7 The search can be aborted with »EXIT«.
8 Press »EXIT« to end the setting.

92 / 116 TRTelevision / User Manual
Antenna settings and searching for digital channels from a satel-lite automatically
Note:7 The following description about the LNB set-
tings premise a substantial expertise about the satellite systems. Ask your specialist dealer.
1 Open the menu with »MENU«.
2 Select menu item »Settings« with »V«, »Λ«, »<« or »>« and press »OK« to confirm.
3 Select the menu item »Source« with »>« or »<« and press »V« to confirm.
– »Source« menu is active.
4 Select the line »Automatic Channel Search« with »V« or »Λ« and press »OK« to confirm.
5 Select the option »Satellite (DVB-S/S2)« with »V« or »Λ« and press »OK« to confirm.
6 Select the line »Antenna Settings« with »V« or »Λ« and press »OK« to confirm.
– The »Antenna Settings« menu is dis-played.
7 Select and set the required option for the antenna settings with »V« or »Λ«:
Satellite Press »OK« then select the required satel-lite with »V« or »Λ« and press »OK« to confirm.
LNB Type Press »OK« then select the required LNB Type with »<« or »>«, enter the required data and confirm with »« (green).
LNB Power Set the LNB power to »Off«, »13/18V« or »14/19V« depending on the LNB type by using »<« or »>«.
LNB selection Only necessary for »DiSEqC 1.0« or »DiSEqC 1.1«, see chapter “Searching for antenna settings for DiSEqC 1.0/1.1 and digital channels from a satellite automati-cally”.
SETTING FURTHER CHANNELS -----------------------------------------------------
8 Exit the antenna settings with »« (blue).
9 Select the Channel Type. Press »V« or »Λ« to select whether you
want to search for only digital channels (Digital) or only radio channels (Radio) or both (Digital + Radio) and press »OK« to select and mark or unmark the »Digital« and/or »Radio« items.
10 Select Scan Mode. To select whether you want to search for
only free digital television channels (Free), only scrambled digital television channels (Scrambled) or both (Free + Scrambled), press »V« or »Λ« and press OK« to select and mark or unmark the »Free« and/or »Scrambled« items.
11 Press »« (red) to start searching.
Notes:7 When updating via the same satellites a
security query is displayed at the start of a search.
7 If the previously stored channels should be retained in the channel list and the new channels found be added to it, then press »« (green).
7 If »« (red) is pressed, the saved channels will be deleted from the current channel list.
– The »Digital Searching« menu appears, and the scan for TV channels begins.
– The search is complete as soon as the message »Search is completed!« appears.
Note:7 The search can be aborted with »EXIT«.
12 Switch to the Channel Editor with »« (yellow);
or
press »EXIT« to end the setting.

Television / User Manual93 / 116 TR
SETTING FURTHER CHANNELS -----------------------------------------------------
Antenna settings, SCR system and searching for digital chan-nels from a satellite automati-cally
Notes:7 Your TV supports SCR system (Single Chan-
nel Router – EN 50494).7 The following description about the LNB set-
tings premise a substantial expertise about the satellite systems. Ask your specialist dealer.
1 Open the menu with »MENU«.
2 Select menu item »Settings« with »V«, »Λ«, »<« or »>« and press »OK« to confirm.
3 Select the menu item »Source« with »>« or »<« and press »V« to confirm.
– »Source« menu is active.
4 Select the line »Automatic Channel Search« with »V« or »Λ« and press »OK« to confirm.
5 Select the option »Satellite (DVB-S/S2)« with »V« or »Λ« and press »OK« to confirm.
6 Select the line »Antenna Settings« with »V« or »Λ« and press »OK« to confirm.
– The »Antenna Settings« menu is dis-played.
7 Select and set the required option for the antenna settings with »V« or »Λ«:
Satellite Press »OK« then select the required satel-lite with »V« or »Λ« and press »OK« to confirm.
LNB type If your antenna system is equipped with a single-cable system multiswitch, use the option »SCR«. Press »OK« and select the »SCR« option with »<« or »>«. Select the »LNB-Frequency High« line with »V« and enter the frequency with »1...0« in five digits.
Select the »LNB-Frequency Low« line with »V« and enter the frequency with »1...0« in five digits. Confirm the settings with »« (green).
LNB selection Depending on the number of LNBs, select the option with »<« or »>«. »1/2« if only 1 LNB is used; if two LNBs are used, select the required LNB (»1/2« or »2/2«).
User band Select the number of the antenna socket used with »<« or »>«.
UB frequency (MHz) Enter the required frequency for the selected antenna socket with »1...0«.
Notes:7 Use installation equipment supported / sug-
gested by your SCR Switch.7 Other users / receivers connected to the
system may be affected if the specified user band number and frequency is changed during installation.
7 User band and user band frequency is specified on the SCR switch used; and each user / receiver must select a specified user band and user band frequency.
7 With SCR satellite system, auto search by several users / receivers at the same time may cause problems.
8 Exit the antenna settings with »« (blue).
9 Select the Channel Type. Press »V« or »Λ« to select whether you
want to search for only digital channels (Digital) or only radio channels (Radio) or both (Digital + Radio) and press »OK« to select and mark or unmark the »Digital« and/or »Radio« items.
10 Select Scan Mode. To select whether you want to search for
only free digital television channels (Free), only scrambled digital television channels (Scrambled) or both (Free + Scrambled), press »V« or »Λ« and press OK« to select and mark or unmark the »Free« and/or »Scrambled« items.

94 / 116 TRTelevision / User Manual
11 Press »« (red) to start searching.
Notes:7 When updating via the same satellites a
security query is displayed at the start of a search.
7 If the previously stored channels should be retained in the channel list and the new channels found be added to it, then press »« (green).
7 If »« (red) is pressed, the saved channels will be deleted from the current channel list.
– The »Digital Searching« menu appears, and the scan for TV channels begins.
– The search is complete as soon as the message »Search is completed!« appears.
Note:7 The search can be aborted with »EXIT«.
12 Switch to the Channel Editor with »« (yellow);
or
press »EXIT« to end the setting.
Antenna settings for DiSEqC 1.0/1.1 and searching digital channels from a satellite auto-matically
Note:7 The following description about the LNB set-
tings premise a substantial expertise about the satellite systems. Ask your specialist dealer.
1 Open the menu with »MENU«.
2 Select menu item »Settings« with »V«, »Λ«, »<« or »>« and press »OK« to confirm.
3 Select the menu item »Source« with »>« or »<« and press »V« to confirm.
– »Source« menu is active.
4 Select the line »Automatic Channel Search« with »V« or »Λ« and press »OK« to confirm.
5 Select the option »Satellite (DVB-S/S2)« with »V« or »Λ« and press »OK« to confirm.
6 Select the line »Antenna Settings« with »V« or »Λ« and press »OK« to confirm.
– The »Antenna Settings« menu is dis-played.
7 Select and set the required option for the antenna settings with »V« or »Λ«:
Satellite Press »OK« then select the required satel-lite with »V« or »Λ« and press »OK« to confirm.
LNB Type Press »OK« then select the required LNB Type with »<« or »>«, enter the required data and confirm with »« (green).
LNB Power Set the LNB power to »Off«, »13/18V« or »14/19V« depending on the LNB type by using »<« or »>«.
LNB selection See DISEqC mode.
SETTING FURTHER CHANNELS -----------------------------------------------------

Television / User Manual95 / 116 TR
DISEqC Mode Based on the number of current satellite sys-tem, select the option »Off« »DiSEqC 1.0« or »DiSEqC 1.1« with »<« or »>«.
– »Off«: For satellite systems with single antenna.
– » DiSEqC 1.0« switch allows for receiving from maximum four satellites at the same time.
From »LNB Selection« use »<« or »> to make the »1/4«, »2/4«, »3/4« or »4/4« selection for the satellite that corresponds to relevant DiSEqC posi-tions.
– » DiSEqC 1.1« switch allows for receiving from maximum sixteen satellites at the same time.
From »LNB selection« use »<« or »>« to make the selections between »1/16« and »16/16« for the satellite that corresponds to relevant DiSEqC positions.
8 Exit the antenna settings with »« (blue).
9 Select the Channel Type. Press »V« or »Λ« to select whether you
want to search for only digital channels (Digital) or only radio channels (Radio) or both (Digital + Radio) and press »OK« to select and mark or unmark the »Digital« and/or »Radio« items.
10 Select Scan Mode. To select whether you want to search for
only free digital television channels (Free), only scrambled digital television channels (Scrambled) or both (Free + Scrambled), press »V« or »Λ« and press OK« to select and mark or unmark the »Free« and/or »Scrambled« items.
11 Press »« (red) to start searching.
Notes:7 When updating via the same satellites a
security query is displayed at the start of a search.
7 If the previously stored channels should be retained in the channel list and the new channels found be added to it, then press »« (green).
SETTING FURTHER CHANNELS -----------------------------------------------------
7 If »« (red) is pressed, the saved channels will be deleted from the current channel list.
– The »Digital Searching« menu appears, and the scan for TV channels begins.
– The search is complete as soon as the message »Search is completed!« appears.
Note:7 The search can be aborted with »EXIT«.
12 Switch to the Channel Editor with »« (yellow);
or
press »EXIT« to end the setting.
Note:7 Repeat the procedure from point 1 for the
settings of the second satellite or any others. These channels will be added to the bottom of the channel table.

96 / 116 TRTelevision / User Manual
SETTING FURTHER CHANNELS -----------------------------------------------------
Motor antenna setup (DiSEqC 1.2)Note:7 The following description about the LNB set-
tings premise a substantial expertise about the satellite systems. Ask your specialist dealer.
Your television supports DiSEqC 1.2 motorized satellite systems. This feature allows to control the satellite through your television.Adjust the satellite antenna position according to each satellite. These settings can be stored and the antenna can be moved to a preset position.
1 Open the menu with »MENU«.
2 Select menu item »Settings« with »V«, »Λ«, »<« or »>« and press »OK« to confirm.
3 Select the menu item »Source« with »>« or »<« and press »V« to confirm.
– »Source« menu is active.
4 Select the line »Manual Channel Search« with »V« or »Λ« and press »OK« to confirm.
5 Select the option »Satellite (DVB-S/S2)« with »V« or »Λ« and press »OK« to confirm.
6 Activate the option »Antenna Settings« with »« (blue).
– The »Antenna Settings« menu is dis-played.
7 Select the line »DiSEqC Mode« with »V« or »Λ« and select »DiSEqC1.2« with »<« or »>«.
– The line »DiSEqC 1.2 SETTINGS« is ac-tive.
8 Select the line »DiSEqC 1.2 SETTINGS« with »V« or »Λ« and press »OK« to confirm.
– »DiSEqC 1.2 SETTINGS« menu is dis-played.
9 Use »V« or »Λ« to select necessary items.
Moving Mode Set the Moving Mode with »<« or »>« to
»Discrete« or »Continuous«. – »Discrete«: Moves the antenna to west or
east for the determined step size. – »Continuous«: Moves the antenna to west
or east continuously.
Step Size With »<« or »>« select the number of steps
the antenna has to rotate. »Step Size« is active when »Moving Mode« is selected as »Discrete«.
Move Motor Adjusts the antenna for the selected satellite.
Set the antenna to »West« with »<« and to »East« with »>«.
– »Go To Stored Position«: Moves the antenna to the preset satellite position. Maximum 50 positions can be saved. Select the setting with »« (green) button, select predefined position with »<« or »>« and confirm with »« (green) button. Antenna will mode to saved position.
– »Store Position«: Stores antenna's current position. Select setting with »« (red) but-ton, select recording position with »<« or »>« and confirm with »« (green) button.
Limit Position – Sets the limit position which the antenna
will be able to move and allows the antenna to move within the determined limits. With »<« specify a limit position in »West« direction and with »>« specify a limit position in »East« direction.
Reset DiSEqC 1.2 Limit – Resets the limit positions set for the an-
tenna.
10 Press »EXIT« to end the setting.

Television / User Manual97 / 116 TR
SETTING FURTHER CHANNELS -----------------------------------------------------
Searching for digital channels from the cable provider auto-matically1 Open the menu with »MENU«.
2 Select menu item »Settings« with »V«, »Λ«, »<« or »>« and press »OK« to confirm.
3 Select the menu item »Source« with »>« or »<« and press »V« to confirm.
– »Source« menu is active.
4 Select the line »Automatic Channel Search« with »V« or »Λ« and press »OK« to confirm.
5 Select the option »Cable (DVB-C)« with »V« or »Λ« and press »OK« to confirm.
– »Automatic Channel Search« menu is displayed.
Scan Type Quick
Frequency AUTO
Network ID AUTO
Picture
Tuesdayxx xxx xxxx
Source TimerSound NetworkTV Parental
Settings > Source > Automatic Channel Search
Continue ExitBack EXITBACKChange Mode
6 Select the line »Scan Type« with »Λ« or »V« and select the option »Quick« or »Full« scan type with »<« or »>«.
– »Quick« scanning function sets the chan-nels according to the cable operator information in the broadcasting signal. Network ID« performs the installation that is suitable to your network. If you know the Network ID, please enter it. If you do not know the Network ID, please select »Auto« for »Frequency« and »Network ID«.
– If scanning cannot be performed with »Quick« option, select »Full«. All current channels are tuned and stored in »Full« scanning. This scanning process can take a long time. This option is recommended if your cable operator does not support quick scanning function.
Note:7 You can speed up the search. To do this,
frequency and network ID information are required. You may get this data from your cable operator or find it in the Internet forums.
7 Confirm the »Continue« with »« (blue).
Note:7 Select whether to search for digital or
analogue TV channels. To do this press »V« or »Λ« to select the option »Digital« or »Analog« and press »OK« to remove or apply the “small tick”.
8 Press »« (red) to start searching.
Notes:7 When updating via the same satellites a
security query is displayed at the start of a search.
7 If the previously stored channels should be retained in the channel list and the new channels found be added to it, then press »« (green).
7 If »« (red) is pressed, the saved channels will be deleted from the current channel list.
– The »Digital Searching« menu appears, and the scan for TV channels begins.
– The search is complete as soon as the message »Search is completed!« appears.
Note:7 The search can be aborted with »EXIT«.
9 Switch to the Channel Editor with »« (yellow) ;
or
press »EXIT« to end the setting.

98 / 116 TRTelevision / User Manual
SETTING FURTHER CHANNELS -----------------------------------------------------
Searching for digital channels from the cable provider manu-ally1 Open the menu with »MENU«.
2 Select menu item »Settings« with »V«, »Λ«, »<« or »>« and press »OK« to confirm.
3 Select the menu item »Source« with »>« or »<« and press »V« to confirm.
– »Source« menu is active.
4 Select the line »Manual Channel Search« with »V« or »Λ« and press »OK« to confirm.
5 Select the option »Cable (DVB-C)« with »V« or »Λ« and press »OK« to confirm.
6 Select whether to search for digital or ana-logue TV channels.
To to this press »V« or »Λ« to select the option »Digital« or »Analogue« and confirm with »OK«.
7 With »V« select »Frequency (MHz)« and enter frequency (4-digit) directly with »1...0«; search will start.
– The search is finished when the channels found appear in the list.
8 Press »EXIT« to end the setting.
Searching for digital terrestrial TV channels automatically1 Open the menu with »MENU«.
2 Select menu item »Settings« with »V«, »Λ«, »<« or »>« and press »OK« to confirm.
3 Select the menu item »Source« with »>« or »<« and press »V« to confirm.
– »Source« menu is active.
4 Select the line »Advanced« with »V« or »Λ« and press »OK« to confirm.
5 Select the line »Active Antenna Power« with »V« or »Λ«.
Switch on the antenna power supply for the antenna with »<« or »>« (»On«).
Important:7 The antenna power supply (5V ) may only
be switched on if the antenna is an active indoor antenna with a signal amplifier and it is not already supplied with a voltage via a mains plug (or similar supply). Otherwise you may cause a short circuit and irrepara-bly damage your antenna.
6 Press »BACK <« to go back one menu level.
7 Select the line »Automatic Channel Search« with »Λ« or »V« and press »OK« to confirm.
8 Select the option »Air (DVB-T/T2)« with »Λ« or »V« and press »OK« to confirm.
9 Select whether to search for digital or ana-logue TV channels.
To to this press »Λ« oder »V« to select the option »Digital« or »Analogue« and confirm with »OK«.
10 Press »« (red) to start searching.
Notes:7 When updating via the same satellites a
security query is displayed at the start of a search.
7 If the previously stored channels should be retained in the channel list and the new channels found be added to it, then press »« (green).
Television / User Manual99 / 116 TR
7 If »« (red) is pressed, the saved channels will be deleted from the current channel list.
– The »Digital Searching« menu appears, and the scan for TV channels begins.
– The search is complete as soon as the message »Search is completed!« appears.
Note:7 The search can be aborted with »EXIT«.
11 Switch to the Channel Editor with »« (yellow) ;
or
press »EXIT« to end the setting.
SETTING FURTHER CHANNELS -----------------------------------------------------
Searching for digital terrestrial TV channels manually1 Open the menu with »MENU«.
2 Select menu item »Settings« with »V«, »Λ«, »<« or »>« and press »OK« to confirm.
3 Select the menu item »Source« with »>« or »<« and press »V« to confirm.
– »Source« menu is active.
4 Select the line »Advanced« with »V« or »Λ« and press »OK« to confirm.
5 Select the line »Active Antenna Power« with »V« or »Λ«.
Switch on the antenna power supply for the antenna with »<« or »>« (»On«)
Important:7 The antenna power supply (5V ) may only
be switched on if the antenna is an active indoor antenna with a signal amplifier and it is not already supplied with a voltage via a mains plug (or similar supply). Otherwise you may cause a short circuit and irrepara-bly damage your antenna.
6 Press »BACK <« to go back one menu level.
7 Select the line »Manual Channel Search« with »Λ« or »V« and press »OK« to confirm.
8 Select the option »Air« with »Λ« or »V« and press »OK« to confirm
– »Manual Channel Search« menu is dis-played.
9 Select whether to search for digital or ana-logue TV channels.
To to this press »Λ« or »V« to select the option »Digital« or »Analogue« and confirm with »OK«.
10 Enter frequency (3-digit) directly with »1...0«.
– Search will start. – The search is finished when the channels
found appear in the list.
11 Press »EXIT« to end the setting.

100 / 116 TRTelevision / User Manual
SETTING FURTHER CHANNELS -----------------------------------------------------
Automatic service update If this function is activated, possible changes of network operators are updated automatically.The unit must be located in stand-by mode.This updating affects all types of reception - ter-restrial, cable and satellite.1 Open the menu with »MENU«.
2 Select menu item »Settings« with »V«, »Λ«, »<« or »>« and press »OK« to confirm.
3 Select the menu item »Source« with »>« or »<« and press »V« to confirm.
– »Source« menu is active.
4 Select the line »Advanced« with »V« or »Λ« and press »OK« to confirm.
5 Select the line »Automatic Service Update« with »V« or »Λ« and select the automatic update with »<« or »>« (»On«).
6 Press »EXIT« to end the setting.
Tuning analogue television channelsThis setting is only necessary if you cannot receive any digital channels and you have not carried out an analogue search during initial setup.The television channel can be set directly or using the search.
Setting all analogue television channelsThe analogue television stations are listed in the channel list after the digital television stations.
Note:7 Plug the rooftop antenna cable (for ana-
logue television stations) into the ANT IN socket on the television.
1 Open the menu with »MENU«.
2 Select menu item »Settings« with »V«, »Λ«, »<« or »>« and press »OK« to confirm.
3 Select the menu item »Source« with »>« or »<« and press »V« to confirm.
– »Source« menu is active.
4 Select the line »Automatic Channel Search« with »V« or »Λ« and press »OK« to confirm.
5 Select the option »Air (DVB-T/T2)« or »Cable (DVB-C)« with »V« or »Λ« and confirm the source you are receiving analog broadcast from by pressing »OK«.
6 Select the option »Digital« with »V« or »Λ« and press »OK« to remove the small tick.
7 Press »« (red) to start searching.

Television / User Manual101 / 116 TR
SETTING FURTHER CHANNELS -----------------------------------------------------
Notes:7 After starting the scan, a security query will
appear. Press »« (green) to confirm the option »Yes«.
– All channel and favourites lists for the analogue channels will be deleted and compiled new.
– The »Analog Searching« menu appears, and the scan for TV channels begins. Depending on the number of television channels received, this can easily take a few minutes.
– The search is complete as soon as the »Search is completed!« appears.
Note:7 The search can be ended prematurely with
»EXIT«.8 Press »« (yellow) to switch to the Chan-
nel Editor;
or
press »EXIT« to end the setting.
Tuning the analogue television channels by entering the channel numbers1 Open the menu with »MENU«.
2 Select menu item »Settings« with »V«, »Λ«, »<« or »>« and press »OK« to confirm.
3 Select the menu item »Source« with »>« or »<« and press »V« to confirm.
– »Source« menu is active.
4 Select the line »Manual Channel Search« with »V« or »Λ« and press »OK« to confirm.
5 Select the option »Air (DVB-T/T2)« or »Cable (DVB-C)« with »V« or »Λ« and confirm the source you are receiving analog broadcast from by pressing »OK«.
6 Select the option »Analog« with »V« or »Λ« and press »OK« to confirm.
– Menu is displayed.
7 Select the line »Program No« with »V« or »Λ« and press »<«, »>« or »1…0« to select the preset.
8 Select the line »Band« with »V« or »Λ«. To select »S« (special channel) or »C« (chan-nel) options press »<« or »>«.
9 Select the line »Channel« with »V« or »Λ«. To enter the channel number step by step, press »<« or »>« or enter it directly with »1…0« or
start a automatic scan with »« (green) or »« (yellow).
Note:7 »The current system is displayed in the
»System«. If the colour and/or sound is not functioning correctly, select »System« with »V« or »Λ. Select the required setting with »<« or »>«.
7 When fine tuning is required, select »Fine Tuning« with »V« or »Λ« and tune with »<« or »>«.
10 To save the setting press »« (blue).
Note:7 To set other television channels, repeat
steps from 7 to 10.
11 Press »EXIT« to end the setting.

102 / 116 TRTelevision / User Manual
SETTING FURTHER CHANNELS -----------------------------------------------------
Changing stored analogue channelsIf channels were stored with the automatic chan-nel search during the tuning of the television channels, you can delete them. You can also change or enter the name of a channel and skip a channel.
Selecting channel lists1 Open the menu with »MENU«.
2 Select menu item »Settings« with »V«, »Λ«, »<« or »>« and press »OK« to confirm.
3 Select the menu item »Source« with »>« or »<« and press »V« to confirm.
– »Source« menu is active.
4 Select the line »Channel Editor« with »V« or »Λ« and press »OK« to confirm.
– »Channel Editor« menu is displayed.
Note:7 Additional operations are explained in the
following sections.
Deleting channels1 In the »Channel Editor« menu, select the
channel(s) you want to delete with »V«, »Λ«, »<« or »>«, and highlight the televi-sion channel by pressing »OK«.
–Channel is marked with »✔«.
Note:7 If several TV channels are to be deleted,
press »V «, »Λ«, »<« or »>« to select these and mark each one with »OK«.
2 Activade the »Tools« menu with »« (yel-low).
3 Select the line »Delete« with »V « or »Λ« and press »OK« to confirm.
4 To confirm deletion process, select the op-tion »OK« with »<« or »>« and press »OK« to confirm;
or
to cancel deletion process, select the option »No« with »<« or »>« and press »OK« to confirm.
5 Press »EXIT« to close the menu.
Entering the analog channel names (maximum 8 characters)1 In the »Channel Editor« menu, select the
channel you want to rename with »V«, »Λ«, »<« or »>«, and highlight it by press-ing »OK«.
– Channel is marked with »✔«.
2 Activade the »Tools« menu with »« (yel-low).
3 Select the line »Rename« with »V « or »Λ« and press »OK« to confirm.
4 Delete the current channel name step-by-step with »« (red).
5 Select the required character with »V«, »Λ«, »<« or »>« and move to the next character with »OK«.
– Using »Shift« ➡ »OK«, you can switch between uppercase letters / numbers and lowercase letters / special characters.
– Select »Del« to delete the character entered and press »OK« to confirm.
6 Confirm the channel name with »« (green).
Note:7 To enter other channel names, repeat steps
1 to 6.

Television / User Manual103 / 116 TR
SETTING FURTHER CHANNELS -----------------------------------------------------
Creating a list of favourites - analog channelsYou can select your favourite channels and save them in up to four lists (FAV1 to FAV4).
1 In the »Channel Editor« menu, select the channel(s) you want to add in the favor-ites list with »V«, »Λ«, »<« or »>«, and highlight the television channel by pressing »OK«.
–Channel is marked with »✔«.
2 Activade the »Tools« menu with »« (yel-low).
3 Select the line »Add To Fav.« with »V « or »Λ« and press »OK« to confirm.
–»Add to Fav.« menu is displayed.
4 Select the favorite list you want to add the selected channels with »V « or »Λ« and store with »OK«.
– The channels are marked in the Channel Editor with »❶«, »❷«, »❸« or »❹«.
– You can add the same channel in more than one favourites list.
– Each favourite list can contain maximum 255 channels.
Notes:7 You can delete channels from the favou-
rites list. Press »« (yellow), select the favorites list the channel is in with »V« or »Λ« and press »OK« to confirm. Select the channel(s) you want to delete with »V«, »Λ«, »<« or »>«, and highlight the channel by pressing »OK«.
Press »« (yellow) and select the line »Remove from Fav.« with »V« or »Λ« and confirm with »OK«. The channel you have selected is now deleted from the favorites list.
7 When a channel stored in the favourite channel list is deleted channel order in the favourite list is updated.
5 Press »EXIT« to close the menu.
Displaying signal information(only for digital television channels)1 Open the menu with »MENU«.
2 Select menu item »Settings« with »V«, »Λ«, »<« or »>« and press »OK« to confirm.
3 Select the menu item »Source« with »>« or »<« and press »V« to confirm.
– »Source« menu is active.
4 Select the line »Advanced« with »V« or »Λ« and press »OK« to confirm.
5 Select the line »Signal Information« with »V« or »Λ« and press »OK« to confirm.
– »Signal Information« menu is displayed.
Notes:7 Signal information changes depending on
the current source.7 Signal information is shown at the top of the
menu. The more »Frequency« and »Signal Strength« bar stretches to the right, the more signal you have.
7 The signal level not only depends on your receiver system, but also on the channel which is currently active. Remember this when aligning your antenna using the signal level display.
6 Press »EXIT« to close the menu.

104 / 116 TRTelevision / User Manual
INFORMATION -------------------------------------------------------------------------------------------------
Wireless LAN Module specification(if WiFi module is available) Standard: IEEE802.11b/g/n Frequency Range: Output Power (Max) 2400 MHz to 2483.5 MHz: <20dBmWireless LAN Module specification(if WiFi module is available) Standard: IEEE802.11a/n/ac Frequency Range: Output Power (Max) 5150 MHz to 5250 MHz: <23dBm 5250 MHz to 5350 MHz: <23dBm 5725 MHz to 5850 MHz: <23dBmBluetooth Module specification(If bluetooth module is available) Frequency Range: Output Power (Max) 2400 MHz to 2483.5 MHz: <20dBm
Service information for dealersThis product complies with European Union directives and regulations below:2014 / 53 / EU Radio equipment
directive.2009/125/EC: Directive and relevant for eco-design for products using energy as well as its following sub-directives.278/2009: Regulation regarding eco friendly design requirements regarding energy consumption of uncharged external power sources and average active efficiency (for models with AC/DC adapters).642/2009: Regulation regarding eco friendly design requirements for televisions.801/2013 on Changes About Environment-Friend-ly Design Requirements for Televisions. 2010/30/EU: Directive regarding Energy Label-ling of Energy-Related products as well as its following sub-directives; 1062/2010: Regulation regarding energy label-ling of televisions. 2011/65/EU: Directive on limitations on use of certain hazardous materials on electric, electronic domestic and office equipment.To receive a copy of declaration of compliance (DoC) visit: http://www.grundig.com.tr You can access the declaration of compliance by running your televi-sion model on the product model search section by entering the model number on the cover of the user’s manual.
Notes for WLAN reception The following information is only applicable for devices that are sold in the countries enforcing EU regulations. TV’s wireless system can only be used in the countries given in the table below.
AT BE BG CH CY CZ DE DK EEES FI FR GB GR HU IE IS ITLI LT LU LV MT NL NO PL PT
RO SE SI SK HR TRThis device can also be operated in the coun-tries outside Europe.
For the customers in ItalyPublic use is subject to service provider’s permis-sion.For the customers in Norway;Radio equipment use is not allowed in a graphi-cal area within 20 km diameter of Ny-Alesund, Svalbord.
For the customers in TurkeyThis device’s WLAN (Wifi) feature is only used indoors. In Turkey, outdoor use is not allowed. Make sure WLAN (Wifi) feature is closed when using outdoors.
For the customers in NorwayThis sub-section does not apply to the geograph-ical region within a radius of 20 km from the centre of NyÅlesund.
Television / User Manual105 / 116 TR
INFORMATION -------------------------------------------------------------------------------------------------
Network interfacesThis product is intended for connection to the ADSL network.
Disposing of the packagingThe packing materials are dangerous for chil-dren. Keep the packing materials out of the reach of children. The packing of your product is manufactured from recyclable materials. Dispose by classifying in accordance with waste instructions. Do not dispose along with normal household waste.
Environmental noteThis product has been made from high-quality parts and materials which can be re-used and recycled.
Therefore, do not dispose of the product with normal household waste at the end of its life. Take it to a collection point for recycling electri-cal and electronic devices. This is indicated by this symbol on the product, in the operating manual and on the packaging.Please find out about collection points operated by your local authorities.Help protect the environment by recycling used products.
Explanation of the symbols which may be present on back side of the television set
Class II or Double insulation. Television set doesn’t require connection to electrical earth (ground).
Alternating current. The set works only with AC line volt-age in your household electric-ity.
Direct current. The set works only with AC/DC adapter.
For the customers in RussiaShort Range Device with FHSS Modulation Applications.Maximum 2.5 mW e.i.r.p.for collecting telemetry information for auto-matic tracking and source calculation systems, 100mW e.i.r.p is the maximum allowed short range device density value permitted for use on outdoor applications without any limitation on installation height. For uses with other purposes, this applies to outdoor application in which this value does not exceed 10m above the ground.Short range device density for indoor applica-tions is 100mW e.i.r.p maximum.Short range device applications with broad-band modulation with DSSS and other than FHSS.The maximum average density value for short range device applications with broadband modulation with DSSS and other than FHSS is 100mW e.i.r.p.For only the purpose of compiling telemetry data for automatic monitoring and source estimation systems, maximum short range device allowed to be used in outdoor applications is 20 mW/MHz or 100 mW e.i.r.p.Maximum density value for indoor use of short range devices is 10mW/MHz or 100 mW e.i.r.p.
For the customers in UkraineMaximum short range device density value for indoor uses, along with internal antenna with 6 dBi amplification factor, is 100 mW e.i.r.p.

106 / 116 TRTelevision / User Manual
INFORMATION -------------------------------------------------------------------------------------------------
TroubleshootingIf the remedies given below do not work, please consult an authorised dealer. Please bear in mind that malfunctions can also be caused by external devices such as video recorders or satellite receiv-ers.
Problem Possible cause Remedy
Screen lit (snow), but no station
Antenna cable Is the antenna cable connected?
No TV station programmed Start a station search
Poor picture contrast Picture settings incorrectly set Adjust the brightness, contrast or colour setting
Problem at station Test with a different station
Interference to picture and/or sound
Interference from other devices Change the position of the device
Ghosting, reflection Channel setting Automatic or manual channel set-ting/fine tuning
Antenna Have antenna cable or system checked
No colour Colour intensity at maximum Turn up the colour
TV standard setting (if setting op-tion is available)
Select the correct colour standard
Problem at station Test with an another channel
Picture but no sound Volume set to minimum Turn up or switch on the volume
Teletext missing or faulty Problem at station Test with an another channel
Television station ( has no tele-text) or antenna system
Test another channel for fine tun-ing and ghosts
Station signal too weak Check the antenna system
Remote control does not work
No optical connection Point the remote control at the television set
Remote control batteries Check the batteries, change if necessary
Operating condition undefined Switch off the television with the main power button for approxi-mately 2 minutes
Picture is dark in PC mode Incorrect setting for picture reso-lution and picture frequency on the PC
Change the setting on the PC (for example, picture resolution 1280 x 768, picture frequency 60Hz)
DMS device cannot be found
DMS device is not switched on or not started
Make sure that the DMS device is on and operating.
Network connection settings are not made.
Check the network settings.

Television / User Manual107 / 116 TR
Note:7 This is a Class A product. During operation the device can cause radio interference. In this case
the user may have to remedy this. Please contact your specialist dealer.
Low image quality (pixel) in WLAN mode
DMS (for example PC) is con-nected to the wireless network and away from the modem
Bring your DMS closer to the modem
Warnings about the con-nection problems on the display
Network Cable or wireless USB network device may be discon-nected
Check network cable or wireless USB network device
Modem do not have Internet connection or has problems
Make sure that your modem has Internet connection
Videos in video applica-tions are lagging during playback in wireless con-nection
Internet connection speed is low. Low Internet speed is a problem that is related with the speed of your subscription or a failure in the Internet infrastructure. Contact with your service provided (ISP).
Videos in video applica-tions are lagging during playback in cable con-nection
Internet connection speed is low. Low Internet speed is a problem that is related with the speed of your subscription or a failure in the Internet infrastructure. Contact with your service provided (ISP).
There are connection problems in Inter@ctive ap-plications.
This may occur due to temporary problems in servers of these ap-plications
Try connecting to the applications again
INFORMATION -------------------------------------------------------------------------------------------------
108 / 116 TRTelevision / User Manual
GLOSSARY --------------------------------------------------------------------------------------------------------------
Depending on the television model.
ARCThe ARC (Audio Return Channel) can be used to play back the audio signal from the television channel using an HDMI cable or an optical cable with a multi-channel amplifier.
BacklightManual setting for back lighting (only active if dynamic back lighting is switched to “OFF”). This setting also directly impacts power con-sumption.
Block Noise ReductionThis function can only be selected with digital reception sources and AV presets. It reduces any interference from artefacts (pixel blocks) from digital programmes due to MPEG compression (such as from DVB-T receivers and lower trans-mission rates or DVD players).
Boot loader versionBoot loader is a software application that is loaded by the device firmware from a bootca-pable medium and then executed. The boot loader then loads further parts of the operatingsystem.
Common InterfaceInterface for a DVB receiver. Encrypted chan-nels can only be viewed with a CA module suitable for the encryption system and in con-junction with the corresponding smart card.
DigilinkThis function uses the CEC (Consumer Electron-ics Control) protocol. CEC allows external devices connected to the HDMI sockets with an HDMI cable (e.g. DVD player) to be operated with a remote control.
DiSEqCDiSEqC (Digital Satellite Equipment Control) is a digital system for controlling complex satellite systems with a motor or several LNBs. DiSEqC is necessary if two or more satellite posi-tions need to be controlled.
DLNA
Digital Living Network Alliance (DLNA) is an international association of entertainment electronics, IT hardware and mobile telephone manufacturers that aims to ensure perfect com-munication between IT devices in the home and personal use sector. The system lets you load and play any accessible files on the network on your Grundig LED TV simply by using the remote control – without the inconvenience of connect-ing a USB hard disk or burning DVDs.
Domain name systemThe domain name system (DNS) is one of the most important services on the Internet. Its main function is to convert an Internet address into the corresponding IP address.
DVB-CDVB-C (Digital Video Broadcasting – Cable) and the successor DVB-C2 standard are varia-tions of DVB which is used for transmitting digital radio and television signals via a cable connec-tion.
DVB-SDVB-S (Digital Video Broadcasting – Satellite) is the name given to broadcasting DVB signals via satellite.
DVB-TDVB-T (Digital Video Broadcasting – Terrestrial) is a variation of DVB which is used for transmit-ting digital radio and television signals via a cable connection.

Television / User Manual109 / 116 TR
Dynamic ContrastThe function dynamically and optimally adjusts the contrast for the respective picture content by analysing images and then altering this depend-ing in a change in contrast. This increase the contract, however may also reduce the visible brightness levels in the picture.
Film modeDetects and processes feature films automati-cally for all channel sources. This means you will always receive an optimal picture. This functions in the modi 480i, 576i and 1080i in TV playback and for other channel sources. If the »Film mode« is switched on for pro-grammes without a feature film signal, minor problems such as picture freeze, defective sub-titles or fine lines in the picture could occur.
Firmware versionFirmware is the term used for software that is em-bedded in a programmed chip (microcontroller). It is mostly stored in a flash memory, an EPROM or an EEPROM. The firmware contains functions for controlling the device.
GammaThis setting establishes which brightness value should be displayed for which digital transmis-sion value. Most recordings are transmitted with a gamma value of 2.2 (all Windows PCs and newer PCs with a MAC operating system work with this, older MAC systems and transmissions without colour profile mostly operate with a gamma value of 1.8).
GLOSSARY --------------------------------------------------------------------------------------------------------------
Gateway IPA gateway allows networks, which may be based on completely different protocols, to communicate with each other. In the home area, a combination of the router and the DSL modem are used as an Internet gateway.
Hardware versionHardware in this context means the device. This includes all components such as processor, display, etc.
HbbTVHbbTV is the interactive successor of video text, which has content with a modern design, high resolution images and video¬sequences. For full functionality of HbbTV, the TV must be connected to the internet.
HDHigh Definition Television is a general term for a range of television standards which feature increased vertical, horizontal or temporal resolu-tion.Full HD is a feature of an HDTV capable device which is able to output or record an HD resolu-tion of 1920 x 1080 pixels.
IP addressAn IP address (Internet protocol address) is used to uniquely identify the address of computers and other devices in an IP network. The most well-known network in which IP addresses are used is the Internet. Here, for example, web servers are addressed using the IP address. The IP address can be provided automatically by the router (automatic address) or can be entered manually in the router (static address). If it is entered manually, this address must also be entered in the hi-fi system.
JPEGJPEG stands for Joint Picture Experts Group. It denotes a process for compressing picture files.

110 / 116 TRTelevision / User Manual
GLOSSARY --------------------------------------------------------------------------------------------------------------
LIVE SHAREWith Live Share, you can stream all the content between WiDi™/Miracast™ certified mobile devices (smartphone or tablet) and the television via wi-fi. You can also easily stream HD content onto the television, and of course vice-versa by transmitting TV content to mobile devices.
LNBLow Noise Block is located in the centre of a parabolic antenna.It converts the satellite frequency from, for ex-ample, 10.7 to 11.75 or 11.8 to 12.75 GHz to the 950-2150 MHz range, thereby enabling the cable transmission using a coaxial cable and more recently also with optical fibre and recep-tion with a satellite receiver.
MEMCImproves the display of moving images through the additional computation of intermediate pic-tures and is only available for devices from 32”. It is displayed with a PPR of 400 (Picture Perfec-tion Rate). If the adjustment value is too high, this may result in ghosting with poor transmission due to the incorrect computation of the interme-diate pictures.
MP3MP3 is the abbreviation for MPEG-1 Level 3 and is based on the MPEG-1 standard, which was developed by the MPEG (Motion Picture Expert Group).
NAS (network access storage)The abbreviation NAS is used for devices that provide data from a hard drive to a network. Network name (SSID) The network name (SSID – service set identifier) is the term used for the identification of a wireless network that is based on IEEE 802.11. Every wireless LAN has a configurable SSID, which uniquely identifies the wireless network. The character sequence of the network name can be up to 32 characters in length. It is configured in the base station (access point) of a wireless LAN and set on all clients which access it.
Network maskThe network mask or net mask, sometimes also referred to as a subnet mask, is a bit mask that separates an IP address into a network part and a device/host part. It is used in IP networks to make routing decisions.
Nois ReductionReduces the visible snow by displaying the picture a little less sharply and creating a slight blurring. Should therefore be used minimally with good picture material.
Perfect ClearImproves the general image by means of a gentle blue hue (giving the appearance of greater sharpness) and improves the black level by setting this entirely to black from specific shade of back. This reduces the visible grey values in the dark areas of the picture.
Private IP addressPrivate IP addresses belong to particular IP ad-dress ranges that are not routed in the Internet. They can be used by anybody for private Net-works, such as LANs. Many computer networks require complete connectivity at IP level, but only limited access to the Internet. If such a com-puter network has a private IP address range, it forms an intranet which cannot be accessed from the Internet as the Internet routers ignore private address ranges. A gateway or router that is placed in this private network and which has a public address in the Internet as well as a private IP address makes the connection to the Internet. This can be performed by a proxy or

Television / User Manual111 / 116 TR
using NAT/PAT/Masquerading. As the address range used can only be viewed within the pri-vate network, the same range can also be used in other private networks. The unique nature of an IP address required by the Internet protocol is ensured by this restricted visibility.
Proxy serverA proxy or proxy server is a service program for computer networks that administers data trans-fer. It makes data transfer faster, and can also increase security by implementing access control mechanisms. The transfer is conducted between computers or programs in computer networks. On the server side, the proxy acts as a client; on the client side, it acts as a server.
RouterA router is a network component that links sev-eral computer networks. The router analyses (on the basis of layer 3 information) the network packages of a protocol it receives and forwards it to the intended destination network. Conven-tional routers work on layer 3 of the application layer. A router has an interface for every net-work connected to it. When data is received, the router determines the correct path to the destina-tion and thereby the suitable interface via which the data can be transferred. For this it uses a locally available routing table that specifies via which router connection a particular network can be reached.
RoviGuide™Electronic channel guide with various informa-tion on the television programmes.
SCR (Single Channel Router)Unrestricted single cable system. If your antenna system is equipped with a single cable multi-switch, the televisions which are con-nected to this antenna system can receive televi-sion channels independently from one another.
Security (WEP/WPA)WEP (wired equivalent privacy) is the standard encryption algorithm for WLAN. It controls both access to the network as well as ensuring the confidentiality and integrity of data. This proce-dure is considered insecure nowadays. For this reason, more recent WLAN installations should use the more secure WPA encryption.
SymbolrateThis is the number of transmitted symbols in the digital transmission technology per time unit
TimeshiftYou can pause the programme you are watch-ing. This is a useful function, for example if the telephone rings while you are watching a film and you do not want to miss anything.The programme is saved in the time¬shift memo-ry of the external data medium.A maximum of 60 minutes of the current programme can be recorded in the time shift memory.
TransponderA transponder receives data on a satellite and then transmits it again. For example, an earth station can transmit data signals for television channels to a geostationary satellite, which sends this back to earth. Any suitable satellite antenna with visual contact to the satellite can receive the signal.
UHD TVUltra High Definition Television (UHDTV or Ultra HDTV) and Ultra High Definition Video (UHDV) are a digital video format which includes two picture resolutions (4K and 8K). Resolution: 3840 × 2160 (UHD-1) or 7680 × 4320 pixels (UHD-2).
GLOSSARY --------------------------------------------------------------------------------------------------------------

112 / 116 TRTelevision / User Manual
USB-RecordingEnables recording and playback of television programmes with digital television channels (DVB-S, DVB-T and DVB-C). This depends on the broadcaster.Recording and playback of programmes can only be carried out using an external data me-dium (hard drive or USB stick).
Vibrant ColourIncreases the colour contrast and the contrast adjustment. This setting is mostly too strong for use with normal pictures and should only be used where necessary (low or off) otherwise nuances in the image can be suppressed.
Wi-FiThe Wi-Fi Alliance is an organisation that has taken on the task of certifying products from different manufacturers on the basis of the IEEE-802.11 standard, thereby ensuring that different wireless devices can operate in parallel.On 31 October 2002, the consortium an-nounced a new encryption technology – Wi-Fi Protected Access (WPA) – a part of the (then) forthcoming IEEE standard 802.11i which would replace the WEP encryption procedure, which was already regarded as insecure before the new standard came into force. After 802.11i came into force, the Wi-Fi group coined the term WPA2.IEEE 802.11e is an industrial standard issued by the Institute of Electrical and Electronics En-gineers (IEEE) and a supplement to the wireless LAN standard IEEE 802.11 for supporting the quality of service.802.11e works according to a similar principle as the QoS procedure DiffServ. Data packages in the WLAN are marked by the sender and the access point is stopped in order to handle pack-ages with higher priority.With the aid of 802.11e, real-time application such as Voice over IP are better supported as they require a certain bandwidth in the network to ensure the connection is not interrupted if other network traffic creates too great a burden on the available data transfer rate.
GLOSSARY --------------------------------------------------------------------------------------------------------------
Television / User Manual113 / 116 TR
INDEX ----------------------------------------------------------------------------------------------------------------------------
A
Access control for CA module and smart cards.....80Accessible Functions.....61Accessories.....71Adjusting the volume.....31Advanced picture settings.....27Advanced Settings.....62Apply the device with HDMI ARC function and activate HDMI ARC.....77Arrange Initial set-up.....19Audio data.....47Audio description (audio subtitles).....61Audio language.....32Audio settings.....34Automatic connection.....82Automatic service update.....100Automatic volume.....30Auto sleep.....62Auto tuning.....69
B
Blocking a television channel.....67Blocking the multifunction switch.....67
C
Calling up a sub-page directly.....38Change TV Name.....88Changing stored analogue channels.....102Changing the audio language.....60Changing the Channel Editor for the digital channels.....23Changing the font size of the channel guide.....35Changing the keyboard language.....60Changing the menu language.....60Changing the picture format.....33Changing the PIN code.....67Changing the subtitle language.....60Concluding the settings.....28, 30Connecting an external device.....76Connecting automatically by entering the net-work password.....20, 86Connecting digital multi-channel amplifier/AV
receiver.....77Connecting external data media.....40, 48Connecting the antenna and power cord.....10Connecting the TV to a “hidden” network.....89Connecting to a home network with a LAN cable.....20Connection options.....75Connections on the television set.....13Control buttons on the TV.....14Creating a list of favourites.....25Creating a list of favourites - analog chan-nels.....103
D
Date and Time Settings.....69Deactivate and activate digital teletext.....37Deactivate and activate HbbTV.....37Deleting a timer.....45Deleting channel history.....72Deleting channels.....102Deleting channels in the Channel Editor.....24Deleting programmes from the recorded files menu.....46Device Control.....74Displaying all applications.....57Displaying channels in the Channel Editor by antenna type.....24Displaying information.....31Displaying signal information.....103Disposing of the packaging.....105
E
Editing the timer.....45Electronic TV Guide.....35Entering the analog channel names (maximum 8 characters).....102Enter own names for the favourites lists (max. 7 characters).....26Environmental note.....105Equalizer.....29
F
Formatting the partition.....42Forward/reverse picture search.....46

114 / 116 TRTelevision / User Manual
INDEX ----------------------------------------------------------------------------------------------------------------------------
G
General information.....7Getting Started with Smart Inter@ctive TV.....56SCR System.....8
H
HbbTV Mode.....36High definition – HD ready.....75
I
Image data.....47Important notes on environmental protection.....8Increasing character size.....38Information on recording and playing television programmes.....39Initial set-up.....17Inserting batteries in the remote control.....12Inserting the CA module.....80
L
Language settings.....60LNB Settings.....92Locking the menus.....66
M
Magic Fidelity.....29Manual connection.....83, 87Manual tuning.....69Motor antenna setup (DiSEqC 1.2).....96Move to desired time.....52Moving the channels in the channel organizer to different channel positions.....24Multimedia Server Mode.....53Muting.....31
N
Navigating in the main menu.....58Network connection.....81Network interfaces.....105Network Setup.....81Night Mode.....29Normal text mode.....38Notes for WLAN reception.....104Notes on still images.....8
O
Off timer (Auto Off).....65One-touch programme recording.....43On timer (Auto On).....64Opening the Programme Table.....23Operation with common interface.....80Overview.....13
P
Packing contents.....9Page stop.....38Parental Guidance.....66Parental Settings.....66Picture settings.....27, 34Playback.....46Playback basic functions.....51Playback during a recording.....46Playing selected tracks.....52Playing the video, music and image files with home network connection.....53Possible limitations when using an external data medium.....39Power LED brightness.....62Power save mode.....62Preparing for mounting on the VESA brack-et.....11Product information.....70Programme setting for recording.....44
R
Receiving digital stations.....8Recording a programme from the channel list.....43Recording programmes.....43Remote control - all functions.....15, 16Removing the external data media.....48Renaming AV channels.....26Repeat functions.....52Reset Functions.....72Resetting PIN code.....68Resetting the television to its original state.....72Restore default settings.....28, 30Reveal answer.....38
Television / User Manual115 / 116 TR
S
Screen share with Liveshare connection.....79Searching and selecting the active external device.....73Searching channels by name in the Channel Editor.....24Searching for all digital channels from a satellite automatically.....90Searching for channels from the cable provider automatically.....97Searching for channels from the cable provider manually.....98Searching for digital television channels from a satellite manually.....91, 93, 94Searching for digital terrestrial TV channels automatically.....98Searching for digital terrestrial TV channels manually.....99Searching forward.....52Searching television channels with satellite signal (DVB-S).....21Selecting a broadcast from the recorded files list.....46Selecting a partition on the external media.....41Selecting a track or picture in steps (SKIP).....52Selecting AV channels.....31Selecting channel lists.....102Selecting channels.....31Selecting external data media.....41Selecting internet applications.....57Selecting partition on HD files.....52Selecting stations from lists.....31Selecting the digital media server.....53Selecting the display duration of the slide show.....50Selecting the display mode.....49Selecting the HDMI source from the televi-sion.....73Selecting the menu.....41, 49Selecting the menu language.....73Selecting the operating mode.....31Selecting titles on HD files.....52Sequencing channels in the Channel Edi-tor.....25Service information for dealers.....104Set the lead/follow-up time.....44
INDEX ----------------------------------------------------------------------------------------------------------------------------
Setting all analogue television channels.....100Setting further channels.....90Settings for connecting to the home net-work.....17Settings in the USB setup menu.....49Settings recovery.....72Setting up or hanging.....11Setting up with stand.....11Set-up and safety.....5Skipping the waiting time.....38Sleep timer.....33, 64SMART Inter@ctive TV 4.0 internet applica-tions.....56Software of the device.....70Software update (Internet).....70Software update (OAD).....70Software update (USB).....70Sorting channels in the favorites list.....25Sound Mode.....29Sound settings.....29Special features of your television set.....7Splitting the screen (Split Screen).....38Stereo/dual channel.....29Store logo view.....62Subtitle Mode.....61Subtitles.....32Subtitle settings.....50Switching off the external device from standby mode.....73Switching on and off.....31Switching the device to standby.....74Switching to automatic preview.....49
T
Teletext Mode.....38Testing external data media.....41The Digi Link functions of the television.....73The file browser.....49The main menu of the file browser.....49Timer Functions.....64Time shift – ″ Pausing” programmes.....42TOP text or FLOF text mode.....38Troubleshooting.....106Tuning analogue television channels.....100

116 / 116 TRTelevision / User Manual
INDEX ----------------------------------------------------------------------------------------------------------------------------
Tuning cable digital television channels (DVB-C).....21Tuning channels.....17Tuning terrestrial digital television channels (DVB-T).....22Tuning the analogue television channels by entering the channel numbers.....101Turning on external device from standby mode.....73Turn the picture display.....52TV operation – additional functions.....33TV operation – Basic functions.....31
U
USB keyboard and mouse.....56USB Opertion.....47USB Recording.....39USB recording settings.....41Using a DVD recorder, DVD player, video recorder or set-top box.....77Using external devices.....73Using HbbTV.....37
V
Video data.....47
W
Watching a blocked television channel.....68WEB Browser.....59Web browser applications.....59Web browser menu.....59What is common interface?.....80What is HbbTV?.....36What is LIVESHARE?.....79Wired network.....81Wired network connection.....81Wired network settings.....82Wireless network.....84Wireless network connection.....84Wireless network settings.....84Wireless screen share (Liveshare).....79Wireless WPS network connection through by pressing a button.....85Wireless WPS network connection with PIN.....85
Z
Zap function.....32Zoom function.....33

2 / 118 TRFernseher / Bedienungsanleitung
INHALT--------------------------------------------------------------------------------------------------------------------------
5- AUFSTELLEN-UND-SICHERHEIT5 Über Ihr Fernsehgerät5 Bestimmungsgemäßer Gebrauch5 Sicherheit 6 Umwelthinweise
7- ALLGEMEINE-INFORMATIO-
NEN-7 Ausstattung des Fernsehgerätes8 Digitale Programme empfangen8 SCR System8 Wichtige Hinweise zum Umweltschutz8 Hinweise zur LCD/LED Technologie
9- LIEFERUMFANG-9 Beigepacktes Zubehör9 Optionales Zubehör
10- ANSCHLIESSEN/VORBEREITEN10 Antenne und Netzkabel anschließen11 Fernsehgerät aufstellen oder aufhängen12 Batterien in die Fernbedienung einlegen
13- AUF-EINEN-BLICK-13 Anschlüsse des Fernsehgerätes14 Bedienelemente des Fernseh- gerätes15 Fernbedienung – Hauptfunktionen16 Fernbedienung – alle Funktionen
17- ERSTINSTALLATION-17 Einstellungen für die Anmeldung am
Heimnetzwerk17 Einstellungen für Programme18 Erstinstallation – Übersicht19 Erstinstallation durchführen23 Programmtabelle für die
digi talen Programme ändern27 Bildeinstellungen 27 Erweiterte Bildeinstellungen 28 Zurück zu den Standardwerten29 Toneinstellungen 30 Zurück zu den Standardwerten30 Einstellungen beenden
31- FERNSEH-BETRIEB-–--
GRUNDFUNKTIONEN-31 Ein- und Ausschalten31 Programme wählen31 Programme aus Listen wählen31 AV-Programmplätze wählen31 Lautstärke ändern31 Ton aus- und einschalten31 Informationen einblenden32 Audiosprache32 Untertitel32 Zapp-Funktion
33- FERNSEH-BETRIEB-–--
WEITERE-FUNKTIONEN-33 Abschaltzeit eingeben33 Zoomfunktion33 Bildformat umschalten34 Klangeffekte wählen34 Bildmodus wählen
35- ELEKTRONISCHE--
PROGRAMMFÜHRER-35 Schriftgröße des Programmführers ändern
36- HBBTV-BETRIEB-36 Was ist HbbTV37 HbbTV Bedienung37 Weitere Funktionen für Video-sequenzen37 HbbTV aus-/einschalten37 Digitalen Videotext aus-/einschalten
38- VIDEOTEXT-BETRIEB-38 TOP-Text oder FLOF-Text Betrieb38 Normaler Textmodus38 Weitere Funktionen
39- USB-RECORDING-39 Informationen zur Aufnahme und Wieder-
gabe von Fernsehsendungen39 Mögliche Einschränkungen bei dem
Betrieb mit externen Datenträger40 Externe Datenträger anschließen 41 Einstellungen für USB Recording42 Timeshift – Sendungen „anhalten″43 Sendungen aufnehmen44 Sendungen für die Aufnahme program-
mieren ...

Fernseher / Bedienungsanleitung3 / 118 TR
INHALT--------------------------------------------------------------------------------------------------------------------------
45 Aufnahmedaten im Timermenü ändern45 Aufnahmedaten im Timermenü löschen46 Wiedergabe46 Sendungen in der Aufnahmeliste löschen
47- USB-BETRIEB-47 Dateiformate für den USB-
Betrieb48 Externe Datenträger anschließen 48 Externe Datenträger entfernen49 Dateimanager 49 Einstellungen im Menü
USB-Einrichtung51 Wiedergabe – Grundfunktionen 52 Zusätzliche Wiedergabe-
funktionen
53- BETRIEB-MIT-MULTI-MEDIA-SERVER53 Wiedergabe von Video-/
Musik-/ und Bilddaten vom Heimnetz
55- APLICATION-CENTER-55 Vereinbarungen zu Vertragsbedingungen
und Vertraulichkeit5v Erste Inbetriebnahme und Bedienung55 Inhalte der akzeptierten Vereinbarungen
zu Vertragsbedingungen und Vertraulich-keit anzeigen und Zustimmung widerrufen
56 Anwendungen zu SMART Inter@ctive TV56 USB-Tastatur und -Maus56 Erste Schritte mit Smart Inter@ctive TV58 Anwendungsportal-Hauptbildschirm58 Navigation am Anwendungsportal-Haupt-
bildschirm
59- WEB-BROWSER-59 Hauptmenü des WEB Browsers59 WebBrowser Applikation
60- SPRACHEINSTELLUNGEN-60 Menüsprache ändern60 Audiosprache ändern60 Untertitelsprache ändern60 Tastatursprache ändern
61- BEHINDERTENGERECHTE--
FUNKTIONEN61 Untertitelmodus61 Audiodeskription
62- ERWEITERTE-EINSTELLUNGEN-62 Automatische Abschaltung62 Geschäftslogoanzeige62 Helligkeit der Betriebsanzeige ändern
oder ausschalten62 Energiesparmodus für den
Radio-Betrieb aktivieren63 Wetterinformationen ein-/ ausschalten63 Hilfe
64- TIMERFUNKTIONEN-64 Einschlaftimer aktivieren64 Einschalttimer65 Ausschalttimer
66- JUGENDSCHUTZEINSTELLUNGEN66 Sendungen autorisieren66 Menüs sperren66 Multifunktionsschalter sperren67 PIN-Code ändern67 Fernsehprogramme sperren 68 Ein gesperrtes Fernsehprogramm ansehen68 PIN-Code zurückstellen
69- DATUM-UND-UHRZEIT-EINSTELLEN69 Automatische Einstellung69 Manuelle Einstellung
70- GERÄTESOFTWARE-70 Softwareversion abrufen70 Software aktualisieren (OAD)70 Software aktualisieren
(Internet)70 Software aktualisieren (USB)
71- ZUBEHÖR-VERWALTEN-
72- RESET-FUNKTIONEN-72 Fernsehgerät auf die Werks einstellungen
zurücksetzen72 Kanalverlauf zurücksetzen72 Einstellungen wiederherstellen

4 / 118 TRFernseher / Bedienungsanleitung
INHALT--------------------------------------------------------------------------------------------------------------------------
73- BETRIEB-MIT-EXTERNEN-GERÄTEN73 DIGI LINK73 DIGI LINK-Funktionen des Fernsehgerätes74 Gerätesteuerung74 Gerät in den Bereitschaftsmodus
schalten75 High-Definition75 Anschlussmöglichkeiten76 Externe Geräte anschließen ...77 Betrieb mit DVD-Player, DVD-Recorder,
Videorecorder oder Set Top-Box77 Hi-Fi-System79 Liveshare-Funktion79 Was ist LIVESHARE?79 Bildschirm mit Liveshare-Verbindung
freigeben
80- BETRIEB-MIT-COMMON-INTER-
FACE-80 Was ist ein Common Interface?80 CA-Module einsetzen80 Zugriffskontrolle für CA-Modul und Smart-
card
81- NETZWERK-INSTALLATION-81 Fernsehgerät am Heimnetzwerk anschlie-
ßen und anmelden81 LAN-Verbindung zum Heimnetzwerk82 Anmeldung am Router für den LAN-
Betrieb84 Betrieb über WLAN84 Anmeldung am Router für den WLAN-
Betrieb88 Name des Fernsehgerätes
ändern89 Fernsehgerät bei einem „versteckten“
Netzwerk anmelden
90- WEITERE-PROGRAMME-EINSTELLEN90 Digitale Programme eines Satelliten auto-
matisch aktualisieren91 Digitale Programme eines Satelliten auf
einem Transponter manuell suchen92 Antenneneinstellungen und digitale
Programme eines Satelliten automatisch suchen
93 Antenneneinstellungen, SCR System und digitale Programme eines Satelliten auto-matisch suchen
94 Antenneneinstellungen für DiSEqC 1.0/1.1 und digitale Programme von mehreren Satelliten automatisch suchen
96 Einstellungen für motorisierte Antennen (DiSEqC 1.2)
97 Digitale Programme vom Kabelbetreiber automatisch suchen
98 Digitale Programme vom Kabelbetreiber manuell suchen
98 Digitale terrestrische Fernsehprogramme automatisch suchen
99 Digitale terrestrische Fernsehprogramme manuell suchen
100 Automatische Aktualisierung 100 Analoge Fernsehprogramme einstellen102 Programmbelegung der analogen Pro-
gramme ändern104 Signalinformationen anzeigen105 Servicehinweise für den Fachhandel105 Hinweise für die WLAN-Funktion107 Umwelthinweis107 Netzwerk Interface107 Hinweis zur Produktverpackung107 Erklärung der Symbole, die sich an der
Rückseite des Fernsehers befinden können107 Kundenberatungs-
zentrum108 Problemlösung
110- GLOSSAR-
115- INDEX-

Fernseher / Bedienungsanleitung5 / 118 TR
AUFSTELLEN-UND-SICHERHEIT------------------------------------------------------
Über-Ihr-Fernsehgerät7 Mit Ihrem Fernsehgerät können Sie digitale
Fernsehprogramme über DVB-S, DVB-T und DVB-C sowie analoge Fernsehprogramme empfangen und sehen.
7 Für viele Funktionen benötigt das Fernsehge-rät einen Internetzugang. Das Fernsehgerät ist mit WLAN und einem LAN-Anschluss aus-gestattet.
7 Das Fernsehgerät kann Sendungen aufzeich-nen. Für diese Funktion benötigen Sie einen USB-Datenträger, z. B. eine externe Festplatte (nicht im Lieferumfang). Aufgezeichnete Sen-dungen lassen sich nur auf demselben Fern-sehgerät wiedergeben. Nach einer Reparatur des Fernsehgeräts ist es möglich, dass sich Aufnahmen nicht mehr wiedergeben lassen.
Bestimmungsgemäßer--Gebrauch7 Das Fernsehgerät ist für den Betrieb in trocke-
nen Räumen bestimmt. 7 Benutzen Sie das Fernsehgerät nur mit dem
mitgelieferten Standfuß oder mit einer geeig-neten VESA-Halterung.
7 Das Fernsehgerät ist vor allem vorgesehen zur Wiedergabe von Fernsehsendungen, Streaminginhalten und Ton-Bild-Material von externen Geräten. Jede andere Verwendung ist ausdrücklich ausgeschlossen.
Es ist nicht geeignet als Infodisplay oder zur überwiegenden Verwendung als Computer-monitor.
Wenn lange ein Standbild oder ein nicht formatfüllendes Bild angezeigt wird, können für einige Zeit auf dem Bildschirm sichtbare Spuren davon zurückbleiben. Dies ist kein Mangel, der einen Anspruch auf Gewährleis-tung begründet.
Sicherheit-WARNUNG
Gefahr-eines-Stromunfalls7 Öffnen Sie nicht das Fernsehgerät. Bei Schä-
den, die durch unsach gemäße Eingriffe entste-hen, geht der Anspruch auf Gewährleistung verloren.
7 Das Fernsehgerät darf nur mit dem bei-liegenden Netzkabel/Netzadapter betrieben werden.
7 Betreiben Sie das Gerät nicht mit defektem Netzkabel/Netzadapter.
7 Wenn der Netzstecker des Fernsehgeräts einen Schutzkontakt besitzt, stecken Sie den Netzstecker nur in eine Steckdose mit Schutz-kontakt.
7 Stecken Sie den Netzstecker des Fernseh-geräts erst dann in die Steckdose, wenn Sie die externen Geräte und die Antenne an-geschlossen haben!
7 Schützen Sie das Fernsehgerät vor Feuchtig-keit. Stellen Sie keine mit Flüssigkeiten gefüll-ten Gefäße (Vasen oder Ähnliches) auf das Fernsehgerät.
Brandgefahr7 Halten Sie Kerzen und andere
offene Flammen vom Gerät fern, damit es nicht zu Bränden kommt.
7 Decken Sie nicht die Lüftungsschlitze am Fern-sehgerät ab.
7 Ziehen Sie bei einem Gewitter immer den Netzstecker und den Antennenstecker.
7 Setzen Sie die Batterien keiner extremen Hitze aus, wie z. B. Sonneneinstrahlung, Feuer etc.
7 Verwenden Sie nur Batterien des gleichen Typs (Marke, Größe, Eigenschaften). Verwen-den Sie nicht gebrauchte und neue Batterien zusammen.

6 / 118 TRFernseher / Bedienungsanleitung
WARNUNGVerletzungen-durch-herunterfallendes-FernsehgerätStellen Sie das Fernsehgerät niemals auf einen instabilen Platz. Das Fernsehgerät kann herun-terfallen und dadurch ernsthafte Verletzungen verursachen, im Einzelfall möglicherweise mit tödlichen Folgen. Beachten Sie die folgenden Vorsichtsmaßnah-men: 7 Verwenden Sie nur die vom Hersteller emp-
fohlenen Schränke oder Standfüße.7 Verwenden Sie nur Möbel, welche das Fern-
sehgerät sicher tragen können.7 Stellen Sie sicher, dass das Fernsehgerät nicht
über die Abmessungen des tragenden Mö-bels hinaus ragt.
7 Platzieren Sie das Fernsehgerät nicht auf hohen Möbeln (z.B. Küchenschrank, Bücher-regal), ohne Möbel und Fernsehgerät sicher zu verankern.
7 Stellen Sie das Fernsehgerät nicht auf Stoff oder andere Materialien, die sich zwischen dem Fernsehgerät und dem Möbel befinden.
7 Weisen Sie Kinder darauf hin, dass Gefahren beim Klettern auf Möbel entstehen, wenn das Fernsehgerät erreicht werden soll.
ACHTUNGVerkürzte-Lebensdauer-durch-hohe-Betriebstemperatur7 Stellen Sie das Fernsehgerät nicht in unmit-
telbare Nähe der Heizung oder in die pralle Sonne.
7 Für ausreichende Belüftung halten Sie mindes-tens 10 cm Abstand um das Fernsehgerät ein.
AUFSTELLEN-UND-SICHERHEIT------------------------------------------------------
Verfärbungen-an-Möbeln-durch--Gummifüße7 Manche Oberflächen von Möbeln können
sich bei Kontakt mit Gummi verfärben. Um Möbel zu schützen, können Sie eine Un-terlage aus Glas oder Kunststoff unter den Standfuß legen. Verwenden Sie keine textilen Unterlagen wie Deckchen.
Umwelthinweise7 Entsorgen Sie die Batterien nicht
im Hausmüll. Verbrauchte Batte-rien müssen im Handel oder in
öffentlichen Sammelstellen abgegeben wer-den. Damit schonen Sie die Umwelt.
7 Achten Sie darauf, Verpackungsmaterialien Ihres Produkts separat entsprechend den Richtlinien örtlicher Behörden zu entsorgen, damit sie umweltfreundlichen Recyclingverfah-ren zugeführt werden können.
7 Wenn Sie Ihr Fernsehgerät kurzzeitig nicht benutzen, schalten Sie es in Bereitschaft. In Bereitschaft verbraucht das Fernsehgerät sehr wenig Energie (≤ 0,5 W).
Wenn Sie das Fernsehgerät längere Zeit nicht benutzen, ziehen Sie den Netzstecker aus der Steckdose. Wenn Sie das Fernsehgerät aus-schalten oder von der Spannungsversorgung trennen, funktionieren der Einschalttimer und programmierte Aufnahmen nicht.
7 Wählen Sie den Aufstellort für das Fernsehge-rät so, dass kein direktes Sonnenlicht auf den Bildschirm fällt. Dadurch kann eine geringere Hintergrundbeleuchtung gewählt werden. Das spart Energie.
7 Das Produkt darf am Ende sei-ner Lebensdauer nicht über den normalen Hausmüll entsorgt werden, sondern muss dem
Recycling von elek trischen und elektronischen Geräten zugeführt werden.

Fernseher / Bedienungsanleitung7 / 118 TR
Ausstattung-des--Fernsehgerätes7 Mit Ihrem Fernsehgerät können Sie digitale
Fernsehprogramme (über DVB-S, DVB-T und DVB-C) empfangen und sehen – dazu zählen auch High Definition-Sendungen (HD). Derzeit ist der Empfang solcher digitaler Fernsehprogramme in HD jedoch lediglich in einigen Ländern Europas möglich.
7 Obwohl dieses Fernsehgerät die aktuellen DVB-S-, DVB-T- und DVB-C-Standards (Stand: August 2012) einhält, kann die Kompatibilität mit künftigen DVB-S-Satellitenübertragungen sowie terrestrischen DVB-T- und DVB-C-Kabel-sendungen nicht garantiert werden.
7 Ihr Fernsehgerät kann alle analoge und nicht verschlüsselte digitale Fernsehprogramme empfangen und verarbeiten. Das Fernseh-gerät ist dazu mit digitalen und analogen Empfängern ausgestattet.
7 Der Elektronische Programmführer (nur bei digitalen Programmen) informiert Sie über kurzfristige Pro grammänderungen, sowie über das gesamte Programmangebot der ver schiedensten Sendeanstalten für die nächs-ten Tage.
7 An den USB-Buchsen können Sie verschiede-ne Datenträger wie zum Beispiel eine externe Festplatte, einen USB-Memory Stick oder eine Digital-Camera anschließen. Mit Hilfe des Dateimanagers können Sie dann gezielt die gewünschten Dateiformate (z.B. MP4-, MP3- oder JPEG-Daten) anwählen und abspielen.
7 Mit der Funktion TimeShift (Zeitversetztes Fernsehen) können Sie die Wiedergabe einer Sendung mit einem Tastendruck einfach und schnell anhalten und zu einem späteren Zeit-punkt fortsetzen. Die Sendung wird auf einem externen Datenträger aufgezeichnet.
ALLGEMEINE-INFORMATIONEN-------------------------------------------------
7 Sie können digitale Fernsehprogramme ihrer Wahl aufnehmen.
Die Fernsehprogramme werden vom Fernseh-gerät konvertiert und auf einem externen Da-tenträger – angeschlossen an der USB-Buchse – gespeichert.
Aus dem Archiv des externen Datenträgers können Sie die gespeicherten Sendungen jederzeit anwählen und wiedergeben.
Sie können auch gleichzeitig während einer Aufnahme eine Sendung aus dem Archiv wie-dergeben.
Mehr Informationen zur Aufnahme und Wie-dergabe von Fernsehsendungen erhalten Sie ab Seite 39.
7 Die Option „SMART inter@ctive TV 4.0” Ihres Fernsehgerätes bieten Ihnen den Zugang zum Internet, wenn das Fernsehgerät an Ihrem Heimnetzwerk mit Internetzugang angeschlos-sen ist.
7 Mit einer drahtlosen USB-Tastatur und Maus können Sie im Web-Browser bequem Einga-ben tätigen.
7 Mit der DLNA Funktion können Sie Medien-daten (Videos, Musiktitel und Bilder), die auf einem Digitalen Medien Server (DMS) im Heimnetzwerk gespeichert sind, auf Ihrem Fernsehgerät wiedergeben.
Das Heimnetzwerk wird mit einem LAN-Kabel oder drahtlos über WLAN mit dem Fernseh-gerät verbunden.
Ein DMS kann z.B. ein PC, ein Smartphone oder eine NAS (Network Attached Storage) sein, die den DLNA-Standard (Digital Living Network Alliance) unterstützen.
Der Digitale Medien Server und das Fernseh-gerät müssen sich im selben Heimnetzwerk befinden.

8 / 118 TRFernseher / Bedienungsanleitung
ALLGEMEINE-INFORMATIONEN-------------------------------------------------
Digitale-Programme-empfangen7 Zum Empfang digitaler Satellitenprogramme
(DVB-S) benötigen Sie eine Satellitenantenne.7 Zum Empfang digitaler Fernsehprogramme
(DVB-T) benötigen Sie eine digitale Außen- oder Innenantenne (passive oder aktive Innen-antenne mit eigener Stromversorgung).
7 Wenn Sie digitale Fernsehprogramme über Ihre Kabelanlage empfangen wollen (DVB-C), muss das Antennenkabel des Kabelbetreibers an das Fernsehgerät angeschlossen sein.
7 Anders als bei der Übertragung analoger Programme ist nicht jedem einzelnen digitalen Programm eine eigene Sendefrequenz zu-geordnet, sondern mehrere Programme sind in einem Bouquet auf regionaler oder na-tionaler Ebene gebündelt. Die aktuellen Über-tragungsdaten können Sie im Videotext-Ange-bot verschiedener Sendeanstalten abfragen bzw. einer aktuellen Fernseh-Fachzeitschrift oder dem Internet entnehmen.
7 Verschiedene digitale Fernsehprogramme von privaten Programmanbietern sind verschlüsselt (DVB-S, DVB-T und DVB-C). Das Ansehen dieser Programme und die Aufnahme- und Wiedergabefunktionen sind nur mit dem ent-sprechenden CI-Modul und einer SmartCard möglich. Fragen Sie bitte Ihren Fachhändler!
Das Programmangebot der öffentlich-recht-lichen Programmanbieter (ARD mit EinsExtra, EinsFestival oder ZDF mit ZDF Info und alle dritten Programme) sind unverschlüsselt und können ohne SmartCard empfangen werden.
SCR-System7 (Single Channel Router – Uneingeschränktes
Einkabelsystem). Wenn Ihre Antennenanlage mit einem Einkabelsystem-Multiswitch ausge-stattet ist, können die Fernsehgeräte, die an dieser Antennenanlage angeschlossen sind die Fernsehprogramme unabhängig voneinan-der empfangen.
Wichtige-Hinweise-zum-Umwelt-schutzDie folgenden Hinweise helfen Ihnen, na türliche Ressourcen zu schonen und Kosten zu sparen.7 Sofern das Gerät mit einem Hauptschalter
ausgestattet ist, reicht das Abschalten über diesen Schalter. Der Energieverbrauch des Fernsehgerätes erreicht dann nahezu 0 W.
7 Im Bereitschaftsmodus verbraucht das Fernseh gerät nur wenig Energie. Allerdings kann es bei bestimmten Funktionen (z. B. beim automatischen Ein- und Ausschalten und bei Timerfunktionen) erforderlich sein, das Fern-sehgerät im Bereitschaftsmodus zu be lassen.
7 Das Fernsehgerät verbraucht bei reduzierter Helligkeit weniger Energie.
Hinweise-zur-LCD/LED--TechnologieWenn ein Standbild längere Zeit auf dem Bild-schirm betrachtet wird, kann dies – bei darauf folgenden bewegten Bildern – schwach im Hintergrund sichtbar bleiben. Der gleiche Effekt kann auftreten, wenn über eine längere Zeit ein Fernsehprogramm betrachtet wird, das nicht formatfüllend ist, z. B. im Format 4 : 3.Diese Effekte sind bedingt durch die LCD/LED Technologie und bieten keinen Anspruch auf Gewährleistung.Um diese Effekte zu vermeiden/minimieren, beachten Sie bitte die folgenden Hinweise:7 Vermeiden Sie, ein Standbild von einem Fern-
sehprogramm für längere Zeit anzuzeigen. Speziell die Logos der Programmanbieter können diesen Effekt verursachen.
7 Beim Betrachten eines Fernsehprogrammes, das nicht „Formatfüllend“ ist (z. B. 4 : 3), än-dern Sie das Bildformat.
7 Hohe Helligkeit-/und/oder Kontrastwerte ver-stärken den Effekt. Wir empfehlen, Helligkeit und Kontrast zu reduzieren.

Fernseher / Bedienungsanleitung9 / 118 TR
LIEFERUMFANG-------------------------------------------------------------------------------------------------
Beigepacktes-Zubehör1- Fernsehgerät
2- Standfüße
3- Fernbedienung
4- Batterien für Fernbedienung
5- Schrauben und Montageanleitung für Standfuß
6- Kurzanleitung
Optionales-ZubehörKomfortfernbedienung „Easy Use Remote Control“Batterien für Easy Use Remote ControlReinigungstuchSchrauben für VESA-Halterung
1
4 5
6
Manual
23

10 / 118 TRFernseher / Bedienungsanleitung
ANSCHLIESSEN/VORBEREITEN----------------------------------------------------
Antenne-und-Netzkabel-anschließen
1 Zum Empfang digitaler Satellitenprogramme (DVB-S) das Kabel der Satellitenantenne an die Antennenbuchse SATELLITE am Fernsehgerät anschließen.
Und/oder
2a Zum Empfang terrestrischer Digitalsender (DVB-T) das Kabel der Haus- oder Zimmerantenne (passive oder aktive Zimmerantenne mit eigener Stromversor-gung) an die An tennenbuchse ANT-IN des Fernseh gerätes anschließen;
oder
2b Zum Empfang digitaler Kabelprogramme (DVB-C) das Kabel der Hausantenne an die Antennenbuchse ANT-IN des Fernseh-gerätes anschließen;
oder
2c Zum Empfang analoger Fernsehprogramme das Kabel der Hausantenne an die Anten-nenbuchse ANT-IN des Fernsehgerätes anschließen.
-Hinweis:7 Beim Anschluss einer Zimmerantenne muss
diese evtl. abwechselnd an verschiedenen Orten platziert werden, um einen optimalen Empfang zu erhalten.
3 Stecker des Netzkabels in eine Steckdose stecken.
Hinweis:7 Stecken Sie den Netzstecker des Ge rätes
erst dann in die Steckdose, wenn Sie die externen Geräte und die Antenne an-geschlossen haben!
7 Verwenden Sie keine Adapterstecker und Verlängerungskabel, die nicht den gelten-den Sicherheitsnormen entsprechen und nehmen Sie auch keinen Eingriff an dem Netzkabel vor.
1 23

Fernseher / Bedienungsanleitung11 / 118 TR
ANSCHLIESSEN/VORBEREITEN----------------------------------------------------
Fernsehgerät-aufstellen-oder-aufhängen7 Wählen Sie den Aufstellort so, dass kein direk-
tes Sonnenlicht auf den Bildschirm fällt.
Aufstellen-mit-Standfuß7 Beachten Sie für die Montage des Standfußes
die beiliegende Montageanleitung.7 Stellen Sie das Fernsehgerät auf eine ebene
und harte Unterlage.
Zur-Montage-an-VESA-Halterung-vor-bereitenSie benötigen:7 eine Schere,7 einen Kreuzschlitz-Schraubendreher.Beachten Sie die Montageanleitung der VESA-Halterung.1- Fernsehgerät in der Folie mit dem Bildschirm
nach unten auf eine glatte Fläche legen.
2- Folie mit einer Schere auf der Rückseite aufschneiden.
3- Benötigte Kabel mit den Anschlüssen des Fernsehgeräts verbinden. Siehe Kapitel „Anschlüsse“ in dieser Anleitung.
4- Kabel zusammenbinden, damit sie nicht auf den Fußboden herunterhängen.
5- VESA-Halterung am Fernsehgerät verschrau-ben und entsprechend ihrer Montageanlei-tung montieren.
VESA

12 / 118 TRFernseher / Bedienungsanleitung
Batterien-in-die-Fernbedienung-einlegen
ANSCHLIESSEN/VORBEREITEN----------------------------------------------------
1- Batteriefach öffnen, dazu Deckel abneh-men.
2- Batterien einlegen (2 x Typ Micro, bzw. R03 oder AAA, 1,5 V). Dabei Polung beachten, im Batteriefachboden markiert.
3- Batteriefach schließen.
Hinweis:-7 Wenn das Fernsehgerät auf die Fernbedien-
befehle nicht mehr richtig reagiert, können die Batterien verbraucht sein. Verbrauchte Batterien unbedingt entfernen.
7 Für Schäden, die durch ausgelaufene Batte-rien entstehen, kann nicht gehaftet werden.
Umwelthinweis:7 Dieses Symbol auf Akkus/
Batterien oder an der Verpackung weist darauf hin, dass der Akku/die
Batterie nicht mit dem regulären Hausmüll entsorgt werden darf. Bei bestimmten Akku/ Batterien kann dieses Symbol durch ein chemisches Symbol ergänzt werden. Symbole für Quecksilber (Hg) oder Blei (Pb) werden angegeben, wenn Akkus/Batterien mehr als 0,0005 % Quecksilber oder mehr als 0,004 % Blei enthalten.
Die Akkus/Batterien – auch schwermetall-freie – dürfen nicht im Hausmüll entsorgt werden. Verbrauchte Batterien müssen in die Altbatteriesammelgefäße bei Handel und öffentlich-rechtlichen Entsorgungs-trägern gegeben werden.
Erkundigen Sie sich nach den jeweiligen Entsorgungsvorschriften an Ihrem Wohnort.

Fernseher / Bedienungsanleitung13 / 118 TR
7 SCART-/-S-VHS-/-COMPONENT: SCART-Buchse, Ton-Bild-Eingang und
-Ausgang. S-VHS-Buchse, Ton-Bild-Eingang für
S-Video-Camerarecorder über SCART – S-VHS Adapter.
Component-Buchse, Ton-Bild-Eingang (YUV-Signal) über SCART – YPbPr Adap-ter.
7 -HDMI1-(ARC):-Eingang für digitale Ton- und Bilddaten mit Ton-Rückkanal. AV-Receiver hier anschließen.
7 -CI: für CA-Module zum Empfang ver-schlüsselter Programme.
AUF-EINEN-BLICK--------------------------------------------------------------------------------------------
Anschlüsse-des-Fernsehgerätes
VGA IN
SERVICE LAN Optic Out USB (HDD) HDMI2 EARPHONESATELLITE
13/18Vmax. 25 0 mA
ANT-IN5V
max. 50 mA
SCA
RT
HD
MI 1
(AR
C)
7 SERVICE: Buchse nur für Service.7 -LAN: Netzwerkanschluss.7 -SATELLITE: für Satellitenantenne. Geeig-
net für GSCR-Einkabelsystem.7 -ANT-IN: für Antennenkabel (terrestrische
Antenne oder Kabelanschluss).7 -Optic-Out: optischer Tonausgang.7 -USB(HDD): hier Datenträger zum Auf-
zeichnen von Sendungen anschließen, z. B. externe Festplatte.
7 -HDMI2: Eingang für digitale Ton- und Bilddaten.
7 U-: Kopfhöreranschluss oder Line-Aus-gang über Adapter.

14 / 118 TRFernseher / Bedienungsanleitung
AUF-EINEN-BLICK--------------------------------------------------------------------------------------------
Bedienelemente-des--Fernseh--gerätes
7 +-VOL: Lautstärke erhöhen.7 VOL-: Lautstärke verringern.7 +-CH: Kanal erhöhen.7 CH-: Kanal verringern.7 SOURCE: Quellenmenü.7 MENU: Blendet das Hauptmenü ein.7 8: Schaltete den Fernseher aus dem Be-
reitschaftsmodus ein oder versetzt ihn in den Bereitschaftsmodus.

Fernseher / Bedienungsanleitung15 / 118 TR
AUF-EINEN-BLICK--------------------------------------------------------------------------------------------
Fernbedienung-–-Hauptfunktionen
Navigieren-in-den-Menüs Bewegen den Cursor in den Menüs nach oben und unten.-Bewegen den Cursor in den Menüs nach links und rechts. Aktiviert verschiedene Funk-tionen und speichert Funktio-nen/Einstellungen.
Ein/Bereitschaft(Stand-by).
Signalquelle
Stummschalten
-Zapp-Funktion; in den Menüs eine Menü-ebene zurückschalten
Hauptmenü
Werkzeuge: Funktionen und Einstellungen
Videotext aufrufen/aus-schalten
„Apps Portal“-Menü
Einschalten aus Stand-by; nächstes/vorheriges Programm
Lautstärke
Informationen anzeigen
Menüs und Applikationen beenden
ProgrammlisteProgrammführer
Einschalten aus Stand-by; Programm-Direktwahl
Favoritenlisten
Aufnehmen, Abspielen, Pause, Stopp (nur digitale
Fernseh-Programme); Videotext auf halbem
Bildschirm
Liveshare
Ohne Funktion
Funktionen entsprechend Bildschirmhilfe, HbbTV
Medienplayer
Untertitel wählen
Tonkanal wählen
Nächstes/vorheriges Bild/Kapitel; nächster/vorheriger Titel

16 / 118 TRFernseher / Bedienungsanleitung
AUF-EINEN-BLICK--------------------------------------------------------------------------------------------
Fernbedienung-–-alle-Funktio-nen (rot),- Wählen/aktivieren Seiten im (grün) Videotext. (gelb) Wählen/aktivieren unterschiedliche (blau) Funktionen in den Menüs.5 Schaltet im Videotext auf doppelte
Zeichengröße; wählt im Medienplayer den vor-herigen Titel/das nächste Bild.
6 Aktualisiert eine Videotextseite; wählt im Medienplayer den nächsten Titel/das vorherige Bild.
3 Stoppt das Umblättern von Seiten im Videotext; startet im Medienplayer den schnellen Rücklauf.
4 Deckt Antworten im Videotext auf; startet im Medienplayer den schnellen Vorlauf.
Startet die Aufnahme (nur bei digitalen Fernsehprogram-men, die Aufnahme erfolgt auf einem externen Datenträger).
8 Startet die Wiedergabe einer Sen- dung vom externen Datenträger; startet die Wiedergabe einer Datei vom Medienserver.
! Timeshift-Betrieb (nur bei digitalen Fernsehprogrammen und wenn ein externer Daten träger angeschlossen ist); Pause bei der Wiedergabe einer Sendung vom externen Datenträger oder vom Medienplayer; Pause beim Abspielen einer Datei vom Medienserver.
7 Teilt die Bildanzeige im Videotext; beendet die Wiedergabe einer Sendung vom externen Datenträger oder vom Medienplayer. Beendet die Aufnahme oder die Wiedergabe im Timeshift-Betrieb. Beendet die Wiedergabe einer Da-tei vom Medienserver.
Wählt unterschiedliche Audio-sprachen (nur bei digitalen Fernsehprogrammen).
Wählt unterschiedliche Untertitel (nur bei digitalen Fernseh- Programmen).
Hinweis:-7 Ihr Fernsehgerät kann von einem Apple
iPhone oder von Android Smartphones fernbedient werden. Die Möglichkeiten sind abhängig vom Funktionsumfang des Fernsehgerätes.
Voraussetzung dafür ist, Sie laden die kos-tenlose Applikation »Grundig TV Remote« vom Apple App Store oder vom Google play (Android Market) und installieren diese auf Ihrem Apple iPhone/Smartphone.
Fernseher / Bedienungsanleitung17 / 118 TR
ERSTINSTALLATION-------------------------------------------------------------------------------------
Das Fernsehgerät ist mit einem „Installationsas-sistenten“ ausgestattet, der Sie Schritt für Schritt durch die Grundeinstellungen führt.Die Benutzerführung mittels Bildschirmdialog erlaubt vermeintlich komplexe Einstellungen und Dateneingaben für jeden leicht und verständlich darzustellen.Am Bildschirm erscheinen Seiten und Dialogzei-len, auf denen Sie die nächsten und möglichen Bedienschritte finden.Unterstützend dazu sehen Sie auch die notwen-digen Tastensymbole der Fernbedienung. Die Grundeinstellungen im Einzelnen:– Sprachauswahl;– Landauswahl;– Wahl des Betriebsmodus;– Position wählen;– Zubehör wählen;– Netzwerkeinstellungen (wenn gewünscht);– Programmeinstellungen (DVB-S, DVB-T, DVB-C
und analoge Programme).Die de tail lierten Einstellungen finden Sie auf den Seiten 19 bis 22.
Einstellungen-für-die-Anmeldung-am-HeimnetzwerkAbhängig von der Verbindung zum Heimnetz-werk melden Sie Ihr Fernsehgerät am Heimnetz-werk an:– über eine LAN-Verbindung oder – ohne Kabel über WLANBei der LAN-Verbindung gibt es zwei Möglich-keiten:
Automatische-Anmeldung dabei werden alle notwendigen Einstellungen
(»IP Adresse«, »DNS«, »Netzmaske« und »Gateway«) vom Router automatisch verge-ben.
Manuelle-Anmeldung hier müssen alle notwendigen Einstellungen
(»IP Adresse«, »DNS«, »Netzmaske« und »Gateway«) von Hand eingegeben werden.
Bei der WLAN-Verbindung gibt es verschiede-ne Möglichkeiten:
Automatische-Anmeldung dabei werden alle notwendigen Einstellungen
(»IP Adresse«, »DNS«, »Netzmaske« und »Gateway«) vom Router automatisch verge-ben.
Abhängig vom Router verwenden Sie: – die Option „PBC“ (Push Button Configurati-
on); – die Anmeldung mittels PIN; – die Anmeldung mit Eingabe des Netzwerk-
Kennwortes.
Manuelle-Anmeldung hier müssen alle notwendigen Einstellungen
(»IP Adresse«, »DNS«, »Netzmaske« und »Gateway«) von Hand eingegeben werden.
Einstellungen-für-ProgrammeAbhängig von der angeschlossenen Antenne können Sie entscheiden, nach welchen Program-men Sie das Gerät suchen lassen wollen.--DVB-S – Digitale Programme vom Satelliten einstellen, ab Seite 21. Bei dieser Suche haben Sie wiederum zwei
Möglichkeiten: – die Basisinstallation, hier ist eine Standard-
auswahl voreingestellt, z.B. der Satellit Astra 19,2° Ost, Sie müssen nur noch den Suchlauf starten;
– die Profiinstallation, hier können Sie alle notwendigen Einstellungen und Parameter für Ihre Empfangsanlage einstellen.
-DVB-C – Digitale Programme vom Kabelanschluss einstellen, auf Seite 22.DVB-T-– Digitale terrestrische Fernseh-Program me einstellen, auf Seite 22.-Analoge Fernsehprogramme einstellen, im Kapitel „Weitere Programme einstellen“, ab
Seite 100.Hinweis:-7 Weitere Einstellungen für digitale Program-
me nach der Erstinstallation finden Sie ebenfalls im Kapitel „Weitere Programme einstellen“, ab Seite 90.

18 / 118 TRFernseher / Bedienungsanleitung
Menüsprache-wählen (S. 19, Pkt. 3)
ERSTINSTALLATION-------------------------------------------------------------------------------------
Erstinstallation-–-Übersicht
Land-wählen (S. 19, Pkt. 5)
Benutzermodus-wählen (S. 19, Pkt. 6)
Heimnetzwerk-Anmeldung (S. 21, Pkt. 12)
Kabel(S. 21 Pkt. 12)
Kabellos(S. 20, Pkt. 17)
Kabellos-WPS(Kapitel S. 85)
Autom.(S. 21 Pkt. 12)
Manuell(Kapitel S. 83)
Autom.(S. 20, Pkt. 17)
Manuell(Kapitel S. 87)
Taste(Kapitel S. 85)
PIN(Kapitel S. 85)
Programmtabelle (S. 23)
Fernsehprogramme-einstellen (S. 21 Pkt. 26)
DVB-T(S. 22 Pkt. 36)
DVB-C(S. 22 Pkt. 31)
DVB-S(S. 22 Pkt. 26)
Komplett(S. 22, Pkt. 31)
Manuell(Kapitel S. 98)
Astra(S. 22 Pkt. 26)
Sky(Kapitel S. 90)
Manuell(Kapitel S. 91)
Autom.(S. 22, Pkt. 36)
Manuell(Kapitel S. 99)
Position-und-Zubehör-wählen (S. 19 Pkt. 7-10)

Fernseher / Bedienungsanleitung19 / 118 TR
ERSTINSTALLATION-------------------------------------------------------------------------------------
Erstinstallation-durchführen1- Fernsehgerät mit »8«, »1…0« oder »P+«
oder »P-« aus Stand-by einschalten. – Bei der ersten Inbetriebnahme wird das
Menü »Menüsprache« eingeblendet.
Smart Inter@ctive 4.0
Bestätigen
Menüsprache
Bitte wählen Sie Ihre gewünsche Menüspache aus
Česky Dansk Deutsch English Espanol Eλληvıκά Français
Hrvatski Italiano Magyar Nederlands Norsk Polski Português
Pyccкий Româneşte Slovenščina Eesti Suomi Svenska Бългaрски
Slovenčina Lietuviu Türkçe
Navigieren
Deutsch
Hilfe:-7 Wird dieses Menü nicht angezeigt, setzen
Sie das Fernsehgerät auf seine Werks-einstellungen zurück (siehe Seite 72).
2- Gewünschte Menüsprache mit »<«, »>«, »V« oder »Λ« wählen und mit »OK« be-stätigen.
– Ein Hinweis zu den Grundeinstellungen wird eingeblendet.
3- Grundeinstellungen mit »OK« starten.
4- Das Land, in dem das Fernsehgerät betrieben wird, mit »<«, »>«, »V« oder »Λ« wählen und mit »OK« bestätigen.
– Das Menü »Benutzermodus« wird ein-geblendet, die Option »Home Modus« ist markiert.
5- Die Option »Home Modus« mit »OK« bestätigen;
oder
die Option »Brilliant« mit »V« oder »Λ« wählen und mit »OK« bestätigen
– Die bei der Option »Home Modus« verwen deten Einstellungen sparen Energie .
– Die Option »Brilliant« dient zu Demon- strationszwecken der Gerätefunk tionen im Fachhandel und bietet optimale Bild- und Tonqualität, verbraucht jedoch mehr Leistung.
6- Die benötigte Option »Standfuß« oder »Wandmontage« mit »V« oder »Λ« wäh-len und mit »OK« bestätigen.
Hinweis:-7 Die Toneinstellungen werden je nach Auf-
stellungsart »Standfuß« oder »Wandmonta-ge« optimal eingestellt.
7- Einstellung mit »OK« bestätigen. – Das Menü »Übersicht« wird eingeblendet.
8- Den nächsten Bedienschritt mit »« (blau) anwählen.
– Das Menü »Zubehör« wird eingeblendet.
9- Wenn für das Fernsehgerät Zubehör ver-wendet wird und es bereits angeschlossen wurde, in diesem Menü die notwendigen Einstellungen durchführen.
Zubehör mit »V« oder »Λ« wählen und Einstellung mit »<« oder »>« wählen.
10- Den nächsten Bedienschritt mit »« (blau) anwählen.
Hinweis:-7 Wenn das Fernsehgerät am Heimnetzwerk
angemeldet werden soll, – weiter bei Punkt 12 für eine automatische
LAN-Verbindung, oder – weiter bei Punkt 17 für eine automatische
WLAN Verbindung.Hinweis:-7 Wird keine Anmeldung am Heimnetzwerk
benötigt, mit »« (blau) die Einstellung überspringen. Einstellung bei Pkt. 25, 30-oder-35 fortsetzen.

20 / 118 TRFernseher / Bedienungsanleitung
ERSTINSTALLATION-------------------------------------------------------------------------------------
Anmeldung-am-Heimnetzwerk-–-mit-einem-LAN-Kabel11- Die Option »Verbindungstyp ändern« mit
»OK« aktivieren.
12- Zeile »Kabel« mit »V« oder »Λ« wählen und mit »OK« bestätigen.
Hinweis:-7 Die Einstellungen für eine manuelle LAN-
Verbindung finden Sie auf Seite 83.13- Anmeldung an das Heimnetzwerk mit »«
(rot) starten. – Die Meldung »Verbinde... Bitte warten«
wird eingeblendet.
14- Wenn die Meldung erlischt, mit »« (grün) die Verbindung zum Netzwerk prüfen.
– Anzeige: »Testen ... Bitte warten«, nach erfolgreicher Anmeldung: »Verbindung mit Gateway: Erfolgreich« und »Internetver-bindung: Erfolgreich«.
15- Den nächsten Bedienschritt mit »« (blau) anwählen.
Hinweis:-7 Die Suche nach Fernsehprogrammen setzen
Sie fort bei: – Punkt 25 für DVB-S Empfang; – Punkt 30 für DVB-C Empfang; – Punkt 35 für DVB-T Empfang.
Anmeldung-am-Heimnetzwerk-–-über-WLAN-–-automatisch,-mit-Eingabe-des-Netzwerk-Kennwortes16- Die Option »Verbindungstyp ändern« mit
»OK« aktivieren.
17- Zeile »Kabellos« mit »V« oder »Λ« wählen und mit »OK« bestätigen.
18- Die Meldung »Möchten Sie WLAN ein-schalten« bestätigen, dazu mit »<« oder »>« die Schaltfläche »Ja« anwählen und mit »OK« bestätigen.
19- Zeile »Netzwerk wählen« mit »V« oder »Λ« wählen und mit »OK« bestätigen.
– Das Menü »Netzwerk wählen« wird ein-geblendet, die vorhandenen Netzwerke werden gesucht und angezeigt.
20- Das gewünschte Netzwerk mit »V« oder »Λ« wählen und mit »OK« bestätigen.
– Das »Kennwort« Menü wird eingeblendet.
21- Das erste Zeichen/Ziffer des benötigten Kennworts mit »V«, »Λ«, »<« und »>« wählen und mit »OK« zur nächsten Einga-bestelle schalten.
– Mit »Shift« ➡ »OK« kann zwischen Großbuchstaben/Nummern und Klein-buchstaben/Sonderzeichen umgeschaltet werden.
– Zum Löschen von Zeichen/Ziffern die Schaltfläche »Del« wählen und mit »OK« bestätigen.
22- Kennwort mit »« (grün) bestätigen. – Die Meldung »Verbinde... Bitte warten«
wird eingeblendet, danach »Verbindung mit Gateway: Erfolgreich«.
23- Wenn die Meldung erlischt, mit »« (grün) die Verbindung zum Netzwerk prüfen.
– Anzeige: »Testen ... Bitte warten«, nach erfolgreicher Anmeldung »Verbindung mit Gateway: Erfolgreich« und »Internetver-bindung: Erfolgreich«.
24-Den nächsten Bedienschritt mit »« (blau) anwählen.
Hinweis:-7 Die Suche nach Fernsehprogrammen setzen
Sie fort bei: – Punkt 25 für DVB-S Empfang; – Punkt 30 für DVB-C Empfang; – Punkt 35 für DVB-T Empfang.

Fernseher / Bedienungsanleitung21 / 118 TR
Programme-(DVB-S)-einstellenHinweis:-7 Wenn bei »Menüsprache wählen« die Op-
tion »Deutsch« und bei »Land« die Option »Deutschland« oder »Österreich« gewählt wurde, gibt es im Menü »Betreiberauswahl« mehrere Möglichkeiten:
– »Astra Schnell«: Schnelle Programmsuche (ca. 30 Sekunden) nach vorsortieren Fernsehprogrammen (ca. 800 Fernsehpro-gramme), empfohlen für Deutschland und Österreich.
– »Komplett«: Vollständiger Programmsuch-lauf (bis zu 10 Minuten) nach vordefinier-ten Transponderfrequenzen des Satelliten Astra mit vorsortierter Programmtabelle (ca. 1300 Fernsehprogramme), empfoh-len für alle Länder.
– »Sky«: diese Option ist nur für Benut-zer geeignet, die Kunde beim Pay TV Anbieter „Sky“ sind. (nicht vorhanden für Österreich und die Schweiz.)
25-Die Option »Satellit (DVB-S/S2)« mit »V« oder »Λ« wählen und mit »OK« bestätigen.
26-Die Option »Astra Schnell« mit »V« oder »Λ« wählen und mit »OK« bestätigen.
– Der Satellit Astra 19,2° Ost ist vor-eingestellt.
27- Die Schaltfläche »Weiter« mit »« (blau) be stätigen.
Hinweise:7 Auswahl treffen, ob nur nach Fernsehpro-
grammen (TV), nur nach Radioprogrammen (Radio) oder nach beidem (Radio + TV) ge-sucht werden soll. Dazu mit »V« oder »Λ« die Option »TV Digital« oder »Radio Digital« anwählen und mit »OK« das „Häkchen“ entfernen oder setzten.
7 Auswahl treffen, ob nur nach unverschlüssel-ten Programmen oder nur nach verschlüs-selten Programmen »V«, »Λ«, »<« oder »>« die Option »Frei« oder »Verschlüsselt« anwählen und mit »OK« das „Häkchen“ entfernen oder setzten.
28- Suchlauf mit »« (rot) starten. – Das Menü »Digital Suche« wird ein-
geblendet, die Suche nach Programmen beginnt.
– Der Suchlauf ist beendet, wenn die Mel-dung »Suche ist abgeschlossen« erscheint.
29- Zur Programmtabelle mit »OK« schalten.
ERSTINSTALLATION-------------------------------------------------------------------------------------

22 / 118 TRFernseher / Bedienungsanleitung
Programme-(DVB-C)-einstellen30-Die Option »Kabel (DVB-C)« mit »V« oder
»Λ« wählen und mit »OK« bestätigen.
31- Die Zeile »Suchlauf nach« mit »V« oder »Λ« wählen. Die gewünschte Option (»Schnell« oder »Komplett«) mit »<« oder »>« wählen.
– Die Suchfunktion »Schnell« stellt die Programme nach den Informationen ihres Kabelbetreibers im Übertragungssignal ein.
– Wird die Option »Komplett« gewählt, wird der gesamte Frequenzbereich durch-sucht. Die Suche kann mit dieser Option sehr lange dauern. Diese Option wird em pfohlen, wenn der Kabelbetreiber den Suchtyp »Schnell« nicht unterstützt.
32-Die Schaltfläche »Weiter« mit »« (blau) be stätigen.
Hinweis:7 Auswahl treffen, ob nach digitalen oder
nach analogen Fernsehprogrammen gesucht werden soll. Dazu mit »V« oder »Λ« die Option »Digital« oder »Analog« anwählen und mit »OK« das „Häkchen“ entfernen oder setzen.
33-Suchlauf mit »« (rot) starten. – Das Menü »Digital Suche« wird ein-
geblendet, die Suche nach Programmen beginnt.
– Der Suchlauf ist beendet, wenn die Mel-dung »Suche ist abgeschlossen« erscheint.
34-Zur Programmtabelle mit »OK« schalten.
ERSTINSTALLATION-------------------------------------------------------------------------------------
Programme-(DVB-T)-einstellen35- Die Option »Terrestrisch (DVB-T/T2)« mit
»V« oder »Λ« wählen und mit »OK« bestätigen.
Achtung:7 Die Antennenspannung (5V ) darf nur
einge schaltet werden, wenn die angeschlos-sene Antenne eine aktive Zimmerantenne mit Signalverstärker ist und diese nicht schon selbst über ein Steckernetzteil (oder ähnliches) mit Spannung versorgt wird. Ansonsten kann es zu einem Kurzschluss oder zur Zerstörung der Antenne kommen!
36- Zeile »Aktivantenne« mit »V« oder »Λ« wählen.
Antennenspannung für die Antenne mit »<« oder »>« einschalten (»Ein«).
37- Zeile »Weiter« mit »V« oder »Λ« wählen und mit »OK« be stätigen.
Hinweis:7 Auswahl treffen, ob nach digitalen oder
nach analogen Fernsehprogrammen gesucht werden soll. Dazu mit »V« oder »Λ« die Option »Digital« oder »Analog« anwählen und mit »OK« das „Häkchen“ entfernen oder setzen.
38- Suchlauf mit »« (rot) starten. – Das Menü »Digital Suche« wird ein-
geblendet, die Suche nach Programmen beginnt.
– Der Suchlauf ist beendet, wenn die Mel-dung »Suche ist abgeschlossen« erscheint.
39- Zur Programmtabelle mit »OK« schalten.
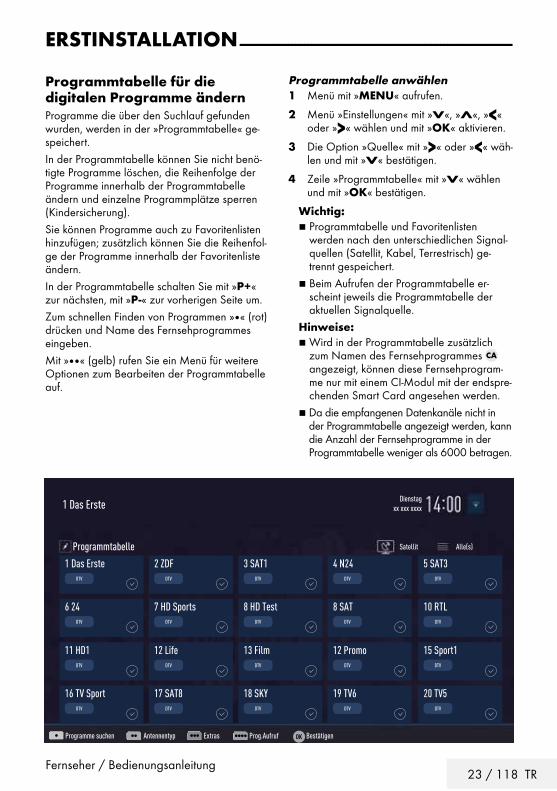
Fernseher / Bedienungsanleitung23 / 118 TR
Programmtabelle-anwählen1- Menü mit »MENU« aufrufen.
2- Menü »Einstellungen« mit »V«, »Λ«, »<« oder »>« wählen und mit »OK« aktivieren.
3- Die Option »Quelle« mit »>« oder »<« wäh-len und mit »V« bestätigen.
4- Zeile »Programmtabelle« mit »V« wählen und mit »OK« bestätigen.
Wichtig:7 Programmtabelle und Favoritenlisten
werden nach den unterschiedlichen Signal-quellen (Satellit, Kabel, Terrestrisch) ge-trennt gespeichert.
7 Beim Aufrufen der Programmtabelle er-scheint jeweils die Programmtabelle der aktuellen Signalquelle.
Hinweise:7 Wird in der Programmtabelle zusätzlich
zum Namen des Fernsehprogrammes angezeigt, können diese Fernsehprogram-me nur mit einem CI-Modul mit der endspre-chenden Smart Card angesehen werden.
7 Da die empfangenen Datenkanäle nicht in der Programmtabelle angezeigt werden, kann die Anzahl der Fernsehprogramme in der Programmtabelle weniger als 6000 betragen.
ERSTINSTALLATION-------------------------------------------------------------------------------------
Programmtabelle-für-die--digi-talen-Programme-ändernProgramme die über den Suchlauf gefunden wurden, werden in der »Programmtabelle« ge-speichert.In der Programmtabelle können Sie nicht benö-tigte Programme löschen, die Reihenfolge der Programme innerhalb der Programmtabelle ändern und einzelne Programmplätze sperren (Kindersicherung).Sie können Programme auch zu Favoritenlisten hinzufügen; zusätzlich können Sie die Reihenfol-ge der Programme innerhalb der Favoritenliste ändern.In der Programmtabelle schalten Sie mit »P+« zur nächsten, mit »P-« zur vorherigen Seite um.Zum schnellen Finden von Programmen »« (rot) drücken und Name des Fernsehprogrammes eingeben.Mit »« (gelb) rufen Sie ein Menü für weitere Optionen zum Bearbeiten der Programmtabelle auf.
Dienstagxx xxx xxxx1 Das Erste
Programme suchen Antennentyp Extras Prog.Aufruf Bestätigen
Satellit Alle(s)Programmtabelle1 Das Erste
DTV
11 HD1DTV
6 24DTV
16 TV SportDTV
3 SAT1DTV
13 FilmDTV
8 HD TestDTV
18 SKYDTV
2 ZDFDTV
12 LifeDTV
7 HD SportsDTV
17 SAT8DTV
4 N24DTV
12 PromoDTV
8 SATDTV
19 TV6DTV
5 SAT3DTV
15 Sport1DTV
10 RTLDTV
20 TV5DTV

24 / 118 TRFernseher / Bedienungsanleitung
ERSTINSTALLATION-------------------------------------------------------------------------------------
Programme-in-der-Programmtabelle-suchenMit dieser Suche werden Programme schnell gefunden. Suchbegriff eingeben (min. 3 Stellen) und die Programme werden angezeigt.1- Im Menü »Programmtabelle« den Suchmo-
dus mit »« (rot) aktivieren.
2- Das erste Zeichen/Ziffer des Programmes mit »V«, »Λ«, »<« und »>« wählen und mit »OK« zur nächsten Eingabestelle schal-ten.
Eingabe für weitere Zeichen/Ziffern wieder-holen.
– Die gefundenen Programme werden an-gezeigt.
3- Zur Liste der gefundenen Programme mit »>« schalten, das Programm mit »V« oder »Λ« wählen und mit »OK« markieren.
Hinweis:7 In der Programmtabelle kann das Programm
in die Favoritenliste „verschoben“ werden, der Programmplatz geändert werden oder das Programm gelöscht werden.
4- Suchmodus mit »BACK <« beenden.
5- Programmtabelle mit »EXIT« abschalten.
Programme-in-der-Programmtabelle-löschen1- Im Menü »Programmtabelle« die zu löschen-
den Programme mit »V«, »Λ«, »<« oder »>« wählen und mit »OK« markieren.
– Die Programme werden mit »✔« markiert.
2- Den Bearbeitungsmodus mit »« (gelb) aktivieren.
3- Die Zeile »Entfernen« mit »V« oder »Λ« wählen und mit »OK« bestätigen.
4- Löschvorgang bestätigen, dazu mit »<« oder »>« die Schaltfläche »OK« anwählen und mit »OK« bestätigen;
oder
Löschvorgang abbrechen, dazu mit »<« oder »>« die Schaltfläche »Nein« anwählen und mit »OK« bestätigen.
5- Programmtabelle mit »EXIT« abschalten.
Reihenfolge-der-Programme-in-der-Programmtabelle-ändern1- Im Menü »Programmtabelle« die Program-
me die verschoben werden sollen mit »V«, »Λ«, »<« oder »>« wählen und mit »OK« markieren.
– Die Programme werden mit »✔« markiert.
2- Den Bearbeitungsmodus mit »« (grün) aktivieren.
Hinweise:7 Bei dem Verschieben der Programme
werden die Programmnummern mit denen die Programme vom Programmanbieter versehen sind verändert.
7 Werden mehrere Programme markiert, dann werden diese Programme an der neu-en Position hintereinander angeordnet.
3- Die Programme mit »V«, »Λ«, »<« oder »>« an ihre neue Position schieben und mit »OK« bestätigen.
4- Programmtabelle mit »EXIT« abschalten.
Programme-von-verschiedenen-Über-tragungsarten-in-der-Programmtabelle-anzeigenWenn Sie Programme von unterschiedlichen Übertragungsarten (Terrestrisch, Kabel oder Satellit) gespeichert haben, können Sie die Programmtabelle umschalten.1- Im Menü »Programmtabelle« die Auswahl
für die Übertragungsart mit »« (gelb) wählen.
2- Zeile »Antennentyp« mit »OK« bestätigen.
3- Die gewünschte Option »Terrestrisch«, »Kabel« oder »Satellit« mit »V« oder »Λ« wählen und mit »OK« bestätigen.
4- Programmtabelle mit »EXIT« abschalten.

Fernseher / Bedienungsanleitung25 / 118 TR
ERSTINSTALLATION-------------------------------------------------------------------------------------
Programme-in-der-Programmtabelle-nach-„Kriterien“-sortierenSie können die Reihenfolge der Programme in der Programmtabelle nach verschiedenen Krite-rien sortieren.1- Im Menü »Programmtabelle« den Bearbei-
tungsmodus mit »« (gelb) aktivieren.
2- Sortierkriterium »Alle(s)«, »Digital«, »Radio«, »Analog«, »Frei« oder »Verschlüsselt« mit »V« oder »Λ« wählen und mit »OK« be-stätigen.
– Die Programme werden in der Programm-tabelle nach dem gewählten Kriterium angezeigt.
3- Programmtabelle mit »EXIT« abschalten.
Favoritenlisten-erstellenIhre Lieblingsprogramme können Sie in bis zu vier Favoritenlisten speichern (FAV 1 bis FAV 4).
Hinweise:7 Favoritenlisten müssen separat für alle
Signalquellen (Satellit, Kabel, Terrestrisch) angelegt werden.
7 Nach dem Erstellen der Favoritenlisten können Sie diese mit »FAV« aufrufen.
1- Im Menü »Programmtabelle« die gewünsch-ten Programme mit »V«, »Λ«, »<« oder »>« wählen und mit »OK« markieren.
– Die Programme werden mit »✔« markiert.
2- Den Bearbeitungsmodus mit »« (gelb) aktivieren.
3- Die Zeile »FAV setzen« mit »V« oder »Λ« wählen und mit »OK« bestätigen.
4- Gewünschte Favoritenliste mit »V« oder »Λ« wählen und mit »OK« bestätigen.
– Die Programme sind in der Programmta-belle mit »❶«, »❷«, »❸« oder »❹« mar-kiert.
– Sie können das gleiche Programm in mehrere Favoritenlisten aufnehmen.
– In jede Favoritenliste können bis zu 255 Programme gespeichert werden.
Hinweise:7 Programme können wieder aus Favoriten-
listen gelöscht werden. Dazu den Bearbeitungsmodus mit »« (gelb) aktivieren. Die benötigte Favoritenliste mit »V« oder »Λ« wählen und mit »OK« bestätigen. Das zu löschende Programm mit »V«, »Λ«, »<« oder »>« wählen und mit »OK« markieren. Den Bearbeitungsmodus mit »« (gelb) aktivieren. Die Zeile »Aus FAV entfernen« mit »V« oder »Λ« wählen und mit »OK« bestäti-gen.
7 Beim Löschen eines Programms aus der Favoritenliste wird die Reihenfolge inner-halb der Favoritenliste aktualisiert.
5- Programmtabelle mit »EXIT« abschalten.
Programme-in-der-Favoritenliste--sortierenSie können die Reihenfolge der Programme in den Favoritenlisten ändern.1- Im Menü »Programmtabelle« den Bearbei-
tungsmodus mit »« (gelb) aktivieren.
2- Die benötigte Favoritenliste mit »V« oder »Λ« wählen und mit »OK« bestätigen.
3- Das Programm das verschoben werden soll mit »V«, »Λ«, »<« oder »>« wählen und mit »OK« markieren.
– Das Programm wird mit »✔« markiert.
4- Den Bearbeitungsmodus mit »« (gelb) aktivieren.
Hinweis:7 Werden mehrere Programme markiert,
dann werden diese Programme an der neu-en Position hintereinander angeordnet.
5- Das Programm mit »V«, »Λ«, »<« oder »>« an seine neue Position schieben und mit »OK« bestätigen.
6- Programmtabelle mit »EXIT« abschalten.

26 / 118 TRFernseher / Bedienungsanleitung
ERSTINSTALLATION-------------------------------------------------------------------------------------
Eigene-Namen-für-die-Favoritenlisten-vergeben-(max.-6-Zeichen)Sie können für alle Favoritenlisten eigene Na-men vergeben.1- Die Übersicht der Favoritenliste mit »FAV«
aufrufen.
2- Gewünschte Favoritenliste mit »V« oder »Λ« wählen.
3- Den Bearbeitungsmodus mit »« (blau) aktivieren.
– Eine Tastatur wird eingeblendet.
4- Den „alten“ Namen (FAV1) mit »« (rot) schrittweise löschen.
5- Das erste Zeichen/Ziffer des gewünschten Namens mit »V«, »Λ«, »<« und »>« wäh-len und mit »OK« bestätigen.
Eingabe für weitere Zeichen/Ziffern wieder-holen.
Hinweis:7 Mit »Shift« ➡ »OK« kann zwischen Groß-
buchstaben/Nummern und Kleinbuchsta-ben/Sonderzeichen umgeschaltet werden.
6- Neuen Namen mit »« (grün) bestätigen.
7- Favoritenliste mit »EXIT« abschalten.
Eigene-Namen-für-die-AV-Programm-plätze-vergebenSie können für alle AV-Programmplätze eigene Namen vergeben.1- Die Übersicht der AV-Programmplätze mit
» « aufrufen.
2- Gewünschten AV-Programmplatz mit »<« oder »>« wählen.
3- Den Bearbeitungsmodus mit »« (blau) aktivieren.
– Ein Menü wird eingeblendet.
4- »OK« drücken und den „alten“ Namen mit »« (rot) schrittweise löschen.
5- Das erste Zeichen/Ziffer des gewünschten Namens mit »V«, »Λ«, »<« und »>« wäh-len und mit »OK« bestätigen.
Eingabe für weitere Zeichen/Ziffern wieder-holen.
Hinweis:7 Mit »Shift« ➡ »OK« kann zwischen Groß-
buchstaben/Nummern und Kleinbuchsta-ben/Sonderzeichen umgeschaltet werden.
6- Neuen Namen mit »« (grün) bestätigen.
7- Wenn gewünschten, Symbol für den AV-Programmplatz mit »<« oder »>« wählen und mit »OK« bestätigen.
8- Neues Symbol mit »« (blau) bestätigen.
9- Übersicht der AV-Programmplätze mit »EXIT« abschalten.

Fernseher / Bedienungsanleitung27 / 118 TR
BILD--/-TONEINSTELLUNGEN----------------------------------------------------------
Bildeinstellungen-1- Menü mit »MENU« aufrufen.
2- Menüpunkt »Einstellungen« mit »V«, »Λ«, »<« oder »>« wählen und mit »OK« bestätigen.
3- Die Option »Bild« mit »>« oder »<« wählen und mit »V« bestätigen.
– Das Menü »Bild« ist aktiv.
Bildformat 16:9
Bildmodus Natürlich
Hintergrundbeleuchtung Eco
Erweitert
Bild-Standardeinstellungen wählen
Bild
Dienstagxx xxx xxxx
Quelle TimerlisteTon NetzwerkTV Jugendschutz
Einstellungen > Bild
Wählen BeendenZurückBACK EXIT
4- Benötigte Zeile »Bildmodus« oder »Hin-tergrundbeleuchtung« mit »V« oder »Λ« wählen und mit »OK« bestätigen.
Gewünschte Option mit »<« oder »>« ein-stellen.
Mit »BACK <« zurückschalten zum Menü.
Hinweis:7 Im Menü »Bildeinstellungen« finden Sie
weitere, zusätzliche Einstellungen.5- Zeile »Erweitert« mit »V« oder »Λ« wählen
und mit »OK« bestätigen.
6- Benötigte Zeile/Funktion »V« oder »Λ« wählen und mit »OK« bestätigen.
Gewünschten Wert/Option mit »<« oder »>« ein stellen und mit »OK« bestätigen.
Mit »BACK <« zurückschalten zum Menü.
7- Einstellung mit »EXIT« beenden.
Erweiterte-Bildeinstellungen-Die „erweiterten Bildeinstellungen“ sind im Prin-zip digitale Bildverbesserungen, die aber bei hervorragendem Bildmaterial und Übertragung dosiert eingesetzt werden sollten. Sie können zwar bei schlechtem Material die Ansicht ver-bessern, aber bei hervorragender Übertragung und Bildmaterial diese beeinträchtigen.
7 »Hintergrundbeleuchtung« Manuelle Einstellung der Hintergrundbe-leuchtung (ist nur aktiv, wenn die dynami-sche Hintergrundbeleuchtung auf „AUS“ geschaltet ist). Diese Einstellung wirkt sich auch direkt auf den Stromverbrauch aus.
7 »Brillante Farben« Erhöht den Farbkontrast und die Kont-rasteinstellung. Meist ist diese Einstellung für den normalen Bildbetrieb zu stark und sollte dosiert (niedrig oder aus) eingesetzt werden, da sonst Nuancen im Bild unter-drückt werden.
7 »Gamma« Diese Einstellung legt fest, welcher Hellig-keitswert bei welchem digitalen Übertra-gungswert dargestellt werden soll. Dabei werden die meisten Aufnahmen mit einem Gamma-Wert von 2,2 übertragen (alle Windows-PCs und neuere PCs mit einem MAC-Betriebssystem arbeiten damit, ältere MAC-Systeme und Übertragungen ohne Farbprofil arbeiten meist mit einem Gamma-Wert von 1.8).
7 »Dynamischer Kontrast« Die Funktion passt den Kontrast dynamisch und optimal an die jeweiligen Bildinhalte an, indem er eine Analyse über einige Bil-der durchführt und danach abhängig von einer Kontraständerung diesen verändert. Dies bewirkt eine Kontrastverstärkung, kann aber dabei die sichtbaren Helligkeits-Abstu-fungen im Bild verringern.

28 / 118 TRFernseher / Bedienungsanleitung
BILD--/TONEINSTELLUNGEN------------------------------------------------------------
7 »Perfect Clear« Verbessert allgemein das Bild durch eine leichte Blautönung (erzeugt scheinbar mehr Schärfe) und verbessert den Schwarzwert, indem ab einem gewissen dunklen Graupe-gel dieser vollständig auf Schwarz gestellt wird. Verringert dabei aber in dunklen Bild-bereichen die sichtbaren Grauwerte.
7 »Filmmodus« Erkennt und verarbeitet Spielfilme bei sämt-lichen Programmquellen automatisch. Da-durch erhalten Sie stets ein optimales Bild.
Dies funktioniert in den Modi 480i, 576i und 1080i bei TV-Wiedergabe und bei anderen Programmquellen.
Wenn der »Filmmodus« bei Sendungen ohne Spielfilmsignal eingeschaltet ist, kön-nen geringfügige Probleme wie Einfrieren des Bildes, defekte Untertitel oder feine Linien im Bild auftreten.
7 »Rauschreduktion« Vermindert das sichtbare Rauschen, indem das Bild ein wenig unschärfer dargestellt und ein leichtes Nachziehen erzeugt wird. Sollte bei einem guten Bildmaterial deshalb minimiert eingesetzt werden.
7 »Blockartefaktreduktion« Diese Funktion kann nur bei digitalen Emp-fangsquellen und AV-Programmplätzen aus-gewählt werden. Sie reduziert Störungen durch Artefakte (Pixelblöcke) bei digitalen Sendungen mit MPEG-Komprimierung (z. B. bei DVB-T-Receivern und geringer Übertra-gungsrate oder DVD-Playern).
Zurück-zu-den-Standardwerten1- Im Menü »Bild« die Zeile »Bild-Standard-
einstellungen wählen« mit »V« oder »Λ« wählen und mit »OK« bestätigen.
2- Sicherheitsabfrage bestätigen, dazu mit »<« oder »>« die Schaltfläche »Ja« anwählen und mit »OK« bestätigen;
oder
Vorgang abbrechen, dazu mit »<« oder »>« die Schaltfläche »Nein« anwählen und mit »OK« bestätigen.
3- Einstellung mit »EXIT« beenden.

Fernseher / Bedienungsanleitung29 / 118 TR
BILD--/TONEINSTELLUNGEN------------------------------------------------------------
Toneinstellungen-1- Menü mit »MENU« aufrufen.
2- Menüpunkt »Einstellungen« mit »V«, »Λ«, »<« oder »>« wählen und mit »OK« bestätigen.
3- Die Option »Ton« mit »>« oder »<« wählen und mit »V« bestätigen.
– Das Menü »Ton« ist aktiv.
Ton-Modus Natürlich
Nacht-Modus Aus
Erweitert
Ton-Standardeinstellungen wählen
Bild
Dienstagxx xxx xxxx
Quelle TimerlisteTon NetzwerkTV Jugendschutz
Einstellungen > Ton
Wählen BeendenZurückBACK EXIT
Hinweis:7 Die weitere Bedienung entnehmen Sie bitte
den folgenden Abschnitten.
Ton-Modus1- Zeile »Ton-Modus« mit »V« oder »Λ«
wählen.
2- Gewünschte Option mit »<« oder »>« wählen.
Magic-FidelityMagic Fidelity ist eine patentierte Audio-Technologie, die im Fersehgerät integriert ist und nur die eingebauten Lautsprecher benötigt, um einen Surround Soundeffekt zu erzeugen.
1- Zeile »Ton-Modus« mit »V« oder »Λ« wählen.
2- Option »Spielfilm«, »Natürlich«, »Sprache« oder »Musik« mit »<« oder »>« wählen.
Standfuß-oder-WandmontageDie Toneinstellungen werden je nach Aufstel-lungsart »Standfuß« oder »Wandmontage« optimal eingestellt.1- Zeile »Erweitert« mit »V« oder »Λ« wählen
und mit »OK« bestätigen.
2- Die Zeile »Fernseherposition« mit »V« oder »Λ« wählen und mit »OK« bestätigen.
3- Benötigte Option »Standfuß« oder »Wand-montage« mit »<« oder »>« wählen.
Stereo/Zweikanalton,-MonoEmpfängt das Gerät Zweikanalton-Sendungen – z. B. einen Spielfilm im Originalton auf Tonkanal B (Anzeige: »Dual II«) und die synchronisierte Fassung auf Tonkanal A (Anzeige: »Dual I«), können Sie den von Ihnen gewünschten Ton-kanal wählen.Empfängt das Gerät Stereo- oder Nicam- Sendungen, schaltet es automatisch auf Stereo-Tonwiedergabe (Anzeige: »STEREO«).1- Zeile »Erweitert« mit »V« oder »Λ« wählen
und mit »OK« bestätigen.
2- Zeile »Tonart« mit »V« oder »Λ« wählen und Einstellung mit »<« oder »>« anpassen.
EqualizerMit dem Equalizer können Sie den Klangeffekt „Benutzer“ selbst definieren.Die Zeile »Equalizer« wird nur dann angezeigt, wenn in Zeile »Ton-Modus« die Option »Benut-zer« gewählt wurde.1- Zeile »Erweitert« mit »V« oder »Λ« wählen
und mit »OK« bestätigen.
2- Die Zeile »Equalizer« mit »V« oder »Λ« wählen und mit »OK« bestätigen.
Das Menü »Equalizer« wird eingeblendet.
3- Frequenzband »120Hz« mit »V« oder »Λ« wählen.
Gewünschten Wert mit »<« oder »>« ein-stellen.
4- Das nächste Frequenzband mit »V« oder »Λ« wählen und Einstellung wiederholen.
5- Einstellung mit »BACK <« speichern.

30 / 118 TRFernseher / Bedienungsanleitung
Automatische-LautstärkeFernsehsender senden meist in unterschiedlichen Lautstärken. Die Funktion AVL (Automatic Volu-me Limiting) gewährleistet eine einheitliche Laut-stärke, wenn Sie von einem Fernsehprogramm auf ein anderes umschalten.1 Zeile »Erweitert« mit »V« oder »Λ« wählen
und mit »OK« bestätigen.
2 Zeile »AVL« mit »V« oder »Λ« wählen und mit »<« oder »>« die Option »Ein« wählen.
Zurück-zu-den-Standardwerten1- Im Menü »Ton« die Zeile »Ton-Standardein-
stellungen wählen« mit »V« oder »Λ« wählen und mit »OK« bestätigen.
2- Sicherheitsabfrage bestätigen, dazu mit »<« oder »>« die Schaltfläche »Ja« anwählen und mit »OK« bestätigen;
oder
Vorgang abbrechen, dazu mit »<« oder »>« die Schaltfläche »Nein« anwählen und mit »OK« bestätigen.
3- Einstellung mit »EXIT« beenden.
Einstellungen-beenden1 Einstellungen mit »EXIT« beenden.
BILD--/TONEINSTELLUNGEN------------------------------------------------------------

Fernseher / Bedienungsanleitung31 / 118 TR
FERNSEH-BETRIEB-–-GRUNDFUNKTIONEN------------------
Ein--und-Ausschalten1- Fernsehgerät mit »8«, »1…0« oder »P+«
oder »P-« aus Bereitschaft (Stand-by) ein-schalten.
2- Fernsehgerät mit »8« in Bereitschaft (Stand-by) schalten
Programme-wählen1- Fernsehprogramme mit »1…0« direkt wäh-
len.
2- Fernsehprogramme mit »P+« oder »P-« schrittweise wählen.
3- Programmliste mit »OK« aufrufen, das ge-wünschte Fernsehprogramm mit »<« oder »>« wählen und mit »OK« bestätigen.
Programmliste mit »EXIT« abschalten.
Hinweise:7 Informationen zu den nächsten Sendun-
gen können in der Programmliste mit »Λ« aufgerufen werden.
7 Umschalten auf Radio-Programme, dazu die Programmliste mit »OK« aufrufen, »« (blau) drücken, mit »V« oder »Λ« die Option »Radio« wählen. Radio-Programm mit »<« oder »>« wählen und mit »OK« bestätigen.
7 Zurückschalten zur TV Programmliste, dazu wieder die Programmliste mit »OK« aufru-fen, »« (blau) drücken, mit »V« oder »Λ« die Option »Digital« wählen und mit »OK« bestätigen.
7 Um Energie zu sparen, können Sie im „Radio-Betrieb“ das Bild abschalten (siehe Kapitel „ERWEITERTE EINSTELLUNGEN“ auf Seite 68).
Programme-aus-Listen-wählenSie können Programme aus verschiedenen Listen (z. B. ALLE(S), FAV 1 bis FAV 4) wählen.1- Übersicht der Programmlisten mit »FAV«
aufrufen. – Die Übersicht wird angezeigt.
2- Gewünschte Programmliste mit »V« oder »Λ« wählen und mit »OK« aufrufen.
3- Gewünschtes Fernsehprogramm mit »<« oder »>« wählen und mit »OK« bestätigen.
4- Programmliste mit »EXIT« abschalten.
AV-Programmplätze-wählen1- Menü »Signalquelle« mit » « aufrufen.
2- Gewünschten AV-Programmplatz mit »<« oder »>« wählen und mit »OK« bestätigen.
3- Mit »1…0« zum Fernsehprogramm zurück-schalten.
Hinweis:7 Die Namen der AV-Programmplätze können
geändert werden. Siehe Kapitel „Einstellun-gen“ auf Seite 26.
Lautstärke-ändern1- Lautstärke mit »– o +« ändern.
Ton-aus--und-einschalten1- Ton mit »p« stummschalten und wieder
ein- schalten.
Informationen-einblendenInformationen zum Fernsehprogramm werden bei jedem Umschalten automatisch eingeblen-det.1- Informationen manuell einblenden, dazu
»?« wiederholt drücken. – Die Einblendung erlischt nach kurzer Zeit
automatisch.

32 / 118 TRFernseher / Bedienungsanleitung
AudiospracheBei digitalen Fernsehprogrammen können Sie unter verschiedenen Sprachen auswählen. Dies ist abhängig von der jeweiligen Sendung.1- Auswahlmenü mit » « aufrufen.
2- Gewünschte Sprache mit »V« oder »Λ« wählen und mit »OK« bestätigen.
3- Menü mit »EXIT« abschalten.
UntertitelBei digitalen Fernsehprogrammen können Sie unter verschiedenen Untertiteln auswählen. Dies ist abhängig von der jeweiligen Sendung.1- Auswahlmenü mit » « aufrufen.
2- Gewünschten Untertitel mit »V« oder »Λ« wählen und mit »OK« bestätigen.
3- Menü mit »EXIT« abschalten.
Zapp-FunktionMit dieser Funktion können Sie das Fernsehpro-gramm, das Sie im Moment ansehen, speichern und zu anderen Fernsehprogrammen schalten (zappen).1- Mit »1…0« oder »P+«, »P–« das Fern-
sehprogramm wählen, das in den Zapp-speicher abgelegt werden soll und mit »BACK <« be stätigen.
2- Mit »1…0« oder »P+«, »P–« auf ein ande-res Fernsehprogramm umschalten.
3- Mit »BACK <« zwischen dem gespeicher-ten Fernsehprogramm und dem zuletzt gese-henen Fernsehprogramm umschalten.
4- Funktion mit »EXIT« beenden.
FERNSEH-BETRIEB-–-GRUNDFUNKTIONEN------------------

Fernseher / Bedienungsanleitung33 / 118 TR
FERNSEH-BETRIEB-–-WEITERE-FUNKTIONEN---------------
Die folgenden Einstellungen finden Sie im Menü »Tools«.
Abschaltzeit-eingebenIm Menü »Abschalttimer« kann für das Fernseh-gerät eine Ausschaltzeit eingegeben werden. Das Fernsehgerät schaltet nach Ablauf der ein-gestellten Zeit in Bereitschaft (Stand-by).1- Menü mit »TOOLS« aufrufen.
2- Zeile »Abschalttimer« mit »V« oder »Λ« wählen.
3- Gewünschte Ausschaltzeit mit »<« oder »>« eingeben.
Hinweis:7 Funktion abschalten, dazu die Ausschaltzeit
mit »<« oder »>« auf »Aus« stellen.4- Menü mit »EXIT« abschalten.
ZoomfunktionMit dieser Funktion können Sie das Bild nach Wunsch vergrößern.1- Menü mit »TOOLS« aufrufen.
2- Zeile »Zoom« mit »V« oder »Λ« wählen und mit »OK« be stätigen.
3- Den Zoomfaktor mit »<« oder »>« wählen und mit »OK« be stätigen.
4- Zum Verschieben des Bildes »« (rot) drü-cken und das Bild mit »V«, »Λ«, »<« oder »>« verschieben.
5- Zurückschalten zum Menü »Zoom« mit »BACK <«.
6- Menü mit »EXIT« abschalten.
Bildformat-umschaltenDas Fernsehgerät schaltet automatisch auf das Format 16:9 um, wenn dieses Format an den Euro-AV-Buchsen erkannt wird.1- Menü mit »TOOLS« aufrufen.
2- Zeile »Bildformat« mit »V« oder »Λ« wählen.
3- Bildformat mit »<« oder »>« wählen und mit »OK« be stätigen
4- Menü mit »EXIT« abschalten.
Hinweis:7 Sie können zwischen folgenden Bildfor-
maten wählen:
Format-»Auto«Bei 16:9-Sendungen wird automatisch auf das Bildformat »16:9« umgeschaltet.Bei 4:3-Sendungen wird automatisch auf das Bildformat »4:3«umgeschaltet.
Formate-»16:9«-und-»14:9«Bei 4:3-Sendungen – und gewählter Funktion »Format 16:9« oder »Format 14:9« – erscheint das Bild horizontal verbreitert.Die Bildgeometrie wird in horizontaler Richtung linear gedehnt.Bei tatsächlichen 16:9 Signalquellen (von einer SET-TOP-Box an der Euro-AV-Buchse) ist das Bild voll ausgefüllt und die Bildgeometrie korrekt.
Format-»4:3«Das Bild wird im Format 4:3 gezeigt.
Format-»Letterbox«-Das Letterbox-Format eignet sich besonders für Sendungen im Format 16:9.Die bisher üblichen schwarzen Streifen oben und unten im Bild werden überschrieben, 4:3-Bilder werden bildschirmfüllend angezeigt.Die gesendeten Bilder werden vergrößert, dabei geht oben und unten etwas Bildinhalt verloren. Die Bildgeometrie bleibt erhalten.

34 / 118 TRFernseher / Bedienungsanleitung
Klangeffekte-wählen1- Menü mit »TOOLS« aufrufen.
2- Zeile »Klangeffekt« mit »V« oder »Λ« wählen.
3- Gewünschte Toneinstellung mit »<« oder »>« wählen.
– Die Toneinstellung »Benutzer« kann ver-ändert werden; siehe Kapitel „Equalizer”, auf Seite 29.
4- Menü mit »EXIT« abschalten.
Bildmodus-wählen1- Menü mit »TOOLS« aufrufen.
2- Zeile »Bildmodus« mit »V« oder »Λ« wählen.
3- Gewünschten Bildmodus mit »<«, »>« wählen.
4- Menü mit »EXIT« abschalten.
FERNSEH-BETRIEB-–-WEITERE-FUNKTIONEN---------------
Format-»Untertitel«Wenn Sie den Untertitel, der am unteren Bild-rand gezeigt wird, nicht erkennen, dann wählen Sie »Untertitel«.
Format-»Panorama«-Diese Einstellung eignet sich für Filme im be-sonders breiten Format.Bei 4:3-Sendungen – und gewählter Funktion »Panorama« – erscheint das Bild horizontal ver-breitert. Die Bildgeometrie wird in horizontaler Richtung gedehnt.
Format-»Overscan«In diesem Modus werden HD-Bilder – von den HDMI-Buchsen oder von den Component- Buchsen nicht beschnitten, sondern in ihrer Originalgröße angezeigt. Dies gilt nur im HDMI-Modus und bei Auflösungen ab 720p.

Fernseher / Bedienungsanleitung35 / 118 TR
Schriftgröße-des-Programmfüh-rers-ändern-1- Zur Übersicht mit »<« schalten, danach mit
»V« die Zeile »Einstellungen« wählen und mit »OK« bestätigen.
2- Die Option »Barrierefreiheit« mit »V« oder »Λ« wählen und mit »OK« bestätigen.
3- Gewünschte Schriftgröße mit »V« oder »Λ« wählen und mit »OK« bestätigen.
4- Einstellung beenden, dazu »BACK <« zweimal drücken.
5- Zurückschalten zur „Programmübersicht“, dazu mit »Λ« die Zeile »Programm« wäh-len und mit »OK« bestätigen.
ELEKTRONISCHE-PROGRAMMFÜHRER-----------------------------
1- Programmführer mit »GUIDE« ein blenden.Hinweise:7 Nicht alle Fernsehprogramme bieten einen
umfassenden TV-Guide.7 Viele Sendeanstalten senden das aktuelle
Tagesprogramm, bieten jedoch keine Detail beschreibung.
7 Es gibt Sendeanstalten, die keinerlei Infor-mationen anbieten.
2- Die Schaltfläche »Weiter« mit »V« wählen und mit »OK« bestätigen.
– Die Sendungen der ersten 5 Programme (in der Reihenfolge der Programmtabelle) werden angezeigt.
3- Gewünschtes Fernsehprogramm mit »V« oder »Λ« wählen.
– Die aktuelle Sendung des gewählten Fernsehprogrammes wird angezeigt.
Hinweis:7 Mit »P+« oder »P-« können die Programme
in „7“-Schritten umgeschaltet werden.4- Zu den Informationen der aktuellen Sen-
dung mit »OK« schalten.
Hinweise:7 Die gewählte Sendung kann aufgezeichnet
werden (wenn ein externen Datenträger angeschlossen ist). Dazu die Schaltfläche »Aufnehmen« mit »>« wählen und mit »OK« bestätigen. Einblendung mit »OK« bestätigen.
7 Die gewählte Sendung kann in den Erin-nerungstimer übernommen werden. Dazu die Schaltfläche »Erinnern« mit »>« wählen und mit »OK« bestätigen. Einblendung mit »OK« bestätigen.
5- Zurückschalten zur Übersicht der Sendun-gen mit »BACK <«.
6- Programminformationen zur nächsten Sendung mit »>« wählen, zurück zu den Programminformationen der aktuellen Sendung mit »<«.
Hinweis:7 Weitere Optionen entnehmen Sie der
Benutzerführung am Bildschirm. 7- Programmführer mit »EXIT« abschalten.

36 / 118 TRFernseher / Bedienungsanleitung
Was-ist-HbbTVHbbTV bietet den interaktiven Nachfolger des Videotexts, mit modern gestalteten Inhalten, hochauflösenden Bildern und Video sequenzen. Voraussetzung für die vollständige Funktionalität von HbbTV ist, dass das Fernsehgerät mit dem Internet verbunden ist.Nach dem Umschalten auf ein Fernsehpro-gramm, das HbbTV anbietet, wird eine entspre-chende Information eingeblendet.
HBBTV-BETRIEB--------------------------------------------------------------------------------------------------

Fernseher / Bedienungsanleitung37 / 118 TR
HbbTV-BedienungNach dem Umschalten auf ein Fernsehpro-gramm das HbbTV unterstützt, wird eine Infor-mation eingeblendet, wenn HbbTV vorhanden ist.1- HbbTV mit »« (rot) einschalten. – Am Bildschirm werden Informationen über
den nutzbaren Service eingeblendet. Des weiteren sind die für die Navigation notwendigen Farbtasten zusehen.
Hinweise:7 Das Themenangebot und die Anwahl der
verschiedenen Themen ist abhängig vom jeweiligen Programmanbieter.
7 Für verschiedene Zusatzfunktionen oder Einstellungen werden die Zifferntasten »1« bis »0« verwendet.
2- Gewünschtes Thema mit »« (grün), »« (gelb) oder »« (blau) oder mit »V«, »Λ«, »<« oder »>« anwählen und mit »OK« be stätigen.
3- Im gewählten Thema mit »V«, »Λ«, »<« oder »>« die gewünschte Option wählen und mit »OK« be stätigen.
4- HbbTV mit »« (rot) abschalten.
Hinweis:7 Wenn die Navigation im HbbTV-Betrieb
nicht funktioniert, kann die Funktion mit »EXIT« beendet werden.
Weitere-Funktionen-für-Video-sequenzen1- Wiedergabe mit »8« starten.
2- Wiedergabe mit »!« unterbrechen (Pause).
3- Wiedergabe mit »8« fortsetzen.
4- Zurückspulen mit »3« oder vorspulen mit »4«.
5- Wiedergabe mit »7« beenden.
HbbTV-aus-/einschaltenWenn Sie den interaktiven Dienst HbbTV aus-schalten, ist dieser Dienst nicht mehr verfügbar.1- Menü mit »MENU« aufrufen.
2- Menüpunkt »Einstellungen« mit »V«, »Λ«, »<« oder »>« wählen und mit »OK« bestätigen.
3- Menüpunkt »Quelle« mit »>« oder »<« wählen und mit »V« bestätigen.
4- Zeile »Erweitert« mit »V« oder »Λ« wählen und mit »OK« bestätigen.
5- Zeile »Hbb TV« mit »V« oder »Λ« wählen.
6- Die Option »Aus« mit »<« oder »>« wählen.
Hinweis:7 Zum Einschalten von HbbTV im Pkt. 6-die
Option »Ein« wählen.7- Einstellung mit »EXIT« beenden.
Digitalen-Videotext-aus-/ein-schaltenWenn Sie den digitalen Videotext ausschalten, kann nur der normale Videotext angewählt werden, die weiteren Funktionen des interakti-ven Dienstes HbbTV stehen jedoch weiter zur Verfügung.1- Menü mit »MENU« aufrufen.
2- Menüpunkt »Einstellungen« mit »V«, »Λ«, »<« oder »>« wählen und mit »OK« bestätigen.
3- Menüpunkt »Quelle« mit »>« oder »<« wählen und mit »V« bestätigen.
4- Die Zeile »Erweitert« mit »V« oder »Λ« wählen und mit »OK« bestätigen.
5- Zeile »Digitaler Videotext« mit »V« oder »Λ« wählen.
6- Die Option »Aus« mit »<« oder »>« wählen.
Hinweis:7 Zum Einschalten des digitalen Videotextes
im Pkt. 6-die Option »Ein« wählen.7- Einstellung mit »EXIT« beenden.
HBBTV-BETRIEB--------------------------------------------------------------------------------------------------

38 / 118 TRFernseher / Bedienungsanleitung
TOP-Text-oder-FLOF-Text-BetriebHinweis:7 Wenn Sie nur diesen „normalen“ Videotext
verwenden wollen, schalten Sie den digita-len Videotext aus, siehe Seite 42.
1- Videotext mit »TXT« einschalten.
2- Videotext-Seiten mit »1...0« direkt wählen oder mit »V« oder »Λ« schrittweise wäh-len.
Zurückschalten zur Videotext-Seite 100 mit »?«.
Hinweis:7 Am unteren Bildschirmrand ist eine Info-
Zeile aus einem roten, grünen und – Sender abhängig – gelben und blauen Schriftfeld zu sehen. Analog dazu verfügt die Fernbe-dienung über farblich gekennzeichnete Tasten mit denen diese Seiten angewählt werden können.
3- Eine Seite zurückblättern mit »« (rot).
4- Zur nächsten Seite mit »« (grün) blättern.
5- Ein gewünschtes Kapitel mit »« (gelb) wählen.
6- Ein gewünschtes Thema mit »« (blau) wählen.
7- Videotext mit »TXT« beenden.
Normaler-Textmodus1- Videotext mit »TXT« einschalten.
2- Videotextseiten mit »1...0« direkt wählen. Zurückschalten zur Videotext-Seite 100 mit »?«.
3- Eine Seite zurückblättern mit »P–«.
4- Zur nächsten Seite mit »P+« blättern.
5- Videotext mit »TXT« beenden.
Weitere-FunktionenWartezeit-überbrückenWährend eine Seite gesucht wird, können Sie zum Fernsehprogramm umschalten.1- Nummer der Videotextseite mit »1…0«
eingeben und danach »6« drücken. – Sobald die Seite gefunden wurde, wird
die Seitennummer angezeigt.
2- Auf die Videotextseite mit »6« umschalten.
Zeichenhöhe-vergrößern1- Zeichenhöhe einer Videotextseite vergrö-
ßern, dazu »5« wiederholt drücken.
SeitenstoppUnter einer Mehrfachseite können mehrere Unterseiten zusammengefasst sein, die von der Sendeanstalt automatisch weitergeblättert werden.1- Das automatische Umblättern der Unter-
seiten mit »3« stoppen.
2- Funktion mit »3« beenden.
Unterseiten-direkt-aufrufenWenn die gewählte Videotextseite weitere Seiten enthält, wird die Nummer der aktuellen Unterseite sowie die Gesamtseitenzahl ange-zeigt.1- Mit » « die Funktion Unterseiten aufrufen.
2- Unterseite mit »« (rot) oder »« (grün) anwählen.
3- Funktion mit » « beenden.
Antworten-aufdeckenIn bestimmten Videotextseiten können verdeckte Antworten oder Informationen enthalten sein.1- Informationen mit »4« einblenden.
2- Informationen mit »4« ausblenden.
Geteilter-BildschirmMit dieser Funktion können Sie das Fernsehpro-gramm auf der linken, den Videotext auf der rechten Seite anzeigen lassen.1- Funktion mit »7« einschalten.
2- Funktion mit »7« abschalten.
VIDEOTEXT-BETRIEB-------------------------------------------------------------------------------------
Fernseher / Bedienungsanleitung39 / 118 TR
USB-RECORDING--------------------------------------------------------------------------------------------
Informationen-zur-Aufnahme-und-Wiedergabe-von-Fernseh-sendungen7 Die Aufnahme und die Wiedergabe von Fern-
sehsendungen sind mit digitalen Fernsehpro-grammen (DVB-S, DVB-T und DVB-C) möglich.
7 Welche digitalen Fernsehprogramme (DVB-S, DVB-T und DVB-C) Sie aufnehmen und wieder-geben können, kann vom jeweiligen Program-manbieter abhängig sein.
7 Die Aufnahme und die Wiedergabe von Sen-dungen sowie die Funktion TimeShift können nur mit einem externen Datenträger (Festplatte oder USB-Stick) durchgeführt werden.
7 Aufnahmen sind mit den meisten auf dem Markt verfügbaren Datenträgern möglich.
Der Betrieb kann jedoch nicht für alle Daten-träger garantiert werden.
7 Wurde eine Sendung auf dem externen Da-tenträger aufgezeichnet, kann diese nur auf Ihrem Fernsehgerät wiedergegeben werden. Die Wiedergabe dieser Sendungen mit ande-ren Geräten ist nicht möglich.
7 Wenn Sie Ihr Fernsehgerät zur Reparatur ge-ben und Hardwarekomponenten aus getauscht werden mussten, können möglicherweise die Aufnahmen mit dem reparierten Gerät nicht mehr wiedergegeben werden.
7 Der Empfang des Programmanbieters SKY ist in Deutschland zur Zeit nur mit einer geeigneten Settop-Box oder einem geeigne-ten CA-Modul möglich.
7 Grundig übernimmt keine Haftung für den eventuellen Verlust gespeicherter Daten auf dem externen Datenträger.
7 Da der USB Multimedia Player verschiedene aufgenommene Sendungen nicht unterstützen kann, verwenden Sie zur Wiedergabe der aufgenommenen Sendungen die Funktion “PVR-Archiv”.
Mögliche-Einschränkungen-bei-dem-Betrieb-mit-externen-Daten-trägerAbhängig vom jeweiligen Programmanbieter kann es bei einigen Fernsehprogrammen zu verschiedenen Einschränkung der Funktionen kommen.
Auf-diese-Einschränkungen-hat--GRUNDIG-keinen-Einfluß!
7 Die Aufnahme einer Sendung auf den exter-nen Datenträger kann durch den Program-manbieter unterbunden werden. Wird die Meldung »URI* geschützt! Aufnahme einge-schränkt« am Bildschirm eingeblendet, so ist durch den Programmanbieter Aufnahme oder Timeshift eingeschränkt (Aufnahme einmal möglich) oder unterbunden (Aufnahme nicht möglich).
7 Wurde eine Sendung auf das Archiv des ex- ernen Datenträgers aufgezeichnet und ge-speichert, kann die Wiedergabe der Sendung eingeschränkt sein.
Der Programmanbieter kann Ihnen gestatten, diese Sendung einmal oder mehrmals an zu- sehen, es ist auch möglich, dass die Sendung nur für einen gewissen Zeitraum zur Verfügung steht.
7 Sendungen die jugendgeschützt sind, ver-langen unmittelbar vor dem Start der Aufnah-me die Eingabe einer PIN-Nummer. Erfolgt diese Autorisierung nicht, darf die Aufnahme nicht starten.
7 Das Überspielen einer Sendung von einem digitalen Fernsehprogramm auf einen Video-/ oder DVD-Recorder über die Buchse SCART/S-VHS/COMPONENT (Ana-loges Bild-/Tonsignal) kann ebenfalls vom Programmanbieter eingeschränkt werden. Vorausgesetzt, Ihr Gerät unterstützt diese Überspielfunktion.
* URI = User right information (Urheberrechtli-che Informationen).
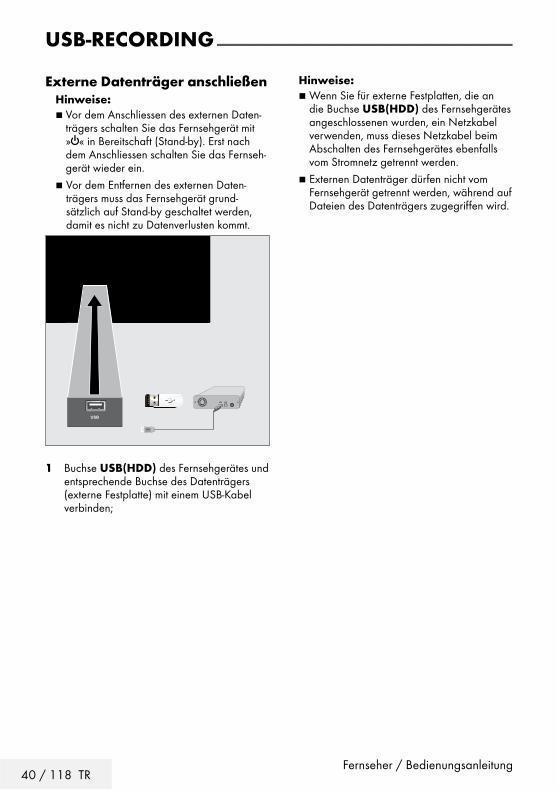
40 / 118 TRFernseher / Bedienungsanleitung
USB-RECORDING--------------------------------------------------------------------------------------------
Externe-Datenträger-anschließen-Hinweise:7 Vor dem Anschliessen des externen Daten-
trägers schalten Sie das Fernsehgerät mit »8« in Bereitschaft (Stand-by). Erst nach dem Anschliessen schalten Sie das Fernseh-gerät wieder ein.
7 Vor dem Entfernen des externen Daten-trägers muss das Fernsehgerät grund-sätzlich auf Stand-by geschaltet werden, damit es nicht zu Datenverlusten kommt.
1 Buchse USB(HDD) des Fernsehgerätes und entsprechende Buchse des Datenträgers (externe Festplatte) mit einem USB-Kabel verbinden;
Hinweise:7 Wenn Sie für externe Festplatten, die an
die Buchse USB(HDD) des Fernsehgerätes angeschlossenen wurden, ein Netzkabel verwenden, muss dieses Netzkabel beim Ab schalten des Fernsehgerätes ebenfalls vom Stromnetz getrennt werden.
7 Externen Datenträger dürfen nicht vom Fernsehgerät getrennt werden, während auf Dateien des Datenträgers zugegriffen wird.

Fernseher / Bedienungsanleitung41 / 118 TR
Einstellungen-für-USB-RecordingMenü-anwählen1- Menü mit »MENU« aufrufen.
2- Menüpunkt »Aufnahmen« mit »V«, »Λ«, »<« oder »>« wählen und mit »OK« bestätigen.
– Das Menü »Medienplayer« wird ange-zeigt.
3- Zeile »PVR« mit »V« or »Λ« wählen und mit »OK« bestätigen.
4- Das Menü »Mediaoptionen« mit »TOOLS« aktivieren.
MedienPlayer > PVR
Channel_1_201548_154649.ts
Dienstagxx xxx xxxx
ZurückBACK
Anzeigemodus Auto
Auto-Vorschau Ein
Diaschauintervall 5
Datenträgerverwaltung
Mediaoptionen
5- Die Zeile »Datenträgerverwaltung« mit »V« oder »Λ« wählen und mit »OK« bestätigen.
Hinweis:7 Die weitere Bedienung entnehmen Sie bitte
den folgenden Abschnitten.
Datenträger-sicher-entfernen1- Im Menü »Datenträgerverwaltung« die Zeile
»Laufwerk sicher trennen« mit »V« oder »Λ« wählen und mit »OK« bestätigen.
Hinweis:7 Der Datenträger kann jetzt von der Buchse
abgezogen werden.
USB-RECORDING--------------------------------------------------------------------------------------------
Externe-Datenmedien-auswählenWenn mehrere externe Datenträger an das Fernsehgerät angeschlossen sind, können Sie den gewünschten Datenträger auswählen.1- Im Menü »Datenträgerverwaltung« die Zeile
»Datenträger« mit »V« oder »Λ« wählen und mit »OK« bestätigen.
2- Gewünschten Datenträger mit »V« oder »Λ« wählen.
3- Eine Menüebene zurückschalten mit »BACK <« oder Einstellung mit »EXIT« beenden.
Partition-des-externen-Datenträgers-wählenWenn der externe Datenträger über mehrere Partitionen verfügt, wählen Sie die gewünschte aus.1- Im Menü »Datenträgerverwaltung« die Zeile
»Partition« mit »V« oder »Λ« wählen und mit »OK« bestätigen.
2- Gewünschte Partition mit »V« oder »Λ« wählen.
3- Eine Menüebene zurückschalten mit »BACK <« oder Einstellung mit »EXIT« beenden.
Externe-Datenträger-prüfenSie können externe Datenträger einer Prüfung unterziehen und so herausfinden, ob sich diese für die gewünschte Funktionalität eignen.1- Im Menü »Datenträgerverwaltung« die Zeile
»Datenträger« mit »V« oder »Λ« wählen. Wenn mehrere Datenträger angeschlossen sind, den gewünschten Datenträger mit »V« oder »Λ« wählen.
2- Zeile »Partition« mit »V« oder »Λ« wählen. Wenn mehrere Partitionen vorhanden sind, die gewünschte Partition mit »V« oder »Λ« wählen.
3- Zeile »Datenträger prüfen« mit »V« oder »Λ« wählen und mit »OK« bestätigen.
– Informationen zum Datenträger werden angezeigt.
4- Eine Menüebene zurückschalten mit »BACK <« oder Einstellung mit »EXIT« beenden.

42 / 118 TRFernseher / Bedienungsanleitung
USB-RECORDING--------------------------------------------------------------------------------------------
Partition-des-externen-Datenträgers-formatieren1- Im Menü »Datenträgerverwaltung« die Zeile
»Partition formatieren« mit »V« oder »Λ« wählen und mit »OK« bestätigen.
2- Sicherheitsabfrage bestätigen, dazu mit »<« oder »>« die Schaltfläche »Ja« anwählen und mit »OK« bestätigen;
oder
Vorgang abbrechen, dazu mit »<« oder »>« die Schaltfläche »Nein« anwählen und mit »OK« bestätigen.
3- Eine Menüebene zurückschalten mit »BACK <« oder Einstellung mit »EXIT« beenden.
Timeshift-–-Sendungen-„anhalten″Die aktuelle Sendung kann „angehalten” wer-den. Dies ist eine nützliche Funktion, wenn z.B. während eines Spielfilmes das Telefon läutet, und Sie die Fortsetzung des Films nicht verpas-sen möchten.Am Bildschirm erscheint ein Standbild der letzten Szene, die Sendung wird im „Time Shift-Speicher” des externen Datenträgers gespei-chertIm „Time Shift-Speicher” können Sie max. 60 Minuten der aktuellen Sendung aufnehmen.
Hinweis:7 Verwenden Sie für störungsfreies „Perma-
nent Timeshift“ eine externe USB-Festplatte.1- Aktuelle Sendung mit »!« anhalten. – Das Bild wird eingefroren, der Zeitversatz
und die restliche Aufnahmezeit werden angezeigt.
2- Sendung mit »8« fortsetzen. – Die Sendung wird weiterhin aufgezeich-
net.
Hinweis:7 Die folgenden Funktionen sind während des
Timeshift-Betriebs möglich: – Zurückspulen, dazu »3« je nach Ge-
schwindigkeit mehrmals drücken (das Bild ist während des Rückspulens eingefroren);
– Vorwärtsspulen, dazu »4« je nach Ge-schwindigkeit mehrmals drücken;
– Pause mit »!« anwählen.3- Timeshift-Funktion mit »7« beenden. – Die Meldung »Livesendung« wird einge-
blendet, Sie sehen die aktuelle Sendung ohne Zeitversatz.
– Die Szenen im „Time Shift-Speicher” sind gelöscht.

Fernseher / Bedienungsanleitung43 / 118 TR
Sendungen-aufnehmenSie können Sendungen aufnehmen. Die Daten dieser Sendungen werden auf einem externen Datenträger gespeichert, die Verwaltung dieses Archivs erfolgt durch das Fernsehgerät.Für 1 Minute Aufnahme benötigen Sie – je nach Fernsehprogramm – 44 MB bis 110 MB Spei-cherplatz auf dem externen Datenträger.Während der Aufnahme können Sie vom Archiv eine andere Sendung wiedergeben.Ein Wechseln des Programmplatzes ist nur bei Fernsehprogrammen möglich, die auf der gleichen Frequenz (DVB-T/C) oder auf dem gleichen Transponder (DVB-S) gesendet werden.Wenn Sie während der Aufnahme auf eine andere Programmquelle umschalten (mit Aus-nahme von DVB-T, DVB-S, DVB-C oder USB) wird die Aufnahme beendet.
Sofortaufnahme-einer-Sendung1- Fernsehprogramm mit »1…0« oder »P+«,
»P–« wählen und Aufnahme mit » « starten.
– Informationen zur Aufnahme werden eingeblendet: Das Aufnahmesymbol, der Programmname, die Sendung, die Auf-nahmezeit und der noch zur Verfügung stehende Speicherplatz.
– Nach kurzer Zeit werden diese Informatio-nen abgeschaltet.
2- Aufnahme mit »7« beenden.
3- Sicherheitsabfrage bestätigen, dazu mit »<« oder »>« die Schaltfläche »Ja« anwählen und mit »OK« bestätigen;
oder
Vorgang abbrechen, dazu mit »<« oder »>« die Schaltfläche »Nein« anwählen und mit »OK« bestätigen.
Hinweise:7 Nach Abschluss der Aufnahme wird die
Aufzeichnung automatisch auf dem exter-nen Datenträger gespeichert.
7 Wird der externe Datenträger während der Aufnahme von der USB-Buchse getrennt, wird die Aufnahme automatisch abgebro-chen und nicht gespeichert.
Aufnahme-einer-Sendung-aus-der-Pro-grammübersicht1- Programmübersicht mit »OK« aufrufen.
2- Das gewünschte Fernsehprogramm mit »<« oder »>« wählen und mit »OK« be stätigen.
3- Programmübersicht mit »EXIT« abschalten.
4- Aufnahme mit » « starten. – Informationen zur Aufnahme werden
eingeblendet: Das Aufnahmesymbol, der Programmname, die Sendung, die Auf-nahmezeit und der noch zur Verfügung stehende Speicherplatz.
– Nach kurzer Zeit werden diese Informatio-nen abgeschaltet.
5- Aufnahme mit »7« beenden.
6- Sicherheitsabfrage bestätigen, dazu mit »<« oder »>« die Schaltfläche »Ja« anwählen und mit »OK« bestätigen;
oder
Vorgang abbrechen, dazu mit »<« oder »>« die Schaltfläche »Nein« anwählen und mit »OK« bestätigen.
USB-RECORDING--------------------------------------------------------------------------------------------
44 / 118 TRFernseher / Bedienungsanleitung
USB-RECORDING--------------------------------------------------------------------------------------------
Sendungen-für-die-Aufnahme-programmieren-...
...-mit-dem-Elektronischen-ProgrammführerSie können die Daten für die gewünschte Sen-dung vom Elektronischen Programmführer (TV-Guide) übernehmen.25 Sendungen können für die Timer-Aufnahme oder als Erinnerung programmiert werden.1- Programminformationen mit »GUIDE«
einblenden. – Der Elektronische Programmführer wird
eingeblendet.
2- Das gewünschte Fernsehprogramm mit »V« oder »Λ« wählen.
– Informationen zur aktuellen Sendung werden angezeigt.
3- Die gewünschte Sendung mit »>« oder »<« wählen.
4- Gewählte Sendung mit »OK« bestätigen. – Umfassende Informationen zur aktuellen
Sendung werden angezeigt.
5- Die Option »Aufnehmen« mit »>« wählen und mit »OK« bestätigen.
– Die Aufnahmedaten werden angezeigt.
6- Aufnahmedaten mit »OK« bestätigen. – Die Daten wurden in den Timer übernom-
men.
7- Programmführer mit »EXIT« abschalten.
Hinweis:7 Sollen die Aufnahmedaten geändert wer-
den, das Menü mit »MENU« aufrufen, mit »V«, »Λ«, »<« oder »>« den Menüpunkt »Timerliste« wählen und mit »OK« bestäti-gen. »« (grün) drücken, die Daten ändern und mit »« (blau) speichern.
Hinweise:7 Vor dem Beginn der Timeraufnahme
erscheint eine Warnmeldung mit einem 10-Sekunden Countdown. Sie können auf das programmierte Fernsehprogramm um-schalten.
7 Sollte der Beginn der Timeraufnahme bei laufender Wiedergabe erreicht werden, wird die Wiedergabe unterbrochen: Die Aufnahme erfolgt automatisch im Hinter-grund, sofern Sie bei der Meldung des Timercountdowns nicht »Ja« wählen.
7 Hinweis für UPC Benutzer: Bei der Aufnah-me einer Sendung kann es vorkommen, dass ein Teil der vorherigen oder der nächs-ten Sendung auch aufgezeichnet wird. Die Ursache kann eine zeitliche Änderung oder eine Ungenauigkeit des Elektronischen Programmführers (TV-Guide) sein. Bitte be-achten Sie, wenn eine oder mehrere dieser Sendungen „jugendgeschützt“ sind, wird der höchste Zugangslevel für alle Sendun-gen verwendet.
„Vorlauf-/Nachlaufzeit-einstellen“Mit dieser Funktion können Sie die Aufnahme-zeit, die der Elektronische Programmführer vor-gibt, verändern.Wenn Sie befürchten, dass eine Sendung einige Minuten früher begonnen oder einige Minuten später beendet wird, können Sie diese Zeit bis zu 60 Minuten „zugeben“1- Menü mit »MENU« aufrufen.
2- Menüpunkt »Timerliste« mit »>« oder »<« wählen und mit »OK« aktivieren.
3- Das Menü »Vorlaufzeit« mit »« (blau) aufrufen.
4- Startzeitpunkt mit »<« oder »>« verändern.
5- Die Zeile »Ende« mit »V« wählen und End-zeitpunkt mit »<« oder »>« verändern.
6- Die Schaltfläche »Speichern« mit »V« anwählen und mit »OK« bestätigen.
7- Menü mit »EXIT« abschalten.

Fernseher / Bedienungsanleitung45 / 118 TR
...-durch-manuelle-DateneingabeSie können 25 Sendungen für die Timer-Aufnah-me programmieren oder 25 Sendungen für den Erinnerungstimer eingeben.1- Programminformationen mit »GUIDE« ein-
blenden. – Der Elektronische Programmführer wird
eingeblendet.
2- Das Menü des Programmführers mit »<« aufrufen.
– Die Option »Programm« ist markiert.
3- Die Zeile »Manu. Aufnahme« mit »V« oder »Λ« wählen und mit »OK« bestätigen.
– Das Menü »Manuelle Aufnahme« wird eingeblendet, die Zeile »KANAL« ist markiert.
Hinweis:7 Wollen sie an eine Senung erinnert werden,
aus dem Menü des Programmführers die Zeile »Erinnern« wählen.
4- »OK« drücken, das gewünschte Programm mit »V« oder »Λ« wählen und mit »OK« bestätigen. Zur nächsten Eingabe mit »V« schalten.
5- »OK« drücken, das gewünschte Datum mit »V« oder »Λ« wählen und mit »OK« bestätigen. Zur nächsten Eingabe mit »V« schalten.
6- »OK« drücken, die gewünschte Startzeit mit »V« oder »Λ« wählen und mit »OK« bestätigen. Zur nächsten Eingabe mit »>« schalten.
7- »OK« drücken, die gewünschte Stoppzeit mit »V« oder »Λ« wählen und mit »OK« bestätigen. Zur nächsten Eingabe mit »V« schalten.
8- »OK« drücken, den gewünschten Modus (»Einmal«, »Wöchentlich« oder »Täglich«) mit »V« oder »Λ« wählen und mit »OK« bestätigen.
9- Die Zeile »AUFNAHME SPEICHERN« mit »V« wählen und mit »OK« bestätigen.
– Die Aufnahmedaten werden angezeigt
10- Aufnahmedaten mit »OK«bestätigen.
11- Menü mit »EXIT« abschalten.
USB-RECORDING--------------------------------------------------------------------------------------------
Hinweise:7 Ist die Erinnerungszeit für die gewählte
Sendung erreicht, wird kurz eine Meldung eingeblendet, danach schaltet das Fernseh-gerät zur Sendung.
7 Vor dem Beginn der Timeraufnahme erscheint eine Warnmeldung mit einem 10-Sekunden Countdown. Sie können auf das pro gram mierte Fernsehprogramm um-schalten.
Aufnahmedaten-im-Timermenü--ändern1- Menü mit »MENU« aufrufen.
2- Menüpunkt »Timerliste« mit »V«, »Λ«, »<« oder »>« wählen und mit »OK« aktivieren.
– Das Menü »Timerliste« wird ein geblendet.
3- Titel der Sendung die geändert werden soll mit »V« oder »Λ« wählen und Timerplatz mit »« (grün) aktivieren.
– Das Eingabemenü wird eingeblendet.
4- Gewünschte Option mit »V« oder »Λ« wählen und Daten mit »1…0« und »<« oder »>« ändern.
5- Änderungen mit »« (blau) speichern.
6- Menü mit »EXIT« abschalten.
Aufnahmedaten-im-Timermenü-löschen1- Menü mit »MENU« aufrufen.
2- Menüpunkt »Timerliste« mit »V«, »Λ«, »<« oder »>« wählen und mit »OK« aktivieren.
– Das Menü »Timerliste« wird ein geblendet.
3- Titel der Sendung die gelöscht werden soll mit »V« oder »Λ« wählen und Aufnahme-daten mit »« (gelb) löschen.
4- Sicherheitsabfrage bestätigen, dazu mit »<« oder »>« die Schaltfläche »Ja« anwählen und mit »OK« bestätigen;
oder
Vorgang abbrechen, dazu mit »<« oder »>« die Schaltfläche »Abbrechen« anwäh-len und mit »OK« bestätigen.
5- Menü mit »EXIT« abschalten.
46 / 118 TRFernseher / Bedienungsanleitung
3- Gewünschte Sendung mit »V«, »Λ«, »>« oder »<« wählen und Wiedergabe mit »8« starten.
– Die Aufnahme wird im Hintergrund fort-gesetzt.
4- Wiedergabe mit »7« beenden.
5- Aufnahme mit »7« beenden.
6- Sicherheitsabfrage mit »« (grün) bestäti-gen;
oder
»« (rot) drücken, die Funktion wird abge-brochen.
Sendungen-in-der-Aufnahmeliste-löschenSie können Sendungen aus der Aufnahmeliste löschen.1- Menü mit »MENU« aufrufen.
2- Menüpunkt »Aufnahmen« mit »V«, »Λ«, »<« oder »>« wählen und mit »OK« akti-vieren.
– Das Menü »Medienplayer« wird einge-blendet.
3- Die Option »PVR« mit »V« oder »Λ« wäh-len und mit »OK« aktivieren.
– Die aufgezeichneten Sendungen werden angezeigt.
4- Sendung die gelöscht werden soll mit »V« oder »Λ« wählen.
5- Sendung mit »« (rot) löschen.
6- Sicherheitsabfrage bestätigen, dazu mit »<« oder »>« die Schaltfläche »Ja« anwählen und mit »OK« bestätigen;
oder
Vorgang abbrechen, dazu mit »<« oder »>« die Schaltfläche »Abbrechen« anwäh-len und mit »OK« bestätigen.
Hinweis:7 Sendungen im Menü »Aufgenommene
Sendungen«, die gerade aufgenommen oder wieder gegeben werden, können nicht gelöscht werden.
7- Menü mit »EXIT« abschalten.
USB-RECORDING--------------------------------------------------------------------------------------------
WiedergabeDie aufgezeichneten Sendungen – ob von Hand gestartet oder mit der Timer-Funktion – werden auf dem externen Datenträger gespei-chert. Das Archiv des externen Datenträgers finden Sie im Menü »Aufnahmen – Medienplay-er«.
Sendung-aus-dem-Archiv--auswählen1- Menü mit »MENU« aufrufen.
2- Menüpunkt »Aufnahmen« mit »V«, »Λ«, »<« oder »>« wählen und mit »OK« akti-vieren.
– Das Menü »Medienplayer« wird einge-blendet.
3- Die Option »PVR« mit »V« oder »Λ« wäh-len und mit »OK« aktivieren.
– Die aufgezeichneten Sendungen werden angezeigt.
4- Gewünschte Sendung mit »V« oder »Λ« wählen und Wiedergabe mit »8« starten.
5- Wiedergabe mit »7« beenden. – Das Menü »Medienplayer« wird einge-
blendet.
Bildsuche-vorwärts/rückwärts1- Während der Wiedergabe mit »4« die
Geschwindigkeit vorwärts (2x, 4x, 8x, 16x oder 32x) anwählen;
oder
während der Wiedergabe mit »3« die Geschwindigkeit rückwärts (2x, 4x, 8x, 16x oder 32x) anwählen.
Wiedergabe-während-einer--AufnahmeSie können entweder das aktuelle Fernsehpro-gramm sehen, das gerade aufgenommen wird, oder ein vorher aufgenommenes Fernsehpro-gramm während eine Aufnahme läuft.1- Fernsehprogramm, das aufgezeichnet
wer den soll, mit »1…0« oder »P+«, »P–« wählen und Aufnahme mit » « starten.
2- Das Menü »Medienplayer« mit »« (rot) auf rufen.
Fernseher / Bedienungsanleitung47 / 118 TR
USB-BETRIEB----------------------------------------------------------------------------------------------------------
Dateiformate-für-den-USB--BetriebIhr Fernsehgerät kann folgende Dateiformate verarbeiten, die über die USB-Buchsen zuge-führt werden.
VideodatenSpezielle Codecs zur Videokomprimierung und – dekomprimierung sorgen für mehr Spei-cherplatz, ohne die Bildqualität übermäßig zu be einträchtigen.Ihr Fernsehgerät gibt Videodateien in den Formaten XVID, H.264/MPEG-4 AVC(L4.1, 4 Referenzbilder), MPEG-4, MPEG-2, MPEG-1, MJPEG und MOV wieder.Dabei werden die folgenden Dateinamener-weiterungen unterstützt: “.avi”, “mkv”, “.mp4”, “.ts”, “.mov”, “.mpg”, “.dat”, “.vob”.Formatierungsinformationen (Codec) sind in den Dateiinhalt eingebettet und können je nach Dateiendung variieren. „.avi“, „.mvk“ oder „.divx“-Dateien mit Divx-Codec werden nicht wiedergegeben.Solche Dateien können auch per MP3, AAC oder Dolby Digital komprimierte Audiodateien enthalten.
BilddatenIhr Fernsehgerät gibt Bilder in den Formaten JPEG, PNG und BMP wieder.JPEG ist eine Abkürzung für Joint Picture Experts Group. Es bezeichnet ein Verfahren zur Kom-primierung von Bilddateien.PNG und BMP sind Verfahren zum Speichern von Bilddaten mit keinen oder nur geringen Verlusten.Bilddateien können gemeinsam mit Dateien anderer Typen auf einem Medium gespeichert werden.Diese Dateien lassen sich in Ordnern und Unter-ordnern organisieren.
AudiodatenIhr Fernsehgerät spielt Audiodaten in den For-maten MP3, AAC, WMA und M4A ab. MP3 ist eine Abkürzung für MPEG-1 Level 3 und basiert auf dem MPEG-1-Standard, der von der MPEG (Motion Picture Expert Group) entwi-ckelt wurde.AAC steht für Advanced Audio Coding und wurde ebenfalls von der MPEG entwickelt. AAC liefert eine bessere Tonqualität bei identi-scher Datenrate.WMA (Windows Media Audio) ist ein von Microsoft entwickelter Komprimierungsstandard für Audiodaten.Solche Formate ermöglichen Aufzeichnung und Wiedergabe von Audiodateien, die so gut wie eine CD klingen, jedoch nur einen Bruchteil des Speicherplatzes belegen.Unterstützte Dateinamenerweiterungen: MP3, MP2, M4A, AAC.MP3-Dateien können wie vom Computer ge-wohnt in Ordnern und Unterordnern organisiert werden.
Für DTS-Patente siehe http://patents.dts.com. Herge-stellt unter Lizenz von DTS Licensing Limited. DTS, das Symbol und die Kombination aus DTS und dem Symbol sind eingetragene Marken und DTS 2.0+Digital Out ist eine Marke der DTS, Inc. © DTS, Inc. Alle Rechte vorbehalten.

48 / 118 TRFernseher / Bedienungsanleitung
USB-BETRIEB----------------------------------------------------------------------------------------------------------
Externe-Datenträger-anschließen-Vor dem Anschliessen des externen Datenträ-gers schalten Sie das Fernsehgerät mit »8« in Bereitschaft (Stand-by). Erst nach dem Anschlies-sen schalten Sie das Fernsehgerät wieder ein.
Vor dem Entfernen des externen Datenträgers muss das Fernsehgerät grundsätzlich auf Stand-by geschaltet werden, damit es nicht zu Daten-verlusten kommt.
Hinweise:7 Externen Datenträger dürfen nicht vom
Fernsehgerät getrennt werden, während auf Dateien des Datenträgers zugegriffen wird.
7 Ein bidirektionaler Datenaustausch im Sinne eines ITE-Gerätes (Information Technology Equipment) gemäß EN 55022/EN 55024 ist nicht möglich.
7 Die USB-Übertragung stellt keine eigene Betriebsart dar, sondern ist lediglich eine Zusatzfunktion.
1- Buchse USB(HDD)-des Fernsehgerätes und entsprechende Buchse des Daten gerätes (externe Festplatte, Digital-Camera, Karten-lesegerät oder MP3-Player) mit einem USB-Kabel verbinden;
Externe-Datenträger-entfernenWenn Sie den Datenträger entfernen wollen, melden Sie ihn vorher ab.1- Menü mit »MENU« aufrufen.
2- Menüpunkt »Medienplayer« mit »V«, »Λ«, »<« oder »>« wählen und mit »OK« akti-vieren.
3- Den Namen des externen Datenträgers mit »V« oder »Λ« wählen und mit »OK« bestätigen.
– Der Inhalt wird angezeigt.
4- Die Option »Mediaoptionen« mit »TOOLS« aufrufen.
5- Zeile »Datenträgerverwaltung« mit »V« oder »Λ« wählen und mit »OK« bestätigen.
6- Zeile »Laufwerk sicher trennen« mit »V« oder »Λ« wählen und mit »OK« bestätigen.
7- Datenträger abziehen.
8- Menü mit »EXIT« abschalten.

Fernseher / Bedienungsanleitung49 / 118 TR
USB-BETRIEB----------------------------------------------------------------------------------------------------------
Dateimanager-Der Dateimanager zeigt Video-, Audio- und Bilddateien auf externen Datenträgern an.Falls ein externer Datenträger Dateien unter-schiedlicher Formate enthält, können Sie nicht benötigte Formate bei Bedarf ausfiltern.
Menü-des-Dateimanagers
Medienplayer > DISK1
Spielfilm
Musik
Foto
Spielfilm.avi
Spielfilm.str
Musik.mp3
Foto.jpg
Dienstagxx xxx xxxx
ZurückBACKTOOLS
Alle(s) Spielfilm Musik Foto
Alles wahlen +Wiedergabe Mediaoptionen Filter TypeNavigierenWiedergabe
4 5
123
1- Vorschau der ausgewählten Datei.
2- Gewähltes Datenformat.
3- Name des Datenträgers.
4- Ordner des Datenträgers.
5- Menünavigation.
Einstellungen-im-Menü--USB-EinrichtungMenü-anwählen1- Menü mit »MENU« aufrufen.
2- Menüpunkt »Medienplayer« mit »V«, »Λ«, »<« oder »>« wählen und mit »OK« akti-vieren.
– Das Menü »Medienplayer« wird einge-blendet.
3- Den Namen des externen Datenträgers mit »V« oder »Λ« wählen und mit »OK« bestätigen.
– Der Inhalt wird angezeigt.
4- Die Option »Mediaoptionen« mit »TOOLS« aufrufen.
Hinweis:7 Die weitere Bedienung entnehmen Sie bitte
den folgenden Abschnitten.
Anzeigemodus-wählenMit dieser Funktion wählen Sie, ob das Medium im Originalformat (z.B. 4:3) dargestellt wird oder auf die Bildschirmgröße skaliert wird.1- Zeile »Anzeigemodus« mit »V« oder »Λ«
wählen.
2- Gewünschte Option mit »<« oder »>« wählen
3- Einstellung mit »EXIT« beenden.
Automatische-Vorschau-einschaltenWenn diese Funktion aktiviert ist, wird eine Vor-schau der ausgewählten Datei im Dateimanager angezeigt.1- Zeile »Auto-Vorschau« mit »V« oder »Λ«
wählen.
2- Funktion mit »<« oder »>« einschalten (»Ein«).
3- Einstellung mit »EXIT« beenden.

50 / 118 TRFernseher / Bedienungsanleitung
Diaschauintervall1- Zeile »Diaschauintervall« mit »V« oder
»Λ« wählen.
2- Gewünschte Zeit mit »<« oder »>« wählen.
3- Einstellung mit »EXIT« beenden.
Einstellungen-für-UntertitelWenn der Film, der wiedergegeben werden soll, Untertitel beinhaltet, können Sie diese ein-/aus-schalten, die Größe und die Farbe ändern.1- Benötigte Zeile »Untertitel Auto-Auswahl«,
»Größe Untertitel« oder »Farbe Untertitel« mit »V« oder »Λ« wählen.
2- Einstellung mit »<« oder »>« wählen.
3- Einstellung mit »EXIT« beenden.
Hinweis:7 Diese Einstellungen können nur mit „exter-
nen“ Untertitel durchgeführt werden.
USB-BETRIEB----------------------------------------------------------------------------------------------------------

Fernseher / Bedienungsanleitung51 / 118 TR
USB-BETRIEB----------------------------------------------------------------------------------------------------------
Wiedergabe-–-Grundfunktionen-1- Menü mit »MENU« aufrufen.
2- Menüpunkt »Medienplayer« mit »V«, »Λ«, »<« oder »>« wählen und mit »OK« akti-vieren.
– Das Menü »Medienplayer« wird einge-blendet.
Hinweis:7 Wenn der Datenträger noch nicht ange-
zeigt wird, mit »« (gelb) die Übersicht aktualisieren.
3- Den Namen des externen Datenträgers mit »V« oder »Λ« wählen und mit »OK« bestätigen.
– Der Inhalt wird angezeigt.
4- Gewünschten Dateityp (Alle(s), Spielfilm, Musik, Foto) mit »<« oder »>« wählen und mit »OK« bestätigen.
5- Gewünschten Ordner oder gewünschte Datei mit »V« oder »Λ« wählen und mit »OK« öffnen.
– Eine Liste der Unterordner (Subdirectory) wird eingeblendet.
Hinweis:7 Zurückschalten zum Hauptordner mit
»BACK <«.6- Gewünschten Titel oder gewünschtes Bild
mit »V« oder »Λ« wählen und Wiederga-be mit »8« starten.
Hinweise:7 Informationen zu den Film-Daten können mit
»?« aufgerufen werden.7 Bei der Wiedergabe von MP3- oder WMA-
Dateien werden Informationen zum Album und Titel angezeigt.
7 Bei der Wiedergabe von Bilddateien kann mit »?« ein „Bedienfeld“ eingeblendet werden.
7- Wiedergabe mit »!« unterbrechen (Pau-se).
8- Wiedergabe mit »8« fortsetzen.
9- Wiedergabe mit »7« beenden. – Der Dateimanager wird angezeigt.
Hinweise:
7 Mit »BACK <« zurückschalten zur Übersicht.
7 Es kann vorkommen, dass auch eigentlich unterstützte Dateien im USB-Betrieb nicht richtig funktionieren. Dies liegt daran, dass bestimmte Dateien mit nicht standardisierten Komprimierungsverfahren aufgezeichnet wurden, obwohl sie die „richtige“ Dateien-dung tragen.
7 Wenn eine Videodatei über mehrere Ton-spuren (Audiostreams) verfügt, können Sie diese bei laufender Wiedergabe im Voll-bildmodus mit » « umschalten.
7 Bei Filmen werden lediglich Untertitel im Format .SRT, .SUB, .ASS, .SSA, .SMI unter-stützt. Dabei müssen die Namen der Unterti-tel- und Filmdatei identisch sein. Andernfalls werden keine Untertitel angezeigt.

52 / 118 TRFernseher / Bedienungsanleitung
Zusätzliche-Wiedergabe--funktionenJe nach Dateiformat stehen die folgenden Zusatzfunktionen zur Verfügung:
Kapitel-einer-Datei-wählen(nur bei Videodateien)1- Während der Wiedergabe das nächste
Kapitel mit »>« wählen.
2- Während der Wiedergabe das vorherige Kapitel mit »<« wählen.
Titel-einer-Datei-wählen(nur bei Videodateien)1- Während der Wiedergabe den nächsten
Titel mit »Λ« wählen.
2- Während der Wiedergabe den vorherigen Titel mit »V« wählen.
Ausgewählte-Titel-wiedergebenNur die markierten Titel werden wiedergege-ben.1- Titel mit »V« oder »Λ« wählen und mit
»« (gelb) markieren.
2- Titel mit »V« oder »Λ« wählen und mit »« (gelb) markieren.
3- Wiedergabe mit »8« starten.
4- Wiedergabe mit »7« beenden.
Hinweis:7 Zum Entfernen der Markierung den Titel
mit »V« oder »Λ« wählen und mit »« (gelb) die Markierung abschalten.
Titel/Bild-schrittweise-wählen-(SKIP)1- Während der Wiedergabe den nächsten
Titel/das nächste Bild mit »6« wählen.
2- Während der Wiedergabe den vorherigen Titel/das vorherige Bild mit »5« wählen.
– Die Wiedergabe beginnt mit dem aus-gewählten Titel oder Bild.
USB-BETRIEB----------------------------------------------------------------------------------------------------------
Eine-gewünschte-Wiedergabe--passage-anwählen(nur bei Videodateien)1- Während der Wiedergabe »OK« drücken.
2- Gewünschte Passage (Zeitangabe) mit »1...0« eingeben und mit »OK« bestätigen.
Schneller-Vorlauf(nur bei Video- und Audiodateien)Sie können zwischen unterschiedlichen Ge-schwindigkeiten (2-fach, 4-fach, 8-fach, 16-fach und 32-fach vorwärts und rückwärts) wählen.1- Während der Wiedergabe gewünschte
Wiedergabe-Geschwindigkeit mit »3« oder »4« wählen
2- Wiedergabe mit »8« fortsetzen.
Bilder-drehen-(nur bei Bilddateien)Sie können die Bildanzeige um 90° drehen.1- Während der Wiedergabe das Bedienfeld
mit »OK« einblenden.
2- Die „Taste“ » « mit »<« oder »>« wäh-lenund mit »OK« das Bild um jeweils 90° drehen.
Wiederhol-FunktionenDie Möglichkeiten: – »Diese«: Der ausgewählte Titel wird wieder-
holt. – »Alles«: Alle Titel werden wieder holt wieder-
gegeben. – »Zufällig«: Alle Titel werden in zufälliger
Reihenfolge wiedergegeben. – »Keine«: Die Wiederhol-Funktion ist abge-
schaltet.1- Wiedergabe mit »8« starten.
2- Während der Wiedergabe das Bedienfeld mit »?« einblenden.
3- Die „Taste“ » « mit »<« oder »>« wählen-und mit »OK« die gewünschte Wiederhol-Funktion wählen.

Fernseher / Bedienungsanleitung53 / 118 TR
BETRIEB-MIT-MULTI-MEDIA-SERVER----------------------------------------------
Wiedergabe-von-Video-/--Musik-/-und-Bilddaten-vom-Heimnetz Sie können die Video-/ Musik-/ und Bilddateien, die auf dem Digitalen Medien Server gespei-chert sind im DLNA Menü Ihres Fernsehgerätes auswählen und wiedergeben.
Hinweise:7 Sie können auf Videos, Musik oder Fotos
von z.B. einem PC, Smartphone oder NAS (Network Attached Storage) zugreifen, die kompatibel zum DLNA-Standard sind und als Digital Media Server (DMS) dienen.
7 Wenn der Digitale Medienserver und das Fernsehgerät gleichzeitig mit dem Heim-netzwerk drahtlos verbunden sind, kann es bei der Videowiedergabe zu Bildstörungen kommen.
7 Ihr Fernsehgerät kann auch auf einen PC zugreifen, der über Software als Digital Media Server eingerichtet wurde. Ein prob-lemloser Zugriff bei nicht DMS-zertifizierter Software kann nicht garantiert werden.
7 Wenn Sie einen PC mit einem Windows Betriebssystem verwenden, können Sie den Windows Media Player so konfigurieren, dass er als Digital Media Server verwendet werden kann (ab Version 11).
Die notwendigen Einstellungen sind abhän-gig von der jeweiligen Softwareversion.
Digitalen-Medien-Server-anwählen1- Menü mit »MENU« aufrufen.
2- Menüpunkt »Medienplayer« mit »>« oder »<« wählen und mit »OK« aktivieren.
– Das Menü »Medienplayer« wird einge-blendet.
– Die vorhandenen Digitale Media Server werden angezeigt.
Hinweis:7 Wenn kein Digitaler Media Server an-
gezeigt wird, überprüfen Sie bitte den Anschluß und die Anmeldung an das Heim-netzwerk.
3- Den gewünschten Digitalen Media Server mit »V« oder »Λ« wählen und mit »OK« bestätigen.
– Der Inhalt wird angezeigt.
Medienplayer > PC1
Musik
Foto
Video
Dienstagxx xxx xxxx
ZurückBACK
Alle(s) Spielfilm Musik Foto
TOOLS Mediaoptionen Filter TypeNavigierenBestätigen
Hinweise:7 Die Struktur der Dateien und der Ordner
des Digitalen Media Servers im Menü ist abhängig vom Media Server, den Sie ver-wenden.
7 Werden vom Digitalen Media Server Filme mit Untertiteln angeboten, so können diese Untertitel nicht angezeigt werden.
7 Nur Video-Dateiformate mit einem DLNA Zertifikat (»MPEG_PS_NTSC«, »MPEG_PS_PAL«, »MPEG_TS_SD_EU« und »MPEG_TS_EU_ ISO«) werden unterstützt.
7 Bei der Wiedergabe von Videos mit hoher Bitrate können Bildstörungen auftreten.

54 / 118 TRFernseher / Bedienungsanleitung
BETRIEB-MIT-MULTI-MEDIA-SERVER----------------------------------------------
7 Ordner, die in der DLNA-Anwendung als unbekannt angezeigt werden, können nicht mit dem Fernsehgerät wiedergegeben werden. Dieses Problem lässt sich eventuell durch Installation eines entsprechenden Codec im Computer korrigieren.
7 Nur die Audio-Dateiformate mit einem DLNA Zertifikat (»AAC_ADTS_320«, »LPCM«, »MP3«, »WMABASE« und »WMA-FULL«) werden unterstützt.
7 Nur die Bild-Dateiformate mit einem DLNA Zertifikat (»JPEG_LRG«, »JPEG_MED« und »JPEG_SM«) werden unterstützt.
Wiedergabe-starten1- Im Inhaltsverzeichnis den gewünschten
Ordner mit »V« oder »Λ« wählen und mit »OK« bestätigen.
– Die vorhandenen Titel werden angezeigt.
2- Gewünschten Titel mit »V« oder »Λ« wählen.
3- Wiedergabe mit »8« starten.
Weitere-Wiedergabefunktionen1- Wiedergabe Pause mit »!« wählen.
2- Wiedergabe mit »8« fortsetzen.
3- Vorhergehenden Titel mit »5« anwählen, nächsten Titel mit »6« anwählen.
4- Wiedergabe mit »7« beenden.
5- Zurückschalten zur Übersicht mit »BACK <«.
6- Medienplayer mit »EXIT« beenden.
7- Sicherheitsabfrage bestätigen, dazu mit »<« oder »>« die Schaltfläche »Ja« anwählen und mit »OK« bestätigen;
oder
Vorgang abbrechen, dazu mit »<« oder »>« die Schaltfläche »Nein« anwählen und mit »OK« bestätigen.
Hinweis:7 Die im Kapitel aufgeführten und weitere
Wiedergabefunktionen können auch mit dem Funktionsmenü am Bildschirm ange-wählt werden:
– » « Wiederhol-Funktion anwählen; – »5« vorhergehenden Titel anwählen – »3« Passage suchen rückwärts; – »8« Wiedergabe; – »!« Pause; – »7« Wiedergabe beenden; – »4« Passage suchen vorwärts; – »6« nächsten Titel anwählen.
Fernseher / Bedienungsanleitung55 / 118 TR
APLICATION-CENTER-------------------------------------------------------------------------------------
Vertragsbedingungen-und-Vertraulichkeit
Vereinbarungen-zu-Vertragsbe-dingungen-und-VertraulichkeitDie Vereinbarungen zu Vertragsbedingungen und Vertraulichkeit sind Vereinbarungen, denen Sie zur Nutzung aller Funktionen von Smart Inter@ctive zustimmen müssen.Nur wenn die Vereinbarungen zu Vertragsbedin-gungen und Vertraulichkeit akzeptiert werden, können alle Funktionen von Smart Inter@ctive ge-nutzt werden und die erforderlichen Daten über die Nutzung des Fernsehers erfasst werden.Falls die Vereinbarungen zu Vertragsbedingun-gen und Vertraulichkeit nicht akzeptiert werden, kann nicht auf das Anwendungsportal, die Soft-wareaktualisierung via Internet und die Anwen-dungen und Webbrowser von Smart Inter@ctive zugegriffen werden. Außerdem werden keine Daten über die Nutzung des Fernsehers erfasst. Die DLNA- und LiveShare-Funktionen dagegen können genutzt werden.
Erste-Inbetriebnahme-und-Bedie-nungNachdem Sie den Fernseher eingeschaltet haben, erscheint die „Informationen“-Seite, wenn der Fern-seher erstmalig mit dem Internet verbunden wurde. Auf dieser Seite werden Sie darüber in Kenntnis gesetzt, dass Sie die Inhalte zu Vertragsbedingun-gen und Vertraulichkeit zur Nutzung der Funktio-nen von Smart Inter@ctive lesen und akzeptieren müssen. Hier müssen Sie „Weiter“ betätigen. 7 Wenn Sie diese Seite ohne Betätigen von
„Weiter“ verlassen (mit der Exit-Taste an der Fernbedienung oder durch Abschalten des Fernsehers), wird die „Informationsseite“ erneut angezeigt, sobald der Fernseher das nächste Mal eingeschaltet und mit dem Internet ver-bunden wird. Dies geschieht so lange, bis die Vereinbarungen zu Vertragsbedingungen und Vertraulichkeit gelesen und akzeptiert wurden.
7 Wenn Sie „Weiter“ betätigen, gelangen Sie auf eine Seite, auf der Sie die Inhalte der Vereinbarungen zu Vertragsbedingungen und Vertraulichkeit lesen können.
7 Umgang mit den Vereinbarungen zu Vertrags-bedingungen und Vertraulichkeit. Es gibt zwei
Optionen für beide Vereinbarungen zusam-men: „Zustimmen“ oder „Ablehnen“ Sie kön-nen nicht individuell zustimmen oder ablehnen.7 Wenn Sie „Zustimmen“ betätigen, können
Sie mit der Benutzung Ihres Fernsehers fortfahren.
7 Wenn Sie „Ablehnen“ betätigen: 7 Die „Informationsseite“ wird erneut an-
gezeigt, wenn der Fernseher das nächste Mal eingeschaltet oder mit dem Internet verbunden wird.
Wenn der Inhalt der Vereinbarungen zu Ver-tragsbedingungen und Vertraulichkeit aktuali-siert wird, erscheint die „Informationen“-Seite, wenn der Fernseher das nächste Mal mit dem Internet verbunden wird. Auf dieser Seite wer-den Sie darüber in Kenntnis gesetzt, dass die Inhalte von Vereinbarungen zu Vertragsbedin-gungen und Vertraulichkeit aktualisiert wurden. Zudem können Sie die Inhalte von Vereinbarun-gen zu Vertragsbedingungen und Vertraulichkeit lesen und akzeptieren. Betätigen Sie „Weiter“ und die nächsten Schritte sind wieder wie oben beschrieben.
Inhalte-der-akzeptierten-Verein-barungen-zu-Vertragsbedingun-gen-und-Vertraulichkeit-anzeigen-und-Zustimmung-widerrufenSie können die Vereinbarungen zu Vertragsbe-dingungen und Vertraulichkeit erneut lesen und Ihre Zustimmung widerrufen. Gehen Sie dazu wie folgt vor: 7 Rufen Sie zum Zugreifen auf die von Ihnen
akzeptierten Vereinbarungen zu Vertragsbe-dingungen und Vertraulichkeit die Einstellun-gen-Seite des Anwendungsportals oder die Einstellungen des Fernsehmenüs auf.
7 Hier finden Sie die aktuellsten Versionen der akzeptierten Vereinbarungen zu Vertragsbe-dingungen und Vertraulichkeit.
7 Sie können die aktuellste Version der Ver-einbarungen zu Vertragsbedingungen und Vertraulichkeit lesen und werden dort auch die Option „Zustimmung widerrufen“ finden. Wenn Sie „Zustimmung widerrufen“:7 Die „Informationsseite“ wird wieder angezeigt,
wenn der Fernseher das nächste Mal einge-schaltet oder mit dem Internet verbunden wird.
56 / 118 TRFernseher / Bedienungsanleitung
Anwendungen-zu-SMART-Inter@ctive-TVInternetanwendungen von SMART Inter@ctive TV bieten Ihrem Fernseher Internetdienste und -seiten. Diese Anwendungen sind entsprechend Ihrem Fernseher gestaltet.Mit der Funktion SMART Inter@ctive TV können Sie viele lokale und globale Internetanwendun-gen ausführen. Diese Anwendungen beinhalten verschiedene Arten, wie Video-, Bild-, Musik-, Social-Networking-, Nachrichten-, Sport- und Wettervorhersage-Anwendungen.
Hinweise:7 Die Verfügbarkeit von Anwendungen zu
SMART Inter@ctive TV kann von Land zu Land unterschiedlich sein.
7 Mit SMART Inter@ctive TV können keine Dateien heruntergeladen oder dauerhaft gespeichert werden. Ein Upload von Dateien auf eine Webseite wird nicht unter-stützt. Add-ons können mit Ausnahme der Anmeldeseiten einiger Anwendungen nicht installiert werden.
7 Grundig übernimmt keine Verantwortung für die Inhalte und die Qualität der Inhalte von Inhaltsanbietern.
7 Die lokalen und globalen Anwendungen, die über SMART Inter@ctive TV in Ihrem Fernseher bereitgestellt werden, unterliegen einem begrenzten Anwendungszeitraum durch die Dienstanbieter. Anwendungsinha-ber können diese Anwendungen nach eige-nem Ermessen aktualisieren, modifizieren, beschränken oder vollständig entfernen. Grundig kann für solche Änderungen nicht verantwortlich gemacht werden.
7 Grundig behält sich alle Rechte zum Än-dern, Einschränken, Erweitern und Entfernen der über SMART Inter@ctive TV bereitge-stellten Internetanwendungen vor.
7 Bei der Anmeldung zu einigen Anwen-dungen müssen Sie möglicherweise eine Verbindung zu der Webseite der entspre-chenden Anwendung herstellen. Betreffen-de Webseiten können Links enthalten, die nicht mit der Anmeldung in Verbindung
stehen. Bei Verbindung mit solchen Links greift der Fernseher möglicherweise auf das offene Netz zu und zeigt Inhalte, die von Ihrem Fernseher nicht unterstützt werden. Wenn Sie sich im offenen Netz befinden, kann Ihr Fernseher solche nicht unterstützten Inhalte nicht steuern und kann nicht für sie verantwortlich gemacht werden.
USB-Tastatur-und--MausSie können zur Verwendung im Webbrowser eine Tastatur oder Maus an beide Anschlüsse USB(HDD) anschließen. Tastaturen und Mäu-se, die spezielle Treiber erfordern, werden nicht unterstützt
Erste-Schritte-mit-Smart-Inter@ctive-TV1- Öffnen Sie das Menü mit »MENU«.
2- Wählen Sie mit »<« oder »>«das Menüele-ment »Anwendungscenter«, drücken Sie zum Bestätigen »OK«.
– Das „Anwendungsportal“-Menü wird angezeigt.
Hinweise:7 Wenn Sie „@“ drücken, ohne dass ein
Menü geöffnet ist, können Sie auf das „Anwendungsportal“-Menü zugreifen.
7 Wenn Sie versuchen, Inter@ctive-Anwen-dungen ohne ein verbundenes Kabel oder einen verbundenen Drahtlosadapter zu starten, wird eine entsprechende Warnung am Bildschirm angezeigt. Falls Ihr Kabel oder Drahtlosadapter verbunden ist, Sie aber keine IP erhalten oder keine Inter-netverbindung besteht, können die Inter@ctive-Anwendungen nicht gestartet werden. Prüfen Sie in diesem Fall die Netzwerkver-bindungseinstellungen. Siehe Seite 87 oder 90.
APLICATION-CENTER-------------------------------------------------------------------------------------

Fernseher / Bedienungsanleitung57 / 118 TR
Internetanwendungen-auswählen1- Wählen Sie „Anwendungsstore“ aus dem
Menü oder drücken Sie „@“. – Das Anwendungsportal wird angezeigt.
Smart Inter@ctive TV
Navigation Auswählen Einstellungen Beenden
Empfohlen
Am beliebtesten
Neue Anwendungen
abc...
abc...
abc...
abc...
abc...
abc...
abc...
abc...
abc...
abc...
abc...
abc...
abc...
abc...
abc...
abc...
abc...
abc...
abc...
abc...
abc...
abc...
abc...
abc...
Suchwort eingeben Alle AnwendungenFavoriten
2- Wählen Sie mit „V“, „Λ“, „<“ und „>“ die erforderliche Anwendung, drücken Sie zum Bestätigen „OK“.
– Das Hauptmenü der Anwendung wird kurz darauf angezeigt.
Hinweise:7 Wenn Sie versuchen, eine Anwendung
ohne eine Kabel- oder Drahtlosnetzwerkver-bindung zu starten, wird eine entsprechen-de Warnung am Bildschirm angezeigt.
7 Anwendungen starten nicht, falls Sie keinen Internetzugang haben oder keine IP bezie-hen können, selbst wenn Ihr Kabel mit dem Fernseher oder Sie mit einem Drahtlosnetz-werk verbunden sind. Prüfen Sie in diesem Fall die Netzwerkverbindungseinstellungen.
APLICATION-CENTER-------------------------------------------------------------------------------------
Alle-Anwendungen-anzeigenAuf der Startseite von SMART Inter@ctive TV angezeigte Anwendungen sind nur einige der Anwendungen, die auf dem Fernseher laufen können. Sie können andere Anwendungen unter »Alle Anwendungen« anzeigen und auswählen.1- Wählen Sie „Anwendungsstore“ aus dem
Menü oder drücken Sie „@“. – Das Anwendungsportal wird angezeigt.
2- Wählen Sie mit „V“, „Λ“, „<“ oder „>“ die Option „Alle Apps“, drücken Sie zum Bestätigen „OK“.
– Das „Alle Anwendungen“-Menü wird angezeigt.
Anwendungen-als-Favoriten-markierenSie können bevorzugte Anwendungen als Fa-voriten markieren und diese unter „Favoriten“ sammeln.1- Wählen Sie mit „V“, „Λ“, „<“ oder
„>“die Anwendung, die Sie Ihren Favoriten zufügen möchten, und drücken Sie „FAV“.
– Die von Ihnen ausgewählte Anwendung wird Ihren Favoriten zugefügt.
Hinweis:7 Drücken Sie zum Entfernen einer Anwen-
dung aus den Favoriten „FAV“.

58 / 118 TRFernseher / Bedienungsanleitung
Navigation-am-Anwendungs-portal-Hauptbildschirm1- Wählen Sie auf der Startseite des Anwen-
dungsportals mit »V«, »Λ«, »<« und »>« die erforderliche Anwendung, drücken Sie zum Bestätigen »OK«.
– Das Hauptmenü der Anwendung wird kurz darauf angezeigt.
2- Die Nutzung der Anwendung hängt primär von ihrem Aufbau ab. Befolgen Sie die Bildschirmhinweise.
Hinweis:7 Im Einstellungen-Menü können Sie das Land
des Anwendungsportals ändern und dafür sorgen, dass Anwendungen des ausgewähl-ten Landes auf der Seite „Alle Anwendun-gen“ angezeigt werden.
APLICATION-CENTER-------------------------------------------------------------------------------------
Anwendungsportal-Hauptbild-schirm1- Anwendungen
2- Alle Anwendungen
3- Favoriten
4- Suchleiste
5- Beenden
SMART Inter@ctive TV
Navigation Auswählen Einstellungen Rechtlicher Hinweis Beenden
Außergewöhnlich
Am beliebtesten
Neue Anwendungen
abc...
abc...
abc...
abc...
abc...
abc...
abc...
abc...
abc...
abc...
abc...
abc...
abc...
abc...
abc...
abc...
abc...
abc...
abc...
abc...
abc...
abc...
abc...
abc...
Sucheinstellungen eingeben Alle Anwendungen1
2
5
4Favorites 3

Fernseher / Bedienungsanleitung59 / 118 TR
WEB-BROWSER----------------------------------------------------------------------------------------------------
1- Tasten für die Navigation im WebBrowser.
2- Aufgerufene Seite.
3- Eine Seite zurück.
4- Eine Seite vor.
5- Aktualisieren.
6- Neuen Tab erstellen.
7- Adressfeld.
8- Suchfunktion.
9- Favoriten.
10- Startseite.
11- Einstellungen
12- Chronik.
13- Suche im Web.
14- Zoom.
15- WebBrowser schließen.
16- Tab schließen.
WebBrowser-ApplikationDie Applikation WebBrowser bietet Ihnen den bequemen Zugang zum Internet.1- Menü mit »MENU« aufrufen.
2- Menüpunkt »Webbrowser« mit »V«, »Λ«, »<« oder »>« wählen und mit »OK« bestätigen.
– Der Webbrowser wird eingeblendet.
3- Adressfeld mit »Λ« oder »V« anwählen und mit »OK« bestätigen.
– Eine virtuelle Tastatur wird eingeblendet.
4- Suchbegriff/Adresse eingeben und mit »OK« bestätigen
Hinweise:7 Weitere Funktionen und Bedienmöglichkei-
ten werden unten am Bildschirm angezeigt.7 Wir empfehlen für das einfache Navigieren
im WebBrowser den Gebrauch einer Tasta-tur und einer Maus. Diese können an den Buchsen USB(HDD) angeschlossen wer-den. Tastaturen die einen speziellen Treiber benötigen, werden nicht unterstützt.
Hauptmenü-des-WEB-Browsers
Zoom Out Zoom In Page Up Page Down Navigation WindowList Werkzeuge
2
1
3 4 5 7 8 9 10 11 12 13 14 156
16

60 / 118 TRFernseher / Bedienungsanleitung
SPRACHEINSTELLUNGEN---------------------------------------------------------------------
1- Menü mit »MENU« aufrufen.
2- Menüpunkt »Einstellungen« mit »V«, »Λ«, »<« oder »>« wählen und mit »OK« bestätigen.
3- Die Option »TV« mit »>« oder »<« wählen und mit »V« bestätigen.
– Das Menü »TV« ist aktiv.
Sprache und Tastatur
Audio Deskription
Zubehör
Erweitert
Info
Bild
Dienstagxx xxx xxxx
Quelle TimerlisteTon NetzwerkTV Jugendschutz
Einstellungen > TV
Wählen Bestätigen BeendenZurückBACK EXIT
Hinweis:7 Die weitere Bedienung entnehmen Sie bitte
den folgenden Abschnitten.
Menüsprache-ändern1- Zeile »Sprache und Tastatur« mit »V« oder
»Λ« wählen und mit »OK« bestätigen.
2- Zeile »Menüsprache« mit »V« oder »Λ« wählen und mit »OK« bestätigen.
3- Gewünschte Menüsprache mit »V« oder »Λ« wählen und mit »OK« bestätigen.
4- Eine Menüebene zurückschalten mit »BACK <« oder Einstellung mit »EXIT« beenden.
Audiosprache-ändern(nur bei digitalen Fernsehprogrammen)Sie können eine primäre und eine sekundäre Audiosprache festlegen.1- Zeile »Sprache und Tastatur« mit »V« oder
»Λ« wählen und mit »OK« bestätigen.
2- Zeile »Audiosprache« mit »V« oder »Λ« wählen und mit »OK« bestätigen.
3- Gewünschte Audiosprache mit »V« oder »Λ« wählen, danach mit »« (rot) als pri-märe Audiosprache oder mit »« (grün) als sekundäre Audiosprache festlegen.
– Primäre und sekundäre Sprache werden oben im Menü angezeigt.
4- Eine Menüebene zurückschalten mit »BACK <« oder Einstellung mit »EXIT« beenden.
Untertitelsprache-ändern(nur bei digitalen Fernsehprogrammen)Sie können die Untertitelsprache auswählen und eine zweite Untertitelsprache zuweisen.1- Zeile »Sprache und Tastatur« mit »V« oder
»Λ« wählen und mit »OK« bestätigen.
2- Zeile »Untertitelsprache« mit »V« oder »Λ« wählen und mit »OK« bestätigen.
3- Gewünschte Untertitelsprache mit »V« oder »Λ« wählen, danach mit »« (rot) als primä-re Untertitelsprache oder mit »« (grün) als sekundäre Untertitelsprache fest legen.
– Primäre und sekundäre Sprache werden oben im Menü angezeigt.
4- Eine Menüebene zurückschalten mit »BACK <« oder Einstellung mit »EXIT« beenden.
Tastatursprache-ändern1- Zeile »Sprache und Tastatur« mit »V« oder
»Λ« wählen und mit »OK« bestätigen.
2- Zeile »Tastatursprache« mit »V« oder »Λ« wählen und mit »OK« bestätigen.
3- Gewünschte Tastatursprache mit »V« oder »Λ« wählen und mit »OK« bestätigen.
4- Eine Menüebene zurückschalten mit »BACK <« oder Einstellung mit »EXIT« beenden.

Fernseher / Bedienungsanleitung61 / 118 TR
BEHINDERTENGERECHTE-FUNKTIONEN---------------------------
1- Menü mit »MENU« aufrufen.
2- Menüpunkt »Einstellungen« mit »V«, »Λ«, »<« oder »>« wählen und mit »OK« bestätigen.
3- Die Option »TV« mit »>« oder »<« wählen und mit »V« bestätigen.
– Das Menü »TV« ist aktiv.
4- Die Zeile »Audio Deskription« mit »V« oder »Λ« wählen und mit »OK« aktivieren.
Untertitelmodus Aus
Audio Deskription Gemischt
Audiobeschreibungslautstärke 20
Bild
Dienstagxx xxx xxxx
Quelle TimerlisteTon NetzwerkTV Jugendschutz
Einstellungen > TV > Audio Deskription
Wählen Modus ändern BeendenZurückBACK EXIT
Hinweis:7 Die weitere Bedienung entnehmen Sie bitte
den folgenden Abschnitten.
Untertitelmodus(nur bei digitalen Fernsehprogrammen)Sie können Untertitel für Gehörlose und Schwer-hörige ein- und ausschalten.1- Im Menü »Audio Deskription« die Zeile »Un-
tertitelmodus« mit »V« oder »Λ« wählen.
2- Die Option »Hörgeschädigte« mit »<« oder »>« wählen.
3- Eine Menüebene zurückschalten mit »BACK <« oder Einstellung mit »EXIT« beenden.
AudiodeskriptionAudiodeskription ist ein zusätzlicher Audiokanal für sehbehinderte Menschen. Unter anderem werden Aktivitäten, Umgebungen, Szenen-änderungen, Gesten und Gesichts ausdrücke der Schauspieler beschrieben.Dieser Audiokanal wird bei Digitalen Program-men zeitgleich mit dem normalen Ton übertra-gen. Die Verfügbarkeit hängt vom jeweiligen Programm und der Sendeanstalt ab.1- Im Menü »Audio Deskription« die Zeile
»Audio Deskription« mit »V« oder »Λ« wählen.
2- Funktion mit »<« oder »>« einschalten (»Ge-mischt« oder »Kopfhörer«).
3- Die Zeile »Audiobeschreibungslautstärke« mit »V« oder »Λ« wählen.
Gewünschte Lautstärke mit »<« oder »>« einstellen.
4- Eine Menüebene zurückschalten mit »BACK <« oder Einstellung mit »EXIT« beenden.

62 / 118 TRFernseher / Bedienungsanleitung
ERWEITERTE-EINSTELLUNGEN---------------------------------------------------------
1- Menü mit »MENU« aufrufen.
2- Menüpunkt »Einstellungen« mit »V«, »Λ«, »<« oder »>« wählen und mit »OK« bestätigen.
3- Die Option »TV« mit »>« oder »<« wählen und mit »V« bestätigen.
– Das Menü »TV« ist aktiv.
4- Die Zeile »Erweitert« mit »V« oder »Λ« wählen und mit »OK« aktivieren.
Autom. Abschaltung 4 Stunden
Geschäftslogoanzeige Nein
Betriebs-LED-Helligkeit Mittel
Energiesparmodus Aus
Permanenter Zeitversatz Aus
Bild
Dienstagxx xxx xxxx
Quelle TimerlisteTon NetzwerkTV Jugendschutz
Einstellungen > TV > Erweiterte Einstellungen
Wählen Modus ändern BeendenZurückBACK EXIT
Hinweis:7 Die weitere Bedienung entnehmen Sie bitte
den folgenden Abschnitten.
Automatische-AbschaltungIst diese Funktion aktiviert, schaltet das Fern-sehgerät nach 5 Minuten automatisch in Bereit-schaft, wenn kein Bildsignal gesendet wird. Das Fernsehgerät wird auch automatisch in Bereitschaft geschaltet, wenn innerhalb der ein-gestellten Zeit keine Taste an der Fernbedienung oder am Fernsehgerät betätigt wird. (Gefordert durch Europäische Richtlinie.)1- Im Menü »Erweitert« die Zeile »Autom.
Abschaltung« mit »V« oder »Λ« wählen.
2- Gewünschte Ausschaltzeit (4, 6 oder 8 Stunden mit »<« oder »>« eingeben.
Hinweis:7 Funktion abschalten, dazu mit »<« oder
»>« die Option »Aus« wählen.3- Eine Menüebene zurückschalten mit »BACK
<« oder Einstellung mit »EXIT« beenden.
GeschäftslogoanzeigeWenn Sie diese Funktion einschalten, werden die Funktionen Ihres Gerätes als Werbeeinblen-dungen angezeigt.1- Im Menü »Erweitert« die Zeile »Geschäftslo-
goanzeige« mit »V« oder »Λ« wählen.
2- Funktion mit »<« oder »>« einschalten (»Ja«).
3- Eine Menüebene zurückschalten mit »BACK <« oder Einstellung mit »EXIT« beenden.
Helligkeit-der-Betriebsanzeige-ändern-oder-ausschaltenSie können die Helligkeit der Betriebsanzeige ändern.Im Stand-by Modus leuchtet sie jedoch mit redu-zierter Helligkeit immer.1- Im Menü »Erweitert« die Zeile »Betriebs-
LED-Helligkeit« mit »V« oder »Λ« wählen.
2- Gewünschte Option (»Niedrig«, »Mittel« oder »Hoch«) mit »<« oder »>« wählen.
3- Eine Menüebene zurückschalten mit »BACK <« oder Einstellung mit »EXIT« beenden.
Energiesparmodus-für-den--Radio-Betrieb-aktivierenWird diese Funktion aktiviert, schaltet sich das Bild nach der eingestellten Zeit ab, wenn Audio-daten abgespielt werden.1- Im Menü »Erweitert« die Zeile »Energiespar-
modus« mit »V« oder »Λ« wählen.
2- Gewünschte Ausschaltzeit (10, 30 oder 60 Sekunden) mit »<« oder »>« wählen.
3- Eine Menüebene zurückschalten mit »BACK <« oder Einstellung mit »EXIT« beenden.
Hinweis:7 Wenn das Bild im USB Modus abschaltet,
das Menü mit »MENU« aufrufen und mit »<« oder »>« die Funktion abschalten (»Aus«).

Fernseher / Bedienungsanleitung63 / 118 TR
ERWEITERTE-EINSTELLUNGEN---------------------------------------------------------
Wetterinformationen-ein-/-aus-schaltenWenn diese Funktion aktiviert ist, wird ein Wet-terlogo und die Temperatur vom Standort des Gerätes eingeblendet.1- Im Menü »Erweitert« die Zeile »Wetterlage«
mit »V« oder »Λ« wählen.
2- Funktion mit »<« oder »>« einschalten (»Ein«).
3- Einstellung mit »EXIT« beenden.
HilfeZusatzinformationen über die entsprechende Funktion werden angezeigt, wenn Sie eine der Optionen im Menü wählen und kurz warten. Diese Benachrichtigung kann aktiviert oder deaktiviert werden.1- Wählen Sie mit »V« oder »Λ« die Option
»Hilfe« im »Erweitert«-Menü.
2- Wählen Sie mit »<« oder »>« zwischen »Ein« und »Aus«.
3- Drücken Sie zum Zurückkehren um eine Menüebene »BACK <« bzw. zum Been-den der Einstellungen »EXIT«.

64 / 118 TRFernseher / Bedienungsanleitung
TIMERFUNKTIONEN------------------------------------------------------------------------------------
1- Menü mit »MENU« aufrufen.
2- Menüpunkt »Einstellungen« mit »V«, »Λ«, »<« oder »>« wählen und mit »OK« bestätigen.
3- Die Option »Timerliste« mit »>« oder »<« wählen und mit »V« bestätigen.
– Das Menü »Timerliste« ist aktiv.
Einschlaftimer Aus
Einschalttimer
Ausschalttimer
Erweitert
Bild
Dienstagxx xxx xxxx
Quelle TimerlisteTon NetzwerkTV Jugendschutz
Einstellungen > Timerliste
Wählen Modus ändern BeendenZurückBACK EXIT
Hinweis:7 Die weitere Bedienung entnehmen Sie bitte
den folgenden Abschnitten.
Einschlaftimer-aktivierenIm Menü »Einschlaftimer« kann für das Fernseh-gerät eine Ausschaltzeit (in 10 Minuten-Schrit-ten) eingegeben werden. Das Fernsehgerät schaltet nach Ablauf der eingestellten Zeit in Bereitschaft (Stand-by).1- Zeile »Einschlaftimer« mit »V« oder »Λ«
wählen.
2- Gewünschte Ausschaltzeit mit »<« oder »>« eingeben.
Hinweis:7 Funktion abschalten, dazu die Ausschaltzeit
mit »<« oder »>« auf »Aus« stellen.3- Eine Menüebene zurückschalten mit »BACK
<« oder Einstellung mit »EXIT« beenden.
EinschalttimerIm Menü »Einschalttimer« kann für das Fernseh-gerät eine Einschaltzeit eingegeben werden. Das Fernsehgerät schaltet nach Ablauf der einge stellten Zeit aus Bereitschaft – mit der vorgewählten Lautstärke und dem gewünschten Fernsehprogramm – ein.1- Zeile »Einschalttimer« mit »V« oder »Λ«
wählen und mit »OK« bestätigen.
2- Zeile »Modus« mit »V« oder »Λ« wählen und mit »<« oder »>« wählen, wann das Fernsehgerät sich einschalten soll.
3- Zeile »Signalquelle« mit »V« oder »Λ« wählen und mit »<« oder »>« die Signal-quelle auswählen.
4- Zeile »Programmtyp« mit »V« oder »Λ« wählen und mit »<« oder »>« die ge-wünschte Option (ATV, DTV oder RADIO) wählen.
5- Zeile »Programm« mit »V« oder »Λ« wäh-len und mit »<« oder »>« das gewünschte Programm auswählen.
Hinweis:7 Die Zeile »Programm« ist nur dann aktiv,
wenn die aktuell benutzte Signalquelle ein-gestellt wurde. Erfolgte hier keine Eingabe, dann wird das erste Programm der gewähl-ten Signalquelle verwendet.
6- Zeile »Lautstärke« mit »V« oder »Λ« wäh-len und mit »<« oder »>« die Lautstärke einstellen.
7- Zeile »Zeit einstellen« mit »V« oder »Λ« wählen und die Zeit mit »1…0« eingeben.
8- Daten mit »« (blau) speichern.
9- Eine Menüebene zurückschalten mit »BACK <« oder Einstellung mit »EXIT« beenden.

Fernseher / Bedienungsanleitung65 / 118 TR
AusschalttimerIm Menü »Ausschalttimer« kann für das Fern-sehgerät eine exakte Ausschaltzeit eingegeben werden. Das Fernsehgerät schaltet bei Erreichen der eingestellten Zeit in Bereitschaft (Stand-by).1- Zeile »Ausschalttimer« mit »V« oder »Λ«
wählen und mit »OK« bestätigen.
2- Zeile »Modus« mit »V« oder »Λ« wählen und den gewünschten Modus mit »<« oder »>« einstellen.
3- Zeile »Zeit einstellen« mit »V« oder »Λ« wählen und die Zeit mit »1…0« eingeben.
4- Daten mit »« (blau) speichern.
5- Eine Menüebene zurückschalten mit »BACK <« oder Einstellung mit »EXIT« beenden.
TIMERFUNKTIONEN------------------------------------------------------------------------------------

66 / 118 TRFernseher / Bedienungsanleitung
JUGENDSCHUTZEINSTELLUNGEN-------------------------------------------
1- Menü mit »MENU« aufrufen.
2- Menüpunkt »Einstellungen« mit »V«, »Λ«, »<« oder »>« wählen und mit »OK« bestätigen.
3- Die Option »Jugendschutz« mit »>« oder »<« wählen und mit »V« bestätigen.
– Das Menü »Jugendschutz« ist aktiv
Jugendschutz Aus
Menü sperren Aus
Tastensperre Aus
PIN ändern
Bild
Dienstagxx xxx xxxx
Quelle TimerlisteTon NetzwerkTV Jugendschutz
Einstellungen > Jugendschutz
Wählen Modus ändern BeendenZurückBACK EXIT
Hinweis:7 Die weitere Bedienung entnehmen Sie bitte
den folgenden Abschnitten.
Sendungen-autorisierenEs gibt Spielfilme, deren Inhalt oder auch Szenen nicht für Kinder geeignet sind. Diese Sendungen enthalten Informationen, die den Inhalt oder die Szenen markieren und sind mit Zugangslevel von 4 bis 18 versehen. Sie können einen der Zugangslevel wählen und da-mit die Wiedergabe autorisieren.1- Im Menü »Jugendschutz« die Zeile »Jugend-
schutz« mit »V« oder »Λ« wählen und mit »<« oder »>« bestätigen.
2- PIN-Code »1234« mit »1...0« eingeben.
3- Zugangslevel mit »<« oder »>« wählen.
4- Eine Menüebene zurückschalten mit »BACK <« oder Einstellung mit »EXIT« beenden.
Hinweis:7 Bei der Wiedergabe einer Time-Shift Auf-
nahme kann es vorkommen, dass ein Zu-gangslevel eingegeben werden muss. Der Grund hierfür ist, die aktuell aufgezeichnete Sendung im Time-Shift Speicher ist “jugend-geschützt”.
Menüs-sperrenMit dieser Funktion können Sie folgende Me-nüs des Fernsehgerätes sperren: »Automatischer Suchlauf«, »Manuelle Abstimmung« und »Pro-grammtabelle«. Diese Menüs sind nur durch Ein-gabe des PIN-Codes zugänglich.1- Im Menü »Jugendschutz« die Zeile »Menü
sperren« mit »V« oder »Λ« wählen und mit »<« oder »>« bestätigen.
2- PIN-Code »1234« mit »1...0« eingeben.
3- Sperre mit »<« oder »>« aktivieren (»Ein«).
Hinweis:7 Menüsperre abschalten dazu mit »<« oder
»>« die Einstellung »Aus« wählen.4- Eine Menüebene zurückschalten mit »BACK
<« oder Einstellung mit »EXIT« beenden.
Multifunktionsschalter-sperrenBei aktiver Tastensperre ist der Mulifunktions-schalter am Fernsehgerät ohne Funktion.1- Im Menü »Jugendschutz« die Zeile »Tasten-
sperre« mit »V« oder »Λ« wählen und mit »<« oder »>« bestätigen.
2- PIN-Code »1234« mit »1...0« eingeben.
3- Tastensperre mit »<« oder »>« aktivieren (Ein) oder abschalten (Aus).
4- Eine Menüebene zurückschalten mit »BACK <« oder Einstellung mit »EXIT« beenden.
Fernseher / Bedienungsanleitung67 / 118 TR
JUGENDSCHUTZEINSTELLUNGEN-------------------------------------------
PIN-Code-ändernSie können statt des Werkscodes »1234« einen persönlichen PIN-Code eingeben. Notieren Sie sich bitte Ihren persönlichen PIN-Code.1- Im Menü »Jugendschutz« die Zeile »PIN
ändern« mit »V« oder »Λ« wählen und mit »OK« bestätigen.
2- Aktuellen PIN-Code 1 2 3 4 mit »1...0« eingeben.
3- Persönlichen neuen PIN-Code mit »1...0« vierstellig eingeben.
4- Persönlichen neuen PIN-Code mit »1...0« noch einmal eingeben.
5- Eine Menüebene zurückschalten mit »BACK <« oder Einstellung mit »EXIT« beenden.
Fernsehprogramme-sperren-Sie können einzelne Fernsehprogramme mit einem persönlichen PIN-Code sperren, zum Beispiel Programme, die sich nicht für Kinder eignen.1- Menü mit »MENU« aufrufen.
2- Menüpunkt »Einstellungen« mit »V«, »Λ«, »<« oder »>« wählen und mit »OK« bestä-tigen.
3- Die Option »Quelle« mit »>« oder »<« wählen und mit »V« bestätigen.
4- Die Zeile »Programmtabelle« mit »V« oder »Λ« wählen und mit »OK« bestätigen.
5- Das zu sperrende Programm mit »V«, »Λ«, »<« oder »>« markieren.
– Das Programm wird mit »✔« markiert.
6- Den Bearbeitungsmodus mit »« (gelb) aktivieren.
7- Die Zeile »Programmsperre« mit »V« oder »Λ« wählen und mit »OK« bestätigen.
8- PIN-Code »1234« mit »1-...-0« eingeben.
9- Funktion mit »OK« bestätigen. – Das Programm wird mit » « markiert.
Hinweis:7 Zum Aufheben der Sperre das Programm
mit »V«, »Λ«, »<« oder »>« wieder an-wählen, den Bearbeitungsmodus mit »« (gelb) aktivieren, die Zeile »Programm frei-geben« mit »V« oder »Λ« wählen und mit »OK« bestätigen.
10- Einstellung mit »EXIT« beenden.
68 / 118 TRFernseher / Bedienungsanleitung
JUGENDSCHUTZEINSTELLUNGEN-------------------------------------------
Ein-gesperrtes-Fernsehpro-gramm-ansehenSie können ein durch den PIN-Code gesperrtes Fernsehprogramm freigeben.1- Das gesperrte Fernsehprogramm mit
»1…0« oder »P+«, »P–« anwählen.
2- PIN-Code »1234« mit »1-...-0« eingeben.
Hinweis:7 Das Fernsehprogramm wird nach einem
Wechsel des Programmplatzes wieder gesperrt.
PIN-Code-zurückstellenDiese Funktion benutzen Sie, wenn Sie den PIN-Code vergessen haben.1- Im Menü »Jugendschutz« die Zeile »PIN
ändern« mit »V« oder »Λ« wählen und mit »OK« bestätigen.
2- PIN-Code 2 3 5 6 mit »1...0« eingeben.
3- Persönlichen neuen PIN-Code mit »1...0« vierstellig eingeben.
4- Persönlichen neuen PIN-Code mit »1...0« noch einmal eingeben.
5- Eine Menüebene zurückschalten mit »BACK <« oder Einstellung mit »EXIT« beenden.

Fernseher / Bedienungsanleitung69 / 118 TR
DATUM-UND-UHRZEIT-EINSTELLEN-----------------------------------------
1- Menü mit »MENU« aufrufen.
2- Menüpunkt »Einstellungen« mit »V«, »Λ«, »<« oder »>« wählen und mit »OK« bestä-tigen
3- Die Option »Timerliste« mit »>« oder »<« wählen und mit »V« bestätigen.
– Das Menü »Timerliste« ist aktiv.
4- Die Zeile »Erweitert« mit »V« oder »Λ« wählen und mit »OK« aktivieren.
Einschlaftimer Aus
Einschalttimer
Ausschalttimer
Datum und Uhrzeit
Datum/Zeit
Zeitanpassung Auto
Bild
Dienstagxx xxx xxxx
Quelle TimerlisteTon NetzwerkTV Jugendschutz
Einstellungen > Timerliste
Wählen Bestätigen ExitErw. Einst. schl.BACK EXIT
Hinweis:7 Die weitere Bedienung entnehmen Sie bitte
den folgenden Abschnitten.
Automatische-EinstellungIhr Fernsehgerät erkennt die zeitliche Differenz zur Greenwich Mean Time (GMT) automatisch, sofern das ausgewählte Programm ein Zeitsignal überträgt. 1- Im Menü »Erweitert« die Zeile »Datum/Zeit«
mit »V« oder »Λ« wählen und mit »OK« bestätigen.
2- In Zeile »Modus« die Option »Auto« mit »<« oder »>« wählen.
– Datum und Uhrzeit werden automatisch aktualisiert.
3- Eine Menüebene zurückschalten mit »BACK <« oder Einstellung mit »EXIT« beenden.
Manuelle-EinstellungSie können die zeitliche Differenz auch manuell einstellen – zum Beispiel dann, wenn die rich-tige Zeit nicht automatisch erkannt wurde oder aus anderen Gründen nicht mit Ihrer Ortszeit übereinstimmt.1- Im Menü »Erweitert« die Zeile »Zeitanpas-
sung« mit »V« oder »Λ« wählen und mit »OK« bestätigen.
2- Die Option »Manuell« mit »<« oder »>« wählen.
– Die Zeilen »Zeitzone« und »Sommer-/ Winterzeit« sind aktiv.
3- Zeile »Zeitzone« mit »V« oder »Λ« wählen und mit »OK« bestätigen.
– Das Menü »Zeitzone wählen« wird ein-geblendet.
4- Benötigte Zeitzone mit »V« oder »Λ wäh-len und mit »OK« bestätigen.
5- Zeile »Sommer-/Winterzeit« mit »V«, wählen und mit »<« oder »>« die Option »Auto«, »Aus« oder »Ein« einstellen.
6- Eine Menüebene zurückschalten mit »BACK <« oder Einstellung mit »EXIT« beenden.
Hinweis:7 Wenn in der Zeile »Zeitanpassung« die
Option »Auto« gewählt wurde, passt das Fernsehgerät die Uhrzeit automatisch an das Zeitsignal des jeweiligen Programms an. Allerdings können unterschiedliche Programme auch von Ihrem Heimatland verschiedene Zeitbasen nutzen; z. B. bei ausländischen Sendern. In solchen Fällen können Erinnerungen und geplante Auf-nahmen aufgrund der Zeitdifferenz außer Kraft gesetzt werden.

70 / 118 TRFernseher / Bedienungsanleitung
GERÄTESOFTWARE---------------------------------------------------------------------------------------
1- Menü mit »MENU« aufrufen.
2- Menüpunkt »Einstellungen« mit »V«, »Λ«, »<« oder »>« wählen und mit »OK« bestä-tigen.
3- Die Option »TV« mit »>« oder »<« wählen und mit »V« bestätigen.
– Das Menü »TV« ist aktiv.
4- Die Zeile »Info« mit »V« oder »Λ« wählen und mit »OK« aktivieren.
Produktinfo
TV Name Smart Inter@ctive 4...
Softwareaktualisierungen
Werkseinstellungen
Kanalverlauf rücksetzen
Land Dutchland
Bild
Dienstagxx xxx xxxx
Quelle TimerlisteTon NetzwerkTV Jugendschutz
Einstellungen > TV > Info
Wählen Bestätigen BeendenZurückBACK EXIT
Hinweis:7 Die weitere Bedienung entnehmen Sie bitte
den folgenden Abschnitten.
Softwareversion-abrufen1- Im Menü »Info« die Zeile »Produktinfo«
mit »V« oder »Λ« wählen und mit »OK« bestätigen.
– Die Softwareversion des Gerätes wird eingeblendet.
2- Eine Menüebene zurückschalten mit »BACK <« oder Einstellung mit »EXIT« beenden.
Software-aktualisieren-(OAD)(über Satellit, nur bei digitalen Programmen)1- Im Menü »Info« die Zeile »Softwareaktuali-
sierungen« mit »V« oder »Λ« wählen und mit »OK« bestätigen.
2- Die Option »OAD« mit »V« oder »Λ« wäh-len und mit »OK« bestätigen.
– Die neue Software wird gesucht.
Hinweis:7 Ist keine neue Software vorhanden, wird
das Menü automatisch abgeschaltet.3- Ist eine neue Software vorhanden, die Soft-
ware mit »« (grün) installieren. – Die neue Software wird geladen.
Achtung:7 Während des Updates das Fernsehgerät
nicht ausschalten! Nach erfolgreichen Up-date schaltet sich das Fernsehgerät automa-tisch aus und wieder ein.
Hinweis:7 Wenn automatisch nach Softwareaktuali-
sierungen gesucht werden soll, im Menü »Quelle« ➡ »Erweitert« die Zeile »OAD« mit »V« oder »Λ« wählen und mit »<« oder »>« die Option »Ein« wählen.
Software-aktualisieren-(Internet)(über Internet, nur bei digitalen Programmen)1- Im Menü »Info« die Zeile »Softwareaktuali-
sierungen« mit »V« oder »Λ« wählen und mit »OK« bestätigen.
2- Die Option »Internet« mit »V« oder »Λ« wählen und mit »OK« bestätigen.
– Die neue Software wird gesucht.
Hinweis:7 Ist keine neue Software vorhanden, wird
das Menü automatisch abgeschaltet.3- Ist eine neue Software vorhanden, die Soft-
ware mit »« (grün) installieren. – Die neue Software wird geladen.
Achtung:7 Während des Updates das Fernsehgerät
nicht ausschalten! Nach erfolgreichen Up-date schaltet sich das Fernsehgerät automa-tisch aus und wieder ein.
Software-aktualisieren-(USB)1- USB-Stecker des USB-Memory Sticks in der
Buchsen USB des Fernsehgerätes stecken.
2- Im Menü »Info« die Zeile »Softwareaktuali-sierungen« mit »V« oder »Λ« wählen und mit »OK« bestätigen.
3- Die Option »USB« mit »V« oder »Λ« wäh-len und mit »OK« bestätigen.
– Die Software vom USB-Memory Stick wird installiert.

Fernseher / Bedienungsanleitung71 / 118 TR
ZUBEHÖR-VERWALTEN---------------------------------------------------------------------------
Sie können an Ihr Fernsehgerät umfangreiches Zubehör anschließen. Im folgend beschriebenen Menü sehen Sie den Status des jeweiligen Gerä-tes und können dafür Einstellungen vornehmen.1- Menü mit »MENU« aufrufen.
2- Menüpunkt »Einstellungen« mit »V«, »Λ«, »<« oder »>« wählen und mit »OK« bestä-tigen.
3- Die Option »TV« mit »>« oder »<« wählen und mit »V« bestätigen.
– Das Menü »TV« ist aktiv.
4- Die Zeile »Zubehör« mit »V« oder »Λ« wählen und mit »OK« bestätigen.
5- Die benötigte Zeile mit »V« oder »Λ« wählen und mit »OK« bestätigen.
Die gewünschte Funktion mit »>« oder »<« wählen.
6- Eine Menüebene zurückschalten mit »BACK <« oder Einstellung mit »EXIT« beenden.
Hinweise:7 Das Zubehör ist nicht im Lieferumfang des
Fernsehgerätes enthalten. Fragen Sie bitte Ihren Fachhändler.
7 Die Anzeige des Status und die Einstel-lungen sind abhängig vom verwendeten Zubehör.

72 / 118 TRFernseher / Bedienungsanleitung
RESET-FUNKTIONEN-----------------------------------------------------------------------------------
1- Menü mit »MENU« aufrufen.
2- Menüpunkt »Einstellungen« mit »V«, »Λ«, »<« oder »>« wählen und mit »OK« bestätigen.
3- Die Option »TV« mit »>« oder »<« wählen und mit »V« bestätigen.
– Das Menü »TV« ist aktiv.
4- Die Zeile »Info« mit »V« oder »Λ« wählen und mit »OK« aktivieren.
Produktinfo
TV Name Smart Inter@ctive 4...
Softwareaktualisierungen
Werksinstellungen
Kanalverlauf rücksetzen
Land Deutschland
Bild
Dienstagxx xxx xxxx
Quelle TimerlisteTon NetzwerkTV Jugendschutz
Einstellungen > TV > Info
Wählen Bestätigen BeendenZurückBACK EXIT
Hinweis:7 Die weitere Bedienung entnehmen Sie bitte
den folgenden Abschnitten.
Fernsehgerät-auf-die-Werks-einstellungen-zurücksetzenMit dieser Funktion löschen Sie die Programm-tabellen und alle persönlichen Einstellungen.1- Im Menü »Info« die Zeile »Werkseinstellun-
gen« mit »V« oder »Λ« wählen und mit »OK« bestätigen.
– Eine Warnung wird eingeblendet.
Hinweis:7 Wenn die geladenen Applikationen auch
gelöscht werden sollen, die Zeile »Installier-te Anwendungen speichern« mit »Λ« wäh-len und mit »OK« das Häkchen entfernen.
2- Sicherheitsabfrage bestätigen, dazu mit »<« oder »>« die Schaltfläche »Ja« anwählen und mit »OK« bestätigen;
oder
Vorgang abbrechen, dazu mit »<« oder »>« die Schaltfläche »Nein« anwählen und mit »OK« bestätigen.
– Das Menü »TV« wird kurz ein geblendet.
3- Einstellungen mit Kapitel „Erstinstallation und Fernsehprogramme einstellen“ auf Seite 19 fortsetzen.
Kanalverlauf-zurücksetzenMit dieser Funktion löschen Sie die zuletzt gese-henen Programme im Hauptmenü.1- Im Menü »Info« die Zeile »Kanalverlauf
rücksetzen« mit »V« oder »Λ« wählen und mit »OK« bestätigen.
– Eine Warnung wird eingeblendet.
2- Sicherheitsabfrage bestätigen, dazu mit »<« oder »>« die Schaltfläche »Ja« anwählen und mit »OK« bestätigen;
oder
Vorgang abbrechen, dazu mit »<« oder »>« die Schaltfläche »Nein« anwählen und mit »OK« bestätigen.
– Die zuletzt gesehenen Programme im Hauptmenü sind gelöscht.
3- Eine Menüebene zurückschalten mit »BACK <« oder Einstellung mit »EXIT« beenden.
Einstellungen-wiederherstellenMit dieser Funktion können Sie all Ihre Einstel-lungen sichern, die gesicherten Einstellungen später wiederherstellen.1- Im »Info«-Menü wählen Sie mit den Tasten
»V« / »Λ« die Option »Einstellungen wiederherstellen«, anschließend bestätigen Sie mit »OK«.
2- Bestätigen Sie »Wiederherstellungspunkt erstellen« mit »OK«.
3- Wählen Sie »Ja« zum Bestätigen der Sicher-heitsfrage.
Alternativ:
Wählen Sie »Nein«, drücken Sie dann »OK«, wenn Sie abbrechen möchten.
4- Mit »BACK <« gelangen Sie wieder zum vorherigen Menü, mit »EXIT« verlassen Sie die Einstellung.

Fernseher / Bedienungsanleitung73 / 118 TR
DIGI-LINKIhr Fernsehgerät ist mit der DIGI LINK-Funktion ausgestattet.Diese Funktion verwendet das CEC (Consumer Electronics Control) Protokoll.
CEC ermöglicht, externe Geräte, die mit einem HDMI-Kabel an die Buchsen HDMI an ge-schlossen sind (z. B. DVD-Player), mit einer Fern-bedienung zu steuern.Voraussetzung ist, die angeschlossenen Geräte unterstützen CEC. Lesen Sie in der Bedienungs-anleitung des externen Gerätes nach, wie die entsprechenden Funktionen hier aktiviert wer-den.
DIGI-LINK-Funktionen-des-Fern-sehgerätesAutomatisches-Einschalten-des-Fernseh-gerätes-aus-Stand-byWenn das externe Gerät (z. B. ein Blu-ray Play-er) eingeschaltet wird, schaltet sich damit auch das Fernsehgerät ein und der passende HDMI-Programmplatz wird automatisch gewählt.Abhängig von der Ausstattung des externen Gerätes kann aber auch nur das externe Gerät (z. B. AV Receiver) eingeschaltet werden, das Fernsehgerät bleibt in Stand-by.
Automatische-Wahl-des-HDMI-Pro-grammplatzes-am-FernsehgerätWenn Ihr Fernsehgerät eingeschaltet ist und Sie schalten danach das externe Geräte (z. B. einen DVD-Player) ein, wird der passende HDMI-Programmplatz am Fernsehgerät gewählt.
Menüsprache-wählenAm externen Gerät (z. B. DVD-Player) wird auto-matisch die Menüsprache des Fernsehgerätes eingestellt.Das externe Gerät muss diese Funktion unter-stützen.
BETRIEB-MIT-EXTERNEN-GERÄTEN--------------------------------------------
Automatisches-Abschalten-des--externen-GerätesWenn Sie Ihr Fernsehgerät in den Bereitschafts-modus schalten, wird auch das externe Gerät (sofern eingeschaltet) in den Bereitschaftsmodus versetzt.DIGI LINK ist bei Ihrem Fernsehgerät grund-sätzlich aktiv.
Externe-Geräte-suchen-und--akti-vierenSie können bis zu 11 Geräte mit DIGI LINK-Funktionen an Ihr Fernsehgerät anschließen.1- Menü mit »TOOLS« aufrufen.
2- Zeile »Digilink« mit »V« oder »Λ« wählen und mit »OK« be stätigen.
– Die »HDMI-Geräteliste« wird einge-blendet.
3- Gerätesuche mit »« (blau) starten. – Die gefundenen Geräte werden im Menü
angezeigt.
4- Das zu steuernde Gerät mit »V« oder »Λ« wählen und mit »OK« markieren.
– Wenn das ausgewählte Gerät an einen anderen als den aktuellen Eingang an-geschlossen ist, wird automatisch zum jeweiligen Eingang umgeschaltet.
74 / 118 TRFernseher / Bedienungsanleitung
BETRIEB-MIT-EXTERNEN-GERÄTEN--------------------------------------------
GerätesteuerungSie können festlegen, ob externe Geräte auch auf die Fernbedienung Ihres Fernsehgerätes reagieren sollen.1- » « drücken, mit »<« oder »>« den Pro-
grammplatz »HDMI1« bis »HDMI2« wäh-len und mit »OK« bestätigen.
2- Menü mit »MENU« aufrufen.
3- Menüpunkt »Einstellungen« mit »V«, »Λ«, »<« oder »>« wählen und mit »OK« bestä-tigen.
4- Die Option »Quelle« mit »>« oder »<« wäh-len und mit »V« bestätigen.
– Das Menü »Quelle« ist aktiv.
Gerät - - - -
Frenbedienungsverhalten Deck
Gerät in Standby schalten
Bild
Dienstagxx xxx xxxx
Quelle TimerlisteTon NetzwerkTV Jugendschutz
Einstellungen > Quelle
Wählen Bestätigen ZurückBACK
5- Die Zeile »Fernbedienungsverhalten« mit »V« oder »Λ« wählen.
6- Die Steuerungsart »Durchleitung«, »Deck« oder »Tuner« mit »<« oder »>« wählen.
Hinweise:7 »Durchleitung« kann für sämtliche Geräte
eingesetzt werden. »Deck« und »Tuner« können je nach ange-
schlossenem externem Gerät ausgewählt werden.
7 Probieren Sie aus, bei welcher Steuerungs-art das externe Gerät am besten auf die Fernbedienung reagiert.
7 Den Funktionsumfang des DIGILINK-kompa-tiblen Gerätes finden Sie in der Bedienungs-anleitung des externen Gerätes.
7- Einstellung mit »EXIT« beenden.
Gerät-in-den-Bereitschaftsmodus--schaltenDiese Option schaltet das externe Gerät in den Bereitschaftsmodus.1- » « drücken, mit »<« oder »>« den Pro-
grammplatz »HDMI1« bis »HDMI2« wäh-len und mit »OK« bestätigen.
2- Menü mit »MENU« aufrufen.
3- Menüpunkt »Einstellungen« mit »V«, »Λ«, »<« oder »>« wählen und mit »OK« bestä-tigen.
4- Die Option »Quelle« mit »>« oder »<« wäh-len und mit »V« bestätigen.
– Das Menü »Quelle« ist aktiv.
5- Zeile »Gerät in Standby schalten« mit »V« oder »Λ« und mit »OK« bestätigen.
– Das externe Gerät schaltet sich ab.

Fernseher / Bedienungsanleitung75 / 118 TR
BETRIEB-MIT-EXTERNEN-GERÄTEN--------------------------------------------
HDMI, the HDMI logo and High-Definition Mul-timedia Interface are trademarks or registered trademarks of HDMI Licensing LLC.
High-Definition Die entsprechenden Signalquellen (z. B. HDTV-Empfänger oder HD-DVD-Player) schließen Sie an die Buchsen HDMI (für digitale HDTV-Quellen) an.Dadurch können Sie auch digitale HDTV-Sen-dungen, die kopiergeschützt sind (HDCP High Bandwidth Digital Content Protection), ohne Probleme ansehen.
Anschlussmöglichkeiten7 An welche Buchsen des Fernsehgerätes Sie
Ihre externen Geräte anschließen, hängt davon ab, mit welchen Anschlüssen das externe Gerät ausgestattet ist und welche Signale zur Verfügung stehen.
7 Beachten Sie: Bei vielen externen Geräten muss die Auflösung des Videosignals an die Eingänge des Fernsehgerätes ange-passt werden (siehe Bedienungsanleitung des externen Gerätes). Welchen Wert Sie einstellen müssen, entnehmen Sie bitte den angegebenen Richtwerten in den Kapiteln über die verschiedenen Anschlussmöglich-keiten.
7 Schließen Sie keine Geräte an, wenn Ihr Gerät eingeschaltet ist. Schalten Sie vor dem Anschließen auch die anderen Geräte aus!
7 Stecken Sie den Netzstecker des Ge rätes erst dann in die Steckdose, wenn Sie die externen Geräte und die Antenne an-geschlossen haben!
VGA IN
SERVICE LAN Optic Out USB (HDD) HDMI2 EARPHONESATELLITE
13/18Vmax. 25 0 mA
ANT-IN5V
max. 50 mA
SCA
RT
HD
MI 1
(AR
C)

76 / 118 TRFernseher / Bedienungsanleitung
Externe-Geräte-anschließen-......-mit-digitalen-Ton-/Bildsignalen7 Geeignete Geräte: Digitaler Satelliten-
Receiver, Playstation, BluRay-Player, DVD-Player/-Recorder, Set Top Box, Notebook und PC‘s.
7 Bildsignal: Digital; Auflösung: Standard 576p; HDTV 720p, 1080i und 1080p.
7 Tonsignal: Digital (Stereo, Mehrkanal kompri-miert, unkomprimiert).
7 Programmplätze »HDMI 1«, »HDMI 2«.1- Buchse HDMI1oder HDMI2 des Fern-
sehgerätes und die entsprechenden HDMI-Buchse des externen Gerätes mit einem handelsüblichen HDMI-Kabel verbinden (digitales Bildsignal und Tonsignal).
...-mit-analogem-Videosignal--(Progressive)7 Geeignete Geräte: DVD-Player/-Recorder,
Spielekonsole.7 Bildsignal: YUV; Auflösung: Standard 576p;
HDTV 720p, 1080i, 1080p.7 Tonsignal: Stereo, analog.7 Programmplatz »SCART«.1- Buchsen SCART des Fernsehgerätes und
die entsprechenden Buchsen des externen Gerätes über Scart/YUV Adapter verbinden (Bildsignal und Tonsignal).
...-über-die-EURO-AV-Buchse-(FBAS/RGB-Signal)7 Geeignete Geräte: Digitaler Satelliten-
Receiver, DVD-Player/-Recorder, Set Top Box, Spielekonsole, Videorecorder, Decoder.
7 Bildsignal: FBAS/RGB.7 Tonsignal: Stereo, analog.7 Programmplatz »SCART«.1- Buchse SCART des Fernsehgerätes und die
entsprechende Buchse des externen Gerätes mit einem EURO/AV-Kabel verbinden (Bild- und Tonsignal).
BETRIEB-MIT-EXTERNEN-GERÄTEN--------------------------------------------
Lautstärkeregelung-für-den-Ausgang-„SCART/S-VHS“-festlegen-1- Menü mit »MENU« aufrufen.
2- Menüpunkt »Einstellungen« mit »V«, »Λ«, »<« oder »>« wählen und mit »OK« bestätigen.
3- Die Option »Ton« mit »>« oder »<« wählen und mit »V« bestätigen.
– Das Menü »Ton« ist aktiv.
4- Die Zeile »Erweitert« mit »V« oder »Λ« wählen und mit »OK« bestätigen.
5- Die Zeile »AV1-Ausgang« mit »V« oder »Λ« wählen.
6- Gewünschte Option (»Fest« oder »Regel-bar«) mit »<« oder »>« wählen.
Hinweis:7 Wird die Option »Regelbar« gewählt, ist
die Zeile »Lautstärke« aktiv.7- Die Zeile »Lautstärke« mit »V« oder »Λ«
wählen und Lautstärke mit »<« oder »>« einstellen.
8- Einstellung mit »EXIT« beenden.
...-mit-S-Video-Signal7 Geeignete Geräte: DVD-Player/-Recorder,
Videorecorder, Camera-Recorder, Notebook und PC‘s.
7 Bildsignal: Y/C.7 Tonsignal: Stereo, analog.7 Programmplatz »SCART«.1- Buchse SCART-des Fernsehgerätes und die
entsprechende Buchse des externen Gerä-tes mit einem EURO/AV-Kabel verbinden (Bild- und Tonsignal).
Fernseher / Bedienungsanleitung77 / 118 TR
BETRIEB-MIT-EXTERNEN-GERÄTEN--------------------------------------------
Betrieb-mit-DVD-Player,-DVD-Recorder,-Videorecorder-oder-Set-Top-Box1- Externes Gerät einschalten und die ge-
wünschte Funktion wählen.
2- » « drücken, mit »<« oder »>« den Programmplatz des gewünschten Eingangs-signals (»SCART«, »HDMI1«, »HDMI2«) wählen und mit »OK« bestätigen.
Hi-Fi-System
Digitalen-Multikanal-Verstärker/AV-Receiver-anschließenDurch diese Verbindung kann das Audiosignal vom Fernsehprogramm mittels HDMI-Kabel über den digitalen Multikanal-Verstärker oder AV-Receiver wiedergegeben werden. 1- Buchse HDMI1-(ARC) (HDMI 1.4 Audio
Return Channel/Audiorückkanal) des Fern-sehgerätes und die entsprechende Buchse des digitalen Multikanal-Verstärkers/AV-Receivers mit einem HDMI-Kabel (HDMI) verbinden (digitales Tonsignal);
oder
2- Buchse Optic-Out des Fernsehgerätes und die entsprechende Buchse des digitalen Multikanal-Verstärkers/AV-Receivers mit einem optischen Digitalkabel verbinden (digitales Tonsignal).
Achtung:7 Das HDMI-Kabel darf nicht länger als 5m
sein.
Gerät-mit-HDMI-ARC-Funktion-anmel-den-und-HDMI-ARC-einschalten1- Digitalen Multikanal-Verstärker/AV-Receiver
einschalten. Ist am AV-Receiver ein Blu-ray Player angeschlossen, muss auch dieser eingeschaltet werden.
2- Menü mit »TOOLS« aufrufen.
3- Zeile »Digilink« mit »V« oder »Λ« wählen und mit »OK« bestätigen.
– Die »HDMI-Geräteliste« wird eingeblen-det.
4- Gerätesuche mit »« (blau) starten. – Das an Buchse HDMI1-(ARC) ange-
schlossene Gerät wird im Menü ange-zeigt.
5- Das zu steuernde Gerät mit »V« oder »Λ« wählen und mit »OK« bestätigen.
78 / 118 TRFernseher / Bedienungsanleitung
Hinweise:7 Wenn der AV-Receiver auch mit einer
Wiedergabefunktion ausgestattet ist (z.B. bei einem Home Theater System), dann werden in der »HDMI-Geräteliste« zwei Geräte dargestellt. Der erste Eintrag ist z.B. der DVD-Player, der zweite Eintrag ist die Audiowiedergabe.
7 Wenn am AV-Receiver ein Blu-ray Player angeschlossen ist, darf während des Anmel-devorganges im Player keine Disk eingelegt sein
6- Menü mit »MENU« aufrufen.
7- Menüpunkt »Einstellungen« mit »V«, »Λ«, »<« oder »>« wählen und mit »OK« bestätigen.
8- Die Option »Ton« mit »>« oder »<« wählen und mit »V« bestätigen.
– Das Menü »Ton« ist aktiv.
9- Die Zeile »Erweitert« mit »V« oder »Λ« wählen und mit »OK« bestätigen.
10- Die Zeile »ARC« mit »V« oder »Λ« wäh-len.
11- Die ARC-Funktion mit »<« oder »>« ein-schalten (»Ein«).
Hinweise:7 Die Lautsprecher des Fernsehgerätes wer-
den automatisch abgeschaltet.7 Die Lautstärke des AV-Receivers wird über
die Fernbedienung des Fernsehgerätes eingestellt.
7 Die ARC-Funktion kann mit »<« oder »>« ausgeschaltet werden (»Aus«).
7 Wird das Fernsehgerät ausgeschaltet, dann wird dadurch auch die ARC-Funktion ausge-schaltet, die Lautsprecher des Fernsehgerä-tes sind wieder aktiv.
12- Einstellung mit »EXIT« beenden.
BETRIEB-MIT-EXTERNEN-GERÄTEN--------------------------------------------
Dolby, Dolby Audio und das Doppel-D-Symbol sind Marken von Dolby Laboratories.

Fernseher / Bedienungsanleitung79 / 118 TR
BETRIEB-MIT-EXTERNEN-GERÄTEN--------------------------------------------
Was-ist-LIVESHARE?7 Miracast ist eine Drahtlostechnologie, mit de-
ren Hilfe Android-Geräte Bilder miteinander teilen können. Diese Technologie wird unter dem Namen Liveshare von Ihrem Fernseher unterstützt.
Bildschirm-mit-Liveshare-Verbin-dung-freigeben1- Öffnen Sie das Menü mit »MENU«.
2- Wählen Sie mit „V“, „Λ“, „<“ oder „>“ die Option „Bildschirm freigeben“ und drücken Sie zum Bestätigen „OK“.
– Das „Miracast“-Menü wird angezeigt.
3- Starten Sie die Miracast-Anwendung mit Ih-rem Notebook oder Mobilgerät und wählen Sie Ihren Fernseher.
– Miracast beginnt in Kürze und der Bildin-halt von Ihrem Notebook oder Mobilgerät wird am Fernseher angezeigt.
4- Drücken Sie zum Beenden der Liveshare-Anwendung „EXIT“.
Hinweis:7 Bitte schauen Sie auf der Webseite des
Herstellers Ihres Notebooks/Mobilgerätes nach, ob es Miracast unterstützt.
Liveshare-Funktion

80 / 118 TRFernseher / Bedienungsanleitung
BETRIEB-MIT-COMMON-INTERFACE----------------------------------------
Was-ist-ein-Common-Interface?7 Common Interface (CI) ist eine Schnittstelle
für DVB-Empfänger.7 Verschlüsselte Programme können nur mit
einem dem Verschlüsselungssystem ent-sprechenden CA-Modul in Verbindung mit der dazugehörigen Smartcard gesehen werden.
7 Das Fernsehgerät ist mit einem Common Interface-Schacht ausgestattet, in den CA-Module verschiedener Anbieter eingesetzt werden können.
7 In das CA-Modul wird die entsprechende Smartcard des Anbieters zum „Frei schalten“ gewünschter verschlüsselter Programme eingeschoben.
CA-Module-einsetzenHinweis:7 Schalten Sie das Gerät aus, bevor Sie ein
CA-Modul in den Steckplatz CI ein setzen.1- Entsprechende Smartcard in das CA-Modul
schieben
2- CA-Modul mit Smartcard in den Schacht CI des Fernsehgerätes stecken.
Hinweise:7 Das »CA-Modul«-Untermenü informiert Sie,
welches CA-Modul im CI-Steckplatz einge-setzt ist.
7 Wenn Sie ein CA-Modul zum ersten Mal in den CI-Steckplatz des Fernsehgerätes ein-setzen, müssen Sie einen Moment warten, bis das CA-Modul erkannt wurde.
Zugriffskontrolle-für-CA-Modul-und-Smartcard1- Menü mit »MENU« aufrufen.
2- Menüpunkt »Einstellungen« mit »V«, »Λ«, »<« oder »>« wählen und mit »OK« bestätigen.
3- Die Option »Quelle« mit »>« oder »<« wäh-len und mit »V« bestätigen.
– Das Menü »Quelle« ist aktiv.
4- Zeile »Erweitert« mit »V« oder »Λ« wählen und mit »OK« bestätigen.
5- Zeile »CA-Modul« mit »V« oder »Λ« wählen und mit »OK« bestätigen.
Hinweise:7 Über dieses Menü erhalten Sie Bedien-
hinweise und nach der Eingabe Ihres PIN-Codes den Zugriff auf die Programme des PAY-TV-Anbieters.
7 Die weiteren Einstellungen entnehmen Sie bitte der Bedienungsanleitung des CA-Moduls und der Smartcard.
7 Das CA-Modul wird in bestimmten Ländern und Re gionen nicht unterstützt; bitte wenden Sie sich an Ihren autorisierten Händler.
6- Einstellung mit »EXIT« beenden.

Fernseher / Bedienungsanleitung81 / 118 TR
NETZWERK-INSTALLATION-------------------------------------------------------------------
Zur Nutzung der Funktionen von SMART inter@ctive müssen Sie den Fernseher mit Ihrem Heim-netzwerk mit Internetzugang verbinden und sich anmelden.Sie können verschiedene Anwendungen im Meine-Anwendungen-Portal von Grundig starten. Diese Anwendungen beinhalten ver-schiedene Arten, wie Video-, Bild-, Musik-, Social-Networking-, Nachrichten-, Sport- und Wettervorhersage-Anwendungen. Ihr Fernseher unterstützt Fernbedienungsfunkti-onen für Apple iPhones und Android-basierte Telefone. Je nach Funktionen Ihres Telefons kön-nen Sie Ihren Fernseher nach Herunterladen der kostenlosen Anwendung »Grundig TV Remote« aus dem Apple App Store oder Google Play (Android-Markt) übe Ihr Telefon steuern.
Fernsehgerät-am-Heimnetzwerk-anschließen-und-anmeldenSie können Ihr Fernsehgerät über eine LAN-Verbindung oder ohne Kabel über WLAN mit dem Heimnetzwerk verbinden.Wenn Sie eine LAN-Verbindung verwenden, lesen Sie im Kapitel „LAN-Verbindung zum Heimnetzwerk” auf dieser Seite weiter;wenn Sie WLAN benutzen wollen, folgen Sie der Beschreibung im Kapitel „Betrieb über WLAN” ab Seite 84.
Hinweis:7 Die folgenden Kapitel beschreiben die
Anmeldung am Heimnetzwerk, wenn Sie diese noch nicht bei der „Erstinstallation“ durchgeführt haben.
LAN-Verbindung-zum-Heimnetz-werkLAN-Kabel-anschließen1- Ausgangsbuchse des Routers mit handels-
üblichen LAN-Kabel an die Buchse LAN des Fernsehgerätes anschließen.
Hinweis:7 Das LAN-Kabel ist nicht im Lieferumfang
enthalten.

82 / 118 TRFernseher / Bedienungsanleitung
NETZWERK-INSTALLATION-------------------------------------------------------------------
Anmeldung-am-Router-für-den-LAN-BetriebSie haben zwei Möglichkeiten, Ihr Fernsehgerät am Heimnetzwerk anzumelden.A Die automatische Anmeldung, dabei werden alle notwendigen Einstellun-
gen (»IP Adresse«, »DNS«, »Netzmaske« und »Gateway«) vom Router automatisch vergeben.
B Die manuelle Anmeldung, hier müssen alle notwendigen Einstellungen
(»IP Adresse«, »DNS«, »Netzmaske« und »Gateway«) von Hand eingegeben werden.
Automatische-AnmeldungDie meisten Heimnetze sind dynamisch. Wenn Sie ein dynamisches Netzwerk verwenden, benötigen Sie einen DSL Router, der DHCP unterstützt.Bei dynamischen Heimnetzen werden die Daten für IP Adresse, Netzwerkmaske und Gateway vom Router automatisch zugewiesen. Manuelle Einstellungen sind nicht notwendig.1- Menü mit »MENU« aufrufen.
2- Menüpunkt »Einstellungen« mit »V«, »Λ«, »<« oder »>« wählen und mit »OK« bestä-tigen.
3- Die Option »Netzwerk« mit »>« oder »<« wählen und mit »V« bestätigen.
– Das Menü »Netzwerk« ist aktiv.
Bild
Dienstagxx xxx xxxx
Quelle TimerlisteTon NetzwerkTV Jugendschutz
Einstellungen > Netzwerk
WählenVerbinden Testen Bestätigen ZurückBACK
Verbindungstyp ändern Kabel
Netzwerkkonfiguration Auto
Wake-on-LAN Aus
Erweitert Aus
4- Zeile »Verbindungstyp ändern« mit »V« oder »Λ« wählen und mit »OK« bestäti-gen.
5- Die Option »Kabel« mit »V« or »Λ« wäh-len und mit »OK« bestätigen.
6- Zeile »Netzwerkkonfiguration« mit »V« oder »Λ« wählen und die Option »Auto« mit »<« oder »>« wählen.
7- Anmeldung an das Heimnetzwerk mit »« (rot) starten.
– Die Meldung »Verbinde... Bitte warten« wird eingeblendet.
8- Wenn die Meldung erlischt, mit »« (grün) die Verbindung zum Netzwerk prüfen.
– Anzeige: »Testen ... Bitte warten«, nach erfolgreicher Anmeldung: »Verbindung mit Gateway: Erfolgreich« und »Internetver-bindung: Erfolgreich«.
9- Einstellung mit »EXIT« beenden.
Hinweis:7 Wenn die IP Adresse nicht automatisch
vergeben wird, setzen Sie die Einstellung im Kapitel „Manuelle Anmeldung“ fort.

Fernseher / Bedienungsanleitung83 / 118 TR
NETZWERK-INSTALLATION-------------------------------------------------------------------
Manuelle-AnmeldungWenn keine automatische IP-Adresse vorhanden ist, müssen Sie die Zugangsdaten für »IP Adres-se«, »DNS«, »Netzmaske« und »Gateway« von Hand eingeben. Diese Zugangsdaten erhalten Sie vom Administrator Ihres Netzwerkes.1- Menü mit »MENU« aufrufen.
2- Menüpunkt »Einstellungen« mit »V«, »Λ«, »<« oder »>« wählen und mit »OK« bestä-tigen.
3- Die Option »Netzwerk« mit »>« oder »<« wählen und mit »V« bestätigen.
– Das Menü »Netzwerk« ist aktiv.
4- Zeile »Verbindungstyp ändern« mit »V« oder »Λ« wählen und mit »OK« bestätigen.
5- Die Option »Kabel« mit »V« oder »Λ« wählen und mit »OK« bestätigen.
6- Zeile »Netzwerkkonfiguration« mit »V« oder »Λ« wählen und die Option »Manu-ell« mit »<« oder »>« wählen.
– Die Eingaben für »IP Adresse«, »DNS«, »Netzmaske« und »Gateway« sind aktiv.
Verbindungstyp ändern Kabel
Netzwerkkonfiguration Manuell
Wake-on-LAN Aus
IP Adresse 192 . 168 . 000 . 200
DNS 192 . 168 . 000 . 254
Netzmaske 255 . 255 . 255 . 200
Bild
Dienstagxx xxx xxxx
Quelle TimerlisteTon NetzwerkTV Jugendschutz
Einstellungen > Netzwerk
WählenVerbinden Testen Eingabemodus BeendenErw. Einst. schl. EXITBACK
7- Zeile »IP Adresse« mit »V« wählen. IP Adresse mit »1…0« eingeben.
8- Zeile »DNS« mit »V« wählen. DNS mit »1…0« eingeben.
9- Zeile »Netzmaske« mit »V« wählen. Netzmaske mit »1…0« eingeben.
10- Zeile »Gateway« mit »V« wählen. Gateway mit »1…0« eingeben.
11- Anmeldung an das Heimnetzwerk mit »« (rot) starten.
– Die Meldung »Verbinde... Bitte warten« wird eingeblendet.
12- Wenn die Meldung erlischt, mit »« (grün) die Verbindung zum Netzwerk prüfen.
– Anzeige: »Testen ... Bitte warten«, nach erfolgreicher Anmeldung »Verbindung mit Gateway: Erfolgreich« und »Internetver-bindung: Erfolgreich«.
13- Einstellung mit »EXIT« beenden.

84 / 118 TRFernseher / Bedienungsanleitung
NETZWERK-INSTALLATION-------------------------------------------------------------------
Betrieb-über-WLAN
1- Das Gerät ist mit einem eingebautem WLAN Modul für die Verbindung zum Heimnetzwerk ausgestattet.
Hinweise:7 Das WLAN Modul unterstützt das Daten-
übertragungsprotokoll nach IEEE 802.11B/G und N.
Um Videostörungen zu vermeiden, empfeh-len wir – wenn vom Router unterstützt – den Standard IEEE 802.11N zu verwenden.
Die beste Bildqualität bei HD Videowieder- gabe erhalten Sie nur über eine LAN-Verbindung.
7 Wenn Sie einen Router verwenden, der den Standard IEEE 802.11B/G unterstützt, kann die Qualität der Videowiedergabe, verglichen zum Standard IEEE 802.11N, geringer sein. Die Ursache ist die geringe-re Datentransferrate des Standards IEEE 802.11B/G.
7 Die Wiedergabequalität beim Betrieb mit einer DLNA-Applikation und mit der SMART inter@ctive TV Funktion ist davon abhängig, wieviele Benutzer das kabellose Heimnetz gleichzeitig nutzen.
7 Wir empfehlen, während des Betriebes mit der SMART Inter@ctive TV Funktion andere Geräte im Heimnetzwerk abzuschalten, um unnötigen Datenverkehr zu vermeiden.
7 Stellen Sie den Router an einer erhöhten Position auf, um die Empfangsqualität des WLAN Moduls zu verbessern.
7 Die Empfangsqualität beim drahtlosen Betrieb ist abhängig vom Router und dem Abstand zwischen Router und Fernsehgerät sowie dem Digitalen Media Server (DMS).
Anmeldung-am-Router-für-den-WLAN-BetriebSie haben verschiedene Möglichkeiten, Ihr Fern-sehgerät am Heimnetzwerk anzumelden.A Die automatische Anmeldung, dabei werden alle notwendigen Einstellun-
gen (»IP Adresse«, »DNS«, »Netzmaske« und »Gateway«) vom Router automatisch vergeben.
Abhängig vom Router verwenden Sie: – die Option „WPS-PBC“ (Push Button Con-
figuration); – die Anmeldung mittels WPS-PIN; – die Anmeldung mit Eingabe des Netz-
werk-Kennwortes.
B Die manuelle Anmeldung, hier müssen alle notwendigen Einstellungen
(»IP Adresse«, »DNS«, »Netzmaske« und »Gateway«) von Hand eingegeben werden.

Fernseher / Bedienungsanleitung85 / 118 TR
NETZWERK-INSTALLATION-------------------------------------------------------------------
VoraussetzungenDie meisten Heimnetze sind dynamisch, d.h. die Daten für IP Adresse, Netzwerkmaske und Gateway werden vom Router automatisch zu-gewiesen.Wenn Sie ein dynamisches Netzwerk verwen-den, benötigen Sie einen DSL Router, der DHCP unterstützt.
Automatische-Anmeldung-mit-„WPS-PBC“-(Push-Button-Configuration)-Verwenden Sie diese Art der Anmeldung, wenn Ihr Router „WPS-PBC“ unterstützt. Alle Sicherheitseinstellungen werden automatisch übernommen.1- Menü mit »MENU« aufrufen.
2- Menüpunkt »Einstellungen« mit »V«, »Λ«, »<« oder »>« wählen und mit »OK« bestä-tigen.
3- Die Option »Netzwerk« mit »>« oder »<« wählen und mit »V« bestätigen.
– Das Menü »Netzwerk« ist aktiv.
4- Zeile »Verbindungstyp ändern« mit »V« oder »Λ« wählen und mit »OK« bestätigen.
5- Die Option »Kabellos WPS« mit »<« oder »>« wählen und mit »OK« bestätigen.
– Eine Abfrage wird eingeblendet.
6- Sicherheitsabfrage bestätigen, dazu mit »<« oder »>« die Schaltfläche »Ja« anwählen und mit »OK« bestätigen.
7- Zeile »WPS-Typ« mit »V« oder »Λ« wählen und die Option »Taste« mit »<« oder »>« wählen.
Verbindungstyp ändern Kabellos WPS
WLAN Ein
WPS-Typ Taste
Netzwerk wählen N/A
Netzwerkkonfiguration Auto
Wake-on-LAN Aus
Bild
Dienstagxx xxx xxxx
Quelle TimerlisteTon NetzwerkTV Jugendschutz
Einstellungen > Netzwerk
WählenVerbinden Testen BeendenZurück EXITBACKModus ändern
8- Anmeldung an das Heimnetzwerk mit »« (rot) starten.
– Die Meldung »WPS-Taste an ...« wird eingeblendet.
9- Am Router die WPS-Taste drücken.
10- Die Schaltfläche »Weiter« mit »>« oder »<« wählen und mit »OK« bestätigen.
– Die Meldung »Verbindung mit Gateway: Erfolgreich« wird eingeblendet.
11- Wenn die Meldung erlischt, mit »« (grün) die Verbindung zum Netzwerk prüfen.
– Anzeige: »Testen ... Bitte warten«, nach erfolgreicher Anmeldung »Verbindung mit Gateway: Erfolgreich« und »Internetver-bindung: Erfolgreich«.
12- Einstellung mit »EXIT« beenden.
Automatische-Anmeldung-mit-WPS-PIN-EingabeVerwenden Sie diese Art der Anmeldung, wenn Ihr Router die WPS-PIN-Eingabe unterstützt. Alle Sicherheitseinstellungen werden automatisch übernommen.1- Menü mit »MENU« aufrufen.
2- Menüpunkt »Einstellungen« mit »V«, »Λ«, »<« oder »>« wählen und mit »OK« bestä-tigen.
3- Die Option »Netzwerk« mit »>« oder »<« wählen und mit »V« bestätigen.
– Das Menü »Netzwerk« ist aktiv.
4- Zeile »Verbindungstyp ändern« mit »V« oder »Λ« wählen und mit »OK« bestätigen.
5- Die Option »Kabellos WPS« mit »<« oder »>« wählen und mit »OK« bestätigen.
– Eine Abfrage wird eingeblendet.
6- Sicherheitsabfrage bestätigen, dazu mit »<« oder »>« die Schaltfläche »Ja« anwählen und mit »OK« bestätigen.
7- Zeile »WPS-Typ« mit »V« oder »Λ« wählen und die Option »PIN« mit »<« oder »>« wählen.

86 / 118 TRFernseher / Bedienungsanleitung
Verbindungstyp ändern Kabellos WPS
WLAN Ein
WPS-Typ PIN
Netzwerk wählen N/A
Netzwerkkonfiguration Auto
Wake-on-LAN Aus
Bild
Dienstagxx xxx xxxx
Quelle TimerlisteTon NetzwerkTV Jugendschutz
Einstellungen > Netzwerk
Wählen BeendenZurück EXITBACKModus ändern
8- Zeile »Netzwerk wählen« mit »V« oder »Λ« wählen und mit »OK« bestätigen.
– Das Menü »Netzwerk auswählen« wird eingeblendet, die vorhandenen Netzwer-ke werden gesucht und angezeigt.
9- Das gewünschte Netzwerk mit »V« oder »Λ« wählen und mit »OK« bestätigen.
– Die zur Anmeldung am Router benötigte PIN wird angezeigt (8 Stellen).
Hinweis:7 Entnehmen Sie der Bedienungsanleitung
des Routers, wie die PIN mittels PC einge-geben wird.
10- Die PIN mit dem PC am Router eingeben (z.B. AVM FRITZ!Box: Menüpunkt WLAN-Einstellungen … WPS) und speichern.
Hinweis:7 Die PIN muss innerhalb von 2 Minuten
eingegeben werden. Ist dies nicht der Fall, wird die Verbindung zwischen Fernsehgerät und Router abgebrochen.
11- Anmeldung an das Heimnetzwerk mit »« (grün) starten.
– Die Meldung »Verbindung mit Gateway: Erfolgreich« wird eingeblendet.
12- Wenn die Meldung erlischt, mit »« (grün) die Verbindung zum Netzwerk prüfen.
– Anzeige: »Testen ... Bitte warten«, nach erfolgreicher Anmeldung »Verbindung mit Gateway: Erfolgreich« und »Internetver-bindung: Erfolgreich«.
13- Einstellung mit »EXIT« beenden.
Automatische-Anmeldung-mit-Eingabe-des-Netzwerk-KennwortesVerwenden Sie diese Art der Anmeldung, wenn Ihr Router „WPS-PBC“ oder die WPS-PIN-Einga-be nicht unterstützt.1- Menü mit »MENU« aufrufen.
2- Menüpunkt »Einstellungen« mit »V«, »Λ«, »<« oder »>« wählen und mit »OK« bestä-tigen.
3- Die Option »Netzwerk« mit »>« oder »<« wählen und mit »V« bestätigen.
– Das Menü »Netzwerk« ist aktiv.
Verbindungstyp ändern Kabellos
Netzwerkkonfiguration Auto
Wake-on-LAN Aus
Erweitert
Bild
Dienstagxx xxx xxxx
Quelle TimerlisteTon NetzwerkTV Jugendschutz
Einstellungen > Netzwerk
WählenVerbinden Testen Bestätigen ZurückBACK BeendenEXIT
4- Die Zeile »Verbindungstyp ändern« mit »V« oder »Λ« wählen und mit »OK« bestätigen.
5- Die Option »Kabellos« mit »V« oder »Λ« wählen und mit »OK« bestätigen.
– Eine Abfrage wird eingeblendet.
6- Sicherheitsabfrage bestätigen, dazu mit »<« oder »>« die Schaltfläche »Ja« anwählen und mit »OK« bestätigen.
7- Die Zeile »Netzwerkkonfiguration« mit »V« oder »Λ« wählen und die Option »Auto« mit »<« oder »>« wählen.
8- Die Zeile »Netzwerk wählen« mit »Λ« oder »V« wählen und mit »OK« bestätigen.
– Das Menü »Netzwerk wählen« wird ein-geblendet, die vorhandenen Netzwerke werden gesucht und angezeigt.
9- Das gewünschte Netzwerk mit »V« oder »Λ« wählen und mit »OK« bestätigen.
– Das »Kennwort« Menü wird eingeblendet.
NETZWERK-INSTALLATION-------------------------------------------------------------------
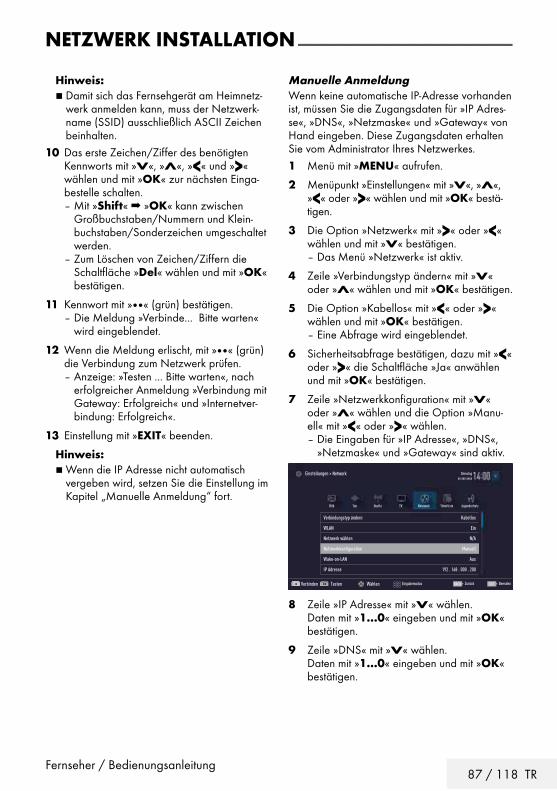
Fernseher / Bedienungsanleitung87 / 118 TR
NETZWERK-INSTALLATION-------------------------------------------------------------------
Hinweis:7 Damit sich das Fernsehgerät am Heimnetz-
werk anmelden kann, muss der Netzwerk-name (SSID) ausschließlich ASCII Zeichen beinhalten.
10- Das erste Zeichen/Ziffer des benötigten Kennworts mit »V«, »Λ«, »<« und »>« wählen und mit »OK« zur nächsten Einga-bestelle schalten.
– Mit »Shift« ➡ »OK« kann zwischen Großbuchstaben/Nummern und Klein-buchstaben/Sonderzeichen umgeschaltet werden.
– Zum Löschen von Zeichen/Ziffern die Schaltfläche »Del« wählen und mit »OK« bestätigen.
11- Kennwort mit »« (grün) bestätigen. – Die Meldung »Verbinde... Bitte warten«
wird eingeblendet.
12- Wenn die Meldung erlischt, mit »« (grün) die Verbindung zum Netzwerk prüfen.
– Anzeige: »Testen ... Bitte warten«, nach erfolgreicher Anmeldung »Verbindung mit Gateway: Erfolgreich« und »Internetver-bindung: Erfolgreich«.
13- Einstellung mit »EXIT« beenden.
Hinweis:7 Wenn die IP Adresse nicht automatisch
vergeben wird, setzen Sie die Einstellung im Kapitel „Manuelle Anmeldung“ fort.
Manuelle-AnmeldungWenn keine automatische IP-Adresse vorhanden ist, müssen Sie die Zugangsdaten für »IP Adres-se«, »DNS«, »Netzmaske« und »Gateway« von Hand eingeben. Diese Zugangsdaten erhalten Sie vom Administrator Ihres Netzwerkes.1- Menü mit »MENU« aufrufen.
2- Menüpunkt »Einstellungen« mit »V«, »Λ«, »<« oder »>« wählen und mit »OK« bestä-tigen.
3- Die Option »Netzwerk« mit »>« oder »<« wählen und mit »V« bestätigen.
– Das Menü »Netzwerk« ist aktiv.
4- Zeile »Verbindungstyp ändern« mit »V« oder »Λ« wählen und mit »OK« bestätigen.
5- Die Option »Kabellos« mit »<« oder »>« wählen und mit »OK« bestätigen.
– Eine Abfrage wird eingeblendet.
6- Sicherheitsabfrage bestätigen, dazu mit »<« oder »>« die Schaltfläche »Ja« anwählen und mit »OK« bestätigen.
7- Zeile »Netzwerkkonfiguration« mit »V« oder »Λ« wählen und die Option »Manu-ell« mit »<« oder »>« wählen.
– Die Eingaben für »IP Adresse«, »DNS«, »Netzmaske« und »Gateway« sind aktiv.
Verbindungstyp ändern Kabellos
WLAN Ein
Netzwerk wählen N/A
Netzwerkkonfiguration Manuell
Wake-on-LAN Aus
IP Adresse 192 . 168 . 000 . 200
Bild
Dienstagxx xxx xxxx
Quelle TimerlisteTon NetzwerkTV Jugendschutz
Einstellungen > Network
WählenVerbinden Tasten Eingabemodus BeendenZurück EXITBACK
8- Zeile »IP Adresse« mit »V« wählen. Daten mit »1…0« eingeben und mit »OK«
bestätigen.
9- Zeile »DNS« mit »V« wählen. Daten mit »1…0« eingeben und mit »OK«
bestätigen.

88 / 118 TRFernseher / Bedienungsanleitung
NETZWERK-INSTALLATION-------------------------------------------------------------------
10- Zeile »Netzmaske« mit »V« wählen und mit »OK« bestätigen.
Daten mit »1…0« eingeben und mit »OK« bestätigen.
11- Zeile »Gateway« mit »V« wählen. Daten mit »1…0« eingeben und mit »OK«
bestätigen.
12- Zeile »Netzwerk wählen« mit »Λ« oder »V« wählen und mit »OK« bestätigen.
– Das Menü »Netzwerk auswählen« wird eingeblendet, die vorhandenen Netzwer-ke werden gesucht und dann angezeigt.
13- Das gewünschte Netzwerk mit »V« oder »Λ« wählen und mit »OK« bestätigen.
– Das »Kennwort« Menü wird eingeblendet.
Hinweis:7 Damit sich das Fernsehgerät am Heimnetz-
werk anmelden kann, muss der Netzwerk-name (SSID) ausschließlich ASCII Zeichen beinhalten.
14- Das erste Zeichen/Ziffer des benötigten Kennworts mit »V«, »Λ«, »<« und »>« wählen und mit »OK« zur nächsten Einga-bestelle schalten.
– Mit »Shift« ➡ »OK« kann zwischen Großbuchstaben/Nummern und Klein-buchstaben/Sonderzeichen umgeschaltet werden.
– Zum Löschen von Zeichen/Ziffern die Schaltfläche »Del« wählen und mit »OK« bestätigen.
15- Kennwort mit »« (grün) bestätigen. – Die Meldung »Verbinde... Bitte warten«
wird eingeblendet.
16- Wenn die Meldung erlischt, mit »« (grün) die Verbindung zum Netzwerk prüfen.
– Anzeige: »Testen ... Bitte warten«, nach erfolgreicher Anmeldung »Verbindung mit Gateway: Erfolgreich« und »Internetver-bindung: Erfolgreich«.
17- Einstellung mit »EXIT« beenden.
Name-des-Fernsehgerätes--ändernUm Ihr Fernsehgerät im Netzwerk identifizieren zu können, ist ab Werk der Name „Smart Inter@ctive 4.0“ vergeben. Sie können den Namen ändern.1- Menü mit »MENU« aufrufen.
2- Menüpunkt »Einstellungen« mit »V«, »Λ«, »<« oder »>« wählen und mit »OK« bestä-tigen.
3- Die Option »TV« mit »>« oder »<« wählen und mit »V« bestätigen.
– Das Menü »TV« ist aktiv.
4- Die Zeile »Info« mit »V« oder »Λ« wählen und mit »OK« bestätigen.
5- Zeile »TV-Name« mit »V« oder »Λ« wäh-len und mit »OK« bestätigen.
6- Aktuellen Namen mit »« (rot) schrittweise löschen.
7- Das erste Zeichen/Ziffer des neuen Na-mens mit »V«, »Λ«, »<« und »>« wählen und mit »OK« zur nächsten Eingabestelle schalten.
– Mit »Shift« ➡ »OK« kann zwischen Großbuchstaben/Nummern und Klein-buchstaben/Sonderzeichen umgeschaltet werden.
– Zum Löschen von Zeichen/Ziffern die Schaltfläche »Del« wählen und mit »OK« bestätigen.
8- Neuen Namen mit »« (grün) bestätigen.
9- Einstellung mit »EXIT« beenden.

Fernseher / Bedienungsanleitung89 / 118 TR
NETZWERK-INSTALLATION-------------------------------------------------------------------
Fernsehgerät-bei-einem-„ver-steckten“-Netzwerk-anmeldenAuch wenn die SSID (Service Set Identifier) des Routers nicht sichtbar ist, können Sie Ihr Fernseh-gerät an diesem Netzwerk anmelden.1- Menü mit »MENU« aufrufen.
2- Menüpunkt »Einstellungen« mit »V«, »Λ«, »<« oder »>« wählen und mit »OK« bestä-tigen.
3- Die Option »Netzwerk« mit »>« oder »<« wählen und mit »V« bestätigen.
– Das Menü »Netzwerk« ist aktiv.
4- Zeile »Netzwerk wählen« mit »V« oder »Λ« wählen und mit »OK« bestätigen.
– Das Menü »Netzwerk wählen« wird ein-geblendet, die vorhandenen Netzwerke werden gesucht und dann angezeigt.
5- »« (rot) drücken. – Das Menü »Netzwerk hinzufügen« wird
eingeblendet.
6- Zeile »Routername« mit »V« oder »Λ« wählen und mit »OK« bestätigen.
– Ein Menü für die Eingabe der SSID wird eingeblendet.
Hinweis:7 Damit sich das Fernsehgerät am Heimnetz-
werk anmelden kann, muss der Netzwerk-name (SSID) ausschließlich ASCII Zeichen beinhalten.
7- Das erste Zeichen/Ziffer der SSID mit »V«, »Λ«, »<« und »>« wählen und mit »OK« zur nächsten Eingabestelle schalten.
– Mit »Shift« ➡ »OK« kann zwischen Großbuchstaben/Nummern und Klein-buchstaben/Sonderzeichen umgeschaltet werden.
– Zum Löschen von Zeichen/Ziffern die Schaltfläche »Del« wählen und mit »OK« bestätigen.
8- SSID mit »« (grün) bestätigen.
9- Zeile »Sicherheitstyp« mit »V« oder »Λ« wählen und mit »<« oder »>« die benötigte Option (WPA2) wählen.
10- Einstellung mit »« (rot) bestätigen. – Das Netzwerk wird jetzt im Menü »Netz-
werk auswählen« angezeigt.
11- Das Netzwerk mit »V« oder »Λ« wählen und mit »OK« bestätigen.
– Das »Kennwort« Menü wird eingeblendet.
12- Das erste Zeichen/Ziffer des benötigten Kennworts mit »V«, »Λ«, »<« und »>« wählen und mit »OK« zur nächsten Einga-bestelle schalten.
– Mit »Shift« ➡ »OK« kann zwischen Großbuchstaben/Nummern und Klein-buchstaben/Sonderzeichen umgeschaltet werden.
– Zum Löschen von Zeichen/Ziffern die Schaltfläche »Del« wählen und mit »OK« bestätigen.
13- Kennwort mit »« (grün) bestätigen. – Die Meldung »Verbinde... Bitte warten«
wird eingeblendet.
14- Wenn die Meldung erlischt, mit »« (grün) die Verbindung zum Netzwerk prüfen.
– Anzeige: »Testen ... Bitte warten«, nach erfolgreicher Anmeldung »Verbindung mit Gateway: Erfolgreich« und »Internetver-bindung: Erfolgreich«.
15- Einstellung mit »EXIT« beenden.

90 / 118 TRFernseher / Bedienungsanleitung
WEITERE-PROGRAMME-EINSTELLEN--------------------------------------
Digitale-Programme-eines-Satel-liten-automatisch-aktualisierenSatellitendaten ändern sich häufig, neue Pro-gramme kommen immer wieder hinzu. Daher sollten Sie von Zeit zu Zeit eine automatische Suche ausführen.Dabei werden alle Transponder nach neuen Programmen durchsucht.1- Menü mit »MENU« aufrufen.
2- Menüpunkt »Einstellungen« mit »V«, »Λ«, »<« oder »>« wählen und mit »OK« bestä-tigen.
3- Die Option »Quelle« mit »>« oder »<« wäh-len und mit »V« bestätigen.
– Das Menü »Quelle« ist aktiv.
Autumatischer Suchlauf
Manuelle Abstimmung
Programmtabelle
Erweiterte Einstellungen
Bild
Dienstagxx xxx xxxx
Quelle TimerlisteTon NetzwerkTV Jugendschutz
Einstellungen > Quelle
Wählen Bestätigen BeendenZurück EXITBACK
4- Die Zeile »Automatischer Suchlauf« mit »V« oder »Λ« wählen und mit »OK« bestätigen.
– Das Menü wird eingeblendet.
5- Im Menü die Option »Satellit (DVB-S/S2)« mit »V« oder »Λ« wählen und mit »OK« bestätigen.
6- Im Menü »Betreiberauswahl« mit »V« oder »Λ« die Option »Astra Schnell«, »Sky« (wenn Sie Kunde beim Programmanbieter Sky sind) oder »Komplett« wählen und mit »OK« bestätigen.
Hinweis:7 Die Option »Sky« wird in Österreich und
der Schweiz nicht angeboten.7- Die Schaltfläche »Weiter« mit »« (blau)
bestätigen.
8- Gewünschten Programmtypen wählen. Die Optionen »TV Digital« und »Radio Digi-
tal« sind vorgewählt. Nicht benötigte Option mit »V« or »Λ« wählen und mit »OK« abwählen (das Häkchen erlischt).
9- »V« drücken und Suchlaufmodus wählen. Die Optionen »Frei« und »Verschlüsselt«
sind vorgewählt. Nicht benötigte Option mit »V« or »Λ« wählen und mit »OK« abwäh-len (das Häkchen erlischt).
10- Suchlauf mit »« (rot) starten.
Hinweise:7 Bei einer Aktualisierung über den gleichen
Satelliten wird beim Start des Suchlaufes eine Sicherheitsabfrage eingeblendet.
7 Sollen die vorher gespeicherten Programme in der Programmliste beibehalten und die neu gefundenen hinzugefügt werden, dann »« (grün) drücken.
7 Wird »« (rot) gedrückt, werden die gespeicherten Programme der aktuellen Programmliste gelöscht.
– Das Menü »Digital Suche« wird einge-blendet, die Suche nach Programmen beginnt.
– Die Suche ist beendet, wenn die Meldung »Suche ist abgeschlossen« eingeblendet wird.
Hinweis:7 Die Suche kann mit »EXIT« vorzeitig abge-
brochen werden.11- Mit »« (gelb) zur Programmtabelle
schalten;
oder
Einstellung mit »EXIT« beenden.

Fernseher / Bedienungsanleitung91 / 118 TR
WEITERE-PROGRAMME-EINSTELLEN--------------------------------------
Digitale-Programme-eines--Satelliten-auf-einem-Transponter-manuell-suchenWenn Sie die Parameter eines neuen Program-mes kennen, können Sie dieses auch manuell suchen. Aktuelle Transponderdaten finden Sie im Videotext, in Satelliten-TV-Magazinen oder im Internet.1- Menü mit »MENU« aufrufen.
2- Menüpunkt »Einstellungen« mit »V«, »Λ«, »<« oder »>« wählen und mit »OK« bestätigen.
3- Die Option »Quelle« mit »>« oder »<« wäh-len und mit »V« bestätigen.
– Das Menü »Quelle« ist aktiv.
4- Die Zeile »Manuelle Abstimmung« mit »V« oder »Λ« wählen und mit »OK« bestätigen.
5- Die Option »Satellit (DVB-S/S2)« mit »V« oder »Λ« wählen und mit »OK« bestätigen.
6- Benötigte Option für die manuelle Ab-stimmung mit »V« oder »Λ« wählen und einstellen:
- Programmtyp Mit »<« oder »>« wählen, ob nur nach
Fernsehprogrammen (TV), nur nach Radio-Programmen (Radio) oder nach beidem (Radio+TV) gesucht werden soll.
- Suchlauf-nach Mit »<« oder »>« wählen, ob nur nach
unverschlüsselten (Frei), nur nach verschlüs-selten (Verschlüsselt) Programmen oder nach beidem (Frei + Verschlüsselt) gesucht werden soll.
- Transponder Frequenz des Transponders mit »1...0«
fünfstellig eingeben.
- Symbolrate Symbolrate des Transponders mit »1...0«
fünfstellig eingeben.
- Polarisierung Polarisation für den Transponder mit »<«
oder »>« auf »Horizontal« oder »Vertikal« einstellen.
- Netzwerksuche Mit »<« oder »>« die Option »Ein« oder
»Aus« wählen.
7- Suchlauf mit »« (rot) starten. – Das Menü »Digital Suche« wird einge-
blendet, die Suche nach Programmen beginnt.
– Alle auf dem Transponder gefundenen Programme werden angezeigt. Die neuen Programme werden am Ende der Programmtabelle angefügt.
Hinweis:7 Die Suche kann mit »EXIT« vorzeitig abge-
brochen werden.8- Einstellung mit »EXIT« beenden.

92 / 118 TRFernseher / Bedienungsanleitung
WEITERE-PROGRAMME-EINSTELLEN--------------------------------------
Antenneneinstellungen-und-digi-tale-Programme-eines-Satelliten-automatisch-suchen
Hinweis:7 Die im Kapitel beschriebenen LNB-Einstel-
lungen erfordern umfangreiches Fachwis-sen, auch über die Antennenanlage. Lassen Sie sich von einem Fachmann beraten.
1- Menü mit »MENU« aufrufen.
2- Menüpunkt »Einstellungen« mit »V«, »Λ«, »<« oder »>« wählen und mit »OK« bestä-tigen.
3- Die Option »Quelle« mit »>« oder »<« wäh-len und mit »V« bestätigen.
– Das Menü »Quelle« ist aktiv.
4- Die Zeile »Automatischer Suchlauf« mit »V« oder »Λ« wählen und mit »OK« bestätigen.
5- Die Option »Satellit (DVB-S/S2)« mit »V« oder »Λ« wählen und mit »OK« bestätigen.
6- Die Option »Komplett« mit »V« oder »Λ« wählen und mit »OK« bestätigen.
7- Die Option »Antenneneinstellungen« mit »V« oder »Λ« wählen und mit »OK« be-stätigen.
– Das Menü »Antenneneinstellungen« wird eingeblendet.
8- Benötigte Option für die Antenneneinstel-lungen mit »V« oder »Λ« wählen und einstellen:
- Satellit »OK« drücken, gewünschten Satelliten mit
»V« oder »Λ« wählen und mit »OK« be-stätigen.
- LNB-Typ »OK« drücken und benötigten LNB-Typ mit
»<« oder »>« wählen, notwendige Daten eingeben und mit »« (grün) bestätigen.
- LNB-Stromversorgung Benötigte LNB-Stromversorgung (je nach
LNB-Typ) mit »<« oder »>« auf »Aus«, »13/18 V« oder »14/19 V« einstellen.
- LNB-Auswahl Nur bei »DiSEqC 1.0« oder »DiSEqC 1.1«
notwendig, siehe Kapitel „Antenneneinstellun-gen für DiSEqC 1.0/1.1 ...“.
9- Antenneneinstellungen mit »« (blau)beenden.
10- Gewünschten Programmtypen wählen. Die Optionen »TV Digital« und »Radio Digi-
tal« sind vorgewählt. Nicht benötigte Option mit »V« or »Λ« wählen und mit »OK« abwählen (das Häkchen erlischt).
11- »V« drücken und Suchlaufmodus wählen. Die Optionen »Frei« und »Verschlüsselt«
sind vorgewählt. Nicht benötigte Option mit »V« or »Λ« wählen und mit »OK« abwäh-len (das Häkchen erlischt).
12- Suchlauf mit »« (rot) starten.
Hinweise:7 Bei einer Aktualisierung über den gleichen
Satelliten wird beim Start des Suchlaufes eine Sicherheitsabfrage eingeblendet.
7 Sollen die vorher gespeicherten Programme in der Programmliste beibehalten und die neu gefundenen hinzugefügt werden, dann »« (grün) drücken.
7 Wird »« (rot) gedrückt, werden die gespeicherten Programme der aktuellen Programmliste gelöscht.
– Das Menü »Digital Suche« wird einge-blendet, die Suche nach Programmen beginnt.
– Die Suche ist beendet, wenn die Meldung »Suche ist abgeschlossen« eingeblendet wird.
Hinweis:7 Die Suche kann mit »EXIT« vorzeitig abge-
brochen werden.13- Mit »« (gelb) zur Programmtabelle
schalten;
oder
Einstellung mit »EXIT« beenden.

Fernseher / Bedienungsanleitung93 / 118 TR
WEITERE-PROGRAMME-EINSTELLEN--------------------------------------
Antenneneinstellungen,-SCR-System-und-digitale-Programme-eines-Satelliten-automatisch-su-chen
Hinweise:7 Ihr Fernsehgerät unterstützt das SCR
System (Satellite Channel Router – Un-eingeschränktes Einkabelsystem nach EN 50494).
7 Die im Kapitel beschriebenen LNB-Einstel-lungen erfordern umfangreiches Fachwis-sen, auch über die Antennenanlage. Lassen Sie sich von einem Fachmann beraten.
1- Menü mit »MENU« aufrufen.
2- Menüpunkt »Einstellungen« mit »V«, »Λ«, »<« oder »>« wählen und mit »OK« bestä-tigen.
3- Die Option »Quelle« mit »>« oder »<« wäh-len und mit »V« bestätigen.
– Das Menü »Quelle« ist aktiv.
4- Die Zeile »Automatischer Suchlauf« mit »V« oder »Λ« wählen und mit »OK« bestätigen.
5- Die Option »Satellit (DVB-S/S2)« mit »V« oder »Λ« wählen und mit »OK« bestätigen.
6- Die Option »Komplett« mit »V« oder »Λ« wählen und mit »OK« bestätigen.
7- Die Option »Antenneneinstellungen« mit »V« oder »Λ« wählen und mit »OK« be-stätigen.
– Das Menü »Antenneneinstellungen« wird eingeblendet.
8- Benötigte Option für die Antenneneinstel-lungen mit »V« oder »Λ« wählen und einstellen:
- Satellit »OK« drücken, gewünschten Satelliten mit
»V« oder »Λ« wählen und mit »OK« be-stätigen.
- LNB-Typ Ist Ihre Antennenanlage mit einem Einkabel-
system-Multiswitch ausgerüstet, verwenden Sie die Einstellung »SCR«.
»OK« drücken und die Option »SCR« mit »>« oder »<« wählen.
Zeile »LNB-Frequenz Hoch« mit »V« an-wählen und Frequenz mit »1...0« fünfstellig eingeben.
Zeile »LNB-Frequenz Niedrig« mit »V« an-wählen und Frequenz mit »1...0« fünfstellig eingeben.
Einstellungen mit »« (grün) bestätigen.
- LNB-Auswahl Abhängig von der Anzahl der LNB´s die Opti-
on mit »>« oder »<« wählen. »1/2« wenn nur 1 LNB verwendet wird; wenn zwei LNB´s verwendet werden, das
benötigte LNB (»1/2« oder »2/2«) wählen.
- Nutzerband Benötigte Nummer für die gewählte Antennen-
dose mit »<« oder »>« eingeben.
- NB-Frequenz-(MHz) Benötigte Frequenz für die gewählte Anten-
nendose mit »1...0« eingeben.
Hinweise:7 Verwenden Sie bei der Montage nur Teile,
die zum verwendeten Einkabelsystem-Mul-tiswitch passen.
7 Werden in der gleichen Satellitenanlage mehrere Fernsehgeräte betrieben, müssen die zugewiesenen Parameter für das Nut-zerband und die NB-Frequenz unbedingt eingehalten werden.
7 Die Parameter für das Nutzerband und die NB-Frequenz entnehmen Sie der Anleitung des Multiswitch. Jede Antennendose (Fern-sehgerät) hat seine eigenen Parameter.
7 Bei der Verwendung des SCR Systems kann es zu Problemen kommen, wenn mehrere Benutzer gleichzeitig einen Automatischen Suchlauf durchführen.
9- Antenneneinstellungen mit »« (blau)beenden.

94 / 118 TRFernseher / Bedienungsanleitung
10- Gewünschten Programmtypen wählen. Die Optionen »TV Digital« und »Radio Digi-
tal« sind vorgewählt. Nicht benötigte Option mit »V« or »Λ« wählen und mit »OK« abwählen (das Häkchen erlischt).
11- »V« drücken und Suchlaufmodus wählen. Die Optionen »Frei« und »Verschlüsselt«
sind vorgewählt. Nicht benötigte Option mit »V« or »Λ« wählen und mit »OK« abwäh-len (das Häkchen erlischt).
12- Suchlauf mit »« (rot) starten.
Hinweise:7 Bei einer Aktualisierung über den gleichen
Satelliten wird beim Start des Suchlaufes eine Sicherheitsabfrage eingeblendet.
7 Sollen die vorher gespeicherten Programme in der Programmliste beibehalten und die neu gefundenen hinzugefügt werden, dann »« (grün) drücken.
7 Wird »« (rot) gedrückt, werden die gespeicherten Programme der aktuellen Programmliste gelöscht.
– Das Menü »Digital Suche« wird einge-blendet, die Suche nach Programmen beginnt.
– Die Suche ist beendet, wenn die Meldung »Suche ist abgeschlossen« eingeblendet wird.
Hinweis:7 Die Suche kann mit »EXIT« vorzeitig abge-
brochen werden.13- Mit »« (gelb) zur Programmtabelle
schalten;
oder
Einstellung mit »EXIT« beenden.
Antenneneinstellungen-für--DiSEqC-1.0/1.1-und-digitale-Pro-gramme-von-mehreren-Satelli-ten-automatisch-suchen
Hinweis:7 Die im Kapitel beschriebenen LNB-Einstel-
lungen erfordern umfangreiches Fachwis-sen, auch über die Antennenanlage. Lassen Sie sich von einem Fachmann beraten.
1- Menü mit »MENU« aufrufen.
2- Menüpunkt »Einstellungen« mit »V«, »Λ«, »<« oder »>« wählen und mit »OK« bestä-tigen.
3- Die Option »Quelle« mit »>« oder »<« wäh-len und mit »V« bestätigen.
– Das Menü »Quelle« ist aktiv.
4- Die Zeile »Automatischer Suchlauf« mit »V« oder »Λ« wählen und mit »OK« bestätigen.
5- Die Option »Satellit (DVB-S/S2)« mit »V« oder »Λ« wählen und mit »OK« bestätigen.
6- Die Option »Komplett« mit »V« oder »Λ« wählen und mit »OK« bestätigen.
7- Die Option »Antenneneinstellungen« mit »V« oder »Λ« wählen und mit »OK« be-stätigen.
– Das Menü »Antenneneinstellungen« wird eingeblendet.
8- Benötigte Option für die Antenneneinstel-lungen mit »V« oder »Λ« wählen und einstellen:
- Satellit »OK« drücken, gewünschten Satelliten mit
»V« oder »Λ« wählen und mit »OK« be-stätigen.
- LNB-Typ »OK« drücken und benötigten LNB-Typ mit
»<« oder »>« wählen, notwendige Daten eingeben und mit »« (grün) bestätigen.
- LNB-Stromversorgung Benötigte LNB-Stromversorgung (je nach
LNB-Typ) mit »<« oder »>« auf »Aus«, »13/18 V« oder »14/19 V« einstellen.
WEITERE-PROGRAMME-EINSTELLEN--------------------------------------

Fernseher / Bedienungsanleitung95 / 118 TR
- LNB-Auswahl Siehe DISEqC-Modus.
- DISEqC-Modus Abhängig von der Anzahl der verwendeten
Antennen/LNB´s mit »<« oder »>« die Op-tion »Aus«, »DiSEqC 1.0« oder »DiSEqC 1.1« wählen.
– »Aus«: für eine Satellitenanlage mit einer einzigen Antenne.
– »DiSEqC 1.0«: ermöglicht den Empfang von bis zu vier Satelliten gleichzeitig.
Unter »LNB-Auswahl« mit »<« oder »>« die Option »1/4«, »2/4«, »3/4« oder »4/4« für den zugewiesenen Satelliten wählen.
– »DiSEqC 1.1«: ermöglicht den Empfang von bis zu 16 Satelliten gleichzeitig.
Unter »LNB-Auswahl« mit »<« oder »>« die Option »1/16« bis »16/16« für den zugewiesenen Satelliten wäh-len.
9- Antenneneinstellungen mit »« (blau)beenden.
10- Gewünschten Programmtypen wählen. Die Optionen »TV Digital« und »Radio Digi-
tal« sind vorgewählt. Nicht benötigte Option mit »V« or »Λ« wählen und mit »OK« abwählen (das Häkchen erlischt).
11- »V« drücken und Suchlaufmodus wählen. Die Optionen »Frei« und »Verschlüsselt«
sind vorgewählt. Nicht benötigte Option mit »V« or »Λ« wählen und mit »OK« abwäh-len (das Häkchen erlischt).
12- Suchlauf für den ersten Satelliten mit »« (rot) starten.
Hinweise:7 Bei einer Aktualisierung über den gleichen
Satelliten wird beim Start des Suchlaufes eine Sicherheitsabfrage eingeblendet.
7 Sollen die vorher gespeicherten Programme in der Programmliste beibehalten und die neu gefundenen hinzugefügt werden, dann »« (grün) drücken.
7 Wird »« (rot) gedrückt, werden die gespeicherten Programme der aktuellen Programmliste gelöscht.
WEITERE-PROGRAMME-EINSTELLEN--------------------------------------
– Das Menü »Digital Suche« wird einge-blendet, die Suche nach Programmen beginnt.
– Die Suche ist beendet, wenn die Meldung »Suche ist abgeschlossen« eingeblendet wird.
Hinweis:7 Die Suche kann mit »EXIT« vorzeitig abge-
brochen werden.13- Mit »« (gelb) zur Programmtabelle
schalten;
oder
Einstellung mit »EXIT« beenden.
Hinweis:7 Für die Einstellungen des zweiten und weite-
rer Satelliten den Vorgang ab Pkt. 1 wieder-holen. Diese Programme werden am Ende der Programmtabelle angefügt.

96 / 118 TRFernseher / Bedienungsanleitung
WEITERE-PROGRAMME-EINSTELLEN--------------------------------------
Einstellungen-für-motorisierte-Antennen-(DiSEqC-1.2)
Hinweis:7 Die im Kapitel beschriebenen LNB-Einstel-
lungen erfordern umfangreiches Fachwis-sen, auch über die Antennenanlage. Lassen Sie sich von einem Fachmann beraten.
Ihr Fernsehgerät unterstützt motorisierte Satel-liten anlagen gemäß DiSEqC 1.2. Diese Funktion ermöglicht die Steuerung der Satellitenantenne über das Fernsehgerät.Passen Sie die Ausrichtung der Satellitenantenne an jeden einzelnen Satelliten an. Diese Einstel-lungen werden gespeichert, so dass die Anten-ne später problemlos zu jeder gespeicherten Ausrichtung geführt werden kann.1- Menü mit »MENU« aufrufen.
2- Menüpunkt »Einstellungen« mit »V«, »Λ«, »<« oder »>« wählen und mit »OK« bestä-tigen.
3- Die Option »Quelle« mit »>« oder »<« wäh-len und mit »V« bestätigen.
– Das Menü »Quelle« ist aktiv.
4- Die Zeile »Manuelle Abstimmung« mit »V« oder »Λ« wählen und mit »OK« bestätigen.
5- Die Option »Satellit (DVB-S/S2)« mit »V« oder »Λ« wählen und mit »OK« bestätigen.
6- Die Option »Antenneneinstellungen« mit »« (blau) aktivieren.
– Das Menü »Antenneneinstellungen« wird eingeblendet.
7- Zeile »DiSEqC-Modus« mit »V« oder »Λ« wählen. Danach die Option »DiSEqC1.2« mit »<« oder »>« wählen.
– Die Zeile »DiSEqC 1.2 Einstellungen« wird aktiv.
8- Zeile »DiSEqc 1.2-Einstellungen« mit »V« oder »Λ« wählen und mit »OK« bestätigen.
9- Benötigte Option mit »V« oder »Λ« wäh-len:
- Transportmodus Mit »<« oder »>« die Option »Diskret« oder
»Fortlaufend« wählen. – »Diskret«: Bewegt die Antenne in fest-ge-
legten Schritten nach Westen und Osten. – »Fortlaufend«: Bewegt die Antenne
kontinuierlich nach Westen oder Osten.
- Schrittweite Mit »<« oder »>« die Anzahl von Schritten,
mit denen sich die Antenne dreht wählen. »Schrittweite« ist nur aktiv, wenn der »Trans-portmodus« auf »Diskret« eingestellt wurde.
- Motor-bewegen – Richtet die Antenne auf den ausgewählten
Satelliten aus. Mit »<« nach »West«, mit »>« nach »Ost«.
– »Zur gespeicherten Position«: richtet die Antenne auf eine gespeicherte Sa-tellitenposition aus. Bis zu 50 Positionen können gespeichert werden. »OK« drü-cken und anschließend die gespeicherte Position mit »<« oder »>« wählen. Mit »« (grün) bestätigen– die Antenne wird auf die gespeicherte Position aus-gerichtet.
– »Aktuelle Position speichern«: Die aktuelle Antennenausrichtung wird gespeichert. »« (rot) drücken, die Position mit »<« oder »>« wählen und mit »« (grün) bestätigen.
- Limitposition – Legt fest, in welchem Umfang sich die
Antenne bewegen darf. Mit »<« die west-liche Begrenzung ein stellen, mit »>« die östliche Begrenzung ein stellen.
- DiSEqC-1.2-Grenzen-rücksetzen – Setzt die Begrenzungspositionen der
Antenne wieder zurück.
10- Einstellung mit »EXIT« beenden.

Fernseher / Bedienungsanleitung97 / 118 TR
WEITERE-PROGRAMME-EINSTELLEN--------------------------------------
Digitale-Programme-vom--Kabelbetreiber-automatisch--suchen1- Menü mit »MENU« aufrufen.
2- Menüpunkt »Einstellungen« mit »V«, »Λ«, »<« oder »>« wählen und mit »OK« bestä-tigen.
3- Die Option »Quelle« mit »>« oder »<« wäh-len und mit »V« bestätigen.
– Das Menü »Quelle« ist aktiv.
4- Die Zeile »Automatischer Suchlauf« mit »V« oder »Λ« wählen und mit »OK« bestätigen.
5- Die Option »Kabel (DVB-C)« mit »V« oder »Λ« wählen und mit »OK« bestätigen.
– Das Menü wird eingeblendet.
Suchlauf nach Schnell
Frequenz Auto
Netzwerk ID Auto
Bild
Dienstag xx xxx xxxx
Quelle TimerlisteTon NetzwerkTV Jugendschutz
Einstellungen > Quelle > Automatischer Suchlauf
Weiter BeendenZurück EXITBACKModus ändern
6- Die Zeile »Suchlauf nach« mit »Λ« oder »V« wählen.
Die Option »Schnell« oder »Komplett« mit »<« oder »>« einstellen.
– Die Suchfunktion »Schnell« stellt die Pro-gramme nach den Informationen ihres Kabelbetreibers im Übertragungssignal ein.
– Wird die Option »Komplett« gewählt, wird der gesamte Frequenzbereich durch-sucht. Die Suche kann mit dieser Option sehr lange dauern. Diese Option wird empfohlen, wenn ihr Kabelbetreiber den Suchtyp »Schnell« nicht unterstützt.
Hinweis:7 Sie können den Suchlauf beschleunigen.
Dazu benötigen Sie Informationen über die Frequenz und die Netzwerk-ID. Diese Daten bekommen Sie in der Regel von Ihrem Kabelnetzbetreiber oder Sie finden sie in Foren im Internet. Für Deutschland kann zum Beispiel die Frequenz 402MHz und die Netzwerk-ID 61441 eingegeben werden.
7- Den nächsten Bedienschritt mit »« (blau) anwählen.
Hinweis:7 Auswahl treffen, ob nach digitalen oder
nach analogen Fernsehprogrammen ge-sucht werden soll. Dazu mit »V« oder »Λ« die Option »Digital« oder »Analog« anwäh-len und mit »OK« das „Häkchen“ entfernen oder setzten.
8- Suchlauf mit »« (rot) starten.
Hinweise:7 Nach dem Start des Suchlaufes wird eine
Sicherheitsabfrage eingeblendet.7 Sollen die vorher gespeicherten Programme
in der Programmliste beibehalten und die neu gefundenen hinzu gefügt werden, dann »« (grün) drücken.
7 Wird »« (rot) gedrückt, werden die gespeicherten Programme der aktuellen Programmliste gelöscht.
– Das Menü »Digital Suche« erscheint, die Suche nach Fernsehprogrammen beginnt. Je nach Anzahl der empfangenen Fern-sehprogramme kann dies durchaus einige Minuten dauern.
– Der Suchlauf ist beendet, wenn die Mel-dung »Suche ist abgeschlossen« erscheint.
9- Mit »« (gelb) zur Programmtabelle schalten;
oder
Einstellung mit »EXIT« beenden.

98 / 118 TRFernseher / Bedienungsanleitung
WEITERE-PROGRAMME-EINSTELLEN--------------------------------------
Digitale-terrestrische-Fernseh-programme-automatisch-suchen1- Menü mit »MENU« aufrufen.
2- Menüpunkt »Einstellungen« mit »V«, »Λ«, »<« oder »>« wählen und mit »OK« bestä-tigen.
3- Die Option »Quelle« mit »>« oder »<« wäh-len und mit »V« bestätigen.
– Das Menü »Quelle« ist aktiv.
4- Die Zeile »Erweitert« mit »V« oder »Λ« wählen und mit »OK« bestätigen.
5- Zeile »Aktivantenne« mit »V« oder »Λ« wählen. Antennenspannung für die Antenne mit »<« oder »>« einschalten (»Ein«).
Achtung:7 Die Antennenspannung (Zeile »Aktivanten-
ne«) darf nur eingeschaltet werden, wenn die Antenne eine aktive Zimmerantenne mit Signalverstärker ist und diese nicht schon selbst über ein Steckernetzteil oder ähnli-ches mit Spannung versorgt wird. Ansonsten kann es zu einem Kurzschluss oder zur Zerstörung der Antenne kommen!
6- Eine Menüebene zurückschalten mit »BACK <«.
7- Die Zeile »Automatischer Suchlauf« mit »Λ« oder »V« wählen und mit »OK« bestätigen
8- Die Option »Terrestrisch (DVB-T/T2)« mit »Λ« oder »V« wählen und mit »OK« be-stätigen.
9- Auswahl treffen, ob nach digitalen oder nach analogen Fernsehprogrammen ge-sucht werden soll.
Dazu mit »Λ« oder »V« die Option »Digi-tal« oder »Analog« anwählen und mit »OK« das „Häkchen“ entfernen oder setzten.
10- Suchlauf mit »« (rot) starten.
Digitale-Programme-vom-Kabelbetreiber-manuell--suchen1- Menü mit »MENU« aufrufen.
2- Menüpunkt »Einstellungen« mit »V«, »Λ«, »<« oder »>« wählen und mit »OK« bestä-tigen.
3- Die Option »Quelle« mit »>« oder »<« wäh-len und mit »V« bestätigen.
– Das Menü »Quelle« ist aktiv.
4- Die Zeile »Manuelle Abstimmung« mit »V« oder »Λ« wählen und mit »OK« bestätigen.
5- Die Option »Kabel (DVB-C)« mit »V« oder »Λ« wählen und mit »OK« bestätigen.
6- Auswahl treffen, ob nach digitalen oder nach analogen Fernsehprogrammen ge-sucht werden soll.
Dazu mit »V« oder »Λ« die Option »Digi-tal« oder »Analog« anwählen und mit »OK« bestätigen.
7- Frequenz vierstellig mit »1...0« eingeben. – Die Suche beginnt, die gefundenen Pro-
gramme werden angezeigt.
8- Einstellung mit »EXIT« beenden.

Fernseher / Bedienungsanleitung99 / 118 TR
Digitale-terrestrische-Fernseh-programme-manuell-suchen1- Menü mit »MENU« aufrufen.
2- Menüpunkt »Einstellungen« mit »V«, »Λ«, »<« oder »>« wählen und mit »OK« bestä-tigen.
3- Die Option »Quelle« mit »>« oder »<« wäh-len und mit »V« bestätigen.
– Das Menü »Quelle« ist aktiv.
4- Die Zeile »Erweitert« mit »V« oder »Λ« wählen und mit »OK« bestätigen.
5- Zeile »Aktivantenne« mit »V« oder »Λ« wählen. Antennenspannung für die Antenne mit »<« oder »>« einschalten (»Ein«).
Achtung:7 Die Antennenspannung (Zeile »Aktivanten-
ne«) darf nur eingeschaltet werden, wenn die Antenne eine aktive Zimmerantenne mit Signalverstärker ist und diese nicht schon selbst über ein Steckernetzteil oder ähnli-ches mit Spannung versorgt wird. Ansonsten kann es zu einem Kurzschluss oder zur Zerstörung der Antenne kommen!
6- Eine Menüebene zurückschalten mit »BACK <«.
7- Die Zeile »Manuelle Abstimmung« mit »V« oder »Λ« wählen und mit »OK« bestätigen
8- Die Option »Terrestrisch (DVB-T/T2)« mit »V« oder »Λ« wählen und mit »OK« be-stätigen.
9- Auswahl treffen, ob nach digitalen oder nach analogen Fernsehprogrammen ge-sucht werden soll.
Dazu mit »V« oder »Λ«« die Option »Digi-tal« oder »Analog« anwählen und mit »OK« bestätigen.
10- Kanalzahl mit »1...0« eingeben. – Nach Abschluss der Suche werden die
gefundenen Programme angezeigt
11- Einstellung mit »EXIT« beenden.
WEITERE-PROGRAMME-EINSTELLEN--------------------------------------
Hinweise:7 Nach dem Start des Suchlaufes wird eine
Sicherheitsabfrage eingeblendet.7 Sollen die vorher gespeicherten Programme
in der Programmliste beibehalten und die neu gefundenen hinzu gefügt werden, dann »« (grün) drücken.
7 Wird »« (rot) gedrückt, werden die gespeicherten Programme der aktuellen Programmliste gelöscht.
– Das Menü »Digital Suche« erscheint, die Suche nach Fernsehprogrammen beginnt. Je nach Anzahl der empfangenen Fern-sehprogramme kann dies durchaus einige Minuten dauern.
– Der Suchlauf ist beendet, wenn die Mel-dung »Suche ist abgeschlossen« erscheint.
11- Mit »« (gelb) zur Programmtabelle schalten;
oder
Einstellung mit »EXIT« beenden.

100 / 118 TRFernseher / Bedienungsanleitung
Analoge-Fernsehprogramme-einstellenDiese Einstellung ist nur dann erforderlich, wenn Sie keine digitalen Programme empfangen können und bei der ersten Installation noch nicht nach analogen Programmen gesucht haben.Fernsehprogramme können direkt oder über den Suchlauf eingestellt werden.
Alle-analogen-Fernsehprogramme-ein-stellenAnaloge Programme werden in der Programm-liste im Anschluss an die digitalen Programme angezeigt.
Hinweis:7 Antennenkabel der Hausantenne (für
ana loge Fernsehprogramme) in die Anten-nenbuchse ANT-IN des Fernsehgerätes stecken.
1- Menü mit »MENU« aufrufen.
2- Menüpunkt »Einstellungen« mit »V«, »Λ«, »<« oder »>« wählen und mit »OK« bestä-tigen.
3- Die Option »Quelle« mit »>« oder »<« wäh-len und mit »V« bestätigen.
– Das Menü »Quelle« ist aktiv.
4- Die Zeile »Automatischer Suchlauf« mit »V« oder »Λ« wählen und mit »OK« bestätigen.
5- Die Option »Terrestrisch (DVB-T/T2)« oder »Kabel (DVB-C)« mit »V« oder »Λ« wäh-len und mit »OK« bestätigen.
6- Die Option »Digital« mit »V« oder »Λ« anwählen und mit »OK« das Häkchen ent-fernen.
7- Suchlauf mit »« (rot) starten.
WEITERE-PROGRAMME-EINSTELLEN--------------------------------------
Automatische-Aktualisierung-Wenn Sie diese Funktion einschalten, werden mögliche Änderungen von Netzbetreibern auto-matisch aktualisiert.Das Gerät muss sich dabei im Stand-by Modus befinden.Diese Aktualisierung betrifft alle Empfangsarten – Terrestrisch, Kabel und Satellit.1- Menü mit »MENU« aufrufen.
2- Menüpunkt »Einstellungen« mit »V«, »Λ«, »<« oder »>« wählen und mit »OK« bestä-tigen.
3- Die Option »Quelle« mit »>« oder »<« wäh-len und mit »V« bestätigen.
– Das Menü »Quelle« ist aktiv.
4- Die Zeile »Erweitert« mit »V« oder »Λ« wählen und mit »OK« bestätigen.
5- Zeile »Auto-Diensteaktual.« mit »V« oder »Λ« wählen und mit »<« oder »>« ein-schalten (»Ein«).
6- Einstellung mit »EXIT« beenden.

Fernseher / Bedienungsanleitung101 / 118 TR
WEITERE-PROGRAMME-EINSTELLEN--------------------------------------
Hinweis:7 Nach dem Start des Suchlaufes wird eine
Sicher heitsabfrage eingeblendet. Die Op-tion »Ja« mit »« (grün) bestätigen.
– Alle Programm- und Favoritenlisten der analogen Programme werden gelöscht und erneut angelegt.
– Das Menü »Automatischer Suchlauf« erscheint, die Suche nach Fernsehpro-grammen beginnt. Je nach Anzahl der empfangenen Fernsehprogramme kann dies durchaus einige Minuten dauern.
– Der Suchlauf ist beendet, wenn die Mel-dung »Suche ist abgeschlossen« erscheint.
Hinweis:7 Mit »EXIT« kann die Suche vorzeitig abge-
brochen werden.8 Mit »« (gelb) zur Programmtabelle schal-
ten;
oder
Einstellung mit »EXIT« beenden.
Analoge-Fernsehprogramme-durch-Ein-geben-der-Kanalzahlen--einstellen1- Menü mit »MENU« aufrufen.
2- Menüpunkt »Einstellungen« mit »V«, »Λ«, »<« oder »>« wählen und mit »OK« bestä-tigen.
3- Die Option »Quelle« mit »>« oder »<« wäh-len und mit »V« bestätigen.
– Das Menü »Quelle« ist aktiv.
4- Die Zeile »Manuelle Abstimmung« mit »V« oder »Λ« wählen und mit »OK« bestätigen.
5- Die Option »Terrestrisch (DVB-T/T2)« oder »Kabel (DVB-C)« mit »V« oder »Λ« wäh-len und mit »OK« bestätigen.
6- Die Option »Analog« mit »V« oder »Λ« anwählen und mit »OK« bestätigen.
7- Zeile »Prog Nummer« mit »V« oder »Λ« wählen und mit »<« oder »>« den ge-wünschten Programmplatz einstellen.
8- Zeile »Band« mit »V« oder »Λ« wählen und mit »<« oder »>« « zwischen »S« (Sonder kanal) und »C« (normaler Kanal) wählen.
9- Zeile »Programm« mit »V« oder »Λ« wäh-len und Kanalzahl mit »<« oder »>« schritt-weise eingeben oder
Kanalzahl mit »1…0« direkt eingeben oder Suchlauf mit »« (grün) oder »« (gelb) starten.
Hinweise:7 Das aktuelle System wird in der Zeile »TV-
System« angezeigt. Sind die Farbe und/oder der Ton nicht in Ordnung, die Zeile »TV-System« mit »V« oder »Λ« wählen. Mit »<« oder »>« die benötigte Einstellung wählen.
7 Sollte eine Feinabstimmung erforderlich sein, die Zeile »Feinabstimmung« mit »V« oder »Λ« wählen und Einstellung mit »<« oder »>« durchführen.
10- Einstellung mit »« (blau) speichern.
Hinweis:7 Wenn Sie weitere Fernsehprogramme
abstellen möchten, wiederholen Sie die Schritte 7 bis 10.
11- Einstellung mit »EXIT« beenden.
102 / 118 TRFernseher / Bedienungsanleitung
Programme-löschen1- Im Menü »Programmtabelle« das zu
löschende Fernsehprogramm mit »V «, »Λ«, »<« oder »>« wählen und mit »OK« markieren.
Hinweis:7 Sollen mehrere Fernsehprogramme gelöscht
werden, diese mit »V «, »Λ«, »<« oder »>« wählen und jeweils mit »OK« markie-ren.
2- Den Bearbeitungsmodus mit »« (gelb) aktivieren.
3- Die Zeile »Entfernen« mit »V« oder »Λ« wählen und mit »OK« bestätigen.
4- Sicherheitsabfrage bestätigen, dazu mit »<« oder »>« die Schaltfläche »Ja« anwählen und mit »OK« bestätigen;
oder
Vorgang abbrechen, dazu mit »<« oder »>« die Schaltfläche »Nein« anwählen und mit »OK« bestätigen.
5- Programmtabelle mit »EXIT« abschalten.
WEITERE-PROGRAMME-EINSTELLEN--------------------------------------
Programmbelegung-der-analo-gen-Programme-ändernWurden beim Einstellen der Fernsehprogramme mit dem automatischen Programmsuchlauf Fern-sehprogramme mehrfach gespeichert, können Sie diese löschen. Sie können auch Fernseh-programme auf einen anderen Programmplatz verschieben, einen Programmnamen ändern oder neu eingeben sowie Programmplätze über-springen.
Programmtabelle-anwählen1- Menü mit »MENU« aufrufen.
2- Menüpunkt »Einstellungen« mit »V«, »Λ«, »<« oder »>« wählen und mit »OK« bestä-tigen.
3- Die Option »Quelle« mit »>« oder »<« wäh-len und mit »V« bestätigen.
– Das Menü »Quelle« ist aktiv.
4- Zeile »Programmtabelle« mit »V« oder »Λ« wählen und mit »OK« bestätigen.
– Das Menü »Programmtabelle« wird einge-blendet.
Hinweis:7 Die weitere Bedienung entnehmen Sie bitte
den folgenden Abschnitten.
Fernseher / Bedienungsanleitung103 / 118 TR
WEITERE-PROGRAMME-EINSTELLEN--------------------------------------
Programmnamen-eingeben--(maximal-8-Zeichen)1- Im Menü »Programmtabelle« das gewünsch-
te Fernsehprogramm mit »V «, »Λ«, »<« oder »>« wählen.
2- Den Bearbeitungsmodus mit »« (gelb) aktivieren.
3- Die Zeile »Umbenennen« mit »V« oder »Λ« wählen und mit »OK« bestätigen.
4- Den aktuellen Programmnamen mit »« (rot) schrittweise löschen.
5- Gewünschten Buchstaben oder Ziffer mit »V«, »Λ«, »<« und »>« wählen und mit »OK« zur nächsten Eingabestelle schalten.
– Mit »Shift« ➡ »OK« kann zwischen Großbuchstaben/Nummern und Klein-buchstaben/Sonderzeichen umgeschaltet werden.
– Zum Löschen von Zeichen/Ziffern die Schaltfläche »Del« wählen und mit »OK« bestätigen.
6- Neuen Programmnamen mit »« (grün) bestätigen.
Hinweis:7 Wenn Sie weitere Programmnamen einge-
ben möchten, wiederholen Sie die Schritte 1-bis 6.
Favoritenlisten-erstellenIhre Lieblingsprogramme können Sie in bis zu vier Favoritenlisten speichern (FAV 1 bis FAV 4).1- Im Menü »Programmtabelle« die gewünsch-
ten Programme mit »V«, »Λ«, »<« oder »>« wählen und mit »OK« markieren.
– Die Programme werden mit »✔« markiert.
2- Den Bearbeitungsmodus mit »« (gelb) aktivieren.
3- Die Zeile »FAV setzen« mit »V« oder »Λ« wählen und mit »OK« bestätigen.
4- Gewünschte Favoritenliste mit »V« oder »Λ« wählen und mit »OK« bestätigen.
– Die Programme sind in der Programmta-belle mit »❶«, »❷«, »❸« oder »❹« mar-kiert.
– Sie können das gleiche Programm in mehrere Favoritenlisten aufnehmen.
– In jede Favoritenliste können bis zu 255 Programme gespeichert werden.
Hinweise:7 Programme können wieder aus Favoriten-
listen gelöscht werden. Den Bearbeitungsmodus mit »« (gelb) aktivieren. Die benötigte Favoritenliste mit »V« oder »Λ« wählen und mit »OK« bestätigen. Das zu löschende Programm mit »V«, »Λ«, »<« oder »>« wählen und mit »OK« markieren. Den Bearbeitungsmodus mit »« (gelb) aktivieren. Die Zeile »Aus FAV entfernen« mit »V« oder »Λ« wählen und mit »OK« bestäti-gen.
7 Beim Löschen eines Programms aus der Favoritenliste wird die Reihenfolge inner-halb der Favoritenliste aktualisiert.
5- Programmtabelle mit »EXIT« abschalten.

104 / 118 TRFernseher / Bedienungsanleitung
WEITERE-PROGRAMME-EINSTELLEN--------------------------------------
Signalinformationen-anzeigen(nur bei digitalen Programmen)1- Menü mit »MENU« aufrufen.
2- Menüpunkt »Einstellungen« mit »V«, »Λ«, »<« oder »>« wählen und mit »OK« bestä-tigen.
3- Die Option »Quelle« mit »>« oder »<« wäh-len und mit »V« bestätigen.
– Das Menü »Quelle« ist aktiv.
4- Die Zeile »Erweitert« mit »V« oder »Λ« wählen und mit »OK« bestätigen.
5- Zeile »Signalinformation« mit »V« oder »Λ« wählen und mit »OK« bestätigen.
– Informationen zu Satellit, Betreiber-auswahl, Modulation, Polarisierung, Symbolrate, Coderate, Signalstärke und Frequenz werden angezeigt.
Hinweise:7 Die Signalinformation wechselt je nach
aktueller Signalquelle.7 Im oberen Bereich des Menüs werden die
Signaleigenschaften dargestellt.7 Der Signalpegel hängt nicht nur von Ihrer
Empfangsanlage, sondern auch von dem gerade aktiven Kanal ab. Beachten Sie dies, wenn Sie anhand der Signalstärke-anzeige die Ausrichtung Ihrer Antenne kontrollieren!
6- Menü mit »EXIT« abschalten.
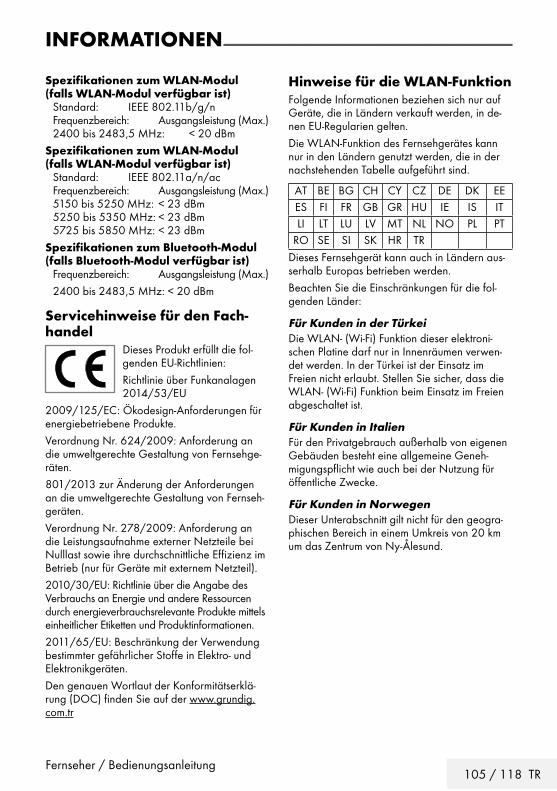
Fernseher / Bedienungsanleitung105 / 118 TR
INFORMATIONEN------------------------------------------------------------------------------------------
Spezifikationen-zum-WLAN-Modul(falls-WLAN-Modul-verfügbar-ist)- Standard: IEEE 802.11b/g/n Frequenzbereich: Ausgangsleistung (Max.) 2400 bis 2483,5 MHz: < 20 dBmSpezifikationen-zum-WLAN-Modul(falls-WLAN-Modul-verfügbar-ist)- Standard: IEEE 802.11a/n/ac Frequenzbereich: Ausgangsleistung (Max.) 5150 bis 5250 MHz: < 23 dBm 5250 bis 5350 MHz: < 23 dBm 5725 bis 5850 MHz: < 23 dBmSpezifikationen-zum-Bluetooth-Modul(falls-Bluetooth-Modul-verfügbar-ist) Frequenzbereich: Ausgangsleistung (Max.) 2400 bis 2483,5 MHz: < 20 dBm
Servicehinweise-für-den-Fach-handel
Dieses Produkt erfüllt die fol-genden EU-Richtlinien:Richtlinie über Funkanalagen 2014/53/EU
2009/125/EC: Ökodesign-Anforderungen für energiebetriebene Produkte.Verordnung Nr. 624/2009: Anforderung an die umweltgerechte Gestaltung von Fernsehge-räten.801/2013 zur Änderung der Anforderungen an die umweltgerechte Gestaltung von Fernseh-geräten.Verordnung Nr. 278/2009: Anforderung an die Leistungsaufnahme externer Netzteile bei Nulllast sowie ihre durchschnittliche Effizienz im Betrieb (nur für Geräte mit externem Netzteil).2010/30/EU: Richtlinie über die Angabe des Verbrauchs an Energie und andere Ressourcen durch energieverbrauchsrelevante Produkte mittels einheitlicher Etiketten und Produktinformationen.2011/65/EU: Beschränkung der Verwendung bestimmter gefährlicher Stoffe in Elektro- und Elektronikgeräten.Den genauen Wortlaut der Konformitätserklä-rung (DOC) finden Sie auf der www.grundig.com.tr
Hinweise-für-die-WLAN-FunktionFolgende Informationen beziehen sich nur auf Geräte, die in Ländern verkauft werden, in de-nen EU-Regularien gelten.Die WLAN-Funktion des Fernsehgerätes kann nur in den Ländern genutzt werden, die in der nachstehenden Tabelle aufgeführt sind.
AT BE BG CH CY CZ DE DK EEES FI FR GB GR HU IE IS ITLI LT LU LV MT NL NO PL PT
RO SE SI SK HR TRDieses Fernsehgerät kann auch in Ländern aus-serhalb Europas betrieben werden.Beachten Sie die Einschränkungen für die fol-genden Länder:
Für-Kunden-in-der-TürkeiDie WLAN- (Wi-Fi) Funktion dieser elektroni-schen Platine darf nur in Innenräumen verwen-det werden. In der Türkei ist der Einsatz im Freien nicht erlaubt. Stellen Sie sicher, dass die WLAN- (Wi-Fi) Funktion beim Einsatz im Freien abgeschaltet ist.
Für-Kunden-in-ItalienFür den Privatgebrauch außerhalb von eigenen Gebäuden besteht eine allgemeine Geneh-migungspflicht wie auch bei der Nutzung für öffentliche Zwecke.
Für-Kunden-in-NorwegenDieser Unterabschnitt gilt nicht für den geogra-phischen Bereich in einem Umkreis von 20 km um das Zentrum von Ny-Ålesund.

106 / 118 TRFernseher / Bedienungsanleitung
INFORMATIONEN------------------------------------------------------------------------------------------
Für-Kunden-in-Russland1. SRD mit FHSS Modulation7 Maximum 2,5 mW EIRP.7 Maximum 100 mW EIRP. Erlaubt für die Be-
nutzung im Aussenbereich ohne Einschränkun-gen an den Aufstellort (Höhe) des Gerätes, zum Sammeln und Überwachen von Telemet-riedaten und Berechnungssysteme.
Bei anderen, wie oben aufgeführten Anwen-dungen, darf der Aufstellort (Höhe) des Gerä-tes 10 m nicht überschreiten.
7 Maximum 100 mW EIRP im Innenbereich.2. SRD mit DSSS und anderen Breitband-Modu-lationssystemen als FHSS7 Maximaler Mittelwert EIRP, Signaldichte bei
2 mW/MHz. Maximum 100 mW EIRP.7 Maximum 100 mW EIRP. Erlaubt für die
Benutzung im Aussenbereich ohne Einschrän-kungen an den Aufstellort (Höhe) des Ge-rätes, zum Sammeln und Überwachen von Telemetriedaten, Berechnungssysteme und Sicherheitseinrichtungen.
7 Maximaler Mittelwert EIRP, Signaldichte bei 10 mW/MHz. Maximum 100 mW EIRP. Im Innenbereich.
Für-Kunden-in-der-UkraineEIRP ≤100 mW mit eingebauter Antenne und einem Verstärkungsfaktor bis zu 6 dBi.
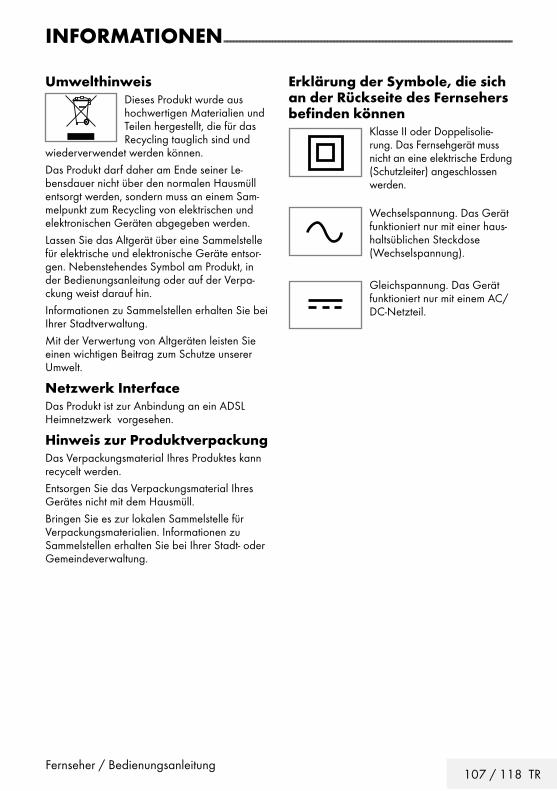
Fernseher / Bedienungsanleitung107 / 118 TR
INFORMATIONEN------------------------------------------------------------------------------------------
Erklärung-der-Symbole,-die-sich-an-der-Rückseite-des-Fernsehers-befinden-können
Klasse II oder Doppelisolie-rung. Das Fernsehgerät muss nicht an eine elektrische Erdung (Schutzleiter) angeschlossen werden.
Wechselspannung. Das Gerät funktioniert nur mit einer haus-haltsüblichen Steckdose (Wechselspannung).
Gleichspannung. Das Gerät funktioniert nur mit einem AC/DC-Netzteil.
UmwelthinweisDieses Produkt wurde aus hochwertigen Ma terialien und Teilen hergestellt, die für das Recycling tauglich sind und
wiederverwendet werden können.Das Produkt darf daher am Ende seiner Le-bensdauer nicht über den normalen Hausmüll entsorgt werden, sondern muss an einem Sam-melpunkt zum Recycling von elek trischen und elektronischen Geräten abgegeben werden.Lassen Sie das Altgerät über eine Sammel stelle für elektrische und elektronische Geräte entsor-gen. Nebenstehendes Symbol am Produkt, in der Bedienungsanleitung oder auf der Verpa-ckung weist darauf hin.Informationen zu Sammelstellen erhalten Sie bei Ihrer Stadtverwaltung.Mit der Verwertung von Altgeräten leisten Sie einen wichtigen Beitrag zum Schutze unserer Umwelt.
Netzwerk-InterfaceDas Produkt ist zur Anbindung an ein ADSL Heimnetzwerk vorgesehen.
Hinweis-zur-ProduktverpackungDas Verpackungsmaterial Ihres Produktes kann recycelt werden.Entsorgen Sie das Verpackungsmaterial Ihres Gerätes nicht mit dem Hausmüll.Bringen Sie es zur lokalen Sammelstelle für Verpackungsmaterialien. Informationen zu Sammelstellen erhalten Sie bei Ihrer Stadt- oder Gemeindeverwaltung.

108 / 118 TRFernseher / Bedienungsanleitung
INFORMATIONEN------------------------------------------------------------------------------------------
ProblemlösungSollten die unterstehenden Hilfestellungen zu keinem befriedigendem Ergebnis führen, wenden Sie sich bitte an einen autorisierten Fachhändler. Bitte ziehen Sie in Betracht, dass Störungen auch durch externe Geräte wie Videorecorder und Satellitenreceiver hervorgerufen werden können.
Problem Mögliche-Ursache Abhilfe
Bild hell (Rauschen), aber kein Sender sichtbar
Antennenkabel Ist das Antennenkabel ange-schlossen?
Kein Fernsehprogramm einge-stellt
Programmsuchlauf starten
Bild kontrastarm Bildeinstellungen nicht richtig eingestellt
Helligkeit-, Kontrast-, bzw. Farb-einstellung verändern
Problem liegt am Programm Mit anderem Sender testen
Bild und/oder Ton gestört Störungen durch andere Geräte Geräte anders aufstellen
Geisterbilder, Reflexion Programmeinstellung Automatische oder manuelle Programmeinstellung/Feinab-stimmung
Antenne Antennenkabel oder -anlage über prüfen lassen
Keine Farbe Farbintensität auf Minimum Farbe hochregeln
TV-Norm anpassen (wenn Einstellmöglichkeit vor-handen)
Richtige Farbnorm wählen
Problem liegt am Programm Mit anderem Programm testen
Bild vorhanden, aber kein Ton
Lautstärke minimal eingestellt Lautstärke hochregeln/einschal-ten
Kein oder gestörter Video-text
Problem liegt am Programm Mit anderem Programm testen
Fernsehprogramm (hat keinen Vi-deotext) oder Antennensystem
Mit anderem Fernsehprogramm prüfen, Feinabstimmung durch-führen
Sendersignal zu schwach Antennenanlage überprüfen
Fernbedienung funktioniert nicht
Hindernis zwischen Fernbedie-nung und Gerät
Fernbedienung auf Fernsehgerät richten
Batterieproblem Batterien überprüfen und gege-benenfalls austauschen
Undefinierter Betriebszustand Fernsehgerät über den Netz-schalter zwei Minuten lang abschalten
Bild im PC-Betrieb zu dunkel Falsche Einstellung der Bild-schirmauflösung und der Bildfre-quenz am PC
Einstellungen am PC ändern (z. B. Auflösung 1280 x 768, Bildwiederhol frequenz 60 Hz)

Fernseher / Bedienungsanleitung109 / 118 TR
INFORMATIONEN------------------------------------------------------------------------------------------
Problem Mögliche-Ursache Abhilfe
Der Digitale Media Server wurde nicht gefunden.
Der Digitale Media Server ist nicht in Betrieb.
Digitalen Media Server ein-schalten und im Netzwerk anmelden.
Die notwendigen Einstellungen für den Digitalen Media Server wurden nicht durchgeführt.
Netzwerkeinstellungen über-prüfen.
Schlechte Bildqualität („Ruckeln”) bei Videos in Applikationen im WLAN-Betrieb.
WiFi-Signal zu schwach durch bauliche Abschirmung.
Standort des WLAN-Routers ändern.
Langsame Internetverbindung. Eine langsame Internetverbin-dung ist abhänging von der ver-fügbaren Geschwindigkeit Ihres Internetproviders oder eines Fehlers bei der Netzinfrastruk-tur. Bitte kontaktieren Sie Ihren Provider.
Der Digitale Medien Server (z.B. PC) ist am Heimnetzwerk ange-meldet, der Router ist jedoch zu weit entfernt.
Den Digitalen Medien Server näher am Router platzieren.
Hinweis über Verbindungs-problem wird angezeigt.
Das LAN-Kabel ist nicht richtig angeschlossen oder die Ve-bindung zum WLAN-Router ist gestört.
LAN-Kabel oder WLAN-Router überprüfen.
Der WLAN-Router ist nicht mit dem Internet verbunden oder die Verbindung ist gestört.
Überprüfen Sie, ob der WLAN-Router mit dem Internet verbun-den ist.
Schlechte Bildqualität („Ruckeln”) bei Videos in Applikationen im LAN-Betrieb.
Langsame Internetverbindung. Eine langsame Internetverbin-dung ist abhänging von der ver-fügbaren Geschwindigkeit Ihres Internetproviders oder eines Fehlers bei der Netzinfrastruk-tur. Bitte kontaktieren Sie Ihren Provider.
Verbindungsprobleme bei den Smart inter@ctive Appli-kationen.
Zeitweiliger Ausfall oder Prob-leme der Server von den jeweili-gen Anwendungen.
Verbindungsaufbau zu den Ap-plikationen wiederholen.
Hinweis:7 Dies ist ein Produkt der Klasse A. Im Betrieb kann es zu Funkstörungen kommen. In diesem Fall
muss der Anwender unter Umständen für Abhilfe sorgen. Bitte wenden Sie sich an Ihren Fach-händler.

110 / 118 TRFernseher / Bedienungsanleitung
Abhängig von der Ausstattung des Fernsehge-rätes.
ARCMit ARC (Audio Return Channel) kann das Audiosignal des Fernsehprogrammes über ein HDMI Kabel oder einem optischen Kabel mit einem Multikanal-Verstärker wiedergegeben werden.
Brilliante-FarbenDiese Funktion erhöht den Farbkontrast und die Kontrasteinstellung. Meist ist diese Einstellung für den normalen Bildbetrieb zu stark und sollte dosiert (niedrig oder aus) eingesetzt werden, da sonst Nuancen im Bild unterdrückt werden.
Common-InterfaceSchnittstelle für DVB-Empfänger.Verschlüsselte Programme können nur mit einem dem Ver-schlüsselungssystem ent sprechenden CA-Modul in Verbindung mit der dazugehörigen Smart-card angesehen werden.
DigilinkDiese Funktion verwendet das CEC (Consumer Electronics Control) Protokoll. CEC ermöglicht, externe Geräte, die mit einem HDMI-Kabel an die HDMI-Buchsen an ge-schlossen sind (z. B. DVD-Player), mit einer Fern-bedienung zu steuern.
DiSEqCDiSEqC (Digital Satellite Equipment Control) ist ein digitales System zur Ansteuerung komplexer Satellitenanlagen mit Motor oder mehreren LNBs. DiSEqC wird benötigt, wenn zwei oder mehr Satelliten-Positionen angesteuert werden sollen.
DLNADigital Living Network Alliance ist eine inter-nationale Vereinigung von Herstellern der Unterhaltungselektronik, von IT-Hardware und von Mobiltelefonen. Ziel der Vereinigung ist es, die reibungslose Kommunikation von informati-onstechnischen Geräten aus dem Bereich Heim- und Eigengebrauch sicherzustellen. Dadurch können ganz einfach über die Fernbedienung des Grundig LED-TVs in Ihrem Netzwerk frei-gegebene Dateien aufgerufen und auf dem TV abgespielt werden – ohne umständliches Anschließen von USB-Festplatten oder Brennen von DVDs.
Domain-Name-SystemDas Domain Name System (DNS) ist einer der wichtigsten Dienste im Internet. Seine Hauptauf-gabe ist die Umsetzung von „Internetadressen“ in die zugehörige IP-Adresse.
DVB-CDVB-C (Digital Video Broadcasting – Cable) bezeichnet eine Variante von DVB, die für die Übertragung von digitalen Hörfunk- und Fern-sehsignalen über Kabelanschluss verwendet wird.
DVB-S/S2DVB-S/S2 (Digital Video Broadcasting – Satelli-te) ist die Bezeichnung für die Ausstrahlung von DVB-Signalen über Satellit.
GLOSSAR-------------------------------------------------------------------------------------------------------------------

Fernseher / Bedienungsanleitung111 / 118 TR
Gateway-Mit einem Gateway können Netzwerke, die auf völlig unterschiedlichen Protokollen basieren, miteinander kommunizieren. Im Heimbereich wird überwiegend eine Kombination aus Router und DSL-Modem als Internet-Gateway verwen-det.
Hardware-VersionMit Hardware ist das Gerät gemeint. Dazu ge-hören alle Baugruppen (wie Prozessor, Display usw.).
HbbTVHbbTV ist der interaktive Nachfolger des Video-texts, mit modern gestalteten Inhalten, hochauf-lösenden Bildern und Video sequenzen sowie Mediatheken. Voraussetzung für die vollständige Funktionalität von HbbTV ist, dass das Fernsehgerät mit dem Internet verbunden ist.
HD/FullHD/UHDHigh Definition Television (hochauflösendes Fernsehen) ist ein Sammelbegriff, der eine Reihe von Fernsehnormen bezeichnet, die sich durch eine erhöhte vertikale, horizontale oder tempo-rale Auflösung auszeichnen.Mit Full HD wird die Eigenschaft eines HDTV-fähigen Gerätes bezeichnet, eine HD-Auflösung von 1920 x 1080 Pixeln ausgeben oder auf-zeichnen zu können. Bei UHD beträgt die HD-Auflösung 3840 x 2160 Pixel.
HintergrundbeleuchtungManuelle Einstellung der Hintergrundbeleuch-tung (ist nur aktiv, wenn die dynamische Hin-tergrundbeleuchtung auf „AUS“ geschaltet ist). Diese Einstellung wirkt sich auch direkt auf den Stromverbrauch aus.
DVB-T/T2DVB-T/T2 (Digital Video Broadcasting – Terrest-rial) bezeichnet eine Variante von DVB, die für die Funkübertragung von digitalen Hörfunk- und Fernsehsignalen über terrestrische (erdgebunde-ne) Wege verwendet wird.
Dynamischer-KontrastDie Funktion passt den Kontrast dynamisch und optimal an die jeweiligen Bildinhalte an, indem er eine Analyse über einige Bilder durchführt und danach abhängig von einer Kontrastände-rung diesen verändert. Dies bewirkt eine Kont-rastverstärkung, kann aber dabei die sichtbaren Helligkeits-Abstufungen im Bild verringern.
FilmmodusDieser Modus erkennt und verarbeitet Spielfilme bei sämtlichen Programmquellen automatisch. Dadurch erhalten Sie stets ein optimales Bild.Dies funktioniert in den Modi 480i, 576i und 1080i bei TV-Wiedergabe und bei anderen Programmquellen.Wenn der »Filmmodus« bei Sendungen ohne Spielfilmsignal eingeschaltet ist, können ge-ringfügige Probleme wie Einfrieren des Bildes, defekte Untertitel oder feine Linien im Bild auf-treten.
Firmware-VersionFirmware bezeichnet die Software, die in einem programmierbaren Chip (Microcontroller) einge-bettet ist. Sie ist zumeist in einem Flash-Speicher, einem EPROM oder einem EEPROM abgelegt. Die Firmware enthält Funktionen zur Steuerung des Gerätes.
GammaDiese Einstellung legt fest, welcher Helligkeits-wert bei welchem digitalen Übertragungswert dargestellt werden soll. Dabei werden die meis-ten Aufnahmen mit einem Gamma-Wert von 2,2 übertragen (alle Windows-PCs und neuere PCs mit einem MAC-Betriebssystem arbeiten damit, ältere MAC-Systeme und Übertragungen ohne Farbprofil arbeiten meist mit einem Gamma-Wert von 1.8).
GLOSSAR-------------------------------------------------------------------------------------------------------------------
112 / 118 TRFernseher / Bedienungsanleitung
IP-AdresseEine IP-Adresse (Internet-Protocol-Adresse) dient zur eindeutigen Adressierung von Rechnern und anderen Geräten in einem IP-Netzwerk. Das bekannteste Netzwerk, in dem IP-Adressen verwendet werden, ist das Internet. Dort werden beispielsweise Webserver über IP-Adressen angesprochen. Die IP-Adresse kann vom Router automatisch angeboten werden (Automatic Ad-ress) oder Sie wurde im Router manuell einge-geben (Statische Adresse). Wurde sie manuell eingegeben, muss auch im Fernsehgerät diese IP-Adresse eingegeben werden.
JPEGJPEG ist eine Abkürzung für Joint Picture Experts Group. Es bezeichnet ein Verfahren zur Kom-primierung von Bilddateien.
LIVE-SHAREMit Live Share können alle Inhalte zwischen Widi™/Miracast™-zertifizierten Mobilgeräten (Smartphone oder Tablet) und PCs und dem Fernsehgerät über WiFi gestreamt werden. Auch HD-Inhalte können Sie problemlos auf den Fern-seher streamen und umgekehrt natürlich auch TV-Inhalte auf Mobilgeräte/PC übertragen.
LNBRauscharmer Signalumsetzer (Low Noise Block), der sich im Zentrum einer Parabolantenne be-findet.Er setzt die Satellitenfrequenz von beispielswei-se 10,7–11,75 oder 11,8–12,75 GHz auf den Bereich 950–2150 MHz um und ermöglicht da-durch die Kabelübertragung durch ein Koaxial-kabel und neuerdings auch mit Lichtwellenleitern und den Empfang mit einem Satellitenreceiver.
MEMC Verbessert die Darstellung von Bewegtbilder durch zusätzliche Berechnung von Zwischenbil-dern und ist nur in höherwertigen Geräten ab 32‘‘ verfügbar. Er wird mit PPR (Picture Perfec-tion Rate) angezeigt. Bei zu hohem Einstellwert kann dies bei schlechter Übertragung zu Geis-terbildern wegen fehlerhaften Berechnung der Zwischenbilder führen.
MP3Komprimiertes Audio-Dateiformat.
MPEG-Artefact-ReduktionDiese Funktion reduziert Störungen durch Arte-fakte (Pixelblöcke) bei digitalen Sendungen mit MPEG-Komprimierung (z. B. bei DVB-T-Recei-vern und geringer Übertragungsrate oder DVD-Playern). Nur bei digitalen Empfangsquellen und AV-Programmplätzen.
NAS-(Network-Attached-Storage)Mit der Bezeichnung NAS werden Geräte be-nannt, die Daten von einer Festplatte in einem Netzwerk anbieten.
Network-Name-(SSID)Der Netzwerkname (SSID – Service Set Identi-fier) bezeichnet die Kennung eines Funknetzwer-kes, das auf IEEE 802.11 basiert. Jedes Wireless LAN besitzt eine konfigurierbare SSID, um das Funknetz eindeutig identifizieren zu können. Die Zeichenfolge des Netzwerknamens kann bis zu 64 Zeichen lang sein. Sie wird in der Basis-station (Access Point) eines Wireless LAN konfi-guriert und auf allen Clients, die darauf Zugriff haben sollen, eingestellt.
NetzmaskeDie Netzmaske oder Netzwerkmaske, teils noch als Subnetzmaske bezeichnet, ist eine Bitmaske, die eine IP-Adresse in einen Netzwerk- und einen Geräte- bzw. Hostteil trennt. Sie wird in IP-Netzwerken verwendet, um Routingentschei-dungen zu treffen.
GLOSSAR-------------------------------------------------------------------------------------------------------------------

Fernseher / Bedienungsanleitung113 / 118 TR
RauschreduktionVermindert das sichtbare Rauschen, indem das Bild ein wenig unschärfer dargestellt und ein leichtes Nachziehen erzeugt wird. Sollte bei einem guten Bildmaterial deshalb minimiert eingesetzt werden.
RouterEin Router ist eine Netzwerkkomponente, die mehrere Rechnernetze koppelt. Der Router analysiert bei ihm eintreffende Netzwerk-Pakete eines Protokolls (auf Basis von Layer-3-Infor-mationen) und leitet sie zum vorgesehenen Zielnetz weiter. Klassische Router arbeiten auf Schicht 3 des OSI-Referenzmodells. Ein Router besitzt für jedes an ihn angeschlossene Netz eine Schnittstelle (auch Interface genannt). Beim Eintreffen von Daten bestimmt der Router den richtigen Weg zum Ziel und damit die passende Schnittstelle, über welche die Daten weiterge-leitet werden. Dazu bedient er sich einer lokal vorhandenen Routingtabelle, die angibt, über welchen Anschluss des Routers welches Netz erreichbar ist.
SCR-(Single-Channel-Router)Einkabelsystem nach EN 50494. Wenn Ihre Antennenanlage mit einem Einkabel-system-Multiswitch ausgestattet ist, können die Fernsehgeräte, die an dieser Antennenanlage angeschlossen sind die Fernsehprogramme unabhängig voneinander empfangen.
Sicherheit-(WEP/WPA)WEP (Wired Equivalent Privacy) ist der Stan-dard-Verschlüsselungsalgorithmus für WLAN. Er soll sowohl den Zugang zum Netz regeln, als auch die Vertraulichkeit und Integrität der Daten sicherstellen. Dieses Verfahren wird mittlerweile als unsicher angesehen. Daher sollten aktuelle WLAN-Installationen die sicherere WPA-Ver-schlüsselung verwenden.
Perfect-ClearVerbessert allgemein das Bild durch eine leichte Blautönung (erzeugt scheinbar mehr Schärfe) und verbessert den Schwarzwert, indem ab einem gewissen dunklen Graupegel dieser vollständig auf Schwarz gestellt wird. Verringert dabei aber in dunklen Bildbereichen die sichtba-ren Grauwerte.
Private-IP-AdressePrivate IP-Adressen gehören zu bestimmten IP-Adressbereichen, die im Internet nicht gerou-tet werden. Sie können von jedem für private Netze wie etwa LANs verwendet werden. Viele Rechnernetze benötigen zwar untereinander volle Konnektivität auf IP-Ebene, jedoch nur einen eingeschränkten Internetzugang. Weist man einem solchen Rechnernetz einen privaten IP-Adressbereich zu, so bildet es ein Intranet, auf das aus dem Internet heraus nicht zugegriffen werden kann, da die Internet-Router die privaten Adressbereiche ignorieren. Ein Gateway oder Router, der in diesem privaten Netz platziert ist, und neben der privaten IP-Adresse zusätzlich über eine öffentliche Adresse des Internets verfügt, stellt den Internetzugang her. Dies kann über einen Proxy geschehen oder mittels NAT/ PAT/Masquerading. Da der genutzte Adressbe-reich nur innerhalb des privaten Netzes sichtbar ist, kann derselbe Bereich auch in anderen privaten Netzen verwendet werden. Die vom Internet Protocol benötigte Eindeutigkeit einer IP-Adresse bleibt durch die eingeschränkte Sicht-barkeit gewahrt.
Proxy-ServerEin Proxy oder Proxy-Server ist ein Dienstpro-gramm für Computernetze, das im Datenverkehr vermittelt. Es macht den Datentransfer schneller, kann aber auch durch Einsatz von Zugriffskon-trollmechanismen die Sicherheit erhöhen. Die Vermittlung erfolgt zwischen Computern oder Programmen in so genannten Rechnernetzen. Aus Sicht des Servers verhält sich der Proxy wie ein Client, dem Client gegenüber wie ein Server.
GLOSSAR-------------------------------------------------------------------------------------------------------------------

114 / 118 TRFernseher / Bedienungsanleitung
SymbolrateAnzahl der übertragenen Symbole pro Zeitein-heit in der digitalen Übertragungstechnik.
TimeshiftDie aktuelle Sendung kann „angehalten” wer-den. Dies ist eine nützliche Funktion, wenn z.B. während eines Spielfilmes das Telefon läutet, und Sie die Fortsetzung des Films nicht verpas-sen möchten.Die Sendung wird im „Time Shift-Speicher” des externen Datenträgers gespeichertIm „Time Shift-Speicher” kann max. 60 Minuten der aktuellen Sendung aufgezeichnet werden.
TransponderZusammenfassung von verschiedenen Sendern auf einer Frequenz.
USB-RecordingErmöglicht die Aufnahme und die Wiedergabe von Fernsehsendungen von digitalen Fernseh-programmen (DVB-S, DVB-T und DVB-C). Dies ist vom jeweiligen Programmanbieter abhängig.Die Aufnahme und die Wiedergabe von Sen-dungen können nur mit einem externen Daten-träger (Festplatte oder USB-Stick) durchgeführt werden.
Wi-FiKabellose Übertragung von Internet- / und Intranet-Paketen.
WMAWMA (Windows Media Audio) ist ein von Microsoft entwickelter Komprimierungsstandard für Audiodaten.Diese Formate ermöglichen Aufzeichnung und Wiedergabe von Audiodateien, die so gut wie eine CD klingen, jedoch nur einen Bruchteil des Speicherplatzes belegen.
GLOSSAR-------------------------------------------------------------------------------------------------------------------

Fernseher / Bedienungsanleitung115 / 118 TR
INDEX-----------------------------------------------------------------------------------------------------------------------------
A
Abschaltzeit eingeben.....33Alle analogen Fernsehprogramme einstel-len.....100Alle Anwendungen anzeigen.....57ALLGEMEINE INFORMATIONEN.....7Analoge Fernsehprogramme durch Eingeben der Kanalzahlen einstellen.....101Analoge Fernsehprogramme einstellen.....100Anmeldung am Heimnetzwerk – mit einem LAN-Kabel.....20Anmeldung am Heimnetzwerk – über WLAN – automatisch, mit Eingabe des Netzwerk-Kennwortes.....20Anmeldung am Router für den LAN-Be-trieb.....82Anmeldung am Router für den WLAN-Be-trieb.....84Anschlüsse des Fernsehgerätes.....13Anschlussmöglichkeiten.....75Antenne und Netzkabel anschließen.....10Antworten aufdecken.....38Anzeigemodus wählen.....49Audiodaten.....47Audiodeskription.....61Audiosprache.....32Audiosprache ändern.....60AUF EINEN BLICK.....13Aufnahmedaten im Timermenü ändern.....45Aufnahmedaten im Timermenü löschen.....45Aufnahme einer Sendung aus der Programm-übersicht.....43Aufstellen mit Standfuß.....11AUFSTELLEN UND SICHERHEIT.....5Ausgewählte Titel wiedergeben.....52Ausschalttimer.....65Ausstattung des Fernsehgerätes.....7Automatische Abschaltung.....62Automatische Aktualisierung.....100Automatische Anmeldung.....82Automatische Anmeldung mit Eingabe des Netzwerk-Kennwortes.....86Automatische Anmeldung mit „WPS-PBC“ (Push Button Configuration).....85Automatische Anmeldung mit WPS-PIN-Einga-be.....85
Automatische Einstellung.....69Automatische Lautstärke.....29, 30Automatisches Abschalten des externen Gerä-tes.....73Automatisches Einschalten des Fernsehgerätes aus Stand-by.....73Automatische Vorschau einschalten.....49Automatische Wahl des HDMI-Programmplatzes am Fernsehgerät.....73AV-Programmplätze wählen.....31
B
Batterien in die Fernbedienung einlegen.....12Bedienelemente des Fernseh- gerätes.....14Behindertengerechte Funktionen.....61Beigepacktes Zubehör.....9Betrieb mit Common Interface.....80Betrieb mit DVD-Player, DVD-Recorder, Videore-corder oder Set Top-Box.....77Betrieb mit externen Geräten.....73Betrieb mit Multi Media Server.....53Betrieb über WLAN.....84Bilddaten.....47Bildeinstellungen.....27Bilder drehen.....52Bildformat umschalten.....33Bildmodus wählen.....34Bildschirm mit Liveshare-Verbindung freige-ben.....79Bildsuche vorwärts/rückwärts.....46
C
CA-Module einsetzen.....80
D
Dateiformate für den USB-Betrieb.....47Dateimanager.....49Datenträger sicher entfernen.....41Datum und Uhrzeit einstellen.....69Diaschauintervall.....50DIGI LINK.....73DIGI LINK-Funktionen des Fernsehgerätes.....73Digitalen Medien Server anwählen.....53Digitalen Multikanal-Verstärker/AV-Receiver anschließen.....77Digitalen Programme vom Kabelbetreiber automatisch suchen.....97

116 / 118 TRFernseher / Bedienungsanleitung
INDEX-----------------------------------------------------------------------------------------------------------------------------
Digitalen Programme vom Kabelbetreiber manuell suchen.....98Digitalen Videotext aus-/einschalten.....37Digitale Programme eines Satelliten automatisch aktualisieren.....90Digitale Programme eines Satelliten manuell suchen.....91, 92, 93, 94Digitale Programme empfangen.....8Digitale terrestrische Fernsehprogramme auto-matisch suchen.....98Digitale terrestrische Fernsehprogramme manu-ell suchen.....99
E
Eigene Namen für die AV-Programmplätze vergeben (max. 10 Zeichen).....26Eigene Namen für die Favoritenlisten vergeben (max. 7 Zeichen).....26Eine gewünschte Wiedergabe- passage anwählen.....52Ein gesperrtes Fernsehprogramm ansehen.....68Einschalttimer.....64Einschlaftimer aktivieren.....64Einstellungen beenden.....28, 30Einstellungen für die Anmeldung am Heimnetz-werk.....17Einstellungen für motorisierte Antennen (DiSEqC 1.2).....96Einstellungen für Programme.....17Einstellungen für Untertitel.....50Einstellungen für USB Recording.....41Einstellungen im Menü USB-Einrichtung.....49Einstellungen wiederherstellen.....72Ein- und Ausschalten.....31Elktronische Programmführer.....35Energiesparmodus für den Radio-Betrieb aktivieren.....62, 63Equalizer.....29Erste Schritte mit Smart Inter@ctive TV.....56Erstinstallation.....17Erstinstallation durchführen.....19Erstinstallation – Übersicht.....18Erweiterte Bildeinstellungen.....27Erweiterte Einstellungen.....62Externe Datenmedien auswählen.....41Externe Datenträger anschließen.....40, 48
Externe Datenträger entfernen.....48Externe Datenträger prüfen.....41Externe Geräte anschließen ........76Externe Geräte suchen und aktivieren.....73
F
Favoritenlisten erstellen.....25, 103Fernbedienung – alle Funktionen.....16Fernbedienung – Hauptfunktionen.....15Fernseh-Betrieb – Grundfunktionen.....31Fernseh-Betrien – weitere Funktionen.....33Fernsehgerät am Heimnetzwerk anschließen und anmelden.....81Fernsehgerät auf die Werkseinstellungen zurück-setzen.....72Fernsehgerät aufstellen oder aufhängen.....11Fernsehgerät bei einem „versteckten“ Netzwerk anmelden.....89Fernsehprogramme (DVB-C) einstellen.....22Fernsehprogramme (DVB-S) einstellen.....21Fernsehprogramme sperren.....67Format »4:3«.....33Format »Auto«.....33Formate »16:9« und »14:9«.....33Format »Letterbox«.....33Format »Overscan«.....34Format »Panorama«.....34Formatting the partition.....42Format »Untertitel«.....34
G
Gerätesoftware.....70Gerätesteuerung.....74Gerät in den Bereitschaftsmodus schalten.....74Gerät mit HDMI ARC Funktion anmelden und HDMI ARC einschalten.....77Geschäftslogoanzeige.....62Geteilter Bildschirm.....38SCR System.....8
H
Hauptmenü des WEB Browsers.....59HbbTV aus-/einschalten.....37HbbTV Bedienung.....37HbbTV-Betrieb.....36Helligkeit der Betriebsanzeige ändern oder ausschalten.....62Hinweise für die WLAN-Funktion.....105

Fernseher / Bedienungsanleitung117 / 118 TR
INDEX-----------------------------------------------------------------------------------------------------------------------------
Hinweise zur LCD/LED Technologie.....8Hinweis zur Produktverpackung.....107
I
Im Hauptmenü navigieren.....58Informationen.....110Informationen einblenden.....31Informationen zur Aufnahme und Wiedergabe von Fernsehsendungen.....39Internetanwendungen auswählen.....57
J
Jugendschutzeinstellungen.....66
K
Kanalverlauf zurücksetzen.....72Kapitel einer Datei wählen.....52Klangeffekte wählen.....34
L
LAN-Kabel anschließen.....81LAN-Verbindung zum Heimnetzwerk.....81Lautstärke ändern.....31Lieferumfang.....9Liveshare-Funktion.....79LNB-Einstellungen.....92, 93, 94
M
Magic Fidelity.....29Manuelle Anmeldung.....83, 87Manuelle Einstellung.....69Menü des Dateimanagers.....49Menüsprache ändern.....60Menüsprache wählen.....73Menüs sperren.....66Mögliche Einschränkungen bei dem Betrieb mit externen Datenträger.....39Multifunktionsschalter sperren.....66
N
Name des Fernsehgerätes ändern.....88Netzwerk Installation.....81Netzwerk Interface.....107Normaler Textmodus.....38
P
Partition des externen Datenträgers wäh-len.....41PIN-Code ändern.....67PIN-Code zurückstellen.....68Problemlösung.....108Programmbelegung der analogen Programme ändern.....102Programme aus Listen wählen.....31Programme in der Favoritenliste sortieren.....25Programme in der Programmtabelle lö-schen.....24Programme in der Programmtabelle nach „Krite-rien“ sortieren.....25Programme in der Programmtabelle su-chen.....24Programme löschen.....102Programme von verschiedenen Übertragungsar-ten in der Programmtabelle anzeigen.....24Programme wählen.....31Programmnamen eingeben (maximal 8 Zeichen).....103Programmtabelle anwählen.....23Programmtabelle auswählen.....102Programmtabelle für die digitalen Programme ändern.....23
R
Reihenfolge der Programme in der Programmta-belle ändern.....24Reset-Funktionen.....72
S
Schneller Vorlauf.....52Schriftgröße des Programmführers ändern.....35Seitenstopp.....38Sendung aus dem Archiv auswählen.....46Sendungen aufnehmen.....43Sendungen autorisieren.....66Sendungen für die Aufnahme programmieren ........44Sendungen in der Aufnahmeliste löschen.....46Signalinformationen anzeigen.....104SMART Inter@active TV 3.0 Funktionen.....55SMART Inter@ctive TV 4.0 – Internetanwendun-gen.....56Sofortaufnahme einer Sendung.....43Software aktualisieren (Internet).....70Software aktualisieren (OAD).....70
118 / 118 TRFernseher / Bedienungsanleitung
INDEX-----------------------------------------------------------------------------------------------------------------------------
Software aktualisieren (USB).....70Softwareversion abrufen.....70Spracheinstellungen.....60Stereo/Zweikanalton, Mono.....29
T
Tastatursprache ändern.....60Timerfunktionen.....64, 65Timeshift – Sendungen „anhalten″.....42Titel/Bild schrittweise wählen (SKIP).....52Titel einer Datei wählen.....52Ton aus- und einschalten.....31Toneinstellungen.....29TOP-Text oder FLOF-Text Betrieb.....38
U
Umwelthinweis.....107Unterseiten direkt aufrufen.....38Untertitel.....32Untertitelmodus.....61Untertitelsprache ändern.....60USB-Betrieb.....47USB-Rcording.....39USB-Tastatur und -Maus.....56
V
Videodaten.....47Videotext-Betrieb.....38„Vorlauf-/Nachlaufzeit einstellen“.....44
W
Wartezeit überbrücken.....38Was ist ein Common Interface?.....80Was ist HbbTV.....36Was ist LIVESHARE?.....79WEB Browser.....59WebBrowser Applikation.....59Weitere Programme einstellen.....90Weitere Wiedergabefunktionen.....54Wichtige Hinweise zum Umweltschutz.....8Wiedergabe.....46Wiedergabe – Grundfunktionen.....51Wiedergabe starten.....54Wiedergabe von Video-/ Musik-/ und Bilddaten vom Heimnetz.....53Wiedergabe während einer Aufnahme.....46Wiederhol-Funktionen.....52
Z
Zapp-Funktion.....32Zeichenhöhe vergrößern.....38Zoomfunktion.....33Zubehör verwalten.....71Zugriffskontrolle für CA-Modul und Smart-card.....80Zur Montage an VESA-Halterung vorberei-ten.....11Zurück zu den Standardwerten.....28, 30Zusätzliche Wiedergabe- funktionen.....52