Toon Boom Studio 8.1 User Guide
542
Toon Boom Studio 8.1 User Guide
-
Upload
khangminh22 -
Category
Documents
-
view
0 -
download
0
Transcript of Toon Boom Studio 8.1 User Guide

Toon Boom Studio 8.1User Guide

Toon Boom Studio 8.1 User Guide
2
Legal NoticesToon BoomAnimation Inc.4200 Saint-Laurent, Suite 1020Montreal, Quebec, CanadaH2W 2R2
Tel: +1 514 278 8666Fax: +1 514 278 2666
toonboom.com
Disclaimer
The content of this guide is covered by a specific limited warranty and exclusions and limit of liability under theapplicable License Agreement as supplemented by the special terms and conditions for Adobe®Flash® FileFormat (SWF). For details, refer to the License Agreement and to those special terms and conditions.
The content of this guide is the property of Toon BoomAnimation Inc. and is copyrighted.
Any reproduction in whole or in part is strictly prohibited.
Trademarks
Toon Boom Studio® is a registered trademark, and the Toon Boom logo are trademarks of Toon BoomAnimation Inc.
Credits
Art Development: Shabana Ali, Marie-Eve Chartrand, Tania Gray, Anouk Whissell
Technical Editor: Peter Cawthorne, Pamela Grimaud, Liven Tam
Technical Reviewer: Gabriel Bouchard, Virginie Filion, John Payne, Natalia Solari, Jacques Tremblay
Technical Writer: Shabana Ali, Marie-Eve Chartrand, Christopher Diaz, Annie Rodrigue, Liven Tam, PhoebeWang-Chao, Anouk Whissell
Publication Date
2014-05-06
Copyright © 2014 Toon BoomAnimation Inc. All rights reserved.
PUSG101TBS81EN
Avis LégalToon Boom Animation Inc.4200, boul. St-Laurent, Bureau 1020Montréal, Québec, Canada H2W 2R2
Tél: +1 514 278 8666Fax: +1 514 278 2666
toonboom.com
Avis de non-responsabilité

Toon Boom Studio 8.1 User Guide
3
Toon BoomAnimation Inc. et ses auteurs ont déployé leurs meilleurs efforts pour préparer cemanuel et soncontenu est basé sur la dernière version du logiciel dans la mesure du possible. Certaines parties du textepeuvent provenir d’autres versions du logiciel décrit ici. Toon BoomAnimation Inc. et ses auteurs déclinent toutegarantie e ou tacite d'utilisation ou des résultats de l'utilisation de la documentation en termes d'exactitude, deprécision, de fiabilité ou autre. Toon Boom et ses auteurs ne seront en aucun cas responsables envers vous oudes tiers en cas de dommages indirects, spéciaux, exemplaires, accidentels, dissuasifs, de couverture ouaccessoires (y compris, et sans s'y limiter, les dommages pour inaptitude à utiliser l'équipement ou accéder auxdonnées, perte d'exploitation, perte de profits, interruption de l'activité et tout autre dommage, direct ouindirect), liés à l'utilisation ou à l'impossibilité d'utilisation de la documentation, même si Toon Boom ou sesreprésentants ont été prévenus de la possibilité de tels dommages.
L’information dans cemanuel est sujette à changement sans préavis. Le contenu de cemanuel est couvert par lesclauses deGarantie limitée et limitation de responsabilité et de Conditions d'utilisation spéciales pour le formatde fichier de Flash d’Adobe (SWF) incluses dans le Contrat de Licence Utilisateur. Veuillez vous référer au Contratde Licence Utilisateur et à ces clauses particulières pour plus de détails.
Le contenu de cemanuel est la propriété de Toon BoomAnimation Inc. and est protégé de droits. Le présentmanuel ne doit faire l'objet d'aucune copie, photocopie, reproduction, traduction ou conversion sous quelqueforme que ce soit, électronique ou lisible par machine, sans le consentement écrit de Toon BoomAnimation Inc.
Pour des copies additionnelles, veuillez communiquer avec Toon BoomAnimation Inc.
Marques déposée
Remerciements
Art Development: Shabana Ali, Marie-Eve Chartrand, Tania Gray, Anouk Whissell
Technical Editor: Peter Cawthorne, Pamela Grimaud, Liven Tam
Technical Reviewer: Gabriel Bouchard, Virginie Filion, John Payne, Natalia Solari, Jacques Tremblay
Technical Writer: Shabana Ali, Marie-Eve Chartrand, Christopher Diaz, Annie Rodrigue, Liven Tam, PhoebeWang-Chao, Anouk Whissell
Date de parution: 2014-05-06
Copyright © 2014 Toon BoomAnimation Inc. All rights reserved.
PUSG101TBS81EN

Toon Boom Studio 8.1 User Guide Contents
4
ContentsToon Boom Studio 8.1 User Guide 1
Legal Notices 2
Avis Légal 2
Contents 4
Chapter 1: Introduction 23
Animation Techniques in a Nutshell 24
Resources 28
Documentation 28
Online Resources 28
Workout Series 28
Video Lessons 29
Tutorials 29
Tips and Tricks 29
Templates 29
Registered Members 30
Get Help and Hone Your Skills! 30
Knowledge Base 30
User Forum 30
Animation Glossary 30
Chapter 2: Starting Your Project 31
Starting Toon Boom Studio 32
Welcome Screen 33
Creating and Opening a Project 34
What are Frame Rates and Formats? 34
Creating and Opening Projects from the Welcome Screen 34
Creating a New Project from the Welcome Screen 35
Opening a Project from the Welcome Screen 36
Creating and Opening a Project from the File Menu 36
Creating a New Project from the File Menu 37
Opening a Project from the File Menu 37
Opening a Project File from Another Toon Boom Product 37
Changing the Project Format 38
Organizing Your Work 39
Naming Your Files 39

Toon Boom Studio 8.1 User Guide
5
Saving Files and Structuring a Project 39
User Interface Language 41
Windows 41
Mac OS X 41
Adding Template Copyright and User Name Information 42
Setting the Location of Global Library 43
Some Basic Animation Concepts 44
Bitmap and Vector Graphics 44
Bitmap Image Types 44
Vector Image Types 44
Advantages and Disadvantages of Bitmap and Vector Images 45
Palettes 45
Advantages of Using a Colour Palette 45
Exposure Sheet and Timeline 46
Exposure Sheet 46
Timeline 47
Exposure Sheet and Timeline Usage 47
Pegs 48
Multiplane Camera 48
Multiplane Usage 49
Planning Your Project 50
What is a Scene? 50
Planning Your Scenes 50
Help Tools 51
Toon Boom Studio 8.1 Getting Started Guide 51
Toon Boom Studio 8.1 Online Help 51
Context Sensitive Help 51
Preferences 52
Preference Highlights 52
Accessing the Preferences Panel 53
Display 53
Renderer 53
Rendering Options 54
Tablet Support 54
Chapter 3: Discovering the Interface 55
Interface Components 56

Toon Boom Studio 8.1 User Guide Contents
6
Menus 56
TopMenu 56
Quick Access Menu 56
Toolbars 57
Views 58
Interface Highlights 60
Camera View 60
View Navigation Toolbar 61
Switch View Toolbar 61
Timeline View 62
Timeline View Toolbar 62
Drawing Tools Toolbar 63
Animation Tools Toolbar 63
Interactive Playback Toolbar and Play Menu 64
Interactive Playback Toolbar 64
Play Menu 64
Managing Views 66
Adding a New View 66
Closing a View 67
Undocking and DockingWindows and Views 67
Undocking 68
Docking 69
Moving the FloatingWindow Around the Desktop 70
Swapping Views 70
Resizing a View 71
Showing and Hiding the Status Bar 71
Extending the Side Panel 72
Managing Toolbars 73
Showing or Hiding Toolbars 73
Moving Toolbars on Windows 73
Customizing Toolbars on Mac OS X 73
Workspaces 75
Loading a Workspace 75
Creating a Workspace 75
Renaming a Workspace 76
Saving a Workspace 76

Toon Boom Studio 8.1 User Guide
7
Deleting a Workspace 76
Restoring the Default Workspaces 76
Interface Navigation 77
Preferences 78
Interface Preferences 78
Element Colours 78
Window Background Colours 78
Show All Tips Again 78
Keyboard Shortcuts 79
Chapter 4: Drawing and Design 81
Drawing Basics 82
Drawing in the Drawing or Camera View 83
Drawing View 83
Camera View 83
Drawing Using the Brush or Pencil Tool 85
Brush Tool 85
Pencil Tool 85
Converting Lines 86
Convert Lines to Brush 86
Extract Centre Line - Converting a Brush Shape to a Pencil line 86
Relative Sizes of Characters and Props 88
Sketching 90
Tracing 92
Erasing Part of a Drawing 95
Selecting Drawing Objects 96
Repositioning a Pivot Point 97
Pen View 99
Setting Up the Brush and Eraser Tools 99
Eraser and Brush Styles 100
Setting Up the Pencil Tool 100
Setting Up the Shape Tools and Polyline Tool 101
Changing the Thickness of a Centreline Object 101
Managing Pen Styles 102
Adding a Pen Style 102
Editing a Pen Style 102
Removing a Pen Style 103

Toon Boom Studio 8.1 User Guide Contents
8
Drawing Invisible Lines 104
WorkingWith Text 106
Creating Text 106
Formatting the Text 107
Converting Text into Separate Objects 107
More Drawing Tools 109
Shape Tools 109
Polyline Tool 110
Contour Editor Tool 111
Snap to Contour 113
Perspective Tool 113
Cutter Tool 114
Scissor Tool 115
More Drawing Options 117
Group and Ungroup 117
Smooth 118
Flatten and Optimize 118
Flatten 119
Optimize 119
Transform 120
Arrange 121
Show Current Drawing on Top 121
Preferences 123
Window Background Colours 123
Light Table 124
Chapter 5: Adding Colours 125
How to Paint 126
Colours 127
Adding a Colour Swatch 127
Solid Colour Swatch 128
Gradient Colour Swatch 134
Bitmap Texture Swatch 138
Deleting a Colour Swatch 140
Colour Display Modes 141
Using the Painting Tools 142
Painting with the Paint Tool 142

Toon Boom Studio 8.1 User Guide
9
Painting with the Paint Unpainted Tool 143
Unpainting Areas with the Unpaint Tool 144
Closing Gaps 145
What is a Gap? 145
Closing Holes with the Close Gap Tool 145
Closing Holes Using Automatic Close Gap 146
Selecting a Colour in a Drawing 148
Editing Gradients and Textures 149
Setting a Gradient or Texture with the Paint Tool 149
Setting a Gradient or Texture with the Edit Texture Tool 150
Palettes 152
Creating a Colour Palette 153
Renaming a Colour Palette 153
Deleting a Colour Palette 154
Duplicating a Colour Palette 155
Creating a Palette Style 156
Assigning a Style 157
Deleting a Style 157
Mixing the Colours 157
Exporting a Colour Palette 159
Importing a Colour Palette 159
Chapter 6: Importing Artwork 161
Importing Bitmap Images 162
Importing Bitmaps Without Vectorizing 162
Adding Images to a Bitmap Layer 163
Vectorization of an Image Element or Image Cell 164
Importing and Vectorizing Images 165
Import Images with Keying 168
Importing Multilayered PSD Files 172
Importing AI and PDF files 174
Importing from Adobe Flash 176
Importing a Movie 177
Importing a BitmapMovie File 177
Importing a Movie in an Existing Image Layer 178
Capture 179
Scanning Images 180

Toon Boom Studio 8.1 User Guide Contents
10
Library 182
Understanding the Library Concept 182
What is a Library? 182
What is a Template? 182
Library View 183
Preview 183
Library List 184
Template List 184
Structuring the Library 184
Creating a Library 185
Opening and Closing a Library 186
Creating a Catalog 186
Renaming a Catalog 187
Deleting a Catalog 187
Refreshing the Library 187
Reloading Default Templates 187
Saving the Library 187
Templates 187
Creating a Template 188
Deleting a Template 189
Editing a Template 189
Template Properties 191
Importing Multimedia files into the Library view 192
Importing a Template in Your Scene 192
Linking Templates to Media Elements 193
Copying Selected Template Contents into Your Animation 193
Using Paste Special to Update Content from a Template 194
Chapter 7: Layers and Timing 197
Understanding the Timeline and Exposure Sheet Views 198
Timeline View 198
Timeline View Toolbar 198
Layer Section 199
Timing Section 200
Exposure Sheet View 200
Main Section 201
Element List Section 201

Toon Boom Studio 8.1 User Guide
11
Exposure Sheet Toolbar 202
Column Header 202
Drawing 202
Frame Numbers 202
Layers and Columns 204
Layer Concepts 204
Layer Types 205
Drawing Element 205
Image Element 205
Camera Element 205
Effect Element 205
Peg Element 206
Sound Element 206
Annotation Element 206
Media Element 207
Adding New Elements 207
Adding Layers in the Timeline View 207
Adding an Element from the TopMenu 208
Adding New Columns in the Exposure Sheet View 208
Deleting Elements 208
Deleting a Layer from the Timeline View 208
Deleting Columns from the Exposure Sheet View 209
Modifying Elements 209
Ordering Elements 209
Show and Hide Elements 210
Renaming an Element 212
Exposure Sheet Thumbnails 213
Changing the Colour of a Column or Layer 213
Expanding and Collapsing Layers 215
Modifying the Column Width 215
Filling Exposure 217
Typing Exposure 217
Extending Exposure 218
Dragging Cells 219
Increasing and Decreasing Exposure 220
Add Exposure 220

Toon Boom Studio 8.1 User Guide Contents
12
Remove Exposure 221
Deleting Exposure 222
Inserting Blank Cells 222
Setting the Exposure 223
Filling a Selection with a Sequence 224
Creating Cycles 225
Navigating Between Frames and Columns 228
Managing Drawings 230
Renaming a Drawing 230
Duplicating a Drawing 230
Copying and Pasting Drawings 231
Preferences 232
Time Measurement 232
Chapter 8: Traditional Digital Animation 233
Traditional Animation Tools 234
Onion Skin 234
Auto Light Table 235
Static Light Table 236
Reposition All Drawings 238
Lock Drawing 239
Clear Drawing 240
Animating Traditionally 241
Animating 241
Cleaning Up 243
Power Painting 245
Setting the Timing 246
Playing Back Your Animation 246
Rotoscoping 247
What is Rotoscoping? 247
Reasons for Rotoscoping 247
Selecting a Video 248
Importing a Video 248
Tracing the Character 249
Tracing 249
Fine Tuning the Animation 250
Painting the Animation 251

Toon Boom Studio 8.1 User Guide
13
Marking Corrections and Notes 252
Annotation Elements 252
Working with Notes 253
Layer Notes 253
Cell Notes 253
Preferences 255
Onion Skin 255
Static Light Table 255
Chapter 9: Creating a Cut-out Puppet 257
About Building a Cut-out Puppet 258
Choosing Your Character 259
Creating a New Project and Importing a Character 259
Creating a Colour Palette 260
Cutting the Character into Pieces 261
How to Cut the Pieces 261
Cutting Out Your Pieces 262
Drawing your Pieces 264
Attaching the Pieces 267
Ordering Your Layers 268
Attaching the Layers 269
Ordering Parented Layers 269
Adding a Master Peg 271
Setting the Pivots 273
Storing the Character in the Library 276
Chapter 10: Setting the Scene 277
Importing the Scene Elements 278
Background, Sound or Movie 278
Show Scene Background Colour 278
Templates 278
Ordering the Element Layers 279
Ordering Layers in the Timeline View 279
Ordering Layers Using the Arrange Command 280
Ordering Layer Types 280
Positioning the Scene Elements 281
Positioning Elements Using the Select Tool 281
Positioning Elements Using the Properties View 281

Toon Boom Studio 8.1 User Guide Contents
14
Flipping Elements 282
Show Outline Selection 283
Locking Elements 283
Locking and Unlocking a Layer 283
Locking and Unlocking All Layers 284
Locking All Other Layers 284
Cloning and Duplicating Elements 285
Cloning Layers 285
Duplicating Layers 286
Setting the Camera Frame 288
Adding a Camera Layer 288
Choosing the Active Camera Layer 289
Setting the Camera Frame Position 290
Setting the Frame Using the Select Tool 290
Setting the Frame Using the Properties View 291
Creating a Multiplane 293
Distributing the Elements on the Z-axis 293
Top and Side Views 294
Camera View 296
Properties View 296
Chapter 11: Creating Motion Paths 299
Animating Objects on a Layer 300
Instant Motion 301
Instant Motion Properties 303
Orienting Animation on a Path 303
Pegs 305
Adding a Peg 305
Adding a Parent Peg 305
Parenting Elements to a Peg 306
Expanding and Collapsing Layers 307
Peg Only Mode 307
Peg Toolbar 308
Motion Path 310
Creating a Basic Motion Path 310
Displaying and Hiding a Motion Path 312
Adding and Controlling Motion Points 312

Toon Boom Studio 8.1 User Guide
15
Switching between Keyframes and Control Points 315
Adjusting the Tension, Bias and Continuity 316
Previous and Next Control Point 317
Orient to Path 318
Constant Z 319
Snap Last Keyframe 319
Animating the Camera 320
Adding a Peg to Your Camera 320
Making a Basic Camera Move 320
Function Editor View 322
Function Editor View - Overview 322
Adjusting the Velocity 323
Adding and Deleting Motion Points in the Function Editor View 325
Adding Motion Points 326
Delete Motion Points 327
Changing the Values of a Motion Point 327
Other Options 330
Attach to Next Object 330
Detach from Parent 330
Changing the Start Frame 331
Changing the Duration 331
Change Loops 332
Element Notes 333
Show Timeline Selection 334
Paste Special 335
Paste Special Again 337
Preferences 338
Sceneplanning Preferences 338
Motion Points 338
Coordinate Units 338
Show Units 339
Coordinate Units 339
Camera View 339
Use Box Highlighting 339
Selection Always Visible 340
Pegs 340

Toon Boom Studio 8.1 User Guide Contents
16
Create Linear Spline 340
Create Constant Keyframes 340
Timeline 341
Single Cell Selection 341
Chapter 12: Bones 343
About the Skeleton Effect 344
Bone Tools Toolbar 345
Setup Mode 345
Animation Mode 347
Choosing Your Character 349
Planning and Preparing Your Character 350
Adding the Skeleton 352
Robo-Skeleton Templates 352
Choosing Your Robo-Skeleton Template from the Library 352
Importing Your Robo-Skeleton into a Scene 355
Adding Your Own Character to the Robo-Skeleton Template 355
Building the Skeleton 361
Adding Bones 361
Adding Bones from the Timeline View 364
Setting Up the Bones 366
Resetting the Position of a Bone 369
Setting the Influence Area 369
Influence Area 370
Infinite 371
Elliptical 371
Modifying the Size and Shape of the Influence Area 371
Parenting Bone Chains 373
Unparenting Bone Chains 375
Animating the Skeleton 376
Reassembling the Character 376
Ordering Limbs 378
Character with Limbs on Different Drawing Layers 378
Character on a Single Drawing Layer 379
Hiding Bones 379
Animating Bones 380
Onion Skin Toolbar 383

Toon Boom Studio 8.1 User Guide
17
Natural Movement 383
Blocking the Body's Position 385
Deleting Keyframes 386
Removing All Keyframes 386
Adjusting the Velocity and Functions 387
Disabling a Bone Animation 388
Skeleton Effect Properties 389
Preferences 392
Chapter 13: Animating a Puppet 395
Getting the Character From the Library 396
Extending the Exposure 397
Extending the Exposure of a Peg's Children Layers 397
Understanding Keyframes and Drawings 399
Keyframes and Drawing Blocks 399
Creating a Simple Cut-out Animation 400
Animating the Parts 400
Blocking the Body's Position 401
Deleting Keyframes 402
Copying and Pasting Keyframes 402
Constant and Non-Constant Segments 403
Non-Constant Segment 403
Constant Segment 404
Navigating Inside a Hierarchy 404
Selecting a Parent or Child Element 405
Selecting Brother Elements 406
Using the Different Animation Tools 407
Using the Transform Tool 407
Using the Motion Tool 408
Using the Rotate Tool 408
Using the Skew Tool 409
Using the Scale Tool 410
Using the Select Tool 411
Adjusting the Velocity 411
Using the Onion Skin in Cut-out Animation 415
Swapping Images 416
Preferences 418

Toon Boom Studio 8.1 User Guide Contents
18
Sceneplanning Tab Preferences 418
Create Linear Spline 418
Create Constant Keyframes 418
Chapter 14: Sound and Lip-sync 421
Accessing the Sound and Lip-sync Tools 422
Sound Toolbar 423
Sound Layer Properties 423
Importing a Sound File 424
Sound Display 425
Sound Display - Exposure Sheet View 425
Sound Name 425
Waveform 425
Lip-sync Mouth Shapes - Name 426
Lip-sync Mouth - Thumbnails 426
Sound Display - Timeline View 426
Sound Playback 428
Playing the Sound and Animation 428
Playing Only the Sound 428
Sound Scrubbing in the Timeline View 429
Editing a Sound File 430
Sound Element Editor 430
Changing the Start or End Frame of a Sound 431
Trimming a Sound File 433
Looping a Sound 434
Mixing the Sound Volume 435
Custom Playback Range 437
Changing from Event to Streamed Sounds 437
Sound Scrubbing in the Sound Element Editor 439
Deleting a Sound 439
Adding an Empty Sound Layer 441
Lip-sync 442
Lip-sync View 444
Creating a Lip-sync Using a Mouth Template 444
Creating a Lip-Sync Using Your Own Drawings 446
Lip-sync Detection 447
Automatic Lip-sync Detection 448

Toon Boom Studio 8.1 User Guide
19
Modifying the Lip-sync Detection 449
Modifying the Lip-sync in the Exposure Sheet View 449
Modifying the Lip-sync in the Sound Element Editor 449
Recomputing the Mouth Chart 450
Chapter 15: Stop-motion Animation 451
Characters and Stage 452
Gathering Your Characters 452
Setting Up Your Background 452
Image Capture Settings 454
Setting Up the Image Capture Options 454
Light Table and Onion Skin 455
Capture Features 457
Auto Capture 457
Preview Window 457
Colour Keying 458
Image Capture 460
Capturing Images in an Existing Layer 462
Vectorization and Clean-up 463
Chapter 16: Enhancing with Effects 465
Special Effects 466
Previewing Effects 466
Blur Effect 470
Colour Transform Effect 473
Feather Edge Effect 477
Drop Shadow Effect 480
Clipping Effect 484
Shake Effect 489
Blockbuster and Forces of Nature Effects 492
Forces of Nature Effects 492
Rain Effect 494
Snow Effect 495
Hail Effect 496
Fog Effect 496
Cloud Effect 497
Volcano Effect 498
Blockbuster Effects 499

Toon Boom Studio 8.1 User Guide Contents
20
Shatter Effects 500
Magic Effects 502
Explosion Effects 503
Splash Effects 503
Fire Effects 504
Celestial Effects 505
Customizing Your Effect 505
Effects 506
General Properties Buttons 506
Static Parameters Tab 507
Dynamic Parameters Tab 508
Disabling All Effects 510
Chapter 17: Scenes and Transitions 511
Working with Scenes and Transitions 512
About the Storyline View 513
Playing a Sequence 513
Working with Scenes 514
Applying Transitions 517
Transitions 518
Fade 518
Wipe 519
Slide 519
Clock Wipe 520
Checker 520
Cross Dissolve 520
Chapter 18: Exporting Your Project 523
Export Drawing to PDF 524
Export Movie 525
Export Snapshot 527
Export to YouTube and Facebook 528
Exporting to YouTube 528
Exporting to Facebook 530
Print 533
Chapter 19: Keyboard Shortcuts for Toon Boom Studio 537
COMMAND 537
EDIT MENU 538

Toon Boom Studio 8.1 User Guide
21
FILE MENU 538
HELP MENU 538
LIBRARY MENU 539
PLAY MENU 539
TOOLS MENU 539
VIEW MENU 540
WINDOWS MENU 541

Toon Boom Studio 8.1 User Guide
22

Toon Boom Studio 8.1 User Guide
23
Chapter 1: IntroductionToon Boom Studio 8.1 is a multi-technique, vector-based software that is suitable for all your animation projects,be they clean and classic or futuristic and cutting-edge. It possesses leading edge features based on industryproven technology, making it themost dynamic and exciting software on themarket. Further, between the step-by-step instruction contained in this guide, the software's user-friendly interface and a handful of helpful onlineresources, you'll find that Studio is also ideal for simply learning how to animate.
Studio allows you to produce at least six different styles of animation:
• Traditional Animation
• Traditional Digital Animation, also known as Tradigital Animation
• Cut-out Animation
• Bone Animation
• Stop-motion Animation
• Rotoscoping
The following chapters will give a greater insight into how Studio works and what you can do to produce somegreat animation:
• Starting Your Project on page 31
• Discovering the Interface on page 55
• Drawing and Design on page 81
• Adding Colours on page 125
• Importing Artwork on page 161
• Layers and Timing on page 197
• Traditional Digital Animation on page 233
• Setting the Scene on page 277
• CreatingMotion Paths on page 299
• Creating a Cut-out Puppet on page 257
• Bones on page 343
• Animating a Puppet on page 395
• Sound and Lip-sync on page 421
• Stop-motion Animation on page 451
• Enhancing with Effects on page 465
• Scenes and Transitions on page 511
• Exporting Your Project on page 523
• Keyboard Shortcuts for Toon Boom Studio on page 537

Chapter 1: Introduction
24
Animation Techniques in a NutshellWith Studio you can still animate traditionally in much the way animators have done for decades by simplyputting pen to paper. Traditional animationmethods can be used with Studio, from drawing your roughanimation (the underlying structure of your animation), to cleaning it up, tracing solid and clean lines over therough to achieve closed zones, and last, but not least, inking it.
For example, to animate a walk-cycle, you will begin with the torso movements and the legs. The head, arms andclothes are added later, during the secondary phase.
You can also work in a traditional fashion, but animate digitally. Traditional digital animation, also known ashand-drawn or tradigital animation, is the process of drawing every frame of an animation directly in Studiowithout the use of paper or scanner.
With Studio's extensive set of tools, you can create animated puppets from your drawings or photographs. Thistechnique is known as cut-out animation because of the way youmove cut-out pieces around instead of drawing.

Toon Boom Studio 8.1 User Guide
25
The Studio cut-out puppet principle is very similar to cutting up a character drawn on a sheet of paper andassembling the pieces using little brass fasteners. You create a drawing for each of your character's body partsand then attach them in the Timeline view. Next, you can articulate the character and animate it by giving it aslightly different pose on each frame.
Studio has stop-motion animation capabilities, and its intuitive and easy to use image capture window allows youto set up and capture all your images. Stop-motion animation has been around since animators first realized thatall it took to produce the illusion of motion was to nudge a clay figure, puppet or object and then capture it in aseries of snapshots. In this digital age, the process has only become simpler and more fun, as it is now possibleto mix stop-motion animation with numerous other animation techniques. It is as easy as plugging in yourrecording device, be it a digital camera, video camera or webcam, followed by adjusting the focus in thesoftware, keying out the background and taking the snapshots. In short: endless possibilities.

Chapter 1: Introduction
26
Studio also has rotoscoping capabilities for experimenting with or producing realistic movement in yourcharacters.
This technique requires the animator to trace over each frame of a live-actionmovie, a process that results insome very realistic movement. This rotoscoping technique was invented by the animation pioneer Max Fleischerin 1915 and involved projecting a movie frame-by-frame onto a optically correct glass surface. The animatorwould then trace over the character projected on the glass to produce a cel. The equipment used in this processis called a rotoscope, an ingenious invention that has now been replaced by the computer. Studio's rotoscopingcapabilities allows you to import a video clip and trace over it directly in the software.
Mastering the fundamentals of animation is not only important in and of itself, it also affords you the necessaryfoundation fromwhich you can grow to master both the nuances and ever-evolving techniques of this dynamicart form. This is the beauty of Studio; within it are the tools required to create, experiment with and finallymaster your technique, along with some exciting bells and whistles. Nothing beats seeing your first animatedcharacter spring to life, even if it lasts but a few seconds. But there are also thrills to be had in taking thingsfurther; applying sophisticated colour-schemes to your scene or overall project, for example, or by incorporatingsound effects and dialogue into your narrative. With the introduction of its new and improved Bone tools,ToonBoom has expanded upon, yet simplified, the unlimited options inherent in an animated character. Unlimitedoptions leading to endless story possibilities, that's it!

Toon Boom Studio 8.1 User Guide
27
Toon Boom has also taken the ability to enhance your work to a whole new level by introducing effects based onHollywood blockbuster effects and the natural world, from volcanic eruptions, to earth quakes, rain showers,hail, snow and fog. Blurring the edges of a candle can add a little extra atmosphere to a dimly-lit room, whilecasting a very long shadow may serve to add a note of realism or mood to an outdoor encounter. The sky is thelimit!

Chapter 1: Introduction Resources
28
ResourcesToon Boom Studio has a wide variety of resources available.
• Documentation below
• Online Resources below
• RegisteredMembers on page 30
• Get Help and Hone Your Skills! on page 30
DocumentationIn addition to theOnline Help available at docs.toonboom.com, there are other useful documents at yourdisposal. Learn how to get themost out of Studio with our easy-to-use documentation package:
• Getting StartedGuide
In Studio, select Help > Getting Started to open this quick Toon Boom Studio overview.
• Tooltips
To view a short description of a menu command or toolbar button, known as a tooltip, simply hover overa button with your mouse.
• Context-Sensitive Help
To view a brief, but somewhat more detailed description of a menu command or toolbar button, selectHelp >What's This and then click on the item. A pop-up window opens, displaying pertinent informationregarding the item you clicked on.
Online ResourcesToon Boom's Resources tools, available at www.toonboom.com/resources, will help you to broaden yourStudio and general animating skills. Choose from basic to advanced tools to take your animation know-how tothe next level. You can also open the Resources page from Studio:
Select Help > Toon Boom on the Web to open the Toon Boomwebsite in your default web browser. SelectHome Users > Studio > Resources.
Workout Series
The Toon BoomAnimationWorkout Series is a dedicated program of exercises designed to help you developthe skills and techniques necessary to get themost out of Studio. Sharpen your skills while raising yourendorphins!

Toon Boom Studio 8.1 User Guide
29
Video Lessons
Studio Training Videos are the perfect way to gain first-hand instruction on how to use the software.
Tutorials
Video and print tutorials will get you started and introduce you to the application one step at a time.
Tips and Tricks
From bitmaps to going bananas (with rotoscoping), frommodel sheets to motion points, visit the Tips andTricks resource section on the Toon Boomwebsite for nifty pointers on how to get themost - and themost fun -from your animation projects.
Templates
Use the ready-made templates to create an animation quickly and easily, while learning how to draw and animatein the cut-out style!
A wide variety of character and prop collections are available in our online store.

Chapter 1: Introduction Resources
30
Registered MembersRemember to register Toon Boom Studio. Register now and become a member of the Toon Boom community!
As a registered member you can:
• Easily recover your activation key 24/7.
• Reinstall your product anytime, anywhere.
• Get info on software updates and upgrades.
• Subscribe to exclusive announcements.
Get Help and Hone Your Skills!
Knowledge BaseFind answers to your Studio questions in the Knowledge Base, located on our website at:
• beta.toonboom.com/knowledge-base
User ForumRegistered Studio members can access and post questions, queries and comments on the User Forum. Shareyour thoughts and learn what others in the Toon Boom community are up to, or simply view the Forum contentas a guest.
• forums.toonboom.com/toon-boom-studio
Animation GlossaryA comprehensive glossary of terms is available on the Toon Boomwebsite. Access it through the KnowledgeBase at:
• beta.toonboom.com/glossary

Toon Boom Studio 8.1 User Guide
31
Chapter 2: Starting Your ProjectToon Boom Studio is a great tool for learning animation; it is both easy to use and powerful—just what you needwhen you are starting out! Using Studio, you can easily create a project and see it through to the finished output.
In this chapter, you will learn the following:
• Starting Toon Boom Studio on the next page
• Welcome Screen on page 33
• Creating and Opening a Project on page 34
• Changing the Project Format on page 38
• Organizing Your Work on page 39
• Adding Template Copyright and User Name Information on page 42
• Setting the Location of Global Library on page 43
• Some Basic Animation Concepts on page 44
• Planning Your Project on page 50
• Help Tools on page 51
• Preferences on page 52

Chapter 2: Starting Your Project Starting Toon Boom Studio
32
Starting Toon Boom StudioTo use Toon Boom Studio, you have to start the application. Remember, you can use Studio onMacOS X orWindows operating systems.
To start Toon Boom Studio, do one of the following:
‣ MacOS X: Double-click the Toon Boom Studio 8.1 icon or select Applications > Toon Boom
Studio 8.1.
‣ Windows: Double-click the Toon Boom Studio 8.1 icon or select Start > Programs / All Programs
> Toon Boom Animation > Toon Boom Studio 8.1 > Toon Boom Studio 8.1.
Toon Boom Studio opens, displaying theWelcome Screen.

Toon Boom Studio 8.1 User Guide
33
Welcome ScreenWhen Toon Boom Studio starts, theWelcome Screen appears. This screen is also accessible once you are insidea project. To display theWelcome Screen fromwithin the application, youmust close the current project byselecting File > Close. This command closes the scene which is currently open.
TheWelcome Screen allows you to:
• Create new projects
• Select the format, frame rate and camera size of your project
• Access the Getting Started Guide
• Work on a sample project
• View your Toon Boom Studio account
• Access the Learn Toon Boom Studio area
• View the Showcase and User Stories area
• Access Support

Chapter 2: Starting Your Project Creating and Opening a Project
34
Creating and Opening a ProjectAs you start your project in Toon Boom Studio, you need to understand the format and the frame rate you willuse.
• What are Frame Rates and Formats? below
• Creating a New Project from theWelcome Screen on the facing page
• Creating a New Project from the FileMenu on page 37
• Opening a Project File fromAnother Toon Boom Product on page 37
What are Frame Rates and Formats?When you create an animation, the images you animatemust move fluidly to produce the correct effect. If theydon't, you will have a jumpy animation which won't look good. To get a fluid movement between the drawingsyou need several images per second. You need a minimum of 12 images per second, any slower than that and theanimation becomes jumpy. An image can also be called a frame, therefore the frame rate is the number of framesyou play per second in your animation.
The format of your project is the size of your camera frame in pixels. Youmay not be familiar with the term pixel,but you have probably seen it when youmagnify a digital photograph. A pixel is the smallest element of an imagedisplayed on a monitor or TV screen. Pixel, short for Picture Element, is a single point in a graphic image. It is asmall sample of an image, a dot, a square or a very small sectionmade out of smooth filtering. If you zoom inclose enough on a digital image, you will see the pixels; they look like small squares of different colours andintensity.
Depending on the type of project you want to do, you will need a different image size. For example, if you wantto put your project on the web, you will probably export your movie as a small size so that it is light to play backonce it is on the web. The larger the images are, the heavier the project is, but also, the better the quality. If youwant to export your project for the theatre, you will need to create your project using a large format so theimage is of a high quality and looks good on the big screen.
Also, some displaymedia such as iPod, TV or theatre have an exact format requirement. For example, one TVformat that has been a standard for the past decades is a 4:3 size ratio, meaning that the width of your scene hasto be an equivalent of 4 units compared to 3 units for the height.
In recent years, a new TV standard has been defined with the advent of Blu-ray and high-definition technologies.It is the 16:9 format, which is often referred to as HDTV (High Definition Television). Themost common 16:9format in pixel is 1920x1080.
You can find most of the formats in the presets list provided in theWelcome Screen.
To recap, the format is the size of your camera frame in pixels, and it matches the width and height required forthemedium in which you want to show your final movie.
Creating and Opening Projects from the WelcomeScreenUsing theWelcome Screen, you can create new projects and open existing ones.
This section is divided as follows:
• Creating a New Project from theWelcome Screen on the facing page

Toon Boom Studio 8.1 User Guide
35
• Opening a Project from theWelcome Screen on the next page
Creating a New Project from the Welcome ScreenTo create a project from the Welcome Screen:
1. In the Name field, type a name for your new project. Make sure to give it a namewhich easily identifies theproject, such as JumpingFrog. That way, when you have several projects, you can locate specific onesmore easily.
2. In the Format list, select the format in which you want to produce your project.
You can choose from a wide variety of presets such as Web, iPod and DV. By default, the option selectedis Most Recent. This means that it will use the last setting you chose when creating your last project.
When you create a project for the first time, it will use the settings marked in the Frame Rate and CameraSize field. By selecting any of the presets, the Frame Rate and Camera Size fields will be automaticallypopulated with the corresponding values.
3. If you prefer to use your own settings, you can type the Frame Rate and the Camera Size directly in thefields.
4. Once the information is in place, click Create to make your project.
The new project opens.
Now that you have created a new project, the next step is to save it to the correct location.
It is a good idea to follow a structure when saving your work, so that your files are not scattered all over yourcomputer.
Refer to the Organizing Your Work on page 39 topic to learn more about structuring your files.
To save your project for the first time:
1. Select File > Save As or press [Ctrl] + [Shift] + [S] (Windows) or [⌘ ] + [Shift] + [S] (MacOS X).
The Save As dialog box opens.

Chapter 2: Starting Your Project Creating and Opening a Project
36
2. In the Save As window, browse to the location where you want to save your project. If needed, rename itin the File Name field. Remember to give the project a name you can identify easily.
3. Click on the Save button to complete the operation.
Opening a Project from the Welcome ScreenWhen you already have a project youmay find that you want to reopen it to work on it somemore or to makesome adjustments. You can do that by using theWelcome Screen.
To open a project from the Welcome screen:
1. In theOpen Recent section, click on the Browse option.
TheOpenwindow displays.
2. Browse and select the file for the project you want to open.
‣ *.tbp (Toon Boom Project) (Windows)
OR
‣ *.tbpd (Toon Boom Studio Document) (MacOS X)
This is why it is important to give each project a name you can identify. If you have several projectscalled project1.tbp, project2.tbp and project3.tbp, it would be difficult to rememberwhat was in each.
3. Click Open.
If your project is already open and youwant to work on a specific scene in that project, you can also do that fromtheWelcome screen.
To open a recent project from the Welcome screen:
1. In theOpen Recent section, select a project from the list.
Creating and Opening a Project from the File MenuIf a project is already open and youwant to create a new one, you can use the File menu.
This section is divided as follows:
• Creating a New Project from the FileMenu on the facing page
• Opening a Project from the FileMenu on the facing page

Toon Boom Studio 8.1 User Guide
37
Creating a New Project from the File MenuTo create a project from the File menu:
1. Do one of the following:
‣ Select File > New.
‣ In theMain toolbar (Top toolbar onMacOS X), click the New button.
‣ Press [Ctrl] + [N] (Windows) or [⌘ ] + [N] (MacOS X).
A new project is created from the currently open project's settings.
Opening a Project from the File MenuTo open a project from the File menu:
1. Do one of the following:
‣ Select File > Open.
‣ In theMain toolbar(Top toolbar onMacOS X), click theOpen button.
‣ Press [Ctrl] + [O] (Windows) or [⌘ ] + [O] (MacOS X)
TheOpen Project browser opens.
2. Browse and select the *.tbp or *.tbpd file you want to open.
3. Click Open.
To open a recent project from the File menu:
1. Select File > Open Recent.
2. In theOpen Recent list, select the project you want to open.
3. Click the project name to open the project.
‣ Select theClear Menu command to remove all projects from theOpen Recent list.
Opening a Project File from Another Toon BoomProductIt is possible to open a Flip Boom (*.fbp / *.fbpd) (Flip Boom Classic, Flip BoomCartoon, Flip BoomDoodle), Flip BoomAll-Star (*.fba), Comic Boom (*.cbp,*.cbpd), Garfield's Comic Boom (*.cbg) andAnimation-ish (*.ish1,*.ish2*.ish3) projects in Toon Boom Studio.
If you have another project open, you will be prompted to save it, and it will close after you confirm your choice.
To open an existing Flip Boom, Animation-ish or Comic Boom Project:
1. Start Toon Boom Studioto display theWelcome screen.
2. Click the Browse button to display theOpenwindow.
TheOpen dialog box appears.
3. Browse to the folder where your project is located.
4. Select the file to open and click Open.
The project opens in Toon Boom Studio.

Chapter 2: Starting Your Project Changing the Project Format
38
Changing the Project FormatYou can change your project's format or frame rate from the File menu.
When you change the format of your project, if the size ratio is not the same, you may have toreposition some elements.
For example, if you change from a square format to a rectangular format, you will need to fill the sides of thescreen.
To change your project's format:
1. Select File > Animation Properties.
The Animation Properties dialog box opens.
2. In the Frame Rate field, type the new frame rate for your project.
3. In the Camera Size field, type the new format for your project.
4. If you want this format to be used each time you create a new project, click Set As Default.
5. Click OK.

Toon Boom Studio 8.1 User Guide
39
Organizing Your WorkIn order to start your project on the right track, it is a good idea to organize your files and directories properly.
In this section, you will learn tips to help organize your work:
• Naming Your Files below
• Saving Files and Structuring a Project below
Naming Your FilesTo make it easier to remember what each project, layer, drawing or colour palette is, name your file with arelevant name representing the content of your project.
Make sure to give it a namewhich easily identifies the project, such as JumpingFrog. That way, when you haveseveral projects, you can locate specific ones more easily.
We recommend that you name your scene using alphanumeric characters: a to z, 0 to 9 and underscore ( _ ).Avoid spaces in the file names. Try to provide themaximum amount of information for future identification,which helps ensure that you do not mix up elements and lose information.
Here are some typical examples of project names:
• AdventureProject
• TurtleAdventure_Episode001
• Turtle_PuppetConstruction
Saving Files and Structuring a ProjectWhen you create your project, youmust save it somewhere. It is a good idea to create a folder on your harddrive to contain all the elements of your project. Keeping everything together in one place is always useful forretrieving scenes, sounds, artwork, or referencematerial.
There aremany ways to structure your project folder. Here is an example you could use to start.
Before you save any elements in your production, you should decide on a project name, which should reflect thecontent or title. Use the name to create your main folder on your local hard drive, where you will save all yourproduction elements.
For example, themain directory could be called SuperTurtleAdventure_Project.
Once your main folder is created, you should create a subfolder to contain the different categories of materialyou will store in it. For example, you could have categories such as:

Chapter 2: Starting Your Project Organizing Your Work
40
• Studio Project: In this folder, you can store the actual Toon Boom Studio projects.
• Design: In this folder, you can store designs or any development drawings you have done for your projecteither on paper or in another software. You can scan your drawings and store them here.
• Background: If you drew some backgrounds and painted them in a third party software or took somephotographs to use as backgrounds in your scene, store them here.
• Reference Material: To get inspiration for your project or design your characters, you can search theInternet to find pictures related to your project and store them here. You could also take photos with acamera and store them in this folder.
• Audio Files: Use Store anymusic or dialogue tracks you will use in your movie in this folder.
• Export:Once a scene or your project is ready, you will export it into a movie format or image sequence.You can store all your exported material in this folder.
• Colour Palette Backup:When you create characters and background, you will create a colour palette foreach one of them. It is a good idea to export them from your project and store them in this folder as abackup in case youmodify the colours by accident.

Toon Boom Studio 8.1 User Guide
41
User Interface LanguageToon Boom Studio's user interface is available in both English and Français. You can toggle between bothlanguages at any time.
This section is divided as follows:
• Windows below
• MacOS X below
WindowsTo change the user interface language usingWindows:
1. In the top menu, select Edit > Preferences.
The Preferences panel opens.
2. Select theGeneral tab.
3. From the Language list, select English or Français.
4. Click OK.
5. Close the Toon Boom Studio application and restart it for themodification to take effect.
Mac OS XTo change the software's languagewhen usingMacOS X, you need to change your operating system's languagepreferences.
You can open the System Preferences option by selecting System Preferences from the Applemenu.
Refer to the Mac OS X's documentation to learn how to set up your applications languagepreferences list. In this list, you need to make sure Français is a higher priority than English.
If Toon Boom Studio was already started when youmade the changes, youmust restart it in order for the newlanguage settings to take effect.

Chapter 2: Starting Your Project Adding Template Copyright and User Name Information
42
Adding Template Copyright and User NameInformationToon Boom Studio allows you to set author and copyright information for the templates. A template is an assetthat you can share and reuse. It can be anything from a drawing to a complete animation. When you storeartwork in your Library, it is converted to a template and an author and copyright owner is assigned to it at thesame time.
In order to set the author and the legally entitled copyright owner information, youmust set your preferencesprior to creating your templates. It is a good idea to set them as you start your project.
By default, the names assigned are the User Name and Copyright values entered while installing Toon BoomStudio on your machine.
If you are unsure about entering the copyright information, contact your manager or companyadministrator for this information.
To set the author and copyright owner:
1. From the top menu, select Edit > Preferences (Windows) or Toon Boom Studio 8.1 > Preferences (MacOS X).
The Preferences panel opens.
2. Select theGeneral tab.
3. In the User Name field, type the author's name.
4. In the Copyright field, type the owner or company name legally entitled to the copyright.
5. Click OK.

Toon Boom Studio 8.1 User Guide
43
Setting the Location of Global LibraryBy default, when you install Toon Boom Studio, a main library folder is created. This library is calledGlobalLibrary. You can store any kind of artwork as a template in this folder and access it from any of your projects.
By default, the Global Library is installed in:
• Windows: C:\Documents and Settings\userName\MyDocuments\Toon Boom Studio - Global Library 8.0
• MacOS X: /users/userName/Documents/Toon Boom Studio 8.1
If you prefer to place theGlobal Library in another location, you can change it though the Preferences panel.
To set the Global Library's location:
1. From the top menu, select Edit > Preferences (Windows) or Studio > Preferences (MacOS X).
The Preferences panel opens.
2. Select theGeneral tab.
3. Beside theGlobal Library field, click Browse.
4. Browse for the Global Library's new location.
5. Click OK/Choose to close the Browse window.
6. Click OK to close the Preferences panel.

Chapter 2: Starting Your Project Some Basic Animation Concepts
44
Some Basic Animation ConceptsIn Toon Boom Studio, you will find several concepts based on traditional animation. Whether you are new toanimation or an existing animator who wants to understand Toon Boom Studio, this section is for you.
You will learn about:
• Bitmap and Vector Graphics below
• Palettes on the facing page
• Exposure Sheet and Timeline on page 46
• Pegs on page 48
• Multiplane Camera on page 48
Bitmap and Vector GraphicsThere are two types of digital images:
• Bitmap Image Types below
• Vector Image Types below
Bitmap Image Types
Abitmap image consists of pixels and has a fixed size. A pixel, short for Picture Element, is a single point in agraphic image. It is a small sample of an image, a dot, a square or a very small sectionmade out of smoothfiltering. If you zoom in enough on a digital image, you will see the pixels. They look like small squares of differentcolours and intensity. So, a bitmap image is composed of pixels and has a single resolution (size); if it is enlargedtoo much, it will start losing definition and pixels will start to appear. This is known as pixelation.
Vector Image Types
A vector-based image is composed of points and Bezier curves. The computer reads the points and traces thesegments linking them to reproduce the image shape. There is no fixed size or resolution in a vector image. Thegraphic can be enlarged and distorted as much as desired and the systemwill simply recalculate the segments

Toon Boom Studio 8.1 User Guide
45
and rebuild the shapes. The segment's shape can be controlled with Bezier handles to curve and smooth it.Vector images are translated and displayed in pixels once the calculation is done.
Advantages and Disadvantages of Bitmap and Vector ImagesBitmap images allow a more structured style. Since everything has a fixed size and is alreadymade out of pixels,more effects are possible, such as blur, painting look, texturing, shading, and so on. The bitmap format isexcellent for creating backgrounds and overlay elements. However, because of the specific resolution, in orderto zoom in on or to work in high resolution such as HDTV, the created file must be large.
Vector-based graphics can be very useful in creating large illustrations, as these graphics are resolutionindependent. The images can be enlarged significantly without losing definition. A vector-based image generallyhas a smaller file size than a bitmap, as it is a set of mathematical points. However, if there aremany vectorscomposing the graphic, the result can be larger than a bitmap file. A vector shape can always bemodified. It alsocreates very crisp images.
Palettes
In colour animation, exact colours are used to paint each particular character. In order to maintain consistencybetween the scenes and episodes, a colour palette is created for each character, prop, and effect throughoutthe project.
Before computers, painters used real colour pots mixed by a colour palette artist. Now, using computers, adigital colour palette is created. This allows consistent colour accuracy by always having the same group ofcolours associated with each character.
Advantages of Using a Colour PaletteUsing a colour palette has many benefits, including:
• Each character consistently retains their dedicated colours.
• You cannot accidentally use a colour which is not related to the character.
• Standardization and colour consistency throughout the project.
• Multiple artists can use the same colour palette and produce the same results.

Chapter 2: Starting Your Project Some Basic Animation Concepts
46
Exposure Sheet and TimelineThe exposure sheet o rXsheet and the timeline will be used a lot as you work on your project. This sectionexplains what they are and how you canmake use of them.
Exposure Sheet
The exposure sheet, also known as the Xsheet or Dope Sheet, is used when an animator is planning a scene. Theanimator enters the layers, the name of the drawings and their exposure into the Xsheet. The exposure sheetallows the user to see the timing in detail.
The exposure sheet is composed of columns corresponding to the different layers. Each column is split into rowsrepresenting the frames in the scene. A paper exposure sheet usually has eighty rows and ten columns. Thisenables the animator to associate a layer with a certain element and record the frame in which each drawingappears.
The traditional paper exposure sheet was mainly created for the animator to write down the drawing timingsand main actions. Toon Boom Studio uses a digital exposure sheet for the same purpose.

Toon Boom Studio 8.1 User Guide
47
TimelineA timeline is a horizontal and chronological representation of events occurring within a particular period.
In animation or digital process, the timeline is quite similar. The timeline is read from left to right and helps youto understand the scene and its timing. The frames or time codes are placed at the top and the elements orlayers on the left. There is no drawing name or value information. The timeline displays the timing and elementsin a simplified and systematic manner, making it easy to read globally. The timeline can be considered to be aquick overview of the whole scene.
Exposure Sheet and Timeline UsageExposure sheets and timelines are used for different tasks. With hand-drawn animation, the exposure sheet isuseful for keeping track of the drawings' ordering, names, and timings. The exposure sheet is used to reproducethe animator's work in the digital software or the camera.
For puppet animation, compute-generated trajectories, and distortions, there is a lot of extra informationinvolved, including keyframes, velocities, function curves, and so on. A keyframe is a computer-generated keypose that contains values for the element's on-screen positioning; keyframes can be displayed in the exposuresheet as values. If there are too many keyframes, modifying one can be difficult due to all of the values present.This is why there are digital timelines. Their simplified version of the timing is quite useful in these situations. Thetimeline does not display drawing names or keyframe values, instead it represents them as symbols, making itmuch easier for the eye to detect the desired element for modification. Although the name and value informationis not directly displayed, the exposure sheet is still very valuable when retrieving this type of information.

Chapter 2: Starting Your Project Some Basic Animation Concepts
48
Pegs
Pegs have been used for a long time in the animation process, mainly for registration purposes. Peg holes at thebottom or top of animation paper are used to keep all of the sheets even and at the same registration.
There are three peg holes in regular animation paper. The centre one is circular and the left and right ones arerectangular and situated 4 inches on either side of the centre one.
To keep the drawings together, we use a peg bar. This bar has three pins shaped exactly like the peg holes. Pegbars are normally found at the bottom and top of animation discs.
Before computers, the peg bars were also used to move layers under the camera stand. They were theequivalent of the digital trajectories. Toon Boom Studio makes use of these concepts to create animation andcamera moves.
Multiplane Camera
In an animation context, multiplaning is used to create a scene with a multiple planes placed at differentdistances from the camera to recreate a perspective illusion. A plane is a layer or an element. In regular flat 2Dscenes, all the elements are at the same distance superposed one on top of another. So, when the camera

Toon Boom Studio 8.1 User Guide
49
moves, all the elements aremoving at the same speed. In real life, all objects and elements are placed at differentdistances from our eyes so whenwewalk past, the closest objects appear to bemoving away faster. Thefarthest ones, likemountains, are barely moving. In animation, that perspective effect has to be reproducedmanually.
In 1933, theWalt Disney Company invented themultiplane camera. They got the idea from looking at methodsused in the theatre to introduce perspective into a space with limited depth. In the theatre, cutouts and flatpieces were placed in a variety of layers in front of a backdrop which allowed actors to move through the varioussets while giving the illusion of depth. Walt Disney's final design for themultiplane camera used this sameconcept. Themultiplane camera which was set up vertically, much like a photographic enlarger, would shootdown through as many as five planes attached to vertical posts that allowed four of the planes to moveindependently of one another. The first two planes were used for animation, the next two were for backgrounds,and the fifth was fixed and used for sky backgrounds. The finished result produced a depth of perspective whichhad not previously been seen in animated film.
Multiplane UsageMultiplane camera effects can be created digitally. There is no longer a need to use the big multiplane camera.Multiplane shots are normally used to add depth to a scene to reproduce perspective effect more easily. Theycan also be used on a smaller scale to make elements pass in front of and behind certain objects like trees or achair.

Chapter 2: Starting Your Project Planning Your Project
50
Planning Your ProjectPlanning is an important step in creating your animation project. This involves listing the scenes that you need toanimate, the characters you have to design and the different backgrounds to incorporate.
First of all, you need an idea. It does not need to be complicated at all. It can be a very simple idea such as abutterfly flying in a field of flowers. In this example, you would need to design a butterfly, a field full of flowers,and a sky. Then you could compose a movie of two or three scenes.
What is a Scene?
In animation, a scene is the action happening in front of the camera while the camera does not change angle. Aslong as the camera does not stop "filming" , you are in the same scene.A good example would be twocharacters talking. When the camera is facing the first character, this is one scene. When the camera cuts andfilms the second character, you have a second scene. When the camera returns to the first character, you have athird scene, and so on.
A group of scenes occurring in the same location about the same action or event is called a sequence. Whenthere is a change of location or subject, it becomes a second sequence.
Planning Your Scenes
To plan your scenes, you can create a simple list of the different scenes you want to animate in your project, but ifyou want to take it further, you can create a drawing that represents each scene with a short action description.This concept is called storyboarding. You can create a simple storyboard on paper or you can use another ToonBoom software called Toon Boom Storyboard Pro.
Once you know which scenes you need in your project, you can create your scene list based on your plan.
Related Topics
• Working with Scenes on page 514

Toon Boom Studio 8.1 User Guide
51
Help ToolsWhile learning and working with Toon Boom Studio, you have access to the following help tools:
• Toon Boom Studio 8.1 Getting Started Guide below
• Toon Boom Studio 8.1Online Help below
• Context Sensitive Help below
Toon Boom Studio 8.1 Getting Started GuideTheGetting Started guide briefly explains the general features and concepts included in the application so thatyou can quickly get up to speed with Toon Boom Studio. It is available through theHelp > Getting Startedmenu, as PDF file.
Toon Boom Studio 8.1 Online HelpTheOnline Help explains in details each command and feature included in the application. It is available throughtheHelp > Online Helpmenu. TheOnline Help is available online at docs.toonboom.com. TheOnline Help canbe prompted using [F1] (Windows) or [⌘ ] + [Shift] + [?] (MacOS X).
Context Sensitive HelpThe Context Sensitive Help is a built in help system prompting a short description of the selected tool orcommand. It is available in both French and English.
To prompt the Context Sensitive Help:
1. Press the [Shift] + [F1] (Windows) or [Alt] + [Shift] + [?] (MacOS X) keyboard shortcut.
2. Once you get theQuestionMark or Hand icon, click on the button or menu item youwant to learn about.
3. A short description is displayed in the bottom Status bar and a longer description appears onmouse-over.

Chapter 2: Starting Your Project Preferences
52
PreferencesAn important feature of Toon Boom Studio is the Preferences panel. From here you can customize your interface,tool behaviour, and shortcuts. Throughout this guide, you are often required to go to the Preferences panel toset parameters and options.
In this section, you will learn how to access the Preferences panel and also find a general description of itsfunctionality.
This section covers the following topics:
• Preference Highlights below
• Accessing the Preferences Panel on the facing page
• Display on the facing page
To learn about the different preferences available, refer to the following chapters:
• Starting Your Project on page 31
• Drawing and Design on page 81
• Importing Artwork on page 161
• Adding Colours on page 125
• Layers and Timing on page 197
• Animating a Puppet on page 395
• Setting the Scene on page 277
Preference HighlightsYou can set over 40 preferences in the Preferences panel. You will learn about them as you read through thisguide.
The Preferences panel is divided into the following tabbed sections:
• General
• Shortcuts
• Interface
• Light Table
• Display
• Sceneplanning
Some preferences require you to exit and restart the application or to close a view and reopen it.

Toon Boom Studio 8.1 User Guide
53
Accessing the Preferences PanelTo access the Preferences panel:
1. In the top menu, select Edit > Preferences (Windows) or Toon Boom Studio 8.1 > Preferences (MacOSX).
DisplayYou can optimize the display performance of the software, by using the preferences available to you.Optimization of the display performance is dependent on the task you are doing and your graphics card andsystem. These preferences can be found in the Preferences panel.
To open the Preferences panel:
‣ Windows: Select Edit > Preferences.
‣ MacOS X: Select Toon Boom Studio 8.1 > Preferences.
You can find the display performance preferences under the Display tab.
Renderer• Direct3D : By default, Toon Boom Studio uses Direct3D for rendering images in the Camera and Drawingviews, but you can change this preference to useOpenGL (Windows).
• Improve Pencil Rendering Performance: Select this option if you are having problems with centrelinestrokes slowing down the software.
Note that you must restart the application in order for the Renderer settings to take effect.

Chapter 2: Starting Your Project Preferences
54
Rendering Options• Smooth Textures & Bitmaps: Improves bitmap image quality by smoothing-out the pixels of bitmapimages when zooming in.
• Smooth Tools: This option is enabled by default; it increases the display quality of tools. Disabling it willlower the display quality but increase the display speed.
• Smooth Pegs: This option increases the display quality of pegs and is enabled by default. Disabling it willlower the display quality of the peg but increase the display speed.
• OpenGL Full Scene Anti-Aliasing: Full Scene antialiasing is generated by your computer's graphics card.This antialiasing will not only antialias your drawings but all the different views in the interface. You canturn the Full Scene Antialiasing preference on or off. Full Scene Antialiasing parameters are only valid whileyou work in your scene. The scene will be rendered out to 100% of its resolution regardless of yoursettings in the Preferences or graphics card panel.
• Texture & Images resolution: You can change the bitmap quality of your images while working on yourproject in the Drawing or Camera views. This helps lower thememory usage while working, but does notaffect the final render quality of your project. Depending onwhether you want a faster display or betterquality, drag the slider left or right.
• System Memory Usage: You can change the amount of systemmemory allocated to bitmap files in youranimation project. This does not affect the quality of your work. Depending onwhether you want thesystem to usemore or less memory for bitmapmaterial, drag the slider left or right.
Tablet SupportThese options are used to fix issues youmay have using a tablet.
• Handle Tablet Events With Qt: This option changes the way the events are treated within the system andthis might be needed to allow the drawing functionality of a tablet that is not a Wacom tablet.Thispreference is only used withMacOS X.
• Ignore All Tablet Events: This option is used to deactivate all events from a tablet that is not a Wacomtablet. This will allow the tablet to work as a mouse. It will deactivate the pressure sensitivity but allowdrawing just like a mouse.
• Enable Tablet PC Portrait Mode Correction: This preference is used to fix a past issue with a WacomTablet PC driver. When in portrait mode, the cursor would not correctly follow the penmovement. Thispreference is only available usingWindows and a Tablet PC.
• Use QtWintab Support (Need Relaunch): This preference is used to fix other possible issue with aTablet PC by changing the protocol used to manage the tablet events. This preference is only availableusingWindows and a Tablet PC.

Toon Boom Studio 8.1 User Guide
55
Chapter 3: Discovering the Interface
Toon Boom Studio has a very user friendly interface that is easy to manage and understand. In this chapter, youwill discover themain interface highlights and how to organize your workspace.
This chapter is divided as follows:
• Interface Components on the next page
• Interface Highlights on page 60
• Managing Views on page 66
• Managing Toolbars on page 73
• Workspaces on page 75
• Interface Navigation on page 77
• Preferences on page 78

Chapter 3: Discovering the Interface Interface Components
56
Interface ComponentsToon Boom Studio's user interface has threemain components that you will use all the timewhile creating youranimation:
• Menus below
• Toolbars on the facing page
• Views on page 58
MenusStudio has two kinds of menus:
• TopMenu below
• Quick Access Menu below
Top MenuThe top menu is always located at the top-left corner of the interface. OnWindows, it is part of the user interfaceand onMacOS X, it is located at the very top of the screen.
In the top menu, you find most of the commands that are used throughout your project.
Quick Access Menu
TheQuick Access menu is a contextual menu containing only the commands relative to the view and area in whichyou are working. Instead of going all the way to the top menu, just right-click in the view in which you are workingto display it.
There are a series of Quick Access menus throughout the interface. Here is a list of themain ones:
• Camera View
• Drawing View

Toon Boom Studio 8.1 User Guide
57
• Timeline Layers (Timeline's left side)
• Timeline Frame (Timeline's right side)
• Xsheet ColumnHeader
• Xsheet ColumnCells
• Colour Palette View
• Library Folders (Library's left side)
• Library Templates (Library's right side)
Toolbars
Instead of selecting a command in a menu, you can click on the buttons in the toolbars. Toolbars are found at thetop and left side of the interface, and also within certain views, such as the Timeline view.
It may bemore visual and easier to find a feature if you browse through the different toolbars.
Themain toolbars are:
• Main Toolbar (Windows)
• Drawing Tools Toolbar
• Animation Tools Toolbar
• Bone Tools Toolbar
• Effects Toolbar
• Interactive Playback Toolbar (Windows)
• Grid Control Toolbar (Windows)
• Onion Skin Toolbar (Windows)
• Peg Toolbar (Windows)
• Scene View Toolbar (Windows)
• Sound Toolbar (Windows)
• Workspace Toolbar
• Exposure Sheet Toolbar
• Timeline View Toolbar

Chapter 3: Discovering the Interface Interface Components
58
To customize the top toolbar for Mac OS X, refer to Customizing Toolbars on Mac OS X on page 73.
ViewsToon Boom Studio's interface is composed of several different views used to perform different actions. Themainviews you use for your project are the Camera and Timeline views.
Each view specializes in one or two aspects of the production. For example, the Camera view is used for motionpath animation and scene setup. The Drawing view is used for drawing and the Timeline view for setting timingand creating simple effects.
Here are the different views available in the software:
• Camera View
• Cell View
• Colour Palette View
• Drawing View
• Exposure Sheet View
• Function View
• Library View
• Pen View
• Properties View
• Storyline View
• Side View

Toon Boom Studio 8.1 User Guide
59
• Text View
• Timeline View
• Top View

Chapter 3: Discovering the Interface Interface Highlights
60
Interface HighlightsIn Toon Boom Studio, there are several different views and toolbars. In this section, you will learn about themainones that are used frequently. All others are described in context in other chapters.
In this topic, you will learn about the followings:
• Camera View below
• Timeline View on page 62
• Drawing Tools Toolbar on page 63
• Animation Tools Toolbar on page 63
• Timeline View Toolbar on page 62
Camera View
The Camera view is themain view you use to create your artwork and animate it. In the Camera view, you find thecamera frame in which you position elements to be part of your final movie. Anything outside the camera framedoes not appear in your final export.
In the Camera view, you also find two toolbars:
• View Navigation Toolbar on the facing page
• Switch View Toolbar on the facing page

Toon Boom Studio 8.1 User Guide
61
View Navigation ToolbarIn the View Navigation Toolbar, you will find five buttons allowing you to zoom, pan and rotate the Camera view.
Icon Tool Name Description Shortcut
Switch between Two Views
Switches between the two last zoom levels youused. For example, if you zoom in on a drawingand then zoom out to a global view, clicking thisbutton switches between the close up and theglobal zoom levels.
[B]
Reset Zoom and Pan
Resets any zoom, rotation and pan action youdid while navigating in the Camera view workingarea. The camera framewill be re-centred in theCamera view. Note that it does not reset anypositioning youmay have done on your drawingsand images.
[Shift] + [V]
Recentre the Active ViewCentres the camera frame in the Camera view.Any rotation or zoom action will remain thesame.
[Shift] + [Space]
Reset the Rotation of theWindow
Resets any rotation you did on the Camera viewworking area. The pan and zoom levels willremain the same. Note that it does not reset anypositioning youmay have done on your drawingsand images.
[Shift] + [C]
Reset the Zoom Level of theWindow
Resets any zoom action you did on the Cameraview working area. The pan and rotation willremain the same. Note that it does not reset anypositioning youmay have done on your drawingsand images.
[Shift] + [Z]
Switch View ToolbarIn the Switch View toolbar, there are four buttons allowing you to toggle between the following views:
• Drawing View
• Camera View
• Side View
• Top View
This toolbar is useful when switching between these views to save room in your workspace. You can also havethese views separately by selecting them in theWindow menu.

Chapter 3: Discovering the Interface Interface Highlights
62
Timeline View
The Timeline view is themain view used to create layers, set your timing and create simple effects.
The Timeline view is divided in three sections:
• Timeline View Toolbar
• Layers Section
• Timing Section
Timeline View ToolbarThe Timeline View toolbar is composed of eight different buttons allowing you to add, enable and disable layersas well as switching between the different scenes of a same project.
Icon Name of tool Description
Show/Hide All Switches between showing and hiding all layers in the Timeline view.
Solo ModeLets you see only the currently selected layer, as well as the layer that was selec-ted when you enabled the Solo Mode. This lets you use it as a reference withouthaving to disable all the other layers.
Add New ElementsAdds a new element (layer) to the timeline. When you click this button, the NewElement dialog box opens and lets you choose which type of element you want,how many, and how youwant to name it
Delete Element
Deletes the selected layers in the timeline.
Note: If you delete a layer with other layers connected to it, all the layers will bedeleted at the same time. Also, if you only have one layer in the timeline, you willnot be able to delete it. The Toon Boom Studio Timeline view must always haveat least one drawing layer in it.
Add Drawing Ele-ment
Adds a drawing layer in the Timeline view. You can then double-click the newdrawing layer to rename it.
Add Parent PegAdds a peg layer in the Timeline view and connects it to any selected layer. Youcan then double-click the new peg layer to rename it.

Toon Boom Studio 8.1 User Guide
63
SceneMenu Cycles through the different scenes in your project.
Timeline View Menu Displays a menu of commands related only to the Timeline view.
Drawing Tools Toolbar
TheDrawing Tools toolbar contains all of the different tools you need to draw and design your artwork. Someextra commands are located in the top Tools menu.
Some of the buttons in the toolbar have a black drop-down arrow, this lets you open a menuwith extra drawingtools.
Refer to the Drawing and Design on page 81 chapter to learn more about the drawing tools.
Animation Tools Toolbar
The Animation Tools toolbar contains all of the different tools you need to position and animate your layers.
Some of the buttons in the toolbar have a black drop-down arrow, this lets you open a menuwith extraAnimation tools.

Chapter 3: Discovering the Interface Interface Highlights
64
Refer to the Setting the Scene on page 277 chapter to learn more about the Animation tools.
Interactive Playback Toolbar and Play MenuYou can play back animation and sound by using the Interactive Playback toolbar or the Playmenu (in top menu).
Interactive Playback Toolbar
Icon Tool Name Description Play menu Shortcut
Play/Stop Plays or stops playback Play > Play or Play > Stop [P]
Loop Repeats playback indefinitely Play > Loop
Previous Frame Go to the previous frame Play > Previous Frame [A]
Next Frame Go to the next frame Play > Next Frame [S]
First Frame Go to the first frame Play > First Frame
Last Frame Go to the last frame Play > Last Frame
Play MenuSelect any of the following from the top menu Play heading:
• Frame Rate: Lets you choose the playback speed of your animation. By default, the option is set to usethe same playback speed you set in your Animation Properties when you created the project. In the drop-downmenu, you can change it to 1, 2, 12, 24 or 30 frame per second.
• Force Frame Rate: Forces Toon Boom Studio to play the right playback speed. If a scene is too heavy tobe played back in real time, Toon Boom Studio drops images rather than playing back all images at aslower pace.
• Playback Range: Specifies the range of frames to be played back. By default, the option is set toAutomatic Fit allowing you to play the full scene length. If you set the option to Free, black markersappear in the Timeline view.You can drag thesemarkers to the first and last frames you want to be played back.

Toon Boom Studio 8.1 User Guide
65
You can also select Play > Playback Range > Change the Playback Start Frame to type the number ofthe first frame of the playback range.
You can also select Play > Playback Range > Change the Playback End Frame to type the number of thelast frame of the playback range.
• Preview Movie: Exports a QuickTimemovie of the entire animation project including all its scenes. Youcan press [Ctrl] + [Shift] + [Enter] (Windows) or [⌘ ] + [Shift] + [Enter] (MacOS X).
• Preview Scene: Exports a QuickTimemovie of your current scene, ignoring the other scenes in theproject. You can press [Ctrl] + [Enter] (Windows) or [⌘ ] + [Enter] (MacOS X).
• Preview Exposure Sheet: Exports a QuickTimemovie of the drawings in the exposure sheet of thecurrent scene only. This type of render ignores all themotion path and scene planning done in the Cameraview. You can press [Ctrl] + [Alt] + [Enter] (Windows) or [⌘ ] + [Alt] + [Enter] (MacOS X).
• Preview Exposure Sheet Selection: Exports a QuickTimemovie of the selected drawings in theexposure sheet of the current scene only. This type of render ignores all themotion path and scene setupdone in the Camera view. You can press [Shift] + [Enter].
• Turn Off/On Sound Playback: Enables or disables the sound while playing back the scene.
• Turn Off/On Sound Scrubbing: Enables or disables the sound scrubbing effect while changing frames inthe Timeline view. The sound scrubbing option is mainly used to do lip-sync decoding.
• Quick Preview: Exports a Flash SWFmovie of your current scene ignoring the other scenes in the project.You can press [Enter].

Chapter 3: Discovering the Interface Managing Views
66
Managing ViewsThe Toon Boom Studio user interface is composed of different views, each one designed for a specific purpose.
This section explains how you canmodify the location and accessibility of the views by adding a new view as a tabor as a window. You can also swap the view locations around.
This section covers the following topics:
• Adding a New View below
• Closing a View on the facing page
• Swapping Views on page 70
• Resizing a View on page 71
• Showing and Hiding the Status Bar on page 71
• Extending the Side Panel on page 72
Adding a New ViewTo add a view:
1. Select the view youwant to add fromWindow > the desired view.
2. If your view appears as a floating window and youwant to dock it to your workspace, drag the window'stab onto one of the workspace's views.
‣ To insert your view into an existing area, wait until the zone is highlighted (Windows), then drop it.
‣ To insert your window between existing views, drag your window to the border of an existing viewand wait for a new space to slide open before dropping it.

Toon Boom Studio 8.1 User Guide
67
Closing a ViewTo close a view:
1. Click theX (close view) button.
Undocking and Docking Windows and ViewsIn Toon Boom Studio you can rapidly dock, undock, or move windows and views around the interface and yourdesktop. This makes it easier for you to organise your workspace and obtain themaximum use from theavailable desktop real estate.
In fact, if you have a dual monitor setup, you can drag it away from the Studio interface and place it on thesecondmonitor's desktop.

Chapter 3: Discovering the Interface Managing Views
68
UndockingTo undock a window or view from the Toon Boom Studio interface, do the following:
1. Double-click on the window or view's name tab.
The window detaches automatically from its docked position and appears floating in the interface.
2. Once you have detached the window, you can resize it to fit your work needs.

Toon Boom Studio 8.1 User Guide
69
DockingTo return the floatingwindow to its docked location, do the following:
1. Double-click on the floating window's title bar. The window returns automatically to the docked location.
Next time you double-click on that window's name tab, it undocks and returns to its last location on yourdesktop.

Chapter 3: Discovering the Interface Managing Views
70
Moving the Floating Window Around the DesktopAfter the window is undocked, you canmove it around and position it anywhere on your desktop.
Tomove the floatingwindow around the desktop:
1. Click on the window's title bar, hold themouse button down and drag the window to the new location.
Next time you double-click on that window's name tab, it undocks and returns to its last location on yourdesktop.
Swapping ViewsTo swap views around:
1. Select the view tab and drag it onto one of the view's separators, top area or onto another view.
2. When a darker zone appears showing an available location for the view, release themouse button anddrop the view into position.

Toon Boom Studio 8.1 User Guide
71
You can drop views on either side, above and below the Camera view. Your layout can have onecolumns on the left, one column on the right, one column on top and one below the Camera view.You cannot have two columns on either side.
Resizing a ViewTo change the width and height of the views in the workspace, drag the side of the view.
To resize a view:
1. In the interface, position your cursor on the edge of the view youwant to resize.
2. When you see the Resizing cursor, click and drag the side of the window to the desired width or height.
Showing and Hiding the Status BarToon Boom Studio has a Status bar located at the bottom of its user interface. This displays information relatedto the tool or feature themouse is passing over. You can show and hide this bar. Windows andMacOS X do notshow the same information.
To show or hide the Status bar:
1. SelectWindow > Show/Hide Status Bar.

Chapter 3: Discovering the Interface Managing Views
72
Extending the Side PanelIn Toon Boom Studio's Default workspace, the utility views such as the Colour Palette and the Pen views arelocated to the right side of the interface. At the bottom of the workspace, there is the Timeline. Some usersprefer to have their timeline take the full width of the workspace and some other prefer to have the utility viewstake the full height. You can toggle between the two options using the Extend Side Panel option.
To extend the side panel:
1. SelectWindow > Extend Side Panel.

Toon Boom Studio 8.1 User Guide
73
Managing ToolbarsThe Toon Boom Studio user interface contains toolbars which, by default, are located at the top or side of theinterface. You can reposition the toolbars to suit your work style or hide unused ones.
This section covers the following topics:
• Showing or Hiding Toolbars below
• Moving Toolbars onWindows below
• Customizing Toolbars onMacOS X below
Showing or Hiding ToolbarsTo show or hide a toolbar:
1. SelectWindow > Toolbar > the desired toolbar.
Moving Toolbars on WindowsTomove a toolbar:
1. Select the toolbar you want to move by clicking on its anchor point and dragging it to another position inthe top or side interface toolbar area.
2. When a rectangle outline appears showing an available location for the toolbar, release themouse buttonand drop the toolbar into position.
Customizing Toolbars on Mac OS XOnMacOS X, you can customize toolbars to display buttons that access the commands that you use themost.
To customize toolbars in MacOS X:
1. Select View > Customize Toolbar.
A window opens displaying all of the buttons available for the view you are currently working in.

Chapter 3: Discovering the Interface Managing Toolbars
74
2. Drag the buttons you want to the toolbar in the current view.
3. You can also use the Show drop-down list and decide to show:
‣ Icon and Text
‣ IconOnly
‣ Text Only
4. By default, the Studio displays large buttons. You can enable the Use Small Icon option to switch tosmaller buttons.
5. When you are finished making changes, click Done.
6. To remove buttons, drag them away from the toolbar.

Toon Boom Studio 8.1 User Guide
75
WorkspacesToon Boom Studio's user interface is composed of several views. You can customize your workspace to suit yourworking preferences, then save it as a new workspace and load it from theWindow menu.
This section covers the following topics:
• Loading a Workspace below
• Creating a Workspace below
• Renaming a Workspace on the next page
• Saving a Workspace on the next page
• Deleting a Workspace on the next page
Loading a WorkspaceThe first time you open Toon Boom Studio, the default workspace is loaded. Other available workspaces includethe Drawing, Full Screen Drawing, and Scene Planning workspaces, which display different views and toolbars.You can access these workspaces and the ones you create from theWindow menu.
To load a workspace:
1. In the top menu, selectWindow >Workspaces and select a workspace from the list. You can also selectthe same option in theWorkspace toolbar (Top toolbar onMacOS X).
There are several useful workspaces available in the list. One of them, the Full Screen Drawing isautomatically set to Full Screen to allow a larger drawing space. To exit the Full Screen mode, selectView > Turn Off Full Screen or press [Ctrl] + [F] (Windows) or [⌘ ] + [F] (Mac OS X).
Creating a WorkspaceTo create a workspace:
1. Reposition the views and toolbars the way you want them in your new workspace.
2. SelectWindow >Workspaces > New Workspace. You can also select the same option in the Workspacetoolbar (Top toolbar on Mac OS X).
Theworkspace dialog box opens.
3. Rename your new workspace.
4. Click OK.
The new workspace is created and can be loaded from theWindow >Workspacesmenu.

Chapter 3: Discovering the Interface Workspaces
76
Renaming a WorkspaceYou can only rename a customworkspace. You cannot renameworkspaces provided with Toon Boom Studio.
To rename a workspace:
1. SelectWindow >Workspaces > and select the workspace you want to rename. You can also select thesame option in the Workspace toolbar (Top toolbar on Mac OS X).
2. SelectWindow >Workspaces > Rename "current workspace's name". You can also select the sameoption in theWorkspace toolbar (Top toolbar onMacOS X).
The RenameWorkspace dialog box opens.
3. Rename the workspace.
4. Click OK.
Saving a WorkspaceYou cannot savemodifications in the Default workspace. You can only savemodifications in the Drawing, FullScreen Drawing, and Scene Planning workspaces.
To save a workspace:
1. SelectWindow >Workspaces > Save"workspace's name". You can also select the same option in theWorkspace toolbar (Top toolbar on Mac OS X).
Deleting a WorkspaceYou can only delete a customworkspace. You cannot delete workspaces provided with Toon Boom Studio.
To delete a workspace:
1. SelectWindow >Workspaces > Delete <workspace name>. You can also select the same option in theWorkspace toolbar (Top toolbar on Mac OS X).
Restoring the Default WorkspacesYou can restoremodified workspaces to their default layout if you save themodifications.
To restore the default workspaces:
1. SelectWindow >Workspaces > Restore <workspace name> You can also select the same option in theWorkspace toolbar (Top toolbar onMacOS X).

Toon Boom Studio 8.1 User Guide
77
Interface NavigationToon Boom Studio supports Zoom In, ZoomOut, Rotate, Pan and Reset View Position for easy interfacenavigation.
Command Action Access Methods
Zoom In Zooms into the view. View > Zoom In
Press [X].
ZoomOut Zooms out of the view. View > Zoom Out
Press [Z].
Pan Hold down the key-board shortcut [Space-bar] and drag yourmouse in the directionyou want to pan theview.
Rotate Clockwise View > Rotate Clockwise
Press [V].
Rotate Counter Clockwise View > Rotate CounterClockwise
Press [C].
Recentre the Active Space View > Recentre
Press [Shift] + [Space].
Reset View Resets the view to itsdefault position.
View > Reset View
Press [Shift] + [V].
Reset Rotation Resets the view's rota-tion to its default pos-ition.
View > Reset Rotation
Press [Shift] + [C].
Reset Zoom Resets the view's zoomto its default position.
View > Reset Zoom
Press [Shift] + [Z].
TurnOn/Off Full Screen Enlarges the selectedview to full screen,keeping the side panel.
View > Turn On/Off FullScreen
Press [Ctrl] + [F] (Windows) or[⌘ ] + [F] (MacOS X).

Chapter 3: Discovering the Interface Preferences
78
PreferencesTo customize your interface, you will use some of the preferences located in the Interface category.
Interface PreferencesTo customize your interface, open your preference panel and select the interface tab.
Element ColoursDouble-click on the colour swatches to modify the colour of the different elements listed in the section. Forexample, you can change the colour of the Camera in the Timeline view.
Window Background ColoursDouble-click on the Drawing or Timeline colour swatch to modify the colour of the background in the Drawing orTimeline view. If you do not want to have white as a background colour and would prefer to use a grey colour,change the colour swatch to grey.
Show All Tips AgainToon Boom Studio prompts you to provide information about certain situations. You can select the Do NotShow This Message Again option to avoid getting message prompts.
If you want to see thesemessages, click Show All Tips Again.

Toon Boom Studio 8.1 User Guide
79
Keyboard ShortcutsTo speed up your work, all of Toon Boom Studio's keyboard shortcuts can be customized.
You can customizemost of the shortcuts by opening the Preferences panel and going to the Shortcuts tab.
To set a shortcut:
1. Open the Preferences panel.
2. In the Preferences panel, select the Shortcuts tab.
3. In the Category list, select themenu containing the command youwant to modify.
4. In the left window, select the command to modify.
5. Click the shortcut button to modify the shortcut.The currently assigned shortcut is displayed on this button. If no shortcut is currently assigned for theselected command, the word "None" is displayed instead.
6. On your keyboard, press on the desired key for the new shortcut.
‣ To remove any keyboard shortcut associated with a command, click Remove.
‣ To reset all the keyboard shortcuts to their default values, click Reset All.
7. If a keyboard shortcut is already in use, a message appears in the Currently Assigned To window notifyingyou of the command to which it is already associated.
‣ Click Override to ignore the previous association and assign the shortcut to the selected command.The other command's shortcut is set to None.
‣ If you click theOK button before overriding the shortcut assignation, the action is cancelled.
8. Click OK.

Toon Boom Studio 8.1 User Guide
80

Toon Boom Studio 8.1 User Guide
81
Chapter 4: Drawing and Design
This chapter explains themain options, features and tools you will need when drawing and designing in ToonBoom Studio.
In this chapter, you will learn about the following:
• Drawing Basics on the next page
• Drawing in the Drawing or Camera View on page 83
• Drawing Using the Brush or Pencil Tool on page 85
• Relative Sizes of Characters and Props on page 88
• Sketching on page 90
• Tracing on page 92
• Erasing Part of a Drawing on page 95
• Selecting Drawing Objects on page 96
• Pen View on page 99
• Drawing Invisible Lines on page 104
• WorkingWith Text on page 106
• More Drawing Tools on page 109
• More Drawing Options on page 117
• Preferences on page 123

Chapter 4: Drawing and Design Drawing Basics
82
Drawing Basics
As soon as Toon Boom Studio is started, you can immediately start drawing using the drawing layer which isalready available.
How to draw:
1. Click the Drawing View button in the top-right corner of themain window.
2. In the Drawing Tools toolbar, select the Brush tool or press [@].
3. In the Timeline or Exposure Sheet view, select the first cell in the drawing layer.
4. In the Drawing view, start drawing.
You can also draw directly in the Camera view without switching to the Drawing view.

Toon Boom Studio 8.1 User Guide
83
Drawing in the Drawing or Camera ViewIn Toon Boom Studio, you can draw in the Drawing or Camera view. Although the views look similar, there aresome differences when it comes to drawing.
Drawing ViewBy default, only the selected cell drawing is displayed in the Drawing view. You can use the Light Table to
display the current frame drawing of all the visible layers of your scene in washed out colours, or theOnion Skinto display the previous and next drawings of the currently selected drawing layer.
To switch to the Drawing view:
‣ Click the Drawing View button in the top-right corner of themain window.
Camera ViewBy default, all the visible layers drawing of the selected frame are displayed in the Camera view. The selecteddrawing is automatically displayed on top when you are using a drawing tool to edit a drawing. You can also usetheOnion Skin tool to display the previous and next drawings of the selected drawing layer.
To switch to the Camera view:
‣ Click the Camera View button in the top-right corner of themain window.
To hide and show layers in the Timeline view:
1. In the Timeline view, select the checkbox corresponding to the layer you want to hide.
‣ A selected checkbox means that the layer is visible.
‣ Adeselected checkbox means that the layer is hidden.
If you have a single drawing layer in the Timeline view and it is deselected, and you then select thatlayer, its contents will display in the Camera view even if deselected. When you have two layers ormore, deselected and selected layers will not display its contents.
To show or hide all layers in the Timeline view:
1. In the Timeline view, click the Show/Hide All button.

Chapter 4: Drawing and Design Drawing in the Drawing or Camera View
84
Refer to Traditional Digital Animation on page 233 to learn more about the Onion Skin tool.

Toon Boom Studio 8.1 User Guide
85
Drawing Using the Brush or Pencil Tool
The Brush and Pencil tools are used for drawing and sketching.
Brush ToolThe Brush tool takes account of pressure sensitivity, allowing you to create lines with variable thicknesses
when using a pen tablet, creating a contour vector shape. You can set different parameters, such as the size andsmoothness of the Brush tool in the Pen view.
Refer to Pen View on page 99 to learn more about setting the Brush tool parameters.
To select the Brush tool:
‣ In the Drawing Tools toolbar, select the Brush tool.
‣ Select Tools > Drawing Tools > Brush.
‣ Press [@].
Pencil ToolThe Pencil , Polyline and Shape tools let you create a central vector line of uniform thickness.
You can set different parameters, such as the size and smoothness of the Pencil tool in the Pen view.
Refer to Pen View on page 99 to learn more about setting the Pencil tool parameters.

Chapter 4: Drawing and Design Drawing Using the Brush or Pencil Tool
86
To select the Pencil tool:
‣ In the Drawing Tools toolbar, select the Pencil tool.
‣ Select Tools > Drawing Tools > Pencil.
‣ Press [2] to cycle through tools.
Converting LinesYou can easily convert your pencil lines to brush shapes and your brush shapes to pencil lines using thesefeatures:
• Convert Lines to Brush
• Extract Centre Line
Convert Lines to BrushYou can draw with a Pencil tool and then convert it to a brush line using the Convert Lines to Brush option,
and then you canmodify its thickness using the Contour Editor tool.
To convert a pencil line to a brush zone:
1. Do one of the following:
‣ From the Drawing Tools toolbar, select the Select tool.
‣ Select Tools > Drawing Tools > Select.
‣ Press [!].
2. In the Drawing or Camera view, select the pencil line to convert and select Tools > Convert Lines toBrush.
Refer to More Drawing Tools on page 109 to learn more about the Contour Editor tool.
Extract Centre Line - Converting a Brush Shape to a Pencil lineYou can convert a brush shape into a pencil line using the Extract Centre Line option.
The brush line loses its thick and thin characteristics when is converted from a contour vector to acentral vector type.

Toon Boom Studio 8.1 User Guide
87
To convert a brush zone to a pencil line:
1. Do one of the following:
‣ From the Drawing Tools toolbar, select the Select tool.
‣ Select Tools > Drawing Tools > Select.
‣ Press [!].
2. In the Drawing or Camera view, select the brush zone youwant to convert and select Tools > ExtractCentre Line.

Chapter 4: Drawing and Design Relative Sizes of Characters and Props
88
Relative Sizes of Characters and Props
Your project can containmany characters and props. When characters are placed together in a scene, noticethat theymay be various sizes; somewill be too tall or too small, the character's sizemay vary from one scene tothe next. Youmay also find that when a character is scaled down using the Animation tools, its outline is thinner.Sometimes, the outlinemay be so thin that the difference between the resized character's outline and the outlineof the original un-resized character is quite noticeable.
When you design characters or props, keep inmind how they will look together. The grid can be displayed in theCamera or Drawing views. This is useful when determining the proportions between characters and props in ascene.
To display the grid when working in the Camera or Drawing view:
‣ From theGrid Control toolbar, click the Show Grid button or select View > Grid > Show Grid.
To select the grid units when working in the Camera or Drawing view:
With the grid displayed, click and hold the grid unit button in theGrid Control toolbar to display the other gridunit options and choose one of the following:
‣ Normal: Sets the grid units to squares. You can also select View > Grid > Normal.

Toon Boom Studio 8.1 User Guide
89
‣ 12 Field: Sets the grid units to rectangles for a 12 field grid. You can also select View > Grid > 12
Field.
‣ 16 Field: Sets the grid units to rectangles for a 16 field grid. You can also select View > Grid > 16
Field.
By default, the grid is displayed as an underlay so it appears behind the drawings. If you prefer it to appear infront of the drawings, you can display it as an overlay.
To display the grid as an overlay:
1. In the Grid Control toolbar, click theOverlay button or select View > Grid > Overlay. When the
button appears pushed in, the grid is displayed as an overlay.
2. In the Grid Control toolbar, click the pushed-in Overlay button or select View > Grid > Underlay to
switch back to the underlay grid displaymode.
You must be working in the Camera or Drawing view when setting the grid options, otherwise theGrid Control toolbar and the related top menu commands will be greyed out. When working in theCamera view, the grid is only displayed if a Drawing tool is selected.

Chapter 4: Drawing and Design Sketching
90
Sketching
A sketch is a rough version of your design. When you sketch a rough of a new design for a character, you canproduce whatever you imagine without being concerned about the final look of your lines. Making a roughversion of your character helps you build a solid base shape and come up with some new design ideas. ToonBoom Studio has many tools available for sketching.
Tomake a sketch:
1. In the Drawing Tools toolbar, select the Brush tool or press [@].
2. In the Pen view, set the look of the brush:
‣ Click the Brush Preview area and select a brush shape.
‣ Use the sliders to set theMinimum andMaximumbrush sizes.
As you set your brush size, the Brush Preview area displays theMinimum size of the brush in black and theMaximum size in dark grey.
‣ You can also set the Smoothness value of the Brush tool. Use this option to smooth out the brushstroke after you trace it. The higher the value, themore smoothness will be applied to your line.

Toon Boom Studio 8.1 User Guide
91
3. In the Colour view, select a default colour swatch to change the colour of the Brush tool.
4. In the Timeline or Exposure Sheet view, select the first cell of the drawing layer.
5. In the Drawing view, sketch your character.
Related Topics
• Adding Colours on page 125
• Pen View on page 99

Chapter 4: Drawing and Design Tracing
92
Tracing
Once you have sketched a rough version of your design, the next step is to trace it. Tracing lets you determinethe final look and line style of your drawing. Toon Boom Studio has many tools available for you to trace andperfect your drawing line.
To trace a drawing:
1. In the Drawing Tools toolbar, select the Brush tool or press [@].
2. In the Pen view, set the look of the brush:
‣ Click the Brush Preview area and select a brush shape.
‣ Use the sliders to set theMinimum andMaximumbrush sizes.
As you set your brush size, the Brush Preview area displays theMinimum size of the brush in black and theMaximum size in dark grey.
‣ You can also set the Smoothness value of the Brush tool. Use this option to smooth out the brushstroke after you trace it. The higher the value, themore smoothness will be applied to your line.

Toon Boom Studio 8.1 User Guide
93
3. In the Colour view, select a default colour swatch to change the colour of the Brush tool.
4. In the Timeline or Exposure Sheet view, click the Add Drawing Element button to add a new drawing
layer.
5. In the Timeline or Exposure Sheet view, select the cell of the new drawing layer corresponding to theframe your sketch is in.
6. To see your sketch as a reference, do one of the following:
‣ In theOnion Skin toolbar, click the Auto Light Table button.
‣ Select View > Turn Auto Light Table On.
‣ Press [L].
Your sketch drawing layer appears washed-out in the Drawing view.
7. Sometimes it helps to hide elements, specially when there aremany drawing layers. You can hide elementsin the Drawing view using the Exposure Sheet view, so you can focus on a specific layer.

Chapter 4: Drawing and Design Tracing
94
‣ In the Exposure Sheet view, select the column containing the drawing youwant to hide and selectElement > Display > Exposure Sheet > Hide.
‣ To hide all the drawing columns except the currently selected ones, selectElement > Display > Exposure Sheet > Hide All Others.
‣ To show again the hidden columns, selectElement > Display > Exposure Sheet > Show All Exposure Sheet Elements.
8. In the Drawing view, trace your character.
9. You can use the Rotary Table to rotate your workspace in the sameway as you would rotate a sheet ofpaper you are tracing on:
• Press and hold [Ctrl] + [Alt] (Windows) or [Ctrl] + [⌘ ] (MacOS X) to display the rotary table and thenclick and drag inside the drawing view to rotate the workspace.
• Select View > Reset Rotation or press [Shift] + [C] to reset the rotation of the view.
Once you are comfortable using the Drawing tools, you can improve your line art using the ContourEditor tool.
Related Topics
• Adding Colours on page 125
• Pen View on page 99
• More Drawing Tools on page 109

Toon Boom Studio 8.1 User Guide
95
Erasing Part of a Drawing
The Eraser tool lets you change part or all of your drawing. It is pressure sensitive, just like the Brush tool.
Pressure sensitivity provides more precision for erasing parts of a drawing. You can set its parameters in the Penview, such as size, smoothness, and eraser shape—Setting Up the Brush and Eraser Tools on page 99.
To erase with the Eraser tool:
1. Do one of the following:
‣ In the Drawing Tools toolbar, select the Eraser tool.
‣ Select Tools > Drawing Tools > Eraser.
‣ Press [$].
2. In the Drawing or Camera view, erase parts of the drawing.
You can also delete drawing objects by selecting them and pressing [Del].

Chapter 4: Drawing and Design Selecting Drawing Objects
96
Selecting Drawing Objects
The Select tool is used to select drawing objects in the Drawing or Camera view and to apply basic
transformations, such as repositioning, rotating or scaling, using the different handles of the bounding box.
To select with the Select tool:
1. In the Drawing Tools toolbar, select the Select tool or press [!].
2. In the Drawing or Camera view, select the drawing objects.
‣ Select all the drawing objects in a drawing by pressing [Ctrl] + [A] (Windows) or [⌘ ] + [A] (MacOS X).
‣ Switch to lasso selectionmode by holding down [Ctrl] (Windows) or [⌘ ] (MacOS X).
To deform or reposition selected drawing objects:
‣ To reposition, click the selected drawing object and drag the selection to a new area.
‣ To rotate, drag the selection box handle.

Toon Boom Studio 8.1 User Guide
97
‣ To scale, pull or push the side, top, or corner control point.Hold down [Shift] to lock the scaling ratio.
While working with the Select tool, you can hold [Ctrl] (Windows) or [Alt] (Mac OS X) to temporarilyswitch to the Perspective tool, allowing further transformations—see Perspective Tool on page 113.
Repositioning a Pivot Point
Some of the transformations such as rotation, scale and flip, are done using the position of the pivot point as thecentral point. By default, this pivot point is located in the centre of your selection. You can temporarily repositionthis pivot point for a transformation using the Select tool.
To temporarily reposition the pivot point:
1. In the Drawing or Camera view, select the drawing object you want to transform.
The pivot point appears in themiddle of your selection.

Chapter 4: Drawing and Design Selecting Drawing Objects
98
2. Click the pivot point and drag it to a new position.
This becomes the new position of the pivot point for the current transformation and will remain there untilyoumake a new selection.

Toon Boom Studio 8.1 User Guide
99
Pen ViewThe Pen view lets you customize the size, smoothness, or tip shape of the Brush , Eraser , Pencil ,
Shapes and Polyline tools.
Setting Up the Brush and Eraser ToolsThe Brush and Eraser tools become pressure sensitive when using a pen tablet, meaning they will
produce a thick and thin effect when drawing or erasing, depending on how hard you press on your pen. Unlikethe Pencil tool, you can set a minimum andmaximumbrush size for this effect.
To set up the Brush or Eraser tool:
1. In the Drawing Tools toolbar, select the Brush or Eraser tool.
2. In the Pen view, select a pen style from the Pen Style list—seeManaging Pen Styles on page 102.
3. Use theMinimum Size andMaximum Size sliders to set theMinimum andMaximumbrush sizes for thethick and thin effect.
As you set your brush size, the Brush Preview area displays theMinimum size of your brush in black andtheMaximum size in dark grey.
4. Use the Smoothness slider to set the smoothness value for your line. When you draw, Toon Boom Studiomakes an adjustment to the line based on this value and smooths out any sharp edges or jagged peaks inthe line.

Chapter 4: Drawing and Design Pen View
100
5. Click the Preview area and select a Brush tip shape from themenu.
Eraser and Brush StylesIn the Pen Style list of the Pen view, there is a Brush and Eraser marker.
Thesemarkers show the active pen style linked to the Eraser tool, and the active pen style linked to the Brush,Pencil, Shapes and Polyline tools. When you switch from one type of tool to the other, the active pen style linkedto it is automatically selected. This way you can quickly switch from the Eraser to the Drawing tool withouthaving to change the settings in between.
Setting Up the Pencil ToolThe Pencil tool is not pressure sensitive and only has one value to set, unlike the Brush or Eraser tools.
To set up the Pencil tool:
1. In the Drawing Tools toolbar, select the Pencil tool.
2. In the Pen view, select a pen style from the Pen Style list—seeManaging Pen Styles on page 102.
3. Use theMinimum Size andMaximum Size sliders to set theMinimum andMaximumbrush sizes for thethick and thin effect.
As you set your brush size, the Brush Preview area displays theMinimum size of your brush in black andtheMaximum size in dark grey.

Toon Boom Studio 8.1 User Guide
101
4. Use the Smoothness slider to set the smoothness value for your line. When you draw, Toon Boom Studiomakes an adjustment to the line based on this value and smooths out any sharp edges or jagged peaks inthe line.
5. Click the Preview area and select a Brush tip shape from themenu.
Setting Up the Shape Tools and Polyline ToolTo customize the size of the Shapes and Polyline tools, you only have to set one value.
To set the shapes and Polyline tools size:
1. In the Drawing Tools toolbar, select the Line , Ellipse , Rectangle or Polyline tool.
2. In the Pen view, use theMaximum Size slider to set the size of the tool.
Changing the Thickness of a Centreline ObjectYou can use the Pen view to resize the thickness of existing centreline drawing objects, such as a Pencil lines,Shapes or Polylines.
To resize a centreline object stroke:
1. In the Drawing Tools toolbar, select the Select tool or press [!].
2. In the Drawing or Camera view, select the centreline drawing object whose thickness you want to change.

Chapter 4: Drawing and Design Pen View
102
3. In the Pen view, use theMaximum Size slider to set the new line thickness.
Managing Pen Styles
There are five default pen styles you can use; each one can be edited. You can also add your own custom penstyles to the Pen Style list.
Adding a Pen StyleTo create a pen style:
1. In the Pen view, click the Add Pen Style button.
A new pen style is added at the end of the pen style list. This new pen style is based on the previouslyselected style.
2. Double-click on the new pen style to rename it.
3. Set the desired values for your new pen style, such as Minimum andMaximum Sizes, Smoothness andBrush tip shape.
Editing a Pen StyleTo edit a pen style:
1. In the Pen view, select a pen style to edit.

Toon Boom Studio 8.1 User Guide
103
2. In the Pen Style list, double-click on a pen style to rename it.
3. Set the new values for the pen style, such as Minimum or Maximum size, Smoothness, and Brush tipshape.
Removing a Pen StyleTo remove a pen style:
1. In the Pen view, select a pen style to remove.
2. Click the Remove Pen Style button.

Chapter 4: Drawing and Design Drawing Invisible Lines
104
Drawing Invisible Lines
Using the Pencil tool, you can draw as strokes only, meaning that the line will be invisible. This can be useful fordrawing tones and highlights directly on the character.
To draw invisible lines with the Pencil tool:
1. In the Timeline or Exposure Sheet view, select the cell on which you want to draw.
2. Do one of the following:
‣ In the Drawing Tools toolbar, click the Pencil tool.
‣ Select Tools > Drawing Tools > Pencil.
‣ Press [2] to cycle through tools.
3. Select View > Show Strokes or press [K] to make the lines visible, enabling you to see them as you draw.
4. In the Pen Style view, set the Pen tool maximum size to 0. You can also adjust the smoothness.
5. In the Camera or Drawing view, start drawing.
You can modify the stroke shape with the Contour Editor tool—see More Drawing Tools onpage 109.

Toon Boom Studio 8.1 User Guide
105
You can also draw with invisible lines using the Stroke tool. However, you will not be able to controlthe smoothness value for your line.
To select the Stroke tool:
1. Do one of the following:
‣ In the Drawing Tools toolbar, click the Stroke tool.
‣ Select Tools > Drawing Tools > Stroke.
‣ Press [3] to cycle through tools.

Chapter 4: Drawing and Design WorkingWith Text
106
Working With TextWith the Text tool, you can type text in your project using various fonts and texts attributes. Text objects arepart of a drawing, so you canmanipulate them the sameway.
Creating TextTo add text to your drawings:
1. Do one of the following:
‣ In the Drawing Tools toolbar, click the Text tool.
‣ Select Tools > Drawing Tools > Text.
‣ Press [T].
2. In the Timeline view, select the frame containing the drawing in which you want to add text.
3. In the Drawing or Camera view, click on the location you want your text to begin.
4. You can use the Text view to select the font, font size, and format of the text—see Formatting the Texton the facing page.
5. Type in the desired text.
6. If you want to create another text object, click outside the currently active text box. You can always returnto edit the text by selecting the Text tool and clicking in the text.

Toon Boom Studio 8.1 User Guide
107
Formatting the TextUse the Text view to select the font type and other formatting options you want to apply to the text.
1. Font Type: Lets you select a font from the list of fonts available on your system.
2. Font Size: Type the desired size for the text in this field. You can also use the up and down arrow buttonsto set the desired value.
3. Font Style: Use these buttons to select a style for your text:
‣ Bold
‣ Italic
4. Kerning: Use the kerning field to modify the spacing between characters. You can select the Auto Kernoption to set the kerning automatically, based on the font's predefined standard. A negative valuedecreases spacing between each character and a positive value increases it.
5. Alignment: Use these buttons to align the paragraph.
‣ Left
‣ Centered
‣ Right
‣ Justified
6. Indent: Enter a value increase or decrease the amount of indentation on the first line of your text. Apositive value sets the first line of your paragraph farther to the right and a negative value sets it fartherto the left.
7. Line Spacing: Enter a value to decrease or increase the space between each line of text.
Converting Text into Separate ObjectsText contained in a text field is treated as a single drawing object. You can easily separate the text so that eachcharacter becomes an individual drawing object that you can select and modify independently.
To break a text object:
1. In the Drawing Tools toolbar, click the Select tool or press [!].

Chapter 4: Drawing and Design WorkingWith Text
108
2. In the Drawing or Camera view, select the text object you want to break.
3. Select Tools > Break Text Apart.
Each character is surrounded by its own bounding box that you canmodify; they remain text objects youcan edit.
4. Select Tools > Break Text Apart on a single character to break it into a regular drawing object with nomore text attributes.

Toon Boom Studio 8.1 User Guide
109
More Drawing ToolsToon Boom Studio provides some other useful drawing tools:
• Shape Tools below
• Polyline Tool on the next page
• Contour Editor Tool on page 111
• Perspective Tool on page 113
• Cutter Tool on page 114
• Scissor Tool on page 115
Shape ToolsIn Toon Boom Studio, you can use the shape tools to draw with circles, squares, or lines.
To draw with a shape tool:
1. In the Timeline view, select the frame youwant to draw in.
2. In the Drawing Tools toolbar, select a Shape tool:
‣ Ellipse tool: You can also select Tools > Drawing Tools > Ellipse or press [2] to cycle through the
tools.
‣ Rectangle tool: You can also select Tools > Drawing Tools > Rectangle or press [2] to cycle
through the tools.
‣ Line tool: You can also select Tools > Drawing Tools > Line or press [2] to cycle through the
tools.
3. In the Pen view, set the size of your shape's line using theMaximum slider.
4. Change the colour of the shape's line using the colour swatches in the Colour view.
5. In the Drawing or Camera view, click and drag to draw your shape.

Chapter 4: Drawing and Design More Drawing Tools
110
‣ Hold down [Shift] to lock the rectangle or ellipse ratio to 1:1to create a square or circle.
‣ Hold down [Alt] to draw the rectangle or ellipse from its centre.
‣ Hold down [Shift] to snap the line at 15 degree increments.
‣ Hold down [Alt] to connect the starting point of the line you are drawing to the ending point of theprevious one using the Line tool.
Related Topics
• Pen View on page 99
• Adding Colours on page 125
Polyline ToolThe Polyline tool lets you draw shapes, and like the Pencil and Shape tools, it is a central vector type of line. Toform a shape, click to add points. Repeat until the shape is formed. To make curves, click and without releasingthemouse, drag to pull the handle in the desired direction before adding the next point.
To use the Polyline tool:
1. In the Timeline view, select the frame in which you want to draw a polyline shape.
2. Do one of the following:
‣ In Drawing Tools toolbar, select the Polyline tool.
‣ Select Tools > Drawing Tools > Polyline.
‣ Press [2] to cycle through the tools.
3. In the Pen view, set the size of the polyline using theMaximum slider.
4. You can change the colour of the polyline using the colour swatches in the Colour view.
5. In the Drawing or Camera view, click and drag to create a starting point and a Bezier handle to shape yourline.
‣ Press [Alt] to pull only one handle, instead of two.
‣ Press [Shift] to lock the handles to 45°, 90°, or 180°.

Toon Boom Studio 8.1 User Guide
111
6. Click again in a new area and drag to create a second point and Bezier handle.
7. Repeat the previous step until the shape is completed.
8. To close a shape so that there are no gaps:
‣ Place your pointer over a point and click.An "o" appears when you add a point that will close a shape.
‣ Place your pointer over any location on the shape you are drawing and click.A plus sign (+) appears when your pointer is over a spot you can use to close the shape.
9. To remove a control point on the line, press [Shift] and click on the point.A dash (-) appears when your pointer is over a point to delete.
10. If needed, use the Contour Editor tool to reshape the line—see Contour Editor Tool below.
Contour Editor ToolThe Contour Editor tool lets you correct line shapes and modify part of a colour zone. If a line is too thin or has agap in it, you canmodify and correct it with this tool. This tool can also be used to create elaborate shapes froma simple one.
The Contour Editor tool displays the vector points around a shape and the central vector point in a pencil line.Pulling or Pushing on these points adjusts a brush line's thickness or a central vector shape.
To use the Contour Editor tool:
1. Do one of the following:
‣ In the Drawing Tools toolbar, select the Contour Editor tool.
‣ Select Tools > Drawing Tools > Contour Editor.

Chapter 4: Drawing and Design More Drawing Tools
112
‣ Press [1] to cycle through the tools.
2. In the Drawing or Camera view, click on the shape's line or on a pencil line to edit it.
3. Select one point or several points by clicking on them or circling around them.
4. To modify the shape, you can:
‣ Pull on the Bezier handle. Both point's handles will move as one.
‣ Hold down [Alt] (Windows) or [⌘ ] (MacOS X) and pull on one of the Bezier handles. The point'shandles will move independently from the other one.
‣ Move the selected points to a new area.
‣ Pull directly on the line between two points. No selection is necessary.

Toon Boom Studio 8.1 User Guide
113
‣ Hold down [Ctrl] (Windows) or [Alt] (MacOS X) and click on the line to add a new control point.
‣ Select a control point and press [Del] to delete it.
Snap to ContourWhen using the Contour Editor tool, you can snap the selected control point to the vector line.
To snap a control point to the vector line:
1. In the Drawing Tools toolbar, select the Contour Editor tool.
2. Select Tools > Snap to Contour.
3. Select a control point and as youmove it, it is attracted to the contour lines. Releasing the point on theline snaps it to it.
Perspective Tool
The Perspective tool lets you deform a selection and alter its perspective.

Chapter 4: Drawing and Design More Drawing Tools
114
To deform a drawing object:
1. Do one of the following:
‣ In the Drawing Tools toolbar, select the Perspective tool.
‣ Select Tools > Drawing Tools > Perspective
‣ Press [1] to cycle through the tools.
2. In the Drawing or Camera view, select the drawing objects you want to deform.
3. Click and drag the bounding box's anchored points to deform it.
You can temporarily switch to the Perspective tool by holding [Ctrl] (Windows) or [Alt] (Mac OS X)while using the Select tool—see Selecting Drawing Objects on page 96.
Cutter Tool
The Cutter tool lets you cut a part of your drawing and separate it from the rest. A vector stroke is created thatlets you split the shape. You can show the vector strokes whichmake up your drawing and visualize the vectorline drawn by the Cutter tool as you draw it.
To use the Cutter tool:
1. Do one of the following:
‣ In the Drawing Tools toolbar, select the Cutter tool.
‣ Select Tools > Drawing Tools > Cutter.
‣ Press [4] to cycle through the tools.
2. Select View > Show Strokes or press [K] to display the vector lines composing your drawing.

Toon Boom Studio 8.1 User Guide
115
3. In the Drawing or Camera view, draw the separation line on your drawing.
4. Once you split the drawing, you can use the Select tool to select the separated part and reposition or
transform it—see Selecting Drawing Objects on page 96.
Scissor Tool
The Scissor tool lets you cut a selection inside a drawing object, and reposition or transform it right-awaywithout switching tools.
To cut parts from a drawing using the Scissor tool:
1. Do one of the following:

Chapter 4: Drawing and Design More Drawing Tools
116
‣ In the Drawing Tools toolbar, select the Scissor tool.
‣ Select Tools > Drawing Tools > Scissor.
‣ Press [4] to cycle through the tools.
2. In the Drawing or Camera view, click and drag to create a square selection to cut inside your drawing. Youcan hold [Alt] (Windows) or [⌘ ] (MacOS X) to make a lasso selection.
3. Use the Scissor tool to move, scale, rotate, or translate the drawing piece. If you deselect the cut piece orthe Scissor tool, the cut area will disappear and the object will remain whole.

Toon Boom Studio 8.1 User Guide
117
More Drawing OptionsToon Boom Studio provides many useful drawing and design options.
• Group and Ungroup below
• Smooth on the next page
• Optimize on page 119
• Flatten and Optimize on the next page
• Transform on page 120
• Arrange on page 121
• Show Current Drawing on Top on page 121
Group and Ungroup
In Toon Boom Studio, each stroke in a drawing can be selected independently until they are flattened, but theneach different colour shapes still remain independent from one another. It is useful to be able to edit yourdrawing one shape at a time, but depending on the current task, it might be useful to quickly select a groupingof these strokes.For example, when you need to reposition or transform the entire head of a character, you donot want to drop the nose or an eye.
To group drawing objects:
1. Do one of the following:
‣ In the Drawing Tools toolbar, click the Select tool.
‣ Select Tools > Drawing Tools > Select.
‣ Press the [!].
2. In the Drawing or Camera view, select the drawing objects you want to group. To select all the shapes inyour drawing, press [Ctrl] + [A] (Windows) or [⌘ ] + [A] (MacOS X).

Chapter 4: Drawing and Design More Drawing Options
118
3. Select Tools > Group or press [Ctrl] + [G] (Windows) or [⌘ ] + [G] (MacOS X).
Your drawing objects are grouped and can be selected with a single click.
Grouping is reversible, you can always ungroup selected drawing objects and select the shapesindependently.
To ungroup drawing objects:
1. Do one of the following:
‣ In the Drawing Tools toolbar, click the Select tool.
‣ Select Tools > Drawing Tools > Select.
‣ Press [!].
2. In the Drawing or Camera view, select a grouped object and selectTools > Ungroup or press [Ctrl] + [Shift] + [G] (Windows) or [⌘ ] + [Shift] + [G] (MacOS X).
SmoothThe Smooth operation is used to smooth out a selected drawing object and remove extra vector points.
To use the Smooth operation:
1. In the Drawing or Camera view, select a drawing object to smooth using the Select tool.
2. Select Tools > Smooth.
Flatten and OptimizeThe Flatten and Optimize operations are similar. They are used to merge shapes and brush strokes in the samedrawing into a single flat layer. If you draw lines to fix a drawing or a line withmany brush strokes, or draw acomplex shape frommany different shapes superposed, it can be useful to flatten them all into a single shape

Toon Boom Studio 8.1 User Guide
119
because lines are drawn one of top of each other. If you intend on repainting the shape or line or modifying it, itwill be easier if they aremerged together as one.
FlattenThe Flatten operationmerges shapes and brush strokes of a drawing into a single flat layer. This means that ifyou have shapes or strokes of a transparent colour, you will lose the overlapping effect.
To use the Flatten operation:
1. In the Drawing or Camera view, select the drawing objects to flatten using the Select tool. To select
all shapes in your drawing, press [Ctrl] + [A] (Windows) or [⌘ ] + [A] (MacOS X).
2. Select Tools > Flatten.
‣ Shapes of the same colour aremerged together. In this example, the two circles overlapping oneanother were painted using a transparent colour.
‣ Shapes of different colours remain separate. In this example, the two circles overlapping one anotherwere painted using two different transparent colours. The green circle on the right was painted on topof the blue circle on the left. When they are flattened, the parts overlapped by a higher level layershape are removed, in this case, leaving the blue circle cropped.
When drawing with the Brush tool, you can also decide to instantly flatten the strokes as you draw them
using the Draw Top Layer option.
To enable the Draw Top Layer option:
‣ Select Tools > Draw Top Layer.
OptimizeTheOptimize operation is used to merge shapes and brush strokes in the drawing into a single flat layer. Unlikethe Flatten option, theOptimize commandmerges the selected drawing shapes or strokes only if doing so willnot change the appearance of the final image.
If you have transparent shapes overlapping one another, they will not bemerged or flattened. The transparentoverlapping effect is preserved.

Chapter 4: Drawing and Design More Drawing Options
120
To use the Optimize operation:
1. In the Drawing or Camera view, select the drawing objects you want to optimize using the Select tool.
To select every shape in your drawing, press [Ctrl] + [A] (Windows) or [⌘ ] + [A] (MacOS X).
2. Select Tools > Optimize.
Overlapping shapes of the same non-transparent colour aremerged together.
Overlapping shapes of different non-transparent colours aremerged and cropped.
TransformUse the different Transform operations to apply a specific transformation, such as a flip or a rotation to adrawing shape selection.
To use the Transform options:
1. In the Drawing or Camera view, select the drawing object to flip using the Select tool. To select every
shape in your drawing, press [Ctrl] + [A] (Windows) or [⌘ ] + [A] (MacOS X).
2. Select Tools > Transform and one of the following:
‣ Flip Horizontal: Flips the currently selected shape horizontally.
‣ Flip Vertical: Flips the currently selected shape vertically.
‣ Rotate 90 CW: Rotates the currently selected shape clockwise 90°.
‣ Rotate 90 CCW: Roates the currently selected shape counterclockwise 90°.

Toon Boom Studio 8.1 User Guide
121
‣ Rotate 180: Rotates the currently selected shape 180°.
Arrange
You can reorder the shapes and strokes of a drawing.
This option will only reorder strokes within a drawing. If you want to reorder layers in the Timelineview, see Ordering Your Layers on page 268 and Ordering Parented Layers on page 269.
To reorder shapes in a drawing:
1. In the Drawing or Camera view, use the Select tool to select the drawing objects to reorder.
2. Select Tools > Arrange and one of the following:
‣ Bring to Front: Moves the currently selected shape on top of all the others.
‣ Bring Forward: Moves the currently selected shape one level higher.
‣ Send to Back:; Moves the currently selected shape under all the others.
‣ Send Backward: Moves the currently selected shape one level lower.
Show Current Drawing on TopBy default, the Show Current Drawing on Top option is enabled. This means that when you are working in theCamera view with a drawing tool, the selected drawing is automatically displayed on top of all the others. Thisfacilitates editing.

Chapter 4: Drawing and Design More Drawing Options
122
If you need to work on the selected drawing while seeing the final composition of your scene, youmust place thedrawing in the correct order compared to all the others in the scene. In the following example, the belly of theturtle was selected.
To use the Show Current Drawing on Top option:
‣ Select View > Show Current Drawing on Top.

Toon Boom Studio 8.1 User Guide
123
PreferencesYou can customize some options in the Studio Preferences panel. Here are the options related to Drawing andDesigning:
• Window Background Colours below
• Light Table on the next page
To open the Preferences panel:
‣ Windows: Select Edit > Preferences.
‣ MacOS X: Select Toon Boom Studio > Preferences.
Window Background ColoursYou can change the background colour of the Drawing view. Youmay want to do this if you are drawing withvery light colours.
To change the colour of the Drawing view:
1. In the Preferences panel, select the Interface tab.
2. In theWindow Background Colours section, click the square beside Drawing.
The Select Colour dialog box opens.

Chapter 4: Drawing and Design Preferences
124
3. Choose a colour and click OK.
4. Click OK in the Preferences panel.
The Drawing view background colour changes to the selected colour.
Light TableYou can change the way the drawings are displayed when using the Autoight Table option.
To use the Automatic Light Table:
1. In the Preferences panel, select the LightTable tab.
2. In the Automatic LightTable section:
‣ Select the Enable Shade option to display the other columns drawings as washed out colours whenusing the Automatic Light Table.
‣ Deselect the Enable Shade option to display the other columns drawings with their real colours whenyou are using the Automatic Light Table.
3. Click OK.

Toon Boom Studio 8.1 User Guide
125
Chapter 5: Adding Colours
With Toon Boom Studio, you can add colour to your projects and even create sets of colours for your characters.These sets of colours are called colour palettes. With these palettes, you will discover that adding colours toyour movie is one of the easiest and useful steps in the process!
In this chapter, you will learn about the following:
• How to Paint on the next page
• Colours on page 127
• Colour DisplayModes on page 141
• Using the Painting Tools on page 142
• Closing Gaps on page 145
• Selecting a Colour in a Drawing on page 148
• Editing Gradients and Textures on page 149
• Palettes on page 152

Chapter 5: Adding Colours How to Paint
126
How to PaintFollow these very simple instructions to learn how to paint your drawings. Once youmaster this operation youwill be able to try all the tools and features explained below.
To paint your drawings:
1. Do one of the following:
‣ In the Drawing Tools toolbar, select the Paint tool.
‣ Select Tools > Drawing Tools > Paint.
‣ Press [#].
2. In the Colour Palette view, select a colour from the palette.
3. In the Camera or Drawing view, start painting the colours on your drawing.

Toon Boom Studio 8.1 User Guide
127
Colours
In Toon Boom Studio, you use different colour swatches to paint your drawings rather thanmodifying the tint ofone colour each time youwant a different colour. A colour swatch can also be called a colour pot.
In the Colour Palette view, you choose a different colour swatch for each colour you want to paint in yourdrawing. You can add as many swatches as you want. You can also rename them or modify existing ones.
When youmodify the colour of an existing swatch, it automatically updates all the zones painted with this swatchthroughout the entire project. The colour swatch has a unique identification number that associates it with thepainted zones. This way, you can change the look of your character anytimewithout having to repaint it!
This topic is divided as follows:
• Adding a Colour Swatch below
• Deleting a Colour Swatch on page 140
Adding a Colour SwatchYou can create three different types of colour swatches:
• Solid Colour Swatch on the next page
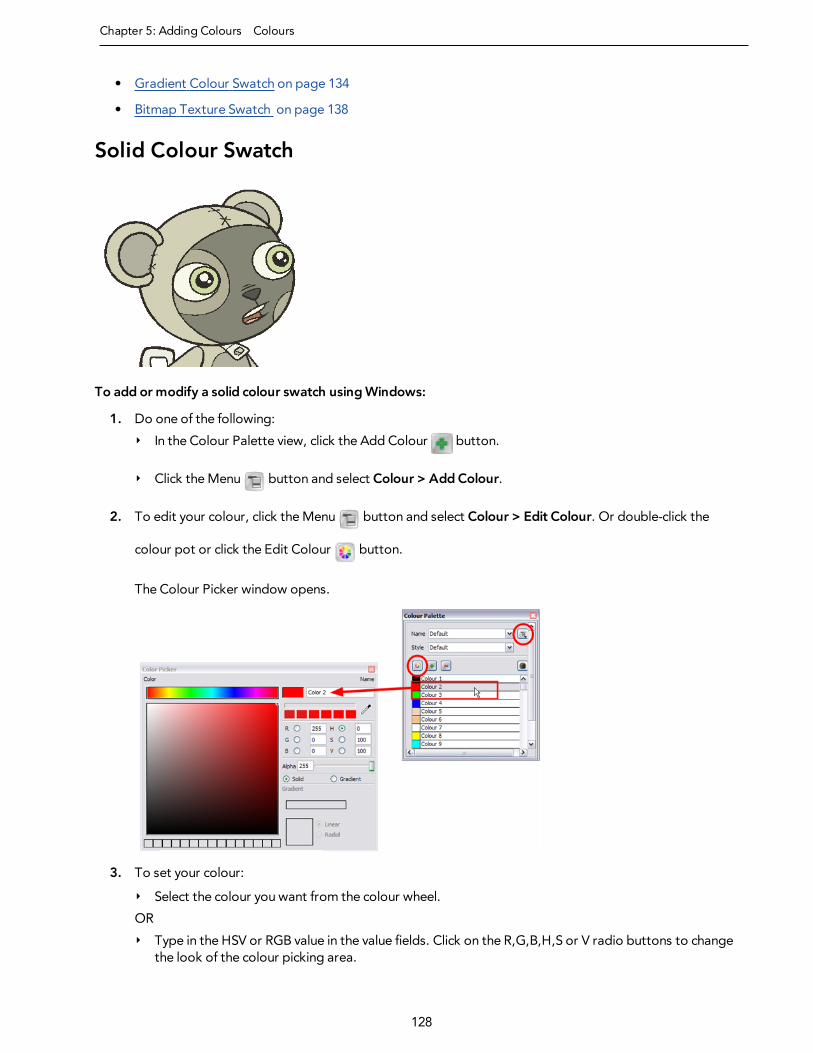
Chapter 5: Adding Colours Colours
128
• Gradient Colour Swatch on page 134
• Bitmap Texture Swatch on page 138
Solid Colour Swatch
To add or modify a solid colour swatch usingWindows:
1. Do one of the following:
‣ In the Colour Palette view, click the Add Colour button.
‣ Click theMenu button and select Colour > AddColour.
2. To edit your colour, click theMenu button and select Colour > Edit Colour. Or double-click the
colour pot or click the Edit Colour button.
The Colour Picker window opens.
3. To set your colour:
‣ Select the colour you want from the colour wheel.
OR
‣ Type in the HSV or RGB value in the value fields. Click on the R,G,B,H,S or V radio buttons to changethe look of the colour picking area.

Toon Boom Studio 8.1 User Guide
129
OR
‣ Click theDropper button to select any colour on your screen. It can be from the Toon BoomStudio's interface, your operating system, or any other opened application.
4. If needed, click the Shade Scale's swatches to modify the shade of the selected colour.
5. If necessary, adjust the level of transparency with the Alpha slider, or type the value directly in the Alphafield. 0 = 100% transparent, 255 = 100% opaque. Any value between 0 and 255 gives a more-or-less semi-transparent colour.
6. If necessary, select the new colour from the Colour Display area and drag it to the Colour Storage Library,so you can quickly access it later.
7. You can rename the colour swatch in the Colour Picker window or directly in the colour list by double-clicking on its name.

Chapter 5: Adding Colours Colours
130
To add or modify a solid colour swatch usingMacOS X:
1. In the Colour Palette view, click the Add Colour button. Or click theMenu button and select
Colour > AddColour.
2. To edit the colour, click theMenu button and select Colour > Edit Colour. Or double-click the colour
pot or click the Edit Colour button.
The Colour window opens.
3. Use the top buttons to select one of the five colour picker displaymodes:
‣ Colour Wheel
‣ Colour Slider
‣ Colour Palettes
‣ Image Palettes
‣ Crayons
4. To select a colour from the Colour Wheel displaymode:

Toon Boom Studio 8.1 User Guide
131
‣ Pick the colour you want from the colour wheel.
‣ If needed, use the Shade Scale's slider to modify the shade of the selected colour.
5. To select a colour from the Colour Slider displaymode:
‣ From the slider type drop-down list, select the type of slider you want to use:
• Greyscale slider
• RGB sliders

Chapter 5: Adding Colours Colours
132
• HSB sliders
‣ Use the sliders to select a colour. You can also type in the values directly into the fields.
6. To select a colour from the Colour Palettes displaymode:
‣ Use the palette drop-down list to select a system palette to display. System palettes are not linked toToon Boom Studio.
‣ From the PaletteMenu button, select one of the following:
New to create a new system palette.
Open to open a system palette stored on your computer.
Rename to rename to current palette. Note that you can not rename an Apple default palette.
Remove to delete the current palette. Note that you can not remove an Apple default palette.
‣ Use the plus button (+) to add a new colour swatch to a palette you created. Note that you can notadd colours to one of Apple's default palettes.
‣ Use theminus button (-) to remove a colour swatch from a palette you created. Note that you can notremove colours from one of Apple's default palettes.
‣ Type a letter in the search field to narrow down the list to only swatch name containing this letter tohelp you find a particular colour from the current palette colour list.
7. To select a colour from the Image Palettes displaymode:

Toon Boom Studio 8.1 User Guide
133
‣ From the Image drop-down list, select the image youwant to display in themain space. By default,only the Spectrum image is available. Once you start adding pictures, they will be added to the list.
‣ From the Palette drop-downmenu, select one of the following:
New from File to browse to a picture of your choice to be displayed in themain space.
Rename to rename the current picture. This is the name that appears in the Image drop-list. Note thatyou can not rename an Apple default picture.
Remove to remove the current picture. Note that you cannot remove an Apple default picture.
Copy to add the current image to your clipboard.
New from Clipboard to use a copied image file or a selection within an image, still stored in yourclipboard.
8. To select a colour from the Crayons displaymode:
‣ Click a crayon from the image to select that colour.
9. In all of the colour picker displaymodes, you can also:
‣ Click theMagnifier to select any colour on your screen. It can be from the Toon Boom Studio'sinterface, your operating system or any other opened application.

Chapter 5: Adding Colours Colours
134
‣ If necessary, adjust the level of transparency with theOpacity slider, or type the value directly in thepercentage field. 0 = 100% transparent, 255 = 100% opaque. Any value between 0 and 255 gives amore-or-less semi-transparent colour.
10. You can rename the colour swatch in the Colour Palette view colour list by double-clicking on its name.
Gradient Colour Swatch
To create a gradient colour swatch usingWindows:
1. In the Colour Palette view, select a colour to modify.
2. Click the Colour PaletteMenu button and select Colour > Edit Colour. You can also double-click thecolour swatch.
The Colour Picker window opens.

Toon Boom Studio 8.1 User Guide
135
3. Select theGradient option.
4. Select the Linear or Radial option.
5. Select the Gradient arrows to modify the colours.
‣ Click between the arrows to add extra colours.
‣ Pull down the arrows to remove them.
‣ Move the arrows left and right to modify the gradient distance.

Chapter 5: Adding Colours Colours
136
To create a gradient colour swatch usingMacOS X.
1. In the Colour Palette view, select the colour to bemodified.
2. Click on the Colour PaletteMenu button and select Colour > Edit Colour. You can also double-click onthe colour swatch.
The Colours window opens.
3. Select theGradient option.
4. Select the Linear or Radial option.
5. Select the Gradient arrows to modify the colours.

Toon Boom Studio 8.1 User Guide
137
‣ Click between the arrows to add extra colours.
‣ Pull up the arrows to remove them.
‣ Move the arrows left and right to modify the gradient distance.
6. By default the Deformable by Skeleton option is enabled. This means that when creating a skeletonpuppet animation, the gradient will be deformed following the bones. You can disable this option if youwant the gradient to stay as it is—see Bones on page 343 to learnmore about Skeletons and Bones.

Chapter 5: Adding Colours Colours
138
Bitmap Texture Swatch
To create and edit a texture colour:
1. In the Colour Palette view, click theMenu button and select Colour > Add Texture.
2. Browse for any bitmap file created in a third party software.
3. Click Open to create the colour swatch.
4. In the Colour Palette view, select the texture swatch that you want to modify the texture of.
5. Double-click on the colour swatch to edit.
The Texture Properties dialog box opens.
6. To rename the colour swatch, type a new name in theName field.

Toon Boom Studio 8.1 User Guide
139
7. Disable the Tile option if you want the texture to automatically scale up to the size of the painted zone.Enable the Tile option if you want your image to repeat over and over inside the drawing zone.
8. Click OK.
Refer to the Editing Gradients and Textures on page 149 topic to learn how to reposition texturedzones in your drawings.
You can also replace a texture once it is painted. For instance, if you decide to make the character's suit a darkgranite colour instead of pink cotton, just update the texture file in the swatch and the entire project updates.Any transformation previously applied to the texture's position in your drawings is kept.
To replace a texture swatch:
1. In the Colour Palette view, select the texture swatch you want to modify the texture of.
2. Double-click the colour swatch to edit.
The Texture Properties dialog box opens.

Chapter 5: Adding Colours Colours
140
3. Click the Browse button.
The Browse window opens.
4. Browse for any bitmap file created in a third party software.
5. Click Open to update the colour swatch.
6. Click OK.
Deleting a Colour SwatchIf a colour is not needed in a project, you can delete it from the list to avoid having too many colour swatches inyour Colour Palette view.
To delete a colour swatch:
1. In the Colour view, select the colour swatches to delete.
2. In the Colour Palette view, click the Delete Colour button. You can also click theMenu button and
select Colour > Delete Colour.
‣ If you delete colour swatches already in use, the zones painted with them turn red so you can easilyidentify them.

Toon Boom Studio 8.1 User Guide
141
Colour Display ModesThe Colour Palette view can display the colour swatches in two different ways:
• List mode
• Swatchmode
To toggle between the display modes:
‣ In the Colour Palette view, click the Show/Hide Colour Names button to switch between the two
modes. You can also click theMenu button and select Show/Hide Colour Names.

Chapter 5: Adding Colours Using the Painting Tools
142
Using the Painting ToolsThe Paint tool is themain tool for painting your drawings. Other painting tools are also available to make
your painting process easier and faster.
The painting tools only paint closed zones. If you have gaps in your lines, youmust close them using either theBrush, Pencil, Close Gap tools or the Automatic Close Gap option.
This topic is divided as follows:
• Painting with the Paint Tool below
• Painting with the Paint Unpainted Tool on the facing page
• Unpainting Areas with the Unpaint Tool on page 144
Painting with the Paint ToolTo paint with the Paint tool:
1. In the Timeline or Exposure Sheet view, select a drawing to paint.
2. Do one of the following:
‣ In the Drawing Tools toolbar, select the Paint tool.
‣ Select Tools > Drawing Tools > Paint.
‣ Press [#]..
3. In the Colour Palette view, select a colour.
4. In the Drawing or Camera view, start painting by clicking in the different closed zones.

Toon Boom Studio 8.1 User Guide
143
Painting with the Paint Unpainted Tool
The Paint Unpainted tool only paints empty zones. Any line or filled zone remains unchanged. For example, if youare painting a cow or a leopard, this tool is very useful when it is time to paint all the spots on the body. Insteadof trying to click in each one of them, you can draw a large selection around the body to paint all the spots atonce. All the empty zones are painted and all the filled zones remain untouched.
To paint with the Paint Unpainted tool:
1. In the Timeline or Exposure Sheet view, select a drawing to paint.
2. In the Drawing Tools toolbar, select the Paint Unpainted tool, under the Paint tool category. Or
Tools > Drawing Tools > Paint Unpainted.
3. In the Drawing or Camera view, draw a wide selection containing all the zones to paint.

Chapter 5: Adding Colours Using the Painting Tools
144
Unpainting Areas with the Unpaint Tool
The Unpaint tool unpaints everything it touches. You can use it to unpaint zones you have painted bymistake, orto simply unpaint a drawing.
To unpaint a drawingwith the Unpaint tool:
1. In the Timeline or Exposure Sheet view, select a drawing to unpaint.
2. In the Drawing Tools toolbar, select the Unpaint tool, under the Paint tool category. You can also
select the Unpaint tool from the top menu Tools > Drawing Tools > Unpaint.
3. In the Drawing or Camera view, click on the zones to unpaint.

Toon Boom Studio 8.1 User Guide
145
Closing Gaps
When painting, you will notice that some of your drawing areas are not closed. To close the zone, you can drawthemissing line with the Brush or Pencil tool. You can also close the gap with an invisible line. To do so, you canuse the Close Gap tool or the automatic close gap feature.
What is a Gap?
Agap is a hole or break in your lines causing a zone to be opened, therefore not paintable. You can often findgaps where lines intersect or if you erased a portion of the line accidentally.
Closing Holes with the Close Gap ToolThe Close Gap tool is used to close small gaps in a drawing. The Paint tool only paints closed areas. The CloseGap tool creates a small, invisible stroke between the two closest points to close the colour zone. You do notneed to trace directly over the gap. You can draw it a few millimetres away and the two closest points areautomatically chosen and the gap between them is closed.
To use the Close Gap tool:
1. In the Drawing Tools toolbar, select the Close Gap tool under the Paint tool category.
2. Select Tools > Drawing Tools > Close Gap.
You can display invisible lines by selecting View > Show Strokes or pressing [K].
3. In the Camera or Drawing view, draw an invisible line near to the gap to be closed. The gap closesautomatically.

Chapter 5: Adding Colours Closing Gaps
146
The new invisible line closing the gap appears.
4. In the Drawing or Camera view, paint the newly closed zone.
Closing Holes Using Automatic Close GapThe Auto Gap option is used while painting drawings with small gaps. Instead of having to close themmanuallyeither with the Brush tool or Close Gap tool, Toon Boom Studio analyzes the drawing and close the gaps whileyou paint according to the selected mode.
The Auto Gap option has four modes available:
• No Close Gap: No opened zones, regardless of the zoom level, is painted.
• Close Small Gap: Only the zones with very small gaps in the lines are painted. Larger gaps are not painted.
• Close MediumGap: Zones with small and medium gaps are painted. The zones with larger gaps are not painted.
• Close Large Gap: Zones with small, medium and large gaps are painted. Although, zones with very wide gaps arenot painted.
The automated gap closing is done using the zoom level of your Camera or Drawing view. If your eye does notsee the gap, Toon Boom Studio won't either. If the gap is too big in the Camera or Drawing view, Toon BoomStudio does not close it and the zone is not painted.

Toon Boom Studio 8.1 User Guide
147

Chapter 5: Adding Colours Selecting a Colour in a Drawing
148
Selecting a Colour in a DrawingWhile working in your Camera or Drawing view, youmay need to pick a colour from your drawing without goingto the Colour Palette view, especially if you do not know which colour swatch it is. To do this, you use theDropper tool.
Once you select your colour on your drawing using the Dropper tool, the colour swatch is automatically selectedin the Colour Palette view.
To use the Dropper tool:
1. In the Drawing Tools toolbar, select theDropper tool, under the Paint tool category or select Tools
> Drawing Tools > Dropper.
2. In the Camera or Drawing view, click on the colour zone you want to select the colour from.

Toon Boom Studio 8.1 User Guide
149
Editing Gradients and Textures
There are two ways to position your gradient and textures when you paint a drawing. You can do it when youpaint with the Paint tool or afterwards using the Edit Texture tool.
Setting a Gradient or Texture with the Paint ToolWhen you paint a zone with a gradient or bitmap texture colour swatch, you can position and orient the colour inthe zone directly with the Paint tool by tracing a selection in the direction you want the gradient or texture to be.
To set a gradient or texture with the Paint tool:
1. Do one of the following:
‣ In the Drawing Tools toolbar, select the Paint tool.
‣ Select Tools > Drawing Tools > Paint.
‣ Press [#].
2. In the Colour Palette view, select a gradient or texture swatch.
3. In the Drawing or Camera view, click in the zone to be painted and drag a selection in the direction youwant the gradient or texture to be. The length of your selection determines the size and centre of yourtexture or gradient.

Chapter 5: Adding Colours Editing Gradients and Textures
150
Setting a Gradient or Texture with the Edit TextureToolIf you paint a zone with a gradient or texture colour, you can use the Edit Texture tool to modify its position inthe zone. You canmove, scale, rotate and skew. If you have to match the colour to the animation, you can set thefirst texture position and copy the Edit Texture's position. Whenmoving to the next drawing, you can select thenext texture and paste the previous position to continue themodifications.
To use Edit Texture tool:
1. In the Drawing Tools toolbar, select the Edit Texture tool under the Paint category or select Tools >
Drawing Tools > Edit Texture.
2. Click theGradient or Texture zone to bemodified.
3. Move the edit texture's anchor points to obtain the look you want.
‣ If the samemodification needs to be applied to another gradient in another drawing or texture zone,you can select themodified zone and select Edit > Copy or press[Ctrl] + [C] (Windows) or [⌘ ] + [C](MacOS X).

Toon Boom Studio 8.1 User Guide
151
‣ Select the zone to bemodified in the other drawing and select Edit > Paste or press [Ctrl] + [V](Windows) or [⌘ ] + [V] (MacOS X).

Chapter 5: Adding Colours Palettes
152
Palettes
Toon Boom Studio uses colour palettes to add colour to your project.
The idea behind a colour palette is to create a set of colours for each character, object or background that youreuse each time you have a new drawing to paint. If you create a teddy bear character, you create a teddy bearcolour palette that you use each time that character appears in your project.
You do not use that teddy bear palette to paint a bedroom background or a doll. You would create newpalettes specifically for each of those. This way, colours never get mixed up and your character is always thesame colour scheme. It also makes your work more organized.
Using a colour palette has many benefits, including:
• Characters consistently retain dedicated colours
• You cannot accidentally use a colour which is not in the palette
• Standardization and colour consistency throughout the project
• The results are repeatable, no matter who uses the colour palette
A palette is created by assigning a set of colours to each character, prop or effect. You can create a new paletteand add a new colour, known as a colour swatch, for each zone on the character, such as the skin, hair, tongue,shirt, pants, etc.
This topic is divided as follows:
• Creating a Colour Palette on the facing page
• Renaming a Colour Palette on the facing page
• Deleting a Colour Palette on page 154
• Duplicating a Colour Palette on page 155
• Creating a Palette Style on page 156
• Assigning a Style on page 157
• Deleting a Style on page 157
• Mixing the Colours on page 157
• Exporting a Colour Palette on page 159
• Importing a Colour Palette on page 159

Toon Boom Studio 8.1 User Guide
153
Creating a Colour PaletteThe first step in the palette process is to create a new palette rather than using the default palette to paint all ofyour drawings.
To create a new palette:
1. In the Colour Palette view, click theMenu button and select Palette > New Palette.
The new palette appears in the Colour Palette view.
The Rename Palette dialog box opens.
2. In the Palette Name field, type the new palette's name and click OK.
3. Analyze the character or background youwant to create this palette for and list all the colour swatchesyou need to paint it.
4. Add the colour swatches needed—see Adding a Colour Swatch on page 127.
Renaming a Colour PaletteTo keep your palette organized, you can rename them to better represent who and what they are used for.
To rename a palette:
1. In the Colour Palette view, select the palette to rename.
2. Click theMenu button and select Palette > Rename Palette.

Chapter 5: Adding Colours Palettes
154
The Rename Palette dialog box opens.
3. In the Palette Name field, type the new palette's name and click OK.
Deleting a Colour PaletteYou can remove palettes from your Palette list if they are not needed in your scene.
To delete a palette:
1. In the Colour Palette view, select the palette to remove.
2. In the Colour Palette view, click theMenu button and select Palette > Delete Palette.
AWarning dialog box opens to confirm the operation.
3. Click OK.
‣ If the palette was in use in your scene, the zones painted with its colours turns red.

Toon Boom Studio 8.1 User Guide
155
Duplicating a Colour PaletteIf you have two characters using similar colours and colour pots, you can use the Duplicate palette option tocopy the existing palette and modify the new one instead of creating a new palette from scratch. This saves timecreating new colour swatches and renaming them.
The original and the duplicate palettes are completely independent.Once a palette is duplicated,you can change whatever you want in it without affecting the first one and vice-versa.
To duplicate a palette:
1. In the Colour view, select the palette to be duplicated.
2. In the Colour Palette view, click theMenu button and select Palette > Duplicate Palette.
The new palette appears in the Colour Palette view.
3. In the Colour Palette view, click theMenu button and select Palette > Rename Palette.
The Rename Palette dialog box opens.
4. In the Palette Name field, type the new palette's name and click OK.

Chapter 5: Adding Colours Palettes
156
Creating a Palette Style
A character usually has one colour palette, although there are times when the characters are placed in differentlighting conditions and require a different colour shading. The night palette is a popular choice when a scene orsequence changes from day to night. It can be difficult and time-consuming to repaint everything and creatingtwo independent palettes can be quite complex. As an alternative, you can create a palette style.
The palette style is a copy of themain palette. The colours in each palette have the same properties. The colourshave the same identification number pointing to the same colour painted zones, the same names, but theswatches can be different colours. Depending on the selected style (night or day), the painted drawing updates.There is no need to repaint the animation, only to create or import a clone palette (palette style).
To create a palette style:
1. In the Colour Palette view, select the palette you want to create a new style for.
2. In the Colour Palette view, click theMenu button and select Style > Duplicate Style.
The new style appears in the Style list.
3. In the Colour Palette view, click theMenu button and select Style > Rename Style.
The Rename Style dialog box opens.
The Rename Palette dialog box opens.
4. In the Palette Name field, type the new palette's name and click OK.
In the Colour Palette view, you canmodify the colours individually by using the Colour Picker window or all atonce using the Tint Panel window.

Toon Boom Studio 8.1 User Guide
157
Refer to the Mixing the Colours below topic to learn how to modify your palette style's colours.
Assigning a StyleOnce you paint a character with a palette, youmay want to assign a different style to it. Note that the style isused for the entire length of the scene. You cannot use two different styles in one scene. Although, you can use adifferent style for each scene in the project.
Refer to the Planning Your Project on page 50 topic in the Starting Your Project on page 31 chapterto learn how to create scenes.
To select a palette style:
1. In the Colour Palette view, open the Style list and select the palette style to use for the current scene.
Deleting a StyleIf a style is not needed anymore, you can delete it from the Style list.
To delete a palette style:
1. In the Colour Palette view, select the palette you want to delete a style from.
2. In the Colour Palette view, click theMenu button and select Style > Delete Style.
The zones painted with the current styles are now painted with the default style.
Mixing the ColoursIf you want to modify a series of colours at once to blend a tint in them or offset their colour, you use the TintBlend or the Tint Offset panels. These panels are quite useful when creating palette styles such as "night" and

Chapter 5: Adding Colours Palettes
158
"day" styles.
The Tint Offset panel takes all the current colours in your palette and changes their tints. The Tint Blend paneltakes a selected colour and applies it over your current colours.
Tomix colours:
1. In the Colour Palette view, select the palette and the style to offset or blend the colours for.
2. In the Colour Palette view, click theMenu button and select Style > Tint Offset or Tint Blend.
The Tint Offset or the Tint Blend panel opens.
3. To modify your colours:
‣ In the Tint Offset panel, move the R (red) slider to the right to increase the amount of red in yourpalette. Slide it to the left to remove the amount of red in your palette. You can do the samewith theG (green) and B (blue) sliders.
‣ In the Tint Blend panel, move the R (red) slider to the right to increase the amount of red in the colourto blend in your palette. Slide it to the left to remove the amount of red in the colour to blend in yourpalette. You can do the samewith theG (green) and B (blue) sliders.
‣ If you select the HSBmode rather than the RGBmode to modify your colours, you canmodify thecolour the sameway bymoving the H(hue), S (saturation) and B (brightness) sliders left or right. Thoseare simply two different ways of selecting a colour. Some people aremore comfortablemodifyingcolours by changing the Red, Green and Blue amounts and others aremore comfortable changing theHue, Saturation and Brightness values.
‣ If you want your colours to become semi-transparent or your semi-transparent colours to becomeopaque, move the Alpha (transparency) slider left or right to increase or decrease the transparencylevel.
‣ Finally, increase or decrease the Blending amount to indicate how strong the blending or offset of thecolours should be.
If you blend a colour in your palette, the blending amount progressively turns all your colours into thatsame colour. If you offset your colours, all the colours progressively changes to another tint, but they donot necessarily end up all the same colour.

Toon Boom Studio 8.1 User Guide
159
4. Click OK.
Exporting a Colour PaletteWhen youwork on a project, you should create a backup for your palettes. Since you canmodify all the coloursthroughout the whole project, export your palettes once they are final and keep them in an external folder.
Also, it is quite possible that you will reuse your characters in other projects and youwill want to reuse the colourpalettes you already created instead of recreating them. You simply need to export your palette from theprevious project and import it in the new one.
To export a palette:
1. In the Colour Palette view, click theMenu button and select Palette > Export Palette.
The Export Palette dialog box opens.
2. In the Palette Selection section, select the palettes you want to export.
3. In the File section, click the Browse button and select a location to save your backup palettes.
4. Click Export.
Importing a Colour PaletteIf you created a palette in another project and youwould like to import it in your current project, you can browsefor the palette file on your computer and add it to your project. When the palette is imported in your scene, the

Chapter 5: Adding Colours Palettes
160
file is copied in the project's directory. It is not linked to the original file.
To import a palette into your project:
1. In the Colour Palette view, click on theMenu button and select Palette > Import Palette.
The Browser window opens.
2. Browse for a palette file located on your hard drive.
3. Click Open.
The palette appears in the Palette list.

Toon Boom Studio 8.1 User Guide
161
Chapter 6: Importing Artwork
With Toon Boom Studio, you can import visual content, such as images and movies that were created outside ofthe software.
In this chapter, you will learn about the following:
• Importing Bitmap Images on the next page
• Import Images with Keying on page 168
• Importing Multilayered PSD Files on page 172
• Importing AI and PDF files on page 174
• Importing fromAdobe Flash on page 176
• Importing a Movie on page 177
• Scanning Images on page 180
• Capture on page 179
• Library on page 182

Chapter 6: Importing Artwork Importing Bitmap Images
162
Importing Bitmap Images
Images can come inmany different file formats. Some formats are able to preserve transparency or transparentlayers. Toon Boom Studio supports the following formats: GIF, JPEG, JPEG 2000, PICT, SGI, BMP, PNG, PSD,TIFF, TGA, MacPaint, QuickTime, and FlashPix.
In this section, you will cover the following topics:
• Importing Bitmaps Without Vectorizing below
• Vectorization of an Image Element or Image Cell on page 164
• Importing and Vectorizing Images on page 165
Importing Bitmaps Without VectorizingTo import bitmaps:
1. Select File > Import File.
TheOpen browser opens.
2. Browse for your bitmap image file and click Open.
The Import Options dialog box opens.
3. In the Import Options dialog box, set the Image Import Option:
‣ Fit Image to CameraWidthBy default this option is enabled, meaning that your image is resized to fit the width of the cameraframe. You can disable this option to import the image at its original size.

Toon Boom Studio 8.1 User Guide
163
4. Click OK.
You can also select a bitmap file directly from your operating system browser and drag it in theCamera, Drawing, Top, Side, Timeline or Exposure Sheet view.
Adding Images to a Bitmap LayerOnce you created a bitmap layer, it is possible to addmore images inside it.
To add an image element from the topmenu:
1. Select Element > Add > Image.
The new image column is added to your scene.
To add an image layer from the Timeline view:
1. In the Timeline View toolbar, click the Add Layer button.
TheNew Elements dialog box opens.
2. Choose Image from the Type list.

Chapter 6: Importing Artwork Importing Bitmap Images
164
3. Enter a name for your new image layer in theName field.
4. Choose how many image layers you want to add to your scene using theNumber field.
5. Click OK.
To add an image element from the Exposure Sheet view:
1. In the Exposure Sheet View toolbar, click the New Image button.
The new image element is added to your scene.
To add images to a bitmap layer:
1. In the Timeline or Exposure Sheet view, select the cell into which you want to import the image.
2. Right-click in the selected cell and select:
‣ Timeline View: Import Images > Import Images.
‣ Exposure Sheet View: Import Images > From File.
TheOpen browser opens.
3. Select the desired bitmap image file. You can select multiple image files if needed.
4. Click OK.
The image is imported in the selected cell.
Vectorization of an Image Element or Image CellYou can vectorize a bitmap after it has been imported to your project. You can do this by using the ConvertElement to Vector option or a regular Copy/Paste command.
To vectorize bitmaps using the Convert Element to Vector option:
1. In the Timeline view, select the cells containing the images you want to convert into vectors:
‣ Select specific cells in the right side of the Timeline view.
OR
‣ Select the full Image element by clicking on it in the left side of the Timeline view.
2. Right-click on a selected cell and select Convert Element to Vector.
The files are converted and a new Drawing element containing the vectorized files is created.

Toon Boom Studio 8.1 User Guide
165
To vectorize bitmaps using copy/paste command:
1. In the Timeline view, select the cells containing the images you wish to convert into vectors:
‣ Select specific cells in the right side of the Timeline view.
OR
‣ Select the full Image element by clicking on it in the left side of the Timeline view.
2. Select Edit > Copy or press [Ctrl] + [C] (Windows) or [⌘ ] + [C] (MacOS X) to copy the cells.
3. In the Timeline view, select the destination of your copied image element or cells:
‣ Select a cell in the Drawing element in which you want to paste your copied cels into.
OR
‣ Select the entire Drawing element in which you want to paste your Image element into.
4. Select Edit > Paste or press [Ctrl] + [V] (Windows) or [⌘ ] + [V] (MacOS X).
Your cells are copied and simultaneously converted into vectors.
Importing and Vectorizing ImagesIn Toon Boom Studio, you can import bitmap images and vectorize them.
To import and vectorize bitmap images:
1. In the Timeline or Exposure Sheet view, click the Add Drawing Element button if you do not already
have an empty drawing element in your scene.
The new drawing element is added to your scene.
2. In the Timeline or Exposure Sheet view, select an empty cell.
3. Right-click in the empty cell and select Import and Vectorize > From File or select File > Import andVectorize > From File.
TheOpen browser opens.
4. Locate the bitmap image file(s) you want to import and vectorize, and click Open. You can select multiplefiles if necessary.
The Import and VectorizeOptions dialog box opens.

Chapter 6: Importing Artwork Importing Bitmap Images
166
5. Click Preview to display your image in the preview space. Click Preview every time you change thesettings to update the result.
6. Click the plus (+)and minus (-) buttons to zoom in and out in the preview space.
7. Set up the desired parameters:
‣ Files: This field displays the image you selected to browse. You can click on the browse button tochange your selection.
‣ Vectorization Types:
Black andWhite: Vectorizes the images in black and white. This is used when vectorizing line art thatcan be coloured in Toon Boom Studio later. This makes use of the Filters options described later inthis section.

Toon Boom Studio 8.1 User Guide
167
With Texture: When the Vectorization type is set to With Texture, Toon Boom Studio imports thebitmap and applies it as a texture on a vector shape. This allows for direct manipulation of bitmapimages within Studio.
‣ Filters
No Filter: Vectorizes without applying a filter.
Smoothing + Loss Of Sharpness: Smooths the image. This process causes a loss of sharpness of theoriginal image.
Smoothing + Greater Loss Of Sharpness: Smooths the image. This process causes a greater loss ofsharpness of the original image than the option above.
Edge Enhancement: Enhances the edge of the image, resulting in a more precise result.
SharpeningWith Clearness: Sharpens the images, resulting in a more precise and clear result.
Threshold%: Lets you adjust the threshold value. The greater the percentage, themore grey pixelsare allowed into the final vectorization of the line.

Chapter 6: Importing Artwork Import Images with Keying
168
Import Images with Keying
Keying is a concept used in animation but also in live actionmovies. Keying is the process of picking a precisecolour value and removing it from the image to isolate a character or object. Themore common use of keying iswhen filming actors against a green screen in cinema.
In Toon Boom Studio, you can import your images with the keying option, which isolates an element in an imagewith a single-coloured background.
To import images with keying:
1. In the Timeline view, select an empty cell in a bitmap image layer.
2. Right-click and select Import Images > Import Images with Keying.
TheOpen Browser opens.
3. Select the images you want to import and key. Hold down the [Shift] key while selecting your images tomake a multiple selection.
The Import Images With Keying dialog box opens.
‣ In the Files section, click the Browse button if you want to change the selected images.

Toon Boom Studio 8.1 User Guide
169
‣ If you selected many image files, use the Previous andNext buttons to display the other drawings.The name of the currently selected drawing is displayed above the buttons.
‣ Use the plus (+) and minus (-) buttons to zoom in or out of the Preview area. Above the buttons isdisplayed the total number of drawings loaded in the Import Images With Keying dialog box.
4. In the Keying Options section, set the keying parameters:
‣ In the Keying Type list, select a keying type.
None: Selecting theNone optionmeans that there is no keying on this drawing. Selecting Nonemakes the other parameters greyed out.
Chroma Keying (YUV): This optionmakes the pixels corresponding to the selected colourtransparent, using the YUV channels.
Chroma Keying (RGB): This optionmakes the pixels corresponding to the selected colourtransparent, using the RGB channels.
Luma Keying (YUV): With this option, you can set different levels of transparency on your drawing.The level of transparency is determined by the different levels of colours, where the white colour iscompletely transparent and the black colour completely opaque.
‣ Pick Colour: When you select one of the two Chroma Keying types from the drop-downmenu, thisoption becomes available.
‣ Click Pick Colour to change your cursor to a dropper and select the background colour of your pictureyou want to illuminate from the preview area. As soon as you click on a colour, this colour is displayedin the colour swatch and is removed from the preview area. A grey checkerboard is displayed to
represent the transparent area.

Chapter 6: Importing Artwork Import Images with Keying
170
Click the colour swatch to open the Select Colour dialog box and select a precise colour from there.
‣ Luma Correction, Matte andHide Checkerboard
Matte: Displays thematte in the preview area.
Luma Correction: Applies a luma correction filter on your image.
Hide Checkerboard : By default Toon Boom Studio displays a checkerboard pattern in the previewarea to represent the transparent zones. You can enable the Hide Checkerboard option to concealthe checkerboard pattern and display the zone as white.
‣ Minimum, Maximum: Lets you adjust theminimum andmaximum level values to be considered in thekeying process following the parameters you set above. You can see the result in the preview area.
‣ Filter list: Lets you select an effect to apply on your keying selection to make it more precise. You canalso use the Effect Intensity list to choose the level of intensity.
None: No filter is applied to your keying selection.
Gaussian: A gaussian blur effect is applied to your selection to soften the edge of the keyed selection.
Mean: Amean filter is applied to your selection to soften the edge of the keyed selection with aminimum of blurry result.
Erode: The edge of the keyed selection is cropped following the effect intensity level chosen below.

Toon Boom Studio 8.1 User Guide
171
Dilate: The edge of the keyed selection is increased following the effect intensity level chosen below.
Distance: The edge of the keyed selection is increased with a blur following the effect intensity levelchosen below.
‣ Click Apply if you need to applymultiple passes of keying. Once you set up your first keying passvalues and options, click Apply. You are now ready to set up your next keying pass.
5. Click OK.

Chapter 6: Importing Artwork Importing Multilayered PSD Files
172
Importing Multilayered PSD Files
In Toon Boom Studio you can import bitmap images. You can also import multilayered Adobe Photoshop *.psd(version 4 or higher) files and retain their layering when you enable the option during the import. Toon BoomStudio creates an image element for every layer contained in the PSD file.
To import multilayered PSD files:
1. Select File > Import File.
TheOpen browser opens.
2. Browse for your multilayered PSD image file and click Open.
The Import Options dialog box opens.
3. In the Image Import Options section, the Fit Image to Camera Width option is enabled by default. Thismeans your image is resized to fit the camera width frame. You can disable this option to import theimage at its original size.
4. In the Photoshop Import Options section, the Preserve original layers of Photoshop files is deselected bydefault. This means means that when you import the PSD file, the layers are flattened to create a singleimage element in your scene.

Toon Boom Studio 8.1 User Guide
173
You can enable this option to preserve the PSD file layering, which creates a different image element foreach layers contained in your Adobe Photoshop file.
5. Click OK.
You can also select a PSD file directly from your operating system browser and drag it in the Camera,Drawing, Top, Side, Timeline or Exposure Sheet view. Then, follow steps 3 and 4.

Chapter 6: Importing Artwork Importing AI and PDF files
174
Importing AI and PDF files
In Toon Boom Studio, you can import a vector-based Adobe Illustrator or PDF file and preserve its layering whenyou enable the option during the import. Studio creates a drawing layer for every layer contained in the AI file orcreates a drawing layer and separate drawing frames for each page contained in the PDF file.
Studio supports Adobe Illustrator files from version 5. Youmust create a PDF compatible file when you saveAdobe Illustrator CS files to be able to import them into Studio.
When you import an Adobe Illustrator or PDF file, Studio:
• Converts CMYK colours to RGB.
You can convert the colour space of your Adobe Illustrator or PDF files when you save them. SeeAdobe Illustrator documentation for instructions. However, to ensure the colour results you want,develop your web colours in the web-safe RGB palette.
• Displays objects that were hidden in the Adobe Illustrator file.
• Does not import text. Youmust convert text to outlines to import it.
• Does not import global colour swatches from V8 and under.
• Does not convert transparent objects drawnwith the Brush tool.
If your Adobe Illustrator file contains bitmaps, be sure those bitmaps are copied into the file. If theyare linked, Toon Boom Studio can not import them.
To import multilayered AI or PDF files:
1. Select File > Import File.
TheOpen browser opens.
2. Browse for an .ai or .pdf image file and click Open.
The Import Options dialog box opens.

Toon Boom Studio 8.1 User Guide
175
3. Preserve original layers of illustrator documents: By default this option is disabled. When you importthe .ai or .pdf file, the layers and the pages are flattened. Select this option to preserve the AdobeIllustrator file layering, which creates a different drawing for each layer contained in your AI file.
4. Click OK.
To import an Illustrator or PDF file in an already existing drawing layer:
1. In the Timeline or Exposure Sheet view, select a cell in the drawing layer into which you want to import theimage.
2. Right-click in the selected cell and select Import Illustrator.
TheOpen browser opens.
3. Select an .ai or .pdf file. You can select multiple image files if needed.
4. Click OK.
An information dialog box opens, notifying you that the layers will not be preserved but that you can usethe File > Import File command to import your files and preserve its layers.
5. Click OK.
The image is imported in the selected cell.

Chapter 6: Importing Artwork Importing from Adobe Flash
176
Importing from Adobe Flash
If a project was started in Adobe Flash, you can addmore dimension to it by adding multiplane cameramovements or effects to it. Although *.fla files are not supported, you can export your Flash project to *.swfmovies and import them into Studio.
When you import an SWF file into your scene, its contents are expanded and laid out as a collection of elements.Pegs are automatically created to manage any scaling, rotation or motion animated in the file.
A new palette is automatically created and given a name corresponding to themovie file. This palette contains allthe colours in themovie.
To import a SWF movie:
1. Select File > Import File.
TheOpen browser opens.
2. Browse for your video file and click Open.
The video appears in the Timeline view. Each SWF element has its own drawing layer which is connectedto pegs (if there is a motion). A palette is also created in the Colour Palette view.
You can import SWF files as template from the Library view and link SWF files into Media Elements—see Importing Multimedia files into the Library view on page 192 and Linking Templates to MediaElements on page 193.

Toon Boom Studio 8.1 User Guide
177
Importing a Movie
There are several reasons why youmay need to import a movie into your animation project— to create arotoscope animation, add 2D animation to a live video or incorporate a television showing a program inside yourscene.
Studio allows you to import several movie types into your project:
• AVI
• MPG
• M4V
• QuickTime
You can also import a SWF movie file—see Importing from Adobe Flash on the previous page.
Importing a Bitmap Movie FileAVI, M4V, MPG andQuickTimemovies have one thing in common. They are all bitmapmovie files. When they areimported into Studio, a bitmap image sequence is created.
To import an AVI, M4V, MPGor QuickTime movie:
1. Select File > Import File.
TheOpen browser opens.
2. Browse for your video file and click Open.
The Import Options dialog box opens.
3. In the Import Options dialog box, set theMovie Import Options:

Chapter 6: Importing Artwork Importing a Movie
178
‣ Set Opacity Value: Sometimes you want to import a movie as a reference and youwould like it tohave a specific transparency value. Select this option to edit the opacity value of themovie.
‣ Opacity% (1-100%):When the Set Opacity Value option is selected , theOpacity% field becomesavailable. Type in the desired Opacity% value from 1 to 100.
4. Click OK.
The video appears on its own image layer in the Timeline and Exposure Sheet view as a bitmap imagesequence.
Importing a Movie in an Existing Image LayerYou can import a bitmapmovie file in an already existing image layer.
To import a movie as an image sequence:
1. In the Timeline or Exposure Sheet view, select the cell on which you want your movie to start playing.
2. Right-click in the cell and select Import Movie File as Image Sequence.
TheOpen browser opens.
3. Browse for your movie file and click Open.
The Import Options dialog box opens.
4. In the Import Options dialog box, set theMovie Import Options:
‣ Set Opacity Value: Sometimes you want to import a movie as a reference and youwould like it tohave a specific transparency value. Select this option to edit the opacity value of themovie.
‣ Opacity% (1-100%):When the Set Opacity Value option is selected , theOpacity% field becomesavailable. Type in the desired Opacity% value from 1 to 100.
5. Click OK.
The image sequence appears in the image layer at the selected starting cell.

Toon Boom Studio 8.1 User Guide
179
Capture
In Toon Boom Studio, you can capture from a device, such as a digital camera to create original stop-motionanimation. Studio has an integrated image capture feature–an intuitive and easy-to-use image capture window,which allows you to set up and capture all your images.
Refer to the Stop-motion Animation on page 451 chapter to learn how to capture images and createyour own stop-motion animation project.

Chapter 6: Importing Artwork Scanning Images
180
Scanning Images
Instead of importing images from files, you can use Toon Boom Studio to get images from any TWAIN device,such as scanners and cameras. You can load them as bitmaps into your scene or convert them into vector imagesthat you can edit in Studio.
You must install the TWAIN driver in order to access its contents. To get the latest TWAIN driver foryour particular device you should refer to that manufacturer's website.
To select a device:
1. Do one of the following:
‣ In the Exposure Sheet or Timeline view, right-click in a cell or on an image element and select ImportImages > Select TWAIN Source.
‣ Right-click in a cell from a drawing element and select Import and Vectorize > Select TWAIN Source.
The Select Source dialog box opens.
2. Use the Select Source dialog box to select the device you want to acquire content from.
3. Click OK.
To scan or get a bitmap from a TWAIN device:
1. Select a cell in an Image element.
2. Right-click in the cell and select Import Images > From TWAIN.
A dialog box with your device's options appears.
3. Use the options in this dialog box to set your parameters and then scan or load the drawings into Studio.
To vectorize a bitmap retrieved from a TWAIN device:
1. Select a cell in a drawing element in the Exposure Sheet or Timeline view.
2. Right-click in the cell and select Import and Vectorize > From TWAIN.
The Import and Vectorize Settings dialog box opens.

Toon Boom Studio 8.1 User Guide
181
3. Set the vectorization settings:
‣ Black andWhite: Uses the filters listed below to transform the bitmap into vector art.
‣ With Texture: Applies the bitmap as a texture on the drawing shape.
4. Select a filter. Youmay have to experiment with these settings depending on the quality of the images forvectorization.
‣ Smoothing + Loss of Sharpness: Select this option if the lines in your image are thin. This filter blursthe lines in the image slightly, so thin lines are picked up in the vectorization process.
‣ Smoothing + Greater Loss of Sharpnes: Select this option if the lines in your image are very fine. Thisfilter blurs the lines in your imagemore so more lines are transformed in the vectorization process.
‣ Edge Enhancement: Select this option if the lines in your image are thick. This filter merges fine lines(noise) into larger lines to create cleaner objects.
‣ Sharpeningwith Clearness: Select this option if the lines in your images are thick and include a lot offine detail. This filter sharpens edges to enhance details in your images.
5. Select a Threshold percentage. The Threshold value filters out noise in your images. Noise can be dirt orfaint smudges on your scanned images. For example, if your value is set to 70%, all colour values below70% are converted to white and ignored in the final image.
6. Click OK.
A dialog box with your device's options appears.
7. Use the options here to select your parameters and then load and vectorize the drawings into Toon BoomStudio.
Refer to the Importing and Vectorizing Images on page 165 topic to learn more about vectorizationoptions.

Chapter 6: Importing Artwork Library
182
Library
You can share and reuse any elements you create in Toon Boom Studio as templates. The Library in Studio hasready-to-use templates and is where you can store different elements you create like puppets, backgrounds oranimations. In fact, almost anything you create or use in Studio can be stored in the library.
In this chapter, you will learn about the following:
• Understanding the Library Concept below
• Library View on the facing page
• Structuring the Library on page 184
• Templates on page 187
Understanding the Library ConceptUse the Library view to reuse your artwork and animation in other scenes.
This topic is divided as follows:
• What is a Library? below
• What is a Template? below
What is a Library?A library is a folder where you store your templates. You can access these folders from your different projects.To store your artwork in the Library, drag the content into the Library. To reuse artwork, drag it into yourTimeline view.
A library can be organized using subfolders, you can have several different library folders on your hard drive.
What is a Template?A template is a copy of the artwork stored in the library,which can be reused in different scenes. Once a templateis stored in the library, it is accessible from any project. Dragging a template into your scene copies the contentto your timeline and does not create a link to the original. This individual copy can bemodified at anytime.
You can create a template out of pieces of animation content, such as elements, drawings, images, or sounds oreven collections of animation content such as drawings, images and sounds in one single template.

Toon Boom Studio 8.1 User Guide
183
Library ViewThe Library window is the centre for managing reusable content in Toon Boom Studio.
The Library view is used to create and manage your templates, display the folders and manage all of the content.
1. Preview
2. Library List
3. Templates List
Preview
You can use the Preview area to check the contents of the Library. You can preview any type of template.However, if your template consists of a peg or a camera element only, nothing is going to show in the previewwindow.
To preview content in the library:
1. In the Library view, make sure that the preview checkbox is enabled.
2. Select the template you want to preview:
‣ In the Library list, select a Scene folder to display the entire scene in the preview area.
OR
‣ In the Template list, double-click on the template you want to preview.

Chapter 6: Importing Artwork Library
184
The preview appears in the Preview area.
3. If there aremultiple frames in the selected template or scene, click on the Play button to play it back. Youcan also use the slider to select the frame youwant to see.
Library List
The Library List is used to navigate through the different libraries and subfolders. You can also open, close andcreate new libraries from here.
The Library List contains four default Libraries:
• Animation: This library stores all the elements and drawings contained in your project. It is organized byscene and is constantly updated as you work in your project.
• Local: This library store templates that you want to use in the current animation project. In your system,this library is stored in the Template folder inside of your project's main folder.
• Global: This library stores templates that you can use in any project animation that you create on yourcomputer.
• Toon Boom Templates: This library stores templates provided by Toon Boom Studio. Here you can findinteresting artwork organized in subfolders,called catalogs, by categories such as Backgrounds,Storyboarding, Props, Characters, Cut-out Characters, Clip Arts and Special Events. You cannot edit thislibrary.
Template List
The templates contained in the selected Library list are displayed on the right side of the Library view asthumbnails, either as a list or as details.
To change the templates list display:
1. In the Library view's right side, right-click and select View > List, Thumbnails or Details.
Structuring the LibraryAs you create templates, you will soon realize that they need to be organized. You can create different librariesand catalogs to easily have access to your assets.

Toon Boom Studio 8.1 User Guide
185
For example, in your global library, you can create a different library for each project and divide it into severalcategories, such as:
• Characters
• Props
• Backgrounds
This topic is divided as follows:
• Creating a Library below
• Opening and Closing a Library on the next page
• Creating a Catalog on the next page
• Renaming a Catalog on page 187
• Deleting a Catalog on page 187
• Refreshing the Library on page 187
• Reloading Default Templates on page 187
• Saving the Library on page 187
Creating a LibraryYou can create libraries in the Library view.
To create a library:
1. In the Library List, right-click and select Create Library.
The Browser window opens.
2. Browse for the location where you want your new library to be stored.
3. ClickMake New Folder.
4. Give a relevant name to your new library and click OK.
The new library appears in the Library list area.

Chapter 6: Importing Artwork Library
186
To rename a library:
1. In the Library list, select the library you want to rename, right-click and select Rename Library.
The library name becomes an editable field.
2. Rename the Library and press [Enter] to validate.
Opening and Closing a LibraryYou can load libraries of templates stored on your computer or on another computer through your network.
Libraries make it easier for you to work on productions with other users who share the same templates. ToonBoom Studio identifies libraries with the extension *.tbc. To load a library, the folder must have a file with the*.tbc extension.
To load and close a library:
1. Right-click in the library list and selectOpen Library.
A browser dialog box opens.
2. Locate the library you want to open and click Open.
3. The selected library appears in the library list.
To close a library:
1. Select the library you want to close and right-click on the library and select Close Library.
If you havemade changes to the library since you last saved the global library, a message appears askingyou to confirm your desire to close the library.
‣ Click Yes to close the library without saving changes.
‣ Click No to keep the library open so that you can save changes.
2. Select File > Save Global Library to save changes to the library.
Creating a CatalogSymbols and templates libraries need to be organized, you can create different subfolders in the Library view sothat you can gain easy access to your assets. These subfolders are called catalogs.
To create a catalog:
1. In the Library view's left side, select the library to which you want to add a catalog.
2. Right-click on the selected library and select New Catalog.
The new folder appears in the Library. When you have a library with catalogs, click on the plus sign (+) toexpand it to make the catalogs visible.

Toon Boom Studio 8.1 User Guide
187
3. Name the new catalog and press [Enter] to validate.
Renaming a CatalogTo rename a catalog:
1. In the Library list, select the catalog you want to rename, right-click and select Rename Catalog.
The catalog name becomes an editable field.
2. Rename the catalog and press [Enter] to validate.
Deleting a CatalogTo delete a catalog:
1. In the Library list, select the catalog you want to delete, right-click and select Delete.
The catalog is deleted.
Refreshing the LibrarySometimes youmay need to refresh the Template list to see the latest changes.
To refresh the library:
1. In the Template list, right-click and select Refresh or press [F5].
The Template list is refreshed.
Reloading Default TemplatesIf you close the Toon Boom Templates library, you can always quickly bring it back to the library list.
To reload the default Templates:
1. In the Library list, right-click and select ReloadDefault Templates.
The Toon Boom Templates library is reopened.
Saving the LibraryWhen you save your Toon Boom Studio project, the library is automatically saved. You can also save only thechanges made to the library without saving your Studio project.
To save the library:
1. Select File > Save Global Library.
TemplatesIf you want to reuse artwork and animation from your project into other scenes, you need to create a templateout of it.

Chapter 6: Importing Artwork Library
188
This topic is divided as follows:
• Creating a Template below
• Deleting a Template on the facing page
• Editing a Template on the facing page
• Template Properties on page 191
• Importing Multimedia files into the Library view on page 192
• Importing a Template in Your Scene on page 192
• Linking Templates to Media Elements on page 193
• Copying Selected Template Contents into Your Animation on page 193
• Using Paste Special to Update Content from a Template on page 194
Creating a TemplateIn Toon Boom Studio, creating a template is as easy as selecting what you want from the Exposure Sheet orTimeline view and dragging it into the Library view.
You can create templates from any piece of animation content:
• From the Exposure Sheet view, you can create templates from single or multiple images and drawings, orsounds.
• From the Timeline view, you can create templates from single or multiple layers, or from a selection offrames across multiple layers. You can store anything available in the Timeline view as a template.
To create a template:
1. Make a selection of what you want to include in the template:
‣ In the Timeline view, select some cells or layers.
OR
‣ In the Exposure Sheet view, select some cells from one or multiple columns.
2. In the Library view, select the destination library or catalog from the library list.
3. Drag the current selection to the template list in the Library view.

Toon Boom Studio 8.1 User Guide
189
You can drag a selection to any library or catalog folder icon in the library list and the template isadded to that library or catalog.
The template is added to the template list.
4. The name of the template is shown as an active text field, type the desired name for your template andpress [Enter] to validate.
To rename a template:
1. In the Library view, select the folder containing the template to rename.
2. Select the template you want to rename from the template list.
3. Right-click on the selected template and select Rename Template.
4. Enter the new name in the active text field and press [Enter] to validate.
The template is renamed.
Deleting a TemplateYou can easily delete templates from the Library view if you do not need them anymore. This action can beundone if necessary.
To delete a template:
1. In the Library view, select the folder containing the template to delete.
2. Select the template you want to delete from the template list.
3. Right-click on the selected template and select Delete Template or press [Del].
The template is removed from the library.
Editing a TemplateYou canmodify the templates contained in theGlobal, Local and any Library you created. A template is like ascene, you can open it and edit it as any regular project.

Chapter 6: Importing Artwork Library
190
If you want to do somemodifications in your templates, you can edit them using the Edit Template command.
To edit templates:
1. In the Library view, select the folder containing the template to modify.
2. Select the template you want to edit from the template list.
3. In the Library window, right-click on the selected template you want to edit and select Edit Templatefrom the pop-up menu.
The identification of the active scene changes in the SceneManager view.
The contents of the template you are editing appear in all views and the title bar on the Exposure Sheetand Timeline views changes to indicate that you are currently editing a template.
4. Now that you are in template editing mode, you canmake any change youwant to the contents of thetemplate in any the views. You can adjust timing, add drawings, edit existing drawings or even add layers.
5. Save your template.
‣ Select File > Save to save the changes to the local and global template, as well as the animationproject.
‣ Select File > Save Global Library to save the contents of the Library view only and not the animationproject.
6. To exit the edit templatemode, in the template list of the Library view, right-click on the selectedtemplate and select Return to Scene. You can also double-click on the scene name in the SceneManagerview.
7. In the Library view, right-click in the template list and select Refresh or press [F5] to refresh the templatesso that the thumbnail displays the latest changes.

Toon Boom Studio 8.1 User Guide
191
Refer to the Refreshing the Library on page 187 topic to learn how to display your template asthumbnails.
Template PropertiesIf you needmore information about a template, you can view the template's properties. The template'sproperties shows the following information:
1. The name and a preview thumbnail of the template.
2. The template's type and version of Toon Boom Studio that was used.
3. The name of the artist who created the template and copyright information.
4. The size of the template and the date of the latest modification.
5. The contents of the template and their duration.
To display a template's properties:
1. Right-click on a template and select Template Properties.
The Properties dialog box opens.
Refer to the Starting Your Project chapter to learn how to set up your artist name and copyright info.

Chapter 6: Importing Artwork Library
192
Importing Multimedia files into the Library viewIf you have a SWF file, a QuickTime file, a sound file, an image, or even another template that is not currently inyour animation set, you can import it into the Library view to gain quick access to them.
To create templates from multimedia files:
1. In the Library view, select the library into which you want to import themultimedia file.
2. Right-click in the template list and select Import > and one of the following choices:
‣ Import Image File: Imports a bitmap image.
‣ Import Movie File: Imports a movie file.
‣ Import Sound File: Imports a sound file.
‣ Import Template File: Imports a template created in Toon Boom Studio.
A browser opens.
3. Browse and select the file you want to import and click OK.
The file is added in the library.
Importing a Template in Your SceneYou can drag a template from the Library view to the Exposure Sheet or Timeline view to add its contents toyour animation.
Copying templates into your animation increases the file size of your movies. You can link templatesto your animation to keep the file size of your animation small. Refer to the Linking Templates toMedia Elements on the facing page topic to learn more about template linking.
To import a template into your scene:
1. In the Library view, select the template you want to import.
2. Drag the selected template to the Camera view or Timeline view's left side.
‣ You can also drag a template to the Timeline view's right side into existing layers if the layer structureis the same as the existing one.

Toon Boom Studio 8.1 User Guide
193
Linking Templates to Media ElementsYoumust usemedia elements to link templates to your animations. Media elements identify the contents theycontain as references to a centrally stored file. If the template you link contains multiple elements, all of thoseelements are composited into one element, themedia element.
Linking templates has two advantages:
• It keeps the file size of your SWF animations small.
• It updates and manages frequently-used material in a central location.
If the contents of the template are updated, Toon Boom Studio updates it in all animations.
To link a template to a media element:
1. Select Element > Add >Media.
A new element appears in the Timeline view.
2. In the Library view, select the template you want to link and drag it to themedia element you created inthe Timeline view's right side.
‣ You can also create a media element as you link a template, by pressing [Alt] as you drag the templateto the Timeline view's left side.
Studio links to the original file.
Copying Selected Template Contents into Your AnimationWhen you drag templates from the Library window, you can open the Timeline Drag& Drop Preferences toselect the template contents that you want to copy into your animation.

Chapter 6: Importing Artwork Library
194
To copy selected template contents into your animation:
1. In the Library view, select the template you want to copy.
2. Drag the template to the Timeline view and place the template on top of the elements where you want toplace it.
Youmust select the same number and hierarchy of elements as there are in the template. Otherwise youcannot complete the drag operation. Refer to the Template Properties on page 191 topic to learn how toopen the Template properties.
3. Press and hold [Alt] and then release themouse button.
The Timeline Drag & Drop Preferences dialog box opens.
4. Select the properties you want to copy to the animation.
5. Click OK.
Refer to the Animating a Puppet chapter to learn more about the Paste Special options
Using Paste Special to Update Content from a TemplateYou can use the Paste Special command to update selected content withmaterial stored in a template file. Youcan use this command to update drawings, timing, layout, as well as palettes.
To use paste special to update content:
1. Select the template in the Library and select Edit > Copy Template.
2. In the Timeline, select the elements you want to paste the template onto.
Youmust select the same number and hierarchy of elements as are in the template. Otherwise you cannotcomplete the paste operation. Refer to the Template Properties on page 191 topic to learn how to openthe Template properties.
3. Select Edit > Paste Special or press [Ctrl] + [B] (Windows) or [⌘ ] + [B] (MacOS X).
The Paste Special dialog box opens.

Toon Boom Studio 8.1 User Guide
195
4. Select the options from the Paste Special dialog box.
5. Click OK.
Refer to the Animating a Puppet on page 395 chapter to learn more about the Paste Special options.

Toon Boom Studio 8.1 User Guide
196

Toon Boom Studio 8.1 User Guide
197
Chapter 7: Layers and Timing
When you create animation, it is important to know how to set and modify the timing of your drawings. You canadjust the timing in both the Timeline and Exposure Sheet views, depending onwhich one you prefer.
In this chapter, you will learn how to work on your drawing's exposure and length. The keyframes and motionpaths are covered in a separate chapter.
To animate with motion paths (pegs) and keyframes—see Creating Motion Paths on page 299.
In this chapter, you will learn about the following:
• Understanding the Timeline and Exposure Sheet Views on the next page
• Layers and Columns on page 204
• Filling Exposure on page 217
• Navigating Between Frames and Columns on page 228
• Managing Drawings on page 230
• Preferences on page 232

Chapter 7: Layers and Timing Understanding the Timeline and Exposure Sheet Views
198
Understanding the Timeline and ExposureSheet ViewsTo set your animation timing, you will work mostly with the Timeline and Exposure Sheet views. This section willhelp you become familiar with these views, how they work and the differences between them.
Timeline View
The Timeline view allows you to read your drawings and timing from left to right. It represents the scene'selements in their simplest form.
In the Timeline view, you can see layers and their names, as well as the drawing timing. The drawing name isdisplayed when you place your cursor above the drawing's exposure.
The Timeline view has threemain sections:
• Timeline View Toolbar below
• Layer Section on the facing page
• Timing Section on page 200
Timeline View ToolbarThe Timeline View toolbar contains eight different buttons allowing you to add, enable and disable layers as wellas switch between the different scenes of a same project.
• Show/Hide All: Shows or hides all the layers in the timeline.

Toon Boom Studio 8.1 User Guide
199
• SoloMode: Turns the Solo mode on or off . The Solo mode lets you see only the currently
selected layer, as well as the layer that was selected when you enabled the Solo Mode to use it as areference without having to disable all the other layers.
• AddNew Elements: Adds a new element (layer) to your timeline. When you click this button, the
New Element dialog box opens and lets you choose which type of element you want, how many and howyouwant to name it.
• Delete Element: Deletes the selected layers in your timeline. Note that if you delete a layer with
other layers connected to it, all the layers connected will be deleted at the same time. Also, if you onlyhave one layer in your timeline, you are not able to delete it. Toon Boom Studio's Timeline view mustalways have at least one drawing layer in it.
• AddDrawing Element: Adds a drawing layer in your timeline without having to go through the Add
New Element dialog box. Simply click on the button and a new drawing layer appears in the Timeline view.You can then double-click on the new layer to rename it.
• Add Parent Peg: Adds a peg layer in your timeline and connect it to any selected layer without having
to go through the Add New Element dialog box. Simply click on the button and a new peg layer appearsin the Timeline view and the selected layer is connected to it. You can then double-click on the new layer torename it.
• Scene Menu: Lets youmove between the different scenes in your project.
• Timeline View ContextualMenu: Displays a drop-downmenuwith commands related only to the
Timeline view.
Layer Section
The Layer section is on the left side of the Timeline view. This is where you can add, delete, rename, reorder andattach layers.

Chapter 7: Layers and Timing Understanding the Timeline and Exposure Sheet Views
200
Timing Section
The Timing section is on the right side of the Timeline view. This is where you can increase and decrease adrawing's exposure, duplicate drawings, add blank cells, etc. Any operation you do that affects a drawing or itstiming is done in this section.
Exposure Sheet View
The Exposure Sheet view lets you read your timing vertically where the columns represent drawing layers.
The Exposure Sheet view has two main sections and several other components:
• Main Section on the facing page
• Element List Section on the facing page
• Exposure Sheet Toolbar on page 202

Toon Boom Studio 8.1 User Guide
201
• ColumnHeader on the next page
• Drawing on the next page
• FrameNumbers on the next page
Main Section
TheMain section shows the Drawing, Image, Sound andMedia columns. You can see the drawing timing andnames.
Element List Section
The Element List section allows you to show and hide columns from your Exposure Sheet view. When you hide acolumn using your Exposure Sheet view, it is NOT disabled in the Timeline view. When you hide a column in yourExposure Sheet, the artwork is hidden from the Drawing view, but NOT from the Camera view. To hide elementsin the Camera view, disable the layers in the Timeline view.
To display the Element List section:
1. In the Exposure Sheet toolbar, click the Toggle Element List button.

Chapter 7: Layers and Timing Understanding the Timeline and Exposure Sheet Views
202
Exposure Sheet Toolbar
The Exposure Sheet view has its own toolbar where you can find themost common features. This toolbar isdisplayed by default. If you do not see it, selectWindows > Toolbar > Exposure Sheet. The Exposure Sheetview must be part of your workspace in order to display its toolbar.
Column HeaderEach column available in the Exposure Sheet view has a header displaying the column's name. Thecolumn's name is the same as the corresponding timeline layer. If you rename one or the other,they will both be renamed.
A quick access menu is available when you right-click. This menu contains the command that affectsan entire column such as renaming, changing the default colour or deleting a column.
Drawing
When you see a cell containing a name or number, it represents the drawing you created in theDrawing or Camera view.
Frame NumbersThe frame numbers are located on the left side of the Exposure Sheet view. They read vertically instead of leftto right, as in the Timeline view.
• To go to a particular frame, you click on the frame number.
• If you click and drag a selection downwards, you select an entire frame range.
In the Xsheet view, you can remove any selected frame range by pressing the [Del] key.
To delete a frame range:
1. In the Exposure Sheet view, select a frame range by clicking on the first frame's number to delete anddragging down to the last frame to delete.

Toon Boom Studio 8.1 User Guide
203
2. Press [Del] to delete the selection.

Chapter 7: Layers and Timing Layers and Columns
204
Layers and ColumnsIn Studio there are two ways to see your layers:
• As horizontal layers in the Timeline view
• As vertical columns in the Exposure Sheet view.
Whether you work in the Timeline or Exposure Sheet view, they are the same and anymodification you do to oneor the other is applied to both.
This topic is divided as follows:
• Layer Concepts below
• Layer Types on the facing page
• Adding New Elements on page 207
• Deleting Elements on page 208
• Modifying Elements on page 209
• Expanding and Collapsing Layers on page 215
Layer ConceptsIn order to understand what happens when you duplicate a drawing, extend an exposure, create cycles or deletea drawing, it is important to know how layers and columns work.
The layers are linked to a folder containing all the drawings you create. This folder is contained inside your Studioproject's folder.
When you create a new drawing in your Camera view, a drawing file is created inside the Drawing folder.
When you type a drawing name in a Exposure Sheet cell or Timeline frame, the system looks in the Drawingfolder for the corresponding drawing to display. If there is no corresponding drawing, a new one is created.
.
When you create a drawing cycle, all of the repeated drawings are linked to the same original drawing. Thismeans that when youmodify, repaint or correct a drawing named "1", all drawings named "1" are updated

Toon Boom Studio 8.1 User Guide
205
simultaneously. In order to modify a drawing independently from its other exposures, youmust duplicate thedrawing—seeDuplicating a Drawing on page 230.
Layer TypesThere are several types of layers you can add in the Timeline and Exposure Sheet views.
Drawing Element
Themost common layer type is the Drawing element. Any time you need to create a vector drawing, use aDrawing element. Note that bitmap images are contained in Image Element layers.
The Drawing layer is tagged with the Drawing icon.
Image Element
If you import picture or bitmap images into your project, they are inserted in an Image element.
The Image layer is tagged with the Image icon.
Refer to the Importing Artwork on page 161 chapter to learn how to import images.
Camera Element
The Camera element represents the camera filming your stage. Youmust position it if you want to change thecamera frame in your scene or animate it with a Peg layer if you want to create a camera motion.
• The Camera layer is tagged with the Camera icon.
• The Camera layer is not visible in the Exposure Sheet view.
If you want to have several cameras with different settings, you can keep adding Camera layers in your Timelineview. To switch between available cameras, select a camera from the Camera list located in the Scene toolbar.
Refer to the Setting the Scene on page 277 chapter to learn how to animate the camera.
Effect Element
To enhance the look of your scene, you can add effect layers and attach your drawings to them. In Toon BoomStudio, there are seven effects.

Chapter 7: Layers and Timing Layers and Columns
206
In the Timeline view, the Effect element is tagged with the Effect icon.
The Effect layers are not visible in the Exposure Sheet view.
Refer to the Enhancing with Effects on page 465 chapter to learn how to add effects to your project.
Peg Element
A Peg Element can be described as a trajectory or motion path layer that does not contain drawings. It can beattached to any drawing layer, cut-out puppet or other peg layers. The layers attached to the Peg layer followthe trajectory that you set in this Peg layer.
In the Timeline view, the Peg element is tagged with the Peg icon.
Peg layers are not visible in the Exposure Sheet view.
Refer to the Setting the Scene on page 277 chapter to learn more about pegs.
Sound Element
You can import sound files to add dialog and sound effects to your project. The sound layer is added to yourTimeline and Exposure Sheet view when you import a sound file in your scene.
The Sound element is tagged with the Sound icon.
Refer to the Sound and Lip-sync on page 421 chapter to learn how to import and play sound.
Annotation Element
AnAnnotation Element is mainly used for educational purpose. The teacher can use these layers to draw andmark comments and corrections over an animation.
In the Timeline view, the Annotation element is tagged with the Annotation icon.

Toon Boom Studio 8.1 User Guide
207
Refer to the Traditional Digital Animation on page 233 chapter to learn more about annotationelements.
Media Element
AMedia Element is used in different ways. Themain way is to import an SWFmovie in your project and keep it inone single layer instead of it being spread on several layers. The second way is to link a media element to yourscene instead of importing templates from the Library directly in your scene. This way you can connect severalscenes to the same template. If youmodify the original template, it is altered in all the scenes simultaneously.
TheMedia element is tagged with theMedia icon.
Refer to the Setting the Scene on page 277 chapter to learn more about media elements.
Adding New ElementsIn this section you will learn the different ways to add elements to your project. By default, when you create anew scene, there is one Drawing layer included in the Timeline and Exposure Sheet views.
This section is divided as follows:
• Adding Layers in the Timeline View below
• Adding an Element from the TopMenu on the next page
• Adding New Columns in the Exposure Sheet View on the next page
Adding Layers in the Timeline ViewYou can add a new layer in the Timeline view in two different ways; using the Layer toolbar or using theNewElements dialog box.
To add a Drawing layer using the Timeline's Layer toolbar:
1. In the Timeline's Layer toolbar, click theAddDrawing Elements button.
A new layer appears in the Timeline and Exposure Sheet view.
2. Double-click the layer to rename it.
To add layers using the New Elements dialog box:
1. In the Timeline's Layer toolbar, click theAdd Elements button.
The New Elements dialog box opens.

Chapter 7: Layers and Timing Layers and Columns
208
2. In the Type list, select an element type.
3. In the Name field, type a name for the layer. If you are adding more than one layer at the same time, all ofthese layers are given that layer's name and a numerical suffix.
4. In the Number field, set the number of layers.
5. Click OK.
Adding an Element from the Top MenuTo add a new element from the topmenu:
1. Select Element > Add > Element Type.
A new element appears in the Timeline and Exposure Sheet view.
Adding New Columns in the Exposure Sheet ViewTo add a new column:
1. In the Exposure Sheet toolbar, click one of the following buttons:
• Add Drawing Element
• Add Image Element
• Add Sound Element
• AddMedia Element
• Add Annotation Element
A new element appears in the Timeline and Exposure Sheet view.
2. Double-click the Column header to rename the new column.
Deleting ElementsYou can delete elements from your scene in two different locations: the Timeline and Exposure Sheet view.
Deleting a Layer from the Timeline ViewThere are three ways to delete a layer in the Timeline view:
• Delete Layers button

Toon Boom Studio 8.1 User Guide
209
• Topmenu > Element > Delete Element
• Quick access menu
To delete layers in the Timeline view:
1. In the Timeline view, select the layers to delete.
2. In the Timeline's Layer toolbar, click on theDelete Layers button or right-click on the selection and
select Delete Element.
Deleting Columns from the Exposure Sheet ViewYou can delete columns in the Exposure Sheet view by using the quick access menu or the top menu.
To delete layers in the Exposure Sheet view:
1. In the Exposure Sheet view, select the columns to delete by clicking on their header.
2. From the top menu, select Element > Delete Element or right-click and select Delete Element.
Modifying ElementsOnce you add elements to your project, you canmodify their properties, name or ordering.
This section is divided as follows:
• Ordering Elements below
• Show and Hide Elements on the next page
• Renaming an Element on page 212
• Exposure Sheet Thumbnails on page 213
• Changing the Colour of a Column or Layer on page 213
Ordering ElementsYou can change the order of your layers in the Timeline and Exposure Sheet view. When you change the order ofyour layers in one of these views, the other one is updated automatically.

Chapter 7: Layers and Timing Layers and Columns
210
To reorder layers in the Timeline view:
1. In the Timeline view, select the layers to move.
2. Drag the selection to the new location and drop it in between the existing layers. Dropping the selectionon an existing layer would create a hierarchy.
‣ Layers located on top of the Timeline view are displayed in front of the other ones.
‣ Layers located at the bottom are displayed behind.
To reorder columns in the Xsheet view:
1. In the Exposure Sheet toolbar, click the Show Element List button to display the Element List panel.
2. In the Element List panel, drag up or down the columns to reorder. Layers located on top of the ElementList are displayed in front of the other ones. Layers located at the bottom are displayed behind.
Show and Hide ElementsAs youwork in the Drawing or Camera view, some elements may be in the way or are used as references. Youcan hide these layers to make your work area easier and less cluttered.
The show/hide operation in the Timeline and Exposure Sheet views are independent from eachother and will not affect the other view. For example, hiding layers in the Timeline does not affectthe layer's availability in the Exposure Sheet view and vice versa.
To show or hide all layers in the Timeline view:
‣ In the Timeline's Layer toolbar, click the Enable/Disable All button or select Element > Display >
Timeline > Show All.
To show or hide individual layers in the Timeline view:
‣ In the Timeline view, deselect the layer's checkbox or select Element > Display > Timeline >Show/Hide.

Toon Boom Studio 8.1 User Guide
211
To disable all layers but the selected one:
‣ Select Element > Display > Timeline > Hide All Others from the top menu or select Display > HideAll Others in the Timeline contextual menu.
To show and hide columns in the Exposure Sheet view:
1. In the Exposure Sheet toolbar, click the Show Element List button.
2. In the Element List section, show or hide the columns by selecting or deselecting a column's checkbox.
‣ Select Element > Display > Exposure Sheet > Hide to hide a column.
To disable all columns except the selected one:
1. Select Element > Display > Exposure Sheet > Hide All Others.

Chapter 7: Layers and Timing Layers and Columns
212
To show all hidden Exposure Sheet columns:
1. Select Element > Display > Show All Exposure Sheet Elements.
Renaming an ElementYou can rename an element in three different ways; directly in the column header, in the Timeline layer or in theRename dialog box.
To rename a layer in the Timeline view:
1. In the Timeline view, double-click on the name of the layer to rename.
2. In the Name field rename the layer and press [Return] to validate themodifications.
To rename a layer in the Exposure Sheet view:
1. In the Exposure Sheet view, double-click on the column header of the layer to rename.
2. In the Name field, type a new name and press [Enter]to validate themodifications.
To rename a layer in the Rename Element dialog box:
1. In the Timeline or Exposure Sheet view, select the layer to rename.
2. Select Element > Rename Element or right-click and select Rename Element.

Toon Boom Studio 8.1 User Guide
213
The Rename Element dialog box opens.
3. In the Name field, rename the layer.
4. Click OK.
Exposure Sheet Thumbnails
When there are a large number of columns and drawings in the Exposure Sheet, it is not always easy to quicklyidentify a particular column. Displaying the column thumbnails makes this easier. This option displays a smallthumbnail picture in each cell where there is a drawing.
To display the thumbnails:
1. In the Exposure Sheet toolbar, click the Thumbnails button or select View > Thumbnails from the
Exposure Sheet contextual menu or right-click and select View > Thumbnails.
The thumbnails appear.
Changing the Colour of a Column or LayerTo easily identify layers in your Timeline and Exposure Sheet views, you can change their colour. You can changethe drawing exposure colour and track background independently.
To change the drawing exposure colour:
1. In the Timeline or Exposure Sheet view, select the layer whose colour you want to change.
2. Select Element > Display > Change Colour from the top menu or right-click the header of the column inthe exposure sheet and select Display > Change Colour.

Chapter 7: Layers and Timing Layers and Columns
214
3. In the Select Colour window, select the new colour for your layer.
4. Click OK.
The layer's colour is updated.
To change the Timeline layer's background colour:
1. In the Timeline view, select the layer whose background colour you want to change.
2. Select Element > Display > Background Colour or right-click in the Timeline and select Display >Background Colour.
3. In the Select Colour window, select the new colour for your layer.

Toon Boom Studio 8.1 User Guide
215
4. Click OK.
The layer's background colour is updated.
To reset a layer's colour in the Timeline view:
1. In the Timeline or Exposure Sheet view, select the layers whose colour you want to reset and selectElement > Display > Default Colour or right-click in the Timeline and select Display > Default Colour.
Expanding and Collapsing LayersTo simplify the look of your Timeline view, you can collapse and expand your layers. If some layers are attached,you can collapse the top layer to hide all of the layers attached to it.
To collapse a layer selection in the Timeline view:
1. In the Timeline view, click the ExpandArrow button on the layer you want to collapse.
Modifying the Column WidthIn the Exposure Sheet view, you can change the width of a column. If the name of your column is too long anddoes not fit in the column header, make the columnwider to see it all.
Tomodify the column's width:
1. In the Exposure Sheet view, place your cursor on the edge of the column header you want to adjust.

Chapter 7: Layers and Timing Layers and Columns
216
2. Once you see the Extend cursor appear, adjust the columnwidth by clicking and dragging the ExtendCursor.
3. To restore all columns to their default width, in the Exposure Sheet contextual menu, select
View > Reset Column Width or by right-clicking on the column and select Display > Reset ColumnWidth.

Toon Boom Studio 8.1 User Guide
217
Filling ExposureStudio provides different tools to fill in exposures and values, create cycles, and set increments.
This section is divided as follows:
• Typing Exposure below
• Extending Exposure on the next page
• Dragging Cells on page 219
• Increasing and Decreasing Exposure on page 220
• Deleting Exposure on page 222
• Inserting Blank Cells on page 222
• Setting the Exposure on page 223
• Filling a Selection with a Sequence on page 224
• Creating Cycles on page 225
Typing ExposureTo fill-in your exposure, you can directly type the values in the Exposure Sheet view.
To enter a value in a column's cell, you have to either double-click in the cell or use the Change Label commandand type in the numbers or letters.
You can only use alphanumeric values (0-9, a-z, underscore (_) and dash (-)).
The following shortcuts can be helpful when editing the exposure values:
• [Return] to move to the next cell.
• [Esc] to exit the typing mode and return to normal mode.
To type values in the Exposure Sheet view:
1. In a column, double-click on one cell or right-click on the selected cell and select Change Label.
2. Type a value in the cell.
3. Press [Return] to move on to the next cell.

Chapter 7: Layers and Timing Filling Exposure
218
4. Press [Esc] to quit the edit mode.
Extending ExposureThe Extend Exposure feature allows you to select a drawing exposure to make it appear longer in the scene.
To extend a drawing exposure:
1. In the Exposure Sheet or Timeline view, select the drawing (cell) to extend.
You can also select the last cell of the area where you want the drawing exposure to end, as opposed toselecting the drawing cell directly. The cell must be an empty cell.
2. Select Element > Cell > Extend Exposure or press [Ctrl] + [Shift] + [1] (Windows) or [⌘ ] + [Shift] + [1](MacOS X).
If you selected the drawing cell, the Extend Exposure dialog box opens.
If you selected the last cell where you want the exposure to end, the exposure is automatically extended.
3. In the Extend to Frame field, type the frame number you want to extend the cell to.
4. Click OK.

Toon Boom Studio 8.1 User Guide
219
Dragging CellsTo readjust your timing, you can drag one or several cells to a new location in both the Timeline and ExposureSheet view. You can only drag a cell in the same column or layer.
To drag a cell to another location:
1. In the Timeline or Exposure Sheet view, select one or several cells to move.
2. Click on the cell selection and drag it to a new location.
‣ If you drop the selection, it overwrites the existing cells.
‣ If you hold [Ctrl] (Windows) or [⌘ ] (MacOS X) while dropping the selection, the cells are copied andnot moved.

Chapter 7: Layers and Timing Filling Exposure
220
‣ To change the starting frame of an element, use the Change Start Frame command.
3. Select Element > Change Start Frame.
4. Type the frame number where you want the selected layer to start.
5. Click OK.
Increasing and Decreasing ExposureOnce a value is entered in the Timeline or Exposure Sheet view, you can increase and decrease its exposure.
This section is divided as follows:
• Add Exposure below
• Remove Exposure on the facing page
Add ExposureIncreasing the exposure adds onemore exposures to a selected cell. Repeating this action adds an extra cellevery time. This is a quick way of extending a drawing exposure. Increasing an exposure always pushes theexisting exposure down.
To add exposure to a drawing:
1. In the Timeline or Exposure Sheet view, select a cell.
2. Select Element > Cell > Add Exposure or right-click the selected cell and select:
‣ From the Timeline view, Exposure > Add Exposure.
‣ From the Exposure Sheet view, Add Exposure.
‣ Press [R].

Toon Boom Studio 8.1 User Guide
221
Remove ExposureDecreasing the exposure removes one exposure from a selected cell. Repeating this action removes an extra cellevery time. This is a quick way to reduce a drawing exposure and remove the exposed drawing.
To decrease the exposure:
1. In the Timeline or Exposure Sheet view, select a cell.
2. Select Element > Cell > Remove Exposure or right-click the selected cell and select:
‣ From the Timeline view, Exposure > Remove Exposure.
‣ From the Exposure Sheet view, Remove Exposure.
‣ Press [E].

Chapter 7: Layers and Timing Filling Exposure
222
Deleting ExposureYou can delete a drawing's exposure and blank cells in several simple ways. Note that when you delete adrawing's exposure from the Timeline or Exposure Sheet view, you are not deleting the actual drawing file. Youcan always bring it back by typing its name again in a cell.
Refer to the Layer Concepts on page 204 topic to learn more about the drawing concept.
To delete selected exposures:
1. In the Timeline or Exposure Sheet view, select all the exposures you want to delete.
2. Press [Del] or right-click and select Delete Cell.
To delete blank cells:
1. In the Timeline or Exposure Sheet view, select a blank cell.
2. Select Element > Cell > Delete Blank Cell or right-click and select Delete Blank Cell or press [Shift] + [E].
Inserting Blank CellsUse the Insert Blank Cell option to place an empty cell between other cells. This pushes down existing exposure.

Toon Boom Studio 8.1 User Guide
223
To insert blank cells:
1. In the Exposure Sheet or Timeline view, select the cell where you want to insert a blank cell.
2. Select Element > Cell > Insert Blank Cell or right-clickthe selected cell and select Insert Blank Cell orpress [Shift] + [R].
The blank cell is inserted.
Setting the ExposureYou can easily increase or decrease the exposure for a selected cell range by using the Set Exposure options.
To use the Set Exposure options:
1. In the Timeline or Exposure Sheet view, select the cell range that you want to set the exposure for.
2. In the top menu, select one of the following:
• Element > Cell > Set Exposure to 1
• Element > Cell > Set Exposure to 2
• Element > Cell > Set Exposure to 3
• Element > Cell > Set Exposure
You can also select the frames in the Timeline view or in the Exposure Sheet and right-click to selectExposure > Set Desired.
‣ If you choose the Set Exposure option, the Set Exposure dialog box opens.
‣ Type the number of frames you want each of the drawings to be displayed.
‣ Click OK
The new timing is displayed.

Chapter 7: Layers and Timing Filling Exposure
224
Filling a Selection with a SequenceThe Insert Cell option is used to create a numbered sequence over a selection.
To fill a selection with a sequence:
1. In the Exposure Sheet or Timeline view, select one cell or a cell range.
2. Select Element > Cell > Insert Cell.
‣ If you selected only one cell, the Insert Cell dialog box opens.
‣ If you selected a frame range, the timing sequence appears.
‣ If you select multiple cells across different layers (i.e. one cell on each layer), the behavior is that InsertCell adds an extra row of blank cells before the selected cells.
3. In the Number field, type the number of cells.
4. If you want to insert cells with numbers in it, select the Named Cells option. If you want to insert blankcells, deselect theNamedCells option.
5. If you want to insert these new cells in all the layers, select the In All Elements option. If you want the newcells to be added only in the currently selected layer, deselect the In All Elements option.

Toon Boom Studio 8.1 User Guide
225
Selecting In All Elements disables the Named Cells option and the cells added to all the elements areblank.
6. If you want the new cells to be inserted before the currently selected cell, select the Before option. If youwant the new cells to be inserted after the currently selected cell, select the After option.
7. Click OK.
Creating CyclesOnce you have entered a series of drawings and exposures, you can create cycles out of them in several ways.
You can loop your drawings using the following commands:
• Create Cycle
• Create Advanced Cycle
The Create Cycle command is used to do simple cycles on your selected drawings. The Create Advanced Cyclecommand is used to createmore complex cycles including reversed cycle.
For example, a bouncing ball cycle where the sequence of drawings goes backwards and forwards during thecycle (1-2-3-4-3-2-1).
You can use the Advanced Cycle dialog box to automate the process of creating complex cycles.
When you cycle your selection, you are not duplicating the drawings. If you have a drawing named "1" in yourcycle, when youmodify that drawing, it is updated in all the cycles at once.
To use the Create Cycle command:
1. In the Timeline or Exposure Sheet view, select the cell range to cycle.
2. Select Element > Cell > Create Cycle or right-click and select Create Cycle.
The Create Cycle dialog box opens.
3. Enter the number of cycles you want, including the current selection.
4. Click OK.
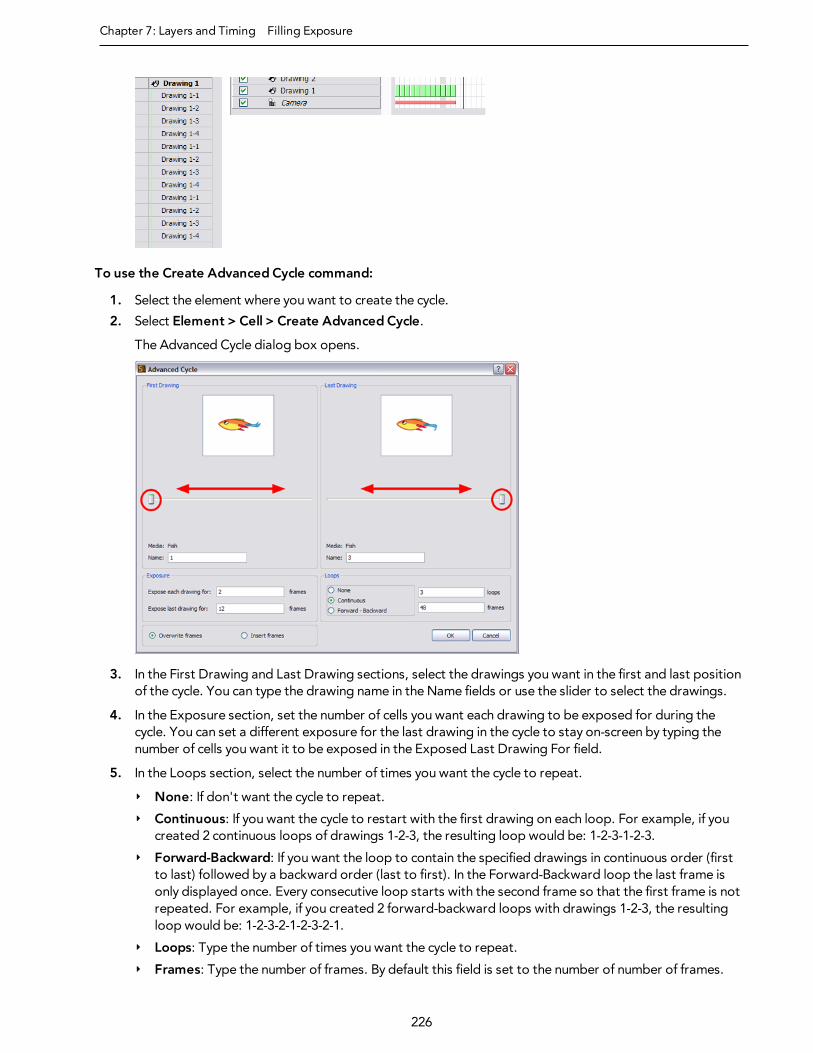
Chapter 7: Layers and Timing Filling Exposure
226
To use the Create Advanced Cycle command:
1. Select the element where you want to create the cycle.
2. Select Element > Cell > Create Advanced Cycle.
The Advanced Cycle dialog box opens.
3. In the First Drawing and Last Drawing sections, select the drawings you want in the first and last positionof the cycle. You can type the drawing name in theName fields or use the slider to select the drawings.
4. In the Exposure section, set the number of cells you want each drawing to be exposed for during thecycle. You can set a different exposure for the last drawing in the cycle to stay on-screen by typing thenumber of cells you want it to be exposed in the Exposed Last Drawing For field.
5. In the Loops section, select the number of times you want the cycle to repeat.
‣ None: If don't want the cycle to repeat.
‣ Continuous: If you want the cycle to restart with the first drawing on each loop. For example, if youcreated 2 continuous loops of drawings 1-2-3, the resulting loop would be: 1-2-3-1-2-3.
‣ Forward-Backward: If you want the loop to contain the specified drawings in continuous order (firstto last) followed by a backward order (last to first). In the Forward-Backward loop the last frame isonly displayed once. Every consecutive loop starts with the second frame so that the first frame is notrepeated. For example, if you created 2 forward-backward loops with drawings 1-2-3, the resultingloop would be: 1-2-3-2-1-2-3-2-1.
‣ Loops: Type the number of times you want the cycle to repeat.
‣ Frames: Type the number of frames. By default this field is set to the number of number of frames.

Toon Boom Studio 8.1 User Guide
227
6. Select how youwant to insert the cycle.
‣ Insert Frames: Adds the cycle in the current location.
‣ Overwrite Frames: Deletes frames that overlap the cycle.
7. Click OK.

Chapter 7: Layers and Timing Navigating Between Frames and Columns
228
Navigating Between Frames and ColumnsOnce a cell is selected in the Timeline or Exposure Sheet view, you can navigate between the layers and drawingsusing keyboard shortcuts that work in the Camera, Drawing, Timeline and Exposure Sheet views.
You can navigate through:
• Columns
• Drawings
• Frames
• Elements
To navigate through the drawings, frames and elements:
1. In the Timeline or Exposure Sheet view, select a cell.
2. Once the cell is selected, you can navigate between:
‣ Previous andNext Timeline Layers: Press [D] and [F].
‣ Previous andNext Exposure Sheet Column: Press [Shift] + [D] and [Shift] + [F].
‣ Previous andNext Drawings: Press [Shift] + [A] and [Shift] + [S].

Toon Boom Studio 8.1 User Guide
229
‣ Previous andNext Frames: Press [A] and [S].

Chapter 7: Layers and Timing Managing Drawings
230
Managing DrawingsDrawings that are created in Studio are not encapsulated in their cells. They are actual files stored in theproject's Drawing folder. If you want to rename a drawing, you need to use the RenameDrawing command,instead of typing in the cell.
This section is divided as follows:
• Renaming a Drawing below
• Duplicating a Drawing below
• Copying and Pasting Drawings on the facing page
Renaming a DrawingTo rename a drawing select the cell containing the drawing and use the RenameDrawing command from theExposure Sheet contextual menu.
Do not type the new name in the cell as this creates a new drawing instead of renaming the existingone.
To rename a drawing:
1. In the Exposure Sheet view, select the drawing to rename.
2. Right-click on the selection and select Rename Drawing.
The RenameDrawing dialog box opens.
3. In the Drawing Name field, type the new drawing name.
4. Click OK.
Duplicating a DrawingIf you want to modify an existing drawing, but keep the original drawing intact, you can duplicate the drawingand work on the copy. When duplicating a drawing, the selected cell is replaced with the new drawing. The

Toon Boom Studio 8.1 User Guide
231
original drawing is not deleted and can still be accessed from the Drawing folder.
To duplicate a drawing:
1. In the Timeline or Exposure Sheet view, select the drawing to duplicate.
2. Right-click on the selection and select Duplicate Drawing.
Copying and Pasting DrawingsWhen you copy and paste a selection in the Timeline or Exposure Sheet view, you are not copying and pastingthe actual drawings, you are pasting the exposure.
If you want to copy and paste the selected drawings into a different layer or paste the selection in the same layerto duplicate the drawings, youmust use the Paste New Object command.
To paste drawings as new objects:
1. In the Timeline or Exposure Sheet view, select the drawings to copy.
2. Select Edit > Copy/Copy Cell or press [Ctrl] + [C] (Windows) or [⌘ ] + [C] (MacOS X).
3. In the Timeline or Exposure Sheet view, select the cell where you want your pasted selection to start.
4. Select Edit > Paste New Object or press [Ctrl] + [V] (Windows) or [⌘ ] + [V] (MacOS X).

Chapter 7: Layers and Timing Preferences
232
PreferencesWhen adjusting your timing in the Timeline and Exposure Sheet views, youmay want to set some preferences.This section covers the preference related to the timing measurement.
To open the Preferences panel:
‣ Windows: Select Edit > Preferences.
‣ MacOS X: Select Toon Boom Studio 8.0 > Preferences.
Time MeasurementThe TimeMeasurement preference is on the Interface tab. It is used to change the way the timing measurementis displayed in the Timeline and Exposure Sheet view.
‣ In the TimeMeasurement drop-downmenu, select Frames or Feet and Frames and click OK.
There are two ways of measuring an animation timing:
Frames: The animation timing is measured in frames per second. To get a fluid animation, you need a minimumof 12 frames per second. This technique is frequently used whenworking with a software.
Feet and Frames: This technique is mainly used when shooting the animation frame-by-frame directly on film.The length of the animation is calculated in length of film instead of frames per second.

Toon Boom Studio 8.1 User Guide
233
Chapter 8: Traditional Digital Animation
Traditional digital animation, also known as hand-drawn animation, is the process of drawing every frame of ananimation. This is very different from using cut-out puppets, where body parts drawn at different angles arestored in a bank and swapped. These drawings do not usemotion paths; everything is hand drawn.
With the advent of digital animation, much has changed in the way that animation is done. However, there arestill tried and true animation tools and techniques that every animator may still find useful. Most of thesetechniques are derived from the classic method of traditional animation.
The following sections will be covered in this chapter:
• Traditional Animation Tools on the next page
• Animating Traditionally on page 241
• Rotoscoping on page 247
• Marking Corrections and Notes on page 252
• Preferences on page 255

Chapter 8: Traditional Digital Animation Traditional Animation Tools
234
Traditional Animation ToolsWhen you animate digitally using traditional techniques, certain tools are needed to work effectively. Just as ananimation table, paper and pencils are essential to the traditional animator, the tools listed here are needed fortraditional animation when it is done digitally.
• Onion Skin below
• Auto Light Table on the facing page
• Static Light Table on page 236
• Reposition All Drawings on page 238
• Lock Drawing on page 239
• Clear Drawing on page 240
Onion Skin
TheOnion Skin is used to preview the previous and next drawings. This feature comes in handy when animatingbecause it allows you to see the flow of a movement and lays it out in visible steps. By default, the previousdrawings appear with a shade of red and the next drawings are displayed with a shade of green, but you canchange the display options in the Preferences panel.
Refer to the Preferences on page 255 topic to learn about the Onion Skin preferences.
To use the Onion Skin feature:
1. Do one of the following to turn on theOnion Skin feature:
‣ Windows: In theOnion Skin toolbar, click the Show Onion Skin button.
‣ MacOS X: In the Top toolbar, click the Show Onion Skin button.
‣ Windows andMacOS X: Select View > Onion Skin > Turn On Onion Skin.

Toon Boom Studio 8.1 User Guide
235
2. You can select the number of previous and next drawings you want to show by clicking the button on theOnion Skin toolbar or by following any of themenu paths listed below:
‣ Select View > Onion Skin > No Previous Drawing or press [Shift] + [Q].
‣ Select View > Onion Skin > Previous Drawing.
‣ Select View > Onion Skin > Previous Two Drawings.
‣ Select View > Onion Skin > Previous Three Drawings.
‣ Select View > Onion Skin > NoNext Drawing or press [Shift] + [W].
‣ Select View > Onion Skin > Next Drawing.
‣ Select View > Onion Skin > Next Two Drawings.
‣ Select View > Onion Skin > Next Three Drawings.
The previous and next drawings appear in the Drawing and Camera views.
Auto Light Table
The Light Table lets you preview the active layers above and beneath the selected layer. It is useful to be able tosee the other layers when designing, animating, or cleaning up your animation.
The Light Table feature is only available in the Drawing view.

Chapter 8: Traditional Digital Animation Traditional Animation Tools
236
To use the Light Table feature:
1. Do one of the following:
‣ Whenworking in the Drawing view, select View > Turn On Auto LightTable.
‣ In theOnion Skin toolbar, select the Light Table button.
The drawings are displayed in the Exposure Sheet view.
2. In the Exposure Sheet view, you can deselect the layers you want to hide from the Light Table for theDrawing view.
Static Light Table

Toon Boom Studio 8.1 User Guide
237
The Static Light Table works differently than the Auto Light Table and can only be accessed from the ExposureSheet view. By using this feature, you can lock one drawing and have it appear in washed-out colours behindevery drawing, existing on any frame, belonging to any layer.
To use the Static Light Table feature:
1. In the Exposure Sheet view, right-click on the cell that contains the drawing that you want to lock onto theStatic Light Table.
2. Select Send to Static Light Table.
3. Click on another cell where you would like to work with the aid of the drawing locked on the Static LightTable, then proceed to draw in the Drawing or Camera view.
To display the elements on the Static Light Table:
1. From the Exposure Sheet toolbars, click the Toggle Static Light Table button.
Thumbnails of the drawing appear under the Exposure Sheet columns.
2. Sendmore than one cell containing drawings to the Static Light Table.
3. Use the check mark boxes to show or hide the drawings sent to the Static Light Table.
4. Use the foreground/background swatches button to toggle the drawings sent to the Static Light Tableeither behind or in front of your other drawings seen in the Drawing view.
To clear a cell from the Static Light Table:
1. Right-click on the thumbnail that you want to delete and select Delete to remove that particular cell, orDelete All to remove all cells from the Static Light Table.

Chapter 8: Traditional Digital Animation Traditional Animation Tools
238
Reposition All Drawings
The Reposition All Drawings tool is used to change the position, scaling, rotation, or skewing of all the drawingstrokes on every frame belonging to the same layer.
To reposition all drawings:
1. In the Drawing Tools toolbar, select the Reposition All Drawings tool or press 1 to alternate
between all the tools under the Select Tool drop-downmenu.
In the Drawing view, every stroke that composes your drawing is selected.
To deform or reposition a selection:
‣ To reposition, click and drag your selection to a new area.
‣ To rotate, move the selection box handle in a circular motion.

Toon Boom Studio 8.1 User Guide
239
‣ To scale, pull or push on the side, top or corner control point. Hold down [Shift] to lock the selection'sratio.
‣ To skew, drag the sides or top and bottom segments, between the control points.
When you release the pointer, every drawing contained in the drawing layer you repositioned, scaled,rotated or skewed follows the same transformation.
Lock DrawingAlthough the Reposition All Drawings tool can be quite useful, sometimes youmay need to reposition all but afew drawings. For example, one or two elements, such as a background or point of referencemight have toremain absolutely fixed. The Lock Drawing option is a good way to keep certain individual frames frommoving,or from accidentally being drawn on.
To use the Lock Drawing option:
1. In the Exposure Sheet view, select the cell that contains the drawing youwant to lock.
2. Right-click on this cell and select Lock Drawing.
The cell containing the drawing is locked as indicated by the lock icon beside the cell name.
3. In the Timeline view, you can also right-click on a selected layer and select Lock > Lock or another desiredoption.

Chapter 8: Traditional Digital Animation Traditional Animation Tools
240
Clear DrawingAnother feature that makes drawing by hand much easier is the Clear Drawing feature in the Exposure Sheetview. Often when you are drawing with your Wacom tablet directly in the software, youmay decide that youwant to start a particular drawing in an action sequence from scratch.
If you delete the frame from the Timeline view, there is a gap in your timeline. If you use the Select tool to selectall your drawing strokes and delete them, you risk missing a few strokes while taking twice as long to do so.
To use the Clear Drawing command:
1. In the Exposure Sheet view, right-click on the cell that contains the drawing strokes you want to delete.
2. Select Clear Drawing.
The Clear Drawing command does not work on Image layers or on extended exposure cells; thecommand only works on Drawing layers.

Toon Boom Studio 8.1 User Guide
241
Animating TraditionallyIn Studio, you can easily animate traditionally and work entirely digitally. The process of hand-drawn animationthrough traditional animation procedures has been divided to lead you easily through the process.
• Animating below
• Cleaning Up on page 243
• Power Painting on page 245
• Setting the Timing on page 246
• Playing Back Your Animation on page 246
Animating
The first step to complete is the rough animation, which is the skeleton of your animation. You would usuallystart with themain action. For example, to animate a walk-cycle, you will start with the torso moves and the legs.The head, arms, and clothes are added later, during the secondary animation.
For a satisfactory animation, complete themain action before adding all the details. If you start animating thedetails right away, you lose a lot of time if you have to do corrections, and your animation often looks too rigid.
To animate:
1. In the Timeline view, create a new drawing layer and name it Rough.
2. In the Drawing Tools toolbar, select the Brush tool or press [@].
3. In the Colour view, select the colour you will use to draw. It is a good idea to choose a light colour for yourrough animation to help for the following task, the clean up process.
4. In the Timeline or Exposure Sheet view, select the cell where the first drawing will appear.
5. In the Drawing or Camera view, draw the first key drawing.

Chapter 8: Traditional Digital Animation Animating Traditionally
242
6. In theOnion Skin toolbar, click the EnableOnion Skin button.
7. From theOnion Skin toolbar, click the onion skin's Previous or Next drawing buttons and from
their drop-downs, select the number of previous and next visible drawings that you think you will need.
8. In the Timeline or Exposure Sheet view, select the cell where your next key drawing will appear.
9. In the Camera view, draw your second key drawing.
10. In the Exposure Sheet View, select a cell between your two key drawings.
11. Draw your new drawing.

Toon Boom Studio 8.1 User Guide
243
12. In the Timeline or Exposure Sheet view, select a new cell and repeat these steps for the new drawings.
Cleaning Up
When your rough animation is ready, it is time to clean it up and ink it. The clean-up is also called tracing. Itconsists of tracing solid and clean lines over the rough animation to get closed zones. This is the final paperlessanimation step before the ink and paint step.
You need to add a new drawing layer to draw your clean drawings. This is the equivalent of adding a sheet ofpaper and tracing over the rough using the animation disk.
If you plan on tracing your animation in the Drawing view, you need to turn on theLight Table feature in order to display all the layers of your project.
To trace your animation in a new layer:
1. In the Timeline view toolbar, click the Add Drawing Layer button.
2. Rename your new layer Clean.

Chapter 8: Traditional Digital Animation Animating Traditionally
244
3. In the Timeline view, select your rough layer,
4. Click theMenu button, and select Lock > Lock. This is to prevent any accidental changes.
5. In the Timeline or Exposure Sheet view, select the cell on the clean layer corresponding to the first keydrawing of your rough animation.
6. In the Drawing Tools toolbar, select a drawing tool.
7. In the Colour view, select the colour to trace your animation. Pick a bold dark colour, such as black tomake sure it contrasts well with the light colour of your rough animation.
8. In the Camera view, start tracing the first key drawing.
9. If you have some other layers in the way, you can deselect them temporarily so that only your roughanimation and your clean-up layer are displayed. You can do this in two ways, by deselecting these layersin the Timeline to affect what is seen in the Camera view, or by disabling them in the Exposure Sheet viewto affect the Drawing view.
10. In theOnion Skin toolbar, select the EnableOnion Skin button and extend the previous and next
drawing numbers.
11. In the Timeline or Exposure Sheet view, select the next cell corresponding to a rough drawing.
12. In the Drawing or Camera view, trace your next drawing.

Toon Boom Studio 8.1 User Guide
245
13. Repeat these steps for the rest of your rough drawings until you have a full set of clean ones.
This method allows you to keep the roughs and the cleans intact. You only need to disable the rough layer toprevent it from appearing in the scene.
Power PaintingWhen you create a traditional digital animation, you need to paint each drawing one at a time. But you can usethe Paint All tool to automatically paint closed zones in the same location within an element. To use the Paint Alltool, you click a zone in a drawing object. Toon Boom Studio then flips through all of the drawings in the elementto see if there is a closed zone in the location you clicked. If there is, it fills the zone with the same colour. Thissaves you a lot of timewhen painting your animation.
You can use the onion skin to select a location.
To learn more about painting, colour palettes and Onion Skin, see Adding Colours on page 125
To power paint drawings in an element:
1. Do one of the following to enable theOnion Skin feature:
‣ Windows: In theOnion Skin toolbar, click the Show Onion Skin button.
‣ Windows andMacOS X: Select View > Onion Skin > Turn On Onion Skin.
2. You can select the number of previous and next drawings you want to show by clicking on the button fromtheOnion Skin toolbar or by using theView > Onion Skinmenu.
The previous and next drawings appears in both the Drawing and Camera view.

Chapter 8: Traditional Digital Animation Animating Traditionally
246
3. From the Colour Palette view, select the swatch you want to use to paint the zone.
4. Select the Paint tool from the Drawing Tools toolbar or select Tools > Drawing Tools > Paint.
5. Press [Shift] + [Alt] and click a zone that many drawings in the element share.
Studio evaluates all of the drawings in the element to determine if there is a closed zone beneath whereyou clicked.
Setting the Timing
To learn how to set the timing of your animation, see Layers and Timing on page 197.
Playing Back Your AnimationYou can play back your animation in the Camera view using the Playback toolbar.
To play back your animation:
1. Be sure you are currently using the Camera view, as this feature is not available in the Drawing view.
2. In the Timeline view, deselect the layers you do not want to show during playback.
3. In the Playback toolbar, click the Loop button if you want the playback to loop.
4. In the Playback toolbar, click the Play button to start the animation.

Toon Boom Studio 8.1 User Guide
247
RotoscopingMaybe you have heard about this process, but do not know how to use it. Perhaps you have an idea of how thistechnique works, but do not know where to begin. This section will help you get started.
• What is Rotoscoping? below
• Selecting a Video on the next page
• Tracing the Character on page 249
• Painting the Animation on page 251
What is Rotoscoping?
Rotoscoping is an animation technique where the animator traces over each frame of a live-actionmovie toreproduce a realistic movement. This technique was invented byMax Fleischer in 1915. Themovie was projectedframe by frame onto a piece of glass that the animator could trace over. The piece of equipment used in thisprocess is called a rotoscope. Today, the rotoscope has been replaced by the computer.
Reasons for RotoscopingSome reasons youmay chose to use this process:
• Themotion is very realistic.
• The timing is accurate.
• The characters or other elements retain their proportions and volume.
• It helps you learn how to animate.
• It helps you understand how to break down a movement.
• It teaches you how to animate very subtlemotions, like a slight head turn or a slow raise of the hand.
You can also superimpose your character design and only use themotion but not the actual object, person oranimal from the video.
Because rotoscoping is so realistic, it leaves little room for exaggeration, movement, squash and stretch, or avery cartoony look. If you use this technique, make sure it suits your project.

Chapter 8: Traditional Digital Animation Rotoscoping
248
Selecting a Video
Selecting a video to rotoscope is simple. You can:
• Film the actions you need to animate yourself. For example, you could film a dog playing with a ball or aperson running,
• Find a freemovie clip on the web, or
• Purchase a royalty-freemovie clip from a website.
Your movie format can be any of the following:
• AVI (*.avi)
• QuickTime (*.mov)
• MPEG (*.mpg)
• iPod (*.m4v)
If you find a movie clip that is not in any of these formats, you can easily convert it in an editing software.
Your clip does not need to have a very high resolution, however the higher the resolution, themore detail yousee. Aminimum resolution of 300x200 is recommended.
Importing a VideoWhen you create your Toon Boom Studio project, you can avoid having too many drawings to trace over bycreating the project with a rate of 12 frames per second instead of 24.
To import your video:
1. Select File > Import File.
2. In theOpen dialog box, browse for your clip and click Open.
3. In the Import Options dialog box, doNOT set an opacity value.

Toon Boom Studio 8.1 User Guide
249
4. Click OK.
Tracing the CharacterBefore you start tracing your movie, set up your brush with a low smoothness and a lively tracing colour. This isso your lines will bemore faithful to the video still and you will be able to see your lines clearly.
Tracing
When you trace over your imported movie, concentrate on one element at a time. For example, if there is a boyrunning with a balloon, trace the boy first and then the balloon. This helps when trying to create separatemovements. The boymoves differently than a balloon, even if they aremoving at the same speed and in the samedirection.If the two objects or characters are interacting, it is best to draw them on the same layer.
Remember, when you trace over the character, try to close your zones for fast and efficient painting later on.
To trace your animation:
1. In the Timeline view, add a new layer to trace your animation.
2. If you work in the Drawing view, enable the Light Table to see the live-action frames.
3. In the Camera/Drawing view, zoom in on your image to see the details better.
4. Trace your first frame.
5. In the Timeline view, select the second cell and trace the second image.
6. If necessary enableOnion Skin to see your previous drawings.

Chapter 8: Traditional Digital Animation Rotoscoping
250
7. Repeat the process until the animation is entirely traced.
Fine Tuning the AnimationOnce your animation is traced, it is a good idea to deselect the live-action clip layer or turn off the Light Table,and then go over your animation to fix the little details, such as open zones and uncompleted lines.
To learn more about closing gaps, see Adding Colours and to learn more about making invisiblestrokes, see Drawing and Design on page 81.
If you want your final project to be lighter once you are done tracing, select your lines and flatten them.
To flatten your drawings:
1. In the Drawing Tools toolbar, click the Select tool.
2. In the Timeline view, select the first frame of the tracing layer.
3. In the Camera/Drawing view, select your entire drawing.
4. Select Tools > Flatten.
5. Repeat this process for all your drawings.

Toon Boom Studio 8.1 User Guide
251
Painting the Animation
To create your colour palette, use Toon Boom Studio's special dropper to pick colours from your live-actionmovie and paint your animation in the same colours as the clip.
To create your colour palette:
1. In the Colour view, create and rename your new palette.
2. In the Colour list section, add a new colour swatch by clicking theAddColour button.
3. In the Camera view, display your live actionmovie.
4. Double-click on the new colour swatch to display the Colour Picker window.
5. In the Colour picker window, click the Eye Dropper button.
6. In the Camera view, pick a colour.
7. Repeat this process until the colour palette is entirely finished.
Your animation is now ready for painting.
When you are ready to publish your animation, see Exporting Your Project on page 523.

Chapter 8: Traditional Digital Animation Marking Corrections and Notes
252
Marking Corrections and NotesToon Boom Studio has integrated several features to make adding notes and making visual corrections easy.
• Annotation Elements
• Notes
Annotation ElementsIt does not matter if you want to place notes, suggestions or corrections to the anatomy of a drawing, you willfind the annotation levels are invaluable.
To create an annotation element:
1. Do one of the following:
‣ From the Timeline view's contextual menu, select New > Annotation
‣ Select Element > Add > Annotation.
‣ In the Exposure Sheet View toolbar, click the Add Annotation button.
The Annotation element appears in the Timeline and Exposure Sheet view.
2. Draw or make notes on this layer.
You can also select an existing Drawing element and convert it to an Annotation element.
To set a Drawing element as an Annotation element:
1. In the Timeline view, select a Drawing element.
2. From the Timeline view's the contextual menu, select Annotation Elements > Set As Annotation
Element or select View >Annotation Elements > Set As Annotation Element.
The colour of the element name changes from black to blue and the prefix Annotation is added to it.

Toon Boom Studio 8.1 User Guide
253
After the animator has made all the requested changes, it is possible to view the full animation without seeing allthe red marks and arrows.
To hide an annotation element:
1. In the Timeline view, select the annotation element.
2. From the Timeline view's the contextual menu, select Annotation Elements > Hide All Annotation
Elements or select View > Annotation Elements > Hide All Annotation Elements.
Working with Notes
Layer NotesAnother way to write small reminders to yourself or for others is by writing a layer/element note.
To write a layer/element note:
1. In the Timeline view, right-click on a layer and select Add Element Note or select Element > AddElement Note.
TheNote dialog box appears.
2. Type in a message, either to remind yourself about something concerning this layer, or for the nextperson you are passing this project on to.
3. When you are finished typing your message, click OK.
The existence of themessage is indicated by a small note icon on the respective element in both theTimeline and Exposure Sheet views.
Later on, if you want to edit or reread your ownmessage, or access themessage of another person, simplydouble-click on the icon or from the top menu, select Element > Update Element Note and theNote boxreappears.
Cell NotesTo go into greater detail or to make notes more specific, you can also create notes for an individual cell or frame.

Chapter 8: Traditional Digital Animation Marking Corrections and Notes
254
To create a cell note:
1. In the Exposure Sheet view, select the cell you want to make notes on.
2. Right-click and select AddCell Note or select Element > Cell > AddCell Note.
TheNote dialog box opens.
3. Compose a message about that specific cell or a drawing on that cell.
4. When you are finished composing your message, click OK.
The existence of the cell note is indicated by a small note icon on the respective cell in the Exposure Sheetview.
Later on, if you want to edit or reread your ownmessage, or access themessage of another person,right-click on the cell and select Update Cell Note or select Element > Cell > Update Cell Note.

Toon Boom Studio 8.1 User Guide
255
PreferencesWhen doing traditional digital animation, you work with features and options. You can customize the defaultbehaviour of most tools via the Preferences panel.
To open the Preferences panel:
‣ Windows: Select Edit > Preferences.
‣ MacOS X: Select Toon Boom Studio 8.0 > Preferences.
You can find the preferences relating to theOnion Skin and Static Light Table features on the Light Table tab ofthe Preferences panel.
Onion Skin
By default the onion skin is displayed as the element's shape in washed-out colours. Green represents the nextframes and red represents the previous frames. You can customize the onion skin display.
• Enable Transparency: By default the onion skin is displayed with transparency. You can change this behaviour tomake the onion skin drawing opaque by deselecting this option.
• Enable Colour Shading: By default the onion skin's previous and next drawing are displayed in red and greenwashed-out colour. You can deselect this option to use the current drawing's colours washed-out as the onion skindisplay.
• Previous Drawing Colour: Click the red colour swatch to display the colour picker in which you can select a newcolour for the previous drawings displayed in the Camera view.
• Next Drawing Colour: Click the green colour swatch to display the colour picker in which you can select a newcolour for the next drawings displayed in the Camera view.
Static Light Table

Chapter 8: Traditional Digital Animation Preferences
256
• Enable Shade: By default the Static Light Table displays the other drawings as washed-out colours. You can turnoff this option to display the other drawings with their real colours.

Toon Boom Studio 8.1 User Guide
257
Chapter 9: Creating a Cut-out Puppet
With Toon Boom Studio's extensive set of tools, you can create animated puppets from your drawings orphotographs. This technique is known as cut-out animation because of the way youmove cut-out pieces aroundinstead of drawing.
This chapter is divided as follows:
• About Building a Cut-out Puppet on the next page
• Choosing Your Character on page 259
• Cutting the Character into Pieces on page 261
• Attaching the Pieces on page 267
• Storing the Character in the Library on page 276

Chapter 9: Creating a Cut-out Puppet About Building a Cut-out Puppet
258
About Building a Cut-out PuppetThe Toon Boom Studio cut-out puppet principle is very similar to cutting up a character drawn on a sheet ofpaper and assembling the pieces using little brass fasteners. You create a drawing for each character's bodyparts and attach them in the Timeline view. Then, you can articulate the character and animate it by giving it aslightly different pose on each frame.

Toon Boom Studio 8.1 User Guide
259
Choosing Your CharacterAs you start building your puppet, the first thing you need to do is to select your character. If this is your firstpuppet, it is always better to choose a simple character. A simple character is a character with two legs, twoarms, a head and torso. To start with, you should avoid a character with too many loose clothes such as a cloakor baggy pants. Once you are used to constructing puppets, you will understand how to cut them apart andloose clothing will not be as much of a challenge for you.
The character we chose for this cut-out demonstration is a turtle.
You could also create your character from a picture. Instead of drawing a turtle, you could use a photograph of aturtle and break it apart in Toon Boom Studio or another third party software, such as Adobe Photoshop.
Creating a New Project and Importing a CharacterThe best way to break down your character is to create a new scene and import the character into the scene.There are several ways to import your character in a scene:
• Create a template using the Library and import it into your new scene.
• Import a bitmap image.
• Scan a drawing.
• Import a picture, etc.

Chapter 9: Creating a Cut-out Puppet Choosing Your Character
260
If you import a picture, make sure to import it as a Vector element and not an Image element in order to eraseportions and cut pieces.
Related Topics
• Creating and Opening a Project on page 34
• Scanning Images on page 180
• Importing Bitmap Images on page 162
• Library on page 182
Creating a Colour PaletteOnce your drawing is imported into your new scene, you need to create a new colour palette for your puppet,unless, of course, you are using a photograph.
Related Topics
• Palettes on page 152

Toon Boom Studio 8.1 User Guide
261
Cutting the Character into PiecesTo cut up your character into pieces, youmust first decide which parts of the final character will move.
If you are building your first puppet, start with a very simple breakdown. Most of the time, you will want toanimate the arms, legs and head. It is not necessary to separate all the facial features from the head or to breakdown the knees and elbows to get a working puppet. Breaking down the character into six pieces is enough toproduce a basic animation.
If you like, you can extend the amount of the puppet's articulation. You can bend the arms and legs, andseparate the head into several different pieces to animate the eyebrows and make the eyes blink.
How to Cut the PiecesOnce you know what you want to animate, it is time to cut the different pieces required for the animation. Thereare two ways to do so. First, you can use the Cutter and Scissor tools to cut the portion needed and use thedrawing tools to complete themissing portion or, if you are not using a photo, you can trace the new piecesusing the drawing tools.

Chapter 9: Creating a Cut-out Puppet Cutting the Character into Pieces
262
Cutting Out Your PiecesYouwill now learn about cutting parts of your character and completing anymissing areas. If you are using apicture, and because Toon Boom Studio mainly edits vector images, youmay want to do this in a bitmap editingsoftware, such as Adobe Photoshop.
You can use the Show Strokes feature to help you clearly see the region you are cutting using theCutter tool. To display the strokes, select View > Show Strokes or press [K].
To cut your pieces:
1. In the Tools toolbar or in the Drawing Tools toolbar, select the Cutter tool.
2. In the Drawing view, trace a selection around the part to cut.
3. In the Tools toolbar or in the Drawing Tools toolbar, select the Drawing Select tool.
4. In the Drawing view, select the cut zone.
5. Select Edit > Copy DrawingObject or press [Ctrl] + [C] (Windows) or [⌘ ] + [C] (MacOS X).

Toon Boom Studio 8.1 User Guide
263
6. In the Timeline view, click the Add Drawing Element button and rename the new layer corresponding
to the new piece you want to create.
7. On the right side of the Timeline view, select the new layer's first cell.
8. Click the Drawing view, to activate it.
9. Select Edit > Paste DrawingObject or press [Ctrl] + [V] (Windows) or [⌘ ] + [V] (MacOS X).
10. In the Tools toolbar, select a drawing tool to clean and complete your new drawing. The Brush and
Eraser tools are recommended.
11. In theOnion Skin toolbar (Top toolbar onMacOS X), click the Light Table button so you can see your
original drawing while you draw.
12. In the Drawing view, clean and complete your new drawing. Make sure to draw a complete shape thatoverlaps the other body parts.
13. In the Tools toolbar, select the Paint tool.
14. In the Colour Palette view, select the colour needed.

Chapter 9: Creating a Cut-out Puppet Cutting the Character into Pieces
264
15. In the Drawing view, paint your new drawing.
16. Save your project.
17. Repeat the same process for each new piece to create.
Drawing your PiecesTo draw your pieces:
1. In the Timeline view, click the Add Drawing Element button and rename the new layer corresponding
to the new piece you want to create.
2. On the right side of the Timeline view, select the new layer's first cell.

Toon Boom Studio 8.1 User Guide
265
3. In the Drawing Tools toolbar, select the drawing tool of your choice. The Brush tool is recommended.
4. In theOnion Skin toolbar (Top toolbar onMacOS X), click the Light Table button to see your original
drawing while you draw.
5. In the Drawing view, trace the new piece. Make sure to draw a complete shape overlapping with the otherbody parts.
6. In the Tools toolbar, select the Paint tool.
7. In the Colour Palette view, select the colour needed.
8. In the Drawing view, paint your new drawing.
9. Save your project.
10. Repeat the same process for each new piece to create.

Chapter 9: Creating a Cut-out Puppet Cutting the Character into Pieces
266

Toon Boom Studio 8.1 User Guide
267
Attaching the Pieces
Once all your pieces are completed, it is time to attach them to each other, the same as you would do with thebrass fasteners. To do so, you will connect your layers to each other in the Timeline view.
This process is divided in the following steps:
• Ordering Your Layers on the next page
• Attaching the Layers on page 269
• Ordering Parented Layers on page 269
• Adding a Master Peg on page 271
• Setting the Pivots on page 273

Chapter 9: Creating a Cut-out Puppet Attaching the Pieces
268
Ordering Your Layers
Once you have finished drawing all your pieces, youmay find that your drawings need to be reordered. You canplace these pieces in the correct order before attaching your pieces to each other.
To reorder your layers:
1. In the Timeline view, select the drawing to bring in front of the others.
2. Drag the selected layer and drop it BETWEEN the existing layers. DoNOT drop it onto a layer because itwill connect them, and in this case, you do not want to connect them.
3. Repeat this process until the entire character is in the correct order.
To reorder parented layers, see Ordering Parented Layers on the facing page.

Toon Boom Studio 8.1 User Guide
269
Attaching the LayersWhen you animate, you will often want the forearm and hand to follow the upper armwhen you select and moveit. To do this, youmust attach the forearm to the upper arm and the hand to the forearm.
To attach a layer to another one, drag the layers one onto the other in the Timeline view.
To attach a layer to another one:
1. In the Timeline view, select the layer you want to attach to another one. For example, select the forearmlayer to attach it to the upper arm.
2. Drag the selected layer ONTO the one youwant to attach it to.
Once the layer is attached to another one, it is pushed to the right.
3. Repeat this process until every piece is connected.
Ordering Parented LayersTo reorder parented layers:
1. If the piece you connected is supposed to be in front of the layer it is attached to, you can push it in frontusing a keyboard shortcut, which is explained below.

Chapter 9: Creating a Cut-out Puppet Attaching the Pieces
270
‣ In the Animation Tools toolbar, select the Transform tool.
‣ In the Camera view, select the part to bring in front.
‣ Hold down the [Alt]key and press the [DownArrow] key to nudge the drawing forward. Doing somoves the drawing very slightly forward. If you press on the key several times, the drawing will moveforward evenmore. You can also use the [Up Arrow] key to send the drawing backward.

Toon Boom Studio 8.1 User Guide
271
Adding a Master Peg
Agood element to add to your puppet is a Master Peg. This is a trajectory on which you attach your puppet tomake it travel through your scene. t is also used when youwant to scale the entire character up or downwithoutdoing it on each individual piece. For example, you could animate your puppet walking on the spot then use theMaster Peg to get it to move from left to right.
To add aMaster Peg:
1. In the Timeline view, click the Add Parent Peg button.
2. Double-click the new Peg and name it myCharacterName-Peg.
3. In the Timeline view, select all your puppet's layers.

Chapter 9: Creating a Cut-out Puppet Attaching the Pieces
272
4. Drag the selectionONTO the new peg.
All the layers are connected to the peg andmoved slightly to the right.

Toon Boom Studio 8.1 User Guide
273
Setting the Pivots
In order for your pieces to rotate properly, it is important to set the pivots at the right location. The pivot is thepoint fromwhich the body part will rotate; they generally correspond to an articulation. To know where toposition a pivot point, think of your own body. If you aremoving an arm, notice that your own arm rotates fromthe shoulder. So, the pivot point for the puppet's armmust be located at the shoulder. The pivot point for theforearmwill be the elbow, etc.
You can apply this technique to anything you want to animate that contains a joint or pivot. For example, if youare animating a spider, study a real spider or a film of a spider moving to determine where you should place thepivot points correctly in your animation.
To position the pivots:
1. In the Animation Tools toolbar, select the Rotate tool.
2. In the Timeline or Camera view, select the first layer on which to set the pivot.
The green pivot point appears.

Chapter 9: Creating a Cut-out Puppet Attaching the Pieces
274
3. In the Properties view, select the Properties tab. In the Properties, decide how youwant to apply thepivot:
‣ Rotation: The pivot point applies to rotation only.
‣ Scale: The pivot point applies to scaling only.
‣ Both: The pivot point applies to both rotation and scaling.
4. In the Camera view, click the green pivot point and drag it to a new position.

Toon Boom Studio 8.1 User Guide
275
5. In the Camera view, rotate the part to see if the point is well positioned. If not, relocate it.
6. Repeat this process for each piece. Do not forget to set a pivot for the eyes and mouth. This is generallylocated at the centre of the drawing.
Do not forget to do this for your master peg. Positioning the pivot between the feet is often a goodoption.

Chapter 9: Creating a Cut-out Puppet Storing the Character in the Library
276
Storing the Character in the LibraryYour puppet is now ready and can be imported into your different scenes to be animated. The best way to reuseyour puppet is to store it in the Library as a template. From there, you can open a different scene or project anddrag it from the Library into your scene.
Refer to the Importing Artwork on page 161 chapter to learn more about creating templates andorganizing your library.
To store your puppet in the library:
1. In the Timeline view, click theMaster Peg's collapsing arrow button to collapse your puppet.
2. In the left side of the Timeline view, select the puppet's master peg.
3. Drag your selection to theGlobal Library folder or any other one youmay have created for your project.
4. Double-click the template and rename it with your character's name.
5. Select File > Save Global Library.
Your puppet is completed.

Toon Boom Studio 8.1 User Guide
277
Chapter 10: Setting the Scene
Setting up your scene can be compared to building a set for a television show. This is the point where youposition each scene element, such as the Camera frame, background elements, and characters.
In this chapter, you will learn about the following:
• Importing the Scene Elements on the next page
• Ordering the Element Layers on page 279
• Positioning the Scene Elements on page 281
• Cloning and Duplicating Elements on page 285
• Setting the Camera Frame on page 288
• Creating a Multiplane on page 293

Chapter 10: Setting the Scene Importing the Scene Elements
278
Importing the Scene ElementsThe first step when building your set is to gather up the scene's elements and import them into your Studioproject.
Background, Sound or MovieRefer to Importing Artwork on page 161 to learn how to import different types of elements inside your scene.
Refer to Sound and Lip-sync on page 421 to learn how to import sound files.
Show Scene Background ColourIf you have no background and want to use your Scene Background Colour as a colour card, enable the ShowScene Background Colour option. A colour card has no boundary.
By default, the Scene Background Colour is set to white. Refer to Starting Your Project on page 31 tolearn how to set the colour of your colour card.
To enable the Show Scene Background Colour option:
‣ Select View > Show Scene Background Colour.
To disable the Show Scene Background Colour option:
‣ Select View > Hide Scene Background Colour.
TemplatesRefer to Importing Artwork on page 161 to learn how to import elements from the Library view.

Toon Boom Studio 8.1 User Guide
279
Ordering the Element Layers
When you import the elements of your scene, theymight not appear in the right order in which case, you need toreorder your layers. This can be easily done in the Timeline view or by using the Arrange commands from the Topmenu. You can also use theOrdering Layer Types in the Properties view.
• Ordering Layers in the Timeline View below
• Ordering Layers Using the Arrange Command on the next page
• Ordering Layer Types on the next page
Ordering Layers in the Timeline ViewOrdering your layers in Studio is as easy as a drag and drop.
The order in the Timeline view will determine the way the layers appear in the Camera view.
• The layer on top of the Timeline view will appear in front of all the other elements in the Camera view.
• The layer on the bottom of the Timeline view will appear behind all other elements in the Camera view.
To order layers in the Timeline view:
1. In the Timeline view, select the layers to move.
2. Drag the selection to the new location and drop it between the layers. Be careful not to drop yourselection on a layer, this would create hierarchy.

Chapter 10: Setting the Scene Ordering the Element Layers
280
Ordering Layers Using the Arrange CommandYou can also reorder the layers in your scene by using theArrangemenu command.
To arrange the layers:
1. In the Timeline view, select the layer you wish to reorder.
2. Select Arrange > the desired option from the Timeline View menu. You can also select Element >Arrange > the desired option:
‣ Bring to Front: Moves the layer to the top of the Timeline view order. Your element is displayed infront of everything else in the Camera view.
‣ Bring Forward: Moves the layer one step higher in the Timeline view order. Your element is displayedone level higher in the Camera view.
‣ Send to Back: Moves the layer to the bottom of the Timeline view order. Your element is displayedbehind everything else in the Camera view.
‣ Send Backward: Moves the layer one step lower in the Timeline view order. Your element is displayedone level lower in the Camera view.
This option will permanently reorder layers in the Timeline view. If you want to reorder the drawingstrokes, see Arrange on page 121 or if you want to animate the layer postion over time, see OrderingYour Layers on page 268 and Ordering Parented Layers on page 269.
Ordering Layer TypesIn the Properties view, you can also set a layer ordering type for your elements.
• Background: Setting your layer as a Background type layer automatically orders this element behind allothers in the Camera view. When it is set to Background, the Timeline ordering will have no effect on thislayer.
• Normal: By default all layers are set as the Normal type layer. A layer set to theNormal type is affected bythe ordering level in the Timeline view.
• Foreground: Setting your layer as a Foreground type layer automatically places this element in front of allothers in the Camera view. When it is set to Foreground, the Timeline ordering has no effect on this layer.
To set the ordering layer type of an element:
1. In the Timeline or Camera view, select the element for which you wish to set the ordering type.
The selected layer parameters appear in the Properties view.
2. From the Typemenu, select a layer type for your element.
Your element is ordered in the Camera view.

Toon Boom Studio 8.1 User Guide
281
Positioning the Scene ElementsIn Studio it is easy to position your elements. You can do this by using the Select tool or the Properties view.
This topic is divided as follow:
• Positioning Elements Using the Select Tool below
• Positioning Elements Using the Properties View below
• Flipping Elements on the next page
• Show Outline Selection on page 283
• Locking Elements on page 283
Positioning Elements Using the Select ToolUsing the Select tool, you can position, scale, rotate, and skew elements directly in the Camera view without
creating a keyframe.
To use the Select tool:
1. In the Animation Tools toolbar, click the Select tool, select Tools > Animation Tools > Select, or
press [6].
2. In the Camera or Timeline view, select the element you want to position.
3. Use one of the bounding box handles to position and transform your element.
‣ Hold down the [Shift] key as you scale to keep the ratio when using the corner handles.
‣ Hold down the [Shift] key as you rotate to lock the rotation every 15 degrees.
Positioning Elements Using the Properties ViewUsing the Properties view, you can position, scale, rotate, and skew elements using exact values.
To use the Properties view:
1. In the Timeline view, select the layer of the element you want to position.

Chapter 10: Setting the Scene Positioning the Scene Elements
282
The layer is displayed in the Properties view.
2. In the Properties view, set the positioning values:
‣ Rotation: Enter a rotation angle value for the position of your element.
‣ Skew: Enter a skew angle value for the position of your element.
‣ Offset: Enter the X and Y values for the position of your element.
‣ Rotation Pivot: Enter the X and Y values for the position of the Rotation Pivot of your element. This isthe central point to which your rotation angle is calculated.
‣ Scale Pivot: Enter the X and Y values for the position of the Scale Pivot of your element. This is thecentral point to which the scaling is calculated.
‣ Scale: Enter the scaling value for the position of your element. 1 = 100%.
‣ Keep Proportions: Retains the proportions of the original element when scaling it down or up.
You can change the type of unit that is displayed and used in the Properties view to inches orcentimetres instead of the default Field values—see Preferences on page 338.
Flipping ElementsSometimes youmay need to flip a character element when you are positioning it. For example, if you want a faceto look in the opposite direction. This can be easily done using the Flip commands which can produce ahorizontal or vertical mirror image of your element.
To flip an element:
1. In the Camera or Timeline view, select the element you want to flip.
2. Select Element > Transform > Flip Horizontal or Flip Vertical.

Toon Boom Studio 8.1 User Guide
283
Show Outline SelectionWhen you positionmany overlapping elements, use the Show Outline Selection option. This is very useful andonce enabled it displays the outline of the selected element as blue lines that appear on top of everything else.
To enable the Show Outline Selection option:
1. Select View > Show Outline Selection.
Locking ElementsWhen you are positioning your elements in the Camera view you can lock the layers so that they will not move.Locking layers prevents them from being accidentally selected or moved.
Locking and Unlocking a LayerTo lock a layer:
1. In the Timeline view, select the element you want to lock.
2. In the Timeline View Menu, select Lock > Lock or right-click on the selected layer and Lock > Lock.
The name of locked layers appears in red.

Chapter 10: Setting the Scene Positioning the Scene Elements
284
To unlock a layer:
1. In the Timeline view, select the locked element you want to unlock.
2. In the Timeline View menu, select Lock > Unlock or right-click on the selected layer and Lock > Unlock.
Locking and Unlocking All LayersTo lock/unlock all layers:
1. In the Timeline view, select a layer.
2. In the Timeline View menu, select Lock > Lock All or Unlock All or right-click on the selected layer andLock > Lock All or Unlock All.
All layers in the Timeline view are locked or unlocked depending onwhat you selected.
Locking All Other LayersTo lock all other layers:
1. In the Timeline view, select the element you want to keep unlocked.
2. In the Timeline View menu, select Lock > Lock All Others or right-click on the selected layer and Lock >Lock All Other.
All layers, except the selected one is locked.

Toon Boom Studio 8.1 User Guide
285
Cloning and Duplicating Elements
It's easy to create crowd scenes or reuse animation in your scene bymaking use of the clone and duplicateoptions. The example we use here is the creation of a school of fish swimming in the sea.
Cloning Layers
Cloning a layer provides you with a copy of the selected layer that uses the same drawings as the original. If youmodify a drawing in the cloned or original layer it is updated in both layers. You canmodify the layers' timingindependently one from the other, but the drawings remain linked.
This feature is useful when youwant to reuse an animation but have different timings.
To clone a layer:
1. In the Timeline view or Exposure sheet, click the layer you want to clone.
2. In the Timeline View menu, select Clone Element or in the top menu Element > Clone Element or right-click on the row header and select Clone Element.
The cloned layer appears in the Timeline view. In the Camera view, an identical element appears at thesame place as the original one.
3. Repeat step 2 until you have all the cloned layers you need.

Chapter 10: Setting the Scene Cloning and Duplicating Elements
286
4. In the Camera view, you can reposition and transform your duplicated layers if you need by using theAnimation Select tool—see Positioning the Scene Elements on page 281 to learnmore about the
Animation Select tool.
Duplicating Layers
Duplicating a layer provides you with an independent copy of the drawings and their exposure. You canmodifyanything you want in the duplicated layer without affecting the original one.
You can use duplicated layers if, for example, you want to reuse an animation of a fish to create a school of fishbut you still want to modify some of them to give them their own personality.
To duplicate a layer:
1. In the Timeline view, click the layer you want to duplicate.
2. In the Timeline View menu, select Duplicate Element or in the top menu select Element > DuplicatedElement or right-click the row header and select Duplicate Element.

Toon Boom Studio 8.1 User Guide
287
The duplicated layer appears in the Timeline view. In the Camera view, an identical element appears at thesame exact place as the original one.
3. Repeat step 2 until you have all the duplicated layers you need.
4. In the Camera view, you can reposition and transform your duplicated layers by using the Animation Select
tool—see Positioning the Scene Elements on page 281 to learnmore about the Animation Selecttool.
5. In the Drawing view, modify your drawings if needed—seeDrawing and Design on page 81 to learn howto draw in Studio.
Refer to Pegs on page 305 to learn how to use cloned or duplicated fish to create a school of fishswimming along a defined trajectory.

Chapter 10: Setting the Scene Setting the Camera Frame
288
Setting the Camera FrameThe scene action occurs inside the camera frame, so it is really important to set it up correctly.
• Adding a Camera Layer below
• Choosing the Active Camera Layer on the facing page
• Setting the Camera Frame Position on page 290
Adding a Camera LayerBy default, Toon Boom Studio automatically adds a camera to every new project you create, but you can alsoadd your own camera layer if needed.
The default Camera layer cannot be deleted.
To add a Camera layer from the Timeline view:
1. In the Timeline view, click the Add Element button.
TheNew Elements dialog box opens.
‣ In the Type drop-downmenu, select Camera.
‣ In the Name field, type in a name for your Camera layer. By default, the name of your Toon BoomStudio project appears in this field.
‣ In the Number field, type in the number of Camera layers you want to add. You can also use the up anddown arrow buttons to change the numbers.
‣ Click OK.
The new Camera layer appears in the Timeline view.
You can also use the Scene View toolbar (Top toolbar onMacOS X) to add a new Camera layer to your scene.
To add a Camera layer from the Scene View toolbar (Top toolbar on MacOS X):
1. In the Scene View toolbar (Top toolbar onMacOS X), click the Camera drop-downmenu button.

Toon Boom Studio 8.1 User Guide
289
2. Select AddCamera from the drop-downmenu.
A new Camera layer appears in the Timeline view.
Refer to Discovering the Interface on page 55 to learn how to customize your workspace and displaythe different toolbars.
Choosing the Active Camera LayerThe Camera layer provided in your scene is the active camera by default. If you add several cameras to your sceneand want to have different settings on each, you can use the Scene View toolbar (Top toolbar onMacOS X)camera list to switch from one camera to another. You can use this feature if you are still working on your scenecomposition and you have different camera setups to choose from. Remember that a peg is automaticallyattached to the camera.
To select an camera:
1. In the Scene View toolbar (Top toolbar onMacOS X), click the Camera drop-downmenu button.
2. Select a camera from themenu.
In the Timeline view, the active Camera layer is displayed in italics.
Refer to Discovering the Interface on page 55 to learn how to customize your workspace and displaythe different toolbars.

Chapter 10: Setting the Scene Setting the Camera Frame
290
Setting the Camera Frame PositionYou can set the Camera Frame position by using the Animation Select tool or the Properties view.
Setting the Frame Using the Select ToolFirst, you can set the position of the camera frame.
To set up the camera frame using the Select tool:
1. In the Animation Tools toolbar, click the Select tool or select Tools > Animation Tools > Select or
press [6].
2. In the Camera or Timeline view, select the camera.
The frame turns red in the Camera view.
3. In the Camera view, grab the camera frame and drag it to the desired position.
As you position your camera, notice that the camera frame is moving slightly slower than your cursor. This is dueto the perspective effect because the Camera is not situated at the same depth level as the elements.
You can set your Active Camera to the Default Camera using the Scene View toolbar (Top toolbar onMacOS X).This will enable a default camera frame in which you can position your Camera framewithout experiencing theperspective illusion. Note that you cannot move the default camera; it is only an indication of the default cameraspace.
To enable the Default camera:
1. In the Scene View toolbar (Top toolbar onMacOS X), click the Camera menu button and select Default.
A checkmark identifies the currently active camera in the list.

Toon Boom Studio 8.1 User Guide
291
Refer to Discovering the Interface on page 55 to learn how to customize your workspace and displaythe different toolbars.
You can also set the Field of View, which is also called the Zoom level of the camera frame.
If the default camera is enabled, you can not set the Field of View angle with the Select tool.
To set the Field of View angle using the Select tool:
1. In the Camera or Timeline view, select the camera. Once it is selected, the framewill become red in theCamera view.
2. In the Camera view, grab the FOV square at the bottom of the frame and drag it to change the zoomlevel.
Setting the Frame Using the Properties ViewYou can also set the camera position and field of view with exact values using the Properties view.

Chapter 10: Setting the Scene Setting the Camera Frame
292
Refer to Discovering the Interface on page 55 to learn how to customize your workspace and displaythe different toolbars.
To use the Properties view:
1. In the Camera or Timeline view, select your camera.
The Camera information is displayed in the Properties view.
2. In the Properties view, set the desired positioning values:
‣ Offset: Type in the X and Y position values.
‣ FOV Type:
Static: By default the Static Field of View type is enabled, this means that the zoom value will not beanimated, it will stay the same throughout the scene. Type in the desired Field of View angle value.
Dynamic: Enable this option to animate the zooming value over time—see Animating the Camera onpage 320 to learnmore about animating the Field of View.
You can change the type of unit to be displayed and used in the Properties view to inches orcentimetres instead of the default Field values—see Preferences on page 338.

Toon Boom Studio 8.1 User Guide
293
Creating a Multiplane
One of the exciting features in Studio is theMultiplane. In theMultiplane you can create backgrounds in severallayers and spread them in depth along the Z-axis. This way you add depth to your project, and when youmovethe camera through this environment, it creates an impressive perspective illusion.
Distributing the Elements on the Z-axisWhen it is time to position elements along the Z-axis, you can do it via the Top, Side, Camera, or Properties view
• Top and Side Views on the next page
• Camera View on page 296
• Properties View on page 296

Chapter 10: Setting the Scene Creating a Multiplane
294
Top and Side Views
The Top and Side views are representations of your scene's space viewed from the top and side.
When youmove your element along the Z-axis, you will notice that it seems they are getting smaller or larger.This is because of the perspective effect, the elements that are closer to the camera appear larger and theelements that are far away, appear smaller. Because of this, once they are positioned youmight need to resizeyour elements using the Animation Select tool.
To position elements in the Top view:
1. In the Animation Tools toolbar, select the proper tool:
‣ Select the Animation Select tool if you want to set the static position of your element. The element
will be positioned without creating a keyframe.
‣ Select the Transform tool if you want to animate the element along the Z-axis, this will create a
keyframe.
2. In the Timeline or Camera view, select the elements you want to reorder.
In the Top view, the selected element is represented by a darker green line.
3. In the Top view, grab your element and drag it to a new position or use the arrow keys:
‣ A vertical drag will position it along the Z-axis (Forward or Backward).

Toon Boom Studio 8.1 User Guide
295
‣ An horizontal drag will position it on the X-axis (East or West).
As you position your elements in the Top view, you can see the position update simultaneously in theCamera view.
To position elements in the Side view:
1. In the Animation Tools toolbar, select a tool:
‣ Select the Animation Select tool if you want to set the static position of your element. The element
will be positioned without creating a keyframe.
‣ Select the Transform tool if you want to animate the element along the Z-axis. This will create a
keyframe.
2. In the Timeline or Camera view, select the element you want to reorder.
In the Side view, the selected element is represented by a darker green line.
3. In the Side view, grab your element and drag it to a new position or use your arrow keys:
‣ A vertical drag will position it along the Y-axis (North or South).
‣ An horizontal drag will position it on the Z-axis (Forward or Backward).

Chapter 10: Setting the Scene Creating a Multiplane
296
As you position your elements in the Side view, you can see the position updating simultaneously in theCamera view.
Camera ViewYou can order your elements along the Z-axis directly in the Camera view.
To distribute elements in the Camera view:
1. In the Animation Tools toolbar, select the proper tool:
‣ Select the Animation Select tool if you want to set the static position of your element. The element
will be positioned without creating a keyframe.
‣ Select the Transform tool if you want to animate the element along the Z-axis, this will create a
keyframe.
2. In the Camera view, select the element you want, then to reorder it press and hold the [Alt].
3. Next, press the [Up Arrow] arrow key to nudge the element backward or the [DownArrow] arrow key tonudge the element forward. As you send your element backward or forward, you can see the result in theTop or Side view.
Properties ViewYou can use the Properties view to order your elements along the Z-axis using positive and negative values.
To order elements using the Properties view:
1. In the Timeline view, select the layer of the element you want to order.
The layer properties are displayed in the Properties view.

Toon Boom Studio 8.1 User Guide
297
2. In the Properties view, set the desired values:
‣ Offset: Type in a positive or negative value for the Z-axis position.
‣ Scale: Type in a positive or negative value to resize your element following the Z-axis position of yourelement.
‣ Keep Proportions: Retains the ratio, and resizes your element proportionally.
Instead of using the default Field value, you can change of type of unit displayed in the Propertiesview to inches or centimetres—see Preferences on page 338.

Toon Boom Studio 8.1 User Guide
298

Toon Boom Studio 8.1 User Guide
299
Chapter 11: Creating Motion Paths
Another step in setting your scene is to create a motion path. Once your space and camera frame it set up, youcan connect animate objects, instantly createmotion, or connect elements to a peg to animate them on atrajectory.
In this topic, you will learn about the following:
• Animating Objects on a Layer on the next page
• Instant Motion on page 301
• Pegs on page 305
• Motion Path on page 310
• Animating the Camera on page 320
• Function Editor View on page 322
• Other Options on page 330
• Preferences on page 338

Chapter 11: Creating Motion Paths Animating Objects on a Layer
300
Animating Objects on a LayerThis section describes the basics of animating objects on a layer. Studio's wide range of features let you produceaccurate trajectories. However, before reaching this level youmust learn how to create a simplemotion.
To animate a layer:
1. In the Animation Tools toolbar, select the Transform tool.
2. In the Timeline view, go to the first frame.
3. In the Camera view, select the element to animate and move it to its first position.
4. In the Timeline view, go to the frame onwhich you want to set the second position.
5. In the Camera view, move the selected element to its new position.

Toon Boom Studio 8.1 User Guide
301
6. In the Playback toolbar, click the Play button to view your animation.
Instant MotionWith Instant Motion, creating animation could not be easier. First, you create a drawing and then you translate,scale, or rotate it. As youmanipulate your drawing, small dots are created, representing keyframes. The slowerthemovement, themore dots are created.
Once you release the pointer, your animation is created. It is represented on the Timeline view as a path. Youranimation can be as long or as short as you like. As you continue to move your drawing, by default, the path isautomatically extended. You can createmoremotion paths, one after the other. Each one is automaticallyadded to the end of the last one.
To create instant motion:
1. Create a drawing—seeDrawing and Design on page 81.
2. In the Animation toolbar, click the Instant Motion button.

Chapter 11: Creating Motion Paths Animating Objects on a Layer
302
A bounding box with control points and a rotation handle appear around your drawing, and the InstantMotion box opens.
3. Do one of the following to animate your drawing (only one single transformation type is possible permotion recording):
‣ Translate: To move the drawing, position the pointer over your drawing and drag it to a new locationon the screen.
‣ Scale: Position the pointer at one of the bounding box points, and drag to scale your drawing.
‣ Rotate: Position the pointer on the rotation handle or rotation point at a corner of your drawing.Drag to rotate the drawing.
As you translate, scale, or rotate your drawing, small dots are created to represent the keyframes of youranimation. When you release the pointer, the speed path of your animation is recorded.

Toon Boom Studio 8.1 User Guide
303
4. Click the Play button to view your animation.
5. If you want to combine different motions such as a rotation and a scale, you can record themotionsseparately using parented pegs. The first peg can be used for the rotation and the second one for thescale. In the Timeline view, select your drawing layer and click on the Add Parent Peg button to attach apeg to it. Select that peg andmove it around with the Instant Motion tool like you did previously for yourdrawing layer. You can add as many parented pegs as you want to decompose your motions. It is alwaysbetter to have themain translation (trajectory) as the top parent peg to avoid a conflict with rotation andscaling motion that you affect your entire trajectory rather than the drawing only.
If you want to change a section of your animation once it is recorded, you can move the Timelineplayhead to the frame where you want to start overriding the exiting keyframes with a new recordingand move your drawing again using the Instant Motion tool.
Instant Motion PropertiesThe Instant Motion box lets you set the speed at which keyframes are created (the capture speed) and decide ifyou want to automatically extend the drawing exposure. By default, drawing movements are always recorded.
• Capture Speed: The speed at which keyframes are created as youmanipulate your drawing. The defaultvalue is 100. The higher the number, the faster movement recording occurs in the viewer, as indicated bythe numbers of dots in the viewer.
• Auto ExtendDrawing Exposure: By default, this option is on. This option automatically extends thedrawing exposure. This means you do not have to extend your existing drawings once themotion iscreated.
• Smoothness: Smooths themovement of the animation. The higher the value, the smooth themotion.
Orienting Animation on a PathOnce you have created your animation, you can orient the drawing to themotion path. TheOrient to Pathoption is available in the Properties view.
In this example, the default setting shows the fish keeping its original orientation throughout themotion path.However, when theOrient to Path option is enabled, the fish follows themotion path.

Chapter 11: Creating Motion Paths Animating Objects on a Layer
304
To orient your animation on a path:
1. Create a drawing.
2. Use Instant Motion to create themotion path.
3. In the Properties view, select theOrient to Path option.
Make sure to create your animation using Instant Motion before selecting the Orient to Path option.

Toon Boom Studio 8.1 User Guide
305
PegsWhen creating a motion path for your element, you need to add Peg layers in your scene and parent yourelements to them.
This topic includes the following:
• Adding a Peg below
• Adding a Parent Peg below
• Parenting Elements to a Peg on the next page
• Expanding and Collapsing Layers on page 307
• Peg OnlyMode on page 307
• Peg Toolbar on page 308
Adding a PegA Peg layer is a trajectory that contains no drawing, onto which you can attach your drawings.
To add a Peg:
1. Do one of the following:
‣ In the top menu, select Element > Add > Peg.
‣ In the Timeline View toolbar, click theAddNew Elements button and select Peg from the dialogwindow.
‣ In the contextual menu in the Timeline view, select New > Peg.
The Peg layer appears in the Timeline view, on top of the selected element.
Adding a Parent PegAdding a Parent Peg will automatically parent the new peg with the selected element as it is created.
To add a Parent Peg:
1. In the Timeline view, select the element you want to parent to a peg.
2. Do one of the following:
‣ In the top menu, select Element > Add > Parent Peg.

Chapter 11: Creating Motion Paths Pegs
306
‣ In the contextual menu in the Timeline view, select New>Parent Peg.
‣ In the Timeline View toolbar, select the Parent Peg Button.
The Parent Peg layer appears in the Timeline view with the selected element already connected to it.
Parenting Elements to a PegIf you want to connect an element to an existing peg or if you need to connect several layers to a peg at once,here is how you can do it.
Using the school of fish example in the Cloning and Duplicating Elements on page 285 topic, we'd like to makethe fish swim together as a team. To do this, youmust parent them all to the same peg.
To parent elements to a peg:
1. In the Timeline view, select the elements you want to connect to a peg. You canmake a multiple selectionwith [Shift] + click.
2. Click and drag your selection on the desired peg.
You can also use the Attach to Next Object and Detach from Parent commands to connect and disconnectelements from a peg or from one another—seeOther Options on page 330.

Toon Boom Studio 8.1 User Guide
307
Expanding and Collapsing LayersTo simplify the look of your Timeline view, you can collapse and expand your layers. If some layers are parentedto other ones, you can collapse the parent layer to hide its children.
To collapse a layer selection in the Timeline view:
1. In the Timeline view, select the layers to collapse.
2. Select Arrange > Collapse/Expand from the contextual menu or click the Expand Children Arrow on theparent layer.
To expand a layer selection in the Timeline view:
1. In the Timeline view, select the layers to expand.
2. Select Arrange > Collapse/Expand from the contextual menu or click the Expand Children Arrow on theparent layer.
Peg Only ModeOnce you start to add Peg elements in your scene you can change the selectionmode in the Camera view so thatyou can only select pegs. This can be useful when you are working on your motion paths and youwant to preventthe selection of elements in the Camera view.
To enable PegOnly Mode:
• Select Tools > Turn On Peg-Only Mode or press [M].
To disable PegOnly Mode:
• Select Tools > Turn Off Peg-Only Mode or press [M].

Chapter 11: Creating Motion Paths Pegs
308
Peg ToolbarThe Peg Toolbar provides useful peg display options. InMacOS X, youmay customize your top toolbar to addthese buttons—see Customizing Toolbars onMacOS X on page 73.
• Show All Pegs
Enable or disable this option to display or hide all the pegs of your scene. If you have hidden pegs, you canshow themwithout changing their show/hide status in the element list in the Timeline window.You can also select View > Pegs > Show All Pegs.
• Show PegGhosts
When you are creating motion paths, elements linked to a Peg element may be offset from themotionpath. This canmake it difficult to visualize how an element will change position as it follows the peg. Youcan display peg ghosts in the Camera view to see the path that an element linked to a peg will follow.You can also select View > Pegs > Show PegGhosts.
• Show Pivot Path
When you animated a peg pivot, you can display the resulting path in the Camera view.You can also select View > Pegs > Show Pivot Path.

Toon Boom Studio 8.1 User Guide
309
Refer to Function Editor View on page 322 to learn how to animate a peg pivot.
• Show Element Arms
You can show element arms when you are rotating a peg that you have attached multiple elements to.When you show element arms, a rotation handle appears on each element attached to the peg. You canalso select View > Pegs > Show Element Arms.

Chapter 11: Creating Motion Paths Motion Path
310
Motion Path
Once you have hooked your elements to a peg, you can start adding keyframes to create a motion path. Thisway, you canmake an animation, such as an on-the-spot walk cycle or swimming cycle cross the screen.
This topic includes the following:
• Creating a BasicMotion Path below
• Displaying and Hiding a Motion Path on page 312
• Adding and Controlling Motion Points on page 312
• Switching between Keyframes and Control Points on page 315
• Adjusting the Tension, Bias and Continuity on page 316
• Previous and Next Control Point on page 317
• Orient to Path on page 318
• Constant Z on page 319
• Snap Last Keyframe on page 319
Creating a Basic Motion PathTo create a basicmotion path:
1. In the Animation Tools toolbar, select theMotion tool. It is also possible to create your motion path
with the Transform tool.
2. Select Tools > Turn On Peg-Only Mode or press [M] to turn on the Peg-only mode. This will limitselection in the Camera view to pegs only.
3. In the Timeline view, go to the frame onwhich you want themotion path to start.
4. In the Camera view, select the elements that you want to follow a motion path. Their parent peg willautomatically be selected because of the Peg-only mode.

Toon Boom Studio 8.1 User Guide
311
5. In the Camera view, click and drag your selection to the first position of themotion path trajectory.
A keyframe is automatically created in the Timeline view. This keyframe is also displayed in the Camera,Top and Side views as a red square with an arrow.
6. In the Timeline view, go to the last frame of your trajectory.
7. In the Camera view, drag your selection to the last position of themotion path trajectory.
The trajectory appears in the Camera view and a new keyframe is created in the Timeline view.
When you create a motion path with non-constant segments, notice a series of tick marks that representthe position of the element for each frame.
A basic motion path is created and your animation now follows the trajectory you created. In thisexample, the fish will swim across the screen in a straight line.
You can also modify the velocity of themotion path using the Function Editor view—see Function EditorView on page 322.
You can set your preferences, so when you create a motion path, a default velocity is automaticallyapplied—see Preferences on page 338.

Chapter 11: Creating Motion Paths Motion Path
312
Displaying and Hiding a Motion PathBy default, when you select a peg, its motion path is automatically displayed in the Camera view but as soon asyou select an element that is not related to this peg, themotion path is hidden. You can enable the peg layer toallow themotion path to be displayed at anytime in the Camera view, even when it is not selected.
To display a motion path:
1. In the Timeline view, click the peg layer arrow button to expand it.
2. In the Timeline view, enable the peg layer.
Themotion path is displayed in the Camera view even when the peg is not selected.
It is important that the peg layer is NOT collapsed when enabling or disabling it or else all of theparented layers would also be enabled and disabled at the same time.
Adding and Controlling Motion PointsYou can create a motion path that is not straight by adding motion points to the trajectory. Motion points canbe either keyframes or control points. Keyframes are locked to a specific frame and control points are not.
• Add keyframes when youwant your element to reach a specific position on a specific frame number. Akeyframe is displayed as a red square.
• Add control points when youwant your element to reach a specific position, but not at a specific framenumber. A control point is displayed as a green circle.
With theMotion tool, you canmodify motion paths by adding andmoving keyframes on the peg.
When used simultaneously, the Camera, Top and Side views allow you to createmotion paths that go from X, Y,or Z.
• In the Camera view, you can control the X and Y positions of themotion path.

Toon Boom Studio 8.1 User Guide
313
• In the Top view, you can control the X, Y, and Z positions of themotion path.
• In the Side view, you can control the Y and Z positions of themotion path.
To addmotion point:
1. In the Animation Tools toolbar, select theMotion tool.
2. In the Timeline view, select the peg layer.
Themotion path trajectory will appear in the Camera, Top and Side views.
3. In the Camera, Top or Side view, place the pointer over the trajectory while holding one these two keys:
‣ Hold the [Alt] key and click to add a keyframe. The pointer will change to a black square.
‣ Hold the [Shift] key to add a control point. The pointer will change to a black diamond.
4. In the Camera, Top or Side view, place the black square where you want your motion point to be addedand click.

Chapter 11: Creating Motion Paths Motion Path
314
A keyframe or a control point is added exactly at that place.
5. In the Camera view, click and drag the new control points to control themotion path.
‣ The keyframe is locked to a specific frame. Repositioning the new keyframe along the path will modifythe speed of the two segments.
‣ The control point is not locked to a specific frame. Repositioning the new control point will not affectthe speed of the two segment, it will remain constant throughout themotion path.
6. To delete a control point, select it from themotion path and press [Del].
To add and remove control points from the Properties view:
1. In the Animation Tools toolbar, select theMotion tool.
2. In the Timeline view, select themotion path peg to display it in the Camera view.
3. In the Camera view, select one of the control points on your motion path.The control point properties are displayed in the Properties view.
4. In the bottom of the properties view, click on the Add button.
The AddMotion Point dialog box opens.

Toon Boom Studio 8.1 User Guide
315
5. Use the Point Type drop downmenu to select between Control Point and Keyframe.
6. In the Frame field, enter the frame number where you want the new motion point to be added.
7. Click OK.
The new motion point is added to your motion path.
8. To delete a selected motion point using the Properties view, click Delete.
You can also modify the velocity between the different control points using the Function Editor view—seeFunction Editor View on page 322.
Switching between Keyframes and Control PointsYou can easily switch from a keyframe to a control point or the opposite using the Properties view.
To switch between keyframe and control point using the Properties view:
1. In the Animation Tools toolbar, select theMotion tool.
2. In the Timeline view, select themotion path peg to display it in the Camera view.
3. In the Camera view, select one of the control points on your motion path.
The control point properties are displayed in the Properties view.
4. Select or deselect the Lock in Time option:

Chapter 11: Creating Motion Paths Motion Path
316
‣ If you selected a control point, the Lock in Time option is disabled. Enable it to turn your control pointinto a keyframe.
‣ If you selected a keyframe, the Lock in Time option is enabled. Disable it to turn your keyframe into acontrol point.
5. You can also enable or disable theConstant Segment option:
‣ By default, the Constant Segment is disabled because Studio automatically creates non-constantsegments between keyframes. Enable it to turn your segment to a constant segment.
‣ If themotion point you selected precedes a constant segment, the option will be enabled. Disable it tochange your segment to a non-constant segment.
Refer to the Animating a Puppet on page 395 chapter to learn more about keyframes and constantvs. non-constant segments.
Adjusting the Tension, Bias and ContinuityYou can use the Tool Properties view to edit keyframes and control point parameters such as position,continuity, bias, tension and lock in time.
Each time a Keyframe or a Control Point is selected in the Camera, Top or Side view, its parameters appear inthe Properties view.
You can adjust these parameters on existing Control Points and Keyframes by selecting the point in the CameraView with theMotion tool and using the Continuity, Tension and Bias sliders in the Properties view.
• Continuity: Controls the smoothness of a transition between the segments joined by a point.
• Tension: Controls how sharply the path bends as it passes through a control point or keyframe.

Toon Boom Studio 8.1 User Guide
317
• Bias: Controls the path slope so that it flows towards one side of themotion point or the other.
You can customize the default Tension, Continuity and Bias values in your preferences. Refer to thePreferences on page 338 topic to learn how to set your preferences.
Previous and Next Control PointIn Studio, there are shortcuts and options available for navigating between control points on a motion path.
To navigate between control points using shortcuts andmenu option:
1. In the Animation Tools toolbar, select theMotion tool.
2. In the Timeline view, select themotion path peg to display it in the Camera view.
3. In the Camera view, select one of the control points on your motion path.
‣ To go to the previous control point, select Element > Arrange > Previous Control Point or press [,].
‣ To go to the next control point, select Element > Arrange > Next Control Point or press [.].

Chapter 11: Creating Motion Paths Motion Path
318
To navigate between control points using the Properties view:
1. In the Animation Tools toolbar, select theMotion tool.
2. In the Timeline view, select themotion path peg to display it in the Camera view.
3. In the Camera view, select one of the control points on your motion path.
The control point properties are displayed in the Properties view.
4. In the bottom of the Properties view, click on the Previous and Next buttons to navigate through thecontrol points.
Orient to PathStudio has an option which forces the element connected to the path to follow themotion path.TheOrient toPath option is available in the Peg layer Properties view.
In this example, the default setting shows the fish keeping its original orientation throughout themotion path.However, when theOrient to Path option is enabled, the fish follows themotion path. You could use this optionif you wanted to make the fish leap out of the water and back in again.
To enable the Orient to Path option:
1. In the Timeline view, select the parent peg of the element you want to follow themotion path.
The properties of the selected peg are displayed in the Properties view.
2. In the Properties view, select theOrient to Path option.

Toon Boom Studio 8.1 User Guide
319
Constant ZIn the Properties view of a peg layer, you have the Constant Z option. This option is disabled by default, whichmeans that when you create a motion path along the Z-axis, the automatic interpolation calculates the X, Y and Zaxis values. When it is enabled, the interpolation calculates the X and Y axis values and will keep the Z-axis valueas constant.
To enable the Constant Z option:
1. In the Timeline view, select the peg onwhich you want to enable the constant Z option.
The properties of the selected peg appear in the Properties view.
2. In the Properties view, select theConstant Z option.
Snap Last KeyframeThe Snap Last Keyframe command forces the last keyframe and the keyframe before it to retain the sameposition values.
To enable the Snap Last Keyframe option:
1. Select Tools > Snap Last Keyframe.

Chapter 11: Creating Motion Paths Animating the Camera
320
Animating the CameraIn Studio, a peg is automatically added on a camera. This lets you animate the camera visually in the Camera, Topand Side views, with the function curve, or by typing values in the Properties view.
Scenes are not only composed of characters moving around in a static camera field, they are also composed ofcamera movements. Although it is not always something that we think about, often it is the exact opposite, thecharacter is static while the camera moves through elements on the stage. Camera pans, jumps, cuts and zoomsare as important to storytelling as the story itself.
Studio has a camera that canmove along the X, Y and Z axes. Having the camera move on the Z-axis allows youto create truck in and truck out, as well as multiplane camera moves.
This topic is divided as follow:
• Adding a Peg to Your Camera below
• Making a Basic Camera Move below
Adding a Peg to Your CameraIf your camera layer is not attached to a peg, you canmanually add one.
To add a parent peg to your camera:
1. In the Timeline view, select the Camera layer.
2. From the top menu, select Element > Add > Parent Peg.
A Peg layer appears directly above the Camera layer and the Camera layer is automatically attached to it.The Peg layer automatically takes the name of the camera and adds the suffix -P to indicate that it is apeg layer, for example Camera-P.
Making a Basic Camera MoveBecause a peg is automatically added on a camera, you are ready to animate your camera.
To animate your camera:
1. In the Animation Tools toolbar, select theMotion tool.
2. In the Timeline view, select the camera peg layer on the first framewhere you want your camera motion tostart. It can be the first frame of the scene or any other frame.
3. Right-click and select AddKeyframe or press [l].
4. In the Top view, select the camera and move it to the desired position. You can refer back to the Cameraview to see how this camera moves the frames in your scene.

Toon Boom Studio 8.1 User Guide
321
5. In the Timeline view, click on a cell in the Camera Peg layer where you want the camera move to end.
6. Right-click and select AddKeyframe or press [l].
A keyframe appears in that cell.
7. In the Top view, select the camera and move it to the desired position.
A second keyframe appears and a line is created between the two frames to indicate that Studio createda non-constant segment, meaning that it will automatically interpolate themovement.
Related Topics
• Setting the Camera Frame on page 288
• Creating a BasicMotion Path on page 310

Chapter 11: Creating Motion Paths Function Editor View
322
Function Editor ViewThe graph in the Function Editor View displays themotion over the first and last keyframes set in the scene, aswell as anymotion points created in between.
If the scene is 60 frames, but the motion path ends at frame 40, then the editor will only display up toframe 40.
You can use the Function Editor View to create and edit motion paths and movements as well as edit velocity.
This topic is divided as follows:
• Function Editor View -Overview below
• Adjusting the Velocity on the facing page
• Adding and DeletingMotion Points in the Function Editor View on page 325
• Changing the Values of a Motion Point on page 327
Function Editor View - Overview
1. Function Editor View toolbar:
‣ Select: Lets youmanipulate themotion point and velocity Bezier handles.
‣ Grabber: Lets you pan in the Function Editor view.

Toon Boom Studio 8.1 User Guide
323
‣ Zoom: Lets you zoom in and zoom out (hold [Alt]) in the Function Editor View.
‣ Show Grid: Shows or hides the grid.
‣ Reset: Resets the pan and zoom in the Function Editor View.
‣ Add Keyframe: Lets you add a keyframe on the curve.
‣ Remove Keyframe: Lets you delete a keyframe on the curve.
‣ Lock In Time: Lets you toggle the selected motion point between a keyframe or a control point.
‣ Function Drop-downmenu: Choose the function you want to display and edit from thisdrop-downmenu.
‣ Projection X: Displays the X axis values in the Fields scale of the graph.
‣ Projection Y: Displays the Y Axis values in the Fields scale of the graph.
‣ Projection Z: Displays the Z Axis values in the Fields scale of the graph.
2. Graph Area: Displays a Fields scale vertically on the left, a Frame scale on the top and the selectedfunction curves and motion points.
3. Function Editor View Status Bar: Displays the values, frame and fields, for the currently selected motion point.
4. Editing Panel: The Editing Panel is contextual, the fields displayed there are relative to the type of function youselected in the function drop-down menu. Enter specific values in these fields to edit the motion points on thecurve.
5. Function Curve: Displays the selected movement of a peg as an editable curve with visible motion points.
6. Frames and Fields Scales Zoom: These sliders let you increase or decrease the spacing between each value onthe Frames or Fields scale.
7. Function Editor View bottom toolbar:
‣ Sync Current Frame:When this option is enabled, when you select frames in theFunction Editor view, the entire scene's views (Camera, Timeline, etc) will be in-sync and follow. Whenthis option is disabled and you select frames in the Function Editor view, the other scene views stay atthe current frame.
‣ Show/Hide toolbars: Shows or hides the Function Editor View toolbar.
‣ Show/Hide Editing Panel: Shows or hides the Editing Panel.
Adjusting the VelocityThe velocity, or ease-in ease-out, is used on non-constant segments to give a more natural feeling to themovement.

Chapter 11: Creating Motion Paths Function Editor View
324
Ease-in and ease-out is the acceleration and deceleration of themovement. The speed of themotion is adjustedbetween two keyframes so that themovement will start slowly, speed up and then slow down again as it reachesthe second keyframe. Adjusting the velocity will create a more natural feel to themovement.
You can set your preferences so that when you create a motion path, a default velocity isautomatically applied—see Preferences on page 338
To adjust the velocity of a movement:
1. In the Animation Tools toolbar, select theMotion tool.
2. In the Camera or Timeline view, select themotion path peg whose velocity you want to adjust.
The selected peg properties appear in the Properties view.
3. In the Properties view, click the Edit Velocity button.
The Function Editor view opens.
4. In the drop-downmenu, select Velocity-based, to edit the velocity of themotion path.
5. In the Function Editor view, click the Curve button and adjust your curve:
‣ Click on a keyframe to select it.
‣ Drag the handle to adjust the curve.

Toon Boom Studio 8.1 User Guide
325
6. You can also use the default curve options to quickly adjust your velocity.
‣ Click theCurve icon to open the drop-downmenu and select the desired velocity option.
• Constant: Changes a non-constant segment to a constant segment removing the automatic
motion tweening created by Studio.
• Linear: Creates a straight line of constant speed for a more automated animation look.
• Ease in/out: Creates a gradual acceleration at the beginning and a gradual deceleration at the
end of the curve. This creates a more natural animation look.
• Fast in/out: Creates a curve that starts quickly, slows down in the middle and ends with a final
acceleration.
• Extreme ease in/out: Creates a more dramatic ease in, ease out effect.
• Extreme fast in/out: Creates a more dramatic fast in, fast out effect.
• Slow acceleration: Creates a curve that starts slowly to smoothly accelerate over time.
• Slow deceleration: Creates a curve that starts quickly to smoothly decelerate over time.
Adding and Deleting Motion Points in the FunctionEditor ViewModifications can bemade to a motion path and any peg or element movement by adding and deleting motionpoints in the function curve. This is done in the Function Editor View.

Chapter 11: Creating Motion Paths Function Editor View
326
Adding Motion PointsTo addmotion points in the Function Editor View:
1. In the Animation Tools toolbar, select theMotion tool.
2. In the Camera or Timeline view, select the peg of themotion path you want to edit.
The selected peg's function curve will appear in the Function Editor View.
3. In the graph section, click on the frame number where you would like to add a motion point. You can alsotype in the desired frame in the Editing Panel.
In the graph section, the selected frame number is indicated by a blue vertical line.
4. Click the Add Keyframes button.
A keyframe appears on the function curve at the selected frame. This new keyframe is also visible on yourmotion path in the Camera, Top and Side views, as well as on your peg layer in the Timeline view.
‣ If you want the new motion point to be a control point rather than a keyframe, click the Lock In Timebutton to disable it.
The selected keyframe changes to a control point.
‣ To change a control point into a keyframe, select the control point on the function curve and click onthe Lock In Time button to enable it. The selected control point changes into a keyframe.

Toon Boom Studio 8.1 User Guide
327
Delete Motion PointsTo remove motion points from the Function Editor View:
1. In the Animation Tools toolbar, select theMotion tool.
2. In the Camera or Timeline view, select the peg of themotion path you want to edit.
The selected peg's function curve will appear in the Function Editor view.
3. In the graph section, click on themotion point you want to delete. You can also type in the desired framein the Edition Panel.
The selected motion point is highlighted in the function curve.
‣ If the selected motion point is a control point, you first need to change it to a keyframe by clicking theLock In Time button to enable it.
4. Click the Remove Keyframe button.
The selected keyframe is deleted from the function curve. It is also deleted from your motion path in theCamera, Top and Side views as well as on your peg layer in the Timeline view.
Changing the Values of a Motion PointYou canmodify your motion paths and movements by positioning themotion points directly in the Camera, Topor Side view, but you can also modify the value of themotion points from the Function Editor View.
Tomodify a motion path motion point's values:
1. In the Animation Tools toolbar, select theMotion tool.
2. In the Camera or Timeline view, select the peg of themotion path you want to edit.
The selected peg's function curve will appear in the Function Editor view.
3. In the graph section, click on themotion point you want to reposition.
The selected motion point will be highlighted in the function curve.

Chapter 11: Creating Motion Paths Function Editor View
328
4. Choose with the Field Values buttons which values: X, Y, or Z you want to edit and displayin the vertical value scale of the graph.
5. Position your motion point:
‣ Keyframe: Drag your keyframe up and down to modify the Fields value of the keyframe. Since akeyframe is locked in time, you cannot modify the Frame value. A red guide appears to help you alignthe keyframe to the right value.
You can also type in the desired value in the Editing Panel.
‣ Select theConstant Segment option if you want to change the non-constant segment following theselected keyframe to constant.
‣ Control Point: Drag your control point along the curve to modify the Fields value. A control point isnot locked in time but is constrained by the curve. The frame value will automatically be changed inrelation to the fields value you are giving it. A red guide appears to help you align the keyframe to theright value.
You can also type in the desired value in the Editing panel.

Toon Boom Studio 8.1 User Guide
329

Chapter 11: Creating Motion Paths Other Options
330
Other OptionsMany features, options and tools are available to help you learn, create, and optimize your projects. Here aresomewhich are useful when setting up your scene and creating motion paths:
• Attach to Next Object below
• Detach from Parent below
• Changing the Start Frame on the facing page
• Changing the Duration on the facing page
• Change Loops on page 332
• Element Notes on page 333
• Show Timeline Selection on page 334
• Paste Special on page 335
Attach to Next ObjectYou can easily connect elements to one another using drag and drops in the Timeline view. If you prefer, you canalso use the Attach to Next Object when it is time to create a hierarchy.
The Attach to Next Object command connects the selected element to the one situated one level lower in theTimeline view order making it its child.
To attach elements using the Attach to Next Object command:
1. In the Timeline view, select the element you want to attach to the element situated immediately below it.
‣ You can also use a sceneplanning tool and select the element directly in the Camera, Top or Side view.
2. Select Element > Arrange > Attach to Next Object.
The selected element becomes the child of the element that was below it.
Detach from ParentYou can easily manipulate hierarchy connections using drag and drops in the Timeline view. If you prefer, you canalso use the Detach from Parent command to disconnect a child element from its parent from the Camera, Topor Side view.
To detach a child element from its parent:
1. In the Animation Tools toolbar, click the Select tool, select Tools > Animation Tools > Select or
press [6]
2. In the Camera, Top or Side view, select the element you want to detach from its parent. You can alsoselect the element directly in the Timeline view.

Toon Boom Studio 8.1 User Guide
331
3. Select Element > Arrange > Detach from Parent.
The selected element is detached from its parent.
Changing the Start FrameYou can quickly offset the timing of elements in your scene. This can be useful if for instance, you realize that theplanned action would be better occurring at a later moment or if you inserted new elements or action at thebeginning of your Timeline.
To change the starting frame of an element or peg's motion:
1. In the Timeline view, select the element you want to offset.
2. Select Element > Change Start Frame.
The Change Start Frame dialog box opens.
3. In the Change Start Frame dialog box, type in the frame number where you want your element to start.
The starting frame of the selected element will be changed to the one you typed in the Change StartFrame dialog box.
Changing the DurationYoumay need to extend the duration of a peg, for example if you add content or change the exposure of theelement that is attached to it.
To change the duration of a motion:
1. In the Timeline view, select the peg element of which you want to change the duration.

Chapter 11: Creating Motion Paths Other Options
332
2. Select Element > Change Duration.
The ChangeDuration dialog box opens.
The Enter the New Duration field displays the current duration of your element.
3. In the ChangeDuration dialog box, type in the desired duration.
The duration of the selected element will be updated.
The duration of a peg element can also be changed by stretching the peg's motion block in the Timeline view.
To stretch a Peg element:
1. In the Timeline view, move the pointer to the edge of the peg element's motion block and drag it right orleft to increase or decrease the length of themotion.
Stretching a peg moves all of the keyframes proportionally.
Change LoopsIf you want a Peg element to repeat a motion, you can loop it.
Note that each time the loop restarts, it skips the first frame of the peg. This is similar to a walk-cycle where thelast step leads naturally to the first step in the cycle; this ensures the logical continuation of the looped action.Therefore, if you loop a 10-frame peg action three times, the entire length of the peg will be 28 frames.
To loop a pegmotion using the Change Loops command:
1. In the Timeline view, click on the Peg element's motion segment you want to loop.

Toon Boom Studio 8.1 User Guide
333
2. Select Element > Change Loops or right-click (Windows) or [Ctrl] + click (MacOS X) directly on the Pegelement's motion segment you want to loop and select Change Loops.
The Change Loops dialog box opens.
3. In the Change Loops dialog box, type the number of times you want to repeat the selected motionsegment and click OK.
The peg repeats itself for the number of loops you entered. After the first segment, the pegmotion barrepresenting the looped segment is displayed in light grey.
To remove the loop, go through the previous step by step once again and type the value 0 in theChange Loops dialog box. You can also loop a motion with a click and drag.
To loop a pegmotion by dragging the motion segment:
1. In the Timeline view, hold [Ctrl] Windows or [z] (MacOS X) and drag the end of the peg's motion segmentto the desired position.
2. Release to create a loop that will repeat until the destination frame.
Element NotesThe Element Notes option lets you write notes or comments in a layer for future reference.
To create an element note:
1. In the Timeline view, select the layer in which you want to include a note or a comment.

Chapter 11: Creating Motion Paths Other Options
334
2. In the Timelinemenu, select Add Element Note or right-click (Windows) or [Ctrl] + click (MacOS X) onthe layer and select Add Element Note.
TheNote dialog box opens.
3. In the empty text field, type in your note or comment and click OK.
TheNote icon appears on the selected layer.
To open and edit an element note:
1. In the Timeline view, select the layer containing the element note.
2. In the Timelinemenu, select Update Element Note or right-click (Windows) or [Ctrl] + click (MacOS X) onthe layer and select Update Element Note. You can also double-click the Note icon of the layer.
TheNote dialog opens, displaying the element's note previously entered.
3. You can edit the note if needed, and click OK.
Show Timeline SelectionUse this option if your scene becomes crowded and youwant to quickly find the layer in the Timeline view thatcorresponds to the selected element in the Camera view.
To show the timeline selection:
1. In the Camera view, select the element you want to find in the Timeline view.

Toon Boom Studio 8.1 User Guide
335
2. Select View > Show Timeline Selection or press [O].
The Timeline view automatically sets its focus so that the selected layer appears on top of the view.
Paste SpecialUse the Paste Special command to paste a copied selection of frames in the Timeline view and to define whichproperties you want to paste.
To use the Paste Special command:
1. In the Timeline view, select the frames to copy. This selection can include single or multiple frames,drawings and keyframes.
2. Select Edit > Copy Cell or press [Ctrl] + [C] (Windows) or [⌘ ] + [C] (MacOS X)
3. In the Timeline view, select the cell in which you want to paste the copied values.
4. Select Edit > Paste Special or press [Ctrl] + [B] (Windows) or [⌘ ] + [B] (MacOS X).
The Timeline Paste Special Preferences dialog box opens.

Chapter 11: Creating Motion Paths Other Options
336
5. In the Pegs section select/deselect the options to choose the values of the keyframe youwant to paste:
‣ Create/Delete Motion Key Frames: Pastes the translation value of the copied keyframe.
‣ Create/Delete Rotation Key Frames: Pastes the rotation value of the copied keyframe.
‣ Create/Delete Scale Key Frames: Pastes the scale value of the copied keyframe.
‣ Create/Delete Pivot Key Frames: Pastes the pivot position value of the copied keyframe.
‣ Create/Delete Velocity Key Frames: Pastes the velocity value of the copied keyframe.
‣ Create/Delete Skew Key Frames: Pastes the skew value of the copied keyframe.
‣ Create additional key frames at beginning and end of selection: Create an additional keyframe atthe beginning and at the end of your pasted selection to block the copied values between them.
6. In the Drawings section select/deselect the desired options:
‣ Create/Delete Exposure: Pastes the drawing exposure. Disabling this option will grey out the rest ofthe Drawings options, as it will mean that you only wish to paste position and peg values.
‣ Overwrite existing drawings:Overwrites existing drawings in the destination layer if they have thesame name as the copied ones. When this option is disabled, new drawings will be created instead.
‣ Automatically extend the exposure: Automatically extends the exposure of the last copied frame tothe last frame of the destination layer, overwriting the existing exposure. Disabling this option willgrey out the KeyframeMode (substitution) option.
‣ Keyframe Mode (substitution): This option is used with the Automatically extend the exposureoption. It will paste and extend the keyframe information of the copied element in the destinationlayer following the same rules as the Automatically extend the exposure option.
‣ Update Colours:When pasting templates, this option updates the current animation colours to thoseused in the templates.

Toon Boom Studio 8.1 User Guide
337
Refer to the Animating a Puppet on page 395 chapter to learn how to copy and paste keyframes onlyfrom an element using the Paste Special command.
Paste Special AgainOnce you set up the proper option in the Paste Special dialog box, you can use the Paste Special Againcommand to quickly paste the parameters using the same options without going through the Paste Specialdialog box.
To use Paste Special Again:
1. In the Timeline view, select the frames you wish to copy. This selection can include single or multipleframes, drawings and keyframes.
2. Select Edit > Copy Cell or press [Ctrl] + [C] (Windows) or [⌘ ] + [C] (MacOS X).
3. In the Timeline view, select the cell in which you want to paste the copied values.
4. Select Edit > Paste Special Again or press [Ctrl] + [Shift] + [B] (Windows) or [⌘ ] + [Shift] + [B] (MacOS X).
Your copied selection is pasted using the same options as the last time you used the Paste Specialcommand.

Chapter 11: Creating Motion Paths Preferences
338
PreferencesYou can set preferences that can help you bemore efficient and comfortable when youwork on your scenesetup:
In Studio, you can set your own preferences to fit your work style and needs when setting up your scene andcreating motion paths.
To open the preferences panel:
‣ Windows: Select Edit > Preferences.
‣ MacOS X: Select Toon Boom Studio 8.1 8.0 > Preferences.
Sceneplanning Preferences
Motion PointsIn theMotion Points section, you can set the default Tension, Continuity and Bias values when adding motionpoints to your motion paths—see Switching between Keyframes and Control Points on page 315.
Coordinate UnitsYou can choose the coordinate units used in the scene's Properties view.

Toon Boom Studio 8.1 User Guide
339
Show Units
This option lets you show or hide the unit type in the Properties view. Note that the unit type can only be hiddenwhen the unit type is set to Fields.
Coordinate Units
This drop-downmenu lets you choose between the three available unit types.
Camera ViewThis section lets you set the selection display preferences for the Camera view.
Use Box Highlighting
When this option is enabled, the bounding box of a selected item in the Camera view is highlighted. When it isdisabled, the bounding box is a regular thin grey line box and the element itself is highlighted.

Chapter 11: Creating Motion Paths Preferences
340
Selection Always Visible
When this option is enabled, even when a layer is hidden in the Timeline view, it will remain visible in the Cameraview when it is selected. When the option is disabled, a hidden layer in the Timeline view will remain hidden in theCamera view when it is selected.
PegsUse the Pegs section options to set your preferences related to motion paths creation.
Create Linear Spline
By default, the Create Linear Spline option is enabled, so when you animate an element with a motion, rotationor scaling, the velocity will be set to Linear. This means that themotion tweening executed by Studio will bestraight with no variation in the speed. You can disable this option so that every time you create a motion,rotation or scaling, the velocity will be set to the default ease-in, ease-out curve—see Adjusting the Velocity onpage 323.
Create Constant Keyframes
By default, the Create Constant Keyframes is disabled so every time you create a motion, a non-constantsegment is created between every two keyframes and themotion tweening is automatically calculated by Studio.
You can enable the Create Constant Keyframes so that every time you create a motion, the segments betweenthe keyframes will automatically be constant. No motion tweening is calculated and the position jumps from oneto another at each keyframe—see Animating a Puppet on page 395 to learnmore about constant and non-constant segments.

Toon Boom Studio 8.1 User Guide
341
Timeline
Single Cell Selection
This option is enabled by default. This means that when you select a cell in the Timeline view, only this cell isselected. You can disable this option so that when you select a cell in the Timeline view, the entire exposureblock of this layer is selected at once.

Toon Boom Studio 8.1 User Guide
342

Toon Boom Studio 8.1 User Guide
343
Chapter 12: Bones
The Bones feature in Toon Boom Studio allows you to create a skeleton over your character by using thedifferent Bone tools and then animate it as if it were a body with the Skeleton effect. The skeleton can be used tonot only animate vector-based drawings, but also bitmaps.
This chapter is divided as follows:
• About the Skeleton Effect on the next page
• Choosing Your Character on page 349
• Adding the Skeleton on page 352
• Animating the Skeleton on page 376
• Skeleton Effect Properties on page 389
• Preferences on page 392
You can follow the different exercises of this chapter using the different bones templates providedwithin the software's library!
You can find these templates inside the Library view by following this path:
• Toon Boom Templates > Bones

Chapter 12: Bones About the Skeleton Effect
344
About the Skeleton Effect
The Toon Boom Studio Skeleton effect is used to create an animatable bone structure in a character or design.The structure will let you bend a limb, automatically creating a joint with a distortion of the artwork such as thearm example above. The arm is drawn straight on a single flattened drawing; the skeleton effect automaticallycreates the elbow joint.
When you animate the arm bending, a keyframe is created in the Timeline view and themotion is automaticallyinterpolated (all the drawings between the two keyframes will be created for you) if your keyframes are set tonon-constant.
Once you gain confidence, you can also use your creativity and try the Skeleton effect on other animatabledesigns other than limbs to create some interesting distortion effects, like this animated smiling fish!
Related Topics
• Understanding Keyframes and Drawings on page 399
• Constant and Non-Constant Segments on page 403
• Adjusting the Velocity on page 411
• Using the Onion Skin in Cut-out Animation on page 415

Toon Boom Studio 8.1 User Guide
345
Bone Tools Toolbar
By default, the Bone Tools toolbar is located just below the Animation Tools toolbar on the left side of theapplication. Use these tools to create, set up and animate your bone structure.
There are two types of tools:
• Setup mode
• Animationmode
It is very important to understand that when selecting a Bone tool, the camera display and Skeleton effect willautomatically switch to either Setup mode or Animationmode.
Setup ModeThe Setup mode is active when you are using tools to set up the initial bone structure of the skeleton. Movingbones around with these tools will not create keyframes or animation in the Timeline view.
When in Setup mode, a large circle appears at the base of your bones.
These are the bone setup tools. Selecting any of these will switch the Skeleton Effect to Setup mode:
• Bone Setup Tool
This tool is used to position the selected bones on your drawing. Use this tool to drag, rotate and scale abone or a hierarchy of bones.You can also select Tools > Bone Tools > Bone Setup or press [J].

Chapter 12: Bones About the Skeleton Effect
346
• Bone Creator Tool
This tool is used to create individual bones. Once a bone is created, it is automatically selected. When abone is selected, the next bone created will automatically be parented to it, creating a chain. If you wantto break the chain to create a freestanding bone or to start a new chain, hold down the [Shift] key as youcreate.
You can also select Tools > Bone Tools > Bone Creator or press [U].
• Bone Influence Tool
The zone of influence is the area around the selected bone that determines what part of the underlyingdrawing will be influenced by it. This tool is used to modify the size and shape of that area. By default, thezone of influence remains invisible, as the Influence type is set to Infinite in the Tool Properties panel. If theInfluence type is changed to Elliptical, the zone of influence will appear as a large ellipse, surrounded by abounding box, around the selected bone. You can use the Bone Influence tool to move the square pointson the bounding box to reshape the elliptical zone of influence.
You can also select Tools > Bone Tools > Bone Influence.
• Bone Parent Tool
This tool is used to parent different bone chains to one another. You can also select Tools > Bone Tools> Bone Parent.

Toon Boom Studio 8.1 User Guide
347
• Connect Character SetupMode Tool
This tool is primarily used with the Robo-Skeleton templates. Each template has a layer named Envelopein its Skin Group. Click the Connect character set-up mode button to see the envelope zones appear andto see the character revert to Setup mode, where its body parts are typically separated and spreadapart—see Adding Your OwnCharacter to the Robo-Skeleton Template on page 355.
To have this command work with your own creations, create your own templates and set the layer type ofyour envelope drawing to Envelope in the Layer Properties panel.
You can also select Tools > Bone Tools > Show-Hide.
Refer to the Adding the Skeleton on page 352 topic to learn how to use these tools.
Animation ModeThe Animationmode is automatically active when you select the BoneManipulator tool or the Natural
Movement tools. This means that the Camera view displays the current pose of the bone structure at the
selected frame and anymanipulation youmake creates a keyframe in the Timeline and is animated.
When in Animationmode, notice that the large circle at the base of the bones in Setup mode disappears.

Chapter 12: Bones About the Skeleton Effect
348
• Bone Manipulator Tool
This tool is used to animate the bone structure. You can drag, squash, stretch, rotate or scale a selectedbone chain, creating an animation keyframe in your Timeline view.
You can also access this tool by selecting Tools > Bone Tools > Bone Manipulator or pressing [H]—seeAnimating Bones on page 380.
• NaturalMovement Inverse and Forward Tools
These tools are used to animate the bone structure. The squash and stretchmust be the sameway as theBoneManipulator tool, but when rotating a bone, all children bones in the chainmust also slightly rotatealong to create a smoother and more natural movement.
TheNatural Movement Inverse rotates the children bone in the opposite direction of the parent, creatingresistance. TheNatural Movement Forward rotates the children bone in the same direction as the parent,creating graceful movement such as a ballerina lifting her arm.
You can also access this tool by selecting Tools > Bone Tools > Natural Movement Inverse andNaturalMovement Forward—seeNatural Movement on page 383.
Refer to the Animating the Skeleton on page 376 topic to learn more about these tools.

Toon Boom Studio 8.1 User Guide
349
Choosing Your CharacterBefore building your skeleton, the first thing you need to do is select and prepare your character. If this is yourfirst puppet, then it is best to choose a simple character. A simple character has two legs, two arms, a head andtorso. To begin with, you should avoid a character with loose clothing such as a cloak or baggy pants. As youprogress and gain experience creating and animating skeleton puppets, you will learn what to do to optimizeyour animation and workflow.
We chose a skeleton pirate character to demonstrate how to use the Skeleton effect and Bone tools.
You can also create your character from a picture or a bitmap image, however be sure to vectorize the imagewhen importing, otherwise it will not be editable. For more information on importing and vectorizing bitmapsimages, see Importing and Vectorizing Images on page 165.
If you plan to use one of Studio's Robo-Skeleton templates, see Robo-Skeleton Templates onpage 352 to select a template first, then follow the remaining steps to prepare your character.

Chapter 12: Bones Choosing Your Character
350
Planning and Preparing Your CharacterWhen choosing and preparing your character, all parts of the character should be separated in space. This is toensure the cleanest movement between character pieces when animating bones affected by elliptical influenceareas. You should also group each of the separate parts and arrange the ordering of these limbs and bodygroups inside the drawing.
The limbs do not need to be on separate drawing layers. They simply need to be drawn separatelywithin the same drawing. If you want to have more flexibility in ordering your layers, such as havingan arm pass in front of the torso and another one behind, draw your pieces on separate drawinglayers and attach them to the same Skin layer within the Skeleton effect.
Refer to Drawing and Design on page 81 to learn about the drawing tools and options.
This is an example of what could happen if a character's limbs are overlapping during setup (Figure A), versusone whose limbs were separated from the body during setup (Figure B).

Toon Boom Studio 8.1 User Guide
351
Since the Skeleton effect is applied to any art contained inside a bone's influence area in Setup mode, thefollowing happens:
• Figure A: The character's shoulder in this example was overlapping the body at setup. Thereforeanimating the shoulder will also move any part of the torso that was included in the influence area.
• Figure B: The character's shoulder was not overlapping the torso during setup, so no part of the torsowill be influenced by the animation of this bone.
You can draw all your character's parts on the same drawing element, or you can separate the different parts soeach is on a different drawing layer. For example, you could have five drawing elements for your character; onefor the body and head combined and one for each of the four limbs. Drawing each part on a separate elementsimplifies the process of ordering the limbs later.
Refer to the Adding the Skeleton on the next page and Animating the Skeleton on page 376 topicsto learn more.

Chapter 12: Bones Adding the Skeleton
352
Adding the SkeletonWhen it comes to adding bones to your drawings, there are two options to choose from. You can choose one ofStudio's pre-made Robo-Skeleton templates that has an animated sequence built in, or you can build your ownskeleton. If you choose to create your own skeleton, then you will have the freedom to make your own animatedsequences.
• Robo-Skeleton Templates below
• Building the Skeleton on page 361
Robo-Skeleton Templates
Although creating a character can be fun, the process of animating it can be a little daunting. Take away some ofthe work by using Studio's pre-made Robo-Skeleton templates. You can easily add your own character artworkto the template and watch it move withinminutes.
Choosing Your Robo-Skeleton Template from the LibraryAll the Robo-Skeletons are available from the Library view. To access the templates, follow this path: ToonBoom Templates > Robo-Skeleton.
If you do not see the folder Toon Boom Templates in the Library, right-click under the Local andGlobal folders and select Reload Default Templates.

Toon Boom Studio 8.1 User Guide
353
Inside the Robo-Skeleton folder are Robo-Skeleton templates of both human and animal characters. Eachcharacter has its own subfolder containing templates grouped into front, side and 3/4 poses. Refer to thefollowing table for a more detailed description of the templates:
Folder Human Animal
Front
Jumping
Jumping Jacks
Stretching
Waving
DanceMove 01
DanceMove 02
DanceMove 03
Sitting
Stretching
Tilting Head
Walking
Side
Jumping
Running
Squat
Walking
DanceMove 01
DanceMove 02
DanceMove 03
Jumping
Running
Sitting
Sniffing
Stretching
Walking
3/4 View
Jumping
Running
Squat
Jumping
Running
Sitting

Chapter 12: Bones Adding the Skeleton
354
Walking
Waving
DanceMove 01
DanceMove 02
DanceMove 03
Stretching
Tilting Head
Walking
To see a thumbnail of the template, right-click in the right section of the Library view and select View >Thumbnails.

Toon Boom Studio 8.1 User Guide
355
Importing Your Robo-Skeleton into a SceneYou can drag a template from the Library view to the Camera or Timeline view to add it to your animation.
To import a template into a scene:
1. In the Library view, select the template you want to import.
2. Drag and drop the selected template in the Camera view or Timeline view's left side.
Adding Your Own Character to the Robo-Skeleton Template

Chapter 12: Bones Adding the Skeleton
356
Now that your Robo-Skeleton appears in the Camera view, you have all the pieces necessary to create your ownhumanoid or four-legged character. This means that you need not use this template as is, but you can useelements of the template, such as the animation, for your own purposes.
The first thing you need to do is examine the layers included in your Robo-Skeleton template, specifically the SkinGroup.
Notice how there are two drawing layers attached to the Skin Group. The first layer, in this case called dog_side, contains all the artwork for the dog that you currently see in the Camera view. The envelope layer containsdrawings of zones surrounding each body part of the character.
To view the envelope layer:
1. In the Bone Tools toolbar, click the Connect Character Set-upMode button.
The envelope zones appear and the character is split apart as you would see it in SetupMode.
To have the character move with the pre-made animation of the Robo-Skeleton template, you need to add yourown artwork to the Skin Group to replace the dog_side layer. You can do this in several ways: by creating anew drawing layer, using the envelope zones as guidelines and then creating your own artwork, or by erasing theartwork from the dog_side layer and drawing your own artwork directly in that layer.
To add your own character to the Robo-Skeleton template:
1. In the Timeline view, click the Add New Drawing Layer button to create a new drawing layer.
2. Go to the Drawing view by clicking on the Drawing view button on the upper-right side of the Cameraview.
OR

Toon Boom Studio 8.1 User Guide
357
If you want to continue working in the Camera view, click the Connect Character Set-upMode button
to display the envelope zones.
Use the Erase tool or Select tool in combination with the [Del] key to get rid of the current
artwork on that layer.
3. If you are working in the Drawing view, turn on the Light Table by clicking the Auto Light Table button
in theOnion Skin toolbar (Top toolbar onMacOS X).
The envelope image appears in washed out colours in the Drawing view. Youmay notice that it does notlook as it did in the Camera view; some of the limbs of the character may be detached and spread out.

Chapter 12: Bones Adding the Skeleton
358
As is the case with the dog, when the character is whole, two of the legs are partially hidden behind therest of the body. This would also happen to the image of a human character in profile; one arm and oneleg would be hidden. To fix problems like this, all the limbs are separated and then reattached to thebody in the Bone setup stage (which is already done for the Robo-Skeleton templates), so all the bodyparts canmove independently.
4. If you are working in the Camera view, in the Timeline view, hide (deselect) the current Skin Group artlayer. In this case, it is the dog_side layer. Leave the envelope layer enabled.
OR
If you are working in the Drawing view, in the Exposure Sheet view, click the Toggle Element List buttonand then hide (deselect) the current Skin Group art layer. In this case, it is the dog_side layer. Leave theenvelope layer enabled
Instead of hiding the Skin Group art layer, you could simply delete its contents and then create yourown artwork directly on it.
5. In the Drawing or Camera view, import and vectorize an image, or use the drawing tools to create yourown version of the chosen character type on the new layer. If you import an image, you can use thedrawing tools to cut it up, as long as it is vectorized. Youmust also scale the pieces and place them in the

Toon Boom Studio 8.1 User Guide
359
correct location, over their corresponding envelope zone. In either case, be sure to stay within theenvelope zone limits.
For more information on how to create your own artwork, see Drawing and Design on page 81.
For more information on how to import bitmap images, see Importing and Vectorizing Images onpage 165.
6. In the Timeline view, rename the drawing layer to something appropriate and extend the exposure of thedrawing for the total length of the animated sequence. You can do this by:
‣ Right-clicking on the frame youwant to extend the exposure to and selecting Extend Exposure.
OR
‣ Clicking on the frame that you want to extend the exposure to and pressing [Ctrl] + [Shift] + [1](Windows) or [⌘ ] + [Shift] + [1] (MacOS X).
7. If you are not already there, return to the Camera view by clicking the Camera view button.
8. If you did not draw directly on the old Skin Group art layer, then in the Timeline view, select your characterartwork layer and drag and drop it over the Skin Group layer.

Chapter 12: Bones Adding the Skeleton
360
9. If you did not create your new character artwork on the old Skin Group art layer, either hide the old SkinGroup art layer or delete it from the Timeline view entirely.
10. Hide the envelope by deselecting the Connect Character Set-upMode button from the Bone Tools
toolbar.
The envelope disappears and the Robo-Skeleton character appears reassembled. If it does notreassemble automatically, youmay have one of the Bone setup tools selected. If so, click the BoneManipulator tool.
As a test, click the envelope layer and take a look at the Layer Properties panel. Notice the Type is set toEnvelope. Any layer set to Envelope through the Properties panel can be controlled by the ConnectCharacter Set-upMode button.
Your character is connected to the Robo-Skeleton template and appears in place of the generic envelope.
11. In the Playback toolbar (Top toolbar onMacOS X), click the Play button to watch the pre-made
animation as it now appears, connected with your character artwork.

Toon Boom Studio 8.1 User Guide
361
If your artwork appears warped when animated, you may need to tweak the Zones of Influence or theBone Setup—see Setting the Influence Area on page 369 and Setting Up the Bones on page 366.
Building the SkeletonOnce your character design is ready, you can start building the structure of the puppet's skeleton. Here are thedifferent steps and tools:
• Adding Bones below
• Setting Up the Bones on page 366
• Setting the Influence Area on page 369
• Parenting Bone Chains on page 373
Adding BonesThere are two different ways you can add bones to artwork. The fastest and easiest way is to select the layerwith your artwork, and then select the Bone Creator tool. The last step is simply to create bones on top of yourartwork. You can also add bones through the Timeline view by adding a Skeleton effect.
To add bones to your character:
1. Make sure you are working in the Camera view.
2. In the Timeline view, select the layer that contains your artwork.
3. From the Bone Tools toolbar, select the Bone Creator tool or press [U].
4. Take a look at your character or object, and decide which parts will be at the back (hidden behind otherparts). These are the parts you should start creating bones for first.

Chapter 12: Bones Adding the Skeleton
362
The bones and bone chains that are created first will be at the top of the Timeline layer stack when youare finished; therefore, they will be located at the front of the visibility hierarchy.
5. In the Camera view, click and drag to create the first bone, following your design.
When creating the bone structure, think about where you want the image to bend. In this example, wewant to have two bends (one at the elbow and one at the wrist). Therefore three bones should becreated: the arm, forearm and hand.

Toon Boom Studio 8.1 User Guide
363
If you do not position the bone perfectly the first time, you can fix it later using the Bone Setuptool—see Setting Up the Bones on page 366.
6. Once you have created a bone, it automatically becomes selected and appears in red. The next bone youcreate is automatically linked and parented to the currently selected bone. This creates a chain linked by ajoint.
7. Once you have created a full bone chain for one limb, you can, for example, start a new freestanding boneor bone chain for a different part of your character or object. Hold down the [Shift] key to do this.
Be sure to let go of the [Shift] key if you want to create a connected chain, otherwise, you will createa series of unconnected bones.
8. Take a look at the Timeline view. As you create a bone chain, notice that a new bone layer is automaticallyadded for each bone in the chain under the BoneGroup. The bones in a chain are organized in a hierarchy,while freestanding bones are just below themain BoneGroup.

Chapter 12: Bones Adding the Skeleton
364
Notice also that the drawing layer with your character or object artwork is automatically connected to theSkin Group of your new Skeleton effect group. This auto-parenting occurs because you started creatingyour bones with this layer selected.
Refer to the Layers and Timing on page 197 chapter to learn more about layers.
Your character's bone structure is now complete. Notice how the bones of the body parts, including the body ofthe character, are independent from each other. They are all separate bone chains, totally unconnected.
Adding Bones from the Timeline View
Another way to add bones to your artwork is to add a Skeleton effect to your Timeline view and then connectyour character's artwork to it.
To add a Skeleton effect:
1. In the Timeline view, click the Add New Elements button.

Toon Boom Studio 8.1 User Guide
365
TheNew Elements dialog box opens.
2. From the Type list, select Skeleton Effect.
3. In the Name field, give a name to the Skeleton Effect element.
4. Click OK.
The Skeleton effect appears in the Timeline view.
5. Select and drag the drawing layer containing your character onto the Skin Group. This is where youconnect any art layer that you want to be influenced by the bones. Make sure to drop the drawing layerdirectly on the Skin Group to parent it to the Skin Group.
If your character's parts are drawn on different elements, make sure to parent all the drawing elements tothe Skin Group.
6. Once layers are parented in the Timeline view, you can click on the blue triangle icon at the head of agroup to collapse or expand the group. This is useful when the Timeline view becomes filled with layers.

Chapter 12: Bones Adding the Skeleton
366
You can add any drawing layer to the Skin Group or remove any drawing layer from it at any time.You can also save a bone structure in your library as a template and then reuse it with other characterdesigns! Refer to Library on page 182 to learn more about using the Library view.
7. From the Bone Tools toolbar, select the Bone Creator tool or press [U].
8. Take a look at your character or object, and decide which parts will be at the back (hidden behind otherparts). These are the parts you should start creating bones for first.
The bones and bone chains that are created first will be at the bottom of the Timeline layer stack whenyou are finished; therefore, they will be located at the bottom of the visibility hierarchy.
9. In the Camera view, click and drag to create the first bone, following your design.
10. Once you have created a bone, it automatically becomes selected and appears in red. The next bone youcreate is automatically linked and parented to the currently selected bone. This creates a chain linked by ajoint.
11. Once you have finished creating the bone structure on a first limb, in the Timeline view, select the top layerof the Skeleton Effect; this lets you start the bone structure for the next limb. Then, repeat steps 8 and 9until a bone structure is created for each of the body parts.
Setting Up the BonesOnce you start creating bones you can, at any time, modify them in Setup mode to optimize their positioningwithout creating an animation.
Tomodify bones using the Bone Setup tool:
1. From the Bones Tools toolbar, select the Bone Setup tool or press [J].
2. In the Camera view, select the bone youwant to modify.
The selected bone turns red and two control handles appear.
‣ To rotate the bone, place the pointer over the bone until you see the rotation cursor. Click and dragto rotate the selected bone. You can change the rotation angle of any bone in the chain.

Toon Boom Studio 8.1 User Guide
367
‣ To shorten or lengthen the bone, click on the round handle at the tip of the bone and either drag ittowards or away from the root of the bone. You can lengthen or shorten any bone in your chain. Youcan also rotate as you scale, creating two transformations in one step.

Chapter 12: Bones Adding the Skeleton
368
‣ To reposition the bone, click the square handle and drag it to the desired position.
You should only reposition the first parent of the bone chain to avoid creating gaps in your joints thatcould result in an unwanted distortion of the art.
You can also use the Properties view to define the position of a selected bone.
Tomodify bones using the Properties view:
1. In the Camera view or Timeline view, select the bone youwant to modify.
Its position values appear in the Properties view.

Toon Boom Studio 8.1 User Guide
369
2. In the Properties view:
‣ Position: Enter the X-axis and Y-axis values to set the position of the selected bone. You should notreposition a bone that is not the first parent. This will prevent gaps from forming at the joint area,creating an unwanted distortion of the art.
‣ Length: Lets you set the length of the selected bone. You can resize any bone from the chain.
‣ Rotation: Lets youmodify the rotation angle of the selected bone. You can change the rotation angleof any bone from the chain.
Resetting the Position of a Bone
You can reset the position of a selected bone at any time using the Properties view. You can also reset theselected bone's position and rotation values to default.
To reset the position of bones:
1. In the Timeline view, select the bone youwant to reset.
2. In the Properties view, set the Position and Rotation values to 0.
3. Repeat these steps to reset the position of other bones.
You can also use the Reset option to reset both the bone positions and keyframes simultaneously.
To reset the position of bones and clear keyframes:
1. In the Timeline view, select the bone element you want to reset. You can perform a multiselection andreset the position of multiple bones at the same time.
2. In the Timeline View menu, select Reset. You can also right-click in the right or left section of the
Timeline view and select Reset.
Setting the Influence AreaThe influence area is the zone that defines which art is included in the Skeleton effect and is distorted whenanimated. Once you setup the bone structure, you need to adjust the influence area of your bones.
This topic is divided as follow:
• Influence Area on the next page
• Modifying the Size and Shape of the Influence Area on page 371

Chapter 12: Bones Adding the Skeleton
370
Influence Area
The influence area determines the boundaries of the effect that a bonewill have over artwork that lies withinthose boundaries.
Any art on a drawing layer that is connected to the Skin Group and appears inside the bone influence area, willfollow themovement of that animated bone.
When setting the influence area around bones, make sure that no unwanted art is included in the area. Anyunwanted art included in a bone influence area will follow the animated bone and become distorted.
There are two types of influence area possible for a selected bone: Elliptical and Infinite.

Toon Boom Studio 8.1 User Guide
371
Infinite
By default, the influence area is set to Infinite. The entire art which is part of the Skin Group and which is notcontained inside the Elliptical influence area of another bone, will move with the selected bone. If two bones havean Infinite influence type, then they influence the artwork up to where theymeet, in other words, up to the joint.
Elliptical
You can set the influence area type for a selected bone to Elliptical using the Properties view. When set toElliptical, an ellipse appears in the Camera view around the selected bone. An Elliptical influence typemeans thatan ellipse shape determines the boundaries inside which art will be influenced by the selected bone animation.This area can be redefined using the Bone Influence tool or Properties view.
Note that if two influence areas overlap, the bone that is situated lower in the Timeline view'sordering is the one that will take precedence over the other. Therefore, the influence area of thebone that is situated higher in the Timeline view's layer stack, will have no influence over theoverlapping area—see Modifying the Size and Shape of the Influence Area below.
Modifying the Size and Shape of the Influence Area
If you set the influence area of a bone to Elliptical, meaning it is bound within an ellipse shape, you canmodifythat shape. To modify the size and form of the ellipse, simplymanipulate the square points around its boundingbox.
Tomodify the influence area using the Bone Influence tool:
1. From the Bone Tools toolbar, select the Bone Influence tool.
2. In the Camera view, select the bonewhose influence area you want to modify. Make sure that in theProperties view, the zone of influence is set to Elliptical.
The selected bone appears in red and a black bounding box is displayed around the influence area.

Chapter 12: Bones Adding the Skeleton
372
3. Click and drag the square points to resize or reshape the influence area.

Toon Boom Studio 8.1 User Guide
373
Parenting Bone ChainsOnce you create several bone chains for your character's limbs and body, you can connect them all by parentingthem. This unifies the character and, if you want to, allows the limbs to follow themovements of your character'sbody. This step is very simple, as you only use a single tool, the Bone Parent tool.
You can only parent bone chains that are connected to the same Skeleton effect. If you haveseperate Skeleton effects for different limbs, you must parent them using pegs.
To parent bone chains:
1. From the Bone Tools toolbar, select the Bone Parent tool.
2. In the Camera view, locate the bonewhich is the starting point of the limb youwant to parent to anotherchain. In this example, the armwill be parented to the body of the Skeleton.
3. Click on the base of the limb bone and then drag the pointer to the bone youwant to parent it to. As youdrag, a red arrow points in the direction you are dragging. When a straight line appears beside it, itmeans that it is ready to connect to the selected bone.

Chapter 12: Bones Adding the Skeleton
374
4. Release the pointer to complete the connection.
5. Repeat the previous steps until all the limbs are parented to the body.

Toon Boom Studio 8.1 User Guide
375
Unparenting Bone ChainsIf for some reason you decide that you no longer want a bone or chain parented to another bone or chain, youcan easily unparent.
To unparent a bone or bone chain:
1. From the Bone Tools toolbar, select the Bone Parent tool.
2. In the Camera view, locate the bone youwant to separate from another bone or bone chain. If you wantto separate part of a chain from a larger chain, find the bone that would represent the head of the newchain.
3. Click on the selected bone, then rapidly pull away from the parent bone or bone chain.
The selected bone and any of its children are separated from its parent bone or bone chain.

Chapter 12: Bones Animating the Skeleton
376
Animating the SkeletonOnce you have finished creating your character's skeleton, it is time to switch to the BoneManipulator tool,reconnect the limbs to the body and animate it.
• Reassembling the Character below
• Ordering Limbs on page 378
• Hiding Bones on page 379
• Animating Bones on page 380
• Disabling a Bone Animation on page 388
Reassembling the CharacterThe first step is to reassemble the character so that the limbs do not appear spread apart, as in Setup mode.
To reassemble the character:
1. From the Bone Tools toolbar, select the BoneManipulator tool.
The Camera view changes to Animationmode display.
2. In the Timeline view, make sure the red marker is at the first frame.
3. In the Camera view, select themain bone of one of the limbs.
4. Use the square handle to drag the bone chain to the desired position.

Toon Boom Studio 8.1 User Guide
377
A keyframe is added to the limb's bone layer on the first frame, locking its position in time.
5. Repeat the previous steps for each limb youwant to assemble to the body.
When your character is assembled and ready for animation, you should save it in the Library view forfuture reference, and easy reuse between projects—see Library on page 182.

Chapter 12: Bones Animating the Skeleton
378
Ordering LimbsWhen reassembling your character, youmight find a limb that does not appear in the correct order, such as thefollowing arm that appears under the body.
The ordering method will differ, depending onwhether your entire character is from a single drawing layer, or ifyour character's pieces are separated on several drawing layers.
• Character with Limbs onDifferent Drawing Layers below
• Character on a Single Drawing Layer on the facing page
Character with Limbs on Different Drawing LayersIf your drawing layers are in the wrong order, you can easily change the order in the Timeline view within the SkinGroup.
To reorder layers in the Timeline view:
1. In the Timeline view, select the layer you want to reorder.
2. Drag the layer to the correct position within the Skin Group. Be careful to drop it between layers, and noton a layer as this would parent them.

Toon Boom Studio 8.1 User Guide
379
Remember that the ordering of the drawing elements in the Timeline view works as follows: Thehigher the drawing element is in the Timeline ordering, the closer to the front it will appear in theCamera view—see Ordering Layers in the Timeline View on page 279.
Character on a Single Drawing LayerYou cannot change the order of the limbs when they are all drawn in the same layer. If you want to have an armpass in front of the torso and the other one behind, you should draw them on separate drawing layers andattach them to the same Skin Group. At that point, you can change the order of your layers within theSkin Group.
The ordering of the bones determines the ordering of the drawing art that is included in its influence area.
To reorder the bone elements:
1. In the Timeline view, select the layer you want to reorder.
2. Drag the Bone element to the desired position within the BoneGroup. Be careful to drop it betweenexisting bone element hierarchies and not drop it on one as this would parent them.
Note that the ordering of the Bone elements in the Timeline view is the opposite of the otherelements. The higher the bone element is in the Timeline ordering, the further back it will appear inthe Camera view.
Hiding BonesYoumight need to hide the bones from the Camera view. If so, you can simply hide the BoneGroup.
To hide the Bone Group:
1. In the Timeline view, locate the BoneGroup youwant to hide.
2. Select the layer's check box to hide it.

Chapter 12: Bones Animating the Skeleton
380
Note that hiding the Bone Group will only hide the bones and not disable the Skeleton Animation—see Disabling a Bone Animation on page 388.
Animating BonesNow that the Skeleton puppet is ready, you can start animating it.
To animate bones:
1. From the Bone Tools toolbar, select the BoneManipulator tool.
2. In the Timeline view, go to the framewhere you want to set the first pose of the puppet.
3. In the Camera view, select the bone youwant to animate.
4. When a bone is selected you can:
‣ Use the square handle to drag the selected bone to a new position. Note that this handle is onlyavailable on the parent bone of a chain.
Repositioning a bonewill create a square black keyframemarker in the Timeline view, on the layer of theselected bone.
‣ Use the circle handle to squash and stretch the bone. In the example below, notice how the parentbone is unaffected, but the child bone becomes squashed and stretched.

Toon Boom Studio 8.1 User Guide
381
Scaling a bonewith the BoneManipulator tool will create up and down arrow-shaped keyframemarkers in the Timeline view, on the layer of the selected bone, as well as on the layer of the childbone. The reason this manipulation produces the same types of keyframemarkers that you wouldtypically see for a scale and a rotation, is because the BoneManipulator tool allows you to scale androtate in the samemovement.
You can also use the Scale tool from the Animation tools toolbar to perform a different type of
scaling. Grab the tip of the bone to squash and stretch it. In the example below, notice that theparent and child bones are unaffected by the scaling, but the child's position changes relative to thescaling of the selected bone.
Scaling a bone with the Scale tool will create a down arrow keyframe marker in the Timeline view, onthe layer of the selected bone.
‣ With the BoneManipulator tool, click directly on the bone and drag the cursor to rotate it.

Chapter 12: Bones Animating the Skeleton
382
Rotating a bonewill create a tiny up arrow keyframemarker in the Timeline view, on the layer of theselected bone.
‣ If the Skeleton Effect is collapsed, note that you will not see the keyframemarker. If you expand thepuppet's elements by clicking on the arrow next to themaster peg element, notice a red square onthe parent element of the bone youmoved. This indicates that a child of this bone has a keyframe.
5. In the Timeline view, go to the framewhere you want to set a second keyframe.
6. In the Camera view, animate the character.
7. Repeat this process until all the poses are done.
By default, Toon Boom Studio is set to create non-constant keyframes. This means that the softwarewill automatically create the movement between two keyframes. This can be very handy whenanimating your skeleton puppet. If in some situations you would rather create each keyframe in the

Toon Boom Studio 8.1 User Guide
383
interpolation of your movement, you can set your keyframe to be non-constant—see Constant andNon-Constant Segments on page 403
Onion Skin ToolbarYou can use theOnion Skin toolbar to help you create your animation. It will let you see the previous and nextdrawings of your animation as a handy reference while animating—see Using theOnion Skin in Cut-outAnimation on page 415
Natural Movement

Chapter 12: Bones Animating the Skeleton
384
Using theNatural Movement tools, you can easily animate smooth and natural actions. TheNatural MovementForward and Natural Movement Inverse tools let you to rotate the parent bone and the rest of the children in thechain will follow themainmovement and also rotate on their own to create fluid motions. Without these littleadditional rotations, themovement can be stiff and youwill have to rotate the children bones on your own tosmooth out themovement and make it flow naturally.
There are two natural movement tools:
• NaturalMovement Inverse
TheNatural Movement Inverse tool rotates the children bones in the opposite direction from the
parent. Therefore, if you rotate the upper arm of a character upward, the forearm and hand also rotatedownward.This provides an illusion resistance in themotion as if gravity or air pressure were delaying therotation of the limbs. This animation principle is called follow through. If you animate a flower bending inthe wind, you will use theNatural Movement Inverse tool.

Toon Boom Studio 8.1 User Guide
385
• NaturalMovement Forward
TheNatural Movement Forward tool rotates the children bones in the same direction as the parent.
Therefore, if you rotate the upper arm of a character upward, the forearm and hand also rotate upward.There is no illusion of resistance in this motion. The arm is deliberately bending.
To use the Natural Movement Inverse and Forward:
1. In the Bones Tools toolbar, select the Natural Movement Forward or Natural Movement Inverse
tool. You can also access these tools by selecting Tools > Bone Tools > Natural Movement Forward orNatural Movement Inverse.
2. In the Camera view, click the bone youwant to animate and rotate it.
3. To toggle between theNatural Movement Forward and Natural Movement Inverse, hold down [Alt]before you start themotion to select the opposite tool.
Blocking the Body's PositionOnce you position your puppet, you can create a keyframe for all the bone elements of your collapsed skeletonand block the complete body at a specific frame.
To block the entire body position:
1. Make sure your Skeleton Effect layer is collapsed.
2. In the Timeline view, on the Skeleton Effect layer, select the frame at which you want to block the puppet'sposition.
3. Select Element > Peg > AddKeyframe or press [l]. If you expand the Skeleton effect after adding thekeyframe, a keyframewill be added to all children layers. Do not forget to collapse your Skeleton effectbefore continuing your animation.

Chapter 12: Bones Animating the Skeleton
386
Deleting KeyframesTo delete keyframes:
1. In the Timeline view, select the keyframe youwant to remove.
2. Select Element > Peg > Remove Keyframe or press [Ctrl] + [R] (Windows) or [⌘ ] + [R] (MacOS X).
The selected keyframe is deleted.
If you select a keyframe on a collapsed layer, all the keyframes for all of that frame's collapsedelements will be removed.
Removing All KeyframesYou can use the Remove All Keyframes option if you need to delete all the keyframes on one or many selectedbone elements.
To remove all keyframes:
1. In the Timeline view, select the bone elements you want to remove all the keyframes from. You can selectmany elements at once.
2. In the Timeline View menu, select Remove All Keyframes or right-click in the right side of the
Timeline view, and select Remove All Keyframes.

Toon Boom Studio 8.1 User Guide
387
Adjusting the Velocity and FunctionsYou can adjust the velocity to create ease-in and ease out motions or edit themovement Functions using theFunction Editor view. This greatly improves the quality and look of an animation, giving a more organic feel tothemovement. You can edit the velocity and function of your skeleton or bones in the Function Editor view.
To display the selected bone or skeleton in the Function Editor view:
1. In the Timeline view, select the Skeleton Effect master element or the bone element whose velocity youwant to edit.
2. In the Properties view, click the Function Editor or Edit Velocity button.
The Function Editor view is displayed and the select bone or skeleton function is selected.
To learn how to adjust the velocity and functions, see:
• Adjusting the Velocity on page 411
• Function Editor View on page 322
To learnmore about the Skeleton Effect Properties view options, see:
• Skeleton Effect Properties on page 389
To learnmore about the Bone element Properties view options, see:
• Setting Up the Bones on page 366
• Setting the Influence Area on page 369

Chapter 12: Bones Animating the Skeleton
388
Disabling a Bone AnimationAt times, youmay need to disable the bone animation. If so, you can simply disable the Skeleton effect.
To disable the Skeleton Effect:
1. In the Timeline view, locate the Skeleton effect top layer, it is the one with a bone icon.
2. Select in the layer's check box to disable it.
Notice that the Camera view automatically switches to Setup mode display.

Toon Boom Studio 8.1 User Guide
389
Skeleton Effect PropertiesWhen the Skeleton effect master element is selected, many options aremade available to you in the Propertiesview.
Because you can animate themaster element of the Skeleton effect just like themaster Peg element of a puppet,many options refer to motion paths.
To learn more about animating trajectories and motion paths, see Setting the Scene on page 277.
You can animate this element using the animation tools available in the Animation Tools toolbar—see Using theDifferent Animation Tools on page 407.

Chapter 12: Bones Skeleton Effect Properties
390
• Name: Displays the name of the selected Skeleton Effect element.
• Start: Displays the first frame number to which a keyframe is inserted on the Skeleton Effect element.
• Duration: Displays the duration of the animation of the Skeleton Effect element.
• LoopMode: Displays if the layer is looped—see Change Loops on page 332 to learnmore about loopinga pegmovement.
• Edit Velocity: Click on this button to display the Skeleton Element in the Function Editor view. To learnhow to adjust the velocity—see Adjusting the Velocity and Functions on page 387 and Adjusting theVelocity on page 411
• Skeleton Colour: Click in the colour square to open the Select Colour dialog box. Pick a colour toinstantly change the colour of the selected Skeleton Effect elements. The colour will change in both theTimeline and Camera view. You can also change the default colour for each new Skeleton Effect you willadd to your project using the Preferences panel—see Refer to Preferences on page 392.
• Show Track: Displays themotion path of your animation in the Camera view—see Pegs on page 305.
• Show Root: Displays the root, which is the centre point of the bone structure. Before themaster elementof the Skeleton Effect is animated, the center point is situated in the centre of the Camera view.
• Show Influence: By default this option is enabled, letting you see the influence areas of the skeleton'sbones in the Camera view. You can disable this option to hide the influence areas.
• Vector Quality: Choosing the vector quality level of your skeleton will either improve or depreciate theresult of the bone distortion effect.
Highest
High
Medium
Low
• Scale: Type in the desired width and height scaling values: 1 = 100%. You can also use the Scale tool
in the Animation Tools toolbar.
• Keep Proportions: Enable this option to keep proportions when scaling the skeleton.
• Skewing: Type in the desired skewing angle value. You can also use the Skew tool from the
Animation Tools toolbar.
• Rotation: Type in the desired rotation angle value. You can also use the Rotate tool from the
Animation Tools toolbar.
• Apply Pivot to: Select to which transformation you want to apply the pivot to.
Rotation
Scaling
• Constant Z: This option is disabled by default. When you create a motion path on the Z-axis, theautomatic interpolation calculates the X, Y and Z axis values. When it is enabled, the interpolationcalculates the X and Y axis values and keeps the Z-axis value as constant—see Pegs on page 305
• Orient to Path: Forces the element connected to the path to follow themotion path—see Pegs onpage 305

Toon Boom Studio 8.1 User Guide
391
• Copy Resting Position to Current Frame: Brings the skeleton and artwork back to the set-up
position only on the currently selected frame. You can then reparent and set up the bones and theircorresponding artwork in a new formation.
• Copy Resting Position to All Key Frames: Maintains all the position information in the keyframes
that are part of an animated sequence, while restoring the puppet's bones to the set-up position andresetting all the transformation information back to zero.

Chapter 12: Bones Preferences
392
PreferencesWhenworking with the bones feature, you can set the colour preference of the bone display from thePreferences panel.
To open the Preferences panel:
‣ Windows: Select Edit > Preferences.
‣ MacOS X: Select Toon Boom Studio 8.1 > Preferences.
To change the bones colour display:
1. In the Preferences panel, select the Interface tab.
2. In the Element Colours section, double-click on the Skeletons and Bones colour swatch to display theSelect Colour dialog box.
3. Pick a colour in the Select Colour dialog box and click OK.
4. In the Preferences panel, click OK.
5. Every new Skeleton Effect you create uses colour as its default display in the Timeline and Camera view.

Toon Boom Studio 8.1 User Guide
393
You can also change the colour of an already created Skeleton effect by using its Properties view—see Skeleton Effect Properties on page 389.

Toon Boom Studio 8.1 User Guide
394

Toon Boom Studio 8.1 User Guide
395
Chapter 13: Animating a Puppet
Start animating your characters with Toon Boom Studio's easy to use tools.
In this chapter, you will learn about the following:
• Getting the Character From the Library on the next page
• Understanding Keyframes and Drawings on page 399
• Creating a Simple Cut-out Animation on page 400
• Preferences on page 418
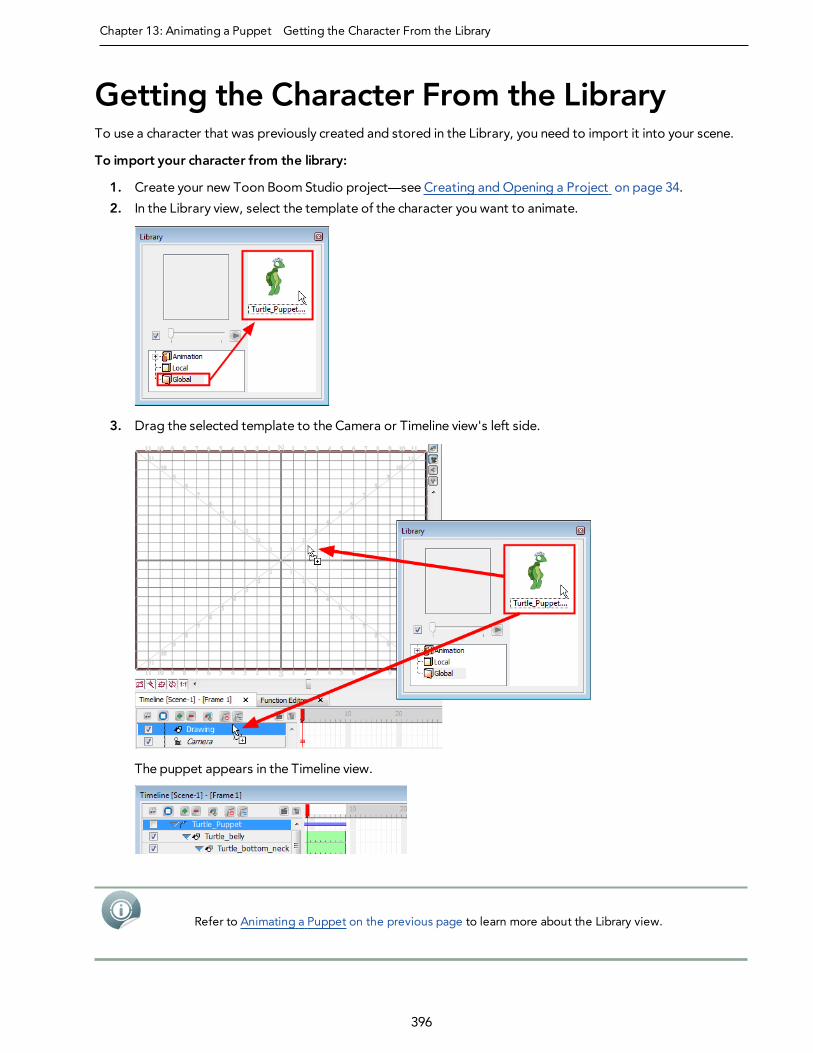
Chapter 13: Animating a Puppet Getting the Character From the Library
396
Getting the Character From the LibraryTo use a character that was previously created and stored in the Library, you need to import it into your scene.
To import your character from the library:
1. Create your new Toon Boom Studio project—see Creating and Opening a Project on page 34.
2. In the Library view, select the template of the character you want to animate.
3. Drag the selected template to the Camera or Timeline view's left side.
The puppet appears in the Timeline view.
Refer to Animating a Puppet on the previous page to learn more about the Library view.

Toon Boom Studio 8.1 User Guide
397
Extending the ExposureTo extend the puppet exposure:
1. In the Timeline view, click the arrow beside the top layer of your puppet to collapse it.
In the Timeline view, select your puppet main layer and select Element > Cell > Extend Exposure or press [Ctrl]+ [Shift] + [1] (Windows) or [⌘ ] + [Shift] + [1] (MacOS X).
The Extend Exposure dialog box opens.
2. In the Extend to Frame field, enter the planned final frame of your animation and click OK. This extendsthe exposure of every element contained in your puppet.
Refer to Traditional Digital Animation on page 233 to learn more about exposure and timing.
Extending the Exposure of a Peg's Children LayersWhen several layers such as drawings and pegs are parented to another layer such as a peg, you have thepossibility to expand the exposure of all parented layers at once by collapsing themain layer and using theExtend Children Exposure function.
To extend the exposure of a puppet's children layers:
1. In the Timeline view, in the puppet layer's row, select the frame to where you would like to extend all thelayers' exposure. Make sure themain layer is collapsed.
2. Right-click on the frame and select Extend Children Exposure.
The children's exposure is indicated by a thin bar.

Chapter 13: Animating a Puppet Getting the Character From the Library
398
When you uncollapse the Puppet Peg layer, the children's extended exposures are revealed.

Toon Boom Studio 8.1 User Guide
399
Understanding Keyframes and DrawingsBefore starting to animate it is important to understand the difference between drawings and keyframes.
Keyframes lock a change in position, rotation or scale to a specific frame and store the value for thattransformation. When you add a keyframe to define the values for one or more transformations, such as motion,scale, skew or rotation, you can use the features in Toon Boom Studio to animate the changes between them.
Just as creating a drawing element and selecting a new position over 20 frames is faster than creating 20drawings for 20 frames, adding keyframes for a peg's transformations and letting Toon Boom Studio animatethe rest saves evenmore time.
Keyframes and Drawing BlocksIn the Timeline view, if you extend the exposure of a drawing, it is represented as a green block. A new greenblock is displayed for every new drawing you create. These are called drawing blocks.
To change the position of a drawing over time, you do not need to create a second drawing block, just add aposition keyframe.
The position keyframes record the position of your drawing on a particular frame. They appear as black squaresin the Timeline view. Notice that the keyframes are positioned on frames independent of the beginning and endof each drawing block.

Chapter 13: Animating a Puppet Creating a Simple Cut-out Animation
400
Creating a Simple Cut-out AnimationIn this section, you will learn about different tools and features available in Toon Boom Studio to help youanimate your cut-out puppet.
This topic is divided as follow:
• Animating the Parts below
• Constant and Non-Constant Segments on page 403
• Navigating Inside a Hierarchy on page 404
• Using the Different Animation Tools on page 407
• Adjusting the Velocity on page 411
• Using theOnion Skin in Cut-out Animation on page 415
• Swapping Images on page 416
Animating the PartsOnce you import your cut-out puppet into your Studio project, you can start animating it.
To animate a puppet:
1. In the Animation Tools toolbar, select the Transform tool or select
Tools > Animation Tools > Transform or press [7].
2. In the Timeline view, go to the framewhere you want to set the first pose of your puppet.
3. In the Camera or Timeline view, select the parts to animate.
‣ If your puppet is collapsed, click the top layer arrow to expand it.
4. Use the Transform tool to rotate, skew, scale or translate the selection to its new position.

Toon Boom Studio 8.1 User Guide
401
A keyframe is created in the Timeline view. If your puppet is collapsed, note that you do not see thekeyframe on themaster peg layer.
‣ If you expand the elements of your puppet by clicking the arrow next to themaster peg element, youwill notice a red square on the parent element of the element youmoved. This is an indication that achild of this element has a keyframe.
‣ Ablack square on the element youmoved represents the keyframe.
5. In the Timeline view, go to the framewhere you want to set a second keyframe.
6. In the Camera view, animate your character.
Blocking the Body's PositionOnce you position your puppet, you can create a keyframe for all the elements of your collapsed puppet andblock the complete body at a specific frame.
To block the entire body position:
1. In the Timeline view, on themaster peg, select the frame at which you want to block your puppet'sposition.
2. Select Element > Peg > AddKeyframe or press [l].

Chapter 13: Animating a Puppet Creating a Simple Cut-out Animation
402
Deleting KeyframesTo delete keyframes:
1. In the Timeline view, select the keyframe youwant to remove.
2. Select Element > Peg > Remove Keyframe or press [Ctrl] + [R] (Windows) or [⌘ ] + [R] (MacOS X).
The selected keyframe is deleted.
If you select a keyframe on a collapsed layer, all the keyframes for all of that frame's collapsedelements are removed.
Copying and Pasting KeyframesIf you want to copy the value of a keyframewithout copying the entire drawing contained in the selected cell, youneed to use the Paste Special command.
To copy and paste keyframes:
1. In the Timeline view, select the keyframe that contains the position values you want to copy.
2. Select Edit > Copy Cell or press [Ctrl] + [C] (Windows) or [⌘ ] + [C] (MacOS X).
3. In the Timeline view, select the cell in which you want to paste the copied position values.
4. Select Edit > Paste Special or press [Ctrl] + [B] (Windows) or [⌘ ] + [B] (MacOS X).
The Timeline Paste Special Preferences dialog box opens.
5. In the Pegs section, select or deselect the following options to choose which values of the keyframe youwant to paste:
‣ Create/Delete Motion Key Frames: Pastes the translation value of the copied keyframe.
‣ Create/Delete Rotation Key Frames: Pastes the rotation value of the copied keyframe.
‣ Create/Delete Scale Key Frames: Pastes the scale value of the copied keyframe.
‣ Create/Delete Pivot Key Frames: Pastes the pivot position value of the copied keyframe.
‣ Create/Delete Velocity Key Frames: Pastes the velocity value of the copied keyframe.

Toon Boom Studio 8.1 User Guide
403
‣ Create/Delete Skew Key Frames: Pastes the skew value of the copied keyframe.
‣ Create additional key frames at beginning and end of selection: Creates an additional keyframe atthe beginning and at the end of your pasted selection to block the copied values between them.
6. In the Drawings section, deselect theCreate/Delete Exposure option. If this option is selected, thedrawing exposure is copied at the same time as the position value.
Constant and Non-Constant SegmentsBy default, when you add keyframes, non-constant segments are created between them. You can change thisoption to create constant segments.
Refer to the Preferences topic to learn how you can change the default behaviour of Toon BoomStudio so it creates constant segments by default.
Non-Constant SegmentA non-constant segment means that Toon Boom Studio automatically creates the interpolation between the twokeyframes, creating a motion.
A non-constant segment is represented as grey lines going from one keyframe to the other.
To switch from a constant to a non-constant segment:
1. In the Timeline view, select the first keyframe of the constant segment you wish to turn to non-constant.

Chapter 13: Animating a Puppet Creating a Simple Cut-out Animation
404
2. Select Element > Peg > Set Non-Constant Segment or press [Ctrl] + [Shift] + [L] (Windows) or [⌘ ] +[Shift] + [L] (MacOS X).
The segment turns to a non-constant segment.
Constant SegmentA constant segment means that the drawing automatically jumps from one position to the other withoutcreating anymotion in between.
A constant segment is represented as a blank gap between two keyframes.
To switch from a non-constant to a constant segment:
1. In the Timeline view, select the first keyframe of the non-constant segment you want to turn to constant.
2. Select Element > Peg > Set Constant Segment or press [Ctrl] + [L] (Windows) or [⌘ ] + [L] (MacOS X).
The segment turns to a constant segment.
Navigating Inside a HierarchyTo create a layer hierarchy when you build your puppet, use the hierarchy navigation command to travel up anddown the parent-children chain and to move between the children. This is useful if you want to select small partsthat are difficult to reach. You can also select different parts from the Timeline or Camera view.

Toon Boom Studio 8.1 User Guide
405
Selecting a Parent or Child ElementIn a hierarchy, elements connected to one another are called parent and child.
To select the parent or child element:
1. In the Animation Tools toolbar, select the Transform tool, select Tools > Animation Tools >
Transform or press [7].
2. In the Camera or Timeline view, select an element that is attached to a hierarchy.
3. Select Element > Arrange > Select Parent.
The selection changes to the parent of the selected element.
4. Once a parent peg is selected, select Element > Arrange > Select Child to select its child.
To select all children of an element:
1. In the Animation Tools toolbar, select the Transform tool, select Tools > Animation Tools >
Transform or press [7].

Chapter 13: Animating a Puppet Creating a Simple Cut-out Animation
406
2. In the Camera or Timeline view, select an element which is part of a hierarchy and is a parent of otherelements.
3. Select Element > Arrange > Select Children.
The selection changes to select all the elements that are attached to the selected parent element.
Selecting Brother ElementsElements that are on the same hierarchy level are called brothers.
To select previous and next brother:
1. In the Animation Tools toolbar, select the Transform tool, select Tools > Animation Tools >
Transform or press [7].
2. In the Camera or Timeline view, select an element that is part of a hierarchy.
3. Select Element > Arrange > Select Previous Brother or Select Next Brother.

Toon Boom Studio 8.1 User Guide
407
This option selects the previous or next brother of the selected element. Previous brother is the onesituated a level higher, while the next brother is the one situated a level lower in the Timeline view order.
Using the Different Animation ToolsThe animation tool you use determines the kind of keyframe you create. In the Timeline view, each of thesekeyframe types are displayed differently.
• Transform Tool
Creates a keyframe for motion, scale, rotation and skew values at once.
• Motion Tool
Creates a keyframe for the position values only.
• Rotate Tool
Creates a keyframe for the angle values only.
• Skew Tool
Creates a keyframe for the skew values only.
• Scale Tool
Creates a keyframe for the horizontal and vertical scale values only.
Using the Transform ToolUse the Transform tool to create a keyframes for position, scale, rotation and skew values simultaneously.

Chapter 13: Animating a Puppet Creating a Simple Cut-out Animation
408
To use the Transform tool:
1. In the AnimationTools toolbar, select the Transform tool, select Tools > AnimationTools >
Transform or press [7].
2. In the Camera or Timeline view, select the element you want to transform.
3. Use one of the bounding box handles to transform your element.
‣ Hold down the [Shift] key as you scale to keep the ratio when using the corner handles.
‣ Holding down the [Shift] key as you rotate, locks the rotation every 15 degrees.
Using the Motion ToolUse theMotion tool to create a keyframe for the position value.
To use the Motion tool:
1. In the AnimationTools toolbar, select theMotion tool, select Tools > Animation Tools > Motion or
press [0].
2. In the Camera or Timeline view, select the element you wish to reposition and drag it to the new position.
‣ Hold down the [Shift] key as you reposition your element to temporarily display a guide showing youthe starting position and the path of themotion you are creating.
Using the Rotate ToolUse the Rotate tool to create a keyframe for the rotation angle value.

Toon Boom Studio 8.1 User Guide
409
To use the Rotate tool:
1. In the AnimationTools toolbar, select the Rotate tool or select Tools > Animation Tools > Rotate.
2. In the Camera or Timeline view, select the element you want to rotate.
3. Use the rotation handle to rotate your element.
As you rotate your element an angle guide appears, displaying the rotation angle you are creating.
‣ Holding down the [Shift] key as you rotate, locks the rotation every 15 degrees.
Using the Skew ToolUse the Skew tool to create a keyframe for the skew value.
To use the Skew tool:
1. In the Animation Tools toolbar, select the Skew tool or select Tools > Animation Tools > Skew.

Chapter 13: Animating a Puppet Creating a Simple Cut-out Animation
410
2. In the Camera or Timeline view, select the element you want to skew.
3. Use the handles to skew your element.
Using the Scale ToolUse the Scale tool to create a keyframe for the scaling value.
To use the Scale tool:
1. In the Animation Tools toolbar, select the Scale tool, select Tools > Animation Tools > Scale or
press [9].
2. In the Camera or Timeline view, select the element you wish to resize.
3. Use the handles to resize your element.
‣ Hold down the [Shift] key as you scale to keep the ratio when using the corner handles.

Toon Boom Studio 8.1 User Guide
411
Using the Select ToolUse the Select tool to position, scale, rotate and skew your elements without creating a keyframe.
To use the Select tool:
1. In the Animation Tools toolbar, select the Select tool, select Tools > Animation Tools > Select or
press [6].
2. In the Camera or Timeline view, select the element you wish to transformwithout creating a keyframe.
3. Use one of the bounding box handles to transform your element.
‣ Hold down the [Shift] key as you scale to keep the ratio when using the corner handles.
‣ Holding down the [Shift] key as you rotate, locks the rotation every 15 degrees.
Adjusting the VelocityThe velocity, or ease-in ease-out, is used on non-constant segments to create a more natural movement.
Ease-in and ease-out is the acceleration and deceleration of the movement. The speed of the motionis adjusted between two keyframes so that the movement starts slowly, speeds up and then slows

Chapter 13: Animating a Puppet Creating a Simple Cut-out Animation
412
down again as it reaches the second keyframe. Adjusting the velocity creates a more natural feel tothe movement.
To adjust the velocity of a movement:
1. In the Animation Tools toolbar, select one of the animation tools, selectTools > Animation Tools > the desired tool, or use the desired tool keyboard shortcut.
2. In the Camera or Timeline view, select the animated element of which you want to adjust the velocity.
The selected element's properties appear in the Properties view.
3. In the Properties view, click the Edit Velocity button.
The Function Editor view opens.
4. In the drop-downmenu, select themovement for which you want to adjust the velocity.
The curve corresponding to the selected movement is displayed.

Toon Boom Studio 8.1 User Guide
413
5. Adjust your curve:
‣ Click on a keyframe to select it.
‣ Drag the handle to adjust the curve.
‣ Repeat Step 3 and Step 4 for each keyframe.
You can also use the default curve options to quickly adjust your velocity.
‣ Click on the Curve icon to open the drop-downmenu and select the desired velocity option.

Chapter 13: Animating a Puppet Creating a Simple Cut-out Animation
414
• Constant: Changes a non-constant segment to a constant segment, and removes the automatic
motion tweening created by Toon Boom Studio.
• Linear: Creates a straight line of constant speed for a more automated animation look.
• Ease in/out: Creates an acceleration effect at the beginning of the curve, speeding upmiddle and
slowing down at the end of the curve. This creates a more natural animation look.
• Fast in/out: Creates a curve that starts quickly, slows down in the middle and ends with a final
acceleration.
• Extreme ease in/out: Creates a more dramatic ease in, ease out effect.
• Extreme fast in/out: Creates a more dramatic fast in, fast out effect.
• Slow acceleration: Creates a curve that starts slowly to smoothly accelerate over time.
• Slow deceleration: Creates a curve that starts quickly to smoothly decelerate over time.
Refer to the Discovering the Interface on page 55 chapter to learn more about customizing yourworkspace and adding views.
Refer to the Setting the Scene on page 277 chapter to learn more about the Function Editor view.

Toon Boom Studio 8.1 User Guide
415
Using the Onion Skin in Cut-out Animation
You can use theOnion Skin option to display the previous three and the next three drawings of your character asyou animate your puppet. Being able to refer to these poses helps you accurately determine the size, angle orposition of the drawing you are working on.
By default the onion skin is displayed as the element's shape in washed-out colours. Green represents theprevious frames and red represents the next frames.
To enable the Onion Skin option:
1. In theOnion Skin toolbar (Top toolbar onMacOS X), click theOnion Skin button or select
View > Onion Skin > Turn On Onion Skin—seeCustomizing Toolbars onMacOS X on page 73.
2. Select the range of previous and next frames to be displayed in theOnion Skin. Click and hold thePrevious and theNext onion skin buttons to open each drop-downmenu and select the desired option.You can also select View > Onion Skin > and one of the following choices:
‣ No Previous Drawing: Does not display the content of the previous frames.
‣ Previous Drawing: Displays the content of the previous frame.
‣ Previous Two Drawings: Displays the content of the two previous frames.

Chapter 13: Animating a Puppet Creating a Simple Cut-out Animation
416
‣ Previous Three Drawings: Displays the content of the three previous frames.
‣ NoNext Drawing: Does not display the content of the previous frames.
‣ Next Drawing: Displays the content of the next frame.
‣ Next Two Drawings: Displays the content of the two previous frames.
‣ Next Three Drawings: Displays the content of the three previous frames.
Refer to Traditional Digital Animation on page 233 - Preferences on page 255 to know how tocustomize the display options of the Onion Skin.
Swapping Images
If your puppet contains extra drawings, such as extra heads, mouths, eyes or hands, you can use the imageswapping trick to animate your puppet.
For example, if your puppet contains extra drawings of eyes, such as an open eye, a half-closed eye and a closedeye, you can easily animate a blink.
To create a blinking eye with image swapping:
1. Use a tool from the Animation Tools toolbar. You can also select Tools > Animation Tools > the desiredtool.
2. In the Camera or Timeline view, select the eye.
3. In the Timeline view, select the frame at which you want the puppet to start closing its eye.

Toon Boom Studio 8.1 User Guide
417
4. In the Cells view, use the swapper slider to select the half-closed eye drawing.
The selected drawing displays in the preview area, and the exposure is updated automatically in theTimeline view.
5. In the Timeline view, select two frames later.
6. In the Cells view, use the swapper slider to select the closed eye drawing.
7. To change back to the open eye, repeat Step 5 and Step 6.

Chapter 13: Animating a Puppet Preferences
418
PreferencesIn Toon Boom Studio, you can set your own preferences to fit your cut-out animation work style.
To open the Preferences panel:
‣ Windows: Select Edit > Preferences.
‣ MacOS X: Select Toon Boom Studio 8.0 > Preferences.
Sceneplanning Tab PreferencesSelect the Sceneplanning tab to customize the preferences relative to cut-out animation.
Create Linear SplineWhen you animate an element with a motion, rotation or scaling, the velocity is set to Linear by default. Thismeans that themotion tweening executed by Toon Boom Studio is straight with no variation in the speed.
You can turn off this option by deselecting the Create Linear Spline box, so that every time you create a motion,rotation or scaling, the velocity is set to the default ease-in, ease-out curve.
Refer to the Adjusting the Velocity on page 411 topic to learn more about velocity and ease-in,ease-out concept.
Create Constant KeyframesBy default, the Create Constant Keyframes is disabled. When you create a motion, a non-constant segment iscreated between every two keyframes and themotion tweening is automatically calculated by Toon BoomStudio.

Toon Boom Studio 8.1 User Guide
419
You can create constant keyframes by selecting the Create Constant Keyframes option. Every time you create amotion, the segments between the keyframes are automatically constant segments. No motion tweening iscalculated and the position jumps from one to another at each keyframe.

Toon Boom Studio 8.1 User Guide
420

Toon Boom Studio 8.1 User Guide
421
Chapter 14: Sound and Lip-sync
With Studio, you can import soundtracks and dialogue into your animation to make it more engaging andentertaining. Studio has many sound editing features to help you work with soundtracks and dialogue.
Studio can automatically analyze voice tracks to determine which of the eight animation phonemes (mouthshapes) is optimal for each frame of the sound. You can then easily draw mouth shapes for your characterfollowing the useful mouth chart that the software automatically generates. Furthermore, Studio can alsoautomatically apply drawings of mouth shapes to each frame of your animation based on themouth chart.
In this chapter, you will learn about the following:
• Accessing the Sound and Lip-sync Tools on the next page
• Importing a Sound File on page 424
• Sound Display on page 425
• Sound Playback on page 428
• Sound Scrubbing in the Timeline View on page 429
• Editing a Sound File on page 430
• Adding an Empty Sound Layer on page 441
• Lip-sync on page 442

Chapter 14: Sound and Lip-sync Accessing the Sound and Lip-sync Tools
422
Accessing the Sound and Lip-sync ToolsBefore you can import sounds and add sync them to a character`s mouth, you will need to know how to accessthe sound and lip-sync tools. There are three tools you can use:
Lip-sync View: The Lip-sync view is where you can create andmapmouth charts, as well as import
mouth templates for your characters. To open the Lip-syncview:Select a sound layer from the Timeline view or a cell in the Exposure Sheet view.Do one of the

Toon Boom Studio 8.1 User Guide
423
following:From the Sound toolbar (Top toolbar on MacOS X), click the Lip-sync button.In the
Properties panel, click the Lip-sync button.
Sound Element Editor: The Sound Element Editor is where you edit sounds that were created outside
of Studio and imported into your scene.
Import Sound: Lets you locate and select sound files to import.
Sound ToolbarThe Sound toolbar lets you access the Lip-sync view, Sound Element Editor view, and import sound. The Soundtoolbar is located at the top of the screen in Studio.
Sound Layer PropertiesOnce you have imported a sound file, you can easily access the Sound element editor and Lip-sync views fromlayer properties.
Related Topics
• Modifying the Lip-sync Detection on page 449 on page 443
• Sound Element Editor on page 430

Chapter 14: Sound and Lip-sync Importing a Sound File
424
Importing a Sound FileWhen you decide that you want to add sound to your movie, youmust prepare this sound outside of Toon BoomStudio. Then, in Studio, you add a Sound element to organize sound files in your animation.
A sound will play in themovie until it reaches the end of the file or a stop frame created in the Sound ElementEditor. If the sound extends into multiple scenes, it will continue to play.
You can import as many sound files as you like. However, if you will be delivering your movies over the Internet,themore sounds you add, the larger the file size of your final movie.
Toon Boom Studio imports, exports and plays sounds using QuickTime. Studio only supports the sound formatsrecognized byQt®, with one exception: Flash ADPCM format, which is supported natively.
To import a sound file:
1. Do one of the following:
‣ From the Sound toolbar (Top toolbar onMacOS X), click the Import Sound button—see
Customizing Toolbars onMacOS X on page 73.
‣ From the top menu, select File > Import File.
‣ In the Exposure Sheet view, right-click on any cell and select Import Sound File.
‣ In the Timeline view, click on theAddNew Elements button. In the dialog box, select the Sound type,name the layer and click onOK. In the Properties view, click on the Import Sound File button.
‣ In the Exposure Sheet view, in the top toolbar, click on the Sound button. In the Properties view, clickon the Import Sound File button.
TheOpen dialog box displays.
2. From theOpen dialog box, browse for your sound file (*.aiff, *.mp3, *.wav, or *.m4a) and click Open.
The sound layer appears in the Timeline view and is displayed as a waveform. The sound file also appearsin Exposure Sheet view.

Toon Boom Studio 8.1 User Guide
425
Sound DisplayOnce you import a sound file into your project, there aremany ways to display it in the Exposure Sheet orTimeline view. You can use the waveform as a guide to synchronize a certain sound peak to an action in youranimation, or the Lip-syncmouth display to help you with your lip-sync animation.
Sound Display - Exposure Sheet ViewThe sound file can be displayed in four different ways in the Exposure Sheet view: by name, waveform, lip-syncmouth shapes or lip-sync thumbnails.
Sound Name
By default, the sound is displayed showing the name of the sound file and the file format. For example, Line1.wav.
A numbered exposure appears in each frame for the entire length of the sound file. Whenever there are no othersound display options enabled, this is how the sound columnwill look.
Waveform
Sound can be displayed vertically, divided into cells. A waveform represents the sound as it rises and falls involume, silence is shown as a straight line. Notice that the volume increases as the size of the waveformincreases. You can use the size of the waveform as a guide to sync the sound effect with the action in your scene.
To display the waveform:
‣ In the Exposure Sheet View toolbar, click the Thumbnail button.

Chapter 14: Sound and Lip-sync Sound Display
426
Lip-sync Mouth Shapes - Name
You can display a sound file by letter or name, depending on the way you label the character's mouth positions,in the column's frames. Only onemouth position is allotted per frame and this position should correspond to thesound file after lip-sync detection is performed.
To turn on the mouth shapes display:
‣ In the Exposure Sheet view, right-click (Windows) or [Ctrl] + click (MacOS X) on a cell of the soundcolumn and select Show Lip-sync.
Lip-sync Mouth - Thumbnails
You can display a sound file by letter or name, depending on the way you label a character's mouth positions inthe column's frames, and as a thumbnail of themouth shape.
To turn on the mouth shapes thumbnails display:
‣ Click the Thumbnail button. The Show Lip-sync optionmust already be enabled in the Exposure
Sheet View toolbar.
Refer to Lip-sync on page 442 to learn more about the lip-sync detection.
Sound Display - Timeline ViewBy default, the waveform of your sound file is displayed in the Timeline view, but you can choose to show or hideit.

Toon Boom Studio 8.1 User Guide
427
To show or hide the waveform:
1. If the waveform is visible, select View > Hide Waveform.
2. If the waveform is hidden, select View > Show Waveform.

Chapter 14: Sound and Lip-sync Sound Playback
428
Sound PlaybackThere are two ways you can play back sound in a project. You can play your animation and the sound, or playonly the sound.
Playing the Sound and AnimationBefore attempting to play back a sound, make sure the Sound Playback option is enabled.
To enable or disable the Sound Playback option:
‣ In the top menu, select Play > Turn On Sound Playback to enable the option.
‣ In the top menu, select Play > Turn Off Sound Playback to disable the option.
You can then play your scene as usual using the Playback toolbar controls and the sound will play as well.
Playing Only the SoundWhen you only play the sound, it is played for the entire length of the currently exposed sound. Unlike the regularplayback option, playing only the sound does not restrict your playback to exposed drawing cells.
To play back only the sound:
1. In the Exposure Sheet view, right-click (Windows) or [Ctrl] + click (MacOS X) in the sound column's cell atthe point you want to start the playback, and select Play.

Toon Boom Studio 8.1 User Guide
429
Sound Scrubbing in the Timeline ViewStudio uses a process known as sound scrubbing. This lets you hear the sound in real time as youmove theplayback pointer forwards or backwards along the waveform. This is extremely useful for fine-tuning the lip-synching or sound synchronisation. You can scrub sounds in the Timeline view.
To scrub a sound in the Timeline view:
1. Select Play > Turn On Sound Playback.
2. Select Play > Turn On Sound Scrubbing.
3. At the top of the Timeline view, drag the red framemarker left or right along the waveform to hear thesound at each frame.
If you require finer control over the sound scrubbing, you can also enable Sound Scrubbing in theSound Element Editor—see Editing a Sound File on the next page.

Chapter 14: Sound and Lip-sync Editing a Sound File
430
Editing a Sound FileNow that you have successfully imported your sound file into Studio, it is time to familiarize yourself with thesound editing interface.
Sound Element EditorThe Sound Element Editor is where you edit sounds that were created outside of Studio and imported into yourscene.
The Sound Element Editor consists of threemain panels.
1. Sound Element - The waveform in the top Sound Element window is the actual sample that will be heardwhen the final movie is rendered. It may be shorter than the original sound sample due to length of thescene. If any edits aremade to the sound sample, they can be heard here.
2. Current Sound - The Current Sound window displays the original sound file in its entirety. This is alsowhere you can edit its properties. This window remains empty until you click inside the Sound Elementwindow.
3. Lip-sync Preview - You can preview the automated detection and manually insert different mouthpositions to correspond with the sound sample—see Lip-sync on page 442.
You can do the following in the Sound Element Editor:
• Changing the Start or End Frame of a Sound on the facing page
• Trimming a Sound File on page 433
• Looping a Sound on page 434
• Mixing the Sound Volume on page 435
• Custom Playback Range on page 437

Toon Boom Studio 8.1 User Guide
431
• Changing from Event to Streamed Sounds on page 437
• Sound Scrubbing in the Sound Element Editor on page 439
• Deleting a Sound on page 439
• Recomputing theMouth Chart on page 450
To open the Sound Element Editor:
1. In the Timeline or Exposure Sheet view, select the sound element you want to edit and do one of thefollowing:
‣ In the Sound toolbar or Properties panel, click the Edit Sound button.
‣ Click the Timeline View menu and select Edit Sound.
‣ From the top menu, select Element > Edit Sound.
‣ Right-click in the Timeline Sound layer or on the Exposure Sheet view sound column and select EditSound.
The Sound Element Editor opens.
Changing the Start or End Frame of a SoundTo synchronize the sound with specific images in your scene, youmust set a start frame for your sound. To makesure the sound ends at a specific frame, youmust set an end frame.
To change the start frame or the end frame of a sound:
1. In the Timeline or Exposure Sheet view, select the Sound element you want to edit.
2. In the Sound toolbar or Properties panel, click the Edit Sound button.

Chapter 14: Sound and Lip-sync Editing a Sound File
432
The Sound Element Editor opens.
3. Select a sound sample from the Sound Element panel. To distinguish one sound section from another onthe same sound layer, check the frame numbers that appear on the tabs beside the start and stop lines ofeach waveform section.
4. In the Current Sound panel, click the Play button (only the selected sound plays).
5. In the Sound Element panel, drag the selected clip to the frame number where you want it to start playing.
You can only move the clip to a section that does not already contain a clip; you cannot overlap twoclips in the same element.
6. To change the end frame, drag the yellow marker at the end of the waveform to the frame position whereyou want it to stop playing.
7. To hear how all of the clips fit together in the element, click Play in the Sound Element panel.

Toon Boom Studio 8.1 User Guide
433
8. In the Current Sound panel, click the Play button if you want to hear only the selected clip.
9. Click OK.
The Exposure Sheet and Timeline views display the sound clip at the start frame you selected.
Trimming a Sound FileTo play only a section of a sound file, use the Sound Element Editor to select the part you want to use. Forexample, if there extraneous noise at the start of the sound, you can use the Sound Element Editor to edit outthe noise.
The Sound Element Editor does not change the original sound file; it only plays a section of it, ignoring the rest.The complete sound file is still kept in the project. This means that the entire sound file is included on export. Ifyou need to consider restrictions in file size, it is better to completely edit the sound files in a third party soundeditor before bringing them into Studio.
To trim the start and end of a sound file:
1. In the Timeline or Exposure Sheet view, select the Sound element you want to edit.
2. In the Sound toolbar or Properties panel, click the Edit Sound button.
The Sound Element Editor opens.
3. Select a sound from the Sound Element panel. To distinguish one sound section from another on the samesound layer, check the frame numbers that appear on the tabs beside the start and stop lines of eachwaveform section.
4. In the Current Sound panel, click the Play button (only the selected sound plays).

Chapter 14: Sound and Lip-sync Editing a Sound File
434
5. Using the Current Sound panel, you can decide which part of the file you want to play by dragging the leftand right boundaries of the selection area.
6. In the Current Sound panel, click the Play button to play the trimmed sound and check that you have
trimmed the sections correctly. Use the Zoom slider at the bottom of the panel to zoom in on thewaveform so you can trim it more accurately.
7. Once you are sure that the sound is trimmed correctly, click OK.
The trimmed sound sample appears in both the Timeline and Xsheet Views at the start and end positionsthat you selected.
Looping a SoundTo repeat a sound, you need to specify, in the Sound Element Editor the number of times that you want it toloop.
To loop a sound sample:
1. In the Timeline or Exposure Sheet view, select the Sound element you want to loop.
2. In the Sound toolbar or Properties panel, click the Edit Sound button.
The Sound Element Editor opens.
3. From the Sound Element panel, select the sound section you want to loop.

Toon Boom Studio 8.1 User Guide
435
4. In the Current Sound panel, type the number of times you want the sound to play in the Number of Loopsfield.
5. Press the [Return] key.
The looped sound appears after the current sound and is represented by grey waveforms, as opposed toblack.
When you loop a sound, the looped sections fill the cells in the Sound element (column or layer) until thenext sound sample starts or until the scene ends. This means that the looping could effectively get cut ifthe next sound sample starts too soon or if the scene ends too quickly.
Mixing the Sound VolumeYou can adjust the volume of an entire sound clip or modify the volume in increments by adjusting the fade-in andfade-out times. The fade edit only affects the playback; the original sound file is not affected.
To adjust the overall volume of the entire sound clip:
1. In the Timeline or Exposure Sheet view, select the Sound element you want to loop.
2. In the Sound toolbar or Properties panel, click the Edit Sound button.
The Sound Element Editor opens.
3. In the Sound Element panel, select the sound that you want to work on.
An expanded version of the selected sound showing more detail appears in the Current Sound panel.

Chapter 14: Sound and Lip-sync Editing a Sound File
436
4. In the Current Sound panel, use the Volume slider to adjust the volume.
5. In the Current Sound panel, click the Play button to verify the volume.
To create a fade in/out effect on a sound clip:
1. In the Timeline or Exposure Sheet view, select the Sound element you want to edit.
2. In the Sound toolbar or Properties panel, click the Edit Sound button.
The Sound Element Editor opens.
3. In the Sound Element panel, select the sound that you want to work on.
4. In the Current Sound panel, click the thin blue line above the waveform to add a volume control point.

Toon Boom Studio 8.1 User Guide
437
5. Drag the control point to adjust the volume and to create the time of the transition. The line from theedge of the clip to the control point identifies how the volume increases (fades-in) or decreases (fades-out) over time.
Dragging the control point to the bottom of the channel will mute the volume, while dragging it upwardswill increase the volume. To create an even effect, be sure to adjust the control points uniformly in boththe left and right (bottom and top) channels.
6. In the Current Sound panel, click the Play button to check the fade.
Custom Playback RangeTo hear a specific section of the sound element, adjust the playback range in the Sound Element Editor to startor stop at specific frames. This custom playback range does not affect the actual sound in the Sound element.
To change the playback range in the Sound Element Editor dialog box:
1. In the Sound Element Editor, drag the start or end rangemarkers in the Sound Element panel to theboundary frames you want.
2. In the Sound Editor Element panel, click the Play button to play only the sound between the two
markers.
Changing from Event to Streamed SoundsYou can set up your sounds to be either streamed or event sounds when they are exported to the Adobe®Flash® format.

Chapter 14: Sound and Lip-sync Editing a Sound File
438
Refer to Exporting Your Project on page 523 to learn more about exporting your movie and exportformats.
There are two major distinctions between event and stream sounds in the Adobe® Flash® file:
• Downloading
• Event sounds are downloaded by the Adobe® Flash® player before they play.
• Event sounds are reusable. Once downloaded, the Adobe® Flash® player can play the soundrepeatedly without downloading it again. This is not possible with streamed sound.
• Streamed sound plays as it arrives.
• Streamed sound samples are broken into small bits and inserted between the video frame. This allowsthe Adobe® Flash® player to start to play before receiving the full sound track which is helpful for along sound track (like background music).
• Synchronization
• Streamed sounds are kept synchronized with the video by the Adobe® Flash® player. The playerdrops frames if necessary to keep up with the sound.
• Event sounds are not synchronized with video. After a while, an event sound may fall out of sync withthe video.
By default, the sounds are set to Event, but because streamed sounds aremore likely to be synchronized withthe images in your animation, lip sync sounds and sound effects should be set to stream. If you set more than onesound to stream, they will bemixed together and exported as one streamed sound.
To stream the sounds in an element:
1. In the Timeline or Exposure Sheet view, select the Sound element you want to edit.
2. In the Sound toolbar or Properties panel, click the Edit Sound button.
The Sound Element Editor opens.
3. In the Sound Element panel, select the sound youwant to work on.
4. Select the Streamed option.

Toon Boom Studio 8.1 User Guide
439
This turns streaming on or off. If the Streamed option is not selected, the sound is set as an eventsound.
Sound Scrubbing in the Sound Element EditorStudio uses a process known as sound scrubbing. This lets you hear the sound in real time as you move the playbackpointer forwards or backwards along the waveform. This is extremely useful if you have to fine tune the lip-syncing orsound synchronisation You can scrub sounds in the Sound Element Editor.
To scrub a sound from the Sound Element Editor:
1. In the Timeline or Exposure Sheet view, select the Sound element you want to edit.
2. In the Sound toolbar or Properties panel, click the Edit Sound button.
The Sound Element Editor opens.
3. In the Sound Element panel, select the waveform youwant to scrub.
4. Below the Current Sound panel, select the Enable Scrubbing option. This option sets the red markers inscrub mode.
5. Drag the red playback marker left and right to hear the sound in sound scrubbing.
Deleting a SoundYou can delete a sound in the Sound Element Editor.
To delete a sound:
1. In the Timeline or Exposure Sheet view, select the Sound element you want to remove the sound file from.
2. In the Sound toolbar or Properties panel, click the Edit Sound button.
The Sound Element Editor opens.

Chapter 14: Sound and Lip-sync Editing a Sound File
440
3. In the Sound Element panel, select the sound youwant to delete.
4. To distinguish one sound section from another on the same sound layer, check the frame numbers thatappear on the tabs beside the start and stop lines of each waveform section.
5. Click Delete.
The Sound is removed from the Exposure Sheet and Timeline views.

Toon Boom Studio 8.1 User Guide
441
Adding an Empty Sound LayerWhen performing sound editing tasks, it can be useful to chop up a sound sample into different layers. Forexample, when performing a lip-sync, only a single view of the various mouth positions for a character can existon one layer. Therefore, if you want your character to turn its head from a profile view to a three-quarter viewand havemouth position changes to fit with the sound sample from these two different views, you would need tocut-up the sound samples needed for the profile view mouth positions on one layer and the sound samplesneeded for the three-quarter view on another. For this task, you will need an empty sound layer.
To add an empty sound layer:
‣ In the Exposure Sheet view, click the Add Sound button in the Exposure Sheet View toolbar or
select Add> Sound from the Exposure Sheet view contextual menu.
‣ In the Timeline view, select New > Sound from the Timeline view contextual menu.
‣ Select Element > Add > Sound.
An empty sound element appears in the Exposure Sheet and Timeline view.

Chapter 14: Sound and Lip-sync Lip-sync
442
Lip-sync
Adding a lip-sync to a project can really enhance its quality and storytelling. However, it can be difficult to shapea character's mouth so it matches the sound at the precise frame. To solve this problem, Studio provides a lip-sync feature which analyzes the content of a sound element and generates a mouth chart based (see below) onthe eight animation phonemes (A, B, C, D, E, F, G, and X, which is used to represent silence). You can lip-sync thetraditional way or let the Studio automatically create the basic detection.
Themouth shapes used by Studio are based on the conventional mouth chart used in the animation industry. Theletters used to represent the shapes doNOT correspond to an actual sound.
Here is an approximation of which sound eachmouth shape can produce:
Mouth ShapeApproximate sound themouth shapematches to
A b, m, p
B d, h, i, j, k, s
C a, e
D A, E
E o
F oo, u
G f, ph
X Silence, undetermined sound

Toon Boom Studio 8.1 User Guide
443
You can refer to themouth chart positions as you draw the shape of your character's mouth.
This section explains:
• Modifying the Lip-sync Detection on page 449 below
• Creating a Lip-sync Using a Mouth Template on the next page
• Creating a Lip-Sync Using Your OwnDrawings on page 446
• Lip-sync on the previous page
• Automatic Lip-sync Detection on page 448
• Modifying the Lip-sync Detection on page 449

Chapter 14: Sound and Lip-sync Lip-sync
444
Lip-sync ViewThe Lip-sync view is where you can create and mapmouth charts, as well as import mouth templates for yourcharacters.
To open the Lip-sync view:
1. Select a sound layer from the Timeline view or a cell in the Exposure Sheet view.
2. Do one of the following:
‣ From the Sound toolbar (Top toolbar onMacOS X), click the Lip-sync button.
‣ In the Properties panel, click the Lip-sync button.
Creating a Lip-sync Using a Mouth TemplateStudio comes with a variety of mouth templates that you can play and experiment with on your characters. Youcan create a lip-sync and use an existing sound layer or create the lip-sync and then import the sound.
To create a lip-sync using a mouth template:
1. From the Sound toolbar, click the Lip-sync button (Top toolbar onMacOS X).

Toon Boom Studio 8.1 User Guide
445
2. Do one of the following to add sound:
‣ Click the Import Sound button. From theOpen dialog box, select a sound file and click Open.
‣ From the Sound list, select a sound file you have already imported.
3. If needed, edit the sound by clicking the Edit Sound button and making any adjustments inthe Sound Element Editor.
4. Click the Import Template button.
The template dialog box opens to display themouth templates.
5. Select a mouth template and click OK.
In the Timeline view, a Drawing layer is created containing eight mouth drawings.
6. In the Lip-Sync view, click Apply to generate the lip-sync with the sound file.
Themouth shapes are synced with the sound file.
7. In the Drawing view, use the Select tool in the Animation Tools toolbar to scale themouth drawings
on the layer.
8. In the Camera view, place themouth at the correct location on your character.

Chapter 14: Sound and Lip-sync Lip-sync
446
Creating a Lip-Sync Using Your Own DrawingsYou can use your own drawings to generate a lip-sync.
To create a lip-sync using your own drawings:
1. In the Timeline view, select the drawing layer that contains your eight mouth drawings.
2. From the Sound toolbar (Top toolbar onMacOS X), click the Lip-sync button.
The Lip-sync view displays. Your eight mouth drawings are automatically mapped with the animationphonemes.
3. Do one of the following to add sound:
‣ Click the Import Sound button. From theOpen dialog box, select a sound file and click Open.
‣ From the Sound list, select a sound file you have previously imported.
4. If needed, edit the sound by clicking the Edit Sound button and making any adjustments in theSound Element Editor.
5. If needed, you can adjust themouthmapping by clicking the Previous Drawing and Next Drawing arrowsbeside any of themouths.

Toon Boom Studio 8.1 User Guide
447
6. Click Apply to generate the lip-sync with the sound file.
Themouth shapes are synced with the sound file.
Lip-sync DetectionYou can detect the lip-sync for a sound in the Exposure Sheet view or Sound Element Editor.
To detect lip-sync for a sound in the Exposure Sheet view:
1. In the Exposure Sheet view, right-click on a cell of the sound column and select Show Lip-sync.
Studio analyzes the selected sound clips and assigns a lip-sync letter to each sound cell. The number ineach frame is replaced by a letter that represents themouth shape.
You can enable the Thumbnails display option to show a preview image of the mouth shape. Onceyou enable the Show Lip-sync option, click the Thumbnail button in the Exposure Sheet View
toolbar.
To detect lip-sync for a sound using the Sound Element Editor:
1. In the Timeline or Exposure Sheet view, select the Sound element fromwhich you want to generate a chartof mouth shapes.
2. In the Sound toolbar or Properties panel, click the Edit Sound button.
The Sound Element Editor opens.
3. In the Sound Element panel, select the waveform fromwhich you want to generate themouth chart andclick Lip-sync.
A progress bar appears as Studio analyzes the selected sound clips and assigns a lip-sync letter to eachsound cell.
4. Click the Play button to hear the sound clip.

Chapter 14: Sound and Lip-sync Lip-sync
448
The Lip-sync Preview area shows a preview of the result.
Automatic Lip-sync DetectionStudio can automatically map drawings in an element to themouth chart you have generated for a sound usingthe Lip-sync button in the Sound Element Editor dialog box. This can save timewhen lip-syncing a voice track.
This means that in the Lip-SyncMapping dialog box, you can identify each lip drawing of a character mouthelement. Studio then automatically labels all of the cells in the character's element with the appropriate name.
To automatically map lip-sync drawings to a mouth chart:
1. In the Exposure Sheet view, right-clickon the header of the sound element was already lip-synced andselectModify Lip-syncMapping.
The Lip-SyncMapping dialog box opens.
‣ Source element: The Sound element fromwhich the lip-syncmapping will be based.
‣ Destination element: Lets you select the element that contains themouth shapes of your character.
‣ Mapping: In this section, type the destination drawing name in each field corresponding to themouthphoneme that the thumbnail on the left represents. If your drawings are already named using thestandard phoneme letters, you do not need to change anything.
2. Click OK.
3. Click the Play button in the Playback toolbar to see and hear the results in the Camera view.

Toon Boom Studio 8.1 User Guide
449
4. To play back your scene with sound, enable the sound if you not already done so. From the topmenu,select Play > Turn On Sound Playback.
Modifying the Lip-sync DetectionIf you think that another position would bemore appropriate, you can change themouth position that has beenassigned to a frame.
For example, youmay have a character who remains silent for ten frames between two speeches. Studio wouldnormally assign an X image to the silence. However, if you want your character's mouth to hang open inastonishment for these ten frames, you can change the lip assignment for these frames from an X to an E.
You canmodify the lip-sync from the Exposure Sheet view or Sound Element Editor.
Modifying the Lip-sync in the Exposure Sheet ViewTo change the lip assignment of a sound in the Exposure Sheet:
1. In the Exposure Sheet view, right-click in the cell that contains themouth position you want to change.
2. Select Lip-sync > A, B, C, D, E, F, G or X. Choose the letter that reflects themouth position you want touse for that sound.
The drawing automatically updates in the Exposure Sheet and Timeline view.
Modifying the Lip-sync in the Sound Element EditorTo change the mouth position assignment of a sound in the Sound Element Editor:
1. In the Timeline or Exposure Sheet view, select the Sound element with the lip-sync you want to modify.
2. In the Sound toolbar or Properties panel, click the Edit Sound button.
3. In the Sound Element panel, drag the red frame slider to the framewith themouth position you want tochange.
4.

Chapter 14: Sound and Lip-sync Lip-sync
450
In the Lip-sync image area, the image on top represents the lip position currently assigned to the frame.
5. To change the image assigned to the frame, select a mouth position below the preview image.
The preview image changes to themouth position image you selected. The position is also updated in theExposure Sheet and Timeline views.
Recomputing the Mouth Chart
Recomputing the mouth chart erases any manual modifications you made to the mouth assignmentsin the mouth chart.
When you generate themouth chart for a sound in a sound element, you can either accept themouth positionsassigned by Studio or assign your own lip-sync images.
However, if you change the sound's start frame, edit it or reassign its mouth position afterwards, youmustreanalyze the sound, and regenerate themouth chart for it.
To recompute the mouth chart for a selected sound in the Exposure Sheet:
Remember that recomputing erases modifications (see warning above).
1. In a Sound column in the Exposure Sheet, right-click on a cell that contains the sound file you want torecompute and select Recompute Lip-sync.
Themouth position assignment for each frame is recomputed, erasing anymodifications youmade.
To recompute the mouth chart for a selected sound in the Sound Element Editor:
Remember that recomputing erases modifications (see warning above).
1. In the Timeline or Exposure Sheet view, select the Sound element.
2. In the Sound toolbar or Properties panel, click the Edit Sound button.
The Sound Element Editor opens.
3. In the Sound Element panel, select a waveform to recompute and click Lip-sync.

Toon Boom Studio 8.1 User Guide
451
Chapter 15: Stop-motion Animation
Stop-motion animation has been around since animators first realized that all it took was a nudge to a clayfigure, puppet or object and then taking a series of snapshots to produce the illusion of motion. In this digitalage, the process has only become easier and more fun as it is now possible to mix in 2D animation.
Toon Boom Studio has an integrated image capture feature. An intuitive and easy-to-use image capture window,which allows you to set up and capture all your images. It is as easy as plugging in your recording device — be it adigital, video or web camera, fixing the settings in the software, keying out the background and taking thesnapshots.
This chapter is divided into the following sections:
• Characters and Stage on the next page
• Image Capture Settings on page 454
• Light Table and Onion Skin on page 455
• Colour Keying on page 458
• Image Capture on page 460
• Vectorization and Clean-up on page 463

Chapter 15: Stop-motion Animation Characters and Stage
452
Characters and StageBefore you begin, it is important to gather the characters that you intend to use and set up a stage onwhich torecord your stop-motion animation.
Gathering Your Characters
When deciding on characters, it is best to look for or create figures that have ball and socket joints for full rotarymovement. Just like a cut-out puppet, you want to be able to move your principal character at the shoulders,legs, knees and elbows if possible. If you choose to create or use characters that have less mobility, youranimationmight look a little stiff, which is not necessarily a bad thing if this is the look you want.
Setting Up Your Background
Depending onwhether you want a 2D or 3D environment, you have to set up your background accordingly. Ifyou prefer a 3D background, then you would treat the elements in the samemanner that you treat your stop-motion characters. If you would like a 2D cartoon background, then you need to set up what is known as either ablue or green screen.
A blue or green screen is a solid-coloured piece of fabric that you can easily select and block out in the software.This process is known as colour keying. You can then superimpose another background, such as a 2D drawingcreated in Studio or a 3D photograph or a piece of video footage.

Toon Boom Studio 8.1 User Guide
453
An important element to consider when setting up either a green screen backdrop or a stop-motion setting, isthe lighting. In the case of a green screen, soft, flat lighting can be the key to making thematerial look smoothand shadowless. The fewer variations in tone, the easier it is to key out the colour later on. Lighting does notnecessarily mean a multi-lamp setup; a well-lit roomwith natural daylight is often best.

Chapter 15: Stop-motion Animation Image Capture Settings
454
Image Capture SettingsBefore you start, be sure your image recording device is plugged into your computer and turned on. Follow thecamera manufacturer's instructions on how to connect the camera to a computer. It is recommended for thestop-motion image capture process that you support your camera in a fixed position by using a tripod or someother mounting system. The camera must be rigidly fixed because anymovement of the camera, such as shakingor vibration, affects the captured images. The only items that move are the items on the stage.
Setting Up the Image Capture OptionsTo set up for image capture:
1. From the File menu, select Acquire > From Capture Device.
The Image Capture window appears.
2. In theOptions section, select the Source tab. Find and select your recording device from the Device list.
3. From the Source list, select Full-Resolution Photo if it is available for your recording device (somedevices, such as webcams may not allow for this option). Otherwise, select Live Preview if you prefer totake faster, lighter images for a rough test.
The Capture window can be used to capture more than just live physical models with a recordingdevice. You can also "capture" hand-drawn images with the use of a scanner.
To learn more about scanning from TWAIN, see Importing Artwork on page 161.
4. If you are using a scanner with a WIA driver (Windows Image Acquisition), the Resolution list will beenabled. From the list, select the resolution at which you want to scan your images.

Toon Boom Studio 8.1 User Guide
455
5. If you want to smooth out some of your colours, select theNoise Reduction option. If you want tocapturemore detail, leave this option deselected.
6. Click Properties.
The Camera Properties window appears.
This is an example of a typical Camera Properties window.
The Camera Properties page is different for every capture device. The information displayed on thatpage comes from the device itself and therefore contains different options for each device.
7. Most of the settings that you see in the Exposure section are set manually on your camera. If you changea setting in the software, such as the ISO, it is changed on your camera. If you change a setting on yourcamera, it is also changed in the software.
8. In theWhite Balance section, play with the options from theMode list and select the one relating to yourlighting set up, or until the colours in the preview window displays evenly balanced colours. Make fineadjustments with the colour sliders.
9. In the Focus section, use theNear and Far increments to bring the preview image into focus. For greaterfocal detail, use the Left, Right, Up andDown buttons to move around the Zoom Preview rectangle inthe preview window. When you find a good section to examine, such as an area of high contrast, clickZoom Preview to view that section in detail. Use theNear and Far increments to make finer adjustments.
10. Click Close.
Light Table and Onion SkinThe Light Table feature for stop-motion image capture can be used in two different ways: as a light table or asan onion skin option. As a light table, it can be used to display a series of images, such as JPEGs of a walk-cycle,behind the live image in the preview window. This can be useful if you want to use a template for the stop-motion

Chapter 15: Stop-motion Animation Image Capture Settings
456
poses you need. As an onion skin option, the preview window displays the live imagewith the one that wascaptured just moments before.
The different uses of the light table are based on the layer selected in the Layer list. Choosing the same layer asthe one you are capturing the images on enables theOnion Skin option. Selecting any other layer serves as areference when capturing images for the stop-motion. Only image (bitmap) layers, as opposed to drawing(vector) layers, appear in the list.
To use the Light Table feature:
1. From the Layer list, select the layer that you want to see in the preview window.
2. If the images you are capturing do not have the same ratio as your Toon Boom Studio 8.1 User Guideproject (for example 16:9 instead of 3:4) the Aspect Ratio list is enabled. Select the ratio option that suitsyour needs.
3. Use theOpacity slider to control the transparency of the image being seen through the light table oronion skin.
To use the Light Table feature as an Onion Skin option:
1. Capture the first imagewithout specifying the Layer to be used as a reference (in the Light Table section,the Layer list is set to Disabled).
2. Once the first image is captured, go to the Layer list and select the layer on which the image has beencaptured.
3. If the images that you are capturing do not have the same ratio as your Studio project (for example 16:9instead of 3:4), the Aspect Ratio list is enabled. Select the ratio option that suits your needs.
4. Use theOpacity slider to control the transparency of the image being seen through the light table oronion skin.

Toon Boom Studio 8.1 User Guide
457
Capture Features
Auto Capture
Although somemotions are easy to record by posing and reposing a figure while taking snapshots betweeneachmovement, others are not. The Auto Capture feature allows you to automatically record movement when itis not practical to manually press the record button in succession. For example, capturing a ball dropping, or anevent which takes place over an extended period of time, such as a time-lapse recording of a sunset.
To use the Auto Capture feature:
1. In the Auto Capture section, select a number of increments from the first drop-list.
2. From the second drop-list, select the units (msec, sec, min, hour, day).
3. When ready, click Start.
Preview WindowYou can expand the preview window in the Image Capture window if it is not large enough for you to see all the
details of the elements in your scene. Click the Show/Hide Capture Options button to expand this window.

Chapter 15: Stop-motion Animation Colour Keying
458
Colour Keying
One of the ways that Studio has ensured greater flexibility for your stop-motion projects is by including a ColourKeying feature. With this feature, you can easily remove the background around your character and insteadreplace it with a hand-drawn background.
In order for the Colour Keying feature to work, it is essential to place a solid-coloured fabric behind yourcharacter so that it hides anything else that might appear in the camera frame.
To key out your coloured background:
1. If it is not already open, from the File menu, select Acquire > From Capture Device to open the ImageCapture window.
2. Select theKeying tab.
3. From the first list, select a Keying type. It is recommended that you select the type that shows themostsensitivity to your background. This might not be obvious until you pick the colour that you want to keyout. You can gauge sensitivity by the amount of dancing pixels seen in the preview window.
‣ Chroma Keying (YUV): YUV is a colour model (like RGB or CMYK) that encodes a colour image orvideo taking human perception into consideration. It allows transmission and compression errors to

Toon Boom Studio 8.1 User Guide
459
bemore efficiently masked by human perception than when using an RGB representation. Choose YUVif your recording device conforms to certain YUV standards.
‣ Chroma Keying (RGB): The RGB colour model is an additive colour model in which red, green, andblue light are added together in various ways to reproduce a broad array of colours. RGB is a device-dependent color space: different devices detect or reproduce a given RGB value differently. Thus anRGB value does not define the same color across devices without some kind of colour management.
‣ Luma Keying: Luma corresponds to the brightness in an image, the "black and white" portion. Lumais typically paired with chroma. Luma represents the achromatic imagewithout any colour, while thechroma represents the colour information. Converting the output of a camera into luma and chromaallows a video system to optimize its performance for the human visual system, since human vision ismore sensitive to luminance ("black and white") detail than colour detail.
4. Click Pick Colour.
5. Use the eye dropper to select your background in the preview window. If there are some unavoidablehighlights and shadows on your green screen, try to select a mid-tone area. The selected colour appearsin the swatch area beside the Pick Colour button.
Your preview window comes alive with dancing pixels.
6. If you selected Luma Keying as the keying type, you can also select Luma correction to help even out theimage so it is easier to extract a drawing from the background.
7. If you selected one of the chroma keying types, select theMatte option if you want to render the previewwindow achromatic. This optionmakes the keying process visually easier by seeing the selected portionbeing reduced to black and the keyed out portion being reduced to white.
8. Select theHide Background option, if you want to see which part of the image is rendered transparent.
9. Play with theMinimum andMaximum sliders until your background disappears into a solid white (ortransparent depending onwhich options were selected).
10. If there are still green areas remaining, try selecting one of the effects from the drop-downmenu andchose the degree of Effect Intensity until you see a clean white or near clean white background in thepreview field.
You are now ready to capture images for you stop-motion animation.

Chapter 15: Stop-motion Animation Image Capture
460
Image Capture
This is the easiest part of the stop-motion animation process. Once you start capturing, your images arerecorded on an Image Capture layer as a string of frames on the Timeline.
If you are using a video camera, it will act as a still-frame camera; it only captures the single imageswithin its field of view.
To perform an image capture:
1. If it is not already open, select Acquire > From Capture Device from the File menu to open the ImageCapture window.
2. Set up your first pose. Use the preview window and the recording device viewfinder to make sure that it iscorrectly framed.

Toon Boom Studio 8.1 User Guide
461
3. When you are ready, click Capture.
4. Reposition your character and/or other elements on the stage. The smaller themovement, the smootherthe animation.
5. Click Capture.
At this point, the Timeline view looks something like this. Each frame represents an image capture.
6. Repeat this process until you have completed your motion sequence.
7. When you are finished, click Close.

Chapter 15: Stop-motion Animation Image Capture
462
Capturing Images in an Existing LayerInstead of recording all the images that you need in one session, youmay decide to divide the action sequencesinto different recording sessions. However, if you do this, youmay notice that each time you close the Capturewindow and start it again, the software automatically creates a new Image Capture layer.
To add image captures onto an existing layer:
1. In the Timeline or Exposure Sheet view, right-click on the empty cell where you would like the newcaptures to begin and select Import and Vectorize > From Capture Device.
The Capture window opens.
2. Continue with the capture process.

Toon Boom Studio 8.1 User Guide
463
Vectorization and Clean-upAfter recording your stop-motion animation, youmay notice that your character was not as cleanly keyed as youwould like. The fastest way to resolve this is to perform a clean-up. However, you cannot execute a clean-upwithout first converting your bitmap image sequence into vectors with a bitmap texture fill.
To vectorize and clean up your image sequence:
1. In the Timeline view, select and right-click on one of the cells in the Image Capture layer and
2. select Convert Element to Vector.
A new Drawing layer appears above the original layer with the same number of cells converted intovectors.
3. In the Timeline view, select the first cell of the Image Capture layer.
4. In the Drawing view, use the Contour Editor tool to delete or move vector points until you have a
clean outline around the bitmap fill. To quickly reduce the amount of points to clean, using the ContourEditor tool, select the drawing to clean and select Tools > Smooth.
5. Scrub through your animation to check for any anomalies in the contour of your character.

Toon Boom Studio 8.1 User Guide
464

Toon Boom Studio 8.1 User Guide
465
Chapter 16: Enhancing with Effects
Themost important part of animation is creating lifelikemovement, followed by telling a good story and thecreation of memorable characters. However, when all that is done, it is nice to add a little icing on the cake.Enhance your animation by giving it some subtle atmosphere or by turning up the wow factor. Toon BoomStudio offers eleven different pre-installed effects to choose from.
• Special Effects on the next page
• Blockbuster and Forces of Nature Effects
• Disabling All Effects on page 510

Chapter 16: Enhancing with Effects Special Effects
466
Special Effects
Studio's special effects let you add a shadow to your character that follows its everymovement, soften theedges of atmospheric elements, such as the sun and clouds, as well as create a beautiful sunset and much, muchmore.
• Previewing Effects below
• Blur Effect on page 470
• Colour Transform Effect on page 473
• Feather Edge Effect on page 477
• Drop Shadow Effect on page 480
• Clipping Effect on page 484
• Shake Effect on page 489
Previewing EffectsTo see the final look of some of your effects such as the blur, the system needs to calculate and render them. TheCamera view shows a simple version of your effects so you can play back your animation quickly. Therefore, tosee your final effects as you adjust them, you need the Effect Preview view which gives you the ability to renderthe current frame and display it in a window.
Toon Boom Studio will keep in memory 200MB of rendered images. (~25 frames in HD, ~100 is halfHD and ~400 in quarter HD).
To open the Effect Preview view:
1. SelectWindow > Effect Preview.
2. Grab the floating view and dock it beside your Camera view.

Toon Boom Studio 8.1 User Guide
467
The Effect Preview view allows you to render a single frame, a frame range or your whole scene to see youreffects. You can render the images to a quarter, half or full size of your project depending on how muchmemoryyou want to use.
To preview a blur effect:
1. In the Special Effects toolbar, click the Blur Effect button.
2. In the Timeline view, parent the drawing layers that you want to blur to the Blur effect.
3. In the Effect Preview view, click Render Single Frame.
The current frame preview appears at a quarter of the project's size.

Chapter 16: Enhancing with Effects Special Effects
468
4. For a better quality render, in the Size list, select Half Size or Full Size.
5. Click Render Single Frame to update the preview.
6. In the Properties view, increase the Radius value.
7. In the Effect Preview view, click Render Single Frame.

Toon Boom Studio 8.1 User Guide
469
8. In the Render drop-downmenu, select Render Playback Range to render your whole scene or theplayback range section, if you customized it. Select Render from Current Frame if you want to render allthe frames starting from the current frame.
9. Once you have rendered a range of images, you can play them back by pressing the Play button in the
Interactive Playback toolbar (Top toolbar onMacOS X). If you want to play back your scene withoutplaying back the rendered frames, deselect the Sync Current Frame option. This will allow you to playback only the Camera view and leave the Effect Preview window at the current frame. To play back yourrendered frames, select the Sync Current Frame option.
10. Once you have rendered a range of images, you can play them back by pressing the Play button in the
Interactive Playback toolbar (Top toolbar onMacOS X). If you want to play back your scene withoutplaying back the rendered frames, deselect the Sync Current Frame option. This will allow you to playback only the Camera view and leave the Effect Preview window at the current frame. To play back yourrendered frames, select the Sync Current Frame option.
11. From the Render drop-downmenu, select Clear if you want to delete the previously rendered frames toclear somememory. Toon Boom Studio will keep up to 200MB of images inmemory. If the renderingbuffer is full, select this option to empty it.

Chapter 16: Enhancing with Effects Special Effects
470
Blur Effect
If you are animating an image that is visible from a great distance, or through adverse weather conditions such asfog, you can use the Blur effect to give a soft-focus look to your image. With the Blur effect, you can alter theoverall blurriness of an element and then set keyframes to animate the blurriness over time. In this way, you canboth increase and decrease the level of blurriness throughout the animation.
To create a Blur effect:
1. In the Special Effects toolbar, click the Blur Effect button.
You can also add the Blur effect from the Timeline toolbar.
‣ In the Timeline view, click the Add New Element button.
TheNew Elements dialog box opens.
‣ From the Type list, select Blur Effect.
‣ In the Name field, rename the effect appropriately.
‣ Click OK.
A new Blur layer appears in the Timeline view.
2. In the Timeline view, select the drawing layer that you would like to attach to the Blur effect and drag itonto the Blur effect layer.

Toon Boom Studio 8.1 User Guide
471
3. Double-click the Blur effect layer to rename it in accordance with the Drawing layer that is attached to it.This is good practice, as youmay want to addmore than one Blur effect to the Timeline view. Youmaywant to addmore than one Blur effect because as the camera approaches different elements, thoseelements in front will come into focus before those farther back. In order to create different timingsequences, you needmultiple versions of the same effect.
4. If you do not want the Blur effect to start at the first frame, you can select the effect's cells and drag themto the starting frame that you prefer.
You can also right-click anywhere on the effect's cells and select Change Start Frame.
Enter the start frame that you would like into the Enter the New Start Frame field and click OK. The entirerow of effect cells will be shifted down the Timeline view.
5. If you want the transition to be shorter or longer, select the end of the group of frames, wait until you getthe double arrow cursor and then pull towards the left or right.
You can also right-click anywhere on the effect's cells and select Change Duration.
Enter the duration that you would like the effect to last for in the Enter the New Duration field and clickOK. The exposure of the effect will be extended or shortened depending on the value entered.
6. In the Timeline view, drag the red playhead to the frame on your effect layer where you would like to add akeyframe.
In the Tool Properties panel for the Blur effect, click the Add Blur Effect Keyframe button.
A new keyframe is added to the chosen location.
7. In the Timeline view, drag the red playhead to a frame on your effect layer where you would like to deletea keyframe.

Chapter 16: Enhancing with Effects Special Effects
472
In the Tool Properties panel for the Blur effect, click the Delete Keyframe button.
The keyframe is deleted from the chosen location.
8. In the Timeline view, go to the frame containing your first keyframe and select the Blur effect layer.
9. In the Properties view, move the Radius slider to increase or decrease the Blur Radius, or simply enter avalue directly into the field. You can enter decimal increments for more precision.
10. Deselect the Radial option if you want to create a Motion Blur. The Angle slider will automatically becomeactive. You can still modify the blur intensity with the Radius slider and the angle of the blur with the Angleslider.
Choose a large Radius value, such as 200. You can enter different radius values for the start and endkeyframes of your effect to see the blur trail either increase or decrease in length. You can also enter adifferent Angle value for the start and end keyframes to have the direction of theMotion Blur rotatearound the object. Obviously, theMotion Blur will look more natural if you apply this effect to a movingobject.
It is important to play with and animate the effect to ensure a convincing result. For example, in thisexample, the school of fish flip abruptly and start swimming upwards in the opposite direction. Now the30 degree angle no longer looks good. It would be better to key a new angle at the point of the flip in theTimeline. Also, as the fish slow down before the flip, their motion blur would inevitably shorten, thenlengthen again when they speed up.

Toon Boom Studio 8.1 User Guide
473
A trick that you could do is to create a solid version of your object over a blurred version. You can achievethis effect by duplicating the original object. If the object contains multiple drawings and keyframes, thenyou could create a template of it in the Library first. Be sure that the timing is aligned in the Timeline, astemplates often start at frame 0. Add a Motion Blur to the version lower in the Timeline layer stack.
The only way to preview the Blur effect is to export a render of your scene. To minimize render time,export only the frames that contain the effect and not the entire scene—see Export Movie onpage 525.
Colour Transform Effect
If you animate a sunrise, a distant object moving closer to the camera or something appearing and disappearingetc., you can use the Colour Transform effect to animate a colour or transparency change.
With the Colour Transform effect, you can change the overall colour or transparency of an element and set keyson different frames. Toon Boom Studio will animate the colour change between these frames. This way, while thesun rises, you can change the colour of the sky from apple green to azure blue, or change a ghost transparencylevel from fully transparent to completely opaque.
The Colour Transform effect also works with the Drop Shadow effect. Any colour changes youmake can beconfined to the object, applied to an object`s shadow, or both—seeDrop Shadow Effect on page 480.

Chapter 16: Enhancing with Effects Special Effects
474
To create a Colour Transform effect:
1. Do one of the following:
‣ In the Special Effects toolbar, click theColour Transform Effect button.
‣ In the Timeline view, click theAddNew Element button. In the New Elements dialog box that
opens, select Colour Transform Effect from the Type list. Rename the effect appropriately and clickOK.
A new Colour Transform layer appears in the Timeline view. By default, the effect has a 20 frame transitionwith two keyframes, one at the beginning and one at the end. No values are entered in these keyframes.
2. In the Timeline view, select the layers you want to apply the colour transformation on and drag themONTO the Colour Transformation layer.
3. If you do not want the colour transformation to start at the first frame, select the transition cells and dragthem to the desired starting frame.
4. To make the transition to be shorter or longer, select the end of the transition, wait until the doublearrow cursor appears, then pull or push it to adjust the length.
5. In the Timeline view, go to the frame containing your transition first keyframe and select the ColourTransform layer.

Toon Boom Studio 8.1 User Guide
475
6. In the Properties view, adjust the colour parameters using the Additive or Multiplicative settings. You canadjust the Red, Green, Blue and Alpha (transparency) parameters.
‣ Themore you increase theMultiplicative values, themore washed-out your colours will be. Themoreyou decrease it, the darker your colours will be.
‣ Themore you increase the Additive values, themore red, green or blue will bemixed in your originalcolours. Themore you decrease the Additive values themore red, green or blue will be removed fromyour colours. You can end up with a white, black, red, green, yellow or blue drawing using theseparameters.
7. In the Timeline view, go to the last frame of the transition and select theColour Transform layer.
8. In the Properties view, adjust the colour parameters for the second colour keyframe.

Chapter 16: Enhancing with Effects Special Effects
476
9. If you want to add a new keyframe in your Colour Transformation effect, in the Timeline view, go to thedesired frame and select the Colour Transform layer.
10. In the Properties view, click the Add Keyframe button.
‣ You can use the Delete Keyframe button to remove a keyframe youmay have added earlier. Note
that you cannot delete the first and last keyframes.
In the Properties view, adjust the colour parameters.
11. If you are creating your own custom drop shadow effect or any other effect involving transparency andseveral drawing layers, youmay want to flatten the final result.
12. Because the shapes become semi-transparent, the zone becomes darker when two drawings overlap.
‣ In the Properties view, select the Flatten option for a uniform result.

Toon Boom Studio 8.1 User Guide
477
13. Play back your scene to see the final result.
Feather Edge Effect
If you have a drawing of something such as the sun or a flame, youmay want to soften or blur the edges. ToonBoom Studio has a Feather Edge effect that you can use for this. This effect is not done in the Timeline view;rather a transformation is applied directly onto your drawing. If you decide to add feather edges to yourdrawing, it will most certainly appear transformed.
The Feather Edge effect is different from the Blur effect. A Blur effect transforms your image into a bitmapimage. The Feather Edge effect remains vector-based.

Chapter 16: Enhancing with Effects Special Effects
478
If you zoom in very close to your drawing, you will see that several rims of different transparency are addedaround your drawing, creating the soft edge illusion.
It is not recommended to apply the Feather Edge effect on an entire animation sequence because it can be heavyto handle and export. Apply this effect on single drawings, such as the sun or a cloud.
To create a feather edge:
1. In the Timeline view, select the cell containing the drawing onwhich you want to apply a feather edge.
2. In the Drawing Tools toolbar, select the Select tool.
3. In the Camera or Drawing view, select the drawing area you want to apply a feather edge on.

Toon Boom Studio 8.1 User Guide
479
4. Select Tools > Feather Edges.
The Feather Edges dialog box opens.
5. In theWidth of Each Step field, enter the width of each rim around the drawing edge.
6. In the Number of Steps field, enter the number of rims around the edge of your drawing.
7. Click OK.

Chapter 16: Enhancing with Effects Special Effects
480
Drop Shadow Effect
To really improve the look of your scene, you can use the Drop Shadow effect. It is easy and efficient to use. If youhave a light source such as the sun or a lamp in a scene, use the Drop Shadow effect to give a more convincinglook to your scene. The shadow you create will follow your animation, even if youmake somemodificationsafterward.
To create a Drop Shadow effect:
1. In the Special Effects toolbar, click the Drop Shadow Effect button.
You can also add the Drop Shadow effect from the Timeline toolbar.
‣ In the Timeline view, click the Add New Element button.
TheNew Elements dialog box opens.
‣ From the Type list, select Drop Shadow Effect.

Toon Boom Studio 8.1 User Guide
481
‣ In the Name field, rename the effect appropriately.
‣ Click OK.
2. Drag the selected layerONTO the Drop Shadow layer.
The shadow appears in the Camera view.
3. In the Timeline view, select theDrop Shadow effect.
4. In the Camera view, click on the shadow's anchor points and position the drop shadow.

Chapter 16: Enhancing with Effects Special Effects
482
5. In the Properties view, click the colour swatch and adjust the colour.
If you`re using the Colour Transform effect, the colour changes you make can be applied to thedrawing, shadow, or both. You can select these options from the Parent Colour Transform Optionslist.
6. In the Properties view, adjust theOpacity slider to modify the shadow's transparency.

Toon Boom Studio 8.1 User Guide
483
7. In the Properties view, select theHide Elements option if you want to temporarily hide the originaldrawing while you reposition its shadow.
8. In the Properties view, click Reset Position if you want to cancel any positionmodifications youmade tothe shadow.

Chapter 16: Enhancing with Effects Special Effects
484
Clipping Effect
The Clipping effect can also be called amask effect. This effect allows you to cut and hide part of your animation.For example, if your background is a picture of the seabed with seaweed in front, youmay want your animationto pass between the seaweed and the rest of the images instead of passing in front.
To do so, you will need to create a drawing of the zone where you want your animation to appear and connect itto a Clipping effect. This drawing is called amask. The Clipping effect hides any portion of your animationoutside of themask drawing you did. It will hide it, not delete it. Your animation remains intact.

Toon Boom Studio 8.1 User Guide
485
To create a Clipping effect:
1. In the Timeline view, click the Add Drawing Element button to add a new layer for your mask drawing.
2. Double-click on the new layer and rename it Mask Drawing.
3. In the Tools toolbar, select the Brush tool.
4. In the Colour Palette view, select any bright colour.
5. In the Camera view, trace the section that you want to remain visible in your animation.

Chapter 16: Enhancing with Effects Special Effects
486
6. In the Tools toolbar, select the Paint tool.
7. In the Camera view, paint the closed zones of your mask drawing.
8. In the Effects toolbar, click the Clipping Effect button.
You can also add the Clipping effect from the Timeline view.
‣ In the Timeline view, click the Add Element button.
‣ TheNew Elements dialog box opens.
‣ In the Type list, select the Clipping Effect layer.
‣ In the Name field, rename the effect appropriately.

Toon Boom Studio 8.1 User Guide
487
‣ Click OK.
9. In the Timeline view, select your Mask drawing and drag itONTO the Clipping's Mask layer.
10. Select your image or animation and drag itONTO the Clipping Effect layer.
11. Play back your animation. You should now see only the portion you want to be visible.

Chapter 16: Enhancing with Effects Special Effects
488
If you feel that your Timeline view is too crowded with the effects that you are adding, you can hide themaskelements of your Clipping effects. This will hide themask layers in the Timeline view without disabling the effect.
To hide the mask elements of a selected Clipping effect:
1. In the Timeline view, select the Clipping effect.
2. From the Timeline view's contextual menu, select Display > Hide Effect Parameters. You can also
select View > Effects > Hide Effect Parameters.
To hide the mask elements of all Clipping effects:
1. From the Timeline view's contextual menu, select Display > Hide All Effects Parameters. You can
also select View > Effects > Hide All Effects Parameters.Once you chose to hide the effect parameters,you can easily display them again.
To show the hidden mask elements of a selected Clipping effect:
1. In the Timeline view, select the Clipping effect whosemask elements are hidden.
2. From the Timeline view's contextual menu, select Display > Show Effect Parameters. You can also
select View > Effects > Show Effect Parameters.
To show the hidden mask elements of all Clipping effects:
1. From the Timeline view's contextual menu, select Display > Show All Effects Parameters. You can
also select View > Effects > Show All Effects Parameters.

Toon Boom Studio 8.1 User Guide
489
Shake Effect
With the Shake effect, an animated drawing or static element, such as a character or landscape, can bemade toshake. This effect can be used to imitate earthquakes, camera shakes, or a character who is freezing on a coldwinter day.
In the image above, the hula girl and air freshener were animated in the cut-out style because their shakinginvolves rotating from a pivot. However, the entire car, including the dashboard, windshield, hula girl and airfreshener, all shake up and down and side to side together, due to the bumps on the road.
To create a Shake effect:
1. In the Effects toolbar, click the Shake button.
2. In the Timeline view, select the Drawing or Peg layer that you would like to attach to the Shake effect anddrag it onto the Shake effect layer.
3. Double-click on your Shake effect layer to rename in accordance with the Drawing or Peg layer that isattached to it. This is good practice, as youmay want to addmore than one Shake effect to your timeline.Youmay want to addmore than one Shake effect in order to have a shake occur on the x-axis and anotheron the y-axis. In order to create different timing sequences, you needmultiple versions of the same effect.
4. If you do not want the Shake effect to start at the first frame, you can select the effect's cells and dragthem to the starting frame that you prefer.
You can also right-click anywhere on the effect's cells and select Change Start Frame.

Chapter 16: Enhancing with Effects Special Effects
490
Enter the start frame that you would like into the Enter the New Start Frame field and click OK. Theentire row of effect cells will be shifted down the Timeline.
5. If you want the transition to be shorter or longer, select the end of the group of frames, wait until you getthe double arrow cursor and then pull towards the left or right.
You can also right-click anywhere on the effect's cells and select Change Duration.
Enter the duration that you would like the effect to last for in the Enter the New Duration field and clickOK. The exposure of the effect will be extended or shortened depending on the value entered.
6. In the Timeline view, drag the red playhead to a frame on your effect layer where you would like to add akeyframe.
In the Tool Properties panel for the Shake effect, in the Dynamic Parameters tab, click the Add Keyframebutton.
A new keyframe is added to the chosen location.
7. In the Timeline view, drag the red playhead to a frame on your effect layer where you would like to deletea keyframe.
In the Tool Properties panel for the Shake effect, in the Dynamic Parameters tab, click the DeleteKeyframe button.
The keyframe is deleted from the chosen location.

Toon Boom Studio 8.1 User Guide
491
8. In the Timeline view, go to the frame containing your first keyframe and select the Shake effect layer.
9. In the Properties view, adjust some of the following parameters, according to your preferences.
Shake effect icon (drop-downmenu)
• Mini Shake: Default Amplitude is 0.1
• Great Earthquake: Default Amplitude is 2.
Static Parameters
• Axis: Decide whether you want your object to shake from left to right (X), up and down (Y) or forwardand backward (Z). You can parent an X-axis Shake effect, along with its Drawing/Peg layer, to anotherShake effect whose Axis is set to Y. This way, your object can shake both side to side and up anddown.
• Wave Time: This indicates the length of a cycle. The smaller the number, the shakier the effect will be,as the effect needs to reach a certain amplitude in a smaller time frame, but could reach this amplitudemore often as its cycle length is so short.
• Half Life: This refers to the number of frames for themovement to be half its amplitude. If you enter avalue of 0, the amplitude is cut to half right away and the shake is less intense. If you want to keep thefull intensity of the shake for the complete duration of the effect, make the half-life the duration of theShake effect. This way, the amplitude drops to half when the effect is finished. If you want the shake togradually taper off, make the half-life smaller than half the duration (in number of frames) that yourshake effect lasts in the Timeline. For example, if your Shake effect lasts for 30 frames, make the half-life less than 15 frames.
Dynamic Parameters
• Amplitude: Themaximumdisplacement from a zero value during one shake cycle. This value ismeasured in fields.
You can always turn on the 12 x 12 field grid to get a better understanding of the system ofmeasurement. Remember that the grid is only visible in the Camera view if both a Drawing layer anda Drawing tool are selected.

Chapter 16: Enhancing with Effects Blockbuster and Forces of Nature Effects
492
Blockbuster and Forces of Nature Effects
With Toon Boom Studio, you can easily create breathtaking effects. The software comes loaded with presetparticle effects that you can customize as you wish and even add your own drawing to it. There are two maincategories of preset effects. The Blockbuster effects allow you to add glitter, sparkles, stars, wall shatter,explosions. super-nova and other great Hollywood themed effects. The Forces of Nature effects are all aboutrain, storm, crazy precipitations of gummy bears, diamond, water, heavy fog, clouds and muchmore.
The playback speed of the preset effects is linked to the frame rate of your scene.
This section is divided as follows:
• Forces of Nature Effects below
• Blockbuster Effects on page 499
• Customizing Your Effect on page 505
Forces of Nature EffectsEffects that are the result of natural phenomenon can be among the hardest create in an animation, as theyinvolve drawing and animating hundreds of tiny particles or fluctuating organic shapes. Toon Boom Studio helpsyou bypass this labour-intensive process by providing six Forces of Nature Effects.
• Rain Effect on page 494
• Snow Effect on page 495
• Hail Effect on page 496
• Fog Effect on page 496

Toon Boom Studio 8.1 User Guide
493
• Cloud Effect on page 497
• Volcano Effect on page 498
To add a Forces of Nature effect:
1. In the Special Effect toolbar, click the Forces of Nature Effect button.
A Forces of Nature effect layer, as well as its child, a Sprite-Drawing layer, is added to the Timeline view. ASprite is the particle multiplied and generated by the Forces of Nature effect. In the example below, adrawing of a raindrop is used as the Sprite.
By default, the Rain effect is selected and visible in the Camera view.
2. Create your own Sprite on a Drawing layer, or import an image to use as a Sprite. In the case of theForces of Nature effects, Sprites animated using keyframes and/or pegs lose their animation. Only theoriginal image is used.
Traditionally animated drawings are treated as multiple versions of the same particle type. For example, atraditionally drawnwalk-cycle appears as a series of frames on the same layer. Each frame contains aslightly modified version of a character's legs and arms moving. If this layer were to be used as a Sprite, allthose different drawings would be randomized and appear as non-sequential, static, singular particles inthe effect.
However, you can use this behaviour to your advantage. For example, if you want to create five types ofsnowflakes to bemultiplied and generated, you could simply create five different drawings on the samelayer. Each drawing is on their own frame.
3. Drag your newly created Sprite layer onto the Sprite-Drawings layer to parent it. The Forces of Natureeffect Sprite (unseen in the Timeline view) is automatically overridden by your custom Sprite.

Chapter 16: Enhancing with Effects Blockbuster and Forces of Nature Effects
494
If no Sprite is created for a Forces of Nature effect, the default Sprite will be visible.
Rain Effect
The Rain effect produces a simulation of water droplets falling from the sky in nine various presets:
• Rain: The default setting.
• Tropical Storm: The rain drops are bigger and greater in number, producing a more intense effect.
• Mist: The rain drops are smaller and fewer for a less intense effect.
• Straight: The rain falls on a diagonal, suggesting a driving rain shower.
• Bubble: The rain falls in large, rounded drops of water.
• Droplets: The rain falls in droplets of water.
• Gummy Bears: A sweet shower of red and yellow gummy bears.
• Rays: Sun rays caught by particles of light illuminate your scene.
• Stars: Your scene is showered by stars, both near and far.
Notes
Parameters such as Bounciness and Floor Height are less applicable to this effect. However, Max Amount ofObjects and Direction are good parameters to modify and animate for the Rain effect.

Toon Boom Studio 8.1 User Guide
495
Snow Effect
The Snow effect produces a simulation of snowflakes falling from the sky in ten various presets:
• Snow: This is the default setting.
• Snow Flurries: Fewer snowflakes produced than with snow for a less intense effect.
• Snow Storm: The snowflakes are bigger, falling faster and are greater in number, thereby creating amore intense effect.
• Simple Snowflakes: These are soft, light paper cut-out snowflakes.
• Shiny Snowflakes: Large, shiny snowflakes, great for an icy winter scene.
• Sun Dust: Soft snow raised by a gust of wind and lit by a bright winter's sun.
• Ashes: Light ashes fall, gently filling your scene.
• Leaves: Brown, last-to-fall autumn leaves float gently downwards.
• Cotton Candy: Fluffy pink cotton candy for a sweet, playful scene.
• Dandelion Puffs: Fluffy dandelions, ideal for lazy summer scenes and making wishes.
Notes
The Floor Height can play a role as snow can land and accumulate on the ground. While Bounciness does little tochange this effect, as it is not a natural property of snow, the Intensity andMin Speed canmake the differencebetween Snow Flurries and a Snow Storm. If you are looking to produce an effect where the snow melts before ithits the ground, you can lower the Floor Height so that it is not visible in the Camera, as well as check off theFade box to have your snowflakes lightly melt away.

Chapter 16: Enhancing with Effects Blockbuster and Forces of Nature Effects
496
Hail Effect
The Hail effect produces a simulation of ice pellets falling from the sky in nine various presets:
• Hail: This is the default setting.
• Light Hail: There are fewer ice pellets produced for a less intense effect.
• Hail Storm: The ice pellets are bigger, falling faster and in greater in number, creating a more intenseeffect.
• Crystallized Hail: Sparse, gentle flecks of crystal fall steadily throughout your scene.
• Baseball Hail: Heavy, large, quick-falling hailstones, to be avoided by all windshields.
• Diamonds: A different kind of ice, these yellow, pink and blue diamonds fall hard and fast.
• Candy: Colourful bonbons populate your scene to create a candyland effect.
• Coins: Bright pennies (and more) from heaven enrich your scene with a little fun.
• Gears: Rust, gold and grey gears tumble from top to bottom; great for gear heads.
Notes
The Floor Height and Bounciness play a big role in identifying the effect, as ice pellets bounce when they hit asurface or ground. Subtle differences in the Dynamic parameters determine the difference between a Light Hailand a Hail Storm, as well as theMax Amount of Objects andMax Visibility values.
Fog Effect

Toon Boom Studio 8.1 User Guide
497
The Fog effect produces a simulation of a gaseous vapour hanging in the air in nine various presets:
• Fog: This is the default setting.
• Misty: There are fewer particles produced in a smaller region for a less intense effect.
• Thick Fog: There are a greater number of particles in a larger region, creating a more intense effect.
• Curly Fog: A cluster of fog tendrils floats and expands to cover themajority of your scene.
• Smokey Fog: A dark fog that expands ominously across your scene.
• Sumi-e Fog: In various shades of grey, this fog has a classic Japanese ink wash sensibility.
• Balloons: Red, yellow and blue balloons radiate, then float, from the center of your scene.
• Fireflies: Growing green fireflies evoke a balmy summer evening.
• Bushes: A row of lush bushes rises, gently expanding and rustling, from the bottom of the screen.
Notes
The Region dimensions, including the Floor Height, play a role in the intensity of this effect. The smaller theregion, the less intense the effect, as you can see some sky in the background.
TheMax Amount of Objects contributes to the fog's density, which can also make it more or less intense. It isrecommended that you explore the parameters for this effect, as they are a little less obvious than the othereffects.
Cloud Effect
The Cloud effect produces a simulation of a condensed gaseous vapour floating through the sky in nine variouspresets:
• Cloud: This is the default setting.
• Fluffy Clouds: There are fewer particles produced, with lower visibility at a slower speed, therebycreating a less intense effect.
• Storm Clouds: There are a greater number of particles produced, with higher visibility, thereby creating amore intense effect.
• 2D Puffy Clouds: Dense fairweather clouds in various shades of blue.
• 2D Stylized Clouds: Swirling, curly-Q clouds in shades of blue and cafe au lait.
• Shape Clouds: Fluffy clouds in the shape of a duck , a dragon and an elephant. Perfect for daydreaming.

Chapter 16: Enhancing with Effects Blockbuster and Forces of Nature Effects
498
• Forest: A dense forest of trees and foliage sweeps through your scene.
• 2D Storm Clouds: Enormous, ominous clouds sweep past, filling your scene from front to back.
• Candy Clouds: Swirling clouds in shades of candy pink.
Notes
The Cloud effect is one of themost complicated Forces of Nature effects, due to the number of parameters thatneed to be adjusted in order to make both subtle and dramatic differences to this effect. Some of the keyparameters to look out for are Start of Simulation, Max Amount of Objects, Max Visibility (including Fade), aswell as Intensity and Speed.
Volcano Effect
The Volcano effect produces a simulation of flowing lava bubbles from a single source in nine various presets:
• Volcano: This is the default setting.
• Puff: There are fewer particles produced, with a lower intensity for a less intense effect.
• Volcano Eruption: There are a greater number of particles produced, with higher intensity, creating amore intense effect.
• Deformed Lava: Lava flows, radiating outward towards the floor of your scene.
• Popcorn: Popped kernels of corn bubble from the center of your scene.
• Petroleum: Dark petroleum gushes and oozes outward from the center of your scene.
• Fountain: A fountain of water emanates up and out in a wash of blues.
• Colour Candy: Pink, gold and blue candies spring up and out for a visual sugar rush.
• Steam: Droplets of steam and wispy vapour rise from the bottom of your scene, emanating outwards.
Notes
The Volcano effect is a unique effect in that it is the only effect that is produced from a single source. You canmove the position of the source by changing the value of the Floor Height. The number of particles (Max Amountof Objects), as well as the size of the particles (Scale) are important factors. The Start of Simulation valuedetermines whether you see the lava erupt from the source (either 0, or a positive value), or if it will already beflowing when the scene starts.

Toon Boom Studio 8.1 User Guide
499
Blockbuster EffectsThe Toon Boom Studio Blockbuster effects allow you to add some glamour and bang to your animation!
This section is divided as follows:
• Shatter Effects on the next page
• Magic Effects
• Explosion Effects on page 503
• Splash Effects on page 503
• Fire Effects on page 504
• Celestial Effects on page 505
To add a Blockbuster effect:
1. Do one of the following:
‣ In the Special Effect toolbar, click the Blockbuster Effect button.
‣ Select Element > Add > Blockbuster Effects.
‣ In Timeline View toolbar, click theAddNew Elements button and select Blockbuster Effect from
the Type list.
A Blockbuster effect layer, as well as its child, a Sprite-Drawings layer, is added to the Timeline view. Asprite is the particle multiplied and generated by the Blockbuster effect. In the example below, a drawingof a brick is used as the sprite.
By default, the brick wall shatter effect is selected and visible in the Camera view.
2. You have the possibility to create your own effect and customize it as you want. Create your own particleon a drawing layer, or import an image to use as a sprite (particle to multiply in the effect). Then you canattach that drawing to the existing Blockbuster effect and it will override the default content.
In the case of the Blockbuster Shatter effects, the first imagewill be used as the image to break to piecesand the second drawing will be used as the pieces and area to break in the first drawing—see ShatterEffects on the next page.

Chapter 16: Enhancing with Effects Blockbuster and Forces of Nature Effects
500
For theMagic and other Blockbuster effects, traditionally animated drawings will be treated as multipleversions of the same particle type. For example, a traditionally drawnwalk cycle appears as a series offrames on the same layer. Each frame contains a slightly modified version of a character's legs and armsmoving. If this layer were to be used as a sprite, all those different drawings would be randomized andappear as non-sequential, static, singular particles in the effect. Therefore, if you draw a glitter particle inthe first cell, a different colour glitter particle in the second cell and a different one of another colour in thethird frame, you will obtain a multicolour glitter effect.
You can use this behaviour to your advantage; for example, in the event that you want to create five typesof stars to bemultiplied and generated. Simply create five different drawings on the same layer, butdrawing each on their own frame.
3. Drag your newly created Sprite layer onto the Sprite-Drawings layer to parent it. The Blockbuster effectSprite (unseen in the Timeline view) is automatically overridden by your custom Sprite.
If no sprite is created for a Blockbuster effect, the default sprite will be visible.
Shatter Effects
The Shatter effect produces a simulation of a solid pane breaking to pieces in nine various presets:
• Wall Destruction: This is the default setting.
• Wall Breach: Only a portion of the wall breaks apart.
• Wall Breakthrough: A character shape breaks away from the wall giving the illusion a character ranthrough.
• Bottle Explosion: A bottle explodes completely breaks apart .
• Bottle Break: A bottle breaks apart.
• Bottle Fragment: A bottle cracks and breaks.
• ShatteredGlass: A glass pane is shattered to pieces.
• Broken Glass: A portion of a glass pane is broken to pieces.

Toon Boom Studio 8.1 User Guide
501
• Peak-a-glass: A character shape breaks away from the glass pane giving the illusion a character ranthrough
To create your own shatter sprite, draw your pane in the first cell of a drawing layer.
In the second cell, draw the pieces in which you want the pane to break apart. The areas where there will not beany drawing will remain untouched. If you want your pane to break in pieces without leaving a gap between thepieces, draw your pieces separately.
With the Select tool, move them together so that they overlap. If you want to make sure that the outline remainswith the painted zone and that your pieces do not get mixed up, you should group them (outline and colour fill)together before overlapping your pieces.

Chapter 16: Enhancing with Effects Blockbuster and Forces of Nature Effects
502
Once your sprite is ready, you can drag your sprite drawing layer onto the Sprite-Drawings layer of your ShatterBlockbuster effect.
Magic Effects
TheMagic effect produces a simulation of shiny sparkles and particles in nine various presets:
• Glitter Shower: This is the default setting.
• Glitter Mist: A light glitter rain falls down.
• Glitter Fall: A string of glitter falls down as from a fairy or magic wand.
• Ocean Bubbles: A large amount of bubbles float up.
• Sea Bubbles: A series of bubbles float up.
• Aquarium Bubbles: A few little bubbles float up.
• Omni Star Storm: A series of multicolour stars rush toward the screen.
• Omni Star Mist: A few multicolour stars float toward the screen.
• Omni Star Spin: Stars spin in the scene to similate dizziness.

Toon Boom Studio 8.1 User Guide
503
Explosion Effects
The Explosion effect produces a simulation of smoke and fire explosions in nine various presets:
• Blast: This is the default setting.
• Blowup: A big smoke cloud explosion.
• Bang: A small cloud explosion.
• Long Electrical Circuit: A long lightning bolt between two electrodes.
• Medium Electrical Circuit: Amedium lightning bolt between two electrodes.
• Short Electrical Circuit: A short lightning bolt between two electrodes.
• Dazzling Fireworks: A series of multicolour fireworks.
• Brilliant Fireworks: A few multicolour fireworks.
• Glittery Fireworks: Onemulticolour firework.
Splash Effects
The Splash effect produces a splash of water, goop or mud in nine various presets:
• Water Splash: This is the default setting.
• Water Spray: Amediumwater splash.
• Water Squirt: A small water splash.
• Goop Splatter: A big goopy splash.

Chapter 16: Enhancing with Effects Blockbuster and Forces of Nature Effects
504
• Goop Blob: Amedium goopy splash.
• GoopDab: A small goopy splash.
• Mud Splatter: A big muddy splash.
• MudBlob: Amediummuddy splash.
• MudDab: A small muddy splash.
The Splash effect custom sprite does not work like other Blockbuster effects. The sprite must be atraditional splash animation.
Fire Effects
The Fire effect produces a simulation of fire and smoke in nine various presets:
• Inferno: This is the default setting.
• Fire: Amedium size fire.
• Flame: A small size fire.
• Smoke Screen: A big smoke chimney.
• Smoke Fog: Amedium smoke chimney.
• Smoke Cloud: A small smoke chimney.
• Blaze: A huge spark.
• Ignite: Amedium spark.
• Spark: A small spark.
The Fire effect custom sprite does not work like other Blockbuster effects. The sprite must be atraditional fire animation.

Toon Boom Studio 8.1 User Guide
505
Celestial Effects
The Celestial effect produces a simulation of space explosions in nine various presets:
• Brilliant Supernova: This is the default setting.
• Bright Supernova: A big and bright supernova explosion.
• Glimmer Supernova: A small and faraway supernova explosion.
• Intense White Nova: A gigantic white nova explosion and its large smoke ring.
• Luminous White Nova: A big white nova explosion and its smoke ring.
• LightWhite Nova: A small white nova explosion and its smoke ring.
• Meteor Storm: An intense and largemeteor shower.
• Meteor Shower: Anmediummeteor shower.
• MeteorMist: An small meteor shower.
Customizing Your EffectTo customize and animate your Forces of Nature and Blockbuster effects, youmust adjust the parameters in theProperties panel. Use the Static Parameters to customize the general settings for the effect. Any frame of theeffect layer can be selected in the Timeline view whenmodifying values in this tab. If you want to animate theproperties of the effect, add keyframes accordingly, then change the keyframe values in the Dynamic Parameterstab.

Chapter 16: Enhancing with Effects Blockbuster and Forces of Nature Effects
506
Effects
From the top row of icons, click the button corresponding to the Forces of Nature or Blockbuster effect that youwant to use. It will turn dark grey to indicate that it is selected. If you are unsure as to which Forces of Nature orBlockbuster effect is depicted on a given button, hover your pointer over the button and a tooltip will appear.
The effect will change in the Camera view depending onwhich effect you choose. Click on the effect you want touse; the corresponding sub-menu appears with its associated parameters.
In the above example, Clouds is the general option that has been selected. Every effect has a sub-menu featuringnumerous options, ones that vary in density, shape and character. To determine what each effect does, hoveryour mouse over the effect icon. The tool tip appears, indicating the name of this particular effect. To activatethe effect, click on the icon. A dark grey box surrounds the icon, indicating that it is activated.
The six different Nature effects are discussed inmore detail in their own individual sections below.
General Properties Buttons
• Reset to Default Values: After you havemade adjustments to the parameters in the Static or
Dynamic Parameters tab and youwould like to bring back the defailt settings, click this button to reset

Toon Boom Studio 8.1 User Guide
507
the default values in both tabs.
• Add Fill: Use this button to divide an effect on the Timeline. Once divided, a different effect can be
applied to one of the two halves. This allows for two different effects to exist on the same layer in theTimeline.
• Delete Fill: Use this button to delete all the cells of a single effect, in a layer wheremultiple effects
exist.
Static Parameters Tab
• Background: Choose from one of three background colour options: Dark Gradient Blue Sky, LightGradient Blue Sky, or Transparent.
• Start of Simulation: The frame number where you want the generation of particles to start. If you wantthe effect to be in progress beginning at the start of your scene, keep the default value of -1. This numberis relative to the First Frame value.
• First Frame: The frame number where you want the effect to start. You could have your effect start onframe 20, but not have the particle generation start until four frames in.
• Duration: The number of frames that you want the effect to last.
• Max Amount of Objects: Themaximum number of particles (copy of the sprite) that can be generated atone time in the Camera view. These particles are not all created at the same time, but eventually fill theCamera view with their number. For example, if a value of 2 is entered, then only two particles aregenerated until they disappear from the Camera view (finish their life span). At that time, another two orless particles are generated to replace the two that disappeared from view.
• Max Visibility: Themaximum number of frames that a particle exists in the Camera view, otherwise knownas the particle life span. For example, even if theMax Amount of Objects is set to 3000, if theMaxVisibility is set to 10, thenmost particles disappear well before 3000 particles can be created. In addition,

Chapter 16: Enhancing with Effects Blockbuster and Forces of Nature Effects
508
if it takes 60 frames for a particle to fall from sky to ground, thenmost of these particles will never touchthe ground, as they will die or disappear before the 10th frame.
• Fade: Select this option if you the particles to slowly fade out as they reach the end of their life spaninstead of disappearing abruptly.
• Region: Think of the region where the particles are generated, live and die as a 3D cube. Use the slidersto select a value between 0 and 36 for theWidth, Height and Depth of this 3D region. Although youcannot see the depth of the region, youmay notice that some particles appear larger or smaller thanothers, even though they are all generated from the same sprite. This is because some are closer orfurther back in depth.
• Floor Height: The value in this field represents the height of an invisible floor. This floor is where thesimulation ends. With the example of snow, if you want to see snow hitting and covering the ground, raisethe height of the floor to be visible in the Camera view.
Dynamic Parameters Tab
The parameters in this tab only become active when a framewith a keyframe is selected in the Timeline view.
• Intensity: This value determines the strength of the simulation. For example, if the first keyframe has anIntensity of 1 and the second keyframe has an Intensity of 25, then only a few particles will be produced atthe start of the animation, producing progressively more and more.
• Scale: This value determines the size of the particles as a percentage. For example, a value of 1.5 wouldbe 1.5 times the size of the original particle or Sprite. Remember that all the particles are the same size; itis just that some are further back or closer in space.
• Bounciness: This value determines the height of a particle's bounce, or in other words, how bouncy theparticle is. The greater the value, the higher the bounce, hence themore bouncy the particle. Thisparameter is important for the Hail and Shatter effects.
• Min Speed: Theminimum speed at which the particles canmove.
• Max Speed: Themaximum speed at which the particles canmove.
• Direction: These parameters can be used to push the particle movement at an angle, giving the illusionthat they are being blown in a certain direction by the wind. Use the sliders in this section to manipulatethe following:
East-West: Direction along the X-axis.

Toon Boom Studio 8.1 User Guide
509
North-South: Direction along the Y-axis.
Back-Front: direction along the Z-axis.
You can use both positive and negative values, as well as decimal increments.
• AddKeyframe: Add a keyframe on the Forces of Nature layer in the Timeline view. The keyframewill
be added to whichever frame is selected in the Timeline view, indicated by the position of the redplayhead. Once the keyframe is created, modify the values in the Dynamic Parameters tab to have thoseparameters recorded in the keyframe.
• Delete Keyframe: Delete a selected keyframe from the Forces of Nature layer in the Timeline view.

Chapter 16: Enhancing with Effects Disabling All Effects
510
Disabling All EffectsYou can disable all the effects in your scene in order to preview it without them. Doing so will hide all effects fromthe Camera view, but the effects elements remain visible in the Timeline view.
To disable all effects:
1. Select View > Disable All Effects.
Once you have disabled the effects in your scene, you can easily re-enable them.
To enable all effects:
1. Select View > Enable All Effects.
Your project will be exported with the effects visible, regardless if the Disable All Effects option is on.

Toon Boom Studio 8.1 User Guide
511
Chapter 17: Scenes and Transitions
With Studio, you can work in the Storyline view to arrange your scenes, and then add transition effects tosmoothly move from one scene to the next.
In this chapter, you will learn about the following:
• Working with Scenes and Transitions on the next page
• About the Storyline View on page 513
• Working with Scenes on page 514
• Applying Transitions on page 517

Chapter 17: Scenes and Transitions Working with Scenes and Transitions
512
Working with Scenes and TransitionsIn animation, a scene is the action happening in front of the camera while the camera does not change angle. Aslong as the camera does not stop "filming" , you are in the same scene. To create scenes in a Studio project, youwill use the SceneManager where you can select scenes, create and delete scenes, as well as reorder scenes.When you are satisfied with your scenes, you can add transitions to them.
A transition is a change, like a fade, wipe, or cross dissolve, that you can apply between scenes on the Storylineview. You can apply transitions to the beginning or end of a single scene, or between two scenes.
In this chapter, you will learn the following:
• About the Storyline View on the facing page
• Working with Scenes on page 514
• Applying Transitions on page 517

Toon Boom Studio 8.1 User Guide
513
About the Storyline ViewThe Storyline view is where you canmanage your scenes, view scenes in a sequence, and add transitions betweenscenes.
To access the Storyline view:
1. Do one of the following:
‣ At the bottom of the Studio screen, click on the Storyline view tab.
‣ SelectWindow > Storyline.
‣ Press [Ctrl] + [Shift] + [M] (Windows) or [⌘ ] + [Shift] + [M] (MacOS X)
The Storyline view is displayed.
To zoom the Storyline view:
1. In the upper-left corner of the scene area, drag the zoom control right zoom in on the scene area. Dragright to zoom out.
Playing a SequenceAgroup of scenes occurring in the same location about the same action or event is called a sequence. Once youhave constructed your scenes into a sequences and inserted transitions, you can preview your sequence to seethe result.
To play a sequence:
• In the Storyline view, click the Play Storyline button.

Chapter 17: Scenes and Transitions Working with Scenes
514
Working with ScenesIn animation, a scene is the action happening in front of the camera while the camera does not change angle. Aslong as the camera does not stop "filming" , you are in the same scene. To create scenes in a Studio project, youwill use the SceneManager section of the Storyline view.
To create scene:
1. In the Storyline view, go to the SceneManager section and do one of the following:
‣ In the top area, click the New Scene button.
‣ Click theMenu button and select New Scene.
‣ In the Scene list, right-click on a scene and select New Scene.
The new scene appears in the scene list.
2. To open a scene from the list, double-click on the scene's name.
To select a scene:
1. Do one of the following:
‣ From the Storyline view, select a scene.
‣ In the SceneManager, select a scene from the list.
‣ From the Scene View toolbar (Top toolbar onMacOS X), select a scene from the drop-downmenu.

Toon Boom Studio 8.1 User Guide
515
The scene`s properties are displayed in the Properties panel.
To change the background colour of a scene:
1. Select a scene.
The scene`s properties are displayed in the Properties panel.
2. Click the Colour Picker swatch.
The Colour Picker opens.
3. Select a colour and click OK.
To rename a scene:
1. Select a scene.
The scene`s properties are displayed in the Properties panel.
2. Type in a new name in theName field.
To delete a scene:
1. Select a scene from the SceneManager.
2. Do one of the following:
‣ Click the Delete Scene button.
‣ Click theMenu button and select Delete Scene.

Chapter 17: Scenes and Transitions Working with Scenes
516
‣ Right-click a scene and select Delete Scene.
The selected scene is removed from your list.
To reorder a scene:
1. In the SceneManager, select a scene and drag it to a new location.
The reordered sequence is displayed in the scene area of the Storyline view.
To showing or hide a scene:
1. In the SceneManager, select the scenes you want to appear in the Storyline view. Deselect the scenes youwant to hide.
The selected scenes are displayed in the scene area of the Storyline view. The deselected scenes arehidden.

Toon Boom Studio 8.1 User Guide
517
Applying TransitionsA transition is a change, like a fade, wipe, or cross dissolve, that you can apply between scenes on the Storylineview. You can apply transitions to the beginning or end of a single scene, or between two scenes.
For example, you can use a one-sided transition to fade into a scene at the beginning of your sequence. You canthen apply wipes, slides, and cross dissolves between other clips in the Storyline view to move smoothly fromone scene to the next.
The default transition between scenes is fade in and out.
To apply a transition:
1. In the Storyline view, select the transition to modify between the scenes. If you removed the existingtransition, select the edit point at the beginning or end of the scene, or between two scenes.
The edit point is highlighted and red playhead snaps to the location you clicked.
2. In the Properties panel, select a transition from the Type list. By default, Fade is the default setting.
3. In the Properties panel, edit the transition properties.
4. Enter the Duration (in frames) for the transition. If you select the Fade transition, youmust enter the LeftDuration, Blank Duration, andDuration Right.
5. The transition appears in the Storyline view.

Chapter 17: Scenes and Transitions Applying Transitions
518
6. In the Storyline view, click the Play Storyline button.
To remove a transition:
1. Select a transition.
The transition's properties are displayed in the Properties panel.
2. From the Type list, select No Transition.
TransitionsThere are six different transitions to choose from in Studio. Once you apply a transition, you can edit itsproperties to get just the right look for your project.
• Fade below
• Wipe on the facing page
• Slide on the facing page
• Clock Wipe on page 520
• Checker on page 520
• Cross Dissolve on page 520
FadeThe Fade transition lets you adjust the video levels to fade in or fade out a clip. You can also specify the colourfromwhich the scene fades in or to which it fades out.

Toon Boom Studio 8.1 User Guide
519
Left Duration: The number of frames at the beginning of the transition.
Colour: Opens the colour picker so you can select the colour of the transition.
Blank Duration: The number of blank frames at the end of the transition.
WipeTheWipe effect transition lets you create a transition between two scenes, such that the second clip is revealedaccording to a specified pattern.
Duration: The number of frames the transition lasts.
Colour: Opens the colour picker so you can select the colour of the transition.
Angle: Let you set the angle at which the transition starts, from 0° to 359°.
Direction: The direction the transition is moving towards: In or Out. In the In direction, the transitionmovestowards the left. In theOut direction, the transitionmoves towards the right.
SlideThe Slide transition lets you show the outgoing scenemoving upwards to reveal the incoming scene.

Chapter 17: Scenes and Transitions Applying Transitions
520
Duration: The number of frames the transition lasts.
Colour: Opens the colour picker so you can select the colour of the transition.
Angle: Let you set the angle at which the transition starts, from 0° to 359°.
Clock WipeThe Clock Wipe transition lets you create a wipe transition that moves clockwise or counterclockwise.
Duration: The number of frames the transition lasts.
Colour: Opens the colour picker so you can select the colour of the transition.
Angle: Let you set the angle at which the transition starts, from 0° to 359°.
Direction: The direction the transition is moving: Clockwise or Counterclockwise.
CheckerThe Checker transition lets you create a transition that resembles a checkerboard. You can change the size andcolour of the checkerboard tiles.
Duration: The number of frames the transition lasts.
Colour: Opens the colour picker so you can select the colour of the transition.
Size: Lets you adjust the size of the checkboard tiles. Drag left for smaller tiles and drag right for larger ones.
Cross DissolveThe Cross Dissolve transition lets you between scenes in which the image from one scene gradually becomes lessdistinct as the image from the other scene replaces it.

Toon Boom Studio 8.1 User Guide
521
Duration: The number of frames the transition lasts.

Toon Boom Studio 8.1 User Guide
522

Toon Boom Studio 8.1 User Guide
523
Chapter 18: Exporting Your Project
Studio supports several formats for all your rendering needs; it all depends on what you want to do with yourfinal output. You could, for instance, create a flip book or produce a video to post directly to the web or iPod.
In this chapter, you will learn how to do the following:
• Export Drawing to PDF on the next page
• Export Movie on page 525
• Export to YouTube and Facebook on page 528
• Export Snapshot on page 527
• Print on page 533

Chapter 18: Exporting Your Project Export Drawing to PDF
524
Export Drawing to PDFExporting a frame of your animation to PDF is useful if you need a vector-based image from your movie.
To export a drawing to PDF:
1. Select the frame of your project that you want to render. It must be from a drawing (vector based) layerand not an image (bitmap) layer.
2. Select File > Export Drawing to PDF.
The Save As dialog box appears.
3. Browse to the location where you want to save your file.
4. In the File name field, enter a name for your file.
5. Click Save.
6. Browse to the location where you saved your file and double-click on it to view the results. It is alsopossible to open this file in a vector-based, third-party software, such as Adobe Illustrator.

Toon Boom Studio 8.1 User Guide
525
Export MovieThe format and settings that you decide uponwhenwanting to export your animation often depends on whatyou intend to do with it next. Do you plan to bring your project into a third-party software for post-productionediting or put it up on the web?
To export your movie:
1. Select File > Export toMovie.
The Export dialog box appears.
2. In the Save As section, click on the Browse button at the end of the path field and browse for the locationwhere you intend to save your rendering.
3. In the Export Format list, select a format. The Export Settings Options changes depending on the formatselected from this section.
4. Click Options to customize the format settings.
5. In the Export Type section, choose from the following options:
‣ Full Movie: Renders all scenes and all layers that are enabled, from the first to last frame, including alleffects.
‣ Current Scene: Camera View: Renders all layers that are enabled in that specific scene that can beseen in the Camera view with the option to choose a frame range.
‣ Current Scene: Drawing View: Renders only what exists on a single layer in that specific scene. Thiscan be a good option for running tests on a specific character or object's motion, or to bring oneanimated element into a third party software.
6. From the Export Range Section, choose from the following options:
‣ All: Renders your entire project.
‣ All No Transitions: Renders the entire project without transitions.
‣ Frame Range: Allows you to select a specific section of your project to render by frame number.
‣ Selection: Renders whichever layer or element that you selected before starting the export process.

Chapter 18: Exporting Your Project Export Movie
526
1. Free Playback Range: In the Timeline view, right-click on the timeline ruler (top) and select PlaybackRange > Free. Two black diamonds appear at the start and finish of your project. Drag thesemarkers toselect a range. Note: This must be done before you open the Export Dialog window.
2. Select or deselect the Launch Player After Export option.
3. Click PublishingOptions.
The Publishing dialog box appears.
4. From the Publishing dialog box, select the option to Export to HTML if your project is destined for theweb and/or if you would like to send a copy to your iTunes Library.
5. When you are finished, click OK.
6. In the Export dialog box, when you are through, click OK.
A progress bar appears.
7. Browse to the location on your computer where you saved your movie and double-click on the file to viewyour export.

Toon Boom Studio 8.1 User Guide
527
Export SnapshotSometimes youmay want to digitally save one specific shot of your animation, perhaps rough sketches for yourworkflow or a polished scene for promotional purposes. The best way to produce this render is by exporting asnapshot.
To export a snapshot:
1. In the Timeline or Exposure view, select the location in your animation where you are able to frame theimage that you want render perfectly in the Camera view.
2. Select File > Export Snapshot.
The Snapshot dialog box opens.
3. From the Snapshot dialog box, browse to the location on your computer where you want to save yourwork and rename your image accordingly.
4. Click Save.
5. In the Snapshot dialog box, click Options.
The Export Image Sequence Settings dialog box opens.
This is the same dialog box that would appear if you were rendering an Image Sequence through theExport Movie process, however only the format option applies as you are only rendering one image.
6. From the Format list, select the format type.
7. Click OK.
8. Browse to the location on your computer where you saved your snapshot and double-click to view it.

Chapter 18: Exporting Your Project Export to YouTube and Facebook
528
Export to YouTube and Facebook
Toon Boom Studio simplifies the upload of your animated projects to these two popular websites: YouTube andFacebook. Using the Export Movie command, you can choose an option to export your movie directly to one ofthese sites. Toon Boom Studio automatically redirects you to your YouTube or Facebook profile where yourvideo will automatically be uploaded.
You require an active account on YouTube or Facebook before you can upload your videos.
Exporting to YouTubeTo export your movie to YouTube, youmust already have a YouTube account. If you do not have an account,create one at www.youtube.com.
To export your movie to your YouTube account:
1. Select File > Export toMovie.
The Export dialog box opens.

Toon Boom Studio 8.1 User Guide
529
2. In the Save As section, click the Browse button at the end of the path field and browse for the locationwhere your render will be saved.
3. From the Export Format list, select YouTube.
4. In the Export Type section, choose from the following options:
‣ Full Movie: Renders all scenes and all layers that are enabled, from the first to last frame, including alleffects.
‣ Current Scene: Camera View: Renders all layers that are enabled in that specific scene that can beseen in the Camera view with the option to choose a frame range.
‣ Current Scene: Drawing View: Renders only what exists on a single layer in that specific scene.
5. From the Export Range Section, choose from the following options:
‣ All: Renders the entire project.
‣ All No Transitions: Renders the entire project without transitions.
‣ Frame Range: Allows you to select a specific section of your project to render by frame number.
‣ Selector: Renders whichever layer or element that you selected prior to launching the export process.
‣ Free Playback Range: In the Timeline view, right-click on the timeline ruler (top) and select PlaybackRange > Free.
Two black diamonds appear at the start and finish of your project. Drag thesemarkers to select a range.
6. Click OK.
A progress bar appears, showing you the rendering process, followed by the YouTube uploadinformation dialog box.

Chapter 18: Exporting Your Project Export to YouTube and Facebook
530
7. Fill in the information.
General Information: The information that appears on your YouTube account.
• Title: Type in the name of your video
• Category: Use the drop-downmenu to select the category that best fits your video.
• Description: Type in a description of your video.
Login Information: Fill in this information to automatically login to your YouTube account.
• Login: Type in your YouTube account username.
• Password: Type in your YouTube account password.
8. Click OK.
A progress bar appears, showing you the uploading process, followed by a dialog box notifying you thatyour video has been successfully uploaded.
9. Click OK.
Exporting to FacebookTo export your movie to Facebook, youmust already have a Facebook profile. If you do not have a profile,create one at www.facebook.com. Once it is done, upload your creations to your profile to share with yourfriends on Facebook.
To export your movie to your Facebook profile:
1. Select File > Export toMovie.
The Export dialog box opens.
2. In the Save As section, click the Browse button at the end of the path field and browse for the locationwhere your render will be saved.
3. In the Export Format drop-downmenu, select Facebook.
4. In the Export Type section, choose from the following options:

Toon Boom Studio 8.1 User Guide
531
‣ Full Movie: Renders all scenes and all layers that are enabled, from the first to last frame, including alleffects.
‣ Current Scene: Camera View - Renders all layers that are enabled in that specific scene that can beseen in the Camera view with the option to choose a frame range.
‣ Current Scene: Drawing View - Renders only what exists on a single layer in that specific scene.
5. From the Export Range Section, choose from the following options:
‣ All - Renders the entire project.
‣ Frame Range - Allows you to select a specific section of your project to render by frame number.
‣ Selector - Renders out whichever layer or element that you selected prior to launching the exportprocess.
‣ Free Playback Range - In the Timeline view, Right-click on the timeline ruler (top) and from the pop-upmenu select Playback Range > Free. Two black diamonds appear at the start and finish of yourproject. Drag thesemarkers to select the range that you desire.
6. Click OK.
A progress bar appears, showing you the rendering process, followed by the Facebook uploadinformation dialog box.
7. Fill in the information that appears on your Facebook account.
‣ Title: Type in the name of your video
‣ Description: Type in a description of your video.
8. Click OK.
The Facebook wizard dialog box opens and your internet browser is launched and automatically directedon the Facebook login page.
9. In your internet browser, log into your Facebook account.

Chapter 18: Exporting Your Project Export to YouTube and Facebook
532
Although you are not on the Facebook website you are now logged into Facebook. To log out youneed to go onto your account on the Facebook website.
10. In the Facebook wizard, click Next.
The Facebook wizard checks for permissions.
11. The first time you go through these steps, when the Facebook wizard asks for permissions, the internetbrowser is automatically directed to the Facebook confirmation page, where you need to give yourauthorization.The next time you export a video to your Facebook account, the wizard automatically uploads the videoto your account.
• In the Internet browser, click Allow Video Uploads.The Facebook page notifies you that the permissions have been saved.
• In the Facebook wizard dialog box, click Next.
The wizard finishes the upload and a dialog box opens notifying you that your video has been successfullyuploaded
12. Click OK.

Toon Boom Studio 8.1 User Guide
533
PrintAlthough youmay want to print out part or all or your finished or unfinished animation for reasons such as for amodel sheet or storyboarding, a fun project you could make with this feature is a flip book.
To print a flip book or a from your project:
1. Select File > Print.
The Printing dialog box opens.
2. From the Printer section, look through theName list to select a printer, which is connected to yourcomputer.
3. Click Page Setup.
The Page Setup dialog box opens.
4. Customize your page setup and click OK.
5. In the Printer section, if you want to print your file digitally and have it saved somewhere on yourcomputer, select the Print to File option and browse to the location where you would like to save this fileon your computer. Select the As PDF if you so desire.

Chapter 18: Exporting Your Project Print
534
As you want to print a flip book, do not select this section.
6. In the Copies section, select the number of copies of each individual page from the drop-down. Forexample, if you chose the number two, the printer prints two copies of page 1, two copies of page 2, etc.
7. In the Layout section, decide how many frames you would like per page. Selecting the Flip book optionautomatically places either 6 to 8 frames per page and leaves a margin for binding purposes.Once the images are printed, you have to cut your images to create your flip book. If you put only oneimage per page, it is difficult to quickly flip through the drawings as the pages are too big to handle.Smaller sheets aremuch easier to flip.
8. In the Export Type section, decide on one of the following options:
‣ Full Movie: By default prints the entire frame range of your project, including all scenes and all enabledlayers.
‣ Current Scene: Camera View: Prints all elements, from all enabled layers, for a specific scene,including all transformations visible in the Camera view and allows for the selection of a frame range.
‣ Current Scene: Drawing View: Prints all elements on a selected layer visible through the Drawingview, as well as other layers visible with the aid of the Light Table tool.
‣ Selected Level: Drawing View: Prints all elements on only one selected layer and offers the option ofprinting individual drawings only.
9. In the Export Range section, decide on one of the following options:
‣ All: Renders the entire project.
‣ Frame Range: Allows you to select a specific section of your project to render by frame number.
‣ Selector: Renders whichever layer or element you selected before starting the printing process.
‣ Free Playback Range: In the Timeline view, right-click on the timeline ruler (top) and select PlaybackRange > Free.
Two black diamonds appear at the start and finish of your project. Drag thesemarkers to select therange that you desire. Note: This must be done before you open the Export Dialog window.
‣
10. In the same section, decide on one, both or none of the following options:
‣ Keyframes only: Prints drawings on a framewith a keyframe in the Timeline view.
‣ Individual drawings only: Prints the first instance of a drawing. For example, if a drawing on a cell orframe is extended for 10 exposures in either the Xsheet or Timeline view, these extended exposuresare not printed. In other words, you receive only one printout of this drawing instead of ten.
11. From the Decoration section, decide whether or not you want to select the Print Camera Frame option.
12. Click OK.
You now have a frame-by-frame printed copy of your animation that is ready to be cut and bound into aflip book.

Toon Boom Studio 8.1 User Guide
535

Toon Boom Studio 8.1 User Guide
536

Toon Boom Studio 8.1 User Guide
537
Chapter 19: Keyboard Shortcuts forToon Boom StudioThis document lists the default keyboard shortcuts for Toon Boom Studio. To use a shortcut, press the key(s)and the character simultaneously. The plus sign (+) is not part of the sequence.
Commands without shortcuts are left blank in these tables.
The Custom column is provided so you may write down the shortcuts you customize.
In Toon Boom Studio, you can create your own keyboard shortcuts.
To assign your own keyboard shortcuts, select Edit >Preferences > Shortcuts from (Windows) or Toon BoomStudio > Preferences > Shortcuts (MacOS X).
COMMANDCOMMAND WINDOWS MAC OS X CUSTOM
Centre onMouse [N] [N]
Next Drawing [Shift] + [S] [Shift] + [S]
Next Element [F] [F]
Next Element in ExposureSheet
[Shift] + [F] [Shift] + [F]
Next Frame [S] [S]
Previous Drawing [Shift] + [A] [Shift] + [A]
Previous Element [D] [D]
Previous Element inExposure Sheet
[Shift] + [D] [Shift] + [D]
Previous Frame [A] [A]
Select Skeleton Root [Y] [Y]

Chapter 19: Keyboard Shortcuts for Toon Boom Studio
538
EDIT MENUCOMMAND WINDOWS MACOS X CUSTOM
Copy [Ctrl] + [C] [⌘ ] + [C]
Cut [Ctrl] + [X] [⌘ ] + [X]
Cut Special [Ctrl] + [Shift] +[X] [⌘ ] + [Shift] +[X]
Delete [Del] [Del]
Deselect All [Ctrl] + [Shift] + [A] [⌘ ] + [Shift] + [A]
Paste [Ctrl] + [V] [⌘ ] + [V]
Paste New Object [Ctrl] + [Shift] + [V] [⌘ ] + [O]
Paste Special [Ctrl] + [B] [⌘ ] + [B]
Paste Special Again [Ctrl] + [Shift] + [B] [⌘ ] + [Shift] + [B]
Redo [Ctrl] + [Shift] + [Z] [⌘ ] + [Shift] + [Z]
Select All [Ctrl] + [A] [⌘ ] + [A]
Undo [Ctrl] + [Z] [⌘ ] + [Z]
FILE MENUCOMMAND WINDOWS MACOS X CUSTOM
Close [Ctrl] + [W] [⌘ ] + [W]
Exit [Ctrl] + [Q] [⌘ ] + [Q]
New [Ctrl] + [N] [⌘ ] + [N]
Open [Ctrl] + [O] [⌘ ] + [O]
Print [Ctrl] + [P] [⌘ ] + [P]
Save [Ctrl] + [S] [⌘ ] + [S]
Save As [Ctrl] + [Shift] + [S] [⌘ ] + [Shift] + [S]
HELP MENUCOMMAND WINDOWS MACOS X CUSTOM
Toon Boom Studio Help [F1] [⌘ ] + [Shift] + [?]
What's This? Help [Shift] + [F1] [Alt] + [Shift] + [?]

Toon Boom Studio 8.1 User Guide
539
LIBRARY MENUCOMMAND WINDOWS MACOS X CUSTOM
Refresh [F5] [F5]
PLAY MENUCOMMAND WINDOWS MACOS X CUSTOM
Play [P] [P]
Preview Exposure Sheet [Ctrl] + [Alt] + [Enter] [⌘ ] + [Alt] + [Enter]
Preview Exposure SheetSelection
[Shift] + [Enter] [Shift] + [Enter]
Preview Movie [Ctrl] + [Shift] + [Enter] [⌘ ] + [Shift] + [Enter]
Preview Scene [Ctrl] + [Enter] [⌘ ] + [Enter]
Quick Preview [Return] [Return]
TOOLS MENUCOMMAND WINDOWS MAC OS X CUSTOM
Bone Creator Tool [U] [U]
BoneManipulator [H] [H]
Bone Setup Tool [J] [J]
Brush [@] [@]
Cycle Brush Tools [2] [2]
Cycle Eraser Tools [4] [4]
Cycle Paint Tools [3] [3]
Cycle Rotate Tools [8] [8]
Cycle Select Tools [1] [1]
Cycle Zoom Tools [5] [5]
Dropper (when Brush, Paintor Pencil tool is selected)
[Alt] [Alt]
Eraser [$] [$]
Grabber [^] [^]
Group Selection [Ctrl] + [G] [⌘ ] + [G]
Motion [0] [0]
Nudge Backwards (when [Alt] + Up Arrow] [Alt] + Up Arrow]

Chapter 19: Keyboard Shortcuts for Toon Boom Studio
540
TOOLS MENUCOMMAND WINDOWS MAC OS X CUSTOM
Transform tool is selected)
Nudge Forwards (whenTransform tool is selected)
[Alt] + [DownArrow] [Alt] + [DownArrow]
Paint [#] [#]
Paint Multiple Drawings [Shift] + [Alt] [Shift] + [Alt]
Peg-OnlyMode [M] [M]
Scale [9] [9]
Select Drawing Objects [!] [!]
Select Elements [6] [6]
Start New Bone Chain(when Bone Creator Tool isselected)
[Shift] [Shift]
Text [T] [T]
Transform [7] [7]
Ungroup Selection [Ctrl] + [Shift] + [G] [⌘ ] + [Shift] + [G]
Zoom [%] [%]
VIEW MENUCOMMAND WINDOWS MACOS X CUSTOM
Toggle FloatingWindowsVisibility
[Tab] [Tab]
Grid Display Toggle [G] [G]
No Next Drawings [Shift] + [W] [Shift] + [W]
No Previous Drawings [Shift] + [Q] [Shift] + [Q]
Onion Skin Next DrawingCycle
[W] [W]
Onion Skin Previous DrawingCycle
[Q] [Q]
Recentre [Shift] + [Space] [Shift] + [Space]
Reset Rotation [Shift] + [C] [Shift] + [C]
Reset View [Shift] + [V] [Shift] + [V]
Reset Zoom [Shift] + [Z] [Shift] + [Z]
Rotate Clockwise [V] [V]

Toon Boom Studio 8.1 User Guide
541
VIEW MENUCOMMAND WINDOWS MACOS X CUSTOM
Rotate Counterclockwise [C] [C]
Show/Hide Strokes [K] [K]
Switch Active View [B] [B]
Turn Auto Light TableOn/Off [L] [L]
Turn Full ScreenOn/Off [Ctrl] + [F] [⌘ ] + [F]
Zoom In [X] [X]
ZoomOut [Z] [Z]
WINDOWS MENUCOMMAND WINDOWS MACOS X CUSTOM
Colour Palette [Ctrl] + [Shift] + [C] [⌘ ] + [Shift] + [C]
Exposure [Ctrl] + [Shift] + [E] [⌘ ] + [Shift] + [E]
Function Editor [Ctrl] + [Shift] + [F] [⌘ ] + [Shift] + [F]
Minimize [⌘ ] + [M]
Pen View [Ctrl] + [Shift] + [N] [⌘ ] + [Shift] + [N]
Properties view [Ctrl] + [Shift] + [P] [⌘ ] + [Shift] + [P]
SceneManager [Ctrl] + [Shift] + [M] [⌘ ] + [Shift] + [M]
Timeline [Ctrl] + [Shift] + [T] [⌘ ] + [Shift] + [T]

Toon Boom Studio 8.1 User Guide
542