THE WRIGHT BROTHERS from Bicycles to Airplanes - EAA
88
THE WRIGHT BROTHERS from Bicycles to Airplanes Civil Air Patrol, the Official Auxiliary of the United States Air Force Where Imagination Takes Flight!
-
Upload
khangminh22 -
Category
Documents
-
view
1 -
download
0
Transcript of THE WRIGHT BROTHERS from Bicycles to Airplanes - EAA

THE WRIGHT BROTHERSfrom Bicycles to Airplanes
Civil Air Patrol, the Official Auxiliary of the United States Air Force
Where Imagination Takes Flight!

A single copy of this publication may be ordered from:
HQ CAP/ETMAXWELL AFB, AL 36112-6332

THE WRIGHT BROTHERSfrom Bicycles to Airplanes
Edited byJudy Stone
Layout and Graphics byPeggy Greenlee
Published September 2002 byNational Headquarters
Civil Air PatrolMaxwell Air Force Base, Alabama
i

TABLE OF CONTENTS
ii
1. Contents.............................................................................................................................................. ii2. Acknowledgments............................................................................................................................... iv3. Introduction......................................................................................................................................... 14. Teaching Tips...................................................................................................................................... 25. Student Record Sheet......................................................................................................................... 46. Wright Brothers Background Information............................................................................................ 57. Task #1 - Art
+ Teacher Lesson Plan.......................................................................................................... 13+ Student Information............................................................................................................. 15
8. Task #2 - Science and Mathematics+ Teacher Lesson Plan.......................................................................................................... 16+ Student Information............................................................................................................. 19
9. Task #3 - Art+ Teacher Lesson Plan.......................................................................................................... 21+ Student Information............................................................................................................. 23
10. Task #4 - Language Arts andCareers+ Teacher Lesson Plan.......................................................................................................... 25+ Student Information............................................................................................................. 27
11. Task #5 - Geography+ Teacher Lesson Plan.......................................................................................................... 28+ Student Information............................................................................................................. 29
12. Task #6 - Social Studies and Language Arts+ Teacher Lesson Plan.......................................................................................................... 30+ Student Information............................................................................................................. 32
13. Task #7 - Health+ Teacher Lesson Plan.......................................................................................................... 33+ Student Information............................................................................................................. 35
14. Task #8 - Language and Art+ Teacher Lesson Plan.......................................................................................................... 36+ Student Information............................................................................................................. 38
15. Task #9 - Language Arts+ Teacher Lesson Plan.......................................................................................................... 39+ Student Information............................................................................................................. 40
16. Task #10 - Language Arts+ Teacher Lesson Plan.......................................................................................................... 41+ Student Information............................................................................................................. 43
17. Task #11 - Mathematics+ Teacher Lesson Plan.......................................................................................................... 44+ Student Information............................................................................................................. 46
18. Task #12 - Mathematics+ Teacher Lesson Plan.......................................................................................................... 48+ Student Information............................................................................................................. 50
19. Task #13 - Social Studies and Economics+ Teacher Lesson Plan.......................................................................................................... 52+ Student Information............................................................................................................. 53
20. Task # 14 - Music and Language Arts+ Teacher Lesson Plan.......................................................................................................... 55+ Student Information............................................................................................................. 57
21. Task # 15 - Physical Education and Language Arts+ Teacher Lesson Plan.......................................................................................................... 58+ Student Information............................................................................................................. 60
22. Task # 16 - Reading+ Teacher Lesson Plan.......................................................................................................... 61+ Student Information............................................................................................................. 63

TABLE OF CONTENTS (Continued)
iii
23. Task # 17 -Science+ Teacher Lesson Plan........................................................................................................... 64+ Student Information............................................................................................................. 66
24. Task # 18 - Language Arts+ Teacher Lesson Plan........................................................................................................... 67+ Student Information............................................................................................................. 69
25. Task # 19 - Science+ Teacher Lesson Plan........................................................................................................... 71+ Student Information............................................................................................................. 73
26. Evaluation Techniques and/or Answers to Tasks......................................................................... 7527. Wright Brothers Test Key.................................................................................................................7828. Wright Brothers Test........................................................................................................................7929 Achievement Award..................................................................................................Inside back cover

ACKNOWLEDGMENTS
We wish to thank the many experts at the National Aeronautics and Space Administration (NASA) who share our commitment to aerospace education and whose information, ideas, and activities are incorporated in this thematic unit.
We would also like to thank Dr. Ann Walko, Judy Stone, Peggy Greenlee, and the following talented education students from Kean University, Union, New Jersey, who revised our old Wright Brothers packet and prepared it for the Centennial of the Wright Brothers' great accomplishment: Older Azard, B. Patty Bruno, Carl J. Buffalino, Karen Carlson, Michele Chizzoniti, Kendra Colburn, Jennifer Dunlop, Jodi Frohnapfel, Kathleen Hauser, Sylvia Leon, Julie Liloia, Debra Loprete, Jennifer Lorenzo, Kamila Miazio, Lauren Murphy, Valley Nash, Noemi Natal-Villegas, Miquel Orejas, Kelly A. Rappa, Alicia Ribeca, Andrea Romano, Saundra Sharp-Conte, Carol Sibilia, Jacqui Swanson, Rosaria Taglialavore, and Donna Wozniak.
iv

Since World War II, there has been a need to provide classroom teachers with materials to aid them in teaching about the aerospace world. Aerospace personalities (the people who moved us from Kitty Hawk to the International Space Station) is one such area. The feats of individuals making history in this or in any other field are often, at best, misunderstood and, at worst, forgotten after achieving their first notoriety.
This thematic unit contains information about the Wright Brothers. We want this unit to point out certain facts to develop an understanding of the Wright Brothers' contributions in the field of manned flight in a heavier-than-air machine. The Wright Brothers succeeded in controlled, powered, heavier-than-air flight because of a combination of factors. First, they had access to the knowledge gained by others before them; second, the first practical power plant, the gasoline engine, had been developed; and finally, they were highly creative, possessed outstanding mechanical aptitude, and were endowed with a great deal of personal integrity. They approached the task of manned flight in a methodical, scientific manner. Using wind tunnels and unmanned flight tests, they developed the first controlled flying aircraft. Then they added a power plant of their own design. The result was the Flyer, changing mankind from a two-dimensional creature to three dimensions. The world has never been the same. Wilbur and Orville's contributions didn't stop there. They provided an inspiration to airmen throughout the world and remained active in aviation for the rest of their lives.
Understanding any subject requires a knowledge of the terminology and structure associated with the subject. A background of the subject's origin and subsequent development is also required. This unit on the Wright Brothers provides information in narrative form, and students will experience reinforcement of their knowledge as they complete the various activities and study the accompanying visual displays.
We have compiled this thematic unit to incorporate across the curriculum disciplines with corresponding National Content Standards. Included are background information, teacher lesson plans, student information for each activity, a section with examples of how to evaluate, and/or answer each activity, and a unit test with answer key. This unit may be used in its entirety for a portfolio assessment or individual
1899 Wright Kite Drawings
Wilbur and Orville Wright
INTRODUCTION
activities may be selected at random and evaluated by rubric or other method of assessment. The optional test can be used as a pretest and/or posttest for the unit. Each activity may be used for a total class lesson, or by small groups in a learning center, or by individual students. Although developed for the middle school, this material can be adapted to upper elementary or high school students.
This packet includes an aerospace education achievement award with a dual signature line for leader signatures; a student record sheet; and posters for display. The record sheet may be used for portfolio contents and how, when, and by whom each activity was evaluated.
Feel free to adapt this material to fit your specific situation and need. The purpose of this unit is to learn about the Wright Brothers and their contribution to the history of flight. To accomplish this, each activity urges creativity and provides information designed to emphasize National Content Standards. Subjects addressed include science, social studies, mathematics, language arts, careers, art, music, and physical education.
1

TEACHING TIPS
PREPARATION:+ To use tasks repeatedly, you may want to laminate them.
+ Provide materials and supplies in a designated place.
+ Display the enclosed posters (artwork) on a bulletin board where they will be visible and can serve
as a source of information.
+ Laminate instruction information card that can be placed between the Student Information folder
box and the box of student folders. The directions should read:
1. Take a task from the Student Information box.
2. Enter the date on your record sheet when you start the task.
3. After you have finished the task, enter the date on your record sheet.
4. Place your finished work in your folder.
5. Place the task back in the Student Information box.
+ Prepare a personalized folder for each student or let them design their own folder.
+ Provide a copy of the student record sheet for each student.
PRESENTATION:
+ Introduce the material by using the background information.
+ Instruct the students on:
! The text.
! How to use the task sheets.
! Where the materials are located.
+ Instruct the students to select the task sheets in the order of their choice, (or in the order assigned
by you).
+ Hand out personalized folders and copies of students' record sheet.
! Explain how to fill out the record sheets.
! Assign a location for the folders.
+ Administer the pretest before the students begin their activities.
! The test key is included.
! Record the scores on the students' record sheets.
Note: If small groups will be doing the tasks, it is beneficial to have heterogeneous groups with a stronger
reader assigned to a weaker reader.
EVALUATION
+ Suggestions for assessment:
! Student Portfolio (the folders kept by each student).
2

! Teacher Rubric (especially for group work).
Performance Grading
! Pre and Post Test
+ Go over assignments, and initial students' record sheets.
+ Meet with small groups to evaluate and schedule future plans (skits, etc.).
+ Administer the post test and record the scores on the students' record sheets.
+ Award certificates of achievement to students who have satisfactorily completed the activities given
on the task sheets and who have shown a gain in knowledge of the Wright Brothers.
http://teachers.teachnology.com/webtools/
rubrics/ (a site for sample rubrics).
LET'S GET STARTED!
3

TASK NUMBER TEACHER COMMENTSTEACHER INITIALS
DATESTARTED
DATEFINISHED
4
Task 1 - Art
Task 2 - Science & Mathematics
Task 3 - Art
Task 4 - Language Arts and Careers
Task 5 - Geography
Task 6 - Social Studies andLanguage Arts
Task 7 - Health
Task 8 - Language and Art
Task 9 - Language Arts
Task 10 - Language Arts
Task 11 - Mathematics
Task 12 - Mathematics
Task 13 - Social Studies and Economics Task 14 - Music and Language
Arts
Task 15 - Physical Education and Language Arts
Task 16 - Reading
Task 17 - Science
Task 18 - Language Arts
Task 19 - Science
Student Record Sheet
THE WRIGHT BROTHERS: FROM BICYCLES TO AIRPLANES
By
Name ___________________________________________________________________

WRIGHT BROTHERS BACKGROUND INFORMATION
Family life:The parents of the famous Wright Brothers were Milton and Susan Catherine Koerner Wright. Milton Wright, a minister who later became a bishop in the United Brethren in Christ Church, and his wife were well-educated. Wilbur was born near Millville, Indiana, on April 16, 1867 and Orville was born on August 19, 1871 in Dayton, Ohio. The family moved often because of the father's ministry. The Wright family allowed freedom of expression and the children were taught to be self-sufficient with an emphasis placed on learning. Although Wilbur was an outstanding student, he did not graduate from high school due to a family move prior to graduation. He had planned to attend Yale University, but a skating accident spoiled his intentions. Orville, on the other hand, caused much mischief in school and quit before his last year to start a printing shop. Both brothers, however, shared an interest in technological problem solving, which was encouraged by Milton Wright, who filled the house with two extensive libraries.
Wilbur in 1878 Age 12
The Wright Home at 7 Hawthorne Street in Dayton, Ohio
Orville in 1878 Age 8
Early Businessmen:Orville went into the printing business with a friend, printing handbills, tickets, and other small jobs. In 1889, Wilbur joined them and they began publishing the West Side News, a small four-page newspaper. Their printing venture
lasted until 1896. During this time, they published the Evening Item and their most successful publication, a weekly magazine called Snapshots. In 1892, the Wright Brothers became bicycle manufacturers to capitalize on the bicycle “craze” sweeping the
5
nation. Their company produced three models the “Van Cleve”,the "St. Clair" and the lower priced "Wright Special".
Wilbur at work in the Wright Cycle Shop at 1127 West Third Street in Dayton, Ohio, 1897.

Interest in Flight:When Orville was 7 and Wilbur was 11 years old, their father gave them a toy helicopter which was “powered” by two counterrotating propellers and it actually flew. This was the beginning of their interest in flight. Kites also fascinated the brothers and they built and flew them, even as adults. Between 1891 and 1899, the Wrights read everything they could find about flight. They closely followed the gliding exploits of Otto Lilienthal and read the published material of such aviation pioneers as Samuel Pierpont Langely and Octave Chanute. They particularly liked what they found in Chanute's works. The more they studied, the more interested they became in building and flying their own aircraft.
The Wrights decided the best glider design would be a biplane, or “double-decker,” as Chanute called it. The brothers knew their biggest problem would be in maintaining equilibrium. The Wrights calculated that movable surfaces were the answer to equilibrium problems and proceeded to work out the design for their first glider.
The Wright "Bat" Is a rubber band-powered helicopter that Wilbur and Orville first made when they were children. A propeller Is a wing that spins in a circle.
They were also looking for a place to perform flight tests and they finally selected Kitty Hawk, North Carolina, as the location. This was not a random selection; the methodical Wrights looked for a place with fairly constant wind and Kitty Hawk most nearly answered this requirement.
To perform flight tests, the Wrights needed fairly constant wind and sandy rolling hills which were found to be ideal at Kitty Hawk, North Carolina.
1901 Kitty Hawk Camp
6
INTO THE AIR
1900 Wright Glider Flown as a Kite
Nonpowered Flight/GlidersThe Wright Brothers' first aircraft was flown as a kite with movable surfaces manipulated from the ground by long control lines. The next, a larger version of the first, was flown first as a kite and later with a pilot aboard. The craft was difficult to manipulate and did not fly well. Nevertheless, the brothers were enthusiastic about the results and reached the following conclusions during the first test flights:! Practice is the key to the secret of flying.! Drag or wind resistance can be reduced by the pilot
assuming a horizontal position.! Up and down motion can be controlled by adding a

7
The 1901 glider was such a disappointmentthat Wilbur almost gave up.
smaller wing, set at a negative angle in front of the main wings.
! Side-to-side motion can be controlled by wing-warping (presenting different angles of the wings ends to the wind).
In July 1901, they returned to Kitty Hawk with their new, much larger glider. Things didn't go well. The control system worked, but the craft performed poorly and the maximum glide distance attained was only 389 feet. Chanute observed these flights, and he and the Wrights concluded the problem was with the tables of air pressure (on an airfoil) that had been worked out by Lilienthal. The Wrights were discouraged. However, the encouragement of Chanute coupled with their interest and innate curiosity motivated them to continue to study and approach the problem scientifically.
During the winter of 1901-1902, they built a wind tunnel to test airfoils and recomputed pressure tables. The results of their research and tests gave them the inspiration to continue their “hobby,” and to build a new glider. The 1902 glider had been modified to maximum lift, optimum controllability, and a rudder added to the rear of the craft. This time it performed well, gliding distance of 622 feet. They knew they had solved the problem of manned flight, and at this point the brothers became very secretive about their work.
The Wright Brothers used their own wind tunnel to test airfoil shapes.
The Lifesaving Crew at Kitty Hawk in 1900.
The 1902 Wright Glider in Flight.
Powered FlightOn March 23, 1903, the Wright Brothers applied for patents for their flight control system. They were confident that a motor (or engine) could be added for sustained flight. Attempts at finding a suitable commercial motor failed so the Wrights and C.E. Taylor, a machinist from their bicycle shop, constructed a lightweight, four-cylinder engine. This engine produced twelve horsepower. The next task was to design propellers for the craft. After much experimentation, their final design consisted of two counterrotating propellers of the “pusher” type.On September 23, 1903, the Wrights once again left Dayton for Kitty Hawk. Only three weeks were required to assemble their craft but the flights were delayed due to mechanical problems and bad weather. While they waited for the weather to clear, the Wrights devised instruments for their craft: an anemometer to gauge the speed of the “relative wind,” a stopwatch to measure the time airborne, and a counting device to measure the revolutions made by the propellers.

In 1905, the new “Flyer” was airborne. This plane had a tendency to slip and stall in the turns but they found the problem was one of piloting technique rather than faulty design and construction.
8
On December 17, 1903, at 10:35 in the morning, with J.T. Daniels, W.S. Dough, A.D. Ethridge, W.C. Brinkley, and Johnny Moore as witnesses, Orville got on the machine for an attempt at flight. The wind velocity was averaging about 24 miles per hour. With throttle “forward,” the craft left the rail when it was about 40 feet down the 60-foot track. With the wind slightly gusty and the front rudder (elevator) erratic in its operation, Orville's flight was made like a roller coaster ride. However, the flight from level ground to level ground covered 120 feet in about 12 seconds and powered manned flight into history. Three additional flights were made that same day. The second and third flight each covered approximately 175 feet, and the fourth and final flight of the day covered 859 feet in 59 seconds. The rough landing damaged the front rudder frame, and while “parked” at the hangar for repairs, a sudden gust of wind caught the craft, turned it over, and demolished it. There was nothing left to do but go home.
The Wrights wanted wide news coverage of their feat but were disappointed when the press was indifferent and newspaper accounts were brief and inaccurate.
The Wright Brothers and Charlie Taylor built this engine to power the 1903 Flyer I.
The Wright Brothers' second powered aircraft was completed about May 16, 1904. It was heavier and stronger than the 1903 craft and had a more powerful engine. They invited the press and public to witness their demonstration flights at Huffman Prairie. Nothing went well. The winds were too light, they had motor trouble, and the craft simply did not get into the air. Although they corrected the problems and made longer and longer flights, public interest was lacking.
The 1903 Wright Flyer I on it's first flight December 17, 1903
The 1904 Flyer flew the first circles and figure-8s, but it was difficult to control.
Orville and Wilbur

Promoters wanted to buy the plane as a money-making, circus type attraction, and representatives from several European countries were also interested in purchasing the plane. The Wrights wanted the United States to have first chance at their invention so they wrote the Secretary of War offering the plane for sale. The offer was refused. Then, they began negotiations with foreign countries but these failed because of patent troubles and their “buy-now, fly-later” attitude.
FameBetween October 1905, and February 1908, the Wright Brothers did no flying. They were afraid that spies would steal their invention, so they kept it hidden from public view. In February 1908, they finally signed a contract with the United States Army, and in March of that year they negotiated a contract with a French company. They developed a new aircraft called the “Type A.” Wilbur took one to France to demonstrate it while Orville tested one for the Army. On September 17, 1908, during the last test flight for the Army, the plane developed propeller troubles and crashed, killing Lieutenant T.E. Selfridge and breaking Orville's leg. However, this accident did not deter the Army's interest in the plane and the contract was fulfilled. In 1909 and 1910, Europe and America were intensely interested in flying. During this time, the Wrights were involved in many legal battles defending their patents. They won major judgments against early aviators and aircraft manufacturers.
9
Orville demonstrates the first military airplane at Fort Meyer in 1908.
Orville crashes the Military Flyer at Fort Meyer, 1908.
The Wrights were having no luck trying to sell their airplane to the U. S. Army or even in Europe. However, in 1906, the government finally granted them the "grandfather" patent for the airplane.

10
Orville and Wilbur ready the 1909 Military Flyer before a flight at Fort Meyer.
Transporting the U.S. Army's First Military Aircraft.
Wilbur flying the Model A at LeMans, France
Orville and Wilbur at Belmont International Airmeet in 1909.
Wilbur Wright prepares to take his sister Katherine aloft for the first time in France, 1909. Note the string tied around her skirt to keep it from blowing. This started a new fashion in women's dress called the "hobble" skirt.
Orville and Wilbur Wright testing the wind, preparing for a flight in France in 1909.

11
Wilbur flies inNew York beforea million people and around the Statue of Liberty.
INTO HISTORY
The Wright Brothers produced new, modified models of their plane. These models had the elevator and rudder mounted at the rear and wheels permanently attached to their skids. Wilbur and Orville also taught many people to fly and these new “instructor pilots” went on to teach others. The Wright Brothers gained fame and financial success. By 1911 everything was going well for them. Their factory was producing aircraft at capacity, and they had sold their patent rights to France and Italy. Then, in May 1912, Wilbur was stricken with typhoid fever. He died on May 30, 1912. Orville continued working. His inventions included the “automatic stabilizer” and several more models of their aircraft. In 1915, he sold the patents held by the Wright Company but continued to work in his private laboratory. Orville lived the remaining years of his life in financial security and peace. He died in January of 1948.
The Wrights arrive home to find they have becomecelebrities in America as well as Europe. They aretreated to an endless series of awards and honors,including a city-wide celebration in Dayton, Ohio.
Orville is shown here with Amelia Earhart at the Franklin Institute.
Orville standing beside the gigantic Curtis-Wright engine in 1941.
Orville sat on the boards of several institutions and corporations as an advisor.

12
The 1910 Wright Flying School at Montgomery, Alabama
U.S. Army pilots prepare to fire a Lewis Machine Gun from a Wright Model B
The Wright Model G Flying Boat
The Assembly Room at the Wright Company.
Orville and his first civilian student pilots in Alabama.
The Incorporationpapers for theWright Company.
The Wright Model F has an Enclosed Fuselage.

13
TASK #1 – ARTTeacher Lesson Plan
Objective:Students will create a magazine cover to announcethe first flight of Orville and Wilbur Wright.
National Standards:Art
I. Understand and apply media techniques and processes.II. Using knowledge of structure and functions.
Technology7. Understanding of the influence of technology on history.8. Understanding of the attributes of design.
11. Ability to apply the design process.12. Ability to use and maintain technological products and systems.
Materials:Computer with design component, a Wright Brothers video, internet, paper, pencil, art supplies.
Estimated Time:Two 60-minute periods (one for the video and one to discuss, plan, and create the magazine cover).
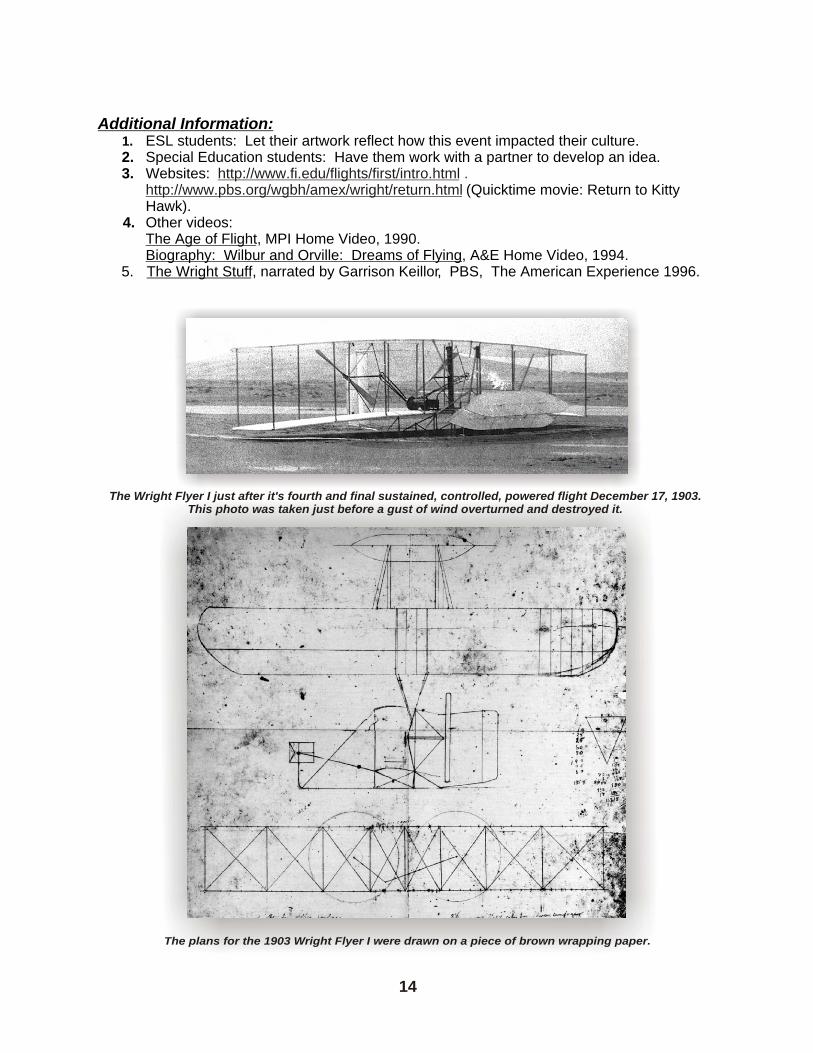
Background Information: On December 17, 1903, Wilbur and Orville Wright made history by being the first to successfully sustain and control powered flight. The Wrights wanted wide news coverage of their feat but were disappointed when the press was indifferent and newspaper accounts were brief and inaccurate. However, after many battles to defend their patent and gain interest in their invention, the Wright brothers received fame and financial success.
Procedure/Activity:1. Tell students they will design a magazine cover to show Orville and Wilbur Wright's
great accomplishment on December 17, 1903.2. Students may create their magazine covers with any art medium. They may also use
computer design.3. Discuss the magazines that would have been available in the early 1900s such as
National Geographic, Saturday Evening Post, Look, and Life. Have them use one ofthese magazine names to create their covers.
4. Also, give students a perspective on the event by showing a video on the Wright Brothers accomplishments. (Several suggestions are listed in "Additional Information.")
Rationale:This lesson will provide a creative way for students to view the first flight event.
Assessment:Use a rubric emphasizing design creativity, neatness, and historical relevance.
14
Additional Information:1. ESL students: Let their artwork reflect how this event impacted their culture.2. Special Education students: Have them work with a partner to develop an idea.3. Websites:
(Quicktime movie: Return to Kitty Hawk).
4. Other videos:The Age of Flight, MPI Home Video, 1990.Biography: Wilbur and Orville: Dreams of Flying, A&E Home Video, 1994.
5. The Wright Stuff, narrated by Garrison Keillor, PBS, The American Experience 1996.
http://www.fi.edu/flights/first/intro.html . http://www.pbs.org/wgbh/amex/wright/return.html
The Wright Flyer I just after it's fourth and final sustained, controlled, powered flight December 17, 1903.This photo was taken just before a gust of wind overturned and destroyed it.
The plans for the 1903 Wright Flyer I were drawn on a piece of brown wrapping paper.
15
TASK #1 – ART Student Information
Background Information: On December 17, 1903, Wilbur and Orville Wright made history by being the first to successfully sustain and control powered flight. The Wrights wanted wide news coverage of their feat but weredisappointed when the press was indifferent and newspaper accounts were brief and inaccurate. However, after many battles to defend their patent and gain interest in their invention, the Wright brothers received fame and financial success.
Materials: Internet, computer with design component, paper, pencil, art supplies.
Directions:1. After viewing the film on the Wright brothers and their December 17, 1903 flight, you will
select a magazine name and design a cover that will inform the world of this greathistorical event.
2. Use any art medium to create your magazine cover. You may even design it using computer graphics.
The 1903 Wright Flyer I on it's first flight December 17, 1903
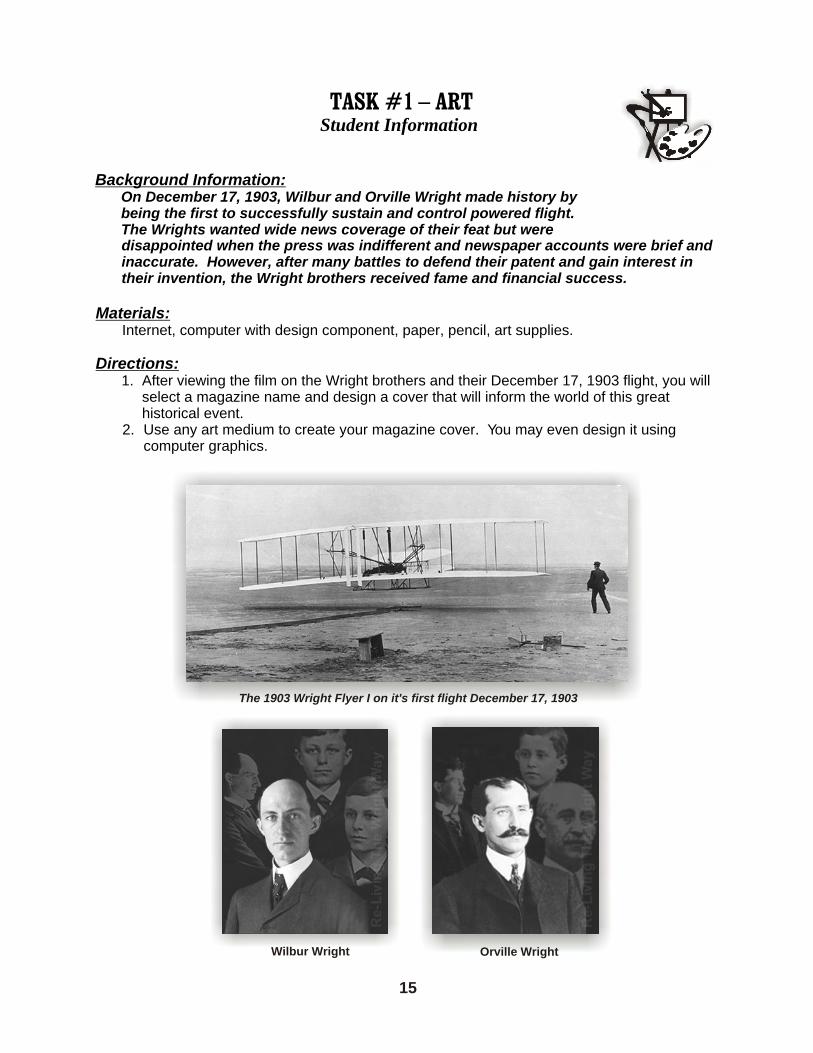
Wilbur Wright Orville Wright

16
TASK 2 - SCIENCE AND MATHEMATICSTeacher Lesson Plan
Objectives:Students will:
1. Read a Beaufort Wind Scale.2. Build an anemometer and record wind speed.
National Standards:Science:
Standard E: Science and Technology! Abilities of technological design! Understandings about science and technology
Unifying Concepts and Processes:! Constancy, change, and measurement
Mathematics:1. Number and Operations:
Compute fluently and make reasonable estimates.4. Measurement:
Understand measurable attributes of objects and the units, systems, and processes of measurement.
Materials:Pencil, worksheet with Beaufort Wind Scale chart and data table for anemometer readings, anemometer (modeling clay, five Dixie cups = 3 ounce, two straight plastic soda straws, sharp pencil with new eraser, a pin, scissors, paper punch, and small stapler).
Estimated Time:40 minutes to read Beaufort Chart and build anemometer. One minute each for 5 days to time and record wind speed.
Background Information: In August of 1900, Wilbur built his first glider. He then contacted the U.S. Weather Bureau for information on windy regions of the country. Reviewing the list, he chose a remote sandy area off the coast of North Carolina named Kitty Hawk, where winds averaged 13 mph.
On the afternoon of September 13, 1900, Wilbur Wright wrote, “In answering I would say that you would find here nearly any type of ground you wish; you could, for instance, get a stretch of sandy land 1 mile by five with a bare hill in the center 80 feet high, not a tree or bush anywhere to break the evenness of the wind current. This in my opinion would be a fine place; our winds are always steady, generally from 10 to 20 miles velocity per hour.”
On December 17, 1903, Orville Wright boarded the Wright brothers plane at 10:35 am. The wind was a brisk 21 miles per hour out of the northeast.
Procedure/Activity:1. Have students locate and record the wind conditions on the Beaufort Wind Scale on
Land chart for the three examples in the background information.2. Have students construct an anemometer from the following steps:

17
! Take one of the cups and punch four holes equally spaced around the cup and about ¼ inch below the rim. Punch a hole in the bottom center of this cup.
! Take the other four cups and punch one hole in each one about ½ inch below the rim. Take one of the four and color or mark it so that it is different from the other three.
! Take one of the four cups and push one of the straws through the hole. Bend the end of the straw inside of the cup and staple it to the side of the cup across from the hole. Do the same thing for another one-hole cup and the other straw.
! Slide one cup and straw through two opposite holes in the four-hole cup. Push another one-hole cup on the end of the straw and bend and staple, making sure that the cups face in opposite directions.
! Do the same thing with the other straw and cup assembly.! Line up the four cups so that their open ends face in the same direction around the
center cup. Push the straight pin through the two straws where they intersect with ! the sharp end down.! Push the eraser end of the pencil through the bottom hole of the center cup and push
the sharp end of the pin into the end of the eraser as far as you can.! The anemometer should rotate easily around. Push the sharp end of the pencil into
a modeling clay base set on a cardboard square ( so that it can be moved easily).! To find the wind speed, count the number of revolutions your anemometer spins in a
minute. Take this reading once a day (same time) for 5 days and record therevolutions on the data table.
! EXTRA: Determine wind speed by counting the number of revolutions per minute. Next calculate the circumference of the circle (in feet) made by the rotating paper cups. Multiply the revolutions per minute by the circumference of the circle (in feet per revolution), and you will have the velocity of the wind in feet per minute. Try converting feet per minute into miles per hour.
3. Students should record wind speed for 5 days and discuss what effect the wind seemed to have on the weather each day.
Rationale:This lesson provides students with information about wind speed and how it is measured.
Assessment:Students should turn in their data sheetsand compare results.
Your anemometer shouldlook like this one. The Robinson Cup Anemometer
on the roof of the Armagh Observatory had been in action since March 1847.
Source: Armagh Observatory

18
WIND SPEED INFORMATION AND DATA SHEET
Name______________________________________________________________________
Beaufort Wind Scale on Land
Wind Force m.p.h. Wind Descriptions
0 Less than 1 Calm Smoke rises vertically.
1 1-3 Light air Direction of wind shown by smoke drift.
2 4-7 Light breeze Wind felt on face, leaves rustle.
3 8-11 Gentle breeze Leaves and small twigs in constant motion, wind extends flag.
4 12-18 Moderate breeze Wind raises dust and loose paper, smallbranches move.
5 19-24 Fresh breeze Small trees in leaf start to sway.
6 25-31 Strong breeze Large branches in motion, umbrellas used with difficulty.
7 32-38 Near gale Whole trees in motion, inconvenient towalk against wind.
8 39-47 Gale Twigs break from trees, difficult to walk.
9 48-54 Strong gale Slight structural damage occurs, slates removed.
10 55-63 Storm Trees uprooted, considerable structuraldamage.
Anemometer Data TableDay Date Revolutions/minute Observations of wind speed's affect EXTRA:
mph and wind speed
1
2
3
4
5

19
TASK #2 SCIENCE AND MATHEMATICSStudent Information
Background Information: In August of 1900, Wilbur built his first glider. He then contacted the U.S. Weather Bureau for information on windy regions of the country. Reviewing the list, he chose a remote sandy area off the coast of North Carolina named Kitty Hawk, where winds averaged 13 m.p.h.
On the afternoon of September 13, 1900, Wilbur Wright wrote, “ In answering, I would say that you would find here nearly any type of ground you wish; you could, for instance, get a stretch of sandy land 1 mile by five with a bare hill in the center 80 feet high, not a tree or bush anywhere to break the evenness of the wind current. This in my opinion would be a fine place; our winds are always steady, generally, from 10 to 20 miles velocity per hour.”
On December 17, 1903, Orville Wright boarded the Wright brothers plane at 10:35 am. The wind was a brisk 21 miles per hour out of the northeast.
Materials: Pencil, worksheet with Beaufort Wind Scale chart and data table for anemometer readings, anemometer (modeling clay, five Dixie cups = 3 ounce, two straight plastic soda straws, sharp pencil with new eraser, a pin, scissors, paper punch, and small stapler).
Directions:1. Find the speed of the wind from the background information. There are three different
wind speeds. On the back of the worksheet you are given, write the type of wind and the description of that type of wind by using the Beaufort Wind Scale on Land chart on the front of the worksheet.
2. Build an anemometer by using the materials listed above and following the directionsbelow:! Take one of the cups and punch four holes equally spaced around the cup and about
¼ inch below the rim. Punch a hole in the bottom center of this cup.! Take the other four cups and punch one hole in each one about ½ inch below the rim.
Take one of the four and color or mark it so that it is different from the other three.! Take one of the four cups and push one of the straws through the hole. Bend the end
of the straw inside of the cup and staple it to the side of the cup across from the hole. Do the same thing for another one-hole cup and the other straw.
! Slide one cup and straw through two opposite holes in the four-hole cup. Push another one-hole cup on the end of the straw and bend and staple, making sure that the cups face in opposite directions.
! Do the same thing with the other straw and cup assembly.! Line up the four cups so that their open ends face in the same direction around the
center cup. Push the straight pin through the two straws where they intersect with the sharp end down.
! Push the eraser end of the pencil through the bottom hole of the center cup and push the sharp end of the pin into the end of the eraser as far as you can.

20
! The anemometer should rotate easily around. Push the sharp end of the pencil into a modeling clay base set on a cardboard square ( so that it can be moved easily).
! To find the wind speed, count the number of revolutions your anemometer spins in a minute. Take this reading once a day (same time) for 5 days and record therevolutions on the data table.
! EXTRA: Determine wind speed by counting the number of revolutions per minute. Next calculate the circumference of the circle (in feet) made by the rotating paper cups. Multiply the revolutions per minute by the circumference of the circle (in feet per revolution), and you will have the velocity of the wind in feet per minute. Try converting feet per minute into miles per hour.
3. Students should record wind speed for 5 days and discuss what effect the wind seemed to have on the weather each day.
Your anemometer shouldlook like this one.
The Robinson Cup Anemometeron the roof of the Armagh Observatory had been in action since March 1847.
Source: Armagh Observatory

TASK #3 - ARTTeacher Lesson Plan
Objective: Students will explore different methods for printing.
National Standards:Art:
I. Understand and apply media techniques and processes.
Materials:1. Fruits and vegetables of all kinds such as carrots, potatoes, apples, broccoli, etc., paint
or ink, sponges and Styrofoam tray (putting paint on a sponge to press the object into allows only a little paint to come off…because a little is all you need), paintbrushes, water, water containers, paper, a covered work area.
2. Sponges cut into different shapes, tempera paint, paper, water, a covered work area.3. Old puzzle pieces, white glue, cereal box cardboard, safety scissors, paint, printmaking
ink, paint roller or printmaking brayer, construction paper, old cookie trays to use as ink trays.
Estimated Time:40 minutes (preparation, creation, and cleanup).
Background Information: The first time Wilbur and Orville referred to themselves, as “The Wright Brothers” was when they started their own printing firm at the ages of 22 and 18. Using a damaged tombstone and buggy parts, they built a press and printed odd jobs as well as their own newspaper. In 1889, they started publishing a weekly newspaper called “The West Side News” and later in 1890 they changed the name and promoted it to a daily “The Evening Item.” They also did a favor for a friend when they printed “The Tattler,” launched by Paul Laurence Dunbar (who went on to become a famous African-American writer, lecturer, and the poet laureate of his race).
Printing and printmaking are ancient forms of art. There are many methods to print an image other than using a printing press.
Procedure/Activity:1. Students should choose one method of printing and directions from the three choices
listed:! Fruit and veggie prints (see student information).! Sponge prints (see student information).
21
CEREAL
GLUE

22
! Puzzle prints (see student information).2. Have students design their artwork with some connection to the Wright Brothers (their
name, an object that pertains to them, or a special Wright design).3. Make sure students are responsible for clean-up when project is completed.4. EXTRA: Have students create their own method of printing and explain it to others.
Rationale:This lesson teaches students about printmaking and gives students an insight into another skill the Wright Brothers possessed.
Assessment:Use a rubric to identify desirable outcomes such as material usage; artwork applies to theme; and clean-up procedure.
Additional Information:1. ESL students: Have them follow visual directions from another student.2. Special Education students: Assign a specific printmaking strategy and help as needed.3. Helpful hints:
! Old shirts or garbage bags with arm holes cut out will help keep clothes from getting messy.
! Use water-based paints and inks when possible.! Newspapers or plastic grocery bags will be good to cover work surfaces.! Printing surfaces can be construction paper, manila paper, newsprint, fabric, etc.
In 1890, Wilbur joined Orville in the printing business serving as editor for The Westside News, as weekly newspaper for their west Dayton neighborhood.

TASK #3 - ARTStudent Information
Background Information: The first time Wilbur and Orville referred to themselves, as “The Wright Brothers” was when they started their own printing firm at the ages of 22 and 18. Using a damaged tombstone and buggy parts, they built a press and printed odd jobs as well as their own newspaper. In 1889, they started publishing a weekly newspaper called “The West Side News” and later in 1890 they changed the name and promoted it to a daily “The Evening Item.” They also did a favor for a friend when they printed “The Tattler,” launched by Paul Laurence Dunbar (who went on to become a famous African-American writer, lecturer, and the poet laureate of his race).
Printing and printmaking are ancient forms of art. There are many methods to print an image other than using a printing press.
Materials:1. Fruits and vegetables of all kinds such as carrots, potatoes, apples, broccoli, etc., paint
or ink sponges and Styrofoam tray (putting paint on a sponge to press the object into allows only a little paint to come off…because a little is all you need), paintbrushes, water, water containers, paper, a covered work area.
2. Sponges cut into different shapes, tempera paint, paper, water, a covered work area.3. Old puzzle pieces, white glue, cereal box cardboard, safety scissors, paint or
printmaking brayer, construction paper, old cookie trays to use as ink trays.
Directions:Choose one of the following printmaking strategies and create a print that relates to the Wright Brothers (their name, an object or design that represents them). Make 3 copies of your print.
Fruit and veggie prints1. Collect materials and decide on arrangement of fruit and veggie design. 2. Dip fruits or vegetables in paint (being careful not to get too much paint on
object). You can also dip a sponge in the paint and gently dab it on the object to be printed.
3. When 3 copies are made, compare your creation with that of a friend. Ask them: Which print is the best and how are they different?
23
CEREAL
GLUE

*SAFETY: NO knives are needed except to cut the fruit or vegetables into pieces (which the teacher can do ahead of time).
Sponge prints1. Use miracle sponges (those that are flat and expand when dipped in water).2. Draw a shape or object on the sponge and cut out (being sure to use the
leftover sponge pieces as well in your design).3. Dip sponges into water to expand them. Squeeze out excess water. Paint or dip
sponges with paint and create a “Wright Brothers” artwork.4. After you make 3 copies, discuss your artwork with a friend and have them share
their artwork with you.
Puzzle prints1. Cut a piece of cereal box down to a nice size (about 6” by 8”).2. Take several puzzle pieces and arrange them on the cereal box cardboard to
represent the Wright Brothers.3. Once you are satisfied with your arrangement, glue them down and let the glue
dry.4. If you have a printmaking brayer or small paint roller:! Place a small amount of ink or paint on a cookie tray, plexiglass, or glass
sheet.! Roll roller both ways (horizontally and vertically) to evenly pick up the ink
or paint. Roll until the ink or paint comes up in little “points.”! Roll away from yourself to pick up ink.! Roll toward yourself quickly to remove excess ink.! Once the printing plate is inked (roll the brayer over the puzzle pieces),
place a piece of paper over the inked puzzle pieces and rub with your hand or a wooden spoon.
5. Remove the paper and repeat the process 2 more times for copies. Share your printmaking creation with a friend.
*Be sure and clean up your area and put materials back like you found them. Discard waste.
24

25
TASK #4 - LANGUAGE ARTS AND CAREERSTeacher Lesson Plan
Objective:Students will investigate the past, present and future of specific careers.
National Standards:English Language Arts
4. Communication Skills5. Communication Strategies6. Applying Knowledge7. Evaluating Data8. Developing Research Skills
12. Applying Language Skills
Social Studies2. Time, Continuity, and Change8. Science, Technology, and Society
Technology6. Understanding of the role of society in the development and use of technology.
11. Understanding of and ability to select and use information and communication technologies.
Materials:Computer with Internet access, paper, pen.
Estimated Time:50 minutes
Background Information: The Wright Brothers became adults during an economic depression, when work was scarce. They decided to form their own companies, first as printers, then newspapermen, then as printers again. They also turned their bicycle pleasure riding into a business and became bicycle repairmen, later, bicycle builders.
Even though these interests seemed very different, a common thread ran through both - working side by side on mechanical things. They even built an internal combustion engine to run the power tools in their bicycle shop.
These skills and the creative, efficient team they formed enabled them to experiment with flying machines.
Procedure/Activity:1. Tell students to choose one of the Wright Brothers' careers (newspapermen, bicycle
building and repair, or airplane building).2. Have them research the career and find out the following:
a. How has this career changed from the Wright's time until now?

26
b. Is there more or less need for jobs in this career now? Why?c. What do you think will happen in the future with this career?
3. Have students write the information they learned in a report and share with 2 other students that researched the other two careers.
Rationale:This lesson will allow students to investigate specific careers.
Assessment:Use a rubric to evaluate each report.
Additional Information:1. Special Education Students: Allow students to give oral reports from notes on their
research. These students may also be allowed to present their information the next day.2. Useful Web Sites:
(History of aviation). (Brief history of newspaper).
(Printing, engraving, and printmaking, newspapers). (Timeline of bicycle history in the U.S.).
(Timeline and future of bike).
http://www.aviation-history.com/http://www.historicpages.com/nprhist.htmhttp://inventors.about.com/science/inventors/library/inventors/blprinting.htm
http://www.ibike.org/historyusa.htmhttp://www.bikewise.co.nz/kidz/history/default.asp#top
Inside the Cycle Company

27
TASK #4 - LANGUAGE ARTS AND CAREERSStudent Information
Background Information: The Wright Brothers became adults during an economic depression, when work was scarce. They decided to form their own companies, first as printers, then newspapermen, then as printers again. They also turned their bicycle pleasure riding into a business and became bicycle repairmen, later, bicycle builders.
Even though these interests seemed very different, a common thread ran through both - working side by side on mechanical things. They even built an internal combustion engine to run the power tools in their bicycle shop.
These skills and the creative, efficient team they formed enabled them to experiment with flying machines.
Materials:Computer with Internet access, paper, pen.
Directions:1. Choose one of the Wright Brothers' careers (newspaperman, bicycle
building and repair, or airplane building).2. Research the career and find out the following:
a. How has this career changed from the Wright's time until now?b. Is there more or less need for jobs in this career now? Why?c. What do you think will happen in the future with this career?
3. Write the information you learned in a report and share with 2 other classmates that did the other two careers.
Inside the Cycle Company

28
Task #5- GEOGRAPHYTeacher Lesson Plan
Objective:Students will identify certain geographical locations pertaining to the Wright Brothers.
National Standards:Social Studies:
3. People, Places, and Environments.
Materials:Biographical Information on the Wright Brothers, paper, pen/pencil, U.S. atlas.
Estimated Time:15 minutes to locate information.30 minutes to create map.
Background Information: (See “Wilbur and Orville Wright's Background” in front of this book).
Procedure/Activity:1. Tell students to find out what these places have to do with Wilbur and/or Orville Wright's
lives:! Millville, Indiana.! Dayton, Ohio.! Kitty Hawk, North Carolina.! Montgomery, Alabama.! Fort Myer, Virginia.! College Park, Maryland.
2. Have students create a map of the United States and locate each place on the map. Have them make a legend to go with their maps.
Rationale:This lesson will give students a better understanding of where the Wright Brothers lived and worked.
Assessment:Evaluate the map and date information for accuracy and neatness.
Additional Information:1. ESL Students: Prepare a tape of “Background Information” in the student's native
language. Have them work with a partner on the map.2. EXTRA ACTIVITIES:
! Design a time capsule journey describing the events represented by each location.
! Create a personal map and locate places visited by student and why that location is important to the student.
! Fill in a blank U.S. map with all states and their capitals.
29
TASK #5 - GEOGRAPHYStudent Information
Background Information:The teacher will provide this information from the teacher's book.
Materials: Biographical Information on the Wright Brothers, paper, pen/pencil, U.S. atlas.
Directions:1. Using the Biographical Information on the Wright Brothers, find out why the following
locations were important in the lives of Wilbur and/or Orville Wright:! Millville, Indiana.! Dayton, Ohio.! Kitty Hawk, North Carolina.! Montgomery, Alabama.! Fort Myer, Virginia.! College Park, Maryland.
2. Create a map of the United States and locate each place on the map. Also make a legend to explain each location.
3. EXTRA ACTIVITIES:! Design a time capsule journey describing the events represented by each
location.! Create your own personal map and locate places you have visited or lived
and why that location is important to you.
TASK #6 - SOCIAL STUDIES and LANGUAGE ARTSTeacher Lesson Plan
Objectives:Students will:
1. Research the culture of another country.2. Write a journal entry.
National Standards:Social Studies
1. Culture.3. People, Places, and Environments.
English Language Arts3. Evaluation Strategies.4. Communication Skills.5. Communication Strategies.6. Applying Knowledge.7. Evaluating Data.8. Developing Research Skills.9. Multicultural Understanding.
12. Applying Language Skills.
Technology17. Understanding of and ability to select and use information and communication
technologies.
Materials:Reference materials (including the Internet) on the cultures of France, England, Germany, and Italy; paper, pen.
Estimated Time: Two 40-minute periods (one for research and note taking and the other for writing and editing journal entry).
Background Information: By 1905, the Wright Brothers were receiving requests and inquiries from foreign governments regarding their airplane. In 1908, the Wrights closed a contract with a Frenchman to form a syndicate for the right to manufacture, sell, or license the use of the Wright machine in France. Orville went to Germany to make flights and formed a German Wright company. Wilbur, in the meantime, received awards and prizes for his French flights, where he also taught a number of Frenchmen to fly. The Wrights also sold an airplane in Italy, and Wilbur trained fliers there. There was also a British Wright company formed in 1913.
Procedure/Activity:1. Have students research one of the countries that the Wright's did business in.2. After they have collected data on the culture of this country, have them write a journal
entry for one of the Wright Brothers describing his visit to this country and how the culture is different and similar to the culture in the United States.
30

31
3. EXTRA: This entry could be done as a multimedia presentation or use Power Point or Hyperstudio for the presentation.
Rationale:This lesson allows students to investigate another culture and relate information about that culture in a creative way.
Assessment:Use a rubric to evaluate journal entries based on creativity and accurate data.
Additional Information:1. ESL or Special Education Students: Use peer tutoring or classroom assistants for
researching and writing.2. Research web sites for countries:! France
(Facts about France).
(French business customs and practices).! England
(English customs and culture).
(All about England).
! Germany
(All facts about Germany).! Italy
(Culture in Italy). (Learn about Italian culture, art,
science, music, and recipes).
http://frenchculture.about.com/culture/frenchculture/library/blfrancefacts.htm
http://frenchculture.about.com/culture/frenchculture/library/blfrenchbusiness1.htm
http://englishculture.about.com/aboutuk/englishculture/library/weekly/aa082599.htm
http://englishculture.about.com/aboutuk/englishculture/library/weekly/topicmenu.htm
http://germanculture.about.com/culture/germanculture/library/facts/bl_germany.htm
http://www.expatboards.com/Italy/ItalyContent/Culture.shtmlhttp://library.thinkquest.org/2838/culture.htm?tqskip=1

TASK #6 - SOCIAL STUDIES and LANGUAGE ARTSStudent Information
Background Information: By 1905, the Wright Brothers were receiving requests and inquiries from foreign governments regarding their airplane. In 1908, the Wrights closed a contract with a Frenchman to form a syndicate for the right to manufacture, sell, or license the use of the Wright machine in France. Orville went to Germany to make flights and formed a German Wright company. Wilbur, in the meantime, received awards and prizes for his French flights, where he also taught a number of Frenchmen to fly. The Wrights also sold an airplane in Italy, and Wilbur trained fliers there. There was also a British Wright company formed in 1913.
Materials:Reference materials (including the Internet) on the cultures of France, England, Germany, and Italy; paper, pen.
Directions:1. Research one of the countries that the Wrights did business in (France, England,
Germany, or Italy).2. After you have collected data on the culture of the country you selected, write a
journal entry for one of the Wright Brothers describing his visit to this country.Describe the people and the similarities and differences between their customs and those of the people in the United States.
32
The Wright Model A passes over several horse-drawn carriages in France in 1909.
Wilbur Wright prepares to take his sister Katherine aloft for the first time in France, 1909. Note the string tied around her skirt to keep it from blowing. This started a new fashion in women's dress called the "hobble" skirt.

TASK #7 - HEALTHTeacher Lesson Plan
Objectives:Students will:1. Research dental injuries, health, and care.2. Design a collage concerning dental health.
National Standards:Health
1. Comprehend concepts related to health promotion and disease prevention.2. Ability to access valid health information and health-promoting products and services.3. Ability to practice health-enhancing behaviors and reduce health risks.7. Ability to advocate for personal, family, and community health.
ScienceStandard F: Science in Personal and Social Perspectives.! Personal health.
Materials:Reference materials on dental health, family magazines, paper, pen, glue, scissors,
construction paper. Optional: Computer with Internet access for research.
Estimated Time:Research and information: 40 minutes.Collage: 30 minutes.
Background Information: Wilbur Wright liked to play football and a game called “shiney” which is like icehockey, but is played on land. While playing this game, he was hit in the mouth with a wooden stick. He lost five teeth, and was unable to eat because his mouth was so sore. Later, three more teeth had to be taken out. Wilbur's unfortunate accident makes us realize the importance of our teeth.
Procedure/Activity:1. Have students research dental injuries and dental care.2. Have them list 5 ways to prevent injuries to your teeth and tell how dental care should be accomplished.3. Have students look through magazines and find advertisements that promote dental health and make a collage.4. EXTRA: Toothpaste care and consumer knowledge: Have students research toothbrushes and recommend types to the class.
Rationale:This lesson will provide information on and an appreciation of dental health.
33

34
Assessment:Use rubric or other evaluation technique to grade research information and collage.
Additional Information:1. Special Education Students: Have them write 5 tips for good dental health on 3x5 index
cards and share with class.2. ESL Students: Have them draw pictures showing good dental health.3. Web Sites:
(American Dental Association resources for teens).
(Dental History Quiz for teens).
(Dental Injuries).
http://www.ada.org/public/topics/teens/teens.html
http://www.ada.org/public/topics/teens/quiz.htmlhttp://www.medicinenet.com/Script/Main/Art.asp?li=MNI&d=294&cu=31337&w=0&ArticleKey=221
BONE
DENTINPULP
ENAMEL

TASK #7 HEALTHStudent Information
Background Information: Wilbur Wright liked to play football and a game called “shiney” which is like ice hockey, but is played on land. While playing this game, he was hit in the mouth with a wooden stick. He lost five teeth, and was unable to eat because his mouth was so sore. Later, three more teeth had to be taken out. Wilbur's unfortunate accident makes us realize the importance of our teeth.
Materials:Reference materials on dental health, family magazines, paper, pen, glue, scissors, construction paper. Optional: Computer with Internet access for research.
Directions:1. Research dental injuries and dental care.2. List 5 ways to prevent injuries to your teeth and tell how dental care should be
accomplished. Write this information in a report.3. Look through magazines provided and find advertisements that promote dental health.
Make a collage.
35
BONE
DENTINPULP
ENAMEL

TASK #8 LANGUAGE AND ARTTeacher Lesson Plan
Objective:Students will write and illustrate an acrostic poem about the Wright Brothers.
National Standards:English Language Arts
4. Communication Skills.5. Communication Strategies.6. Applying Knowledge.
12. Applying Language Skills.
Visual ArtsI. Understanding and applying media, techniques, and processes.II. Using knowledge of structures and functions.VI. Making connections between visual arts and other disciplines.
Materials:Thesaurus, dictionary, book about Wright Brothers, paper, pen, art materials (crayons, markers, colored pencils, etc.).
Estimated Time:40 minutes.
Background Information: An acrostic poem is a poem in which the first letter of each line forms a name or message. After listening to a book or background information on the Wright Brothers, an acrostic poem can be written. A poem on the name Wright might read:
Wind tunnel,
Reading, observations,
Interviewed Chanute,
Gliders, kites,
Heights possible,
Today.
Procedure/Activity:1. After reading or hearing the information about the Wright Brothers, tell students to create
a poem or message using Orville or Wilbur, or make a different acrostic for Wright. They could even use a phrase like “First Flight.”
2. This poem can then be illustrated by the student.3. Have students share their work.4. Students may choose to type their acrostic poem on the computer in a fancy font and
include graphics and different colors.
Rationale:This lesson will allow students to express knowledge of the Wright Brothers in a creative way.
36

Assessment:Evaluate students based on following acrostic form and applying the poem to the Wright Brothers.
Extra Information:1. Special Education Students: Have a partner help make a list of words beginning with
each letter in “Wright.” Let students put together an acrostic poem from the list and illustrate.
2. Multiculturalism: Make an acrostic poem about France, England, or any country where the Wright Brothers visited or flew. Get information from the library or the Internet.
3. Suggested books to be used as background information to read or be read to students:! The Wright Brothers: Pioneers of American Aviation (Landmark Books) by Quentin
Reynolds, paperback, reading leve,l 9-12, 156 pages.! Wright Brothers at Kitty Hawk by Donald J. Sobel, paperback, 12+ year olds.
A biography of aviators Orville and Wilbur Wright and their historic first flight at Kitty Hawk.
! Wright Brothers: How They Invented the Airplane by Russell Freedman, paperback or hardcover, 12-18 year olds. This is a story of the first, powered, sustained, and controlled airplane flight and the men behind it.
! The Bishop's Boys: A Life of Wilbur and Orville Wright by Tom D. Crouch.
Wright's Night Flight
37

TASK #8 - LANGUAGE AND ARTStudent Information
Background Information: An acrostic poem is a poem in which the first letter of each line forms a name or message. After listening to a book or background information on the Wright Brothers, an acrostic poem can be written. A poem on the name Wright might read:
Example of Acrostic Poem
38
W
R
I
G
H
T
ind tunnel,
eading, observations,
nterviewed Chanute,
liders, kites,
eights possible
oday.
W
R
I
G
H
T
Materials: Thesaurus, dictionary, book about Wright Brothers, paper, pen, art materials (crayons, markers, colored pencils, etc.).
Directions:1. Read or listen to background information on the Wright Brothers. 2. Create an acrostic poem (one in which the first letter of each line forms a name or
message) using “Wilbur” or “Orville”, or make a different acrostic (from the example) on “Wright”. You can even make your poem from a phrase like “First Flight.”
3. Illustrate your acrostic poem.4. You may choose to type your acrostic poem on the computer in a fancy font and include
graphics and different colors.5. Share your poem with the group.

39
TASK #9 LANGUAGE ARTSTeacher Lesson Plan
Objective: Students will create a news broadcast concerning an important event in the invention and testing of the airplane.
National Standards:English Language Arts:
4. Communication Skills.5. Communication Strategies.6. Applying Knowledge.
12. Applying Language Skills.
Materials:Information on Wright Brothers inventing, exhibiting, and testing the airplane, paper, pen, media equipment for recording the broadcast (optional).
Estimated Time:50 minutes.
Background Information: There are several events in the Wright Brothers inventing, exhibiting, and testing of the airplane that would be newsworthy to report. Such events as:! Five people watch the brothers toss a coin to see who will be the first to fly. Wilbur
wins. The flight is a 3 ½ second hop.! Wilbur gives exhibition flights in France and sets a world flight record of 1 ½ hours.! Orville and Lieutenant Selfridge crash while testing a plane for the army. Lieutenant
Selfridge is killed and Orville receives a broken leg and cracked ribs.For more information on these events, go to:
Procedure/Activity: 1. Tell students to create a news broadcast for use on the TV news for one of the events
described in the background information.2. Students may choose to film their broadcast or perform live.3. Ask students to perform their news broadcast for the class.
Rationale:This lesson allows for an enactment of a moment in history concerning the development of the airplane.
Assessment:Use a rubric to evaluate each group's presentation for historical accuracy and creativity.
Additional Information:! Special Education Students: Work with a partner or group and give examples before
the presentation.! Multiculturalism: Have students use the Internet to research what people of Europe
(France, England, Germany, etc.) thought about the Wright Brothers.
http://statelibrary.dcr.state.nc.us/nc/ncsites/wright4.htm#Flight.

40
TASK #9 LANGUAGE ARTSStudent Information
Background Information: There are several events in the Wright Brothers inventing, exhibiting, and testing of the airplane that would be newsworthy to report. Such events include:! Five people watch the brothers toss a coin to see who will be the first to fly.
Wilbur wins. The flight is a 3 ½ second hop.! Wilbur gives exhibition flights in France and sets a world flight record of 1 ½
hours.! Orville and Lieutenant Selfridge crash while testing a plane for the army.
Lieutenant Selfridge is killed and Orville receives a broken leg and cracked ribs.For more information, go to
Materials:Information on Wright Brothers inventing, exhibiting, and testing the airplane, paper, pen, media equipment for recording the broadcast (optional).
Directions:1. Create a news broadcast for use on the TV news for one of the events described in the
background information.2. Your group may choose to film your broadcast or perform live.3. Perform your news broadcast for the class.
http://statelibrary.dcr.state.nc.us/nc/ncsites/wright4.htm#Flight .
Ready for First Flight
Side View of 1903 Flyer

41
TASK #10 - LANGUAGE ARTSTeacher Lesson Plan
Objective: Students will give a speech to present a medal to the Wright Brothers.
National Standards:English Language Arts:
4. Communication Skills.7. Evaluating Data.8. Developing Research Skills.
12. Applying Language Skills.Technology Standards:
4. Understanding of the cultural, social, economic, and political effects of technology.17. Understanding of and ability to select and use information and communication
technologies.
Materials:Reference materials on Wright Brothers, paper, pen, optional (computers/Internet, multimedia presentation materials).
Estimated Time:40 minutes to research and write.2 minutes per speech.
Background Information: In 1909, Orville and his sister Katherine went to France to watch Wilbur give exhibition flights. King Alfonse of Spain, King Edward VII of England, and enthusiastic crowds also watched Wilbur.
The Wrights received medals in Paris, France and London, England, and from President Taft at the White House. Officers in the state of Ohio and the city of Dayton also gave awards.
Procedure/Activity:1. Tell students to research the Wright Brothers' experiments, goals, achievements,
disappointments, and recognition.2. Tell students to pretend they are to present a medal to the Wrights. They should make
a speech about one or two minutes long and talk about how they started, their experiments, life, and accomplishments. Have them tell about why these two men are being honored by the city, state, or country presenting the medal.
Rationale:This lesson gets students directly involved with verbally sharing information about the Wright Brothers.
Assessment:Use rubric (like the example on page 77) or make your own to evaluate each speech.

42
Additional Information:! Special Education adaptations: Give students no time limit to speak; allow them to use
visuals; create time for students to peer tutor each other (in creating the speech or practicing it); narrow the focus of the topic; give graphic organizers and extra assistance while preparing speech; give guide sheet on Speech-Making Tips; give specific time frame for accomplishment of each piece of the task.
! ESL: Have students research clothing styles of the time period (1909) to show what would be worn in England and in France by the men and by the women. Have students create posters or drawings to illustrate the type of dress. Have them note the difference between casual dress and what would be worn for a formal presentation of medals.
Wilbur with King Alphonse of Spain
Dayton Homecoming from a triumphal visit to France.

43
TASK #10 - LANGUAGE ARTSStudent Information
Background Information: In 1909, Orville and his sister Katherine went to France to watchWilbur give exhibition flights. King Alfonse of Spain, King Edward VII of England, and enthusiastic crowds also watched Wilbur.
The Wrights received medals in Paris, France and London, England, and from President Taft at the White House. Officers in the state of Ohio and the city of Dayton also gave awards.
Materials:Reference materials on Wright Brothers, paper, pen, optional(computers/Internet, multimedia presentation materials).
Directions:1. Research the Wright Brothers' experiments, goals, achievements, disappointments, and
recognition.2. Pretend you are to present a medal to the Wrights. You should make a speech about
one or two minutes long and talk about how they started, their experiments, life, and accomplishments. Tell about why these two men are being honored by the city, state, or country presenting the medal.
3. Have some visual aids or multimedia aids to add to your presentation.
Speech-Making Tips
1. Speak clearly so your audience can hear all that you say.2. Maintain the interest of your audience by speaking slowly and
carefully, trying to change your voice, and by using pictures or other props.
3. Become so familiar with your material that you can have eye contact with your audience.
4. Organize your material effectively to make meaning for your audience.
5. Make sure appearance is well presented.6. Use pauses effectively to emphasize a point, or to allow the audience to react to a fact,
anecdote, or joke.7. Do not fidget or make other nervous gestures. Use hand gestures effectively. 8. Be yourself, allowing your own personality to come across in your speech.9. Make sure the subject matter flows smoothly with an introduction, interesting aspect
of topic, and conclusion.10. Make material appealing so the audience wants to listen, learns something, is motivated,
amused, or entertained.

TASK #11- MATHEMATICSTeacher Lesson Plan
Objective: Students will gain basic understanding of data from wind tunnel tests.
National Standards:Mathematics Standards:
4. Measurement Standard:! Understand measurable attributes of objects and the units, systems, and
processes of measurement.5. Data Analysis and Probability Standard:! Develop and evaluate inferences and predictions that are based on data.
10. Use representations to model and interpret physical, social, and mathematical phenomena.
Materials: Paper, pencil, “Marty Northrop's Glider Wind Tunnel Data Table,” question sheet.
Estimated Time: 50 minutes.
Background Information: In July of 1901, the Wright Brothers were at Big Kill Devil Hill in North Carolina for
thmore tests on their glider. On one day in particular, July 27 , there were many unsuccessful launches. The glider did get into the air, but it would stall. The stall occurred under the same circumstances for each flight. It happened when the glider slowed its speed. When its speed slowed, the pilot would increase the wing angle to compensate and maintain lift. At a certain critical point when the angle was very steep, the airflow over the top of the wing would become turbulent. This meant that the wing stopped generating lift.
When the brothers returned to Dayton, Ohio, for the winter, they needed to perform some experiments on the angle of attack for the 1901 glider. They used their own wind tunnel to test airfoil shapes.
One day, the boy who lived down the road from the Wright Brothers, young Martin Northrop, brought in a glider he had made and asked if the brothers would test his model. Marty wanted some test data so he could fly his glider more efficiently, and even improve his glider design. Marty had these questions about his glider:! Which angle of attack would give the glider the greatest amount of lift?! What cruising angle would be the most efficient for flight?! What is the stall angle for his glider?
The Brothers agreed to help. They told Marty to return in a few days and they would have the data for him. When Marty returned, he received the results found on the data table called “Marty Northrop's Glider Wind Tunnel Data Table.”
Procedure/Activity:1. After discussing the background information, have students examine the data table and
answer the questions associated with it.
44

2. Have students come together as a group and discuss the results.Rationale:
This lesson will introduce students to statistics gathered on wind tunnel experiments and teach them how to read and interpret basic facts from the table.
Assessment:Questions should be answered correctly and table should be read correctly.
Additional Information:1. ESL and Special Education Students: Pair students with other students that have good
math skills.2. Web site: This lesson was taken from a unit on Mars Airplane Design by NASA found at
http://quest.arc.nasa.gov/aero/planetary/teachers/mar_final.pdf.
Wright Brothers Wind Tunnel
45
The Wright Brothers used their own wind tunnel to test airfoil shapes.

TASK #11 - MATHEMATICSStudent Information
Background Information: In July of 1901, the Wright Brothers were at Big Kill Devil Hill inNorth Carolina for more tests on their glider. On one day in
thparticular, July 27 , there were many unsuccessful launches. The glider did get into the air, but it would stall. The stall occurred under the same circumstances for each flight. It happened when the glider slowed its speed. When its speed slowed, the pilot would increase the wing angle to compensate and maintain lift. At a certain critical point when the angle was very steep, the airflow over the top of the wing would become turbulent. This meant that the wing stopped generating lift.
When the brothers returned to Dayton, Ohio, for the winter, they needed to perform some experiments on the angle of attack for the 1901 glider. They used their own wind tunnel to test airfoil shapes.
One day, the boy who lived down the road from the Wright Brothers, young Martin Northrop, brought in a glider he had made and asked if the brothers would test his model. Marty wanted some test data so he could fly his glider more efficiently, and even improve his glider design. Marty had these questions about his glider:! Which angle of attack would give the glider the greatest amount of lift?! What cruising angle would be the most efficient for flight?! What is the stall angle for his glider?
The Brothers agreed to help. They told Marty to return in a few days and they would have the data for him. When Marty returned, he received the results found on the data table called “Marty Northrop's Glider Wind Tunnel Data Table.”
Materials:Paper, pencil, “Marty Northrop's Glider Wind Tunnel Data Table,” question sheet.
Directions:1. Discuss the background information and examine the data table for understanding.2. Answer the questions pertaining to the information on the data table.3. Come together as a group and discuss answers.
The Wright Brothers used their own wind tunnel to test airfoil shapes.
46

Marty Northrop's Glider Wind Tunnel Data Table
Run # (Test #)
Point # (Points where data was
taken)
Alpha (degree) Angle of attack
Lift (lbs.)
Drag (lbs.)
CL (coefficient
of lift)
CD (coefficient
of drag)
L/D Lift/Drag
Ratio
1 1 0 0.10 0.02 0.14 0.03 5.00 1 2 1 0.30 0.04 0.41 0.05 7.50 1 3 2 0.50 0.05 0.68 0.07 10.00 1 4 4 0.66 0.06 0.89 0.08 11.00 1 5 6 0.88 0.07 1.19 0.09 12.57 1 6 8 1.10 0.08 1.49 0.10 14.67 1 7 9 1.20 0.12 1.62 0.16 10.00 1 8 10 1.00 0.16 1.35 0.22 6.25 1 9 11 0.99 0.24 1.34 0.32 4.13 1 10 12 0.77 0.50 1.04 0.68 1.54 2 1 0 0.40 0.08 0.14 0.03 5.00 2 2 1 1.20 0.16 0.41 0.05 7.50 2 3 2 2.00 0.20 0.68 0.07 10.00 2 4 4 2.64 0.24 0.89 0.08 11.00 2 5 6 3.52 0.28 1.19 0.09 12.57 2 6 8 4.40 0.30 1.49 0.10 14.67 2 7 9 4.80 0.48 1.62 0.16 10.00 2 8 10 4.00 0.64 1.35 0.22 6.25 2 9 11 3.96 0.96 1.34 0.32 4.13 2 10 12 3.08 2.00 1.04 0.68 1.54
Data Table Questions (Show Your Work!):
1. For Test #1 looking at points #1 through10. What is the difference in lift between the greatest weight and the lowest weight?
2. For Test #2 looking at points #1 through10. What is the difference in drag between the lowest weight and the highest weight?
3. Which angle of attack (alpha) overall generated the greatest amount of lift? 4. Which angle of attack (alpha) overall generated the least amount of drag? 5. Which angle of attack (alpha) overall generated the lowest L/D? 6. Which angle of attack (alpha) overall generated the greatest L/D? 7. For Run #1, looking at Points #1 through10. Find the greatest L/D. 8. For Run #1, looking at Points #1 through10. Give the number following the greatest L/D. 9. Using the information from questions 7 and 8, what is the angle of attack (alpha) at which
the glider is not generating as much lift as it was before?10. Overall, which angle of attack (alpha) generates the greatest CL?11. Overall, which angle of attack (alpha) generates the lowest CL?12. Overall, which angle of attack (alpha) generates the greatest CD?13. Overall, which angle of attack (alpha) generates the lowest CD?14. Overall, which angle of attack (alpha) do you think is the stall angle? Explain your
reasoning. (Hint: Look over your answers for questions 7 through 12.)
47

TASK #12 - MATHEMATICSTeacher Lesson Plan
Objective: Students will compare the Wright Brothers 1903 Wright Flyer to thePiper J-3 Cub and solve word problems connected to the Wright Brothers.
National Standards:Mathematics Standards:
1. Number and Operations Standard:! Compute fluently and make reasonable estimates.
4. Measurement Standard:! Understand measurable attributes of objects and the units, systems, and
processes of measurement.6. Problem Solving Standard:! Solve problems that arise in mathematics and in other contexts.! Apply and adapt a variety of appropriate strategies to solve problems.
Materials:Paper, pencil, data chart on Wright Flyer and Piper J-3 Cub, questions.
Estimated Time:40 minutes.
Background Information:The Wright Flyer - In 1903, after months of studying how propellers work, the Wright Brothers designed a motor and a new aircraft sturdy enough to accommodate the added weight and vibrations of the motor. The craft weighed over 700 pounds and came to be known as the Flyer. The brothers built a movable track to help launch the Flyer. The downhill track would help the aircraft gain enough airspeed to fly. After two attempts to fly this machine, one of which resulted in a minor crash, Orville took it for a 12-second, sustained flight on December 17. This was the first successful, powered, piloted flight in history.
The Piper J-3 Cub - First built in 1938, the Piper J-3 earned its fame as a trainer. So successful was it that the name “Cub” soon came to be a generic term for all light airplanes and it remains one of the most recognized designs in aviation. Cubs were flown during WWII as observation, liaison, and ambulance airplanes as well as trainers. In 1938, Piper standardized a color scheme to bright yellow with black trim.
Procedure/Activity:1. Have students answer the math questions concerning the Wright Flyer and the Piper J-3
Cub.2. Have students get together and discuss the answers and the background information.3. EXTRA: Have students go outside to a surfaced area and draw the dimensions of the
Wright Flyer and the Piper J-3 Cub.
Rationale:This lesson will give students practice solving problems, reading a data table, and computing mathematical operations.
48

Assessment:Math answers should be correct and students should be able to explain how they came to the solutions.
Additional Information:1. Special Education Adaptations: Calculate figures within a small group, use a calculator
to check calculations, and provide conversion charts and process help.2. For more information on the Wright Flyer stats go to:
3. For more information on the Piper J-3 Cub go to: http://www.wrightflyer.org/WrtFlyer/stats.html.
http://www.nasm.edu/nasm/aero/aircraft/piperj3.htm .
The Piper Cub
49
The Wright Flyer
RuddersChange Yaw(Side-to-Side)
Fuselage (Body)Hold Things Together
(Carry Payload)
PropellersGenerate Thrust
ElevatorsChange Pitch
(Up Down)
MotorDrive Propellers
Wing TipsWarp to Change Roll
(Rotate Body)
Wings Generate Lift
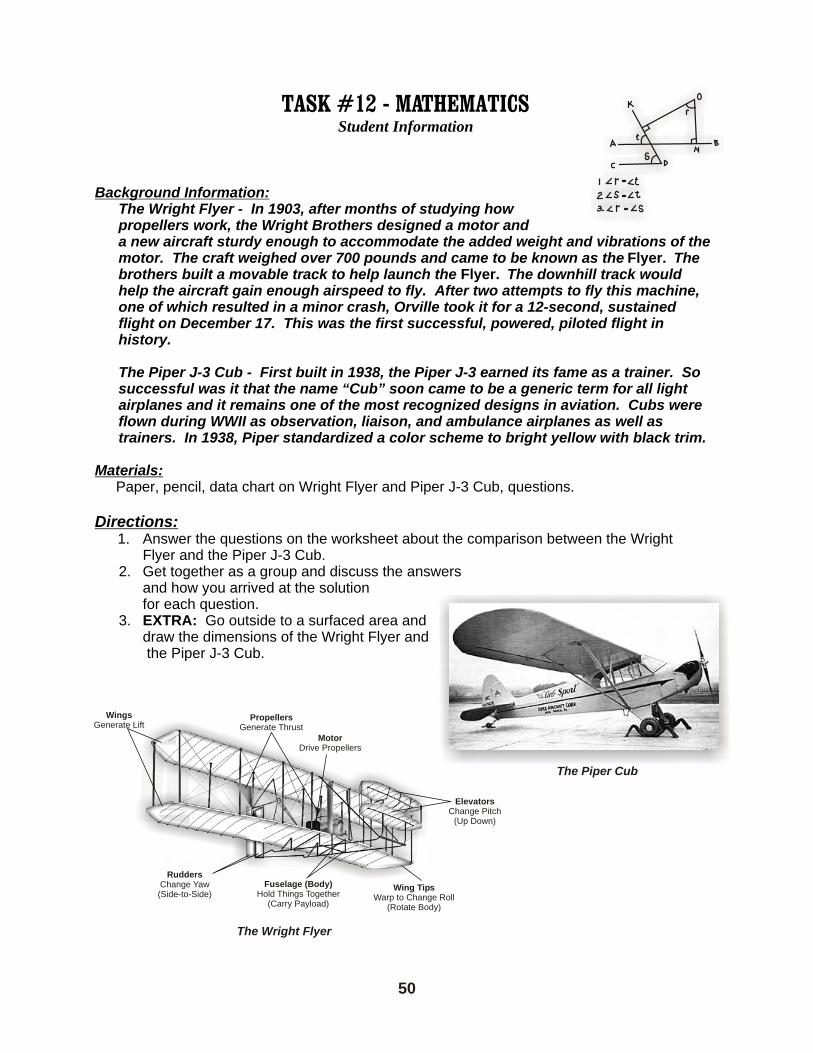
TASK #12 - MATHEMATICSStudent Information
Background Information:The Wright Flyer - In 1903, after months of studying how propellers work, the Wright Brothers designed a motor and a new aircraft sturdy enough to accommodate the added weight and vibrations of the motor. The craft weighed over 700 pounds and came to be known as the Flyer. The brothers built a movable track to help launch the Flyer. The downhill track would help the aircraft gain enough airspeed to fly. After two attempts to fly this machine, one of which resulted in a minor crash, Orville took it for a 12-second, sustained flight on December 17. This was the first successful, powered, piloted flight in history.
The Piper J-3 Cub - First built in 1938, the Piper J-3 earned its fame as a trainer. So successful was it that the name “Cub” soon came to be a generic term for all light airplanes and it remains one of the most recognized designs in aviation. Cubs were flown during WWII as observation, liaison, and ambulance airplanes as well as trainers. In 1938, Piper standardized a color scheme to bright yellow with black trim.
Materials:Paper, pencil, data chart on Wright Flyer and Piper J-3 Cub, questions.
Directions:1. Answer the questions on the worksheet about the comparison between the Wright
Flyer and the Piper J-3 Cub.2. Get together as a group and discuss the answers
and how you arrived at the solution for each question.
3. EXTRA: Go outside to a surfaced area and draw the dimensions of the Wright Flyer and the Piper J-3 Cub.
The Wright Flyer
The Piper Cub
50
RuddersChange Yaw(Side-to-Side)
Fuselage (Body)Hold Things Together
(Carry Payload)
PropellersGenerate Thrust
ElevatorsChange Pitch
(Up Down)
MotorDrive Propellers
Wing TipsWarp to Change Roll
(Rotate Body)
Wings Generate Lift

Statistic Piper J-3 Cub Wright Flyer
Wingspan 35 ft. 2 in. 40 ft. 4 in. Length 22 ft. 2 in. 21 ft. 1 in. Height 6 ft. 8 in. 8 ft. 1 in. Weight 1220 lbs. 750 lbs. Speed 85 mph 30 mph Year 1930’s 1903 Engine Lycoming 65-hp air-
cooled 12 BHP 4-cylinder water-
cooled Crew 2 1 Cost $20,000+ (today) $5000 (1912)
Data Table for Wright Flyer and Piper J-3 Cub
Trivia:1. The Wright Brothers first flight was shorter than the wingspan of a B-52 bomber.2. Wilbur and Orville's first successful airplane flight covered a distance of 120 feet in
12 seconds.
Questions:1. How much difference is there between the wingspan of the Wright Flyer and the Piper J-
3 Cub?2. How much less than 1 ton are the combined weights of the Wright Flyer and the Piper J-
3 Cub?3. How much faster is the speed of the Piper J-3 Cub than the speed of the Wright Flyer?4. How many Wright Flyers could you buy for the cost of one Piper Cub?5. Compare, in a ratio, the length to the height of the Piper Cub.6. Compare, in a ratio, the length to the height of the Wright Flyer.7. How much difference is there between the length of the Piper J-3 Cub and the Wright
Flyer?8. How many years older is the Wright Flyer than the Piper J-3 Cub?9. How many feet per second did the first successful Wright flight average?
10. If Orville had continued flying 120 feet every 12 seconds, how many feet would he have covered in a minute? How many yards is that?
51
?
?
?
?
?
??How Much?
How Many?

TASK #13 - SOCIAL STUDIES and ECONOMICSTeacher Lesson Plan
Objective: Students will understand the difference between needs and wants by doing a chart and establish a budget.
National Standards:Social Studies Standards:
7. Production, Distribution, and Consumption.
Materials:Pencil, budget worksheet, background information.
Estimated Time:40 minutes.
Background Information: The Wright children were taught to be self-sufficient and emphasis was placed on learning. When the Wright Brothers were young, they sold homemade mechanical toys to earn pocket money. Orville became interested in printing and started his own newspaper using a homemade printing press. Later, they opened a bicycle shop and used any money made from the venture to fund more aeronautically oriented experiments.
Procedure/Activity:1. Discuss needs (specific quantity of a specific good for which an individual would pay any
price. These are the goods and services a person must have) and wants (a desire that can be satisfied by consuming a good or service).
2. As a class, make a list of Wright Brothers needs and wants.3. Have students make a list of their needs and wants. Have them compare with a partner
or make a class chart.4. Have students discuss and agree on a reasonable amount for an allowance based on
chores completed or jobs completed. Have them create a budget of how they will spend this “allowance” or “salary.”
5. For older students, have them choose from a selected number of professions, a salary, and discuss and create a budget for a family of four. Other information and lesson plans can be found at
Rationale:This lesson will give students a better understanding of budgeting and needs and wants.
Assessment:Evaluate student's ability to distinguish between a need and a want and the reasonableness of their budgets.
Additional Information:1. ESL and Special Education students: These students can work with a partner or create
a collage of pictures of needs and want. Also, students could use play money to establish income and expenses in a concrete manner.
2. Use games and simulations to illustrate budgeting and expenses (games such as Life, etc.).
www.moneymanagement.org/Education/Resources.
52

TASK #13 - SOCIAL STUDIES and ECONOMICSStudent Information
Background Information: The Wright children were taught to be self-sufficient and emphasis was placed on learning. When the Wright Brothers were young, they sold homemade mechanical toys to earn pocket money. Orville became interested in printing and started his own newspaper using a homemade printing press. Later, they opened a bicycle shop and used any money made from the venture to fund more aeronautically oriented experiments.
Materials:Pencil, budget worksheet, background information.
Directions:1. Discuss needs and wants with your class. 2. Make a class list of what you think the needs and wants of the Wright Brothers would
have been.3. Make your own list of your personal needs and wants.4. Decide on a reasonable amount for an allowance and payment for jobs done. Then,
create a budget with income and expenses.
Vocabulary:1. budget -a plan for how to use your money.2. expense -money paid for a good or service. Expenses can be fixed or variable.3. income - money received for work. Income can be earned or unearned.4. need -a specific quantity of a specific good for which an individual would pay any price.
These are the goods and services a person must have.5. opportunity cost - the most important thing that you give up when making a decision.6. saving - not spending income.7. want- a desire that can be satisfied by consuming a good or service.
A Portion of theWright Brothers Sales Ledger
53
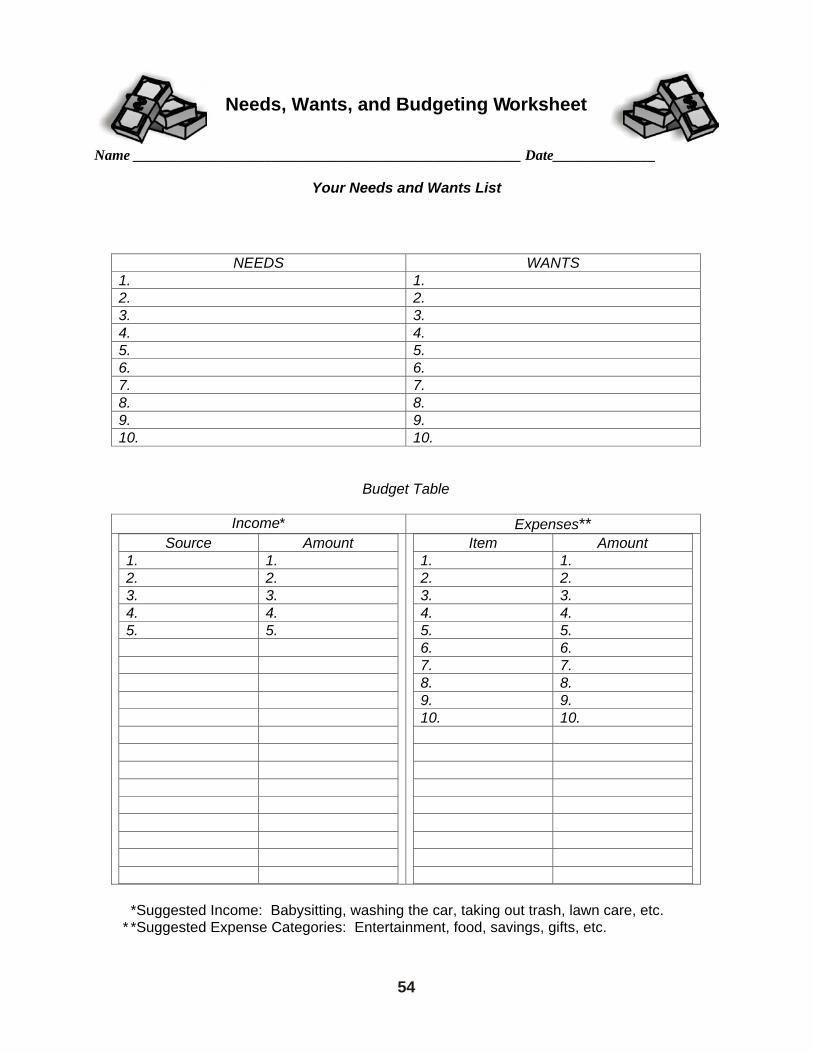
Needs, Wants, and Budgeting Worksheet
Name _____________________________________________________ Date______________
Your Needs and Wants List
54
NEEDS WANTS 1. 1. 2. 2. 3. 3. 4. 4. 5. 5. 6. 6. 7. 7. 8. 8. 9. 9. 10. 10.
Budget Table
Income* Expenses**
Source Amount 1. 1. 2. 2. 3. 3. 4. 4. 5. 5.
Item Amount 1. 1. 2. 2. 3. 3. 4. 4. 5. 5. 6. 6. 7. 7. 8. 8. 9. 9. 10. 10.
*Suggested Income: Babysitting, washing the car, taking out trash, lawn care, etc. * *Suggested Expense Categories: Entertainment, food, savings, gifts, etc.

T ASK #14 - MUSIC and LANGUAGE ARTSTeacher Lesson Plan
Objective:Students will learn about the mandolin and harmony.
National Standards:English Language Arts Standards:
4. Communication Skills.8. Developing Research Skills.
12. Applying Language Skills.Music Standards:
2. Performing on instruments, alone and with others, a varied repertoire of music.3. Improvising melodies, variations, and accompaniments.4. Composing and arranging music within specified guidelines.5. Listening to, analyzing, and describing music.
Materials:Homemade instruments materials, reference materials (including Internet), paper, pen, recordings of mandolin and harmonica music.
Estimated Time:50 minutes.
Background Information: Wilbur and Orville set up a camp at Kitty Hawk, North Carolina and had few visitors except for the Tate family and a mockingbird (the song of the mockingbird is, in fact, a medley of the calls of many other birds and other sounds. Each imitation is repeated two or three times, then another song is started, all in rapid succession). The mockingbird would occasionally join in harmony while Orville played on his mandolin. ! Music was something the Wright family enjoyed. Orville began
lessons on the mandolin while the harmonica was the instrument of choice for Wilbur.
! Wilbur was the youngest member of an informal social club known as the Ten Dayton Boys; singing being a favorite pastime and Wilbur having a fine bass voice.
! Orville was called out of class at school, when he was about seven, to show the pupils proficiency in music. There were three in the group of singers. As Orville said, he was chosen for his good voice, another for the volume of sound, and the third “to keep it going.”
Procedure/Activity:1. Have students research the mandolin and the harmonica. Have them write a summary
of their findings. Ask them to listen to some recordings of mandolin and harmonica music and tell how it makes them feel.
2. Have students define harmony and try to harmonize with someone or write a few measures of harmony.
3. Have students choose an instrument from those available in the classroom or make one of their own.
55

Rationale: This lesson will tie music to the lives of the Wright Brothers while also providing information and a creative outlet for students.
Assessment:Evaluate students on their ability to reproduce a series of notes and their knowledge of harmony, the mandolin, and the harmonica.
Additional Information:1. ESL students: Have them also demonstrate instruments and harmonies of their native
country.2. Students can work in pairs to address different ability levels.3. Web sites for homemade instruments:
! http://net22.com/qazingulaza/inventedinstruments.html.! http://www.kinderart.com/teachers/9instruments.htm. ! http://familycrafts.about.com/cs/musicalcrafts/index.htm.
Mandolin
Phonograph
56

TASK #14 - MUSIC and LANGUAGE ARTSStudent Information
Background Information: Wilbur and Orville set up a camp at Kitty Hawk, North Carolina and had few visitors except for the Tate family and a mockingbird(the song of the mockingbird is, in fact, a medley of the calls of many other birds and other sounds. Each imitation is repeated twoor three times, then another song is started, all in rapid succession.) The mockingbird would occasionally join in harmony while Orville played on his mandolin. ! Music was something the Wright family usually enjoyed. Orville began
lessons on the mandolin while the harmonica was the instrument of choice for Wilbur.
! Wilbur was the youngest member of an informal social club known as the Ten Dayton Boys; singing being a favorite pastime and Wilbur having a fine bass voice.
! Orville was called out of class at school, when he was about seven, to show the pupils proficiency in music. There were three in the group of singers. As Orville said, he was chosen for his good voice, another for the volume of sound, and the third “to keep it going.”
Materials:Homemade instruments materials, reference materials (including Internet), paper, pen, recordings of mandolin and harmonica music.
Directions:1. Research the mandolin and the harmonica. Write a summary of your findings. Listen to
some recordings of mandolin and harmonica music. Tell how they make you feel.2. Define harmony and try to harmonize with someone or write a few measures of
harmony.3. Choose an instrument or make one of your own. 4. Create a series of notes and ask your classmates to duplicate your song twice.
Mandolin
Phonograph
57

TASK #15 - PHYSICAL EDUCATION and LANGUAGE ARTSTeacher Lesson Plan
Objective:Students will:
1. Research racquetball, football, and sports cycling.2. Practice skills associated with racquetball and football.
National Standards:English Language Arts Standards:
3. Evaluation Strategies.4. Communication Skills.5. Communication Strategies.6. Applying Knowledge.7. Evaluating Data.8. Developing Research Skills.
12. Applying Language Skills.
Physical Education Standards:1. Demonstrates competency in many movement forms and proficiency in a few
movement forms.2. Applies involvement concepts and principles to the learning and development
of motor skills.3. Exhibits a physically active lifestyle.4. Achieves and maintains a health-enhancing level of physical fitness.5. Demonstrates responsible personal and social behavior in physical activity settings.6. Demonstrates understanding and respect for differences among people in physical
activity settings.7. Understands that physical activity provides opportunities for enjoyment, challenge,
self-expression, and social interaction.
Materials:Reference materials and/or Internet, paper, pen, Nerf footballs, safety glasses, racquetballs/handballs, wall space, level area.
Estimated Time:Two 40 minute periods (one for research and writing; the other for presenting and physical skills activities).
Background Information: To keep in shape, the Wright Brothers played racquetball, a game similar to handball. When they were younger they also enjoyed playing football. Wilbur and Orville did not just build bikes and sell them, they were passionate sports cyclists and raced.
Procedure/Activity:Research:
1. Racquetball or handball: Have students use reference books or the internet and write a report on the game's objective, where it is played, the number of players, the type of equipment used, and scoring procedure.
2. Football: Have students use reference books or the Internet to compare how football
58

has changed from the game the Wrights played in the early 1900s to today.3. Sports Cyclists: Have students create a list of bicycle safety tips.
Physical Education Skills:1. Football: Divide students into groups of four and have them pass and catch the Nerf
footballs. Start out close (ten feet apart) and work towards being far apart (twenty-five feet).
2. Handball: Using handballs or racquetballs, have students play “Keep It Going.” Students should return the ball to the front wall in sequence (player “1”, then “2”, etc.) with no bounce or wait rules, just make it hit the front wall regardless of the number of tries. Caution: Have students wear eye guards or safety glasses.
Rationale:This lesson allows students to explore racquetball, football, and cycling as part of a physically active lifestyle.
Assessment:Evaluate students on quality of research and information conveyed as well as cooperative skills during activities.
Additional Information:1. Physically Challenged Students should have a partner to modify the activity to allow
them to do as much as possible.2. Special Education and ESL students: Peer tutors can help with the research and these
students can also demonstrate some of their findings.3. Web sites:
Racquetball/handball:
Football:
Sports Cycling:
http://www.sports-media.org/(database of information about PE and sports).
http://www.gmu.edu/service/recsport/Intramural/Game_Rules/Rules_Raquetball.htm.
http://wwwwbs.cs.tu-berlin.de/user/tiny/fhistory.html. http://www.pebbles91.net/football/history.html.
http://www.bikeleague.org/educenter/factsheets.htm. http://www.kidshealth.org/parent/firstaid_safe/outdoor/bike_safety.html.
Wright Brothers Van Cleve Bicycle Racquetball Football Cycling
59

TASK #15 - PHYSICAL EDUCATION and LANGUAGE ARTSStudent Information
Background Information: To keep in shape, the Wright Brothers played racquetball, a game similar to handball. When they were younger they alsoenjoyed playing football. Wilbur and Orville did not just buildbikes and sell them, they were passionate sports cyclists and raced.
Materials:Reference materials and/or Internet, paper, pen, Nerf footballs, safety glasses, racquetballs/handballs, wall space, level area.
Directions:Research:
1. Racquetball or handball - Using reference books or the Internet, write a report on the game's objective, where it is played, the number of players, the type of equipment used, and scoring procedure.
2. Football: Use reference books or the Internet to compare how football has changed from the game the Wrights played in the early 1900s to today.
3. Sports Cyclists: Create a list of bicycle safety tips.
Physical Education Skills:1. Football: In groups of four, pass and catch the football. Start out close (ten feet apart)
and work towards being far apart (twenty-five feet).2. Handball/Racquetball: Play “Keep It Going” by getting a partner and returning the
handball to the front wall in sequence (player “1”, then “2”, etc.) with no bounce or wait rules -just make it hit the front wall regardless of the number of tries. Caution: Wear eye guards or safety glasses
http://www.gmu.edu/service/recsport/Intramural/Game_Rules/Rules_Raquetball.htm.
http://wwwwbs.cs.tu-berlin.de/user/tiny/fhistory.html http://www.pebbles91.net/football/history.html
http://www.bikeleague.org/educenter/factsheets.htm http://www.kidshealth.org/parent/firstaid_safe/outdoor/bike_safety.html
(http://www.sports-media.org/ database of information aboutPE and sports).
Wright Brothers Van Cleve Bicycle Racquetball Football Cycling
60

TASK #16 - READINGTeacher Lesson Plan
Objective:Students will learn about an author and read and present a book report from a book by that author.
National Standards:English Language Arts Standards:
1. Reading for Perspective.2. Understanding the Human Experience.3. Evaluation Strategies.4. Communication Skills.5. Communication Strategies.6. Applying Knowledge.8. Developing Research Skills.9. Multicultural Understanding.
12. Applying Language Skills.
Technology Standards:17. Understanding of and ability to select and use information and communication
technologies.
Materials:Selection of suggested books, Internet, paper, pen, poster board, art supplies.
Estimated Time:Besides time for reading the book, 50 minutes to work on book report writing, and presentation time (about 3-5 minutes per student).
Background Information:Orville and Wilbur's parents believed in reading. With their house was filled with books, they encouraged the children to read at an early age. When Wilbur took care of his ailing mother, he used his spare time to read and study from his father's large and varied library. He studied ethics and science, the Encyclopaedia Britannica and Chamber's Cyclopedia as well as classics of history and biography. He read Plutarch's Lives, Gibbon's Decline and Fall of the Roman Empire, Guizot on the history of France, Greene on the history of England, and Boswell's Life of Samuel Johnson. He also read the sets of Hawthorne and Sir Walter Scott.
Procedure/Activity:1. Tell students to read a book from one of the following authors (or a list of your choice) or
assign one selection for the entire group:Scott O'Dell Ann M. MartinDan Gutman Gertrude Chandler WarnerLewis Carroll Roald DahlWilson Rawls C. S. LewisE.B. White Phyllis Reynolds NaylorLaura Ingalls Wilder R. L. StineShel Silverstein J. K. Rowling
61

1. Have students use the Internet to find out about the author and write five facts about the author.
2. Have students present the book they read by the chosen author in one of the following ways:
a. Have students create story webs (which includes the main characters, setting, the problem and the solution) on poster paper.
b. Students can print a book report or review on the computer.c. Tell students to create a model of the chosen book. For instance: cover a cereal
box with paper. Write the title, author, illustrator and draw picture on the front of the box. On the back of the box copy the story web.
3. Have students present their book choice to the group in a 3-5 minute talk.
Rationale:This lesson provides a reading experience as well as a creative way for students to communicate what they have read.
Assessment:Evaluate students using a rubric for book reports.
Additional Information:1. ESL Students: Have them read books in native language or with a partner.2. Special Education Students: Use books on tape and allow for verbal responses.3. Technology: Use Internet for research and Microsoft Word or other similar program for
creating book report. Hyperstudio or Power Point could also be used for multimedia presentation.
4. Multiculturalism: Students from varied cultures could read authors such as:Laurence Yep (Asian American)Gary Soto (Mexican American)Mildred Taylor or Walter Dean Myers (African American)
5. Web Sites :! - Literature and language
arts lesson plans.! - Book report and
creative writing ideas.
http://edtech.kennesaw.edu/jcheek1/larts.htm
http://teenwriting.about.com/cs/bookreport/index.htm
62

TASK #16 - READINGStudent Information
Background Information:Orville and Wilbur's parents believed in reading. With their house was filled with books, they encouraged the children to read at an early age. When Wilbur took care of his ailing mother, he used his spare time to read and study from his father's large and varied library. He studied, ethics and science, the Encyclopaedia Britannica and Chamber's Cyclopedia as well as classics of history and biography. He read Plutarch's Lives, Gibbon's Decline and Fall of the Roman Empire, Guizot on the history of France, Greene on the history of England, and Boswell's Life of Samuel Johnson. He also read the sets of Hawthorne and Sir Walter Scott.
Materials:Selection of suggested books, Internet, paper, pen, poster board, art supplies.
Directions:1. Choose one of the following authors and select a book by this author:
Scott O'Dell Ann M. MartinDan Gutman Gertrude Chandler WarnerLewis Carroll Roald DahlWilson Rawls C.S. LewisE.B. White Phyllis Reynolds NaylorLaura Ingalls Wilder R.L. StineShel Silverstein J.K. Rowling
2. Use the Internet to find out about the author and write five facts about the author.3. Choose one of the following to do to present your book to the group after you have read
the book:! Create a story web (which includes the main
characters, the setting, the problem and thesolution) on poster paper.
! Print a book report or review on the computer.
! Create a model of the chosen book: Cover a cereal box with paper. Write
the title, author, and illustrator and draw a picture on the front of the box. On the back of the box, copy the storyweb.
4. Be prepared to share your presentation with the group for 3-5 minutes.
63

TASK #17 - SCIENCETeacher Lesson Plan
Objective: Students will select an invention and tell how they would improve it.
National Standards:Science Standards:
Standard B: Physical Science:! Properties and changes of properties in matter.
Standard E: Science and Technology:! Abilities of technological design.! Understandings about science and technology.
Standard F: Science in Personal and Social Perspectives:! Science and technology in society.
Standard G: History and nature of science:! Science as a human endeavor.
Technology Standards:6. Understanding of the role of society in the
development and use of technology.8. Understanding of the attributes of design.9. Understanding of engineering design.
10. Understanding of the role of troubleshooting, research and development, invention andinnovation, and experimentation inproblem solving.
11. Ability to apply the design process.12. Ability to use and maintain technological
products and systems.13. Ability to assess the impact of products
and systems.
Materials:Invention to explain and modify, paper, pencil,Internet and research resources.
Estimated Time:Time in and out of class may be used.Timeline should be established by instructor for:! Choosing invention.! Deciding how to modify it (can be actually
modified or drawing or model done to show change).
! Writing findings.! Presenting to class.
Background Information:Milton Wright, the Wright Brothers father, believed in the educational value of toys and brought home a toy helicopter as a gift for Orville and Wilbur. The Wright Brothers built a number of copies of this toy, improving on it. Orville, in particular,
64
Replica of the Wright Bat rubber-band powered helicopter.
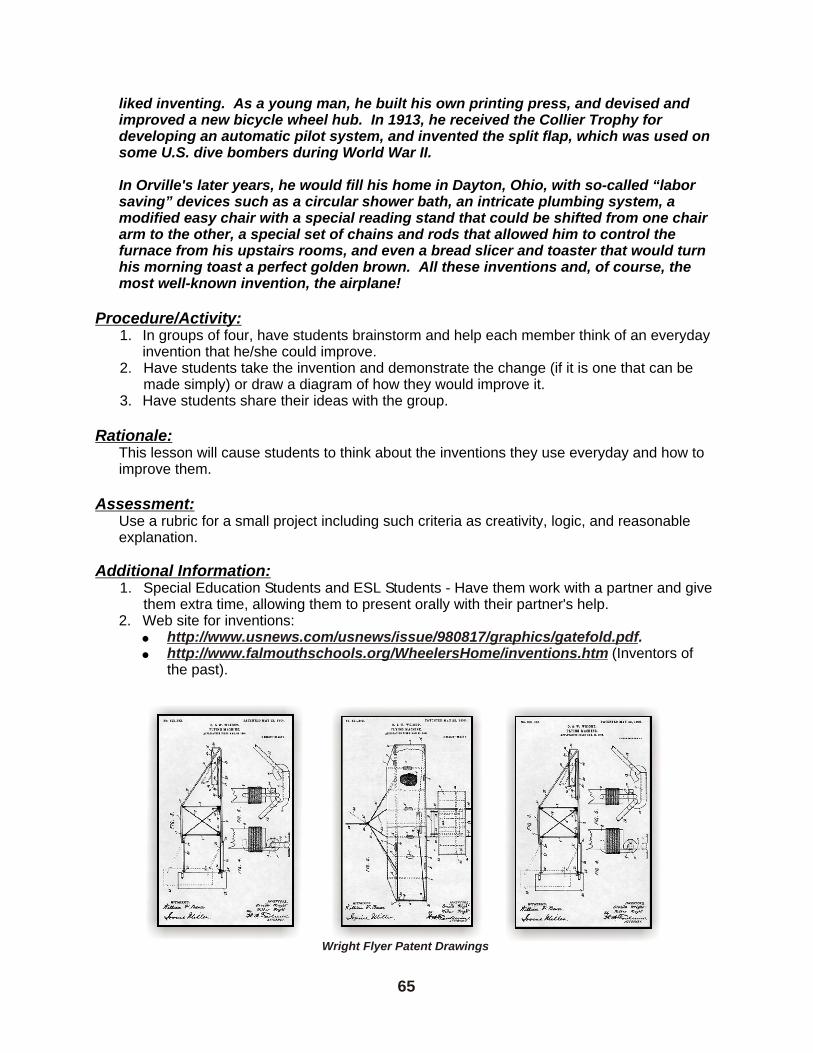
liked inventing. As a young man, he built his own printing press, and devised and improved a new bicycle wheel hub. In 1913, he received the Collier Trophy for developing an automatic pilot system, and invented the split flap, which was used on some U.S. dive bombers during World War II. In Orville's later years, he would fill his home in Dayton, Ohio, with so-called “labor saving” devices such as a circular shower bath, an intricate plumbing system, a modified easy chair with a special reading stand that could be shifted from one chair arm to the other, a special set of chains and rods that allowed him to control the furnace from his upstairs rooms, and even a bread slicer and toaster that would turn his morning toast a perfect golden brown. All these inventions and, of course, the most well-known invention, the airplane!
Procedure/Activity:1. In groups of four, have students brainstorm and help each member think of an everyday
invention that he/she could improve.2. Have students take the invention and demonstrate the change (if it is one that can be
made simply) or draw a diagram of how they would improve it.3. Have students share their ideas with the group.
Rationale:This lesson will cause students to think about the inventions they use everyday and how to improve them.
Assessment:Use a rubric for a small project including such criteria as creativity, logic, and reasonable explanation.
Additional Information:1. Special Education Students and ESL Students - Have them work with a partner and give
them extra time, allowing them to present orally with their partner's help.2. Web site for inventions:!
! (Inventors of the past).
http://www.usnews.com/usnews/issue/980817/graphics/gatefold.pdf.http://www.falmouthschools.org/WheelersHome/inventions.htm
65
Wright Flyer Patent Drawings
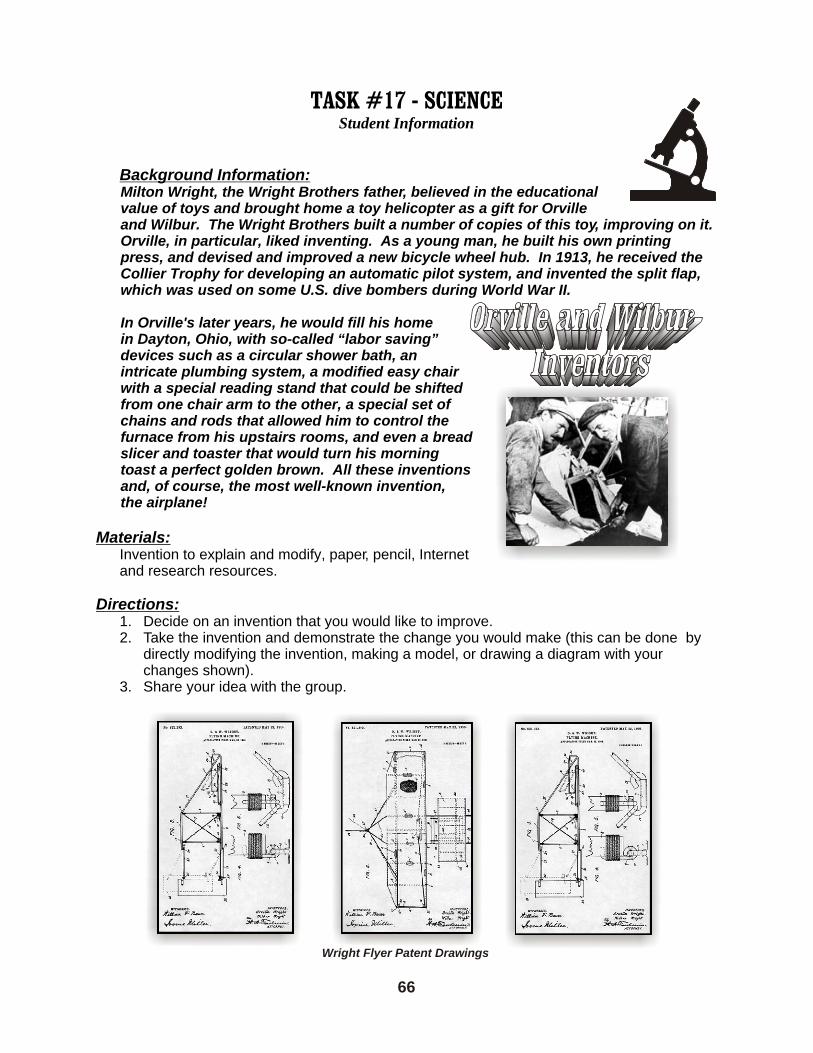
TASK #17 - SCIENCEStudent Information
Background Information:Milton Wright, the Wright Brothers father, believed in the educationalvalue of toys and brought home a toy helicopter as a gift for Orvilleand Wilbur. The Wright Brothers built a number of copies of this toy, improving on it. Orville, in particular, liked inventing. As a young man, he built his own printing press, and devised and improved a new bicycle wheel hub. In 1913, he received the Collier Trophy for developing an automatic pilot system, and invented the split flap, which was used on some U.S. dive bombers during World War II.
In Orville's later years, he would fill his home in Dayton, Ohio, with so-called “labor saving” devices such as a circular shower bath, an intricate plumbing system, a modified easy chairwith a special reading stand that could be shiftedfrom one chair arm to the other, a special set ofchains and rods that allowed him to control thefurnace from his upstairs rooms, and even a bread slicer and toaster that would turn his morning toast a perfect golden brown. All these inventions and, of course, the most well-known invention, the airplane!
Materials:Invention to explain and modify, paper, pencil, Internet and research resources.
Directions:1. Decide on an invention that you would like to improve.2. Take the invention and demonstrate the change you would make (this can be done by
directly modifying the invention, making a model, or drawing a diagram with yourchanges shown).
3. Share your idea with the group.
66
Wright Flyer Patent Drawings

TASK #18 - LANGUAGE ARTSTeacher Lesson Plan
Objective:Students will learn new vocabulary and write a group story usingthe new words.
National Standards:English Language Arts
3. Evaluation Strategies.4. Communication Skills.5. Communication Strategies.6. Applying Knowledge.
12. Applying Language Skills.
Materials:Dictionary, paper, pen, poster board, and art supplies.
Estimated Time:50 minutes.
Background Information: As young men, the Wright Brothers were curious, determined, and patient. After growing up, they remained devoted readers and discussed scientific theories and errors they discovered in their designs and tests.
Other people had tried, and were still trying, to invent flying machines. During those dangerous days, many pathfinders perished in crashes. Some kept records, gave lectures, and had scientific or engineering training. Wilbur and Orville were self-taught scientists who read about other people's ideas and used their mechanical talents and creativity to build a lightweight engine.
They gained knowledge by conducting experiments in a wind tunnel. As a result of three years' labor, the Wright Brothers proved manned flight was possible.
The newspaper accounts were not important. Some people thought these obscure brothers had created a carnival attraction. Once the Wright Brothers flew, they applied their eager minds to developing another superior machine.
Procedure/Activity:1. Tell students to look up the underlined words in the “Background Information” and write
the definitions.2. Students should then get together in groups of four and create their own story using the
words they have learned. This could be a continuous story where the first student begins the story with a sentence, then passes the story to the next student who adds a sentence and keeps the story going until all words have been used.
3. When stories are complete, have the students work on an art display illustrating their story on poster board.
4. Share the stories with the class.
67
5. While students are working on their story, the search and find puzzle attached could be used or simply have them thinking of other additions to their story until their turn comes to add.
Rationale:This lesson will increase students' vocabulary and involve them in creative story writing as a cooperative group project.
Assessment:Evaluate students on proper use of new vocabulary.
Additional Information:1. Special Education and ESL students: Assign to a group with academically strong
students and give them six words.2. Web site: “Ten Tips for Young Writers” at
www.educationworld.com/a_curr/curr172.shtml
68

TASK #18 - LANGUAGE ARTSStudent Information
Background Information: As young men, the Wright Brothers were curious, determined, and patient. After growing up, they remained devoted readers and discussed scientific theories and errors they discovered in their designs and tests.
Other people had tried, and were still trying, to invent flying machines. During those dangerous days, many pathfinders perished in crashes. Some kept records, gave lectures, and had scientific or engineering training. Wilbur and Orville were self-taught scientists who read about other people's ideas and used their mechanical talents and creativity to build a lightweight engine.
They gained knowledge by conducting experiments in a wind tunnel. As a result of three years' labor, the Wright Brothers proved manned flight was possible.
The newspaper accounts were not important. Some people thought these obscure brothers had created a carnival attraction. Once the Wright Brothers flew, they applied their eager minds to developing another superior machine.
Materials:Dictionary, paper, pen, poster board, and art supplies.
Directions:1. Look up the underlined words from the “Background Information” above and write the
definitions.2. Get together in groups of four and create your own story using the words you have
learned. Do a continuous story where one group member writes the first line of the story using one of the underlined words, then passes the story to the next group member who adds a sentence. Keep the story moving until all words are used.
3. When your story is complete, your group should work on an art display illustrating your story on poster board.
4. Share the stories with the class.
69

R X S K L C Q R U N A P S D E I L P P A G C
X E U N X G Q S P C N P E C P T Y B E Y R K
J J I H V Y N G U A V I A Q C R N R K E C A
K B B S Q Q C E J O B D N T F J U E B E V W
P Y M Y I N E F F W R O M E H C I C I J A M
M J W J U V W W I F F E E M S F O U I T B C
A Y T I V I T A E R C I G B R A I C I D A Y
I I J I R P F C W J Y L O N D D V N T Q N P
M W D V S G U D W Y O O K I A R D T D W R D
Q X K D U R X J J V N P W U T D G H D E E B
Y Y I E I E R R E G A E Z M J P C N Y N R J
D K F O B X U L C B V H R F R T P R I A U S
N M U D I P V C R K C A J S R S Z M E Z D V
Q S P P B W G N D O U N N X W W R E Q D R E
H L K D J D F Z N P Z J G R F E N V E T L E
J X O E U F B D P R V C Y U T G L T U G K G
W M J I W W U K L U Z Z V E I I O N N V C U
C Z N I V C J H B A K K D N J V T S Z H M X
K W A T T M R O I R E P U S E H F C C Q R T
G W V I B X G V Q H B D A D I P P W L Z L O
G B N H Z E Z J S C R E L E C T U R E S A W
D G Y N Z V J O V H A K R N J X Y X J B R V
TASK #18 - JUMBLE
Words to Find:
curiousdeterminedpatientdevoted
This jumble was created by NASA Kids! http://kids.msfc.nasa.gov/
70
X
E
J
B
Y
J
Y
I
W
X
Y
K
M
S
L
X
M
Z
W
W
B
G
R
X
J
K
P
M
A
I
M
Q
Y
D
N
Q
H
J
W
C
K
G
G
D
dangerouspathfinderslecturescreativity
conductingobscureapplied

TASK #19 - SCIENCETeacher Lesson Plan
Objective:Students will build, test and collect data on 3 different paper airplanes.
National Standards:Science Standards:
Standard A: Science as Inquiry:Standard B: Physical Science:! Motions and Forces.
Standard E: Science and Technology:! Abilities of technological design.! Understandings about science and technology.
Standard G: History and Nature of Science:! Nature of science.
Unifying Concepts and Processes:! Evidence, models, and explanation.! Constancy, change, and measurement.! Form and function.
Materials:Copier paper (or similar weight paper), data collection sheet, pencil, measured-off runway, stopwatch.
Estimated Time:60 minutes.
Background Information:Orville and Wilbur Wright were convinced of the need to control an aircraft in three axes of motion. An elevator, or horizontal control surface in front of the wings on their aircraft, enabled the pilot to control climb and descent (pitch axis). The elevator was controlled by a lever in the pilot's left hand. A “wingwarping” system controlled the aircraft in a roll (roll axis). To initiate a roll, the pilot would shift his hips from side to side in a cradle on the lower wing, “twisting” the wings left or right or restoring them to level flight. Orville and Wilbur developed this idea from observing birds in flight. They observed the buzzards keeping their balance one wing more than the other. In 1902, the brothers added a vertical rudder to the rear of their machines to control the left and right motion of the nose of the aircraft (yaw axis). Wilbur and Orville conducted many experiments with gliders, kites, wind tunnels, and finally “The Flyer” before their dream of flight materialized.
Procedure/Activity:1. Have students construct three different paper airplane models.2. Have them make a list of the different variables that will affect the length of the flight and
how long the plane stays in the air.3. Tell students to choose 3 variables and test the performance of each airplane based on
these variables. Do repeated tests to verify your findings.4. Have students fill out the data table. 5. The class should then share results.
71

Rationale:This lesson allows students to test variables and collect data using the inquiry process.
Assessment:Evaluate students on their accurate testing and recording methods.
Additional Information:1. Special Education and ESL students: Have small group work with teacher or peer tutor.2. Web site: “The Wright Way” Simulations at
Web pages for 3 paper airplane models: http://www.grc.nasa.gov/WWW/Wright/sim.htm.
http://kidscorner.larc.nasa.gov/egret.html.http://kidscorner.larc.nasa.gov/flex.html. http://kidscorner.larc.nasa.gov/square.html.
CAPs Paper Airplane(Enlarge to 8.5"X11")
72

TASK #19 - SCIENCEStudent Information
Background Information:Orville and Wilbur Wright were convinced of the need to control an aircraft in three axes of motion. An elevator, or horizontal control surface in front of the wings on their aircraft, enabled the pilot to control climb and descent (pitch axis). The elevator was controlled by a lever in the pilot's left hand. A “wingwarping” system controlled the aircraft in a roll (roll axis). To initiate a roll, the pilot would shift his hips from side to side in a cradle on the lower wing, “twisting” the wings left or right or restoring them to level flight. Orville and Wilbur developed this idea from observing birds in flight. They observed the buzzards keeping their balance one wing more than the other. In 1902, the brothers added a vertical rudder to the rear of their machines to control the left and right motion of the nose of the aircraft (yaw axis). Wilbur and Orville conducted many experiments with gliders, kites, wind tunnels, and finally “The Flyer” before their dream of flight materialized.
Materials:Copier paper (or similar weight paper), data collection sheet, pencil,measured-off runway, stopwatch.
73
CAPs Paper Airplane(Enlarge to 8.5" X 11").
Directions:1. Construct three different
paper airplane models.2. Make a list of the different
variables that will affect thelength of the flight and howlong the plane stays in the air.
3. Choose 3 variables and test the performance of each airplane based on these variables. Do repeated tests to verifyyour findings.
4. Fill out the data table.5. Share your results.

74
TASK #1 - TEST FLIGHT DATA SHEET
Test Flight # Airplane Tested Variable Tested Flight Distance
1 A
2 A
3 A
1 B
2 B
3 B
1 C
2 C
3 C
How long was each airplane aloft?Is the paper used for building the plane thick or thin?Is the wind blowing against you as you throw or is it blowing on your back?
Designed by ________________________________________
Design name:
A = ___________________________________
B = _______________________________________________
C = _______________________________________________
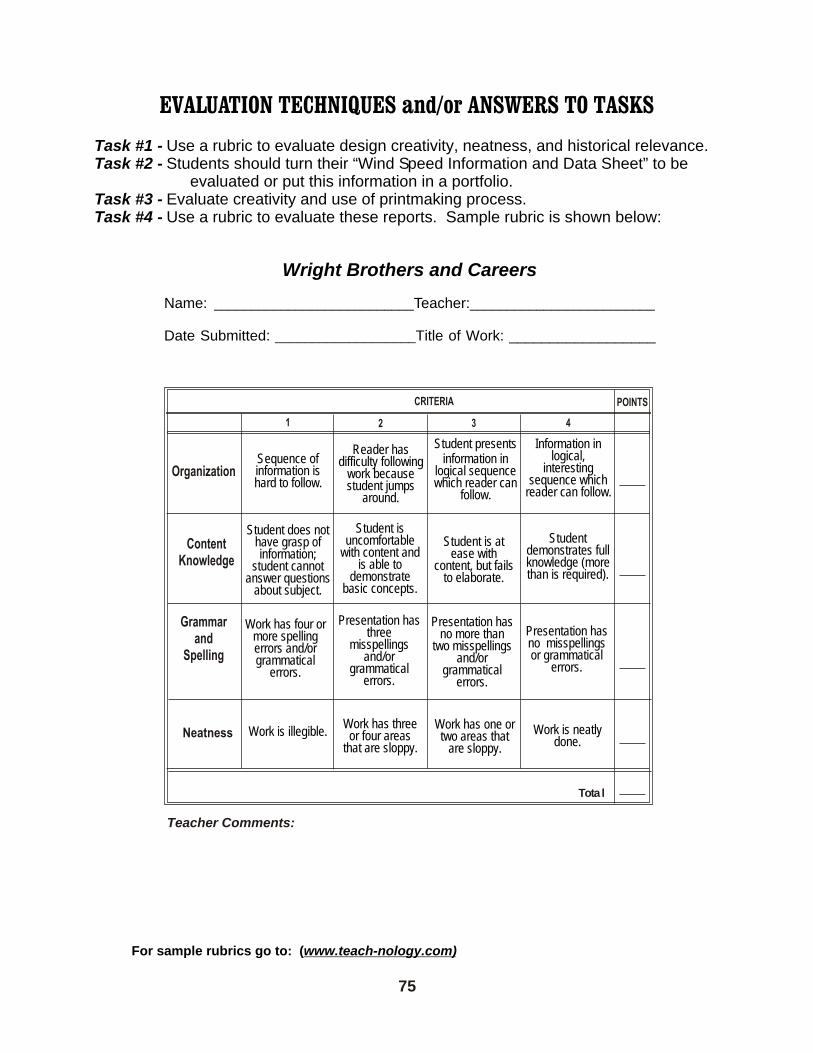
75
EVALUATION TECHNIQUES and/or ANSWERS TO TASKS
Task #1 - Use a rubric to evaluate design creativity, neatness, and historical relevance.Task #2 - Students should turn their “Wind Speed Information and Data Sheet” to be
evaluated or put this information in a portfolio.Task #3 - Evaluate creativity and use of printmaking process.Task #4 - Use a rubric to evaluate these reports. Sample rubric is shown below:
Wright Brothers and Careers
Name: ___________________________Teacher:_________________________
Date Submitted: ___________________Title of Work: __________________
Sequence of information is hard to follow.
Student does not have grasp of information;
student cannot answer questions
about subject.
Work has four or more spelling errors and/or grammatical
errors.
Presentation has three
misspellings and/or
grammatical errors.
Work is illegible.Work has three or four areas
that are sloppy.
Work has one or two areas that
are sloppy.
Work is neatly done.
Presentation has no more than
two misspellings and/or
grammatical errors.
Presentation has no misspellings or grammatical
errors.
Student is uncomfortable
with content and is able to
demonstrate basic concepts.
Student is at ease with
content, but fails to elaborate.
Student demonstrates full knowledge (more than is required).
Reader has difficulty following
work because student jumps
around.
Student presentsinformation in
logical sequence which reader can
follow.
Information in logical,
interesting sequence which
reader can follow.
POINTSCRITERIA
21 3 4
Grammar and
Spelling
ContentKnowledge
Organization
Neatness
Tota l
Teacher Comments:
For sample rubrics go to: (www.teach-nology.com)

76
Task # 5 - Evaluate students on the accuracy of their information and the map.! Millville, Indiana: Wilbur was born in Millville (near Richmond).! Dayton, Ohio: Orville was born here and the family lived in Dayton.! Kitty Hawk, North Carolina: The Wright Brothers performed flight tests and the
historic first flight occurred here.! Montgomery, Alabama: The Wright Brothers started a flight training school here in
1910.! Fort Meyer, Virginia: 1908 Flyer was brought to Fort Myer so Orville could make
public flights. He established a record by staying aloft for over an hour and tookLt. Frank P. Lahm up as the first Army officer to fly as a passenger. On a later flight, Orville was injured and Lt. Selfridge was killed.
! College Park, Maryland The Wright Brothers constructed the 1911 Wright B forthe military's first Army Aviation School.
Task #6 - Use a rubric to evaluate journal entries similar to the one below:
Journal entry for Wright Brothers
Name: ________________________ Teacher:
Date : ___________________ Title of Work: ___________________
Criteria Points 1 2 3 4
Information Contains no
accurate information.
Contains several
accurate facts.
Contains accurate
information but not
enough.
Contains accurate and
complete information.
____
Neatness Unable to read. Barely able to
read.
Able to read but
corrections are
noticeable.
Very neat and readable.
____
Spelling and Grammar.
Over 10 mistakes.
8-10 mistakes. 4-7 mistakes. 1-3 mistakes. ____
Creativity Facts are boring
and simply stated.
Facts are more interesting but still lacking in
creativity.
Facts are more
personally related and
appear to be interesting.
Facts are creatively
presented and make the
reader believe he/she is
there.
____
____
Total----> ____ Teacher Comments:
For sample rubrics go to: (www.teach-nology.com)

77
Task #8 - Evaluate students based on following acrostic form and applying the poem to the Wright Brothers.
Task #9 - Use a rubric to evaluate each group's presentation for historical accuracy and creativity.
Task #10 - Use a rubric like the one below or make your own to evaluate each speech:
Wright Brothers Speech
Teacher Comments:
Name: ________________________ Teacher: Date Submitted: ____________ Title of Work: ___________________
Criteria Points
1 2 3 4
Body Language
No movement or descriptive gestures.
Very little movem ent or
descriptive gestures.
Made movem ents or gestures that
enhanced articulation.
Movem ents seemed fluid
and helped the audience visualize.
____
Eye Contact No eye contact with
audience.
Displayed minimal eye contact with audience.
Consistent use of direct eye contact with audience.
Holds attention of entire
audience with the use of direct eye contact.
____
Introduction and Closure
Student does not display clear
introductory or closing remarks.
Student clearly uses either an introductory or closing remark,
but not both.
Student displays clear introductory or
closing remark s.
Student delivers open and closing
remarks that capture the
attention of the audience and set the mood.
____
Pacing
Delivery is either too quick or too
slow to meet apportioned time
interval.
Delive ry is in bursts and does
not meet apportioned time
interval.
Delivery is patterned, but does not meet
apportioned time interval.
Good use of drama and
student mee ts apportioned time interval.
____
Poise
Tension and nervousness is
obvious; has trouble recovering
from m istakes.
Displays mild tension; has
trouble recovering from
mistakes.
Makes minor mistakes, but
quickly recovers from them; displays
l itt le or no tension.
Student displays
relaxed, self-confident
nature about self, with no
mistakes.
____
Voice Consistently uses a
monotone voice.
Displays some level of inflection
throughout delivery.
Satisfactor y use of
inflection, but does not
consistently use fluid speech.
Use of fluid speech and
inflection maintains the interest of the
audience.
____
Total----> ____
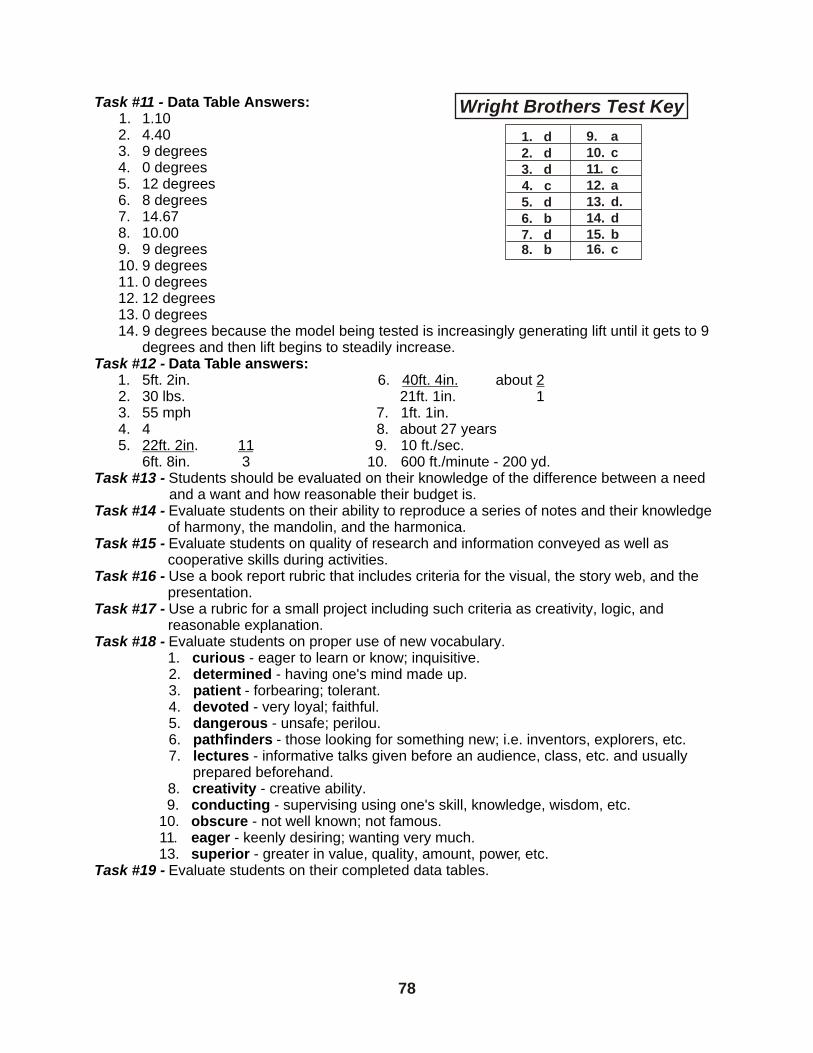
78
Task #11 - Data Table Answers:1. 1.102. 4.403. 9 degrees4. 0 degrees5. 12 degrees6. 8 degrees7. 14.678. 10.009. 9 degrees10. 9 degrees11. 0 degrees12. 12 degrees13. 0 degrees14. 9 degrees because the model being tested is increasingly generating lift until it gets to 9
degrees and then lift begins to steadily increase.Task #12 - Data Table answers:
1. 5ft. 2in.2. 30 lbs.3. 55 mph4. 45. 22ft. 2in. 11
6ft. 8in. 3Task #13 - Students should be evaluated on their knowledge of the difference between a need
and a want and how reasonable their budget is.Task #14 - Evaluate students on their ability to reproduce a series of notes and their knowledge
of harmony, the mandolin, and the harmonica.Task #15 - Evaluate students on quality of research and information conveyed as well as
cooperative skills during activities.Task #16 - Use a book report rubric that includes criteria for the visual, the story web, and the
presentation.Task #17 - Use a rubric for a small project including such criteria as creativity, logic, and
reasonable explanation.Task #18 - Evaluate students on proper use of new vocabulary.
1. curious - eager to learn or know; inquisitive.2. determined - having one's mind made up.3. patient - forbearing; tolerant.4. devoted - very loyal; faithful.5. dangerous - unsafe; perilou.6. pathfinders - those looking for something new; i.e. inventors, explorers, etc.7. lectures - informative talks given before an audience, class, etc. and usually
prepared beforehand.8. creativity - creative ability.9. conducting - supervising using one's skill, knowledge, wisdom, etc.
10. obscure - not well known; not famous.11. eager - keenly desiring; wanting very much.13. superior - greater in value, quality, amount, power, etc.
Task #19 - Evaluate students on their completed data tables.
Wright Brothers Test Key
1. d2. d3. d4. c5. d6. b7. d8. b
9. a10. c11. c12. a13. d.14. d15. b 16. c
6. 40ft. 4in. about 221ft. 1in. 1
7. 1ft. 1in.8. about 27 years9. 10 ft./sec.
10. 600 ft./minute - 200 yd.

79
WRIGHT BROTHERS TEST
1. The Wright Brothers' father was a a. doctor.b. lawyer.c. printer.d. minister.
2. The Wright Brothers hada. two brothers and a sister.b. two brothers and two sisters.c. an older sister and no brothers.d. two older brothers and a younger sister.
3. Because of Milton's job, the Wright familya. had money for experimenting.b. was able to attend special schools.c. traveled extensively around Europe.d. moved frequently in the children's younger years.
4. Wilbur Wrighta. was younger than Orville and died first.b. was younger than Orville and outlived him.c. was four years older than Orville and died first.d. was two and one half years older than Orville and outlived him.
5. After a skating accident,a. Orville began printing handbills.b. Wilbur had to give up racing bikes.c. Orville broke his leg and couldn't ride his bike.d. Wilbur lost eight teeth and was ill for a long time.
6. When Orville was 7 and Wilbur was 11, their father gave thema. a printing press.b. a toy helicopter.c. a bicycle.d. a collection of books on flying.
7. Which statement is the MOST informative about the Wright Brothers?a. Orville played the mandolin and Wilbur read.b. They succeeded in building a flying machine while others failed.c. They had difficulty reaching Kitty Hawk because there were no bridges and few inhabitants.d. They began building bikes, experimenting with flight, overcoming failures, and
became world famous inventors.8. Which words do NOT make us think of the Wright Brothers?
a. Kites, gliders, and airplanes.b. Jets, airports, airlines, and jet lag.c. Printing press, bicycles, and motor patentsd. Wind tunnel, experiments, failures, and success.
9. Pick the FALSE statement. The Wright Brothersa. died in poverty.b. wanted to sell their airplane.c. were successful in their bicycle business.d. studied and read the works of other men and learned from them.

80
10. The first powered flight was flown by a. Orville on July 4, 1776.b. Wilbur on December 17, 1871.c. Orville on December 17, 1903.d. Wilbur and Orville on December 17, 1913.
11. The Wright Brothers built or inventeda. bicycles, airplanes, gliders, and cars.b. engines, bicycles, and a sewing machine.c. bicycles, gliders, airplanes, and engines.d. kites, stoves, mandolins, and a printing press.
12. The Wright Brothers lived most of their lives in a. Dayton, Ohio, and traveled through the United States and Europe.b. Columbus, Ohio, and traveled through the United States and Europe.c. Indianapolis, Indiana, but made many trips to Kitty Hawk, North Carolina.d. Kitty Hawk, North Carolina and traveled to Washington, D.C., and Europe.
13. The Wright Brothersa. knew only success.b. depended on others, especially newspaper men.c. could sew and read, and worked for the Weather Bureau.d. had many crashes but their worst injury was Orville's broken leg.
14. Which expression BEST fits the Wright Brothers?a. Nothing succeeds like success.b. All work makes Jack a dull boy.c. A penny saved is a penny earned.d. If at first you don't succeed, try, try again.
15. Who helped most in seeing that each Wright Brother became successful?a. Newspaper men.b. The other brother.c. Royalty from Europe.d. The United States Government.
16. In which of the following countries did the Wright Brothers try to sell their airplanes?a. Spain.b. Canada.c. France.d. Russia.
AER
OSPA
CE E
DUCA
TION
ACH
IEVE
MEN
T AW
ARD
C
L
IVO
ILR
AT
IA
R P
C
L
IVO
ILR
AT
IA
R P E
ED
CU
AC
PA
S
T
O
IO
RE
N
A
EE
DC
UA
CP
AS
T
O
IO
RE
N
A
Has
suc
cess
fully
com
plet
ed
Giv
en th
is__
____
____
____
_day
of _
____
____
____
____
____
____
____
____
_
TH
E A
ER
OS
PAC
E E
DU
CA
TIO
N
LE
AR
NIN
G P
AC
KE
TO
N T
HE
WR
IGH
T B
RO
TH
ER
S
UXI IARYL
U
CI VI
IRP
LA
AT
RO
L
NITEDS
SA
IRR
CE
A
FO
TATE

Produced by Civil Air Patrol Aerospace Education In Cooperation with: The Centennial of Flight, Centennial of Flight America’s Air Force, Aerospace Education Foundation