The Crow Canyon Archaeological Center Laboratory Manual ...
265
The Crow Canyon Archaeological Center Laboratory Manual, Version 1 By Scott G. Ortman, Erin L. Baxter, Carole L. Graham, G. Robin Lyle, Lew W. Matis, Jamie A. Merewether, R. David Satterwhite, and Jonathan D. Till May 2005 This publication was paid for in part by a State Historical Fund grant from the Colorado Historical Society. Copyright © 2005 by Crow Canyon Archaeological Center. All rights reserved.
-
Upload
khangminh22 -
Category
Documents
-
view
0 -
download
0
Transcript of The Crow Canyon Archaeological Center Laboratory Manual ...

The Crow Canyon Archaeological CenterLaboratory Manual, Version 1
By
Scott G. Ortman, Erin L. Baxter, Carole L. Graham, G. Robin Lyle, Lew W. Matis, Jamie A. Merewether,
R. David Satterwhite, and Jonathan D. Till
May 2005
This publication was paid for in part by a State Historical Fund grant from the Colorado Historical Society.
Copyright © 2005 by Crow Canyon Archaeological Center. All rights reserved.

Contents
Chapter 1. Introduction.................................................................................................1 - 1
Chapter 2. The Flow of Artifacts Through the Laboratory............................................2 - 1
Chapter 3. Artifact Cataloging Procedures...................................................................3 - 1
Chapter 4. Artifact Identification Criteria.......................................................................4 - 1
Chapter 5. Pottery Type Definitions..............................................................................5 - 1
Chapter 6. Basic Pottery Analysis................................................................................6 - 1
Chapter 7. Detailed Pottery Analyses...........................................................................7 - 1
Chapter 8. Stone Material Identification.......................................................................8 - 1
Chapter 9. Bulk Chipped Stone Analysis......................................................................9 - 1
Chapter 10. Detailed Stone Artifact Analyses............................................................10 - 1
Chapter 11. Flotation Sample Processing..................................................................11 - 1
Chapter 12. Preparation of the Collections for Curation.............................................12 - 1
Chapter 13. Quality-Control Procedures....................................................................13 - 1
References Cited........................................................................................................14 - 1

1 - 1
Chapter 1Introduction
This manual documents current practices of the research laboratory at the Crow CanyonArchaeological Center, a not-for-profit organization in Cortez, Colorado. The mission of ourorganization is to initiate and conduct archaeological research and public education programs inpartnership with Native Americans and institutions with common interests. One way weaccomplish this mission is by maintaining an active excavation program at ancestral PuebloIndian archaeological sites in southwestern Colorado. These excavations produce a steady streamof artifacts and samples that must be organized, processed, analyzed, and documented if we areto fulfill the ethical obligations associated with archaeological fieldwork and succeed in theresearch and education aspects of our mission. The various chapters of this manual describe indetail the standard procedures we follow in our laboratory, from the time artifacts are brought infrom the field until they are transferred to a permanent curation facility.
Three basic tenets guide us in our laboratory work. First, we are committed to accomplishinglong-term research on a par with the finest archaeological research conducted anywhere in theworld. Thus, in our laboratory procedures, we strive to analyze artifacts consistently andsystematically, in ways that meet or exceed the standards set by our colleagues, and to ensure thequality of the resultant data. We also balance the long-term benefits of maintaining analyticalconsistency across projects with the need to collect data that squarely address the specificquestions under investigation in our current project.
Second, we are committed to what former Crow Canyon research director Bill Lipe has calledthe “conservation model” of archaeological research (see Lipe 1974*1). Adherence to this modelin practice requires that we excavate only small portions of sites, which in turn demands that wechoose the locations of excavation units carefully. When choosing excavation units, we reasonbackward from our research questions to the types of evidence that we believe can address thosequestions; we then choose locations and contexts where such evidence is most likely to beuncovered. An inevitable outcome of such an approach is a focus on the quantitative sampling ofartifact assemblages in various site contexts, and this puts a heavy burden on high-qualityanalysis of the recovered materials in the laboratory. In addition, our laboratory strives to curatecollections in a manner that allows them to be used by other researchers, so as to reduce the needfor more excavations in the future. This requires more than just labeling and organizing artifacts;it also requires thorough documentation of the collection in a user-friendly, well-maintained, andwidely accessible database. Our goal is to make it easy for researchers outside our organizationto query our database for specific artifact types from specific contexts at one or more sites wehave excavated. Researchers should then be able to create lists of objects that can be retrievedeasily from the curation facility.
1 - 2
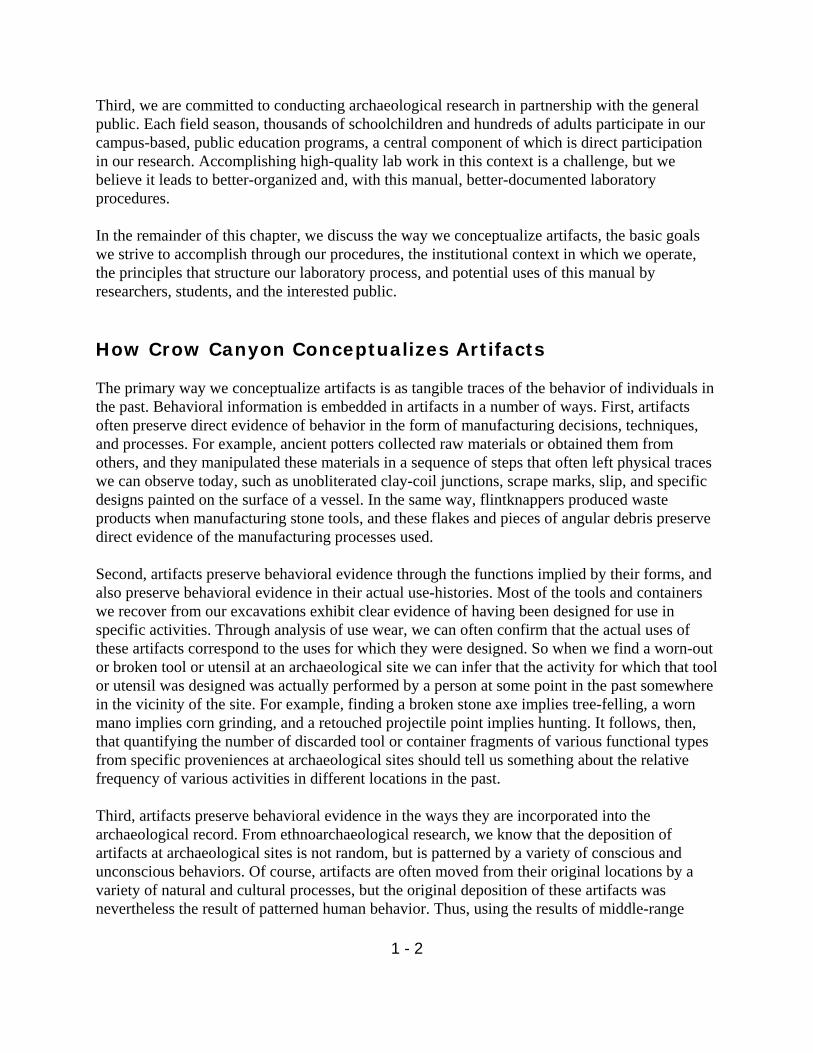
Third, we are committed to conducting archaeological research in partnership with the generalpublic. Each field season, thousands of schoolchildren and hundreds of adults participate in ourcampus-based, public education programs, a central component of which is direct participationin our research. Accomplishing high-quality lab work in this context is a challenge, but webelieve it leads to better-organized and, with this manual, better-documented laboratoryprocedures.
In the remainder of this chapter, we discuss the way we conceptualize artifacts, the basic goalswe strive to accomplish through our procedures, the institutional context in which we operate,the principles that structure our laboratory process, and potential uses of this manual byresearchers, students, and the interested public.
How Crow Canyon Conceptualizes Artifacts
The primary way we conceptualize artifacts is as tangible traces of the behavior of individuals inthe past. Behavioral information is embedded in artifacts in a number of ways. First, artifactsoften preserve direct evidence of behavior in the form of manufacturing decisions, techniques,and processes. For example, ancient potters collected raw materials or obtained them fromothers, and they manipulated these materials in a sequence of steps that often left physical traceswe can observe today, such as unobliterated clay-coil junctions, scrape marks, slip, and specificdesigns painted on the surface of a vessel. In the same way, flintknappers produced wasteproducts when manufacturing stone tools, and these flakes and pieces of angular debris preservedirect evidence of the manufacturing processes used.
Second, artifacts preserve behavioral evidence through the functions implied by their forms, andalso preserve behavioral evidence in their actual use-histories. Most of the tools and containerswe recover from our excavations exhibit clear evidence of having been designed for use inspecific activities. Through analysis of use wear, we can often confirm that the actual uses ofthese artifacts correspond to the uses for which they were designed. So when we find a worn-outor broken tool or utensil at an archaeological site we can infer that the activity for which that toolor utensil was designed was actually performed by a person at some point in the past somewherein the vicinity of the site. For example, finding a broken stone axe implies tree-felling, a wornmano implies corn grinding, and a retouched projectile point implies hunting. It follows, then,that quantifying the number of discarded tool or container fragments of various functional typesfrom specific proveniences at archaeological sites should tell us something about the relativefrequency of various activities in different locations in the past.
Third, artifacts preserve behavioral evidence in the ways they are incorporated into thearchaeological record. From ethnoarchaeological research, we know that the deposition ofartifacts at archaeological sites is not random, but is patterned by a variety of conscious andunconscious behaviors. Of course, artifacts are often moved from their original locations by avariety of natural and cultural processes, but the original deposition of these artifacts wasnevertheless the result of patterned human behavior. Thus, using the results of middle-range

1 - 3
research on site-formation processes, we can often make inferences about the behaviors thatcontributed to the spatial patterns we see in artifact distributions within and betweenarchaeological sites. For example, the number and variety of artifacts in the postabandonment fillof a kiva can sometimes tell us whether or not occupation continued in adjacent structures afterthe kiva in question was abandoned. To make such inferences, however, we must first quantifythe artifacts in the kiva fill in such a way that we can compare these deposits directly withdeposits in other kivas we have excavated.
Because we believe identification of patterns in past behavior is the primary way archaeologistslearn new things about the past, and because artifacts contain so much direct and indirectevidence of behavior, our laboratory procedures focus on collecting data that quantify thesebehaviors. That is, we use the numbers and kinds of artifacts recovered from various contexts, inconjunction with linking arguments that specify the behavioral correlates of physicalcharacteristics of these artifacts, to study variation in past behavior in time and space. Ourlaboratory procedures therefore focus on generating quantitative summaries of the physicalcharacteristics of common artifacts from various contexts, as opposed to compiling detailed,qualitative descriptions of rare artifacts. Our laboratory procedures are modeled more along thelines of a sociological survey than of an art historical study.
The Goals of Lab Work at Crow Canyon
Building on the philosophical principles that guide our research and the way in which weconceptualize artifacts, we have developed a number of specific goals that we try to accomplishthrough our laboratory procedures. These specific goals are highlighted below:
• We provide a basic functional interpretation for every artifact we collect in the field. Toaccomplish this, we have designed our artifact classification system to emphasize functionaldifferences among artifacts.
• We maintain provenience control of every artifact from the time it comes into the lab until itleaves for a permanent curation facility. That is, no matter what happens to each artifact, weensure that every item is associated with a provenience label specifying the precise locationfrom which it was collected (see The Crow Canyon Archaeological Center Field Manual[Crow Canyon Archaeological Center 2001*1] for an explanation of how these artifacts areprovenienced in the field).
• We ensure that our basic analytical procedures and the resultant data are consistent with thecurrent standard in the profession. We continually review new archaeological reports tomake sure that we collect data that are comparable to, and compatible with, those collectedby archaeologists working at other institutions.
• We put less emphasis on detailed description of individual artifacts and more onquantification of common artifacts, with the goal of estimating population parameters for

1 - 4
functional categories of artifacts in various site contexts. Thus, we classify and count and/orweigh every artifact that comes into our lab.
• Our procedures focus more on producing complete and accurate computer databases thanon producing paper archives. Databases are a priority because they are critical for our ownresearch, and we believe they will facilitate the use of our collections by other researchers toa greater extent than will paper records. The contextual and analytical data recorded bycontemporary archaeologists are far too detailed and voluminous for a paper archive to be aneffective tool for organizing and retrieving artifacts and artifact data for research. We believeinformation must be stored in a well-designed relational database if it is to be a benefit toothers.
• We ensure that all artifact data, even when collected by multiple analysts, in multiple studies,and at different times, are relatable at the level of the individual object. We do this for tworeasons. First, we want to be able to combine observations made by various researchers forspecific objects to facilitate identification of new patterns in material culture. For example,we identify paint and temper types for pottery sherds during different steps of our analysis,but want to ensure that in the end we can determine those sherds that exhibit variouscombinations of paint and temper. Second, we want to make it possible for other researchersto check our work by comparing each observation to the actual object of study. This couldprove important in relating data collected by our staff to data collected by other researchers.To accomplish this goal, we ensure that every artifact that will be analyzed individually isfirst associated with a unique series of identifying numbers.
• We bag and label artifacts as we analyze them, so that there is a one-to-onecorrespondence between lines of data in our database and bags of artifacts in the collections.Again, we want to make it as easy as possible for other researchers to use our collections andcheck our work.
• Finally, we prepare our collections for permanent curation according to current federal andprofessional standards. We organize the collections to make individual bags of artifactseasier to find, and we use archival-quality packaging that is designed to last for generations.
The Institutional Context of Lab Work at Crow Canyon
The institutional context within which our laboratory operates is unique. Our lab is currentlystaffed by three full-time employees who work in the lab year-round and three full-timeemployees who work in the lab seasonally. Each of the year-round staff is responsible formanaging one of the three primary areas of our operation: collections, analyses, and databases.Although these three individuals are called on to perform the various tasks described throughoutthis manual from time to time, they spend much of their time training and supervising theinterns, volunteers, participants, and seasonal staff who actually accomplish most of the basicwork. In their remaining time, our full-time staff work on a variety of tasks, including curation,
1 - 5
quality control, database design and management, special analyses, quantitative analysis ofartifact data, and writing for professional publications.
The three staff members who assist in the lab seasonally are an educator who works in the labduring the program season, and two staff archaeologists, who work in the lab during the winter.The educator is responsible for designing and revising our educational curriculum, and is theprimary instructor in participant programs. The staff archaeologists perform a wide variety of labtasks, focusing especially on artifact analysis.
Our staff is augmented by research interns and local volunteers. Each year we offer fourlaboratory internships that are designed for advanced undergraduates and beginning graduatestudents. During their 11-week tenure, interns are trained in all aspects of our basic laboratoryprocess, including collections management, cataloging and analysis, data entry, and qualitycontrol. The interns perform various tasks described in this manual every day, and accomplish agreat deal of work over the course of a year. Our local volunteers are individuals who live withincommuting distance of the Center, exhibit some aptitude for lab work, and can commit toworking on a consistent schedule each week. These volunteers are trained and supervised by thelab staff while performing many artifact-processing tasks, including washing, cataloging,chipped-stone analysis, and pottery analysis. Although the number of volunteers who work withus varies from year to year, over the long term they have made an invaluable contribution to ourresearch.
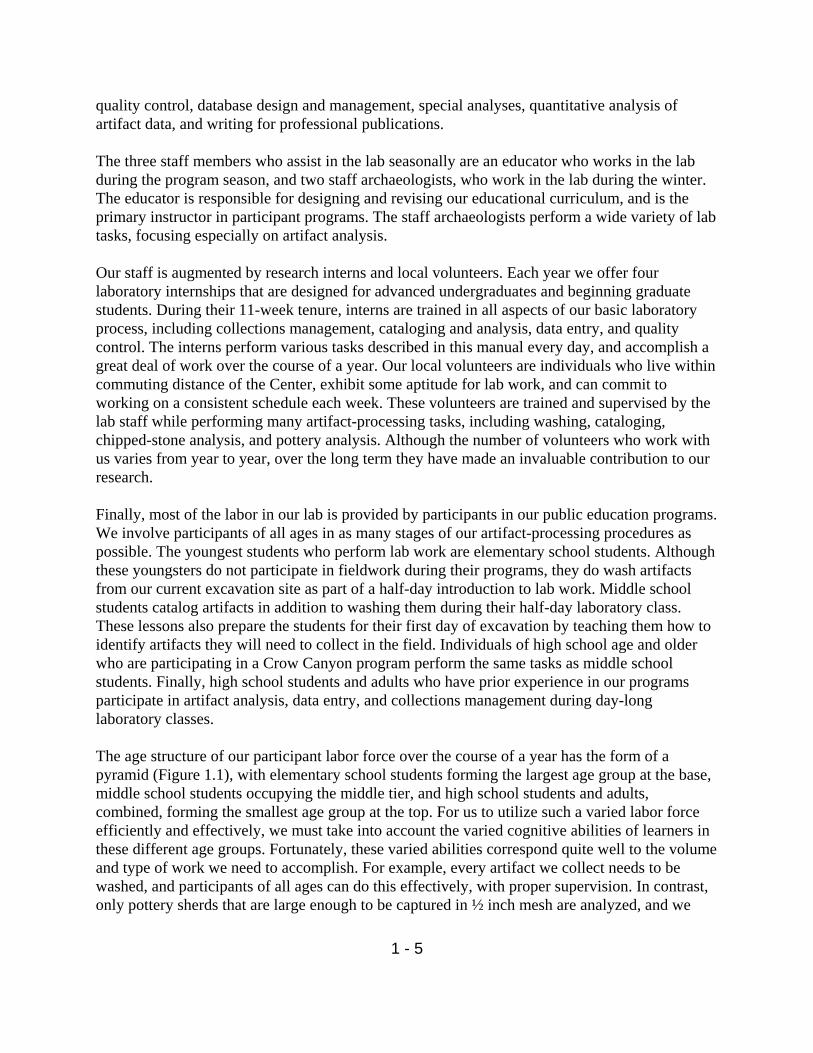
Finally, most of the labor in our lab is provided by participants in our public education programs.We involve participants of all ages in as many stages of our artifact-processing procedures aspossible. The youngest students who perform lab work are elementary school students. Althoughthese youngsters do not participate in fieldwork during their programs, they do wash artifactsfrom our current excavation site as part of a half-day introduction to lab work. Middle schoolstudents catalog artifacts in addition to washing them during their half-day laboratory class.These lessons also prepare the students for their first day of excavation by teaching them how toidentify artifacts they will need to collect in the field. Individuals of high school age and olderwho are participating in a Crow Canyon program perform the same tasks as middle schoolstudents. Finally, high school students and adults who have prior experience in our programsparticipate in artifact analysis, data entry, and collections management during day-longlaboratory classes.
The age structure of our participant labor force over the course of a year has the form of apyramid (Figure 1.1), with elementary school students forming the largest age group at the base,middle school students occupying the middle tier, and high school students and adults,combined, forming the smallest age group at the top. For us to utilize such a varied labor forceefficiently and effectively, we must take into account the varied cognitive abilities of learners inthese different age groups. Fortunately, these varied abilities correspond quite well to the volumeand type of work we need to accomplish. For example, every artifact we collect needs to bewashed, and participants of all ages can do this effectively, with proper supervision. In contrast,only pottery sherds that are large enough to be captured in ½ inch mesh are analyzed, and we

1 - 6
save this more detailed work for participants of high school age and up, staff, interns, andvolunteers.
Figure 1.1. The participant pyramid at Crow Canyon.
Each year, the center offers a few week-long programs for adults that focus on laboratoryanalysis, but most participants contribute to our lab work as part of a broader program thatincludes fieldwork as well. In general, participants in these programs spend more timeexcavating in the field than they spend in the lab. During a week-long program, participantschedules are generally as follows: middle school students spend one day digging and a half dayin the lab; adult novices, one and a half days digging and one day in the lab; high schoolstudents, two days digging and one day in the lab; and experienced adults, three and a half daysdigging and one and a half days in the lab. Because our participants generally spend more hoursexcavating than they do working in the lab, we have an incentive to make our laboratory lessonsand procedures as efficient as possible. Otherwise, we run the risk of accumulating a significantbacklog of unprocessed materials.
Principles that Structure Crow Canyon’s Lab Procedures
To help us accomplish our goals in the institutional context described above, we have developedseveral general principles that structure our lab processes. These principles are embedded in allstages of our process, as the chapters of this manual attest.

1 - 7
• We match the expertise and cognitive abilities of various individuals to the subtlety of theobservations required for a given activity. As a result, younger and/or less experiencedparticipants are generally involved in earlier stages of processing, and older, moreexperienced participants assist in later stages.
• We separate the collections-management function of the lab from the research function inour procedures. Because the systems we use to organize our collections and maintainprovenience control are more straightforward than are the observations we record duringanalysis, we load collections management tasks toward the early steps of processing thatyounger participants perform, and data collection tasks toward the later stages ofprocessing that older and/or more experienced participants perform.
• We structure our procedures in ways that minimize opportunities for record-keepingerrors to occur, so that fewer retroactive changes to data and labels are needed. Aconcrete example may help clarify this principle: Before 2001, we removed artifactsmade of animal (nonhuman) bone from bags of “bulk,” unmodified, animal bone duringcataloging. We assigned each bone artifact a unique Field Specimen (FS) number beforesending all nonhuman bone—both modified and unmodified—to the specialist foranalysis. During faunal analysis, the specialist routinely discovered additional boneartifacts that we had not previously recognized in the bags of “bulk,” unmodified animalbone. Further, the specialist commonly determined that some of the bones we hadidentified as artifacts during cataloging were, in fact, unmodified bones. Both situationscreated substantial additional work: all original records, labels and data had to becorrected. In 2001 we resolved this problem by recognizing that during faunal analysisthe specialist analyzes each identifiable faunal bone individually, creates a line of data foreach bone, and records modification when present. As a result, there is no reason toidentify bone artifacts (an analysis task) at the cataloging stage (a collections-management task). Therefore, we changed our procedure so that we now catalog allanimal bone from a provenience together and let the faunal analyst identify boneartifacts, recording them using the same system that is used for other animal bones. Thishas made cataloging animal bone so much simpler that we can now do it with middleschool students, whereas before only staff members and interns had the expertise to dothis step.
• We distinguish the series of steps involved in identifying artifacts from the criteria usedto identify them. Much of the general knowledge that experts bring to bear in classifyingartifacts has become second-nature through years of training and experience. We havefound that this knowledge must be conveyed explicitly to participants, but that it is tooextensive to be conveyed all at once. We try to alleviate this problem by formalizing thesteps involved in classifying artifacts, so that we can give participants the informationnecessary to accomplish each step, one step at a time. For example, before one candetermine that a piece of pottery should be classified as Mesa Verde Black-on-white, onefirst needs to recognize it as a piece of pottery, determine whether a portion of the rim ofthe original vessel is preserved or not, and determine the vessel form. One needs to do

1 - 8
this because the criteria used to assign sherds to pottery type varies, depending on theform and part of the vessel one has to work with. It is therefore critical that participantscorrectly identify the form and part of each decorated sherd before attempting to assign itto a pottery type. Thus, identification of form and part are distinct steps in the pottery-sorting process that each utilize specific identification criteria.
• We tailor the level of supervision to the subtlety of observation required in a given task.The ratio of staff to participants in washing artifacts can be as high as 20 to 1, becausethe only thing participants must do at this stage is make sure the artifacts are cleaned welland do not get mixed with those from other proveniences. The ratio of staff toparticipants for cataloging, however, is normally no greater than 5 to 1, and for potteryanalysis, no greater than 3 to 1.
• We strive to maintain a balance between efficiency and accuracy. Many of the researchquestions we pursue are addressed through quantitative comparison of assemblages fromvarious contexts. In statistical language, we use samples of artifacts from variouscontexts to estimate unknown parameters of the total artifact population from which thesample was drawn. Because we work with samples and not with populations, ourestimates of population parameters will always be subject to some degree of error, even ifevery single artifact recovered in our sample is analyzed and recorded correctly. Thus,the need to quantify our artifact samples accurately must be balanced against the realitythat our population parameter estimates will always be imperfect and that we havelimited resources to bring to bear in processing collections. We therefore focus onprocedures that lead to practical improvement in the population parameter estimates weuse in our research (such as the proportions of artifacts of various types in anassemblage), as opposed to focusing on accuracy for its own sake.
• We attempt to minimize the number of recording steps that take place between sortingartifacts and entering the resultant data in our research database. As was mentionedabove, two primary goals of our processing procedures are (1) to create computerdatabases that store accurate provenience and analysis information for each artifact and(2) to organize the collection in such a way that each computer record corresponds to thelabel and contents of a specific bag of artifacts. Whether the intervening paperworkcorresponds to computer records and bag labels is in a sense immaterial, but when it doesnot match we need to determine where the inconsistency lies and make sure the labels,artifacts and data in the computer are correct and in agreement. Because errors andinconsistencies can be introduced every time information is written down, there will befewer opportunities for us to make errors if we record this information fewer times beforeentering it in the computer. For example, during pottery analysis, we bag sherds in such away that each bag has a label that describes its contents, and each bag and labelcorrespond to a line of data in our pottery database. We enter pottery data into thedatabase directly from the bag label, so that the person entering the data can check thatthe label accurately describes the sherds inside the bag. In contrast, if we were to enterpottery data from a separate recording sheet, the person entering the data would not be

1 - 9
able to verify the correspondence between the sherds, the analysis label, and thecomputer data.
• Finally, we have found that working deliberately and accurately takes less time over thelong run than working quickly and fixing errors retroactively. For example, it takes moretime to find a particular bag of artifacts with a recording error on its label than it does tocheck the label when it is first written. Similarly, solving logical inconsistencies in thedata for a group of artifacts is easiest when the artifacts are in front of you, rather thanfiled away in curation.
Potential uses of this manual
This manual is the most systematic attempt yet made by our staff to put down on paper the fullextent of our collective knowledge and experience. We believe the information contained hereinwill be useful to a variety of people, and for a variety of purposes. In Table 1.1, we list thechapters of this manual and indicate which might be most useful to different kinds of users.
First and foremost, we hope this manual documents our lab processes thoroughly enough thatCrow Canyon staff will be able to use it to train interns, volunteers, participants, and new staff inour basic procedures for years to come. All chapters of this manual should be useful for trainingnew staff; chapters that deal specifically with processing procedures should be helpful in traininginterns and volunteers.
Second, we hope this manual will be a useful tool for researchers working with artifact datagenerated by our lab. Crow Canyon artifact data appear in numerous works published in books,journals, and other print media as well as in a number of resources published on Crow Canyon’sweb site (www.crowcanyon.org). The latter include site reports and databases for individualexcavation projects and a multisite research database that allows users to submit queries,generate artifact data tables, and download these data for their own purposes. This manualprovides an explanation of every artifact code and category that might be encountered in thecourse of using these resources to conduct one’s own research. The chapters that will be mostuseful to researchers working with our artifact data are those that present definitions of thecategories we use in analyzing artifacts.
Third, we hope the information in this introduction, as well as in the chapters that focus onprocessing procedures and quality-control measures, will be of interest to archaeologists who aresetting up research laboratories or artifact-processing systems for their own projects orinstitutions. Because we are continuously engaged in organizing, analyzing, and documentingcollections from excavations, and because we perform these tasks in the context of an ongoingpublic education program, we believe we have developed some expertise in such areas asefficiency in laboratory procedures, quality control, integrating lab work with relationaldatabases, and teaching artifact analysis to novices. We hope our collective experience,

1 - 10
presented in the following pages, will help other lab managers design procedures that workefficiently and produce high-quality data and well-organized collections.
Finally, we hope that participants in our programs, as well as other individuals who areinterested in learning how to identify artifacts from ancestral Pueblo archaeological sites, willfind this manual a useful learning aid. The Four Corners country is blessed with an abundance ofancestral Pueblo archaeological sites, many of which are accessible to the public. The chapters ofthis manual that focus on artifact analysis procedures should be very helpful for those who wantto explore such places as Mesa Verde National Park, Canyons of the Ancients NationalMonument, Natural Bridges National Monument, Canyonlands National Park, and the variouspublic lands of southwestern Colorado and southeastern Utah. We hope this manual willreinforce how much can be learned from proper study of artifacts at archaeological sites and,consequently, how important it is to leave these artifacts in place for the benefit and enjoymentof future generations.

1 - 11
Table 1.1. Chapters that will be of Interest to Various Users.
ChapterNumber
Chapter Title User
CrowCanyoninterns andvolunteers
Researchers LabManagers
GeneralPublic
2. The Flow of Artifacts Throughthe Laboratory X X
3. Artifact Cataloging Procedures X X X
4. Artifact Identification Criteria X
5. Pottery Type Definitions X
6. Basic Pottery Analysis X X X
7. Detailed Pottery Analysis X X
8. Stone Material Identification X X X
9. Chipped-Stone Analysis X X X X
10. Analysis of Bifaces, Points,and Drills X X
11. Flotation Sample Processing X
12. Preparation of Collections forCuration X X
13. Quality-Control Procedures X X

2 - 1
Chapter 2The Flow of Artifacts through the Laboratory
This chapter includes a flowchart (Figure 2.1) that diagrams the way we process artifacts andsamples in the Crow Canyon laboratory. This chart illustrates that we follow a specific sequencein processing artifacts recovered during fieldwork. Although the chart itself is fairly simple, thetask of organizing, cleaning, analyzing, managing, and interpreting artifacts is complex and time-consuming—it can easily take four to six years to completely process all the materials recoveredfrom a single excavation project. Several hundred thousand artifacts are typically collectedduring a 3-4 year Crow Canyon excavation project. It is in the laboratory that we bring order tothis volume of material, ensuring that all collected items are properly cared for and examinedand that the relevant analytical data are collected and entered into our database.
As indicated at the top of the chart, lab work begins when bags of artifacts, accompanied by fieldinventory forms, are submitted by the field staff. Subsequent steps detailed in the chart illustratehow artifacts and samples are organized in the lab and how various individual artifacts, “bulk”artifacts, and samples are processed. The lower half of the chart shows that certain kinds ofartifacts receive detailed analysis—that is, data for each specific item is recorded and enteredinto our database. After analysis and data entry are complete, the artifacts are organized andpackaged for curation. The last step, indicated at the bottom of the chart, occurs when the entirecollection from a field project is turned over to a permanent curation facility.
The key on the flow chart distinguishes artifact categories (white boxes) from processingactivities (gray boxes) and data entry (red boxes). Staff and interns perform every processingactivity and data-entry step listed on this chart. Volunteers and program participants performonly those activities marked with an asterisk (*).
Although the titles of chapters in this manual and the sequence in which the chapters arepresented differ somewhat from what is shown on the flowchart, all the artifact categories,activities, and data-entry tasks represented on the flowchart are accounted for in the body of thisdocument. The table of contents should be consulted to find out where information about specificcomponents of our laboratory process can be found.
Readers will notice that human remains are not considered in Figure 2.1. We have left thiscategory off the flowchart because our treatment of human remains has varied from project toproject, and our current practice is to make every effort to avoid collecting human remains.Readers should consult the chapters on human remains in individual site reports for furtherinformation on how remains from specific sites have been treated. Crow Canyon has a formalpolicy on the treatment of human remains, which was developed in consultation with theCenter’s Native American advisory group and has been endorsed by the Board of Trustees. Thispolicy is published in Crow Canyon’s field manual (Crow Canyon Archaeological Center2001*1).

Field bags, inventory forms
Check-in
Organize bags in PD order
Clear bags
Sort
Small artifacts Large artifacts Vegetal samples Nonhuman bone Tree-ring samples Pollen samples
Spray Wash* Wet Brush
Catalog*
DE
Bulk artifacts Individual artifacts
Bulk sherds, large Bulk chipped stoneOther artifacts, mostcommonly:•Bulk sherds, small•Gizzard stones•Adobe•Bulk indeterminategroundstone•Historic artifacts
Chipped-stone analysis*Pottery analysis*
Detailed analysis
DE
Consistency check
Detailed analysis
•Nonhuman bone•Tree-ring sample•Vegetal sample•Pollen sample
DEPD/FS order within artifact category
Curation label*
Organize and box collection
Transport to curation facility
DE
Sent to specialists for analysis
Figure 2.1. The Flow of Artifacts Through the
Laboratory
DE
DEDE
Provenience data from field
Samples
Flotation Samples
Flotation*
DE
Artifact category
Activity
Data entry
Key:
2 - 2
Consistency check
* Tasks performed by volunteers and participants

3 - 1
Chapter 3Artifact Cataloging Procedures
The purpose of cataloging artifacts is threefold: to assign artifacts and samples to artifactcategories, to record basic information about the artifacts, and to assign a catalog numbers to allmaterials. The catalog number at Crow Canyon is called a Field Specimen, or FS, number. AnFS number is assigned to each artifact, group of like artifacts, or sample that is collected from asite. In the field, any given excavated space is assigned a provenience designation (PD) number.The provenience associated with each number is described in terms of study unit type and studyunit number (for example, “Structure 1201”) and the specific horizontal and vertical locationwithin the study unit (for example, “East Half, Stratum 2”). (See The Crow CanyonArchaeological Center Field Manual, pages 1-3, for a detailed explanation of the proveniencesystem [Crow Canyon Archaeological Center 2001*1]). Together, these two numbers, the PDfollowed by the FS, provide a unique identifier for every sample, artifact, or group of likeartifacts collected from a site. The two numbers are used for managing and organizing theartifact collection and, equally important, for managing artifact data in the artifact database.
Cataloging occurs after the initial sorting and cleaning of the artifacts (see Chapter 2, flowchart).At Crow Canyon, we rely on the help provided by program participants (sixth graders throughadults), volunteers, interns, and staff to accomplish this task.
Cataloging is the important first step that sets the stage for the more detailed analysis of theartifacts that takes place later. As stated above, it is during cataloging that artifacts are assignedto a specific artifact category and given a unique number comprised of a PD number and an FSnumber. During later steps of analysis, the PD-FS number combination is entered into thecomputer database along with the data generated during analysis. The PD-FS numbers linkmultiple tables in the database and are critical for later comparative studies that form the basis ofinterpretation.
The PD-FS combination is also used to physically organize and manage the materials collectedfrom a site. The numbers facilitate retrieval of specific artifacts from the collection, much theway a library catalog number for a book makes it easy to find a book on a library shelf.Organization by artifact type and PD-FS number also prepares a collection for permanentcuration at the Anasazi Heritage Center.
This chapter is composed of three main elements. The first is a Cataloging Flowchart, which is agraphic outline of the multiple steps in the cataloging process. The second element is a 23-pagesection (Cataloging Procedures) that provides detailed instructions about the steps presented inthe flow chart. The third element, called “Universal Section,” contains instructions forperforming tasks that are repeated many times during the cataloging process.

3 - 2
Overview: Cataloging Artifacts
To catalog artifacts, you need the following items:• A bag of artifacts that has been cleared, sorted, and washed (Page 3-3).• The Field Specimen (FS) Form with the same PD number as the bag of artifacts (Page 3-
5).• Several Field Specimen labels (Page 3-12).• Several archival-quality plastic bags of assorted sizes.• A sharpened pencil.
Keep the following information in mind as you catalog artifacts:• Three-letter codes are used in this chapter to identify artifact categories listed on the
Field Specimen (FS) Coding Sheet (see page 3-28). The three-letter codes are shown inparentheses following the names of the artifacts.
• Light blue boxes, like the one below, are used throughout this chapter to highlightimportant instructions or information.
Please note: Record all information written onthe FS Form and the FS label in pencil.

Cataloging Procedures
Purple boxes like the one to the left appear often in the following pages. These boxes refer to procedures and information that are relevant to multiple steps. Rather than presenting this information each time it is needed, it is presented once in the universal section at the end of this chapter (pages 3-27 through 3-34). Whenever one of these boxes is shown, you should refer to the corresponding topic in the universal section. The topics, arranged alphabetically according to the letters shown in bold, are as follows:
Bagging, Codes, Condition, Material, FS Form, Label, and Weight
You should familiarize yourself with the universal section before you begin cataloging artifacts.
The artifact categories we work with are grouped as follows:• Bulk artifact categories are used to classify and group multiple pieces of the same artifact type, such as pottery
sherds or chipped-stone debris. Bulk artifacts are cataloged by lot; that is, all the items in the group are assigned a single FS number.
• Individual artifact categories are used to classify a variety of relatively uncommon artifacts. These items are cataloged individually; that is each piece receives its own FS number.
• Sample categories are used to classify materials that provide information about the past environment. Some samples may consist of multiple items (vegetal samples, nonhuman bone); these are treated similarly to bulk artifacts. In other cases (tree-ring samples), each item is given a separate FS number.
LLBBBaggingBagging
3 - 4
The following pages walk you through our cataloging procedures, step-by-step. EVERYTHING you need to know to perform these procedures is contained in these pages. In our system, the term “artifact category” refers to anything to which we assign a field specimen (FS) number. This includes artifacts, ecofacts (see page 3-25), manuports (items that must have been brought to the site by its inhabitants), and a variety of other materials and samples.
The FS Coding Sheet, found on pages 3-28 and 3-29, gives a complete list of all artifact categories and explains how we we group them into bulk artifacts, individual artifacts, and samples.
Using the Universal Section

First, get a bag of artifacts. A staff member will help with this.
• On the bag, locate the field bag label (Figure 3.1). This label describes the location from which the artifacts were collected. On the top line of the label, find the PD number.
3 - 5
Figure 3.2. Field Specimen (FS) Form.
FS PL ArtifactCategory
BagDate
FSDate
LabSup Cond Mat Count Wght Comments Data Entry
9 Initials
9 Initials
Data Entry
9 Initials
9 Initials
Crow Canyon Archaeological CenterCrow Canyon Archaeological Center Site: 5MT123Site: 5MT123
Field Specimen (FS) FormField Specimen (FS) Form PD: 932PD: 932Study Unit: NST 601 SU Horizontal: 1x1 436 478Study Unit: NST 601 SU Horizontal: 1x1 436 478 SU Vertical: SR00 1SU Vertical: SR00 1
Feature: Feature 4 (Pit: not Fe Horizontal: SEG 1Feature: Feature 4 (Pit: not Fe Horizontal: SEG 1 Fe Vertical: STLV 1Fe Vertical: STLV 1--11further specified)further specified)
• Next, locate the Field Specimen (FS) Form (Figure 3.2) with the same PD number on it. Field Specimen forms are filed in notebooks in the lab and are organized numerically by PD number. Information about the artifacts you catalog will be recorded on this form.
• Confirm that the information on the field bag label matches the information at the top of the FS Form.
• It organizes the collection for tracking and management, further study, and eventual curation.• It accomplishes the initial identification and analysis of each artifact.• It generates basic artifact data that are entered into our database to facilitate collections management, additional
study, and statistical analysis.
Step 1: Getting StartedStep 1: Getting Started
Figure 3.1. Field bag label.
Why Catalog Artifacts?Cataloging is the process of sorting, identifying, and assigning field specimen (FS) numbers to the artifacts collected from each provenience at a site. The combination of a site number, a PD number, and an FS number creates a unique key for each sample, artifact or group of artifacts from a specific provenience at a specific site. That is, there are no two bags of artifacts in the world that have the same set of identifying numbers. Cataloging thus serves three functions:

Small Artifacts: The bag labeled “Small Artifacts” should contain small pieces of pottery, chipped-stone artifacts, and/or other materials that fell through a ½-inch screen before they were washed (see Chapter 13 for a description of the in-lab screening process) (Figure 3.4). These “small artifacts” aretreated differently than the “large artifacts” that were caught in the ½-inch screen. The large artifacts are in the large field bag in which the “small artifacts” bag is nested.
Nonhuman Bone: This bag may also be labeled “NHB” or “faunal.” At the site, nonhuman bones are usually collected in a separate bag to protect them from being crushed by heavier stone artifacts. This bag may contain modified, as well as unmodified, animal bone (Figure 3.5).
Vegetal Samples: This bag may also be labeled “charcoal” (Figure 3.6) or “corncob” (Figure 3.7). Rare or unusual vegetal items like corncobs or kernels are usually bagged separately in the field. In most cases, vegetal material has to have been charred to be preserved in an archaeological site. Unburned plant material usually decomposes without a trace.
Point-located Artifacts: These bags will have a Point Location (PL) Number on the bag label (Figure 3.8) and will contain a single artifact. PL numbers are assigned to artifacts whose precise locations are plotted on maps drawn by archaeologists in the field.
Step 2: Assess the Contents of the Artifact Field BagStep 2: Assess the Contents of the Artifact Field Bag
You might find a number of smaller bags nested inside the large field bag (Figure 3.3). Remove these and set them aside. The description written on the contents line of these smaller bags may be any of the following:
Figure 3.3. Smaller bags you might find inside the larger field bag.
Figure 3.4. Small artifacts.
Figure 3.5. Non human bone.
Figure 3.6. Vegetal sample (charcoal).
Figure 3.7. Vegetal sample (burned corn cob).
Figure 3.8. A field bag label showing PL 2, a black-on-white pottery rim.
3 - 6

Step 3: Check the Contents of the Small BagsStep 3: Check the Contents of the Small Bags
The next step is to check the contents of each small bag to make sure all items have been sorted correctly. It’s often helpful to empty the contents of the bags onto a clean piece of paper to verify that the contents are all the same and that they match the “contents” line of the bag label. Once the contents have been checked, they should be put back in the bag so they don’t get damaged or mixed with the contents of other bags. There are several things you should look for in the small bags:
• Any bag marked “small artifacts” should contain only small artifacts. If you see any nonhuman bone, eggshell fragments, or vegetal material these items should be removed and added to the appropriate bag(s). If no bag exists, set these items aside until you begin cataloging.
• Any bags labeled nonhuman bone should not contain vegetal material, flakes, or sherds. If you find any of these they should be removed and placed in the correct bag(s).
• Any bag marked “vegetal” or “charcoal” should contain only one kind of plant material (such as corncobs, seeds, or wood charcoal). If more than one type of material is present, they should be set aside so they can be cataloged separately. If you see any burned bone in the vegetal bag, it should be removed and added to the nonhuman bone bag.
• Each bag with a PL number should contain only one artifact, and should be identified on the contents line of the bag label. If the item in the bag doesn’t match what’s written on the contents line, consult a staff member.
3 - 7
When you’re sure that everything in each small bag matches what is written on the contents line of the bag labels, set the small bags aside and move on to Step 4, (sorting the contents of the large-artifacts bag). The reason for waiting to catalog the artifacts in the small bags is that there may be items in the large-artifacts bag that also belong in one or more of your small bags.

Step 4: Sort the Contents of the Bag of Large ArtifactsStep 4: Sort the Contents of the Bag of Large Artifacts
• Pottery: If it’s made of pottery, put it in a pottery pile.
• Stone: If it’s made of stone, put it in a stone pile.
• Other: If it’s not made of pottery or stone, put it in an “other pile.”
Figure 3.9. Contents of a large-artifact bag.
Figure 3.10. Contents of a large-artifact bag sorted into pottery and stone.
3 - 8
Carefully empty the contents of the large-artifacts bag onto the table (Figure 3.9). Sort the artifacts into the following three categories (Figure 3.10):

Step 5: Sort the Large Pottery Step 5: Sort the Large Pottery SherdsSherdsMove the stone and “other” piles to the side, and focus on the pottery pile. Sort the sherds into the following three categories:
Figure 3.13. Painted sherd.
For more information about pottery classification, see Chapters 5 and 6.
Figure 3.11. Corrugated sherds.
3 - 9
Corrugated pottery has a distinctive patterned texture on the exterior surface that was created when the potter pressed a finger or tool into the clay coils at regular intervals as the vessel was being formed (Figure 3.11). Occasionally, fingerprints are visible in the indentations. Neckbandedpottery should also be included in the corrugated pile. Neckbanded pottery has unobliterated coils on the exterior, but the coils lack the finger or tool indentations of corrugated pottery (Figure 3.12). If you see both corrugation and paint on a sherd, put it in the painted pile. In our cataloging and pottery-analysis system, paint “trumps” corrugation.
Painted pottery consists of any white or gray-colored sherd with paint on it (Figure 3.13). The paint can be on the interior surface, the exterior surface and/or the rim. Most painted pottery is also slipped and polished. Examine the sherds closely because on many there is only a small painted area. If you see a red-colored sherd with or without paint on it, place it in the “other” pile.
“Other” pottery includes all red-colored sherds and any white or gray sherds that are neither corrugated nor painted (Figures 3.14-3.16). Figure 3.12. Neckbanded
sherd.
Examples of “Other” Pottery.
Figure 3.14. Red sherd. Figure 3.15. Gray sherd. Figure 3.16. Unpainted white sherd.
Step 6: Identify Modified and Shaped SherdsStep 6: Identify Modified and Shaped Sherds
After sorting the pottery into corrugated, painted and “other” categories, re-examine the sherds in each pile to determine if any have been modified in some way. If so, remove them from the “bulk” sherds and set them aside.
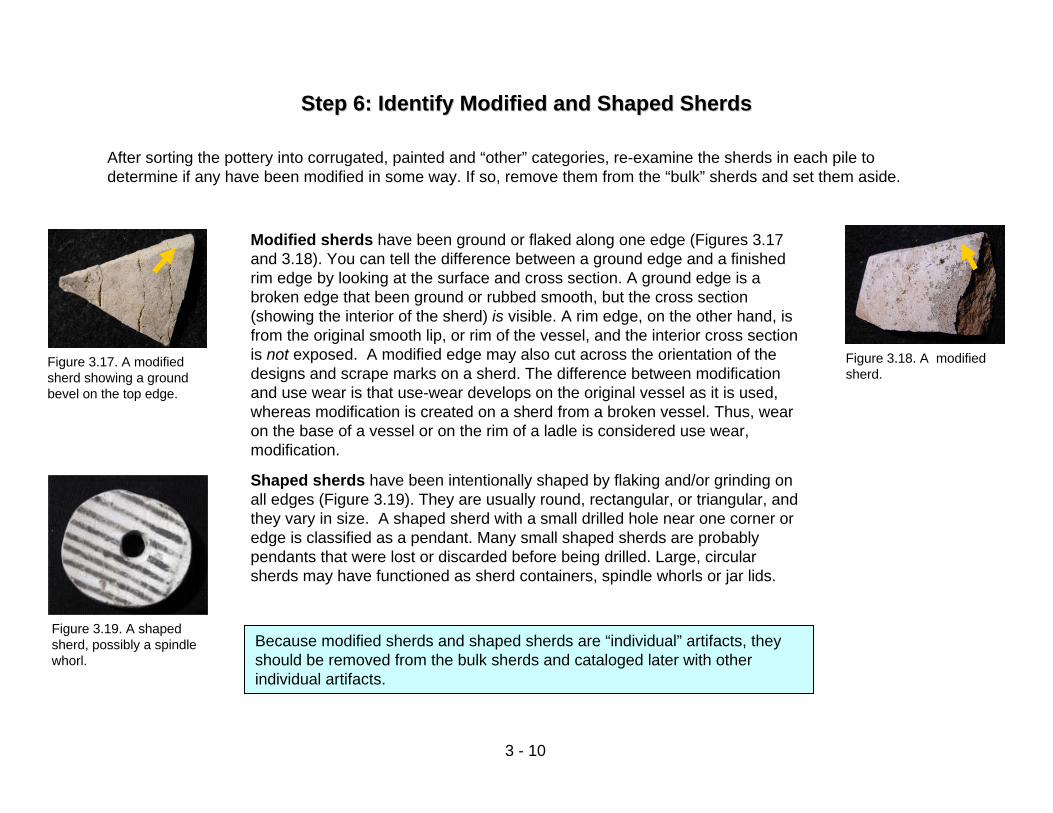
Modified sherds have been ground or flaked along one edge (Figures 3.17 and 3.18). You can tell the difference between a ground edge and a finished rim edge by looking at the surface and cross section. A ground edge is a broken edge that been ground or rubbed smooth, but the cross section (showing the interior of the sherd) is visible. A rim edge, on the other hand, is from the original smooth lip, or rim of the vessel, and the interior cross section is not exposed. A modified edge may also cut across the orientation of the designs and scrape marks on a sherd. The difference between modification and use wear is that use-wear develops on the original vessel as it is used, whereas modification is created on a sherd from a broken vessel. Thus, wear on the base of a vessel or on the rim of a ladle is considered use wear, modification.
Figure 3.17. A modified sherd showing a ground bevel on the top edge.
Figure 3.18. A modified sherd.
Figure 3.19. A shaped sherd, possibly a spindle whorl.
Shaped sherds have been intentionally shaped by flaking and/or grinding on all edges (Figure 3.19). They are usually round, rectangular, or triangular, and they vary in size. A shaped sherd with a small drilled hole near one corner or edge is classified as a pendant. Many small shaped sherds are probably pendants that were lost or discarded before being drilled. Large, circular sherds may have functioned as sherd containers, spindle whorls or jar lids.
Because modified sherds and shaped sherds are “individual” artifacts, they should be removed from the bulk sherds and cataloged later with other individual artifacts.
3 - 10

Step 7: Catalog the Bulk Step 7: Catalog the Bulk SherdsSherds, Large (page 1 of 2), Large (page 1 of 2)
1. Place each of the three pottery piles (corrugated, painted, and “other”) in a separate plastic bag.
2. Get the Field Specimen (FS) Form, find the first available line, and write down the next available number, which will be “1” if this is the first bag of artifacts from your PD to be cataloged.
3. On the same line, draw a dash (--) in the PL column, and write BSL (bulk sherds, large) under “Artifact Category,” as shown in Figure 3.20. Then write the bag date under “Bag Date,” today’s date under “FS Date,” and the initials of the staff person helping you under “Lab Sup” (“Lab Supervisor”).
4. Weigh all three bags of pottery together and record the weight on the FS Form.
3 - 11
11
FS PL ArtifactCategory
BagDate
FSDate
LabSup Cond Mat Count Wght Comments Data Entry
9 Initials
9 Initials
9 Initials
9 Initials
9 Initials
BSL
Figure 3.20. Field Specimen Form for bulk sherds, large. The three-letter code (BSL) for bulk sherds, large, is written in the artifact category column.
FS numbers start with “1” and are assigned sequentially across all artifacts and artifact types within a PD.
The light blue boxes indicate what needs to be recorded for bulk sherds large.
A dash should be drawn through all columns in which nothing is recorded, as shown above. This shows us that you have not forgotten to record anything.
NOTE: For bulk artifacts and samples, information is recorded in only certain columns of the FS Form. The information that should be recorded for each artifact category is highlighted in the major headings in italic print on the FS Coding Sheet (page 3-28).
LLCCCodeCode
LLBBBaggingBagging
WWWeightWeight

The FS number is the same number recorded on the FS Form for this bag.
SITE: 5MT123 DE date _______
PD____________ FS__________ PL______STUDY UNIT________________________HOR._________________ VERT.________FEATURE___________________________HOR._________________ VERT.________BAG DATE___________ FIELD SUP_____CONTENTS__________________________Count_________________ Weight_______________
Bulk Sherds, Large
Ana
lyst
____
Dat
e___
_11
On the contents line write the full name of the artifact category as listed on the FS Coding Sheet. Do not use the three-letter code you used on the FS Form. In this cataloging step, the category name is “bulk sherds, large.”
LLLabelLabelLL
LabelLabel
5. Fill out the FS Label that will go into the bag of bulk sherds. All the information you need for the FS label can be found on the field bag label or on the Field Specimen (FS) Form. Be careful to copy the information onto the label exactly as it is written elsewhere. Use the same FS number you recorded on the FS Form. Also, WRITE OUT the name of the artifact category (in this case, “bulk sherds, large”) on the contents line of the FS label, not the three-letter code you used on the FS Form. Copy the total weight from the FS Form to the appropriate line of the label.
6. To secure the contents of the three bags of pottery, fold over the excess plastice; if the bags are nearly full, close them with a twist-tie instead. Then place the three bags inside a larger plastic bag, add the FS label facing out so it can be read through the bag, and close the outer bag using a twist-tie. Set this bag aside.
Step 7: Catalog the Bulk Step 7: Catalog the Bulk SherdsSherds, Large (page 2 of 2), Large (page 2 of 2)
3 - 12
Figure 3.21. Field specimen (FS) label for bulk sherds, large.
The light blue boxes indicate where information, mostly from the original artifact bag, needs to be recorded.
It is not necessary to count the sherds. Draw a horizontal line through this space.
The DE (“data entry”) date, analyst, and date on the FS Label can be ignored at this time.
PLEASE: You should twist the bag tie only two half-twists. This will be sufficient for securing a bag’s contents.
Record the total weight of all sherdsin the “weight” space.
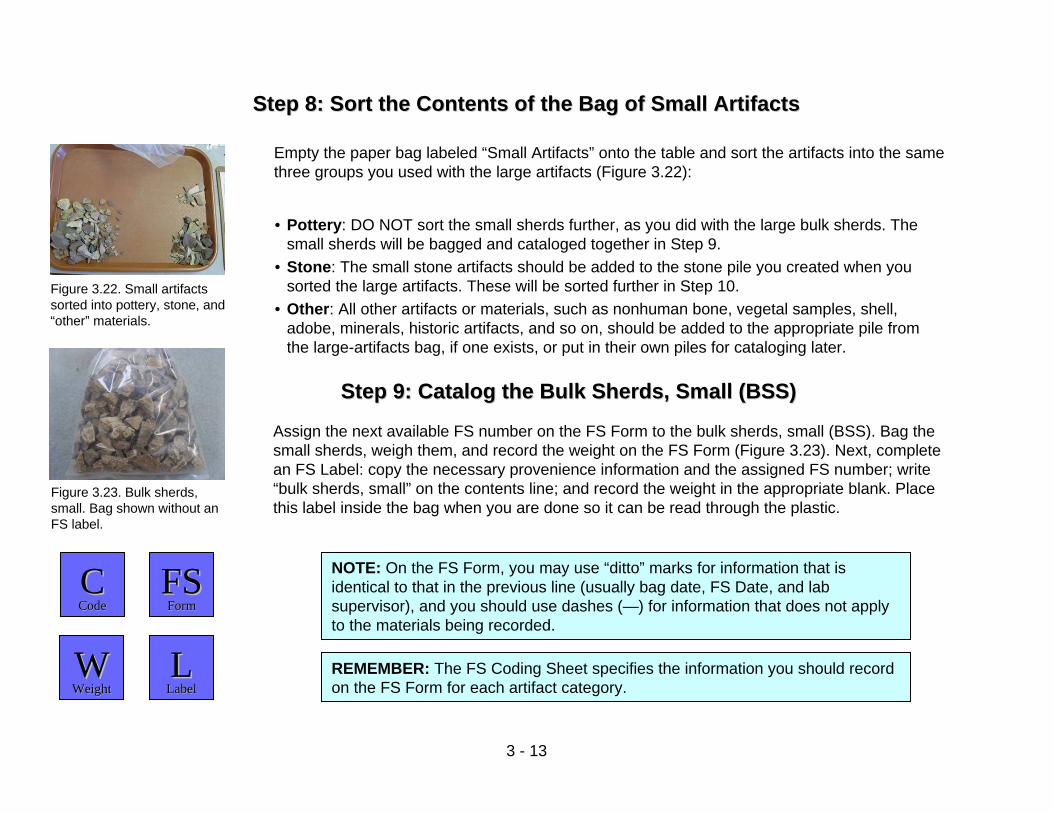
Figure 3.23. Bulk sherds, small. Bag shown without an FS label.
Assign the next available FS number on the FS Form to the bulk sherds, small (BSS). Bag the small sherds, weigh them, and record the weight on the FS Form (Figure 3.23). Next, complete an FS Label: copy the necessary provenience information and the assigned FS number; write “bulk sherds, small” on the contents line; and record the weight in the appropriate blank. Place this label inside the bag when you are done so it can be read through the plastic.
Figure 3.22. Small artifacts sorted into pottery, stone, and “other” materials.
3 - 13
LLFSFSFormForm
LLCCCodeCode
Empty the paper bag labeled “Small Artifacts” onto the table and sort the artifacts into the same three groups you used with the large artifacts (Figure 3.22):
REMEMBER: The FS Coding Sheet specifies the information you should record on the FS Form for each artifact category.
• Pottery: DO NOT sort the small sherds further, as you did with the large bulk sherds. The small sherds will be bagged and cataloged together in Step 9.
• Stone: The small stone artifacts should be added to the stone pile you created when you sorted the large artifacts. These will be sorted further in Step 10.
• Other: All other artifacts or materials, such as nonhuman bone, vegetal samples, shell, adobe, minerals, historic artifacts, and so on, should be added to the appropriate pile from the large-artifacts bag, if one exists, or put in their own piles for cataloging later.
Step 8: Sort the Contents of the Bag of Small ArtifactsStep 8: Sort the Contents of the Bag of Small Artifacts
Step 9: Catalog the Bulk Step 9: Catalog the Bulk SherdsSherds, Small (BSS), Small (BSS)
NOTE: On the FS Form, you may use “ditto” marks for information that is identical to that in the previous line (usually bag date, FS Date, and lab supervisor), and you should use dashes (—) for information that does not apply to the materials being recorded.
WWWeightWeight
LLLabelLabel

Step 10: Sort Stone Artifacts by Modification Type (Page 1 of 2)Step 10: Sort Stone Artifacts by Modification Type (Page 1 of 2)Sort the items in the stone pile into one of four broad modification categories – chipped stone, ground stone, battered/polished stone, and other stone. Be sure to include any stone artifacts identified during your sort of the small-artifacts (Step 8). The four categories are described below; see the FS Coding Sheet (page 3-28) for a list of the “bulk” and “individual” artifacts in each.
• Flake scars on one or more surfaces with distinct ridges between flake scars.
• Sharp edges. • Ripples from “concoidal fractures” (visible in the flake
scars).• A range of materials from coarse-grained silicified
sandstones to non-grainy cherts, jasper, and obsidian.
• Surfaces that are significantly smoother than the natural texture of the rock, the result of use wear.
• Evidence of shaping by flaking and pecking.• Ground surfaces that are “dimpled,” the result of their
having been pecked to facilitate grinding.• The use of materials such as igneous rock, sandstone,
and conglomerate.
3 - 14
Figure 3.25. Projectile point, a type of chipped-stone tool.
Figure 3.24. Chipped-stone debitage.
Figure 3.27. This tool’s edges exhibit shaping by flaking. The smooth surface on this stone was created by grinding.
Figure 3.26. This ground-stone tool exhibits shaping and dimpling.
Chipped-stone artifacts are made by chipping stone with a hammerstone or an antler flaker. Both tools and byproducts from making them are included in this category (Figures 3.24 and 3.25). Look for the following:
Ground-stone artifacts may have been shaped by a variety of mechanisms, but have at least one surface that was smoothed by abrasion (Figures 3.26 and 3.27). Look for the following:

Figure 3.28. This stone shows battering damage, the result of its having been struck against other rocks.
Figure 3.29. Polished stone.
Step 10: Sort Stone Artifacts by Modification Type (Page 2 of 2)Step 10: Sort Stone Artifacts by Modification Type (Page 2 of 2)
Figure 3.30. This stone has been heavily shaped and polished.
Figure 3.31. A stone like this should be placed in the “other stone” pile.
3 - 15
• Rough, damaged areas resulting from the repeated striking of the stone against other stones or hard materials.
• Smoothly ground surfaces, such as the polished bit of an axe.
• Highly polished areas resulting from the rubbing of the stone against softer materials.
• A variety of materials ranging from tough, grainy stone (battered stone artifacts) to fine grained material (polished stone artifacts).
NOTE: In our cataloging system, artifacts are classified according to their last use. Therefore, if an artifact has been modified in more than one way and you believe that the different types of modification occurred at different times, place the artifact in the category that corresponds to the most recent modification.
Battered/polished-stone artifacts are shaped and/or worn by battering, polishing, and/or grinding (Figures 3.28-3.30). Look for the following:
Other stone artifacts are those that do not “fit” in the other three categories (Figure 3.31). Specimens in this category include unusual minerals or stones that may or may not have been modified. If you can’t decide which broad use category is most appropriate, place the artifact in the “other” pile for now.

Examine each item in the pile of chipped stone (see Step 10) and determine whether it is bulk chipped stone or an individual chipped-stone artifact.The category “bulk chipped stone” includes debitage (unused flakes and angular debris) generated during (1) the manufacture of chipped-stone tools, (2) the deliberate modification of other kinds of stone tools, and (3) the shaping of architectural stone. It also includes two types of flake tools – modified flakes and utilized flakes – that show signs of either incidental damage through use or deliberate modification, but that still retain many of the features of the original flakes from which they were made. Figures 3.32-3.34 illustrate the attributes of flakes, flake tools, and angular debris. Individual chipped-stone artifacts are characterized by multiple flake scars on multiples surfaces. The individual chipped-stone artifact recognized in our system are cores, modified cores, bifaces, projectile points, drills, and other chipped-stone tools. These artifact types are defined and described in Chapter 4, and photographs of examples or all but the last are provided on page 3-21. Separate all the individual chipped-stone artifacts from the bulk chipped stone and set them aside; you will catalog them after you have finished cataloging the bulk chipped stone. Place all the pieces of bulk chipped stone in piles of 10 to facilitate counting in Step 12.
Attributes of Flakes, Modified Flakes, Utilized Flakes, and Angular Debris
3 - 16
Once separated from the individual stone artifacts, the bulk chipped stone can be cataloged as shown on the next page.
Figure 3.34. Angular debris is a by-product of chipped-stone-tool manufacture, but it lacks a bulb of percussion and is thicker than most flakes.
Figure 3.33. Modified and utilized flakes.
MODIFIED FLAKE: A pattern of multiple, uniform flake scars along one or more edges, indicating intentional shaping.
UTILIZED FLAKE: Very small, irregular flake scars of uneven size, resulting from usage of the flake for cutting or scraping.
Figure 3.32. Flake attributes.
PlatformBulb of percussion
Erailleurscar(s)
Flake scars
VENTRAL VIEW(interior surface)
LATERAL VIEW DORSAL VIEW(exterior surface)
Ripple marks
Cortex
Step 11: Separate Bulk ChippedStep 11: Separate Bulk Chipped--stone from Individual Chippedstone from Individual Chipped--Stone ArtifactsStone Artifacts

Step 12: Catalog Bulk ChippedStep 12: Catalog Bulk Chipped--stone (BCS)stone (BCS)
Assign all the pieces of bulk chipped stone, which includes debitage and flake tools, a single FS number. Record the relevant data for the entire lot on a single line of the FS Form, fill out just one FS label, and bag all the items together in the same bag (Figure 3.35). Be sure to record lot count and weight on both the form an the label (see the FS Coding Sheet on page 3-28). Both the debitage and the flake tools (utilized and modified flakes) will receive further attention in a later stage of analysis (see Chapter 9).
3 - 17
LLCCCodeCode
LLFSFSFormForm
WWWeightWeight
NOTE: Don’t forget to include small flakes and pieces of angular debris identified in the small-artifacts bag in your total count and weight for bulk chipped stone!
LLLabelLabel
Figure 3.35. Bulk chipped stone with a completed FS label. The artifacts and label are bagged together.

In Step 10 you identified a group of ground-stone artifacts. Now you will separate these into bulk indeterminate ground stone and individual ground=stone artifacts (manos, including one- and two-handed manos; metates, including basin, trough, and slab metates; abraders; mortars; and pestles). Read the descriptions of the various individual ground-stone artifacts on page 3-22; then carefully examine each item in the pile. If you identify any individual ground stone artifacts, seta them aside for now. The remaining pieces – that is, those that are too fragmentary to be identified as one of the specific types of ground-stone tools – are “bulk indeterminate ground stone” and you will catelog them in the next step.
Step 14: Catalog the Bulk Indeterminate Ground Stone (BIG)Step 14: Catalog the Bulk Indeterminate Ground Stone (BIG)All pieces of bulk indeterminate ground stone that are of the same stone material type are given a single FS number, are recorded together on a single line of the FS Form, and are bagged, labeled, counted, and weighed together. As is noted on the FS Coding Sheet, bulk indeterminate ground stone is the only bulk artifact category for which material type is recorded. In most cases, the material type will be sandstone, conglomerate, or silicifiedsandstone. If the artifacts in your pile of bulk indeterminate ground stone are more than one material type, you will need to assign separate FS numbers.
3 - 18
Step 13: Separate the Bulk Indeterminate Ground Stone Step 13: Separate the Bulk Indeterminate Ground Stone from Individual Ground Stone Artifactsfrom Individual Ground Stone Artifacts
See the universal section if you need help with recording procedures.
WWWeightWeight
LLLabelLabel
FSFSFormForm
CCCodeCode
MMMaterialMaterial

Step 15: Sort Gizzard Stones and Pebbles from the Other Step 15: Sort Gizzard Stones and Pebbles from the Other Stone Artifacts, and Catalog Gizzard Stones and PebblesStone Artifacts, and Catalog Gizzard Stones and Pebbles
Figure 3.37. Pebble.
Figure 3.36. Gizzard stones.
Gizzard stones are ecofacts that derive from turkey gizzards (Figure 3.36). Like most birds, turkeys have a small, muscular pouch at the base of the esophagus called a gizzard. Turkeys swallow small stones, which are retained in the gizzard, where they aid in digestion by grinding up food particles. Gizzard stones become highly polished through this grinding action. Because ancestral Pueblo people raised turkeys, gizzard stones are found on archaeological sites. The surfaces of gizzard stones often feel greasy to the touch. In addition to swallowing small “natural” stones, turkeys also sometimes ingested tiny flakes and even projectile points. If you can identify any gizzard stone as a “recycled” artifact, you should note this in the comments column on the FS Form.
Pebbles are small, smooth stones that are water worn but are not otherwise modified (Figure 3.37). The stones may be from streambeds or from conglomerate deposits. Because neither of these sources occur naturally at, or near, most sites excavated by Crow Canyon, pebbles are interpreted as manuports—objects that were carried to the site by humans. Pebbles are usually slightly rougher in appearance than gizzard stones. If the pebbles originated from conglomerate, you might see small sand grains or remnants of the matrix that originally “cemented” the conglomerate particles together.
3 - 19
Return to the Other Stone artifacts. Two kinds of small, smooth stones, which need to be distinguished, may be in this pile. These stones are pebbles and gizzard stones. Both were smoothed and polished by natural processes, but collect them from archaeological sites because of their potential cultural significance, as described below:
CCCodeCode
FSFSFormForm
LLLabelLabel
WWWeightWeight
As stated on the FS Coding Sheet, gizzard stones and pebbles are counted, weighed, labeled, and recorded as a two bulk artifact groups.

Step 16: Catalog the Individual ArtifactsStep 16: Catalog the Individual Artifacts
“Individual artifacts” fall into eight general groups: chipped-stone artifacts (e.g., Figure 3.38), ground stone artifacts (e.g., Figure 3.39)battered/polished stone (e.g., Figures 3.40 and 3.41), other stone artifacts, other ceramic artifacts, ornaments, shell artifacts, and other artifacts. If you may have identified any individual artifacts in previous steps of cataloging, it is now time to catalog them.
Individual artifacts are treated differently than bulk artifacts:
• Each individual artifact is given its own FS number and is recorded on a separate line on the FS Form. • In addition to “Count” (which is always “1”) and “Weight,” “Condition” and “Material” are also recorded on the FS Form. • Each artifact gets its own FS label and is bagged individually.
Figure 3.38. Chipped-stone artifact.
Figure 3.39. Ground-stone artifact.
Figure 3.41. Polished stone artifact.
Figure 3.40. Battered stone artifact.
3 - 20
LLLLLabelLabel
LLCCCodeCode
LLCnCnConditionCondition
LLMMMaterialMaterial
LLFSFSFormForm
REMEMBER: Some individual artifacts exhibit evidence of two or more different uses. For example, a stone axe that was broken may have later been used as a core. In such cases, the artifact is classified according to its last use. It is important, however, for you to include comments regarding prior uses on the FS Form.
The different individual artifacts are described on pages 3-21 through 3-24; the most common artifacts are discussed first, and unusual or rare artifacts are discussed last. More-detailed descriptions of individual artifacts are provided in Chapter 4; “Artifact Identification Criteria.”
LLWWWeightWeight
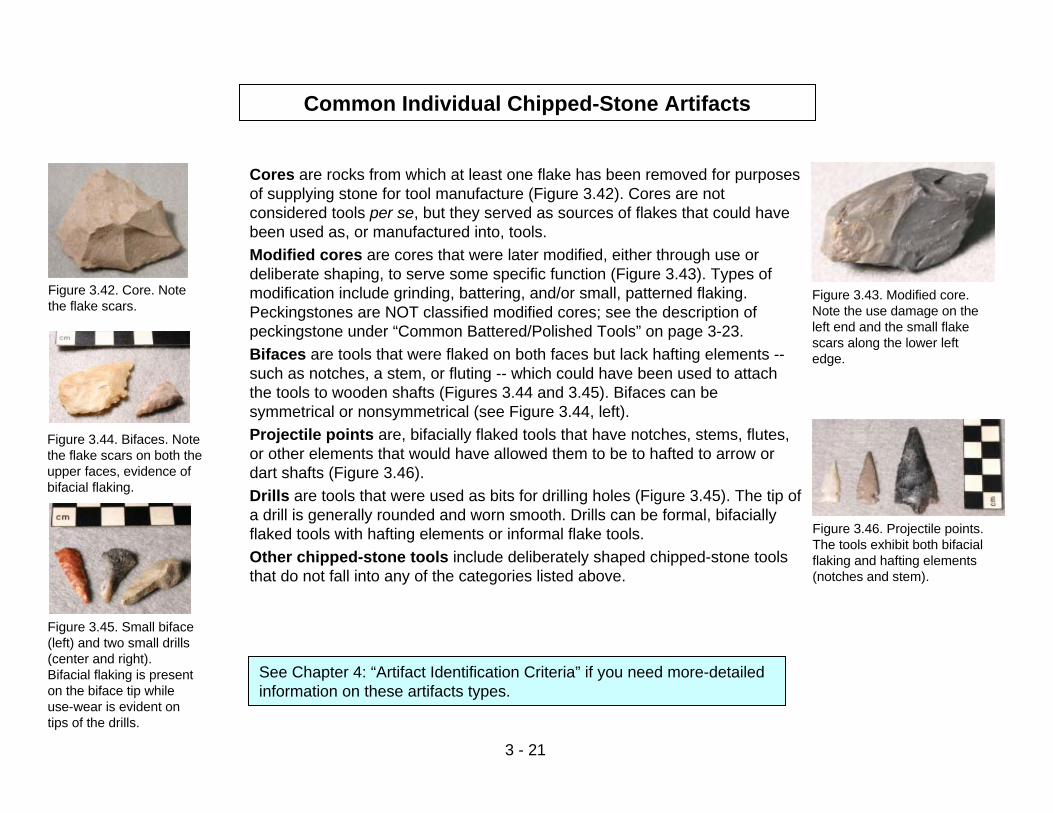
Cores are rocks from which at least one flake has been removed for purposes of supplying stone for tool manufacture (Figure 3.42). Cores are not considered tools per se, but they served as sources of flakes that could have been used as, or manufactured into, tools. Modified cores are cores that were later modified, either through use or deliberate shaping, to serve some specific function (Figure 3.43). Types of modification include grinding, battering, and/or small, patterned flaking. Peckingstones are NOT classified modified cores; see the description of peckingstone under “Common Battered/Polished Tools” on page 3-23.Bifaces are tools that were flaked on both faces but lack hafting elements --such as notches, a stem, or fluting -- which could have been used to attach the tools to wooden shafts (Figures 3.44 and 3.45). Bifaces can be symmetrical or nonsymmetrical (see Figure 3.44, left). Projectile points are, bifacially flaked tools that have notches, stems, flutes, or other elements that would have allowed them to be to hafted to arrow or dart shafts (Figure 3.46).Drills are tools that were used as bits for drilling holes (Figure 3.45). The tip of a drill is generally rounded and worn smooth. Drills can be formal, bifaciallyflaked tools with hafting elements or informal flake tools.Other chipped-stone tools include deliberately shaped chipped-stone tools that do not fall into any of the categories listed above.
Common Individual Chipped-Stone Artifacts
Figure 3.42. Core. Note the flake scars.
Figure 3.45. Small biface(left) and two small drills (center and right). Bifacial flaking is present on the biface tip while use-wear is evident on tips of the drills.
Figure 3.44. Bifaces. Note the flake scars on both the upper faces, evidence of bifacial flaking.
Figure 3.43. Modified core. Note the use damage on the left end and the small flake scars along the lower left edge.
See Chapter 4: “Artifact Identification Criteria” if you need more-detailed information on these artifacts types.
3 - 21
Figure 3.46. Projectile points. The tools exhibit both bifacialflaking and hafting elements (notches and stem).
Common Individual Ground-Stone Artifacts
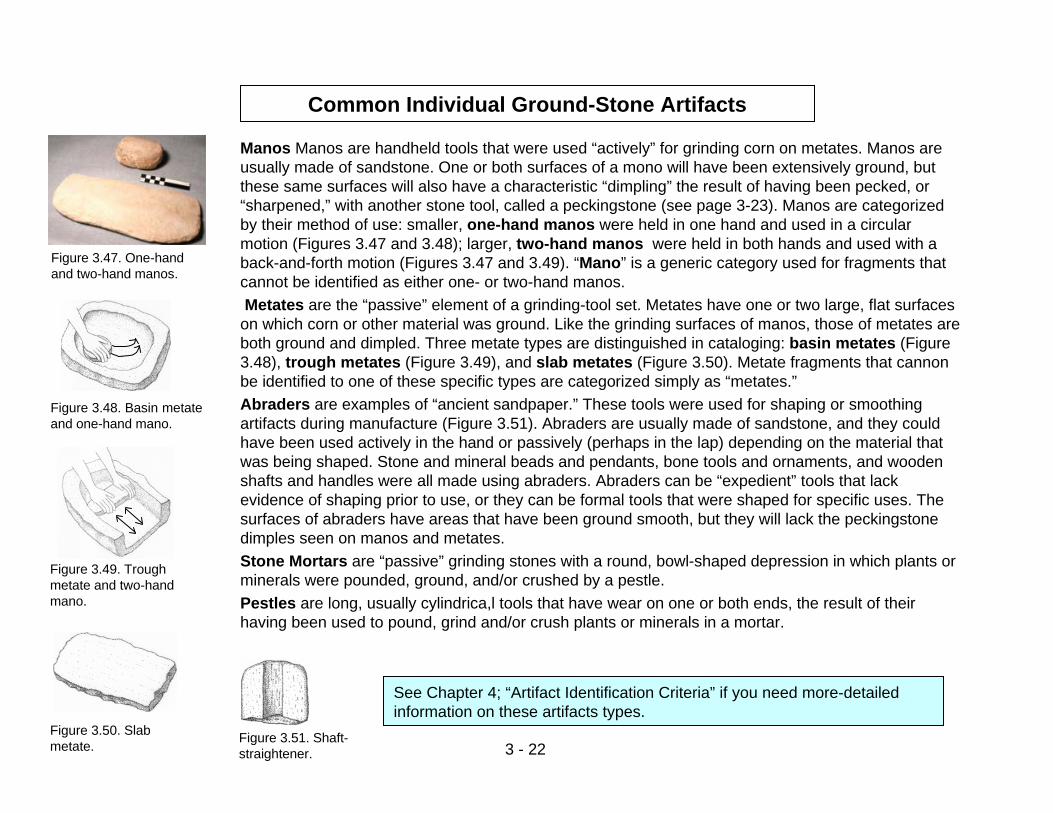
Manos Manos are handheld tools that were used “actively” for grinding corn on metates. Manos are usually made of sandstone. One or both surfaces of a mono will have been extensively ground, but these same surfaces will also have a characteristic “dimpling” the result of having been pecked, or “sharpened,” with another stone tool, called a peckingstone (see page 3-23). Manos are categorized by their method of use: smaller, one-hand manos were held in one hand and used in a circular motion (Figures 3.47 and 3.48); larger, two-hand manos were held in both hands and used with a back-and-forth motion (Figures 3.47 and 3.49). “Mano” is a generic category used for fragments that cannot be identified as either one- or two-hand manos. Metates are the “passive” element of a grinding-tool set. Metates have one or two large, flat surfaces
on which corn or other material was ground. Like the grinding surfaces of manos, those of metates are both ground and dimpled. Three metate types are distinguished in cataloging: basin metates (Figure 3.48), trough metates (Figure 3.49), and slab metates (Figure 3.50). Metate fragments that cannon be identified to one of these specific types are categorized simply as “metates.”Abraders are examples of “ancient sandpaper.” These tools were used for shaping or smoothing artifacts during manufacture (Figure 3.51). Abraders are usually made of sandstone, and they could have been used actively in the hand or passively (perhaps in the lap) depending on the material that was being shaped. Stone and mineral beads and pendants, bone tools and ornaments, and wooden shafts and handles were all made using abraders. Abraders can be “expedient” tools that lack evidence of shaping prior to use, or they can be formal tools that were shaped for specific uses. The surfaces of abraders have areas that have been ground smooth, but they will lack the peckingstonedimples seen on manos and metates.Stone Mortars are “passive” grinding stones with a round, bowl-shaped depression in which plants or minerals were pounded, ground, and/or crushed by a pestle.Pestles are long, usually cylindrica,l tools that have wear on one or both ends, the result of their having been used to pound, grind and/or crush plants or minerals in a mortar.
3 - 22Figure 3.51. Shaft-straightener.
Figure 3.50. Slab metate.
Figure 3.48. Basin metateand one-hand mano.
Figure 3.47. One-hand and two-hand manos.
Figure 3.49. Trough metate and two-hand mano.
See Chapter 4; “Artifact Identification Criteria” if you need more-detailed information on these artifacts types.

Common Battered/Polished Tools
Figure 3.53. Hammerstone.
Figure 3.56. Polishing stone. The high polish on the upper surface is usewear.
Figure 3.54. Single-bitted axe. Note the smoothly ground bit and pecked-groove hafting element.
“Battering” is the heavy damage that results when a stone tool is struck against another stone. It is usually most evident on the raised edges or ridges of a stone. “Polish” results when a stone is rubbed against a softer materia,l such as pottery clay or animal hide. Polish is usually confined to a specific area on a stone’s surface or edge.
Peckingstones are handheld rocks that were used to shape other stone, or to “sharpen” manos and metates by pecking out dimples which would catch and break corn kernels during grinding (Figure 3.52). Peckingstones are recognized by their multiples flake scars and distinctive pocked and battered usewear along the ridges between the scars. Hammerstones are handheld, oval-shaped rocks used to shape chipped-stone tools (Figure 3.53). The resulting damage is usually localized on the rounded ends. Polishing/hammerstones are pebbles or small cobbles with battering damage on rounded ends and polishing wear on one or more surfaces. These tools may have been used in leatherworking. Axes are tools with a sharpened “bit” or cutting edge and they were used for chopping wood or removing roots and stumps from the soil (Figure 3.54). Most were initially shaped by flaking and pecking; the bit was then ground and polished to a smooth, sharp edge. Axes also have pecked grooves or notches, which allowed them to be hafted onto wooden handles. Axes can be single-bitted or double-bitted. Use the generic “axe” category only when the number of bits cannot be determined. Mauls are relatively hefty tools with blunt ends used for breaking and shaping large pieces of stone, such as building stones (Figure 3.55). The ends are heavily battered from use. Like axes, mauls have a pecked grooves or notches used to haft the tools onto wooden handles. Use axe/maul for fragmentary hafted tools that could have been axes or mauls.Polishing Stones are pebbles or small cobbles that are highly polished along an edge or on one or more surfaces (Figure 3.56). Polishing stones were used extensively for polishing the surfaces of white ware pottery vessels. A small stone that is uniformly smooth on all surfaces is more likely a pebble or gizzard stone (see Step 15).
Figure 3.52. Peckingstone. Note the flake scars and damage on the left forward ridge.
3 - 23
Figure 3.55. Maul. Note the battered ends and groove for handle.

The individual artifacts listed on this page are those included on the FS Coding Sheet under the broader headings Other Stone Artifacts, Other Ceramic Artifacts, Ornaments, Shell Artifacts, andOther. Although the following lists include a few comments about selected artifact types, you should refer to the detailed descriptions provided in Chapter 4 for more comprehensive descriptions.
• The category “Other Stone Artifacts” includes Modified Stone, Other Modified Mineral, Stone Disk, and Unmodified Stone. Modification can include alterations such as flaking, grinding, battering, or incising.
• The category “Other Ceramic Artifacts” includes Modified Sherd, Shaped Sherd, and Other Ceramic Artifact. Descriptions and photographs of modified sherds and shaped sherds, see page 3-10 and Figures 3.17, 3.18, and 3.19.
• Ornaments include Bead, Bracelet, Pendant, Ring, and Tube. Beads, bracelets, pendants, and rings can be made of stone, pottery, shell or bone. A pendant that lacks a hole is cataloged as Other Modified Stone, but the corresponding data line should include the comment “pendant blank.” Tubes are most often made of nonhuman bone.
• The category “Shell Artifacts” is perhaps a little misleading. In this case, the category is limited to Other Modified Shell, which refers to a shell or shell fragment that has been modified by a human, but is not identifiable as any one of the ornament types listed above.
• The “Other” category is made up of artifacts identified as any of the following: Basketry, Effigy, Cylinder, Petroglyph, Other Modified Vegetal, Textile, Other Modified Vegetal, Other, and Void.
3 - 24
LL
Uncommon Individual Artifacts
REMEMBER: All bone artifacts, including ornaments, are kept in the bulk nonhuman bone category.
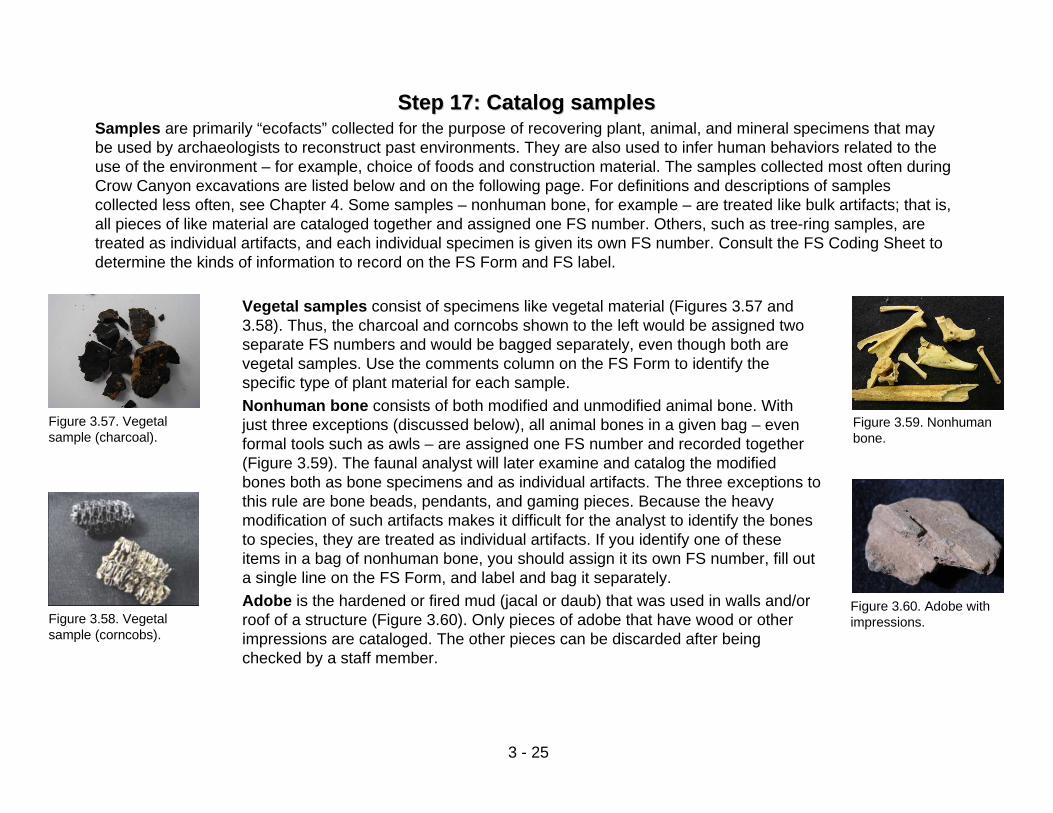
Step 17: Catalog Step 17: Catalog samplessamples
Vegetal samples consist of specimens like vegetal material (Figures 3.57 and 3.58). Thus, the charcoal and corncobs shown to the left would be assigned two separate FS numbers and would be bagged separately, even though both are vegetal samples. Use the comments column on the FS Form to identify the specific type of plant material for each sample. Nonhuman bone consists of both modified and unmodified animal bone. With just three exceptions (discussed below), all animal bones in a given bag – even formal tools such as awls – are assigned one FS number and recorded together (Figure 3.59). The faunal analyst will later examine and catalog the modified bones both as bone specimens and as individual artifacts. The three exceptions to this rule are bone beads, pendants, and gaming pieces. Because the heavy modification of such artifacts makes it difficult for the analyst to identify the bones to species, they are treated as individual artifacts. If you identify one of these items in a bag of nonhuman bone, you should assign it its own FS number, fill out a single line on the FS Form, and label and bag it separately.Adobe is the hardened or fired mud (jacal or daub) that was used in walls and/or roof of a structure (Figure 3.60). Only pieces of adobe that have wood or other impressions are cataloged. The other pieces can be discarded after being checked by a staff member.
Figure 3.58. Vegetal sample (corncobs).
Figure 3.59. Nonhuman bone.
Figure 3.60. Adobe with impressions.
Samples are primarily “ecofacts” collected for the purpose of recovering plant, animal, and mineral specimens that may be used by archaeologists to reconstruct past environments. They are also used to infer human behaviors related to the use of the environment – for example, choice of foods and construction material. The samples collected most often during Crow Canyon excavations are listed below and on the following page. For definitions and descriptions of samplescollected less often, see Chapter 4. Some samples – nonhuman bone, for example – are treated like bulk artifacts; that is, all pieces of like material are cataloged together and assigned one FS number. Others, such as tree-ring samples, are treated as individual artifacts, and each individual specimen is given its own FS number. Consult the FS Coding Sheet to determine the kinds of information to record on the FS Form and FS label.
3 - 25
Figure 3.57. Vegetal sample (charcoal).

3 - 26
LLLabelLabelLL
LabelLabelWW
WeightWeightLLMM
MaterialMaterialLLFSFS
FormFormLLCC
Mineral samples are geological in origin and include materials such as hematite (a paint pigment), unfired clay, and unmodified igneous rock (Figure 3.61). The kind of material should be recorded in the material column of the FS form. Eggshell is just that and at the sites excavated by Crow Canyon, consists of small eggshell fragments from domesticated turkeys (Figure 3.62).Shell refers to any unmodified shell that is not an eggshell. This category and includes both marine shell and terrestrial snail shell. On the FS Form, comment should be added that identifies the type of shell.
Figure 3.62. Eggshell.
Step 18: Record and Bag Step 18: Record and Bag samplessamplesThe information recorded for samples on the FS Form and on the FS label varies by sample type, so consult the FS Coding Sheet and the pages of the universal section indicated below to determine what should be recorded.
Figure 3.63. A vegetal sample ready for double bagging. The folded bag with charcoal will be inserted into the bag on the left and the label will be placed between the two bags.
Figure 3.61. Mineral (pigment).
Important: Any samples that will smudge the FS label, such as charcoal, should be double bagged, and the label should be placed between the two bags (Figure 3.63).
LLCCCodeCode
LLBBBaggingBagging
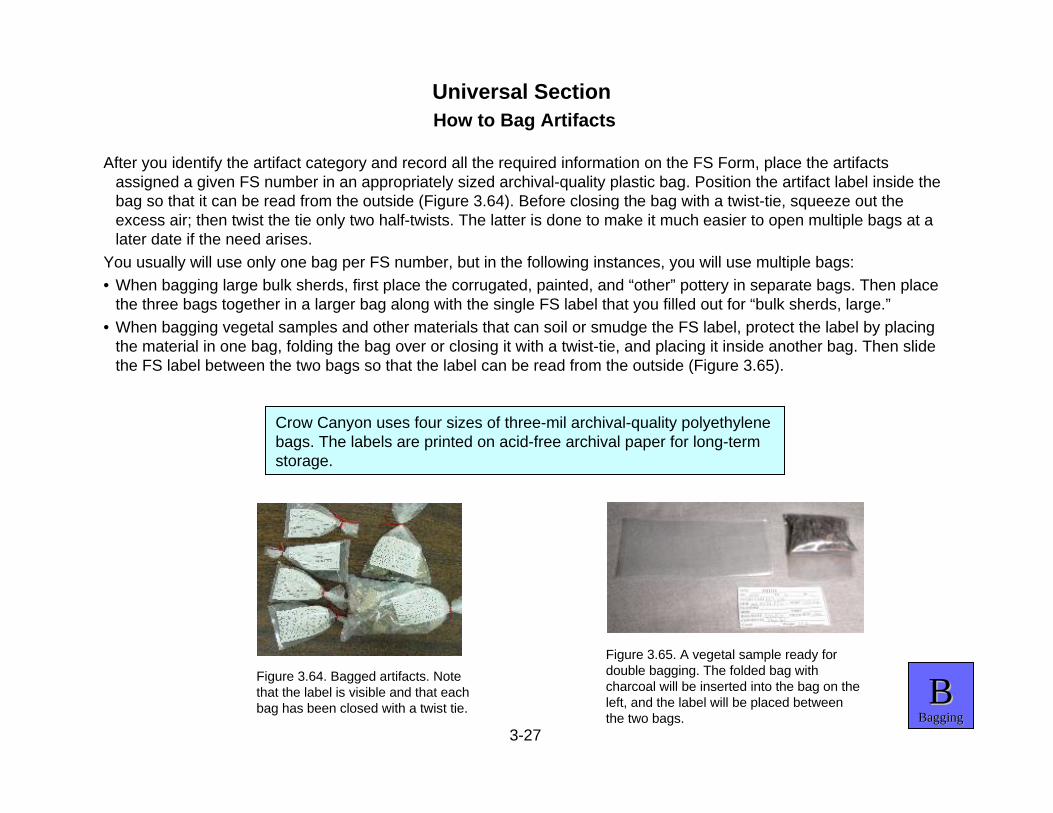
How to Bag Artifacts
After you identify the artifact category and record all the required information on the FS Form, place the artifacts assigned a given FS number in an appropriately sized archival-quality plastic bag. Position the artifact label inside the bag so that it can be read from the outside (Figure 3.64). Before closing the bag with a twist-tie, squeeze out the excess air; then twist the tie only two half-twists. The latter is done to make it much easier to open multiple bags at a later date if the need arises.
You usually will use only one bag per FS number, but in the following instances, you will use multiple bags:• When bagging large bulk sherds, first place the corrugated, painted, and “other” pottery in separate bags. Then place
the three bags together in a larger bag along with the single FS label that you filled out for “bulk sherds, large.” • When bagging vegetal samples and other materials that can soil or smudge the FS label, protect the label by placing
the material in one bag, folding the bag over or closing it with a twist-tie, and placing it inside another bag. Then slide the FS label between the two bags so that the label can be read from the outside (Figure 3.65).
Figure 3.64. Bagged artifacts. Note that the label is visible and that each bag has been closed with a twist tie.
3-27
Crow Canyon uses four sizes of three-mil archival-quality polyethylene bags. The labels are printed on acid-free archival paper for long-term storage.
Figure 3.65. A vegetal sample ready for double bagging. The folded bag with charcoal will be inserted into the bag on the left, and the label will be placed between the two bags.
Universal Section
LLBBBaggingBagging
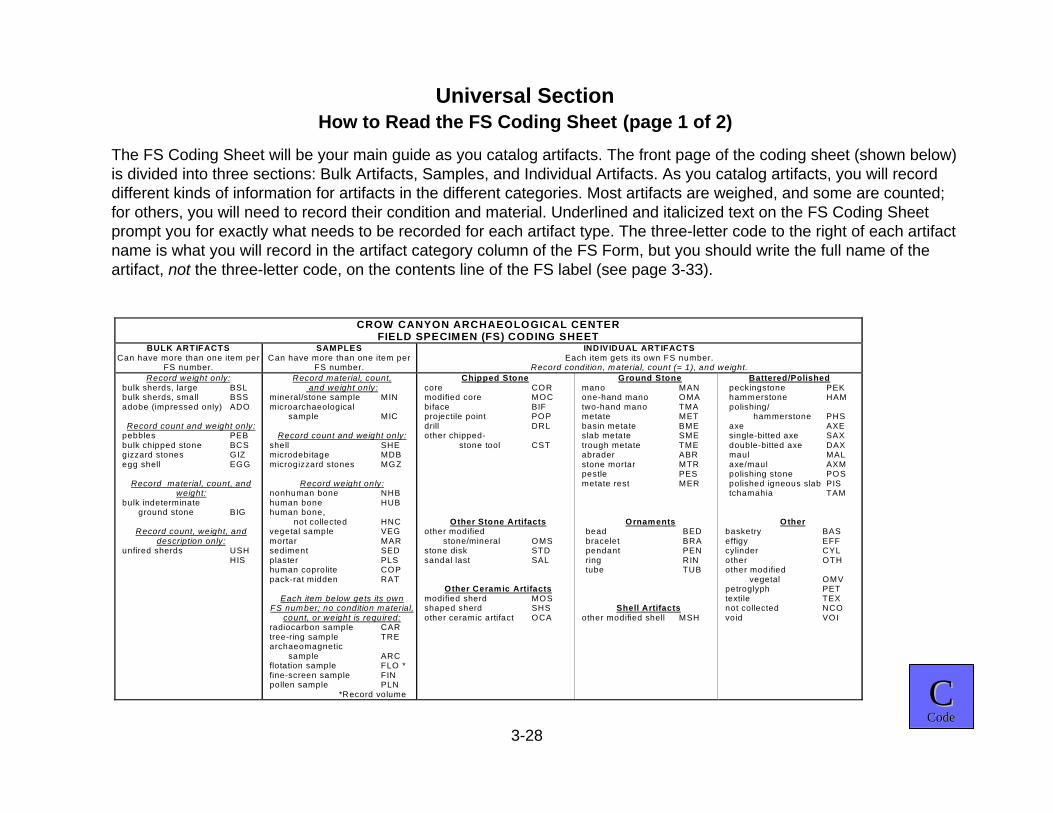
How to Read the FS Coding Sheet (page 1 of 2)
LLCCCodeCode
The FS Coding Sheet will be your main guide as you catalog artifacts. The front page of the coding sheet (shown below) is divided into three sections: Bulk Artifacts, Samples, and Individual Artifacts. As you catalog artifacts, you will record different kinds of information for artifacts in the different categories. Most artifacts are weighed, and some are counted; for others, you will need to record their condition and material. Underlined and italicized text on the FS Coding Sheet prompt you for exactly what needs to be recorded for each artifact type. The three-letter code to the right of each artifact name is what you will record in the artifact category column of the FS Form, but you should write the full name of the artifact, not the three-letter code, on the contents line of the FS label (see page 3-33).
3-28
Universal Section
CROW CANYON ARCHAEOLOGICAL CENTERFIELD SPECIMEN (FS) CODING SHEET
BULK ARTIFACTSCan have more than one item per
FS number.
SAMPLESCan have more than one item per
FS number.
INDIVIDUAL ARTIFACTSEach item gets its own FS number.
Record condition, material, count (= 1), and weight.Record weight only:
bulk sherds, large BSLbulk sherds, small BSSadobe (impressed only) ADO
Record count and weight only:pebbles PEBbulk chipped stone BCSgizzard stones GIZegg shell EGG
Record material, count, andweight:
bulk indeterminate ground stone BIG
Record count, weight, anddescription only:
unfired sherds USHHIS
Record material, count, and weight only:
mineral/stone sample MINmicroarchaeological sample MIC
Record count and weight only:shell SHEmicrodebitage MDBmicrogizzard stones MGZ
Record weight only:nonhuman bone NHBhuman bone HUBhuman bone, not collected HNCvegetal sample VEGmortar MARsediment SEDplaster PLShuman coprolite COPpack-rat midden RAT
Each item below gets its ownFS number; no condition material,
count, or weight is requ ired:radiocarbon sample CARtree-ring sample TREarchaeomagnetic sample ARCflotation sample FLO *fine-screen sample FINpollen sample PLN *Record volume
Chipped Stonecore CORmodified core MOCbiface BIFprojectile point POPdrill DRLother chipped- stone tool CST
Other Stone Artifactsother modified stone/mineral OMSstone disk STDsandal last SAL
Other Ceramic Artifactsmodified sherd MOSshaped sherd SHSother ceramic artifact OCA
Ground Stonemano MANone-hand mano OMAtwo-hand mano TMAmetate METbasin metate BMEslab metate SMEtrough metate TMEabrader ABRstone mortar MTRpestle PESmetate rest MER
Ornamentsbead BEDbracelet BRApendant PENring RINtube TUB
Shell Artifactsother modified shell MSH
Battered/Polishedpeckingstone PEKhammerstone HAMpolishing/ hammerstone PHSaxe AXEsingle-bitted axe SAXdouble-bitted axe DAXmaul MALaxe/maul AXMpolishing stone POSpolished igneous slab PIStchamahia TAM
Otherbasketry BASeffigy EFFcylinder CYLother OTHother modified vegetal OMVpetroglyph PETtextile TEXnot collected NCOvoid VOI

How to Read the Coding Sheet (Page 2 of 2)
LLCCCodeCode
The back page of the FS Coding Sheet is divided into three sections: Condition Codes, Stone MaterialCodes, and Other Material Codes. The condition codes allow you to record the completeness of an artifact, and the material codes record the material from which an artifact was made. These two observations are not recorded for all artifacts; the italicized and underlined instructions on the front page of the FS Coding Sheet tell you which observations to record for which artifacts. Additional information for recording condition and material is found on the following two pages.
3-29
Universal Section
CONDITION CODES STONE MATERIAL CODES
complete COM
incomplete INC(original size/shape can beestimated)
fragment FRG(original size/shape cannot beestimated)
Local Stone Materials
Dakota/Burro Canyonsilicified sandstone (DQT) KDB
Burro Canyon chert (BUR) KBCMorrison mudstone (MCS) KJMMorrison chert (MCS) KJCMorrison silicified
sandstone (MQT) JMSBrushy Basin chert (BBC) JMCSandstone SNDNotes:1. K = cretaceous geologic period, J = Jurassic geologic period.2. Relationships between obsolete codes and current categoriesare shown using parentheses and small type).
Nonlocal Stone Materials
jet JETobsidian OBSred jasper RJSturquoise TURWashington Pass chert WPCnonlocal chert/ silt stone NCS
Other Stone Material Types
agate/chalcedony ACHcaliche CALconglomerate COGconcretion CONgypsum/calcite/ barite GCBigneous OIGpetrified wood PETquartz QTZslate/shale SLS
unknown chert/siltstone UCSunknown silicified USS
sandstone (UQT)
unknown stone UNS
OTHER MATERIAL CODES
Other Materialsclay CLAcomposite COMfossil FOSpigment PIGshell SHEunknown bone UNBunknown UNK
Please note that old codes for material categories, given in parentheses and using small type, are listed in the stone material codes. These codes are no longer in use, but are reflected in our database.

How to Determine Condition
Figure 3.67. From left to right, the conditions of these pendants are recorded as complete, incomplete, and fragment. Although the pendant in the center is smaller than the pendant on the right, enough of its original shape is present for us to infer its original size. The original length of the pendant on the right, however, cannot be determined, so it is classified as a fragment.
LLCnCnConditionCondition
FS PL ArtifactCategory
BagDate
FSDate
LabSup Cond Mat Count Wght Comments Data Entry
9 Initials
9 Initials
9 Initials
Data Entry
9 Initials
9 Initials
9 Initials
Once you have determined the artifact’s condition, write the three-letter code in the “condition” column (“Cond”) of the FS Form.
3-30
Universal Section
Figure 3.66. From left to right, the conditions of these projectile points are recorded as complete, incomplete, and fragment.
In the Crow Canyon system, artifact condition is recorded as: complete, incomplete, orfragment (Figures 3.66 and 3.67).
Complete (COM): The artifact’s original shape and size are easily determined because no part of the artifact is missing. If an artifact is broken but all the pieces are present and can be refit to form the complete artifact, the condition should be recorded as complete, and a comment should be written on the FS Form.
Incomplete (INC): Enough of the artifact is present to allow you to infer its original size and shape.
Fragment (FRG): The portion of the artifact present isn’t large enough or complete enough to allow you to infer the artifact’s original size and shape.
CONDITION CODES
complete COM
incomplete INC(original size/shape can beestimated)
fragment FRG(original size/shape cannot beestimated)

How to Determine Artifact Material
LLMMMaterialMaterial
During cataloging, artifact material is recorded for bulk indeterminate ground stone, mineral samples, and many individual artifacts. You should familiarize yourself with the material codes on the back page of the FS Coding Sheet (shown below). Also see “Chapter 8: Stone Material Identification,” for photographs and descriptions of stone material types.
FS PL ArtifactCategory
BagDate
FSDate
LabSup Cond Mat Count Wght Comments Data Entry
9 Initials
9 Initials
9 Initials
Data Entry
9 Initials
9 Initials
9 Initials
3-31
Universal Section
STONE MATERIAL CODES
Local Stone Materials
Dakota/Burro Canyonsilicified sandstone (DQT) KDB
Burro Canyon chert (BUR) KBCMorrison mudstone (MCS) KJMMorrison chert (MCS) KJCMorrison silicified
sandstone (MQT) JMSBrushy Basin chert (BBC) JMCSandstone SNDNotes:1. K = cretaceous geologic period, J = Jurassic geologic period.2. Relationships between obsolete codes and current categoriesare shown using parentheses and small type).
Nonlocal Stone Materials
jet JETobsidian OBSred jasper RJSturquoise TURWashington Pass chert WPCnonlocal chert/ silt stone NCS
Other Stone Material Types
agate/chalcedony ACHcaliche CALconglomerate COGconcretion CONgypsum/calcite/ barite GCBigneous OIGpetrified wood PETquartz QTZslate/shale SLS
unknown chert/siltstone UCSunknown silicified USS
sandstone (UQT)
unknown stone UNS
OTHER MATERIAL CODES
Other Materialsclay CLAcomposite COMfossil FOSpigment PIGshell SHEunknown bone UNBunknown UNK

FS PL ArtifactCategory
BagDate
FSDate
LabSup Cond Mat Count Wght Comments Data Entry
9 Initials
9 Initials
Data Entry
9 Initials
9 Initials
The Field Specimen (FS) Form is used in the lab to assign and record catalog, or field specimen (FS), numbers to all artifacts and samples from an archaeological site. A separate FS Form is created for each provenience designation (PD) number. The combination of a PD number and an FS number creates a unique identifier for every sample, artifact, or group of artifacts collected from a site, and it is the means by which we track through the entire lab process. The PD number and its corresponding provenience information (the information on the field bag label) is printed at the top of theFS Form. Before you begin cataloging, verify that the information on the field bag is identical to that on the FS Form. FS numbers are assigned sequentially as information relevant to each artifact or sample is recorded.
LLFSFSFormForm
FS, or field specimen, numbers, are assigned sequentially as the artifacts and samples are cataloged. Each FS number is also written on its corresponding FS label (see page 3-33.)
PL, or point location, numbers identify artifacts drawn on a map made during excavation. Each artifact is put in its own field bag and the PL number is written on the field bag label. Only artifacts associated with use surfaces or ones that are unique or diagnostic are mapped. A horizontal line should be drawn in this space for artifacts that do not have a PL number.
Artifact Category refersto the three-letter code written to the right of each artifact or sample name listed on the FS Coding Sheet.
Bag Date is the date that the first materials were collected from this unit. You will find this date on the field artifact bag.
FS Date is the date the artifacts are being cataloged.
Lab Sup (lab supervisor) refers to the three-letter initials of the lab staff member or intern who is supervising your work.
Cond (condition) refers to the “completeness” of an artifact. An artifact can be complete, incomplete, or a fragment. Guidelines for assessing condition are provided on page 3-30.
Mat (material) is recorded for all individual artifacts and for a few bulk artifacts and samples. Refer to the material codes listed on the back of the FS Coding Sheet; also see p. 3-31. For more information on stone materials, consult Chapter 8, “Stone Material Identification. “
The Comments column is where additional information about an artifact, usually something unique or significant, is recorded.
Data Entry is filled out when the information on the FS Form is entered into the artifact database. Leave this column blank for now.
3-32
How to Fill Out the Field Specimen (FS) FormUniversal Section
Remember that all the forms and labels are filled out in pencil.
Count is recorded for only some of the artifact categories. See the instructions on the FS Coding Sheet. For individual artifacts, the count is always “1.”
Wght (weight) is recorded for most artifact types; see the FS Coding Sheet for instructions. See page 3-34 for information on weighing procedures. All weights are recorded in grams (g).

How to Fill Out the Field Specimen (FS) Label
SITE: 5MT123 DE date _______
PD____________ FS__________ PL______STUDY UNIT________________________HOR._________________ VERT.________FEATURE___________________________HOR._________________ VERT.________BAG DATE___________ FIELD SUP_____CONTENTS__________________________Count_________________ Weight_______________ A
naly
st__
__ D
ate_
___
A field specimen label, as shown below, is filled out and placed inside each archival-quality bag as materials are cataloged and assigned FS numbers. The information needed to fill out the label can be found on the original field bag label and at the top of the Field Specimen (FS) Form. This information, including any dashes, should be copied exactly onto the FS label. Dashes indicate that the information in question is not applicable; they assure us that no information was overlooked.
PD, or Provenience Designation, number is a number that identifies the horizontal and vertical location of every space that is investigated at a site. Each provenience, or space, is assigned a unique number, which is linked to information about the context in which the artifacts were found.
The FS, or Field Specimen, number is the number assigned in the lab during cataloging. Each category of artifact or sample collected from a given provenience is assigned its own FS number as the FS Form is filled out. The FS number on both the FS label and the FS Form must be the same and must refer to the same artifact or sample.
The PL, or point-location, number identifies an artifact located on a field map drawn during excavation. A “point-located” artifact will be in its own field bag, and the PL number will be written on the field bag label. A horizontal line should be drawn in this space for artifacts not assigned a PL number. PL numbers must be recorded on the FS Label and the FS Form.
The Study Unit number identifies the specific area of investigation by study unit type. and identifies the study unit type (abbreviated STR, ARB, or NST) and number. The study unit type and number are determined by the field crew and are written on the field bag label.
The Study Unit Horizontal data identify a horizontal space within the study unit.
The Feature data identify a construction within a study unit; it is usually integrated into architecture or a surface. Examples are hearths, pits, niches, and doorways. The feature number and type are written here.
The Study Unit Vertical data identify a vertical space within the study unit.
The Feature Horizontal data identify the horizontal location of a feature.
The Feature Vertical data identify the vertical location of a feature.
The Bag Date is the date that artifacts and samples began to be collected from this provenience. The date should be recorded as month/date/year.
Field Supervisor refers to the initials of the field staff or field intern supervising the excavation.
Contents identifies the artifact category or sample being cataloged. The artifact category and FS number written on this label must be the same as those on the FS Form. Be sure to write the full name of the artifact category or sample (as listed on the FS Coding Sheet); do not use the three-letter code that you wrote on the FS Form.
Count and Weight, when required, are recorded here. Weight is recorded in grams. See page 3-34 for instructions on operating the scales.
Analyst and Date are not filled out during cataloging. They are filled out later when the artifacts are analyzed.
LLLLLabelLabel
The DE Date, or data-entry date, is the date that the analysis results for certain artifact categories are entered into Crow Canyon’s database. This is left blank during cataloging.
3-33
Universal Section
Remember that all forms and labels are filled out in pencil.

How to Weigh ArtifactsThe lab uses digital scales to record weights to the nearest tenth of gram. The scales must be level to be accurate. This is done by turning two adjustable feet under the front of the scale clockwise or counter-clockwise until the bubble at the back of the scale is centered. Ask a staff person for assistance if needed.
Turn on the scale by lifting up on the menu bar at the front of the scale. Reset the scale to 0.0 grams by pressing down on the menu bar. You should reset the scale both
before and after you weigh an artifact. See Figure 3.68.When weighing a single object, such as an individual artifact or a sample that is treated individually,
it is easiest to weigh the object before putting it in a curation bag. Be sure the scale is resetbefore placing the artifact on the scale.
When weighing multiple objects, such as bulk artifacts or samples that consist of more than one item, you can tare the scale as described below and shown in Figure 3.69.
• Place the artifacts in a curation bag without the FS label.• Get a curation bag of the same size as the one holding the artifacts.• Reset the scale to 0.0 by pressing down on the menu bar.• Place the empty bag on the scale and wait until its weight is shown.• Reset the scale to 0.0 again. Make sure that the bag stays in place until the scale display
registers 0.0.• Now remove the bag, and the scale should register the bag’s weight as a negative value. • Place the bag of artifacts on the scale. The weight shown will be the weight of the artifacts
because the weight of the bag has been subtracted from the combined weight of the artifacts and the bag.
Figure 3.68. View shows the Menu bar and the scale reset to read 0.0 g.
Figure 3.69. Three views showing the steps to tare the scale.
WWWeightWeight
FS PL ArtifactCategory
BagDate
FSDate
LabSup Cond Mat Count Wght Comments Data Entry
9 Initials
9 Initials
Data Entry
9 Initials
9 Initials
3-34
Write the weight on the FS Form and the FS label. For artifacts that weigh an even gram include a zero after the decimal point. For items that register as less than one gram, include a zero before the decimal point.
Universal Section

4 - 1
Chapter 4Artifact Identification Criteria
In Crow Canyon’s cataloging system, the term “artifact category” refers to anything to which weassign a field specimen (FS) number (see Chapter 3). This includes artifacts, ecofacts (forexample, vegetal samples, faunal remains), manuports, and a variety of other materials andsamples. In our system, artifacts are classified according to their last use. So, for example, asingle-bitted axe that was broken and subsequently used as a core would be classified as a coreand not as a single-bitted axe.
The following lists include all artifact categories currently in use, as well as a number that arenot, that have been used in the past and therefore appear in our research database. The latter aredistinguished below through the use of smaller typeface.
Bulk Artifacts
Artifacts that are recorded as a group and assigned a single field specimen (FS) number duringcataloging are called “bulk artifacts.” Many of these artifacts are analyzed further in subsequentsteps in our laboratory process (see Chapter 5 and Chapter 9).
Bulk Chipped Stone (BCS). This category includes: 1) debitage, which consists of flakes andangular debris created during the manufacture of chipped-stone tools, the intentionalmodification of other stone tools, or the shaping of architectural stone; and 2) expedientflake tools, including utilized flakes and modified flakes. Before 2001, modified flakes(MOF) were distinguished during cataloging and assigned their own artifact category andFS number (Figure 4.1).
Bulk Indeterminate Ground Stone (BIG). Fragments of ground-stone artifacts that cannot beassigned to a more specific ground-stone category. If more than one ground surface ispresent on an individual fragment, this should be noted in comments. Fragments of bulkindeterminate ground stone are grouped by stone material, and each group of artifacts ofa given stone material receives its own FS number. Before 2001, each piece ofindeterminate ground stone (IGS) was treated as an individual artifact and assigned aseparate FS number (Figure 4.2).
Bulk Sherds, Large (BSL). Unmodified pottery sherds that are captured in a screen with ½-inchmesh. All such sherds in a given bag of artifacts are grouped together and assigned asingle FS number. Before the 1998 field season, all unmodified pottery sherds wereclassified as bulk sherds (BSH), regardless of size (Figure 4.3).
Bulk Sherds (BSH). This category was discontinued in 2000. From 1998 through most of 2000, three bulk sherd codes [BSH],[BSL], [BSS], were used. We stopped using the BSH code in late 2000, when we began to screen artifacts through ½inch mesh to separate the larger sherds (greater than ½"), BSL, from the smaller sherds (smaller than ½"), BSS.

4 - 2
Bulk Sherds, Small (BSS). Unmodified pottery sherds that fall through a screen with ½-inchmesh but are captured in a screen with 1/4 -inch mesh. All such sherds in a given bag ofartifacts are grouped together and assigned a single FS number. Before the 1998 fieldseason, all unmodified pottery sherds were classified as bulk sherds (BSH), regardless ofsize (Figure 4.4).
Gizzard Stones (GIZ). Small stones or flakes that are highly polished on their surfaces and insideall cracks and crevices. Such stones are believed to be from the gizzards of turkeys thatwere kept during the occupation of a site. All gizzard stones in a given bag of artifacts aregrouped together and assigned a single FS number (Figure 4.5).
Historic Artifacts (HIS). Any artifacts of modern origin. They are of interest to Crow Canyonarchaeologists primarily because they can tell us something about the recent use anddisturbance of prehistoric sites. All historic artifacts in a given bag of artifacts are groupedtogether and assigned a single FS number. Specific information on the kind or kinds ofhistoric artifacts should be noted in the comments.
Microdebitage (MDB). Chipped stone debris, identified in the heavy fraction of flotationsamples, that also falls through a screen with ¼ inch mesh. All such pieces are groupedtogether and given a single FS number.
Pebbles (PEB). Small stones that are naturally rounded but not culturally modified. Such stonesmay be from streambeds or from conglomerate sandstones. In either case, they areinterpreted as manuports–that is, as objects brought to a site by humans. Pebbles areusually slightly rougher in appearance than gizzard stones, and do not have the use wearcharacteristic of polishing stones. All pebbles are grouped together and given a single FSnumber.
Unfired Sherds (USH). Sherds from unfired pottery vessels. All unfired sherds are groupedtogether and given a single FS number.
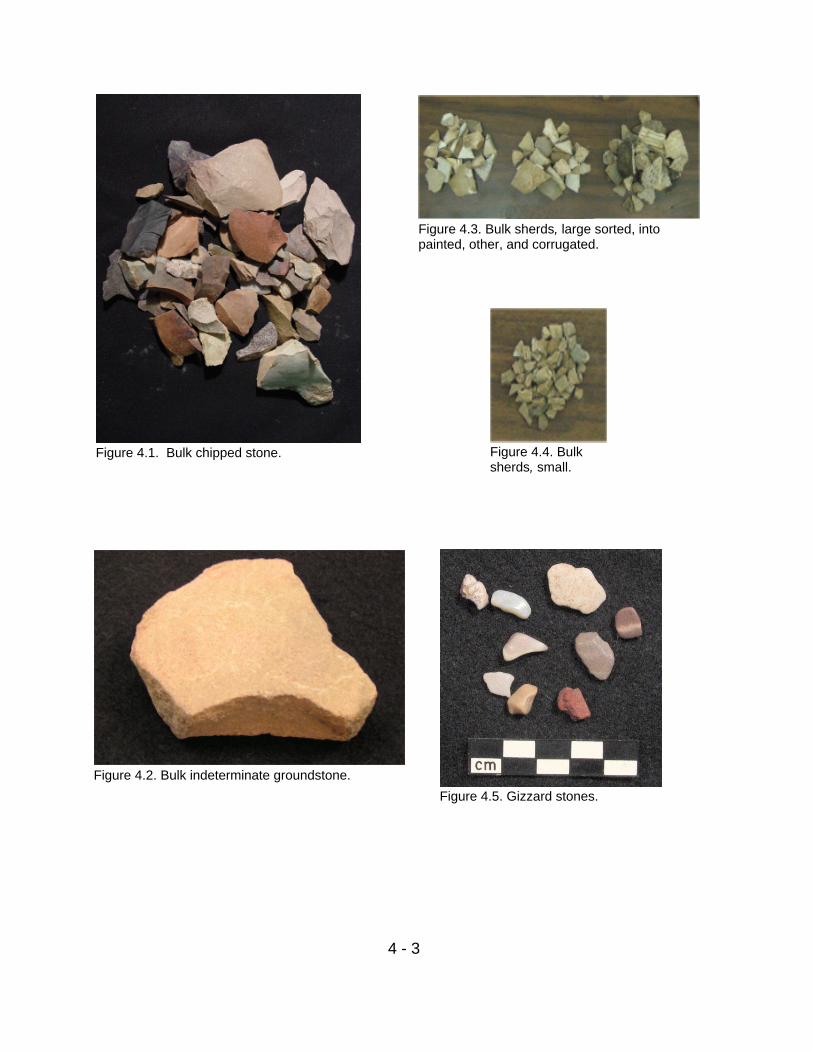
4 - 3
Figure 4.1. Bulk chipped stone.
Figure 4.5. Gizzard stones.
Figure 4.3. Bulk sherds, large sorted, intopainted, other, and corrugated.
Figure 4.4. Bulksherds, small.
Figure 4.2. Bulk indeterminate groundstone.

4 - 4
Samples
Samples include a variety of artifacts and ecofacts that may be used to reconstruct paleo-environments and to infer resource use. Some types of samples are cataloged in “lots” andassigned a single field (FS) specimen number; others, such as the various dating samples, aretreated as individual artifacts, with each assigned its own FS number.
Adobe (ADO). Before 1998, this category referred to any fragment of adobe, jacal, or daubcollected in the field and brought into the lab. Since 1998, this category has referred onlyto adobe, jacal, or daub with wood or finger impressions. All such fragments in a givenartifact bag are grouped together and assigned a single FS number (Figure 4.6).
Archaeomagnetic Sample (ARC). Archaeomagnetic samples are collected from the clay of well-fired and well-preserved hearths or other burned features. These samples may be sent toan archaeomagnetic laboratory for dating. Each archaeomagnetic sample is assigned itsown FS number.
Eggshell (EGG). Eggshell fragments, most of which were probably from turkey eggs (Figure4.7).
Fine-Screen Sample (FIN). Fine-screen samples consist of 500 ml of sediment collected for thepurpose of finding small artifacts that would not be found during standard screeningthrough 1/4-inch mesh. These samples are screen through 1/16-inch mesh, and thecaptured artifacts are assigned a single FS number, regardless of type.
Flotation Sample (FLO). Sediment collected from an individual stratigraphic layer or the fill of a
feature for the purpose of recovering small plant remains. The vegetal remains fromflotation samples are used to infer the use of plants for food, fuel and construction. Whenpossible, flotation samples are subdivided into 1 liter samples when they are cataloged inthe lab, and each liter is given its own FS number to facilitate flotation processing.
Human Bone (HUB). Crow Canyon stopped the intentional collection of human remains after the2000 field season. However, fragmentary human remains are occasionally collectedinadvertently with nonhuman bone samples, and when this occurs we use this category tocatalog these remains. See page 2-1 for more information on the treatment of humanremains.
Human Bone, Not Collected (HNC). Human bones that are identified by a physicalanthropologist in the field. Such remains are not collected and are reburied in situ. Formore information, the reader is referred to page 2-1.
Human Coprolite (COP). Human feces. Such samples can be examined by a specialist to gaininformation about the diet and health of a person in the past.

4 - 5
Microarchaeological Sample (MIC). Sediment collected for the purpose of recoveringmicrodebitage or other small artifacts that would not be captured during standardscreening through a 1/4-in mesh. These samples are may be processed using nestedgeological screens.
Microgizzard stones (MGZ). Gizzard stones recovered from sediment that has been screenedthrough a mesh finer than the standard 1/4-inch mesh used for routine screening.Microgizzard stones are cataloged together and given a single FS number.
Mineral Sample (MIN). Unmodified objects of a variety of materials, including softer minerals(for example, caliche, hematite, calcite, and gypsum) and harder minerals (for example,conglomerate sandstone, igneous, quartz, turquoise, jet). It is assumed that such materialswere carried to the site by humans because they do not occur widely in the local surfacegeology and it is known that such materials were commonly used by the ancestral Pueblopeople. All specimens of a given material type are grouped together and assigned a singleFS number.
Mortar Sample (MAR). Samples of mortar used in masonry wall construction.
Nonhuman Bone (NHB). Before 2001, only unmodified animal bones were cataloged asnonhuman bone, and each bone tool was cataloged separately and given an individual FSnumber (see the artifact categories under Bone Artifacts, below). As of 2001, this categoryis used to catalog all animal bone (except those objects classified as ornaments) bothmodified and unmodified. Modified animal bones are identified, classified, and recordedduring faunal analysis (Figure 4.8).
Pack-Rat Midden Collection (RAT). These are samples of a pack-rat midden collected for thepurpose of obtaining vegetal remains that can be used in paleoenvironmentalreconstructions.
Plaster Sample (PLS). Samples of plaster collected from structure walls.
Pollen Sample (PLN). A sample of sediment, usually about 120 ml, that is collected from asealed context for the purpose of recovering pollen for paleoenvironmental reconstruction.Such samples can be sent to a palynology lab for processing and analysis.
Radiocarbon Sample (CAR). Carbon 14, Radiocarbon, or C14, samples consist of charredorganic material, collected from undisturbed contexts. Such samples may be sent to aradiocarbon laboratory for dating. Each radiocarbon sample is assigned its own FSnumber.
Sediment Sample (SED). Samples of sediment that can be used for a variety of analyses (e.g.,mineralogical analysis, or in anticipation of pollen, flotation, or microarchaeologicalsampling).

4 - 6
Shell (SHE).Unmodified marine shell and local, terrestrial snail shell. If the item is a terrestrialshell, a comment should be added that identifies it as such (Figure 4.9).
Tree-Ring Sample (TRE). Pieces of burned and unburned wood that are point-located (plotted ona map) and collected for dendro-chronological analysis. Multiple pieces from the sametimber are collected as a single sample and are assigned one FS number, regardless of thenumber of fragments contained in the field bag. These samples are sent to the Laboratoryof Tree-ring Research, University of Arizona, for cross dating and species identification.
Vegetal Sample (VEG). All unworked vegetal materials that are not suitable for tree-ringanalysis are cataloged as vegetal samples. In most cases, vegetal material is sorted by“material type” (charcoal, unburned wood, corn, seeds, and other vegetal) duringcataloging, and the fragments of each material are cataloged separately. Modified vegetalobjects are cataloged as individual artifacts when they can be identified in the field or lab(Figure 4.10).

4 - 7
Figure 4.7. Eggshell (turkey).
Figure 4.6. Wood-impressed adobe.
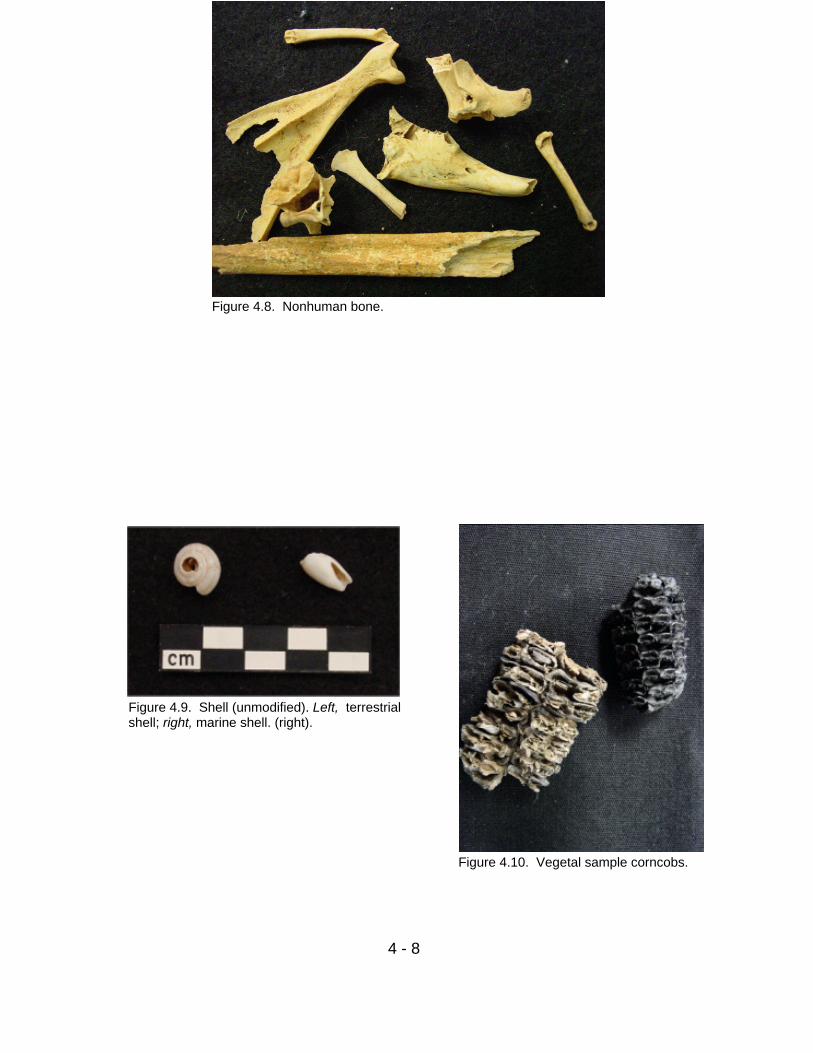
4 - 8
Figure 4.10. Vegetal sample corncobs.
Figure 4.8. Nonhuman bone.
Figure 4.9. Shell (unmodified). Left, terrestrialshell; right, marine shell. (right).

4 - 9
Individual Artifacts
A variety of easily identified tools are cataloged as individual artifacts. During cataloging, eachindividual artifact is assigned its own FS number and the material, condition, and weight of eachartifact are recorded. Certain types of individual artifacts are subsequently subjected to additionalanalyses by specialists. To aid in identification, individual artifact categories are grouped intoseveral general categories: battered and polished stone, chipped-stone, ground stone, other stoneartifacts, other ceramic artifacts, ornaments, shell artifacts, bone artifacts, , and other artifacts.Individual artifact categories are listed below in alphabetical order within each general group.
Battered- and Polished-Stone Artifacts
Artifacts in this group show evidence of having been battered through used and/or polishedthrough use and during their manufacture. A stone that has been used to break or shape anotherstone will have battering damage. A stone that has been used for polishing or has itself beenpolished will have areas that are very smooth and shiny; in some cases, parallel striations thatindicate the direction of the polish will be visible. The polishing usually extends across any flakescars that may have been created when the tool was shaped during manufacture. A tool may havebeen both battered and polished, but usually one type of wear predominates.
Axe (AXE). A tool that can be used to fell trees, to shape wood, or as a weapon. Axes were madein a variety of ways. Most often, a piece of ignwou s rock or silicified sandstone was firstshaped by flaking or pecking, and then hafting elements, in the form of a groove oropposed notches, were pecked into the midsection of the blank. Finally, the bit wassharpened by grinding. An axe is thickest near the groove and then tapers to a wide, butsmooth and sharpened, bit. On a single-bitted axe (Figures 4.11 and 4.12), the cuttingedge is called the “bit” and the opposite end is called the “poll.” The poll end is blunt andserves as a counterweight; it also could have been used as a maul. A double-bitted axehas a bit on both ends of the tool. The generic “axe” category is used only for polished axefragments on which it is impossible to determine whether the original tool had a secondbit or a poll opposite the identifiable bit end. Flakes from axes or ground-stone toolsshould be classified as bulk chipped stone. If it is clear that certain of these flakes resultedfrom the use of an axe, this should be recorded in the comments.
Axe/maul (AXM). A polished and battered tool fragment that is from either an axe or a maul,where the elements that would allow us to distinguish between the two are absent. Forexample, a fragment on which a hafting element and a poll, but not a polished bit, arepreserved would be classified as an axe/maul.
Double-Bitted Axe (DAX). An axe with a sharp bit on both ends and a pecked groove or notchfor attaching a wooden handle at its midsection. Double-bitted axes are usually made ofigneous rock or silicified sandstone that has been modified through a combination offlaking, pecking, and polishing. The bits are usually highly polished and often exhibit

4 - 10
evidence of battering damage. Both ends of the axe must be present for you to distinguisha single- or double-bitted axe from a generic axe.
Hammerstone (HAM). A relatively smooth stone, often a waterworn cobble, that exhibitsbattering damage across broad areas on the rounded ends. Most often used forflintknapping, hammerstones are usually small enough to hold in one hand and are madeof materials – such as igneous rock, silicified sandstone, and quartzite – that are harderand less brittle than those they were intended to flake. Batter is often the only type ofmodification present. In contrast, peckingstones have been both flaked and battered, andthe battering damage tends to be concentrated along the narrow ridges between flake scars(Figures 4.13).
Maul (MAL). A stone tool with two blunt ends and a pecked groove or notch at its midsection.Mauls are not usually polished or ground, and they may exhibit evidence of heavybattering on one or both ends. Many axes with broken bits were subsequently used asmauls. Such artifacts should be classified as mauls and their previous use recorded in thecomments (Figures 4.12. and 4.14).
Peckingstone (PEK). A rock with edges or ridges that have been battered through use; grinding issometimes evident in small areas as well. Most peckingstones are essentially batteredcores (the sharp edges and ridges produced when flakes are struck from a core are idealfor pecking other stone surfaces), but some peckingstones were made of large, sharpflakes or of unmodified stones with naturally sharp edges. Peckingstones were used toroughen or “sharpen,” mano and metate surfaces that had become too smooth through useto effectively grind corn. They may also have been used to shape building stones and otherstone artifacts. Platform preparation on a core should not be confused with use-wear frompecking (Figures 4.15).
Polished Igneous Slab (PIS). A flat, igneous stone against which other objects were ground andrubbed, producing a polished surface.
Polishing/Hammerstone (PHS). A pebble or small cobble with battering damage on its roundedends and polishing wear on one or more surfaces. The polishing often has both a very highsheen on the "high spots" and fine scratches or striations. Ethnographic evidence suggeststhat these tools were used to process animal hides.
Polishing Stone (POS). A pebble or small cobble that appears to have been used for polishing thesurfaces of pottery vessels. The polishing often has both a very high sheen on the "highspots" and fine scratches or striations. Do not confuse a waterworn pebble or cobble thathas a naturally smooth surface with one that has been worn smooth and polished throughuse (Figure 4.16).
Single-bitted Axe (SAX). An axe with a sharp bit on one end, a blunt counterweight, or poll, onthe other end, and two pecked notches or a groove for attaching a wooden handle at its

4 - 11
Figure 4.11. Single-bitted axe.
Figure 4.14. Maul.
midsection. Single-bitted axes are usually made of igneous rock or silicified sandstonethat has been modified through a combination of flaking, pecking, and polishing. The bitis usually highly polished and often exhibits evidence of battering damage. The poll end,too, may exhibit battering damage. Both ends of the axe must be present for you todistinguish a single- or double-bitted axe from a generic axe (Figures 4.11 and 4.12).
Tchamahia (TAM). A thin, flat stone shaped like a narrow paddle, and having a sharp bit on oneend. Tchamahias are initially shaped by flaking and then are ground to a fine, smoothfinish; often the flake scars are totally obliterated by the grinding. Tchamahias resemblestone hoes or celts that could have been used in farming, but in ethnographic literaturetchamahias are documented as having ceremonial or ritual significance (Parsons1939:194). Examples from archaeological contexts may have been ceremonial objects aswell, because they are often made of beautiful, fine-grained siltstone, and theworkmanship is often very fine (Figure 4.17).

4 - 12
Figure 4.15. Peckingstone.
Figure 4.13. Hammerstones.
Figure 4.16. Polishing stones. Figure 4.17. Tchamahia.
Figure 4.12. Top row, single-bitted axes; bottomrow, mauls.

4 - 13
Chipped-Stone Artifacts
Artifacts in this group are usually made of siliceous materials (for example, chert, siltstone,silicified sandstone, mudstone, and chalcedony) that tend to fracture concoidally when struck.The tools in this group were manufactured primarily by flaking, and they lack evidence ofpecking, polishing, and battering damage.
Biface (BIF). A chipped-stone tool that has been bifacially thinned but cannot be classified as aprojectile point or drill. The flake scars on bifaces usually span both faces of the tool,rather than being confined to the edges only. This category can include knives, formal andinformal preforms, and unclassifiable tip and midsection fragments (Figures 4.18 and4.19).
Core (COR). Cores are not necessarily tools per se, but may they have provided flakes forsubsequent tool manufacture. Cores were not usually made from flakes, although verylarge flakes sometimes served as cores. All cores are recognized by the presence of flakescars, curved indentations that indicate where flakes were removed. If battering is alsopresent along the ridges between the flake scars, the core should be classified as apeckingstone. If the artifact is ground and/or polished, or if it is flaked in such a way tosuggest its use as a tool, the artifact should be classified as a modified core. Platformpreparation does not constitute modification. The condition of a core should be recordedas complete unless there is clear evidence of fragmentation unrelated to flaking (Figures4.20 and 4.21).
Drill (DRL). A chipped-stone tool with a projection that was used as a bit for drilling holes. Thecharacteristic common to all drills is a worn and polished bit. Use wear on drill bitstypically consists of tiny striations oriented perpendicular to the long axis of the tool,indicating rotary motion. Drills can take a variety of forms. Some are formal, bifaciallyflaked tools with hafting elements – these include tools that were manufacturedspecifically for drilling, as well as recycles projectile points on which the tip was“retouched” to create a narrow drill bit. The bits of these formal drills are often beveled inopposite directions. Drills may also be informal, expediently manufactured tools that wereheld in the hand and that retain most of the characteristics of the original flakes fromwhich they were made (Figures 4.22.and 4.23).
Modified Core (MOC). A core that was subjected to additional modification, either deliberatelythrough flaking (“retouch”) or incidentally through use (for example, scraping)/ Use wearcan consist of flaking, grinding, and/or polishing along one or more edges or ridges; a corethat has been battered, however, should be classified as a peckingstone, not as a modifiedcore. The flake scars along a modified edge should be small and regular enough to suggestuse or deliberate shaping, rather than the removal of flakes for stone tool manufacture.Platform preparation does not constitute modification (Figures 4.24 and 4.25).

4 - 14
Modified Flake (MOF). As of 2001, we include modified flakes in the bulk chipped stone category during cataloging; they areidentified and analyzed specifically during bulk chipped-stone analysis (see Chapter 10). Before 2001, however,modified flakes were distinguished as individual artifacts during cataloging and were recorded in our research databaseas such. A modified flake is a flake with one or more edges that were deliberately modified through unifacial flaking.Use-wear by itself does not constitute modification. The flake scars along a modified edge (1) usually are orientedperpendicular to the edge, (2) are regular enough to suggest deliberate modification of the edge rather than incidentaldamage or wear through use, and (3) must clearly represent flakes that were removed after the original flake wasdetached from the core. A modified flake still shows at least some of the characteristic features of the flake from whichit was made (platform, bulb, ripples on the ventral face, etc.). A chipped-stone tool not made from a flake, or one madefrom a flake on which most of the original flake features have been obliterated by subsequent modification, should beclassified as one of the other chipped-stone tool types. Modified flakes may or may not exhibit evidence of use, butwhen such evidence was visible, a note was made in the comments.
Other Chipped-Stone Tool (CST). A stone tool, deliberately shaped by flaking, that does not fallinto any other category of chipped-stone tool. Examples include (1) "chunks" or pieces ofrock that are not flakes or cores, but that have at least one edge that was modified byflaking, and (2) heavily modified flakes with unusual forms. A comment should be addedto the FS form that describes the tool.
Projectile Point (POP). A formal chipped-stone tool that appears to have functioned as an arrowpoint, spear point, or dart point. Projectile points were deliberately shaped by bifacialflaking, and they possess a hafting element. Before 1994, all bifacially flaked toolfragments on which hafting elements were absent were classified as bifaces. Since thattime, we have taken size into account, and bifacially flaked tips of appropriate size arenow classified as projectile points even if the hafting elements are missing (Figures 4.26.and 4.27).

4 - 15
Figure 4.19. Close-up of biface shown in Figure4.18.
Figure 4.18. Bifaces.
Figure 4.20. Cores.
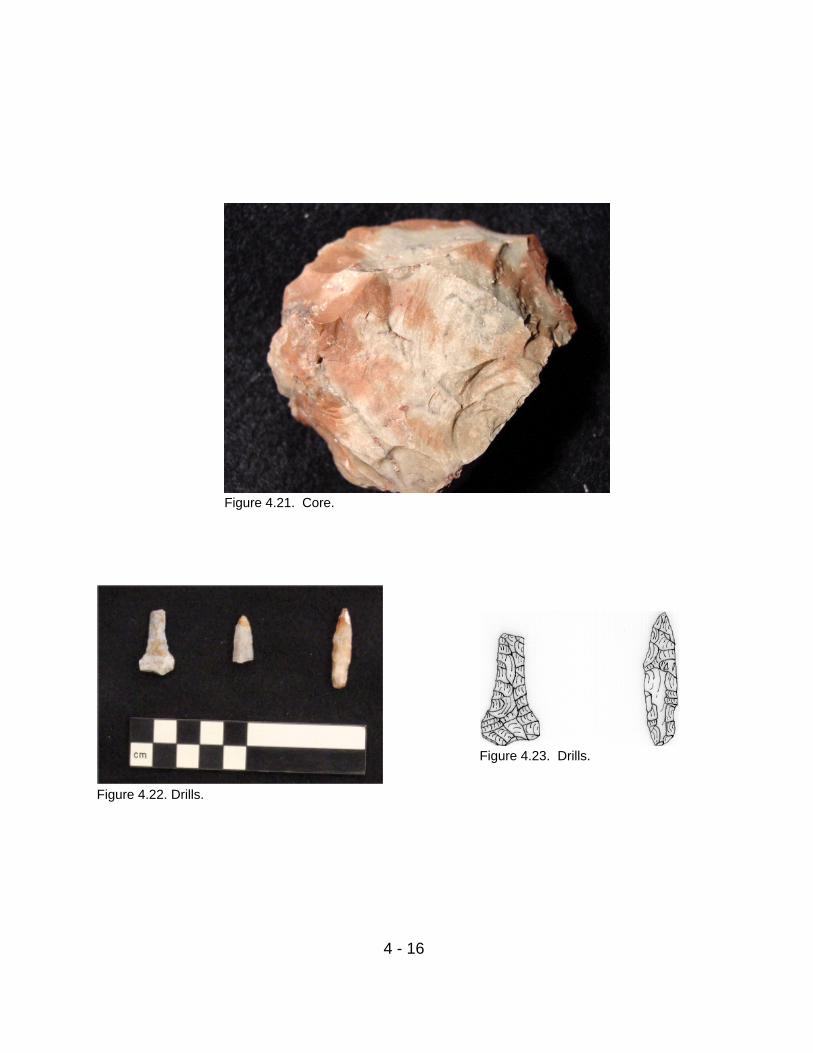
4 - 16
Figure 4.21. Core.
Figure 4.22. Drills.
Figure 4.23. Drills.

4 - 17
Figure 4.25. Modified core.
Figure 4.27. Projectile points.
Figure 4.26. Projectile points (actualsize).
Figure 4.24. Modified core.

4 - 18
Ground-Stone Artifacts
Tools in this group were used for grinding plant, animal, or mineral substances. Ground-stonetools are usually made of conglomerate, sandstone, silicified sandstone, or igneous rock.Although artifacts in this category may have been flaked or pecked during manufacture, theprimary form of modification is grinding. Manos and metates, two very common ground-stonetools were used for grinding corn kernels into meal. Repeated use of these tools resulted in theirsurfaces becoming too smooth to effectively grind corn, so they would be periodically“sharpened,” or roughened, by being pecked with a peckingstone. Other ground-stone tools(especially abraders) were used for grinding bone or mineral, as would occur during themanufacture of certain ornaments.
Abrader (ABR). A coarse-textured, abrasive rock (usually sandstone or conglomerate) that hasone or more ground surfaces, but lacks formal shaping (as from pecking or flaking).Abraders were usually made from pieces of tabular stone that fit comfortably in the hand,and their ground surfaces do not appear “sharpened” (that is, they are not pitted orotherwise roughened), Abraders could have been used “actively” for tanning hides,smoothing plaster, or grinding down rough edges on axes, or they could have ben used“passively” for manufacturing beads, bone tubes, gaming pieces, and pendants. “Shaft-abrader” (Figure 3.52) are small tools that have a narrow groove ground into one surface.Such artifacts should be classified as abraders, and “shaft-abrader” should be entered inthe comments. If an abrader has two ground surfaces, this should also be noted in thecomments (Figure 4.28).
Basin Metate (BME). A metate with a concave, basin-shaped grinding area, produced by acircular grinding motion in the central area of the stone. Basin metates were used withone-hand manos. They may exhibit evidence of “sharpening,” or roughening with apeckingstone (Figure 4.29).
Indeterminate Ground-Stone (IGS). This individual artifact category is no longer used. Starting in 2001, fragments of indeterminate ground stone have been treated as bulk artifacts and cataloged as bulk indeterminate ground stone (BIG).Before 2001, each fragment of ground stone that could not be assigned to a more specific category was treated as anindividual artifact and assigned a separate FS number. If grinding was observed on more than one surface of a piece ofindeterminate ground stone, this was noted in the comments.
Mano (MAN). The active element of the two-piece grinding set that consisted of a mano and ametate. The mano was held in the hand and used to grind seeds (most often, corn kernels)and minerals against the metate, which rested on the ground. This generic category wouldbe used only for mano fragments that cannot be identified more specifically as one- ortwo-handed manos (Figure 4.30). All manos share the following characteristics: a formalshape in a plan and cross section, on or more flat or convex surfaces that have beenground through use, and evidence of those surfaces having been roughened, or“sharpened” with a peckingstone.

4 - 19
Metate (MET). The passive element of the two-piece grinding set that consisted of a mano and ametate. The metate rested on the ground and was the stationary stone against which seeds(most often, corn kernels) and minerals were ground by the hand-held mano. The genericcategory should be used only for metate fragments that cannot be identified morespecifically as basin, trough or slab metates (Figure 4.29). All metates have at least oneflat-to-concave surface that has been both ground through use and roughened or“sharpened,” with a peckingstone.
Metate Rest (MER). Any object used to support one end of a metate to provide an angle suitablefor grinding. A metate rest may be a rock, a chunk of hardened adobe, or any object strongenough to support the weight of a metate. Metate rests can only be identified in the fieldon the basis of context.
One-Hand Mano (OMA). A mano that was held in one hand and used in a circular grindingmotion inside a basin metate. One-hand manos are usually round to oval in plan and ovalin cross section. One or both surfaces of a one-hand mano will have been ground orground and pecked (“sharpened”). The grinding surfaces are convex, the result of havingbeen used on a basin metate. One-hand manos may be made from cobbles, sandstone,conglomerate, or other coarse material (Figure 4.30a,b).
Pestle (PES). A handheld pounding and grinding implement with a long, cylindrical shape andwith grinding and battering wear on at least one end. The ends of pestles were used topound and grind plant, animal, and mineral substances inside the cavity of a mortar.Pestles can be distinguished from manos by the location and type of modifications present.Pestles have grinding and battering damage on their ends, whereas manos will havegrinding and pecking on their working surfaces. Pestles are usually made of toughmaterials such as silicified sandstone or igneous rock.
Slab Metate (SME). A metate with a flat or nearly flat grinding surface that spans or nearly spansthe length and width. The grinding surface may be slightly concave in longitudinal crosssection as the result of use, but it will be a flat (that is,not trough- or basin-shaped) inlateral cross section. Slab metates were used in conjunction with two-hand manos, andtheir grinding surfaces often exhibit evidence of having been roughened or “sharpened”with a peckingstone. The edges of slab metates usually were deliberately shaped (Figure4.29b).
Stone Mortar (MTR). A grinding implement with a hollowed-out, steep-sided bowl suitable foruse with a pestle. The bowl of a mortar should exhibit evidence of pounding and grinding.Mortars are usually made of a tough, coarse-grained material such as sandstone,conglomerate, or igneous rock (Figure 4.31).
Trough Metate (TME). A metate with a trough-shaped grinding area that runs parallel to thelong axis of the stone. Trough depths range from fairly shallow to quite deep, dependingon the length of time the metate was used and the thickness of the original stone. Trough
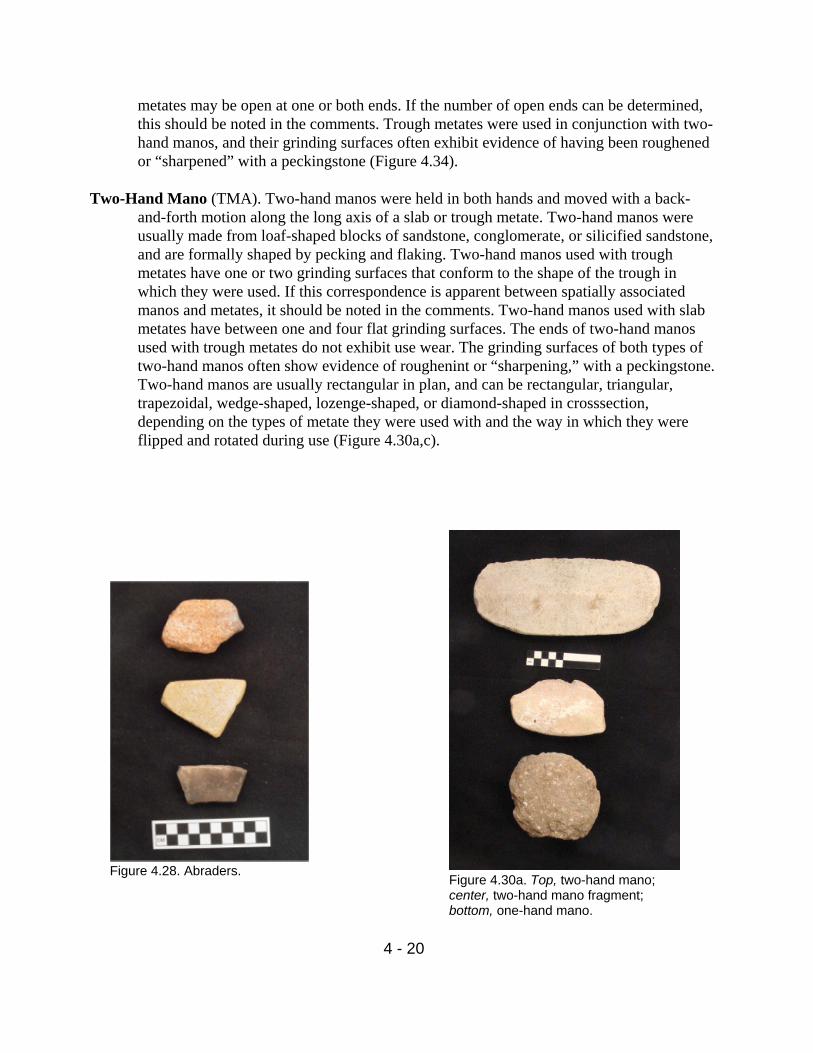
4 - 20
Figure 4.28. Abraders.Figure 4.30a. Top, two-hand mano;center, two-hand mano fragment;bottom, one-hand mano.
metates may be open at one or both ends. If the number of open ends can be determined,this should be noted in the comments. Trough metates were used in conjunction with two-hand manos, and their grinding surfaces often exhibit evidence of having been roughenedor “sharpened” with a peckingstone (Figure 4.34).
Two-Hand Mano (TMA). Two-hand manos were held in both hands and moved with a back-and-forth motion along the long axis of a slab or trough metate. Two-hand manos wereusually made from loaf-shaped blocks of sandstone, conglomerate, or silicified sandstone,and are formally shaped by pecking and flaking. Two-hand manos used with troughmetates have one or two grinding surfaces that conform to the shape of the trough inwhich they were used. If this correspondence is apparent between spatially associatedmanos and metates, it should be noted in the comments. Two-hand manos used with slabmetates have between one and four flat grinding surfaces. The ends of two-hand manosused with trough metates do not exhibit use wear. The grinding surfaces of both types oftwo-hand manos often show evidence of roughenint or “sharpening,” with a peckingstone.Two-hand manos are usually rectangular in plan, and can be rectangular, triangular,trapezoidal, wedge-shaped, lozenge-shaped, or diamond-shaped in crosssection,depending on the types of metate they were used with and the way in which they wereflipped and rotated during use (Figure 4.30a,c).

4 - 21
Figure 4.30c. Two-hand mano.
Figure 4.31. Cross-section view of a mortar.
Figure 4.29a. Basin metate. Figure 4.29b. Slab metate.
Figure 4.29c. Trough metate.
Figure 4.30b. One-hand mano.

4 - 22
Ornaments
Artifacts in this group are interpreted as items of personal adornment. They were made of a widevariety of stones, minerals, shell, pottery, and bone. As of 2001, and with the exception of beads,pendants, and gaming pieces, the lab no longer separates bone tools and ornaments fromunmodified nonhuman bone during cataloging. These artifacts are now identified during faunalanalysis and distinguished using an item number at that time.
Bead (BED). A small, round or cylindrical object with a hole that would have allowed it to bethreaded on a cord with other similar objects to form a beaded string. Most beads aremade from stone or bone. Stone drills were often used to drill from opposite sites towardthe center of the object, which created a hole with a distinctive biconical shape. Beads alsocould have been made by someone taking advantage of (and possibly enhancing) a naturalhole, such as that which occurs in a long-bone shaft. Use common sense whendistinguishing beads from pendants. To distinguish a hollow bone bead from a hollowbone tube, use the diameter:length ratio. If the ratio is 1 or more (that is, the diameter isequal to or larger than the length), classify the object as a bead; if it is less (that is, thediameter is less than the length), classify it as a tube (Figure 4.32).
Bracelet (BRA). A deliberately modified circular or oval band large enough to be worn on thewrist or ankle. Bracelets may consist of open or closed bands. They may be made of avariety of materials, but Glycymeris shell is the most common.
Pendant (PEN). A small, flat, deliberately shaped object with a hole near an edge that wouldhave permitted suspension from a string or cord. Stone drills were often used to drill fromopposite sides toward the center of the object, which created a hole with a distinctivebiconical shape. Pendants were fashioned from a variety of materials, including stone,bone, pottery, and shell. Pottery pendants usually were not shaped or polished on their flatsurfaces, but pendants of other materials often were. Items with incompletely drilled holesmay be classified as pendants if the analyst is confident that a pendant was the desired endproduct. Objects with shaped surfaces and sides but lacking evidence of a hole forstringing should be classified as other modified stone, even though it is possible that someof these were pendant blanks (Figure 4.33).
Ring (RIN). A deliberately modified circular band small enough to be worn on the finger. Ringsmay be made of a variety of materials, including stone, bone, and shell (Figure 4.34).
Tube (TUB). A deliberately modified cylindrical object with a hollow center and adiameter:length ratio that is less than 1 (the diameter is less than the length; see Bead,above). Tubes are almost always made of animal long-bone shafts in whose naturalmarrow cavities were cleaned and enlarged (Figure 4.35).

4 - 23
Figure 4.34. Ring.
Figure 4.35. Tube.
Figure 4.33. Pendants.
Figure 4.32. Beads.
Other Artifacts
Basketry (BAS). Any artifact woven, sewn, or assembled without the aid of a loom to form arigid or semirigid container. In the northern Southwest, such artifacts are typically madeof yucca, willow, juniper bark, and/or skunkbush fibers.
Cylinder (CYL). A solid cylindrical object that appears to have been deliberately shaped duringmanufacture or incidentally shaped through use. Cylinders are usually made of stone ormineral, but they can also be made of other suitable materials, such as wood. Items thatappear to be naturally cylindrical are not considered artifacts (Figure 4.36).
Effigy (EFF). An object shaped in the form of a human or animal being. Effigies can be made of avariety of materials, including stone, mineral, pottery, wood, and unfired clay.

4 - 24
Not Collected (NCO). This category is used for any type of artifact (except human bone) orecofact that has been mapped and described in the field but was not collected because ofits size, the context in which it was found, lack of modification, etc.
Other (OTH). Any artifact that does not fall into any other artifact category, usually because it iscomposed of a rare material (for example, hair), or is made of multiple materials (forexample, a paho that has both bone and vegetal components). Artifacts classified as"other" may be treated either as bulk artifacts (for example, hair) or as individual artifacts(for example, composite artifacts), as determined on a case-by-case basis. All artifactsclassified as “Other” should be described thoroughly in the comments.
Other Modified Vegetal (OMV). Any vegetal (plant) material that has been modified byhumans, but that does not fall into any of the more specific artifact categories listed here.Burning resulting from use as fuel is not considered modification. Yucca cordage isincluded in this category. As of 2001, the lab no longer inspects the contents of vegetalsamples for modified objects. It is assumed that any such objects will be identified in thecourse of archaeo-botanical analysis or identified in the field and collected separately.
Petroglyph (PTG). A design or image pecked and/or ground into a stone, usually sandstone.Building stones with petroglyphs are collected and cataloged as this artifact type if theyhave fallen from their original locations. Petroglyphs on stones that are still incorporatedinto standing architecture and pecked and/or ground into bedrock are considered ecofacts,and are recorded in the field.
Textile (TEX). In contrast to basketry, textiles are relatively flexible and may or may not form acontainer. Textiles are made with or without a loom, but are characterized by the use ofwarps and wefts (as noted above, items such as cordage, which does not exhibit warp andweft, is recorded as Other Modified . Artifacts assigned to this category include cottoncloth, netting, fur and feather cloth, woven belts, bands, tumplines, sashes, clothing, andsandals. Yucca, cotton, and dogbane were materials used often in the production ofancient textiles of the northern Southwest. All textiles should be described thoroughly inthe comments.
Unmodified Artifact (UNK). This category has not been used since 1991. Before then, some unmodified objects thought to havebeen brought to the site by humans were cataloged as this artifact type. Since 1991, all such items have been classifiedas mineral samples.
Void (VOI). This category is assigned in the lab if an item was given a point-location (PL)number, mapped, and identified as an artifact by the field crew, but was later found to bean unmodified object when it was examined in the lab. Because it was mapped anddocumented in the field, the “void” designation is used to maintain a paper trail for thatobject and for reconciling field maps with lab records, even though the object itself wasdiscarded.

4 - 25
Figure 4.36. Cylinder.
Other Pottery Artifacts
The most common objects of pottery found at ancestral Pueblo sites are sherds –that is, pieces ofbroken vessels–and most sherds were simply discarded when their parent vessels broke. Howeversome pottery objects were never parts of vessels, and some pottery sherds were “recycled” for useas tools or other implements. The categories listed below are used to catalog such artifacts.
Modified Sherd (MOS). A sherd that has been modified, usually by flaking and/or grinding, onat least one edge but not on all edges. The modification may be deliberate, incidental, orboth, but it should have occurred after the parent vessel broke into sherds. Sherds withwear related to the use of the parent vessel are not classified as modified sherds (forexample, the rim of a ladle). Many modified sherds were modified as a result of theirbeing used to shape wet clay during pottery manufacture (Figure 4.37).

4 - 26
Figure 4.38. Shaped sherd.Figure 4.37. Modified sherd.
Other Ceramic Artifact (OCA). An object that was made of fired, tempered clay, but that doesnot appear to have derived from a pottery vessel. “Ceramic” is another term for pottery.
Shaped Sherd (SHS). A sherd that has been modified, usually by flaking and/or grinding, on alledges. These items are usually small and round, triangular, or rectangular in shape. Manyshaped sherds probably represent pendants in various stages of manufacture. A smallshaped sherd with a hole near one edge is classified as a pendant (Figure 4.48).
Other Stone Artifacts
Modified Cobble (MCO). Before 1998, this category was used to catalog cobbles that had been modified deliberately orincidentally through use, but that could not be assigned to a more specific artifact category. Since 1998, all such objectshave been cataloged as other modified stone (OMS).
Other Modified Mineral (OMM). Prior to 1998, this category was assigned pieces of mineral that had been modified, but couldnot be assigned to a more specific artifact category. Materials classified as "mineral" included, but were not restricted to:gypsum, calcite, barite, hematite, caliche, and pigment. As of 1998, we catalog all such objects as Other ModifiedStone/Mineral (OMS).
Other Modified Stone/Mineral (OMS). A stone or mineral that has been modified, but that doesnot conform to any of the definitions listed here. This designation is often applied toextremely small stone tool fragments, but also may be used to describe whole or nearlywhole artifacts that simply do not fit into any of the more specific categories. Each pieceshould be described in the comments.

4 - 27
Figure 4.39. Stone disk.
Sandal Last (SAL). A thin, flat, deliberately modified stone roughly the size and shape of a(large) sandal. Sandal lasts often appear to have been shaped by both flaking and grinding,and they usually polished to a smooth, fine finish.
Stone Disk (STD). A flat, round stone was been deliberately shaped by flaking, grinding, orpecking. Stone disks were most often used as lids for pottery vessels. (Figure 4.39).
Unmodified Cobble (UCO). Before 1989, this category was used to catalog cobbles that exhibited no signs of deliberate orincidental modification. It is assumed that such objects were carried to the site by humans because the materials theyconsist of do not occur widely in the local surface geology and it is known that such materials were used by theancestral Pueblo people. Since 1989, all such objects have been cataloged as mineral/stone samples (MIN).
Unmodified Stone (UST). Before 1998, this category was assigned to stones, other than cobbles and sandstone building blocks,that exhibited no signs of deliberate or incidental modification. In many cases, such objects may have been carried to thesite by humans because the materials they consist of do not occur widely in local surface geology and it is known thatsuch materials were used by the site inhabitants. Since 1998, all such objects have been cataloged as mineral/stonesamples (MIN).
Shell Artifacts
Other Modified Shell (MSH). A shell or shell fragment that has been modified by a human, butthat does not fall into any of the more specific artifact categories such as pendant or bead.
Bone Artifacts
Bone artifacts are tools made from nonhuman bone. Prior to 2001, bone tools and bone ornamentswere separated from the unmodified nonhuman bone, and each was cataloged as a separate item.Since 2001, modified bone tools have been cataloged with “bulk” unmodified nonhuman bone, sothese artifacts now are usually identified and described during faunal analysis. Cut marks,
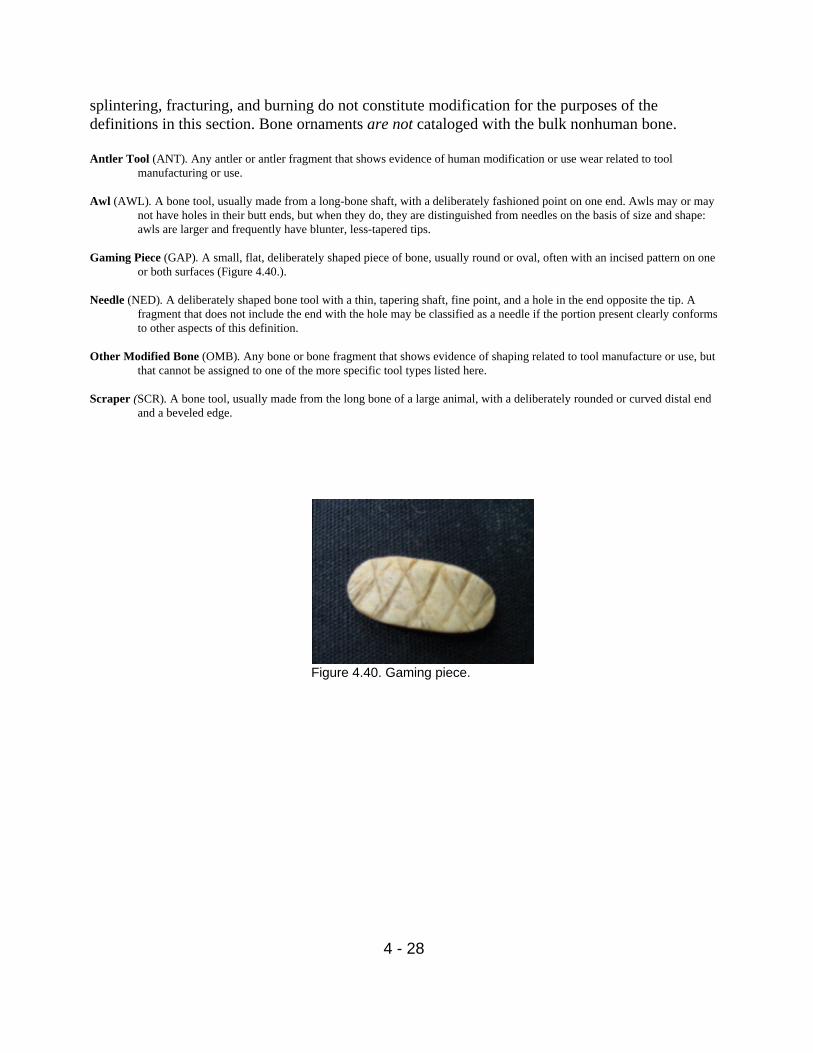
4 - 28
Figure 4.40. Gaming piece.
splintering, fracturing, and burning do not constitute modification for the purposes of thedefinitions in this section. Bone ornaments are not cataloged with the bulk nonhuman bone.
Antler Tool (ANT). Any antler or antler fragment that shows evidence of human modification or use wear related to toolmanufacturing or use.
Awl (AWL). A bone tool, usually made from a long-bone shaft, with a deliberately fashioned point on one end. Awls may or maynot have holes in their butt ends, but when they do, they are distinguished from needles on the basis of size and shape:awls are larger and frequently have blunter, less-tapered tips.
Gaming Piece (GAP). A small, flat, deliberately shaped piece of bone, usually round or oval, often with an incised pattern on oneor both surfaces (Figure 4.40.).
Needle (NED). A deliberately shaped bone tool with a thin, tapering shaft, fine point, and a hole in the end opposite the tip. Afragment that does not include the end with the hole may be classified as a needle if the portion present clearly conformsto other aspects of this definition.
Other Modified Bone (OMB). Any bone or bone fragment that shows evidence of shaping related to tool manufacture or use, butthat cannot be assigned to one of the more specific tool types listed here.
Scraper (SCR). A bone tool, usually made from the long bone of a large animal, with a deliberately rounded or curved distal endand a beveled edge.

5 - 1
Chapter 5Pottery Type Definitions
This chapter presents the ware and type definitions currently used by Crow Canyonarchaeologists for pottery sherd and vessel analysis. This chapter is intended primarily forresearchers, participants, and students working with Crow Canyon pottery analysis data, whichhave appeared a numerous books, journal articles, and Internet-based research publicationsproduced over the years by the research staff. For more information on how to identify potterysherds in the field or during laboratory analysis, consult Chapter 6: Pottery Analysis Procedures.
The pottery typology described here was first used in February 1989 (Crow CanyonArchaeological Center, 1990*1). Although the type names and type codes have not changedsince that time, definitions of several types have evolved slightly with the benefit of experience.Unless otherwise noted, the pottery types defined in this guide are considered "local"; that is,they are believed to have been manufactured in the Mesa Verde, or northern San Juan, region.The pottery descriptions are organized chronologically within each ware category, beginningwith mud ware then continuing with the local gray, white, and red ware types. Descriptions ofnonlocal wares are provided at the end of the chapter. Many of the definitions are based ondescriptions of traditional pottery types published in Breternitz et al. (1974*1) and in Wilson andBlinman (1995*1). In addition, definitions of several more-general “grouped” types (forexample, Pueblo II White Painted and Pueblo III White Painted) are provided; these categorieswere created by Crow Canyon researches to accommodate sherds that do not fit easily intopreviously recognized traditional categories. Date ranges for the types described below are takenin part from Wilson and Blinman (1999*2). However, the date ranges of several types haverecently been revised as a result of a joint effort by Washington State University and the CrowCanyon Archaeological Center to compile pottery-assemblage data for excavated sites of knownage in southwestern Colorado.
When using this guide, keep in mind that, although we have attempted to minimize subjectivity,pottery analysis, is an inherently subjective enterprise. There are two reasons for this. First, whenclassifying pottery, we examine numerous attributes, including painted design layouts and designelements, paint type, paste and temper characteristics, surface treatment, thickness, and rim form.These attributes are correlated through time, but nevertheless evolved somewhat independently.Thus, it is not possible to define a type using attributes that covary without exception. Thisdocument therefore contains descriptions of pottery types that have been dated to various timespans, rather than definitions in the strict sense of “necessary and sufficient criteria.” Potterytypes were developed to help researchers estimate the age of archaeological deposits. Duringpottery sherd classification, the question that is really being answered for each sherd is, What isthe likely time span during which this sherd was deposited at the site? Because ancient potteryvessels were made in the context of an ongoing, creative art tradition, and not for the purpose ofproviding archaeologists with dating information, this question is more often answered throughsubjective pattern-matching than through the application of objective definitions.
5 - 2
Second, sherd analysis at Crow Canyon is typically performed by numerous individuals, bothprofessional and nonprofessional, in educational programs and as part of our regular researcheffort. The laboratory staff makes every effort to check the work of our participants, volunteers,interns, and fellow staff members. But because so many different people classify pottery in CrowCanyon’s lab, some interobserver variation is unavoidable.
The following sections provide definitions of key terms that are used throughout this chapter andChapter 6, and descriptions of each pottery type we recognize within each ware of the MesaVerde tradition in our basic pottery analysis. Following these sections are descriptions of typecategories we use for vessels and sherds of other and unknown traditions.
Definitions of Terms
A number of technical terms are used in the following descriptions of pottery wares and types.The following glossary provides brief definitions of many of these terms:
active background—a design characteristic that occurs when the unpainted area within a black-on-white pottery design forms a distinct pattern that differs in shape from the painted area.
attribute—also called a variable. A particular characteristic of design, style or form. Eachattribute observed on pottery can occur in more than one state.
paste—the mixture of clay, temper, and water used to make a pottery vessel.
slip—a thin wash of clay applied to the surface of a pottery vessel after forming, when the bodyclay has dried leather-hard.
polish—created by rubbing a smooth, hard stone over a pottery vessel surface after it has driedbut before it is painted. Polishing produces a smooth, lustrous surface.
temper—aplastic material that is mixed with clay and water during paste preparation. Temperedpaste does not shrink as much as pure clay when it dries, and is also more resistant to breakagefrom thermal and mechanical stress after firing .
tradition—the geographic region of postulated origin for a series of pottery wares and types. Inthe four corners area, pottery of a specific tradition is usually distinguished from other traditionsby raw material attributes such as temper, paint, paste, and slip clay. The local pottery analyzedin our lab is of the Mesa Verde, or Northern San Juan, tradition.
true background—a design characteristic that occurs when the unpainted area in a black-on-white design serves as the “canvas” on which the design is applied. The unpainted area does notmake a distinct pattern of its own, and is merely the remainder of the field after painting.
type—the characteristic pottery of a particular ware and tradition during a specific period of
5 - 3
time. Each type is defined on the basis of a cluster of attributes.
ware—pottery with a specific surface treatment that is characteristic of a particular tradition overa long period of time. Each ware encompasses a series of chronologically-specific types, andgroups of wares comprise a tradition. Mesa Verde tradition pottery occurs as mud ware, grayware, red ware, and white ware.
Mud Ware
Basketmaker Mud Ware, BMW (A.D. 575–700). This ware represents theearliest pottery manufactured in the northern Southwest (see Morris 1927*1). It is identified onthe basis of vegetal fiber temper, and basket impressions are sometimes visible on the exteriorsurfaces of the vessels. Basketmaker Mud Ware sherds range in color from reddish brown togray brown, and they are usually very soft and easily broken. This is probably due to the fact thatthe Basketmaker Mud Ware was poorly fired—the temperature during the firing was low and/orthe length of the firing was short. Thus, mud ware sherds range in color from reddish brown togray brown, and they are usually very soft and easily broken. Like gray ware sherds,Basketmaker Mud Ware sherds lack slip, polish, and paint; nevertheless, mud ware is verydistinct from the gray ware types described below.
Local Gray Ware Types
Gray ware sherds are not slipped, polished, or painted. Wilson and Blinman (1995*1: 38-39)describe a local gray ware type, Twin-Trees Gray, that has limited surface polish, but this type isnot used in the Crow Canyon analysis system. Gray ware sherds are from vessels that were firedin a neutral atmosphere, and they tend to have coarser pastes than either white ware or red waresherds. Crushed igneous rock is the most common temper in gray ware pottery manufactured inthe Sand Canyon locality. It is usually coarse and often protrudes from the sherd surface.Crushed conglomerate sandstone temper characterizes the gray ware pottery produced in the areabetween Montezuma Creek and Yellow Jacket Creek because igneous rock was not available inthis area (Wilson 1991*1: 5 ).
Two categories of gray ware—plain and corrugated—are recognized on the basis of surfacetreatment, particularly as observed on jar forms. All gray ware pottery was made by coiling, andthe coil junctions on the interior surfaces of all vessels were obliterated by scraping. However,coil junctions on the exterior surfaces of vessels were treated differently through time. Plain grayware pottery was made before approximately A.D. 980. The coil junctions on the exteriorsurfaces of plain gray jars were scraped smooth from at least the vessel base to the vesselshoulder; from the shoulder to the rim, the coils were either scraped smooth or left exposed butnot further manipulated. It is the exterior surface treatment of this portion of the vessel—that is,the neck—that distinguishes the plain gray ware types from one another. After approximatelyA.D. 980, the exterior coil junctions on gray ware jars were left exposed from base to rim, andthe coils were indented, or “corrugated,” to produce a distinctive textured surface. These

5 - 4
patterned indentations were created when the potter pressed a finger or tool into the clay coils atuniform intervals as the vessel was being formed.
The tempering agents used in local gray ware pastes (crushed igneous rock and crushedconglomerate sandstone) are indistinguishable to the naked eye from those used in other parts ofthe Southwest, including the San Juan River basin and northeastern Arizona. Thus, it is oftenimpossible to distinguish local from nonlocal gray ware sherds. As a result, we assume that allgray ware sherds lacking definite evidence of nonlocal manufacture derive from locally madegray ware vessels. We identify Chuska Gray Ware sherds when fragments of trachyte or biotitemica are noted in gray ware paste during analysis. Using a binocular microscope, we alsoconduct temper analysis on a sample of sherds from each site using a binocular microscope toestimate the frequency of nonlocal sherds in each assemblage (see Chapter 7).
Chapin Gray, CGR (A.D. 600–980). This type refers to plain gray ware vessels onwhich the coils have been scraped smooth over the entire exterior surface. Because neckbandedvessels were scraped smooth below the shoulder, Chapin Gray sherds can be distinguished fromsherds of other plain gray types only if they are from the neck or rim of the vessel (Figure 5.1).Also, a neck or rim sherd must be large enough for the analyst to be certain that it is from avessel whose neck has been scraped smooth (that is, it must be larger than the width of aneckband and larger than the width of the uncorrugated coil that forms the rim of a corrugatedjar). Because relatively few plain gray sherds—and none from below the vessel shoulder—meetall these criteria, most are categorized as Indeterminate Local Gray (see type description below).
Chapin Gray vessel forms include wide-mouth cooking jars, storage jars, ollas, ladles, bowls,and seed jars. Chapin Gray is analogous to Lino Gray of the Cibola and Kayenta traditions, RosaGray of the upper San Juan tradition, and Bennett Gray of the Chuska tradition.
Moccasin Gray, MGR (A.D. 800–980). Moccasin Gray vessels are distinguished byrelatively wide, flat, nonoverlapping coils, or “neckbands,” on the exterior surface, fromapproximately the shoulder to the rim; from the shoulder to the base, the exterior surface wasscraped smooth. Only rim or neck sherds that preserve evidence of unobliterated coils fitting theforegoing description can be classified as Moccasin Gray (Figures 5.2 and 5.4). Sherds below theneck cannot be distinguished from those that derive from the lower halves of Chapin Gray,Mancos Gray, and Indeterminate Neckbanded Gray vessels and therefore are categorized asIndeterminate Local Gray.
Moccasin Gray vessels are predominantly wide-mouth cooking or storage jars, but pitchers ofthis type are also found. Ollas are extremely rare, and other vessel forms are nonexistent.Moccasin Gray sherds have been identified at sites dating from as early as A.D. 725, but they arenot consistently present at sites dating from before A.D. 800. Moccasin Gray was the dominantgray ware type between A.D. 800 and 920, and it persisted through at least A.D. 980.
Mancos Gray, AGR (A.D. 880–1060). Mancos Gray vessels are distinguished byrelatively narrow, rounded, and overlapping neckband coils from approximately the shoulder to

5 - 5
the rim. From the shoulder to the base, the exterior surface was scraped smooth. Only rim orneck sherds that preserve evidence of unobliterated coils fitting the foregoing description can beclassified as Mancos Gray (Figures 5.3 and 5.4). Sherds from below the neck cannot bedistinguished from those that derive from the lower halves of Chapin Gray, Moccasin Gray, andIndeterminate Neckbanded Gray vessels and therefore are categorized as Indeterminate LocalGray.
The predominant vessel form of this type is a wide-mouth cooking and storage jar, but pitchersof this type are also found. Mancos Gray appears in sites dating from as early as A.D. 840. It wasconsistently present after A.D. 860, was the dominant gray ware type between A.D. 920 and 980,and persisted through the early decades of the eleventh century. Mancos Gray is analogous toKana’a Gray and most Coconino Gray of the Kayenta and Cibola traditions and to Gray HillsBanded, some Tocito Gray, and some Captain Tom Corrugated of the Chuska tradition.
Indeterminate Neckbanded Gray, ING (A.D. 800–1060). This category isfor neckbanded sherds that cannot be typed more specifically as Mancos Gray or Moccasin Graybecause (1) only one wide band is present, making it impossible to assess the degree of overlapbetween bands, or (2) the configuration of the coils or bands is transitional between the twotypes.
Indeterminate Local Gray, GRA (A.D. 575–1020). This type includes (1) plaingray body sherds that are not from the rim or neck of a vessel, (2) plain gray rim and/or necksherds that are too small for the analyst to determine whether they came from a neckbanded,corrugated, or plain gray vessel, and (3) plain gray rim and/or neck sherds that have ambiguouscharacteristics (for example, a sherd on which the neckbands have been only partly scraped over)(Figure 5.5).
Mancos Corrugated Gray, MRG (A.D. 920–1180). This type is used for rimsherds only. Mancos Corrugated Gray rim sherds are distinguished from Mesa Verde CorrugatedGray rim sherds on the basis of the degree of outward flare of the rim, called “rim eversion”(Figure 5.6, 5.7, and 5.8). To determine the degree of rim eversion, the analyst orients the sherdso that the rim is level, as it would have appeared when part of a whole vessel. If the rim isrelatively vertical or only slightly flared (less than 30 degrees from vertical), the sherd isclassified as Mancos Corrugated Gray (Figure 6.14). Rim sherds for which the degree ofeversion cannot be determined and all corrugated body sherds are classified as IndeterminateLocal Corrugated Gray. The predominant vessel form of this pottery type is a wide-mouth cooking and storage jar(Figure 5.8). Mancos Corrugated Gray is found at sites that date from as early as A.D. 920. Itwas consistently present after A.D. 980, was the dominant gray ware between A.D. 1020 and1100, and persisted through the middle decades of the twelfth century.
Mesa Verde Corrugated Gray, VRG (A.D. 1100–1280). This type is used forrim sherds only. The rims of Mesa Verde Corrugated Gray vessels are more flared than the rimsof Mancos Corrugated Gray vessels (Figures 5.9 and 5.10). To determine the degree of rim

5 - 6
eversion, the analyst orients the sherd so that the rim is level, as it would have appeared whenpart of a whole vessel. If the rim eversion is greater than or equal to 30 degrees, the sherd isclassified as Mesa Verde Corrugated. Rim sherds for which the degree of eversion cannot bedetermined and all corrugated body sherds are classified as Indeterminate Local CorrugatedGray.
The predominant vessel form of Mesa Verde Corrugated Gray is a wide-mouth cooking andstorage jar (Figure 5.11). This pottery type is found at sites dating from as early as A.D. 1060,was consistently present after A.D. 1100, and was the dominant gray ware type between A.D.1140 and 1280.
Wilson and Blinman (1995*1:43) subdivide what Crow Canyon researchers categorize as MesaVerde Corrugated Gray into two types: Dolores Corrugated (rim eversion between 30 and 55degrees) and their version of Mesa Verde Corrugated (rim eversion greater than 55 degrees).Wilson and Blinman (1995*1:43) argue that Dolores Corrugated was produced fromapproximately A.D. 1050 to 1200. Although distinguishing between Dolores and Mesa VerdeCorrugated during analysis obviously can help researchers refine their date estimates for sites,we do not attempt to identify the former in our system, because it would be difficult to ensureconsistent analysis by participants in the Center’s research and education programs. Therefore,the time span assigned to Mesa Verde Corrugated in Crow Canyon’s sherd analysis is longerthan the date range for this type as defined by Wilson and Blinman.
Mummy Lake Gray, MLG (A.D. 1050–1200). This type is used for rim sherdsonly. The distinctive feature of Mummy Lake Gray is a single exposed band encircling the rim,which is usually flared (Figure 5.12). The remainder of the vessel consists of corrugated coilsthat were scraped over, obliterating most or all of the corrugated texture. Mummy Lake Grayvessels and sherds are extremely rare. Wilson and Blinman (1995*1:43) state that Mummy LakeGray has been reported from contexts dating from as early as A.D. 700, they warn that thepottery in question is probably misidentified Moccasin Gray and Mancos Gray. The time rangefor Mummy Lake Gray is thought to be A.D. 1050 through 1200.
Indeterminate Local Corrugated Gray, CRG (A.D. 920–1280). Sherds areassigned to Indeterminate Local Corrugated Gray if (1) they are corrugated rim sherds that aretoo small or too irregular for the analyst to assess degree of rim eversion or (2) they arecorrugated body sherds (Figure 5.13).

5 - 7
Local White Ware Types
Most decorated pottery manufactured in the northern San Juan region was white ware, exceptduring the Pueblo I period, when red ware was more common. Overall, the frequency of whiteware pottery increased from the Basketmaker III period through the Pueblo III period (Wilsonand Blinman 1991*1: 16).
White ware sherds exhibit slip, polish, and paint or any combination of these. White ware vesselswere fired in a neutral atmosphere, resulting in a gray to white surface color. The majority ofwhite ware vessels have designs executed in mineral or organic paint, but many white waresherds derive from unpainted portions of such vessels, especially jars. Slip refers to the solutionof fine, watery clay that was applied to the surface of a partially dried vessel; it changed thecolor of the vessel and created a more uniform surface for painting. Polish refers to the sheen orluster produced when a partially dry vessel was rubbed with a hard, smooth stone to compressthe clay surface and flatten out irregularities. Polish is seen primarily on slipped vessel surfaces,but unslipped surfaces were sometimes polished as well.
The pastes from which “early” (pre–A.D. 920) white ware vessels were made are relativelycoarse and do not differ appreciably from the pastes of contemporaneous gray ware vessels. Theearliest white ware vessels were not usually slipped or polished, and sherds from these wouldappear identical to contemporaneous plain gray sherds were it not for the presence of painteddesigns. Vessels made somewhat later were more often slipped and polished, but they were notusually as well finished as vessels made after A.D. 920. Early white ware vessels werecommonly tempered with crushed igneous rock or sand, and they had relatively thin wallscompared with vessels of later types (especially McElmo Black-on-white and Mesa VerdeBlack-on-white).
“Late” (post–A.D. 920) white ware vessels were made from finer pastes, and their sufaces weremore finely finished than those of either earlier white ware vessels or the contemporaneous grayware vessels. They were usually slipped and polished, especially on decorated surfaces (that isbowl interiors and jar exteriors), although the amount of polishing and the thickness of the slipvaries. Vessel thickness is also variable: The walls of Cortez Black-on-white vessels are oftenvery thin; the walls of Mancos Black-on-white vessels are thicker; and the walls of vessels of thelatest types (McElmo Black-on-white, Mesa Verde Black-on-white, and Pueblo III WhitePainted) can be quite thick (greater than 6 cm). The pastes of late white ware vessels often weretempered with crushed sherd, but crushed igneous rock, crushed sandstone and sand were alsoused.
The attributes that define white ware types varied somewhat independently through time. To aidthe analyst in assigning a white ware sherd to a pottery type, we provide attribute lists in thefollowing type definitions.
Chapin Black-on-white, CBW (A.D. 575–880): Found at sites that date from asearly as A.D. 575, Chapin Black-on-white is the oldest decorated white ware type in the Mesa

5 - 8
Verde region (Figures 5.14 and 5.15). It was the only decorated white ware manufacturedthrough the seventh and eighth centuries. Sherds of this type are rare at sites occupied after A.D.800, but they are found sporadically in sites occupied up to A.D. 880. White ware sherds datingfrom the ninth century often show characteristics that are intermediate between Chapin Black-on-White and Piedra Black-on-white. The range of design elements of Chapin Black-on-white issimilar to that documented for Lino Black-on-white of the Kayenta tradition, La Plata Black-on-white of the Cibola tradition, Crozier Black-on-white of the Chuska tradition, and Rosa Black-on-white of the upper San Juan tradition.
Paste: Medium to coarse; similar to that of contemporaneous local gray ware.
Temper: Crushed igneous rock or sand.
Surface Treatment: Vessels were scraped and rubbed, perhaps with water, but they werenever slipped and rarely polished. Temper particles can often be seen protrudingfrom vessel surfaces. Cracks radiating out from these temper particles are theresult of the clay shrinking as it dried prior to being fired. Vessel exteriors weresometimes decorated with a “fugitive red” pigment consisting of an iron oxidesolution that was applied after the vessel was fired.
Thickness: Relatively thin compared with the latest types (McElmo Black-on-white,Mesa Verde Black-on-white, and Pueblo III White Painted).
Painted Design:Paint Type–Usually iron or manganese mineral paint, although glaze and organicpigments were also used. Organic paint is found frequently on sherds found insoutheastern Utah. Glaze paint is found on some sherds in assemblages from theAnimas and La Plata river valleys; we classify such pottery as a nonlocal type,Rosa Black-on-white.
Design–Usually sparse; simple, and poorly executed, painted designs float on atrue background. Most designs on Chapin Black-on-white sherds closely mimicthose found on contemporaneous coiled baskets. Designs on bowls often radiateupward and outward from the center toward the rim. Sometimes the decoratedareas are outlined, and the space inside is filled with simple design elements.Common design elements include, but are not restricted to, the following: dots,Z's, S’s, triangles, and various forms of tick marks. Bowl exteriors are not usuallypainted.
Rim: Tapered. Usually undecorated, but if decorations is present, it typically consists of asingle solid line.
Forms: Bowls are most common, although seed jars, ollas, and effigy vessels are alsofound.

5 - 9
Piedra Black-on-white, PBW (A.D. 800–920). Piedra Black-on-white is thedominant white ware type between A.D. 800 and 920 (Figures 5.16 and 5.17). However, PiedraBlack-on-white sherds generally make up only a small proportion of an assemblage, and they areusually less common than sherds of the contemporaneous red ware types, Abajo Red-on-orangeand Bluff Black-on-red. Piedra Black-on-white shares some characteristics withcontemporaneous types in other regions, including Kana'a Black-on-white of the Kayentatradition, Drolet Black-on-white of the Chuska tradition, and Kiatuthlana Black-on-white of theCibola tradition.
Paste: Medium.
Temper: Crushed igneous rock or sand.
Surface Treatment: Variable, but distinguished from Chapin Black-on-white by thecommon occurrence of scraping and polishing on painted surfaces (even thoughthe polish may be erratic). Early Piedra Black-on-white sherds are unslipped, butthe incidence of slipping increases through time. Fugitive red coatings are rare.Surfaces were not prepared as carefully or as consistently as they were on laterpottery types.
Thickness: Relatively thin compared with the latest types (McElmo Black-on-white,Mesa Verde Black-on-white, and Pueblo III White Painted).
Painted Design:Paint Type - Mineral, carbon, or mixed mineral and carbon.
Design - There is more sophistication in painted designs than on Chapin Black-on-white vessels, although the designs are still relatively crude compared withthose seen on later types. Bowl interiors are often decorated with parallel linesthat drop down from the rim and extend across the vessel surface. The exteriorsurfaces of bowls are rarely painted. Jars often have parallel lines that wraparound the body. The parallel lines are relatively wide and are spaced fairly closetogether. The space between the lines is roughly one to two times the width of thelines themselves. Flags, tick marks, and triangles are commonly appended toouter lines.
Rim: Tapered. Often decorated with a solid painted line.
Forms: Bowls are the predominate form, but jars, gourd jars, pitchers, and ladles are alsopresent.

5 - 10
Early White Painted, RBW (A.D. 575–920). The Early White Painted typeincludes sherds that could be either Chapin Black-on-white or Piedra Black-on-white. This typeis used when a sherd is too small or lacks enough design to be assigned to a more specific typebut is thought on the basis of its paste, temper, and surface treatment to have been made duringthe Basketmaker III or Pueblo I periods.
Paste: Medium to coarse.
Temper: Usually crushed igneous rock or sand.
Surface Treatment: Variable. Vessel surfaces were rarely slipped, but the exterior of jarsand the interior of bowls were often polished, slightly as if the surfaces wererubbed with a little water or a wet cloth. Temper particles can often be seenprotruding from vessel surfaces. Cracks radiating out from these temper particlesare the result of the clay shrinking as it dried prior to being fired. Slip and/orpolish when present, are relatively crude.
Thickness: Relatively thin.
Painted Design:Paint Type - Mineral, carbon, or mixed mineral and carbon.
Design - There usually is not enough design present on the sherd for the analyst toidentify specific layouts and design elements, but what is present could be fromeither a Chapin Black-on-white vessel or a Piedra Black-on-white vessel. Theexterior surfaces of bowls are usually not painted.
Rim: Tapered. May or may not be decorated; if decorated, it is painted with a single,solid line.
Forms: Bowls are the most common form, but seed jars, ollas, gourd jars, pitchers, ladlesand effigy vessels are also present.
Early White Unpainted, EWU (A.D. 575–920). This category is used to describesherds that are white ware and are believed on the basis of paste and temper characteristics to befrom vessels made before A.D. 920. A sherd is placed in the Early White Unpainted categorywhen all three of the following conditions are met: (1) the presence of polish indicates that thesherd is a white ware; (2) the medium to coarse paste tempered with crushed igneous rock orsand indicates that the sherd is from a vessel that predates A.D. 920; and (3) no paint is visibleon the sherd. Relatively thin, tapered rim sherds with little or no slip or polish are also placed inthis grouped type.
Paste: Medium to coarse.
5 - 11
Temper: Usually crushed igneous rock or sand.
Surface Treatment: Vessel surfaces were rarely slipped, but the exterior of jars and theinterior of bowls were often polished, slightly as if the surfaces were rubbed witha little water or a wet cloth. Sherds may or may not have been slipped but arevirtually always polished. If slip is present, it is thin and “washy” compared withthe thick, crackled slips of late white ware sherds. Temper particles can often beseen protruding from vessel surfaces. Cracks radiating out from these temperparticles are the result of the clay shrinking as it dried prior to being fired.
Thickness: Relatively thin.
Rim: Tapered.
Forms: Bowls are the most common form, but seed jars, ollas, gourd jars, pitchers, ladlesand effigy vessels are also present.
Cortez Black-on-white, ZBW (A.D. 920–1060). The combination of surfacetreatment and design makes Cortez Black-on-white (Figures 5.18 and 5.19) a distinctive typewhen compared with the continuous variation in the earlier Chapin Black-on-white and PiedraBlack-on-white types and in the later Mancos, McElmo, and Mesa Verde black-on-white types.Our best data indicate that this pottery type first occurred in low frequencies at sites dating fromA.D. 880 and 920 and that it became the dominant white ware type in sites dating from A.D. 920through 980. It began to be replaced by Mancos Black-on-white around A.D. 980, with completereplacement by A.D. 1060. Cortez Black-on-white design styles share characteristics withNaschitti and Newcomb black-on-white of the Chuska tradition; Red Mesa black-on-white of theCibola tradition and Arboles black-on-white of the Upper San Juan tradition. Some designelements are shared with Kiatuthlana black-on-white of the Cibola tradition, Black Mesa andKana'a black-on-white of the Kayenta tradition.
Paste: Medium to fine.
Temper: Primarily crushed igneous rock.
Surface Treatment: Painted surfaces are usually covered with a bright white slip and arewell polished. Bowl exteriors are often unslipped and unpolished, and they oftenhave an undulating appearance, the result of their having been cradled in thehands as their interior surfaces were scraped during manufacture.
Thickness: Relatively thin; in general, the thinnest of all white ware types in the MesaVerde region.
Painted Design: Paint Type - Almost always mineral.

5 - 12
Design - Vessel surfaces, especially bowl interiors, tend to be divided into thirdsor quarters, within which complex, fluid patterns are repeated. Linear patternswith appended motifs similar to Piedra Black-on-white designs are still evident,but the lines on Cortez Black-on-white sherds are generally thinner and morewidely spaced, and they are often curvilinear. The exterior surfaces of bowls areusually unpainted, and jar exteriors are commonly decorated with band designs.Common design elements include, but are not restricted to, dots, ticks, flags,rickrack, scrolls, interlocking scrolls, stepped triangles, squiggles, squigglehachure, and right triangles with ticks along the hypotenuse.
Rim: Rounded to very tapered; often decorated with a solid painted line.
Forms: A wide range, including bowls, jars, seed jars, and ladles.
Mancos Black-on-white, MBW (A.D. 920–1180). Mancos Black-on-whiteencompasses more variation in both technology and design attributes than any other Mesa VerdeWhite Ware type (Figures 5.20–5.22). Mancos Black-on-white first appears in sites dating fromthe middle decades of the tenth century, is the most common white ware type in sites dating fromA.D. 1020 to 1180, and is occasionally found in contexts dating from the A.D. 1200s. In otherregions of the Southwest, types analogous to Mancos Black-on-white are subdivided in manyways, including the following: Gallup, Escavada, Puerco, and Chaco black-on-white of theCibola tradition; Chuska, Toadlena, and Burnham black-on-white of the Chuska tradition; BlackMesa, Sosi, and Dogoszhi black-on-white of the Kayenta tradition; and Kwahe'e black-on-whitein the upper Rio Grande valley. In the Mesa Verde region, Hayes (1964*1:63-64) considered thecarbon-painted variety of Mancos Black-on-white a separate type, which he called WetherillBlack-on-white. In the Crow Canyon system, such sherds are classified as either Mancos Black-on-white or McElmo Black-on-white and the paint type is recorded as carbon.
Paste: Medium to fine.
Temper: Usually crushed sherd, but crushed igneous rock, crushed sandstone, and sandwere also used.
Surface Treatment: Variable. Painted surfaces are usually slipped and polished, but thequality of both is variable. The exterior surfaces of early Mancos Black-on-whitebowls are often unslipped and unpolished, and they sometimes undulate, the resultof the vessels having been cradled in the hands as their interior surfaces werescraped. Bowl exteriors can also be corrugated or basket-impressed. Surfacetreatment often appears cruder than that seen on Cortez Black-on-white, McElmoBlack-on-white, Mesa Verde Black-on-white, and Pueblo III White Paintedsherds.

5 - 13
Thickness: Variable. Usually thicker than Cortez Black-on-white but thinner thanMcElmo Black-on-white and Mesa Verde Black-on-white.
Painted Design:Paint Type - Mineral paint is dominant in early Mancos Black-on-white sherds,but carbon (see Hayes’s [1964*1:63-64] Wetherill Black-on-white) and mixedpaint (a mineral paint suspended in an organic, pigmented binder) are morecommon on later examples.
Design - Design layouts take one of two forms: (1) wide “band” designs dividedinto panels by multiple, parallel lines oriented perpendicular to the rim, and withbold, solid geometric motifs inside each panel; and (2) "all-over," meander or fretdesigns made using broad solid lines or thin parallel lines with hachure filling.These fret patterns are similar to those seen in twill-plaited ring baskets. Otherdesign motifs include checkerboards, dots, triangles, triangles with tick marksalong sides that are oblique to the rim, and "drip lines." Bowl exteriors usually arenot painted.
Rim: Usually tapered, but sometimes almost square. Often undecorated, but in the lateexamples may be painted with a solid line or simple, closely spaced tick marks.
Forms: A wide range, including bowls, jars, ollas, and ladles.
Pueblo II White Painted, TBW (A.D. 920–1180). Sherds are assigned to thistype when they are too small, or the painted designs are too ambiguous, for the analyst todetermine whether they are Cortez Black-on-white or Mancos Black-on-white. Because CortezBlack-on-white has such a distinctive appearance, it is usually possible to determine whether asherd belongs to this type or not. Pueblo II sherds that are definitely not Cortez Black-on-whiteare classified as Mancos Black-on-white by default. As a result, few sherds are assigned to thisgrouped type.
Paste: Medium to fine.
Temper: Crushed igneous rock, crushed sandstone, crushed sherd and sand.
Surface Treatment: Variable. Ranges from well slipped and well polished to poorlyslipped and poorly polished.
Thickness: Variable. Very thin to fairly thick, but not as thick as McElmo Black-on-white, Mesa Verde Black-on-white, or Pueblo III White Painted.
Painted Design:

5 - 14
Paint Type - Usually mineral (carbon-painted Pueblo II sherds are typicallyclassified as Mancos Black-on-white).
Design - Most often, not enough design is present for the analyst to identifyspecific layouts and elements, but when discernible, design layouts and elementsare consistent with those listed under the type descriptions for both Cortez Black-on-white and Mancos Black-on-white.
Rim: Usually tapered. May or may not be decorated; when decorated, usually paintedwith a solid line. Simple rim ticking is also found on some late examples that are transitional to McElmo Black-on-white.
Forms: A wide range, including bowls, jars, ollas, and ladles.
McElmo Black-on-white, EBW (A.D. 1060–1260). McElmo Black-on-white isone of the most difficult types to recognize in sherd collections (Figures 5.23–5.25). This is dueto the significant design overlap with Mesa Verde Black-on-white and, to a lesser extent, withMancos Black-on-white. Also, few “pure” McElmo Black-on-white assemblages have beenreported in the literature. There is more agreement on the distinctions between McElmo Black-on-white and Mancos Black-on-white than on those between McElmo Black-on-white and MesaVerde Black-on-white. Many researchers choose to not separate McElmo and Mesa Verde black-on-white as distinct types.
McElmo Black-on-white first appears at sites dating from around A.D. 1060, and it was quitecommon between A.D. 1100 and 1180. It continued to be made until the region was abandonedaround A.D. 1280, but it was less common than Mesa Verde Black-on-white during thethirteenth century. McElmo Black-on-white is similar, but not identical, to Nava Black-on-whiteof the Chuska tradition and Chaco-McElmo Black-on-white of the Cibola tradition. Some stylesof Flagstaff Black-on-white of the Kayenta tradition also bear a slight resemblance to McElmoBlack-on-white.
Paste: Fine.
Temper: Usually crushed sherd, although some crushed igneous rock, crushed sandstoneand sand were also used.
Surface Treatment: Decorated surfaces are often, but not always, well slipped but theyare well polished, resulting in a finely finished surface. The exterior surfaces ofbowls are usually slipped and polished, but they are not as finely finished as theinterior surfaces.
Thickness: Thicker than the preceding types, but not as thick as late Mesa Verde Black-on-white.

5 - 15
Painted Design: Paint Type – Both carbon and mineral paint were used. In general the frequencyof mineral paint use declined over time, but the pace of this change varied fromplace to place (Wilson 1991*1: 29).
Design - Painted designs on McElmo Black-on-white vessels are transitionalbetween those seen on Mancos Black-on-white and Mesa Verde Black-on-whitevessels. Band designs predominate. Bowl exteriors are usually unpainted, butwhen they are decorated, the designs are simpler than those seen on the exteriorsurfaces of Mesa Verde Black-on-white bowls. In general, there are fewer designelements per piece, the designs themselves are simpler, and the design executionis a bit sloppier than what is seen in Mesa Verde Black-on-white. McElmo Black-on-white designs are made with lines of uniform width (as if they were executedusing a single brush) on a true background, in contrast to designs on Mesa VerdeBlack-on-white vessels. The following design styles are diagnostic of McElmo:
1. Repeating, geometric band designs without framing lines (a framing line is adetached line that is oriented parallel to the rim and the main band of design,thus "framing" the design).
2. Band designs with one or more framing lines of equal thickness.
3. A band design consisting of framing lines of equal thickness, with or withouttick marks in the spaces between the lines.
Other elements seen on McElmo Black-on-white sherds include triangles,checkerboards, stepped triangles, and solid stepped frets.
Rim: Fairly square, but not as square as the rims of Mesa Verde Black-on-white bowls.Occasionally rims are slightly tapered. If decorated, rims are painted with "ticks,"not solid lines (Figure 5.24). Ticking is simple, not elaborate (cf. Mesa VerdeBlack-on-white type description).
Forms: Bowls, jars, ollas, ladles, and mugs are common.
Mesa Verde Black-on-white, VBW (A.D. 1180–1280). Recent research hasdocumented sporadic occurrences of this type as early as A.D. 1100, but Mesa Verde Black-on-white first appears consistently in sites dating from about A.D. 1180. It became the dominantwhite ware type in the first decades of the thirteenth century and was still dominant when theMesa Verde region was depopulated, around A.D. 1280 (Figures 5.26 and 5.27). Mesa VerdeBlack-on-white designs are similar, but not identical, to designs on other Pueblo III types in thenorthern Southwest, including Tusayan Black-on-white of the Kayenta tradition, Crumbled

5 - 16
House Black-on-white of the Chuska tradition, and Galisteo Black-on-white and Sante Fe Black-on-white of the Rio Grande tradition.
Paste: Fine.
Temper: Usually crushed sherd, although crushed rock and crushed sandstone were alsoused.
Surface Treatment: All visible vessel surfaces were well slipped and well polished.Surfaces may have even more of a pearly luster than the surfaces of McElmoBlack-on-white vessels, and they often appear “crackled” because of the thicknessof the slip
Thickness: In general, the thickest of all the listed types.
Painted Design: Paint Type - Usually carbon, but some are mineral and some have both carbonand mineral paint. Mineral paint is common in sites along the Colorado-Utahborder and near Aztec, New Mexico.
Design – The design layouts take one of three forms: flowing band designs, all-over designs, and designs composed entirely of framing elements. Bowls aresometimes decorated on their exterior surfaces, and when they are, the designs aremore elaborate than the exterior designs seen on vessels of earlier types. Ingeneral, designs are more complex and vessel surfaces are more "filled in" withpainted design than on McElmo Black-on-white vessels.
A. The following design characteristics are diagnostic of Mesa Verde Black-on-white flowing band designs:
1. Band designs are framed by multiple detached framing lines that musthave been painted with brushes of varying widths. “Thick-and-thin”framing lines is one hallmark of Mesa Verde Black-on-white.
2. The solid motifs within the band interact via bifold rotation. That is thesolid designs are repeated and rotated 180 degrees so that they nest againstone another, see the designs on Figures 6.80 and 6.81.
3. The bands are either undivided or are divided into sections usingoblique lines. As a result, the designs appear to “flow” continuouslyaround the band.
4. Design in the band has an active background—that is, the white areahas a distinct shape or design of its own.

5 - 17
5. Motifs commonly seen in Mesa Verde Black-on-white band designsinclude stepped triangles, “crow’s feet,” triangles with ticking along thesides that are vertical with respect to the rim, and solid-line frets thatfill band sections.
B. The following design characteristics are diagnostic of Mesa Verde Black-on-white all-over designs:
1. On bowl interiors, use of hachure as a background filler around a solid,centered "medallion" design with radiating arms. The centered medallionmay divide the vessel interior into halves, thirds, or quarters. There isusually a thin negative space of uniform width separating the solid designfrom the background hachure. Framing lines in such designs are usuallylimited to a single thick line at the rim.
2. Complex all-over designs in which typical Mesa Verde Black-on-whiteband designs are abstracted and used as panels that are oriented at anglesto the rim instead of parallel to the rim.
C. Designs composed solely of complex framing elements include multiple-widthframing lines and often patterned tick marks in the spaces between framing lines.
Rim: Bowl rims are square and usually decorated. Early Mesa Verde Black-on-whitebowl rims are decorated with simple, repeating tick marks, but rim decorationsbecome more elaborate through time and eventually include continuous zig-zags,X’s, patterned ticking with gaps, and ticks of multiple sizes.
Forms: Many forms including: bowls, jars, kiva jars, mugs and ladles.
Pueblo III White Painted, HBW (A.D. 1100–1280). Pueblo III White Paintedis another of the grouped types. This category is used to classify sherds that clearly are fromvessels made during the Pueblo III period , but which are not clearly McElmo Black-on-white orMesa Verde Black-on-white. Pueblo III White Painted is both a catch all for painted sherds thatare small or have ambiguous characteristics and a category into which sherds possessingattributes intermediate between McElmo and Mesa Verde black-on-white are placed. In analysissystems that do not have grouped types, but instead recognize only traditional types, these sherdswould be assigned to either McElmo Black-on-white or Mesa Verde Black-on-white.
Paste: Fine.
Temper: Usually crushed sherd, although some crushed rock, crushed sandstone and sandwere also used.
5 - 18
Surface Treatment: All visible surfaces are well slipped and well polished, with a pearlyluster.
Thickness: Relatively thick.
Painted Design: Paint Type - Usually carbon paint, but some mineral and mixed carbon andmineral paints also occur.
Design - Any thick, painted sherd with fine paste, thick white slip, and a highlypolished, lustrous surface—and on which the painted design is not clearlyMcElmo Black-on-white or Mesa Verde Black-on-white—is typed as Pueblo IIIWhite Painted. Specific design elements on Pueblo III White Painted sherds aresimilar to those listed above for McElmo Black-on-white and Mesa Verde Black-on-white.
Rim: Square or almost square. May or may not be decorated; if decorated, painted withsimple tick marks.
Forms: Bowls, jars, kiva jars, and mugs are most common; other vessel forms are seen,but less often.
Late White Painted, LBW (A.D. 920–1280). The criteria for assigning sherds tothe Late White Painted category are more general than those used to assign sherds to either thePueblo II White Painted or the Pueblo III White Painted types. Late White Painted is used forsherds with attributes that are recognized as definitely not characteristics of pottery made duringthe Basketmaker III or Pueblo I periods; thus, these sherds are from vessels made during eitherthe Pueblo II or Pueblo III periods. Late White Painted sherds do not meet the criteria forassignment to a more specific Pueblo II or Pueblo III category. Usually, the Late White Paintedcategory is used for sherds that are too small, show too little painted design, or are toodeteriorated to allow a more specific identification to be made. If paste, temper, and surfacetreatment indicate a post–A.D. 900 date of manufacture, but not enough of the painted design isleft on the surface to allow the analyst to assess design layout or identify design elements, thenthe sherd is typed as Late White Painted.
For the most part, rim sherds are assigned to a more specific type than the Late White Painted;however, some small rims may be assigned to this category. Such rims are usually undecoratedand relatively thin. Typically, so little of the painted design is present on sherds assigned to thistype that design layout cannot be determined. If any of the design layouts described above forthe traditional named types or for the Pueblo II or Pueblo III grouped types are present, the sherdwould not be assigned to the Late White Painted category.

5 - 19
Late White Unpainted, LWU (A.D. 920–1280). Body sherds and rim sherds areassigned to this type derive from vessels that are interpreted to have been manufacturedsometime after A.D. 900. Because these sherds do not have painted designs, classification isbased solely on paste, temper, surface treatment, and thickness. Paste is medium to fine, andtemper is usually crushed sherd, although crushed igneous rock, sand, and crushed sandstone areseen as well. Sherds assigned to this type are slipped and polished, but these surface treatmentsare of variable quality. Sherd thickness ranges from thin to thick.
Indeterminate Local White Painted, IBW (A.D. 575–1280). Sherdsclassified as Indeterminate Local White Painted are believed to have been manufactured locally,on the basis of their paste and temper but they are too small to be assigned to a more specifictype.
Indeterminate Local White Unpainted, IND (A.D. 575–1280). Sherds areassigned to the Indeterminate Local White Unpainted category on the basis of the same criteriaas are used for assigning sherds to the Indeterminate Local White Painted category; however, theformer category is used for sherds with no painted decoration.
Local Red Ware Types
Red ware vessels were fired in an oxidizing atmosphere, which produced an orange to redsurface finish. Red ware sherds may or may not be slipped but they are consistently polished.Red ware vessels generally have painted designs, but individual sherds may not.
Most red ware pottery excavated by Crow Canyon is of the San Juan tradition, it wasmanufactured in what today is southeastern Utah between A.D. 775 and at least A.D. 1050(Wilson and Blinman 1995*1: 54) and is called San Juan Red Ware. These red ware sherds aretreated as local types. San Juan Red Ware is most common in the western portion of the MesaVerde region and becomes increasingly rare as one travels east. Thus, sherds of this wareaccount for as much as 25 percent of assemblages from Alkali Ridge in Utah, 8 to 10 percent ofassemblages in the Dolores River area (Colorado), and only a small percentage of assemblages inthe Animas River drainage, near Durango, Colorado (Wilson and Blinman 1995*1: 53-54). AfterA.D. 1050, red ware production shifted to northeastern Arizona (Tsegi Orange Ware of theKayenta tradition) and west-central New Mexico and east-central Arizona (White Mountain RedWare). Both Tsegi Orange Ware and White Mountain Red Ware are treated as nonlocal potteryin the Crow Canyon analysis system (refer to Nonlocal Pottery section, pages 5-20–5-21).
Sherds of the different red wares are distinguished primarily on the basis of paste and tempercharacteristics. San Juan Red Ware pottery was fired in a poorly controlled atmosphere, and as aresult, paste colors grade from red to orange to gray on a single vessel. The paste is usually fineand tempered with igneous rock. Only San Juan Red Ware sherds are analyzed to traditional typein Crow Canyon’s basic pottery analysis. Red ware sherds of other traditions are classified asone of two general “grouped” types, Other Red Nonlocal or Unknown Red. When it is possible

5 - 20
to identify such sherds to a traditional nonlocal ware and type, this information is recorded onthe comments line of the analysis label.
Abajo Red-on-orange, ARO (A.D. 725–880). Abajo Red-on-orange first appearsin sites dating from approximately A.D. 725. It was the only red ware type at sites in the MesaVerde region until about A.D. 800, after which it was gradually replaced by Bluff Black-on-red.Abajo Red-on-orange disappears from assemblages by about A.D. 880.
Abajo Red-on-orange is recognized primarily on the basis of paint and background sherd color(Figure 5.28). Abajo Red-on-orange is characterized by an orange background with orange- tored-painted designs and crushed-rock temper. The orange surface is the result of the potteryhaving been oxidized during firing. The core is usually gray. The sherds are highly polished, andthe paint is polished as well. Sherds of this type are usually unslipped.
Designs on Abajo Red-on-orange vessels are relatively simple and bold, and they often appear tohave been painted with the fingers rather than with a brush. Design elements include straightlines, wavy lines, triangles, and ticked lines. Design layout may be bilateral, spiral, all-over, or,more rarely, band. The predominant vessel form is the bowl, but occasionally other vessel formsare found.
Bluff Black-on-red, BRE (A.D. 800–1020). This type began to succeed AbajoRed-on-orange in the early 800s, and the transition was complete by about A.D. 840. Sherds ofthis type are present in contexts dating from as late as A.D. 920, and the type may have persistedthrough the early eleventh century.
As with Abajo Red-on-orange, it is the paint and background color, more than the designelements and layout, that are used to identify sherds as Bluff Black-on-red (Figure 5.29). A sherdwith crushed-rock temper and black paint on an orange to light red background is classified asBluff Black-on-red. These sherds are usually not slipped, but occasionally a thin, washy slip ispresent. Paint sometimes consists of specular hematite, and it may be polished. Pastecharacteristics are identical to those described for Abajo Red-on-orange.
Design elements on early Bluff Black-on-red vessels are identical to those on Abajo Red-on-orange vessels. Through time, there is a trend toward increasingly fine linework and designelements, a distinct change from the straight and wavy lines evident in the earlier Bluff pottery.Designs on late examples overlap with Deadmans Black-on-red designs.
Deadmans Black-on-red, DRE (A.D. 880–1100). This type began to replaceBluff Black-on-red in the late ninth century, and persisted until A.D. 1100. This date of onset issignificantly later than previously reported (Breternitz et al. 1974*1) because analysts todayidentify some slipped sherds with black-painted designs as Bluff Black-on-red, whereas earlieranalysts classified all slipped San Juan Red Ware sherds as Deadmans Black-on-red. Designs onDeadmans Black-on-red vessels are similar to those on Tusayan Black-on-red and MiddletonBlack-on-red vessels (both Tsegi Orange Ware), reflecting a single northern red ware style

5 - 21
during the period of overlap between the two traditions (Wilson and Blinman 1995*1: 57).Distinguishing Deadmans Black-on-red sherds from Tusayan Black-on-red sherds requires acareful examination of temper. Deadmans Black-on-red has at least some crushed igneous rock,whereas Tusayan Black-on-red has sherd and sand tempers only.
Deadmans Black-on-red vessels usually have a deep red slip (Figure 5.30) that is distinct fromthe surface color of a Bluff Black-on-red vessel. Deadmans Black-on-red designs are alsodistinctive among red ware types, and are similar to those of Cortez Black-on-white. Designelements include the use of bands filled with diagonal and squiggle hachure and the use of thin,straight nested lines with attached triangles. The hachure design elements are often part of an all-over design layout (Dogoszhi-style).
Indeterminate Local Red Painted, RED (A.D. 725–1100). Red ware sherdstempered with at least some crushed igneous rock are assigned to this category when (1) thepaint color is ambiguous (neither red nor black—frequently the result of misfiring), or (2) ablack-painted sherd is too small for the analyst to determine the design configuration and/or thepresence/absence of slip.
Indeterminate Local Red Unpainted, INR (A.D. 725–1100). Anyunpainted red ware sherd tempered with at least some crushed igneous rock is assigned to thistype.
Nonlocal Pottery
Nonlocal sherds are assigned to one of several very general nonlocal grouped types duringpreliminary sherd analysis: Other Gray Nonlocal (OGR), Other White Nonlocal (OBW), OtherRed Nonlocal (ORE), and Polychrome (PLY). When it is possible for the analyst to determine aspecific nonlocal ware, that information is recorded on the comments line of the analysis label.Listed below are criteria for the identification of nonlocal sherds to more-specific warecategories (after Wilson and Blinman 1988*1); these are the names that should be recorded onthe comments line.
Chuska White Ware and Gray Ware. Chuska wares are characterized by thepresence of a distinctive crushed trachybasalt (trachyte, sanadine basalt) temper that sparkles onthe surface of the sherd even without magnification. Biotite mica is also present with somefrequency. Pastes are generally blue-gray in color. When present, slip will be thin, and paint canbe organic or mineral. The fine-line hachure of Gallup Black-on-white (Chuska White Ware) isdistinctive (Figure 5.31) when compared to the thicker-lined, less careful hachure on MesaVerde types.
Cibola White Ware and Gray Ware. Cibola wares are characterized by sand orcrushed-sandstone temper. Because of this, Cibola Gray Ware is often indistinguishable fromTusayan Gray Ware, which has quartz sand temper. However, one of the crushed-sandstone

5 - 21
tempers used in Cibola Gray Ware has a distinctive pink chalcedonic cement that does not occurin other gray wares. It should also be noted that crushed conglomerate sandstone was used astemper in locally made vessels in parts of the Mesa Verde region (Wilson 1991*1).
Cibola white ware has a brown to red mineral paint, and a thin, washy slip that is not highlypolished. “Slip-slop” (slip that was applied only around the rim area) can occur on the exteriorsurfaces of bowls, but otherwise bowl exteriors are usually unslipped and unpolished. The fine-line hachure of Chaco Black-on-white (Cibola White Ware) is also distinctive (Figure 5.31)when compared to the hachure of the Mesa Verde types which tends to be made of thicker linesthat are less carefully applied.
White Mountain Red Ware. This very distinctive red ware, which derives from thePuerco River region of west-central New Mexico and east-central Arizona, has a buff to redbody clay that is tempered with large pieces of crushed sherd. Sherds have a thick, bright redslip, and the paint can be organic or mineral. Polychromes are common, especially with whiteand red on bowl exteriors, and black and red on bowl interiors (Figure 5.32).
Tusayan White Ware and Gray Ware. These wares originate in northeasternArizona and are identified by their quartz sand temper—there is no igneous rock temper. Asnoted above, Tusayan Gray Ware are only distinguishable from Cibola Gray Ware at themicroscopic level by identifying the temper. On Tusayan White Ware vessels, pastes are white toblue in color, surfaces were polished to a pearly white but were rarely slipped. Rim ticking onbowls is rare. The designs on white ware vessels are distinctive (see Beals, et al. 1945*1) andwere executed in organic paints in all time periods.
Tsegi Orange Ware. This ware, which derives from northeastern Arizona, ischaracterized by crushed-sherd temper; no igneous rock temper is used. Surfaces were decoratedwith mineral and clay paints and slip is rare (hence the orange ware label instead of red ware).Designs are distinctive, and include polychrome designs that do incorporate slips (Figure 5.33).
Unknown Pottery
In some cases it is impossible to determine whether small or heavily eroded sherds were madelocally or not. Such sherds are assigned to one of the general categories: Unknown Gray (UNG),Unknown White (UNW), Unknown Red (UNR), and Unknown Pottery (UNP).

5 - 22
Figure 5.1. Chapin Gray rim sherds.
Figure 5.2. Moccasin Gray (neckbanded)body sherd.
Figure 5.3. Mancos Gray (neckbanded)body sherds.
Figure 5.4. A comparison ofMancos Gray (top) andMoccasin Gray (bottom)sherds, showing variation incoil flatness.
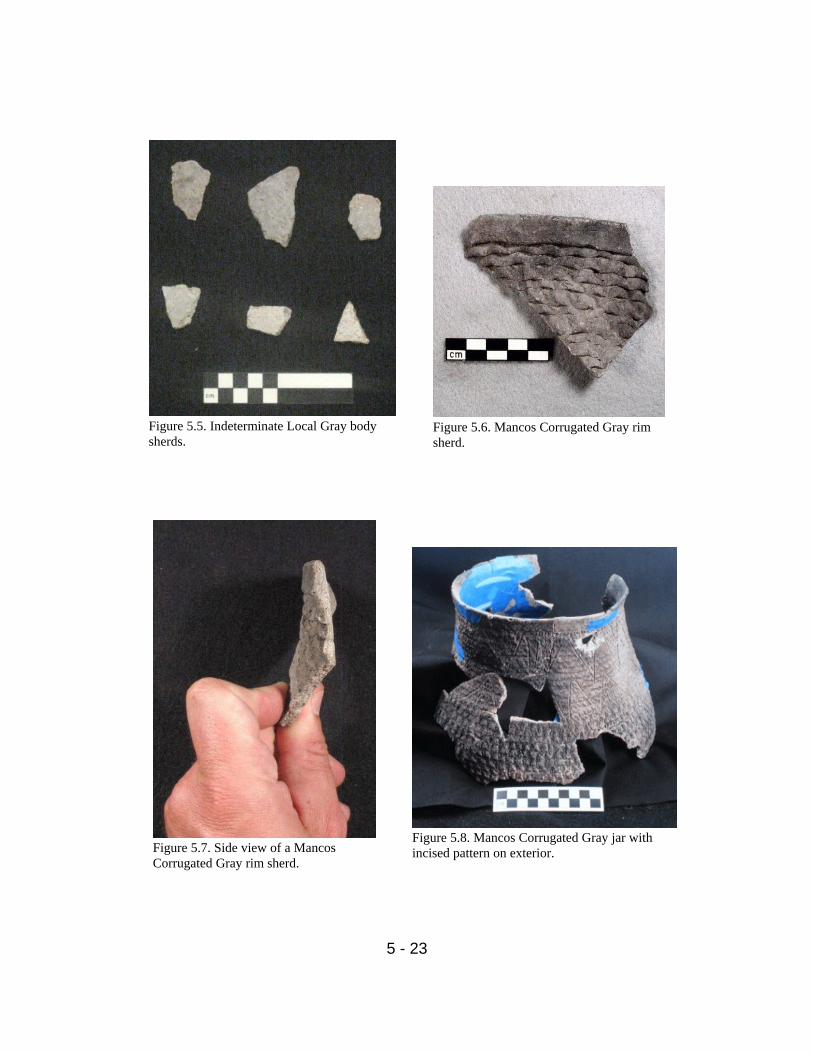
5 - 23
Figure 5.5. Indeterminate Local Gray bodysherds.
Figure 5.8. Mancos Corrugated Gray jar withincised pattern on exterior.
Figure 5.6. Mancos Corrugated Gray rimsherd.
Figure 5.7. Side view of a MancosCorrugated Gray rim sherd.

5 - 24
Figure 5.10. Side view of a MesaVerde Corrugated Gray rimsherd.
Figure 5.9. Mesa Verde Corrugated Grayrim sherds.
Figure 5.11. Mesa Verde Corrugated Gray jar.

5 - 25
Figure 5.13. Indeterminate LocalCorrugated Gray body sherds.
Figure 5.14. Chapin Black-on-whitesherds.
Figure 5.15. Chapin Black-on-white bowlfragment.
Figure 5.12. Mummy Lake Gray rimsherds.

5 - 26
Figure 5.17. Piedra Black-on-white bowlfragment.
Figure 5.18. Cortez Black-on-white sherds.
Figure 5.16. Piedra Black-on-white sherds.
Figure 5.19. Cortez Black-on-white bowl fragment.

5 - 27
Figure 5.20. Mancos Black-on-white sherds.
Figure 5.23. McElmo Black-on-white sherds.
Figure 5.21. Mancos Black-on-whitebowl.
Figure 5.22. Side view of a Mancos Black-on-white bowl. Note the U-shaped profile of thevessel and corrugated exterior.

5 - 28
Figure 5.26. Mesa Verde Black-on-white sherds.
Figure 5.24. McElmo Black-on-whitebowl.
Figure 5.25. Side view of a McElmo Black-on-whitebowl. Note the hemispherical profile of the vessel.

5 - 29
Figure 5.28. Abajo Red-on-orange sherds.
Figure 5.27. Mesa Verde Black-on-white bowlfragment.
Figure 5.29. Bluff Black-on-red sherds.

5 - 30
Figure 5.30. Deadmans Black-on-redsherd.
Figure 5.33. Examples of Tsegi Orange Waresherds.
Figure 5.31. Gallup Black-on-white (top row)and Chaco Black-on-white (bottom row)sherds.
Figure 5.32. White Mountain Red Waresherds.

6 - 1
Chapter 6Basic Pottery Analysis
The ancestral Pueblo people manufactured pottery vessels in their own communities, and they imported pottery from other communities and regions. Over time and across space, potterychanged in many of its features, including the raw materials from which it was made, the shapesof vessels, and the styles of painted designs. This, coupled with the fact that fired clay is quitedurable, makes pottery an extremely valuable source of information for archaeologists. Pottery isan important tool in the dating of ancient Pueblo sites, and it can provide insights into a widevariety of other topics of interest to researchers—for example, population size, length of siteoccupation, patterns of trade, the evolution of technological skill, and the kinds of activities thattook place in specific locations within sites.
Given the wealth of information that pottery analysis can yield, it is not surprising that CrowCanyon puts strong emphasis on this component of our laboratory process. Basic pottery analysisfollows cataloging (see the flowchart in Chapter 2) and is performed by staff, interns, volunteers,high school students, and adult participants in our programs. Because we strive for highlyreliable data, we continuously reassess our analysis methods. The procedures presented in thischapter reflect our current methods of pottery analysis which we believe produce highlyaccurate, comprehensive, and reliable results.
The remainder of this chapter is divided into six parts. “Using this Guide” and “Getting Started”contain introductory material designed to orient you before you begin actual analysis. The nextthree sections, which make up the main body of the chapter, focus on the analysis methods usedby Crow Canyon: “Corrugated and Neckbanded Pottery” on page 6-4; “‘Other’ Pottery” beginson page 6-13 and includes a discussion of plain gray ware, unpainted white ware, red ware, andnonlocal pottery; “Painted Pottery” begins on page 6-25 and covers locally produced paintedpottery. The final section, “Pottery Universals,” starts on page 6-41. It is a reference section thatprovides details about specific pottery attributes or about analysis procedures that are repeatednumerous times during analysis. Rather than repeat this information many times, we provide itjust once at the end of the chapter.

Using this Guide
The following pages walk you through Crow Canyon’s pottery analysis procedures, step-by-step. Everything you need to know to perform these procedures is contained in these pages.
In our analysis system we identify the ware, part, form, finish, and type of each sherd, and we count and weigh all sherds either individually or in groups, depending on the situation. REMEMBER: Most bags of pottery will not contain every type of sherd discussed in this guide. If you do not have any sherds of the type discussed in a particular step, you should move on to the next step.
Red boxes like the one to the left indicate that there is additional information in “Pottery Universals” that may help you perform a step correctly. These boxes can also prompt an action on your part. For example, the capital letter “F” and the word “Form” in the box to the left indicates that you should sort sherds according to vessel form as part of any step for which this box is displayed. If you can’t remember all the possible vessel forms or how to identify them, you should turn to the Form page of the universal section to get this information.
The following topics are considered in “Pottery Universals” (the code for each is shown in bold):
Bag, Comments, Count and Weight, Form, Finish, Item Number, Analysis Label, Part, Slip and Polish, Temper and Paste.
These topics are arranged alphabetically by the code letters. You may find it helpful to peruse the universal section before beginning pottery analysis.
6 - 2
FForm

SITE: 5MT123 DE date _______
PD____________ FS__________ PL______STUDY UNIT________________________HOR._________________ VERT.________FEATURE___________________________HOR._________________ VERT.________BAG DATE___________ FIELD SUP_____CONTENTS__________________________Count_________________ Weight_______________ A
naly
st__
__ D
ate_
___
Figure 6.2. Provenience label.
Getting Started
Inside the bag of “bulk sherds, large” you will find a field specimen (FS) label that providesthe provenience information for the items in this bag (Figure 6.1). The label should be mostly filled out. A blank label is illustrated in Figure 6.2. DO NOT CONTINUE IF YOU CANNOT FIND THIS LABEL, FIND A STAFF PERSON AND NOTIFY THEM OF THE PROBLEM!
Nested inside the bag will be some or all of the following:
• A bag of corrugated and/or neckbanded gray ware pottery. The sherds in this bag should have exposed, unobliterated coils on their exterior surfaces. They do not have slip, polish or paint. We will analyze the contents of this bag first (Chapter 6: Section A).
• A bag of painted white ware pottery. These sherds should be white ware sherdswith paint on one or both surfaces. The contents of this bag will be analyzed last (Chapter 6: Section C).
• A bag of “other” pottery. This bag contains the sherds that do not belong in the other two bags. The contents of this bag will be analyzed second (Chapter 6: Section B).
Before you begin, make sure the provenience label has been filled out correctly. If information is missing from the label or if there are other problems ask a staff person to check the label.
Figure 6.1. Contents of bulk sherds, large bag with provenience label.
6 - 3

Figure 6.4. The scraped interior surface of a corrugated gray ware sherd.
Section A: Corrugated and Section A: Corrugated and NeckbandedNeckbanded Gray Ware PotteryGray Ware Pottery
Step 1: Empty the Contents of the Bag Step 1: Empty the Contents of the Bag
Step 2: Separate Corrugated Gray Ware Step 2: Separate Corrugated Gray Ware SherdsSherds from the rest of the from the rest of the sherdssherds
Important: There may be sherds in this bag that are not corrugated gray ware. These include neckbandedsherds, basket-impressed sherds, and sherds from white ware jars or bowls that also have corrugations. See the following two pages for more information on these special cases.
Corrugated gray ware sherds have patterned indentations on their exterior surfaces (Figure 6.3),. The result of a finger, thumb, or tool having been pressed at uniform intervals into the clay coils as the vessel was formed. On the interior surface, the coils were scraped smooth (Figure 6.4). Corrugated gray ware pottery has no slip, polish, or paint. The temper particles are visible to the naked eye on both surfaces and in the broken cross section of the sherd.
6 - 4
Figure 6.3. The exterior surface of a corrugated gray ware sherdshowing finger indentations and temper (see the arrows in the photo on the right)
TP Temper and
Paste
FnFinish
SP Slip and Polish
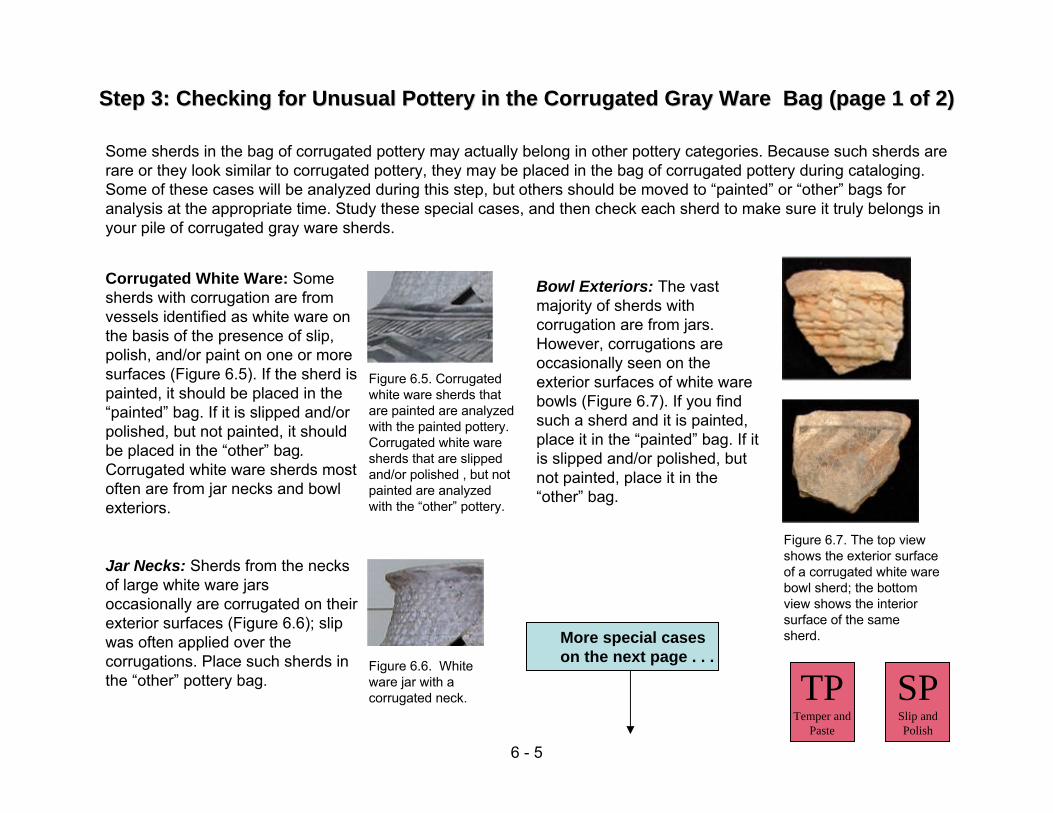
Step 3: Checking for Unusual Pottery in the Corrugated Gray WareStep 3: Checking for Unusual Pottery in the Corrugated Gray Ware Bag (page 1 of 2)Bag (page 1 of 2)
Some sherds in the bag of corrugated pottery may actually belong in other pottery categories. Because such sherds are rare or they look similar to corrugated pottery, they may be placed in the bag of corrugated pottery during cataloging. Some of these cases will be analyzed during this step, but others should be moved to “painted” or “other” bags for analysis at the appropriate time. Study these special cases, and then check each sherd to make sure it truly belongs in your pile of corrugated gray ware sherds.
Figure 6.5. Corrugated white ware sherds that are painted are analyzed with the painted pottery. Corrugated white ware sherds that are slipped and/or polished , but not painted are analyzed with the “other” pottery.
Figure 6.6. White ware jar with a corrugated neck.
Figure 6.7. The top view shows the exterior surface of a corrugated white ware bowl sherd; the bottom view shows the interior surface of the same sherd.
Jar Necks: Sherds from the necks of large white ware jars occasionally are corrugated on their exterior surfaces (Figure 6.6); slip was often applied over the corrugations. Place such sherds in the “other” pottery bag.
Bowl Exteriors: The vast majority of sherds with corrugation are from jars. However, corrugations are occasionally seen on the exterior surfaces of white ware bowls (Figure 6.7). If you find such a sherd and it is painted, place it in the “painted” bag. If it is slipped and/or polished, but not painted, place it in the “other” bag.
More special cases on the next page . . .
6 - 5
Corrugated White Ware: Some sherds with corrugation are from vessels identified as white ware on the basis of the presence of slip, polish, and/or paint on one or more surfaces (Figure 6.5). If the sherd is painted, it should be placed in the “painted” bag. If it is slipped and/or polished, but not painted, it should be placed in the “other” bag.Corrugated white ware sherds most often are from jar necks and bowl exteriors.
SP Slip and Polish
TP Temper and
Paste

Figure 6.8. A basket-impressed sherd; detail. The basket that made this particular impression was made by coiling.
Basket-Impressed: These are sherds from bowls that were molded into a basket (Figure 6.8). Impressions will be visible on the exterior surface. If you find such a sherd and it is painted, place it in the “painted” pottery bag; if it is slipped and/or polished, but not painted, place it in the “other” pottery bag.
Neckbanded: Neckbanded gray ware sherds are from jars that had exposed coils on the exterior surfaces of their necks (Figure 6.9). These coils are not corrugated, they can vary from wide and flat to narrow and round. Any neckbanded sherds should be set aside and analyzed in Step 8, this section.
Step 3: Checking for Unusual Pottery in the Corrugated Gary WareStep 3: Checking for Unusual Pottery in the Corrugated Gary Ware Bag (page 2 of 2)Bag (page 2 of 2)
Note: Each basket-impressed sherd will be given an item number,regardless of whether it is a rim sherd or a body sherd.
Figure 6.9. Neckbandedgray ware jar.
6 - 6
TP Temper and
Paste
SP Slip and Polish
CComments

Step 4: Sort the Corrugated Gray Ware Step 4: Sort the Corrugated Gray Ware SherdsSherds by Part: Body by Part: Body SherdsSherds, Rim , Rim SherdsSherds, , and Base and Base SherdsSherds
Body sherds
Body sherds come from the medial portion of the vessel and exclude the rim and the base (Figure 6.10). Body sherds are broken on all edges (Figure 6.11). As you sort body sherds, place them in piles of 10 for easier counting.
Rim sherds
Rim sherds have a finished edge that was part of the rim of the jar (Figures 6.10 and 6.12). On many corrugated gray ware jars, the clay was smoothed in a band around the rim, forming a fillet. It is common for a vessel to break at the juncture of the rim fillet and the first circuit of corrugation. The resulting piece has an undulating edge at the break. Set the rim sherds aside.
Figure 6.12. Corrugated rim sherd.
Figure 6.11. Corrugated body sherds.
6 - 7
Figure 6.10. Corrugated jar. Shaded areas indicate body and rim sherds.
Base Sherds
Sherds from the bases of corrugated jars show the coils starting at a center point and spiraling outward (Figure 6.13). Set these sherds aside.
Figure 6.13. Sherd from the base of a corrugated jar.
PPart

On the analysis label, the light blue boxes indicate areas where information specific to your bag of pottery should be recorded. The first thing to do is fill in the PD and FS numbers. Next, fill in the type name. The type name may be abbreviated as Ind. Corrugated. The type code is “CRG.” The form is “jar.” The part is “body.” Determine count and weight, and record them in appropriate spaces. Finish, vessel #, and item are not applicable to this group of sherds. Use the Comment line to record anything noteworthy or unusual about any of the sherds in this bag. YOU SHOULD ALWAYS PUT A DASH IN ANY SPACE FOR WHICH INFORMATION IS NOT APPLICABLE. This tells a reader that you have filled out the label completely.
SITE: 5MT123 PD FS ItemType nameType codeForm PartFinish Vessel # Count WeightComments
Ind. CorrugatedCRG
jar body
Corrugated gray ware body sherds are typed as Indeterminate Local Corrugated Gray (CRG). Fill out the pottery analysis label according to the instructions in the blue box. Place the corrugated body sherds and the pottery analysis label in a bag. Crow Canyon no longer uses a pottery analysis form, all of the data is recorded on the analysis label and is entered into the database directly from the analysis labels.
Step 5: Record and Bag the Corrugated Gray Ware Body Step 5: Record and Bag the Corrugated Gray Ware Body SherdsSherds
6 - 8
CW Count and
Weight
BBag
LLabel

Step 6: Identify, Record and Bag Step 6: Identify, Record and Bag Mancos Corrugated GrayMancos Corrugated Gray, , Mesa Verde Corrugated Mesa Verde Corrugated GrayGray, and , and Indeterminate Corrugated Gray Indeterminate Corrugated Gray Rim Rim SherdsSherds by Type:by Type:
Corrugated rims are identified as one of three types on the basis of the degree of rim eversion. Rim eversion refers to the degree to which the rim flared outward from vertical on the parent vessel. If the rim eversion is less than 30 degrees, the sherd is classified as Mancos Corrugated Gray (MRG) (Figure 6.14). If the rim eversion is 30 degrees or more, the sherd is classified as Mesa Verde Corrugated Gray (VRG) (Figure 6.15).
Figure 6.14. View of a Mancos CorrugatedGray jar showing the less-everted rim.
Figure 6.15. View of a Mesa Verde Corrugated Gray jar, showing the more-everted rim. Photo by David M. Grimes.
Angle is ≥ 30ºAngle is < 30º
Indeterminate Local Corrugated Gray (CRG)Rims that are too small or too irregular for the degree of eversion to be determined are classified as Indeterminate Local Corrugated Gray.
SITE: 5MT123 PD FS ItemType nameType codeForm PartFinish Vessel # Count WeightComments
Jar Rim
1
Mancos Corrugated Gray (MRG) Mesa Verde Corrugated Gray (VRG)
Important: Each rim sherd is assigned an item number. Item numbers are assigned sequentially, beginning with 1 and continuing until all sherds from a bag of pottery assigned a given FS number have been analyzed. Sherdsfrom the bases of corrugated jars also receive item numbers (see Step 7, this section). Each sherd assigned an item number gets a label and is bagged individually.
Tips for determining rim eversion:Pick three points along the rim, and orient them on a level plane.Look at the curvature around the jar (at the inflection point). It should parallel the rim (Figures 6.14 and 6.15). Look for scrape marks on the interior surface of the sherd—these should also parallel the rim. Now, while holding the rim sherd in its correct position in relation to the whole vessel, try to determine the degree of eversion.
6 - 9
Inflection pointInflection point
Rim
Sherd
Rim
Sherd
A label can now be filled out for each corrugated rim, remember each gets an item number.
BBag
CW Count and
Weight
IItem
Number

Each sherd from the exterior base of a corrugated jar is also given an item number. These sherds can be identified by the coils starting at a center point and spiraling outward (Figure 6.16). NOTE: There is no part code for base. Such sherds are recorded as body sherds and are bagged individually; a comment is written to identify each as being from the base of a corrugated jar. Also, if the direction of the coiling can be determined (see Figure 6.16 caption) it should be written in the comment field.
Figure 6.16. This photo shows a sherd from the base of a corrugated jar, where the potter initiated the coiling pattern. Note that the coiling spirals clockwise on this sherd.
On the analysis label, record type name as Ind. Corrugated. The type code is “CRG.” The form is “jar.” The part is “body.” Determine count and weight and record them in the appropriate spaces. Finish, vessel #, and Item are not applicable to this group of sherds, so put a dash in these spaces.
SITE: 5MT123 PD FS ItemType nameType codeForm PartFinish Vessel # Count WeightComments
Ind. CorrugatedCRG
jar body
Corrugated base, clockwise.1
Step 7: Identify, Record and Bag Step 7: Identify, Record and Bag SherdsSherds from the Bases of Corrugated Gray Ware Jars from the Bases of Corrugated Gray Ware Jars
6 - 10
CW Count and
Weight
CComments
BBag

Step 8: Identify the Step 8: Identify the NeckbandedNeckbanded Gray Ware Gray Ware SherdsSherds by Type: by Type: Mancos Gray and Mancos Gray and Moccasin GrayMoccasin Gray
As the name suggests, neckbanded jars are distinguished by the presence of distinctive bands on the exterior surfaces of their necks. The bands are the unscraped coils used to build the vessel; unlike the unscraped coils of corrugated vessels, those on neckbanded jars were not textured with indentations (corrugations). The coils of neckbanded jars were usually scraped smooth below the vessel shoulder, so sherds that derive wholly from the lower portions of these containers are not recognized or classified as neckbanded (Figures 6.17 and 6.18). The temper of neckbanded sherds is usually coarse and visible on both interior and exterior surfaces. Be aware that on some corrugated gray vessels, potters created overall surface patterns by corrugating some coils and leaving others smooth. If you find a sherd with both smooth and corrugated coils, classify it as corrugated, not as neckbanded.
Two types of neckbanded pottery can be differentiated on the basis of the size and shape of the bands and the degree to which they overlap.
See the next page to learn about Indeterminate Neckbanded Gray and how to fill out the analysis label.
Moccasin Gray (MGR) is distinguished by relatively wide, flat coils that are stacked “edge to edge” on top of one another and therefore do not overlap (Figures 6.17, 6.19 and 6.20). On occasion, crude scraping during manufacture resulted in the partial obliteration of the coil junctures.
Figure 6.17. On Moccasin Gray sherds the coils are wide, flat, and “stacked” one on top of another.
Figure 6.19. Moccasin Grayneck sherd with wide, flat, stacked coils.
Mancos Gray (AGR) is distinguished by narrow, rounded coils or by wider, overlapping coils on the neck of a vessel (Figures 6.18, 6.21 and 6.22).
Figure 6.18. On Mancos Graysherds the coils are
• small and round, or• wide and flat, with each coil
overlapping the coil below it.
Figure 6.21. Rim sherds from a Mancos Gray jar.
Figure 6.22. Cross section of Mancos Gray sherdshowing wide, overlapping coils.
6 - 11
Figure 6.20. Cross section of Moccasin Gray sherdshowing stacked coils.
Sherds from below the shoulder are not classified as neckbandedgray ware.
FForm
PPart

Record Moccasin Gray (MGR), Mancos Gray (AGR), or Indeterminate Neckbanded Gray (ING) on the type name and type code lines of the analysis label. Record form which, for all of these sherds will be “jar” and part which could be rim or body. Finish and vessel # are not applicable, so draw lines through these spaces. Be sure to record count and weight.
Step 9: Identify Indeterminate Step 9: Identify Indeterminate NeckbandedNeckbanded Gray Ware Gray Ware SherdsSherds
SITE: 5MT123 PD FS ItemType nameType codeForm PartFinish Vessel # Count WeightComments
jar
Neckbanded body sherds of the same type and form are bagged and labeled together. Be sure to record the count and weight on the analysis label.
Each neckbanded rim sherd is given an item number and then is labeled and bagged individually. Continue assigning item numbers where you left off with the corrugated rims and bases.
Important: Handle sherds are also given item numbers. Occasionally neckbanded sherds have handles or handle attachments. Such sherds are also given item numbers, even if no part of the rim is present. If the rim is present, the sherd is identified as a rim sherd, but a comment should be included stating that the sherd also has a handle or part of a handle.
6 - 12
Step10: Record and Bag Step10: Record and Bag NeckbandedNeckbanded Gray Ware Gray Ware SherdsSherds
Sherds that cannot be clearly identified as either Mancos Gray (AGR) or Moccasin Gray (MGR) are classified asIndeterminate Neckbanded Gray (ING) are classified as Indeterminate Neckbanded Gray (ING). Neckbanded coils are considered to be indeterminate if you cannot determine whether they are wide and flat or narrow and rounded.
FForm
PPart
LLabel
IItem
Number
CW Count and
Weight
BBag

Section B: “Other” PotterySection B: “Other” Pottery
Find the bag of “other” pottery and pour out its contents. Make sure there are no corrugated, gray, neckbanded gray or painted white ware sherds in the bag. If any are found, integrate them with the appropriate bags. Sort the remaining sherds into the following five groups:
“Other” pottery includes all sherds that do not belong in the “painted white ware” or “corrugated and neckbanded gray ware” categories.
Figure 6.25. Local red ware sherd.
Plain Gray Ware: sherds have surfaces that were scraped (that is, the coil junctions were obliterated), but were neither polished nor slipped (Figure 6.23). The temper is visible to the naked eye, and the paste is coarse, similar to the temper and paste of corrugated gray pottery.
Local Red Ware: sherds have reddish surfaces because their parent vessels were fired in an oxidizing atmosphere. They are usually polished, and they may or may not be slipped and/or painted (Figure 6.25). Local red ware vessels usually have a fine paste, a gray core in cross section, and finely crushed rock temper.
Figure 6.27. “Unknown” sherd.
“Unknown” sherds are those that do not appear to fit into any other categories (Figure 6.27).
Step 1: Identify the Contents of the Other Pottery Bag Step 1: Identify the Contents of the Other Pottery Bag
Nonlocal sherds were made by people who were not part of the Mesa Verde cultural tradition (Figure 6.26). Nonlocal sherds are identified on the basis of paste, temper, and/or painted design. You should seek the assistance of a staff member if you think you have any nonlocal pottery.
Figure 6.26. Nonlocalsherds (White Mountain Red Ware).
Remember: You can skip each step for which you do not have any examples in your bag.
Figure 6.23. Plain Gray ware sherd.
Unpainted White Ware: sherds are slipped and/or polished, but not painted (Figure 6.24). These sherds often are from undecorated portions of painted vessels. White ware pottery usually has finer paste than gray ware pottery, and the temper is often difficult to see with the naked eye.
Figure 6.24. Unpainted white ware sherd.
6 - 13

Step 2: Identify, Record and Bag the Plain Gray Ware Step 2: Identify, Record and Bag the Plain Gray Ware SherdsSherds by by PartPart
Once you have identified the plain gray sherds, sort them by vessel part, rim or body sherds. All plain gray body sherds, that is sherds that are from below the rim of the vessel, are classified as Indeterminate Local Gray (GRA) (Figure 6.28) and are considered to be from jars. The body sherds can now be recorded, counted, weighed, and they can be bagged as a group with the analysis label.
See the next page for information about plain gray rims and handles.
Rim or Handle
Body
Go to Step 3, this section, for information on sorting plain gray rims and handles.
Figure 6.28. Indeterminate Local Gray body sherds.
Form = “Jar”
Type = “Ind. Local Gray” (GRA)
Note: Check each plain gray sherd for traces of red pigment, called “fugitive red,” smeared over the exterior surface (Figure 6.29). All sherds on which this occurs are typed as Chapin Gray (CGR), and “fugitive red” is recorded on the comments line of the analysis label.
Finish = “—”
Figure 6.29. Chapin Graybody sherd with fugitive red pigment.
6 - 14
TP Temper and
Paste
PPart
CW Count and
Weight
LLabel
BBag

Step 3: Identify, Record and Bag the Plain Gray Rim and Handle Step 3: Identify, Record and Bag the Plain Gray Rim and Handle SherdsSherds
Figure 6.30. Chapin Gray rim sherd.
Figure 6.31. Neckbanded sherd.
Note: When examining a gray ware rim, be sure it is not a corrugated jar rim. Corrugated jar rims often break along the junction between the smooth rim fillet and the first corrugated coil. The break often looks wavy, because the potter attached the rim fillet to the corrugated body by smoothing onto the corrugated pattern. These sherds should be analyzed as corrugated rims. Go back to Step 6, Section A if you find a corrugated jar rim.
Plain gray rim sherds are typed as Chapin Gray (CGR) (Figures 6.30 and 6.31). Chapin Gray rims have no visible bands or coils. In contrast, neckbanded vessels have coil junctures that are visible on the exterior of the neck (Figure 6.31). Plain gray handle sherds are typed as Indeterminate Local Gray(GRA). Plain gray rims and handles come from a variety of vessel forms. Consult the Form page in “Pottery Universals” for help in identifying these. Once you have identified the pottery type and vessel form of each rim and handle, you will need to fill out an analysis label. Remember that each rim and handle gets an analysis label and an item number.
Finish = “—” (Count = 1)
6 - 15
BBag
IItem
Number
FForm
CW Count and
Weight
LLabel

Step 4: Identify the Unpainted White Ware Step 4: Identify the Unpainted White Ware SherdsSherds by Type:by Type: Early White Unpainted, Early White Unpainted, Late White Unpainted, Late White Unpainted, andand Indeterminate Local White UnpaintedIndeterminate Local White Unpainted
Although they are sometimes difficult to identify, unpainted white ware sherds are distinguishable from plain gray sherds by their paste, temper, and surface treatment. Unpainted white ware sherds usually have fine paste and the temper is usually made up of either finely crushed-sherd or finely crushed-rock. Plain gray vessels are made with coarse paste and the temper is usually large pieces of crushed-rock. Unpainted white ware sherds are slipped, polished, or both, whereas plain gray sherds are neither slipped or polished.
Early White Unpainted (EWU): Sherds of this type are characterized by medium to coarse paste, the absence of sherd temper, and relatively thin vessel walls. They are always polished, but usually not slipped (Figures 6.32 and 6.34). To distinguish a polished surface from one that was simply rubbed with water, remember that polishing with a smooth stone will compact a surface, whereas rubbing with water will only smooth it. If slip is present, it will be thin, such that the body clay still shows through.
Indeterminate White Unpainted (IND): These sherds are determined on the basis of paste and temper to be local white ware, but they are too small, damaged, or ambiguous in their characteristics to be assigned to a more specific type.
Figure 6.33. A Late White Unpaintedsherd. Note the fine polish and heavy slip.
We identify three types of unpainted white ware: Early White Unpainted, Late White Unpainted, and Indeterminate Local White Painted. “Early” refers to the Basketmaker III and Pueblo I periods (A. D. 600—980), and “Late” refers to the Pueblo II and Pueblo III periods (A. D. 920—1280). The distinguishing characteristics of these types are described below.
Late White Unpainted (LWU): Sherds of this type are distinguished by medium to fine paste, fine temper (including crushed sherd temper), and the presence of polish and/or slip (Figures 6.33 and 6.34). The slip is usually thick enough to cover the body clay on the surface.
Figure 6.32. Close-up of the surface of an Early White Unpainted sherd. Note the slight polish on the bumpy surface.
6 - 16Figure 6.34. Early White Unpainted(bottom) and Late White Unpainted (top).
TP Temper and
Paste

Step 5: Sort, Record and Bag the Unpainted White WareStep 5: Sort, Record and Bag the Unpainted White Ware Sherds by Form and PartSherds by Form and Part
Once you have identified the unpainted white ware sherds as Early White Unpainted, Late White Unpainted, Early White Unpainted, and/or Indeterminate Local White Unpainted, sort the sherds in each pile by form and part. All body sherds of the same pottery type, vessel form, and vessel part can then be counted, weighed, labeled, and bagged together. Each rim and handle sherd should be assigned an item number on the label before being bagged individually. Remember to continue the item number sequence you started with the corrugated rim sherds.
6 - 17
Rim or Handle
Body
Finish = “—”
Finish = “—”
(Count = 1)
FForm
BBag
BBag
IItem
Number
LLabel
LLabel
CW Count and
Weight
CW Count and
Weight
PPart

Step 6: Distinguish Local from Step 6: Distinguish Local from NonlocalNonlocal Red Ware Red Ware SherdsSherds
Both local and nonlocal red ware vessels were fired in an oxidizing atmosphere that produced an orange to red surface. Red ware sherds are always polished, but may or may not be painted or slipped. As with white ware vessels, red ware vessels are generally painted, but individual sherds from a vessel may not be.
Red ware sherds that we consider to be local are actually from vessels that were made in southeastern Utah. Called Indeterminate Local Red Painted(RED) or Indeterminate Local Red Unpainted (INR) in our analysis, they are also known also as San Juan Red Ware, these sherds are treated as local because the part of Utah from which their parent vessels came is within the Mesa Verde culture area. San Juan Red Ware sherds are usually tempered with finely crushed igneous rock, and, if decorated, they have either red paint on an orange background (“red-on-orange”) or black paint on a red background (“black-on-red”) (Figures 6.35–6.37).
Other Red Nonlocal (NON) sherds include Tsegi Orange Ware and White Mountain Red Ware (Figures 6.38 and 6.39). Such sherds are typically tempered with crushed sherds and/or white sedimentary rock, and they often have polychrome designs painted in red, orange, white, and/or black. You will need the assistance of a staff member to determine whether a red ware sherdis local or nonlocal.
Local red ware sherds are analyzed in Steps 7and 8, and nonlocal red ware sherds are analyzed with other nonlocal sherds in Steps 9—11 (this section).
Figure 6.35. Indeterminate Local Red Paintedsherd (San Juan Red Ware).
Figure 6.36. Indeterminate Local Red Paintedsherd (San Juan Red Ware).
Figure 6.37. Indeterminate Local Red Painted sherd(San Juan Red Ware).
Figure 6.38. Other RedNonlocal sherds; TsegiOrange ware.
Figure 6.39. Other Red Nonlocal sherds; White Mountain Red Ware.
6 - 18

Step 7: Identify Local Red Ware Pottery TypesStep 7: Identify Local Red Ware Pottery Types
Figure 6.40. AbajoRed-on-orange sherd.
Figure 6.41. Bluff Black-on-red sherd.
Figure 6.42. Deadmans Black-on-red sherd.
Abajo Red-on-orange (ARO): Sherds of this type have designs in red paint on an orange to pink surface (Figure 6.40). In many cases, the designs look as though they were painted with the fingers instead of with a paintbrush. Abajo Red-on-orange sherds often exhibit evidence of having been fired in a poorly controlled atmosphere. Painted surfaces are polished but not slipped.
Bluff Black-on-red (BRE): Sherds of this type have designs in black paint on an orange to light red background (Figure 6.41). Bluff Black-on-red sherds, too, exhibit evidence of having been fired in a poorly controlled atmosphere. Painted surfaces are polished and most often unslipped. If slip is present, it is so thin that the body clay shows through.
Deadmans Black-on-red (DRE): Sherds of this type have designs in black paint that are comparable to those of Pueblo II, white ware types (Cortez Black-on-white and Mancos Black-on-white) (Figure 6.42). Deadmans Black-on-red sherdsexhibit evidence of having been fired in a more controlled atmosphere, and painted surfaces often have a thick slip of deep, brick red color.
Indeterminate Local Red Painted (RED): Local red ware sherds (that is, those tempered with crushed igneous rock) are assigned to this category when the paint color is ambiguous (neither red nor black, frequently the result of misfiring) and/or a sherd is painted but is too small to determine the design configuration or the presence or absence of slip.
Indeterminate Local Red Unpainted (INR): Any unpainted red ware sherd with crushed-igneous temper is assigned to this type.
Sort the local red ware sherds according to the five types described below. Nonlocalred ware types are described in Steps 9—11.
6 - 19
TP Temper and
Paste
SP Slip and Polish
CComments

Step 8: Sort the Local Red Ware Step 8: Sort the Local Red Ware SherdsSherds by Part and Form by Part and Form
Rim or Handle Body
For each type of local red ware, sort the sherds by form and part, and determine the presence or absence of slip (see Figures 6.43 and 6.44).
Figure 6.44. Unslippedsurface of a local red ware sherd.
(Finish)
(Finish) (Count = 1)
Note: “Finish” is documented with regard to slip, not paint type on red ware sherds. We established this convention because slip is more important than paint type for dating these sherds. If a Local Red Ware sherd is slipped, put “slipped” or an “S” in the finish line of the analysis label, if the sherd is not slipped record “unslipped” or “U” on the analysis label.
6 - 20
Figure 6.43. Slip seen on the edge of a local red ware sherd.
CComments
TP Temper and
Paste
PPart
FForm
FForm
LLabel
LLabel
CW Count and
Weight
CW Count and
Weight
SP Slip and Polish
SP Slip and Polish
BBag
BBag
IItem
Number

Step 9: IdentifyStep 9: Identify NonlocalNonlocal SherdsSherds (page 1 of 2)(page 1 of 2)
Nonlocal pottery can be distinguished on the basis of a variety of characteristics, including temper, paste, surface treatment, and/or painted designs. Nonlocalsherds are distinguished only at the level of ware in our analysis system. The general categories we record on the type name and type code lines of the pottery analysis label are as follows:
Other Gray Nonlocal (OGR)Other White Nonlocal (OBW)Other Red Nonlocal (ORE)
Polychrome (PLY)
If you are able to identify nonlocal sherds to a more specific nonlocal ware, record the information on the comments line of the analysis label.
Nonlocal white wares and gray wares are often identified on the basis of temper (Figure 6.45). Nonlocal red wares are the most common, and they can be identified by their distinctive surface treatment and design style in addition to their temper (Figure 6.46).
Other common nonlocal pottery wares are Chuskan White Ware and ChuskanGray Ware, Cibola White Ware and Cibola Gray Ware, White Mountain Red Ware, Tusayan White Ware and Tusayan Gray Ware, and Tsegi Orange Ware. These wares are described on the next page.
Figure 6.45. Example of sparkly, nonlocal temper.
Figure 6.46. Other Red Nonlocal sherds; White Mountain Red Ware. Note: You might identify more nonlocal sherds later, when you sort
painted white ware pottery. If so, you should refer back to these pages.
TP Temper and
Paste
CComments
FnFinish
SP Slip and Polish
6 - 21
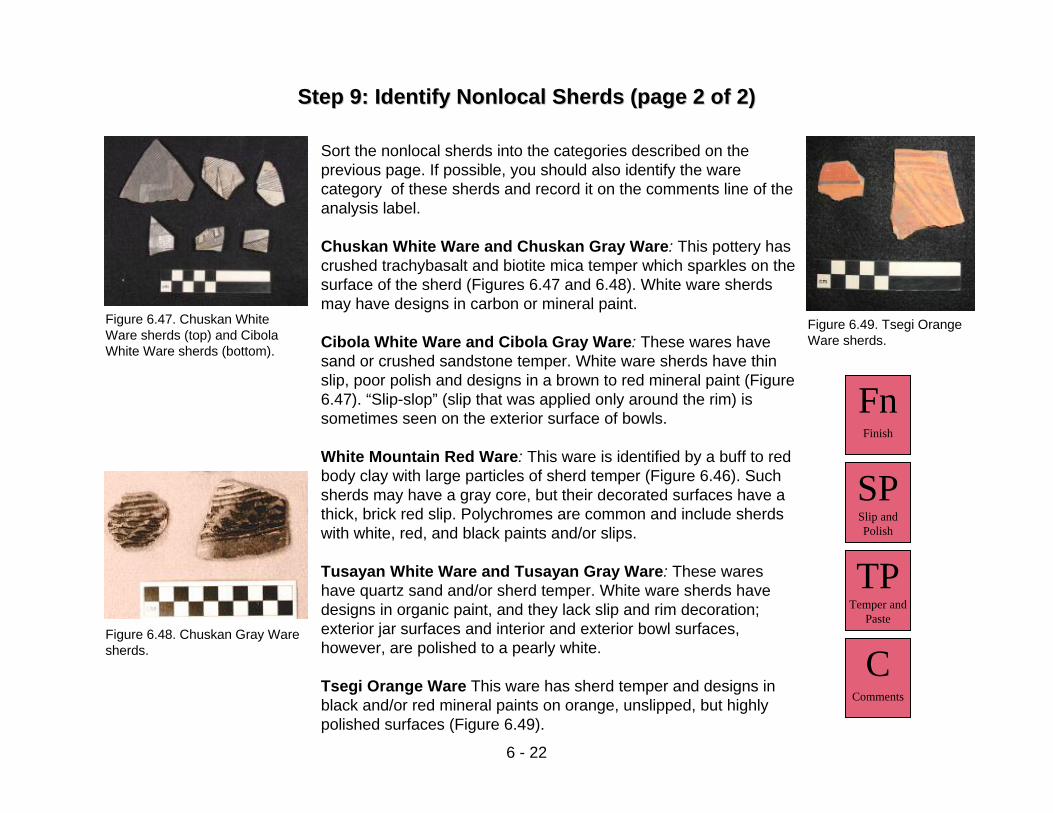
Step 9: Identify Step 9: Identify NonlocalNonlocal SherdsSherds (page 2 of 2)(page 2 of 2)
Figure 6.47. Chuskan White Ware sherds (top) and Cibola White Ware sherds (bottom).
Figure 2.34. ChuskanGray ware
Sort the nonlocal sherds into the categories described on the previous page. If possible, you should also identify the ware category of these sherds and record it on the comments line of the analysis label.
Chuskan White Ware and Chuskan Gray Ware: This pottery has crushed trachybasalt and biotite mica temper which sparkles on the surface of the sherd (Figures 6.47 and 6.48). White ware sherdsmay have designs in carbon or mineral paint.
Cibola White Ware and Cibola Gray Ware: These wares have sand or crushed sandstone temper. White ware sherds have thin slip, poor polish and designs in a brown to red mineral paint (Figure 6.47). “Slip-slop” (slip that was applied only around the rim) is sometimes seen on the exterior surface of bowls.
White Mountain Red Ware: This ware is identified by a buff to red body clay with large particles of sherd temper (Figure 6.46). Such sherds may have a gray core, but their decorated surfaces have a thick, brick red slip. Polychromes are common and include sherdswith white, red, and black paints and/or slips.
Tusayan White Ware and Tusayan Gray Ware: These wares have quartz sand and/or sherd temper. White ware sherds have designs in organic paint, and they lack slip and rim decoration;exterior jar surfaces and interior and exterior bowl surfaces, however, are polished to a pearly white.
Tsegi Orange Ware This ware has sherd temper and designs in black and/or red mineral paints on orange, unslipped, but highly polished surfaces (Figure 6.49).
Figure 6.48. Chuskan Gray Ware sherds.
Figure 6.49. Tsegi Orange Ware sherds.
FnFinish
SP Slip and Polish
TP Temper and
Paste
CComments
6 - 22

Step 10: Sort NonStep 10: Sort Non--local Pottery Types by Part, Form, and Finishlocal Pottery Types by Part, Form, and Finish
Rim or Handle
Sort each type of nonlocal pottery identified by part, form, and finish. For painted white ware sherds, finish is determined on the basis of paint type; for local red ware sherds, finish is determined on the basis of slip.
Body
(Count = 1) (Ware)
(Ware)
CComments
CComments
FForm
FForm
FnFinish
FnFinish
BBag
BBag
CW Count and
Weight
CW Count and
Weight
LLabel
LLabel
PPart
IItem
Number
6 - 23
Note: You should keep these bags handy. You may have to add to them because you may find more nonlocal pottery in the painted sherd bag

Step 11: Identify, Record, and Bag Unknown PotteryStep 11: Identify, Record, and Bag Unknown Pottery
Within each unknown type sort the sherds by form, part, and finish, if possible. Be sure to assign item numbers to rims and handles.
The category “Unknown pottery” includes all sherds that are too small or too damaged to be placed into one of the other four piles of “other pottery.” If you can identify such sherds as gray, white, or red ware, record the appropriate code as listed below; if you cannot, record the sherd(s) as simply “Unknown Pottery” (UNP):
Rim or Handle
Unknown Gray (UNG)Unknown White (UNW)Unknown Red (UNR)
Body
(Count = 1) (Ware)
(Ware)
CComments
CComments
FForm
FForm
FnFinish
FnFinish
BBag
BBag
CW Count and
Weight
CW Count and
Weight
LLabel
LLabel
PPart
IItem
Number
6 - 24

1. Rim Sherds (do these first)
2. Handles (do these second)
3. Body Sherds(do these third)
The flowchart below summarizes the steps you’ll follow when analyzing a bag of painted pottery. Beginning with Step 1, this section, you will first sort sherds by vessel part—that is, by rim, handle, and body sherds. Then you’ll analyze each “part” group in a specific sequence. First rim sherds, and then handle sherds, are carried through Steps 2–9. Remember that each rim and handle is assigned an item number and is analyzed, labeled, and bagged individually. Body sherds, which are analyzed last, are not given item numbers, so all body sherds that can be fully described using the same label (that is, all the sherds are of the same type, form, and finish) are recorded, counted, weighed, and bagged together. As you can see from the chart, the analysis of painted pottery involves repeating a number of sequential steps, which means that you will have to work through the following pages several times as you analyze any given bag.
Step 1: Sort painted sherds by vessel part.
Step 2: Sort by vessel form (bowl,
ladle, jar, etc.).
Step 3: Sort by finish (paint type) one “form-part” group at a time.
Steps 4 through 9: Determine pottery type
(one part-form-finish group at a time)
(If rim or handle, Count = 1)
Section C: Painted White Ware PotterySection C: Painted White Ware Pottery
Note: If you think you have any nonlocal sherds in your bag of painted pottery, refer to Step 9, Section B and get help from a staff member.
If rim or handle )(
Repeat Step 4 until all “finish” groups have been bagged.
Repeat Step 3 until all “form” groups have been bagged.Repeat Step 2
and analyze the next “part” group.
PPart
FForm
FnFinish
IItem
Number
BBag
LLabel
CW Count and
Weight
6 - 25

Step 1: Sort Painted White Ware Step 1: Sort Painted White Ware SherdsSherds by Partby Part
Body SherdsAll edges will be broken.
Why Analyze Rim Sherds First?• Painted rim sherds usually provide present more-diagnostic information than do body and handle sherds. They,
therefore help novices learn our pottery typology.• Rim sherds are given item numbers and analyzed one at a time. Analyzing rim sherds is therefore simpler than
analyzing body sherds, especially when one is learning pottery analysis.
Sort the painted white ware sherds into the three groups below:
Rim SherdsHave one finished edge.
Handle SherdsCan be broken on one or both ends or can have a portion of the vessel body attached to one or both ends. Body sherds that have evidence of a handle attachment should also be included in this group.
Analyze all rim sherds first,(Steps 2–9).
Analyze handle sherds second(Steps 2–9).
Analyze body sherds last (Steps 2–9).
Notes:1. Remember, each rim and handle sherd is given an item number and is labeled and bagged individually.2. Rims “trump” handles. When a rim sherd has a partial handle or handle attachment, it is recorded as a “rim,” and the presence of a partial handle or handle attachment is noted on the Comments line of the analysis label.
6 - 26
PPart

Step 2: Sort the “Part” Group by FormStep 2: Sort the “Part” Group by Form
1. Bowl• Paint, polish, and/or slip are visible on the interior surface. • If paint, polish, and/or slip are also present on the exterior
surface, they will usually not be as well executed as on the interior.
2. Ladle and Dipper• The nonhandle portion of the vessel is shaped like a bowl, but
with tighter rim curvature. • Surface treatment is like that seen on bowls.• Some rim sherds show use wear on the outside edge, the
result of the “bowl” portion of the vessel being used as a scoop.
• Evidence of a handle or handle attachment may be present.• Ladle handles are long and straight: dippers in their entireties
are shaped like gourds what have been cut in half longitudinally.
3. Jar (undifferentiated)• Paint, polish, and slip are on the exterior surface only. Scrape
marks are preserved on the interior surfaces.• Ollas, which have an upright neck, small opening, everted rim,
and horizontal lug handles, are included in this category.• The interior surface of olla necks may be slipped immediately
below the rim.• Other jar sherds that cannot be further distinguished are
included here.
5. Kiva and Seed Jar• A rim is needed to distinguish these
vessel forms from other jar forms.• Kiva jars and seed jars are spherical
and have a circular opening.• A seed jar has a simple rim; a kiva jar
rim has a lip and seat for a lid.
4. Mug and Pitcher• Mugs are small and have straight upright
sides, a flat rim and base, and a thin, vertical handle.
• Pitchers have a globular base and a straight nect, like a gourd with the stem cut off.
• The vessel’s rim, handle, and exterior surface are often slipped, polished, and painted with intricate, small-scale designs.
6. Canteen• A rim is needed to distinguish canteens
from other jar forms.• Canteens have a short neck, an opening
small enough for a person’s lips to fit around (< 5 cm), and small, loop handles to which a strap can be attached.
7. Other• Unusual or uncommon forms, such as
effigy vessels, jar lids, feather boxes, cylinder jars, etc.
• Consult a staff person if you think you have a sherd from an unusual vessel form.
8. Unknown• Use only when vessel form cannot be
determined.
6 - 27
Sort the “part” group you are working with into the “form” groups described below. For more information on pottery vessel forms, see the “Pottery Universals.”
Next, walk each “part-form” group through Steps 3 through 9 before returning to this step for the next “part” group.
Note: Be sure to distinguish between kiva jars and seed jars, between ladles and dippers, and between mugs and pitchers on the Comments line of the analysis label.
FForm

Step 3: Sort One “PartStep 3: Sort One “Part--Form” Group by FinishForm” Group by Finish
“Finish” refers to the kind of paint that was used to produce the designs on painted white ware pottery. Two kinds of paint were used by the ancestral Pueblo people:
•Mineral Paint: This type of paint consists of compounds of iron oxide derived from rocks with high iron content.
•Carbon Paint: This type of paint type consists of carbonized sugars derived by boiling the stems and leaves of specific plants.
In our analysis, you have four options for finish: mineral paint, carbon paint, mixed paint, and indeterminate paint. Before performing this step, study the information on the Finish pages of the universals section. Be sure to have a staff person check your sort!
Sort one of your “part-form” groups by finish, then run each “part-form-finish” group through Steps 4–9 before returning to this step for the next “part-form” group.
6 - 28
FnFinish

Step 4: Sort One “PartStep 4: Sort One “Part--FormForm--Finish” Group by Pottery TypeFinish” Group by Pottery Type
Figure 6.50 is a “decision tree” designed to help you sort out the various typological options for painted sherds derived from local white ware vessels. The type code and time span of manufacture are listed with each type name, and the enumerated steps (beginning with Step 5) guide you to specific instructions and criteria on the following pages. The pottery types we use include specific “traditional” types that have a long history of use, but they also include a number of more-general (and therefore less-diagnostic) “grouped” types defined by our staff to categorize sherds that are too small or too ambiguous to be assigned to one of the more specific types. An example of a specific, traditional type is McElmoBlack-on-white; an example of a more general grouped type is Pueblo III White Painted. The most specific type to which a given sherd can be identified is the one we record during analysis. Thus, for example, it is understood that a sherdtyped as McElmo Black-on-white (most specific) is also a Pueblo III White Painted sherd (less specific) and a Late White Painted sherd (least specific). In this case, “McElmo Black-on-white” and “EBW” would be recorded on the type name and type code lines of the pottery analysis label. See also Chapter 5 for detailed descriptions of pottery wares and types.
Indeterminate Local White Painted
(IBW)(A.D. 575–1280)
Early White Painted (RBW)
A.D. 575–980
Late White Painted (LBW)
A.D.920–1280
Chapin Black-on-white (CBW)
A.D. 575–800
Piedra Black-on-white (PBW)
A.D. 800–980
Cortez Black-on-white (ZBW)
A.D. 920–1060
Mancos Black-on-white (MBW)
A.D. 920–1180
McElmo Black-on-white (EBW)
A.D. 1060–1260
Mesa Verde Black-on-white (VBW)
A.D. 1180–1280
Step 5
PII White Painted (TBW)
A.D. 920–1180
PIII White Painted (HBW)
A.D. 1060–1280Step 7
Step 6
Step 8 Step 9
Figure 6.50. Pottery-type decision tree for painted white wares.
6 - 29

Step 5: Distinguish Step 5: Distinguish Early White PaintedEarly White Painted from from Late White PaintedLate White Painted (page 1 of 2)(page 1 of 2)Early White Painted (RBW)
• Surface Treatment (Slip/Polish): Vessels may show evidence of having been wetted and rubbed with the hands during manufacture, producing uneven, undulating surfaces. Slip varies from nonexistent to thin and watery. Polish, if present, will be uneven and confined mostly to the high parts of the uneven surface.
• Paste: Usually coarse, indicating minimal processing (grinding) of the clay; identifiable by a rough cross section where the break occurs.
• Temper: Crushed igneous rock or sand. Temper particles are relatively large, they often protrude from sherd surfaces, and they are visible to the naked eye.
• Finish: Usually mineral.
Bowls and Ladles only . . .Interior/Exterior Surface Treatment: If slip and/or polish
are present, they will occur only on the interior surfaces.
Late White Painted (LBW)
• Surface Treatment (Slip/Polish): Vessels were scraped with a tool during manufacture, resulting in surfaces that range from undulating to uniform, depending on how well they were scraped. The slip is usually thicker and more evenly applied than on early white wares; polish is uniform and well done.
• Paste Usually fine, indicating more-extensive processing of the clay; identifiable by a smooth cross section where the break occurs.
• Temper: Most often crushed sherd, but sand and rock were also used. The temper particles are finer than in early white ware sherds often being invisible to the naked eye.
• Finish: Mineral, carbon, or mixed.
Bowls and Ladles only . . .Interior/Exterior Surface Treatment: Both
surfaces are usually slipped and polished, but the interior treatment is usually better executed than the exterior treatment.
See Figures 6.51 and 6.52 (next page) for examples of some of these attributes.
SP Slip and Polish
TP Temper and
Paste
FnFinish
6 - 30

Step 5: Distinguish Step 5: Distinguish Early White PaintedEarly White Painted from from Late White PaintedLate White Painted (page 2 of 2)(page 2 of 2)
Surface is poorly smoothed and uneven.
Temper protrudes above surface.
Figure 6.51. Early White Painted (RBW) surface treatment.
If present, slip is thin and watery; polish is uneven.
Figure 6.52. Late White Painted (LBW) surface preparation and treatment.
Surface can be well scraped and even, like here, or poorly scraped and undulating.
Slip can be thick and heavy; polish is even, often resulting in a shiny surface.
Temper seldom protrudes above surface.
You should now determine whether or not the sherds you have placed in each category can be subdivided further (refer to Step 4, this section). Any sherds that cannot be categorized further will be recorded using the type names and codes on this page.
6 - 31

Step 6: Distinguish Step 6: Distinguish Chapin Chapin BlackBlack--onon--whitewhite from from PiedraPiedra BlackBlack--onon--whitewhite (Page 1 of 2)(Page 1 of 2)
Chapin Black-on-white (CBW)• Surface Treatment (Slip/Polish): Looks like plain
gray pottery with paint (usually mineral). Has no slip or polish.
• Designs: are usually not oriented in relation to the rim.
Piedra Black-on-white (PBW)Surface Treatment (Slip/Polish): May have a thin, watery slip and limited polish on the highest parts of the undulating surface. On bowls, only the interior surface has slip and polish.
• Designs: are usually oriented in relation to the rim.
Figure 6.53. Narrow, parallel lines, widely spaced and poorly executed.
Figure 6.55. Dots, Z’s, and S’s used as “fillers.”
Figure 6.54. Various forms of “ticks.”
The following common Chapin Black-on-white design motifs (Figures 6.53–6.56) were used to make isolated, “floating” designs on the vessel surface.
The following common Piedra Black-on-white design motifs (Figures 6.57–6.59) were used in combination to create “overall” designs on the vessel surface.
Figure 6.57. Narrow, parallel lines, closely spaced and poorly executed.
Figure 6.58. Lines with “ticks” and lengthwise “squiggles.”
Figure 6.56. Triangles used occasionally as the only solid painted area.
Figure 6.59. Various triangle designs.
Rim decoration, if present, is a solid line for both types.
See Figures 6.60 and 6.61 (next page) for photographs of Chapin Black-on-white and Piedra Black-on-white sherds.
HINT: The presence or absence of slip can help you differentiate between these two types.
6 - 32

Step 6: Distinguish Step 6: Distinguish Chapin BlackChapin Black--onon--whitewhite from from PiedraPiedra BlackBlack--onon--whitewhite (page 2 of 2)(page 2 of 2)
You should count, weigh, label, and bag any Chapin Black-on-white (CBW) or Piedra B/ack-on-white (PBW) sherds now, using the appropriate type names and codes. Any sherds that cannot be assigned to these more specific categories should be recorded simply as Early White Painted (RBW).
Figure 6.60. Examples of Chapin Black-on-white (CBW) sherds. Figure 6.61. Examples of Piedra Black-on-white (PBW) sherds.
6 - 33
CW Count and
Weight
LLabel
BBag

Step 7: Distinguish Step 7: Distinguish Pueblo II White PaintedPueblo II White Painted from from Pueblo III White PaintedPueblo III White Painted (page 1 of 2)(page 1 of 2)
Pueblo II White Painted (TBW)•Rim Shape: Tapered and pointed or rounded, often shaped with the hands.
•Rim Decoration: If present, a thin, solid line around the circumference of the rim is typical.
•Thickness: Usually thinner than PIII White Painted (4–5 mm).
•Surface Treatment: Varies greatly, from hand-built without the aid of a scraper to well scraped. Slip varies from thin and watery to thick and creamy; polish may vary from poorly polished to highly polished.
Pueblo III White Painted (HBW)•Rim Shape: Slightly tapered to untapered; flattened on top; usually shaped with a scraper.
•Rim Decoration: If present, ticks, dots, and other simple, repeating designs are typical.
•Thickness: Usually thicker than Pueblo II White Painted (6–7 mm).
•Surface Treatment: Vessels are generally well scraped. Slip is usually thick and crazed (crackled), completely obscuring the body clay; surface is also well polished to a smooth, lustrous finish.
Bowls and ladles only . . . •Interior/Exterior Surface Treatment: Both surfaces may be slipped and polished, but the interior surface is usually treated with much more care.
•Bowl Shape: U-shaped—that is, shaped like the base of an inverted cone, producing fairly straight, sloping sides and a flattened bottom (Figure 6.62).
Bowls and ladles only . . .• Interior/Exterior Surface Treatment: Both surfaces
are well slipped and polished, and the care given to the exterior surface is more similar to that given the interior surface.
• Bowl Shape: Hemispherical, that is, shaped like a sphere that has been cut in half, producing uniformly curved sides that are vertical at the rim and horizontal at the base (Figure 6.63).
Figure 6.62. Pueblo II bowl shape.
Figure 6.63. Pueblo III bowl shape.
See Figures 6.64 and 6.65 (next page) for examples of some of these attributes.
6 - 34

Step 7: Distinguish Step 7: Distinguish Pueblo II White PaintedPueblo II White Painted from from Pueblo III White PaintedPueblo III White Painted (page 2 of 2)(page 2 of 2)
Vessel walls are more even, smoother, and thicker. Polish is usually evident on the entire surface.
Rims are squared and flattened.
Figure 6.64. PII White Painted (TBW) characteristics.
Rims are tapered and pointed or rounded.
Figure 6.65. PIII White Painted (HBW) characteristics.
Paint ticks on rim are common.
Paint on rim, if present, is a solid line.
Note that the exterior surface is not as well prepared as the interior surface.
Both the interior and the exterior surfaces are well-slipped and well-polished. Photo by David M. Grimes
Vessel walls are thinner and can be uneven or “undulating.” Polish will only be on the high points.
You should now determine whether the sherds you have placed in each category can be subdivided further (refer to Step 4, this section). Any sherds that cannot be categorized further will be recorded using the type names and codes on this page.
6 - 35

Figure 6.70. Narrow and broad parallel lines form shapes or patterns, including parallel lines with hachure.
Step 8: Distinguish Step 8: Distinguish Cortez BlackCortez Black--onon--whitewhite from from Mancos BlackMancos Black--onon--whitewhite (page 1 of 2)(page 1 of 2)
Cortez Black-on-white (ZBW)• Finish: Always has mineral paint.• Surface Treatment: Decorated surfaces are usually well scraped,
even, and smooth. Decorated surfaces are well slipped and polished.
• Design: Overall designs composed of multiple geometric elements in fluid patterns. Examples are given below (Figures 6.66–5.69).
Mancos Black-on-white (MBW)• Finish: Can have mineral, carbon, or mixed paint.• Surface Treatment: Surface preparation varies greatly, from unscraped
to basket-impressed to corrugated to well-scraped. Slip and polish vary greatly, from unslipped and unpolished to well slipped and polished.
• Design: Overall and band designs composed of geometric elements in geometric patterns. Examples are given below (Figures 6.70–6.73).
Figure 6.71. Fret motifs of various shapes are common and can be solid or hatched, triangular, rectilinear, or curvilinear.
Figure 6.72. Various triangle motifs are common.
Figure 6.73. Checkerboard patterns are common, but they can alsooccur on Cortez Black-on-white and McElmo Black-on-white sherds.
Figure 6.67. Lines can include the following:cross ticking lengthwise “squiggle” “squiggle” hachure
Figure 6.66. Multiple, narrow, parallel lines, closely spaced and generally well executed. “Squiggles” are also common.
Figure 6.69. Triangles with tick marks along the hypotenuse are common, but this design can also occur on Mancos Black-on-white sherds.
Figure 6.68. Circular scrolls and interlocking scrolls are very common.
See Figures 6.74 and 6.75 (next page) for photographs of Cortez Black-on-white and Mancos Black-on-white.
6 - 36

Step 8: Distinguish Step 8: Distinguish Cortez BlackCortez Black--onon--whitewhite from from Mancos BlackMancos Black--onon--whitewhite (page 2 of 2)(page 2 of 2)
Figure 6.74. Cortez Black-on-white (ZBW) sherds.
Figure 6.75. Mancos Black- on-white (MBW) sherds.
The high quality of the slip and polish can help you distinguish Cortez Black-on-white from Mancos Black-on-white.
NOTE: A Pueblo II White Painted sherd with carbon paint is typed as Mancos Black-on-white because Cortez Black-on-white can only have mineral paint.
You should count, weigh, label, and bag any Cortez Black-on-white (ZBW) or Mancos Black-on-white (MBW) sherds now, using the appropriate type names and codes. Any sherds that cannot be assigned to these more specific categories should be recorded simply as Pueblo II White Painted (TBW).
6 - 37
CW Count and
Weight
LLabel
BBag

Step 9: Distinguish Step 9: Distinguish McElmoMcElmo BlackBlack--onon--whitewhite from from Mesa Verde BlackMesa Verde Black--onon--whitewhite(page 1 of 3)(page 1 of 3)
McElmo Black-on-white (EBW)• Finish: Can have mineral, carbon, or mixed paint.• Bowl Exterior Decoration: Rare.• Designs: McElmo Black-on-white can be thought of as a Pueblo III
sherd with Mancos Black-on-white designs. Most designs are painted using a single brush (that is, line width is relatively uniform). Characteristics are given below (Figures 6.76–6.79).
Mesa Verde Black-on-white (VBW)• Finish: Can have mineral, carbon, or mixed paint; carbon is
most common. • Bowl Exterior Decoration: Common on very late vessels.• Designs: Complex designs that were painted using brushes of
different widths (that is, line width varies). Characteristics are given below (Figures 6.80–6.82).
Figure 6.81. Hatching is used as a background filler to accentuate the solid design elements in a banded or all-over layout.
Figure 6.77. A single, wide framing line parallel to the rim and with attached motifs that hang down is a common design.
Figure 6.78. Designs often consist of narrow or wide parallel lines made using a single brush. Designs have “true” backgrounds—that is, the white area is the “canvas” on which the design is applied; the white area does not make a distinct pattern of its own.
Figure 6.80. Banded designs parallel to the vessel rim are composed of several elements:
• A wide framing line at the top and bottom in conjunction with several narrow framing lines.
• A repetitive design between the framing lines.
• Design in the band has an active background—that is, the white area has a distinct shape or design of its own.
• Painting requires the use of brushes of different widths.
Figure 6.82. Rims can be decorated with simple repeating ticks or with more complex patterns involving gaps or lines.
Figure 6.79. When rims are decorated, they have simple, repeating ticks.
Figure 6.76. Common motifs include stepped triangles, solid frets, and checkerboards.
See Figures 6.83 and 6.84 (next page) photographs of McElmo Black-on-whiteand Mesa Verde Black-on-white sherds.
6 - 38
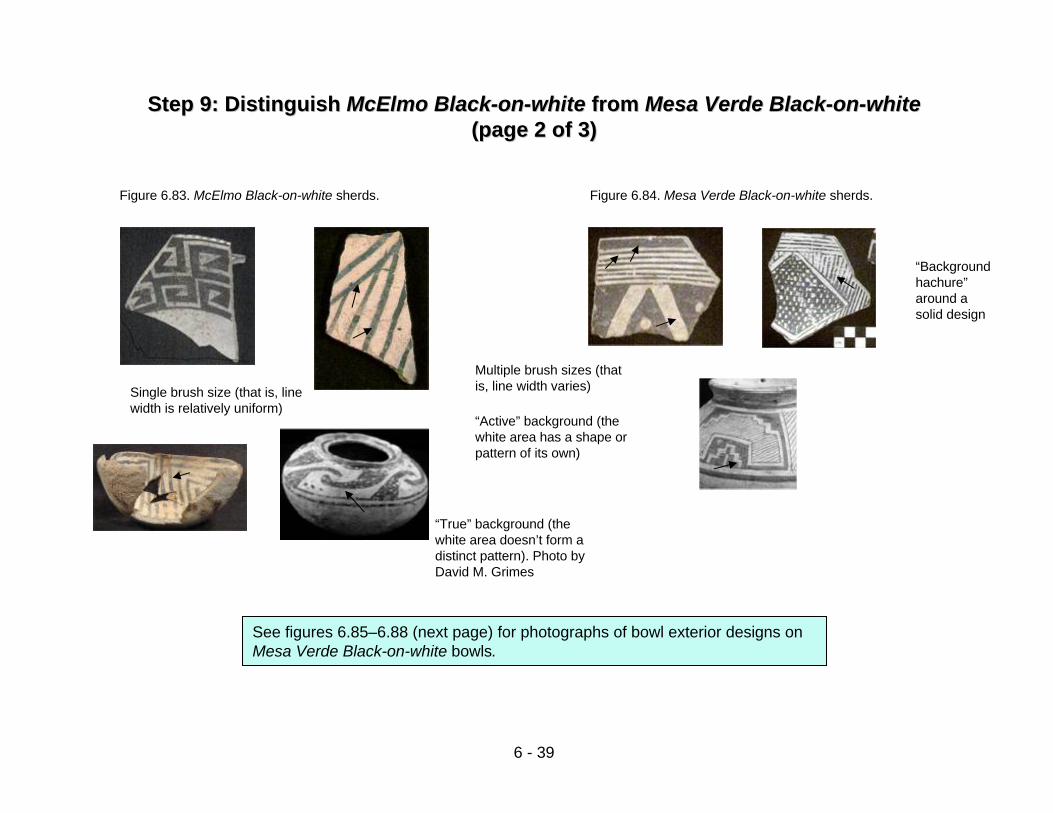
Step 9: Distinguish Step 9: Distinguish McElmoMcElmo BlackBlack--onon--whitewhite from from Mesa Verde BlackMesa Verde Black--onon--whitewhite(page 2 of 3)(page 2 of 3)
Figure 6.83. McElmo Black-on-white sherds. Figure 6.84. Mesa Verde Black-on-white sherds.
Single brush size (that is, line width is relatively uniform)
“True” background (the white area doesn’t form a distinct pattern). Photo by David M. Grimes
“Background hachure” around a solid design
Multiple brush sizes (that is, line width varies)
“Active” background (the white area has a shape or pattern of its own)
See figures 6.85–6.88 (next page) for photographs of bowl exterior designs on Mesa Verde Black-on-white bowls.
6 - 39

Step 9: Distinguish Step 9: Distinguish McElmoMcElmo BlackBlack--onon--whitewhite from from Mesa Verde BlackMesa Verde Black--onon--whitewhite(page 3 of 3)(page 3 of 3)
Examples of exterior designs on Mesa Verde Black-on-white bowls
Figure 6.87. Parallel lines. Photo by David M. Grimes
You should count, weigh, label, and bag any McElmo Black-on-white (EBW) or Mesa Verde Black-on-white (VBW) sherds now, using the appropriate type names and codes. Any sherds that cannot be assigned to these more specific categories should be recorded simply as Pueblo III White Painted (HBW).
6 - 40
CW Count and
Weight
LLabel
BBag
Figure 6.88. Animal figures. Photo by David M. Grimes
Figure 6.86. “Textile” design. Photo by David M. Grimes
Figure 6.85. Repeating band design. Photo by David M. Grimes

The topics in the following pages are called “universal” because they come into play during several different steps of pottery analysis. For example, vessel form needs to be recorded for all sherds. Instead of presenting the same information about vessel form every time it is relevant, this guide uses a red box containing a letter code (in this example, F or “Form”) to indicate the specific universal page that should be consulted. The pages in this section have the identifying box prompt in the lower right-hand corner. On many pages in this chapter you will see one or more prompts, which refer you to specific universal pages contained in this section.
Section D: Pottery Universals
The universal topics are arranged alphabetically according to code letters:
Bagging, Comments, Count and Weight, Form, Finish, Item Number, Analysis Label, Part, Slip and Polish, and Temper and Paste.
You may find it helpful to peruse all the universal topics before beginning pottery analysis.
6 - 41
BBag
CComments
CW Count and
Weight
FForm
FnFinish
IItem
Number
LLabel
PPart
SP Slip and Polish
TP Temper and
Paste

How to Bag PotteryHow to Bag Pottery
After being sorted by form, part, finish, and type, all pottery is bagged and labeled. If an artifact has beengiven an item number, as is done with rim sherds and handles, then it is bagged individually. Otherwise, all body sherdsfrom a bag of “bulk sherds, large” that can be described using the same analysis label are counted, weighed, and bagged together. For example, all jar (form) body (part) sherds with carbon paint that are identified as Mancos Black-on-white(type) should be counted, weighed, and bagged together.
Place the sherds inside an appropriately sized bag, one in which the sherds will be neither stuffed nor “swimming.” The analysis label is placed in the bag so that it can be read from the outside. When bagging a sherd that has been assigned an item number, be sure the decorated face of the piece is not obscured by the analysis label. This will facilitate checking during data entry.
To close the bag, simply fold its top over (unless the bag is very full, in which case, you should use a twist tie). When you complete the analysis of a bag of large bulk sherds, all the smaller bags you generate will be nested back inside the original bag containing the field specimen (FS) label (Figure 6.90). Be sure to place the FS label facing out, so it can be read from the outside. This larger bag will be twist-tied shut. REMEMBER, YOU ONLY TWIST TWICE!
Crow Canyon uses archival polyethylene bags. The labels are printed on acid-free archival paper.
Figure 6.90. Bagged sherds. Larger, multiple-sherd bags are at the top; the bottom row consists of individual sherds that were assigned item numbers. All will be placed back inside the original bag (left) with the FS label.
Figure 6.89. A bag of Indeterminate Local Corrugated Gray jar body sherds.
Universal Section
BBag
6 - 42
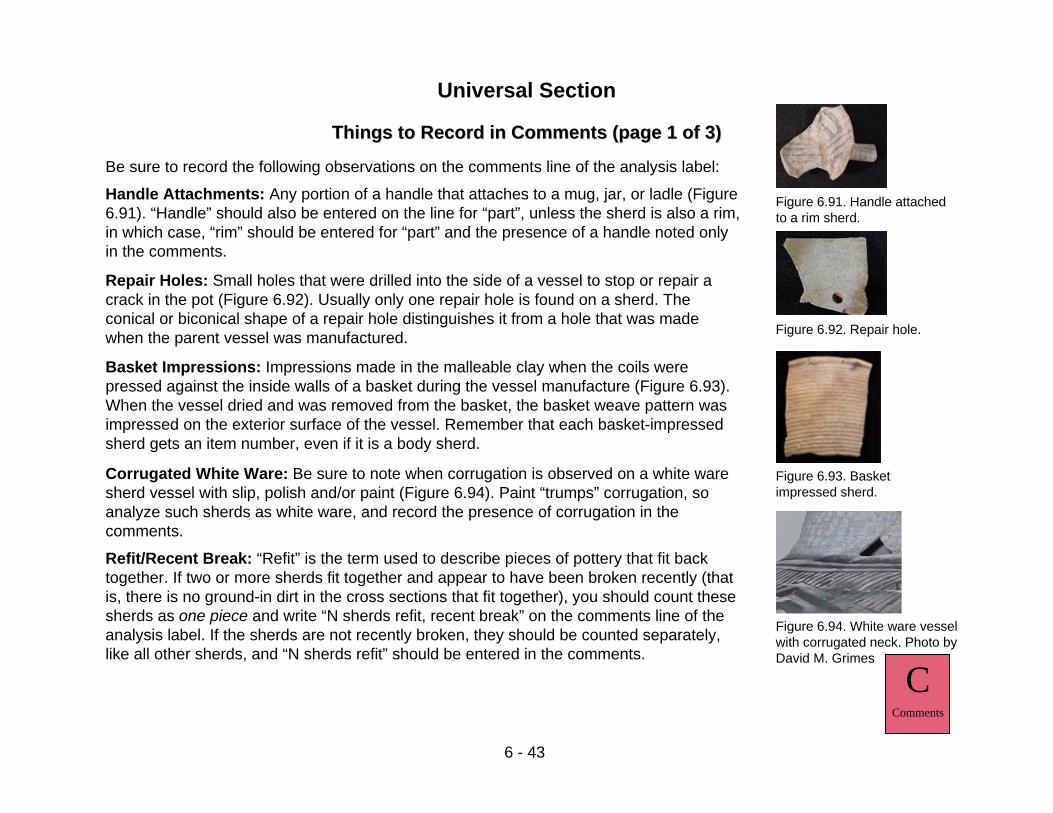
Figure 6.91. Handle attached to a rim sherd.
Figure 6.92. Repair hole.
Figure 6.94. White ware vessel with corrugated neck. Photo by David M. Grimes
Figure 6.93. Basket impressed sherd.
Repair Holes: Small holes that were drilled into the side of a vessel to stop or repair a crack in the pot (Figure 6.92). Usually only one repair hole is found on a sherd. The conical or biconical shape of a repair hole distinguishes it from a hole that was made when the parent vessel was manufactured.
Handle Attachments: Any portion of a handle that attaches to a mug, jar, or ladle (Figure 6.91). “Handle” should also be entered on the line for “part”, unless the sherd is also a rim, in which case, “rim” should be entered for “part” and the presence of a handle noted only in the comments.
Basket Impressions: Impressions made in the malleable clay when the coils were pressed against the inside walls of a basket during the vessel manufacture (Figure 6.93). When the vessel dried and was removed from the basket, the basket weave pattern was impressed on the exterior surface of the vessel. Remember that each basket-impressed sherd gets an item number, even if it is a body sherd.
Corrugated White Ware: Be sure to note when corrugation is observed on a white ware sherd vessel with slip, polish and/or paint (Figure 6.94). Paint “trumps” corrugation, so analyze such sherds as white ware, and record the presence of corrugation in the comments.
Refit/Recent Break: “Refit” is the term used to describe pieces of pottery that fit back together. If two or more sherds fit together and appear to have been broken recently (that is, there is no ground-in dirt in the cross sections that fit together), you should count these sherds as one piece and write “N sherds refit, recent break” on the comments line of the analysis label. If the sherds are not recently broken, they should be counted separately, like all other sherds, and “N sherds refit” should be entered in the comments.
Things to Record in Comments (page 1 of 3)Things to Record in Comments (page 1 of 3)
Universal Section
Be sure to record the following observations on the comments line of the analysis label:
CComments
6 - 43

Misfired/Oxidized: We describe sherds as “misfired” if it is apparent that something went wrong during the firing of the parent vessel. Sherds that are warped, discolored, vitrified (glassy or bubbly), or pitted are all considered misfired. Oxidization occurs when the clay of a vessel absorbs too much oxygen when it is being fired. The oxygen reacts with the iron in the clay and “rusts,” or discolors, the vessel, usually resulting in a buff, pink, red, or reddish brown color. This discoloration will be visible throughout the sherd (including the paste in cross section).
Kiva or Seed Jar: On the form line of the analysis label, both of these are described as kiva jars; therefore you must distinguish whether the sherd is from a kiva or a seed jar in the comments.
Trachyte or Biotite Temper: You may occasionally see fragments of biotite mica or trachyte sparkling on the surface or in the cross-section of a sherd (Figure 6.96). This usually indicates that the parent vessel was made with non local raw materials from the Chuska mountains. Such sherds can often be identified by beginning analysts (but you must be alert)!
Fugitive Red: This is a red pigment, usually powdered hematite, that was applied to the surface of some vessels after they were fired (Figure 6.95). This “fugitive” pigment tends to wash away, so such sherds should not be washed.
Figure 6.96. Biotitemica temper.
Figure 6.95. Sherd with fugitive red pigment.
Ladle or Dipper: On the form line of the analysis label, both of these are described as ladles; you therefore must record “dipper” in the comments if the sherd is from a container with a half-gourd shape.
CComments
Things to Record in Comments (page 2 of 3)Things to Record in Comments (page 2 of 3)
Universal Section
6 - 44

Some of the items listed above may be difficult to identify. Always seek the advice of a staff member if you think you should record a comment. However, please note anything that seems unusual or noteworthy.
Other Vessel Forms: These include miniatures, effigies, feather boxes, etc. They areidentified as “other” on the form line of the analysis label, but if possible you should also describe the specific form in the comments.
Use Wear: This is wear that results from repetitive rubbing, grinding, or some other action that smoothes and weathers the slip, paint, and/or paste of a vessel while it is a complete vessel. Use wear in this context is distinct from modification that occurred on an individual sherd after the parent vessel broke (see the definitions of modified sherds and shaped sherds in Chapter 4).
Corrugated Base Sherds: Any sherd that preserves the exterior center of the base of a corrugated vessel (Figure 6.97) should be given an item number and identified in comments. If you can tell the direction (clockwise, counter clockwise) of the coil, record this in your comment as well. The comment could say “Corrugated base, clockwise”, for example.
Figure 6.97. Sherdfrom the base of a corrugated jar.
6 - 45
Things to Record in Comments (page 3 of 3)Things to Record in Comments (page 3 of 3)
Universal Section
CComments

•Counting Tips: When counting large numbers of sherds, especially corrugated jar body sherds, it is often helpful to place the sherds in piles of 10 or 100 to help you keep track of the number. That way, you won’t have to start over if you lose count! Also, any sherdsthat refit across fresh breaks should be counted as a single sherd, because fresh breaks occur only during excavation or lab processing (see “Refit/Recent Break” on the Comments page).
Figure 6.98. Using the scale
•Weighing Tips: Before you weigh anything, make sure that the bubble in the circular level at the back of the scale is centered. If it is not, notify a staff member. You should also make sure the scale reads 0.0 g before proceeding (Figure 6.98). To turn on and zero the scale, press the long silver bar on the front. The scales are very sensitive and will give inaccurate or unstable readings if you lean on the table. Round all weights to the nearest tenth of a gram, or to the first placeholder after the decimal.
•Weights of Individual Sherds: Place the sherd directly on the scale and record the weight.
•Weights of Multiple Sherds: It is easiest to weigh large groups of sherds after bagging them, while accounting for the bag weight. To do this, you must first tare the scale. Find an empty plastic bag of the same size and thickness as the one you used for the sherds, place the empty bag on the scale, and then press the reset bar. This will reset the scale to 0.0 with the bag on the tray, and will return the negative bag weight when you remove the empty bag. You may then place the bag of sherds on the scale and record the weight, which will now be of the sherds, less the weight of the bag.
Every sherd that passes through the lab is counted and weighed, either individually or as a group. Each sherd that is assigned an item number is counted and weighed individually. In contrast, all sherds that do not receive item numbers and that can be described using a single analysis label are counted and weighed together.
How to Count and Weigh How to Count and Weigh SherdsSherds
Universal Section
CW Count and
Weight
6 - 46

Ladle/DipperTwo kinds of white ware sherds are assigned to this category: •A rim sherd from an “open” vessel form with tight curvature (15 cm or less) and significant use wear on the exterior edge of the rim.
•A sherd from an “open” vessel with all or a portion of a handle attachment on the exterior surface.
Sherds from dippers (ladles with a half gourd shape) are also includedin this category. Be sure to note in the comments if a ladle sherd is from a dipper. Also, note any use-wear present. Figure 6.102 illustrates the difference between ladles and dippers.
JarAll plain gray ware and corrugated gray ware sherds are assigned to the jar category, unless you have a rim sherd that is curved in such a way that it could only be from a bowl or some other vessel form. White ware and red ware sherds are assigned to the jar category on the basis of curvature and the absence of slip, polish and paint on the interior surface. Marks made when the wet clay coils were scraped during manufacture will often be visible on the interior surface of a jar sherd because jar interiors were not subsequently polished or slipped. Figure 6.99 shows examples of various jar shapes.
BowlWhite ware and red ware sherds are recorded as bowls on the basis of curvature and the presence of slip, polish, and/or paint on the interior surface. A gray ware sherd should be assigned to this category only if it is a rim and is curved in such a way that it could only be from a bowl. Figure 6.100 shows examples of bowl shapes.
Corrugated Jar Neck banded JarOlla
Figure 6.99. Jar shapes.
Figure 6.100. Bowl shapes.Figure 6.102. Ladle (left) and dipper (right) forms.
Mug/PitcherWhite ware sherds from small, cylindrical vessels with single handles are characterized as mug sherds. Mugs often have a well-prepared and intricately painted exterior and a thin, well-prepared strap handle (Figure 6.101). The top part of the interior of a mug is sometimes slipped and polished.
Sherds from pitchers (mugs with a gourd shape) are also included in this category. Be sure to note in the comments if a mug sherd is from a pitcher.
Pottery Forms (page 1 of 2): Common FormsPottery Forms (page 1 of 2): Common Forms
Universal Section
FForm
Figure 6.101. Pitcher (left) and mug (center and right) forms.
6 - 47
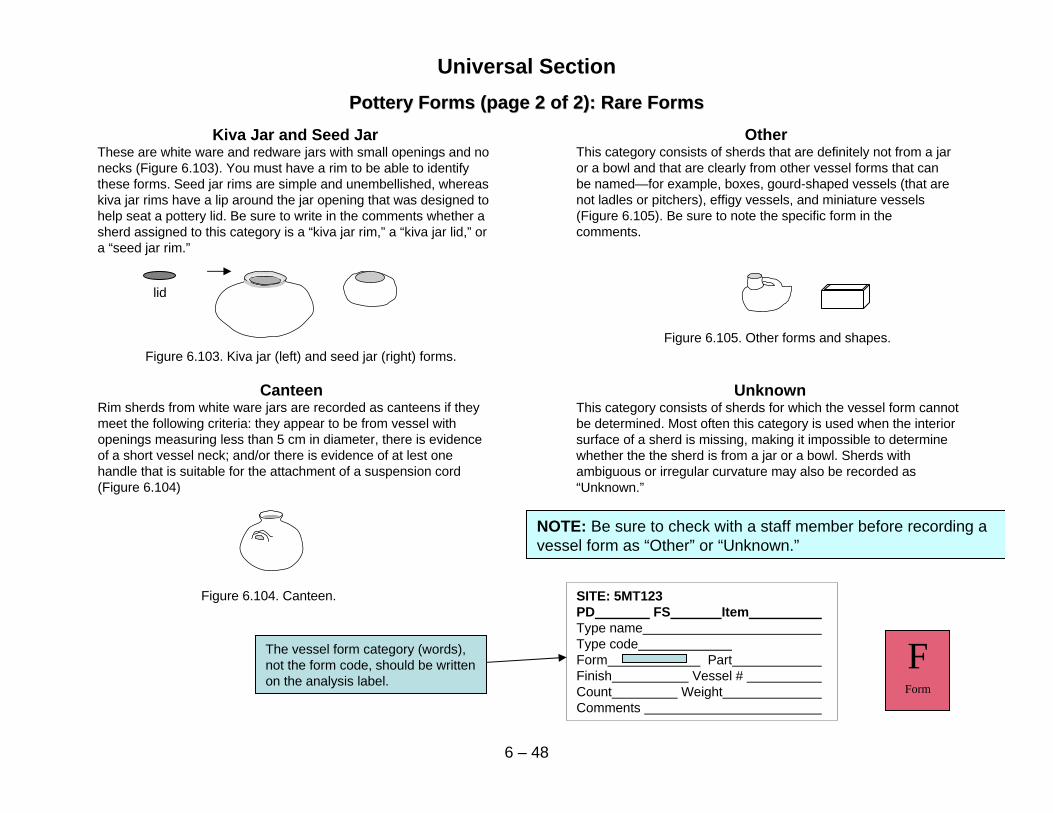
OtherThis category consists of sherds that are definitely not from a jar or a bowl and that are clearly from other vessel forms that can be named—for example, boxes, gourd-shaped vessels (that are not ladles or pitchers), effigy vessels, and miniature vessels (Figure 6.105). Be sure to note the specific form in the comments.
Kiva Jar and Seed JarThese are white ware and redware jars with small openings and no necks (Figure 6.103). You must have a rim to be able to identifythese forms. Seed jar rims are simple and unembellished, whereaskiva jar rims have a lip around the jar opening that was designed tohelp seat a pottery lid. Be sure to write in the comments whether a sherd assigned to this category is a “kiva jar rim,” a “kiva jar lid,” or a “seed jar rim.”
CanteenRim sherds from white ware jars are recorded as canteens if they meet the following criteria: they appear to be from vessel with openings measuring less than 5 cm in diameter, there is evidenceof a short vessel neck; and/or there is evidence of at lest one handle that is suitable for the attachment of a suspension cord (Figure 6.104)
UnknownThis category consists of sherds for which the vessel form cannot be determined. Most often this category is used when the interior surface of a sherd is missing, making it impossible to determine whether the the sherd is from a jar or a bowl. Sherds with ambiguous or irregular curvature may also be recorded as “Unknown.”
lid
Figure 6.103. Kiva jar (left) and seed jar (right) forms.
Figure 6.104. Canteen.
Figure 6.105. Other forms and shapes.
NOTE: Be sure to check with a staff member before recording a vessel form as “Other” or “Unknown.”
SITE: 5MT123 PD FS ItemType nameType codeForm PartFinish Vessel # Count WeightComments
The vessel form category (words), not the form code, should be written on the analysis label.
Pottery Forms (page 2 of 2): Rare FormsPottery Forms (page 2 of 2): Rare Forms
Universal Section
6 – 48
FForm

Paint is entered on the analysis label as carbon, mineral, mixed, or indeterminate.
– The paint covers the vessel surface but does not soak into it. (Note: The slip is visible under the paint.)
– If the paint is thick, the vessel surface will not be visible through the paint.
– The paint can be dull to shiny, but it is usually “different” than the sheen of the vessel surface.
– The color can vary from black to reddish brown.
– The paint has a fine but grainy texture.– The paint edges are sharp and do not
“bleed.”– The paint frequently flakes off, exposing
the vessel surface underneath.
Mineral Paint • The main ingredient of mineral paint is a finely ground iron
oxide derived from specific rocks with a high iron content. • The ground mineral paint is mixed with water, carbon paint, or
other liquid medium for application to the vessel surface (Figure 6.106)..
• Because it is applied as a mixture, mineral paint behaves like an oil paint–that is, it sits upon and covers the vessel surface, producing the following characteristics:
– The paint soaks into the vessel surface (note the stained appearance).
– The paint edges are often “fuzzy,” the result of “bleeding” into surrounding unpainted areas.
– Marks from surface preparation are visible through the paint (note the polishing marks visible in both painted and unpainted areas).
– The painted and unpainted areas have the same luster, which is dependent on the degree of polish, not on the properties of the applied paint.
– The color can range from a bluish black to brown.
– The paint can appear “washed out” if it was over-diluted with water before application to the vessel surface.
– The paint can appear “puddled” because gravity pulls the pigment downward as it dries.
Carbon Paint• Carbon paint consists of a sugar solution derived by boiling the
leaves and stems of specific plants such as Rocky Mountain beeweed (Figure 6.107).
• Because it is a solution, carbon paint behaves like a watercolor or stain, soaking into the vessel surface and producing the following characteristics:
Mixed Paint and Indeterminate Paint The mixed paint category is used when mineral and carbon paints occur distinctly and separately on the same sherd. It is NOT used when there is a physical “blend” of the two paint types. Mineral paint requires some sort of binder or glue to hold the pigment on the vessel surface prior to firing. In some cases, this binder contains organic pigment, resulting in a paint that exhibits characteristics of both paint types. In this case, the paint type is coded as “mineral.” Indeterminateis used when the paint type cannot be determined from the available evidence.
SITE: 5MT123 PD FS ItemType nameType codeForm PartFinish Vessel # Count WeightComments
Figure 6.107. Sherd with carbon paint.
NOTE: Finish for red ware sherds is determined on the basis of slip. See the “Slip and Polish” page for more information on red ware finish.
Figure 6.106. Sherd with mineral paint.
FnFinish
White Ware Finish: Paint TypesWhite Ware Finish: Paint TypesUniversal Section
6 - 49

Item numbers are assigned in numerical sequence within each lot of analyzed pottery assigned a given FS number (usually a bag with a provenience label). These numbers are used to identify sherds for which we will collect additional data after basic pottery analysis is complete. Assigning item numbers during pottery analysis ensures that all future data collected for such sherds will be relatable at the level of the individual sherd. No two sherds in our collections will have the same combination of site, PD, FS, and item numbers.
We assign item numbers to each rim sherd (Figure 6.108), basket impressed sherd (Figure 6.109), handle or handle fragment (Figure 6.110), and corrugated jar base (Figure 6.111).
The sequence of item numbers continues from the first corrugated rim through the last white ware rim in a bag of sherds. You should not start a new number sequence when you proceed from corrugated sherds to other sherds and then to painted sherds.
Sherds assigned item numbers are always bagged individually with their own analysis labels.
SITE: 5MT123 PD FS ItemType nameType codeForm PartFinish Vessel # Count WeightComments
Once an item number is assigned, be sure to record it on the pottery analysis label and add a comment, if necessary.
Figure 6.108. Rim sherd.
Figure 6.109. Basket-impressed sherd.
Figure 6.110. Handle fragment.
Figure 6.111. Base of a corrugated jar.
Item NumbersItem Numbers
Universal Section
IItem
Number
6 - 50

SITE: 5MT123 PD FS ItemType nameType codeForm PartFinish Vessel # Count WeightComments
PD: This is an acronym for “provenience designation number.” Each unique three-dimensional space excavated at a site is assigned a unique number by the field crew. You will find this number should be written on the FS label of your bag.
FS: This is an acronym for “field specimen” number. A unique FS number is assigned to each category of artifact or sample collected from a PD. You will find this number on the FS label of your bag.
Item: This is a number assigned sequentially within an FS to each rim sherd, basket-impressed sherd, corrugated jar base, and handle sherd.
Type Name: The full name of a pottery type.
Type Code: The three-letter code associated with a given type name.
Form: The shape of the parent vessel. Write the form description, not the form code, in this space.
Part: Record this as body, handle, or rim. Write the part description, not the part code, in this space.
Finish: For painted white ware sherds, paint type is recorded here. For red ware sherds, the presence or absence of slip is recorded. Write the finish description, not the finish code, in this space.
Count and Weight: Record the total number of sherds described by this label. If the label refers to a piece to which an item number has been assigned, the count should be “1.” The weight of sherds described by the label should be recorded to the nearest tenth of a gram.
Vessel #: This line is filled out when enough sherds refit for a direct measurement of a vessel dimension to be taken; all those sherdsare bagged together. Sherds that are not from the same vessel are bagged separately and a dash should be entered on the vessel # line. Vessel numbers are assigned sequentially across the entire collection from a site.
Comments: A variety of information is recorded in comments.
NOTE: You should enter a dash (–) for every label entry that is not applicable for a given sherd or set of sherds. This will document that you have not forgotten to record something that should be recorded!
How to Fill Out the Analysis LabelHow to Fill Out the Analysis Label
Universal Section
6 - 51
LLabel

Body sherds
Rim sherds
Handles
SITE: 5MT123 PD FS ItemType nameType codeForm PartFinish Vessel # Count WeightComments
Remember: Each rim and handle sherdis given an item number and bagged individually.
Write out “Body,” “Handle,” or “Rim” on the analysis label. Do not use the part code.
HandleHandles include all sherds with evidence of a handle or handle attachment (Figure 6.114). If portions of both a handle and a rim are present on the same sherd, ”rim” trumps “handle.”
Figure 6.114. Handle sherd.
RimRim sherds preserve a portion of the finished lip or mouth of a vessel (Figure 6.113). The rim edge should look uniform in color whereas on a broken edge you should see a a dark streak in the cross section. Be careful not to mistake use wear or a broken coil of a corrugated or neckbanded jar for a rim.
Figure 6.113. Rim sherd.
Figure 6.113. Pottery vessel parts.
BodyBody sherds include all sherds that do not preserve portions of a rim or handle (Figure 6.112).
Figure 6.112. Body sherd.
There are only three options for vessel part: body, rim, and handle (Figure 6.113). Because “body” is the default option, youcan record vessel part for every sherd.
Vessel PartVessel Part
Universal Section
PPart
6 - 52

“Slip” refers to a thin wash of water and clay applied to the surface of a pottery vessel after it is formed. If slip is applied thickly enough, it will obscure the temper particles and scrape marks that would otherwise be visible on the surface and, once fired, will have a crazed or crackled, appearance. The slip often is a different color than the underlying paste. Figure 6.115—6.117 show examples of slipped and unslipped sherds.
“Polish” is created by rubbing a smooth stone over the surface of a vessel after it has partly dried but before it is painted. Polishing produces a smooth, lustrous finish. Polishing marks—broad and flat shiny streaks—are often visible. Polishing also obliterates scrape marks, the thin, linear scratches created when the vessel was formed. Figures 6.116 and 6.117 show examples of polished sherds.
Figure 6.115. Unslippedwhite ware sherd.
Figure 6.116. Unslipped, polished red ware sherd.
Figure 6.117. Slipped, polished red ware sherd.
Remember: “Finish” for red ware sherds is determined on the basis of slip.
SITE: 5MT123 PD FS ItemType nameType codeForm PartFinish Vessel # Count WeightComments
If you are describing red ware sherds, write “Slipped,” “Unslipped,” or “Indeterminate” on the finish line of the analysis label. Although white ware sherds are usually slipped, we do not record the presence or absence of slip in our analysis.
Slip and PolishSlip and Polish
Universal Section
6 - 53
SP Slip and Polish

•Corrugated gray and plain gray pottery is always tempered with large fragments of crushed igneous or sedimentary rock that is visible to the naked eye.
•The temper in early white ware is often crushed rock but the temper size is much smaller than in corrugated gray ware or plain gray ware.
•Any white ware sherd with crushed-sherd temper is a late white ware. Crushed sherd temper has the same consistency as the surrounding paste, and will often be invisible to the naked eye. Any white ware sherd with crushed-sherd temper is a late white ware.
•Sparkly trachybasalt or biotite mica temper is characteristic of imported Chuskanpottery.
Figure 6.118. Temper particles are visible in this sherds cross section.
Paste refers to the mixture of clay, temper, and water used to make a pottery vessel. Most of the clays used in ancestral Pueblo pottery derived from sedimentary shales, and they were mined from bedrock or residual bedrock sources. The relative coarseness of pottery paste changed through time. Gray and early white ware pastes consist of coarsely ground clay and temper particles, and late white ware pastes consist of more finely ground clay and temper.
Temper and Paste (page 1 of 2): DefinitionsTemper and Paste (page 1 of 2): Definitions
Universal Section
6 - 54
TP Temper and
Paste
Temper refers to aplastic material that is mixed with clay and water during the manufacturing process (Figure 6.118). Temper makes the resultant paste (see below) more flexible, it reduces shrinkage, and it protects against cracking as newly formed vessels are dried. It also makes cooking pots more resistant to thermal stress after they have been fired. The tempers used by ancient potters in Southwestern Colorado include recycled pottery sherds, crushed igneous and sedimentary rocks, and sand.
Identification of tempers can help us distinguish gray ware from white ware, early white ware from late white ware, and imported pottery from local pottery:

Plain and NeckbandedGray ware
Basketmaker III–Pueblo 1
Early White Unpainted/Early White Painted Basketmaker III–
Pueblo I
Late White Unpainted/Late White Painted
Pueblo II–Pueblo III
Indeterminate Local White
Unpainted (IND) Pueblo I–Pueblo III
Coarse FineTemper and
Paste
Less-coarse temper visible on surface; usually crushed rock or
sand
Slightly smoother especially on “high
points”
Less-coarse paste; breaks more
evenly
More-even surface
Coarse temper visible on surface; usually
crushed rock or sand
Scrape marks visible
Rough, uneven surface
Coarse paste; breaks unevenly
Distinguishing Gray Ware Paste from White Ware PasteDistinguishing Gray Ware Paste from White Ware Paste
•Coarse paste and coarse temper.•Coarse paste and coarse temper but finer than gray ware temper. •Fine paste and fine temper.
Sherds that cannot clearly be identified as Early White Unpainted or Late White Unpainted.
Fine temper; often crushed sherd; not visible on surface
Very smooth and well polished; bowls more so on interior
surface
Fine paste; breaks smoothly; often has a
darker center, or “carbon streak”
Very even surface
Temper and Paste (page 2 of 2): DefinitionsTemper and Paste (page 2 of 2): Definitions
Universal Section
Figure 6.119. Comparison of Temper and Paste on Gray ware, Early and Late White wares.
6 - 55
TP Temper and
Paste

7 - 1
Chapter 7Detailed Pottery Analyses
During basic pottery analysis (see Chapter 6), we identify the ware, type, form, part, and finishof every sherd cataloged as “bulk sherds, large.” After this basic analysis has been completedand the information entered into the database (see Figure 2.1), we record additional data about avariety of pottery artifacts, including whole and reconstructed vessels, unfired sherds, modifiedand shaped sherds, and rim sherds from selected spatial or temporal contexts. The followinganalyses are conducted as standard steps in the processing of pottery assemblages from ourexcavations: reconstructible-vessel analysis, rim-arc analysis, and temper analysis. Each of theseis described in the following pages.
Reconstructible-Vessel Analysis
In the Crow Canyon lab, the term reconstructible vessel refers to (1) sets of conjoining sherdsthat make up enough of a vessel that at least one vessel dimension can be measured, and (2)vessels that are recovered intact or nearly so. We assign a vessel number to each reconstructiblevessel found in the assemblage from a site. This number is associated with the analysis recordsfor the relevant sherds in the basic pottery analysis data table and with a record in our vesselanalysis data table.
The identification of vessels begins in the field. As a site is excavated, members of the field staffnote any intact vessels and/or clusters of sherds that appear to be from reconstructible vessels asthey are uncovered. The “find spots” of these items are plotted on a map, and point-locationnumbers are assigned to the objects depicted on the map. These items are then bagged separatelyand labeled to alert the lab to their presence.
Members of the lab staff also look for potential reconstructible vessels when artifacts arescreened and washed after being brought in from the field. The assessment of potentialreconstructible vessels is based on sherd size (large sherds that give a sense of vesseldimensions), the number of sherds from the same vessel (that is, sherds that refit and/or have thesame surface and stylistic treatments), and context (structure floors and formal midden depositsare contexts in which whole or partial vessels are most likely to be found).
Finally, the lab staff identify reconstructible vessels during cataloging and basic pottery analysis.During cataloging, any comments on the field bag related to reconstructible vessels are copied tothe comments line of the Field Specimen (FS) Form associated with that FS and PL number.During basic pottery analysis, vessel numbers are assigned to all reconstructible vesselsidentified in previous processing steps, and a final check is made for additional vessels that mayhave been overlooked earlier.
As each vessel is recognized, a member of the lab staff assigns a unique number to that vessel.Vessel numbers are assigned sequentially as vessels are identified within a site assemblage, and

7 - 2
they are documented in a reconstructible-vessel log for that site. This log consists of potteryvessel analysis forms (Figure 7.1), one form per vessel, on which all information about a givenvessel is recorded.
The pottery data table also links the vessel number with the pottery analysis records for thesherds that make up the vessel. After the completion of basic pottery analysis, the database canbe queried for a list of all sherds from reconstructible vessels and their proveniences. Adjacentproveniences may then be searched for additional sherds that might be associated with a givenvessel.
In order to collect reconstructible-vessel data, we must temporarily refit the sherds from eachvessel. This task is usually performed by volunteers, staff, and/or interns (Figures 7.2-7.4). As avessel is being reassembled, the sherds are held in place by masking tape. To ensure that wemaintain provenience control during this process, an additional piece of masking tape is fixed toeach sherd and labeled with the PD, FS, and item numbers for that sherd. Once the pieces of avessel have been refit, the appropriate data are recorded on the Pottery Vessel Analysis Form andthe vessel is photographed (these steps are described in detail below). After the data have beenrecorded and the photographs taken, all masking tape is removed and the individual sherds areplaced back in their original curation bags.
Recording Reconstructible-Vessel Data
Reconstructible-vessel data reside in computer data tables that store information on vessel type,form, size, use, modification, and completeness, as well as various volumetric and dimensionalmeasurements. The following information is recorded on the Pottery Vessel Analysis Form(Figure 7.1) and subsequently entered into the computer:
C pottery typeC vessel formC size classC modified-form classC vessel volume, weight, and dimensions (a variety of measurements are recorded)C handles/applicationsC modification and use wear (a variety of attributes are recorded)C condition and estimated portion present
In the following paragraphs we describe these variables and their attributes.
Pottery Type
This is a qualitative variable that refers to the pottery type designation appropriate to the entirevessel. Because our basic pottery analysis is sherd-based—that is, each sherd is evaluated as anindividual item—the pottery types recorded for individual sherds from a single vessel oftendiffer from one another and from the pottery type assigned to the vessel as a whole. During
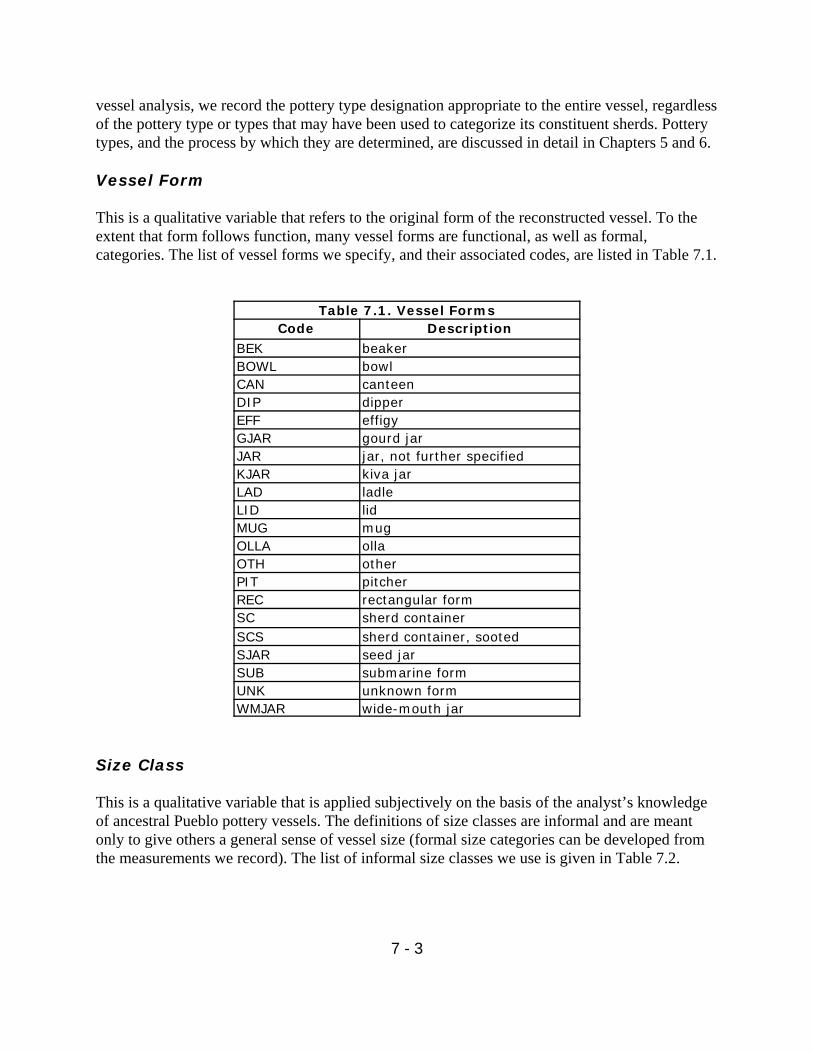
7 - 3
vessel analysis, we record the pottery type designation appropriate to the entire vessel, regardlessof the pottery type or types that may have been used to categorize its constituent sherds. Potterytypes, and the process by which they are determined, are discussed in detail in Chapters 5 and 6.
Vessel Form
This is a qualitative variable that refers to the original form of the reconstructed vessel. To theextent that form follows function, many vessel forms are functional, as well as formal,categories. The list of vessel forms we specify, and their associated codes, are listed in Table 7.1.
Table 7.1. Vessel FormsCode Description
BEK beakerBOWL bowlCAN canteenDIP dipperEFF effigyGJAR gourd jarJAR jar, not further specifiedKJAR kiva jarLAD ladleLID lidMUG mugOLLA ollaOTH otherPIT pitcherREC rectangular formSC sherd containerSCS sherd container, sootedSJAR seed jarSUB submarine formUNK unknown formWMJAR wide-mouth jar
Size Class
This is a qualitative variable that is applied subjectively on the basis of the analyst’s knowledgeof ancestral Pueblo pottery vessels. The definitions of size classes are informal and are meantonly to give others a general sense of vessel size (formal size categories can be developed fromthe measurements we record). The list of informal size classes we use is given in Table 7.2.

7 - 4
Table 7.2. Size ClassCode Description
LG largeMED mediumMIN miniatureSM small
Modified-Form Class
Modified-form class is recorded for still-usable containers that were created when portions oftheir parent vessels were removed through chipping and/or grinding, resulting in a change inform and probably use. Modified vessels most often were created after their parent vessels brokeor were no longer usable for their original intended functions. We often refer to modified vesselsderived from broken vessels as “sherd containers.” Because there is no defined list of options forthis variable, entries in this field consist of descriptive labels (for example, “puki” and “sherdplate.”
Vessel Volume, Weight, and Dimensions
A variety of data pertinent to a vessel’s size and shape are recorded. See Figure 7.5 forillustrations of specific vessel dimensions. Some measurements are not applicable for certainvessel forms, and many measurements cannot be obtained for partial reconstructible vessels. Thetools used to obtain these vessel measurements include, but are not limited to, calipers, tapemeasures (with millimeter increments), osteometric boards, bird seed and graduated cylinders(for volume), and a digital scale (for weight). Dimensions are recorded in millimeters (mm),volumes are recorded in milliliters (ml), and weights are recorded in grams (g). Brief instructionsfor how to record each measurement are given below.
Maximum Diameter: Record the largest diameter on the exterior surface of the vessel.
Maximum Diameter Height: Measure the height above the base where the maximum diametermeasurement was taken.
Orifice Diameter: On a jar, measure the inside of the narrowest point on the neck. On a bowl,measure the interior rim edge.
Orifice Diameter Height: On a jar, record the height above the base where the orifice diametermeasurement was taken. On a bowl, the orifice diameter height is identical to the rim height.
Rim Diameter: On a bowl, measure the diameter of the outside lip of the vessel rim. On a bowl,rim diameter is identical to the maximum diameter.
Rim Height: Measure the total height from the base to the rim.

7 - 5
Rim Thickness: Record the average thickness of the rim.
Body Wall Thickness: This may be obtained by measuring the thickness of individual sherds thatmake up a reconstructible vessel. Note if the measurement is an average.
Effective Volume: Use bird seed to determine volume. Fill the vessel to the rim of a bowl and tothe inflection point of a jar, and then measure the volume by pouring the bird seed into graduatedcylinders.
Total volume: Use bird seed to determine volume. Fill the vessel to the rim and then measure thevolume using graduated cylinders.
Sherd Container Volume: Follow the same procedure as above for effective volume.
Sherd Container Diameter: Measure the maximum width of the vessel in the same way that rimdiameter is measured.
Weight: Record the weight of the reconstructed vessel; also note the weight of the unreconstructed portion.
Certain measurements were recorded in the past but are not part of our current analysis. Becausesome data for these discontinued measurements are present in our database, they are describedhere using small type.
Inflection Point Diameter: This measurement is usually the same as the orifice diameter (depending on the vesselform), but is measured from the outside of the vessel.
Inflection Point Height: This measurement is taken from the base to the inflection point on the outside of the vessel.
Condition
Two variables are used to record vessel condition. The “Completeness” of the vessel asencountered in the collection is described using the categories in Table 7.7; and the “estimatedportion present” is estimated to the nearest 5% when the sherds from a vessel are reconstructed.Both measures are entered in the appropriate spaces on the Pottery Vessel Analysis Form.

7 - 6
Table 7.3. CompletenessCode DescriptionCRV complete, reconstructibleCUV complete, unbrokenNCV nearly completeORS other refitted sherdsPV partial
Handles/Applications
These attributes document the type and placement of handles or applications. Tables 7.4 and 7.5describe the handle types, handle locations, and the database codes for these attributes.
Table 7.4. Handle TypeCode Description
AF animal formAS application scarCF coil formLH lug handleOH other handleSF spiral form
Table 7.5. Handle LocationCode Description
BA baseBO bodyH handleI interiorL lipN neckO otherR rimS shoulder
Modification/Use-wear
Modification and use-wear are modifications to a vessel that do not affect its original form andpresumed function. Several attributes document these modifications, including: use wear type,location, coverage, and degree of expression. Use-wear type codes and descriptions are given in

7 - 7
Table 7.6. Use-wear location is described using the codes in Table 7.7, and/or the handlelocation codes (Table 7.5). Coverage is a percentage estimate of the vessel surface area that iscovered by a given type of use wear. Finally, degree of expression is a qualitative attribute thatrecords whether the modification is slight, moderate, or heavy.
Table 7.6. Use Wear Type Code Description
A abrasionS sootingST striations
Table 7.7. Use-Wear LocationCode Description
E exteriorH handleI interiorL lipN neckR rim
Other Data Recorded with Reconstructible Vessels
The Pottery Vessel Analysis Form also includes a large space for written description and notes.Although the analyst may exercise some discretion in what he or she deems noteworthy, thefollowing information is required in the “Description/Explanation” section of the form:
• Provenience information: Record the study unit type(s) and number(s) (for example,Structure 101, Nonstructure 211, Arbitrary Unit 302), as well as the PD, FS, and PLnumbers for sherds associated with each vessel. This information helps the lab staffmanage the collections and data.
• Sherd analysis data: Record general descriptive data about the sherds that make up thevessel (for example, 11 bowl bodies and three bowl rims).
• Photograph numbers: Photographs are almost always helpful in documentingreconstructed vessels. If photos are taken, the roll and frame numbers should be recordedin the vessel description section.
• Vessel illustration: Sketch the vessel, as reconstructed, on a separate sheet of paper.Label the sheet with the site number and vessel number and attach it to the Pottery Vessel

7 - 8
Analysis Form for that vessel.
• Location: Note the location of the sherds or vessel (for example, “stored in bulk sherds,”or “on display in curation room”).
Photographing Reconstructible Vessels
Photography is an important part of the documentation process for reconstructible vessels. Inaddition to supplementing descriptive information on the Pottery Vessel Analysis Form, photosare used in Crow Canyon’s publications, including on-line databases. We currently photographreconstructible vessels on color slide film to ensure safe archiving of the images; however, it islikely that we will incorporate digital photography into our procedures in the future.
Photographs of reconstructible vessels are taken in the lab. Once a vessel is reconstructed andanalyzed, it is prepared for photography. This generally requires removing as much masking tapeas possible without compromising provenience control or the stability of the vessel. Anappropriate background is selected, usually a black or gray felt. Metric scales are used in allcases unless a particular detail shot of a vessel is desired.
A 35-mm camera, mounted on a tripod, is used to shoot the photos. If artificial light is used, thelight from two to three incandescent lights is bounced off white walls or a foam-core backgroundsurrounding the subject to provide indirect lighting. We also use indirect natural light comingthrough a window when possible. Using a cable release, a low-speed setting (usually no less than½ second), and a low-speed slide film, we can produce a high-quality slide image of the artifact.One or more photographs from different angles may be taken to show the vessel’s form anddesign elements.
Detailed Rim-Sherd Analysis
We normally collect data on a variety of attributes on samples of rim sherds after completingbasic pottery analysis of the entire sherd collection. We conduct detailed analysis only onsamples of rim sherds in a collection for several reasons. First, we focus on rim sherds becausethey preserve more attributes of their parent vessels than is the case for body sherds, and it isoften possible for us to control for those sherds that derive from the same vessel using rimsherds. As a result, detailed analysis data can be conceived of as representing vessel attributes asopposed to sherd attributes. Second, it is time-consuming to collect such data, and it requiressubstantial training beyond that which can be accomplished in the context of our publiceducation programs. As a result only staff and interns are normally capable of collecting suchdata consistently and accurately. Finally, detailed analysis data are most germane to specificresearch questions that are most easily answered using material from tightly controlled spatialand temporal contexts. Thus, collecting detailed analysis data for rim sherds from all contextswould involve significant unproductive time and expense.
The selection of rim-sherd samples for detailed analysis varies from project to project based on

7 - 9
our research design and the nature of the contexts encountered during field work. Currently, wecollect detailed analysis data from samples of rims from gray ware jars (including plain andcorrugated jars) and white ware bowls from well-dated midden contexts. However, additionalvessel forms and contexts have been analyzed in the past for specific purposes (see, for example,Pierce et al. 1999*2). In addition, we normally select a subset of rims that are large enough (asjudged by their weights recorded during pottery analysis) to allow us to accurately record theattributes we are interested in. Our experience is that rim sherds weighing less than 2 g arealmost always too small for detailed analysis.
We typically collect data on a variety of attributes of rim sherds, including rim-arcmeasurements, temper and paste characteristics, design attributes, and rim form attributes.Because the specific attributes studied varies from project to project, and varies across wares andforms, we do not maintain a standard form that we use every time we conduct rim-sherdanalysis. Rather, we design a form for the specific data we wish to record for a given collectionfor each type of rim analyzed (corrugated jar, white ware bowl, etc.). We have found that it ismost efficient to first determine the full suite of attributes we wish to record for a single sampleof rim sherds, and then to create the forms and database tables necessary so we can record all theattributes we are interested in at once during detailed pottery analysis.
Once the sample of rim sherds to be analyzed is chosen, an inventory is created using a query ofthe basic pottery analysis data. This inventory lists the PD, FS, and Item Numbers, as well as thebasic pottery analysis data for each artifact. As each sherd is analyzed, it is checked off theinventory list. If any corrections to the original pottery analysis data are warranted, they shouldbe written on the inventory and the changes made in the database at the conclusion of analysis.Each analyzed sherd is identified on the recording sheet using its catalog information (Site, PD,FS, and Item numbers) on the inventory list and on the analysis label associated with the sherd.This ensures that any future data collected from that sherd can be linked to the detailed analysisresults.
Although the complete list of attributes examined in detailed rim-sherd analysis varies fromproject to project, we collect rim-arc and temper data as standard procedure during detailedpottery analysis. We therefore describe the methods we use in collecting these data in thefollowing paragraphs. For details on additional design and form attributes collected duringvarious projects, see the “Artifacts” chapters for various projects available on Crow Canyon’sweb site.
Rim-Arc Analysis
Rim-arc analysis is a method of estimating the proportion of a vessel circumference representedby a rim sherd, and the rim diameter of the original vessel, based on the length and curvature of arim sherd from that vessel. Such data yield important information about vessel sizes, relativenumbers, and details of vessel shapes. For a discussion on the interpretation of rim-arc data, thereader is referred to Pierce and others (1999*2). The way we take rim-radius and degree-of-arcmeasurements is described below:

7 - 10
Radius: Place the rim surface in the center of the rim-arc template in proper orientation (asthough it were sitting upside down in a complete vessel) and slide the sherd outward until thebest fit is found between the outside edge of the rim and one of the nested circles on the template(Figure 7.7). The template circles are in centimeter intervals. Record the radius estimate to thenearest centimeter.
Degrees of Arc: Once the radius estimate has been determined, the degrees of arc represented bythat rim segment can be estimated by determining the slice of a 360 degree pie represented bythat rim. This should be done to the nearest 5 degrees using the guides on the rim-arc template.
When too little of the rim is present for a specific measurement, a line should be drawn throughthe relevant space to indicate that no measurement could be made. A note should also be addedin comments stating why no information was recorded.
Temper Analysis
Temper refers to the aplastic inclusions that are mixed with raw clay during pottery manufacture.These materials make clay pastes more flexible, less likely to crack during drying and firing, andmore resistant to the stresses of thermal expansion. Certain tempering agents preferred by pottersin specific times and places are found only in certain locations on the landscape. As a result,sherds containing these tempers either were made close to sources of these tempers or were madeusing imported raw materials. Patterns in the distribution of sherds with specific tempers vis-a-vis their natural distributions thus provide evidence of exchange and social interaction networks.The following paragraphs describe the methods we use in collecting temper data.
Analysts examine the cross-section of a fresh break on each analyzed sherd using a binocularmicroscope (Figure 7.9). The fresh break is made by using pliers to remove a nip from eachsherd in a manner that is the least likely to impair our ability to extract other kinds of informationfrom the sherd (for example, rim length, rim form, or painted design). The attributes recordedinclude paste color, temper type, abundance, size, and the relative frequency of a particulartemper type in relation to other types found within the same sherd. In addition, the MunsellColor Chart is used to record the color of the paste and carbon streak of the sherd. Theseattributes and their documentation methods are described below.
Temper Type: The categories we use are essentially based on the direct observations of theanalyst. To minimize interobserver variation, we have developed a temper identification guidethat include photomicrographs of materials we encounter most frequently (Lyle and Tucholke2003*1). Currently, 13 temper types are recognized and documented in Crow Canyon’sdatabase. These types, and their associated codes, are given in Table 7.9.
Table 7.9. Temper TypesNumber Code Description
0 I indeterminate

7 - 11
1 CS crushed sandstone2 QS quartz sand3 IR igneous rock4 SH crushed pottery sherds5 TB trachyte6 PS pink-cemented sandstone7 O other8 MX mixed9 LI multilithic sand10 SL shale11 MR crushed metamorphic rock12 WS weathered silicified sandstone13 CQ crushed quartz
Temper Type Frequency: The relative frequency of temper types observed within the crosssection of a single sherd is indicated by recording up to three temper types in decreasing order oftheir observed abundance.
Temper Abundance: The abundance of all tempers considered together is recorded using ageotechnical gauge (Figure 7.10), which illustrates the density of particles corresponding to aparticular percent abundance. The categories illustrated on the gauge are: 3%, 5%, 15%, 25%,40%, and 50%. These are the six categories recorded by analysts. If the abundance cannot bedetermined, no data are entered.
Particle Size: The size of temper particles is documented using a grain-sizing folder (Figure7.11), which illustrates ranges of measurable grain sizes. We record one or more of the four grainsize options listed in Table 7.10, below. If particle size cannot be reasonably determined, no dataare recorded.
Table 7.10. Particle sizeRange (mm) Code Description
1/8–1/4 F Fine1/4–1/2 M Medium1/2–1.0 C Coarse1.0–2.0 VC Very Coarse
Paste Color: We record the color of the unrefired paste and the carbon streak, if present, as astandard part of temper analysis. These observations are made using indirect incandescent lighton a fresh break by comparing the observed color to the color chips on the Munsell Color Chart.
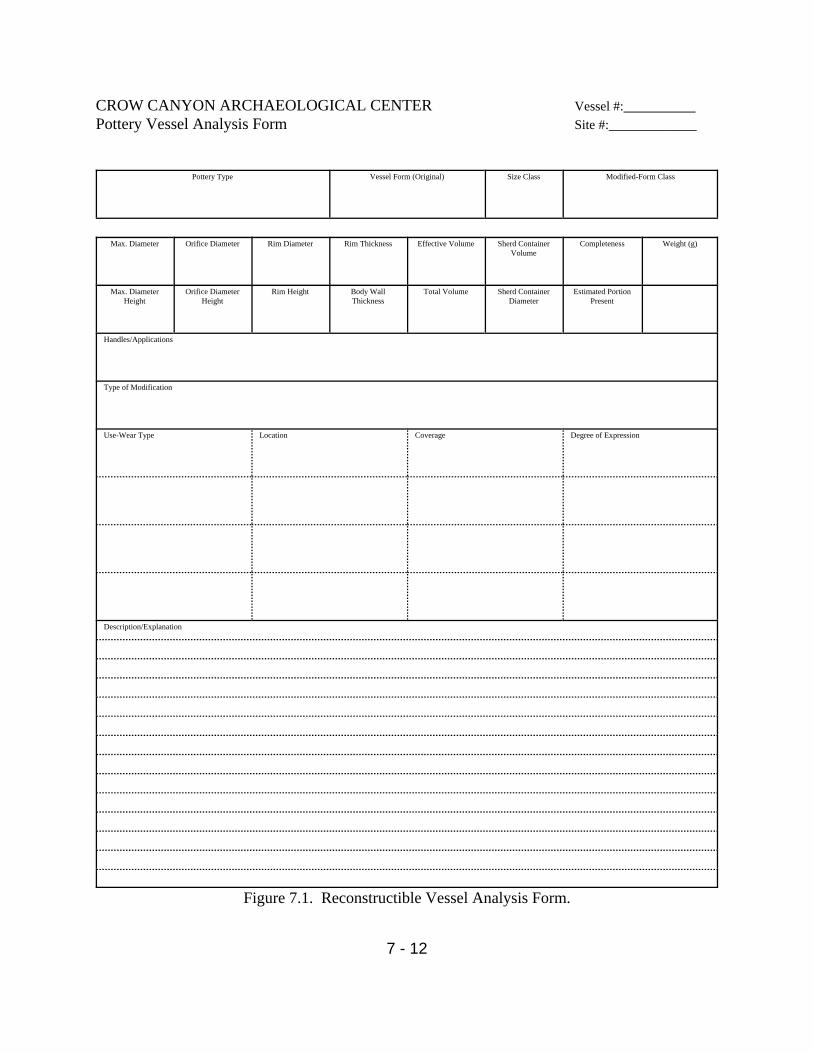
7 - 12
CROW CANYON ARCHAEOLOGICAL CENTER Vessel #:_________Pottery Vessel Analysis Form Site #:___________
Pottery Type Vessel Form (Original) Size Class Modified-Form Class
Max. Diameter Orifice Diameter Rim Diameter Rim Thickness Effective Volume Sherd ContainerVolume
Completeness Weight (g)
Max. DiameterHeight
Orifice DiameterHeight
Rim Height Body WallThickness
Total Volume Sherd ContainerDiameter
Estimated PortionPresent
Handles/Applications
Type of Modification
Use-Wear Type Location Coverage Degree of Expression
Description/Explanation
Figure 7.1. Reconstructible Vessel Analysis Form.

7 - 13
Figure 7.2. Reconstructing a jar.
Figure 7.3. Refitting sherds withmasking tape.
Figure 7.4. Labeling the masking tapeon refitted sherds with provenienceinformation.

7 - 14
MD = Maximum DiameterOD = Orifice DiameterRH = Rim HeightRT = Rim Thickness
RD = Rim DiameterODH = Orifice Diameter HeightMDH = Maximum Diameter Height
MD / RD
OD
RT
RH / MDH
MD / RD
OD
RT
RH / MDH
OD
MD
MDH
ODH
RH
RD
OD
MD
MDH
ODH
RH
RD
Figure 7.5. Vessel Measurements
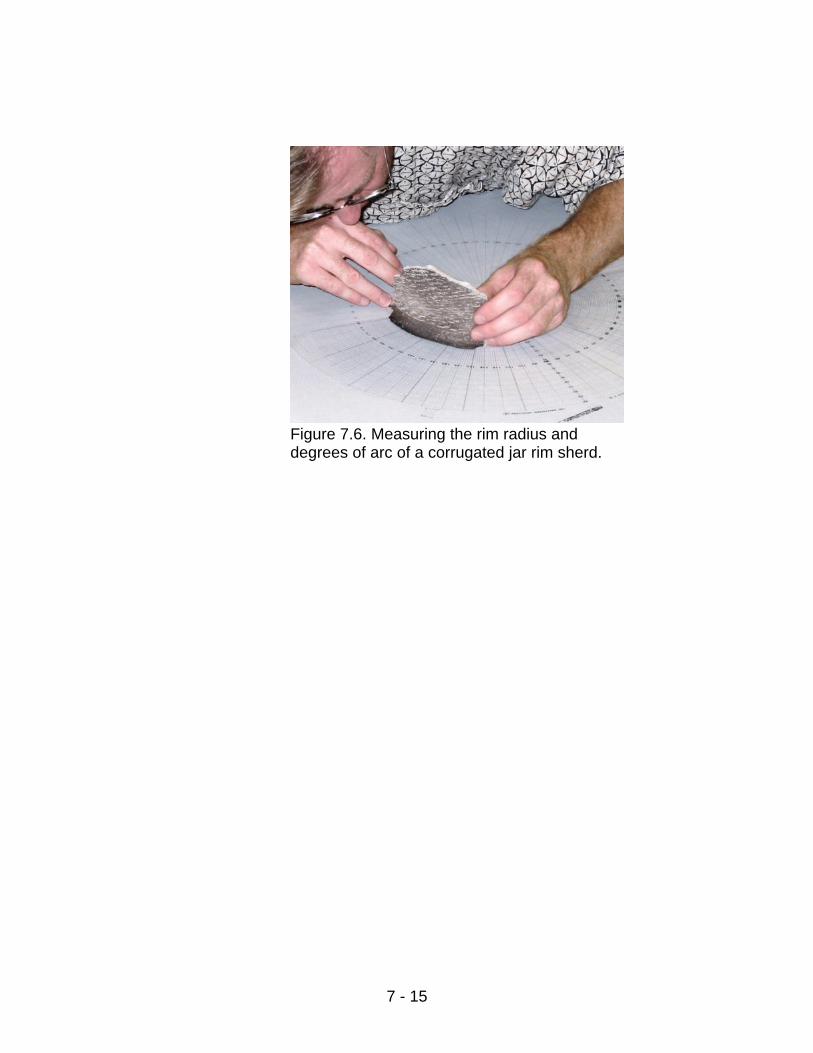
7 - 15
Figure 7.6. Measuring the rim radius anddegrees of arc of a corrugated jar rim sherd.

7 - 16
Figure 7.7. Identifying temper using thebinocular microscope.
Figure 7.8. A geotechnical gauge. The abundance scale is located inthe second row from the top.
Figure 7.9. Grain-sizing folder.
8 - 1
Chapter 8Stone Material Identification
Identification of the materials used for chipped-stone tools, ground-stone tools, and stoneornaments is an important part artifact analysis. Raw materials for tools and ornamentswere obtained either directly from natural sources or through trade. By studying thesources of raw materials vis-á-vis the sites where artifacts of these materials arerecovered, we gain valuable insight into interaction networks and the organization ofstone-artifact production. In this chapter, we provide detailed descriptions of the variousstone materials observed in assemblages from sites excavated by Crow Canyon. We usethese descriptions during both cataloging (Chapter 3) and bulk chipped stone analysis(Chapter 9) to identify the materials from which artifacts were made. Our descriptions oflocal material types rely heavily on the work of Gerhardt (2001*1).
This chapter is organized in such a way that identification proceeds from the mostcommon stone materials to the least common materials. An overview of stone materialscodes is given on page 8-2. Pages 8-3 and 8-4 explain how to distinguish the mostcommon stone materials from the Morrison Formation. Then, pages 8-5 through 8-8provide detailed descriptions of each Morrison Formation material we recognize. Thesedescriptions include: 1) information on the physical attributes of each material, such asgrain size, texture, color, opacity (ability to transmit light) and luster (ability to reflectlight); 2) a listing of the artifact categories in which the given material is most oftenrepresented; 3) a photograph of one or more specimens of the material; 4) how and wheneach material was formed in geologic time; and 5) an explanation of the three-letter codewe use to record the material type during cataloging and bulk chipped-stone analysis.
Page 8-9 organizes the other stone materials we recognize according to the grain size andrelative abundance of each in artifact assemblages from archaeological sites insouthwestern Colorado. Pages 8-10 through 8-21 provide detailed descriptions for themost common of these materials using the same format as that described above forMorrison Formation materials. Finally, pages 8-22 and 8-23 provide descriptions ofvarious rare stone materials, and the categories we use for unknown and indeterminatestone materials. Identification of specimens of these material types will always requirethe assistance of a staff member.

8 - 2
The stone material codes below match those found on the back of the FS coding sheet (Chapter 3). The material name is on the left and the corresponding code is in capital letters on the right. Over the past few years many of the stone materials we identify have been reinterpreted in geological terms. Old codes for these categories, which are no longer in use but are reflected in our database, are listed next to the current category name in parentheses and using small type.
Stone Material IdentificationOverview of stone material codesOverview of stone material codes
STONE MATERIAL CODES
Local Stone Materials
Dakota/Burro Canyonsilicified sandstone (DQT) KDB
Burro Canyon chert (BUR) KBCMorrison mudstone (MCS) KJMMorrison chert (MCS) KJCMorrison silicified
sandstone (MQT) JMSBrushy Basin chert (BBC) JMCSandstone SNDNotes:1. K = cretaceous geologic period, J = Jurassic geologic period.2. Relationships between obsolete codes and current categoriesare shown using parentheses and small type).
Nonlocal Stone Materials
jet JETobsidian OBSred jasper RJSturquoise TURWashington Pass chert WPCnonlocal chert/ silt stone NCS
Other Stone material types
agate/chalcedony ACHcaliche CALconglomerate COGconcretion CONgypsum/calcite/ barite GCBigneous OIGpetrified wood PETquartz QTZslate/shale SLS
unknown chert/siltstone UCSunknown silicified USS
sandstone (UQT)
unknown stone UNS

8 - 3
Step 1: Distinguish Morrison formation materials from all othersStep 1: Distinguish Morrison formation materials from all others
Morrison Formation materials (Figure 8.1, left) are always opaque (no light can be seen through the edges of the object), and have muted colors ranging from green and maroon to brown, tan, and light gray. Morrison formationmaterials most often have a consistent color, but can also be spotted or banded. Only the finest Morrison formation materials are reflective; most have a dull, matte appearance. Most of the chipped-stone artifacts we recover from our excavations are made from Morrison formation materials. These materials will be subdivided further in Step 2.
Other materials (Figure 8.1, right) include all stones that do not fit the description above. These materials are described on pages 8-9 through 8-23, and include sandstone, conglomerate, slate, shale, agate, chalcedony, jasper, obsidian, petrified wood, a variety of cherts, silicified sandstones, and minerals. These materials will be subdivided further in Step 3.
If you are trying to identify the material of an individual artifact, determine which of these two categories the material fallsinto. If you are identifying materials in bulk chipped-stone, separate the artifacts into two piles:
Figure 8.1 (Left). A bag of chipped stone divided into Morrison formation materials on the right, and other materials on the left.

8 - 4
Morrison Chert(KJC)
(page 8-7)• Bright, shiny colors.• Few to no grains: mostly
silica.• Smooth texture.
Brushy Basin Chert(JMC)
(page 8-8)• Multiple, banded pastel
colors.• No grains: pure silica.• Very smooth “waxy”
texture.
Morrison Silicified Sandstone(JMS)
(page 8-5)• Dull, matte colors.• Grains visible to the naked
eye.• Rough texture.
Morrison Mudstone(KJM)
(page 8-6)• Dull, matte colors.• Grains not visible to
the naked eye.• Gritty texture.
Step 2: Identify specific Morrison formation materialsStep 2: Identify specific Morrison formation materials
Sand-sized Grains
Silt-sized Grains
Clay-sized Particles
Pebble-sized Grains
(Particles visible to unaided eye)
(Particles visible underlow magnification)
(Particles visible underhigh magnification)
Amorphous, non-granular
1% Silica cement, between grains
100% Silica, no grains
Specific Morrison formation materials are distinguished on the basis of grain size and the proportion of material that is silica. Coarse materials consist primarily of grains cemented together with silica, whereas fine materials consist primarily or exclusively of silica. The four varieties of Morrison formation material are arranged along this continuum below. See the specific description of each material for more details.
After you have identified all Morrison formation materials, go on to Step 3 (Page 8-9) to identify all other materials.
Figure 8.2 (Left). Morrison formation materials grouped by material type; from left to right: Morrison Silicified Sandstone, Morrison Mudstone, Morrison Chert, and Brushy Basin Chert.

8 - 5
hard and tough material, difficult to flake preciselyCharacteristic features
always opaqueOpacity
Morrison Silicified Sandstone (JMS)
always dull; large-grained specimens are visibly rough; medium-grained specimens will look smoother
Appearance
usually rough to the touchTexture/hardness
varies from large- to medium-sized grains that may require low magnification to be seen
Grain size
varying shades of maroon, green, tan, and brown; colors are often mottled
Color
Morrison Silicified Sandstone (JMS)Morrison silicified sandstone is a coarse-grained, multicolored, silicified sedimentary rock (Figure 8.3). Because it is locally abundant and durable, it was used extensively for a variety of tools.
Code DescriptionGeological Formation/OriginsArtifact Types
J = Jurassic periodM = Morrison FormationS = Silica-cemented sandstone
From the Brushy Basin Member of the Morrison Formation. The sedimentary sands were deposited in a still-water setting and later cemented together with silica
Debitage is the most common; also a preferred material for stone axes, peckingstones, cores, and flake tools; projectile points and drills are not common
Figure 8.3. Morrison silicified sandstone. Note the mottled colors; close-up views show a rougher sample on the left and a somewhat smoother sample on the right.

8 - 6
Morrison Mudstone (KJM)Morrison mudstone is a multicolored silicified sedimentary rock composed of fine silts and/orsilicified volcanic ash (Figure 8.4). Its colors are similar to those seen in Morrison silicifiedsandstone, but it has a smoother texture. It is widely available in the local Morrison and Burro Canyon formations and was used for a variety of chipped-stone tools.
always opaqueOpacity
diversity of colors, including mottled combinations of light and dark colors
Characteristic features
Morrison Mudstone (KJM)
dull, nonreflectiveAppearance
moderately smooth, may feel grittyTexture/hardness
medium to fine (visible with a hand lens)Grain size
varies from light to dark shades of gray, tan, brown, maroon, and green; colors are often mottled
Color
K = Cretaceous periodJ = Jurassic periodM = Mudstone
These mudstones are from the Burro Canyon Formation and the Brushy Basin Member of the Morrison Formation. They are fine-grained and composed of silicified silt and volcanic ash that were originally deposited in a lake environment
Debitage, peckingstones, and cores are common; bifaces, projectile points, drills, and axes are less common
Code DescriptionGeological Formation/OriginsArtifact Types
Figure 8.4. Morrison mudstone. Note the variety of colors.

8 - 7
Morrison Chert (KJC)Morrison chert is a local, multicolored, very finegrained, silicified sedimentary rock that has excellent flaking qualities and was commonly used for a variety of chipped-stone tools (Figure 8.5). It occurs in a variety of colors.
variation in grain-size and silica content within the material
Characteristic features
bright, shiny surfaceAppearance
very smooth, although flaws frequently occur in the rock which make it rough or difficult to flake
Texture/hardness
very fine; high magnification is required to see occasional small grains
Grain size
always opaqueOpacity
varying shades of maroon, green, tan, and brown; colors are often mottled.
Color
Morrison Chert (KJC)
Code DescriptionGeological Formation/OriginsArtifact Types
K = Cretaceous periodJ = Jurassic periodC = Chert
Morrison chert is a fine-grained chert found in the Burro Canyon Formation and the Brushy Basin Member of the Morrison Formation. It is derrived from volcanic ash deposited in shallow lake environments.
Mostly chipped-stone tools (cores, flake tools, bifaces, projectile points, and drills);also fairly common in debitage
Figure 8.5. Morrison chert. Note the smooth texture, shiny surface, and mottled colors.

8 - 8
Brushy Basin Chert (JMC)This extremely finegrained, multicolored, silicified sedimentary rock is found in the Brushy Basin Member of the Morrison Formation along the Utah—Colorado border (Figure 8.6). It is one of the finest materials in the region and was used for making chipped- and polished-stone artifacts.
always opaqueOpacity
banded or swirled colors; subtle pastels are commonCharacteristic features
Brushy Basin Chert (JMC)
usually shiny; polished artifacts have a very high lusterAppearance
very smooth and waxyTexture/hardness
nongranular; all grains have been replaced by silicaGrain size
White and pastel shades of tan, pink, green, and orange, combined with darker shades of brown, reddish brown and gray; combinations of three or more colors in swirled or banded (layered) patterns are common
Color
Code DescriptionGeological Formation/OriginsArtifact Types
J = Jurassic PeriodM = Morrison Formation (Brushy Basin Member)C = Chert
Found in the Brushy Basin Member of the Morrison Formation; it derives from very fine-grained volcanic ash that was deposited in a shallow lake environment
Chipped- and polished-stone artifacts (cores, debitage, bifaces, projectile points, tchamahias andpendants) (See Chapter 4)
Figure 8.6. Brushy Basin chert. Note the subtle banded colors.

8 - 9
Porter Mudstone (PMS)(page 8-14)
• Reddish brown, terra cotta.• Opaque, dull, soft, gritty.
Slate/Shale (SLS)(page 8-15)
• Medium to dark gray.• Opaque, matte.
Agate/Chalcedony (ACH)(page 8-19)
• White to yellow.• Highly translucent.
Red Jasper (RJS)(page 8-17)
• Red, brown, yellow.• Opaque and shiny.
Washington Pass Chert (WPC)
(page 8-20)• Pink to orange.• Translucent.• chalcedony inclusions.Petrified Wood (PET)
(page 8-18)• Varied colors.• Fossilized wood structure.
Step 3: Identify Other Stone MaterialsStep 3: Identify Other Stone Materials
Obsidian (OBS)(page 8-21)
• Black or brown, may be striped.
• Glassy appearance.
Other Igneous (OIG)(Page 8-12)
• Crystals of many shapes and colors.
Dakota/ Burro Canyon Silicified Sandstone (KDB)
(page 8-13)• “Sugary” appearance.• White, tan, gray.
Burro Canyon Chert (KBC)(page 8-16)
• Varied colors, shiny.• chalcedony inclusions.
Conglomerate (COG)(page 8-10)
• Multi-colored, waterworn pebbles visible.
Sandstone (SND)(page 8-11)
• Multi-colored sandgrains visible.
Sand-sized Grains
Silt-sized Grains
Clay-sized Particles
Pebble-sized Grains
(Particles visible to unaided eye)
(Particles visible underlow magnification)
(Particles visible underhigh magnification)
Amorphous, non-granular
Other stone materials can be arranged along the same continuum used for Morrison formation materials. Coarse materials consist of: 1) grains cemented with silica, or 2) a mass of crystals of varying size, color, and shape. Fine materials are non-particulate, and usually consist primarily of silica. Determine where the unknown material fits along this continuum, then consult the appropriate detailed descriptions for more information on these materials.
Caliche (CAL)(Page 8-22)
• Soft, white and chalky.
Concretion (CON)(Page 8-22)
• Granular iron oxide • Globular shapes.
Jet (JET)(Page 8-22)
• Morphosed coal.• Black, opaque, soft.
Quartz (QTZ)(Page 8-22)
• Silica crystals.• Hexagonal shape.• Highly transparent.
Turquoise (TUR)(Page 8-22)
• Green to bluish green.• Very smooth.
Gypsum/Calcite/Barite (GCB)(Page 8-22)
•Transparent crystals
Mor
e co
mm
onLe
ss c
omm
on
Mineral
If the material does not match ANY of these categories, consult with a staff member and go to Step 4 (Page 8-23) for unknown stone material codes.

8 - 10
Conglomerate (COG)Conglomerate is a very coarsegrained, sedimentary rock that is found locally in the Dakota Sandstone and Burro Canyon Formations (Figure 8.7). It consists primarily of silica-cemented waterworn pebbles that are visible to the naked eye. This material was used primarily for manos and metates.
always opaqueOpacity
multi-colored waterworn pebblesCharacteristic features
Conglomerate (COG)
dullAppearance
bumpy; rough silica cement combined with waterworn pebbles; can be friable
Texture/hardness
very coarse; sand grains and small pebbles easily visible to the unaided eye
Grain Size
usually light tan to light yellowish brown matrix surrounding sand grains and pebbles of different colors
Color
COG = Three-letter abbreviation for conglomerate
Sedimentary gravels at the interface of the Dakota and Burro Canyon Formations; derived from fine gravels deposited in a riverine or delta setting.
Primarily manos and metates
Code DescriptionGeological Formation/OriginsArtifact Types
Figure 8.7. Conglomerate.

8 - 11
Sandstone (SND)Sandstone is a dull, grainy rock that consists of sand grains held together in a matrix of silica (Figure 8.8). It is common throughout all local geologic formations. Sandstone is a relatively friable material that is easily ground. pecked, or broken because it has undergone less silicification than other sedimentary rocks. It was a preferred material for manos, metates, and other ground-stone tools, as well as for building stone.
always opaqueOpacity
multicolored sand grains and friabilityCharacteristic features
Sandstone (SND)
always dull; can be thin and tabular, blocky, or irregularly-shaped; edges are often slightly rounded because the softnessof the stone promotes wear and erosion
Appearance
rough and friable, like sandpaperTexture/hardness
grains are visible to the unaided eyeGrain size
yellowish to reddish tans grading into yellowish to reddish browns; sand grains are multicolored and distinguishable from the surrounding matrix
Color
Code DescriptionGeological Formation/OriginsArtifact Types
SND = Three-letter abbreviation for sandstone
Dakota Sandstone and Burro Canyon Formation sandstones derive from aeolian sand dunes in a shoreline setting
Mostly manos, metates, and other ground-stone tools; also the primary building stone
Figure 8.8. Sandstone.

8 - 12
Other Igneous (OIG)“Other Igneous” refers to rocks that derive from lavas and magmas produced during volcanic activity and that are“other” than obsidian (Figure 8.9). They are usually light to dark gray in color and nongranular, but they do contain a variety of crystalline inclusions. Igneous rocks outcrop in intrusive mountains of the Mesa Verde region, and weathered igneous cobbles can be found along watercourses that drain these mountains. Igneous rock was used as temper in pottery, and cobbles were used for ground-stone tools, hammerstones, and other battered/polished tools.
rough texture and small crystalline inclusionsCharacteristic features
dull except for the shiny inclusionsAppearance
rough, varies from verh hard and tough to friableTexture/hardness
nongranular, but crystalline inclusions are visible to the unaided eye
Grain Size
always opaque although the crystals within the matrixcan be translucent
Opacity
mostly shades of gray, with multicolored crystalline inclusions
Color
Other Igneous (OIG)
Code DescriptionGeological Formation/OriginsArtifact Types
OIG = Three-letterabbreviation for “other igneous”
Produced as magma or lava during volcanic activity; crystals form during the cooling process; closest sources are the Ute and La Plata mountains, Dolores and Mancos rivers, and McElmo Creek
Crushed and used as temper in pottery; cobbles were also used for hammerstones, manos, and other battered/polished artifacts
Figure 8.9. Examples of “otherigneous” rock.
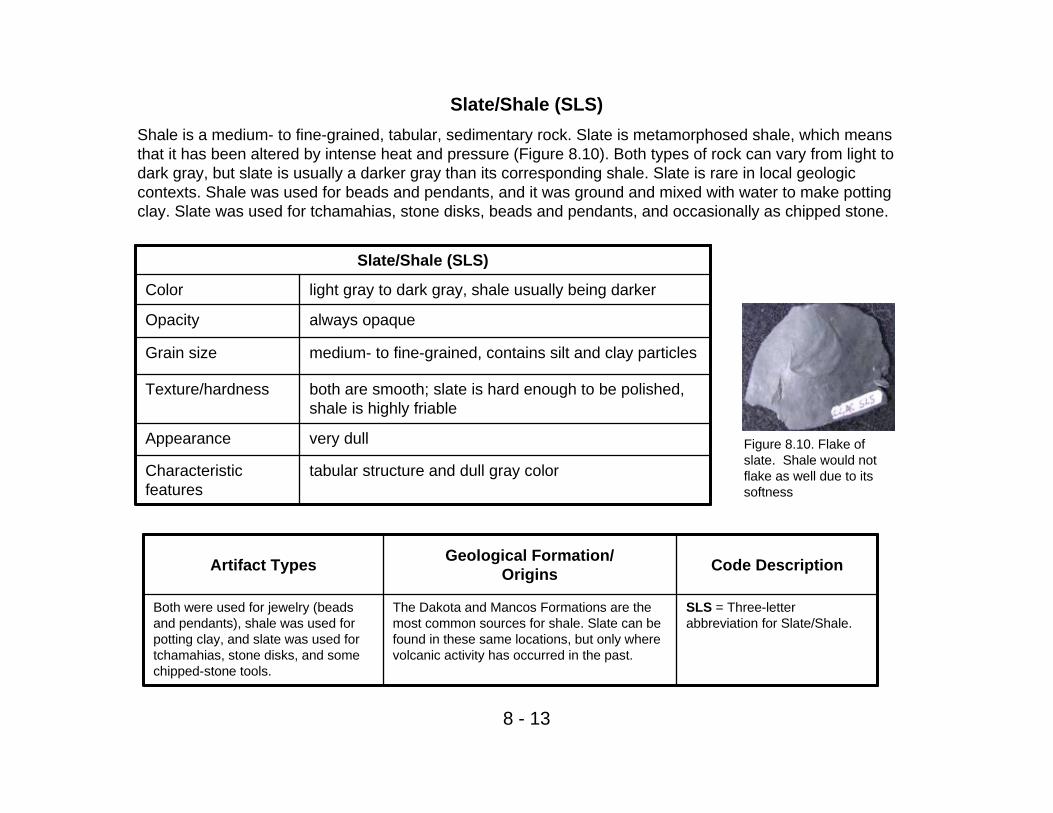
8 - 13
Slate/Shale (SLS)Shale is a medium- to fine-grained, tabular, sedimentary rock. Slate is metamorphosed shale, which means that it has been altered by intense heat and pressure (Figure 8.10). Both types of rock can vary from light to dark gray, but slate is usually a darker gray than its corresponding shale. Slate is rare in local geologic contexts. Shale was used for beads and pendants, and it was ground and mixed with water to make potting clay. Slate was used for tchamahias, stone disks, beads and pendants, and occasionally as chipped stone.
tabular structure and dull gray colorCharacteristic features
very dullAppearance
both are smooth; slate is hard enough to be polished, shale is highly friable
Texture/hardness
medium- to fine-grained, contains silt and clay particlesGrain size
always opaqueOpacity
light gray to dark gray, shale usually being darkerColor
Slate/Shale (SLS)
SLS = Three-letter abbreviation for Slate/Shale.
The Dakota and Mancos Formations are the most common sources for shale. Slate can be found in these same locations, but only where volcanic activity has occurred in the past.
Both were used for jewelry (beads and pendants), shale was used for potting clay, and slate was used for tchamahias, stone disks, and some chipped-stone tools.
Code DescriptionGeological Formation/OriginsArtifact Types
Figure 8.10. Flake of slate. Shale would not flake as well due to its softness

8 - 14
Dakota/Burro Canyon Silicified Sandstone (KDB)This material type refers to medium-grained silicified sedimentary rock that is found locally in the DakotaSandstone and the Burro Canyon Formation. It is not possible for us to distinguish stones from these two formations, but both are characterized by a distinct glistening appearance, often described as “sugary” (Figure 8.11). This material type was used for chipped- and ground-stone tools.
sugarlike microcrystalline quartz dispersed throughout the stone
Characteristic features
can be opaque or slightly translucent, but seldom bothOpacity
Dakota/Burro Canyon Silicified Sandstone (KDB)
sugary surfaces that are slightly rough and unevenAppearance
variable texture; always hard and toughTexture/hardness
medium (visible with a hand lens); many sand grains have been dissolved and replaced by microcrystalline quartz
Grain size
tan, white, light gray, sometimes blending to medium grayColor
Code DescriptionGeological Formation/OriginsArtifact Types
K = Cretaceous periodD = Dakota SandstoneB = Burro Canyon Formation
From the Dakota Sandstone and the Burro Canyon Formation. This material derives from sand dunesdeposited in fluvial environments, where the grains were first cemented by silica, followed by replacement of sand grains by microcrystalline quartz
Debitage, cores, modified cores, peckingstones, bifaces, projectile points,drills, and manos
Figure 8.11. Dakota/Burro Canyon silicified sandstone is best identified by ”sugarlike” sparkles.

8 - 15
Porter Mudstone (PMS)Porter mudstone is a reddish brown, very soft, medium-grained sedimentary rock that was first identified in the assemblage from Albert Porter Pueblo (5MT123) (Figure 8.12). It has a chalklike texture and softness. Most material appears flaked, but some pieces show small areas of grinding and other forms of edge damage.
always opaqueOpacity
reddish-brown color and soft, chalklike texture, which is evidenced by the worn edges and ridges
Characteristic features
Porter Mudstone (PMS)
very dull and non-reflectiveAppearance
chalklike, as evidenced by the wear present on most edges and ridges
Texture/hardness
medium- to fine-grainedGrain size
terra cotta, rust, reddish brown, brown, and occasionally yellowish brown
Color
Code DescriptionGeological Formation/OriginsArtifact Types
PMS = Three-letter abbreviation for Porter mudstone
This material probably outcrops close to Albert Porter Pueblo, but its geological source and formation process are currently unknown
Although relatively soft, this material is commonly seen as debitage, modified flakes, and cores in the Albert Porter Pueblo assemblage
Figure 8.12. Porter mudstone.

8 - 16
Burro Canyon Chert (KBC)This material type is a local, multicolored, very finegrained, silicified sedimentary rock from the Burro Canyon Formation (Figure 8.13). It has excellent flaking qualities and was used for a variety of chipped-stone tools. Burro Canyon chert is characterized by small, opal-like, chalcedony “blebs,” or inclusions, within its matrix.
tans, browns, and grays are often transparent; greens are usually opaque; chalcedony blebs are of varying degrees of translucence
Opacity
small chalcedony nodules (blebs) throughoutCharacteristic features
Burro Canyon Chert (KBC)
moderate to very shinyAppearance
very smooth and hardTexture/hardness
very fine; remnant sand grains are present, butmost have been replaced by microcrystalline quartz
Grain size
shades of light tan to medium brown, light to medium green, and light to medium gray; chalcedony blebs are usually white or light gray
Color
Figure 8.13. Burro Canyon chert. The top photographshows the variety of colors; the lower close-upshows chalcedony blebs.K = Cretaceous period
B = Burro Canyon Formation C = Chert
From the Burro Canyon Formation. Stones of this type form through progressive replacement of sandstone by precipitates of silica; remnant sand grains are present
Debitage, cores, drills, bifaces, and projectile points
Code DescriptionGeological Formation/OriginsArtifact Types

8 - 17
always opaqueOpacity
rich shades of red and consistent opacityCharacteristic features
Red Jasper (RJS)
shiny, but not glassyAppearance
very smooth and somewhat brittleTexture/hardness
amorphous, nongranularGrain size
varying shades of medium to dark red and brownish red; occasionally combined with brown, yellow-brown, and yellow streaks
Color
Red Jasper (RJS)Red jasper is a very finegrained, opaque, reddish chert (Figure 8.14). Its nearest sources are in the redrock formations of southeastern Utah, and thus is considered to be nonlocal when found at sites in southwestern Colorado. It has excellent flaking qualities and was used for a variety of chipped-stone artifacts.
Code DescriptionGeological Formation/OriginsArtifact Types
RJS = Three-letter abbreviation for redjasper
A fine-grained chert found in the red shale interbedsof the Permian and Triassic sandstones that outcrop west of Comb Ridge in southeastern Utah. Stones of this type form through replacement of limestone by precipitates of silica
Because this material was imported to southwestern Colorado, it occurs most often as projectile points
Figure 8.14. Red jasper.

8 - 18
translucent browns and grays, opaque greens;chalcedony blebs are of varying degrees of translucence
Opacity
striated, linear structure resembling wood grain; ring patterns may be discernible if the piece contains some cross section of a petrified log
Characteristic features
Petrified Wood (PET)
very shinyAppearance
very hard, texture varies from smooth to the texture of wood grain
Texture/hardness
very fine, nongranular but structuredGrain size
combinations of dark gray, brown, and green, sometimes with small flecks of red. White or light gray chalcedony nodules or blebs may be present
Color
Code DescriptionGeological Formation/OriginsArtifact Types
PET = three-letter abbreviation for petrified wood
Formed by precipitates of silica replacing the organic matter in ancient trees. Often found in uranium-rich conglomerate sandstones of Triassic, Jurassic, and Cretaceous formations
Chipped-stone artifacts such as debitage, cores, bifaces, and projectile points
Figure 8.15. Petrified wood.
Petrified Wood (PET)Cherts classified as petrified wood are varicolored, fossilized remains of trees that were buried in floodplain muds (Figure 8.15). These cherts often exhibit the structure of the wood itself, and thus have a striated appearance (Figure 8.15). Petrified wood may be found associated with the shales and conglomerate sandstones of any of the local Triassic, Jurassic, and Cretaceous formations.

8 - 19
Agate/Chalcedony (ACH)Chalcedony is a white or off-white, translucent, fine-grained material that formed as a precipitate of silica (Figure 8.16). Nodules are found locally in the Burro Canyon Formation. It was commonly used for projectile points and other chipped-stone tools.
translucent to almost transparent on thin edgesOpacity
combination of white color and translucenceCharacteristic features
Agate/Chalcedony (ACH)
shiny with a high lusterAppearance
very smoothTexture/hardness
amorphous, nongranularGrain size
white to off-whiteColor
Figure 8.16. Agate/chalcedony.
A = AgateCH = Chalcedony
Found in isolated outcrops in the Dakota Sandstone and the Burro Canyon Formation. This is the end product of the dissolution and precipitation of silica
Mostly chipped-stone artifacts, especially projectile points
Code DescriptionGeological Formation/OriginsArtifact Types

8 - 20
Washington Pass Chert (WPC) Washington Pass chert is a very finegrained, siliceous, translucent material that is composed primarily of chalcedony (Figure 8.17). Its color generally varies from shades of pale pink to reddish orange. It is notable for its “waxy” texture. This material comes from theNarbona Pass area (formerly named “Washington Pass”) in the Chuska Mountains on the Arizona—New Mexico border. Because of its excellent flaking characteristics it was traded throughout the Southwest; it is especially common in Chaco Canyon sites.
varying degrees of translucence, occasionally transparent
Opacity
waxy texture, pink to orange colorCharacteristic features
Washington Pass Chert (WPC)
very shiny, sometimes glassyAppearance
very smooth; often has a “waxy” feelTexture/hardness
amorphous, nongranularGrain size
shades of pinkish to reddish orange; can also containsmall nodules or blebs of white or gray chalcedony
Color
Code DescriptionGeological Formation/OriginsArtifact Types
WPC = Three-letter abbreviation for Washington Pass chert
Formed by hydrothermic precipitation of silica during formation of the Chuska mountains; found as nodules weathering out of the igneous cap rock at Narbona Pass
Debitage, cores, bifaces, and projectile points
Figure 8.17. Washington Pass chert. Note the Chalcedony blebs visible below the surface

8 - 21
Obsidian (OBS)Obsidian is a volcanic glass (Figure 8.18) that produces the sharpest edge of any stone material. It is usually black and transparent to highly translucent. Depending on its source, however, it can also be brown, gray or astreaked combination of colors, and it can have low translucence or even be opaque. The closest natural sources of obsidian are in the Jemez Mountains and Mt. Taylor in New Mexico, and the San Francisco Peaks in Arizona. Obsidian was widely traded throughout the southwest.
often transparent or highly translucent, although some varieties are relatively opaque
Opacity
dark (usually black) color, high translucence,sharpness, and glassy appearance
Characteristic features
Obsidian (OBS)
glassyAppearance
very smooth, brittleTexture/hardness
nongranular, amorphousGrain Size
mostly black, although it can be brown or black with streaks of brown
Color
Code DescriptionGeological Formation/OriginsArtifact Types
OBS = Three-letter abbreviation for obsidian.
Obsidian is melted silica that forms under certain volcanic conditions. Most of the specimens from southwestern Colorado that have been sourced can be traced to the Jemez Mountains of New Mexico
bifaces, projectile points, and small flakes removed duringtool retouch
Figure 8.18. Obsidian. Note its glasslike qualities.
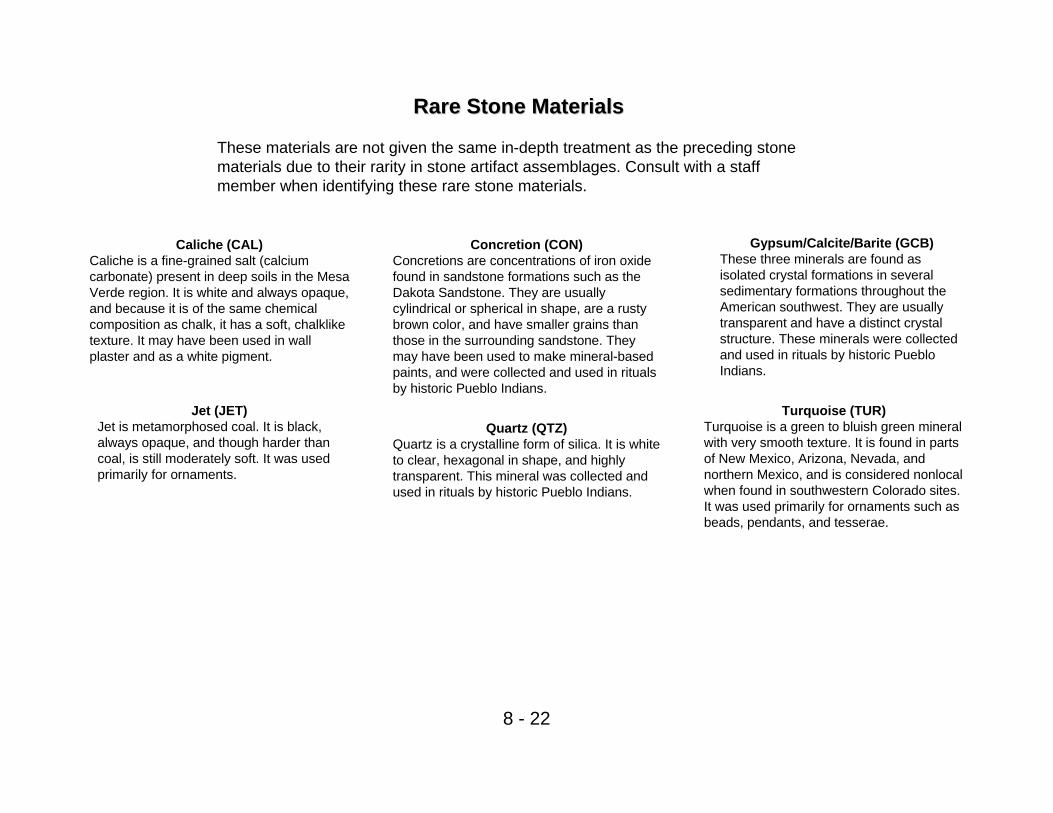
8 - 22
RareRare Stone MaterialsStone Materials
These materials are not given the same in-depth treatment as the preceding stone materials due to their rarity in stone artifact assemblages. Consult with a staff member when identifying these rare stone materials.
Caliche (CAL)Caliche is a fine-grained salt (calcium carbonate) present in deep soils in the Mesa Verde region. It is white and always opaque, and because it is of the same chemical composition as chalk, it has a soft, chalkliketexture. It may have been used in wallplaster and as a white pigment.
Concretion (CON)Concretions are concentrations of iron oxide found in sandstone formations such as the Dakota Sandstone. They are usually cylindrical or spherical in shape, are a rusty brown color, and have smaller grains than those in the surrounding sandstone. They may have been used to make mineral-based paints, and were collected and used in rituals by historic Pueblo Indians.
Gypsum/Calcite/Barite (GCB)These three minerals are found as isolated crystal formations in several sedimentary formations throughout the American southwest. They are usually transparent and have a distinct crystal structure. These minerals were collected and used in rituals by historic Pueblo Indians.
Jet (JET)Jet is metamorphosed coal. It is black, always opaque, and though harder than coal, is still moderately soft. It was used primarily for ornaments.
Turquoise (TUR)Turquoise is a green to bluish green mineral with very smooth texture. It is found in parts of New Mexico, Arizona, Nevada, andnorthern Mexico, and is considered nonlocal when found in southwestern Colorado sites.It was used primarily for ornaments such as beads, pendants, and tesserae.
Quartz (QTZ)Quartz is a crystalline form of silica. It is white to clear, hexagonal in shape, and highly transparent. This mineral was collected and used in rituals by historic Pueblo Indians.

8 - 23
Step 4: Record Unknown Stone MaterialsStep 4: Record Unknown Stone Materials
Other Mineral( MIN)
Unknown Chert/Siltstone (UCS)
NonLocal Chert /Siltstone (NCS)
Unknown Quartzite/SilicifiedSandstone (USS)
Unknown Stone (UNS)
Use these codes for materials that cannot be assigned to any of the categories discussed in the previous pages. you will need the assistance of a staff member to distinguish clearly nonlocal stone from stone that is unknown (may or may not be nonlocal).

9 - 1
Chapter 9Bulk Chipped Stone Analysis
This chapter presents the procedures we use in analyzing bulk chipped stone in our lab.Bulk chipped stone is one of the bulk artifact categories into which artifacts are separatedduring the cataloging process described in Chapter 3. This artifact category consists ofdebitage, which includes flakes and angular debris generated during stone toolmanufacture; and flake tools, which includes flakes that were used for cutting, slicing, orscraping, and flakes that were modified for such uses. Bulk chipped stone analysis isdone with adult participants, interns, volunteers, and staff. Depending on the size of thecollection, the nature of our sampling strategy, and the nature of our research questions,we may analyze the entire bulk chipped stone assemblage or select a sample for analysis.
Our analysis of bulk chipped stone is largely a mass analysis (Ahler 1989*1; Patterson1990*1; Shott 1994*1) as opposed to a detailed analysis of attributes of individual piecesof chipped stone (for a review of various approaches to lithic debitage analysis, seeAndrefsky 1998*1: Chapter 6). Mass analysis approaches build on the experimentalfinding that the size of a piece of debitage is correlated with a number of attributes thatreflect the stages of stone tool manufacture and maintenance. The size of a piece ofdebitage can be determined quickly and consistently using a set of screens with gradedmesh sizes, and the distribution of debitage sizes obtained through size-sorting, combinedwith stone material identifications, provide coarse but adequate data for addressing ourprimary research goals: 1) to distinguish stone materials that were reduced from rawmaterial at the site from stone materials for which initial reduction took place elsewhere;2) to identify locations where various stages of stone tool production and maintenanceoccurred; 3) to identify the geologic source of each chipped-stone artifact as an aid inidentification of trade items; and 4) to determine the stone materials and types of flakesthat were selected for use as expedient flake tools.
Our methods are designed to collect a large amount of chipped-stone data efficiently andconsistently. Although it is likely that more could be learned through detailed analysis ofindividual pieces, we have found that such an approach is too time intensive, relative tothe size of our collections, the amount of time we have to process them, and theadditional knowledge gained, for us to invest significant staff time in an attribute-basedanalysis of individual pieces. Also, we have found that it is difficult to achieve aconsistent and replicable attribute-based analysis of bulk chipped stone working withparticipants in our public education programs. We therefore feel that mass analysis is anappropriate approach, given the context in which our laboratory operates.

Getting StartedGetting Started
Figure 9.1. Bag of “bulk chipped stone.”
You will need the following items in order to analyze a bag of bulk chipped stone:•a bag of “bulk chipped stone” (Figure 9.1).•a stack of bulk chipped stone analysis labels (Figure 9.2).•a bulk chipped stone analysis form (Figure 9.3).
SITE: PD _______FS ______ ITEM # ________CATEGORY_____ MATCODE ______MATERIAL NAME:____________________________CORTEX ______
Figure 9.2. Bulk chipped stoneanalysis label.
Figure 9.3 (Left). Top portion of Bulk chipped stoneanalysis form.
9 - 2
CROW CANYON ARCHAEOLOGICAL CENTER
Bulk Chipped Stone Analysis Form
Site Number PD FS PL Bag Date Date Analyzed Analyst D E initials___ _____ _DE date___ ____ ___
Chip
ped
Ston
e Ca
tegor
y
Item
No.
Material Name
Mat
eria
l Co
de
Cort
ex
Size
Coun
t
Weig
ht
Comments

SITE: 5MT123 DE date _9/2/03_
PD__1293______ FS__3_______ PL_----__STUDY UNIT__NST 133_______________HOR._1x2 502.1N 489.5E VERT._FULC__FEATURE__------_____________________HOR._------__________ VERT._------_____BAG DATE_7/14/03____ FIELD SUP_SCRCONTENTS_Bulk Chipped Stone ________Count__11_____________ Weight__43.1_________
Ana
lyst
____
Dat
e___
_
Figure 9.4. Sample FS label for a bag of Bulk Chipped Stone.
Step Step 1:1: Check Contents of Bulk ChippedCheck Contents of Bulk Chipped--Stone BagStone Bag
Figure 9.5 (Right).Unsorted bulkchipped stone.
See Step 2 for definitions of debitage, flakes, angular debris, modified flakes and utilized flakes.
9 - 3
Empty the bag of chipped stone onto a tray or table and remove the field specimen (FS) label (Figure 9.4). The contents line of this label should read “bulk chipped stone.” Copy all pertinent information from the label onto the top of the Bulk Chipped Stone Analysis Form (Figure 9.3). Draw a dash through any fields that do not have a corresponding entry on the FS label.
Next, look through the items. The pile should include only debitage, which includes flakes and angular debris (Figure 9.5), and flake tools, which consist of flakes that exhibit evidence of use (utilization) or intentional modification (see definitions on pages 9-4 and 9-5). Nothing that we would categorize as an individual chipped-stone artifact—such as a core, biface, or projectile point—should be in the bag (see Chapter 4 for descriptions of individual chipped-stone artifacts). Any such items that you do find in the bag were overlooked during cataloging and should be removed now and cataloged as individual artifacts. Put each individual artifact you find in its own bag and fill out an FS label for each one, leaving the FS number blank (Figure 9.4). These objects will be assigned new FS numbers later (see Chapter 3 for instructions on how to assign FS numbers).
NOTE: Do not change the count and weight on the FS label of the bulk chipped stone, even if you remove one or more individual artifacts from the bag. The analysis data you are about to collect will supercede these data, and we often use the counts and weights as originally entered in the database to track down labeling errors.

Step 2: Definitions (Page 1 of 2)Step 2: Definitions (Page 1 of 2)Debitage is defined as artifacts created by chipping pieces of stone off of a parent stone. Debitage is generated during the manufacture and maintenance of chipped-stone tools, as well as the shaping of architectural stone. Debitage is generally angular, has sharp edges, and includes both flakes and angular debris.
Figure 9.6. Three views of a chipped stone flake. Left, dorsal view; center, lateral (side) view; right, ventral view.
Striking Platform
Bulb of percussion
Erraillures
Ripple marks
CortexFlake scars
9 - 4
Flakes have characteristics that distinguish them from stones that are broken naturally (Figure 9.6). The ventral side of a complete flake (the side facing toward the core when it was struck) should have a bulb of percussion, a striking platform and ripple marks. It may also exhibit erraillures, which are leaf-shaped scars left when small flakes pops off the bulb of percussion during the striking of the larger flake. The dorsal side (the side facing away from the core when it was struck) may exhibit partial negative scars from flakes that were removed previously from the core. For further reading, see Andrefsky (1998*1) and Whittaker (1994*1).
Angular debris, also called shatter, is a by-product of chipped-stone tool manufacture. It consists of irregular, angular pieces of stone that lack a bulb of percussion and clear ventral and dorsal surfaces. We do not distinguish flakes from angular debris in this analysis, but it is an important distinction in more detailed analyses.
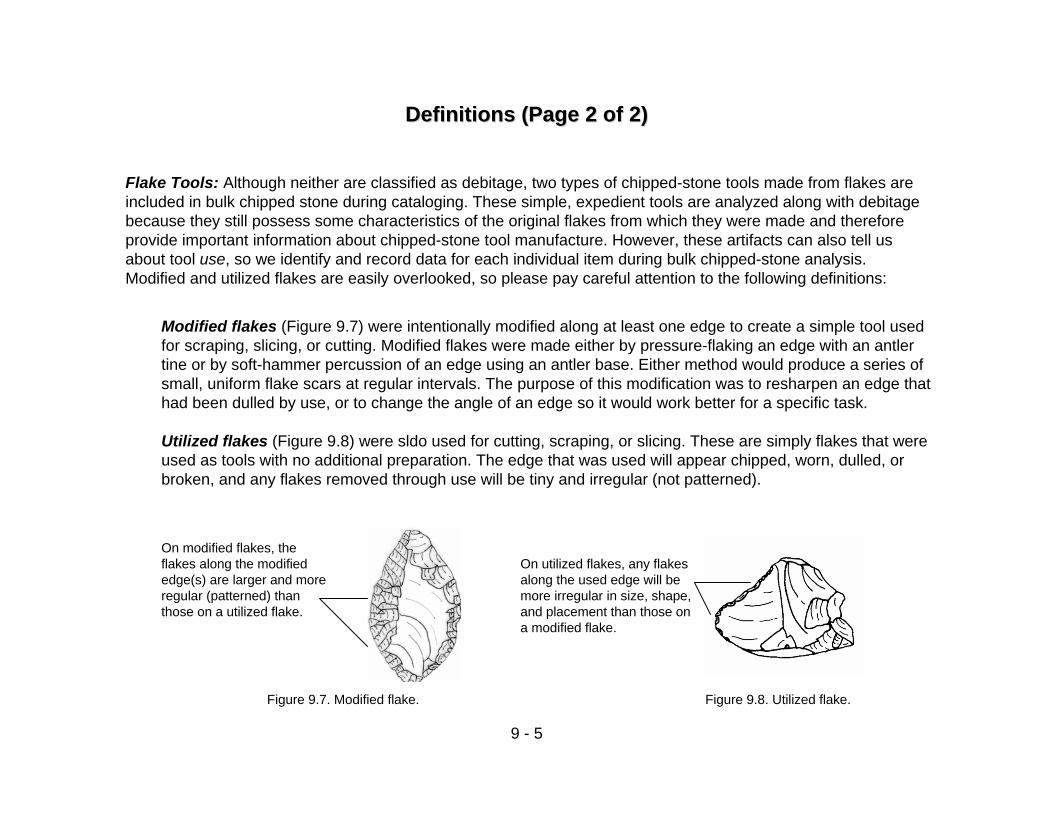
Flake Tools: Although neither are classified as debitage, two types of chipped-stone tools made from flakes are included in bulk chipped stone during cataloging. These simple, expedient tools are analyzed along with debitagebecause they still possess some characteristics of the original flakes from which they were made and therefore provide important information about chipped-stone tool manufacture. However, these artifacts can also tell us about tool use, so we identify and record data for each individual item during bulk chipped-stone analysis. Modified and utilized flakes are easily overlooked, so please pay careful attention to the following definitions:
Definitions (Page 2 of 2)Definitions (Page 2 of 2)
Figure 9.7. Modified flake. Figure 9.8. Utilized flake.
On modified flakes, the flakes along the modified edge(s) are larger and more regular (patterned) than those on a utilized flake.
On utilized flakes, any flakes along the used edge will bemore irregular in size, shape, and placement than those on a modified flake.
9 - 5
Modified flakes (Figure 9.7) were intentionally modified along at least one edge to create a simple tool used for scraping, slicing, or cutting. Modified flakes were made either by pressure-flaking an edge with an antler tine or by soft-hammer percussion of an edge using an antler base. Either method would produce a series of small, uniform flake scars at regular intervals. The purpose of this modification was to resharpen an edge that had been dulled by use, or to change the angle of an edge so it would work better for a specific task.
Utilized flakes (Figure 9.8) were sldo used for cutting, scraping, or slicing. These are simply flakes that were used as tools with no additional preparation. The edge that was used will appear chipped, worn, dulled, or broken, and any flakes removed through use will be tiny and irregular (not patterned).

Step 3: Sort Step 3: Sort Flake Tools vs. DebitageFlake Tools vs. Debitage
Sort the chipped stone into three categories: modified flakes, utilized flakes and debitage. Be sure to look at each piece carefully, and examine all edges for evidence of modification or use. If none is found, the item should be placed in the debitage pile. Modified and utilized flakes are relatively rare, so not every bag of bulk chipped-stone will contain one of these items. Be sure to have a staff member check your work.
If you have any modified flakes or utilized flakes you should fill out an analysis label for each one (Figure 9.9). The site number will normally be printed on the analysis labels when they are generated by the computer. You should transfer the PD and FS numbers from the FS label. Then, assign an item number to each flake tool, beginning with “1” continuing sequentially for each flake tool you identify within this bag. Then, enter the appropriate chipped-stone category code for each flake tool to indicate whether the item is a modified flake (M) or a utilized flake (U). Once you have filled out this information, place each flake tool on its corresponding label and set it aside.
SITE: 5MT123PD_______FS______ ITEM #________CATEGORY_____MATCODE______MATERIAL NAME:____________________________CORTEX______
If you find any flake tools, write the appropriate chipped stone category code here. “M” for modified flake.“U” for utilized flake. Set the flake tools aside
for now and continue to Step 4, where you will sort the debitage by stone material type.
9 - 6
Figure 9.9. Where to enter the chipped-stone category on the analysis label.
Item numbers are assigned to each flake tool. Item numbers are assigned consecutively, beginning with “1,” to each modified and utilized flake found in and FS of bulk chipped-stone.

Step 4: Sort Step 4: Sort Debitage byDebitage by Stone Material Stone Material TypeType
Return to the large pile of debitage and sort it by stone material type (Figure 9.11). The procedures for identifying stone material types are given in “Chapter 8: Stone Material Identification.” You will need to consult this chapter and follow the instructions it contains to accomplish this step. You should place each piece of debitage into a pile corresponding to its stone material type. The stone material types we recognize are listed in Figure 9.20 (Page 9-13).
Once you have sorted the debitage by material type, fill out an analysis label for each resultant pile (Figure 9.12). As was the case for the flake tools, you should transfer the PD and FS numbers from the FS label; however, we do not assign item numbers to debitage, so you should enter a dash (—) in the item number space for all labels that correspond to debitage. Then, enter a “D” for the chipped-stone category to indicate that the label corresponds to debitage. Once you have filled out this information, place the label with the corresponding pile of debitage . Eachlabel should have the PD, FS, Artifact Category, Material Name and Material Code filled out. Be sure to have a staff member check your sort before going on to the next step.
Figure 9.11. Participants sorting debitage by material type.
9 - 7
SITE: 5MT123PD_______FS______ ITEM #________CATEGORY_____MATCODE______MATERIAL NAME:____________________________CORTEX______
The chipped-stone category for debitage is “D”.
Matcode: The three-letter abbreviation for the stone material type of the objects described by the label (from Figure 9.21).
Material Name: The materialtype name corresponding to the material code, written out (from Figure 9.21).
Item numbers are not assigned todebitage. Enter a dash (—) if the chipped-stone category is “D.”
Figure 9.12. What to enter on the analysis label for each pile of debitage of a given stone material.

Step 5: Sort Material Types Step 5: Sort Material Types byby the Presence or Absence of Cortexthe Presence or Absence of Cortex
Determine whether each piece of debitage has cortex or not. Cortex is the natural, weathered exterior surface of the parent rock from which the chipped-stone artifact was struck. It can be thought of as a “rind” that forms over time as the stone is exposed to the environment. Cortex will often have a different color, texture and luster than the interior of the rock.
The first step in chipped-stone tool manufacture was to remove the cortex from piece of raw material. Thus, we record the presence or absence of cortex during chipped-stone analysis to help us determine whether primary reduction of specific raw materials occurred in a given location.
To sort debitage based on the presence or absence of cortex, examine each piece in each stone materialpile. On flakes, look for cortex on the striking platform and dorsal surface (the side facing out from the core from which it was struck), and on angular debris, examine all surfaces. Split each stone material pilefrom Step 4 into two piles, one that consists of pieces with cortex and a second that consists of pieces lacking cortex. Once you have accomplished this sort, you will need to fill out a second analysis label for each stone material type, and indicate the presence of cortex on one label, and the absence of cortex on the other (Figure 9.13).
9 - 8
SITE: 5MT123PD_______FS______ ITEM #________CATEGORY_____MATCODE______MATERIAL NAME:____________________________CORTEX______
Cortex: Record presence (P) or absence (A) of cortex.
Figure 9.13. Where to indicate the presence or absence of cortex on the analysis label.

Step 6: Step 6: Complete Steps 4 and 5 for Flake Tools and Check Analysis LabelsComplete Steps 4 and 5 for Flake Tools and Check Analysis Labels
After you have sorted all debitage by stone material type and by the presence or absence of cortex, and have filled out an analysis label for every resultant pile, you should return to the flake tools and make the same determinations for each itemized flake tool from Step 3. Because each flake tool will already have an analysis label started from Step 3, you should add information to the existing label as you determine the stone material type and presence or absence of cortex for each item.
You should now have a completely filled-out analysis label for each modified flake, utilized flake, and pile of debitage of a given stone material type and cortex status. Figure 9.14 reviews what should be recorded in each space of each analysis label. The analysis codes are also summarized in Figure 9.20 (page 9-13).
9 - 9
SITE: 5MT123PD_______FS______ ITEM #________CATEGORY_____MATCODE______MATERIAL NAME:____________________________CORTEX______
PD: Copied from the original bulk chipped stone FS label.
FS: Copied from the original bulk chipped stone FS label. Item #: Assigned to each flake tool.
Item numbers begin with one and are assigned consecutively to each modified flake or utilized flake found in an FS of bulk chipped-stone.
Category: Specifies the category of bulk chipped stone: M=modified flake,U=utilized flake, and D=debitage. Matcode: The three-letter abbreviation
for the stone material of the objects described by the label.
Material Name: The complete material type name corresponding to the material code.
Cortex: Indicates the presence (P) or absence (A) of cortex.
Figure 9.14. What to record in each space on the analysis label.

Step 7: Step 7: SortSort One CategoryOne Category--MaterialMaterial--CortexCortex GroupGroup by Sizeby Size
In this step you will determine the size of each artifact. This information is important because debitage from early stages of chipped-stone-tool production tends to be larger than debitage from later stages. To determine size we use a set of nested screens with different mesh sizes (Figures 9.15-9.18).
By now you may have many piles of chipped stone on the table, each one with an analysis label that describes theattributes of that particular “category-material-cortex” group. Note that each flake tool should have an item number and will fall into its own group. Select one group and carefully place the artifact(s) in that group into the nested screens, whch are stacked top to bottom in order of decreasing mesh size (Figure 9.17). Gently shake the screens to get the flakes to drop through. Any artifact that can pass through a screen in any direction without forcing should be put through.
Figure 9.15. A nested set of screens for size-sorting bulk chipped stone.
Figure 9.16. Disassembled set of screens. Left to right: Bottom tray (no mesh), ¼-inch mesh, ½-inch mesh,and 1-inch mesh.
Figure 9.17. Droppingartifacts into the screens. The screens are stacked so that the screen with the largest mesh (1-inch) is on the top and the screen with the smallest mesh (¼-inch) rests on the bottom tray.
Figure 9.18. After screening: the debitage found in the bottom (<¼-inch) tray.
9 - 10
When you have finished size-sorting a group, you will record the information for each category-material-cortex-size group on the Bulk Chipped Stone Analysis Form in Step 8.
Note: Each flake tool will have an item number and will fall into its own category-material-cortex group.

Step 8: Step 8: Fill Out the Analysis FormFill Out the Analysis Form
In this step you will record all the data generated during steps 1 through 7 on the Bulk Chipped Stone Analysis Form (Figure9.19). Fill out the form for each “category-material-cortex” group as you sort the group by size, using the following sub-steps:
9 - 11
a) Copy the analysis data recorded on the analysis label onto a line of boxes on the form, including the chipped stone category, material name, material code, and cortex code for that group.
b) Then record the size category of the largest-mesh screen that has artifacts in it: 1=1-inch mesh; 2=½-inch mesh; 4=¼-inch mesh; 5=<¼-inch mesh (bottom tray) (see Figure 9.20).
c) Count and weigh the artifacts in this screen (see Chapter 3 for information on weighing artifacts) and record these data in the appropriate spaces on that line.
d) Record comments that are relevant to a given category-material-cortex-size group. Things to record in comments include: evidence of burning or heat treatment, the deposition of precipitate, evidence thatone or more flakes derived from tools (such as an axe or hammerstone), and the location and nature of modification or use. Consult a staff member for the appropriate notes to make in the comments box.
e) Repeat sub-steps a-d for each screen with smaller mesh containing artifacts until all the artifacts in the category-material-cortex group have been accounted for (see Figure 9.19).
f) Once all the artifacts in a category-material-context group have been recorded, the artifacts from the various screens should be grouped back together and placed in an appropriately-sized plastic bag along with the analysis label facing outward so it can be read through the bag.
g) Then repeat Steps 7 and 8 for the next category-material-size group until all such groups have been recorded on the analysis form and bagged with their associated analysis labels.

Figure 9.19 (right). A Filled-out Bulk Chipped Stone Analysis Form
Brackets indicate artifacts of the same category-material-cortex group, which are bagged together after they have been size-sorted, counted, weighed, and recorded.
9 - 12
CROW CANYON ARCHAEOLOGICAL CENTER
Bulk Chipped Stone Analysis Form
Site Number 5MT123 PD 16 FS 7 PL ----- Bag Date 5/1/01 Date Analyzed SGO Analyst 10/9/02 DE initials__LFJ__D E date__6/19/03_ __
Chip
ped
Ston
e
Item
No.
Material Name
Mat
eria
l
Cort
ex
Size
Coun
t
Weig
ht Comments
D – Morrison SilicifiedSandstone
JMS A 1 1 49.5
D – Morrison SilicifiedSandstone
JMS A 2 18 81.4
One piece is an axefragment.
D – Morrison SilicifiedSandstone
JMS A 4 41 32.6
D – Morrison SilicifiedSandstone
JMS P 1 2 28.3
D – Morrison SilicifiedSandstone
JMS P 2 10 67.1
D -- Morrison SilicifiedSandstone
JMS P 4 8 8.4
D – Morrison Mudstone KJM A 1 1 49.0
D -- Morrison Mudstone KJM A 2 4 25.5
D -- Morrison Mudstone KJM A 4 14 6.3
D – Morrison Mudstone KJM P 2 5 21.4
M 1 Burro Canyonchert/siltstone
KBC A 2 1 1.0 Modification on twomargins.
U 2 Morrison Chert KJC A 1 1 23.1
Use wear on tip.

CROW CANYON ARCHAEOLOGICAL CENTERBULK CHIPPED STONE ANALYSIS CODES
CHIPPED STONE CATEGORYD = debitageM = modified flakeU = utilized flake
MATERIAL CODES AND NAMESACH = agate/chalcedony CAL = calicheCOG = conglomerate CON = concretionGCB = gypsum/calcite/bariteJET = jetJMC = Brushy Basin chert (old code: BBC)JMS = Morrison silicified sandstone (old code: MQT)KDB = Dakota/Burro Canyon silicified sandstone (old code: DQT)KBC = Burro canyon chert (old code: BUR)KJC = Morrison chert (old code: MCS)KJM = Morrison mudstone (old code: MCS)MIN = other mineralNCS = nonlocal chert/siltstoneOBS = obsidian OIG = other igneousPET = petrified woodPMS = Porter mudstoneQTZ = quartzRJS = red jasperSND = sandstoneSLS = slate/shaleTUR = turquoiseUCS = unknown chert/siltstoneUSS = unknown quartzite; unknown silicified sandstone (old code: UQT)UNS = unknown stoneWPC = Washington Pass chert
SCREEN SIZE1 = 1" screen2 = 1/2" screen4 = 1/4" screen5 = < 1/4" screen
CORTEXP = presentA = absent
Figure 9.20. Bulk Chipped Stone Analysis Codes.
9 - 13

Step 9: Step 9: Bag the Analyzed BulkBag the Analyzed Bulk Chipped StoneChipped Stone
The last step in the analysis is to package the analyzed artifacts for storage. Each bag containing a category-material-cortex group with analysis label will go back into the original bulk chipped stone bag you emptied at the beginning of the analysis. The category-material-cortex bags do not need to be twist-tied unless the contents are in danger of spilling out. As you put these bags back in the original bag, be sure each one has an analysis label inside,and check the analysis form to be sure that the contents of each bag were recorded correctly.
REMEMBER: Each modified or utilized flake should have been bagged individually, should have an analysis label with a unique item number on it, and should have a line of data on the analysis form for that specific item.
When everything has been checked and any errors corrected, the analysis date and analyst’s initials (for participants, these are the initials of the staff member who checked your work) should be recorded in the spaces provided along the right edge of the original FS label (Figure 9.21), and then this label should be inserted in the bag facing out so it can be read from the outside. Finally, close the bag with a twist tie (Figure 9.22) and give the bag and analysis form to a staff member.
Figure 9.22. Bagging bulk chipped stone artifacts after analysis.
9 - 14
SITE: 5MT123 DE date _9/2/03_
PD__1293______ FS__3_______ PL_----__STUDY UNIT__NST 133_______________HOR._1x2 502.1N 489.5E VERT._FULC__FEATURE__------_____________________HOR._------__________ VERT._------_____BAG DATE_7/14/03____ FIELD SUP_SCRCONTENTS_Bulk Chipped Stone ________Count__11_____________ Weight__43.1_________
Ana
lyst
____
Dat
e___
_
Figure 9.21 (Left). Enter the analysis date and analyst’s initials on the right edge of the original FS label of the Bulk Chipped Stone bag you have just analyzed when you finish the analysis.

10 - 1
Chapter 10Detailed Stone Artifact Analyses
This chapter provides a guide to detailed analyses we perform on various categories of individualstone artifacts. This includes analyses we conduct as part of our standard procedure, and analyseswe have performed on specific artifacts in specific collections to address project-specificresearch questions. The majority of this chapter describes our standard, detailed analysis offormal chipped-stone tools, which include bifaces, projectile points, and drills. A second sectionat the end of the chapter describes the analysis data we collect from other stone artifacts, eitheras part of our standard procedure or as part of problem-oriented studies.
Analysis of Bifaces, Projectile points, and Drills
Formal chipped-stone tools are first identified during cataloging (Chapter 3), and at that time thecondition, material, and weight of each artifact are recorded on the FS Form. After the entirecollection from a site has been cataloged and a consistency check of all individual stone artifactshas been completed (see Chapter 13), staff, interns, and/or volunteers record additional data fromall formal chipped-stone tools in the collection on the Biface Analysis Form (Figure 10.1). Weperform this detailed analysis as part of our standard procedure because formal chipped-stonetools possess more interpretive potential than many other stone artifacts. Over the years,archaeologists have used formal-chipped-stone-tool data to address questions of chronology,production and exchange, cultural identity, and specific cultural practices such as hunting andwarfare.
The goals of our analysis of formal chipped-stone tools are: 1) to assess the most probable initialfunction of each tool (the final use of each artifact is reflected in the artifact category, which wasrecorded during cataloging); 2) to assess the relative age and cultural affiliation of eachprojectile point by determining its culture-historical type, when possible; 3) to collect basicmetric data that can be used by future researchers; and 4) to collect technological data about themanufacture and “life histories” of these artifacts. Although most artifacts we classify as bifaces,projectile points, or drills are truly formal, bifacially-flaked tools that were deliberately shaped tofit a pre-conceived template, some artifacts assigned to these categories were not formally-shaped, including drills that were neither bifacially-flaked nor hafted, and bifaces that wereneither formal tools nor formal tool preforms. We nevertheless analyze every artifact that isassigned to one of these three categories, regardless of its degree of formality.
The following paragraphs explain how the Biface Analysis Form is filled out. When performingthis analysis, analysts enter a dash (–) for all items that are not applicable, or where the object isnot complete enough to warrant the measurement or description.

10 - 2
Figure 10.1. Biface Analysis Form
Provenience
Copy the Site, PD number, and FS numbers from the FS label associated with the artifact to theappropriate spaces on the Biface Analysis Form.
Morphology
Tool morphology is described in terms of a variety of quantitative measurements and qualitativeattributes. All measurements are recorded to the nearest hundredth of a centimeter. Descriptionsof the attributes are listed below. The locations of the measurements and attributes are providedbelow. The parts of a projectile point and several basic measurements are illustrate in Figure10.2.
Crow Canyon Archaeological Center Biface Analysis Form 4/27/05
Analyst_____________ Date___________ Tracing
Provenience:Site Number:___________ PD:_________ FS:______
B. Morphology (measurements in 100ths of a cm): Max. Length:________ Max. Width:___________
Max. Thickness:_______ Notch Width:__________
Neck Width:_________ Notch Locations: _________
Max. Width Location:________ Size Class:_______
Portion Present:__________ Side Shape:__________
Base/Stem Shape:________ Serration?:_________
C. Technology/Function:
Primary Function:______ Reduction Stage:_______
Blank Form:_________ Cortex:______________
Use-Phase:__________ Rejection:_____________
Edge Grinding:_______ Use Wear:____________
Fracture Location:_______ Raw Material:________ Resharpened?:_________
D.Type:___________________________ E.Comments:________________________________________
_______________________________________________________________________________________

10 - 3
Biface/Projectile Point Morphological Terminology
Notch Width Max. Width
Max. Length
Max. Thickness
Tip
Mid section Side
Shoulder
Base
Stem
Biface/Projectile Point Morphological Terminology
Notch Width Max. Width
Max. Length
Max. ThicknessNotch Width Max. Width
Max. Length
Max. Thickness
Tip
Mid section Side
Shoulder
Base
Stem
Tip
Mid section Side
Shoulder
Base
Stem
Figure 10.2. Projectile Point Morphology.
Maximum Length: The maximum linear dimension between the tip and base of the tool.

10 - 4
Maximum Width: The maximum cross section preserved between the lateral edges of the tool.This measurement is perpendicular to the length.
Maximum Thickness: This measurement is also perpendicular to the length, but it spans themaximum distance between the two faces of the tool.
Notch Width: The distance between the shoulder and the corner of the base on a projectile point.This measurement is taken only if the point is notched or stemmed and the complete width canbe measured. If both notches are preserved, both are measured and the average distance isrecorded.
Neck Width: The minimum distance between the notches. Record a dash (–) if the tool does nothave notches.
Notch Locations: Record the location of notches (hafting elements) on a tool (Table 10.1).Multiple values may be entered for this attribute, separated by commas.
Table 10.1. Notch LocationsCode Description
C cornerS sideB baseN no notchesI indeterminate
Maximum Width Location: The place on the tool where the maximum width was recorded(Table 10.2).
Table 10.2. Maximum Width LocationCode Description
S sidesH shoulderB baseI indeterminate or incomplete
Size Class: Projectile points with complete necks are assigned to one of the three size classesdefined in Table 10.3, based on the width of the neck. If the neck is incomplete, then the point isassigned to the “indeterminate” size class.

10 - 5
Table 10.3. Size ClassCode Description (neck width)
S small (<6 mm)M medium (6 to 10 mm)L large (>10 mm)I indeterminate (incomplete neck)
Portion Present: Record the category that best describes the portion of the tool that is availablefor analysis (Table 10.4).
Table 10.4. Portion PresentCode Description
C completeTB tip brokenTO tip onlyMO mid-section onlyMP partial mid-sectionBB base brokenBM base missingBO base/stem onlySB shoulder/side brokenTBB tip and base brokenTSB tip and shoulder brokenSBB shoulder and base broken
I indeterminate
Shape of Sides: Record the general shape of the sides of the tool (Table 10.5).
Table 10.5. Side ShapeCode Description
S straightC concaveX convexA angledI indeterminate
Shape of Base or Stem: Record the shape of the base on a notched tool, and the shape of the stemon a stemmed tool (Table 10.6). Definitions of stem shapes may be found in Holmer (1986*1).

10 - 6
Table 10.6. Shape of Base/StemCode Description
SB straight baseCB concave baseXB convex baseCS contracting stemES expanding stemSS straight stemI indeterminate
Serration: Record the presence (Y) or absence (N) of serrated edges. If no edges are present, or iftoo little of an edge is preserved, record this attribute at indeterminate (I).
Technology/Function Data
Technology and function data, unlike the morphological data, are all qualitative in nature. Theseare largely subjective assessments, and thus are prone to revision in future analyses.
Primary Function: The original intended use of the object as inferred on the basis of grossmorphology, not use-wear analysis (Table 10.7).
Table 10.7. Primary FunctionCode Description
A arrow point (small)D atlatl dartB blade (knife or spear)R drillI indeterminate
Reduction Stage: The latest stage of bifacial reduction evident on the tool. The particular stagesused derive from Whittaker (1994*1:199-206), with slight changes in the numbering sequence(Table 10.8).
Table 10.8. Biface Reduction StageCode Description
S1 bifacially-edged blankS2 primary thinned preformS3 refined bifaceS4 finishingF finishedI indeterminate

10 - 7
N not applicable
Blank Form: The type of blank from which a tool was produced (Table 10.9). These blank typesare discussed in Andrefsky (1998*1) and Whittaker (1994*1).
Table 10.9. Blank FormCode Description
F1 other (non-bipolar) flakeF2 biface thinning flakeF3 bipolar flakeF4 bifacially-reduced blankF5 indeterminate
Cortex: Record the presence (P) or absence (A) of cortex on the tool. See page 9-8 for furtherinformation on how to identify cortex.
Use-Phase: This attribute refers to whether the tool was finished or unfinished, usable orunusable, when it was deposited in the archaeological record (Table 10.10). Unbroken tools aregenerally assumed to have been usable even if they were unfinished. Broken, burned, or poorlymade tools are usually inferred to have been unusable. The inferred reason for discard isrecorded under “Rejection,” below.
Table 10.10. Use-phaseCode Description
1 unfinished, usable2 unfinished, unusable3 finished, usable4 finished, unusable
Rejection: A subjective assessment of the reason why a tool was discarded (Table 10.11). Fordefinitions of fracture types see Cotterell and Kamminga (1979*1) and Whittaker (1994*1). If noreason for discard is apparent, enter “R10" (indeterminate).
Table 10.11. Reason for RejectionCode Description
R1 limited potential for further work/useR2 bending fracture/end shockR3 material flaw/qualityR4 outre-passe fracture

10 - 8
R5 compound hinge/step occurrenceR6 impact fracture
R7 heat fractureR8 lateral breakR9 crescentic chunk from marginR10 indeterminate
Edge Grinding: Describe the location(s) of edge grinding on the tool, if such grinding is present.Edge grinding is a characteristic of Archaic projectile points in the Southwest (Table 10.12).
Table 10.12. Edge-Grinding LocationCode Description
S sidesB baseA all edgesN noneI indeterminate
Use Wear: Record the type(s) and locations(s) of macroscopic use wear (Table 10.13). Morethan one type of use wear may be recorded for a given item.
Table 10.13. Use WearCode Description
T tip re-sharpenedR retouching of bladeD wear from drillingH repaired haftU use wear on bladeI indeterminateN no use wear
Fracture Location: Record the locations of fractures that are inferred to be related to the use ofthe tool. Record as many options as are relevant (Table 10.14).
Table 10.14. Fracture Location(s)Code Description
B bladeT tipS shoulder

10 - 9
H haft or baseL lateral bodyI indeterminateN no fractures
Raw Material: Copy the stone raw material category recorded for this tool during cataloging. Wecopy this information onto the Biface Analysis Form because it is helpful to have all theinformation for a given artifact on a single piece of paper.
Type
Record the number corresponding to the type of which the point is an example. The projectilepoint typology used by Crow Canyon researchers is based on point styles defined by numerousarchaeologists working over a period of many years in the Southwest. We keep a running list ofrecognized point types as we conduct this analysis and add new types to the end of our list asthey are encountered in our collections or defined by other researchers. The point types includedin our list to date are listed and briefly described in Table 10.15, below. Sources for morethorough descriptions of these types include Geib 1996*1; Hayes and Lancaster 1975*1; Holmer1986*1; Irwin-Williams 1973*1; Lekson 1997*1; Matson 1991*1; and Thomas 1981*1.Selected types are illustrated in Figures 10.3, 10.4, and 10.5.
Table 10.15. Formal Tool Types
Code Type Name/Description Culture (DateRange)
Reference(s)
0 Projectile point, not further specified
1 small, side-notched; unspecified baseshape (if base shape can bedetermined, point should be classifiedas type 22, 23, or 24)
Pueblo II–Pueblo III(A.D. 900–1300)
Hayes andLancaster1975*1: 145,Style C
2 Large, corner-notched, with flaringtangs
Basketmaker III–Pueblo I (A.D.500–900)
Hayes andLancaster1975*1: 145,Style A; Figure10.3
3 Desert Side-Notched point: small,side-notched, with an expanding,concave base, with or without a basalnotch.
Protohistoric Numicand Athabaskangroups (A.D.1150–1750)
Thomas 1981*1

10 - 10
4 Small corner-notched; of theRosegate series
A.D. 300–1000 Hayes andLancaster1975*1: 145,Style B; Holmer1986*1
5 Short Bull Creek point, total length of4.0 cm or less, straight sides,concave base, and no notches
Pueblo III insoutheast Utah(A.D. 1100–1300)
Geib 1996*1: 107
6 Large, corner-notched point withconvex base
Basketmaker II(B.C. 1000–A.D.500)
Matson 1991*1:80
7 Medium corner-notched Middle and LatePueblo II (A.D.1050–1150)
Hayes andLancaster1975*1: 145,Style B
8 Biface, not further specified
9 Drill, not further specified
10 Cottonwood Triangular: a small,triangular point with a straight baseand no notches
Pueblo II–Protohistoric insoutheast Utah(A.D. 950–1750)
Holmer 1986*1;Figure 10.4
11 Small, contracting-stemmed Pueblo II–Pueblo III(A.D. 900–1300)
12 Long Bull Creek point, total length of4.5 cm or more, straight sides,concave base, and no notches
Fremont insoutheast Utah(A.D. 1000–1300)
Geib 1996*1: 107
13 Medium side-notched Pueblo II–III (A.D.900-1300)
Hayes andLancaster1975*1: 145,Style C
14 Medium-size point with thin corner-notches, possibly of the Rosegateseries
Pueblo II in NewMexico (A.D.900–1150)
Lekson 1997*1;Hayes andLancaster1975*1: 145,Style B
15 Elko Corner-Notched: large (neckwidth greater than 1.0 cm) triangularpoint with expanding stem andtanged corners (down-slopingshoulders)
Archaic (8500–1000B.C.)
Holmer 1986*1;Figure 10.5

10 - 11
16 Elko Eared: large triangular pointwith concave base and expandingstem
Late Archaic (1500B.C.–A.D. 500)
Holmer 1986*1;Figure 10.5
17 Rocker Side-Notched: largelanceolate point with semicircular,smooth basal edges and moderatelyhigh side notches
Middle Archaic(3500-1500
Holmer 1986*1;Figure 10.5
18 Sudden Side-Notched: largetriangular-shaped point with highside-notches, contracting stem, andslightly convex bases and bladeedges
Middle Archaic(3500-1500 B.C)
Holmer 1986*1;Figure 10.5
19 Bajada/Pinto Stemmed: large dartpoint with relatively high shouldersand indented or concave base thatcannot be identified specifically as aBajada Stemmed (Type 30) or PintoStemmed (Type 29) point
Archaic (8500–1000B.C.)
Holmer 1986*1;Irwin-Williams1973*1; Figure10.5
20 Armijo Complex point: short, withwide expanding stem, serrated bladeedges, slightly concave base, andpossible shallow corner notches
Archaic (8500–1000B.C.)
Irwin-Williams1973*1
21 Nawthis Side-Notched: a long pointwith low notches
Fremont in southernUtah (A.D.1000–1300)
Holmer 1986*1;Figure 10.4
22 Small, side-notched, with straightbase
Pueblo III (A.D.1150–1300)
Hayes andLancaster1975*1: 145,Style C; Figure10.4
23 Small, side-notched, with slightlyconcave base
Late Pueblo II (A.D.1100–1150)
Hayes andLancaster1975*1: 145,Style C
24 Small, side-notched, with convexbase
Pueblo III (A.D.1150–1300)
Hayes andLancaster1975*1: 145,Style C; Figure10.3
25 Archaic corner-notched, not furtherspecified
Archaic (8500–1000B.C)

10 - 12
26 Parowan Basal-Notched: A long,triangular point with two basalnotches
Fremont and VirginAnasazi (A.D.1000–1300)
Holmer 1986*1
27 Humboldt Basal-Notched: A largelanceolate point with concave baseand a single basal notch
Archaic (8500–1000B.C)
Holmer 1986*1
28 White Dog Point: large, corner-notched points with lanceolate-shaped sides
Basketmaker II(1000 B.C.–A.D.5000)
Geib 1996*1: 63
29 Pinto Stemmed: A large, shouldereddart point with a split stem
Late Archaic (1500B.C.–A.D. 500)
Holmer 1986*1
30 Bajada Stemmed: large, slightly-shouldered dart point with basalthinning and indentation
Early Archaic(8500–3500 B.C.)
Holmer 1986*1;Irwin-Williams1973*1
31 San Jose Stemmed: large,shouldered dart point, shorter stemto blade ratio than in BajadaStemmed, and serrated edges arecommon
Late Archaic (1500B.C.–A.D. 500)
Holmer 1986*1;Irwin-Williams1973*1
Additional Stone Artifact Analyses and Data
We record a variety of data from individual stone artifacts in addition to the data for bifaces,projectile points, and drills described above. Some of these data are recorded as part of our basicartifact processing procedures. For example, the weight, condition, and material of every stoneartifact assigned to an individual artifact category is recorded during cataloging (Chapter 3). Wealso record the material, weight, size category, and presence or absence of cortex for eachmodified and utilized flake encountered during bulk chipped-stone analysis (Chapter 9).Modified and utilized flakes are clearly stone tools, but they are not distinguished as individualstone artifacts during cataloging because: 1) their identification is beyond the abilities of moststudents who catalog the majority of our collections; and 2) the kinds of information we want tocollect from these tools are the same as those we record for debitage. We have therefore found itmost efficient to include modified and utilized flakes along with debitage in our bulk chippedstone category during cataloging, and analyze them as part of bulk chipped stone analysis.
We collect additional stone artifact analysis data in ways that vary from project to project,depending on the specific research questions being pursued and the interests of the lab staff. Forexample, we have collected detailed information from two-hand manos, axes and mauls, andother modified stones over the years to address specific questions related to our research. Fordetails on these specific, problem-oriented analyses, the reader should refer to reports generated

10 - 13
by our lab for various projects (%Lightfoot and Etzkorn 1993*1; %Pierce et al. 1999*2;%Ortman 2000*2, 2002*1, 2003).

10 - 14
Figure 10.3. Projectile point types. Top row: Type 22. Middlerow: Type 24. Bottom row: Type 2.

10 - 15
Figure 10.4. Examples of Type 22 (left),Cottonwood Triangular (Type 10,middle), and Nawthis Side-notched(Type 21, right).

10 - 16
Figure 10.5. Examples of Archaic projectile point types.Top, l-r: Elko Earred (Type16), Sudden Side-notched (Type18), and Rocker Side-notched (Type 17). Bottom, l-r:Bajada/Pinto Archaic Stemmed (Type 19), and 2 ElkoCorner-notched (Type 15).

11 - 1
Chapter 11Flotation Sample Processing
This chapter describes the procedure we use to process flotation samples. Flotation samples aresamples of sediment containing both organic debris (primarily burned vegetal remains) andinorganic materials (stones, including small artifacts), which, once freed from the matrix, can besubjected to a variety of analyses. The procedure we use to process flotation samples involvesmixing the sample with water to separate the constituent elements. The vegetal materials float tothe top of the water and are called the “light fraction”; the heavier stones, pebbles, and sandgrains sink to the bottom and are called the “heavy fraction.” The sediment itself is largelywashed away during the procedure.
We process flotation samples for three reasons. First, flotation separates plant remains from otherconstituents of a sample, thus facilitating archaeobotanical analysis. This analysis is performedby specialists and is not considered in this manual; however, a detailed description of themethods used is available at www.crowcanyon.org/plantmethods (Adams 2004*1). Second, byremoving the sediment, we can better examine the heavy fraction for small artifacts that are notroutinely caught in the ¼-inch mesh used to screen sediments in the field. (See Ortman [2003*1:par. 135– 142] for an example of a study that uses artifact data from the heavy fractions offlotation samples.) Third, by removing the sediment, flotation reduces the volume and weight ofmaterial that must be curated, thus saving on curation space and cost.
On the following pages we describe and illustrate our flotation procedures, which are performedby staff, interns, volunteers, and participants of middle-school age and older.

Step 1: Gather Flotation EquipmentStep 1: Gather Flotation Equipment
The flotation equipment used in our lab is simple and inexpensive, and most of the materials needed to make it may be found in any hardware store or fabric store (Figures 11.1 and 11.2):
• 1-gallon bucket• rubber spatula• sink-fitting screen and a drying screen, both with ¼-inch mesh• pieces of fine meshed wedding veil material (0.355-mm) cut to fit the screen• binder clips• graduated cylinder (1 liter)• newspaper•10-20 clothespins and clothesline
Other materials include those necessary for paperwork, documentation, and curation (archival polyethylene bags, twist ties, Field Specimen (FS) Form, FS labels, etc.).
Figure 11.1. Flotation equipment. Left to right:0.355-mm mesh wedding veil, a bucket, a graduated cylinder, binder clips, a spatula, and a sink-fitting screen with ¼-inch hardware mesh.
Figure 11.2. Drying screen (with ¼-inch hardware mesh).
11-2

Step 2: Measure the SampleStep 2: Measure the Sample
First, get a flotation sample, which will still be in its original field bag (Figure 11.3), and confirm that it has been cleared for processing. A cleared sample will have the letters “CL” written in red ink on the bag label (see Chapter 13). Find the FS form for the provenience designation (PD) listed on the bag, and then open the bag (Figure 11.4) and carefully pour its contents into a graduated cylinder of 1000 milliliters (ml) in volume (Figure 11.5). If the sediments are very fine, you may want to do this outside or in a well-ventilated area.
The field archaeologists generally collect flotation samples of approximately 1000 ml. However, this is not always the case. If a feature such as a hearth is being sampled, the flotation sample may be very large. In this step you shouldsubdivide large samples into as many 1000 ml samples as are possible and give each one a unique FS number (see Step 3). Pass the remainder through a ¼-inch screen, and catalog any artifacts found following the procedures described in Chapter 3. If the sample sent in from the field is less than 1000 ml, measure and catalog the entire sample. After measuring the sample pour the contents into an appropriately sized polyethylene bag (Figure 11.6).
Figure 11.3. Flotation sample as packaged in the field.
Figure 11.4. Opening the flotation sample bag.
Figure 11.5. Pouring the flotation sample into a graduated cylinder.
Figure 11.6. Pouring a measuredflotation sample into a polyethylene bag.
11-3

Step 3: Cataloging the Sample (page 1 of 2)Step 3: Cataloging the Sample (page 1 of 2)
Documentation of a flotation sample begins with its entry on the FS Form for the PD from which it was collected (Figure 11.7). Although the same cataloging process described in Chapter 3 is followed here, there are a few details specific to flotation samples. First, as mentioned in Step 2, no cataloged flotation sample should measure more than 1000 ml. Ifthe sample from the field is larger than 1000 ml, it should be divided into as many 1000 ml samples as are possible, and each one given a distinct FS number. If a flotation sample from the field measures less than 1000 ml, the entiresample is kept and the volume recorded in the comments field on the FS Form. Second, the first six columns of the FS Form, plus the comments column, are filled out (the volume of the sample should be entered as a comment). Keep the field bag and the FS Form handy, as you will need both in the next step.
See next page for more “paperwork.”
FS PL ArtifactCategory
BagDate
FSDate
LabSup Cond Mat Count Wt Comments Data Entry
4 — FLO 7/20/03 2/7/04 JDT 1000 ml 9 Initials
9 Initials
9 Initials
Data Entry
9 Initials
9 Initials
9 Initials
Fill out these columns (the artifact category code “FLO” stands for “flotation sample”).
Record the volume in the Comments column (usually “1000 ml”).
Figure 11.7. How to fill out the FS Form for a flotation sample.
11-4
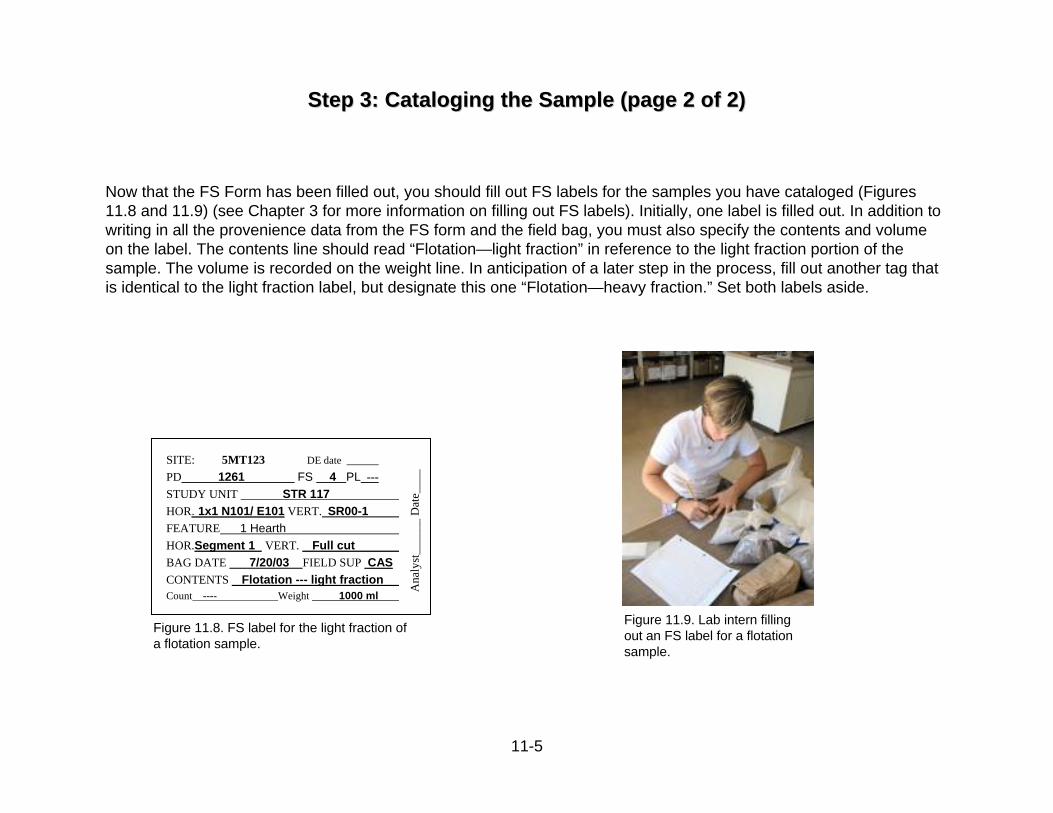
Step 3: Cataloging the Sample (page 2 of 2)Step 3: Cataloging the Sample (page 2 of 2)
Now that the FS Form has been filled out, you should fill out FS labels for the samples you have cataloged (Figures 11.8 and 11.9) (see Chapter 3 for more information on filling out FS labels). Initially, one label is filled out. In addition towriting in all the provenience data from the FS form and the field bag, you must also specify the contents and volume on the label. The contents line should read “Flotation—light fraction” in reference to the light fraction portion of the sample. The volume is recorded on the weight line. In anticipation of a later step in the process, fill out another tag that is identical to the light fraction label, but designate this one “Flotation—heavy fraction.” Set both labels aside.
Figure 11.9. Lab intern filling out an FS label for a flotation sample.
Figure 11.8. FS label for the light fraction of a flotation sample.
SITE: 5MT123 DE date ______PD 1261 FS 4 PL ---STUDY UNIT STR 117 . HOR. 1x1 N101/ E101 VERT. SR00-1 .FEATURE 1 Hearth . HOR.Segment 1 VERT. Full cut .BAG DATE 7/20/03 FIELD SUP CASCONTENTS Flotation --- light fraction .Count ---- Weight 1000 ml .
Ana
lyst
____
__ D
ate_
___
11-5

Step 4: Set Up the EquipmentStep 4: Set Up the Equipment
Place the screen over the sink. Clip the 0.355-mm mesh onto the screen in such a way that it will catch materials as water is poured through it (Figure 11.10). Position the bucket in the sink under the tap. Have a staff member help you with this procedure if you have questions.
Figure 11.10. Using binder clips to attach the mesh to the sink-fitting screen.
11-6
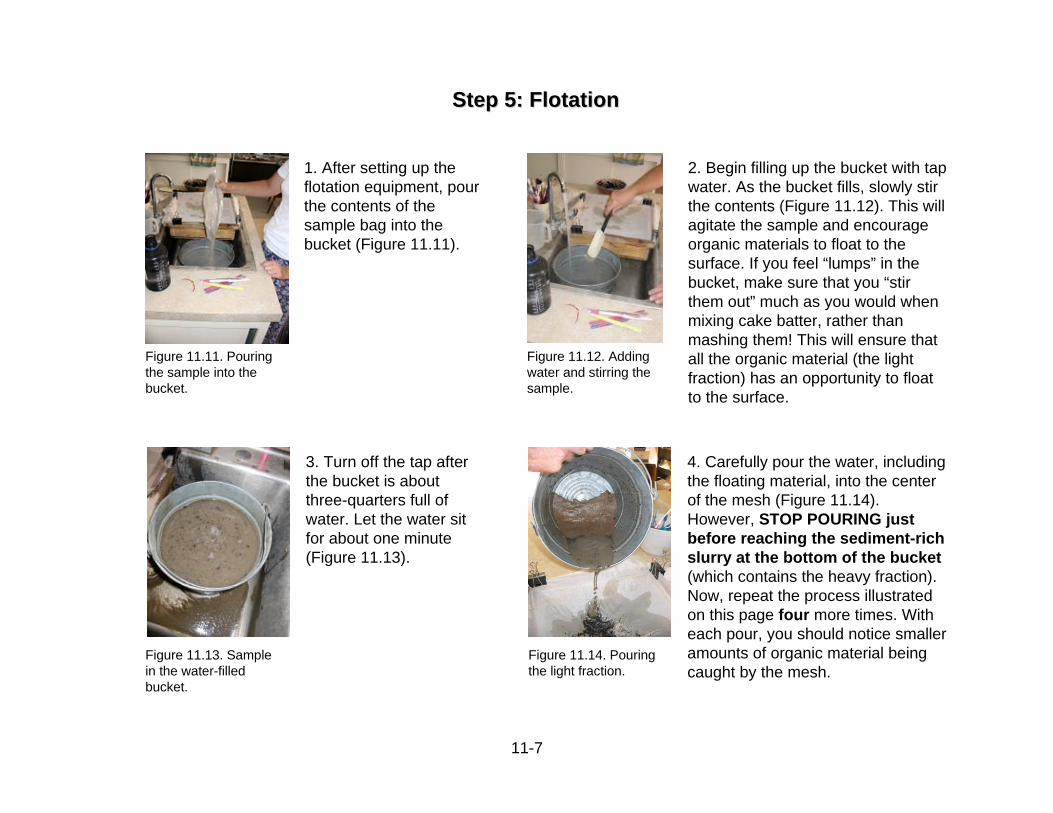
Step 5: FlotationStep 5: Flotation
1. After setting up the flotation equipment, pour the contents of the sample bag into the bucket (Figure 11.11).
2. Begin filling up the bucket with tap water. As the bucket fills, slowly stir the contents (Figure 11.12). This will agitate the sample and encourage organic materials to float to the surface. If you feel “lumps” in the bucket, make sure that you “stir them out” much as you would when mixing cake batter, rather than mashing them! This will ensure that all the organic material (the light fraction) has an opportunity to float to the surface.
Figure 11.11. Pouring the sample into the bucket.
Figure 11.12. Adding water and stirring the sample.
3. Turn off the tap after the bucket is about three-quarters full of water. Let the water sit for about one minute (Figure 11.13).
4. Carefully pour the water, including the floating material, into the center of the mesh (Figure 11.14). However, STOP POURING just before reaching the sediment-rich slurry at the bottom of the bucket (which contains the heavy fraction). Now, repeat the process illustrated on this page four more times. With each pour, you should notice smaller amounts of organic material being caught by the mesh.
Figure 11.13. Sample in the water-filled bucket.
Figure 11.14. Pouring the light fraction.
11-7

Step 6: Dry the Light FractionStep 6: Dry the Light Fraction
Figure 11.16. Twist-tying the light fraction in the mesh.
Figure 11.17. Hanging the light fraction to dry.
Figure 11.15. Light fraction in 0.355-mm mesh.
1. After the fifth pour of the light fraction into the 0.355-mm mesh, you may want to gently pour some water around the edges of the screen to “chase” the organic material into the center of the mesh (Figure 11.15). This will help prepare the sample for drying. This will also help rid the sample of any fine sediments that were inadvertently poured into the mesh.
2. Undo the binder clips that attach the mesh to the screen. Gather up the four corners of the mesh so that the sample bunches up in the center and hangs down in a small bundle. Twist tie this bundle to secure the sample (Figure 11.16).
3. Put the FS label for the light fraction into a small archival bag. Using a binder clip, clothespin, or something similar, clamp the label and the mesh bundle together and then hang the light fraction to dry on a clothes line set up in a convenient location (Figure 11.17).
11-8
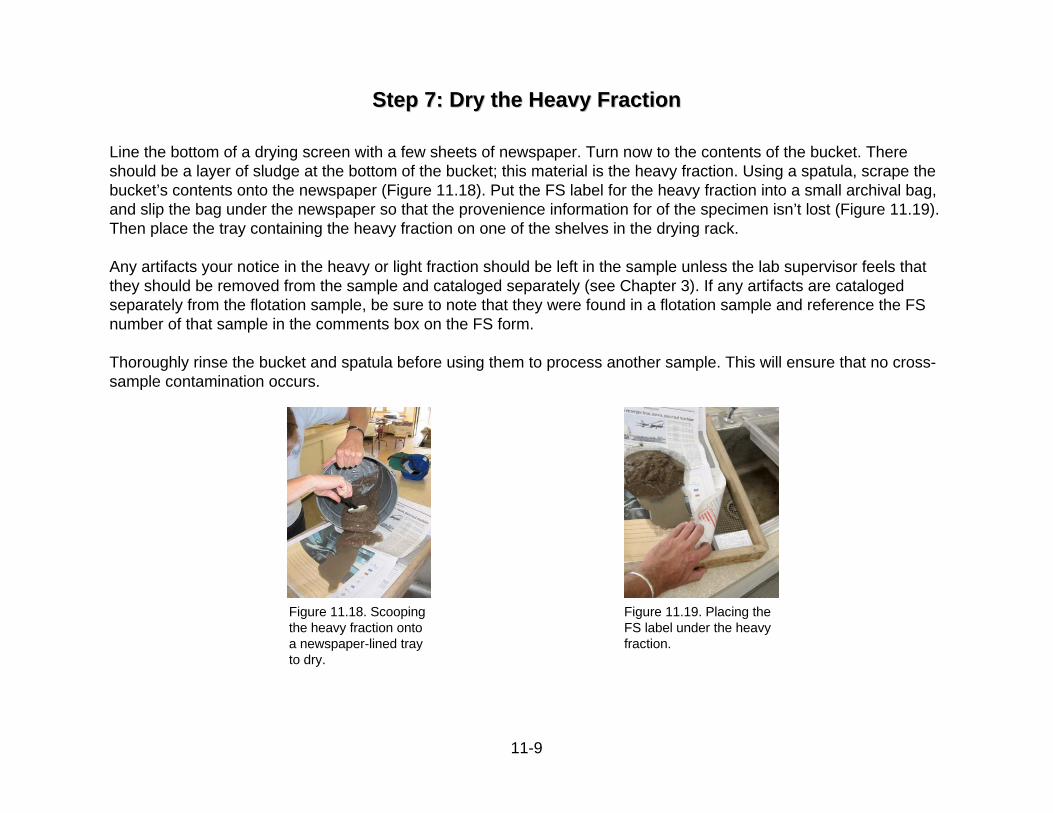
Step 7: Dry the Heavy FractionStep 7: Dry the Heavy Fraction
Figure 11.18. Scooping the heavy fraction onto a newspaper-lined tray to dry.
Figure 11.19. Placing the FS label under the heavy fraction.
Line the bottom of a drying screen with a few sheets of newspaper. Turn now to the contents of the bucket. There should be a layer of sludge at the bottom of the bucket; this material is the heavy fraction. Using a spatula, scrape the bucket’s contents onto the newspaper (Figure 11.18). Put the FS label for the heavy fraction into a small archival bag, and slip the bag under the newspaper so that the provenience information for of the specimen isn’t lost (Figure 11.19). Then place the tray containing the heavy fraction on one of the shelves in the drying rack.
Any artifacts your notice in the heavy or light fraction should be left in the sample unless the lab supervisor feels that they should be removed from the sample and cataloged separately (see Chapter 3). If any artifacts are cataloged separately from the flotation sample, be sure to note that they were found in a flotation sample and reference the FS number of that sample in the comments box on the FS form.
Thoroughly rinse the bucket and spatula before using them to process another sample. This will ensure that no cross-sample contamination occurs.
11-9

Step 8: Bag the Light and Heavy FractionsStep 8: Bag the Light and Heavy Fractions
Figure 11.22. Bagging the dried heavy fraction.
Figure 11.21. Bagging the dried light fraction.
The processed samples may take several days to dry. It is important that the samples be completely dry before they are bagged, because any residual moisture may encourage mold growth.
Once the light fraction is dry, simply dump the contents of the mesh bundle onto a clean sheet of paper (Figure 11.20). The sample may then be funneled into an archival polyethylene bag of appropriate size (Figure 11.21). Slip the FS label, which should already be inside a protective bag, inside the sample bag, facing outward so it can be read from the outside. Putting the label inside it’s own protective bag helps prevent charcoal smears which might obscure the writing. Twist-tie the sample bag shut.
For the heavy fraction, use the newspaper itself to funnel the sample into an appropriately sized archival bag (Figure 11.22). Slip the previously bagged FS label into the sample bag, and twist-tie the bag shut.
Both samples are now ready for additional analysis (Figure 11.23).
Figure 11.20. Pouring the dried light fraction onto a sheet of paper.
Figure 11.23. Bagged flotation samples (light fractions on the left, heavy fractions on the right).
11-10

12 - 1
Chapter 12Preparation of Collections for Curation
After the completion of fieldwork on an archaeological project, much remains to be done in thelaboratory. In previous chapters, we have described the ways we process artifacts and samples inour lab. One of the last steps in this process is preparing the collection from each project forpermanent curation at a museum or other curation facility. The term “collection” in this contextincludes the following: (1) all the artifacts and samples (except tree-ring samples) collected froma site; (2) all the paper forms, maps, and photographs that were generated during fieldwork; (3)all the lab forms filled out during processing of the artifacts and samples, including catalogingand analysis records; (4) all the electronic data generated as a result of cataloging and analysis;and (5) major reports and papers written by research staff members using information generatedby the project. Preparing the artifacts and samples for curation involves organizing them;replacing the handwritten field specimen (FS) labels with final, printed labels; repackaging theartifacts (if necessary); organizing the curated items in boxes; and creating the final boxinventories. The paper records must be gathered, organized into file folders, and inventoried. Inaddition, the electronic data (field and lab records that have been entered into the computerdatabase) are also curated. Essentially, everything pertaining to the excavation of the site, fromthe field to the lab, is organized, packaged, labeled, and inventoried before being transferred tothe curation facility.
Curation of collections resulting from archaeological fieldwork is considered so important that itis one of the stipulations of federal and state permits, which are required for any persons orinstitutions who conduct any kind of archaeological fieldwork on public lands. Included in anypermit is a written requirement that all the artifacts and samples, as well as all field and labrecords, be turned over to a recognized curation facility that will store the collection inperpetuity and maintain its organization to facilitate future study. Therefore, before fieldworkcan begin, an agreement is drawn up with a recognized curation facility to accept the collectionby a specified date.
Every curation facility has guidelines that detail how a collection should be packaged, organized,and documented. Our local curation facility, the Anasazi Heritage Center (AHC) in Dolores,Colorado, has a policy document called “Requirements for Collection Organization, Packagingand Delivery”. This document specifies the type of bags that should be used for artifact andsample packaging, the kind and size of boxes that should be used for artifact and documentstorage, the kind of paper that labels and forms should be printed on, how a collection should beorganized, and so forth. The document also details the kinds of processing techniques that areand are not acceptable, and it lists various items that the AHC does not accept for curation.Curation fees, which are based on the ownership status of the land on which the site is locatedand on the number of boxes in the collection, are also defined in this document.
Preparing a collection for curation is a time-consuming process that is best begun after all the

12 - 2
fieldwork, lab analyses, and data entry and editing have been completed. The report-writingphase of an excavation project should also be completed, because the field and lab records for asite are repeatedly consulted during this process, resulting in additional changes to forms,documents, maps, photographs, and even artifact labels.
The first step in the curation process is to gather all the artifacts from and documents for the siteand compile any information that could affect the way in which the collection is to be curated.This requires communicating with all researchers and publications staff who have been involvedin the fieldwork, analysis, and/or report writing. They should be informed that the curationprocess is about to begin and asked to return any site documents or artifacts that they may haveborrowed from the lab. In addition, they should be asked if any additional work will beundertaken with the artifacts, samples, or records, or if they anticipate any further changes to themaps or any other data set. Since additional work might affect the collection, the lab needs toknow what work is being done, when it will be completed, and what parts of the collection willbe affected. This information is needed before the work plan for the curation process is prepared.Once the curation process begins, no further changes to the forms or artifact data are allowed.
Setting up a Curation File
It is helpful at this early stage to set aside an area of the lab for temporary storage of any files,notes, and supplies that are needed for the curation process. Four files should also be establishedat this time. These are described below.
1. Receiving File. Most curation facilities provide a collections-receiving form, which isfilled out as a collection is prepared for curation and which must accompany thematerials when they are accessioned. The form used by the AHC is called the“Archeological Project Summary/Collection Receiving Form.” This form provides spacefor a description of the project and for a list of the items being transferred (types ofartifacts, samples, and site documents). Researchers should become familiar with thereceiving form and be aware of any special curation requirements before beginningfieldwork and lab processing. A copy of the form should be made and kept in a“receiving file” as one begins to organize the collection for transfer.
2. Clearing File. A “clearing file” should also be started to keep track of the manymanagement aspects of curation. This file should contain documents that pertainspecifically to the management, location, and history of the collection. Thus, the clearingfile can include loan forms; records that document changes made in the artifact orprovenience data; lists of artifacts or samples that underwent destructive analysis; lists ofartifacts and samples that were used in displays; notes about artifacts, samples, forms, orphotos that are missing, damaged, or destroyed; lists of problems that still need to beresolved; and lists of bag changes that were requested by field or lab personnel. Twoinformation sources used to compile the clearing files are described below:
! Loan forms are generally kept in a collection’s clearing file. These forms should bereviewed to be sure that any collections that were sent out for analysis were returned,

12 - 3
along with(1) the resultant data, (2) descriptions of analytical procedures and protocols,and (3) an interpretative report, if such a report was requested. If any loaned materials have not been returned, the original borrower must be contacted about the status of theanalysis, and it should be determined when the items will be returned and the analysisinformation submitted. The date that loaned materials are returned should be entered intothe FS data table (e.g., “returned as of 5/5/03"), and a new printout should be run thatprovides the latest information.
! Other information pertinent to a collection’s clearing file may be found in CrowCanyon’s research database, particularly in the FS data-management form. For example,check boxes are provided in the FS data file so that one can flag items that underwentdestructive analysis, artifacts that are on display, artifacts that are missing, artifacts thatwere not collected, and artifacts that were “voided”. Next to each check box there is acomments field where one describes the condition of the artifact or the status of theanalysis. When setting up the clearing file for a collection, computer printouts should begenerated for each of the situations described above. Each printout should include the sitenumber, the provenience designation (PD) and FS numbers, the artifact category, and thecomments. These lists should then be consulted as the collection is being organized andprepared. They may help lab personnel locate artifacts or otherwise solve problems thatare identified during the curation process. They may also need to be edited as missingitems are found, items are removed from display, loaned samples and artifacts arereturned, and so on. As the curation process continues, the lab staff should refer to theclearing file frequently to remain familiar with the problems and issues that could affectthe collection.
3. Methodology File. A “methodology file” should be set up for forms or other documents thatare relevant to how the artifacts and samples were collected, processed, and analyzed.This file should include copies of the forms and codes used in the lab, as well asdocumentation about analysis procedures (the AHC maintains these files for all CrowCanyon field projects). Be sure to include documentation of any departures from standardfield and lab procedures or of changes to previous systems (for example, new or updatedanalysis forms, codes, and protocol; documentation of new field strategies or processingtechniques).
4. Curation Checklist. Finally, a “curation checklist” should be created to list the tasks that haveto be completed as part of the curation process. It might be helpful to have deadlinesindicated as well. As noted above, preparing a collection for curation can take a long timeand is often done by many different people; therefore, a checklist can help ensure that allthe steps involved are dealt with in a timely manner and none is overlooked.
Final Datachecks and Initial Organization
After establishing the files necessary for tracking the curation process, we turn to the collection

12 - 4
itself. Before preparing the artifacts, we perform a datacheck to ensure that all the data have beenentered, edited, and cross-checked. Each data set should be checked to be sure all the data havebeen entered. This is accomplished by a quick review of the analysis sheets and the researchdatabase. Every recording sheet and label we use includes a space in which the data entry dateshould be written; there may also be paper printouts or additional notations on the forms andlabels to indicate that the data have been edited. These records should also show any correctionsthat have been made in the database. If any data still need to be entered or edits need to be made,these tasks should be completed before you proceed.
The next step is to organize the artifact and sample collection. Up to this point, some artifactsmay still be organized by year of collection. Now, however, the collections from individual fieldseasons should be integrated into a single sequence. The bags containing samples and artifactsshould be organized by artifact category, then by PD number, and finally by FS number. Whileorganizing the bags, look for any FS labels with missing information, labels that are incorrect, orbags that have been filed with the wrong artifact category. When an entire artifact category hasbeen organized, now is the time to resolve any problems that are discovered. To solve theproblems, consult the clearing file and check the database to see if there are notes in the file or inthe database that might help resolve inconsistencies. When problems are resolved, it should benoted on the problem list and any necessary changes should be made in the database. If aparticular problem cannot be resolved at this time, a note about the problem should be made andplaced in the clearing file. Some discrepancies may not be resolved until all the artifacts andsamples are organized and all the FS labels are replaced (see the following section).
Replacing FS Labels
After the collection is organized, the FS labels in the artifact and sample bags are replaced withnew labels. Up to this point, the labels have been the original handwritten labels that were filledout when the contents of the bag were originally cataloged (see Chapters 3 and 11). Theseoriginal labels should be replaced at this stage with new, printed FS labels generated from thedatabase. The new labels are more readable and have current and accurate information on themthat reflect any changes that have been made since cataloging was completed. These final labelsare printed on acid-free paper as required by the AHC. The information on the labels includesthe site number, PD number, FS number, and artifact category. The computer-generated FSlabels also act as an inventory for each artifact category.
To replace the labels, assemble all boxes or flats containing artifacts of a particular artifactcategory. Then make sure the bags are organized in PD-FS order. Once the artifact bags are inorder, start replacing the FS labels. Remember, the new label must go in the correct bag, orprovenience control will be lost for the contents of that bag, or— worse— the provenienceof several bags will get mixed up. To avoid problems, one should compare the site, PD, and FSnumbers on the old label to the same numbers on the new one before the old label is removedfrom the bag. If the labels match, then the old label can be removed and the new label inserted.The original FS labels should be placed face down on the table in PD-FS order. The new labelshould not be folded and should always be placed in the bag so it can be easily read from the

12 - 5
outside. If possible, place the label so that it is oriented horizontally in the bottom of the bag. Ifthe bag is too small for this, then place the label vertically so it can be read left to right from thebottom of the bag up. The bag can then be fastened with a plastic twist tie (remember to twistonly twice!). The artifact bag should be put to the side, in PD-FS order with the other bags.Because the labels and the artifacts are in PD-FS order, it should be easy to proceed through therest of the collection, replacing old labels with acid-free labels, collecting the original labels inan organized pile, and placing the bags with the new labels in rows that are still in PD-FSnumber order. The old labels are retained during this process so they can be checked if itbecomes necessary to track an error.
During this process, several problems might be encountered. There might be a computer-generated FS label that does not have a matching bag, or a there might be a bag without acomputer-generated label. Often these problems can be resolved by looking up the PD and FSnumbers in the database. The problems are usually related to errors made during cataloging:perhaps the label was filled out incorrectly. To resolve this kind of error, and to confirm the FSnumber assignment, you might have to find other bags from that PD and consult the database.Problems can also be due to changes made to the FS or PD numbers by the field or lab staff afterthe original bag label was filled out, these changes should have been recorded in the FS form inthe database, in the “Changes” section. If the problem cannot be resolved, it should be noted in“Comments” section of the FS form in the database where the problem should be described aswell as the steps taken to address the problem, if possible. Luckily, by the end of the curationprocess, most errors are resolved.
As the labels are being replaced, you will need to check the packaging of the collection. Bagsthat are damaged, or that are not of archival quality should be replaced. Twist-ties should also bechecked: very short twist-ties and paper ties should be replaced with plastic ties of adequatelength. When working with vegetal samples, flotation samples, and other types of sedimentsamples, be sure to place the label in a small, archival-quality, polyethylene plastic bag insidethe sample bag so that the label is not in direct contact with the sample (this is supposed to bedone during the cataloging or sample-processing stages — make sure it has). Artifacts andsamples should not be stored in film canisters or drug bottles; if these containers have been used,the items should be removed from them and placed in standard polyethylene bags. If any items inthe collection are fragile, they should be placed in curation boxes with acid-free tissue andcuration-quality foam. The box can then be placed in an archival-quality bag with the label onthe outside of the box.
When the labels have been replaced in all bags for a given artifact category, check that the bagsare still in PD-FS order. If any bags are out of order, it could indicate an error in ordering thebags and/or labels before or after replacing the labels. The most serious problems, of course, areones resulting from placing the wrong label in a bag. If the bag contains analyzed pottery orchipped-stone, it is possible to cross-check the new computer-generated FS label against theoriginal handwritten analysis label. Otherwise, you will have to rely on the weights of theartifacts and/or the order of the replaced handwritten labels to resolve the problem.

12 - 6
Boxing the Collection
Once all problems have been resolved, the artifacts can be placed in archival storage boxes. Besure to use the correct type and size of box — curation facilities often have specific, but varying,box requirements. The artifacts are organized in the box in a specific order. The bag with thelowest PD-FS number combination is placed in the bottom front on the left side of the box; theothers bags follow toward the back. If there is enough space, another row should be started in thefront of the box on the right side and filled in to the back of the box. When the bottom of the boxis full, place a square of archival quality plastic (this can be a large plastic bag or a sheet ofplastic) on top of the artifacts and begin another row of artifacts, starting at the left front againand proceeding to the back. If the artifacts and samples are small and light, there can be as manyas three layers in a box. If the artifacts are heavy, the box should not be filled to capacity. Theweight of the filled box should not exceed what an average person can lift over his or her head.When the box is full, put a label on the outside of the box. At this point, the label can be a simplenote that is taped onto the box. The label should have the following information: site number,artifact category and the PD and FS number of the first bag in the box and the PD and FSnumber of the last bag in the box. Permanent labels will be placed on the boxes when the entirecollection is completely boxed and organized and the box numbers are assigned. The followingimportant information us written on the permanent box labels: the site number and name, the boxcontents (artifact category), the range of PD-FS numbers encompassed by the artifacts in thebox, and the box number out of the total number of boxes in the collection (Figure 13.1). Verylarge artifacts, such as metates, are often too large to be placed in a curation box. Such artifactsare placed inside a large polyethylene bag with the FS label visible inside the bag. Although the order in which the boxes are organized and numbered is not critical, we prefer tobegin with samples; we then move on to bulk artifacts and finish with boxes of individualartifacts. The artifacts and samples within those three major divisions are organized inalphabetical order by category (see Chapter 4 for category lists). The oversize artifacts are listedat the end of the log with a note that indicates that they are oversize.
Once the artifacts and samples have been boxed, the database is used to produce a completeinventory of each box (Figure 13.2). The inventory lists each artifact in the box in PD-FS orderand includes some of the basic information that was recorded about each artifact. Two copies ofeach box inventory should be made. Place one copy in the top of the box it inventories. Place thesecond copy in box number order with the other box inventories for the site and file the completeset with the lab forms. Next create a box inventory log either by hand or by computer that liststhe site number, the box number, the artifact category, and the PD-FS range in each box. This logis filed with the complete set of box inventories, and a copy is kept in Crow Canyon’s files.
Review of the Clearing File
At this point, the clearing file (that is, the list of missing artifacts, artifacts that were subjected todestructive analysis, artifacts still on loan, artifacts not collected, etc.) should be looked over onemore time. Most problems identified during previous steps of the curation process should have

12 - 7
been resolved by now, but any remaining problems or inconsistencies should be resolved ordocumented as unresolved at this time. The information in the database should now be complete,accurate, and up to date. If any changes to the data are made after this stage, new lists should berun; changes should not be handwritten on the existing printouts. A file folder containing thesefinal clearing lists should be placed in the lab records file.
Curation of Documents and Records
All documents related to an archaeological project must be curated. These include forms filledout by the field and lab staffs, photographs, maps, administrative records, and major reports andpapers written by Crow Canyon staff about the site (or that use site data). The forms are placedin acid-free file folders labeled with an archival pen as follows: Crow Canyon ArchaeologicalCenter, the site name and number, the project name, and the contents of the file. The files areplaced in archival-quality document boxes in a specific order: The administrative records areplaced at the beginning of the file box, followed by field records and maps, lab forms,photographs, and copies of reports, publications and papers. Electronic data are also curated.These include all field data that have been entered into the database, the FS data and the analysisdata. Oversize maps are placed in a large, cardboard folder that is labeled similarly to the files.The various types of files are further described in the following paragraphs.
The administrative records include all documents and correspondence related to Crow Canyon’swork at a given site. These records include permits issued from the state and/or federalgovernments that granted us permission to perform the fieldwork. There should also be copies ofagreements with curation facilities for the storage of collections and records from the site. Ifwork was done on private property, any agreements made with private landowners should beincluded in the file as well. There should also be signed donation forms, which deed any artifactsfound on private property to the curation facility.
The field records for a site are organized in folders, one or more for each study unit, dependingon how many subdivisions of the study unit there are and how much documentation exists foreach (for more information on Crow Canyon field forms, see the online field manual atwww.crowcanyon.org/fieldmanual). The folders are ordered by study unit number. If there arenumerous horizontal subdivisions in a study unit a folder may be made for each subdivision andthey should be organized by the horizontal subdivisions. In this case the first folder shouldcontain the study unit log and it should be labeled with the site number, study unit type and studyunit number and the words “Study Unit Log.” Inside the folder for a given study unit, thefollowing records should be filed, as applicable: the study unit log; study unit maps (notoversize); point-location (PL) logs; the feature log; feature forms (with feature maps and PLlogs), organized by feature number; masonry forms; profile maps (not oversize); stratigraphyforms; and PD forms, ordered by PD number. Sometimes there are so many PD forms that theyneed to be placed in their own folder behind the associated study unit folder. If it is necessary tocreate a separate PD folder, it should be labeled with the site number, study unit type and studyunit number, horizontal subdivision (if necessary), and the words “Provenience Designation(PD) Forms.” Some field documentation describes or pertains to the site as a whole, rather than

12 - 8
to an individual study unit, these papers are filed in folders at the beginning of the field records.A complete set of copies of the original field forms is generally archived at the Crow CanyonArchaeological Center.
Lab forms document a wide variety of data. Records that deal with the collection as a whole areplaced at the beginning of the lab forms section. The box inventory log and the box inventoriesare filed next. The next two files contain the field inventory forms, organized by date, and the FSforms, organized by PD number. The analysis forms come next (see the preceding chapters ofthis manual for examples of these forms). For each type of analysis there should be a folder thatincludes a blank analysis sheet, a coding sheet, and a document that describes the analysisprocedure and protocol. The next file folder contains the analysis forms, organized by PDnumber and then by FS number. The forms for standard pottery analysis are followed by thoseused for more-specialized pottery analyses, such as vessel, rim-arc and temper studies. Theforms for basic chipped-stone analysis are next, followed by the forms for more-specializedanalysis of selected chipped-stone tools — for example, bifaces, drills, and projectile points. Theanalysis forms for samples are next. Archaeobotanical (vegetal), pollen, and tree-ring analysisforms are followed by forms for any other sample analyses. Any analysis that is performed byoutside specialists should have a file that contains the original forms, blank analysis sheets,protocol and procedural information, and the final report written by the specialist, if such areport was requested. All of the original analysis forms are curated. Because these data aremaintained in our database, Crow Canyon does not keep copies of lab forms except for thosegenerated by outside specialists (for example, pollen, tree-ring, human remains, and obsidian-sourcing reporting forms).
Field and lab photographs are organized by film type (color slide or black-and-white contactsheets) and then by roll number. The color slides, contact sheets, and negatives are placed inarchival-quality photo pages. Each slide is labeled with the site, roll, and exposure numbers.Each slide page is labeled with the name of the institution (Crow Canyon) and with the sitenumber, roll number, year, and page number. The associated field photo log is filed in front ofthe photographs and negatives. The photographs are then filed in archival-quality folders. Ifphotographs of more than one site are on the roll, only those of the site whose collection arecurrently being prepared for curation are included. The remainder are removed and placed inanother slide page for future curation.
Field maps are usually filed with the field forms for the appropriate study unit. If the maps arelarger than 8½ x 11 inches, they are considered oversize. The oversize maps must not be foldedor rolled. Instead, they are organized by map number and placed flat in a temporary cardboardmap folder. The map folder is labeled “Crow Canyon Archaeological Center, site number,Oversized maps, folder _ of _.” When the folder is turned over to the AHC, the maps areremoved and placed in a flat-file cabinet for permanent curation.
Reports, publications, and papers that are written about the site, or that use data generated as aresult of our work at the site, should be copied and put in the file. Reports can be added to thefile at any time until the collection is delivered to the AHC. The AHC requests that two copies of

12 - 9
a project’s final published report be included in the submission. To be sure that all reports aregathered, we ask all the people who worked on the site or on the analyses if they know of anyother reports or documents that need to be included in the report section.
As the end of the curation process approaches, we contact the curation facility and schedule adate of transfer. Some facilities want several months of lead time to prepare for the transfer, andthey want a count or estimate of the number of boxes that are in the collection. The final tasksare to complete the curation facility’s collection-receiving form, to resolve any remainingproblems or questions and to create the final lists of artifacts, samples, that are missing,destroyed, or oversize. These final lists concerning the artifacts are stored in file folders at thebeginning of the lab records section. The collection-receiving form is given to the curator of thecuration facility when the collection is delivered. When these tasks are done, the boxes can betransferred to the curation facility.

12 - 10
Figure 13.1. Curation box label.
PD________FS_________ THROUGH PD_________FS__________
BOX___________OF _____________
SITE NUMBER and NAME:
___________________________________________
CONTENTS:
_______________________________________________________
_______________________________________________________
_______________________________________________________
CROW CANYONARCHAEOLOGICAL
CENTER

12 - 11
Crow Canyon Archaeological Center Yellowjacket Pueblo 5MT5 Inventory for Box 110 Slab Metate (SME): PD 46 FS 4 through PD 434 FS 8
PD FS PL Artifact Ware Study Study SU SU ID SU SU SU Vert Vert. Feature Fea. Fea Fea. Fea. Fea. FeaCategory Unit Type Unit # Horiz North East Vertical No Sub No Type No Hor North East Vert Horiz
35 23 SME STR 704 1x1 1149.00 1013.00 STLV 2 1
46 4 SME ARB 600 2x1 1139.00 1004.00 STRA 2
69 10 SME NST 604 1x1 1106.00 1003.00 STLV 2 1
140 6 1 SME STR 1207 SEG 1 STRA 2
140 11 SME STR 1207 SEG 1 STRA 2
147 4 SME STR 1204 SEG 1 STRA 3
157 3 SME STR 1210 SEG 1 STLV 2 1
172 2 SME ARB 1200 SEG 1 STRA 1
181 4 SME STR 1209 SEG 1 STRA 3
212 1 SME NST 1003 1x1 1256.00 1073.00 STRA 1
213 11 SME ARB 1100 2x1 1282.00 1094.00 STRA 2
214 3 1 SME ARB 1000 2x1 1269.00 1059.00 STRA 2
217 2 SME NST 1003 1x1 1256.00 1073.00 STRA 2
286 6 SME STR 704 1x1 1149.00 1013.00 STRA 4
333 9 SME ARB 200 2x1 973.00 992.00 STRA 1
396 4 SME ARB 2500 2x1 904.00 866.00 STRA 1
433 5 SME ARB 200 2x1 973.00 992.00 STRA 2
433 12 SME ARB 200 2x1 973.00 992.00 STRA 2
434 7 SME ARB 100 2x1 937.00 965.00 STRA 2
434 8 SME ARB 100 2x1 937.00 965.00 STRA 2
Wednesday, April 14, 2004Page 1 of 1
Figure 13.2. Example of a Box Inventory.

13 - 1
Chapter 13 Quality-Control Procedures
This chapter describes the procedures we use in the Crow Canyon laboratory to ensure theintegrity of all systems and products related to the analysis and management of our collections.Standardized procedures for monitoring the quality of our data are essential because so manypeople of varied abilities and from different backgrounds work with the materials in our lab. Thequality-control measures we have implemented are designed to address several basic goals thatare key to the successful operation of any archaeological laboratory. The first is simply theorganization and tracking of artifacts and samples, so we can ensure that they are processed,cataloged, and analyzed in accordance with institutional standards. The second is theidentification and correction of errors made during recording and data entry, to ensure that thelabels in bags of analyzed materials correspond exactly to lines of data in the database. The thirdis the verification of the actual analysis data, to ensure that observations are made and recordedconsistently within and between projects. In this chapter, the procedures we have developed toaccomplish these goals are presented in the order in which they occur, from the time materialsare first brought into the lab until the completion of in-house analyses (see Figure 2.1 in Chapter2). Explanations of how the various procedures promote both efficiency of operation andaccuracy of the resultant data are offered throughout.
Field Inventory and Check-In
One of the basic tasks of any archaeological laboratory is to house, organize, and keep track ofartifacts and samples until they are turned over to an appropriate facility for permanent curation.At sites excavated by Crow Canyon, pottery and stone artifacts of all types from eachProvenience Designation (PD) are combined in one or more field bags on which provenienceinformation is recorded. In contrast, samples such as nonhuman bone, vegetal samples, flotationsamples, and tree-ring samples are bagged separately by type. When materials are brought intothe lab, they are accompanied by a field inventory that has been filled out by the field crew. Thisinventory lists the collection date, site number, PD number, and contents of each bag. The labstaff checks the bags against the field inventory. If there are bags that are not on the inventory orbags that do not match the inventory, the problem bags and the inventory are sent back to thefield crew for correction. If there are no problems with the inventory, or when all discrepancieshave been resolved, the inventory is filed with the field forms. The field inventories thus provideour first record of the artifacts and samples that have come into the lab.
After the artifacts and samples are checked against the field inventory, the bags are organized byPD number. From one PD there are usually several bags containing artifacts and several smallerbags that contain nonhuman bone, adobe samples, and vegetal samples. The small bags areplaced inside the larger artifact bag to ensure that the artifacts and samples of the same PDremain together. The bags are then placed in boxes on the wash lab shelves in PD number order.The boxes are labeled “Artifacts: not cleared, not screened, not washed.” Flotation samples andtree-ring samples are stored separately from other artifacts because they are processed separately

13 - 2
and are often large and awkward.
Checking Field Forms and “Clearing”
The field crew fills out a variety of forms that describe each excavated unit and the deposits andfeatures found within it (Crow Canyon Archaeological Center 2001*1). The field crew assigns aunique PD number to each distinct horizontal and vertical space that is excavated and/or fromwhich materials are collected. A PD log is filled out in the field that lists each PD number andspecifies the horizontal and vertical space it refers to. The field crew also fills out a PD Form forevery provenience investigated. This form includes space for the field crew to record the locationof the PD and to describe the sediment, inclusions, and any other salient observations. The fieldcrew also draws maps and fills out forms that illustrate and describe architectural features,masonry, and stratigraphy. All of these forms are turned into the lab when the excavation of aunit is complete.
Before clearing artifacts for processing, the lab checks the original field forms for consistencyand accuracy. If any errors or inconsistencies are found, the forms and/or maps are sent back tothe field crew for clarification or correction. We need to be sure that the PD information iscorrect because we copy this information onto paper labels numerous times as the artifacts in afield bag are processed and analyzed. In the course of cataloging and analyzing the contents ofan artifact bag, we could transfer the PD number written on the original field bag to more than 50labels. If we were to discover partway through or at the end of processing that this number wasincorrect, we would have to find the bags with incorrect labels, change the PD number on all theincorrect labels, and file the corrected bags according to their new PD order - a lot of extra work!
Once the PD forms have been checked, and any problems resolved, the PD data are entered intoour research database, and a Field Specimen (FS) Form is printed for each newly entered PD (seeFigure 3.2 for an example of an FS Form). The FS Form will be filled out when the artifactsfrom that PD are cataloged. At the top of the form is the PD number and the provenienceinformation associated with that number.
The next step in the process is to “clear” the artifact and sample bags that are labeled withverified PD numbers. The lab staff takes an FS Form and retrieves the field bags with the samePD number from the boxes of “Artifacts: not cleared, not screened, not washed.” When the bagsare found, the provenience data on the bag are compared with the corresponding data on the FSForm. If the provenience data on the bag match those on the form then a large “CL” is written onthe top of the bag with a red pen, and the bag is placed in a new box labeled “Artifacts: cleared,not screened, not washed.” The bags in this box are always kept in order by PD number.
Size-Sorting and Washing
Once the artifact and sample bags have been cleared, they are ready to be washed or otherwiseprocessed. The specific procedures followed for special samples depend on the type of sample inquestion. For example, tree-ring samples are assigned FS numbers and packaged for shipment to

13 - 3
the Laboratory of Tree-Ring Research at the University of Arizona for analysis, and flotationsamples are prepared for archaeobotanical analysis following the procedures discussed inChapter 11. The next steps in processing cleared bags of artifacts, nonhuman bone, and vegetalmaterial are described below.
First, all bags of artifacts, nonhuman bone, and vegetal material from a PD are removed from theboxes, and the contents of each artifact bag in turn are dumped into a pair of nested screensplaced over a garbage can. The screen on the bottom has ¼-inch mesh (the same size used in thefield), and the screen on top has ½-inch mesh. As the artifacts are screened, any nonhuman boneor vegetal material observed in either screen is removed and put in an existing bag from that PDcontaining the same material. If no bag for this material yet exists, then one is made and theinformation from the original bag label is copied onto the new bag label. The pottery and stoneartifacts that fall through the ½-inch mesh but are caught in the ¼-inch mesh are placed in a newpaper bag labeled with the same information as appears on the original field bag, with theexception that the contents of this new bag are described as “Small Artifacts.” The artifactscaught by the ½-inch screen are placed back in the original bag, and the description of thecontents on this bag is changed to “Large Artifacts.” All other bags, including the newly createdsmall-artifacts bag and any existing vegetal sample and nonhuman bone bags, are placed insidethe large-artifacts bag. Then the large-artifacts bag, with the other bags nested inside, is placed ina box labeled “Artifacts: cleared, screened, not washed.” As more large-artifacts bags are addedto the box, they are arranged in order by PD number.
When it is time to wash the artifacts, a large-artifacts bag is removed from one of the boxeslabeled “Artifacts: cleared, screened, not washed,” and the small bags nested inside it (smallartifacts, vegetal samples, and nonhuman bone) are placed to the side. The “large artifacts” in thebag are emptied into a shallow tray in a lab sink, and are gently scrubbed in plain, cool waterwith a toothbrush. The items are placed on a tray that has a fine wire mesh for its base. Theoriginal artifact bag that the artifacts came out of is placed in the tray with the artifacts and thetray is placed in a drying rack. A new tray is used for the “small artifacts,” these artifacts areplaced in a tray in the bottom of the sink and sprayed with water. The original bag is placed onthe tray and the tray is placed in a drying rack. Vegetal samples are not washed, but they shouldbe kept with the other artifacts that have been washed from the same PD, the bag should beplaced in the drying racks with the nonhuman bone or other artifacts from that PD. Nonhumanbone samples are not submerged in water but are gently brushed with a wet, soft toothbrush andthen placed on a tray with a screen base. If there are bone fragments that are very small theyshould be placed on a paper towel in the tray so they can’t fall through the mesh. The originalbag should always be kept in the tray with the washed artifacts and when the artifact trays areplaced on the drying rack. Once all the washed items are dry, the large artifacts are put back inthe large-artifacts bag. The small artifacts and nonhuman bones are returned to their respectivebags and are once again nested, along with the vegetal samples (which were never removed fromtheir bag), inside the large-artifacts bag. The artifacts and other materials are then ready to becataloged (see Chapter 3).
There are two reasons why we follow this somewhat complex procedure for organizing, size-

13 - 4
sorting and processing artifacts in the wash lab. First, although it is important to place nonhumanbone and vegetal samples in separate bags in the field to protect them from being crushed underthe weight of pottery and stone, this sort is rarely perfect. That is, we often find nonhuman boneand vegetal material in artifact bags, and we find a few stone or pottery artifacts in bags ofnonhuman bone. It is important that we finalize this sort before cataloging to ensure that weassign as few FS numbers as possible for each PD. For example, if a few nonhuman bones werepresent in a bag of artifacts, and this bag was cataloged separately from the bag of nonhumanbone, we would be forced to assign two FS numbers to nonhuman bone from this provenience,because it would take us much longer to find the previously cataloged bag of nonhuman bone,add the new material to it, and change the associated cataloging sheet and database record. Andeven this solution generates unnecessary work, because every FS number has a correspondinglabel that must be handwritten and ultimately replaced by a computer-generated label, as well ascorresponding line of data in the database that must be entered and checked. The most efficientsolution, overall, is to make sure that these sorts are accurate before cataloging begins and tocatalog all material from a given PD at the same time.
Secondly, we size-sort artifacts before cataloging to separate pottery sherds that fall through a ½-inch mesh from larger sherds. We use screens with ¼-inch mesh in the field to make sure wecollect small flakes, beads, and animal bones from our excavations. However, we have foundthat it is rarely possible to classify sherds that fall through ½-inch mesh to a specific type. Toincrease efficiency in pottery analysis, we catalog sherds that fall through the ½-inch meshseparately from those that are captured by it, and we analyze only the larger sherds. Even thoughpottery in the “bulk sherds, small” category constitutes only about 10 percent of the pottery in anartifact bag by weight, it can represent 50 percent of these sherds by count. So size-sortingartifacts has the effect of reducing the number of sherds to be washed and analyzed by one-half,while resulting in minimal loss of analysis information. This approach thus saves our staff,interns, volunteers, and participants countless hours of pottery analysis. We size-sort all potteryand stone artifacts before washing because we do not want to spend time scrubbing sherds thatwe know we will not analyze. Furthermore, it turns out that dirt does not adhere strongly to smallstone artifacts. So by spraying the small artifacts instead of washing them individually withtoothbrushes, we reduce our washing-labor needs by about one-half. During cataloging (Chapter3), the small stone artifacts are reintegrated with the larger stone artifacts, but the small sherdsare kept separate from the larger sherds and are cataloged as “bulk sherds, small.”
Catalog Data Entry and Edit
Once the artifacts from a field bag have been cataloged, the filled-out FS Form is placed in thepocket at the front of the FS Form notebook until the information recorded on it is entered intothe database. As each Field Specimen is entered into the database and saved, the individualdoing the data entry should fill out the “data entry” section of the FS Form. This includes thedate of entry and the intials of the person doing the data entry.
Once all the FS data for a field project is entered into the database, a printout is made thatincludes all the data fields on the FS form. The records on this printout are ordered by PD
13 - 5
number and then by FS number. This printout is then scanned for data entry errors by comparingthe handwritten FS forms to the printout. Any errors or other problems are noted on the printoutusing red ink. When this line-by-line comparison is done, all necessary corrections are made tothe FS data in the database. As the changes are made, a note is written on the printout to indicatethat the indicated changes have been made in database, and the date of completion of these editsis also written. This printout is kept to document that a line-by-line edit has been accomplishedfor the catalog of the artifacts and samples in the collection.
Organizing Cataloged Artifacts
After the artifacts from a given artifact bag have been cataloged, they are sorted into boxesaccording to the artifact category written on each FS label. When the entire collection from thatfield season has been cataloged, the bags within each category are organized in cardboard flats inorder by PD and FS numbers. As we organize the bags, we look for labels with missing orincorrect data, labels that are not properly filled out, bags that were placed in the wrong artifactcategory box after cataloging, and so forth. Such problems are corrected at this time. When wecomplete our excavations at a site and have finished cataloging the entire collection, we thenintegrate the materials from the different field seasons in a single set of cardboard flats, againorganized by artifact category, PD number and FS number. However, due to time constraints it isnot always possible to organize all the artifacts of a given artifact type before the data checksneed to be done. If that is the case, the data checks are done by field season and the wholeartifact collection might not be organized in one set of cardboard flats until the collection isbeing prepared for curation.
Organizing bags by site, artifact category, PD, and FS is essential for all subsequent datachecksbecause it makes it easy for staff members to find specific bags if it becomes necessary to checktheir contents or the data generated about them. For example, individuals entering FS data mightencounter problems with specific records that cannot be resolved at the time of data entry. Theseproblems are written on lists in the FS notebooks. Once the collection has been organized, theseproblems can be solved efficiently. In addition, we periodically query our database forincomplete records, and we generate printouts that list artifact bags for which certain data aremissing or contradictory. Working from these printouts, the staff can find the relevant bags,solve the problems, and correct the data.
Consistency Check
Once the entire collection from a site has been organized by artifact category, PD, and FS, a“consistency check” is done for all artifacts that were assigned to an individual artifact categoryduring cataloging. This check is performed to ensure that individual artifacts have been classifiedconsistently over the course of the project. This is an important check for the following reasons:(1) many different people catalog artifacts over a long period of time, and therefore the potentialfor inconsistency is significant; (2) most individual artifacts are rare enough that interns,volunteers, and participants do not have an opportunity to apprehend the full range of variationin any particular artifact category; and (3) the ability of interns, volunteers, and participants to

13 - 6
correctly identify fragmentary individual artifacts varies widely.
To accomplish this task, we first generate a printout that lists the PD number, FS number, andassociated catalog data for all artifacts of a specific category. In preparation for the consistencycheck, the staff also reviews Crow Canyon’s artifact definitions, the stone material typedefinitions, and the stone material type collection. During the consistency check, all bagscontaining artifacts of a given category are examined at the same time by the entire lab staff, orthey are examined by a staff member who is in constant communication with the rest of thegroup. The artifacts in a specific category are compared item-by-item to the printout, and all dataon the printout are checked, including the PD number, FS number, artifact category, materialtype, condition, weight, and comments. As errors are found, the correct information is written onthe printout. If the artifact category recorded for a given item needs to be changed, the newartifact-category name is written on the printout and the bag label, and the artifact bag is thenplaced with other artifacts in the same category. When the consistency check is finished, allchanges that were handwritten on the printout are entered into the database. The consistencycheck allows us to correct errors in identification, fill in missing data, organize the collection,and create a final inventory for each artifact category.
Datachecks: Pottery Analysis
A number of procedures have been established to ensure that the data generated during basicpottery sherd analysis (Chapter 5) are complete, consistent, and accurate. During potteryanalysis, each sort performed by a participant and/or a volunteer is checked by a staff member asit occurs. Both the actual sherds in each pile and the analysis label filled out to describe each pileare checked before the sherds are bagged with the label. Staff members also make a point ofconsulting one another when ambiguous or difficult sherds are encountered, to make sure that allstaff maintain a similar understanding of the pottery types we use in our analysis.
Each label filled out during pottery analysis describes the type, form, part, and finish of a groupof sherds from a given PD and FS. We enter these data directly from the analysis label so that theperson entering the data has a second opportunity to check the contents of the bag against theanalysis label and correct any errors. This assures that each analysis label and the associatedsherds correspond to a single line of data in our pottery database.
When pottery analysis data are entered into the database, a staff person or intern opens the bag of“bulk sherds, large” for a given PD and FS and removes the smaller bags containing analyzedsherds and analysis labels nested inside. These bags are organized on a table by the computer.Bags with item numbers (see Chapter 5) on their analysis labels are set out in order, and bagswithout item numbers are organized by pottery type. Then the data on each analysis label areentered into the database. The person entering the data looks for missing, incorrect, and/orinconsistent information as the data for each bag are entered. For example, “finish” informationshould never be recorded on a label for an unpainted pottery type, and there should never be alabel on which the part entry is recorded as “rim” if there is not also an item number. Anyproblems discovered during data entry are corrected on both the analysis label and in the

13 - 7
database at that time. When all the data for the entire pottery bag have been entered, the data areprinted out and checked again against the information on each analysis label. Once all theproblems have been corrected, the smaller bags are nested back inside the original “bulk sherds,large” bag (with the FS label), and the final, clean analysis data are printed and filed in anotebook by PD-FS. The artifact bag is placed in a box labeled “Bulk Sherds, Large—analyzed,entered, bag checked.”
After all the pottery collected during a given field season has been analyzed, a set of standardqueries is run against the pottery database. These queries are designed to find errors, missingdata, and logical inconsistencies in the pottery data. For example, when our pottery analysisprocedures are followed correctly, there will be no records for which the “part” entry is “rim”and the “count” entry is greater than 1; there will be no records with an item number that alsohave a count greater than 1; there will be no records for which the “type” entry is an unpaintedpottery type and a paint type is entered in the “finish” field, and so forth. Each query we rungenerates a printout that lists the pottery bags for which there are logical problems like these inthe associated data. In most cases, the problem bags have to be retrieved from storage and thedata checked against the herds to resolve the problem. As problems are resolved, the appropriatecorrections are made on the relevant analysis labels, if necessary, and on the printout generatedby the query. The database entries are then corrected, a new analysis data report is printed andfiled, and the old analysis report is discarded. When all problems encountered through thisprocess have been resolved, the bags of analyzed and data checked pottery are put in PD-FSorder in cardboard flats labeled “Site number/ BSL —data checked/ PD_____FS______ throughPD______FS_____” and stored in the curation room. The analysis data reports are also filed inPD-FS order in a folder or notebook labeled “Pottery Analysis—data checked.” When wecomplete the pottery analysis for an excavation project, the same standard queries are run againto make sure that all problem records have been fixed. These final queries also systematicallycheck to make sure that every bag of cataloged “bulk sherds, large” from the site has beenanalyzed and the resulting data have been entered into the database.
Datachecks: Chipped-Stone Analysis
Bulk chipped stone is analyzed by staff, adult participants, interns, and volunteers (see Chapter9). The resultant data are recorded on analysis sheets and on the analysis labels that are placed inthe bags with the artifacts. As is the case with pottery analysis, one or more staff members checkeach sort performed by participants, volunteers, and/or interns before the resultant piles ofartifacts are bagged, labeled, and recorded on the analysis sheet. The analyzed bags of bulkchipped stone are put in boxes labeled “BCS Analyzed,” and the analysis sheets are filed. Thedata are entered into the database from the analysis sheets. The staff person or intern entering thedata looks for missing and/or inconsistent data and attempts to correct any errors. If it is notpossible to resolve an error without looking at the artifacts again, the problem is noted on aproblem sheet.
At the end of each field season, the analysis forms are put in PD-FS order, the bulk chippedstone data are printed out, and the analysis forms are compared line-by line with the database

13 - 8
records. Any data-entry errors are noted and corrected in the database and on the analysis formsat that time. After this edit has been completed, the database is queried for bags of chipped stonethat have contradictory data in various fields, as is done for the pottery-analysis data. Whenerrors are discovered, the relevant bulk chipped stone bag is found, the artifacts are taken out,and the analysis labels are checked to the artifacts. The data must then be corrected on theanalysis sheet and labels, as well as in the computer database. When all the problems have beenresolved, the bags of analyzed and data checked bulk-chipped stone are put in PD-FS order incardboard flats labeled “site number/ BCS— data checked/ PD____-FS____ through PD____-FS____” and stored in the curation room. At the end of each project, these queries are run againand any additional problems are resolved. Queries are also run at this time to make sure that allcataloged bags of bulk chipped stone have been analyzed.
Data Validation
In addition to the quality-control procedures we perform during analysis and data entry, we havealso incorporated quality-control measures into the design of the database itself. These hardwiredchecks prevent certain kinds of analytical and typing errors from being entered in the first place,and they provide the staff with numerous opportunities for problem records to be identified. Thefirst check we have hardwired is a check for valid codes. Every field that stores categoryinformation in our artifact data tables is linked to a “lookup table” that specifies the list of codesthat are valid entries for that field. If the person entering the data attempts to type in an invalidcode, the database will return an error message. If the invalid code resulted from a typing errorduring data entry, it can be fixed immediately. If the invalid code was recorded during analysisand the correct code cannot be determined, then that record is not entered and a note is added toa problem sheet.
A second hardwired check prevents the entry of invalid key-field combinations. Key-fields arefields that, taken together, uniquely identify individual records of specific data tables. Forexample, the key-fields in the PD table are “Site Number” and “PD Number,” and the key-fieldsin the FS table are “Site Number,” “PD Number,” and “FS Number.” When someone entersartifact data, the computer checks to make sure that the site number and PD number written on arecording sheet or analysis label are associated with an existing record in the PD table. If arecord for that site and PD number does not exist in the PD table, the computer will return anerror message and will not allow artifact data from the unknown PD to be entered. Most of theseerrors are simple typing or recording errors, but making sure these do not occur is extremelyimportant if we are to maintain provenience control over our collections.
A third hardwired check verifies that our analysis data are associated with the correct PD and FSnumbers. When we enter pottery-analysis data into the pottery table, the computer checks the FStable to make sure that the site, PD, and FS numbers on each analysis label correspond to arecord for an artifact category that is indeed pottery (bulk sherds, large; bulk sherds, small;modified sherd, shaped sherd, or “other ceramic artifact”). If this is not the case, an errormessage is returned. Such errors can result from FS data-entry errors, pottery-analysis recordingerrors, or typing errors. The same cross-checking process occurs during data entry for chipped-

13 - 9
stone, archaeobotanical, and tree-ring analysis.
A fourth hardwired check ensures that the analysis data we receive from specialists contain noinvalid codes, missing data, or key-field errors before we add the data to our database. An errorlist is printed, and the data problems are resolved before the data are transferred to the database.
Final Checks
The final check of an artifact collection and its associated records is performed as the collectionis prepared for curation (see Chapter 13). At that time, artifact bags are organized by artifactcategory, PD number, and FS number, and the original, handwritten FS label inside each bag isreplaced by a computer-generated label. During this process, any remaining problems with theprovenience labels in artifact bags are identified and corrected. When all issues are resolved andlabels have been replaced, a final artifact inventory for a given collection is printed from thedatabase.

References Cited
Adams 2004*1Adams, K. R.
2004 Archaeobotanical Analysis: Principles and Methods [HTML Title]. Available:http://www.crowcanyon.org/plantmethods.
Andrefsky 1998*1Andrefsky, William, Jr.
1998 Lithics: Macroscopic Approaches to Analysis. Cambridge University Press,Cambridge.
Beals et al. 1945*1Beals, R. L., G. W. Brainerd, and W. Smith
1945 Archaeological Studies in Northeast Arizona: A Report on the ArchaeologicalWork of the Rainbow Bridge–Monument Valley Expedition. University ofCalifornia Publications in American Archaeology and Ethnology, vol. 44, no. 1.University of California Press, Berkeley.
Blinman 1993*1Blinman, E.
1993 Anasazi Pottery: Evolution of a Technology. Expedition 35(1):14–22.
Breternitz et al. 1974*1Breternitz, D. A., A. H. Rohn, Jr., and E. A. Morris (compilers)
1974 Prehistoric Ceramics of the Mesa Verde Region. Ceramic Series, no. 5. Museumof Northern Arizona, Flagstaff.
Cotterell and Kamminga 1979*1Cotterell, B., and J. Kamminga
1979 The Mechanics of Flaking. In Lithic Use-Wear Analysis, edited by B. Hayden, pp.97–112. Academic Press, New York.
Crow Canyon Archaeological Center 1990*1Crow Canyon Archaeological Center
1990 Crow Canyon Archaeological Center Ceramic Typology Guide. Manuscript onfile, Crow Canyon Archaeological Center, Cortez, Colorado.
Crow Canyon Archaeological Center 2001*1Crow Canyon Archaeological Center
2001 The Crow Canyon Archaeological Center Field Manual [HTML Title].Available: http://www.crowcanyon.org/fieldmanual.

Geib 1996*1Geib, P. R.
1996 Formative Cultures and Boundaries: Reconsideration of the Fremont and Anasazi.In Glen Canyon Revisited, authored by P. R. Geib, pp. 98–114. University of UtahAnthropological Papers, no. 119. University of Utah Press, Salt Lake City.
Gerhardt 2001*1Gerhardt, K.
2001 Lithic Source Materials Classification Standards. Manuscript on file, AnasaziHeritage Center, Dolores, Colorado.
Hayes 1964*1Hayes, A. C.
1964 The Archeological Survey of Wetherill Mesa, Mesa Verde National Park,Colorado. Archeological Research Series, no. 7-A. National Park Service,Washington, D.C.
Hayes and Lancaster 1975*1Hayes, A. C., and J. A. Lancaster
1975 Badger House Community, Mesa Verde National Park. Publications inArcheology, no. 7E. National Park Service, Washington, D.C.
Holmer 1986*1Holmer, R. N.
1986 Common Projectile Points of the Intermountain West. In Anthropology of theDesert West: Essays in Honor of Jesse D. Jennings, edited by C. J. Condie and D.D. Fowler, pp. 89–115. Anthropological Papers, no. 110. University of UtahPress, Salt Lake City.
Irwin-Williams 1973*1Irwin-Williams, C.
1973 The Oshara Tradition: Origins of Anasazi Culture. Contributions inAnthropology, vol. 5, no. 1. Eastern New Mexico University, Portales.
Lekson 1997*1Lekson, S. H.
1997 Points, Knives, and Drills of Chaco Canyon. In Ceramics, Lithics, and Ornamentsof Chaco Canyon: Analyses of Artifacts from the Chaco Project, 1971–1978,Volume II: Lithics, edited by F. J. Mathien, pp. 659–697. Publications inArcheology, no. 18G. National Park Service, Santa Fe.
Lightfoot and Etzkorn 1993*1Lightfoot, R. R., and M. C. Etzkorn (editors)
1993 The Duckfoot Site, Volume 1: Descriptive Archaeology. Occasional Papers, no. 3.Crow Canyon Archaeological Center, Cortez, Colorado.

Lipe 1974*1Lipe, W. D.
1974 A Conservation Model for American Archaeology. The Kiva 39:213–245.
Lyle and Tucholke 2003*1Lyle, R., and D. R. Tucholke
2003 A General Guide to Temper Analysis. Manuscript on file, Crow CanyonArchaeological Center, Cortez, Colorado.
Morris 1927*1Morris, E. H.
1927 The Beginnings of Pottery Making in the San Juan Area: Unfired Prototypes andWares of the Earliest Ceramic Period. Anthropological Papers, vol. 28, part 2.American Museum of Natural History, New York
Ortman 2000*2Ortman, S. G.
2000 Artifacts. In The Archaeology of Castle Rock Pueblo: A Thirteenth-CenturyVillage in Southwestern Colorado [HTML Title], edited by K. A. Kuckelman.Available: http://www.crowcanyon.org/castlerock.
Ortman 2002*1Ortman, S. G.
2002 Artifacts. In The Archaeology of Woods Canyon Pueblo: A Canyon-Rim Villagein Southwestern Colorado [HTML Title], edited by M. J. Churchill. Available:http://www.crowcanyon.org/woodscanyon.
Ortman 2003*1Ortman, S. G.
2003 Artifacts. In The Archaeology of Yellow Jacket Pueblo: Excavations at a LargeCommunity Center in Southwestern Colorado [HTML Title], edited by K. A.Kuckelman. Available: http://www.crowcanyon.org/yellowjacket.
Pierce et al. 1999*2Pierce, C., M. D. Varien, J. C. Driver, G. T. Gross, and J. W. Keleher
1999 Artifacts. In The Sand Canyon Archaeological Project: Site Testing [HTMLTitle], edited by M. D. Varien, Chapter 15. Available:http://www.crowcanyon.org/sitetesting.
Thomas 1981*1Thomas, D. H.
1981 How to Classify the Projectile Points from Monitor Valley, Nevada. Journal ofCalifornia and Great Basin Anthropology 3:7–43.

Whittaker 1994*1Whittaker, J. C.
1994 Flintknapping: Making and Understanding Stone Tools. University of TexasPress, Austin.
Wilson 1991*1Wilson, C. D.
1991 Ceramic Analysis: Hovenweep Laterals Project. In Archaeological Excavationson the Hovenweep Laterals, authored by J. N. Morris, pp. 677–762. CompleteArchaeological Service Associates, Cortez, Colorado.
Wilson and Blinman 1988*1Wilson, C. D., and E. Blinman
1988 Identification of Non–Mesa Verde Ceramics in Dolores Archaeological ProgramCollections. In Dolores Archaeological Program: Supporting Studies: Additiveand Reductive Technologies, compiled by E. Blinman, C. J. Phagan, and R. H.Wilshusen, pp. 363–374. Bureau of Reclamation, Engineering and ResearchCenter, Denver.
Wilson and Blinman 1995*1Wilson, C. D., and E. Blinman
1995 Ceramic Types of the Mesa Verde Region. In Archaeological Pottery ofColorado: Ceramic Clues to the Prehistoric and Protohistoric Lives of the State'sNative Peoples, edited by R. H. Brunswig, Jr., B. Bradley, and S. Chandler, pp.33–64. Occasional Papers, no. 2. Colorado Council of ProfessionalArchaeologists, Denver.
Wilson and Blinman 1999*2Wilson, C. D., and E. Blinman
1999 Pottery Dating. In The Sand Canyon Archaeological Project: Site Testing [HTMLTitle], edited by M. D. Varien, Appendix A(2). Available:http://www.crowcanyon.org/sitetesting.