Symantec™ Dynamic Multi-Pathing 6.1 Installation Guide - AIX
162
Symantec™ Dynamic Multi-Pathing 6.1 Installation Guide - AIX February 2015
-
Upload
khangminh22 -
Category
Documents
-
view
2 -
download
0
Transcript of Symantec™ Dynamic Multi-Pathing 6.1 Installation Guide - AIX

Symantec™ DynamicMulti-Pathing 6.1 InstallationGuide - AIX
February 2015

Symantec™ Dynamic Multi-Pathing Installation GuideThe software described in this book is furnished under a license agreement and may be usedonly in accordance with the terms of the agreement.
Product version: 6.1
Document version: 6.1 Rev 3
Legal NoticeCopyright © 2015 Symantec Corporation. All rights reserved.
Symantec, the Symantec Logo, the Checkmark Logo, Veritas, Veritas Storage Foundation,CommandCentral, NetBackup, Enterprise Vault, and LiveUpdate are trademarks or registeredtrademarks of Symantec Corporation or its affiliates in the U.S. and other countries. Othernames may be trademarks of their respective owners.
The product described in this document is distributed under licenses restricting its use, copying,distribution, and decompilation/reverse engineering. No part of this document may bereproduced in any form by any means without prior written authorization of SymantecCorporation and its licensors, if any.
THE DOCUMENTATION IS PROVIDED "AS IS" AND ALL EXPRESS OR IMPLIEDCONDITIONS, REPRESENTATIONS AND WARRANTIES, INCLUDING ANY IMPLIEDWARRANTY OF MERCHANTABILITY, FITNESS FOR A PARTICULAR PURPOSE ORNON-INFRINGEMENT, ARE DISCLAIMED, EXCEPT TO THE EXTENT THAT SUCHDISCLAIMERS ARE HELD TO BE LEGALLY INVALID. SYMANTEC CORPORATION SHALLNOT BE LIABLE FOR INCIDENTAL OR CONSEQUENTIAL DAMAGES IN CONNECTIONWITH THE FURNISHING, PERFORMANCE, OR USE OF THIS DOCUMENTATION. THEINFORMATION CONTAINED IN THIS DOCUMENTATION IS SUBJECT TO CHANGEWITHOUT NOTICE.
The Licensed Software and Documentation are deemed to be commercial computer softwareas defined in FAR 12.212 and subject to restricted rights as defined in FAR Section 52.227-19"Commercial Computer Software - Restricted Rights" and DFARS 227.7202, "Rights inCommercial Computer Software or Commercial Computer Software Documentation", asapplicable, and any successor regulations, whether delivered by Symantec as on premisesor hosted services. Any use, modification, reproduction release, performance, display ordisclosure of the Licensed Software and Documentation by the U.S. Government shall besolely in accordance with the terms of this Agreement.

Symantec Corporation350 Ellis StreetMountain View, CA 94043
http://www.symantec.com

Technical SupportSymantec Technical Support maintains support centers globally. Technical Support’sprimary role is to respond to specific queries about product features and functionality.The Technical Support group also creates content for our online Knowledge Base.The Technical Support group works collaboratively with the other functional areaswithin Symantec to answer your questions in a timely fashion. For example, theTechnical Support group works with Product Engineering and Symantec SecurityResponse to provide alerting services and virus definition updates.
Symantec’s support offerings include the following:
■ A range of support options that give you the flexibility to select the right amountof service for any size organization
■ Telephone and/or Web-based support that provides rapid response andup-to-the-minute information
■ Upgrade assurance that delivers software upgrades
■ Global support purchased on a regional business hours or 24 hours a day, 7days a week basis
■ Premium service offerings that include Account Management Services
For information about Symantec’s support offerings, you can visit our website atthe following URL:
www.symantec.com/business/support/index.jsp
All support services will be delivered in accordance with your support agreementand the then-current enterprise technical support policy.
Contacting Technical SupportCustomers with a current support agreement may access Technical Supportinformation at the following URL:
www.symantec.com/business/support/contact_techsupp_static.jsp
Before contacting Technical Support, make sure you have satisfied the systemrequirements that are listed in your product documentation. Also, you should be atthe computer on which the problem occurred, in case it is necessary to replicatethe problem.
When you contact Technical Support, please have the following informationavailable:
■ Product release level
■ Hardware information

■ Available memory, disk space, and NIC information
■ Operating system
■ Version and patch level
■ Network topology
■ Router, gateway, and IP address information
■ Problem description:
■ Error messages and log files
■ Troubleshooting that was performed before contacting Symantec
■ Recent software configuration changes and network changes
Licensing and registrationIf your Symantec product requires registration or a license key, access our technicalsupport Web page at the following URL:
www.symantec.com/business/support/
Customer serviceCustomer service information is available at the following URL:
www.symantec.com/business/support/
Customer Service is available to assist with non-technical questions, such as thefollowing types of issues:
■ Questions regarding product licensing or serialization
■ Product registration updates, such as address or name changes
■ General product information (features, language availability, local dealers)
■ Latest information about product updates and upgrades
■ Information about upgrade assurance and support contracts
■ Information about the Symantec Buying Programs
■ Advice about Symantec's technical support options
■ Nontechnical presales questions
■ Issues that are related to CD-ROMs or manuals
DocumentationProduct guides are available on the media in PDF format. Make sure that you areusing the current version of the documentation. The document version appears on

page 2 of each guide. The latest product documentation is available on the Symantecwebsite.
https://sort.symantec.com/documents
Your feedback on product documentation is important to us. Send suggestions forimprovements and reports on errors or omissions. Include the title and documentversion (located on the second page), and chapter and section titles of the text onwhich you are reporting. Send feedback to:
For information regarding the latest HOWTO articles, documentation updates, orto ask a question regarding product documentation, visit the Storage and ClusteringDocumentation forum on Symantec Connect.
https://www-secure.symantec.com/connect/storage-management/forums/storage-and-clustering-documentation
About Symantec ConnectSymantec Connect is the peer-to-peer technical community site for Symantec’senterprise customers. Participants can connect and share information with otherproduct users, including creating forum posts, articles, videos, downloads, blogsand suggesting ideas, as well as interact with Symantec product teams andTechnical Support. Content is rated by the community, and members receive rewardpoints for their contributions.
http://www.symantec.com/connect/storage-management
Support agreement resourcesIf you want to contact Symantec regarding an existing support agreement, pleasecontact the support agreement administration team for your region as follows:
[email protected] and Japan
[email protected], Middle-East, and Africa
[email protected] America and Latin America

Technical Support ............................................................................................... 4
Section 1 Installation overview and planning .................. 13
Chapter 1 Introducing Symantec Dynamic Multi-Pathing ............. 14
About Symantec Dynamic Multi-Pathing (DMP) .................................. 14About Veritas Operations Manager ................................................... 15About Symantec Operations Readiness Tools .................................... 15
Chapter 2 System requirements ......................................................... 18
Release notes ............................................................................. 18Important preinstallation information for DMP ..................................... 18Supported operating systems .......................................................... 19Disk space requirements ................................................................ 19Virtual I/O Server (VIOS) requirements ............................................. 19Checking installed product versions and downloading maintenance
releases and hot fixes ............................................................. 20Obtaining installer hot fixes ............................................................. 21Disabling external network connection attempts .................................. 22
Chapter 3 Planning to install DMP ..................................................... 24
About planning for DMP installation .................................................. 24About installation and configuration methods ...................................... 24
Chapter 4 Licensing DMP ..................................................................... 27
About Symantec product licensing ................................................... 27Setting or changing the product level for keyless licensing .................... 28Installing Symantec product license keys ........................................... 30
Contents

Section 2 Installation of DMP ..................................................... 32
Chapter 5 Preparing to install DMP ................................................... 33
Installation preparation overview ...................................................... 33Setting environment variables ......................................................... 34About using ssh or rsh with the installer ............................................ 34Mounting the product disc .............................................................. 35Assessing the system for installation readiness .................................. 36
Prechecking your systems using the installer ............................... 37
Chapter 6 Installing DMP using the script-based installer ........... 38
About the script-based installer ....................................................... 38Installing DMP using the script-based installer .................................... 40Performing a postcheck on a node ................................................... 43
Chapter 7 Installing DMP using the web-based installer .............. 44
About the web-based installer ......................................................... 44Before using the web-based installer ................................................ 45Starting the web-based installer ....................................................... 45Obtaining a security exception on Mozilla Firefox ................................ 46Performing a preinstallation check with the web-based installer .............. 47Installing DMP with the web-based installer ....................................... 47
Chapter 8 Automated installation using response files ................. 50
About response files ..................................................................... 50Installing DMP using response files .................................................. 51Upgrading DMP using response files ................................................ 51Uninstalling DMP using response files .............................................. 52Syntax in the response file ............................................................. 52Response file variable definitions .................................................... 53
Chapter 9 Installing DMP using operating system-specificmethods .......................................................................... 56
About installing DMP using operating system-specific methods .............. 56Installing DMP using NIM and the installer ......................................... 57
Preparing the installation bundle on the NIM server ....................... 57Installing DMP on the NIM client using SMIT on the NIM
server ............................................................................ 58
8Contents

Installing DMP and the operating system on the NIM client usingSMIT ............................................................................. 59
Installing Symantec Dynamic Multi-Pathing using the mksysb
utility .................................................................................... 59Creating the mksysb backup image ............................................ 60Installing mksysb image on alternate disk .................................... 61Verifying the installation ........................................................... 63
Section 3 Managing your Symantecdeployments ............................................................. 64
Chapter 10 Performing centralized installations using theDeployment Server ....................................................... 65
About the Deployment Server ......................................................... 66How to install the Deployment Script ................................................ 67Deployment management overview ................................................. 68Setting up a Deployment Server ...................................................... 68Setting deployment preferences ...................................................... 71Using the Deployment Server command line option to specify a
non-default repository location .................................................. 72Using the Deployment Server command line options to load and
download the most recent release information .............................. 73Viewing or downloading available release images ............................... 74Viewing or removing repository images stored in your repository ............ 78Deploying Symantec product updates to your environment ................... 81Finding out which releases you have, and which upgrades or updates
you may need ........................................................................ 82Deploying a specific Symantec release ............................................. 84Updating release information on systems without Internet access ........... 85
Section 4 Post-installation tasks .............................................. 87
Chapter 11 Verifying the DMP installation ......................................... 88
Verifying that the products were installed ........................................... 88Installation log files ....................................................................... 89Starting and stopping processes for the Symantec products ................. 89
9Contents

Section 5 Upgrade of DMP ........................................................... 91
Chapter 12 Planning to upgrade DMP ................................................. 92
Upgrade methods for DMP ............................................................. 92Supported upgrade paths for DMP ................................................... 93Preparing to upgrade DMP ............................................................. 94
Getting ready for the upgrade ................................................... 94Preparing for an upgrade of Symantec Dynamic
Multi-Pathing ................................................................... 95Creating backups ................................................................... 96Upgrading the array support ..................................................... 96
Using Install Bundles to simultaneously install or upgrade basereleases, maintenance patches, and hot fixes .............................. 97
Chapter 13 Upgrading DMP .................................................................. 100
Upgrading Symantec Dynamic Multi-Pathing with the productinstaller ............................................................................... 100
Upgrading DMP using the web-based installer .................................. 101Upgrade Symantec Dynamic Multi-Pathing and AIX on a DMP-enabled
rootvg ................................................................................. 102Upgrading from DMP 5.1SP1 (or later) on AIX 6.1 to DMP 6.1 on
a DMP-enabled rootvg ..................................................... 103Upgrading from DMP 5.1SP1 (or later) on AIX 5.3 to DMP 6.1 on
AIX 6.1 or AIX 7.1 on a DMP-enabled rootvg ........................ 103Upgrading DMP on a Virtual I/O server (VIOS) from 5.1SP1 or later to
6.1 .................................................................................... 104Upgrading the AIX operating system .............................................. 105
Chapter 14 Upgrading DMP using an alternate disk ....................... 107
About upgrading DMP using an alternate disk ................................... 107Supported upgrade scenarios ....................................................... 108Supported upgrade paths for DMP using alternate disks ..................... 108Preparing to upgrade DMP on an alternate disk ................................ 108Upgrading DMP on an alternate disk ............................................... 110Verifying the upgrade .................................................................. 111
10Contents

Chapter 15 Upgrading DMP using Network Install ManagerAlternate Disk Migration ............................................ 113
Supported upgrade paths for DMP using NIM ADM ........................... 113Preparing to upgrade DMP and the operating system using the nimadm
utility .................................................................................. 114Preparing the installation bundle on the NIM server ........................... 114Upgrading DMP and the operating system using the nimadm
utility .................................................................................. 115Verifying the upgrade performed using the NIM ADM utility .................. 117
Chapter 16 Performing post-upgrade tasks ...................................... 119
Updating variables ...................................................................... 119Verifying the Symantec Dynamic Multi-Pathing upgrade ...................... 119
Section 6 Uninstallation of DMP ............................................. 120
Chapter 17 Uninstalling DMP ............................................................... 121
Uninstalling DMP ........................................................................ 121Uninstalling DMP with the web-based installer .................................. 122Removing Storage Foundation products using SMIT .......................... 123
Section 7 Installation reference .............................................. 126
Appendix A Installation scripts ............................................................ 127
Command options for the installation script ...................................... 127Command options for uninstall script .............................................. 133
Appendix B Tunable files for installation ........................................... 136
About setting tunable parameters using the installer or a responsefile ..................................................................................... 136
Setting tunables for an installation, configuration, or upgrade ............... 137Setting tunables with no other installer-related operations ................... 138Setting tunables with an un-integrated response file ........................... 139Preparing the tunables file ............................................................ 140Setting parameters for the tunables file ........................................... 140Tunables value parameter definitions .............................................. 141
11Contents

Appendix C Configuring the secure shell or the remote shell forcommunications .......................................................... 145
About configuring secure shell or remote shell communication modesbefore installing products ........................................................ 145
Manually configuring and passwordless ssh ..................................... 146Restarting the ssh session ............................................................ 150Enabling rsh for AIX .................................................................... 150
Appendix D DMP components .............................................................. 152
Symantec Dynamic Multi-Pathing installation filesets .......................... 152
Appendix E Troubleshooting installation issues .............................. 154
Restarting the installer after a failed connection ................................ 154What to do if you see a licensing reminder ....................................... 154Troubleshooting an installation on AIX ............................................ 155Incorrect permissions for root on remote system ............................... 155Resource temporarily unavailable .................................................. 156Inaccessible system .................................................................... 157
Appendix F Compatibility issues when installing DMP with otherproducts ........................................................................ 158
Installing, uninstalling, or upgrading Storage Foundation products whenother Symantec products are present ........................................ 158
Installing, uninstalling, or upgrading Storage Foundation products whenVOM is already present .......................................................... 159
Installing, uninstalling, or upgrading Storage Foundation products whenNetBackup is already present .................................................. 159
Index ................................................................................................................... 160
12Contents

Installation overview andplanning
■ Chapter 1. Introducing Symantec Dynamic Multi-Pathing
■ Chapter 2. System requirements
■ Chapter 3. Planning to install DMP
■ Chapter 4. Licensing DMP
1Section

Introducing SymantecDynamic Multi-Pathing
This chapter includes the following topics:
■ About Symantec Dynamic Multi-Pathing (DMP)
■ About Veritas Operations Manager
■ About Symantec Operations Readiness Tools
About Symantec Dynamic Multi-Pathing (DMP)Symantec Dynamic Multi-Pathing (DMP) provides multi-pathing functionality for theoperating system native devices that are configured on the system. DMP createsDMP metadevices (also known as DMP nodes) to represent all the device pathsto the same physical LUN.
DMP is also available as a standalone product, which extends DMP metadevicesto support the OS native logical volume manager (LVM). You can create LVMvolumes and volume groups on DMP metadevices.
DMP supports the LVM volume devices that are used as the paging devices.
Symantec Dynamic Multi-Pathing can be licensed separately from StorageFoundation products. Veritas Volume Manager and Veritas File System functionalityis not provided with a DMP license.
DMP functionality is available with a Storage Foundation (SF) Enterprise license,an SFHA Enterprise license, and a Storage Foundation Standard license.
Veritas Volume Manager (VxVM) volumes and disk groups can co-exist with LVMvolumes and volume groups. But, each device can only support one of the types.If a disk has a VxVM label, then the disk is not available to LVM. Similarly, if a diskis in use by LVM, then the disk is not available to VxVM.
1Chapter

About Veritas Operations ManagerVeritas Operations Manager provides a centralized management console forSymantec Storage Foundation and High Availability products. You can use VeritasOperations Manager to monitor, visualize, and manage storage resources andgenerate reports.
Symantec recommends using Veritas Operations Manager (VOM) to manageStorage Foundation and Cluster Server environments.
You can download Veritas Operations Manager at no charge athttp://go.symantec.com/vom.
Refer to the Veritas Operations Manager documentation for installation, upgrade,and configuration instructions.
The Veritas Enterprise Administrator (VEA) console is no longer packaged withStorage Foundation products. If you want to continue using VEA, a software versionis available for download fromhttp://www.symantec.com/operations-manager/support. Symantec StorageFoundation Management Server is deprecated.
About Symantec Operations Readiness ToolsSymantec Operations Readiness Tools (SORT) is a website that automates andsimplifies some of the most time-consuming administrative tasks. It helps you identifyrisks in your datacenters and improve operational efficiency, enabling you to managethe complexity that is associated with datacenter architectures and scale
Table 1-1 lists three major datacenter tasks and the SORT tools that can help youaccomplish them.
15Introducing Symantec Dynamic Multi-PathingAbout Veritas Operations Manager

Table 1-1 Datacenter tasks and the SORT tools
SORT toolsTask
■ Installation and Upgrade checklistsDisplay system requirements including memory, diskspace, and architecture.
■ Installation and Upgrade custom reportsCreate reports that determine if you're ready to installor upgrade a Symantec enterprise product.
■ Array-specific Module FinderList the latest Array Support Libraries (ASLs) and ArrayPolicy Modules (APMs) for UNIX servers, and DeviceDriver Installers (DDIs) and Device Discovery Layers(DDLs) for Windows servers.
■ High Availability Agents tableFind and download the agents for applications,databases, replication, and Symantec partners.
Prepare for installations andupgrades
■ Patch notificationsReceive automatic email notifications about patchupdates. (Sign in required.)
■ Risk Assessment check listsDisplay configuration recommendations based on yourSymantec product and platform.
■ Risk Assessment custom reportsCreate reports that analyze your system and give yourecommendations about system availability, storageuse, performance, and best practices.
■ Error code descriptions and solutionsDisplay detailed information on thousands of Symantecerror codes.
Identify risks and getserver-specificrecommendations
16Introducing Symantec Dynamic Multi-PathingAbout Symantec Operations Readiness Tools

Table 1-1 Datacenter tasks and the SORT tools (continued)
SORT toolsTask
■ Patch FinderList and download patches for your Symantec enterpriseproducts.
■ License/Deployment custom reportsCreate custom reports that list your installed Symantecproducts and license keys. Display licenses by product,platform, server tier, and system.
■ Symantec Performance Value Unit (SPVU) CalculatorUse the calculator to assist you with the pricing metertransition.
■ DocumentationList and download Symantec product documentation,including manual pages, product guides, and supportarticles.
■ Related linksDisplay links to Symantec product support, forums,customer care, and vendor information on a single page.
Improve efficiency
SORT is available at no additional charge.
To access SORT, go to:
https://sort.symantec.com
17Introducing Symantec Dynamic Multi-PathingAbout Symantec Operations Readiness Tools

System requirements
This chapter includes the following topics:
■ Release notes
■ Important preinstallation information for DMP
■ Supported operating systems
■ Disk space requirements
■ Virtual I/O Server (VIOS) requirements
■ Checking installed product versions and downloading maintenance releasesand hot fixes
■ Obtaining installer hot fixes
■ Disabling external network connection attempts
Release notesThe Release Notes for each Symantec product contains last-minute news andimportant details for each product, including updates to system requirements andsupported software. Review the Release notes for the latest information before youstart installing the product.
The product documentation is available on the web at the following location:
https://sort.symantec.com/documents
Important preinstallation information for DMPBefore you install DMP, make sure that you have reviewed the following information:
2Chapter

■ Preinstallation checklist for your configuration. Go to the SORT installationchecklist tool. From the drop-down lists, select the information for the Symantecproduct you want to install, and click Generate Checklist.
■ Hardware compatibility list for information about supported hardware:http://www.symantec.com/docs/TECH211575
■ For important updates regarding this release, review the Late-Breaking NewsTechnote on the Symantec Technical Support website:http://www.symantec.com/docs/TECH211540
Supported operating systemsFor information on supported operating systems, see the Symantec DynamicMulti-Pathing Release Notes.
Disk space requirementsBefore installing your products, confirm that your system has enough free diskspace.
Use the Perform a Preinstallation Check (P) menu for the web-based installer todetermine whether there is sufficient space.
Or, go to the installation directory and run the installer with the -precheck option.
# ./installer -precheck
See “About the script-based installer” on page 38.
Virtual I/O Server (VIOS) requirementsTo run DMP in VIOS, the minimum VIOS level that is required is 2.1.3.10-FP-23 orlater.
Before installing DMP on VIOS, confirm the following:
If any path to the target disk has SCSI reserve ODM attribute set, then change theattributes to release the SCSI reservation from the paths, on a restart.
■ If a path has the reserve_policy attribute set, change thereserve_policyattribute to no_reserve for all the paths.# lsattr -E1 hdisk557 | grep resreserve_policy single_path
Reserve Policy True
19System requirementsSupported operating systems

# chdev -l hdisk557 -a reserve_policy=no_reserve -Phdisk557 changed
■ If a path has the reserve_lock attribute set, change the reserve_lockattributeto no.# lsattr -E1 hdisk558 | grep reserve_lockreserve_lock yes
Reserve Device on open True
# chdev -l hdisk558 -a reserve_lock=no -Phdisk558 changed
Checking installed product versions anddownloadingmaintenance releases and hot fixes
Symantec provides a means to check the Symantec filesets you have installed,and download any needed maintenance releases and hot fixes.
Use the installer command with the -version option to determine what is installedon your system, and download any needed maintenance releases or hot fixes. Afteryou have installed the current version of the product, you can use the showversion
script in the /opt/VRTS/install directory to find product information.
The version option or the showversion script checks the specified systems anddiscovers the following:
■ Storage Foundation and High Availability product versions that are installed onthe system
■ All the required filesets and the optional Symantec filesets installed on the system
■ Any required or optional filesets (if applicable) that are not present
■ Installed hot fixes
■ Available base releases (major or minor)
■ Available maintenance releases
■ Available hot fix releases
20System requirementsChecking installed product versions and downloading maintenance releases and hot fixes

To check your systems and download maintenance releases and hot fixes
1 Mount the media, or navigate to the installation directory.
2 Start the installer with the -version option.
# ./installer -version sys1 sys2
For each system, the installer lists all of the installed base releases,maintenance releases, and hot fixes, followed by the lists of availabledownloads.
3 If you have Internet access, follow the prompts to download the availablemaintenance releases and hot fixes to the local system.
4 If you do not have Internet access, you can download any needed maintenancereleases and hot fixes from the Symantec Operations Readiness Tools (SORT)Patch Finder page at:
https://sort.symantec.com/patch/finder
You can obtain installer hot fixes automatically or manually.
See “Obtaining installer hot fixes” on page 21.
Downloading maintenance releases and hot fixes requires the installer to makeoutbound networking calls. You can also disable external network connectionattempts.
See “Disabling external network connection attempts” on page 22.
Obtaining installer hot fixesSymantec occasionally finds issues with the Symantec Dynamic Multi-Pathinginstaller, and posts public installer hot fixes on the Symantec Operations ReadinessTools (SORT) website's Patch Finder page at:
https://sort.symantec.com/patch/finder
You can access installer hot fixes automatically or manually.
To download installer hot fixes automatically
◆ Starting with Symantec Dynamic Multi-Pathing version 6.1, installer hot fixesare downloaded automatically. No action is needed on your part.
If you are running Symantec Dynamic Multi-Pathing version 6.1 or later, andyour system has Internet access, the installer automatically imports any neededinstaller hot fix, and begins using it.
Automatically downloading installer hot fixes requires the installer to make outboundnetworking calls. You can also disable external network connection attempts.
21System requirementsObtaining installer hot fixes

See “Disabling external network connection attempts” on page 22.
If your system does not have Internet access, you can download installer hot fixesmanually.
To download installer hot fixes manually
1 Go to the Symantec Operations Readiness Tools (SORT) website's PatchFinder page, and save the most current Symantec patch on your local system.
2 Navigate to the directory where you want to unzip the file you downloaded instep 1.
3 Unzip the patch tar file. For example, run the following command:
# gunzip cpi-6.1P2-patches.tar.gz
4 Untar the file. For example, enter the following:
# tar -xvf cpi-6.1P2-patches.tar
patches/
patches/CPI61P2.pl
README
5 Navigate to the installation media or to the installation directory.
6 To start using the patch, run the installer command with the -require option.For example, enter the following:
# ./installer -require /target_directory/patches/CPI61P2.pl
Disabling external network connection attemptsWhen you execute the installer command, the installer attempts to make anoutbound networking call to get information about release updates and installer hotfixes. If you know your systems are behind a firewall, or do not want the installerto make outbound networking calls, you can disable external network connectionattempts by the installer.
22System requirementsDisabling external network connection attempts

To disable external network connection attempts
◆ Disable inter-process communication (IPC).
To do this, run the installer with the -noipc option.
For example, to disable IPC for system1 (sys1) and system2 (sys2) enter thefollowing:
# ./installer -noipc sys1 sys2
23System requirementsDisabling external network connection attempts

Planning to install DMP
This chapter includes the following topics:
■ About planning for DMP installation
■ About installation and configuration methods
About planning for DMP installationBefore you continue, make sure that you have the current version of this guide.The latest documentation is available on the Symantec Operations Readiness Tools(SORT) website.
https://sort.symantec.com/documents
Document version: 6.1 Rev 3.
This installation guide is designed for system administrators who already have basicknowledge of UNIX system and network administration. Basic knowledge includescommands such as tar, mkdir, and simple shell scripting. What is also requiredis familiarity with the specific platform and operating system where DMP is to beinstalled.
Follow the preinstallation instructions if you want to install Symantec DynamicMulti-Pathing.
See the chapter, "Preparing to install Symantec Dynamic Multi-Pathing" for moreinformation.
About installation and configuration methodsYou can install and configure DMP using Symantec installation programs or usingnative operating system methods.
Table 3-1 shows the installation and configuration methods that DMP supports.
3Chapter

Table 3-1 Installation and configuration methods
DescriptionMethod
Using the script-based installer, you can install Symantecproducts (version 6.1 and later) from a driver system runninga supported platform to target computers running anysupported platform.
To install your Symantec product using the installer, chooseone of the following:
■ The general product installer:installer
The general product installer script provides a menu thatsimplifies the selection of installation and configurationoptions. Use the general product installer if you want toinstall multiple products from a disc.
■ Product-specific installation scripts:installdmp
The product-specific installation scripts providecommand-line interface options. Installing and configuringwith the installdmp script is identical to running thegeneral product installer and specifying DMP from thelist of products to install.Use the product-specific installation scripts to install orconfigure individual products you download electronically.
See “About the script-based installer” on page 38.
The script-based installer
Using the web-based installer, you can install Symantecproducts (version 6.1 and later) from a driver system runninga supported platform to target computers running anysupported platform
The web-based installer provides an interface to managethe installation and configuration from a remote site using astandard web browser.
webinstaller
See “About the web-based installer” on page 44.
The web-based installer
Using the Deployment Server, you can store multiple releaseimages in one central location and deploy them to systemsof any supported platform.
See “About the Deployment Server” on page 66.
Deployment Server
25Planning to install DMPAbout installation and configuration methods

Table 3-1 Installation and configuration methods (continued)
DescriptionMethod
Response files automate installation and configuration byusing the information that is stored in a specified file insteadof prompting you for information.
You can use any of the above options to generate a responsefile. You can then customize the response file for anothersystem. Run the product installation script with the responsefile option to install silently on one or more systems.
See “About response files” on page 50.
Silent installation usingresponse files
Beginning with version 6.1, you can easily install or upgradeyour systems directly to a base, maintenance, or hot fix levelin one step using Install Bundles,.
The installer installs both releases as if they were combinedin the same release image. The various scripts, filesets, andpatch components are merged, and multiple releases areinstalled together as if they are one combined release.
See “Using Install Bundles to simultaneously install orupgrade base releases, maintenance patches, and hot fixes”on page 97.
Install Bundles
You can perform many advanced NIM installation tasks usingthe NIM command interface and the System ManagementInterface Tool (SMIT). Use the product installer or theproduct-specific installation script to generate a NIMinstallp bundle. Use the generated installp bundle toinstall Symantec filesets from your NIM server.
Network Installation Manager(NIM)
26Planning to install DMPAbout installation and configuration methods

Licensing DMP
This chapter includes the following topics:
■ About Symantec product licensing
■ Setting or changing the product level for keyless licensing
■ Installing Symantec product license keys
About Symantec product licensingYou have the option to install Symantec products without a license key. Installationwithout a license does not eliminate the need to obtain a license. A software licenseis a legal instrument governing the usage or redistribution of copyright protectedsoftware. The administrator and company representatives must ensure that a serveror cluster is entitled to the license level for the products installed. Symantec reservesthe right to ensure entitlement and compliance through auditing.
If you encounter problems while licensing this product, visit the Symantec licensingSupport website.
http://www.symantec.com/products-solutions/licensing/activating-software/detail.jsp?detail_id=licensing_portal
The product installer prompts you to select one of the following licensing methods:
■ Install a license key for the product and features that you want to install.When you purchase a Symantec product, you receive a License Key certificate.The certificate specifies the product keys and the number of product licensespurchased.
■ Continue to install without a license key.The installer prompts for the product modes and options that you want to install,and then sets the required product level.
4Chapter

Within 60 days of choosing this option, you must install a valid license keycorresponding to the license level entitled. If you do not comply with the aboveterms, continuing to use the Symantec product is a violation of your End UserLicense Agreement, and results in warning messagesFor more information about keyless licensing, see the following URL:http://go.symantec.com/sfhakeyless
If you upgrade to this release from a previous release of the Symantec software,the installer asks whether you want to upgrade the key to the new version. Theexisting license keys may not activate new features in this release.
If you upgrade with the product installer, or if you install or upgrade with a methodother than the product installer, you must do one of the following to license theproducts:
■ Run the vxkeyless command to set the product level for the products you havepurchased. This option also requires that you manage the server or cluster witha management server.See “Setting or changing the product level for keyless licensing” on page 28.See the vxkeyless(1m) manual page.
■ Use the vxlicinst command to install a valid product license key for theproducts you have purchased.See “Installing Symantec product license keys” on page 30.See the vxlicinst(1m) manual page.
You can also use the above options to change the product levels to another levelthat you are authorized to use. For example, you can add the replication option tothe installed product. You must ensure that you have the appropriate license forthe product level and options in use.
Note: To change from one product group to another, you may need to performadditional steps.
Setting or changing the product level for keylesslicensing
The keyless licensing method uses product levels to determine the Symantecproducts and functionality that are licensed.
For more information to use keyless licensing and to download the managementserver, see the following URL:
http://go.symantec.com/vom
28Licensing DMPSetting or changing the product level for keyless licensing

When you set the product license level for the first time, you enable keyless licensingfor that system. If you install with the product installer and select the keyless option,you are prompted to select the product and feature level that you want to license.
When you upgrade from a previous release, the product installer prompts you toupdate the vxkeyless license product level to the current release level. If you updatethe vxkeyless license product level during the upgrade process, no further actionis required. If you do not update the vxkeyless license product level, the outputyou see when you run the vxkeyless display command includes the previousrelease's vxkeyless license product level. Each vxkeyless license product levelname includes the suffix _previous_release_version. For example, DMP_6.0, orSFENT_VR_5.1SP1, or VCS_GCO_5.1. If there is no suffix, it is the current releaseversion.
You would see the suffix _previous_release_version if you did not update thevxkeyless product level when prompted by the product installer. Symantec highlyrecommends that you always use the current release version of the product levels.To do so, use the vxkeyless set command with the desired product levels. If yousee SFENT_60, VCS_60, use the vxkeyless set SFENT,VCS command to updatethe product levels to the current release.
After you install or upgrade, you can change product license levels at any time toreflect the products and functionality that you want to license. When you set aproduct level, you agree that you have the license for that functionality.
To set or change the product level
1 Change your current working directory:
# export PATH=$PATH:/opt/VRTSvlic/bin
2 View the current setting for the product level.
# vxkeyless -v display
3 View the possible settings for the product level.
# vxkeyless displayall
4 Set the desired product level.
# vxkeyless set prod_levels
where prod_levels is a comma-separated list of keywords. The keywords arethe product levels as shown by the output of step 3.
29Licensing DMPSetting or changing the product level for keyless licensing

If you want to remove keyless licensing and enter a key, you must clear the keylesslicenses. Use the NONE keyword to clear all keys from the system.
Warning: Clearing the keys disables the Symantec products until you install a newkey or set a new product level.
See “Installing Symantec product license keys” on page 30.
To clear the product license level
1 View the current setting for the product license level.
# vxkeyless [-v] display
2 If there are keyless licenses installed, remove all keyless licenses:
# vxkeyless [-q] set NONE
For more details on using the vxkeyless utility, see the vxkeyless(1m) manualpage.
Installing Symantec product license keysThe VRTSvlic fileset enables product licensing. After the VRTSvlic is installed, thefollowing commands and their manual pages are available on the system:
Installs a license key for a Symantec productvxlicinst
Displays the currently installed licensesvxlicrep
Retrieves the features and their descriptions that are encoded in alicense key
vxlictest
Even though other products are included on the enclosed software discs, you canonly use the Symantec software products for which you have purchased a license.
30Licensing DMPInstalling Symantec product license keys

To install or change a license
1 Run the following commands. In a cluster environment, run the commands oneach node in the cluster:
# cd /opt/VRTS/bin
# ./vxlicinst -k license key
2 Run the following Veritas Volume Manager (VxVM) command to recognize thenew license:
# vxdctl license init
See the vxdctl(1M) manual page.
If you have vxkeyless licensing, you can view or update the keyless productlicensing levels.
See “Setting or changing the product level for keyless licensing” on page 28.
31Licensing DMPInstalling Symantec product license keys
Installation of DMP
■ Chapter 5. Preparing to install DMP
■ Chapter 6. Installing DMP using the script-based installer
■ Chapter 7. Installing DMP using the web-based installer
■ Chapter 8. Automated installation using response files
■ Chapter 9. Installing DMP using operating system-specific methods
2Section
Preparing to install DMP
This chapter includes the following topics:
■ Installation preparation overview
■ Setting environment variables
■ About using ssh or rsh with the installer
■ Mounting the product disc
■ Assessing the system for installation readiness
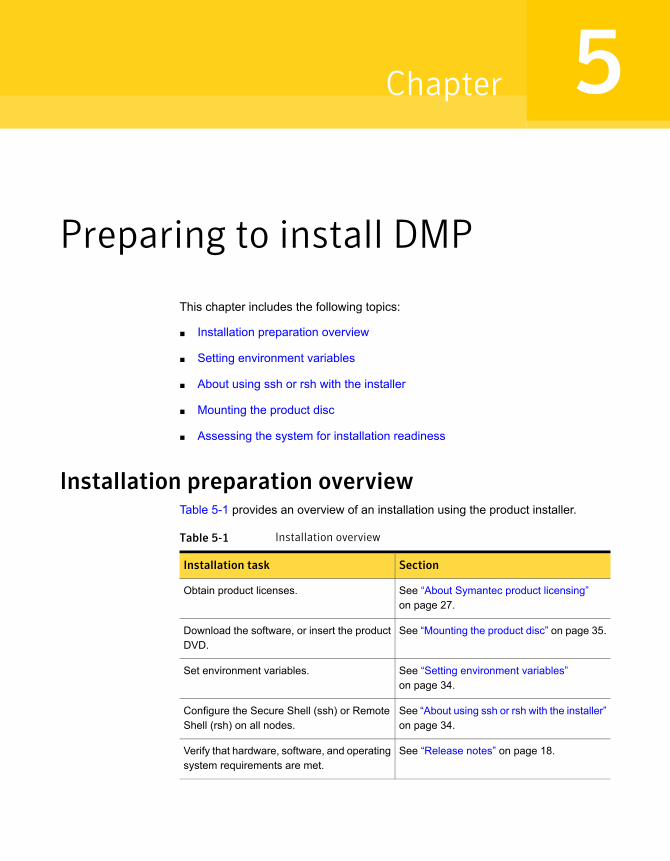
Installation preparation overviewTable 5-1 provides an overview of an installation using the product installer.
Table 5-1 Installation overview
SectionInstallation task
See “About Symantec product licensing”on page 27.
Obtain product licenses.
See “Mounting the product disc” on page 35.Download the software, or insert the productDVD.
See “Setting environment variables”on page 34.
Set environment variables.
See “About using ssh or rsh with the installer”on page 34.
Configure the Secure Shell (ssh) or RemoteShell (rsh) on all nodes.
See “Release notes” on page 18.Verify that hardware, software, and operatingsystem requirements are met.
5Chapter

Table 5-1 Installation overview (continued)
SectionInstallation task
See “Disk space requirements” on page 19.Check that sufficient disk space is available.
See “About the script-based installer”on page 38.
Use the installer to install the products.
Setting environment variablesMost of the commands which are used in the installation are present in the /sbin
or /usr/sbin directory. Add these directories to your PATH environment variableas necessary.
After installation, DMP commands are in /opt/VRTS/bin. DMP manual pages arestored in /opt/VRTS/man.
Add the following directories to your PATH and MANPATH environment variable:
■ If you want to use Bourne or Korn shell (sh or ksh), enter the following:
$ PATH=$PATH:/usr/sbin:/opt/VRTS/bin
$ MANPATH=/usr/share/man:/opt/VRTS/man:$MANPATH
$ export PATH MANPATH
■ If you want to use a C shell (csh or tcsh), enter the following:
% set path = ( $path /usr/sbin /opt/VRTS/bin )
% setenv MANPATH /usr/share/man:/opt/VRTS/man:$MANPATH
The nroff versions of the online manual pages are not readable using the man
command if the bos.txt.tfs fileset is not installed. However, the VRTSvxvm andVRTSvxfs filesets install ASCII versions in the /opt/VRTS/man/cat* and/opt/VRTS/man/man* directories that are readable without the bos.txt.tfs fileset.
About using ssh or rsh with the installerThe installer uses passwordless Secure Shell (ssh) or Remote Shell (rsh)communications among systems. The installer uses the ssh daemon or rsh daemonthat comes bundled with the operating system. During an installation, you choosethe communication method that you want to use. Or, you can run the installer
-comsetup command to set up ssh or rsh explicitly. You then provide the installerwith the superuser passwords for the systems where you plan to install. The ssh
34Preparing to install DMPSetting environment variables

communication or rsh communication among the systems is removed when theinstallation process completes, unless the installation abruptly terminates. Ifinstallation terminated abruptly, use the installation script's -comcleanup option toremove the ssh configuration or rsh configuration from the systems.
In most installation, configuration, upgrade (where necessary), and uninstallationscenarios, the installer can configure ssh or rsh on the target systems. In thefollowing scenarios, you need to set up ssh or rsh manually, or use the installer
-comsetup option to set up an ssh or rsh configuration from the systems.
■ When you perform installer sessions using a response file.
See “About configuring secure shell or remote shell communication modes beforeinstalling products” on page 145.
Mounting the product discYou must have superuser (root) privileges to load the DMP software.
To mount the product disc
1 Log in as superuser on a system where you want to install DMP.
The systems must be in the same subnet.
2 Determine the device access name of the disc drive. For example, enter:
# lsdev -C -c cdrom
The output resembles:
cd0 Available 1G-19-00 IDE DVD-ROM Drive
In this example, cd0 is the disc’s device access name.
35Preparing to install DMPMounting the product disc

3 Make sure that the /cdrom file system is created:
# cat /etc/filesystems
If the /cdrom file system exists, the output contains a listing that resembles:
.
.
/cdrom:
dev = /dev/cd0
vfs = cdrfs
mount = false
options = ro
account = false
.
.
4 If the /cdrom file system does not exist, create it:
# crfs -v cdrfs -p ro -d cd0 -m /cdrom
5 Insert the product disc with the DMP software into a drive that is connected tothe system.
6 Mount the disc:
# mount /cdrom
# cd /cdrom
Assessing the system for installation readinessSymantec provides the following tools for assessing your system, to ensure thatthe system meets the requirements for installing Symantec Dynamic Multi-Pathing6.1.
Symantec Operations Readiness Tools(SORT) is a web-based application that isdesigned to support Symantec enterpriseproducts.
See “About Symantec Operations ReadinessTools” on page 15.
Symantec Operations Readiness Tools
36Preparing to install DMPAssessing the system for installation readiness

Performs a preinstallation check on thespecified systems. The product installerreports whether the specified systems meetthe minimum requirements for installingSymantec Dynamic Multi-Pathing 6.1.
See “Prechecking your systems using theinstaller” on page 37.
Prechecking your systems using the installer
Prechecking your systems using the installerThe script-based and web-based installer's precheck option checks for the following:
■ Recommended swap space for installation
■ Recommended memory sizes on target systems for Symantec programs forbest performance
■ Required operating system versions
To use the precheck option
1 Start the script-based or web-based installer.
See “Installing DMP using the script-based installer” on page 40.
See “Installing DMP with the web-based installer” on page 47.
2 Select the precheck option:
■ From the web-based installer, select the Perform a Pre-Installation Checkfrom the Task pull-down menu.
■ In the script-based installer, from root on the system where you want toperform the check, start the installer.
# ./installer
In the Task Menu, press the p key to start the precheck.
3 Enter the system name or the IP address of the system that you want to check.
4 Review the output and make the changes that the installer recommends.
37Preparing to install DMPAssessing the system for installation readiness

Installing DMP using thescript-based installer
This chapter includes the following topics:
■ About the script-based installer
■ Installing DMP using the script-based installer
■ Performing a postcheck on a node
About the script-based installerYou can use the script-based installer to install Symantec products (version 6.1and later) from a driver system that runs any supported platform to a target systemthat runs different supported platforms.
To install your Symantec product, use one of the following methods:
■ The general product installer (installer). The general product installer scriptprovides a menu that simplifies the selection of installation and configurationoptions. Use the general product installer if you want to install multiple productsfrom a disc.See “Installing DMP using the script-based installer” on page 40.
■ Product-specific installation scripts (installdmp). The product-specific installationscripts provide command-line interface options. Installing and configuring withthe installdmp script is identical to running the general product installer andspecifying DMP from the list of products to install. Use the product-specificinstallation scripts to install or configure individual products you downloadelectronically. You can find these scripts at the root of the product media. Thesescripts are also installed with the product.
6Chapter

Table 6-1 lists all the SFHA Solutions product installation scripts. The list ofproduct-specific installation scripts that you find on your system depends on theproduct that you install on your system.
Table 6-1 Product installation scripts
Script name after aninstallation
Script name in the mediaSymantec productname
N/AinstallerFor all SFHA Solutionsproducts
installapplicationha<version>
installapplicationhaSymantec ApplicationHA
installvcs<version>installvcsSymantec ClusterServer (VCS)
installsf<version>installsfSymantec StorageFoundation (SF)
installsfha<version>installsfhaSymantec StorageFoundation and HighAvailability (SFHA)
installsfcfsha<version>installsfcfshaSymantec StorageFoundation Cluster FileSystem High Availability(SFCFSHA)
installsfrac<version>installsfracSymantec StorageFoundation for OracleRAC (SF Oracle RAC)
installdmp<version>installdmpSymantec DynamicMulti-pathing (DMP)
When you install from the installation media, the script name does not include aproduct version.
When you configure the product after an installation, the installation scripts includethe product version in the script name.
For example, for the 6.1 version:
# /opt/VRTS/install/installdmp61 -configure
39Installing DMP using the script-based installerAbout the script-based installer

Note: The general product installer (installer) script does not include the productversion.
At most points during the installation you can type the following characters fordifferent actions:
■ Use b (back) to return to a previous section of the installation procedure. Theback feature of the installation scripts is context-sensitive, so it returns to thebeginning of a grouped section of questions.
■ Use Control+c to stop and exit the program if an installation procedure hangs.After a short delay, the script exits.
■ Use q to quit the installer.
■ Use ? to display help information.
■ Use the Enter button to accept a default response.
See “Command options for the installation script” on page 127.
See “Command options for uninstall script” on page 133.
Installing DMP using the script-based installerUse the installer program to install Symantec Dynamic Multi-pathing (DMP) on yoursystem.
The following sample procedure installs DMP on a single system.
To install DMP
1 To install on multiple systems, set up the systems so that commands betweensystems execute without prompting for passwords or confirmations.
See “About configuring secure shell or remote shell communication modesbefore installing products” on page 145.
2 Load and mount the software disc.
See “Mounting the product disc” on page 35.
3 Move to the top-level directory on the disc.
# cd /mnt/cdrom
40Installing DMP using the script-based installerInstalling DMP using the script-based installer

4 From this directory, type the following command to install on the local system.Also use this command to install on remote systems provided that the SecureShell (SSH) or Remote Shellrsh) utilities are configured:
# ./installer
5 Enter I to install and press the Return key.
6 When the list of available products is displayed, to select Symantec DynamicMulti-Pathing, enter the corresponding number, and press the Return key.
7 At the prompt, specify whether you accept the terms of the End User LicenseAgreement (EULA). Press the return key to proceed.
8 Select one of the following installation options:
■ A minimal installation installs filesets for minimal functionality for the selectedproduct.
■ A recommended installation installs the recommended DMP filesets thatprovide complete functionality of the product.Note that this option is the default.
■ The display selection displays all filesets and provides information aboutthem. Note that the recommended installation installs the minimum and therecommended filesets.
9 When the installer prompts you, indicate the systems where you want to installDMP. Enter one or more system names, using spaces to separate them.
10 The installer program verifies the system for installation. If the installer doesnot verify a system, fix the issue and return to the installer.
After the system checks complete, the installer displays a list of the filesets tobe installed. Press Return to continue with the installation.
11 The installer can configure Remote Shell or Secure Shell communications foryou among systems, however each system needs to have rsh or SSH serversinstalled. You also need to provide the superuser passwords for the systems.Note that for security reasons, the installation program neither stores nor cachesthese passwords.
41Installing DMP using the script-based installerInstalling DMP using the script-based installer

12 The installer installs the product filesets.
The installer program prompts you to choose a licensing method.
If you have a valid license key, select 1 and enter the license key at the prompt.
To install through keyless licensing, select 2.
Note: With the keyless license option, you must manage the systems with amanagement server.
For more information, go to the following website:
http://go.symantec.com/sfhakeyless
13 The installer starts DMP processes. When you are prompted next, specifywhether you want to send your installation information to Symantec. Note thatthe information that is sent to Symantec is only to help improve the installersoftware.
Installation procedures and diagnostic information were saved
in the log files under directory /var/tmp/installer-<platform>-<uuid>.
Analyzing this information helps Symantec discover and fix failed
operations performed by the installer. Would you like to send the
information about this installation to Symantec to help improve
installation in the future? [y,n,q,?] (y)y
14 The installer program completes the installation. If the VRTSvxvm fileset requiresrestart while installing it on the system, run the/opt/VRTS/install/installdmp61 -configure command after restart tostart the DMP processes. If required, check the log files to confirm theinstallation.
Installation log files, summary file, and response file
are saved at:
/opt/VRTS/install/logs/installer-****
15 Restart the systems if the installer prompts for a restart, to enable DMP nativesupport.
16 Start the DMP processes.
See “Starting and stopping processes for the Symantec products ” on page 89.
42Installing DMP using the script-based installerInstalling DMP using the script-based installer

Performing a postcheck on a nodeThe installer's postcheck command can help you to determine installation-relatedproblems.
To run the postcheck command on a node
1 Run the installer with the -postcheck option.
# ./installer -postcheck system_name
Or you can run the following command on your local macihne once DMP isinstalled.
# /opt/VRTS/install/installdmp61 -postcheck
2 The installer reports some errors or warnings if any processes or drivers donot start.
43Installing DMP using the script-based installerPerforming a postcheck on a node

Installing DMP using theweb-based installer
This chapter includes the following topics:
■ About the web-based installer
■ Before using the web-based installer
■ Starting the web-based installer
■ Obtaining a security exception on Mozilla Firefox
■ Performing a preinstallation check with the web-based installer
■ Installing DMP with the web-based installer
About the web-based installerUse the web-based installer interface to install Symantec products. The web-basedinstaller can perform most of the tasks that the script-based installer performs.
You use the webinstaller script to start and stop the Veritas XPortal Serverxprtlwid process. The webinstaller script can also be used to check the statusof the XPortal Server.
When the webinstaller script starts the xprtlwid process, the script displays aURL. Use this URL to access the web-based installer from a web browser such asInternet Explorer or FireFox.
The web installer creates log files whenever the web installer operates. While theinstallation processes operate, the log files are located in a session-based directoryunder the /var/tmp directory. After the install process completes, the log files are
7Chapter

located in the /opt/VRTS/install/logs directory. Symantec recommends thatyou keep these files for auditing, debugging, and future use.
The location of the Veritas XPortal Server configuration file is/var/opt/webinstaller/xprtlwid.conf.
See “Before using the web-based installer” on page 45.
See “Starting the web-based installer” on page 45.
Before using the web-based installerThe web-based installer requires the following configuration.
Table 7-1 Web-based installer requirements
RequirementsFunctionSystem
Must be a supportedplatform for SymantecDynamic Multi-Pathing6.1.
The systems where you plan to installthe Symantec products.
Target system
Must be at one of thesupported operatingsystem update levels.
The server where you start theinstallation. The installation media isaccessible from the installation server.
Installation server
Must have a webbrowser.
Supported browsers:
■ Internet Explorer 6, 7,and 8
■ Firefox 3.x and later
The system where you run the webbrowser to perform the installation.
Administrative system
Starting the web-based installerThis section describes starting the web-based installer.
45Installing DMP using the web-based installerBefore using the web-based installer
To start the web-based installer
1 Start the Veritas XPortal Server process xprtlwid, on the installation server:
# ./webinstaller start
The webinstaller script displays a URL. Note this URL.
Note: If you do not see the URL, please check your firewall and iptables settings.If you have configured a firewall, ensure that the firewall settings allow accessto the port 14172. You can alternatively use the -port option to use a free portinstead.
You can use the following command to display the details about ports used bywebinstaller and its status:
# ./webinstaller status
2 On the administrative server, start the web browser.
3 Navigate to the URL that the script displayed.
4 Certain browsers may display the following message:
Secure Connection Failed
Obtain a security exception for your browser.
When you are prompted, enter root and root's password of the installationserver.
5 Log in as superuser.
Obtaining a security exception on Mozilla FirefoxYou may need to get a security exception on Mozilla Firefox.
The following instructions are general. They may change because of the rapidrelease cycle of Mozilla browsers.
To obtain a security exception
1 Click Or you can add an exception link.
2 Click I Understand the Risks, or You can add an exception.
3 Click Get Certificate button.
4 Uncheck Permanently Store this exception checkbox (recommended).
46Installing DMP using the web-based installerObtaining a security exception on Mozilla Firefox
5 Click Confirm Security Exception button.
6 Enter root in User Name field and root password of the web server in thePassword field.
Performing a preinstallation check with theweb-based installer
This section describes performing a preinstallation check with the web-basedinstaller.
To perform a preinstallation check
1 Start the web-based installer.
See “Starting the web-based installer” on page 45.
2 On the Select a task and a product page, select Perform a Pre-installationCheck from the Task drop-down list.
3 Select Symantec Dynamic Multi-Pathing from the Product drop-down list,and click Next.
4 Indicate the systems on which to perform the precheck. Enter one or moresystem names, separated by spaces. Click Next.
5 The installer performs the precheck and displays the results.
6 If the validation completes successfully, click Next. The installer prompts youto begin the installation. Click Yes to install on the selected system. Click Noto install later.
7 Click Finish. The installer prompts you for another task.
Installing DMP with the web-based installerThis section describes installing DMP with the Symantec web-based installer.
To install DMP using the web-based installer
1 Perform preliminary steps.
See “Performing a preinstallation check with the web-based installer”on page 47.
2 Start the web-based installer.
See “Starting the web-based installer” on page 45.
3 Select Install a Product from the Task drop-down list.
47Installing DMP using the web-based installerPerforming a preinstallation check with the web-based installer

4 Select Symantec Dynamic Multi-Pathing from the Product drop-down list,and click Next.
5 On the License agreement page, read the End User License Agreement (EULA).To continue, select Yes, I agree and click Next.
6 Choose minimal or recommended filesets. Click Next.
7 Indicate the systems where you want to install. Separate multiple system nameswith spaces. Click Next.
8 If you have not yet configured a communication mode among systems, youhave the option to let the installer configure ssh or rsh. If you choose to allowthis configuration, select the communication mode and provide the superuserpasswords for the systems.
9 After the validation completes successfully, click Next to install DMP on theselected system.
10 After the installation completes, you must choose your licensing method.
On the license page, select one of the following radio buttons:
■ Enable keyless licensing and complete system licensing later
Note: The keyless license option enables you to install without entering akey. However, to ensure compliance, you must manage the systems witha management server.
For more information, go to the following website:
http://go.symantec.com/sfhakeyless
Click Next
■ Enter a valid license keyIf you have a valid license key, input the license key and click Next.
11 After the product is registered, the processes are started.
If the VRTSvxvm fileset requires restart while installing it on the system, run theconfigure task after restart to start the DMP processes.
For information about migrating your data volumes to DMP devices, refer tothe Symantec Dynamic Multi-Pathing Administrator's Guide.
48Installing DMP using the web-based installerInstalling DMP with the web-based installer

12 If you are prompted, enter the option to specify whether you want to send yourinstallation information to Symantec.
Installation procedures and diagnostic information were saved in
the log files under directory
/var/tmp/installer-<platform>-<uuid>. Analyzing this information
helps Symantec discover and fix failed operations performed by
the installer. Would you like to send the information about this
installation to Symantec to help improve installation in the
future? [y,n,q,?]
Click Finish. The installer asks if you want to read the summary file. SelectYes to read the summary file. If you select No, the installer prompts you foranother task.
13 Restart the systems if the installer prompts for a restart to enable DMP nativesupport.
49Installing DMP using the web-based installerInstalling DMP with the web-based installer

Automated installationusing response files
This chapter includes the following topics:
■ About response files
■ Installing DMP using response files
■ Upgrading DMP using response files
■ Uninstalling DMP using response files
■ Syntax in the response file
■ Response file variable definitions
About response filesThe installer script or product installation script generates a response file duringany installation, configuration, upgrade, or uninstall procedure. The response filecontains the configuration information that you entered during the procedure. Whenthe procedure completes, the installation script displays the location of the responsefiles.
You can use the response file for future installation procedures by invoking aninstallation script with the -responsefile option. The response file passesarguments to the script to automate the installation of that product. You can editthe file to automate installation and configuration of additional systems.
You can generate a response file using the -makeresponsefile option.
8Chapter

Installing DMP using response filesTypically, you can use the response file that the installer generates after you performDMP installation on a system to install DMP on other systems. You can also createa response file using the -makeresponsefile option of the installer.
To install DMP using response files
1 Make sure the systems where you want to install DMP meet the installationrequirements.
2 Make sure that the preinstallation tasks are completed.
3 Copy the response file to the system where you want to install DMP.
4 Edit the values of the response file variables as necessary.
5 Mount the product disc and navigate to the directory that contains the installationprogram.
6 Start the installation from the system to which you copied the response file.For example:
# ./installer -responsefile /tmp/response_file
# ./installdmp -responsefile /tmp/response_file
Where /tmp/response_file is the response file’s full path name.
See “About the script-based installer” on page 38.
7 Complete the DMP post-installation tasks.
For instructions, see the chapter Performing post-installation and configurationtasks in this document.
Upgrading DMP using response filesTypically, you can use the response file that the installer generates after you performDMP upgrade on one system to upgrade DMP on other systems. You can alsocreate a response file using the makeresponsefile option of the installer.
To perform automated DMP upgrade
1 Make sure the systems where you want to upgrade DMP meet the upgraderequirements.
2 Make sure the pre-upgrade tasks are completed.
3 Copy the response file to one of the systems where you want to upgrade DMP.
51Automated installation using response filesInstalling DMP using response files

4 Edit the values of the response file variables as necessary.
5 Mount the product disc and navigate to the folder that contains the installationprogram.
6 Start the upgrade from the system to which you copied the response file. Forexample:
# ./installer -responsefile /tmp/response_file
# ./installdmp -responsefile /tmp/response_file
Where /tmp/response_file is the response file’s full path name.
Uninstalling DMP using response filesTypically, you can use the response file that the installer generates after you performDMP uninstallation on one system to uninstall DMP on other systems.
To perform an automated uninstallation
1 Make sure that you meet the prerequisites to uninstall DMP.
2 Copy the response file to one of the cluster systems where you want to uninstallDMP.
3 Edit the values of the response file variables as necessary.
4 Start the uninstallation from the system to which you copied the response file.For example:
# /opt/VRTS/install/uninstalldmp<version>
-responsefile /tmp/response_file
Where <version> is the specific release version, and /tmp/response_file is theresponse file’s full path name.
See “About the script-based installer” on page 38.
Syntax in the response fileThe syntax of the Perl statements that is included in the response file variablesvaries. It can depend on whether the variables require scalar or list values.
For example, in the case of a string value:
$CFG{Scalar_variable}="value";
52Automated installation using response filesUninstalling DMP using response files

or, in the case of an integer value:
$CFG{Scalar_variable}=123;
or, in the case of a list:
$CFG{List_variable}=["value 1 ", "value 2 ", "value 3 "];
Response file variable definitionsTable 8-1 lists the variables that are used in the response file and their definitions.
Table 8-1 Response file variables
DescriptionVariable
Installs DMP filesets. Configuration can be performedat a later time using the -configure option.
List or scalar: scalar
Optional or required: optional
CFG{opt}{install}
Specifies whether you agree with the EULA.pdf fileon the media.
List or scalar: scalar
Optional or required: required
CFG{accepteula}
Installs the product with keyless license.
List of scalar: scalar
Optional or required: optional
CFG{opt}{vxkeyless}
List of systems on which the product is to be installed,uninstalled, or configured.
List or scalar: list
Optional or required: required
CFG{systems}
Defines the product to be installed, uninstalled, orconfigured.
List or scalar: scalar
Optional or required: required
CFG{prod}
53Automated installation using response filesResponse file variable definitions

Table 8-1 Response file variables (continued)
DescriptionVariable
Defines the location of an ssh keyfile that is used tocommunicate with all remote systems.
List or scalar: scalar
Optional or required: optional
CFG{opt}{keyfile}
Defines a location, typically an NFS mount, fromwhich all remote systems can install product patches.The location must be accessible from all targetsystems.
List or scalar: scalar
Optional or required: optional
CFG{opt}{patchpath}
Defines a location, typically an NFS mount, fromwhich all remote systems can install product filesets.The location must be accessible from all targetsystems.
List or scalar: scalar
Optional or required: optional
CFG{opt}{pkgpath}
Defines the location where a working directory iscreated to store temporary files and the filesets thatare needed during the install. The default location is/var/tmp.
List or scalar: scalar
Optional or required: optional
CFG{opt}{tmppath}
Defines that rsh must be used instead of ssh as thecommunication method between systems.
List or scalar: scalar
Optional or required: optional
CFG{opt}{rsh}
Mentions the location where the log files are to becopied. The default location is /opt/VRTS/install/logs.
List or scalar: scalar
Optional or required: optional
CFG{opt}{logpath}
54Automated installation using response filesResponse file variable definitions

Table 8-1 Response file variables (continued)
DescriptionVariable
Performs the configuration after the filesets areinstalled using the -install option.
List or scalar: scalar
Optional or required: optional
CFG{opt}{configure}
Upgrades all filesets installed, without configuration.
List or scalar: list
Optional or required: optional
CFG{opt}{upgrade}
Uninstalls DMP filesets.
List or scalar: scalar
Optional or required: optional
CFG{opt}{uninstall}
If it is set to 1, Dynamic Multi-pathing support for thenative LVM volume groups and ZFS pools is disabledafter upgrade.
List or scalar: scalar
Optional or required: optional
CFG{opt}{disable_dmp_native_support}
55Automated installation using response filesResponse file variable definitions

Installing DMP usingoperating system-specificmethods
This chapter includes the following topics:
■ About installing DMP using operating system-specific methods
■ Installing DMP using NIM and the installer
■ Installing Symantec Dynamic Multi-Pathing using the mksysb utility
About installingDMPusing operating system-specificmethods
On AIX, you can install DMP using the following methods:
■ You can use the product installer along with Network Installation Manager (NIM)to install the Symantec product, or to install the operating system with theSymantec product.See “Installing DMP using NIM and the installer” on page 57.
■ You can use the mksysb utility to back up the system image. You can then installDMP through mksysb image.See “Installing Symantec Dynamic Multi-Pathing using the mksysb utility”on page 59.
9Chapter

Installing DMP using NIM and the installerYou can use the product installer in concert with NIM to install the Symantec product,or to install the operating system and the Symantec product.
The instructions in this section assume a working knowledge of the NetworkInstallation Management process. See the operating system documentation fordetailed information on Network Installation Management.
In the following samples, the LPP resource uses LPP-7100-up2date and its relevantSPOT resource is spot-7100-up2date.
Preparing the installation bundle on the NIM serverYou need to prepare the installation bundle on the NIM server before you use NIMto install DMP filesets. The following actions are executed on the NIM server.
Note:Make sure that the appropriate NIM LPP_SOURCE and SPOT resources arepresent on the NIM server.
To prepare the installation bundle
1 Insert and mount the installation media.
2 Choose an LPP source:
# lsnim |grep -i lpp_source
LPP-7100-up2date resources lpp_source
3 Navigate to the product directory on the installation media and run theinstalldmp command to prepare the bundle resource:
# ./installdmp -nim LPP-7100-up2date
The installation program copies the necessary filesets and patches to the LPPresource directory.
57Installing DMP using operating system-specific methodsInstalling DMP using NIM and the installer

4 Enter a name for the bundle, for example DMP61.
5 Run the lsnim -l command to check that the installp_bundle resource iscreated successfully.
# lsnim -l DMP61
DMP61:
class = resources
type = installp_bundle
Rstate = ready for use
prev_state = unavailable for use
location = /opt/VRTS/nim/DMP61.bundle
alloc_count = 0
server = master
Installing DMP on the NIM client using SMIT on the NIM serverYou can install DMP on the NIM client using the SMIT tool on the NIM server.
Perform these steps on each node to have DMP installed in a cluster.
To install DMP
1 On the NIM server, start SMIT.
# smitty nim
2 In the menu, select Perform NIM Software Installation and MaintenanceTasks.
3 In the menu, select Install and Update Software.
4 In the menu, select Install Software Bundle.
5 Select the systems from the list on which to install the software bundle.
6 In the menu, select the LPP_SOURCE. In this example, specifyLPP-7100-up2date.
7 In the menu, select the bundle, for example, DMP61.
8 For the installp flags, specify that the ACCEPT new license agreements flaghas a yes value.
9 Press the Enter key to start the installation. Note that it may take some timeto finish.
10 After the installation completes, configure DMP.
For instructions, see the chapter Configuring DMP in this document.
58Installing DMP using operating system-specific methodsInstalling DMP using NIM and the installer

Installing DMP and the operating system on the NIM client usingSMIT
You can install DMP and the operating system on the NIM client using the SMITtool.
Perform these steps on each node to have DMP and AIX installed in a cluster.
To install DMP and the operating system
1 On the NIM server, start smitty for a NIM and operating system installation.
# smitty nim_bosinst
2 In the menu, select the standalone target.
3 In the menu, select spot - Install a copy of a SPOT resource.
4 In the menu, select the spot resource spot-7100-up2date.
5 In the menu, select the LPP_SOURCE. In this example, selectLPP-7100-up2date.
6 In the menu, select the following options:
■ For the ACCEPT new license agreements option, specify yes.
■ For the Additional Bundles to Install option, specify DMP61.
7 For the installp flags, specify that the ACCEPT new license agreements flaghas a yes value.
8 After the installation completes, configure DMP.
For instructions, see the chapter Configuring DMP in this document.
Installing SymantecDynamicMulti-Pathing using themksysb utility
On AIX, one can use the mksysb utility to back up the system image. This imagecan be installed on another host. For example, you can use this utility to set up adisaster recovery site. Symantec Dynamic Multi-Pathing can be installed throughmksysb image.
You can install the mksysb image on the same computer or on any NIM client througha NIM server. This procedure assumes that you have knowledge of mksysb. Seeyour operating system installation guide for more details about mksysb.
The installation process involves the following steps:
59Installing DMP using operating system-specific methodsInstalling Symantec Dynamic Multi-Pathing using the mksysb utility

■ Creating the mksysb image.
■ Installing the DMP stack through mksysb image on a computer.
■ Verifying the installation.
Creating the mksysb backup imageYou can create the mksysb backup image with the SMIT interface or with manualsteps.
Before you begin, make sure that the DMP installation media is available.
To create an mksysb image using SMIT interface
1 Check maximum file size limit with ulimit. It should be sufficient for creating abackup image
2 Check that all the required filesets are installed for a particular product stack.You can obtain the list of filesets from the installer.
The recommended approach is to install all of the filesets. But do not configurethe product stack before you take mksysb image if the image is to be installedon a different computer.
3 Enter fast path smitty mksysb and enter the required values.
4 Press enter to start the backup image creation.
To create an mksysb image using commands manually
1 Check maximum file size limit with ulimit. It should be sufficient for creating thebackup image
2 Check that all the required file sets are installed for a particular product stack.You can obtain the list of filesets from the installer.
The recommended approach is to install all of the filesets. But do not configureproduct stack before you take the mksysb image if the image is to be installedon a different computer.
3 Create the mksysb image in one of the following ways:
■ If you want to restore the mksysb backup of SF-configured host on the samehost, run the following command:
# /usr/bin/mksysb '-i' '-X' backup_file_name
■ If you want to restore the mksysb backup of SF-configured host on anotherhost, run the following commands:Create the file /etc/exclude.rootvg.
60Installing DMP using operating system-specific methodsInstalling Symantec Dynamic Multi-Pathing using the mksysb utility

Add the following entries to the file /etc/exclude.rootvg.
# cat /etc/exclude.rootvg
^./etc/vx/cvmtab
^./etc/vx/ddlconfig.info
^./etc/vx/volboot
If DMP root support is enabled, run the following command:
# vxdmpadm native release
Run the following command to restore the backup:
# /usr/bin/mksysb -e '-i' '-X' backup_file_name
If DMP native support is run, execute the following:
# vxdmpadm native acquire
Installing mksysb image on alternate diskYou can install the mksysb image on the same system or on any NIM client througha NIM server.
Before you restore mksysb on an alternate disk, perform the following steps toprepare the target disk
1 If DMP root support is enabled, run the following command:
# vxdmpadm native release
2 Remove the disk from VM.
# vxdmpadm getsubpaths dmpnodename=disk_1 | grep hdisk
hdisk1 ENABLED(A) - sas0 Disk disk -
# vxdisk rm disk_1
3 Clear the PV id of the target disk.
# chdev -l hdisk1 -a pv=clear
hdisk1 changed
61Installing DMP using operating system-specific methodsInstalling Symantec Dynamic Multi-Pathing using the mksysb utility

To install DMP with mksysb on an alternate disk of the same system using SMIT
1 Type smitty and then select Software Installation and Maintenance ->Alternate Disk Installation -> Install mksysb on an Alternate Disk
2 Select target disks
3 Select mksysb image to be installed
4 Select appropriate values for remaining options
5 Press enter to start the mksysb image installation.
6 If DMP native support is enabled, execute this command before restarting:
# vxdmpadm native acquire
7 After installation is complete restart from the alternate disk.
8 If DMP was not configured in the mksysb image then run/opt/VRTS/install/installdmp<version> -configure after restart.
Where <version> is the specific release version.
See “About the script-based installer” on page 38.
To install DMPwithmksysbonanalternate disk of the samesystemusing commandsmanually
◆ To install DMP with mksysb on an alternate disk of the same system usingcommands manually
# /usr/sbin/alt_disk_mksysb -m mksysb_image -P "all" -d "disk_name"
To install DMP with mksysb on an alternate disk of the NIM client using SMIT
1 Create an mksysb resource from the mksysb image that has been created onNIM server.
2 Set up the system on which you want to install DMP as NIM client.
3 Type smitty nim then select Perform NIM Software Installation andMaintenance Tasks -> Alternate Disk Installation -> Install mksysb on anAlternate Disk
4 Select target system.
5 Select target disks.
6 Select mksysb image to be installed.
7 Select appropriate values for remaining options.
8 Press enter to start the mksysb image installation.
62Installing DMP using operating system-specific methodsInstalling Symantec Dynamic Multi-Pathing using the mksysb utility

9 If DMP native support is enabled, execute this command before restarting:
# vxdmpadm native acquire
10 If DMP was not configured in the mksysb image then run/opt/VRTS/install/installdmp<version> -configure after you restartNIM client.
Where <version> is the specific release version.
See “About the script-based installer” on page 38.
To install DMP with mksysb on an alternate disk of a NIM client using commandsmanually
1 Create an mksysb resource from the mksysb image that has been created onNIM server.
2 Set up the system on which you want to install DMP as NIM client.
3 To install DMP with mksysb on an alternate disk of a NIM client using commandsmanually:
# /usr/sbin/nim -o alt_disk_install \
-a source=mksysb -a mksysb=mksysb_resource -a \
disk=hdisk_name system_name
4 If DMP was not configured in the mksysb image then run/opt/VRTS/install/installdmp<version> -configure after you restartNIM client.
Where <version> is the specific release version.
See “About the script-based installer” on page 38.
Verifying the installationAfter the installation is finished, verify the installation using the following command:
# lslpp -l|grep -i vrts
All the filesets should be installed properly.
See “Checking installed product versions and downloading maintenance releasesand hot fixes” on page 20.
63Installing DMP using operating system-specific methodsInstalling Symantec Dynamic Multi-Pathing using the mksysb utility

Managing your Symantecdeployments
■ Chapter 10. Performing centralized installations using the Deployment Server
3Section

Performing centralizedinstallations using theDeployment Server
This chapter includes the following topics:
■ About the Deployment Server
■ How to install the Deployment Script
■ Deployment management overview
■ Setting up a Deployment Server
■ Setting deployment preferences
■ Using the Deployment Server command line option to specify a non-defaultrepository location
■ Using the Deployment Server command line options to load and download themost recent release information
■ Viewing or downloading available release images
■ Viewing or removing repository images stored in your repository
■ Deploying Symantec product updates to your environment
■ Finding out which releases you have, and which upgrades or updates you mayneed
■ Deploying a specific Symantec release
■ Updating release information on systems without Internet access
10Chapter

About the Deployment ServerThe Deployment Server is a script that makes it easier to install or upgrade SFHAreleases. The Deployment Server lets you store multiple release images in onecentral location and deploy them to systems of any supported UNIX or Linuxoperating system (6.1 or later). Prior to 6.1, releases still require the same platform,architecture, distribution, and version of the operating system. You can use theDeployment Server if you want to install or upgrade multiple releases and or multipleplatforms.
The Deployment Server lets you do the following as described in Table 10-1.
Table 10-1 Deployment Server functionality
DescriptionFeature
■ View available SFHA releases.■ Download maintenance and hot fix release images from the
Symantec Operations Readiness Tools (SORT) website into arepository.
■ Load the downloaded release image files from FileConnect andSORT into the repository.
■ View and remove release image files stored in the repository.
Manage releaseimages
■ Discover filesets and patches installed on designated systems andinforms you of the product and version installed, including installedhot fixes.
■ Identify base, maintenance, and hot fix level upgrades to your systemand download maintenance and hot fix releases.
■ Query SORT for the most recent updates.
Check versions
■ Install or upgrade a release stored in the repository on selectedsystems.
■ In release 6.1 and later:■ Install hot fix level releases.■ Install SFHA from any supported UNIX or Linux operating system
to any other supported UNIX or Linux operating system.■ Automatically load the script-based installer hot fixes that apply
to that release.
Install or upgradesystems
■ Download, load the release matrix updates, and script-based installerupdates for systems behind a firewall.
■ Define or reset program settings.
Update metadataand preferences
66Performing centralized installations using the Deployment ServerAbout the Deployment Server

Note: The Deployment Server is available only for the script-based installer, not theweb-based installer.
How to install the Deployment ScriptThe Deployment Script is the utility for managing your Deployment Server.
You can obtain the Deployment Script by either:
■ Installing the Deployment Script manually.
■ Running the Deployment Script after installing at least one Symantec 6.1 product.
Note:The VRTSperl and the VRTSsfcpi<version>filesets are included in all StorageFoundation (SF) products, so installing any Symantec 6.1 product lets you accessthe Deployment Script.
To install the Deployment Script manually
1 Log in as superuser.
2 Mount the installation media.
See “Mounting the product disc” on page 35.
3 Move to the top-level directory on the disc.
# cd /mnt/cdrom
4 Navigate to the following directory:
# cd pkgs
5 Run the following commands to install the VRTSperl and theVRTSsfcpi<version> filesets:
# installp -C
# installp -aXd ./VRTSperl.bff VRTSperl
# installp -aXd ./VRTSsfcpi<version>.bff VRTSsfcpi<version>
67Performing centralized installations using the Deployment ServerHow to install the Deployment Script

To run the Deployment Script
1 Log in as superuser.
2 Navigate to the following directory:
# cd /opt/VRTS/install
3 Run the Deployment Script.
# ./deploy_sfha
Deployment management overviewAfter obtaining and installing the Deployment Server and defining a centralrepository, you can begin managing your deployments from that repository. Youcan load and store product images for Symantec products up to version 5.1 in yourDeployment Server. The Deployment Server is a central installation server forstoring and managing your product updates.
See “How to install the Deployment Script” on page 67.
Setting up and managing your repository involves the following tasks:
■ Setting up a Deployment Server.See “Setting up a Deployment Server” on page 68.
■ Finding out which products you have installed, and which upgrades or updatesyou may need.See “Viewing or downloading available release images” on page 74.
■ Adding release images to your Deployment Server.See “Viewing or downloading available release images” on page 74.
■ Removing release images from your Deployment Server.See “Viewing or removing repository images stored in your repository”on page 78.
Later, when your repository is set up, you can use it to deploy Symantec productsto other systems in your environment.
See “Deploying Symantec product updates to your environment” on page 81.
Setting up a Deployment ServerFor large deployments, Symantec recommends that you create a dedicatedDeployment Server to manage your product updates.
68Performing centralized installations using the Deployment ServerDeployment management overview

A Deployment Server is useful for doing the following tasks:
■ Downloading and storing release images for the latest upgrades and updatesfrom Symantec in a central repository directory.
■ Installing and updating systems directly by accessing the release images thatare stored within a central repository (direct installation).
■ Performing heterogeneous push installations (installing Symantec products fromthe Deployment Server to systems running any supported platform).
Note: The script-based installer for version 6.1 and higher supports installationsfrom one operating system node onto a different operating system. Therefore,heterogeneous push installations are supported for 6.1 and higher releasesonly. To perform push installations for product versions 5.1, 6.0, or 6.0.1 releases,you must have a separate Deployment Server for each operating system.
■ Creating a file share on the repository directory provides a convenient, centrallocation from which systems running any supported platform can install the latestSymantec products and updates.
Create a central repository on the Deployment Server to store and manage thefollowing types of Symantec releases:
■ Base releases. These major releases and minor releases are available for allSymantec products. They contain new features, and you can download themfrom FileConnect.
■ Maintenance releases. These releases are available for all Symantec products.They contain bug fixes and a limited number of new features, and you candownload them from the Symantec Operations Readiness Tools (SORT) website.
■ Hot fixes. These releases contain fixes for specific products, and you candownload them from the SORT website.
Note:All DMP base releases and maintenance releases can be deployed using theinstall scripts that are included in the release. Hot fixes are typically installedmanually, however, from the 6.1 release and onwards, install scripts are includedwith hot fix releases.
You can set up a Deployment Server with or without Internet access.
■ If you set up a Deployment Server that has Internet access, you can downloadDMP maintenance releases and hot fixes from Symantec directly. Then, youcan deploy them to your systems.Setting up a Deployment Server that has Internet access
69Performing centralized installations using the Deployment ServerSetting up a Deployment Server

■ If you set up a Deployment Server that does not have Internet access, you candownload DMP maintenance releases and hot fixes from Symantec on anothersystem that has Internet access. Then, you can load the images onto theDeployment Server separately.Setting up a Deployment Server that does not have Internet access
Setting up a Deployment Server that has Internet accessFigure 10-1 shows a Deployment Server that can download product images directlyfrom Symantec using the Deployment Server.
Figure 10-1 Example Deployment Server that has Internet access
Setting up a Deployment Server that does not have InternetaccessFigure 10-2 shows a Deployment Server that does not have Internet access. In thisscenario, release images and metadata updates are downloaded from anothersystem. Then, they are copied to a file location available to the Deployment Server,and loaded.
70Performing centralized installations using the Deployment ServerSetting up a Deployment Server

Figure 10-2 Example Deployment Server that does not have Internet access
Setting deployment preferencesYou can set preferences for managing the deployment of products dating back toversion 5.1.
Note:You can select option T (Terminology and Usage) to obtain more informationabout Deployment Server terminology and usage.
71Performing centralized installations using the Deployment ServerSetting deployment preferences

To set deployment preferences
1 Launch the Deployment Server.
# /opt/VRTS/install/deploy_sfha
You see the following output:
Task Menu:
R) Manage Repository Images M) Update Metadata
V) Version Check Systems S) Set Preferences
U) Upgrade/Install Systems T) Terminology and Usage
?) Help Q) Quit
Enter a Task: [R,M,V,S,U,T,?,Q]
2 Select option S, Set Preferences.
3 In the current preferences page, select option S, Set Preferences.
4 Do one of the following:
■ To set the default repository, enter 1. Then enter the name of the repositoryin which you want to store your downloads. For example, enter the following:
# /opt/VRTS/install/ProductDownloads
If the specified repository replaces a previous repository, the installer asksif you want to move all your files into the new repository. To move your filesto the new repository, enter y.
■ To set the option for saving or removing tar files, enter 2. At the prompt, ifyou want to save the tar files after untarring them, enter y. Or, if you wantto remove tar files after untarring them, enter n.By default, the installer does not remove tar files after the releases havebeen untarred.
Using the Deployment Server command line optionto specify a non-default repository location
You can specify a repository location other than the default that has been set withinthe system preferences by using the command line option. The command line optionis mainly used to install a release image from a different repository location. Whenyou use the command line option, the designated repository folder is used instead
72Performing centralized installations using the Deployment ServerUsing the Deployment Server command line option to specify a non-default repository location

of the default for the execution time of the script. Using the command line optiondoes not override the repository preference set by the Set Preference menu item.
To use the command line option to specify a non-default repository location
◆ At the command line, to specify a non-default repository location, enter thefollowing:
# ./deploy_sfha -repository repository_path
where repository_path is the preferred location of the repository.
Using the Deployment Server command line optionsto load and download the most recent releaseinformation
You can use the Deployment Server command line options to perform the followingoperations:
■ Load the most recent SF release information and installer hot fixes on systemswithout Internet access using the deploy_sfha command.
■ Download a .tar file containing the most recent SF release information andinstaller hot fixes from the SORT site. This .tar file is used to update releaseinformation on systems without Internet access using the deploy_sfha
-load_metadata command.
To use the Deployment Server command line option to load the most recent SFrelease information and installer hot fixes without Internet access
◆ At the command line, enter the following:
# ./deploy_sfha -load_metadata metadata_tar_file
where metadata_tar_file is the name of the metadata tar file where you wantto load the most recent SF release information and installer hot fixes.
You can download the .tar file from the SORT site at:
https://sort.symantec.com/support/related_links/offline-release-updates
Or, you can create it by running the deploy_sfha -download_metadata
command from a system that does have Internet access and can connect tothe SORT site.
73Performing centralized installations using the Deployment ServerUsing the Deployment Server command line options to load and download the most recent release information

To use the Deployment Server command line option to download the most recentSF release information and installer hot fixes from the SORT site
◆ At the command line, enter the following:
# ./deploy_sfha -download_metadata
Viewing or downloading available release imagesYou can use the Deployment Server to conveniently view or download availableDMP release images to be deployed on other systems in your environment.
Note: If you have Internet access, communication with the Symantec OperationsReadiness Tools (SORT) provides the latest release information. If you do not haveInternet access, static release matrix files are referenced, and the most recentupdates may not be included.
See “Updating release information on systems without Internet access” on page 85.
74Performing centralized installations using the Deployment ServerViewing or downloading available release images

To view or download available release images
1 Launch the Deployment Server.
# /opt/VRTS/install/deploy_sfha
You see the following output:
Task Menu:
R) Manage Repository Images M) Update Metadata
V) Version Check Systems S) Set Preferences
U) Upgrade/Install Systems T) Terminology and Usage
?) Help Q) Quit
Enter a Task: [R,M,V,S,U,T,?,Q]
2 Select option R, Manage Repository Images.
You see the following output:
1) View/Download Available Releases
2) View/Remove Repository Images
3) Load a Release Image
b) Back to previous menu
Select the option you would like to perform [1-3,b,q,?]
3 Select option 1, View/Download Available Releases, to view or downloadwhat is currently installed on your system.
You see a list of platforms and release levels.
To view or download available releases, the platform type and release
level type must be selected.
1) AIX 5.3 2) AIX 6.1
3) AIX 7.1 4) HP-UX 11.31
5) RHEL5 x86_64 6) RHEL6 x86_64
7) SLES10 x86_64 8) SLES11 x86_64
9) Solaris 9 Sparc 10) Solaris 10 Sparc
11) Solaris 10 x64 12) Solaris 11 Sparc
13) Solaris 11 x64 b) Back to previous menu
Select the platform of the release to view/download [1-13,b,q]
75Performing centralized installations using the Deployment ServerViewing or downloading available release images
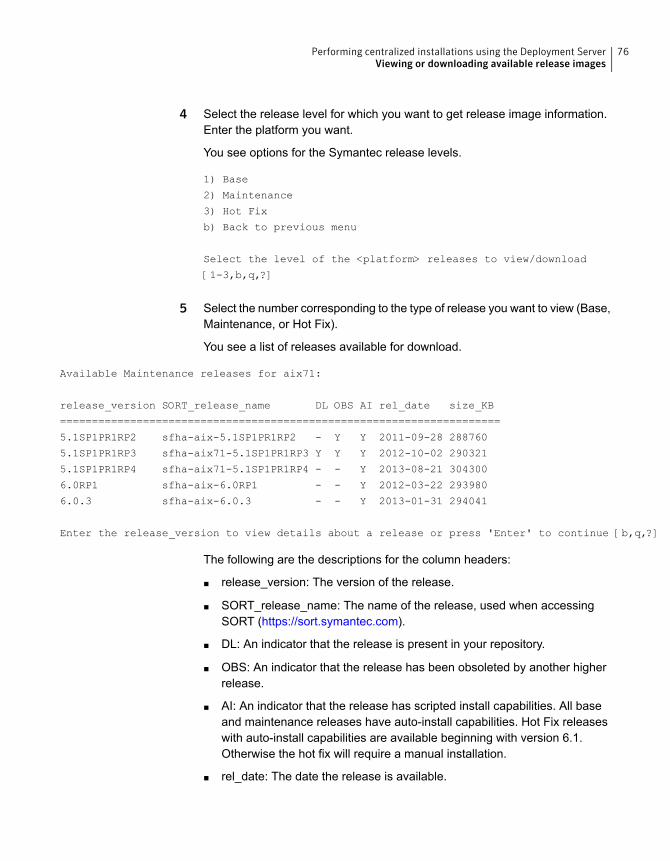
4 Select the release level for which you want to get release image information.Enter the platform you want.
You see options for the Symantec release levels.
1) Base
2) Maintenance
3) Hot Fix
b) Back to previous menu
Select the level of the <platform> releases to view/download
[1-3,b,q,?]
5 Select the number corresponding to the type of release you want to view (Base,Maintenance, or Hot Fix).
You see a list of releases available for download.
Available Maintenance releases for aix71:
release_version SORT_release_name DL OBS AI rel_date size_KB
=====================================================================
5.1SP1PR1RP2 sfha-aix-5.1SP1PR1RP2 - Y Y 2011-09-28 288760
5.1SP1PR1RP3 sfha-aix71-5.1SP1PR1RP3 Y Y Y 2012-10-02 290321
5.1SP1PR1RP4 sfha-aix71-5.1SP1PR1RP4 - - Y 2013-08-21 304300
6.0RP1 sfha-aix-6.0RP1 - - Y 2012-03-22 293980
6.0.3 sfha-aix-6.0.3 - - Y 2013-01-31 294041
Enter the release_version to view details about a release or press 'Enter' to continue [b,q,?]
The following are the descriptions for the column headers:
■ release_version: The version of the release.
■ SORT_release_name: The name of the release, used when accessingSORT (https://sort.symantec.com).
■ DL: An indicator that the release is present in your repository.
■ OBS: An indicator that the release has been obsoleted by another higherrelease.
■ AI: An indicator that the release has scripted install capabilities. All baseand maintenance releases have auto-install capabilities. Hot Fix releaseswith auto-install capabilities are available beginning with version 6.1.Otherwise the hot fix will require a manual installation.
■ rel_date: The date the release is available.
76Performing centralized installations using the Deployment ServerViewing or downloading available release images

■ size_KB: The file size of the release in kilobytes.
6 If you are interested in viewing more details about any release, type the releaseversion. For example, enter the following:
6.0.3
You see the following output:
release_version: 6.0.3
release_name: sfha-aix-6.0.3
release_type: MR
release_date: 2013-01-31
install_path: aix/installmr
upload_location: ftp://ftp.veritas.com/pub/support/patchcentral
/AIX/6.0.3/sfha/sfha-aix-6.0.3-patches.tar.gz
obsoletes: 6.0.1.200-fs,6.0.1.200-vm
obsoleted_by: None
Would you like to download this patch? [y,n,q] (y) n
Enter the release_version to view the details about a release or press
'Enter' to continue [b,q,?]
7 If you do not need to check detail information, you can press Enter.
You see the following question:
Would you like to download a aix Maintenance Release Image?
[y,n,q] (n) y
If you select a y, you see a menu of all releases that are not currently in therepository.
1) 5.1SP1PR1RP2
2) 5.1SP1PR1RP4
3) 6.0RP1
4) All non-obsoleted releases
5) All releases
b) Back to previous menu
Select the patch release to download, 'All non-obsoleted releases' to
download all non-obsoleted releases, or 'All releases' to download
all releases [1-5,b,q] 3
77Performing centralized installations using the Deployment ServerViewing or downloading available release images

8 Select the number corresponding to the release that you want to download. Itis possible to download a single release, all non-obsoleted releases, or allreleases.
The selected release images are downloaded to the Deployment Server.
Downloading sfha-aix-6.0RP1 from SORT - https://sort.symantec.com
Downloading 215118373 bytes (Total 215118373 bytes [205.15 MB]): 100%
Untarring sfha-aix-6.0RP1 ....................................................... Done
sfha-aix-6.0RP1 has been downloaded successfully.
9 From the menu, select option 2, View/Remove Repository Images, and followthe prompts to check that the release images are loaded.
See “Viewing or downloading available release images” on page 74.
Viewing or removing repository images stored in yourrepository
You can use the Deployment Server to conveniently view or remove the releaseimages that are stored in your repository.
78Performing centralized installations using the Deployment ServerViewing or removing repository images stored in your repository

To view or remove release images stored in your repository
1 Launch the Deployment Server.
# /opt/VRTS/install/deploy_sfha
You see the following output:
Task Menu:
R) Manage Repository Images M) Update Metadata
V) Version Check Systems S) Set Preferences
U) Upgrade/Install Systems T) Terminology and Usage
?) Help Q) Quit
Enter a Task: [R,M,V,S,U,T,?,Q]
2 Select option R, Manage Repository Images.
You see the following output:
1) View/Download Available Releases
2) View/Remove Repository Images
3) Load a Release Image
b) Back to previous menu
Select the option you would like to perform [1-3,b,q,?]
3 Select option 2, View/Remove Repository Images, to view or remove therelease images currently installed on your system.
You see a list of platforms and release levels if you have downloaded thecorresponding Base, Maintenance, or Hot Fix release on that platform.
To view or remove repository images, the platform type and
release level type must be selected.
1) AIX 5.3 2) AIX 6.1
3) AIX 7.1 4) HP-UX 11.31
5) RHEL5 x86_64 6) RHEL6 x86_64
7) SLES10 x86_64 8) SLES11 x86_64
9) Solaris 9 Sparc 10) Solaris 10 Sparc
11) Solaris 10 x64 12) Solaris 11 Sparc
13) Solaris 11 x64 b) Back to previous menu
Select the platform of the release to view/remove [1-13,b,q]
79Performing centralized installations using the Deployment ServerViewing or removing repository images stored in your repository
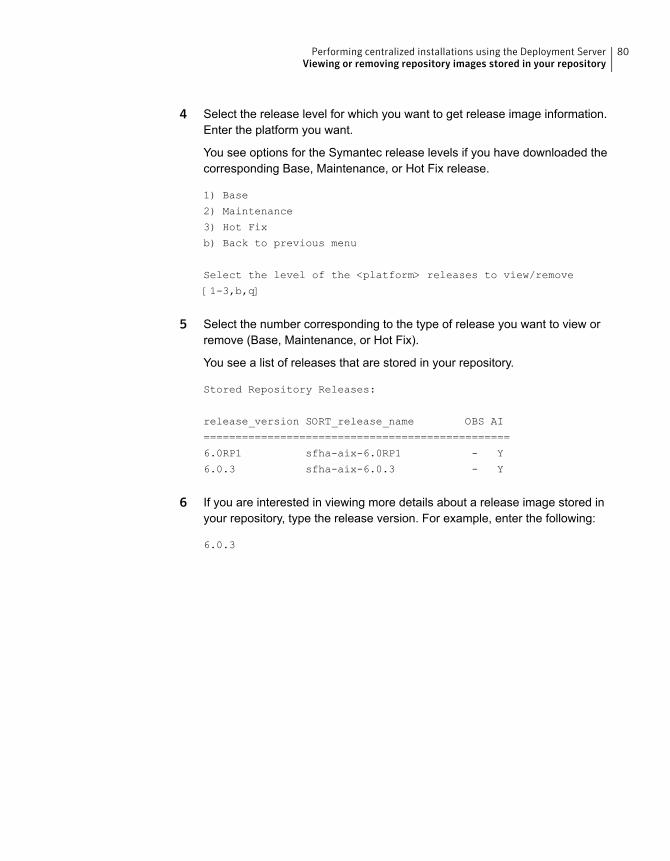
4 Select the release level for which you want to get release image information.Enter the platform you want.
You see options for the Symantec release levels if you have downloaded thecorresponding Base, Maintenance, or Hot Fix release.
1) Base
2) Maintenance
3) Hot Fix
b) Back to previous menu
Select the level of the <platform> releases to view/remove
[1-3,b,q]
5 Select the number corresponding to the type of release you want to view orremove (Base, Maintenance, or Hot Fix).
You see a list of releases that are stored in your repository.
Stored Repository Releases:
release_version SORT_release_name OBS AI
================================================
6.0RP1 sfha-aix-6.0RP1 - Y
6.0.3 sfha-aix-6.0.3 - Y
6 If you are interested in viewing more details about a release image stored inyour repository, type the release version. For example, enter the following:
6.0.3
80Performing centralized installations using the Deployment ServerViewing or removing repository images stored in your repository

7 If you do not need to check detail information, you can press Enter.
You see the following question:
Would you like to remove a aix61 Maintenance Release Image?
[y,n,q] (n) y
If you select a y, you see a menu of all releases stored in your repository thatmatch the selected platform and release level.
1) 6.0RP1
2) 6.0.3
b) Back to previous menu
Select the patch release to remove [1-2,b,q] 1
8 Type the number corresponding to the release version you want to remove.
The release images are removed from the Deployment Server.
Removing sfha-aix-6.0RP1-patches ............................ Done
sfha-aix-6.0RP1-patches has been removed successfully.
9 From the menu, select option 2, View/Remove Repository Images, and followthe prompts to check that the release images are removed.
See “Viewing or downloading available release images” on page 74.
Deploying Symantec product updates to yourenvironment
After you install at least one Symantec 6.1 product on a server, you can use theDeployment Server to deploy release images to the systems in your environmentas follows:
■ If you are not sure what to deploy, perform a version check. A version checktells you if there are any Symantec products installed on your systems. Itsuggests patches and maintenance releases, and gives you the option to installupdates.See “Finding out which releases you have, and which upgrades or updates youmay need” on page 82.
81Performing centralized installations using the Deployment ServerDeploying Symantec product updates to your environment

■ If you know which update you want to deploy on your systems, use theUpgrade/Install Systems script to deploy a specific Symantec release.See “Deploying a specific Symantec release” on page 84.
Finding out which releases you have, and whichupgrades or updates you may need
Use the Version Check script to determine which Symantec product you need todeploy. The Version Check script is useful if you are not sure which releases youalready have installed, or want to know about available releases.
The Version Check script gives the following information:
■ Installed products and their versions (base, maintenance releases, and hot fixes)
■ Installed filesets (required and optional)
■ Available releases (base, maintenance releases, and hot fixes) relative to theversion which is installed on the system
To determine which Symantec product updates to deploy
1 Launch the Deployment Server. For example, enter the following:
# /opt/VRTS/install/deploy_sfha
You see the following output:
Task Menu:
R) Manage Repository Images M) Update Metadata
V) Version Check Systems S) Set Preferences
U) Upgrade/Install Systems T) Terminology and Usage
?) Help Q) Quit
Enter a Task: [R,M,V,S,U,T,?,Q]
2 Select option V, Version Check Systems.
82Performing centralized installations using the Deployment ServerFinding out which releases you have, and which upgrades or updates you may need

3 At the prompt, enter the system names for the systems you want to check. Forexample, enter the following:
sys1
You see output for the installed filesets (required, optional, or missing).
You see a list of releases available for download.
Available Base Releases for Veritas Storage Foundation HA 6.0.1:
None
Available Maintenance Releases for Veritas Storage Foundation HA 6.0.1:
release_version SORT_release_name DL OBS AI rel_date size_KB
==================================================================
6.0.3 sfha-aix-6.0.3 Y - - 2013-02-01 212507
Available Public Hot Fixes for Veritas Storage Foundation HA 6.0.1:
release_version SORT_release_name DL OBS AI rel_date size_KB
===================================================================
6.0.1.200-fs fs-aix-6.0.1.200 - Y - 2012-09-20 14346
6.0.1.200-vm vm-aix-6.0.1.200 - Y - 2012-10-10 47880
Would you like to download the available Maintenance or Public Hot Fix
releases which cannot be found in the repository? [y,n,q] (n) y
4 If you want to download any of the available maintenance releases or hot fixes,enter y.
5 If you have not set a default repository for releases you download, the installerprompts you for a directory. (You can also set the default repository in SetPreferences).
See “Setting deployment preferences” on page 71.
You can also specify a non-default repository location using the command line.
See “Using the Deployment Server command line option to specify a non-defaultrepository location” on page 72.
6 Select an option for downloading products.
The installer downloads the releases you specified and stores them in the repository.
83Performing centralized installations using the Deployment ServerFinding out which releases you have, and which upgrades or updates you may need

Deploying a specific Symantec releaseAfter you install at least one Symantec 6.1 product on a server, you can use theDeployment Server to deploy your licensed Symantec products dating back toversion 5.1. If you know which product version you want to install, follow the stepsin this section to install it.
To deploy a specific Symantec release
1 From the directory in which you installed your Symantec product (version 6.1or later), launch the Deployment Server with the upgrade and install systemsoption. For example, enter the following:
# /opt/VRTS/install/deploy_sfha
You see the following output:
Task Menu:
R) Manage Repository Images M) Update Metadata
V) Version Check Systems S) Set Preferences
U) Upgrade/Install Systems T) Terminology and Usage
?) Help Q) Quit
Enter a Task: [R,M,V,S,U,T,?,Q]
2 Select option U, Upgrade/Install Systems.
You see the following output:
1) AIX 5.3
2) AIX 6.1
3) AIX 7.1
4) RHEL5 x86_64
b) Back to previous menu
Select the platform of the available release(s) to be
upgraded/installed [1-4,b,q,?]
84Performing centralized installations using the Deployment ServerDeploying a specific Symantec release

3 Select the number corresponding to the platform for the release you want todeploy. For example, select the number for the RHEL5 x86_64 release or theAIX 6.1 release.
4 Select a Symantec product release.
The installation script is executed and the release is deployed on the specifiedserver.
Updating release information on systems withoutInternet access
When you install the Deployment Server, the installation includes product metadatathat includes information about Symantec, all prior base, maintenance, and hot fixreleases across all the products and the platforms. If your system has Internetaccess, release matrix information is automatically updated from the SymantecOperations Readiness Tools (SORT) site with each use. If your system is behinda firewall, these updates are not possible and the release matrices eventually getout of date.
To update release information on systems without Internet access, you can downloada .tar file (deploy_sfha.tar) containing all the latest release matrices. Then, loadit on to your Deployment Server. The deploy_sfha.tar file available from the SORTsite is updated on a daily basis, and there are typically several release updatesevery week captured in the updates.
Downloading a .tar file from the SORT site
Loading releases and hot fixes onto your Deployment Server
Downloading a .tar file from the SORT siteTo obtain a .tar file with release updates, the easiest method is to download acopy from the SORT website.
To download a .tar file from the SORT site
1 Navigate to the following link:
https://sort.symantec.com/support/related_links/offline-release-updates
2 Click on deploy_sfha.tar [Download].
3 Save the file to your desktop.
Loading releases and hot fixes onto your Deployment ServerIn this procedure, the Internet-enabled system is the system to which youdownloaded the deploy_sfha.tar file.
85Performing centralized installations using the Deployment ServerUpdating release information on systems without Internet access
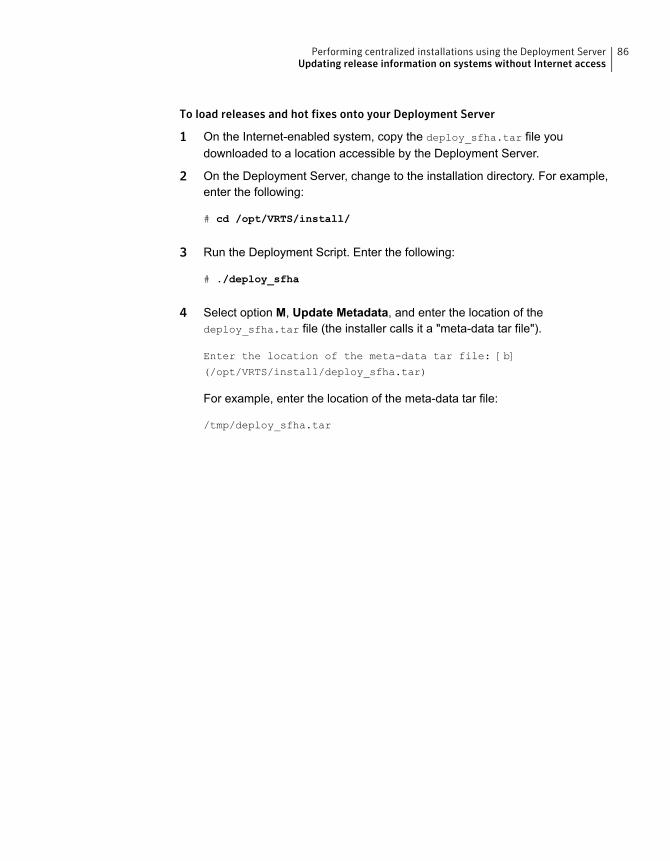
To load releases and hot fixes onto your Deployment Server
1 On the Internet-enabled system, copy the deploy_sfha.tar file youdownloaded to a location accessible by the Deployment Server.
2 On the Deployment Server, change to the installation directory. For example,enter the following:
# cd /opt/VRTS/install/
3 Run the Deployment Script. Enter the following:
# ./deploy_sfha
4 Select option M, Update Metadata, and enter the location of thedeploy_sfha.tar file (the installer calls it a "meta-data tar file").
Enter the location of the meta-data tar file: [b]
(/opt/VRTS/install/deploy_sfha.tar)
For example, enter the location of the meta-data tar file:
/tmp/deploy_sfha.tar
86Performing centralized installations using the Deployment ServerUpdating release information on systems without Internet access

Post-installation tasks
■ Chapter 11. Verifying the DMP installation
4Section

Verifying the DMPinstallation
This chapter includes the following topics:
■ Verifying that the products were installed
■ Installation log files
■ Starting and stopping processes for the Symantec products
Verifying that the products were installedVerify that the DMP products are installed.
Use the lslpp command to check which filesets have been installed:
# lslpp -L | grep VRTS
The filesets should be in the COMMITTED state, as indicated by a C in the output:
root@dbaix1-v3:[/] # lslpp -L | grep VRTSaslapm
VRTSaslapm 6.1.0.0 C F Array Support Libraries...
See “Symantec Dynamic Multi-Pathing installation filesets” on page 152.
You can verify the version of the installed product. Use the following command:
# /opt/VRTS/install/installdmp<version>
Where <version> is the specific release version.
See “About the script-based installer” on page 38.
Use the following sections to further verify the product installation.
11Chapter

Installation log filesThe Symantec product installer or product installation script installdmp creates logfiles for auditing and debugging. After every product installation, configuration, oruninstall, the installer displays the name and location of the files. The files arelocated in the /opt/VRTS/install/logs directory. Symantec recommends thatyou keep the files for auditing, debugging, and future use.
The log files include the following types of text files:
The installation log file contains all the commands that areexecuted during the procedure, their output, and the errors thatare generated. This file is for debugging installation problems andcan be used for analysis by Symantec Support.
Installation log file
The response file contains the configuration information that youentered during the procedure. You can use the response file forfuture installation procedures by invoking an installation script withthe responsefile option. The response file passes argumentsto the script to automate the installation of that product. You canedit the file to automate installation and configuration of additionalsystems.
See “Installing DMP using response files” on page 51.
Response file
The summary file contains the results of the installation by thecommon product installer or product installation scripts. Thesummary includes the list of the filesets, and the status (successor failure) of each fileset. The summary also indicates whichprocesses were stopped or restarted during the installation. Afterinstallation, refer to the summary file to determine whether anyprocesses need to be started.
Summary file
Starting and stopping processes for the Symantecproducts
After the installation and configuration is complete, the Symantec product installerstarts the processes that the installed products use. You can use the product installerto stop or start the processes, if required.
89Verifying the DMP installationInstallation log files

To stop the processes
◆ Use the -stop option to stop the product installation script.
For example, to stop the product's processes, enter the following command:
# ./installer -stop
or
# /opt/VRTS/install/installdmp<version> -stop
Where <version> is the specific release version.
See “About the script-based installer” on page 38.
To start the processes
◆ Use the -start option to start the product installation script.
For example, to start the product's processes, enter the following command:
# ./installer -start
or
# /opt/VRTS/install/installdmp<version> -start
Where <version> is the specific release version.
See “About the script-based installer” on page 38.
90Verifying the DMP installationStarting and stopping processes for the Symantec products

Upgrade of DMP
■ Chapter 12. Planning to upgrade DMP
■ Chapter 13. Upgrading DMP
■ Chapter 14. Upgrading DMP using an alternate disk
■ Chapter 15. Upgrading DMP using Network Install Manager Alternate DiskMigration
■ Chapter 16. Performing post-upgrade tasks
5Section

Planning to upgrade DMP
This chapter includes the following topics:
■ Upgrade methods for DMP
■ Supported upgrade paths for DMP
■ Preparing to upgrade DMP
■ Using Install Bundles to simultaneously install or upgrade base releases,maintenance patches, and hot fixes
Upgrade methods for DMPSymantec offers you several different ways to upgrade. You need to decide whichupgrade method best suits your environment, your expertise, and the downtimerequired.
Table 12-1 Review this table to determine how you want to perform the upgrade
Methods available for upgradeUpgrade types and considerations
Script-based—you can use this method toupgrade for the supported upgrade paths
Web-based—you can use this method toupgrade for the supported upgrade paths
Manual—you can use this method to upgradefrom the previous release
Response file—you can use this method toupgrade from the supported upgrade paths
Typical upgrades—use a Symantec providedtool or you can perform the upgrade manually.Requires some server downtime.
12Chapter

Table 12-1 Review this table to determine how you want to perform the upgrade(continued)
Methods available for upgradeUpgrade types and considerations
Operating system-specific methods
Operating system upgrades
Native operating system upgrade—use theupgrade software that comes with theoperating system. Note that not all operatingsystems support native upgrades.
Deployment Server
See “About the Deployment Server”on page 66.
Upgrade from any supported UNIX or Linuxplatform to any other supported UNIX or Linuxplatform.
Install Bundles
See “Using Install Bundles to simultaneouslyinstall or upgrade base releases, maintenancepatches, and hot fixes” on page 97.
Simultaneously upgrade base releases,maintenance patches, and hot fixes.
Supported upgrade paths for DMPThe following tables describe upgrading to 6.1.
Table 12-2 AIX upgrades using the script- or web-based installer
7.16.15.3Symantec softwareversion
N/AUpgrade theoperating system to6.1 TL6—do notupgrade to 7.1. Usethe installer toupgrade yourSymantec product to6.1.
Then, upgrade theoperating system to7.1 if you want to useyour Symantecproduct on AIX 7.1.
Upgrade theoperating system to6.1 TL6—do notupgrade to 7.1. Usethe installer toupgrade yourSymantec product to6.1.
Then, upgrade theoperating system to7.1 if you want to useyour Symantecproduct on AIX 7.1.
5.1 SP1 and later
Use the installer toupgrade to 6.1 of yourSymantec Product.
N/AN/A5.1 SP1 PR1
93Planning to upgrade DMPSupported upgrade paths for DMP

Table 12-2 AIX upgrades using the script- or web-based installer (continued)
7.16.15.3Symantec softwareversion
Use the installer toinstall the 6.1 versionof your SymantecProduct.
Upgrade theoperating system to6.1 TL6. Use the 6.1version of yourSymantec Product.
Then, upgrade theoperating system to7.1 if you want to useyour Symantecproduct on AIX 7.1.
N/A6.0
6.0 RP1
6.0.1
6.0.3
Perform a full 6.1installation using theinstaller script.
Perform a full 6.1installation using theinstaller script.
N/ANo Symantec product
Preparing to upgrade DMPBefore you upgrade, you need to prepare the systems and storage. Review thefollowing procedures and perform the appropriate tasks.
Getting ready for the upgradeComplete the following tasks before you perform the upgrade:
■ Review the Symantec Technical Support website for additional information:http://www.symantec.com/techsupp/
■ Make sure that the administrator who performs the upgrade has root accessand a good knowledge of the operating system's administration.
■ Make sure that all users are logged off and that all major user applications areproperly shut down.
■ Make sure that you have created a valid backup.See “Creating backups” on page 96.
■ Ensure that you have enough file system space to upgrade. Identify where youwant to copy the filesets, for example /packages/Veritas when the root filesystem has enough space or /var/tmp/packages if the /var file system hasenough space.
94Planning to upgrade DMPPreparing to upgrade DMP

Do not put the files on a file system that is inaccessible before running theupgrade script.You can use a Symantec-supplied disc for the upgrade as long as modificationsto the upgrade script are not required.
■ For any startup scripts in /etc/init.d/, comment out any application commandsor processes that are known to hang if their file systems are not present.
■ Make sure that the current operating system supports version 6.1 of the product.If the operating system does not support it, plan for a staged upgrade.
■ Schedule sufficient outage time and downtime for the upgrade and anyapplications that use the Symantec products. Depending on the configuration,the outage can take several hours.
■ Make sure that the file systems are clean before upgrading.
■ Upgrade arrays (if required).See “Upgrading the array support” on page 96.
■ To reliably save information on a mirrored disk, shut down the system andphysically remove the mirrored disk. Removing the disk in this manner offers afailback point.
■ If CP server-based coordination points are used in your current fencingconfiguration, then check that your CP servers are upgraded to 6.1 beforestarting the upgrade process.
■ Make sure that DMP support for native stack is disabled(dmp_native_support=off). If DMP support for native stack is enabled(dmp_native_support=on), the installer may detect it and ask you to restart thesystem.
Preparing for an upgrade of Symantec Dynamic Multi-PathingBefore you upgrade, perform the following procedure.
To prepare for an upgrade of Symantec Dynamic Multi-Pathing
1 Log in as root.
2 Stop activity to all file systems and raw volumes, for example by unmountingany file systems that have been created on volumes.
# umount mnt_point
95Planning to upgrade DMPPreparing to upgrade DMP

3 Stop all the volumes by entering the following command for each disk group:
# vxvol -g diskgroup stopall
4 Upgrade AIX on your system to the required levels if applicable.
Creating backupsSave relevant system information before the upgrade.
To create backups
1 Log in as superuser.
2 Before the upgrade, ensure that you have made backups of all data that youwant to preserve.
3 Installer verifies that recent backups of configuration files in VxVM privateregion have been saved in /etc/vx/cbr/bk.
If not, a warning message is displayed.
Warning: Backup /etc/vx/cbr/bk directory.
4 Run the vxlicrep, vxdisk list, and vxprint -ht commands and recordthe output. Use this information to reconfigure your system after the upgrade.
Upgrading the array supportThe Storage Foundation 6.1 release includes all array support in a single fileset,VRTSaslapm. The array support fileset includes the array support previously includedin the VRTSvxvm fileset. The array support fileset also includes support previouslypackaged as external Array Support Libraries (ASLs) and array policy modules(APMs).
See the 6.1 Hardware Compatibility List for information about supported arrays.
When you upgrade Storage Foundation products with the product installer, theinstaller automatically upgrades the array support. If you upgrade StorageFoundation products with manual steps, you should remove any external ASLs orAPMs that were installed previously on your system. Installing the VRTSvxvm filesetexits with an error if external ASLs or APMs are detected.
After you have installed Storage Foundation 6.1, Symantec provides support fornew disk arrays through updates to the VRTSaslapm fileset.
96Planning to upgrade DMPPreparing to upgrade DMP

For more information about array support, see the Symantec Storage FoundationAdministrator's Guide.
Using Install Bundles to simultaneously install orupgrade base releases, maintenance patches, andhot fixes
Beginning with version 6.1, Symantec offers you a method to easily install or upgradeyour systems directly to a base, maintenance, or hot fix level in one step usingInstall Bundles. With Install Bundles, the installers have the ability to merge so thatcustomers can install or upgrade directly to maintenance or hot fix levels in oneexecution. The various scripts, filesets, and patch components are merged, andmultiple releases are installed together as if they are one combined release. Youdo not have to perform two or more install actions to install or upgrade systems tomaintenance levels or hot fix levels.
Releases are divided into the following categories:
Table 12-3 Release Levels
Downloadlocation
Releasetypes
Applies toForm factorContentLevel
FileConnectMajor, minor,Service Pack(SP), PlatformRelease (PR)
All productsfilesetsFeaturesBase
SymantecOperationsReadinessTools (SORT)
MaintenanceRelease (MR)
All productsfilesets,patches
Fixes, newfeatures
Maintenance
SORT,Support site
P-Patch,Public hot fix,Private hot fix
Singleproduct
filesetsFixesHot fix
When you install or upgrade using Install Bundles:
■ SFHA products are discovered and assigned as a single version to themaintenance level. Each system can also have one or more hot fixes applied.
■ Base releases are accessible from FileConnect that requires customer serialnumbers. Maintenance and hot fix releases can be automatically downloaded
97Planning to upgrade DMPUsing Install Bundles to simultaneously install or upgrade base releases, maintenance patches, and hot fixes

from SORT. You can download them from the SORT website manually or usethe deploy_sfha script.
■ Public hot fix releases can be installed using automated installers from the 6.1version or later.
■ Private hot fixes can now be detected to prevent upgrade conflict. Private hotfix releases are not offered as a combined release. They are only available fromSymantec Technical Support on a need basis.
You can use the -base_path and -hotfix_path options to import installation codefrom multiple releases. You can find filesets and patches from different media paths,and merge fileset and patch definitions for multiple releases. You can use theseoptions to use new task and phase functionality to correctly perform requiredoperations for each release component. You can install the filesets and patches indefined phases using these options, which helps you when you want to perform asingle start or stop process and perform pre and post operations for all level in asingle operation.
Four possible methods of integration exist. All commands must be executed fromthe highest base or maintenance level install script.
For example:
1. Base + maintenance:
This integration method can be used when you install or upgrade from a lowerversion to 6.1.1.
Enter the following command:
# installmr -base_path <path_to_base>
2. Base + hot fix:
This integration method can be used when you install or upgrade from a lowerversion to 6.1.0.100.
Enter the following command:
# installer -hotfix_path <path_to_hotfix>
3. Maintenance + hot fix:
This integration method can be used when you upgrade from version 6.1 to6.1.1.100.
Enter the following command:
# installmr -hotfix_path <path_to_hotfix>
98Planning to upgrade DMPUsing Install Bundles to simultaneously install or upgrade base releases, maintenance patches, and hot fixes

4. Base + maintenance + hot fix:
This integration method can be used when you install or upgrade from a lowerversion to 6.1.1.100.
Enter the following command:
# installmr -base_path <path_to_base>
-hotfix_path <path_to_hotfix>
Note: For the 6.1 release, you can add a maximum of five hot fixes using-hotfix_path <path_to_hotfix> -hotfix2_path <path_to_hotfix> ... -hotfix5_path<path_to_hotfix>
99Planning to upgrade DMPUsing Install Bundles to simultaneously install or upgrade base releases, maintenance patches, and hot fixes

Upgrading DMP
This chapter includes the following topics:
■ Upgrading Symantec Dynamic Multi-Pathing with the product installer
■ Upgrading DMP using the web-based installer
■ Upgrade Symantec Dynamic Multi-Pathing and AIX on a DMP-enabled rootvg
■ Upgrading DMP on a Virtual I/O server (VIOS) from 5.1SP1 or later to 6.1
■ Upgrading the AIX operating system
Upgrading SymantecDynamicMulti-Pathingwith theproduct installer
This section describes upgrading from Symantec Dynamic Multi-Pathing productsto 6.1.
To upgrade Symantec Dynamic Multi-Pathing
1 Log in as superuser.
2 Load and mount the disc. If you downloaded the software, navigate to the toplevel of the download directory.
3 From the disc, run the installer command. If you downloaded the software,run the ./installer command.
# cd /cdrom/cdrom0
# ./installer
4 Enter G to upgrade and select the Full Upgrade.
13Chapter

5 You are prompted to enter the system names (in the following example, "sys1")on which the software is to be installed. Enter the system name or names andthen press Return.
Enter the system names separated by spaces on which to
install DMP: sys1 sys2
Depending on your existing configuration, various messages and prompts mayappear. Answer the prompts appropriately.
6 The installer asks if you agree with the terms of the End User LicenseAgreement. Press y to agree and continue.
7 The installer lists the filesets to install or to update. You are prompted to confirmthat you are ready to upgrade.
8 Stop the product's processes.
Do you want to stop DMP processes now? [y,n,q] (y) y
If you select y, the installer stops the product processes and makes someconfiguration updates before it upgrades.
9 The installer stops, uninstalls, reinstalls, and starts specified filesets.
10 If the upgrade was done from 5.0 or if the Symantec Dynamic Multi-Pathingwas done without vxkeyless keys, the installer shows the following warning:
CPI WARNING V-9-40-5323 DMP license version 5.0 is not
updated to 6.1 on sys1. It's recommended to upgrade to a 6.1 key.
CPI WARNING V-9-40-5323 DMP license version 5.0 is not updated
to 6.1 on sys2. It's recommended to upgrade to a 6.1 key.
DMP is licensed on the systems.
Do you wish to enter additional licenses? [y,n,q,b] (n) n
11 The Symantec Dynamic Multi-Pathing software is verified and configured.
12 The installer prompts you to provide feedback, and provides the log locationfor the upgrade.
13 Restart the systems if the installer prompts restart to enable DMP nativesupport.
Upgrading DMP using the web-based installerThis section describes upgrading DMP with the web-based installer. The installerdetects and upgrades the product that is currently installed on the specified systemor systems.
101Upgrading DMPUpgrading DMP using the web-based installer

To upgrade DMP
1 Perform the required steps to save any data that you want to preserve. Forexample, make configuration file backups.
2 Start the web-based installer.
See “Starting the web-based installer” on page 45.
3 On the Select a task and a product page, select Upgrade a Product from theTask drop-down menu.
The product is discovered once you specify the system. Click Next.
4 Indicate the systems on which to upgrade. Enter one or more system names,separated by spaces. Click Next.
5 Installer detects the product that is installed on the specified system. It showsthe cluster information and lets you confirm if you want to perform upgrade onthe cluster. Select Yes and click Next.
6 Click Next to complete the upgrade.
After the upgrade completes, the installer displays the location of the log andsummary files. If required, view the files to confirm the installation status.
7 If you are prompted to restart the systems, enter the following restart command:
# /usr/sbin/shutdown -r now
Upgrade Symantec Dynamic Multi-Pathing and AIXon a DMP-enabled rootvg
The following upgrade paths are supported to upgrade DMP and AIX on aDMP-enabled rootvg
Table 13-1 Upgrade paths for DMP on a DMP-enabled rootvg
ProcedureUpgrade path
See “Upgrading from DMP 5.1SP1 (or later) on AIX 6.1to DMP 6.1 on a DMP-enabled rootvg” on page 103.
DMP 5.1SP1 (or later) on AIX 6.1to DMP 6.1
See “Upgrading from DMP 5.1SP1 (or later) on AIX 5.3to DMP 6.1 on AIX 6.1 or AIX 7.1 on a DMP-enabledrootvg” on page 103.
DMP 5.1SP1 (or later) on AIX 5.3to DMP 6.1 on AIX 6.1/ 7.1
102Upgrading DMPUpgrade Symantec Dynamic Multi-Pathing and AIX on a DMP-enabled rootvg

Upgrading from DMP 5.1SP1 (or later) on AIX 6.1 to DMP 6.1 on aDMP-enabled rootvg
When you upgrade from a previous version of DMP on a DMP-enabled rootvg toDMP 6.1, you must disable DMP root support before performing the upgrade. Enablethe DMP root support after the upgrade. If the AIX version is less than 6.1, anoperating system upgrade is required.
See “Upgrading from DMP 5.1SP1 (or later) on AIX 5.3 to DMP 6.1 on AIX 6.1 orAIX 7.1 on a DMP-enabled rootvg” on page 103.
To upgrade from DMP 5.1SP1 or later to DMP 6.1 on a DMP-enabled rootvg
1 Disable DMP support for the rootvg:
# vxdmpadm native disable vgname=rootvg
Please reboot the system to disable DMP support for LVM
bootability
2 Restart the system.
3 Upgrade DMP to 6.1.
Run the installer command on the disc, and enter G for the upgrade task.
See “Upgrading Symantec Dynamic Multi-Pathing with the product installer”on page 100.
4 Restart the system.
5 Enable DMP for rootvg.
# vxdmpadm native enable vgname=rootvg
Please reboot the system to enable DMP support for LVM bootability
6 Restart the system. After the restart, the system has DMP root support enabled.
Upgrading from DMP 5.1SP1 (or later) on AIX 5.3 to DMP 6.1 onAIX 6.1 or AIX 7.1 on a DMP-enabled rootvg
DMP 6.1 requires at least AIX 6.1. When you upgrade DMP from a previous versionon a system that uses AIX 5.3, you must also upgrade the AIX operating system.If the rootvg is enabled for DMP, follow these steps.
103Upgrading DMPUpgrade Symantec Dynamic Multi-Pathing and AIX on a DMP-enabled rootvg

To upgrade from DMP 5.1SP1 or later to DMP 6.1 on a DMP-enabled rootvg
1 Disable DMP support for the rootvg:
# vxdmpadm native disable vgname=rootvg
Please reboot the system to disable DMP support for LVM
bootability
2 Upgrade the AIX operating system from 5.3 to 6.1 before restarting.
3 Restart the system.
4 Upgrade DMP to 6.1.
See “Upgrading Symantec Dynamic Multi-Pathing with the product installer”on page 100.
Restart the system if the installer prompts for restart during upgrade.
If vxconfigd cannot be started after the upgrade, restart the system.
5 Enable DMP for rootvg.
# vxdmpadm native enable vgname=rootvg
Please reboot the system to enable DMP support for LVM
bootability
6 Restart the system. After the restart, the system has DMP root support enabled.
Upgrading DMP on a Virtual I/O server (VIOS) from5.1SP1 or later to 6.1
This section provides the instructions to upgrade DMP on a Virtual I/O server (VIOS)from 5.1SP1 or later to 6.1.
To upgrade DMP on VIOS
1 Shut down all Virtual I/O clients not having a failover capability, and onlydependent on the Virtual I/O server being upgraded.
2 Disable DMP support for the rootvg:
# vxdmpadm native disable vgname=rootvg
Please reboot the system to disable DMP support for LVM
bootability
3 Restart the system.
104Upgrading DMPUpgrading DMP on a Virtual I/O server (VIOS) from 5.1SP1 or later to 6.1

4 Log in to the VIO Server partition.
Use the following command to access the non-restricted root shell.
$ oem_setup_env
Note: In this procedure, invoke all subsequent commands from thenon-restricted shell.
Symantec recommends that you take a backup, in case you want to revertback to the earlier version.
5 Unconfigure all virtual devices from all virtual adapters.
# rmdev -p vhost0
vtscsi0 Defined
..
6 Follow the procedure to upgrade DMP on a Virtual I/O server.
See “Upgrading Symantec Dynamic Multi-Pathing with the product installer”on page 100.
7 If required, reconfigure all the virtual target devices from all the virtual adapters.
# cfgmgr -p vhost0
8 Enable DMP for rootvg.
# vxdmpadm native enable vgname=rootvg
Please reboot the system to enable DMP support for LVM bootability
9 Restart the system. After the restart, the system has DMP root support enabled.
10 For all the Virtual I/O servers, repeat step 1 through step 5.
11 Restart all the Virtual I/O clients you had shut down, and verify the configuration.
Upgrading the AIX operating systemUse this procedure to upgrade the AIX operating system if DMP 6.1 is installed.You must upgrade to a version that DMP 6.1 supports.
105Upgrading DMPUpgrading the AIX operating system

To upgrade the AIX operating system
1 If DMP root support is enabled, run the vxdmpadm native release commandto give back pvids to OS device paths.
# vxdmpadm native release
2 Upgrade the AIX operating system. See the operating system documentationfor more information.
3 Apply the necessary APARs.
4 Restart the system.
# shutdown -Fr
106Upgrading DMPUpgrading the AIX operating system

Upgrading DMP using analternate disk
This chapter includes the following topics:
■ About upgrading DMP using an alternate disk
■ Supported upgrade scenarios
■ Supported upgrade paths for DMP using alternate disks
■ Preparing to upgrade DMP on an alternate disk
■ Upgrading DMP on an alternate disk
■ Verifying the upgrade
About upgrading DMP using an alternate diskUse the alternate disk installation process to upgrade the operating system andDMP on a production server while the server runs. Perform the upgrade on analternate or inactive boot environment. After the upgrade, restart the system on thealternate disk to use the updated environment. The instructions in this sectionassume a working knowledge of the alternate disk installation process. See theoperating system documentation for detailed information on alternate diskinstallations.
Note:Only Technology Level (TL) and Service Pack (SP) releases of the operatingsystem can be upgraded using this procedure.
Upgrading DMP on an alternate disk has the following advantages:
14Chapter

■ The server remains active during the time the new boot environment is createdand upgraded on the alternate boot device.
■ The actual downtime for the upgrade is reduced to the period of time that isrequired for a single restart.
■ The original boot environment is still available for use if the updated environmentfails to become active.
Supported upgrade scenariosThe following upgrade scenarios are supported on an alternate disk:
■ Upgrading only DMPSee “ Upgrading DMP on an alternate disk” on page 110.
■ Upgrading only the operating system (Technology Level (TL) and Service Pack(SP) releases)
Note: For instructions, see the operating system documentation. No additionalsteps are required for DMP after the operating system upgrade.
■ Upgrading the operating system (Technology Level (TL) and Service Pack (SP)releases) and DMPSee “ Upgrading DMP on an alternate disk” on page 110.
Supported upgrade paths for DMP using alternatedisks
You can upgrade the operating system and DMP using an alternate disk from thefollowing versions:
Technology Level and Service Pack releases of AIX 6.1/ 7.1AIX version
5.1 and laterDMP version
Preparing to upgrade DMP on an alternate diskComplete the preparatory steps in the following procedure before you upgrade DMPon an alternate disk.
108Upgrading DMP using an alternate diskSupported upgrade scenarios

To prepare to upgrade DMP on an alternate disk
1 Make sure that the DMP installation media is available.
2 Check the status of the physical disks on your system.
Note: The alternate disk must have a physical identifier and must not containany mounted volume groups.
# lspv
Output similar to the following displays:
hdisk0 0009710fa9c79877 rootvg active
hdisk1 0009710f0b90db93 None
If the alternate disk does not have a physical identifier, set the physical identifierfor the disk:
# chdev -l hdisk1 -a pv=yes
3 Make sure that the following filesets are installed on the primary disk:bos.alt_disk_install.boot_images, bos.alt_disk_install.rte
4 Mount the DMP installation media.
Determine the filesets you want to install on the alternate disk.
# ./installdmp -install_option
where install_option is one of the following:
-minpkgs: For installing the minimum set of filesets
-recpkgs: For installing the recommended filesets
-allpkgs: For installing all filesets
Copy the required filesets from the pkgs directory on the installation media toa directory on the primary boot disk, for example /tmp/prod_name
If you want to upgrade the operating system along with DMP, copy thenecessary operating system filesets and the DMP filesets to a directory on theprimary disk, for example /tmp/prod_name.
See the operating system documentation to determine the operating systemfilesets.
109Upgrading DMP using an alternate diskPreparing to upgrade DMP on an alternate disk

Upgrading DMP on an alternate diskThis section provides instructions to clone the primary boot environment to thealternate disk, upgrade DMP on the alternate disk, and restart the system to startfrom the alternate disk. You may perform the steps manually or using the SMITinterface.
In the procedure examples, the primary or current boot environment resides onhdisk0 and the alternate or inactive boot environment resides on hdisk1.
To upgrade DMP on an alternate disk
1 Clone the primary boot disk rootvg to an alternate disk using one of thefollowing methods:
Run the following command:
# /usr/sbin/alt_disk_copy -I "acNgXY" -P "all" \-l "/tmp/prod_name" -w "all" -d "hdisk1"
Where:
■ -d indicates the name of the target disk on which you clonethe primary disk.
■ -l indicates the full path of the directory that contains thefilesets to be upgraded
■ -w indicates the list of DMP filesets that you want toupgrade on the alternate boot disk. The option allindicates that all the filesets that are contained in thedirectory you specified (using option -l) must be installedto the alternate boot disk.
Manual
Start the SMIT menu and enter the required information atthe prompts:
# smitty alt_clone
■ Target disk to install: hdisk1■ Fileset(s) to install: all■ Directory or Device with images (full path of the directory
that contains the filesets to be upgraded):/tmp/prod_name
■ ACCEPT new license agreements? yes■ Set bootlist to boot from this disk on next restartyes
Press Enter to start the upgrade on the alternate disk. Theupgrade process takes some time.
Using SMIT interface
110Upgrading DMP using an alternate diskUpgrading DMP on an alternate disk

Note:DMP rootability-enabled systems require additional steps. For instructions,see the topic "Cloning an LVM rootvg that is enabled for DMP" in the SymantecDynamic Multi-Pathing Administrator's Guide.
2 Verify that the alternate disk is created:
# lspv |grep rootvg
hdisk0 0009710fa9c79877 rootvg
hdisk1 0009710f0b90db93 altinst_rootvg
3 Verify that the normal boot list includes the name of the alternate boot disk. Bydefault, the alternate disk installation process changes the boot list to enablethe system to boot from the alternate disk.
# bootlist -m normal -o
hdisk1
4 Restart all the nodes in the cluster. The boot environment on the alternate diskis activated when you restart the nodes.
# shutdown -r
5 Copy the product installation scripts to the alternate disk:
# /opt/VRTS/install/bin/UXRT<version>/add_install_scripts
Where <version> is the specific release version.
See “About the script-based installer” on page 38.
The command copies the installation scripts and uninstallation scripts to thealternate disk.
6 Start all the processes and ports.
# ./installsf -start
7 Verify the upgrade.
See “Verifying the upgrade” on page 111.
Verifying the upgradeTo ensure that alternate disk installation has completed successfully, verify that thesystem has booted from the alternate boot environment.
111Upgrading DMP using an alternate diskVerifying the upgrade

To verify the upgrade
1 Verify that the alternate boot environment is active:
# lspv |grep rootvg
hdisk0 0009710fa9c79877 old_rootvg
hdisk1 0009710f0b90db93 rootvg active
2 Verify that the version of the upgraded filesets on the alternate boot disk is6.1.0.0.
Note: The VRTSsfcpi60 fileset still exists on the alternate boot disk. You needto manually uninstall the fileset.
If you upgraded the operating system (TL or SP):
# oslevel -s
112Upgrading DMP using an alternate diskVerifying the upgrade

Upgrading DMP usingNetwork Install ManagerAlternate Disk Migration
This chapter includes the following topics:
■ Supported upgrade paths for DMP using NIM ADM
■ Preparing to upgrade DMP and the operating system using the nimadm utility
■ Preparing the installation bundle on the NIM server
■ Upgrading DMP and the operating system using the nimadm utility
■ Verifying the upgrade performed using the NIM ADM utility
Supported upgrade paths for DMP using NIM ADMYou can perform an upgrade of the product and the operating system using NetworkInstall Manager Alternate Disk Migration (NIM ADM).
The supported upgrade paths are as follows:
AIX 5.3
AIX 6.1
AIX 7.1
AIX version
5.1 SP1 and laterDMP version
15Chapter

Preparing to upgrade DMP and the operating systemusing the nimadm utility
Complete the preparatory steps in the following procedure before you upgrade DMPand the operating system.
To prepare to upgrade DMP and the operating system using the nimadm utility
1 Make sure that the DMP installation media is available.
2 Check the status of the physical disks on each node in the cluster.
Note: The alternate disk must have a physical identifier and must not containany mounted volume groups.
# lspv
Output similar to the following displays:
hdisk0 0009710fa9c79877 rootvg active
hdisk1 0009710f0b90db93 None
If the alternate disk does not have a physical identifier, set the physical identifierfor the disk:
# chdev -l hdisk1 -a pv=yes
3 Make sure that the following filesets are installed on the NIM server and theclient: bos.alt_disk_install.boot_images, bos.alt_disk_install.rte
Preparing the installation bundle on the NIM serverYou need to prepare the installation bundle installp on the NIM server beforeyou use nimadm to upgrade DMP filesets. The following actions are executed onthe NIM server.
Note: Make sure that a NIM LPP_SOURCE is present on the NIM server.
To prepare the installation bundle
1 Insert and mount the product installation media.
2 Choose an LPP source:
# lsnim |grep -i lpp_source
LPP-6100-up2date resources lpp_source
114Upgrading DMP using Network Install Manager Alternate Disk MigrationPreparing to upgrade DMP and the operating system using the nimadm utility

3 Check that the NIM LPP_RESOURCE and corresponding SPOT are in healthystate before you start upgrade:
# nim -Fo check LPP-7100-up2date
# nim -Fo check SPOT-7100-up2date
4 Navigate to the product directory on the installation media and run theinstalldmp command to prepare the bundle resource:
# ./installdmp -nim LPP-7100-up2date
The installation program copies the necessary filesets and patches to the LPPresource directory.
5 Enter a name for the bundle, for example DMP61.
6 Run the lsnim -l command to check that the installp_bundle resource iscreated successfully.
# lsnim -l DMP61
DMP61:
class = resources
type = installp_bundle
Rstate = ready for use
prev_state = unavailable for use
location = /opt/VRTS/nim/DMP61.bundle
alloc_count = 0
server = master
Upgrading DMP and the operating system using thenimadm utility
This section provides instructions to upgrade DMP and the operating system usingthe nimadm utility. You may perform the steps manually or using the SMIT interface.
In the procedure examples, hdisk0 indicates the primary or current boot environmentand hdisk1 indicates the alternate or inactive boot environment.
To upgrade DMP and the operating system using the nimadm utility
1 Clone the primary boot disk rootvg to an alternate disk using one of thefollowing methods:
115Upgrading DMP using Network Install Manager Alternate Disk MigrationUpgrading DMP and the operating system using the nimadm utility

Upgrade DMP and the operating system by running thefollowing command on the NIM server:
# nimadm -l lpp_source -c nim_client \-s spot_name -b bundle_name \-d nimclient_altdisk_name -Y
For example:
# nimadm -l LPP-7100-up2date -c node1 \-s spot-7100-up2date -b dmp61 \-d hdisk1 -Y
Where:
■ -l : Specifies the LPP_SOURCE■ -c: Specifies the NIM client■ -s: Specifies the SPOT resource■ -b: Specifies the DMP bundle■ -d: Specifies the alternate disk on which the installation is
performed■ -Y: Specifies the acceptance of all licenses
Manual
Start the SMIT menu:
# smit nimadm
Select the option Perform NIM Alternate Disk Migration.
Enter the required information at the prompts:
■ Target NIM Client: sys1■ NIM LPP_SOURCE resource: LPP-7100-up2date■ NIM SPOT resource: SPOT-7100-up2date■ Bundle name: dmp61■ Target disk(s) to install: hdisk1■ Phase to execute: all■ Set Client bootlist to alternate disk? yes■ ACCEPT new license agreements? yes
Press Enter to start the upgrade on the alternate disk. Theupgrade process takes some time.
Using SMIT interface
2 Verify that the alternate disk is created:
# lspv | grep rootvg
hdisk0 0009710fa9c79877 rootvg
hdisk1 0009710f0b90db93 altinst_rootvg
116Upgrading DMP using Network Install Manager Alternate Disk MigrationUpgrading DMP and the operating system using the nimadm utility

3 Verify that the normal boot list includes the name of the alternate boot disk. Bydefault, the alternate disk installation process changes the boot list to enablethe system to boot from the alternate disk.
# bootlist -m normal -o
hdisk1
4 Restart the system. The boot environment on the alternate disk is activatedwhen you restart the system.
# shutdown -r
5 Verify the upgrade.
See “Verifying the upgrade” on page 111.
Note: If the operating system version is incorrect, and the bos.txt.spell andbos.txt.tfs filesets are missed, update these filesets manually through nim
6.1TL7SPX lpp_source.
# oslevel -rl 6100-07
Fileset Actual Level Recommended ML
---------------------------------------------------------
bos.txt.spell 5.3.12.0 6.1.6.0
bos.txt.tfs 5.3.12.0 6.1.6.0
To update the bos.txt.spell fileset manually, do the following:
smitty nim >> Perform NIM Software Installation and Maintenance Tasks >>Install and Update Software >> Install Software >> Select correspondingLPP_SOURCE >> * Software to Install >> Select bos.txt.spell
Follow the same procedure for the bos.txt.tfs fileset.
Verifying the upgrade performed using the NIM ADMutility
To ensure that alternate disk installation has completed successfully, verify that allthe nodes have booted from the alternate boot environment and joined the cluster.
117Upgrading DMP using Network Install Manager Alternate Disk MigrationVerifying the upgrade performed using the NIM ADM utility

To verify the upgrade using the NIM ADM utility
1 Verify that the alternate boot environment is active:
# lspv | grep rootvg
hdisk0 0009710fa9c79877 old_rootvg
hdisk1 0009710f0b90db93 rootvg active
2 Verify that the version of the upgraded filesets on the alternate boot disk is6.1.0.0.
Note: The VRTSsfcpi60 fileset still exists on the alternate boot disk. You needto manually uninstall the fileset.
If you upgraded the operating system:
# oslevel -s
118Upgrading DMP using Network Install Manager Alternate Disk MigrationVerifying the upgrade performed using the NIM ADM utility

Performing post-upgradetasks
This chapter includes the following topics:
■ Updating variables
■ Verifying the Symantec Dynamic Multi-Pathing upgrade
Updating variablesIn /etc/profile, update the PATH and MANPATH variables as needed.
MANPATH can include /opt/VRTS/man and PATH can include /opt/VRTS/bin.
Verifying the Symantec Dynamic Multi-Pathingupgrade
Refer to the section about verifying the installation to verify the upgrade.
See “Verifying that the products were installed” on page 88.
16Chapter

Uninstallation of DMP
■ Chapter 17. Uninstalling DMP
6Section

Uninstalling DMP
This chapter includes the following topics:
■ Uninstalling DMP
■ Uninstalling DMP with the web-based installer
■ Removing Storage Foundation products using SMIT
Uninstalling DMPUse the following procedure to remove Symantec Dynamic Multi-Pathing (DMP).
To uninstall DMP
1 To uninstall from multiple systems, set up the systems so that commandsbetween systems execute without prompting for passwords or confirmations.
See “About configuring secure shell or remote shell communication modesbefore installing products” on page 145.
2 On the system where you plan to remove DMP, move to the/opt/VRTS/install directory.
3 Run the uninstalldmp command.
# ./uninstalldmp<version>
Where <version> is the specific release version.
See “About the script-based installer” on page 38.
4 When the installer prompts you, enter the names of each system where youwant to uninstall DMP. Separate system names with spaces.
17Chapter

5 The installer program checks the systems. It then asks you if you want to stopDMP processes.
Do you want to stop DMP processes now? [y,n,q,?] (y)
If you respond yes, the processes are stopped and the filesets are uninstalled.
6 After the uninstall completes, the installer displays the location of the summary,response, and log files. If required, view the files to confirm the status of theremoval.
7 Restart all the nodes.
Uninstalling DMP with the web-based installerThis section describes how to uninstall using the web-based installer.
Note:After you uninstall the product, you cannot access any file systems you createdusing the default disk layout version in DMP 6.1 with a previous version of DMP.
To uninstall DMP
1 Perform the required steps to save any data that you want to preserve. Forexample, take backups of configuration files.
2 Disable DMP native support, if it is enabled. Run the following command todisable DMP native support
# vxdmpadm settune dmp_native_support=off
# reboot
3 Start the web-based installer.
See “Starting the web-based installer” on page 45.
4 On the Select a task and a product page, select Uninstall a Product from theTask drop-down list.
5 Select Symantec Dynamic Multi-Pathing from the Product drop-down list,and click Next.
6 Indicate the systems on which to uninstall. Enter one or more system names,separated by spaces. Click Next.
7 After the validation completes successfully, click Next to uninstall DMP on theselected system.
122Uninstalling DMPUninstalling DMP with the web-based installer

8 Restart the systems if DMP native support is on, and the systems need a restartto disable DMP native support, if the step 2 is not already executed. Re-runthe uninstallation after the restart.
9 If there are any processes running on the target system, the installer stops theprocesses. Click Next.
10 After the installer stops the processes, the installer removes the products fromthe specified system.
Click Next.
11 After the uninstall completes, the installer displays the location of the summary,response, and log files. If required, view the files to confirm the status of theremoval.
12 Click Finish.
Most filesets have kernel components. To ensure their complete removal, asystem restart is recommended after all the filesets have been removed.
Removing Storage Foundation products using SMITUse the following procedure to remove Storage Foundation products using SMIT.
123Uninstalling DMPRemoving Storage Foundation products using SMIT

To remove the filesets using SMIT
1 Stop the following SFCFSHA modules: VCS, VxFEN, ODM, GAB, and LLT.
Run the following commands to stop the SFCFSHA modules:
# hastop -all
# /etc/methods/glmkextadm unload
# /etc/rc.d/rc2.d/s99odm stop
# /etc/methods/gmskextadm unload
# /etc/init.d/vxfen.rc stop
# /etc/init.d/gab.rc stop
# /etc/init.d/llt.rc stop
Run the following commands to check if all the modules have been stopped:
# gabconfig -a
# ltconfig
2 Disable DMP native support, if it is enabled. Run the following command todisable DMP native support
# vxdmpadm settune dmp_native_support=off
# reboot
3 Enter this command to invoke SMIT:
# smit
4 In SMIT, select Software Installation and Maintenance > SoftwareMaintenance and Utilities > Remove Installed Software.
5 Under the SOFTWARE name menu, press F4 or Esc-4 to list all the softwarethat is installed on the system.
6 Enter "/" for Find, type "VRTS" to find all Symantec filesets, and select thefilesets that you want to remove.
124Uninstalling DMPRemoving Storage Foundation products using SMIT

7 Restart the system after removing all Storage Foundation filesets.
Note: Restart is required only if the root device is under DMP control.
8 Depending on the choices that were made when Storage Foundation wasoriginally installed, you may find that not all of the listed Storage Foundationfilesets are installed on the system. You may also choose to remove theVRTSvlic licensing fileset unless some other Symantec software requires it.
125Uninstalling DMPRemoving Storage Foundation products using SMIT

Installation reference
■ Appendix A. Installation scripts
■ Appendix B. Tunable files for installation
■ Appendix C. Configuring the secure shell or the remote shell for communications
■ Appendix D. DMP components
■ Appendix E. Troubleshooting installation issues
■ Appendix F. Compatibility issues when installing DMP with other products
7Section

Installation scripts
This appendix includes the following topics:
■ Command options for the installation script
■ Command options for uninstall script
Command options for the installation scriptThe installdmp command usage takes the following form:
installdmp [ sys1 sys2... ]
[ -configure | -license | -upgrade | -precheck | -requirements
| -start | -stop | -postcheck ]
[-require installer_hot_fix_file ]
[ -responsefile response_file ]
[ -logpath log_path ]
[ -tmppath tmp_path ]
[ -tunablesfile tunables_file ]
[ -timeout timeout_value ]
[ -hostfile hostfile_path ]
[ -keyfile ssh_key_file ]
[ -pkgpath pkg_path ]
[ -prod product_name ]
[ -hotfix_path hotfix_path ]
[ -hotfix2_path hotfix2_path ]
[ -hotfix3_path hotfix3_path ]
[ -hotfix4_path hotfix4_path ]
[ -hotfix5_path hotfix5_path ]
AAppendix

[ -nim LLT_SOURCE ]
[ -serial | -rsh | -redirect | -installminpkgs | -installrecpkgs
| -installallpkgs | -minpkgs | -recpkgs | -allpkgs
| -pkgset | -pkgtable | -pkginfo | -makeresponsefile| -serial
| -comcleanup | -comsetup -version | -nolic | -settunables
| -tunables | -noipc | -disable_dmp_native_support ]
Table A-1 lists the installdmp command options.
Table A-1 installdmp options
DescriptionOption and Syntax
View a list of all DMP filesets and patches. The installdmp liststhe filesets and patches in the correct installation order.
You can use the output to create scripts for command-lineinstallation, or for installations over a network.
See the -minpkgs and the -recpkgs options.
-allpkgs
The -comcleanup option removes the ssh or rsh configurationadded by installer on the systems. The option is only requiredwhen installation routines that performed auto-configuration ofssh or rsh are abruptly terminated.
-comcleanup
Configure DMP after using -install option to install DMP.-configure
Disables Dynamic Multi-pathing support for the native LVMvolume groups and ZFS pools during upgrade. RetainingDynamic Multi-pathing support for the native LVM volumegroups and ZFS pools during upgrade increases fileset upgradetime depending on the number of LUNs and native LVM volumegroups and ZFS pools configured on the system.
-disable_dmp_native_support
Defines the path of a hot fix level release to be integrated witha base or a maintenance level release in order for multiplereleases to be simultaneously installed .
-hotfix_path
Defines the path of a second hot fix level release to beintegrated with a base or a maintenance level release in orderfor multiple releases to be simultaneously installed.
-hotfix2_path
Defines the path of a third hot fix level release to be integratedwith a base or a maintenance level release in order for multiplereleases to be simultaneously installed.
-hotfix3_path
128Installation scriptsCommand options for the installation script

Table A-1 installdmp options (continued)
DescriptionOption and Syntax
Defines the path of a fourth hot fix level release to be integratedwith a base or a maintenance level release in order for multiplereleases to be simultaneously installed.
-hotfix4_path
Defines the path of a fifth hot fix level release to be integratedwith a base or a maintenance level release in order for multiplereleases to be simultaneously installed.
-hotfix5_path
Specifies the location of a file that contains the system namesfor the installer.
-hostfilefull_path_to_file
Selects all the filesets for installation.
See the -allpkgs option.
-installallpkgs
Selects the minimum filesets for installation.
See the -minpkgs option.
-installminpkgs
Selects the recommended filesets for installation.
See the -recpkgs option.
-installrecpkgs
Specifies a key file for SSH. The option passes -issh_key_file with each SSH invocation.
-keyfile ssh_key_file
Register or update product licenses on the specified systems.This option is useful to replace a demo license.
-license
Specifies that log_path, not /opt/VRTS/install/logs, is thelocation where install log files, summary files, and responsefiles are saved.
-logpath log_path
Create a response file. This option only generates a responsefile and does not install DMP.
-makeresponsefile
View a list of the minimal filesets and the patches that arerequired for DMP. The installdmp lists the filesets and patchesin the correct installation order. The list does not include theoptional filesets.
You can use the output to create scripts for command-lineinstallation, or for installations over a network.
See the -allpkgs and the -recpkgs options.
-minpkgs
Generates an installp_bundle for the NIM Server to install DMP.You must specify a valid LLT_SOURCE location.
-nim LLT_SOURCE
129Installation scriptsCommand options for the installation script

Table A-1 installdmp options (continued)
DescriptionOption and Syntax
Disables installdmp from making outbound networking calls toSORT in order to automatically obtain hot fix and releaseinformation updates.
-noipc
Allows installation of product filesets without entering a licensekey. Licensed features cannot be configured, started, or usedwhen this option is specified.
-nolic
Displays a list of filesets in the order of installation in auser-friendly format.
Use this option with one of the following options:
■ -allpkgsIf you do not specify an option, -allpkgs is used by default.
■ -minpkgs■ -recpkgs
-pkginfo
Specifies that pkg_path contains all filesets that the installdmpis about to install on all systems. The pkg_path is the completepath of a directory, usually NFS mounted.
-pkgpath pkg_path
Discovers and lists the 6.1 filesets installed on the systemsthat you specify.
-pkgset
Displays the DMP 6.1 filesets in the correct installation order.-pkgtable
Checks that the processes are running and otherpost-installation checks.
-postcheck
Verify that systems meet the installation requirements beforeproceeding with DMP installation.
Symantec recommends doing a precheck before you installDMP.
-precheck
Specifies the product for the operations.-prod
View a list of the recommended filesets and the patches thatare required for DMP. The installdmp lists the filesets andpatches in the correct installation order. The list does notinclude the optional filesets.
You can use the output to create scripts for command-lineinstallation, or for installations over a network.
See the -allpkgs and the -minpkgs options.
-recpkgs
130Installation scriptsCommand options for the installation script

Table A-1 installdmp options (continued)
DescriptionOption and Syntax
Specifies that the installer need not display the progress bardetails during the installation.
-redirect
Specifies an installer hot fix file.-require
View a list of required operating system version, requiredpatches, file system space, and other system requirements toinstall DMP.
-requirements
Perform automated DMP installation using the system and theconfiguration information that is stored in a specified file insteadof prompting for information.
The response_file must be a full path name. You must edit theresponse file to use it for subsequent installations. Variablefield definitions are defined within the file.
See “Installing DMP using response files” on page 51.
See “Upgrading DMP using response files” on page 51.
-responsefileresponse_file
Specifies that rsh and rcp are to be used for communicationbetween systems instead of ssh and scp. This option requiresthat systems be preconfigured such that rsh commandsbetween systems execute without prompting for passwords orconfirmations
-rsh
Performs the installation, uninstallation, start, and stopoperations on the systems in a serial fashion. By default, theinstaller performs these operations simultaneously on all thesystems.
-serial
Specify this option when you want to set tunable parametersafter you install and configure a product. You may need torestart processes of the product for the tunable parametervalues to take effect. You must use this option together withthe -tunablesfile option.
-settunables
131Installation scriptsCommand options for the installation script

Table A-1 installdmp options (continued)
DescriptionOption and Syntax
Starts the daemons and processes for DMP.
If the installdmp failed to start up all the DMP processes, youcan use the -stop option to stop all the processes and then usethe -start option to start the processes.
See the -stop option.
See “Starting and stopping processes for the Symantecproducts ” on page 89.
-start
Stops the daemons and processes for DMP.
If the installdmp failed to start up all the DMP processes, youcan use the -stop option to stop all the processes and then usethe -start option to start the processes.
See the -start option.
See “Starting and stopping processes for the Symantecproducts ” on page 89.
-stop
The -timeout option is used to specify the number of secondsthat the script must wait for each command to complete beforetiming out. Setting the -timeout option overrides the defaultvalue of 1200 seconds. Setting the -timeout option to 0prevents the script from timing out. The -timeout option doesnot work with the -serial option.
-timeout
Specifies that tmp_path is the working directory for installdmp.This path is different from the /var/tmp path. This destinationis where the installdmp performs the initial logging and wherethe installdmp copies the filesets on remote systems beforeinstallation.
-tmppath tmp_path
Lists all supported tunables and create a tunables file template.-tunables
Specify this option when you specify a tunables file. Thetunables file should include tunable parameters.
-tunablesfile
Upgrades the installed filesets on the systems that you specify.-upgrade
132Installation scriptsCommand options for the installation script

Table A-1 installdmp options (continued)
DescriptionOption and Syntax
Checks and reports the installed products and their versions.Identifies the installed and missing filesets and patches whereapplicable for the product. Provides a summary that includesthe count of the installed and any missing filesets and patcheswhere applicable. Lists the installed patches, hot fixes, andavailable updates for the installed product if an Internetconnection is available.
-version
Command options for uninstall scriptThe uninstalldmp command usage takes the following form:
uninstalldmp [ <sys1> <sys2>... ]
[ -require <installer_hot_fix_file> ]
[ -responsefile <response_file> ]
[ -logpath <log_path> ]
[ -tmppath <tmp_path> ]
[ -timeout <timeout_value> ]
[ -hostfile <hostfile_path> ]
[ -keyfile <ssh_key_file> ]
[ -prod <product_name> ]
[ -hotfix_path <hotfix_path> ]
[ -hotfix2_path <hotfix2_path> ]
[ -hotfix3_path <hotfix3_path> ]
[ -hotfix4_path <hotfix4_path> ]
[ -hotfix5_path <hotfix5_path> ]
[ -serial | -rsh | -redirect | -makeresponsefile | -comcleanup
| -comsetup | -version | -noipc | -disable_dmp_native_support ]
Table A-2 lists the uninstalldmp command options.
Table A-2 uninstalldmp options
DescriptionOption and Syntax
The -comcleanup option removes the ssh or rsh configurationadded by installer on the systems. The option is only requiredwhen installation routines that performed auto-configuration ofssh or rsh are abruptly terminated.
-comcleanup
133Installation scriptsCommand options for uninstall script

Table A-2 uninstalldmp options (continued)
DescriptionOption and Syntax
Specifies the location of a file that contains the system namesfor the installer.
-hostfilefull_path_to_file
Disables Dynamic Multi-pathing support for the native LVMvolume groups and ZFS pools during upgrade. RetainingDynamic Multi-pathing support for the native LVM volumegroups and ZFS pools during upgrade increases fileset upgradetime depending on the number of LUNs and native LVM volumegroups and ZFS pools configured on the system.
-disable_dmp_native_support
Defines the path of a hot fix level release to be integrated witha base or a maintenance level release in order for multiplereleases to be simultaneously installed .
-hotfix_path
Defines the path of a second hot fix level release to beintegrated with a base or a maintenance level release in orderfor multiple releases to be simultaneously installed.
-hotfix2_path
Defines the path of a third hot fix level release to be integratedwith a base or a maintenance level release in order for multiplereleases to be simultaneously installed.
-hotfix3_path
Defines the path of a fourth hot fix level release to be integratedwith a base or a maintenance level release in order for multiplereleases to be simultaneously installed.
-hotfix4_path
Defines the path of a fifth hot fix level release to be integratedwith a base or a maintenance level release in order for multiplereleases to be simultaneously installed.
-hotfix5_path
Specifies a key file for SSH. The option passes -issh_key_file with each SSH invocation.
-keyfilessh_key_file
Specifies that log_path, not /opt/VRTS/install/logs, is thelocation where uninstalldmp log files, summary file, andresponse file are saved.
-logpath log_path
Use this option to create a response file or to verify that yoursystem configuration is ready for uninstalling DMP.
-makeresponsefile
Displays progress details without showing progress bar.-redirect
Specifies an installer hot fix file.-require
134Installation scriptsCommand options for uninstall script

Table A-2 uninstalldmp options (continued)
DescriptionOption and Syntax
Perform automated DMP uninstallation using the system andthe configuration information that is stored in a specified fileinstead of prompting for information.
The response_file must be a full path name. You must edit theresponse file to use it for subsequent installations. Variablefield definitions are defined within the file.
See “Uninstalling DMP using response files” on page 52.
-responsefileresponse_file
Specifies that rsh and rcp are to be used for communicationbetween systems instead of ssh and scp. This option requiresthat systems be preconfigured such that rsh commandsbetween systems execute without prompting for passwords orconfirmations
-rsh
Performs the installation, uninstallation, start, and stopoperations on the systems in a serial fashion. By default, theinstaller performs these operations simultaneously on all thesystems.
-serial
Specifies that tmp_path is the working directory foruninstalldmp. This path is different from the /var/tmp path. Thisdestination is where the uninstalldmp performs the initial loggingand where the installdmp copies the filesets on remote systemsbefore installation.
-tmppath tmp_path
The -timeout option is used to specify the number of secondsthat the script should wait for each command to complete beforetiming out. Setting the -timeout option overrides the defaultvalue of 1200 seconds. Setting the -timeout option to 0 willprevent the script from timing out. The -timeout option doesnot work with the -serial option.
-timeout
Checks and reports the installed products and their versions.Identifies the installed and missing filesets and patches whereapplicable for the product. Provides a summary that includesthe count of the installed and any missing filesets and patcheswhere applicable.
-version
135Installation scriptsCommand options for uninstall script

Tunable files for installation
This appendix includes the following topics:
■ About setting tunable parameters using the installer or a response file
■ Setting tunables for an installation, configuration, or upgrade
■ Setting tunables with no other installer-related operations
■ Setting tunables with an un-integrated response file
■ Preparing the tunables file
■ Setting parameters for the tunables file
■ Tunables value parameter definitions
About setting tunable parameters using the installeror a response file
You can set non-default product and system tunable parameters using a tunablesfile. With the file, you can set tunables such as the I/O policy or toggle nativemulti-pathing. The tunables file passes arguments to the installer script to settunables. With the file, you can set the tunables for the following operations:
■ When you install, configure, or upgrade systems.
# ./installer -tunablesfile tunables_file_name
See “Setting tunables for an installation, configuration, or upgrade” on page 137.
■ When you apply the tunables file with no other installer-related operations.
# ./installer -tunablesfile tunables_file_name -settunables [
sys1 sys2 ...]
BAppendix

See “Setting tunables with no other installer-related operations” on page 138.
■ When you apply the tunables file with an un-integrated response file.
# ./installer -responsefile response_file_name -tunablesfile
tunables_file_name
See “Setting tunables with an un-integrated response file” on page 139.
See “About response files” on page 50.
You must select the tunables that you want to use from this guide.
See “Tunables value parameter definitions” on page 141.
Setting tunables for an installation, configuration, orupgrade
You can use a tunables file for installation procedures to set non-default tunables.You invoke the installation script with the tunablesfile option. The tunables filepasses arguments to the script to set the selected tunables. You must select thetunables that you want to use from this guide.
See “Tunables value parameter definitions” on page 141.
Note: Certain tunables only take effect after a system reboot.
To set the non-default tunables for an installation, configuration, or upgrade
1 Prepare the tunables file.
See “Preparing the tunables file” on page 140.
2 Make sure the systems where you want to install DMP meet the installationrequirements.
3 Complete any preinstallation tasks.
4 Copy the tunables file to one of the systems where you want to install, configure,or upgrade the product.
5 Mount the product disc and navigate to the directory that contains the installationprogram.
137Tunable files for installationSetting tunables for an installation, configuration, or upgrade

6 Start the installer for the installation, configuration, or upgrade. For example:
# ./installer -tunablesfile /tmp/tunables_file
-settunables [sys1 sys2 ...]
Where /tmp/tunables_file is the full path name for the tunables file.
7 Proceed with the operation. When prompted, accept the tunable parameters.
Certain tunables are only activated after a reboot. Review the output carefullyto determine if the system requires a reboot to set the tunable value.
8 The installer validates the tunables. If an error occurs, exit the installer andcheck the tunables file.
Setting tunables with no other installer-relatedoperations
You can use the installer to set tunable parameters without any other installer-relatedoperations. You must use the parameters described in this guide. Note that manyof the parameters are product-specific. You must select the tunables that you wantto use from this guide.
See “Tunables value parameter definitions” on page 141.
Note: Certain tunables only take effect after a system reboot.
To set tunables with no other installer-related operations
1 Prepare the tunables file.
See “Preparing the tunables file” on page 140.
2 Make sure the systems where you want to install DMP meet the installationrequirements.
3 Complete any preinstallation tasks.
4 Copy the tunables file to one of the systems that you want to tune.
5 Mount the product disc and navigate to the directory that contains the installationprogram.
6 Start the installer with the -settunables option.
# ./installer -tunablesfile tunables_file_name -settunables [
sys123 sys234 ...]
Where /tmp/tunables_file is the full path name for the tunables file.
138Tunable files for installationSetting tunables with no other installer-related operations

7 Proceed with the operation. When prompted, accept the tunable parameters.
Certain tunables are only activated after a reboot. Review the output carefullyto determine if the system requires a reboot to set the tunable value.
8 The installer validates the tunables. If an error occurs, exit the installer andcheck the tunables file.
Setting tunables with an un-integrated response fileYou can use the installer to set tunable parameters with an un-integrated responsefile. You must use the parameters described in this guide. Note that many of theparameters are product-specific. You must select the tunables that you want to usefrom this guide.
See “Tunables value parameter definitions” on page 141.
Note: Certain tunables only take effect after a system reboot.
To set tunables with an un-integrated response file
1 Make sure the systems where you want to install DMP meet the installationrequirements.
2 Complete any preinstallation tasks.
3 Prepare the tunables file.
See “Preparing the tunables file” on page 140.
4 Copy the tunables file to one of the systems that you want to tune.
5 Mount the product disc and navigate to the directory that contains the installationprogram.
6 Start the installer with the -responsefile and -tunablesfile options.
# ./installer -responsefile response_file_name -tunablesfile
tunables_file_name
Where response_file_name is the full path name for the response file andtunables_file_name is the full path name for the tunables file.
7 Certain tunables are only activated after a reboot. Review the output carefullyto determine if the system requires a reboot to set the tunable value.
8 The installer validates the tunables. If an error occurs, exit the installer andcheck the tunables file.
139Tunable files for installationSetting tunables with an un-integrated response file

Preparing the tunables fileA tunables file is a Perl module and consists of an opening and closing statement,with the tunables defined between. Use the hash symbol at the beginning of theline to comment out the line. The tunables file opens with the line "our %TUN;" andends with the return true "1;" line. The final return true line only needs to appearonce at the end of the file. Define each tunable parameter on its own line.
You can use the installer to create a tunables file template, or manually formattunables files you create.
To create a tunables file template
◆ Start the installer with the -tunables option. Enter the following:
# ./installer -tunables
You see a list of all supported tunables, and the location of the tunables filetemplate.
To manually format tunables files
◆ Format the tunable parameter as follows:
$TUN{"tunable_name"}{"system_name"|"*"}=value_of_tunable;
For the system_name, use the name of the system, its IP address, or a wildcardsymbol. The value_of_tunable depends on the type of tunable you are setting. Endthe line with a semicolon.
The following is an example of a tunables file.
#
# Tunable Parameter Values:
#
our %TUN;
$TUN{"tunable1"}{"*"}=1024;
$TUN{"tunable3"}{"sys123"}="SHA256";
1;
Setting parameters for the tunables fileEach tunables file defines different tunable parameters. The values that you canuse are listed in the description of each parameter. Select the tunables that youwant to add to the tunables file and then configure each parameter.
140Tunable files for installationPreparing the tunables file

See “Tunables value parameter definitions” on page 141.
Each line for the parameter value starts with $TUN. The name of the tunable is incurly brackets and double-quotes. The system name is enclosed in curly bracketsand double-quotes. Finally define the value and end the line with a semicolon, forexample:
$TUN{"dmp_daemon_count"}{"node123"}=16;
In this example, you are changing the dmp_daemon_count value from its defaultof 10 to 16. You can use the wildcard symbol "*" for all systems. For example:
$TUN{"dmp_daemon_count"}{"*"}=16;
Tunables value parameter definitionsWhen you create a tunables file for the installer you can only use the parametersin the following list.
Prior to making any updates to the tunables, refer to the Symantec StorageFoundation Cluster File System High Availability Administrator's Guide for detailedinformation on product tunable ranges and recommendations.
Table B-1 describes the supported tunable parameters that can be specified in atunables file.
Table B-1 Supported tunable parameters
DescriptionTunable
(Veritas Volume Manager) Enable reminoringin case of conflicts during disk group import.
autoreminor
(Veritas Volume Manager) Enable theautomatic recovery of volumes.
autostartvolumes
(Symantec Dynamic Multi-Pathing) Whetherthe first open on a device performed by anarray support library (ASL) is cached.
dmp_cache_open
(Symantec Dynamic Multi-Pathing) Thenumber of kernel threads for DMPadministrative tasks.
dmp_daemon_count
(Symantec Dynamic Multi-Pathing) The timeinterval for which DMP delays the errorprocessing if the device is busy.
dmp_delayq_interval
141Tunable files for installationTunables value parameter definitions
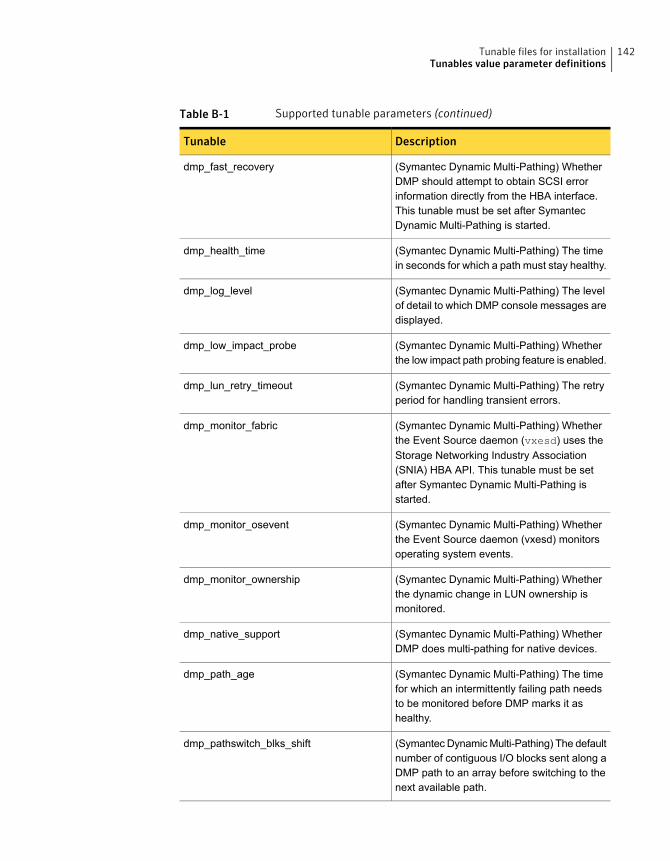
Table B-1 Supported tunable parameters (continued)
DescriptionTunable
(Symantec Dynamic Multi-Pathing) WhetherDMP should attempt to obtain SCSI errorinformation directly from the HBA interface.This tunable must be set after SymantecDynamic Multi-Pathing is started.
dmp_fast_recovery
(Symantec Dynamic Multi-Pathing) The timein seconds for which a path must stay healthy.
dmp_health_time
(Symantec Dynamic Multi-Pathing) The levelof detail to which DMP console messages aredisplayed.
dmp_log_level
(Symantec Dynamic Multi-Pathing) Whetherthe low impact path probing feature is enabled.
dmp_low_impact_probe
(Symantec Dynamic Multi-Pathing) The retryperiod for handling transient errors.
dmp_lun_retry_timeout
(Symantec Dynamic Multi-Pathing) Whetherthe Event Source daemon (vxesd) uses theStorage Networking Industry Association(SNIA) HBA API. This tunable must be setafter Symantec Dynamic Multi-Pathing isstarted.
dmp_monitor_fabric
(Symantec Dynamic Multi-Pathing) Whetherthe Event Source daemon (vxesd) monitorsoperating system events.
dmp_monitor_osevent
(Symantec Dynamic Multi-Pathing) Whetherthe dynamic change in LUN ownership ismonitored.
dmp_monitor_ownership
(Symantec Dynamic Multi-Pathing) WhetherDMP does multi-pathing for native devices.
dmp_native_support
(Symantec Dynamic Multi-Pathing) The timefor which an intermittently failing path needsto be monitored before DMP marks it ashealthy.
dmp_path_age
(Symantec Dynamic Multi-Pathing) The defaultnumber of contiguous I/O blocks sent along aDMP path to an array before switching to thenext available path.
dmp_pathswitch_blks_shift
142Tunable files for installationTunables value parameter definitions

Table B-1 Supported tunable parameters (continued)
DescriptionTunable
(Symantec Dynamic Multi-Pathing) Whetherthe path restoration kernel thread probes idleLUNs.
dmp_probe_idle_lun
(Symantec Dynamic Multi-Pathing) Thenumber of paths will be probed by the restoredaemon.
dmp_probe_threshold
(Symantec Dynamic Multi-Pathing) Thenumber of cycles between running thecheck_all policy when the restore policy ischeck_periodic.
dmp_restore_cycles
(Symantec Dynamic Multi-Pathing) The timeinterval in seconds the restore daemonanalyzes the condition of paths.
dmp_restore_interval
(Symantec Dynamic Multi-Pathing) The policyused by DMP path restoration thread.
dmp_restore_policy
(Symantec Dynamic Multi-Pathing) Whetherkernel thread for DMP path restoration isstarted.
dmp_restore_state
(Symantec Dynamic Multi-Pathing) Thenumber of times a path reports a path busyerror consecutively before DMP marks thepath as failed.
dmp_retry_count
(Symantec Dynamic Multi-Pathing) Thetimeout value for any SCSI command sent viaDMP.
dmp_scsi_timeout
(Symantec Dynamic Multi-Pathing) The statusof the subpaths failover group (SFG) feature.
dmp_sfg_threshold
(Symantec Dynamic Multi-Pathing) The timeinterval between gathering DMP statistics.
dmp_stat_interval
(Veritas Volume Manager) The file systemusage threshold for SmartMove (percent). Thistunable must be set after Veritas VolumeManager is started.
fssmartmovethreshold
143Tunable files for installationTunables value parameter definitions

Table B-1 Supported tunable parameters (continued)
DescriptionTunable
(Veritas Volume Manager) Time of day to startreclamation for deleted volumes. This tunablemust be set after Veritas Volume Manager isstarted.
reclaim_on_delete_start_time
(Veritas Volume Manager) Days to wait beforestarting reclamation for deleted volumes. Thistunable must be set after Veritas VolumeManager is started.
reclaim_on_delete_wait_period
(Veritas Volume Manager) Use the samefencing key for all disk groups. This tunablemust be set after Veritas Volume Manager isstarted.
same_key_for_alldgs
(Veritas Volume Manager) Start of range touse for minor numbers for shared disk groups.This tunable must be set after Veritas VolumeManager is started.
sharedminorstart
(Veritas Volume Manager) The CVM storageconnectivity type. This tunable must be setafter Veritas Volume Manager is started.
storage_connectivity
(Veritas Volume Manager) ConfigureSmartMove feature (all, thinonly, none). Thistunable must be set after Veritas VolumeManager is started.
usefssmartmove
144Tunable files for installationTunables value parameter definitions

Configuring the secure shellor the remote shell forcommunications
This appendix includes the following topics:
■ About configuring secure shell or remote shell communication modes beforeinstalling products
■ Manually configuring and passwordless ssh
■ Restarting the ssh session
■ Enabling rsh for AIX
About configuring secure shell or remote shellcommunication modes before installing products
Establishing communication between nodes is required to install Symantec softwarefrom a remote system, or to install and configure a system. The system from whichthe installer is run must have permissions to run rsh (remote shell) or ssh (secureshell) utilities. You need to run the installer with superuser privileges on the systemswhere you plan to install Symantec software.
You can install products to remote systems using either secure shell (ssh) or remoteshell (rsh). Symantec recommends that you use ssh as it is more secure than rsh.
This section contains an example of how to set up ssh password free communication.The example sets up ssh between a source system (sys1) that contains theinstallation directories, and a target system (sys2). This procedure also applies tomultiple target systems.
CAppendix

Note: The script- and web-based installers support establishing passwordlesscommunication for you.
Manually configuring and passwordless sshThe ssh program enables you to log into and execute commands on a remotesystem. ssh enables encrypted communications and an authentication processbetween two untrusted hosts over an insecure network.
In this procedure, you first create a DSA key pair. From the key pair, you appendthe public key from the source system to the authorized_keys file on the targetsystems.
Figure C-1 illustrates this procedure.
Figure C-1 Creating the DSA key pair and appending it to target systems
Source System: sys1 Target System: sys2
PrivateKey
PublicKey
authorized_keysfile
Read the ssh documentation and online manual pages before enabling ssh. Contactyour operating system support provider for issues regarding ssh configuration.
Visit the OpenSSH website that is located at: http://openssh.org to access onlinemanuals and other resources.
146Configuring the secure shell or the remote shell for communicationsManually configuring and passwordless ssh

To create the DSA key pair
1 On the source system (sys1), log in as root, and navigate to the root directory.
sys1 # cd /
2 Make sure the /.ssh directory is on all the target installation systems (sys2 inthis example). If that directory is not present, create it on all the target systemsand set the write permission to root only:
sys2 # mkdir /.ssh
Change the permissions of this directory, to secure it.
sys2 # chmod go-w /.ssh
3 To generate a DSA key pair on the source system, type the following command:
sys1 # ssh-keygen -t dsa
System output similar to the following is displayed:
Generating public/private dsa key pair.
Enter file in which to save the key (//.ssh/id_dsa):
4 Press Enter to accept the default location of /.ssh/id_dsa.
5 When the program asks you to enter the passphrase, press the Enter key twice.
Enter passphrase (empty for no passphrase):
Do not enter a passphrase. Press Enter.
Enter same passphrase again:
Press Enter again.
147Configuring the secure shell or the remote shell for communicationsManually configuring and passwordless ssh

To append the public key from the source system to the authorized_keys file onthe target system, using secure file transfer
1 From the source system (sys1), move the public key to a temporary file on thetarget system (sys2).
Use the secure file transfer program.
In this example, the file name id_dsa.pub in the root directory is the name forthe temporary file for the public key.
Use the following command for secure file transfer:
sys1 # sftp sys2
If the secure file transfer is set up for the first time on this system, output similarto the following lines is displayed:
Connecting to sys2 ...
The authenticity of host 'sys2 (10.182.00.00)'
can't be established. DSA key fingerprint is
fb:6f:9f:61:91:9d:44:6b:87:86:ef:68:a6:fd:88:7d.
Are you sure you want to continue connecting (yes/no)?
2 Enter yes.
Output similar to the following is displayed:
Warning: Permanently added 'sys2,10.182.00.00'
(DSA) to the list of known hosts.
root@sys2 password:
3 Enter the root password of sys2.
4 At the sftp prompt, type the following command:
sftp> put /.ssh/id_dsa.pub
The following output is displayed:
Uploading /.ssh/id_dsa.pub to /id_dsa.pub
5 To quit the SFTP session, type the following command:
sftp> quit
148Configuring the secure shell or the remote shell for communicationsManually configuring and passwordless ssh

6 To begin the ssh session on the target system (sys2 in this example), type thefollowing command on sys1:
sys1 # ssh sys2
Enter the root password of sys2 at the prompt:
password:
7 After you log in to sys2, enter the following command to append the id_dsa.pub
file to the authorized_keys file:
sys2 # cat /id_dsa.pub >> /.ssh/authorized_keys
8 After the id_dsa.pub public key file is copied to the target system (sys2), andadded to the authorized keys file, delete it. To delete the id_dsa.pub publickey file, enter the following command on sys2:
sys2 # rm /id_dsa.pub
9 To log out of the ssh session, enter the following command:
sys2 # exit
10 Run the following commands on the source installation system. If your sshsession has expired or terminated, you can also run these commands to renewthe session. These commands bring the private key into the shell environmentand make the key globally available to the user root:
sys1 # exec /usr/bin/ssh-agent $SHELL
sys1 # ssh-add
Identity added: //.ssh/id_dsa
This shell-specific step is valid only while the shell is active. You must executethe procedure again if you close the shell during the session.
149Configuring the secure shell or the remote shell for communicationsManually configuring and passwordless ssh

To verify that you can connect to a target system
1 On the source system (sys1), enter the following command:
sys1 # ssh -l root sys2 uname -a
where sys2 is the name of the target system.
2 The command should execute from the source system (sys1) to the targetsystem (sys2) without the system requesting a passphrase or password.
3 Repeat this procedure for each target system.
Restarting the ssh sessionAfter you complete this procedure, ssh can be restarted in any of the followingscenarios:
■ After a terminal session is closed
■ After a new terminal session is opened
■ After a system is restarted
■ After too much time has elapsed, to refresh ssh
To restart ssh
1 On the source installation system (sys1), bring the private key into the shellenvironment.
sys1 # exec /usr/bin/ssh-agent $SHELL
2 Make the key globally available for the user root
sys1 # ssh-add
Enabling rsh for AIXTo enable rsh, create a /.rhosts file on each target system. Then add a line tothe file specifying the full domain name of the source system. For example, addthe line:
sysname.domainname.com root
Change permissions on the /.rhosts file to 600 by typing the following command:
# chmod 600 /.rhosts
150Configuring the secure shell or the remote shell for communicationsRestarting the ssh session

After you complete an installation procedure, delete the .rhosts file from eachtarget system to ensure security:
# rm -f /.rhosts
151Configuring the secure shell or the remote shell for communicationsEnabling rsh for AIX

DMP components
This appendix includes the following topics:
■ Symantec Dynamic Multi-Pathing installation filesets
SymantecDynamicMulti-Pathing installation filesetsTable D-1 shows the fileset name and contents for each English language filesetfor Symantec Dynamic Multi-Pathing. The table also gives you guidelines for whichfilesets to install based whether you want the minimum, recommended, or advancedconfiguration.
Table D-1 Symantec Dynamic Multi-Pathing filesets
ConfigurationContentsfilesets
MinimumSymantec Array Support Library (ASL)and Array Policy Module(APM) binaries
Required for the support andcompatibility of various storage arrays.
VRTSaslapm
MinimumPerl 5.16.1 for Symantec.VRTSperl
MinimumSymantec Kernel Interface
Contains a common set of modules thatother Symantec drivers use.
VRTSveki
MinimumSymantec License Utilities
Installs the license key layout filesrequired to decode the StorageFoundation license keys. Provides thestandard license key utilities vxlicrep,vxlicinst, and vxlictest.
VRTSvlic
DAppendix

Table D-1 Symantec Dynamic Multi-Pathing filesets (continued)
ConfigurationContentsfilesets
MinimumSymantec Volume Manager binariesVRTSvxvm
MinimumSymantec Storage Foundation CommonProduct Installer
The Storage Foundation CommonProduct installer fileset contains thescripts that perform the following:
■ installation■ configuration■ upgrade■ uninstallation■ adding nodes■ removing nodes■ etc.
You can use this script to simplify thenative operating system installations,configurations, and upgrades.
VRTSsfcpi61
RecommendedSymantec Storage Foundation ManagedHost
Discovers configuration information ona Storage Foundation managed host.This information is stored on a centraldatabase, which is not part of thisrelease. You must download thedatabase separately at:
http://www.symantec.com/business/storage-foundation-manager
VRTSsfmh
RecommendedSymantec Software Support ToolsVRTSspt
153DMP componentsSymantec Dynamic Multi-Pathing installation filesets

Troubleshootinginstallation issues
This appendix includes the following topics:
■ Restarting the installer after a failed connection
■ What to do if you see a licensing reminder
■ Troubleshooting an installation on AIX
■ Incorrect permissions for root on remote system
■ Resource temporarily unavailable
■ Inaccessible system
Restarting the installer after a failed connectionIf an installation is killed because of a failed connection, you can restart the installerto resume the installation. The installer detects the existing installation. The installerprompts you whether you want to resume the installation. If you resume theinstallation, the installation proceeds from the point where the installation failed.
What to do if you see a licensing reminderIn this release, you can install without a license key. In order to comply with theEnd User License Agreement, you must either install a license key or make thehost managed by a Management Server. If you do not comply with these termswithin 60 days, the following warning messages result:
EAppendix

WARNING V-365-1-1 This host is not entitled to run Symantec Storage
Foundation/Symantec Cluster Server.As set forth in the End User
License Agreement (EULA) you must complete one of the two options
set forth below. To comply with this condition of the EULA and
stop logging of this message, you have <nn> days to either:
- make this host managed by a Management Server (see
http://go.symantec.com/sfhakeyless for details and free download),
or
- add a valid license key matching the functionality in use on this host
using the command 'vxlicinst' and validate using the command
'vxkeyless set NONE'.
To comply with the terms of the EULA, and remove these messages, you must doone of the following within 60 days:
■ Install a valid license key corresponding to the functionality in use on the host.After you install the license key, you must validate the license key using thefollowing command:
# /opt/VRTS/bin/vxlicrep
■ Continue with keyless licensing by managing the server or cluster with amanagement server.For more information about keyless licensing, see the following URL:http://go.symantec.com/sfhakeyless
Troubleshooting an installation on AIXSave a copy of /var/adm/ras/errtmplt and /etc/trcfmt files before you installthe product. If the filesets fail to install due to the template file is corrupted
error message, replace /var/adm/ras/errtmplt file and /etc/trcfmt file with theones that you had saved, uninstall all the filesets installed.
Then reinstall.
Incorrect permissions for root on remote systemThe permissions are inappropriate. Make sure you have remote root accesspermission on each system to which you are installing.
Failed to setup rsh communication on 10.198.89.241:
'rsh 10.198.89.241 <command>' failed
155Troubleshooting installation issuesTroubleshooting an installation on AIX

Trying to setup ssh communication on 10.198.89.241.
Failed to setup ssh communication on 10.198.89.241:
Login denied
Failed to login to remote system(s) 10.198.89.241.
Please make sure the password(s) are correct and superuser(root)
can login to the remote system(s) with the password(s).
If you want to setup rsh on remote system(s), please make sure
rsh with command argument ('rsh <host> <command>') is not
denied by remote system(s).
Either ssh or rsh is needed to be setup between the local node
and 10.198.89.241 for communication
Would you like the installer to setup ssh/rsh communication
automatically between the nodes?
Superuser passwords for the systems will be asked. [y,n,q] (y) n
System verification did not complete successfully
The following errors were discovered on the systems:
The ssh permission denied on 10.198.89.241
rsh exited 1 on 10.198.89.241
either ssh or rsh is needed to be setup between the local node
and 10.198.89.241 for communication
Suggested solution: You need to set up the systems to allow remote access usingssh or rsh.
See “About configuring secure shell or remote shell communication modes beforeinstalling products” on page 145.
Note: Remove remote shell permissions after completing the DMP installation andconfiguration.
Resource temporarily unavailableIf the installation fails with the following error message on the console:
fork() failed: Resource temporarily unavailable
156Troubleshooting installation issuesResource temporarily unavailable

The value of maximum number of processes allowed per user may not be largeenough. This kernel attribute is a tunable and can be changed on any node of thecluster.
To determine the current value of "Maximum number of PROCESSES allowed peruser", enter:
# lsattr -H -E -l sys0 -a maxuproc
To see the default value of this tunable and its valid range of values, enter:
# odmget -q "attribute=maxuproc" PdAt
If necessary, you can change the value of the tunable using the smitty interface:
# smitty chgsys
You can also directly change the CuAt class using the following command:
# chdev -l sys0 -a maxuproc=600
Increasing the value of the parameter takes effect immediately; otherwise the changetakes effect after a reboot.
See the smitty and chdev manual pages.
Inaccessible systemThe system you specified is not accessible. This could be for a variety of reasonssuch as, the system name was entered incorrectly or the system is not availableover the network.
Suggested solution: Verify that you entered the system name correctly; use theping(1M) command to verify the accessibility of the host.
157Troubleshooting installation issuesInaccessible system

Compatibility issues wheninstalling DMP with otherproducts
This appendix includes the following topics:
■ Installing, uninstalling, or upgrading Storage Foundation products when otherSymantec products are present
■ Installing, uninstalling, or upgrading Storage Foundation products when VOMis already present
■ Installing, uninstalling, or upgrading Storage Foundation products whenNetBackup is already present
Installing, uninstalling, or upgrading StorageFoundation products when other Symantec productsare present
Installing Storage Foundation when other Symantec products are installed cancreate compatibility issues. For example, installing Storage Foundation productswhen VOM, ApplicationHA, and NetBackup are present on the systems.
FAppendix

Installing, uninstalling, or upgrading StorageFoundation products when VOM is already present
If you plan to install or upgrade Storage Foundation products on systems whereVOM has already been installed, be aware of the following compatibility issues:
■ When you install or upgrade Storage Foundation products where VOM CentralServer is present, the installer skips the VRTSsfmh upgrade and leaves theVOM Central Server and Managed Host filesets as is.
■ When uninstalling Storage Foundation products where VOM Central Server ispresent, the installer does not uninstall VRTSsfmh.
■ When you install or upgrade Storage Foundation products where VOM ManagedHost is present, the installer gives warning messages that it will upgradeVRTSsfmh.
Installing, uninstalling, or upgrading StorageFoundation products when NetBackup is alreadypresent
If you plan to install or upgrade Storage Foundation on systems where NetBackuphas already been installed, be aware of the following compatibility issues:
■ When you install or upgrade Storage Foundation products where NetBackup ispresent, the installer does not uninstall VRTSpbx and VRTSicsco. It does notupgrade VRTSat.
■ When you uninstall Storage Foundation products where NetBackup is present,the installer does not uninstall VRTSpbx, VRTSicsco, and VRTSat.
159Compatibility issues when installing DMP with other productsInstalling, uninstalling, or upgrading Storage Foundation products when VOM is already present

Aabout
Deployment Server 66DMP 14installation and configuration methods 24installation preparation 33installation using operating system-specific
methods 56planning for installation 24response files 50SORT 15Symantec product licensing 27upgrading using an alternate disk 107Veritas Operations Manager 15web-based installer 44
assesing systeminstallation readiness 36
Bbefore using
web-based installer 45
Cchecking
installation readiness 36checking product versions 20configuring
rsh 34ssh 34
creatingbackups 96
Ddeploying
specific Symantec release 84Symantec product updates to your
environment 81deployment management
overview 68
deployment preferencessetting 71
Deployment Scriptinstalling 67
Deployment Serverabout 66setting up 68
Deployment Server command line optionfor loading and downloading the most recent
release information 73for specifying a non-default repository location 72
disablingexternal network connection attempts 22
disk space requirements 19DMP installation
preinstallation information 18downloading maintenance releases and hot fixes 20
IInstall Bundles
integration options 97installation
log files 89using the mksysb utility 59
installerabout the script-based installer 38
installer hot fixesobtaining either manually or automatically 21
installer program 40Installing
DMP with the web-based installer 47web-based installer 47
installingDMP 40, 121DMP using operating system-specific methods 56on NIM client using SMIT on NIM server 58operating system on the NIM client using
SMIT 59Symantec product license keys 30the Deployment Script 67using NIM 57
Index

installing (continued)using response files 51
Kkeyless licensing
setting or changing the product level 28
Llicensing
installing Symantec product license keys 30setting or changing the product level for keyless
licensing 28loading and downloading the most recent release
informationDeployment Server command line option for 73
Mmksysb
creating backup image 60installation 59installing image on alternate disk 61verifying installation 63
mountingsoftware disc 35
NNIM
installing 57preparing the installation bundle 57
NIM ADMpreparing the installation bundle 114preparing to upgrade 114supported upgrade paths 113upgrading DMP and the operating system 115verifying the upgrade 117
Oobtaining
installer hot fixes either automatically ormanually 21
security exception on Mozilla Firefox 46overview
deployment management 68
Pperforming
postcheck on a node 43
post-upgradeupdating variables 119verifying 119
precheckingusing the installer 37
preinstallation checkweb-based installer 47
preparing to upgrade 94using alternate disk 108
Rrelease images
viewing or downloading available 74release information
updating on systems without Internet access 85release notes 18releases
finding out which releases you have, and whichupgrades or updates you may need 82
removing Storage Foundation products usingSMIT 123
repository imagesviewing and removing repository images stored
in your repository 78response files
about 50installation 51syntax 52uninstalling 52upgrading 51variable definitions 53
rshconfiguration 34
Sscript-based installer
about 38setting
deployment preferences 71environment variables 34
setting upDeployment Server 68
simulataneous install or upgrade 97specifying
non-default repository location 72ssh
configuration 34
161Index

startingweb-based installer 45
supported upgrade pathsusing alternate disks 108using NIM ADM 113
Symantec product license keysinstalling 30
Symantec product updatesdeploying to your environment 81
Symantec productsstarting process 89stopping process 89
Symantec releasedeploying a specific release 84
Ttunables file
about setting parameters 136parameter definitions 141preparing 140setting for configuration 137setting for installation 137setting for upgrade 137setting parameters 140setting with no other operations 138setting with un-integrated response file 139
Uuninstalldmp command 121uninstalling
Storage Foundation products using SMIT 123using response files 52using the web-based installer 122
updating release informationon systems without Internet access 85
upgradearray support 96creating backups 96getting ready 94methods 92preparing for upgrade 95supported upgrade paths 93
upgrades or updatesfinding out which releases you have 82
upgradingAIX operating system 105DMP-enabled rootvg 102–103on a Virtual I/O server (VIOS) 104
upgrading (continued)on an alternate disk 110using product installer 100using response files 51using the web-based installer 101
upgrading using alternate diskpreparing to upgrade 108verifying 111
upgrading using alternate diskssupported upgrade paths 108
upgrading using an alternate diskabout 107supported upgrade scenarios 108
Vverifying
product installation 88upgrading using alternate disk 111
viewing and removing repository imagesstored in your repository 78
viewing or downloadingavailable release images 74
VIOS requirements 19
Wweb-based installer 47
about 44before using 45installation 47preinstallation check 47starting 45uninstalling 122upgrading 101
162Index