Sun Blade X6240 Server Module Operating System ...
94
Sun Microsystems, Inc. www.sun.com Submit comments about this document by clicking the Feedback[+] link at: http://docs.sun.com Sun Blade ™ X6240 Server Module Operating System Installation Guide Part No. 820-3969-11, Rev. A August 2009
-
Upload
khangminh22 -
Category
Documents
-
view
0 -
download
0
Transcript of Sun Blade X6240 Server Module Operating System ...

Sun Microsystems, Inc.www.sun.com
Submit comments about this document by clicking the Feedback[+] link at: http://docs.sun.com
Sun Blade™ X6240 Server ModuleOperating System Installation
Guide
Part No. 820-3969-11, Rev. AAugust 2009

PleaseRecycle
Copyright © 2009 Sun Microsystems, Inc., 4150 Network Circle, Santa Clara, California 95054, U.S.A. All rights reserved.
Sun Microsystems, Inc. has intellectual property rights relating to technology embodied in the product that is described in this document. Inparticular, and without limitation, these intellectual property rights may include one or more of the U.S. patents listed athttp://www.sun.com/patents and one or more additional patents or pending patent applications in the U.S. and in other countries.
Parts of the product may be derived from Berkeley BSD systems, licensed from the University of California. UNIX is a registered trademark inthe U.S. and in other countries, exclusively licensed through X/Open Company, Ltd.
Sun, Sun Microsystems, the Sun logo, Java, Solaris, OpenSolaris, Sun Blade, docs.sun.com, Sun Fire and the Solaris logo are trademarks orregistered trademarks of Sun Microsystems, Inc., or its subsidiaries, in the U.S. and other countries.
Microsoft is a trademark or registered trademark of Microsoft Corporation or its subsidiaries in the United States and Other countries. Windowsis a trademark or registered trademark of Microsoft Corporation or its subsidiaries in the United States and Other countries. The Adobe. logo isa registered trademark of Adobe Systems, Incorporated.
Use of any spare or replacement CPUs is limited to repair or one-for-one replacement of CPUs in products exported in compliance with U.S.export laws. Use of CPUs as product upgrades unless authorized by the U.S. Government is strictly prohibited.
DOCUMENTATION IS PROVIDED “AS IS” AND ALL EXPRESS OR IMPLIED CONDITIONS, REPRESENTATIONS AND WARRANTIES,INCLUDING ANY IMPLIED WARRANTY OF MERCHANTABILITY, FITNESS FOR A PARTICULAR PURPOSE OR NON-INFRINGEMENT,ARE DISCLAIMED, EXCEPT TO THE EXTENT THAT SUCH DISCLAIMERS ARE HELD TO BE LEGALLY INVALID.
Copyright © 2009 Sun Microsystems, Inc., 4150 Network Circle, Santa Clara, California 95054, Etats-Unis. Tous droits réservés.
Sun Microsystems, Inc. détient les droits de propriété intellectuels relatifs à la technologie incorporée dans le produit qui est décrit dans cedocument. En particulier, et ce sans limitation, ces droits de propriété intellectuelle peuvent inclure un ou plus des brevets américains listés àl’adresse http://www.sun.com/patents et un ou les brevets supplémentaires ou les applications de brevet en attente aux Etats - Unis et dans lesautres pays.
Des parties de ce produit pourront être dérivées des systèmes Berkeley BSD licenciés par l’Université de Californie. UNIX est une marquedéposée aux Etats-Unis et dans d’autres pays et licenciée exclusivement par X/Open Company, Ltd.
Sun, Sun Microsystems, le logo Sun, Java, Solaris, OpenSolaris, Sun Blade, docs.sun.com, Sun Fire et le logo Solaris sont des marques defabrique ou des marques déposée de Sun Microsystems, Inc., ou ses filiales, aux Etats-Unis et autres pays.
Microsoft sont est marques de fabrique ou des marques déposées de Microsoft Corporation ou de sa filiale aux Etats-Unis et dans d’autres pays.Windows est une marque de fabrique ou une marques déposée de Microsoft Corporation ou de sa filiale aux Etats-Unis et dans d’autres pays. Lelogo Adobe est une marque déposée de Adobe Systems, Incorporated.
L’utilisation de pieces detachees ou d’unites centrales de remplacement est limitee aux reparations ou a l’echange standard d’unites centralespour les produits exportes, conformement a la legislation americaine en matiere d’exportation. Sauf autorisation par les autorites des Etats-Unis, l’utilisation d’unites centrales pour proceder a des mises a jour de produits est rigoureusement interdite.
LA DOCUMENTATION EST FOURNIE “EN L’ETAT” ET TOUTES AUTRES CONDITIONS, DECLARATIONS ET GARANTIES EXPRESSESOU TACITES SONT FORMELLEMENT EXCLUES, DANS LA MESURE AUTORISEE PAR LA LOI APPLICABLE, Y COMPRIS NOTAMMENTTOUTE GARANTIE IMPLICITE RELATIVE A LA QUALITE MARCHANDE, A L’APTITUDE A UNE UTILISATION PARTICULIERE OU AL’ABSENCE DE CONTREFACON.

Contents
Preface ix
1. Overview 1
About Installing an Operating System on a Sun Blade X6240 Server Module 1
Supported Operating Systems 2
Installation Prerequisites 2
Installation Instructions 3
Installation Options 3
Related Documentation 4
2. Installing Red Hat Enterprise Linux 5
About the Red Hat Enterprise Linux Installation 5
Red Hat Installation and Administration Documentation 6
Task Map for the RHEL Installation 7
Preparing to Install the RHEL Operating System 7
Obtaining Updated RHEL Operating System Media Kits 8
Additional Software Updates or Patches 8
Installing the RHEL Operating System From Distribution Media 8
Before You Begin 8
Required Items 9
▼ To Install RHEL From Local Distribution Media 9
iii

Installing the RHEL OS Using the Remote Console Application 10
▼ To Install RHEL Using the ILOM Remote Console Application 10
Installing Red Hat Enterprise Linux Using PXE 11
Task Map for the RHEL Installation Using PXE 12
Preconfiguring a Network to Support PXE Installation of RHEL 12
Required Items 13
▼ To Configure a DHCP Server 13
▼ To Install Portmap on the DHCP Server 14
▼ To Configure the TFTP Service on the DHCP Server 14
▼ To Install and Configure the neopxe Boot Server Daemon 15
▼ To Configure the NFS Service on the DHCP Server 16
▼ To Disable the Firewall 17
Rebooting the PXE/DHCP Server 18
Installing the RHEL Operating System From a PXE Server 18
Before You Begin 18
▼ To Install a RHEL Operating System From a PXE Server 18
▼ To Update the RHEL Drivers 19
Updating the RHEL Operating System 20
▼ To Update the RHEL 4 Software 20
▼ To Update the RHEL 5 Software 20
3. Installing SUSE Linux Enterprise Server 10 23
About the SUSE Linux Installation 24
Installing the SLES 10 Operating System 24
SLES 10 Installation and Configuration Documentation 24
Task Map for the SLES 10 Installation 25
Preparing to Install the SLES 10 Operating System 26
Installing the SLES 10 Operating System From Distribution Media 26
Required Items 26
iv Sun Blade X6240 Server Module Operating System Installation Guide • August 2009

▼ To Install SLES 10 From Distribution Media 26
Installing SLES 10 Operating System Using the Remote ConsoleApplication 27
▼ To Install SLES 10 Using the Remote Console Application 27
Preconfiguring the Network to Support PXE Installation of SLES 10 28
Required Items 28
Configuring the DHCP Server 29
▼ To Configure the DHCP Server 29
Installing Portmap 30
▼ To Install Portmap 30
Configuring the TFTP Service 30
▼ To Configure the TFTP Service 31
Installing and Configuring the neopxe Boot Server Daemon 31
▼ To Install and Configure the neopxe Boot Server Daemon 31
Configuring the NFS Service 33
▼ To Configure the NFS Service 33
Disabling the Firewall 34
▼ To Disable the Firewall 34
Installing the SLES 10 Operating System Using PXE 35
Before You Begin 35
Task Map for the SLES 10 Installation 35
Required Items 35
Configuring a SLES 10 PXE Install Image on the PXE Server 36
Setting Up and Copying SLES 10 Operating System to a Directory 36
▼ To Set Up and Copy the SLES 10 Operating System to a Directory 36
Creating Links to SLES 10 PXE Files 37
▼ To Create Links to the SLES 10 PXE Files 37
Installing SLES 10 From a PXE Server 37
Before You Begin 38
Contents v

▼ To Install SLES 10 From a PXE Server 38
Updating the SLES 10 Operating System 38
▼ To Update the SLES Operating System 38
Updating the SLES Drivers 39
▼ To Update the SLES Drivers 39
4. Installing Solaris 10 41
About the Solaris 10 Installation 42
System Requirements 42
Download Solaris OS 43
Solaris Documentation 43
Installation Methods 44
Task Map for Solaris 10 Installation 46
Preparing to Install the Solaris Operating System 47
Installation Prerequisites 47
Booting a Server in a GRUB-Based Environment 48
Booting a Server Over the Network Using PXE 49
Before You Begin 49
▼ To Boot a Server Over the Network Using PXE 49
▼ Boot the server over the network using PXE. 50
Installing the Solaris Operating System From Distribution Media 50
▼ To Install the Solaris OS From Distribution Media 50
Installing the Solaris Operating System Using a Serial Console 51
Before You Begin 51
▼ To Install the Solaris Operating System Using a Serial Console 52
5. Installing OpenSolaris 55
About the OpenSolaris 10 Installation 55
System Requirements 56
Download OpenSolaris 56
vi Sun Blade X6240 Server Module Operating System Installation Guide • August 2009
OpenSolaris Documentation 57
Installation Methods 57
Task Map for OpenSolaris Installation 58
Installing OpenSolaris Operating System Using Local or Remote Media 59
Installation Prerequisites 59
▼ To Install OpenSolaris OS From Local or Remote Media. 60
Post OpenSolaris Installation Tasks 67
Install System Device Drivers to Support Additional Hardware 67
Install OpenSolaris Support Repository Updates 67
Enable Option for Wake On LAN 67
6. Installing VMware ESX Server 3.5 Software 69
Before You Begin 69
Task Map for VMware ESX Server 3.5 Installation 70
VMware Installation and Administration Documentation 70
Planning Network Interfaces 71
Select an Installation Method 71
VMware ESX Server 3.5 Update 1 Installation Overview 72
Downloading the VMware ESX Server 3.5 ISO Image 72
▼ To Download the VMware ESX Server 3.5 ISO Image 72
Installing the VMware ESX Server 3.5 From a Remote CD or RemoteISO Image 73
▼ To Install VMware ESX Server 3.5 From a Remote CD or RemoteISO Image 73
Installing the VMware ESX Server 3.5 Update 1 From a Local CD 75
Required Items 75
▼ To Install VMware ESX Server 3.5 From a Local CD 75
Updating the VMware Server 3.5 Software With Updates and Patches 77
Index 79
Contents vii

viii Sun Blade X6240 Server Module Operating System Installation Guide • August 2009

Preface
This Sun Blade X6240 Server Module Operating System Installation Guide containsoperating system installation and initial software configuration procedures forbringing the server module to a configurable and usable state.
Product UpdatesFor product updates that you can download for the Sun Blade X6240 server module,visit the following web site:
http://www.sun.com/download/index.jsp.
Find the Hardware Drivers section and click x64 Servers & Workstations. The SunBlade X6240 server module site contains updates for firmware and drivers, as well asCD-ROM .iso images.
Related DocumentationFor a description of the document set for the Sun Blade X6240 Server Module, see theSun Blade X6240 Server Module Getting Started Guide (820-3975) that is packed withyour server module and also posted at the product's documentation site. Go to thefollowing URL, then navigate to the Sun Blade X6240 product documentation:
http://docs.sun.com/
The documents listed in the following table are available at that site.
ix
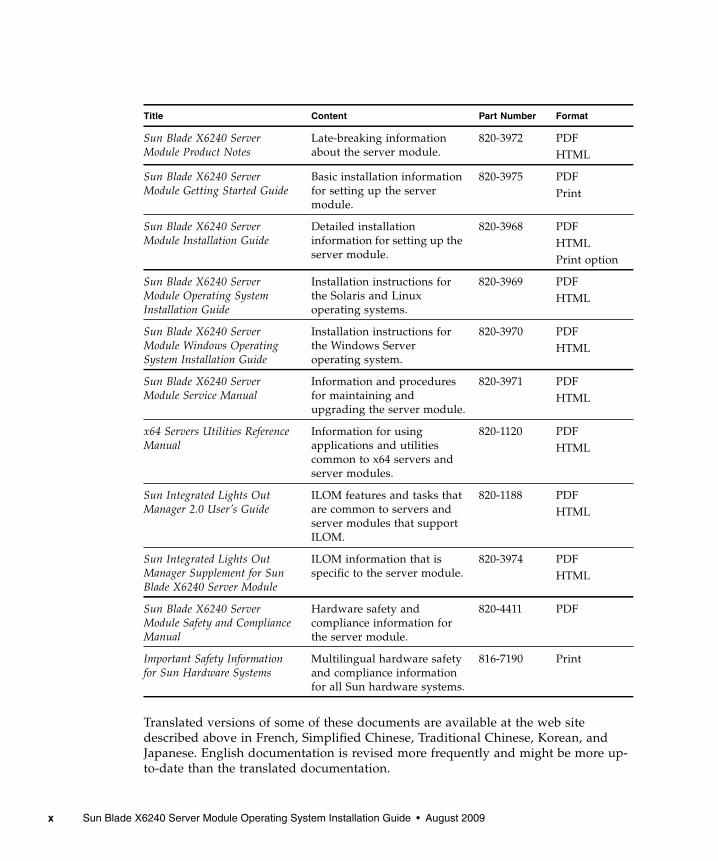
Translated versions of some of these documents are available at the web sitedescribed above in French, Simplified Chinese, Traditional Chinese, Korean, andJapanese. English documentation is revised more frequently and might be more up-to-date than the translated documentation.
Title Content Part Number Format
Sun Blade X6240 ServerModule Product Notes
Late-breaking informationabout the server module.
820-3972 PDFHTML
Sun Blade X6240 ServerModule Getting Started Guide
Basic installation informationfor setting up the servermodule.
820-3975 PDFPrint
Sun Blade X6240 ServerModule Installation Guide
Detailed installationinformation for setting up theserver module.
820-3968 PDFHTMLPrint option
Sun Blade X6240 ServerModule Operating SystemInstallation Guide
Installation instructions forthe Solaris and Linuxoperating systems.
820-3969 PDFHTML
Sun Blade X6240 ServerModule Windows OperatingSystem Installation Guide
Installation instructions forthe Windows Serveroperating system.
820-3970 PDFHTML
Sun Blade X6240 ServerModule Service Manual
Information and proceduresfor maintaining andupgrading the server module.
820-3971 PDFHTML
x64 Servers Utilities ReferenceManual
Information for usingapplications and utilitiescommon to x64 servers andserver modules.
820-1120 PDFHTML
Sun Integrated Lights OutManager 2.0 User’s Guide
ILOM features and tasks thatare common to servers andserver modules that supportILOM.
820-1188 PDFHTML
Sun Integrated Lights OutManager Supplement for SunBlade X6240 Server Module
ILOM information that isspecific to the server module.
820-3974 PDFHTML
Sun Blade X6240 ServerModule Safety and ComplianceManual
Hardware safety andcompliance information forthe server module.
820-4411 PDF
Important Safety Informationfor Sun Hardware Systems
Multilingual hardware safetyand compliance informationfor all Sun hardware systems.
816-7190 Print
x Sun Blade X6240 Server Module Operating System Installation Guide • August 2009
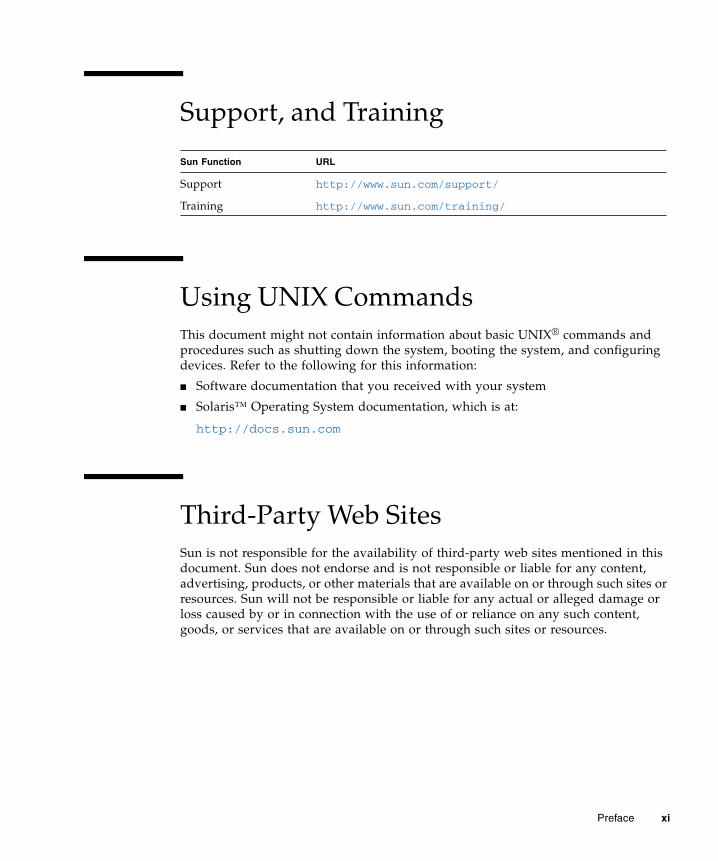
Support, and Training
Using UNIX CommandsThis document might not contain information about basic UNIX® commands andprocedures such as shutting down the system, booting the system, and configuringdevices. Refer to the following for this information:
■ Software documentation that you received with your system
■ Solaris™ Operating System documentation, which is at:
http://docs.sun.com
Third-Party Web SitesSun is not responsible for the availability of third-party web sites mentioned in thisdocument. Sun does not endorse and is not responsible or liable for any content,advertising, products, or other materials that are available on or through such sites orresources. Sun will not be responsible or liable for any actual or alleged damage orloss caused by or in connection with the use of or reliance on any such content,goods, or services that are available on or through such sites or resources.
Sun Function URL
Support http://www.sun.com/support/
Training http://www.sun.com/training/
Preface xi
Typographic Conventions
Sun Welcomes Your CommentsSun is interested in improving its documentation and welcomes your comments andsuggestions. You can submit your comments by going to:
http://www.sun.com/hwdocs/feedback
Please include the following document title and part number with your feedback:
Sun Blade X6240 Server Module Operating System Installation Guide, 820-3969-11
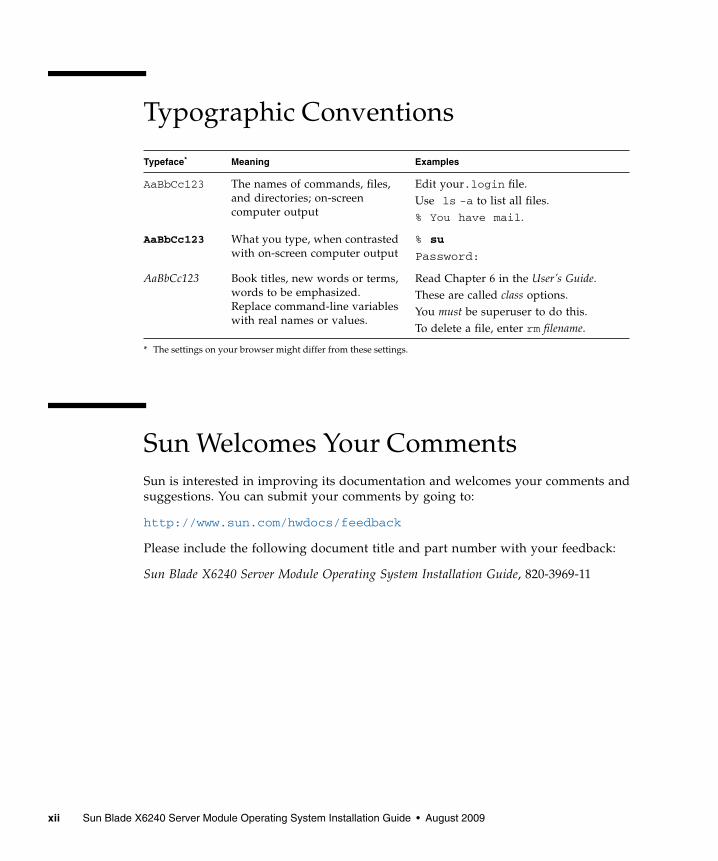
Typeface*
* The settings on your browser might differ from these settings.
Meaning Examples
AaBbCc123 The names of commands, files,and directories; on-screencomputer output
Edit your.login file.Use ls -a to list all files.% You have mail.
AaBbCc123 What you type, when contrastedwith on-screen computer output
% su
Password:
AaBbCc123 Book titles, new words or terms,words to be emphasized.Replace command-line variableswith real names or values.
Read Chapter 6 in the User’s Guide.These are called class options.You must be superuser to do this.To delete a file, enter rm filename.
xii Sun Blade X6240 Server Module Operating System Installation Guide • August 2009

CHAPTER 1
Overview
This chapter provides an overview of the operating system (OS) installation processfor the Sun Blade X6240 server module.
This chapter contains the following sections:
■ “About Installing an Operating System on a Sun Blade X6240 Server Module” onpage 1
■ “Supported Operating Systems” on page 2
■ “Installation Prerequisites” on page 2
■ “Installation Instructions” on page 3
■ “Installation Options” on page 3
■ “Related Documentation” on page 4
Note – This document only covers supported Solaris™, OpenSolaris, Linux, andVMware OS installation. For instructions on installing the Microsoft Windows Server2003/2008 operating systems onto the Sun Blade X6240 server module, see the SunBlade X6240 Server Module Windows Operating System Installation Guide, 820-3970.
About Installing an Operating System ona Sun Blade X6240 Server ModuleThere are several supported operating system (OS) distributions and several ways toinstall each. This document is intended only as a general guide that refers you todetailed procedures.
1

Supported Operating SystemsSolaris 10 or OpenSolaris 2009.06 is preinstalled on your Sun Blade X6240 servermodule, if ordered. You may also install these operating systems:
■ Solaris 10 5/08 and later
■ OpenSolaris 2009.06 or later
■ Red Hat Enterprise Linux (RHEL) 4.6, 32-bit and 64-bit
■ RHEL 5.1, 64-bit
■ SUSE Linux Enterprise Server (SLES) 10 SP2, 64-bit
■ VMware ESX Server 3.5 Update 1
■ Microsoft Windows Server 2003 Enterprise R2 SP2, 32-bit and 64-bit
■ Wicrosoft Windows Server 2008 Enterprise and Datacenter 32-bit and 64-bit
Note – The Solaris 10 5/08 Operating System or OpenSolaris 2009.06 OperatingSystem is preinstalled on the Sun Blade X6240 server module boot disk.
Note – For instructions on installing the Windows operating systems onto the SunBlade X6240 server module, see the Sun Blade X6240 Server Module WindowsOperating System Installation Guide (820-3963).
Installation PrerequisitesYou must complete the following prerequisite tasks before you can begin installingan OS.
■ Install the server hardware.
■ Configure the service processor.
■ Ensure that the ILOM version installed on the Sun Blade X6240 server module isthe same as the version installed on the chassis management module (CMM).ILOM version 2.0.3.9 is recommended.
■ Gather needed information, such as IP address and netmask.
2 Sun Blade X6240 Server Module Operating System Installation Guide • August 2009

Installation InstructionsChapter 2 (RHEL), Chapter 3 (SLES), Chapter 4 (Solaris), Chapter 5 (OpenSolaris),and Chapter 6 (VMware) provide the information you need to manually install theseoperating systems.
Tip – We recommend using the Sun Installation Assistant (SIA) to install the RedHat Enterprise Linux and the SUSE Linux Enterprise Server operating systems. SIAis a convenient, front-end application designed to assist you in installing theseoperating systems on your server module. SIA supplements the standard installationutilities and procedures that ship with the operating system; it does not replacethem. For more information, refer to the Sun Installation Assistant User’s Guide (820-3357).
Installation OptionsYou have three options for installing an operating system:
■ Local CD Installation. To install the operating system at the server, you will needto use a dongle cable connected to the front slot of the Sun Blade X6240 servermodule. The dongle can connect a physical USB CD drive, a keyboard, a mouse,and a monitor. Depending on the equipment you have, you may need a USB hubto increase the number of USB ports available (the Sun-supplied dongle onlyincludes two USB ports).
■ Remote Console Installation. You can use the ILOM Remote Console applicationto install the operating system from a server on your network. ILOM 2.0 or lateris required. You can download the ILOM 2.0.3.9 firmware for your Sun BladeX6240 server module from the product download page athttp://www.sun.com/downloads.
■ PXE Boot The network ports for the Sun Blade X6240 server module are providedeither through a network express module (NEM, NEM+) or PCI express module(PCI EM) installed on the back of the chassis.
Chapter 1 Overview 3
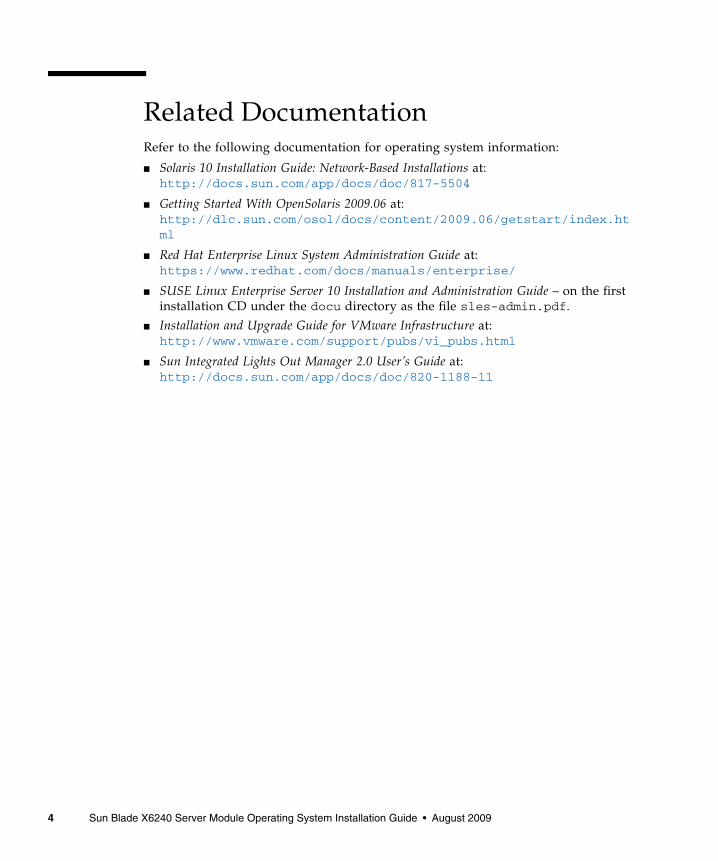
Related DocumentationRefer to the following documentation for operating system information:
■ Solaris 10 Installation Guide: Network-Based Installations at:http://docs.sun.com/app/docs/doc/817-5504
■ Getting Started With OpenSolaris 2009.06 at:http://dlc.sun.com/osol/docs/content/2009.06/getstart/index.html
■ Red Hat Enterprise Linux System Administration Guide at:https://www.redhat.com/docs/manuals/enterprise/
■ SUSE Linux Enterprise Server 10 Installation and Administration Guide – on the firstinstallation CD under the docu directory as the file sles-admin.pdf.
■ Installation and Upgrade Guide for VMware Infrastructure at:http://www.vmware.com/support/pubs/vi_pubs.html
■ Sun Integrated Lights Out Manager 2.0 User’s Guide at:http://docs.sun.com/app/docs/doc/820-1188-11
4 Sun Blade X6240 Server Module Operating System Installation Guide • August 2009

CHAPTER 2
Installing Red Hat Enterprise Linux
This chapter provides information about manually installing Red Hat EnterpriseLinux on a Sun Blade X6240 server module.
This chapter contains the following sections:
■ “About the Red Hat Enterprise Linux Installation” on page 5
■ “Preparing to Install the RHEL Operating System” on page 7
■ “Installing the RHEL Operating System From Distribution Media” on page 8
■ “Updating the RHEL Operating System” on page 20
■ “Installing the RHEL OS Using the Remote Console Application” on page 10
■ “Installing Red Hat Enterprise Linux Using PXE” on page 11
About the Red Hat Enterprise LinuxInstallationIf you have installed Red Hat Enterprise Linux (RHEL) operating system (OS) onother Intel or AMD Opteron servers, you are already familiar with how to install iton a Sun Blade X6240 server module. The two most common methods to installRHEL on your server are to use:
■ The RHEL distribution media
■ The automatic KickStart installation from RHEL OS (installation tree) stored on aPreboot Execution Environment (PXE) network server
5
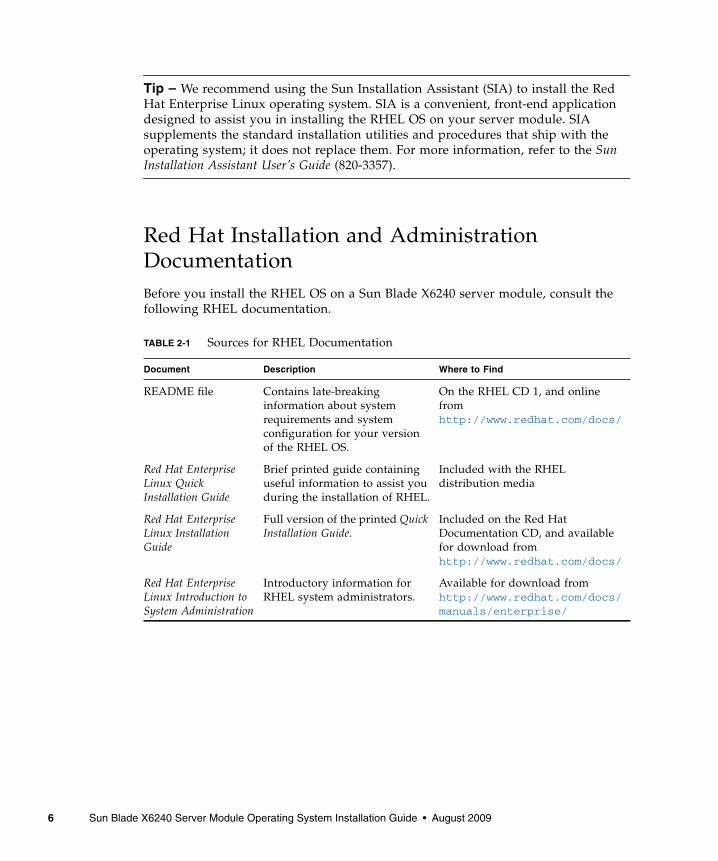
Tip – We recommend using the Sun Installation Assistant (SIA) to install the RedHat Enterprise Linux operating system. SIA is a convenient, front-end applicationdesigned to assist you in installing the RHEL OS on your server module. SIAsupplements the standard installation utilities and procedures that ship with theoperating system; it does not replace them. For more information, refer to the SunInstallation Assistant User’s Guide (820-3357).
Red Hat Installation and AdministrationDocumentationBefore you install the RHEL OS on a Sun Blade X6240 server module, consult thefollowing RHEL documentation.
TABLE 2-1 Sources for RHEL Documentation
Document Description Where to Find
README file Contains late-breakinginformation about systemrequirements and systemconfiguration for your versionof the RHEL OS.
On the RHEL CD 1, and onlinefromhttp://www.redhat.com/docs/
Red Hat EnterpriseLinux QuickInstallation Guide
Brief printed guide containinguseful information to assist youduring the installation of RHEL.
Included with the RHELdistribution media
Red Hat EnterpriseLinux InstallationGuide
Full version of the printed QuickInstallation Guide.
Included on the Red HatDocumentation CD, and availablefor download fromhttp://www.redhat.com/docs/
Red Hat EnterpriseLinux Introduction toSystem Administration
Introductory information forRHEL system administrators.
Available for download fromhttp://www.redhat.com/docs/manuals/enterprise/
6 Sun Blade X6240 Server Module Operating System Installation Guide • August 2009

Task Map for the RHEL InstallationConsult TABLE 2-2 to determine which topics documented in this guide are relevantto the installation tasks that you want to perform.
Preparing to Install the RHEL OperatingSystemYou can install the RHEL OS from a local CD/DVD or from the network. However,you will need to collect some information about your system and your networkbefore you proceed with either of these installation methods. Before you begininstalling the RHEL OS, review the procedures listed in this chapter for yourinstallation method.
Red Hat EnterpriseLinux SystemAdministration Guide
Information on customizing theRHEL OS.
Available for download fromhttp://www.redhat.com/docs/manuals/enterprise/
System Administrationfor Diskless Booting
Information on configuring yourserver and Red Hat Linux fordiskless booting.
Available for download as the RedHat Enterprise Linux InstallationGuide for the x86, Itanium™, andAMD64 Architectures athttp://www.redhat.com/docs/manuals/enterprise/
Red Hat EnterpriseLinux Security Guide
Guide for securing the RHELOS.
Available for download fromhttp://www.redhat.com/docs/manuals/enterprise/
TABLE 2-2 Task Map for the RHEL Installation
Installation Task) Relevant Topic
Collect information about your system andnetwork.
“Preparing to Install the RHEL OperatingSystem” on page 7
Install RHEL from distribution media using alocal or network-attached CD or DVD drive.
“Installing the RHEL Operating System FromDistribution Media” on page 8
Update the RHEL OS files and drivers. “Updating the RHEL Operating System” onpage 20
TABLE 2-1 Sources for RHEL Documentation (Continued)
Document Description Where to Find
Chapter 2 Installing Red Hat Enterprise Linux 7

Obtaining Updated RHEL Operating SystemMedia KitsThe Sun Blade X6240 server module supports the latest versions of the RHEL OS:RHEL 4.6 and RHEL 5.1. To install either of these versions on the server module, youhave to obtain either the RHEL 4.6 or RHEL 5.1 Update Media Kit, available athttp://rhn.redhat.com.
You will need your Enterprise account information to download the updated ISOimages. An Enterprise account is an account that the customer creates to access RedHat's support network after purchasing the RHEL Update Media Kit.
Additional Software Updates or PatchesAfter installing the RHEL OS on the server module, you may also need to update theOS with updates or patches. For more information, see “Updating the RHELOperating System” on page 20 for details.
Installing the RHEL Operating SystemFrom Distribution MediaRHEL provides both a text mode and graphical interface for installing andconfiguring the OS from distribution media. At the boot prompt, you can select theinterface that you want to use. Both options are shown later in this section.
Before You BeginInstalling the RHEL OS from CDs consists of the following procedures:
1. Download the RHEL Update Media Kit from http://rhn.redhat.com.
See “Obtaining Updated RHEL Operating System Media Kits” on page 8.
2. Install the RHEL OS.
3. Update the RHEL OS.
See “Updating the RHEL Operating System” on page 20.
8 Sun Blade X6240 Server Module Operating System Installation Guide • August 2009

Required ItemsInstallation from distribution media requires the following items:
■ Sun Blade X6240 server module equipped with the following four items:
■ USB keyboard and mouse
■ USB CD/DVD drive
■ Monitor
■ Multi-port dongle cable to plug into the front slot of the Sun Blade X6240server module. Refer to the Sun Blade X6240 Server Module Installation Guide(820-3968).
■ RHEL OS media CD-ROM set
▼ To Install RHEL From Local Distribution Media1. Connect the multi-port dongle cable to the connector on the front of the Sun
Blade X6240 server module.
For more information, refer to the Sun Blade X6240 Server Module Installation Guide(820-3968).
2. Connect the USB connector of the CD/DVD drive to the USB port of the donglecable.
3. Power on the system.
4. Insert the RHEL Distribution CD-ROM #1 into the CD/DVD drive connected tothe Sun Blade X6240 server module and reboot the server.
The server will boot from the CD-ROM and display a boot: prompt.
If the installation process does not recognize the CD-ROM, refer to the Sun BladeX6240 Server Module Product Notes (820-3972).
5. At the boot prompt, select one of the following:
■ For text mode, enter the following command:
boot: linux text
■ For graphical mode, press Enter.
6. Refer to the Red Hat Enterprise Linux Installation Guide to guide you through theremainder of the installation process.
7. After completing the OS installation, proceed to “Updating the RHEL OperatingSystem” on page 20.
Chapter 2 Installing Red Hat Enterprise Linux 9

8. Update the RHEL drivers.
See “To Update the RHEL Drivers” on page 19.
Installing the RHEL OS Using theRemote Console ApplicationThis section explains how to install the RHEL OS on your server using theIntegrated Lights Out Manager (ILOM) Remote Console application.
Use the following procedure to install the RHEL 4.6 (or later) OS using the ILOMRemote Console application.
Note – Refer to the Sun Integrated Lights Out Manager 2.0 User’s Guide (820-1188) formore information on completing the following steps. This guide provides details onusing the ILOM service processor web interface to redirect the console to the RemoteConsole.
▼ To Install RHEL Using the ILOM RemoteConsole Application1. Locate your RHEL installation CD/DVD or the equivalent ISO images.
2. Connect to the ILOM service processor web interface.
3. Select the Remote Control tab, then select the Mouse Mode Settings tab.
4. If necessary, change the mouse mode to Relative Mouse Mode.
See the “Remote Console Application” chapter of the Sun Integrated Lights OutManager 2.0 User’s Guide (820-1188) for further instructions.
5. Select the Redirection tab.
6. Click the Launch Redirection button to start the JavaRConsole application.
7. Log in to the JavaRConsole.
8. Select Keyboard and Mouse in the Devices menu to start keyboard and mouseredirection.
10 Sun Blade X6240 Server Module Operating System Installation Guide • August 2009

9. Start CD/DVD redirection.
From the JavaRConsole Devices menu, you can redirect the CD in two ways:
■ If you are installing a physical CD-ROM into the remote console CD drive,insert the CD-ROM into the drive and select CD-ROM.
■ If you are using an ISO image installed on the remote console, select CD-ROMimage and provide the location of the ISO file.
10. Power on the server using the ILOM web interface.
11. When the boot prompt appears, type linux text.
12. When prompted to test the CD media before installation, select Skip if you donot want the media test to run.
13. Refer to the Red Hat Enterprise Linux Installation Guide to guide you through theremainder of the installation process.
Installing Red Hat Enterprise LinuxUsing PXEThe on-board network interface card (NIC) in your Sun Blade X6240 server modulesupports the Preboot Execution Environment (PXE) network booting protocol. Thesystem BIOS and network interface BIOS on the server module automatically querythe network for a Dynamic Host Configuration Protocol (DHCP) server. If a DHCPserver on the network has been configured to support the PXE protocol and PXEimage servers on the same network, then the BIOS on the server module can be usedto install a bootable Red Hat Enterprise Linux (RHEL) image.
Tip – PXE is a powerful and convenient solution for setting up a number of SunBlade X6240 server modules with identical configurations.
Chapter 2 Installing Red Hat Enterprise Linux 11

Task Map for the RHEL Installation Using PXEIf you do not have PXE set up on your network and you would like to takeadvantage of PXE to install RHEL on your network, you need to perform thefollowing tasks:
Preconfiguring a Network to Support PXEInstallation of RHELThis section describes how to preconfigure a network running the RHEL OS tosupport PXE installation of the RHEL OS on a server module. These proceduresassume that you already have a bootable server that is running a version of theRHEL OS to use as a PXE server.
Perform the following procedures to preconfigure your network for PXE installation:
■ Configure a DHCP Server
See “To Configure a DHCP Server” on page 13.
■ Install Portmap
See “To Install Portmap on the DHCP Server” on page 14.
■ Configure the TFTP Service
See “To Configure the TFTP Service on the DHCP Server” on page 14.
■ Install and Configure the neopxe Boot Server Daemon
See “To Install and Configure the neopxe Boot Server Daemon” on page 15.
■ Configure the NFS Service
See “To Configure the NFS Service on the DHCP Server” on page 16.
■ Disable the Firewall
See “To Disable the Firewall” on page 17.
TABLE 2-3 Task Map for PXE RHEL Installation
Installation Task Relevant Topic
Obtain the RHEL Update Media Kit athttp://rhn.redhat.com.
“Obtaining Updated RHEL Operating SystemMedia Kits” on page 8.
Set up a Linux network and the PXE server. “Preconfiguring a Network to Support PXEInstallation of RHEL” on page 12.
Reboot the PXE server “Rebooting the PXE/DHCP Server” onpage 18
Install the RHEL OS from the PXE server. “Installing the RHEL Operating System Froma PXE Server” on page 18.
12 Sun Blade X6240 Server Module Operating System Installation Guide • August 2009
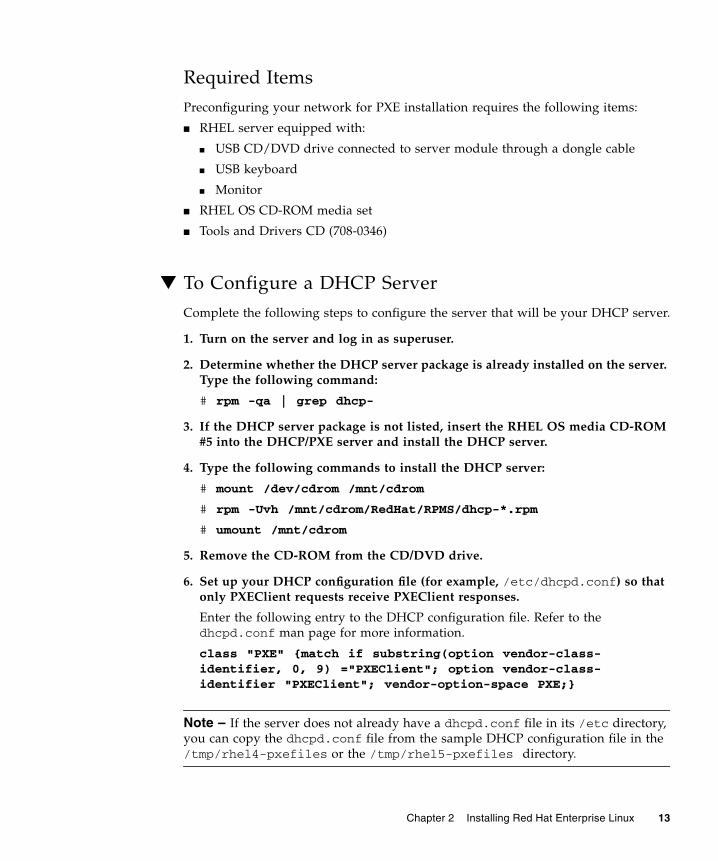
Required ItemsPreconfiguring your network for PXE installation requires the following items:
■ RHEL server equipped with:
■ USB CD/DVD drive connected to server module through a dongle cable
■ USB keyboard
■ Monitor
■ RHEL OS CD-ROM media set
■ Tools and Drivers CD (708-0346)
▼ To Configure a DHCP ServerComplete the following steps to configure the server that will be your DHCP server.
1. Turn on the server and log in as superuser.
2. Determine whether the DHCP server package is already installed on the server.Type the following command:
# rpm -qa | grep dhcp-
3. If the DHCP server package is not listed, insert the RHEL OS media CD-ROM#5 into the DHCP/PXE server and install the DHCP server.
4. Type the following commands to install the DHCP server:
# mount /dev/cdrom /mnt/cdrom
# rpm -Uvh /mnt/cdrom/RedHat/RPMS/dhcp-*.rpm
# umount /mnt/cdrom
5. Remove the CD-ROM from the CD/DVD drive.
6. Set up your DHCP configuration file (for example, /etc/dhcpd.conf) so thatonly PXEClient requests receive PXEClient responses.
Enter the following entry to the DHCP configuration file. Refer to thedhcpd.conf man page for more information.
class "PXE" {match if substring(option vendor-class-identifier, 0, 9) ="PXEClient"; option vendor-class-identifier "PXEClient"; vendor-option-space PXE;}
Note – If the server does not already have a dhcpd.conf file in its /etc directory,you can copy the dhcpd.conf file from the sample DHCP configuration file in the/tmp/rhel4-pxefiles or the /tmp/rhel5-pxefiles directory.
Chapter 2 Installing Red Hat Enterprise Linux 13

7. To start the DHCP service, type:
# service dhcpd start
8. To configure the server to always start DHCP, type:
# chkconfig dhcpd on
▼ To Install Portmap on the DHCP Server1. Determine whether the portmap server package is already installed on the
server. Type:
# rpm -qa | grep portmap
2. If portmap is not listed, insert RHEL CD #2 and install the portmap service byentering the following commands:
# mount /dev/cdrom /mnt/cdrom
# rpm -Uvh /mnt/cdrom/RedHat/RPMS/portmap-*
# umount /mnt/cdrom
3. Remove the CD from the server.
▼ To Configure the TFTP Service on the DHCP Server1. Determine whether the TFTP server package is already installed on the server.
Type:
# rpm -qa | grep tftp-server
2. If the TFTP server package is not listed, insert RHEL CD #4 and install theTFTP service by typing the following commands:
# mount /dev/cdrom /mnt/cdrom
# rpm -Uvh /mnt/cdrom/RedHat/RPMS/tftp-server*
# umount /mnt/cdrom
3. Remove the CD from the server.
4. Edit and save the /etc/xinetd.d/tftp file.
Make the following changes:
■ Change the -s /tftpboot entry to -v -s /home/pxeboot.
■ Change the disable attribute to no.
5. Restart the inetd server. Type:
# service xinetd restart
14 Sun Blade X6240 Server Module Operating System Installation Guide • August 2009

▼ To Install and Configure the neopxe Boot ServerDaemonComplete the following steps on the DHCP server to install the neopxe boot serverdaemon. The neopxe server is designed for use with a DHCP server that is runningon the same system.
1. Install the neopxe boot server daemon onto the system that is the DHCPserver. Type:
# cd /tmp/rhel4-pxefiles/neopxe-0.2.0
# ./configure
# make
# make install
2. Append the path /usr/local/sbin/neopxe to the rc.local file by typingthe following command, making sure to use two greater-than signs:
# echo "/usr/local/sbin/neopxe" >> /etc/rc.d/rc.local
3. Copy the PXE Linux image from the /tmp/ directory. Type:
# mkdir /home/pxeboot
# cp /tmp/rhel4-pxefiles/pxelinux.0 /home/pxeboot
4. Configure the PXE Linux image. Type:
# mkdir /home/pxeboot/pxelinux.cfg/
# touch /home/pxeboot/pxelinux.cfg/default
5. Edit the /usr/local/etc/neopxe.conf configuration file, which is read byneopxe at startup.
■ If the neopxe.conf file is not in the /usr/local/etc directory, copy it fromthe /tmp/rhel4-pxefiles/neopxe-0.2.0/ directory.
■ A valid configuration file must have entries for each of the following lines,including at least one service line.
ip_addr=n.n.n.n
prompt=boot-prompt-string
prompt_timeout=timeout
service=service-number,boot-server,boot-file,label
Where:
■ n.n.n.n is the IP address of your PXE server.
■ boot-prompt-string is the character string displayed during a network bootthat prompts the user to press the F8 key for a boot menu.
Chapter 2 Installing Red Hat Enterprise Linux 15

■ timeout is the number of seconds the prompt is displayed before the serverdefaults to the first service for booting.
■ service-number is an integer in the range of 1 to 254 that identifies the bootservice.
■ boot-server is the IP address of the boot server for that boot service.
■ boot-file is the name of the boot file that is read from your /home/pxebootdirectory.
■ label is the text string that is displayed when the boot menu is invoked bypressing the F8 key.
For example:
ip_addr=192.168.0.1
prompt=Press [F8] for menu.
prompt_timeout=10
service=1,192.168.0.1,pxelinux.0,Linux
service=2,192.169.0.1,nbp.unknown,Solaris
Note – Refer to the neopxe.conf man page for more information.
6. Start the neopxe daemon. Type:
# /usr/local/sbin/neopxe
▼ To Configure the NFS Service on the DHCP Server1. Determine whether the NFS service package is already installed on the server.
Type:
# rpm -qa | grep nfs-utils
2. If the NFS service package is not listed, insert RHEL CD #2 and install the NFSservice by typing the following commands:
# mount /dev/cdrom /mnt/cdrom
# rpm -Uvh /mnt/cdrom/RedHat/RPMS/nfs-utils-*
# umount /mnt/cdrom
3. Remove the CD from the server.
4. Edit and save the /etc/exports file to add the following line:
/home/pxeboot *(no_root_squash,no_subtree_check,insecure)
16 Sun Blade X6240 Server Module Operating System Installation Guide • August 2009
5. Start the NFS service. Type:
# service nfs start
6. Configure the server to always start the NFS service. Type:
# chkconfig nfs on
# chkconfig nfslock on
Note – If you are using a DNS server, verify that DNS entries exist for the range ofaddresses defined in the PXE subnet dynamic-bootp entry in the dhcpd.conf file. Ifyou are not using a DNS server, edit the /etc/hosts file to add the range of hostaddresses found in the PXE subnet dynamic-bootp entry in the dhcpd.conf file.
▼ To Disable the Firewall
Caution – Security vulnerability. When you disable the firewall protection on thesystem that is your PXE server, the security of the data on that server cannot beensured. If this server is networked outside of your local intranet, be sure to re-enable the firewall after downloading software to PXE clients.
If you enabled firewall security when you installed the RHEL OS on the system thatwill be your PXE server, complete the following steps to disable the firewall so thatPXE clients can download from the server.
1. Stop the ipchains service. Type the command:
# service ipchains stop
2. Stop the iptables service. Type the command:
# service iptables stop
3. Stop the ipchains service from starting when you restart the server. Type thecommand:
# chkconfig ipchains off
4. Stop the iptables service from starting when you restart the server. Type thecommand:
# chkconfig iptables off
Note – You might encounter error messages if the ipchains service is not installedon the server. You can safely ignore these messages.
Chapter 2 Installing Red Hat Enterprise Linux 17
Rebooting the PXE/DHCP ServerWhen you have completed all the previous configuration steps, reboot thePXE/DHCP server and proceed to the next section, “Installing the RHEL OperatingSystem From a PXE Server” on page 18.
Installing the RHEL Operating System From aPXE ServerThis procedure describes how to configure your Sun Blade X6240 server module toinitiate the request to download the RHEL OS boot image file from the PXE/DHCPserver and how to install the boot image onto your Sun Blade X6240 server module.
Before You BeginBefore you install the RHEL OS from a PXE server, you must complete the followingtasks:
■ Configured your Linux network to support a PXE server. See “Preconfiguring aNetwork to Support PXE Installation of RHEL” on page 12.
■ Reboot the PXE/DHCP server. See “Rebooting the PXE/DHCP Server” onpage 18.
▼ To Install a RHEL Operating System From a PXE Server1. Connect the PXE client to the same network as the PXE server, and power on
the PXE client.
The PXE client is the target Sun Blade X6240 server module to which you areinstalling the RHEL OS.
2. When the PXE client prompts you for a network boot, press the F12 key.
The PXE client connects to the PXE server and attempts to obtain an IP addressfrom the DHCP server.
3. When prompted, press the F8 key to begin downloading the PXE boot image.
4. At the boot: prompt, enter in the label you gave the image when you installedthe RHEL image on the PXE server.
The RHEL install image downloads onto the target Sun Blade X6240 servermodule.
18 Sun Blade X6240 Server Module Operating System Installation Guide • August 2009

5. To configure the RHEL OS for your server, refer to the manual that is shippedwith your RHEL OS media kit.
6. Update the RHEL drivers.
See “To Update the RHEL Drivers” on page 19
7. Update the RHEL OS files.
See “Updating the RHEL Operating System” on page 20
▼ To Update the RHEL Drivers1. Insert the Tools and Drivers CD for Sun Blade X6240 and mount it onto the
directory /mnt it by typing the following command:
# mount /dev/cdrom /mnt
2. To install the igb and nvsata drivers, type:
# cdrom/drivers/linux/red_hat/install.sh
3. If the server module has a REM that uses LSI drivers and you are using RHEL4.6, do the following:
a. Type: # cd /mnt/drivers/linux/RAID/LSI/drivers/RHEL4-SLES9
b. Unzip the file linuxmpt_RH4_SLES9_3122700-1.zip
c. Type: # rpm -ivh nvsata-rhel4.6-3.2-1.24.x86_64.rpm
4. If the server module has a REM that uses LSI drivers and you are using RHEL5, do the following:
a. Type: # cd /mnt/drivers/linux/RAID/LSI/drivers/RHEL5-SLES10
b. Unzip the file linuxmpt_RH5_SLES10_4002100-1.zip
c. Type: # rpm -ivh nvsata-rhel5u1-3.4-1.24.x86_64.rpm
5. If the server module has a REM that uses StorageTek drivers, do the following:
a. Type: # cd /mnt/drivers/linux/RAID/StorageTek/drivers/
b. Unzip the file linux_aac_1152455.zip
c. Type: # rpm -ivh aacraid-1.1.5-2455.rpm
The installation of the drivers is now complete.
6. Reboot the server module for the changes to take effect. Type:
# reboot
Chapter 2 Installing Red Hat Enterprise Linux 19
Updating the RHEL Operating SystemSince software is constantly being updated, your distribution media might notcontain the most up-to-date versions of the OS.
The following procedures assume that you have already installed the RHEL OS onthe Sun Blade X6240 server module. This procedure explains how to update theRHEL installation with the latest OS.
To use the RHEL 5 update program, your server must be registered with the Red HatNetwork (RHN).
To update the RHEL OS, perform one of the following procedures as appropriate:
■ “To Update the RHEL 4 Software” on page 20
■ “To Update the RHEL 5 Software” on page 20
▼ To Update the RHEL 4 SoftwareThis procedure assumes that your server module has access to the internet.
1. Set up the up2date program on the server module.
Refer to the documentation included with your RHEL Update Media Kit fordetails.
2. Run the up2date program.
Select the kernel packages in the available package updates section.
▼ To Update the RHEL 5 SoftwareYour server module must have access to the internet and be registered with the RedHat Network.
1. To run the yum update program, type:
# yum
The program checks that the machine is registered with Red Hat Network. If so,yum downloads necessary updates from the Red Hat Network repository.
20 Sun Blade X6240 Server Module Operating System Installation Guide • August 2009
2. Answer the questions and make your choices before the packages aredownloaded and installed.
You should periodically update your system using yum.
For more information, refer to the man page. Type:
# man yum
Chapter 2 Installing Red Hat Enterprise Linux 21

22 Sun Blade X6240 Server Module Operating System Installation Guide • August 2009

CHAPTER 3
Installing SUSE Linux EnterpriseServer 10
This chapter contains information about manually installing SUSE Linux EnterpriseServer (SLES) 10 operating system (OS) on a Sun Blade X6240 server.
This chapter contains the following sections:
■ “Installing the SLES 10 Operating System” on page 24.
■ “Preconfiguring the Network to Support PXE Installation of SLES 10” on page 28
■ “Installing the SLES 10 Operating System Using PXE” on page 35
■ “Updating the SLES 10 Operating System” on page 38
■ “Updating the SLES Drivers” on page 39
Tip – We recommend using the Sun Installation Assistant (SIA) to install the SUSELinux Enterprise Server operating system. SIA is a convenient, front-end applicationdesigned to assist you in installing the SLES OS on your server module. SIAsupplements the standard installation utilities and procedures that ship with SLES; itdoes not replace them. For more information, refer to the Sun Installation AssistantWindows and Linux User’s Guide, 820-3357.
23
About the SUSE Linux InstallationThe most common methods for installing SLES 10 on your server are:
■ Installation from your SLES 10 distribution media from a local or remote CD (see“Preparing to Install the SLES 10 Operating System” on page 26).
■ Installation from the network, either from a Preboot Execution Environment(PXE) image stored on a PXE server on your local network or from an imagestored elsewhere on your network (see “Installing the SLES 10 Operating SystemUsing PXE” on page 35)
Installing the SLES 10 Operating SystemThis section describes how to install the SLES 10 OS.
Note – The minimum supported SLES version is SLES 10 Service Pack 2 (SP2).
SLES 10 Installation and ConfigurationDocumentationBefore you install SLES 10 on your server, refer to the SLES 10 documentation.
TABLE 3-1 Sources for SLES 10 Documentation
Document Description Where to Find
README file This file contains late-breakinginformation about systemrequirements and systemconfiguration for your versionof SLES 10.
On the first SLES 10 installation CD
Release Notes Product Release Notes On the first SLES 10 installation CDunder the docu directory
24 Sun Blade X6240 Server Module Operating System Installation Guide • August 2009

Task Map for the SLES 10 InstallationConsult the following table to determine which procedures documented in this helpsystem are relevant to the installation task(s) that you need to perform.
SUSE LinuxEnterprise Server 10Start-Up Guide
This short manual provides aquick introduction to theinstallation.
On the first installation CD underthe docu directory under theappropriate language directory asthe file startup.pdf.
SUSE LinuxEnterprise Server 10Installation andAdministration Guide
This manual provides detailedinformation about planning,deployment, configuration andadministration of SLES 10.
On the first installation CD underthe docu directory under theappropriate language directory asthe file sles-admin.pdf.
SLES 10 SupportSites
SUSE provides considerabletechnical information about theSLES OS at its product andsupport web sites.
See the SLES 10 home page athttp://www.novell.com/products/server/.
TABLE 3-2 Task Map for the SLES 10 Installation
Installation Task Relevant Topic
Install the SLES 10 SP2 OS from local or remoteCD/DVD drive.
“Preparing to Install the SLES 10 OperatingSystem” on page 26 or “Installing SLES 10Operating System Using the RemoteConsole Application” on page 27
Install the SLES 10 SP2 OS using one of thefollowing methods:
• Install the SLES 10 SP2 OS from local orremote CD/DVD drive or PXE server.
“Preparing to Install the SLES 10 OperatingSystem” on page 26 or “Installing SLES 10Operating System Using the RemoteConsole Application” on page 27
• Install the SLES 10 SP2 OS from an imagestored on a networked system.
SUSE Linux Enterprise Server 10 Installationand Administration Guide
• Install the SLES 10 SP2 OS from a PXE server. “Installing the SLES 10 Operating SystemUsing PXE” on page 35
TABLE 3-1 Sources for SLES 10 Documentation (Continued)
Document Description Where to Find
Chapter 3 Installing SUSE Linux Enterprise Server 10 25

Preparing to Install the SLES 10 Operating SystemYou can install the SLES 10 OS from a local CD/DVD drive, remote CD/DVD drive,or the network; however, you need to collect some information about your systembefore you proceed with any one of these installation methods.
Before installing SLES 10 on your server, verify or collect the following information:
■ Dynamic Host Configuration Protocol (DHCP) server name
■ MAC address on system label
■ SLES 10 SP2 CD set
Installing the SLES 10 Operating System FromDistribution MediaThe SLES 10 OS provides an easy-to-use graphical interface for installing andconfiguring the OS. Whether you are using Distribution CDs to install the SLES 10OS from a locally attached CD/DVD drive or from a remote CD/DVD driveattached via KVMS, the installation procedure is fundamentally the same.
Required Items■ SLES 10 media base CD or DVD set
■ SLES 10 installation guide, SUSE Linux Enterprise Server 10 Installation andAdministration Guide (see “SLES 10 Installation and ConfigurationDocumentation” on page 24)
■ Sun Blade X6240 server module equipped with equipped the following fouritems:
■ USB keyboard and mouse.
■ USB CD/DVD drive.
■ Monitor.
■ Multi-port dongle cable to connect to the front of the Sun Blade X6240 servermodule. Refer to the Sun Blade X6240 Server Module Installation Guide (820-3968).
▼ To Install SLES 10 From Distribution Media1. Connect the USB CD/DVD drive to the USB port of the dongle.
2. Power on the system.
26 Sun Blade X6240 Server Module Operating System Installation Guide • August 2009

3. Press F8 and select CDROM when prompted.
4. Insert SLES 10 CD #1 into your local CD/DVD drive.
5. Follow the installation instructions provided in the SUSE Linux Enterprise Server10 Installation and Administration Guide to complete the installation of the systemOS.
Installing SLES 10 Operating System Using theRemote Console ApplicationThis section describes how to install the SLES 10 OS on your Sun Blade X6240 servermodule using the ILOM Remote Console application.
▼ To Install SLES 10 Using the Remote ConsoleApplication1. Locate your SLES 10 OS installation CD/DVD or the equivalent ISO images.
2. Connect to the ILOM service processor web interface.
See the topic that describes how to log in to the Sun ILOM web interface in theSun Integrated Lights-Out Manager 2.0 User’s Guide (820-1188).
Note – There are multiple versions of ILOM. Be sure to refer to the guide thatmatches your server’s installed version of ILOM.
3. Select the Remote Control tab, then the Mouse Mode Settings tab.
4. If necessary, change the mouse mode to Relative Mouse Mode.
See the “Remote Console Application” chapter of the Sun Integrated Lights OutManager 2.0 User’s Guide for more information (820-1188).
5. Select the Redirection tab.
6. Click the Launch Redirection button to start the JavaRConsole application.
7. Log in to the JavaRConsole.
8. Start keyboard and mouse redirection.
Select Keyboard and Mouse in the Devices menu.
9. Start CD/DVD redirection.
From the JavaRConsole Devices menu, you can redirect the CD in two ways:
Chapter 3 Installing SUSE Linux Enterprise Server 10 27

■ If you are installing a physical CD into the remote console CD ROM drive,insert the CD into the drive and select CD-ROM.
■ If you are using an ISO image installed on the remote console, select CD-ROMimage and provide the location of the ISO file.
10. Power on the server using the ILOM web interface.
11. When the SLES 10 OS installation menu appears, use the arrow keys to selectInstallation and press Enter.
12. Proceed with the SLES 10 OS installation as usual.
Preconfiguring the Network to SupportPXE Installation of SLES 10These procedures describe how to preconfigure your network running the 10 OS tosupport Preboot Execution Environment (PXE) installation of the SLES OS on yourSun Blade X6240 server. These procedures assume that you already have a bootableserver that is running a version of the SLES 10 OS.
Preconfiguring your network for PXE installation involves the following procedures:
■ “Configuring the DHCP Server” on page 29
■ “Installing Portmap” on page 30
■ “Configuring the TFTP Service” on page 30
■ “Installing and Configuring the neopxe Boot Server Daemon” on page 31
■ “Configuring the NFS Service” on page 33
■ “Disabling the Firewall” on page 34
Required ItemsPreconfiguring your network for PXE installation requires the following items:
■ SLES 10 server equipped with:
■ CD/DVD drive
■ USB keyboard
■ Monitor (optional)
■ SLES 10 media set
■ Tools and Drivers CD (708-0346)
28 Sun Blade X6240 Server Module Operating System Installation Guide • August 2009
Configuring the DHCP ServerComplete the following steps on the server that will be your DHCP server.
▼ To Configure the DHCP Server1. Power on the server and log in as superuser.
2. Determine whether the DHCP server package is already installed on the server.Type the following command:
# rpm -qa | grep dhcp-server
3. If the DHCP server package is not listed, install the package using YaST. Typethe following command:
# yast -i dhcp-server
4. Set up the DHCP configuration file (for example, /etc/dhcpd.conf) so thatonly PXEClient requests receive PXEClient responses.
Add the following entry to the DHCP configuration file (refer to the dhcpd.confman page for more information).
class “PXE” {match if substring(option vendor-class-identifier, 0,9) = “PXEClient”; option vendor-class-identifier “PXEClient”; vendor-option-space PXE; next-servern.n.n.n;}
Where n.n.n.n is the IP address of the server.
Note – You can start with a sample DHCP configuration file in the /tmp/sles9-pxefiles or /tmp/sles10-pxefiles directory.
5. In the DHCP configuration file, edit the server-identifier entry:
server-identifier n.n.n.n
Where n.n.n.n is the PXE/DHCP server’s IP address.
6. In the DHCP configuration file, find the subnet entry fields:
subnet 1.2.3.0 netmask 255.255.255.0 {
range dynamic-bootp 1.2.3.100 1.2.3.200;
option routers 1.2.3.1;
option broadcast-address 1.2.3.225;
}
Chapter 3 Installing SUSE Linux Enterprise Server 10 29

7. Edit the subnet, range, router and broadcast-address entries according tothe PXE/DHCP server’s network configuration.
8. Edit the /etc/sysconfig/dhcpd file and verify that the DHCPD_INTERFACE isset to the interface that is connected to the network you are planning to run thePXE server.
For example, if you are using Ethernet interface 0, the DHCPD_INTERFACEvariable would be set as follows:
DHCPD_INTERFACE="eth0"
9. Start the DHCP service. Type the following command:
# /etc/init.d/dhcpd start
10. Configure the server to always start DHCP. Type the following command:
# chkconfig dhcpd on
Installing PortmapComplete the following steps on your DHCP server to install the portmap serverpackage.
▼ To Install Portmap1. Determine whether the portmap server package is already installed on the
DHCP server. Type the following command:
# rpm -qa | grep portmap
2. If portmap is not listed, install the package using YaST. Type the followingcommand:
# yast -i portmap
Configuring the TFTP ServiceComplete the following steps on your DHCP server to configure the TFTP service.
30 Sun Blade X6240 Server Module Operating System Installation Guide • August 2009

▼ To Configure the TFTP Service1. Determine whether the TFTP server package is already installed on the DHCP
server. Type the following command:
# rpm -qa | grep tftp
2. If the TFTP server package is not listed, install the package using YaST. Typethe following command:
# yast -i tftp
3. Edit and save the /etc/xinetd.d/tftp file. Make the following changes:
■ Change the -s /tftpboot entry to -v -s /home/pxeboot
■ Change the disable attribute to no
4. Restart the inetd server. Type the following command:
# /etc/init.d/xinetd restart
Installing and Configuring the neopxe Boot ServerDaemonComplete the following steps ton the DHCP server to configure the neopxe bootserver daemon. The neopxe server is designed for use with a DHCP server that isrunning on the same system.
▼ To Install and Configure the neopxe Boot ServerDaemon1. If a compiler is not installed on the server, use YaST to install gcc with the
following commands:
# yast -i gcc
# yast -i make
2. Install the neopxe boot server daemon on the DHCP server. Depending on yourOS version, type the following command:
For SLES 9:
# cd /tmp/sles9-pxefiles/neopxe-0.2.0
For SLES 10:
# cd /tmp/sles10-pxefiles/neopxe-0.2.0
Chapter 3 Installing SUSE Linux Enterprise Server 10 31
3. Type the following commands:
# ./configure
# make
# make install
4. Append the path /usr/local/sbin/neopxe to the rc.local file by typingthe following command, making sure to use two greater-than signs:
# echo "/usr/local/sbin/neopxe" >> /etc/rc.d/boot.local
5. Copy the PXE Linux image from the /tmp/ directory. Type the followingcommands:
# mkdir /home/pxeboot
6. Depending on your OS version, type the following command:
For SLES 9:
# cp /tmp/sles9-pxefiles/pxelinux.0 /home/pxeboot
For SLES 10:
# cp /tmp/sles10-pxefiles/pxelinux.0 /home/pxeboot
7. Configure the PXE Linux image. Type the following commands:
# mkdir /home/pxeboot/pxelinux.cfg/
# touch /home/pxeboot/pxelinux.cfg/default
8. Edit the /usr/local/etc/neopxe.conf configuration file, which is read byneopxe at startup.
If the /usr/local/etc/ directory does not exist, create it with the followingcommand:
# mkdir /usr/local/etc
If you need to create the neopxe.conf file, you can copy it from the/tmp/slesX-pxefiles/neopxe-0.2.0/ directory. Where X is the OS version(9 or 10).
A valid configuration file must have entries for each of the following lines,including at least one service line.
ip_addr=n.n.n.n
prompt=boot-prompt-string
prompt_timeout=timeout
service=service-number,boot-server,boot-file,label
Where:
■ n.n.n.n is the IP address of your PXE server.
■ boot-prompt-string is the character string displayed during a network boot thatprompts the user to press the F8 key for a boot menu.
32 Sun Blade X6240 Server Module Operating System Installation Guide • August 2009

■ timeout is the number of seconds the prompt is displayed before the serverdefaults to the first service for booting.
■ service-number is an integer in the range of 1 to 254 that identifies the bootservice.
■ boot-server is the IP address of the boot server for that boot service.
■ boot-file is the name of the boot file that is read from your /home/pxebootdirectory.
■ label is the text string that is displayed when the boot menu is invoked bypressing the F8 key.
For example:
ip_addr=192.168.0.1
prompt=Press [F8] for menu...
prompt_timeout=10
service=1,192.168.0.1,pxelinux.0,Linux
service=2,192.169.0.1,nbp.unknown,Solaris
Note – Refer to the neopxe.conf man page for more information.
9. Start the neopxe daemon. Type the following command:
# /usr/local/sbin/neopxe
Configuring the NFS ServiceComplete the following steps on your DHCP server to configure the NFS service.
▼ To Configure the NFS Service1. Determine whether the NFS service package is already installed on the server.
Type the following command:
# rpm -qa | grep nfs-utils
2. If the NFS service package is not listed, install the package using YaST. Typethe following command:
# yast -i nfs-utils
3. Edit and save the /etc/exports file to add the following line to it:
/home/pxeboot *(sync,no_root_squash,no_subtree_check,insecure)
Chapter 3 Installing SUSE Linux Enterprise Server 10 33
4. Start the NFS service. Type the following command:
# /etc/init.d/nfsserver start
5. Configure the server to always start the NFS service. Type the followingcommands:
# chkconfig nfslock on
# chkconfig nfsserver on
Note – If you are using a DNS server, verify that DNS entries exist for the range ofaddresses defined in the PXE subnet dynamic-bootp entry in the dhcpd.conf file.If you are not using a DNS server, edit the /etc/hosts file to add the range of hostaddresses found in the PXE subnet dynamic-bootp entry in the dhcpd.conf file.
Disabling the FirewallIf a firewall is enabled on your PXE/DHCP server, you must disable it beforeattempting to install a PXE image onto the client system.
Caution – Network security vulnerability. When you disable the firewall protectionon the system that is your PXE server, the security of the data on that server cannotbe ensured. If this server is networked outside of your local intranet, be sure to re-enable the firewall after downloading software to PXE clients.
▼ To Disable the Firewall1. Execute the YaST command. Type the following command:
yast
2. Select Security & Users.
3. Select Firewall.
■ Select none to disable the firewall for all network interfaces.
■ Select specific interfaces to enable the firewall on only those interfaces.
34 Sun Blade X6240 Server Module Operating System Installation Guide • August 2009
Installing the SLES 10 Operating SystemUsing PXEPXE is a powerful and convenient solution for setting up a number of Sun BladeX6240 server module so that their configurations are identical.
Before You BeginThe network interface card (NIC) in your Sun Blade X6240 server module supportsthe PXE network booting protocol. The system BIOS and network interface BIOS onthe server module automatically query the network for a DHCP server.
Task Map for the SLES 10 InstallationBefore you can perform PXE installations over the network, you need to completethe following tasks.
Required ItemsThe PXE installation procedure requires the following items:
■ The DHCP server that you set up when you preconfigured your network tosupport PXE installation equipped with a CD/DVD drive
■ SLES 10 CD media set
■ Tools and Drivers CD (708-0346)
TABLE 3-3 Task Map for Installing SLES 10 Using PXE
Task Related Topic
Set up your Linux network and PXE server. “Preconfiguring the Network to Support PXEInstallation of SLES 10” on page 28
Install a SLES 10 image on that PXE server. “Configuring a SLES 10 PXE Install Image onthe PXE Server” on page 36
Configure your server to boot from or toinstall from a SLES 10 image on a PXEserver.
“Installing SLES 10 From a PXE Server” onpage 37
Chapter 3 Installing SUSE Linux Enterprise Server 10 35
Configuring a SLES 10 PXE Install Image on thePXE ServerThis procedure describes how to configure a PXE install image on the DHCP serverso that it can also act as your PXE server. The PXE server provides the OS files toyour PXE client.
Perform the following procedures to create an SLES 10 image on the PXE server:
■ “Setting Up and Copying SLES 10 Operating System to a Directory” on page 36
■ “Creating Links to SLES 10 PXE Files” on page 37
Setting Up and Copying SLES 10 Operating System to aDirectoryThe following procedure describes how to create and set up the directory that willcontain the SLES 10 files for PXE installation and how to copy the SLES 10 OS to thedirectory.
▼ To Set Up and Copy the SLES 10 Operating System to aDirectory
Note – You can use a different target directory than the /home/pxeboot/sles10/directory shown. The examples in this procedure use this directory.
1. Set up the directory structure that will hold the SLES 10 image. Type thefollowing commands:
# mkdir -p /home/pxeboot/sles10/CD1
# mkdir -p /home/pxeboot/sles10/CD2
# mkdir -p /home/pxeboot/sles10/CD3
# mkdir -p /home/pxeboot/sles10/CD4
2. Insert SLES 10 CD #1 into your server and copy its content to your PXE server.Type the following command:
# mount /dev/cdrom /mnt/cdrom
# cp -r /mnt/cdrom/* /home/pxeboot/sles10/CD1/
# umount /mnt/cdrom
3. Remove SLE S10 CD #1 from the server.
36 Sun Blade X6240 Server Module Operating System Installation Guide • August 2009
4. Repeat the above procedure for copying CD #2, #3 and #4 to theircorresponding directories in /home/pxeboot/sles10/ as given below:
# cp -r /mnt/cdrom/* /home/pxeboot/sles10/CD2/
# cp -r /mnt/cdrom/* /home/pxeboot/sles10/CD3/
# cp -r /mnt/cdrom/* /home/pxeboot/sles10/CD4/
Creating Links to SLES 10 PXE FilesPerform the following procedure to create links to the PXE files.
▼ To Create Links to the SLES 10 PXE Files1. Copy the autoinst.xml file from the /tmp/sles10/ directory to the root of
the PXE image. Type the following command:
# cp /tmp/sles10/autoinst.xml /home/pxeboot/sles10/
2. On your PXE server, modify the file home/pxeboot/pxelinux.cfg/defaultadding the following entry to it:
Note – Type the text block from append through autoinst.xml below as onecontinuous line with no returns.
default sles10
label sles10
kernel sles10/CD1/boot/x86_64/loader/linux
append textmode=1 initrd=sles10/CD1/boot/x86_64/loader/initrdinstall=nfs://n.n.n.n/home/pxeboot/sles10/CD1autoyast=nfs://n.n.n.n/home/pxeboot/sles10/autoinst.xml
Where n.n.n.n is the IP address of your PXE server.
3. Save and exit the file.
Installing SLES 10 From a PXE ServerThis procedure describes how to configure your Sun Blade X6240 server module toinitiate the request to download the boot image file from the PXE/DHCP server andhow to install the SLES 10 boot image onto the Sun Blade X6240 server module.
Chapter 3 Installing SUSE Linux Enterprise Server 10 37

Before You BeginBefore performing with this procedure, you must complete the following tasks:
■ Configured your Linux network to support a PXE server. See “Installing the SLES10 Operating System Using PXE” on page 35.
■ Installed a SLES 10 image on that Linux PXE server. See “Configuring a SLES 10PXE Install Image on the PXE Server” on page 36.
▼ To Install SLES 10 From a PXE Server1. Connect the PXE client to the same network as the PXE server.
The PXE client is the target Sun Blade X6240 server module to which you areinstalling the SLES 10 OS.
2. Power on the PXE client and press F12 to select network boot.
3. When you are prompted at the boot: prompt, type in the label you gave theimage when you installed it on the PXE server (sles10 in the example above).
4. To configure your SLES 10 Linux server, refer to the Installation andAdministration Guide on SLES 10 CD #1.
5. Perform an Online Software Update to update the OS files (see “Updating theSLES 10 Operating System” on page 38).
Updating the SLES 10 Operating SystemThe SLES OS installation media might not contain the most up-to-date versions ofthe SLES OS. This procedure describes how to update the SLES OS on your serverafter you have installed it from a PXE server or distribution CDs.
▼ To Update the SLES Operating System1. Log in as superuser.
2. Type the following command to run the YaST Online Update:
# you
Note that YaST can operate in both text and graphical modes. These directionsapply to both.
38 Sun Blade X6240 Server Module Operating System Installation Guide • August 2009

3. If you are behind a network firewall and need to use a proxy server in order toaccess the internet, you must first configure YaST with the correct proxyinformation.
a. Select the Network Services tab on the left, then the Proxy screen on theright. Type the correct proxy URLs in both the HTTP and HTTPS fields.
Note – In order for the on-line update service to function correctly through anetwork HTTP proxy, the following additional configuration step must beperformed.
b. Exit the YaST utility and run the following command:
rug set-prefs proxy-url Proxy URL
where Proxy URL is the fully qualified URL of your proxy server (for example:http://proxy.yourdomain:3128/).
c. After successfully running the command, launch YaST again.
4. Register with the Novell Customer Center.
Note – You will need your Novell Customer Center user name and password, aswell as an SLES 10 product activation code.
a. Select the Software tab on the left.
b. Select Novell Customer Center Configuration and follow the directions.
5. Once registered, select the Online Update tab to perform the software update.
Updating the SLES DriversThe SLES drivers need to be updated. Perform this procedure after you haveinstalled and updated the SLES 10 OS.
▼ To Update the SLES Drivers1. Insert the Tools and Drivers CD for Sun Blade X6240 and mount it onto the
directory /mnt it by typing the following command:
# mount /dev/cdrom /mnt
Chapter 3 Installing SUSE Linux Enterprise Server 10 39
2. To install the igb and nvsata drivers, type:
# cdrom/drivers/linux/suse/install.sh
3. If the server module has a REM that uses LSI drivers and you are using SLES10, do the following:
a. Type: # cd /mnt/drivers/linux/RAID/LSI/drivers/RHEL5-SLES10
b. Unzip the file linuxmpt_RH5_SLES10_4002100-1.zip
c. Type: # rpm -ivh nvsata-rhel5u1-3.4-1.24.x86_64.rpm
4. If the server module has a REM that uses StorageTek drivers, do the following:
a. Type: # cd /mnt/drivers/linux/RAID/StorageTek/drivers/
b. Unzip the file linux_aac_1152455.zip
c. Type: # rpm -ivh aacraid-1.1.5-2455.rpm
The installation of the drivers is now complete.
5. Reboot the server module for the changes to take effect. Type:
# reboot
40 Sun Blade X6240 Server Module Operating System Installation Guide • August 2009

CHAPTER 4
Installing Solaris 10
This chapter provides information about installing the Solaris 10 5/08 OperatingSystem (Solaris 10 OS) on a Sun Blade X6240 server module.
This chapter includes the following sections:
■ “About the Solaris 10 Installation” on page 42
■ “System Requirements” on page 42
■ “Download Solaris OS” on page 43
■ “Solaris Documentation” on page 43
■ “Installation Methods” on page 44
■ “Task Map for Solaris 10 Installation” on page 46
■ “Preparing to Install the Solaris Operating System” on page 47
■ “Booting a Server in a GRUB-Based Environment” on page 48
■ “Booting a Server Over the Network Using PXE” on page 49
■ “Installing the Solaris Operating System From Distribution Media” on page 50
■ “Installing the Solaris Operating System Using a Serial Console” on page 51
Note – The information in this chapter is intended for experienced systemadministrators who are familiar with using the Solaris Operating System on an x86platform.
41

About the Solaris 10 Installation
Note – This chapter contains information about installing the Solaris 10 OS fromnetwork or media. If you are configuring the preinstalled Solaris 10 OS that isshipped with the server, refer to the Sun Blade X6240 Server Module Installation Guide(820-3961).
The sections in this chapter describe what you need to know to install Solaris OS ona Sun Blade X6240 server module. However, to complete the installation you willneed to frequently reference procedures in other Solaris OS documentation. A list ofthe necessary additional documentation is provided in the section “SolarisDocumentation” on page 43.
Note – In this chapter the term “x86” refers to the Intel 32-bit family ofmicroprocessors and compatible 64-bit and 32-bit microprocessors made by AMD.For supported systems, see the Solaris Hardware Compatibility List athttp://www.sun.com/bigadmin/hcl.
System RequirementsTABLE 4-1 summarizes the system requirements for installing Solaris 10 on a SunBlade X6240.
TABLE 4-1 System Requirements
Requirement Description
Hardwarerequirements
The server hardware and the initial service processor configurationmust be installed before you install the Solaris OS.
Minimum Solaris OS Solaris 10 5/08 OS.
Memory to install Memory size is between 4 GB and 64 GB.
Disk space 12 GB or greater.
42 Sun Blade X6240 Server Module Operating System Installation Guide • August 2009

Download Solaris OS■ You can download or order the media for Solaris 10 5/08 at
http://www.sun.com/servers/blades/downloads.jsp.
■ Additional software is shipped separately on a Tools and Drivers CD. Contactyour Sun service provider if you need to order the Solaris OS or if you aremissing the Tools and Drivers CD.
■ For updates on Solaris 10 versions and hardware compatibility, go tohttp://www.sunsolve.sun.com.
Note – The Solaris 10 OS is shipped with the CD and DVD media anddocumentation that you will need to install the Solaris OS for both SPARC and x86platforms. For a Sun Blade X6240 server module, use the media for x86 platforms.
Solaris DocumentationSolaris OS documentation is available from the web at http://docs.sun.com/.
■ For the Solaris 10 installation guides, seehttp://docs.sun.com/app/docs/coll/1236.8
■ For the Solaris 10 administration guides, seehttp://docs.sun.com/app/docs/coll/47.16
■ For information about upgrading your system, seehttp://docs.sun.com/app/docs/doc/820-4041
■ For troubleshooting information, see Appendix A athttp://docs.sun.com/app/docs/doc/820-4040
Swap area 512 MB is the default size.
x86/x64 processorrequirements
x86/x64 120-MHz or faster processor is recommended. Hardwarefloating point support is required.
BIOS Industry standard x86/x64 BIOS (resident in FLASH). The BIOSmust be able to boot from CD or DVD media.
TABLE 4-1 System Requirements (Continued)
Requirement Description
Chapter 4 Installing Solaris 10 43
Note – The Solaris installation guides are provided as a collection of installationrelated documents. The URL for the installation guides listed above points to theinstallation collection for Solaris 10 5/08. A listing of installation collections fordifferent versions of Solaris (including more recent versions if available) is providedat http://docs.sun.com/app/docs/prod/solaris.10
Solaris 10 documentation is also available on the Solaris Documentation DVDincluded with your Solaris OS software.
Installation MethodsThe Sun Blade X6240 server module supports the following Solaris OS installationmethods:
■ Boot from the preinstalled Solaris 10 OS image on the hard drive.
■ Install one server from DVD or CD-ROM media interactively with the SolarisInstallation Program. The Solaris Installation Program is available on the Solaris10 media and includes the Solaris Device Configuration Assistant. You can runthe Solaris Installation Program with either a graphical user interface (GUI) or asan interactive text installer in a console session.
■ Install one or several servers over the network with Preboot ExecutionEnvironment (PXE) technology and the following installation methods:
■ Solaris installation program over the network from remote DVD or CD images
■ JumpStart™ installation
■ Diskless boot installation
■ Serial console installation
44 Sun Blade X6240 Server Module Operating System Installation Guide • August 2009
TABLE 4-2 summarizes the installation methods described in this chapter, andprovides pointers to the installation instructions.
Note – The Solaris OS provides additional programs for installation, such asbooting over a wide area network (WAN), but Sun Blade X6240 server modulessupport only those methods listed in this guide.
TABLE 4-2 Installation Methods
Method Description Instructions
Boot from thepreinstalled image.
The Solaris 5/08 OS image is preinstalled on the SunBlade X6240 server module hard drive.
Sun Blade X6240 Server ModuleInstallation Guide (820-3968)
Install from DVD orCD-ROM media.
Use the Solaris Installation Program on the CD orDVD media to install one server interactively.
“Installing the Solaris OperatingSystem From Distribution Media”on page 50
Install from thenetwork using PXE.
Use a PXE to install the Solaris OS over the networkfrom remote DVD or CD images or to automate theinstallation process and install several systems witha JumpStart installation.To boot over the network using PXE, you need to setup an install server and a DHCP server, andconfigure the BIOS on each server to boot from thenetwork.
To set up for a PXE installation,see “x86: Guidelines for Bootingwith PXE,” in the Solaris 10Installation Guide: Network-BasedInstallationsTo boot by using PXE, see“Booting a Server Over theNetwork Using PXE” on page 49
Install from a serialconsole.
Use a serial console to install the Solaris OS in aPXE-based network installation.
“Installing the Solaris OperatingSystem Using a Serial Console”on page 51
Perform a disklessboot.
Boot the Solaris OS on a Sun Blade X6240 servermodule without a hard drive. Use this method witha PXE-based network installation.
“x86: Booting and Installing Overthe Network PXE,” in theSolaris10 Installation Guide:Network-Based Installations
Chapter 4 Installing Solaris 10 45

Task Map for Solaris 10 InstallationUse TABLE 4-3 to preview the installation process defined as a series of tasks. Thetable defines each task, describes it, and provides pointers to the instructions for thattask.
TABLE 4-3 Task Map for the Solaris 10 Installation
Task Description Relevant Topic
Set up your server. Install your server hardware andconfigure the service processor.
Sun Blade X6240 Server ModuleInstallation Guide (820-3968)
Review the Sun Blade X6240 ServerModule Product Notes.
The product notes contain late-breaking news about the Solaris OSsoftware and patches.
Sun Blade X6240 Server ModuleProduct Notes (820-3972)
Review the system requirements. Verify that your server meets theminimum system requirements.
TABLE 4-1
Gather the information you need toinstall the Solaris OS.
The type of information you need tocollect depends on your environmentand the method you choose to installthe Solaris OS.
“About the Solaris 10Installation” on page 42
Locate the Solaris OSdocumentation.
The Solaris OS documentationincluded with your software containsmost of what you need to know aboutinstallation.
“Solaris Documentation” onpage 43
Install the Solaris OS. Choose an installation method andlocate the installation instructions.
TABLE 4-2
Install additional software, ifnecessary.
The Solaris OS drivers for the serverare bundled in the Solaris OS.However, you may need to installadditional software from the Toolsand Drivers CD.
Sun Blade X6240 Server ModuleProduct Notes (820-3972)
Install patches, if necessary. Patches are available from theSunSolve Patch Portal athttp://www.sunsolve.sun.com.
Sun Blade X6240 Server ModuleProduct Notes (820-3972)
46 Sun Blade X6240 Server Module Operating System Installation Guide • August 2009

Preparing to Install the Solaris OperatingSystemYou need to gather information about your system before you install the Solaris OS.The amount of planning and initial set up that you need to perform varies anddepends on whether you are preparing for a local installation from CD/DVD, or youare preparing for a PXE-based network installation.
You also need to obtain the appropriate media for your installation.
Installation PrerequisitesYou must complete the following tasks before you install the Solaris OS.
1. Verify that your system meets the minimum system requirements (see “SystemRequirements” on page 42).
2. If you are using the Solaris Installation Program GUI or text installer, you needa local CD/DVD drive or a network connection, a keyboard, and a monitor. Youwill also need the multi-port dongle cable to connect to the front of the servermodule. For more information, see the Sun Blade X6240 Server Module InstallationGuide (820-3968).
3. Gather the information you need to install the Solaris OS.
■ See the “Checklist for Installation,” in Chapter 1 in Solaris 10 Installation Guide:Basic Installations at http://docs.sun.com/app/docs/doc/817-0544.
■ For Solaris 10 installations go to http://docs.sun.com/app/docs/doc/819-5775.
TABLE 4-4 Installation Media
Media Title
DVD Solaris 10 OS 5/08 DVD
CD-ROM Solaris 10 OS 5/08 Software CDsSolaris 10 5/08 Languages for x86 Platforms CDTools and Drivers CD
Patches See the Sun Blade X6240 Server Module Product Notes for information aboutpatches.
Chapter 4 Installing Solaris 10 47
■ For a non-networked system, you need to know the host name of the system youare installing and the language and the locales that you intend to use on thesystem.
■ For a networked system, use the checklist to gather the following information:
■ Host name of the system that you are installing
■ Language and locales that you intend to use on the system
■ IP address of the name server
■ Subnet mask
■ Type of name service (for example, DNS, NIS, or NIS+)
■ IP address of gateway
■ Domain name
■ Host name of the name server
■ IP address of the name server
■ Root password
4. If you are installing the Solaris OS over the network, you need to set up a PXE-based network installation before you install the Solaris OS.
■ For information about setting up a PXE-based network installation, see“Booting a Server Over the Network Using PXE” on page 49.
Note – Consult the appropriate platform guide that ships with Solaris 10 fordetailed information about remote installation via USB. If USB-based installation isnot supported, use PXE.
Booting a Server in a GRUB-BasedEnvironmentStarting with the Solaris 10 1/06 (Solaris 10 version 1/06) release, x86-based systemsuse the open-source GNU Grand Unified Bootloader (GRUB). GRUB is the bootloader that is responsible for loading a boot archive into a system's memory. Theboot archive contains the kernel modules and configuration files that are required toboot the system. For more information on GRUB, refer to the grub(5) man page.
For information on how to boot a Sun Blade X6240 server module that is runningSolaris 10 in a GRUB-based environment, refer to the Solaris 10 System AdministrationGuide: Basic Administration at: http://docs.sun.com/app/docs/doc/819-2379
48 Sun Blade X6240 Server Module Operating System Installation Guide • August 2009
Booting a Server Over the NetworkUsing PXEUse this procedure along with the instructions in Solaris 10 Installation Guide:Networked-Based Installations at http://docs.sun.com/app/docs/doc/820-4040.
The Sun Blade X6240 server module implements the PXE specification required for aPXE network boot. PXE technology provides the server module with the capabilityto boot the Solaris OS over the network using the Dynamic Host ConfigurationProtocol (DHCP). Using a PXE-based network installation, you can install the SolarisOS onto a server module from the network with remote CD or DVD images. You canalso automate the installation process and install the Solaris OS on several Sun BladeX6240 server modules using a JumpStart scenario.
A PXE network boot is a direct network boot. No boot media is required on the SunBlade X6240 server module client system.
Before You BeginBefore you can boot over the network using PXE, you must complete the followingtasks:
1. Set up an installation server.
2. Add the Sun Blade X6240 server module clients to be installed.
3. Set up a DHCP server.
▼ To Boot a Server Over the Network Using PXE1. Perform the tasks in “Guidelines for Booting with PXE,” located in Solaris 10
Installation Guide: Network-Based Installations, located athttp://docs.sun.com/app/docs/doc/817-5504.
If you have already set up the systems you need for a PXE boot, review the TaskMap (TABLE 4-3) to verify that you have performed all the steps.
Chapter 4 Installing Solaris 10 49

▼ Boot the server over the network using PXE.1. Complete the steps in Solaris 10 Installation Guide: Network-Based Installations at
http://docs.sun.com/app/docs/doc/817-5504.
2. Follow the instructions on the screen.
3. When the BIOS screen appears, press F12 to perform a network boot from thePXE server.
Installing the Solaris Operating SystemFrom Distribution MediaUse this procedure to install the Solaris OS onto a Sun Blade X6240 server modulefrom CD/DVD media. This procedure describes an interactive installation using theSolaris Installation Program.
The Solaris Installation Program on the Solaris 10 OS media can be run with a GUIor as an interactive text installer in a console session. The GUI or command-lineinterface (CLI) uses screens to guide you step-by-step through installing the OS.
Note – The Solaris 10 5/08 Operating System or Solaris 2009.06 Operating System ispreinstalled on the Sun Blade X6240 server module boot disk. If Solaris 10 5/08 OS isinstalled, you do not have to use this procedure unless you are installing a newerversion. Instructions for installing the Solaris 5/08 OS from the boot disk areprovided in the Sun Blade X6240 Server Module Installation Guide (820-3968).
▼ To Install the Solaris OS From DistributionMedia
Note – Before starting this procedure, perform the tasks described in“Preparing toInstall the Solaris Operating System” on page 47.
1. Power down the server module.
2. Connect the multi-port dongle cable to the connector on the front of the server.
50 Sun Blade X6240 Server Module Operating System Installation Guide • August 2009

3. Connect a USB CD/DVD drive to the USB connector on the multi-port donglecable.
4. Power on to boot the server module.
The server module BIOS supports booting from a CD/DVD.
5. Insert the Solaris 10 OS CD/DVD into your Sun Blade X6240 server module.
6. Continue the installation procedure by performing the steps in the procedure:“x86: To Install or Upgrade with the Solaris Installation Program,” in Chapter 2at http://docs.sun.com/app/docs/doc/817-0544.
Start the procedure at Step 4. When prompted, answer the configurationquestions to complete the installation.
You can accept the default values on the screens to format the entire hard disk,use auto-layout file systems, and install a preselected set of software. Alternately,you can customize the installation to modify the hard disk layout, modify aSolaris fdisk partition, and select the software that you want to install.
Installing the Solaris Operating SystemUsing a Serial ConsoleThe Solaris text installer enables you to type information in to a terminal or aconsole window to interact with the Solaris OS Installation Program. You can usethis procedure to install the Solaris 10 OS over the network using PXE.
Before You BeginThe network interface card (NIC) in your Sun Blade X6240 server supports the PXEnetwork booting protocol. The system BIOS and network interface BIOS on yourserver module automatically query the network for a DHCP server.
Before you set up the serial console, you need to set up the following systems for aPXE-based network installation:
■ DHCP server configured to support PXE-based network installations
■ PXE server configured to support installation of the Solaris 10 OS.
To set up these systems, see Solaris 10 Installation Guide: Network-Based Installations athttp://docs.sun.com/app/docs/doc/820-4040.
Chapter 4 Installing Solaris 10 51

▼ To Install the Solaris Operating System Using aSerial Console
Note – For more information on Steps 1 through 3 of this procedure, see Solaris 10Installation Guide: Network-Based Installations athttp://docs.sun.com/app/docs/doc/820-4040.
1. Connect a terminal to the serial port on the service processor.
You can use a terminal, a PC running terminal emulation software, or a terminalserver.
2. Set the terminal to receive at 9600 baud.
3. Add an x86 install client to an install server and specify a boot device to useduring the installation.
If you specify the boot device when you set up the install client, you are notprompted for this information by the Device Configuration Assistant during theinstallation.
The examples below use the following values:
■ Client MAC address: 00:07:e9:04:4a:bf
■ Server IP address (GRUB only): 192.168.0.123
■ Client macro name (GRUB only): 01000039FCF2EF
Enter the commands specified in the examples below for the OS version that youare using:
Tip – See the man pages for these commands for more information on usage.
■ For the Solaris 10 5/08 OS system with GRUB booting:
# cd /export/boot/Solaris_10/Tools
# ./add_install_client -d -e “00:07:e9:04:4a:bf” \
-b “consolatory” i86pc
# datum -A -m 01000039FCF2EF \
-d “:BootSrvA=192.168.0.123:BootFile=01000039FCF2EF:”
# pntadm -f 01 -A $CLIENT_IP -i 01000039FCF2EF \
-m 01000039FCF2EF $CLIENT_NET
4. Log in to the service processor as an Administrator.
52 Sun Blade X6240 Server Module Operating System Installation Guide • August 2009
5. Type the following command to use the serial console:
start /SP/console
6. Boot the Sun Blade X6240 server module.
Refer to the instructions in Solaris 10 Installation Guide: Network-Based Installationsat http://docs.sun.com/app/docs/doc/817-5504.
7. When prompted, press F12 at the BIOS menu.
8. After the OS is installed, log in to the system and type the following eepromcommand to change bootenv.rc:
eeprom input-console=ttya
Chapter 4 Installing Solaris 10 53

54 Sun Blade X6240 Server Module Operating System Installation Guide • August 2009

CHAPTER 5
Installing OpenSolaris
This chapter provides information about installing the OpenSolaris OperatingSystem (OpenSolaris 10 OS) on a Sun Blade X6240 server module.
This chapter contains the following sections:
■ “About the OpenSolaris 10 Installation” on page 55
■ “System Requirements” on page 56
■ “Download OpenSolaris” on page 56
■ “OpenSolaris Documentation” on page 57
■ “Installation Methods” on page 57
■ “Task Map for OpenSolaris Installation” on page 58
■ “Installing OpenSolaris Operating System Using Local or Remote Media” onpage 59
■ “Post OpenSolaris Installation Tasks” on page 67
About the OpenSolaris 10 InstallationThis chapter contains information about installing the OpenSolaris 10 OS fromnetwork or media. If you are configuring the preinstalled OpenSolaris 10 OS that isshipped with the server, refer to the Sun Blade X6240 Server Module Installation Guide(820-3961).
The sections in this chapter describe what you need to know to install OpenSolarisOS on a Sun Blade X6240 server module. However, to complete the installation youwill need to frequently reference procedures in other OpenSolaris OSdocumentation. Refer to “OpenSolaris Documentation” on page 57.
55
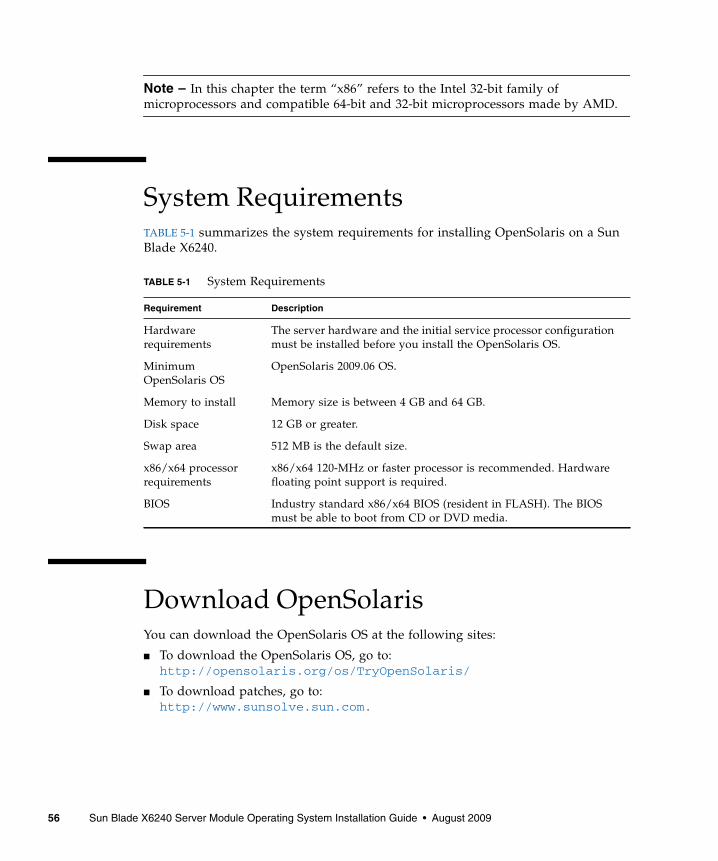
Note – In this chapter the term “x86” refers to the Intel 32-bit family ofmicroprocessors and compatible 64-bit and 32-bit microprocessors made by AMD.
System RequirementsTABLE 5-1 summarizes the system requirements for installing OpenSolaris on a SunBlade X6240.
Download OpenSolarisYou can download the OpenSolaris OS at the following sites:
■ To download the OpenSolaris OS, go to:http://opensolaris.org/os/TryOpenSolaris/
■ To download patches, go to:http://www.sunsolve.sun.com.
TABLE 5-1 System Requirements
Requirement Description
Hardwarerequirements
The server hardware and the initial service processor configurationmust be installed before you install the OpenSolaris OS.
MinimumOpenSolaris OS
OpenSolaris 2009.06 OS.
Memory to install Memory size is between 4 GB and 64 GB.
Disk space 12 GB or greater.
Swap area 512 MB is the default size.
x86/x64 processorrequirements
x86/x64 120-MHz or faster processor is recommended. Hardwarefloating point support is required.
BIOS Industry standard x86/x64 BIOS (resident in FLASH). The BIOSmust be able to boot from CD or DVD media.
56 Sun Blade X6240 Server Module Operating System Installation Guide • August 2009
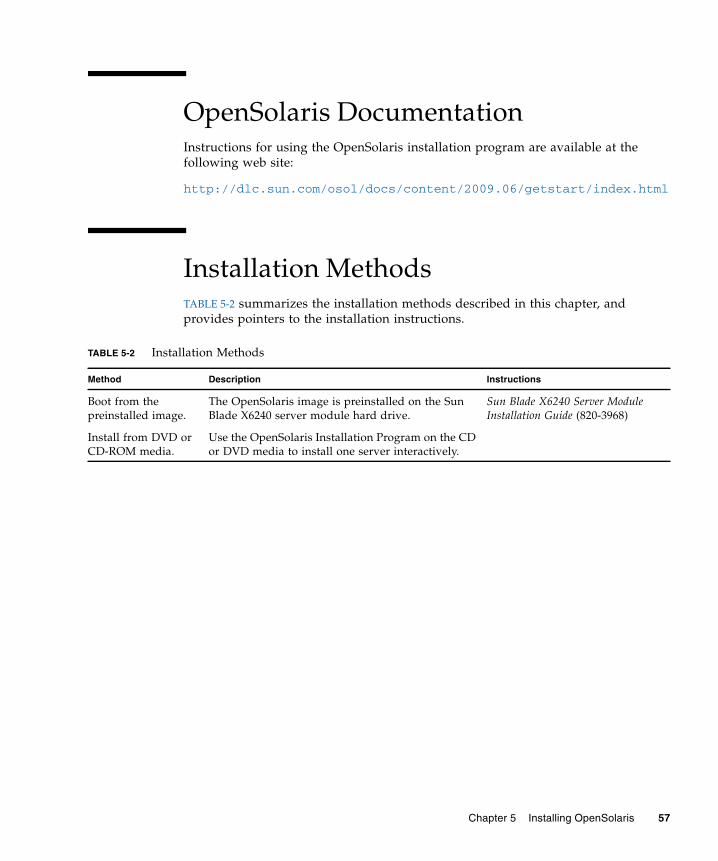
OpenSolaris DocumentationInstructions for using the OpenSolaris installation program are available at thefollowing web site:
http://dlc.sun.com/osol/docs/content/2009.06/getstart/index.html
Installation MethodsTABLE 5-2 summarizes the installation methods described in this chapter, andprovides pointers to the installation instructions.
TABLE 5-2 Installation Methods
Method Description Instructions
Boot from thepreinstalled image.
The OpenSolaris image is preinstalled on the SunBlade X6240 server module hard drive.
Sun Blade X6240 Server ModuleInstallation Guide (820-3968)
Install from DVD orCD-ROM media.
Use the OpenSolaris Installation Program on the CDor DVD media to install one server interactively.
Chapter 5 Installing OpenSolaris 57

Task Map for OpenSolaris InstallationUse TABLE 5-3 to preview the installation process defined as a series of tasks. Thetable defines each task, describes it, and provides pointers to the instructions for thattask.
TABLE 5-3 Task Map for the OpenSolaris Installation
Step Task Description Relevant Topic(s)
1 Review installationprerequisites.
Verify that all applicable requirements aremet for installing an operating system to aSun Blade X6240 server module.
• “Installation Prerequisites” onpage 59
2 Choose an installationmethod.
Evaluate and select an installation methodthat meets the needs of your infrastructure.
• “Installation Methods” onpage 57
3 Ensure that the BIOSfactory defaults are set.
Verify that the factory default settings in theBIOS are set prior to performing theoperating system installation.
• Sun Blade X6240 Server ModuleInstallation Guide
4 Gather OpenSolaris2009.06 installationmedia.
The OpenSolaris OS is shipped with the CDand DVD media and documentation thatyou will need to install the OpenSolaris OSfor both SPARC and x86 platforms.For the Sun Blade X6240 server module, usethe media for x86 platforms.
• You can download or orderthe media for the OpenSolarisOS at:http://opensolaris.org/os/downloads/
5 Perform theOpenSolaris OSinstallation.
The installation instructions in this chapterdescribe the initial steps for booting theinstallation media and launching theOpenSolaris Installation Program.For further information about installingOpenSolaris, refer to the Getting Startedwith OpenSolaris 2009.06 web site at:http://dlc.sun.com/osol/docs/content/2009.06/getstart/
• “Installing OpenSolarisOperating System Using Localor Remote Media” on page 59
6 Install driver(s), postinstallation, if necessary.
If the OpenSolaris OS does not include thenecessary device drivers to support yoursystem, you might need to install additionaldevice drivers.
• “Install System Device Driversto Support AdditionalHardware” on page 67
7 Install SRUs, postinstallation, if necessary.
If necessary, download and installOpenSolaris Support Repository Updates(SRUs). SRUs provide critical fixes to theOpenSolaris OS.
• “Install OpenSolaris SupportRepository Updates” onpage 67
58 Sun Blade X6240 Server Module Operating System Installation Guide • August 2009
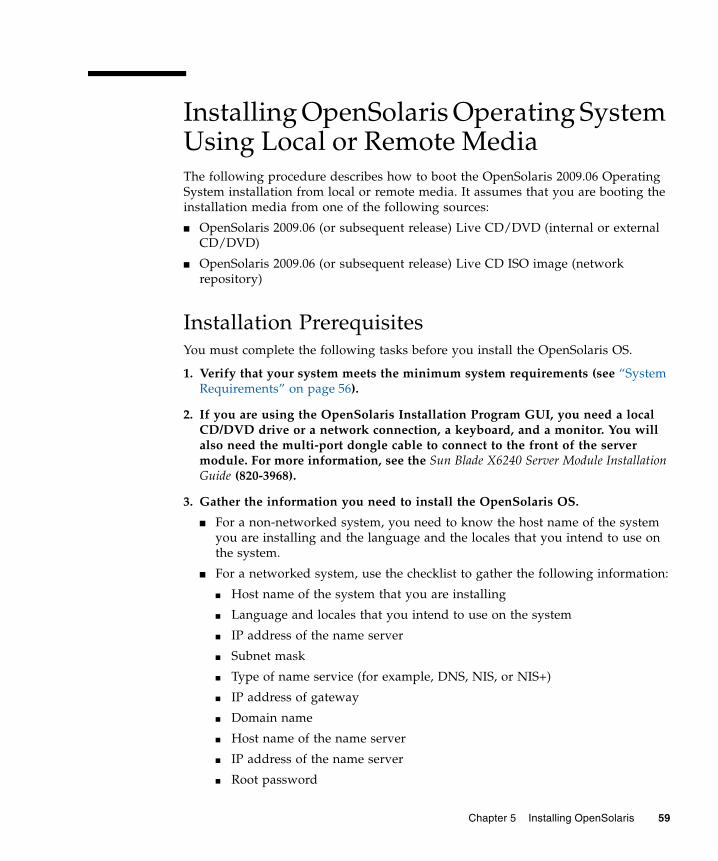
Installing OpenSolaris Operating SystemUsing Local or Remote MediaThe following procedure describes how to boot the OpenSolaris 2009.06 OperatingSystem installation from local or remote media. It assumes that you are booting theinstallation media from one of the following sources:
■ OpenSolaris 2009.06 (or subsequent release) Live CD/DVD (internal or externalCD/DVD)
■ OpenSolaris 2009.06 (or subsequent release) Live CD ISO image (networkrepository)
Installation PrerequisitesYou must complete the following tasks before you install the OpenSolaris OS.
1. Verify that your system meets the minimum system requirements (see “SystemRequirements” on page 56).
2. If you are using the OpenSolaris Installation Program GUI, you need a localCD/DVD drive or a network connection, a keyboard, and a monitor. You willalso need the multi-port dongle cable to connect to the front of the servermodule. For more information, see the Sun Blade X6240 Server Module InstallationGuide (820-3968).
3. Gather the information you need to install the OpenSolaris OS.
■ For a non-networked system, you need to know the host name of the systemyou are installing and the language and the locales that you intend to use onthe system.
■ For a networked system, use the checklist to gather the following information:
■ Host name of the system that you are installing
■ Language and locales that you intend to use on the system
■ IP address of the name server
■ Subnet mask
■ Type of name service (for example, DNS, NIS, or NIS+)
■ IP address of gateway
■ Domain name
■ Host name of the name server
■ IP address of the name server
■ Root password
Chapter 5 Installing OpenSolaris 59
Note that the following procedure explains the initial steps for booting the installmedia and launching the OpenSolaris Installation Program.
After completing this procedure, you should review and perform the required postinstallation tasks described later in this chapter. For more details, see “PostOpenSolaris Installation Tasks” on page 67.
▼ To Install OpenSolaris OS From Local or RemoteMedia.1. Power down the server module.
2. Connect the multi-port dongle cable to the connector on the front of the server.
3. Connect a USB CD/DVD drive to the USB connector on the multi-port donglecable.
4. Ensure that the install media is available to boot.
■ For distribution CD/DVD. Insert the OpenSolaris 2009.06 Distribution Media(CD labeled 1 or the single DVD) into the local or remote CD/DVD-ROMdrive.
■ For ISO image. Ensure that the ISO images are available and that the SunILOM Remote Console application is aware of the first ISO image location.
5. Reset the power on the server.
For example:
■ From the ILOM web interface, select the Remote Control --> RemotePower Control tab, then select the Power Cycle option from the Hostaction drop-down list box.
■ From the local server, press the Power button (approximately 1 second) on thefront panel of the server module to turn the server module off, then press thePower button again to power on the server module.
■ From the ILOM CLI on the server module SP, type: reset /SYS
■ From the ILOM CLI on the CMM, type reset /CH/BLn/SYS
Where n is the slot number of the server module in the chassis.
The BIOS screen appears.
60 Sun Blade X6240 Server Module Operating System Installation Guide • August 2009

Note – The next events occur very quickly; therefore, focused attention is needed forthe following steps. Please watch carefully for these messages as they appear on thescreen for a brief time. You might want to enlarge the size of your screen to eliminatescroll bars.
6. In the BIOS power-on self-test screen, press F8 to specify a temporary bootdevice for the OpenSolaris installation.
The Please Select Boot Device menu appears.
Chapter 5 Installing OpenSolaris 61
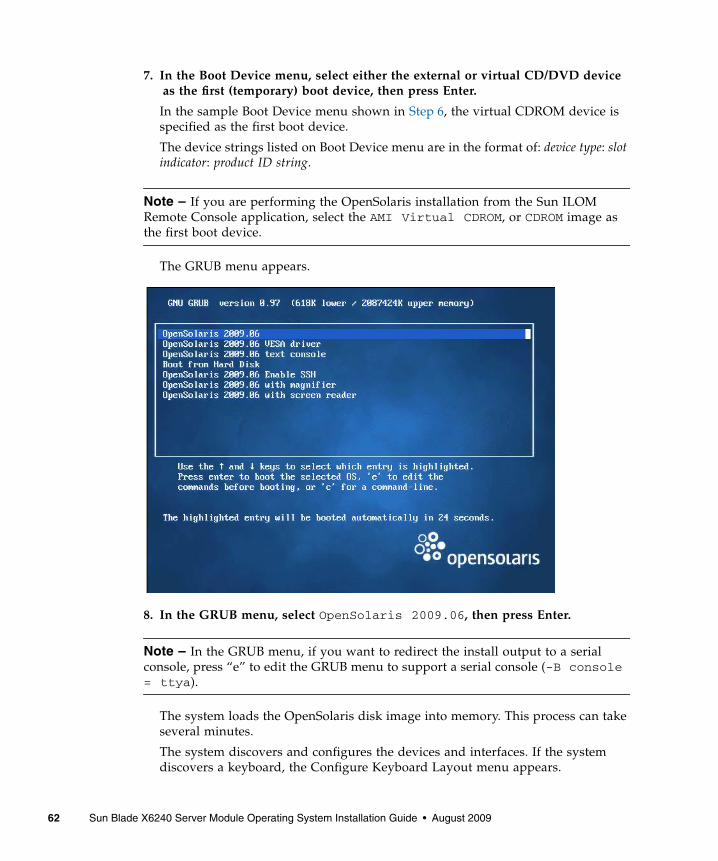
7. In the Boot Device menu, select either the external or virtual CD/DVD deviceas the first (temporary) boot device, then press Enter.
In the sample Boot Device menu shown in Step 6, the virtual CDROM device isspecified as the first boot device.
The device strings listed on Boot Device menu are in the format of: device type: slotindicator: product ID string.
Note – If you are performing the OpenSolaris installation from the Sun ILOMRemote Console application, select the AMI Virtual CDROM, or CDROM image asthe first boot device.
The GRUB menu appears.
8. In the GRUB menu, select OpenSolaris 2009.06, then press Enter.
Note – In the GRUB menu, if you want to redirect the install output to a serialconsole, press “e” to edit the GRUB menu to support a serial console (-B console= ttya).
The system loads the OpenSolaris disk image into memory. This process can takeseveral minutes.
The system discovers and configures the devices and interfaces. If the systemdiscovers a keyboard, the Configure Keyboard Layout menu appears.
62 Sun Blade X6240 Server Module Operating System Installation Guide • August 2009
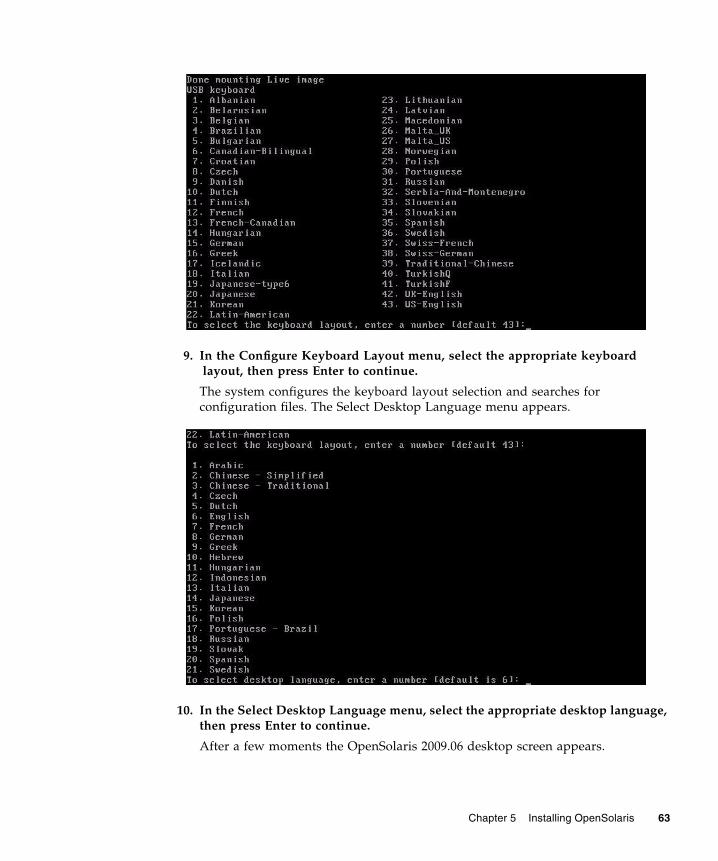
9. In the Configure Keyboard Layout menu, select the appropriate keyboardlayout, then press Enter to continue.
The system configures the keyboard layout selection and searches forconfiguration files. The Select Desktop Language menu appears.
10. In the Select Desktop Language menu, select the appropriate desktop language,then press Enter to continue.
After a few moments the OpenSolaris 2009.06 desktop screen appears.
Chapter 5 Installing OpenSolaris 63

11. In the OpenSolaris desktop screen, double-click the Install OpenSolaris icon tobegin the OS installation.
The OpenSolaris Installer Welcome screen appears.
64 Sun Blade X6240 Server Module Operating System Installation Guide • August 2009

12. In the Welcome screen, click Next to begin the installation.
The OpenSolaris installation program will display several configuration screens.
13. Follow the on-screen instructions to complete the OpenSolaris installation.
For additional information, refer to the Getting Started with OpenSolaris 2009.06web site at:
http://dlc.sun.com/osol/docs/content/2009.06/getstart
Note – If you did not configure the system to automatically reboot when theinstallation completes, you must manually reboot the system.
14. Proceed to the section “Post OpenSolaris Installation Tasks” on page 67 toperform the post OpenSolaris configuration tasks.
Chapter 5 Installing OpenSolaris 65

Post OpenSolaris Installation TasksAfter completing the OpenSolaris installation and rebooting the operating system,review the following post installation tasks and, if necessary, perform the tasks thatare applicable to your system.
■ “Install System Device Drivers to Support Additional Hardware” on page 67
■ “Install OpenSolaris Support Repository Updates” on page 67
■ “Enable Option for Wake On LAN” on page 67 (optional)
Install System Device Drivers to SupportAdditional HardwareThe Device Driver Utility enables you to connect to the Image Packaging System(IPS) and use it to search for device drivers for the devices on your system that donot have a driver attached with them.
To start the Device Driver Utility, click the Device Driver Utility icon on theOpenSolaris desktop.
Install OpenSolaris Support Repository UpdatesA Support Repository Update (SRU) contains the latest released bug fixes for yourOpenSolaris release.
Directions for accessing and installing SRUs can be found at:
http://sunsolve.sun.com/show.do?target=opensolaris
Enable Option for Wake On LANAfter installing the operating system, you might want to consider enabling the WakeOn LAN (WOL) option in the BIOS Setup utility. This features enables you to poweron the server from another location over the network.
66 Sun Blade X6240 Server Module Operating System Installation Guide • August 2009

Chapter 5 Installing OpenSolaris 67

68 Sun Blade X6240 Server Module Operating System Installation Guide • August 2009
CHAPTER 6
Installing VMware ESX Server 3.5Software
This chapter explains the procedure for installing VMware ESX Server 3.5 Update 1on the Sun Blade X6240 server module.
This chapter contains the following sections:
■ “Before You Begin” on page 69
■ “VMware ESX Server 3.5 Update 1 Installation Overview” on page 72
■ “Downloading the VMware ESX Server 3.5 ISO Image” on page 72
■ “Installing the VMware ESX Server 3.5 From a Remote CD or Remote ISO Image”on page 73
■ “Installing the VMware ESX Server 3.5 Update 1 From a Local CD” on page 75
■ “Updating the VMware Server 3.5 Software With Updates and Patches” onpage 77
Before You BeginReview the following sections:
■ “Task Map for VMware ESX Server 3.5 Installation” on page 70
■ “VMware Installation and Administration Documentation” on page 70
■ “Planning Network Interfaces” on page 71
■ “Select an Installation Method” on page 71
69
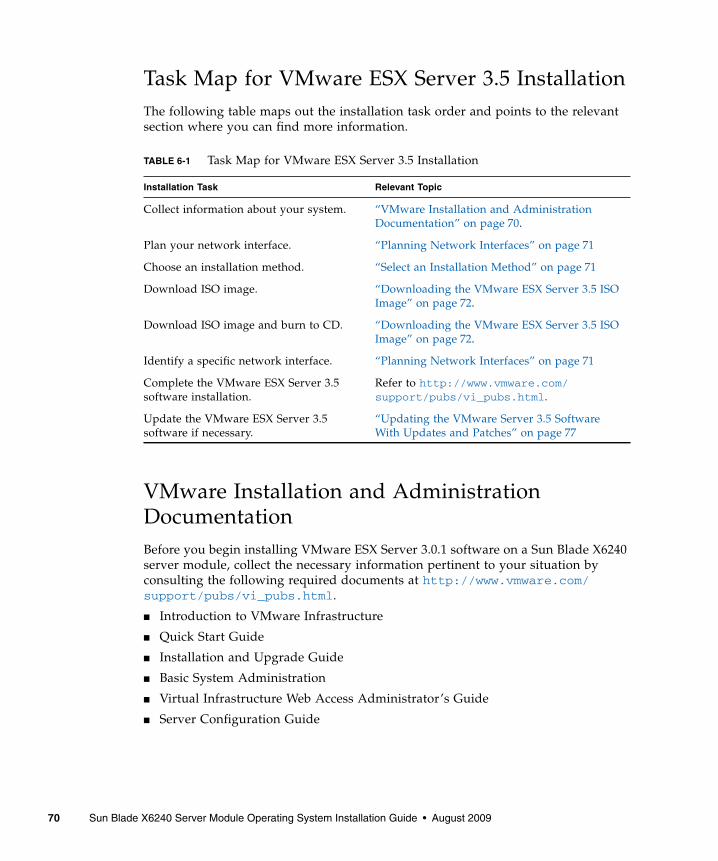
Task Map for VMware ESX Server 3.5 InstallationThe following table maps out the installation task order and points to the relevantsection where you can find more information.
VMware Installation and AdministrationDocumentationBefore you begin installing VMware ESX Server 3.0.1 software on a Sun Blade X6240server module, collect the necessary information pertinent to your situation byconsulting the following required documents at http://www.vmware.com/support/pubs/vi_pubs.html.
■ Introduction to VMware Infrastructure
■ Quick Start Guide
■ Installation and Upgrade Guide
■ Basic System Administration
■ Virtual Infrastructure Web Access Administrator’s Guide
■ Server Configuration Guide
TABLE 6-1 Task Map for VMware ESX Server 3.5 Installation
Installation Task Relevant Topic
Collect information about your system. “VMware Installation and AdministrationDocumentation” on page 70.
Plan your network interface. “Planning Network Interfaces” on page 71
Choose an installation method. “Select an Installation Method” on page 71
Download ISO image. “Downloading the VMware ESX Server 3.5 ISOImage” on page 72.
Download ISO image and burn to CD. “Downloading the VMware ESX Server 3.5 ISOImage” on page 72.
Identify a specific network interface. “Planning Network Interfaces” on page 71
Complete the VMware ESX Server 3.5software installation.
Refer to http://www.vmware.com/support/pubs/vi_pubs.html.
Update the VMware ESX Server 3.5software if necessary.
“Updating the VMware Server 3.5 SoftwareWith Updates and Patches” on page 77
70 Sun Blade X6240 Server Module Operating System Installation Guide • August 2009

Planning Network Interfaces■ The Virtual Infrastructure 3 service console and management interface is
dependent on a network interface. The service console does not automatically usethe first interface with a live connection. A live interface must be associated withthe service console for host management.
Refer to the Sun Blade X6240 Server Module Service Manual for detailed informationconcerning network interface cabling and the BIOS considerations of theseinterfaces.
■ By default, vmnic0 is assigned for service console communications.
Select an Installation MethodThe most common methods for installing VMware on your server are to use:
■ A remote ISO image downloaded from the VMware website, redirected throughthe ILOM Remote Console application (JavaRConsole).
■ A remote CD/DVD drive (with a CD-ROM burned from the ISO imagedownloaded from the VMware web site) redirected through the ILOM RemoteConsole application.
■ A local CD/DVD drive (with a CD-ROM burned from the ISO image downloadedfrom the VMware web site).
■ Automatic KickStart installation from VMware software (installation tree) storedon a Preboot Execution Environment (PXE) network server.
This chapter contains the procedures for the first three methods. For informationabout preparing for PXE installation, see the VMware Installation and Upgrade Guidefor VESX Server 3 and Virtual Center 2.0, Chapter 6, “Remote and ScriptedInstallations.” To access this document go to:http://www.vmware.com/pdf/vi3_301_201_installation_guide.pdf
Alternately, go to the following web site and search for the document title:
http://www.vmware.com/support/pubs/vi_pubs.html
Chapter 6 Installing VMware ESX Server 3.5 Software 71

VMware ESX Server 3.5 Update 1Installation OverviewPerform the following steps to install the VMware server software:
1. Review the VMware ESX Server 3.5 documentation, available athttp://www.vmware.com/support/pubs/vi_pubs.html.
For a list of the documents, see “VMware Installation and AdministrationDocumentation” on page 70.
2. Download the VMware server ISO image.
See “Downloading the VMware ESX Server 3.5 ISO Image” on page 72.
3. Depending on the installation method that you selected, use the appropriateprocedure below to install the VMware server software:
■ Remote installation. From a remote ISO image or from a remote CD/DVDdrive (with a CD-ROM burned from an ISO image) (see “Installing theVMware ESX Server 3.5 From a Remote CD or Remote ISO Image” on page 73).
■ Local installation. From a local USB CD/DVD drive (with a CD-ROM burnedfrom an ISO image) connected to the Sun Blade X6240 server module (see “ToInstall VMware ESX Server 3.5 From a Local CD” on page 75).
4. Update the ESX Server 3.5 software with the latest updates and patches, ifnecessary.
See “Updating the VMware Server 3.5 Software With Updates and Patches” onpage 77
Downloading the VMware ESX Server3.5 ISO ImageRegardless of the method you choose to install VMware ESX Server, you must firstdownload an ISO image of the software installation CD.
▼ To Download the VMware ESX Server 3.5 ISOImage1. Download the ISO image using a network-connected system with CD-burning
capabilities from:
http://www.vmware.com/download/vi/eval.html
2. Optionally, burn the image to a CD.
72 Sun Blade X6240 Server Module Operating System Installation Guide • August 2009

Installing the VMware ESX Server 3.5From a Remote CD or Remote ISO ImageThe following procedure describes how to use the Integrated Light Out Manager(ILOM) Remote Console to install VMware ESX Server 3.5 from a remote CD/DVDdrive or a remote ISO image.
Note – Read the Sun Integrated Lights Out Manager 2.0 User’s Guide (820-1188) beforecompleting the following steps. This guide provides details on using the ILOMservice processor web interface to redirect the console.
▼ To Install VMware ESX Server 3.5 From aRemote CD or Remote ISO Image1. Locate your VMware ESX Server installation CD/DVD or the equivalent ISO
image.
2. Connect to the ILOM service processor web interface.
3. Select the Remote Control tab, then the Mouse Mode Settings tab.
4. Select the Redirection tab.
5. Click the Launch Redirection button to start the JavaRConsole application.
6. Log in to the JavaRConsole.
7. Start keyboard and mouse redirection.
Select Keyboard and Mouse in the Devices menu.
8. Start CD/DVD redirection.
From the JavaRConsole Devices menu, you can redirect the CD in two ways:
■ If you are installing a physical CD-ROM into the remote console CD drive,insert the CD-ROM into the drive and select CD-ROM.
■ If you are using an ISO image installed on the remote console, select CD-ROMImage and provide the location.
Chapter 6 Installing VMware ESX Server 3.5 Software 73

Note – Depending on the number of USB devices in use, you may be prompted forthe install location or device. This deviates from the normal installation. To continueinstallation under these circumstances, select CD-ROM Image. Then, whenprompted to select a device driver, select Linux USB Driver.
9. Refer to the Installation and Upgrade Guide for VMware Infrastructure to guideyou through the installation process.
From your network-connected system go tohttp://www.vmware.com/support/pubs/vi_pubs.html.
10. Identify the specific network interface for the Sun Blade X6240 server module.
In the service console window on the Sun Blade X6240 server module, identify theavailable network configuration alternatives. See FIGURE 6-1 for ESX Server 3.5Update 1.
FIGURE 6-1 ESX Server 3.5 Update 1 Network Configuration Dialog Box
74 Sun Blade X6240 Server Module Operating System Installation Guide • August 2009
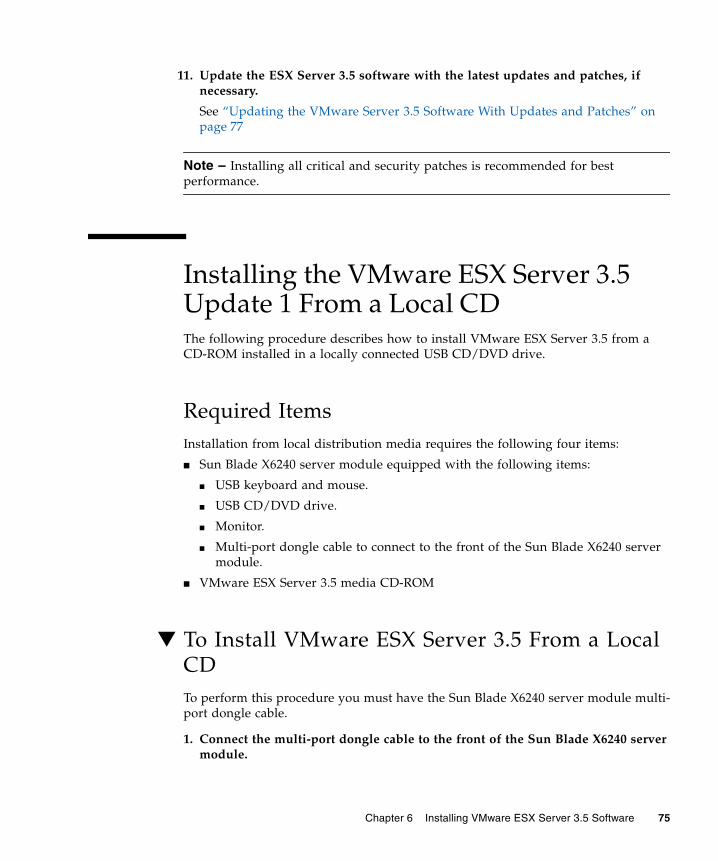
11. Update the ESX Server 3.5 software with the latest updates and patches, ifnecessary.
See “Updating the VMware Server 3.5 Software With Updates and Patches” onpage 77
Note – Installing all critical and security patches is recommended for bestperformance.
Installing the VMware ESX Server 3.5Update 1 From a Local CDThe following procedure describes how to install VMware ESX Server 3.5 from aCD-ROM installed in a locally connected USB CD/DVD drive.
Required ItemsInstallation from local distribution media requires the following four items:
■ Sun Blade X6240 server module equipped with the following items:
■ USB keyboard and mouse.
■ USB CD/DVD drive.
■ Monitor.
■ Multi-port dongle cable to connect to the front of the Sun Blade X6240 servermodule.
■ VMware ESX Server 3.5 media CD-ROM
▼ To Install VMware ESX Server 3.5 From a LocalCDTo perform this procedure you must have the Sun Blade X6240 server module multi-port dongle cable.
1. Connect the multi-port dongle cable to the front of the Sun Blade X6240 servermodule.
Chapter 6 Installing VMware ESX Server 3.5 Software 75
2. Connect the following to the USB ports on the dongle:
■ A CD/DVD drive
■ A USB Keyboard and Mouse
Note – You can also configure keyboard, video and mouse (KVM) access through aJavaRConsole.
3. Connect a monitor connected to the server module (this is not required if youare using Java KVM).
4. Power on the server module.
5. Insert the CD-ROM media into CD/DVD drive. The server will boot from theCD-ROM and display a boot prompt.
boot:
6. To access graphical mode, press Enter.
7. To work in text mode, enter the following:
esx text
8. Refer to the Installation and Upgrade Guide for VMware Infrastructure to guideyou through the installation process.
From your network-connected system, go tohttp://www.vmware.com/support/pubs/vi_pubs.html.
9. Identify the specific network interface for the Sun Blade X6240 server module.
In the service console window on the Sun Blade X6240 server module, identify theavailable network configuration alternatives (see FIGURE 6-1 for ESX Server 3.5Update 1).
10. Complete the VMware installation.
This is detailed in the Installation and Upgrade Guide for VMware Infrastructure athttp://www.vmware.com/support/pubs/vi_pubs.html.
11. Update the VMware ESX Server 3.5 software with the latest updates andpatches, if necessary.
See “Updating the VMware Server 3.5 Software With Updates and Patches” onpage 77.
Note – We strongly recommend installing all critical and security patches.
76 Sun Blade X6240 Server Module Operating System Installation Guide • August 2009

Updating the VMware Server 3.5Software With Updates and PatchesBecause software is constantly being updated, your distribution media might notcontain the latest updates and patches.
VMware ESX Server 3.5 update images are available for download athttp://www.vmware.com/download/vi/vi3_patches.html.
Chapter 6 Installing VMware ESX Server 3.5 Software 77

78 Sun Blade X6240 Server Module Operating System Installation Guide • August 2009

Index
BBIOS Setup utility, 67Boot Device menu
OpenSolaris OS, 62boot server daemon, 31booting in GRUB, 48
CConfigure Keyboard Layout menu
OpenSolaris OS, 63configuring boot server, 31configuring TFTP service, 30
Ddevice strings
OpenSolaris OS, 62DHCP server configuration, 13documentation
OpenSolaris, 57Red Hat Enterprise Linux, 6related to operating systems, 4RHEL, 6Solaris 10 Operating System, 43SUSE Linux Enterprise Server, 24VMware, 70
Ffirewall, 39
disabling, 17
GGRUB menu
OpenSolaris OS, 63GRUB-based booting, 48
Iinstallation task map
OpenSolaris, 58Red Hat Enterprise Linux, 7Red Hat Enterprise Linux PXE installation, 12Solaris 10, 46Suse Linux Enterprise Server 10, 25VMware, 70
installingportmap, 14
installing an operating systemOpenSolaris, 55overview, 1Red Hat Enterprise Linux, 5Solaris 10, 42, 55Suse Linux Enterprise Server 10, 24VMware, 73
installing using the Remote Console applicationRed Hat Enterprise Linux, 10Suse Linux Enterprise Server 10, 27VMware, 73
installing VMwarefrom a local CD, 75task map, 70
LLocal CD installation
79

VMware, 75
Mmedia installation
Solaris 10, 50
Nneopxe daemon configuration, 15NFS service configuration, 16
OOpenSolaris OS
Boot Device menu, 62Configure Keyboard Layout menu, 63device strings, 62ILOM web interface, 60install
GRUB menu, 63post installation tasks, 67resetting server power
interfaces supported, 60Sun ILOM Remote Console application, 62Welcome screen, 66
OpenSolaris OS installSun ILOM Remote Console application, 60
Pportmap
installing, 14, 30post installation tasks
OpenSolaris OS, 67preparing for installation
Solaris 10, 47, 59SUSE Linux Enterprise Server, 26
prerequisitesRed Hat Enterprise Linux media installation, 8
proxy server, 39PXE installation
preconfiguring for Red Hat Enterprise Linux, 12Red Hat Enterprise Linux, 11
configuring neopxe daemon, 15configuring NFS service, 16configuring TFTP service, 14configuring the DHCP server, 13disabling the firewall, 17installing from PXE server, 18installing portmap, 14
preconfiguring the network, 12Solaris 10, 50
RRed Hat Enterprise Linux
installing from media, 8obtaining media kits, 8prerequisites, 8PXE installation
configuring neopxe daemon, 15configuring NFS service, 16configuring TFTP service, 14configuring the DHCP server, 13disabling the firewall, 17installing from the PXE server, 18installing portmap, 14preconfiguring the network, 12
PXE installation task map, 12software updates or patches, 8
Red Hat Enterprise Linux installationPXE installation, 11
remote console installationVMware, 73
Sserial console installation
Solaris 10, 51Solaris 10 installation
media installation, 50overview, 42, 55preparation, 47, 59PXE installation, 50serial console installation, 51
Sun ILOM Remote Console applicationOpenSolaris OS Install, 62OpenSolaris OS install, 60
SUSE Linux Enterprise Server installationpreparation, 26
TTFTP service
configuring, 30TFTP service configuration, 14typographic conventions, xii
UUpdating, 20
80 Sun Blade X6240 Server Module Operating System Installation Guide • August 2009

VVMware
installing from local CD, 75installing from remote console, 73
WWelcome screen, 66WOL option
OpenSolaris OSenabling, 67
YYaST utility, 39
Index 81

82 Sun Blade X6240 Server Module Operating System Installation Guide • August 2009