Spring Collection 2019
17
Spring Coection 2019 1
-
Upload
khangminh22 -
Category
Documents
-
view
3 -
download
0
Transcript of Spring Collection 2019

Spring Collection 2019
1
Majestic beachside cliffs. Serene desert landscapes. Pacific Ocean sunsets. Come with Paul Mitchell® Professional Hair Color
as we hit the highway for an iconic road trip across California. Each look in this collection captures the essence of a stop on our journey and pays homage to the
diverse natural beauty and alluring looks of the state that we’re proud to call home. Soak up the vibes and be endlessly inspired by a little California Dreaming.
32

Majestic beachside cliffs. Serene desert landscapes. Pacific Ocean sunsets. Come with us as we hit the highway for an iconic road trip across California.
Each look in this collection captures the essence of a stop on our journey and pays homage to the diverse natural beauty and alluring looks of the state that we’re proud to call home. Soak up the vibes and be endlessly inspired by
a little California Dreaming.
Colin began coloring hair at only 12 years old as a way to express himself. The former teen skateboarder colored his friends’ hair in
his parents’ basement, and later turned his passion into a career. As a member of the John Paul Mitchell Systems® family for more than 15 years, Colin has traveled the world as an International Platform Artist and Educator, and built the wildly successful Salon CARU, located in Hoboken, New Jersey. In 2017, John Paul Mitchell Systems® proudly introduced Colin as Artistic Director of Professional Hair Color.
Colin CarusoThomas Cousins
Clinton Norris
Noogie Thai
John Paul Mitchell Systems® Artistic Director of Professional Hair Color
John Paul Mitchell Systems® Artist
John Paul Mitchell Systems® Artist
John Paul Mitchell Systems® Editorial Director Growing up in a traditional Chinese family, education was a top priority for Noogie Thai. After studying Social Ecology and managing education programs at his university,
Noogie was looking for something more. He followed his passion for hair to a Paul Mitchell School and he hasn’t looked back. With specialties focused on long hairstyling, editorial work and television, the International Educator has earned two Emmy nominations and a People’s Choice Award.
Heather Ka’anoiJohn Paul Mitchell Systems® Artistic Director
Heather Ka’anoi began her career with John Paul Mitchell Systems® in 2006, when she received a once-in-a-lifetime scholarship opportunity from Angus Mitchell to attend a Paul Mitchell School. She became a stylist at a Paul Mitchell® Signature Salon before
joining the education team at Paul Mitchell The School Costa Mesa and later JPMS™ as an International Educator. Traveling around the world alongside industry legends and JPMS™ Art Directors has given Heather an advanced education in artistry, innovation and business strategy. She is now Artistic Director for JPMS™ and the proud co-owner of Dead Endz in Costa Mesa, California.
Though his father was a hairstylist for 48 years, Thomas Cousins did not see himself following in his footsteps at first. It took two years in college and serving in the Air Force
National Guard to realize he was destined for hairstyling. In 2004, Thomas was invited to audition for a position with the Paul Mitchell® Platform Artist team. He made the cut
and hasn’t stopped learning, sharing and showcasing his love of the craft from A Thomas Cousins Salon in Mandeville, Louisiana.
After graduating from Paul Mitchell The School San Diego in 2007, Clinton Norris entered the Rising Star program at A Robert Cromeans
Salon. A passion for education led him to Paul Mitchell The School Costa Mesa and Paul Mitchell The School Sherman Oaks, where he
served as clinic floor leader. He returned to Paul Mitchell The School San Diego, where he leads the cutting team. As an Advanced Academy Educator, Clinton shows his audiences how to customize shape, form, and functionality to create the ideal look.
Donna Mizell Lucas DoneyJohn Paul Mitchell Systems® Artist
John Paul Mitchell Systems® Artist
Growing up in Georgia and aspiring to broaden her horizons, Donna Mizell moved to Los Angeles to pursue her education
at a Vidal Sassoon Academy, where she was trained by a few of the greats, including Lucie Doughty. After graduating in 1999, Donna moved to San Diego to work for A Robert Cromeans Salon, where she currently amazes behind the chair.
Lucas Doney is what we like to call homegrown, starting his journey as a student at Paul Mitchell The School Colorado Springs. Beginning as a Service Desk Leader while still working to finish the program, Lucas
eventually moved back to his hometown of San Diego and joined A Robert Cromeans Salon, where he had the opportunity to attend an open audition and, ultimately, become a National Educator with a specialty in haircutting.
PAUL MITCHELL®
TEAM OF ARTISTRYMeet the talented group of artists who captured the essence of California in the alluring looks that make up our dreamiest collection yet.
@COLINCARUSO
@LUCASDONEY
@NOOGIETHAI
@H_KAANOI
@THOMASCOUSINS
@EARTHMAMAHAIRDRAMA
@CLINTONCUTSHAIR

With the soaring San Jacinto Mountains and iconic mid-century modern architecture as inspiration, this look captures the timelessness of the
glamorous desert retreat. Flecks of creamy yellow and lustrous rose gold grace a clean-lined bob like a fierce sunset across the desert skies.
PALM SPRINGSDesert rose blonde bob
6 7

COLOR FORMULAS & TECHNIQUESLOOK 1 - PALM SPRINGS
PHASE 1 – PRE-LIGHTENING
PHASE 2 - COLOR FORMULAS
PHASE 1 - PRE-LIGHTENING
PHASE 2 – COLOR APPLICATION
Create a Mohawk section through the top of the head. Clip away hair for control.
Create a shine line on remaining hair. Start the shine line 1 inch from the base of the head. Paint Formula 1 approximately 2-3 inches around the head.
Move to the top panel and begin in the front. Use the Platinum Card technique in the fringe using Formula 2. Once past the fringe, move to a fine weave continuing to use Formula 2.
Continue working through the panel of hair. Once you reach the top of the crown, begin using the Teasy Highlight technique using Formula 2 until there is no more hair in the panel.
Process until desired lightness is achieved.
Once processed, shampoo with Color Protect® Post Color Shampoo and The DetanglerTM
to condition. Dry hair without styling product.
Begin Phase 2 by mirroring the sectioning in Phase 1. This will be Segment 1.
Create a crescent-shaped section starting just below Segment 1 on the left side. Follow the round of the head to just below the occipital bone, then move to the opposite side and connect the section just below Segment 1. This will create one large segment. Within Segment 2, create three panels and clip for control.
The remaining hair will be Segment 3.
Start color application on the front hairline. Apply Formula 1 throughout Segment 3.
Drop down the first panel in Segment 2. Start by taking a ½-inch section and apply Formula 5 from the base to the ends, using foils to separate.
On the next ½-inch section, apply Formula 5 to the base. Apply Formulas 2 and 3 through the mid-shaft, and Formula 5 through the ends.
On the final ½-inch section, use Formula 5 from the base to the ends.
Repeat on the second and third panels of hair.
Move to the fringe and alternate Formulas 4 and 6.
Apply Formula 4 to the remaining hair.
Process for 20 minutes.
1 1
2 2
3
344
5 5
66
7
9
8
10
11
TIP: Smudge color transitions with gloved fingers for a seamless color blend.
TIP: Keep the base and end colors the same, but alternate Formulas 2 and 3 for a more creative color placement.
FORMULA 1 FORMULA 2 FORMULA 3 FORMULA 4 FORMULA 5 FORMULA 6
+ + + +POP XG™
Pink Flamingo POP XG™
YellowPaul Mitchell®
Processing Liquid 1 oz. (30 g/ml)
Paul Mitchell®
Processing Liquid 1 oz. (30 g/ml)
Paul Mitchell®
Processing Liquid 1 oz. (30 g/ml)
Paul Mitchell®
Processing Liquid 1 oz. (30 g/ml)
The Demi 7PA (7/81)
1 oz. (30 g/ml)
The Demi Rose Gold
1 oz. (30 g/ml)
The Demi Lavender
1 oz. (30 g/ml)
The Demi Silver
1 oz. (30 g/ml)
Formula 1: Skylight® 1 scoop + 40 volume Paul Mitchell® Cream Developer 1.5 oz. (45 g/ml)
Formula 2: SynchroLift® + 20 volume Paul Mitchell® Cream Developer
*POP XGTM does not require intermixing with developer.
See how the models get ready for their closeup at the California Dreaming photoshoot with this inside look at the behind-the-scenes preparation.
8 9

COLOR DIAGRAMSLOOK 1 - PALM SPRINGS
“CALIFORNIA IS SO MUCH MORE THAN JUST THE HOLLYWOOD SIGN AND CELEBRITIES IT’S ICONIC FOR. LUCAS AND I DECIDED TO FOCUS ON THE STRENGTH AND BEAUTY FOUND IN THE CANYONS AND DESERTS OF CALIFORNIA. THE COLOR IS SOFT AND MUTED LIKE A DESERT SUNSET, WHILE THE CUT IS STRONG.”
“WE LOOKED TO THE MID-CENTURY MODERN ARCHITECTURE IN PALM SPRINGS BY INTRODUCING A CLEAN, STRUCTURED SHAPE WITH STRONG FRINGE. THE MARRIAGE OF DESERT TONES WITH THE STRONG OUTLINE OF A CLASSIC, GRADUATED BOB CREATES A GREAT JUXTAPOSITION.”
“LIV’S BOLD SHAPE WAS IDEAL TO STYLE MODERN-CHIC WAVES AND BENDS THAT ARE UNIQUE AND LAID-BACK LIKE A CALIFORNIAN.”
COLORIST: COLIN CARUSO HAIRCUTTER: LUCAS DONEY STYLIST : NOOGIE THAI
10 11
CUTTING TECHNIQUELOOK 1 - PALM SPRINGS
TECHNIQUE TOOLS OF THE TRADE
GET THE LOOK
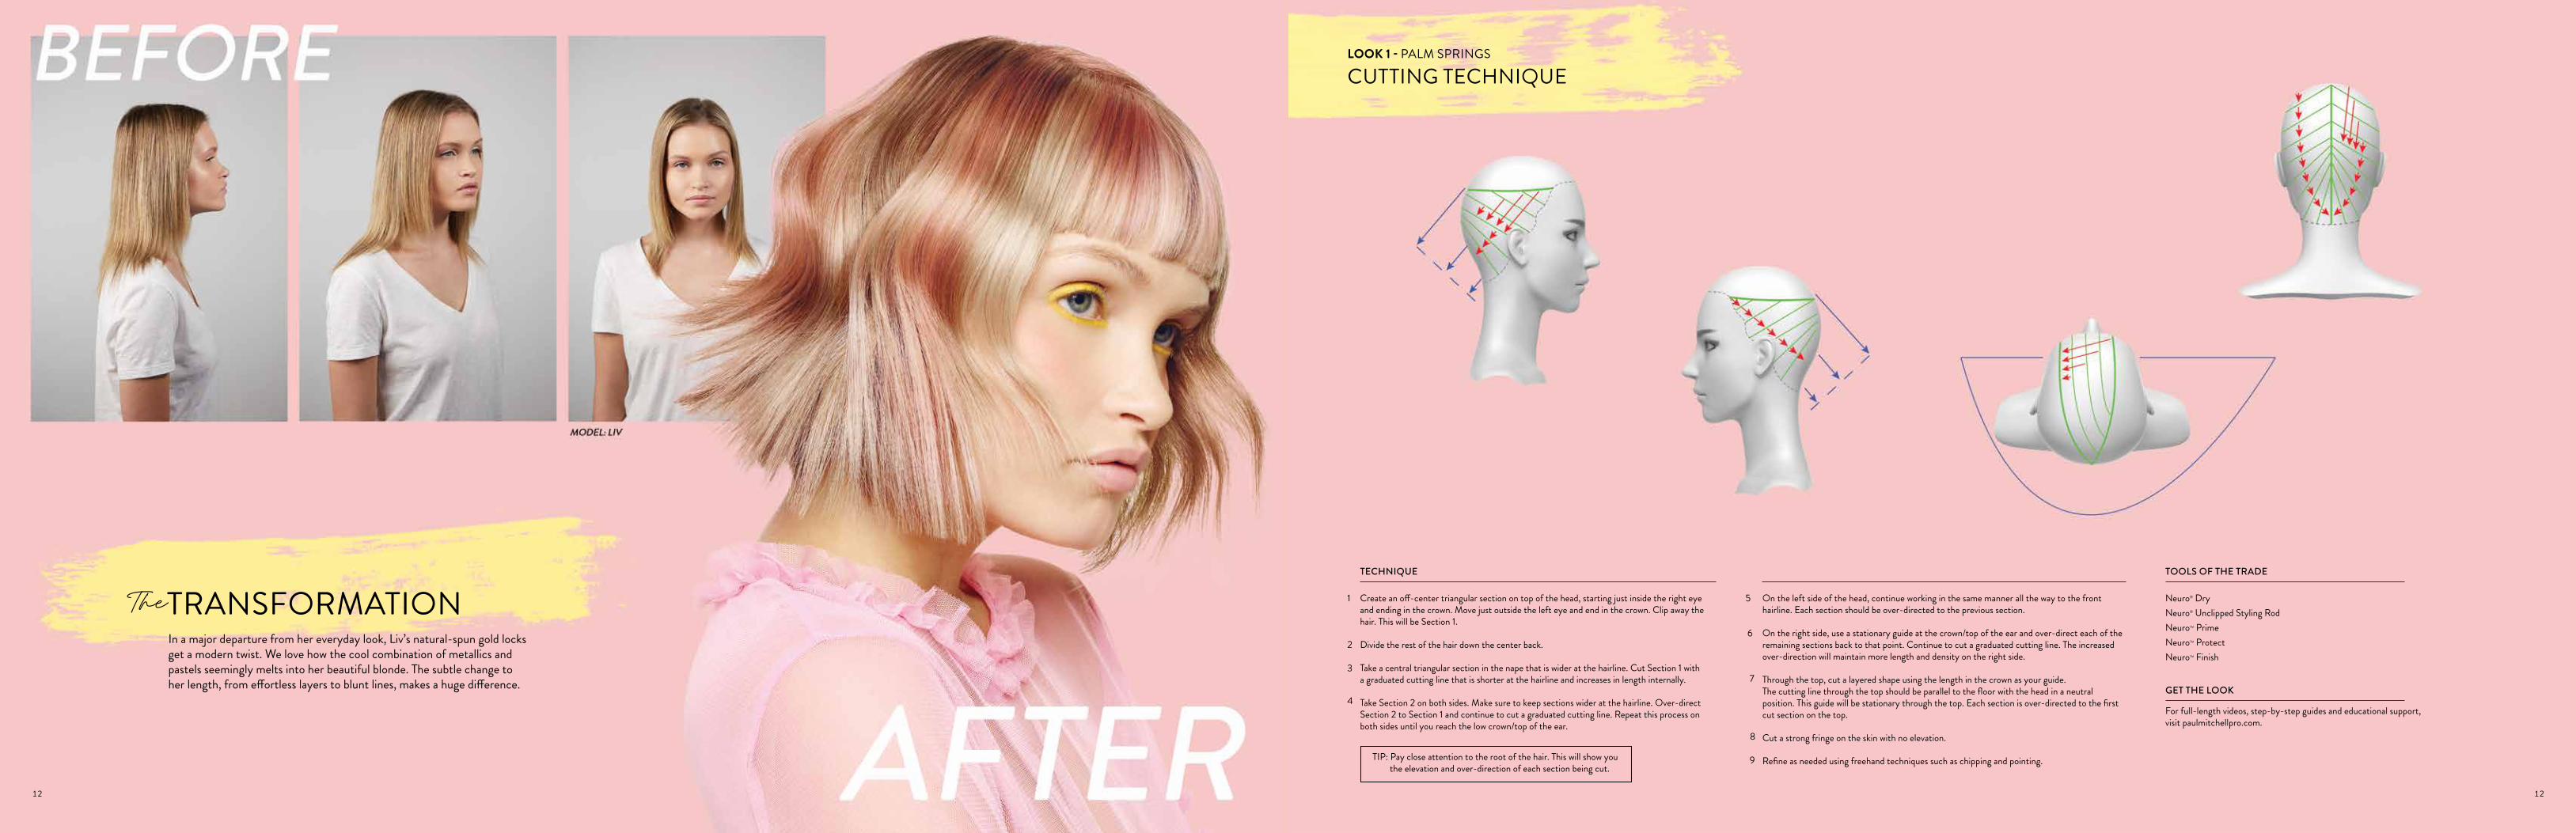
Create an off-center triangular section on top of the head, starting just inside the right eye and ending in the crown. Move just outside the left eye and end in the crown. Clip away the hair. This will be Section 1.
Divide the rest of the hair down the center back.
Take a central triangular section in the nape that is wider at the hairline. Cut Section 1 with a graduated cutting line that is shorter at the hairline and increases in length internally.
Take Section 2 on both sides. Make sure to keep sections wider at the hairline. Over-direct Section 2 to Section 1 and continue to cut a graduated cutting line. Repeat this process on both sides until you reach the low crown/top of the ear.
On the left side of the head, continue working in the same manner all the way to the front hairline. Each section should be over-directed to the previous section.
On the right side, use a stationary guide at the crown/top of the ear and over-direct each of the remaining sections back to that point. Continue to cut a graduated cutting line. The increased over-direction will maintain more length and density on the right side.
Through the top, cut a layered shape using the length in the crown as your guide. The cutting line through the top should be parallel to the floor with the head in a neutral position. This guide will be stationary through the top. Each section is over-directed to the first cut section on the top.
Cut a strong fringe on the skin with no elevation.
Refine as needed using freehand techniques such as chipping and pointing.
Neuro® Dry Neuro® Unclipped Styling RodNeuroTM Prime NeuroTM Protect NeuroTM Finish
For full-length videos, step-by-step guides and educational support, visit paulmitchellpro.com.
1 5
26
37
4
8
9TIP: Pay close attention to the root of the hair. This will show you the elevation and over-direction of each section being cut.
TRANSFORMATIONTheIn a major departure from her everyday look, Liv’s natural-spun gold locks get a modern twist. We love how the cool combination of metallics and pastels seemingly melts into her beautiful blonde. The subtle change to her length, from effortless layers to blunt lines, makes a huge difference.
12 12

Inspired by the twists and turns of scenic Highway 1, this look features subtle whispers of blue and green tones on a canvas of tousled curls.
The disconnected, halo-shaped cut brings expansion and edge to the delicate, hand-painted neutrals.
BIG SURNatural curls with an edge
14 15

LOOK 2 - BIG SUR
PHASE 1 – PRE-LIGHTENING
PHASE 2 - COLOR FORMULAS
PHASE 1 - PRE-LIGHTENING
PHASE 2 – COLOR APPLICATION
Create a crescent-shaped section starting just behind the fringe on the right side. Follow the round of the head to just below the occipital bone and move to the opposite side, connecting the section at the fringe. This will be one large segment.
Within this segment, make three subsections for control.
Create a cat eye-shaped section through the top of the head. This is Segment 1.
Create a middle parting starting at the back of the cat eye-shaped section and down to the bottom segment. Split this off to create two subsections: One on the left side and one on the right side. These are Segments 2 and 3. The remaining hair will be Segment 4.
Begin hand-painting on the left side of Segment 4. Place film for control and cleanliness. Move around the head, continuing to hand-paint until you reach the opposite side.
Drop down Segment 2 and 3. This will now become one large segment. Apply a visor to the fringe to separate. Begin hand-painting on the left side of the segment taking diagonal sections. Apply the film for control and cleanliness. Continue taking diagonal sections around the head until you reach the opposite side. Move into the fringe and hand-paint until complete. Apply a second visor for control and cleanliness.
Once complete, let hair process until the desired lightness is achieved.
Once processed, shampoo with Color Protect® Post Color Shampoo and The DetanglerTM to condition. Dry hair without styling product and resection into the same segments used in Phase 1.
Apply Formula 1 to the base of Segment 1. Once complete, apply film and apply Formula 2 to the mid-shaft and ends.
Move to Segment 4. Braid off the pre-lightened sections for control. Apply Formula 1 to the base. Apply film and apply Formula 2 to the mid-shaft and ends. Once complete, remove the film. Move to the pre-lightened pieces, and unbraid and apply Formula 1 to the base. On the mid-shaft to the ends, start to alternate Formulas 3-6 on pre-lightened hair, overlapping sections to allow for a beautiful processing experience.
Within Segments 2 and 3, apply Formulas 3-6 on pre-lightened hair to create a unique color application. Use ¼-inch sections to apply formulas and to ensure saturation. Use a creative placement or use film for control.
Process for 20 minutes. Rinse, shampoo with Color Protect® Post Color Shampoo and condition as desired.
1 1
22
3
34
45
6
7
8
TIPS: 1/ Adapt sectioning to fit your guest’s needs. 2/ Apply NeuroTM Protect to prevent flyaways and static. 3/ Use larger or smaller sections while hand-painting, depending on the dimension desired.
FORMULA 1 ON BASE
FORMULA 3 FORMULA 4
FORMULA 5 FORMULA 6
FORMULA 2 MID-SHAFT TO ENDS
+ +
+ +
++ +++the color XG®
6NN (6/00) 1 oz. (30 g/ml)
the color XG® 6NN (6/00)
1 oz. (30 g/ml)
the color XG® UTV (UTV/6) 1 oz. (30 g/ml)
the color XG®
10NB (10/07) 1 oz. (30 g/ml)
Violet Intensifier (0/66)
1 pea size drop
the color XG® 6NN (6/00)
1 oz. (30 g/ml)
the color XG® HLA (12/1)
0.5 oz. (15 g/ml)
Formula: SynchroLift® + 30 volume Paul Mitchell® Cream Developer
30 volumePaul Mitchell®
Cream Developer 1 oz. (30 g/ml)
30 volumePaul Mitchell®
Cream Developer 1.5 oz. (45 g/ml)
5 volumePaul Mitchell®
Cream Developer1 oz. (30 g/ml)
5 volumePaul Mitchell®
Cream Developer2.5 oz. (75 g/ml)
5 volumePaul Mitchell®
Cream Developer1 oz. (30 g/ml)
5 volumePaul Mitchell®
Cream Developer2 oz. (60 g/ml)
+ +++the color XG®
Clear Booster 2 oz. (60 g/ml)
the color XG®
UTA (UTA/1) 1 oz. (30 g/ml)
the color XG® 8MT (8/2)
0.5 oz. (15 g/ml)
Blue Intensifier (0/88)
1 pea size drop
Gold Intensifier (0/33)
2”
Green Intensifier (0/22)
1”
COLOR FORMULAS & TECHNIQUES
16 17
COLOR DIAGRAMSLOOK 2 - BIG SUR
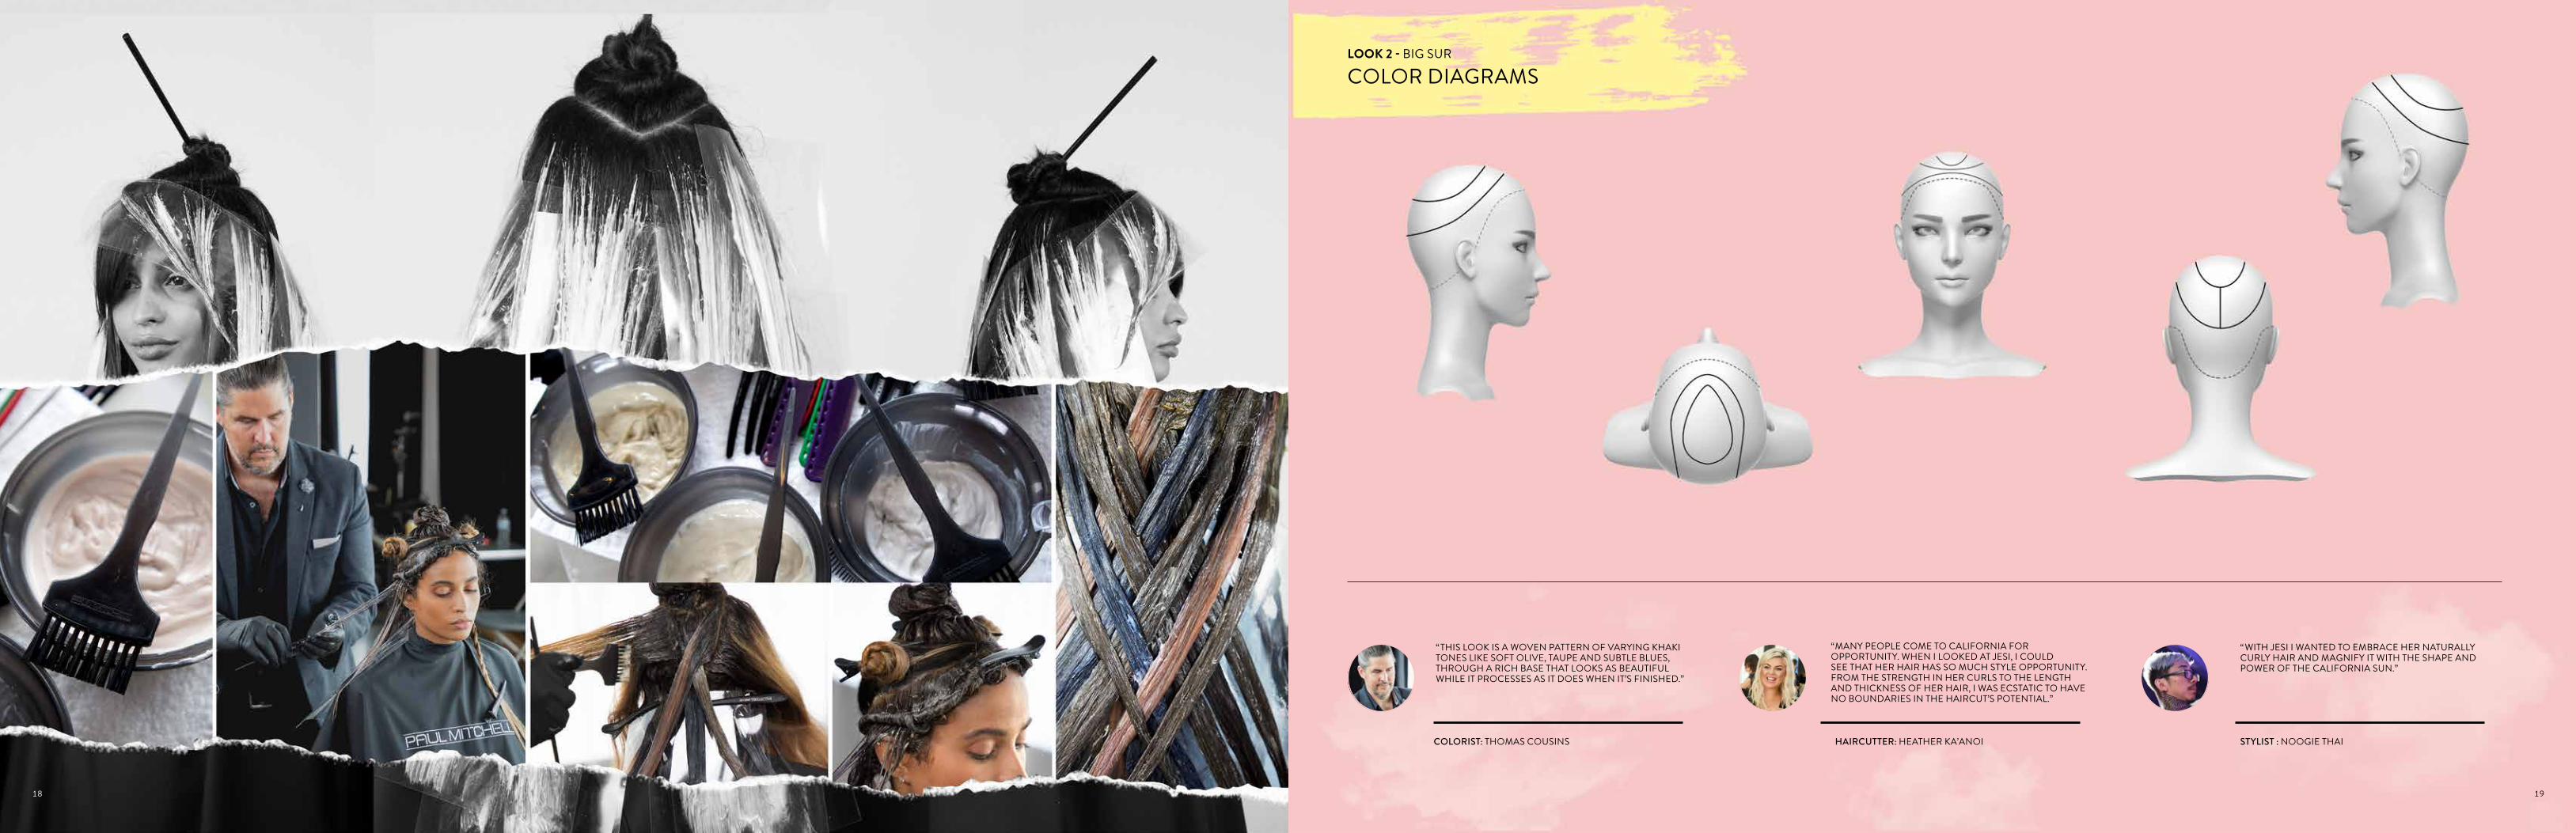
“THIS LOOK IS A WOVEN PATTERN OF VARYING KHAKI TONES LIKE SOFT OLIVE, TAUPE AND SUBTLE BLUES, THROUGH A RICH BASE THAT LOOKS AS BEAUTIFUL WHILE IT PROCESSES AS IT DOES WHEN IT’S FINISHED.”
“MANY PEOPLE COME TO CALIFORNIA FOR OPPORTUNITY. WHEN I LOOKED AT JESI, I COULD SEE THAT HER HAIR HAS SO MUCH STYLE OPPORTUNITY. FROM THE STRENGTH IN HER CURLS TO THE LENGTH AND THICKNESS OF HER HAIR, I WAS ECSTATIC TO HAVE NO BOUNDARIES IN THE HAIRCUT’S POTENTIAL.”
“WITH JESI I WANTED TO EMBRACE HER NATURALLY CURLY HAIR AND MAGNIFY IT WITH THE SHAPE AND POWER OF THE CALIFORNIA SUN.”
COLORIST: THOMAS COUSINS HAIRCUTTER: HEATHER KA’ANOI STYLIST : NOOGIE THAI
18 19

CUTTING TECHNIQUELOOK 2 - BIG SUR
TECHNIQUE TOOLS OF THE TRADE
GET THE LOOK
Create four standard segments with a center division line from the front hairline into the nape.
Section a horizontal line around the occipital area to separate hair density below the occipital. In some cases, this hair may not be cut.
Take a 1-inch-thick diagonal back section mirroring the hairline on both sides of the center division line. Starting in the center front, hold the hair with minimal tension and low elevation. Cut a horizontal cutting line. Comb the hair on the sides of the head near the temporal area up with elevation and continue to cut in the same horizontal cutting line. Check balance on both sides for evenness.
After the guideline is established, transition to vertical sections and over-direct hair forward and elevate hair to the stationary guide and cut a horizontal line. Work from the right side to the left side of the head for consistency. Work the vertical section until you reach the vertical segment line from the apex to the mastoid.
Start to pivot your sections to be more diagonal coming from the apex to behind the ear working to the center division line. Continue to over-direct the hair forward to the front hairline and elevate hair to the stationary guide front.
Style hair as desired.
Express Ion Turbolight®+ (with diffuser)Awapuhi Wild Ginger® HydroCream Whip®
Awapuhi Wild Ginger® Styling Treatment Oil®
Awapuhi Wild Ginger® Finishing SprayTM
For full-length videos, step-by-step guides and educational support, visit paulmitchellpro.com.
1
5
2
6
3
4TRANSFORMATIONTheThe artists took Jesi’s curls to the next level with an amazing mix of hues. The neutral shades are woven into the curls so subtly that you almost don’t notice it, but then you do. Her traditional layers were modernized with a disconnected haircut that, together with the styling, plays up the volume of her curls, putting her color on full display.
20 21

The sun meeting the sea served as muse to this look, defined by an unexpected palette of soft neutrals in sage, turquoise and pink beige.
Like the tide rising, this lengthy take on a pixie cut creates movement and dimension.
MALIBULayers of sunset pastels
22 23

COLOR FORMULAS & TECHNIQUES LOOK 3 - MALIBU
PHASE 1 – PRE-LIGHTENING
PHASE 2 – COLOR APPLICATION
PHASE 2 - COLOR FORMULAS
PHASE 1 - PRE-LIGHTENING
Pre-lighten hair with Formulas 1 and 2 using the Platinum Card technique.
Once processed to a level 9, rinse and shampoo with Color Protect® Post Color Shampoo. Condition as needed.
Create a cat eye-shaped section from the hairline to the top of the crown. You will place your foil pattern within this segment.
Begin by taking diagonal ½-inch sections, placing the first foil on the front left side using Formula 1. To ensure saturation, create subsections within the panel.
Place a second foil back-to-back with the first foil and apply Formula 2.
Take a ½-inch section and leave it out of the foil. This will allow for dimension in the end result.
Take an additional ¼-inch section and place it in the foil. Apply Formula 3.
The front segment will have a total of three foils.
Move to the back right side and place a total of four foils alternating Formulas 1, 2 and 3. Be sure to leave ½-inch sections in between for dimension.
Section hair into four segments for control.
Using a visor or film to protect the neck, begin application on the back left side. Apply Formula 3 to the base and extend out about ½ inch from the base, including the base of hair in foils.
Once the touchup is complete, apply Formula 4 from the mid-shaft to the ends, including the hair left out when doing foil work.
Process for 20 minutes. Rinse, shampoo with Color Protect® Post Color Shampoo and condition as desired.
1
1
11
2
2
3
4
5
6
7
8
9
10
FORMULA 1 FORMULA 3
FORMULA 4
FORMULA 2
+
+
++ ++++POP XGTM
Mint Conditionthe color XG®
7NB (7/07) 1 oz. (30 g/ml)
the color XG® 7RV (7/46)
0.5 oz. (15 g/ml)
Violet Intensifier (0/66)
4 pea size drops
the color XG® 7MT (7/2)
0.5 oz. (15 g/ml)
Formula 1: SynchroLift® + 30 volume Paul Mitchell® Cream Developer off-scalp Formula 2: SynchroLift® + 20 volume Paul Mitchell® Cream Developer on-scalp
10 volumePaul Mitchell®
Cream Developer1.5 oz. (45 g/ml)
+ +The Demi 9OR (9/34)
1 oz. (30 g/ml)
The Demi 8N (8/0)
0.5 oz. (15 g/ml)
the color XG® 8MT (8/2)
1 oz. (30 g/ml)
The Demi 6R (6/4)
2.5 capfuls
Blue Intensifier (0/88)
1”
Green Intensifier (0/22)
2”
10 volumePaul Mitchell®
Cream Developer1.5 oz. (45 g/ml)
Paul Mitchell®
Processing Liquid 1.5 oz. (45 g/ml)
1/ The amount of foil work will vary depending on your guest’s needs and hair density. 2/ More color equals more dimension.3/ Clean sections ensure application accuracy when applying the base color to hair.
TIPS:
24 25
COLOR DIAGRAMSLOOK 3 - MALIBU
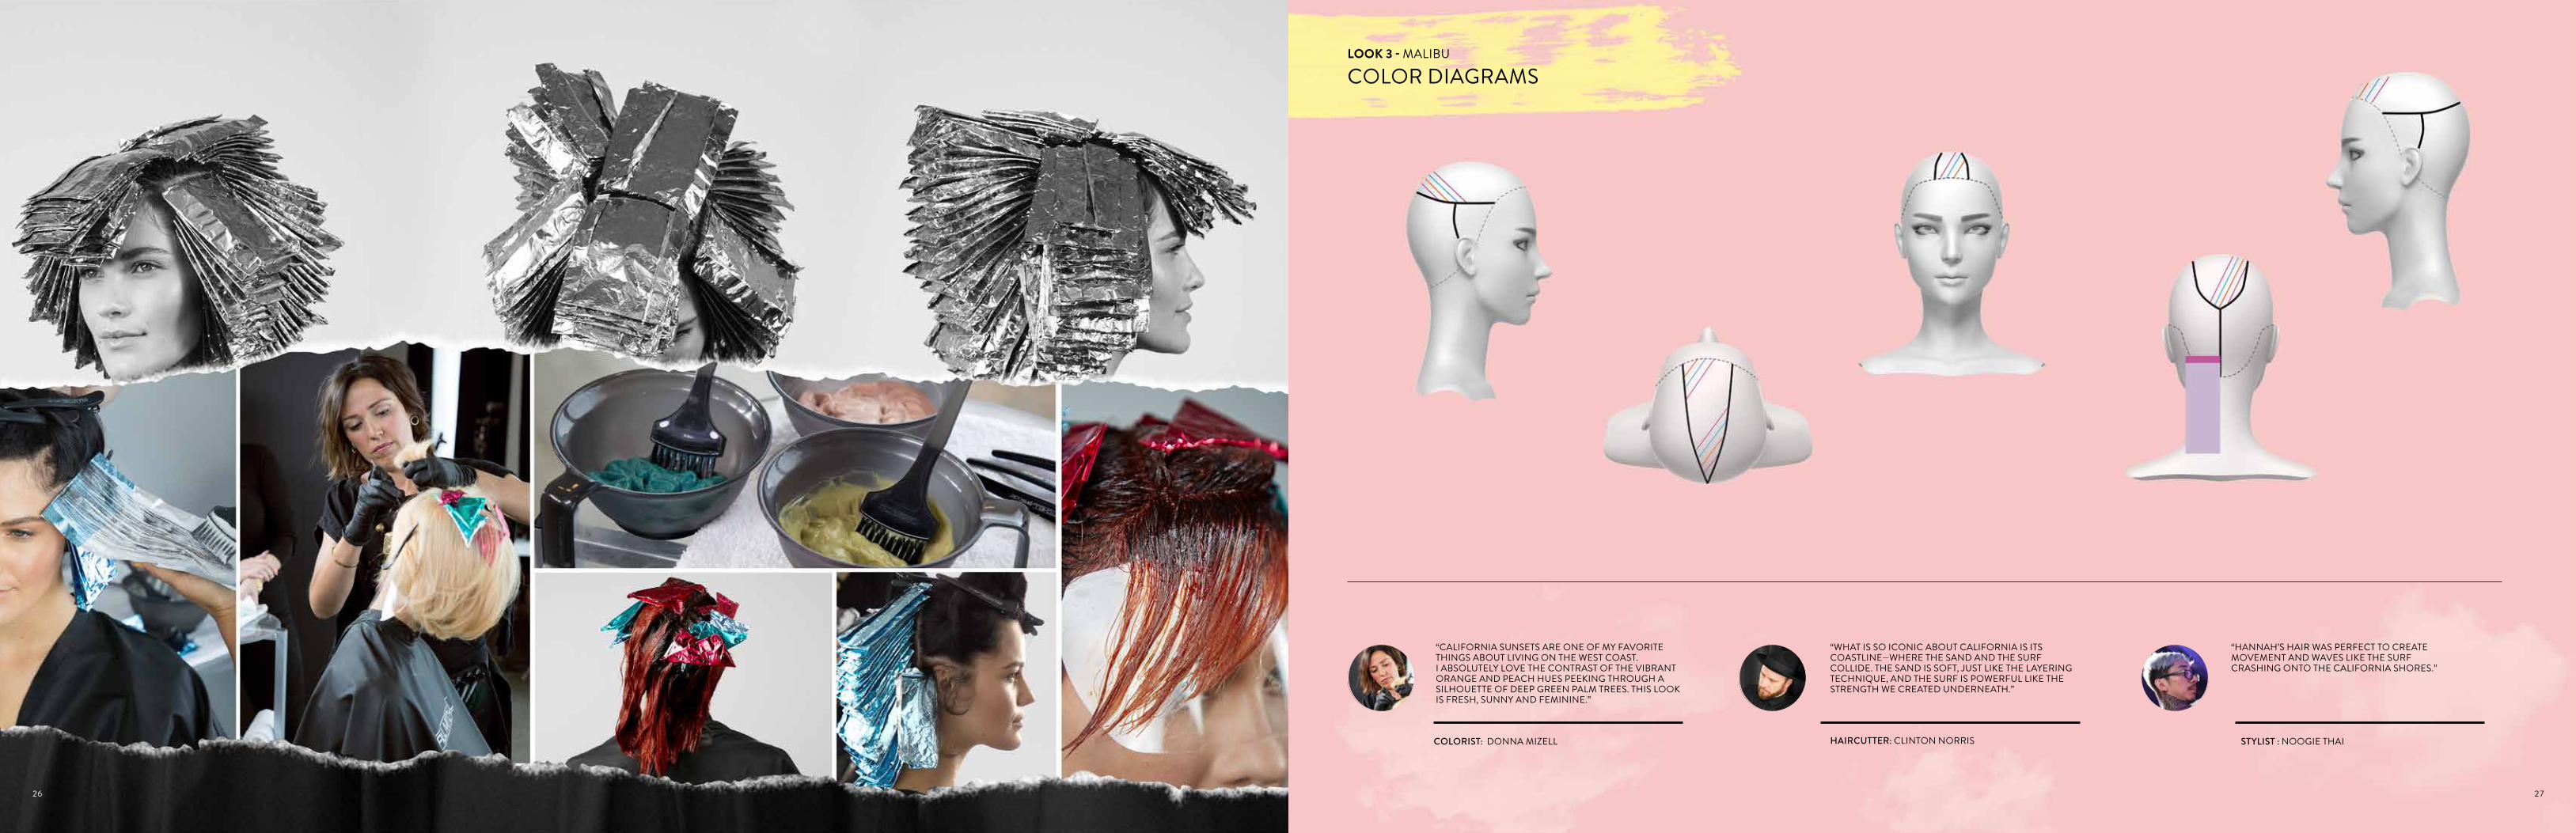
“CALIFORNIA SUNSETS ARE ONE OF MY FAVORITE THINGS ABOUT LIVING ON THE WEST COAST. I ABSOLUTELY LOVE THE CONTRAST OF THE VIBRANT ORANGE AND PEACH HUES PEEKING THROUGH A SILHOUETTE OF DEEP GREEN PALM TREES. THIS LOOK IS FRESH, SUNNY AND FEMININE.”
“WHAT IS SO ICONIC ABOUT CALIFORNIA IS ITS COASTLINE—WHERE THE SAND AND THE SURF COLLIDE. THE SAND IS SOFT, JUST LIKE THE LAYERING TECHNIQUE, AND THE SURF IS POWERFUL LIKE THE STRENGTH WE CREATED UNDERNEATH.”
“HANNAH’S HAIR WAS PERFECT TO CREATE MOVEMENT AND WAVES LIKE THE SURF CRASHING ONTO THE CALIFORNIA SHORES.”
COLORIST: DONNA MIZELL HAIRCUTTER: CLINTON NORRIS STYLIST : NOOGIE THAI
26 27

CUTTING TECHNIQUELOOK 3 - MALIBU
TECHNIQUE TOOLS OF THE TRADE
GET THE LOOK
Begin by parting off a panel of hair from the recession at the front hairline to the low crown on both sides.
Take a vertical section in the center back from the panel at low crown to the bottom hairline.
Elevate to 90 degrees from the head shape using an in-hand position. Use a cutting line that follows the head shape.
Continue taking vertical sections from the center back to the top of the ear with no over-direction.
Once you get to the ear, begin over-directing the hair back to preserve length at the front hairline.
Repeat on the other side.
Crosscheck horizontally for consistency in over-direction and balance.
Take a section from the parietal ridge to the parietal ridge at the highest point of the head.
Elevate to 90 degrees from the head shape and cut a flat cutting line so that the length increases at the parietal ridge.
Continue to the front hairline, elevating all sections vertically.
Repeat from the highest point of the head to the low crown.
Crosscheck from the front hairline to the low crown to check for balance and consistent over-direction.
To connect both panels, take a vertical section from the top of the crown to the occipital bone and elevate to 90 degrees from the natural fall.
Using a flat cutting line, use the length at the top of the bottom panel and connect the two lengths.
Continue working vertically to the top of the ear utilizing no over-direction.
Once you get to the ear, begin using backward over-direction to preserve length at the front hairline.
Style hair as desired and refine as needed.
Express Ion Turbolight®+ (with diffuser) Neuro® Unclipped Styling RodHair Sculpting LotionTM
Sculpting FoamTM
Hot Off The Press® Stay Strong®
For full-length videos, step-by-step guides and educational support, visit paulmitchellpro.com.
1
2
3
4
5
6
7
8
9
10
11
12
13
14
15
16
17
TRANSFORMATIONTheThe changes to Hannah’s hair will inspire a double take. In order to trade her naturally dark hair for a shade of strawberry blonde, the artists lightened her raven strands, then boldly infused it with green and terracotta tones. The best part about the hair-color move? The unexpected twist of the layered, textured pixie that really makes the color stand out.
28 29

“CALIFORNIA DREAMING”
BY PENNYWISE
COLIN CARUSO
BY AULI’I CRAVALHO
“HOW FAR I’LL GO” NOOGIE THAI
“SAN DIEGO”
BY BLINK-182
LUCAS DONEY
“CALIFORNIA LOVE”
BY 2PAC, FEATURING DR. DRE
HEATHER KA’ANOI
BY PHANTOM PLANET
“CALIFORNIA” CLINTON NORRIS
BY THE NOTORIOUS B.I.G.
“GOING BACK TO CALI” THOMAS COUSINS
“AMERICAN GIRL”
BY TOM PETTY AND THE HEARTBREAKERS
DONNA MIZELL
Inspired by our adventure across The Golden State, we asked our artists to share their perfect road-tripping tunes. These iconic songs span several decades and genres to evoke the diversity and laid-back vibe California is known for. So put in your earbuds, crank up the volume and enjoy some inspirational tunes as you take your own musical journey through sunny California.
ROAD TRIP PLAYLIST
30 31

Spring Collection 2019
32