SPECBOOK ZEN.indd - Terreal Roof Tiles
51
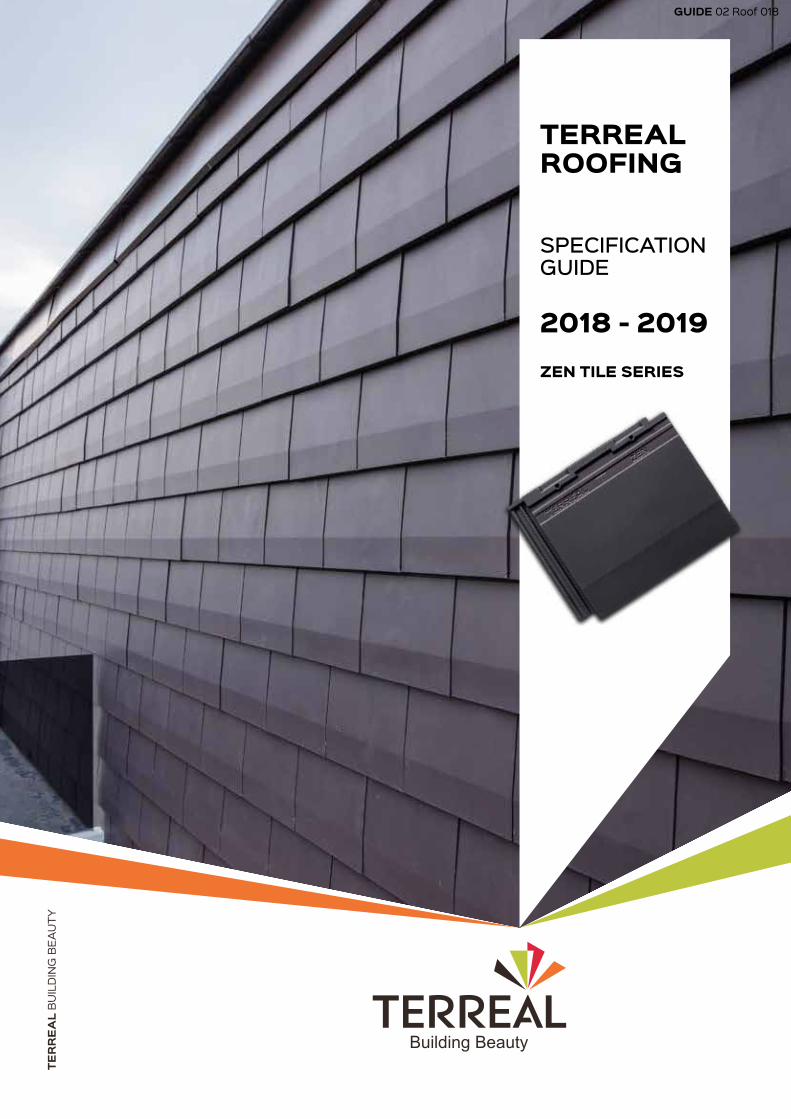
TERREAL BUILDING BEAUTY TERREAL ROOFING SPECIFICATION GUIDE 2018 - 2019 ZEN TILE SERIES GUIDE 02 Roof 018
-
Upload
khangminh22 -
Category
Documents
-
view
0 -
download
0
Transcript of SPECBOOK ZEN.indd - Terreal Roof Tiles
TER
RE
AL
BU
ILD
ING
BEA
UTY
TERREALROOFING
SPECIFICATIONGUIDE
2018 - 2019ZEN TILE SERIES
GUIDE 02 Roof 018

TERREAL Building BeautyThe construction industry is a rapidly evolving sector with a major goal of adding value to urban develop-ments and promoting reasonable housing. At the heart of these economic, environmental and social aims are builders, who must act sustainable for the collective well being and better living.
At Terreal, we put this ambition at the core of our mis-sion. We want to contribute to improving housing by providing our professional clients and end users with economic and construction benefits while promoting beauty and comfort. Inspired for over 150 years by the beauty and natural advantages of terracotta, we design, produce and market innovative solutions for building envelope in four areas: roofing, façade, struc-ture and decoration.
Every Terreal manufacturing site measures and regu-larly declares all its impacts, and implements optimiza-tion measures: limiting dust emissions and recycling in-dustrial waste. Before beginning to exploit its quarries, Terreal conducts an initial examination of the fauna and flora, establishes a biodiversity conservation plan and then afterwards rehabilitates the area: reforesta-tion, re-cultivation, creating an area of water, etc.
Terreal. Building Beauty.
CONTENTS
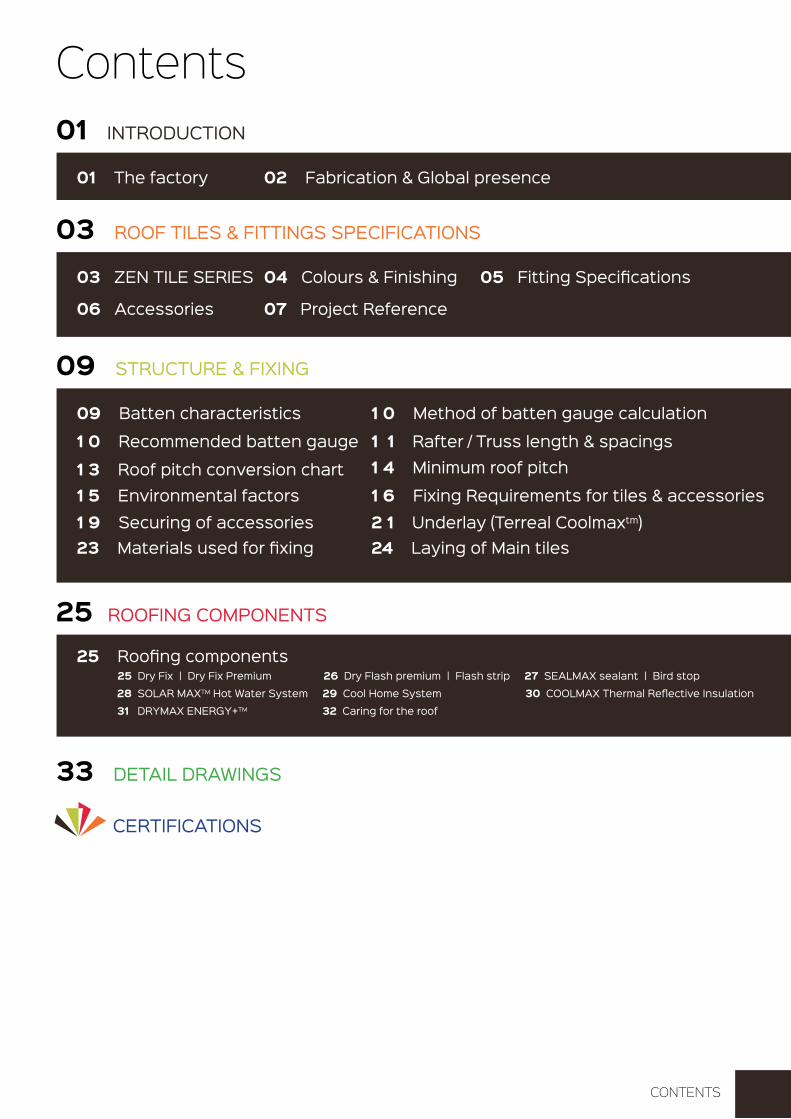
Contents01 INTRODUCTION
01 The factory 02 Fabrication & Global presence
03 ROOF TILES & FITTINGS SPECIFICATIONS
03 ZEN TILE SERIES 04 Colours & Finishing 05 Fitting Specifications
06 Accessories 07 Project Reference
09 STRUCTURE & FIXING
09 Batten characteristics 1 0 Method of batten gauge calculation
1 1 Rafter / Truss length & spacings
25 ROOFING COMPONENTS
33 DETAIL DRAWINGS
CERTIFICATIONS
1 0 Recommended batten gauge
1 3 Roof pitch conversion chart1 5 Environmental factors1 9 Securing of accessories23 Materials used for fixing 24 Laying of Main tiles
2 1 Underlay (Terreal Coolmaxtm)1 6 Fixing Requirements for tiles & accessories
1 4 Minimum roof pitch
25 Roofing components 25 Dry Fix | Dry Fix Premium 26 Dry Flash premium | Flash strip 27 SEALMAX sealant | Bird stop 28 SOLAR MAXTM Hot Water System 29 Cool Home System 30 COOLMAX Thermal Reflective Insulation 31 DRYMAX ENERGY+TM 32 Caring for the roof

Stringent tests and processes to ensure high quality products
1
The Factory
INTRODUCTION
Terreal Malaysia is part of the Terreal Group, a renowned clay building materials manufacturer with over 160 years of experience and a total of 26 plants worldwide. With heavy investments on the latest European technologies, Terreal Malaysia is the leading manufacturer in Asia Pacific for cre-ating beautiful and performant clay roof tiles.
With precise considerations however, Terreal Malaysia has recently extended their product line to introduce the unique flat pressed mineral tiles, Zen tile series which soon became a reference in term of aesthetics and performance. From there on, groundbreaking success followed which led to the construction of our new factory the Kluang 3. With Kluang 3 as our arsenal of producing mineral tiles, we will be able to cater for the ever-growing demand with better efficiency and quality assurance. The Kluang 3 is located in Kluang Johor nearby our main factory that produces clay products. This 2700m2 factory is truly a touch of genius, equipped with the latest machineries with production ca-pabilities so efficient that it will enable us to keep a compet-itive edge in term of product development and innovation.

Extraction Grinding
Mixing & ExtrudingCutting & PressingDrying of tiles
Firing of tiles Automatic Palletization
Fabrication
Our global presence
The Factory
2INTRODUCTION
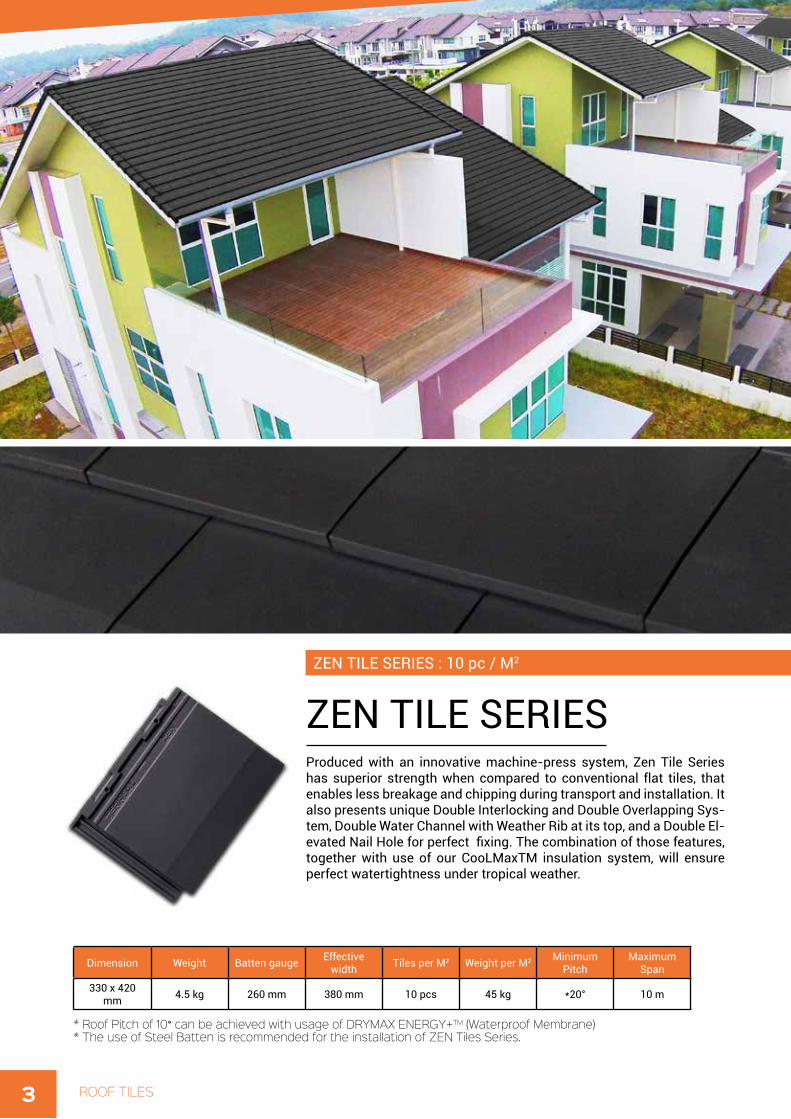
Produced with an innovative machine-press system, Zen Tile Series has superior strength when compared to conventional flat tiles, that enables less breakage and chipping during transport and installation. It also presents unique Double Interlocking and Double Overlapping Sys-tem, Double Water Channel with Weather Rib at its top, and a Double El-evated Nail Hole for perfect fixing. The combination of those features, together with use of our CooLMaxTM insulation system, will ensure perfect watertightness under tropical weather.
ZEN TILE SERIES : 10 pc / M2
ZEN TILE SERIES
Dimension Weight Batten gauge Effective width Tiles per M2 Weight per M2 Minimum
PitchMaximum
Span
330 x 420 mm 4.5 kg 260 mm 380 mm 10 pcs 45 kg *20° 10 m
* Roof Pitch of 10° can be achieved with usage of DRYMAX ENERGY+TM (Waterproof Membrane)* The use of Steel Batten is recommended for the installation of ZEN Tiles Series.
3 ROOF TILES
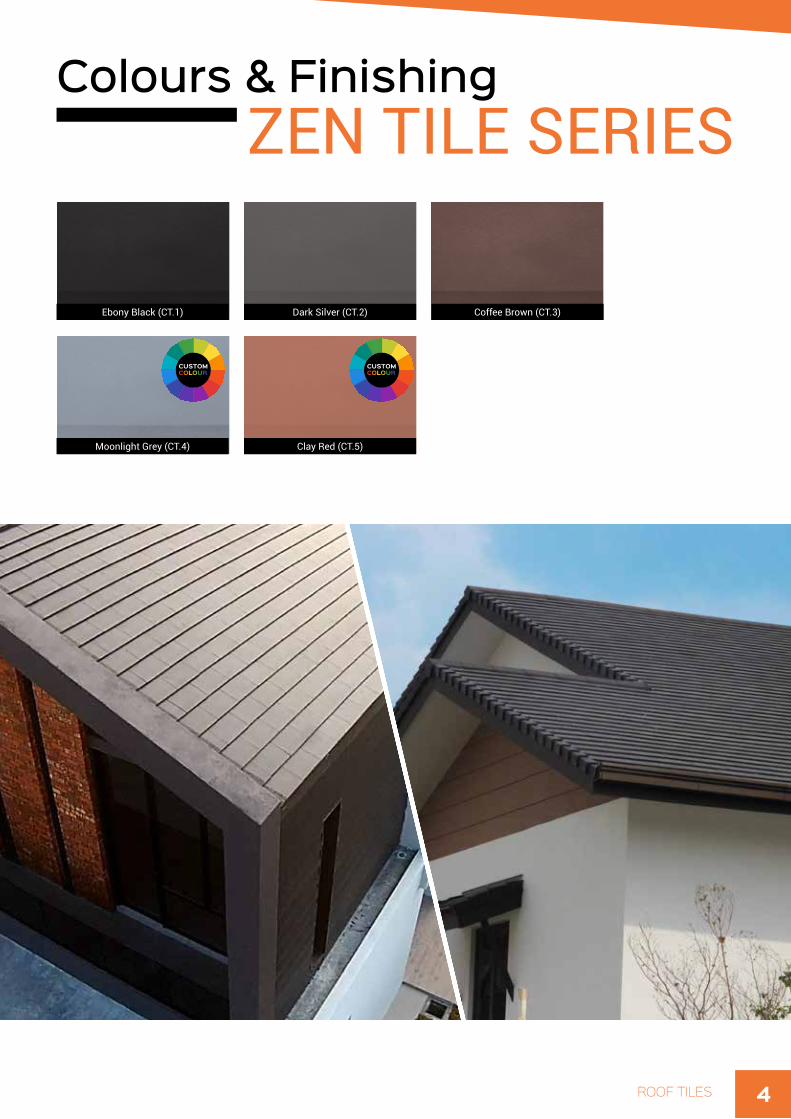
Colours & Finishing ZEN TILE SERIES
Ebony Black (CT.1) Dark Silver (CT.2) Coffee Brown (CT.3)
Moonlight Grey (CT.4) Clay Red (CT.5)
4ROOF TILES

5 ROOF TILES
RIDGE / HIP ENDLength : 395mmWidth : 270mm Weight per piece : 4.6kg
RIDGE / HIP TILELength : 390mmWidth : 240mmWeight per piece : 4.4kgCoverage : 2.5pc/m
RIDGE END CAPLength : 390mmWidth : 240mm Weight per piece : 5.4kg
OVERLAPPING VERGE TILELength : 312mmWidth : 170mmWeight per piece : 2.2kgCoverage : 2.5pc/m
3 WAY APEXAngle : 95°Width : 385mmWeight per piece : 5.5kg
OVERLAPPING VERGE ENDLength : 275mmWidth : 165mmWeight per piece : 2.5kg
4 WAY APEXAngle : 125°Width : 350mmWeight per piece : 5.5kg
ZEN CLEAR TILESLength: 332mmWidth: 420mmWeight: 800g
SOCKET TILE + V PIPE SETLength : 420mmWidth : 330mmWeight per piece : 6.4kgBatten Gauge : 260mm
MONOPITCH END (U)Angle : 75°Length : 286mmWidth : 166mmWeight per piece : 2.5kg
MONOPITCH TILES (U)Angle : 75°Length : 457mmWidth : 166mmWeight per piece : 3.7kgCoverage : 2.7pc/m
Fittings specifications ZEN TILE SERIES (Guide Values)

pex
pex
ile + V
Tile
Tile EndTERREAL DRY FLASHTM
TERREAL COOLMAX PREMIUMTM
TERREAL DRY FIXTM
Ridge / Hip End ZM1
3 Way ApexZM12
Ridge / Hip Tile(2.5pcs/m)ZM3
4 Way ApexZM13
Ridge End CapZM6
Socket Tile + V Pipe SetZM15
Overlapping Verge TileZM8
Monopitch Tile(2.5pcs/m)SL25
Overlapping Verge EndZM9
Monopitch Tile EndSL26U TERREAL DRY FLASHTM
TERREAL COOLMAX PREMIU
TERREAL DRY FI
6ROOF TILES
Accessories for ZEN TILE SERIES
MONOPITCH END (U)Angle : 75°Length : 286mmWidth : 166mmWeight per piece : 2.5kg
MONOPITCH TILES (U)Angle : 75°Length : 457mmWidth : 166mmWeight per piece : 3.7kgCoverage : 2.7pc/m

7 ROOF TILES
- ECO Spring, Johor Bahru -Architect : Arkitek N. Kang
Product : ZEN Tiles Series CT.1

- ZEN 88, Ipoh -Architect : A3 Projects
Product : Zen Tile Series CT.1 Ebony Black
8ROOF TILES
- ECO Spring, Johor Bahru -Architect : Arkitek N. Kang
Product : ZEN Tiles Series CT.1
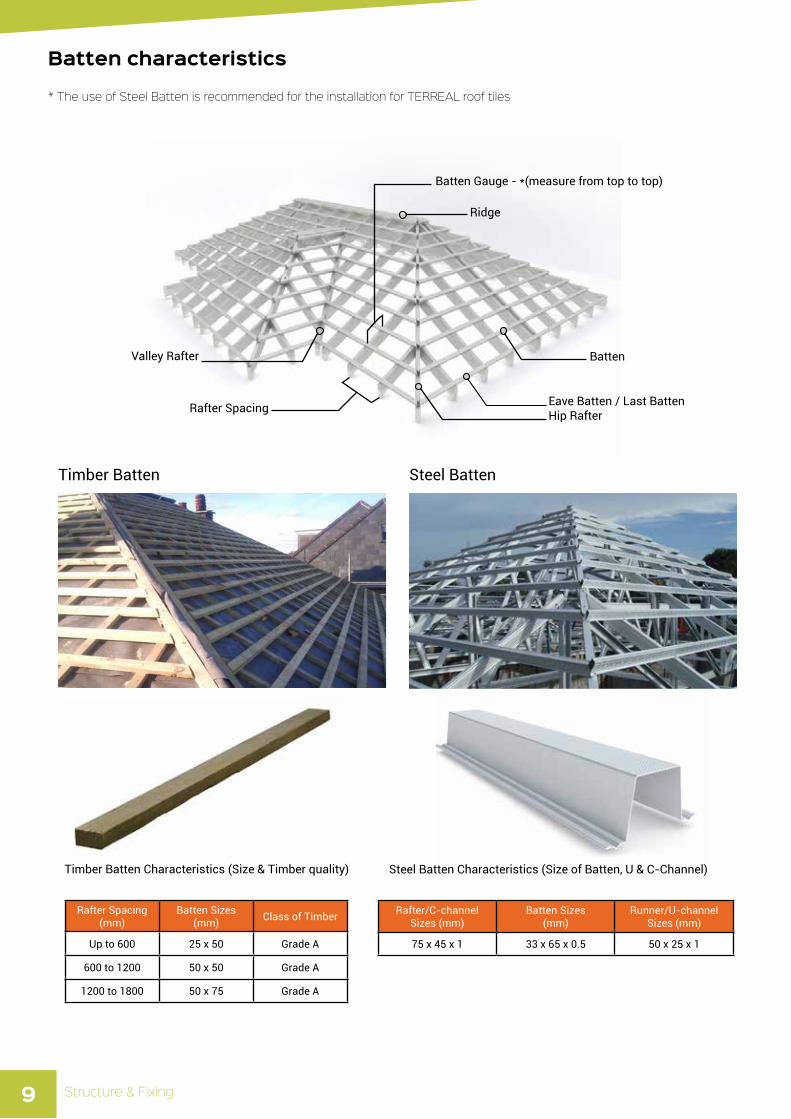
Batten Gauge - *(measure from top to top)
Ridge
Batten
Eave Batten / Last Batten Hip RafterRafter Spacing
Valley Rafter
Timber Batten Steel Batten
Timber Batten Characteristics (Size & Timber quality) Steel Batten Characteristics (Size of Batten, U & C-Channel)
Rafter Spacing (mm)
Batten Sizes(mm) Class of Timber
Up to 600 25 x 50 Grade A
600 to 1200 50 x 50 Grade A
1200 to 1800 50 x 75 Grade A
Rafter/C-channel Sizes (mm)
Batten Sizes(mm)
Runner/U-channel Sizes (mm)
75 x 45 x 1 33 x 65 x 0.5 50 x 25 x 1
9 Structure & Fixing
Batten characteristics
* The use of Steel Batten is recommended for the installation for TERREAL roof tiles

Batten
Eave Batten / Last Batten Hip Rafter
10Structure & Fixing
Before laying of tiles, the batten has to be fixed in the correct batten gauge. TERREAL has recommendations on the batten gauge for all roof tile products, and this is how we determine them:
Step 1 : Take 10 tiles at random and lay them out as far as possible by interlocking them. Step 2 : Measure the Distance between bottom edge of the 1st tile and the bottom edge of 10th tile. (Distance A) Step 3 : Take 10 tiles at random and lay them out as close as possible by interlocking them. Step 4 : Measure the Distance between bottom edge of the 1st tile and the bottom edge of 10th tile. (Distance B)Step 5 : With these 2 measurements, do the calculation : (Distance A + Distance B) ÷ 20Step 6 : The result of ((Distance A + Distance B) ÷ 20 ) is the correct batten gauge.
Example:
* Batten size for eave should be 20-25 mm higher than normal batten height.
2620mm
2580mm
Distance A
Distance B
2620 + 258020
= 260mm
Method of batten gauge calculation
Recommended batten gauge
Example for ZEN TILE SERIES
ZEN Tile Series : 260±2 mm
Profile Batten X(mm)
Batten Y(mm)
Zen Tile Series 260 ± 2 200 - 210
(BATTEN X)(BATTEN Y)
Rafter / Truss length & spacings
11
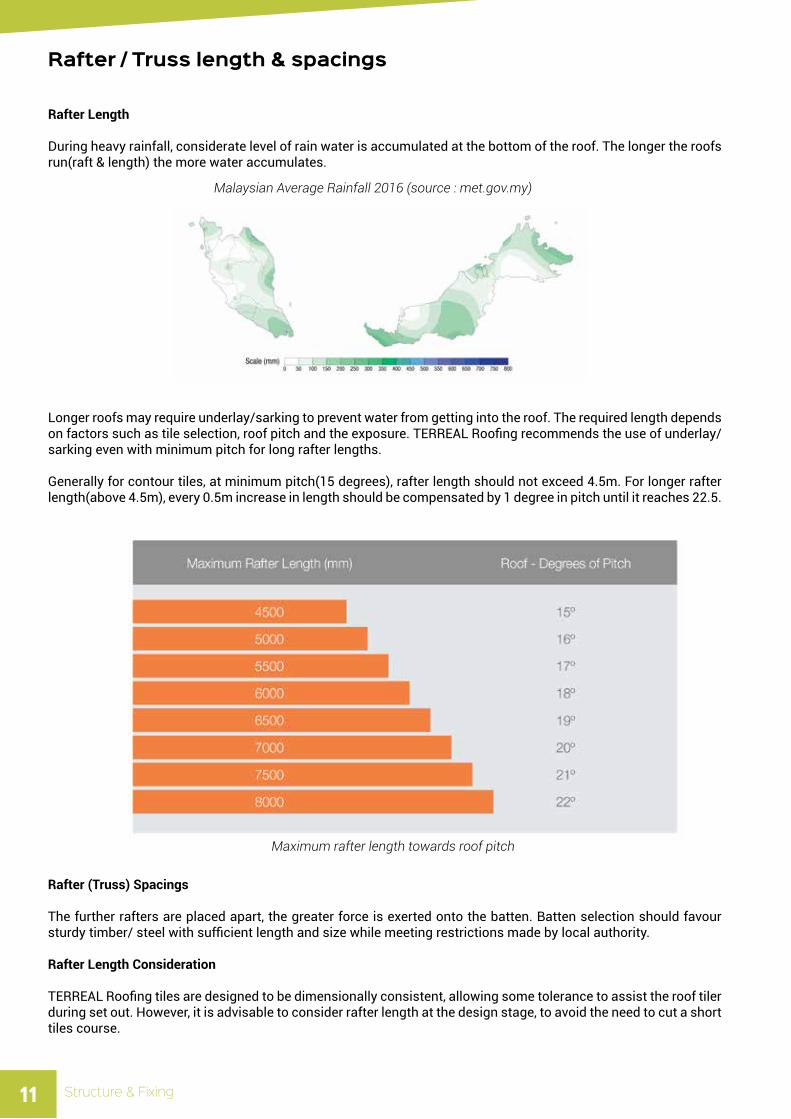
Rafter Length
During heavy rainfall, considerate level of rain water is accumulated at the bottom of the roof. The longer the roofs run(raft & length) the more water accumulates.
Longer roofs may require underlay/sarking to prevent water from getting into the roof. The required length depends on factors such as tile selection, roof pitch and the exposure. TERREAL Roofing recommends the use of underlay/sarking even with minimum pitch for long rafter lengths.
Generally for contour tiles, at minimum pitch(15 degrees), rafter length should not exceed 4.5m. For longer rafter length(above 4.5m), every 0.5m increase in length should be compensated by 1 degree in pitch until it reaches 22.5.
Malaysian Average Rainfall 2016 (source : met.gov.my)
Rafter (Truss) Spacings
The further rafters are placed apart, the greater force is exerted onto the batten. Batten selection should favour sturdy timber/ steel with sufficient length and size while meeting restrictions made by local authority.
Rafter Length Consideration
TERREAL Roofing tiles are designed to be dimensionally consistent, allowing some tolerance to assist the roof tiler during set out. However, it is advisable to consider rafter length at the design stage, to avoid the need to cut a short tiles course.
Maximum rafter length towards roof pitch
Structure & Fixing

12
Battens
*When installing battens to rafters, observce loading re-quirements.*TERREAL recommends the use of steel battens for better performance.
Securing Fixing to Rafter
• Fixing with non ferrous stainless steel or steel with appropriate corrosion-resistant coating material is used for both tiles to battens and for battens to steel frame.
• Opt for clouts nails with minimum diameter of 2.8mm, and a minimum penetration of 15 to 18mm into the rafter.
• Local council requirements should be met by self-drilling screws used in fixing battens.
Joints in Battens
Batten joints should be arranged so that none of three consecutive battens are jointed on the same rafter. All batten joints must not be secured over girder truss-es, but instead, in the centre of trusses or rafters. They should also be nailed or screwed.
Hip and Valley Joint
Give adequate support wherever battens touches hip board and valleys.
Steel Batten
For technical fixing specification, contact steel batten suppliers. Pay special consideration to battens spac-ing. Roof tilers may not be the only installer for battens.
For further details on light roof trusses and batten, please refer to the manufacturer or a structural engineer.
Structure & Fixing

13
Roof pitch conversion chart
Structure & Fixing

TERREAL Roofing tiles are engineered and tested to withstand various wind movement and weather conditions. Your roof structure should take the following factors into consideration:
Roof Tile Selection
High profile tiles act as a natural watercourse, enabling water to be channelled down the roof quickly.
Flat profile roof depressions are either less prominent or do not feature. As a result, water is to be pushed across the roof surface by wind. The effect is that water migrates to the watercourse of the tile.
The Pitch of the Roof
The more pitched the roofs is, the more compound force from gravity and wind when pulling water from the roof.
The less the pitch there is, the lesser compound force from gravity and wind when pulling water from the roof.
Therefore, when building without an expert’s consultation and recommendation from the manufacturer, the minimum pitch should be always be above 19 degrees.
Underlay is a foil installed prior to the fixing of the roof battens. It acts as a secondary water protection, and also keeps your home cooler and free from dust.Given the different types and grades of underlay available in the market, our local TERREAL representatives are always happy to assist you with the appropriate match and application in your design.
14
Minimum roof pitch
Structure & Fixing

Natural air movement and their effects should be considered when determining roofing materials and structure. The resulting negative pressure formed at the leeward side of a pitched roof at 35m/s (126 km/h) and can be greater than the weight of the tiles. Determining the wind force affecting a site at height is essential to identify the appropriate level of proper installation.
Environmental factorsWind categories
Terrain is the shielding provided by permanent structures, hills and vegetation. It effects and modifies wind speeds. Terrain categories are used for determining a site’s expo-sure to the wind. For effective use of this tool, the direction and speed of wind flows towards a site must be assessed. There are four terrain categories.
Terrain categories
15 Structure & Fixing

16
Fixing requirements for tiles & accessories
FIXING REQUIREMENTS FOR TILES AND ACCESSORIES
§ The following tile fixing specifications are minimum recommended standards. In all situations, local authority fixing requirements must take precedence when in excess of these specifications.
§ The specifications are applicable to normal wind exposure situations for roofs up to 15 meters in
height. Notes :
§ Ridge tiles must be secured with corrosive proof GI screw and in the event that the Ridge tile is cut or unable to secure with GI screw then this tiles must be secured with Terreal Sealmax adhesive/sealant.
§ At gable ends, every full and half tile should be nailed or screwed.
§ At hips and valleys, cut tiles should be fixed by drilling and either nailing/screwing or bonded with Terreal Sealmax adhesive/sealant.
§ On open eaves, every tile must be secured.
• Tiles should be fixed to resist wind uplift;
- Tiles and fittings of all roof parameters must be screwed. - For pitch between 10° to 30° it is recommended to screw every four courses. (Refer to picture A). - For pitch between 30° to 45° it is recommended to screw every 3 courses.
(Refer to picture B) - For pitch between 45° to 50° tiles must be screwed every 2 courses.
(Refer to picture C) - Above 50° all tiles to be screwed. (Refer to Picture D)
Where location with wind ˃ 40m/s (144km/h), facing the open space, on hill top, tiles must be nailed/screwed every alternate row Roof overhang without ceiling boards, all tiles in such area must be screwed to prevent uplift of tiles in strong wind conditions.
PictureA-ForPitch10-30degree(4courses)
x x x x x x x x x x x x x
x x x x
x x x x
x x x x
x x x x
x x x x x
x x x x x x x x x x x x x
Indicates all parameter around the roof must be screwed.
PictureB-ForPitch30-45degree(3courses)
x x x x x x x x x x x x x
x x
x x x
x
x x x x
x x x x x
x x x x x
x x x x x
x x x x x x x x x x x x x
x
Structure & Fixing

PictureA-ForPitch10-30degree(4courses)
x x x x x x x x x x x x x
x x x x
x x x x
x x x x
x x x x
x x x x x
x x x x x x x x x x x x x
Indicates all parameter around the roof must be screwed.
PictureB-ForPitch30-45degree(3courses)
x x x x x x x x x x x x x
x x
x x x
x
x x x x
x x x x x
x x x x x
x x x x x
x x x x x x x x x x x x x
x
PictureC-ForPitch45to50degree(2courses)
x x x x x x x x x x x x x
x
x
x
x
x
x x
x x x
x
x
x
x
x
x x
x
x
x
x
x
x x x
x
x x
x x x x x x x x x x x x x
PictureD–Above50Degreepitch.
x x x x x x x x x x x x x
x x x x x x x x x x x x x
x x x x x x x x x x x x x
x x x x x x x x x x x x x
x x x x x x x x x x x x x
x x x x x x x x x x x x x
x x x x x x x x x x x x x
17 Structure & Fixing

Thin Clay can be puncture when Nailed or screwed.
x Indicatesover-hangingsectionoftheroofwithout
ceiling.
Laying Ridge and Hip Tiles Ridge and hip tiling – General Notes
§ All ridge tiles should be laid in straight line and ensure the end laps face the same direction, with consideration given to the direction of prevailing winds.
§ The ridge tiles are initially laid onto a bed of mortar and finished with flexible pointing materials.
Bed And Point Materials
§ Mortar mixture – 1 : 5 cement : sand or 1 : 1 : 6 cement : lime : sand
§ An additive (bonding agent) to improve adhesion may be added.
§ Ridge and hips should be laid along string line on the wet bedding mixture. Ridge and hip should be pushed firmly into mortar bedding until 12-25mm above the tiles. Care should be taken to ensure ridge and clips are straight, level and correctly spaced.
PictureE-Foroverhangingroofwithoutceiling.
x x x x x x x x x x x x x
x
x
x
x
x x x x
x
x
x
x
x
x
x
x
x x x x x
x x x x x x x x x x x x x
x x x x x x x x x x x x x
x x x x x x x x x x x x x
Nail hole at the highest peak
To avoid water seepage through nail hole.
Nail hole
18Structure & Fixing
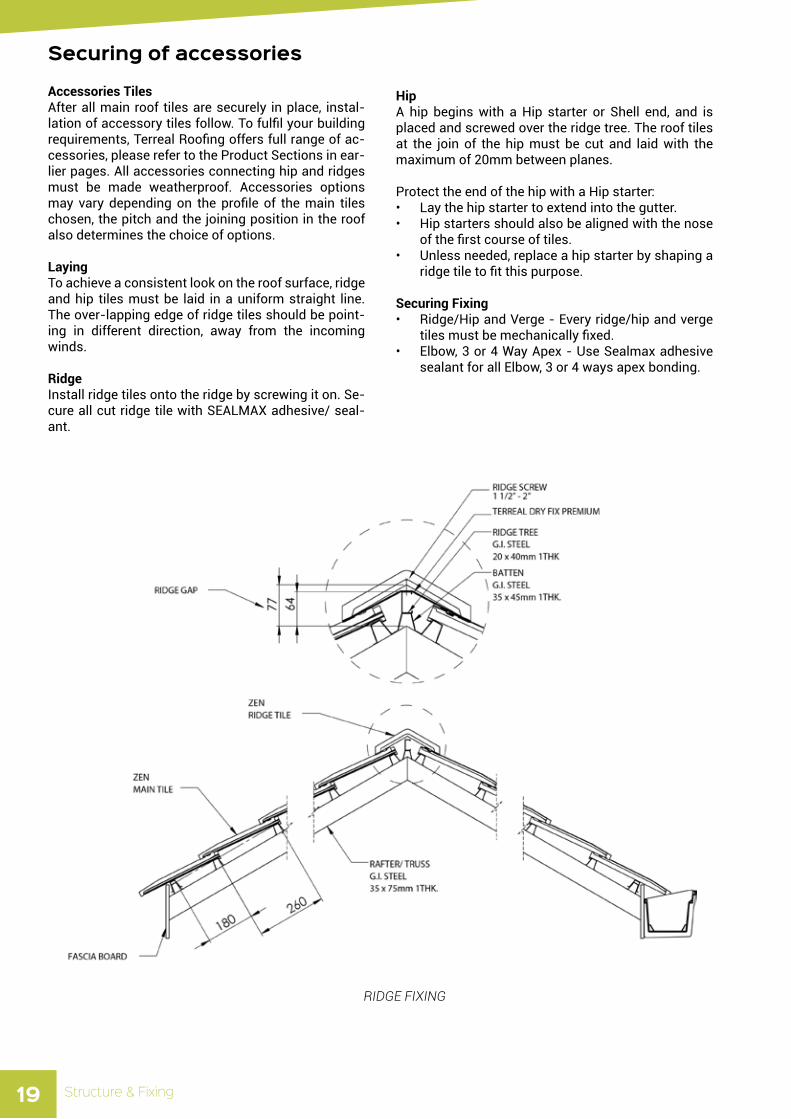
Accessories TilesAfter all main roof tiles are securely in place, instal-lation of accessory tiles follow. To fulfil your building requirements, Terreal Roofing offers full range of ac-cessories, please refer to the Product Sections in ear-lier pages. All accessories connecting hip and ridges must be made weatherproof. Accessories options may vary depending on the profile of the main tiles chosen, the pitch and the joining position in the roof also determines the choice of options.
LayingTo achieve a consistent look on the roof surface, ridge and hip tiles must be laid in a uniform straight line. The over-lapping edge of ridge tiles should be point-ing in different direction, away from the incoming winds.
RidgeInstall ridge tiles onto the ridge by screwing it on. Se-cure all cut ridge tile with SEALMAX adhesive/ seal-ant.
HipA hip begins with a Hip starter or Shell end, and is placed and screwed over the ridge tree. The roof tiles at the join of the hip must be cut and laid with the maximum of 20mm between planes.
Protect the end of the hip with a Hip starter: • Lay the hip starter to extend into the gutter.• Hip starters should also be aligned with the nose
of the first course of tiles. • Unless needed, replace a hip starter by shaping a
ridge tile to fit this purpose.
Securing Fixing• Ridge/Hip and Verge - Every ridge/hip and verge
tiles must be mechanically fixed.• Elbow, 3 or 4 Way Apex - Use Sealmax adhesive
sealant for all Elbow, 3 or 4 ways apex bonding.
Securing of accessories
RIDGE FIXING
19 Structure & Fixing

Valley Tile InstallationVarious weather conditions determines the optimum valley width. In normal weather conditions, an acceptable gap of 50 to 100mm between tiles is required.
In high rainfall areas, seal the valley tiles with bitumen impregnated foam or Sealmax sealant. The valley gap may in-crease to 100mm. Valley design and downpipe position should also be design to suit the roof’s function in channelling rain water.
Fire Walls/Internal Separating WallsFill up the chamber above the fire wall up to the underside of the tiles, with a fire retardant material. Prevent all timber and other flammable building element from passing through the fire-wall.
Counter Battening“Close Boarding” is refers to the process where the lining material is installed over rafters. In these sce-narios, counter battens need to be installed to ensure Underlay can be installed. This also provides a base for the tile battens to be fixed.
Verge/GableIt is a good and common practice for roof tiles to finish with equal length of tile at both ends on gable roofs.
VALLEY TILES
VALLEY
20Structure & Fixing
OVERHANG VERGE TILE
50 -100GAP

Underlay is a foil laminate that is reflective, water resistant. Commonly used as building membrane (or self supporting building paper) that sits snugly beneath the batten of a tiled roof.They serve two purposes:
• The foil finish acts as a thermal insulator, reflecting up to 95% of radiant heat.
• Underlay act as a second barrier when roof tiles are bro-ken or dislodged, particularly in cases of low roof pitches.
For circumstances unforeseen, we recommend mandatory underlay installation for roofs with long run rafters or low pitch.
Recommendations Below are some scenarios where we recommend the use of underlay, if not considered mandatory:
• Areas where relevant local authorities recommend taking precaution against extreme weather condi-tions, i.e. cliff tops, open exposed sites, bushfire prone hot zones or coastal area.
• Areas where bushfires are prone to occur, to pre-vent embers from entering your roof space.
• Areas where design wind velocity exceeds 41 to 45m/s. (147.6 to 162 km/h)
• Areas underneath and around solar hot water col-lector and reaching towards the gutter.
• Areas where heavy condensation may occur.• To act as a barrier to reduce dust from building up
in the ceiling cavity.
• At the point of roof pitch joint, from that joint to the eaves gutter.
• Where rafter length exceeds 4.5m at minimum pitch.
• Where rafters are exposed and under raked ceil-ings.
Terreal recommends the use of Underlay in all roofs.
Underlay ( TERREAL COOLMAXTM )
21 Structure & Fixing

LayingThe Underlay should have its reflective side facing upwards.
Over-lappingUnderlay should overlap more than 150mm, the up-per layer should have sufficient overlapping volume over the top of the lower layer. Where a roll of Underlay ends, the overlapping area should be at least one raft-er spacing. The maximum Underlay sagging allowed in between rafters is 40mm.
Obstacle in the RoofHot Flue: The Underlay should be trimmed back to al-low a spacing of 50mm.
PenetrationsTo avoid water from getting into the roof, the Under-lay should end upwards and sealed. In the absence of the gutter with the fascia batten used intead of fas-cia board, the Underlay material should be trimmed to end at the outside edge of the fascia batten.
Use of Security PadSecurity pad or anti-flap pads can avoid constant flexing of the Underlay material, preventing it from premature deterioration. Install security pads in an intersecting pattern under each second row of the battens between each pair of rafters.
Underlay at EavesUnderlay should have an extended length between 25mm and 50mm over the fascia board to ensure ef-fective run off into the gutter.
Underlay SupportWe recommend anti-ponding board on roofs with low pitch. Refer to regional restrictions for approved specifications.
When Underlay extend across rafter centres exceed-ing 600mm, it should be adequately reinforced. When Underlay extend across rafter centres exceeding 900mm, its supporting component becomes manda-tory:• Use approved heavy grade Underlay • Installation of Underlay support • Installation safety mesh
Underlay at ValleysHold the Underlay in position with a valley batten par-allel to the valley gutter. The Underlay should overlap the valley at a maximum measurement of 25mm or be rolled over or trimmed at the valley batten. The roof is prone to leakage if the Underlay extends too far into the valley.
Important: Underlay is mandatory where wind exceed 33m/s (109kph).
Installation steps
22Structure & Fixing

Materials used for fixing
23
Nails and screws
• For timber battens, we recommend using 2 inch gal-vanized nails.
• For steel battens, we recommend using screws.
DRY FIX or DRY FIX PREMIUM
• For ridge and hips fixing• Recommended method rather than cement mortar
fixing
TERREAL SEALMAX
• For securing small pieces of cut tiles.• For socket, extension pipe and lantern.
DRY FLASH PREMIUM
• For abutment to wall and verge tile fixing
Retouch PaInt
• For colouring cut edges of tiles, cement of ridges and lead flashing
Tiles should be laid and secured in accordance with the “Installation of Roof Tiles”. This section clarifies Terreal Roofing’s installation specifications that are developed from regional experience, research and practical applica-tion and in context of the building codes and standards.
When there are local adaptations are needed, your roof tiling contractors should:
• Install an appropriate fall protection system to meet the guidelines of Department of Occupational Safety and Health (subject to regional practice).
• Install tile battens• Install underlay• Install tiles and accessories using recommended safety protocol.
LoadingPrior to starting the tiling process, all battens and underlays must be in place. Where rafters are exposed or longer than 6m, the weight of tiles should be evenly distributed by loading them from each side of the roof structure.
First CourseThe first course of tiles should project approximately 70mm over fascia and into the gutter.
LayingFor the best visual aesthetic of the roof, all tile courses should be aligned horizontally, vertically and diagonally. The tiles should appear on a straight, uniform pattern even at the roof edge.
Laying tiles
Structure & Fixing
24
Steep and Vertical pitchAll tiles should be fixed between pitches of 40-70 degrees in a process called “mechanically fixing”, by screwing every tile. However in harsher conditions, the mechanical fixing method is not as effective as clips.
Where roof pitch exceeds 70 degrees, tiles must be double mechanical fixed and bedded with Underlay.
Screws utilized in the mechanical fixing process should be: • Non ferrous or galvanized• 2.8mm diameter• Long enough to penetrate the rafter at least 15 to 18mm.
For better holding power, TERREAL Roofing’s Security Fixing system also offers the use of standard and heavy duty clip, screws and Sealmax adhesive/sealant.
Structure & Fixing
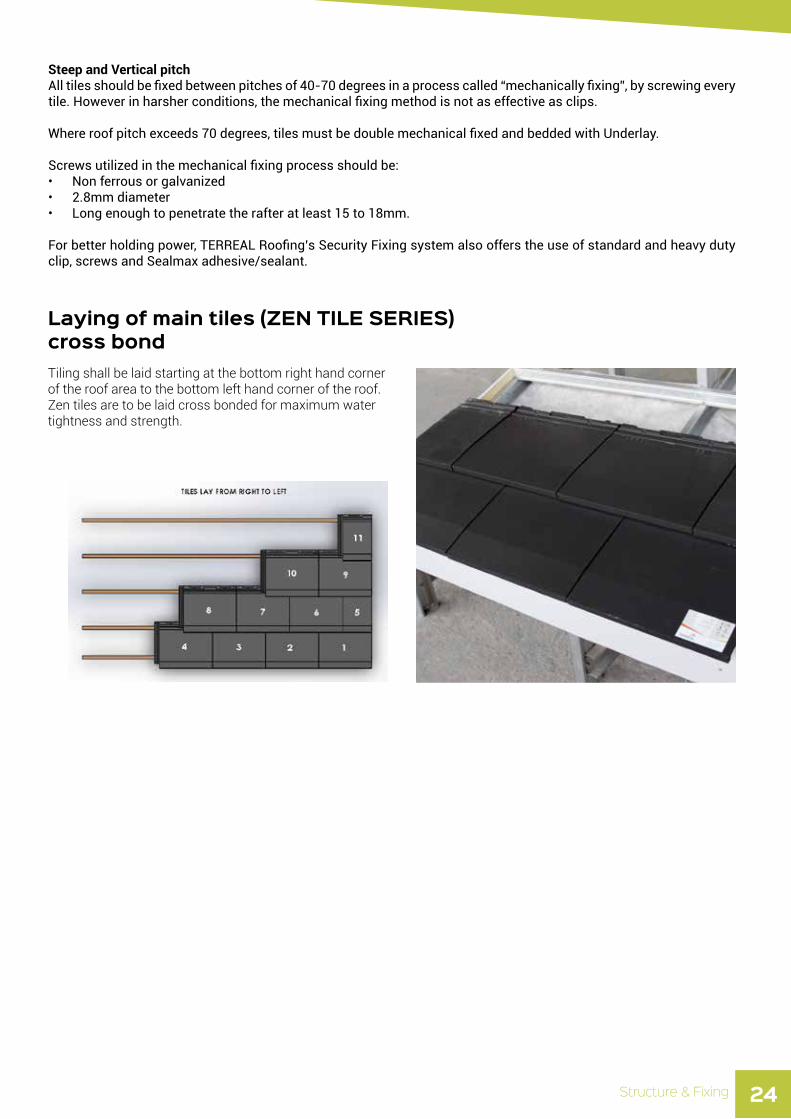
Laying of main tiles (ZEN TILE SERIES)cross bond
LAYING OF TILES The roof should be set out correctly, to ensure that the roof presents a regular and even appearance. Tiling shall be laid starting at the bottom right hand corner of the roof area to the bottom left hand corner of the roof. Zen tiles are to be laid cross bonded for maximum water tightness and strength.
Always start laying the tile from right to left with example as shown in the picture below:-
Tiling shall be laid starting at the bottom right hand corner of the roof area to the bottom left hand corner of the roof. Zen tiles are to be laid cross bonded for maximum water tightness and strength.

TERREAL DRY FIX PREMIUMTM
TERREAL DRY FIXTM
SIZE : Per roll of 310mm (W) x 10m (L)
Thanks to it’s aluminum and ventilated fabric body, the Terreal Dry Fix PremiumTM is highly durable, weather resistant, and provides ventilation on roof ridges. The pre-determined bending lines and the wide butyl adhesive makes it easier to bend at walls and ensures water tightness against rain.
25
TERREAL roofing components
Roofing Components

LEAD BROWNTERRACOTTA
Terreal Flash Strip is made of clean colour bond zincalume. It is installed over the top edge of Dry Flash. This is to further secure the Dry Flash to the wall in case of paint peeling in the future.
SIZE : Per pc 80mm (W) x 1m (L)
TERREAL FLASH STRIP
LEAD TERRACOTTA GULL GREYDARK BROWN
26Roofing components
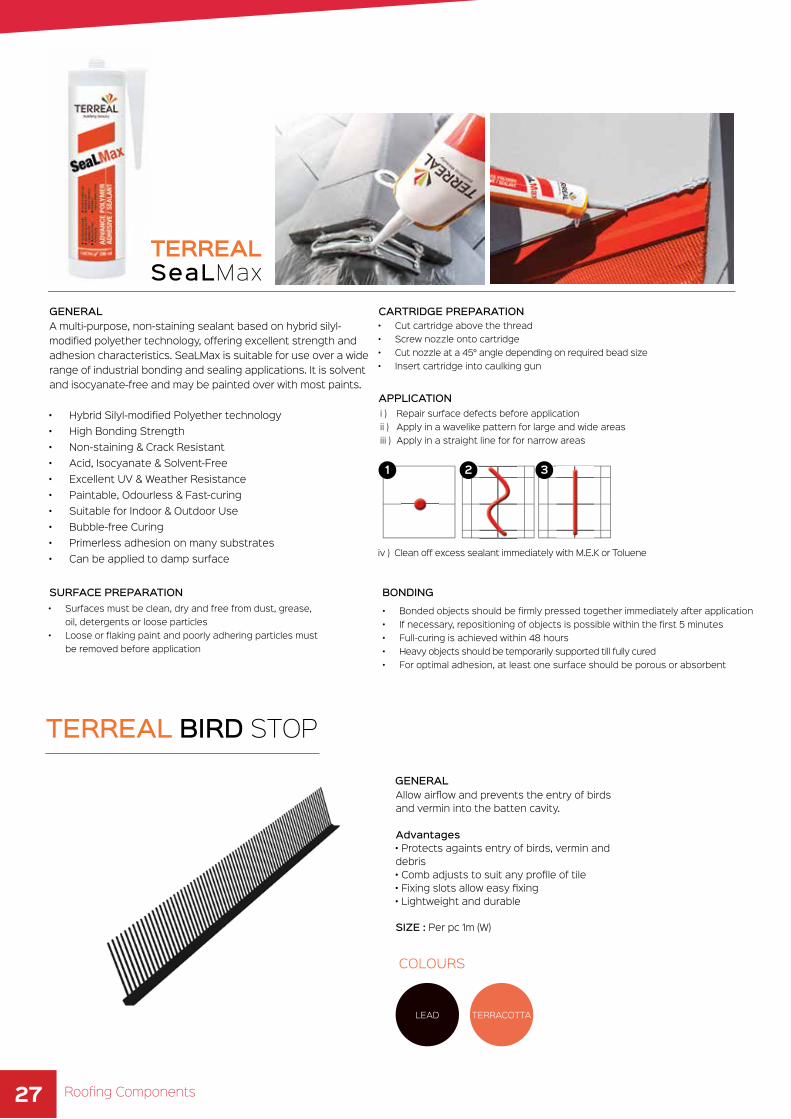
TERREAL BIRD STOP
Allow airflow and prevents the entry of birds and vermin into the batten cavity.
Advantages• Protects againts entry of birds, vermin and debris• Comb adjusts to suit any profile of tile• Fixing slots allow easy fixing• Lightweight and durable
SIZE : Per pc 1m (W)
27 Roofing Components

STANDARD SW30 SW60 SW66
136 Litters / 30 Gallons 272 Litters / 60 Gallons 300 Litters / 66 Gallons
3 - 4 Person 4 - 6 Person 7 - 8 Person
TERREAL SOLARMAXTM HOT WATER SYSTEM
Premium SW60 Premium SW300L
Benefits
• Up to 30% saving of Electricity Consumption
• Solar Energy is clean and pollution free
• No Electricity mishap and Safe from Electrocution
• Direct heating system with minimal maintenance required
• Incorporated a back-up booster for Rainy days or When you need more hot water than usual. Just turn on the switch for 30 - 40 minutes, and it is thermostat controlled
• We provide up to 10 Years Product Warranty in Malaysia• We provide up to 5 years Product Warranty for Export and
Island Installation
28Roofing components
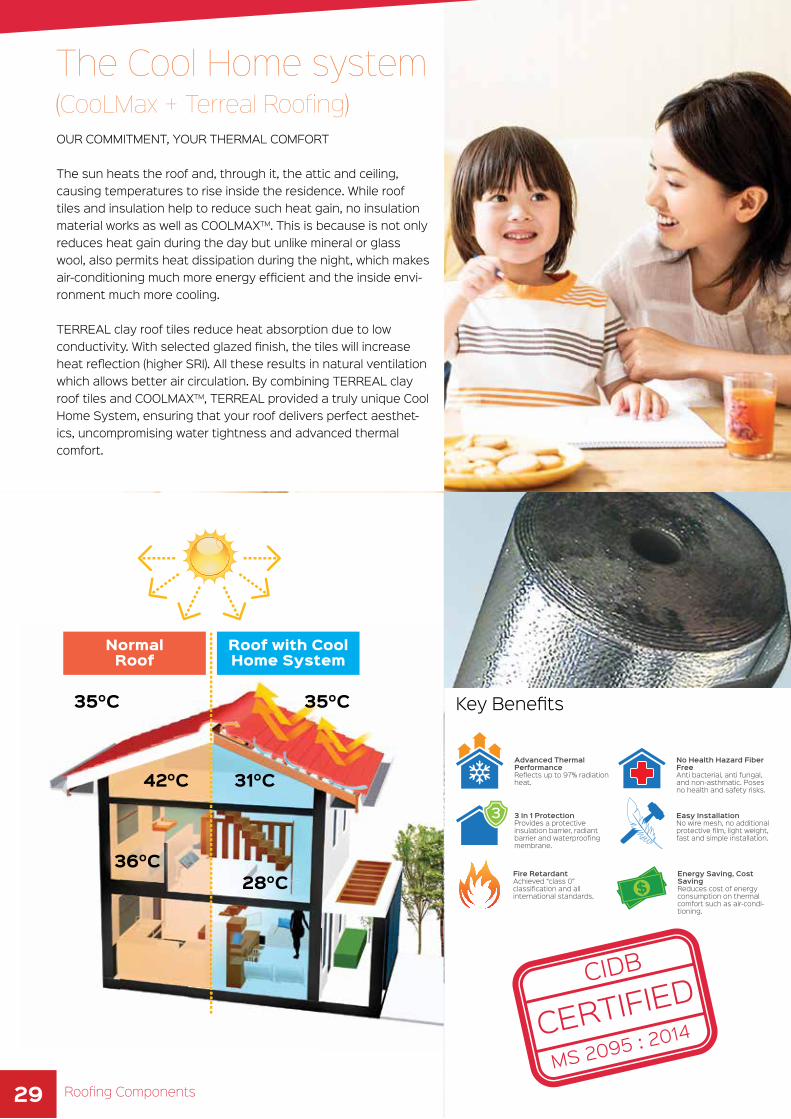
35ºC 35ºC
42ºC 31ºC
36ºC28ºC
Key Benefits
OUR COMMITMENT, YOUR THERMAL COMFORT
The sun heats the roof and, through it, the attic and ceiling, causing temperatures to rise inside the residence. While roof tiles and insulation help to reduce such heat gain, no insulation material works as well as COOLMAXTM. This is because is not only reduces heat gain during the day but unlike mineral or glass wool, also permits heat dissipation during the night, which makes air-conditioning much more energy efficient and the inside envi-ronment much more cooling.
TERREAL clay roof tiles reduce heat absorption due to low conductivity. With selected glazed finish, the tiles will increase heat reflection (higher SRI). All these results in natural ventilation which allows better air circulation. By combining TERREAL clay roof tiles and COOLMAXTM, TERREAL provided a truly unique Cool Home System, ensuring that your roof delivers perfect aesthet-ics, uncompromising water tightness and advanced thermal comfort.
29 Roofing Components

CPM5 Net (Triplex FR Net)ROLL SIZE: 1.2 m ( W ) x 30 m ( L ) x 9 mm ( T )COVERAGE: 36 sqmThermo-cellular, thermal break reflective insula-tion 9 mm thick, consists of Two fire retardant small air bubbles covering fire retardant XPE foam. The bubbles are made with reflective high resistance premium pure aluminium surfaces, consisting of extra low Emissivity (0.02 to 0.04 for each reflective surface) with a reinforced bi-directional fiber net.
CP3 Net (Select 40+ FR Net)ROLL SIZE: 1.2 m ( W ) x 50 m ( L ) x 4 mm ( T )COVERAGE: 60 sqmThermo-cellular reflective insulation 4 mm thick, consists of fire retardant small air bubbles and two reflective high resistance premium pure aluminium surfaces, consisting of extra low Emissivity (0.02 to 0.04 for each reflective sur-face) with a reinforced bi-directional fiber net.
CF2A-FR (MS AWA K750)ROLL SIZE: 1.22 m ( W ) x 60 m ( L )COVERAGE: 73.2 sqmFive layers laminate made up of double sided reflective material ( aluminium ), bonded to rein-force high density polyethylene woven fabric by special tie layer bonding material.
CF1-FR (FRAL 1)ROLL SIZE: 1.25 m ( W ) x 48 m ( L )COVERAGE: 60 sqmThree layers laminate made up of a single sided reflective aluminium bonded to reinforce high density polyethylene woven fabric with special fire retardant material.
CP3 (Select 40+ FR)ROLL SIZE: 1.2 m ( W ) x 60 m ( L ) x 4 mm ( T )COVERAGE: 72 sqmThermo-cellular reflective insulation 4 mm thick, consists of fire retardant small air bubbles and two reflective high resistance pure aluminium surfaces, with low Emissivity. (0.02 to 0.04 for each reflective surface)
CPS5 Net (Select 80 FR Net)ROLL SIZE: 1.2 m ( W ) x 30 m ( L ) x 8 mm ( T )COVERAGE: 36 sqmThermo-cellular reflective insulation 8 mm thick, consists of fire retardant large air bubbles and two reflective high resistance premium pure aluminium surfaces, consisting of extra low Emissivity (0.02 to 0.04 for each reflective surface) with a reinforced bi-directional fiber net.
CF2-FR (FRAM2)ROLL SIZE: 1.25 m ( W ) x 48 m ( L )COVERAGE: 60 sqmFive layers laminate made up of double sided reflective material (aluminium & metalized), bonded to reinforce high density polyethylene woven fabric by special tie layer bonding material.
CN2-FR (LFRAM2)ROLL SIZE: 1.25 m ( W ) x 48 m ( L )COVERAGE: 60 sqmFive layers laminate made up of double sided reflective material (aluminium & metalized) bond-ed to reinforce high density polyethylene Leno Fabric with special FR polymer bonding material.
TERREAL COOLMAXTM MS2095:2014 Compliant
MS 2095:2014 30Roofing components

GENERAL
DRYMAX ENERGY+TM is a non-woven breathable membrane using latest state of the art micro-per-foration technology, designed to keep both water and air out, yet allowing vapor to flow out.
ADVANTAGES
• Fully waterproof : W1• Fully air-tight : Windbreak • High water vapour permeable: Sd < 0.07 m• CE marking as Vapour control layer
SIZE : Per roll of 1.5m (W) x 50m (L)
TERREAL DRYMAX ENERGY+TM
WATERPROOF MEMBRANE
31 Roofing Components
ZEN TILE SERIES + DRYMAXTM THE ZEN 10 SYSTEM :SOLUTION FOR LOW & HIGH PITCH MODERN ROOFS. PERFECT FOR MINIMALIST DESIGN & CONTEMPORARY ARCHITECTURE.
The Zen Tile Series & DRYMAXTM incorporate an innovative low & high pitch roofing system that truly elevates the performance of modern roofs. This system allows the roof pitch to be as low as 10° with perfect water tightness!

So your roof has finally been installed, and it assures you long-lasting waterproof protection and shelter. When properly installed, these roof tiles are guaranteed to do their job for at least 10 years. But like anything with a lifespan, whether old or new, the crown of your home needs care and maintenance in order to prolong its life. By following some procedures, you’ll be able to avoid causing any unwanted damage to your roof.
Roof CompletionUpon completion roof tiling, tilers should clear all roof and gutters of remaining debris and rubble. Steel de-bris, such as nails and screws, must be removed as a priority, to prevent rust from staining roof tiles or corroding the gutters. Perform a detailed final check-ing of the roof surface to spot any broken, cracked or damaged tiles. Replace them to ensure the roof’s wa-terproofing capability.
Handle with careRoofs should be treated as fragile, so direct foot traf-fic on them should be avoided, as it can cause dam-ages. Use appropriate access equipment such as ladders and crawling boards with packing underneath to avoid point loading and damage. If you decide to access your roof without crawling boards, make sure to step on the lower centre part of a tile. Avoid un-necessary roof access: If, for example, an object like a ball gets stuck on the roof, try to remove it using a long stick instead of retrieving it by roof access. When using an extension ladder, make sure to extend it at least 1m higher than your gutter or roof and that its angle is secured.
Regular checksCheck for clogged gutters, leaks, and debris on your rooftop, as this can affect the way water runs off your roof. If you need to clear this, either hire a profession-al, or take the appropriate safety precautions before embarking on your mission.
Do take safety precautions seriouslyFrom what you wear to where you step, your safety is of the utmost importance. Be aware that wearing non-slip or soft-soled shoes, as well as observing weather conditions, could make or break both you and your tiles. A securely fastened safety harness can be used to protect you from falls.
CautionIf in doubt, hire a professional. Working on roofs can be very dangerous, especially if you have not been trained to do so. Before proceeding with any checks or repairs, we do recommend that you to speak to and employ a seasoned professional to see to the matter at hand.
Without proper care, leakages may be a likely problem. When leaks occur, even if it’s minor, it can cause major damages like rotting and mould. There could be many reasons for leakages, most of the leakages are caused by the following:
Cracked, broken or displaced roof tilesReplace any cracked or broken tiles.
Damaged roof tile pointing and bedding mortarIf tiles are loosened and unsecured, it is possible that your roof bedding may need re-bedding and/or re-pointing.
Clogged drainage channels, valleys or guttersClogs can be caused by leaves, branches, debris and
dirt. Removal of the blockage will help water flow off better.
Inadequate or damaged flashingsFlashings are found around roof vents and pipes, and if damaged or inadequate, they should be replaced or added.
Although we guarantee the quality of our roof tiles, this does not cover damage caused by unforeseen circum-stances such as:
• Damages caused by third-parties (such as plumbers, window cleaners, installers, and etc) • Maltreatment (such as high powered jet washes or inappropriate treatment with chemicals/coatings) • Natural disasters (such as hurricanes, tornadoes, and earth quakes)• Air pollutants and natural weathering• Foreign objects falling onto the roof • War, terrorism, or rioting
Remember, replacing an entire roof is a costly and time-consuming affair, but with the proper care and mainte-nance of your existing roof, it can last you a long time to come.
Caring for the roof
32Roofing components

ZEN TILE SERIES DETAIL DRAWINGS
33 Detail drawings

EAVE AREA

RID
GE
AREA

ABUTMENT TO WALL
ZEN MAIN TILE
TERREAL DRY FLASHPREMIUM
TERREAL FLASH STRIP
CONCRETE NAILTERREAL SEALMAX

MONOPITCH TILES

VALLEY CUT TILESMONOPITCH TILES
50 -100GAP

VALL
EY D
ETAI
L

OVE
RHAN
G V
ERG
E TI
LE D
ETAI
L

HID
DEN
GU
TTER

FLAS
HIN
G T
O S
IDE
ABU
TMEN
T

CERTIFICATIONS
43 CERTIFICATIONS

377

378

379