
Software Development for Engineers. with C, Pascal, C++ ...
640
Specialization in software development is becoming a thing of the past. Previously many software developers specialized on software languages such as FORTRAN, C and Pascal. This was mainly because these languages allowed access to all the required functionality. In modem times with the move towards graphical user interface programming a developer must choose not only the required software language(s) but also the required set of development tools for a specific purpose. Typical decision might be to: 9 Minimize development time; 9 Create a usable interface (such as DOS, or Microsoft Windows or X- Windows, and so on); 9 Operate within critical timings (such as the use of fast code, or that DOS programs generally operate faster than Microsoft Windows programs, or that compiled programs generally work faster than interpreted programs); 9 Integrate with other software or systems (such as the integration with previous written software, different operating systems or with precompiled libraries); 9 Maintain the long-term development of the program (typical questions might be: will there be updates to the development tools; will the development company still be around in a few years?, and so on). Typical modem development languages are C/C++, Visual Basic, Ada (especially in military applications), Java and Delphi. This book introduces C/C++ which can be used in C/C++ and Java development applications. Pascal is useful in developing Delphi and Ada applications. Visual Basic is used to write Microsoft Windows applications, and 80X86 Assembly Lan- guage programming is useful in writing extremely fast sections of code and in appreciating the operation of the PC. The main objective of the text is to provide a single source of reference and learning material for most of the main technical programming lan- guages. It can be used by undergraduates through a course of study from first year to final and from introductory tutorial work to advanced user inter- faces and project work. It can also be used by professional developers with a knowledge of one or more of the software development language who wish to learn some, or all, of the others, or how these languages can be used in 'real-life' applications.
-
Upload
khangminh22 -
Category
Documents
-
view
5 -
download
0
Transcript of Software Development for Engineers. with C, Pascal, C++ ...

Specialization in software development is becoming a thing of the past. Previously many software developers specialized on software languages such as FORTRAN, C and Pascal. This was mainly because these languages allowed access to all the required functionality. In modem times with the move towards graphical user interface programming a developer must choose not only the required software language(s) but also the required set of development tools for a specific purpose. Typical decision might be to:
�9 Minimize development time; �9 Create a usable interface (such as DOS, or Microsoft Windows or X-
Windows, and so on); �9 Operate within critical timings (such as the use of fast code, or that DOS
programs generally operate faster than Microsoft Windows programs, or that compiled programs generally work faster than interpreted programs);
�9 Integrate with other software or systems (such as the integration with previous written software, different operating systems or with precompiled libraries);
�9 Maintain the long-term development of the program (typical questions might be: will there be updates to the development tools; will the development company still be around in a few years?, and so on).
Typical modem development languages are C/C++, Visual Basic, Ada (especially in military applications), Java and Delphi. This book introduces C/C++ which can be used in C/C++ and Java development applications. Pascal is useful in developing Delphi and Ada applications. Visual Basic is used to write Microsoft Windows applications, and 80X86 Assembly Lan- guage programming is useful in writing extremely fast sections of code and in appreciating the operation of the PC.
The main objective of the text is to provide a single source of reference and learning material for most of the main technical programming lan- guages. It can be used by undergraduates through a course of study from first year to final and from introductory tutorial work to advanced user inter- faces and project work. It can also be used by professional developers with a knowledge of one or more of the software development language who wish to learn some, or all, of the others, or how these languages can be used in 'real-life' applications.
xiv Preface
The text splits into nine main sections"
Part A: Pascal/C programming- gives an introduction to structured soft- ware development using Pascal and C. Part B" C++ programming - gives an introduction to object-oriented de- sign with C++. Part C: 80x86 Assembly Language programs- gives an introduction to Assembly Language programming and PC architecture. Part D" Visual Basic programming- gives an introduction to the devel- opment of graphical user interfaces for Microsoft Windows. Part E: HTML and Java programs - show how to develop WWW-based pages and gives an introduction to Java. Part F: DOS. Part G: Windows 3. Part H: Windows 95. Part I: UNIX.
The text uses C and Pascal to provide a basic grounding in software devel- opment. These are used to show structured software development concepts, such as repetition, decision making and modular development. The more advanced concepts of object-oriented design is introduced with the C++ de- velopment. The Visual Basic section contains program examples which can be used to develop graphical user interface programs.
Many software development job advertisements now specify the re- quirement for a mixture of software languages on possibly several different operating systems. Software development has thus evolved to the point where it is possible to integrate different software tools to produce the re- quired system. The user interface of a program might be developed using a graphical programming language such as Visual Basic and various special- ized modules within the program could be developed in C/C++. In summary, in a changing employment market:
'it is essential to become multi-skil led in different areas and applications '.
Author email" WWW page: Source code:
w. buchanan@napier, ac. uk
http://www.eece.napier.ac.uk/~bill b
http://www.eece.napier.ac.uk/~bill b/soft.html

Introduction
1.1 Introduction
Software development has grown over the years from simple BASIC pro- grams written on small hobby computers to large software systems that con- trol factories. Many applications that at one time used dedicated hardware are now implemented using software and programmable hardware. This shift in emphasis has meant that, as a percentage, an increasing amount of time is spent on software and less on hardware development.
Electrical, electronic and software engineers require a great deal of flexibility in their approach to system development. They must have an un- derstanding of all levels of abstraction of the system, whether it be hard- ware, software or firmware. The system itself could range from a small 4-bit central heating controller to a large industrial control system. In the devel- opment of any system the engineer must understand the system specification from its interface requirements, its timing requirements, its electrical charac- teristics, and so on.
The software that runs on a system must be flexible in its structure as the developer could require to interrogate memory addresses for their contents or to model a part of the system as an algorithm. For this purpose the pro- gramming languages C and Pascal are excellent in that they allow a high- level of abstraction (such as algorithm specification) and allow low-level operations (such as operations on binary digits). They have a wide range of applications, from commerce and business to industry and research, which is a distinct advantage as many software languages have facilities that make them useful only in a particular environment. For example, in the past, busi- ness and commercial applications used COBOL extensively, whereas engi- neering and science used FORTRAN.
1.2 Hardware, software and firmware
A system consists of hardware, software and firmware, all of which inter- connect. Hardware is 'the bits that can be touched', that is, the components, the screws and nuts, the case, the electrical wires, and so on. Software is the programs that run on programmable hardware and change their operation depending on the inputs to the system. These inputs could be taken from a

4 Introduction
keyboard, interface hardware or from an external device. The program itself cannot exist without some form of programmable hardware such as a micro- processor or controller. Firmware is a hardware device that is programmed using software. Typical firmware devices are EEPROMs (Electrically Eras- able Read Only Memories), and interface devices that are programmed using registers.
In most applications, dedicated hardware is faster than hardware that is rtmning software, although systems running software programs tend to be easier to modify and require less development time.
1.3 Basic computer architecture
The main elements of a basic computer system are a central processing unit (or microprocessor), memory, and input/output (I/O) interfacing circuitry. These are interconnected by three main buses: the address bus; the control bus; and the data bus, as illustrated in Figure 1.1. External devices such as a keyboard, display, disk drives, and so on, can connect directly onto the data, address and control buses, or connect through I/O interfacing circuitry.
Memory normally consists of RAM (random access memory) and ROM (read only memory). ROM stores permanent binary information, whereas RAM is a non-permanent memory and loses its contents when the power is taken away. RAM memory is used to run application programs and to store information temporarily.
The microprocessor is the main controller of the computer. It fetches bi- nary instructions (known as machine code) from memory, it then decodes these into a series of simple actions and carries out the actions in a sequence of steps. These steps are synchronized by a system clock.
The microprocessor accesses a memory location by putting its address on the address bus. The contents at this address are placed on the data bus and the microprocessor reads the data from the data bus. To store data in mem- ory the microprocessor places the data on the data bus. The address of the location in memory is then put on the address bus and the data is then read from the data bus into the required memory address location.
Figure 1.1 Block diagram of a simple computer system

Compiling, linking and producing an executable program 5
1.4 Compiling, linking and producing an executable program
A microprocessor only understands binary information and operates on a series of binary commands known as machine code. It is extremely difficult to write large programs in machine code, so that high-level languages are used instead. A low-level language is one which is similar to machine code and normally involves the usage of keyword macros to replace machine code instructions. A high-level language has a syntax that is almost like written English and thus makes a program easy to read and to modify. In most programs the actual operation of the hardware is invisible to the pro- grammer.
A compiler changes the high-level language into machine code. High- level languages include C, BASIC, COBOL, FORTRAN and Pascal; an ex- ample of a low-level language is 80386 Assembly Language.
Figure 1.2 shows the sequence of events that occur to generate an execu- table program from a C or Pascal source code file (the filenames used in this example relate to a PC-based system). An editor creates and modifies the source code file; a compiler then converts this source code into a form which the microprocessor can understand, that is, machine code. The file produced by the compiler is named an object code file code (note that Turbo Pascal does not produce an object code file). This file cannot be executed as it does not have all the required information to run the program. The final stage of the process is linking, which involves adding extra machine code into the program so that it can use devices such as a keyboard, a monitor, and so on. A linker links the object code file with other object code files and with libraries to produce an executable program. These libraries contain other object code modules that are compiled source code.
Editor (create and
modify code)
Library and other object
code
Compiler l (converts source
code into machine code)
I 1 Source code: I Object code: I I
I FILE.C 1 ~ FILE.OBJ ! I FILE.PAS I I I I ' I I I I
Errors/warnings
Linker (adds extra information)
Executable file: FILE.EXE FILE.EXE
r
Figure 1.2 Edit, compile and link processes
If compilation or linking steps generate errors or wamings then the source code must be modified to eliminate them and the process of compila- tion/linking begins again. Warnings in the compile/link process do not stop the compiler or linker from producing an output, but errors will. All errors in
6 Introduction
the compilation or linking stage must be eliminated, whereas it is only ad- visable to eliminate warnings.
1.5 C compilation
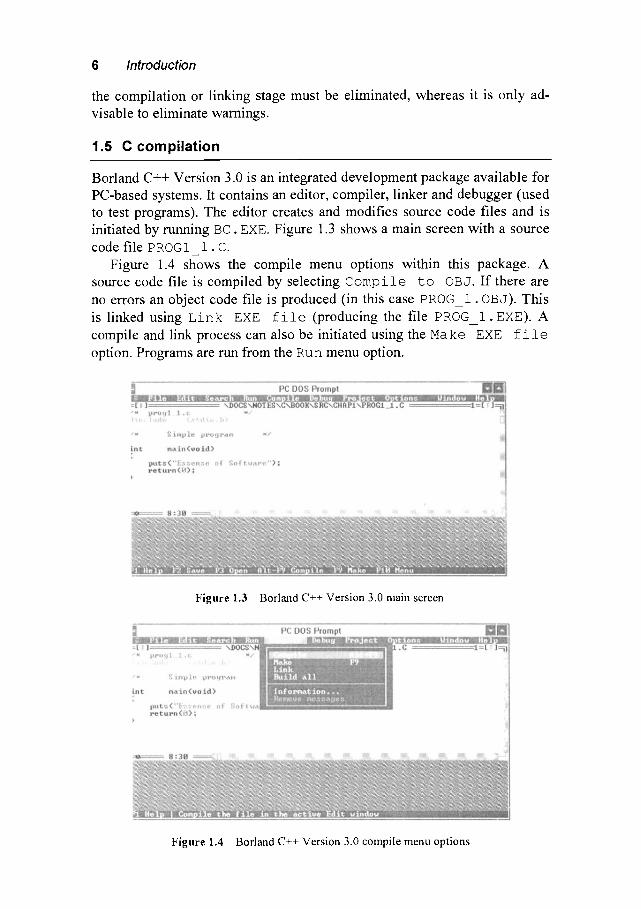
Borland C++ Version 3.0 is an integrated development package available for PC-based systems. It contains an editor, compiler, linker and debugger (used to test programs). The editor creates and modifies source code files and is initiated by running BC. EXE. Figure 1.3 shows a main screen with a source code file PROGI 1. C.
Figure 1.4 shows the compile menu options within this package. A source code file is compiled by selecting C o m p i l e t o OBJ. If there are no errors an object code file is produced (in this case PROG_I. OBJ). This is linked using L i n k EXE f i l e (producing the file PROG_I. EXE). A compile and link process can also be initiated using the Make EXE f i l e option. Programs are run from the Run menu option.
Figure 1.3 Borland C++ Version 3.0 main screen
Figure 1.4 Borland C++ Version 3.0 compile menu options

1.6 Pascal compilation
Pascal compilation 7
Turbo Pascal Version 5.0 is an integrated development package available for PC-based systems. It contains an editor, compiler, linker and debugger (used to test programs). The editor creates and modifies source code files and is initiated by running TURBO. EXE. Figure 1.5 shows a main screen with a source code file P ROGI i. PAS.
Figure 1.6 shows the compile menu options within this package. A source code file is compiled by selecting C o m p i l e . If there are no errors then an executable program is produced. If the destination is given as Mem- o r y then it does not save the executable file to the disk but runs it from memory. If the destination is to the D i s k then an executable file will be produced (producing the file PROG 1. EXE). The destination can be toggled by pressing the ENTER key while the line cursor is on the D e s t i n a t i o n option. A program is run from the Run menu option.
Figure 1.5 Turbo Pascal Version 5.0 main screen
Figure 1.6 Turbo Pascal Version 5.0 compile menu options

8 Introduction
1.7 Introduction to C
This section gives a brief introduction to ANSI-C.
1.7.1 Pre-processor
The pre-processor acts on programs before the compiler. It uses commands that have a number-sign symbol ( '# ' ) as the first non-blank character on a line. Figure 1.7 shows its main uses, which are" including special files (header files) and defining various macros (or symbolic tokens). The #include directive includes a header file and #define defines macros. By placing these directives near the top of a source code file then all parts of the program have access to the information contained in them.
Source
c~ I Replace macros with #define directive
Pre-processor
I Include files with #include directive
Compiler (converts source
code into machine code)
Library and other object
code
Linker (adds extra information)
v
Figure 1.7 Operations o11 the program to produce an executable file
For example, the pre-processor directive:
#include "main. h"
includes the header file main.h. The inverted commas inform the pre- processor that this file will be found in the current working directory, while the directive
#include <stdio.h>
includes the file stdio.h found in the default include directory. This directory is normally set-up automatically by the system. For example, Turbo C Ver- sion 2.0 stores its header files, by default, in the directory \ T C \ INCLUDE and Borland C uses \B �9 Typically, header files on a Unix system are stored in t h e / u s r / i n c l u d e directory.
To summarize, inverted commas (" ") inform the pre-processor to search for the specified header file in the current directory (or the directory speci- fied in the pathname). The chevron characters (<>) inform the pre- processor to search in the default include directory. It is not advisable to
Introduction to C 9
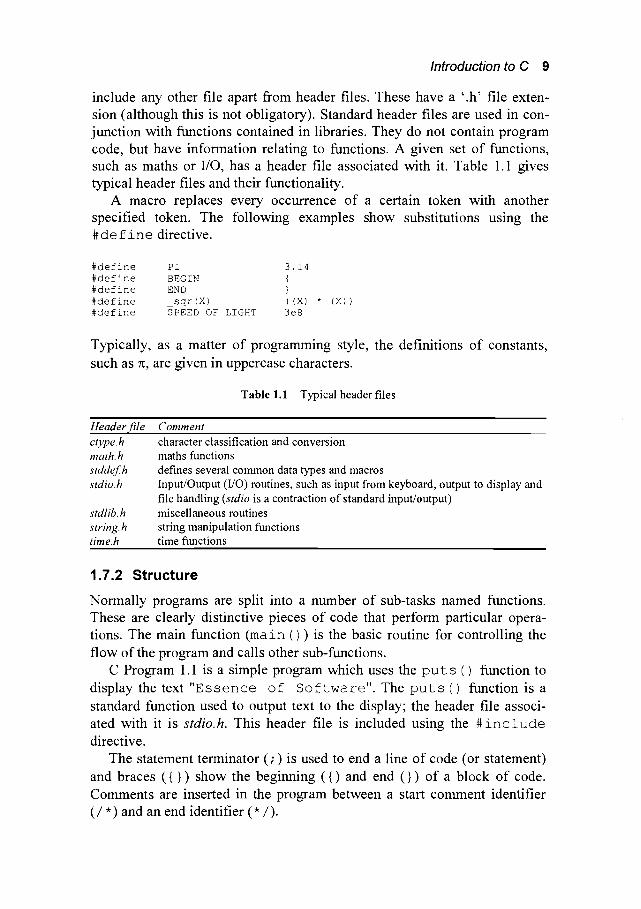
include any other file apart from header files. These have a '.h' file exten- sion (although this is not obligatory). Standard header files are used in con- junction with fimctions contained in libraries. They do not contain program code, but have information relating to functions. A given set of functions, such as maths or I/O, has a header file associated with it. Table 1.1 gives typical header files and their functionality.
A macro replaces every occurrence of a certain token with another specified token. The following examples show substitutions using the # d e f i n e directive.
#define PI 3.14 #define BEGIN { #define END } #define sqr(X) ((X) #define SPEED OF LIGHT 3e8
* (x))
Typically, as a matter of programming style, the definitions of constants, such as n, are given in uppercase characters.
Table 1.1 Typical header files
Header file ctype, h math.h stddef h stdio.h
stdlib.h string.h time.h
Comment character classification and conversion maths functions defines several common data types and macros Input/Output (I/O) routines, such as input from keyboard, output to display and file handling (stdio is a contraction of standard input/output) miscellaneous routines string manipulation functions time functions
1.7.2 Structure
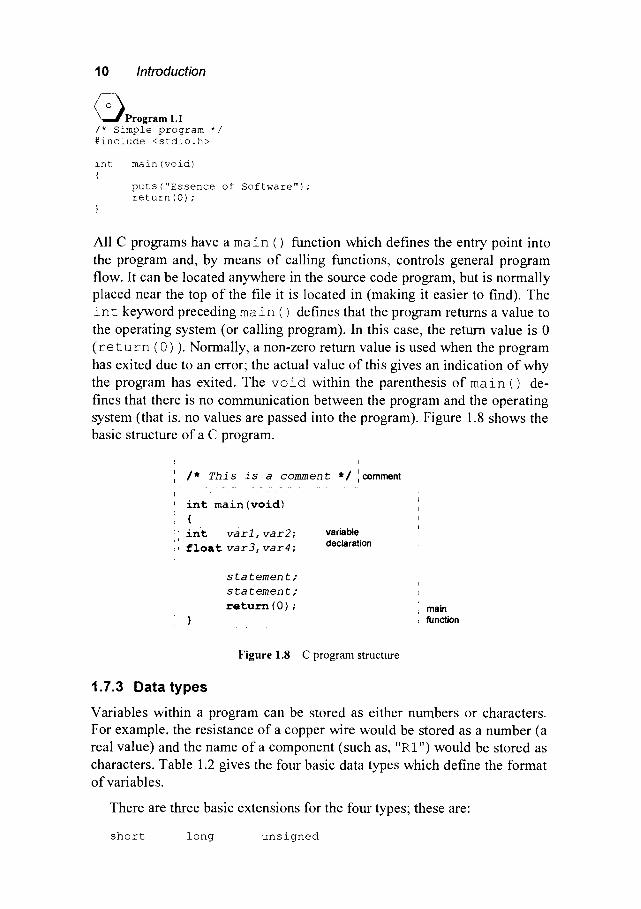
Normally programs are split into a number of sub-tasks named functions. These are clearly distinctive pieces of code that perform particular opera- tions. The main function ( m a i n ( ) ) is the basic routine for controlling the flow of the program and calls other sub-functions.
C Program 1.1 is a simple program which uses the p u t s () function to display the text " E s s e n c e o f S o f t w a r e " . The p u t s ( ) function is a standard function used to output text to the display; the header file associ- ated with it is stdio.h. This header file is included using the # i n c l u d e directive.
The statement terminator ( ; ) is used to end a line of code (or statement) and braces ({}) show the beginning ({) and end (}) of a block of code. Comments are inserted in the program between a start comment identifier ( / * ) and an end identifier (* / ) .
10 Introduction
OProgram 1.1 /* Simple program */ #include <stdio.h>
int main (void) {
puts ("Essence of Software") ; return(O);
All C programs have a m a i n () function which defines the entry point into the program and, by means of calling functions, controls general program flow. It can be located anywhere in the source code program, but is normally placed near the top of the file it is located in (making it easier to find). The i n t keyword preceding ma i n ( ) defines that the program returns a value to the operating system (or calling program). In this case, the return value is 0 ( re t u r n (0 ) ) . Normally, a non-zero return value is used when the program has exited due to an error; the actual value of this gives an indication of why the program has exited. The v o i d within the parenthesis of m a i n ( ) de- fines that there is no communication between the program and the operating system (that is, no values are passed into the program). Figure 1.8 shows the basic structure of a C program.
I
/* This is a comment */ ' i oomment
int main (void) (
in t ~ VarX, var2; i
float var3, var4;
va ria ble declaration
statement ;
statement ;
return ( 0 ) ; main function
Figure 1.8 C program structure
1.7.3 Data types
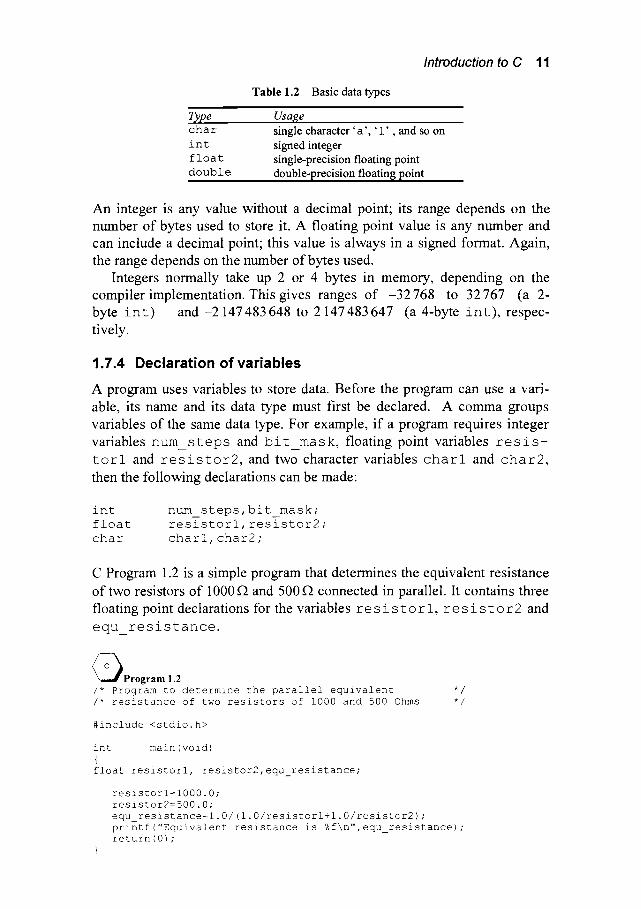
Variables within a program can be stored as either numbers or characters. For example, the resistance of a copper wire would be stored as a number (a real value) and the name of a component (such as, "RI") would be stored as characters. Table 1.2 gives the four basic data types which define the format of variables.
There are three basic extensions for the four types; these are:
short long unsigned
Introduction to C 11
Table 1.2 Basic data types
Type Usage c h a r single character ' a ' , ' 1 ' , and so on i n t signed integer f l o a t single-precision floating point d o u b 1 e double-precision floatint~ point
An integer is any value without a decimal point; its range depends on the number of bytes used to store it. A floating point value is any number and can include a decimal point; this value is always in a signed format. Again, the range depends on the number of bytes used.
Integers normally take up 2 or 4 bytes in memory, depending on the compiler implementation. This gives ranges of -32 768 to 32 767 (a 2- byte i n t ) and -2 147483648 to 2 147483647 (a 4-byte i n t ) , respec- tively.
1.7.4 Declaration of variables
A program uses variables to store data. Before the program can use a vari- able, its name and its data type must first be declared. A comma groups variables of the same data type. For example, if a program requires integer variables n u m s t e p s and b i t ma s k, floating point variables r e s i s -
t o r l and r e s i s t o r 2 , and two character variables c h a r l and c h a r 2 , then the following declarations can be made:
int float char
num steps,bit mask; resistorl, resistor2; charl, char2 ;
C Program 1.2 is a simple program that determines the equivalent resistance of two resistors of 1000f) and 500f~ connected in parallel. It contains three floating point declarations for the variables r e s i s t o r l , r e s i s t o r 2 and equ_resistance.
OProgram 1.2 /* Program to determine the parallel equivalent /* resistance of two resistors of i000 and 500 Ohms
#include <stdio.h>
int main (void) { float resistorl, resistor2,equ resistance;
resistorl=1000.0; resistor2=500.0; equ_resistance=l.0/(l.0/resistorl+l.0/resistor2);
*/ */
printf("Equivalent resistance is %f\n",equ_resistance); return(0) ;

12 Introduction
It is also possible to assign an initial value to a variable at the point in the program at which it is declared; this is known as variable initialization. C Program 1.3 gives an example of this with the declared variables r e s i s - t o r 1 and r e s i s t o r 2 initialized to 10 00 . 0 and 5 00 . O, respectively.
~Program 1.3 /* Program to determine the parallel equivalent /* resistance of two resistors of i000 and 500 ohms
#include <stdio.h>
*/ */
int main (void) { float resistorl=1000.0, resistor2=500.0,equ_resistance;
equ_resistance=l.0/(l.0/resistorl+l.0/resistor2); printf("Equivalent resistance is %f \n",equ_resistance);
return(0) ; }
1.7.5 Keywords
ANSI-C has very few reserved keywords (only 32); these cannot be used as program identifiers. C is case-sensitive and thus they must be used in lower- case. From these simple building blocks large programs can be built. The following gives a list of the keywords.
auto do for return switch break double goto short typedef
case else if signed union char enum int sizeof unsigned const extern long static void continue float register struct volatile default while
Functions are sections of code that perform a specified operation. They re- ceive some input and produce an output in a way dictated by their func- tionality. These can be standardized functions which are inserted into librar- ies or are written by the programmer. ANSI-C defines some standard func- tions which provide basic input/output to/from the keyboard and display, mathematical functions, character handling, and so on. They are grouped together into library files and are not an intrinsic part of the language. These libraries link into a program to produce an executable program.
1.8 Introduction to Pascal
This section gives a brief introduction to Turbo Pascal.

Introduction to Pascal 13
1.8.1 Constant declarations
Pascal uses the const keyword to defined constant numeric values. The
following examples show constant declarations for n and the speed of light (which is 3 • 108).
const PI=3.14; SPEED OF LIGHT=3e8;
In Pascal the case of the characters is ignored but, as a matter of program-
ming style, the definition of constants, such as rt, is given in uppercase char- acters.
1.8.2 Structure
Normally programs are split into a number of sub-tasks named procedures or functions. These are clearly distinctive pieces of code that perform particu- lar operations. The main program is the basic routine to control the flow of a program and calls other sub-functions.
Pascal Program 1.1 is a simple program which uses the w r i t e 1 n proce-. dure to display the text 'Essence o f S o f t w a r e ' . The w r i t e l n proce- dure is a standard procedure which is used to output text to the display.
The statement terminator (; ) is used to end a line of code (or statement) and the keywords b e g i n and e n d define the beginning and end of a block of code. Comments are inserted into the program between a start comment identifier ( (*) and an end identifier (*) ).
All Pascal programs have a main program which defines the entry point into the program and, by means of calling functions and procedures, controls general program flow. In most cases it is be located at the end of the source code file.
~Program I.I program progl_l (input,output) ; (* Simple program *) begin
writeln('Essence of Software' ) ; end.
Figure 1.9 shows the basic structure of a Pascal program. Each program has a program header which is defined with the p r o g r a m keyword. After this the program variables are declared. In this case the variables declared are vat1, vat2 (which are integers) and vat3, vat4 (which are real values). The main program is defined after the variable declaration and can be identified between the begin and end keywords. The final end keyword has a full-
stop after it.

14 Introduction
program progname (input, output) ; ' I
~ I~'ogram ~ he~l~r
. . . . . . . . . . . . . . . . . . . . . . . . . . . . . . . . . . . . . . . . J
. . . . . . . . . . . . . . . . . . . . . . . . . . . . . . . . . . . ,
var va r l , va r2: integer; var3, vat4 : r e a l ;
begin
end.
statement ;
sta tement ;
vadable oeclaraUon
main program
F i g u r e 1.9 Pascal p rog ram s t ructure
1.8.3 Data types
Variables within a program can be stored as either numbers or characters. For example, the resistance of a copper wire would be stored as a number (a real value) and the name of a component (such as, 'p,l') would be stored as characters. Table 1.3 gives the four basic data types which define the format of variables.
T a b l e 1.3 Basic Pascal data types
Type Usage c h a r s ingle character ' a ' , '1 ' , and so on
i n t e g e r s igned integer
r e a 1 s ing le-prec is ion f loat ing point
b o o l e a n boo lean t),pe
Range Charac te r range
- 3 2 768 to 32 767 2 .9x19 3~ to 1 .7xlO 38
true or false
Other data types used in Turbo Pascal include:
shortint, longint, byte, word and double
An integer is any value without a decimal point; its range depends on the number of bytes used to store it. A floating point value is any number and can include a decimal point; this value is always in a signed format. Again, the range depends on the number of bytes used.
The integer type uses 2 bytes in memory. This gives ranges of -32 768 to 32767 (a 2-byte i n t ) a n d - 2 147483648 to 2 147483647 (a 4- byte 1 on g i n t ) , respectively.
1.8.4 Declaration of variables
A program uses variables to store data. Before the program can use a vari- able, its name and its data type must first be declared. A comma groups variables of the same data type. For example, if a program requires integer
Introduction to Pascal 15
variables num steps and bit mask, floating point variables resis-
t o r l and r e s i s t o r 2 , and two character variables c h a r l and c h a r 2 , then the following declarations can be made"
var
var
var
num steps,bit mask- integer;
resistorl, resistor2 �9 float ;
charl, char2 �9 char;
Pascal Program 1.2 is a simple program that determines the equivalent resis- tance of two resistors of 1000 ff~ and 500 ff~ connected in parallel. It contains three floating point declarations for the variables r e s i s t o r l , r e s i s - t o r 2 and eq_resistance.
• Program 1.2
program progl_2(input,output) ; (* Program to determine the parallel equivalent (* resistance of two resistors of i000 and 500 Ohms
var resistorl,resistor2,equ_resistance'real;
begin resistorl'=1000; resistor2-=500;
equ_resistance-=i/(i/resistorl+i/resistor2) ;
end.
*) *)
writeln('Equivalent resistance is ',equ_resistance) ;
1.8.5 Keywords
Turbo Pascal has 52 reserved keywords; these cannot be used as program identifiers and can be in upper- or lower-case. Large programs can be built from these simple building blocks. The following gives a list of the key- words.
absolute and array begin case const constructor destructor div do downto else end external file
for forward function goto if implementation in inline interface interrupt label mod nil not object of or packed procedure program record repeat set shl shr string then to type unit until uses var virtual while
with xor
Functions and procedures are sections of code that perform a specified op- eration. They receive some input and produce an output in a way dictated by their functionality. These can be standardized functions which are inserted into libraries or are written by the programmer. Turbo Pascal defines some

16 Introduction
standard functions which provide basic input/output to/from the keyboard and display, mathematical functions, character handling, and so on. They are grouped together into library files and are not an intrinsic part of the lan- guage. These libraries link into a program to produce an executable pro- gram.
1.9 Exercises
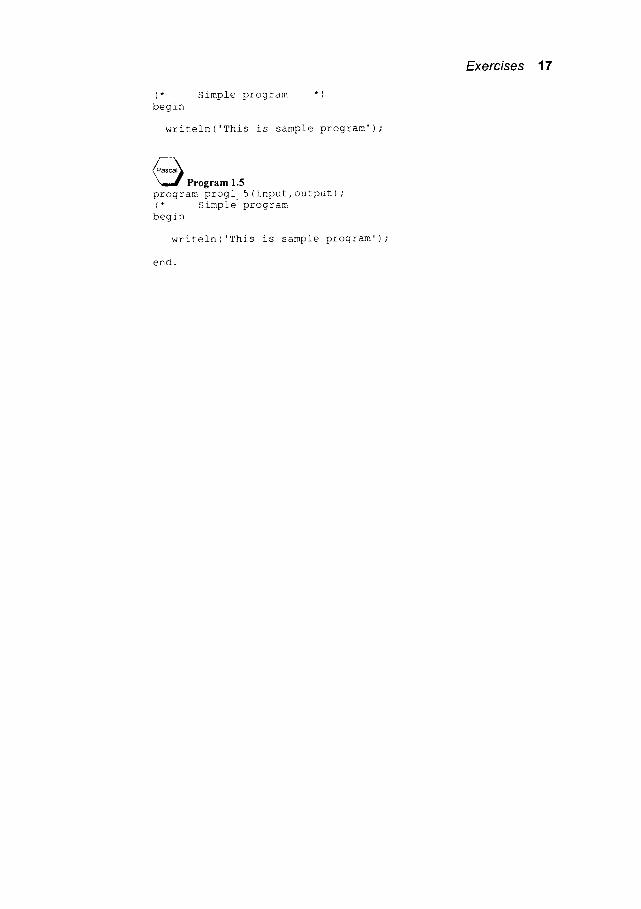
1.9.1 Determine the errors in the C Programs 1.4 to 1.6 or the Pascal Programs 1.3 to 1.5. Each program has a single error. Enter them into the compiler and after the error has been corrected, run them.
~Program 1.4 #include <stdio. h> /* Simple program */
int main(void) {
puts("This is a sample program") return(0);
}
~ P r o g r a m 1.5 #include <stdio.h> /* Simple program */ int main (void) {
puts ("This is another sample program") ; return(0) ;
<•Program 1.6 #include <stdio.h> /* Simple program
int main (void) {
puts("And another one"); return(0);
Pas• Program 1.3 program progl 3 (input,output) (* Simple program *) begin
writeln('This is sample program');
end.
• Program 1.4
program progl 4 (input,output) ; m
Exercises 17
(* Simple program *) begin
writeln('This is sample program');
Pas• Program 1.5 program progl 5(input,output) ; (* Simple-program begin
writeln('This is sample program');
end.
18 Introduction
Worksheet I
W I . I Which programming language is your choice for software devel- opment (tick one)"
c [ ] Turbo Pascal [ ] Mixture of C and Pascal [ ]
Reason for choice"
WI.2 If you are rtmning the compiler over the network then what is your login name:
Login name"
WI.3 Locate and run Pascal or C compiler"
How is it selected:
WI.4 Enter either C Program 1.1 or Pascal Program 1.1 and save this to a file on floppy disk as PROGI_I . PAS (for the Pascal file) or PROG1 1. C (for the C file).
Completed successfully" YES/NO Notes"
WI.5 Compile the program and note any messages that the compiler gives.
Worksheet I 19
Program compiled successfully: Notes:
YES/NO
Wl.6 If there are errors in the program then compare the entered file with the program listing and try to identify how they differ. The compiler should identify the location of the error (note look also at the line before). Then recompile.
Program compiled successfully" Notes:
YES/NO
Wl.7 After the program has been successfully compiled, run the pro- gram and determine its output.
Program output"
WI.8 Enter either C Program 1.2 or Pascal Program 1.2 and save file on floppy disk as PROGI_2.PAS (for the Pascal file) or PROG1 2. C (for the C file).
Completed successfully: Program output:
YES/NO
Wl.9 Using C Program 1.2 or Pascal Program 1.2 determine the equiva- lent resistance for two parallel resistors. Use this program and by changing the resistor values complete Table W 1.1.

20 Introduction
Resistor l (.O) 1000 25 le6 ( 1 M ~ ) 150
Table Wl.1 Equivalent resistance
Resistor2 (.Q) 1000 100 le6 50
Equivalent resistance (.(2)

Input/Output
2.1 Introduction
Every program has some form of output and normally an input. Figure 2.1 shows some examples of input and output devices. The input could be from a keyboard, a file, input/output ports, a mouse, and so on. Output can be sent to devices such as displays, printers, hard-disks, and so on. Typically, engi- neers also communicate with devices such as ADC/DACs, LEDs, interface adapters, IC programmers, and so on.
The default input device is normal from a keyboard and the default out- put from a display. Most programs prompt the user to enter data from the keyboard. This data is then processed and the results displayed to the screen. The user can then enter new data and so the cycle continues.
Most operating systems also allows a redirection of the input or output. For example, a text file can act as an input to a program and the printer as the output.
I Disk drive !
Mouse ~[ Computer p___[ LEDs System
ISwitches~f I [Printer[ Memory
Figure 2.1 Input/output devices
2.2 Pascal input/output
Compared with C, Pascal has a very limited set of input/output statements

22 Input/output
(for this reason this chapter contains many more pages on the C input/output statements). Pascal uses the keyboard as the standard input and the display as the standard output. The two statements which are used to control this in- put and output are r e a d and w r i t e .
2.2.1 writeln
The statements used to output data from a program to the screen are w r i t e l n and w r i t e . The w r i t e statement does not move the cursor to a newline once the data has been printed, whereas the w r i t e l n will. The
standard format is"
wr i te ln( ' tex t ' ,argnl , arg2 ... argn);
outputs a text string defined by 'text' and values given by arguments argl..argn. The output is appended with a new- line.
wri te( ' text ' ,argnl, arg2 ... argn); outputs a text string defined by 'text' and values given by arguments argl..argn. The output is not appended with a new-line.
A text string is enclosed within quotes (' ') and can be printed at any place in the w r i t e statement. Values will be printed in a format defined by their type. For example an integer will be displayed without a decimal point, a very large or small real value will be displayed in exponent form. The actual format of the value to be printed can be modified using the colon modifier, the standard format is:
value'n
value-n'm
prints v a l u e with n spaces used to print the variable prints v a l u e with n spaces and m places after the decimal
point
Note that all printed values are right justified.
2.2.2 readln
The statements used to input data into a program from the keyboard are r e ad and r e a d l n . The r e ad statement does not move the cursor to a new-line once the data has been entered, whereas the r e a d l n will. The standard format is"
r e a d l n (argl,arg2.. .argn)
read (argl,arg2.. .argn)
reads values from the keyboard and loads them into the argu- ments argl, arg2, and so on.
reads values from the keyboard and loads them into the argu- ments argl, arg2, and so on.
ch = r e a d k e y () reads a single character from the keyboard into ch

C input/output 23
Pascal Program 2.1 shows a simple example of a program which uses in- put/output statements
Program 2.1 program prog2 1 (input,output) ; var voltage, current, resistance : real;
begin writeln('Enter voltage and current') ; readln(voltage,current) ; resistance : :voltage/current ; writeln('Resistance is ' ,resistance:8:3, ' Ohms') ;
end.
2.3 C input/output
The standard input/output (I/O) functions in C are not intrinsic (built-in) to the language, but are stored in libraries that are linked into the program. The # i n c l u d e pre-processor directive includes the header files associated with them. Input/Output functions use stdio.h. In order to allow all parts of the source code access to the functions defined in the header file the pre- processor directive is located near the top of the file in which it is used. The compiler will then initiate extra error checking whenever any of the standard I/O functions are used. C Program 2.1 shows a program which includes the file stdio.h.
qw.~Program 2.1 #include <stdio.h>
int main (void) {
printf("Enter a value of resistance") ;
return(0) ; }
2.3.1 C standard output ( p r i n t f () , pu ts () and p u t c h a r ( ) )
There are three basic output functions in C, these are:
p r i n t f ( " f o r m a t " argl, arg2 ... outputs a formatted text string to the output in a form de- argn) fined by "Jormat" using the arguments argl..argn
puts("s tr ing") outputs a text string to the standard output and appends it with a new line
p u t c h a r ( c h ) outputs a single character (ch) to the standard output
The p r i n t f () function sends a formatted string to the standard output (the display). This string can display formatted variables and special control characters, such as new lines ( ' \ n ' ) , backspaces ( ' \ b ' ) and tabspaces ('\ t '); these are listed in Table 2.1.

24 Input/output
The p u t s () fimction writes a string of text to the standard output and no formatted variables can be used. At the end of the text, a new line is automatically appended.
The parameters passed into p r i n t f() are known as arguments; these are separated commas. C Program 2.1 contains a p r i n t f ( ) statement with only one argument, that is, a text string. This string is referred to as the message string and is always the first argument of p r i n t f ( ) . It can contain special control characters and/or parameter conversion control characters.
Conversion control characters describe the format of how the message string uses the other arguments. If p r i n t f ( ) contains more than one ar- gument then the format of the output is defined using a percent (%) character followed by a format description character. A signed integer uses the %d conversion control characters, an unsigned integer %u. A floating point value uses the % f conversion control characters, while scientific notation uses % e. Table 2.2 lists the main conversion control characters.
Table 2.1 Special control (or escape sequence) characters
Characters Function Characters Function \ " Double quotes (") \ b
\ ' Single quote ( ' ) \ f \ \ Backslash ( \ ) \ n \ nnn ASCII character in octal \ r
code, such as \ 0 41 gives ' ! ' \ 0 x n n ASCII character in hexa- \ t
decimal code, such as \ 0x 41 gives an 'A'
\ a Audible bell
Backspace (move back one space) Form-feed New line (line-feed) Carriage retum
Horizontal tab spacing
Table 2.2 Conversion control characters
Operator Format % c single character % d signed decimal integer % e scientific floating point % f floating point % u unsisned decimal inteser
Operator Format % s string of characters % o unsigned octal integer % % prints % character % x unsigned hexadecimal integer % g either floatin$ point or scientific notation
Figure 2.2 shows an example of the printf () statement with four arguments. The first argument is the message string followed by the parameters to be printed in the message string. In this case the parameters are v a l l , v a l 2 and ch; v a l l is formatted in the message string as a floating point (% f), v a l 2 as an integer (%d) and ch as a character (%c). Fi- nally, a new line character ( ' \n ' ) is used to force a new line on the output.

C input~output 25
float integer
1 ~ char
printf("Values are %f %d %c\n",vall,val2,ch);
force a new line
Figure 2.2 An example p r i n g f ( ) statement
A numerical value is output to a given specification using a precision specifier. This specifies the number of characters used to display the value and the number of places after the decimal point. The general format of a floating point value is:
%m.nX
where m is the width of the value (the number of digits including the deci- mal point), n is the number of digits following the decimal point, and X is the format type (f for float). The general format of a string or integer is"
%mX
where X is the format type (c for character, s for string or d for integer) and m is the width of the output. Table 2.3 gives a few examples.
Table 2.3 Example of conversion control modifiers
Format Function %.3f
%8.3f
%lOd
%3o
%10.6e
format floating point value with 3 decimal places and a default width format floating point with 8 reserved spaces and 3 places atter the decimal point such as 3 2 . 4 5 3 format integer for 10 reserved spaces such as 23 format octal integer number for 3 hexadecimal characters format exponent format with 6 decimal places
2.3.2 C standard input (scanf (), gets () and getchar ())
The keyboard is normally the standard input to a program. As with the out- put functions, the input functions are not part of the standard language and are contained in a standard C library. Definitions (or prototypes) of these functions are found in the header file stdio.h. By including this header file a degree of error checking is initiated at compilation. The compiler checks, among other things, the data types of the parameters passed into the func- tions. It is thus less likely that there will be any run-time errors.
There are three main input functions, these are:
26 Input/output
s c a n f ( "format",&argl,&arg2..&argn )
gets (string)
ch = getchar ()
reads formatted values from the keyboard in a format defined by format and loads them into the arguments argl, arg2, etc.
reads a string of text from the keyboard into string (up to a new line)
reads a single character from the keyboard into ch
If a numeric or a character variable is used with the scanf () function an ampersand (&) precedes each parameter in the argument list (there are exceptions and these will be discussed in Chapters 6 and 7). This prefix causes the memory address of the variable to be used as a parameter and not the value. This allows s c a n f () to change the value of the variable (this will also be explained in more detail in Chapter 6). For now, it should be as- sumed that an ampersand precedes all simple numerical and character data types when using s c a n f ( ) . The general format of the s c a n f () function is s c a n f ( f o r m a t , s a r g l , & a r g 2 . . . ).
The first argument format is a string that defines the format of all entered values. For example, "% f % d" specifies that argl is entered as a float and arg2 as an integer. This string should only contain the conversion control characters such as %d, %f, %c, %s, etc., separated by spaces. Figure 2.3 shows an example of the s c a n f () function reading a float, an integer and a character into the variables v a l l , v a l 2 and ch.
The g e t s ( s t r ) function reads a number of characters into a variable (in this case s t r ) ; these characters are read until the ENTER key is pressed. The g e t c h a r ( ) function reads a single character from the input. This character is returned via the function header and not through the argument list.
float
scanf ( "%f
integer
char
%d %c", &vall,&val2, &ch) ;
Figure 2.3 An example of the scanf ( ) statement
2.4 Examples
This section contains some practical electronics-related examples of C and Pascal programs. Each of the test runs relate to a run of the C program (although most of the Pascal test runs are almost identical).

Examples 27
2.4.1 Fahrenheit to centigrade conversion
Temperature is typically measured in either centigrade or Fahrenheit. The conversion from Fahrenheit to centigrade is:
C---.5 (F-32) oc 9
Program 2.2 converts from an entered value of Fahrenheit (faren) into centigrade ( c e n t ) . and Test run 2.1 shows a sample run for an entered value of 80~ The resultant value is displayed with 8 places reserved for the answer and 2 decimal places. This is specified in C as % 8 . 2 f and in Pascal with �9 8 - 2 after the variable.
C•Program 2.2 #include <stdio.h>
int main (void) { float faren, cent;
puts("Program to convert Fahrenheit to centigrade"); printf("Enter a temperature (in Fahrenheit)") ; scanf("%f",&faren) ;
cent:5.0/9.0*(faren-32);
printf("Temperature is %8.2f deg C\n",cent);
return(0) ; }
~ P r o g r a m 2.2 program prog2_2 (input,output) ;
var faren, cent'real;
begin writeln('Program to convert Fahrenheit to centigrade'); writeln('Enter a temperature (in Fahrenheit)'); readln(faren);
cent.=5/9 * (faren-32) ;
writeln('Temperature is ',cent'8"2, ' deg C') ;
end.
Test run 2.1 Program to convert Fahrenheit to centigrade Enter a temperature (in Fahrenheit) 80 Temperature is 26.67 deg C

28 Input/output
2.4.2 Gradient of a straight line
The equation o f a straight line is:
y = m x + c
where m is the gradient o f the line and c is the point at which the line cuts the y-axis. If two points on the line are known, (xl,y~) and (x2,y2) then m can be calculated by:
Y2 -Yl m - - - X 2 - - X 1
and the c value can be calculated from:
c = y - m x
= Y l - m x l
Program 2.3 determines the gradient o f a straight line for entered value o f x~,y~ and x2,y2 (Note that the solution o f the value for c will be left as an ex- ercise). Test run 2.2 is a sample test run.
<•.•Program 2.3 #include <stdio.h>
int main(void) {
float xl,x2,yl,y2,m;
puts("Program to determine the gradient"); puts("of a straight line")
printf("Enter xl, yl >> ") scanf("~f ~f", &xl,&yl);
printf("Enter x2, y2 >> ") scanf("%f %f",&x2,&y2);
m:(y2-yl)/(x2-xl);
printf("Gradient is %8.2f",m);
return(0); }
~Program 2.3 program prog2_3(input,output);
var xl,x2,yl,y2,m:real;
Examples 29
begin writeln('Program to determine the gradient'); writeln('of a straight line');
write('Enter xl, yl >> '); readln(xl,yl); write('Enter x2, y2 >> '); readln(x2,y2);
m "=(y2-yl)/(x2-xl) ;
writeln('Gradient is ',m'8"2) ; end.
Testrun2.2 Program to determine the gradient of a straight line Enter xl, yl >> 3 4 Enter x2, y2 >> 5 6 Gradient is 1.00
2.4.3 Force of attraction
The gravitational force between two objects of mass m~ and m2 of a distance d apart is given by:
F = G'ml "m2 N d 2
where G is a gravitation constant and is equal to 6.67• -~ m3.kg-~sec-2. Program 2.4 determines the gravitation force and Test run 2.3 shows a test run for the gravitation force between an apple and the earth. The parameters used are:
mearth =6x 10 24 kg mapple --0.1 kg /'earth = 6 3 7 0 0 0 0 m
The resultant gravitation force is 0.99 N, which is similar to the calculation using"
F - m a
= 0.1 x 9.81 N
=9.81 N
The gravitation force constant (G) has been defined, in C, with the # de f i ne statement and, in Pascal, with a c o n s t .

30 Input/output
C•Program 2.4 #define G 6.67e-ii
#include <stdio.h>
int { float
main (void)
force, ml, m2, distance;
puts("Program to force between two objects");
printf("Enter mass of first object (kg)"); scanf ("%f", &ml) ;
printf("Enter mass of second object (kg)"); scanf("%f",&m2);
printf("Enter distance between objects (m)") ; scanf("%f",&distance) ;
force=G*ml*m2/(distance*distance);
printf("Force is %8.2f N\n",force) ; return(0) ;
Program 2.4 program prog2_4 (input,output) ; const G=6.67e-ll;
vat force, ml, m2, distance" real ;
begin writeln('Program to force between two objects');
writeln('Enter mass of first object (kg)') ; readln (ml) ;
writeln('Enter mass of second object (kg)'); readln(m2);
writeln('Enter distance between objects (m) '); readln(distance ;
force.=G*ml*m2/(distance*distance);
writeln('Force is ', force-8"2, ' N') ; end.
Test run 2.3 Program to force between two objects Enter mass of first object (kg) 6e24 Enter mass of second object (kg) 0.i Enter distance between objects (m) 6.67e-ii Force is 0.99 N
2.4.4 Capacitive reactance
The reactance of a capacitor depends upon the applied frequency. At low frequencies the reactance is extremely high and at high frequencies it is low.
Examples 31
The reactance (Xc) of a capacitor, of capacitance C (Farads), at an applied frequency f(Hertz) is be given by:
1
Xc = 2nfC
Figure 2.4 shows a schematic of this arrangement. There is one output vari- able (Xc), two input variables ( f and C) and a single constant (~). Program 2.5 shows a sample program and test run 2.4 is a sample run. In C a constant is declared with the # d e f i n e pre-processor option and Pascal uses the c on s t keyword.
C
Figure 2.4 Capacitor connected to sinusoidal voltage source
< C~Program 2.5 /* Program to calculate capacitive reactance #include <stdio.h> #define PI 3. 14159
*/
int { float
main (void)
freq, cap, X c;
puts ("Enter frequency and capacitance") ; scanf("%f %f", &freq, &cap) ;
X c=l.0/ (2.0*PI*freq*cap) ;
printf("Capacitive Reactance is %6.3f ohms\n", X_c) ; return(0) ;
Program 2.5 program prog2 2 (input,output) ;
const PI:3.14157;
var freq, cap, X c'real;
begin writeln('Enter frequency and capacitance'); readln(freq, cap);
X c'=i/ (2*PI*freq*cap) ;
writeln('Capacitive reactance is ',X c'8"3,' ohms'); end.
32 Input/output
I"-! Test run 2.4
Enter frequency and capacitance 10e3 le- 6 Capacitive Reactance is 15.916 ohms
2.4.5 Impedance of an RL ser ies circuit
The magnitude of the impedance of an RL series circuit (modulus 17,1) is given by the equation:
[Z[ = ~[R2 + X L2 ~
and the angle of the impedance (argument ( z ) ) is given by:
-I XL (Z) = tan R
Figure 2.5 shows a schematic of an RL series circuit. Program 2.3 deter- mines the magnitude and the angle of the impedance using entered values of resistance (R), inductance (L) and frequency ( f r e q ) . In C the inverse tan- gent (tan -~) function is defined (or prototyped) in math.h and is named a t a n ( ) , whereas, Pascal uses the a r c t a n ( ) function. Both these func- tions return the inverse tangent in radians. The program converts the returned value into degrees by scaling it by rd 180.
The program uses the square root function; in C this function is ( s q r t ( ) ) which is prototyped in the math.h header file. This inclusion helps the compiler check the format of the values sent to the function as it checks the general syntax of the function call. It also informs the compiler that the value remmed is a floating point (this will be discussed in greater detail in a later chapter). In Pascal it is also named s q r t ().
Test run 2.5 is a sample output using entered values R= 100f~, L = 100mH and f requency = 1 kHz. The impedance has a magnitude of 118.10 f2 and an angle of 32.14 ~
Figure 2.5 RL series circuit

Examples 33
~Program 2.6 /* Program to determine the impedance of a /* series RL circuit
*/ */
#include #include
<stdio.h> <math.h> /*required for sqrt() and atan()*/
#define PI 3.14159
int main (void) {
float R,L, freq, Xl, Zin mag, Zin angle;
printf("Enter R, L and frequency >>"); scanf("%f %f %f",&R,&L,&freq);
Xl = 2 * PI * freq * L; Zin mag = sqrt(R*R+Xl*X1); Zin_angle= atan(Xl/R)*180.0/PI;
/* atan is arc tan and returns radians /* 180/PI converts to degrees
*/ */
printf("Zin mag %6.2f ohm, angle %6.2f degrees\n", Zin mag, Zin_angle); return(0) ;
Program 2.6 program prog2_3 ( input, output ) ;
const PI=3.14159"
vat R,L, freq, X1,Zin mag, Zin angle" real;
begin write( 'Enter R, L and frequency >>'); readln (R, L, freq) ; XI': 2 * PI * freq * L; Zin mag "= sqrt (R*R+XI*XI) ; Zin angle .= arctan(Xl/R)*180.0/PI;
{ arctan is arc tan and returns radians } { 180/PI converts to degrees }
writeln('Zin mag ', Zin mag'6"2, ' ohm, angle ',Zin_angle'6"2, ' deg') ; end.
Test {un 2.5 Enter R, L and frequency >> i00 10e-3 i000 Zin mag 118.10 ohm, angle 32.14 degrees
2.4.6 Resistors in parallel
Program 2.7 determines the equivalent resistance of three resistors con- nected in parallel. Figure 2.6 gives a schematic diagram of this set-up. The resistors connected are R 1, R 2 and R 3 and the equivalent input resistance is Req u. Test run 2.6 shows a run with values of 250, 500 and 1000 f2.
34 Input/output
o
R equ
O
iR ! R2
1 Req , -
3 1 1 1 - - - + - - ' 4 - - - R n R2 R 3
Figure 2.6 Three resistors connected in parallel
C•Program 2.7 /* Program to determine equivalent resistance #include <stdio.h>
*/
int main(void) { float RI,R2,R3,R_equ;
puts("Program to determine equivalent resistance"); puts("of three resistors connected in parallel"); puts("Enter three values of resistance >>"); scanf("%f %f %f",&RI,&R2,&R3);
R_equ=I.0/(I.0/RI+I/R2+I/R3);
printf("Rl=%8.3f, R2=%8.3f and R3=%8.3f ohms\n", RI,R2,R3); printf("Equivalent resistance is %8.3f ohms\n",R equ) ; return(0) ;
~ P r o g r a m 2 . 7 program prog2_4(input,output);
var RI,R2,R3,R equ:real; begin
writeln('Program to determine equivalent resistance'); write('of three resistors connected in parallel'); write('Enter three values of resistance >>'); readln(Ri,R2,R3);
R_equ:=I.0/(I.0/RI+I/R2+I/R3); writeln('Rl=',Rl,'R2=',R2,' and R3=',R3, ' ohms'); writeln('Equivalent resistance is ',R equ,' ohms');
end.
D
I--3 Test run 2.6 Program to determine equivalent resistance of three resistors connected in parallel Enter three values of resistance >> i000 500 250 RI=I000.000, R2 = 500.000, R3 = 250.000 ohms Equivalent resistance is 142.857 ohms
2.4.7 Bit operations
Program 2.8 relates to digital electronics and illustrates the power o f C and
Examples 35
Pascal when dealing with low-level bit operators. The C program uses &, I , ^ and ~ bitwise operators to create AND, OR, EX-OR, N A N D and NOR Boolean functions. Pascal uses the operators: and, or, xor and not. The N A N D and NOR functions are generated by inverting the A N D and OR operations.
The C program allows the entry of hexadecimal values using the % x for- mat descriptor in s c a n f () statement. Test run 2.7 shows a run with test values.
••.•Program 2.8 /* Program to bitwise AND, OR, NAND, NOR and EX-OR /* two hexadecimal values
#include <stdio.h>
*/ */
int main (void) {
int valuel, value2;
/* & - bitwise AND operator */ /* l - bitwise OR operator */ /* ^ - bitwise EX-OR operator */ /* ~ - bitwise NOT operator */
printf("Enter two hex values >>> "); scanf("%x %x",&valuel,&value2);
printf("Values ANDed is %x\n",valuel & value2); printf("Values ORed is %x\n",valuel I value2); printf("Values Ex-ORed is %x\n",valuel A value2); printf("Values NANDed is %x\n",~(valuel & value2)); printf("Values NORed is %x\n", ~(valuel I value2)); return(0);
Testrun2.7 Enter two hex values >>> E215 C431 Values ANDed is c011 Values ORed is e635 Values Ex-ORed is 2624 Values NANDed is 3fee Values NORed is 19ca
The bit patterns used in the test run are 1 1 1 0 0 010 0 0 01 0 1 0 1 (E215h) and 1 1 0 0 0 1 0 0 0 0 1 1 0 0 01 (C 4 31 h). To verify the program the hexa- decimal equivalents of these values are operated on by the Boolean opera- tors and the results checked against the test run results. The A N D operation gives the tollowing:
HEX BINARY E215 C431
iii0 0010 0001 0101
Ii00 0100 0011 0001
C011 ii00 0000 0001 0001
36 Input/output
The OR operation gives the following"
HEX BINARY E215
C431
iii0 0010 0001 0101
ii00 0100 0011 0001
E635 iii0 0110 0011 0101
The EX-OR function gives the following"
HEX BINARY E215
C431
iii0 0010 0001 0101
ii00 0100 0011 0001
2624 0010 0110 0010 0100
The inverse ofAND (NAND) will be 0011 Iiii iii0 iii0 (3FEEh);
the inverse of the OR (NOR) is 0001 i001 II00 i010 (19CAh).
These results are identical to these in test run 2.16. Thus the test has been successful.
The Pascal Program 2.8 allows the input of the values as an integer. Test run 2.8 shows a sample test run.
Program 2.8 program prog2 8 (input,output) ;
var valuel, value2"integer;
begin writeln ('Enter integer values >>> ' ) ; readln(valuel,value2) ; writeln('Values ANDed is ',valuel and value2); writeln('Values ORed is ',valuel or value2) ; writeln('Values Ex-ORed is ',valuel xor value2); writeln('Values NANDed is ',not (valuel and value2) ) ; writeln('Values NORed is ', not (valuel or value2) ) ;
end.
Testrun2.8 Enter integer values >>> =5 ii Values ANDed is 9 Values ORed is 27 Values Ex-ORed is 18 Values NANDed is -i0 Values NORed is -28

Worksheet 2
Worksheet 2 37
W2.1
W 2 . 2
W2.3
W2.4
Enter two programs from the chapter and verify that their output conforms with the sample test runs.
Completed successfully: YES/NO
Modify program 2.3 so that it also calculates the value of c. Use this program to complete Table W2.1.
Table W2.1 Straight lines calculations
X1 y l X2 ,,122
3 3 6 5 7 1 -1 4 1000 500 10 40 - 100 3 - 5 - 9
5 -10 -10 10
m c
Write a program which calculates the magnitude of a complex number of x+ j y (or in another form x+ i y) and complete Table W2.2 (note that the first row has been completed). The magnitude is given by"
M a g - ~/ x 2 -+- y2
Table W2.2 Magnitude
x y 3 4 50 70 -9 -9 100 100 0.1 0.5 30 -lO
Mag 5
Write a program which calculates the angle of a complex number of x + j y (or in another form x + i y ) and complete Table W2.3. The angle is given by"

38 Input/output
Angle-tan-~/Y / radians
Table W2.3 Angle
X
3 -9 100 0.1 30
Y 4 -9 100 0.5 -10
Angle (radians) 0.9273

Works heet 3
Worksheet 3 39
W3.1
W3.2
W3.3
Modify the program written in W2.4 so that it converts the angle to degree and complete Table W3.1. An angle convened from radians to degree using:
Angle (degrees) = 1 8 0 .Angle(radians) n"
Table W3.1 Angle
x y 3 4 -9 -9 100 100 30 -10
Angle (degrees) 53.13
Write a program which determines the equivalent resistance of three parallel resistors. Use this program to complete Table W3.2.
Table W3.2 Equivalent parallel resistance
R1(.(2) R2 (~) R3 (.Q) 1000 1000 1000 200 100 50 1.2K 1K 800 1M 0.5M 250K
R_equ(.(-2)
Modify the program in Question W3.2 so that the user enters the applied voltage to the parallel resistors and the program deter- mines the current in each of the resistor and the input current. Use this program to complete Table W3.3. Note that the current in each of the resistors is simply the applied voltage divided by each of the resistors. A sample test is given in Test run 2.9.
T e s t r u n 2 . 9
Enter resistor values RI, R2 and R3>> i000 500 250
Enter applied voltage >> i0 Equivalent resistance is 142.86 ohms Ii=0.010 A, I2=0.020 A, I3=0.040 A, I=0.070 A
40 Input/output
~,, R l (.f 2) R2(.(-2) R3(.C2) 10 1000 1000 1000 1 200 100 50 5 1.2K 1K 800 100 1M 0.5M 250k
W3.4
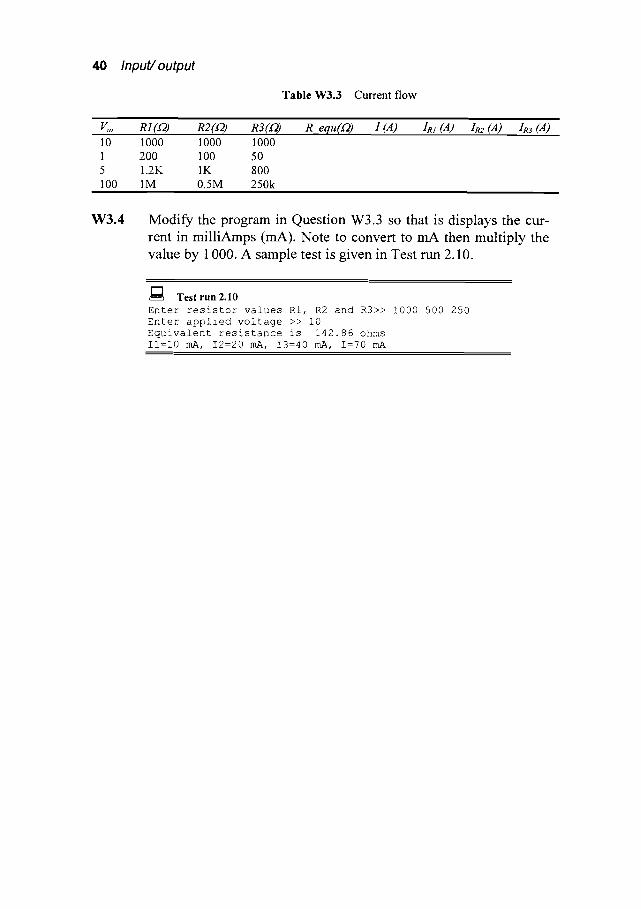
Table W3.3 Current flow
R_equ(.(2) I (A) Im (A) Im (A) Im (A)
Modify the program in Question W3.3 so that is displays the cur- rent in milliAmps (mA). Note to convert to mA then multiply the value by 1 000. A sample test is given in Test run 2.10.
I--1 Test run 2.10
Enter resistor values RI, R2 and R3>> i000 500 250 Enter applied voltage >> i0 Equivalent resistance is 142.86 ohms Ii=10 mA, I2=20 mA, I3=40 mA, I=70 mA
Selection Statements
3.1 i f . . . e l s e statements
A decision is made with the i f statement. It logically determines whether a conditional expression is TRUE or FALSE. For a TRUE, the program exe- cutes one block of code; a FALSE causes the execution of another (if any). The keyword e l s e identifies the FALSE block. In C, braces ( { } ) are used to define the start and end of the block. In Pascal, the b e g i n and e n d key- words are used.
Relationship operators, include:
�9 Greater than (>) .
�9 Less than (<).
�9 Greater than or equal to (>=).
�9 Less than or equal to (<-) .
�9 Equal to (in C, it is == and, in Pascal, it is =).
�9 Not equal to (in C, it is != and, in Pascal it is <>).
These operations yield a TRUE or FALSE from their operation. Logical statements (&&, I I, !) can then group these together to give the required functionality. These are"
�9 AND (in C, it is & &, and, in Pascal it is and) ;
�9 OR (in C, it is I I, and, in Pascal it is o r ) ;
�9 NOT (in C, it is !, and, in Pascal it is n o t ) .
If the operation is not a relationship, such as bitwise or an arithmetic opera- tion, then any non-zero value is TRUE and a zero is FALSE. The following is an example syntax of the i f statement. If the statement block has only one statement then, in C, the braces ( { } ) can be excluded (in Pascal the b e g i n and end can be excluded).

42 Selection statements
i 9 Syntax if (expression) begin
statement block
end;
• Syntax
if (expression) {
statement block }
The following is an example format with an e i s e extension.
Syntax if (expression) begin
statement blockl
end else begin
statement block2
end;
~ Syntax if (expression) {
statement blockl } else {
statement block2 }
It is possible to nest i f . . e i s e statements to give a required functionality. In the next example, statement blockl is executed if e x p r e s s i o n 1 is TRUE. If it is FALSE then the program checks the next expression. If this is TRUE the program executes statement block2, else it checks the next ex- pression, and so on. If all expressions are FALSE then the program executes the final e l s e statement block, in this case, statement block 4:
Syntax if (expressionl) then begin
statement blockl
end else if (expression2) then begin
statement block2
end else if (expression3) then begin
statement block3
end else begin
statement block4
end;
c • Syntax if (expressionl) {
statement blockl } else if (expression2) {
statement block2 } else if (expression3) {
statement block3 } else {
statement block4 }
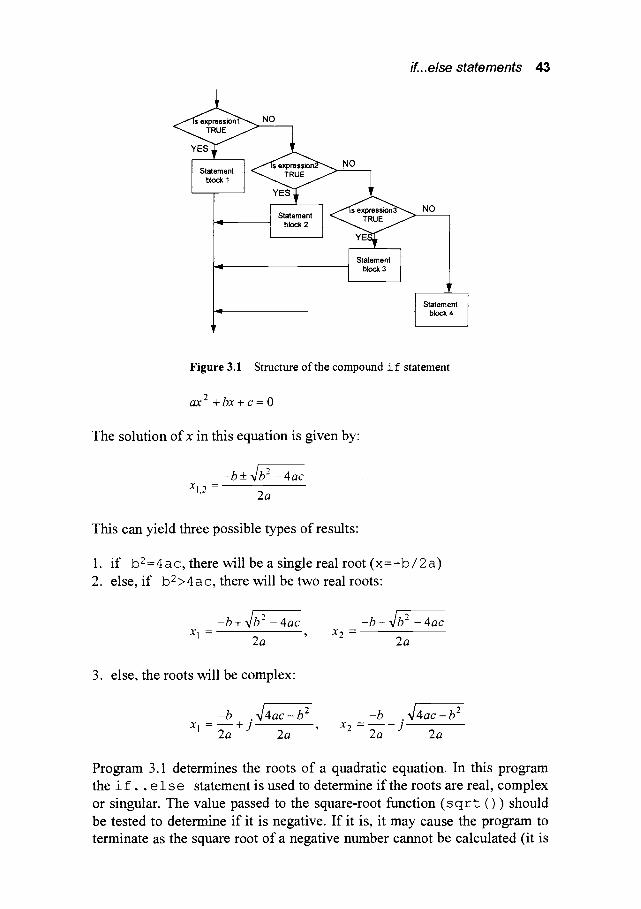
Figure 3.1 shows a diagrammatic represention of this example statement.
3.1.1 Examples
This section contains some C and Pascal example programs.
Quadratic equations Some electrical examples require the solution of a quadratic equation. The standard form is:
if...else statements 43
ir
Stbt el~ ~ " ' " ~ ~ " ' f ~ 1
_... I st.~,~ nt ' ~ e~u~]~
Statement
NO
Staten" ~t blo~
Figure 3.1 Structure of the compound i f statement
ax 2 + b x + c - O
The solution of x in this equation is given by"
X l , 2 =
- b + x/b 2 - 4 a c
2a
This can yield three possible types of results"
1. if b 2 = 4 a c , there will be a single real root ( x = - b / 2 a ) 2. else, if b2> 4 ac , there will be two real roots:
- b + x/b2 _ 4 a c - b - ~/b2 _ 4 a c X 1 = , X 2 =
2a 2a
3. else, the roots will be complex:
/ / 2 2
- b . ~14ac - b - b . " 4 4 a c - b = , X 2 = xl zaT- + ] 2a zXa ] 2a
Program 3.1 determines the roots of a quadratic equation. In this program the i f . . e 1 s e statement is used to determine if the roots are real, complex or singular. The value passed to the square-root function ( s q r t ( ) ) should be tested to determine if it is negative. If it is, it may cause the program to terminate as the square root of a negative number cannot be calculated (it is

44 Selection statements
numerically invalid). The program may also terminate i f a is zero as this causes a divide by zero error (the trap for this error is left as a tutorial ques- tion). Note that, in C, the s q r t ( ) function is prototyped in the math.h, thus the math.h header is included in the program.
C•Program 3.1 /* Program to determine roots of a quadratic equation*/ #include <stdio.h> #include <math.h>
int main(void) { float a,b,c, reall,real2,imag;
puts("Program to determine roots of a quadratic equation"); printf("Enter a,b and c >>>");
scanf("%f %f %f", &a, &b, &c) ;
printf("Equation is %.2fx*x + %.2fx + %.2f\n",a,b,c); if ((b*b)==(4*a*c)) { /* singular root */
reall--b/(2*a); printf("Root is %.2f\n",reall ;
} else if ((b*b)>(4*a*c)) { /* real roots */
reall=(-b+sqrt((b*b)-4*a*c) /(2*a); real2=(-b-sqrt((b*b)-4*a*c) /(2*a); printf("Roots are %.2f, %.2f\n",reall,real2);
} else { /* complex roots */
reall=-b/(2*a); imag=sqrt(4*a*c-b*b)/(2*a); printf("Roots are %.2f +/- j%.2fkn",reall,imag);
} return(0);
P•'•Program 3.1 program ifl(input,output); (* Program to determine roots of a quadratic equation *)
var a,b,c, reall,real2,imag:real;
begin writeln('Program to determine roots of a quadratic equation'); write('Enter a, b and c >'); readln(a,b,c);
writeln('Equation is ',a:6:2, 'x*x+',b:6:2,'x+',c:6:2);
if ((b*b)=(4*a*c)) then begin
reall:=-b/(2*a); writeln('Root is ',reall:6:2)
end else if ({b*b)>=(4*a*c)) then begin
reall:=(-b+sqrt( (b*b)-4*a*c) real2:=(-b-sqrt( (b*b)-4*a*c)
/ (2*a) ; I (2*a) ;
if...else statements 45
writeln('Roots are ',reall:6:2,real2:6:2) ; end else begin
reall:=-b/(2*a) ; imag: =sqrt (4*a'c-b'b) / (2*a) ; writeln('Roots are ',reall:6:2, '+/-j', imag:6:2) ;
end; end.
Three test runs 3.1, 3.2 and 3.3 test each of the three types of roots that oc- cur. In Test run 3.1 the roots of the equation are real. In Test run 3.2 the roots are complex, i.e. in the form • j y. In Test run 3.3 the result is a sin- gular root.
Testrun3.1 Program to determine roots of a quadratic equation Enter a,b and c >>> 1 1 -2 Equation is 1.00x*x + 1.00x + -2.00 Roots are 1.00, -2.00
I-'I Test run 3.2
Program to determine roots of a quadratic equation Enter a,b and c >>> 2 2 4 Equation is 2.00x*x + 2.00x + 4.00 Roots are -0.50 +/- ji.32
r - 1 Test run 3.3
Program to determine roots of a quadratic equation Enter a,b and c >>> 1 2 1 Equation is 1.00x*x + 2.00x + 1.00 Root is-i
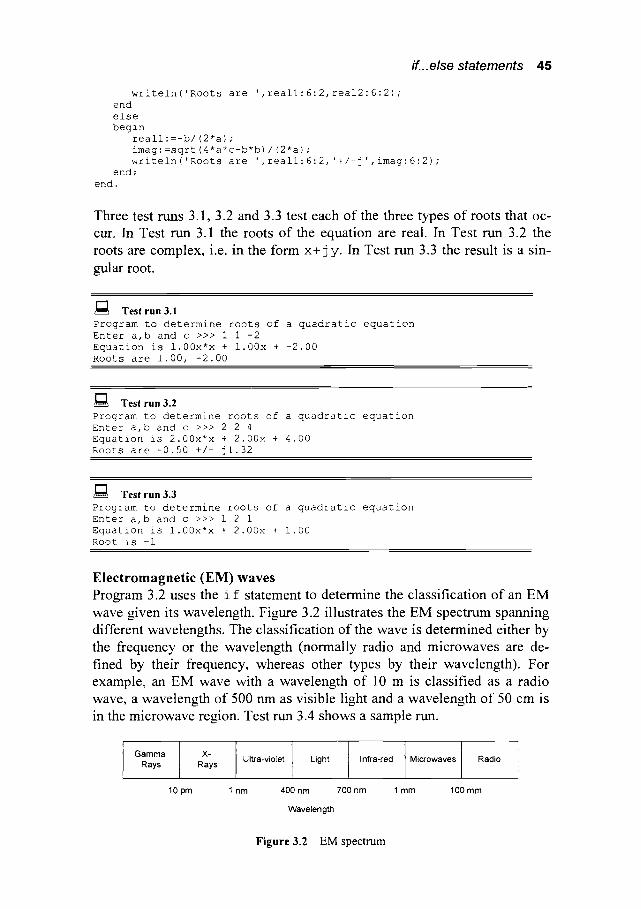
Electromagnet ic (EM) waves Program 3.2 uses the i f statement to determine the classification of an EM wave given its wavelength. Figure 3.2 illustrates the EM spectrum spanning different wavelengths. The classification of the wave is determined either by the frequency or the wavelength (normally radio and microwaves are de- fined by their frequency, whereas other types by their wavelength). For example, an EM wave with a wavelength of 10 m is classified as a radio wave, a wavelength of 500 nm as visible light and a wavelength of 50 cm is in the microwave region. Test run 3.4 shows a sample run.
Gamma Rays
X- Rays
Ultra-violet Light Infra-red Microwaves Radio
10 pm 1 nm 400 nm
Wavelength
700 nm 1 mm a oo mm
Figure 3.2 EM spectrum

46 Selection statements
~Program 3.2 /* Program to determine type of EM wave for a given wavelength */ #include <stdio.h> int main(void) {
float lambda;
printf("Enter wavelength>>>") ; scanf ("%f", &lambda) ;
printf("Electromagnetic wave is ") ; if (lambda<le-ll) puts ("Gamma Ray ! ! !") ; else if (lambda<le-9) puts("X-ray") ; else if (lambda<400e-9) puts("Ultaviolet") ; else if (lambda<700e-9) puts ("LIGHT") ; else if (lambda<le-3) puts ("Infrared") ; else if (lambda<le-l) puts ("Microwave") ; else puts ("Radio wave") ;
return(0) ;
Program 3.2 program if2(input,output) ; (* Program to determine type of EM wave for a given wavelength *) var lambda" real;
begin write('Enter wavelength >>>') ; readln(lambda);
write('Electomagnetic wave is ');
if (lambda<le-ll) then writeln('Gamma Rays ! ! !') else if (lambda<le-9) then writeln('X-rays') else if (lambda<400e-9) then writeln('Ultra-violet') else if (lambda<700e-9) then writeln('LIGHT') else if (lambda<le-3) then writeln('Infrared') else if (lambda<le-l) then writeln('Microwaves') else writeln('Radio waves') ;
end.
Testrun3.4 Enter wavelength>>> le-10 Electromagnetic wave is X-ray
EM waves can also be specified by their frequency. Program 3.3 allows the user to enter the frequency of the wave, and the program then determines the wavelength using the formula:
C
f
where c is the speed of light and f the frequency of the wave.
if...else statements 47
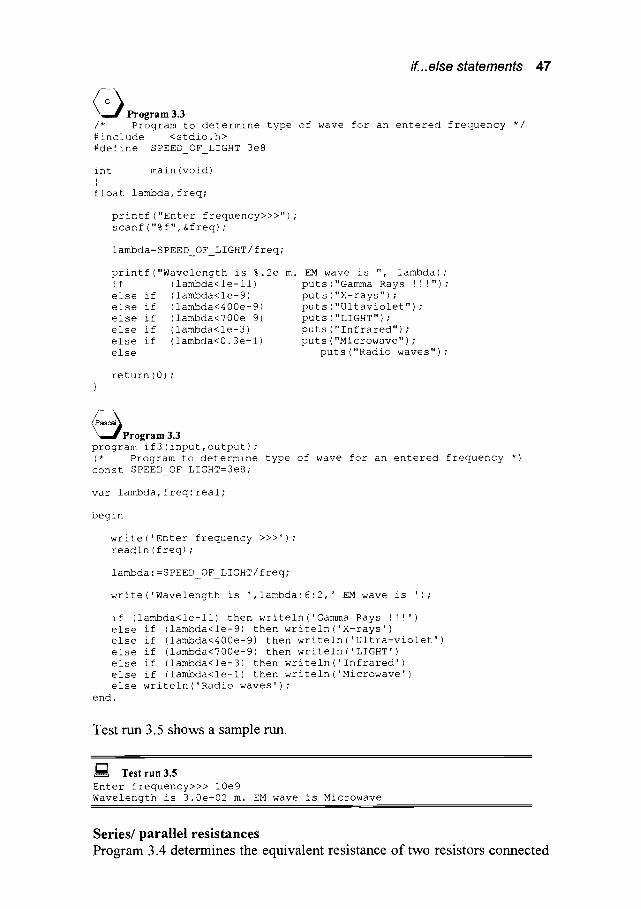
• Program 3.3
/* Program to determine type of wave for an entered frequency */ #include <stdio. h> #define SPEED OF LIGHT 3e8
int main (void) { float lambda, freq;
printf("Enter frequency>>>") ; scanf ("%f", &freq) ;
lambda=SPEED OF LIGHT/freq;
printf("Wavelength is %.2e m. EM wave is ", lambda); if (lambda<le-ll) puts ("Gamma Rays ! ! !") ; else if (lambda<le-9) puts ("X-rays") ; else if (lambda<400e-9) puts("Ultaviolet") ; else if (lambda<700e-9) puts ("LIGHT") ; else if (lambda<le-3) puts ("Infrared") ; else if (lambda<0.3e-l) puts("Microwave") ; else puts ("Radio waves") ;
return(0) ; }
Program 3.3 program if3 (input,output) ; (* Program to determine type of wave for an entered frequency *) const SPEED OF LIGHT=3e8;
var lambda, freq:real;
begin
write('Enter frequency >>>') ; readln(freq) ;
lambda:=SPEED OF LIGHT/freq;
write('Wavelength is ',lambda:6:2, ' EM wave is ') ;
if (lambda<le-ll) then writeln('Gamma Rays ! ! !') else if (lambda<le-9) then writeln('X-rays') else if (lambda<400e-9) then writeln('Ultra-violet') else if (lambda<700e-9) then writeln('LIGHT') else if (lambda<le-3) then writeln('Infrared') else if (lambda<le-l) then writeln('Microwave') else writeln('Radio waves') ;
end.
Test run 3.5 shows a sample run.
Test run 3.5 Enter frequency>>> 10e9 Wavelength is 3.0e-02 m. EM wave is Microwave
Series/parallel resistances Program 3.4 determines the equivalent resistance of two resistors connected

48 Selection statements
either in series or parallel. The C program uses s c a n f () to get the two resistance values and g e t c h a r () to select the circuit configuration. Prob- lems can occur when using g e t c h a r ()after s c a n f ( ) due to new-line characters being stored in the keyboard buffer. The statement f f l u s h ( s t d i n ) has been inserted into the program in order to clear the buffer before g e t c h a r () is called ( s t d i n represents the standard input device, that is, the keyboard). The C program also uses t o l o w e r () to convert the entered circuit selection character to lower-case (this is pro- toyped in the ctype.h). In Turbo Pascal there is no lowercase conversion so the uppercase equivalent is used ( u p c a s e ) .
• Program 3.4
/* Program to determine the equivalent resistance of two*/ /* resistors connected either in series or parallel */
#include <stdio.h> #include <ctype.h> /* required for tolower() function */
int main (void) { float RI,R2,R equ; char ch;
printf("Enter two resistance values >>");
scanf("%f %f", &RI,&R2) ;
fflush(stdin) ; /* flush keyboard buffer printf("Do you require (s)eries or (p)arallel >>"); ch=getchar() ;
*/
if (tolower(ch)=='s ') /* convert character to lowercase */ {
R_equ=Rl+R2 ; printf("Equivalent series resistance is %8.2f ohms",R_equ);
} else if (tolower(ch)=='p')
R equ = RI*R2) /(RI+R2) ; printf "Equivalent parallel resistance is %8.2f ohms",R_equ);
else puts "Invalid entry");
return(0) ; }
Program 3.4 program if4 (input,output) ;
(* Program to determine the equivalent resistance of two *) (* resistors either connected in series of parallel *)
var RI,R2,R equ:real; m
ch" char ; begin
wrlteln('Enter two resistor values >>') ; readln (RI, R2) ;
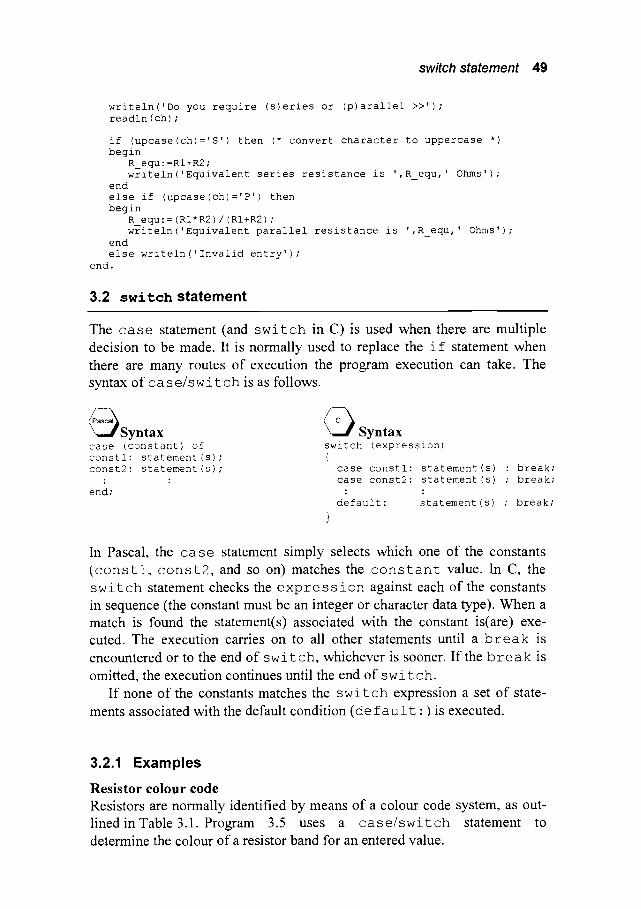
switch statement 49
writeln('Do you require (s)eries or (p)arallel >>') ; readln (ch) ;
if (upcase(ch)='S ') then (* convert character to uppercase *) begin
R_equ �9 =RI+R2 ; writeln('Equivalent series resistance is ',R_equ, ' Ohms') ;
end else if (upcase(ch)='P ') then begin
R_equ:=(RI*R2)/(RI+R2) ; writeln('Equivalent parallel resistance is ',R_equ, ' Ohms') ;
end else writeln('Invalid entry') ;
end.
3.2 s w i t c h statement
The case statement (and switch in C) is used when there are multiple decision to be made. It is normally used to replace the i f statement when there are many routes of execution the program execution can take. The syntax of c a s e / s w i t c h is as follows.
Syntax case (constant) of constl" statement (s) ; const2" statement (s) ;
�9
end;
c • Syntax switch (expression) {
case constl: statement(s) : break; case const2: statement (s) ; break;
default: statement (s) ; break;
}
In Pascal, the case statement simply selects which one of the constants
( c o n s t l , c o n s t 2 , and so on) matches the c o n s t a n t value. In C, the s w i t c h statement checks the e x p r e s s i o n against each of the constants in sequence (the constant must be an integer or character data type). When a match is found the statement(s) associated with the constant is(are) exe- cuted. The execution carries on to all other statements until a b r e a k is
encountered or to the end of s w i t c h , whichever is sooner. If the b r e a k is
omitted, the execution continues until the end of s w i t ch. If none of the constants matches the s w i t c h expression a set of state-
ments associated with the default condition (de f a u l t : ) is executed.
3.2.1 Examples
Resistor colour code Resistors are normally identified by means of a colour code system, as out- lined in Table 3.1. Program 3.5 uses a c a s e / s w i t c h statement to
determine the colour of a resistor band for an entered value.

50 Selection statements
Table 3.1 Resistor colour coding system
...... D!~it Colour Multiplier_ . . . . . . . . . . . . . D . i _~ ( . . . . . . . . . . . . . . . . . _C_o . l ou_£ . . . . . . . . . . . . . . . . . . . . . . . . . . . . . . . . . Mult./p..lie[ .................... SILVER 0.01 4 YELLOW 10 K GOLD 0.1 5 GREEN 100 K
0 BLACK 1 6 BLUE 1 M 1 BROWN 10 7 VIOLET 10 M 2 RED 100 8 GREY 3 ORANGE 1 K 9 WHITE
~ P r o g r a m 3.5 /* Program to determine colour code for a single /* resistor band digit #include <stdio.h>
int main (void) { int colour;
printf("Enter value of colour band(0-9)>>"); scanf("%d",&colour);
printf("Resistor colour band is ");
switch (colour) {
case 0: printf("BLACK"); break; case i: printf("BROWN"); break; case 2: printf("RED"); break; case 3: printf("ORANGE"); break; case 4: printf("YELLOW"); break; case 5: printf{"GREEN"); break; case 6: printf("BLUE"); break; case 7: printf("VIOLET"); break; case 8: printf("GREY"); break; case 9: printf("WHITE"); break;
} return(0);
*/ */
~Program 3.5 program casel(input,output); (* Program to determine colour code for a single (* resistor band digit
vat colour:integer;
begin write('Enter value >>'); readln(colour);
write('Resistor colour band is ');
case (colour) of 0: write BLACK'); i: write BROWN'); 2: write RED'); 3: write ORANGE'); 4: write YELLOW'); 5: write GREEN');
*) *)

end.
6: write ( ' BLUE' ) ; 7 : write ( 'VIOLET' ) ; 8: write('GREY') ; 9: write('WHITE') ; end;
Test run 3.6 shows a sample run.
switchstatement 51
t " l ?~ Test run 3.6
Enter value of colour band(0-9)>> 3 Resistor colour band is ORANGE
Program 3.6 uses #define directives to define each of the resistor colour bands. There may be a clash with these defines if other header files contain these definitions. If this occurs change the defines to RES BLACK, RES BROWN, etc.
A d e f a u l t : has been added to catch any invalid input (such as less than 0 or greater than 9).
• Program 3.6
/* Program to determine colour code for resistor band digit #include <stdio.h> #define BLACK 0 #define BROWN 1 #define RED 2 #define ORANGE 3 #define YELLOW 4 #define GREEN 5 #define BLUE 6 #define VIOLET 7 #define GREY 8 #define WHITE 9
*/
int main (void) { int colour;
printf("Enter value of colour band(0-9)>>"); scanf("%d", &colour) ; printf("Resistor colour band is ") ;
switch (colour) {
case BLACK: printf("BLACK") ; case BROWN: printf("BROWN") ; case RED: printf("RED") ; case ORANGE:printf("ORANGE") ; case YELLOW:printf("YELLOW") ; case GREEN: printf("GREEN") ; case BLUE: printf("BLUE") ; case VIOLET:printf("VIOLET") ; case GREY: printf("GREY") ; case WHITE: printf("WHITE") ; default: printf("NO COLOUR") ;
} return(0) ;
break; break; break; break; break; break; break; break; break; break; break;
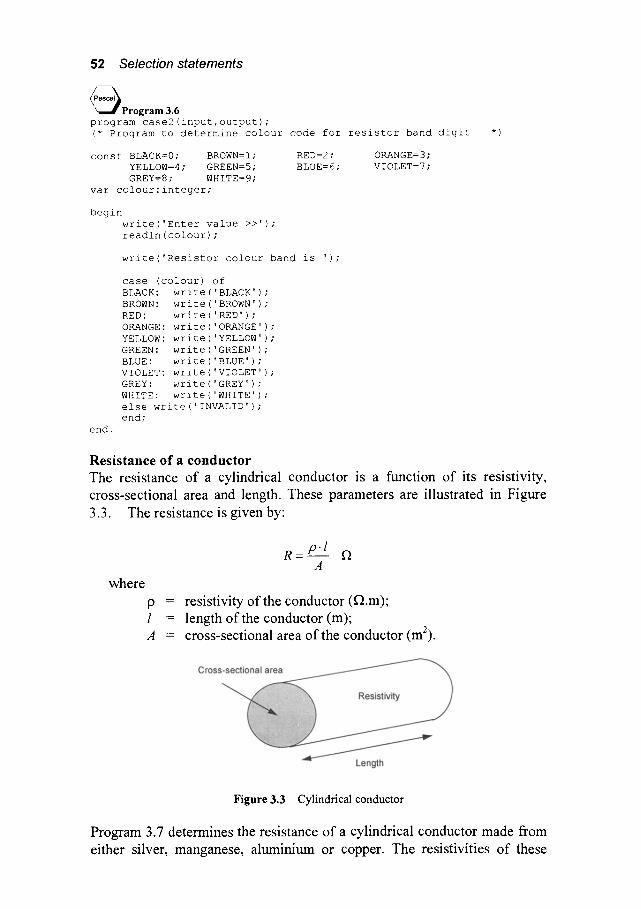
52 Selection statements
Program 3.6 program case2 (input,output) ; (* Program to determine colour code for resistor band digit
const BLACK=0; BROWN=I; YELLOW=4; GREEN=5; GREY=8; WHITE=9;
var colour:integer;
RED=2; ORANGE=3; BLUE=6; VIOLET=7;
begin write('Enter value >>');
readln(colour);
write('Resistor colour band is ') ;
case (colour) of BLACK: write ( 'BLACK' ) ; BROWN: write('BROWN') ; RED: write ( ' RED' ) ; ORANGE: write('ORANGE') ; YELLOW: write('YELLOW') ; GREEN: write ( ' GREEN' ) ; BLUE: write('BLUE') ; VIOLET: write('VIOLET') ; GREY: write('GREY') ; WHITE: write ('WHITE') ; else write('INVALID') ; end;
end.
Resistance of a conductor The resistance of a cylindrical conductor is a function of its resistivity, cross-sectional area and length. These parameters are illustrated in Figure 3.3. The resistance is given by"
R - p I f2 A
where p = resistivity of the conductor (f2.m); l = length of the conductor (m); A - cross-sectional area of the conductor (m2).
Figure 3.3 Cylindrical conductor
Program 3.7 determines the resistance of a cylindrical conductor made from either silver, manganese, aluminium or copper. The resistivities of these

switch statement 53
materials have been defined using #define macros (in C) or const (in Pascal).
The user enters the conductor type as a character ('c', 'a', 's' or 'm') which can either be in upper or lowercase format as the t o l o w e r () function converts the entered character to lowercase (this is protyped in ctype.h). When an invalid character is entered the default condition of the c a s e statement is executed, and the text I n v a l i d o p t i o n is displayed. The program then calls the e x i t () function; the argument passed to this func- tion is the termination status. A value of 0 describes a normal termination; any other value signals an abnormal program termination.
In C, the p r i n t f () statement displays the resistance in scientific for- mat (% e) as values are typically much less than 1 f~ (such as m ~ or ~t~).
O Program 3.7 /* Program to determine the resistance */ /* of a cylindrical conductor */ #include <stdio.h> #include <math.h> #include <ctype.h> #include <stdlib.h> /* Define resistivities */ #define RHO COPPER 17e-9 #define RHO AL 25.4e-9 #define RHO SILVER 16e-9 #define RHO MANGANESE 1400e-9 #define PI 3.14
int { float char ch;
main (void)
radius, length, area,rho, resistance;
puts ("Type of conductor >>") ; put s ( " (c) opper." ) ; puts (" (a) luminium") ; puts (" (s) ilver") ; puts (" (m) anganese") ; /* get conductor type
ch=getchar() ;
*/
printf("Enter radius and length of conductor >>"); scanf("%f %f",&radius,&length);
/* area of conductor area:PI*(radius*radius);
*/
/* convert to lowercase and determine resistivity */ switch (tolower(ch)) {
case 'c' �9 rho=RHO COPPER; case 'a' �9 rho=RHO AL; case 's' �9 rho=RHO SILVER; case 'm'' rho=RHO MANGANESE; default" puts ("Invalid option") ;
} resistance= rho*length/area; printf("Resistance of conductor is %.3e ohm", return(0) ;
break; break; break; break; exit(0); break;
resistance);
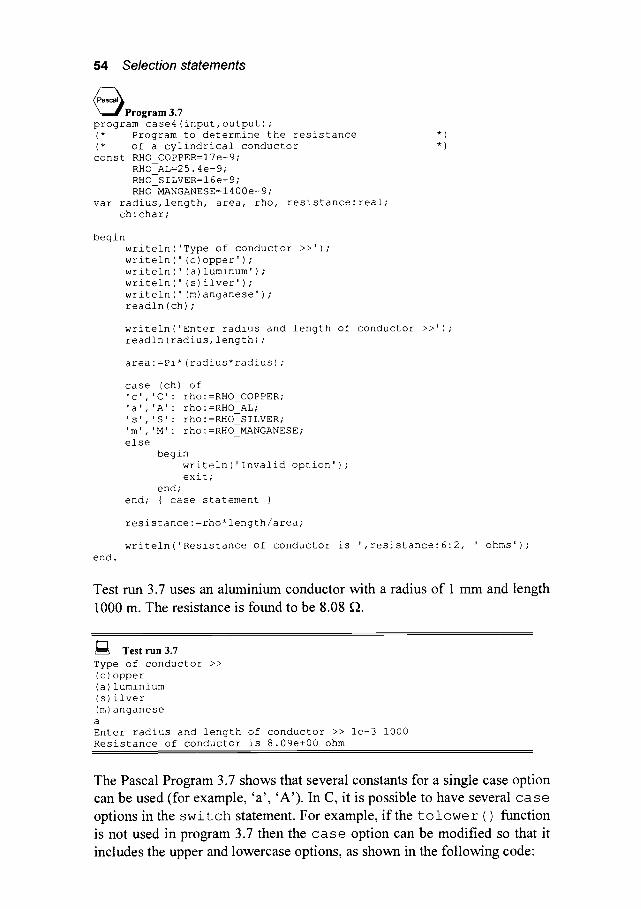
S4 Selection statements
O Program 3.7
program case4 (input,output) ; (* Program to determine the resistance (* of a cylindrical conductor const RHO COPPER=I7e-9;
RHO AL=25.4e-9; RHO SILVER=I 6e-9 ; RHO MANGANESE=I400e-9;
var radius, length, area, rho, resistance" real;
ch" char ;
*) *)
begin writeln('Type of conductor >>') ; writeln(' (c)opper') ; writeln (' (a) luminum' ) ; writeln(' (s)ilver') ; writeln ( ' (m) anganese' ) ; readln (ch) ;
writeln('Enter radius and length of conductor >>'); readln(radius,length);
area':Pi* (radius*radius) ;
case (ch) of 'c', 'C' �9 rho-=RHO COPPER; 'a', 'A' �9 rho'=RHO AL;
's', 'S' �9 rho'=RHO SILVER; 'm', 'M' �9 rho'=RHO MANGANESE;
else begin
writeln('Invalid option') ; exit;
end; end; { case statement }
end.
resistance" =rho*length/area;
writeln('Resistance of conductor is ',resistance'6"2, ' ohms') ;
Test run 3.7 uses an aluminium conductor with a radius of 1 mm and length 1000 m. The resistance is found to be 8.08 f).
r " - i Test run 3.7
Type of conductor >> ( c ) opper (a) luminium ( s ) iiver (m) anganese a
Enter radius and length of conductor >> le-3 i000 Resistance of conductor is 8.09e+00 ohm
The Pascal Program 3.7 shows that several constants for a single case option can be used (for example, 'a', 'A'). In C, it is possible to have several c a s e options in the s w i t c h statement. For example, if the t o l o w e r () function is not used in program 3.7 then the c a s e option can be modified so that it includes the upper and lowercase options, as shown in the following code:
switch (ch) {
case 'C'-case 'c'' rho=RHO COPPER; break; case 'A'-case 'a'- rho=RHO AL; break; case 'S''case 's'' rho=RHO SILVER; break; case 'M'-case 'm'- rho=RHO MANGANESE; break; default" puts ("Invalid option") ; exit (0) ;
}
3.3 Exercises
Exercises 55
3.3.1
3.3.2
Modify Program 3.1 so that it cannot generate a divide by zero error, that is, when a is 0 (zero). Note that if a is 0 then the root will be - c / b .
Modify Program 3.2 so that the user can enter the EM wave as a frequency or a wavelength. A sample rtm is shown in test run 3.8.
! - '1 ?~ Test run 3.8 Do you wish to enter
(f) requency or
(w) avelength >>> f
Enter frequency >>> 10e9 Wavelength is 3.0e-02 Electromagnetic wave is Microwave
3.3.3
3.3.4
Modify Program 3.2 so it uses the #define statement to define limits for the wavelength, for example"
#define GAMMA RAY LIMIT le-ll w
Capacitance is normally defined as a value and a specified unit, such as pF, nF, gF, mF or F. Write a program in which a capaci- tance value and the unit are entered and the program displays the actual numerical value in Farads. The capacitance unit should be entered as a character. A sample test run is given in Test run 3.9. Note that pF is 10 -~2 F, pF is 10 -9 F, gF is 10 -6 F and mF is 10 -6 F.
! - '1 ? '~ Test run 3.9 Enter value" 1 Enter unit p,n,u, or m " u Capacitance value is 0.000001 Farads
3.3.5 Repeat Q3.10 for the value of the resistance. The units entered are either mr2 ('m'), f~ ('1'), k ~ ('k') or Mr2 ('M'). Test run 3.11 shows a sample run. Note that mr2 is 10 -3 ~ , kf2 is 10 3 f2 and Mf~ is 10 6 ~ .
[ - '1 ? ' ~ Test run 3.10
Enter value" 3.21 Enter unit m,l,k, or M �9 k
Resistance value is 3210 ohms
56 Selection statements
Wo rks heet 4
W4.1
W4.2
W4.3
Enter Program 3.1 and use it to complete Table W4.1
Table W4.1 Roots of a quadratic equation
Equation X 2 + 2 1 x - 7 2 - 0
5x2 + 2 x + 1 - 0
25x 2 _ 30x + 9 - 0
6x 2 + 9x - 20 = 0
Root(s)
Modify Program 3.1 so that it cannot generate a divide by zero
error, that is, when a is 0 (zero). Note that if a is 0 then the root
will be - c / b .
Table W4.2 Root of a quadratic equation
Equation Ox" - + 4 x - 2 - 0
0x ~ - + 6 x + 6 - 0
Root
Write a program in which the user enters a value of resistance and
the program displays the resistance value in the best possible units.
A possible implementat ion could be"
If the resistance is less than 1 000 ~ (1 e3) then it is printed as the value in ohms; else, if it is between l O00 (le3) and 1 0 0 0 0 0 0 ~ (le6) then the value is printed as k~; else, if it is greater than 1 000 000 (le6) then it is printed in M~.
Test run W4.1 shows some sample runs.
r"l a~ TestrunW4.1 Enter a value of resistance >> 500
Resistor value is 500 ohms
Enter a value of resistance >> 1200
Resistance value is 1.200 kohms
Enter a value of resistance >> 1.2e6
Resistance value is 1.2 Mohms

Works heet 5
Exercises 57
W5.1
W5.2
O P T I O N A L . Enter Program 3.5 and test the results.
Write a program using the case (or switch) statement that
allows the user to select from a menu of options. These options allow the user to select either the calculation of the equivalent re- sistance of two series or two parallel resistors. The user should enter a 1 if the series equivalent is required or a 2 if parallel re- quired. Sample run W5.1 shows a sample test nm.
r-I ~=~ Test run W5.1
Enter R1 >> I00
Enter R2 >> I00
Select an option (i) Series resistance (2) Parallel resistance
Option >> 2 Equivalent resistance is 50.00 ohms
W 5 . 3 The textbackground function allows the colour of the back-
ground to be changed to BLACK, BROWN, RED, ... and c 1 r s c r
clears the screen. Sample program 3.8 shows an example program of their use. Write a program which allows the user to enter a col- our and the then program changes the background colour. Table W5.1 shows the colour definitions.
Table W5.1
, , , , , , , , : :
Colour Value Colour Value
BLACK 0 BLUE 1 GREEN 2 , t l l H,.,,...
CYAN 3 RED 4 MAGENTA 5
. . . . . . . . . . . . . . . . . . . . . . . . . . . . . . . . . .
•c • Program 3.8 #include <conio.h>
int main (void) (
textbackground (RED) ; clrscr () ; return(0) ;
}

58 Selection statements
~ P r o g r a m 3.8 program temp;
uses crt;
begin
end.
textbackground(RED); clrscr;
El Test run W5.2 Select a background colour >> ( 0 ) BLACK ( 1 ) BLUE ( 2 ) GREEN ( 3 ) C YAN (4) RED ( 5 ) MAGNETA
Option >> 2
O P T I O N A L E X E R C I S E
W5.4 Modify the program written in W5.2 so that the user enters an 's' for series resistance and a 'p' for parallel. Sample run W5.2 shows a sample test run. Note that the program should accept the input characters in uppercase or lowercase.
[:3 ~=~ Test run W5.2 Enter R1 >> i00
Enter R2 >> i00
Select an option (S)eries resistance (P)arallel resistance
Option >> p
Equivalent resistance is 50.00 ohms
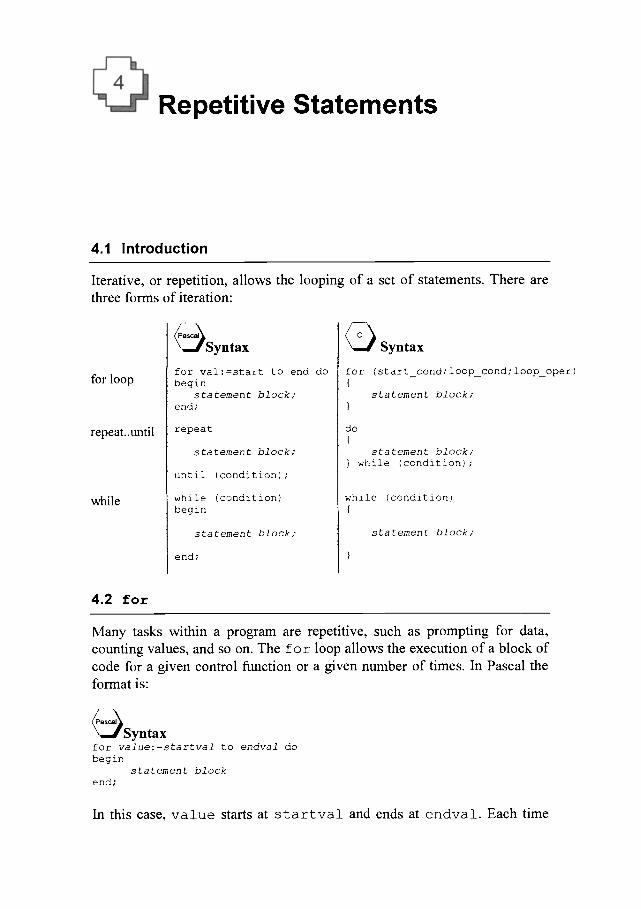
Repetitive Statements
4.1 Introduction
Iterative, or repetition, allows the looping of a set of statements. There are three forms of iteration"
for loop
repeat. . unti l
while
~ S y n t a x
for val-=start to end do begin
statement block; end;
repeat
statement block;
until (condition) ;
while (condition) begin
statement block;
end;
~ Syntax
for (start_cond; loop_cond; loop_oper) {
statement block; }
do {
statement block" } while (condition) ;
while (condition) {
statement block;
4.2 for
Many tasks within a program are repetitive, such as prompting for data, counting values, and so on. The f o r loop allows the execution of a block of code for a given control function or a given number of times. In Pascal the format is:
Syntax for value'=startval to endval do begin
statement block end;
In this case, v a l u e starts at s t a r t v a Z and ends at e n d v a 1. Each time

60 Repetitive statements
round the loop, value will be incremented by 1. If there is only one state- ment in the block then the b e g i n and e n d reserved words can be omitted. In C the format is:
Syntax for (starting condition; test condition;operation) {
statement block }
where:
starting condition
test condition
operation
- the starting value for the loop; - if test condition is TRUE the loop will continue
execution; - the operation conducted at the end of the loop.
4.3 Examples
4.3.1 ASCII characters
Program 4.1 displays ASCII characters for entered start and end decimal values. Test run 4.1 displays the ASCII characters from decimal 40 (' (') to 50 ('2').
Program 4.1 program forl(input,output) ; { Program to display ASCII characters } vat i, startloop, endloop" integer;
begin write( 'Enter start and end for ASCII char.>> '); readln(startloop, endloop) ;
writeln('INTEGER CHARACTER'); { The function chr() is used to determine the character } { associate with the ASCII integer value }
for i'=startloop to endloop do writeln(i'5,chr(i) "i0) ;
end.
• Program 4.1
/* Program to print ASCII characters #include <stdio.h> int main (void) {
int i, start, end;
*/
printf("Enter start and end for ASCII characters >>"); scanf("%d %d" , &start , &end) ;

Examples 61
puts("INTEGER HEX ASCII");
for (i=start; i<=end; i++) printf ("%5d %5x
return(0) ;
%5c\n", i, i, i) ;
Test run 4.1 Enter start and end for ASCII characters >> 40 50 INTEGER HEX ASCII
40 28 ( 41 29 ) 42 2a * 43 2b + 44 2c , 45 2d - 46 2e 47 2f ) 48 30 0 49 31 1 50 32 2
4.3.2 Transient response of an RC circuit
Figure 4.1 illustrates an RC circuit with a voltage step applied at t=0 . When a voltage step, amplitude E volts, is applied to this circuit it produces an ex- ponential current.
t=O
E
I !
Vc
I
Figure 4.1 RC circuit with step input applied at t = 0
The following defines the transient current in the circuit.
t E
i = - - e RC R
and the voltage across the resistor will be"
t
V R = E e RC
Program 4.3 determines the voltage across the resistor at given time inter- vals. The user enters the end time and the number of time steps required; the
62 Repetitive statements
program determines the voltage at each of the time steps.
~Program 4.2 program for3(input,output) ; { Program to determine transient response of an RC circuit }
var R,C,tend, t,Vin,v:real; i, tsteps : integer;
begin writeln('Program to determine voltage across'); writeln('resistor is an RC circuit');
write('Enter R,C >>') ; readln (R, C) ;
write('Enter number of time steps and end time'); readln(tsteps,tend) ;
write('Enter voltage step applied>>') ; readln (Vin) ;
writeln ( ' TIME VOLTAGE' ) ; t:=0; { start at time equal to zero }
for i:=l to tsteps do begin
v:=Vin*exp(-t/(R*C)) ; writeln(t:8:4,v:8:2) ; t : =t+tend/tsteps;
end; end.
• Program 4.2 /* Program to determine transient response of an RC circuit #include <math.h> /* required for exp() #include <stdio.h>
*/ */
int main (void) { float R, C, tend, t, E, Vr; int tsteps;
puts ("Program to determine voltage across"); puts ( "Resistor in an RC circuit");
printf("Enter R,C >> ") ; scanf("%f %f",&R,&C) ;
printf("Enter number of time steps and end time>>"); scanf("%d %f",&tsteps,&tend); /* enter integer and float*/
printf("Enter voltage step applied>>") ; scanf ("%f", &E) ;
put s (" TIME VOLTAGE" ) ; for (t=0 ; t<tend; t+=tend/tsteps) {
Vr=E*exp (-t/ (R'C)) ; printf("%8.4f %8.2f\n",t,Vr) ;
} return (0) ;

Examples 63
Test run 4.2 shows that the voltage across the resistor starts at a maximmn at t=0. This is because the voltage across the capacitor is initially zero. As the capacitor charges, the voltage across it will increase until it almost equals the applied voltage. The current in the circuit will also be at a maximum when the step is applied. It will then decay to almost zero at a rate deter- mined by the time constant (which is a product of R and C).
T e s t r u n 4 . 2 Program to determine voltage across Resistor in an RC circuit Enter R,C >> le3 le-6 Enter number of time steps and end time>> 20 10e-3 Enter voltage step applied>> i0
TIME VOLTAGE 0.0000 I0.00 0.0005 6.07 0.0010 3.68 0.0015 2.23 0.0020 1.35 0.0025 0.82 0.0030 0.50 O.OO35 O.3O 0.0040 0.18 0.0045 0.ii 0.0050 0.07 0.0O55 O.O4 0.0060 0.02 O.O065 O.O2 O.OO7O 0.01 0.0075 0.01 0.0080 0.00 0.0085 0.00 0.0090 0.00 0.0095 0.00
4.3.3 Boolean logic
Program 4.3 is an example of how a Boolean logic function can be analyzed and a truth table generated. The f o r loop generates all the required binary permutations for a truth table. The Boolean function used is"
Z-(A.B)+C
A schematic of this equation is given in Figure 4.2. Test run 4.3 shows a sample run.
A �9
o o ) o z C �9 i
Figure 4.2 Digital circuit
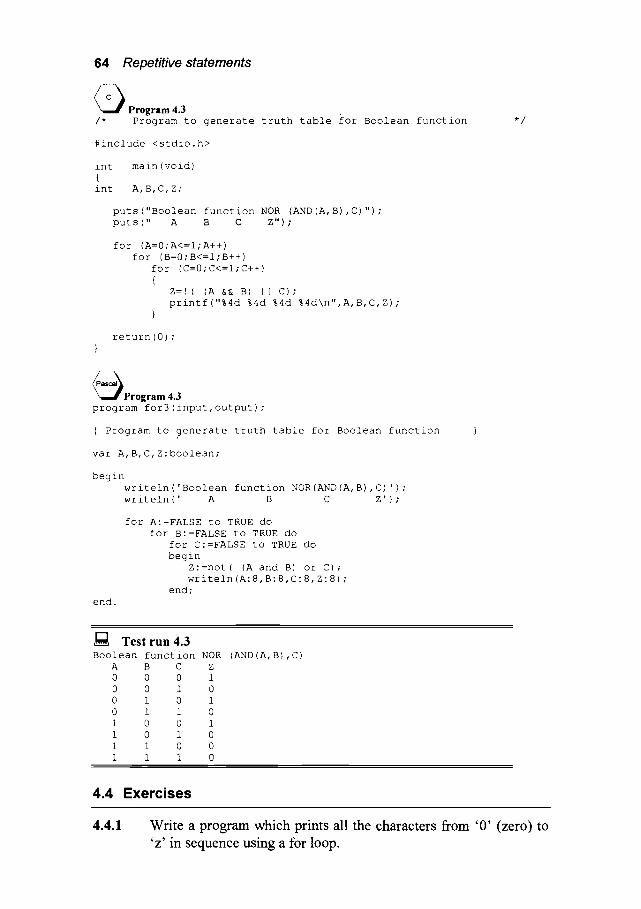
64 Repetitive statements
~ c ~ Program 4.3 /* Program to generate truth table for Boolean function
#include <stdio.h>
in[ main (void) { int A, B, C, Z;
puts ("Boolean function NOR (AND (A, B) , C) " ) ; puts(" A B C Z");
for (A=0 ;A<=I ; A++) for (B=0; B<=I; B++)
for (C=0; C<=I; C++) {
Z:! ( (A && B) II C) ; printf("%4d %4d %4d %4d\n",A,B,C,Z);
}
return(0) ; }
Program 4.3 program for3(input,output) ;
{ Program to generate truth table for Boolean function
vat A, B, C, Z " boolean;
begin writeln('Boolean function NOR (AND (A, B) , C) ') ; writeln(' A B C Z') ;
for A'=FALSE to TRUE do for B'=FALSE to TRUE do
for C'=FALSE to TRUE do begin
Z'=not ( (A and B) or C) ; writeln(A'8,B'8,C-8,Z'8) ;
end; end.
*/
~[ Test run 4.3 Boolean function NOR (AND (A, B) , C)
A B C Z 0 0 0 1 0 0 1 0 0 1 0 1 0 1 1 0 1 0 0 1 1 0 1 0 1 1 0 0 1 1 1 0
4.4 Exercises
4.4.1 Write a program which prims all the characters from '0' (zero) to 'z' in sequence using a for loop.

4.4.2
Exercises 65
Write a program which displays the squares, cubes and fourth powers of the first 15 integers. A sample output is given next.
Number Square Cube Fourth
1 1 1 1 2 4 8 16 3 9 27 81
etr
4.4.3 Write a program which displays the y values in the formulas given below and with the given x steps.
Equation . . . . . . . . . . . Range ofx ........... : ................ (i) y - 4x + 1 0 to 50 in steps of 5
(ii) y = ~ x - 1 1 to 1 O, steps of 0.5
(iii) y = 5x 2 + 3x - 2 -5 to 5 in steps 0.5 . . , . ! ; , , . . , < : : i : : : : : < : < < - : : : : ~ = : : < : < _ : : : : : : : : : : : : : : : : < . . . . . . : : : : : _ . : : : : : : : : : : : : : : < . : : : : : : : : : : : : : : : , , , , , . , , , , , . . . . . . . , . . . . . . . . . . . . . . . .
A sample rtm of the first equation is given next.
EQUATION y=4x+l, x goes from 0 to 50 in steps of 5
x y
0 1 5 21
i0 41 15 61
etc
4.4.4
4.4.5
Write a program which displays the sine of a number from 0 ~ degrees to 90 ~ in steps of 10 ~
Modify Program 4.3 so that it determines the truth table for the following Boolean equation:
Z=(A+B) .C
Table 4.1 Truth table
"A ....... ? . . . . . . . Z
0 0 0 0 0 1 0 1 0 0 1 1 1 0 0 1 0 1 1 1 0 1 1 1

66 Repetitive statements
4.4.6 Write a program which will determine the impedance of an RL series circuit. The program must calculate the magnitude of the impedance.

Worksheet 6
Worksheet 6 67
W6.1
W6.2
Enter Program 4.1 and use it to complete Table W6.1.
Table W6.1 ASCII characters
..... G l u e ........ Character ...............
34 35 36 37 38 64 65 66 67 68 69 70
Write a program which lists the square of the values from 1 to 10. A sample run in shown in Test run W6.1.
r-1 Test run W6.1
Value Square 1 1 2 4 3 9 4 16 5 25 6 36 7 49 8 64 9 81 i0 i00
W6.3 Complete either Exercise 4.4.3(i), Exercise 4.4.4 or Exercise 4.4.5.
68 Repetitive statements
4.5 while()
The whi l e statement allows a block of code to be executed while a speci- fied condition is TRUE. It checks the condition at the start of the block; if this is TRUE the block is executed, else it will exit the loop. The syntax is
while Syntax
while (condition) begin
statement block;
end;
• Syntax
while (condition) {
statement block;
If the statement block contains a single statement then the braces may be omitted (although it does no harm to keep them). A few examples are"
Syntax while (i>lO)
while ( letter <> 'q')
while ((index <= i0) and (va]ue =:3))
C• Syntax while (i>lO)
while ( letter !: 'q')
while ((index <: i0) && (value ::3))
this will repeat the associated statement block while i is greater than 10.
this will repeat the associated s t a t e m e n t block while letter is not equal to the character ' q '
this will repeat the associated s ta t emen t block while i n d e x is less than or equal to 10 and v a l u e is equal to 3.
4.6 repeat..until() and do..while()
In C the d o . . w h i l e () statement is similar in its operation to w h i l e () except that it tests the condition at the bottom of the loop. The repeat..tmtil() in Pascal is also similar to the while() statement but unlike while() the loop quits when the associated condition is true. These loops thus allow s ta te-
ment b lock to be executed at least once. The syntax is:
repeat..until do..while
Syntax repeat
statement block;
until (condition);
c • Syntax do {
s t a t e m e n t b l o c k ;
} while (condition) ;
As with f o r and w h i l e loops the braces are optional. The d o . . w h i l e ( ) and r e p e a t . , u n t i l ( ) loops require a semicolon at the end of the loop, whereas the w h i l e () does not.

4.7 Examples
Examples 69
4.7.1 Repeating program
Often a user is asked to repeat the program once it has finished calculating values. This is sometimes done by asking the user if they want to repeat (or continue) the program. If the user enters a 'y' character then the program is repeated, else a 'n' character will exit the program. Program 4.4 implements this with a repeat., until ( )/do.. while ( ) loop.
~Program 4.4 program repeatl(input,output) ;
var RI,R2,R equ'real; ch'char;
begin repeat
writeln('Enter R1 and R2 >>'); readln(Ri,R2); R_equ'=(RI*R2)/(RI+R2); writeln('Parallel resistance is ',R_equ-8"2,' ohms');
writeln('Do you wish to continue (y/n)'); readln(ch);
until (ch='n'); end.
• Program 4.4
#include <stdio.h>
int main (void) { float RI,R2,R equ; char ch;
do {
printf("Enter R1 and R2 >>"); scanf("%f %f",&RI,&R2);
R_equ = (RI*R2) / (RI+R2) ; printf("Parallel resistance is %8.2f ohms\n",R_equ);
printf("Do you wish to continue (y/n)"); fflush(stdin); /* flush keyboard buffer */ ch=getchar();
} while (ch=='y');
return(0) ;
4.7.2 Limiting ranges of inputs
Most of the values that are entered into a program have a certain range. For example if a user is asked enter their age then the value will always be:
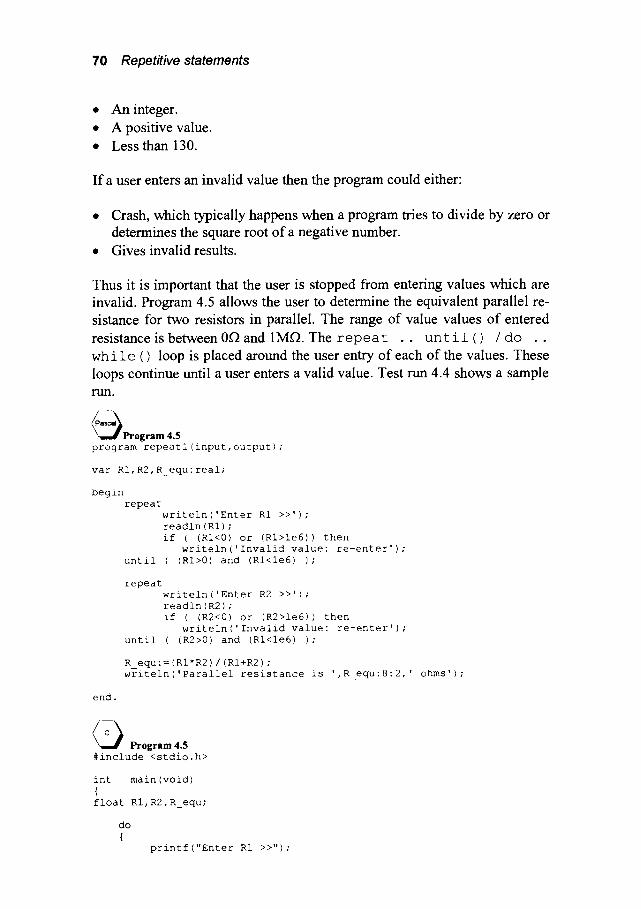
70 Repetitive statements
�9 An integer. �9 A positive value. �9 Less than 130.
If a user enters an invalid value then the program could either:
�9 Crash, which typically happens when a program tries to divide by zero or determines the square root o f a negative nmnber.
�9 Gives invalid results.
Thus it is important that the user is stopped from entering values which are invalid. Program 4.5 allows the user to determine the equivalent parallel re- sistance for two resistors in parallel. The range of value values of entered
resistance is between 0 ~ and 1M~. The repeat . . until ( ) / do . . w h i 1 e ( ) loop is placed around the user entry of each of the values. These loops continue until a user enters a valid value. Test run 4.4 shows a sample r u n .
Program 4.5 program repeatl(input,output) ;
vat RI,R2,R_equ:real;
begin repeat
writeln('Enter R1 >>') ; readln (RI) ; if ( (RI<0) or (Rl>le6)) then
writeln('Invalid value: re-enter') ; until ( (RI>0) and (Rl<le6) );
repeat writeln('Enter R2 >>') ; readln (R2) ; if ( (R2<0) or (R2>le6)) then
writeln('Invalid value: re-enter') ; until ( (R2>0) and (Rl<le6) );
R equ "= (RI*R2) / (RI+R2) ; writeln('Parallel resistance is ',R_equ'8"2, ' ohms') ;
end.
c • Program 4.5 #include <stdio.h>
int main (void) { float Ri,R2,R_equ;
do {
printf("Enter R1 >>") ;

Examples 71
scanf("%f", &RI) ; if ((RI<0) J J (Rl>le6))
} while ( (RI<0) J J (Rl>le6) ) ; printf("Invalid value: re-enter\n");
do {
printf("Enter R2 >>") ; scanf ("%f", &R2) ; if ((R2<0) j J (R2>le6))
} while ( (R2<0) J J (R2>le6) ) ; printf("Invalid value" re-enter\n");
R_equ= (RI*R2) / (RI+R2) ; printf("Parallel resistance is %8.2f ohms\n",R_equ) ; return(0) ;
T e s t r u n 4 . 4 Enter R1 >> le7 Invalid value: re-enter Enter R1 >> -I00 Invalid value: re-enter Enter R1 >> i00 Enter R2 >> I00 Parallel resistance is 50.00 ohms
Program 4.6 gives an example of the determination of acceleration giving the initial and end velocity, and the time difference. The range of velocity values is between 0 and 1000 m/s, and the range of time difference values is between 0 and 60 s. Test run 4.5 shows a sample run.
Program 4.6 program repeat3(input,output) ;
var vl,v2,t,accel'real;
begin repeat
writeln('Enter initial velocity (m/s)>>'); readln(vl) ; if ( (vl<0) or (vl>le3)) then
writeln('Invalid value: re-enter') ; until ( (vl>0) and (vl<le3) ) ;
repeat writeln('Enter final velocity (m/s)>>') ; readln (v2) ; if ( (v2<0) or (v2>le3)) then
writeln('Invalid value: re-enter') ; until ( (v2>0) and (v2<le3) ) ;
repeat writeln('Enter time (secs)>>') ; readln (t) ; if ( (t<0) or (t>60)) then
writeln('Invalid value: re-enter') ; until ( (t>0) and (t<60) );
accel- = (v2-vl) /t ;
writeln('Acceleration is ',accel-8"2, ' m/s2') ; end.

72 Repetitive statements
'•Program 4.6 #include <stdio.h>
int main(void) { float vl,v2,t,accel;
do {
printf("Enter initial velocity (m/s)>>"); scanf("%f",&vl);
if ( (vl<0) i I (vl>le3)) puts("Invalid value: re-enter"); } while ((vl<0) i I (vl>le3));
do {
printf("Enter final velocity (m/s)>>"); scanf("%f",&v2);
if ( (v2<0) I I (v2>le3)) puts("Invalid value: re-enter"); } while ((v2<0) if (v2>le3));
do {
printf("Enter time (secs)>>"); scanf("%f",&t); if ( (t<0) Jl (t>60)) puts("Invalid value: re-enter");
} while ((t<0) i I (t>60) );
accel=(v2-vl)/t;
printf("Acceleration is %8.2f m/s2\n",accel); return(0);
Testrua4 .5 Enter initial velocity (m/s)>> -i00 Invalid value: re-enter Enter initial velocity (m/s)>> le7 Invalid value: re-enter Enter initial velocity (m/s)>> 20 Enter final velocity (m/s)>> i0 Enter time (secs)>> 2 Acceleration is -5.00 m/s2
4.8 Exercises
4.8.1 Correct the errors in the following programs:
(a) Program tutla(input,output)
{ This Program should calculate the current { flowing in a resistor but has two syntax { errors and one functional error
var resistance,voltage, ch : real;
begin
writeln('Program to determine current flowing writeln('a resistor');
in');
Exercises 73
4.8.2
repeat
writeln('Enter voltage and resistance'); readln(Voltage, Resistance);
{ always catch divide by zero errors ! }
if (resistance=0) then Writeln('INFINITE CURRENT !!!') else writeln('Current is ',voltage/resistance:8:3,' Amps');
write('Do you wish to continue (y/n)>>');
Readln(ch);
until (ch='y'); END.
(b) program tutlb(input,output);
{ This Program should calculate the impedance} { of a capacitor but has three errors }
begin
var frequency, capacitance,Xc : real; ch : char;
writeln('Program to determine impedance'); writeln('a a capacitor');
repeat
writeln('Enter frequency and capacitance'); readln(Frequency);
if ( (frequency=0) or (capacitance=0)) then Writeln('INFINITE IMPEDANCE ! [ ! ')
else BEGIN
Xc=i/(2*PI*Frequency*Capacitance); writeln('Impedance is ',Xc:8:3,' Ohms');
end;
write('Do you wish to continue (y/n)>>'); readln(ch);
until (ch='n'); end.
What will the following sections of code output to the screen. (i)
i:=l; while (i<10) do begin
i:=i+2; writeln('i = ',i);
end;
(ii) i:=8; while (i<10) do begin
i:=i+2;

74 Repetitive statements
4.8.3
writeln('i = ',i); end;
(iii) i:=l; repeat
i:=i+2; writeln('i = ',i);
until (i<10);
(iv) i:=10; repeat
i:=i-2; Writeln('i = ',i);
until (i<10);
(v) i:=l; repeat
i:=2*i; writeln('i = ',i);
until (i<10);
(vi) i:=l; repeat
i::2*i; writeln('i - ',i);
until not(i=10);
(vii) i:=l; repeat
i:=2*i; writeln('i = ',i);
until (i>10);
Determine the errors in the following programs (i)
Program 4.1 /* Prints the square of the numbers 1 to i0 /* ie 1,4,9..100 #include <stdio.h>
int main(void) { int i;
for (i=l,i<10,i++) printf("The square of i is %d,i*i);
return(0); }
(ii) Program 4.2
Prints values from 1 to i00 in power of 3 The step used is 0.3
*/ */
*/ */

Exercises 75
#include <stdio.h> int main (void) { int i;
while (i != i00) {
printf("%d to the power of three is %d /n", i += 0.3;
return(0);
i*i*i) ;
(iii) Program 4.3
/* Prints the square of the numbers 1 to i0 /* ie 1,4,9..100 #include <stdio.h>
int main (void) { int i;
for (i=l;i<=10;i++); printf("The square of i is %d,i*i);
return(0) ; }
*/ */
(iv) Program 4.4
/* Program to determine input resistance given the /* input voltage and current #include <stdio.h> int main (void) {
char input;
puts("Program to determine the resistance given"); puts("input voltage and current");
while (input == 'y') {
printf("Enter voltage and current >> ") ; scanf("%f %f",voltage, current) ; printf("The resistance is %f",voltage/current) ; puts ("Do you wish to continue (y/n)") input = getchar() ;
}
return(0) ;
*/ */
(v) [~ Program 4.5 #include <stdio.h>
int main (void) {
puts("Program to determine the resistance given"); puts("input voltage and current");
while (i) {
printf("Enter voltage and current >> ") ; scanf("%f %f",voltage,current) ;

76 Repetitive statements
printf("The resistance is %f",voltage/current);
puts ("Do you wish to continue(y/n)"); ch=getchar () ; if ( (ch=='n ') && (ch=='N ') ) break;
} puts ("Program exited") ; return(O) ;
4.8.4 Determine the output from the following sections of code (beware of infinite loops).
(i) for (i=O; i<lO; i+=2)
printf("%d ",i) ;
(ii) for (i=l; i<120; i*=3)
printf("%d ",i) ;
(iii) for (i=19;i<12;i--)
printf("%d ",i) ;
(iv) i=6; do {
i++; printf("%d ", i) ;
} while (i<lO) ;
(v) i=l; while (i) {
i++; printf ("%d ", i) ; if (i==4) break;
}
(vi) i = 2 for (;;) {
i++; printf("%d ",i) ; i*=2; if (i==256) break;
}
(vii) i=lO; while (i<lO) {
i--; printf("%d ",i) ;
}

4.8.5
Exercises 77
(viii) i=10; do {
i--; printf("%d ",i) ;
} while (i<10) ;
(ix) i=l; while (i>O) {
i++; printf("%d ",i);
}
Write a Program to convert a decimal number to octal (base 8). A sample run is given in Test run 4.6.
[ - 2 Test run 4.6
Enter a decimal number -> 18 The octal equivalent (backwards) is 22
4.8.6 Replace the following for loop with a repeat..until and with a w h i l e . , do in the examples below.
(i) for i'=l to 20 do begin end;
(ii) for j'=-10 do i0 do begin end;
(iii) for k-= 4 to i00 do begin
j'= 4*k; end;
4.8.7 Write a program to convert hexadecimal to decimal. A sample run is shown in Test run 4.7.
r-1 Test run 4.7
Number of hex characters> 2 Enter 1 > A Enter 2 > 1 The hex. equivalent is 31.

78 Repetitive statements
4.8.8 The drain current, in milliamps, of a sample depletion-type FET is given by"
ID--6. 1+ mA 4
Write a program which determines the drain current (in mA) for gate-source voltages (VGs) f rom-5 to 5 V in steps of 0.5 V. A sample run is given in Test run 4.8.
Test run 4.8
VGS(V) IDS (mA) -5.00 0.38 -4.50 0.09 -4.00 0.00 -3.50 0.09 -3.00 0.38 -2.50 O.84 -2.00 1.50 -1.50 2.34 -i.00 3.38 -0.50 4.59 0.00 6.00 0.50 7.59 1.00 9.38 1.50 11.34
00 13 50 ~_.
2.50 15.84 3.00 18.38 3.50 21.09 4.00 24.00 4.50 27.09 5.00 30.38

Worksheet 7
Worksheet 7 79
W7.1
W7.2
Modify a program from a previous worksheet so that it prompts the user to if they want to repeat the program.
Write a program which will calculate the equivalent resistance o f three resistors in parallel. If the user enters an invalid value (such as a negative value) the program will prompt the user to enter a valid input. A sample run is shown in Test run W7.1.
TestrunW7.1 Enter RI> -i INVALID INPUT PLEASE RE-ENTER Enter RI> 6 Enter R2> i0 Enter R3> 14 Equivalent resistance is 2.96 ohms
W7.3 Write a program which will convert decimal value to hexadecimal (base 16). A sample run is shown in Test run W7.2.
TestrunW7.2 Enter decimal number 17 The hexadecimal equivalent is ii. Do you wish to continue (y/n) n
W7.4 Write a Program in which you enter the number of bits in a binary number, enter these bits and then calculate the decimal equivalent. A sample run is given in test run W7.3. Note that the valid input for the bits should be only a 0 or a 1.
TestrunW7.3 Enter the number of bits -> Enter bit 1 1 Enter bit 2 1 Enter bit 3 0 Enter bit 4 0 Enter bit 5 1 Enter bit 6 0 The decimal equivalent is 19
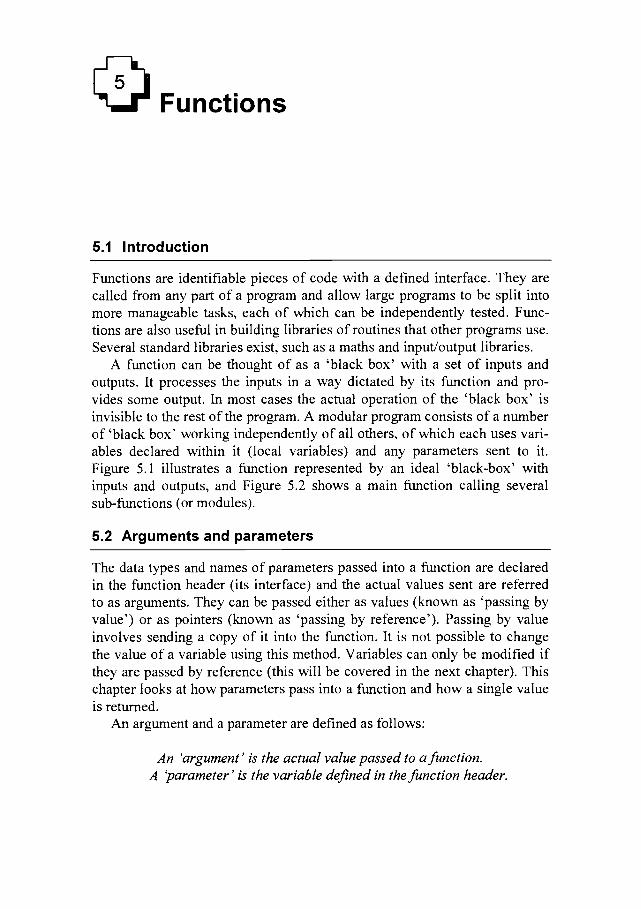
[ Functions
5.1 Introduction
Functions are identifiable pieces of code with a defined interface. They are called from any part of a program and allow large programs to be split into more manageable tasks, each of which can be independently tested. Func- tions are also useful in building libraries of routines that other programs use. Several standard libraries exist, such as a maths and input/output libraries.
A function can be thought of as a 'black box' with a set of inputs and outputs. It processes the inputs in a way dictated by its function and pro- vides some output. In most cases the actual operation of the 'black box' is invisible to the rest of the program. A modular program consists of a number of 'black box' working independently of all others, of which each uses vari- ables declared within it (local variables) and any parameters sent to it. Figure 5.1 illustrates a function represented by an ideal 'black-box' with inputs and outputs, and Figure 5.2 shows a main fimction calling several sub-functions (or modules).
5.2 Arguments and parameters
The data types and names of parameters passed into a function are declared in the fimction header (its interface) and the actual values sent are referred to as arguments. They can be passed either as values (known as 'passing by value') or as pointers (known as 'passing by reference'). Passing by value involves sending a copy of it into the function. It is not possible to change the value of a variable using this method. Variables can only be modified if they are passed by reference (this will be covered in the next chapter). This chapter looks at how parameters pass into a function and how a single value is returned.
An argument and a parameter are defined as follows:
An 'argument' is the actual value passed to a function. A 'parameter' is the variable defined in the function header.
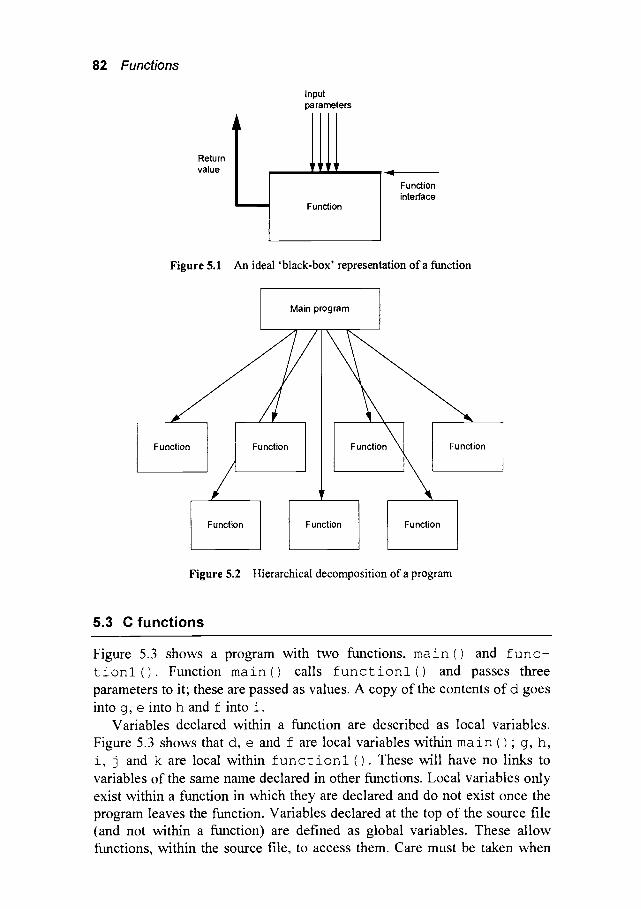
Return value
Main program
Input parameters
Function
Function interface
Figure 5.1 An ideal 'black-box' representation of a function
ion Function Function
82 Functions
Function Function Function
Figure 5.2 Hierarchical decomposition of a program
5.3 C functions
Figure 5.3 shows a program with two functions, main() and func-
tionl (). Function main() calls functionl() and passes three
parameters to it; these are passed as values. A copy of the contents of d goes
into g, e into h and f into i . Variables declared within a function are described as local variables.
Figure 5.3 shows that d, e and f are local variables within ma i n () ; g, h, i , j and k are local within f u n c t i o n l ( ) . These will have no links to
variables of the same name declared in other functions. Local variables only exist within a function in which they are declared and do not exist once the program leaves the function. Variables declared at the top of the source file (and not within a function) are defined as global variables. These allow functions, within the source file, to access them. Care must be taken when

C functions 83
using global variables for many reasons, one of which is that they tend to lead to programs that are unstructured and difficult to maintain.
In Figure 5.3 the function f u n c t i o n 1 ( ) makes use of the variable a as this is declared as a global variable. This function cannot be modelled as a 'black box' as it can modify a variable which is not passed to it. In a rela- tively small program this may not create a problem but as the size of the program increases the control of variables can become difficult.
int
access to variable a can be made from any function
a,b,c;~
int main (void) {
int d,e, f;~
functionl (d, e, f) ;
f u n c t i o n l ( i n t g, i n t h, i n t i ) { in t j , k; ~
j = a + h ; /
}
GLOBAL VARIABLES - these variables can be used by any function within this file
LOCAL VARIABLES - these variables can only be used within the m a i n () function
PARAMETERS PASSED from d, e and f into g, h and i respectively
LOCAL VARIABLES - these variables can only be used within f u n c t i o n l ()
Figure 5.3 Local and global variables
Figure 5.4 shows an example of how things can go wrong with global variables. In this example, a global variable i is used by two functions. Ini- tially, the value of i within the loop in m a i n ( ) will be 0. The f u n c t i o n 1 () function is called within this loop, which uses the variable i within another loop. Each time it is incremented the global variable takes on the incremented value. When the program leaves this function the value of i will have changed (that is, it will be 10). This causes the f o r () loop in m a i n () to end. If the variable i had been declared locally within both main() and functionl () this problem would not have occurred. As a rule, called modules should be self-contained and use only the parameters sent to them.

84 Functions
int i;
int main (void) {
int d, e, f ;
for (i=O;i<5;i++)
l functionl (d, e, f) ; : : : : : : : : : : : : : : : :
}
functionl (int x, int y ' {
int j, k;
for (i=O;i<lO;i++) {
: : : : : : : : : : :
}
}
Both functions make use of global variable i
Figure 5.4 An example of the use of global variables
Program 5.1 contains a function named print_values(). This is called from m a i n () and variables a and b are passed into the parameters c and d, respectively; c and d are local parameters and only exist within p r i n t v a l u e s (). The values of c and d can be changed with no effect on the values of a and b.
• Program 5.1
/* Simple program that shows parameter passing */ #include <stdio.h>
void print values(int a, int b); m
/. i. function prototype, to be discussed */
int main (void) { int a=5,b=6;
print values (a, b) ; return(0) ;
void print values(int c, int d) {
printf("The values passed are %d %d \n",c,d); }
5.3.1 Return value
The return statement returns a single value from a function to the calling routine. Programs in previous chapters have used functions that return val- ues. If there are no r e t u r n statements in a function the execution returns automatically to the calling routine upon execution of the closing brace (i.e. after the final statement within the fimction). Program 5.2 contains functions
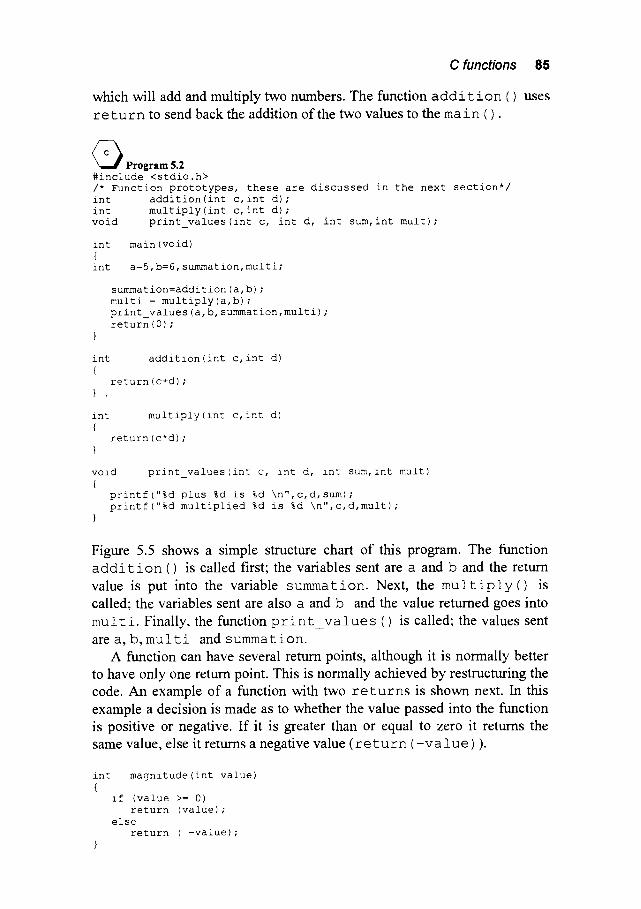
C functions 85
which will add and multiply two numbers. The function a d d i t i o n ( ) uses r e t u r n to send back the addition of the two values to the m a i n () .
c ~ Program 5.2 #include <stdio.h> /* Function prototypes, these are discussed in the next section*/ int addition(int c, int d) ; int multiply(int c, int d); void print_values (int c, int d, int sum, int mult) ;
int main (void) { int a=5, b=6, summation,multi;
summation=addition (a, b) ; multi = multiply (a, b) ; print values (a, b, summation,multi) ; return(O) ;
int {
,
addition(int c, int d)
return(c+d) ;
int multiply(int c, int d) {
return(c'd) ; }
void print values(int c, int d, int sum, int mult) {
printf("%d plus %d is %d \n",c,d, sum); printf("%d multiplied %d is %d \n",c,d,mult);
}
Figure 5.5 shows a simple structure chart of this program. The fimction a d d i t i o n () is called first; the variables sent are a and b and the return value is put into the variable s u m m a t i o n . Next, the m u l t i p l y ( ) is called; the variables sent are also a and b and the value returned goes into m u l t i . Finally, the function p r i n t _ v a l u e s () is called; the values sent are a, b, multi and summation.
A function can have several return points, although it is normally better to have only one return point. This is normally achieved by restructuring the code. An example of a function with two r e t u r n s is shown next. In this example a decision is made as to whether the value passed into the function is positive or negative. If it is greater than or equal to zero it retums the same value, else it returns a negative value ( r e t u r n ( - v a l u e ) ).
int magnitude(int value) {
if (value >= 0) return (value);
else return ( -value);
}

86 Functions
main
a,b, a,b on, multi
~ ~ a'b ~ ;multi
addition multiply print values
Figure 5.5 Basic structure chart for program 5.2
5.3.2 Function type
Program 5.2 contains functions that return integer data types. It is possible to return any other of C's data types, including f l o a t , d o u b l e and c h a r , by inserting the data type before the function name. If no data type is given then the default return type is i n t . The following gives the general syntax of a function.
type_def function_name(parameter list) { }
C is a flexible language in its structure. It allows the arrangement of func- tions in any order and even within different files. If the compiler finds a function that has not been defined (or prototyped) then it assumes the return type will be i n t . It also assumes that at the linking stage the linker will be able to find the required function either in the current compiled program, the libraries or other object codes. It is thus important that the function return data type is defined when the compiler is compiling the function; otherwise it will assume that the return type is i n t .
Function declarations (or prototypes) are normally inserted either at the top of each file, locally within a function, or in a header file (the .h files). These declarations allow the compiler to determine the return type and the data types of all parameters passed to the function. It thus allows the com- piler to test for illegal data types passed to a function in error. For example the following are invalid uses of the function p r i n t f ( ) , s q r t ( ) and s c a n f () . The p r • () has an incorrect syntax as the first argument should be a format statement (i.e. a string), the s q r t () function should be passed a floating point value and the s c a n f () function requires a format string as the first argument.
printf (23, "Value is %d\n") ;
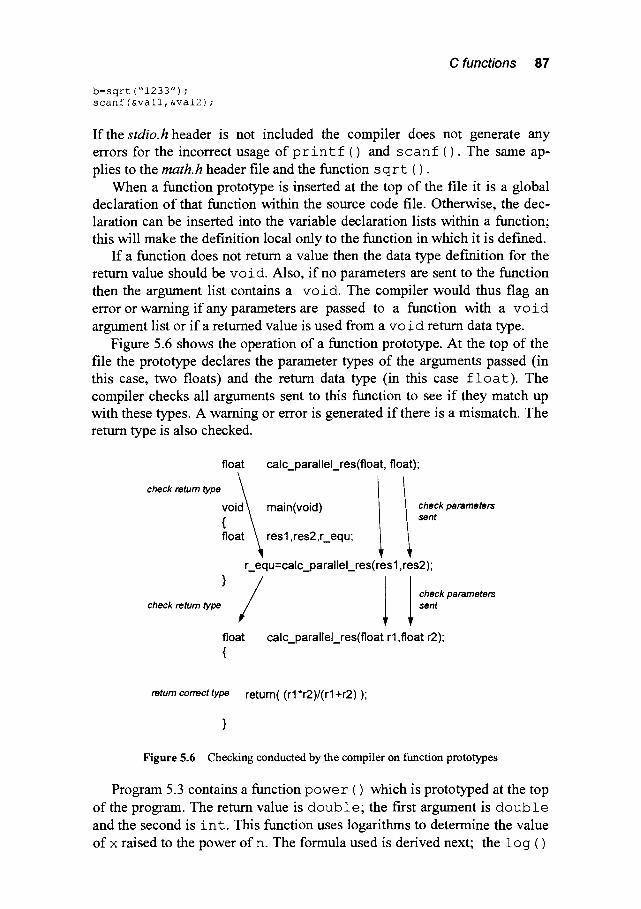
C functions 87
b=sqrt ("1233") ; scanf (&vall, &val2) ;
If the stdio.h header is not included the compiler does not generate any errors for the incorrect usage of p r i n t f () and s c a n f ( ) . The same ap- plies to the math.h header file and the function s q r g () .
When a function prototype is inserted at the top of the file it is a global declaration of that function within the source code file. Otherwise, the dec- laration can be inserted into the variable declaration lists within a function; this will make the definition local only to the function in which it is def'med.
If a function does not return a value then the data type def'mition for the return value should be vo i d. Also, if no parameters are sent to the function then the argument list contains a v o i d . The compiler would thus flag an error or warning if any parameters are passed to a function with a v o i d argument list or if a returned value is used from a v o s d return data type.
Figure 5.6 shows the operation of a function prototype. At the top of the file the prototype declares the parameter types of the arguments passed (in this case, two floats) and the return data type (in this case f l o a t ) . The compiler checks all arguments sent to this function to see if they match up with these types. A warning or error is generated if there is a mismatch. The return type is also checked.
float
check retum type \ [oi ,oa,
calc_parallel_res(float, float);
main(void) check parameters sent
resl ,res2,r_equ"
r_eq u =ca Ic_p a ral lel_re s( res 1, res2 );
check retum type } / float {
I check parameters sent
calc_parallel_res(float rl ,float r2);
retum correct type return( (r l*r2)/(r l+r2));
Figure 5.6 Checking conducted by the compiler on function prototypes
Program 5.3 contains a function power () which is prototyped at the top of the program. The return value is d o u b l e ; the first argument is d o u b l e and the second is i n t . This function uses logarithms to determine the value of x raised to the power of n. The formula used is derived next; the 1 og ( )
88 Functions
function is the natural logarithm and the e x p ( ) the exponential function. Both of these require the parameter sent as d o u b l e and the return type is also d o u b 1 e.
y=x"
log(y): log(x log(y) = n. log(x)
y = exp(n, log(x))
c • Program 5.3 #include <math.h> #include <stdio.h>
double power(double x, int n); /* declare function prototype */
main (void) int { double x, val; int n;
puts("Program to determine the result of a value"); puts ("raised to the power of an integer");
printf("Enter x to the power of n >>"); scanf("%f %d",&x,&n) ;
val=power(x,n) ; printf("%f to power of %d is %f\n",x,n,val); return(O) ;
double power (double x, int n) {
return (exp (n*log (x)) ) ; }
Some compilers give a warning if the return value data type is different from the data type of the variable to which it is assigned. For example, if the data type of the variable x in Program 5.3 is changed to a f l o a t then it is good practice to recast the return value to a f 1 oa t , as shown next.
int main (void) { float x, val; int n;
val=(float) power(x,n) ; . . . . . . .
. . . . . . .
5.4 Pascal functions
In Pascal a function returns a single value. It is identified by the function header, which is in the form:

Pascal functions 89
FUNCTION function_name(formal_parameter_list) �9 result_type;
where the parameters are passed through the f o rma l_pa r ame t e r_l i s t and the result type is defined by r e s u i t_t ype.
Program 5.1 contains two functions named addition and multiply.
In calling the addition function and variables a and b are passed into the
parameters c and d, respectively; c and d are local parameters and only ex- ist within a d d i t i o n ( ) . The values of c and d can be changed with no effect on the values of a and b. This function returns a value back to the main program by setting a value which is the same name as the fimction.
Program 5.1 also uses a procedure which, in this case, is similar to a function but does not retum any values back to the calling program.
Program 5.1 program test (input,output) ; var a,b, summation,multi'integer;
function addition (c, d" integer) -integer; begin
addition" =c+d; end;
function multiply(c,d'integer)'integer; begin multiply-=c*d;
end;
procedure print values (c, d, sum, mult'integer); begin
writeln(c, ' plus ',d, ' is ', sum) ; writeln(c,' multiplied by ',d, ' is ',mult);
ena;
begln a:=5; b: =6; summation: :addition (a, b) ; multi :: multiply (a, b) ; print values (a, b, summation, multi ) ;
end.
Figure 5.5 shows a simple structure chart of this program. The function a d d i t i o n () is called first; the variables sent are a and b and the return value is put into the variable s u m m a t i o n . Next, the m u l t i p l y ( ) is called" the variables sent are also a and b and the value returned goes into m u l t i . Finally, the function p r i n t v a l u e s () is called; the values sent are a, b, multi and summation.
Program 5.2 contains functions that return integer data types. It is possi- ble to return any other of C's data types, including r e a l , d o u b l e and c h a r a c t e r , by inserting the data type after the function name.
A function can have several return points, although it is normally better
90 Functions
to have only one return point. This is normally achieved by restructuring the code. An example of a function with two returns is shown next. In this ex- ample a decision is made as to whether the value passed into the fimction is positive or negative. If it is greater than or equal to zero it returns the same value, else it returns a negative value ( m a g = - v a l ) .
program test(input,output) ;
var a:integer;
function mag(val:integer):integer; begin
if (val<0) then mag:=-val else mag:=val;
end;
begin a.=-5; writeln('Mag(a) = ',mag(a));
end.
Program 5.2 contains a function power () which has a return data type of d o u b l e ; the first argument is d o u b l e and the second is i n t e g e r . This function uses logarithms to determine the value of x raised to the power of n. The formula used is derived next; the l n ( ) function is the natural logarithm and the e xp () the exponential function.
y=x n
In(y) = In(x" )
In(y) = n. In(x)
y = exp(n.ln(x))
Program 5.2 program pow(input,output) ;
var x,val'double; n'integer;
function power(x'double;n-integer) "double; begin
power "=exp(n*in(x)) ; end;
begin
writeln('Program to determine the result of a value'); writeln('raised to the power of an integer');
writeln('Enter x to the power of n >>'); readln (x, n) ;
val" =power (x, n) ; writeln(x, ' to power of ',n, ' is ',val) ;
end.

5.5 Examples
Examples 91
This section contains a few sample C and Pascal programs which use func- tions.
5.5.1 Tan function
There is no tan function in Pascal; thus to overcome this Pascal Program 5.3 contains a tan function and Test run 5.1 shows a sample run.
Program 5.3 Program function3(input,output) ; (* Program that uses a function to calculate the (* tan of a number
var answer,number- real;
function tan(a'real) "real; begin
tan .= sin (a) /cos (a) ; end;
(* tan is sin over cos *)
begin write('Enter number >> ') ; readln (number) ;
answer-=tan(number);
writeln('The tan of ',number-8"3, ' is ',answer-8"3) ; end.
TestrunS.1 Enter number >> 1.23 The tan of 1.230 is 2 .820
C, unlike Pascal, has a tan function, thus to avoid redeclaring it C Program 5.4 has a function called t a n g e n t ( ) . To improve accuracy the program uses d o u b l e data types. For this reason the s c a n f ( ) and p r i n t f ( ) functions use the data type % i f conversion characters.
• Program 5.4
/* Program that uses a function to calculate the /* tan of a number
*/ */
#include <stdio.h> #include <math.h>
/* Define function prototype */ double tangent(double a);
int main (void) { double answer, number;
printf("Enter number >> ") ;
92 Functions
scanf ("%if", &number) ;
answer=tangent (number) ;
printf("The tan of %8.31f is %8.31f\n",number,answer); return(0) ;
}
double tangent(double a) {
return (sin (a) /cos (a) ) ; }
/* tan is sin over cos */
5.5.2 Centigrade to Fahrenheit conversion
Pascal Program 5.4 uses two functions to convert from Fahrenheit to centi- grade, and vice versa. Test run 5.2 shows a sample test run.
Program 5.4 Program function4 (input,output) ; (* Program that uses a function to convert fahrenheit to centigrade *)
var fahrenheit,centigrade'real;
function convert to centigrade(f'real )'real; begin
convert to centigrade'=5/9* (f-32); end;
function convert to fahrenheit(c'real ) begin
convert to fahrenheit'=9/5*c+32; end;
�9 real;
begin write('Enter value in fahrenheit >> ') ; readln(fahrenheit) ;
cent igrade �9 =convert_to_centigrade (fahrenheit) ;
writeln (fahrenheit" 6" 3, 'deg F is ', centigrade" 6" 3, ' deg C') ;
write('Enter value in centigrade') ; readln(centigrade) ;
fahrenheit-:convert to fahrenhiet (centigrade) ;
writeln (centigrade" 6" 3, ' deg C is ', fahrenheit �9 6" 3, ' deg F') ; end.
Testrun5.2 Enter value in fahrenheit >> 12 12.000 deg F is -ii.iii deg C Enter value in centigrade >> 60
60.000 deg C is 15.556 deg F
• Program 5.5
/* Program that uses a function to convert fahrenheit to centigrade */ #include <stdio.h>

Examples 93
/* Function prototypes */ float convert to centigrade(float f); float convert to fahrenheit(float c);
int main (void) {
float fahrenheit,centigrade;
printf("Enter value in fahrenheit >> "); scanf("%f",&fahrenheit);
centigrade=convert to centigrade(fahrenheit) ;
printf("%8.3f deg F is %8.3f deg C\n",fahrenheit,centigrade);
printf("Enter value in centigrade") ; scanf ("%f", ¢igrade) ;
fahrenheit=convert to fahrenheit(centigrade); m
printf("%8.3f deg C is %8.3f deg F\n",centigrade, fahrenheit); return(0) ;
float convert to centigrade(float f) {
return(5.0/9.0* (f-32)) ; }
float convert to fahrenheit(float c) w
{ return(9.0/5.0*c+32) ;
}
Pascal Program 5.5 and C Program 5.6 uses the two function developed in the previous programs to display a table of values from 0~ to 100~ in steps of 10~ Test run 5.3 shows a sample run.
Program 5.5 Program function5(input,output) ; { Program that uses a function to convert centigrade to { fahrenheit. Centigrade goes from 0 to i00 in steps of i0.
var fahrenheit'centigrade:real; i: integer;
function convert to fahrenheit(c:real ):real; begin
convert to fahrenheit:=9/5*c+32; end;
begin writeln('Centigrade Farenheit') ;
for i:=0 to I0 do begin
centigrade : =10*i; fahrenheit:=convert to fahrenheit(centigrade);
writeln (centigrade" 8?3, fahrenheit- 8-3) ; end;
end.

94 Functions
T e s t r u n 5 . 3 Centicrade Farenheit
0 000 32.000 i0 000 50.000 20 000 68.000 30 000 86.000 40 000 104.000 50 000 122.000 60 000 140.000 70 000 158.000 80 000 176.000 90 000 194.000
i00 000 212.000
~Program 5.6 /* Program that uses a function to convert /* fahrenheit to centigrade #include <stdio.h>
*/ */
/* Function prototypes */ float convert to centigrade(float f); float convert to fahrenheit(float c);
int main(void) { float fahrenheit,centigrade;
printf("Centigrade Farenheit\n");
for (centigrade=0;centigrade<=100;centigrade+=10) {
fahrenheit=convert to fahrenheit(centigrade); printf("%8.3f %8.3f\n",centigrade, fahrenheit);
} return(0);
float convert to centigrade(float f) {
return (5.0/9.0" (f-32)) ; }
float convert to fahrenheit(float c) {
return(9.0/5.0*c+32) ; }
5.5.3 Combinational logic
In this example, the following Boolean equation is processed to determine its truth table.
Z = (A + B + ( A . C ) ) . C
Figure 5.7 gives a schematic representation of this Boolean function.
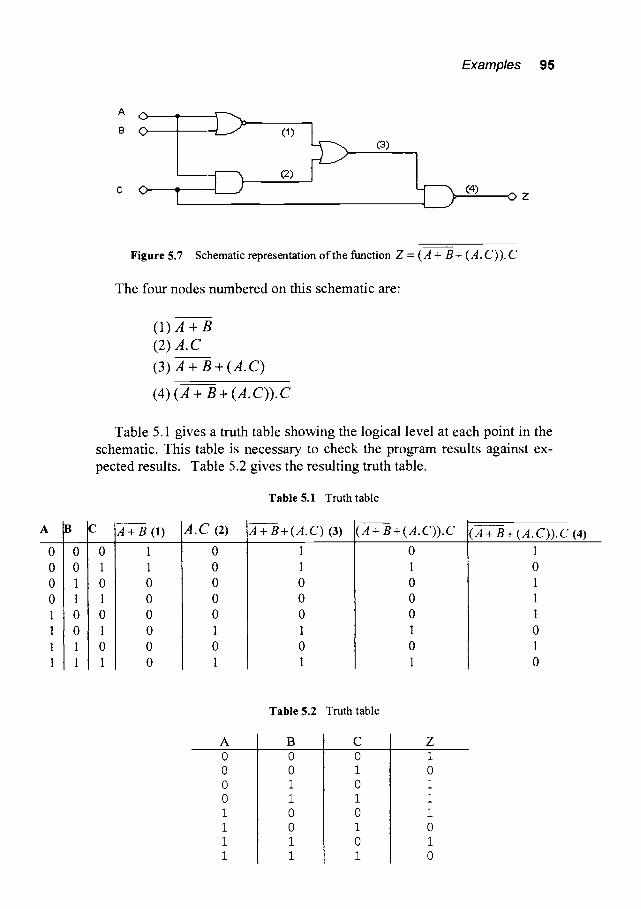
Examples 95
A o -
B O O)
o z
A B
0 0 0 0 1 1 1 1
Figure 5.7 Schematic representation of the function Z = (A + B + (A. C)). C
The four nodes numbered on this schematic are:
( 1 ) A + B
(2) A. C
(3) A + B + ( A . C )
(4) (A + B + (A. C)). C
Table 5.1 gives a truth table showing the logical level at each point in the schematic. This table is necessary to check the program results against ex- pected results. Table 5.2 gives the resulting truth table.
Table 5.1 Truth table
A+B (1)
1 1 0 0 0 0 0 0
A . C (2)
0 0 0 0 0 1 0 1
A + B+(A.C) (3)
1 1 0 0 0 1 0 1
(A+B+(A.C)) .C
0 1 0 0 0 1 0 1
(A + B+(A.C)) .C (4) 1 0 1 1 1 0 1 0
A
Table 5.2 Truth table

96 Functions
The permutations of the truth table input variables (i.e. 0 0 0, 0 01, 010, 011, ..., 111) are generated using 3 nested f o r loops. The inner loop tog- gles C from a 0 to a 1, the next loop toggles B and the outer loop toggles A. The Boolean functions use the logical operators & & and II. Recall that these operators treat a value of 0 (zero) as FALSE and any other value as TRUE.
• Program 5.7
#include <stdio.h> #define FALSE #define TRUE
/* ANSI C function prototypes */ int AND(int x, int y) ; int NAND(int x, int y); int NOR(int x, int y) ; int OR (int x, int y); int NOT (int x) ;
int main (void) { int a,b,c,z;
/* Go through all permutations of truth table */ puts (" A B C Result") ; puts(" ****************************** ; for (a=FALSE; a<=TRUE; a++)
for (b=FALSE; b<=TRUE; b++) for (c=FALSE; c<=TRUE; c++) {
z=NAND(OR(NOR(a,b),AND(a,c)),c) ; printf("%6d %6d %6d %6d\n", a, b, c, z) ;
} return(0) ;
}
int {
AND(int x, int y)
if ( x && y ) return(TRUE); else return(FALSE);
int {
NAND(int x, int y)
if ( x && y ) return(FALSE); else return (TRUE) ;
int {
OR(int x, int y)
if (x J [ y ) return(TRUE); else return(FALSE);
int {
NOR(int x, int y)
if (x [ I y ) return(FALSE); else return(TRUE);
int {
NOT (int x)
if (x) return (FALSE) ; else return (TRUE) ;

Examples 97
Test run 5.4 shows a sample run of the program. Notice that the results are identical to the truth table generated by analyzing the schematic.
Test run 5.4 A B C Result
0 0 0 1 0 0 1 0 0 1 0 1 0 1 1 1 1 0 0 1 1 0 1 0 1 1 0 1 1 1 1 0
Pascal Program 5.6 shows the equivalent Pascal program. As Pascal has re- served keywords for AND, OR and NOT the function names have been changed to reflect the number of inputs they have, such as OR3 for a 3-input OR gate and AND2 for a 2-input AND gate.
Program 5.6 program test (input,output) ; var a, b, c, z" boolean;
function NOR2(x, y'boolean)'boolean; begin
if ( x or y ) then nor2"=FALSE else nor2"=TRUE;
end;
function OR2(x, y'boolean) "boolean; begin
if ( x or y) then or2"=TRUE else or2 �9 =FALSE;
end;
function AND2(x, y-boolean)'boolean; begin
if ( x and y) then and2"=TRUE else and2-=FALSE;
end;
function NAND2(x, y'boolean)'boolean; begin
if ( x and y ) then nand2:FALSE else nand2"=TRUE;
end;
begin writeln(' writeln('
A B C Result') ; * * * * * * * * * * * * * * * * * * * * * * * * * * * * * , ) ;
for a:=FALSE to TRUE do for b:=FALSE to TRUE do
for c:=FALSE to TRUE do begin
z : =NAND2 (OR2 (NOR2 (a, b), AND2 (a, c) ), c) ; writeln(a:6,b:6,c:6, z:6) ;
end; end.

98 Functions
5.5.4 I m p e d a n c e of a s e r i e s RL circuit
The magnitude of the impedance of an RL circuit is given by the equation:
Izl-
and the phase angle of this impedance is given by:
( Z > - tan-' R
Figure 5.8 gives a schematic of an RL series circuit.
Figure 5.8 RL series circuit
Figure 5.9 gives a structure chart which outlines a basic design for this problem. Inputs are resistance (R), inductance (L) and frequency (f). The program determines the magnitude and phase angle of the impedance. In order to determine these values the reactance of the inductor must be de- termined using X L = 2~fL.
main
_ t _
int ~t
rad ~l~ang
rad to
deg
Figure 5.9 Structure chart for a series RL circuit program
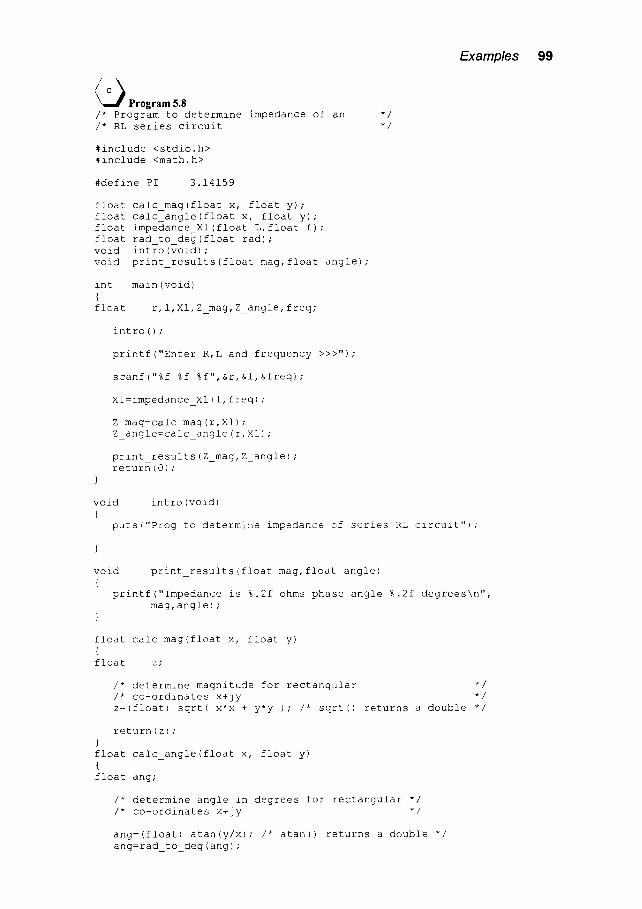
/•Program 5.8 /* Program to determine impedance of an */ /* RL series circuit */
#include <stdio.h> #include <math.h>
#define PI 3.14159
float calc_mag(float x, float y); float calc angle(float x, float y); float impedance_Xl(float L, float f); float rad to deg(float rad); void intro(void); void print_results(float mag, float angle)
int main(void) { float r,l,Xi,Z_mag, Z_angle,freq;
intro();
printf("Enter R,L and frequency >>>");
scanf("%f %f %f",&r,&l,&freq)
Xl=impedance_Xl(l,freq);
Z_mag calc_mag(r,Xl); Z_angle=calc_angle(r,Xl);
print_results(Z mag, Z_angle) return(0);
}
void intro(void)
puts{"P~og to determine impedance of ser±es RL circuit");
Examples 99
vold print results(float mag,float angle) {
printf("Impedance is %.2f ohms phase angle %.2f degrees\n", mag,angle);
}
float calc mag(float x, float y) { float z;
/* determine magnitude for rectangular */ /* co-ordinates x+jy */ z:(float) sqrt( x*x + y*y ); /* sqrt() returns a double */
return(z); } float calc_angle(float x, float y) { float ang;
/* determine angle in degrees for rectangular */ /* co-ordinates x+jy */
ang=(float) atan(y/x); /* atan() returns a double */ ang=rad to deg(ang);

100 Functions
return (ang) ; }
float impedance_Xl(float L, float f) {
/* determine impedance of inductor */ return(2*PI*f*L);
}
float rad_to_deg(float rad) {
/* convert from radians to degrees */ return(rad*lS0/PI) ;
}
Test run 5.5 gives a sample run of this program. The input parameters used are resistance 1 kf2, inductance 1 mH and applied frequency 1 MHz.
T e s t r u n S . 5 Program to determine impedance of series RL circuit Enter R,L and frequency >>> i000 le-3 le6 Impedance is 6362.27 ohms phase angle 80.96 degrees
Pascal Program 5.7 gives the equivalent Pascal program.
Program 5.7 program xlimpedance(input,output);
var r,I,XI,Z mag, Z_angle, freq'real;
procedure intro; begin
writeln('Prog to determine impedance of series RL circuit'); end;
procedure print results(mag,angle:real); begin
writeln('Impedance is ',mag:8:2, ' ohms phase angle ', angle:8:2, ' degrees');
end; function rad to deg(rad:real):real;
n
begin (* convert from radians to degrees *) rad_to_deg:=rad*180/PI;
end;
function calc mag(x, y'real)'real; var z-real; begin
(* determine magnitude for rectangular co-ordinates x+jy *) z'=sqrt( x*x + y*y ); calc_mag-=z;
end;
function calc_angle(x, y'real) "real; var ang" real; begin
(* determine angle in degrees for rectangular *) (* co-ordinates x+jy *)
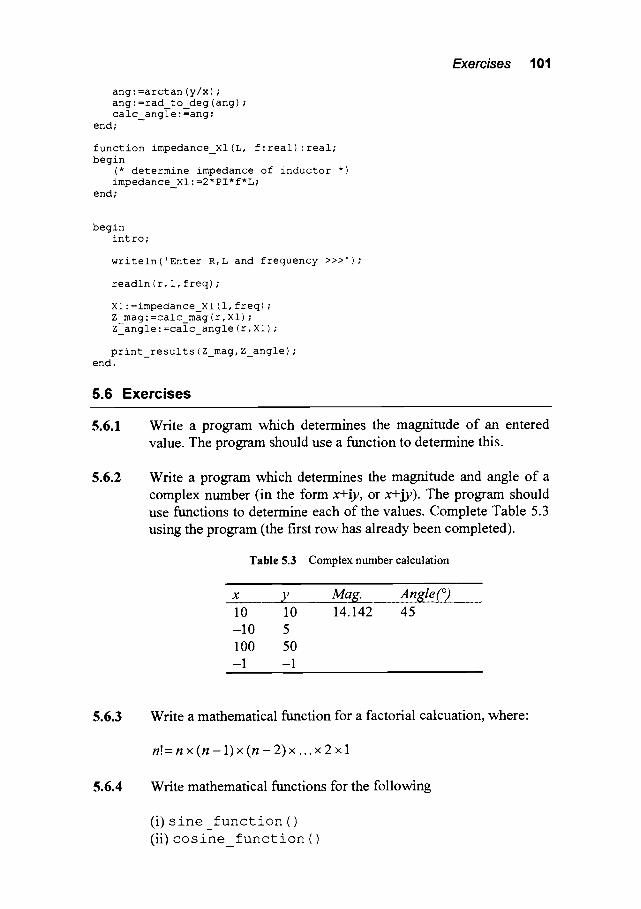
Exercises 101
ang:--arctan (y/x) ; ang: -rad_to_deg (ang) ; calc_angle : -ang;
end;
function impedance_Xl(L, f:real):real; begin
(* determine impedance of inductor *) impedance_Xl:=2*PI*f*L;
end;
begin intro;
writeln('Enter R,L and frequency >>>');
readln (r, i, freq) ;
Xl- =impedance_Xl (i, freq) ; Z mag" =calc_mag (r, Xl) ; Z_angle" =calc_angle (r, Xl) ;
print_results (Z_mag, Z_angle) ; end.
5.6 Exercises
5.6.1
5.6.2
Write a program which determines the magnitude of an entered value. The program should use a function to determine this.
Write a program which determines the magnitude and angle of a complex number (in the form x+iy, or x+jy). The program should use functions to determine each of the values. Complete Table 5.3 using the program (the first row has already been completed).
Table 5.3 Complex number calculation
X
10 -10 100 -1
i
l ,,,,, ,, , ,,,,,,,,,
~ _ y Mag. _.An_~le ( o )
10 14.142 45 5 50 -1
,,,,,,,,,,, , ,,,,, , ,,, , ,,, , ,,,,
5.6.3
5.6.4
Write a mathematical function for a factorial calcuation, where"
n!=nx(n-1)x(n- 2 ) x . . . x 2x 1
Write mathematical functions for the following
(i) sine function() (ii) cosine function()

102 Functions
The sine and cosine functions should calculated from first princi- ples with:
2 X
cos(x) = 1 - 2~
3 X o j ~
s i n ( x ) = x - 3!
X 4 X 6 X 8
4! 6! 8! X 5 X 7 X 9
5! 7! 9!
The error in the functions should be less than 1 x 10 -6 .
5.6.5 Using the functions developed in Exercise 5.6.2 and the standard sine and cosine library functions, write a program which deter- mines the error between the standard library functions and the developed functions. From this, complete Table 5.3.
Table 5.3 Sine and cosine results
Value Standard cosine Developed cosine Standard sine Developed s,ne
funct i~ function function , f u nction 2 -0.41614683 0.9092974 -0.5 1 -1
777777 . . . . . . i : 777~: ~ 7 ~ l i l l i i i ~ 7 7 : 777 _ " ' l : : l : : : : :7 7 : 1 : : : : : : : : 7 75 7 I r ' " ? l ? ? l ? " ? ? " [ ~ i i : i i ~ : ? " : : : : : : : : : : : : : : : : : : : : : : : : : : : : ' ? ? : ? ' : : 7 7 " " 7775:71 [ :: i i i l i i l 1] 11]] I ]
5.6.6 Write a mathematical function which determines the exponential of a value using the first principles formula:
2 3 4 X X X X X e - 1 + - - + ~ + ~ + ~ 1! 2! 3! 4!
+ . . .
Compare the result with the standard e xp () library function.
5.6.7 Write Boolean logic functions for the following four digital gates:
AND3 (A, B, C) OR3 (A, B, C) NAND3 (A, B, C) NOR3 (A, B, C)

Worksheet 8
Worksheet 8 103
WS.I
W8.2
Write a program with separate functions which determine the gra- dient of a straight line (m) and the point at which a straight line cut the y-axis (c). The entered parameters are two points on the line, that is, (xl, yl) and (x2, y2). From this program complete Table W8.1 (the first row has already been completed).
Table W8.1 Straight line calculations
. . . . . . . . . . . . . ,, ,,, , ,,,,,,,,, ,,,,,,,,,,,, ,,, ,, ,,,,,,, ,,,,,
xl YL x2 . . . . . . . . . y2 ............ m ........... c . . . . . . . . .
3 3 4 5 2 -3 -1 5 0 -1 100 50 -10 -10 -1 -1 1 3
, , , , i i i i , i i l l
Write a program which has a function which will only return a real value when the entered value is within a specified range. Examples of calls to this function (which, in this case, is named g e t r e a 1) are given next.
inval'=get real(O, lO0) ; inval=get real(O, lO0) ;
(* in Pascal *) /* in C */
which will only return a value from the function when the entered value is between 0 and 100. A sample run is given next.
r-1 Test r-n W$.I
Enter a value > -I
INVALID INPUT PLEASE RE-ENTER
Enter a value > 6
Success. Bye.
W8.3 Modify the program developed and use it to prompt the use to en- ter a value of current (between 0A and 10A) and voltage (between 0V and 100V). The program will then determine the resistance by dividing the entered voltage by the entered current. The program should contain two functions: get real () and c a l c c u r r e n t ( ) .
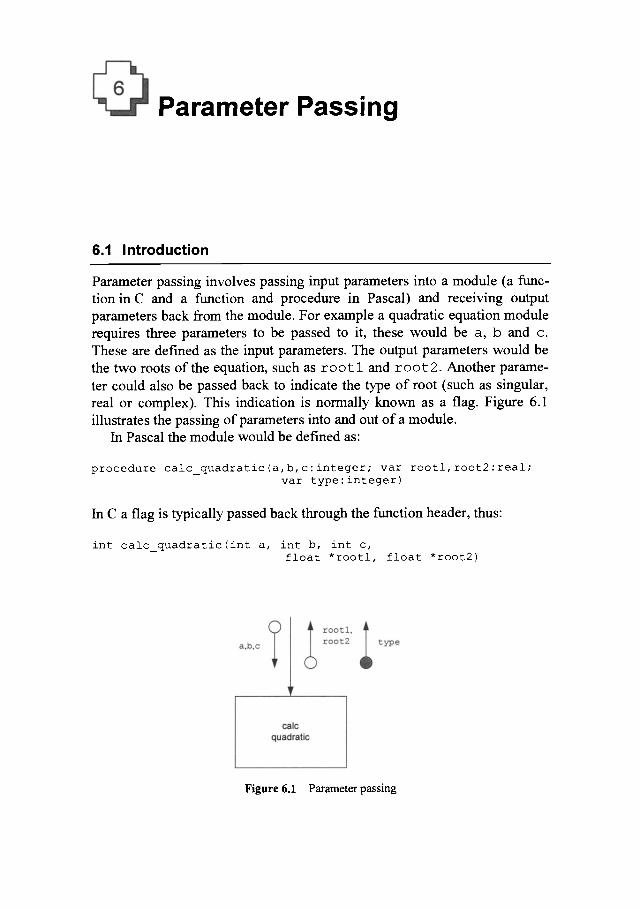
Parameter Passing
6.1 Introduction
Parameter passing involves passing input parameters imo a module (a func- tion in C and a function and procedure in Pascal) and receiving output parameters back from the module. For example a quadratic equation module requires three parameters to be passed to it, these would be a, 13 and c. These are defined as the input parameters. The output parameters would be the two roots of the equation, such as r o o t l and r o o t 2 . Another parame- ter could also be passed back to indicate the type of root (such as singular, real or complex). This indication is normally known as a flag. Figure 6.1 illustrates the passing of parameters into and out of a module.
In Pascal the module would be defined as:
procedure calc_quadratic(a,b,c:integer; vat rootl,root2:real; var type : integer)
In C a flag is typically passed back through the function header, thus:
int calc_quadratic(int a, int b, int c, float *rootl, float *root2)
Figure 6.1 Parameter passing

106 Parameter passing
6.2 Pascal parameter passing
Procedures are used in Pascal when parameters need to be passed back to the calling routine. Functions are normally used when there is only one value passed back, whereas a procedure can return any number (or even none). The first part of def'ming a procedure is to defme the input parame- ters and the output parameters. The input parameters are declared in the pa- rameter list and output parameters are defmed with a preceding v a r key- word. For example, if the input parameters are x and y, and the output pa- rameters are w and z then the following procedure would be defined:
procedure
begin
end;
procl (x, y- real; var w, z- real) ;
In this case only values will be passed into the variables x and y, whereas the values of w and z will be passed back to the calling module. If a proce- dure requires local variables then these are declared after the procedure header. For example, if the procedure in the last example has two local vari- ables named t emp 1 and t emp 2 then it will have the form:
procedure procl (x, y" real;
var templ, temp2 �9 real;
begin
end;
var w, z" real) ;
Local variables only exist within the procedure and their contents are lost when the procedure quits.
Program 6.1 shows an example program with a procedure which swaps the values of two variables. In this case a temporary local value ( t emp) holds one of the values ( t emp : =x) so that the contents of the other value can be placed in it (x : =y). The temporary value is then put into the other variable (y" =temp). This operation performs a swap.
~Program 6.1 program procl(input,output) ;
var a,b" integer;
procedure swap(var x,y: integer); var temp: integer; begin
temp -= x; x := y; y := temp
end;
begin

Cparameterpassing 107
write( 'Enter two integer values >> '); readln (a, b) ;
writeln('Values are ',a, ' and ',b) ; swap (a, b) ; writeln('Values swapped are ',a,' and ',b);
end.
Program 6.2 calculates the gradient of a straight line given two co-ordinates (xl,yl) and (x2w2).
~Program 6.2 program proc2(input,output);
var xl,yl,x2,y2"real;
procedure get_coord(var x,y:real) ; begin
writeln('Enter x and y coordinate'); readln (x, y) ;
end;
function gradient(xstart,ystart,xend, yend'real) -real; begin
gradient .= (yend-ystart) / (xend-xstart) ; end;
begin writeln('Start co-ordinate') ; get_coord (xl, yl) ; writeln('End co-ordinate') ; get_coord (x2, y2) ; writeln('The gradient is ',gradient(xl,yl,x2,y2) :6:2 );
end.
6.3 C parameter passing
One of the most confusion areas of C programming is the usage of pointers. They basically refer to addresses in memory but to the novice they are one of the least liked elements of C programming. In many cases they are ex- tremely useful and allow the programmer to directly access areas of mem- ory.
6.3.1 Introduction
If a company were to send a form to a person and they neglected to inform the person of the correct return address then it would not be possible for the recipient to send back the modified form (unless the person already knows the address). Variables sent to functions operate in a similar manner. If the function does not know where a variable lives (its address in memory) then the function cannot change its contents.
A program uses data which is stored by variables. These are assigned to a unique space in memory, the number of bytes they use depends on their data type. For example, a c h a r uses 1 byte, an i n t will typically take 2 or 4

108 Parameter passing
bytes, and a f 1 oa t , typically, 4 or 8 bytes. Each memory location contains one byte and has a unique address associated with it (that is, its binary ad- dress). This address is normally specified as a hexadecimal value as this can be easily converted to the actual binary address. The memory map in Figure 6.2 shows how three variables v a l u e l , v a l u e 2 and ch could be allocated in memory. This diagram assumes that a f l o a t uses 4 bytes, and an i n t 2 bytes. The compiler, in this case, has allocated v a l u e l from addresses 100h to 103h, v a l u e 2 at 104h and 105h, and ch is allocated to 106h. The start of the variable's address in memory can be described as a memory pointer to the variable. A pointer variable is used to store a memory address.
Variables sent to a function can have their contents changed by passing a pointer in the argument list. This method involves sending a memory ad- dress rather than a copy o f the variable's value. A preceding ampersand (&) specifies a pointer. This can be thought of as representing the address of'.
&variable name {address of variable name}
A pointer to a variable will store the address to the first byte of the area allocated to the variable. An asterisk (*) preceding a pointer is used to access the contents of the location pointed to. The number of bytes accessed will depend on the data type of the pointer. The * operator can be thought of representing at address"
*ptr {value stored at address specified by ptr}
Figure 6.2 Example memory map

Cparameterpassing 109
Figure 6.3 shows an example memory map. A variable resistance_l has the value of 310. 0 and is stored at a memory location starting at 10 7 h.
If the data type is a short integer then it will take up 2 bytes in memory (i.e. 10 7 h and 10 8 h), if it is a float it may take up 4 bytes in memory (i.e. 10 7 h to 110h) . The memory map also shows that a pointer p t r points to mem- ory location 10 2 h. The value stored at this location is 15; * p t r accesses its contents. The declaration of the pointer defines the data type of the pointer and thus the number of bytes used to store the value at the address pointed to by the pointer.
ptr
pt r is a pointer and it is currently pointing to address 102h.
&resistor 1
resistor 1 is stored at address 107h-110h and its value is 310
/
310.0
r
8bits wide
I
~-Address location 100h
~ A d d r e s s location 101 h
/ / / ~-Address location 102h / / / /
~--Address location 107h
Address location 108h
Figure 6.3 Example memory map
6.3.2 Pointers with functions
In the previous chapter it was shown that a single value is passed out of a function through the function header. In order to pass values out through the argument list the address of the variable is passed; that is referred to as 'call by reference'. To declare a pointer the data type is specified and the pointer name is preceded by an asterisk. The following is the general format:
type def *ptr name;
In this case ptr_name is the name of the pointer. The contents of the vari- able at this address can be accessed using * p t r name. When a function is to modify a variable then a pointer to its address is sent. For example, if the variable to be modified is v a l u e then the argument passed is & v a l u e .
Program 6.1 shows an example of a function that swaps the contents of two variables (a and b). Figure 6.4 shows how the compiler checks the pa- rameters passed to the function and the retum type. The function prototype, in this case, specifies that the parameters sent are pointers to integer values

110 Parameter passing
and the return type is vo i d. The compiler checks that the parameters sent to the function are integer pointers and that nothing is assigned to the retm'n value from the function.
~ Program 6.1 #include <stdio.h>
void swap(int *ptrl,int *ptr2) ;
int main (void) { int a,b;
a:5; b=6; swap(&a,&b) ; /* send addresses of a and b */ printf("a: %d b = %d \n",a,b); return(O) ;
void {
int
swap(int *ptrl,int *ptr2)
/* ptrl and ptr2 are pointers (addresses). */ temp;
temp = *ptrl; *ptrl = *ptr2; *ptr2 = temp;
void
check return type
V O
{ int
swap(int *ptrl, int */otr2) ; / /
.d main (vo '/d) / / check parameters
son,
swap (&a, &b) ;
~ ~ checkparameters
n t s w a p ( i * p t r l , • * p t r 2 ) ;
check return type
void {
int temp;
temp=*ptrl ; *ptrl=*ptr2; *ptr2=temp
Figure 6.4 Compiler checking for Program 6.1

Examples 111
Program 6.2 calculates the gradient of a straight line given two co-ordinates (xl,yl) and (x2,y2). Within the g e t _ c o o r d ( ) function the s c a n f () do not require a preceding ampersand; the variable argmnents are already pointers.
• Program 6.2
#include <stdio.h>
/* Define function prototypes */ void get_coord(float *x, float *y); float gradient(float xstart,float ystart,float xend, float yend);
int main (void) { float xl,yl,x2,y2;
printf("Start co ordinate >>") ; get coord (&xl, &yl) ; printf("End co ordinate >> ") ; get_coord (&x2, &y2) ; printf("The gradient is %8.2f\n",gradient(xl,yl,x2,y2)) ; return(0) ;
void get_coord(float *x, float *y) {
printf("Enter x and y coordinate"); scanf("%f %f",x,y); /* x and y are pointers, thus no &'s are required */
}
float gradient (float xstart,float ystart,float xend, float yend) {
return((yend-ystart)/(xend-xstart)) ; }
An example of a standard C function that uses call by reference is s c a n f ()where a pointer is passed for each variable. This allows the func- tion to change its contents.
6.4 Examples
6.4.1 Quadratic equations
C Program 6.2 determines the roots of a quadratic equation. The function g e t v a l u e s ( ) gets variables a, b and c; these variables are passed as pointers.
The function to determine the root(s) of a quadratic equation is q u a d - r a t i c equ () . This returns the root type (such as, singular, real or com- plex) through the function header and passes the equation root(s) through the argument list using pointers. The root type rettmaed can be referred to as a return flag; this flag is set up using an enum declaration. There are three possible states for this: SINGULAR (a value of 0), REAL_ROOTS (a value of 1) and COMPLEX ROOTS (a value of 2). The program then uses the flag

112 Parameter passing
to determine how the root(s) are to be displayed. If the root is singular then p r i n t r e s u l t s () prints a single value of r o o t 1 ; else, if the roots are real, then two values r o o g l and r o o t 2 are printed; and if the roots are complex the function will print the roots in the form r o o t 1 + / - j root2.
Figure 6.5 gives a basic structure chart of this program. The return flag from the q u a d r a t i c equ () function is represented by an arrow with a circle on the end.
Figure 6.5 Structure chart for Program 6.3
c • Program 6.3 #include <stdio.h> #include <math.h> enum {SINGULAR, REAL ROOTS,COMPLEX_ROOTS } quad_roots;
void int void
get values (float *ain, float *bin, float *cin) ; quadratic_equ(float a, float b, float c, float *rl,float *r2); print results(int r type, float a, float b, float c, float rl,
float r2) ;
int main (void) { float a,b,c, rootl,root2; int root_type;
get_values (&a, &b, &c) ; root_type=quadratic_equ(a,b,c,&rootl,&root2) ; print_results (root_type, a, b, c, rootl,root2) ; return(0) ;
void get_values (float *ain, float *bin, float *cin) {
printf("Enter a, b and c >>"); scanf("%f %f %f",ain,bin, cin); /*ain, bin and cin are pointers */
}
int quadratic_equ(float a, float b, float c, float *rl,float *r2) {
if (a==0) {
*rl=-c/b; return (SINGULAR) ;
}

Examples 113
else if ((b*b)>(4*a*c)) {
*rl= (-b+sqrt (b*b-4*a*c)) / (2*a) ; *r2= (-b-sqrt (b*b-4*a*c)) / (2*a) ; return (REAL ROOTS) ;
m
} else if ((b*b)<(4*a*c)) {
*rl=-b/(2*a) ; *r2=sqrt (4*a'c-b'b) / (2*a) ; return (COMPLEX ROOTS) ;
} else {
*rl=-b/(2*a) ; return (SINGULAR) ;
}
void print_results(int r_type, float a, float b, float c, float rl,float r2)
printf("Quadratic equation %8.3f x^2 + %8.3f x + %8.3f\n",a,b,c); if (r_type==SINGULAR)
printf("Singular root of %8.3f\n",rl); else if (r_type==REAL ROOTS)
printf("Real roots of %8.3f and %8.3f\n",rl,r2); else
printf("Complex root of %8.3f +/-j %8.3f\n",rl,r2);
Pascal Program 6.3 is similar to the C Program 6.3 for the following:
�9 The flag for the quadratic equation is passed as one of the variables in the parameter of q u a d r a t i c _ e q u ( r t y p e ) .
�9 The quadratic equation root types are defined as constants using c o n s t .
~Program 6.3 program quad(input,output) ;
const SINGULAR=0; REAL ROOTS=I;COMPLEX ROOTS=2;
var a,b, c, rootl, root2 : real; root type:integer;
procedure get_values(var ain,bin, cin:real) ; begin
write('Enter a, b and c >>'); readln(ain,bin, cin) ;
end;
procedure quadratic equ(a,b,c:real; var rl,r2:real; var rtype:integer); begin
if (a=0) then begin
rl:=-c/b; rtype : =SINGULAR;
end else if ((b'b)> 4*a'c)) then begin
rl:=(-b+sqrt b*b-4*a*c) ) / (2*a) ; r2:=(-b-sqrt b*b-4*a*c) )/(2*a) ; rtype:=REAL ROOTS;

114 Parameter passing
end else if ((b*b)<(4*a*c)) then begin
rl-=-b/(2*a) ; r2 : =sqrt (4*a'c-b'b) / (2*a) ; rt ype" =COMPLEX_ROOTS ;
end else begin
rl'=-b/(2*a) ; rt ype" =SINGULAR;
end; end;
procedure print_results (r_type" integer; a,b,c, rl,r2"real) ; begin
writeln('Quadratic equation ',a-8"3, ' x^2 + ', b'8"3, ' x + ',c'8"3) ; if (r_type=SINGULAR) then
writeln('Singular root of ',rl) else if (r type=REAL ROOTS) then
writeln('Real roots of ', ri'8"3, ' and ',r2"8"3) else
writeln('Complex root of ',ri'8"3, ' +/-j ',r2"8"3) ; end;
begin get_values (a, b, c) ; quadratic_equ (a, b, c, rootl, root2, root_type) ; print_results (root_type, a, b, c, rootl, root2) ;
end.
Test run 6.1 shows tests for each of the root types.
r-1 Test run 6.1
Enter a, b and c >> 211
Quadratic equation 2.000 x^2 + 1.000 x + 1.000 Complex root of -0.250 +/-j 0.661
Enter a, b and c >> 1 -2 -3
Quadratic equation 1.000 x^2 + -2.000 x + -3.000 Real roots of 3.000 and -i.000
Enter a, b and c >> 1 2 1
Quadratic equation 1.000 x^2 + Singular root of -i.000
2.000 x + 1.000
6.4.2 Equivalent parallel resistance
C Program 6.3 uses pointers to determine the equivalent parallel resistance of two resistors. A basic structure chart, given in Figure 6.6, shows that g e t v a l u e s () returns the variables R1 and R2; in order to change their values they are sent as pointers. It also shows that the variables sent to c a l c _ p a r a l l e l _ r e s () are R1, R2 and R_equ is returned. Variables R1, R2 and R_equ are then passed into p r i n t _ r e s u l t s ( ) .
Pascal Program 6.4 gives the Pascal equivalent of this program.
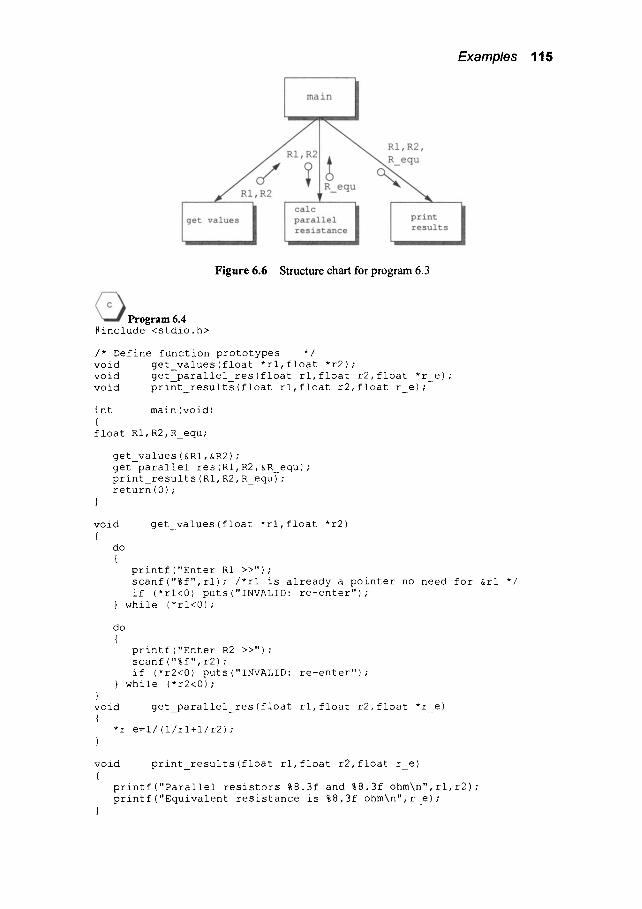
main i
~ RI,R2
21 R~_equA ~
i ca c i get values parallel print resistance results
Examples 115
Figure 6.6 Structure chart for program 6.3
< ~ P r o g r a m 6.4 #include <stdio.h>
/* Define function prototypes */ void get_values(float *rl,float *r2); void get parallel_res(float rl,float r2,float *r e); void print_results(float rl,float r2,float r e);
int main(void) { float RI,R2,R equ;
get_values(&Rl,&R2); get_parallel_res(Ri,R2,&R equ); print_results(Ri,R2,R_equ); return(0);
void get values(float *rl,float *r2) {
do {
printf("Enter R1 >>"); scanf("%f",rl); /*rl is already a pointer no need for &rl */ if (*rl<0) puts("INVALID: re-enter")
} while (*rl<0);
do {
printf{"Enter R2 >>"); scanf("%f",r2); if (*r2<0) puts("INVALID: re-enter")
} while (*r2<0); } void get_parallel res(float rl,float r2,float *r e) {
*r e=i/(i/rl+i/r2); }
void print_results(float rl,float r2,float r_e) {
printf("Parallel resistors %8.3f and %8.3f ohm\n",rl,r2); printf("Equivalent resistance is %8.3f ohm\n",r_e);
}
116 Parameter passing
~ P r o g r a m 6.4 program par_res(input,output) ;
var RI,R2,R equ:real;
procedure get_values(var rl,r2-real) ; begin
repeat write('Enter R1 >>') ; readln (rl) ; if (rl<=0) then writeln('INVALID" re-enter') ;
until (rl>0) ;
repeat write('Enter R2 >>') ; readln (r2) ; if (r2<=0) then writeln('INVALID: re-enter');
until (r2>0) ; end;
procedure get_parallel_res(rl,r2"real;var r_e'real) ; begin
r e'=i/(i/rl+i/r2) ; end;
procedure print_results(rl,r2,r_e'real) ; begin
writeln('Parallel resistors ', ri'8"3, ' and ',r2"8"3, 'ohm'); writeln('Equivalent resistance is ',r_e'8"3, ' ohm') ;
end;
begin get_values(Ri,R2); get_parallel res(Ri,R2,R equ); print_results(RI,R2,R_equ);
end.
Test run 6.2 shows a sample run.
I - -1 ~6 Test run 6.2 Enter R1 >> i000 Enter R2 >> 800 Parallel resistors i000.000 and 800.000 ohm Equivalent resistance is 444.444 ohm
6.5 Exercises
6.5.1 Write a program with a single module that returns both the value of m and c for a straight line, given passed values of (x/, yl) and (x : , y : ) . The equation of the straight line is given by:
y = m x + c where m = Y2 -Y l X 2 - - X 1
a n d c = Yl - m x l
Example calls for C and Pascal are"

6.5.2
6.5.3
Exercises 117
calc line(xl,yl,x2,y2,m,c) ;
calc line(xl,yl,x2,y2,&m,&c) ;
(* in Pascal *) /* in C */
where x 1, y 1, x 2, y2 are the coordinates, m is the return gradient and c is the returned value for the point at which the line cuts the y-axis.
Write a program which contains a module which is passed two parameters. The module should arrange the values of the parame- ters so that the first parameter is the largest.
Resistors are normally identified by means of a colour coding system, which is given in Table 6.1. Figure 6.7 shows a 4-band re- sistor, where the first two bands give a digit, the third a multiplier and the fourth the tolerance. Write a program, with parameter passing, in which the user enters the first three values of the code and the program determines the resistor value. The value range of inputs is between 0 and 9 and A sample run is shown in Test run 6.3.
~Testrun6.3 Enter band 1 value >> i00 INVALID: re-enter Enter band 1 value >> 3 Enter band 2 value >> 4 Enter band 3 value >> 2 Resistor value is 3400 ohms
Table 6.1 Resistor colour coding
Dig k ..... C0!our .... Multiplier N 0. of zeros Silver 0.01 -2 Gold 0.1 -1
0 Black 1 0 1 Brown 10 1 2 Red 100 2 3 Orange lk 3 4 Yellow 10k 4 5 Green 100k 5 6 Blue 1M 6 7 Violet 10M 7 8 Grey 9 White
i . . . . , H . . . . . H H I
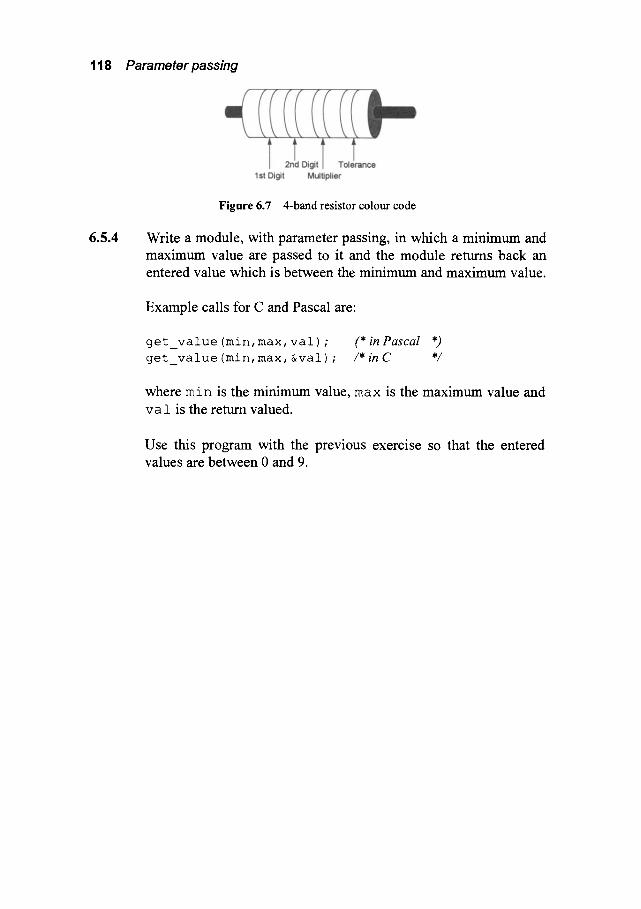
118 Parameter passing
6.5.4
Figure 6.7 4-band resistor colour code
Write a module, with parameter passing, in which a minimum and maximum value are passed to it and the module returns back an entered value which is between the minimum and maximum value.
Example calls for C and Pascal are:
g e t v a l u e (min , max, v a l ) ; (* in Pascal *) g e t v a l u e (min , max, & v a l ) ; /* in C */
where m i n is the minimum value, max is the maximum value and v a l is the return valued.
Use this program with the previous exercise so that the entered values are between 0 and 9.

Worksheet 9
Exercises 119
W9.1
W9.2
Write a program which has a module which converts a complex number in rectangular form into polar form (magnitude and angle). The module should have two values passed to it (x and y) and re- turn two values for the magnitude and angle of the complex num- ber (mag and angle). These values are determined using:
i f ~ = l z l < o > = x+~y
then
[Zl = ~/x2 +y2
O= tan=l(y) radians
Example calls for C and Pascal are"
convert_polar (x, y,mag, angle) ; (* in Pascal *)
convert_polar (x, y, &mag, &angle) ; /* in C */
Write a program which has a module which converts a complex number in polar form into rectangular form (real and imaginary). The module should have two values passed to it (mag and angle) and return two values for the real and imaginary parts of the com- plex number (x and y). These values are determined using:
i f z = Izl<o> = x + ~ y
then
- - Iz l~o~e
y -- IZ[sine
Example calls for C and Pascal are"
convert rect(mag, angle,x,y) ;
convert rect(mag, angle, &x, &y) ;
(* in Pascal *) /* in C */

Arrays
7.1 Introduction
An array stores more than one value, of a common data type, under a col- lective name. Each value has a unique slot and is referenced using an indexing technique. Figure 7.1 shows a circuit with 5 resistors, which could be declared with a program with 5 simple float (in C) or real (in Pascal) declarations. If these resistor variables were required to be passed into a function all 5 would have to be passed through the parameter list. A neater method uses arrays to store all of the values under a common name (in this case R). Thus a single array variable can then be passed into any function that uses it.
Rl R 2 R3
?-o
R4 R5
O . . O
SIMPLE VARIABLE DECLARATION ARRAY INDEXING
C Pascal:
float RI, R2, R3, R4, R5; vat RI, R2, R3, R4, RS:real;
float R[5] ; var R:array[0..4] of real;
/ ",,, R[0], R[I], R[2], R[3], R[4]
Figure 7.1 Simple variables against array indexing
7.2 C arrays
The declaration of an array specifies the data type, the array name and the

122 Arrays
number of elements in the array in brackets ( [ ] ) . The following gives the standard format for an array declaration.
data_type array_name[size] ;
Figure 7.2 shows that the first element of the array is indexed 0 and the last element as s i z e - 1. The compiler allocates memory for the first element a r r a y _ n a m e [ 0 ] to the last array element a r r a y _ n a m e [ s i z e - 1 ]. The number of bytes allocated in memory will be the number of elements in the array multiplied by the number of bytes used to store the data type of the array.
The following gives some example array declarations:
int circuit[lO]; /* allocates space for circuit[O] to circuit[9] */ float impedance[50]; /* allocates for impedance[O] to impedance[49] */
size elements
array_name[O]
array_name[ 1 ]
array_name[2]
array_name[size-3] I--
array_name[size-2] [ ~"
array_name[size-1 ] !~" I -...1
array element 0
array element 1
array element 2
array element size-3
array element size-2
array element size-1
Figure 7.2 Array elements
7.2.1 Pointers and arrays
In C, there is a strong relationship between pointers and arrays. A pointer variable stores a memory address which can be modified, whereas an array name stores a fixed address, set to the first element in the array. The address of the first element of an array named arrname is thus &arrname [0].
Table 7.1 shows examples of how arrays and pointers use different indexing notations and how it is possible to interchange them.
Figure 7.3 shows two array declarations for a r r n a m e . Each has five elements; the first is a r r n a m e [ 0 ] and the last a r r n a m e [ 4 ]. The number of bytes allocated to each element depends on the data type declaration. A c h a r array uses one byte for each element, whereas an i n t array will typi- cally take 2 or 4 bytes. The array name a r r n a m e is set to the address of the first element of the array. Each element within the array is referenced with respect to this address.
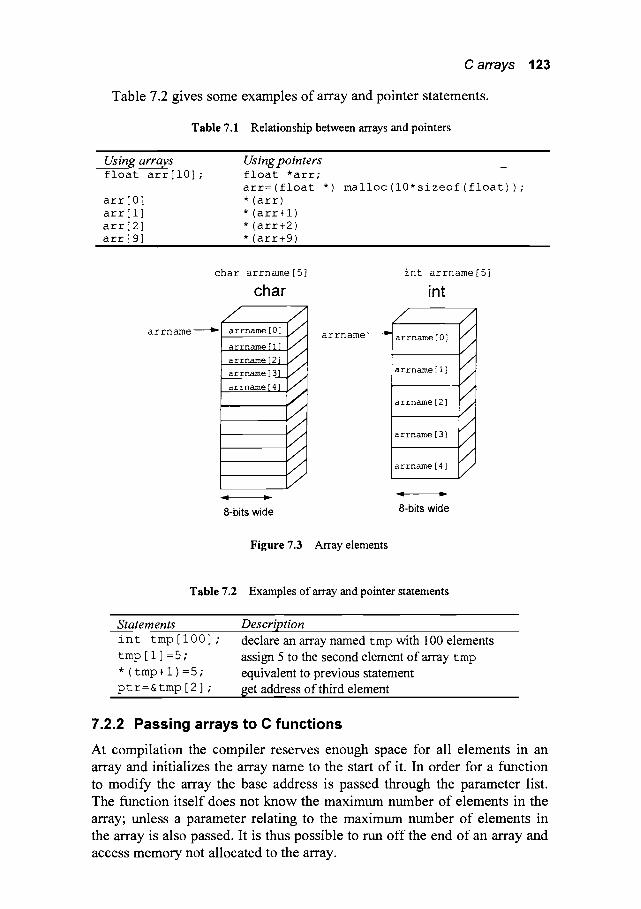
C arrays 123
Table 7.2 gives some examples of array and pointer statements.
Table 7.1 Relationship between arrays and pointers
, Using,, arrays .............. float arr[lO] ;
arr[O] arr[l] arr[2] arr[9]
. . . . . U s i n g p o i n t e r s . . . . . . . . . . . . . . . . . . . . .
float *arr; arr=(float *) malloc(lO*sizeof(float) ) ; * (arr) * (arr+l) * ( arr+2 ) * (arr+9)
, , ,,,
char arrname [5 ]
char /
arrname~ arrname [0]
arrname [ 1 ]
arrname [2 ] b//
arrname [ 3 ]
arrname [ 4 ]
8-bits wide
arrname----~
int arrname [5]
int
/
arrname [ 0 ]
arrname [ 1 ]
arrname [ 2 ]
arrname [ 3 ]
arrname [ 4 ]
/ / / / / / / / / / /
8-bits wide
Figure 7.3 Array elements
Table 7.2 Examples of array and pointer statements
.... s ta tements int tmp[lO0] ;
tmp[l]=5;
* (tmp+l)=5;
ptr =&tmp[2] ; ,,,,,,,,, , , , ,,, ,,,,
D e s c r i p t i o n . . . . . . . . . . . .
declare an array named tmp ~th i O0 elements assign 5 to the second element of array tmp equivalent to previous statement get address of t~r d element
7.2.2 Passing arrays to C functions
At compilation the compiler reserves enough space for all elements in an array and initializes the array name to the start of it. In order for a function to modify the array the base address is passed through the parameter list. The function itself does not know the maximum number of elements in the array; unless a parameter relating to the maximum number of elements in the array is also passed. It is thus possible to run off the end of an array and access memory not allocated to the array.

124 Arrays
The notation used to signify that an array is being passed in a function is square brackets (this signifies that it is a fixed address and not a pointer variable). The following gives an example of array passing.
float maximum(int number_of_elements, float arrayname [] ) { float max; /* number of elements maximum number of elements in the array */ /* this function determines maximum value in an array */
max=arrayname [ 0 ] ; for (i=l;i<number of elements;i++)
if (max<arrayname[i]) max=arrayname[i]; return (max) ;
}
7.3 Pascal arrays
In Pascal, the declaration of an array specifies the data type, the array name and the number of elements in the array in brackets ( [ ] ) . The following gives the standard format for an array declaration.
var arr_name �9 array[startval . .endval] of datatype;
This declares an array of type datatype with the first element of array_ name [startval] to the last array element array_name [endval]. The follow- ing gives some example array declarations and assignments.
vat circuit'array[l..lO] of integer;
vat impedance'array[l..50] of real;
circuit[l] "=42;
impedance [20] �9 =3.14 ;
7.3.1 Passing arrays to functions
In order to pass an array into a Pascal function or a procedure the array type must first be defined. This is achieved with the g ype keyword and an array definition is normally done before any of the procedures or functions. For example to define an array type with 100 elements of real values:
type arrtype'array[l..i00] of real;
and an example array is declared with:
var myarr- arrtype;
When an array is passed into a function or a procedure, the type definition must be used to define the array type. The following section of code gives an example of array being passing into a function. In this case the array type has been defined as a r r g y p e and the name of the array in the main pro- gram is a r r 1. In the function the array name is a r r a y in .
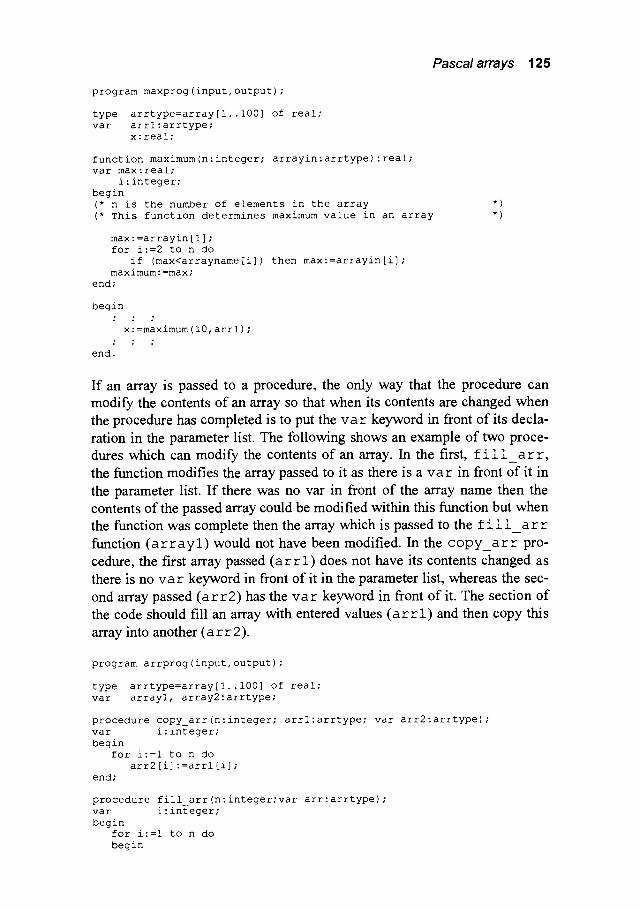
Pascal arrays 125
program maxprog(input,output);
type arrtype=array[l..100] of real; var arrl'arrtype;
x-real;
function maximum(n:integer; arrayin:arrtype):real; var max:real;
i:integer; begin (* n is the number of elements in the array
(* This function determines maximum value in an array
*) *)
max: =arrayin [i ] ; for i-=2 to n do
if (max<arrayname[i]) then max:=arrayin[i] ; max imum: =max;
end;
begin 2 " "
x" =maximum (i0, arrl) ; �9 . .
end.
If an array is passed to a procedure, the only way that the procedure can modify the contents of an array so that when its contents are changed when the procedure has completed is to put the v a r keyword in front of its decla- ration in the parameter list. The following shows an example of two proce- dures which can modify the contents of an array. In the first, f i l l _ a r r , the function modifies the array passed to it as there is a v a r in front of it in the parameter list. If there was no var in front of the array name then the contents of the passed array could be modified within this function but when the function was complete then the array which is passed to the f i 1 l _ a r r function ( a r r a y l ) would not have been modified. In the c o p y _ a r r pro- cedure, the first array passed ( a r r 1) does not have its contents changed as there is no v a r keyword in front of it in the parameter list, whereas the sec- ond array passed ( a r r 2 ) has the v a r keyword in front of it. The section of the code should fill an array with entered values ( a r r 1) and then copy this array into another (a r r 2 ).
program arrprog(input,output);
type arrtype=array[l..100] of real; var arrayl, array2"arrtype;
procedure copy_arr(n:integer; arrl:arrtype; var arr2:arrtype); vat i:integer; begin
for i:=l to n do arr2 [i] :=arrl [i] ;
end;
procedure fill arr(n'integer;var arr:arrtype); m
var i'integer; begin
for i'=l to n do begin

126 Arrays
write('Enter value >>') ; readln(arr[i]) ;
end; end;
begin fill arr(10,arrayl) ; copy_arr (i0, arrayl, array2) ; . . :
end.
7.4 Examples
7.4.1 Running average program
Program 7.1 is a 3-point rtmning average program. This type of program has a low-pass filter response and can filter data samples. Figure 7.4 illustrates how the output is a function of the average of three elements in the input array; this is achieved by generating a running average.
The first and last values of the processed array will take on the same val- ues as the input array as there are not three values over which to take an average. Test rtm 7.1 shows a sample run with 10 entered values.
1
|
1 2 ~3 4 5
INPUT ARRAY
PROCESSED ARRAY
Figure 7.4 Array elements
O Program 7.1 #include <stdio.h>
#define MAX 150 #define TRUE 1 #define FALSE 0
/* maximum values in the array */
void void void
filter(int n, float array_in[],float array_out[]) ; get values(int *n, float array[]) ; print_values(int n, float array_in[],float array_out[]) ;
int { float int
main (void)
input [MAX] , output [MAX] ; /*input values, processed values */ nvalues ;
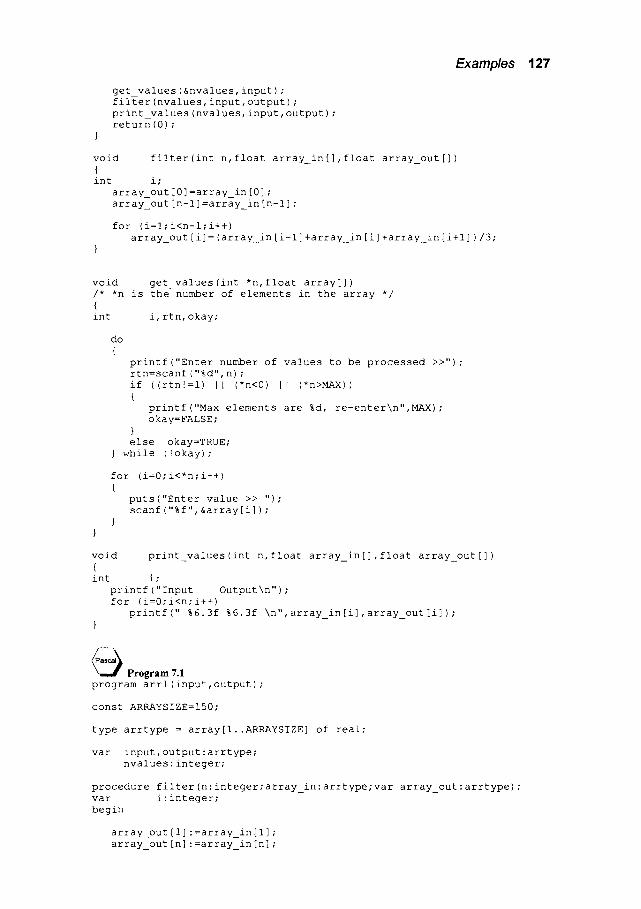
Examples 127
get_values (&nvalues, input) ; filter (nvalues, input, output) ; print values(nvalues, input,output) ; return(0) ;
void filter(int n, float array_in[],float array_out[]) { int i;
array_out [0 ] =array_in [0] ; array_out [n-i ]=array_in [n-l] ;
for (i=l;i<n-l;i++) array_out [ i] = (array_in [i-i ] +array_in [i] +array_in [i+l ] )/3;
void get_values(int *n, float array[]) /* *n is the number of elements in the array */ { int i, rtn, okay;
do {
printf("Enter number of values to be processed >>"); rtn=scanf ("%d", n) ; if ((rtn!=l) I I (*n<0) i I (*n>MAX)) {
printf("Max elements are %d, re-enter\n", MAX) ; okay=FALSE;
} else okay=TRUE;
} while (!okay) ;
for (i=0;i<*n;i++) {
puts ("Enter value >> ") ; scanf("%f",&array[i]) ;
}
void print values(int n, float array_in[],float array_out[]) { int i;
printf ("Input Output\n") ; for (i=0;i<n;i++)
printf(" %6.3f %6.3f \n",array_in[i],array_out[i]) ; }
• Program 7.1
program arrl(input,output) ;
const ARRAYSIZE=I50;
type arrtype = array[I..ARRAYSIZE] of real;
var input,output'arrtype; nvalues-integer;
procedure filter(n'integer;array_in-arrtype;var array_out-arrtype); var i'integer; begin
array_out [i ] -=array_in [i] ; array_out [n] "=array_in[n] ;

128 Arrays
for i'=2 to n-i do array_out [i] �9 = (array_in [i-i ] +array_in [i] +array_in [i+l ] )/3;
end;
procedure get_values(var n'integer;var arr'arrtype); var i- integer;
okay-boolean; begin
repeat writeln('Enter number of values to be processed >>'); readln (n) ; if ((n<0) or (n>ARRAYSIZE)) then begin
writeln('Max elements are ',ARRAYSIZE) ; okay" =FALSE;
end else okay- =TRUE;
until (okay=TRUE) ;
for i:=l to n do begin
write('Enter value >> '); readln(arr[i]);
end; end;
procedure print_values(n'integer; array_in, array_out'arrtype); var i'integer; begin
writeln(' Input Output') ; for i'=l to n do
writeln(array_in[i] -6-3,array_out[i] "6"3) ; end;
begin get_values (nvalues, input) ; filter(nvalues, input,output) ; print values(nvalues,input,output) ;
end.
T e s t r u n 7.1 Enter number of values to be processed >> i0 Enter value >> 3 Enter value >> -2 Enter value >> 4 Enter value >> i0 Enter value >> 3 Enter value >> 2 Enter value >> 1 Enter value >> 0 Enter value >> 19 Enter value >> 14 Input Output
3.000 3.000 -2.000 1.667 4.000 4.000
I0.000 5.667 3.000 5.000 2.00O 2.000 1.000 1.000 0.000 6.667
19.000 ii.000 14.000 14.000
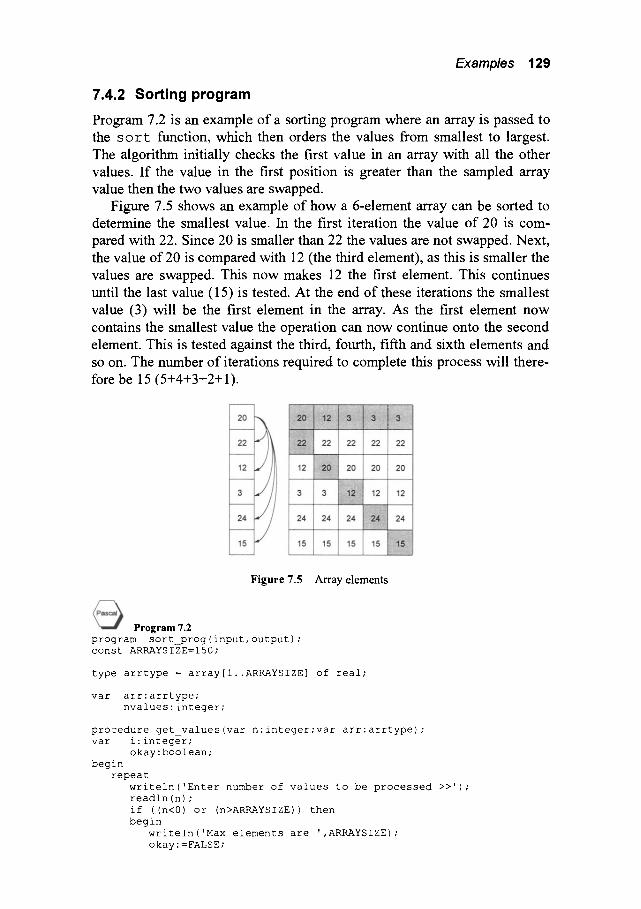
Examples 129
7.4.2 Sorting program
Program 7.2 is an example of a sorting program where an array is passed to the s o r t : function, which then orders the values from smallest to largest. The algorithm initially checks the first value in an array with all the other values. If the value in the first position is greater than the sampled array value then the two values are swapped.
Figure 7.5 shows an example of how a 6-element array can be sorted to determine the smallest value. In the first iteration the value of 20 is com- pared with 22. Since 20 is smaller than 22 the values are not swapped. Next, the value of 20 is compared with 12 (the third element), as this is smaller the values are swapped. This now makes 12 the first element. This continues until the last value (15) is tested. At the end of these iterations the smallest value (3) will be the first element in the array. As the first element now contains the smallest value the operation can now continue onto the second element. This is tested against the third, fourth, fifth and sixth elements and so on. The number of iterations required to complete this process will there- fore be 15 (5+4+3+2+ 1).
Figure 7.5 Array elements
Program 7.2 program sort_prog (input, output) ; const ARRAYSIZE=I50;
type arrtype = array[I..ARRAYSIZE] of real;
var arr'arrtype; nvalues-integer;
procedure get_values(var n'integer;var arr'arrtype) ; var i" integer ;
okay: boolean; begin
repeat writeln('Enter number of values to be processed >>'); readln (n) ; if ((n<0) or (n>ARRAYSIZE)) then begin
writeln('Max elements are ',ARRAYSIZE); okay" =FALSE;

130 Arrays
end else okay" =TRUE;
until (okay=TRUE) ;
for i:=l to n do begin
write('Enter value >> '); readln(arr[i]);
end; end;
procedure print_values(n'integer; array_in:arrtype); var i'integer; begin
writeln('Ordered values'); for i'=l to n do
writeln(array_in[i]'8"3); end;
procedure order(var vall,val2:real); (* vall is the smallest *) var temp:real; begin
if (vall> val2) then begin
temp := vall; vall := val2; val2 := temp;
end; end;
procedure sort(n:integer; var inarr:arrtype); var i,j:integer; begin
for i:=l to n-i do for j:=n downto i+l do
order(inarr[i],inarr[j]) ; end;
begin get_values (nvalues, arr) ; sort(nvalues,arr) ; print_values (nvalues, arr) ;
end.
~ Program 7.2 #include <stdio.h>
#define MAX 150 #define TRUE 1 #define FALSE 0
/* maximum values in the array */
void void void
filter(int n, float array_in[],float array_out[]) ; get_values(int *n, float array[]) ; print_values(int n, float array_in[],float array_out[]) ;
int { float int
main (void)
input [MAX] ,output [MAX] ;/*input values, processed values */ nvalues;
get_values (&nvalues, input) ; filter (nvalues, input, output) ; print_values (nvalues, input, output ) ;

Examples 131
return(O); }
void filter(int n, float array_in[],float array_out[]) { int i;
array_out[0]=array_in[0]; array_out[n-l]=array_in[n-l];
for (i=l;i<n-l;i++) array out[i]=(array_in[i-l]+array_in[i]+array_in[i+l])/3;
void get_values(int *n, float array[]) /* *n is the number of elements in the array */ { int i,rtn,okay;
do {
printf("Enter number of values to be processed >>"); rtn=scanf("%d",n); if ((rtn!=l) II (*n<0) I I (*n>MAX)) {
printf("Max elements are %d, re-enter\n",MAX); okay=FALSE;
} else okay=TRUE;
} while (!okay);
for (i=0;i<*n;i++) {
puts("Enter value >> "); scanf("%f",&array[i]);
}
void print_values(int n,float array_in[],float array_out[] { int i;
printf("Input Output\n"); for (i=0;i<n;i++)
printf(" %6.3f %6.3f \n",array_in[i],array_out[i]);
}
Test run 7.2 s h o w s a sample run with 10 entered values.
Tes trun 7.2 Enter number of values be entered >> I0 Enter value >> 3 Enter value >> -2 Enter value >> 4 Enter value >> i0 Enter value >> 3 Enter value >> 2 Enter value >> 1 Enter value >> 0 Enter value >> 19 Enter value >> 14 Ordered values
-2.000 0.000 1.000 2.000 i0.000 14.000 19.000
3.000 3.000 4.000
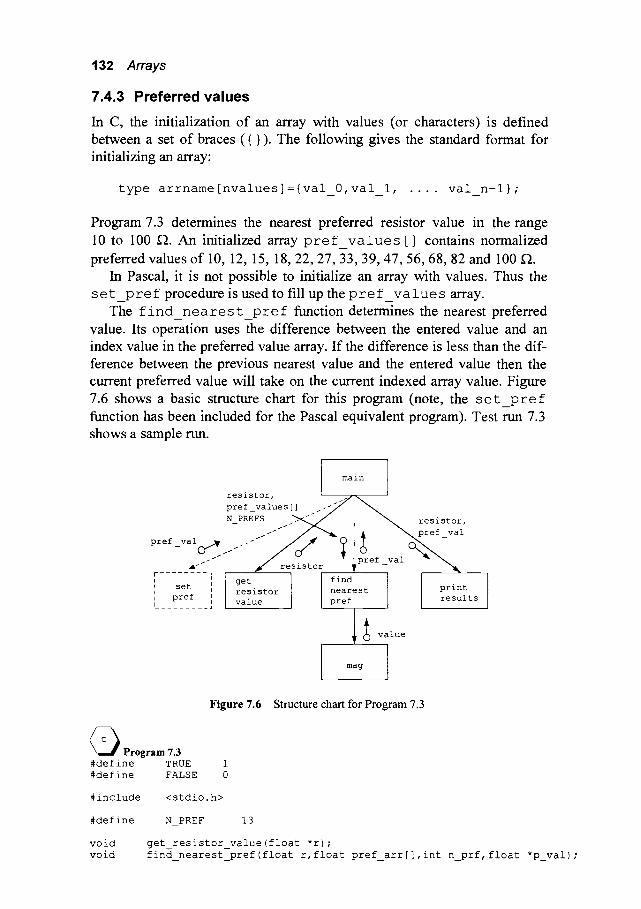
132 Arrays
7.4.3 Preferred values
In C, the initialization of an array with values (or characters) is defined between a set of braces ({ }). The following gives the standard format for initializing an array:
type arrname[nvalues]={val 0,val i, .... val n-l};
Program 7.3 determines the nearest preferred resistor value in the range 10 to 100 f/. An initialized array p re f va 1 ue s [ ] contains normalized preferred values of 10, 12, 15, 18, 22, 27, 33, 39, 47, 56, 68, 82 and 100 f2.
In Pascal, it is not possible to initialize an array with values. Thus the s e t _ p r e f procedure is used to fill up the p r e f _ v a 1 ue s array.
The f i n d _ n e a r e s t _ p r e f function determines the nearest preferred value. Its operation uses the difference between the entered value and an index value in the preferred value array. If the difference is less than the dif- ference between the previous nearest value and the entered value then the current preferred value will take on the current indexed array value. Figure 7.6 shows a basic structure chart for this program (note, the s e t _ p r e f function has been included for the Pascal equivalent program). Test run 7.3 shows a sample run.
main
resistor, pref_values[] - ~ N_PREFS I~~// I ~ resistor,
-''" /~ ~'~ -- ] A ~ pref val
prefva~~ "I" -/resi/sto ~l~Pr r ef_val
........ i get find , set I resistor nearest print I pref I value pref results I . . . . . . . . . j
I ~ value
mag
Figure 7.6 Structure chart for Program 7.3
• Program 7.3
#define TRUE #define FALSE
#include <stdio.h>
#define N PREF 13
void void
get_resistor_value(float *r) ; find_nearest_pref(float r, float pref_arr[],int n_prf, float *p_val);
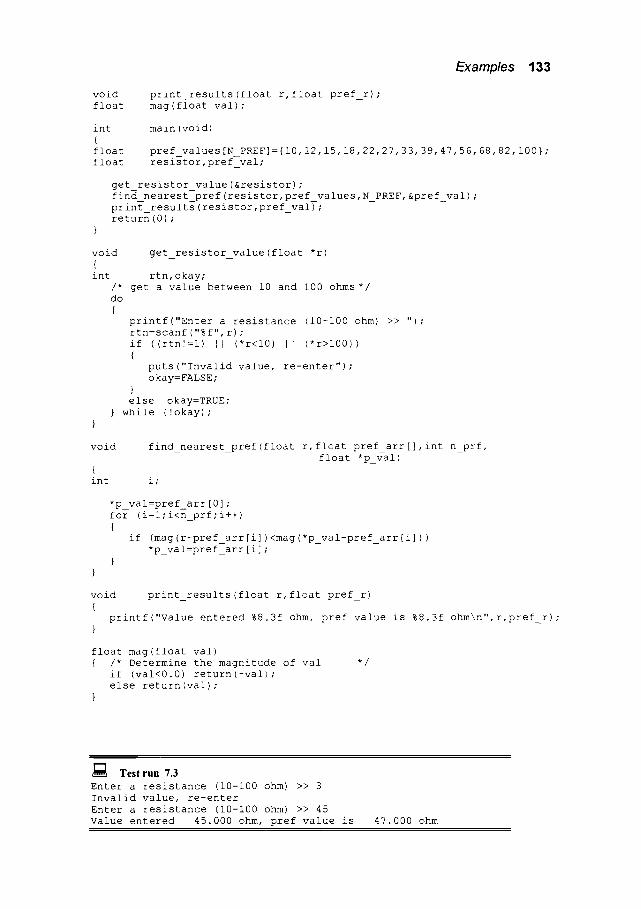
Examples 133
void float
print results(float r, float pref_r); mag(float val);
int { float float
main (void)
pref values[N PREF]={10,12,15,18, 22, 27, 33, 39, 47, 56, 68, 82,100} ; resistor, pref--val ;
get_resistor_value (&resistor) ; find . . . . nearest_pref(resistor,pref values,N PREF,&pref val); print_results (resistor,pref_val) ; return(0) ;
void get_resistor_value (float *r) { int rtn, okay;
/* get a value between i0 and i00 ohms*/ do {
printf("Enter a resistance (i0-i00 ohm) >> "); rtn=scanf("%f",r) ; if ((rtn!=l) I I (*r<10) i I (*r>100)) {
puts ("Invalid value, re-enter") ; okay=FALSE;
} else okay=TRUE;
} while (!okay) ;
void
{ int
find_nearest_pref(float r, float pref_arr[],int n_prf, float *p val)
i;
*p_val=pref_arr [0] ; for (i=l;i<n_prf;i++) {
if (mag(r-pref arr[i])<mag(*p_val-pref_arr[i])) *p_val=pref_arr [i] ;
}
void print_results (float r, float pref_r) {
printf("Value entered %8.3f ohm, pref value is %8.3f ohm\n",r,pref_r); }
float mag(float val) { /* Determine the magnitude of val
if (val<0.0) return(-val) ; else return(val) ;
}
*/
I-'I ~'~ Test run 7.3
Enter a resistance (I0-i00 ohm) >> 3 Invalid value, re-enter Enter a resistance (I0-i00 ohm) >> 45 Value entered 45.000 ohm, pref value is 47.000 ohm

134 Arrays
Program 7.3 const N PREF=I3;
type arrtype = array[l..N_PREF] of integer;
var pref_values:arrtype; resistor,pref_val:integer;
procedure set pref(var arr:arrtype); begin
arr[l]:=10; arr[2]:=12; arr[3]:=15; arr[4]:=18; arr[5]:=22; arr[6]:=27; arr[7]:=33; arr[8]:=39; arr[9]:=47; arr[10]:=56; arr[ll]:=68; arr[12]:=82; arr[13]:=100;
end;
procedure get_resistor_value(var r:integer); var okay:boolean; begin
(* get a value between i0 and i00 ohms*) repeat
write('Enter a resistance (i0-i00 ohm) >> '); readln(r); if ( (r<10) or (r>100)) then begin
writeln('Invalid value, re-enter'); okay:=FALSE;
end else okay:=TRUE;
until (okay=TRUE); end;
function mag(val:integer):integer; begin
(* Determine the magnitude of val if (val<0.0) then mag:=-val else mag:=val;
end;
*)
procedure find_nearest_pref(r:integer;pref arr:arrtype; n_prf:integer; vat p_val:integer); var i:integer; begin
p_val:=pref art[l];
for i:=2 to n prf do begin
if (mag(r-pref_arr[i])<mag(p val-pref_arr[i])) then p_val:=pref_arr[i];
end; end;
, pref_r:8:3,' ohm');
procedure print_results(r,pref_r:real); begin
writeln('Value entered ', r:8:3, ', pref value is ' end;
begin set_pref(pref values); get resistor value(resistor); find_nearest~pref(resistor,pref_values,N PREF, pref_val); print results(resistor,pref_val);
end.
7.5 Exercises
Exercises 135
7.5.1
7.5.2
7.5.3
Write a function that will arrange an array in descending values. Refer to Program 7.2.
Modify Program 7.3 so that it determines the nearest preferred re- sistor value between 10 and 100 ~ for the set of preferred values given in Table 7.3.
Table 7.3 Preferred resistor values
i0 16 27 43 68 Ii 18 30 47 76 12 20 33 51 82 13 22 36 56 91 15 24 39 62 I00
Write a function which scales an entered real value so that it scales it between 10 and 100 and displays the number of zeros. A sample run is given in Test run 7.4.
Testrun 7.4
Enter a value >> 32100 Value is 32.1 with 3 zeros
7.5.4
Possible algorithm is:
O O num zeros'=0; num zeros=0;
while (val<=10) while (val<=10)
begin {
val : =val/10 ; val=val/10;
num zeros'=num zeros+l; num zeros++; w m
end; }
where, after these codes are complete, the value of v a l will be between 10 and 1 O0 and the n um z e r o s will have the nmnber of scaling zeros.
Modify the program in 7.2 so the user can enter any value of resis- tance and the program will determine the nearest preferred resistor value. Test run 7.5 gives a sample run. Hint: write a function which scales the entered value between 10 and 100 f2 (as written in Exercise 7.5.3) then pass the scaled value to the preferred value' s function.
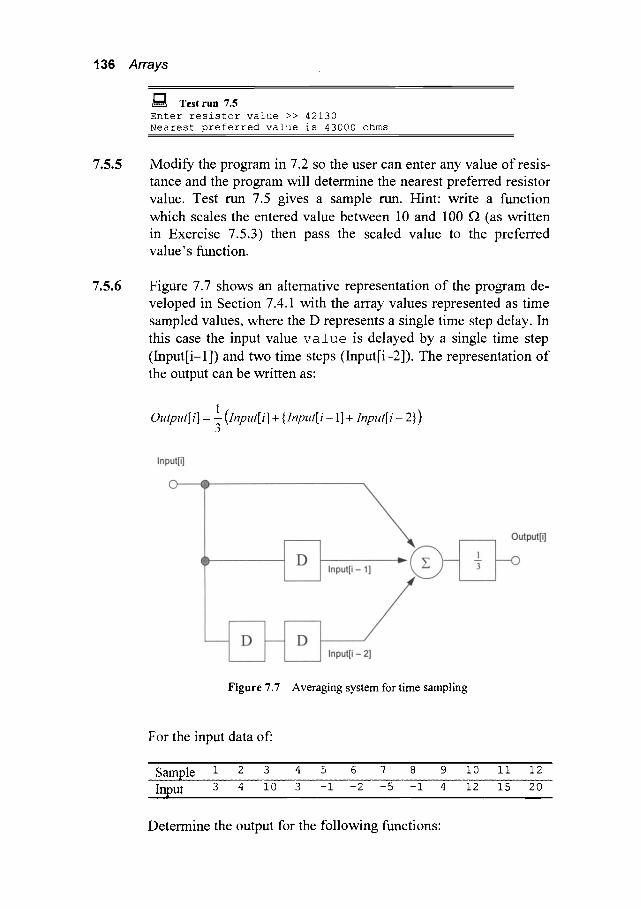
136 Arrays
I'-1 Test run 7.5
Enter resistor value >> 42130 Nearest preferred value is 43000 ohms
7.5.5
7.5.6
Modify the program in 7.2 so the user can enter any value of resis- tance and the program will determine the nearest preferred resistor value. Test run 7.5 gives a sample run. Hint" write a function which scales the entered value between 10 and 100 ff~ (as written in Exercise 7.5.3) then pass the scaled value to the preferred value' s function.
Figure 7.7 shows an alternative representation of the program de- veloped in Section 7.4.1 with the array values represented as time sampled values, where the D represents a single time step delay. In this case the input value v a l u e is delayed by a single time step (Input[i-I]) and two time steps (Input[i-2]). The representation of the output can be written as:
1 (Input[i]+ { Input[ i - l ]+ Input[ i - 2}) Output[i] - -~
Figure 7.7 Averaging system for time sampling
For the input data of:
' " . , s a m p l e ..... i ~ ....... ~. ..... 3 ........... 4 ............. 5 ..... g ...... v ~ ....... S ~- ..... 9 ............ i O:~--~ii ....... i < ~
Input . . . . . . . . 3 4 10 3 -1 -2 -5 -1 4 12 15 20 . . . . . . . . . . . . . . . . . . . . . . . . . . . . . . .
Determine the output for the following functions:
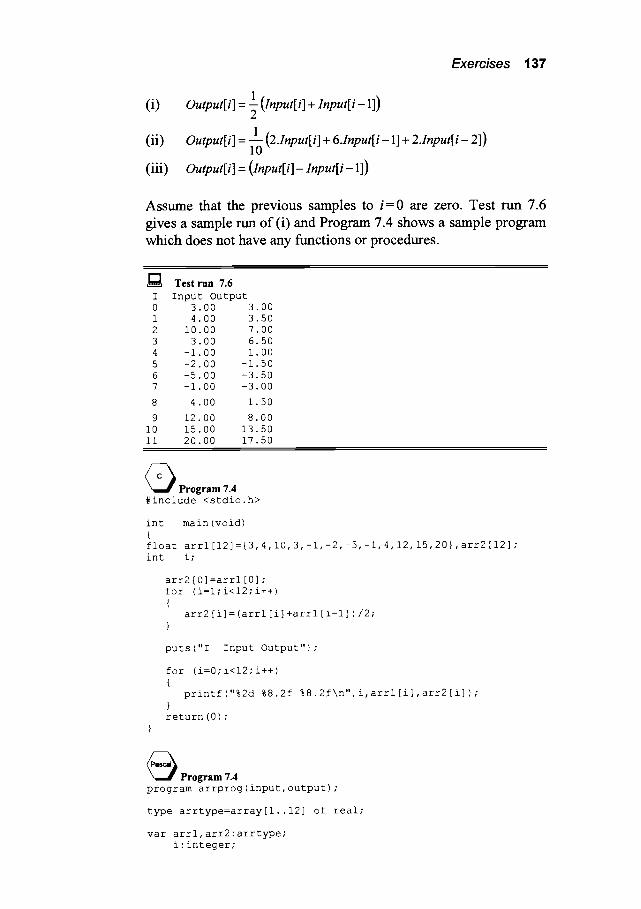
Exercises 137
(i)
(ii)
(iii)
1 (Input[i] + Inpu t [ i - 11) Output[ i] : -~
1 (2 . Input[ i] + 6 . I n p u t [ i - 1] + 2 . I n p u t [ i - 2]) Output[ i] = -i-6
Output[ i] = (Input[i] - Inpu t [ i - 1])
Assume that the previous samples to i = 0 are zero. Test run 7.6 gives a sample run of (i) and Program 7.4 shows a sample program which does not have any functions or procedures.
Testrun 7.6 I Input Output 0 1 2 3 4 5 6 7
8
9 i0 ii
3.00 3.00 4.00 3.50
i0.00 7.00 3.00 6.50
-i.00 1.00 -2.00 -1.50 -5.00 -3.50 -I.00 -3.00
4.00 1.50
12.00 8.00 15.00 13.50 20.00 17.50
• Program 7.4
#include <stdio.h>
int main (void) { float arrl [12]={3, 4, i0, 3,-i,-2, -5,-i, 4, 12, 15, 20}, arr2 [12] ; int i;
arr2[O]=arrl[O] ; for (i=l;i<12;i++) {
arr2 [i] = (arrl [i] +arrl [i-i ] ) /2 ; }
puts("I Input Output") ;
for (i=O;i<12;i++) {
printf("%2d %8.2f %8.2f\n",i,arrl[i],arr2[i]) ; } return(O) ;
• Program 7.4
program arrprog(input,output) ;
type arrtype=array[l..12] of real;
var arrl,arr2:arrtype; i : integer;

138 Arrays
begin arrl[l]:=3; arrl[2]:=4; arrl[3]:=lO; arrl[4]:=3; arrl[5]:=-l;arrl[6]:=-2; arrl[7]:=-5; arrl[8]:=-l;arrl[9]:=4; arrl[lO]:=12; arrl[ll]:=15; arrl[12]:=20;
arr2 [i] :=arrl [i] ;
for i:=2 to 12 do begin
arr2[i]:=(arrl[i]+arrl[i-l])/2; end;
writeln('I Input Output');
for i:=l to 12 do begin
writeln(i:3,arrl[i]:8:2,arr2[i]:8:2); end;
end.
Worksheet 10 139
Worksheet 10
WlO.1 Write a program, using arrays, with a function that will return the largest value entered by the user.
W10.2 Repeat W 10.1 with a minimum function.
WlO.3 Write a program which will fill an array with values for the func- tion:
y = X 2 + 6 x - 2
for x = 1 to 10 (that is, 1, 2, 3, 4, 5, ... 10).
WlO.4 Modify the program in W 10.3 for a range o f - 1 to 1, with a step of O. 1 in-between (that is, - 1, -0.9, -0.8, ... 0.8, 0.9, 1).
Strings
8.1 Introduction
Strings are one-dimensional arrays containing characters. In most cases the number of characters a string has will vary, depending on the input. Thus they must be declared with the maximum number of characters that is likely to occur. In Pascal, strings are relatively easy to use; whereas strings in C are relatively complex, but C has the advantage of having powerful string manipulation routines.
8.2 Pascal strings
Pascal has a special data type reserved for character arrays, which is s t r i n g . The string size can be set as the standard form of an array decla- ration. For example:
var strl : string [i00] ; str2:string[50] ;
(* string with i00 characters *) (* string with 50 characters *)
If the string size parameter is excluded, such as:
var strl : string; (* string with 255 characters *)
then the string is assumed to have a size of 255 characters. Table 8.1 lists the routines (functions and procedures) which are used to
manipulate strings and Table 8.2 shows the routines which are used to con- vert from numeric value into strings, and vice-versa.
Program 8.1 shows an example program which uses strings. The assign- ment operator ( :=) is used to assign one string to another (in this case, strl to str2). The length function is also used to determine the num- ber of characters in the entered string.
A major problem in software development is to guard against incorrect user input. Typically a user may enter a string of characters instead of a nu- meric value, or a real value instead of an integer. Program 8.2 contains a function (get_int) which overcomes this problem. In this function the user enters an input into a string ( inp) . This string is then converted into a

142 Strings
numeric value using the val function. One o f the parameters o f the val func- tion is code. If, after it is called, it is a zero then the string has been success- fully converted, else either a string or a real value was entered. The user will be told that the input is invalid and will be reprompted for another value (as the r e p e a t . . , u n t i l condition is false). The equivalent function to get a real value is:
function get_real(msg:string):real; var inp:string;
code:integer; value:real; begin
write(msg); repeat
readln(inp); val (inp, value, code) ; if (code<>0) then writeln('Invalid input') ;
until (code=0) ; get_real:=value;
end;
Table 8.1 Pascal array routines : . : : : : : : : : : : : : : : : : . . . . . : : : : : : : : : : : : . : : : : : : : : : . . . . . . . . . . . . . . . . . . . . : : : . : : : : : : . : . . . . . . . . . : :
Routine ...... funcs i0n p0 s ( sub S t r: s t ring;
str" string) "byte;
Descr~tion Searches a string (st r) for a Substring ( s u b s t r ) and returns its position.
procedure Delete(var str �9 string;
index �9 Integer; count �9 Integer) ; Deletes a substring ( s t r) from a string starting at i n d e x and ending at i n -
d e x + c o u n t
function Copy(str �9 string; index �9 Integer; count �9 Integer) �9 string;
Returns a substring of a string (str)
starting at index and ending at in-
dex+count
function Concat(sl [, s2, string)" string;
�9 . . , sn] �9 Concatenates a sequence of strings.
procedure Insert(source �9 string; var str �9 string; index �9
Integer);
Inserts a substring (st r) into a string (s).
. . . . . . . ~ , , . . : . . . . . . . . . . . . . . .
Routine . . . . . . . . . . . . . . . . . . .
.... procedure Val(str string; var val ; var code �9 Integer) ;
Table 8.2 Pascal string conversion routines
. . . . . . . . . . . . . . . . . . . . . . . . . D e s c r i p t i o n . . . . . . .
Converts a string Value (str) to its numeric rep- resentation (va l ) , as if it were read from a text file with Read. c o d e is a variable of type Integer. If it is 0 then there is no error else it displays the position of the error.
procedure Str (x [ �9 width [ �9 Converts a numeric value (x) into a string repre- decimals ] ] ; vat str �9 string) ; sentation (str).
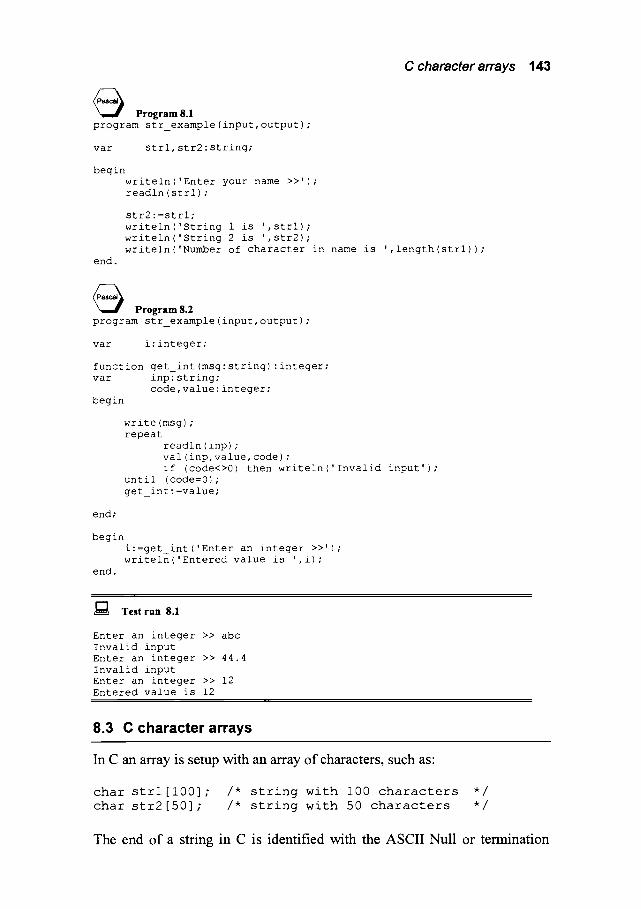
C character arrays 143
Program 8.1 program str_example (input, output) ;
var strl, str2" string;
begin writeln('Enter your name >>'); readln(strl);
str2 : =strl; writeln('String 1 is ',strl) ; writeln('String 2 is ',str2); writeln('Number of character in name is ',length(strl)) ;
end.
Program 8.2 program str_example(input,output);
var i'integer;
function get_int(msg:string):integer; var inp:string;
code,value:integer; begin
write (msg) ; repeat
readln (inp) ; val(inp,value, code) ; if (code<>0) then writeln('Invalid input') ;
until (code=0) ; get int :=value;
end;
begin i'=get int('Enter an integer >>');
m
writeln('Entered value is ',i); end.
Test run 8.1
Enter an integer >> abc Invalid input Enter an integer >> 44.4 Invalid input Enter an integer >> 12 Entered value is 12
,,, . . . . . . . . . . |
8.3 C character arrays
In C an array is setup with an array of characters, such as:
char strl [i00] ;
char str2 [50] ;
/* string with i00 characters */
/* string with 50 characters */
The end of a string in C is identified with the ASCII Null or termination
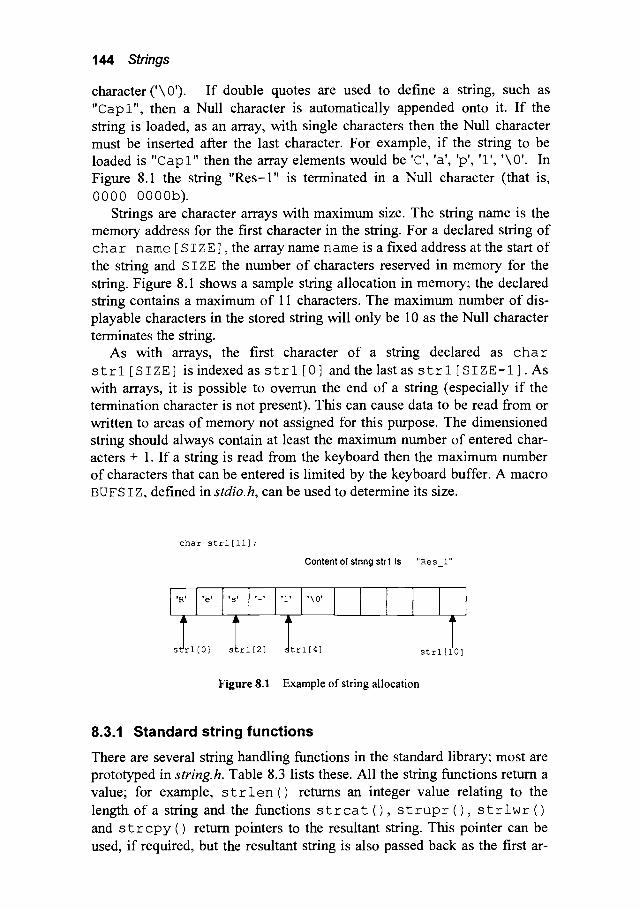
144 Strings
character ( ' \0 ' ) . If double quotes are used to define a string, such as "Cap l" , then a Null character is automatically appended onto it. If the string is loaded, as an array, with single characters then the Null character must be inserted after the last character. For example, if the string to be loaded is " C a p l " then the array elements would be 'C', 'a', 'p', '1', ' \0 ' . In Figure 8.1 the string "Res-1" is terminated in a Null character (that is, 0000 0000b).
Strings are character arrays with maximum size. The string name is the
memory address for the first character in the string. For a declared string of c h a r name [ S I ZE ], the array name name is a fixed address at the start of the string and SIZE the number of characters reserved in memory for the string. Figure 8.1 shows a sample string allocation in memory; the declared string contains a maximum of 11 characters. The maximum number of dis- playable characters in the stored string will only be 10 as the Null character terminates the string.
As with arrays, the first character of a string declared as c h a r s t r i [ S I Z E ] is indexed as s t r I [ 0 ] and the last as s t r I [ S I z E- 1 ]. As
with arrays, it is possible to overrun the end of a string (especially if the termination character is not present). This can cause data to be read from or written to areas of memory not assigned for this purpose. The dimensioned string should always contain at least the maximum number of entered char- acters + 1. If a string is read from the keyboard then the maximum number of characters that can be entered is limited by the keyboard buffer. A macro BUFS I Z, defined in stdio.h, can be used to determine its size.
char strl [ii] ; Content of string strl is "Res_l"
'R' 'e' 's' '-' 'I' '\0'
slrl[O] slrl[2] ~rl[4]
Figure 8.1
T strl [i0]
Example of string allocation
8.3.1 Standard string functions
There are several string handling functions in the standard library; most are prototyped in string.h. Table 8.3 lists these. All the string functions retum a value; for example, s t r l e n ( ) retums an integer value relating to the length of a string and the functions strcat (), strupr (), strlwr ()
and s trcpy () return pointers to the resultant string. This pointer can be
used, if required, but the resultant string is also passed back as the first ar-

C character arrays 145
gument of these functions. The s t r cmp () function returns a 0 (zero) only if both strings are identical.
C Program 8.1 shows how s s c a n f () scans a string with different data t y p e s .
Table 8.3 The main string handling functions
Conversion functions
int strcmp(char *strl,char *str2) ;
Header Description .... f i l e .................
str ing.h Function: Compares ~ 0 Strings s t r 1 and str2.
Return: A 0 (zero) is returned if the strings are identical, a negative value if s t r 1 is less than s t r 2, or a positive value if s t r 1 is greater than s t r 2 .
int strlen(char *str); string.h Function: Determines the number of characters in str. Return: Number of characters in s t r.
char *strcat (char *strl, char *str2) ;
string.h Function: Appends s t r 2 onto s t r 1. The resultant string s t r 1 will contain s t r 1 and str2.
Return: A pointer to the resultant string.
char *strlwr(char *strl) ; string.h Function: Converts uppercase letters in a string to lowercase Return: A pointer to the resultant string
char *strupr(char *strl); string.h Function: Converts lowercase letters in a string to uppercase. Return: A pointer to the resultant string.
char *strcpy(char *strl, char *str2) ;
string.h Function: Copies s t r 2 into s t r 1. Return: A pointer to the resultant string.
int sprintf(char *str, char *format str, argl ..... ) ;
stdio.h Function: Similar to p r i n t f () but output goes into string s t r . Return: Number of characters output.
int sscanf(char *str, char *format str, argl .... ) ;
stdio.h Function" Similar to scanf () but input is from string s t r.
Return: Number O f fields successfully scanned. ....
In this case, the user enters a string of text. The first word of the string is read as a string ( r e s _ n a m e ) and the second as a float ( r e s _ v a l u e s ) . The s s c a n f () retums the number of fields successfully scanned; if the number of fields scanned is equal to 2 the variable o k a y is set to TRUE and the do { } w h i l e ( ) loop will thus end. If it is not equal to 2 the o k a y variable is set to FALSE and an error message is displayed, the user will then be

146 Strings
prompted to re-enter the values.
• Program 8.1
#define TRUE #define FALSE #include <stdio.h> #include <string. h>
int { char float int
do {
main (void)
res name [BUFSIZ], instr [BUFSIZ], outstr [BUFSIZ] ; res value;
D
rtn, okay;
printf("Enter resistor identifier and the value >>"); gets(instr) ;
rtn=sscanf(instr,"%s %f",res name,&res value) ; if (rtn!=2) {
okay=FALSE; printf("Invalid input <%s>\n",instr) ;
} else okay=TRUE;
} while (!okay) ;
printf("Resistor name is %s, value is %8.3f ohm\n", res name, res value);
m
sprintf(outstr,"Resistor name is %s, value is %8.3f ohm\n", res name, res value);
puts(outstr) ; return(0);
Test run 8.2 shows a sample run.
,, , ,, , ,,, . . . . . , % , . . . . . . . . .
Test run 8.2 Enter resistor identifier and the value >> resistor 1 1430
Resistor name is resistor i, value is 1430.000 ohm m
Resistor name is resistor I, value is 1430.000 ohm
C Program 8.2 uses the s~/ng function strcmp(). The do{ }while ()
loop continues until the user enters the word "exit". Test run 8.3 shows a
sample run.
• Program 8.2
#include <stdio.h> #include <string.h>
int { char
main (void)
strI[BUFSIZ],str2[BUFSIZ],instr[BUFSIZ] ;

Examples 147
do {
printf("Enter a string >> "); gets(strl) ;
printf("Enter a string >> "); gets(str2) ;
if (!strcmp(strl,str2))puts(">>>Strings are identical<<<") ; else puts(">>>Strings differ<<<") ;
printf("Do you wish to continue (type 'exit' to quit)>>") ; gets(instr) ;
} while (strcmp(instr,"exit")) ; return(0) ;
, ,
Testrun 8.3 Enter a string >> this is a string
Enter a string >> this is another string
>>>Strings differ<<< Do you wish to continue (type 'exit' to quit)>> Enter a string >> input is zero
Enter a string >> input is zero
>>>Strings are identical<<<
Do you wish to continue (type 'exit' to quit)>> exit
8.4 Examples
8.4.1 Counting the number of characters
Program 8.3 contains a function (nochars ()) which scans a string and determines the number of occurrences of a given character. It uses g e t s ( ) to read the string as it accepts spaces between words.
The function n o c h a r s () uses pointer arithmetic to read each of the characters in the passed string until a Null character. The g e t c h a r ( ) function is used to get the search character. Test run 8.4 shows a sample run.
~ . ~ Program 8.3 #include <stdio.h>
/* Find the number of occurrences in a string */
int nochars(char *str, char ch) ;
int main (void) { char strl [BUFSIZ], ch;
printf("Enter a string >>"); gets(strl) ;
printf("Enter character to find >>") ; ch=getchar () ;
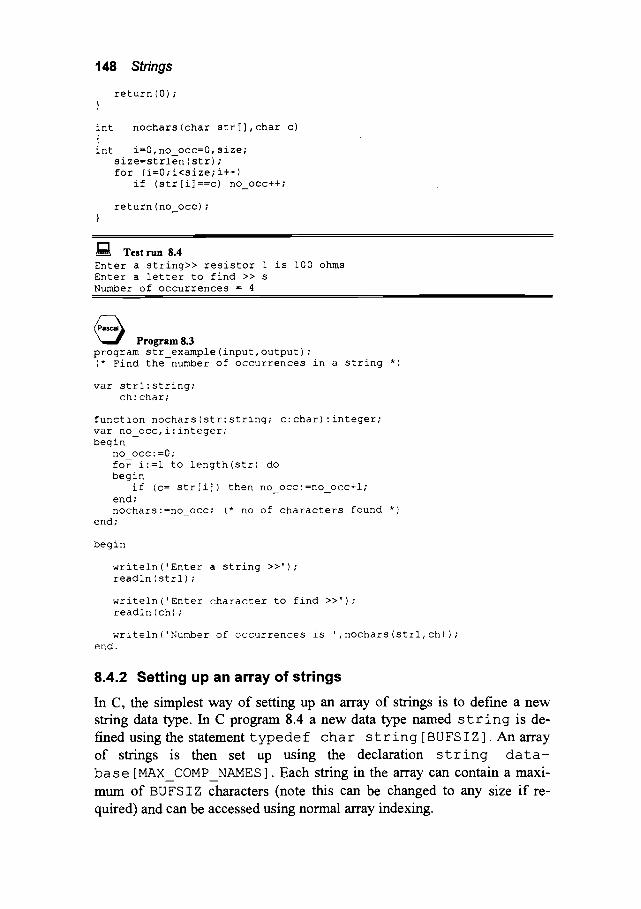
148 Strings
return(0); }
int nochars(char str[],char c) { int i=0,no occ=0,size;
size=strlen (str); for (i=0; i<size; i++)
if (str [i] ==c) no occ++;
return (no_occ) ; }
F'I Test run 8.4
Enter a string>> resistor 1 is i00 ohms Enter a letter to find >> s Number of occurrences = 4
Program 8.3 program str_example(input,output) ; (* Find the number of occurrences in a string *)
var strl'string; ch'char;
function nochars(str'string; c'char)'integer; var no occ, i'integer; begin
no occ : =0 ; m
for i'=l to length(str) do begin
if (c = str[i]) then no occ'=no occ+l; end; nochars'=no occ; (* no of characters found *)
end;
begin
writeln('Enter a string >>'); readln (strl) ;
writeln('Enter character to find >>'); readln (ch) ;
writeln('Number of occurrences is ',nochars(strl,ch)) ; end.
8.4.2 Setting up an array of strings
In C, the simplest way of setting up an array of strings is to define a new string data type. In C program 8.4 a new data type named s t r i n g is de- fined using the statement typedef char string [BUFSIZ]. An array of strings is then set up using the declaration s t r i n g d a t a - b a s e [MAX COMP NAMES]. Each string in the array can contain a maxi- mum of BUFSIZ characters (note this can be changed to any size if re- quired) and can be accessed using normal array indexing.

~ P r o g r a m 8.4 #include <stdio.h> #include <string.h>
#define MAX COMP NAMES
typedef char string[BUFSIZ];
void void
i00
get_component_name (int *comp, string data [] ) ; print_component_names (int comp, string data [] ) ;
int main (void) { int component s=0; string database[MAX COMP NAMES];
do {
get_component_name ( &components, database ) ;
if (strcmp(database[components-1],"exit")) break;
print_component_names (components, database) ; } while (components<MAX_COMP_NAMES) ; return(0) ;
Examples 149
void {
get_component_name(int *comp, string data[])
printf("Enter component name >>");
gets (data [*comp] ) ;
(*comp) ++;
void { int
print_component_names(int comp, string data[])
i;
puts ("Component Names");
for (i=0; i<comp; i++) printf("%d %s\n",i,data[i]) ;
A sample run is given in Test run 8.5. Note that the string " e x i t" quits the program.
~;~ Testrun 8.5 Enter component name >>resistor 1 0 resistor 1 Enter component name >>resistor 2 Component Names 0 resistor 1 1 resistor 2 Enter component name >>capacitor 1 Component Names
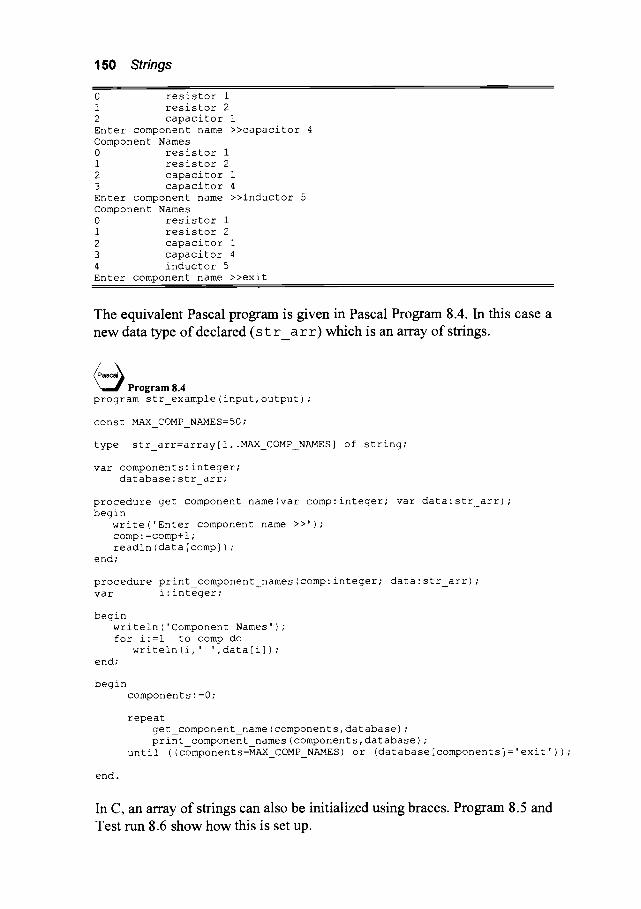
150 Strings
0 resistor 1 1 resistor 2 2 capacitor 1 Enter component name >>capacitor 4 Component Names 0 resistor 1 1 resistor 2 2 capacitor 1 3 capacitor 4 Enter component name >>inductor 5 Component Names 0 resistor 1 1 resistor 2 2 capacitor 1 3 capacitor 4 4 inductor 5 Enter component name >>exit
The equivalent Pascal program is given in Pascal Program 8.4. In this case a new data type of declared ( s t r _ a r r ) which is an array of strings.
Pa'• Program 8.4 program str_example(input,output) ;
const MAX COMP NAMES=50;
type str_arr=array[l..MAX_COMP_NAMES] of string;
var components'integer; database'str arr;
procedure get_component_name(var comp'integer; var data'str_arr); begin
write('Enter component name >>'); comp'=comp+l; readln(data[comp]);
end;
procedure print_component_names(comp'integer; data'str_arr); var i'integer;
begin writeln('Component Names'); for i:=l to comp do
writeln(i,' ',data[i]); end;
begin components'=0;
repeat get_component_name(components,database); print-c~176176176
until ((components=MAX_COMP_NAMES) or (database[components]='exit'));
end.
In C, an array of strings can also be initialized using braces. Program 8.5 and Test run 8.6 show how this is set up.

Examples 151
Q Program 8.5
#include <stdio.h> #define MAX COMP NAMES
typedef char string[BUFSIZ] ;
int main (void) { string database[MAX COMP NAMES]={"Res l","Res 2","Res 3",
"Res 4", "Cap I"}; int i;
for (i=0;i<MAX COMP NAMES;i++) m
printf("%s\n",database[i]); return(0) ;
I-'! Test run 8.6
Res i Res 2 Res 3 Res 4 Cap 1
8.4.3 Impedance of a parallel RC circuit
The program in this section determines the impedance of a parallel RC cir- cuit. Figure 8.2 gives a schematic of this circuit. The impedance of this cir- cuit can be found using the product of the impedances over the sum. Thus"
The magnitude of the impedance is thus"
Izl =
�9
~/1 + (6oRC) 2
A
O
Zin
1 R - -
R R z = s_________~_~ = _ n ~
1 jcoC(R+ 1 ) jcoCR+I
m m m m
Figure 8.2 Parallel RC circuit
A structure chart for a program which determines this magnitude is given in Figure 8.3 (note that for clarity the parameters passed to the two of the calls

lS2 Strings
to the g e t f l o a t () function have not been included). The g e t _ p a r a m e t e r s () function gets three variables (Res , Cap and f r e q ) ; p a r a l l e l _ i m p e d a n c e () determines the input impedance and returns it back into the variable z i n . Finally, p r i n t _ i m p e d a n c e ( ) displays the input parameters and calculated impedance.
The g e t f l o a t () (or g e t r e a l () in Pascal) function gets a value by first putting the entered information into a string and then convening it into a floating point value. If the conversion fails then the user is asked to re-enter the value. It also contains a check for the minimum and maximum value of the entered value.
Res,Cap, / freq ~
g e t parameters
0,
g e t float
get float
main
/ ~ R e s , Cap, :;[ 0 ~~q, Zin
req ~ Zin ~
parallel print impedance impedance
r z
calc mag
Figure 8.3 Structure chart for Program 8.7
~Program 8.6 #include <stdio.h> #define TRUE #define FALSE #define PI #define MICRO
1 0 3.14159 le-6
void void void float void
get_parameters (float *r, float *c, float *f) ; parallel_impedance (float r,float c, float f, float *Z) ; print_impedance (float r, float c, float f, float Z) ; calc_mag(float x, float y) ; get_float (char msg[],float min, float max, float *val) ;
int { float
main (void)
Res,Cap, freq, Zin;
get_parameters (&Res, &Cap, &freq) ; parallel_impedance (Res, Cap, freq, &Zin) ; print_impedance (Res, Cap, freq, Zin) ;
Examples 16:3
return(0); }
void get_parameters (float *r, float *c, float *f) {
get_float ("Enter resistance >> ", 0,10e6, r) ; get_float("Enter capacitance >> ",0,l,c) ; get_float ("Enter frequency >> ",0,1e7,f) ;
}
void { char int
do {
get float(char msg[],float min, float max, float *val) m
instr [BUFSIZ] ; rtn, okay;
printf ("%s", msg) ; gets(instr) ; rtn=sscanf (instr, "%f", val) ; if ((rtn!=l) I I (*val<min) I I (*val>max)) {
okay=FALSE; printf("Invalid input <%s>\n",instr) ;
} else okay=TRUE;
} while (!okay) ; }
void print_impedance (float r, float c, float f, float Z) {
printf("R=%f ohms C=%f uF f=%f Hz\n",r,c/MICRO, f); printf("Zin = %f ohms\n",Z);
}
void parallel_impedance (float r, float c, float f, float *Z) {
*Z=r/(calc_mag(l,2*PI*f*r*c) ) ; }
float calc_mag(float x, float y) {
return (x*x+y*y) ; }
Test run 8.7 shows that the user can enter a value in the incorrect format and the program will re-prompt for another. Notice that the user has entered the strings " n o n e " and " f r e d " ; the program copes with these and re-prompts for an input.
~[ Testrun 8.7 Enter resistance >>none Invalid input <none> Enter resistance >>fred Invalid input <fred> Enter resistance >>-i00 Invalid input <-i00> Enter resistance >>i000 Enter capacitance >>le-6 Enter frequency >>le3 R=I000.000 ohms C= 1.00 uF f=1000.000 Hz Zin = 24.704565 ohms

154 Strings
• Program 8.5
program str_example (input, output ) ; const PI=3.14159; MICRO=Ie-6;
var Res, Cap, freq, Zin: real;
procedure get_real(msg:string; min, max:real; var value:real) ; var instr:string;
code : integer; okay:boolean;
begin repeat
write (msg) ; readln (instr) ; val (instr, value, code) ; if (code<>0) then (* invalid input *) begin
okay: =FALSE; writeln('Invalid input <',instr, '>') ;
end else okay : =TRUE;
until (okay=TRUE); end;
procedure get parameters(var r, c, f : real) ; begin
get real('Enter resistance >> ',0,10e6, r) ; get_real('Enter capacitance >> ',0, l,c) ; get_real('Enter frequency >> ',0,1e7,f);
end;
procedure print_impedance(r,c,f,Z:real) ; begin
writeln('R=',r, ' ohms C =',c/MICRO, ' uF f=',f, 'Hz') ; writeln('Zin = ',Z, ' ohms') ;
end;
function calc_mag(x,y'real)'real; begin
calc_mag'=x*x+y*y; end;
procedure parallel_impedance(r,c,f-real;var Z'real) ; begin
Z'=r/(calc mag(l,2*PI*f*r*c)) ; end;
begin get_parameters (Res, Cap, freq) ; parallel_impedance (Res, Cap, freq, Zin) ; print_impedance (Res, Cap, freq, Zin) ;
end.
8.5 Exercises
8.5.1 Explain why it is better to input numeric values as a string and then converting it to a numeric value rather than entering it with s c a n f () (in C) or r e a d l n () (in Pascal).
8.5.2 Write a program that declares the following seven strings. "RL series", "RC series","LC series",
Exercises lS5
"RL parallel", "RC parallel", "LC parallel", "EXIT"
Store these strings as a single array of strings named menu by de- claring an array of strings. The program should display these strings as menu options using a f o r loop. Test run 8.8 shows a sample run.
Testrun 8.8 Menu Options
RL series RC series LC series RL parallel RC parallel LC parallel EXIT
8.5.3 Modify the program in Exercise 8.5.2 so that the user can enter the menu option. The program will display a message on the option selected. Test run 8.9 shows a sample run.
Testrun 8.9 Menu Options
RL series RC series LC series RL parallel RC parallel LC parallel QUIT
Enter option >> RL series >>> RL series circuit selected
Menu Options RL series RC series LC series RL parallel RC parallel LC parallel QUIT
Enter option >> QUIT
8.5.4
8.5.5
8.5.6
8.5.7
Modify some programs in previous chapters so that program pa- rameters are entered using the g e t _ f l o a t () (or g e t _ r e a l ( ) ) function.
Write a function that will capitalize all the characters in a string.
Repeat Exercise 8.5.5 but make the characters lowercase.
Write a function that will determine the number of words in a string.

156 Strings
Works heet 11
W I I . I Write a program in which the user enters a string of text and then presses the RETURN key. The program will then display the num- ber of characters in the entered text. A sample run is shown in Test run 8.10.
r-1 pa~ Test run 8.10 Enter some text >> This is some sample text
This string has 24 characters
W l l . 2 Write a program in which the user enters a string of either "sin", "cos" or "tan" and then a value. The program will then determine the corresponding sine, cosine or tan of the value. A sample run is shown in Test run 8.11.
r'l Test run 8.11
Enter a math function
Sin
Cos Tan
Exit
>> Sin Enter a value (in degrees) >> 30
Sin of 30 degrees is 0.5
Enter a math function
Sin
Cos Tan Exit
>> Exit
W l l . 3
W l l . 4
Modify the program in W 11.2 so that the program reads in the en- tered value as a string and converts it to a real value. The program should re-prompt if the value is invalid.
Write a program in which the user enters a number of names, each followed by the RETURN key. The end of the names is signified by entering no characters. The program should store these in an ar- ray of strings and then display them to the user. A sample run is shown in Test run 8.12.
Worksheet 11 157
r'l Test run 8.12
Enter names (or press return for end of list) >>
FRED BERT
BILL
GARY
The names entered were:
FRED
BERT
BILL
GARY

File I10
9.1 Introduction
Information on computers is organized into directories and files. Typical ly
files have a fi lename followed by a f i lename extension which identifies the
type of file. This file extension is important in some operating systems, such as Windows 95 and Windows NT, as it identifies the application program which is associated with the file. Table 9.1 shows some typical file types.
Table 9.1 Typical file types
L , , , , , , , , , , ,
File File type File extension extension
File type
�9 c C program �9 j Pg �9 doc Word processor . t x g �9 bmp Bitmapped graphics file . e x e �9 g i f GIF file (compressed . o b j ,
image file) . o �9 a v i Motion video . x 1 s �9 ps Postscript file (printer . h l p
output) �9 a u Compressed sound file . f o r �9 way Sound file . p a s �9 mpg Compress motion video . j a v a
JPEG file (compressed image) Text file (ASCII coding) PC executable file Object code
Microsoft Excell spreadsheet Help files
FORTRAN program Pascal program Java program
Files either contain text in the form of ASCII (a text file) or a binary file. A
text file uses ASCII characters and a binary file uses the binary digits which the computer uses to store values. It is not normally possible to view a bi- nary file without a special program, but a text file can be viewed with a text
editor. Figure 9.1 shows an example of two files which contain four integer val-
ues. The binary file stores integers using two bytes in 2s complement signed
notation, whereas the text file uses ASCII characters to represent the values.
For example, the value of -1 is represented as 1 1 1 1 1 1 1 1 1 1 1 1 1 1 1 1 in
2s complement. This binary pattern is stored to the binary file. The text file uses ASCII characters to represent -1 (these will be ' - '

160 Files
File pointer
Binary file
11111111 11111111 11111111 11100000 00000000 00000000 00000000 01000001
Figure 9.1 File pointer
and '1'), and the bit pattern stored for the text file will thus be 0010 1101 (ASCII ' - ' ) and 0011 0001 (ASCII '1'). If a new line is required after each number then a new-line character is inserted after it. Note, there is no new-line character in ASCII and it is typical to represent a new-line with two characters, a carriage return (CR) and a line feed (LF). In C, the new- line character is denoted by ' \ n'.
The file pointer moves as each element is read/written. Figure 9.2 shows a file pointer pointing to the current position within the file.
The number of bytes used to store each of the elements will depend on the data type of the variable. For example, a long integer will be stored as four bytes, whereas a floating point value can be stored as four bytes (on some systems). The floating point format differs from an integer format; the standard floating point format uses a sign-bit, a significand and an exponent. The end of the file is signified by an EOF character.
Figure 9.2 Binary and text files

9.2 Pascal file I I0
Pascal file l/O 161
Pascal has a very basic set of file input/output. The functions used are de- freed in Table 9.2.
In Pascal, a file pointer is def'med either with the text keyword (for a text file) or with:
var j ~ t r " file of type;
Thus a file pointer for an integer file would use the following:
var fptr- file of integer;
Pascal Program 9.1 reads in a number of integer values and writes each one in turn to a file ( ' o u t . d a t ' ) . The program initially assigns the filename to the file pointer ( f o u r ) using the a s s i g n function. Next the file is created with the r e w r i t e function. Each value that is entered is then written to the file using the w r i t e function. The program keeps prompting for values until the user enters a -1 value. When this happens the program will exit the r e p e a t . . , u n t i l loop. The file pointer is then reset to the start of the file with the r e s e t function. Next the values are read back using the r e a d function. Finally, after the -1 value is read-in, the file is closed with the c 1 o s e routine.
Table 9.2 Pascal file I/O functions
Function . . . . .
a s s i g n OCptr , fname ) Description Assigns a fiie point (fptri to a fiie (/name). ..........
rewrite Ofp tr ) Creates and opens a file which has been assigned with fptr.
reset (fptr) Opens an existing file which has been assigned with fptr.
write (fptr, val) Writes a value (val) to a file which has been assigned with fptr.
r e a d (fptr, val) Reads a file which has been assigned withfptr and puts the value into val.
, ~, ,,, ,,, .................................... ~,~ ,~ ....
• Program 9.1
program example file(input,output) ;
var lout : text; val : integer;
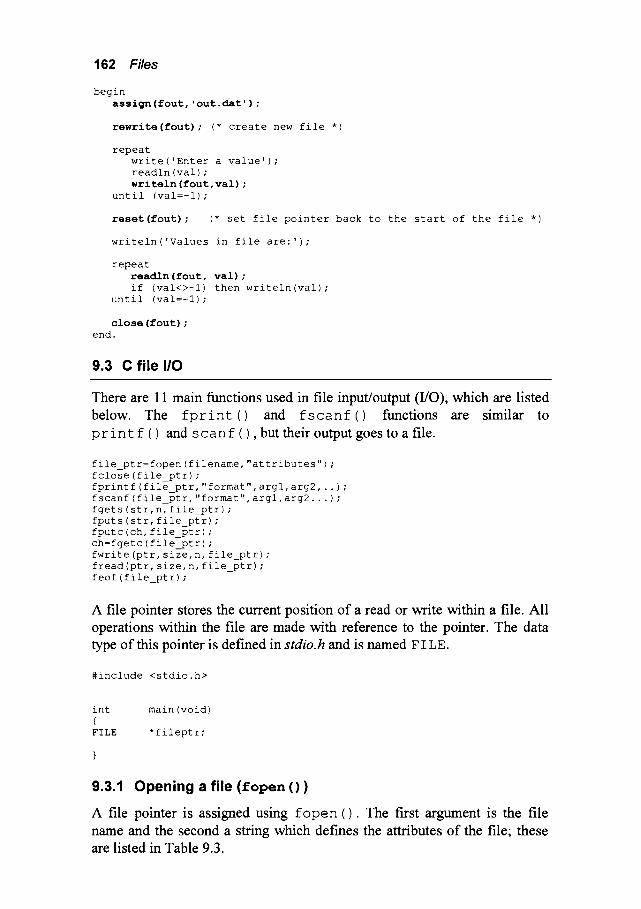
162 Files
begin assign (lout, ' out. dat' ) ;
rewrite (lout) ; (* create new file *)
repeat write('Enter a value') ; readln (val) ; writeln (lout, val) ;
until (val=-l) ;
reset(lout); (* set file pointer back to the start of the file *)
writeln('Values in file are:');
repeat readln (four, val) ; if (val<>-l) then writeln(val) ;
until (val=-l) ;
close (four) ; end.
9.3 C file I10
There are 11 main functions used in file input/output (I/O), which are listed below. The f p r i n t () and f s c a n f () functions are similar to p r i n t f () and s c a n f ( ) , but their output goes to a file.
file_ptr=fopen (filename, "attributes") ; fclose (file_ptr) ; fprintf (file_ptr, "format", argl, arg2, . . ) ; fscanf (file_ptr, "format", argl, arg2... ) ; fgets(str,n, file_ptr) ; fputs (str, file_ptr) ; fputc (ch, file_ptr) ; ch=fgetc (file_ptr) ; fwrite (ptr, size, n, file_ptr) ; fread (ptr, size, n, file_ptr) ; feof (file_ptr) ;
A file pointer stores the current position of a read or write within a file. All operations within the file are made with reference to the pointer. The data type of this pointer is defined in stdio.h and is named FILE.
#include <stdio.h>
int main (void) { FILE *fileptr;
9.3.1 Opening a file (fopen())
A file pointer is assigned using f o p e n ( ) . The first argument is the file name and the second a string which defines the attributes of the file; these are listed in Table 9.3.
C file I /0 163
The default mode for opening files is text, but a t att~bute can be appended onto the attribute string to specify a text file. For example, the attribute " w t " opens a text file for writing. A binary file is specified by appending a b onto the attribute string. For example, " r b " will open a bi- nary file for reading.
The format of the f o p e n ( ) ftmction is:
file_ptr=fopen ( "Filename", "attrib" ) ;
If fopen () is completed successfully a file pointer will be returned, and this is initialized to the start of the file. If was not able to open the file then a NULL will be returned. There can be many reasons why a file cannot be opened, such as:
�9 The file does not exist.
�9 The file is protected from reading from and/or writing to.
�9 The file is a directory.
It is important that a program does not read from a file that cannot be opened as it may cause the program to act unpredictably. A test for this condition is given next.
int main (void) { FILE *in;
if ( (in=fopen("in.dat '',''r''))=:NULL) {
printf("File IN.DAT could not be opened") ; } . . . . . . . . . . . . . . . . . . . . . . . . . .
return(0) ; }
Table 9.3 File attributes
Attribute Function " r "
" w " " a i,
ww r + ww
ww W+ ww , , a + , ,
open for reading only create for writing append; open for writing at the end-of-file or create for writing if the file does not exist open an existing file for update (read and write) create a new file for update open for append: open (or create if the file does not exist) for up-
...... date a t the end 0fthe file) .........................................................................
9.3.2 Closing a file ( f c l o s e ())
Once a file has been used it must be closed before the program is termi- nated. A file which is not closed properly can cause problems in the file

164 Files
system. The standard format is given next; the return value ( r t n ) returns a 0 (a zero) on success, otherwise EOF if any errors occur. The macro EOF is defined in stdio.h.
rtn=fclose (file_ptr)
The f e o f ( ) function detects the end-of-file character. It returns a non-zero value (that is, a TRUE) if the file pointer is at the end of a file, else a 0 is returned. The function shown next uses the f e o f () function to detect the end of the file and also tests the return from the f s c a n f () so that an un- successful reading from the file is disregarded.
int { FILE int
get values(int maxval, char fname[],int *n, float arr[] )
*in; i=0, rtn;
if ((in=fopen(fname,"r"))==NULL) {
printf("Cannot open %s\n", fname) ; return (NOFILE) ;
}
while (! (feof(in))) {
rtn=fscanf (in, "%f", &art [i] ) ; if (rtn!=EOF) i++; if (i==maxval) break;
}
fclose(in) ; *n=i; return ( ! NOFILE) ;
9.3.3 R e a d i n g from f i les
Table 9.4 lists the main functions and examples used in reading from files.
Table 9.4 Reading from files
F u n c t i o n . . . . . .
fgetc
,,,, ,, ,,,,,,,,,,, ,, ,,,,, ,,,
................... D e s c r i p t i o n . . . . . . . . . . . . . . . . . . . . . . . . . . . . . . . . . . . . . . . . . . . . . . . . . . . . . . . . . . . . . .
The f g e t c () function is similar to g e t c h a r ( ) and is used to read a single character from a file.
ch=fgetc (file_ptr) This reads ch from the file specifed by f ile_ptr. If there is an error in getting the character an EOF will be returned.
fputc The f p u t c ( ) function is similar to p u t c h a r ( ) and is used to write a single character to a file. The standard format is given next.

Cfilel/O 165
rtn-fputc (ch, file_ptr) This writes c h to the file specifed by f i l e _ p t r . The return ( r t n ) returns the last character written; if there is an error it will return EOF.
fgets The f g e t s ( ) function is similar to g e t s ( ) and is used to get a string of text from a file up to a new-line character.
rtn=fgets (str, n, file_ptr) It reads from the file specifed by f i 1 e _ p t r into s t r with a maximum of n characters. The return ( r t n ) points to a string pointed to by s t r or will return a NULL if the end-of-file (or an error) is encountered.
fscanf The f s c a n f () function is used with text files and has a similar format to s c a n f () but the input is read from a file.
rtn=fscanf (file_ptr, "%s %d %d",
strl, &vall, &val2)
This function returns the number of fields successfully scanned (rtn) or, if there was an attempt to read from the end-of-file, an EOF value is returned.
. . . . . . . . . . . . . . . . . . . . . . . . . .
9.3.4 Writing to files
Table 9.5 lists the main functions used in writing to files.
Table 9.5 Writing to files
, ,J, , ,, ,,,
Func t ion fprintf
Descrip~.on . . . . . . . . . . . . . . . . The f p r i n t f () function is used with text files and has a similar format to p r i n t f () but the output goes to a file.
rtn=fprintf (file_ptr, "%s %d",strl,valuel)
The return value (rtn) returns the number of bytes sent to the file; in the event of an error it returns EOF.
fputc The f p u t c ( ) function is similar to p u t c h a r ( ) and is used to write a single character to a file.
rtn=fputc (ch, file_ptr) This writes c h to the file specifed by f i l e _ p t r . The return ( r t n ) returns the last character written; if there is an error it will return EOF.
fputs The f p u t s ( ) function is similar to p u t s ( ) and is used to write a string of text to a file. It does not append the output with a new line.
rtn=fputs (str, file_ptr) This outputs s t r to the file specifed by f i le_pt r.
The return (rtn) returns the last character written; if there is an error it returns EOF.

166 Files
9.4 Examples
9.4.1 Averages program
C Program 9.1 and Pascal Program 9.2 use text files to determine the aver- age value of a number of floating point values contained in a file. The g e t v a l u e s ( ) function is used to read the values from a file, in this case, IN.DAT. This file can be created using a text editor.
c • Program 9.1 /* Program to determine the average of a file /* containing a number of floating point values
#include <stdio.h>
#define #define
int float void
*/ */
NOVALUES i00 /* max. number of entered values */ NOFILE 0
get_values(int maxvals, char fname[],int *n, float arr[]) ; calc average(int nval,float arr[]) ; display_average(int nval,float arr[],float aver) ;
int main (void) { float values[NOVALUES],average; int nvalues;
if (get_values (NOVALUES, "IN. DAT", &nvalues, values) ==NOFILE) return(1) ; average=calc_average (nvalues, values) ; display_average (nvalues, values, average) ; return(0) ;
get_values(int maxvals, char fname[],int *n, float arr[])
*in; i=0, rtn;
if ( (in=fopen (fname, "r") )==NULL) {
printf("Cannot open %s\n",fname) ; return(NOFILE) ;
}
int { FILE int
while (!feof(in)) {
rtn=fscanf(in,"%f",&arr[i]) ; if (rtn!=EOF) i++; if (i==maxvals) break;
} fclose(in) ;
*n=i; return(!NOFILE) ;
float calc_average(int nval,float arr[]) {
int i; float running_total=0;

Examples 167
for (i=0; i<nval; i++) running_total+=arr [i] ;
/* note there is no test for a divide by zero */ return(running_total/nval);
void { int
display_average(int nval,float arr[],float aver)
i;
puts("INPUT VALUES ARE'");
for (i=0; i<nval;i++) printf("%8.3f\n",arr[i]);
printf("Average is %8. 3f\n", aver) ; }
An example of the contents of the IN.DA T file are given next.
3.240
1.232 6.543 -1.432
A sample run using this file is given in Test rtm 9.1.
I--I ~'~ Test run 9.1
INPUT VALUES ARE: 3.240 1.232 6.543
-1.432
Average is 2.396
• Program 9.2
(* Program to determine the average of a file (* containing a number of floating point values
*) *)
const NOVALUES=I00; (* max. number of entered values *)
type arrtype=array[l..NOVALUES] of real;
var values'arrtype; average-real; nvalues:integer;
procedure get_values(maxvals-integer; fname'string; var n-integer; var arr-arrtype);
var infile:text; begin
n.=0; assign(infile,fname); reset(infile); while ( (not eof(infile)) and (n<maxvals)) do begin
if (not eof(infile)) then n:=n+l;
168 Files
read(infile,arr[n]) ; end; close(infile) ;
end;
function calc average(nval'integer; arr'arrtype)'real; var i'integer;
running_total'real; begin
running_total'=0; for i'=l to nval do
running_total'=running_total+arr[i];
(* note there is no test for a divide by zero *) calc_average'=running_total/nval;
end;
procedure display_average(nval'integer; arr'arrtype; aver'real); var i-integer; begin
writeln('INPUT VALUES ARE- ') ;
for i-=l to nval do writeln(arr[i] "8"3) ;
writeln('Average is ',aver'8"3) ; end;
begin get values (NOVALUES, 'IN.DAT',nvalues,values) ; average::calc average(nvalues,values) ; display_average(nvalues,values,average) ;
end.
9.4.2 Binary read/write
C Program 9.2 and Pascal Program 9.3 is an example of how an array of floating point values is written to a binary file. In the C program the floating point values are writen using f w r i t e () and then read back using f r e a d () . Note that the NOFILE flags returned from d u m p _ d a t a () and r e a d d a t a () are ignored by main () . In the Pascal program the values are written to the file using w r i t e and read using the r e a d routine.
c • Program 9.2 /* Writes and reads an array of floats /* to and from a binary file
*/ */
#include <stdio.h> #define NOFILE 0 #define MAXSTRING i00 #define MAXVALUES i00
/* error flag is file does not exist */ /* max. number of char's in filename */ /* max. number of floats in array */
void void int int void
get_filename(char fname[]) ; get_values(int maxvals, float vals[],int *nov) ; dump_data (char fname[],float arr[],int nov) ; read data (char fname[],float arr[],int *nov) ; print values(float arr[],int nov) ;
int main (void)
Examples 169
char float int
fname [MAXSTRING] ; values [MAXVALUES ] ; no values; /* number of values in the array */
n
get_filename ( fname ) ; get_values (MAXVALUES, values, &no_values ) ; dump_data ( fname, values, no_values ) ; read data(fname,values,&no values) ; print values(values,no values); return(0) ;
void get filename(char fname[]) {
printf("Enter file name >>") ; scanf ("%s", fname) ;
}
void { int
get_values(int maxvals, float vals[],int *nov)
i;
do {
printf("Number of values to be entered >>"); scanf ("%d", nov) ; if (*nov>maxvals)
printf("Too many values: MAX: %d\n",MAXVALUES); } while (*nov>MAXVALUES) ;
for (i=0; i<*nov; i++) {
printf("Enter value %d >>",i); scanf("%f",&vals[i]) ;
}
int { FILE int
dump_data(char fname[],float arr[],int nov)
*out; i;
/* open for binary write */ if ((out=fopen(fname,"wb"))==NULL) {
printf("Cannot open %s\n",fname); return(NOFILE); /* unsuccessful file open */
}
for (i=0; i<nov; i++) fwrite(&arr[i],sizeof (float),l,out) ;
fclose (out) ; return ( ! NOFILE) ;
int { FILE
read data (char fname[],float arr[],int *nov) m
*in;
*nov=0; /* number of values in the array */
/* open for binary read */ if ((in=fopen (fname, "rb"))==NULL) {
printf("Cannot open %s\n",fname); return(NOFILE); /* unsuccessful file open */
}
170 Files
while (!feof(in)) {
if (fread(&arr[*nov],sizeof (float),l,in)==l) (*nov) ++;
}
fclose (in) ;
return(!NOFILE) ; }
void print values(float arr[],int nov) { int i;
printf("Values are'\n") ;
for (i=0; i<nov; i++) printf ("%d %8.3f\n", i,arr [i] ) ;
A sample test run is given in Test run 9.2.
~m~ Test run 9.2
Enter file name >>number.dat Number of values to be entered >>5 Enter value 0 >>1.435 Enter value 1 >>0.432 Enter value 2 >>-54.32 Enter value 3 >>-1.543 Enter value 4 >>i00.01 Values are: 0 1.435 1 0.432 2 -54.320 3 -1.543 4 I00.010
• Program 9.3
(* Writes and reads and array of floats (* to and from a binary file
const MAXVALUES=I00; (* max. number of floats in array
type float_file=file of real; float_arr=array[l..M/LXVALUES] of real;
var fname'string; values-float arr; no values'integer;
E
procedure get_filename(var fname'string); begin
write('Enter file name >>'); readln(fname);
end;
procedure get_values(maxvals'integer; var vals'float_arr;var nov'integer); vat i'integer; begin

Examples 171
repeat write('Number of values to be entered >>'); readln(nov); if (nov>maxvals) then
writeln('Too many values: MAX:',MAXVALUES); until ((nov>0) and (nov<maxvals));
for i:=l to nov do begin
write('Enter value ',i,' >>'); readln(vals[i]);
end; end;
procedure dump_data(fname'string;arr'float_arr;nov'integer); var outfile'float file;
i'integer; begin
assign(outfile, fname) ; (* assign binary file *) rewrite (outfile) ;
for i'=l to nov do write(outfile, arr[i]);
close (outfile) ; end;
procedure read_data(fname'string; var arr'float_arr;var nov'integer); var infile'float file; begin
nov'=0; (* number of values in the array *)
assign(infile, fname); reset(infile);
while ( not eof(infile)) do begin
nov : =nov+ 1 ; read (infile, arr [nov] ) ;
end;
close(infile); end;
procedure print values(arr'float_arr;nov'integer); var i'integer; begin
writeln('Values are'');
for i'=l to nov do writeln(i'3,arr[i] "8"3) ;
end;
begin get_filename ( fname ) ; get_values (MAXVALUES, values, no_values) ; dump_data ( fname, values, no_values ) ; read data(fname,values,no values) ; print_values (values, no_values ) ;
end.
9.5 Reading and writing one character at a time
In C a single character is read from a file with f g e t c () and read back with

172 Files
the f p u t c ( ) . C Program 9.3 shows an example of reading a character, one at a time, from a file and writing it to another file. Pascal Program 9.4 gives the equivalent program. It uses the r e a d and wr i t e routines.
• Program 9.3
#include <stdio.h>
int main (void) { FILE *in, *out; char ch;
in=fopen ("in. dat", "r") ; out=fopen ("out. dat", "w") ;
while ( ! f e o f ( i n ) ) {
ch=fgetc(in) ; /* read character printf("%c",ch) ; /* show character to screen fputc(ch, out) ; /* write character
} fclose(in) ; fclose(out); return(0) ;
* / * / * /
• Program 9.4
program copytext(input,output) ; var inf, outf: text;
ch" char ; begin
assign(inf, 'in.dat') ; reset (inf) ;
assign(outf, 'out.dat') ; rewrite(outf) ; (* create file
while (not eof(inf) ) do begin
read(inf, ch) ; (* read character write(ch) ; (* show character to screen write(outf, ch) ; (* write character
end; close(inf); close(outf) ;
end.
*)
*) *) *)
9.6 Exercises
9.6.1 Write a program in which the user enters any character and the program will determine the number of occurrences of that charac- ter in the specified file. For example:
P'I Test run 8.3
Enter filename: fred.dat Enter character to search for: i There are 14 occurrences of the character i in the file fred.dat.
9.6.2
9.6.3
9.6.4
Exercises 173
Write a program which will determine the number of words in a file. (Hint" count the number of spaces in the file.)
Write a program which will determine the number of lines in a file. A possible method is to count the new-line characters.
Write a program which will get rid of blank lines in an input file and writes the processed file to an output file. Example input and output files are given next.
Input file" Frequency Impedance (mag) i00 i01.i
150 165.1
200 300.5
Output file: Frequency i00 150
Impedance (mag) I01.i 165.1

174 Files
Worksheet 12
W12.1 Write a program which will determine the average, the largest and the smallest values of a text file containing floating point values in a text form.
W12.2 Write a program which will count the number of characters in a file. Hint" read the file one character at a time.
W12.3 Write a program which will count the occurrences of the letter 'a' in a file. Hint: read the file one character at a time.
W12.4 Modify Program 9.1 so that the output is written to a file.

Structures and Records
10.1 Introduction
A structure (or, in Pascal, a record) is an identifiable object that contains items which defme it. These items are linked under a common grouping. For example, an electrical circuit has certain properties that define it. These could be:
�9 A circuit title. �9 Circuit components with identifiable names. �9 Circuit components with known values.
For example, a circuit may have a title of "RC F i l t e r C i r c u i t " , the circuit components are named "RI", "R2" and " e l " and the values of these
are 4320 ~ , 1200 ~ and 1 ktF, respectively. The title and the component names are character strings, whereas the component values are floating points. A structure (or record) groups these properties into a single entity. These groupings are referred to as fields and each field is made up of mem- bers.
10.2 Records in Pascal
A structure is a type that is a composite of elements that are distinctive and perhaps of different data types. The following is an example of a structure which will store a single electrical component. The record variable declared, in this case, is C o m p o n e n t . It has three fields of differing data types; c o s t (a float), c o d e (an integer) and name (a character string).
type comp = record
cost:real; code:integer; name:string;
end;
var Component'comp;

176 Structures and records
The dot notation ( . ) accesses each of the members within the record. For example"
Component.cost:=30.1; Component.code:=32201; Component.name:='Resistor i';
Pascal Program 10.1 is a simple database program. The database stores a record of a single electrical component which includes its name (Component. name), its cost (Component. cost) and its code number (Component. code). The name is a string, the code a signed integer and the cost a floating point value.
~ P r o g r a m 10.1 program struct ex(input,output); type
comp = record cost:real; code:integer; name:string;
end;
var Component'comp;
begin Component.cost:=30.1; Component.code:=32201; Component.name:='Resistor i'; writeln('Name ',Component.name,' Code ',Component.code,
' Cost ',Component.cost); end.
Test run 10.1 shows a sample rtm.
!--1 Test run I0.I
Name Resistor 1 Code 32201 Cost 30.100000
Pascal Program 10.2 contains a procedure to print the record ( p r i n t _ c o m p o n e n t ()) . To pass a structure into a function the data type of parameter passed must be defined. For the purpose the t y p e keyword is used to define a new data type, in this case, it is named comp.
• Program 10.2 program struct ex(input,output) ;
type comp = record
cost : real; code : integer; name : string;
end; var Component : comptype ;
RecordsinPascal 177
procedure print_component(comp'comptype); begin
writeln('Name ',Comp.code, ' Code ',Comp.code,' Cost ',Comp.cost); end;
begin Component.cost:=30.1; Component.code:=32201; Component.name:='Resistor i'; writeln('Name ',Component.name,' Code ',Component.code,
' Cost ',Component.cost); end.
Test run 10.2 shows a sample run.
t ' l Test run 10.2
Name Resistor 1 Code 32201 Cost 30.100000
Pascal Program 10.3 uses a function to get data into the record ( g e t _ c o m p o n e n t ( ) ) . The parameter passed into this function has a v a r in front of the parameter so that it can be passed back to the calling routine.
• Program 10.3
program struct ex(input,output) ;
type comp = record
cost:real; code:integer; name:string;
end;
var Component'comptype;
procedure get component(var comp:compType); begin
Comp.cost:=30.1; Comp.code:=32201; Comp.name:='Resistor i';
end;
procedure print_component(comp'comptype); begin
writeln('Name ',Comp.name,' Code ',Comp.code,' Cost ',Comp.cost); end;
begin get_component(Component); print_component(Component);
end.
Test run 10.3 shows that the results are identical to the previous run.
I"I ~'~ Test run 10.3 Name Resistor 1 Code 32201 Cost 30.100000
178 Structures and records
10.3 Structures in C
A structure is a type that is a composite of elements that are distinctive and perhaps of different data types. The following gives an example of a struc- ture declaration (in this case the strings have been declared with a maximum of 100 characters).
struct {
char title[lO0] ; char compl_name[lO0], comp2_name[lO0], comp3_name[lO0] ; float compl_val, comp2_val, comp3_val;
} circuit;
The following is an example of a structure which will store a single electri- cal component. The structure variable declared, in this case, is Compo- n e n t . It has three fields of differing data types; cost (a float), code (an integer) and name (a character string).
struct {
float cost; int code; char name[BUFSIZ];
} Component;
The dot notation ( . ) accesses each of the members within the structure. For example"
Component.cost=12.3 Component.code=31004; strcpy(Component.name,"Resistor I");
C Program 10.1 is a simple database program. The database stores a record of a single electrical component which includes its name ( C o m p o n e n t . name), its cost ( C o m p o n e n t . c o s t ) and its code number ( C o m p o n e n t . code ) . The name is a string, the code a signed integer and the cost a floating point value.
••.• Program 10.1
#include <stdio.h> #include <string. h>
int main(void) { struct {
float cost; int code; char name[BUFSIZ];
} Component;
Component.cost=30.1;

Structures in C 179
Component. code=32201 ; strcpy (Component . name, "Resistor 1") ;
printf("Name %s Code %d Cost %f\n", Component. name, Component. code, Component. cost) ;
return(0) ;
Test run 10.4 shows a sample run.
Testrunl0.4 Name Resistor 1 Code 32201 Cost 30.100000
Note that the structure could have been set up at initialization using the following"
struct (
float cost; int code; char name[BUFSIZ];
} Component={30.1, 32201, "Resistor i"};
C Program 10.2 contains a function to print the structure ( p r i n t component ()). To pass a structure into a function the data type of parameter passed must be defined. For the purpose the t y p e d e f key- word is used to define a new data type; in this case, it is named CompType . The program also uses braces to initialize the fields within the structure.
c • Program |0.2 #include <stdio.h> #include <string.h>
typedef struct (
float cost; int code; char name[BUFSIZ];
} CompType;
void print_component(CompType Comp);
int main (void) ( CompType Component= { 30 .1, 32201, "Resistor i"};
print_component (Component) ; return(0);
void print_component (CompType Comp) {
printf("Name %s Code %d Cost %f\n", Comp. name, Comp. code, Comp. cost ) ;
}

180 Structures and records
Test run 10.5 shows a sample run.
r - ' l ~'~ Test run 10.5 Name Resistor 1 Code 32201 Cost 30.100000
C Program 10.3 uses a function to get data into the structure (get: c o m p o n e n t ( ) ) . The parameter passed into this function will be a pointer to the base address of the structure. For this purpose, an ampersand is inserted before the structure name. The structure pointer operator ( - > ) is used with the structure pointer to access a member of a field.
• Program 10.3
#include <stdio.h> #include <string.h>
typedef struct {
float cost; int code; char name[BUFSIZ];
} CompType;
void void
get_component(CompType *Comp); print_component(CompType Comp);
int main (void) { CompType Component ;
get_component(&Component); print_component(Component); return(0);
void {
get_component (CompType *Comp)
Comp->cost=30.1; Comp->code=32201; strcpy(Comp->name,"Resistor i");
void {
print_component(CompType Comp)
printf("Name %s Code %d Cost %f\n", Comp. name, Comp. code, Comp. cost) ;
Test run 10.6 shows that the results are identical to the previous run.
r-1 ~,~ Test run 18.6
Name Resistor 1 Code 32201 Cost 30.100000

10.4 Array of structures
Array of structures 181
An array of structures can be set up in a way similar to normal array index- ing. When an array is declared the compiler assigns enough memory to hold all its elements. Program 10.4 is similar to Program 10.3, but uses an array of structures to store up to 5 electrical components. Figure 10.1 shows a structure chart of this program. It uses get_float ( ) and get_int ( ) to filter any invalid inputs for the cost and code of a component. These func- tions were developed in Chapter 9 and have been reused as they have been well tested and are easily ported into any program. The cost of the electrical components is now limited between 0 and 1,000 and the component code from 0 to 32,767. A g e t _ s t r i n g () function has also been added to get the name of the component. Test run 10.7 shows a sample run.
structure meters: component.name; main component.cost; component.code; ~ ~ i t r
component //component] ~ , _
~ ~ e n t string
msg 1~ ~ get get get string float int
Figure 10.1 Structure chart for Program 10.4
c • Program 18.4 #include #include
<string.h> <stdio.h>
#define TRUE #define FALSE #define MAXCOMPONENTS
1 0 50
typedef struct {
float cost; int code; char name[BUFSIZ];
} CompType;
void void
get_component (int *n, CompType Comp [ ] ) ; print_component (int n, CompType Comp [ ] ) ;

182 Structures and records
void void void
int { int char
get_int(char msg[],int min, int max, int *val) ; get_float (char msg[],float min, float max, float *val) ; get_string(char msg[],char ins[]);
main(void)
NumComponents=0; instr[BUFSIZ];
CompType Component[MAXCOMPONENTS];
do {
get_component ( &NumComponents, Component ) ; print_component (NumComponent s, Component ) ; get_string("Do you wish to continue (type 'exit' to leave)",
instr ) ; } while (strcmp(instr,"exit") !=0) ; return(0) ;
void { int
get_component(int *n, CompType Comp[])
i;
i=*n; get_string ("Enter name of component >> ",Comp[i] .name); get_float("Enter cost of component >> ",0.0, i000.0,
&Comp[i] .cost) ; get_int("Enter component code >> ",0,32767,&Comp[i] .code); (*n) ++;
void { int
print_component (int n,CompType Comp[])
i;
for (i=0;i<n;i++) printf("Name %12s Code %8d Cost %8.2fkn",
Comp [i] .name, Comp [i] . code, Comp [i] . cost) ; } void get_string(char msg[],char ins[]) {
printf("%s",msg) ; gets(ins) ;
}
void { char int
do {
get_float (char msg[],float min, float max, float *val)
instr[BUFSIZ]; rtn, okay;
printf("%s",msg) ; gets(instr) ; rtn=sscanf (instr, "%f", val) ; if ((rtn!=l) I I (*val<min) I I (*val>max)) {
okay=FALSE; printf("Invalid input <%s>\n",instr) ;
} else okay=TRUE;
} while (!okay);
void {
get int(char msg[],int min, int max, int *val)

Array of structures 183
char instr [BUFSIZ] ; int rtn, okay;
/* get an integer value between min and max */ do {
printf("%s",msg) ; gets(instr) ; rtn=sscanf(instr,"%d",val) ; if ((rtn!=l) I l (*val<min) i I (*val>max)) {
okay=FALSE; printf("Invalid input <%s>\n",instr) ;
} else okay=TRUE;
} while (!okay) ; }
Testrunl0.7 Enter name of component >> resistor 1 Enter cost of component >> 1.23 Enter component code >> 32455 Name resistor 1 Code 32455 Cost 1.23 Do you wish to continue (type 'exit' to leave)y Enter name of component >> capacitor 1 Enter cost of component >> 2.68 Enter component code >> 32456 Name resistor 1 Code 32455 Cost 1.23 Name capacitor 1 Code 32456 Cost 2.68 Do you wish to continue (type 'exit' to leave)y Enter name of component >> inductor 2 Enter cost of component >> 6.32 Enter component code >> 32457 Name resistor 1 Code 32455 Cost 1.23 Name capacitor 1 Code 32456 Cost 2.68 Name inductor 2 Code 32457 Cost 6.32 Do you wish to continue (type 'exit' to leave)exit
~ Program 10.4 const MAXCOMPONENTS=50;
type comptype = record
cost:real; code:integer; name:string;
end;
comp_arr=array[l..MAXCOMPONENTS] of comptype;
var Component'comp arr; NumComponents'integer; instr'string;
procedure print_component (n'integer;comp'comp_arr) ; var i" integer ; begin
for i'=l to n do writeln('Name ',Comp[i] .name, ' Code ',Comp[i] .code,
' Cost ',Comp[i] .cost) ; end;

184 Structures and records
procedure get_string(msg-string;var ins~ begin
write(msg); readln(ins);
end;
procedure get_real(msg:string; min, max:real; var value:real); var instr:string;
code:integer; okay:boolean;
begin repeat
write(msg); readln(instr); val(instr,value, code); if (code<>0) then begin
okay:=FALSE; writeln('Invalid input <',instr,'>');
end else okay:=TRUE;
until (okay=TRUE); end;
procedure get_int(msg:string; min, max:integer; var value:integer); var instr:string;
code:integer; okay:boolean;
begin repeat
write (msg) ; readln (instr) ; val (instr, value, code) ; if (code<>0) then begin
okay:=FALSE; writeln('Invalid input <',instr, '>');
end else okay:=TRUE;
until (okay=TRUE); end;
procedure get_component(var n-integer; var Comp'Comp_arr); begin
n" =n+l; get_string('Enter name of component >> ',Comp[n] .name); get_real ('Enter cost of component >> ',0.0,1000.0,Comp[n] .cost) ; get_int('Enter component code >> ',0,1000,Comp[n] .code) ;
end;
begin NumComponents:=0; repeat
get_component(NumComponents,Component); print_component(NumComponents,Component); get_string('Do you wish to continue (type "exit" to leave)',instr);
until (instr='exit'); end.
10.4.1 Complex arithmetic
Program 10.5 uses a structure (or record) to multiply to complex numbers. If these complex numbers are a+jb and c+jd and the result is z then:

Array of structures 185
z = ( a + j b X c + j d )
= ac + jad + j b c - bd
= ( a c - bd) + j (ad + bc)
Re(z)= a c - bd
Im(z) = a d + bc
This operation is implemented in the function (procedure) m u l t i _ c o m p l e x () . Test am 10.8 gives a test run for the result of 3+j4 and 6+j2.
< ~ P r o g r a m 10.5 #include <stdio.h> typedef struct {
float x,y; } complex;
void multi_complex (complex a, complex b, complex *c) ; void show_complex (complex a) ;
int main (void) { complex zl, z2, z3;
zl.x=3; zl.y=4; z2.x=6; z2. y=2; multi_complex(zl, z2,&z3) ; show_complex (z3) ; return(O) ;
void multi_complex(complex a, complex b, complex *c) {
c->x=a.x*b.x-a, y*b. y; c->y=a, x*b. y+a. y*b. x;
}
void show_complex (complex a) {
printf("%8.2f + j %8.2f\n",a.x,a.y); }
Test run 10.8 10 + j 30
~ Program 10.5 t y p e
rect=record x,y-real;
end;
var zl,z2,z3:rect;
procedure multi rect(a,b-rect;var c'rect);
186 Structures and records
begin
end;
c.x-=a.x*b.x-a.y*b.y; c.y:=a.x*b.y+a.y*b.x;
procedure show_rect(a:rect); begin
writeln(a.x'8:2, '+j ',a.y'8:2); end;
begin zl.x:=3; zl.y:=4; z2.x:=6; z2.y:=2; multi rect(zl, z2,z3); show rect(z3);
m
end.
10.5 Exercises
10.5.1 Write a database program, based on Program 10.4, which gives a menu choice as to whether the user wishes to enter input a new electric component, to list all the components already in the data- base, or to exit the program. A sample run is given in Test rtm 10.9.
Testrunl0 .9 Do you wish to (i) Input a component (2) List all components (3) Exit from program Enter option >>>
10.5.2
10.5.3
Write a program which converts from rectangular notation to polar form. In rectangular notation:
Z=X+~
in polar form this is:
z =1 1<4
where Izl = ~/x 2 + y 2 and ( z ) - t a n - l ( y )
Write a program using structures (or records) with complex im- pedance values that will determine the parallel impedance of two impedances Zt and Z2. The formula for the impedances in parallel is given below:

Exercises 187
Z I Z 2
Z EQ - Z1 + Z 2
10.5.4 Write a program which contains the following complex number manipulation routines"
(i) (ii) (iii) (iv)
complex number add. complex number subtract. complex number multiply. complex number divide.
10.5.5 Modify the database program in the text so that the user can select an option which will order the component names in alphabetic or- der.

Introduction to C++
11.1 Introduction
C is an excellent software development language for many general purpose applications. Its approach is that data and associated functions are distinct, data is declared and the functions are then implemented. Object-oriented programming languages allow the encapsulation of a set of data types and associated functions into objects. These objects are integrated entities.
C++ is by far the most popular object-oriented language. It was devel- oped by Bjane Stoustrup at AT&T Bell Laboratories. A new programming language, based on C++, called Java, has since been developed by Sun Microsystems. C++ is well supported and there are many different development systems. Figure 11.1 shows Microsoft Visual C++ Version 4.0. Microsoft Visual Version 5.0 is similar but has enhanced support for WWW applications. The default file extension for a C++ program is CPP.
Figure 11.1 Microsoft Visual C++

192 Introduction to C++
11.2 Enhancements to C++
C++ has many enhancements over C. These include"
I/O stream support. This facility allows data to be directed to an input and/or an output stream. Section 11.3 outlines this. Objects. An object incorporates data def'mitions and the declaration and def'mitions of functions which operate on that data. Classes. These are used to implement objects and can be initialized and dis- carded with constructors and destructors, respectively. Section 11.6 outlines this. Complex numbers. C++ supports the usage of complex numbers and their mathematical operations. Section 11.7 outlines these. Data hiding. This allows certain data to be hidden from parts of a program which are not allowed access to it. Section 11.6 outlines this. Overloading. This allows more than one definition and implementation of a function. Section 11.5 outlines this. Virtual functions. This allows any one of a number of multiple defined functions to be called at run-time. Template classes. This allows the same class to be used by different data.
11.3 I10 stream
In C, output is sent to the standard output using the p r i n t f () function. In C++, standard input and output are taken from streams. The standard output stream is c o u t (normally to the monitor) and the standard input stream is taken from c i n (normally from the keyboard). To be able to use these streams, the i o s t r e a m , h header file must be included in the program. The redirection operator (<<) is used to direct the data to the input or output. Program 11.1 shows an example program and Test run 11.1 shows a sample r u n .
• Program 11.1
#include <iostream.h>
int main (void) { int a=10,b=12;
cout << "Value of a is " << a << " and b is " << b; return(0);
! - " !
~-~ Test run II.I
The value of a is I0 and the value of b is 12
Program 11.2 shows another example and Test run 11.2 show a sample run.

Functionoverloading 193
• Program 11.2
#include <iostream. h>
#define PI 3.14157
int main (void) {
float radius,area;
cout << "Enter the radius > "; cin >> radius; area=PI*radius*radius; cout<< "Area is " << area; return(0);
i - - I ~-~ Test run 11.2
Enter radius > 32
Area is 3619. 967773
11.4 Comments
C++ supports single line comment with a double slash ( / / ) or multiline comment which are defined between a (* and a *) . The single line com- ment makes everything on the line after the double slash a comment. A few examples are:
PI=3. 14157;
area=PI*r*r
// Sets the value of pi
// Area is PI times the square of the radius
11.5 Function overloading
Often the programmer requires to call a function in a number of ways but still wants the same name for the different implementations. C++ allows this with function overloading. With this the programmer writes a number of functions with the same number but which are called with a different argu- ment list or return type. The compiler then automatically decides which one should be called. For example, in C++ Program 11.3 the programmer has defined three square functions named s q r () . The data type of the argument passed is of a different type for each of the functions, that is, either an • a float or a double. The return type is also different. In this program, three variables, of different types, have been declared in the m a i n () func- tion. The compiler will then call the correct format function for each of the calls. Test am 11.3 shows a sample run. It can be seen that the implementa- tion of the square function with a f 1 o a t data type produces some rounding errors.
194 Introduction to C ++
• Program 11.3
#include <iostream.h>
int sqr (int x) ; float sqr (float x) ; double sqr (double x) ;
int main (void) { int vall=4; float va12=4, i; double va13=4. I;
cout << "Square of 4 is " << sqr(vall)<< "\n"; cout << "Square of 4.1 is " << sqr(val2)<< "\n"; cout << "Square of 4.1 is " << sqr(val3)<< "\n"; return(O) ;
int sqr (int x) {
return (x'x) ; }
float sqr (float x) {
return(x'x) ; }
double sqr (double x) {
return(x'x) ; }
Tes t run 11 .3 Square of 4 is 16
Square of 4.1 is 16.809999
Square of 4.1 is 16.81
The argument list of the overloaded function does not have to have the same number of arguments for each of the overloaded functions. C++ Program 11.4 shows an example of an overloaded function which has a different number of arguments for each of the function calls. In this case, the s h o w _ r e s u l t s () function can either be called with a message, followed by three values, or the three values, or with a single value.
• Program 11.4
#include <iostream.h>
void get_values(char msg[],float *Rl,float *R2); float calc_parallel(float Rl,float R2) ; void show_results(char msg[],float RI, float R2,float Requ); void show results(float RI, float R2,float Requ); void show results (float Requ) ;
int main (void)

Classes 195
{ float rl, r2, requ;
get_values("Enter RI and R2 and press RETURN ",&rl,&r2) ; requ=calc_parallel (rl, r2) ; show results("Rl, R2 and Req are ",rl,r2,requ) ;
return(0) ;
float calc_parallel(float Rl,float R2) {
return ((RI*R2) / (RI+R2)) ;
void get_values(char msg[],float *Rl,float *R2) {
cout << msg; cin >> *RI >> *R2;
void show results (char msg[],float RI, float R2,float Requ) {
cout << msg; cout << .... << R1 << .... << R2 << .... << Requ << "\n";
} void show results(float RI, float R2,float Requ) {
cout << .... << R1 << .... << R2 << .... << Requ << "\n"; }
void show results (float Requ) {
cout << Requ << "\n"; }
11.6 Classes
Classes are a general form of structures (struct). In C, a struct gathers together data members and in C++ the struct may also have function mem- bers. The main difference between a c l a s s and a s t r u c t is that in a s t r u c t all members of the structure are public, while in a c l a s s the members are, by default private (restricted). In a class, members are made public with the p u b l i c keyword, and private with the p r i v a t e keyword.
C++ Program 11.3 shows an example of a class. It can be seen that it is similar to a structure, but that some parts of the class are private while others are public. These are defined as follows:
�9 A public member of a class can be accessed by external code that is not part of the class. Often the public member is a function.
�9 A private class member can only be used by code defined in a member function of the same class.
It is obvious that all classes must have a public content so that they can be
196 Introduction to C ++
accessed by external functions. In C++ Program 11.5 the circuit c l a s s has a private part, in this case, the variable r t e m p . The public parts are the functions pa r a 11 e 1 ( ) and s e r i a 1 ( ) , which determine the parallel and series resistance of two resistors. In the main function the class is declared to c l . The series calculation is called with c l . s e r i e s (rl, r2) and the parallel calculation is called with c l . p a r a l l e l (rl, r2).
~ Program 11.5 #include <iostream.h>
class circuit { private:
float rtemp; public:
float parallel(float rl, float r2) {
return((rl*r2)/(rl+r2)) ; } float series(float rl, float r2) {
return(rl+r2); }
int main (void) {
circuit cl; float res;
res=cl.series (2000,1000) ; cout << "Series resistance is " << res << "ohms\n";
res=cl.parallel(1000,1000) ; cout << "Parallel resistance is " << res << "ohms\n";
return(0) ; }
I - ' 1 ~-~ Test run II.4
Series resistance is 2000 ohms
Parallel resistance is 500 ohms
The class would get cumbersome if the functions within it where to be de- fined in it. C++ Program 11.6 shows how the functions can be defined in another part of the program. In this case the class name is defined followed by a double colon (: : ) and then the function name.
~ Program 11.6 #include <iostream.h>
class circuit { private"

Classes 197
float rtemp; public:
float series(float, float) ; float parallel(float,float) ;
};
int main (void) {
circuit cl; float res ;
res=cl, series (2000,1000) ; cout << "Series resistance is " << res << " ohms\n";
res=cl.parallel(lO00,1000); cout << "Parallel resistance is " << res << " ohms\n";
return(O) ; }
float circuit: :parallel(float rl, float r2) {
return((rl*r2)/(rl+r2)) ; }
float circuit: :series(float rl, float r2) {
return(rl+r2) ; }
The private part of a class is typically used to store variables which are local only to the class. An example is shown in C++ Program 11.7 where the vari- ables local to the circuit class are r l and r2 . The g e t r e s () function is then used to set these values and the other two functions then use them.
• Program 11.7
#include <iostream.h>
class circuit { private:
float rl,r2; public:
void get_res (void) ; float series (void) ; float parallel (void) ;
};
int main (void) {
circuit cl; float res;
cl.get_res();
res=cl.series(); cout << "Series resistance is " << res << " ohms\n";
res=cl.parallel() ; cout << "Parallel resistance is " << res << " ohms\n";
return(O) ;

198 Introduction to C++
void circuit : : get_res (void) {
cout << "Enter rl >> "; cin >> rl; cout << "Enter r2 >> "; cin >> r2;
}
float circuit: :parallel(void) {
return((rl*r2)/(rl+r2)) ; }
float circuit: :series(void) {
return(rl+r2) ; }
r-1 ~m~ Test run | 1.5
Enter rl >> i000
Enter r2 >> I000
Series resistance is 2000 ohms
Parallel resistance is 500 ohms
In many cases the use of passing parameters by pointers can be eliminated by using classes. This is shown in C++ Program 11.8 where the g e t r e s ( ) function is private to the c i r c u i t class. Then within the s e r i e s () and p a r a l l e l () functions the g e t r e s ( ) function is called. Note that no other function can call this function as it is private to c i r - c u i t .
• Program I 1.8
# i n c l u d e < i o s t r e a m . h >
class circuit { private:
float rl,r2;
void get_res(void);
public: float series(void);
float parallel(void); };
int main (void) {
circuit cl; float res;
res=cl.series() ; cout << "Series resistance is " << res << " ohms\n";
res=cl.parallel() ;
cout << "Parallel resistance is " << res << " ohms\n";
return(0) ; }
void circuit �9 �9 get_res (void) {
cout << "Enter rl >> "; cin >> rl; cout << "Enter r2 >> "; cin >> r2;
float circuit: :parallel(void) {
get_res () ; return((rl*r2)/(rl+r2)) ;
}
float circuit: :series(void) {
get res () ; return(rl+r2) ;
}
11.7 Complex numbers
Complex numbers 199
C++ contains a range of fimctions which support complex numbers. These are prototyped in c o m p l e x , h and are outlined in Table 11.1.
The data type c o m p l e x is used to declare a complex variable. In C++ Program 11.9 the variable z has been declared a complex variable. The c o m p l e x () function is used to convert the x and y variables into a com- plex number. The functions r e a l ( ) , imag ( ) , c o n j ( ) , a b s () and pow () are used and Test rtm 11.6 displays a sample run.
• Program 11.9
#include <iostream.h> #include <complex.h>
int main (void) { complex z; double x = 3, y = 4;
z = complex (x, y) ; cout << "z = "<< z << "In"; cout << "The real part is " << real(z) << "in"; cout << "The imaginary part is " << imag(z) << "in"; cout << "Complex conjugate is " << conj (z) << "in"; cout << "Magnitude is " << abs(z) << "in"; cout << "Squared is " << pow(z,2.0) << "in"; return (0);
Test run 11.6 z= (3, 4)
The real part is 3
The imaginary part is 4
Complex conjugate is (3,4)
Magnitude is 5
Squared is, (-7,24)
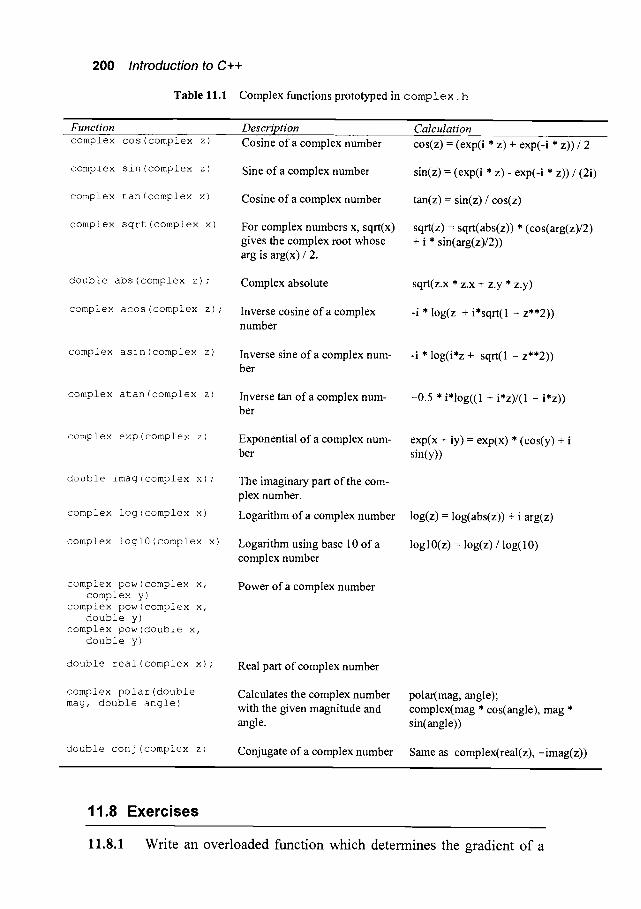
200 Introduction to C++
Table 11.1 Complex functions prototyped in c o m p l e x , h
Func i ion . . . . . . . D e s c r i p t i o n Ca lcu la t ion ' complex cos ( complex z ) Cosine of a complex number cos(z) = (exp(i * Z) + exp(,i �9 z)) / 2 .............
complex sin(complex z) Sine of a complex number sin(z) = (exp(i * z) - exp(-i * z)) / (2i)
complex tan(complex x) Cosine of a complex number tan(z) : sin(z) / cos(z)
complex sqrt(complex x) For complex numbers x, sqrt(x) gives the complex root whose arg is arg(x) / 2.
sqrt(z) : sqrt(abs(z)) * (cos(arg(z)/2) + i * sin(arg(z)/2))
double abs(complex z);
complex acos(complex z) ;
Complex absolute
Inverse cosine of a complex number
sqrt(z.x * z.x + z.y * z.y)
-i * log(z + i*sqrt(1 - z**2))
complex asin(complex z) Inverse sine of a complex num- -i * log(i*z + sqrt(1 - z**2)) ber
complex atan(complex z) Inverse tan of a complex num- ber
-0.5 * i*log((1 + i 'z)/(1 - i ' z ) )
complex exp(complex z
double imag(complex x ;
complex log(complex x
complex loglO(complex x)
Exponential of a complex num- ber
The imaginary part of the com- plex number.
Logarithm of a complex number
Logarithm using base 10 of a complex number
exp(x + iy )= exp(x) * (cos(y) + i sin(y))
log(z) = log(abs(z)) + i arg(z)
l o g l 0 ( z ) - log(z) / log(10)
complex pow(complex x, complex y)
complex pow(complex x, double y )
complex pow(double x, double y)
double real (complex x) ;
Power of a complex number
Real part of complex number
complex polar (double mag, double angle)
Calculates the complex number with the given magnitude and angle.
polar(mag, angle); complex(mag * cos(angle), mag * sin(angle))
double conj (complex z)
. . . . . .
Conjugate of a complex number Same as complex(real(z), - imag(z))
11.8 Exercises
11.8.1 Write an overloaded function which determines the gradient of a
Exercises 201
straight line. The parameters passed are either two (x, y) co- ordinates (xl, yl, x2, y2) or if the change in x and the change in y (dx, dy). The gradient will be calculated as follows:
Y2 -Yl m = ~ or X 2 --X 1
ay m ~ m
dx
11.8.2 Write an overloaded function which determines the angle of a straight line. The parameters passed are either two co-ordinates (xl, yl, x2, y2) or if the change in x and the change in y (dx, dy). The gradient will be calculated as follows:
O= tan-l (Y2x2 _-Ylx1 ] or O= tan-~ ( - ~ ]
11.8.3 The following C++ class definition contains date functions. The g e t d a t e () fimction should fill the variables day, month and y e a r . The v a l i d _ d a t a ( ) function should then test if the en- tered date is valid.
class datefunction ( private:
day, month, year;
public" void int
};
get_date(void) ; // get day, month and year valid date(void); // check valid date
Write a C++ program which contains this class definition.
11.8.4 C++ Program 11.10 has a m a t h f u n c t i o n class which contains multiply and divide functions. Write a program which adds several other mathematical functions, to give the following"
class mathfunction (
public: float mult(float a, float b); float div(float a, float b); float add(float a, float b); float sub(float a, float b) ; float sqrt (float a); float sin(float a) ; float cos(float a) ; float mod(int a, int b);
};
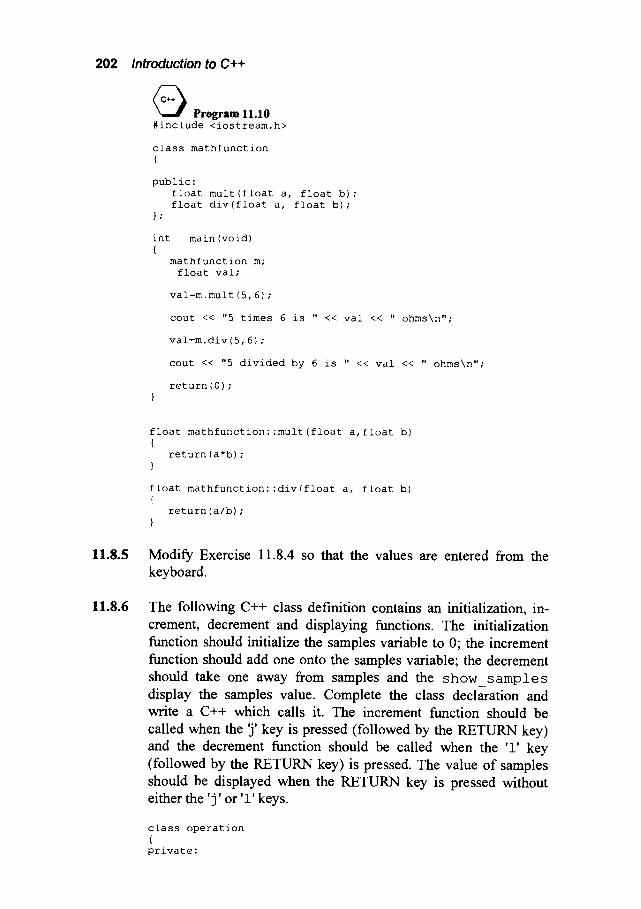
202 Introduction to C++
11.8.5
11.8.6
~ Program 11.10 #include <iostream.h>
class mathfunction {
public: float mult(float a, float b) ; float div(float a, float b) ;
};
int main (void) {
mathfunction m; float val;
val=m.mult (5, 6) ;
cout << "5 times 6 is " << val << " ohms\n";
val=m.div (5, 6) ;
cout << "5 divided by 6 is " << val << " ohms\n";
return(O) ; )
float mathfunction: :mult (float a, float b) {
return (a'b) ; )
float mathfunction: :div(float a, float b) {
return(a/b) ; )
Modify Exercise 11.8.4 so that the values are entered from the keyboard.
The following C++ class def'mition contains an initialization, in- crement, decrement and displaying functions. The initialization function should initialize the samples variable to 0; the increment function should add one onto the samples variable; the decrement shoed rake one away ~om samples and ~e show samples
display the samples value. Complete the class declaration and write a C++ which calls it. The increment function should be called when the 'j' key is pressed (followed by the RETURN key) and the decrement function should be called when the ' l ' key (followed by the RETURN key) is pressed. The value of samples should be displayed when the RETURN key is pressed without either the ' j ' or ' l ' keys.
class operation { private"

Exercises 203
samples;
public: void int int void
);
init_samples() {samples=O} ; // initialize samples increment () { tobe completed } ; // increment samples decrement () { to be completed } ; // decrement samples show_samples () { tobe completed } ; // show samples
11.8.7 Using the complex number functions determine the following, for the complex number a =4 + i5 and b = 6 + i 10:
(a) a+b (b) axb (c) a -b (d) a+b (e) a 2 (f) b 3
(g) lal (h) e a
(i) 4a
Note that in electrical engineering a complex number is typically represented as a + jb.
More C++
12.1 Constructors and destructors
A constructor allows for the initialization of a class and a destructor allows the class function to be removed from memory. They are defined as follows:
�9 A constructor is a special initialization function that is automatically called whenever a class is declared. The constructor always has the same name as the class name, and no data types are defined for the argument list or the return type. Normally a constructor is used to initialize a class.
�9 A destructor is a member of a function which is automatically called when the class is destroyed. It has the same name as the class name but is preceded by a tilde (-~). Normally a destructor is used to clean-up when the class is destroyed.
C++ Program 12.1 has a class which is named class_ex. The constructor for this class is c l a s s ex () and the destructor is ~ c l a s s ex ( ) . Test run 12.1 shows a sample run. It can be seen that initially when the program is run the message Constructing is displayed. This is because the class is initially declared to c 1. Then when the function t e s t () is called the Con- structing message is again displayed as a new class is defined (c2). When the program leaves this function the destructor is called and thus the mes- sage Destructor is displayed. Finally, when the program quits the destructor is again called.
• Program 12.1
#include <iostream.h>
void test (void) ;
class class ex {
private"
public" class ex () { cout << "Constructing\n"; } // Constructor
206 More C++
};
~class ex() { cout << "Destructing\n"; } void show msg(void) { cout << "Hello\n"; }
int main (void) { class ex cl;
cout << "Test point l\n"; cl. show_msg () ; cout << "Test point 2\n"; test () ; cout << "Test point 3\n";
return(0) ; }
void test (void) { class ex c2;
cout << "In test function\n"; }
/ / Destructor
T e s t r u n l 2 . 1 Constructing Test point 1 Hello Test point 2 Constructing In test function
Destructing
Test point 3
Destructing
12.2 Function templates
Function templates allow fimctions to be capable of operating on arguments of any data type. To define a function template the following is done:
Prefix the function with the t emp i a t e keyword. Define one or more identifiers that define parameterized types within angled brackets.
In C++ Program 12.2 the template is created for a m a x i m u m ( ) function. The template definition:
template <class number>
defines that number can be of any data type. Thus:
number maximum (number vall, number val2) ;

Class templates 207
could be matched to any one of the following:
int maximum(int vall, int val2) ; float maximum(float vall,float val2) ; double maximum(double vall,double val2);
The definition of the function is given as:
template <class number> number maximum(number vail,number val2) {
if (vall>val2) return(vall) ; else return(val2) ;
}
• Program 12.2
#include <iostream.h>
template <class number> number maximum(number vall,number val2);
int main (void) { float valuel=lO.O, value2=lO0.O, value3;
value3=maximum (valuel, value2) ;
cout << "Largest value is " << value3;
return(O) ;
template <class number> number maximum(number vall,number val2) {
if (vall>val2) return(vall); else return(val2);
}
12.3 Class templates
The class template is a generalization of the function template. These allow collections of objects of any type using the same class template. Program 12.3 shows an example of a class c a l c c u r r e n t . In this case the tem- plate is defined as:
template <class number>
which defines that number can be of any data type. When defining the class variable the data type is defined. For example, to define the data type of number as an i n t , then"
calc current<int> il;
208 More C++
or as a float:
calc current<float> i2;
In the case of C++ Program 12.3 the class which uses an i n t will perform integer operations and the float declaration will perform f 1 oa t operations.
~ Program 12.3 // Program to determine the current through a resistor with i0 V // across the resistor #include <iostream.h>
template <class number> class calc current { private:
number v, res; public:
calc current() {
v=10; }
// constructor, set v to I0 Volts
void get_res() { cout<< "Enter resistance "; cin >> res;} void print current() { cout << v/res << "\n";}
int main(void) { calc current <int> Ii; calc current <float> i2;
il.get_res(); il.print current();
i2.get_res(); i2.print current();
m
return(0) ; }
12.4 I /0 streams
The standard C++ library provides an expanded set of functions, templates, string-handling classes and many other enhancements to C. One of the main enhancements is the stream I/O library.
The stream I/O library gets rids of a particular problem in C where func- tions such as p r i n t f () and s c a n f ( ) , gives run-time errors when the data they are handling is in the incorrect data form. For example:
scanf ("%d", &i) ;
would create an error if i was declared as a floating-point value. The stream I/O function for input from the standard input is:

I/0 streams 209
cin >> i
This allows for automatic data type conversion. To support the stream I/O the s t d i o . h header file has been replaced by the header files i o s - t r e a m . h , f s t r e a m . h and i o m a n i p . h , and classes which are automatically defined are:
c o u t for standard output. c i n for standard input. c e r r for standard error.
The stream I/O class hierarchy is given in Figure 12.1. The i o s (I/O state) class is declared in i o s t r e a m . h , and it contains information about the state of the stream. It includes functions which are used to open and close streams, and it also has stream format flags.
The file I/O classes ifstream and ofstream are declared in the header file f s t r e a m , h. and the class i o s t r e a m inherits both i s t r e a n a and o s t r e a m , and is declared in i o s t r e a m . h , i f s t r e a m inherits all the standard input stream operations defined by i s t r e a m and adds a few more, such as constructors and functions for opening files, o f s t r e a m similarly related to o s t r e am.
Finally, f s t r e a m , declared in the header file f s t r e a m . h , inherits iostream and contains functions and constructors that allow files to be opened in input/output mode.
The classes can be summarized by:
Abstract Stream Base Class ios Stream base class.
Input Stream Classes istream General-purpose input stream class and base class
for other input streams.
ifstream Input file stream class.
Output Stream Classes ostream General-purpose output stream class and base
class for other output streams.
ofstream Output file stream class.
Input/Output Stream Classes iostream
fstream
General-purpose input/output stream class and base class for other input/output streams.
Input/output file stream class.

210 More C++
ios
istream --7 [-ifstream '
ostream y L_ ofstream
iostream
L_ fstream
Figure 12.1 Block diagram of a simple computer system
12.4.1 Opening and closing a file
The functions used to open and close a stream are o p e n () and c l o s e ( ) ,
respectively.
open()
For a program to use a file stream ( f s t r e a m ) it must first be associated
with a specific disk file with the o p e n function. This function is used with an associated open_mode flag, which can be combined together with the bitwise OR ( I ) operator. Table 12.1 defines these flags.
Table 12.1 F i l e o p e n f l a g s
Flag Function . . . . . . . . . . . . . . . . . . . . . . . . . . . . . . . . . . . . . . . .
i o s " " a p p Opens an output file for appending.
ios" "ate Opens an existing file and sets the file pointer to the end of the file.
los" -binary Opens file in binary mode (Note that the default mode is text mode).
ios" " in Opens an input file. Use ios::in as an open_mode for an of- stream file to prevent truncating an existing file.
ios - " nocreate Open the file only if it already exists. Otherwise the operation fails.
ios" �9 noreplace Opens the file only if it does not exist. Otherwise the opera- tion fails.
ios" "out Opens an output file. When you use ios::out for an ofstream object without ios::app, ios::ate, or ios::in, ios::trtmc is im- plied.
ios-'trunc ................ Opens a fi!e and deletes the old file (if it already e~sts ). ....
I/0 streams 211
To declare a file pointer the class ofstream is used. For example, to declare a stream of myfile which has the file name of out.dat and is an output file:
#include <fstream.h>
int main (void) { ofstream myfile("out.dat", los: :out ) ;
: }
This type of declaration can be used when the stream has a fixed name and file_open flag. It is also possible to use the open function to open the file. The following achieves the same as the previous sample program.
#include <fstream.h>
int main (void) { fstream myfile;
myfile.open("c'\\out.dat",ios. "out) ; �9
The following gives an example of a binary file which is only for input:
myfile.open("c'\\out.dat",ios. �9 I ios" "in) ;
while the following gives an example of a binary file which is only for input and output:
myfile.open("c'\\out.dat",ios'-binary I ios''out I ios''in);
close()
The close member function is used to close the file associated with an output file stream. The f s t r e a l n destructor automatically closes the file when the class is destroyed. It is typically used when the stream needs to be associated with another file.
C++ Program 12.4 opens a file for output and writes the character 'H' to it an4 '~"" c!e_oe_ o the 9_!e.
~ Program 12.4 #include <fstream. h>
int main (void) { fstream myfile;
myfile.open("c-\\out.dat",ios. "out) ; // open a file for output

212 More C++
cout << "Writing to file"; myfile.put ( ' H' ) ;
myfile, close () ; return(O) ;
12.4.2 Text IIO
The two main functions used for text I/O are p u t () and g e t () .
put()
The p u t member function writes a single character to the output stream. C++ Program 12.4 shows an example of the p u t () fimction.
get()
The unformatted g e t member function works like the > > operator with two exceptions:
�9 The g e t function includes white-space characters, whereas the extractor excludes white space.
�9 The g e t function is less likely to cause a tied output stream ( c o u t , for example) to be flushed.
To extract a string:
stream.get( char *str, int nCount, char delim = 'ha' ); stream.get( tmsigned char *str, int nCount, char delim = 'ha' ); stream.get( signed char *str, int nCount, char delim = 'ha' );
Or to extract a single character:
stream.get( char *ch ); stream.get( unsigned char *ch ); stream.get( signed char *ch);
where nCount is the maximum number of characters to store the line and delim is the delimiter character (which by default is a new-line).
getline()
The g e t 1 • member function is similar to the get function, but they dif- fer as the g e t function leaves the terminating character in the stream; whereas g e t 1 • ne removes the terminating character.
C++ Program 12.5 gives an example of the g e t Z i n e () function.

I/0 streams 213
~ Program 12.5 #include <string.h>
int main (void) { char instr[lO0] ;
cin.getline(instr, lO0) ; //get an input of a maximum of i00 chars
cout.write(instr, strlen(instr) ) ;
re turn(O) ; }
12.4.3 Error processing functions
The I/O stream libraries also contain a number of member functions which
can be used to test for errors while reading and writing to a stream. Table
12.2 lists these flags. C++ Program 12.6 shows an example program which uses the f a i l ()
and g o o d () functions. The f a i 1 () function allows the program to test i f
the file has been opened and the g o o d ( ) fimction allows the program to
test if the end-of-file has been reached (or if an error has occurred).
Table 12.2 Error processing functions
Function Return value bad Returns TRUE if there is an unrecoverable error.
fail Returns TRUE if there is an unrecoverable error or an "expected" condition, such as a conversion error, or if the file is not found.
good Returns TRUE if there is no error condition (unrecoverable or other- wise) and the end-of-file flag is not set.
eof Returns TRUE on the end-of-file condition.
clear Sets the internal error state. If called with the default arguments, it clears all error bits.
r d s t a t e Returns the cu r ren t e r ro r state.
~ Program 12.6 #include <fstream.h>
int main (void) { char ch; ifstream infile;

214 More C++
infile.open( "c'\\in.dat", ios" "in) ; if( !infile.fail() )
while (infile.good() ) {
infile.get( ch ); if( !ch ) break; cout << ch;
} } else {
// EOF or failure stops the reading
// quit on null
cout << "ERROR" Cannot open out.dat." << "\n"; } return(O) ;
Note that:
if( !infile.fail() )
can be replaced by:
if (infile)
as the ! operator is overloaded to perform the same function as the f a i 1 () function.
12.4.4 File pointers
The s e e k g () and t e l l g () are uses to set ( s e e k g ) or get ( t e l l g ) the current file point for an input stream. On the output stream the s e e k p ( ) and t e l l p () are used. The s e e k g format is:
stream, seekg (streampos pos) ; stream, seekg ( streamoff off, ios" �9 seek_dir dir) ;
where pos specifies the new position value, off is the new offset value, (streamoff and streampos are a typedef equivalent to a l o n g i n t ) and dir is the seek direction which must be one of the following:
�9 ios" "beg
�9 ios" �9 cur
�9 ios" "end
seek from the beginning of the stream. seek from the current position in the stream.
seek from the end of the stream.
C++ Program 12.7 gives an example of a file pointer being set to the begin- ning of a file with m y f i l e . s e e k p ( 0 1 , i o s : : b e g ) ) , where 01 represents a zero offset and i o s : : b e g the flag for the beginning of the file.
The t e 11 g ( ) format is:

I /0 streams 215
s t r e a m , t e l l g () ;
where the streampos type is a long int.
12.4.5 Binary IIO
read
The read member function is similar to the read function in C. It reads a specified number of bytes from a file into specified areas of memory. C++ Program 12.7 gives an example a single floating point value beginning written to a file and then read back.
• Program 12.7
#include <fstream.h>
int main (void) { fstream myfile; float vall=lO.l,val2;
myfile.open("c:\\out.dat",ios: :binary I ios: :out I ios: :in) ;
myfile.write( (char *) &vall,sizeof(float) ) ;
myfile.seekp(Ol, ios::beg); // rewind to start of file
myfile.read((char *)&val2,sizeof(float)) ;
cout << val2 << "in";
myfile.close() ; return(O) ;
}
write The w r i t e member fimction is similar to the w r i t e () function in C. It writes a specified number of bytes from memory into a file. C++ Program 12.8 gives an example of writing a 10 element array to a file and then read- ing it back.
• Programl2.8
#include <fstream.h>
int main (void) { int arr [i0] ={ i, 2,3,4,5, 6,7,8,9, i0} ,val, i; fstream outfile,infile;
outfile.open("c'\\out.dat",ios" "binary I ios" "out) ;
cout << "Writing to file\n";
216 More O++
for (i=O;i<lO;i++) {
outfile.write((char *)&arr[i],sizeof(int)) ; } outfile.close() ;
infile.open("c:\kout.dat",ios: -binary I ios: :in) ;
cout << "Reading from file\n";
for (i=O;i<lO;i++) {
infile.read((char *)&val, sizeof(int)); cout << val << "\n";
} infile.close() ;
return(O) ; }
12.5 Exercises
12.5.1
12.5.2
12.5.3
12.5.4
Modify C++ Program 12.2 so that it implements a minimum func- tion.
Using a function template write a program which will calculate the current in a circuit where the voltage and resistance can either be i n t s , f l o a t s or d o u b l e s . The current is given by"
I= V- A R
Write a program which will read the text from a file i n . da t and copy it, one character at a time, to the file o u t . d a t .
Write a program in which the user enters 10 floating-point values from the keyboard. The program should then store these to a binary file ( f i l e 1. da t ) . Finally the file should be read-back to check its contents.
Introduction
13.1 Introduction
High-level languages such as C, Pascal, Basic and FORTRAN are useful in representing operations in an algorithm-like manner. These high-level lan- guages tend to hide much of the system operations away from the programmer. In most cases, the operation of the program within the com- puter is invisible and the location of the data or the program code in memory is also unimportant. This is important in most applications as the program- mer can forget about much of the low-level operations and get on with high- level operations such as mathematical calculations, graphics, and so on.
There are three main reasons for learning Assembly Language, these are:
�9 It increases the understanding of the operation of the computer. �9 Assembly Language codes generally can be used to finely tune the op-
eration of the code. This fine tuning often speeds-up the operation of the program. This is because high-level compilers do not always optimize the generated code for speed.
�9 To gain access to certain hardware operations.
Many programs use a mixture of a high-level language and Assembly Lan- guage for machine or time critical operations.
13.2 Basic computer architecture
The main elements of a basic computer system are a central processing unit (or microprocessor), memory, and input/output (I/O) interfacing circuitry. These are connected by means of three main buses: the address bus; the control bus; and the data bus, as illustrated in Figure 13.1. External devices such as a keyboard, display, disk drives, and so on, can connect directly onto the data, address and control bus or can be connected via the I/O interfacing circuit. A bus is a collection of common electrical connections grouped by a single name.
Memory normally consists of RAM (random access memory) and ROM (read only memory). ROM stores permanent binary information, whereas
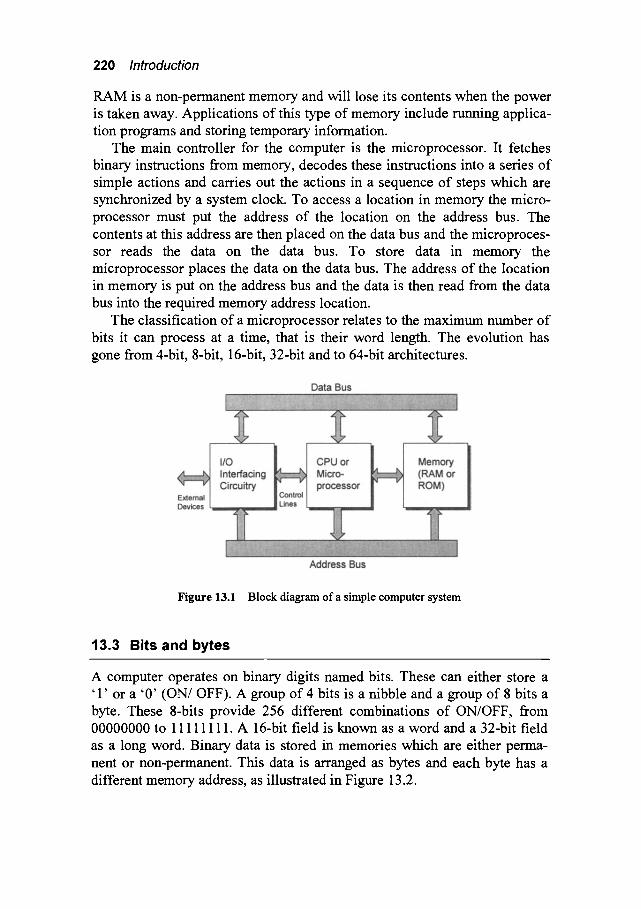
220 Introduction
RAM is a non-permanent memory and will lose its contents when the power is taken away. Applications of this type of memory include running applica- tion programs and storing temporary information.
The main controller for the computer is the microprocessor. It fetches binary instructions from memory, decodes these instructions into a series of simple actions and carries out the actions in a sequence of steps which are synchronized by a system clock. To access a location in memory the micro- processor must put the address of the location on the address bus. The contents at this address are then placed on the data bus and the microproces- sor reads the data on the data bus. To store data in memory the microprocessor places the data on the data bus. The address of the location in memory is put on the address bus and the data is then read from the data bus into the required memory address location.
The classification of a microprocessor relates to the maximum number of bits it can process at a time, that is their word length. The evolution has gone from 4-bit, 8-bit, 16-bit, 32-bit and to 64-bit architectures.
Figure 13.1 Block diagram of a simple computer system
13.3 Bits and bytes
A computer operates on binary digits named bits. These can either store a '1' or a '0' (ON/OFF). A group of 4 bits is a nibble and a group of 8 bits a byte. These 8-bits provide 256 different combinations of ON/OFF, from 00000000 to 11111111. A 16-bit field is known as a word and a 32-bit field as a long word. Binary data is stored in memories which are either perma- nent or non-permanent. This data is arranged as bytes and each byte has a different memory address, as illustrated in Figure 13.2.

Bits and bytes 221
Figure 13.2 Memory storage (each address holds eight bits).
13.3.1 Binary numbers
A computer operates on binary digits which use a base-2 numbering system. To determine the decimal equivalent of a binary number each column is rep- resented by 2 raised to the power of 0, 1, 2, and so on. For example, the decimal equivalents of 10 0 0 0 0 01 and o 1 o 1 0 011 are"
2 v 2 6 2 ~ 2 4 2 3 2 2 21 2 o
128 64 32 16 8 4 2 1 Decimal 1 0 0 0 0 0 0 1 129 0 1 0 1 0 0 1 1 83
Thus 010 01111 gives"
(0x 128) + ( lx64) + (0x32) + (0x 16)+ ( lx8) + ( lx4) + ( lx2) + ( l x l ) = 95
The number of decimal values that a binary number can represent relates to the number of bits. For example:
�9 8 bits gives 0 to 28-1 (255) different representations; �9 16 bits gives 0 to 216-1 (65 535) different representations; �9 32 bits gives 0 to 232-1 (4 294 967 295) different representations.
The most significant bit (msb) is at the left-hand side of the binary number and the least significant bit (lsb) on the right-hand side. To convert from decimal (base-10) to binary the decimal value is divided by 2 recursively and remainder noted. The first remainder gives the least significant digit (LSD) and the last the most significant digit (MSD). For example:

222 Introduction
54 27 r 0 <<< LSD 13 r l 6 r l 3 r 0 1 r l 0 r 1 <<< MSD
Thus 110110 in binary is 54 decimal.
13.4 Binary arithmetic
The basic binary addition operation is given next.
0 + 0 = 0 1 + 0 = 1 1 + 1 = 1 0 1+1+1 = 1 1
This is used when adding two binary numbers together. For example:
0010001 0001111
0100000
iiiii
13.5 Numbers and representations
Numbers are stored in several different ways. These can be:
�9 integers or floating point values. �9 single precision or double precision numbers. �9 signed or unsigned integers.
13.5.1 Negative numbers
Signed integers use a notation called 2s complement to represent negative values. In this representation the binary digits have a '1 ' in the most signifi- cant bit column if the number is negative, else it is a '0 ' . To convert a decimal value into 2s complement notation, the magnitude of the negative number is represented in binary fo~xn. Next, all the bits are inverted and a '1' is added. For example, to determine the 16-bit 2s complement of the value -65, the following steps are taken:
+65 invert add 1
00000000 01000001 l l l l l l l l l O l l l l l O l l l l l l l l l O l l l l l l
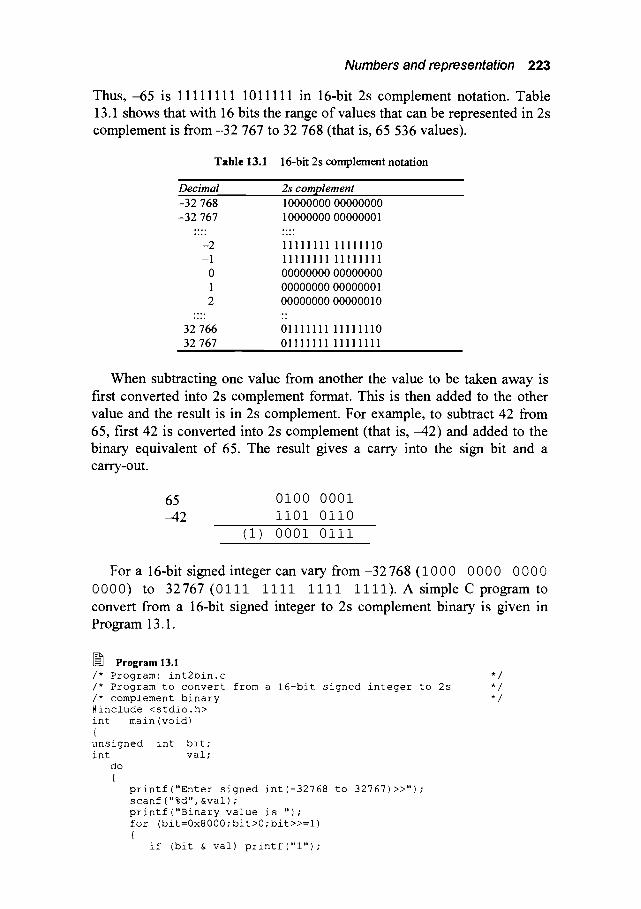
Numbers and representation 223
Thus, -65 is 11111111 1011111 in 16-bit 2s complement notation. Table 13.1 shows that with 16 bits the range of values that can be represented in 2s complement is from-32 767 to 32 768 (that is, 65 536 values).
Table 13.1 16-bit 2s complement notation
Decimal 2s complement -32 768 10000000 00000000 -32 767 10000000 00000001
. . ~
-2 11111111 11111110 -1 11111111 11111111
0 00000000 00000000 1 00000000 00000001 2 00000000 00000010
32 766 01111111 11111110 32 767 01111111 11111111
When subtracting one value from another the value to be taken away is first convened into 2s complement format. This is then added to the other value and the result is in 2s complement. For example, to subtract 42 from 65, first 42 is convened into 2s complement (that is, -42) and added to the binary equivalent of 65. The result gives a carry into the sign bit and a carry-out.
65 0100 0001 -42 1101 0110
(i) 0001 0111
For a 16-bit signed integer can vary from -32 768 (10 0 0 0 0 0 0 0 0 0 0 0000) to 32767 (0111 1111 1111 1111) . A simple C program to convert from a 16-bit signed integer to 2s complement binary is given in Program 13.1.
Program 13.1 /* Program: int2bin.c /* Program to convert from a 16-bit signed integer to 2s /* complement binary #include <stdio.h> int main(void) { unsigned int bit;
val; int do {
printf("Enter signed int(-32768 to 32767)>>"); scanf ("%d", &val) ; printf("Binary value is ") ; for (bit=0x8000; bit>0 ; bit>>=l) {
if (bit & val) printf("l") ;
* / * / * /

224 Introduction
else printf("0") ; } printf ("\n") ;
} while (val!=0) ; return(0) ;
A sample run is given in Test run 13.1.
J~ Testrunl3.1 Enter szgned integer (-32768 to 32767)>>-1 Binary value zs iiiiiiiiiiiiiiii Enter slgned integer (-32768 to 32767)>>-2 Binary value as Iiiiiiiiiiiiiii0 Enter signed integer (-32768 to 32767)>>-3 Binary value is Iiiiiiiiiiiiii01 Enter signed integer (-32768 to 32767)>>1 Binary value as 0000000000000001 Enter slgned integer (-32768 to 32767)>>2 Binary value as 0000000000000010 Enter slgned integer (-32768 to 32767)>>100 Binary value as 0000000001100100 Enter slgned integer (-32768 to 32767)>>-32767 Binary value as i000000000000001 Enter signed integer (-32768 to 32767)>>-32768 Binary value is i000000000000000 Enter signed integer (-32768 to 32767)>>32767 Binary value is 0111111111111111 Enter signed integer (-32768 to 32767)>>1 Binary value is 0000000000000001 Enter signed integer (-32768 to 32767)>>0 Binary value is 0000000000000000
13.5.2 Hexadecimal and octal numbers
In assembly language binary numbers are represented with a proceeding b, for example 0 1 0 1 0 1 1 1 1 0 1 0 b and 1 0 1 1 1 1 1 0 1 0 1 0 b are binary numbers. Binary digits are often commonly represented in hexadecimal (base 16) or octal (base 8) representation. Table 13.2 shows the basic conversion be- tween decimal, binary, octal and hexadecimal numbers. In assembly language hexadecimal numbers have a proceeding h and octal number an o. For example, 4 3 F l h is a hexadecimal value whereas 4 3 1 0 o is octal.
To represent a binary digit as a hexadecimal value the binary digits are split into groups of four bits (starting from the least significant bit). A hexa- decimal equivalent value then replaces each of the binary groups. For example, to represent 0 1 1 1 0 1 0 1 1 1 0 0 0 0 0 0b the bits are split into sec- tions of 4 to give:
Binary 0111 0101 ii00 0000
Hex 7 5 C 0

Numbers and representation 225
Table 13.2 Decimal, binary, octal and hexadecimal conversions
Decimal . . . . . Binary. Octal ....................... Hex ". ...............................
0 1 2 3 4 5 6 7 8 9 10 11 12 13 14 15
0000 0 0 0001 1 1 0010 2 2 0011 3 3 0100 4 4 0101 5 5 0110 6 6 0111 7 7 1000 10 8 1001 11 9 1010 12 A 1011 13 B 1100 14 C 1101 15 D 1110 16 E 1111 17 F
i
Thus, 75C0h represents the binary number 0111010111000000b. To convert from decimal to hexadecimal the decimal value is divided by 16 re- cursively and each remainder noted. The first remainder gives the least sig- nificant digit and the final remainder the most significant digit. For example, the following shows the hexadecimal equivalent of the decimal number 1103:
16 1103
68
4
0
r F <<< LSD (least significant digit)
r 4
r 4 <<< MSD (most significant digit)
Thus the decimal value 110 3 is equivalent to 0 4 4 Fh. In C, hexadecimal values are preceded by a 0 (zero) and the character 'x'
(0x) and an octal number a preceding zero 0 (zero). In Pascal, a dollar sign is used to signify a hexadecimal value, for example $C4. Table 13.3 gives some example formats.
Table 13.3 Decimal, binary, octal and hexadecimal conversions
Assembly language Pascal C Base representation representation representation of number F2 Ch $ F2 C 0xF2 C hexadecimal 4 3 2 o 0 4 3 2 octal 3 21 3 21 3 21 decimal 10010011) binar~
, ,, ,,,

226 Introduction
13.6 Memory addressing size
The size of the address bus indicates the maximum addressable number of bytes. Table 13.4 shows the size of addressable memory for a given address bus size. For example"
�9 A 1-bit address bus can address up to two locations (that is 0 and 1). �9 A 2-bit address bus can address 22 or 4 locations (that is 00, 01, 10 and
11). �9 A 20-bit address bus can address up to 22o addresses (1 MB). �9 A 24-bit address bus can address up to 16 MB. �9 A 32-bit address bus can address up to 4 GB.
Table 13.4 Addressable memory (in bytes) related to address bus size
Address A ddress ab le bus size ..... m e m o ~ (bytes) I 2 2 4 3 8 4 16 5 32 6 64 7 128 8 256 9 512 10 IK* 11 2K 12 4K 13 8K 14 16K
* 1 K represents 1024 t 1M represents 1 048 576 (1024 K) :I: 1 G represents 1 073 741 824 (1024 M)
Address A ddress ab le bus s ize m e m o r y (bytes) 15 32K 16 64K 17 128K 18 256K 19 512K 20 l M t 21 2M 22 4M 23 8M 24 16M 25 32M 26 64M 32 4G:I: 64 16GG
13.7 Exercises
13.7.1 Complete the table below (assume 8-bit unsigned binary values):
D e c i m a l . . . . . . . . . Binary . (8 'b iO ......................... i'i . . . . . . . . . ' ..... 12 235 128 255
1011 O110 0110 1001
, . . . . . . . . . . , , , , , , , , , , ,
13.7.2 Determine the binary or decimal equivalents for the following values (assume 16-bit values and 2s complement notation):
Exercises 227
13.7.3
13.7.4
..... .~.e. .~iihal ............. ' .......................................... ~.i.-..arz... .............. ' ..i .......................................... ' . i ...................................... iiii ................. '..~..~..~.~..~.i.. 32
354 -34
-128
-32651 15481
100001101111 1111 0000 0000 0000 0101 1111 1111 1111 1000
1111 0000 0000 0000 , . , , i , . l . .
Complete the table below (assume 16-bit signed integers and 2s complement)"
Decimal Hex Octai ' 'Binary ' . . . . . . . . . . . . . . . . . . . . . . . .
13 95 -432
fl f2de 10bc
432 7776 120
1000 1111 0110 1010 0000 1001 0011 0110
Determine the following subtractions using 2s complement nota- tion (assume 8-bit values and the answer should be in 2s complement):
(i) 43-21 (ii) 12-46 (iii) 127-126 (iv) 0-72 (v) 32+75

Computer Architecture
14.1 History of the PC
In 1959, IBM built the first commercial transistorized computer named the IBM 7090/7094 series. It was so successful that it dominated the computer market for many years. Later, in 1965, they produced the famous IBM sys- tem 360 which was built with integrated circuits. Then in 1970 IBM intro- duced the 370 system, which included semiconductor memories. Unfortu- nately, these computers were extremely expensive to purchase and maintain.
Around the same time the electronics industry was producing cheap pocket calculators. The development of affordable computers happened when the Japanese company, Busicon, commissioned a small, at the time, company named Intel to produce a set of eight to twelve ICs for a calculator. Instead of designing a complete set of ICs, Intel produced a set of ICs which could be programmed to perform different tasks. These were the first ever microprocessors. Soon Intel (short for Integrated Electronics) produced a general-purpose 4-bit microprocessor, named the 4004, and a more powerful 8-bit version, named the 8080. Other companies, such as Motorola, MOS Technologies and Zilog were soon also making microprocessors.
IBM's virtual monopoly on computer systems soon started to slip as many companies developed computers based around the newly available 8- bit microprocessors, namely MOS Technologies 6502 and Zilog's Z-80. IBM's main contenders were Apple and Commodore who introduced a new type of computer - the personal computer (PC). The leading systems were the Apple I and the Commodore PET. These spawned many others, includ- ing the Sinclair ZX80/ZX81, the Sinclair Spectrum, the Commodore Vic-20 and the classic Apple II (all of which where based on or around the 6502 or Z-80).
IBM realized the potential of the microprocessor and used Intel's 16-bit 8086 microprocessor in their version of the PC. It was named the IBM PC and has since become the parent of all the PCs ever produced. IBM's main aim was to make a computer which could run business applications, such as word processors, spreadsheets and databases. To increase the production of this software they made information on the hardware freely available. This resulted in many software packages being developed and helped clone

230 Computer architecture
manufacturers to copy the original design. So the term 'IBM-compatible' was born and it quickly became an industry standard by sheer market domi- nance.
14.2 Intel microprocessors
Intel marketed the first microprocessor, named the 4004, and it caused a revolution in the electronics industry because previous electronic systems had a fixed functionality. With this processor the functionality could be pro- grammed by software. It could handle just four bits of data at a time (a nib- ble), contained 2,000 transistors, operated with 46 instructions and allowed 4 KB of program code and 1 KB of data.
The second generation of Intel microprocessors began in 1974 with the 8-bit processors; these were named the 8008, 8080 and the 8085. As they could handle more bits at a time they were much more powerful than the previous 4-bit devices. They were typically used in early microcomputers and applications such as electronic instrmnents and printers. The 8008 had a 14-bit address bus and could thus address up to 16 KB of memory and the 8080 had a 16-bit address bus thus giving it a 64 KB limit.
The third generation of microprocessors began with the launch of the 16-bit processors. Intel released the 8086 microprocessor, which was mainly an extension to the original 8080 processor, and thus retained a degree of software compatibility. IBM's designers realized the power of the 8086 and used it in the original IBM PC and IBM XT (eXtended Technology). It had a 16-bit data bus and a 20-bit address bus, giving a maximum addressable capacity of 1 MB. It could also handle either 8 or 16 bits of data at a time (although in a messy way). The PC has evolved since using Intel processors.
A stripped-down 8-bit external data bus version called the 8088 was also available. This stripped down processor allowed designers to produce less complex (and cheaper) computer systems. An improved architecture version of the 8088/88, called the 80286, was launched in 1982, and was used in the IBM AT (Advanced Technology).
In 1985, Intel introduced its first 32-bit microprocessor, the 80386DX. This device was compatible with the previous 8088/8086/80286 (80X86) processors and gave excellent performance. It could handle 8, 16 or 32 bits at a time and had a full 32-bit data and address buses. This gave it a physical addressing capability of 4GB. A stripped-down 16-bit external data bus and 24-bit address bus version called the 80386SX was released in 1988. Thus, because of its limited address bus size, it could only access up to 16 MB of physical memory.
In 1989, Intel introduced the 80486DX which was basically an improved 80386DX with a memory cache and math co-processor integrated onto the chip. It had an improved internal structure making it around 50% faster than a comparable 80386. The 80486SX was also introduced, which was merely a 80486DX with the link to the math co-processor broken. A major limiting

80386~80486microprocessor 231
factor on the speed of the processor became the speed of the system clock. For this reason clock doublers and treblers where released allowed the proc- essor to use a higher clock speed than the system clock. Thus internal op- erations within the processors were much faster but the processor had to slow down to the system clock to communicate with external devices. Typi- cally, systems with clock doubler processors operated around 75% faster than the comparable non-doubled processors (because much of the operation within the computer is done with the processor). Typical clock doubler processors are DX2-66 and DX2-50 which rtm from 33 MHz and 25 MHz clocks, respectively. Intel also produced a range of microprocessors that run at three or four times the system clock speed and are referred to as DX4 processors. These include the Intel DX4-100 (25 MHz clock) and Intel DX4- 75 (25 MHz clock).
The Pentium (or P-5) is a 64-bit 'superscalar' processor. It can execute more than one instruction at a time and has a full 64-bit (8-byte) data bus and a 32-bit address bus, and can operate at speeds from 75 MHz to over 200 MHz (which runs from the 66 MHz system clock). In terms of perform- ance, it operates almost twice as fast as the equivalent 80486. It also has improved floating-point operations (roughly three times faster) and is fully compatible with previous 80x86 processors. Figure 14.1 shows how Intel processors interface to external equipment.
Figure 14.1 Intel microprocessors and their external interfacing
14.3 803861 80486 microprocessor
Figure 14.2 shows the main 80386/80486 processor connections. The Pen- tium processor connections are similar but it has a 64-bit data bus. There are
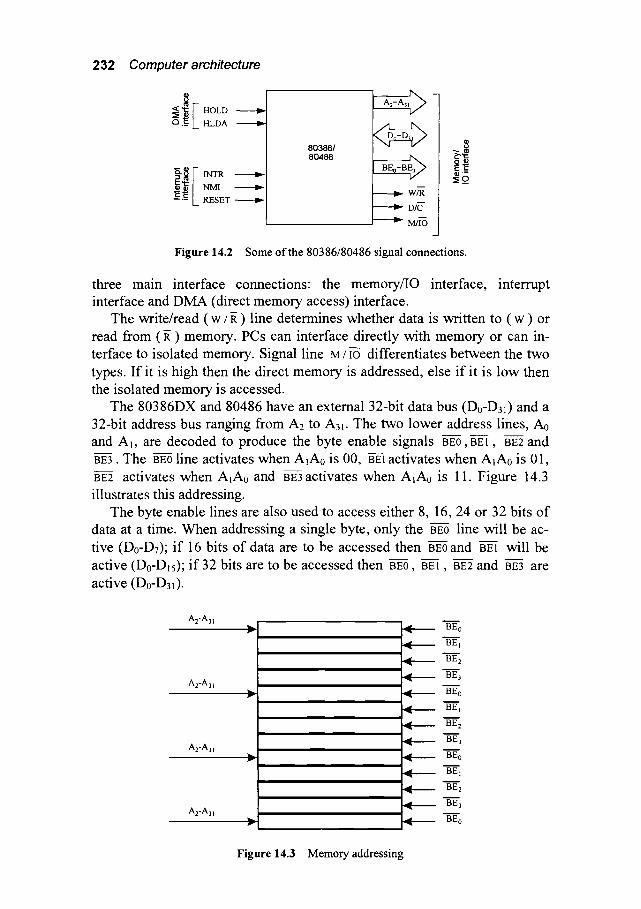
232 Computer architecture
8 < ~: r- HOLD
l a ._ HLDA
"'E g ~ INTR ~a) NMI
E ~ RESET
Figure 14.2
A2_A31 ~ -
803861 ( ~ ~ 80486 B E o _ B ~
~ W/R u
~ DIe
m
Some of the 80386/80486 signal connections.
8
8~ ~8
three main interface connections: the memory/IO interface, interrupt interface and DMA (direct memory access) interface.
The write/read ( w / ~ ) line determines whether data is written to ( w ) or read from ( ~ ) memory. PCs can interface directly with memory or can in- terface to isolated memory. Signal line M/i-6 differentiates between the two types. If it is high then the direct memory is addressed, else if it is low then the isolated memory is accessed.
The 80386DX and 80486 have an external 32-bit data bus (D0-D31) and a 32-bit address bus ranging from A2 to A31. The two lower address lines, A0 and A~, are decoded to produce the byte enable signals BE0,BE1, BE2 and BE3. The ~ line activates when A~Ao is 00, ggi activates when A~Ao is 01, BE2 activates when A~A0 and ~ activates when A~Ao is 11. Figure 14.3 illustrates this addressing.
The byte enable lines are also used to access either 8, 16, 24 or 32 bits of data at a time. When addressing a single byte, only the g-E-6 line will be ac- tive (D0-D7); if 16 bits of data are to be accessed then BE0 and g-ffi will be active (Do-D~5); if 32 bits are to be accessed then BE0, BE1, BE2 and BE3 are active (Do-D31).
A2-A31
A2-A3)
A2-A31
A2-A31 v
I... BE"-'- o
~ BE1
~ "ffff2 ~ BE3
~ BEo
BE I
~ BE2
-~ BE 3
-~ BE o
BE I
.A BE 2
BE 3
BE o
Figure 14.3 Memory addressing

Registers 233
The D/~ line differentiates between data and control signals. When it is high then data is read from or written to memory, else if it is low then a control operation is indicated, such as a shutdown command.
The interrupt lines are interrupt request (rYTR), non-maskable interrupt request ( N ~ ) and system reset ( RESET ), all of which are active high signals. The rYTR line is activated when an external device, such as a hard disk or a serial port, wishes to communicate with the processor. This interrupt is maskable and the processor can ignore the interrupt if it wants. The NMI is a non-maskable interrupt and is always acted-on. When it becomes active the processor calls the non-maskable interrupt service routine. The RESET signal causes a hardware reset and is normally made active when the processor is powered-up.
14.4 Registers
All the PC-based Intel microprocessors are compatible with the original 8086 process and are normally backwardly compatible. Thus, for example, a Pentium can run 8086 and 80386 code. Microprocessors use registers to per- form their operations. These registers are basically special memory locations in that they are given names. The 8086 has 14 registers which are grouped into four categories, as illustrated in Figure 14.4.
14.4.1 General purpose registers
There are four general purpose registers which are AX, BX, CX and DX. Each can be used to manipulate a whole 16-bit word or with two separate 8-bit bytes. These bytes are called the lower and upper order bytes. Each of these registers can be used as two 8-bit registers; for example, AL represents an 8-bit register which is the lower half of AX and AH represents the upper ha l fo fAX.
The AX register is the most general purpose of the four registers and is usually used for all types of operations. Each of the other registers has one or more implied extra functions. These are"
�9 AX, which is named the accumulator. It is used for all input/output op- erations and some arithmetic operations. For example, multiply, divide and translate instructions assume the use of AX.
�9 BX, which is named the base register. It can be used as an address register.
�9 CX, which is the count register. It is used by instructions which require to count. Typically it is used for controlling the number of times a loop is repeated and in bit shift operations.
�9 DX, which is the data register. It is used for some input/output and also when multiplying and dividing.

234 Computer architecture
AX (Accumulator)
BX (Base register)
CX (Count register)
DX (Data register)
SS (Stack pointer)
BP (Base pointer)
SP (Source pointer)
DI (Destination index)
CS (Code segment)
DS (Data segment)
SS (Stack segment)
\
AH I AL
8 bits 8 bits
BH BL
8 bits 8 bits
- , q l - - I = ~ .,gF.------I=~ 8 bits 8 bits
DH I DL
8 bits 8 bits
innnnBngngnggnn| Flags
Figure 14.4 8086/88 registers
14.4.2 Addressing registers
The addressing registers are used in memory addressing operations, such as holding the source address of the memory and the destination address. These address registers are named BP, SP, SI and DI, which are"
�9 SI, which is the source index. This is used with extended addressing commands.
�9 DI, which is the destination index. The destination is used in some addressing modes.
�9 BP, which is the base pointer. �9 SS, which is the stack pointer.
14.4.3 Status registers
Status registers are used to test for various conditions in an operation, such as 'is the result negative', 'is the result zero', and so on. The two status reg- isters have 16 bits and are called the instruction pointer (IP) and the flag register (F):
IP, which is the instruction pointer. The IP register contains the address of the next instruction of the program.

Bit Flag Name position
C 0 Set on carry
A 4 Set on 1/2 carry
S 7 Set on negative result
Z 6 Set on zero result
O 11 Set on overflow
P 2 Set on even parity
Table 14.1
D 10 Direction
I 9 Interrupt enable
z 8 T r a p .
Registers 235
Processor flags
Description
Contains the carry from the most significant bit (left hand bit) following a shift, rotate or arithmetic operation.
Contains the sign of an arithmetic operation (0 for positive, 1 for negative).
Contains results of last arithmetic or com- pare result (0 for non-zero, 1 for zero).
Indicates that an overflow has occurred in the most significant bit from an arithmetic operation.
Indicates whether the interrupt has been disabled.
Flag register. The flag register holds a collection of 16 different condi- tions. Table 14.1 outlines the most used flags.
14.4.4 S e g m e n t s registers
There are four areas of memory called segments, each of which have 16 bits and can thus address up to 64 KB (from 0 0 0 0 h to FFFFh). These segments are"
�9 Code segment (cs register). This defines the memory location where the program code (or instructions) is stored.
�9 Data segment (ds register). This def'mes where data from the program will be stored (ds stands for data segment register).
�9 Stack segment (ss register). This defines where the stack is stored.
�9 Extra segment (es).
All addresses are with reference to the segment registers.

236 Computer architecture
The 8086 has a segmented memory, these registers are used to manipu- late these segments. Each segment provides 64 KB of memory, this area of memory is known as the current segment. Segmented memory will be dis- cussed in more detail in the next section.
14.4.5 Memory addressing
There are several methods of accessing memory locations, these are:
�9 Implied addressing which uses an instruction in which it is known which registers are used.
�9 Immediate (or literal) addressing uses a simple constant number to define the address location.
�9 Register addressing which uses the address registers for the addressing (such as AX, BX, and so on).
�9 Memory addressing which is used to read or write to a specified memory location.
14.5 Memory segmentation
The 80386, 80486 and Pentium processors rtm in one of two modes, either virtual or real. When using the virtual mode they act as a pseudo-8086 16-bit processor, known as the protected mode. In the real-mode they can use the full capabilities of their address and data bus. The mode and their addressing capabilities depend on the software and thus all DOS-based programs use the virtual mode.
The 8086 has a 20-bit address bus so that when the PC is nmning 8086- compatible code it can only address up to 1 MB of memory. It also has a segmented memory architecture and can only directly address 64 KB of data at a time. A chunk of memory is known as a segment and hence the phrase 'segmented memory architecture'.
Memory addresses are normally defined by their hexadecimal address. A 4-bit address bus can address 16 locations from 0 0 0 0b to 1111 b. This can be represented in hexadecimal as Oh to Fh. An 8-bit bus can address up to 256 locations from 00h to FFh.
Two important addressing capabilities for the PC relate to a 16- and a 20- bit address bus. A 16-bit address bus addresses up to 64 KB of memory from 0000h to FFFFh and a 20-bit address bus addresses a total of 1 MB from 00000h to VFFVFh. The 80386/80486/Pentium processors have a 32- bit address bus and can address from 00000000h to VFVFFVFVh.
A memory location is identified with a segment and an offset address and the standard notation is s e g m e n t : o f f s e t . A s e g m e n t address is a 4- digit hexadecimal address which points to the start of a 64 kB chunk of data. The o f f s e t is also a 4-digit hexadecimal address which defines the ad- dress offset from the segment base pointer. This is illustrated in Figure 14.5.

Memory segmentation 237
The segment:offset address is defmed as the logical address, the ac- tual physical address is calculated by shifting the segment address 4 bits to the left and adding the offset. The example given next shows that the actual address of 2 F 8 4 : 0 5 3 2 is 2 F D 7 2 h .
Segment (2 F84): 0010 1111 1000 0100 0000 Offset (0532): 0000 0101 0011 0010
Actual address: 0010 1111 1101 0111 0010
Figure 14.5 Memory addressing
14.5.1 Accessing memory using C and Pascal
In C the address 1234 : 9 8 7 6 h is specified as 0 x 1 2 3 4 9 8 7 6 . Turbo Pascal accesses a memory location using the predefined array mere [ ] (to access a byte), memw [ ] (a word) or memw [ ] (a long integer). The general format is mem [segment : offset ].
14.5.2 Near and far pointers
A near pointer is a 16-bit pointer which can only be used to address up to 64 KB of data whereas a far pointer is a 20-bit pointer which can address up to 1 MB of data. A far pointer can be declared using the f a r data type modifier, as shown next.
char far *ptr; /* declare a far pointer */ ptr=(char far *) Oxl234567;/*initialize far pointer */
In the program shown in Figure 14.6 a near pointer p t r 1 and a far pointer p t r 2 have been declared. In the bottom part of the screen the actual ad- dresses stored in these pointers are displayed. In this case p t r l is DS- 1234 h and p t r 2 is 0 0 0 0 �9 1234 h. Notice that the address notation of p t r l is limited to a 4-digit hexadecimal address, whereas p t r 2 has a s e g m e n t : o f f s e t address. The address o f p t r l is in the form DS : XXXX where DS (the data segment) is a fixed address in memory and x x x x is the offset.
238 Computer architecture
Figure 14.6 Near and far pointers
There are several modes in which the compiler operates. In the small model the compiler declares all memory addresses as near pointers and in the large model they are declared as far pointers. Figure 14.7 shows how the large memory model is selected in Borland C (Options---> Compiler---> Model----> Large). The large model allows a program to store up to I MB of
data and code. Normally the small model is the default and only allows a maximum of 64 KB for data and 64 KB for code.
Figure 14.7 Compiling a program in the large model
14.6 View inside the processor
To be able to view the processor the user must use a debugging program.
View inside the processor 239
Figure 14.8 shows an example of Turbo Debugger which is available with most of the Borland software development products and can be used to view the operation of a program. It can be seen that the machine code and equivalent assembly language macro appears in the top left hand window. A sample code line is:
cs-01FA-+55 push bp
which specifies that the memory location is O IFA in the code segment (c s : 01 FA). Machine code at this location is 5 5 (0101 0101) and the equivalent Assembly Language instruction is p u s h bp. Note that the cs segment address in this case is 5 7 5 7h, thus the actual physical address will be with reference to the address 5 7 57 Oh (see Section 14.5 for a fuller ex- planation).
+-[ ]-CPU 80486 m
: cs:01FA--)55 push I cs:01FB 8BEC mov
: cs:01FD 83EC08 sub
: cs:0200 56 push
: cs:0201 57 push
cs'0202 B89401 mov
cs'0205 50 push cs'0206 E8D40B call cs'0209 59 pop
cs'020A B8B501 mov
bp bp, sp sp, 0008 si di
ax, 0194 ax _put s cx
ax, 01B5
: ds:0000 00 00 00 00 54 75 72 62 Turb : ds:0008 6F 2D 43 20 2D 20 43 6F o-C - Co : ds:0010 70 79 72 69 67 68 74 20 pyright :
: ds:0018 28 63 29 20 31 39 38 38 (c) 1988 :
- - D . . . . . . . i - [i~.I] [LI] - +
ax 0000 : c=0 ',
bx 062A :z=i: cx 0009 :s=0: dx AB02 : o = 0 : si 0145 :p=i: di 060A :a=0:
_ bp FFD2 :i=i: sp FFC8 :d=0 : ds 58A0 : : es 58A0 : : ss 58A0 : : cs 5757 : : ip 01FA : :
+ A
+
ss'FFCA 0001
ss" FFC8-+01 ID
Figure 14.8 Example screen from Turbo Debugger
The contents of the flag register are shown on the fight-hand side. In this case the flags are"
C=0, Z=I, S=0, O=0, P=I, A=0, I=1 and D=0.
The registers are shown to the left of the flag register. In this case the con- tents are:
AX=0000h, BX=062Ah, CX=0009h, DX=AB02h, BP=FFD2h, SP=FFC8h, DS=58A0h, ES=58A0h, IP=01FAh.
SI=0145h, DI=060Ah, SS=58A0h, CS=5757h,
The data (in the data segment) is shown at the bottom left hand comer of the screen. The first line:

240 Computer architecture
ds:0000 00 00 00 00 54 75 72 62 Turb
shows the first 8 bytes in memory (from DS:0000 to DS:0007). The first byte in memory is 00h (0000 0000) and the next is also 00h. After the 8 bytes are defined the 8 equivalent ASCII characters are shown. In this case, these are:
Turb
The ASCII equivalent character for 5A (1001 1010) is 'T' and for 75 (0111 0101) it is 'u'. Note that, in this case, the data segment register has 58A0h. Thus the location of the data will be referenced to the address 58A00h.
The bottom right-hand window shows the contents of the stack.
14.7 Machine code and assembly language
An important differentiation is between machine code and assembly lan- guage. The actual code which rtms on the processor is machine code. These are made up to unique bit sequences which identifies the command and other values which these commands operate on. For example, for the debug- ger screen from Figure 14.8, the assembly language line to move a value into the AX register is"
mov ax, 0194
the equivalent machine code is:
B8 94 01
where the code BSh (I011 1000b) identifies the instruction to move a 16- bit value into the AX register and the value to be loaded is 0194 h (0000 0001 1001 0100b). Note that the reason the 94h value is stored before the 0 lh value is that on the PC the least significant byte is stored in the first memory location and the most significant byte in the highest memory loca- tion. Figure 14.9 gives an example of storage within the code segment. In this case the two instructions are mov and push . In machine code these are B 8 h and 50 h, respectively.
14.8 Exercises
14.8.1 For the debug screen given in Figure 14.10 determine the follow- ing:
(i) (ii) (iii)
Contents of AX, BX, CX, DX, SI, DI. Contents of AH, AL, BH and BL. The first assembly language command.

Exercises 241
cs:0000
CS'0001
CS:0010
CS:0011
CS'0100
cs:0101
cs:0110
B8
94
01
50
B8
B5
01
mov ax, 0195
push ax
mov ax, 0 IB5
Figure 14.9 Example memory storage for code segment
(iv)
(v)
The memory address of the first line of code (Hint: the c s : 02 C2 and the value in the cs register need to be used). The memory address of the data (Hint: the ds : 0 0 0 0 and the value in the ds register need to be used).
+-[ ]-CPU 80486
cs'02C2>55 push bp cs'02C3 8BEC mov bp, sp
: cs:02C5 B8AA00 mov : cs:02C8 50 push : cs:02C9 E8F609 call : cs:02CC 59 pop
: cs:02CD 33C0 xor : cs:02CF EB00 jmp
: cs:02Dl 5D pop
ax, 00AA ax _puts cx
ax, ax w
#PROGI i#I0 (
bp i
: ds:0000 00 00 00 00 42 6F 72 6C Borl I : ds:0008 61 6E 64 20 43 2B 2B 20 and C++ + : ds:0010 2D 20 43 6F 70 79 72 69 - Copyri : : ds:0018 67 68 74 20 31 39 39 31 ght 1991 I +___
D ....... 1- [[]] [i~]-+
ax 0100 :c=0: bx 02CE :z=l: cx 0001 :s=0: dx 02CE :o=0: si 02C8 :p=l: di 02CE :a=0: bp 0000 :i=l: sp FFF8 :d=0: ds 5846 : : es 5846 : : ss 5846 : : cs 5751 : : ip 02C2 : :
ss'FFFA 0000 ' ss'FFF8 015B '
+
Figure 14.10 Example screen from Turbo Debugger

8086188 Instructions
15.1 Introduction
This chapter discusses 8086/88 assembly language. As previously men- tioned all of the 80X86 and Pentium processors can run 8086 code. The 80386, 80486 and Pentium processors rtm in one of two modes, either vir- tual or real. When using the virtual mode they act as a pseudo-8086 16-bit processor, known as the protected mode. All DOS-based programs use the virtual mode.
15.2 Characters and numbers
Integers can be represented as binary, octal, decimal, or hexadecimal num- bers; 8086 Assembly Language represents these with a preceding B, O, D or H, respectively. A decimal integer is assumed if there is no letter. Examples of numeric constants are"
OlO01100b 3eh 10b ffffh 17o
Character constants are enclosed with single quotes when they have a fixed number of characters (such as 'b', 'fred', and so on), or if they have a variable number of characters they are enclosed with double quotes (such as "a", "fred", and so on).
For example:
'c' 'Press ENTER' "Input Value>" "x"
15.3 Comments
Assembly Language programs probably need more comments than high- level language as some of the operations give little information on their pur- pose. The character used to signify a comment is the semi-colon (;) and all comments within a program are ignored by the assembler. For example, the following lines have comments:
244 8086/8088 instructions
mov ax, 1
; This is a comment
; move instruction will be discussed next
15.4 Move (MOV)
The move instruction (mov) moves either a byte (8 bits) or a word (16 bits) from one place to another. There are three possible methods"
�9 Moving data from a register to a memory location. �9 Moving data from a memory location to a register. �9 Moving data from one register to another.
Note that in 8086/88 it is not possible to move data directly from one memory location to another using a single instruction. To move data from one memory location to another then first the data is move from the memory location into a register, next it is moved from the register to the destination address.
Examples of moving a constant value into registers are:
mov cx,20
mov ax, lOh
mov ax, OlllOllOb
; moves decimal 20 into cx
; moves i0 hex into ax
; moves binary 01110110 into ax
An address location is identified within square bracket ( [] ). Then to move data into a specified address the address location must be loaded into a register. For example, to load the value of 50h (0101 0000) into address location 2 0 Oh the following lines are used:
m o v b x , 2 0 0 h
m o v [ b x ] , 5 0 h ; load 50 hex into memory location 200h
The general format of the mov instruction is:
mov r/m , r/m/d or
mov sr , r16/m16 or
mov r16/m16 , sr
Where r / m stands for register (such as AH, AL, BH, BL, CH, CL, DH, DL, AX, BX, CX, DX, BP, ST, DI) or memory location. And r / m / d stands for a register, memory or a constant value. The register s r stands for any of the segment registers (CS, DS, ES, SS) and r l 6 /m16 stand for any 16-bit reg- ister (AX, BX, CX, SP, BP, SI , DI) and 16-bit memory address.
15.5 Addressing memory
An address location can be specified with either the BX, BP, SI or DI regis- ter. Examples are"
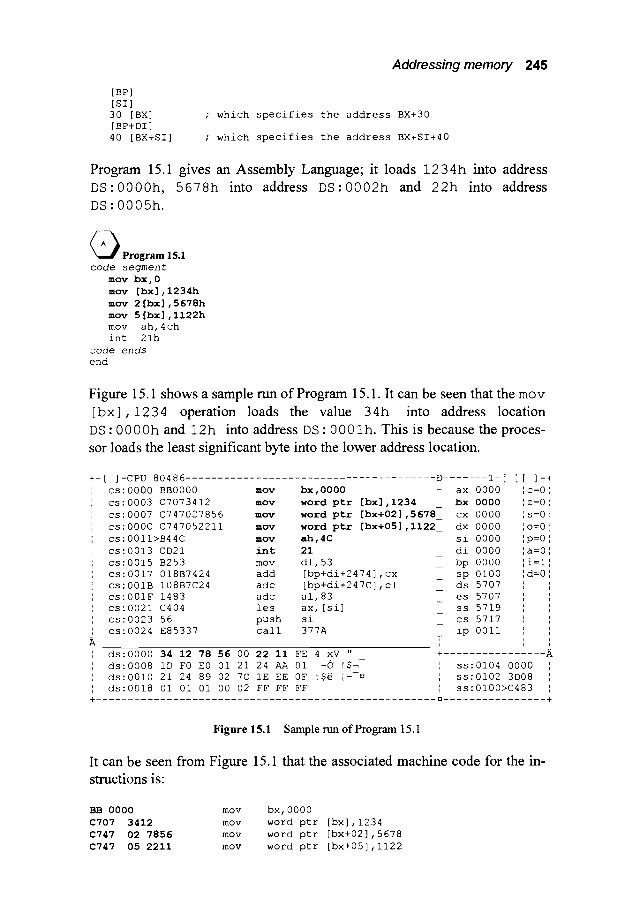
[BP]
[SI]
30 [BX]
[BP+DI]
40 [BX+SI]
Addressing memory 245
; which specifies the address BX+30
; which specifies the address BX+SI+40
Program 15.1 gives an Assembly Language; it loads 1234h into address D S - 0 0 0 0 h , 5 6 7 8 h into address D S ' 0 0 0 2 h and 22h into address DS" 0005h.
~ Program 15.1 code segment
mov bx, 0
mov [bx] ,1234h
mov 2 [bx] ,5678h
mov 5 [bx] , i122h
mov ah, 4 ch
int 21h
code ends end
Figure 15.1 shows a sample run of Program 15.1. It can be seen that the mov [bx],1234 operation loads the value 34h into address location
DS : 0000 h and 12 h into address DS : 0001 h. This is because the proces-
sor loads the least significant byte into the lower address location.
+-[ ]-CPU 80486 D ....... i-[ ] [ ]-+
' cs'0000 BB0000 mov bx,0000 - ax 0000 'c=0'
' cs'0003 C7073412 mov word ptr [bx],1234 bx 0000 'z=0'
' cs'0007 C747027856 mov word ptr [bx+02],5678 cx 0000 's=0'
' cs'000C C747052211 mov word ptr [bx+05],i122 dx 0000 :o=0'
' cs'0011>B44C mov ah,4C si 0000 :p=0:
' cs-0013 CD21 int 21 di 0000 :a=0:
' cs-0015 B253 mov di,53 bp 0000 :i=l'
' cs-0017 018B7424 add [bp+di+2474],cx sp 0100 :d=0:
' cs'001B I08B7C24 adc [bp+di+247C],cl ds 5707 : :
' cs'001F 1483 adc ai,83 es 5707 : :
' cs'0021 C404 les ax, [si] ss 5719 ' '
' cs'0023 56 push si cs 5717 ' '
' cs'0024 E85337 call 377A ip 0011 : '
A , o ! !
' ds'0000 34 12 78 56 00 22 ii FE 4:xV " ~ A
' ds-0008 ID F0 E0 01 21 24 AA 01 -6! !$91
' ds'0010 21 24 89 02 7C IE EE OF !$~i J---~
' ds'0018 01 01 01 00 02 FF FF FF ii! ~ "
ss'0104 0000 '
ss'0102 3D08 '
ss'0100>C483 ' +
Figure 15.1 Sample run of Program 15.1
It can be seen from Figure 15.1 that the associated machine code for the in- structions is:
BB 0000 mov bx, 0000
C707 3412 mov word ptr [bx],1234
C747 02 7856 mov word ptr [bx+02],5678
C747 05 2211 mov word ptr [bx+05],1122

246 8086/8088 instructions
B4 4C mov ah,4C
Thus BBh is the machine code to load a value into the BX register, C 7 0 7 h loads as value into the address pointed to and C747h loads an offseted value into an address location.
15.6 Addition and subtraction (ADD and SUB)
As they imply, the ADD and SUB perform addition and subtraction of two words or bytes. The ADD and SUB instruction operate on two operands and put the result into the first operand. The source or destination can be a regis- ter or address. Examples are:
mov ax, i00 add ax, 20 sub ax, 12
mov bx, i0 add ax, bx
;adds 20 onto the contents of ax ;subtracts 12 from ax and puts result into ax
;move i0 into bx ;adds ax and bx and puts result into ax
The standard format of the add instruction is
add r/m , r/m/d
where r is any register, m is memory location and d is any constant value.
15.7 Compare (CMP)
The CMP instruction acts like the SUB instruction, but the result is dis- carded. It thus leaves both operands intact but sets the status flags, such as the O (overflow), C (carry), Z (zero) and S (sign flag). It is typically used to determine if two numbers are the same, or if one value is greater, or less than, another value. Examples are:
cmp 6, 5 cmp i0, i0 cmp 5, 6
;result is I, this sets C=0 S=0; Z=0 O=0 ;result is 0, this sets Z=I the rest as above ;result is -i, this sets negative flag S=I
15.8 Unary operations (INC, DEC and NEG)
The unary operations operate on a single operand. An INC instruction in- crements the operand by 1, the DEC instruction decrements the operand by 1 and the NEG instruction makes the operand negative. Examples are"
mov al,10 inc al inc al dec al neg al
; adds 1 onto AL, AL will thus store ii ; AL now stores 12 ; takes 1 away from AL (thus it will be equal to ii) ; make AL negative, thus AL stores -ii

Shift/rotate instructions 247
15.9 Boolean bitwise instructions (AND, OR, XOR and NOT)
The Boolean bitwise instructions operate logically on individual bits. The XOR function yields a 1 when the bits in a given bit position differ; the AND function yields a 1 only when the given bit positions are both Is. The OR operation gives a 1 when any one of the given bit positions are a 1. These operations are summarised in Table 15.1. For example:
00110011 i0101111 00011001
AND iii01110 OR i0111111 XOR ii011111
00100010 i0111111 ii000110
Table 15.1 Bitwise operations
A B AND OR EX-OR
0 0 0 0 0 0 1 0 1 1 1 0 0 1 1 1 1 1 1 0
Examples of Assembly Language instructions which use bitwise operations are"
mov al,7dh and al,03h
mov ax,03f2h xor ax, ffffh
;loads 01111101 into al ; 01111101 AND 00000011 gives 00000001 ; al stores 00000001 or 1
; loads 0000 0011 iiii 0010 into AX ; exclusive OR iiii iiii iiii iiii with AX, ; AX now contain Iiii ii00 0000 Ii01
15.10 Shift/rotate instructions (SHL, SAL, SHR, SAR, ROL, ROR, RCL and RCR)
The shift/rotate instructions are"
S HL-shift bits left SAL-shift arithmetic left R C L - r o t a t e through carry left ROL-rotate bits left
S HR-shift bits fight SAR-shift arithmetic fight R C R - r o t a t e through carry right ROR-rotate bits right
The shift instructions move the bits, with or without the carry flag, and can either be an arithmetic shift or logical shift, whereas the rotate instructions are cyclic and may involve the carry flag. The SIlL and S HR shift bits to the left and right, respectively. They shift the bits to the left or right where the bit shifted out is put into the carry flag and the bit shifted in is a 0. The ro- tate operations (ROL, ROR, RCL, RCR) are cyclic. Rotate with carry
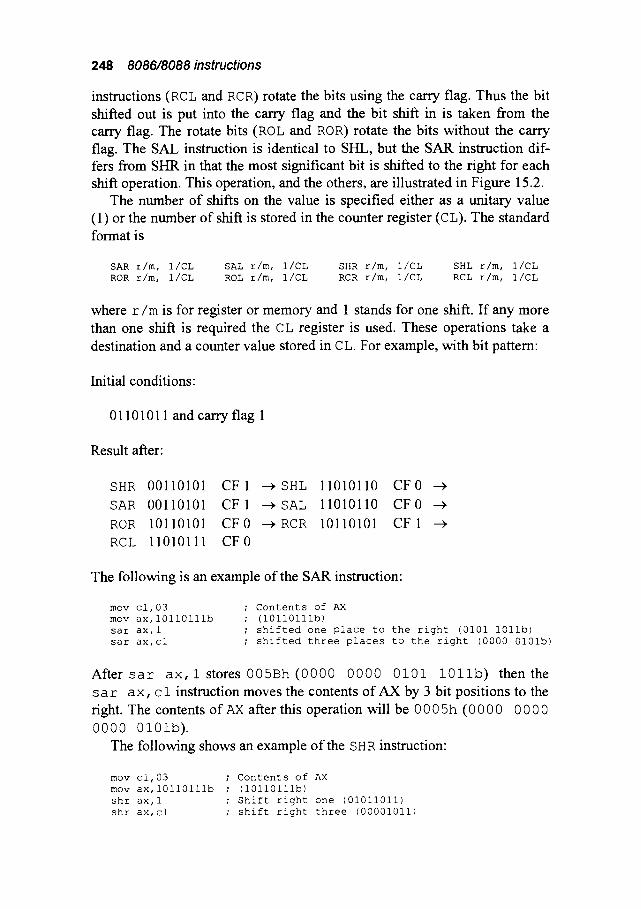
248 8086/8088 instructions
instructions (RCT, and RCR) rotate the bits using the carry flag. Thus the bit shifted out is put into the carry flag and the bit shift in is taken from the carry flag. The rotate bits (ROL and ROR) rotate the bits without the carry flag. The SAL instruction is identical to SHL, but the SAR instruction dif- fers from SHR in that the most significant bit is shifted to the right for each shift operation. This operation, and the others, are illustrated in Figure 15.2.
The number of shifts on the value is specified either as a unitary value (1) or the number of shift is stored in the counter register (EL). The standard format is
SAR r/m, I/CL ROR r/m, I/CL
SAL r/m, I/CL ROL r/m, I/CL
SHR r/m, I/CL RCR r/m, I/CL
SHL r/m, I/CL RCL r/m, I/CL
where r / m is for register or memory and 1 stands for one shift. If any more than one shift is required the CL register is used. These operations take a destination and a counter value stored in CL. For example, with bit pattern:
Initial conditions"
O1101011 and carry flag 1
Result after:
SHR 00110101 CF 1 --~ SHL 11010110 CF 0 --~
SAR 00110101 CF 1 --~ SAL 11010110 CF 0 --~
ROR 10110101 CF0 ~ R C R 10110101 CF1 -~ RCL 11010111 CF0
The following is an example of the SAR instruction:
mov cl,03 mov ax,10110111b sar ax, l sar ax, cl
; Contents of AX ; (10110111b) ; shifted one place to the right (0101 1011b) ; shifted three places to the right (0000 0101b)
After sar ax, l stores 005Bh (0000 0000 0101 1011b) then the s a r a x, c i instruction moves the contents of AX by 3 bit positions to the right. The contents of A• after this operation will be 0 0 0 5h (0 0 0 0 0 0 0 0 0000 0101b) .
The following shows an example of the S HR instruction:
mov ci,03 ; Contents of AX mov ax,10110111b ; (10110111b) shr ax, l ; Shift right one (01011011) shr ax, cl ; shift right three (00001011)
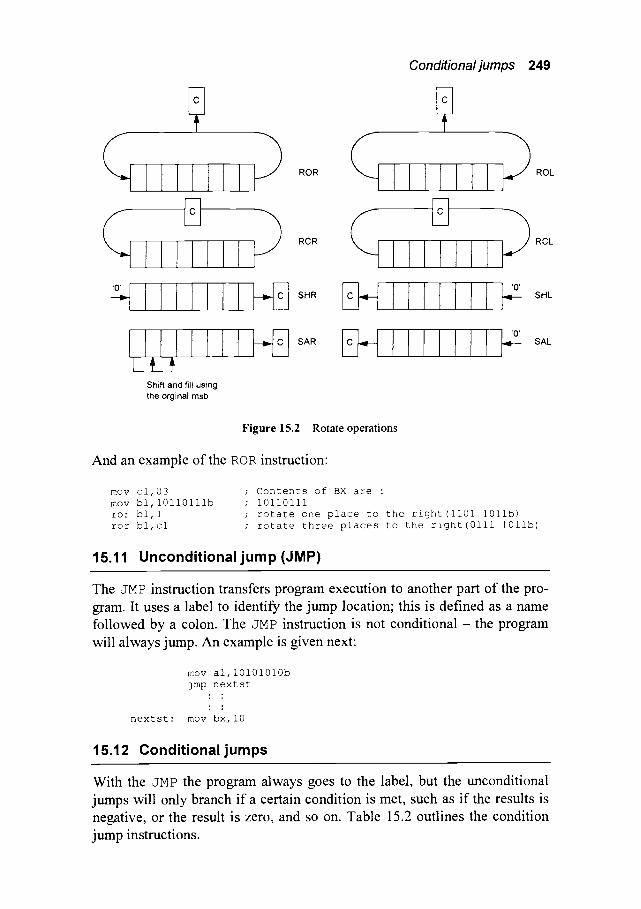
ROR
RCR
~ . ~ SHR
Conditional jumps 249
~ROL
~ RCL
SHL
Shift and fill using the orginal msb
SAL
Figure 15.2 Rotate operations
And an example of the R�9 instruction:
mov cl,03 mov bl,10110111b
ror bl, l ror bl,cl
; Contents of BX are : ; i0110111 ; rotate one place to the right(ll01 1011b)
; rotate three places to the right(0111 1011b)
15.11 Unconditional jump (JMP)
The JMP instruction transfers program execution to another part of the pro- gram. It uses a label to identify the jump location; this is defined as a name followed by a colon. The JMP instruction is not conditional - the program will always jump. An example is given next"
nextst
mov al,10101010b
jmp nextst �9 .
�9 .
mov bx,10
15.12 Conditional jumps
With the JMP the program always goes to the label, but the unconditional jumps will only branch if a certain condition is met, such as if the results is negative, or the result is zero, and so on. Table 15.2 outlines the condition jump instructions.

250 8086/8088 instructions
Table 15.2 Conditional jump instructions
Name Description Flag tests JC jump if carry C=I JS jump if sign S=I
JNS jump is not sign S=0 JNZ jump if not zero Z=0
JGE jump if greater or equal
JA jump if above
m ........ jump,,,if be,!ow,
S=Ov
Name Description JZ jump if zero JNC jump if not
can3' JL jump if less JLE jump if less or
equal JG jump if greater
C=0 and JNB jump if not Z=0 below
Flag tests Z=I C=0
Z=0 S=Ov
A few example are"
fred2"
fred �9
mov al, ii cmp al, 10 jle fred ; last operation was less than I0
; then branch to label fred
mov ax, 300 sub ax, i000
j g fred5
; subtract i000 from 300 ; no jump since result was not greater
sub al, 12 cmp al, 0 j z fred2 ;no jump since not equal to zero
15.13 Subroutine calls (CALL and RET)
Subroutines allow a section of code to be called and for the program to return back to where it was called. The instructions are CALL and RET. An
example is given next:
call add
�9 .
. .
fred al,bl
; Goto fred routine
fred" mov al,00h add al,bl ret ; return to place that called
15.14 Push and pop
The PUSH and POP instructions are typically used with subroutines. A
PUSH instruction puts the operand onto a temporary storage called a stack (this will be covered in more detail later). The stack is a LIFO (last in, first out) where the last element to be loaded is the first to be taken off, and so

Moving data around in memory 251
on. The POP instruction is used to extract the last value which was put on the stack.
Typically they are used to preserve the contents of various registers so that their contems are recovered after a subroutine is called. For example, if a subroutine modifies the AX, BX and CX registers, then the registers are put on the stack with:
PUSH AX
PUSH BX
PUSH CX
Next the subroutine can use these registers for its own use. Finally, within the subroutine, the original registers are restored with:
POP CX
POP BX
POP AX
The order of the POP instructions must be the reverse of the PUSH instruc- tions so that the contents are properly restored. For example:
subl"
call subl
add al, bl : :
: :
push ax
push bx
mov ax, llllh
mov bx, llllh
add ax, bx : :
: :
pop bx
pop ax
ret ; return to place that called
15.15 Moving around data in memory
Program 15.2 loads the memory locations from DS : 0 0 0 0 h to DS : 0 0 FFh with values starting at 00h and ending at FFh. After the AL and BX registers have been initialized to 00h then the code runs round a loop until all the memory locations have been loaded. The BX register contains the address the value will be loaded to. This increments each time round the loop. The AL register stores the value to be loaded into the currently specified memory location. Figure 15.3 shows a sample run.
~ Program 15.2 code segment assume cs'code,ds'data
start:
mov al, OOh
252 8086/8088 instructions
mov bx,00h loopl:
mov [bx],al inc bx inc al cmp al,0ffh jne loopl
mov ah,4ch int 21h
code ends
end start
+-[ ]-CPU 80486 : cs:0000 B000 mov al,00 -
: cs:0002 BB0000 mov bx,0000 m
] cs:0005 8807 mov [bx],al m
: cs:0007 43 inc bx : cs:0008 FEC0 inc al
: cs:000A>3CFF cmp aI,FF
: cs:000C 75F7 jne 0005
: cs:000E B44C mov ah,4C : cs:0010 CD21 int 21 : cs:0012 50 push ax : cs:0013 6A01 push 0001 : cs:0015 9AB2467711 call I177:46B2 : cs:001A FF76FE push word ptr [bp -
D .......
' ds'0000 00 01 02 03 04 05 06 07 I][II]{I[]{] ' i L i
' ds'0008 08 09 0A 0B 0C 0D 0E OF ~ +
' ds'0010 i0 ii 12 13 14 15 16 17 : ~!i]~w '
' ds-0018 18 19 IA IB IC ID IE IF ..... - '
1 - [u] [Eli-+ ax 0020 :c=l:
bx 0020 :z=0:
cx 0000 :s=0:
dx 0000 :o=0: si 0000 :p=0:
di 0000 la=l:
bp 0000 :i=l: sp 0100 :d=Ol ds 5705 : : es 5705 : : ss 5717 : : cs 5715 : : ip 000A : :
- - A
ss'0102 C033
ss'0100 i000C
!
i
+
Figure 15.3 Sample debug screen
15.16 Assembler directives
There are various structure directives that allow the user to structure the program. These are defined in Table 15.3.
Table 15.3 Assembler directives
Directive .......... Nam"e s ~ . G M ~ . N T . . . . . . . . . . segment and definition ENDS
, , ,,,,,, , , ,, ,
. . . . . Description The SEGMENT and ENDS directives mark the beginning and the end of a program segment. Its general format is:
name segment �9
�9
main program �9
name ends
end
END source file end The END directive marks the end of a module�9 The as- sembler will ignore any statements after the end directive�9
Data definition 253
GROUP segment group
ASSUME segment registers
ORG segment origin
PROC and procedure ENDP definition
and end ~ , , ,
15.17 Data definition
The ASSUME directive specifies the default segment register name. For example:
assume cs'code
The general format is
assume segmentregister'segmentregistername
The ORG statement tells the assembler at which location the code should be located.
These statement define the start and end of a procedure.
Variables are declared in the data segment. To define a variable the DB (define byte) and DW (define word) macros are used. For example, to define (and initialize) a variable t emp, which has the value 15 assigned to it, is
declared as follows:
temp db 15
an uninitialized variable has a value which is a question mark, for example"
temp db ?
There are other definition types used, these are"
�9 d d (define doubleword- 2 times 16 bits which is 4 bytes).
�9 dq (define quadword, which is 8 bytes).
�9 d t (define 10 bytes).
The data definition is defined within the data segment. In Turbo Assembler (TASM) the data segment is defined after the . DATA directive (as shown in TASM Program 15.4). Microsoft Assembler (MASM) defines the data seg- ment between the data segment and data ends, as shown in MASM Program 15.3.
Program 15.3 declares two variables named v a i 1 and v a 12. The value vall is loaded with the value 1 2 3 4 h and val2 is loaded with 5678 h. Figure 15.4 shows an example screen after the three mov instructions have been executed. It can be seen v a l l has been stored at DS: 0000 and v a l 2 at
DS : 0002.

254 8086/8088 instructions
~ Program 15.3 data segment
vall dw val2 dw
data ends
code segment assume cs'code,ds-data
org 0100h
start" mov ax,1234h
mov vall,ax
mov va12,5678h
code end
mov ah,4Ch ; DOS exit int 2 lh
ends start
Q Program 15.4
�9 MODEL SMALL
. DATA
vall dw 9 val2 dw 9
.CODE org 0100h mov ax,1234h mov vall,ax mov va12,5678h
mov ah,4Ch ; DOS exit int 21h
end
+-[ ]-CPU 80486 u I cs:0000 B83412 mov ax,1234 - ax 1234
: cs:0003 A30000 mov [O000],ax bx 0000 m : cs:0006 C70602007856 mov word ptr [0002],5678 cx 0000
: cs:000C>B44C mov ah,4C dx 0000 : cs:000E CD21 int 21 si 0000 : cs:0010 OF db OF di 0000 : cs:0011 FE db FE bp 0000
: cs:0012 50 push ax sp 0100 : cs:0013 6A01 push 0001 ds 5705 : cs:0015 9AB2467711 call I177:46B2 es 5705 : cs:001A FF76FE push word ptr [bp-02] ss 5717 : cs:001D 8D8661FE lea ax, [bp-019F] cs 5715 : cs:0021 50 push ax i
' ds'0000 34 12 78 56 00 9A F0 FE 4 xV U-
' ds'0008 ID F0 E0 01 20 24 AA 01 -O $~ ' ds'0010 20 24 89 02 7B IE ED OF $e {-9~
' ds'00]8 01 01 01 00 02 FF FF FF +
D ....... 1-[: ][ : ]-+ c=O
z=O
s=O
0=0 p=O a=O i=l d=O
ip 000C : : : : :
' ss'0102 C033 ' ' ss" OlOOi lO00C :
+
Figure 15.4 Sample debug screen
15.18 Equates (EQU)
To define a token to a certain value the EQU (equates) statement can be used. For example"
one equ 1
outA equ iflh
PI equ 3. 14159
prompt equ 'Type Enter'
The general format is:
name EQU expression

Exercises 255
The assembler simply replaces every occurrence of the token with the value given.
15.19 Exercises Part I
In this tutorial the sample code should be inserted, by replacing the high- lighted code, into Program 15.5.
~ Program 15.5 code segment
mov bx, 0
mov [bx] ,1234h
mov 2 [bx] , 5678h
mov 5 [bx] , I122h mov ah, 4 ch int 21h
code ends end
15.19.1 Enter the following code and run the debugger to determine the values given next.
mov al, 54h mov bl, 36h add al, bl
AL Carry flag Overflow flag Sign flag Zero flag
15.19.2 Enter the following code and run the debugger to determine the values given below.
mov al, 54h mov bl, 36h sub al, bl
AL Can3' flag Overflow flag Sign flag Zero flag
15.19.3 Enter the following code and run the debugger to determine the values given below.
mov al, 47h

256 8086/8088 instructions
mov bl, 62h sub al, bl
AL Carry flag Overflow flag Sign flag Zero flag
15.19.4 Enter the following code and run the debugger to determine the values given below.
mov al, 54h mov bl, 36h and al, bl
AL Carry flag Overflow flag Sign flag Zero flag
15.19.5 Enter the following code and run the debugger to determine the values given below.
mov al, 73h mov bl, 36h xor al, bl
15.19.6
AL Carry flag Overflow flag Sign flag Zero flag
Enter the following code and run the debugger to determine the values given below.
mov al, 54h not al
AL Carry flag Overflow flag Sign flag Zero flag

Exercises 257
15.19.7 Enter the following code and run the debugger to determine the values given below.
mov ax, lf54h mov bx,5a36h add al,bl
AL Carry flag Overflow flag Sign flag Zero flag
15.19.8 Enter the following code and run the debugger to determine the values given below.
mov ax, 3a54h mov bx, 0236h mov ci,3 shr ax, 1 shl bx, cl
AX BX Carry flag Overflow flag Zero flag
15.19.9 Enter the following code and run the debugger to determine the values given below.
mov ax, 3a54h mov bx, 0236h mov ci,3 sar bx, cl
AX BX Carry flag Overflow flag Zero flag
15.19.10 Enter the following code and run the debugger to determine the values given below.
mov ax, 3a54h mov bx, 0236h mov cl, 3 ror ax, cl rcl bx, cl

258 8086/8088 instructions
AX BX Carry flag Overflow flag Zero flag
15.19.11 Enter the following code and run the debugger to determine the values given below.
mov al, 54h mov bl, 66h
cmp al, bl
AL BL Carry flag Overflow flag Zero flag
15.19.12 Enter the following code and run the debugger to determine the values given below.
mov al, 32 mov ah, 53
mov bx, 236 xor ax, bx
AX BX Carry flag Overflow flag Zero flag
15.19.13 Enter the following code and run the debugger to determine the values given below.
mov ax, 3a54h mov bx, lOOh
mov [bx],ax
AX Contents of address 100h Contents of address 101h Overflow flag Zero flag
15.19.14 Enter the following code and run the debugger to determine the values given below.

Exercises 259
mov ax, 3a54h
mov bx, 120h
mov 20 [bx], ax
AX Contems of address 100h Comems of address 120h Contents of address 121 h Zero flag
15.19.15 Enter the following code and rtm the debugger to determine the values given below.
mov al, 'a'
mov ah, 'b'
AL BL Cany flag Overflow flag Zero flag
15.20 Exercises Part 2
15.20.1 Write an Assembly Language program which contains a function which adds the contents of the AX and BX registers and puts the result into the CX register.
15.20.2 Write a program which loads the values 00h, 0 l h, 02h,...FEh, FFh into the memory locations starting from address DS:0008h. A basic layout is shown below.
loop:
mov al, OOh
mov bx, 08h : :
: :
jne loop
15.20.3 Write a program which will load the values FFh, FEh, FDh,...01h, 00h into the memory locations starting from address ms- 0000h .
15.20.4 Write a program which moves a block of memory from DS- 0 0 2 0 h to 010 0 h to addresses which start at address 0 2 0 0 h.
15.20.5 Write a program which determines the largest byte in the memory locations 0 0 0 0 h to 0050h .

8086 Interfacing and Timing
16.1 Introduction
There are two main methods of communicating external equipment, either they are mapped into the physical memory and given a real address on the address bus (memory mapped I/O) or they are mapped into a special area of input/output memory (isolated I/O). Figure 16.1 shows the two methods. Devices mapped into memory are accessed by reading or writing to the physical address. Isolated I/O provides ports which are gateways between the interface device and the processor. They are isolated from the system using a buffering system and are accessed by four machine code instruc- tions. The IN instruction inputs a byte, or a word, and the OUT instruction outputs a byte, or a word. C and Pascal compilers interpret the equivalent high-level functions and produce machine code which uses these instruc- tions.
Figure 16.1 Memory mapping or isolated interfacing

262 8086 interfacing and timing
16.2 Interfacing with memory
The 80X86 processor interfaces with memory through a bus controller, as shown in Figure 16.2. This device interprets the microprocessor signals and generates the required memory signals. Two main output lines differentiate between a read or a write operation (R/W) and between direct and isolated memory access (M/I-O). The R / ~ line is low when data is being written to memory and high when data is being read. When M/i-6 is high, direct mem- ory access is selected and when low, the isolated memory is selected.
Figure 16.2 Access memory mapped and isolated I/O
16.3 Memory mapped I10
Interface devices can map directly onto the system address and data bus. In a PC-compatible system the address bus is 20 bits wide, from address 0 0 0 0 0 h to FFFFFh (1 MB). If the PC is being used in an enhanced mode (such as with Microsoft Windows) it can access the area of memory above the 1 MB. If it uses 16-bit software (such as Microsoft Windows 3.1) then it can address up to 16 MB of physical memory, from 0 00 00 0 h to FFFFFFh. If it uses 32-bit software (such as Microsoft Windows 95) then the software can address up to 4GB of physical memory, from 0 0 0 0 0 0 0 0 h to FFFFFFFFh. Table 16.1 and Figure 16.3 gives a typical memory allocation.
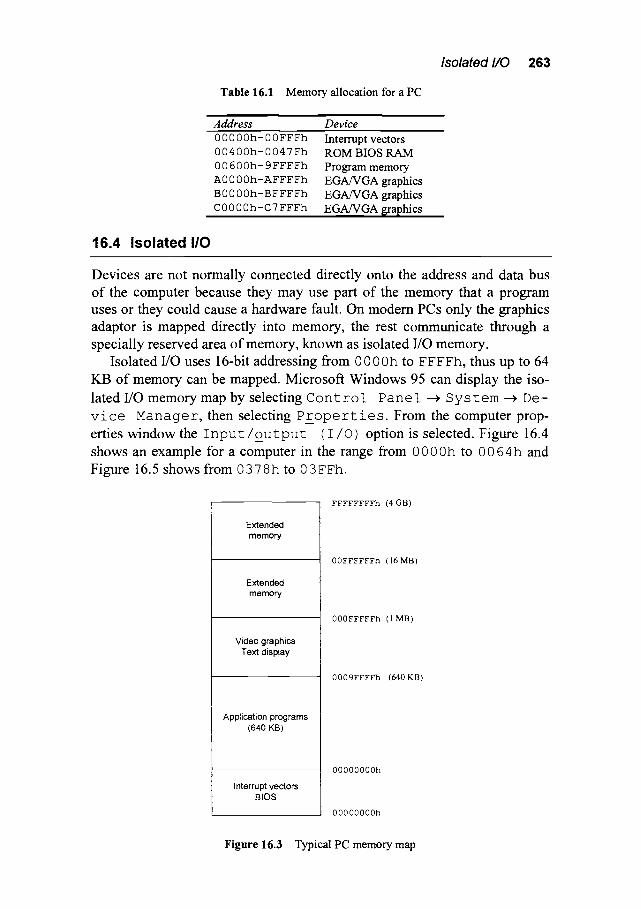
16.4 Isolated I10
Table 16.1 Memory allocation for a PC
Address Device 00000h-00FFFh
00400h-0047Fh
00600h-9FFFFh
A0000h-AFFFFh
B0000h-BFFFFh
C0000h-C7FFFh
Interrupt vectors ROM BIOS RAM Program memory EGA/VGA graphics EGA/VGA graphics EGA/VGA ~raphics
Isolated I /0 263
Devices are not normally connected directly onto the address and data bus of the computer because they may use part of the memory that a program uses or they could cause a hardware fault. On modem PCs only the graphics adaptor is mapped directly into memory, the rest communicate through a specially reserved area of memory, known as isolated I/O memory.
Isolated I/O uses 16-bit addressing from 0 000h to FFFFh, thus up to 64 KB of memory can be mapped. Microsoft Windows 95 can display the iso-
lated I/O memory map by selecting C o n t r o l Vane1 --> S y s t e m ---> De- v i c e M a n a g e r , then selecting P r o p e r t i e s . From the computer prop- erties window the I n p u t / o u t p u t ( I / O ) option is selected. Figure 16.4 shows an example for a computer in the range from 0 0 0 0h to 0 0 64 h and Figure 16.5 shows from 0 37 8 h to O 3 FFh.
Extended memory
Extended memory
Video graphics Text display
Application programs (640 KB)
Interrupt vectors BIOS
FFFFFFFFh (4 GB)
00FFFFFFh (16 MB)
000FFFFFh (I MB)
0009FFFFh (640 KB)
00000000h
00000000h
Figure 16.3 Typical PC memory map

264 8086 interfacing and timing
Figure 16.4 Example I/O memory map from 0000h to 0064h
It can be seen from Figure 16.5 that the keyboard maps into address
0 0 6 0h and 0 0 6 4 h, the speaker maps to address 0 0 6 l h and the sys tem
timer between 0 0 4 0 h and 0 0 4 3 h. Table 16.2 shows the typical uses of the
isolated memory area.
Figure 16.5 Example I/O memory map from 0378h to 03FFh

Isolated I /0 265
Address
Table 16.2 Typical isolated I/O memory map
Device 000h-01Fh
020h-021h
040h-05Fh
060h-07Fh
080h-09Fh
0A0h-0BFh
0C0h-0DFh
0E0h-0FFh
170h-178h
iF0h-IF8h
200h-20Fh
210h-217h
278h-27Fh
2F8h-2FFh
300h-31Fh
378h-37Fh
380h-38Ch
3A0h-3AFh
3B0h-3BFh
3C0h-3DFh
3F0h-3F7h
3FSh-3FFh
DMA controller Programmable interrupt controller Counter/Timer Digital I/O DMA controller NM/reset DMA controller Math coprocessor Hard-disk (Secondary IDE drive or CD-ROM drive) Hard-disk (Primary IDE drive) Game I/O adapter Expansion unit Second parallel port (LPT2:) Second serial port (COM2:) Prototype card Primary parallel port (LPT 1 :) SDLC interface Primary binary synchronous port Graphics adapter Graphics adapter Floppy disk controller Primar~ serial port (COM1 :~
16.4.1 Inputting a byte from an I10 port
The assembly language command to input a byte is:
IN AL, DX
where DX is the Data Register which contains the address of the input port. The 8-bit value loaded from this address is put into the register AL.
For Turbo/Borland C the equivalent function is i n p o r t b ( ) . Its general
syntax is as follows"
value=inportb ( PORTADDRESS ) ;
where PORTADDRESS is the address of the input port and v a l u e is loaded with the 8-bit value from this address. This function is proto- typed in the header file d o s . h.
For Turbo Pascal the equivalent is accessed via the p o r t [] array. Its gen- eral syntax is as follows:
value- =port [PORTADDRESS] ;

266 8086 interfacing and timing
where PORTADDRESS is the address of the input port and value the 8-bit value at this address. To gain access to this function the state- ment u s e s dos requires to be placed near the top of the program.
Microsoft C++ uses the equivalent inp () function (which is prototyped in c o n i o , h).
16.4.2 Inputting a word from a port
The assembly language command to input a word is:
IN AX, DX
where DX is the Data Register which contains the address of the input port. The 16-value loaded from this address is put into the register AX.
For Turbo/Borland C the equivalent function is inport (). Its general syntax is as follows"
value=inport ( PORTADDRESS ) ;
where PORTADDRESS is the address of the input port and value is loaded with the 16-bit value at this address. This function is proto- typed in the header file d o s . h.
For Turbo Pascal the equivalent is accessed via the p o r t w [ ] array. Its gen- eral syntax is as follows:
value : =portw [PORTADDRESS] ;
where PORTADDRESS is the address of the input port and value is the 16-bit value at this address. To gain access to this function the statement u s e s dos requires to be placed near the top of the pro- gram.
Microsoft C++ uses the equivalem inpw () function (which is prototyped in c o n i o , h).
16.4 .30utput t ing a byte to an I10 port
The assembly language command to output a byte is:
OUT DX, AL

Isolated I/0 267
where DX is the Data Register which contains the address of the out- put port. The 8-bit value sent to this address is stored in register AL.
For Turbo/Borland C the equivalent function is o u t p o r t b () . Its general syntax is as follows:
outportb ( PORTADDRESS, value ) ; where PORTADDRESS is the address of the output port and value is
the 8-bit value to be sent to this address. This function is prototyped
in the header file dos. h.
For Turbo Pascal the equivalent is accessed via the port [] array. Its gen- eral syntax is as follows:
port [PORTADDRESS] : =value;
where PORTADDRESS is the address of the output port and value is the 8-bit value to be sent to that address. To gain access to this ftmc- tion the statement u s e s dos requires to be placed near the top of the program.
Microsoft C++ uses the equivalent outp () function (which is prototyped in c o n i o , h).
1 6 . 4 . 4 0 u t p u t t i n g a word
The assembly language command to input a byte is:
OUT DX, AX
where DX is the Data Register which contains the address of the out- put port. The 16-bit value sent to this address is stored in register AX.
For Turbo/Borland C the equivalent function is outport (). Its general syntax is as follows:
outport ( PORTADDRESS, value ) ;
where PORTADDRESS is the address of the output port and value is the 16-bit value to be sent to that address. This function is prototyped in the header file d o s . h.
For Turbo Pascal the equivalent is accessed via the p o r t [] array. Its gen- eral syntax is as follows:
268 8086 interfacing and timing
portw [ PORTADDRESS ] �9 =value;
where PORTADDRESS is the address of the output port and v a l u e is the 16-bit value to be sent to that address. To gain access to this function the statement u s e s d o s requires to be placed near the top of the program.
Microsoft C++ uses the equivalent outp () function (which is prototyped in c o n i o , h).
16.5 Digital IIO using the 8255
Each 8255 IC has 24 digital input/output lines. These are grouped into three groups of 8 bits and are named Port A, Port B and Port C. A single 8-bit register, known as the control register, programs the functionality of these ports. Port C can be split into two halves to give Port C (upper) and Port C (lower). The ports and the control register map into the input/output memory with an assigned base address. The arrangement of the port addresses with respect to the base address is given in Table 16.3.
Figure 16.6 shows the functional layout of the 8255. The control register programs each of the ports to be an input or an output and also their mode of operation. There are four main parts which are programmed: Port A, Port B, Port C (lower) and Port C (upper).
Figure 16.7 shows the definition of the Control Register bits. The msb (most significant bit) D7 either makes the device active or inactive. If it is set to a 0 it is inactive, else it will be active. The input/output status of Port A is set by D4. If it is a 0 then Port A is an output, else it will be an input. The status of Port B is set by D1, Port C (lower) by DO and Port C (upper) by D3.
Port A can operate in one of three modes - 0, 1 and 2. These are set by bits D5 and D6. If they are set to 00 then Mode 0 is selected, 01 to Mode 1 and 10 to Mode 2. Port B can be used in two modes (Mode 0 and 1) and is set by bit D2. Examples of bit definitions and the mode of operation are given in Table 16.4.
Table 16.3 PPI addresses
Port address Function
BASE ADDRESS BASE ADDRESS+ 1 BASE ADDRESS+2
m
BASE ADDRESS+3 m
PortA Port B Port C Control re[~ister

Digital interfacing using the 8255 269
Figure 16.6 Layout of PPI
Figure 16.7 PPI Control Register Bit Definitions
16.5.1 ModeO
Mode 0 is the simplest mode with no handshaking. In this mode the bits on Port C can be programmed as inputs or outputs.
Table 16.4 Example bit patterns for control register
Bit pattern 01101000
I0011000
Mode of operation Device is inactive as D7 set to 0
Mode 0 Port A input, Port C (upper) input, Mode 0 Port B output, Port C (lower) output
i0101000 Mode 1 Port A output, Port C (upper) input, Mode 0 Port B output, Port C (lower) output

270 8086 interfacing and timing
16.5.2 Mode 1
This mode gives handshaking for the synchronization of data. Handshaking is normally required when one device is faster than another. In a typical handshaking operation the originator of the data asks the recipient if it is ready to receive data. If it is not then the recipient sends back a 'not ready for data' signal. When it is ready it sends a 'ready for data' signal and the originator then sends the data.
If Ports A and B are inputs then the bits on Port C have the def'mitions given in Table 16.5.
When inputting data, the STB going low (active) writes data into the port. After this data is written into the port, the I B F line automatically goes high. This automatically remains high tmtil the data is read from the port.
If any of the ports are outputs, then the bit definitions of Port C are given in Table 16.6.
In this mode, when data is written to the port the OBF line goes low, which indicates that data is ready to be read from the port. The OBF line will not go high until the ACK is pulled low.
Table 16.5 Mode 1 handshaking lines for inputting data
Signal Port A Port B PC4 PC2
Strobe ( S TB )
Input Buffer full (IBF) PC5 PC1
Table 16.6 Mode 1 handshaking lines for outputting data
Signal Port C Port B
Output Buffer Full ( OBF ) PC7 PCl
Acknowledge ( ACK ) PC6 PC2
16.5.3 Mode 2
This mode allows bi-directional I/O. The signal lines are given in Table 16.7.
Table 16.7 Mode 2 operation for bi-directional I/O
Signal Port A PC7
OBF ACK PC6
PC4 STB IBF PC5

16.6 Digital IIO programs
Digital I/0 programs 271
Program 16.1 outputs the binary code for 0 to 255 to Port B with a one- second delay between changes. The program exits when the output reaches 255. A delay routine has been added which uses the system timer. This will be discussed in more detail in Section 17.10. Figure 16.8 shows a typical set-up to test the program where Port B has been connected to eight light- emitting diodes (LEDs).
In 8086 Assembly Language a macro is defined using the equ statement. Program 16.1 uses these to define each of the port addresses. This helps to document the program and makes it easier to make global changes. For ex- ample, a different base address is relatively easy to set up, as a single change to BASE_ADDRESS automatically updates all port def'mes in the program. In this case the base address is 1 F0h. This address should be changed to the required base address of the DIO card.
Figure 16.8 Possible system set-up
The statements:
mov dx, CNTRLREG mov al,90h out dx, al
; set up PPI with ; Port B as Output
output the value 90h (1001 0000b) to the control register (CNTRLREG). The statements:
loopl" mov ax,00h
mov dx, PORTB out dx, al
call delay inc ax cmp ax, 100h jnz loopl
; output to Port B
; repeat until all is
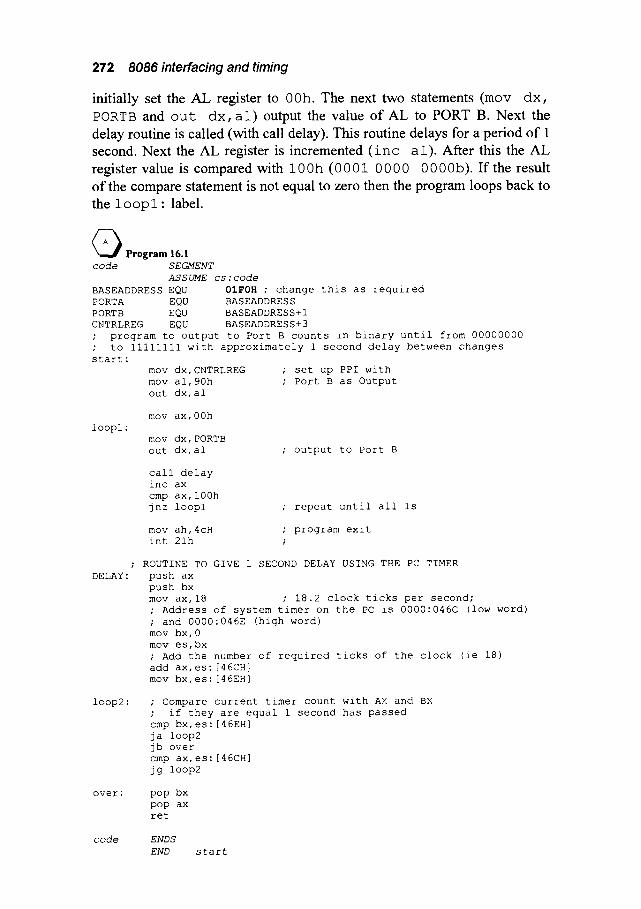
272 8086 interfacing and timing
initially set the AL register to 00h. The next two statements (mov dx, PORTB and o u t d x , a l ) output the value of AL to PORT B. Next the delay routine is called (with call delay). This routine delays for a period of 1 second. Next the AL register is incremented ( i n c a 1). After this the AL register value is compared with 100 h ( 0 0 0 1 0 0 0 0 0 0 0 0 b ) . If the result of the compare statement is not equal to zero then the program loops back to the 1 o o p 1 : label.
~Program 16.1 code SEGMENT
ASSUME cs:code
BASEADDRESS EQU 01FOH ; change this as required PORTA EQU BASEADDRESS PORTB EQU BASEADDRESS+I CNTRLREG EQU BASEADDRESS+3 ; program to output to Port B counts in binary until from 00000000 ; to Iiiiiiii with approximately 1 second delay between changes
start: mov dx, CNTRLREG ; set up PPI with mov al,90h ; Port B as Output out dx, al
loopl" mov ax,00h
mov dx, PORTB out dx, al ; output to Port B
call delay inc ax cmp ax, 100h jnz loopl ; repeat until all is
mov ah,4cH ; program exit int 21h
; ROUTINE TO GIVE i SECOND DELAY USING THE PC TIMER
DELAY: push ax push bx mov ax,18 ; 18.2 clock ticks per second; ; Address of system timer on the PC is 0000:046C (low word) ; and 0000:046E (high word) mov bx,0 mov es,bx ; Add the number of required ticks of the clock (ie 18) add ax, es: [46CH] mov bx, es: [46EH]
loop2: ; Compare current timer count with AX and BX ; if they are equal 1 second has passed cmp bx, es: [46EH] ja loop2 jb over cmp ax, es: [46CH] jg loop2
over" pop bx pop ax ret
code ENDS
END start

Timing 273
Program 16.2 reads the binary input from Port A and sends it to Port B. It will stop only when all the input bits on port A are 1 s. It shows how a byte can be read from a port and then output-ted to another port. Port A is used, in this example, as the input and Port B as the output. Figure 16.9 shows how Port A could be connected to input switches and Port B to the light-emitting diodes (LEDs). Loading the bit pattern 90h into the control register initial- izes the correct set-up for Ports A and B.
Figure 16.9 Typical system set-up
Program 16.2 code SEGMENT
ASSUME cs:code
; program to read from Port A and send to ; Port B. Program stops with all l's start:
mov dx,lf3h
mov al,90h out dx, al
loop:
mov dx, lf0h
in al,dx ; read from Port A
mov dx,lflh out dx, al ; output to Port B
code
cmp al,ffh jnz loop: mov ah,4cH int 21h
ENDS
END start
; repeat until all is ; program exit
16.7 Timing
Each instruction takes a finite time to complete. The speed of operation is determined by the processor clock speed. To f'md out how long a certain instruction will take determine the number of clock cycles to execute it and multiply this by the clock period. For example, if the clock rate is 8 MHz the clock period is 0.125 Its. The following gives the number of clock cycles

274 8086 interfacing and timing
for various instructions. Note that different processors take differing num- bers of clock cycles to execute a command. Notice also that the 80386 proc- essor is around twice as fast as the 8086 for many of the commands. This is due to improved architecture.
Table 16.8 Instruction timings for different processors
Command Example 8086 80286 80386 mov mov ax, 1234 4 2 2
mov mov dx, ax 2 2 2
out out dx, al 8 3 11 i n c i n c ax 3 2 2 d e c d e c bx 3 2 2 and and ax, 0b6h 4 3 2 jne (nj) jne fred 16(4) 7(3) 7(3) d i v d i v cx 80 (b) 14 (b) 14 (b)
144 (w) 22 (w) 22 (w) nop nop 2 2 2
, ,,,, , ,,, ,,,,, ,,,,, ,,, , ,,, ,,,,,, ,,, , ,, ,,, ,, ,, ,,, ,,, ,
where (b) - byte divide, (w) - word divide, (nj) - no jump. For example, the mov a x , 1 2 3 4 statement takes 0.5 ~s assuming a
8 MHz clock. The following program will output an increment value every two seconds. Note the great improvement in the 80286/386 over the 8086 on dealing with mathematics operations. In the 8086 it takes 144 clock cycles to perform a word divide while the 80386 only takes 22 clock cycles (nearly seven times faster).
loop" mov dx, lf3h mov al,90h out dx, al
; control register address ; set port A input, port B output
mov dx, lf0h in al,dx ;read byte from port A
mov dx, lflh out dx, al ; send byte to port B
call delay jmp loop
; two second delay loop for 8 MHz clock delay: mov ax, 13 outer: mov bx,64777 ;;; ) outer inner: dec bx ;;;;; ) inner
jnz inner ;;; ;; ) loop dec ax jnz outer ;;; ) loop ret
Within the second (inner) loop: inner: dec bx jnz inner
will be executed 64 777 times. The number of cycles to do a d e c and a j nz
Timing 275
is 3+ 16 cycles. Thus it takes 19 cy-cles to complete this loop. The total time to complete this inner loop is thus:
Number of cycles x clock period = 19 x 0.125 kts = 2.375 ~s.
Total time to complete this loop is 64 777 x 2.375 ~ts = 0.1538 s.
This inner loop is executed 7 times, thus the total delay time is 13 x 0.1538 = 2 s .
In general, for a general purpose loop with A and B as the variables in AX and BX, then:
delay" outer" inner"
mov ax,A ; 4 clock cycles mov bx, B ; 4
dec bx ; 3 jnz inner ; 16
dec ax ; 3 jnz outer ; 16 ret
First the inner loop"
inner- dec bx ; 3
jnz inner ; 16
Then the number of cycles for inner loop will be Bx 19"
inner" dec bx ; 3 jnz inner ; 16
dec ax ; 3 jnz outer ; 16
Number of cycles = A x ((B x 19) + 16 + 3)
If 19 x B is much greater than 19 then the following approximation can be made:
Number of cycles = 19 x A x B
Thus"
Time taken = Number of clock cycles
Clock frequency
1 9 • 2 1 5
Clock frequency

276 8086 interfacing and timing
For example, in the last example (assuming a 4 MHz clock) the value of A is 13 and B is 64 777, thus"
19 x 13 x 64 777 Time taken = = 2 s
8 x 1 0 6
Typical processor clocks are"
8086 386 486 Pentium
4.77 MHz, 8 MHz. 16 MHz, 25 MHz, 33 MHz. 33 MHz, 50 MHz, 66 MHz, 100 MHz. 60 MHz, 90 MHz, 120 MHz, 200 MHz.
16.8 E x e r c i s e s
16.8.1 Write a program to input a byte from Port A.
16.8.2 Write a program which will send to Port B all l 's.
16.8.3 Write a program which will read a byte from Port A. This byte is then sent to Port B.
16.8.4 Write a program that sends a 'walking-ones' code to Port B. The delay between changes should be one second. A 'walking-ones' code is as follows:
00000001 00000010 00000100 00001000
: :
i0000000 00000001 00000010
andsoon.
16.8.5
Hint: Use the shift left operator, that is < < or s h l .
Write separate programs which output the pattems in (a) and (b). The sequences are as follows:
(a) 00000001 (b) i0000001 OOOOOO1O OZO00010 00000100 00100100 00001000 00011000 00010000 00100100 0o100000 ozoooolo 01000000 i0000001 i0000000 01000010
Exercises 277
01000000 00100000 00010000
::
00000001 00000010
andsoon.
00100100 00011000 00100100
and so on.
16.8.6 Write separate programs which output the following sequences"
(a) 1 0 1 0 1010 (b) 1 1 1 1 1 1 1 1 O l O l O l O l 0 0 0 0 0 0 0 0 1OlO 1OlO 1111 1111 0101 0101 0000 0000 and so on. and so on.
(C) 0000 0001 (d) 0000 0001 0000 0011 0000 0011 0000 Iiii 0000 0111 0001 iiii 0000 Iiii 0011 Iiii 0001 iiii 0111 iiii 0011 iiii iiii iiii 0111 iiii 0000 0001 IIii iiii 0000 0011 0111 iiii 0000 0111 0011 iiii 0000 iiii 0001 iiii 0001 iiii 0000 iiii
a n d s o o n , a n d s o o n .
(e) The inverse of (d) above.
16.8.7 Write a program that reads a byte from Port A and sends the l s complement representation to Port B. Note that ls complement is all bits inverted.
16.8.8 Change the program in Exercise 16.8.9 so that it gives the 2s complement value on Port B. Hint: Either complement all the bits of the value and add 1 or send the negated value.
16.8.9 Write a program which will count from 00h to ffh with 1 s delay between each count. The output should go to Port B.
16.8.10 Write a program which will sample Port A every l s then sends it to Port B.
16.8.11 Write a program which will simulate the following logic functions.
NOT PB0 = not (PA0) AND PB0 = PA0 and PA 1

278 8086 interfacing and timing
OR PB0 = PA0 or PA 1
where PA0 is bit 0 of Port A, PA 1 is bit 1 of Port A and PB0 is bit 0 of Port B.
16.8.12 Write a program which will simulate a traffic light sequence. The delay between changes should be approximately 1 second.
PB0 is RED PB 1 is AMBER PB2 is GREEN
and the sequence is:
RED AMBER GREEN AMBER RED AMBER GREEN a n d s o on .
16.8.13 Modify the program in 16.8.12 so that the sequence is"
RED RED and AMBER GREEN AMBER RED RED and AMBER GREEN a n d s o on .
16.8.14 Write a program which will input a value from Port A. This value is sent to Port B and the bits are rotated with a delay of 1 second.
16.8.15 Write a program which will sample port A when bit 0 of Port C is changed from a 0 to a 1. Values are then entered via Port A by switching PC0 from a 0 to a 1. These values are put into memory starting from address 100h. The end of the input session is given by PC 1 being set (ie PC 1 is equal to a 1). When this is set all the input values are sent to Port B with a 2 s interval.
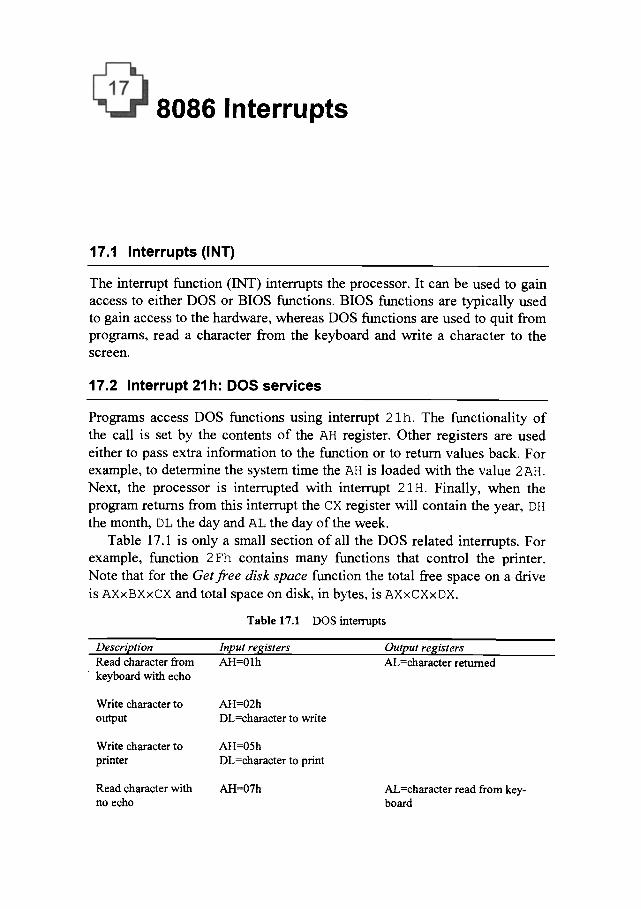
8086 Interrupts
17.1 Interrupts (INT)
The interrupt function (INT) interrupts the processor. It can be used to gain access to either DOS or BIOS functions. BIOS functions are typically used to gain access to the hardware, whereas DOS functions are used to quit from programs, read a character from the keyboard and write a character to the screen.
17.2 Interrupt 21h" DOS services
Programs access DOS functions using interrupt 2 l h. The functionality of the call is set by the contents of the All register. Other registers are used either to pass extra information to the function or to return values back. For example, to determine the system time the AH is loaded with the value 2AH. Next, the processor is interrupted with interrupt 21H. Finally, when the program returns from this interrupt the CX register will contain the year, DH the month, DL the day and AL the day of the week.
Table 17.1 is only a small section of all the DOS related interrupts. For example, function 2Fh contains many functions that control the printer. Note that for the Get free disk space function the total free space on a drive is AXxBXxCX and total space on disk, in bytes, is AXxCXxDX.
Table 17.1 DOS interrupts
Description Input resisters Read character from AH=0 lh keyboard with echo
Output registers AL=character returned
Write character to AH=02h output DL=character to write
Write character to AH=05h printer DL=character to print
Read character with AH=07h n o echo
AL=character read from key- board

280 8086 interrupts
Get k/b status AH=0Bh AL=0 no characters AL=FFh characters
Get system date
Set system date
Get system time
Set system time
Get DOS version
AH=2Ah
AH=2Bh, CX=year, DH-month, DL=day
AH=2Ch
AH=2Dh, CH=hour CL=minute, DH=second DL = 1 / 100 second
AH=30h
CX=year, DH=month DL=day, AL=day of week (0-Sunday, and so on)
CL=hour CL=minute DH=second DL = 1/100 seconds
AL=major version number AH=minor version number
Terminate and stay resident
Get boot drive
Get free disk space
AH=32h DL=driver (0-default, 1- A: ,and so on)
AX:3305h
AL:36h DL:drive number (0:A, etc.)
DL:boot drive (I:A, and so on)
AX:sectors per cluster BX:number of free clusters CX=bytes per sector DX--total clusters on driver
DOS exit AH:4ch
In P rogram 17.1, funct ion 0 2 h (write charac ter to the output) is used to
display the character 'A'. In this case, the funct ion n u m b e r 0 2 h is loaded
into AH and the character to be d isp layed is loaded into DL.
Program 17.1 code segment assume cs'code,ds'data
start" mov ah,2
mov dl,'A'
int 21h
code end
mov ah,4Ch ; DOS exit
int 21h ends start
Program 17.2 uses the funct ion 0 l h to get a character f rom the keyboa rd
and then the funct ion 0 2 h to display it.

/nterrupt 1Oh 281
( ~ Program 17.2 code segment
assume cs'code,ds'data
start" mov ah, l int 21h ; read character from keyboard
mov dl,al mov ah,2 int 21h
; put character read-in into dl ; DOS interrupt to print to screen
; show character to the screen
mov ah,4Ch ; DOS exit
int 21h
code ends end start
Program 17.3 displays the default boot drive. In most cases the default boot drive will be C.
( ~ Program 17.3
code segment assume cs'code,ds'data
start: mov ax,3305h int 21h add dl,'A'-i mov ah,2 int 21h
mov ah,4Ch ; DOS exit
int 21h
code ends end start
17.3 Interrupt 10h" BIOS video mode
Interrupt 1 Oh allows access to the video display. Table 17.2 outlines typical interrupt calls. Program 17.4 uses the BIOS video interrupt to display a bor- der around the screen which changes colour each second from black to light blue. These colours are set-up with an e num data type definition. In this case, BLACK is defined as 0, BLUE as 1, and so on.
To display a border the AH register is loaded with 0Bh, BH with 00h and B L with the border colour. Next, the interrupt 10h is called with these parameters. Figure 17.1 shows the bit defmition for the colours.

282 8086 interrupts
Table 17.2
Description Input resisters Set video mode AH=00h
BIOS video interrupt
Set cursor position
Read cursor position
Write character and attribute at cursor position
Read character and attribute at cursor position
Set background/ border colour
AH = 02h BH = 00h DH = row (00h is top) DL - column (00h is left)
AH = 02h BH = 00h
AH = 09h AL = character to display BH = 00h BL = attribute (text mode) or colour (graphics mode) if bit 7 set in graphics mode, character is Exclusive-ORed on the
screen CX = number of times to write characters
AH = 08h BH = 00h
AH = 0Bh BH = 00h BL = background/border colour (border only in text modes)
Output resisters AL = video mode flag
0 (Text:40x25 B/W) 1 (Text:40x25 B/W) 2 (Text:80x25 Colour)
3 (Text:60x25 Colour) 4 (Graphics:320x200 Colour)
5 (Graphics:320x200 B/W)
6 (Graphics: 640x200 Colour)
DH = row (00h is top) DL = column (00h is left)
AH = attribute (see Figure 17.1) AL = character
Figure 17.1 Character attribute

Interrupt 11h 283
• Program 17.4
code segment assume cs'code,ds'data
start: mov ah,0bh mov bh,0 mov cl,0
loopl: mov bl, cl int 10h
inc cl call delay cmp ci,7 jne loopl mov ah,4Ch ; DOS exit int 21h
DELAY: push ax push bx mov ax,18 ; 18.2 clock ticks per second; ; Address of system timer on the PC is 0000:046C (low word) ; and 0000:046E (high word) mov bx,0 mov es,bx ; Add the number of required ticks of the clock (ie 18) add ax, es: [46CH] mov bx, es: [46EH]
loop2: ; Compare current timer count with AX and BX ; if they are equal 1 second has passed cmp bx,es: [46EH] ja loop2 jb over cmp ax,es: [46CH] jg loop2
over" pop bx pop ax ret
code ends end start
17.4 Interrupt 11h" BIOS equipment check
Interrupt 1 lh returns a word which gives a basic indication of the types of equipment connected. It is useful in determining if there is a math co- processor present and the number of parallel and serial ports connected. Table 17.3 shows the format of the call.
Table 17.3 BIOS equipment check interrupt
Description Input registers Get equipment list
Output registers AX = BIOS equipment list word
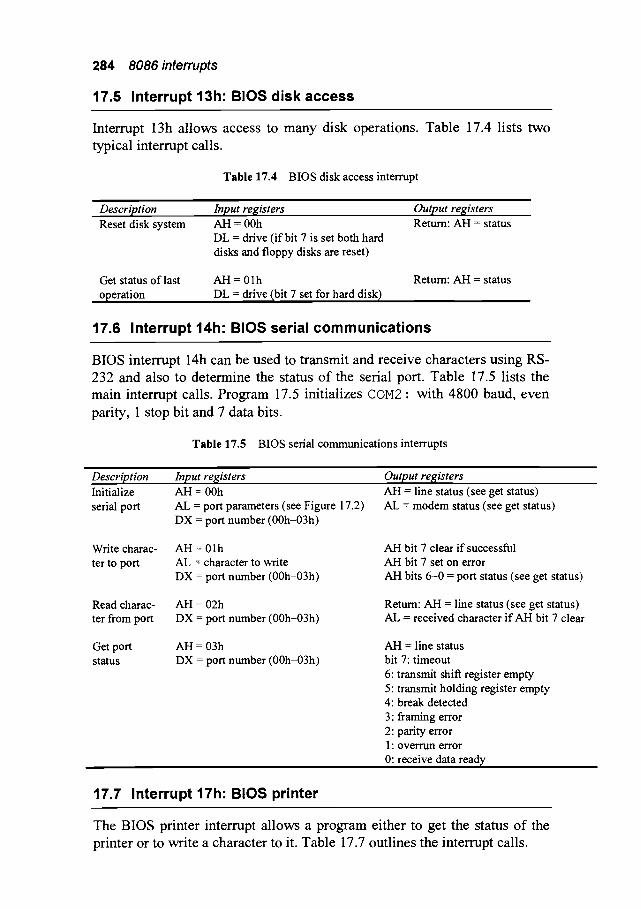
284 8086 interrupts
17.5 Interrupt 13h: BIOS disk access
Interrupt 13h allows access to many disk operations. Table 17.4 lists two typical interrupt calls.
T a b l e 17.4 BIOS disk access interrupt
Description Reset disk system
Input registers AH = 00h DL = drive (if bit 7 is set both hard disks and floppy disks are reset)
Output registers Return: AH = status
Get status of last operation
AH = 0 1 h DL = drive ~bit 7 set for hard disk)
Return: AH = status
17.6 Interrupt 14h: BIOS serial communications
BIOS interrupt 14h can be used to transmit and receive characters using RS- 232 and also to determine the status of the serial port. Table 17.5 lists the main interrupt calls. Program 17.5 initializes COM2" with 4800 baud, even parity, 1 stop bit and 7 data bits.
T a b l e 17.5 BIOS serial communications interrupts
Description Initialize serial port
Input registers AH = 00h AL = port parameters (see Figure 17.2) DX = port number (00h-03h)
Output registers AH = line status (see get status) AL = modem status (see get status)
Write charac- ter to port
AH - 0 1 h AL = character to write DX = port number (00h-03h)
AH bit 7 clear if successful AH bit 7 set on error AH bits 6 -0 = port status (see get status)
Read charac- ter from port
AH = 02h DX = port number (00h-03h)
Get port AH = 03h status DX = port number (00h-03h)
Return: AH = line status (see get status) AL = received character if AH bit 7 clear
AH = line status bit 7: timeout 6: transmit shift register empty 5: transmit holding register empty 4: break detected 3: framing error
2: parity error
1: overrun error
0: receive data ready I '
17.7 Interrupt 17h: BIOS printer
The BIOS printer interrupt allows a program either to get the status of the printer or to write a character to it. Table 17.7 outlines the interrupt calls.

Interrupt 16h 285
~ Program 17.5 code segmen t assume cs'code,ds'data
start: mov ah,02h mov al,0d2h ; ii01 0010
mov dx,01h int 14h
code end
mov ah,4Ch ; DOS exit int 21h
ends start
I i i 0 0 0 - 100 b a u d 100 - 1 2 0 0 baud
001 - 150 b a u d 101 - 2 4 0 0 baud 0 1 0 - 3 0 0 b a u d 110 - 4 8 0 0 baud 0 1 1 - 6 0 0 b a u d 1 1 1 - 9 6 0 0 b a u d
O0 - N o pari ty
01 - O d d pari ty 10 - E v e n pari ty
1 1 T
0 - 1 stop bit
1 - 2 stop bits
10 - 7 da ta bits 11 - 8 da ta bits
1 1
Figure 17.2 Bit definitions for serial port initialization
17.8 Interrupt 16h" BIOS keyboard
Interrupt 16h allows access to the keyboard. Program 17.6 uses the BIOS keyboard interrupt to display characters, entered from the keyboard, to the screen. Initially, the code:
start �9 mov ah, 1
int 16h j z start
; test for keystroke repeat loop ; until the zero flag is not set
tests to see if a key has been pressed. It repeats until the zero flag is unset (this happens when a key has been pressed. The check for keystroke interrupt call sets the zero flag (ZF) if there are no characters in the buffer, otherwise it will be a 0. Next the code:
mov ah,0 ; get keystroke int 16h
gets the key that has been pressed and puts the result into the DL register. Finally, the DOS interrupt is used to display the character to the screen.
286 8086 interrupts
Table 17.6 BIOSkeyboard interrupt
Description Get keystroke
Input registers Output resisters AH = 00h AH = scan code
AL = ASCII character
Check for keystroke
Get shift flags
• Program 17.6
code segment assume cs'code,ds'data
AH =01h
AH = 02h
Return: ZF set if no keystroke available ZF clear if keystroke available AH = scan code AL = ASCII character AL = shift flags bit 7: Insert active 6: CapsLock active 5: NumLock active 4: ScrollLock active 3: Alt key pressed 2: Ctrl key pressed 1: left shift key pressed 0" ri~,ht shift key pressed
start �9 mov ah, 1 int 16h j z start
; test for keystroke repeat loop ; until the zero flag is not set
mov ah,0 ; get keystroke int 16h
mov dl,al mov ah,2 ; display keystroke int 2 lh
mov ah,4Ch ; DOS exit int 2 lh
code ends end start
17.9 Interrupt 19h" BIOS reboot
Interrupt 19h reboots the system without clearing memory or restoring inter- rupt vectors. For a warm boot, equivalent to Ctrl-Alt-Del, then 1 2 3 4 h
should be stored at 0 0 4 0 h - 0 0 7 2 h . For a cold boot, equivalent to a reset,
then 0 0 0 0 h is stored at 0 04 0 h : 0 07 2 h. Care should be taken with this
interrupt as it may cause the PC to 'hang' .
17.10 Interrupt 1Ah" BIOS system time
The BIOS system time interrupt allows a program to get access to the sys- tem timer. Table 17.8 outlines the interrupt calls.
Interrupt 1Ah 287
Description Initialize printer port
Write character to printer
Get printer status
Description Get system time
Set system time
Set real-time clock time
Table 17.7
Input registers AH = 0 1 h DX = printer number (00h-02h)
BIOS printer interrupt
Output registers AH = printer status bit 7: not busy 6: acknowledge 5: out of paper 4: selected 3: UO error 2: unused 1: unused 0: timeout
AH = 00h AL = character to write DX = printer number (00h-02h)
AH = 02h DX = printer number ~00h-02h)
AH = printer status
Table 17.8
AH = printer status
Input registers AH = 00h
AH =01h
BIOS system time interrupt
Output registers CX:DX = number of clock ticks since midnight AL = midnight flag, non-zero if midnight passed since time last read
AH = 0 3 h CH = hour (BCD) CL = minutes (BCD) DH = seconds (BCD) DL = daylight savings flag (00h standard time, 0 lh daylight time)
CX:DX = number of clock ticks since midnight
Get real-time AH = 02h clock time
Return: CF clear if successful CH = hour (BCD) CL = minutes (BCD) DH = seconds (BCD) DL = daylight savings flag (00h standard time, 01h daylight time) CF set on error
17.11 C and Pascal interrupts
See Section D.3.

288 8086 interrupts
17.12 Exercises
17.11.1 Using BIOS video interrupt 1 Oh write programs which perform the following:
(a) fill a complete screen with the character 'A' of a text colour of red with a background of blue;
(b) repeat (a), but the character displayed should cycle from 'A' to 'Z' with a one-second delay between outputs;
(c) repeat (a), but the foreground colour should cycle through all available colours with a one-second delay between out- puts;
(d) repeat (a) so that the background colour cycles through all available colours with a one-second delay between outputs.
17.11.2 Using BIOS keyboard interrupt 16h write a program, in C or Pas- cal, that displays the status of the Shift, Caps lock, Cntrl, Scroll and Num keys.
Introduction
18.1 Introduction
Microsoft Windows has become the de-facto PC operating system. All ver- sions up to, and including, Windows 3.11 used DOS as the core operating system. New versions of Windows, such as Windows NT and Windows 95 do not use DOS and can thus use the full capabilities of memory and of the processor. The most popular programming languages for Windows pro- gramming are"
�9 Microsoft Visual Basic. �9 Microsoft Visual C++ and Borland C++. �9 Delphi (which is available from Borland).
Visual Basic has the advantage over the other language in that it is relatively easy to use and to program with, although the development packages which are used with C++ and Delphi make constructing the user interface rela- tively easy. Visual Basic Version 4 is shown in Figure 18.1 and Version 5 is shown in Figure 18.2.
18.2 Event-driven programming
Traditional methods of programming involve writing a program which flows from one part to the next in a linear manner. Most programs are designed using a top-down structured design, where the task is split into a number of submodules, these are then called when they are required. This means that it is relatively difficult to interrupt the operation of a certain part of a program to do another activity, such as updating the graphics display.
Visual Basic in general is"
Object-oriented. Where the program is designed around a number of ready-made objects. Event-driven. Where the execution of a program is not predef'med and its execution is triggered by events, such as a mouse click, a keyboard press, and so on.

292 Introduction
Designed f rom the user interface ou twards . The program is typically designed by first developing the user interface and then coded to respond to events within the interface.
Figure 18.1 Visual Basic 4 user interface
Figure 18.2 Visual Basic 5 user interface
Other terms 293
18.3 Visual Basic files
A listing of a sample directory which contains Visual Basic files is"
DDE BAS 143 12/01/96 0:00 DDE.BAS DDE VBP 338 12/01/96 0:00 DDE.VBP EXECUTE FRM 2,431 12/01/96 0:00 EXECUTE.FRM MAIN FRM 18,468 12/01/96 0:00 MAIN.FRM
The files are:
�9 Projec t files. Projects bind together the individual elements of a Visual Basic program. Initially the user creates a project file for the program and this is loaded whenever the program is being developed. The default ex- tension for a project is either . t ~ K or . VBP extension. Projects gener- ally make it easier to control the various elements of a program.
�9 Modules. Code that is attached to a form is accessible from anywhere on that form, but a program may have more than one form. It will sometimes be necessary to have program code that can be reached from any form, and in this case the code would be written on a module. Modules disap- pear from view when the program runs - only forms have an on-screen existence. There may be several modules in one program, and each is saved as a separate file. These are marked by a .BAS extension.
�9 Forms. A form forms the anchor for all parts of a Visual Basic program. Initially it is a blank window and the user pastes controls onto it to create the required user interface. Code is then associated with events on the form, such as responding to a button press or a slider control, although some control elements do not have associated code. A program can have one or more forms, each of which displays and handles data in different ways. To make forms shareable with other programs then each is saved separately with a . FRM extension.
�9 Icons. These are, normally, small graphics images and have a . I CO ex-
tension.
�9 Graphics images. These are normally either BMP (bitmapped) files or (windows metafile) files with the . BMP and . WMF extensions,
respectively.
�9 Others . Other files also exist, such as VBX which is Visual Basic eXtension.
18.4 Other terms
Visual Basic uses a number of other terms to describe design procedure, these are:
Controls . The VB interface contains a window with control objects which are pasted onto a form. These controls can be simple text, menus, spreadsheet grids, radio buttons, and so on. Each control has a set of

294 Introduction
properties that defines their operation, such as their colour, the font size, whether it can be resized, and so on. Some controls, such as command buttons, menus, and so on, normally have code attached to them, but simple controls, such as text and a graphics image can simply exist on a form with no associated code. Procedures. As with C and Pascal, Visual Basic uses procedures, or sub- routines, to structure code. Most of these are associated with an event that occurs from a control and some will be free-alone with no associated event.
18.5 Main screen
Figure 18.3 shows the Visual Basic 4 desktop (Visual Basic 5 is similar, but the windows do not float on the display). It contains a menu form, controls, main form, project windows and properties window.
Figure 18.3 Visual Basic 4 desktop
18.5.1 Menu bar and toolbar
The menu bar and tool bar appear in a single, floating window, as shown in Figure 18.4. The menu bar contains options for file manipulation (File), edit- ing (Edit), viewing (View), running (__Run), testing the program (Debug), manipulating windows (Window) and getting help (Help). These can either be selected with the mouse, using the function key F10 and then selecting the option with the arrow keys and pressing return or use the hot-key. The hot key is Alt and the underlined character, thus AIt-F selects the File menu, AIt-E selects the Edit menu, and so on.

Main screen 295
Figure 18.4 Visual Basic 4 menu bar and toolbar
The toolbar contains shortcut buttons for commonly used menu items. To the fight of the toolbar there are two indicators; these display the position and size of a selected form or control. This area of the window is also used in the compilation phase to display the status of the compilation.
The toolbar buttons are:
Creates a new form.
Creates a new standard module.
Opens an existing project.
Saves the currently active project.
Locks/unlocks the controls on the active form.
Displays the Menu Editor.
Displays the Properties window.
Displays the Object Browser.
Displays the Project window.
Runs the application.
Pauses program execution.
Stops execution.
Toggles a breakpoint (breakpoint on or off).
Displays the value of the current selection in the Code window.
Displays the structure of active calls.
Traces through each line of code and steps into procedures.
Executes code one procedure or statement at a time in the Code window.
18.5.2 Project window
The Project window displays all the forms and modules used in the currently active project; an example is shown in Figure 18.5. A new project is opened by selecting New Project from the File menu, whereas to open an existing project the Open Project option is selected from the File menu, else the open existing project option is selected from the toolbar.

296 Introduction
Only one project can be opened at a time, but that project can have any number of forms. In the Project window the user can do the following: �9 Open a Form window for an existing form by selecting the form name
and clicking the View Form button. �9 Open the Code window for an existing form by selecting the module
name and clicking the View Code button. �9 Remove a file from a project by selecting the file in the Project window,
and then from the File menu choose Remove File.
Figure 18.5 Visual Basic Project window
18.5.3 Form window
The Form window, as shown in Figure 18.6, creates application windows and dialog boxes. A new form is created by selecting the Form from the In- sert menu (or use the toolbar shortcut) and an existing form is opened by selecting the form name and then clicking the View Form button. An exist- ing form is added to a project by selecting the Add File command from the File menu. Any associated code on a form can be viewed by clicking on the View Code button.
Each form has a Control-menu box, Minimize and Maximize buttons, and a title bar, and can be moved and resized. Table 18.1 shows the key combinations in the Form window.
Figure 18.6 Visual Basic Form window

Main screen 297
..Key combin~iion alpha
Table 18.1 Key combination in Form window
Operation Enter a value in the Properties window for the selected property.
CLICK-Drag Select multiple controls.
CTRL+CLICK+ DRAG
Add or remove controls from the current selection.
CTRL-C Copy the selected controls to the Clipboard.
CTRL-CLICK Add or remove a control from the selection.
CTRL-E Display the Menu Editor.
CTRL-J Bring control to front (if controls are overlapping).
CTRL-K Send control to back (if controls are overlapping).
CTRL-V Paste from Clipboard onto the form.
CTRL-X Cut the selected controls to the Clipboard.
CTRL-Z Undo a deleted control.
DEL Delete the selected controls.
F4 Display the Properties window
F7 Open the Code window for the selected object.
SHIFT-CTRL- alpha
Select a property in the Property list of the Properties window.
SHIFT-TAB Cycle backward through controls in tab order.
TAB i , , i
Cycle forw~d throu~ ' con~o!s in tab order. . . . . . . . . . . . . .
18.5.4 Toolbox
The Toolbox contains the icons for controls. These are standard Visual Ba- sic controls and any custom controls and insertable objects, as shown in Figure 18.7. The Toolbox is displayed, if it is not already in view, with Toolbox from the View menu and it is closed by double-clicking the Con- trol-menu box.
Figure 18.6 shows some typical controls, these include"

298 Introduction
Figure 18.7 Toolbox controls
Pointer. The pointer does not draw any control objects and is used to resize or move a control once it has been drawn on a form. When a control is added to a form then the pointer is automatically selected.
PictureBox. Displays graphical images (BMP, WMF, ICO or DIB).
Label. Used to display text that cannot be changed by the user.
TextBox. Allows the user to either enter or change text.
Frame. Used to create a graphical or functional grouping for con- trois. These are grouped by first drawing a Frame around them and then drawing controls inside the frame.
CommandButton. Used to carry out a command.
CheekBox. Used to create a check box, where the user can indicate if something is on or off (true or false), or, when there is more than one option, a multiple of choices.

Main screen 299
�9 OptionButton. Used to display a number of options but only one can be chosen (this differs from the check box which only allows one option to be chosen).
�9 ComboBox. Used to give a combination of a list box and test box, where the user can either enter a value in a text box or choose an item from the list.
ListBox. Used to display a list of items and the user is allowed to choose one of them. This list has a scroll button to allow the list to be scrolled.
HScrol lBar (horizontal scroll bar). Used to scroll up and down through a list of text or graphical information. It can also be used to indi- cate the current position on a scale or by the user to indicate a given strength of value.
VSerollBar (vertical scroll bar). Used to scroll across a list of text or graphical information. It can also be used to indicate the current posi- tion on a scale or by the user to indicate a given strength of value.
Timer. Used to generate timed events at given intervals.
DriveListBox. Used to display currently connected disk drives.
DirListBox (directory list box). Used to display directories and paths.
FileListBox. Used to display a list of files.
Shape. Used to draw shapes, such as rectangles, rounded rectangles, squares, rounded squares, ovals or circles.
Line. Used to draw a variety of line styles on your form at design time (transparent, solid, dash, dot, dash-dot and dash-dot-dot).
Image. Used to display a graphical image, such as a bitmap (BMP), icon (ICO), or metafile (WMF). These images can only be used to dis- play and image and do not have the same control functions as Picture- Box.
Data. Used to provide access to data in databases.
OLE Controller. Used to link and embed objects from other appli- cations (such as Word Documents, Excell Spreadsheets, and so on). OLE stands for Object Linking and Embedding.
CommonDialog. Used to create customized dialog boxes for op-

300 Introduction
erations such as printing files, opening and saving files, setting fonts and help functions.
�9 D B L i s t (data-bound list box). Used as an enhanced ListBox which can be customized to display a list of items from which the user can choose one. The list can be scrolled if it has more items than can be displayed at one time.
�9 D B C o m b o (data-bound combo box). Used as an enhanced Combo which can be customized to display a list of items from which the user can choose one. Use to draw a combination list box and text box. The user can either choose an item from the list or enter a value in the text box.
�9 ............ i ~ DBGrid (data-bound grid). Use to display a series of rows and col- umns and to manipulate the data in its cells. DBGrid is a custom control and has increased data access capabilities that the standard Grid does not have.
18.6 Properties window
The Properties window displays the properties of the currently selected form, control or menu. They allow properties such as the colour, font type and size of text, background colour of a form, type of graphic image, and so o n .
First, the item to be changed is selected and then the Properties option is chosen from the View menu, else the function key F4. The Property window is closed with a double-click on the Control-menu box.
The Properties window contains two main parts, these are"
T h e Object box. This is found below the title bar and identifies the cur- rently selected form or control on the form. In Figure 18.8 the command button has an associated Properties window. The Object box in this case is"
Commandl CommandButton
Where CommandButton is the control item and is named Command l, other control items are PictureBox, Label, TextBox, Frame, CheckBox, OptionButton, ComboBox, ListBox, HScrollBar, VScrollBar, Timer, DriveListBox, FileListBox, Shape, Line, Image, Data, and so on. Click the arrow at the right side of the Object box ( ~ ) to get a list of the con- trois on the current form. From the list, choose the current form or a control on the form whose properties you want to change. An example is given in Figure 18.9. In this case there are three command buttons
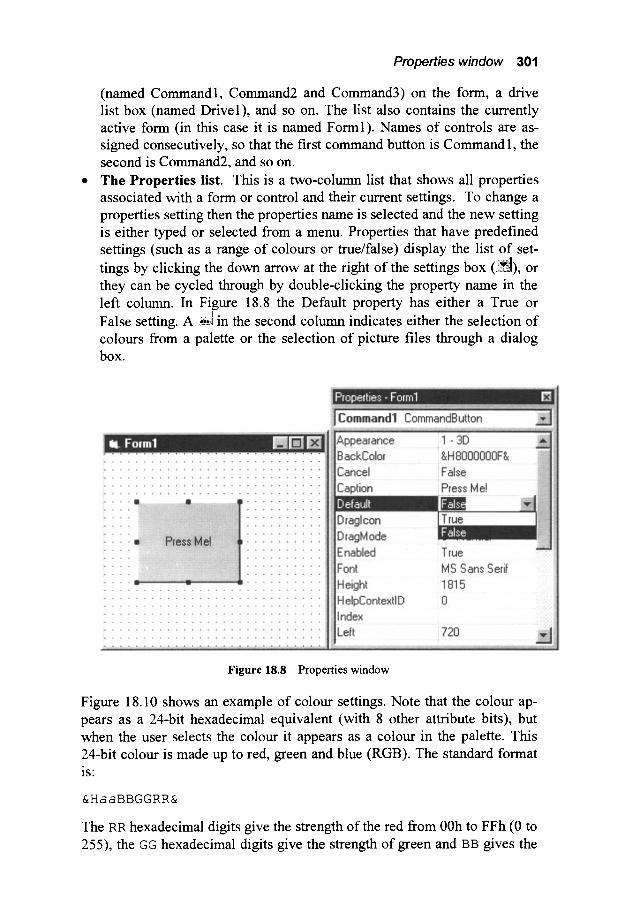
Properties window 301
(named Command l, Command2 and Command3) on the form, a drive list box (named Drive 1), and so on. The list also contains the currently active form (in this case it is named Forml). Names of controls are as- signed consecutively, so that the first command button is Command 1, the second is Command2, and so on. The Properties list. This is a two-column list that shows all properties associated with a form or control and their current settings. To change a properties setting then the properties name is selected and the new setting is either typed or selected from a menu. Properties that have predefined settings (such as a range of colours or true/false) display the list of set- tings by clicking the down arrow at the right of the settings box ( ~ ) , or they can be cycled through by double-clicking the property name in the left column. In Figure 18.8 the Default property has either a True or False setting. A ~1 in the second column indicates either the selection of colours from a palette or the selection of picture files through a dialog box.
Figure 18.8 Properties window
Figure 18.10 shows an example of colour settings. Note that the colour ap- pears as a 24-bit hexadecimal equivalent (with 8 other attribute bits), but when the user selects the colour it appears as a colour in the palette. This 24-bit colour is made up to red, green and blue (RGB). The standard format is:
&HaaBBGGRR&
The RR hexadecimal digits give the strength of the red from 00h to FFh (0 to 255), the GG hexadecimal digits give the strength of green and BB gives the
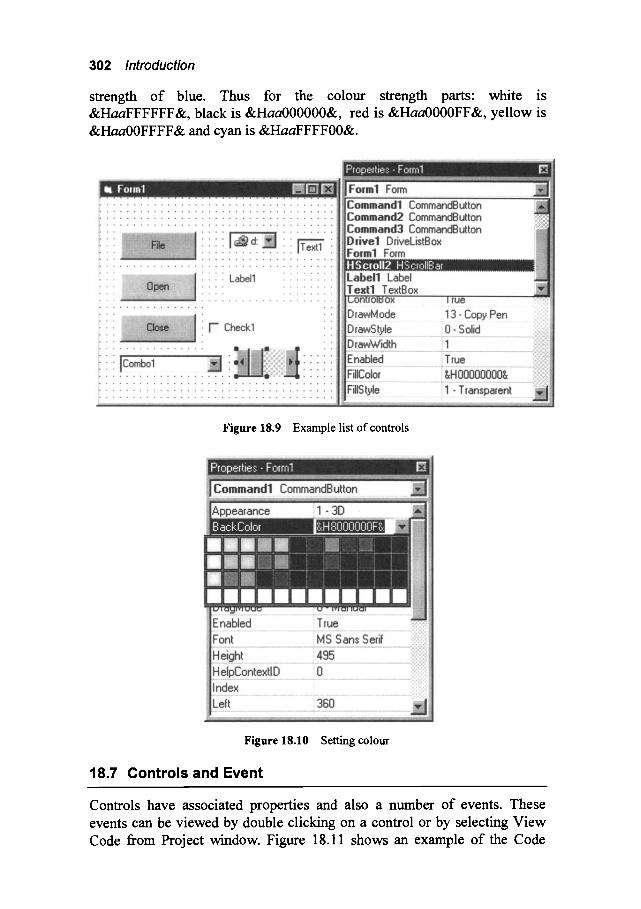
302 Introduction
strength of blue. Thus for the colour strength parts: white is &HaaFFFFFF&, black is &Haa000000&, red is &Haa0000FF&, yellow is &Haa00FFFF& and cyan is &HaaFFFF00&.
Figure 18.9 Example list of controls
Figure 18.10 Setting colour
18.7 Controls and Event
Controls have associated properties and also a number of events. These events can be viewed by double clicking on a control or by selecting View Code from Project window. Figure 18.11 shows an example of the Code

Exercises 303
windows. It can be that the object can be selected by pulling down the menu of the left-hand side and the associated events in the right-hand menu. The associated code with that object and event is shown in the window below these menu options.
Figure 18.12 shows an example of the events that occur when the control is a command button (in this case the object is Command 1). It can be seen that the associated events are: Click, DragDrop, DragOver, GotFocus, Key- Down, KeyPress and KeyUp. Each of these can have associated sections of code to react to the event. For example, the Click event is initiated when the user clicks the mouse button on the command button and KeyDown is initi- ated when a key has been pressed down.
Figure 18.11 Selecting objects
Figure 18.12 Events when the control is a command button
18.8 Exercises
18.8.1 Place a CommandButton on a form and display its properties. Note all of the properties and, with the help of the help manual, identify of the function of each of the properties. Note that help on a prop- erty can be found by highlighting the property and pressing F 1.

304 Introduction
18.8.2 With a CommandButton identify the events that are associated with it.
18.8.3 Determine the actual colours of the following RGB colour values:
(i) &H0080FF80& (ii) &H00FF8080& (ii) &H00C000C0& (iv) &H00EOEOE0&
18.8.4 Conduct the following:
(i) (ii) (iii)
(iv)
(iv) (v)
Add a command button to a form. Change the text on the CommandButton to 'EXIT'. Change the font on the CommandButton to 'Times Roman' and the font size to 16. Resize the CommandButton so that the text fits comfortably into the button. Change the background colour of the form to yellow. Change the Caption name of the form to 'My Application'.
18.8.5 Develop the form given in Figure 18.13.
18.8.6
Figure 18.13 Exercise
Explain why, in the previous exercise, that a radio button is used for the age option and a check box is used to select the choices of Show Graphics and Play Sounds. Which of the following would be radio buttons or check boxes:
(i) (ii) (iii) (iv)
Items on a shopping list. Selection of a horse to win a race. Selection of paint colour on a new car. Selection of several modules on a course.
Visual Basic Language
19.1 Introduction
This chapter discusses the Visual Basic language and how a program is developed.
19.2 Programming language
Visual Basic has an excellent on-line manual in which the user can either search for the occurrence of keywords (with Help ---) Search For Help On) or view the contents of the manual (Help ~ Contents). The left-hand side of Figure 19.1 shows an example manual page after the user has selected Help
Contents ~ Visual Basic Help, and then leads to other parts of the man- ual, such as the Programming Language and Contents Topic. The left-hand side of Figure 19.1 shows an example of the Contents list.
Figure 19.1 Visual Basic 4 on-line help manual
19.3 Entering a program
To start the development of a program with no controls on a form then the
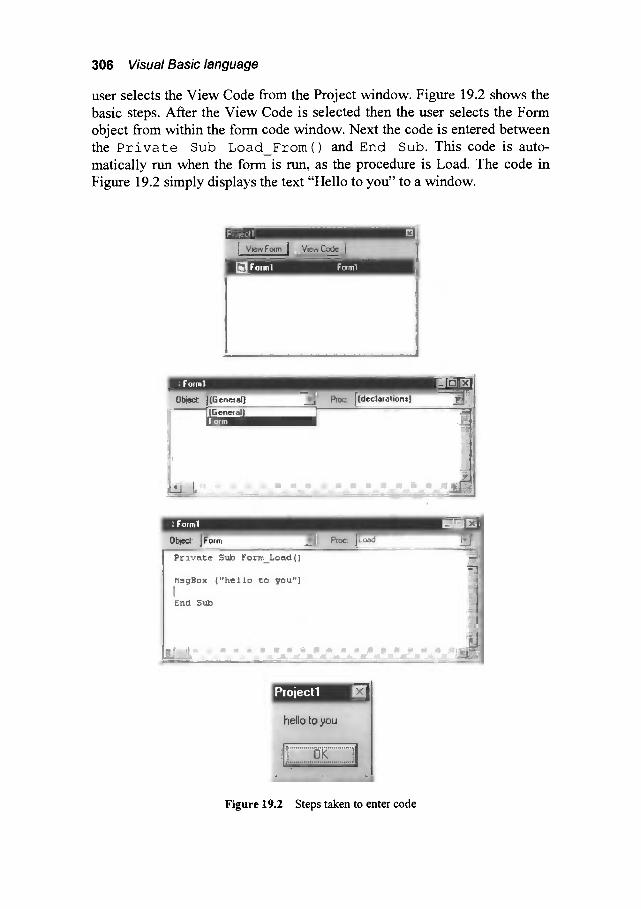
306 Visual Basic language
user selects the View Code from the Project window. Figure 19.2 shows the basic steps. After the View Code is selected then the user selects the Form object from within the form code window. Next the code is entered between the Private Sub Load From() and End Sub. This code is auto- matically nan when the form is run, as the procedure is Load. The code in Figure 19.2 simply displays the text "Hello to you" to a window.
Figure 19.2 Steps taken to enter code
19.4 Language reference
Language reference 307
This section contains a condensed reference to Visual Basic.
19.4.1 Data types and declaring variables
A variable is declared with the Dim keyword. These variables must conform to the following:
�9 Begin with an alphabet character. �9 Cannot contain a dot, '$ ' ' w, ,@, ,#, , . , , o r ' % ' .
�9 Must be less than 256 characters long.
Examples are:
Dim vall As Boolean
Dim x, y As Single
Dim i As Integer
Dim newdate As Date
Dim name As String * 30
which declares a Boolean variable called vall, two single precision floating-point variables: x and y, an integer named i , a d a t e named n e w d a t e and a string of 30 characters named name.
Variables are assigned values with the assignment operation (=), such as:
vall= True
x = 2.134
y = i0.i
newdate = Now
name = "Fred"
which sets the Boolean variable val 1 to a True, the value of x to 2.134, y to 10.1, the date newdate is assigned the current date from the function Now and the string name is assigned the string " F r e d " . Note that strings of characters are defined between inverted commas (" ").
19.4.2 Operators
The basic operators in Visual Basic are similar to the ones used in Pascal. Table 19.1 shows the main operators. The operator precedence is"
�9 Arithmetic operators have the highest precedence, followed by compari- son operators and finally logical operators.
�9 Arithmetic and logical operators are evaluated in the order given in Table 19.1.
�9 Comparison operators all have equal precedence. �9 Multiplication and division have the same precedence, then the operation

308 Visual Basic language
is executed from left to right. The same occurs with addition and sub- traction.
Table 19.1 Operator precedence
'Ar i thmet ic . . . . . . . . . . . . . . . . . . C o m p a r i s o n ......................... L o g i c a l
Exponentiation (") Equality (=) No t Negation (-) Inequality (<>) And Multiplication and division ( *,/) Less than (<) O r Integer division ( \) Greater than (>) Xo r Modulo arithmetic (Mad) Less than or Equal to (<=) Addition and subtraction (+,-) Greater than or Equal to (>=) String concatenation (&)
, , , , , , , , , , , ,
19.4.3 Data types
As with C and Pascal, Visual Basic has a whole range of data types. Their range depends on their format (such as characters, integers and floating point values) and the number of bytes used to store them. Table 19.2 out- lines the main pre-defined (intrinsic) data types. A user defined type can also be defined using the Type statement.
Table 19.2 Data types
_ _ = : : : : : : = : : _ : : : . . . . . . . . . . . . . . . . . . . . . . . . : : ~ , , ~ , , . , , ~ . . . . . . . . . . . . . . . . . .
, D a t a type , S t o r a g e s ize ........ R a n s e .................
Byte 1 byte 0 to 255
Boolean 2 bytes True or False
Integer 2 bytes -32,768 to 32,767
Long (long integer) 4 bytes
Single (single-precision 4 bytes floating-point)
-2,147,483,648 to 2,147,483,647
+3.402823• to +1.401298• -45
Double (double-precision 8 bytes floating-point)
+4.94065645841247x 10 -324 to
+1.79769313486232• 103o8
Currency (scaled integer) 8 bytes +922,337,203,685,477.5808
Date 8 bytes January 1, 100 to December 31, 9999.
String (variable-length) 10 bytes + string length
0 to approximately 2 billion
String (fixed-length) Length of 1 to approximately 65,400 . . . . . . . . . . . . . . . . . . . . . . . . . . . . . . . . . . . . . . . . . . . . . . . . . . . . . . . . . . . . . s ~ g . . . . . . . . . . . . . . . . . . . . . . . . . . . . . . . . . . . . . . . . . . . . . . . . . . . . . . . . . . . . . . . . . . . . . . . . . . . . . . . . .
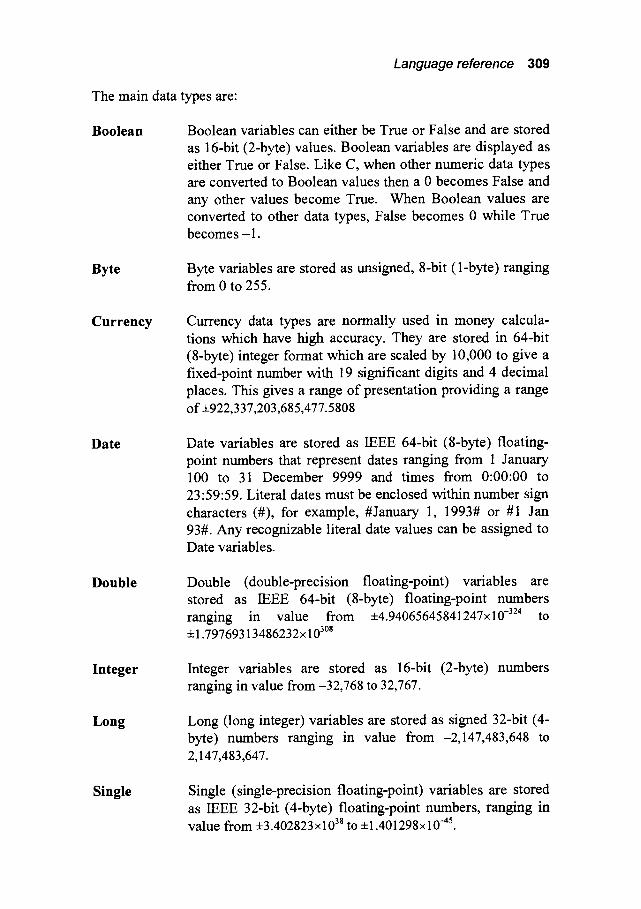
Language reference 309
The main data types are:
Boolean Boolean variables can either be True or False and are stored as 16-bit (2-byte) values. Boolean variables are displayed as either True or False. Like C, when other numeric data types are converted to Boolean values then a 0 becomes False and any other values become True. When Boolean values are converted to other data types, False becomes 0 while True becomes -1.
Byte Byte variables are stored as unsigned, 8-bit (1-byte) ranging from 0 to 255.
Currency Currency data types are normally used in money calcula- tions which have high accuracy. They are stored in 64-bit (8-byte) integer format which are scaled by 10,000 to give a fixed-point number with 19 significant digits and 4 decimal places. This gives a range of presentation providing a range of 4-922,337,203,685,477.5808
Date Date variables are stored as IEEE 64-bit (8-byte) floating- point numbers that represent dates ranging from 1 January 100 to 31 December 9999 and times from 0:00:00 to 23:59:59. Literal dates must be enclosed within number sign characters (#), for example, #January 1, 1993# or #1 Jan 93#. Any recognizable literal date values can be assigned to Date variables.
Double Double (double-precision floating-point) variables are stored as IEEE 64-bit (8-byte) floating-point numbers ranging in value from +4.94065645841247x 10 -324 to + 1.79769313486232x 10³~
Integer Integer variables are stored as 16-bit (2-byte) numbers ranging in value from-32,768 to 32,767.
Long Long (long integer) variables are stored as signed 32-bit (4- byte) numbers ranging in value from-2,147,483,648 to 2,147,483,647.
Single Single (single-precision floating-point) variables are stored as IEEE 32-bit O-byte) floating-point numbers, ranging in value from +3.402823• to +1.401298• -45.
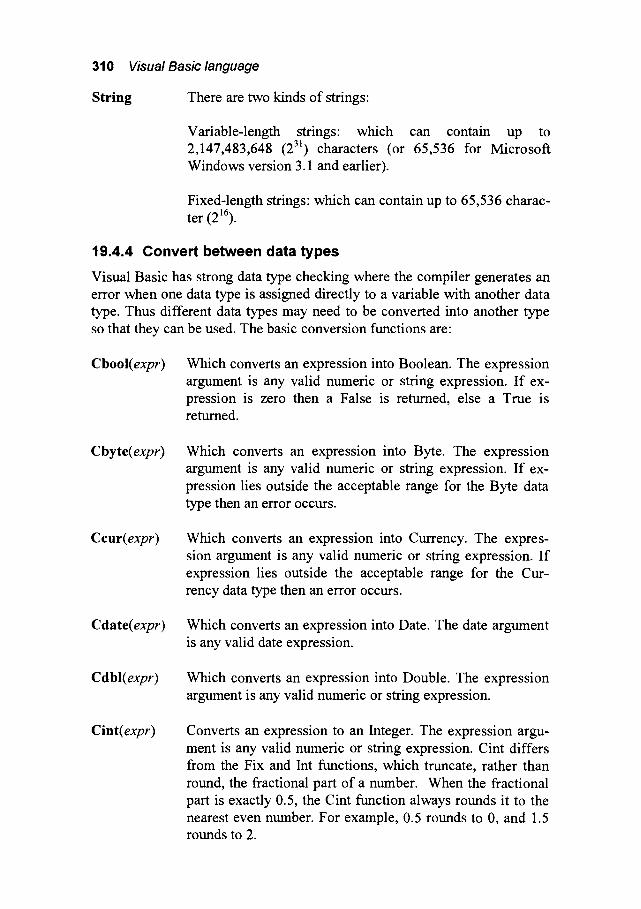
310 Visual Basic language
String There are two kinds of strings:
Variable-length strings: which can contain up to 2,147,483,648 (2 31) characters (or 65,536 for Microsoft Windows version 3.1 and earlier).
Fixed-length strings: which can contain up to 65,536 charac- ter (216).
19.4.4 Convert between data types
Visual Basic has strong data type checking where the compiler generates an error when one data type is assigned directly to a variable with another data type. Thus different data types may need to be converted into another type so that they can be used. The basic conversion functions are:
Cbool(expr) Which converts an expression into Boolean. The expression argument is any valid numeric or string expression. If ex- pression is zero then a False is returned, else a True is returned.
Cbyte(expr) Which converts an expression into Byte. The expression argument is any valid numeric or string expression. If ex- pression lies outside the acceptable range for the Byte data type then an error occurs.
Ccur(expr) Which converts an expression into Currency. The expres- sion argument is any valid numeric or string expression. If expression lies outside the acceptable range for the Cur- rency data type then an error occurs.
Cdate(expr) Which converts an expression into Date. The date argument is any valid date expression.
Cdbl(expr) Which converts an expression into Double. The expression argument is any valid numeric or string expression.
Cint(expr) Converts an expression to an Integer. The expression argu- ment is any valid numeric or string expression. Cint differs from the Fix and Int functions, which truncate, rather than round, the fractional part of a number. When the fractional part is exactly 0.5, the Cint function always rounds it to the nearest even number. For example, 0.5 rounds to 0, and 1.5 rounds to 2.
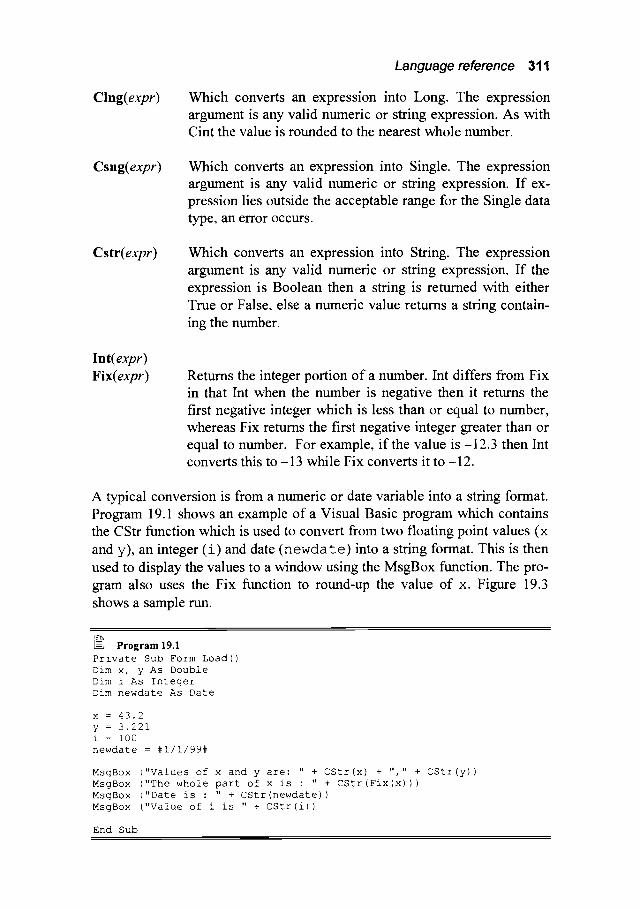
Clng(expr)
Languagereference 311
Which converts an expression into Long. The expression argument is any valid numeric or string expression. As with Cint the value is rounded to the nearest whole number.
Csng(expr) Which converts an expression into Single. The expression argument is any valid numeric or string expression. If ex- pression lies outside the acceptable range for the Single data type, an error occurs.
Cstr(expr) Which converts an expression into String. The expression argument is any valid numeric or string expression. If the expression is Boolean then a string is returned with either True or False, else a numeric value returns a string contain- ing the number.
lnt(expr) Fix(expr) Reamas the integer portion of a number. Int differs from Fix
in that Int when the number is negative then it returns the first negative integer which is less than or equal to number, whereas Fix returns the first negative integer greater than or equal to number. For example, if the value i s -12 .3 then Int converts this to - 13 while Fix converts it to - 12.
A typical conversion is from a numeric or date variable into a string format. Program 19.1 shows an example of a Visual Basic program which contains the CStr function which is used to convert from two tloating point values (x and y), an integer ( i ) and date ( n e w d a t e ) into a string format. This is then used to display the values to a window using the MsgBox function. The pro- gram also uses the Fix function to round-up the value of x. Figure 19.3 shows a sample run.
Program 19.1 Private Sub Form Load()
Dim x, y As Double
Dim i As Integer
Dim newdate As Date
x = 43.2
y = 3.221
i : i00
newdate = #1/1/99#
MsgBox ("Values of x and y are: " + CStr(x) + "," + CStr(y))
MsgBox ("The whole part of x is : " + CStr(Fix(x)))
MsgBox ("Date is : " + CStr(newdate))
MsgBox ("Value of i is " + CStr(i))
End Sub
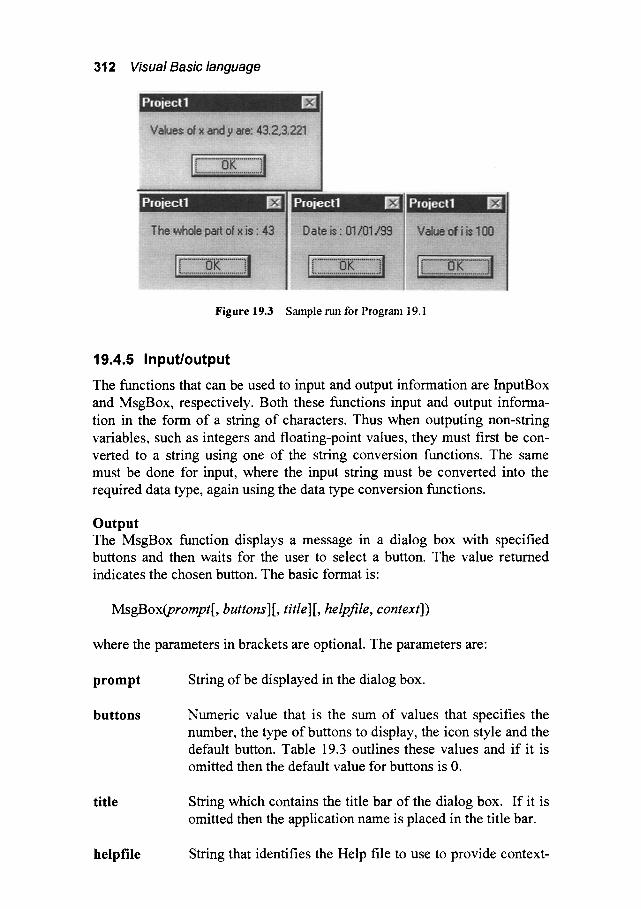
312 Visual Basic language
Figure 19.3 Sample run for Program 19.1
19.4.5 Input/output
The functions that can be used to input and output information are InputBox and MsgBox, respectively. Both these functions input and output informa- tion in the form of a string of characters. Thus when outputing non-string variables, such as integers and floating-point values, they must first be con- verted to a string using one of the string conversion functions. The same must be done for input, where the input string must be converted into the required data type, again using the data type conversion functions.
Output The MsgBox function displays a message in a dialog box with specified buttons and then waits for the user to select a button. The value returned indicates the chosen button. The basic format is:
MsgBox(prompt[, buttons][, tide][, helpfile, context])
where the parameters in brackets are optional. The parameters are:
prompt String of be displayed in the dialog box.
buttons Numeric value that is the sum of values that specifies the number, the type of buttons to display, the icon style and the default button. Table 19.3 outlines these values and if it is omitted then the default value for buttons is 0.
title String which contains the title bar of the dialog box. If it is omitted then the application name is placed in the title bar.
helpfile String that identifies the Help file to use to provide context-

Language reference 313
sensitive Help for the dialog box. If helpfile is provided then context must also be provided.
c o n t e x t Numeric value that is the Help context number the Help author assigned to the appropriate Help topic. If context is provided, helpfile must also be provided. When both help- file and context are provided, the user can press F1 to view the Help topic corresponding to the context.
Table 19.1 defines the button settings. The values from 0 to 5 def'me the type of the button to be displayed. For example, a value of 5 will have two buttons, which are Retry and Cancel. The values 16, 32, 48 and 64 identify the icon to be displayed. For example, a value of 32 will display a question bubble. The 0, 256 and 512 define which button is the default. Each of these values can be added together to create the requires set of buttons, icon and default button. For example, to create a dialog box with the OK and Cancel buttons, a Critical icon and the Cancel button to be the default, then the set- ting would be:
setting = 1 + 16 + 256
which is 273. Note that to aid documentation in the program then the prede- fined constant values can be used, so for the previous example"
setting = vbOKCancel + vbCritical + vbDefaultButton2
I~H,,,,, " ......... " '' '"' '" '"'"'
C o n s t a n t
VbbKd/k~; .............
Table 19.3 Button settings
,H,,,,,, 1 ,, , , , , , ,,,,,t
Value .......... D e s c r i p t i o n
0 Display OK button only
vbOKCancel 1
vbAbortRetryIgnore 2
vbYesNoCancel 3
vbYesNo 4
Display OK and Cancel buttons. See example 1 in Figure 19.4.
Display Abort, Retry, and Ignore buttons. See ex- ample 2 in Figure 19.4.
Display Yes, No, and Cancel buttons. See example 3 in Figure 19.4.
Display Yes and No buttons. See example 4 in Fig- ure 19.4.
vbRetryCancel 5 Display Retry and Cancel buttons. See example 5 in Figure 19.4.
vbCritical 16 Display Critical Message icon. See example 1 in Figure 19.5.
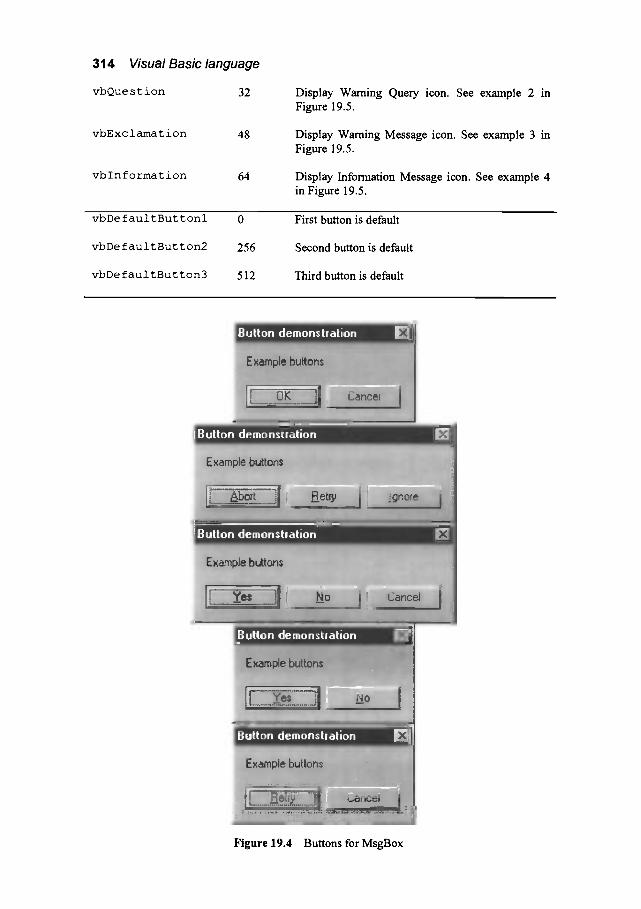
314 Visual Basic language
vbQuestion 32
vbExclamation 48
vbInformation 64
Display Warning Query icon. See example 2 in Figure 19.5.
Display Warning Message icon. See example 3 in Figure 19.5.
Display Information Message icon. See example 4 in Figure 19.5.
vbDefaultButtonl 0
vbDefaultButton2 256
vbDe faultBut ton3 512
First button is default
Second button is default
Third button is default
Figure 19.4 Buttons for MsgBox
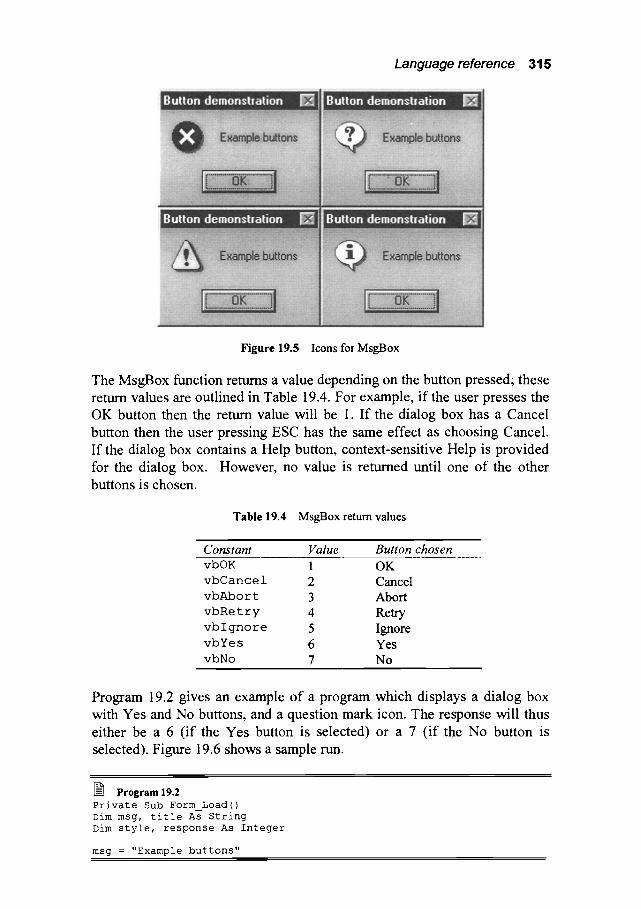
Language reference 315
Figure 19.5 Icons for MsgBox
The MsgBox function returns a value depending on the button pressed; these realm values are outlined in Table 19.4. For example, if the user presses the OK button then the return value will be 1. If the dialog box has a Cancel button then the user pressing ESC has the same effect as choosing Cancel. If the dialog box contains a Help button, context-sensitive Help is provided for the dialog box. However, no value is rettu'ned until one of the other buttons is chosen.
Table 19.4 MsgBox retum values
Constant Value Button chosen vbOK 1 OK
vbCancel 2 Cancel vbAbort 3 Abort vbRetry 4 Rely
vb I gnore 5 Ignore vbYes 6 Yes
vbNo 7 No ,,
Program 19.2 gives an example of a program which displays a dialog box with Yes and No buttons, and a question mark icon. The response will thus either be a 6 (if the Yes button is selected) or a 7 (if the No button is selected). Figure 19.6 shows a sample rtm.
Program 19.2 .Private Sub Form Load() Dim msg, title As String Dim style, response As Integer
msg = "Example buttons"

316 Visual Basic language
style = vbYesNo + vbQuestion
title = "Button demonstration"
response = MsgBox(msg, style, title)
MsgBox ("Response was " + CStr(response))
End SuD
Figure 19.6 Example run
Input The InputBox function prompts the user to input text, or choose a button. It then returns the contents of the text box. The basic format is:
InputBox(prompt[, title][, default][, xpos][, ypos][, helpfile, context])
where the parameters in brackets are optional. The parameters are"
prompt String of be displayed in the dialog box.
title String which contains the title bar of the dialog box. If it is omitted then the application name is placed in the title bar.
default String which is displayed in the text box and is the default response if no other input is provided. If this field is omitted then the text box is initially empty.
xpos Numeric value that specifies (in twips) the horizontal dis- tance of the left edge of the dialog box from the left edge of the screen. If xpos is omitted then the dialog box is horizon- tally centred.
ypos Numeric value that specifies (in twips) the vertical distance of the upper edge of the dialog box from the top of the screen. If ypos is omitted then the dialog box is vertically positioned approximately one-third of the way down the screen.
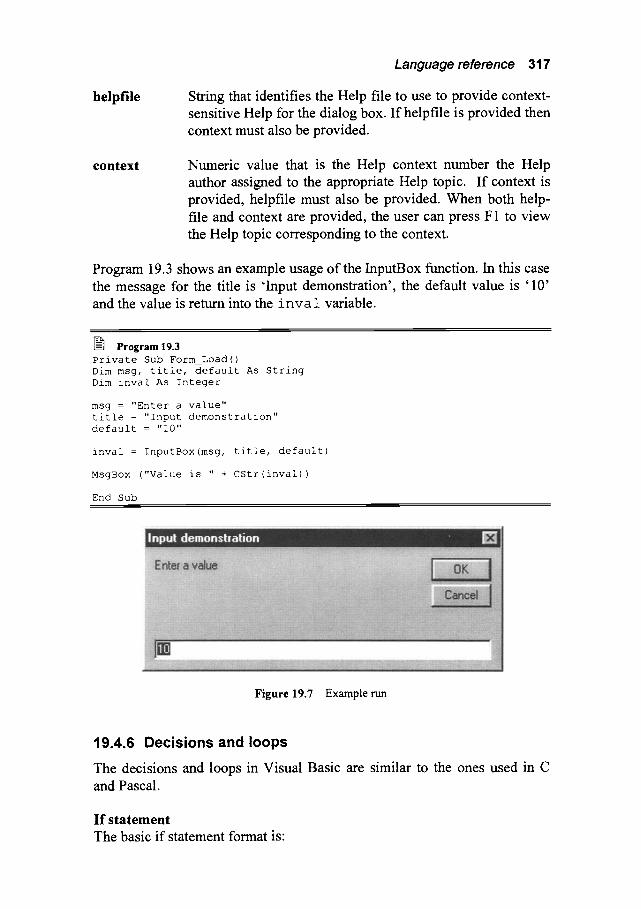
Language reference 317
helpfile String that identifies the Help file to use to provide context- sensitive Help for the dialog box. If helpfile is provided then context must also be provided.
context Numeric value that is the Help context number the Help author assigned to the appropriate Help topic. If context is provided, helpfile must also be provided. When both help- file and context are provided, the user can press F1 to view the Help topic corresponding to the context.
Program 19.3 shows an example usage of the InputBox function. In this case the message for the title is 'Input demonstration', the default value is '10' and the value is return into the i n v a l variable.
Program 19.3 Private Sub Form Load() Dim msg, title, default As String
Dim inval As Integer
msg = "Enter a value"
title = "Input demonstration"
default = "I0"
inval = InputBox(msg, title, default)
MsgBox ("Value is " + CStr(inval))
End Sub
Figure 19.7 Example run
19.4.6 Decisions and loops
The decisions and loops in Visual Basic are similar to the ones used in C and Pascal.
If s tatement The basic if statement format is"

318 Visual Basic language
if (expression) then statement block
end if
or, in general:
if (conditionl) then
statement block elseif (condition2)
statement block . . . .
. . . .
else statement block
end i f
Where the condition can be a numeric or string expression that evaluates to True or False. The statement block contains one or more statements sepa- rated by colons.
As with C and Pascal, if the first condition is True then the first state- ment block is executed, else if the second condition is True then the second statement block is executed, and so on. If none of the conditions are True then the final else statement block is executed (if it exists).
Note that Else and Elself are both optional and there can be any number of Elself clauses but none of them can occur after the Else clause
Program 19.4 gives an example of a program in which the user enters a value from 0 to 2 and the program displays the equivalent resistor colour code colour.
~-- Program 19.4 Private Sub Form Load() Dim msg, title, default As String Dim inval As Integer
msg = "Enter color code value (0-2)" title = "Color code" default = "0"
inval = InputBox(msg, title, default)
If (inval = 0) Then MsgBox ("BLACK")
ElseIf (inval = i) Then MsgBox ("BROWN")
ElseIf (inval = 2) Then MsgBox ("RED")
ElseIf (inval > 2 And inval < i0) Then MsgBox ("Colors not added")
Else MsgBox ("No color value")
End I f End Sub
Case The Case statement is similar to the case and switch statements used in Pascal and C. Its general form is:

Language reference 319
Select Case expression Case expressionvall
statement block1 Case expressionval2
statement block2 Case Else
else statement block1 End Select
The expression can be any numeric or string expression. A match of the ex- pression to the expression value causes the corresponding statement block to be executed. If none of the block match then the Case Else statement block is executed. If testexpression matches any expressionlist expression associ- ated with a Case clause, the statements following that Case clause are exe- cuted up to the next Case clause, or, for the last clause, up to the End Select. Control then passes to the statement following End Select. If testexpression matches an expressionlist expression in more than one Case clause, only the statements following the first match are executed.
Multiple expressions or ranges can be added to the Case cause, such as:
Case -i To 3, i0 To 20, 51, 53
It is also possible to specify ranges and multiple expressions for strings. For example the following matches the string to 'apple' and everything, alpha- betically between, 'banana' and 'carrot"
Case "apple", "banana" To "carrot"
Program 19.5 shows an example of a program which is similar to Program 19.4 but uses a case statement to select the resistor colour code colour.
[~ Program 19.5 Private Sub Form Load()
i
Dim msg, title, default As String Dim inval As Integer
msg = "Enter color code value (0-9)" title = "Color code" default = "0"
inval = InputBox(msg, title, default)
Select Case inval Case 0
MsgBox ("BLACK") Case 1
MsgBox ("BROWN") Case 2
MsgBox ("RED") Case 3, 4, 5, 6, 7, 8, 9
MsgBox ("Colors not added") Case Else
MsgBox ("No Color") End Select End Sub

320 Visual Basic language
For loop The For loop is similar to the for loop in Pascal. It repeats a group of state- ments a number of times. Its general form is"
For counter = start To end [Step step]
statements
Next [counter]
or
For counter = start To end Step stepsize
statements
Next [counter]
Where counter is a numeric variable which as used a loop counter, start is the Initial value of counter, end is the final value of counter and step is the amount by which the count is changed for each loop. This value can either be positive or negative. The default step size, if not specified is 1.
Program 19.6 uses a for loop to calculate the factorial value of an entered value.
l=-I Program 19.6 Private Sub Form Load()
Dim fact As Long
Dim i, inval As Integer
inval = InputBox("Enter a value")
fact = 1
For i = 2 To inval
fact = fact * i
Next i
MsgBox ("Factorial of " + CStr(i) + " is " + CStr(fact))
End Sub
Figure 19.8 Example run
Do .. while loop The Do..while loop is similar to the while() statements used in Pascal and C. Its general form is:
Exercises 321
Do While condition
statement block
Loop
or
Do Until condition
statement block Loop
or
Do
statement block Loop While condition
or
Do statement block
Loop Until condition
Program 19.7 uses a do..while loop to test to see if the user input is within a valid range. In this case the valid input is between 0 and 10 for the voltage input and greater than 0 and up to 10 for the current input. If the user enters a value which is outside this range then a MsgBox is displayed with an error message (INVALID: re-enter).
Program 19.7 Private Sub Form Load()
w
Dim voltage, current, resistance As Double
Do voltage = InputBox("Enter a voltage (0-i0)") If (voltage < 0 Or voltage > i0) Then
MsgBox ("INVALID: re-enter")
End If Loop While (voltage < 0 Or voltage > i0)
Do current = InputBox("Enter a current (0-i0)") If (current <= 0 Or current > i0) Then
MsgBox ("INVALID: re-enter") End If
Loop While (current <= 0 Or current > i0)
reslstance = voltage / current
MsgBox ("Resistance is " + Cstr(resistance))
End Sub
19.5 Exercises
19.5.1 Complete Program 19.5 so that it implements the complete resistor colour code (see Table 6.1 on page 117).

322 Visual Basic language
19.5.2
19.5.3
19.5.4
Change the program in 19.5.1 so that it loops until the user enters a valid value (between 0 and 9).
Change the program in 19.5.2 so that after the result has been dis- played the user is prompted as to whether to repeat the program (OK) or exit the program (Cancel).
Write a program which will continually display the current date and time. The sample code given below displays a single date and time.
Private Sub Form Load() Dim CurrDate, Cu~rTime As Date
CurrTime = Time ' System time
CurrDate = Date ' System date
MsgBox (CurrTime + CurrDate)
End Sub
19.5.5
19.5.6
Modify the program in Exercise 19.5.4 so that the OK and Cancel buttons are shown. If the user selects the Cancel button then the program should exit, else the program should display the new date. The sample code given below displays a single date and time with the OK and Cancel buttons.
Private Sub Form Load()
Dim CurrDate, CurrTime As Date
Dim response As Integer
CurrTime = Time ' System time
CurrDate = Date ' System date
response = MsgBox(CurrDate +
CurrTime, vbOKCancel, "Date")
End Sub
Complete Worksheet 2 on page 37 using Visual Basic. Note that for W2.2 the square root function in Visual Basic is s q r , and in W2.3 the inverse tangent function is a t n.
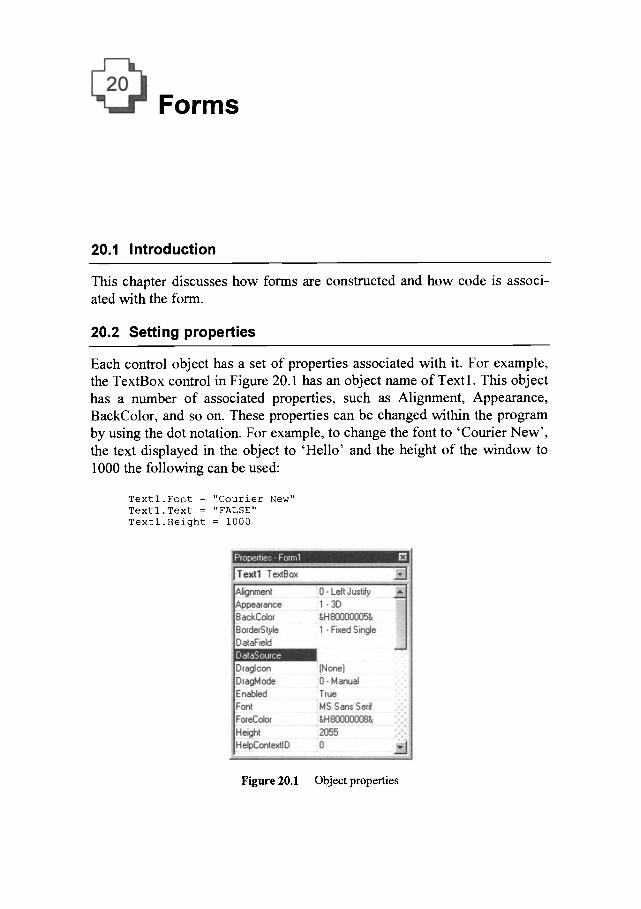
Forms
20.1 Introduction
This chapter discusses how forms are constructed and how code is associ- ated with the form.
20.2 Setting properties
Each control object has a set of properties associated with it. For example, the TextBox control in Figure 20.1 has an object name of Text 1. This object has a number of associated properties, such as Alignment, Appearance, BackColor, and so on. These properties can be changed within the program by using the dot notation. For example, to change the font to 'Courier New', the text displayed in the object to 'Hello' and the height of the window to 1000 the following can be used:
Textl. Font= "Courier New"
Textl.Text = "FALSE"
Textl.Height = i000
Figure 20.1 Object properties
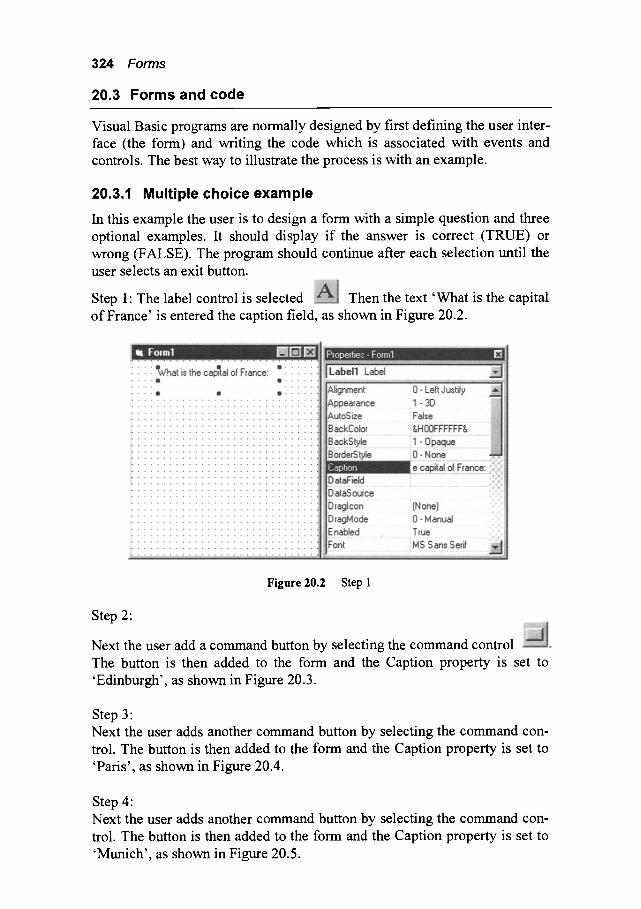
324 Forms
20.3 Forms and code
Visual Basic programs are normally designed by first defining the user inter- face (the form) and writing the code which is associated with events and controls. The best way to illustrate the process is with an example.
20.3.1 Multiple choice example
In this example the user is to design a form with a simple question and three optional examples. It should display if the answer is correct (TRUE) or wrong (FALSE). The program should continue after each selection until the user selects an exit button.
Step 1: The label control is selected Then the text 'What is the capital of France' is entered the caption field, as shown in Figure 20.2.
Figure 20.2 Step 1
Step 2:
Next the user add a command button by selecting the command control The button is then added to the form and the Caption property is set to 'Edinburgh', as shown in Figure 20.3.
Step 3: Next the user adds another command button by selecting the command con- trol. The button is then added to the form and the Caption property is set to 'Paris', as shown in Figure 20.4.
Step 4: Next the user adds another command button by selecting the command con- trol. The button is then added to the form and the Caption property is set to 'Munich', as shown in Figure 20.5.

Forms and code 325
Figure 20.3 Step 2
Figure 20.4 Step 3
Figure 20.5 Step 4

326 Forms
Step 5:
Next the user adds a TextBox This is then added to the right-hand side of the form, as shown in Figure 20.6. The Text property is then changed to have an empty field. The TextBox will be used to display text from the pro- gram.
Figure 20.6 Step 5
Step 6" Next the user adds another command button by selecting the command con- trol. The button is then added to the form and the Caption property is set to 'Exit', as shown in Figure 20.7. A character in the name can be underlined by putting an & before it. Thus '&Exit ' will be displayed as 'Exit'.
Figure 20.7 Step 6
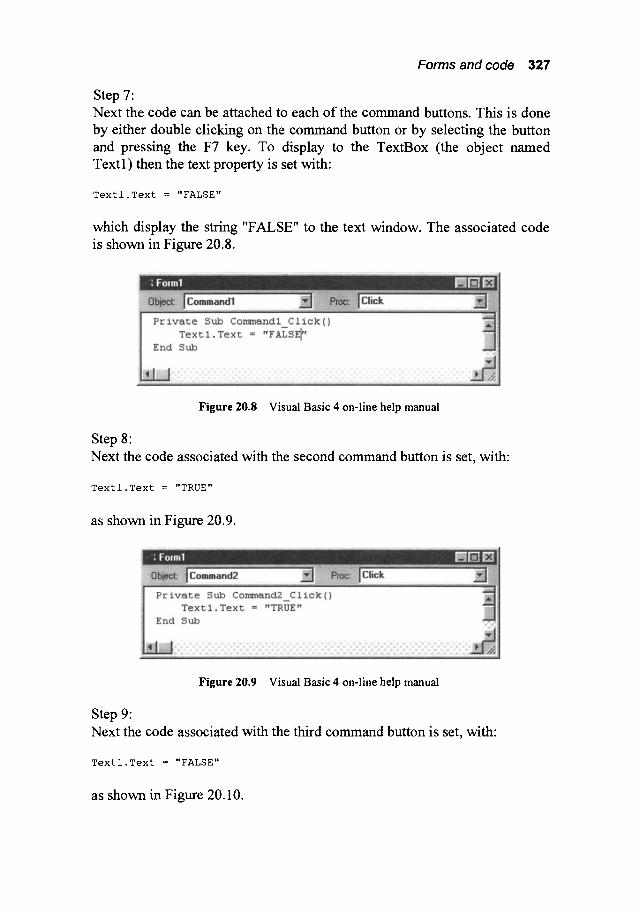
Forms and code 327
Step 7: Next the code can be attached to each of the command buttons. This is done by either double clicking on the command button or by selecting the button and pressing the F7 key. To display to the TextBox (the object named Text 1) then the text property is set with:
Textl.Text = "FALSE"
which display the string "FALSE" to the text window. The associated code is shown in Figure 20.8.
Figure 20.8 Visual Basic 4 on-line help manual
Step 8" Next the code associated with the second command button is set, with:
Textl.Text = "TRUE"
as shown in Figure 20.9.
Figure 20.9 Visual Basic 4 on-line help manual
Step 9: Next the code associated with the third command button is set, with"
Textl.Text = "FALSE"
as shown in Figure 20.10.

328 Forms
Figure 20.10 Visual Basic 4 on-line help manual
Step 10" Finally the code associated with the exit command button is set by adding the code:
End
which causes the program to end and the code is shown in Figure 20.11.
Figure 20.11 Visual Basic 4 on-line help manual
The program can then be executed with Run->Start. Figure 20.12 shows a sample run.
Figure 20.12 Sample test run

Forms and code 329
Next the form and the project are saved using the File---~Save option. If the file has not been saved before then the user will be prompted to give the project and the form a new file name. In this case save the project and the form as VB0 3 0 1 . VBP and VB0 3 0 1 . FRY/. These are listed in Program 20.1. It can be seen that the form file (VB0 3 0 1 . FRM) contains the Visual Basic code along with the properties and definitions of the controls, whereas the project file (VB0 3 _ 0 1 . VBP) defines the user's environment, such as"
�9 The names of any forms. �9 The control types.
[~ Program 20.1: VB03_01.FRM VERSION 4.00
Begin VB.Form Forml
BackColor = &H00FFFFFF&
Caption = "Forml"
ClientHeight = 3630
ClientLeft = 2085
ClientTop = 3195
ClientWidth = 3495
Height = 4035
Left = 2025
LinkTopic = "Forml"
ScaleHeight = 3630
ScaleWidth = 3495
Top = 2850
Width = 3615
Begin VB.CommandButton Command4
Caption = "&Exit"
Height = 615
Left = 480
TabIndex = 5
Top = 2880
Width = 2775
End
Begin VB.TextBox Textl
Height = 2055
Left = 1920
TabIndex = 4
Top = 720
Width = 1335
End
Begin VB.CommandButton Command3
Caption = "Munich"
Height = 615
Left = 480
TabIndex = 3
Top = 2160
Width = 1095
End
Begin VB.CommandButton Command2
Caption = "Paris"
Height = 615
Left = 480
TabIndex = 2
Top = 1440
Width = 1095
End
Begin VB.CommandButton Commandl
Caption = "Edinburgh"

330 Forms
Height = Left = TabIndex =
Top = Width =
End Begin VB.Label Labell
BackColor = Caption = Height = Left = TabIndex =
Top =
Width =
End
End
615 480
1 720 1095
&H00FFFFFF& "What is the capital of France:" 495 480
0 120
2295
Attribute VB Name = "Forml"
Attribute VB Creatable = False
Attribute VB_Exposed = False
Private Sub Commandl Click() Textl. Font = "Courier New" Textl.Text = "FALSE"
Textl.Height = i000
End Sub
Private Sub Command2 Click()
Textl.Text = "TRUE"
End Sub
Private Sub Command3 Click()
Textl.Text = "FALSE"
End Sub
Private Sub Label2 Click() m
End Sub
Private Sub Command4 Click()
End End Sub
Program 20.1" VB03_01.VBP Form=vb03 01.Frm Object={F9043C88-F6F2-101A-A3C9-08002B2F49FB}#1.0#0; COMDLG32.OCX Object={BDC217CS-EDI6-11CD-956C-OOOOCO4E4COA}#1.O#O; TABCTL32.OCX
Object={3B7C8863-D78F-101B-B9B5-04021C009402}#1.0#0; RICHTX32.OCX Object={6B7E6392-850A-101B-AFC0-4210102ASDA7}#1.0#0; COMCTL32.OCX
Object={FAEEE763-117E-101B-8933-08002B2F4F5A}#1.0#0; DBLIST32.OCX
Object={OO028COI-O000-OO00-OO00-OO0000000046}#1.O#O; DBGRID32.OCX
Reference=*\G{BEF6E001-A874-101A-8BBA -
00AA00300CAB}#2.0#0#C'\WINDOWS\SYSTEM\OLEPRO32.DLL#Standard OLE Types Reference=*\G{EE008642-64A8-11CE-920F -
08002B369A33}#1.0#0#c'\windows\system32\msrdo32.dll#Microsoft Remote
Data Object 1.0
ProjWinSize=56,29,273,181
ProjWinShow=0
Name="Projectl ''
HelpContextID="0 '' StartMode=0 VersionCompatible32="0"

Temperature conversion program 331
MajorVer=l MinorVer=O RevisionVer=O Auto IncrementVer=O ServerSupportFiles=O
20.4 Temperature conversion program
In this example the user will enter either a temperature in Centigrade or Fahrenheit and the program will convert to an equivalent Fahrenheit or Centigrade temperature. The steps taken, with reference to Figure 20.13, are:
1. Add a Label control and change its Caption property to 'Centigrade'. 2. Add a Label control and change its Caption property to 'Fahrenheit'. 3. Add a TextBox control and put it beside the Centigrade Label. Next
change its Text property to '0'. 4. Add a TextBox control and put it beside the Fahrenheit Label. Next
change its Text property to ' 32'. 5. Add a CommandButton control and put it below the text boxes. Next
change its Caption property to 'C to F'. This command button will con- vert the value in the Centigrade to Fahrenheit and put the result in the Fahrenheit text box.
6. Add a CommandButton control and put it beside the other command button. Next change its Caption property to 'F to C'. This command button will convert the value in the Fahrenheit to Centigrade and put the result in the Centigrade text box.
7. Select the form and change the Caption property to 'Temperature Con- version'.
Figure 20.13 Temperature conversion form
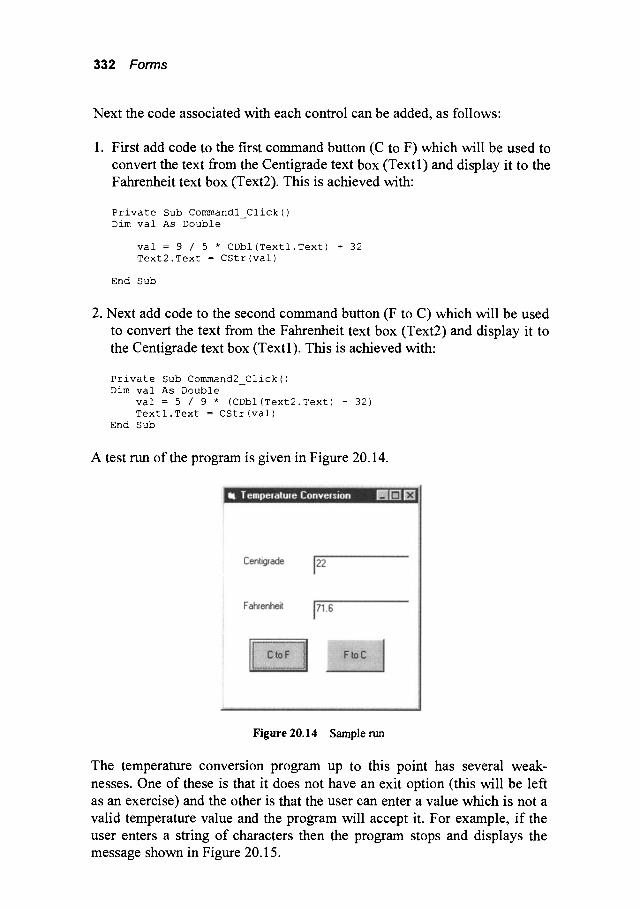
332 Forms
Next the code associated with each control can be added, as follows"
1. First add code to the first command button (C to F) which will be used to convert the text from the Centigrade text box (Text 1) and display it to the Fahrenheit text box (Text2). This is achieved with:
Private Sub Commandl Click() m
Dim val As Double
val = 9 / 5 * CDbl(Textl.Text) + 32
Text2.Text = CStr(val)
End Sub
2. Next add code to the second command button (F to C) which will be used to convert the text from the Fahrenheit text box (Text2) and display it to the Centigrade text box (Text 1). This is achieved with:
Private Sub Command2 Click()
Dim val As Double
val = 5 / 9 * (CDbl(Text2.Text) - 32)
Textl.Text = CStr(val)
End Sub
A test run of the program is given in Figure 20.14.
Figure 20.14 Sample run
The temperature conversion program up to this point has several weak- nesses. One of these is that it does not have an exit option (this will be left as an exercise) and the other is that the user can enter a value which is not a valid temperature value and the program will accept it. For example, if the user enters a string of characters then the program stops and displays the message shown in Figure 20.15.
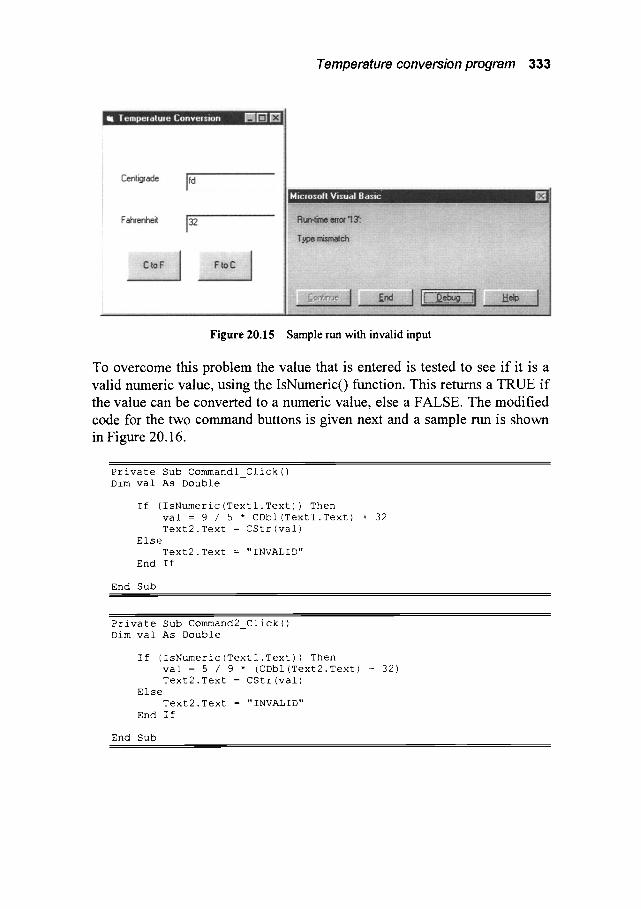
Temperature conversion program 333
Figure 20.15 Sample nm with invalid input
To overcome this problem the value that is entered is tested to see if it is a valid numeric value, using the IsNumeric() function. This returns a TRUE if the value can be converted to a numeric value, else a FALSE. The modified code for the two command buttons is given next and a sample run is shown in Figure 20.16.
Private Sub Commandl Click() m
Dim val As Double
If (IsNumeric(Textl.Text)) Then
val = 9 / 5 * CDbl(Textl.Text) + 32
Text2.Text = CStr(val)
Else
Text2.Text = "INVALID"
End If
End Sub
Private Sub Command2 Click() w
Dim val As Double
If (IsNumeric(Textl.Text)) Then
val = 5 / 9 * (CDbl(Text2.Text) - 32)
Text2.Text = CStr(val)
Else
Text2.Text = "INVALID"
End If
End Sub

334 Forms
Figure 20.16 Sample run with invalid input
20.5 Quadratic roots program
In this example the program calculates the roots of a quadratic equation with a user entered values of a, b and c. The general form of a quadratic equation is:
ax 2 +bx + c = O
the general solution is"
Xl, 2 : - b +_ x/b2 _ 4ac
2a
This leads to three types of roots, these are:
if (b2>4ac) then there are two real roots; else if (b2=4ac) then there is a single root of-b/4a; else if (b2<4ac) then these are two complex roots which are"
b ~[4ac - b 2 - - - - ~ + j
Xl'2 -- 2a 2a
The steps taken, with reference to Figure 20.17, are:
1. Add a Label control and change its Caption proper~ to 'a ' . 2. Add a Label control and change its Caption property to 'b ' . 3. Add a Label control and change its Caption property to 'c ' .

Quadratic roots program 335
4. Add a Label control and change its Caption property to ' x l ' . 5. Add a Label control and change its Caption property to 'x2'. 6. Add a TextBox control and put it beside the a Label. Next change its
Text property to '0' (this is the Textl object). 7. Add a TextBox control and put it beside the b Label. Next change its
Text property to '0' (this is the Text2 object). 8. Add a TextBox control and put it beside the c Label. Next change its
Text property to '0' (this is the Text3 object). 9. Add a TextBox control and put it beside the x l Label. Next change its
Text property tO '0' (this is the Text4 object). 10. Add a TextBox control and put it beside the x2 Label. Next change its
Text property to '0' (this is the Text5 object). 11. Add a CommandButton control and put it below the text boxes. Next
change its Caption property to 'Calculate'. This command button will be used to determine the roots of the equation.
12. Add a CommandButton control and put it beside the other command button. Next change its Caption property to 'Exit'. This command but- ton will be used to exit the program.
13. Select the form and change the Caption property to 'Quadratic Equa- tion'.
Figure 20.17 Quadratic equation form
Next the code associated with each control can be added, as follows"
1. First add code to the first command button (Calculate) which will be used to calculate the roots and display to the roots text box (Text4 and Text5). This is achieved with:
Private Sub Commandl Click()
Dim a, b, c As Double
Dim aval, bval, cval As String
aval = Textl.Text
bval = Text2.Text
cval = Text3.Text
a = CDbl(aval)

336 Forms
b = CDbl (bval)
c = CDbl (cval)
If (Not (IsNumeric(aval)) Or
Not (IsNumeric(bval)) Or Not (IsNumeric(cval))) Then
Text4.Text = ""
Text5.Text = ""
Text6.Text = "INVALID"
ElseIf ((b * b) > (4 * a * c)) Then
Text4.Text = CStr((-b + Sqr(b * b - 4 * a * c)) / (2 * a))
Text5.Text = CStr((-b- Sqr(b * b - 4 * a * c)) / (2 * a))
Text6.Text = "Real"
ElseIf (b * b < 4 * a * c) Then
Text4.Text = CStr(-b / (2 * a))
Text5.Text = "j" + CStr(Sqr(4 * a * c - b * b) / (2 * a))
Text6.Text = "Complex"
Else
Text4.Text = CStr(-b / (2 * a))
Text5.Text = ""
Text6.Text = "Singlar"
End I f
End Sub
Notice that the code includes the _ character which allows the program- mer to continue a statement onto another line.
2. Next add code to the second command button (Exit)"
Private Sub Command2 Click() B
End
End Sub
Figure 20.18 shows two sample runs.
Figure 20.18 Sample runs
20.6 Resistance calculation with slider controls program
An excellent method of allowing the user to input a value within a fixed range is to use a slider control. These slider controls can either be vertical (VScroll) or horizontal (HScroll). The main properties, as shown in Figure 2 0.19, o f a scroll bar are:

Resistance calculation with slider control 337
�9 Max. Which defines the maximum value of the scroll bar. �9 Min. Which defines the minimum value of the scroll bar. �9 Value. Which gives the current slider value.
Figure 20.19 Scroll bar properties
As an example, a horizontal slider will be setup with a voltage range of 0 to 100. The value of the slider will be shown. The steps taken, with reference to Figure 20.20, are"
1. Add a Label control and change its Caption property to 'Voltage'. 2. Add a Label control and change its Caption property to '0'. 3. Add a HScrollBar control below the labels. Next change its Max prop-
erty to '100' and its Min property to '0' .
Figure 20.20 Voltage form
Next the code associated with each control can be added, as follows:
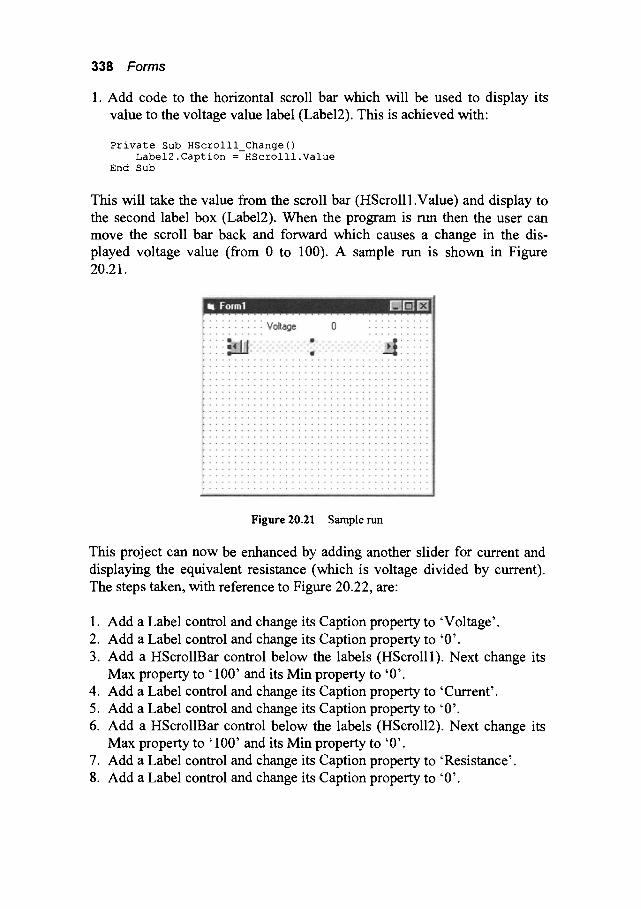
338 Forms
1. Add code to the horizontal scroll bar which will be used to display its value to the voltage value label (Label2). This is achieved with:
Private Sub HScrolll_Change() Label2.Caption = HScrolll.Value
End Sub
This will take the value from the scroll bar (HScroll 1.Value) and display to the second label box (Label2). When the program is run then the user can move the scroll bar back and forward which causes a change in the dis- played voltage value (from 0 to 100). A sample run is shown in Figure 20.21.
Figure 20.21 S a m p l e r u n
This project can now be enhanced by adding another slider for current and displaying the equivalent resistance (which is voltage divided by current). The steps taken, with reference to Figure 20.22, are:
1. Add 2. Add 3. Add
Max 4. Add 5. Add 6. Add
Max 7. Add 8. Add
a Label control and change its Caption property to 'Voltage'. a Label control and change its Caption property to '0'. a HScrollBar control below the labels (HScrolll). Next change its property to '100' and its Min property to '0'. a Label control and change its Caption property to 'Current'. a Label control and change its Caption property to '0'. a HScrollBar control below the labels (HScroll2). Next change its property to '100' and its Min property to '0'. a Label control and change its Caption property to 'Resistance'. a Label control and change its Caption property to '0'.

Resistance calculation with slider control 339
Figure 20.22 New form
Next the code associated with each control can be added, as follows"
1. Add code to the first horizontal scroll bar (HScrolll) which will be used to display its value to the voltage value label (Label2). The resistance la- bel (Label6) is also updated with the result of the voltage divided by the current. This is achieved with:
Private Sub HScrolll Change() N
Label2.Caption = HScrolll.Value If (HScroll2.Value <> 0) Then
Label6.Caption = I00 * HScrolll.Value / HScroll2.Value End If
End Sub
2. Add code to the second horizontal scroll bar (HScroll2) which will be used to display its value to the current value label (Label4) with the value of the scroll bar divided by 100. The resistance label (Label6) is also up- dated with the result of the voltage divided by the current. This is achieved with:
Private Sub HScroll2 Change() Label4.Caption = HScroll2.Value / i00 If (HScroll2.Value <> 0) Then
Label6.Caption = i00 * HScrolll.Value / HScroll2.Value End If
End Sub
Figure 20.23 shows a sample run. One of the problems of the design is that the controls and form have
names which do not document their function. Visual Basic uses a naming convention which uses the type of control and consecutively adds a number, as shown in the design in Figure 20.24.

340 Forms
Figure 20.23 Sample rtm
Figure 20.24 Object names
In this case an improved naming convention might be:
Labell Voltage Label Label2 Voltage Show Label3 Current Label Label4 Current Show Label5 Resistance Label Label6 Resistance Show HScrolll Voltage Value HScroll2 Current Value Forml Resistance Calc
These are set by selecting the properties of each of the objects and then changing the Name property to the required name. An example of changing the name of the form to Resistance_Calc is given in Figure 20.25.
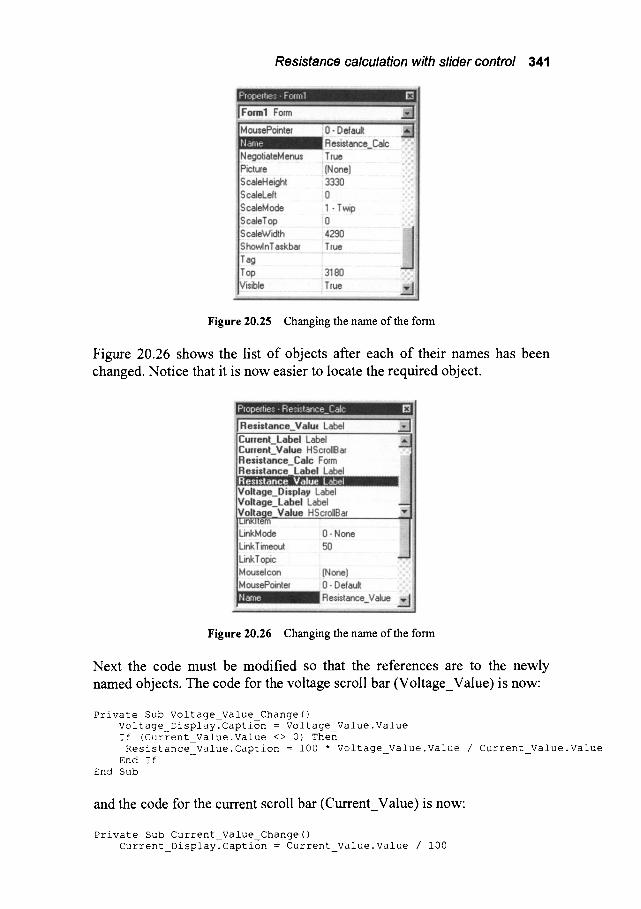
Resistance calculation with slider control 341
Figure 20.25 Changing the name of the form
Figure 20.26 shows the list of objects after each of their names has been changed. Notice that it is now easier to locate the required object.
Figure 20.26 Changing the name of the form
Next the code must be modified so that the references are to the newly named objects. The code for the voltage scroll bar (Voltage_Value) is now:
Private Sub Voltage_Value_Change() Voltage_Display. Caption = Voltage_Value.Value If (Current Value.Value <> O) Then Resistance_Value.Caption = i00 * Voltage_Value.Value / Current_Value. Value
End If End Sub
and the code for the current scroll bar (Current_Value) is now:
Private Sub Current_Value_Change() Current_Display. Caption = Current_Value.Value / I00

342 Forms
If (Current Value.Value <> O) Then n
Resistance_Value. Caption = i00 * Voltage_Value.Value / Current Value. Value
m
End If End Sub
20.7 Exercises
20.7.1 Write a Visual Basic program in which the user enters either a value in either radians or degrees and the program converts to ei- ther degrees or radians, respectively. Figure 20.27 shows a sample run.
20.7.2
20.7.3
20.7.4
20.7.5
Figure 20.27 Radians to degrees conversion
Modify the program in Exercise 20.7.1 so that invalid entries are not accepted.
Modify the program in Exercise 20.7.2 so that the conversion value is automatically converted when the user enters a value (that is, there is no need for the command buttons).
Write separate Visual Basic programs with slider controls for the following formula:
(i) F = m a range" m=0.01 to 1000 g, a=0.01 to 100 m.s -2 (ii) V = I R range: I=0.1 to 100 A, V=0.1 to 100 V
Write a Visual Basic program that calculates the values of m and c for a straight line. The values of (xl, Yl) and (x2, y2) should be gen- erated with slider controls (with a range o f - 1 0 0 to +100 for each of the values). Figure 20.28 shows a sample design.
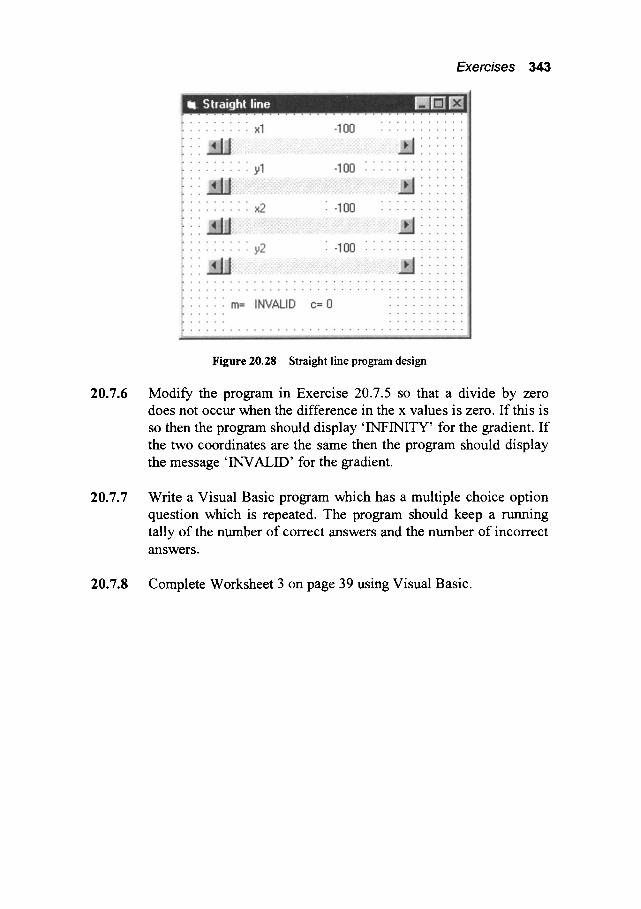
Exercises 343
20.7.6
20.7.7
20.7.8
Figure 20.28 Straight line program design
Modify the program in Exercise 20.7.5 so that a divide by zero does not occur when the difference in the x values is zero. If this is so then the program should display 'INFINITY' for the gradient. If the two coordinates are the same then the program should display the message 'INVALID' for the gradient.
Write a Visual Basic program which has a multiple choice option question which is repeated. The program should keep a running tally of the number of correct answers and the number of incorrect answers.
Complete Worksheet 3 on page 39 using Visual Basic.
Menus and Dialog Boxes
21.1 Introduction
This chapter discusses how menus and dialog boxes are used.
21.2 Menu editor
Most Windows programs have menus in which the user selects from a range of defined pull-down menus with def'med options. Visual Basic has an easy- to-use function called the Menu Editor which is used to create custom menus. The Menu Editor is started from the Tools Menu or from the toolbar
shortcut An example screen from the Menu Editor is shown in Figure 21.1. It in-
cludes"
�9 Cal!tion. Which is a text box in which the name of the menu bar or menu option is entered. A hyphen (-) is entered as a caption if a menu separator bar is required. This bar helps to separate menu options. Often in menus the user can select a menu option by pressing the ALT key and an assigned key (hot key). To specify the ALT-hot key then an & is in- serted before the letter of the menu option. When the program is am then this letter is underlined. For example F i & l e would be displayed as F i l e and the assigned keys would be ALT-L. A double ampersand specifies the ampersand character.
�9 Name. Which is a text box in which the control name for the menu op- tion is specified. This is used by the program code and is not displayed to the user when the program is run.
�9 Index. Which is a numeric value that can be used to specify the menu option. Typically it is used when calling a single function which services several menu items. For example, a File menu may have the options: New, Open and Save, then a single function could be created to service these requests and the index value would be used which option has been selected.
�9 Shortcut. Which is a pull-down menu that can be used to specify a

346 Menus and dialog boxes
shortcut key (Cntrl-A to Cntrl-Z, F 1 to F 12, Cntrl-F 1 to Cntrl-F 12, Shift- F 1 to Shift-F 12, Shift-Cntrl-F 1 to Shift-Cntrl-F 12, Cntrl-Ins, Shift-Ins, Del, Shift-Del, Alt-Bkspace).
�9 l-IelpContextID. Which is a text box in which a unique numeric value is specified for the context ID. This value can be used to f'md the appropri- ate Help topic in the Help file identified by the HelpFile property.
�9 NegotiatePosition. Which is a pull-down list box which allows the user to specify the menu's NegotiatePosition property and d e t e ~ i n e how the menu appears in a form. Value options are 0 (None), 1 (Left) and 2 (Middle) and 3 (Right).
�9 Checked. Which is a check box which specifies if a check mark is to appear initially at the left of a menu item. It is generally used to specify if a toggled menu option is initially on or off.
�9 Enabled. Which is a check box which specifies if the menu item is to respond to events. If it is not enabled then the menu item appears dimmed.
�9 Visible. Which is a check box which specifies if the menu item is to ap- pear in the menu.
Figure 21.1 Menu editor
21.2.1 Creating a menu system
The user enters the caption and name and then uses the outlining buttons to either promote or demote the item to a higher or lower level (with the left and right arrow buttons) or up and down (with the up and down arrow but-

Menu editor 347
tons). With this up to 4 levels of submenus can be created. The list box displays a hierarchical list of menu items with indented
submenu items which indicate their hierarchical position. A menu option is inserted using the Insert button and deleted with the Delete button. The OK button closes the Menu Editor and saves the most recent changes.
The code associated with a menu item is def'med by the menu item name. For example if a menu item has the caption of F i l e and a name of F • Option then the associated code function will be FileOption Click.
For example, to create a menu with:
File Open Save Close
Exit
1. Create a caption &File and add the name of MenuFile. Next press the
Next button. 2. Create a caption &Open and add the name of M e n u F i l e I t e m . Add an
index value of 0. Then select the right arrow button to move the option to the next level, as shown in Figure 21.2. Next press the Next button.
3. Create a caption &Save and add the name of M e n u F i l e I t e m . Add an index value of 1, as shown in Figure 21.3. Next press the Next button.
4. Create a caption & C 1 o s e and add the name of Me nu F i 1 e I t era. Add an index value of 2, as shown in Figure 21.4. Next press the Next button.
5. Create a caption & E x i t and add the name of E x i t . Then select the left arrow button to move the option to the next level, as shown in Figure 21.5. Next press the OK button and the form shown in Figure 21.6 should be displayed.
The associated code modules which are related to these menus items are MenuFile Click ( ), MenuFileItem Click ( ) and Exit Click (). The
MenuFileItem Click() module has the Index parameter passed to it.
This has a value of 0 when Open is select, a I when Save is selected and a
2 when Close is selected. The MenuFileItem is specified with:
Private Sub MenuFileItem Click(Index As Integer) m
End Sub
thus the value of Index will either be O, 1 or 2.
348 Menus and dialog boxes
Figure 21.2 Adding a menu item
Figure 21.3 Adding a menu option

Menu editor 349
Figure 21.4 Adding a menu option
Figure 21.5 Adding a menu option
350 Menus and dialog boxes
Figure 21.6 Menu editor
Next a text box is added to the form (Text 1), as shown in Figure 21.7. The resulting objects are shown in Figure 21.8.
Figure 21.7 Adding text box
Figure 21.8 Program objects

Menueditor 351
Next the code can be added. The MenuFileItem object services the Open, Save and Close options and the Index parameter passed into it. In the code below the Case statement is used to test the Index parameter and, in this case, display some text to the text box.
Program 21.1 Private Sub MenuFileItem Click(Index As Integer)
Select Case Index ' Check index value of selected menu item.
Case 0
Textl.Text = Textl.Text & " Open "
Case 1
Textl.Text = Textl.Text & " Save "
Case 2
Textl.Text = Textl.Text & " Close "
End Select
End Sub
This code appends either 'Open', 'Save' or 'Close' to the text box (Text 1). The & character concatenates two strings together, thus the code T e x t l . T e x t & "Open" simply adds the text 'Open' to the text already in the text window. The exit code is added as follows"
l-=l Program 21.2 Private Sub Exit Click()
End
End Sub
Figure 21.9 shows a sample run of the developed program. The Exit menu option is used to quit the program and the File options (File, Save and Close) simply display the required text to the text box.
Figure 21.9 Example run
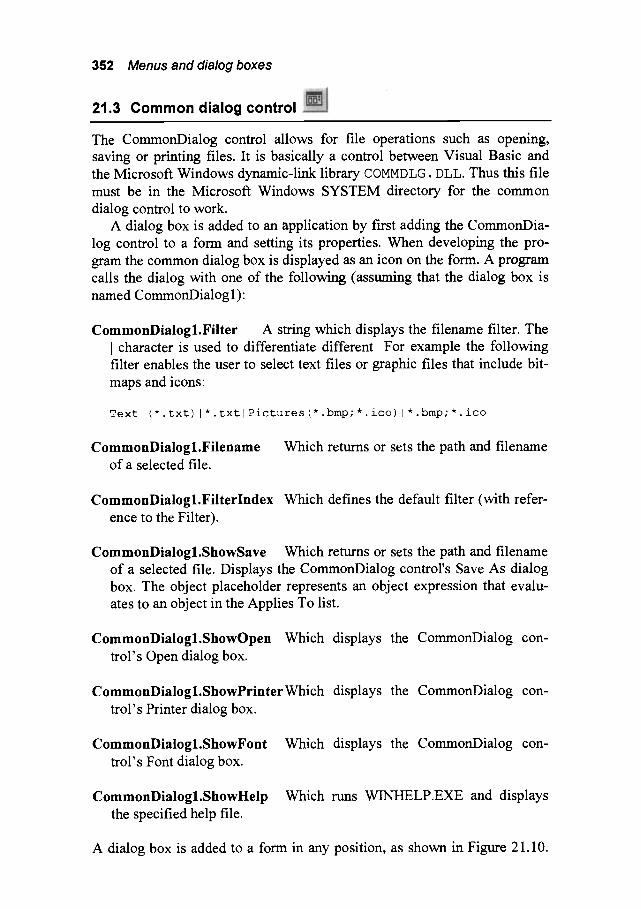
352 Menus and dialog boxes
21.3 Common dialog control
The CommonDialog control allows for file operations such as opening, saving or printing files. It is basically a control between Visual Basic and the Microsoft Windows dynamic-link library COMMDLG. DLL. Thus this file must be in the Microsoft Windows SYSTEM directory for the common dialog control to work.
A dialog box is added to an application by first adding the CommonDia- log control to a form and setting its properties. When developing the pro- gram the common dialog box is displayed as an icon on the form. A program calls the dialog with one of the following (assuming that the dialog box is named CommonDialogl):
CommonDialogl.Filter A string which displays the filename filter. The I character is used to differentiate different For example the following filter enables the user to select text files or graphic files that include bit- maps and icons:
Text (*.txt) l*.txtlPictures(*.bmp;*.ico)l*.bmp;*.ico
CommonDialogl.Filename of a selected file.
Which returns or sets the path and filename
CommonDialogl.Filterlndex Which defines the default filter (with refer- ence to the Filter).
CommonDialogl.ShowSave Which returns or sets the path and filename of a selected file. Displays the CommonDialog control's Save As dialog box. The object placeholder represents an object expression that evalu- ates to an object in the Applies To list.
CommonDialog l.ShowOpen trol's Open dialog box.
Which displays the CommonDialog con-
CommonDialogl.ShowPrinterWhich displays the CommonDialog con- trol's Printer dialog box.
CommonDialogl.ShowFont trol's Font dialog box.
Which displays the CommonDialog con-
CommonDialog l.ShowHelp the specified help file.
Which runs WINHELP.EXE and displays
A dialog box is added to a form in any position, as shown in Figure 21.10.

Common dialog control 353
This box can be placed anywhere as it will not be seen on the form when the program is run.
Figure 21.10 Example run
The common dialog box can be used to determine the filename of a file to be opened or saved. It is used in Program 21.3 (which is a modification of Program 21.1) in the Open and Save file menu options. The filter is set to"
"All Files (*.*) l*.*IText Files (*.txt) l*.txtlTemp Files (*.tmp) l*.tmp"
This displays, in the Type of File field, the three options " A l l Files
(*.*),*.*,Text Files (*.txt),*.txt and Temp Files (*.tmp) l*.tmp".
The default file type is set to the second option with the filter index setting of:
CommonDialogl. FilterIndex = 2
Figure 21.11 shows a sample run and the dialog box. It can be seen that the default Type of File is set to "Text F• ( * . t x t ) " and Figure 21.12 shows an example message box.
Program 21.3 Private Sub MenuFileItem Click (Index As Integer)
m
Dim filename As String
Select Case Index Case 0
CommonDialogl. Filter= "All Files (*.*) [*.*IText Files (*.txt) l*.txtlTemp Files (*.tmp) l*.tmp" CommonDialogl. FilterIndex = 2 CommonDialogl. ShowOpen filename = CommonDialogl.filename MsgBox ("Open Filename" " & filename)
Case 1 CommonDialogl. Filter=
m
"All Files (*.*) l*.*IText Files (*.txt) l*.txtlTemp Files (*.tmp) [*.tmp" CommonDialogl. FilterIndex = 2
354 Menus and dialog boxes
CommonDialogl. ShowSave filename = CommonDialogl.filename MsgBox ("Save Filename: " & filename)
Case 2 Textl.Text = Textl.Text & " Close "
End Select End Sub
Figure 21.11 Example run
Figure 21.12 Example run
21.3.1 File Open/Save Dialog Box Flags
Various flags can be set before the file open/save dialog box. These are de- f'med in Table 21.1 are set with:
CommonDialogl. Flags = flagl +flag2 + ...
The flags can either be defined with their constant name (such as cdlO~'NReadOnly) or by the value (0x01). These values or names can be added together to achieve the required functionality. For example, modifying the previous example to checks the read-only check box for Open dialog box. A sample dialog box is shown in Figure 21.13.
CommonDialogl. Filter= "All Files (*.*) I*.*I Text Files (*.txt) i*.txtITemp Files (*.tmp) l*.tmp"
CommonDialogl. FilterIndex = 2 CommonDialogl. Flags= cdlOFNHideReadOnly CommonDialogl. ShowOpen filename = CommonDialogl.filename MsgBox ("Open Filename: " & filename)

Common dialog control 355
For example, modifying the previous example to hide the read-only check box. A sample dialog box is shown in Figure 21.14.
CommonDialogl. Filter= "All Files (*.*) I*.*I Text Files (*.txt) J*.txtiTemp Files (*.tmp) l*.tmp"
CommonDialogl. FilterIndex = 2 CommonDialogl. Flags= cdlOFNHideReadOnly CommonDialogl. ShowOpen filename = CommonDialogl.filename MsgBox ("Open Filename: " & filename)
For example, modifying the previous example to Allows the File Name list box to have multiple selections. A sample dialog box is shown in Figure 21.15.
CommonDialogl. Filter= "All Files (*.*)I*.*I Text Files (*.txt) J*.txtlTemp Files (*.tmp) l*.tmp"
CommonDialogl. FilterIndex = 2 CommonDialogl. Flags= cdlOFNAllowMultiselect CommonDialogl.ShowOpen filename = CommonDialogl.filename MsgBox ("Open Filename: " & filename)
The flag settings for a dialog box with the read-only box checking and that the user is not allowed to change the directory can either be set with:
CommonDialogl. Flags= cdlOFNReadOnly + cdlOFNNoChangeDir
or
CommonDialogl. Flags= 9
which is 1 (cdlOFNReadOnly) added to 8 (cdlOFNNoChangeDir). The method of using lable constants is preferable as it helps to document the program.
Table 21.1 CommonDialog control constants
, , , , , , , , ,
Constant . . . . . . . . . . . . .
cdlOFNReadOnly V a l u e Description &HI (1) Checks Read-Only check box for Open and
Save As dialog boxes, see Figure 21.13.
cdlOFNOverwritePrompt a l l2 (2) Causes the Save As dialog box to generate a message box if the selected file already exists.
cdlOFNHideReadOnly a l l4 (4) Hides the Read-Only check box, see Figure 21.14.
cdlOFNNoChangeDir a l l8 (8) Sets the current directory to what it was when the dialog box was invoked.
cdlOFNHelpButton &HIO (16)
Causes the dialog box to display the Help button.

356 Menus and dialog boxes
cdlOFNNoValidate &H100 (256)
Allows invalid characters in the returned filename.
cdlOFNAllowMultiselect &H200 (512)
Allows the File Name list box to have multiple selections, see Figure 21.15.
cdlOFNExtensionDifferent &H400 (1024)
The extension of the returned filename is different from the extension set by the De- faultExt property.
cdlOFNPathMustExist &H800 (2096)
User can enter only valid path names.
cdlOFNFileMustExist &H1000 User can enter only names of existing files.
. . . . . . . . . . . . . . . (40 ,9 ,6 ) . . . . . . . . . . . . . . . . . . . . . . . . . . . . . . . . . . . . . . . . . . . . . . . . . . .
Figure 21.13 Example run
Figure 21.14 Example rtm

Common dialog control 357
Figure 21.15 Example run
21.3.2 Showing help manuals
The common dialog box can also be used to run the help program WINHELP. EXE. This is achieved by"
CommonDialogl.ShowHelp
and the name of the help manual is specified by:
CommonDialogl.HelpFile = filename
Various options flags can also be set with the help option, these are speci- fied in Table 21.2.
Table 21.2 CommonDialog control constants
C o n s t a n t Value D e s c r i p t i o n ...........
cdlHelpco~and- &H102 Executes a help macro.
cdl He i pCon tent s &H3 Displays the help contents topic.
cdlHe ipCont ext &H 1 Displays help for a particular context.
cdlHelpContextPopup &H8 Displays in a pop-up window a particular Help topic.
cdlHelpForceFile &H9 Ensures that WinHelp displays the correct Help file. If the correct Help file is cur- rently displayed, no action occurs. If the incorrect Help file is displayed, WinHelp opens the correct file.
cdlHe ipHe ipOnHelp &H4 Displays Help for using the help application itself
3,58 Menus and dialog boxes
cdlHelpIndex &H3 Displays the index of the specified Help file.
cdlHelpKey ,,,,,, ,,, ,,
&H101 ....... D!splays Help for a particular keyword: ..........
Typically a help menu option is added to a program. An example help event is given in Program 21.4. The help command used is c d l H e l p C o n e n t s which shows the index page of the help manual. Figure 21.16 shows an ex- ample of a run and Figure 21.17 shows an example for the An example of V b c b t help manual.
Program 21.4 Private Sub Help_Click() Dim filename As String
CommonDialogl. Filter= "All Files (*.*)[*.*[Help Files (*.hlp) [*.hlp" CommonDialogl. FilterIndex = 2 CommonDialogl.ShowOpen
filename = CommonDialogl.filename
CommonDialogl.HelpFile = filename CommonDialogl.HelpCommand = cdlHelpContents CommonDialogl. ShowHelp
End Sub
Figure 21.16 Selecting help file
21.4 Running an application program
Visual Basic allows for the execution of applications with the Shell com- mand. Its format is:
She 11 (pathname[, windowstyle] )

Running an application program 359
Figure 21.17 Example help manual
where the windowstyle is as def'med in Table 21.3. If this argument is miss- ing then the windowstyle is that the program is started with a minimized fo- CUS.
. . . . .
vbHide
vbNormalFocus
vbMinimi zedFocus
vbMaximi zedFocus
vbNormalNoFocus
vbMinimi zedNoFocus
Table 21.3 Windowstyle named argument . . . . . , . . . . . . . ,,, ,,,,,,, , , , , ,,
Val Description 0 Window is hidden and focus is passed to the
hidden window. 1 Window has focus and is restored to its original
size and position. 2 Window is displayed as an icon with focus. 3 Window is maximized with focus. 4 Window is restored to its most recent size and
position. The currently active window remains active.
6 Window is displayed as an icon. The currently active window remains active.
The following shows an example of executing the Calc.exe and Note-
pad. exe programs:
Program 21.5 Private Sub Notepad_Click() Dim rtn As Integer
rtn = Shell ("c'\windowsknotepad.exe", i)
End Sub
Private Sub Calc Click() Dim rtn As Integer
rtn = Shell ("c:\windows\calc.exe", i)
End Sub

360 Menus and dialog boxes
21.5 Exercises
21.4.1 Write a Visual Basic program with the following menu system:
File Open Save Close
Edit Copy Paste Select All
View Normal Full Screen
Help m
21.4.2 Modify the menu system in Exercise 21.4.1 so that the program displays the function of the menu option.
21.4.3 Expand Program 21.5 and its menu system so that it runs other Windows programs. An example could be:
Utils Calculator Notepad Paint
WordProcessing Word AmiPro
Spreadsheets Lotus123 Excel
Exit
21.4.4 Integrate some of the programs from previous chapters into a sin- gle program with menu options. For example, the menu system could be"
Programs E
Temperature Conversion Quadratic Equation Straight Line
Exit
One possible method of implementing this program is to compile the temperature conversion, quadratic equation and straight line programs to an EXE (File-~Mal!e EXE file...). Then run the Shell function from the object call.
rtn = Shell("tempcon.exe", i)
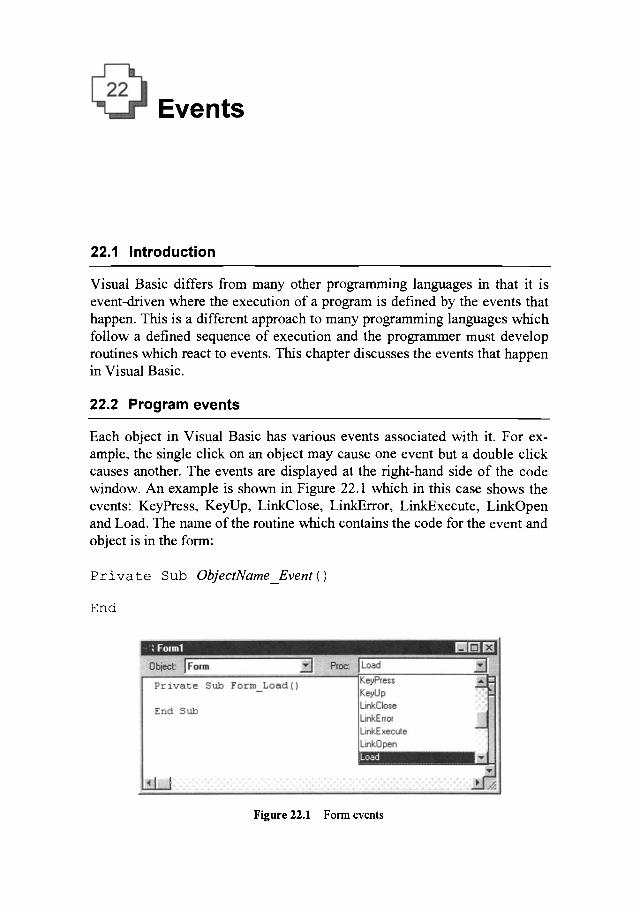
Events
22.1 Introduction
Visual Basic differs from many other programming languages in that it is event-driven where the execution of a program is defined by the events that happen. This is a different approach to many programming languages which follow a defined sequence of execution and the programmer must develop routines which react to events. This chapter discusses the events that happen in Visual Basic.
22.2 Program events
Each object in Visual Basic has various events associated with it. For ex- ample, the single click on an object may cause one event but a double click causes another. The events are displayed at the right-hand side of the code window. An example is shown in Figure 22.1 which in this case shows the events: KeyPress, KeyUp, LinkClose, LinkError, LinkExecute, LinkOpen and Load. The name of the routine which contains the code for the event and object is in the form:
P r i v a t e Sub Objec tName_Event ( )
End
Figure 22.1 Form events
362 Events
The main events that occur in Visual Basic include"
�9 Click. Which occurs when a user performs a single click of the mouse
button on the object. �9 DblClick. Which occurs when a user performs a double click of the
mouse button on the object.
�9 MouseUp. Which occurs when the user releases the mouse button.
�9 M o u s e D o w - . Which occurs when the user presses the mouse button
down.
�9 MouseMove. Which occurs when the user moves the mouse.
�9 KeyUp. Which occurs when the user releases a key.
�9 KeyDown. Which occurs when the user presses a key.
�9 KeyPress . Which occurs when the user presses and releases a key (the KeyDown and KeyUp events).
�9 Load. Which occurs when a form is loaded.
�9 DragDrop . Which occurs at the begin and end of a drag operation of any
control.
�9 LostFocus. Which occurs when an object loses the focus, either by user action, such as tabbing to or clicking another object.
�9 Resize. Which occurs when a form is first displayed or if the object size
is changed.
�9 Unload. Which occurs when a form is about to be removed from the
screen.
Not all controls and forms (objects) have all the events associated with them. For example a form may have the following:
Private Sub Form Activate() Private Sub Form Click() Prlvate Sub Form Deactivate() Private Sub Form DblClick() Private Sub Form DragDrop(Source As Control, X As Single, Y As Single) Private Sub Form DragOver(Source As Control, X As Single, Y As Single, State As Integer) Private Sub Form KeyDown(KeyCode As Integer, Shift As Integer) Private Sub Form KeyPress(KeyAscii As Integer) Private Sub Form KeyUp(KeyCode As Integer, Shift As Integer) Private Sub Form Load() Private Sub Form LostFocus() Private Sub Form MouseDown(Button As Integer, Shift As Integer, X As Single, Y As Single) Private Sub Form MouseMove(Button As Integer, Shift As Integer, X As Single, Y As Single) Private Sub Form MouseUp(Button As Integer, Shift As Integer, X As Single, Y
As Single ) Private Sub Form Resize() Private Sub Form Terminate() Private Sub Form Unload(Cancel As Integer)
whereas a command button has a reduced set of routines:
Program events 363
Private Sub Commandl Click() m
Private Sub Commandl DragDrop(Source As Control, X As Single, Y As Single) Private Sub Commandl DragOver(Source As Control, X As Single, Y As Single, State As Integer) Private Sub Commandl GotFocus() Private Sub Commandl_KeyDown(KeyCode As Integer, Shift As Integer) Private Sub Commandl_KeyPress(KeyAscii As Integer) Private Sub Commandl_KeyUp(KeyCode As Integer, Shift As Integer) Private Sub Commandl LostFocus() Private Sub Commandl MouseDown(Button As Integer, Shift As Integer, X As Single, Y As Single) Private Sub Commandl MouseMove(Button As Integer, Shift As Integer, X As Single, Y As Single) Private Sub Commandl_MouseUp(Button As Integer, Shift As Integer, X As Sin- gle, Y As Single)
The parameters passed into the routine depend on the actions associated with the events. For example, the Keypress event on a command button causes the routine"
Private Sub Commandl KeyPress(KeyAscii As Integer) w
End
to be called. The value of KeyAscii will contain the ASCII value of the character press.
The mouse down event for a command button has the following routine associated with it"
Private Sub Commandl MouseDown(Button As Integer, Shift As Integer, X As Single, Y As Single)
where the value of Button is the value of the button press (0 for none, 1 for the left button and 2 for the right button). Shift specifies if the shift key has been pressed, and X, Y specify the x,y co-ordinates of the mouse point. The following sections discuss some events which occur.
22.2.1 Click
The Click event occurs when the user presses and then releases a mouse button over an object. When the object is a form the event occurs when the user clicks on a blank area or a disabled control. If the object is a control, then the event occurs when the user:
�9 Clicks on a control with any of the mouse buttons. When the control is a CheckBox, CommandButton, or OptionButton control then the Click event occurs only when the user clicks the left mouse button.
�9 Presses the ALT-hotkey for a control, such as pressing AIt-X for the E&xit control property name.
�9 Presses the Enter key when the form has a command button. �9 Presses the Space key when command button, option button or check
box control has the focus.

364 Events
22.2.2 Dbl Click
The Dbl Click event occurs when the user presses and releases the mouse button twice over an object. In a form it occurs when the user double clicks either on a disabled control or a blank area of a form. On a control the event happens when the user:
�9 Double-clicks on a control with the left mouse button.
�9 Double-clicks an item within a ComboBox control whose Style property is set to 1 (Simple).
An example form is shown in Figure 22.2. In this case a text box is added to the form. Then the following code is added to the form:
Private Sub Form DblClick() Textl.Text = "MISS"
End Sub
which will display the text 'MISS' when the user click on any blank area on
the form. The following code is added to the text box"
Private Sub Textl DblClick()
Textl.Text = "HIT" End Sub
which displays the text ' H I T ' when the user double clicks on the text box.
Figure 22.2 Form events
22.2.3 Mouse Up, Mouse Down
The MouseUp event occurs when the user releases the mouse button and the MouseDown event when the user presses a mouse button. The standard for- mat for the associated routines are:

Program events 365
Private Sub Form MouseDown(button As Integer, shift As Integer,
x As Single, y As Single)
Private Sub Form_MouseUp(button As Integer, shift As Integer,
x As Single, y As Single)
where �9 button identifies which button was pressed (MouseDown) or released
(MouseUp). The first bit of the value identifies the left button, the sec- ond identifies the right button and the third bit identifies the middle but- ton. Thus a value of 1 identifies the left button, a value of 2 identifies the right and a value of 4 identifies the middle button (if the mouse has one). A combination of these values can be used to identify button press com- binations, such as a value of 6 identifies that the middle and right buttons have been pressed. Table 22.1 shows the constant names for the buttons. s h i f t identifies the state of the Shift, Cntrl, and Alt keys when the button was pressed (or released). The first bit of the value identifies the Shift key, the second bit identifies the Cntrl key and the third bit identi- fies the Alt key. Thus a value of 1 identifies the Shift key, a value of 2 identifies the Cntrl key and a value of 4 identifies the Alt key. A combi- nation of these values can be used to identify key combinations, such as a value of 6 identifies that the Cntrl and Alt keys are pressed. Table 22.1 shows the constant names for the keys. x, y identifies the current location of the mouse pointer. The x and y values are relatively to the ScaleHeight, ScaleWidth, ScaleLeft, and ScaleTop properties of the object.
An example of code for the mouse down event is given next and a sample run is shown in Figure 22.3.
Private Sub Textl MouseDown(Button As Integer, Shift As Integer, X As
Single, Y As Single)
If (Button = vbLeftButton) Then
Text l.Text = "LEFT BUTTON " & X & .... & Y
ElseIf (Button = vbRightButton) Then:
Textl.Text = "RIGHT BUTTON " & X & " " & Y
ElseIf (Button = vbMiddleButton) Then:
Textl.Text = "MIDDLE BUTTONS " & X & .... & Y
End I f
End Sub
Table 22.1 Button constants
...... ' C o n s t a n t ( B u i i ~ n ) ......... . . . . V a l u e D e s c r i p t i o n ................................
vb Le f tBut t on 1 Left button is pressed vbRi ghtBut t on 2 Right button is pressed
..... v b M i d d l e B u t t o n 4 Middle button is pressed

366 Events
Table 22.2 Button constants
C o n s t a n t Value vbShittMask 1 vbCtrlMask 2 vbAltMask 4
. . . . . . . . . . . . . . . . . . . . . . . . . . , ,,,,, ,,
. . . . Description SHIFT key is pressed CTRL key is pressed
..... ALT key is pressed
Figure 22.3 Form events
22.2.4 Mouse move
The MouseMove event occurs when the user moves the mouse. Thus it is continually being called as it moves across an object. The standard format for the associated routines are:
Private Sub Form MouseMove(button As Integer, shift As Integer, x As Single , y As Single)
Private Sub object MouseMove(button As Integer, shift As Integer, x As Single, y As Single)
where button, shift, x and y have the same settings as the ones defined in the previous section.
An example of code for the MouseMove event is given next and a sample code is shown in Figure 22.4. Figure 22.5 shows a sample run. In this case, the x and y co-ordinate is the mouse pointer and the button pressed are dis- played to the text box.
Private Sub Form MouseMove(Button As Integer, Shift As Integer, m
X As Single, Y As Single)
Text l Text = "X Y'" & X & " " & Y & " Button:" & Button �9 ;
End Sub
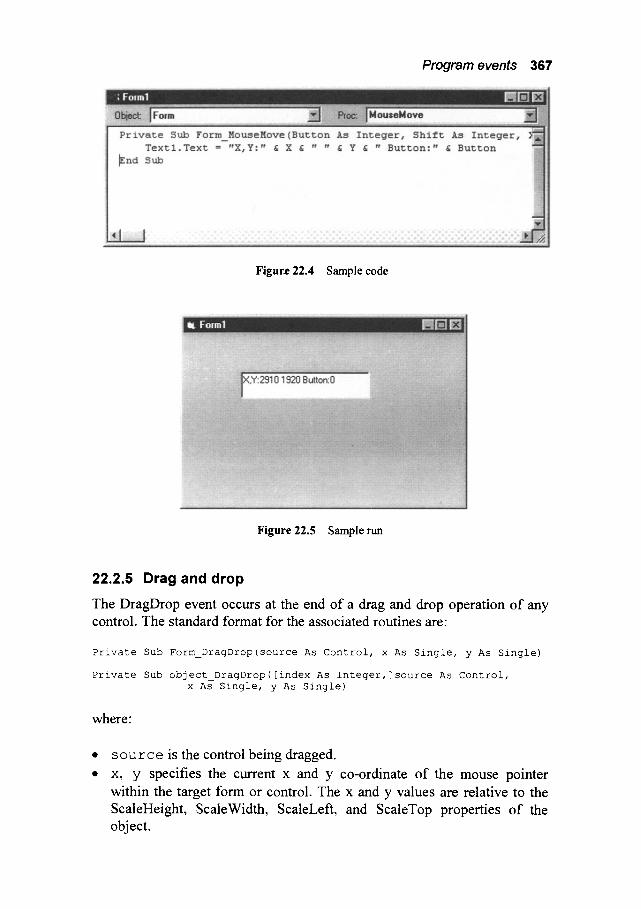
Program events 367
Figure 22.4 Sample code
Figure 22.5 Sample run
22.2.5 Drag and drop
The DragDrop event occurs at the end of a drag and drop operation of any control. The standard format for the associated routines are:
Private Sub Form_DragDrop(source As Control, x As Single, y As Single)
Private Sub object_DragDrop([index As Integer,]source As Control, x As Single, y As Single)
where:
s o u r c e is the control being dragged.
x, y specifies the current x and y co-ordinate of the mouse pointer within the target form or control. The x and y values are relative to the ScaleHeight, ScaleWidth, ScaleLeft, and ScaleTop properties of the object.

368 Events
22.2.6 Keypress
The KeyPress event occurs when the user presses and releases a key (the KeyDown and KeyUp events). The standard format for the associated rou- tines are"
Private Sub Form_KeyPress(Keyascii As Integer) Private Sub object_KeyPress(Keyascii As Integer)
where Keyascii specifies a standard ANSI keycode, this can be converted into an ASCII character with the conversion function:
Chr (KeyAscii)
An example of code for the KeyPress event is given next and a sample run is shown in Figure 22.6. For this program the user can type in the blank area on the form (the grey area) and the text will be displayed in the text box.
Private Sub Form KeyPress(KeyAscii As Integer) m
Textl.Text = Chr(KeyAscii) End Sub
Figure 22.6 Sample run
22.2.7 Lost focus
The Lost focus occurs when an object loses the focus, either by user action, such as tabbing to or clicking another object. The standard format for the associated routines are:
Private Sub Form LostFocus() D
Private Sub object_LostFocus()
22.2.8 Resize
The Resize event occurs when a form is first displayed or if the object size is changed. The standard format for the associated routines are"
Private Sub Form Resize()
Exercises 369
Private Sub object_Resize(height As Single, width As Single)
where:
�9 height is a value specifying the new height of the control. �9 width is a value specifying the new width of the control.
22.2.9 Unload
The Unload event occurs when a form is about to be removed from the screen. Then if the form is reloaded the contents of all its controls are reini- tialized. The standard format for the associated routines are:
Private Sub object_Unload(cancel As Integer)
where cancel determines whether the form is removed from the screen. If it is 0 then the form is removed else it will not be removed.
22.3 Exercises
22.3.1
22.3.2
22.3.3
Write a Visual Basic program which has a single form and a text box. The text box should show all of the events that occur with the form, that is:
Activate, Click, DblClick, Deactivate, DragDrop, DragOver, and SO o n .
Investigate when these events occur. Notice that when an event has code attached then the procedure name in the View Code pull- down menu becomes highlighted.
Write a Visual Basic program which has a single command button and a text box. The text box should show all of the events that oc- cur with the command button, that is"
Click, KeyDown, KeyPress, KeyUp, MouseDown, MouseUp, and SO o n .
Investigate when these events occur.
Write a Visual Basic program in which the program displays the message 'IN TEXT AREA' when the mouse is within the textbox area and 'OUT OF TEXT AREA' when it is out of the textbox a r e a .

370 Events
22.3.4 Write a Visual Basic program which has a command button. If the user presses any lowercase letter then the program ends, else it should continue. A sample event which quits when the letter 'x ' is pressed is given next"
Private Sub Commandl_KeyPress(KeyAscii As Integer) If (Chr(KeyAscii) = "x") Then
End End If
End Sub
22.3.5 Modify the program in Exercise 22.3.4 so that if the user clicks on the form (and not on the command button) the program automati- cally prompts the user for his/her name. This name should then appear in the command button caption property (Command l.caption). An outline of the event is given next:
Private Sub Form Click() Dim username As String
username = InputBox("Enter your name")
End Sub
22.3.6 Write a Visual Basic program which displays the message 'So long and thanks for the fish' when the main form is Unloaded. The form should be removed from the screen.
22.3.7 Write a Visual Basic program with a textbox which displays the current keypress, including Alt-, Ctrl- and Shift- keystrokes.
22.3.8 Modify the program in Exercise 22.3.7 so that it also displays the mouse button press and the coordinates of the mouse.
Graphics
23.1 Introduction
This chapter discusses how graphics files are loaded into the program and how graphic objects can be drawn.
23.2 Loading graphics files
Visual Basic allows a graphic file to be loaded into a form, a picturebox or an image control. The standard function is:
LoadPicture (graphfile )
Where graphfile specifies the name of the graphics file, if no name is given then the graphic in the form, picture box or image control is cleared. The standard graphics files supported by Visual Basic are:
�9 BMP. Windows bitmap file. �9 ICO. Icon file (maximum size of 32x32 pixels). �9 RLE. Run-length encoded files. �9 WMF. Windows metafile files.
Normally graphics files are displayed in a PictureBox the graphic file "CLOUD. BMP" to Picture 1 then:
Thus to display
Picturel. Picture= LoadPicture("CLOUD.BMP")
A picture can be loaded put into the clipboard using"
Clipboard. SetData LoadPicture (filename)
The following example loads a graphics file into a PicmreBox. Figure 23.1 shows a sample form which contains a PictureBox, a CommandButton and a DialogBox.
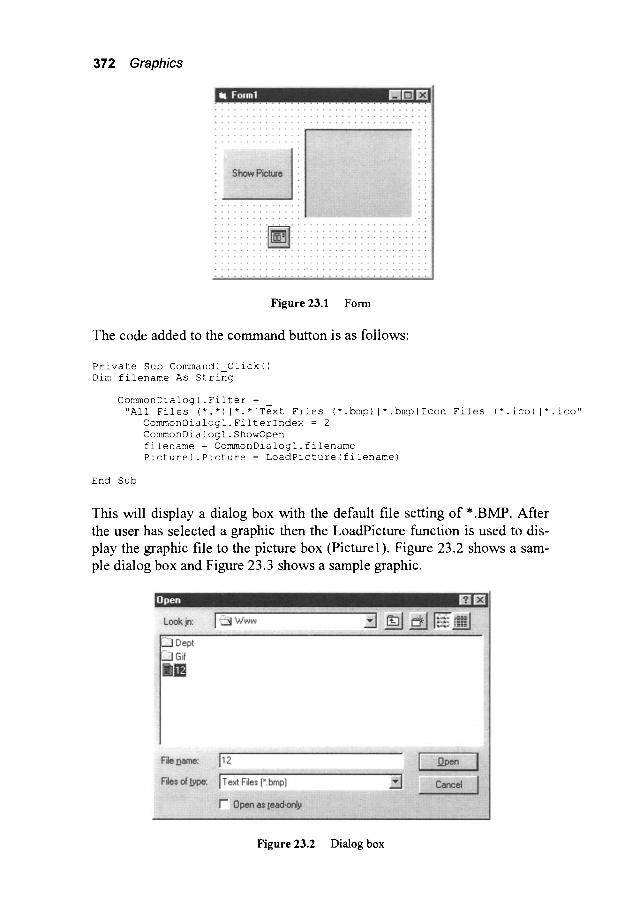
372 Graphics
Figure 23.1 Form
The code added to the command button is as follows:
Private Sub Commandl Click() Dim filename As String
CommonDialogl. Filter= "All Files (*.*) l*.*IText Files (*.bmp) l*.bmplIcon Files (*.ico) l*.ico"
CommonDialogl. FilterIndex = 2 CommonDialogl.ShowOpen filename = CommonDialogl.filename Picturel. Picture: LoadPicture(filename)
End Sub
This will display a dialog box with the default file setting of *.BMP. After the user has selected a graphic then the LoadPicture function is used to dis- play the graphic file to the picture box (Picture 1). Figure 23.2 shows a sam- ple dialog box and Figure 23.3 shows a sample graphic.
Figure 23.2 Dialog box

Co~ours 373
Figure 23.3 Sample graphic
One problem with the previous example code is that a non-graphic file could be loaded and the program would not give an error message. The following code overcomes this by testing for an error. This is achieved by testing the E r r parameter after the picture has been loaded. If it is set to TRUE then an error message is displayed and, after the user has accepted the error then the picture will be cleared from the picture box.
Private Sub Commandl Click() m
Dim filename,Msg As String
CommonDialogl. Filter= "All Files (*.*) i*.*IText Files (*.bmp) i*.bmplIcon Files (*.ico) i*.ico"
CommonDialogl. FilterIndex = 2 CommonDialogl.ShowOpen filename = CommonDialogl.filename Picturel. Picture= LoadPicture(filename)
If Err Then Msg = "Error loading graphics file." MsgBox Msg Picture = LoadPicture()
End If End Sub
23.3 Colours
The background and foreground colour of an object can be modified with the BackColor or ForeColor property, respectively. The standard form is:
object. Ba c kCo io r= colour object. ForeColor= colour
A colour is def'med as its RGB (red/green~lue) strength, with a hexadecimal strength from &H00 to &H77 for each colour. The valid ranges of colour are thus from 0 to &HFFFFFF.
374 Graphics
23.3.1 RGB function
The RGBColor function retums the hexadecimal colour value given the three strengths of red, green and blue. Its standard form is"
colour=RGB (red, green, blue)
where red, green and blue are a value from 0 to 255. Table 23.1 gives some example colours with their RGB colour. For example:
Form. BkColor=QBColor (0, 0,255) Form. ForeColor=QBColor (255,255, 0)
' set background colour to Blue ' set foreground colour to Yellow
Table 23.1 Colour strengths
Colour Red Value Green value Blue Value Black 0 0 0 Blue 0 0 255 Green 0 255 0 Cyan 0 255 255 Red 255 0 0 Magenta 255 0 255 Yellow 255 255 0 White 255 255 255
.,,,, ,, ,. ,,,,.,,,,, ,,, ,,,,, ,...,., , ,
23.3.2 QBColor function
The QBColor fimction has a limited range of 15, typically colours as speci- fied in Table 23.1. For example, the following sets the
Form. BkColor=QBColor(1) ' set background colour to Blue Form. ForeColor=QBColor(6) ' set foreground colour to Yellow
Table 23.2 Colour values
Number Colour Number . . . . . ColOur .............................................. 0 Black 8 Grey 1 Blue 9 Light Blue 2 Green 10 Light Green 3 Cyan 11 Light Cyan 4 Red 12 Light Red 5 Magenta 13 Light Magenta 6 Yellow 14 Light Yellow 7 White .................. 15 ...................... Bright Wl~te ....................
23.4 Drawing
Visual Basic has a wide range of drawing functions (graphics methods); these include:

Drawings 375
�9 Line. Draws lines and rectangles on an object. �9 Circle. Draws a circle, ellipse, or arc on an object. �9 Cls. Clears graphics and text from a Form or PictureBox. �9 Fill eolour. Returns or sets the colour used to fill in shapes (drawn by
Line and Circle graphics methods). �9 Fill style. Rettmas or sets the pattern used to fill Shapes (as created by
Line or Circle graphics methods).
23.4.1 Line
The Line graphic method draws lines and rectangles on an object. Its stan- dard form is"
objec t .L ine S t e p (xl , y l ) - S t e p (x2,y2), colour, BF
where:
�9 S t ep. Keyword specifying the starting point co-ordinates. (Optional) �9 (xl, y l ) Define the starting point co-ordinates of a line or rectangle. If
they are omitted then the line starts at the current x,y position (CurrentX and CurrentY). Optional
�9 Step. Keyword specifying the end point co-ordinates. (Optional) �9 (x2,y2) Define the end point co-ordinates of a line or rectangle.
(Required) �9 color. Defines the RGB colour used to draw the line. If it is omitted then
the ForeColor property setting is used. (Optional) �9 B. If the B option is added then a box is drawn using the co-ordinates for
opposite comers. (Optional) �9 F. If the F option is added then the box is filled with the same colour as
the line colour. (Optional)
The CurrentX and CurrentY values are set to the end of the line after a line has been drawn. The DrawWidth property sets the width of the line and DrawMode and DrawStyle properties define the way that the line or box is drawn.
The following code is added to a form and with the Click event. It dis- plays 15 solid rectangles of a random size and random colour. The QBColor function is used to display one of the 16 predefined colours. Note that the Rnd function returns a random number from 0 to 1.
Private Sub Form Click() Dim xl, x2, yl, y2, i As Integer
For i = 1 To 15 ForeColor = QBColor(i) xl = ScaleWidth * Rnd yl = ScaleHeight * Rnd

376 Graphics
x2 = ScaleWidth * Rnd
y2 = ScaleHeight * Rnd
Line (xl, yl)-(x2, y2), , BF
Next i
End Sub
Figure 23.4 Sample graphic
23.4.2 Circle
The Circle graphic method draws a circle, ellipse or an arc on an object. Its standard form is"
object. C i r c 1 e S t e p (x, y) , radius, colour, start, end, aspect
where"
�9 Step. Keyword specifying that the centre of the circle, ellipse, or arc is relative to the current co-ordinates given by the CurrentX and CurrentY properties of object. (Optional)
�9 (x, y). Value which gives the co-ordinates of the centre of the circle, ellipse or arc. (Required)
�9 radius. Value which specifies the radius of the circle, ellipse or arc. (Required)
�9 color. Value which specifies the colour of the circle's outline. If omitted, the value of the ForeColor property is used. (Optional)
�9 start, end. Values specifying the start and end angle (in radians) for an arc or a partial circle or ellipse is drawn, start and end specify (in radi- ans) the beginning and end positions of the arc. (Optional)
�9 aspect. Value specifying the aspect ratio of the circle. The default value is 1.0, which yields a perfect circle. (Optional)
The QBColor or RGB function are typically used to set the colour. A circle is fill with a defined colour with the FillColor property and the fill style is
Drawings 377
set by the FillStyle properties. The DrawWidth property defines the width of the line used to draw the circle, ellipse, or arc.
The following example code draws 10 circles of increasing size of a ran- dom colour. Figure 23.5 shows a sample run.
Private Sub Form Click()
Dim x, y, Radius, RadiusInc As Double
Dim i As Integer
x = ScaleWidth / 2 ' Set X position.
y = ScaleHeight / 2 ' Set Y position.
If (ScaleWidth > ScaleHeight) Then
RadiusInc = ScaleHeight / 20
Else
RadiusInc = ScaleWidth / 20
End If
For i = 1 To i0 ' Set radius.
Radius = Radius + RadiusInc
Circle (x, y), Radius, RGB(Rnd * 255, Rnd * 255, Rnd * 255)
Next i
End Sub
Figure 23.5 Sample graphic
23.4.3 DrawWidth
The DrawWidth property returns or sets the line width of a graphic method. To set the width of line the following is used:
object.DrawW i dth = size
where the size is a value from 1 (the default) to 32,767 and is measured in pixels.
23.4.4 DrawStyle
The DrawWidth property retums or sets the line style of a graphic method.

378 Graphics
To set the line style the following is used:
o b j e c t . D r a w W i d t h = value
where value is a number from 0 (the default) to 6 which corresponds to the following line styles:
0 Solid. 1 Dash. 2 Dot. 3 Dash-Dot. 4 Dash-Dot-Dot. 5 Transparent. 6 Inside Solid.
For example to set a line style on a Form to dashed"
DrawWidth=l
23.4.5 FillColor
The FillColor property returns or sets the colour used to fill in shapes, cir- cles and boxes. To set the fill colour the following is used:
o b j e c t . F i l l C o l o r : value
where the size is a hexadecimal colour and by default it is Black.
23.4.6 FillStyle
The FillStyle property returns or sets the fill style of a graphic method. To set the line style the following is used:
ob]ect. F i l l S t y l e = value
where value is a number from 0 (the default) to 6 which corresponds to the following line styles:
0 Solid. 2 Horizontal Line. 4 Upward Diagonal. 6 Cross.
1 (Default) Transparent. 3 Vertical Line. 5 Downward Diagonal. 7 Diagonal Cross.
The following example displays 15 randomly filled circles with a radius of 200 pixels. It is initiated with the user clicks on the form. Figure 23.6 shows a sample run.
Private Sub Form Click() u
Dim xl, x2, yl, y2, i As Integer

For i = 1 To 15
ForeColor = QBColor(i)
FillStyle = Int(7 * Rnd)
xl = ScaleWidth * Rnd
yl = ScaleHeight * Rnd
x2 = ScaleWidth * Rnd
y2 = ScaleHeight * Rnd
Circle (xl, yl), 200
Next i
End Sub
Exercises 379
Figure 23.6 Sample graphic
23.4.7 CurrentX, CurrentY
The CurrentX and CurrentY property return or sets the horizontal and verti- cal (CurrentY) co-ordinates, respectively. The standard format is"
object.CurrentX = x
object.CurrentY = y
The (0,0) co-ordinate is at the upper-left hand comer of an object.
23.4.8 Cls
The Cls method clears graphics and text generated at run time from a Form or PictureBox. Its standard form is:
object . C l s
23.5 Exercises
23.5.1 Write a program which displays a coloured rectangle in the middle of a form. Each time the user clicks on the form the rectangle should change colour.
380 Graphics
23.5.2 Write a Visual Basic program which automatically moves a rec- tangle from the top left-hand side of the screen to the bottom right- hand side. The program should quit once it reaches the bottom comer.
23.5.3 Write a Visual Basic program which randomly moves a small rec- tangle around the screen. If the rectangle touches any of the edges it should rebound off the edge.
23.5.4 Write a Visual Basic program in which the user controls the movement of a small rectangle by the arrowkeys.
23.5.5 Write a Visual Basic program which displays a circle on the form which follows the users mouse cursor (note use the c l s function to get rid of the existing circle).
23.5.6 Write separate Visual Basic programs which draw the following objects:
(i) A car. (ii) A ship. (iii) A house.
23.5.7 Write a Visual Basic program which displays the following im- ages. Use the s l e e p and c l s functions to create a timing delay of 1 second between each image display (the animation should look as if it is winking).
HTML (Introduction)
24.1 Introduction
HTML is a standard hypertext language for the WWW and has several dif- ferent versions. Most WWW browsers support HTML 2 and most of the new versions of the browsers support HTML 3. WWW pages are created and edited with a text editor, a word processor or, as is becoming more common, within the WWW browser.
HTML tags contain special formatting commands and are contained within a less than (<) and a greater than (>) symbol (which are also known as angled brackets). Most tags have an opening and closing version; for ex- ample, to highlight bold text the bold opening tag is <B> and the closing tag is < /B> . Table 24.1 outlines a few examples.
Table 24.1 Example HTML tags
. . . . . . . . . . . . . . . . . . . . . . . . . . . . . . . . . . . . . . . . . . . . . . . . . . . . . . . . . . . . . . . . . . . . . . . . . . . . . . . . . . . . . . . . . . . . . . . . . . . . . . . . . . . . . . . . . . . . . . . . . . . . . . . . . . . . . . . . . . . . . . . . . . . . . . . . . . . . . . . . . . . . . . . . . . . . . . . . . . . . . . . . . . . . . . . . . . . . . . . . . . . . ' . ' . i ' i i i .
<HTML> </HTML> Start and end of HTML <HEAD> </HEAD> Defines the HTML header
<BODY> </BODY> Defines the main body of the H T M L
< T I T L E > < / T I T L E > Defines the title of the WWW page < I > < / I > Italic text
<B> < / B > Bold text
<U> < / U> Under l ined text
< B L I N K > < / B L I N K > Make text blink <EM> </EM> Emphasize text
< FONT S I ZE=+ 1 > < / FONT> Increase font size by one increment <FONT S I Z E = - 1 > < / F O N T > Reduce font size by one increment <CENTER> < / CENTER> Center text
< H I > < / H I > Section header, level 1
<H2 > < / H2 > Section header, level 2
<H 3 > < / H3 > Section header, level 3
< P> Create a new paragraph <BR> Create a line break
< ! - - > - - > Comments <SUPER> < / SUPER> Superscript <SUB> < / SUB> Subscript
386 HTML (Introduction)
HTML script 1 gives an example script and Figure 24.1 shows the output from the WWW browser. The first line is always <HTML> and the last line is </HTML>. After this line the HTML header is defined between <HEAD> and </HEAD>. The title of the window in this case is My f i r s t HTML p a g e . The main HTML text is then defined between <BODY> and </BODY>.
Figure 24.1 Example window from example HTML script
~] H T M L script 24.1 <HTML> <HEAD> <TITLE>My first HTML page</TITLE> </HEAD> <BODY> <HI> This is section 1</HI> This is the <b>text</b> for section 1 <HI> This is section 2</HI> This is the <i>text</i> for section 2 <HI> This is section 3</HI> This is the <u>text</u> for section 3 <p>
This is the end of the text </BODY> </HTML>
The WWW browser fits text into the window size and does not interpret line breaks in the HTML source. To force a new line the <BR> (line break) or a new paragraph (<P>) is used. The example also shows bold, italic and underlined text.

Links 387
24.2 Links
The topology of the WWW is set-up using links where pages link to other related pages. A reference takes the form:
<A HRE F="url"> Reference Name </A>
where url defines the URL for the file, Reference Name is the name of the reference and </A> defines the end of the reference name. HTML script 24.2 shows an example of the uses of references and Figure 24.2 shows a sample browser page. The background colour is set using the <BODY BGCOLOR="# FFFFFF"> which set the background colour to white. In this case the default text colour is black and the link is coloured blue.
I~] HTML script 24.2 <HTML>
<HEAD> <TITLE>Fred's page</TITLE> </HEAD>
<BODY BGCOLOR="#FFFFFF">
<Hl>Fred's Home Page</Hl>
If you want to access information on this book <A HREF="softbook.html">click here</A>.
<P>
A reference to the <A REF="http'www.iee.com/">IEE</A>
< / BODY> < / HTML >
24.2.1 Other links
Links can be set-up to send e-mail and newsgroups. For example"
<A HREF="news-sport.tennis"> Newsgroups for tennis</A>
to link to a tennis newsgroup and
<A HREF="mailto [email protected]''>Send a mes- sage to me</A>
to send a mail message to the e-mail address: f . b l o g g s @ fredco, co. uk.
388 HTML (Introduction)
Figure 24.2 Example window from example HTML script 24.2
24.3 Lists
HTML allows ordered and unordered lists. Lists can be declared anywhere in the body of the HTML.
24.3.1 Ordered lists
The start of an ordered list is defined with <OL> and the end of the list by </OL>. Each part of the list is defined after the <LI> tag. Unordered lists are defined between the <UL> and </UL> tags. HTML script 24.3 gives examples of an ordered and an unordered list. Figure 24.3 shows the output from the browser.
D HTML script 24.3 <HTML> <HEAD> <TITLE>Fred's page</TITLE> </HEAD> <BODY BGCOLOR="#FFFFFF"> <Hl>List 1</HI> <OL> <LI>Part 1 <LI>Part 2 <LI>Part 3 </OL> <Hl>List 2</HI> <UL> <LI>Section 1 <LI>Section 2 <LI>Section 3 </UL> </BODY> </HTML>
Lists 389
Figure 24.3 WWW browser with an ordered and unordered lists
Some browsers al low the type of numbered list to be defined with the <OL
TYPE=x>, where x can either be:
�9 A for capital letters (such as a, b, c, and so on).
�9 a for small letters (such as a, b, c, and so on).
�9 I for capital roman letters (such as I, II, III, and so on).
�9 i for small roman letters (such as i, ii, iii, and so on).
�9 I for numbers (which is the default).
<OL Type=I> <LI> List 1 <LI> List 2 <LI> List 3 </OL>
<OL Type=A> <LI> List 1 <LI> List 2 <LI> List 3 </OL>
would be displayed as"
I. List 1 II. List 2 III. List 3 A. List 1 B. List 2 C. List 3

390 HTML (Introduction)
The starting number of the list can be defined using the <LI VALUE=n>
where n defines the initial value of the defined item list.
24.3.2 Unordered lists
Unordered lists are used to list a series of items in no particular order. They are defined between the <UL> and < /UL> tags. Some browsers allow the type of bullet point to be defined with the <LI T Y P E = s h a p e > , where shape can either be:
�9 disc for round solid bullets (which is the default for first level lists). �9 round for round hollow bullets (which is the default for second level
lists). �9 square for square bullets (which is the default for third).
HTML script 24.4 gives an example of an unnumbered list and Figure 24.4 shows the WWW page output for this script. It can be seen from this that the default bullets for level 1 lists are discs, for level 2 they are round and for level 3 they are square.
H T M L script 24.4 <HTML> <HEAD>
<TITLE>Example Iist</TITLE> </HEAD> <HI> Introduction </HI> <UL> <LI> OSI Model <LI> Networks
<UL> <LI> Ethernet
<UL> <LI> MAC addresses </UL>
<LI> Token Ring <LI> FDDI </UL>
<LI> Conclusion </UL> <HI> Wide Area Networks </HI> <UL> <LI> Standards <LI> Examples
<UL> <LI> EastMan </UL>
<LI> Conclusion </UL> </BODY> </HTML>
Lists 391
Figure 24.4 WWW page with an unnumbered list
24.3.3 Definition lists
HTML uses the <DL> and </DL> tags for definition lists. These are nor- mally used when building glossaries. Each entry in the definition is defined by the <DT> tag and the text associated with the item is defined after the <DD> tag. The end of the list is defined by </DL>. HTML script 24.5 shows an example with a definition list and Figure 24.5 gives a sample out- put. Note that it uses the <EM> tag to emphasize the definition subject.
~1 HTML script 24.5 <HTML> <HEAD> <TITLE>Example Iist</TITLE> </HEAD> <HI> Glossary </HI> <DL> <DT> <EM> Address Resolution Protocol (ARP) </EM> <DD> A TCP/IP process which maps an IP address to an Ethernet address. <DT> <EM> American National Standards Institute (ANSI) </EM> <DD> ANSI is a non-profit organization which is made up of expert committees that publish standards for national industries. <DT> <EM> American Standard Code for Information Interchange (ASCII) </EM> <DD> An ANSI-defined character alphabet which has since been adopted as a standard international alphabet for the interchange of characters. </DL> </BODY> </HTML>

392 HTML (Introduction)
Figure 24.5 WWW page with definition list
24.4 Colours
Colours in HTML are defined in the RGB (red/greel~lue) strength. The format is # r r g g b b , where r r is the hexadecimal equivalent for the red component, g g the hexadecimal equivalent for the green component and bb the hexadecimal equivalent for the blue component. Table 24.2 lists some of the codes for certain colours.
Individual hexadecimal numbers use base 16 and range from 0 to F (in decimal this ranges from 0 to 15). A two-digit hexadecimal number ranges from 00 to FF (in decimal this ranges from 0 to 255). Table 24.3 outlines hexadecimal equivalents.
Table 24.2 Hexadecimal colours
, , , , , , ,
Colour Code Colour , t ,,,,,,,,,,,, ,, ,,,,,,, .....
Code White # FFFFFF Dark red #C91 F16 Light red # DC 640 D Orange # F1A60A Yellow # FCE503 Light green # BED2 0 F Dark green #088343 Light blue #O09DBE
Dark blue #0D3981 Purple # 3AOB5 9 Pink #F3D7E3 Nearly black #434343 Dark grey # 777777 Grey # A7 A7 A7
Light grey #D4D4D4 Black #000000 ,, ,t ,,1 ,

Background images 393
Table 24.3 Hexadecimal to decimal conversions
~ Hex' De c. ] Hex. ................ s c. ~ Hex. De c. Hex. De c. ...... 6 .................................. 6 ................................ / i ............................................ i ............................. ..................................... ......................... . . . . . . . . . . . . . . . . . . . . . . 3 ........................
4 4 / 5 5 [ 6 6 7 7 8 8 / 9 9 | m 10 n 11 C 12 ! D 13 | E 14 V 15
HTML uses percentage strengths for the colours. For example, FF repre- sents full strength (100%) and 0 0 represent no strength (0%). Thus, white is made from FF (red), FF (green) and FF (blue) and black is made from 00 (red), 00 (green) and 00 (blue). Grey is made from equal weighting of each of the colours, such as 4 3, 4 3, 4 3 for dark grey (#4 34 34 3) and D4, D4 and D4 for light grey (#D4D4D4). Thus, pure red with be #FF0000, pure green will be # 0 0 FF0 0 and pure blue with be # 0 0 0 0 FF.
Each colour is represented by 8 bits, thus the colour is defined by 24 bits. This gives a total of 16 777216 colours (224 different colours). Note that some video displays will not have enough memory to display 16.777 million colours in the certain mode so that colours may differ depending on the WWW browser and the graphics adapter.
The colours of the background, text and the link can be defined with the BODY tag. An example with a background colour of white, a text colour of orange and a link colour of dark red is:
<BODY BGCOLOR="#FFFFFF" TEXT="#FIA60A '' LINK="#C91FI6">
and for a background colour of red, a text colour of green and a link colour of blue"
<BODY BGCOLOR="#FF0000" TEXT="#00FF00" LINK="#0000FF">
When a link has been visited its colour changes. This colour itself can be changed with the VLINK. For example, to set-up a visited link colour of yellow:
<BODY VLINK=" #FCE503 .... TEXT=#00FF00 .... LINK=#0000FF">
Note that the default link colours are"
Link: # 0 0 0 0 FF (Blue) Visited link: # FF00 FF (Purple)
24.5 Background images
Image (such as GIF and JPEG) can be used as a background to a WWW page. For this purpose the option BACKGROUND='src.gif' is added to the
394 HTML (Introduction)
<BODY> tag. An HTML script with a background of CLOUDS.GIF is given in HTML script 24.6. A sample output from a browser is shown in Figure 24.6.
I[~ HTML script 24.6 <HTML> <HEAD> <TITLE>Fred's page</TITLE> </HEAD> <BODY BAC~ROUND="clouds.gif"> <Hl>Fred's Home Page</Hl> If you want to access information on this book <A HREF="gbook.html">click here</A>.<P> A reference to the <A HREF="http://www.iee.com/">IEE</A> </BODY> </HTML>
Figure 24.6 WWW page with CLOUD.GIF as a background
24.6 Displaying images
WWW pages can support graphics images within a page. The most common sources of images are either JPEG or GIF files, as these types of images normally have a high degree of compression. GIF images, as was previously mentioned, support only 256 colours from a pallet of 16.7 million colours, whereas JPEG supports more than 256 colours.
24.6.1 Inserting an image
Images can be displayed within a page with the <IMG SRC='src.gif >

Displaying images 395
which inserts the graphic src.gif. HTML script 24.7 contains three images: myson , g i f , me. g i f and m y s o n 2 , g i f . These are aligned either to the left or the right using the ALIGN option within the <IMG SRC> tag. The first image (myson. g i f ) is aligned to the right, while the second image (me. g i f ) is aligned to the left. Figure 24.7 shows a sample output from this script. Note that images are left aligned by default.
HTML script 24.7 <HTML> <HEAD> <TITLE>My first home page</TITLE> </HEAD> <BODY BGCOLOR="# ffffff"> <IMG SRC ="myson.gif" ALIGN=RIGHT> <HI> Picture gallery </HI> <P> <P> Here are a few pictures of me and my family. To the right is a picture of my youngest son showing his best smile. Below to the left is a picture of me at Christmas and to the right is a picture of me and my son also taken at Christmas. <P> <P> <IMG SRC ="me.gif" ALIGN=LEFT> <IMG SRC ="myson2.gif" ALIGN=RIGHT>
</BODY> </HTML>
Figure 24.7 ~ page with three images
396 HTML (introduction)
24.6.2 Alternative text
Often users choose not to view images in a page and select an option on the viewer which stops the viewer from displaying any graphic images. If this is the case then the HTML page can contain substitute text which is shown instead of the image. For example:
<IMG SRC ="myson.gif" ALT="Picture of my son" ALIGN=RIGHT> <IMG SRC ="me.gif" ALT="Picture of me ALIGN=LEFT> <IMG SRC ="myson2.gif" ALT="Another picture of my son" ALIGN=RIGHT>
24.6.3 Other options
Other image options can be added, such as"
�9 HSPACE=x VSPACE=y defines the amount of space that should be left around images. The x value defines the number of pixels in the x- direction and the y value defines the number of pixels in the y-direction.
�9 WIDTH= x HEIGHT=y defines the scaling in the x- and y-direction, where x and y are the desired pixel width and height, respectively, of the image.
�9 ALIGN=direction def'mes the alignment of the image. This can be used to align an image with text. Valid options for aligning with text are texttop, top, middle, absmiddle, bottom, baseline or absbottom. HTML script 24.8 shows an example of image alignment with the image a . g i f (which is just the letter 'A' as a graphic) and Figure 24.8 shows a sample output. It can be seen that texttop aligns the image with highest part of the text on the line, top alights the image with the highest element in the line, middle aligns with the middle of the image with the baseline, absmiddle alights the middle of the image with the middle of the largest item, bottom aligns the bottom of the image with the bottom of the text and absbottom aligns the bottom of the image with the bottom of the largest item.
[ ~ HTML script 24.8 <HTML> <HEAD> <TITLE>My first home page</TITLE> </HEAD> <BODY BGCOLOR=" # ffffff"> <IMG SRC ="a.gif" ALIGN=texttop>pple<P> <IMG SRC ="a.gif" ALIGN=top>pple<P> <IMG SRC ="a.gif" ALIGN=middle>pple<P> <IMG SRC ="a.gif" ALIGN=bottom>pple<P> <IMG SRC ="a.gif" ALIGN=baseline>pple<P> <IMG SRC ="a.gif" ALIGN=absbottom>pple </BODY> </HTML>
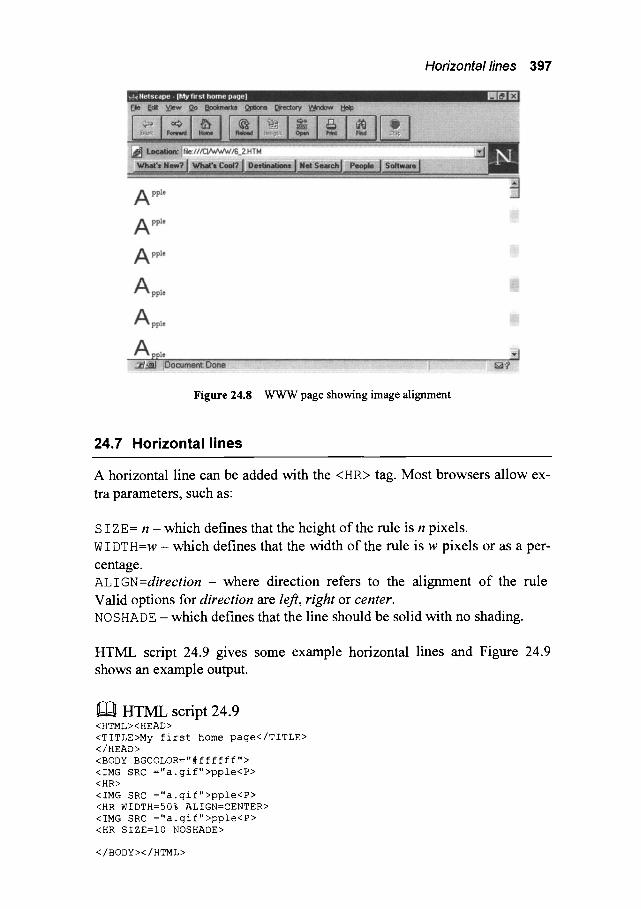
Horizontal lines 397
Figure 24.8 WWW page showing image alignment
24.7 Horizontal lines
A horizontal line can be added with the <HR> tag. Most browsers allow ex-
tra parameters, such as:
S I Z E= n - which defines that the height of the rule is n pixels. WIDTH=w- which defines that the width of the rule is w pixels or as a per-
centage. A L I G N = d i r e c t i o n - where direction refers to the alignment of the rule Valid options for d i r e c t i o n are left , r i g h t or cen ter .
NOSHADE - which defines that the line should be solid with no shading.
HTML script 24.9 gives some example horizontal lines and Figure 24.9 shows an example output.
H T M L script 24.9 <HTML><HEAD> <TITLE>My first home page</TITLE> </HEAD> <BODY BGCOLOR="#ffffff"> <IMG SRC ="a.gif">pple<P> <HR> <IMG SRC ="a.gif">pple<P> <HR WIDTH=50% ALIGN=CENTER> <IMG SRC ="a.gif">pple<P> <HR SIZE=I0 NOSHADE>
</BODY></HTML>
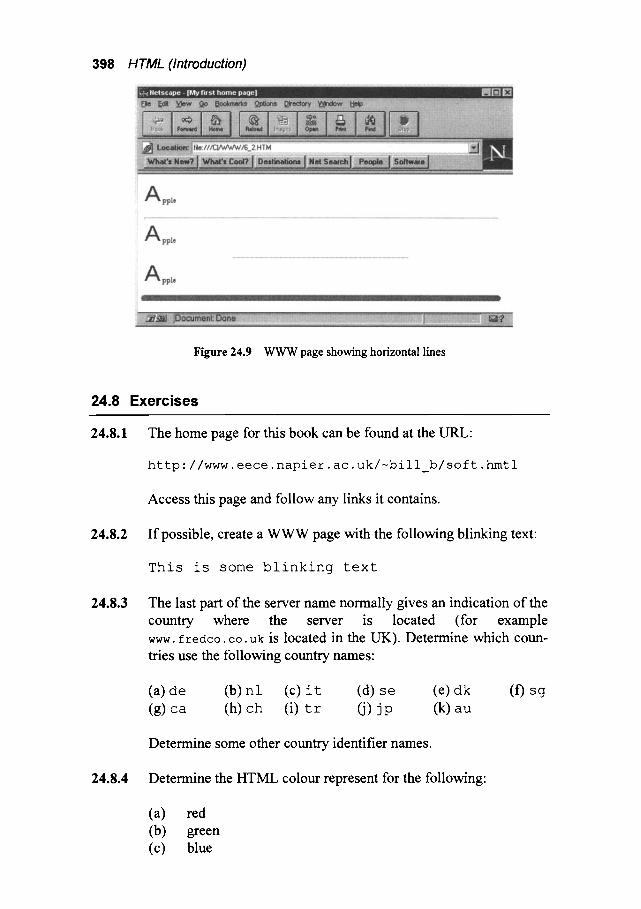
398 HTML (Introduction)
Figure 24.9 WWW page showing horizontal lines
24.8 Exercises
24.8.1 The home page for this book can be found at the URL:
http://www.eece.napier.ac.uk/~bill b/soft.hmtl
Access this page and follow any links it contains.
24.8.2 If possible, create a WWW page with the following blinking text:
This is some blinking text
24.8.3 The last part of the server name normally gives an indication of the country where the server is located (for example www. f redco, co. uk is located in the UK). Determine which coun- tries use the following country names:
(a) de (b) nl (c) it (d) se (e) dk (0 sg (g) ca (h) ch (i) tr ~) jp (k) au
Determine some other country identifier names.
24.8.4 Determine the HTML colour represent for the following"
(a) red (b) green (c) blue
Exercises 399
(d) white (e) black
24.8.5 Determine the HTML for the background, text and link colour:
(a)<BODY BKCOLOR="#00FF00" "TEXT=#FF0000" "LINK=# 0000 FF">
(b) <BODY BKCOLOR="#DC640D" "TEXT=#777777"
"LINK=# 00 9 DBE">
24.8.6 Determine the error in the following HTML script:
~ l HTML script 24.10 <HTML> <HEAD>
<TITLE>Fred's page</TITLE> </HEAD> <BODY BGCOLOR="#FFFFFF"> <Hl>List 1</HI> <OL> <LI>Part 1 <LI>Part 2 <LI>Part 3 <Hl>List 2</HI> <UL> <LI>Section 1 <LI>Section 2 <LI>Section 3 </UL> </BODY> </HTML>

Further HTML
25.1 Introduction
Chapter 24 introduced HTML; this chapter discusses some of HTML's more advanced features. HTML differs from compiled languages, such as C and Pascal, in that the HTML text file is interpreted by an interpreter (the browser) while languages such as C and Pascal must be precompiled before they can be run. HTML thus has the advantage that it does not matter if it is the operating system, the browser type or the computer type that reads the HTML file, as the file does not contain any computer specific code. The main disadvantage of interpreted files is that the interpreter does less error checking as it must produce fast results.
The basic pages on the WWW are likely to evolve around HTML and while HTML can be produced manually with a text editor, it is likely that, in the coming years, there will be an increase in the amount of graphically- based tools that will automatically produce HTML files. Although these tools are graphics-based they still produce standard HTML text files. Thus a knowledge of HTML is important as it defines the basic specification for the presentation of WWW pages.
25.2 Anchors
An anchor allows users to jump from a reference in a WWW page to an- other anchor point within the page. The standard format is:
<A YAME="anchor name">
where anchor name is the name of the section which is referenced. The </A> tag defines the end of an anchor name. A link is specified by:
<A HREF="#anchor name">
followed by the </A> tag. HTML script 25.1 shows a sample script with four anchors and Figure 25.1 shows a sample output. When the user selects one of the references, the browser automatically jumps to that anchor. Fig- ure 25.2 shows the output screen when the user selects the # T o k e n reference. Anchors are typically used when an HTML page is long or when a backwards or forwards reference occurs (such as a reference within a pub- lished paper).

402 Further HTML
HTML script 25.1 <HTML><HEAD><TITLE>Sample page</TITLE></HEAD><BODY BGCOLOR=" # FFFFFF" > <H2>Select which network technology you wish information:</H2> <P><A HREF=" #Ethernet" >Ethernet</A>< / P> <P><A HREF="#Token">Token Ring< /A>< / P> <P><A HREF ='' # FDDI ">FDDI</A></P> <P><A HREF=" #ATM" >ATM</A>< / P> <H2><A NAME="Ethernet" >Ethernet</A></H2 > Ethernet is a popular LAN which works at 10Mbps. <H2><A NAME= " To ken " >To ken Ring</A></H2> Token ring is a ring based network which operates at 4 or 16Mbps. <H2 ><A NAME=" FDDI ">FDDI</A></H2 > FDDI is a popular LAN technology which uses a ring of fibre optic cable and operates at 100Mbps. <H2><A NAME="ATM" >ATM</A></H2 > ATM is a ring based network which operates at 155Mbps.</BODY></HTML>
Figure 25.1 Example window with references
Figure 25.2 Example window with references

25.3 Tables
Tables 403
Tables are one of the best methods to display complex information in a simple way. Unfortunately, in HTML they are relatively complicated to set up. The start of a table is def'med with the <TABLE> tag and the end of a table by </TABLE>. A row is def'med between the <TR> and </TR>, while a table header is def'med between <TH> and </TH>. A regular table entry is def'med between <TD> and </TD>. HTML script 25.2 shows an example of a table with links to other HTML pages. The BORDER=n option has been added to the <TABLE> tag to def'me the thickness of the table border (in pixels). In this case the border size has a thickness of 10 pixels.
i [n HTML script 25.2 <HTML><HEAD><TITLE> Fred Bloggs</TITLE></HEAD> <BODY TEXT="#000000" BGCOLOR="#FFFFFF"> <Hl>Fred Bloggs Home Page</Hl> I'm Fred Bloggs. Below is a tables of links.<HR><P> <TABLE BORDER=I0> <TR>
<TD><B>Gene ra 1 < / B></TD> <TD><A HREF="res. html">Research</TD> <TD><A HREF="cv. htmI">CV</TD> <TD><A HREF="paper.html">Papers Published</TD>
</TR> <TR>
<TD><B>HTML Tutorials</B></TD> <TD><A HREF="intro.html">Tutorial I</TD> <TD><A HREF="inter.html">Tutorial 2</TD> <TD><A HREF="adv.html">Tutorial 3</TD>
</TR> <TR>
<TD><B>Java Tutorials</B></TD> <TD><A HREF="javal.html">Tutorial I</TD> <TD><A HREF="java2.html">Tutorial 2</TD> <TD><A HREF="java3.html">Tutorial 3</TD>
</TR> < / TABLE >< / BODY>< / HTML>
Figure 25.3 Example window from example Java script

404 Further HTML
Other options in the <TABLE> tag are"
�9 WIDTH=x, HEIGHT=y - defines the size of the table with respect to the full window size. The parameters x and y are either absolute values in pixels for the height and width of the table or are percentages of the full window size.
�9 C E L L S P A C I N G = n - defines the number of pixels desired between each cell where n is the number of pixels (note that the default cell spacing is 2 pixels).
Am individual cell can be modified by adding options to the <TH> or <TD> tag. These include:
�9 WIDTH=x, HEIGHT--}, - defines the size of the table with respect to the table size. The parameters x and y are either absolute values in pixels for the height and width of the table or are percentages of the table size.
�9 COLSPAN=n- defines the number of columns the cell should span.
�9 ROWS PAN=n- defines the number of rows the cell should span. �9 ALIGN=direc t ion- defines how the cell 's contents are aligned horizon-
tally. Valid options are left, c en t e r or right .
�9 VALIGN=direction - defines how the cell 's contents are aligned verti- cally. Valid options are top, m idd l e or base l ine .
�9 N O W R A P - informs the browser to keep the text on a single line (that is, with no line breaks).
HTML script 25.3 shows an example use of some of the options in the <TABLE> and <TD> options. In this case the text within each row is centre aligned. On the second row the second and third cells are merged using the COLSPAN=2 option. The first cell of the second and third rows have also been merged using the ROWSPAN=2 option. Figure 25.4 shows an example output. The table width has been increased to 90% of the full window, with a width of 50%.
H T M L script 25.3 <HTML><HEAD><TITLE> Fred Bloggs</TITLE></HEAD> <BODY TEXT="#000000" BGCOLOR="#FFFFFF"> <Hl>Fred Bloggs Home Page</Hl> I'm Fred Bloggs. Below is a table of links. <HR> <P> <TABLE BORDER=I0 WIDTH=90% LENGTH=50%> <TR>
<TD><B>General</B></TD> <TD><A HREF="res. html">Research</TD> <TD><A HREF="cv. htmI">CV</TD> <TD><A HREF="paper. html">Papers Published</TD> <TD></TD>
</TR>

<TR> <TD ROWSPAN=2><B>HTML/Java Tutorials</B></TD> <TD><A HREF="intro.html">Tutorial I</TD> <TD COLSPAN=2><A HREF="inter.html">Tutorial 2</TD>
</TR> <TR>
<TD><A HREF="javal.html">Tutorial I</TD> <TD><A HREF="java2.html">Tutorial 2</TD> <TD><A HREF-"java3.html">Tutorial 3</TD>
</TR> </TABLE></BODY></HTML>
Forms 405
Figure 25.4 Example window from example script
25.4 CGI scripts
CGI (Common Gateway Interface) scripts are normally written in either C or Perl and are compiled to produce an executable program. They can also come precompiled or in the form of a batch file. Perl has the advantage in that it is a script that can be easily run on any computer, while a precom- piled C program requires to be precompiled for the server computer.
CGI scripts allow the user to interact with the server and store and re- quest data. They are often used in conjunction with forms and allow an HTML document to analyze, parse and store information received from a form. On most UNIX-type systems the default directory for CGI scripts is cgi-bin.
25.5 Forms
Forms are excellent methods of gathering data and can be used in conjunc- tion with CGI scripts to collect data for future use.
A form is identified between the <FORM> and </FORM> tags. The method used to get the data from the form is defined with the METHOD="POST". The ACTION option defines the URL script to be run

406 Further HTML
when the form is submitted. Data input is specified by the <INPUT TYPE>
tag. HTML script 25.4 form has the following parts"
�9 <form action ='' /cgi-bin/AnyForm2 '' method="POST"> -
which defines the start of a form and when the " s u b m i t " option is se- lected the cgi script / c g i - b i n / A n y F o r m 2 will be automatically run.
�9 <input type=" submit '' value= " Send Feedback"> - which
causes the program defined in the action option in the < f o rm> tag to be run. The button on the form will contain the text " S e n d F e e d b a c k " , see Figure 25.5 for a sample output screen.
�9 <input type="reset '' value="Reset Form"> - which resets
the data in the form. The button on the form will contain the text " R e s e t Form", see Figure 25.5 for a sample output screen.
�9 <input type="hidden" name="AnyFormTo" value =
"f.bloggs @toytown.ac.uk"> - which passes a value of
[email protected] which has the parameter name of
"AnyFormTo". The program AnyForm2 takes this parameter and
automatically sends it to the email address defined in the value (that is,
f.bloggs @toytown.ac.uk).
�9 <input type="hidden" name="AnyFormSubj ect"
value=" Feedback form"> - which passes a value of Feedback form which has the parameter name of " A n y F o r m S u b j e c t " . The pro- gram AnyForm2 takes this parameter and adds the text " F e e d b a c k f o r m " in the text sent to the email recipient (in this case, f . b l o g g s
@toytown. ac. uk).
�9 Surname <input name="Surname"> - which defines a text input
and assigns this input to the parameter name Surname.
�9 <textarea name="Address" rows=2 cols=40>
</textarea> - which defines a text input area which has two rows
and has a width of 40 characters. The thumb bars appear at the fight-hand
side of the form if the text area exceeds more than 2 rows, see Figure 25.5.
H T M L script 25.4 <HTML> <HEAD> <TITLE>Example form</TITLE> </HEAD> <HI><CENTER>Example form</CENTER></HI ><P> <form action="/cgi-bin/AnyForm2" method="POST">
<input type="hidden '' name="AnyFormTo" value="f.bloggs@toytown, ac. uk"> <input type="hidden" name="AnyFormSubject" value="Feedback form">
Surname <input name="Surname"> First Name/Names <input name="First Name"><P> Address (including country) <P> <textarea name="Address '' rows=2 cols=40></textarea><P>
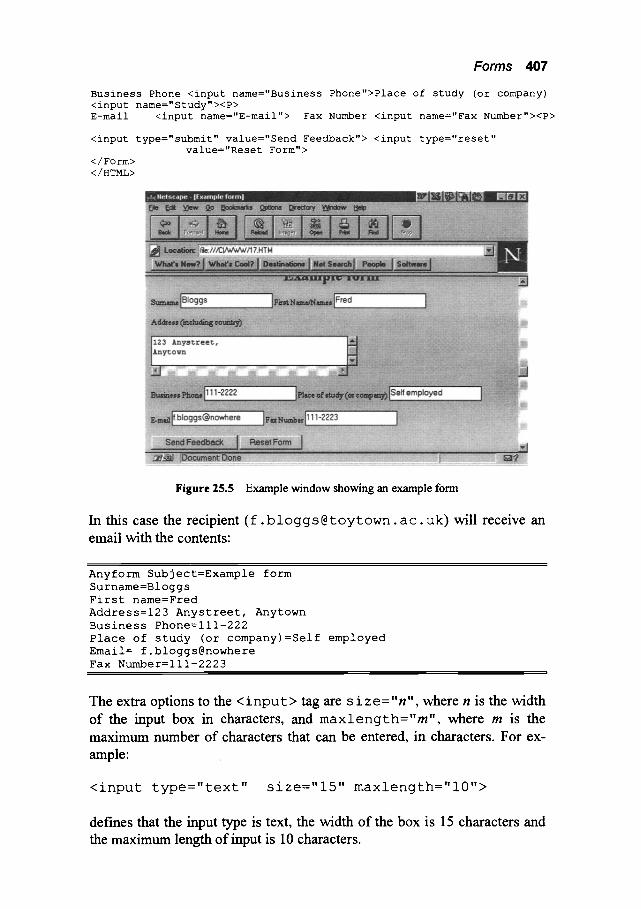
Forms 407
Business Phone <input name="Business Phone">Place of study (or company) <input name="Study"><P> E-mail <input name="E-mail"> Fax Number <input name="Fax Number"><P>
<input type="submit '' value="Send Feedback"> <input type="reset" value="Reset Form">
</Form> </HTML>
Figure 25.5 Example window showing an example form
In this case the recipient (f.bloggs@toytown. ac. uk) will receive an email with the contents:
Anyform Subject=Example form Surname=Bloggs First name=Fred Address=123 Anystreet, Anytown Business Phone=lll-222 Place of study (or company)=Self employed Email= f.bloggs@nowhere Fax Number=lll-2223
The extra options to the < i n p u t > tag are s i z e = " n " , where n is the width of the input box in characters, and m a x l e n g t h = " m " , where m is the maximum number of characters that can be entered, in characters. For ex- ample"
<input type="text" size="15 '' maxlength="10">
defmes that the input type is text, the width of the box is 15 characters and the maximum length of input is 10 characters.

408 Further HTML
25.5.1 Input types
The type options to the < i n p u t > tag are def'med in Table 25.1. H T M L
script 25.5 gives a few examples o f input types and Figure 25.6 shows a sample output.
Table 25.1 Input type options
TYPE= Description " t e x t " The input is normal text.
Options N/X_ME= "nm" where nm is the name that will be sere to the server when the text is entered. S 17, E=" n" where n is the desired box width in characters. S 17, E= " m " where m is the maxi- mum number of input characters.
"password" The input is a password which will be displayed with *'s. For example if the user inputs a 4-1etter password then only **** will be displayed.
S I Z E = " n " where n is the desired box width in characters. S I ZE=" m" where m is the maxi- mum number of input characters.
"radio" The input takes the form of a radio button (such as (9 or O). They are used to allow the user to select a single option from a list of options.
NAME= "radname" where radname defines the name of the button. VALUE="val" where val is the data that will be sent to the server when the button is selected. CHECKED is used to specify that the button is initially set.
"checkbox" The input takes the form of a checkbox (such as or El). They are used to allow the user to select several options from a list of options.
NAME=" chkname" where chkname defines the common name for all the checkbox options. VALUE="defval" where defval defines the name of the option. CHECKED is used to specify that the button is initially' set.
I ~ HTML script 25.5 <HTML><HEAD><TITLE>Example form</TITLE> </HEAD> <FORM METHOD=" Post " > <H2>Enter type of network'</H2><P> <INPUT TYPE="radio" NAME="network" VALUE="ethernet" CHECKED>Ethernet <INPUT TYPE="radio" NAME="network" VALUE="token">
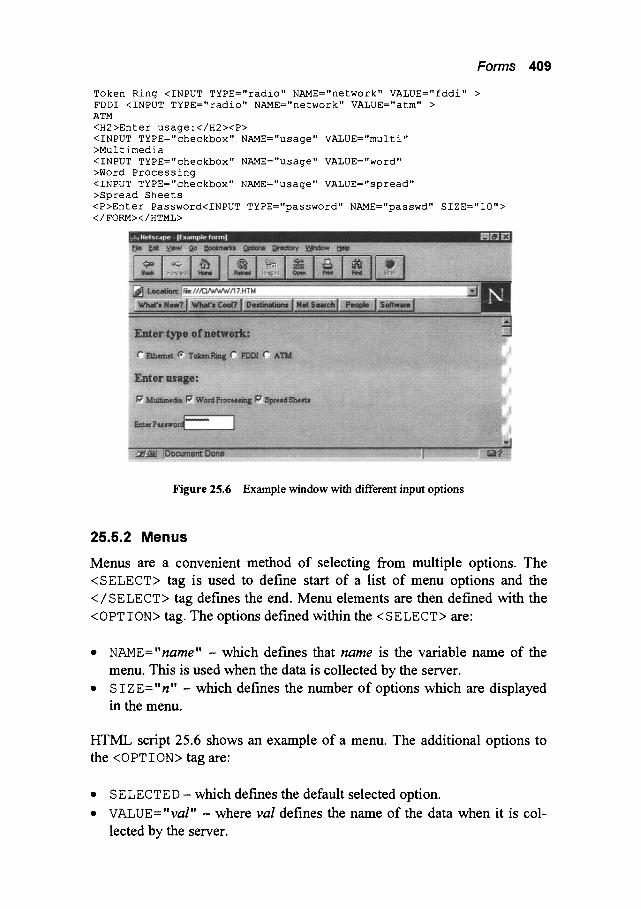
Forms 409
Token Ring <INPUT TYPE="radio" NAME="network" VALUE="fddi" > FDDI <INPUT TYPE="radio" NAME="network" VALUE="atm" > ATM <H2>Enter usage:</H2><P> <INPUT TYPE="checkbox" NAME="usage" VALUE="multi" >Multimedia <INPUT TYPE="checkbox" NAME="usage" VALUE="word" >Word Processing <INPUT TYPE="checkbox" NAME="usage" VALUE="spread" >Spread Sheets <P>Enter Password<INPUT TYPE="password '' NAME="passwd" SIZE="10"> < / FORM></HTML>
Figure 25.6 Example window with different input options
25.5.2 Menus
Menus are a convenient method of selecting from multiple options. The <SELECT> tag is used to define start of a list of menu options and the </SELECT> tag defines the end. Menu elements are then defined with the <OPTION> tag. The options def'med within the <SELECT> are:
�9 N A M E = " n a m e " - which defines that n a m e is the variable name of the menu. This is used when the data is collected by the server.
�9 S I Z E="n" - which defines the number of options which are displayed in the menu.
HTML script 25.6 shows an example of a menu. The additional options to the <OPTION> tag are"
�9 SELECTED- which def'mes the default selected option.
�9 V A L U E = " v a l " - where v a l defines the name of the data when it is col- lected by the server.
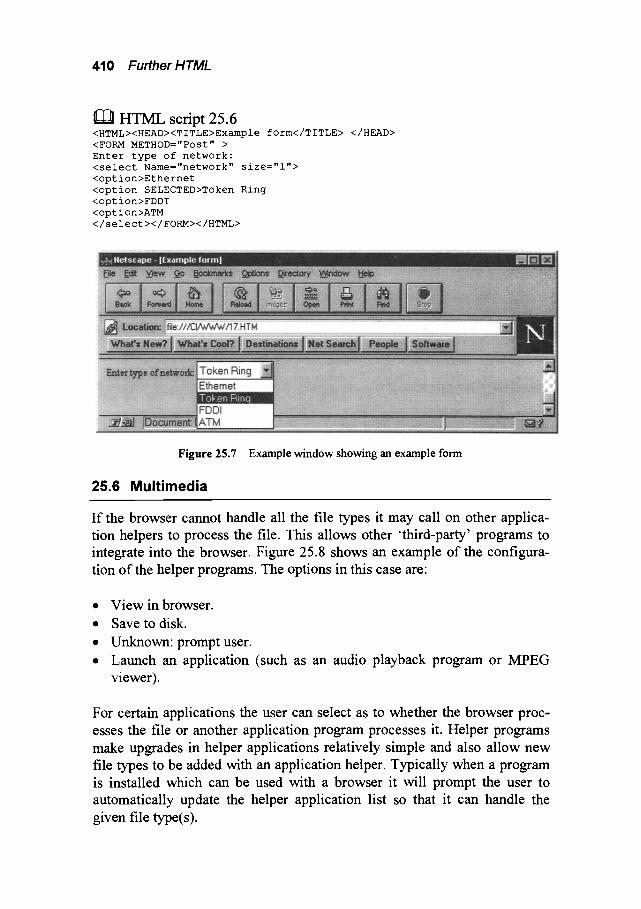
410 Further HTML
i [~ H T M L script 25.6 <HTML><HEAD><TITLE>ExampIe form</TITLE> </HEAD> <FORM METHOD="Post" > Enter type of network: <select Name="network" size="l"> <option>Ethernet <option SELECTED>Token Ring <option>FDDI <option>ATM </select></FORM></HTML>
Figure 25.7 Example window showing an example form
25.6 Multimedia
If the browser cannot handle all the file types it may call on other applica- tion helpers to process the file. This allows other 'third-party' programs to integrate into the browser. Figure 25.8 shows an example of the configura- tion of the helper programs. The options in this case are:
�9 View in browser. �9 Save to disk. �9 Unknown: prompt user. �9 Launch an application (such as an audio playback program or MPEG
viewer).
For certain applications the user can select as to whether the browser proc- esses the file or another application program processes it. Helper programs make upgrades in helper applications relatively simple and also allow new file types to be added with an application helper. Typically when a program is installed which can be used with a browser it will prompt the user to automatically update the helper application list so that it can handle the given file type(s).

Multimedia 411
Figure 25.8 Example window showing an example form
Each file type is defined by the file extension, such as .ps for postscript files, .exe for a binary executable file, and so on. These file extensions have been standardized in MIME (Multipurpose Intemet Mail Extensions) specfi- cation. Table 25.2 shows some typical file extensions.
Table 25.2 Input type options
Mime type application/octet-stream application/postscript application/x-compress application/x-gzip application/x-j avascript application/x-msvideo application/x-perl application/x-tar application/x-zip-compressed audio/basic image/gif image/jpeg image/tiff image/x-MS-bmp text/html text/plain video/mpeg
video/cluicktime
Extension Typical action exe, bin Save ps, ai, eps Ask user Z Compress program gz GZIP compress program js, mocha Ask user avi Audio player pl Save tar Save zip ZIP program au, snd Audio player gif Browser jpeg, jpg, jpe Browser tif, tiff Graphics viewer bmp Graphics viewer htm, html Browser text, txt Browser mpeg, mpg, mpe, mpv, Video player vbs, mpegv qt, mov, moov Video player

412 Further HTML
25.7 Exercises
25.7.1 Construct a WWW page with anchor points for the following"
Select the network you wish to find out about:
Ethernet Token ring FDDI
Ethernet Ethemet is the most widely used networking technology used in LAN (Local Area Network). In itself it cannot make a network and needs some other protocol such as TCP/IP or SPX/IPX to allow nodes to communicate. Unforttmately, Ethernet in its standard form does not cope well with heavy traffic. Its has many advantages, though, including"
Networks are easy to plan and cheap to install. Network components are cheap and well supported. It is well-proven technology which is fairly robust and reliable. Simple to add and delete computers on the network. Supported by most software and hardware systems.
Token ring Token ring networks were developed by several manufacturers, the most prevalent being the IBM Token Ring. Token ring networks cope well with high network traffic loadings. They were at one time extremely popular but their popularity has since been overtaken by Ethemet. Token ring networks have, in the past, suffered from network management problems and poor network fault tolerance. Token ring networks are well suited to situations which have large amounts of traffic and also work well with most traffic loadings. They are not suited to large networks or networks with physically remote stations. Their main advantage is that they cope better with high traffic rates than Ethemet, but require a great deal of maintenance especially when faults occur or when new equipment is added to or removed from the network. Many of these problems have now been overcome by MAUs (multi-station access units), which are similar to the hubs using in Ethemet.

25.7.2
Exercises 413
FDDI A token-passing mechanism allows orderly access to a network. Apart from token ring the most commonly used token-passing network is the Fiber Distributed Data Interchange (FDDI) standard. This operates at 100 Mbps and, to overcome the problems of line breaks, has two concentric token rings. Fibre optic cables have a much high specification over copper cables and allow extremely long interconnection lengths. The maximum circumference of the ring is 100 km (62 miles), with a maximum 2 km between stations (in FDDI stations are also known as stations). It is thus an excellent mechanism for connecting interconnecting networks over a city or a campus. Up to 500 stations can connect to each ring with a maximum of 1,000 stations for the complete network. Each station connected to the FDDI highway can be a normal station or a bridge to a conventional local area network, such as Ethernet or token ring.
Construct a WWW glossary page with the following terms:
Address
Address Resolution Pro- tocol (ARP)
American National Standards Institute (ANSI)
American Standard Code for Information Interchange (ASCII)
Amplitude modulation (AM)
A unique label for the location of data or the identity of a communications device.
A TCP/IP process which maps an IP address to an Ethernet address.
ANSI is a non-profit organization which is made up of expert committees that publish standards for national industries.
An ANSI-defined character alphabet which has since been adopted as a standard international alphabet for the interchange of characters.
Information is contained in the amplitude of a carder.
Amplitude-Shift Keying (ASK)
Application layer
Asynchronous trans- mission
Uses two, or more, amplitudes to represent binary digits. Typically used to transmit binary data over speech-limited channels.
The highest layer of the OSI model.
Transmission where individual characters are sent one-by-one. Normally each character is delimited by a start and stop bit. With asynchronous com- munication the transmitter and receiver only have to be roughly synchronized.

414 Further HTML
25.7.3 Construct a WWW page which can be used to enter a person's CV (note, use a form). The basic fields should be:
Nalzle" Address: Email address: Telephone number: Experience: Interests: Any other information:
25.7.4 Write an HTML script which displays the following timetable.
25.7.5
Monday Tuesday Wednesday Thursday
Friday
9-11 11-1 1-3 Data Comms Networkin~
Software Systems Networkin~ FREE Software C++ Systems FREE
3-5
Networking Data Comms Java FREE Networking FREE
Networking
Design your own home page with a basic user home page ( i n d e x . h t m l ) which contains links to a basic CV page (for ex- ample, it could be named c v . h t m l ) and a page which lists your main interests ( m y i n t e r . h t m l ) . Design one of the home pages with a list of links and another with a table of links. If possible in- corporate graphics files into the pages.

JavaScript
26.1 Introduction
Computer systems contain a microprocessor which controls the operation of the computer. The microprocessor only understands binary information and operates on a series of binary commands known as machine code. It is extremely difficult to write large programs in machine code, so that high- level languages are used instead. A low-level language is one which is similar to machine code and normally involves the usage of keyword macros to replace machine code instructions. High-level languages have a syntax that is almost like written English and thus make programs easy to read and to modify. In most programs the actual operation of the hardware is invisible to the programmer. A compiler changes the high-level language into machine code. Typical high-level languages include C/C++, BASIC, COBOL, FORTRAN and Pascal; an example of a low-level language is 80486 Assembly Language.
Java is a high-level language that has been developed specifically for the WWW and is well suited to networked applications. It was originally devel- oped by Sun Microsystems and is based on C++ (but with less of the difficulties of C++). Most new versions of Web browsers now support its usage. Java's main attributes are:
�9 It runs either as a stand-alone program or it can run within the Web browser. When run within the browser the Java program is known as an applet.
�9 Java is a portable language and applets can run on any type of microprocessor type (such as a PC based on Intel 80486 or Pentium, or a Motorola-based computer).
�9 Java applets are hardware and operating system independent. For exam- ple, the program itself does not have to interface directly to the hardware such as a video adapter or mouse. Typical high-level languages, such as C/C++ and Pascal, produce machine-dependent machine code, and can thus only be executed on a specific computer or operating systems.
�9 Java allows for a client/server approach where the applet can run on the remote computer which thus reduces the loading on the local computer
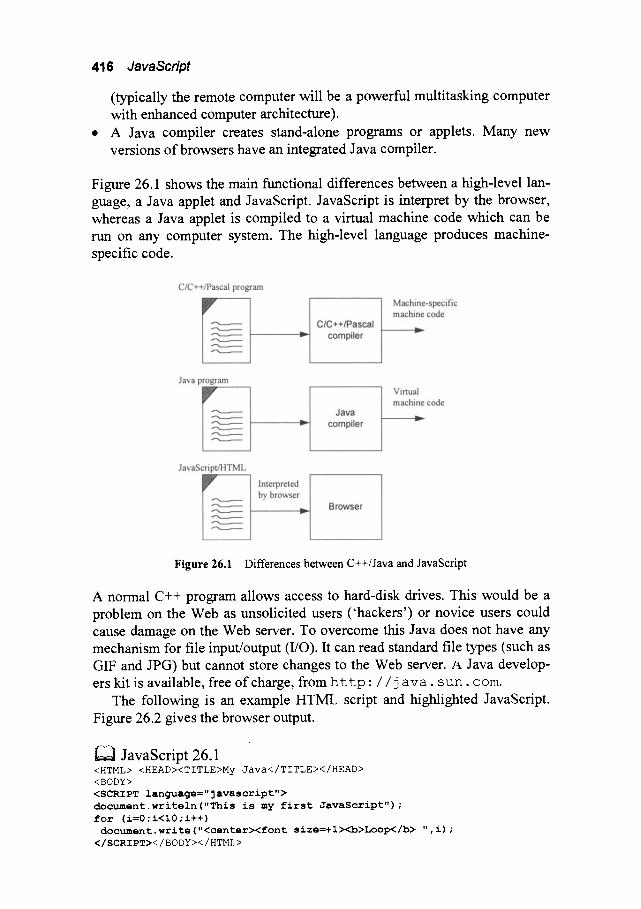
416 JavaScript
(typically the remote computer will be a powerful multitasking computer with enhanced computer architecture). A Java compiler creates stand-alone programs or applets. Many new versions of browsers have an integrated Java compiler.
Figure 26.1 shows the main functional differences between a high-level lan- guage, a Java applet and JavaScript. JavaScript is interpret by the browser, whereas a Java applet is compiled to a virtual machine code which can be run on any computer system. The high-level language produces machine- specific code.
Figure 26.1 Differences between C++/Java and JavaScript
A normal C++ program allows access to hard-disk drives. This would be a problem on the Web as unsolicited users ( 'hackers') or novice users could cause damage on the Web server. To overcome this Java does not have any mechanism for file input/output (I/O). It can read standard file types (such as GIF and JPG) but cannot store changes to the Web server. A Java develop- ers kit is available, free of charge, from h t t p : / / j a v a . s u n . com.
The following is an example HTML script and highlighted JavaScript. Figure 26.2 gives the browser output.
JavaScript 26.1 <HTML> <HEAD><TITLE>My Java</TITLE></HEAD> <BODY> <SCRIPT language="javascript"> document.writeln("This is my first JavaScript"); for (i=0;i<10;i++) document, write ("<centerXfont size=+l><b>Loop</b> ",i) ;
</SCRIPT>< / BODY >< / HTML>

JavaScript language 417
Figure 26.2 Example window from example JavaScript
26.2 JavaScript language
Programming languages can either be compiled to produce an executable program or they can be interpreted while the user runs the program. Java is a program language which needs to be compiled before it is used. It thus can- not be used unless the user has the required Java compiler. JavaScript, on the other hand, is a language which is interpreted by the browser. It is simi- lar in many ways to Java but allows the user to embed Java-like code into an HTML page. JavaScript supports a small number of data types representing numeric, Boolean, and string values and is supported by most modem WWW browsers, such as Microsoft Intemet Explorer and Netscape.
HTML is useful when pages are short and do not contain expressions, loops or decisions. JavaScript allows most of the functionality of a high- level language for developing client and server Intemet applications. It can be used to respond to user events such as mouse clicks, form input, and page navigation.
A major advantage that JavaScript has over HTML is that it supports the use of functions without any special declarative requirements. It is also simpler to use than Java because it has easier syntax, specialized built-in functionality, and minimal requirements for object creation.
Important concepts in Java and JavaScript are objects. Objects are basi- cally containers for values. The main differences between JavaScript and Java are:
JavaScript is interpreted by the client, while Java is compiled on the server before it is executed.
418 JavaScript
�9 JavaScript is embedded into HTML pages, while Java applets are distinct from HTML and accessed from HTML pages.
�9 JavaScript has loose typing for variables (that is, a variables data type does not have to be declared), while Java has strong typing (that is, a variables data type must always be declared before it is used).
�9 JavaScript has dynamic binding where object references are checked at run-time. Java has static binding where object references must exist at compile-time.
26.3 JavaScript values, variables and literals
JavaScript values, variables and literals are similar to the C programming language. Their syntax is discussed in this section.
26.3.1 Values
The four different types of values in JavaScript are:
�9 Numeric value, such as 12 or 91.5432. �9 Boolean values which are either TRUE or FALSE. �9 String types, such as 'Fred Bloggs'. �9 A special keyword for a NULL value
Numeric values differ from those in most programming languages in that there is no explicit distinction between a real value (such as 91.5432) and an integer (such as 12).
26.3.2 Data type conversion
JavaScript differs from Java in that variables do not need to have their data types defined when they are declared (loosely typed). Data types are then automatically converted during the execution of the program. Thus a vari- able could be declared with a numeric value as:
var value
value = 19
and then in the same script it could be assigned a string value, such as:
value = "Enter your name >>"
The conversion between numeric values and strings in JavaScript is easy, as numeric values are automatically converted to an equivalent string. For example:
<HTML><HEAD><TITLE>My Java</TITLE></HEAD>

<BODY BGCOLOR="#ffffff">
.<SCRIPT language="javascript">
var x, y, str
x=13
y=10
str= x + " added to " + y + " is " + x+y
document.writeln(str)
Z=X+y
s tr= x + " added to " + y + " is " + z
document.writeln (str)
</SCRIPT>
</BODY></HTML>
JavaScript values 419
Sample nan 26.1 gives the output from this script. It can be seen that x and y have been converted to a string value (in this case, " 1 3 " and " 1 0 " ) and that x+ y in the string conversion statement has been converted to " 1 3 1 0 ". If a mathematical operation is carded out ( z - x + y ) then z will contain 2 3 after the statement is executed.
J~ Sample run 26.1 13 added to i0 is 1310 13 added to i0 is 23
JavaScript provides several special functions for manipulating string and numeric values"
�9 The eval (string) function which converts a string to a numerical value.
�9 The p a r s e I n t (string [,radix]) fimction which converts a string into an integer of the specified radix (number base). The default radix is base- 10.
�9 The p a r s e F l o a t (string) function which converts a string into a floating-point value.
26.3.3 Variables
Variables are symbolic names for values within the script. A JavaScript identifier must either start with a letter or an underscore ( '_ ') , followed by letters, an underscore or any digit (0-9). Like C, JavaScript is case sensitive so that variables with the same character sequence but with different cases for one or more characters are different. The following are different variable names:
i=5
I=10
valueA=3. 543
VALUEA= 10.543
26.3.4 Variable scope
A variable can be declared by either simply assigning it a value or by using

420 JavaScript
the var keyword. For example, the following declares to variables Valuel and Value2:
var Valuel; Value2=23;
A variable declared within a function is taken as a local variable and can only be used within that function. A variable declared outside a function is a global variable and can be used anywhere in the script. A variable which is declared locally which is already declared as global variable needs to be declared with the var keyword, otherwise the use of the keyword is optional.
26.3.5 Literals
Literal values have fixed values within the script. Various reserved forms can be used to identify special types, such as hexadecimal values, exponent format, and so on. With an integer the following are used:
�9 If the value is preceded by a 0x then the value is a hexadecimal value (that is, base 16). Examples of hexadecimal values are 0xlFFF, 0xCB.
�9 If the value is preceded by a 0 then the value is an octal value (that is, base 8). Examples of octal values are 0777, 010.
�9 If it is not preceded by either a 0x or a 0 then it is a decimal integer.
Floating-point values Floating-point values are typically represented as a real value (such as 1.342) or in exponent format. Some exponent format values are:
Value Exponent format 0.000001 le-6 1342000000 1.342e9
Boolean The true and false literals are used with Boolean operations.
Strings In C a string is represented with double quotes ("str") whereas JavaScript accepts a string within double (") or single (') quotation marks. Examples of strings are"
"A string"
'Another string'
26.4 Expressions and operators
The expressions and operators used in Java and JavaScript are based on C

Expressions and operators 4 2 1
and C++. This section outlines the main expressions and operators used in JavaScript.
26.4.1 Expressions
As with C, expressions are any valid set of literals, variables, operators and expressions that evaluate to a single value. There are basically two types of expression, one which assigns a value to a variable and the other which simply gives a single value. A simple assignment is:
value = 21
which assigns the value of 21 to value (note that the result of the expres- sion is 21).
The result from a JavaScript expression can either be"
�9 A numeric value. �9 A string. �9 A logical value (true or false).
26.5 JavaScript operators
Both Java and JavaScript have a rich set of operators, of which there are four main types:
�9 Arithmetic. �9 Logical. �9 Bitwise. �9 Relational.
26.5.1 Arithmetic
Arithmetic operators operate on numerical values. The basic arithmetic operations are add (+), subtract (-), multiply (*), divide ( / ) and modulus division (%). Modulus division gives the remainder of an integer division. The following gives the basic syntax of two operands with an arithmetic operator.
operand operator operand
The assignment operator (=) is used when a variable 'takes on the value' of an operation. Other short-handed operators are used with it, including add equals (+=), minus equals (---), multiplied equals (*=), divide equals ( /=) and modulus equals (%=). The following examples illustrate their uses.
422 JavaScript
~ a t e m e n t Equiva len t ,, x+=3.0 x=x+3.0 voltage/=sqrt(2) voltage=voltage/sqrt(2) b i t m a s k *=2 b i t m a s k = b i t m a s k * 2
m m
In many applications it is necessary to increment or decrement a variable by 1. For this purpose Java has two special operators; ++ for increment and - - for decrement. These can either precede or follow the variable. If they pre- cede, then a pre-increment/decrement is conducted, whereas if they follow it, a post-increment/decrement is conducted. The following examples show their usage.
Sta tement ,4 Equ iva len t .... ' . . . . . . . . . . . . . . . no values++ no values=no values+l i-- i=i-i
Table 26.1 summarizes the arithmetic operators.
Table 26.1 Ari thmetic operators
Operator Operat ion Example
- subtraction or minus 5 - 4 ~ 1
+ addition 4 + 2 ~ 6
* multiplication 4 * 3--~ 12
/ division 4 / 2 -+ 2
% modulus 13 % 3 ~ 1
+= add equals
minus equals
/ = divide equals
* = multiplied equals
x += 2 is equivalent to x = x + 2
x - = 2 is equivalent to x = x - 2
x / = y is equivalent to x = x / y
x * = 3 2 is equivalent to x = x * 3 2
= assignment x = 1
++ increment Count++ is equivalent to Count=Count+l
decrement S e c - - is equivalent to S e c = S e c - 1
26.5.2 Relationship
The relationship operators determine whether the result of a comparison is TRUE or FALSE. These operators are greater than (>), greater than or equal to (>=), less than (<), less than or equal to (<=), equal to (==) and not equal
Expressions and operators 423
to ( != ) . Table 26.2 lists the relationship operators.
26.5.3 Logical (TRUE or FALSE)
A logical operation is one in which a decision is made as to whether the op- eration performed is TRUE or FALSE. If required, several relationship operations can be grouped together to give the required functionality. C as- sumes that a numerical value of 0 (zero) is FALSE and that any other value is TRUE. Table 26.3 lists the logical operators.
The logical A N D operation will yield a TRUE only if all the operands are TRUE. Table 26.4 gives the result o f the A N D (& &) operator for the op-
eration A& & B. The logical OR operation yields a TRUE if any one of the
operands is TRUE. Table 26.4 gives the logical results of the OR (I I) opera-
tor for the statement A I I B and also gives the logical result o f the N O T (!)
operator for the statement !A.
Table 26.2 Relat ionship operators
Operator Function Example TRUE condition > greater than (b> a ) when b is greater than a
>= greater than or equal ( a > =4 ) when a is greater than or equal to 4
< less than ( c< f) when c is less than f
< = less than or equal ( x < = 4 ) when x is less than or equal to 4
equal to (x==2) when x is equal to 2
! = not equal to ( y ! = x ) when y is not equal to x
Table 26.3 Logical operators
Operator Function Example && AND ((x==l) && (y<2))
II OR ((a!=b) II (a>0))
! NOT (! (a>0))
TRUE condition when x is equal to 1 and y is less than 2
when a is not equal to b o r a is greater than 0
when a is not greater than 0
Table 26 .4 Logical operations
' A B ' " AND(s~) "OR (l I) "'NOT (! A) -- FALSE FALSE FALSE FALSE TRUE FALSE TRUE FALSE FALSE TRUE TRUE TRUE
,i
FALSE TRUE TRUE TRUE TRUE FALSE TRUE FALSE
. . . . . . . . , . . . . . . . . , , ~ . . . . . . . . . . . . . . . . . . . . . . . . . . , ~ , ~ _ ,

424 JavaScript
26.5.4 Bitwise
The bitwise logical operators work conceptually as follows:
�9 The operands are converted to 32-bit integers, and expressed a series of bits (zeros and ones).
�9 Each bit in the first operand is paired with the corresponding bit in the second operand: first bit to first bit, second bit to second bit, and so on.
�9 The operator is applied to each pair of bits, and the result is constructed bitwise.
The bitwise operators are similar to the logical operators but they should not be confused as their operation differs. Bitwise operators operate directly on the individual bits of an operand(s), whereas logical operators determine whether a condition is TRUE or FALSE.
Numerical values are stored as bit patterns in either an unsigned integer format, signed integer (2's complement) or floating-point notation (an expo- nent and mantissa). Characters are normally stored as ASCII characters.
The basic bitwise operations are AND (&), OR (I) , ls complement or bitwise inversion (~ ) , XOR (^), shift left (<<) and shift right (>>). Table 26.5 gives the results of the AND bitwise operation on two b i t s / 3 / t 2 and Bit2.
The Boolean bitwise instructions operate logically on individual bits. The XOR fimction yields a 1 when the bits in a given bit position differ, the AND function yields a 1 only when the given bit positions are both l 's . The OR operation gives a 1 when any one of the given bit positions are a 1. For example:
00110011 i0101111 00011001
AND Iii01110 OR i0111111 XOR ii011111
OOlOO010 i0111111 ll00Oll0
Table 26.5 Bitwise operations
' A B A N D O R E X - O R
0 0 0 0 0 0 1 0 1 1 1 0 0 1 1 1 1 1 1 0
. . . . . . . . . . . . . . . . . . . . . . , , i
To perform bit shifts, the < <, > > and > > > operators are used. These op- erators shift the bits in the operand by a given number defined by a value given on the right-hand side of the operation. The left shift operator (<<) shifts the bits of the operand to the left and zeros fill the result on the right. The sign-propagating right shift operator (>>) shifts the bits of the operand
Expressions and operators 425
to the right and zeros fill the result if the integer is positive; otherwise it will fill with l s. The zero-filled right shift operator (>>>) shifts the bits of the operand to the right and fills the result with zeros. The standard format is:
operand > > no of bit shift_positions
operand >>> no of bit shift_positions
operand << no_of_bit_shift_positions
2 6 . 5 . 5 P r e c e d e n c e
There are several rules for dealing with operators:
�9 Two operators, apart from the assigmnent, should never be placed side by side. For example, x * % 3 is invalid.
�9 Groupings are formed with parentheses; anything within parentheses will be evaluated first. Nested parentheses can also be used to set pri- orities.
�9 A priority level or precedence exists for operators. Operators with a higher precedence are evaluated first; if two operators have the same precedence, then the operator on the left-hand side is evaluated first. The priority levels for operators are as follows:
HIGHEST PRIORITY () [] .
++ --
* / % + -
primary unary
multiply additive
<< >> >>> shift < > <= >= relation
- - ' - - I ' - -
&
& &
LOWEST PRIORITY
= + =
equality
bitwise
logical
assignment
The assignment operator has the lowest precedence.
26.5.6 Conditional expressions
Conditional expressions can result in one of two values based depending on a condition. The syntax is:
(expression) ? valuel �9 value2
If the expression is true then valuel is executed else value2 is executed. For example"

426 JavaScript
(val >= O) ? sign="positive" : sign="negative"
This will assign the string 'positive' to s i gn if the value of val is greater than or equal to O, else it will assign 'negative'.
26.5.7 String operators
The normal comparison operators, such as <, >, >=, ==, and so on, can be used with strings. In addition, the concatenation operator (+) can be used to concatenate two string values together. For example:
str="This is " + "an example"
will result in the string
"This is an example"
26.6 JavaScript statements
JavaScript statements are similar to C and allow a great deal of control of the execution of a script. The basic categories are:
�9 Conditional statements, such as i f...e i se.
�9 Repetitive statements, such a s for, while, break and continue.
�9 Comments, using either the C++ style for single-line comments (//) or
standard C multi-line comments (/*...*/).
�9 Object manipulation statements and operators, such as for...in, new,
this, and with.
26.7 Conditional statements
Conditional statements allow a program to make decisions on the route through a program.
26.7.1 if...else
A decision is made with the • f statement. It logically determines whether a conditional expression is TRUE or FALSE. For a TRUE, the program exe- cutes one block of code; a FALSE causes the execution of another (if any). The keyword e l s e identifies the FALSE block. Braces are used to define the start and end of the block.
Relationship operators (>,<,>=,<=,==,!=) yield a TRUE or FALSE from their operation. Logical statements (&&, I I, !) can then group these together to give the required functionality. If the operation is not a relation- ship, such as bitwise or an arithmetic operation, then any non-zero value is TRUE and a zero is FALSE.

Loops 427
The following is an example syntax of the i f statement. If the statement block has only one statement the braces ( { } ) can be excluded.
if (expression) {
statement block }
The following is an example format with an e 1 s e extension.
if (expression) {
statement blockl } else {
statement block2 }
It is possible to nest i f... e i se statements to give a required functional- ity. In the next example, statement block1 is executed if e xp r e s s i on 1 is TRUE. If it is FALSE then the program checks the next expression. If this is TRUE the program executes statement block2, else it checks the next ex- pression, and so on. If all expressions are FALSE then the program executes the final e l s e statement block, in this case, statement block 4:
if (expressionl) {
statement blockl } else if (expression2) {
statement block2 } else {
statement block4 }
26.8 Loops
26.8.1 s ()
Many tasks within a program are repetitive, such as prompting for data, counting values, and so on. The f o r loop allows the execution of a block of code for a given control function. The following is an example format; if there is only one statement in the block then the braces can be omitted.
for (starting condition; test condition;operation) {
statement block }
where:
428 JavaScript
starting condition - - the starting value for the loop; test condition - - if t e s t condition is TRUE the loop will
continue execution; operation - - the operation conducted at the end of the loop.
26.8.2 while ()
The while() statement allows a block of code to be executed while a specified condition is TRUE. It checks the condition at the start of the block; if this is TRUE the block is executed, else it will exit the loop. The syntax is:
while (condition) {
: : statement block
:
}
If the statement block contains a single statement then the braces may be omitted (although it does no harm to keep them).
26.9 Comments
Comments are author notations that explain what a script does. Comments are ignored by the interpreter. JavaScript supports Java-style comments:
�9 Comments on a single line are preceded by a double-slash ( / / ) . �9 Multiline comments can be preceded by / * and followed by */ .
The following example shows two comments"
// This is a single-line comment. /* This is a multiple-line comment. It can be length, and you can put whatever you want here. */
of any
26.10 Functions
JavaScript supports modular design using functions. A function is defined with a JavaScript with the f u n c t i o n reserved word and the code within the function is defined within curly brackets. The standard format is:
function myfunct(paraml, {
s t a t e m e n t s
return(val) }
param2 ...)
where the parameters ( p a r a m l , pa r am2 , and so on) are the values passed
Document objects 429
into the function. Note that the return value (val) from the function is only required when a value is returned from the function.
JavaScript 26.2 gives an example with two functions ( a d d ( ) and mult ()). In this case the values valuel and value2 are passed into the variables a and b within the a d d ( ) function, the result is then sent back from the function into v a l u e 3 .
Table 26.6 Example JavaScript
JavaScript
JavaScript 26.2 <HTML><T ITLE>Example</T ITLE> <BODY BGCOLOR="#FFFFFF">
<SCRIPT> vat valuel, value2, value3, value4 ;
valuel=15; value2=10; value3=add (valuel, value2 ) value4=mult (valuel, value2) document.write ("Added is ",value3) document.write("<P>Multiplied is ",value4)
function add (a, b) { vat c
c=a+b return ( c )
} function mult(a,b) { var c
c=a*b return(c)
} < / SCRIPT>< / FORM></HTML>
Output
26.11 Objects and properties
JavaScript is based on a simple object-oriented paradigm, where objects are a construct with properties that are JavaScript variables. Each object has properties associated with it and can be accessed with the dot notation, such as"
o bj e c tName . prope r tyName
26.12 Document objects
The document object contains information on the currently opened docu- ment. HTML expressions can be displayed with the d o c u m e n t , w r i t e ( ) or d o c u m e n t , w r i g e l n ( ) functions. The standard format is:

430 JavaScript
document, write ( exprA, [,exprB], ... [,exprN])
which displays one or more expressions to the specified window. To display to the current window the d o c u m e n t , w r i t e ( ) is used. If a display to a specified window then the window reference is defined, for example:
mywin=window, open ( "fred. html ") mywin, document, write ("Hello")
is used to output to the mywin window. The document object can also be used to display HTML properties. The
standard HTML format is:
<BODY BACKGROUD="bgndimage '' BGCOLOR="bcolor '' TEXT=" f color '' LINK="ufcolor" ALINK="actcolor '' VLINK="fcolor '' </BODY>
These and other properties can be accessed within a JavaScript with:
document, alinkColor
document.bgColor document, lastModified document, title document, vlinkColor
document, anchors
document, fgColor document, linkColor document. URL
Table 26.7 shows an example.
Table 26.7 Example JavaScript
davaScript JavaScript 26.3
<HTML > <T ITLE> Examp i e </T ITLE> <BODY BGCOLOR =''#FFFFFF''>
<SCRIPT> document, write('ALINK color is ',
document, alinkColor) document, write('<P>BGCOLOR is ',
document, bgColo r ) document, write('<P>URL is ',document.URL) document, write('<P>Title is',
document, title ) < / SCRIPT></HTML>
Output
26.13 Event handling
JavaScript has event handlers which, on a certain event, causes other events to occur. For example, if a user clicks the mouse button on a certain menu option then the event handler can be made to carry-out a particular action, such as adding to numbers together. Table 26.8 outlines some event handlers.

Eventhand/ing 431
Table 26.8 Example event handers
...... Ev.e...n._t - ..................... .D_e..s_c..ri_12{!o.n__ .......................................................... Ex__a_mp!e . . . . . . . . . . . . . . . . . . . . . . . . . . . . . . . . . . . . . . . . . . . . . . . . . c a ~ e d b y
onBlur Blur events occur when the <INPUT TYPE="text" VALUE="" select, text, select or text field on a form N A M E = " u s e r N a m e " o n - textarea loses focus. B l u r = " c h e c k ( t h i s . v a l u e ) ">
When the onBlur event occurs the JavaS- cript code required is executed (in this case the function c h e c k () is called.
onChange The change event occurs when the select or text field loses focus and its value has been modified.
<INPUT TYPE="button" VALUE="Compute" on-
Click="Calc(this.form)">
When the onChange event occurs the required JavaScript code is executed (in this case the function Ca l c () is called).
button, checkbox, radio, link, reset, submit
onClick The click event occurs when an object on a form is clicked.
<INPUT TYPE="button '' VALUE="Calculate" on- Click="go(this.form)">
button, checkbox, radio, link, reset, submit
onFocus The focus event occurs when a field receives input focus by tabbing with the keyboard or clicking with the mouse. Selecting within a field results in a select event and not a focus event.
<INPUT TYPE="textarea '' VALUE=""
NAME="valueField" onFo-
cus="valueCheck()">
select, text, textarea
onLoad The load event occurs when the browser finishes loading a window.
<BODY on-
Load="window.alert("Hello to my excellent page")>
onMouse Over
A mouseover event occurs each time the mouse pointer moves over an object.
Note that a true value must be returned within the event handler.
<A HREF="http'//home.html/"
onMouseOver="window.status = 'Select this to go home'; return true">
Go Home</A>
onSelect A select event occurs when a user selects some of the text within a text or textarea field. The onSelect event handler executes JavaScript code when a select event occurs.
<INPUT TYPE="text '' VALUE =''''
NAME="valueField" onSe-
lect="selectState () ">
onUnload An Unload event occurs <BODY o n U n l o a d = " g o o d b y e () ">
when the browser quits from a window.
432 JavaScript
26.14 Window objects
The window object is the top-level object for documents and can be used to open and close windows.
26.14.1 Window alert
The alert window shows an alert message to the users. Its format is:
window, alert ("Message")
or
alert ("Message") ;
Table 26.9 Example JavaScript
JavaScript JavaScr ip t 26.4
<HTML><HEAD><T ITLE>Example form</TITLE></HEAD>
<BODY BGCOLOR="#ffffff">
< FORM> Enter name<INPUT TYPE="text" NAME="myname"
onBlur="testname (myname.value) "> </FORM>
<SCRIPT> function testname(name) {
if (name!="fred") alert ("You are not fred") ; } < /SCRI PT >< / HTML>
Output
26.14.2 Opening and closing windows
Windows are opened with window.open ()
dow. c l o s e () . Examples are: and closed with w i n -
fredwin=window, open ("fred. html") ;
fredwin, close (fredwin) ;
or to open a window it is possible to simply use o p e n () and to close the current window the c 1 o s e ( ) function is used. The standard format is"
[win Vat =][window].open("url", "winName", ["features"])
where
Window objects 433
win Var is the name of a new window which can be used to refer to a given window. winName is the window name given to the window; f ea tures is a comma-separated list with any of the following:
toolbar[=yeslno] status[=yeslno] resizable[=yeslno]
location[=yeslno] menubar[=yeslno] width=pixels
dire ctori es [=yes [no ] scrollbars[=yes[no] he igh t~ ixe l s
26.14.3 Window confirm
The window confirm is used to display a confirm dialogue box with a specified message and the OK and Cancel buttons. If the user selects the OK button then the function returns a TRUE, else it returns a FALSE. Table 26.10 gives an example of the confirm window. In this case when the Exit button is selected then the function ConfirmExit () is called. In this function the user is asked to confirm the exit with the confirm window. If the user selects OK then the window is closed (if it is the only window open then the browser quits).
Table 26.10 Example JavaScript with confirm window
JavaS cr ip t .Output ................... <HTML><T ITLE>Example </T ITLE> <BODY BGCOLOR="# FFFFFF">
<form name="Exit Form"> <INPUT TYPE="button" VALUE="Exit" on- Click="ConfirmExit () "> < / FORM>
<SCRIPT> function ConfirmExit() {
if (confirm("Do you want to exit")) {
prompt ("Enter your password") }
} < / SCRIPT></HTML>
26.14.4 Window prompt
The window prompt displays a prompt dialog box which contains a message and an input field. Its standard format is"
prompt ("Message") ;

434 JavaScript
26.15 Object manipulation statements and operators
JavaScript has several methods in which objects can be manipulated. These include" the new operator, the t h i s keyword, the f o r . . . i n statement, and the wi t h statement.
26.15.1 this keyword
The this keyword is used to refer to the current object. The general format is"
t h i s [. propertyName ]
JavaScript 26.5 gives an example of the this keyword. In this case this is used to pass the property values of the input form. This is then passed to the function c h e c k v a l () when the o n B l u r event occurs.
JavaScript 26.5 <HTML><T ITLE>Example</T ITLE> <BODY BGCOLOR="#FFFFFF">
<FORM> Enter a value<INPUT TYPE = "text" NAME = "inputvalue" onBlur="checkval(this, 0, i0)">
<SCRIPT> function checkval(val, minval, maxval) {
if ((val.value < minval) I I (val.value > maxval)) alert("Invalid value (0-i0)")
)
< /SCRI PT >< /FORM> </HTML>
26.15.2 new operator
The new operator is used to defme a new user-defined object type or of one of the pre-defmed object types, such as array, Boolean, date, function and math. JavaScript 26.6 gives an example which creates an array object with 6 elements and then assigns strings to each of the array. Note that in Java the first element of the array is indexed as 0.
JavaScript 26.6 <HTHL><HEAD><TITLE>Java Example</TITLE></HEAD> <BODY BGCOLOR="#ffffff"> <SCRIPT language="javascript">
no of networks=6; m
Networks = new Array(no of networks); D
Networks[0]="Ethernet"; Networks[l]="Token Ring" Networks [2] ="FDDI" ; Networks [3] ="ISDN"
Object manipulation statements and operators 435
Networks [4 ] ="RS-232"; Networks [5] ="ATM"
for (i=0;i<no of networks;i++) m
{ document.writeln("Network type "+Networks[i]) ; document, writeln ( "<P>" ) ;
}
</SCRIPT></BODY></HTML>
Network type Ethernet Network type Token Ring Network type FDDI Network type ISDN Network type RS-232 Network type ATM
Typically the new operator is used to create new data objects. For example:
today = new Date() Xmasday = new Date ( "December 25, 1997 00"00-00") Xmasday = new Date (97,12,25)
26.15.3 for...in
The f or...in statement is used to iterate a variable through all its proper- ties. In general its format is"
for {
(variable i n object)
statements
26.15.4 with
The with statement defines a specified object for a set of statements. A with statement looks as follows:
with (object) {
s t a t e m e n t s }
For example JavaScript 26.7 contains calls to the Math object for the PI property and cos and sin methods. JavaScript 26.8 then uses the with state- ment to define the Match object is the default object.
JavaScript 26.7 <HTML><T I TLE>Example</T ITLE> <BODY BGCOLOR=" # FFFFFF" > <SCRIPT> vat area, x, y, radius

436 JavaScript
radius=20 area=Math. PI*radius*radius x=radius*Math, cos (Math. PI/4 ) y=radius*Math, sin (Math. PI/4) document .write ("Area is ",area) document.write("<P>x is ",x, "<P>y is ",y)
< / SCRIPT>< / FORM></HTML>
JavaScript 26.8 <HTML><T ITLE>Example</T ITLE> <BODY BGCOLOR="#FFFFFF">
<SCRIPT> var area, x, y, radius
radius=10 with (Math) {
area=PI*radius*radius x=radius*cos (PI/4) y=radius*sin (PI/4) document, write ( "Area is ",area) document.write("<P>x is ",x, "<P>y is ",y)
} < / SCRIPT >< / FORM>< /HTML>
26.16 Exercises
26.16.1 Explain how Java differs from JavaScript.
26.16.2 Explain the main advantages of using Java rather than a high-level language, such as C++ or Pascal.
26.16.3 Implement the JavaScripts in the text and test their operation.
26.16.4 Write a JavaScript in which the user enters a value and the script calculates the square of that value.
26.16.5 Write a JavaScript in which the user initially enters their name. The script should then test the entered name and if it is not 'FRED', 'BERT' or 'FREDDY' then the browser exits.
Java (Introduction)
27.1 Introduction
Java has the great advantage over conventional software languages in that it produces code which is computer hardware independent. This is because the compiled code (called bytecodes) is interpreted by the WWW browser. Un- fortunately this leads to slower execution, but as much of the time is spent in graphical user interface programs, to update the graphics, then the overhead is, as far as the user is concerned, not a great one.
The other advantages that Java has over conventional software languages include:
* It is a more dynamic language than C/C++ and Pascal, and was designed to adapt to an evolving environment. It is extremely easy to add new methods and extra libraries without affecting existing applets. It is also useful in Intemet applications as it supports most of the standard image audio and video formats.
�9 It has networking facilities built into the language (support for TCP/IP sockets, URLs, IP addresses and datagrams).
�9 While Java is based on C and C++ it avoids some of the difficult areas of C/C++ code (such as pointers and parameter passing).
�9 It supports client/server applications where the Java applets run on the server and the client receives the updated graphics information. In the most extreme case the client can simply be a graphics terminal which runs Java applets over a network. The small 'black-box' networked computer is one of the founding principles of Java, and it is hoped in the future that small Java-based computers could replace the complex PC/workstation for general purpose applications, like accessing the Intemet or playing network games. This 'black-box' computer concept is illustrated in Figure 27.1.
Most existing Web browsers are enabled for Java applets (such as Intemet Explorer 3.0 and Netscape 2.0 and later versions). Figure 27.2 shows how Java applets are created. First the source code is produced with an editor, next a Java compiler compiles the Java source code into bytecode (normally

438 Java (Introduction)
appending the file name with . c 1 a s s). An HTML page is then constructed which has the reference to the applet. After this a Java-enabled browser or applet viewer can then be used to run the applet.
WVWV server
(with Java applets)
Java source code
Networked black-box
�9 "~ computer ~" v [ (Br~
with Java)
Figure 27.1 Intemet accessing
1.java .._[
-I
PC/Workstation with VWWV browser for Intemet access and programs run locally
PCNVorkstation with VWWV browser for Intemet access and running some Java applets, but most applications are run locally
The future ?
Java compiler (javac)
1 .class.._[ Browser
~ or Applet Viewer
HTML page
1 .html
Figure 27.2 Constructing Java applets
The Java Development Kit (JDK) is available, free, from Sun Microsystems from the WWW site h t t p - / / j a v a . s u n . c o m . This can be used to compile Java applets and stand alone programs. There are versions for Win- dows NT/95, Mac or UNIX-based systems with many sample applets.
Table 27.1 shows the main files used in the PC version. Figure 27.3 shows the directory structure of the JDK tools. The Java compiler, Java in- terpreter and applet viewer programs are stored in the bin directory. On the PC, this directory is normally set up in the PATH directory, so that the Java compiler can be called while the user is in another directory. The following is a typical setup (assuming that the home directory is C: \ JAVA):
PATH=C �9 \WINDOWS ; C" \WINDOWS\COMMAND; C : \JAVA\BIN
CLASSPATH=C �9 \JAVA\LIB; . ; C" \JAVA
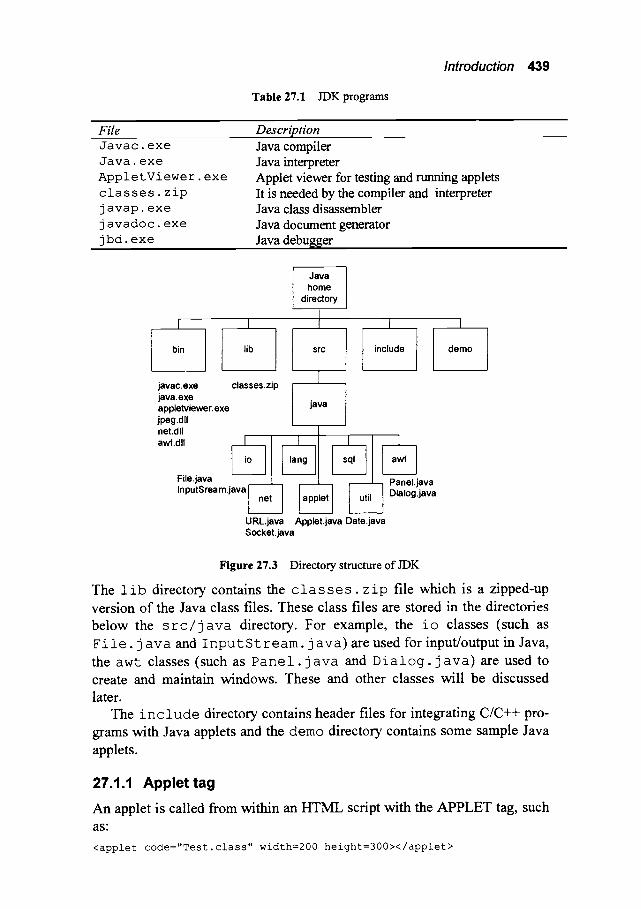
J ,,,,,t_J,
F i l e Javac eXe ......... Java. exe
AppletViewer. exe
classes, zip
javap, exe
j avadoc, exe
jbd. exe . . . . . . . . . . . . . . . . . . . . . . . . . . . . . . . . . . . . . . . . . . . . . . .
bin lib
Introduction 439
Table 27.1 JDK programs
D e s c r i p t i o n . . . . . . . . . . . . . . . . . . . . . . . . . . . . . . . . . . . . . . . . . . . . . .
Java compiler Java interpreter Applet viewer for testing and running applets It is needed by the compiler and interpreter Java class disassembler Java document generator Java debugger ....................................
Java home
directory
I I I
s r c include demo
javac.exe java.exe appletviewer.exe jpeg.dll net.dll awt.dll
File.java InputSream.java
classes.zip
R e
java
I lang
applet
! sql
util
! awl
Panel.java Dialog.java
URL.java Applet.java Date.java Socket.java
Figure 27.3 Directory structure of JDK
The lib directory contains the classes, zip file which is a zipped-up version of the Java class files. These class files are stored in the directories below the s r c / j a v a directory. For example, the i o classes (such as F i l e . j a v a and I n p u t S t r e a m . j a v a ) are used for input/output in Java, the awt classes (such as P a n e l . j a v a and D i a l o g . j a v a ) are used to create and maintain windows. These and other classes will be discussed later.
The i n c l u d e directory contains header files for integrating C/C++ pro- grams with Java applets and the demo directory contains some sample Java applets.
27.1 .1 A p p l e t t ag
An applet is called from within an HTML script with the APPLET tag, such as"
<applet code="Test.class '' width=200 height=300></applet>

440 Java (introduction)
which loads an applet called Test.class and sets the applet size to 200 pixels wide and 300 pixels high. Table 27.2 discusses some optional parameters.
27.1.2 Applet viewer
A useful part of the JDK tools is an applet viewer which is used to test ap- plets before they are run within the browse. The applet viewer on the PC version is AppletViewer.exe and the supplied argument is the HTML file that contains the applet tag(s). It then runs all the associated applets in sepa- rate windows.
Table 27.2 Other applet HTML parameters
App!e.t parameter s .............................. Description CODEBASE=codebaseURL Specifies the directory (codebaseURL)that contains -
the applet's code.
CO DE =appletFile Specifies the name of the file (appletFile) of the com- piled applet.
AL T=alternate Text Specifies the altemative text that is displayed if the browser cannot nm the Java applet.
NAME =appletlnstanceName Specifies a name for the applet instance (appletlnstanceName). This makes it possible for ap- plets on the same page to find each other.
W I DTH= pixels HEIGHT=pixels
Specifies the initial width and height (in pixels) of the applet.
ALIGN=alignment Specifies the alignment of the applet. Possible values are: left, right, top, texttop, middle, absmiddle, base- line, bottom and absbottom.
VSPACE=pixels HSPACE=pixels
Specifies the number ofpixels above and below the applet (VSPACE) and on each side of the applet (HSPACE).
27.2 Creating an applet
Java applet 27.1 shows a simple Java applet which displays two lines of text and HTML script 27.1 shows how the applet integrates into an HTML script.
First the Java applet (j 1. j a v a ) is created. In this case the e d i t pro- gram is used. The directory listing below shows that the files created are j 1. j a v a and j 1. h t m l (Note that Windows NT/95 displays the 8.3 file- name format on the left hand side of the directory listing and the long filename on the right hand side).
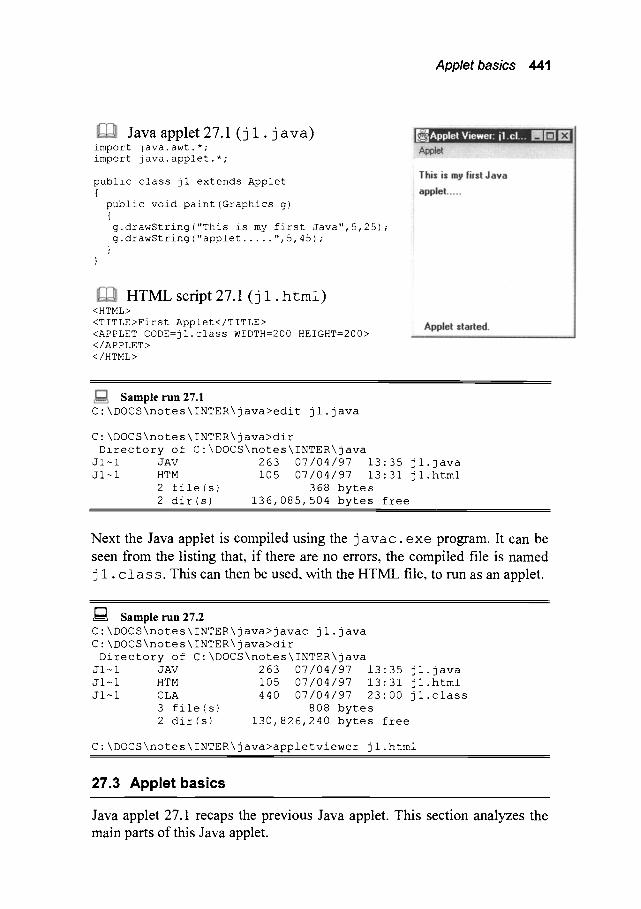
Appletbasics 441
Java applet 27.1 ( j 1 . j ava) import java.awt.*; import java.applet.*;
public class j l extends Applet { public void paint (Graphics g) { g.drawString("This is my first Java", 5,25) ; g.drawString ("applet ..... ", 5, 45) ; }
}
HTML script 27.1 ( j 1. h tml) <HTML>
<TITLE>First Applet</TITLE> <APPLET CODE=jl.class WIDTH=200 HEIGHT=200> </APPLET> </HTML>
Sample run 27.1 C'\DOCS\notes\INTER\java>edit jl.java
C: \ DOCS \notes \ INTER\ j ava>dir Directory of C:\DOCS\notes\INTER\java
Jl~l JAV 263 07/04/97 13:35 jl. java Jl~l HTM 105 07/04/97 13:31 jl.html
2 file(sl 368 bytes 2 dir(s) 136,085,504 bytes free
Next the Java applet is compiled using the j a v a c . e x e program. It can be seen from the listing that, if there are no errors, the compiled file is named j 1. c 1 a s s. This can then be used, with the HTML file, to nan as an applet.
Sample ru- 27.2 C:\DOCS\notes\INTER\java>javac jl.java C:\DOCS\notes\INTER\java>dir Directory of C:\DOCS\notes\INTER\java
Jl~l JAV 263 07/04/97 13:35 jl.java Jl~l HTM 105 07/04/97 13:31 j 1 .html Jl~l CLA 440 07/04/97 23:00 jl.class
3 file(s) 808 bytes 2 dir(s) 130,826,240 bytes free
C-\DOCS\notes\INTER\java>appletviewer jl.html
27.3 Applet basics
Java applet 27.1 recaps the previous Java applet. This section analyzes the main parts of this Java applet.
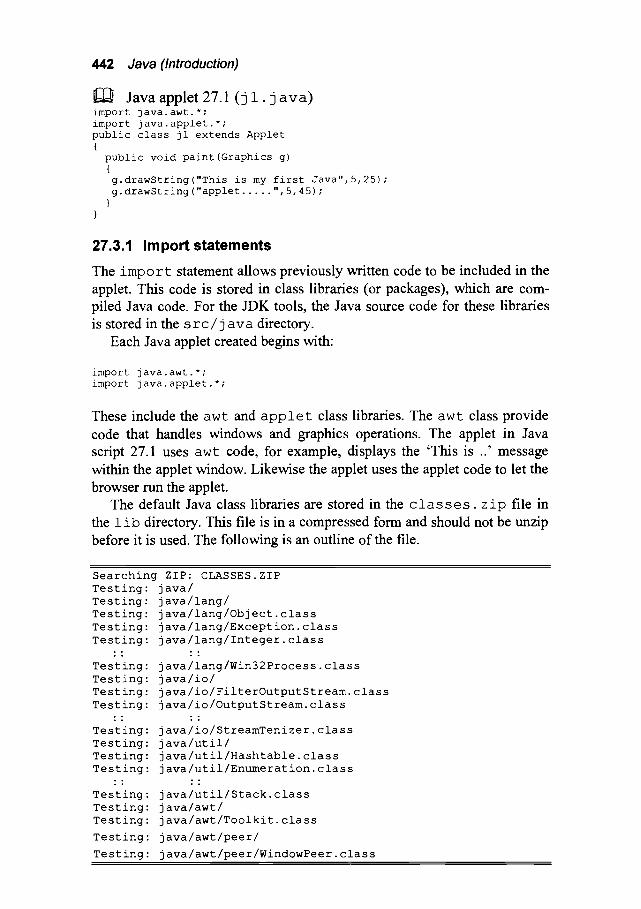
442 Java (Introduction)
Java applet 27.1 (j 1 . j ava) import java.awt.*; import java.applet.*; public class j l extends Applet { public void paint (Graphics g) { g.drawString("This is my first Java",5,25); g. drawString ("applet ..... ", 5, 45) ; }
}
27.3.1 Import statements
The i m p o r t statement allows previously written code to be included in the applet. This code is stored in class libraries (or packages), which are com- piled Java code. For the JDK tools, the Java source code for these libraries is stored in the s r c / j a va directory.
Each Java applet created begins with:
import java.awt.*; import java.applet.*;
These include the awt and applet class libraries. The awt class provide code that handles windows and graphics operations. The applet in Java script 27.1 uses awt code, for example, displays the 'This is ..' message within the applet window. Likewise the applet uses the applet code to let the browser run the applet.
The default Java class libraries are stored in the c l a s s e s , z i p file in the 1 i b directory. This file is in a compressed form and should not be unzip before it is used. The following is an outline of the file.
Searching ZIP: CLASSES.ZIP Testing: java/ Testing: java/lang/ Testing: java/lang/Object.class Testing: java/lang/Exception.class Testing: java/lang/Integer.class
:: :: Testing: java/lang/Win32Process.class Testing: java/io/ Testing: java/io/FilterOutputStream.class Testing: java/io/OutputStream.class
:: :: Testing: java/io/StreamTenizer.class Testing: java/util/ Testing: java/util/Hashtable.class Testing: java/util/Enumeration.class
:: :: Testing: java/util/Stack.class Testing: java/awt/ Testing: java/awt/Toolkit.class
Testing: java/awt/peer/
Testing: java/awt/peer/WindowPeer.class
Applet basics 443
Testing" java2awt/peer/DialogPeer.class Testing: java/awt/Image.class Testing: java/awt/MenuItem, class Testing: java/awt/MenuComponent.class Testing: java/awt/image/
:: ::
:: ::
Testing: java/awt/ImageMediaEntry.class Testing: java/awt/AWTException.class Testing: java/net/ Testing: java/net/URL.class Testing: java/net/URLStreamHandlerFactory.class
:: ::
Testing: 3ava/net/URLEncoder.class Testing: 3ava/applet/ Testlng: 3ava/applet/Applet.class Testing: 3ava/applet/AppletContext.class Testlng: ]ava/applet/AudioClip.class Testlng: 3ava/applet/AppletStub.class
Table 27.3 lists the main class libraries and some sample libraries.
Table 27.3 Class libraries
C l a s s l i b r a r i e s D e s c r i p t i o n . . . . , ...... '" ....
j a v a . l a n g . * Java language
, , , , , , , , , , , , , , , , . . . . . . . . . . . . . . . . . . . . . . .
E x a m p l e l i b r a r i e s . . . . . . .
java. lang. Class java. lang. Number java. lang. Process java. lang. String
j a v a . i o . * I/O routines java.io. InputStream java.io. OutputStream
j a v a . u t i 1 . * Utilities java.util. BitSet java.util. Dictionary
java. awt. * Windows, menus and graphics java.awt. Point java.awt. Polygon java.awt.MenuComponent java.awt.MenuBar java.awt.MenuItem
java. net. *
java. applet. *
Networking (such as sockets, java.net. ServerSocket URL support, tip, telnet, SMTP java.net. Socket and HTTP). java. net. Socket Impl
Code required to run an applet, java. applet .AppletContext java. applet.AppletStub java. applet. AudioClip
It can be seen that upgrading the Java compiler is simple, as all that is required is to replace the class libraries with new ones. For example, if the basic language is upgraded then j a v a . l a n g . * files is simply replaced with a new version. The user can also easily add new class libraries to the standard ones. A complete listing of the classes is given in Appendix A.

444 Java (Introduction)
27.3.2 Applet class
The start of the applet code is defined in the form:
public class jl extends Applet
which informs the Java compiler to create an applet named j 1 that extends the existing Applet class. The pub l i c keyword at the start of the statement allows the Java browser to run the applet, while if it is omitted the browser cannot access your applet.
The c l a s s keyword is used to creating a class object named j 1 that extends the applet class. After this the applet is defined between the left and right braces (grouping symbols).
27.3.3 Applet functions
Functions allow Java applets to be split into smaller sub-tasks called func- tions. These functions have the advantage that:
�9 They allow code to be reused. �9 They allow for top-level design. �9 They make applet debugging easier as each function can be tested in
isolation to the rest of the applet.
A function has the pub 1 i c keyword, followed by the return value (if any) and the name of the function. After this the parameters passed to the function are defined within rounded brackets. Recapping from the previous example:
public void paint (Graphics g) {
g.drawString("This is my first Java", 5,25) ; g.drawString("applet ..... ",5,45) ;
}
This function has the public keyword which allows any user to execute the function. The v o i d type defmes that there is nothing returned from this function and the name of the function is p a i n t (). The parameter passed into the function is g which has the data type of G r a p h i c s . Within the p a i n t () function the d r a w s t r i n g () function is called. This function is defined in j a v a . a w t . G r a p h i c s class library (this library has been in- cluded with the i m p o r t j a v a . a w t . * statement. The definition for this function is:
public abstract void drawString(String str, int x, int y)
which draws a string of characters using the current font and colour. The
Stand-alone programs 445
x,y position is the starting point of the baseline of the string (s t r). It should be noted that Java is case sensitive and the names given must be
refered to in the case that they are defined as.
27.4 Stand-alone programs
A Java program can also be run as a stand-alone program. This allows the Java program to be run without a browser and is normally used when testing a Java applet. The method of output to the screen is"
System.out.println("message");
which prims a message (me s s age) to the display. This type of debugging is messy as these statements need to be manually inserted in the program. It is likely that later versions of the JDK toolkit will contain a rim-time debugger which will allow developers to view the execution of the program.
To run a stand-alone program the j a v a . e x e program is used and the user adds output statements with the S y s t em. o u t . p r i n t 1 n ( ) function. Note that there is no output from applet with the S y s - t e m . out. println ( ) function.
Java stand-alone program 27.1 gives a simple example of a stand-alone program. The public static void main (Strings [ ] args)
defines the main function. Sample run 27.3 shows how the Java program is created (with edit) and then compiler (with javac.exe), and then finally run (with j a v a . e x e).
~ ] Java stand-alone program 27.1 ( j 2 . j a v a ) public class j2 {
public static void main (String[] args) { int I ;
i=10;
System.out.println("This is an example of the "); System.out.println("output from the standalone"); System.out.println("program"); System.out.println("The value of i is " + i);
J~ Sample run 27.3 C:\DOCS\notes\INTER\java>edit j2.java C:\DOCS\notes\INTER\java>javac j2.java C:\DOCSknotes\INTER\java>java j2 This is an example of the output from the standalone program The value of i is i0

446 Java (Introduction)
27.5 Java reserved words
Like any programming language, Java has various reserved words which cannot be used as a variable name. These are given next:
abstract boolean break byte case cast catch char class cons continue default do double else extends final finally float for future generic goto if implements import inner instanceof in interface long native new null operator outer package private protected public rest return short static super switch synchronized this throw throws transient try var unsigned virtual void volatile while
27.6 Applet variables
Variables are used to stored numeric values and characters. In Java all vari- ables must be declared with their data type before they can be used. The Java data types are similar to C/C++ types, and are stated in Table 27.4.
27.6.1 Converting numeric data types
Java is a strongly typed language and various operations follow standard conversions for data types. If the developer wants to convert from one data type to another (such as from an integer to a double) then the data type con- version is used where the converted data type is defined within rounded brackets. For example:
double y, z; int x;
x=(int) (y+z) ;
converts the addition of y and z to an integer.
27.6.2 The paint() object
The paint () object is the object that is called whenever the applet is re- drawn. It will thus be called whenever the applet is run and then it is called whenever the applet is redisplayed.
Table 27.4 Java data types and their range
T ........ e . . . . . . . . . . . . . . . . . . . . . . . . . S t o r a e .... t e s . . . . Range _ ~ : .................................................................................. ~_~_ @~vt_,_~ . . . . . . . . . . . . . . . . . . . . . . . . . . . . . .
b o o l e a n True or False b y t e 1 -128 to 127 c h a r 2 Alphabetic characters i n t 4 -2,147,483,648 to 2,147,483,647 s h o r t 2 -32,768 to 32,767 l o n g 4 -2,147,483,648 to 2,147,483,647 float 4 +3.4x10 -38 to +3.4x10 38
double 8 +l .7x10 -3~ to +l.7x103~ . . . . . . . . . . . . . . . . . . . . . . . . . . , . . . . , , . . . . . . . . . . . . , ~ : ~ . . . . < . . . . . . . . . . . . . . . . . . . . . . . . . . . . . . ~ : ~ : : : ~ : ~ : : . . . . . . . . : : : : . . . . . . . . . . . . .

27.7 Java operators
Mathematical operations 447
The table below recaps the Java operators from the previous chapter.
HIGHEST PR/ORITY () c] .
~ ++ --
/ % + -
<< >> >>>
< > <= >=
~ |~
&
A
I &&
II = +=
LOWEST PRIORITY
primary tmar~
multiply additive
shift relation equality
bitwise
l o g i c a l
a s s i g n m e n t
27.8 Mathematical operations
Java has a basic set of mathematics functions which are defined in the j a v a . l a n g . M a t h class library. Table 27.5 outlines these functions. An example of the functions in this library is a b s ( ) which can be used to re- turn the absolute value of either a double, an int or a long value. Java automatically picks the required format and the return data type will be of type of the value to be operated on.
As the fimctions are part of the Math class they are preceded with the M a t h . class method. For example:
val2=Math.sqrt (vall);
val3=Math, abs (val2) ;
z=Math.min (x, y) ;
Java stand-alone program 27.2 shows a few examples of mathematical op- erations and Sample run 27.4 shows a sample compilation and run session.
Java has also two pre-defined mathematical constants. These are"
�9 p i is equivalent to 3.14159265358979323846.
�9 E is equivalent to 2.7182818284590452354.

448 Java (Introduction)
Table 27.5 Functions defined in java.lang.Math
Function double abs(double a)
float abs(float a)
int abs (int a)
long abs(long a)
double acos(double a)
double asin(double a)
double atan(double a)
double atan2(double a, double b)
double ceil(double a)
double cos(double a)
double exp(double a)
double floor(double a)
double IEEEremainder(double fl, double f2 )
double log (double a)
double max(double a, double b)
double max(float a, float b)
int max(int a, int b)
max(long a, long b)
double min(double a, double b)
float min(float a, float b)
int min(int a, int b)
long min(long a, long b)
double pow(double a, double b)
double random()
double rint(double b)
long round(double a)
int round(float a)
double sin(double a)
double sqrt(double a)
double tan (double a) , ,, , , ,
Description Returns the absolute double Value of a. Returns the absolute float value of a. Returns the absolute integer value of a. Returns the absolute long value of a. Returns the arc cosine of a, in the range of 0.0 through Ps Returns the arc sine of a, in the range of Pi/2 through Pi/2. Returns the arc tangent of a, in the range o f -P i /2 through Pi/2. Converts rectangular coordinates (a, b) to polar (r, theta). Returns the 'ceiling' or smallest whole number greater than or equal to a. Returns the trigonometric cosine of an angle. Returns the exponential number e(2.718...) raised to the power of a. Returns the 'floor' or largest whole number less than or equal to a. Returns the remainder of fl divided by f2 as defined by IEEE 754. Returns the natural logarithm (base e) of a. Takes two double values, a and b, and returns the greater number of the two. Takes two float values, a and b, and returns the greater number of the two. Takes two int values, a and b, and returns the greater number of the two. Takes two long values, a and b, and returns the greater number of the two. Takes two double values, a and b, and returns the smallest number of the two. Takes two float values, a and b, and returns the smallest number of the two. Takes two integer values, a and b, and returns the smallest number of the two. Takes two long values, a and b, and returns the smallest number of the two. Returns the number a raised to the power of b. Generates a random number between 0.0 and 1.0. Converts a double value into an integral value in double format. Rounds off a double value by first adding 0.5 to it and then returning the largest integer that is less than or equal to this new value. Rounds off a float value by first adding 0.5 to it and then returning the largest integer that is less than or equal to this new value. Returns the trigonometric sine of an angle. Returns the square root of a. Returns the trigonometric tangent of an an~le. .....

Java stand-alone program 27.2 ( j 3 . j ava) import j ava . l ang .Math ; public class j2 {
public static void main(String[] args) { double x,y,z; int i ;
i=10; y=Math, log (i0.0) ; x=Math, pow (3.0, 4.0) ; z=Math.random() ; // random number from 0 to 1 System. out.println("Value of i is " + i) ; System. out.println("Value of log(10) is " + y) ; System.out.println("Value of 3^4 is " + x); System.out.println("A random number is " + z); System.out.println("Square root of 2 is " +
Math.sqrt(2)) ;
Loops 449
Sample run 27.4 C:\DOCS\notes\INTER\java>javac j2.java
C:\DOCS\notes\INTER\java>java j2
Value of i is I0
Value of log(10) is 2.30259
Value of 3 ̂ 4 is 81
A random number is 0.0810851
Square root of 2 is 1.41421
27.9 Loops
27.9.1 f o r ()
As with C/C++ and JavaScript the standard format for a f o r () loop is:
for (starting condition; test condition;operation) {
statement block
where:
starting condition - - the starting value for the loop; t e s t c o n d i t i o n - if t e s t c o n d i t i o n is TRUE the loop will
continue execution; operation - - the operation conducted at the end of the loop.
Java applet 27.2 shows how a f o r () loop can be used to display the square and cube of the values from 0 to 9. Notice that the final value of i within the f o r () loop is 9 because the end condition is i < 10 (while i is less than 10).
450 Java (Introduction)
Q Java applet 27.2 ( j 4 . j a v a ) import java.awt.*; import java.applet.*;
public class j4 extends Applet {
public void paint (Graphics g) { int i;
g.drawString("Value Square Cube", 5,10) ; for (i=0;i<10;i++) {
g.drawString( .... + i,5,20+i0"i) ; g.drawString( .... + i*i ,45,20+i0"i) ; g.drawString( .... + i*i*i,85,20+I0"i) ;
}
HTML script 27.2 ( j 4 . html) <HTML> <TITLE>First Applet</TITLE> <APPLET CODE=j4.class WIDTH=200 HEIGHT=200> </APPLET> </HTML>
27.9.2 while ()
The while() statement allows a block of code to be executed while a specified condition is TRUE. It checks the condition at the start of the block; if this is TRUE the block is executed, else it will exit the loop. The syntax is"
while (condition) {
: : statement block :
}
If the statement block contains a single statement then the braces may be omitted (although it does no harm to keep them).
27.10 Conditional statements
Conditional statements allow a program to make decisions on the route through a program.
27.10.1 if... else
As with C/C++ and JavaScript the standard format for a i f () descision is:
if (expression) {
statement block }
Conditionalstatements 451
The following is an example format with an e i s e extension.
if (expression) {
statement block1 } else {
statement block2 }
Java applet 27.3 uses a f o r ( ) loop and the i f ( ) statement to test if a value is less than, equal to or greater than 5. The loop is used to repeat the test 10 times.
The r a n d o m () function is used to generate a value between 0 and 1, the returned value is then multiplied by 10 so as to convert to into a value be- tween 0 and 10. Then it is converted to an integer using the data type modi- fier ( i n t ). The i f ( ) statement is then used to test the value.
Java applet 27.3 (j 5 . j a v a ) import j a v a . a w t . * ; import j a v a . a p p l e t . * ; import j ava . l ang .Math ;
public class j5 extends Applet {
public void paint(Graphics g) {
int i,x; double val; for (i=0;i<10;i++) {
val=Math.random();
x=(int) (val*10.0); // Convert value between 0 and i0
if (x<5) g.drawString("Less than 5", 5,20+i*i0) ;
else if (x==5) g.drawString("Equal to 5", 5,20+i*i0) ;
else g.drawString("Greater than 5",5,20+i*i0) ;
} }
HTML script 27.3 ( j 5 . html) <HTML> <TITLE>First Applet</TITLE>
<APPLET CODE=j5.class WIDTH=200 HEIGHT=200>
</APPLET> </HTML>

452 Java (Introduction)
27.11 Exercises
27.11.1 Write a Java applet which displays the following table of powers.
Value Square Cube Fourth power 1 1 1 1 2 4 8 16 3 9 27 81 4 16 64 256 5 25 125 625 6 36 216 1296
27.11.2 Write a Java applet which displays the following table of square root values from 1 to 15.
Value Squareroot 1 1 2 1.414214 3 1.732051 4 2 5 2.236068 6 2.44949 7 2.645751 8 2.828427 9 3 10 3.162278 11 3.316625 12 3.464102 13 3.605551 14 3.741657 15 3.872983
27.11.3 Write a Java applet which display 20 random numbers from between 0 and 20.
2 7 . 1 1 . 4 Write a Java applet that simulates the rolling of two dice. A sam- ple output is:
Dice 1" 3 Dice 2" 5 Total: 8

Java (Extended functions)
28.1 Introduction
Chapter 27 discussed the Java programming language. This chapter investi- gates event-driven programs. The main events are:
�9 Initialization and exit functions (init ( ) , start ( ) , stop () and destroy() ).
�9 Repainting and resizing ( p a i n t ( ) ) .
�9 Mouse events ( m o u s e U p ( ) , m o u s e D o w n ( ) and m o u s e D r a g ( ) ).
�9 Keyboard events ( k e y U p () and k e y D o w n ()) .
28.2 Initialization and exit functions
Java has various reserved functions which are called when various event occur. Table 28.1 shows typical initialization functions and their events, and Figure 28.1 illustrates how they are called.
Table 28.1 Java initialization and exit functions
F u n c t i o n .............................. D e s c r i p t i o n
.... p u b l i c v o i d i n i t () This function is calledeaChtime the applet is started. It .......... is typically used to add user-interface components.
public void start() This function is called after the i n i t ( ) function is called. It is also called whenever the user returns to the page containing the applet and thus can be called many times as opposed to the i n i t ( ) function which will only be called when the applet is first started. Thus, code which is to be executed only once is normally put in the i n i t ( ) function, and code which must be exe- cuted every time the applet is accessed should be in- serted into the s t a r t () function.
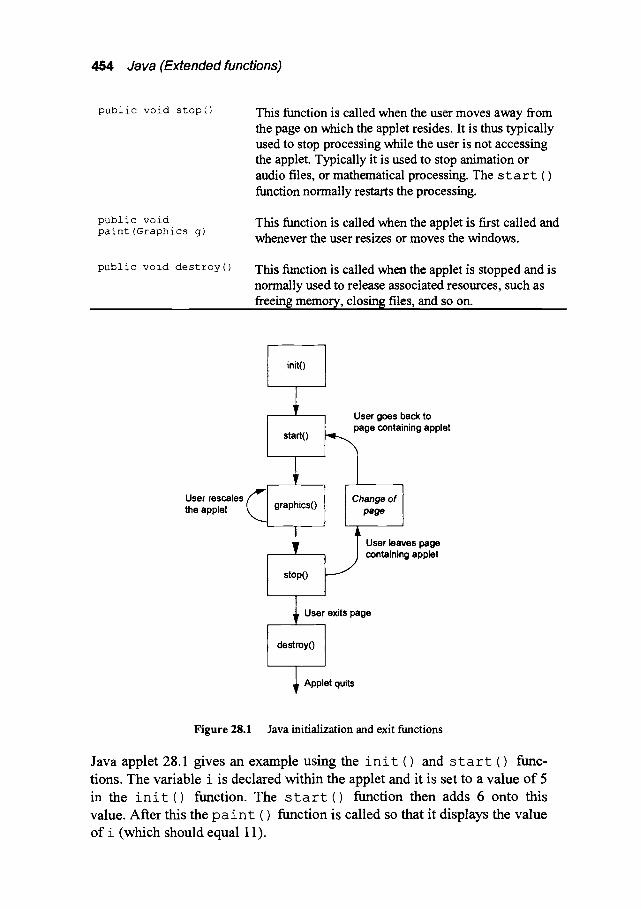
454 Java (Extended functions)
public void stop()
public void paint(Graphics g)
public void destroy()
This function is called when the user moves away from the page on which the applet resides. It is thus typically used to stop processing while the user is not accessing the applet. Typically it is used to stop animation or audio files, or mathematical processing. The s t a r t () function normally restarts the processing.
This function is called when the applet is first called and whenever the user resizes or moves the windows.
This function is called when the applet is stopped and is normally used to release associated resources, such as freeing memor),, dosing files, and soon. .........
initO
start()
i _ User rescales the applet graphics()
User goes back to page containing applet
Change of page
I User leaves page containing applet
stop()
~User e~ts page
destroy()
I Applet quits
Figure 28.1 Java initialization and exit functions
Java applet 28.1 gives an example using the i n i t () and s t a r t () func- tions. The variable i is declared within the applet and it is set to a value of 5 in the i n i t ( ) function. The s t a r t ( ) function then adds 6 onto this value. After this the p a i n t ( ) function is called so that it displays the value of i (which should equal 11).

Mouse events 455
Java applet 28.1 (j 6. java) import java.awt.*; import java.applet.*;
public class j6 extends Applet { int i;
public void init() {
i=5; } public void start() {
i=i+6; } public void paint(Graphics g) { g.drawString("The value of i is " + i,5,25); }
H T M L script 28.1 ( j 6 . h t m l ) <HTML> <T ITLE>Appl et </TITLE> <APPLET CODE=j6.class WIDTH=200 HEIGHT=200> </APPLET> < / HTML>
28.3 Mouse events
Most Java applets require some user interaction, normally with the mouse or from the keyboard. A mouse operation causes mouse events. The three basic events which are supported in Java are"
�9 mouseUp().
�9 mouse Down ().
�9 mouseDrag().
Java applet 28.2 uses the three mouse events to display the current mouse cursor. Each of the functions must return a true value to identify that the event has been handled successfully (the return type is of data type Boolean thus the return could only be a true or a false). In the example applet, on moving the mouse cursor with the left mouse key pressed down the mouse- D r a g ( ) function is automaticitlly called. The x and y co-ordinate of the cursor is stored in the x and y variable when the event occurs. This is used in the functions to build a message string (in the case of the drag event the string name is MouseDragMsg).
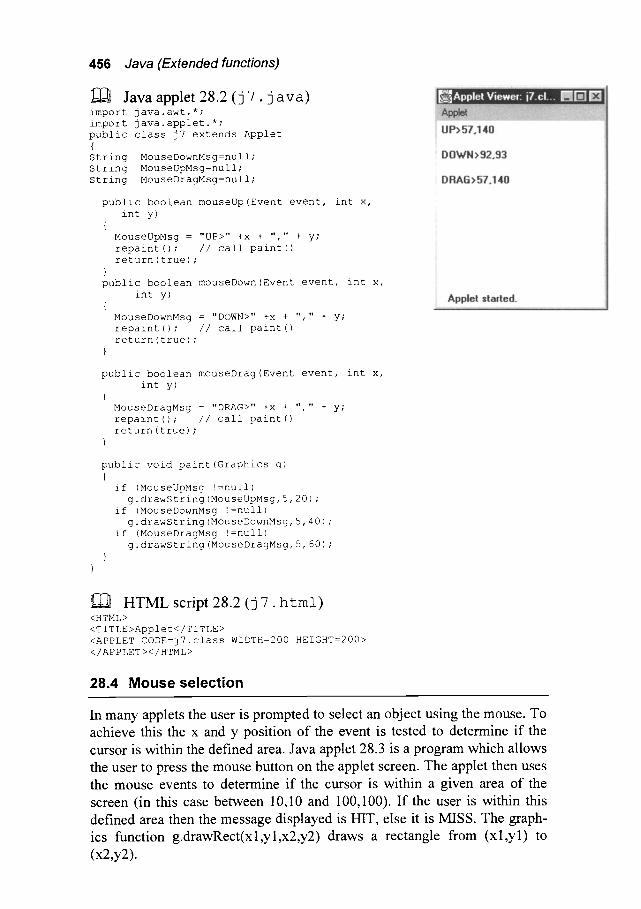
456 Java (Extended functions)
Java applet 28.2 ( j 7 . j a v a ) import java.awt.*; import java.applet.*; public class j7 extends Applet { String MouseDownMsg=null; Strlng MouseUpMsg=null; String MouseDragMsg=null;
public boolean mouseUp(Event event, int x, int y )
{ MouseUpMsg : "UP>" +x + "," + y; repaint () ; // call paint () return (true) ;
} public boolean mouseDown(Event event, int x,
int y ) {
MouseDownMsg = "DOWN>" +x + "," + y; repaint () ; // call paint () return (true) ;
}
public boolean mouseDrag(Event event, int x, int y )
{ MouseDragMsg = "DRAG>" +x + "," + y; repaint () ; // call paint () return (true) ;
}
public void paint (Graphics g) {
if (MouseUpMsg !:null) g.drawString(MouseUpMsg, 5, 20) ;
if (MouseDownMsg !=null) g.drawString(MouseDownMsg, 5, 40) ;
if (MouseDragMsg !=null) g.drawString(MouseDragMsg, 5, 60) ;
}
HTML script 28.2 (j 7 . h t m l ) <HTML> <TITLE>AppIet</TITLE> <APPLET CODE=j7.class WIDTH=200 HEIGHT=200 > </APPLET></HTML>
28.4 Mouse selection
In many applets the user is prompted to select an object using the mouse. To achieve this the x and y position of the event is tested to determine if the cursor is within the defined area. Java applet 28.3 is a program which allows the user to press the mouse button on the applet screen. The applet then uses the mouse events to determine if the cursor is within a given area of the screen (in this case between 10,10 and 100,100). If the user is within this defined area then the message displayed is HIT, else it is MISS. The graph- ics function g.drawRect(xl,yl,x2,y2) draws a rectangle from (x l ,y l ) to (x2,y2).

Java applet 28.3 (j 8 . j ava) import j a v a . a w t . * ; import j a v a . a p p l e t . * ; public class j8 extends Applet { String Msg=null; int x_start,y_start,x_end, y_end;
public void init() {
x start=10; y_start=10; x end=100; y end=50;
}
public boolean mouseUp(Event event, int x, int y)
{ if ((x>x start) && (x<x end) &&
(y>y_start) && (y<y_end)) Msg = "HIT";
else Msg="MISS" ; repaint () ; // call paint () return (true) ;
} public boolean mouseDown(Event event, int x,
int y)
if ((x>x start) && (x<x end) && (y>y_start) && (y<y_end))
Msg = "HIT"; else Msg="MISS" ; repaint () ; // call paint () return (true) ;
public void paint (Graphics g) {
g.drawRect (x_start,y_start,x_end, y_end) ; g.drawString("Hit", 30, 30) ; if (Msg !:null) g.drawString("HIT OR MISS- " + Msg, 5,80) ;
} }
HTML script 28.3 (j 8 . html) <HTML> <TITLE>Applet</TITLE> <APPLET CODE=j8.class WIDTH:200 HEIGHT=200> </AP PLET >< / HTML>
Keyboard input 457
28.5 Keyboard input
Java provides for two keyboard events, these are"
�9 k eyUp ( ).Is called when a key has been released. �9 keyDown () . Is called when a key has been pressed.
The parameters passed into these functions are event (which defines the keyboard state) and an integer Keypressed which describes the key pressed.

458 Java (Extended functions)
Java applet 28.4 (j 9 . j a v a ) import java.awt.*; import java.applet.*;
public class j9 extends Applet { String Msg=null;
public boolean keyUp(Event event, int KeyPress) { Msg="Key pressed="+ (char)KeyPress; repaint () ; // call paint() return (true) ; } public void paint (Graphics g) { if (Msg !=null)
g.drawString(Msg, 5,80); }
HTML script 28.4 (j 9. h tml) <HTML> <TITLE>Applet</TITLE> <APPLET CODE=j9.class WIDTH=200 HEIGHT=200> </APPLET></HTML>
The event contains an identification as to the type of event it is. When one of the function keys is pressed then the variable e v e n t , i d is set to the macro E v e n t . KEY_ACTION (as shown in Java applet 28.5). Other keys, such as the Ctrl, Alt and Shift keys, set bits in the e v e n t . m o d i f i e r vari- able. The test for the Ctrl key is:
if ((event.modifiers & Event.CTRL MASK)!=0) Msg="CONTROL KEY "+KeyPress;
This tests the CTRL_MASK bit; if it is a 1 then the CTRL key has been pressed. Java applet 28.5 shows its uses.
~] Java applet 28.5 (j 10. j ava) import java.awt.*; import java.applet.*;
public class j l0 extends Applet { String Msg=null;
public boolean keyDown(Event event, int KeyPress)
if (event.id == Event.KEY ACTION) Msg="FUNCTION KEY "+KeyPress;
else if ((event.modifiers & Event. SHIFT MASK)!=0) Msg="SHIFT KEY "+KeyPress;
else if ((event.modifiers & Event.CTRL MASK)!=0) Msg="CONTROL KEY "+KeyPress;
else if ((event.modifiers & Event.ALT MASK)!=0) Msg="ALT KEY "+KeyPress;
else Msg=""+(char)KeyPress;

Graphics input 459
repaint(); // call paint() return (true) ;
} public void paint (Graphics g) {
if (Msg!=null) g.drawString (Msg, 5, 80) ;
}
H T M L script 28.5 ( j 1 0 . html) <HTML> <TITLE>Applet</TITLE> <APPLET CODE=jl0.class WIDTH=200 HEIGHT=200> </APPLET ></HTML>
For function keys the KeyPress variable has the following values:
..... ~'alue 'K'e 'Valu'e Key ..... Value Ke Value "Key ....... Value Key . . . . . . . . . . . 'y . . . . . . . T F1 1008 F2 1009 F3 1010 F4 1011 F5 1012 F7 1014 F8 1015 F9 1016 F10 1017 Fll 1018
. . . . . . . . . , , , , , , ,,,,,,,,,, ,, ,,, ,J,,,,,,,,,,,,,,,,,,,,,
Thus, to test for the function keys the following routine can be used:
if (event.id == Event.KEY ACTION) if (KeyPress==1008) Msg="Fl"; else if (KeyPress==1009) Msg="F2"; else if (KeyPress==1010) Msg="F3"; else if (KeyPress==1011) Msg="F4"; else if (KeyPress==1012) Msg="F5"; else if (KeyPress==1013) Msg="F6"; else if (KeyPress==1014) Msg="F7"; else if (KeyPress==1015) Msg="F8"; else if (KeyPress==1016) Msg="F9"; else if (KeyPress==1017) Msg="Fl0";
For control keys the KeyPress variable has the following values:
Key . ..... Valu e .~ ......... Key .'"' ...... vai~e~:~ Key ............ Value~: ''' Key ........... '"""Valu'e ...... Cntrl-A 1 Cntrl-B 2 Cntrl-C 3 Cntrl-D 4 Cntrl-E 5 Cntrl-F 6 Cntrl-G 7 Cntrl-H 8
i i i i i i i i i i i i i i i i i i l l J l l i i i i i i i i i i i i
Thus, to test for the control keys the following routine can be used"
if ((event.modifiers & Event.CTRL MASK) !=0) if (KeyPress==l) Msg="Cntrl-A"; else if (KeyPress==2) Msg="Cntrl-B"; else if (KeyPress==3) Msg="Cntrl-C"; else if (KeyPress==4) Msg="Cntrl-D";
28.6 Graphics images
Java has excellent support images and sound. For graphics files it has sup- port for GIF and JPEG files, each of which is in a compressed form. The image object is declared with:
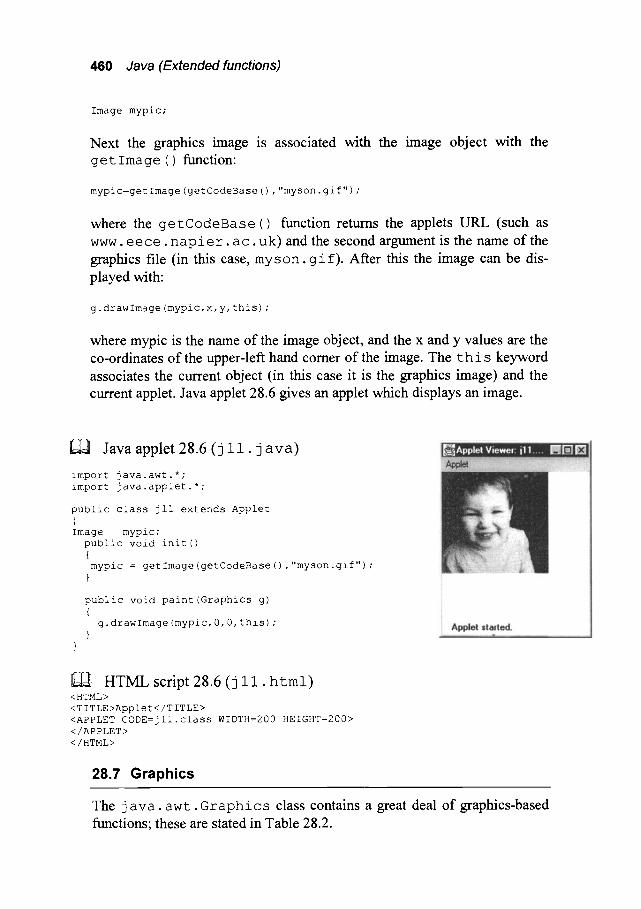
460 Java (Extended functions)
Image mypic;
Next the graphics image is associated with the image object with the g e t Image ( ) function:
mypic=get Image (getCodeBase ( ) , "myson. gif") ;
where the getCodeBase() function returns the applets URL (such as www. e e c e . n a p i e r , a c . uk) and the second argument is the name of the graphics file (in this case, m y s o n , g i f ) . After this the image can be dis- played with:
g. drawImage (mypic, x, y, this) ;
where mypic is the name of the image object, and the x and y values are the co-ordinates of the upper-left hand comer of the image. The t h i s keyword associates the current object (in this case it is the graphics image) and the current applet. Java applet 28.6 gives an applet which displays an image.
Java applet 28.6 ( j 1 1 . j a v a )
import java.awt.*; import java.applet.*;
public class jll extends Applet { Image mypic;
public void init() { mypic = getImage(getCodeBase(),"myson.gif") ; }
public void paint (Graphics g) {
g. drawImage (mypic, 0,0, this) ; }
HTML script 28.6 (j 11. html) <HTML> <TITLE>Applet</TITLE> <APPLET CODE=jll.class WIDTH=200 HEIGHT=200> </APPLET> </HTML>
28.7 Graphics
The java. awt. Graphics class contains a great deal of graphics-based functions; these are stated in Table 28.2.

Graphics 461
Table 28.2 Java graphics functions
Graphics function Description ................... public abstract void Translates the specified parameters into the origin --
translate (int x, int y) of the graphics context. All subsequent operations on this graphics context will be relative to this origin. Parameters: x - the x co-ordinate y - the y co-ordinate
public abstract Color get- Color()
Gets the current colour.
public abstract void setColor(Color c)
Set current drawing colour.
public abstract Font getFont()
public abstract void setFont(Font font)
Gets the current font.
Set the current font.
public FontMetrics getFontMetrics ()
public abstract FontMetrics getFontMetrics (Font f)
Gets the current font metrics.
Gets the current font metrics for the specified font.
public abstract void copyArea(int x, int y,
int width, int height, int dx, int dy)
Copies an area of the screen where (x,y) is the co- ordinate of the top left-hand comer, width and height and the width and height, and dx is the hori- zontal distance and dy the vertical distance.
public abstract void drawLine(int xl,int yl,
int x2, int y2)
Draws a line between the (x l ,y l ) and (x2,y2).
public abstract void fillRect(int x, int y,
int width, int height)
public void drawRect(int x, int y,
int width, int height)
public abstract void clearRect(int x, int y,
int width, int height)
Fills the specified rectangle with the current colour.
Draws the outline of the specified rectangle using the current colour.
Clears the specified rectangle by filling it with the current background colour of the current drawing surface.
public void draw3DRect(int x, int y, int width, int height,boolean raised)
Draws a highlighted 3-D rectangle where raised is a boolean value that defines whether the rectangle is raised or not.
public void fill3DRect(int x, int y, int width, int height,boolean raised)
Paints a highlighted 3-D rectangle using the current colour.
public abstract void drawOval(int x, int y,
int width, int height)
Draws an oval inside the specified rectangle using the current colour.
public abstract void fillOval(int x, int y,
int width, int height)
Fills an oval inside the specified rectangle using the current colour.

462 Java (Extended functions)
public abstract void drawArc(int x, int y, int width, int height, int startAngle, int arcAngle)
Draws an arc bounded by the specified rectangle starting. Zero degrees for startAngle is at the 3- o'clock position and arcAngle specifies the extent of the arc. A positive value for arcAngle indicates a counter-clockwise rotation while a negative value indicates a clockwise rotation. The parameter (x,y) specifies the centre point, and width and height specifies the width and height of a rectangle
public abstract void fillArc(int x, int y, int width, int height, int startAngle, int arcAngle)
Fills a pie-shaped arc using the current colour.
public abstract void drawPolygon(int xPoints[],
int yPoints[],int nPoints)
Draws a polygon using an array of x and y points (xPoints[ ] and yPoints[ ]). The number of points within the array is specified by nPoints.
public abstract void fillPolygon(int xPoints[],
int yPoints[],int nPoints)
Fills a polygon with the current colour.
public abstract void drawString(String str,
int x, int y)
Draws the specified String using the current font and colour.
public abstract boolean drawImage(Image img, int x, int y)
Draws the specified image at the specified co- ordinate (x, y).
public abstract void dispose () Disposes ofthis graphics context.
28.7.1 Setting the colour
The current drawing colour is set using the setColor () function. It is used as follows:
g.setColor(Color.yellow);
Colours are defined in the j a v a . a w t . C o l o r class and valid c o l o ~ s are:
Color.black Color.blue Color.cyan Color.darkGray Color.gray Color.green Color.lightGray Color.magenta Color.orange Color.pink Color.red Color.white Color.yellow
Any other 24-bit colour can be generated with the function Color which has the format:
public Color(int r, int g, int b)
where r, g and b are values of strength from 0 to 255. For example"
C o l o r ( 2 5 5 , 0 , 0) gives red; C o l o r ( 2 5 5 , 2 5 5 , 2 5 5 ) gives white; Co 1 o r ( 0 , 1 2 8 , 1 2 8 ) gives blue/green; Co 1 o r ( 0 , 0, 0 ) gives black.

Graphics 463
28.7.2 Drawing lines and circles
Normally to draw a graphics object the user must plan its layout for the di- mension within the object. Figure 28.2 shows an example graphic with the required dimensions. The d r a w O v a l () function uses the top level hand point for the x and y parameters in the function and the width and height define the width and height of the oval shape. Thus the d r a w O v a l () function can be used to draw circles (if the width is equal to the height) or ovals (if the width is not equal to the height). Java applet 28.7 shows the Java code to draw the object. This applet uses the s e t C o l o r ( ) function to make the circle yellow and the other shapes blue.
Java applet 28.7 (j 1 1 . j a v a ) i m p o r t j a v a . a w t . * ; i m p o r t j a v a . a p p l e t . * ; p u b l i c c l a s s j 1 2 e x t e n d s A p p l e t {
p u b l i c v o i d p a i n t ( G r a p h i c s g) {
g . s e t C o l o r ( C o l o r . y e l l o w ) ; g . f i l l O v a l (50, 30, 50, 50) ; g . s e t C o l o r ( C o l o r . b l u e ) ; g . f i l l O v a l (30, 80, 9 0 , 1 0 0 ) ; g. fillRect (15,130,15,10) ; g. fillRect (120,130,15,10) ;
} }
HTML script 28.7 (j 1 1 . html) <HTML><T I T L E > A p p l e t < /T ITLE> <APPLET CODE=j 12. c l a s s WIDTH=200 HEIGHT=200> </APPLET></HTML>
28.7.3 Drawing polygons
The drawPolygon() function can be used to draw complex objects where the object is defined as a group of (x,y) co-ordinates. Java applet 28.8 draws a basic picture of a car and the xpoints array holds the x co-ordinates and ypoints hold the y co-ordinates. Figure 28.3 illustrates the object.
Java applet 28.8 (j 1 3 . j a v a ) import java.awt.*; import java.applet.*; public class j13 extends Applet { int xpoints [] ={ i0, 30, 30, 90, i00,140,140, ii0, ii0, 90,
90, 40, 40,20,20, i0, i0}, ypoints []={50, 50, 30, 30, 50, 50, 70, 70, 60, 60, 70,
70, 60, 60,70,70,50} ; public void paint (Graphics g) {
g. drawPolygon (xpoints, ypoints, 17) ; }
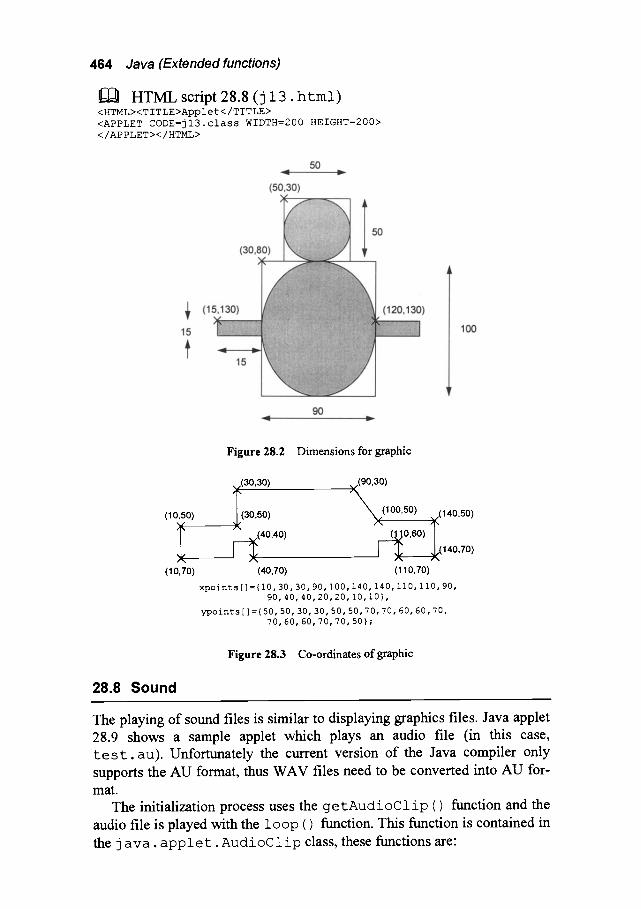
464 Java (Extended functions)
HTML script 28.8 (j 1 3 . html) <HTML><TITLE>Applet</TITLE> <APPLET CODE=jl3.class WIDTH=200 HEIGHT=200> </APPLET></HTML>
Figure 28.2 Dimensions for graphic
28.8 Sound
,,/(30,30) ~(90,30)
(10,50) 30,50) /,, 100,50) v(140,50 )
~ ~40,40) ~0 ,60) 140,70 ) /-k /-k ,,N
(10,70) (40,70) (110,70) xpoints [ ] ={ I0, 30, 30, 90, I00,140,140, ii0, ii0, 90,
90, 40, 40, 20, 20, i0, i0),
ypoints [ ] ={ 50, 50, 30, 30, 50, 50, 70, 70, 60, 60, 70, 70, 60, 60, 70, 70, 50} ;
Figure 28.3 Co-ordinates of graphic
The playing of sound files is similar to displaying graphics files. Java applet 28.9 shows a sample applet which plays an audio file (in this case, t e s g . a u ) . Unfortunately the current version of the Java compiler only supports the AU format, thus WAV files need to be converted into AU for- mat.
The initialization process uses the g e g A u d i o C l i p () function and the audio file is played with the l o o p () function. This function is contained in the j a v a . a p p l e g , k u d i o C l i p class, these functions are:

Dialog boxes 465
public abstract void play()
public abstract void loop()
public abstract void stop()
Plays the audio file and finishes at the end. Starts playing the clip in a loop. Stops playing the clip.
~] Java applet 28.9 (j 14. j ava) import java.awt.*; import java.applet.*;
public class j14 extends Applet { AudioClip audClip;
public void paint (Graphics g) {
audClip=getAudioClip (getCodeBase ( ) , "hello. au") ; audClip.loop();
} }
HTML script 28.9 (j 1 4 . html) <HTML> <TITLE>AppIet</TITLE> <APPLET CODE=jl4.class WIDTH=200 HEIGHT=200> </AP PLET >< / HTML>
28.9 Dialog boxes
One of the features of Java is that it supports dialog boxes and checkboxes. These are used with event handlers to produce event-driven options.
28.9.1 Buttons and events
Java applet 28.10 creates three Button objects. These are created with the add () function which displays the button in the applet window.
Java applet 28.10 (j 1 5 . j a v a ) import j a v a . a w t . * ; import j a v a . a p p l e t . * ;
public class j15 extends Applet {
public void init () {
add (new Button ("Help")) ; add (new Button ("Show")) ; add(new Button ("Exit")) ;
}
HTML script 28.10 (j 1 5 . html) <HTML><T ITLE>Applet </T ITLE> <APPLET CODE=j15.class WIDTH=200 HEIGHT=200> </AP PLET >< / HTML>
Applet 28.10 creates three buttons which do not have any action associated

466 Java (Extended functions)
with them. Java applet 28.11 uses the action function which is called when an event occurs. Within this function the event variable is tested to see if one of the buttons caused the event. This is achieved with:
if (event.target instanceof Button)
If this tests to the true then the Msg string takes on the value of the Object, which hold the name of the button that caused the event.
Java applet 28.11 ( j 1 5 . j a v a ) import j ava . awt .* ; import j a v a . a p p l e t . * ;
public class j16 extends Applet { String Msg=null;
public void init () { add (new Button ("Help")) ; add (new Button ("Show")) ; add (new Button ("Exit")) ;
} public boolean action(Event event, Object object) { if (event.target instanceof Button) {
Msg = (String) object; repaint () ;
} return (true) ;
} public void paint (Graphics g) { if (Msg!=null) g.drawString("Button:" + Msg, 30,80) ;
}
H T M L script 28.11 ( j 1 5 . h t m l ) <HTML> <T ITLE>Applet </T ITLE> <APPLET CODE=j15.class WIDTH=200 HEIGHT=200> </APPLET ></HTML>
28.9.2 Checkboxes
Typically checkboxes are used to select from a number of options. Java applet 28.12 shows how an applet can use checkboxes. As before, the action function is called when a checkbox changes its state and within the function e v e n t , t a r g e t parameter is tested for the checkbox with:
if (event.target instanceof Checkbox)
If this is true, then the function DetermineCheckState () is called which tests event.target for the checkbox value and its state (true or false).

Dialog boxes 467
Java applet 28.12 (j 17 . j ava) import java.awt.*; import java.applet.*; public class j17 extends Applet { String Msg=null;
public void init() { add (new Checkbox ("FAX")) ; add (new Checkbox("Telephone")); add (new Checkbox("Email")) ; add (new Checkbox("Post",null,true)) ;
) public void DetermineCheckState(Checkbox Cbox) { Msg=Cbox.getLabel() + .... + Cbox.getState(); repaint();
} public boolean action(Event event, Object object) { if (event.target instanceof Checkbox)
DetermineCheckState((Checkbox)event.target); return(true);
} public void paint(Graphics g) { if (Msg!=null) g.drawString("Check box:" + Msg, 30,80);
}
I~ HTML script 28.12 (j 1 7 . hgml) <HTML> < T I T L E > A p p l e t < / T I T L E > <APPLET C O D E = j 1 7 . c l a s s WIDTH=200 HEIGHT=200> </APPLET> </HTML>
28.9.3 Radio buttons
The standard checkboxes allow any number of options to be selected. A ra- dio button allows only one option to be selected at a time. The previous ex- ample can be changed as follows"
public void init() {
add (new Checkbox("FAX",RadioGroup, false)); add (new Checkbox ("Telephone", RadioGroup, false) ) ; add (new Checkbox ("Email", RadioGroup, false) ) ; add (new Checkbox("Post",RadioGroup, true));
}
This sets the checkbox type to RadioGroup and it can be seen that only one of the checkboxes is initally set (that is, 'Post').
28 .9 .4 P o p - u p m e n u c h o i c e s
To create a pop-up menu the Choice object is initally created with:
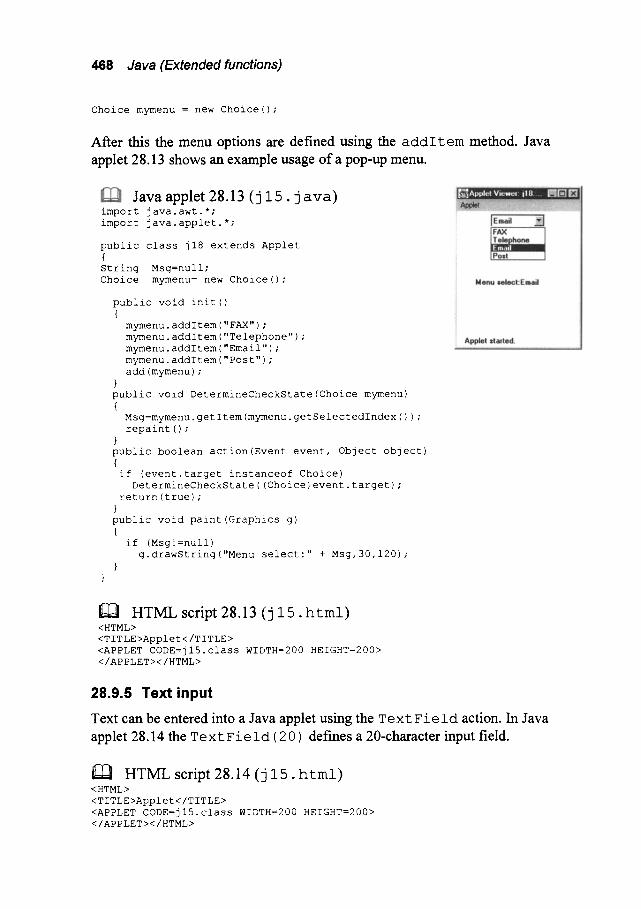
468 Java (Extended functions)
Choice mymenu = new Choice();
After this the menu options are defined using the addItem method. Java applet 28.13 shows an example usage of a pop-up menu.
Java applet 28.13 (j 1 5 . j ava) import java.awt.*; import java.applet.*;
public class j18 extends Applet { String Msg=null; Choice mymenu = new Choice() ;
public void init() {
mymenu, addItem ("FAX") ; mymenu, addItem ("Telephone") ; mymenu, addItem ( "Email" ) ; mymenu, addItem ("Post") ; add (mymenu) ;
} public void DetermineCheckState(Choice mymenu) {
Msg=mymenu. getItem (mymenu. getSelectedIndex ( ) ) ; repaint () ;
} public boolean action(Event event, Object object) { if (event.target instanceof Choice)
DetermineCheckState ((Choice) event, target) ; return (true) ;
} public void paint (Graphics g) {
if (Msg !=null) g.drawString("Menu select:" + Msg, 30,120) ;
}
i ~ HTML script 28.13 (j 15. html) <HTML> <T ITLE>Applet </T ITLE> <APPLET CODE=jl5.class WIDTH=200 HEIGHT=200> </APPLET></HTML>
28.9.5 Text input
Text can be entered into a Java applet using the TextField action. In Java applet 28.14 the T e x t F i e l d (20) defines a 20-character input field.
]~ HTML script 28.14 (j 15. h tml) <HTML> <TITLE>Applet</TITLE> <APPLET CODE=j15.class WIDTH=200 HEIGHT=200> </APPLET></HTML>
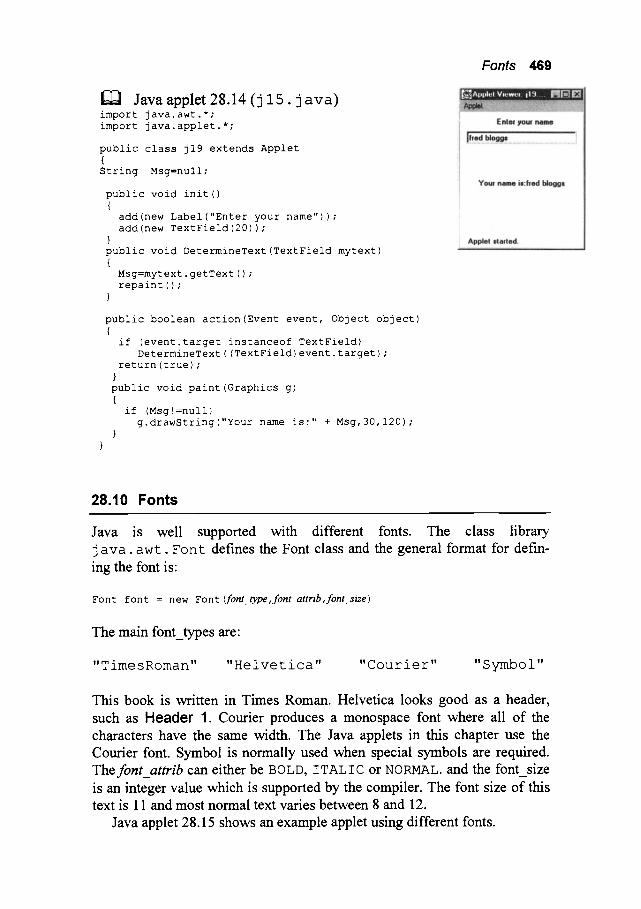
Java applet 28.14 ( j 1 5 . j a v a ) import java.awt.*; import java.applet.*;
public class j19 extends Applet { String Msg-null;
public void init() {
add (new Label ("Enter your name")) ; add(new TextField(20) ) ;
} public void DetermineText(TextField mytext) {
Msg=mytext. getText ( ) ; repaint () ;
}
public boolean action(Event event, Object object) {
if (event. target instanceof TextField) DetermineText ((TextField) event, target) ;
return (true) ; } public void paint (Graphics g) {
if (Msg! =null) g.drawString("Your name is:" + Msg, 30,120) ;
}
Fonts 469
28.10 Fonts
Java is well supported with different fonts. The class library j a v a . awg. F o n t defines the Font class and the general format for def'm- ing the font is"
Font font = new Font (font_type,font_attrib,font_size)
The main font_types are"
"Time sRoman" "Helvetica" "Courier" "Symbol"
This book is written in Times Roman. Helvetica looks good as a header, such as Header 1. Courier produces a monospace font where all of the characters have the same width. The Java applets in this chapter use the Courier font. Symbol is normally used when special symbols are required. Thefont_attrib can either be BOLD, ITALIC or NORMAL. and the font_size is an integer value which is supported by the compiler. The font size of this text is 11 and most normal text varies between 8 and 12.
Java applet 28.15 shows an example applet using different fonts.

470 Java (Extended functions)
Java applet 28.15 ( j 2 0 . j a v a ) import java.awt.*; import java.applet.*;
public class j20 extends Applet { Font TimesRoman = new Font ( "TimesRoman", Font. BOLD, 24 ) ; Font Courier = new Font ("Courier", Font.BOLD, 24); Font Helvetica = new Font ("Helvetica", Font.BOLD, 24) ; Font Symbol = new Font ("Symbol", Font .BOLD, 24) ;
public void paint (Graphics g) {
g. setFont (TimesRoman) ; g.drawString("Sample text",10, 40) ; g. setFont (Courier) ; g.drawString("Sample text",10,60) ; g. setFont (Helvetica) ; g.drawString("Sample text",10, 80) ; g. setFont (Symbol) ; g.drawString("Sample text",10,100) ;
HTML script 28.15 (j 2 0 . h t m l ) <HTML><TITLE>Applet</TITLE> <APPLET CODE=j20.class WIDTH=200 HEIGHT=200> </APPLET></HTML>
28.11 Exercises
28.11.1
28.11.2
Explain how the three mouse events occur.
Write a Java applet that contains a target which has areas with dif- ferent point values. These point values are 50, 100 and 150. The program should accumulate the score so far. A sample screen is given in Figure 28.4 (refer to Java applet 28.3 for the outline of the program).
50 100
150
28.11.3
Points: 400
Figure 28.4
Modify the program in 28.11.2 so that a RESET button is dis- played. When selected the points value should be reset to zero.

Exercises 471
28.11.4 Write a Java applet which displays a square at a starting position (50,50) with a width and length of 50 units. The user should then be able to move the rectangle up, down, left or right using the u key (for up), d key (for down), 1 key (for left) and r key (for right). The program should continue until the x key is pressed.
28.11.5 Write a Java applet which displays which function key or control key (Cntrl) has been pressed. The program should run continu- ously until the Cntrl-Z keystroke is pressed.
28.11.6 Write separate Java applets, using simple rectangles and circles, to display the following graphics:
(a) a television (a sample graphic is shown in Figure 28.5) (b) a face (c) a house (d) a robot
Figure 28.5
28.11.7 Locate three GIF or JPEG files. Then write a Java applet which allows the user to choose which one should be displayed. The function key F1 selects the first image, F2 the second, and F3 the third. The function key F4 should exit the applet.
28.11.8 Using an applet which displays the text TEST TEXT, determine the approximate colour of the following colour settings:
(a) (b) (c) (d) (e)
color(100, 50, I0) color (200,200, 0) color (I0, i00, I00) color (200,200,200) color (I0, i0, i00)
28.11.9 Write an applet using a polygon for the following shapes:

472 Java (Extended functions)
(a) a ship (a sample is shown in Figure 28.6) (b) a tank (c) a plane
Figure 28.6
28.11.10 Locate a sound file and write an application which uses it.
28.11.11 Write a Java applet which displays the following:
Sample Applet Please press the x key to exit
Note that Sample Applet is bold Arial text with a size of 20 and the other text is Courier of size of 14.
28.11.12 Write a Java applet in which the user enters some text. If the user enters EXIT then the program will exit.

Introduction
29.1 Introduction
In 1947 the invention of the transistor caused a great revolution. In fact sci- entists at the Bell Laboratories kept its invention secret for over seven months so that they could fully understand its operation. On 30 June 1948 the transistor was finally revealed to the world. Unfortunately, as with many other great inventions, it received little public attention and even less press coverage (the New York Times gave it 4�89 inches on page 46).
Transistors had, initially, been made from germanium, which is not a ro- bust material and cannot withstand high temperatures. The first company to propose a method of using silicon transistors was a geological research company named Texas Instruments (which had diversified into transistors). Soon many companies were producing silicon transistors and by 1955 the electronic valve market had peaked, while the market for transistors was rocketing. The larger electronic valve manufacturers, such as Western Elec- tric, CBS, Raytheon and Westinghouse failed to adapt to the changing mar- ket and quickly lost their market share to the new transistor manufacturing companies, such as Texas Instnmaents, Motorola, Hughes and RCA.
In 1959, IBM built the first commercial transistorized computer named the IBM 7090/7094 series. It was so successful that it dominated the com- puter market for many years. In 1965, they produced the famous IBM sys- tem 360 which was built with integrated circuits. Then in 1970 IBM intro- duced the 370 system, which included semiconductor memories. Unfortu- nately, these computers were extremely expensive to purchase and maintain.
Around the same time the electronics industry was producing cheap pocket calculators. The development of affordable computers happened when the Japanese company Busicon commissioned a small, at the time, company named Intel to produce a set of eight to twelve ICs for a calculator. Instead of designing a complete set of ICs, Intel produced a set of ICs which could be programmed to perform different tasks. These were the first ever microprocessors. Soon Intel (short for Integrated Electronics) produced a general-purpose 4-bit microprocessor, named the 4004 and a more powerful 8-bit version, named the 8080. Other companies, such as Motorola, MOS Technologies and Zilog were soon also making microprocessors.

476 DOS
IBM's virtual monopoly on computer systems soon started to slip as many companies developed computers based around the newly available 8- bit microprocessors, namely MOS Technologies 6502 and Zilog's Z-80. IBM's main contenders were Apple and Commodore who introduced a new type of computer - the personal computer (PC). The leading systems were the Apple I and the Commodore PET. These spawned many others, includ- ing the Sinclair ZX80/ZX81, the BBC microcomputer, the Sinclair Spec- tnma, the Commodore Vic-20 and the classic Apple II (all of which were based on or around the 6502 or Z-80).
IBM realized the potential of the microprocessor and used Intel's 16-bit 8086 microprocessor in their version of the PC. It was named the IBM PC and has since become the parent of all the PCs ever produced. IBM's main aim was to make a computer which could run business applications, such as word processors, spread-sheets and databases. To increase the production of this software they made information on the hardware freely available. This resulted in many software packages being developed and helped clone manufacturers to copy the original design. So the term 'IBM-compatible' was born and it quickly became an industry standard by sheer market domi- nance.
On previous computers IBM had written most of their programs for their systems. For the PC they had a strict time limit, so they went to a small computer company called Microsoft to develop the operating system pro- gram. This program was named the Disk Operating System (DOS) because of its original purpose of controlling the disk drives. It accepted commands from the keyboard and displayed them to the monitor. The language of DOS consisted of a set of commands which were emered directly by the user and interpreted to perform file managemem tasks, program execution and system configuration. The main functions of DOS were to rtm programs, copy and remove files, create directories, move within a directory structure and to list files.
Microsoft has since gone on develop industry-standard software such as Microsoft Windows Version 3, Microsoft Office and Microsoft Windows 95. Intel has also benefited greatly from the developmem of the PC and has developed a large market share for their industry-standard microprocessors, such as the 80286, 80386, 80486, Pentium and Pentium Pro processors.
29.2 Introduction to DOS
Most modem PCs either rtm DOS or allow access to an emulated version of it. All version of Microsoft Windows up to, and including Microsoft Win- dows 3.1, required DOS to be nmning before Windows could run. Windows 95 and Windows NT are complete operating systems within themselves and display an emulated version of DOS.
29.2.1 Checking the Version of DOS (VER)
The first version of DOS was released in 1981 and each subsequent release
Introduction to DOS 477
has been assigned a new version number. When there is a major change in DOS then the first number is changed, such as, Versions 1.0, 2.0, 3.0, and so on. The second number changes with a relatively minor change, such as version 1.1, 1.2, 1.3, and so on. Most versions of DOS are compatible with previous versions.
To determine the version of DOS that a computer is running then enter the VER command, as shown in Test run 29.1. Many current systems use Version 6 or run an emulated DOS from Windows 95 or Windows NT.
DOS versions later than Version 4 have an on-line help manual. To dis- play the help page on a command then HELP command_name is entered, as shown in Test run 29.2.
r-1 Test run 29.1
C" \ >vet MS-DOS Version 5.00 C'\>
T e s t r u n 2 9 . 2
C'\>help ver
Displays the MS-DOS version. VER
29.2.2 Checking the date and time (DATE and TIME)
Most PCs have an on-board clock which is powered by a rechargeable bat- tery. The DATE command displays the current date and allows the user to change the system data, if required. Test run 29.3 shows an example. If the date is displayed correctly then the <ENTER> key is pressed, as shown in Test run 29.3.
I ' - ! Test run 29.3
C" \ >date Current date is Wed 13/09/1995 Enter new date (dd-mm-yy).
If this date is incorrect then the correct date is entered at the Enter new
date (dd-mm-yy) prompt. The example in Test run 29.4 shows that the
current date has been changed to Sunday 8/9/96. Care must be taken when entering the current date as the system may be set up to display the date in USA format, that is, MM-DD-YY (MONTH, DAY and YEAR).
The TIME command displays the current time. As with the date com- mand the user is prompted as to whether to change the current time, or not. Pressing the ENTER key does not change the current time. Test run 29.6 shows an example of changing the system time from 10:55 am to 11:15 pm.

478 DOS
r'1 ~'~ Test run 29.4
C : \>date Current date is Sat 07/09/1996 Enter new date (dd-mm-yy) :
C : \ >date Current date is Sat 07/09/1996 Enter new date (dd-mm-yy) : 8/9/96
C : \>date Current date is Sun 08/09/1996 Enter new date (dd-mm-yy) :
r'2 Test run 29.5
C- \ > t i m e Current time is
Enter new time:
18 : 40" 24.62
Testrun29.6 C:\>time Current time is I0:55:21.76
Enter new time: 11:15
C:\>time Current time is 11:15:05.40
Enter new time:
29.2.3 Clearing the screen (CLS)
The CLS command clears the screen and leaves only a prompt and the c u r s o r .
29.2.4 Starting and stopping DOS
When the PC is restarted, DOS is normally started automatically from the hard-disk (unless the system has no hard-disks). Some PCs try to read the floppy disks drives for the DOS system files. If this happens make sure there are no floppy disks in the drives.
The method of starting DOS is described as the boot procedure. There are two main methods of starting (or re-starting DOS)"
�9 A cold boot - occurs at power-up and causes the system to start a se l f -
test program; �9 A warm b o o t - is executed when the C t r l , A l t and Del keys are
pressed down simultaneously (described as C t r l - A l t - D e l ) . This is normally required when a program has crashed and the system has hung- up.
The Ctrl-Break keys (or Cntrl-C) are used to interrupt a DOS com- mand. Test run 29.7 shows how the TIME command is interrupted using the C t r l and 'C' keys.

Formatting floppy disks 479
T~trun29.7 C:\>tile Current time is ii:44:11.21
Enter new time: ^C ,,,,, , , ,
29.3 Disks
Computers store data on floppy disks, hard-disks and optical disks. The disk drives on a PC are identified by the labels from A- to 7,.. It is convention that the primary hard-disk drive is drive C :, the primary floppy drive is A: , and the secondary floppy drive is B : . , as given in Table 29.1.
Floppy and hard-disks store of information using magnetically fields on separate concentric r i n g s - known as tracks. These are subdivided into blocks of 512 bits - known as sectors. There are various different formats for these tracks and sectors with varying capacities; these are given in Fig- ure 29.2. Differing capacities may lead to compatibility problems.
Table 29.1 Disk drive allocation
Drive Allocation A: B: C: D:
Description Primary floppy disk drive Secondary floppy disk drive Primary hard-disk drive Secondary hard-disk drive or CD-ROM drive
Table 29.2 Floppy disk capacity
Format Tracks Sectors Size Double-sided 360 KB 40 9 5.25" Double-sided 720 KB 80 9 3.5" Double-sided 1.2 MB 80 15 5.25" Double-sided 1.4 MB 160 9 3.5"
29.4 Formatting floppy disks (FORMAT)
The primary hard-disk is named C" and the primary disk drive is named A-. If the PC has another floppy disk drive it is given the name B ' . Other drives can exist, such as for network drives, a secondary hard-disk, a CD-ROM drive, and so on.
There are two main types of floppy disks. These are usually referred to by the disks dimensions, as shown in Figure 29.2. Originally PCs used the 5.25" floppy disks. They are extremely sensitive to physical damage, espe- cially when they are bent. Data on the disk can also be corrupted by extemal particles or f'mger prints. The disk can be put into a dust cover - although it provides little protection to being bent. A better floppy disk uses a sliding metal shutter to protect the magnetic disk, this is the 3.5" disk. It also allows a greater amount of data storage.

480 DOS
A 3.5" disk can be protected from over-writing stored data by sliding the write protect button, as shown in Figure 29.2. There are two types 3.5" disk types, these differ in the m o u n t of data that can be safely stored on them. They are named the double density (DD) and high density (HD) disk. The DD disk has a maximum capacity of 720 KB and the HD has 1.4 MB. Nor- mally, HD disks are more reliable than DD disks, but they cost more to buy. An HD disk can be identified either by the HD symbol or by the notch at the other side of the write protect slider.
Figure 29.1 3.5" floppy disks.
29.4.1 Formatting a 3.5" disk
The FORMAT command sets up the necessary format on the disk so that files can be stored. A sample session is shown in Test run 29.8.
Testrun29.8
C'\>format a:
Insert new diskette for drive A" and press ENTER when ready... Checking existing disk format. Saving UNFORMAT information. Verifying 1.44M Format complete.
Volume label (ii characters, ENTER for none)? fred
1457664 bytes total disk space 1457664 bytes available on disk
512 bytes in each allocation unit. 2847 allocation units available on disk.
Volume Serial Number is 1720-18EE
Format another (Y/N)?n C-\>
Notice that the message Saving UNFORMAT information is dis- played. This allows the user to unformat a disk that has been formatted acci- dentally (but only if no new files have been written to the disk).
It is also possible to force the FORMAT command to format with a differ- ent capacity. The / f switch extension is used for this purpose. Table 29.3 outlines how it is modified for different capacities.

File system structure 481
Capacit), 720K 1.44M 360K 1.2M
Table 29.3 Floppy disk capacity
Command Notes format a" / f" 7 2 0 DD 3.5" floppy disk
format a" / f" i. 4 4 Hn 3.5" floppy disk
format a" /f" 360 DD 5 I/4" floppy disk
format a- / f" i. 2 HD 5 I/4" flopp[ disk
29.5 File system structure
Files store data in the form of programs, documents, spread-sheets, and so on. They are organized into a tree structure. The top of the structure is the root directory and each branch is called a subdirectory. This structure makes finding files easier than having all files stored in the one directory.
The route through the tree structure to a given file is known as the path- name and reference to files external to the current directory is possible by using the correct path. The pathname for a given file is traced through the tree structure from the root directory to the location of the file.
Test run 29.9 shows an example list of a top-level directory. The prompt should be set-up to display the current directory. In this case, the DOS prompt is C" \ >.
The top level directory in this case contains various sub-directories such as DOCS, WINDOWS, PSP and TURBO. Each of these directories contains files and/or sub-directories. The function of each directory is normally obvi- ous from its name. For example, the DOS directory contains DOS program, help manuals and system files, the WINDOWS directory contains programs for Microsoft Windows.
r-1 Test run 29.9
C ' \ > dA.r /w Volume in drive C is THINKPAD Volume Serial Number is 3A40-09E8 Directory of C'\ [APPL ] [ ASYMPRES ] [DISKETTS] [DOCS] [IPFWIN] [LLW] [PCAUDIO] [PRIDE] [STEVE M] [TALKWRKS] [TURBO] [UNIVBE] AUTOEXEC. BAT COMMAND. COM
36 file (s)
[BORLANDC] [CCMOBILE] [CSW] [ DOS ] [ FACTORY ] [ GMOUSE ] [MSIMEV60 ] [OLDFILES] [ORGANIZE] [ PSP] [RTT] [ SCRNCAM ] [TANNER] [THINKPAD] [TRANXIT] [UTILS] [WINDOWS] [WINZIPI6] CONFIG. SYS SYSLEVEL. TP WIN. BAT
65,786 bytes 42,008,576 bytes free
The top-level directory is the root directory, and is given the name \. A small section of the directory hierarchy is given in Figure 29.2. Notice that there are four sub-directories below the root directory and that below the DOCS directory there are three sub-directories NOTES, CLASSES and ADMIN. There is also one sub-directory below WINDOWS. To identify the directories a pathname must be given. The full pathname each directory is:

482 DOS
\DOCS \WINDOWS \DOCSkCLASSES \DOS
\DOCS \ADMIN \WINDOWS\SYSTEM \DOCSkNOTES \DOCS \ADMINkMEMO
All these directories are stored on the hard disk which is labelled as C:, thus the full pathname, with the disk drive, of the directories are:
C-\DOCS C'\WINDOWS C'\DOCS\ADMIN C-\DOCS\CLASSES C'\DOS C'\DOCS\NOTES
C" \WINDOWS\SYSTEM C" \ DOCS \ADMIN I MEMO
I j Noo p j I i sYsTEM ]
I I
l , NOTES][
I MEMO
Top-level directory
I I DOCS ] I DOS
t i[ ' I ADMIN CLASSES
I
FAX
Figure 29.2 Sample file structure
These pathnames are the full pathnames and are absolute pathnames. It is also possible to specify a relative pathname. With relative pathname the name given does not have the preceding top-level directory ( \ ) . For exam- ple, if we are in the GAMES directory the relative pathname for the DATA directory is CHESS\DATA and if we are in the WINDOWS directory the relative pathname for the SYSTEM directory is simply SYSTEM.
2 9 . 6 D O S F i l e n a m e s
Files are stored on disks with a filename and an extension. The filename can be up to eight characters long and the extension up to three characters. A period ( ' . ') separates the filename from the extension. Figure 29.3 shows the standard format. The extension name gives an indication about what type of file it is.
The valid characters that can be used for the filename are alphabetic characters ( 'A' - ' Z ' ) , numbers ( '0 ' - ' 9 ' ) , underscores (' '), braces (' {', ' } '), parentheses ( ' ( ' , ' ) ' ) , tilde ('-~'), caret (,A,), ampersand ( ' & ' ) , ex- clamation point ( ' ! ' ) , pound sign ( 's hyphen ( '- ') , and dollar sign ( '$ ') . Other special characters such as ( '* ') , ( '? ') , ( ' : ' ) , ( ' ; ') , ( ' , ' ) , ( '= ') , and so on. are reserved for special functions. Some valid and invalid filenames are given in Table 29.4.

File extension (up to 3 characters)
ABCDEFGH. XYZ
Filename (up to 8 characters)
Figure 29.3 DOS filenames
Listing files 483
29.7 File types
Most files created have a certain purpose; for example documents from a word processor, spread-sheets, text files. The filename extension adds extra information about what type of file it is. Common filename extensions are given in Table 29.5.
Table 29.4 Examples o f valid and invalid DOS filenames.
Valid DOS file- Invalid DOS file- Valid DOS file- Invalid DOS file- names name names name FRED I.DOC FRED ?.DOC SET{I}.BAT SET{I}.???
ACC9192 .WKI ACC91/92 .WKI INFO^I0. SYS INFO, SYS
INCOME-I. TXT INCOME �9 I.TXT $$$I . $$$ FRED 1 . C
Test run 29.10 shows a sample DOS listing. Notice that this directory contains System Files (. SYS), DOS Commands (. COM and . EXE), Text Files (. T• and Help Files (. HLP). The other typical files include Basic Language Files (. BAS), Initialization Files (. INI) and Listings (.LST). Programs with the . COM,. EXE or . BAT extension can be executed.
Table 29.5 Example file extensions
File extension File type File extension File type �9 ASC ASCII Text . PAS Pascal file
�9 BAK Backup File . POX Picture file
�9 BAT DOS Batch File . PRN Print File
�9 C C language File . S YS System File
�9 COM DOS Program File . TXT Text File
�9 EXE DOS Executable program . WK1 123 Ver 1/2 File
�9 HLP Help File . WK3 1-2-3 Ver 3 File
. OVL Overla~' Fi!e used by program . TMP Temporar~ File
29.8 Listing files (DIR)
The D IR command displays the contents of a directory. A help manual on D I R is given in Test run 29.11.
Various switches modify the way the D IR command displays the direc- tory listing. Refer to the user manual shown in Test run 29.11 for a complete listing. Test run 29.12 shows a sample listing without switches.

484 DOS
Testrun29.10 C:\DOS> dir /w Volume in drive C is THINKPAD Volume Serial Number is 3A40-09E8 Directory of C:\DOS [.] [..] [DATA] 4208.CPI ADDHELP.OVL ADMIN.PRF ASSIGN.COM ATTRIB.EXE AUTORUN.PRF
: : : : : : : : : :
WNSCHEDL.EXE WNTOOLS.GRP WNUNDEL.HLP WNVCVECI.DLL WNVEI.DLL WNVFI.DLL
176 file(s) 6,894,171 bytes 41,385,984 bytes free
[SYSTEM] 4201.CPI ANSI.SYS APPEND.EXE DOSSHELL.INI CHKDSK.COM
WNUNDEL.EXE WNVCI.DLL XCOPY.EXE CHECKUP.DB
Testrun29.11 C:\> help dir DIR [drive:] [path] [filename] [/P] [/W] [/A[ [:]attributes] ] [/O[ [:]sortorder] ] [/S] [/B] [/L] [drive:] [path] [filename] Specifies drive, directory, or files to list
/P Pauses after each screenful of information. /W Uses wide list format. /A Displays files with specified attributes. attributes D Directories R Read-only files
H Hidden files A Files ready for archiving S System files - Prefix meaning "not"
/O List by files in sorted order. sortorder N By name (alphabetic) S By size (smallest first)
E By extension (alphabetic) D By date & time G Group directories first - Prefix to reverse order
/S Displays files in specified directory and all subdirectories.
Table 29.6 Example switches for the DIR command
Command DIR /w
DIR /p
DIR /s
DIR /od
DIR /i
Description display directory in five columns displays one screen of listing at a time display all subdirectories and files display directory in order of date displays directories in lower case
Test run 29.12 shows an example session using some of the formats. No- tice that the basic DIR command displays not only the filename and exten- sion, but also the following:
�9 The volume label of the disk (in this case, THINKPAD). �9 The volume serial number, every disk drive has a unique volume serial
number (3A4 0 - 0 9 E 8 ) . �9 The current directory name (C : \) . �9 The directory name or filename. �9 The date file or subdirectory was created, or was last modified (for ex-
ample, for the DOS directory it is 0 5 / 01 / 95). �9 The time the file or directory was created, or was last modified (for ex-
ample, for the DOS directory it is 12 : 0 0). �9 The number of files in the directory (in this case, 37).

Listing files 485
• T h e ~ s k s p a c e u s e d u p b y the files m thecurre~ d~ectory (mthiscase , 65,786 bytes).
• The amount of avail~le disk ~ace (in this case, 41,353,216 bytes).
T e s t r u n 2 9 . 1 2 C : \ c i i r Volume in drive C is. THINKPAD Volume Serial Number is 3A40-09E8 Directory of C:\
APPL <DIR> ASYMPRES <DIR> BORLANDC <DIR> CCMOBILE <DIR> CSW <DIR> DISKETTS <DIR> DOCS <DIR> DOS <DIR> FACTORY <DIR> GMOUSE <DIR>
TANNER <DIR> THINKPAD <DIR> TRANXIT <DIR> TURBO <DIR> UNIVBE <DIR> UTILS <DIR> WINDOWS <DIR> WINZIPI6 <DIR> AUTOEXEC BAT 992 COMMAND COM 54,654 CONFIG SYS 648 SYSLEVEL TP i0 WIN BAT 133 WINA20 386 9,349
37 file(s)
05/02/95 15:22 05/01/95 12:00 19/02/95 8:20 05/01/95 12:00 05/01/95 12:00 05/01/95 12:00 08/08/95 10:54 05/01/95 12:00 05/01/95 12:00 18/08/96 19:50
27/08/96 9:45 05/01/95 12:00 05/01/95 12:00 20/08/96 19:12 18/08/96 20:44 09/08/96 13:31 05/01/95 12:00 18/08/96 19:56 18/08/96 19:55 25/01/94 i:00 04/01/95 12:39 05/01/95 13:04 01/01/95 10:49 25/01/94 i:00
65,786 bytes 41,353,216 bytes free
The DIR / p displays one screen of directory information and the user is prompted to P r e s s a n d key to cont inue .... This continues until all the directory information is displayed. The DIR / s command is useful for finding files in subdirectories. Several switches can be used at a single time, for example to display all subdirectories with a pause between each screenful the command used is DIR / p / s .
486 DOS
Worksheet 14
Note, i f you are using Windows NT/95 then select either the MSDOS Prompt or shutdown Windows and select Restart the computer in MSDOS mode.
W14.1 Determine the DOS version of the PC you are using.
[ Version:'
w14.2 Display the current date on the PC.
[Date:
W14.3 Display the current time of the PC.
Xime:
W14.4 Modify the date and time and redisplay.
New date"
New time"
W14.5
W14.6
Change the date and time back so that they show the correct date and time.
Completed successfully: YES/NO
Use the Cgrl -C (or C g r l - B r e a k ) keystrokes to quit from the TIME command.
Completed successfully:
W14.7 Clear the screen.
W14.8
YES/NO
[Completed successfully: YES/NO
Locate the following keys (tick, if found):
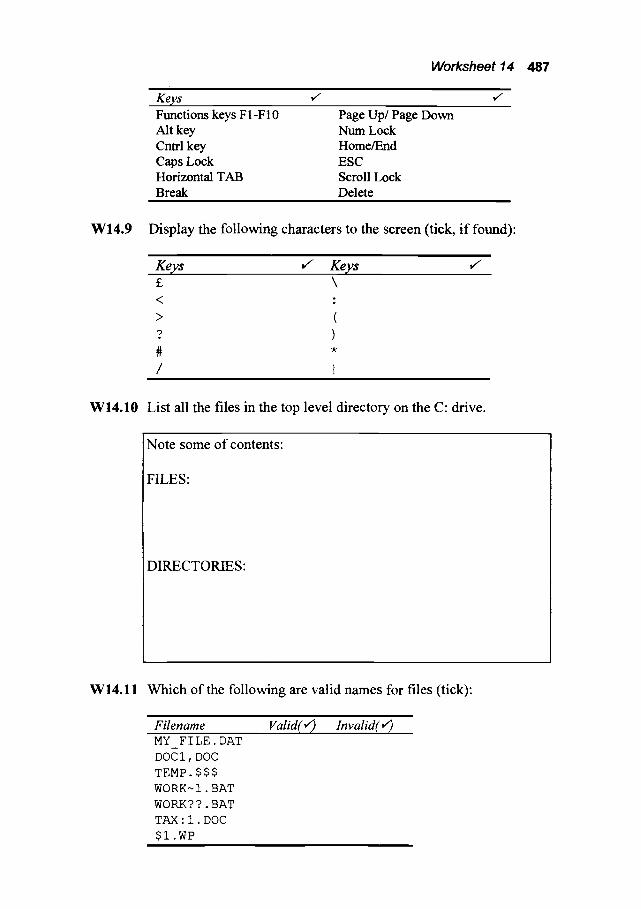
Worksheet 14 487
Keys ~ r Functions keys F 1-F 10 Page Up/Page Down Alt key Num Lock Cntrl key Home/End Caps Lock ESC Horizontal TAB Scroll Lock Break Delete
i
W14.9 Display the following characters to the screen (tick, if found)"
i
Keys r Keys s \
<
> (
? ) # *
/ I
r
W I4.10 List all the files in the top level directory on the C" drive.
Note some of contents"
FILES:
DIRECTORIES:
W14.11 Which of the following are valid names for files (tick)"
Filename Valid(g) Invalid(g) MY FILE. DAT
DOC 1, DOC
TEMP. $ $ $
WORK ~ 1. BAT
WORK? ?. BAT
TAX : 1. DOC
$i .WP

488 DOS
W14.12 For the file structure given in Figure W14.1 complete the table given next (the first one has been completed):
Directory ADMIN MEMO BERT BATCH WINDOWS SYSTEM
Full pathname C- \ DOCS \ADMIN
Figure W14.1 File structure
W14.13 For the file structure given in Figure W14.2 determine the full pathnames for the files given next (the first one has been com- pleted):
FILE T SHEET.DOC P SHEET.DOC MEMOI.DOC XCOPY.EXE MESSAGE.BAT MOUSE.SYS
Full pathname C-\DOCS\ADMIN\T SHEET.DOC
m
Figure W14.2 File structure
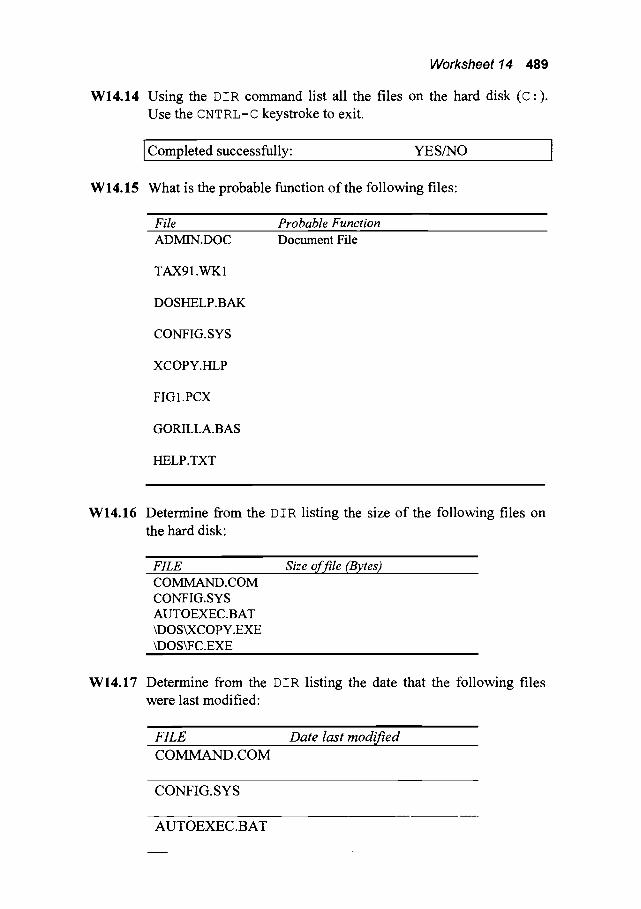
Worksheet 14 489
W14.14 Using the DTR command list all the files on the hard disk (C-). Use the CNTRL-C keystroke to exit.
Completed successfully: YES/NO
W14.15 What is the probable function of the following files"
File Probable Function ADMIN.DOC Document File
TAX91.WK1
DOSHELP.BAK
CONFIG.SYS
XCOPY.HLP
FIG1.PCX
GORILLA.BAS
HELP.TXT
W14.16 Determine from the DIR listing the size of the following files on the hard disk:
FILE COMMAND.COM CONFIG.SYS AUTOEXEC.BAT kDOSkXCOPY.EXE kDOSkFC.EXE
Size of file (Bytes)
W14.17 Determine from the DIR listing the date that the following files were last modified:
FILE COMMAND.COM
Date last modified
CONFIG.SYS
AUTOEXEC.BAT

490 DOS
~DOSkXCOPY.EXE
kDOS~FC.EXE
W14.18 Determine the amount of disk space that is remaining on the hard disk.
I Disk space:
W14.19 Determine the amount of disk space used up by all the files in the ~DOS directory:
I Disk space used by DOS directory:
W14.20 Determine the number of files in the kDOS directory (or the \WINDOWS directory if there is no ~DOS directory):
I Number of files:
W14.21 State what the following DIR commands do (try them out):
Command Function di r /b
dir /i
Lists directories and displays only the name of the file/directory (bare listing)
dir /on
dir /os
dir /od
W14.22 Reboot the computer using a warm-boot.
I Completed successfully: YES/NO
W14.23 Reboot the computer using a cold-boot.
Completed successfully: YES/NO

DOS File System/Editor
30.1 Changing directory (CD o r CHDIR)
The change directory command, CD (or CHDIR) allows the user to move around the file system. Table 30.1 shows a few sample commands and Sample session 30.1 shows a sample session. At the beginning of this ses- sion the user is in the top level directory (c" \). The DIR/W command lists contents of the directory across the screen in five columns. In this case the main directory contains a subdirectory named \DOCS. To change the cur- rent directory to this directory the C D DOCS command line is used. Next, contents of this directory are listed using D I R/W.
In the \ DOCS directory there are nine subdirectories. Each of these sub- directories have their own function; for example, lecture notes are stored in the NOTES directory and general administration documents are stored in the ADMIN directory. Note that the full pathname for the NOTES directory is C" \DOCS\NOTES.
Next, the user changes the current working directory to the DOCS direc- tory and then to the DOS subdirectory. There are several files in this directory including the files DOS. DOC and DOS S l . DOC. The full path- name of the file DOS. DOC is C" \ DOS \ DOCS \NOTES \ DOS \ DOS. DOC.
Table 30.1 Examples of the CD command
Example CD . .
CD \ CD \docs\notes\dos
CD notes
|
Description change directory to the one above the current directory change directory to the top-level directory change directory to the directory kDOCSkNOTESkDOS chan~e directo~ to the sub-directo~ NOTES
' ~ Sample ,e.~sio'n 30.1 . . . . . . . . . . C" \>dir /w Volume in drive C is HARD-DISK Directory of C:\ [ DOS ] [WINDOWS ] [VGAUT IL ] [ GWS ] [ RESEARCH ] [ TC ] [MASM] [RTT] [T] [MSOFFICE] [CIRRUS] [DISCWLD. CD] [ GAMES ] [ PANA ] [ SOUND ]
[DOCS] [WINWORD] [123] [CIE] [ EXECUTOR ]
. . . . . .
[COMBIOSW] [VIRUS]
[ INTER ] [ROUTE] [BILL]

492 DOS
[FAXWORKS] [NOTES] CONFIG.SYS CONFIG.BAK
31 file(s) 1,497 bytes 112,345,088 bytes free
C:\>cd docs C:\DOCS>diE /w Volume in drive C is HARD-DISK Directory of C:\DOCS [.] [..] [NOTES] [RTT] [TEMPLATE] [RESEARCH] [PAPERS] DOCS.ZIP
12 file(s) 118,444 bytes 112,345,088 bytes free
C:\DOCS>cd notes C:\DOCS\NOTES>dir /w Volume in drive C is HARD-DISK Directory of C:\DOCS\NOTES [. ] [.. ] [COMMS] [DOS] [MICROP] [IOCOR] [FORTRAN] [ICD] [TRANSP] [SOFT AP] [COMB ARC] [ETHER] [RADii] [WINDOWS] IRES_DeC] ELECT.DeC
26 file(s) 1,534,592 bytes i12,345,088 bytes free
C:\DOCSXNOTES>cd dos C:\DOCS\NOTESkDOS>cLir Volume in drive C is HARD-DISK Directory of C:\DOCSkNOTESiDOS
<DIR> 01/01/80 23:53 .. <DIR> 01/01/80 23:53 DOC S2 Dec 152,028 17/10/93 19:38 DOS LZH 73,728 29/07/94 15:50 Dec S1 Dec 219,067 15/07/94 11:33 DOS Dec 372,624 17/10/93 i0:00 DOSNEW Dec 438,272 14/09/95 1:48
7 file(s) 1,255,719 bytes 112,345,088 bytes free
C:\DOCS\NOTES\DOS>cd .. C:\DOCS\NOTES>d_ir /w Volume in drive C is HARD-DISK Directory of C:\DOCS\NOTES [.] [..] [COMMS] [DOS] [MICROP] [IOCOR] [FORTRAN] [ICD] [TRANSP] [SOFT AP] [COMB ARC] [ETHER] [RADAR] [WINDOWS] [RES_DOC] ELECT.DeC
26 file(s) 1,534,592 bytes 111,845,376 bytes free
C:\DOCS\NOTES>cd \ C:\>dir/w
Volume in drive C is HARD-DISK Directory of C:\
[DOS] [WINDOWS] [GWS] [RESEARCH] [MASM] [RTT] [MSOFFICE] [CIRRUS] [GAMES] [PANA] [FAXWORKS] [NOTES]
31 file(s)
[VGAUTIL] [TC] [T] [DISCWLD.CD] [SOUND] CONFIG.SYS
1,497 bytes
111,845,376 bytes free
AUTOEXEC.BAT
[CLASSES] [ABSTRACT]
[c] [ORCAD] [VAX] [X] NET.DeC
[c] [ORCAD] [VAX] IX] NET.DeC
[DOCS] [WINWORD] [123] [CIE] [EXECUTOR] AUTOEXEC.BAT
LIST
[ADMIN] [OLDDOC2]
[PASCAL] [UNIX] [RS232] [TESTS] BILL.REC
[PASCAL] [UNIX] [RS232] [TESTS] BILL.REC
[COMBIOSW] [VIRUS] [INTER] [ROUTE] [BILL] CONFIG.BAK
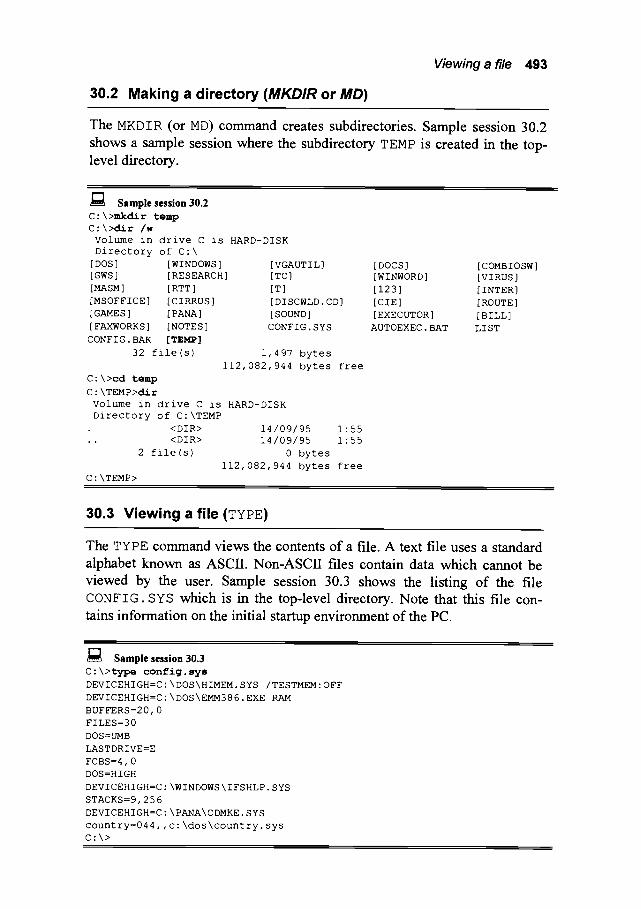
30.2 Making a directory (MKDIR or MD)
Viewing a file 493
The MKDIR (or MD) command creates subdirectories. Sample session 30.2 shows a sample session where the subdirectory TEMP is created in the top- level directory.
r'1 ~ i Sample session 30.2 C" \ > m k d i r temp C" \ > d i r /w Volume in drive C is HARD-DISK Directory of C:\
[ DOS ] [WINDOWS ] [ VGAUT IL ] [ DOCS ] [ COMBIOSW ] [ GWS ] [RESEARCH] [TC ] [ WINWORD ] [VIRUS ]
[MASM ] [RTT ] [T ] [ 123 ] [ INTER ] [MSOFFICE] [CIRRUS] [DISCWLD. CD] [CIE] [ROUTE]
[ GAMES ] [ PANA ] [ SOUND ] [ EXECUTOR ] [ BILL ]
[ FAXWORKS ] [NOTES] CONFIG. SYS AUTOEXEC. BAT LIST CONFIG. BAK [ TEMP]
32 file (s) 1,497 bytes
112,082,944 bytes free C:\>cd temp
C:\TEMP>dir Volume in drive C is HARD-DISK Directory of C:\TEMP
�9 <DIR> 14/09/95 .. <DIR> 14/09/95
2 file(s) 0 bytes
C" \TEMP>
1-55 1"55
i12,082,944 bytes free
30.3 Viewing a file (TYPE)
The TYPE command views the contents of a file. A text file uses a standard alphabet known as ASCII. Non-ASCII files contain data which cannot be viewed by the user. Sample session 30.3 shows the listing of the file CONFIG. SYS which is in the top-level directory. Note that this file con- tains information on the initial startup environment of the PC.
I--I Sample session 30.3
C : \>type config, sys
DEVICEHIGH=C:\DOS\HIMEM.SYS /TESTMEM:OFF
DEVICEHIGH=C: \DOS\EMM386.EXE RAM BUFFERS=20, 0 FILES=30
DOS =UMB
LASTDRIVE=E
FCBS=4,0
DOS=HIGH
DEVICEHIGH=C : \WINDOWSkIFSHLP. SYS STACKS=9,256
DEVICEHIGH=C : \PANAkCDMKE. SYS
country=044,, c: \dos\country. sys C:\>

494 DOS
30.4 Wild-cards (* or ?)
Wild-cards are special characters which can be used to substitute various characters in a filename. There are two wild-cards used in DOS, these are:
replaces any number of characters replaces only one character
Sample session 30.4 shows a sample session. The user starts in the top-level directory and lists all files or directories which start with the letter 'd' (using the D IR d* command). Next the user changes the directory to \DOS. When in this directory the user lists the files which have a S YS file exten- sion (using D IR *. S YS). Next, all files which begin with the letter 'c' are listed (using D IR C*). Finally, all files which begin with the letter 'm' have any second letter followed by the letters 'av ' and with any file extension are listed (using D I R m ? a v . *).
30.5 Creating a text file
DOS Version 5.0/6.0 and Windows 96 have a text editor named E DI T. This editor is useful to create text files but cannot be used with software pro- grams. For this reason an integrated development environment (IDE) editor will be used.. The example used in this section is Borland C++ Version 3.0, as shown in Figure 30.1.
Many networks allows access to the compiler through a menu option. On computers where the compiler is installed on the local hard disk, then typical set-ups are given in Table 30.1.
For the Borland products (Turbo Pascal/Borland C/Turbo C) a file is en- tered by simply entering text into the edit window. The main menu options are File, Edit, Run, Compile, Options, Debug. Once the file text has been entered then it is saved by using the File-+Save option. As a default C files are give a C extension, C++ are given a CPP extension, and Pascal files are automatically assigned a PAS extension. To load a previ- ously saved file the F i l e - + O p e n option is used.
Table 30.2 IDE packages
IDE Program to run Typical home directory Borland C++ Version 4 BC. EXE C:kBORLANDkBIN Turbo C Version 2 TC. EXE C:\TC Turbo Pascal TURBO. EXE C:\TURBO ,,
I - 1 Sample session 30.4
C: \ > c l i r d*
Volume in drive C is HARD-DISK
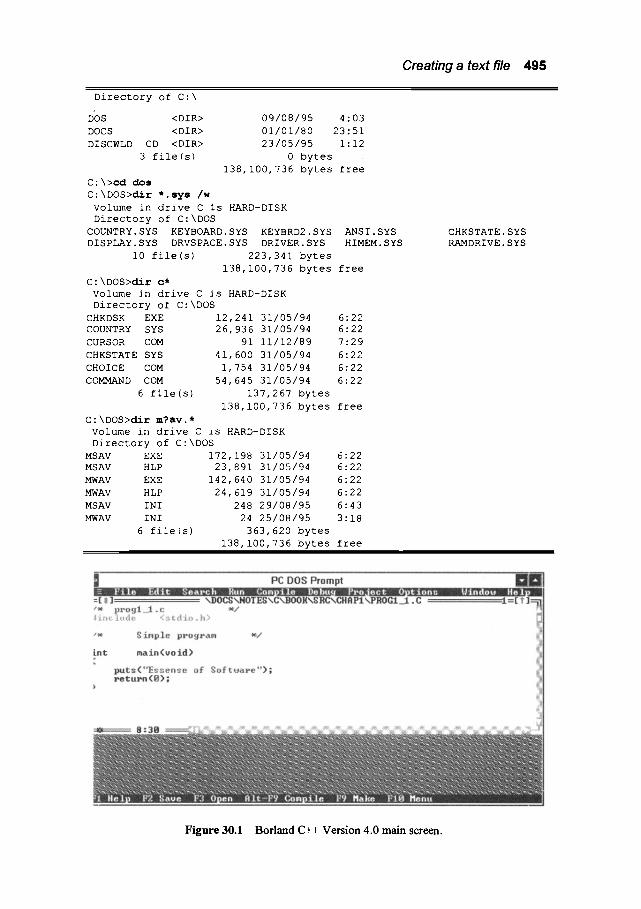
Creating a text file 495
Directory of C:\
DOS <DIR> 09/08/95 4:03
DOCS <DIR> 01/01/80 23:51 DISCWLD CD <DIR> 23/05/95 1:12
3 file(s) 0 bytes
138,100,736 bytes free
C:\>cddos C:\DOS>dir *.sys /w
Volume in drive C is HARD-DISK Directory of C:\DOS
COUNTRY.SYS KEYBOARD.SYS KEYBRD2.SYS DISPLAY.SYS DRVSPACE.SYS DRIVER.SYS
i0 file(s) 223,341 bytes
138,100,736 bytes free
C:\DOS>dir c* Volume in drive C is HARD-DISK Directory of C:\DOS
CHKDSK EXE 12,241 31/05/94 6:22 COUNTRY SYS 26,936 31/05/94 6:22
CURSOR COM 91 11/12/89 7:29
CHKSTATE SYS 41,600 31/05/94 6:22
CHOICE COM 1,754 31/05/94 6:22
COMMAND COM 54,645 31/05/94 6:22
6 file(s) 137,267 bytes
138,100,736 bytes free
C:\DOS>dir m?av.* Volume in drive C is HARD-DISK Directory of C:\DOS
MSAV EXE 172,198 31/05/94 6:22 MSAV HLP 23,891 31/05/94 6:22
MWAV EXE 142,640 31/05/94 6:22
MWAV HLP 24,619 31/05/94 6:22
MSAV INI 248 29/08/95 6:43
MWAV INI 24 25/08/95 3:18 6 file(s) 363,620 bytes
138,100,736 bytes free
ANSI.SYS HIMEM.SYS
CHKSTATE.SYS RAMDRIVE.SYS
Figure 30.1 Borland C++ Version 4.0 main screen.

496 DOS
30.8 Deleting Files (DEL or ERASE)
The DEL and ERASE commands delete files. Wild-cards can be used to re- place filenames, if required. Sample session 30.5 shows a sample session where the file TEST3. TXT is deleted from the TEMP directory. Next, all the files with a TXT extension are deleted.
As an extra safeguard against accidentally deleting, or selectively delet- ing files the / P switch can be used. Notice in Sample session 30.6 the user is prompted to delete each of the files individually.
Samplesession30.5 C'\>cd temp C'\TEMP>dir/w Volume in drive C is MS-DOS 5 Volume Serial Number is 3B33-13D3 Directory of C:\TEMP [.] [..] TEST3.TXT TEST2.TXT
5 file(s) 701 bytes 54509568 bytes free
C:\TEMP>erase test3.txt C.\TEMP>dir/w Volume in drive C is MS-DOS 5 Volume Serial Number is 3B33-13D3 Directory of C'\TEMP [.] [..] TEST2.TXT TEST4.TXT
4 file(s) 467 bytes 54513664 bytes free
C'\TEMP>erase *.txt C'\TEMP>dir Volume in drive C is MS-DOS 5 Volume Serial Number is 3B33-13D3 Directory of C'\TEMP
�9 <DIR> 04/10/93 18:27 .. <DIR> 04/10/93 18:27
2 file(s) 0 bytes 54521856 bytes free
C.\TEMP>
TEST4.TXT
30.9 Copying files (coPY)
The COPY command is used to copy files. The format of the COPY com- mand is given next:
COPY SOURCE DESTINATION
where SOURCE is the name of the file to copy and DESTINATION is the name of the file, or directory, to copy to.
In Sample session 30.7 the user creates a directory named TEMP. Next, the user changes the directory to the TEMP sub-directory. Note that this di- rectory is empty. A file named TEST1. TXT is created using the DOS editor (EDIT). After this it is listed using the TYPE TEST1. TXT command line.
Next the directory is listed using D IR and then the COPY command is

Worksheet 15 497
used to copy the new created file to TEST2. TXT. A directory listing (DIR) then shows that there are now two files in this directory (TEST1. TXT and TEST2. TXT). Next, the first file (TEST1. TXT) is deleted using ERASE command.
Samplesession30.6 C:\TEMP>del * . t x t / p Volume in drive C is MS-DOS 5
m
Volume Serial Number is 3B33-13D3 Directory of C:\TEMP
[.] [..] 5 file (s)
TEST3.TXT TEST2.TXT 701 bytes
54509568 bytes free
TEST4.TXT
C:\TEMP>del *.txt /p C:\TEMP\TEST3.TXT, C:\TEMP\TEST2.TXT, C:\TEMP\TEST4.TXT,
Delete (Y/N)?n Delete (Y/N)?y Delete (Y/N)?n
C'\TEMP>dir/w Volume in drive C is MS-DOS 5 Volume Serial Number is 3B33-13D3 Directory of C'\TEMP
[.] [..] 4 file (s)
C" \TEMP>
TEST3.TXT 467 bytes
54513664 bytes free
TEST4.TXT
r'1 ~m% Sample session 30.7 C" \>mkdir temp C" \>cd temp C" \TEMP>dir Volume in drive C is MS-DOS 5 Volume Serial Number is 3B33-13D3 Directory of C'\TEMP
<DIR> 04/10/93 18" 27 <DIR> 04/10/93 18" 27
2 file(s) 0 bytes
61628416 bytes free C'\TEMP>edit testl.txt
C:\TEMP>type testl.txt This is a mail message from FRED to BERT regarding the usage of printers on the network.
Note that the printers will be switched off at the following times"
5pm - 6am Mon-Fri All Day Sat, Sun
BERT.
C'\TEMP> dir
Directory of C'\TEMP

498 DOS
�9 ~
TEST1
<DIR> 04/10/93 18:27 <DIR> 04/10/93 18:27
TXT 239 04/10/93 18:30 3 file(s) 239 bytes
61624320 bytes free
C:\TEMP>copy testl.txt test2.txt 1 file(s) copied
C'\TEMP>cEir
Volume in drive C is MS-DOS 5 Volume Serial Number is 3B33-13D3 Directory of C-\TEMP
�9 <DIR> 04/I0/93 18:27 <DIR> 04/10/93 18"27
TESTI TXT 239 04/10/93 18-30 TEST2 TXT 239 04/10/93 18"30
4 file(s) 478 bytes 61620224 bytes free
C'\TEMP>erase testl.txt
C" \TEMP>dir
Volume in drive C is MS-DOS 5 Volume Serial Number is 3B33-13D3 Directory of C'\TEMP
<DIR> 04/10/93 18:27 <DIR> 04/10/93 18:27
TXT 239 04/10/93 18:30 3 file(s) 239 bytes
61624320 bytes free C- \TEMP>

Worksheet 15
Worksheet 15 499
W15.1 Go to the top-level directory, then move around the file system looking in various directories. Try to determine the likely function of the directories.
Directory C- \DOS
Likely function DOS directory containing some DOS commands, help functions, system files, and so on
W15.2 Find all the files which have the D o e extension on the hard disk (hint. use the DI R / S command).
File(*.DOC} DOS. Doe
Directory C" \NOTES\DOeS\DOS
Find all the files on the hard disk with the BAT extension.
File (*.BAT) Directory AUTOEXEC . BAT C" \
W15.3
W15.4
Create a directory named TEMP on the hard disk.
[Command used:
Go into the directory you have just created.

500 DOS
[Command used:
W15.5 Create a file name PROG1.C (if you indent to use C) or P ROG1. PAS (if you indend to use Pascal) from the IDE editor, enter the following text and save the file.
Program 1.1 program progl(input,output) ; begin
writeln ( ' Hello' ) ; end.
C•Program B.I int main (void) {
printf ("Hello") ; }
W15.6 Check that the file just created exists using the DIR command
Does it exist" YES/NO
W15.7 View the contents of this file using TYPE.
[Are the contents correct: YES/NO
W15.8 Copy this file into a file named PROG2. C (or PROG2. PAS if the file created is PROG1. PAS) using the COPY command.
[Command used"
W15.9 Verify that the COPY command has worked by listing the direc- tory.
Has the file been copied correctly: YES/NO
Wlfi.10 View the contents of the newly created file using TYPE.
Are the contents correct: YES/NO
WlS.11 Insert a disk into one of the disk drives and format a floppy disk (if you have one).
Worksheet 15 501
[Command used: YES/NO
W15.12 Go to the floppy disk and copy the file PROGI.C (or PROG 1.PAS) from the C" \ TEMP directory and confirm that it has copied correctly.
[Command used:
WlS.13 Determine the Volume label of the hard disk you are using.
[Volume label:
W15.14 Determine the names that DOS will use for the following files/ directories"
Filename MY FILE 42 1.TEXT DOC$1001 .D ACC 91 92.WK1 BACKUP.$$1 1
m
DOCS.FRED. 1 MEMO FRED.200
m
DOS filename actually given MY FILE .TEX
W15.15 Copy the following files that should be in the top-level directory on the hard disk.
Copy from AUTOEXEC.BAT
CONFIG.SYS
Copy to AUTOEXEC . OLD CONFIG. OLD
Files copied okay: YES/NO
WlS.16 Make a directory named OLDBATS and copy the CONFIG.OLD and AUTOEXEC.OLD into this directory.
Files copied okay: YES/NO
files

Introduction
31.1 Introduction
A modem Personal Computer (PC) consists of a keyboard, a monitor, a mouse, a floppy disk drive, a hard disk drive and a system unit. An operating system allows the user to access these devices in an easy-to-use manner, as illustrated in Figure 31.1. Microsoft DOS (Disk Operating System) is a text- based system in which commands are entered via the keyboard to perform operations such as copying files and running programs.
Microsoft Windows is a program which presents an easy-to-use graphical interface to the PC hardware. It uses windows, icons, menus and pointers (WIMPs) to access application programs, disk drives, file systems, and so on. Most operations are conducted using a mouse instead of keyboard com- mands. The user is presented with a series of icons which represent applica- tion programs. It is far simpler to use than DOS as the information is pre- sented graphically. A major disadvantage of DOS is that the syntax and for- mat of the text command requires to be remembered.
Windows has gone through three major transformations, from the origi- nal Version 1.0 to the most widely available version to Version 3.1 (and Version 3.1 l) and now to Windows 95/NT. It is installed on almost every new PC sold and is becoming the de-facto standard for PC packages. This and the next chapter discuss Windows 3.1/3.11.
f /
/
Text entryl interface (DOS) \
\ \
f
computer hardware
J
\ \
\
"~-~Graphical user / interface
(Windows) / /
Figure 31.1 Using an operating system to access hardware

506 Windows 3.x (Introduction)
31.2 Running Windows
Windows 3.x is a program which is run from DOS. It will either start auto- matically when the PC is switched on, or can be run by typing WIN at the DOS prompt and pressing <RETURN>.
C : \ > WIN
31.3 Windows desktop
After Windows is started the screen displays the Microsoft start-up screen for a short time. This displays the version number of the software. The main Windows desktop is displayed after this. On top of the desk is the p r o g r a m M a n a g e r window. It contains a number of windows and icons within it. Programs and applications are placed into groups. These groups contain icons which relate to the program. The inactive windows are displayed as group icons. There are four of these, as shown in Figure 31.2. A window is made active by double clicking on the group icon. This expands the window to its normal form.
Figure 31.2 Main desktop screen
A program which has been running but is currently paused is shown as an icon at the bottom of the screen. In the example screen in Figure 31.3 there are 4 active groups, these are: Accessor ies , Main, Msoffice and Applications. Within the Accessories group there are 12 programs, these are" Write, Paintbrush, Terminal, Notepad, Recorder, Card-

Window items 507
file, Calculator, Clock, Object Packager, Character Map- per, Media Player and Sound Recorder.
The current active window has a blue title bars whilst an inactive win- dow has a grey title bar. Only icons within an active window can be se- lected.
31.4 Window items
Windows are made up to four main parts, these are:
�9 Ma in title bar. Every window has an identification title at the top of it, as shown in Figure 31.3.
�9 M e n u bar. Some windows have menu options to choose from, as shown in Figure 31.4. Hot-keys are often underlined.
�9 Scroll bar. When only part of a window is displayed a scroll bar (often called a thumbnail) will appear. Holding down the mouse button on the small square within the scroll bar moves the contents of the window.
�9 Cont ro l menu box. As shown in Figure 31.3.
Figure 31.3 A basic group window
Figure 31.4 Menu bar on a window
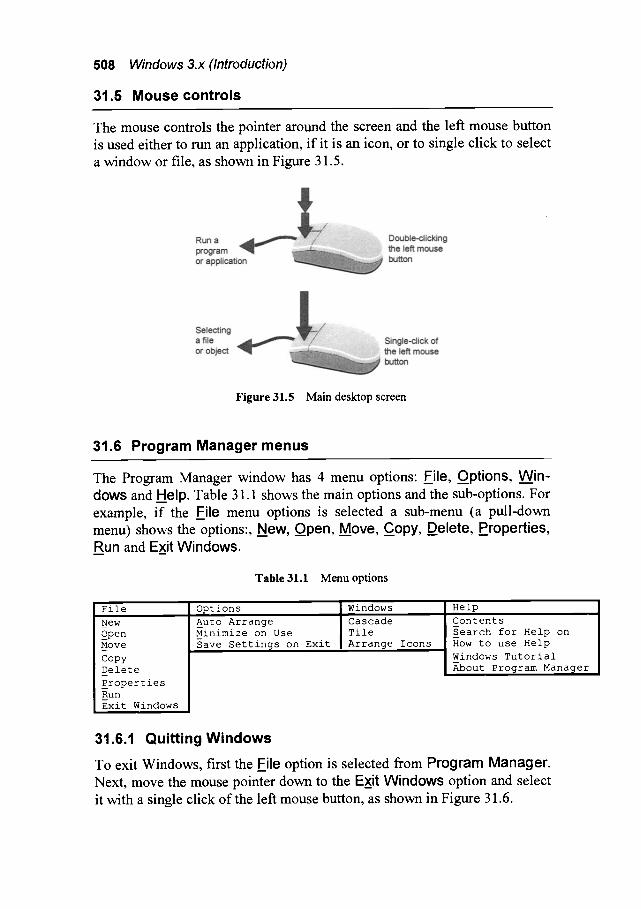
508 Windows 3.x (Introduction)
31.5 Mouse controls
The mouse controls the pointer around the screen and the left mouse button is used either to rtm an application, if it is an icon, or to single click to select a window or file, as shown in Figure 31.5.
Figure 31.5 Main desktop screen
31.6 Program Manager menus
The Program Manager window has 4 menu options: File, Options, Win- dows and Help. Table 31.1 shows the main options and the sub-options. For example, if the File menu options is selected a sub-menu (a pull-down menu) shows the options', New, Open, Move, Copy, Delete, Properties, Run and Exit Windows.
m
Table 31.1 Menu options
I file New Open Move
Copy Delete
Properties Run Exit Windows
Options
Auto Arrange Minimize on Use Save Settings on Exit m
Windows
Cascade Tile Arrange Icons
~elp
Contents m
Search for Help on How to use Help D
Windows Tutorial About Program Manager
31.6.1 Quitting Windows
To exit Windows, first the _.File option is selected from Program Manager. Next, move the mouse pointer down to the Exit Windows option and select it with a single click of the left mouse button, as shown in Figure 31.6.
Moving and resizing a window 509
Figure 31.6 Quitting Windows
31.6.2 Getting help
The best method of getting help is to refer to the user manual. If that is not available then there is on-line help. If the Help menu option is selected on the Program Manager menu displays the options Contents , S e a r c h for Help on, How to use Help, __Windows Tutorial and About Program Manager.
31.7 Moving and resizing a window
The options used to change the windows size are:
�9 Maximizing a window. A window can be made to fill the complete
screen by selecting the at the top right-hand comer of the screen. �9 Minimizing a window. A window can be minimized to an icon using
�9 Making a window smaller. If a window is filling the complete screen it
can be made into a smaller window by selecting �9 Moving a window. A window can be moved by placing the mouse
pointer on the blue title bar. The left mouse button is pressed down while moving the window to its required position, then the mouse button is re- leased.
�9 Resizing a window. A window can be resized by placing the mouse pointer either at one of the comers or the sides. The pointer shape should change when it is placed over the border of the windows. To expand (or contract) the window vertically the mouse pointer is placed either at the top or bottom border. The mouse is then pressed while moving the border

510 Windows 3.x (Introduction)
of the windows. When the required position is found the mouse button is released. A similar operation can be conducted to expand (or contact) horizontally.
31.8 Closing a window with the Control menu
The Control menu is activated by selecting the top left-hand button on the window. This menu contains the options: _Restore, Move, Size, Minimize, Maximize, Close, Switch to. The Restore, Move, Size, Minimize and Maximize options mimic operations that are conducted by the mouse. A useful option is the Close which exits from the window and closes it down, this is shown in Figure 31.7.
31.9 Exercises
Figure 31.7 Control menu
Conduct the following steps filling in the required information.
31.9.1 Switch PC on. Completed successfully [ ]
31.9.2 Start Microsoft Windows and when it shows the initial start-up screen observe the version number of the software.
Version Number: Version 3.0 [ ] Version 3.1 [ ] (Tick as necessary) Version 3.11 [ ]
31.9.3 Identify each of the active and inactive groups within the Program Manager.
Active groups:

Exercises 511
Inactive groups:
31.9.4 Identify all programs within three of the groups.
1. Group's name:
Programs:
2. Group' s name:
Programs:
3. Group's name:
Programs:
31.9.5 Resize the Program Manager window so that it fills the screen. Tick box if completed successfully.
Completed successfully [ ]
31.9.6 Resize the Program Manager window so that it is shown at its normal position on the screen.
Completed successfully [ ]
31.9.7 Iconize the Program Manager window and then restore it to its normal position.
Completed successfully [ ]
31.9.8 Expand the Program Manager window horizontally, then restore it to its normal position.
Completed successfully [ ]
512 Windows 3.x (introduction)
31.9.9 Contract the Program Manager windows vertically, then restore it to its normal position.
Completed successfully [ ]
31.9.10 Find the following application programs, run them and then exit. Tick box if completed successfully.
Completed successfully [ ]
Completed successfully [ ]
31.9.11 Exit from Windows using the _.File menu option in the Program Manager.
Operations used:
31.9.12 Start Windows again and this time exit using the Control menu.
Operations used:
31.9.13 There is an on-line help facility within Windows. To select this use the Help menu option within the Program Manager. Use this facility to find help on the following topics.
quitting windows:
deleting groups:
starting applications"
deleting programs"

File Management
32.1 Introduction
The Main group contains important application programs which allow the user access to the file system, to setup a different environment, to setup dif- ferent computer hardware, gain access to DOS, etc. It contains C o n t r o l Panel, Print Manager, File Manager, ClipBook Viewer, MS-
DOS Prompt, Windows Setup, PIF Editor and Sysedit. The
icons contained within Main are shown in Figure 32.1. C o n t r o 1 Pan e 1 sets up the Windows environment and can be used to
change the colours of the windows, the fonts used, etc. The P r i n t Man- a g e r program checks the status of files which have been printed. F i l e M a n a g e r allows access to the file system and can be used to copy or move files from one directory to another or from one disk drive to another. The MS-DOS Prompt program gives a DOS window.
Control Print F i le ClipBook Panel Manager Manager Viewer
MS-DOS Windows PIF Editor Sysedit Prompt Setup
Figure 32.1 Main group
32.2 File manager
The file manager is identified by the filing cabinet icon. It is opened by double clicking the cabinet icon. Files and directories are displayed with their file name and an icon which indicates the file type. It employs a select, drag and put technique where a file (or directory), once selected, can be

514 Windows 3.x (File management)
dragged into another directory or onto any disk drive. Note that the file manager in Windows 3.11 differs slightly from the file manager in Windows 3.1. Figure 32.2 shows the Windows 3.11 file manager. The main difference is the icons to the right of the current disk drive name.
Figure 32.2 File manager
A directory is identified with the I~ icon. Files have three main icons
associated with them. Application programs are identified with a I '~, a
document file by ~ and any other file with a ~ . Figure 32.3 shows a sample directory listing.
A document file is a file which when double clicked will start an associ- ated application. Table 32.1 shows some typical file extensions and the ap- plication which is run when the file is double clicked. For example, a file with a d o c extension will run a word processor, a bmp extension will start
the paintbrush package, and so on.
Table 32.1 File associated with application
Fi le exte~'}'"on .... Descr ip t ion . . . . . . . . . . . . . . . . . . . . .i[i['[ .... App l i ca t i on s tar ted way Sound file Sound package t x t Text file Notepad doc Document Word processor w k 3 Lotus 123 worksheet Lotus 123 wr i Write document Write h l p Help file Windows help pcx Graphics file Paintbrush x l s Microsoft Excell worksheet Microsoft Excell p p t Microsoft Powerpoint presentation Microsoft Powerpoint bm p ......................... Bit-mapped,graphics file . . . . . . . . . Paintbrush ...............

Goto directory above
Directory icon
Other files
Document files. These automatical start the associated application
it,, ~cdploy ~gemes t~3ini ~ini2 ~ini3 ~msapps ~new ~system ~temp ~vgautil ~win386.swp i~1 field.bmp
File manager 515
Program files. These files start applications
Filename File extension
I m386.exe I-'1 pmsever.scr I-'1 moricons.dll ~mpleyer.exe ~progmen.exe
beetfive.wev ~msheerts.exe I~1 schdplus.hlp I~1 ree.dme.wri [~l fexopt.dll ~cordfile.exe I~1 gun.wev ~fexview.exe
~schdplus.exe ~ jamesbtw.wav firework.way ~ winfile.hlp
Figure 32.3 File manager
32.2.1 Selecting a drive
A disk drive is selected with a single click on one of the disk icons above the directory listing or by selecting Disk--)Select drive .... In the example in Figure 32.4 there are three drives, a floppy disk on the A- drive, a hard-disk on the C" drive and a CD-ROM on the D- drive. If there are any network drives these will also be displayed.
32.2.2 Selecting a directory
A directory is selected by a single click on the directory icon (or on the
directory name). The open file icon ( ~ ) then shows which directory is currently open; the directory display window displays the contents of this directory. An example of changing the current directory is shown in Figure 32.5. In this example the user has selected to list the contents of the top- level directory on the C: drive. Next the mouse pointer is placed over the d o e s directory which is then opened with a single click of the left mouse button. After this the a d m i n directory is opened. A directory can be closed by single mouse button click when it is open (another click will open it again).
32.2.3 Formatting a disk
A floppy disk must be formatted before it can store files. Some disks are pre-formatted when they are purchased, but others required to be formatted before they are used. Care must be taken when formatting a disk as the cur- rent contents of the disk will be erased.
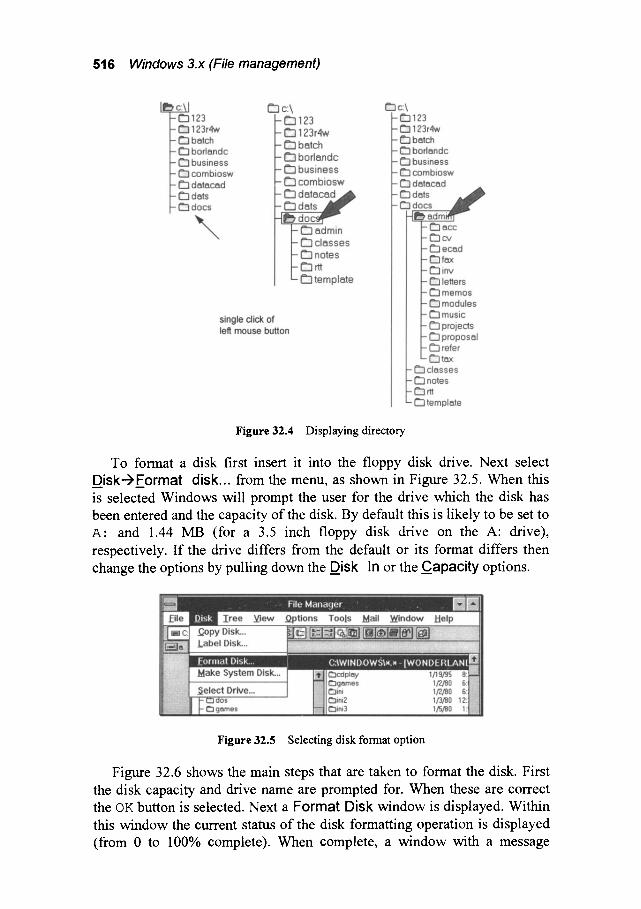
516 Windows 3.x (File management)
Figure 32.4 Displaying directory
To format a disk first insert it into the floppy disk drive. Next select Disk--)_Format disk.., from the menu, as shown in Figure 32.5. When this is selected Windows will prompt the user for the drive which the disk has been entered and the capacity of the disk. By default this is likely to be set to A" and 1.44 MB (for a 3.5 inch floppy disk drive on the A: drive), respectively. If the drive differs from the default or its format differs then change the options by pulling down the Disk In or the Capacity options.
Figure 32.5 Selecting disk format option
Figure 32.6 shows the main steps that are taken to format the disk. First the disk capacity and drive name are prompted for. When these are correct the OK button is selected. Next a Format Disk window is displayed. Within this window the current status of the disk formatting operation is displayed (from 0 to 100% complete). When complete, a window with a message

File manager 517
Creat ing root directory will be displayed. After this the formatted disks' capacity is displayed and the user is prompted as to whether another disk is to be formatted. If no more disks are to be formatted then the No option is selected else __Yes is selected. Note that the C a n c e l option on any of the format status windows can be selected to cancel the format process.
Figure 32.6 Formatting a floppy disk
32.2.4 Moving files on the same disk drive
Microsoft Windows uses a select, drag and drop procedure when copying or moving files or directories. Moving files (copying them but deleting the original file) can be achieved by moving the mouse pointer over the file and
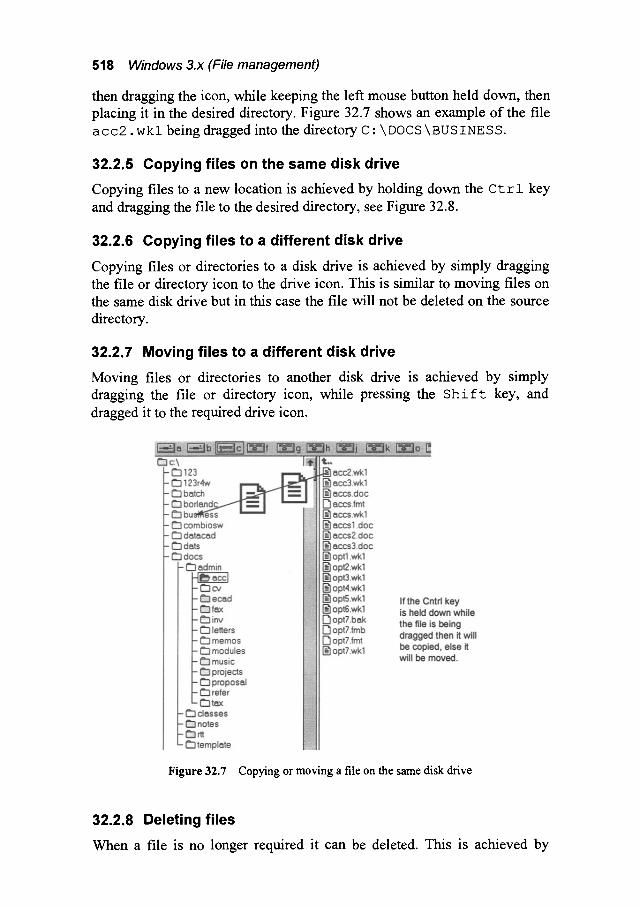
518 Windows 3.x (File management)
then dragging the icon, while keeping the left mouse button held down, then placing it in the desired directory. Figure 32.7 shows an example of the file a c e 2 . wkl being dragged into the directory C: \DOCS\BUSINESS.
32.2.5 Copying files on the s a m e disk drive
Copying files to a new location is achieved by holding down the C t r 1 key and dragging the file to the desired directory, see Figure 32.8.
32.2.6 Copying files to a different disk drive
Copying files or directories to a disk drive is achieved by simply dragging the file or directory icon to the drive icon. This is similar to moving files on the same disk drive but in this case the file will not be deleted on the source directory.
32.2.7 Moving files to a different disk drive
Moving files or directories to another disk drive is achieved by simply dragging the file or directory icon, while pressing the S h i f t key, and dragged it to the required drive icon.
Figure 32.7 Copying or moving a file on the same disk drive
32.2.8 Deleting files
When a file is no longer required it can be deleted. This is achieved by

Exercises 519
clicking on the file to be deleted and pressing the De 1 key on the keyboard. A message asking for confirmation should appear, as shown in Figure 32.8. If the file is to be deleted then the OK button is selected else C a n c e l . The confirmation window for deleting a directory is different, an example is shown in Figure 32.9. After the user selects the directory to delete a confir- mation is displayed with either __Yes or Yes t o A l l . If the user selects Yes then each file within the directory will be prompted for deletion con- firmation. If Yes t o A l l is selected then all files within the directory (and sub-directories) will be deleted without any confirmation.
32.2.9 Running Windows and DOS applications
Running a file is achieved by placing the mouse pointer over the application file and double clicking the left mouse button. If it is a Microsoft Windows application it will be run as a normal Windows application, else if it has an application attached to it then the associated application will be rtm and the selected file loaded into it. For example, if it were a document file (.DOC) then a word processor will be started with the selected document loading into it.
If a DOS-based application is selected then a DOS screen will appear which will then load the program (if it can).
Figure 32.8 Delete confirmation
32.3 Exercises
Figure 32.9 Delete directory confirmation
Conduct the following steps filling in the required information.
32.3.1 Start Microsoft Windows. Completed successfully [ ]
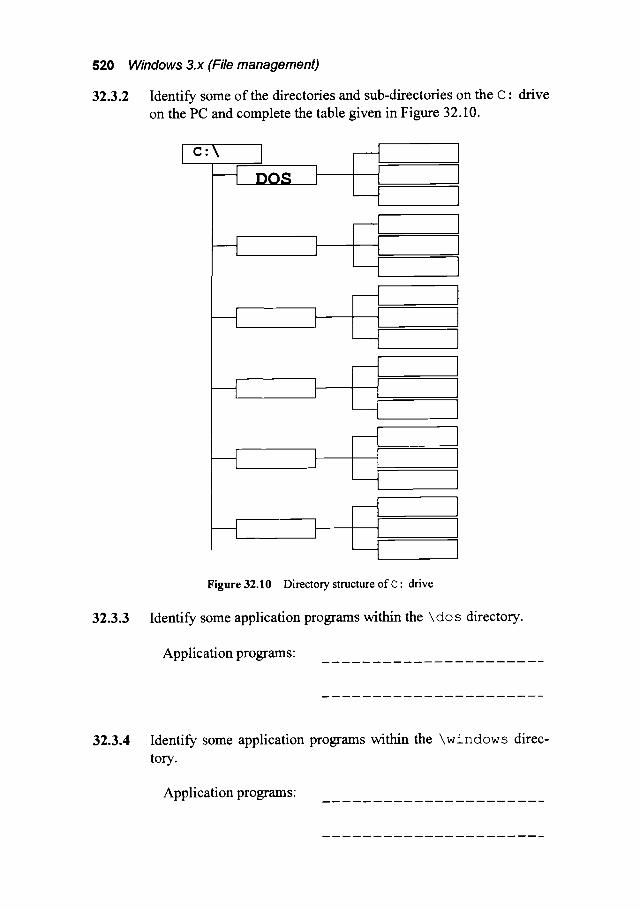
520 Windows 3.x (File management)
32.3.2 Identify some of the directories and sub-directories on the C" drive on the PC and complete the table given in Figure 32.10.
I c'\ I
DOS I !
I t
I !
I I
! I
I ! I I I i J I I i J i i i I I ! J I J ! I [ J l I ! I ! [ I ! I i I I ! I
Figu re 32.10 Directory structure of C" drive
32.3.3 Identify some application programs within the \ dos directory.
Application programs:
32.3.4 Identify some application programs within the \windows direc- tory.
Application programs"

Exercises 521
32.3.5 Identify some files which are in the \WINDOWS directory which will run application programs
Files:
32.3.6 On the C: drive f'md 5 graphics files (in any directory).
Files:
32.3.7 On the C: drive find 5 document files (in any directory).
Files"
32.3.8 Insert a floppy disk in the A" drive and format it.
Total disk space:
32.3.9
32.3.10
32.3.11
Create a document file either by running Cardfile (within the Main group) or nJnning w r i t e (within Accessor ies ) or using a word processor such as Word f o r Windows or ~ i - P r o . Enter some text into the document then save it in the C" \ w i n d o w s directory with the name DOC1. DOC.
Completed successfully [ ]
Verify, with File Manager , that this file is in the \windows directory.
Completed successfully [ ]
Copy the file DOC 1. DOC to the floppy disk in the A: drive. Completed successfully [

522 Windows 3.x (File management)
32.3.12 Verify, with File Manager, that the file has been copied to the A" drive. If it is in the wrong place move it.
Completed successfully [ ]
32.3.13 Create a directory on the C- drive, named g emp, below the top- level directory using the File -->Create Directory menu option.
Completed successfully [ ]
32.3.14 Verify, with File Manager, that this directory exists. If it is in the wrong place move it.
Completed successfully [ ]
32.3.15 Copy the file DOC 1. DOC to the temp directory. Completed successfully [
32.3.16 Verify, with File Manager, that the file is in the t emp directory. Completed successfully [
32.3.17 There is an on-line help facility for the help manager within Win- dows. To select this use the Help menu option within the File Manager. Use this facility to find help on the following topics.
selecting files:
sorting files:
copying disks"
starting applications:

Windows 951NT
33.1 Introduction
Windows NT has provided an excellent network operating system. It com- municates directly with many different types of networks, protocols and computer architectures. Windows NT and Windows 95 have the great ad- vantage of other operating systems in that they have integrated network support. Operating systems now use networks to make peer-to-peer connec- tions and also connections to servers for access to file systems and print servers. The three most widely used operating systems are MS-DOS, Micro- soft Windows and UNIX. Microsoft Windows comes in many flavours; the main versions are outlined below and Table 33.1 lists some of their attrib- utes.
�9 Microsoft Windows 3 . x x - 16-bit PC-based operating system with lim- ited multitasking. It runs from MS-DOS and thus still uses MS-DOS functionality and file system structure.
�9 Microsoft Windows 95 - robust 32-bit multitasking operating system (although there are some 16-bit parts in it) which can run MS-DOS ap- plications, Microsoft Windows 3.xx applications and 32-bit applications.
�9 Microsoft Windows NT - r o b u s t 32-bit multitasking operating system with integrated networking. Networks are built with NT servers and clients. As with Microsoft Windows 95 it can run MS-DOS, Microsoft Windows 3.x applications and 32-bit applications.
33.2 Sewers, workstations and clients
Microsoft Windows NT is a 32-bit, pre-emptive, multitasking operating system. One of the major advantages it has over UNIX is that it can run PC- based software. A Windows NT network normally consists of a server and a number of clients. The server provides file and print servers as well as pow- erful networking applications, such as electronic mail applications, access to local and remote peripherals, and so on.
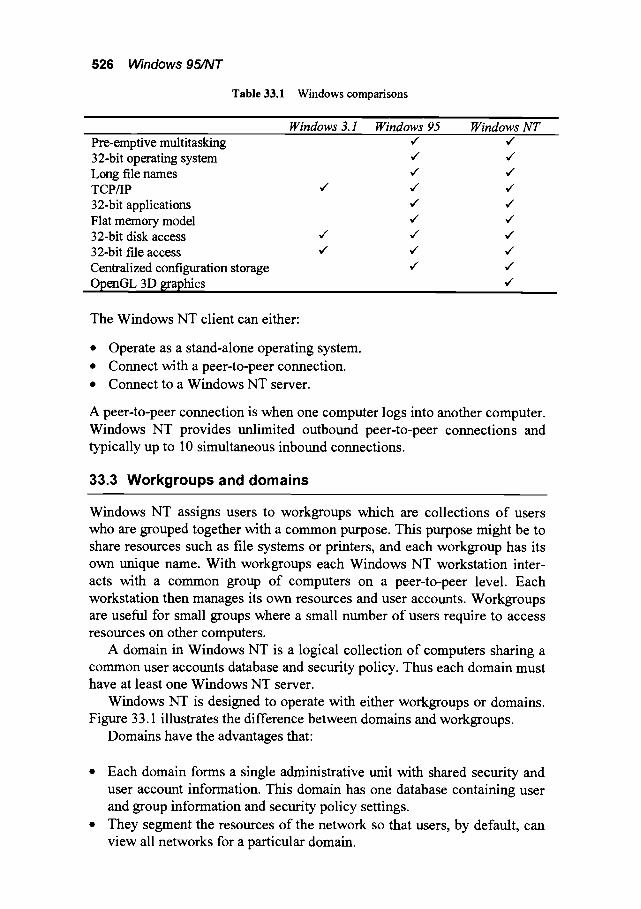
526 Windows 95/NT
Table 33.1 Windows comparisons
Windows 3.1 Windows 95 Windows NT Pre-emptive multitasking 32-bit operating system Long file names TCP/IP 32-bit applications Flat memory model 32-bit disk access 32-bit file access Centralized configuration storage OpenGL 3D graphics
r
r r
r r r r r r r r r
r r r r r r r r r r
The Windows NT client can either:
�9 Operate as a stand-alone operating system.
�9 Connect with a peer-to-peer connection.
�9 Connect to a Windows NT server.
A peer-to-peer connection is when one computer logs into another computer. Windows NT provides unlimited outbotmd peer-to-peer connections and typically up to 10 simultaneous inbotmd connections.
33.3 Workgroups and domains
Windows NT assigns users to workgroups which are collections of users who are grouped together with a common purpose. This purpose might be to share resources such as file systems or printers, and each workgroup has its own unique name. With workgroups each Windows NT workstation inter- acts with a common group of computers on a peer-to-peer level. Each workstation then manages its own resources and user accounts. Workgroups are useful for small groups where a small number of users require to access resources on other computers.
A domain in Windows NT is a logical collection of computers sharing a common user accounts database and security policy. Thus each domain must have at least one Windows NT server.
Windows NT is designed to operate with either workgroups or domains. Figure 33.1 illustrates the difference between domains and workgroups.
Domains have the advantages that:
�9 Each domain forms a single administrative unit with shared security and user account information. This domain has one database containing user and group information and security policy settings.
�9 They segment the resources of the network so that users, by default, can view all networks for a particular domain.
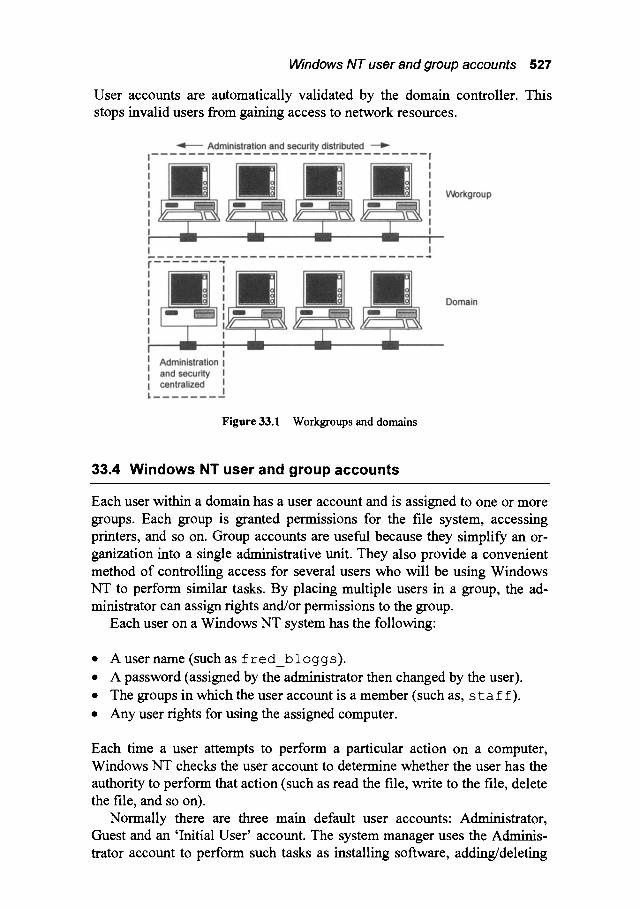
Windows NT user and group accounts 527
User accounts are automatically validated by the domain controller. This stops invalid users from gaining access to network resources.
Figure 33.1 Workgroups and domains
33.4 Windows NT user and group accounts
Each user within a domain has a user account and is assigned to one or more groups. Each group is granted permissions for the file system, accessing printers, and so on. Group accounts are useful because they simplify an or- ganization into a single administrative unit. They also provide a convenient method of controlling access for several users who will be using Windows NT to perform similar tasks. By placing multiple users in a group, the ad- ministrator can assign rights and/or permissions to the group.
Each user on a Windows NT system has the following:
�9 A user name (such as fred bloggs). �9 A password (assigned by the administrator then changed by the user).
�9 The groups in which the user account is a member (such as, staff).
�9 Any user rights for using the assigned computer.
Each time a user attempts to perform a particular action on a computer, Windows NT checks the user account to determine whether the user has the authority to perform that action (such as read the file, write to the file, delete the file, and so on).
Normally there are three main default user accounts: Administrator, Guest and an 'Initial User' account. The system manager uses the Adminis- trator account to perform such tasks as installing software, adding/deleting

528 Windows 95/NT
user accounts, setting up network peripherals, installing hardware, and so o n .
Guest accounts allow occasional users to log on and be granted limited rights on the local computer. The system manager must be sure that the ac- cess rights are limited so that hackers or inexperienced users cannot do damage to the local system.
The 'Initial User' account is created during installation of the Windows NT workstation. This account, assigned a name during installation, is a member of the Administrator's group and therefore has all the Administra- tor's rights and privileges.
After the system has been installed the Administrator can allocate new user accounts, either by creating new user accotmts, or by copying existing accounts.
33.5 File systems
Windows NT supports three different types of file system"
�9 FAT (file allocation t a b l e ) - as used by MS-DOS, OS/2 and Windows NT/95. A single volume can be up to 2 GB.
�9 HPFS (high performance file sys tem)- a UNIX-style file system which is used by OS/2 and Windows NT. A single volume can be up to 8 GB. MS-DOS applications cannot access files.
�9 NTFS (NT file sys tem)- as used by Windows NT. A single volume can be up to 8 GB. MS-DOS applications, themselves, cannot access the file system but they can when run with Windows NT.
The FAT file system is widely used and supported by a variety of operating systems, such as MS-DOS, Windows NT and OS/2. If a system is to use MS-DOS it must be installed with a FAT file system.
33.5.1 FAT
The standard MS-DOS FAT file and directory-naming structure allows an 8- character file name and a 3-character file extension with a dot separator ( . ) between them (the 8.3 file name). It is not case sensitive and the file name and extension cannot contain spaces and other reserved characters, such as:
- - ^ -k- " ) " / \ �9 ; I , . �9
With Windows NT and Windows 95 the FAT file system supports long file names which can be up to 255 characters. The name can also contain multi- ple spaces and dot separators. File names are not case sensitive, but the case of file names is preserved (a file named FredDocument.XYz will be

File systems 529
displayed as FredDocument.XYz but can be accessed with any of the characters in upper or lower case).
Each file in the FAT table has four attributes (or properties): read-only, archive, system and hidden (as shown in Figure 33.2). The FAT uses a linked list where the file's directory entry contains its beginning FAT entry number. This FAT entry in turn contains the location of the next cluster if the file is larger than one cluster, or a marker that designates this is included in the last cluster. A file which occupies 12 clusters will have 11 FAT en- tries and 10 FAT links.
The main disadvantage with FAT is that the disk is segmented into allocated units (or clusters). On large-capacity disks these sectors can be relatively large (typically 512 bytes/sector). Disks with a capacity of between 256 MB and 512 MB use 16 sectors per cluster (8 KB) and disks from 512 MB to 1 GB use 32 sectors per cluster (16 KB). Drives up to 2 GB use 64 sectors per cluster (32 KB). Thus if the disk has a capacity of 512 MB then each cluster will be 8 KB. A file which is only 1 KB will thus take up 8 KB of disk space (a wastage of 7 KB), and a 9 KB file will take up 16 KB (a wastage of 7 KB). Thus a file system which has many small files will be inefficient on a cluster-based system. A floppy disk normally use 1 cluster per sector (512 bytes).
Figure 33.2 File attributes
Windows 95 and Windows NT support up to 255 characters in file names; unfortunately, MS-DOS and Windows 3.xx applications cannot read them. To accommodate this, every long file name has an autogenerated short file name (in the form x x x x x x x x . YYY). Table 33.2 shows three examples. The conversion takes the first six characters of the long name then adds a -~number to the name to give it a unique name. File names with the same

530 Windows 95/NT
initial six characters are identified with different numbers. For example, Program Files and Program Directory would be stored as PRO- GRA ~ 1 and PROGRA~2, respectively. Sample listing 33.1 shows a listing
from Windows INT. The le~-hand column shows the short file name and the far right-hand column shows the long file name.
Table 33.2 File name conversions
.Long file name Program Files
Triangular .bmp
Fredte~l. 1
Short file name PROGRA ~ 1 TRAING~ 1 .BMP FRED. TEXT. 1
Sample listing 33.1 EXAMPL~I DOC 4,608 05/11/96 EXAMPL~2 DOC 4,608 05/11/96 EXAMPL~3 DOC 4,608 05/11/96 EXAMPL~4 DOC 4,608 05/11/96 EXAMPL~5 DOC 4,608 05/11/96 EXAMPL~6 DOC 4,608 05/11/96 EXAMPL~7 DOC 4,608 05/11/96 EXAMPL~8 DOC 4,608 05/11/96 EXAMPL~9 DOC 4,608 05/11/96 EXAMP~I0 DOC 4,608 05/11/96
23:36 Example Document l.doc 23:36 Example Document 2.doc 23:36 Example Document 3.doc 23:36 Example Document 4.doc 23:36 Example Document 5.doc 23:36 Example Document 6.doc 23:36 Example Document 7.doc 23:39 Example assignment A.doc 23:40 Example assignment B.doc 23:40 Example assignment C.doc
33.6 Running Windows 95 and NT
Windows 95 and NT are operating systems in their own right and thus do not require DOS. The version of DOS which is run in Window 95/NT is an emulated version.
Sometimes Windows NT/95 develops a problem when starting the com- puter. If this occurs then it can be started in a safe mode, which does not load network support and using the default settings (VGA monitor, no net- work, Microsoft mouse driver, and the minimum device drivers required to start Windows). This is achieved by pressing the F8 key when Windows is being booted. Normally the user then selects S e t t i n g s and then Con- t r o 1 P a ne 1 to change the systems settings.
Often the problem with the system start-up is to do with either AUTOEXEC. BAT or CONFIG. SYS files. If this is the case the Command Prompt Only operation setting can be selected when starting the com-
puter. This option bypasses the two system files. Otherwise, the Step-by-
Step Confirmation can be selected, which allows the user to load a
specific system driver. Another method of fixing the system is to boot the system with a
bootable DOS disk. The user can then try to fix the system. Note that this can only be done if the disk has been formatted as FAT.

33.7 Basic Windows NT/95
Basic Windows 95/NT 531
There are many enhancements on Windows NT/95 as opposed to previous versions. The main differences are:
Start button and taskbar. The task bar appears at the bottom of the screen and it contains the Start button, which can be used to quickly start a program. The taskbar also shows the programs which are currently running and it can thus be used to switch between programs.
Folders. Documents and programs are stored in folders. In DOS and previous versions of Windows these folders were called directories. The desktop. The desktop is the area of screen which appears when Windows is started. Figure 33.3 shows an example. It can be customized by adding program shortcuts, documents, printers, and the layout and style of the background. To adjust settings such as desktop colour and background, use your right mouse button to click anywhere on the desk- top, and then click Properties. Figure 33.4 shows an example of the Properties window.
Network Neighborhood. Windows 95/NT has extensive support for networking. If a network is present then the Network Neigh- borhood icon appears on your desktop. The user can then browse the entire network by double-clicking the icon.
My Computer. The My Computer icon allows quick and easy access to the computer. The user can browse through the files and folders by double-clicking the My Computer icon.
�9 Windows Explorer. This is a program that allows the user to view both the hierarchy of folders on your computer and all the files and folders in each selected folder. It is typically used to copy and move files, where files can be dragged into a specific folder.
�9 Properties. Each icon which appears in Windows 95/NT has associated properties. It views the properties then the right mouse button clicks on the item, and then clicks Properties from the pop-up menu.
�9 Shortcut menus. A shortcut menu is displayed when the user clicks the right mouse button on an item. This menu allows the user to open, copy or delete the item.

532 Windows 95/NT
Close, Minimize, and Maximize buttons. Each window has a close button in the upper-fight comer which, when clicked, will close the window and quit the program. The windows can also minimize or maximize .
The current active window has a blue title bar whilst an inactive window has a grey title bar. Only icons within an active window can be selected.
Figure 33.3 Example desktop screen
Figure 33.4 Example desktop screen

33.8 Mouse controls
Moving and resizing a window 533
The mouse controls the pointer around the screen. As with previous versions of Windows, a double click of the left mouse button on an icon is used to either run an application and a single click to select a window or file.
33.9 Quitting Windows
The user must shut Windows down before switching off the computer. To do this the user selects the Shut Down... option from the Start bar. Then the user will be given a number of options, as shown in Figure 33.5. If the user is to quit and switch off then the Shut down the computer option is selected and Yes is selected.
Figure 33.5 Quitting Windows
33.9.1 Getting help
The best method of getting help is to refer to the user manual. If that is not available then there is on-line help. The on-line manual is available by selecting the help manual icon.
33.10 Moving and resizing a window
The option used to change the windows size are"
�9 Maximizing a window. A window can be made to fill the complete
screen by selecting the ~ at the top right-hand comer of the screen. �9 Minimizing a window. A window can be minimized to an icon using

534 Windows 95/NT
�9 Making a window smaller. If a window is filling the complete screen it
can be made into a smaller window by selecting ~ . �9 Moving a window. A window can be moved by placing the mouse
pointer on the blue title bar. The left mouse button down is pressed while moving the window to its required position, then the mouse button is re- leased.
�9 Resizing a window. A window can be resized by placing the mouse pointer either at one of the comers or the sides. The pointer shape should change when it is placed over the border of the windows. To expand (or contract) the window vertically the mouse pointer is placed either at the top or bottom border. The mouse is then pressed while moving the border of the windows. When the required position is found the mouse button is released. A similar operation can be conducted to expand (or contract) horizontally.
33.11 Closing a window with the Control menu
The Control menu is activated by select the top left-hand button on the win- dow. This menu contains the options: Restore, Move, Size, Minimize, Maximize and Close. The Restore, Move, Size, Minimize and Maximize options mimic operations that are conducted by the mouse. A useful option is the Close which exits from the window and closes it down; this is shown in Figure 33.6.
Figure 33.6 Control menu
33.12 Start
The Start button at the bottom left-hand side is used to quickly rtm applica- tion programs. An example Start bar is shown in Figure 33.7.

Running DOS 535
Figure 33.7 Example start options
33.13 My Computer
The My Computer window allows access to local disks, such as the floppy disk and hard disks, printers, CD-ROM, and so on. Figure 33.8 shows an example window.
Figure 33.8 Example My Computer
33.14 Running DOS
Windows NT/95 runs an emulated version of DOS. This is typically used to run DOS-based program and also to run DOS commands. Figure 33.9 shows

536 Windows 95/NT
how a DOS window is initiated. It can either run in a window or full-screen. Figure 33.10 shows a sample DOS window.
Figure 33.9 Selecting MS-DOS Prompt
Figure 33.10 DOS window

Exercises 537
33.15 Windows 951NT network drives
Windows NT and 95 displays the currently mounted network drives within the group My Computer. Figure 33.11 shows drives which are either local (C: D: and E:) or mounted using NetWare (F: G: and so on). Windows NT and 95 also automatically scan the neigboufing networks to find network servers. An example is shown in Figures 1.12 and 1.13. Figure 33.13 shows the currently mounted servers (such as, EECE_I) and by selecting the Global Network icon all the other connected local servers can be shown.
Figure 33.11 Mounted network and local drives
Figure 33.12 Network neighbourhood
33.16 Exercises
Conduct the following steps filling in the required information.
33.16.1 Windows version. Windows 95 [ ] Windows NT [ ] Other [ ]
33.16.2 Networked computer. Yes [ ] No [ ]

538 Windows 95/NT
Figure 33.13 Local neighbourhood servers
33.16.3 Identify each of the icons on the desktop:
33.16.4 Select My Computer and resize it so that it fills the screen. Tic box if complete successfully.
Completed successfully [ ]
33.16.5 Resize My Computer so that it is shown at its normal position on the screen.
Completed successfully [ ]
33.16.6 Iconize My Computer and then restore it to its normal position.
Completed successfully [ ]
33.16.7 Expand My Computer horizontally, then restore it to its normal position.
Completed successfully [ ]
33.16.8 Contract My Computer window vertically, then restore it to its normal position.
Completed successfully [ ]

Exercises 539
33.16.9 Find the following application programs, rtm them and then exit. Tic box if complete successfully.
Completed successfully [ ]
Completed successfully [ ]
Completed successfully [ ]
Completed successfully [ ]
Completed successfully [ ]
33.16.10 Open a DOS window and move around the file system. List some of the directories on the system:
33.16.11 Exit from Windows. Completed successfully [ ]
33.16.12 Start Windows again. Completed successfully [ ]
33.16.13 There is an on-line help facility within Windows. To select this, use the Help menu option within the Program Manager. Use this facility to find help on the following topics.
Quitting windows:
Deleting folders:
Starting applications:
Deleting programs:
Extra Windows
34.1 Saving important set-up files
Windows 3.x and Windows 95/NT store important program configuration information in IN/file. These are normally either stored in the default win- dows directory or in the home directory of the application. The important files for Windows configuration are:
�9 SYSTEM. INI. This contains information on the configuration of various programs and also programs which are initiated when Windows is started.
�9 WIN. INI. This contains information of the desktop, such as the groups which are displayed, their position on the desktop and their size.
It is important to backup the initialization files as these can be easily modi- fied by mistake. Initialization files have a I NI extension and are stored in the \WINDOWS directory. To make a backup of these files create a directory named IYI as a subdirectory of the \WINDOWS directory can copy these INI files into it. If one of these files is modified by mistake it is a simple task to copy an older version back into the \WINDOWS directory. This pro- cedure is shown in Test run 34.1.
Testrua34.1 C'\WINDOWS>dir *.ini /w Volume in drive C is MS-DOS 5 Volume Serial Number is 3B33-13D3 Directory of C-\WINDOWS
CONTROL.INI MOUSE.INI MSD.INI SYSTEM.INI ORIG WIN.INI WINFILE.INI
m
PROGMAN.INI MTFONTS.INI CLOCK.INI 32 file(s) 31849 bytes
4640768 bytes free C'\WINDOWS> mkdir ini C'\WINDOWS> copy *.ini ini
ORIGPROG.INI SETUP.INI DOSAPP.INI NMINE.INI WINSIGHT.INI POWERPNT.INI
34.2 Running a program when Windows starts up
Programs can be initiated when Windows is started. Typical programs
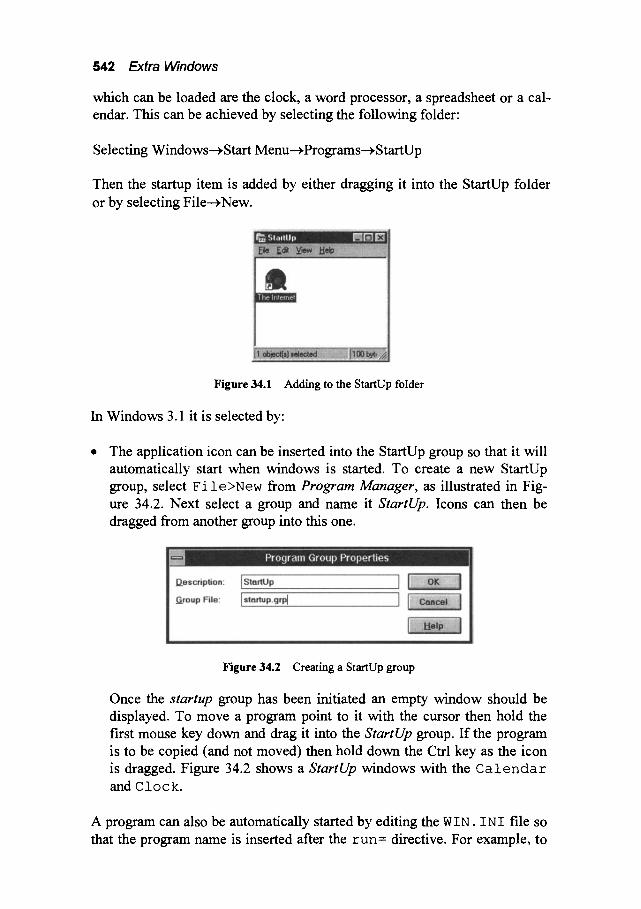
542 Extra Windows
which can be loaded are the clock, a word processor, a spreadsheet or a cal- endar. This can be achieved by selecting the following folder:
Selecting Windows---~Start Menu---~Programs---~StartUp
Then the startup item is added by either dragging it into the StartUp folder or by selecting File---~New.
Figure 34.1 Adding to the StartUp folder
In Windows 3.1 it is selected by:
The application icon can be inserted into the StartUp group so that it will automatically start when windows is started. To create a new StartUp group, select F i l e > N e w from Program Manager, as illustrated in Fig- ure 34.2. Next select a group and name it StartUp. Icons can then be dragged from another group into this one.
Figure 34.2 Creating a StartUp group
Once the startup group has been initiated an empty window should be displayed. To move a program point to it with the cursor then hold the first mouse key down and drag it into the Start Up group. If the program is to be copied (and not moved) then hold down the Ctrl key as the icon is dragged. Figure 34.2 shows a StartUp windows with the C a l e n d a r and Clock.
A program can also be automatically started by editing the WIN. IN I file so that the program name is inserted after the r u n = directive. For example, to

Swapping between applications 543
run the clock and Word for Windows the following can be inserted:
�9 , , , i
[~ Lis t ing o f W I N . I M [windows] spooler=yes run=clock, exe Beep=yes device=PostScript Printer,pscript,LPT2"
,,
To load a program which is minimized (that is, it will appear as an icon at the bottom of the screen) the l o a d = directive is used. For example, to start the programs Word for Windows 6.0 and c a r d f i l e the following can be inserted into the W I N. I N I file
List ing o f WIN.INI [windows] spooler=yes run= load=c'\word6\winword.exe clock.exe Programs=com exe bat pif
34.3 Capturing Windows screen
There are two hot keys set-up in Windows to capture screens:
�9 Print Screen key captures a complete screen. �9 Alt-Print Screen captures only the current window.
These captured screens are put into the clipboard. Figure 34.3 shows the Clipboard Viewer screen after a screen has been captured from Microsoft Word for Windows 2.0. The contents of the clipboard can be imported into a document or other application by pasting. This can either be done by selecting the Paste from a menu or Ctrl-V.
34.4 Swapping between applications
The AIt-TAB hot key can be used to switch between one application and another. For example:
1. Run an application. 2. Press Alt-TAB to cycle through the Windows applications on the desk-
top. The name of the application appears at the top of the screen.
Figure 34.4 shows an example of swapping between a Windows screen and another application.

544 Extra Windows
Figure 34.3 Contents of Clipboard Viewer after a screen has been captured
Figure 34.4 Swapping between applications
34.5 Terminating programs which have crashed
If a program has crashed it can normally be terminated using the Ctrl-Alt- Del keystrokes. If Windows is still nmning it will display a blue screen which asks the user to either press <RETURN> if the program is to be ter- minated to use Ctrl-Alt-Del to reboot the system. Normally it is only required to terminate the crashed program so press <RETURN>.

34.6 Windows file extensions
Exercises 545
Windows uses a large number of file types. Table 34.1 gives the basic file type extensions.
Table 34.1 File extensions . . . . . . . . . . . . . . . . . . . . . . . . . . . . . . . . . . . . . .
Extension Descri tion Extension Description . . . . . . . . . . . . . . . . . . . . . . . . . . . . . . . . . . . . . . . . . . . . . [ t ~ . . . . . . . . . . . .
BMP Bitmapped image HLP Help data file CRD Cardfile data INI Initialization file DLL Dynamic Linked Library PIF Program Information File DRV Device driver REC Recorder macro file EXE Executable file SYS Device driver FON Font TXT Text file
..... GRP Pro~am Manager group WRI ,Write document
34.7 Exercises
34.7.1 Start the calculator program and then press Ctrl-Alt-Del. Confirm that a similar screen to the one shown in Figure 34.5. Next shut down the program.
Completed successfully [ ]
34.7.2
34.7.3
Figure 34.5 Closing an application
Identify some INI files and the application program that they are likely to be linked to.
Completed successfully [ ]
List some of the WIN.INI and SYSTEM.INI files. Identify some of the lines in these files.
Completed successfully [ ]

546 Extra Windows
34.7.4 Run the Calculator and Notepad programs (from the Accessories group) and use the Alt-TAB keystroke to swap between these ap- plications.
Completed successfully [ ]
34.7.5 With the Calculator program, determine the following:
(i) 54 x 32 (ii) 10432 + 54 (iii) ~/163
Completed successfully [ ]
34.7.6 With the Notepad program, create a file called MYFILE.TXT and add the following text:
This is a text file that has been created
from Windows.
Freddy Bloggs.
Completed successfully [ ]
34.7.7 Quit the Calculator and Notepad programs. Completed successfully [
34.7.8 Locate the MYFILE.TXT file and open it to see that it contains the entered text.
Completed successfully [ ]
34.7.9 Close the Notepad program. Completed successfully [ ]
34.7.10 From the operating system, change the name of MYFILE.TXT to MYFILE2.TXT.
Completed successfully [ ]
34.7.11 From the operating system, copy the MYFILE2.TXT file into MYFILE3.TXT file.
Completed successfully [ ]
34.7.12 Format a floppy disk and copy the MYFILE2.TXT file onto it. Completed successfully [

Introduction to UNIX
35.1 Introduction
UNIX is an extremely popular operating system and dominates in the high- powered, multi-tasking workstation market. It is relatively simple to use and to administer, and also has a high degree of security. UNIX computers use TCP/IP communications to mount disk resources from one machine onto another. Its main characteristics are:
�9 Multi-user. �9 Pre-emptive multitasking. �9 Multi-processing. �9 Multi-threaded applications. �9 Memory management with paging (organizing programs so that the pro-
gram is loaded into pages of memory) and swapping (which involves swapping the contents of memory to disk storage).
The two main families of UNIX are UNIX System V and BSD (Berkeley Software Distribution) Version 4.4. System V is the operating system most often used and has descended from a system developed by the Bell Laboratories and was recently sold to SCO (Santa Cruz Operation). Popular UNIX systems are:
�9 AIX (on IBM workstations and mainframes). �9 HP-UX (on HP workstations). �9 Linux (on PC-based systems). �9 OSF/1 (on DEC workstations). �9 Solaris (on Sun workstations).
An initiative by several software vendors has resulted in a common standard for the user interface and the operation of UNIX. The user interface standard is def'med by the common desktop environment (CDE). This allows software vendors to write calls to a standard CDE API (application specific inter- face). The common UNIX standard has been defined as Spec 1170 APIs. Compliance with the CDE and Spec 1170 API is certified by X/Open, which is a UNIX standard organization.

550 Introduction to UNIX
35.2 Login into the system
In order to connect to the system a valid user ID and a password are re- quired. These are assigned initially by the system manager. In Sample ses- sion 35.1 the user b i l 1 b logs in with the correct password. If the user ID and password are valid then system messages are then displayed in a start-up screen (such as system shut-downs, holiday arrangements, and so on) and the command line prompt is displayed (in this case [51" m i r a n d a �9 / net/ castor win/ local user/ bill b ] %). The computer is
now ready for a command.
r-1 Sample session 35.1
HP-UX miranda A.09.01 A 9000/720 (ttys0)
login" bill b Password: ****~***
(c)Copyright 1983-1992 Hewlett-Packard Co., . . . . . .
. . . . . .
( c ) C o p y r i g h t 1988 C a r n e g i e Mel lon
All Rights Reserved.
RESTRICTED RIGHTS LEGEND Use, duplication, or disclosure by the U.S. Government is subject to restrictions as set forth in sub-paragraph (c) (i) (ii) of the Rights in Technical Data and Computer Software clause in DFARS 252.227-7013.
Hewlett-Packard Company 3000 Hanover Street Palo Alto, CA 94304 U.S.A.
Rights for non-DOD U.S. Government Departments and Agencies are as set forth in FAR 52.227-19(c) (i,2).
[51-miranda "/user/bill b ] % m
35.3 Directory structure
Files are used to store permanent information which are used by programs. The information could be schematics, text files, documents, and so on. In order to facilitate the recovery of files they are arranged into directories in a structure that is similar to an office filing system. The UNIX file directory structure takes the form of a tree with the root directory at the highest level. This top level, or root directory, is given the n a m e / . An example of a direc- tory system is shown in Figure 35.1. In this case there are 5 sub-directories below the root level, these are b i n , u s r , e t c , d e v and u s e r . Below the u s r directory there are 3 sub-directories, these are l i b , adm and b i n . In this case, all the users of the system have been assigned to a sub-directory below the users directory, that is, bill_b, fred_a and alan_g.
The full pathname of the b i l l _ b directory is / u s e r s / b i l l _ b and the full pathname of the adm directory i s / u s r / a d m i n . Files can be stored within a directory structure. Figure 35.2 shows an example structure.

Directorystructure 551
Figure 35.1 Basic directory structure
Figure 35.2 Basic directory structure showing files within directories
In this case, the full pathname of the F O R T R A N file p r o g . f t n is:
/user/bill b/src/fortran/prog.ftn
and the full pathname of the c directory is:
/user/bill b/src/c
552 Introduction to UNIX
Files and sub-directories can also be referred to in a relative manner, where the directory is not reference to the top-level (it thus does not have a preced- i n g / ) . For example, if the user was in the b i 11 b directory then the rela- tive path for the C program f 21 e 1 . c is:
src/c/filel, c
35.4 On-line manual
Unix provides an on-line manual to give information on all the UNIX com- mands. To get information man command-name is used, such as:
man command-name
Examples are man l s , man c d , and so on. Sample session 35.2 shows an example of the help manual for the i s command.
Sample session 35.2 [l'miranda -/user/bill b ] % man ls
ls(1)
NAME ls, l, ii, isf, lsr, isx - list contents of directories
SYNOPSIS is [-abcdfgilmnopqrstuxACFHLRl] [names] 1 [is_options] [names] ii [is_options] [names] isf [Is_options] [names] isr [is_options] [names] isx [is_options] [names]
DESCRIPTION For each directory argument, ls lists the contents of the directory. For each file argument, Is repeats its name and any other information requested. The output is sorted in ascending collation order by default (see Environment Variables below). When no argument is given the current directory is listed. When several arguments are given, the arguments are first sorted appropriately, but file arguments appear before directories and their contents.
--More--
35.5 Changing directory
The pwd command can be used to determine the present working directory. and the cd command can be used to change the current working directory. When changing directory either the full pathname or the relative pathname is given. If a / precedes the directory name then it is a full pathname, else it is a relative path. Some special character sequences are used to represent other directory, such as the directory above the current directory is specified by a double dot ( . . ) .

Listing directories 553
Thus to move to the directory above the command c d . . can be used. If the c d command is used without any preceding directory specifier then the directory will be changed to the user's home directory. Some example com- mand sessions are given next.
c a . . move to the directory above
cd / move to the top-level directory
cd /user/bill b/fortran move to the d i rec tory /user /b i l l b/fortran
cd src/c move to the sub-directory c which is below the s r c sub-directory
c d move to the user's home directory
35.6 Listing directories
The l s command lists the contents o f a directory. If no directory-name is given then it lists the contents o f the current directory. Sample session 35.3 shows a typical session. In [ 5 ] the user moves to the directory above and in [ 11 ] the user move back to the home directory.
Samplesession35.3 [2-miranda "/user/bill b ] % is compress design docs mentor [3"miranda "/user/bill b ] % cd design [4"/user/bill b/design ] % is analogue digital ic pcb [5:/user/bill b/design ] % cd .. [6"/user/bill b ] % is compress design docs mentor [7-/user/bill b ] % cd .. [8-/user ] % is bill b george_r [9"/user ] % cd .. [10"/ ] % is TEX.install TEX.new backup log caedata caesys castor win designer-2.0 espresso espresso.ex.tar. Z [ii'I ] % cd [12"/user/bill b ] % is compress design docs mentor [13"/user/bill b ] %
research shells spwfiles
vhdl
research shells spwfiles
local user spwsys m
lost+found syn_sample_lib mentor_bdf syn_sample_lib.8.2_l mentor fonts system mentor fonts 2 temp
m
mentor fonts new tmp methdata ue mf user planb users
research shells spwfiles
The basic directory listing gives no information about the size o f files, i f it is a directory, and so on. To list more information the - 1 option is used. An example session is s h o w n i n Sample session 35.5. In [15] the user requests extended information on the files.

554 Introduction to UNIX
Samplesession35.4 [ 1 4 - / u s e r / b i l l b ] % i s compress design docs [15:/user/bill b ] % Is -i total 14 drwxr-xr-x 2 bill b i0 drwxr-xr-x 7 bill b i0
m
drwxr-xr-x 2 bill b i0 drwxr-xr-x 3 bill b i0 drwxr-xr-x 3 bill b i0 drwxr-xr-x 2 bill b I0 drwxr-xr-x 2 bill b i0 [16:/user/bill b ] % cd shells [17:/user/bill b/shells ] % is -i
m
total 6 -rw-r--r-- 1 bill b i0 -rw-r--r-- 1 bill b i0 -rwxr-xr-x 1 bill b i0 [18-/user/bill b/shells ] %
mentor research shells spwfiles
1024 Nov 1 17:09 compress 1024 Nov 7 i0:ii design
24 Oct 31 09:52 docs 1024 Sep 14 13:48 mentor 1024 Oct 31 09:38 research 1024 Nov 7 10:21 shells 1024 Jun 20 18:12 spwfiles
988 Nov 7 10"20 Cshrc 43 Nov 7 10-20 Login 28 May 12 1993 gopc
Other options can be used with l s; to get a full list use the on-line manual. In Sample session 35.1 it was seen that other possible extensions are a b c d f g i imn opq r s t u xAC FH L R I.
Examples of usage are:
ls -d
is -r
is -t
lists only directories reverse alphabetic order order in time last modif ied
It is also possible to specify more than one extension, such as l s - d r which lists only directories in reverse order.
35.7 File attributes
UNIX provides system security by assigning each file and directory with a set of attributes. These give the privileges on the file usage and their settings are displayed with the i s - 1 command. In the case of [15 ] in Sample session 35.4, the user uses i s - 1 to get extended information. The direc- tory listing gives six main fields; these are:
�9 File attributes. �9 Owner of the files. Person (user ID) who owns the file. �9 Group information. The group name def'mes the name of the group the
group the attributes concern. �9 Size of file. The size of the file in bytes (8 bits). �9 Date and time created or last modified. This gives the date and time the
file was last modified. If it was modified in a different year then the year and date are given, but no time information is given.
�9 Filename.

File attributes 555
Figure 3 5.3 defines the format of the extended file listing. The file attributes contain the letters r , w, x which denote read, write and executable. If the attribute exists then the associated letter is placed at a fixed position, else a - appears. The definition of these attributes are as follows:
�9 Read ( r ) . This file can be copied, viewed, and so on, but it cannot be modified.
�9 Write (w). This file can be copied, viewed and changed, if required. Executable (x). It is possible to execute this program.
file owner name
-rwxr-xr-x 1 bill b
directory attribute
d rwx rwx rwx
USER GROUP WORLD
I
groups date/time filename name last modified
staff 28 May 12 1993 gopc
v
Wodd
Figure 35.3 Extended file listing
The file attributes split into four main sections. The first position identifies if it is a directory or a file. A d character identifies a directory, else it is a file. Positions 2-4 are the owner attributes, positions 5-7 are the groups at- tributes and positions 8-10 are the rest of the world 's attributes. Table 35.1 lists some examples.
Table 35.1 Example file attributes
A}tributes ..................... Descr~t ion . . . . . . . . -r-x--x---
drwxr'xr-x
-rwxrwxrwx
This file can be executed by the owner and his group (e.g. staff, students, admin, research, system, and so on). It can be viewed by the owner but no-one else. N O other privileges exist. . . . . . . This directory can be cannot be written to by the members of group and others. All other privileges exist. This file can be read and written to by everyone and it can also be executed by ever/one (bew~e of this).

556 Introduction to UNIX
35.7.1 Changing attributes of a file
As we have seen, files have certain attributes such a read/write privileges, and so on.
The chmod command can be used by the owner of the file to change any of the file attributes. A general format is given next.
chmod settings f i l ename
where settings define how the attributes are to be changed and which part of the attribute to change. The characters which define which part to modify are u (user), g (group), o (others), or a (all). The characters for the file at- tributes are a sign (+, - or =) followed by the characters r , w, x. A '+ ' , specify that the attribute is to be added, a ' - ' specifies that the attribute is to
be taken away. The '= ' defines the actual attributes. Some examples are given next:
chmod u+x progl.c
chmod a=rwx prog2.c
chmod g-r cprogs
owner has executable rights added sets read, write, execute for all resets read option for group
In Sample session 35.5 [20] the owner of the file changes the execute at-
tribute for the user.
Samplesession35.5 [19"/user/bill b/shells ] % is -i
D
total 6 -rw-r--r-- 1 bill b i0 988 Nov 7 10"20 Cshrc -rw-r--r-- 1 bill b i0 43 Nov 7 10-20 Login -rwxr-xr-x 1 bill b i0 28 May 12 1993 gopc [20"~user~bill b/shells ] % chmod u+x Login [21-/user/bill b/shells ] % is -i total 6 -rw-r--r-- 1 bill b i0 988 Nov 7 10"20 Cshrc -rwxr--r-- 1 bill b i0 43 Nov 7 10"20 Login -rwxr-xr-x 1 bill b i0 28 May 12 1993 gopc [22-/user/bill b/shells ] %
35.8 Special characters ( *, ? and [])
There are several special characters which aid access to files. These are stated in Table 3 5.2.
Table 35.2 Special characters , , , , , , , . , , u . . , , , , , , . . . . , , . , , , , , , , , , , . , , , , , , . . ,
Char Description . . . . . . . . . . . . . . . . . . . . . . . . . . . . . . . . . . . . . ? matches any single character in a filename. * matches zero or more characters in a filename. [] matches one character at a time, these characters are contained in the
squared brackets.
Making and removing directories 557
Sample session 35.6 shows a few sample uses of wildcards. In [24] the user lists all the files which begin with the letter 'm'. In [26] all two letter file- names beginning with 'c' are listed. Then in [27] the files which begin with the letters 'a', 'b' or 'c' are listed.
Samplesession35.6 [23:/user/bill b ] % cd /bin [24:/bin ] % is m* mail make mesg ~5:/bin ] % is c* c89 cd chmod cat chacl chown
cc chgrp cksum [26:/bin ] % is c? cc cd cp [27 :/bin ] % is [a-c]* alias basename cat ar bg cc as c89 cd [28 :/bin ] % is [asz]* alias as sh ar sed size [29 :/bin ] %
mkdir mkfifo mktemp model
cmp cp crypt cnodes cpio csh command cps cstm
chacl chown cnodes chgrp cksum command chmod cmp cp
sleep strip su sync sort stty sum sysdiag
mstm mt
cpio cps crypt
csh cstm
Note that [a-c] represents [abc] and [1-9] represents [123456789].
35.9 Listing contents of a file
The command to list the contents of a file is ca t , its form is:
c a t filename
Sample session 35.7 shows how it is used. If a file is larger than one screen full it is possible to stop the text from scrolling by using Cntl-S (AS) to stop the text and Cntl-Q (AQ) to start.
Samplesession35.7 [30"/user/bill b ] % cd shells [31-/user/bill b/shells ] % is Cshrc Login gopc [32"/user/bill b/shells ] % cat gopc setenv DISPLAY pc9"0 xterm [33"/user/bill b/shells ] %
35.10 Making and removing directories
To make a directory the m k d i r command is used, its form is:
mkdir directory-name
to remove a directory the rmdir command is used, its form is:
558 Introduction to UNIX
rmdir directory-name
In both cases the full pathname or relative pathname can be given.
35.11 Copying, renaming and removing
The command to copy files is the cp command. The standard format is:
cp source destination
and the command to rename (or move) is called mv. Its standard format is:
mv source destination
Files are erased, or deleted, using the rm command. Sample session 35.8 shows some uses of these commands.
Samplesession35.8 [34 : / u s e r / b i l l b ] % m k d i r s r c [35 " / u s e r / b i l l b ] % l s compress dirlist mentor shells src design docs research spwfiles temp [36 ./user/bill b ] % cd src [37 ./user/bill b/src ] % mkdir cprogs [38-/user/bill b/src ] % cd cprogs [39 ./user/bill b/src/cprogs ] % is [40 "/user/bill b/src/cprogs ] % cp ../../docs/*.c . [41 -/user/bill b/src/cprogs ] % is file.c [42 -/user/bill b/src/cprogs ] % cp file.c filel.c [43 "/user/bill b/src/cprogs ] % is file.c filel.c [44 :/user/bill b/src/cprogs ] % mv filel.c file2.c [45 -/user/bill b/src/cprogs ] % is file.c file2.c [46 :/user/bill_b/src/cprogs ] % mkdir list [47 "/user/bill b/src/cprogs ] % cp *.c list [48 "/user/bill b/src/cprogs ] % is file.c file2.c list [49 :/user/bill b/src/cprogs ] % is -i total i0 drwxr-xr-x 3 bill b i0 1024 Nov 14 10-40 . drwxr-xr-x 3 bill b i0 1024 Nov 14 10"38 .. -rw-r--r-- 1 bill b i0 213 Nov 14 10:39 file.c
m
-rw-r--r-- 1 bill b i0 213 Nov 14 10"39 file2.c drwxr-xr-x 2 bill b i0 1024 Nov 14 10:40 list
m
[50 "/user/bill b/src/cprogs ] % cat file.c file2.c > src.lis [51 "/user/bill b/src/cprogs ] % is file.c file2.c list src.lis [52 -/user/bill b/src/cprogs ] % is -i
n
total 12 drwxr-xr-x 3 bill b i0 drwxr-xr-x 3 bill b I0
m
-rw-r--r-- 1 bill b i0 -rw-r--r-- 1 bill b i0 drwxr-xr-x 2 bill b I0 -rw-r--r-- 1 bill b I0
[53 :/user/bill b/src/cprogs ] %
1024 Nov 14 10:43 . 1024 NOV 14 10:38 .. 213 Nov 14 10:39 file.c 213 Nov 14 10:39 file2.c
1024 Nov 14 10:40 list 426 Nov 14 10:43 src.lis
35.12 Standard input and output
Standard input and output 559
The standard input device for a program is via the keyboard and the standard output is to the monitor. In UNIX all input output devices are communicated with through a device file, which are stored in the / d e v directory. For example, each connected keyboard to the system (including remote computers) has a different device name. To determine which is your terminal pathname use the t g y command as shown in Sample session 35.9.
. .
Samplesession35.9 [54 :/user/bill b ] % tty /dev/ttysO [55 :/user/bill b ] %
35.12.1 Redirection
It is possible to direct the input and/or output from a program to another file or device.
Redirecting output The redirection symbol (>) redirects the output of a program to a given file (or output device). This output will not appear on the monitor (unless it is redirected to it). Sample session 35.10 shows how the output from a direc- tory listing can be send to a file named d i r l i s g (see [57]). The contents of this file are then listed in [58].
Samplesession35.10 [56 :/user/bill b ] % is compress design docs mentor [57-/user/bill b ] % is > dirlist [58 -/user/bill b ] % cat dirlist compress design dirlist docs spwfiles [59 "/user/bill b ] %
research shells spwfiles
mentor research shells
The redirection of output is particularly useful when a process is running and an output to the screen is not required. Another advantage of redirection is that it is possible to keep a permanent copy of a program's execution.
To create a text file the c a t command is used with the redirection, as shown next. The file is closed when the user uses the CNTRL-D keystroke, as shown in Sample run 35.11.
If the user does not want the output to appear on the screen then it can be redirected to the file called / d e v / n u l l . This is the systems wastepaper basket and it will automatically be deleted.
Redirecting input The input can be redirected with the redirect symbol (<). The file given after
560 Introduction to UNIX
the symbol is taken as the input. For example'
% progl < inputfile
In this case the program p r o g l takes its input from the file i n p u t f i l e , and not from the keyboard.
Sample session 35.11 [60 "/user/bill b ] % cat > file
m
This is an example of a
file created by cat
^D [61 :/user/bill b ] % ls compress dirlist file research design does mentor shells [62 -/user/bill b ] % cat file
w
This is an example of a file created by cat
spwfiles
35.12.2 Pipes
The pipe allows the output of one program to be sent to another as the input. The symbol used is the vertical bar ( I ) and its standard form is:
program a [arguments] I program_b [arguments]
This notation means that the output of program_a is used as the input to p r o g r a m _ b . The pipe helps in commands where a temporary file/s needs to be created. For example, to find out who is logged into the system the who - a command can be used. If names in a file need t~ be sorted alpha- betically the s o r t command can be used. Thus to sort the users on the sys- tem alphabetically we can use:
r-1 Sample session 35.12
[63 "/user/bill b ] % who -a > temp [64 "/user/bill b ] % sort temp aed 9 ttyp8 Nov 9 13"51 old aed 9 ttyp9 Nov 9 13"51 old bill b ttypl Nov 4 16"05 old bill b ttypa Nov 4 16"02 old bill b ttypb Nov 4 16"05 old bill b ttys0 Nov 14 08"57 julian m ttyp6 Nov 9 13"59 oid peter t ttyp4 Nov i0 ii'i0 old root ttysl Nov 8 09"50 old steve w ttyp3 Nov 9 10-02 old steve w ttyp5 Nov 9 11"17 old steve w ttyp7 Nov 9 10:49 old xia ttys2 Nov 7 12-07 old
[65 �9 b ] %
14496 id= p8 term=0 14497 id= p9 term=0 6288 id = pl term=0 9567 id= pa term=0 9582 id = pb term=0
18715 eesl0 14190 id= p6 term=0 15169 id= p4 term=0 11292 id= sl term=0 13205 id= p3 term=0 13493 id= p5 term=0 13570 id = p7 term=0 9961 id = s2 term=0
exit=0 exit=0 exit=0 exit=0 exit=0
exit=0 exit=0 exit=0 exit=0 exit=0 exit=0 exit=0
It is possible to achieve this with one line using pipes.
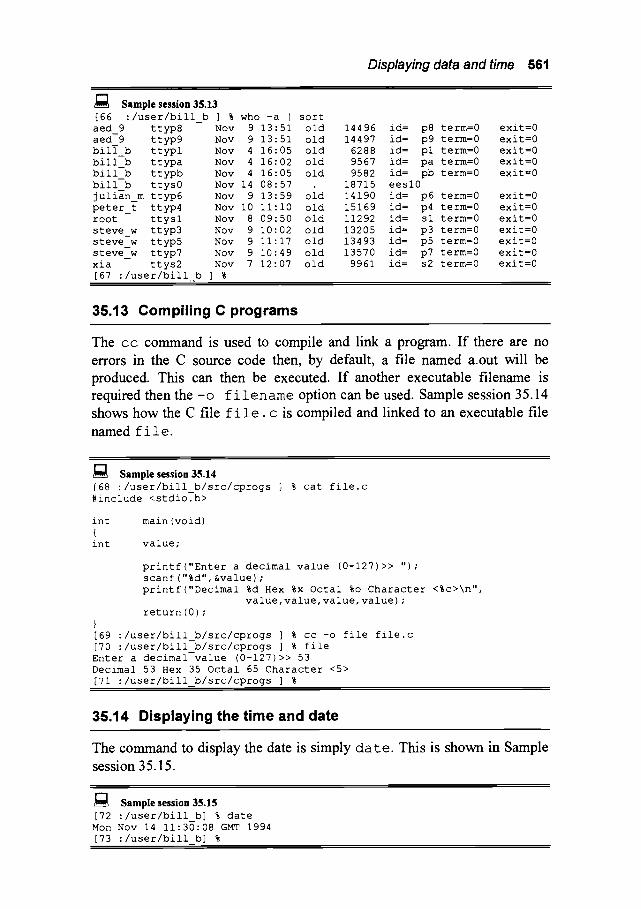
Displaying data and time 561
aed 9 ttyp8 aed 9 ttyp9 bill b ttypl bill b ttypa bill b ttypb bill b ttys0 julian m ttyp6 peter t ttyp4 root ttysl steve w ttyp3 steve w ttyp5 steve w ttyp7 xia ttys2
Samplesession35.13 [66 :/user/bill b ] % who -a I sort
Nov 9 13:51 old 14496 id= p8 term=0 exit=0 Nov 9 13:51 old 14497 id= p9 term=0 exit=0 Nov 4 16:05 old 6288 id = pl term=0 exit=0 Nov 4 16:02 old 9567 id= pa term=0 exit=0 Nov 4 16:05 old 9582 id = pb term=0 exit=0 Nov 14 08:57 18715 eesl0 Nov 9 13:59 oid 14190 id = p6 term=0 exit=0 Nov i0 ii'i0 old 15169 id= p4 term=0 exit=0 Nov 8 09:50 old 11292 id= sl term=0 exit=0 Nov 9 10:02 old 13205 id= p3 term=0 exit=0 Nov 9 11:17 old 13493 id= p5 term=0 exit=0 Nov 9 10:49 old 13570 id= p7 term=0 exit=0 Nov 7 12:07 old 9961 id= s2 term=0 exit=0
[67 :/user/bill b ] %
35.13 Compiling C programs
The c c command is used to compile and link a program. If there are no errors in the C source code then, by default, a file named a.out will be produced. This can then be executed. If another executable filename is required then the - o f • option can be used. Sample session 35.14 shows how the C file f i 1 e . c is compiled and linked to an executable file named file.
Sample session 35.14 [68 ./user/bill b/src/cprogs ] % cat file.c #include <stdio_h>
int main (void) { int value;
printf("Enter a decimal value (0-127)>> "); scanf("%d" &value) ; printf("Decimal %d Hex %x Octal %0 Character <%c>\n",
value, value, value, value) ; return(0) ;
} [69 "/user/bill b/src/cprogs ] % cc -o file file.c [70 "/user/bill b/src/cprogs ] % file Enter a decimal value (0-127)>> 53 Decimal 53 Hex 35 Octal 65 Character <5> [71 :/user/bill b/src/cprogs ] %
35.14 Displaying the time and date
The command to display the date is simply da g e. This is shown in Sample session 35.15.
U'1 Sample session 35.15
[72 " / u s e r / b i l l b] % date Mon Nov 14 11:30-08 GMT 1994 [73 �9 b] %

562 Introduction to UNIX
35.15 Where to find things
UNIX has various default directories which store standard command pro- grams and configuration files. Some of these are defined in the following sections.
35.15.1 /bin
The /bin directory contains most of the standard commands, such as compilers, UNIX commands, program development tools, and so on. Examples are:
�9 FORTRAN and C compilers, f77 and cc. �9 commands such as a r , c a t , man utilities.
35.15.2 Idev
The /dev directory contains special files for external devices, terminals, consoles, line printers, disk drives, and so on.
�9 /dev/console console terminal. �9 /dev/null system wastebasket. �9 /dev/tty* terminals (such a s / d e v / t t y l /dev/tty2).
35.15.3 /etc
The / e t c directory contains restricted system data and system utility pro- grams which are normally used by the system manager. These include pass- word file, login, and so on. Examples are:
�9 /etc/groups
�9 /etc/hosts
�9 /etc/passwd
�9 /etc/termcap
�9 /etc/ttys
�9 /etc/ttytype
�9 /etc/utmp
system group tables. list of system hosts. list of passwords and users. table of terminal devices. terminal initialization information. table of connected terminals. table of users logged in.
35.15.4 /lib
The /lib directory contains system utilities and FORTRAN and C run- time support, system calls and input/output routines.
35.15.5 Itmp
Temporary (scratch) files used by various utilities such as editors, compil- ers, assemblers. These are normally stored in the / t m p directory.
Exercises 563
35.15.6 lusr/adm
The / u s r/adm stores various administrators files, such as"
/usr/adm/lastlog table of recent logins
35.15.7 lusr/bin
T h e / u s r / b i n contains less used utility programs, such as:
/usr/bin/at /usr/bin/bc /usr/bin/cal
35.15.8 lusr/include
The /usr/include directory contains C #include header files, such a s :
/usr/include/stdio. h /usr/include/math. h
35.15.9 lusr/lib
T h e / u s r / l i b directory contains library routines and setup files, such as:
/usr/lib/Cshrc /usr/lib/Login /usr/lib/Logout /usr/lib/Exrc /usr/lib/calendar
35.15.10 /usr/man
T h e / u s r / m a n contains the manual pages, such as
/usr/man/cat [ 1-8 ] /us r/man/man [ 1 - 8 ]
35.16 Exercises
35.17.1 Go to your home directory.
DIRECTORY NAME'. .............................
35.17.2 Display the current system date.
TIME/DATE". ..................................
35.17.3 Display the on-line help manual for the following commands:

564 Introduction to UNIX
1 s
cp r m
Completed successfully: YES/NO
35.17.4 List all the users currently logged into the system.
USERS" . .....................................
35.17.5 Create a directory named s r c in your home directory.
35.17.6 Go into the directory s r c and create a sub-directory named c p r o g s .
35.17.7 Go into the cprogs directory and create a file named filel, c using ca t (or the system editor). Enter the following text and save the file.
.
/* /*
int { int
integer main (void)
filel.c */ Program to determine binary equivalent of an 8-bit*/
*/
val, bit; printf("Enter value (0-255) >>") ; scanf ("%d", &val) ; printf("Binary value is ") ; for (bit=0x80 ; bit>0 ; bit >>=i) {
if (bit & val) printf("l") ; else printf("0") ;
} return(0) ;
35.17.8 List the file you have just created.
Completed successfully: YES/NO
35.17.9 Change the name of this file to file2.c.
Completed successfully: YES/NO
35.17.10 Make a copy of this file and name it f i l e 3 , c.
Completed successfully" YES/NO
35.17.11 Change the file attributes of this file so that the public cannot read from or write to this file.

Exercises 565
35.17.12 Create another named f i l e 2 , c and enter the following source code.
/* file2.c */ /* Program to print ASCII characters */ #include <stdio.h> int main(void) { int i, start,end;
printf("Enter start and end for ASCII characters >>"); scanf("%d %d" &start &end); t i
puts("INTEGER HEX ASCII");
for (i=start;i<=end;i++) printf ("%5d %5x
return (0) ; %5c\n", i, i, i) ;
35.17.13 Concatenate the two files together. src. lis.
Call the resultant file
Completed successfully: YES/NO
35.17.14 Compile and run the two C programs just created.
Completed successfully" YES/NO
35.17.15 Remove the file s r c . l i s
Completed successfully" YES/NO
35.17.16 Investigate the following commands/utilities:
cal
ftp
more
35.17.17 Locate the following utility files and determine their usage.
spell
csh
sort
cc wc
sleep touch
ed
ps
find

566 Introduction to UNIX
35.17.18 Sketch a rough outl ine of the directory structure o f the system.
35.17 Summary
Table 35.3 lists some standard UNIX commands .
Table 35.3 Commands summary
command Description . . . . . . . . . . . man s u b j e c t on-line manual on subject
l s list of a directory ( -1 long listing; - a all; - r reverse listing.
cd change directory
my move file
cp copy file
m k d i r make directory
pwd present working directory
c a t concatenate a file/s
> file redirect output to file
< f i 1 e redirect input from file i i i i i i i i i i i i i i

UNI x Commands
36.1 Process control
UNIX is a multitasking, multiuser operating system, where many tasks c a n
be running at a certain time. Typically there are several processes which are started when the computer is rebooted; these are named daemon processes and they run even when there is no user logged into the system.
36.1.1 ps (process status)
The p s command prints information about the current process status. The basic p s list gives a list of the current jobs of the user. An example is given in Sample session 36.1.
~[~ Samplesession36.1 % ps
PID TTY TIME CMD 43 01 0:15 csh 51 01 0:03 is -R /
i00 01 0:01 ps %
The information provided gives the process identification number (PID), the terminal at which the process was started (TTY), the amount of CPU time used and the command line that was entered (CMD). A process can be stopped using the k i 11 command.
A long listing is achieved using the - 1 option and for a complete listing of all processes on the system the - a option is used, as shown in Sample session 36.2.
Samplesession36.2 % ps - a l F S UID PID PPID CPU PRI NICE ADDR SZ WCHAN TTY TIME CMD 1 S i01 43 1 3 30 20 3211 12 33400 01 0:15 csh 1S 104 44 2 2 27 20 4430 12 51400 04 0:08 sh 1 S 104 76 32 3 30 20 3223 12 33400 04 0:03 vi tmp 1S 104 89 1 3 30 20 10324 02 44103 04 0:01 is 1 R i01 99 55 43 52 20 4432 12 33423 01 0:01 ps

568 UNIX commands
The column headed S gives the state of the process. An S identifies that the process is sleeping (the system is doing something else), W specifies that the system is waiting for another process to stop and R specifies that the process is currently nmning. In summary:
�9 R process is running. �9 T process has stooped. �9 D process in disk wait. �9 S process is sleeping (that is, less than 20 secs.). �9 I process is idle (that is, longer than 20 secs.).
UID is the user identity number. PRI is the priority of the process. A high number means a low priority.
36.1.2 kill (send a signal to a process, or terminate a process)
The k i i i command sends a signal to a process. The general format is"
k i l l -sig processid
The processid is the number given to the process by the computer. This can be found by using the p s command. The sig value defines the amount of strength that is given to the kill process and the strongest value is a -9 . The owner of a process can kill his own, but only the super-user can kill any process. Sample session 36.3 gives an example session.
J~ Samplesession36.3 ps PID TTY TIME CMD 112 01 1"15 csh 145 01 0:05 ipr temp.c 146 01 0:01 ps
% kill -9 145 % ps
PID TTY TIME CMD 112 01 1"15 csh 146 01 0:01 ps
% find / -name "*.c" -print > listing &
% ps PID TTY TIME CMD 112 01 1"15 csh 177 01 0:03 find -nam 179 01 0-01 ps
% kill -9 177 %
36.1.3 at (execute commands at later date)
The at command when used in conjunction with another command will exe- cute that command at some later time. The standard format is"

Process control 569
at time [date] [week]
where time is given using from 1 to 4 digits, followed by either 'a', 'p', 'n' or 'm' for am, pm, noon or midnight, respectively. If no letters are given then a 24-hour clock is assumed. A 1- or 2-digit time is assumed to be given in hours, whereas a 3- or 4-digit time is assumed to be hours and minutes. A colon may also be included to separate the hours from the minutes.
The Date can be specified by the month followed by the day-of-the- month number, such as Mar 31. A Week can be given instead of the day and month.
For example, to compile a program at quarter past eight at night:
I ' - I Sample session 36.4
% a t 2 0 : 15 cc - test test.c
^D
520776201.a at Tue May 26 20"15:00 1997
and to send fred a message at 14:00"
I " 1 ,11 Sample session 36.5
% at 14 �9 00 echo "Time for a tea-break" I mail fred
^D
520777201.a at Mon Jun 4 14"00"00 1989
To remove all files with the .o extensions from the current directory on September 9th at 1 noon.
I"-1 Sample session 36.6
% at in sep 9 rm *. o
^D
520778201.a at Sat Sep 9 13"00"00 1989
To list all jobs that are waiting to executed at some later time use the - 1 option.
I " 1 ~m~ Sample session 36.7 % at -i
520776201.a Mon Jun 4 20" 15"00 1989
520778201.a Sat Sep 9 13-00-00 1989
520777201.a Mon Jun 4 14"00"00 1989
To remove jobs from the schedule the - r option can be used and giving the job number.
570 UNIX commands
Sample session 36.8 % at -r 520777201.a
36.1.4 nice (run a command at a low priority)
The n i c e command runs a command at a low priority. The standard format is as follows:
n i c e -number command [arguments]
The lowest priority i s - 2 0 and the default i s -10 . Sample session 36.9 gives a sample session.
r ' ~ ~'~ Sample session 36.9 % nice -15 is -al % nice -20 find / -name "*.c" -print > Clistings &
36.2 Compilers
The two main compilers on UNIX systems are C (cc) and FORTRAN (f77).
36.2.1 cc (C compiler)
The c c command is the C language compiler and is used to convert a C pro- gram into binary code. It can also link several binary modules together to make an executable file.
Files with the extension .c are taken as C programs and when a C pro- gram is compiled the resulting binary module (the object code) is placed in the current directory. If a - c option is not used the binary code will be called a . o u t . If the - c option is used the binary code will take the name given, the modules produced will have a .o extension. Options are:
- c produce single binary module (object code) with the extension .o. -o outfil this option is used to give the name for the output file. - g produce debug information for use with a debugger (such as dbx).
In Sample session 36.11, the first example of the C program progl.c is compiled; the resulting file produced is called a . o u t . This file can be exe- cuted as required. The second type of compilation ( cc - c *. c) compiles all the C programs and produces an object module with a .o extension. These object modules can be linked together using the compiler. The last example ( cc - o p r o g p r o g l , o p r o g 2 , o) links together the object modules for p r o g l , c and p r o g 2 , c. The executable program, in this case, will be called p r o g .

Compilers 571
Samplesession36.10 % cc progl.c % is
a.out progl.c prog2.c % rm a.out % cc -c *.c % is
progl.c progl.o prog2.c prog2.o % cc -o prog progl.o prog2.o % is
prog progl.c progl.o prog2.c prog2.o
36.2.2 f77 (FORTRAN compiler)
The FORTRAN compiler f77 is used to compile and/or link FORTRAN programs. The source file is assumed to have the .f extension. If the - c op- tion is chosen the compiled module will have the .o extension; this is an object module. Sample session 36.11 gives some examples.
I--1 Sample session 36.11
% f77 - c *. f % f77 -o prog *.o
36.2.3 dbx (debugger for C, FORTRAN and Pascal)
The d b x utility is a source-level debugger for C, FORTRAN and Pascal. It
allows the user to trace a program's execution and list variables. The general format is:
d b x filename
Some commands for d b x are"
r u n
step
cont
list
runs the current program.
step through the program execution one line at a time.
continue program execution where it stopped.
print contents of a variable such as print inputvalue.
list next ten lines of code if no arguments are given; to list from linestart to lineend use list linestart, lineend.
help get help information.
trace trace program execution.
quit exit dbx.

572 UNIX commands
36.2.4 lint (C program verifier)
The lint utility is used to verify C programs. It attempts to detect bugs, non-portable warnings and any wasteful use of C code. The basic C com- piler, c c, does little run time checking or inefficiency checking. To run the
lint program:
1 i n t f i l ename
Sample session 36.12 gives a sample session.
Sample session 36.12 % lint progl.c
function returns value is always ignored printf strcmp
36.3 File manipulation commands
UNIX has a number of file manipulation commands, some of which were defined in the previous chapter and many others are given in this section.
36.3.1 cp (copy files)
The cp command will copy a given file or directory to a given file or direc- tory. There are several options that can be used"
- i
- r
uses interactive mode, the user is prompted whenever a file is to be overwrit- ten. The user answers 'y' or 'n'. uses recursive mode, the cp command all files including each subdirectory it encounters.
The following example will copy a file called f ilel into a file called f i 1 e 2. Note that if f i 1 e 2 were a directory then f i 1 e 2 would be copied
into that directory.
] ~ Sample session 36.13 % cp filel file2
If you want to copy a whole directory and all subdirectories the - r option is used. In the next example the whole directory structure of / u s r / s t a f f / b i l l is copied into the d i r e c t o r y / u s r / s t a f f / f r e d :
Sample session 36.14 % cp-r /usr/staff/bill /usr/staff/fred

File manipulation commands 573
To copy a file into a directory"
! - ' 1 Sample session 36.15
% cp type.c cprogs
36.3.2 Is (list directory)
The Is command lists the contents of a directory. A summary of the various options are given below:
- a lists all entries including files that begin with a . (dot)
-1 lists files in the long format. Information given includes size, ownership, group and time last modified.
- r lists in reverse alphabetic order.
- t lists by time last modified (latest first) instead of name.
-1 lists one entry per line.
- F marks directories with a trailing slash (/), executables with a trailing star (*).
-R recursively lists subdirectories encountered.
Sample session 36.16 gives some examples.
36.3.3 file ( determine file type)
The f • l e command is used to test a file for its type such as a C program, text file, binary file, and so on. Sample session 36.17 gives a typical session. Typical file types include:
�9 mc68020 demand paged executable.
�9 C program text.
�9 ASCII text.
�9 Empty. �9 Archive random library.
�9 Symbolic link. �9 Executable shell script.
36.3.4 du (disk usage)
The du command lists the size of a directory and its subdirectories. If no directory name is given the current directory is assumed. Two options are given next:

574 UNIX commands
- a all file sizes are listed - s summary only
J~ Samplesession36.16 % l s - a l -rw-rw .... 4 bill staff 1102 Jun 4 12:05 .temp drwxr-xr-x 2 bill staff 52 Jun 4 14:20 cprogs -r--r--r-- 1 fred staff 10320 Jan 29 15:11 data file -rw-rw .... 4 bill staff 102 Jun 1 11-13 file?txt -rw-rw .... 4 bill staff 102 Jun 1 11"13 filel.f -rwx--x--x 1 root staff 20 May 31 9:02 list -rwxrwx--- 4 bill staff 9102 Feb 4 1988 runfile dr-xr-xr-x 1 joe staff i00 Jan 14 13:11 temp % is -I drwxr-xr-x 2 bill staff 52 Jun 4 14"20 cprogs -r--r--r-- 1 fred staff 10320 Jan 29 15"11 data file -rw-rw .... 4 bill staff 102 Jun 1 11-13 file?txt -rw-rw .... 4 bill staff 102 Jun 1 11-13 filel.f -rwx--x--x 1 root staff 20 May 31 9-02 list -rwxrwx--- 4 bill staff 9102 Feb 4 1988 runfile dr-xr-xr-x 1 joe staff i00 Jan 14 13"11 temp % Is -r
temp runfile list filel.f file.txt data file m
cprogs % is -i
cprogs data file
w
file.txt filel.f list runfile temp
% is -t cprogs file.txt filel.f list runfile data_file temp
% is -F cprogs/ data_file file.txt filel.f list* runfile*
temp/
Samplesession36.17 % file *
progl.c: C program text test : executable shell script fred dir: symbolic link docsT ascii text
36.3.5 cat (concatenate and display)
The ca t command concatenates and displays the given files to the standard output, which is normally the screen (although this output can be changed using the redirection symbol). For example, to list a file to the screen:
r-1 ~m~ Sample session 36.18
% c a t f i l e . c This is the contents of file.c
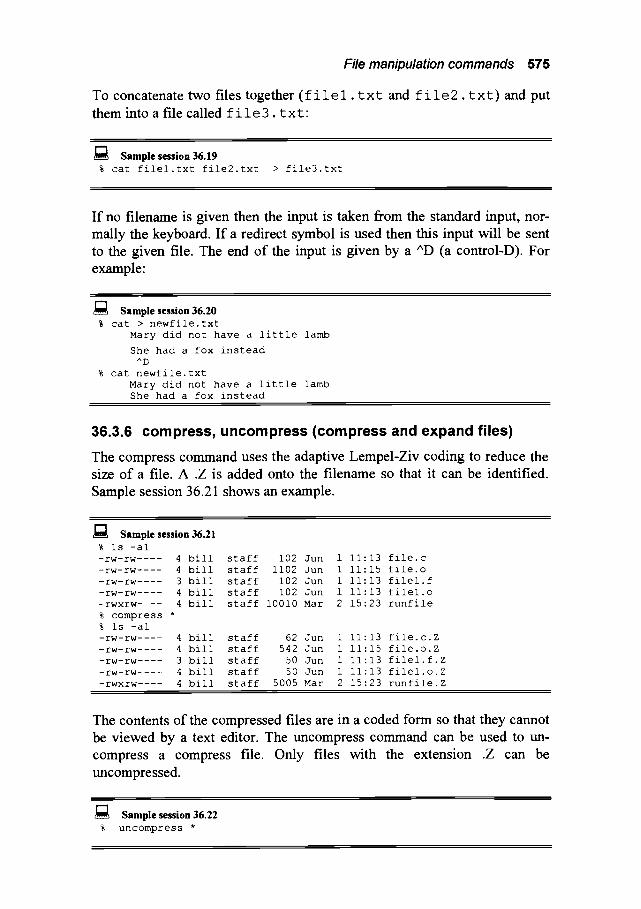
File manipulation commands 575
To concatenate two files together (filel. txt and file2, txt) and put them into a file called f i 1 e 3 . t xt"
r'1
Sample session 36.19 % c a t f i l e l . t x t f i l e 2 . t x t > file3.txt
If no filename is given then the input is taken from the standard input, nor- mally the keyboard. If a redirect symbol is used then this input will be sent to the given file. The end of the input is given by a ^D (a control-D). For example:
Samplesession36.20 % cat > newfile.txt
Mary did not have a little lamb
She had a fox instead
^D
% cat newfile.txt
Mary did not have a little lamb
She had a fox instead
36.3.6 compress, uncompress (compress and expand files)
The compress command uses the adaptive Lempel-Ziv coding to reduce the size of a file. A .Z is added onto the filename so that it can be identified. Sample session 36.21 shows an example.
Sample session 36.21 % is -al
-rw-rw .... 4 bill
-rw-rw .... 4 bill
-rw-rw .... 3 bill
-rw-rw .... 4 bill
-rwxrw .... 4 bill
% compress *
% is -al
-rw-rw .... 4 bill
-rw-rw .... 4 bill
-rw-rw .... 3 bill
-rw-rw .... 4 bill
-rwxrw .... 4 bill
staff 102 Jun 1 11:13 file.c
staff 1102 Jun 1 11:15 file.o
staff 102 Jun 1 11:13 filel.f
staff 102 Jun 1 11:13 filel.o
staff I0010 Mar 2 15:23 runfile
staff 62 Jun 1 ii'13 file.c.Z
staff 542 Jun 1 11"15 file.o.Z
staff 50 Jun 1 11"13 filel.f.Z
staff 50 Jun 1 11"13 filel.o.Z
staff 5005 Mar 2 15"23 runfile. Z
The contents of the compressed files are in a coded form so that they cannot be viewed by a text editor. The uncompress command can be used to un- compress a compress file. Only files with the extension .Z can be uncompressed.
I"-1 Sample session 36.22
% uncompress *

576 UNIX commands
36.3.7 chmod (change mode)
Files in UNIX have various attributes; these attributes can be set or reset with the chmod command. The attributes are:
Owner Group Public r w x r w x r w x
The owner is the person who created the file and the group is a collection of several users, such as research, development, production, admin groups, and so on. The public is for everyone else on the system.
The r attribute stands for read privilege and if it is set then the file can be read (that is, listed or copied) by that type of user. The w attribute stands for write privilege and if it is set then the file can be written to (that is, listed, copied or modified) by that type of user. The x attribute stands for execute privilege and if it is set then the file can be executed (that is, it can be run) by that type of user.
For example - r w - r - - r - - is a file that the owner can read or write but the group and the public can only read this file. Another example is - r - x - - x - - x ; with these attributes the owner can only read the file. No-one else can read the file. No-one can change the contents of the file. Everyone can execute the file. The 1 s - 8 1 listing gives the file attributes.
, , 1
Sample session 36.23
% is-al -rw-rw .... 4 bill staff 1102 Jun 4 12:05 Run_prog drwxr-xr-x 2 bill staff 52 Jun 4 14:20 cprogs -r--r--r-- 1 fred staff 10320 Jan 29 15:11 data file -rw-rw .... 4 bill staff 102 Jun 1 11:13 file.txt -rw-rw .... 4 bill staff 102 Jun 1 11:13 filel.f -rwx--x--x 1 root staff 20 May 31 9:02 list -rwxrwx--- 4 bill staff 9102 Feb 4 1988 runfile
, ,
There are several ways to change the attributes. The general format is given below:
chmod <permission> <file>
The permission can be set by using the octal system. If an attribute exists a 1 is set, if not it is set to a 0. For example, r w - r - - r - - translates to 110 100 100, which is 644 in octal. For example:
to se t to r w x - - x - - - u s e 7 1 0
to s e t t o r - x . . . . . . u s e 500 to se t to r w x r w x r w x u s e 7 7 7
to se t t o - - x . . . . . . u s e 1 0 0
to se t t o r w - r w - r w - u s e 6 6 6

File manipulation commands 577
To make the file file.txt into r w - r w - r - - :
!-'1 ~6 Sample session 36.24
% chmod 664 file.txt
To make the file R u n _ p r o g into - - x - - x - - -
J ~ Samplesession36.25 % chmod ii0 Run_prog % is -al ---x--x--- 4 bill staff 1102 Jun 4 12-05 Run_prog drw-r--r-- 2 bill staff 52 Jun 4 14-20 cprogs -r--r--r-- 1 fred staff 10320 Jan 29 15"11 data file -rw-rw-r-- 4 bill staff 102 Jun 1 11"13 file.txt -rw-rw .... 4 bill staff 102 Jun 1 11"13 filel.f -rwx--x--x 1 root staff 20 May 31 9-02 list -rwxrwx--- 4 bill staff 9102 Feb 4 1988 runfile dr--r--r-- 1 joe staff i00 Jan 14 13-11 temp
The other method used is symbolic notation, these are listed next:
u user permission o others (public) permission = assign a permission - take away permission w write attribute
g group permission a all of user, group and other permissions
+ add a permission r read attribute x execute attribute
For example, to change the file Run_l i st so that it can be executed by all
use"
r-1 Sample session 36.26
% c h m o d +x R u n l i s t
To take away read privilege for all files with the .c extension for the group
use:
t - ' l Sample session 36.27
% chmod g -r * . c
36.3.8 df (disk space)
The df command al lows you to list the usage o f the disk and all other mounted disk drives. Sample session 36.28 gives some examples.
g-2 Sample session 36.28
% d f Filesystem kbytes /dev/nst0 200000 /dev/nstl 5000
used avail capacity Mounted on 50003 159997 25% /
I00 4900 2% /temp

578 UNIX commands
36.3.9 diff (differences between files)
The d i f f command shows the difference between two files or two directories.
diff filel file2
There are various options used and these are summarized next:
- i ignores the case of letters (such as 'b ' is same as 'B').
- W ignore all blanks (such as fred = 16.2 is same as fred=16.2).
Some examples are next. In the output listing the < character refers to the first file given and the > character refers to the second file given. A c refers to a change, a d to a line deleted and an a refers to text that has been ap- pended. The line numbers of the first file always appear first.
Samplesession36.29 % cat oldfile
This is the contents of the old
file. It will be modified and a diff will be done.
% cat newfile
This is the contents of the new
file. It will be modified and a diff will be DONE.
% diff -i oldfile newfile icl < This is the contents of the old - - _ _
> This is the contents of the new 2dl < ***
36.3.10 mv (move files)
The mv command moves files or directories around the file system. The standard formats are:
my [-i] [-J]filenamelfilename2 my [-i] [-/] directory1 directory2 my [-i] [-J] filename directory
There are three different permutations. These are:
�9 Moving a file into another file (like renaming).
�9 Moving a directory into another directory (like renaming).
�9 Moving a file into another directory.

File manipulation commands 579
The options that can be used are:
- i files are moved interactively. When a file is to be moved the system will prompt the user as to whether he wants to move the file. If the answer is 'y' the file will be moved, else it will not be moved.
- f force mode; override any restrictions.
Sample session 36.30 shows examples.
Samplesession36.30 % i s
fortran progl.c prog2.c % mv prog.f fortran
% is fortran progl.c prog2.c
% is fortan
prog.f % mv fortran fortran new
m
% is fortran new progl.c prog2.c
prog3.c prog.f
prog3.c
prog3.c
36.3.11 more (page a file)
The more command allows the user to print one page of text at a time to the standard output. It pauses at the end of the page with the prompt '--More--' at the bottom of the page. Sample session 36.31 shows some examples.
Sample session 36.31 % more doc.txt
fsdfsd dfsfs ddfsdfs d plpfd fdfsfdf fdfsfpl
etc �9 .
--more--
dfsfsdf dfsfdf dfsffgf dfsdf fdfdfhgf
% cat file i more fsdf dfd fghfg fgfg ik;ik;l fdf poper
%
3 6 . 3 . 1 2 rm ( r e m o v e f i l e s or d i r e c t o r i e s )
The rm command removes files or directories. To remove a directory which is empty the r m d i r command can be used. There are various options, such
a s :
- f - r
- i
force mode; remove files without asking questions recursive mode; delete content of a directory, its subdirectories and the directory itself; interactive mode; asks question as to whether each file is to be de- leted.

580 UNIX commands
Sample session 36.32 gives some examples.
Samplesession36.32 % l s
fortran pascal text.l % is fortran
progsl progs2 % rm -r fortran/progs2 % is fortran
progsl % rm text.* % is
fortran pascal
text.2 text.3
36.3.13 In (make links)
The I n command makes a soft link to a file or directory. When the linkname is used the system will go to the place indicated by the link. The general format is"
1 n -sfilename [linkname]
Sample session 36.33 shows some example.
Samplesession36.33 % l s
fredl fred2 fred3 % In -s /usr/staff/bill/prog.txt prog % is
fredl fred2 fred3 program % is -al drw-r--r-- 2 bill staff 52 Jun 4 14:20 fredl dr--r--r-- 1 fred staff I0 Jan 29 15:11 fred2 drw-rw .... 4 bill staff 102 Jun 1 11:13 fred3 irw-rw .... 4 bill staff 102 Jun 4 13:13 prog->/usr/bill/prog.txt % cat prog
This is the contents of the prog.txt file.
36.3.14 find (find file)
The find command searches recursively through a directory structure to find files that match certain criteria. It uses a pathname from where to start seaching; this is the first argument given after f ind . The name of the file is specified after the -name argument and if the user wants the files found printed to the standard output the - p r i n t is specified at the end. Sample session 36.34 gives an example of finding a file called f r e d . f, starting from the current directory.
[-"1 Sample session 36.34
% f i n d . - n a m e f r e d . f - p r i n t d i r l / f r e d , f f o r t r a n / p r o g s / f r e d , f

File manipulation commands 581
Sample session 36.35 shows a search of the file p a s s w d , starting from the top-level directory.
~;~ Sample session 36.35 % find / -name passwd -passwd
/etc/passwd
The wild-card character can be used in the name but this must be inserted in inverted commas (" "). Sample session 36.36 gives an example of search for all C files starting with the / u s r / s t a f f / b i 11 directory.
Sample session 36.36
% find /usr/staff/bill -name "*.c" -print /usr/staff/bill/progl. c /usr/staff/bill/cprogs/prog2. c /usr/staff/bill/cprogs/prog3. c
Other extensions can be used such as - a t i m e which defines the time of last access. The argument following - a t i m e is the number of days since it has been accessed. Sample session 36.37 gives an example of searching for all .o files that have not been used within 10 days.
Sample session 36.37 % find . -name "*.o" -atime +i0 -print
36.3.15 grep (search a file for a pattern)
The grep command will search through given files looking for a given string pattern. There are various options which can be used, a summary of these is given below:
-v
-X
-C
-i
print lines that do not match; display only lines that match exactly; display count of matching lines; ignore case.
Sample session 36.38 gives some examples and the standard format is"
grep [-v][-c][-x][-i] expression [file]
36.3.16 head (displays first few lines of a file)
The h e a d command prints the top n lines of a file. The default number is 10 lines and Sample 2.39 gives examples. The format is as follows:
h e a d -n filename
582 UNIX commands
Sample session 36.38 % grep function *.c
progl.c: function add(a,b) progl.c: function subtract (a, b) prog3.c: function xxx
% grep -i function *.f man.f" FUNCTION ON LINE man.f'C This is the function that prints
% grep -v fred listnames bert baxter sim pointer al gutter
r-1 Sample session 36.39
% h e a d -3 d i a r y . t x t June 5th 1989 Dear Diary, Today I got my head stuck inside a
% head -2 *.doc ==>first.doc<== This is the first document
==>second.doc< ==
And this is the second document.
%
36.3.17 tail (display last part of file)
The tail command displays the last part of a file, where the first argument defines the number of lines to be displayed. For example, to display the last 4 lines of the file f i 1 e 1 . t • t"
Samplesession36.40 $ tail -4 filel.txt
and it dropped onto the third spike on the fence.
36.3.18 wc (word count)
The w c utility counts the words, characters and lines in a file. If several files are given then the sum total of the files will be given. There are three op- tions that can be used; these are c, w and 1, which stand for characters, words and lines.
wc -options filename
If no filename is given then the keyboard is taken as the input and a control- D ends the file input. Examples are:

Samplesession36.41 % cat filel
This is the contents
of the file to be
used as an example. % wc -i filel
3 filel % wc -Ic filel
3 46 filel % wc -w filel
13 filel % wc file*
3 13 46 filel 5 32 103 file2
I0 44 294 file4 18 89 433 total
Other commands 583
36.4 Other commands
36.4.1 ar (archive and library maintainer)
The a r command is used to create and maintain libraries and archives. A library is a file which contains compiled programs. These files are called object modules and are self-contained modules. The object modules have the extension .o. The libraries are used in the linking process. There are certain standard libraries on the system; these include the standard maths library and standard input/output library (normally found i n / u s r / 1 ib) .
a r options filename
There are various options used with ar; these are given in Table 36.1. For example, to create an archive
% ar cr newarc xxx.c
Then to list the archive"
% artv newarc
XXX.C
Op;ion ...... d r
t
X
C
V i
Table 36.1 ar options i i i i . i . i i i i i i
Description delete the named files from the archive replace the named files from archive list the contents of an archive extract a file from an archive create an archive extended l ! s t~ , , o f file

584 UNIX commands
and to extract a file from the archive"
% ar xv newarc xxx.c
x- xxx.c
Then adding all files with .c extension:
% ar rv newarc *.c
a- progl.c
a- prog2, c
a- zzz.c
and listing the archive again:
% artv newarc
a- p r o g l . c a- p r o g 2 , c a- xxx.c
a- zzz.c
To extract a file:
% ar xv newarc zzz.c
x- zzz.c
and to create a library with .o object modules:
% ar cva Newlib *.o
a- progl, o
a- prog2. o
a- xxx. o
a- zzz.o
Archives are useful for keeping many files together in the one file. This makes them useful for printing, storing on tape, and so on. These are stan- dard libraries on the UNIX system, such as"
/lib/libc. a
/usr/lib/libF77. a
which is the standard C library which is the standard FORTRAN library
36.4.2 banner (make posters)
The banner command prints the words given on the screen in large letters. A sample session is shown in Sample session 36.42. The maximum letters on one line is ten. Its standard form is:
banne r line_of_text
36.4.3 cal (calendar)
The c a l command displays a calendar for a given year and/or month. The year may vary from 1 to 9999 and if no month or year is given the current
Other commands 585
month will be printed. Sample session 36.43 shows an example of display- ing the current month and Sample session 36.44 displays a whole year.
] ~ Sample session 36.42 % banner hello
g-2 Sample session 36.43
% c a l 3 1989 March 1989
M T W T F S S
1 2 3 4 5
6 7 8 9 i0 ii 12
13 14 15 16 17 18 19
20 21 22 23 24 25 26
27 28 29 30 31
I"-'1 Sample session 36.44
% c a l 1966
36.4.4 chpass (change password)
The c h p a s s command is used to change the current login password. Sam- ple session 36.45 shows an example.
] ~ Samplesession36.45 $ chpass Enter old password: scooby Enter new password: scrappy Re-enter new password: scrappy Password modified.
36.4.5 date (display or set date)
The da t e command either gives the current date and time or can be used to set the current date and time (although only the superuser can do this). If no arguments are given then the current date and time is printed. If a valid ar- gument is given then the current time is changed. The general format is given below:
d a t e [yymmddhhmm[.ss]]
where yy is the year, mm is the month, dd is the day of month, hh is the hour

586 UNIX commands
(24 hour clock), m m is the minute and ss is the seconds (optional). It is possible to leave out various field such as the year and the seconds.
Sample session 36.46 gives some examples.
Samplesession36.46 % date
Mon Jun 4 09:24:01 PST 1989 % date 06050133 % date
Tue Jun 5 01:33:10 PST 1989
36.4.6 echo (echo arguments)
The echo command writes its argument to the standard output. A C-like standard is used for printing. Sample session 36.47 shows a few examples and the characters used are given below:
\ b backspace \ c print line without new-line \ f form-feed \ n new-line \ r carriage return \ t tab \ v vertical tab \ \ backslash \ Oxx 8-bit ASCII octal code
I"-1 Sample session 36.47
% echo "Mary had \na littlakbe lamb" Mary had a little lamb
% echo "Time to logout" [ mail fred
% echo "Hello fred" > /dev/tty2
36.4.7 finger (display information on users)
The finger command gives information on a given user. This information includes:
�9 Login name. �9 Full name. �9 Terminal name. �9 Idle time. �9 Login time. �9 Office location. �9 Phone number, if known.
The files used are"
/ e t c / u tmp for information about who is logged in; /etc/passwd for user names;
Other commands 587
36.4,8 ftp (file transfer program)
The ftp utility is the standard File Transfer Protocol. It is used to transfer files to and from a remote network. The format is:
f t p hostname
36.4.9 Ipr (print file)
The lpr command spools a file to the printer.
36.4.10 mail (interactive mail)
The m a i 1 utility is used to send and receive messages from/to other users. To send mail the user's name is simply specified after the program name. For example, to send mail to a user f r e d :
l "1 Sample session 36.48
% mail fred This is a message to you fred. It is time for a coffee ^D
Whenever the control-D (^D) keystroke is used then the message is sent to a specified recipient. Other users can be sent the same mail by simply giving their user name as one of the arguments, such as"
I-'1 ~'~ Sample session 36.49 % mail fred jack bill farquar
Hello to you ^D
%
To send a file which has mail the redirect symbol (<) is used, such as:
Sample session 36.50 % mail fred tom < todays_message %
When reading mail the system will typically tell the user when there is mail waiting to be read, such as:
g-'! Sample session 36.51 % You have mail
Then to read the mail the mail program is run, such as:
588 UNIX commands
Then to read the mail the mail program is run, such as:
I--I Sample session 36.52
% mail From fred Tue Jun 4 ii'12-00 1989 I have had enough of this computer, HELP***
?
The mail response with a question mark (?) is used to indicate that the mail program is waiting on the user to enter a command. Possible options are:
? display help information q quit x exit without changing mail p print s f i le save to file d delete mail + next (no delete) m us e r mail user.
36.4.11 passwd (change Iogin password)
The passwd command is used to change the current password. Each user's password is stored in a coded form in / e t c / p a s s w d . Each new pass- word's must be at least 5 characters long if they include upper and lower- case, or 6 if they are monocase. Sample session 36.53 shows an example.
r - ' l , t~ Sample session 36.53
% passwd New password �9 Freddy Retype new password" Freddy
36.4.12 pwd (present working directory)
The pwd command prints the pathname of the current working directory. Examples are:
Samplesession36.54 % cd /usr/staff/fred % pwd
/usr/staff/fred % cd fortran % pwd
/usr/staff/fred/fortran % cd .. % pwd
/usr/staff/fred % cd ../graham % pwd
/usr/staff/graham %
Other commands 589
36.4.13 rlogin (remote Iogin)
The rlogin command allows the user to log into a remote machine. The for- mat is:
r 1 o g i n rhost
36.4.14 sleep (suspend execution for an interval)
The sleep command is used to suspend to command for a given time. The standard format is:
s 1 e ep time
where the time is in seconds. Sample session 36.55 shows an example.
r ' - ! ~l~ Sample session 36.55
% sleep 30; is -al
36.4.15 spell (find spelling errors)
The spell utility finds spelling errors. The UNIX dictionary resides in the f i l e / u s r / c l i c t / w o r d s . The format is given below.
spe i i optionfi lename
There are various options used:
-b British spelling (such as colour instead of color).
-v verbose, full listing.
- X lists every plausible stem for doubtful words.
Sample session 36.56 shows an example.
! ' 1 Sample session 36.56
% spell -b filel expact conder
%
36.4.16 stty (set terminal options)
The stty command sets up the terminal characteristics. There are two main types of options; these are toggles and settings. The standard format is given below.

590 UNIX commands
stty option
Various settings are:
even
odd
echo
icase
tabs
ek
erase c
kill c
300, 1200, and so on
allow even parity allow odd parity echo every character to screen convert capital letters to lowercase preserve tabs set erase and shell characters to # and @ set erase character to c (usually B/S)
, .
set kill character to c (usually @) set baud rate
Sample session 36.57 gives examples.
g-1 Sample session 36.57
% stty speed 9600 baud erase = '#' kill = '@'
% stty erase ^H
% stty kill ^F
36.4.17 tar (tape archiver)
The tar utility al lows files to be saved, recovered or listed from a tape
drive. Its standard form is"
t a r opt ionsf i lenames
Options used are"
to create tape archive to list tape archive to recover tape archive complete listing of file names
Sample session 36.58 shows examples.
Samplesession36.58 % tar cv /usr/staff/fred % tar tv
/usr/staff/fred/doc/docl /usr/staff/fred/doc/doc2 /usr/staff/fred/doc/doc3 /usr/staff/fred/prog/progl.c /usr/staff/fred/prog/prog2.c
% tar xv /usr/staff/fred/doc/doc2
Exercises 591
36.4.18 who (users logged in)
The who command lists all users on the system and which terminal they are using. This information is found in the / e g c / u g m p file. If the arguments given are am i (that is, who am i) then the system prints details about the user. For example:
J~ Samplesession36.59 % who
fred tty2 Jun 5 i0:i0 bill tty3 Jun 5 13:05
% who am i bill tty3 Jun 5 13:05
%
The information given is the user name, terminal logged in on and date that the user logged in.
36.4.19 write (sends messages to users)
The w r i t e utility sends a message to a specified user. A control-D ends the message input and sends it. Examples are:
r-1 Sample session 36.60
% who fred tty2 Jun 5 i0" i0 bill tty3 Jun 5 13" 05
% write fred Time for a break I think ^D
%
36.5 Exercises
36.5.1
36.5.2
36.5.3
36.5.4
36.5.5
Login in the UNIX system and determine the current processes that the user is currently running.
Determine all the current processes that are rtmning and the user which initiated the process. Identify the status of the processes.
Use the cat > newfile command and then the Ctrl-Z key- stroke to suspend the process. Show that the process has been suspended.
Kill the process which has just been suspended.
Using the a t command, run an l s - 1 at a time one minute from

592 UNIX commands
the current time.
36.5.6 From the current directory, determine the file types of the files.
36.5.7 From the current directory, determine the size of all the directories.
36.5.8 Determine the present working directory.
36.5.9 Determine the present date.
36.5.10 List the current directory so that directories have a trailing slash.
36.5.I1 Recursively list the current directory, showing all subdirectories.
36.5.12 Determine the users who are currently logged into the computer.
36.5.13 If there is a user logged into the computer then send an electronic message to them.
36.5.14 Using stty, determine the terminal characteristics.
36.5.15 For the top-level directory, find all the C program files.

Editing and Text Processing
37.1 Introduction
UNIX has several command programs which can be used to edit and process text. These are defined in Table 37.1.
Table 37.1 Editing and text processing programs
, , , ~ , . , , , , , , , , . , . . , , , , , , , , , , , , . , , . . . . . . . . . . . . .
Text editors v i i the vis~i editor
Texipro'cessing .... Textmanipulation ..... n r o f f , format document g rep , looks for a pattern
ex,line editor t r o f f, print formated document
s o r t , sorts lines of text
ed, line editor t b 1, formatting tables spe 11, finds spelling errors
seal, stream text editor p i c, graphics language for typesetting
t r , translates characters
aw k, pattern scanning e qn, typesetting ,,,,,and processin$ ............ mathematics
we, counts characters, words and lines in a file.
37.2 Visual editor
Most UNIX systems have their own text editor which is selected from the Graphical User Interface. The v i editor (pronounced vee-eye) is a text-
based editor and is standard on all UNIX systems. It is not the easiest editor to use but it is available on all UNIX-based system. The editor is called with:
v i f i l e n a m e
37.2.1 Making changes
The v i editor involves using special characters to identify editing
commands. The user enters text only when the editor is in insert mode. All
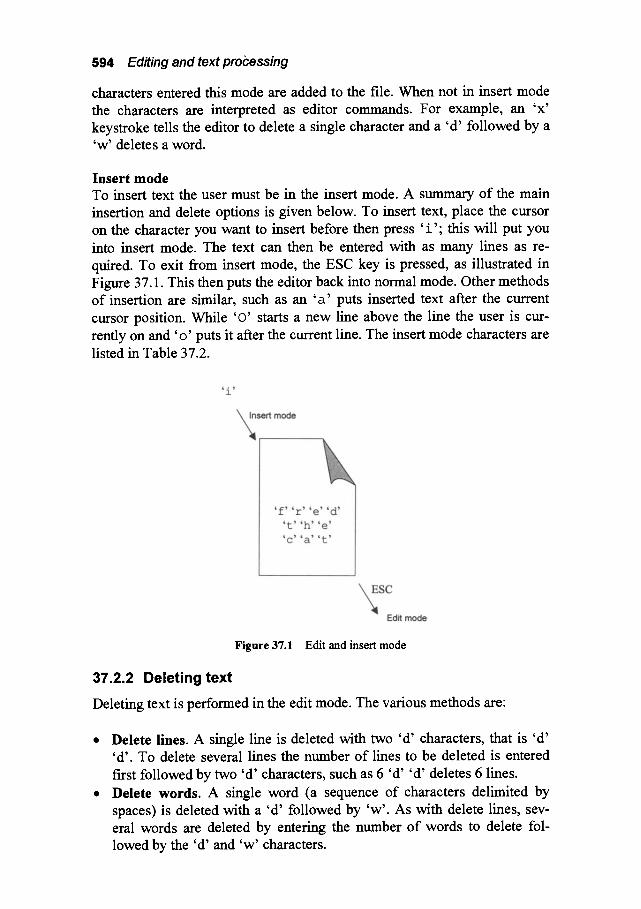
594 Editing and text processing
characters entered this mode are added to the file. When not in insert mode the characters are interpreted as editor commands. For example, an 'x' keystroke tells the editor to delete a single character and a 'd ' followed by a 'w' deletes a word.
Insert mode To insert text the user must be in the insert mode. A summary of the main insertion and delete options is given below. To insert text, place the cursor on the character you want to insert before then press ' i ' ; this will put you into insert mode. The text can then be entered with as many lines as re- quired. To exit from insert mode, the ESC key is pressed, as illustrated in Figure 37.1. This then puts the editor back into normal mode. Other methods of insertion are similar, such as an ' a ' puts inserted text after the current cursor position. While 'O' starts a new line above the line the user is cur- rently on and 'o ' puts it after the current line. The insert mode characters are listed in Table 37.2.
Figure 37.1 Edit and insert mode
37.2.2 Deleting text
Deleting text is performed in the edit mode. The various methods are"
Delete lines. A single line is deleted with two 'd' characters, that is 'd ' 'd ' . To delete several lines the number of lines to be deleted is entered first followed by two 'd ' characters, such as 6 'd' 'd ' deletes 6 lines. Delete words. A single word (a sequence of characters delimited by spaces) is deleted with a 'd ' followed by 'w'. As with delete lines, sev- eral words are deleted by entering the number of words to delete fol- lowed by the 'd' and 'w' characters.
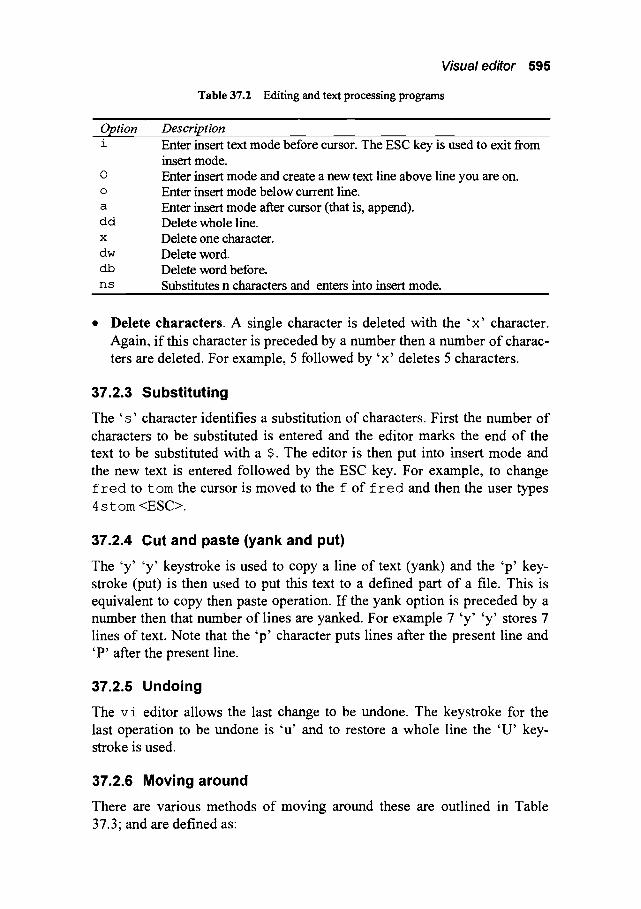
Visual editor 595
Table 37.2 Editing and text processing programs
L
O p t i o n De, rietio,, ...................................... Enter insert text mode before cursor. The ESC key is Used to i exit from insert mode.
O Enter insert mode and create a new text line above line you are on. o Enter insert mode below current line. a Enter insert mode after cursor (that is, append). dd Delete whole line. x Delete one character. dw Delete word. cib Delete word before. ns Substitutes n characters and enters into insert mode.
Delete characters. A single character is deleted with the ' x ' character. Again, if this character is preceded by a number then a number of charac- ters are deleted. For example, 5 followed by ' x ' deletes 5 characters.
37.2 .3 S u b s t i t u t i n g
The ' s ' character identifies a substitution of characters. First the number of characters to be substituted is entered and the editor marks the end of the text to be substituted with a S. The editor is then put into insert mode and the new text is entered followed by the ESC key. For example, to change f r e d to tom the cursor is moved to the f of f r e d and then the user types 4 s tom <ESC>.
37.2.4 Cut and paste (yank and put)
The 'y ' 'y ' keystroke is used to copy a line of text (yank) and the 'p ' key- stroke (put) is then used to put this text to a defined part of a file. This is equivalent to copy then paste operation. If the yank option is preceded by a number then that number of lines are yanked. For example 7 'y ' 'y ' stores 7 lines of text. Note that the 'p ' character puts lines after the present line and 'P' after the present line.
37 .2 .5 U n d o i n g
The v i editor allows the last change to be undone. The keystroke for the last operation to be undone is 'u ' and to restore a whole line the 'U' key- stroke is used.
37.2.6 Moving around
There are various methods of moving around these are outlined in Table 3 7.3; and are defined as:
596 Editing and text processing
�9 Moving cursor . The cursor can be used with the arrow key (4--,--->, and so on) if they are supported by the terminal being used. If the keyboard has no arrow keys (or they are not supported) then the characters used are ' h ' (left), ' 3 ' (down), ' k ' (up)and ' 1 ' ( r ight)keys
�9 Moving by page. The page can be moved back and forward using the PgUp and PgDn keys, if they are supported. Else, to move backwards by one page the ^b (press Cntrl and b at the same time) and to move one page forward then ^ f. A ^u and ^d allows the screen to be scrolled up
or down, respectively. �9 Going to a line. In many situations the user requires to go to a specific
line number (especially when compiling a program). To do this the 'G'
character is followed by the line number. For example, 'G' 1234 goes to
line number 1234.
Table 37.3 Editing and text processing programs
tion Descri tion ,p ,p 1 or ~ move cursor forward one cursor position h or ~ move cursor back one position ^b backwards one page ^f forward one page ^ d scroll down file ^u scroll up file k or $ next line j or 1" previous line G n go to line number n w forward one word b back one word e end of current word w word after this word
37.2.7 Searching for strings
The ' / ' and '? ' characters are used to find a string. A ' / ' searches forwards
for the next occurrence of a string, whereas, ' ? ' searches back for the occur-
rence of the string. Thus:
/ string looks for next occurrence of string
? string looks for previous occurrence of string
37.2.8 Getting out of the editor and saving
There are various options that can be used (depending on what you require). These are specified in Table 37.4. The user 's changes are not stored to the file until the user uses either ' z ' ' z ' , ' " 'w' ' q ' or ' " 'w'. These differ in
Example of text editing 597
that the ' " 'w' ' q ' and 'Z' 'Z ' sequence causes the changes to be saved to the file and quit from the editor, whereas ' " 'w' saves changes and the edi- tor stays active.
A user can abandon the changes that have been made since the last save by using e i t h e r ' " ' q ' ' " o r ' " ' e ' ' " �9 �9 �9
...... Option ............................ gg
�9 wq <CR>
�9 w <CR>
�9 wfilename <CR>
�9 q ! < C R >
�9 el <CR> , . . . . . . . . . . . . . . . . . . . . . . . . . .
Table 37.4 Methods of exiting
,,, , ,, ,,, ,,,,,,,,,
Descript ion
Exits from editor and saves all changes. Same as above (write and quit). Write changes but do not quit. Write changes to filename, no quit. Quit from editor, no changes. Re-edit, discarding changes.
. . . . . . i i i i i i i i i
Note that <CR> stands for pressing the return key.
37.2.9 Reading- in and writ ing-to f i les
The command to read-in files is " r f i l e n a m e and the command to write the file to a specified file is " w f i l e n a m e . For example, " r f r e d reads in a file called f r e d and -w f r e d 2 , t x t writes to a file called f r e d 2 , t x t .
37.2.10 Useful advanced editing facilities
There are many powerful text editing facilities available, some useful ex- amples are:
�9 s/namel/name2/g I0
this changes all occurrences of namel to name2 for 10 lines"
�9 5,18w fredl.txt
writes lines 5 to 18 to file called f r e d . t x t .
37.3 Example of text editing
This section contains a practical example of text editing. Start the editor with:
vi lion.txt
then when the editor has started enter ' i ' to put the editor into insert mode. Enter the text given below and make the changes required. If mistakes are made as the text is being typed-in then the back-space key will delete the
598 Editing and text processing
previous character, else wait until all the text has been entered and then make the required modifications. The text is"
THE LOIN AND THE UNICORN The next moment soldiers came running through the wood, at first in twos and threes, then ten or twenty together, and at last in such crowds that they seemed to fill the whole forest. Alice got behind a tree, for fear of being run over, and watched them go by.
She thought that in all her life she had never seen soldiers so uncertain on their feet" they were always tripping over something or other, and whenever one went down, several more always fell over him, so that the ground was soon covered with little sheeps of men.
Then came horses. Having four feet, these managed rather better that the foot-soldiers; but even they stumbled and then; and it seemed as a regular rule that, whenever a horse stumbled, the rider fell of instantly. The confusion got worse every moment, and Alice was very glad to get out of the wood into an open place, where she found the White King seated on the ground, busily writing in his memorandum-book.
Once the text has been entered then make the following changes/operations:
(a)Change LOIN in the title to LION. This can be done in a number of
ways, such as:
�9 Move cursor to the L of LOIN press 4x (or xxxx ) and then press i to enter insert mode and enter correct word L I ON. Press ESC button to exit from insert mode.
�9 Move cursor to the L of LOIN press 4 s (substitute 4 letters) the $ sign shows the end of the word to be substituted. You will be in insert mode automatically. Enter new text LION and press ESC to return to normal
mode; �9 Move cursor to the L of LION press R (overwrite mode and replace) this
will automatically put you into insert mode. Next enter correct L I ON and
press ESC. �9 For advanced editing go to start of text then type : : s / L O I N / L I O N / g
100 <CR>. This substitutes globally LOIN for LION for 100 lines.
(b)Copy the first 4 lines of the second paragraph and put these after the third paragraph. To do this first yank (to get lines) and the put. First, position the cursor at any position on the line which begins the second paragraph. Next, get the lines by using 4 yy (which gets 4 lines or use 4Y) then move the cursor to the last line and press p to put the lines be-
low last line.

sed editing 599
(c) Delete these new lines. This can be done by moving the cursor to the first line of the new lines and then using 4dd (or d d d d ) to delete these 4 new lines.
(d)Search for the word s h e e p s and change this to h e a p s . To find the word s he ep s use / s he ep s <CR>, the editor will then find the first occurrence after the current cursor position. If the word lies backwards from the cursor then use ? s h e e p s <CR>. Once found replace it with heaps.
(e) Search for the word stumbled. How many occurrences are there?
(f) Write modified text to the file lion2.txt. This is done by using :w lion2, txt <CR>.
(g) Read this file in at the end of the file. Move the cursor to the end of file then use �9 r l i o n 2 , t x t . This will read the file in.
(h) Delete these new lines. Position the cursor on the first new line then use dd to delete a line. Repeat this deletion with the repeat option until all the required lines are deleted.
(i) Find the word confusion and change it to unconfusion, then undo this press u (the undo option).
(j) Save the text. Use :wq <CR>.
37.4 sed editor
The s e d is a non-iterative stream editor. It is useful for editing large files and performing global edits. The following text can be entered and operated on in the examples given; call the file Walrus.
The sun was shining on the sea, Shining with all her might He did her very best to make The billows smooth and bright, And ther was odd, because it was The middle of the night.
37.4.1 Global changing
To globally change stringl to string2 the following is used:
sed s/stringl ~string2 / g filename

600 Editing and text processing
For example, if we use the example given previously to change h i s to h e r , the following can be used:
% sed s/his/her/g Walrus > Walrusl % c a t W a l r u s l
The sun was shining on the sea, Shining with all her might He did her very best to make The billows smooth and bright, And ther was odd, because it was The middle of the night.
We can see that on the fifth line t h i s has been replace by t h e r . To undo this the following could be used:
% sed s/ther/this/g Walrusl >Walrus2 % cat Walrus2
The sun was shining on the sea, Shining with all her might He did her very best to make The billows smooth and bright, And this was odd, because it was The middle of the night.
,
37.5 grep
The g r e p command searches through given files for a given string pattern. Its standard format is"
g r e p [ - v ] [ - c ] [ - x ] [ - i ] expression [file]
where the options which can be used are:
-V
-X
-C
-i
print lines that do not match display only lines that match exactly display count of matching lines ignore case
Examples are:
% grep function *.c progl.c" function add(a,b) progl.c" function subtract(a,b) prog3.c: function xxx
% grep-i function *.f man.f- FUNCTION ON LINE man.f'C This is the function that prints
% grep -v fred listnames bert baxter sim pointer al gutter

sort 601
The g rep is typically used with a pipe to search the output from a com- mand. For example, to find every occurrence of the word set in the manual on the C shell:
% man csh I grep set
which is equivalent to:
% man csh > temp % grep set temp
37.6 sort
The sort utility sorts lines in the given files and writes the output to the standard output. It always uses the characters to sort the text and ignores the values of numerical values. The standard format is:
s o r t +pos I - pos2 f i lename
As an example, create the following file and call it league. Its function is to list a number of individuals, the number of games they have played and the number of points scored. Each field is separated by spaces or tabs.
Bert Ripon 3 3 Fred Green 6 ii James Fortie 5 3 Simon Ripon 1 1 Alan Doo 6 4 Frank Doobie 3 2 Charles Zebidee 4 6 Paul McDonald 7 5
To sort the first field, that is the first name, then the sort is used with no op- tions.
% sort league Alan Doo 6 4 Bert Ripon 3 3 Charles Zebidee 4 6 Frank Doobie 3 2 Fred Green 6 ii James Fortie 5 3 Paul McDonald 7 5 Simon Ripon 1 1
Next, the surnames can be sorted by adding the + 1 option, which causes the sort to skip to the first field.

602 Editing and text processing
% sort +i league Alan Doo 6 4 Frank Doobie 3 2 Fred Green 6 ii James Fortie 5 3 Paul McDonald 7 5 Simon Ripon 1 1 Bert Ripon 3 3 Charles Zebidee 4 6
This is an incorrect sort as Simon Ripon comes before Bert Ripon. The rea- son that it has not sorted these names properly is that it has tested only the surname. To test the first field after the second the - 2 option is added. Thus the s o r t + 1 - 2 l e a g u e command is interpreted as 'skip the first field and then sort but stop sorting after the second field and go back to the start of the line'.
% sort +i -2 league Alan Doo 6 4 Frank Doobie 3 2 Fred Green 6 ii James Fortie 5 3 Paul McDonald 7 5 Bert Ripon 3 3 Simon Ripon 1 1 Charles Zebidee 4 6
To sort the third field (that is, the games played) then the +2n option is used. Thus s o r t + 2 n + 1 Le a g u e is interpreted as 'skip two fields then sort numerically, then they are sorted by skipping the first field'.
% sort +2n +i League Simon Ripon 1 1 Frank Doobie 3 2 Bert Ripon 3 3 Charles Zebidee 4 6 James Fortie 5 3 Fred Green 6 ii Alan Doo 6 4 Paul McDonald 7 5
To sort in reverse the r option is used.
% sort +2nr +i League Simon Ripon 1 1 Bert Ripon 3 3 Frank Doobie 3 2 Charles Zebidee 4 6 James Fortie 5 3 Fred Green 6 ii Alan Doo 6 4 Paul McDonald 7 5
To sort with the fourth field (that is, points):

Exercises 603
% sort +3nr +i League Fred Green 6 ii Charles Zebidee 4 6 Paul McDonald 7 5 Alan Doo 6 4 James Fortie 5 3 Bert Ripon 3 3 Frank Doobie 3 2 Simon Ripon 1 1
37.7 Exercises
37.7.1
37.7.2
37.7.3
37.7.4
37.7.5
Write a command using l s, I and the g r e p that will determine all files, in the current working directory, which contain the letter r .
Using who, I and grep, determine all the users on teletype termi- nals (that is, ttyxx).
Using the i s - a 1 and g r e p , show any file which has the attrib- utes r w x - r - - r - - .
Determine any usage of the string ">>" in the manual on csh and sh.
The following are lists of teams and their games played, goals for, goals against and points. Using the so r g utility, determine:
(i) (ii) (iii) (iv)
The list alphabetically of teams. The teams sorted by decending goals for. The teams sorted by ascending goals against. The teams sorted by points then by goals for.
Hippo Town 4 2 3 3 Lion City 7 14 12 6 Tiger United 1 0 0 0 Horse Head 5 ii 0 9 Hippo City 2 7 3 3
Fox Albion i0 2 2 0
Zebra United 5 12 17 3
37.7.6 Using sort and is -al, list the files in the current directory in order of decreasing size.
38.1 Introduction
The C shell ( c s h ) is one of the interfaces between the user and the UNIX operating system; others include:
�9 Bourne shell (sh) .
�9 Kome shell (ksh).
The C shell includes a command interpreter and a high-level programming language. It has several advantages over the Bourne shell, these include:
�9 Variables are more versatile. �9 It supports arrays of numbers and strings. �9 Improved protection over accidental logout. �9 Improved protection over accidental file overwrite. �9 Alias mechanism. �9 History mechanism to recall past events.
38.2 Entering the C Shell
The Bourne shell and the C shell can be used at any time but only one can be used at a time. To call-up the C shell:
% csh
and the Bourne shell is called-up using s h. Normally, the shell at which a user is put into initially is setup in the / e t c / p a s s w d file. This file can only be change by the system administrator. To list the p a s s w d file:
% more /etc/passwd , ,
this gives a paged list and the shells are given defined by either /bin/sh or/bin/csh. An excerpt from a passwd file is given next:

606 C shell
root'FDEc6.32"l'0"Super unser-/user'/bin/csh
fred-jt.06hLdiSDaA'2"4"Fred Bloggs'/user/fred:/bin/csh
fred2"jtY067SdiSFaA'3"4"Fred Smith'/user/fred2-/bin/csh
In this case, the p a s s w d file has 3 users defined, these are r o o t , f r e d and f r e d 2 . The encrypted password is given in the second field (between the first and second colon). The third field is a unique number that defines the user (in this case f r e d is 2 and f r e d 2 is 3). The fourth field, in this case def'mes the group number. The fifth field is simply a comment field and, in this case, contains the user's names. In the next field the user 's home direc- tory is defined and the final field contains the initial UNIX shell (in this case it is the C shell).
When entering the C shell the . c s h r c file is executed. This file sets up the C shell to the needs of the user and is found in the user's home directory. It can be found by typing l s - a l in the user's home directory. It can be listed as follows:
% cd % cat .cshrc
The . c s h r c file will be discussed later.
38.3 Leaving the C shell
An annoying feature of the Bourne shell is that if the user presses the CONTROL-D keystroke by mistake then they will be logged-out. In the C shell if the i g n o r e e o f variable is set then the CONTROL-D (^D) log out process is inactive. A user can exit from the C shell by typing e x i t . To set the i gno r e e o f variable just type"
% set ignoreeof
This is usually done automatically when entering the shell. An example of entering and leaving the C shell is given below.
% csh % is
fredl % exit
fred2 fred3
Note: If the i g n o r e e o f variable is not set then ^D will exit the C shell.
38.4 History
The history mechanism maintains a list of previous command lines, which are also called events. To set the number of events the s e t h i s t o r y command is used. For example, to set the number of stored events to 10"
'% set history = i0 , i . . . . .
ReexecuUng events 607
and to recall the previous events the history command is typed:
I
% history 3 cat fredl 4 is 5 mkdir temp 6 cd temp 7 is -al 8 cd .. 9 is
i0 cat fred2 ii vi fred2 12 history
, ,,
38.5 Reexecuting events
It is possible to reexecute any event in the history list. The reference to an event is made by starting the line with a !.
38.5.1 Event numbers
An event can be reexecuted using the event number. This is achieved by a ! followed by the event number.
history ,~T
1 is 2 cat temp 3 vi temp 4 history
% !i fredl fred2 fred3
% !2 this is the contents of the temp file.
, , ,,,
A negative number after the exclamation mark refers to an event prior to the current event.
% history 1 is 2 cat temp 3 vi temp 4 history
%!-2 this is the contents of the temp file.
% history 1 is
2 cat temp
3 vi temp 4 history 5 cat temp

608 C shell
38.5.2 Reexecuting previous event
Two exclamation marks (! !) are used to reexecute the previous event. For example"
% Is -al -rw-rw-r-- 2 fred % !!
-rw-rw-r-- 2 fred
5 Mar ii 14-31 filel
5 Mar Ii 14"31 filel
38.5.3 Events using text
To execute a previous event with text then an exclamation mark followed by text at the beginning of the event can be used. For example:
% cat temp This is the content of the temp file.
% ls fredl fred2 fred3
% vi temp % !ca
This is the content of the temp file.
% !i fredl fred2 fred3
38.5.4 Changing last event
Typically a user makes a mistake in a command line and wants to replace a part of the command line with another. To change a string of text in the last event then the caret (^) symbol is used. For example ^fred^temp reexe-
cutes the last event but changes f r e d for temp. For example:
% cat fred file not found
% ^fred^temp This is the contents of the temp file.
% history 1 cat fred 2 cat temp 3 history
38.5.5 Changing previous events
To modify a previous event it is possible to use the : s / o l d / n e w to change a given event. The event is specified by the methods given previously. For example:
% !13-s/temp/fred cat fred llpr
% !cat:s/xxx/yyy more yyy
Variables 609
The first example changes event 13 but substitutes t e m p for f r e d . The second example executes the last event beginning with cat and substitutes y y y for xxx .
38.6 Alias
The alias mechanism allows a user to substitute a given command for a single word (or alias). The following are common aliases:
% alias h history % alias dir is -al % alias w who % alias ^L clear % alias zap kill -9
The first example executes the history command whenever h is entered at the command line. The second executes an l s - a l when d i r is entered.
The user can list the currently def'med aliases by simply typing a l i a s , such as:
% alias h history dir is -al w who
% h 5 dir 6 cat filel 7 vi filel 8 h
% dir -rw-rw-r-- 2 fred -rw-rw-r-- 2 fred
5 Mar ii 14"31 filel 5 Mar ii 14"31 file2
The u n a l i a s command is used to remove an alias, such as:
% alias goodbye exit % alias
h history dir is -al w who
goodbye exit % unalias goodbye
% alias
h history dir is -al w who
38.7 Variables
The C shell only uses strings and does not use numbers. Thus, for example, 5 is interpreted as the character 5 and not as the number 5. To operate on numbers the @ is used.
610 C shefl
38.7.1 Variable substitution
The commands that are used to manipulate variables are:
�9 s e t e n v which operates on global variables (that is, system variables). �9 s e t and @ which operate on local variables to the current shell.
A variable is recognized by a preceding $ followed by the variable name. Examples are $fruit, $numbers, and so on.
38.7.2 String variables
The C shell treats variables as strings. To declare a variable the s e t com- mand is used. For example:
% set myname = Bill % echo $myname
Bill
% set argv() home /usr/staff/eeeal5 Shell /bin/csh myname Bill
This will declare the variable myname which contains the string " B i l l " . Note that a space on either side of the = is necessary.
% set chessl = king % set chess2 = $chessl + pawn % echo $chessl and $chess2.
king and king + pawn.
38.7.3 Arrays of strings
Before an array member is used it must be declared, that is, set. It is used to declare every member of the array.
% set people = ( fred bert frank farquar angus )
% echo Speople fred bert frank farquar angus
% echo $people[4] farquar
% echo $people[l-3] fred bert frank
% set sysusers = ( ........ ' ..... ) % echo $sysusers % set sysusers[4] = $people[2] % echo $sysusers
bert
38.7.4 Numerical variables
The @ command is used to assign a numeric variable. The format of the @ command is:

Variables 611
@ variable-name operator expression
The operator can be any of the C operators. These are"
Arithmetic" % remainder / divide + add * multiply - subtract
Shift operators: << shift left > > shift right
Relationship: > greater than
<= less than or equal to
< less than
l= not equal to
>= greater than or equal to
== equal to
Bitwise: & A N D ^ Exclusive OR I Inclusive OR
Logical" && AND II OR
An example is given next:
@ number = 4
% echo Snumber
4
% @ number = ( 5 * 2 )
% echo Snumber
I0
% @ test = ( $number > 8 )
% echo Stest
0
38.7.5 Files
Files can be tested for their status using the - n option, the standard form is"
-n f i lename
where n can be:
d file is a directory
e file exists
f file is a plain file
o user owns the file
r user has read access to file
w user has write access to file

612 C shell
x user has execute access to file z file is empty
For example
if (-z progl.c) echo "File does not exist"
38.8 Special forms ($#, $? and -)
The number of elements in an array is determined using the S # operator. The general format is"
$ #variable-name
To determine if a variable has been declared the S ? can be used. The gen- eral format is:
$ ?variable-name
The value returned will be zero if it has not been declared and 1 if it has been declared.
% set cars = ( fiat ford vauxhall nissan rover ) % echo The number of car types are $#cars The number of car types are 5
% echo $?cars
1 % unset cars
% echo cars % echo $?cars 0
The ~ (tilde) operator is used to substitute for the full pathname of a given user. For example:
% cd ~fred % cp ~eeeal5/doc/*.txt .
% rmdir ~bill/fortran
Thus ~ f r e d stands for user fred's home directory, and so on.
38.9 Shell variables
These variables can be set by either the shell or the user. There are two basic types: the first is given values, whereas the second is either set or unset.
38.9.1 System variables that take a value
The standard variables that take on values are"
Shefl variables 613
$argv- The argv variable contains all the command line arguments. a r g v [ 0 ] holds the name of the calling program, a r g v [ 1 ] contains the first argument, and so on. For example, if the command line is:
% find abc def xde
Then the argv variables will be:
a r g v [ 0 ] contains f i n d a r g v [ 1 ] contains a b c a r g v [ 2 ] contains d e f a r g v [ 3 ] contains x d e
{ name of program } { first argument}
$ # a r g v -contains the number of command line arguments. In the previ- ous example this will be 4.
$ c d p a t h - The variable is used by the cd command. When a cd com- mand with a simple filename is given, then the system will search the current working directory. If the file is not in the current working direc- tory then the system will search in the directories given by the c d p a t h variable. If a file is found in any of the search paths then the system changes to that directory. It is usually set in the . l o g i n file, for exam- ple:
set cdpath = ( /usr/staff/fred/bin /usr/staff/fred/docs )
$ c w d - full pathname of current directory.
$history- defines the size of the history list. This value is usually set in the . c s h r c file, such as:
set history = 30
echo $history
$home -de f ines the home directory of the user.
set home = /usr/staff/eeeal5
echo $home
Sma i i - files where the shell checks for mail.
S path - gives the directories in which the system searches for executables. Usually the search path is ' . ' , ' / b i n ' and ' / u s r / b i n ' . For example:

614 C shell
set path = ( . /bin /usr/bin ) echo Spath
$ p r ompt - A string that is primed before each command is read. If a '! ' appears in the string the current event number is substituted. The default prompt is a %. An example prompt setting is"
set prompt = " {'whoami'} $cwd- [\!] %"
which will print as a prompt:
{bill b} /usr/staff/bill b/docs" [15] %
if the current directory is /usr/staff/bill_b/docs, the current event was 15 and the user' s name is b i 11 b.
S savehist - c o n t a i n s the number of history events that are stored when the user logs out. These events are stored in the ~ / . h i s t o r y file. When the user next logs in then the current history list will be as the saved event history.
38.9.2 System variables are set
The standard variables that are set are"
$ f i 1 e c - e n a b l e s file name completion. If it is set then the filename is completed when the <ESC> key is pressed and the file is found.
set filec
% vi tem<ESC>
may become:
% vi temporary_file.ftn
The <Cntl-D> (" D) character is used to list any files which match the current input. For example:
% cd FOR<control-D> FORTRAN FOR DO FORever
m
% cd FOR
In this example the files which match the first three characters FOR are listed.
�9 $ ignoreeof - if set the shell ignores the <Cntrl-D> logout command

Controlstructures 615
and exit is used to leave the shell. It is set with:
set ignoreeof
$noclobber - when set there are restrictions on the redirection to files. If a > is given and the file exists it will not be destroyed.
set noclobber
38.10 Shell scripts
A shell script is a file that contains C shell commands. To execute a file the mode must be changed so that it can be executed. For example:
% cat Shelll #simple C shell echo This is a simple shell script
% chmod +x Shelll % Shelll
This is a simple shell script
Note that the first nonblank character in a C shell script must be a #. This tells the shell that it is a C shell script.
38.11 Control Structures
The C shell control statements are if, foreach, while and switch.
38.11.1 If
The general format of the if control structure is given below.
i f (expression) statement
An example of a C shell script using the i f control structure is"
# simple routine to print number of command line # arguments 0 to 2
if ($#argv == 0) echo "No arguments given" if ($#argv == i) echo "One argument" if ($#argv > i) echo "More than one argument"
If the script's filename were argtest then a typical run session may be:
% vi argtest % chmod +x argtest % argtest acb ddd xvf dddddd
More than one argument % argtest
No arguments given
616 C she//
38.11.2 If-then else
There are three different types of if-then else structures"
TyPe l . . . . . . . . Type2 . . . . . . . . . . . Type3 . . . .
if (expression) then if (expression) then if (expression) then commands commands commands
endif else else if (expression) then commands
endif
endif ,
An example of a Shell script using if-then is"
# C shell script to determine a grade for a given # mark set grade set mark = Sargv[l] #
if ( 0 <= $mark && Smark <= 50 ) then grade = fail
else if ( 50 < $mark && $mark <= 60 ) then set grade = C
else if ( 60 < $mark && $mark <= 70 ) then set grade = B
else if ( 70 < $mark && $mark <= i00 ) then set grade = A
else set grade = Invalid
endif #
echo "Mark is $mark , the grade is $grade ."
If the file is called g f a d e then a typical run session may be"
% vi grade % chmod +x grade % grade 55
Mark is 55, the grade is C. % grade -i00
Mark is -i00, the grade is Invalid
38.11.3 Foreach
The f o r e a c h structure reads each argument of an argument list in turn. The standard format is as follows:
foreach loopindex (argument-list) commands
end
When the loop is first executed then loopindex will be assigned the first value in the argument-list. The commands are then executed and the loop retums to the start and the loopindex then takes on the second value in the argument-list, and so on.

Controlstructures 617
38.11.4 While
The general format of the whi 1 e loop is:
while (expression)
commands
end
The following shell script is an example which determines the factorial of a number.
# echo "C Shell program to determine factorial" if ($#argv == 0) goto error set fact = 1 set number = $argv[l] set count = 1 #
while ( $count <= $number ) @ fact *= $count echo "Count is " $count @ count++
end #
echo "Answer is " $fact exit error: echo "Incorrect arguments given" echo "Format <fact number>" echo "For example fact 4 will give 24"
38.11.5 Switch
The switch statement can choose between several different strings. The general format is"
switch (string)
case patternl"
commands
breaksw
case pattern2 �9
commands
breaksw
default:
commands
breaksw
endsw
An example of the switch structure which implements a basic calculator is given next:
# C shell script to act as a calculator
if ($#argv != 3) then echo "Incorrect arguments use <calc 2 - 3> for example"
618 C shell
else
set result
set valuel = Sargv[l]
set value2 = $argv[3]
set operator = $argv[2]
switch ($operator)
case +:
@ result = Svaluel + Svalue2
breaksw
case -"
@ result = $valuel - Svalue2
breaksw
case x-
@ result = $valuel * $value2
breaksw
case /"
@ result = Svaluel / $value2
breaksw
default-
echo "Operator not recognized use +, -, x or /"
exit
breaksw
endsw
echo "Answer is " $result
endif
38.12 Automatically executed C shell scripts (.Iogin .cshrc)
When someone logs on to the system, or starts a C shell, three C shell scripts are run at various times.
38.12.1 The .Iogin file
The .login file is executed when the user logs onto the system. Usually this file contains terminal and keyboard commands. An example of a typical .login file is shown below. In this case, the s e t e nv command is used to set a variable for all shells, that is c s h and s h. The terminal type setup is a vtlO0.
# .login file
echo "Terminal set up is a vtl00"
echo "erase is ^H and kill is ^9,,
setenv TERM vtl00
stty erase ^H kill ^9
38.12.2 The .cshrc file
The . c shr c file is executed whenever a C shell is run. Again it is found in the home directory of the user. It is typically used to set up parameters used
Exercises 619
by the C shell, such as the path, prompt, and so on. A quick way of listing the . c s h r c file wherever you are is:
"~ % .... cat- =). cs-hrc . . . . . . . . . . . . . . . . , , , , . . . . . . . . . . . . .
A typical . c s h r c file is"
,~ . . . . . , . , ii i. . . . . . . . , . . . . . . . . . . , ,, ,
# .cshrc file set noclobber set ignoreeof set history=50 set savehist =50 set prompt = " ! %" set path = (. /bin -bill/bin /usr/bin /usr/ucb)
alias h history alias m more alias dir is -al =t : . . . . . . t , . . . . . J ............
38.12.3 The .Iogout file
The . logout file is automatically executed when the user logs out of the system. It typically contains commands which tidy up the user's work area and also to write messages.
38.13 Exercises
38.13.1 Using an alias, define a command named rename which is equivalent to:
mv-i filel file2
38.13.2 Using the date command, set user prompt to give the date.
38.13.3 Write a C shell script that calculates the sum of numbers up-to and including the number given.
38.13.4 Write a C shell script named a d d _ d o t _ C . w h i c h will add a .c to any given file name. For example:
add dot C fred
would cause the file f r e d to become f r e d . c.
38.13.5 The command for f'mding a given file on the system is:
find / -name filename-print
620 C shell
which searches from the top-level directory for the file called f i l e n a m e . For example, to find p r o g l , c the following can be used:
find / -name progl.c -print
Write a C shell script which is called f i n d f i l e in which the argument passed to it is the filename. For example,
findfile progl.c
38.13.6 The stream editor sed can be used to replace a given word with another word. The format of this command is given below:
sed s/word old/word new/g filename
This changes wordold for wordnew globally in file called f i l e n a m e . Write a shell script called r e p l a c e which gives three argtunents. The first two are for the words and the third for the filename. For example, to replace fred for terry in the file name file:
replace fred terry name file
38.13.7 Write a C shell script which will give information about a given file. The information should include access rights, whether it is of zero length, file type, and so on. Name the shell script t e s t f i 1 e.

java/ java/lang/ java/lang/Object, class java/lang/Exception, class j ava/lang/Integer, class j ava/lan~NumberFormatException, class iava/lang/Throwable.class j ava/lang/Class, class j ava/lang/lllegalAccessException, class j ava/lang/StringBuffer, class i ava/lang/ClassNotFoundException, class iava/lang/IllegalArgumentException, class iava/lang/Number, class j ava/lang/InterruptedException, class j ava/lang/String, class j ava/lang/RuntimeException, class i ava/lang/IntemalError, class iava/lang/Long.class iava/lang/Character.class iava/lang/CloneNotSupportedException, class java/lang/InstantiationException, class j ava/iang/V irtualMachineError, class java/lang/Double, class java/lang/Error, class iava/lang/NullPointerException, class java/lang/Cloneable, class iava/lang/System.class java/lang/ClassLoader, class java/lang/Math.class iava/lang/Float, class i ava/l ang/R unt ime. cl ass iava/lang/
StringlndexOutOfBoundsException. class java/lang/IndexOutOfBoundsException, class j ava/lang/SecurityException, class iava/lang/LinkageError.class java/lang/Runnable.class java/lang/Process, class j ava/lang/SecurityManager, class j ava/lang/Thread, class iava/lang/UnsatisfiedLinkError, class java/lang/IncompatibleClassChangeError, class j ava/lang/NoSuchMethodError, class j ava/lang/IllegalThreadStateException, class j ava/lang/ThreadGroup, class j ava/lang/ThreadDeath, class java/lang/
ArraylndexOutOfBoundsException. class
java/lang/Boolean, class java/lang/Compiler, class j ava/lang~oSuchMethodException, class j ava/lang/ArithmeticException, class j ava/lang/ArrayStoreException, class j ava/lang/ClassCastException, class j ava/lang/NegativeArrayS izeException, class j ava/lang/IllegalMonitorStateException, class j ava/lang/C lassC ircularityError, class j ava/lang/ClassFormatError, class j ava/lang/AbstractMethodError, class j ava/lang/IllegalAccessError, class j ava/lang/InstantiationError, class java/lang/NoSuchFieldError, class j ava/lang/NoClassDefFoundError, class j ava/lang~ erifyError, class j ava/lang/OutOfMemoryError, class j ava/lang/StackOverflowError, class j ava/lang/UnknownError, class j ava/lang/Win32Process, class java/io/ .lava/io/FilterOutputStream. class j ava/io/OutputStream, class java/io/IOException, class j ava/io/PrintStream, class j ava/io/FilelnputStream, class j ava/io/InterruptedlOException, class java/io/File.class java/io/lnputStream.class j ava/io/BufferedlnputStream, class j ava/io/FileOutputStream, class .lava/io/FileNotFoundException. class j ava/io/BufferedOutputStream, class j ava/io/F ileDescriptor, class j ava/io/F ilen ameF ilter, class j ava/io/F ilterlnputStream, class j ava/io/PipedlnputStream, class java/io/PipedOutputStream.class .I ava/io/EOFException, class j ava/io/UTFDataFormatException, class java/io/Datalnput, class .lava/io/DataOutput. class .1 ava/io/DatalnputStream, class java/io/PushbacklnputStream.class j ava/io/B yteArraylnputStream, class java/io/SequencelnputStream, class iava/io/StringBufferlnputStream, class
.lava/io/LineNumberlnputStream. class

622 Appendix A
java/io/DataOutputStream.class java/io/ByteArrayOutputStream.class j ava/io/RandomAccessFile, class j ava/io/StreamTokenizer, class java/util/ java/util/Hashtable, class j ava/util/Enumeration, class j ava/util/HashtableEnumerator, class iava/util/Properties, class j ava/util/HashtableEntry, class j ava/util/Dictionary, class java/util/Date.class j ava/util/NoSuchElementException, class j ava/util/StringTokenizer, class j ava/util/Random, class j ava/util/VectorEnumerator, class j ava/util/Vector, class java/util/BitSet.class java/util/EmptyStackException, class java/util/Observable, class java/util/Observer.class j ava/util/ObserverList, class java/util/Stack.class java/awt/ j ava/awt/Toolkit, class iava/awt/peer/ iava/awt/peer/WindowPeer, class j ava/awt/peer/TextFieldPeer, class i ava/awt/peer/ContainerPeer, class iava/awt/peer/PanelPeer, class java/awt/peer/CanvasPeer, class i ava/awt/peer/FramePeer, class iava/awt/peer/ChoicePeer, class iava/awt/peer/CheckboxMenultemPeer, class j ava/awt/peer/TextAreaPeer, class j ava/awt/peer/FileDialogPeer, class i ava/awt/peer/TextComponentPeer, class java/awt/peer/ScrollbarPeer, class j ava/awt/peer/ButtortPeer, class iava/awt/peer/ComponentPeer, class iava/awt/peer/MenuComponentPeer, class j ava/awt/peer/MenultemPeer, class j ava/awt/peer/CheckboxPeer, class j ava/awt/peer/MenuPeer, class java/awt/peer/ListPeer, class j ava/awt/peer/MenuBarPeer, class j ava/awt/peer/LabelPeer, class i ava/awt/peer/DialogPeer, class java/awt/Image.class java/awt/Menultem.class java/awt/MenuComponent, class java/awt/image/ j ava/awt/image/ImageProducer, class j ava/awt/image/ColorModel, class j ava/awt/image/DirectColorModel, class j ava/awt/image/lmageConsumer, class j ava/awt/image/ImageObserver, class j ava/awt/image/CroplmageFilter, class j ava/awt/image/ImageFilter, class j ava/awt/image/FilteredlmageSource, class j ava/awt/image/IndexColorModel, class
j ava/awt/image/MemoryImageSource, class j ava/awt/image/PixelGrabber, class j ava/awt/image/RGBImageFilter, class j ava/awt/FontMetrics, class java/awt/Checkbox.class j ava/awt/CheckboxCrroup, class j ava/awt/MenuContainer, class java/awl/Menu.class j ava/awt/Insets, class j ava/awt/MenuBar, class java/awt/List.class java/awt/Label.class java/awt/Component.class java/awt/TextField.class j ava/awt/TextComponent, class j ava/awt/Dialog, class java/awt/Font.class j ava/awt/Window, class j ava/awt/FocusManager, class java/awt/Panel.class java/awt/Container.class java/awt/Graphics, class j ava/awt/CheckboxMenultem, class java/awt/Canvas, class java/awt/Frame.class j ava/awt/Choiee, class java/awt/Event.class java/awt/TextArea, class java/awt/AWTError.class java/awt/Polygon, class java/awt/FlowLayout.class java/awt/Point.class java/awt/FileDialog, class java/awt/Scrollbar, class java/awt/Dimension.class java/awt/Color.class j ava/awt/Button, class iava/awt/LayoutManager, class java/awt/Rectangle.class j ava/awt/BorderLayout, class java/awt/GridLayout.class j ava/awt/GridBagConstraints, class j ava/awt/GridBagLayout, class j ava/awt/GridBagLayoutlnfo, class java/awt/CardLayout, class j ava/awt/MediaTracker, class java/awt/MediaEntry.class j ava/awt/ImageMediaEntry, class java/awt/AWTException.class java/net/ java/net/URL.class j ava/net/URLStreamHandlerFactory, class j ava/net/InetAddress, class j ava/net~nknownContentHandler, class j ava/net/UnknownHostException, class java/ne~StreamHandler.class j ava/net/URLConnection, class java/net/MalformedURLException, class j ava/net/ContentHandlerFactory, class j ava/net/ContentHandler, class java/net/UnknownServiceException, class

Java classes 623
j ava/net/ServerSocket, class j ava/net/PlainSocketlmpl, class java/net/Socketlmpl.class j ava/net/ProtocolException, class j ava/net/SocketException, class j ava/net/SocketlnputStream, class j ava/net/Socket, class j ava/net/SocketlmplFactory, class j ava/net/SocketOutputStream, class j ava/net/DatagramPacket, class j ava/net/DatagramSocket, class java/net/URLEncoder, class java/applet/ java/applet/Applet, class j ava/applet/AppletContext, class j ava/applet/AudioClip, class j ava/applet/AppletStub, class sun/ sun/tools/ sun/tools/debug/ sun/tools/debug/BreakpointQueue, class sun/tools/debug/DebuggerCallback, class sun/tools/debug/RemoteThread, class sun/tools/debug/StackFrame, class sun/tools/debug/RemoteAgent, class sun/tools/debug/AgentConstants, class sun/tools/debug/Agentln, class sun/tools/debug/RemoteObj ect. class sun/tools/debug/RemoteStackVariable.class sun/tools/debug/RemoteValue.class sun/tools/debug/RemoteClass, class sun/tools/debug/Agent, class sun/tools/debug/RemoteBoolean, class sun/tools/debug/RemoteChar, class sun/toois/debug/RemoteString, class sun/tools/debug/NoSessionException, class sun/tools/debug/Field, class sun/tools/debug/ NoSuchLineNumberException. class
sun/tools/debug/RemoteShort, class sun/tools/debug/RemoteThreadGroup, class sun/tools/debug/Remotelnt, class sun/tools/debug/ResponseStream, class sun/tools/debug/RemoteDouble, class sun/tools/debug/LocalVariable, class sun/tools/debug/BreakpointSet, class sun/tools/debug/RemoteStackFrame, class sun/tools/debug/MainThread, class sun/tools/debug/BreakpointHandler, class sun/tools/debug/AgentOutputStream, class sun/tools/debug/RemoteLong, class sun/toois/debug/RemoteFloat.class sun/tools/debug/RemoteArray, class sun/tools/debug/InvalidPCException, class sun/tools/debug/LineNumber, class sun/tools/debug/RemoteField, class sun/tools/debug/NoSuchFieldException, class sun/tools/debug/RemoteByte, class sun/tools/debug/Empty App. class sun/tools/debug/RemoteDebugger, class sun/tools/java/
sun/tools/j ava/RuntimeConstants, class sun/tools/java/Constants, class sun/tools/java/Environment, class sun/tools/j ava/ClassPath, class sun/tools/j ava/ClassDeclaration, class sun/tools/j ava/F ieldDefinition, class sun/tools/java/Type.class sun/tools/j ava/ClassNotFound, class sun/tools/j ava/ClassType, class sun/tools/j ava/ClassDefinition, class sun/tools/java/Parser, class sun/tools/j ava/ClassPathEntry, class sun/tools/j ava/CompilerError, class sun/tools/java/Identifier, class sun/tools/java/Package, class sun/tools/j ava/ClassFile, class sun/tools/java/Imports, class sun/tools/j ava/ArrayType, class sun/tools/j ava/AmbiguousField, class sun/tools/j ava/MethodType, class sun/tools/java/Scanner, class sun/tools/j ava/SyntaxError, class sun/tools/j ava/B inaryClass, class sun/tools/java/BinaryField.class sun/tools/java/AmbiguousClass, class sun/tools/j ava/B inaryConstantPool, class sun/tools/java/ScannerlnputStream, class sun/tools/java/BinaryAttribute, class sun/tools/j ava/B inaryCode, class sun/tools/java/BinaryExceptionHandler, class sun/tools/javac/ sun/tools/j avac/M ain. class sun/tools/j avac/SourceClass, class sun/tools/j avac/CompilerF ield. class sun/tools/javac/SourceField, class sun/tools/javac/BatchEnvtronment, class sun/tools/javac/ErrorConsumer, class sun/tools/j avac/ErrorMessage, class sun/tools/j avac/BatchParser, class sun/tools/zip/ sun/tools/zip/ZipFile, class sun/tools/zip/ZipEntry, class sun/tools/zip/ZipFilelnputStream, class sun/tools/zip/ZipConstants, class sun/tools/zip/ZipFormatException, class sun/tools/zip/ZipReaderlnputStream, class sun/tools/zip/ZipReader, class sun/tools/tree/ sun/tools/tree/ConstantExpression, class sun/tools/tree/LocalField.class sun/tools/tree/Expression, class sun/tools/tree/IncDecExpression, class sun/tools/tree/SuperExpression, class sun/tools/tree/NaryExpression, class sun/tools/tree/StringExpression, class sun/tools/tree/UnaryExpression, class sun/tools/tree/Context, class sun/tools/tree/ExpressionStatement, class sun/tools/tree/ConditionVars.class sun/tools/tree/Node, class sun/tools/tree/CharExpression, class

624 Appendix A
sun/tools/tree/CaseStatement, class sun/tools/tree/LessExpression, class sun/tools/tree/lntegerExpression, class sun/tools/tree/SubtractExpression, class sun/tools/tree/Array A ccessExpress i on. cl ass sun/tools/treefrryStatement, class sun/tools/tree/BinaryEqualityExpression.class sun/tools/tree/Statement, class sun/tools/tree/AssignSubtractExpression, class sun/tools/tree/FinallyStatement, class sun/tools/tree/ForStatement.class sun/tools/tree/DivRemExpression, class sun/tools/tree/BinaryExpression.class sun/tools/tree/ShiftRightExpression, class sun/tools/tree/AssignMultiplyExpression, class sun/tools/tree/BooleanExpression, class sun/tools/tree/BinaryArithmeticExpression.class sun/tools/tree/ThrowStatement, class sun/tools/tree/AssignDivideExpression, class sun/tools/tree/AssignShiRLeRExpression, class sun/tools/tree/NewArrayExpression, class sun/tools/tree/AndExpression, class sun/tools/tree/AssignBitOrExpression.class sun/tools/tree/BreakStatement, class sun/toois/tree/SynchronizedStatement, class sun/tools/tree/PreDecExpression, class sun/tools/tree/CompoundStatement, class sun/tools/tree/DoubleExpression, class sun/tools/tree/ConvertExpression, class sun/tools/tree/NullExpression, class sun/tools/tree/LessOrEqualExpression, class sun/tools/tree/IdentifierExpression.class sun/tools/tree/RetumStatement.class sun/tools/tree/B itN otExpression, class sun/tools/tree/LongExpression, class sun/tools/tree/VarDeclarationStatement.class sun/tools/tree/MethodExpression, class sun/tools/treefl'hisExpression, class sun/tools/tree/B itOrExpression, class sun/tools/tree/PositiveExpression, class sun/tools/tree/IfStatement, class sun/tools/tree/FloatExpression, class sun/tools/tree/NotEqualExpression, class sun/tools/tree/InstanceOfExpression, class sun/tools/tree/NotExpression, class sun/tools/tree/BitAndExpression.class sun/tools/tree/DivideExpression, class sun/tools/tree/ShortExpression, class sun/tools/tree/RemamderExpression, class sun/tools/tree./NewlnstanceExpression, class sun/tools/tree/SwitchStatement, class sun/tools/tree/AddExpression, class sun/tools/tree/AssignOpExpression, class sun/tools/tree/EqualExpression, class sun/tools/tree/PostlncExpression, class sun/tools/tree/GreaterExpression, class sun/tools/tree/PostDecExpression, class sun/tools/tree/AssignExpression, class sun/tools/tree/WhileStatement.class sun/tools/tree/ContinueStatement, class sun/tools/tree/ConditionalExpression, class
sun/tools/tree/AssignAddExpression, class sun/tools/tree/BinaryBitExpression, class sun/tools/tree/CastExpression, class sun/tools/tree/AssignBitXorExpression, class sun/tools/tree/ArrayExpression, class sun/tools/tree/InlineMethodExpression, class sun/tools/tree/InlineNewInstanceExpression, class sun/tools/tree/CodeContext, class sun/tools/tree/AssignShiftRightExpression, class sun/tools/tree/UnsignedShiftRightExpression, class sun/tools/tree/AssignBitAndExpression, class sun/tools/tree/ShiRLeftExpression, class sun/tools/tree/CatchStatement, class sun/tools/tree/lntExpression, class sun/tools/tree/TypeExpression, class sun/tools/tree/CommaExpression, class sun/tools/tree/
AssignUnsignedShiftRightExpression. class sun/tools/tree/ExprExpression, class sun/tools/tree/AssignRemainderExpression, class sun/tools/tree/ByteExpression, class sun/tools/tree/BinaryAssignExpression, class sun/tools/tree/DoStatement.class sun/tools/tree/DeclarationStatement, class sun/tools/tree/MultiplyExpression, class sun/tools/tree/InlineReturnStatement, class sun/tools/tree/BitXorExpression.class sun/tools/tree/BinaryCompareExpression, class sun/tools/tree/B inaryShiftExpression, class sun/tools/tree/CheckContext, class sun/tools/tree/PrelncExpression, class sun/tools/tree/GreaterOrEqualExpression, class sun/tools/tree/FieldExpression, class sun/tools/tree/OrExpression, class sun/tools/tree/B m aryLogicalExpression, class sun/tools/tree/NegativeExpression, class sun/tools/tree/LengthExpression, class sun/tools/asm/ sun/tools/asm/Assembler, class sun/tools/asm/Instruction, class sun/toois/asm/LocalVariable.class sun/tools/asm/ArrayData.class sun/tools/asm/L~calVariableTable, class sun/tools/asm/SwitchDataEnumeration, class sun/tools/asm/ConstantPool, class sun/tools/asm/ConstantPoolData, class sun/tools/asm/NameAndTypeConstantData, class sun/tools/asm/NumberConstantData, class sun/tools/asm/FieldConstantData, class sun/tools/asm/TryData, class sun/tools/asm/Label, class sun/tools/asm/SwitchData, class sun/tools/asm/CatchData, class sun/tools/asm/StringExpressionConstantData, class sun/tools/asm/NameAndTypeData, class sun/tools/asm/StringConstantData, class sun/tools/asm/ClassConstantData, class sun/tools/ttydebug/ sun/tools/ttydebug/TTY, class sun/tools/javadoc/ sun/tools/j avadoc/Main, class

Java classes 625
sun/tools/j avadoc/DocumentationGenerator, class sun/tools/javadoc/
HTMLDocumentationGenerator. class sun/tools/javadoc/
MIFDocumentationC, cnerator, class sun/tools/j avadoc/MIFPrintStream, class sun/net/ sun/net/MulticastSocket, class sun/net/URLC anonicalizer, class sun/net/NetworkClient, class sun/net~etworkServer, class sun/net/ProgressData, class sun/net/ProgressEntry, class sun/net/TelnetlnputStream.class sun/net/TelnetProtocolException, class sun/net/TelnetOutputStream, class sun/net/TransferProtocolClient, class sun/net/ftp/ sun/net/fip/FtplnputStream.class sun/net/ftp/FtpClient, class sun/net/f~p/FtpLoginException, class sun/net/ftp/FtpProtocolException, class sun/net/f~/If~lient, class sun/net/nntp/ sun/net/nntp/Newsgrouplnfo, class sun/net/nntp/NntpClient, class sun/net/nntp/UnknownNewsgroupException, class sun/net/nntp/NntpProtocolException, class sun/net/nntp/NntplnputStream, class sun/net/smtp/ sun/net/smtp/SmtpPrintStream, class sun/net/smtp/SmtpClient, class sun/net/smtp/SmtpProtocolException, class sun/net/www/ sun/net/www/auth/ sun/net/www/auth/Authenticator, class sun/net/www/auth/basic, class sun/net/www/content/ sun/net/www/content/text/ sun/net/www/content/text/Generic, class sun/net/www/content/text/plain, class sun/net/www/content/image/ sun/net/www/content/image/gif, class sun/net/www/content/image/jpeg, class sun/net/www/content/image/x_xbitmap, class sun/net/www/content/image/x_xpixmap, class sun/net/www/FormatException, class sun/net/www/MessageHeader, class sun/net/www/MeteredStream, class sun/net/www/ProgressReport, class sun/net/www/MimeEntry, class sun/net/www/MimeLauncher, class sun/net/www/MimeTable, class sun/net/www/URLConnection, class sun/net/wwwAJnknownContentException, class sun/net/wwwAJnknownContentHandler, class sun/net/www/protocol/ sun/net/www/protocol/file/ sun/net/www/protocol/file/Handler, class sun/net/www/protocol/file/
FileURLConnection.class
sun/net/www/protocol/http/ sun/net/www/protocol/http/Handler, class sun/net/www/protocol/http/
HttpURLCormection. class sun/net/www/protocol/http/
HttpPostBufferStream. class sun/net/www/protocol/docd sun/net/www/protocol/doc/Handler, class sun/net/www/protocol/verbatim/ sun/net/www/protocol/verbatim/Handler, class sun/net/www/protocol/verbatim/
VerbatimConnection. class sun/net/www/protocol/gopher/ sun/net/www/protocol/gopher/GopherClient, class sun/net/www/protocol/gopher/
GopherlnputStream.class sun/net/www/http/ sun/net/www/http/
UnauthorizedHttpRequestException. class sun/net/www/http/HttpClient, class sun/net/www/http/Authenticationlnfo, class sun/awt/ sun/awt/HorizBagLayout, class sun/awt/VerticalB agLayout, class sun/awffVariableGridLayout.class sun/awt/FocusingTextField, class sun/awt/win32/ sun/awt/win32/MToolkit.class sun/awt/win32/MMenuBarPeer.class sun/awt/win 32/MB uttonPeer, class sun/awt/win32AVin32Image.class sun/awt/win32/MScrollbarPeer.class sun/awt/win32/MDialogPeer, class sun/awt/win 32/MC heckboxMenultemPeer, class sun/awt/win32AVin32Graphics, class sun/awt/win32/M ListPeer. class sun/awt/win32/MWindowPeer, class sun/awt/win32/MMenultemPeer.class sun/awt/win32/ModalThread.class sun/awt/win32/MCanvasPeer.class sun/awt/win32/MFileDialogPeer.class sun/awt/win 32/MTextAreaPeer. class sun/awt/win 32/MPanelPeer. class sun/awt/win32/MComponentPeer, class sun/awt/win 32/MC heckboxPeer, class sun/awt/win 32/MLabelPeer. class sun/awt/win32AVin32FontMetrics, class sun/awt/win32/MFramePeer, class sun/awt/win32/MMenuPeer, class sun/awt/win32/MChoicePeer.class sun/awt/win32/MTextFieldPeer, class sun/awt/win32AVin32PrintJob.class sun/awt/image/ sun/awt/image/URLImageSource, class sun/awt/image/ImageWatched, class sun/awt/imageAnputStreamlmageSource, class sun/awt/image/ConsumerQueue, class sun/awt/image/ImageDecoder, class sun/awt/image/ImageRepresentation.class sun/awt/image/ImagelnfoGrabber, class sun/awt/image/XbmlmageDecoder, class

626 Appendix A
sun/awt/image/GiflmageDecoder, class sun/awt/image/ImageFetcher, class sun/awt/image/PixelStore, class sun/awt/image./JPEGImageDecoder, class sun/awt/image./PixelStore8, class sun/awt/imagr class sun/awt/image/OffS creenlmageSource, class sun/awt/image/PixelStore32.class sun/awt/image/lmageFormatException, class sun/awt/image/FileImageSource, class sun/awt/image/lmage, class sun/awt/UpdateClient, class sun/awt/ScreenUpdaterEntry, class sun/awt/ScreenUpdater, class sun/misc/ sun/misc/P.ef, class sun/misc/MessageUtils, class sun/misc/Cache, class sun/misc/C acheEntry, class sun/misc/CacheEnumerator.class sun/misc/CEFormatException, class sun/misc/CEStreamExhausted, class sun/misc/CRC 16. class sun/misc/CharacterDecoder, class sun/misc/BASE64Decoder, class sun/misc/UCDecoder, class sun/misc/UUDecoder, class sun/misc/CharacterEncoder, class sun/m isc/B AS E64 Encoder. class surffmisc/HexDumpEncoder, class surdmiscAJCEncoder, class sun/misc/UUEncoder, class
sun/misc~imeable, class sun/misr class sun/misc/Timer.class sun/misc/TimerThread, class sun/misc/ConditionLock, class sun/misc/Lock.class sun/audio/ sun/audio/AudioDataStream class sun/audio/AudioData, class sun/audio/AudioDevice, class sun/audio/AudioPlayer, class sun/audio/AudioStream, class sun/audio/NativeAudioStream class sun/audio/InvalidAudioFormatException, class sun/audio/AudioTranslatorStream class sun/audio/AudioStreamSequence, class sun/audio/ContinuousAudioDataStream class sun/applet/ sun/applet/StdAppletViewerFactory, class sun/applet/TextFrame, class sun/applet/AppletViewerFactory.class sun/applet/AppletViewer.class sun/applet/AppletCopyright, class sun/applet/AppletAudioClip, class sun/applet/AppletSecurity, class sun/applet/AppletThreadGroup.class sun/applet/AppletC lassLoader, class sun/applet/AppletPanel.class sun/applet/AppletViewerPanel.class sun/applet/AppletProps.class sun/applet/AppletSecurityE• class sun/apple)/AppletZipClassLoader, class

Table B.1 Time functions
,,,,, ,,,,,,,,,,,, , , , , ,
Convers ion functions
char ''~ asct ime"i struct tm *ttt) ;
i i i i i i i i i i i i . i
Header
f i l e .......
t ime.h
Description
Function: Converts date and time to string. The time passed as a pointer to a tm structure.
Return: A pointer to the date string.
char *ctime( time t *ttt);
t ime.h Function: Converts date and time to string. The time passed as a pointer to by t t t .
Return: A pointer to the date string.
double difftime( time t time2, time t timel);
t ime.h Function: To determine the number of seconds between t i m e 2 and t i m e 1.
Return: Difference in time returned as a double.
struct tm *gmtime( time t *ttt);
D
t ime.h Function: Converts time into Greenwich Mean Time. The time is passed as a pointer to t t t and the result is put into a tm structure. Return" A pointer to the tra structure.
int localtime ( time t *tt) ;
t ime.h Function: Converts time into local time. The time is passed as a pointer to t t t and the result is put into a tm structure. Return: A pointer to the tm structure.
time t time( time *ttt) ;
t ime.h Function: To determine the time of day. The time is passed as a pointer to t t t and the result gives the number of sec- onds that have passed since 00:00:00 GMT January 1970. This value is re- turned through the pointer t t t . Return: The number of seconds that have passed since January, 1970.
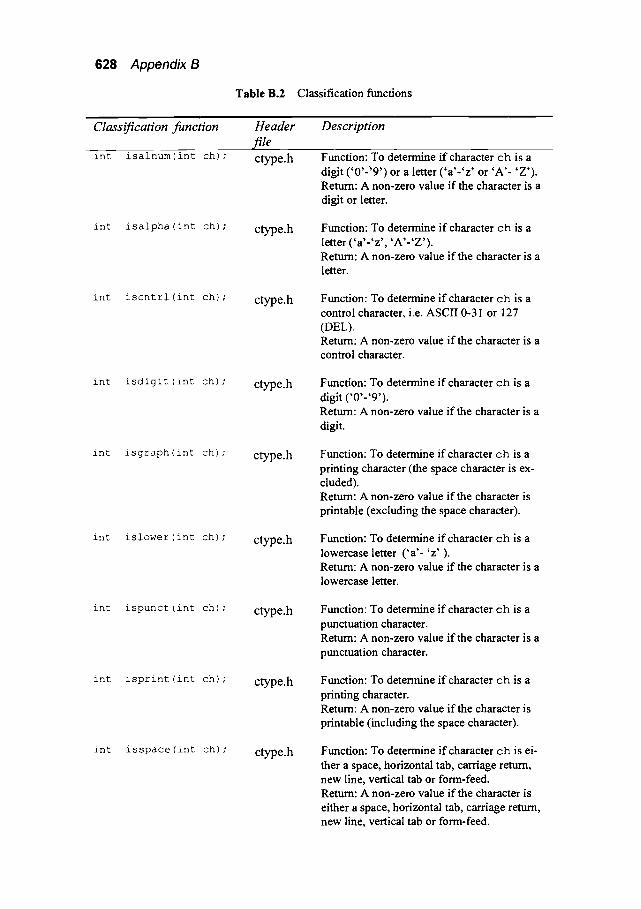
628 Appendix B
Table B.2 Classification functions
Classification fun'ction ' int .... isalnum(int ch) ;
Header file ctype-h
Description
Function: To determine if character ch is a digit ( ' 0 ' 2 9 ' ) or a letter ( ' a ' - ' z ' or 'A'- 'Z') . Return: A non-zero value if the character is a digit or letter.
int isalpha(int ch); ctype .h Function: To determine if character c h is a letter ( ' a ' - ' z ' , 'A ' - 'Z ' ) . Return: A non-zero value if the character is a letter.
int iscntrl(int ch); ctype.h Function: To determine if character ch is a control character, i.e. ASCII 0-31 or 127 (DEL). Retum: A non-zero value if the character is a control character.
int isdigit(int ch); ctype.h Function: To determine if character c h is a digit ( '0 ' - '9 ' ) . Return: A non-zero value if the character is a digit.
int isgraph(int ch); ctype.h Function: To determine if character ch is a printing character (the space character is ex- cluded). Return: A non-zero value if the character is printable (excluding the space character).
int islower(int ch); ctype.h Function: To determine if character ch is a lowercase letter ( 'a '- 'z ' ). Return: A non-zero value if the character is a lowercase letter.
int ispunct (int ch) ; ctype.h Function: To determine if character ch is a punctuation character. Return: A non-zero value if the character is a punctuation character.
int isprint(int ch); ctype.h Function: To determine if character ch is a printing character. Return: A non-zero value if the character is printable (including the space character).
int isspace(int ch); ctype.h Function: To determine if character c h is ei- ther a space, horizontal tab, carriage return, new line, vertical tab or form-feed. Return: A non-zero value if the character is either a space, horizontal tab, carriage return, new line, vertical tab or form-feed.

int isupper(int ch) ;
int isxdigit (int
ch) ;
c type .h
c type .h
ANSI-C functions 629
Function: To determine if character c h is an uppercase letter ( 'A ' - 'Z ' ). Return: A non-zero value if the character is an uppercase letter.
Function: To determine if character ch is a hexadecimal digit i.e. '0 ' - '9 ' , 'a ' - ' f ' , 'A'- 'F' . Return: A non-zero value if the character is a hexadecimal dil~it.
Table B.3 String functions
S t r i n g f u n c t i o n .......
i n t .... s t r cmp ( char *strl, char *str2) ;
/ i"eader ........
f i l e .... s t r ing.h
D e s c r i p t i o n
F~mction: compares two s t f i n g s s t r I and str2.
Return: A 0 (zero) is returned if the strings are identical, a negative value if s t r 1 is less than s t r 2, or a positive value if s t r 1 is greater than s t r 2.
int strlen( char *str);
s t r ing.h Function: Determines the number of charac- ters in s t r. Return: Number of characters in s t r.
char *strcat( char *strl, char *str2);
s t r ing.h Function: Appends s t r 2 onto s t r 1. The resultant string s t r 1 will contain s t r 1 and
str2.
Return: A pointer to the resultant string.
char *strlwr ( char *strl) ;
str ing.h Function: Converts uppercase letters in a string to lowercase Return: A pointer to the resultant string
char *strupr ( char *strl) ;
str ing.h Function: Converts lowercase letters in a string to uppercase. Return: A pointer to the resultant string.
char *strcpy( char *strl, char *str2);
s t r ing.h Function: Copies s t r 2 into s t r 1. Return: A pointer to the resultant string.
int sprintf( char *str, char *format str, argl ..... );
s tdio.h Function: Similar to p r i n t f ( ) but output goes into string s t r . Return: Number of characters output.
int sscanf ( s td io .h Function: Similar to scanf ( ) but input is char *str, from string str. char *format str, a r g l . . . . ) ; - Return: Number of fields successfully
scanned. . . . . . . . . . . . . . . . . . . . . . . . . . . . . . . . . . . . . . .

630 Appendix B
Table B.4 Conversion functions
- Conversion functions
double atof( char *str) ;
Header Description file . . . . . . . . . . . . . . . . . . . . . . stdlib.h Function: Converts a string s t r into a
floating-point number. Return: Converted floating-point value. If value cannot be converted the return value is O.
int atoi(char *str) ; stdlib.h Function: Converts a string s t r into an inte- ger. Return: Converted integer value. If value cannot be converted the retum value is O.
long atol(char *str) ; stdlib.h Function: Converts a string s t r into a long integer. Return: Converted integer value. If value cannot be converted the return value is O.
char *itoa( int val, char *str, int radix);
stdlib.h Function: Converts v a l into a string s t r . The number base used is defined by r a d i x . Return" A pointer to s t r.
char *itoa( long val, char *str, int radix);
stdlib.h Function: Converts v a l into a string s t r . The number base used is defined by r a d i x . Return" A pointer to s t r .
int _tolower ( cD/pe.h int ch) ;
Function: Converts character ch to lower- CaSe.
Return: Converted value lowercase character. Note, ch must be in uppercase when called.
int tolower ( cWne.h int ch) ;
Function" Converts character ch to lower- case. Return" Converted value lowercase character. Return value will be ch unless ch is in up- percase.
int _toupper ( ctype.h int ch) ;
Function: Converts character ch to upper- CaSe.
Return: Converted value lowercase character. Note, ch must be in lowercase when called.
i n t t o u p p e r ( ctype.h Function" Converts character ch to upper- int ch) ; case.
Return: Converted value lowercase character. Return value will be ch unless ch is in low- ercase.
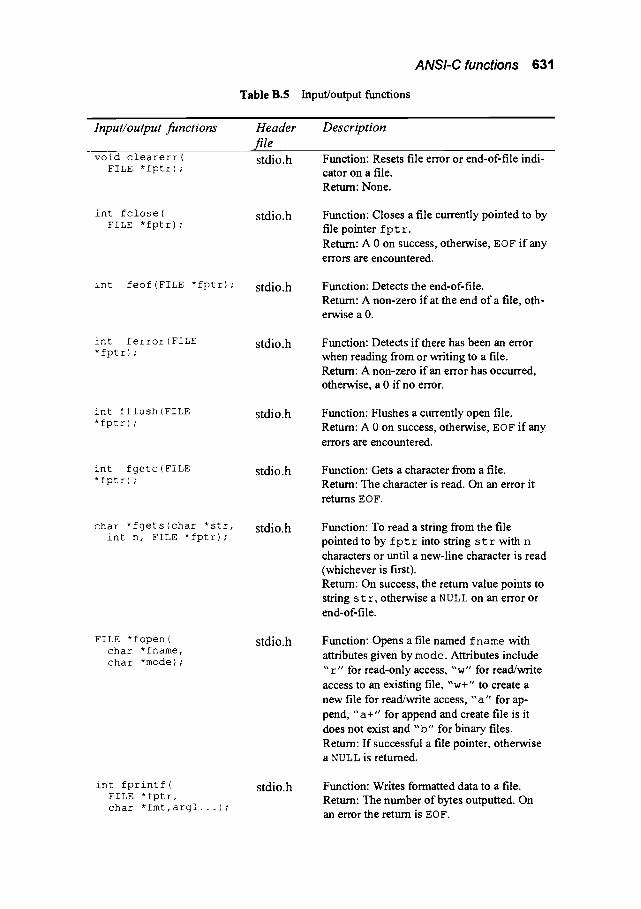
ANSI-C functions 631
Table B.5 Input/output functions
Input/output functions
.... -~d-clearerr ( FILE *fptr) ;
Header file s td io .h
Description
Function: Resets file error or end-of-file indi- cator on a file. Return: None.
int fclose ( FILE *fptr) ;
s td io .h Function: Closes a file currently pointed to by file pointer fpt r. Return: A 0 on success, otherwise, EOF if any
errors are encountered.
int feof(FILE *fptr) ; s tdio .h Function: Detects the end-of-file. Retum: A non-zero if at the end of a file, oth- erwise a 0.
int ferror (FILE *fptr) ;
s tdio .h Function: Detects if there has been an error when reading from or writing to a file. Return: A non-zero if an error has occurred, otherwise, a 0 if no error.
int fflush(FILE *fptr) ;
s tdio .h Function: Flushes a currently open file. Return: A 0 on success, otherwise, EOF if any
errors are encountered.
int fgetc (FILE *fptr) ;
s tdio .h Function: Gets a character from a file. Return: The character is read. On an error it returns EOF.
char *fgets(char *str, int n, FILE *fptr);
s tdio .h Function: To read a string from the file pointed to by f p t r into string s t r with n characters or until a new-line character is read (whichever is first). Return: On success, the return value points to string s t r , otherwise a NULL on an error or end-of-file.
FILE *fopen( char *fname, char *mode);
s tdio .h Function: Opens a file named f n a m e with attributes given by mode. Attributes include "r" for read-only access, "w" for read/write access to an existing file, "w+" to create a
new file for read/write access, " a " for ap- pend, " a +" for append and create file is it does not exist and " b " for binary files. Return: If successful a file pointer, otherwise a NULL is returned.
int fprintf( FILE *fptr, char *fmt,argl...);
s tdio .h Function: Writes formatted data to a file. Return: The number of bytes outputted. On an error the return is EOF.

632 Appendix B
int fputc( int ch, FILE *fptr);
int fread( void *buff, size t size,
m
size t n, FILE--* fptr) ;
int fscanf ( FILE *fptr, char *format, &argl... ) ;
int fseek( FILE *fptr, long offset, int whence);
int fwrite( void *buff, size t size, size t n, FILE--*fptr);
int getc(FILE *fptr) ;
int getchar (void) ;
char *gets( char *str);
int printf( char *fmt, argl .... );
stdio.h
stdio.h
stdio.h
stdio.h
stdio.h
stdio.h
stdio.h
stdio.h
stdio.h
Function: Writes a character ch to a file. Return: The character written, otherwise on an error it returns EO F.
Function: Reads binary data from a file. It reads n items of data, each of length s i z e bytes into the block specified by b u f f . Return: The number of items read. In the event of an error the return will be less than the specified number (n).
Function: Scans and formats input from a file in a format specified by f o r m a t . Return: The number of fields successfully scanned. In the event of a reading from an end-of-file the retum is EOF.
Function: The file pointer f p t r is positioned at an offset specified by o f f s e t beyond the location specified by w h e n c e . This location can be either to SEEK SET (the start of the file), SEEK CUR (the current file position) or SEEK END (the end-of-file). Return: A 0 on success; otherwise, a non-zero value if any errors are encountered.
Function: Writes binary data to a file. It writes n items of data, each of length s i z e bytes from the block specified by b u f f . Return: The number of items written. On the event of an error the return will be less than the specified number (n).
Function: Gets a character ch from a file. Return: The character read, or in the event of an error it returns EOF.
Function: Gets a character from the standard input (normally the keyboard). Return: The character read, or on an error it returns EOF.
Function: Gets a string s t r from the stan- dard input (normally the keyboard). String input is terminated by a carriage return (and not with spaces or tabs, as with s c a n f ( ) ). Return: On success, the return value points to string s t r , otherwise a NULL on an error.
Function: Writes formatted data to the stan- dard output (normally the display). Return: The number of bytes output. On an error the return is EOF.
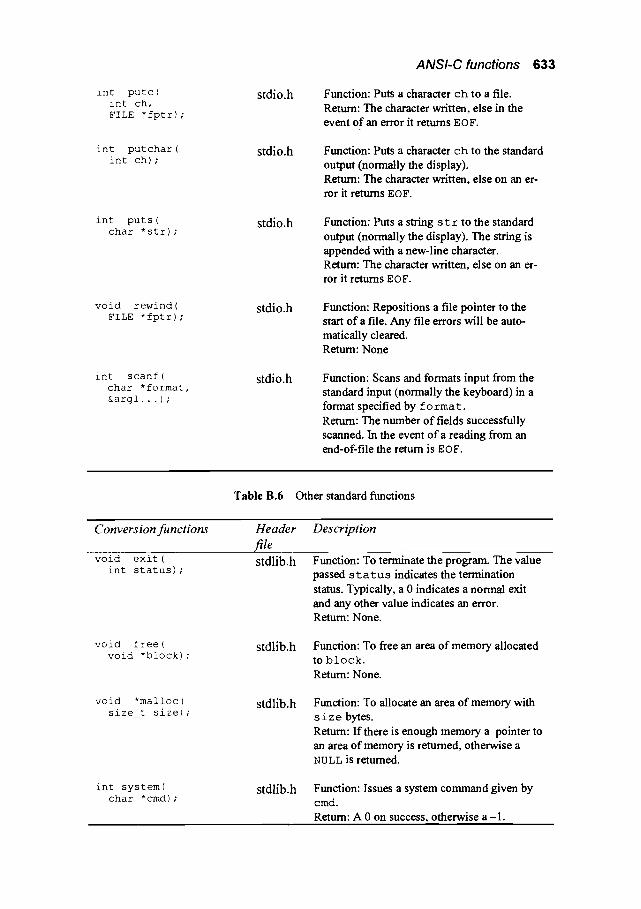
ANSI-C functions 633
int putc( int ch, FILE *fptr);
stdio.h Function: Puts a character ch to a file. Return: The character written, else in the event of an error it returns EOF.
int putchar( int ch);
stdio.h Function: Puts a character c h to the standard output (normally the display). Return: The character written, else on an er- ror it returns EOF.
int puts( char *str);
stdio.h Function: Puts a string s t r to the standard output (normally the display). The string is appended with a new-line character. Return: The character written, else on an er- ror it returns EO F.
void rewind ( FILE *fptr) ;
stdio.h Function: Repositions a file pointer to the start of a file. Any file errors will be auto- matically cleared. Return: None
int scanf( char *format, &argl...);
stdio.h Function: Scans and formats input from the standard input (normally the keyboard) in a format specified by f o rma t . Retttm: The number of fields successfully scanned. In the event of a reading from an end-of-file the return is EOF.
Table B.6 Other standard functions
..... ( " o n v e r s i o n f u n c t i o ~ . . . . H e ' a d e r ..... D e s c r i p ; } ' o n . . . . . . . . .
. . . . . . . . . . . . . . . . . rite - -void e x i t ( s tdl ib.h Function: To terminate ~ e program. The value
i n t s t a t u s ) ; passed s t a t u s indicates the termination
status. Typically, a 0 indicates a normal exit and any other value indicates an error. Return: None.
void free( stdlib.h void *block) ;
Function: To free an area of memory allocated to block. Return: None.
void *malloc ( stdlib.h size t size);
Function: To allocate an area of memory with s i z e bytes. Return: If there is enough memory a pointer to an area of memory is returned, otherwise a N U L L is retumed.
int system( char *cmd) ;
stdlib.h Function: Issues a system command given by cmd. Return: A 0 on success, otherwise a - 1 .
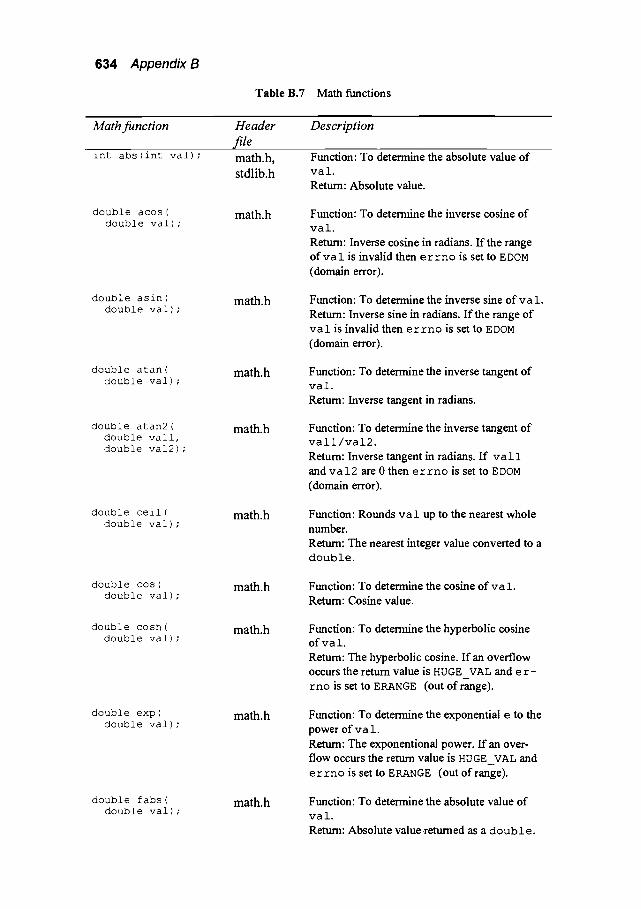
634 Appendix B
Table B.7 Math functions
~ Math funct ion
~ int abs(int val) ;
Header
file math.h,
stdlib.h
Description
Function: To determine the absolute value of v a l . Return: Absolute value.
double acos( double val) ;
math.h Function: To determine the inverse cosine of v a l . Return: Inverse cosine in radians. If the range o f v a l is invalid then e r r n o is set to EDOM (domain error).
double asin( double val) ;
math.h Function: To determine the inverse sine of v a l . Return: Inverse sine in radians. If the range of v a l is invalid then e r r n o is set to EDOM (domain error).
double atan( double val);
math.h Function: To determine the inverse tangent of v a l . Return: Inverse tangent in radians.
double atan2( double vall, double val2);
math.h Function: To determine the inverse tangent of v a l l / v a l 2 .
Return: Inverse tangent in radians. If v a l l and v a l 2 are 0 then e r r n o is set to EDOM (domain error).
double ceil( double val);
math.h Function: Rounds val up to the nearest whole number. Return: The nearest integer value converted to a double.
double cos( double val);
math.h Function: To determine the cosine of v a l . Return: Cosine value.
double cosh( double val) ;
math.h Function: To determine the hyperbolic cosine o f v a l . Return: The hyperbolic cosine. If an overflow occurs the return value is HUGE VAL and e r - r n o is set to ERANGE (out of range).
double exp( double val);
math.h Function: To determine the exponential e to the power o f v a l . Return: The exponentional power. If an over- flow occurs the return value is HUGE VAL and e r r n o is set to E I ~ N G E (out o f range).
double fabs( double val);
math.h Function: To determine the absolute value of val.
Return: Absolute value returned as a double.

double floor( double val);
double fmod( double vall, double val2);
double log( double val);
double loglO( double val);
double pow( double vall, double val2);
int rand(void);
double sin( double val);
double sinh( double val);
double sqrt( double val);
math.h
math.h
math.h
math.h
math.h
math.h
math.h
math.h
math.h
ANSI-C functions 635
Function: Rounds val down to the nearest whole number. Return: The nearest integer value converted to a double.
Function: Determines the remainder of a divsion of v a l 1 by v a l 2 and rounds to the nearest whole number. Return: The nearest integer value converted to a double.
Function: Determines the natural logarithm of v a l . Return: The natural logarithm. If the value passed into the function is less than or equal to 0 then e r r n o is set to EDOM and the value passed back is HUGE VAL.
Function: Determines the base-10 logarithm of v a l . Return: The base-10 logarithm. If the value passed into the function is less than or equal to 0 then e r r n o is set with EDOM and the value passed back is HUGE VAL.
Function: Determines v a l l to the power of v a l 2 . Return: The raised power. If an overflow oc- curs or the power is incalculable then the return value is HUGE VAL and e r r n o is set to ERANGE (out of range) or EDOM (domain er- ror). If both arguments passed are 0 then the return is 1.
Function: Generates a pseudo-random number from 0 to v a I - 1.
Return: The generated random number.
Function" To determine sine of v a l . Return: Sine value.
Function: To determine hyperbolic sine of v a l . Return: The hyperbolic sine. If an overflow oc- curs the return value is HUGE VAL and e r r n o is set to ERANGE (out of range).
Function: Determines the square root of val. Return: The square root. If the value passed into the function is less than 0 then e r r n o is set with E DOM and the value returned is 0.

636 Appendix B
void srand( unsigned int
seed);
stdlib.h Function: Initializes the random-generator with s e e d . Return: None.
double tan ( ma~.h double val) ;
Function: To determine the tangent of v a l . Return: The hyperbolic tangent. If an overflow occurs the remm value is HUGE VAL and e r -
m
r n o is set to ERANGE (out of range).
double tanh ( ma~.h double val) ;
Function: To determine the hyperbolic tangent o f v a l . Return: The hyperbolic tangent.
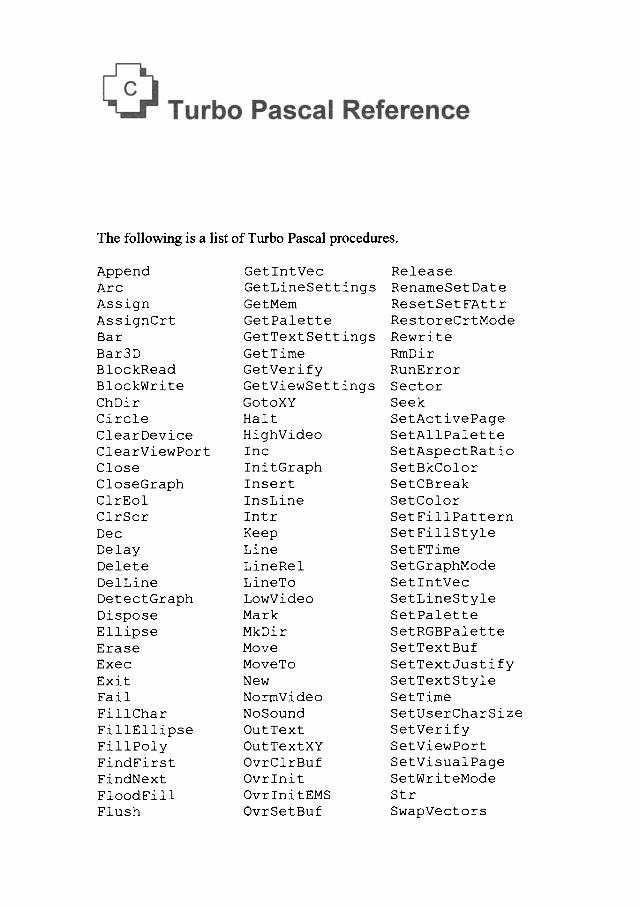
The following is a list of Turbo Pascal procedures.
Append GetIntVec Release Arc GetLineSettings RenameSetDate Assign GetMem ResetSetFAttr AssignCrt GetPalette RestoreCrtMode Bar GetTextSettings Rewrite Bar3D GetTime RmDir BlockRead GetVerify RunError BlockWrite GetViewSettings Sector ChDir GotoXY Seek Circle Halt SetActivePage ClearDevice HighVideo SetAllPalette ClearViewPort Inc SetAspectRatio Close InitGraph SetBkColor CloseGraph Insert SetCBreak ClrEol InsLine SetColor ClrScr Intr SetFillPattern Dec Keep SetFillStyle Delay Line SetFTime Delete LineRel SetGraphMode DelLine LineTo SetIntVec DetectGraph LowVideo SetLineStyle Dispose Mark SetPalette Ellipse MkDir SetRGBPalette Erase Move SetTextBuf Exec MoveTo SetTextJustify Exit New SetTextStyle Fail NormVideo SetTime FillChar NoSound SetUserCharSize FillEllipse OutText SetVerify FillPoly OutTextXY SetViewPort FindFirst OvrClrBuf SetVisualPage FindNext OvrInit SetWriteMode FloodFill OvrInitEMS Str Flush OvrSetBuf SwapVectors

638 Appendix C
FreeMem OvrSetRetry FSplit PackTime GetArcCoords PieSlice GetAspectRatio PutImage GetCBreak PutPixel GetDate Randomize GetDir Read (text) GetFAttr Read (typed) GetFillSettings ReadLn GetFTime Rectangle GetImage
TextBackground TextColor TextMode Truncate UnPackTime Val Window Write (text) Write (typed) WriteLn
The following is a list of Turbo Pascal functions.
Abs GetGraphMode Addr GetMaxMode ArcTan GetMaxX Chr GetMaxY Concat GetModeName Copy GetPaletteSize Cos GetPixel Cseg GetX DiskFree GetY DiskSize GraphErrorMsg DosexitCode GraphResult DosVersion Hi Dseg ImageSize EnvCount InstallUserDriver EnvStr InstallUserFont Eof (text) Int Eof (typed) IOResult Eoln KeyPressed Exp Length FExpand Lo FilePos MaxAvail FileSize MemAvail Frac MsDos FSearch Odd GetBkColor Ofs GetColor Ord GetDefaultPalette OvrGetBuf GetDriverName OvrGetRetry GetEnv ParamCount
ParamStr Pi Pos Pred Ptr Random ReadKey Round SeekEof SeekEoln Seg SetAspectRatio Sin SizeOf Sound SPtr Sqr Sqrt SSeg Succ Swap TextHeight TextWidth Trunc TypeOf UpCase WhereX WhereY

Turbo Pascal reference 639
Turbo Pascal accesses some standard procedures and functions through units, which are libraries of precompiled modules. For example, the C r t unit contains routines which access the text display. To use a unit the u s e s keyword must be included in a statement near the top of the program. For example, to use the c 1 r s c r function:
program test;
uses crt;
begin clrscr; (* clears the screen *) textcolor(RED); textbackground(YELLOW); writeln('Hello');
end.
The listing of modules in the c r t trait is"
AssignCrt InsLine TextBackground ClrEol KeyPressed TextColor ClrScr LowVideo TextMode Delay NormVideo WhereX DelLine NoSound WhereY GotoXY ReadKey Window HighVideo Sound
The listing of modules in the s y s t e m trait is"
Abs GetDir Addr GetMem Append Halt ArcTan Hi Assign Inc BlockRead Insert BlockWrite Int ChDir IOResult Chr Length Close Ln Concat Lo Copy Mark Cos MaxAvail CSeg MemAvail Dec MkDir Delete Move Dispose New DSeg Odd Eof (text) Ofs Eof (typed) Ord
ReadLn Release Rename Reset Rewrite RmDir Round RunError Seek SeekEof SeekEoln Seg SetTextBuf Sin SizeOf Sptr Sqr Sqrt Sseg Str

640 Appendix C
Eoln ParamCount Erase ParamStr Exit Pi Exp Pos FilePos Pred FileSize Ptr FillChar Random Flush Randomize Frac Read (text) FreeMem Read (typed)
Succ Swap Trunc Truncate UpCase Val Write (text) Write (typed) WriteLn
The listing of modules in the dos unit is:
DiskFree Fsplit Ms Dos DiskSize GetCBreak PackTime DosExitCode GetDate SetCBreak DosVersion GetEnv SetDate EnvCount GetFAttr SetFAttr EnvStr GetFTime SetFTime Exec Get IntVec SetIntVec Fexpand GetTime SetTime FindFirst GetVerify SetVerify FindNext Intr SwapVectors Fsear ch Keep Unpac kT ime
The listing of modules in the g r a p h unit is:
Arc GetMaxY PutPixel Bar GetModeName Rectangle Bar3D GetModeRange RegisterBGIdriver Circle GetPalette RegisterBGIfont ClearDevice GetPaletteSize RestoreCrtMode ClearViewPort GetPixel Sector CloseGraph GetTextSettings SetActivePage DetectGraph GetViewSettings SetAllPalette Drawpoly GetX SetAspectRatio Ellipse GetY SetBkColor FillEllipse GraphDefaults SetColor FillPoly GraphErrorMsg SetFillPattern FloodFill GraphResult SetFillStyle GetArcCoords ImageSize SetGraphBufSize GetAspectRatio InitGraph SetGraphMode GetBkColor InstallUserDriver SetLineStyle GetColor InstallUserFont SetPalette GetDefaultPalette Line SetRGBPalette GetDriverName LineRel SetTextJustify

GetFillPattern GetFillSettings GetGraphMode GetImage GetLineSettings GetMaxColor GetMaxMode GetMaxX
LineTo MoveRel MoveTo OutText OutTextXY PieSlice PutImage
Turbo Pascal reference 641
SetTextStyle SetUserCharSize SetViewPort SetVisualPage SetWriteMode TextHeight TextWidth
The following is a quick reference to commonly used ftmctions.
Abs function Abs(x) �9
(Same type as parameter)
ArcTan function ArcTan (x �9 real) �9 real;
Returns absolute value.
Returns the arctangent of the argument. Turbo Pascal does not have a Tan function, but tangents can be calculated using the expression Sin(x) / Cos(x).
Chr function Chr(x �9 Byte) �9
Char; Returns a character with a specified ordinal number.
Concat
Copy
Cos
function Concat(sl
[, s2 ..... sn] �9 string)"
string;
function Copy(s �9 string;
index �9 Integer;count �9
Integer) �9 string;
function Cos(x �9 real) �9
real;
Concatenates a sequence of strings.
Returns a substring of a string.
Returns the cosine of the argument.
DiskFree function DiskFree(
Drive" Byte) �9 Longint; Returns the number of free bytes of a specified disk drive. Unit name Dos.
DiskSize function DiskSize(
Drive" Byte) �9 Longint; Returns the total size in bytes of a specified disk drive.
DosVersion function DosVersion �9 Word; Retums the DOS version number. The low byte of the result is the major version number, and the high byte is the minor version number. Unit name Dos.
Eof function Eof(var f)
�9 Boolean; Returns the end-of-file status of a typed or untyped file.

642 Appendix 0
Eoln function Eoln [ (var f : text) ] : Boolean;
Returns the end-of-line status of a file.
Exp function Exp(x : real) real;
Returns the exponential of the argument.
File function FilePos(var f) Longint;
Returns the current file position of a file.
FileSize
Frac
function FileSize(var f) Longint ;
function Frac(x : real) real;
Returns the current size of a file.
Returns the fractional part of the argtm~ent.
Fsearch function FSearch(Path: PathStr; DirList : string) PathStr;
Searches for a file in a list of directories by DirList. The directories in DirList must be separated by semicolons. The PathStr type is defined in the Dos unit as string [79]. Unit Name Dos.
Int function Int(x : real) real;
Returns the Integer part of the argument.
KeyPressed function KeyPressed �9 Boolean;
Returns True if a key has been pressed on the keyboard, and False otherwise. Unit name Crt.
Length function Length(s �9 string) Integer;
: Returns the dynamic length of a string.
MaxAvail function MaxAvail : Longint; Returns the size of the largest contiguous free block in the heap, corresponding to the size of the largest dynamic variable that can be allocated at that time.
MemAvail function MemAvail �9 Longint; Returns sum of all free blocks in the heap.
MsDos procedure MsDos( var Regs : Registers);
Executes a DOS function call. Unit name Dos.
Odd function Odd(x : Longint) Boolean;
Tests if the argument is an odd number.
Ord function Ord(x) �9 Longint; Returns the ordinal number of an ordinal-type value.

Turbo Pascal reference 643
SeekEoln
Sin
UpCase
WhereX
WhereY
function SeekEoln [
(var f " text) ]" Boolean;
function Sin(x �9 real) -
real;
function UpCase(ch �9 Char) �9
Char;
function WhereX �9 Byte;
function WhereY " Byte;
Returns the end-of-line status of a file.
Returns the sine of the argument.
Converts a character to uppercase.
Returns the X-co-ordinate of the current cursor position, relative to the current window. Unit name Crt.
Retums the Y-co-ordinate of the current cursor position, relative to the current window. Unit name Crt.
The fo l lowing is a quick reference to c o m m o n l y used procedures .
Append p r o c e d u r e A p p e n d ( v a r f �9 Opens an existing file for t ex t ) ; appending.
Assign procedure Assign(var f;
name �9 string) ; Assigns the name of an external file to a file variable.
BlockRead procedure BlockRead(var f"
file; var buf;count �9 Word
[; var result" Word])
Reads one or more records into a variable, where f is an untyped file variable, buf is any variable, count is an expression of type Word, and result is a variable of type Word.
BlockWrite procedure BlockWrite(var f"
file;var buf; count" Word
[; var result" Word])
Writes one or more records from a variable, where f is an untyped file variable, buf is any variable, count is an expression of type Word, and result is a variable of type Word.
ChDir p r o c e d u r e C h D i r ( s �9 s t r i n g ) ; Changes the current directory.
Close procedure Close(var f) ; Closes an open file.
ClrEol procedure ClrEol; Clears all characters from the cursor position to the end of the line without moving the cursor. Unit name Crt.

644 Appendix C
ClrScr procedure ClrScr; Clears the active window and places the cursor in the upper left- hand comer. Unit name Crt.
Dec
Delay
procedure Dec(var x
[ ; n - Longint]);
procedure Delay (MS �9 Word) ;
Decrements a variable.
Delays a specified number of milliseconds. Unit name Crt.
Delete
DelLine
procedure Delete(var s �9
string; index �9 Integer;
count �9 Integer);
procedure DelLine;
Deletes a substring from a string.
Deletes the line containing the cursor.
Erase procedure Erase(var f); Erases an external file.
Exec procedure Exec(Path,
CmdLine �9 string); Executes a specified program with a specified command line. Unit name Dos.
Exit procedure Exit; Exits immediately from the current block. If the current block is the main program, it causes the program to terminate.
FillChar procedure FillChar(var x;
count �9 Word; ch �9 Char); Fills a specified number of contiguous bytes with a specified value.
FindFirst procedure FindFirst(Path �9
string; Attr �9 Word;
var S �9 SearchRec);
Searches the specified (or current) directory for the first entry matching the specified file name and set of attributes. Unit name Dos.
FindNext procedure FindNext(var S �9
SearchRec); Returns the next entry that matches the name and attributes specified in an earlier call to FindFirst. Unit name Dos.
Flush procedure Flush(var f �9
text); Flushes the buffer of a text file open for output.
FreeMem procedure FreeMem(var p �9
pointer; size �9 Word); Disposes a dynamic variable of a
given size. Should not be used with Mark or Release.

Turbo Pascal reference 645
GetCBreak procedure GetCBreak(var Break- Boolean) ;
Rettmas the state of Ctrl-Break checking in DOS. Unit Name Dos.
GetDate
GetDir
procedure GetDate(var Year, Month, Day, DayOfWeek : Word);
procedure GetDir(d �9 Byte; var s �9 string);
Returns the current date set in the operating system. Unit name Dos.
Rettm~ the current directory of a specified drive.
GetFAttr procedure GetFAttr(var F; var Attr �9 Word) ;
Returns the attributes of a file. Unit name Dos.
GetFTime procedure GetFTime(var F; var Time �9 Longint) ;
Returns the date and time a file was last written. Unit name Dos.
GetintVec procedure GetIntVec(IntNo �9 Byte; var Vector �9 pointer);
Returns the address stored in a specified interrupt vector. Unit name Dos.
GetMem procedure GetMem(var p �9
pointer; size �9 Word) ; Creates a new dynamic variable of the specified size and puts the address of the block in a pointer variable.
GetTime
GotoXY
procedure GetTime(var Hour,
Minute, Second, Secl00 �9 Word) ;
procedure GoToXY(X, Y :
Byte ) ;
Returns the current time set in the operating system. Unit name Dos.
Positions the cursor. Unit name Crt.
Halt procedure Halt [ (exitcode �9 Word ) ];
Stops program execution and returns to the operating system.
HighVideo procedure HighVideo; Selects high intensity characters. Unit name Crt.
Inc
Insert
InsLine
procedure Inc(var x [ ; n �9 Longint ] );
procedure Insert(source �9 string; vat s �9 string; index �9 Integer);
procedure InsLine;
Increments a variable.
Inserts a substring into a string.
Inserts an empty line at the cursor position. Unit name Crt.
Intr procedure Intr(IntNo �9 Byte;
var Regs : Registers); Executes a specified sottware interrupt. Unit name Dos.
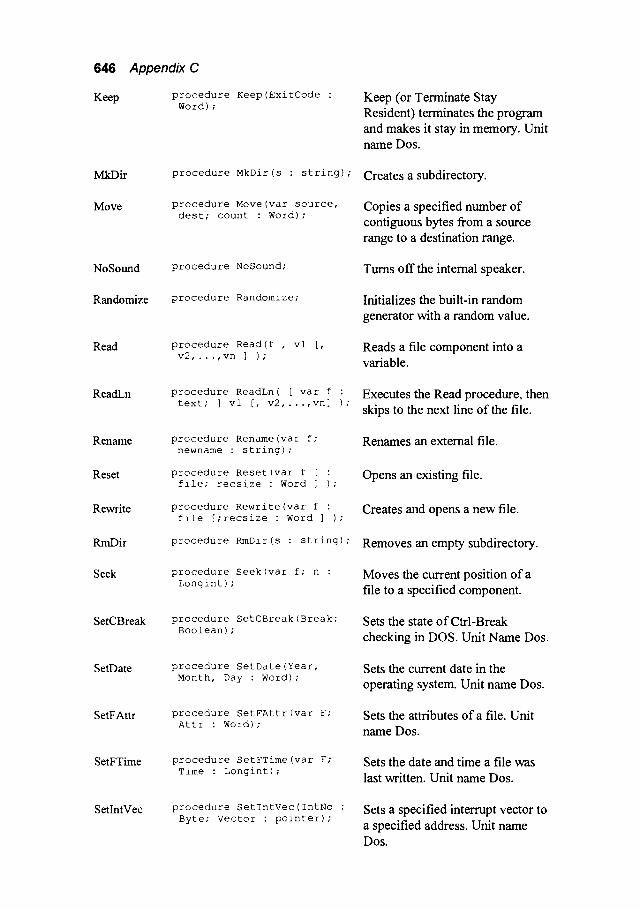
646 Appendix C
Keep procedure Keep(ExitCode �9
Word); Keep (or Terminate Stay Resident) terminates the program and makes it stay in memory. Unit name Dos.
MkDir procedure MkDir (s �9 string) ; Creates a subdkectory.
Move procedure Move(var source,
dest; count �9 Word) ; Copies a specified number of contiguous bytes fi'om a source range to a destination range.
NoSound procedure NoSound; Turns off the internal speaker.
Randomize procedure Randomize; Initializes the built-in random generator with a random value.
Read procedure Read(f , vl [,
v2 ..... vn ] ) ; Reads a file component into a variable.
ReadLn procedure ReadLn( [ vat f �9
text; ] vl [, v2 ..... vn] ) ; Executes the Read procedure, then skips to the next line of the file.
Rename
Reset
Rewrite
RmDir
procedure Rename(var f;
newname �9 string) ;
procedure Reset (var f [ �9
file; recsize �9 Word ] ) ;
procedure Rewrite(var f �9
file [;recsize �9 Word ] ) ;
procedure RmDir(s �9 string) ;
Renames an extemal file.
Opens an existing file.
Creates and opens a new file.
Removes an empty subdirectory.
Seek procedure Seek(var f; n �9
Longint ) ; Moves the current position of a file to a specified component.
SetCBreak procedure SetCBreak(Break"
Boolean); Sets the state of Ctrl-Break checking in DOS. Unit Name Dos.
SetDate procedure SetDate(Year,
Month, Day �9 Word) ; Sets the current date in the operating system. Unit name Dos.
SetFAttr procedure SetFAttr(var F;
Attr �9 Word) ; Sets the attributes of a file. Unit name Dos.
SetFTime procedure SetFTime(var F;
Time �9 Longint) ; Sets the date and time a file was last written. Unit name Dos.
SetlntVec procedure SetIntVec(IntNo �9
Byte; Vector �9 pointer); Sets a specified interrupt vector to a specified address. Unit name Dos.
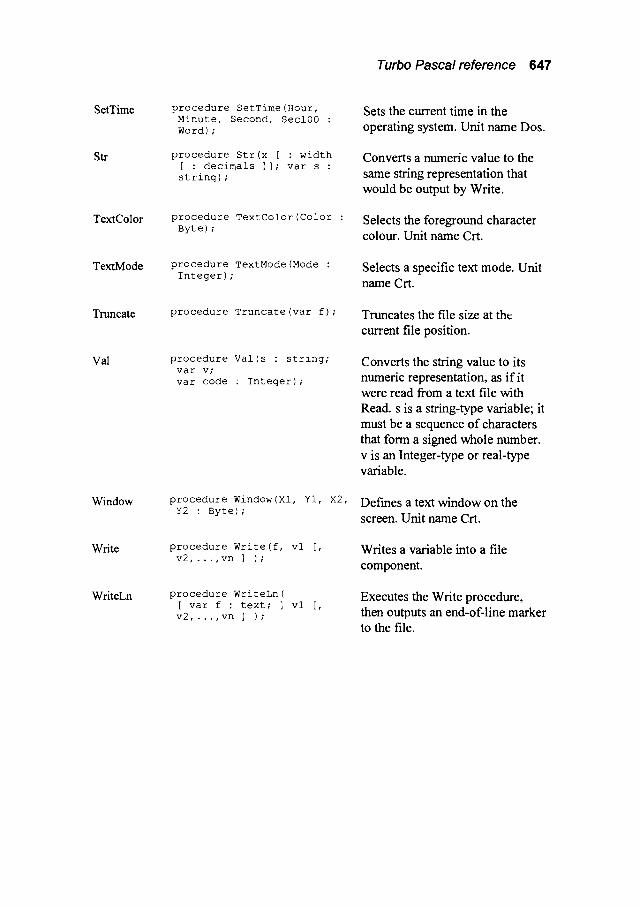
Turbo Pascal reference 647
SetTime
Str
TextColor
TextMode
Truncate
Val
Window
Write
WriteLn
procedure SetTime(Hour,
Minute, Second, Secl00 -
Word) ;
procedure Str(x [ �9 width
[ : decimals ]]; var s �9
string) ;
procedure TextColor(Color �9
Byte);
procedure TextMode(Mode �9
Integer);
procedure Truncate(var f) ;
procedure Val(s �9 string;
var v;
vat code " Integer) ;
procedure Window(Xl, YI, X2,
Y2 �9 Byte) ;
procedure Write(f, vl [,
v2 ..... vn ] ) ;
procedure WriteLn(
[ var f �9 text; ] vl [,
v2 ..... vn ] ) ;
Sets the current time in the operating system. Unit name Dos.
Converts a numeric value to the same string representation that would be output by Write.
Selects the foreground character colour. Unit name Crt.
Selects a specific text mode. Unit name Crt.
Truncates the file size at the current file position.
Converts the string value to its numeric representation, as if it were read from a text file with Read. s is a string-type variable; it must be a sequence of characters that form a signed whole number. v is an Integer-type or real-type variable.
Defines a text window on the screen. Unit name Crt.
Writes a variable into a file component.
Executes the Write procedure, then outputs an end-of-line marker to the file.

D.1 Assembly language mnemonics
Table D.1 outlines the Assembly Language mnemonics (in column 1) and the equivalent encoded bit values (in column 3). It also shows the number of cycles for a 8086 processor and a 80386 processor (columns 4 and 5). The explanation of the encoded bit values is given after the table.
Table D.1 Assembly Language reference
Mnemonic Description Encoding 8086 386
AAA Adjust after addition 00110111 8 4
AAD Adjust before division 11010101 00001010 60 ! 9
ADC accum,immed Add immediate with carry to 0001010w mod,reg,r/m 4 2 accumulator
ADC r/m,immed Add immediate with carry to operand 100000sw mod, reg,r/m
ADC r/m,reg Add register with carry to operand
ADC reg,r/m Add operand with carry to register
ADD accum,immed Add immediate to accumulator
ADD rJm,immed Add immediate to operand
ADD r/m,reg Add register to operand
ADD reg,r/m Add operand to register
000100dw mod,reg,r/m
000100dw mod,reg,r/m
0000010w
100000sw mod, OOO,r/m
0000010w m od,reg,r/m
0000010w mod,reg,r/m
AND accum,immed Bitwise AND immediate with operand 0010010w
AND r/m,immed Bitwise AND register with operand
AND r/m,reg Bitwise AND operand with register
CALL label Call instruction at label
CALL r/m Call instruction indirect
CBW Convert byte to word
CLC Clear carry flag
CLD Clear direction flag
CLI Clear interrupt flag
CMC Complement carry flag
CMP accum, immed Compare immediate with accumulator O011110w
CMP r/m,immed Compare immediate with operand 100000sw
CMP reg,r/m Compare register with operand 001110dw
lO0000sw mod, lOO,r/m
O01000dw mod,reg,r/m
11101000
11111111
10011000
11111000
11111100
11111010
11110101
4 2
3 2
3 2
4 2
4 3
4 2
9 6
4 2
4 2
3 2
19 7
16 7
2 3
2 2
2 2
2 3
2 2
4 2
4 2
3 2

650 Appendix D
CMPS arc,dest
CMPSW
CMPSB
CWD
DAA
DAS
DEC r/m
DEC reg
DIV r/m
ESC immed,r/m
HLT
IDIV
IMUL
IN accum,immed
IN accum,DX
INC r/m
INC reg
INT immed
INTO
IRET
JA label
JAE label
JBE label
JC label
JCXZ label
JE label
JG label
JGE label
JL label
JLE label
JMP label
JMP r/m
JNA label
JNAE label
JNB label
JNBE label
JNC label
JNE label
JNG label
JNGE label
JNO label
JNP label
INS label
JNZ label
Compare strings
Compare strings word by word
Compare string byte by byte
Convert word to double word
Decimal adjust for addition
Decimal adjust for subtraction
Decrement operand
Decrement 16-bit register
Divide accumulator by operand
Escape with 6-bit immediate and operand Halt
Integer divide accumulator by operand Integer multiply accumulator by operand Input from port
Input form port given by DX
Increment operand
Increment 16-bit register
Software interrupt
Interrupt on overflow
Return from interrupt
Jump on above
Jump on above or equal
Jump on below
Jump on carry
Jump on CX zero
Jump on equal
Jump on greater
Jump on greater or equal
Jump on less than
Jump on less than or equal
Jump to label
Jump to instruction directly
Jump on not above
Jump on note above or equal
Jump on not below
Jump on not below or equal
Jump on no carry
Jump on not equal
Jump on not greater
Jump on not greater or equal
Jump on not overflow
Jump on not parity
Jump on not sign
Jump on not zero
1010011w
1010011w
1010011w
10011001
00100111
00101111
l l l l l l l w
01001 reg
l l l l 0 1 1 w
ll011TTT
11110100
l l l l 0 1 1 w
l l l l 0 1 1 w
l l l 0 0 1 0 w
l l l 0110w
l l l l l l l w mod, OOO,r/m
01000 reg
11001101
11001110
11001111
01110111
01110011
01110110
01110010
11100011
01110100
01111111
01111101
01111100
01111110
11101011
111111 mod, llO,r/m
01110110
01110010
01110011
01110111
01110011
01110101
01111110
01111100
01110111
01111011
01111001
01110101
22
22
22
5
4
4
3
3
8o
2
10
8
3
3
51
53
32
4
4
4
4
4
4
4
4
4
4
15
11
4
4
4
4
4
4
4
4
4
4
4
4
10
10
10
2
4
4
2
2
14
5
12
13
2
2
37
35
22
3
3
3
3
3
3
3
3
3
3
7
7
3
3
3
3
3
3
3
3
3
3
3
3
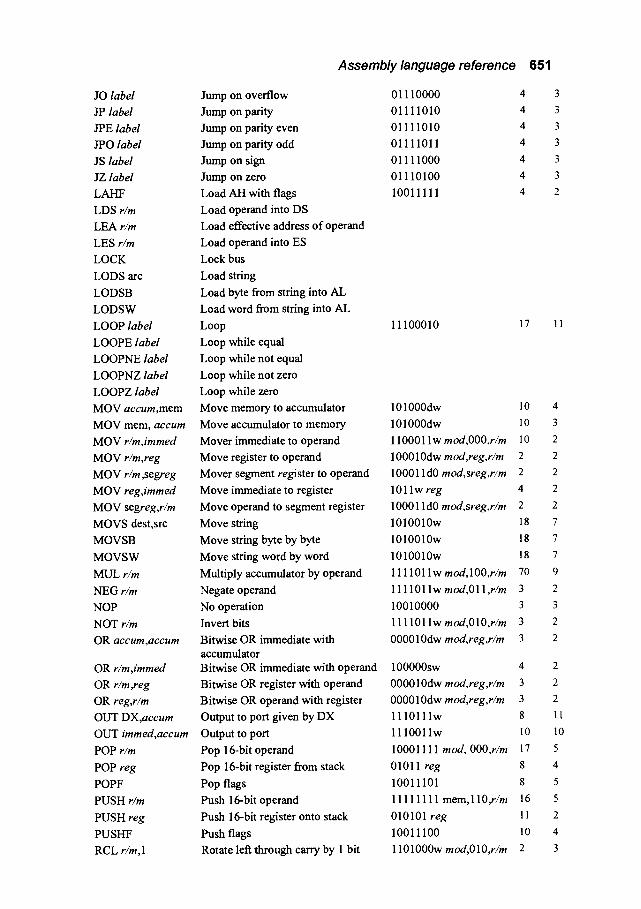
JO label
JP label
JPE label
JPO label
JS label
JZ label
LAHF
LDS r/m
LEA r/m
LES r/m
LOCK
LODS arc
LODSB
LODSW
LOOP label
LOOPE label
LOOPNE label
LOOPNZ label
LOOPZ label
MOV accum,mem
MOV mem, accum
MOV r/m,immed
MOV r/m,reg
MOV r/m,segreg
MOV reg,immed
MOV segreg,r/m
MOVS dest,src
MOVSB
MOVSW
MUL r/m
NEG r/m
NOP
NOT r/m
OR accum,accum
OR r/m,immed
OR r/m,reg
OR reg,r/m
OUT DX,accum
OUT immed,accum
POP r/m
POP reg
POPF
PUSH r/m
PUSH reg
PUSHF
RCL r/m,1
Assembly language reference
Jump on overflow
Jump on parity
Jump on parity even
Jump on parity odd
Jump on sign
Jump on zero
Load AH with flags
Load operand into DS
Load effective address of operand
Load operand into ES
Lock bus
Load string
Load byte from string into AL
Load word from string into AL
Loop
Loop while equal
Loop while not equal
Loop while not zero
Loop while zero
Move memory to accumulator
Move accumulator to memory
Mover immediate to operand
Move register to operand
Mover segment register to operand
Move immediate to register
Move operand to segment register
Move string
Move string byte by byte
Move string word by word
Multiply accumulator by operand
Negate operand
No operation
Invert bits
Bitwise OR immediate with accumulator Bitwise OR immediate with operand
Bitwise OR register with operand
Bitwise OR operand with register
Output to port given by DX
Output to port
Pop 16-bit operand
Pop 16-bit register from stack
Pop flags
Push 16-bit operand
Push 16-bit register onto stack
Push flags
Rotate let~ through carry by 1 bit
651
1 0 1 0 0 0 d w l 0 4
1 0 1 0 0 0 d w l 0 3
1100011 w m od, 000,r/m 10 2
100010dw mod,reg,r/m 2 2
100011 dO mod, sreg,r/m 2 2
101 lw reg 4 2
100011 dO mod, sreg,r/m 2 2
1010010w 18 7
1010010w 18 7
1010010w 18 7
111101 lw mod, lOO,r/m 70 9
111101 lw rood,011,r/m 3 2
10010000 3 3
111101 lw mod, OlO,r/m 3 2
000010dw mod, reg,r/m 3 2
lO0000sw 4 2
O00010dw mod, reg,r/m 3 2
000010dw mod,reg,r/m 3 2
l l l O l l l w 8 1!
ll lO011w 1o 10
10001111 mod, OOO,r/m 17 5
01011 reg 8 4
10011101 8 5
11111111 mem, llO,r/m 16 5
010101 reg 11 2
10011100 10 4
llOlO00w mod, OlO,r/m 2 3
01110000 4 3
01111010 4 3
01111010 4 3
01111011 4 3
01111000 4 3
01110100 4 3
10011111 4 2
11100010 17 11

652 Appendix D
RCL r/m,CL
RCR r/m,1
RCR r/m,CL
REP
REPE
REPNE
REPNZ
RET [immed]
ROL r/m,1
ROL r/m,CL
ROR r/m,1
ROR r/m,CL
SAH]:
SAL r/m,1
SAL r/m,CL
SAR r/m, 1
SAR r/m,CL
SBB accum,immed
SBB r/m,immed
SBB r/m,reg
SBB reg,r/m
SCAS dest
SCASB
SCASW
SHL r/m, 1
SHL r/m,CL
SHR r/m,1
SHR r/m,CL
STC
STD
STI
STOS dest
STOSB
STOSW
SUB accum,immed
SUB r/m,immed
SUB r/m,reg
SUB reg,r/m
TEST accum,immed
TEST r/m,immed
TEST reg,r/m
WAIT
XCHG accum,reg
XCHG r/m,reg
XCHG reg,accum
XCHG reg,r/m
Rotate left through carry by CL bits
Rotate right through carry by 1 bit
Rotate right through carry by CL bits
Repeat
Repeat if equal
Repeat if not equal
Repeat if not zero
Return after popping bytes from stack
Rotate left by 1 bit
Rotate left by CL bits
Rotate right by 1 bit
Rotate right by CL bits
Store AH into flags
Shift arithmetic left by 1 bit
Shift arithmetic left by CL bits
Shift arithmetic right by 1 bit
Shift arithmetic right by CL bits
Subtract immediate and carry flag
Subtract immediate and carry flag
Subtract register and carry flag
Subtract operand and carry flag
Scan string
Scan string for byte in AL
Scan string for word in AX
Shift left by 1 bit
Shift left by CL bits
Shift right by 1 bit
Shift right by CL bits
Set carry flag
Set direction flag
Set interrupt flag
Store string
Store byte in AL at string
Store word in AX at string
Subtract immediate from accumulator
Subtract immediate from operand
Subtract register from operand
Subtract operand from register
Compare immediate bits with accumulator
1101 O0 lw mod, O 10,r/m 8+4n 3
1101000w m od,011 ,r/m 2 3
1101 O01 w mod, O 11,r/m 8+4n 3
11110010 9 8
11110011
11110011
11110011
11000010
1101000w moar, OOO,r/m 2 3
11 O1001w mod, OOO,r/m 8+4n 3
1101000w moat, O01 ,r/m 2 3
1101 O0 l w mod, O01,r/m 8+4n 3
10011110 4 3
1101000w mod, 100,r/m 2 3
1 lO0000w mod, lOO,r/m 8+4n 3
1101000w mod, 101,r/m 2 3
1 lO0000w mod, lOl,r/m 8+4n 3
0001110w 4 2
100000sw mod,011,r/m 4 2
000110dw mod,reg,r/m 3 2
000110dw mod,reg,r/m 3 2
1010111w 15 7
1010111w 15 7
1010111w 15 7
1101000w m od, 100,r/m 2 3
l l00000w mod, lOO,r/m 8+4n 3
1101000w mod, 101 ,r/m 2 3
1100000w mod, lOl,r/m 8+4n 3
11111001 2 2
11111101 2 2
11111011 2 3
1010101w 11 4
1010101w 11 4
1010101w 11 4
0010110w 4 2
100000sw mod, 101,r/m 4 2
001010dw mod,reg,r/m 3 2
001010dw mod,reg,r/m 3 2
1010100w 4 2
Compare immediate bits with operand 1111011 w mod, OOO,r/m
Compare register bits with operand
Wait
Exchange accumulator with register
Exchange operand with register
Exchange register with accumulator
Exchange register with operand
5 2
100001 lw mod, reg,r/m 3 2
10011011 4 6
100011 w m od,reg,r/m 4 3
100011 w m od, reg,r/m 17 5
100011 w mod, reg,r/m 4 3
100011 w mod,reg,r/m 17 5

Assembly language reference 653
XOR accum,immed Bitwise XOR immediate with 001110dw mod,reg,r/m 4 2 accumulator
XOR r/m,immed Bitwise XOR immediate with operand 001100dw mod, reg,r/m 4 2
XOR r/m,reg Bitwise XOR register with operand 001100dw mod, reg,r/m 3 2
XOR reg,r/m Bitwise XOR operand with register 001100dw mod, reg,r/m 3 2 I l i I I I I I I I I I I I I I I I I I I I I I I I I I I I I I I I I I I I I I I I I I I I I I I I
Syntax:
reg A general-purpose register of any size.
segreg A segment registers, such as DS, ES, SS or CS.
accum An accumulator of any size: AL or AX (or EAX on 386/486).
mem A direct or indirect memory operand of any size.
label A labeled memory location in the code segment.
src,dest A source of destination memory operand used in a string operand.
immed A constant operand.
and the bits are specified by:
direction bit. If set (1) then the transfer is from memory to register or register to register, and the destination is a reg field. If not set then the source is a register field and the transfer is from register to memory.
W word/byte bit. If set the 16-bit operands are used, else 8-bit operands are used.
sign bit. If set then the operand has a sign-bit.
m o d mode. Identifies the register/memory mode. These are:
00 If r/m is 110 then direct memory is used, else the displacement is 0 and an indirect memory operand is used.
01 An indirect memory operand is used with an 8-bit displacement.
10 An indirect memory operand is used with a 16-bit displacement.
11 A two-register instruction is used; the reg field specifies the destination and the r/m field specifies the source.

654 Appendix D
reg register. Specifies one of the general-purpose registers. These are:
reg 16-bit, if w = 1 8-bit; if w=0 000 AX AL 001 CX CL 010 DX DL 011 BX BL 100 SP AH 101 BP CH 110 SI DH 111 DI BH
r/m register/memory. Specifies a memory of register operand. If the mod file is 11 then the register is specified with the reg field (as given above), else it has the following settings"
reg Operand address 000 DS : [BX+Sl+disp] O01 DS : [BX+Ill+disp] 010 SS:[BP+SI+disp] 011 SS:[BP+DI+disp] 1 O0 DS:[Sl+disp] 101 DS:[Dl+disp] 110 DS:[BP+disp] 111 DS:[BX+disp]
The instruction encoding has the form:
OPCODE mod, reg, r/m (1-2 bytes) (0-1 byte)
disp immed (0-2 bytes) (0-2 bytes)
where:
disp displacement. Specifies the offset for memory operands.
immed register/memory. Specifies the actual values for constant values.
D.2 Assembler directives
Table D.2 outlines some Assembly Language directives.

Assembly language reference 655
Table D.2 Assembly Language reference
Direct ive . . . . . . . . . . . . . . . . . . . . Descr ip t io n
�9 38 6 Enables assembly of 386 code.
� 9 Enables assembly of 8086 code.
ASSUME segreg :name Selects segreg to be the default segment register for all symbols in the named segment.
�9 CODE Defmes the code segment.
COMMENT Defines a comment.
., CONST Defines a constant.
name D B init Allocations and optionally initializes a byte of storage for each init.
name DW init Allocations and optionally initializes a word of storage for each init.
name D D init Allocations and optionally initializes a double word of storage for each init.
name D F init Allocations and optionally initializes a far word (6 bytes) of storage for each init.
name DQ init Allocations and optionally initializes a quad word (8 bytes) of storage for each init.
�9 DATA Define the data segment.
ELSE Defines an alternative block of the I F directive.
END Defines the end of a module.
ENDIF Def'mes the end of the I F directive.
EXTERN names Defines one of more external variables, labels or sys- tems which are called names .
I F express ion
i fs tatements ENDIF
Defines the I F directive.
INCLUDE f i l e n a m e Includes source code.
. MODEL m e m mode l Defines memory model.

656 Appendix D
NAME module name Def'mes the module name.
ORG express Organizes the program in memory.
�9 STACK size Defines the stack size.
T I TLE text Def ines title. , , , , , , ,
D.3 C and Pascal interrupts
In Turbo/Borland C there are four main functions to interrupt the processor: i n t 8 6 x ( ) , i n t d o s ( ) , i n t r ( ) and i n g 8 6 ( ) . These functions are prototyped in the header file d o s .h. This header file also contains a structure definition that allows a C program to gain access to the processor's registers. Parameters are passed into and out of the interrupt sevice routines via these registers. The format of the structure is:
struct WORDREGS {
unslgned int ax; unslgned int bx; unslgned int cx; unslgned int dx; unslgned int si; unslgned int di; unslgned int cflag;
} struct BYTEREGS {
unsigned char al,ah; unsigned char bl,bh; unsigned char cl,ch; unsigned char dl,dh;
} union REGS {
struct WORDREGS x; struct BYTEREGS h;
}
Registers are accessed either as 8-bit registers (such as AL, AH) or 16-bit registers (such as AX, BX). If a structure name r e g s is declared, then:
regs.h.al
regs.x.ax
accesses the 8-bit AL register accesses the 16-bit AX register.
The syntax of the function i n t 8 6 ( ) takes the form of
int86 (intno, &inregs, &outregs) ;
where the first argument of the parameter list is the interrupt number, the in- put registers are passed as the second argument and the output registers the

Assembly language reference 657
third. Parameters are passed to the interrupt routine by setting certain input registers and parameters are passed back from the interrupt in the output registers.
In a similiar way Turbo Pascal provides access throught the routine named I n t r ( ) . To gain access to this procedure the u s e s d o s ;
statement is placed near the top of the program. A data type named R e g i s t e r s has also been predefined, as shown below. Note that it is possible to use either the 16-bit registers (such as AX, B• or 8-bit (such as m,, AH):
type Registers = record
case Integer of 0: (AX, BX, CX, DX, BP, SI,DI,DS,ES,Flags: Word); i: (AL,AH, BL, BH, CL, CH, DL, DH: Byte) ;
end;
In Program D.1, the DOS interrupt 2 l h and function 02h (write character to the output) is used to display the character 'A'. In this case, the function number 02h is loaded into AH and the character to be displayed is loaded into DL.
[~] Program D.1 #include <dos.h>
int main (void) { union REGS inregs,outregs;
inregs.h.ah:0x02; inregs.h.dl='A';
int86(0x21,&inregs,&outregs) ; return(0);
Program D.I program DOS1; { Program to display 'A' using DOS interrupt
uses dos;
var REGS'registers; begin
regs.ah-=$02; regs.dl'=65;
intr($21,regs) ; end.
Program D.2 shows how a program can gain access to the system date. The function used in this example is 2Ah. Test run D. 1 gives a sample run.

658 Appendix D
Program D.2 #include <stdio.h> #include <dos.h>
int { int
main (void)
day, month, year, day_o f_wee k;
union REGS inregs,outregs;
inregs.h.ah=0x2A; int86(0x21,&inregs,&outregs);
day=outregs.h.dl; month=outregs.h.dh; year=outregs.x.cx; day_of_week=outregs.h.al;
printf("\nDate is %d/%d/%d day of week %dkn", day, month, year, day_of_week) ;
return(0) ;
[~ Program D.2 program DOS2; uses dos ;
var REGS'registers; day,month, year,day_of_week-integer;
begin regs.ah'=$2a; intr($21,regs) ;
day:=regs.dl; month:=regs.dh; year:=regs.cx; day_of_week:=regs.al; writeln('Date is ',day,'/',month,'/',year);
writeln('Day of week is ',day_of_week) ; end.
Test run D.1 Date is 8/9/1993 Day of week is 3
OO
OO
OO
OO
OO
OO
OO
OO
O
OO
OO
OO
OO
OO
OO
OO
O
i-~
i~
i-
~
i-~
i~
~
I.~
i-
~
i~
i.~
i-
~
t~
I-~
I~
I-
~
I.~
O
OO
OO
OO
OO
OO
OO
OO
O
I~
I~
I.~
t-
~
I.-~
I..
~ !
~
I~
O
O
O
O
O
O
O
O
t~
I.-~
I.~
I-
-~ O
O
O
O
t.
-~ I
~
t-~
I.
~
O
O
O
O
I~
I.~
O
O
I.
~
I..~
O
O
I~
I.~
O
O
t-
~
t~
O
O
I.~
O
I-
~
O
I-~
O
I.
-~ O
I~
O
t-
~
O
I~
O
I~
O
DO
P
O
!~
IX~
l~
bO
lX~
lX~
l~O
lX
O
lxO
IX
a lX
~ eO
Ix
~ lx
a
n~
(3
_ I
II
IIII
Il
l I
, I
0 0
0 C
~ 0
0 C
) (2
) C
~ 0
0 (D
C
) (2
)
I~
I-a
t-~
I-
~
t~
I-a
t~
I~
O
O
O
O
O
O
O
O
I-~
I~
t-
~
I-.~
O
O
O
O
I.~
I-
a I~
II
~
O
O
O
O
I.~
I-
~
O
O
I~
I-~
O
O
I.
~
I-~
O
O
t~
I-
~
O
O
I~;
O
I-~
O
I-
a O
I.
~
O
I~
O
k-~
O
I-a
O
I.~
O
G0
00
0
0
00
C
~ C
O
O0
C~0
0~
0
0
G0
G0
C,d
C
~ C
,O
L,O
.,0
V
II A
..
..
~0
0o
-.4
0
~O
n,~
0
o
~ ~.
-~ O
q
OO
OO
OO
OO
OO
OO
OO
OO
O
OO
OO
OO
OO
OO
OO
OO
O
OO
OO
OO
OO
OO
OO
OO
OO
O
OO
OO
OO
OO
OO
OO
OO
O
i-~
i.
~
t.-~
i-~
i-
~
i-.~
i~
i~
O
O
O
O
O
O
O
O
i.-
~ i.
~
i.~
i-
~
O
O
O
O
i.-~
i-~
i-
a
i-a
O
O
O
O
i-
a
I~
O
O
I.~
t-
-~ O
O
I~
I-
~
O
O
i-~
i-
~
O
O
i-~
O
I-
-~ O
I-
~
O
!~
O
I~
O
i-~
O
t.
.~ O
i-
~
O
OO
OO
OO
OO
OO
OO
OO
OO
~
t~
r I~
~
kP
00
--
.40
~
Cn
~ C
~ ~
~-~
O
~ 0
~ ~
~ ~
~ O
~ ~
C~
~ 0
~ ~
0 C
~
i, i
i i
OO
OO
OO
OO
OO
OO
OO
OO
O
OO
OO
OO
OO
OO
OO
OO
O
OO
OO
OO
OO
OO
OO
OO
OO
I-.~
I~
I~
I~
I~
I-
-;
I-~
I-
a O
O
O
O
O
O
O
O
I-
~
I--~
I.~
t~
O
O
O
O
I-
~
I--~
I--
~ I
-~
O
O
O
O
I-~
I.
~
O
O
I-~
I-
a O
O
I.
~
k-..~
O
O
k.a
I.~
O
O
I~
O
I-
~
O
!-~
O
I.-~
O
k.~
O
I~
O
I.~
O
I.
~
O
x.
oZ
,-
> oo
I I
00
00
00
00
00
00
00
00
i-
~ i.
~
i--,
t--,
i--
, i-
-,
i--~
i~,
I-~
i-~
i.-,
i--~
i--
~ i
-~
i_~
i_~
i-~
i.-,
i-~
i.--,
i-~
i-
-~ i
-~
i.-,
t--,
i--
, i-
-~ i
--~
i--
~ I
_~
!._,
i__,
0
00
00
00
00
00
00
00
0
i~
i--~
i-~
i--~
i-~
i.-
-~ !
--~
i-~
0
00
00
00
0
i-~
i~
i.~
i--~
00
00
i-
-,
i-~
i--~
i-~
0
00
0
i--,
i-
-,
00
i-
-~ i
.~
00
t-
.~ t
-~
00
i-
-~ t
--,
00
i-
-,
0 i-
~ 0
i-~
0 i-
-~ 0
i.
~
0 i~
0
i--~
0
i..-~
0
i.~
i.
~
~ i.-
, i-
~ I-
~ i.-
, i-
, t-
~ i-
~ i-
~ t-
~ ~
~ kD
~
I~
I--'
00
00
00
00
00
kD
O
0 -..
...10
"~
o~
o~
o~
o~
o~
o~
o~
o
~
o~
o~,
o~
o
~
o~
o~
o~
o~
,'~
~ t~
~
I~
~ ~
co
--~
o~
cn
,~
c~
ro
~
o
0 ~
~ ~
~-
~
- ~
~ �9
~
o ~
~
00
00
00
00
00
00
00
00
I-
-,
I.-,
I.
-,
I-~
I--~
I-~
t-
~ I-
~ I-
-~ I
--~
t--~
I.-
, t-
~ I.
~
I__~
I__
, I-
-,
i--~
I--
, I.
~ I-
-,
I--,
I-
~ I.
-~ I
--,
I-~
I.~
I.--
, I.
--,
I--,
I._
_, I_
_~
t--,
I~
I-
-,
I--,
I-
-,
I--,
I-
-~ I
--~
00
00
00
00
I~
I-
-,
I--~
I.-
, 0
00
0
I--,
I-
~ I-
-~ t
--,
00
00
I.-
-,
I--,
0
0
I--~
I--
~ 0
0
I--,
t-
~ 0
0
I--~
I--
, 0
0
I--,
0
I--~
0
I--~
0
t.--
, 0
I--,
0
I--,
0
t--,
0
I-~
0
I.--,
I-
-~ I
-~
I--,
I-
-~ I
.--,
I.--,
I.-,
I-
-~ I
.-~
I--,
I.
-,
I__,
I._
~ I~
, I._
_,
-.-J ~
--~J -~J -~J
-.-.l "--J --.J --.J --.J -..J --.J -..J -...J -.,.l ..J
i oo
oooo
oooo
oooo
o ~
o~
~
~~
~~
~~
~~
.
00
00
00
00
00
00
00
00
~
00
00
00
00
00
00
00
0
~~
~~
00
00
00
0
~0
0~
00
~0
0~
0
~0
~0
~0
~0
~0
~0
~0
~
I
~~
~~
~0
~~
~~
00
00
00
00
00
00
00
00
I-~
I-~
i--~ i-~ i--, i.-, i-~
i_~
i__~ i..~ i_~
i_~
i_~
i_,
i_., i._,
00
00
00
00
00
00
00
00
I-~
I-~
I--~ I-~ I-~
I-~
I-~
i-~
00
00
00
00
~-~
~-~
I-~
I-~
00
00
i-~
i-~
i_~
i_~
00
00
I-~
I-~
00
I-~
I-~
00
i-~
i-~
00
i_~
i_~
00
I-~
0 I-~
0 I-~
0 I-~
0 I-~
0 i-~
0 i_~
0 i_~
0
O~
0 m
oo
oo
oo
oo
oo
oo
oo
o
o i-
~ i-
~ i-
~ t-
~ i-
~ i-
~ i-
~
i-~
i-
-~ i
-~
i-~
i--~
i--
~ i.-
~ i.-
~ o
oo
oo
oo
oo
oo
oo
oo
o
I--~
I--~
I--
~ I-
~ I-
' I-
~ I-
~ I-
~ o
o o
o o
o o
o I--
~ I~
I-
-~ I
-~
o o
o 0
I~
I-*
I-~
I-~
o o
o o
I-~
I-~
o o
I-~
I-~
0 o
t-~
I-~
o o
I-~
I-~
o o
I-~
o I-
~ o
I-~
o I'~
o
I-~
o I-
~ o
I-~
o I-
~ o
i-~
i-~
i-~
!.-~
i--
~ i-
~
i.-~
t-~
t-~
i.-~
i-~
~-~
i--~
~_~
i-
~ i_
~ -.-
1 .-.
.1 -
--1
-~1
-...1
-.4
o"
, o
~
o~
o~
o'~
o-~
o-~
o-~
o~
o~
(.;1
d:::
~ to
I',
O i
-~
o ko
0
0
...J
o~
(.;1
,~
0
o
lk)
i-~
o
~~
~
~~
~~
~
o
,Y,
~-"
.~
'.,~
J
"1
('"
o ~
'~
C
:,O
,I-"
~-
i--~
i--,
i--~
i-~
i-
-~ i
--~
t--~
i--
~ i
.-~
i--~
i--
~ i-
~
i--~
i.~
t.
-~
i--~
00
00
00
00
00
00
00
0
0 i--
~ i--
, i.-
~ i-
-~ t
--~
i--~
i--
~ i
--~
t--
~ i-
~ i-
-~ i
..-~
i--~
i--
~ i--
, i_
~
I~
I--~
I--
~ I-
-~ I
--*
I--~
I'-~
I--~
00
00
00
0
0 I--
~ I-
-~ I
--~
I--~
00
00
I-
-~ I
-'~
I--~
I-~
0
00
0
I'-*
I--~
00
I'-
~ I-
-~ 0
0
I--~
I--
~ 0
0
I--~
I--
~ 0
0 I--
~ 0
I-'~
0 I~
0
I-'~
0 I~
0
I--~
0
I--~
0
I'-~
0
I-~
I-~
I'-~
I-~
I-~
I-~
I-~
I-~
I--~
I-~
I-
* I--
~ !-
~ I-
~ I -~
t-
* kO
kO
C
D
(DO
(X
) O
O
(X)
O0
CO
O
O
O0
O0
...J
...J
....1
-..1
I--
~ 0
~O
CO
"-
.J 0
"~
Crl
,Z~
O0
lk)
I--~
0
kO
O0
--J
O~
~ I~
I~
I~
I~
~
I~
I~
I~
I~
I~
1~
I~
I~
I~
I~
~ ~
tD
C~
1~
~ ~
00
0-.
~
O~
O'~
,~
Oo
~o
~-.
, 0
--L--.
_JU
L_._
J_.
-:~'.::
':.:.:.
:.:.
~-
I=
~ ~
-~
~ ~ ~
-i~
i~i'
.~':
':':
'::
I-~
I-~
I--~
I--
~ I-
-~ I
--~
I-~
I--~
I--
~ I-
-~ I
--~
I__~
I__~
I__~
I__~
I_.~
0
00
00
00
00
00
00
00
0
00
00
00
00
00
00
00
00
O
00
00
C)
O
00
00
00
0(
DO
0
i ~'
~ ~"
~ I-
-~ ~
---~
~-~
~-~
~-~
I-'~
0
0 0
0 0
0 0
,
I~
t--~
I--
* I~
0
00
0
I--~
I-~
I-
-~ I
--~
00
00
I--
~ !-
-~ 0
0
I-~
I--~
00
I-
-~ I
.-~
00
I_
_~ I_
_~ 0
0
I-~
0 I-
-~ 0
I-
~ 0
I--~
0
I--,
0
I--~
0
I__~
0
I__~
0
O0
lk)
I--~
0
kO
O0
"-..1
0"~
(j1
,.~
O
0 !~
I-
-~ 0
kO
00
!
oa
0
0
oo
o
0
oo
o
o
o0
o
0
o0
0
o
00
(~
o
0
0o
0
0
(z)
~o
~
: I-
" I-'
~ I-
': (1
), (
1):
(!)~
K')
I~o
I~,
~:
~ (1
), ~
:
I--~
I--~
I--
~ I-
-~ I
-~
i--~
i--
~ i
._~
i_~
i_~
i.~
i_
~ i_
~ i_
~ i_
~ i_
~ 0
00
00
00
00
00
00
00
0
00
00
00
00
00
00
00
00
I~
I--~
I--
~ I-
-~ i
--~
I--~
I--
~ I-
-~ 0
00
00
00
0
I--~
I~
I-~
I--~
00
00
i-
-~ i
--~
i._
~ i_
~ 0
00
0
I~
I--~
00
t-
-~ I
--~
00
I-
-~ I
--~
00
i._
~ i_
~ 0
0
I--'
0 I~
0
I~
0 I-
-~ 0
I-
-~ 0
I-
-~ 0
i.~
0
i._~
0
I--~
I--~
I--
~ i-
-~ i
-~
i--,
i_~
i_~
i_~
i_~
i_~
i_~
i_~
i_~
i_~
i_ ,
(-,'1
(.;
1 (.
n 0"
1 (.
/1 (
/1
(.n
0"1
(j1
(.;1
,.~
,.~
,~
,~
,.~
,Z~
~D
O0
".-1
0"~
(.;1
,.~
O
0 lk
) I-
-~ 0
kO
(X
) ...
J O
~ (j
1 ,~
%0
kO
kO
~0
kO
kO
kO
~ ~D
kD
~
0 %
0 ~
0 ~
0 kO
,~
O
"~
~ ~
C~
t~
~ ~.
O
CO
-40
~
~ ~
OO
~
~ 0
0 P:
~.:>
cn
C~
�9
I :~
~
o 8=
"
�9
~ (1
)
5~ e
= o
..,
~ o

I--'
I -~
! -~
I -~
i-
~
I--~
I -~
I -~
~ I -~
I -
~
I -~
I -~
I -~
I -~
I -
~
I -~
i--~
~ t--
~ I--
~ I -~
~
I-~
i--
~ i--
~ t--
~ !-
~
t--~
~ t--
~
0 0
0 0
00
0
0 0
0 0
0 0
0 0
0 I--
~ I--
~ I-
-,
I-..~
I-.
~ I-
-,
I--,
I--
~ 0
0 0
0 0
0 0
0 I-
~
I--~
I-~
I--
~ 0
00
0
I--~
I--,
t.
~
I--~
0 0
0 0
I--~
I-~
0
0 I--
~ I--
~ 0
0 I--
~ I--
~ 0
0 I--
~ t--
~ 0
0 I--
~ 0
I-~
0
I--~
0 I--
~ 0
I--~
0 I--
~ 0
I--~
0 I-
-,
0
C~
LO
L.O
O
0 C
~ O
0 C
~ O
0 O
0 C
O
lx.~
IX
~ rO
Ik
~ lx
.~
lXJ
~-~
~ ~-~
~ i-~
i.-, ~ -~
~ ~-~
i-~
i-~
~ ~
~ i -~
~-~
~-~
~ ~-~
i--~ i-~ ~ -~
i -~
~-~
~ i-
-, ~
-~
~ ~-~
i -~
i -~
i-~
i-~
i-~
~-~
~ i.-~ i--~
i-~
~ ~
i -~
~ ~
~ ~
i-~
I -~
I -~
I -~
I -~
I-~
I-~
I -~
I -~
I -~
I -~
I--' I -~
I -~
I -~
I -~
I--'
I-~
I-~
I-~
I--~
I-~ I-~
I-~
I-~
0 0
0 0
0 0
0 0
I-~
I-~
I-~
I-~
00
0
0 I-~
I-~
I--~
I-~
0 0
0 0
I-~
I-~
0 0
I-~
I-~
0 0
I--~
I--
~ 0
0 I-~
I-~
0 0
I-~
0 I-~
0 I-~
0 I-~
0 I-~
0 I-~
0 I-~
0 I-~
0
ix.) ix
.) i
~
ix~
I~ i~ IX.) IX
.) IX.
) I%)
i%)
I%)
ix.)
I~
i~
I%)
[] �9
.
= ~L
. �9
o ~
-I-
~.-.--~ IA
IV
H-
[l]
I--~ I-~ I-~
I-~
I--~ I-~ I--~ I-~ i-~
i--~ i-~ i_~
i.~
i_~
i_~
i._~
I-~
I-~
I-~
I-~
I-~
I-~
I-~
I-~
I-~
I-~
I-~
i-~
i-~
i-~
i-~
i-,
00
00
00
00
00
00
00
00
0
00
00
00
00
00
00
00
0
I-~
I-~
I-~
I--~ I--~ I-~
I-~
I-~
00
00
00
00
I-~
I-~
I-~
I-~
00
00
I--~ I-~ I-~
I-~
00
00
I-~
I-~
00
I-~
I--~ 0
0
I-~
I-~
00
I--~ I--~ 0
0
I-~
0 I--~ 0
I--~ 0
I-~
0 I-~
0 I-~
0 I-~
0 I-~
0
50 Ik)
Ik)
Ik)
Ik)
Ik)
Ik)
Ik)
I-~
I-~
I-~
I-~
I-~
I-~
I-~
I-~
00
0
0 0
0 0
0
kO kO kO kO ~
kO kO kO
--I
O~ (.;I ~
(.~
Ik)
I-~
0 kO O0 -..I 0"~ UI ,.~
O0 Ik)
II--d
~- U
~1
I~
~
-r-t
- I
-m-I
I-
r
I-~
I-~
I-~
I-~
I-~
I-~
I-~
I-~
i-~
i-~
i_~
i_~
i_~
I..~ i_~ i_~
I-~
I-~
I-~
I-~
I-~
I-~
i-~
i-~
i-~
i-~
i_~
i_~
i_~
i_~
i_~
i_~
00
00
00
00
00
00
00
00
I-~
I-~
I--~ I-~ I--~ I-~ I-~
I-~
0 0
00
0
0
0 0
I-~
I-~
I-~
I-~
0 0
0 0
I-~
I-~
i-~
i--~ 0
0
0 0
I-~
I-~
0 0
I-~
I-~
0 0
I-~
I-~
00
I-~
I-~
0 0
I-~
0 I-~
0 I-~
0 I-~
0 I-~
0 I-~
0 I-~
0 i-~
0
~ ~
0 ~
~ too)
~J o~ cn ~
~ ~J ~
o
rn
f2, 24, 275
f~
l i
100~, 93 100Mbps, 402, 412 10Mbps, 402 155Mbps, 402 16Mbps, 402
2 ~
24-bit colour, 462 256 colours, 394 2s complement, 159, 222, 223,227, 277,
424
S----
80286, 230, 274, 476 80386, 5, 231,232, 233,236, 243,274,
276, 476, 485, 649, 653,655 80386DX, 230, 232 80486, 231,232, 236, 239, 241,243,
245,252, 254, 276, 415,476, 653 8086, 229, 230, 233,234, 236, 243,244,
261,271,274, 276, 279, 476, 649, 655
8088, 230 8255, 268
A
AA, 245,254 accumulator, 233,649, 650, 651,652,
653 accuracy, 91,309 active, 232, 233,268, 270, 286, 295,300,
506, 507, 510, 532, 597 ADC, 21,649
address bus, 4, 219, 220, 226, 230-232, 236, 261,262
address bus size, 226, 230 addressable memory, 226 addressing
immediate, 236 memory, 226, 236, 237 register, 236
addressing memory, 244 AIX, 549 algorithm, 3, 129, 135,219 alias, 557, 605, 609, 619 AM, 413 American, 391, 413 ampersand, 108, 111,180, 345,483 analogue, 553 AND, 35, 36, 41, 64, 96, 97, 247, 423,
424, 598, 611,649 angle, 32, 33, 37, 39, 98-101, 118, 119,
200, 201,376, 448 animation, 454 ANSI, 8, 12, 15, 96, 368, 391,413,484,
495,627 apple, 29, 229, 319, 476 ARC, 492 archive, 529, 583,584, 590 arctan, 32, 33, 101 arctan0, 32 argument, 81, 86, 87, 90, 108, 109, 111,
162, 193, 194, 205,310, 311,440, 460, 552, 580-582, 585,586, 613, 615,616, 620
arithmetic operator, 421,422 ARP, 391,413 array indexing, 181 array of strings, 148, 150, 155, 156 Array of structures, 181 arrays, 121 arrays of strings, 610 arrow keys, 294, 596 ASCII, 24, 60, 61, 67, 143, 159, 160,
240, 286, 363,368, 391, 413,424, 483,493,565, 573,586, 628 BEL, 191,475,549

664 Index
CR, 160, 597, 598, 599 FF, 245,252,254, 392, 393 LF, 160 SUB, 246, 652
ASCII characters, 60, 61, 67, 159, 240, 424,565
ASK, 413 aspect ratio, 376 assembler directives, 252, 654 assembly, 224, 239, 240, 243,265,266,
267, 655 Assembly Language, 5,219, 239, 243,
245,247, 259, 271,415,649, 654, 655
asynchronous, 413 AT, 191,230 attributes, 162, 163, 415,484, 525,529,
554-556, 565,576, 603, 631 changing, 556
au, 464, 482,485,490-493,499, 501, 530
audio, 410, 411,437, 454,464, 465 AUTOEXEC.BAT, 530 averages program, 166 averaging, 136
B
backspace, 24 base pointer, 234 BASIC, 3, 5, 219, 291-294, 296, 305,
307, 308, 310, 311, 317, 324, 327- 329, 339, 345,352, 361,362, 371, 374, 415,483,530, 551
BCD, 287 bell, 549 Bell Laboratories, 191,475,549 best possible units, 56 binary, 3, 4, 5, 63, 79, 108, 159, 163,
168, 169, 170, 171,210,211,215, 216, 220, 221,222, 223,224, 225, 243,244, 265,271,272, 273, 411, 413,415,564, 570, 573,631,632 address, 108 commands, 5, 415 file, 159, 163, 168, 170, 171,211,
216, 573, 631 I/O, 215 numbers, 221 read/write, 168
BIOS, 263,279, 281-284, 285,286, 287, 288 printer interrupt, 286, 287
bit shitt, 233, 248, 424
bitmapped, 159, 545 bitwise, 35, 41,210, 247, 424--426, 447 bitwise operator, 35,424 black, 81, 82, 83,281,302, 387, 393,
399, 437,462 blank lines, 173 blue, 281,288, 302, 373,374, 387, 392,
393,398,462, 463,507, 509, 532, 534, 544
BMP, 293,299, 371,372, 545 bold, 385,472 Boolean, 307, 308, 309, 310, 311, 417,
418, 420, 424, 434, 455 bitwise, 247, 424 logic, 63, 102
boot drive, 280, 281 Borland C, 238, 265-267, 291,494, 495 Borland C++, 6, 291,494, 495 Bourne shell, 605,606 braces, 9, 41, 68, 132, 150, 179, 426,
427, 428,444, 450, 483 brackets, 122, 124 bridge, 413 browser, 385-389, 393,394, 401,404,
410, 411,415-417, 431,433.437, 438,440, 442,444,445
buffer, 48, 69, 144, 285 Busicon, 229,475 Button settings, 313 byte, 220 byte enable lines, 232
C
arrays, 121 file I/O, 162 functions, 82, 123 parameter passing, 107 program, 9-12, 16, 18, 19, 23, 24, 26,
35, 48, 91, 93, 107, 111,113, 114, 145, 146, 148, 159, 166, 168, 172, 178-180, 223,405, 418, 552, 561, 565,570, 572-574, 592
C shell, 601,605,606, 609, 61 O, 615- 620
C/C++, 415,437,439, 446, 449, 450 C++, 191-202, 205,206, 208, 211-216,
241,266, 267,268, 291, 414--416, 421,426, 436, 437,439, 446, 449, 450, 494, 495 class template, 207 classes, 192, 195,209 constructors, 205,209
data hiding, 192 destructors, 205 function templates, 206 I/O stream support, 192 objects, 192, 417, 429 overloading, 192, 193 template classes, 192 virtual functions, 192
call by reference, 109, 111 capacitance, 55, 73 capacitive reactance, 30, 31 capacitor, 30, 63, 73, 149, 150, 183 caption, 345 caption property, 324, 326, 331,334,
335,337,338 carriage return, 160, 586, 628, 632 carry flag, 247, 248, 649, 652 case options, 54 CBS, 475 CD, 265,479, 491-493,495,515,535 centigrade, 27, 92-94, 331,332 CGI, 405 CGI script, 405 changing directory, 552 character alphabet, 391, 413 character arrays, 141, 143, 144 character handling, 12, 16 character strings, 175 characters and numbers, 243 click, 362, 363,364, 372, 373,375,377,
378 clients, 525 clock cycles, 273-275 clock period, 273,275 cls, 375,379 cluster, 529 CMC, 649 COBOL, 3, 5, 415 code
machine, 4, 5,239, 240, 415 object, 5, 6, 86 source, 5-8, 10, 13, 23, 87
colour, 49-52, 57, 58, 281,282, 288, 293,300-302, 318, 319, 373-378, 387, 392-394, 399, 461,462, 471, 513,531,589
colour code, 49, 50, 51, 52, 318, 319 COM1 :, 265 combinational logic, 94 combinations, 220, 296, 365 comments, 9, 13, 193,243,426, 428 Commodore, 229, 476 commondialog, 352, 355,357 compilation, 5-7, 25, 123,447, 570 compile, 6, 7, 494, 565
Index 665
compiler, 5-8, 11, 13, 16, 18, 19, 23, 25, 32, 86, 87, 108-110, 122, 123, 181, 193,238, 310, 415-417, 438, 439, 443-445,464, 469, 494, 570, 571, 572
complex arithmetic, 184 complex functions, 200 complex impedance, 186 complex number, 37, 101, 118, 184, 188,
192, 199, 200, 203 complex numbers, 192, 199 compress, 411,553,554, 558, 559, 560,
575 compressed, 159 compression, 394 computing, 229 conditional jump, 249, 250 CONFIG.SYS, 530 constants, 9, 13, 49, 54, 113,243,355,
357, 365, 366, 447 control bus, 4 control Register, 268, 269 controls, 293,302 conversion characters, 91 conversion control character, 24, 26 copper wire, 10, 14 copying, renaming and removing, 558 counting the number of characters, 147 CPU, 239, 241,245,252, 254, 567 creating a menu system, 346 csh
event numbers, 607 reexecuting events, 607
cube, 449 currency, 308, 309, 310
D
DAT, 163, 166, 167, 168, 488 data
bus, 4 definition, 253 Register, 265,266, 267 segment, 235,240, 253,655 type, 9-11, 14, 25, 26, 49, 81, 86-91,
108, 109, 121,122, 124, 141,145, 148, 150, 160, 162, 175, 176, 178, 179, 191, 193, 199, 205-207, 209, 237, 281,308-312,417,418,444, 446, 447,451,455
types, 10, 14, 307, 308, 418 database program, 176, 178, 186 date, 201,280, 307, 309, 310, 311,434,
477, 478, 484, 485,487, 490, 554,
666 Index
561,563, 568, 569, 585,586, 591, 592, 619, 627
DD, 391,477, 480, 481,655 debugger, 6, 7, 240, 255-259, 439, 445,
570,571 DEC, 246, 549, 650 decimal, 60, 77, 79, 221-225,227, 243,
244, 309, 392, 393,420, 561,650 decimal point, 25 decisions and loops, 317 declaration, 11, 14 declaration of variables, 11, 14 degrees, 32, 33, 39, 65, 100, 101,156,
462 del, 286, 346, 478, 519, 544, 545 Delphi, 291 destination address, 234, 244 dialog Box, 345,354 Digital, 265,268,271 Directory structure, 550 disk drives, 4, 219, 299, 416, 476, 479,
500, 505,562, 577 divide by zero, 44, 55, 56, 70, 73, 167,
168 division, 308, 421,422, 649 do..while loop, 68-70, 320 DOC, 483,488-492,499, 501, 519, 521,
522, 530 domains, 526, 527 DOS, 236, 243,254, 279, 280, 281,283,
285,286, 291,476-479, 481-485, 487, 490-499, 501,505,506, 513, 519, 525,528-531,535,536, 539, 541 cls, 478 copy, 496, 500 date, 477, 563 delete, 495,628 dir, 484, 485,490--493,494-500, 563 erase, 495,496 exit, 280, 281,283,285,286 filenames, 483 format, 479-481 mkdir, 493 run, 535 services, 279 starting and stopping, 478 time, 477, 479, 487, 563,567, 568 type, 493,496, 500 unformat, 480 ver, 477 version, 280, 477, 487
DOS-based, 243,519 drag and drop, 367
E
earth, 29 Edinburgh, 324 edit, 5,294, 440, 441,445,494, 497,
593,594, 597 editor, 5-7, 159, 166 eece.napier.ac.uk, 398, 460 EEPROM, 4 electronic mail, 525 EM spectrum, 45 EM wave, 45, 46, 47, 55 encapsulation, 191 EOF, 164 equates, 254 equivalent resistance, 12, 15, 20, 34, 39,
40, 57, 58, 79, 115, 116 error, 10, 16, 19, 23, 25, 44, 55, 56, 72,
86, 87, 142, 145, 164, 165, 168,209, 213,284, 287, 310, 311,321,373, 399, 401,617, 631,632, 633,634, 635
error processing, 213 escape sequence, 24 Ethemet, 390, 391,402,408,409, 411-
413,434,435 event handling, 430 executable, 5, 7, 8, 12, 16, 159, 405,411,
417, 555,556, 561,570, 573,574 exp0, 88, 90 Explorer, 417, 531 exponent, 25, 160, 424
F
Fahrenheit, 27, 92, 331,332 farads, 31, 55 FAT, 528, 529 fault tolerance, 412 FAX, 467, 468 FC, 490, 491 fclose(), 163 FDDI, 390, 402, 408, 411-413,434, 435
DAS, 650 feof0, 164 FET, 78 fflushO, 48 fflush(stdin), 48, 69 fgetcO, 164 fgetsO, 165 file
attributes, 163,529, 554 binary read/write, 168 binary, 159, 163, 168

I/O, 159 pointer, 160, 162-164 pointers, 214 system structure, 481 system, 491,499, 505,513,525-529,
539,578 systems, 505,525,526, 528 text, 159, 160, 163, 165, 166, 174 transfer protocol, 587
find_nearest_prefO, 132 firmware, 3, 192 floating point, 11, 14, 15, 24, 25, 32, 152,
160, 166-168, 174, 175, 176, 178, 215,222, 308, 311
floppy disk, 478,479, 480, 481,500, 501,505, 515-517, 521,529, 535, 546
fopenO, 162, 163 for loop, 59, 63, 77, 96, 155,320, 427 force of attraction, 29 format descriptor, 35 forms, 293,323,324, 405 forms and code, 324 FORTRAN, 3, 5, 159, 219, 415,492,
551,562, 570, 571,584, 614 fourth, 65, 129, 602, 606 fprintfO, 165 fputcO, 164, 165 fputs(), 165 frame, 298 France, 324, 330 freadO, 168 free disk space, 279, 280 frequencies, 30 frequency, 30, 31, 32, 33, 45-47, 55, 73,
98-100, 101,153, 154 fscanfO, 162, 164, 165 tip, 443,565,587 function
declarations, 86 header, 81, 105, 109, 111 prototype, 84, 85, 87, 88, 96, 111, 115 general, 12, 15, 81, 106,428,444,
448, 488,627 fwrite(), 168
C,----
gateway, 405 gateways, 261 get_float(), 155, 181 get_intO, 181 get_values(), 111, 114, 166 getcharO, 25, 26, 48, 53, 69, 75, 76, 147,
Index 667
164 gets(), 25, 147, 165 GIF, 159, 393,394, 416, 459, 471 global variable, 82, 83, 84 gradient, 28, 29 graphical user interface, 593 ground, 598
H,
hackers, 416, 528 handshaking, 269, 270 hardware, 3-5,219, 229, 233,263,279,
412, 415,437, 476, 505,513,528 HD, 480, 481 header, 8, 9, 13, 23, 25, 26, 32, 44, 51,
81, 86, 87, 105, 106, 109, 111,192, 209, 265,266, 267, 385,386, 403, 439, 469, 563
header file, 8, 9, 23, 25, 32, 51, 86, 87, 201,439, 563
help, 533 help files, 159 help manuals, 357, 481 hertz, 31 hexadecimal, 24, 25, 35, 77, 79, 108,
224, 225,236, 237, 243,302, 373, 374, 378, 392, 393,420, 629
hierarchical decomposition, 82 high-level language, 5,219, 243,415-
417,436 history, 605,606 hobby computers, 3 hosts, 562 HPFS, 528 HP-UX, 549, 550 HTML, 385-388, 390, 391-397, 399,
401-409, 413,416-419, 429, 430, 432-436, 438, 440, 441,450, 451, 455-460, 463-468,470 anchors, 401 background images, 393 colours, 392 definition lists, 391 displaying images, 394 hexadecimal colours, 392 horizontal lines, 397 input types, 407 links, 387 lists, 388, 491 menus, 345,409 ordered lists, 388 script, 386-388, 390, 391,394-397,
399, 401-404, 406-409, 416, 440,
668 Index
441,450, 451,455-460, 463-468, 470
tables, 403 unordered lists, 388, 390
http, 387, 394, 398, 416, 431,438,443 hubs, 412 Hughes, 475 Hz, 153, 154
I
I/O classes, 209 digital programs, 271 digital, 265,268, 271 inputting a byte, 265 isolated, 261,263 library, 208 memory mapped, 261,262 outputting a word, 267 stream, 192, 208,213 streams, 208
IBM, 229, 230, 412,475,476, 549 IC programmers, 21 icons, 371,372,373,513,514, 515,532,
538 IDE, 265,494, 500 IEEE, 309, 448 if(), 41-43, 45, 49, 426, 427 if...else statements, 41,427 images, 293,299, 393-396, 459 impedance, 32, 73, 98, 100, 101, 151,
173 implied addressing, 236 information, 4, 5, 8, 9, 152, 159, 209,
220, 229, 243,279, 299, 312, 314, 387, 391,394, 402,403,405,413, 415,429, 437,476, 479, 480, 483- 485,493,505,510, 519, 526, 537, 541,545,550, 552-554, 562, 567, 570, 571,573,586, 588, 591,620
initializing an array, 132 input/output, 4, 9, 12, 16, 21, 22, 23, 81,
161,162, 209, 219, 233,261,268, 416, 439, 562, 583
insert mode, 594, 595,597, 598 integrated development, 6, 7,494 Intel, 229, 230, 231,233,415,475,476 Intel microprocessors, 230, 231,233 interface, 81, 231,232, 261,265, 291-
324, 437, 446, 453,505,549 interfacing with memory, 262 Internet, 411,417, 437, 438 Internet Explorer, 417, 437
interrupt 10h, 281 llh, 283 13h, 284 14h, 284 16h, 285 1Ah, 287 21h, 279
interrupts, 279 IP, 234, 391,412, 413,437, 526, 549 IP address, 391, 413, 437 IPX, 412 ISDN, 435
J
Java, 159, 191,403,404, 414--418,421, 422, 428, 434, 436-472 applet, 415,416, 418,437-458, 460,
463-472 compiler, 416, 417, 438,439, 443,
444, 464 script, 442
JPE, 651 JPEG, 159, 393,394, 459, 471 JPG, 416
K
LO, 56 keyboard, 4, 5, 9, 12, 16, 21, 22, 25, 26,
48, 69, 144, 192, 202, 216, 219, 264, 279, 281,285,288, 431,455,457, 476, 505,519, 559, 560, 575,582, 596, 618, 632,633
keyboard buffer, 144 keypress, 361-363,368,458,459 keystroke, 285,286, 471,490, 546, 559,
587, 591,594, 595,606 keywords, 5, 10, 12, 15, 41,176, 179,
415,426 Korne shell, 605
L
LAN, 402, 411 length, 52-54, 141,143, 144, 148, 220,
310, 371,407, 428,471,620, 632 libraries, 5, 9, 12, 15, 23, 81, 86 library, 12, 16, 25, 144, 208, 352,444,
447, 469, 545,563,573,583,584 LIFO, 250 light, 13, 45,271,273,278, 281,393 limiting ranges of inputs, 69

line break, 386, 404, 412 linker, 5, 6, 7, 86 Linux, 549 listing contents of a file, 557 listing directories, 553 lnO, 90 Local and global variables, 83 local area network, 412 local variables, 81, 82, 106, 610 log(), 88, 90 logarithms, 90 logical. 41,308,421,423,426, 611 logical operator, 96, 423,424 login into the system, 550 long integer, 160, 237, 308, 309, 630 long word, 220 lost focus, 368 lowercase, 12, 48, 53, 58, 145,590, 628,
629, 63O LZH, 492
M
Mf~, 56 MAC, 390 MAC addresses, 390 machine code, 4.5,239, 240, 245,246,
261,415,416 machine code and assembly language.
240 macros. 5.8.9. 53. 253.415 main(), 82-84.85.168.193 making and removing directories. 557 manganese, 52 MASM, 253.491,492,493 mathematical functions, 12, 16, 201 memory, 3, 4, 7, 11, 14, 26, 107-109.
122, 144, 181,205,215,219, 220, 221,226, 230, 232-241,244, 246, 248, 251,259, 261-265,268,278, 286, 291,393.454, 526, 549, 633, 651,653-656 address, 3, 4, 26, 108, 122, 144 addressing, 226, 236, 237 cache, 230 map, 108, 109, 261-265 segmentation, 236
menu, 6, 7.57, 155, 186, 294-296, 300, 301,302, 345-349, 351,353,358, 409, 430, 467,468, 494, 507-510, 512, 516, 522, 534, 539, 543
menu editor, 345,346, 347, 350 metafile, 293,299, 371 mF, 55
Index 669
microprocessor, 4, 5, 219, 220, 229, 230, 231,262,415,476
Microsott, 159, 191,253,262, 263,266, 267, 268,291,310, 330, 352, 417, 476, 481,505,506, 510, 514, 517,. 519, 525,530, 543 Assembler, 253 Office, 476 Visual C++, 191,291 Windows, 262,263,291,310, 352,
476, 481. 505, 510. 517, 519, 525 microwaves, 45 MIME, 411 model
large, 238 small, 238
modular program, 81 module, 105, 106, 118, 252, 295,296,
347, 570, 571,655,656 modules, 292 MOS, 229, 476 MOS Technologies, 229, 476 Motion video, 159 Motorola, 229.415 mouse
control, 533 controls, 508, 533 down, 364 up, 364
MOV, 244, 651 move instruction, 244 moving around data in memory, 251 MPEG. 410 MS-DOS, 513,525.528. 529, 536, 541 multimedia, 408, 410 multiple choice example, 324 multiplication, 422 multitasking, 416, 525,526, 549, 567
NAND, 35, 36, 96 Napier
EECE department, 398,460 negative, 85, 90, 145,222, 234, 235,246,
249, 311,320, 426, 462, 607, 629 negative numbers, 222 nested loop, 96 Netscape, 417 network, 18,402,408,409, 411-413,
435,437, 479, 497, 515,525-528, 530, 531,537, 587
network management, 412 network traffic, 412

670 Index
networking, 525, 531 New York Times, 475 newline, 23, 24, 165 nF, 55 nibble, 220 NOR, 35, 36, 64, 96, 97 NTFS, 528 null, 143, 144, 147 numbers and representations, 222
O
object code, 159 object properties, 323 object-oriented, 291 objects, 191, 192, 207, 293,297, 299,
303,340, 341,350, 362, 371, 417, 429, 432,434, 435,463,465
octal, 24, 25, 77, 224, 225,243,420, 576, 586
OLE, 299, 330 opening a file, 162 operating system, 10, 21, 159, 291, 401,
415,476, 505,525,526, 528, 530, 546, 549, 567, 605
operators, 307,425 optical disks, 479 OR, 35, 36, 41, 96, 97, 210, 247, 278,
423,424, 457, 611,651 ordered, 388, 389 organization, 391,413,527 OS/2, 528 OSF/1,549 OSI, 390, 413
m p
paragraph, 386, 550, 598 parallel, 11, 12, 15, 19, 33, 34, 39, 47-
49, 57, 58, 70, 79, 114-116, 151-155, 186, 194-199, 265,283
parallel resistors, 19, 33, 39, 57 parallel_impedance(), 152 parameter conversion, 24 parameter list, 86, 106, 121,123, 125 parameter passing, 81, 84, 105, 106, 107,
198,437 parameters, 24, 25, 29, 52, 81, 82, 84, 86,
87, 89, 100, 104-106, 109, 142, 152- 155, 198, 201,284, 312, 316, 363, 397,404, 428,440, 444, 457, 461, 463
Pascal, 3, 5, 7, 13-16, 18, 19, 21, 22, 23, 26, 27, 31, 32, 35, 36, 41, 48, 49, 53,
54, 68, 88, 91, 92, 93, 97, 100, 104, 105, 106, 113, 114, 118, 119, 121, 124, 132,141,142, 150, 152, 154, 159, 161,166, 168, 172, 175, 176, 177, 219, 225,237, 261,266, 267, 293,307, 308, 318, 320, 401,415, 436, 437, 483,494, 500, 571 array routines, 142 arrays, 124 compilation, 7 file I/O, 161 functions, 88 parameter passing, 106 program, 13, 15, 16, 18, 19, 23, 36,
54, 91-93, 97, 100, 113, 114, 150, 161,166, 168, 172, 176, 177
string, 141, 142 string conversion routines, 142
passing arrays to C fxmctions, 123 passing arrays to functions, 124 passing by reference, 81 passing by value, 81 PC, 5, 6, 7, 159, 229, 230, 233,236, 240,
262, 263,272, 283,291,415,437, 438, 440, 476, 478, 479, 487, 493, 505,506, 510, 520, 525,549
PCX, 483,490 peer-to-peer, 525,526 Pentium, 231,233,236, 243,276, 415,
476 permutations, 63, 96, 578 pF, 55 pixels, 371,377, 378, 396, 397, 403,404,
433,440 pointer variable, 122, 124 pointers, 81,107-109, 110-115, 122-
124, 144, 145, 147, 160, 162-164, 180, 198, 214, 237, 238,437, 505 far, 237, 238 near, 238 near and far, 237, 238 with functions, 109
polygons, 463 ports
number, 284 Port A, 268-270, 273,276-278 Port B, 268-273,276-278 Port C, 268, 269, 270, 278
Postscript, 159 power(), 87, 90 precedence, 307, 308, 425,447 precision specifier, 25 preemptive, 526, 549 preemptive multitasking, 526, 549 preferred resistor value, 135, 136
presentation, 309, 401 print servers, 525 print_results(), 112 printable, 628 printer port, 287 printf0, 23, 24, 25, 53, 86, 87, 91,145,
162, 165, 192, 208, 629 priority, 425, 568, 570 private key, 195 procedures, 293 processor flags, 235 project files, 292 prototyped, 32, 44, 86, 87, 144, 199, 200,
265-267, 268 prototypes, 86, 93, 94 public member, 195 push and pop, 250 putchar0, 23, 164, 165 puts(), 9, 13, 23, 24, 165
--Q quadratic equation, 42-45, 56, 105, 111,
113, 114, 334, 335 quadratic equations, 111 quadratic roots, 334
R
RADAR, 492 radians, 32, 33, 38, 39, 100, 101,376,
634 radio, 45,293,408, 431,467 RAM, 4, 220, 263,493 range, 3, 11, 14, 70, 71,104, 132, 139,
199, 223, 231,263, 301,308, 309, 310, 311,321,336, 337, 345, 374, 392, 446, 448, 634, 635,636
Raytheon, 475 RC circuit, 61-63, 151 RCA, 475 read_data(), 168 reading and writing one character at a
time, 171 readln0, 154 recast, 88 records in Pascal, 175 rectangular, 186, 448 red, 288, 302, 373,374, 392, 393,398,
462 register, 233,235,239-241,244, 246,
248,251,253,259, 265-274, 279, 281,285,649-655
relationship operator, 422
Index 671
repeat. . until, 59, 68, 69, 70, 77, 142, 161 repeating program, 69 resistance, 10-15, 19, 20, 23, 32-34, 39,
40, 48, 49, 52-58, 69-73, 75, 76, 79, 98, 100, 104, 109, 114-116, 133-136, 153, 154, 196, 197, 198, 208,216, 321,338,339
resistance calculation, 336 resistance of a conductor, 52 resistivities, 53 resistor colour code, 49 resize, 362, 368, 369, 511,538 return, 84
flag, 111 statement, 84 value, 10, 84, 85, 87-89, 110, 164,
165,213,279, 315,429, 444, 630- 636
RGB, 302, 373,374, 375,376, 377, 392 ring network, 412 ILL series, 32, 66, 98, 99, 154, 155 RL series circuit, 32, 66, 98, 99, 155 ROM, 4, 263,265,479, 515,535 root, 32, 43, 44, 45, 55, 56, 70, 105, 111-
114, 200, 334,448, 449, 452,481, 482,517, 550, 560, 561,574, 576, 577, 606, 635
root type, 111, 113, 114 RR, 302 RS-232, 284, 435 running average program, 126
S
sampling, 136 scanf 0, 25, 26, 35, 48, 86, 87, 91, 111,
145, 154, 162, 165,208, 629, 632 schematic, 31-33, 63, 95, 97, 98, 151 SCO, 549 scroll bar, 507 search, 8, 147, 172, 305,508, 509, 581,
599, 601,613 section header, 385 sectors, 280, 479, 529 segment, 235-237, 239-241,244, 245,
251-255,280, 281,283,286, 526, 651,653,655
serial, 480, 481,484-498, 541 serial communications, 284 serial port, 283,284, 285 series RL, 98-100 server name, 398 servers, 525,537, 538 shell scripts, 615

672 Index
shell variables, 612 shift instructions, 247 shift/rotate, 247 short integer, 109 signed integer, 11, 14, 24, 176, 178, 223,
224, 227, 424 silver, 52 Sinclair, 229, 476 SMTP, 443 software, 3, 4, 9, 10, 13, 18, 141,191,
229, 230, 236, 239, 262,412, 414, 437, 476, 494, 506, 510, 525,549, 550, 650
software engineers, 3 Solaris, 549 sort(), 129 sorting program, 129 sound, 159, 459, 464, 472 sound file, 159, 514 source, 5, 6, 7, 8, 10, 13, 23, 31, 78, 82,
87, 142, 234, 246, 252, 367, 386, 442, 518, 558, 561,565,571,653
source address, 234 special characters, 556 specification, 3, 25, 401 speech, 413 speed of light, 13, 46 SPX, 412 SPX/IPX, 412 sqrt(), 86, 87, 100 square root, 32, 43 squares, 65,299 sscanf(), 145 stack pointer, 234 standard functions, 12, 16, 633 standard input, 559, 575,583,632, 633 standard input and output, 559 standard output, 559, 574, 580, 586, 601,
633 standard string functions, 144 standards, 391, 413 statement block, 41, 42, 59, 60, 68, 318,
319, 321,427,428, 449, 450, 451 statements, 422
repetitive, 59, 81,105, 121,159 static, 12, 418,445,446, 449 statements
logical, 41,426 status registers, 234 stdin, 48 stop bit, 284, 413 straight line, 28, 29, 104, 107, 111, 201 strcat0, 144 strcmp0, 146 strcpy0, 144
string manipulation, 141 string variables, 610 strings, 141,144, 147, 420, 445 strlen0, 144 strlwr0, 144 structure chart, 85, 86, 89, 98, 112, 114,
115, 132, 151,181 structures, 181, 186
arrays, 181 dot notation, 176, 178 members, 175, 176, 178 pointer operator, 180
structures and Records, 175 SUB, 246, 652 subroutine calls, 250 Sun Microsystems, 191,415,438 swap, 106, 107, 110, 546 swapped, 129 switch statement, 49, 54, 617 switch(), 49, 54 synchronized, 4, 220, 413,446 synchronous, 265 syntax, 86, 265,266, 267, 415,417, 418,
421,425,427, 428,450, 505 system date, 280, 563 system time, 279, 280, 283,287 SYSTEM.INI, 541,545
T
TAB, 297,488,543,546 tables, 403,562, 593 tangent(), 91 TCP, 391,412,413,437, 526, 549 TCP/IP, 391,412, 413,437, 526, 549 TD, 403,404, 405 television, 471 telnet, 443 temperature conversion, 332 temperature conversion program, 331 terminal, 586, 618 terminate and stay, 280 test, 6, 7, 26, 28, 29, 31, 35-37, 39, 40,
45, 55, 57, 58, 60, 79, 86, 89, 90, 92, 97, 163, 167, 168, 170, 185, 201,205, 206, 213,234, 271,285,286, 321, 332, 351,428,436, 440, 449, 451, 458,459, 464,478, 569, 573,574, 602, 611
Texas Instruments, 475 text, 159, 212, 282,323,326, 327,330-
336, 351-355,364, 365,366, 368, 372, 373,468, 483,514, 545,593 blink, 385

editor, 166, 385,401,494, 575,593 file, 159, 494, 514, 545 UO, 212 keyword, 161
textbackground function, 57 time step delay, 136 timing, 261,273 token, 9, 254, 255,408, 412, 413 Token Ring, 390, 402, 408, 409, 412,
413,434, 435 MAUs, 412
token rings, 412 tolower0, 48, 53, 54 topology, 387 TR, 403,404, 405 tracks, 479 traffic, 278, 412 transient response, 61 transistor, 475 transistors, 475 truth table, 63-65, 94-97 Turbo Debugger, 239, 241 Turbo Pascal, 5, 7, 14, 15, 18, 48, 237,
266, 267, 494 TXT, 483,490, 496, 497, 498, 545,546 type keyword, 124, 176 types of roots, 45,334
U---
UK, 398 uncompress, 575 uncompressed, 575 unconditional jump, 249 UNIX, 8, 405,438,492, 525,528, 549,
550, 552, 554, 559, 562, 566, 567, 570, 572, 576, 584, 589, 591,593, 605,606 banner, 584, 585 cal, 563,565,584, 585 cat, 557-566, 574-580, 583,591,600,
606-609, 615, 619 cc, 557, 561,562, 569-572 chmod, 556-577, 615,616 chpass, 585 compiling C programs, 561 cp, 557, 558, 564, 566, 572, 573,612 date, 585 dbx, 570, 571 df, 577 diff, 578 du, 573 echo, 586 f77, 562, 570, 571
Index 673
file, 573 fred, 580 finger, 586 grep, 581,582, 593,600, 601,603 head, 581,582 kill, 567, 568, 590, 609, 618 lint, 572 In, 580 Ipr, 568, 587, 608 Is, 552-560, 564, 566, 567, 570, 571,
573-577, 579, 580, 589, 603,606- 609, 619
mail, 587 more, 553-556, 565,579, 598, 605,
608, 619, 655 mv, 557, 558, 566, 578, 579, 619 nice, 570 passwd, 562, 58 I, 588, 605, 606 pipes, 560 process control, 567 ps, 567, 568 redirection, 559 rlogin, 588, 589 rm, 558, 564, 569, 571,579, 580 sed, 557, 593,599, 600, 620 sleep, 589 sort, 601,603 spell, 565,589, 593 stty, 557, 589, 590, 592, 618 tail, 582 tar, 553, 590 we, 582, 583,593 who, 562, 590 write, 591
unload, 362, 369, 431 unordered lists, 388, 389 upcase, 48, 49 URL, 387, 398, 405,430, 443,460 URLs, 437 USA, 477
V
var keyword, 106, 125,420 variables, 81-85, 89, 96, 106-109, 111,
113, 114, 121,152, 193, 197, 199, 201,253,275,307, 309, 312, 418, 419, 420, 421,429, 446, 552, 571, 605,609, 610, 612-614, 655 initialization, 12 substitution, 609
velocity, 71, 72 version, 229, 230, 280, 310, 385,438,
439, 440, 443,464, 475,476, 477,

674 Index
487, 505,506, 510, 530, 537, 541 VGA, 263,530 video, 159, 281,282, 288, 393,411,437 visible, 45 Visual Basic, 291-294, 296, 305,307,
308, 310, 311, 317, 324, 327-329, 339, 345,352, 361,362, 371,374 controls and events, 302 files, 292 form window, 296, 297 language, 305 menu bar, 294, 507 object box, 300 project window, 295,296, 302, 306 properties window, 295,297, 300,
301,531 toolbox, 296, 298
visual editor, 567, 593,597, 607-609, 614-616 example, 597 insert mode, 594, 595,597, 598 substituting, 595
volatile, 12, 446 voltage, 23, 31, 39, 40, 61--63, 72, 73, 75,
76, 104, 216, 321,337, 338, 339, 341, 422
W
WAV, 464 wavelength, 45, 46, 55 web, 415,416, 437 Western Electric, 475 UNIX, 562 while(), 68, 145, 146, 428,450 white, 212, 302, 387, 393,399, 462 WIMPs, 505 WIN.INI, 541-543,545 Window objects, 432 Windows
capturing a screen, 543 closing a window, 510, 534 deleting files, 518 desktop, 506 file extensions, 545 File manager, 513,514, 515 formatting a disk, 515 help, 509, 533 main group, 513,521 moving and resizing a window, 509,
533
moving files, 517 quitting, 508, 509, 533 running, 506, 519, 530 selecting a directory, 515 selecting a drive, 515 startup, 542 swapping, 543,544 terminating programs, 544
Windows 3.x, 506, 525,529, 541 Windows 95/NT, 159, 262, 263, 291,
476, 477, 505,525,526, 528, 529, 530, 531,537, 541 DOS window, 513, 536, 539 Explorer, 531 My Computer, 531,535,537, 538 network neighborhood, 531,537 start button, 531,534
Windows NT, 159, 291,438, 440, 476, 477, 487, 505,525,526, 527, 528, 530, 531,537, 541 network drives, 537
WK3,484 WMF, 293,299, 371 word, 220 word processor, 159, 514 words, 60, 147, 173,246, 446, 582, 584,
589, 593,594, 620 workgroups, 526, 527 worksheet, 18, 37, 39, 56, 57, 67, 79,
104, 118, 139, 156, 174, 188, 487, 499
workstation, 437, 526, 528, 549 workstations, 525,549 WP, 488 Writing to files, 165 WWW, 191,385,386, 387, 389-398,
401,411,413,415,417, 437, 438
X
X xterm, 557
X/Open, 549 XOR, 247,424, 653
Zilog, 229, 476 ZIP, 411,442, 492
Z