Skills for Employment Investment Program (SEIP)
190
Skills for Employment Investment Program (SEIP) COMPETENCY-BASED LEARNING MATERIAL (STUDENT GUIDE) FOR GRAPHIC DESIGN (IT SECTOR) Finance Division, Ministry of Finance Government of the People’s Republic of Bangladesh
-
Upload
khangminh22 -
Category
Documents
-
view
1 -
download
0
Transcript of Skills for Employment Investment Program (SEIP)

Skills for Employment
Investment Program (SEIP)
COMPETENCY-BASED LEARNING
MATERIAL
(STUDENT GUIDE)
FOR
GRAPHIC DESIGN
(IT SECTOR)
Finance Division, Ministry of Finance
Government of the People’s Republic of Bangladesh

CBLM – Graphic Design (Student Guide) v.1 Dec 2018 2
Skills for Employment Investment Programme (SEIP)
Table of Contents
Copyright 3
How to Use this Competency-based Learning Material 4
List of Icons 5
Modules 6
Module 1: Apply graphic design concepts and guidelines 6
Learning Outcome 1.1 - Identify client server architecture 7
Learning Outcome 1.2 - Identify the browser 16
Learning Outcome 1.3 - Use web design tools 22
Learning Outcome 1.4 - Explain role of web server 31
Review of Competence 36
Answer Key 37
Module 2: Generate shapes and text 40
Learning Outcome 2.1 - Install local web server 41
Learning Outcome 2.2 - Work with the tools of web server 46
Learning Outcome 2.3 - Install FTP clients 51
Review of Competence 56
Answer Key 57
Module 3: Generate design using graphics applications 58
Learning Outcome 3.1 - Recognise HTML 60
Learning Outcome 3.2 - Work with HTML 66
Learning Outcome 3.3 - Apply the fundamentals of typography 78
Learning Outcome 3.4 - Apply the fundamentals of typography 88
Review of Competence 95
Answer Key 96
Module 4: Generate clipping path, logo and mock-up 99
Learning Outcome 4.1 - Explain CSS 100
Learning Outcome 4.2 - Apply CSS 107
Learning Outcome 4.3 - Explain Media Query 115
Learning Outcome 4.4 - Create mock-up 126
Review of Competence 141
Answer Key 142
Module 5: Review final output and print 145
Learning Outcome 5.1 - Install and work with Photoshop 147
Learning Outcome 5.2 - Create and/or work with image 156
Learning Outcome 5.3 - Carry out layout design 159
Learning Outcome 5.4 - Identify JavaScript Core 163
Learning Outcome 5.5 - Introduce BOM and DOM 166
Review of Competence 186
Answer Key 188

CBLM – Graphic Design (Student Guide) v.1 Dec 2018 3
Skills for Employment Investment Programme (SEIP)
Copyright
The Competency-based Learning Material (Student Guide) for Graphic Design, aligned to its applicable
competency standard, for providing training consistent with the requirements of industry in order for
individuals who graduated through the established standard via competency-based assessment to be
suitably qualified for a relevant job.
This document is owned by the Finance Division of the Ministry of Finance of the People’s Republic of
Bangladesh, developed under the Skills for Employment Investment Program (SEIP).
Public and private institutions may use the information contained in this competency-based learning
material for activities benefitting Bangladesh.
Other interested parties must obtain permission from the owner of this document for reproduction of
information in any manner, in whole or in part, of this Competency-based Learning Material, in English or
other language.
This document is available from:
Skills for Employment Investment Program (SEIP) Project
Finance Division
Ministry of Finance
ProbashiKallyan Bhaban (Level – 16)
71-72 Old Elephant Road
Eskaton Garden, Dhaka 1000
Telephone: +8802 551 38598-9 (PABX), +8802 551 38753-5
Facsimile: +8802 551 38752
Website: www.seip-fd.gov.bd

CBLM – Graphic Design (Student Guide) v.1 Dec 2018 4
Skills for Employment Investment Programme (SEIP)
How to Use this Competency-based Learning Material
Welcome to the competency-based learning material for Graphic Design to use in IT Sector. These
modules contain training materials and learning activities for you to complete in order to become
competent and qualified as a skilled worker.
There are five (5) modules that make up this course which comprises the skills, knowledge and attitudes
required to become a skilled worker including:
1. Apply graphic design concepts and guidelines
2. Generate shapes and text
3. Generate design using graphics application
4. Generate clipping path, logo and mock-up
5. Review final output and print
As a learner, you will be required to complete a series of activities in order to achieve each learning
outcome of the module. These activities may be completed as part of structured classroom activities or
simulated workplace demonstrations.
These activities will also require you to complete associated learning and practice activities in order to gain
the skills and knowledge needed to achieve the learning outcomes. You should refer to Learning Activity
pages of each module to know the sequence of learning tasks and the appropriate resources to use for
each task.
This page will serve as the road map towards the achievement of competence. If you read the Information
Sheets, these will give you an understanding of the work, and why things are done the way they are. Once
you have finished reading the Information Sheets, you will then be required to complete the Self-Check
Quizzes.
The self-check quizzes follow the Information Sheets in this learning guide. Completing the self-check
quizzes will help you know how you are progressing. To check your knowledge after completion of the
Self-Check Quizzes, you can review the Answer Key at the end of each module.
You are required to complete all activities as directed in the Learning Activity and Information Sheet.
This is where you will apply your newly acquired knowledge while developing new skills. When working,
high emphasis should be laid on safety requirements. You will be encouraged to raise relevant queries or
ask the facilitator for assistance as required.
When you have completed all the tasks required in this learning guide, formal assessment will be scheduled
to officially evaluate if you have achieved competency of the specified learning outcomes and are ready for
the next task.

CBLM – Graphic Design (Student Guide) v.1 Dec 2018 5
Skills for Employment Investment Programme (SEIP)
List of Icons
Icon Name Icon
Module content
Learning outcomes
Performance criteria
Contents
Assessment criteria
Resources required
Information sheet
Self-check Quiz
Answer key
Activity
Video reference
Learner job sheet
Assessment plan
Review of competency

CBLM – Graphic Design (Student Guide) v.1 Dec 2018 6
Skills for Employment Investment Programme (SEIP)
Module 1: Apply graphic design concepts and guidelines
MODULE CONTENT
Module Descriptor: This module covers the skills, knowledge and attitudes to apply graphic
design concepts and guidelines. It specifically includes applying graphic
design concepts, following basic design guidelines using graphic design
tools, developing conceptual skills and ideas, and seeking strategies for
personal development.
Nominal Duration: 42 hours
LEARNING OUTCOMES:
Upon completion of the module, the student/trainee should be able to:
1.1 Apply graphic design concepts 1.2 Follow basic design guidelines 1.3 Develop conceptual skills and ideas 1.4 Seek strategies for personal development
PERFORMANCE CRITERIA:
1. Brief history of graphic design is discussed. 2. Analog design and basic drawing is identified. 3. Global trend in graphic designing is recognized. 4. Portfolio of trainees is acknowledged. 5. Guidelines on basic design for graphic designing are identified. 6. Technical skills to achieve basic design are identified. 7. Opportunities to continuously improve technical skills in basic design are demonstrated through
identification, practice, feedback, discussion and evaluation. 8. Capabilities to develop technical skills in basic design are demonstrated. 9. Relevant journals, magazines, catalogues and other media are Identified and used to stimulate
technical and professional development in basic design guidelines. 10. Working with others to develop basic design ideas is exhibited. 11. Ability to gain experience in a range of genres and interpretation of basic design guideline is
demonstrated. 12. Work of others is studied to stimulate conceptual idea and development. 13. A range of opportunities to develop own practice and keep informed about current design practices
are identified and used as guidelines for basic designing. 14. Ability to explore and experiment with new ideas in making and/or interpreting work is demonstrated. 15. Exploration and use of technology where appropriate to expand own practice is demonstrated. 16. Strategies for personal development as a designer is sought.

CBLM – Graphic Design (Student Guide) v.1 Dec 2018 7
Skills for Employment Investment Programme (SEIP)
Learning Outcome 1.1 - Apply Graphic Design Concept
Contents:
▪ Discuss history of graphic design in brief
▪ Identify analog design and basic drawing
▪ Recognize global trend in graphic designing
▪ Develop portfolio by trainees
Assessment criteria:
1. Brief history of graphic design is discussed. 2. Analog design and basic drawing are identified. 3. Global trend in graphic designing is recognized. 4. Portfolio of trainees is acknowledged.
Resources required:
Students/trainees must be provided with the following resources:
▪ Workplace (simulated or actual) ▪ Personal computer/laptop ▪ Analog design tools ▪ Graphic design applications ▪ Pen ▪ Paper ▪ Instruction sheet/manual
LEARNING ACTIVITY 1.1.1
Learning Activity Resources/Special Instructions/References
Discuss history of graphic design in brief
▪ Information Sheet: 1.1.1 ▪ Self-Check Quiz: 1.1.1 ▪ Answer Key: 1.1.1
▪ http://www.unahealydesign.com/elements-of-good-graphic-design/
▪ https://www.slideshare.net/smoros/history-of-graphic-design-6092452

CBLM – Graphic Design (Student Guide) v.1 Dec 2018 8
Skills for Employment Investment Programme (SEIP)
INFORMATION SHEET 1.1.1
▪ Learning Objective: to discuss history of graphic design in brief.
History of graphics design:
Graphics design:
▪ Graphics (from Greek γραφικός, graphikos) are the production of visual statements on some surface,
such as a wall, canvas, pottery, computer screen, paper, stone or landscape. It includes everything
that relates to creation of signs, charts, logos, graphs, drawings, line art, symbols, geometric designs
and so on.
▪ Graphic design is the art of combining text, pictures, and ideas in advertisements, publication, or
website.
▪ At its widest definition, it therefore includes the whole history of art, although painting and other
aspects of the subject are more usually treated as art history.
▪ Graphics design is “visual communication” and expresses a message visually.
▪ It’s the arrangement of text, pictures and other layout elements, complemented by a colour scheme.
Elements of Graphics Design:
▪ The Elements of Good Graphic Design are the components or parts of a work of art or design. More
simply put, they are the ingredients of art. Take one-part colour, a pinch of texture, and a whole lot
of shape and the result will be some well-designed graphic design.
▪ Recipes may vary, but all works of art and design contain a combination of the following elements
shown in the infographic:
Brief History:
▪ Graphics Design has a long history since 15,000 BC to till date. As a designer it would be interesting
to know about this history. There are details on this available online.

CBLM – Graphic Design (Student Guide) v.1 Dec 2018 9
Skills for Employment Investment Programme (SEIP)
▪ Here a presentation on history of GD in brief -. watch it carefully and note the key points you feel are
important.
Presentation:
Individual Activity:
▪ Make a presentation on graphics design, its element and history.
▪ Present it to your class for feedback.
▪ Your trainer will Facilitate this session.
SELF-CHECK QUIZ 1.1.1
Mark whether the following statements are true or false:
1. Visual statements on stone is not included in graphics.
2. Graphic design is “visual communication” and expresses a message visually.
3. Take one-part color, a pinch of texture, and a whole lot of shape and the result will be some well-designed graphic design.
4. Graphic design has a long history since 15,000 BC to till date.
LEARNING ACTIVITY 1.1.2
Learning Activity Resources/Special Instructions/References
Identify analog design and basic drawing ▪ Information Sheet: 1.1.2 ▪ Self-Check Quiz: 1.1.2 ▪ Answer Key: 1.1.2
http://vanseodesign.com/web-design/design-concept-thoughts/4/27
INFORMATION SHEET 1.1.2
Learning Objective: to identify analog design and basic drawing.
Analog design:
Analog design is designed without digital devices like computers and software. Some designers don't exclusively use a computer for the design phase. Practically they feel it's much, much faster to use a pencil and paper for projects. For logotypes, it can be very helpful to create a tight, hand-drawn, ink comp of the logo, or a part of the logo, in order to scan it and clean it up digitally. The common analog tools for design are:
Watch presentation on History of Graphics Design and summarize the session after watching the
presentation.
Presentation reference: https://www.slideshare.net/smoros/history-of-graphic-design-6092452

CBLM – Graphic Design (Student Guide) v.1 Dec 2018 10
Skills for Employment Investment Programme (SEIP)
▪ Pencil ▪ Layout Bond sketch pad ▪ Straightedge ▪ Smudge glove ▪ Inking pens ▪ Inking Paper (Bleedproof Paper) ▪ A light table, even if it's small. ▪ Pantone colour books ▪ A small T-square for use on the
sketchpad ▪ Small 30°/60°/90° and 45° triangles
Basic Design Concept
The best designs start with a great concept. Developing a design concept is an individual process. There’s no one right way to generate an idea and what works for one won’t necessarily work for another. However, there are parts to the process that everyone should go through.
- Defining the problem – You can’t solve a problem without knowing what that problem is. Before developing a concept for a site, you need to talk to your client and ask questions about the client’s brand, their customers, their general market, and their goals of the design.
- Research – Your client won’t be able to tell you everything you want to know. You’ll have to do your own research into their industry looking at competing sites and trying to understand more about their market. These two steps should get you thinking and begin the concept generation process.

CBLM – Graphic Design (Student Guide) v.1 Dec 2018 11
Skills for Employment Investment Programme (SEIP)
Example of some famous design concepts:
Funny Graphics
Future Chair
Bookworm
Generating ideas
There are a few ways to generate ideas Brainstorming – it is just writing down any idea that comes to thought as a word or phrase. The goal is to list down as many things as possible without spending much time thinking about any of them except to let them lead to new ideas. Often with brainstorming result is a long list, which can be organized and exclude if necessary.
• Free form writing – This is one of the preferred methods. It’s similar to the above except writing sentences and sentence fragments. The act of writing tends to get brain working a little more and gets the ideas flowing. It can be done with pen and paper or by typing on document or text file with computer.
Group Activity:
As a group, participate in a brain storming session on a selected theme and come out with possible solutions.
Your Trainer will share the Problem statement with you. You have to brainstorm as a group and come up with possible alternatives for resolving the problem.
Carefully write down all options and then narrow down to the final few. Nominate a spokesperson from the group who will summarize the discussion and present key points briefly to the entire class and the Trainer.
Discussion Session (25 Min): Understand topic : 5min Discussion : 5 min Note down points : 3 Min Presentation : 3min per group
Group Activity: Your trainer will divide the class into 3 groups and assign one design concept to each group. For each group: As a group, discuss on the given design concept. What are the strong points of your chosen concept? Why do you think these points add value to the design? If you were given the liberty to enhance the design, which two measures would you choose and why?

CBLM – Graphic Design (Student Guide) v.1 Dec 2018 12
Skills for Employment Investment Programme (SEIP)
• Sketching – Sometimes words alone aren’t enough, and sketching is a better way to generate ideas. Sometimes it’s an idea for a new design and sometimes it’s just some concept that occurs to designers as an image rather than in words.
• Mind Mapping – Mind mapping mainly is a way to brainstorm in a more visual way by showing connections between similar and dissimilar ideas. Mind mapping is a great way to see how different ideas are connected to each other.
Video Lesson
SELF-CHECK QUIZ 1.1.2
Check your understanding by answering the following questions:
1. Write name of five analog tools for designing.
2. What is “Brain storming”?
3. Write short note on sketching.
LEARNING ACTIVITY 1.1.3
Learning Activity Resources/Special Instructions/References
Recognize global trend in graphic designing ▪ Information Sheet: 1.1.3 ▪ Self-Check Quiz: 1.1.3 ▪ Answer Key: 1.1.3
http://www.howdesign.com/design-business/2017-design-trends/
https://www.youtube.com/watch?v=dcc1VyGvaYk
INFORMATION SHEET 1.1.3
Learning Objective: to recognize global trend in graphic designing
Trend of Graphics Design
A trainee must understand the trend of graphics design before starting the course. There is huge
information online to predict graphics design trend. Design trend changes each year. You need to
keep updated on changing trend to be a successful designer.
Watch a short video on “Mind Mapping” and summarize the key points.
Video reference: https://www.youtube.com/watch?v=wLWV0XN7K1g.

CBLM – Graphic Design (Student Guide) v.1 Dec 2018 13
Skills for Employment Investment Programme (SEIP)
Video Lesson
Select an area of Graphics Design, research and develop familiarity with design trends and tools.
Some examples of Graphics Design area are:
- Design tool
- Design application software
- Use of design
- Logo design
- Texture
Your trainer will help you select a topic and form your groups. Please adhere to the timelines stipulated by
your trainer for the activity and make your submissions on time and as per laid down guidelines.
All the best!
SELF-CHECK QUIZ 1.1.3
Fill in the blanks for the following statements:
1. A trainee must understand the __________________ of graphics design before starting the course.
2. Design trend changes _______________________.
LEARNING ACTIVITY 1.1.4
Learning Activity Resources/Special Instructions/References
Develop portfolio by trainees ▪ Information Sheet: 1.1.4 ▪ Self-Check Quiz: 1.1.4 ▪ Answer Key: 1.1.4
http://blog.agencyaccess.com/11-components-of-a-successful-portfolio/
http://www.creativebloq.com/inspiration/8-great-examples-of-graphic-design-portfolios
INFORMATION SHEET 1.1.4
Learning Objective: to develop portfolio by trainees.
Creating a Portfolio
All portfolio types should showcase a designer's best works, presented as professionally as possible. Portfolios should demonstrate the applicant's interests in and aptitudes for advanced future and success. Building your portfolio website should be just as fun as creating the work you put into it.
It is very important to have an attractive portfolio for a graphic designer. This will lead to success as a designer.
Watch a video lesson on “Graphics Design Trend 2018” and summarize the key points. Video reference: https://www.youtube.com/watch?v=dcc1VyGvaYk

CBLM – Graphic Design (Student Guide) v.1 Dec 2018 14
Skills for Employment Investment Programme (SEIP)
There’s no ‘one correct way’ to lay it out. In a way, it means a trainee is free to experiment and showcase creativity in designing own portfolio.
Some portfolio links:
1. Heather Shaw (http://heathershaw.com/) 2. Stefanie Bruckler (http://stefaniebrueckler.com/about) 3. Peter Komierowsk (http://peterkstudio.com/) 4. Tobias van Schneider (http://www.vanschneider.com/) 5. Nicolas Paries (http://nicolasparies.com/)
Components of a good portfolio:
Here are 11 components of a successful portfolio:
1. Consistent Vision
If you are promoting to different markets you should create different portfolios to support those markets, i.e.
food, automotive, lifestyle.
2. Flow and Sequence
Pacing your portfolio to have a strong opening, middle and end is very important. You want to hold the viewer’s
attention and build their confidence in knowing who you are and what you have to offer.
3. Length
Go with 15 to 30 spreads max. Show enough of your work to clearly demonstrate your style and vision, but not so
much that you lose your viewer’s interest.
4. Keep it Current
Especially if a client calls your book in more than once – you do not want them seeing the same images as
previously viewed.
5. Brand it to Your Vision
Be sure to match the colour and feel of your portfolio to your overall brand, as well as to your photographic style.
The best time to ensure this is to take a look at your portfolio before you print it, as your brand plays a strong
focus in your marketing plan.
6. Good Craftsmanship
Since you spend so much time and money building and creating your portfolio, ensure that you also invest in
producing a quality printed piece. Make sure the pages are scored evenly – and that there is no glue mess or
unevenness. If you do not have good crafting skills, I strongly recommend going with a custom bookmaker –
they can also assemble your pages. Remember, your pages must be able to flip easily and lay somewhat flat
without diluting the quality of your images.
7. Paper Choice
I am not a fan of plastic pages – pre-scored Moab, glossy and matte work well. You should get a sample pack
to see what showcases your work best. You will find that different paper choices will need to be handled
differently in terms of binding and post systems, so make sure if you are working with a bookmaker that you let
them know what type of paper you have selected.
8. Case Choice
Again, it should work with your brand. Two companies with custom cases are PACE Cases and Lost Luggage.
9. Size
11 x 14 landscape, 12 x 12 orientated, 11 x 14 portrait or 11 x 17 landscape.
10. Digital Portfolio
An iPad is a great addition, especially if you want to show multiple focuses – personal work, projects or video.
11. Done: You can articulate your portfolio with your attractive design works

CBLM – Graphic Design (Student Guide) v.1 Dec 2018 15
Skills for Employment Investment Programme (SEIP)
Individual Activity:
▪ Create your portfolio with project/assignment jobs thought the course.
▪ Take necessary guidance from your trainer.
SELF-CHECK QUIZ 1.1.4
Check your understanding by answering the following question:
1. Write a short note on “Portfolio”.

CBLM – Graphic Design (Student Guide) v.1 Dec 2018 16
Skills for Employment Investment Programme (SEIP)
Learning Outcome 1.2 - Follow Basic Design Guidelines
Contents:
▪ Identify guidelines on basic design for graphic designing
▪ Identify technical skills to achieve basic design
▪ Demonstrate opportunities to continuously improve technical skills in basic design through
identification, practice, feedback, discussion and evaluation
▪ Demonstrate capabilities to develop technical skills in basic design
▪ Identify and use relevant journals, magazines, catalogues and other media to stimulate technical and
professional development in basic design guidelines
Assessment criteria:
1. Guidelines on basic design for graphic designing is identified. 2. Technical skills to achieve basic design are identified. 3. Opportunities to continuously improve technical skills in basic design are demonstrated through
identification, practice, feedback, discussion and evaluation. 4. Capabilities to develop technical skills in basic design are demonstrated. 5. Relevant journals, magazines, catalogues and other media are identified and used to stimulate
technical and professional development in basic design guidelines.
Resources required:
Students/trainees must be provided with the following resources:
▪ Workplace (simulated or actual) ▪ Personal computer and peripherals ▪ Software (system and applications) ▪ Internet ▪ Pens ▪ Papers ▪ instruction sheet/manual
LEARNING ACTIVITY 1.2.1
Learning Activity Resources/Special Instructions/References
Identify guidelines on basic design for graphic designing
▪ Information Sheet: 1.2.1 ▪ Self-Check Quiz: 1.2.1 ▪ Answer Key: 1.2.1
https://99designs.com/blog/tips/types-of-graphic-design/

CBLM – Graphic Design (Student Guide) v.1 Dec 2018 17
Skills for Employment Investment Programme (SEIP)
INFORMATION SHEET 1.2.1
Learning Objective: to identify guidelines on basic design for graphic designing.
Guidelines on basic design:
Graphic design uses visual compositions to solve problems and communicate ideas through typography,
imagery, colour and form. There’s no one way to do that, and that’s why there are several types of graphic
design, each with their own area of specialization.
Just like with any profession or discipline, design comes with some rules. Both analog and digital design
need to follow those rules. Graphic design focuses on the aesthetics of the requirement of clients and its
related materials by strategically implementing images, colours, fonts, and other elements. A successful
graphics design enhances it by engaging users and helping to build trust and interest in the brand.
Whether you are an aspiring designer or seeking design services for your business, understanding the following eight types of graphic design will help you find the right skills for the job.
1. Visual identity graphic design
2. Marketing and advertising graphic design
3. User interface graphic design
4. Publication graphic design
5. Packaging graphic design
6. Motion graphic design
7. Environmental graphic design
8. Art and illustration for graphic design
Individual Activity:
▪ Browse and find details of each types of graphics design.
▪ List them with description and examples.
▪ Share your work in class.
▪ Take necessary guidance from your trainer.
SELF-CHECK QUIZ 1.2.1
Fill in the blanks on the following statements:
1. Graphic design uses visual ___________________ to solve problems and communicate ideas
through___________________, ___________________, ____________________ and form.
2. Graphic design focuses on the ____________________ of the requirement of clients.
LEARNING ACTIVITY 1.2.2
Learning Activity Resources/Special Instructions/References
Identify technical skills to achieve basic design
▪ Information Sheet: 1.2.2 ▪ Self-Check Quiz: 1.2.2 ▪ Answer Key: 1.2.2

CBLM – Graphic Design (Student Guide) v.1 Dec 2018 18
Skills for Employment Investment Programme (SEIP)
INFORMATION SHEET 1.2-2
Learning Objective: to Identify technical skills to achieve basic design.
Technical skills Working in graphic design is a dream job for many creative individuals, but there are a few key skills
you will need to develop before you can successfully work in graphic design. As a designer these
skills will widen your scope of work. These are:
▪ Photo imaging ▪ Graphics Design ▪ Illustration/technical drawing ▪ Animation ▪ Entertainment design
Individual Activity:
▪ Search in the internet for more technical skills and information on them.
▪ Collect information and list in the following format.
Technical skills Characteristics/scope of work
▪ Share your work in class.
▪ Take necessary guidance from your trainer.
SELF-CHECK QUIZ 1.2.2
Check your understanding by answering the following question:
1. Write name of four technical skills.
LEARNING ACTIVITY 1.2.3
Learning Activity Resources/Special Instructions/References
Demonstrate opportunities to continuously improve technical skills in basic design through identification, practice, feedback, discussion and evaluation.
▪ Information Sheet: 1.2.3 ▪ Self-Check Quiz: 1.2.3 ▪ Answer Key: 1.2.3
INFORMATION SHEET 1.2-3
Learning Objective: to demonstrate opportunities to continuously improve technical skills in basic design
through identification, practice, feedback, discussion and evaluation.

CBLM – Graphic Design (Student Guide) v.1 Dec 2018 19
Skills for Employment Investment Programme (SEIP)
Opportunities to continuously improve technical skills It is obvious that it requires be in practice with design works to improve design skills. The common opportunities for this are: ▪ Exhibitions ▪ Floor talks at galleries ▪ Competitions ▪ Master classes ▪ Trade fairs, expositions ▪ Websites
Individual Activity:
▪ Search in the internet for more technical skills and information on them.
▪ Collect information and list in the following format.
Development opportunities Characteristics/scope of work
▪ Share your work in class.
▪ Take necessary guidance from your trainer.
SELF-CHECK QUIZ 1.2.3
Write correct answer for the following question:
1. Name five opportunities to improve technical skills continuously.
LEARNING ACTIVITY 1.2.4
Learning Activity Resources/Special Instructions/References
Demonstrate capabilities to develop technical skills in basic design
▪ Information Sheet: 1.2.4 ▪ Self-Check Quiz: 1.2.4 ▪ Answer Key: 1.2.4
▪ http://ccea.org.uk/sites/default/files/docs/curriculum/skills_ and.capabilities/tspc/SEN_TSPC_Framework_Guidance_Booklet.pdf
INFORMATION SHEET 1.2.4
Learning Objective: to demonstrate capabilities to develop technical skills in basic design.
Capabilities for development There are 14 progression maps available online and in the Thinking Skills and Personal Capabilities: Guidance. Activities and Resources to Support Learners with Special Educational Needs ring binder. These maps are: ▪ Asking for help ▪ building confidence

CBLM – Graphic Design (Student Guide) v.1 Dec 2018 20
Skills for Employment Investment Programme (SEIP)
▪ class routines and following instructions ▪ communicating appropriately ▪ curiosity, exploration and questioning ▪ gathering information ▪ making connections ▪ managing behaviour ▪ organising themselves ▪ planning a task ▪ problem-solving and taking risks for learning ▪ self-help ▪ target setting and feedback ▪ working as a group.
Development cycle:
Individual Activity:
▪ Divide class into 3-4 groups.
▪ Each group will practice the progression maps for capability development.
▪ Share your experience in class.
▪ Your trainer will facilitate this session.

CBLM – Graphic Design (Student Guide) v.1 Dec 2018 21
Skills for Employment Investment Programme (SEIP)
SELF-CHECK QUIZ 1.2.4
Write the correct answer for the following question:
1. Write five of the 14 progression maps those you think more useful for your capability development.
LEARNING ACTIVITY 1.2.5
Learning Activity Resources/Special Instructions/References
Identify and use relevant journals, magazines, catalogues and other media to stimulate technical and professional development in basic design guidelines
▪ Information Sheet: 1.2.5 ▪ Self-Check Quiz: 1.2.5 ▪ Answer Key: 1.2.5
INFORMATION SHEET 1.2.5
Learning Objective: to identify and use relevant journals, magazines, catalogues and other media to
stimulate technical and professional development in basic design guidelines.
Journals, magazines, catalogues and other media to stimulate technical and professional development ▪ It is a common way to stimulate technical and professional development in design guidelines
through journals, magazines, catalogues and other relevant media.
▪ You can collect printed journals and magazines.
▪ Arrange memberships of online design journals for most recent updates and practices in design
world.
▪ You may use catalogues for quick references.
▪ You can use online media, print and television media, Art exhibitions etc. for technical and
professional development.
Individual Activity:
▪ Browse and prepare list of journals, magazines, catalogues and other media to stimulate technical
and professional development in basic design guidelines.
▪ Share your work in class.
SELF-CHECK QUIZ 1.2.5
Write the correct answer for the following question:
1. What are the ways to stimulate technical and professional development in basic design guidelines?

CBLM – Graphic Design (Student Guide) v.1 Dec 2018 22
Skills for Employment Investment Programme (SEIP)
Learning Outcome 1.3 - Develop Conceptual Skills and Ideas
Contents:
▪ Exhibit working with others to develop basic design ideas
▪ Demonstrate ability to gain experience in a range of genres and interpretation of basic design guideline
▪ Study work of others to stimulate conceptual idea and development
▪ Identify a range of opportunities to develop own practice and keep informed about current design
practices and use as guidelines for basic designing
Assessment criteria:
1. Working with others to develop basic design ideas is exhibited. 2. Ability to gain experience in a range of genres and interpretation of basic design guideline is
demonstrated. 3. Work of others is studied to stimulate conceptual idea and development. 4. A range of opportunities to develop own practice and keep informed about current design practices are
identified and used as guidelines for basic designing.
Resources required:
Students/trainees must be provided with the following resources:
▪ Workplace (simulated or actual) ▪ Personal computer/laptop ▪ Analog design tools ▪ Graphics design application ▪ Pens ▪ Paper ▪ instruction sheet/manual
LEARNING ACTIVITY 1.3.1
Learning Activity Resources/Special Instructions/References
Exhibit working with others to develop basic design ideas
▪ Information Sheet: 1.3.1 ▪ Self-Check Quiz: 1.3.1 ▪ Answer Key: 1.3.1
INFORMATION SHEET 1.3.1
Learning Objective: to exhibit working with others to develop basic design ideas.

CBLM – Graphic Design (Student Guide) v.1 Dec 2018 23
Skills for Employment Investment Programme (SEIP)
Basic design idea generation process
A good graphic design has several layers of visual and verbal meaning that communicate many things. In
real professional world, it is common to engage a team of designers for a specific project. There are some
methods are followed to generate ideas. These are:
▪ Breaking through patterns
All of us can tend to get stuck in certain thinking patterns.
Breaking these thought patterns can help you get your
mind unstuck and generate new ideas. There are several
techniques you can use to break established thought
patterns:
✓ Challenge assumptions and preconceived ideas
✓ Reward the problem
✓ Think in reverse
▪ Express yourself thought different media
✓ All have multiple intelligences but somehow, when faced with workplace challenges we just
tend to use our verbal reasoning ability.
✓ How about expressing the challenge through different media?
Clay, music, word association games, paint, there are several ways you can express the
challenge.
▪ Connect to unconnected
➢ Some of the best ideas seem to occur just by chance. You see something, or you hear
someone, often totally unconnected to the situation you are trying to resolve, and the penny
drops in place. Newton and the apple, Archimedes in the bath tub; examples abound. Why
does this happen? The random element provides a new stimulus and gets our brain cells
ticking. You can capitalize on this knowledge by consciously trying to connect the
unconnected.
✓ Use random input: Choose a word from the dictionary and look for novel connections
between the word and your problem.
✓ Mind map possible ideas: Put a key word or phrase in the middle of the page. Write
whatever else comes in your mind on the same page. See if you can make any
connections.
✓ Pick up a picture. Consider how you can relate it to your situation.
✓ Take an item. Ask yourself questions such as "How could this item help in addressing the
challenge?", or "What attributes of this item could help us solve our challenge?"
▪ Shift perspective
➢ Over the years we all build a certain type of perspective and this perspective yields a certain
type of idea. If you want different ideas, you will have to shift your perspective. To do so:
✓ Get someone else's perspective ✓ Play the "If I were" game: Ask yourself "If I were ..." how would I address this challenge?
You could be anyone: a millionaire, Tiger Woods, anyone.
▪ Employ enablers

CBLM – Graphic Design (Student Guide) v.1 Dec 2018 24
Skills for Employment Investment Programme (SEIP)
➢ Enablers are activities and actions that assist with, rather than directly provoke, idea
generation. They create a positive atmosphere. Some of the enablers that can help you get
your creative juices flowing are:
✓ Belief in yourself
✓ Creative loafing time: Nap, go
for a walk, listen to music. Your
mind needs the rest and will often
come up with connections
precisely when it isn't trying to
make them.
✓ Change of
environment: Sometimes
changing the setting changes your
thought process. Go to a nearby
coffee shop instead of the
conference room in your office or
hold your discussion while walking
together round a local park.
✓ Shutting out distractions: Keep
your thinking space both literally
and mentally clutter-free. Shut off
the Blackberry, close the door,
divert your phone calls and then
think.
✓ Fun and humour: These are
essential ingredients, especially in
team settings.
▪ List opportunities where designers can prove their expertise widely
▪ List journals, magazines, catalogues and other media and write an article how they help for
technical development.
Individual Activity:
▪ Divide class in 3-4 groups.
▪ Generate design ideas in group.
▪ Identify your performance while working with others.
▪ Note key issues and share it in class.
▪ Your trainer will facilitate this session.
SELF-CHECK QUIZ 1.3.1
Write the correct answer for the following questions:
1. Write the techniques those can be used to break thought pattern.
2. Name some different medias with which you can express yourself differently.
3. How will you shift perspectives?
4. What are the enables that assist in developing ideas?

CBLM – Graphic Design (Student Guide) v.1 Dec 2018 25
Skills for Employment Investment Programme (SEIP)
LEARNING ACTIVITY 1.3.2
Learning Activity Resources/Special Instructions/References
Demonstrate ability to gain experience in a range of genres and interpretation of basic design guideline
▪ Information Sheet: 1.3.2 ▪ Self-Check Quiz: 1.3.2 ▪ Answer Key: 1.3.2
https://www.business.vic.gov.au/__data/assets/word.../Design-brief-template.doc
INFORMATION SHEET 1.3.2
Learning Objective: to demonstrate ability to gain experience in a range of genres and interpretation of
basic design guideline.
Design guideline
Designing is a wide area of works. It is too hard to have specific guideline for basic design. Researching
on basics of design a skeleton of basic design guideline is developed. That is:
Design brief
A designer needs to focus on the design brief to mark the design requirements and set time frame for the design work delivery. A design brief establishes clear expectations between a business and the designer. A design brief template cannot be a ‘one size fits all’ because design projects vary so much, ranging from product innovation and improvement, to service delivery, software development and graphic design.
Use this template as a starting point and modify as necessary.
No. Key Points Brief
1. Business name: (Insert business name here)
2. Client contact: (Insert client contact name here)
3. Contact number: (Insert contact number here)
1. Use contrast to help your designs stand out 2. DO take time to choose your colour scheme 3. Choose your font palette 4. DON’T use too many different fonts on one page 5. DON'T use comic sans or crazy fonts that end up being hard to read 6. DO look around and see what’s out there in the design world 7. Never Use Black 8. Always start your design project with a layout grid. No exceptions. 9. DO make sure there is enough contrast between your text and the
background 10. DO establish a typographic hierarchy 11. DON’T make the text too small 12. Use a grid or frame where possible with images 13. The Rule of Thirds: Simply place your main subject where the lines
intersect. 14. Keep it simple

CBLM – Graphic Design (Student Guide) v.1 Dec 2018 26
Skills for Employment Investment Programme (SEIP)
4. Due date for
completion:
(If you have any dependencies which make a particular start and end
date critical make sure you communicate these before you brief a
designer. You may need to negotiate with the designer depending on
how in-demand they are and the complexity of the project. The due
date for completion is when you expect to have the final, approved
design in your hand, ready for use.)
5. Review date/s: (There should be at least one client review to ensure the design
meets client expectations. You can also use this section to specify
completion dates of other key stages.)
6. Budget: (Provide an idea of how much money you plan to spend. This
enables the designer to be realistic when they provide options.)
7. Product/service/brand
name:
(Aim to reflect the purpose of the design project in its title. If it’s in the
public domain title may need to include branding.)
8. Key objectives: (Main business benefits of getting this design successfully delivered.)
9. Marketing objectives
and target audience:
(Detailed description of the target market and marketing approach.
Include details such as occupation, gender ratio, average age,
nationality/location, psychological demographic, lifestyle preferences,
advertising and promotional plans, distribution etc.)
10. Client contact: (Insert client contact name here)
11. Contact number: (Insert contact number here)
12. Due date for
completion:
(If you have any dependencies which make a particular start and end
date critical make sure you communicate these before you brief a
designer. You may need to negotiate with the designer depending on
how in-demand they are and the complexity of the project. The due
date for completion is when you expect to have the final, approved
design in your hand, ready for use.)
13. Review date/s: (There should be at least one client review to ensure the design
meets client expectations. You can also use this section to specify
completion dates of other key stages.)
14. Regulatory issues: (Note any regulations which will impact the design e.g. product
labelling laws.)
15. Scope: (Detailed list of everything this project is expected to deliver.)
16. Not in scope: (Use this section to specify design elements that are out of scope e.g.
if you're completing a web design project but don’t want an email
newsletter.)
17. Purpose and function (Use this section if you are briefing a product designer. To be able to
provide a workable design, the designer needs to know what the
product is supposed to be able to do, who will be using it and in what
circumstances. This information may be obvious to the inventor but
still needs to be spelled out clearly for the designer.)
18. Format: (Use this section if you are briefing a graphic designer. Depending on
how you plan to use the design(s) specify if it is for print or web, file
format, file size, resolution or other attributes. For printed items tell
the designer about the stock you plan to use as factors such as
absorbency can affect the final result and therefore the designer's
approach.)
19. Design Project plan: (List the project milestones, what is needed to complete them and
who is responsible.)
20. Attachments: (Provide anything you want to use e.g. existing logos, sketches of
prototypes, examples of designs or products (as benchmarks or
comparison), or competitors you need to stand out from. Ask the
designer to specify requirements such as minimum resolutions for
samples to be used in the final design.)

CBLM – Graphic Design (Student Guide) v.1 Dec 2018 27
Skills for Employment Investment Programme (SEIP)
21. Measures of success: (How will you ensure the design is appropriate for your objectives and
audience e.g. will you show samples to your potential customers, run
surveys etc.)
Individual Activity:
▪ Select a sample case for design brief.
▪ Fill the template and discuss it in the class.
▪ Some examples of cases may work with are:
✓ Logo and Trademark Development ✓ Letterheads ✓ Business Cards ✓ Brochures ✓ Posters and Flyers
▪ Your trainer will help you select a topic and form your groups. Please adhere to the timelines
stipulated by your trainer for the activity and make your submissions on time and as per laid down
guidelines.
▪ All the best!
SELF-CHECK QUIZ 1.3.2
Fill in the gaps with appropriate words:
1. DO take ______________ to choose your colour scheme.
2. DON’T use too many _______________ fonts on one page.
3. Never Use _______________.
4. Always start your design project with a _______________.
LEARNING ACTIVITY 1.3.3
Learning Activity Resources/Special Instructions/References
Study work of others to stimulate conceptual idea and development
▪ Information Sheet: 1.3.3 ▪ Self-Check Quiz: 1.3.3 ▪ Answer Key: 1.3.3
http://www.thedieline.com/blog/2011/1/27/10-rules-to-properly-judge-commercial-design.html
INFORMATION SHEET 1.3.3
Learning Objective: to study work of others to stimulate conceptual idea and development.
Study design work.
The most common and effective way to stimulate conceptual idea and develop is to study other’s
design works. Following figure shows the judgement points of a commercial design work.

CBLM – Graphic Design (Student Guide) v.1 Dec 2018 28
Skills for Employment Investment Programme (SEIP)
Source of design works
▪ There are a lot of sources for design works.
▪ You will find design works around you while you are walking on or in movement.
▪ Magazines (daily, weekly) could be a reliable source.
▪ You will find a lot of designs in the internet.
▪ Also, the exhibitions and art galleries could be authentic source of design works.
Individual Activity:
▪ Select and study a design work.
▪ Prepare a watch report with your recommendation(s).
▪ Share your work in class.
▪ Take necessary guidance from your trainer.
SELF-CHECK QUIZ 1.3.3
Write the correct answer for the following question:
1. State the rules of judging a design work.

CBLM – Graphic Design (Student Guide) v.1 Dec 2018 29
Skills for Employment Investment Programme (SEIP)
LEARNING ACTIVITY 1.3.4
Learning Activity Resources/Special Instructions/References
Identify a range of opportunities to develop own practice and keep informed about current design practices and use as guidelines for basic designing
▪ Information Sheets: 1.3.4 ▪ Self-Check: 1.3.4 ▪ Answer Key: 1.3.4
INFORMATION SHEET 1.3.4
Learning Objective: to Identify a range of opportunities to develop own practice and keep informed about
current design practices and use as guidelines for basic designing.
Opportunities to develop own design practice
Aim for a variety of projects for your portfolio to show off your versatility. If you specialize in illustrations, those should be prominent in your portfolio. If you're a hope-to-be web designer, include web designs. Even if you haven't worked as a graphic designer yet, you may have school design samples you can include.
Ways to continue practice
Web Design: Just about every designer needs some experience with web design nowadays. In addition
to including samples of any live web pages you worked on, include individual elements such as logos,
navigation buttons or animations. It's fine to include mock-ups, personal design projects and school
designs in your portfolio. Choose your best work.
Logo Work: Most graphic designers for web and print are called upon to design a logo at one point or
another. Include completed logos and the variations you went through to arrive at the completed version
if you have them. Also, hypothetical redesigns of a well-known existing logo can show off your
imagination and style.
Print Design: Even if you don't plan to work in paper on ink, the designs show your strengths and
approaches to design. A few examples of items that appear in portfolios are:
▪ Business Cards. Start small and design your own business card or redesign an existing company's
card.
▪ Brochure. Design your own promotional brochure or try out this business tri-fold project.
▪ Packaging. An example of a packaging design shows off your design skills and your ability to visualize
the special requirements.
▪ Poster or flyer. Even if you have to include a reduced version of a poster, include a poster or flyer. It
should showcase your best design talents, be highly legible and draw the eye.
Considerations
▪ Your portfolio is a conversation starter, so be prepared to answer questions about how you designed
the samples in your portfolio.
▪ If you don't have a good desktop printer to produce clear copies of your samples, go to a copy shop
for colour copies that show off your designs.
▪ Visit and participate Art exhibitions. Talk with artists and designers.
Individual Activity:
▪ Please collect samples of good brochures/flyers etc. and file them:
- Pick up the best three brochures that appeal to you most and justify your selection with
reasons.
- Continue this activity till the end of course and add it to the portfolio.
▪ Your trainer will help you select the designs from your collections.

CBLM – Graphic Design (Student Guide) v.1 Dec 2018 30
Skills for Employment Investment Programme (SEIP)
▪ Please adhere to the timelines stipulated by your trainer for the activity and make your
submissions on time and as per laid down guidelines.
SELF-CHECK QUIZ 1.3.4
Write the correct answer for the following question:
1. Write 4 ways to continue with design practice.

CBLM – Graphic Design (Student Guide) v.1 Dec 2018 31
Skills for Employment Investment Programme (SEIP)
Learning Outcome 1.4 - Seek Strategies for Personal Development
Contents:
▪ Demonstrate ability to explore and experiment with new ideas in making and/or interpreting work ▪ Demonstrate exploration and use of technology where appropriate to expand own practice ▪ Sight strategies for personal development as a designer
Assessment criteria:
1. Ability to explore and experiment with new ideas in making and/or interpreting work is demonstrated. 2. Exploration and use of technology where appropriate to expand own practice is demonstrated. 3. Strategies for personal development as a designer is sought.
Resources required:
Students/trainees must be provided with the following resources:
▪ Workplace (simulated or actual)
▪ Personal computer/laptop
▪ Analog design tools
▪ Graphics design application
▪ Pens
▪ Paper
▪ instruction sheet/manual
LEARNING ACTIVITY 1.4.1
Learning Activity Resources/Special Instructions/References
Demonstrate ability to explore and experiment with new ideas in making and/or interpreting work
▪ Information Sheet: 1.4.1 ▪ Self-Check Quiz: 1.4.1 ▪ Answer Key: 1.4.1
INFORMATION SHEET 1.4.1
Learning Objective: to demonstrate ability to explore and experiment with new ideas in making and/or
interpreting work.
Explore new ideas for design work

CBLM – Graphic Design (Student Guide) v.1 Dec 2018 32
Skills for Employment Investment Programme (SEIP)
▪ Sometimes designers become stuck and are unable to move with creative ideas for their designs. It may happen to you all. You just need a way to get your brain in gear and get the ideas flowing. Following techniques will help you make aware of new ideas and use of technology.
Ways to develop ideas Here are some ways listed to develop new ideas.
▪ Random discussions
▪ Look outside for inspiration
▪ Give full disclosure
▪ Question the brief
▪ Sit around a proper table
▪ Back to basics with physical things
▪ Be honest
▪ Play word games to generate ideas
Use of Technology Trainees need to get idea on recent and updated apps and software technology to enhance their capability. Creative inspiration and pinboard apps are perfect for organising and initiating brainstorming sessions. Here are five of the best.
▪ MindNode
The MindNode mind mapping app is the perfect tool for brainstorming and organising your creative thoughts
▪ Moodboard
Organise your inspiration with Moodboard, a great app for creating moodboards on your iPad.
▪ OmniGraffle
OmniGraffle has an extensive toolset and is a very flexible canvas for designing.
▪ myPANTONE
Colour giant Pantone's mobile App -Clever software allows users to capture over 13,000 pantone colours by selecting specific part of a digital image.
▪ iDesign
iDesign has a unique drawing tool, which allows users to sketch accurately without fingers
getting in the way.
Individual Activity:
▪ Research on recent updates on graphics design software and technology.
▪ Prepare a one-page report and present it before class.
▪ Take necessary guidance from your trainer for this activity.
SELF-CHECK QUIZ 1.4.1
Write correct answer for the following questions.
1. Write 5 ways to develop ideas.
2. Name 3 software to manage design ideas.

CBLM – Graphic Design (Student Guide) v.1 Dec 2018 33
Skills for Employment Investment Programme (SEIP)
LEARNING ACTIVITY 1.4.2
Learning Activity Resources/Special Instructions/References
Demonstrate exploration and use of technology where appropriate to expand own practice
▪ Information Sheet: 1.4.2 ▪ Self-Check Quiz: 1.4.2 ▪ Answer Key: 1.4.2
INFORMATION SHEET 1.4.2
Learning Objective: to demonstrate exploration and use of technology where appropriate to expand own
practice.
Use of technology expand own practice
▪ For professional development, you need to acquire: - an understanding of the design process
- plan and develop ideas, and
- use images and text in design work for the purpose of communication.
▪ You should continue work on short projects. Also focus on the different aspects of the design process: - Basic layout
- composition and design
- typography
- advanced use of colour
▪ Continue designing logos, posters, brochures and magazine layout etc. Working with industry standard software such as Adobe InDesign, Illustrator and Photoshop, you will develop a portfolio of projects that will aid you in pursuing a career in the design field.
▪ You can take up professional courses to develop your technical skills and gain a competitive edge to fast forward your career.
▪ Be updated with recent developments, trends, technology and techniques in Graphic Design. All this will help in your professional development.
▪ Areas to work with are listed on the following table:
Branding
Computer Graphic Applications
Corporate Identity and Logotype Design
Digital Publishing
Illustration
Typography

CBLM – Graphic Design (Student Guide) v.1 Dec 2018 34
Skills for Employment Investment Programme (SEIP)
Visual Communication
Visual Merchandising
Web Design
The Trainee should develop a pool of knowledge and a portfolio of projects that will aid them in their future career.
Individual Activity:
▪ Choose a technology.
▪ Open and use the tool to formulate creative thoughts.
▪ Share your experience in class.
▪ Take necessary assistance from your trainer.
SELF-CHECK QUIZ 1.4.2
Write correct answers of the following questions:
1. What are the different aspects of the design process for personal development?
2. Write 4 areas for continuing with personal development.
LEARNING ACTIVITY 1.4.3
Learning Activity Resources/Special Instructions/References
Sight strategies for personal development as a designer
▪ Information Sheet: 1.4.3 ▪ Self-Check Quiz: 1.4.3 ▪ Answer Key: 1.4.3
http://www.collaborationforimpact.com/the-three-elements-of-continuous-learning-priorities-plans-and-culture/

CBLM – Graphic Design (Student Guide) v.1 Dec 2018 35
Skills for Employment Investment Programme (SEIP)
INFORMATION SHEET 1.4.3
Learning Objective: to sight strategies for personal development as a designer.
Strategies for personal development as a designer
▪ There is no alternative of continuous learning for professional achievements. As a trainee of Graphics Design, you need to follow the three elements of Continuous Learning: Priorities, Plans and Culture
▪ Learning priorities that are co-created and agreed upon.
▪ Learning plans that determine the set of processes and activities required to create a continuous cycle of dialogue and reflection.
▪ And learning culture that allows for openness, trust, and risk-taking.
▪ To illustrate these elements, it might be useful to think of a lighthouse. Imagine that the lantern sheds light onto topics of interest for the design effort as it rotates on its axis (learning priorities).
▪ The tower elevates the light, the taller the tower, the greater the field of vision—as do the processes and activities for effective and efficient learning (learning plan).
▪ The foundation is a solid environment of trust and openness that grounds the work of the lighthouse (learning culture).
▪ All three elements are essential for continuous learning; lacking even one limits the effectiveness of the process.
Individual Activity:
▪ Develop a strategy for your own to develop yourself.
▪ Share it class for feedback.
▪ Take necessary instructions from your trainer..
SELF-CHECK QUIZ 1.4.3
Write the correct answer for the following question:
1. What are the elements of Continuous Learning?

CBLM – Graphic Design (Student Guide) v.1 Dec 2018 36
Skills for Employment Investment Programme (SEIP)
REVIEW OF COMPETENCY
Final Checklist
(for the performance criteria of the module Performing Distempering)
Performance Criteria Yes No
1. Brief history of graphic design is discussed.
2. Analog design and basic drawing is identified.
3. Global trend in graphic designing is recognized.
4. Portfolio of trainees is acknowledged.
5. Guidelines on basic design for graphic designing are identified.
6. Technical skills to achieve basic design are identified.
7. Opportunities to continuously improve technical skills in basic design are demonstrated through identification, practice, feedback, discussion and evaluation.
8. Capabilities to develop technical skills in basic design are demonstrated.
9. Relevant journals, magazines, catalogues and other media are Identified and used to stimulate technical and professional development in basic design guidelines.
10. Working with others to develop basic design ideas is exhibited.
11. Ability to gain experience in a range of genres and interpretation of basic design guideline is demonstrated.
12. Work of others is studied to stimulate conceptual idea and development.
13. A range of opportunities to develop own practice and keep informed about current design practices are identified and used as guidelines for basic designing.
14. Ability to explore and experiment with new ideas in making and/or interpreting work is demonstrated.
15. Exploration and use of technology where appropriate to expand own practice is demonstrated.
16. Strategies for personal development as a designer is sought
Now I feel ready to undertake my formal competency assessment.
Signed: _________________________
Date: _________________________

CBLM – Graphic Design (Student Guide) v.1 Dec 2018 37
Skills for Employment Investment Programme (SEIP)
ANSWER KEY
ANSWER KEY 1.1.1
1. False 2. True 3. True 4. True
ANSWER KEY 1.1.2
1. Five ananlog tools are: ▪ pencil ▪ layout bond sketch pad ▪ straightedge ▪ smudge glove ▪ inking pens
2. Brainstorming is just writing down any idea that comes to thought as a word or phrase. The goal is to list down as many things as possible without spending much time thinking about any of them except to let them lead to new ideas. Often with brainstorming result is a long list, which can be organized and exclude if necessary.
3. Sometimes words alone aren’t enough, and sketching is a better way to generate ideas. Sometimes it’s an idea for a new design and sometimes it’s just some concept that occurs to designers as an image rather than in words.
ANSWER KEY 1.1.3
1. The algorithm of search engines is such that it will try and show you only those results which are popular and trending in market close to your geographic location.
2. Blogs, Fitness, Government, News and Media, People and society
ANSWER KEY 1.1.4
1. Portfolios showcase a designer's best works, presented as professionally as possible. Portfolios should demonstrate the applicant's interests in and aptitudes for advanced future and success. Building your portfolio website should be just as fun as creating the work you put into it. It is very important to have an attractive portfolio for a graphic designer. This will lead to success as a designer
ANSWER KEY 1.2.1
1. Compositions, typography, imagery, colour 2. Aesthetics
ANSWER KEY 1.2.2
▪ Photo imaging ▪ Graphics design ▪ Illustration/technical drawing ▪ Animation
ANSWER KEY 1.2.3
▪ Exhibitions ▪ Floor talks at galleries ▪ Competitions ▪ Master classes

CBLM – Graphic Design (Student Guide) v.1 Dec 2018 38
Skills for Employment Investment Programme (SEIP)
▪ Trade fairs, expositions
ANSWER KEY 1.2.4
▪ Asking for help ▪ Building confidence ▪ Class routines and following instructions ▪ Communicating appropriately ▪ Curiosity, exploration and questioning
ANSWER KEY 1.2.5
▪ Using journals, magazines, catalogues and other relevant media ▪ Memberships of online design journals ▪ Using catalogues ▪ Using online media, print and television media, art exhibitions etc.
ANSWER KEY 1.3.1
1. Techniques are: ▪ Challenge assumptions and preconceived ideas ▪ Reward the problem ▪ Think in reverse
2. Medias are: clay, music, word association games, paint and many more. 3. Shifting perspective is possible by:
▪ Get someone else's perspective ▪ Play the "If I were" game
4. The enables are: ▪ Belief in yourself ▪ Creative loafing time ▪ Change of environment ▪ Shutting out distractions ▪ Fun and humour
ANSWER KEY 1.3.2
1. Time 2. Different 3. Black 4. Layout grid
ANSWER KEY 1.3.3
1. The rules are: ▪ Pretty and ugly do not exist ▪ Not to ignore underlying story ▪ Not to ignore strategy ▪ To consider always customs and cultures ▪ To know the technical limitations and legislations ▪ Strategic reactions rules ▪ To consider the amount of funds assigned to the design ▪ To evaluate according to the category codes ▪ To consider achieving aims as synonym of success ▪ To foresee its future features
ANSWER KEY 1.3.4
1. The ways are: ▪ Web Design ▪ Logo Work

CBLM – Graphic Design (Student Guide) v.1 Dec 2018 39
Skills for Employment Investment Programme (SEIP)
▪ Print Design
ANSWER KEY 1.4.1
1. 5 Ways: ▪ Random discussions ▪ Look outside for inspiration ▪ Give full disclosure ▪ Question the brief ▪ Sit around a proper table
2. Name of three software: ▪ MindNode ▪ Moodboard ▪ iDesign
ANSWER KEY 1.4.2
1. Aspects are: ▪ Basic layout ▪ Composition and design ▪ Typography ▪ Advanced use of colour
2. 4 Areas: ▪ Branding ▪ Corporate identity and Logotype design ▪ Digital publication ▪ Web design
ANSWER KEY 1.4.3
1. The three elements of Continuous Learning are: priorities, plans and culture.

CBLM – Graphic Design (Student Guide) v.1 Dec 2018 40
Skills for Employment Investment Programme (SEIP)
Module 2: Generating shapes and text
MODULE CONTENT
Module Descriptor: This module covers the skills, knowledge and attitudes to generate
shapes and text. It specifically includes installing local web server,
working with the tools of web server and installing FTP clients.
Nominal Duration: 10 hours
LEARNING OUTCOMES:
Upon completion of the module, the student/trainee should be able to:
2.1 Prepare equipment and related software
2.2 Create shapes and text
2.3 Check work quality
PERFORMANCE CRITERIA:
1. Equipment and software are prepared as per workplace requirement.
2. Equipment and software are checked for conformity and usability.
3. Output to be generated is determined in accordance with job requirements/specifications.
4. Page layout application is identified in accordance with job requirements/specification.
5. Shapes and text are created and applied in accordance with job requirements/specifications.
6. Quality of work is checked according to workplace requirements/specifications.
7. Constructive criticism from others is obtained.
8. Work is adjusted where necessary to improve technical, conceptual and commercial value.

CBLM – Graphic Design (Student Guide) v.1 Dec 2018 41
Skills for Employment Investment Programme (SEIP)
Learning Outcome 2.1 - Prepare Equipment and Related Software
Contents:
▪ Preparation of equipment and software ▪ Check equipment and software for conformity and usability
Assessment criteria:
1. Equipment and software are prepared as per workplace requirement. 2. Equipment and software are checked for conformity and usability.
Resources required:
Students/trainees must be provided with the following resources:
▪ Workplace (simulated or actual) ▪ Personal computer and peripherals ▪ Software (system and applications) ▪ Internet ▪ Stationery ▪ Instruction sheet/manual
LEARNING ACTIVITY 2.1.1
Learning Activity Resources/Special Instructions/References
Preparing equipment and software as per workplace requirement
▪ Information Sheet: 2.1.1 ▪ Self-Check Quiz: 2.1.1 ▪ Answer Key: 2.1.1
https://www.creativebloq.com/graphic-design/tools-every-graphic-designer-should-have-6133208
https://99designs.com/blog/design-resources/best-tools-for-graphic-designers/
INFORMATION SHEET 2.1.1
Learning Objective: to prepare equipment and software as per workplace requirement.
Workplace requirement:

CBLM – Graphic Design (Student Guide) v.1 Dec 2018 42
Skills for Employment Investment Programme (SEIP)
Workplace requirement depends on the nature of job you are commonly doing and the client’s design
demand.
You need to prepare both Equipment and Software suitable for assigned job.
Equipment preparation:
You can pick equipment from the following list or choose independently out from the list (add to list).
1. Laptop
2. Desktop
3. Creative software
4. Reliable hard drive/SSD
5. Graphics tablet and stylus
6. Quality sketchpad or notebook
7. Monitor calibrator
8. Pantone swatch book
9. Top-end smartphone
10. Studio camera
11. Variable desk
12. Ergonomic chair
Software Preparation
You can pick any from the following list or choose independently out from the list.
▪ Photoshop
▪ GIMP
▪ Illustrator
▪ Inkscape
▪ CorelDraw
▪ InDesign
Graphic design tools
▪ Procreate
▪ Myfonts.com
▪ Clip Studio Paint
▪ Ron’s Brushes
▪ MacBook Pro with touch bar and touch ID
▪ iPad Pro + Apple Pencil
▪ Wacom Bamboo Tip Stylus
▪ Art supplies
Make sure the arrangement of the equipment, tools and software for your design work.
Preparing design application: installing Adobe Photoshop CC 2017:
Here is the installation process of Adobe Photoshop CC 2017. You can follow the same process to install
Illustrator and InDesign.
1. Download Adobe Photoshop CC (2017) Offline Installer
Offline Installer Links for Adobe Photoshop CC 2017:
Download Adobe Photoshop cc 2017 for Windows 32-bit
Download Adobe Photoshop cc 2017 for Windows 64-bit
Download Adobe Photoshop CC 2017 for Mac OS
Download the Adobe Photoshop from above Offline Installer links for your Operating System and start
your free trial of the tool.
If you like it you can use it further by purchasing its license.

CBLM – Graphic Design (Student Guide) v.1 Dec 2018 43
Skills for Employment Investment Programme (SEIP)
2. Extract the downloaded file to a Folder on your Hard Drive.
3. Run the “Setup” application file from the extracted folder to install Photoshop.
4. It will require to be registered with Adobe Creative Cloud to use the software. Register yourself with
Adobe system.
5. While you are installing offline, select “login later” when login requirement dialog box appears.
6. Follow the instructions till complete the installation.
If you are working in an office, please be aware of the company IT policy before downloading any
software- you may need prior approvals to do so. You may request help from the IT support team
for installation.
Individual Activity:
▪ Prepare an ideal setup layout for you to work as a graphics designer.
▪ Share your work in class for other’s feedback.
▪ Your trainer will guide you to carry on with this activity.
SELF-CHECK QUIZ 2.1.1
Write the correct answer for the following questions:
1. Name 5 equipment for design works.
2. What are the three commonly used graphics design software?
3. Write name of 4 graphics design tools.
LEARNING ACTIVITY 2.1.2
Learning Activity Resources/Special Instructions/References
Check equipment and software for conformity and usability
▪ Information Sheet: 2.1.2 ▪ Self-Check Quiz: 2.1.2 ▪ Answer Key: 2.1.2
INFORMATION SHEET 2.1.2
Learning Objective: to check equipment and software for conformity and usability.
Equipment and software for conformity and usability:
Designers must ensure use of authentic equipment and software during their design works. A designer
has to select equipment according to nature of the work, usage and budget of the project.
Usability and conformity check for equipment
You should create a checklist and follow it before starting any design project. This will increase efficient
use of equipment required for the project.
Here is a sample checklist format for equipment :

CBLM – Graphic Design (Student Guide) v.1 Dec 2018 44
Skills for Employment Investment Programme (SEIP)
No. Equipment Name Have in
collection
Status
(Good/ Bad)
Need to Buy/
Rent
Remarks
1 Computer
2 Mouse
3 Keyboard
4 Printer
5 Scanner
6 Digital Camera
7
8
9
10
Usability and conformity check for software
A designer must be aware of all aspects of Operating System and software he uses Every software has a
licensing period. As a designer and user of different design software, you must check the validity of your
tools or your software validity may expire in the middle of your design work. Therefore, you should
maintain a checklist for Computer software.
Here is a Sample checklist format :
No. Software Name Purchase
date
Validity of
registration
Re-
registration
processing
date
Remarks
1 Operating System
2 Office Application
3 Illustrator
4 Photoshop
5 CorelDraw
6 in Design
7
8
Individual Activity:
▪ Each trainee will complete the usability and conformity chart for a specific design job (i.e. Yearly
Calendar for SEIP of next year) .
- Trainer will guide you to select a design job
- Prepare a list of required equipment and software
- Fill the usability and conformity chart
▪ Please adhere to the timelines stipulated by your trainer for the activity and make your submissions
on time and as per laid down guidelines.
▪ All the best!
SELF-CHECK QUIZ 2.1.2
Write the correct answer for the following questions:
1. Fill in the gaps with the appropriate words on the following statements:
a. Designers must ensure use of _____________ equipment and _____________ during their design works.

CBLM – Graphic Design (Student Guide) v.1 Dec 2018 45
Skills for Employment Investment Programme (SEIP)
b. A designer has to select equipment according to _______ of the work, usage and ____________ of the project.

CBLM – Graphic Design (Student Guide) v.1 Dec 2018 46
Skills for Employment Investment Programme (SEIP)
Learning Outcome 2.2 – Create Shapes and Text
Contents:
▪ Determine output to be generated in accordance with job requirements/specifications ▪ Identify page layout application in accordance with job requirements/specification ▪ Create and apply shapes and text in accordance with job requirements/specifications
Assessment criteria:
1. Output to be generated is determined in accordance with job requirements/specifications. 2. Page layout application is identified in accordance with job requirements/specification. 3. Shapes and text are created and applied in accordance with job requirements/specifications.
Resources required:
Students/trainees must be provided with the following resources:
▪ Workplace (simulated or actual) ▪ Personal computer/laptop ▪ Graphics design application ▪ Pens ▪ Paper ▪ Journals, magazines, catalogues ▪ instruction sheet/manual
LEARNING ACTIVITY 2.2.1
Learning Activity Resources/Special Instructions/References
Determine output to be generated in accordance with job requirements/ specifications
▪ Information Sheet: 2.2.1 ▪ Self-Check Quiz: 2.2.1 ▪ Answer Key: 2.2.1
https://99designs.com/blog/tips/types-of-graphic-design/
INFORMATION SHEET 2.2.1
Learning Objective: to determine output to be generated in accordance with job requirements/
specifications.

CBLM – Graphic Design (Student Guide) v.1 Dec 2018 47
Skills for Employment Investment Programme (SEIP)
Design project output:
Every design work is predefined with its output. Clients have specific target of use of the design works. As
a designer you need to clarify the matter with clients. The types of design work output are discussed here
for your learnings.
Design Output Type Examples
Visual identity graphic design ▪ Postcards and flyers
▪ Magazine and newspaper ads
▪ Posters, banners and billboards
▪ Infographics
▪ Brochures (print and digital)
▪ Vehicle wraps
▪ Signage and trade show displays
▪ Email marketing templates
▪ PowerPoint presentations
▪ Menus
▪ Social media ads, banners and graphics
▪ Banner and retargeting ads
Images for websites and blogs ▪ Logos, typography, colour palettes and image libraries that
represent a brand’s personality etc.
Marketing & advertising graphic
design
▪ Postcards and flyers
▪ Magazine and newspaper ads
▪ Posters, banners and billboards
▪ Infographics
▪ Brochures (print and digital)
▪ Vehicle wraps
▪ Signage and trade show displays
▪ Email marketing templates
▪ PowerPoint presentations
▪ Menus
▪ Social media ads, banners and graphics
▪ Banner and retargeting ads
▪ Images for websites and blogs
User interface graphic design ▪ Web page design
▪ Theme design (WordPress, Shopify, etc.)
▪ Game interfaces
▪ App design
Publication graphic design ▪ Books
▪ Newspapers
▪ Newsletters
▪ Directories
▪ Annual reports
▪ Magazines
▪ Catalogues
Packaging graphic design ▪ labels
▪ beverage cans
▪ food container
▪ children’s toys
▪ Boxes
▪ Gift box
Motion graphic design ▪ Title sequences and end credits
▪ Advertisements
▪ Animated logos

CBLM – Graphic Design (Student Guide) v.1 Dec 2018 48
Skills for Employment Investment Programme (SEIP)
▪ Trailers
▪ Presentations
▪ Promotional videos
▪ Tutorial videos
▪ Websites
▪ Apps
▪ Video games
▪ Banners
▪ GIFs
Environmental graphic design ▪ Signage
▪ Wall murals
▪ Museum exhibitions
▪ Office branding
▪ Public transportation navigation
▪ Retail store interiors
▪ Stadium branding
▪ Event and conference spaces
Individual Activity:
▪ Choose appropriate type of design output.
▪ Make your design work plan for selected output type.
▪ Share your work in class.
▪ Your trainer will guide you to carry on with this activity.
SELF-CHECK QUIZ 2.2.1
Write correct answer for the following question:
1. Write five types of design output.
LEARNING ACTIVITY 2.2.2
Learning Activity Resources/Special Instructions/References
Identify page layout application in accordance with job requirements/specification
▪ Information Sheet: 2.2.2 ▪ Self-Check Quiz: 2.2.2 ▪ Answer Key: 2.2.2
http://www.toptenreviews.com/software/multimedia/best-page-layout-software/
INFORMATION SHEET 2.2.2
Learning Objective: to identify page layout application in accordance with job requirements/specification.
Page Layout Tools:

CBLM – Graphic Design (Student Guide) v.1 Dec 2018 49
Skills for Employment Investment Programme (SEIP)
▪ Whether you own a business and want to print new business cards, or you are designing a magazine or newspaper, page layout design software has all the tools you need to make professional-looking publications. These unique pieces of software offer all kinds of features to help modify your text and graphics and combine them to create a high-quality page spread.
▪ Software such as InDesign, PagePlus and QuarkXPress are great for print publishing and digital publishing for PDF files and eBook formats. Some of these applications even go one step further and offer tools for laying out a website, smartphone app or creating a QR code, which effectively allows you to keep in-step with today’s digital audience. Between clean layouts and myriad editing tools, these programs let you add your own effects to publications.
Individual Activity:
▪ Trainer will put the class in Groups.
▪ Each group will prepare short presentation on the Page layout applications from the following list –
Adobe Page Maker Adobe Frame Maker Page Plus
Creator Professional Adobe in Design
Adobe Illustrator Adobe Photoshop Quark Xpress
▪ Your trainer will help you select a topic and form your groups.
▪ Please adhere to the timelines stipulated by your trainer for the activity and make your submissions
on time and as per laid down guidelines.
▪ All the best!
SELF-CHECK QUIZ 2.2.2
Write correct answer for the following question:
1. What are the three popular page layout software?
LEARNING ACTIVITY 2.2.3
Learning Activity Resources/Special Instructions/References
Create and apply shapes and text in accordance with job requirements/specifications
▪ Information Sheet: 2.2.3 ▪ Self-Check Quiz: 2.2.3 ▪ Answer Key: 2.2.3
https://helpx.adobe.com/photoshop/how-to/adding-text-shapes-basics.html
INFORMATION SHEET 2.2.3
Learning Objective: to create and apply shapes and text in accordance with job
requirements/specifications.
Applying shapes and Texts in designs
▪ When you add text and shapes in Adobe Photoshop CC, they remain editable, and you can
customize them down to the smallest detail.

CBLM – Graphic Design (Student Guide) v.1 Dec 2018 50
Skills for Employment Investment Programme (SEIP)
▪ To add text ✓ In the Tools panel, select the Horizontal Type tool.
✓ In the options bar, choose a font, font size, colour, and other options for your text. You can edit any of these settings later.
✓ Click on the canvas and enter a single line of text. You can also create a paragraph of text by dragging out a text box and then typing inside the box.
✓ Click the check mark in the options bar to accept the text and exit text mode. This automatically creates a new, editable type layer in the Layers panel.
✓ Use the Move tool to move your text into position in the image.
✓ Save your image in the Photoshop (PSD) format to retain the editable type layers for future editing.
▪ To create a shape
✓ In the Tools panel, click and hold the Rectangle tool (or whichever Shape tool is showing in your Tools panel at the moment) to view all the shape tools. Select a tool for the shape you want to draw.
✓ In the options bar, choose a Fill colour and other options for your shape. These can be changed later.
✓ Hold the Shift key to avoid distorting the shape as you drag in an image to create an editable shape. This automatically creates a new shape layer in the Layers panel.
✓ Use the Move tool to move the shape into position in the image. ✓ Scale, transform, or rotate a shape without harming its image quality by choosing Edit >
Free Transform or pressing Control+T (Windows) or Command+T (macOS). ✓ To change the colour of a shape, go to the Layers panel, find the shape layer you want to
change, and double-click the thumbnail on that layer to open the Colour Picker. As you click colours in the Colour Picker, you’ll see a live preview of the selected colour on the shape. When you find a colour you like, click OK to apply the new colour to the shape.
▪ To add a custom shape.
✓ In the Tools panel, click and hold the Rectangle tool (or whichever Shape tool is showing in your Tools panel) and select the Custom Shape tool.
✓ In the options bar, click the down-facing arrow to the right of the Shape picker. To view all the custom shapes that come with Photoshop, click the gear icon on the right of the Shape picker, choose All from the menu, and click OK in the message that appears. Then click the bottom right corner of the Shape picker and drag it out so you can see all the shapes.
Individual Activity:
▪ Apply shapes and texts on a design work.
▪ Share your work in class and get feedback.
▪ Your trainer will guide to complete the activity.
SELF-CHECK QUIZ 2.2.3
Fill in the blanks with the appropriate words:
1. When you add text and shapes in Adobe Photoshop CC, they remain ____________.
2. Use the _______ tool to move your text into position in the image.
3. Hold the ________ key to avoid distorting the shape as you drag in an image to create an editable shape.

CBLM – Graphic Design (Student Guide) v.1 Dec 2018 51
Skills for Employment Investment Programme (SEIP)
Learning Outcome 2.3 - Check Work Quality
Contents:
▪ Check quality of work according to workplace requirements/specifications ▪ Obtain constructive criticism from others ▪ Adjust work where necessary to improve technical, conceptual and commercial value
Assessment criteria:
1. Quality of work is checked according to workplace requirements/specifications. 2. Constructive criticism from others is obtained. 3. Work is adjusted where necessary to improve technical, conceptual and commercial value.
Resources required:
Students/trainees must be provided with the following resources:
▪ Workplace (simulated or actual) ▪ Personal computer and peripherals ▪ Software (system and applications) ▪ Internet ▪ Stationery ▪ Instruction sheet/manual
LEARNING ACTIVITY 2.3.1
Learning Activity Resources/Special Instructions/References
Check quality of work according to workplace requirements/specifications
▪ Information Sheet: 2.3.1 ▪ Self-Check Quiz: 2.3.1 ▪ Answer Key: 2.3.1
INFORMATION SHEET 2.3.1
Learning Objective: to check quality of work according to workplace requirements/specifications..
Design work requirements/specification:
▪ Every design work has specific requirements or specifications. As a designer you need to follow
them to the point and make the work successful. Here is a Job that explains the requirements.
You need to complete the job in a professional manner.

CBLM – Graphic Design (Student Guide) v.1 Dec 2018 52
Skills for Employment Investment Programme (SEIP)
Job Sheet 1: Individual Project
Job Title: Design works with vector image
Job Statement:
Make a vector image of your own face (from a photo of yourself).
Place it on a background made of different shapes, textures and colours.
Job Development
Phases:
This project discusses the case of applying design tools for an art work. The
project will be carried out in the following phases:
◼ Identifying requirements: Refers to understanding the project requirements. This phase is an important phase in a project because it helps the designers to decide on factors such as size of the page and the suitable color combinations.
◼ Designing: Refers to deciding suitable images, shapes, lines, textures and colors that will appear on the document. In this phase, the designer decides on the color of the vector shape, objects and the background color of the document.
◼ Development: Involves creating the required effects in the artwork. In this phase, the designer needs to apply background color and color for the objects. In addition, the designer needs to place the text and the images as per the design and enhance the look and feel of the document by making appropriate changes to it.
◼ Documentation: Involves creating a document that consists of the hard copy of the developed content and the steps followed to create that content. In addition, share the soft copy.
Job Specification: Design size: Height 5” x width 8”
Background: Height 5” x width 8”
Vector Image: Height 4” x width 3”
Colour: CMYK
Job Clue: Create vector image of your face
- Collect your photo - If you don’t have a digital photo, scan hard copy of your photo - Use your photo to create vector image with Illustrator tools.
Create background:
- Use Lines, triangle, rectangle, ellipse, polygon, star and flayer - Arrange the shapes and create eye-catching background for your design - Apply colours to your shapes
Completion of design:
- Put the vector image over background design Make necessary adjustment on background shapes’ colours
Timelines for Job activities
This job has to be done individually. The following table provides a suggested break-up of activities along
with the timelines that you need to follow to ensure timely completion of the Job.
No. Tasks to be Performed Time Limit for creating
Artwork (Use Illustrator) Hours.
1 Understand the requirements .5

CBLM – Graphic Design (Student Guide) v.1 Dec 2018 53
Skills for Employment Investment Programme (SEIP)
No. Tasks to be Performed Time Limit for creating
Artwork (Use Illustrator) Hours.
2 Designing:
• Decide on the page size and color combinations to be used.
• Decide on the pictures to be used or pictures to be created.
• Decide on the format of the text to be used.
• Decide on the background color
• Decide on the color of the objects.
1.5
3 Creation:
• Create vector image and apply the required effects.
• Create shapes and apply the required effects and color.
• Place the vector images and shapes on the document.
• Applying final touches in terms of effects and color changes.
5.5
4 Document the project .5
Total 8
Your trainer will help you with instructions to construct the art work. Please adhere to the timelines
stipulated by your trainer for the activity and make your submissions on time and as per laid down
guidelines.
All the best!
Checking quality:
▪ Now you need to check (self-check) your work if that meet the requirements stated on the job
sheet.
▪ Point out your observations. Male adjustments to your work if you feel necessary to meet the
requirements.
▪ Take feedback from others to make the design work better.
Individual Activity:
▪ Complete the job stated on the job sheet.
▪ Check quality of work according to requirements/specifications.
▪ Share it to your class.
▪ Your trainer will guide you to carry on this activity.
SELF-CHECK QUIZ 2.3.1
Write a short note on following:
1. Where do you find the work requirements?
2. How will you check quality of design work?

CBLM – Graphic Design (Student Guide) v.1 Dec 2018 54
Skills for Employment Investment Programme (SEIP)
LEARNING ACTIVITY 2.3.2
Learning Activity Resources/Special Instructions/References
Obtain constructive criticism from others ▪ Information Sheet: 2.3.2 ▪ Self-Check Quiz: 2.3.2 ▪ Answer Key: 2.3.2
INFORMATION SHEET 2.3.2
Learning Objective: to obtain constructive criticism from others.
Review and critique artworks:
✓ A critique is an oral or written discussion strategy used to analyse, describe, and interpret works of art. Critiques help students hone their persuasive oral and writing, information-gathering, and justification skills.
✓ Provide direction and guidance with the critique to ensure that trainees stay on task and address the purpose and objectives of the lesson.
✓ Below is a sample set of focus questions for an art critique related to four major areas of art criticism: description, analysis, interpretation, judgment. (The number of questions and aspects of specificity will vary according to the art form and number of works in the critique).
Description
✓ Describe the work without using value words such as "beautiful" or "ugly":
• What is the written description on the label or in the program about the work?
• What is the title and who is (are) the artist(s)?
• When and where was the work created?
• Describe the elements of the work (i.e., line movement, light, space).
• Describe the technical qualities of the work (i.e., tools, materials, instruments).
• Describe the subject matter. What is it all about? Are there recognizable images? Analysis ✓ Describe how the work is organized as a complete composition:
• How is the work constructed or planned (i.e., acts, movements, lines)?
• Identify some of the similarities throughout the work (i.e., repetition of lines, two songs in each act).
• Identify some of the points of emphasis in the work (i.e., specific scene, figure, movement).
• If the work has subjects or characters, what are the relationships between or among them? Interpretation ✓ Describe how the work makes you think or feel:
• Describe the expressive qualities you find in the work. What expressive language would you use to describe the qualities (i.e., tragic, ugly, funny)?
• Does the work remind you of other things you have experienced (i.e., analogy or metaphor)?
• How does the work relate to other ideas or events in the world and/or in your other studies? Judgment or Evaluation
✓ Present your opinion of the work's success or failure:
• What qualities of the work make you feel it is a success or failure?
• Compare it with similar works that you think are good or bad.

CBLM – Graphic Design (Student Guide) v.1 Dec 2018 55
Skills for Employment Investment Programme (SEIP)
• What criteria can you list to help others judge this work?
• How original is the work? Why do you feel this work is original or not original?
Individual Activity:
▪ Make a critique of a job done by your co-learners.
▪ Let them make critiques of yours one.
▪ Share your experience in class.
▪ Your trainer will guide you to carry on this activity.
SELF-CHECK QUIZ 2.3.2
Fill in the blanks:
1. A __________ is an oral or written discussion strategy used to analyze, describe, and interpret works
of art.
2. For description, describe the work without using _______ words such as "beautiful" or "ugly"
3. While analysing, identify some of the points of _____________ in the work.
4. While interpreting, describe how the work makes you ________ or feel.
5. During evaluation, present your __________ of the work's success or failure.
LEARNING ACTIVITY 2.3.3
Learning Activity Resources/Special Instructions/References
Adjust work where necessary to improve technical, conceptual and commercial value
▪ Information Sheet: 2.3.3 ▪ Self-Check Quiz: 2.3.3 ▪ Answer Key: 2.3.3
INFORMATION SHEET 2.3.3
Learning Objective: to adjust work where necessary to improve technical, conceptual and commercial
value.
Analysis and adjustment of artwork:
▪ It is important to take every review, critique of your design work positively. ▪ Study and list the feedback received from others. ▪ Make necessary adjustments, if necessary.
Individual Activity:
▪ A mock art exhibition will be arranged with individual project work.
▪ Each trainee will review and critique other’s work.
▪ Remember, critique does not mean criticism; it is constructive evaluation and feedback on the work
with equal emphasis on the strong areas as well as the improvement areas. So, chose your words
with care.
▪ Your trainer will help to select one for you.

CBLM – Graphic Design (Student Guide) v.1 Dec 2018 56
Skills for Employment Investment Programme (SEIP)
▪ Please adhere to the timelines stipulated by your trainer for the activity and make your submissions
on time and as per laid down guidelines.
▪ All the best!
SELF-CHECK QUIZ 2.3.3
Choose the correct answer for the following question:
1. How will you be able to get instructions to adjust work where necessary to improve technical, conceptual and commercial value?
REVIEW OF COMPETENCY
Final Checklist
(for the performance criteria of the module Performing Distempering)
Performance Criteria Yes No
1. Equipment and software are prepared as per workplace requirement.
2. Equipment and software are checked for conformity and usability.
3. Output to be generated is determined in accordance with job requirements/specifications.
4. Page layout application is identified in accordance with job requirements/specification.
5. Shapes and text are created and applied in accordance with job requirements/specifications.
6. Quality of work is checked according to workplace requirements/specifications.
7. Constructive criticism from others is obtained.
8. Work is adjusted where necessary to improve technical, conceptual and commercial value.
Now I feel ready to undertake my formal competency assessment.
Signed: _________________________
Date: _________________________

CBLM – Graphic Design (Student Guide) v.1 Dec 2018 57
Skills for Employment Investment Programme (SEIP)
ANSWER KEY
ANSWER KEY 2.1.1
1. Five equipment for design works are: a. Desktop b. Graphics tablet and stylus c. Quality sketchpad or notebook d. Monitor calibrator e. Pantone swatch book
2. Three commonly used graphics design software are: a. Photoshop b. GIMP c. Illustrator
3. Four graphics design tools are: a. Procreate b. Myfonts.com c. Ron’s Brushes d. MacBook Pro with touch bar and touch ID
ANSWER KEY 2.1.2
1. Fill in the blanks: a. authentic, software b. nature, budget
ANSWER KEY 2.2.1
1. Visual identity graphic design. 2. Images for websites and blogs. 3. Marketing and advertising graphic design. 4. User interface graphic design. 5. Publication graphic design.
ANSWER KEY 2.2.2
1. InDesign 2. PagePlus 3. QuarkXPress
ANSWER KEY 2.2.3
1. Editable 2. Move 3. Shift
ANSWER KEY 2.3.1
1. Work requirements are stated on the job specification sheet, Job sheet or on project document. 2. To check quality of work, that need to be compared with the specific job requirement.
ANSWER KEY 2.3.2
1. Critique 2. Value

CBLM – Graphic Design (Student Guide) v.1 Dec 2018 58
Skills for Employment Investment Programme (SEIP)
3. Emphasis 4. Think 5. Opinion
ANSWER KEY 2.3.3
1. From other’s review on the work. It could be attained from exhibition of the works.

CBLM – Graphic Design (Student Guide) v.1 Dec 2018 59
Skills for Employment Investment Programme (SEIP)
Module 3: Generate design using graphics application
MODULE CONTENT
Module Descriptor: This module covers the skills, knowledge and attitudes to generate design
using graphics application. It specifically includes preparing the work
environment, producing objects with/without typing, setting up layers and
appearance attributes and finalising document.
Nominal Duration: 42 hours
LEARNING OUTCOMES:
Upon completion of the module, the student/trainee should be able to:
3.1 Prepare the work environment 3.2 Produce objects with/without typing 3.3 Set up layers and appearance attributes 3.4 Finalize document
PERFORMANCE CRITERIA:
1. Details of the brief are reviewed to identify preference setting requirements. 2. Monitor is calibrated using an ICC profile to ensure closest possible color match. 3. Palettes are arranged to suit job and personal preferences. 4. View magnification is set for ease of working with the graphics application. 5. Ruler units are set, and grid is displayed to ensure artwork meets design specifications. 6. Tools are used to produce objects, required attributes are entered and shapes manipulation is made
until graphic framework is finalized. 7. Lines and curves are adjusted and edited to fit design specifications. 8. Objects are painted, transposed and strokes and effects are scaled according to the design brief. 9. Colors are created, edited and saved to the color palette and saturation of color is adjusted. 10. Color and appearance attributes are selected and copied as required. 11. Gradients fill, mesh and patterns are used to paint, and blend as required by the layout and design
brief. 12. Objects are grouped or individually selected, moved, scaled or rotated using a variety of methods
according to workplace standard. 13. Required type is added and formatting are set to reflect the design brief. 14. Graphic properties are set and meet the design brief. 15. Effects are added to a graphic and edited to make the appearance more suitable according to the
design brief. 16. Appearances required for further use are saved as styles. 17. Objects are organized in layers and stacking order is controlled. 18. Layers are locked and/or nested and grouped in accordance with the design brief. 19. Styles are added or removed from layers when layer consistency is or is not required. 20. The appropriate format for saving the graphic is identified given the various elements in the graphic. 21. The resolution for effects and any filters is set based on image quality. 22. Document is checked to ensure correct layout file and that there are no non-printable elements. 23. PDF or other export options are fixed to the best settings for the final media and the file is then
exported and saved.

CBLM – Graphic Design (Student Guide) v.1 Dec 2018 60
Skills for Employment Investment Programme (SEIP)
Learning Outcome 3.1 - Prepare the Work Environment
Contents:
▪ Review details of the brief to identify preference setting requirements ▪ Calibrate monitor using an ICC profile to ensure closest possible colour match ▪ Arrange palettes to suit job and personal preferences ▪ Set view magnification for ease of working with the graphics application
Assessment criteria:
1. Details of the brief are reviewed to identify preference setting requirements. 2. Monitor is calibrated using an ICC profile to ensure closest possible color match. 3. Palettes are arranged to suit job and personal preferences. 4. View magnification is set for ease of working with the graphics application.
Resources required:
Students/trainees must be provided with the following resources:
▪ Workplace (simulated or actual) ▪ Personal computer/laptop ▪ Design tools ▪ Graphics design application ▪ Pens ▪ Paper ▪ Instruction sheet/manual
LEARNING ACTIVITY 3.1.1
Learning Activity Resources/Special Instructions/References
Review details of the brief to identify preference setting requirements
▪ Information Sheet: 3.1.1 ▪ Self-Check Quiz: 3.1.1 ▪ Answer Key: 3.1.1
https://www.cleardesignuk.com/design-brief.html
INFORMATION SHEET 3.1.1
Learning Objective: to review details of the brief to identify preference setting requirements.
CBLM – Graphic Design (Student Guide) v.1 Dec 2018 61
Skills for Employment Investment Programme (SEIP)
Design brief: ▪ A design brief is a written explanation - given to a designer - outlining the aims, objectives and
milestones of a design project. ▪ A thorough and articulate design brief is a critical part of the design process. It helps develop trust
and understanding between the client and designer - and serves as an essential point of reference for both parties.
▪ Above all, the design brief ensures that important design issues are considered and questioned before the designer starts work.
Components of a design brief ▪ Here are the points need to include to develop a design brief as a client. You need to practice
developing design brief, and this will make you perfect on meeting preferred requirement of design works. ▪ Company Profile
▪ Start your design brief with a short, honest synopsis of your organisation or company. Don't take this information for granted, and don't assume that the designer will necessarily know anything about your industry sector.
▪ Tell your designer: ✓ What your organisation does ✓ How long you have been established and how many staff you employ ✓ What your niche market is ✓ How you fit in to your industry sector
▪ Your Aims ▪ Good design can have a huge influence on the success of a company's marketing strategy
- but in order for success to be ensured, clear goals must be set. For example, do you want to: ✓ Generate sales? ✓ Encourage enquiries? ✓ Gain newsletter subscribers? ✓ Obtain information from your audience? ✓ Encourage them to tell a friend?
▪ Your Target Audience ▪ Detail your primary, secondary and tertiary audiences. Explain if you are looking to
consolidate your existing client-base or appeal to new markets. ▪ Detail any demographic figures about your audience that may be useful to the designer.
These may include: ✓ Age ✓ Sex ✓ Income ✓ Occupation ✓ Location ✓ Important Keywords
▪ Social Networks ▪ Are Social Networks important to your present and future marketing? ▪ Social Networks such as Facebook, Twitter, LinkedIn and Google + are great ways to
promote your organisation to your targeted audience and people of similar interests. ▪ Include information about your current use of Social Networks and whether you require
advice/recommendations for integrating your accounts into you marketing materials. ▪ Your Budget and Time-Scale
▪ Even if you can only provide a ball-park figure, a budget expectation will give the designer a good idea of the type of solution they will realistically be able to provide.
▪ Time scale is also an important consideration - so let your designer know if there is a specific deadline that has to be met.
▪ Consult with Colleagues ▪ Consult with as many people within your organisation as possible before sending the brief.
Showing the design brief to different people may reveal remarkable differences in the way people see your organisation's aims and objectives.
▪ Resolving any differences in opinion will save considerable time and expense further down the line.
▪ Language ▪ Whilst you should write in clear, concise way - there is no reason why you cannot use
emotive language to emphasise exactly what you are trying to achieve.

CBLM – Graphic Design (Student Guide) v.1 Dec 2018 62
Skills for Employment Investment Programme (SEIP)
▪ Design Examples ▪ Providing examples of what you consider to be effective or relevant design can be a great
help in writing a design brief. ▪ Make sure to include samples of your company's current marketing materials - even their
only purpose is to explain what you don't want from your new marketing materials! ▪ If there is a design style that you particularly like or dislike - then explain why in the brief.
If you're not entirely sure why you like a certain design style, then good starting points include: ✓ Colour ✓ Imagery ✓ Quantity and quality of text ✓ Typography ✓ The atmosphere that particular designs create
▪ Don't feel that you have stick to the medium that you are designing for when giving a list of inspiration and influences. If a television advert or music video creates the atmosphere that you want your flyer to create, then that is a perfectly reasonable statement to make in a design brief.
▪ The more clues you give about your design tastes, the more likely the designer will be able to produce something close to your aims. Expecting your designer to second-guess what you require rarely produces the best results.
▪ Remember that professional designers will not copy the ideas you send them... but will use them as the start of the design process.
JOB SHEET 2
Job Title: Develop a design brief for a specific design (Visiting card, leaflet, signboard, book
cover, newsletter or any)
Instructions: Include following points on your design brief:
▪ Company profile
▪ Design aim
▪ Target audience
▪ Inclusion of Social network
▪ Budget and time line
▪ Language
▪ Design example
Outcome: You will have a design brief of a design work to follow rest of the course.
SELF-CHECK QUIZ 3.1.1
Fill in the gaps for the following statements:
1. A design brief is a written explanation __________ the aims, objectives and milestones of a design project.
2. Start your ___________ _________ with a short, honest synopsis of your organization or company.
3. In order for success to be ensured, clear ________ must be set in design brief.

CBLM – Graphic Design (Student Guide) v.1 Dec 2018 63
Skills for Employment Investment Programme (SEIP)
LEARNING ACTIVITY 3.1.2
Learning Activity Resources/Special Instructions/References
Calibrate monitor using an ICC profile to ensure closest possible colour match
▪ Information Sheet: 3.1.2 ▪ Self-Check Quiz: 3.1.2 ▪ Answer Key: 3.1.2
https://www.youtube.com/watch?v=f1PCG5hXUmE
INFORMATION SHEET 3.1.2
Learning Objective: to calibrate monitor using an ICC profile to ensure closest possible colour match.
Calibrate monitor:
▪ Proper calibration will ensure that your colours and black levels are true and will ensure that your
monitor is producing the best results for editing and viewing images and videos. Plus, it’ll be easier
on your eyes.
▪ There are a handful of web-based calibration tools that help you manually adjust your monitor settings. They can provide more precise, or more customized, calibration then the built-in utilities. ✓ Display Calibration — Display Calibration will let you view several test patterns and samples
of what a properly calibrated screen will look like. Although the site isn’t the most aesthetically pleasing, and it’s rarely updated, the on-screen calibration tools for brightness, contrast, colour depth, and screen resolution can prove useful if you can’t access any built-in calibration tools.
✓ Photo Friday — Photo Friday is a simple web page that’s designed to help you calibrate the brightness and contrast of your screen. Just adjust the monitor settings until the transition of tones from black to white is clearly distinguishable on the screen.
✓ Online Monitor Test — Online Monitor Test is one of the better calibration websites out there. It’s lined with a slew of interactive tests to help you adjust your monitor’s screen colours and to see if your monitor can produce smooth gradients. There are also tools for pinpointing damaged pixels and backlight bleeding, rendering the website one of the more robust web-based calibration tools to date.
✓ The Lagom LCD Monitor Test Pages — The Lagom LCD Monitor Test Pages are handy, both online and offline. The website not only allows you to adjust various things such contrast and response time, but it also allows you to download the images as a 120KB zip file, so you can check any monitor in-store that you are thinking about purchasing.
Individual Activity:
▪ Watch a video on “How to calibrate your monitor”.
▪ Video reference: https://www.youtube.com/watch?v=f1PCG5hXUmE.
▪ Note the key issues and apply them on your own practice.
▪ Share your work in class.
▪ Your trainer will guide you to carry on this activity.
SELF-CHECK QUIZ 3.1.2
Write a short note on:
1. Display calibration.
2. Photo Friday

CBLM – Graphic Design (Student Guide) v.1 Dec 2018 64
Skills for Employment Investment Programme (SEIP)
LEARNING ACTIVITY 3.1.3
Learning Activity Resources/Special Instructions/References
Arrange palettes to suit job and personal preferences
▪ Information Sheet: 3.1.3 ▪ Self-Check Quiz: 3.1.3 ▪ Answer Key: 3.1.3
https://www.youtube.com/watch?v=ADhLgTqL-6o
INFORMATION SHEET 3.1.3
Learning Objective: to arrange palettes to suit job and personal preferences.
Palettes:
▪ Palettes are groups of tools used to edit and manipulate your image.
▪ Photoshop contains over two dozen palettes that can be shown or hidden by using the Window menu and selecting the palette you wish to reveal. Palettes with a checkmark beside their names indicate that they are open in your Photoshop workspace and selecting those check marked palettes will hide them.
▪ You need to select pallets those are required for your design work according to design brief.
Individual Activity:
▪ Watch a short video on “Adobe Photoshop CS6 - Using the Palette“.
▪ Video source: https://www.youtube.com/watch?v=ADhLgTqL-6o
▪ Note the key issues and apply to your own practice.
▪ Share your work in class.
▪ Your trainer will guide you to carry on this activity.
SELF-CHECK QUIZ 3.1.3
Write correct answer for the following question:
1. What are palettes?
LEARNING ACTIVITY 3.1.4
Learning Activity Resources/Special Instructions/References
Set view magnification for ease of working with the graphics application
▪ Information Sheet: 3.1.4 ▪ Self-Check Quiz: 3.1.4 ▪ Answer Key: 3.1.4
https://www.youtube.com/watch?v=8D10-q68FY8

CBLM – Graphic Design (Student Guide) v.1 Dec 2018 65
Skills for Employment Investment Programme (SEIP)
INFORMATION SHEET 3.1.4
Learning Objective: to set view magnification for ease of working with the graphics application.
View magnification: View magnification helps you to preferable view option on monitor during design works. You can zoom in or zoom our any time when you feel required during work.
Individual Activity:
▪ Watch a short video on “How to zoom in and out easily! - Adobe Photoshop CC “.
▪ Video source: https://www.youtube.com/watch?v=8D10-q68FY8.
▪ Note the key issues and apply to your own practice.
▪ Share your work in class.
▪ Your trainer will guide you to carry on this activity.
SELF-CHECK QUIZ 3.1.4
Mark true or false for the following statements:
1. View magnification helps you to preferable view option on monitor during design works.
2. You cannot zoom in or zoom our any time when you feel required during work.

CBLM – Graphic Design (Student Guide) v.1 Dec 2018 66
Skills for Employment Investment Programme (SEIP)
Learning Outcome 3.2 - Produce Objects with/without Typing
Contents:
▪ Set ruler units and display grid to ensure artwork meets design specifications ▪ Use tools to produce objects, enter required attributes and make shapes manipulation until graphic
framework is finalized ▪ Adjust and edit lines and curves to fit design specifications ▪ Paint, transpose objects and scale strokes and effects according to the design brief ▪ Create, edit and save colours to the colour palette and adjust saturation of colour ▪ Select and copy colour and appearance attributes as required ▪ Use gradients fill, mesh and patterns to paint and blend as required by the layout and design brief ▪ Group objects or individually select, move, scale or rotate using a variety of methods according to
workplace standard
Assessment criteria:
1. Ruler units are set, and grid is displayed to ensure artwork meets design specifications. 2. Tools are used to produce objects, required attributes are entered and shapes manipulation is made
until graphic framework is finalized. 3. Lines and curves are adjusted and edited to fit design specifications. 4. Objects are painted, transposed and strokes and effects are scaled according to the design brief. 5. Colors are created, edited and saved to the color palette and saturation of color is adjusted. 6. Color and appearance attributes are selected and copied as required. 7. Gradients fill, mesh and patterns are used to paint and blend as required by the layout and design brief. 8. Objects are grouped or individually selected, moved, scaled or rotated using a variety of methods
according to workplace standard.
Resources required:
Students/trainees must be provided with the following resources:
▪ Workplace (simulated or actual) ▪ Personal computer/laptop ▪ Graphics application software ▪ Pens ▪ Paper ▪ Instruction sheet/manual
LEARNING ACTIVITY 3.2.1
Learning Activity Resources/Special Instructions/References
Set ruler units and display grid to ensure artwork meets design specifications
▪ Information Sheet: 3.2.1 ▪ Self-Check Quiz: 3.2.1

CBLM – Graphic Design (Student Guide) v.1 Dec 2018 67
Skills for Employment Investment Programme (SEIP)
▪ Answer Key: 3.2.1
http://www.informit.com/articles/article.aspx?p=1915790&seqNum=8
INFORMATION SHEET 3.2.1
Learning Objective: to set ruler units and display grid to ensure artwork meets design specifications..
Setting Ruler ▪ While changing the measurable units and rulers do not affect output quality, they do help to
measure information in a document consistent with the specific output device. Ruler Units give you precise information on the width and height of the active document.
Work with Units and Rulers Options
▪ Click the Edit (Win) or Photoshop (Mac) menu, point to Preferences, and then click Units & Rulers. ▪ Select the Units options you want to use:
✓ Rulers. Sets a default measuring system for the Ruler bar.
For example, pixels would be most common for images displayed on a monitor, and picas or
inches most common for output to press or printer.
✓ Type. Use to measure type with pixels, points, or millimetres.
▪ Select the Column Size settings you want to use: ✓ Width. Choose a measurement system and numerical value for column width.
✓ Gutter. Choose a measurement system and numerical value for gutter (the space between the columns).
When you choose a measurement system (points, inches, or centimetres), Photoshop changes
the value to correspond to the type of measurement system.
▪ Select the New Document Pre-set Resolutions settings you want to use: ✓ Print Resolution. Select a print resolution and measurement value for default printing.
✓ Screen Resolution. Select a print resolution and measurement value for default screen display.
▪ Click the PostScript or Traditional option measuring systems for Photoshop’s type tool (PostScript is the most widely used).
▪ Click OK.
Work Display Grid
The grid appears behind your artwork in the illustration window. It does not print. For design works, grids ensure better environment for work.
Golden Ratio:
The Golden Ratio is something every designer should know about. The Ancient Greeks were one of the first to discover a way to harness the beautiful asymmetry found in plants, animals, insects and other natural structures. They expressed this mathematical phenomenon with the Greek letter phi, but today, we call it the golden ratio — also known as the divine proportion, the golden mean, and the golden section. Following figure explains the golden ration and its value.

CBLM – Graphic Design (Student Guide) v.1 Dec 2018 68
Skills for Employment Investment Programme (SEIP)
Here are some examples of grate designs with Golden Ratio:
Individual Activity:
▪ Set ruler unit for your design environment.
▪ Set display grid on the canvas.
▪ Follow golden ratio for better design works.
▪ Share your work in class.
▪ Your trainer will guide you to carry on this activity.
SELF-CHECK QUIZ 3.2.1
Mark true or false for the following statements:
1. Changing the measurable units and rulers do not affect output quality.
2. Ruler units give you precise information on the width and height of the active document.
3. For design works, grids ensure better environment for work.
4. The golden Ratio is something every designer should know about.

CBLM – Graphic Design (Student Guide) v.1 Dec 2018 69
Skills for Employment Investment Programme (SEIP)
LEARNING ACTIVITY 3.2.2
Learning Activity Resources/Special Instructions/References
Use tools to produce objects, enter required attributes and make shapes manipulation until graphic framework is finalized
▪ Information Sheet: 3.2.2 ▪ Self-Check Quiz: 3.2.2 ▪ Answer Key: 3.2.2
https://helpx.adobe.com/photoshop/using/tools.html
INFORMATION SHEET 3.2.2
Learning Objective: to use tools to produce objects, enter required attributes and make shapes
manipulation until graphic framework is finalized.
Photoshop Tools: ▪ When you start Photoshop, the Tools panel appears at the left of the screen. Some tools in the
Tools panel have options that appear in the context-sensitive options bar.
▪ You can view information about any tool by positioning the pointer over it. The name of the tool appears in a tool tip below the pointer.

CBLM – Graphic Design (Student Guide) v.1 Dec 2018 70
Skills for Employment Investment Programme (SEIP)
JOB SHEET 3
Job Title: Create design objects using photoshop tools following design brief.
Instructions: ▪ Select appropriate tool(s) to create objects
▪ Apply required attributes and effects
▪ Apply shapes manipulation
▪ Finalize the work comparing the design requirements.
Outcome: Objects are created following the design brief.
SELF-CHECK QUIZ 3.2.2
Write correct answer for the following question:
1. Write 5 tools of Photoshop that are required to produce objects.
LEARNING ACTIVITY 3.2.3
Learning Activity Resources/Special Instructions/References
Adjust and edit lines and curves to fit design specifications
▪ Information Sheet: 3.2.3 ▪ Self-Check Quiz: 3.2.3 ▪ Answer Key: 3.2.3
https://www.guru99.com/how-to-use-pen-tool-photoshop-cc-tutorial.html
https://simplephotoshop.com/elementsplus/en_US/mask-from-path.htm
INFORMATION SHEET 3.2.3
▪ Learning Objective: to adjust and edit lines and curves to fit design specifications. .
Lines and Curves: ▪ Line and curves are important element in design works. Photoshop has different ways to draw lines
and curves. It has line tool, pen tool, arc tool etc. ▪ Mostly “Pen” tool is used for all types of line and curved designs.
Curvature pen tool ▪ Instead of drawing and modifying paths using Bezier curves, use the Curvature Pen tool in Adobe
Photoshop CC to create paths intuitively, and then simply push and pull segments to modify them. ▪ The Curvature Pen tool is located under the Pen tool in the Tools panel. Select it, and then select
Shape in the tool mode drop-down menu in the Options bar. Then set the Fill and Stroke colours to None.
▪ Click the Path Options button (gear icon) in the Options bar. Adjust path Thickness and Colour.
Working with curvature pen tool: ▪ Click once on the canvas to start drawing a straight line, and then double-click to add a corner
point.

CBLM – Graphic Design (Student Guide) v.1 Dec 2018 71
Skills for Employment Investment Programme (SEIP)
▪ Each double-click creates a straight line between the corner points. Shift-click to constrain your path to 90° and 45° angles.
▪ Press Esc to complete an open path.
Draw and edit curves ▪ Click once to create your first point. Continue tracing around the curved shape, clicking once to
place each point. ▪ Click and drag a point to move it — no need to change tools for this. ▪ Click to add extra points for finer control over the curve. It’s easy to delete any extra points — click
a point to select it, and then press Delete.
Vector mask ▪ You can create a vector mask from a path as follows:
✓ Open the "Paths" dialog. ✓ Select an existing path or create a new one. For example, the path shown on the screenshot
has been made from selection. The source path must be active, which means its outlines should be visible in the document window.
✓ in the Layers palette, choose a maskable layer. ✓ Open the "Masks" dialog.
✓ Apply the "Create Vector Mask from Current Path" command. ✓ If necessary, invert the mask, adjust its size, or invert it.
JOB SHEET 4
Job Title: Create design objects using pen tools following design brief
Instructions: ▪ Select Pen tool to create line and curved objects
▪ Apply required attributes
▪ Adjust and edit line to make the object better
▪ Finalize the work comparing the design requirements.
Outcome: Line and curved objects are created using “Pen” tool.
SELF-CHECK QUIZ 3.2.3
Write correct answer for the following question:
1. Name the tools for drawing line and curved objects in Photoshop.
LEARNING ACTIVITY 3.2.4
Learning Activity Resources/Special Instructions/References
Paint, transpose objects and scale strokes and effects according to the design brief
▪ Information Sheet: 3.2.4 ▪ Self-Check Quiz: 3.2.4 ▪ Answer Key: 3.2.4
https://helpx.adobe.com/photoshop/using/painting-tools.html
https://forums.adobe.com/thread/712718
http://blogs.adobe.com/jkost/2013/01/scaling-effectstyles-in-photoshop-cs6.html

CBLM – Graphic Design (Student Guide) v.1 Dec 2018 72
Skills for Employment Investment Programme (SEIP)
INFORMATION SHEET 3.2.4
Learning Objective: to paint, transpose objects and scale strokes and effects according to the design brief..
Paint:
▪ Adobe Photoshop provides several tools for painting and editing image colour.
▪ The Brush tool and the Pencil tool work like traditional drawing tools applying colour with brush strokes.
▪ Tools like the Eraser tool, Blur tool, and Smudge tool modify the existing colours in the image.
▪ In the options bar for each of these painting tools, you can set how colour is applied to an image and choose from pre-set brush tips.
Transpose objects:
▪ Transpose is similar to transferring a part of an image to another image to fulfil specific purpose or requirement.
Scale strokes and effects ▪ Selecting Image > Image Size and changing the size of an image will scale the Effect/Styles
applied to layers within the image (as long as the Scale Styles option is checked in the Image size dialog box), keeping the Effect/Style in proportion to the layers to which they are applied.
▪ However, when using Edit > Free Transform to scale an individual layer that has a Layer Effect/Style applied to it, Photoshop will not scale the Effect/Style.
▪ To scale the Effect/ Style, do one of the following:
✓ Note the percentage the layer was scaled using Free Transform and then enter that value in the Layer > Layer Style > Scale Effect dialog box. This is much easier than changing the values in the Layer Style dialog (especially when multiple effects have been applied).
✓ Or, before using Free transform on the layer with the Style/Effect, convert the layer to a Smart Object and then transform.
JOB SHEET 5
Job Title: Transpose an image on line artwork
Instructions: ▪ Select the lines: ▪ Choose Object > Expand and click OK ▪ Choose Object > Compound Path > Make ▪ Place your image behind the lines ▪ Select the lines and the image and choose Object > Clipping Mask > Make
Outcome: Image is transposed on the line artwork. The result should be like this:

CBLM – Graphic Design (Student Guide) v.1 Dec 2018 73
Skills for Employment Investment Programme (SEIP)
SELF-CHECK QUIZ 3.2.4
Mark true or false for the following statements:
1. Write the name of two tools those are used for painting in photoshop.
2. What are the tools for modifying existing colors?
LEARNING ACTIVITY 3.2.5
Learning Activity Resources/Special Instructions/References
Create, edit and save colours to the colour palette and adjust saturation of colour
▪ Information Sheet: 3.2.5 ▪ Self-Check Quiz: 3.2.5 ▪ Answer Key: 3.2.5
https://helpx.adobe.com/photoshop/using/color-modes.html
http://planetphotoshop.com/working-with-spot-color-channels.html
http://photoshop911.typepad.com/help/2004/04/saving_and_load.html
INFORMATION SHEET 3.2.5
Learning Objective: to create, edit and save colours to the colour palette and adjust saturation of colour..
For your professional understandings following mode of colours are discussed:
▪ Process colours
▪ Spot colours, and
▪ Registration colours
a. Process colours
In photoshop you can choose different colour modes for design process:
✓ RGB mode (millions of colours)
✓ CMYK mode (four-printed colours)
✓ Index mode (256 colours)
✓ Grayscale mode (256 greys)
✓ Bitmap mode (2 colours)
The colour mode or image mode determines how colours combine based on the number of channels in a colour model. Different colour modes result in different levels of colour detail and file size. For instance, use CMYK colour mode for images in a full-colour print brochure, and use RGB colour mode for images in web or e-mail to reduce file size while maintaining colour integrity.
b. Spot colours
Spot colours can be used with CMYK or Multichannel documents intended for print to add
additional colours, create “bump plates,” and to control varnishes. They can add a bunch to
your printing bill. Or they can reduce your print costs.
A spot channel is added to the image – and to the Channels palette – using the Channels

CBLM – Graphic Design (Student Guide) v.1 Dec 2018 74
Skills for Employment Investment Programme (SEIP)
palette menu command New Spot Channel. If you have an active selection in the image, the
spot channel will automatically be created from it. With no active select, an empty channel is
created.
c. Registration colours
▪ Registration swatch merely means that it's used for printer marks and appears on all ink
plates. Nothing beyond that is implicit. Not the colour, nor any other specifics.
▪ Registration is 100% of all used colours (CMYK and/or Spot).
▪ It should never be used as a rich black.
▪ If you are drawing your own trim, fold or crop marks, use Registration.
▪ That way they will show up on all plates.
▪ As long as you are not using spot colours you may possibly use Registration for the black
in opacity masks but it’s really more professional to make a 100% CMYK swatch for that.
Colour tool:
▪ Colours are one of the important elements of a design. As a designer, you must use colours imaginatively so that it has a positive impact on your design.
▪ Colour attributes include:
✓ foreground and background colours ✓ Create colour ✓ Use swatches Palette ✓ Adjust saturation and hue ✓ Adjust the colour of skin tone ✓ Choose colours with the Eyedropper tool
Create, edit and save colours to the colour palette:
▪ Choose Window > Swatches, or click the Swatches palette tab.
▪ Add Colours to the Swatches palette:
✓ Make the colour you want to add, and make sure it's selected as the foreground colour. ✓ Hover your pointer over an empty space at the bottom of the Swatches palette (Observe: the
pointer turns into the paint bucket tool.) When you click the colour will be added. ✓ Enter a name for the new colour and click OK.
▪ Caveat: Any new colours you create are saved to the Preferences file. If you lose or overwrite this file the colours will go away. To permanently save a colour, save it as a new Swatch Library.
▪ To delete a colour from the Swatches palette drag it to the Trash button. So, you can get rid of colours you don't want.
▪ Save your swatches as a library: ✓ Choose Save Swatches from the Swatches palette menu. ✓ Choose a location for the swatch library, (We recommend saving into the default swatches
directory.) ✓ Enter a filename

CBLM – Graphic Design (Student Guide) v.1 Dec 2018 75
Skills for Employment Investment Programme (SEIP)
✓ Click Save. ▪ Default directory for Windows:
✓ Program Files > Adobe > Photoshop > Pre-sets > Colour Swatches ▪ Default directory for Macintosh:
✓ Applications > Adobe Photoshop > Pre-sets > Colour Swatches (You may also have a "Photoshop Only" folder which contains the "Colour watches" folder.)
▪ Any time you want to load your custom Swatches library ✓ Choose Load Swatches form the Swatches Palette Menu ✓ Locate the custom library and highlight it (Select it) ✓ Click Load.
Individual Activity:
▪ Create, edit and save colours to the colour palette.
▪ Adjust saturation of colour.
▪ Share your experience in class.
▪ Your trainer will guide you to carry on this activity.
SELF-CHECK QUIZ 3.2.5
Mark true or false on the following statements:
1. As a designer, you must use colors imaginatively so that it has a positive impact on your design.
2. To delete a color from the Swatches palette drag it to the Trash button.
3. Any new colors you create are saved to the Preferences file.
LEARNING ACTIVITY 3.2.6
Learning Activity Resources/Special Instructions/References
Select and copy colour and appearance attributes as required
▪ Information Sheet: 3.2.6 ▪ Self-Check Quiz: 3.2.6 ▪ Answer Key: 3.2.6
https://forums.adobe.com/thread/822201
INFORMATION SHEET 3.2.6
Learning Objective: to Select and copy colour and appearance attributes as required.
Copy colour and style: ▪ You can copy colour and layer style to another layer simply doing a right-click on the FX icon and
choosing Copy Layer Style from the menu. Then select the target layer and right-click again then choose Paste Layer Style. You can also hold down the Option key {PC:Alt} then click and drag the fx icon to the target layer.
Copy attributes of an image: ▪ Record an action while performing the steps on an image.
▪ Play back the action on another image.

CBLM – Graphic Design (Student Guide) v.1 Dec 2018 76
Skills for Employment Investment Programme (SEIP)
Copy and appearance attributes (Layer Effects): ▪ In your Layers panel, right-click on the layer you want to copy the effects from and choose Copy
Layer Style.
▪ Now go to your target document, right click on the layer you'd like the effects to be on and choose Paste Layer Style.
Individual Activity:
▪ You will practice applying colours and layer masks for your design. ▪ Following topics are to be covered in this section –
✓ Using colour panel and its attributes ✓ Applying properties of layer for better appearance
▪ Share your experience in class. ▪ Your trainer will guide you to carry on this activity.
SELF-CHECK QUIZ 3.2.6
Fill in the gaps with appropriate answers on the following statements:
1. In your Layers panel, ______________ on the layer you want to copy the effects from and choose Copy Layer __________.
2. Now go to your __________ document, right click on the layer you'd like the effects to be on and choose __________ Layer Style.
LEARNING ACTIVITY 3.2.7
Learning Activity Resources/Special Instructions/References
Use gradients fill, mesh and patterns to paint and blend as required by the layout and design brief
▪ Information Sheet: 3.2.7 ▪ Self-Check Quiz: 3.2.7 ▪ Answer Key: 3.2.7
https://www.youtube.com/watch?v=pgAJdyqrzp4
INFORMATION SHEET 3.2.7
Learning Objective: to use gradients fill, mesh and patterns to paint and blend as required by the layout
and design brief..
Work with gradients fill, mesh and patterns: ▪ Filling the objects with colour, gradients, patterns or mesh proves your expertise to handle them.
▪ Watch a video lesson and note the key issues.
▪ Apply the learnings to your own practice.
Individual Activity:
▪ Watch a video clip on “Working with Colour, Gradient, Pattern Fill Layers”
▪ Note important instructions and apply on their own work.
▪ Video link: https://www.youtube.com/watch?v=pgAJdyqrzp4.

CBLM – Graphic Design (Student Guide) v.1 Dec 2018 77
Skills for Employment Investment Programme (SEIP)
▪ Apply the skill to design an object of your selected project as on design brief.
▪ Share your work in class.
▪ Your trainer will guide you to carry on this activity.
SELF-CHECK QUIZ 3.2.7
Mark true or false on the following statement:
1. Filling the objects with color, gradients, patterns or mesh proves your expertise.
LEARNING ACTIVITY 3.2.8
Learning Activity Resources/Special Instructions/References
Group objects or individually select, move, scale or rotate using a variety of methods according to workplace standard
▪ Information Sheet: 3.2.8 ▪ Self-Check Quiz: 3.2.8 ▪ Answer Key: 3.2.8
https://www.youtube.com/watch?v=VTHudF4fo2I
INFORMATION SHEET 3.2.8
Learning Objective: to group objects or individually select, move, scale or rotate using a variety of methods
according to workplace standard..
Working with objects (select, move, scale and rotate): ▪ You can easily manage objects of your design with design software. ▪ You can select, move, scale and rotate objects. ▪ This will give you a chance of creating millions of verities of your design.
Individual Activity:
▪ watch a video clip on “How to Move, Rotate, Scale & Flip an Image in Photoshop”.
▪ Video link: https://www.youtube.com/watch?v=VTHudF4fo2I.
▪ Note important instructions and apply on their own work.
▪ Apply the skill to design an object of your selected project as on design brief.
▪ Share your work in class.
▪ Your trainer will guide you to carry on this activity.
SELF-CHECK QUIZ 3.2.8
Mark true or false on the following statements:
1. Design software make it complex to manage objects of a design work.
2. You can select, move, scale and rotate objects with Photoshop CC.
3. Object manipulation will give you a chance of creating millions of verities of your design.

CBLM – Graphic Design (Student Guide) v.1 Dec 2018 78
Skills for Employment Investment Programme (SEIP)
Learning Outcome 3.3 – Set-Up Layers and Appearance Attributes
Contents:
▪ Add required type and set formatting to reflect the design brief ▪ Set graphics properties and meet the design brief ▪ Add effects to a graphic and edit to make the appearance more suitable according to the design brief ▪ Save appearances required for further use as styles ▪ Recognize objects in layers and control stacking order ▪ Lock and/or nest and group Layers in accordance with the design brief ▪ Add or remove styles from layers when layer consistency is or is not required
Assessment criteria:
1. Required type is added and formatting are set to reflect the design brief. 2. Graphic properties are set and meet the design brief. 3. Effects are added to a graphic and edited to make the appearance more suitable according to the
design brief. 4. Appearances required for further use are saved as styles. 5. Objects are organized in layers and stacking order is controlled. 6. Layers are locked and/or nested and grouped in accordance with the design brief. 7. Styles are added or removed from layers when layer consistency is or is not required.
Resources required:
Students/trainees must be provided with the following resources:
▪ Workplace (simulated or actual) ▪ Personal computer/laptop ▪ Graphics design application ▪ Pens ▪ Paper ▪ Instruction sheet/manual
LEARNING ACTIVITY 3.3.1
Learning Activity Resources/Special Instructions/References
Add required type and set formatting to reflect the design brief
▪ Information Sheet: 3.3.1 ▪ Self-Check Quiz: 3.3.1 ▪ Answer Key: 3.3.1
https://smallbusiness.chron.com/format-text-photoshop-45850.html

CBLM – Graphic Design (Student Guide) v.1 Dec 2018 79
Skills for Employment Investment Programme (SEIP)
INFORMATION SHEET 3.3.1
Learning Objective: to add required type and set formatting to reflect the design brief.
Text type and formatting: ▪ Alongside image and photo manipulation, Adobe's Photoshop suite allows you to create unique
artwork, company logos, presentation backdrops or any other computer imagery you might need.
▪ Adding text to a presentation, logo design or promotional image is an essential function, and Photoshop provides you with a host of different tools for entering and formatting text in your images.
▪ The Character panel offers size, colour, style, spacing and many other formatting options once the text has been highlighted in the Photoshop document.
▪ Select the "Text" tool from the Control panel on the left side of the Photoshop window. The Text tool is identified by an icon with a capital "T" in it.
▪ Click within your Photoshop document to create a new text layer or click on top of an existing text layer to edit it. Enter your text and highlight the section you want to format by clicking and holding the left mouse button and dragging the cursor over the text.
▪ Change the appropriate options in the Character panel to format the text. Changes will take place immediately, though the text will remain highlighted. Select a different tool from the left Control panel to finish formatting the text and view the result.
Individual Activity:
▪ Apply required type and set formatting according to design brief.
▪ Share your work with class.
▪ Take necessary help from your trainer.
SELF-CHECK QUIZ 3.3.1
Mark true or false for the following statements:
1. The Text tool is identified by an icon with a capital "T" in it.
2. During formatting, Changes will take place immediately, though the text will remain highlighted.
LEARNING ACTIVITY 3.3.2
Learning Activity Resources/Special Instructions/References
Set graphics properties and meet the design brief
▪ Information Sheet: 3.3.2 ▪ Self-Check Quiz: 3.3.2 ▪ Answer Key: 3.3.2
http://www.dummies.com/software/adobe/photoshop/how-to-work-with-the-properties-panel-in-photoshop-cs6/

CBLM – Graphic Design (Student Guide) v.1 Dec 2018 80
Skills for Employment Investment Programme (SEIP)
INFORMATION SHEET 3.3.2
Learning Objective: to set graphics properties and meet the design brief.
Graphics Properties:
▪ Every object of a layer should be set with specific properties basis design requirement. Photoshop layer options give you many options to choose. You can select options from the properties panel or you can create your own to meet the design requirement.
▪ The new Properties panel enables you to add, edit, and manage your layer, vector, and filter masks.
▪ These features in the panel will assist you in getting your mask exactly the way you want it:
• Thumbnail: Shows what layer or mask is currently selected in your file.
• Add Layer Mask/Select Layer Mask: Click this icon to add a layer mask. If you added a layer mask by another means, such as via the Layers panel or Layer menu, the icon is automatically selected.
Remember that when working with masks, black hides areas of your image, white shows areas of your image, and any gray areas are partially hidden at varying percentages, depending how dark or light the gray is.
• Add Vector Mask/Select Vector Mask: Click this icon to add a vector mask. If you added a vector mask by another means, the icon is automatically selected.
• Select Filter Mask: This icon appears only when a Smart Filter has been applied.
• Density: Think of this option as a kind of opacity control for your mask. To lessen the transparency of the masked (or hidden) area, select the mask and drag the slider to the left.
• Feather: The Feather option softens the edges of the mask, creating more of a dissolve between your layers when creating a composited image.
To see the effect on the actual mask itself, hold down Alt (Option on the Mac) and click the mask thumbnail in the Layers panel, which temporarily hides the layer and shows only the mask. Hold down Alt (Option on the Mac) and click to display the layer again.
• Mask Edge: Click this button to bring up the Refine dialog box. In this dialog box, you can fine-tune the edges of your masks to your liking.
• Color Range: Click this button to open the Color Range dialog box. Color range is yet another way to create a selection or mask.
• Invert: This option reverses the colors of the mask. Therefore, black areas become white, white becomes black, dark gray converts to light gray, and so on.
• Load Selection from Mask: Click this option to load your mask as a selection. Note that the black areas of your mask are unselected, the white areas are selected, and the gray areas are partially selected.
• Apply Mask: Click this icon to have your mask permanently applied to the layer. The mask is then deleted. Be careful when applying this option because you can no longer edit the mask and refine your visible areas.
• Disable/Enable Mask: Click this icon to show or hide your mask.
• Delete Mask: Click the trash can icon to delete the mask.
• Mask Options: This first command in the panel menu enables you to change the color and opacity of your mask overlay.

CBLM – Graphic Design (Student Guide) v.1 Dec 2018 81
Skills for Employment Investment Programme (SEIP)
• Add Mask to Selection, Subtract Mask from Selection, Intersect Mask with Selection: These commands, also in the panel menu, allow you to add to, delete from, or intersect with existing selections made from your masks.
Close/Close Tab Group: The final commands in the panel menu close the Masks panel and the group that the Mask panel belongs to, respectively.
Individual Activity:
▪ Set layer properties to meet the design requirement.
▪ Share your work with class.
▪ Take necessary guidance from your trainer.
SELF-CHECK QUIZ 3.3.2
Write correct answer for the following questions:
1. What shows the currently selected layer of mask in your file?
2. Which icon should be clicked to add a layer mask?
3. Which icon appears when a Smart Filter is applied?
4. Which button need to be clicked to bring up the Refine dialog box?
5. What option reverses the colors of the mask?
LEARNING ACTIVITY 3.3.3
Learning Activity Resources/Special Instructions/References
Add effects to a graphic and edit to make the appearance more suitable according to the design brief
▪ Information Sheet: 3.3.3 ▪ Self-Check Quiz: 3.3.3 ▪ Answer Key: 3.3.3
https://www.youtube.com/watch?v=fx_YR5-k1Ko
INFORMATION SHEET 3.3.3
Learning Objective: to add effects to a graphic and edit to make the appearance more suitable according
to the design brief.
Appearance effect: ▪ Photoshop includes many effects to apply on layers for design works. Managing layers efficiently
proves your ability to become a great designer.
Individual Activity:
▪ Open and watch a video lesson from the following link
▪ Video link: https://www.youtube.com/watch?v=fx_YR5-k1Ko.
▪ Note the key issues and apply them in your own practice.
▪ Apply appearance effect on your design work to meet the design requirement.

CBLM – Graphic Design (Student Guide) v.1 Dec 2018 82
Skills for Employment Investment Programme (SEIP)
▪ Share your work with class.
▪ Take necessary guidance from your trainer.
SELF-CHECK QUIZ 3.3.3
Fill in the blanks with appropriate words:
1. Photoshop includes many _________ to apply on _________ for design works.
LEARNING ACTIVITY 3.3.4
Learning Activity Resources/Special Instructions/References
Save appearances required for further use as styles
▪ Information Sheet: 3.3.4 ▪ Self-Check Quiz: 3.3.4 ▪ Answer Key: 3.3.4
INFORMATION SHEET 3.3.4
Learning Objective: to save appearances required for further use as styles.
Saving layer appearances as style: ▪ To save the layer style, click on the New Style button in the top right corner of the Layer Style
dialog box:
▪ ▪
▪ Save the completed layer style by clicking on the "New Style" button. ▪ Photoshop will pop up the New Style dialog box, allowing us to name our new layer style. I'm going
to name mine "Simple Photo Frame". At the bottom of the dialog box are couple of options that we can usually ignore because Photoshop does a good job of automatically selecting these options as needed, although it still helps to know what they're used for.
▪ The first one, Include Layer Effects, deals with whether or not we want to include the individual effects that we've used such as our Stroke, Inner Glow and Inner Shadow.
▪ These individual styles are called layer "effects", and when you combine them for different results, you end up with a layer "style". However, most people just use the term "layer style" whether they're referring to an individual effect or a combination of several effects.
▪ The second option, Include Layer Blending Options, is more of an advanced topic and is only
important if we made any changes in the main Blending Options section of the Layer Style dialog
box. For example, if we had lowered the overall opacity of our photo frame to 50% and we want
to use that same lowered opacity setting every time we apply the frame to a new image, we'd want
to make sure this option is selected. We didn't do anything like that here, so we can leave this
option unchecked:

CBLM – Graphic Design (Student Guide) v.1 Dec 2018 83
Skills for Employment Investment Programme (SEIP)
▪ The "New Style" dialog box.
▪ Click OK when you're done to have Photoshop save the layer style and exit out of the dialog box.
You can also close out of the Layer Style dialog box at this point, since we're now finished with
our photo frame.
Individual Activity:
▪ Apply layer effect to your design and save it for future use.
▪ Share your work with class.
▪ Take necessary guidance from your trainer.
SELF-CHECK QUIZ 3.3.4
Mark true or false for the following statements:
1. You can save layer style from the Layer Style dialog box.
2. ‘Include Layer Blending Options’, is more of an advanced topic.
LEARNING ACTIVITY 3.3.5
Learning Activity Resources/Special Instructions/References
Recognize objects in layers and control stacking order
▪ Information Sheet: 3.3.5 ▪ Self-Check Quiz: 3.3.5 ▪ Answer Key: 3.3.5
https://www.youtube.com/watch?v=muCKSmECJCw
INFORMATION SHEET 3.3.5
Learning Objective: to recognize objects in layers and control stacking order.
Objects in Layers: ▪ As a designer, you will perform many activities with the objects in layers. ▪ Every element considered for a design work is an object and all objects lie on layers. ▪ One layer may contain more than one object. ▪ Photoshop and other design software include some default filters, 3D options, styles, colour and
many other options to apply on objects in layers. ▪ Layers have blending options applicable to the objects on the layers too. You need to identify
which application of the options fits your design.
Individual Activity:
▪ Watch a video lesson on “Layer Management” and note the key issues.
▪ Video link: https://www.youtube.com/watch?v=muCKSmECJCw.

CBLM – Graphic Design (Student Guide) v.1 Dec 2018 84
Skills for Employment Investment Programme (SEIP)
▪ Apply knowledge to your own design works..
▪ Share your works with class.
SELF-CHECK QUIZ 3.3.5
Mark true or false for the following statements:
1. Every element considered for a design work is an object.
2. All objects lie on layers.
3. One layer contains only one object.
4. Layers have blending options applicable to the objects on the layers.
LEARNING ACTIVITY 3.3.6
Learning Activity Resources/Special Instructions/References
Lock and/or nest and group Layers in accordance with the design brief
▪ Information Sheet: 3.3.6 ▪ Self-Check Quiz: 3.3.6 ▪ Answer Key: 3.3.6
http://blogs.adobe.com/jkost/2014/10/locking-and-unlocking-layers-in-photoshop-cc-2014.html
http://blogs.adobe.com/jkost/page/1?s=nesting+layers
INFORMATION SHEET 3.3.6
Learning Objective: to lock and/or nest and group Layers in accordance with the design brief.
Lock and unlock layers: ▪ Use the following shortcuts to lock and unlock layers in Photoshop CC 2014.
✓ Command + / (Mac) | Control + / (Win) toggles between locking and unlocking all selected
layers. (Clicking on the lock icon will also unlock a layer).
✓ Command + Option +/ (Mac) | Control + Alt + / (Win) unlocks all layers (except the Background
layer).
✓ In addition, there is a new menu item Layer> Lock Layers.
▪ Specific to locking Shape layers:
✓ If a shape layer is locked, it now behaves properly and cannot be selected (in previous
versions it could).
✓ When a Shape layer is locked, the Shape Properties in the Properties panel will be
disabled.
Group and ungroup layers ▪ Select multiple layers in the Layers panel.
▪ Do one of the following:
✓ Choose Layer > Group Layers.

CBLM – Graphic Design (Student Guide) v.1 Dec 2018 85
Skills for Employment Investment Programme (SEIP)
✓ Alt-drag (Windows) or Option-drag (Mac OS) layers to the folder icon at the bottom of the
Layers panel to group the layers.
▪ To Ungroup the layers, select the group and choose Layer > Ungroup Layers.
Add layers to a group ▪ Do one of the following:
▪ Select the group in the Layers panel and click the Create a New Layer button .
▪ Drag a layer to the group folder.
▪ Drag a group folder into another group folder. The group and all of its layers move.
▪ Drag an existing group to the New Group button .
Link and unlink layers ▪ You can link two or more layers or groups. Unlike multiple layers selected at the same time, linked
layers retain their relationship until you unlink them. You can move or apply transformations to
linked layers.
▪ Select the layers or groups in the Layers panel.
▪ Click the link icon at the bottom of the Layers panel.
▪ To unlink layers, do one of the following:
▪ Select a linked layer and click the link icon.
▪ To temporarily disable the linked layer, Shift-click the Link icon for the linked layer. A red X
appears. Shift-click the link icon to enable the link again.
▪ Select the linked layers and click the Link icon. To select all linked layers, select one of the layers
and then choose Layer > Select Linked Layers.
Nest layers: ▪ You can nest layers and Layer Groups up to 10 groups deep. It helps organizing even the most
complex documents.
Individual Activity:
▪ Apply lock, nest, link and group to your design work.
▪ Share your work with class.
▪ Take necessary guidance from your trainer.
SELF-CHECK QUIZ 3.3.6
Mark true or false for the following statements:
1. When a Shape layer is locked, the Shape Properties in the Properties panel remains enabled.
2. To Ungroup the layers, select the group and choose Layer > Ungroup Layers.
3. It’s possible to add layers by dragging an existing group to the New Group button.
4. You can nest layers and Layer Groups up to 12 groups deep.
LEARNING ACTIVITY 3.3.7
Learning Activity Resources/Special Instructions/References
Add or remove styles from layers when layer consistency is or is not required
▪ Information Sheet: 3.3.7 ▪ Self-Check Quiz: 3.3.7 ▪ Answer Key: 3.3.7

CBLM – Graphic Design (Student Guide) v.1 Dec 2018 86
Skills for Employment Investment Programme (SEIP)
https://helpx.adobe.com/photoshop/using/layer-effects-styles.html
INFORMATION SHEET 3.3.7
Learning Objective: to add or remove styles from layers when layer consistency is or is not required.
Layer styles: ▪ A layer style is one or more effects applied to a layer or layer group. ▪ You can apply one of the pre-set styles provided with Photoshop or create a custom style using
the Layer Style dialog box.
▪ The layer effects icon appears to the right of the layer’s name in the Layers panel. You can expand the style in the Layers panel to view or edit the effects that compose the style.
▪ You can apply multiple effects in a single layer style. Also, more than one instance of some effects can comprise a layer style.
▪ When you save a custom style, it becomes a pre-set style. Pre-set styles appear in the Styles panel and can be applied to a layer or group with a single click.
Layers panel showing layer with multiple effects applied
(A. Layer effects icon B. Click to expand and show layer effects C. Layer effects)
Apply pre-set styles ▪ You can apply pre-set styles from the Styles panel. The layer styles that come with Photoshop are
grouped into libraries by function. For example, one library contains styles for creating web buttons; another library contains styles for adding effects to text.
▪ You cannot apply layer styles to a background, locked layer, or group.
Display the Styles panel ▪ Choose Window > Styles.
Apply a pre-set style to a layer ▪ Normally, applying a pre-set style replaces the current layer style. However, you can add the
attributes of a second style to those of the current style. ▪ Do one of the following: ▪ Click a style in the Styles panel to apply it to the currently selected layers. ▪ Drag a style from the Styles panel onto a layer in the Layers panel. ▪ Drag a style from the Styles panel to the document window and release the mouse button when
the pointer is over the layer content to which you want to apply the style. ▪ Hold down Shift as you click or drag to add (rather than replace) the style to any existing effects
on the destination layer.

CBLM – Graphic Design (Student Guide) v.1 Dec 2018 87
Skills for Employment Investment Programme (SEIP)
▪ Choose Layer > Layer Style > Blending Options and click the word Styles in the Layer Style dialog box (top item in the list on the left side of the dialog box). Click the style you want to apply and click OK.
▪ When using a Shape tool or Pen tool in shape layers mode, select a style from the pop-up panel in the options bar before drawing the shape.
Apply a style from another layer ▪ In the Layers panel, Alt-drag (Windows) or Option-drag (Mac OS) the style from a layer’s effect
list to copy it to another layer. ▪ In the Layers panel, click-drag the style from a layer’s effect list to move it to another layer.
Layer Style dialog box overview
▪ You can edit styles applied to a layer or create new styles using the Layer Style dialog box.
Individual Activity:
▪ Apply the style pre-set and layer effects to your design works.
▪ Your trainer will guide you to complete this activity.
▪ Share your work with class.
SELF-CHECK QUIZ 3.3.7
Fill in the blanks with appropriate answers for the following statements:
1. A layer style is one or more _________ applied to a layer or layer group.
2. You can _________ the style in the Layers panel.
3. Applying a preset style _________ the current layer style.
4. In the Layers panel, ___________ the style from a layer’s effect list to move it to another layer.
5. You can _______ styles applied to a layer or create new _______ using the Layer Style dialog box.

CBLM – Graphic Design (Student Guide) v.1 Dec 2018 88
Skills for Employment Investment Programme (SEIP)
Learning Outcome 3.4 - Finalise Document
Contents:
▪ Identify the appropriate format for saving the graphic given the various elements in the graphic ▪ Set the resolution for effects and any filters based on image quality ▪ Check document to ensure correct layout file and that there are no non-printable elements ▪ Fix PDF or other export options to the best settings for the final media and then export and save the
file
Assessment criteria:
1. The appropriate format for saving the graphic is identified given the various elements in the graphic. 2. The resolution for effects and any filters is set based on image quality. 3. Document is checked to ensure correct layout file and that there are no non-printable elements. 4. PDF or other export options are fixed to the best settings for the final media and the file is then exported
and saved.
Resources required:
Students/trainees must be provided with the following resources:
▪ Workplace (simulated or actual) ▪ Personal computer and peripherals ▪ Software (system and applications) ▪ Internet ▪ Stationery ▪ Instruction sheet/manual
LEARNING ACTIVITY 3.4.1
Learning Activity Resources/Special Instructions/References
Identify the appropriate format for saving the graphic given the various elements in the graphic
▪ Information Sheet: 3.4.1 ▪ Self-Check Quiz: 3.4.1 ▪ Answer Key: 3.4.1
https://helpx.adobe.com/photoshop/using/file-formats.html

CBLM – Graphic Design (Student Guide) v.1 Dec 2018 89
Skills for Employment Investment Programme (SEIP)
INFORMATION SHEET 3.4.1
Learning Objective: to identify the appropriate format for saving the graphic given the various elements in
the graphic.
File Formats of Photoshop ▪ Format of the design work generally is defined during design brief. Photoshop has its own file
format. It also provides other different types of file format to support other design software and printing opportunity.
▪ Graphic file formats differ in the way they represent image data (as pixels or vectors) and support different compression techniques and Photoshop features.
▪ To preserve all Photoshop features (layers, effects, masks, and so on), save a copy of your image in
Photoshop format (PSD).
File Format Characteristics Maximum allowable size of file
PSD, JPEG 8-bit image 2 GB
Photoshop Large Document Format
(PSB), Cineon, DICOM, TIFF, JPEG,
JPEG 2000, Photoshop PDF,
Photoshop Raw, PNG, Portable Bit Map,
and TIFF
16-bit image 4 GB
Photoshop, Large Document Format
(PSB), OpenEXR, Portable Bitmap,
Radiance, and TIFF
32-bit image Larger than 4 GB
Individual Activity:
▪ Identify appropriate format for your design work.
▪ Save your work as the selected file format.
▪ Share your work with class.
▪ Take necessary guidance from your trainer.
SELF-CHECK QUIZ 3.4.1
Write correct answer for the following questions:
1. What is the characteristic of JPEG format?
2. What is the maximum allowable size of a PSD file?
3. Write the maximum allowable size of TIFF files.
4. Name two file formats that should be used for 32-bit images.
LEARNING ACTIVITY 3.4.2
Learning Activity Resources/Special Instructions/References
Set the resolution for effects and any filters based on image quality
▪ Information Sheet: 3.4.2 ▪ Self-Check Quiz: 3.4.2

CBLM – Graphic Design (Student Guide) v.1 Dec 2018 90
Skills for Employment Investment Programme (SEIP)
▪ Answer Key: 3.4.2
http://www.adobepress.com/articles/article.asp?p=1950630&seqNum=2
INFORMATION SHEET 3.4.2
Learning Objective: to set the resolution for effects and any filters based on image quality.
Set resolution:
▪ The first step in retouching a photograph in Photoshop is to make sure that the image has an appropriate resolution. The term resolution refers to the number of small squares, known as pixels, that describe an image and establish its detail. Resolution is determined by pixel dimensions, or the number of pixels along the width and height of an image.
Pixels in a photographic image
▪ In computer graphics, there are different types of resolutions:
▪ The number of pixels per unit of length in an image is called the image resolution, usually
measured in pixels per inch (ppi). An image with a high resolution has more pixels (and therefore a larger file size) than an image of the same dimensions with a low resolution. Images in Photoshop can vary from high resolution (300 ppi or higher) to low resolution (72 ppi or 96 ppi).
▪ The number of pixels per unit of length on a monitor is the monitor resolution, also usually
measured in pixels per inch (ppi). Image pixels are translated directly into monitor pixels. In Photoshop, if the image resolution is higher than the monitor resolution, the image appears larger onscreen than its specified print dimensions
Individual Activity:
▪ Practice setting and changing resolution and size of design files.
▪ Your Trainer will guide you to choose the options.
▪ Share your work with class.

CBLM – Graphic Design (Student Guide) v.1 Dec 2018 91
Skills for Employment Investment Programme (SEIP)
SELF-CHECK QUIZ 3.4.2
Write a short note on following:
1. Image resolution.
2. High resolution.
3. Low resolution.
LEARNING ACTIVITY 3.4.3
Learning Activity Resources/Special Instructions/References
Check document to ensure correct layout file and that there are no non-printable elements
▪ Information Sheet: 3.4.3 ▪ Self-Check Quiz: 3.4.3 ▪ Answer Key: 3.4.3
https://www.printingforless.com/layout.html
INFORMATION SHEET 3.4.3
Learning Objective: to check document to ensure correct layout file and that there are no non-printable
elements.
Graphic Design Layout Specifications for Printing ▪ The layout specification mainly depends on three elements – Bleed, safe design zone and panel
dimension.
Bleed ▪ Bleed is the amount of printed information which extends beyond the finished size of your piece. ▪ Bleed allows us to print your piece slightly oversized and cut it down to its exact size. This gives
a final seamless appearance of the image "bleeding" off the edges.
▪ We recommend that you build your file with bleed dimensions of an extra 1/8 inch (.125") on each side. This increases the total width and height of your document by 1/4 inch (.25"). For example, a 3.5 x 2" business card is designed as a 3.75 x 2.25" file.
▪ We are happy to provide templates for your use that include bleed dimensions.
▪ If you do not design your piece with bleeds, we are happy to add bleed free of charge!

CBLM – Graphic Design (Student Guide) v.1 Dec 2018 92
Skills for Employment Investment Programme (SEIP)
Safe Design Zone ▪ The safe design zone is the 1/8-inch (.125") area surrounding the inside trim edge of your piece.
▪ Keeping your critical content-text, images, graphics-within the safe design zone ensures that nothing will be positioned too close to the edge, where it could be impacted by trimming variances of up to 1/32 inch. In the 3.5 x 2" business card example, all important content should be positioned within the interior 3.25 x 1.75".
▪ The safe design zone decreases to 1/16 inch (.0625") for envelopes and increases to 3/16 inch (.1875") for catalogues with more than 36 pages.
▪ Borders around the outside edge should be at least 1/8 inch (.125") wide to avoid any visual variance after trimming.
Panel Dimensions ▪ The best way to understand panel dimensions is to make a quick mock-up of your folded piece.
The panel dimensions are listed from narrowest to widest. Once you have a folded mock-up, write the dimensions on the appropriate panels, both front and back. Then translate your page and panel information into your design layout.
▪ Dimensions are provided at bleed size/at trim size
▪ We are happy to provide templates for your use that include fold line indicators.
Tri Fold Closed Gate Fold
8.5 x 11 3.6347 3.6667 3.6987 8.5 x 11 2.735 2.75 2.765 2.75
8.5 x 14 4.6347 4.6667 4.6987 8.5 x 14 3.485 3.55 3.515 3.5
11 x 17 5.6347 5.6667 5.6987 11 x 17 4.235 4.25 4.265 4.25
Z Fold 4-Panel Barrel Roll
8.5 x 11 3.67 3.67 3.67 8.5 x 11 2.69 2.73 2.77 2.81
8.5 x 14 4.67 4.67 4.67 8.5 x 14 3.44 3.48 3.52 3.56
11 x 17 5.67 5.67 5.67 11 x 17 4.19 4.23 4.27 4.31
4-Panel Fold / Double Parallel Accordion Fold / M Fold 8.5 x 11 2.75 2.75 2.75 2.75 8.5 x 11 2.75 2.75 2.75 2.75
8.5 x 14 3.50 3.50 3.50 3.50 8.5 x 14 3.50 3.50 3.50 3.50
11 x 17 4.25 4.25 4.25 4.25 11 x 17 4.25 4.25 4.25 4.25
Non-printable Elements ▪ During designing the project, you might have inserted many elements to develop the project
which were, later no more in use but still in the design work.
▪ These elements make the design file heavier and may cause faulty final printing. You must remove the non-printable elements carefully from the design work.
Individual Activity:
▪ Check document and ensure correct layout file for your design work.
▪ Check document and ensure that all non-printable elements are removed.
▪ Share your work with class.
▪ Take necessary guidance from your trainer.

CBLM – Graphic Design (Student Guide) v.1 Dec 2018 93
Skills for Employment Investment Programme (SEIP)
SELF-CHECK QUIZ 3.4.3
Write a short note on following:
1. Bleed
2. Safe design zone
3. Panel dimensions
4. Non-printable elements
LEARNING ACTIVITY 3.4.4
Learning Activity Resources/Special Instructions/References
Fix PDF or other export options to the best settings for the final media and then export and save the file
▪ Information Sheet: 3.4.4 ▪ Self-Check Quiz: 3.4.4 ▪ Answer Key: 3.4.4
https://helpx.adobe.com/photoshop/using/saving-pdf-files.html
INFORMATION SHEET 3.4.4
Learning Objective: to fix PDF or other export options to the best settings for the final media and then
export and save the file.
Exporting in PDF format: ▪ You can use the Save As command to save RGB, indexed-colour, CMYK, grayscale, Bitmap-
mode, Lab colour, and duotone images in Photoshop PDF format. Because the Photoshop PDF document can preserve Photoshop data, such as layers, alpha channels, notes, and spot colour, you can open the document and edit the images in Photoshop CS2 or later.
▪ For advanced users, the Photoshop PDF format offers options for making the document PDF/X compliant, which is essential, for example, when you send your document to a large commercial press. PDF/X (Portable Document Format Exchange) is a subset of Adobe PDF that eliminates colour, font, and trapping variables that lead to printing problems.
▪ You can also specify security options for restricting access to the PDF document. The 128-bit RC4 (Acrobat 6 and later) encryption has an option for letting users view metadata and thumbnails in a secure PDF document using Adobe Bridge.
▪ You can save your PDF settings as a PDF pre-set for creating consistent Photoshop PDF files. Adobe PDF pre-sets and settings are shared across Adobe components, including Photoshop, InDesign, Illustrator, and Acrobat.
Save in Photoshop PDF format ▪ Choose File > Save As, and then choose Photoshop PDF from the Format menu. You can select
a Colour option if you want to embed a colour profile or use the profile specified with the Proof Setup command. You can also include layers, notes, spot colour, or alpha channels. Click Save.
▪ In the Save Adobe PDF dialog box, choose an Adobe PDF pre-set specifying whether the Photoshop PDF file will be printed on a desktop printer or proofer, sent to a commercial printer, distributed by e-mail, displayed on the web, and so on.

CBLM – Graphic Design (Student Guide) v.1 Dec 2018 94
Skills for Employment Investment Programme (SEIP)
▪ Choosing a pre-set is the easiest way to set options for your Photoshop PDF file. After you choose a pre-set, click Save PDF to generate your Photoshop PDF file. If you want to add security options or fine-tune the saving options for the PDF, follow the remaining steps in this procedure.
▪ (Optional) Choose options from the Standard menu and the Compatibility menu to specify the PDF/X compliance and the Acrobat version compatibility for the PDF document.
▪ (Optional) Select General in the left pane of the Save Adobe PDF dialog box to set general PDF file saving options.
▪ (Optional) Select Compression in the left pane of the Save Adobe PDF dialog box to specify the compression and downsampling options for the PDF file.
▪ (Optional) Select Output in the left pane of the Save Adobe PDF dialog box to specify colour management and PDF/X options.
▪ (Optional) To add security to your PDF document, select Security in the left pane of the Save Adobe PDF dialog box. Specify the password and permissions options for your PDF document.
▪ (Optional) Select Summary in the left pane of the Save Adobe PDF dialog box. You can review the options you specified.
▪ (Optional) If you want to reuse the PDF save settings, click Save Pre-set and save your settings as a PDF pre-set. The new pre-set appears in the Adobe PDF Pre-set menu the next time you save a Photoshop PDF file and in any product in the Adobe Creative Cloud.
▪ Click Save PDF. Photoshop closes the Save Adobe PDF dialog box and creates the PDF document file.
Individual Activity:
▪ Export your design work in PDF format.
▪ Share your work with class.
SELF-CHECK QUIZ 3.4.4
Mark true or false for the following statements:
1. You can use the Save As command to save RGB, indexed-color, CMYK, grayscale, Bitmap-mode, Lab color, and duotone images in Photoshop PDF format.
2. You can specify security options for restricting access to the PDF document.
3. You can save your PDF settings as a PDF preset for creating consistent Photoshop PDF files.
4. When “Save PDF” button is clicked, Photoshop closes the Save Adobe PDF dialog box and creates the PDF document file.

CBLM – Graphic Design (Student Guide) v.1 Dec 2018 95
Skills for Employment Investment Programme (SEIP)
REVIEW OF COMPETENCY
Final Checklist
(for the performance criteria of the module Performing Distempering)
Performance Criteria Yes No
1. Details of the brief are reviewed to identify preference setting requirements.
2. Monitor is calibrated using an ICC profile to ensure closest possible color match.
3. Palettes are arranged to suit job and personal preferences.
4. View magnification is set for ease of working with the graphics application.
5. Ruler units are set, and grid is displayed to ensure artwork meets design specifications.
6. Tools are used to produce objects, required attributes are entered and shapes manipulation is made until graphic framework is finalized.
7. Lines and curves are adjusted and edited to fit design specifications.
8. Objects are painted, transposed and strokes and effects are scaled according to the design brief.
9. Colors are created, edited and saved to the color palette and saturation of color is adjusted.
10. Color and appearance attributes are selected and copied as required.
11. Gradients fill, mesh and patterns are used to paint, and blend as required by the layout and design brief.
12. Objects are grouped or individually selected, moved, scaled or rotated using a variety of methods according to workplace standard.
13. Required type is added and formatting are set to reflect the design brief.
14. Graphic properties are set and meet the design brief.
15. Effects are added to a graphic and edited to make the appearance more suitable according to the design brief.
16. Appearances required for further use are saved as styles.
17. Objects are organized in layers and stacking order is controlled.
18. Layers are locked and / or nested and grouped in accordance with the design brief.
19. Styles are added or removed from layers when layer consistency is or is not required.
20. The appropriate format for saving the graphic is identified given the various elements in the graphic.
21. The resolution for effects and any filters is set based on image quality.
22. Document is checked to ensure correct layout file and that there are no non-printable elements.
23. PDF or other export options are fixed to the best settings for the final media and the file is then exported and saved.
Now I feel ready to undertake my formal competency assessment.
Signed: _________________________
Date: _________________________

CBLM – Graphic Design (Student Guide) v.1 Dec 2018 96
Skills for Employment Investment Programme (SEIP)
ANSWER KEYS
ANSWER KEY 3.1.1
1. Outlining 2. Design brief 3. Uniform resource locator 4. Goals
ANSWER KEY 3.1.2
1. Display Calibration will let you view several test patterns and samples of what a properly calibrated screen will look like. Although the site isn’t the most aesthetically pleasing, and it’s rarely updated, the on-screen calibration tools for brightness, contrast, color depth, and screen resolution can prove useful if you can’t access any built-in calibration tools.
2. Photo Friday is a simple web page that’s designed to help you calibrate the brightness and contrast of your screen. Just adjust the monitor settings until the transition of tones from black to white is clearly distinguishable on the screen.
ANSWER KEY 3.1.3
1. Palettes are groups of tools used to edit and manipulate your image. Photoshop contains over two dozen palettes that can be shown or hidden by using the Window menu and selecting the palette you wish to reveal.
ANSWER KEY 3.1.4
1. True 2. False
ANSWER KEY 3.2.1
1. True 2. True 3. True 4. True
ANSWER KEY 3.2.2
1. Pen tool, Text tool, Brush tool, Pencil tool, Stamp tool
ANSWER KEY 3.2.3
1. Line tool, Pen tool, Arc tool
ANSWER KEY 3.2.4
1. Brush tool and the Pencil tool 2. Eraser tool, Blur tool, and Smudge tool
ANSWER KEY 3.2.5
1. True 2. True 3. True

CBLM – Graphic Design (Student Guide) v.1 Dec 2018 97
Skills for Employment Investment Programme (SEIP)
ANSWER KEY 3.2.6
1. Right-click, Style 2. Target, Paste
ANSWER KEY 3.2.7
1. True
ANSWER KEY 3.2.8
1. False 2. True 3. True
ANSWER KEY 3.3.1
1. True 2. True
ANSWER KEY 3.3.2
1. Thumbnail 2. Add layer mask 3. Select filter Mask 4. Mask edge 5. Invert
ANSWER KEY 3.3.3
1. Effects, layers
ANSWER KEY 3.3.4
1. True 2. True
ANSWER KEY 3.3.5
1. True 2. True 3. False 4. True
ANSWER KEY 3.3.6
1. False 2. True 3. True 4. False
ANSWER KEY 3.3.7
1. Effects 2. Expand 3. Replaces 4. Click-drag 5. Edit, styles

CBLM – Graphic Design (Student Guide) v.1 Dec 2018 98
Skills for Employment Investment Programme (SEIP)
ANSWER KEY 3.4.1
1. 8-bit image 2. 2 GB 3. 4 GB 4. PSB, TIFF
ANSWER KEY 3.4.2
1. The number of pixels per unit of length in an image is called the image resolution, usually measured in pixels per inch (ppi).
2. An image with a high resolution has more pixels and therefore a larger file size. Generally, resolution of 300 ppi or higher is termed as high resolution.
3. An image with a low resolution has less pixels and therefore a lower file size. Generally, resolution of 72 to 92 ppi is termed as low resolution.
ANSWER KEY 3.4.3
1. Bleed is the amount of printed information which extends beyond the finished size of your piece. Bleed allows us to print your piece slightly oversized and cut it down to its exact size. This gives a final seamless appearance of the image "bleeding" off the edges.
2. The safe design zone is the 1/8-inch (.125") area surrounding the inside trim edge of your artwork. The safe design zone decreases to 1/16 inch (.0625") for envelopes and increases to 3/16 inch (.1875") for catalogues with more than 36 pages.
3. The best way to understand panel dimensions is to make a quick mock-up of your folded piece. The panel dimensions are listed from narrowest to widest. Once you have a folded mock-up, write the dimensions on the appropriate panels, both front and back. Then translate your page and panel information into your design layout.
4. During designing the project, you might have inserted many elements to develop the project which were, later no more in use but still in the design work. These elements make the design file heavier and may cause faulty final printing. You must remove the non-printable elements carefully from the design work.
ANSWER KEY 3.4.4
1. True 2. True 3. True 4. True

CBLM – Graphic Design (Student Guide) v.1 Dec 2018 99
Skills for Employment Investment Programme (SEIP)
Module 4: Generating clipping path, logo and mock-up working with cascading style sheets (CSS)
MODULE CONTENT
Module Descriptor: This module covers the skills, knowledge and attitudes to generate
clipping path, logo and mock up working with cascading style sheets
(CSS). It specifically includes preparing the work environment, creating
clipping path, creating logo and creating mock-up.
Nominal Duration: 50 hours
LEARNING OUTCOMES:
Upon completion of the module, the student/trainee should be able to:
4.1 Prepare the work environment
4.2 Create clipping path
4.3 Create logo
4.4 Create mock up
PERFORMANCE CRITERIA:
1. Details of the graphic design project are reviewed to identify preference setting requirements.
2. View magnification is set for ease of working with the graphics application.
3. Graphic design application is opened and used.
4. Application pen tool is used and manipulated.
5. Desired pencil tool option is chosen.
6. Usage of pencil tools are understood.
7. Desired graphics application is opened and used.
8. Path is created using pen tool around the image area.
9. Path is named and saved in the paths panel menu.
10. Clipping path is chosen from the same panel menu.
11. Path drop-down list is chosen from the clipping paths dialog box.
12. Clipping path is saved in the chosen file.
13. Desired graphics application is opened and used.
14. New document is created.
15. Basic shape is created using the pen tool of the selected application.
16. Desired color is selected and applied.
17. Desired shadow is selected where applicable.
18. Text is added in accordance with project design requirement.
19. Background gradient is added where desirable.
20. Logo is completed and saved.
21. Desired graphics application is opened and used.
22. New document is created.
23. Steps in preparing mockup is executed in accordance with conceptualized design.
24. Steps in setting up smart object is executed.
25. Steps in editing smart object is accomplished.
26. Mock up is completed and saved.

CBLM – Graphic Design (Student Guide) v.1 Dec 2018 100
Skills for Employment Investment Programme (SEIP)
Learning Outcome 4.1 - Prepare the Work Environment
Contents:
▪ Review details of the graphic design project to identify preference setting requirements ▪ Set view magnification for ease of working with the graphics application ▪ Open and use graphic design application ▪ Use and manipulate application pen tool ▪ Choose desired pencil tool option ▪ Understand the usage of pencil tools
Assessment criteria:
1. Details of the graphic design project are reviewed to identify preference setting requirements.
2. View magnification is set for ease of working with the graphics application.
3. Graphic design application is opened and used.
4. Application pen tool is used and manipulated.
5. Desired pencil tool option is chosen.
6. Usage of pencil tools are understood.
Resources required:
Students/trainees must be provided with the following resources:
▪ Workplace (simulated or actual) ▪ Personal computer/laptop ▪ Pens ▪ Paper ▪ Instruction sheet/manual
LEARNING ACTIVITY 4.1.1
Learning Activity Resources/Special Instructions/References
Review details of the graphic design project to identify preference setting requirements
▪ Information Sheet: 4.1.1 ▪ Self-Check Quiz: 4.1.1 ▪ Answer Key: 4.1.1

CBLM – Graphic Design (Student Guide) v.1 Dec 2018 101
Skills for Employment Investment Programme (SEIP)
INFORMATION SHEET 4.1.1
Learning Objective: to review details of the graphic design project to identify preference setting
requirements.
Graphics Design Project Brief:
▪ Clients provide their preference setting to their design project statement or in design brief. You are to figure out the requirements and prepare your project plan. Here are some design project statements.
▪ Write required preference setting from the statements.
Sample Graphics Design Project: Logo Design
JOB SHEET 6
Job Title: Prepare preference setting requirements.
Instructions: ▪ Study the above sample graphics design project brief on logo design.
▪ Identify and list the preference setting requirement for this project.
Outcome: ▪ You will have a list of preference setting requirements.
Declaration
I need a logo designed. Design an impressive logo for a Chatting services company
Project skills: Logo Design, Graphic design, Creative designing, Photoshop
Project details:
Need a creative designer or agency to design logo for an outsourcing agency providing chatting services branded as “GoChat247”
Need creative logo designs with wordmark, combination mark any type of new style fitting to the outsourcing market needs.
You will be provided with the details about the brand colour, brand name and all relevant details regarding competitors if you need.
Minimum 10 creative design recommendations are required, and each concept need to be unique. (No copy from logo generator or from other companies please)
Minor amendments will be included in this project
We will need all type of master files for future alterations
Successful completion of this project can lead to corporate identity and sales collateral design project for the same agency.
Budget for this project is 100 USD

CBLM – Graphic Design (Student Guide) v.1 Dec 2018 102
Skills for Employment Investment Programme (SEIP)
SELF-CHECK QUIZ 4.1.1
Mark true or false for the following statements:
1. Preference setting requirements can be found on the design project statement or in design brief.
2. It is not mandatory to have the preference setting requirement for project plan.
LEARNING ACTIVITY 4.1.2
Learning Activity Resources/Special Instructions/References
Set view magnification for ease of working with the graphics application
▪ Information Sheet: 4.1.2
INFORMATION SHEET 4.1.2
Learning Objective: to Set view magnification for ease of working with the graphics application.
Apply view magnification:
▪ Detailed discussions on setting view magnification were made in Module 3 (3.1.4).
▪ Set view magnification of your Apply them to your work.
Individual Activity:
▪ Set view magnification on your PC according to their chosen design project.
▪ Take necessary guidance from your trainer.
LEARNING ACTIVITY 4.1.3
Learning Activity Resources/Special Instructions/References
Open and use graphic design application ▪ Information Sheet: 4.1.3 ▪ Self-Check Quiz: 4.1.3 ▪ Answer Key: 4.1.3
INFORMATION SHEET 4.1.3
Learning Objective: to open and use graphic design application.
Graphic Design Application:
▪ For designing with computers, there are many graphic design applications available. Some are free to use and for some you need to pay for use. Definitely the paid software provides better and

CBLM – Graphic Design (Student Guide) v.1 Dec 2018 103
Skills for Employment Investment Programme (SEIP)
flexible tools and options for your design works. Here is a list of graphic applications which you can choose for designing.
▪ Considering the best support, we will use Illustrator for learning purposes. ▪ Some popular design software is:
✓ Adobe Illustrator CS
✓ CorelDraw X4
✓ In Design CS
✓ Quark Xpress -7
✓ Adobe Photoshop Elements
✓ Photo studio
✓ Cyber link Photo Director
✓ Corel Paint shop Pro
✓ Xara
✓ Serif Photo Plus
▪ Details of software are discussed in Module 2 (2.1)
Individual Activity:
▪ Identify the applications those are required for your design work from the design brief.
▪ List the required software in priority basis.
▪ Share your work in class.
▪ Your trainer will guide you to carry on this activity.
SELF-CHECK QUIZ 4.1.3
Write correct answer for the following question:
1. Write name of five graphics design applications.
LEARNING ACTIVITY 4.1.4
Learning Activity Resources/Special Instructions/References
Use and manipulate application pen tool ▪ Information Sheet: 4.1.4
INFORMATION SHEET 4.1.4
Learning Objective: to use and manipulate application pen tool.
Use Pen tool:
▪ Apply “Pen” tool for your design work. ▪ Open your selected design software (i.e. Illustrator). ▪ Select Pen tool to design objects for your design work. ▪ Details of using Pen Tool is discussed in Module 2 (2.2.2).

CBLM – Graphic Design (Student Guide) v.1 Dec 2018 104
Skills for Employment Investment Programme (SEIP)
Individual Activity:
▪ Use pen tool to create objects for your design works.
▪ Apply necessary effects to those objects to meet the design requirements..
▪ Share your work in class.
▪ Your trainer will guide you to carry on this activity.
LEARNING ACTIVITY 4.1.5
Learning Activity Resources/Special Instructions/References
Choose desired pencil tool option ▪ Information Sheet: 4.1.5 ▪ Self-Check Quiz: 4.1.5 ▪ Answer Key: 4.1.5
https://helpx.adobe.com/illustrator/using/drawing-pen-curvature-or-pencil.html
https://www.vectordiary.com/illustrator/drawing-with-pencil-tool/
INFORMATION SHEET 4.1.5
Learning Objective: to choose desired pencil tool option.
Pencil tool:
▪ The Pencil tool lets you draw open and closed paths as if you were drawing with a pencil on paper. ▪ It is most useful for fast sketching or creating a hand-drawn look. Once you draw a path, you can
immediately change it if needed. ▪ Anchor points are set down as you draw with the Pencil tool; you do not determine where they are
positioned. However, you can adjust them once the path is complete. ▪ The number of anchor points set down is determined by the length and complexity of the path and
by tolerance settings in the Pencil Tool Preferences dialog box. ▪ These settings control how sensitive the Pencil tool is to the movement of your mouse or graphics-
tablet stylus. ▪ Pencil tool and its options are shown in the following figures:
Pencil tool options
▪ Double-click the Pencil tool ( ) to set any of the following options:

CBLM – Graphic Design (Student Guide) v.1 Dec 2018 105
Skills for Employment Investment Programme (SEIP)
▪ Fidelity
Controls how far you have to move your mouse or stylus before a new anchor point is added to the path. The Fidelity slider has five pre-sets you can choose from. The leftmost slider pre-set (Accurate) is most accurate for drawing paths. The rightmost slider pre-set (Smooth) creates the smoothest paths. Choose a pre-set that suits your drawing needs best.
▪ Fill New Pencil Strokes Applies a fill to pencil strokes you draw after selecting this option, but not to existing pencil strokes. Remember to select a fill before you draw the pencil strokes.
▪ Alt/ Option Key Toggles to Smooth Tool Option With this checkbox enabled, while using the Pencil tool or the Brush tool, you can press Alt (Windows) or Option (macOS) to switch to the Smooth tool.
▪ Close Paths When Ends Are Within: _ Pixels When the endpoints of a path you are drawing are in close proximity and within a certain predefined number of pixels of each other, the path-close cursor () is shown. When you release the mouse button, such a path is closed automatically. You can set the predefined number of pixels using this option.
▪ Edit Selected Paths Determines whether or not you can change or merge a selected path when you are within a certain distance of it (specified with the next option).
▪ Within: _ pixels Determines how close your mouse or stylus must be to an existing path in order to edit the path with the Pencil tool. This option is only available when the Edit Selected Paths option is selected.
Individual Activity:
▪ Choose pencil tool options for your design works.
▪ List the options on your project work plan.
▪ Your trainer will guide you to carry on this activity.
SELF-CHECK QUIZ 4.1.5
Write an appropriate answer for the following question:
1. Write short note on “Pencil Tool”.

CBLM – Graphic Design (Student Guide) v.1 Dec 2018 106
Skills for Employment Investment Programme (SEIP)
LEARNING ACTIVITY 4.1.6
Learning Activity Resources/Special Instructions/References
Understand the usage of pencil tools ▪ Information Sheet: 4.1.6 ▪ Self-Check Quiz: 4.1.6 ▪ Answer Key: 4.1.6
https://helpx.adobe.com/illustrator/using/drawing-pen-curvature-or-pencil.html
INFORMATION SHEET 4.1.6
Learning Objective: to understand the usage of pencil tools.
Usage of Pencil tool:
▪ New features of the Pencil Tool make impromptu designs tidier than before, allow for more ability to edit, and have the versatility of the Pen Tool.
▪ Illustrator is a fantastic program for drawing and tool upgrades like this one really promote the illustration side of vector design.
▪ Apply Pencil tool options and watch the effects on your design.
Individual Activity:
▪ Use selected options of pencil tool to your design work.
▪ Share your work in class.
▪ Your trainer will guide you to carry on this activity.
SELF-CHECK QUIZ 4.1.6
Fill in the gaps of the following statements:
1. New features of the Pencil Tool make _______________ designs tidier than before, allow for more ability to ______________.
2. Pencil tool have the versatility of the _______________ tool.

CBLM – Graphic Design (Student Guide) v.1 Dec 2018 107
Skills for Employment Investment Programme (SEIP)
Learning Outcome 4.2 - Create Clipping Path
Contents:
▪ Open and use desired graphics application ▪ Create path using pen tool around the image area ▪ Name and save path in the paths panel menu ▪ Choose clipping path from the same panel menu ▪ Choose path drop-down list from the clipping paths dialog box ▪ Save clipping path in the chosen file
Assessment criteria:
1. Desired graphics application is opened and used.
2. Path is created using pen tool around the image area.
3. Path is named and saved in the paths panel menu.
4. Clipping path is chosen from the same panel menu.
5. Path drop-down list is chosen from the clipping paths dialog box.
6. Clipping path is saved in the chosen file.
Resources required:
Students/trainees must be provided with the following resources:
▪ Workplace (simulated or actual) ▪ Personal computer and peripherals ▪ Software (system and applications) ▪ HTML Editor/software/tools ▪ Internet ▪ Stationery ▪ Instruction sheet/manual
LEARNING ACTIVITY 4.2.1
Learning Activity Resources/Special Instructions/References
Open and use desired graphics application ▪ Information Sheet: 4.2.1 ▪ Self-Check Quiz: 4.2.1 ▪ Answer Key: 4.2.1

CBLM – Graphic Design (Student Guide) v.1 Dec 2018 108
Skills for Employment Investment Programme (SEIP)
INFORMATION SHEET 4.2.1
Learning Objective: to open and use desired graphics application.
Applications for creating Clipping Path
▪ You can choose any of the listed software of Section 4.1.3.
▪ Here we will use Illustrator with the instructions.
▪ Open Illustrator and select image to create a clipping path.
Individual Activity:
▪ Open illustrator.
▪ Create a new document.
▪ Import an image to create a clip.
▪ Your trainer will guide you to carry on this activity.
SELF-CHECK QUIZ 4.2.1
Write correct answer for the following question:
1. What tool you use to create a clipping path?
LEARNING ACTIVITY 4.2.2
Learning Activity Resources/Special Instructions/References
Create path using pen tool around the image area
▪ Information Sheet: 4.2.2 ▪ Self-Check Quiz: 4.2.2 ▪ Answer Key: 4.2.2
https://en.wikipedia.org/wiki/Clipping_path
INFORMATION SHEET 4.2.2
Learning Objective: to create path using pen tool around the image area.
Clipping path:
▪ A clipping path (or "deep etch") is a closed vector path, or shape, used to cut out a 2D image in image editing software.
▪ Anything inside the path will be included after the clipping path is applied; anything outside the path will be omitted from the output.

CBLM – Graphic Design (Student Guide) v.1 Dec 2018 109
Skills for Employment Investment Programme (SEIP)
▪ Applying the clipping path results in a hard (aliased) or soft (anti-aliased) edge, depending on the image editor's capabilities
▪ By convention, the inside of the path is defined by its direction.
▪ Reversing the direction of a path reverses what is considered inside or outside. A compound path results from the combination of multiple paths.
Use pen tool to create clipping path You already know use of pen tool. Now you will use this tool
to create clipping paths.
▪ Choose an image file.
▪ Select the part of the image that you like to be clipped.
▪ Create path and close it.
▪ Make it as Clipping Path.
JOB SHEET 7
Job Title: Create path using pen tool
Instructions: ▪ Open illustrator.
▪ Open an image to new document.
▪ Create path around specified area of the mage with pen tool.
▪ Close the path to the starting point.
Outcome: ▪ A path is created around a specified area of an image.
SELF-CHECK QUIZ 4.2.2
Write appropriate answer for the following question:
1. Write short note on “Clipping Path”.
LEARNING ACTIVITY 4.2.3
Learning Activity Resources/Special Instructions/References
Name and save path in the paths panel menu ▪ Information Sheet: 4.2.3 ▪ Self-Check Quiz: 4.2.3 ▪ Answer Key: 4.2.3
https://helpx.adobe.com/photoshop/using/paths.html

CBLM – Graphic Design (Student Guide) v.1 Dec 2018 110
Skills for Employment Investment Programme (SEIP)
INFORMATION SHEET 4.2.3
Learning Objective: to name and save path in the paths panel menu.
Manage path:
▪ When you use a pen or shape tool to create a work path, the new path appears as the work path in the Paths panel.
▪ The work path is temporary; you must save it to avoid losing its contents.
▪ If you deselect the work path without saving it and start drawing again, a new path will replace the existing one
Save a work path
▪ To save without renaming, drag the work path name to the New Path button at the bottom of the Paths panel.
▪ To save and rename, choose Save Path from the Paths panel menu, enter a new path name in the Save Path dialog box, and click OK.
Rename a saved path
▪ Double-click the path name in the Paths panel, type a new name, and press Enter (Windows) or Return (Mac OS).
Delete a path
▪ Click the path name in the Paths panel.
▪ Do one of the following:
✓ Drag the path to the Delete icon at the bottom of the Paths panel.
✓ Choose Delete Path from the Paths panel menu.
✓ Click the Delete icon at the bottom of the Paths panel and click Yes.
Individual Activity:
▪ Practice naming, saving and deleting paths created.
▪ Share your experiences in class.
▪ Your trainer will guide you to carry on this activity.
SELF-CHECK QUIZ 4.2.3
Write correct answer for the following question:
1. Write how to save a path?
LEARNING ACTIVITY 4.2.4
Learning Activity Resources/Special Instructions/References

CBLM – Graphic Design (Student Guide) v.1 Dec 2018 111
Skills for Employment Investment Programme (SEIP)
Choose clipping path from the same panel menu
▪ Information Sheet: 4.2.4 ▪ Self-Check Quiz: 4.2.4 ▪ Answer Key: 4.2.4
https://helpx.adobe.com/photoshop/using/paths.html
INFORMATION SHEET 4.2.4
Learning Objective: to choose clipping path from the same panel menu.
Path Panel:
▪ The Paths panel (Window > Paths) lists the name and a thumbnail image of each saved path, the current work path, and the current vector mask.
▪ Turning thumbnails off can improve performance. To view a path, you must first select it in the Paths panel.
Paths panel
[A. Saved path B. Temporary work path C. Vector mask path (appears only when shape layer is selected)]
Select a path
▪ Click the path name in the Paths panel. Only one path can be selected at a time.
Deselect a path
▪ Click in a blank area of the Paths panel or press Esc.
Individual Activity:
▪ Practice selecting saved paths.
▪ Share your experience in class.
▪ Your trainer will guide you to carry on this activity.
SELF-CHECK QUIZ 4.2.4
Write correct answer for the following question:
1. How will you access to path panel?

CBLM – Graphic Design (Student Guide) v.1 Dec 2018 112
Skills for Employment Investment Programme (SEIP)
LEARNING ACTIVITY 4.2.5
Learning Activity Resources/Special Instructions/References
Choose path drop-down list from the clipping paths dialog box
▪ Information Sheet: 4.2.5 ▪ Self-Check Quiz: 4.2.5 ▪ Answer Key: 4.2.5
INFORMATION SHEET 4.2.5
Learning Objective: to choose path drop-down list from the clipping paths dialog box.
Clipping path dialog box: ▪ Go to “pop up” menu from the Paths palette and select “Clipping Path…”. A dialogue box will
appear asking to choose your desired path and flatness. ▪ Select the path you want to clip and put the flatness you desire and click “OK”. ▪ You are now almost done. Flatness is the desired amount of pixel you want to make blur the image
edge. ▪ The more amount you use in flatness the more image edge will blur. In general, leave the flatness
box blank (0) and the image edge will be 100% sharp which is most of the time appropriate.
Path palette popup menu
Applying clipping path
Individual Activity:
▪ Design a webpage of your portfolio with 2D/3D transformations.
▪ Share your work in class.
▪ Your trainer will guide you to carry on this activity.

CBLM – Graphic Design (Student Guide) v.1 Dec 2018 113
Skills for Employment Investment Programme (SEIP)
SELF-CHECK QUIZ 4.2.5
Mark true or false on the following statements :
1. When you select Pop up menu from the path’s pallet, a dialogue box will appear asking to choose
your desired size and density.
2. The more amount you use in Flatness the more image edge will be distinct.
LEARNING ACTIVITY 4.2.6
Learning Activity Resources/Special Instructions/References
Save clipping path in the chosen file
▪ Information Sheet: 4.2.6 ▪ Self-Check Quiz: 4.2.6 ▪ Answer Key: 4.2.6
INFORMATION SHEET 4.2.6
Learning Objective: to save clipping path in the chosen file.
Save clipping path: ▪ You can save the file in PSD or TIFF format and place in the program you are working with for
your design. This time you will get the image without the background.
▪ Here are the options related to saving clipping paths.
PNG Files ▪ Assets downloaded or shared as PNG files can have transparent backgrounds if a clipping path
has been added to the original TIFF or PSD uploaded asset. Other file formats of the original asset that contain paths are not supported.
▪ If a clipping path has been added, the saved path will be used to remove the background. ▪ If a clipping path has not been added, the asset will be flattened, and a white background will be
present. ▪ If PNG files with a transparent background are uploaded, the transparent background will
remain. A white background will not be added.
Recall Creating Clipping Paths steps ▪ To create valid clipping paths in Photoshop:
1. Create new document. 2. Click the Layer menu. 3. Click Type. 4. Click Create Work Path. 5. Click the Paths palette. 6. Click Save Path. 7. Click the Paths palette. 8. Click Create Clipping Path. 9. Assign a flatness of .5 device pixels. 10. Save the file in TIFF or PSD format.
Layer masks are not supported, because they will not allow you to download or share assets with their background removed.

CBLM – Graphic Design (Student Guide) v.1 Dec 2018 114
Skills for Employment Investment Programme (SEIP)
Individual Activity:
▪ Practice saving and retrieving clipping paths.
▪ Share your work in class.
▪ Your trainer will guide you to carry on this activity.
SELF-CHECK QUIZ 4.2.6
Mark true or false on the following statements:
1. You can save the path file in PSD or TIFF format.
2. It is possible to place the paths in the program you are working with for your design.
3. Assets downloaded or shared as PNG files can have transparent backgrounds.
4. Layer masks are not supported for clipping path, as they will not allow you to download or share assets with their background removed.

CBLM – Graphic Design (Student Guide) v.1 Dec 2018 115
Skills for Employment Investment Programme (SEIP)
Learning Outcome 4.3 - Create Logo
Contents:
▪ Open and use desired graphics application ▪ Create new document ▪ Create basic shape using the pen tool of the selected application ▪ Select and apply desired colour ▪ Select desired shadow where applicable ▪ Add text in accordance with project design requirement ▪ Add background gradient where desirable ▪ Complete and save logo
Assessment criteria:
1. Desired graphics application is opened and used.
2. New document is created.
3. Basic shape is created using the pen tool of the selected application.
4. Desired colour is selected and applied.
5. Desired shadow is selected where applicable.
6. Text is added in accordance with project design requirement.
7. Background gradient is added where desirable.
8. Logo is completed and saved.
Resources required:
Students/trainees must be provided with the following resources:
▪ Workplace (simulated or actual) ▪ Personal computer and peripherals ▪ Software (system and applications) ▪ HTML Editor/software/tools ▪ Internet ▪ Stationery ▪ Instruction sheet/manual
LEARNING ACTIVITY 4.3.1
Learning Activity Resources/Special Instructions/References
Open and use desired graphics application
▪ Information Sheet: 4.3.1 ▪ Self-Check Quiz: 4.3.1 ▪ Answer Key: 4.3.1

CBLM – Graphic Design (Student Guide) v.1 Dec 2018 116
Skills for Employment Investment Programme (SEIP)
INFORMATION SHEET 4.3.1
Learning Objective: to open and use desired graphics application.
Logo ▪ A logo can be anything. It can be the name of a brand, the name of a company, or even your own
name. There are many ways to create a logo.
Software for Logo design ▪ You can design a Logo with many software and way. Illustrator is without doubt the best software
for creating logos. From ideas to output, you may take advantage of the power and precision of Adobe® Illustrator® software.
Individual Activity:
▪ Open illustrator
▪ Familiar with the working environment.
▪ Your trainer will guide to complete this activity.
SELF-CHECK QUIZ 4.3.1
Write correct answer for the following questions:
1. Write short note on logo.
2. Which design software is the best for logo design?
LEARNING ACTIVITY 4.3.2
Learning Activity Resources/Special Instructions/References
Create new document ▪ Information Sheet: 4.3.2 ▪ Self-Check Quiz: 4.3.2 ▪ Answer Key: 4.3.2
INFORMATION SHEET 4.3.2
Learning Objective: to create new document.
New Document: ▪ For your logo, create a new document on the selected software.
▪ In Illustrator, Select –
File –> New (Or press Ctrl+N)
▪ A New Document dialog box will appear.

CBLM – Graphic Design (Student Guide) v.1 Dec 2018 117
Skills for Employment Investment Programme (SEIP)
▪ Select appropriate options for your new document and press OK.
Individual Activity:
▪ Create a new document I illustrator to design a logo.
▪ Your trainer will guide to complete this activity.
SELF-CHECK QUIZ 4.3.2
Write correct answer for the following question:
1. How will you access to the new document dialogue box?
LEARNING ACTIVITY 4.3.3
Learning Activity Resources/Special Instructions/References
Create basic shape using the pen tool of the selected application
▪ Information Sheet: 4.3.3
https://www.youtube.com/watch?v=_bMABSFCq-o
https://www.youtube.com/watch?v=HUw2A2pjdWY
INFORMATION SHEET 4.3.3
Learning Objective: to create basic shape using the pen tool of the selected application.
Create logo with pen tool: ▪ You already learnt the use of Pen tool.
▪ In illustrator, you can easily place created shapes with pen tool to make a logo.

CBLM – Graphic Design (Student Guide) v.1 Dec 2018 118
Skills for Employment Investment Programme (SEIP)
▪ The reference links will show you ways to create logos using pen tools. You will find so many of examples on YouTube.
Individual Activity:
▪ Watch a video lesson and note the key points and apply them on your own works.
▪ Video reference: https://www.youtube.com/watch?v=HUw2A2pjdWY.
▪ Share your work with class.
▪ Your trainer will guide to complete this activity.
LEARNING ACTIVITY 4.3.4
Learning Activity Resources/Special Instructions/References
Select and apply desired colour ▪ Information Sheet: 4.3.4 ▪ Self-Check Quiz: 4.3.4 ▪ Answer Key: 4.3.4
INFORMATION SHEET 4.3.4
Learning Objective: to select and apply desired colour.
Apply colour: ▪ You learnt using colours on objects.
▪ Here you will apply colours on the objects/ texts to make a logo.
▪ Study the following example and make your own logo.
Example
▪ Create a simple logo or vector graphic using shapes of different colours. Decide on a key colour to be featured in the logo – for example, if you want to achieve an industrial feel, pick a cold grey or blue. Select your logo and bring up the Live Colour panel by going to Edit>Edit Colours> Recolour Artwork.

CBLM – Graphic Design (Student Guide) v.1 Dec 2018 119
Skills for Employment Investment Programme (SEIP)
▪ With the Live Colour panel open, click on the Edit tab to bring up the colour wheel. Here you can see the colours in your group, highlighted with circular anchors. The largest of the anchors indicates your key colour. Make sure your base colour is assigned by Ctrl/right-clicking it and selecting ‘Set as Base Colour’. Note that you can manually change the colours with the CMYK sliders at the bottom of the panel, and limit colour selections to Pantone swatches or web-safe colours.
With your base colour set, click on the drop-down arrow to the top-left of the panel. This brings up a number of colour groups based on the harmony rules of your base colour. At this point you can select a group of your choice (with the option to tweak it later) or create your own group. In my example, I’m using complementary colours at the opposite side of the colour wheel. Once you make a selection you can alter it by clicking the ‘Add or Remove Colour’ command at the bottom-right of the wheel.
▪ Tweak the colours according to your preference, using the colour harmonies as a guide. Once you’re happy with the group, click the New Colour Group button and hit OK to apply the colours to your artwork. Note that the colour group appears in the Swatches panel next to a folder icon. If you double-click the folder icon, you’ll find that you’re able to edit the colour group.
Individual Activity:
▪ Apply colour on your logo work.
▪ Share your work with class.
▪ Your trainer will guide to complete this activity.
SELF-CHECK QUIZ 4.3.4
Write correct answer for the following question:
1. How would you bring up the Live Color panel?

CBLM – Graphic Design (Student Guide) v.1 Dec 2018 120
Skills for Employment Investment Programme (SEIP)
LEARNING ACTIVITY 4.3.5
Learning Activity Resources/Special Instructions/References
Select desired shadow where applicable
▪ Information Sheet: 4.3.5 ▪ Self-Check Quiz: 4.3.5 ▪ Answer Key: 4.3.5
INFORMATION SHEET 4.3.5
Learning Objective: to select desired shadow where applicable.
Apply shadow: ▪ If your design requires, create shadow for your logo.
▪ You can apply Shadow effect directly from the Effect menu in illustrator.
Individual Activity:
▪ Apply shadow to objects of your design objects where required.
▪ Share your work with class.
▪ Your trainer will guide to complete this activity.
SELF-CHECK QUIZ 4.3.5
Fill in the gaps with correct answer in the following statement:
1. You can apply __________ effect directly from the __________ menu in illustrator.
LEARNING ACTIVITY 4.3.6
Learning Activity Resources/Special Instructions/References
Add text in accordance with project design requirement
▪ Information Sheet: 4.3.6 ▪ Self-Check Quiz: 4.3.6 ▪ Answer Key: 4.3.6
https://en.wikipedia.org/wiki/Kerning
INFORMATION SHEET 4.3.6
Learning Objective: to add text in accordance with project design requirement.
Add text to logo: ▪ Follow the following section to learn how to work with text for a Logo. These foundational methods
can unlock infinite potential in the world of logo creation.

CBLM – Graphic Design (Student Guide) v.1 Dec 2018 121
Skills for Employment Investment Programme (SEIP)
01. Start with the word
▪ Start with the word you'd like to design around. I'll be using the make-believe word "AQUIO," which, in our case, is a hydro-electric energy company. Grab a sketchpad and draw some shapes that remind you of the word. These shapes will be starting points for what will "house" our type. Try and push the boundaries, you never know what pieces might make it into your final design.
02. Brainstorm ▪ Open up Illustrator and explore several different typeface options. If you don't have many fonts, it
is suggested heading over to losttype.com and picking up a few. Here you can see some options f. The third one on the right looks good though it's a little tall.
03. Create outlines
▪ The letters are a bit tall and the "A" in this scenario looks odd. Increase your text size, then create outlines by selecting it and hitting ⌘+shift+O or by Type > Create Outlines.
04. Customize the lettering
▪ Delete the "A" and highlight the anchor points on the top half of the text with your direct selection tool. This font works well because it's got vertically straight sides. Use shift+down arrow to make the text a little less condensed but you could drag the points down with your mouse – just make sure you hold the shift key to keep them vertically in line.
05. Create new letterforms
▪ Duplicate the "U" and move it to the left of the "Q"; this will be our new "A". Object > Transform > Reflect it horizontally – if you have it selected, you can also right-click on it and quickly access the Transform > Rotate palette. Because we want to be consistent with the typeface, duplicate the "I", rotate it 90° and bring it over to the new "A" to create a crossbar.

CBLM – Graphic Design (Student Guide) v.1 Dec 2018 122
Skills for Employment Investment Programme (SEIP)
06. Learn to kern
▪ In typography, kerning is the process of adjusting the spacing between characters in a proportional font, usually to achieve a visually pleasing result.
▪ Squeeze the new crossbar in so that it fits inside the stems of the "A". Find a suitable height for the crossbar and group (⌘+G) or Pathfinder > Unite the two shapes that create your new "A." Position it amongst the other letters until your kerning feels appropriate.
07. Begin making the shape
▪ Now, let's look back at our sketches and choose a shape to build. Let’s create the droplet shape. When making a logo, it's best to start with black and white, using negative space to build a shape that can work with just one colour. Let's start with a circle – press L to quickly access your ellipse tool and hold shift while drawing it to make it perfectly round.
08. Make a droplet
▪ Select the top anchor point with your direct select tool and move it up. Switch to your pen tool (P) and hold option – this quickly accesses the convert to anchor point tool. Click the point you just moved to remove the bezier points.
09. Clean up the shape
▪ The shape is a little imperfect, so grab the top handle of the rightmost point and move it up. Place a guide by dragging down from your ruler (turn it on with ⌘+R) and line it up with that top handle – reason being, we want the other side to be perfectly symmetrical. Move the left anchor point's handle up to the guide. Apply a thick white, outside stroke to your new droplet shape.
10. Frame your lettering
▪ Now draw a black rectangle around your letters. Select your letters and change their fill colour to white, then move them in front of your black rectangle with ⌘+X then ⌘+F.
▪ Apply the same white, outside stroke (from the droplet) to the rectangle, and move it, along with your letterforms, on top of the droplet. If it looks like it's behind the droplet, move it above the droplet in the layers palette or use ⌘+X then ⌘+F.
▪ Once everything feels good, duplicate your black rectangle and move it straight up and out of the way (it's going to be our "ribbon" shape later on).
11. Begin creating the ribbon
▪ Select your rectangle behind your letters and Object > Path > Outline Stroke. Then group it with your letters by selecting both and pressing ⌘+G. With your new group selected, Effect > Warp > Arc about 15°. With both still selected, Object > Expand Appearance and then ungroup them with ⌘+shift+G. Return to the black rectangle you moved out of the way earlier and make it a little wider via the bounding box. Add anchor points to the middle of each side (smart guides will help you align them perfectly) and nudge each one towards the middle of the shape to create a "ribbon".

CBLM – Graphic Design (Student Guide) v.1 Dec 2018 123
Skills for Employment Investment Programme (SEIP)
12. Begin setting up your completely flat shape
▪ Turn off the stroke on your "ribbon" shape and apply the same arc effect by pressing ⌘+shift+E (or Effect > Apply Effect). Move it behind your droplet shape and Object > Expand Appearance. Select your droplet, Object > Path > Outline Stroke, and then duplicate it (⌘+C then ⌘+F). With the new droplet still selected, Pathfinder > Unite (this should give you an all-white droplet on top of your other one). Select both the white droplet and your "ribbon" and Pathfinder > Minus Front.
13. Slice and dice your shapes
▪ Select the original black banner (not the text) and its white stroke and ⌘+C, then ⌘+F, then Pathfinder > Unite. Select this white banner and the droplet behind it and Pathfinder > Minus Front. Direct select the white stroke around the banner and delete it with the delete key.
14. Clean up the details
▪ Zoom into your rightmost "ribbon" piece and create a new anchor point along its left side with the pen tool. Move this anchor point next to the bottom right corner of the main banner shape. Remove the handles from the new anchor point as well as the one to its bottom left (in the same shape) by clicking each point with the pen tool while holding option. Direct select both the newly created anchor point and then the bottom right anchor point of the main banner shape (in this order!) and horizontally and vertically align the anchor points using the Align palette. Repeat this process on the left side.
15. Merge your shapes
▪ Select the three banner pieces and Pathfinder > Unite. If for some reason, you can't see your text, just move this new shape below the text in your layers palette. You should now have only three shapes – the text, the banner, the droplet.
16. Finish up with colours
▪ We now have a fully flat logo that is ready for any printer and can be easily manipulated for a one-color or multi-colour version. Try out some different colour combinations and find something you like.
▪ This is only the beginning of what the logo could look like but, in general, simple is best!
Individual Activity:
▪ Use text to your logo design.
▪ Share your work with class.
▪ Your trainer will guide to complete this activity.
SELF-CHECK QUIZ 4.3.6
Write a short note on the following:
1. Kerning
2. Creating droplet
3. Slice and dice shape

CBLM – Graphic Design (Student Guide) v.1 Dec 2018 124
Skills for Employment Investment Programme (SEIP)
LEARNING ACTIVITY 4.3.7
Learning Activity Resources/Special Instructions/References
Add background gradient where desirable
▪ Information Sheet: 4.3.7 ▪ Self-Check Quiz: 4.3.7 ▪ Answer Key: 4.3.7
INFORMATION SHEET 4.3.7
Learning Objective: to add background gradient where desirable.
Use background gradient: ▪ Often using gradient in background of a logo is demanded by client.
Apply a gradient to an object ▪ Select an object and do one of the following:
▪ To apply the last used gradient, click the Gradient box in the Tools panel or the Gradient Fill box in the Gradient panel.
▪ To apply the last used gradient to an unselected object that currently does not contain a gradient,
click the object with the Gradient tool .
▪ To apply a pre-set or previously saved gradient, choose a gradient from the Gradient menu in the Gradient panel or click a gradient swatch in the Swatches panel.
Individual Activity:
▪ Apply background gradient on objects to make logo attractive.
▪ Share your work with class.
▪ Your trainer will guide to complete this activity.
SELF-CHECK QUIZ 4.3.7
Fill in the blanks with correct answer in the following statements:
1. To apply the last used gradient, click the Gradient box in the _______ panel or the Gradient _____ box in the Gradient panel.
2. To apply the last used gradient to an unselected object that currently does not contain a gradient, click
the object with the _____________ tool .
LEARNING ACTIVITY 4.3.8
Learning Activity Resources/Special Instructions/References
Complete and save logo ▪ Information Sheet: 4.3.8 ▪ Self-Check Quiz: 4.3.8 ▪ Answer Key: 4.3.8

CBLM – Graphic Design (Student Guide) v.1 Dec 2018 125
Skills for Employment Investment Programme (SEIP)
https://en.wikipedia.org/wiki/Media_queries
https://gist.github.com/gokulkrishh/242e68d1ee94ad05f488
INFORMATION SHEET 4.3.8
Learning Objective: to complete and save logo.
Complete and save logo:
When all the work with logo is done, save it with desired formats. Take care that: ▪ Compare your final work with design requirements. ▪ Make necessary adjustments if required to meet the requirements. ▪ Save the main design in the regular file format of the software you are using (here .ai for illustrator
or .psd for Photoshop) ▪ Then other format like .jpg, .tiff, .pdf etc you can save for client as they require.
Individual Activity:
▪ Finalize your logo.
▪ Save the logo in a desirable format.
▪ Share your work with class.
▪ Your trainer will guide to complete this activity.
SELF-CHECK QUIZ 4.3.8
Fill in the blanks with correct answer in the following statements:
1. Save the main design in the regular file format of the software you are using, _____ if using illustrator.
2. Then other _________ like .jpg, .tiff, .pdf etc. you can save for client as they __________.

CBLM – Graphic Design (Student Guide) v.1 Dec 2018 126
Skills for Employment Investment Programme (SEIP)
Learning Outcome 4.4 - Create Mock-Up
Contents:
▪ Open and use desired graphics application ▪ Create new document ▪ Execute steps in preparing mock up in accordance with conceptualized design ▪ Executed steps in setting up smart object ▪ Accomplish steps in editing smart object ▪ Complete and save mock-up
Assessment criteria:
1. Desired graphics application is opened and used.
2. New document is created.
3. Steps in preparing mock-up is executed in accordance with conceptualized design.
4. Steps in setting up smart object is executed.
5. Steps in editing smart object is accomplished.
6. Mock-up is completed and saved.
Resources required:
Students/trainees must be provided with the following resources:
▪ Workplace (simulated or actual) ▪ Personal computer/laptop ▪ Pens ▪ Paper ▪ Instruction sheet/manual
LEARNING ACTIVITY 4.4.1
Learning Activity Resources/Special Instructions/References
Open and use desired graphics application ▪ Information Sheet: 4.4.1 ▪ Self-Check Quiz: 4.4.1 ▪ Answer Key: 4.4.1

CBLM – Graphic Design (Student Guide) v.1 Dec 2018 127
Skills for Employment Investment Programme (SEIP)
INFORMATION SHEET 4.4.1
Learning Objective: to open and use desired graphics application.
Mock-up: ▪ Mock-up reflects the design choices for colour schemes, layouts, typography, iconography, the
visuals of navigation, and the overall atmosphere of the product.
▪ Mock-up has several benefits:
✓ Intuitive to stakeholders — Stakeholders can more easily see the final product. ✓ Realistic perspective — Mock-up can help reveal problems that aren’t so apparent on
paper (for example, colour clashes, or smaller type crimes going unnoticed). ✓ Early revisions — It’s easier to make revisions in a mock-up than in the later coding stages
(as long as the mock up itself isn’t coded).
▪ A mock up could be made immediately after wireframing or could be postponed until after some prototype testing.
Graphics application for Mock-up: ▪ To create mock up choose your suitable application software following previous Section 4.3.1 of
this module.
Individual Activity:
▪ Plan for mock-up of your design work manually.
▪ Choose a design software to create mock up.
▪ Your trainer will guide to complete this activity.
SELF-CHECK QUIZ 4.4.1
Write correct answer for the following questions:
1. What is a mock-up?
2. Write the benefits of a mock-up.
LEARNING ACTIVITY 4.4.2
Learning Activity Resources/Special Instructions/References
Create new document ▪ Information Sheet: 4.4.2
INFORMATION SHEET 4.4.2
Learning Objective: to create new document.
Create new document: ▪ Open the selected graphics design software.

CBLM – Graphic Design (Student Guide) v.1 Dec 2018 128
Skills for Employment Investment Programme (SEIP)
▪ Select File->New Document
▪ Set preferences for the document.
Individual Activity:
▪ Open the selected graphics design software,
▪ Open new document and set the preferences of this document.
▪ Your trainer will guide to complete this activity.
LEARNING ACTIVITY 4.4.3
Learning Activity Resources/Special Instructions/References
Execute steps in preparing mock up in accordance with conceptualized design.
▪ Information Sheet: 4.4.3 ▪ Self-Check: 4.4.3 ▪ Answer Key: 4.4.3 ▪
INFORMATION SHEET 4.4.3
Learning Objective: to execute steps in preparing mock up in accordance with conceptualized design.
Steps of creating Mock-up
Step 1
Let’s start by creating a canvas at 1588×1191 pixels big then proceed by changing the background colour to #d2d3d5;
To make this graphic neater looking and not disorganized to work with, we need rulers and grids. You can access the rulers by going to View > Rulers (or press Ctrl + R) as for the grids go to View > Show > Grids (or press Ctrl +,). Here are my settings for the grids, be sure to change yours the same as mine so that the following steps won’t be confusing.

CBLM – Graphic Design (Student Guide) v.1 Dec 2018 129
Skills for Employment Investment Programme (SEIP)
Step 2
Create a New Group and rename it ‘Right Side’. Create a New Layer and name that as ‘Right Side’ as well. Using the Rectangular Marquee Tool, make a selection that is 795×1078 pixels big. Once you’ve done that fill the selection with a random colour. I just filled it with white (#FFFFFF).
Then proceed by making it a Smart Object, you can do so by right-clicking the layer then selecting ‘Make A Smart Object’. Doing so would let us change everything we want we this layer without actually ‘ruining’ it.
Step 3
Create another Group but this time name it ‘Left Side’. Create a New Layer and name that as ‘Left Side’ as well. Just like what we did before, we need to make a selection and then follow up by filling it with a random colour. This time make a selection that is 483×1078 pixels big. Then just like what we did in the previous step, transform the layer into a smart object.
Step 4
Before actually doing the design part, let’s adjust the layers and transform them into a 3d realistic box. And we’ll start with the Right Side of the box. Select that layer and then press Ctrl + T we need to transform it and we’ll start by actually shrinking it (shrink it by 75%) a bit until it’s only 814~ tall. Be sure that you don’t forget to click on the chain icon when shrinking it. Then Go to Edit > Transform >
Then Press Ctrl + T, hold the Ctrl key and you want to shrink the right side just a bit to make it look more like a rectangle rather than a fat square.
Step 5

CBLM – Graphic Design (Student Guide) v.1 Dec 2018 130
Skills for Employment Investment Programme (SEIP)
Just like what we did before, you want to shrink it by 75%. With this section of the box, you just want to use hold the Ctrl key and transform it until you come up with what looks like a 3d box… make sure that the height of the distorted sides is parallel to the distorted part of the right section, don’t forget to shrink the left section of the box.
You’ll have something like this in the end…
Step 6
Now that that’s done, we can finally start doing the design part. We’ll start with the right section of the box so with that being said, select that layer and double-click the smart object to open it. In this part, you can either create your own design or follow what I’m doing. For the design I did, I used a sky-blue colour scheme for the box. So, if you want to follow the design I did, start by changing the background colour to #e1ebe4; mine is actually just a simple one. After the background let’s proceed by doing the title (placed on the top-centre of the design..). I used the following fonts for the title (I used the colour #1f1f20;) :
To add more detail, I added a check (#009a81;) and a registered symbol using the Custom Shape Tool. Then to proceed I added a random text under the title using the Paragraph Tool (this can be accessed by selecting and dragging randomly with the Text Tool). I used the following settings for it:
Step 7
Once you’ve done your design save it and as soon as you save it you’ll see that the design you just made will show up on our original canvas. Now let’s proceed with the left section… so just like before, select the left section and double-click the smart object icon to open it and then create your design for that section. For those who decided to follow the design I did, change the background colour to #a5dfda; then just copy and place the title we did on the right section of the box but tilt the text. Change the colour of the check symbol to white and add more symbols.
Then just like before, add random text on the bottom part of the design.
Once you’re happy with your design, save it. Here is what it looks like right now:
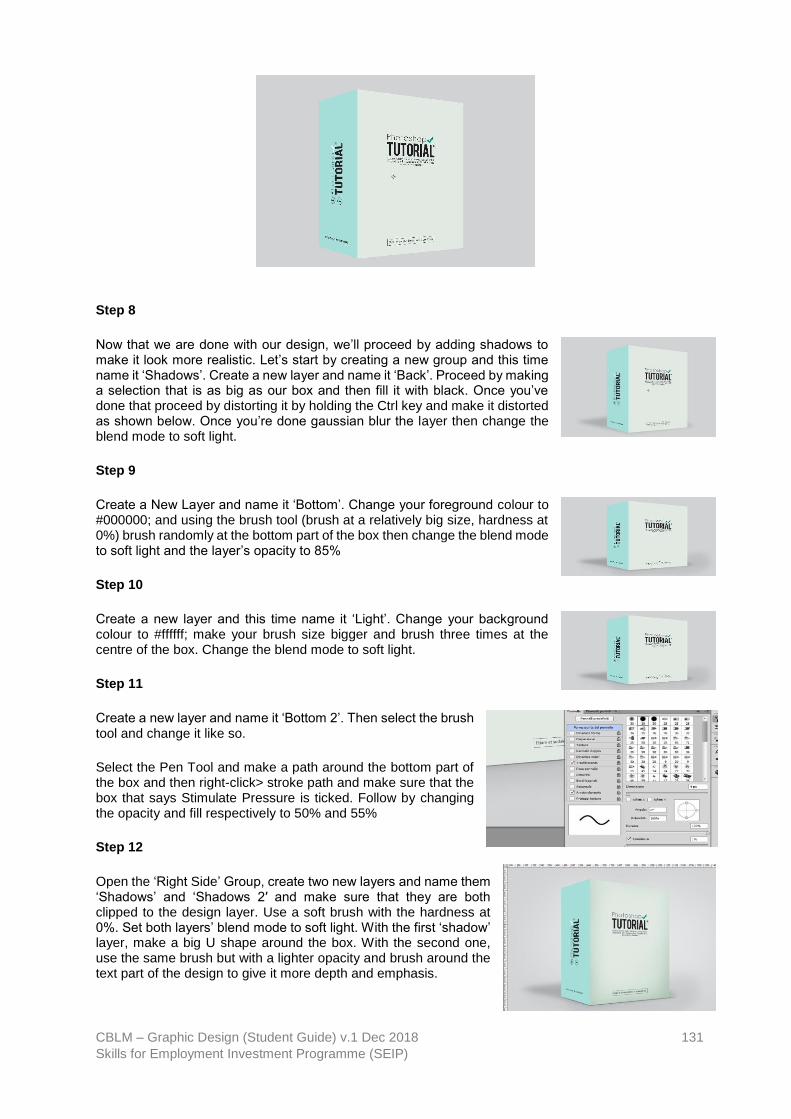
CBLM – Graphic Design (Student Guide) v.1 Dec 2018 131
Skills for Employment Investment Programme (SEIP)
Step 8
Now that we are done with our design, we’ll proceed by adding shadows to make it look more realistic. Let’s start by creating a new group and this time name it ‘Shadows’. Create a new layer and name it ‘Back’. Proceed by making a selection that is as big as our box and then fill it with black. Once you’ve done that proceed by distorting it by holding the Ctrl key and make it distorted as shown below. Once you’re done gaussian blur the layer then change the blend mode to soft light.
Step 9
Create a New Layer and name it ‘Bottom’. Change your foreground colour to #000000; and using the brush tool (brush at a relatively big size, hardness at 0%) brush randomly at the bottom part of the box then change the blend mode to soft light and the layer’s opacity to 85%
Step 10
Create a new layer and this time name it ‘Light’. Change your background colour to #ffffff; make your brush size bigger and brush three times at the centre of the box. Change the blend mode to soft light.
Step 11
Create a new layer and name it ‘Bottom 2’. Then select the brush tool and change it like so.
Select the Pen Tool and make a path around the bottom part of the box and then right-click> stroke path and make sure that the box that says Stimulate Pressure is ticked. Follow by changing the opacity and fill respectively to 50% and 55%
Step 12
Open the ‘Right Side’ Group, create two new layers and name them ‘Shadows’ and ‘Shadows 2′ and make sure that they are both clipped to the design layer. Use a soft brush with the hardness at 0%. Set both layers’ blend mode to soft light. With the first ‘shadow’ layer, make a big U shape around the box. With the second one, use the same brush but with a lighter opacity and brush around the text part of the design to give it more depth and emphasis.

CBLM – Graphic Design (Student Guide) v.1 Dec 2018 132
Skills for Employment Investment Programme (SEIP)
Step 13
Create two new layers and name them ‘details:shadows’ and ‘details:highlights’. In this step you just want to repeat step 11. Use #ffffff; for the highlights and #000000; for the shadows. Make a path just above and below the box
Step 14
Repeat the last two steps with the left section of the box
Step 15
Create a new group and name it ‘Details’. Follow by creating a new layer and naming it ‘Left Flap’. Using the Pen Tool, you want to create a triangle -like shape but with a really flat centre. Then right-click and fill it with #767676; Next you want to add an Inner Shadow to it…
Then some Inner Glow.
Step 16
Create a New layer and name it ‘Shadow’. You want to re-do step 11 but with a slightly bigger brush size (size 4-6px), create a line next to the side that divides the left and right section of the box(place it more to the right side). Then blur it with gaussian blur and change the blend mode to soft light (it is indicated as a red line below)
Step 17
Repeat the previous step but this time name the layer ‘highlights’ and use #ffffff; as your colour and place it more to the left side like so (it is the blue line)

CBLM – Graphic Design (Student Guide) v.1 Dec 2018 133
Skills for Employment Investment Programme (SEIP)
Step 18
Create another layer and name it ‘line’ and using the line tool create a line (at least 2-3px big) on the side that divides the left and right section at #000000; change its blend mode to soft light. (it is indicated as the white line)
Final Results
Individual Activity:
▪ Plan and create mock up for your design work.
▪ Use selected design software.
▪ Your trainer will guide to complete this activity.
SELF-CHECK QUIZ 4.4.3
Write correct answer for the following question: Mockups reflect the design choices for:
a. colour schemes, layouts, typography
b. iconography, the visuals of navigation
c. Both a and b
d. None
LEARNING ACTIVITY 4.4.4
Learning Activity Resources/Special Instructions/References

CBLM – Graphic Design (Student Guide) v.1 Dec 2018 134
Skills for Employment Investment Programme (SEIP)
Steps in setting up smart object is executed
▪ Information Sheet: 4.4.4 ▪ Self-Check Quiz: 4.4.4 ▪ Answer Key: 4.4.4
INFORMATION SHEET 4.4.4
Learning Objective: to steps in setting up smart object is executed.
Smart Object and Mock up. ▪ Using smart objects make quality of a mock up higher. Smart Objects are one of the most powerful
features in Photoshop. Once everything is set up, you can change all of the screen images at once by updating the Smart Object. Each Smart Object can contain multiple layers, making it super quick and easy to change up your presentation.
Prepare the Mock-up Step 1
▪ You can find isolated product shots on PhotoDune or GraphicRiver, and you can use as many as you like in your composition. This particular file has separate layers for the products, their shadows, and the glare on each screen.
Step 2
▪ Prepare a separate layer for each screen. Take the Rectangle Tool (U) and draw a rectangle the same size as each screen. Alternately, you can use the Rectangular Marquee Tool (M) and fill the selection with pixels. Whichever method you use, the "screen" must be on a separate layer.
▪ Draw a rectangle the same size as the screen. This will cover any image you have on the screen and will occupy its own layer.
▪ I prefer to use a Shape Layer because it is easier to make fine adjustments to the shape using the Free Transform (Command-T) command.
Step 3
Make a screen layer for each of the other screens. You can fill the shapes with any colour. These "screen" layers will be used later to mask the Smart Objects. Your mock-up should now look something like the image below:

CBLM – Graphic Design (Student Guide) v.1 Dec 2018 135
Skills for Employment Investment Programme (SEIP)
Step 4
It's a good idea to do some housekeeping at this point. Naming and organizing layers will save you time in the long run. In the image below, I have color-coded all of the layers that belong to each product. To change a layer's colour, click on the layer to highlight it, and then click the flyout menu on the side of the Layers panel and choose Layer Properties.
You can even create Layer Groups for each product. Select all the layers that belong to one product and click the flyout menu on the Layers panel. Choose New Group from Layers, as in the image below. You can then colour the entire group by choosing Group Properties from the flyout menu.
Set Up the Smart Object Step 1
I'm using a screenshot of the Tuts+ website. Drag the screenshot into the mock-up PSD. Move its layer above the Desktop Screen layer. To convert this layer to a Smart Object, you can do one of three things:
1. Go to the Layer menu to Smart Objects> Convert to Smart Object.
2. Click the flyout menu on the Layers panel and choose Convert to Smart Object.
3. Right-click the layer in the Layers panel and choose Convert to Smart Object.
Note: Do not re-size the layer to fit the screen before converting it to a Smart Object.
Step 2
Now you can resize the Smart Object to fit the width of the desktop screen. Press Command/Control-T and use the handles to resize the image. You'll notice a subtle visual cue when working with a Smart Object: the transform handles on a Smart Object are solid, whereas the handles on a regular pixel layer are hollow. Leave the Smart Object hanging off the bottom of the screen for now. If you want, rename the Smart Object layer.
Step 3
Make a duplicate of the Smart Object layer by dragging it to the New Layer icon on the bottom of the Layers panel.

CBLM – Graphic Design (Student Guide) v.1 Dec 2018 136
Skills for Employment Investment Programme (SEIP)
Duplicate the Smart Object layer by dragging it to the New Layer icon.
Step 4
Drag the Smart Object copy above the Laptop Screen layer. As you did before, use Free Transform to re-size it to fit the width of the tablet screen. Again, you can leave it extending beyond the bottom of the screen for now.
Move the Smart Object copy on top of the Laptop Screen layer.
Step 5
Make another copy of the Smart Object and place it above the Tablet Screen layer. As before, resize it to fit the width of the tablet screen. Do not worry about the excess length.
Step 6

CBLM – Graphic Design (Student Guide) v.1 Dec 2018 137
Skills for Employment Investment Programme (SEIP)
Now that all the Smart Objects are in place, you can clip them to their respective screens. This will mask off the part of the image that extends beyond the bottom of the screen, but it won't actually crop the screenshot. First, select the Smart Object layer, and then click the flyout menu on the Layers panel and choose Create Clipping Mask. You can also use the keyboard shortcut, as shown.
Alternately, you can hold down the Option (Alt) key and click between the two layers. You'll see the cursor change to double circles to let you know you're in the right spot.
Hold down the Option/Alt key and click between the
layers to create a Clipping Mask. The cursor changes
to a double-circle icon.
Once the clipping mask is created, the screenshot should fill the dimensions of the screen. You'll also see the layer thumbnail has shifted slightly to the right and has a small downward arrow. This indicates that the Smart Object layer is "clipped" to the layer below. This is why we created those screen layers earlier.
Here is the mock-up, with all the Smart Objects clipped to their respective screens:
Individual Activity:
▪ Create and add smart objects to mock up according to design brief.
▪ Use the tool for developing style sheets.
▪ Your trainer will guide to complete this activity.

CBLM – Graphic Design (Student Guide) v.1 Dec 2018 138
Skills for Employment Investment Programme (SEIP)
SELF-CHECK QUIZ 4.4.4
Write correct answer for the following question:
1. Which one of the following objects cannot be drawn with a Pen tool? a. Circle
b. Square
c. Pyramid d. None
LEARNING ACTIVITY 4.4.5
Learning Activity Resources/Special Instructions/References
Accomplish steps in editing smart object ▪ Information Sheet: 4.4.5 ▪ Self-Check Quiz: 4.4.5 ▪ Answer Key: 4.4.5
INFORMATION SHEET 4.4.5
Learning Objective: to accomplish steps in editing smart object.
Steps of editing objects Step 1
▪ Now that the Smart Object and its copies are in place, you can change the image on all three screens by editing the original Smart Object. Double-click the Smart Object thumbnail to edit. You'll see the following message. Once you become accustomed to working with Smart Objects, you can choose to turn off this warning dialog.
▪ The Smart Object opens as a separate, special file. The file extension is .psb:

CBLM – Graphic Design (Student Guide) v.1 Dec 2018 139
Skills for Employment Investment Programme (SEIP)
Step 2
▪ To edit the Smart Object, I'm just going to drag a different screenshot on top of the existing one. There is no need to flatten the image, as Smart Objects can have multiple layers.
Step 3
▪ Close and save the .psb file. Now the new screenshot will appear on all three screens. There is no need to edit the other two Smart Object layers, because each one is a copy of the original.
▪ You can add or change the image as many times as you like. You could store several screenshots inside the layers in the Smart Object, to quickly present different versions in the same Photoshop document.
Individual Activity:
▪ Practice editing smart objects.
▪ Share your work in class.
▪ Your trainer will guide to complete this activity.

CBLM – Graphic Design (Student Guide) v.1 Dec 2018 140
Skills for Employment Investment Programme (SEIP)
SELF-CHECK QUIZ 4.4.5
Write correct answer for the following question:
1. Which one of the following objects cannot be drawn with Pen tool? a. Circle
b. Square
c. Pyramid
d. None
LEARNING ACTIVITY 4.4.6
Learning Activity Resources/Special Instructions/References
Complete and save mock-up ▪ Information Sheet: 4.4.6
INFORMATION SHEET 4.4.6
Learning Objective: to complete and save mock up.
Complete and save mock up: ▪ When all the works with mock-up are done, save it with desired formats. Take care that you:
▪ Compare your final work with design requirements. ▪ Make necessary adjustments if required to meet the requirements. ▪ Save the main design in the regular file format of the software you are using (here .ai for
illustrator or .psd for Photoshop) ▪ Then other format like .jpg, .tiff, .pdf etc you can save for client as they require.
Individual Activity:
▪ Finalize your mock-up.
▪ Save it in a desirable format.
▪ Share your work with class.
▪ Your trainer will guide to complete this activity.

CBLM – Graphic Design (Student Guide) v.1 Dec 2018 141
Skills for Employment Investment Programme (SEIP)
REVIEW OF COMPETENCY
Final Checklist (for the performance criteria of the module Performing Distempering)
Performance Criteria Yes No
1. Details of the graphic design project are reviewed to identify preference setting requirements.
2. View magnification is set for ease of working with the graphics application.
3. Graphic design application is opened and used.
4. Application pen tool is used and manipulated.
5. Desired pencil tool option is chosen.
6. Usage of pencil tools are understood.
7. Desired graphics application is opened and used.
8. Path is created using pen tool around the image area.
9. Path is named and saved in the paths panel menu.
10. Clipping path is chosen from the same panel menu.
11. Path drop-down list is chosen from the clipping paths dialog box.
12. Clipping path is saved in the chosen file.
13. Desired graphics application is opened and used.
14. New document is created.
15. Basic shape is created using the pen tool of the selected application.
16. Desired color is selected and applied.
17. Desired shadow is selected where applicable.
18. Text is added in accordance with project design requirement.
19. Background gradient is added where desirable.
20. Logo is completed and saved.
21. Desired graphics application is opened and used.
22. New document is created.
23. Steps in preparing mockup is executed in accordance with conceptualized design.
24. Steps in setting up smart object is executed.
25. Steps in editing smart object is accomplished.
26. Mock up is completed and saved.
Now I feel ready to undertake my formal competency assessment.
Signed: _________________________
Date: _________________________

CBLM – Graphic Design (Student Guide) v.1 Dec 2018 142
Skills for Employment Investment Programme (SEIP)
ANSWER KEYS
ANSWER KEY 4.1.1
1. True 2. False
ANSWER KEY 4.1.2
1. Cascading 2. CSS 3. Look 4. Compatible, user 5. Position, reposition 6. Layout
ANSWER KEY 4.1.3
▪ Adobe Illustrator CS ▪ CorelDraw X4 ▪ In Design CS ▪ Quark Xpress -7 ▪ Adobe Photoshop Elements
ANSWER KEY 4.1.5
1. The Pencil tool lets draw open and closed paths as if were drawing with a pencil on paper. It is most useful for fast sketching or creating a hand-drawn look. Once you draw a path, you can immediately change it if needed.
2. CSS.
ANSWER KEY 4.1.6
1. Impromptu, edit 2. Pen
ANSWER KEY 4.2.1
1. Any selection tool preferably Pen tool.
ANSWER KEY 4.2.2
1. A clipping path (or "deep etch") is a closed vector path, or shape, used to cut out a 2D image in image editing software. Anything inside the path will be included after the clipping path is applied; anything outside the path will be omitted from the output.
ANSWER KEY 4.2.3
1. To save without renaming, drag the work path name to the New Path button at the bottom of the Paths panel. To save and rename, choose Save Path from the Paths panel menu, enter a new path name in the Save Path dialog box, and click OK.
ANSWER KEY 4.2.4
1. From menu: Window > Paths

CBLM – Graphic Design (Student Guide) v.1 Dec 2018 143
Skills for Employment Investment Programme (SEIP)
ANSWER KEY 4.2.5
1. False 2. False
ANSWER KEY 4.2.6
1. True 2. True 3. True 4. True
ANSWER KEY 4.3.1
1. A logo can be anything. It can be the name of a brand, the name of a company, or even your own name.
2. Illustrator.
ANSWER KEY 4.3.2
1. File_>New (Or press ctrl_N) 2. Illustrator
ANSWER KEY 4.3.4
1. Edit>Edit Colours> Recolour Artwork.
ANSWER KEY 4.3.5
1. Shadow, Effect.
ANSWER KEY 4.3.6
1. In typography, kerning is the process of adjusting the spacing between characters in a proportional font, usually to achieve a visually pleasing result.
2. Select the top anchor point with your direct select tool and move it up. Switch to your pen tool (P) and hold option – this quickly accesses the convert to anchor point tool. Click the point you just moved to remove the bezier points.
3. Select the original black banner (not the text) and its white stroke and ⌘+C, then ⌘+F, then Pathfinder > Unite. Select this white banner and the droplet behind it and Pathfinder > Minus Front. Direct select the white stroke around the banner and delete it with the delete key.
ANSWER KEY 4.3.7
1. Tools, Fill 2. Gradient
ANSWER KEY 4.3.8
1. .ai 2. Format, require
ANSWER KEY 4.4.1
1. Mock-up reflects the design choices for colour schemes, layouts, typography, iconography, the visuals of navigation, and the overall atmosphere of the product.
2. Benefits: ▪ Intuitive to stakeholders ▪ Realistic perspective ▪ Early revisions

CBLM – Graphic Design (Student Guide) v.1 Dec 2018 144
Skills for Employment Investment Programme (SEIP)
ANSWER KEY 4.4.3
1. C
ANSWER KEY 4.4.4
1. D
ANSWER KEY 4.4.5
1. D

CBLM – Graphic Design (Student Guide) v.1 Dec 2018 145
Skills for Employment Investment Programme (SEIP)
Module 5: Review final output and print
MODULE CONTENT
Module Descriptor: This module covers the skills, knowledge and attitudes to review final output
and print graphic designs. It specifically includes checking image quality and
file size, manipulating objects and text, importing images, setting colour
separation and finalizing media and printing.
Nominal Duration: 50 hours
LEARNING OUTCOMES:
Upon completion of the module, the student/trainee should be able to:
1. Check image quality and file size
2. Manipulate objects and text
3. Import images
4. Set colour separation
5. Finalize media and print
PERFORMANCE CRITERIA:
1. Graphics application and files are opened, and design brief requirements are confirmed.
2. Graphics are repeated efficiently using a symbol or stamp to reduce file size.
3. Slices are created from objects, layers or groups and updated as required.
4. Image quality is checked and adjusted where necessary.
5. File size is checked and adjusted where necessary.
6. Tasks are automated and where necessary scripts are used for automation.
7. Manipulation and editing of objects and text are made according to design brief.
8. Repetition tools are identified and used to create duplicates and manipulated as a group.
9. Complex shapes are created and edited.
10. Bitmap images are embedded and/or linked in the file.
11. Placed Bitmaps are modified and/or duplicated according to design requirements.
12. Bitmaps are masked, and/or an opacity mask is added.
13. Layered file is exported to image editing program and edited.
14. The correct format for the color separation is determined by the requirements of the pre-press
workflow system.
15. Command is set to correct preferences for print quality and process.
16. Based on printer feedback, the color separation options are set according to print requirements of
the design brief.
17. Process and spot colors are combined as require.
18. A screen frequency value appropriate for the print quality is selected and color separation
preferences are saved.
19. Spreads and chokes traps are created to avoid mis-registration.
20. The overlapping and overprint of objects are defined.
21. A proof is created, and the separations checked.

CBLM – Graphic Design (Student Guide) v.1 Dec 2018 146
Skills for Employment Investment Programme (SEIP)
22. Any required editing is completed, and the file is saved.
23. Metadata tags are embedded to catalogue, organized and retrieved artwork.
24. For cross-media publishing purposes, web-safe colors are selected.
25. File formats are chosen to best represent artwork.
26. Objects are linked to create an image map that meets design requirements.
27. Objects are layered to create animation frames and exported for animation set up.
28. Compression options are selected that keep the image quality high and the file size low.
29. Export options are set to the best settings for the final media and the file is saved and exported.
30. Final media is printed.
CBLM – Graphic Design (Student Guide) v.1 Dec 2018 147
Skills for Employment Investment Programme (SEIP)
Learning Outcome 5.1 - Check Image Quality and File Size
Contents:
▪ Open graphics application and files and confirm design brief requirements ▪ Repeat graphics efficiently using a symbol or stamp to reduce file size ▪ Create slices from objects, layers or groups and update as required ▪ Check and adjust image quality where necessary ▪ Check and adjust file size where necessary ▪ Automate tasks and where necessary use scripts for automation
Assessment criteria:
1. Graphics application and files are opened, and design brief requirements are confirmed. 2. Graphics are repeated efficiently using a symbol or stamp to reduce file size. 3. Slices are created from objects, layers or groups and updated as required. 4. Image quality is checked and adjusted where necessary. 5. File size is checked and adjusted where necessary. 6. Tasks are automated and where necessary scripts are used for automation.
Resources required:
Students/trainees must be provided with the following resources:
▪ Workplace (simulated or actual) ▪ Personal computer and peripherals ▪ Different operating software, local web server ▪ Adobe Photoshop CC 2018 19.1.6 (64-bit) ▪ Internet ▪ Stationery ▪ Instruction sheet/manual
LEARNING ACTIVITY 5.1.1
Learning Activity Resources/Special Instructions/References
Open graphics application and files and confirm design brief requirements
▪ Information Sheet: 5.1.1 ▪ Self-Check Quiz: 5.1.1 ▪ Answer Key: 5.1.1

CBLM – Graphic Design (Student Guide) v.1 Dec 2018 148
Skills for Employment Investment Programme (SEIP)
INFORMATION SHEET 5.1.1
Learning Objective: to open graphics application and files and confirm design brief requirements.
Confirm design brief requirements: ▪ As you have completed the design works by this time, now you need to confirm that this design
meets the client’s requirement.
▪ For this, take the checklist prepared along with the design brief for this design work.
▪ Select suitable design software. (photoshop, illustrator, correl draw, InDesign, Quark X Press,
GIMP etc.)
▪ Open the final form of design file with the selected application.
▪ Compare your work with every point of the checklist.
▪ Confirm if all the requirements are met and proceed to deliver the work to client.
Individual Activity:
▪ Search and download offline installation package of Photoshop’s latest version.
▪ Set up Photoshop following the instructions.
▪ Discuss your findings in class.
▪ Your trainer will guide you to carry out this activity.
SELF-CHECK QUIZ 5.1.1
Mark true or false for the following statement:
1. Final design work should be checked with design requirements before submitting to Client.
LEARNING ACTIVITY 5.1.2
Learning Activity Resources/Special Instructions/References
Repeat graphics efficiently using a symbol or stamp to reduce file size
▪ Information Sheet: 5.1.2 ▪ Self-Check Quiz: 5.1.2 ▪ Answer Key: 5.1.2
https://www.mediacollege.com/adobe/photoshop/tool/clone.html
INFORMATION SHEET 5.1.2
Learning Objective: to repeat graphics efficiently using a symbol or stamp to reduce file size.
Reduce file size of final design work: ▪ While you are delivering your design work to client, the size of the artwork often become a matter.
▪ It is common to have the size in gigabyte range for big design.
▪ To reduce the file size designers often apply “Symbol” and “Stamp” tool to reduce file size without
reducing quality of the design work.

CBLM – Graphic Design (Student Guide) v.1 Dec 2018 149
Skills for Employment Investment Programme (SEIP)
Use of Symbols in Illustrator ▪ A symbol is an art object that you can reuse in a document.
▪ For example, if you create a symbol from a flower, you can then add instances of that symbol
multiple times to your artwork without actually adding the complex art multiple times.
▪ Each symbol instance is linked to the symbol in the Symbols panel or to a symbol’s library.
▪ Using symbols can save you time and greatly reduce file size.
Using symbol ▪ Go to the Symbol panel by going to Window>Symbols
▪ To use a symbol, open the Symbols panel, and then drag the symbol that you want into your document.
Create symbols ▪ If you are using an object often, you should turn it into a symbol that will be stored in the symbol
panel.
▪ Go to the Symbol panel by going to Window>Symbols
▪ Select your object, and then click New Symbol in the Symbols panel
▪ Let us learn to create a symbol using our bear that we drew in Illustrator.
▪ Select a name for the symbol and the type, either movie clip or graphic.
▪ Select your options.
▪ Click OK when you are finished.
▪ You will find your object as a symbol on the panel.
▪ You can now use it on your design work.
Stamp tool ▪ Photoshop's clone stamp tool allows you to duplicate part of an image.
▪ The process involves setting a sampling point in the image which will be used as a reference to create a new cloned area.
▪ Select the Clone Stamp tool , then check the settings in the options bar. Make sure you have a brush size appropriate for the job. The following settings are fairly typical:
▪ Aligned: If this option is selected, the new cloned image will be drawn continuously even if you release the mouse button while drawing. If it is deselected, the clone will begin drawing from the sampling point each time you release the mouse and resume painting.
▪ Use All Layers: If this option is selected, information will be used from all visible layers. Otherwise only the active layer will be used.
Individual Activity:
▪ Practice using symbol/stamp tool to reduce file size.
▪ Share your experience in class
▪ Your trainer will guide you to identify the tools.
SELF-CHECK QUIZ 5.1.2
Write correct answer for the following questions:
1. Write short note about Symbol tool.
2. Why and where is the Stamp tool used?

CBLM – Graphic Design (Student Guide) v.1 Dec 2018 150
Skills for Employment Investment Programme (SEIP)
LEARNING ACTIVITY 5.1.3
Learning Activity Resources/Special Instructions/References
Create slices from objects, layers or groups and update as required
▪ Information Sheet: 5.1.3 ▪ Self-Check Quiz: 5.1.3 ▪ Answer Key: 5.1.3
https://helpx.adobe.com/illustrator/using/slices-image-maps.html
INFORMATION SHEET 5.1.3
Learning Objective: to create slices from objects, layers or groups and update as required.
Slices:
▪ Slices in an Illustrator document correspond to table cells in the resulting web page. By default,
the slice area is exported as an image file that is enclosed in a table cell. If you want the table cell
to contain HTML text and a background colour instead of an image file, you can change the slice
type to No Image. If you want to convert Illustrator text to HTML text, you can change the slice
type to HTML Text.
Sliced artwork using different slice types
A. No Image slice B. Image slice C. HTML Text slice
▪ You can view slices on the artboard and in the Save For Web & Devices dialog box. Illustrator
numbers slices from left to right and top to bottom, beginning in the upper left corner of the artwork.
If you change the arrangement or total number of slices, slice numbers are updated to reflect the
new order.
▪ When you create a slice, Illustrator slices the surrounding artwork into automatic slices to maintain
the layout using a web-based table. There are two types of automatic slices: auto slices and sub-
slices.
▪ Auto slices account for the areas of your artwork that you did not define as a slice. Illustrator
regenerates auto slices every time you add or edit slices.
▪ Sub-slices indicate how overlapping user-defined slices will be divided. Although sub-slices are
numbered and display a slice symbol, you cannot select them separately from the underlying slice.
Illustrator regenerates sub-slices and auto slices as needed while you work.

CBLM – Graphic Design (Student Guide) v.1 Dec 2018 151
Skills for Employment Investment Programme (SEIP)
Create slices ▪ Select one or more objects on the artboard and choose Object > Slice > Make.
▪ Select the Slice tool and drag over the area where you want to create a slice. Shift-drag to
constrain the slice to a square. Alt-drag (Windows) or Option-drag (Mac OS) to draw from the
centre.
▪ Select one or more objects on the artboard and choose Object > Slice > Create From Selection.
▪ Place guides where you want to slice the artwork and choose Object > Slice > Create From
Guides.
▪ Select an existing slice and choose Object > Slice > Duplicate Slice.
Individual Activity:
▪ Practice applying slicing on your artwork.
▪ Share your work in class.
▪ Your trainer will guide you to carry on with this activity.
SELF-CHECK QUIZ 5.1.3
Fill in the gaps of the following statements:
1. Slices in an _____________ document correspond to table cells in the resulting _____ page.
2. Illustrator ________________ auto slices every time you add or edit slices.
LEARNING ACTIVITY 5.1.4
Learning Activity Resources/Special Instructions/References
Check and adjust image quality where necessary
▪ Information Sheet: 5.1.4 ▪ Self-Check Quiz: 5.1.4 ▪ Answer Key: 5.1.4
http://www.stillcreekpress.com/how-to-prepare-your-files-for-output-to-a-large-format-printer/
INFORMATION SHEET 5.1.4
Learning Objective: to check and adjust image quality where necessary.
Adjust image quality: ▪ You need to check the image quality of your design work.
▪ For this the standard mentioned on the design brief document is to be meet.
▪ You may need to adjust the quality to meet the requirements.

CBLM – Graphic Design (Student Guide) v.1 Dec 2018 152
Skills for Employment Investment Programme (SEIP)
How to Prepare Files for Output to a Large Format Printer ▪ Designing a billboard or a large banner for a trade
show, convention, conference or corporate event can be an intimidating experience. Here are a few things to be aware of to ensure a successful outcome of your large format print project.
Document bleeds ▪ The usual 0.125 in bleeds apply for wide format
printing. If we are finishing your project with grommets for mounting, please leave at least two inches between the trim and your live area.
Colour space ▪ This is still print, so although you’re preparing files at a lower resolution than you are used to, you
still need to make sure all your images are CMYK.
Resolution of graphics ▪ The process we use is governed purely by the end result and size. Viewing distance governs the
file setup and image quality. We use the following rules of thumb:
Authoring application ▪ Vector objects produced in Adobe Illustrator or Adobe InDesign are your best bet for small, easy
to transfer files and sharp final output because they scale seamlessly. ▪ When you are working with large dimensions, bitmapped images are going to be enormous (at
least 300+ MB) and very difficult for your computer to handle; saves can take several minutes as well. You can definitely use photos; as per the recommended resolutions above, however, link them to your authoring application.
Working at a scaled percentage ▪ If your banner will be larger than the maximum allowed dimensions in your authoring application,
you must work on a scaled down file. ▪ The maximum dimension in InDesign is 216 inches in either direction. For Illustrator, maximum
dimensions are a little larger, 227.5 inches in either width or height. QuarkXPress is not really designed for banner or large sign work, as it can only create a document 48 inches in either direction. In addition, there is a maximum file output increase of 400%, meaning you can’t scale anything down smaller than 25% of the final size.
▪ While working on your images in Photoshop, make them half the scale and double the resolution, so a 120 x 80-inch photo at 100 ppi becomes a 60 x 40-inch photo at 200 ppi. When you link the images into your banner in InDesign or Illustrator, you will need this half-size image because your document is half the final size.
Saving ▪ When you are done with the design, save the file in EPS or PDF format. PDF is what we
recommend for both image and vector-based designs as both vector quality and image compressions can be managed more efficiently.
Pre-flight ▪ Before you upload file(s) to us, open the EPS or PDF file you just saved. Review all the graphics
and text and make sure the dimension is what you expect.
Digital proof ▪ Digital soft proofs are generated from the print file. These proofs should be used for layout and
content purposes only and not to judge colour or print quality. We can provide you with an electronic proof in either a PDF or JPEG format.
Print proofs ▪ At your request we can run out a reduced size printed proof of your large format project and, if
need be, a section at full size. This will add a modest cost and some time to the turnaround but if you have specific design expectations then we would say it’s essential.

CBLM – Graphic Design (Student Guide) v.1 Dec 2018 153
Skills for Employment Investment Programme (SEIP)
Individual Activity:
▪ Practice with layers:
✓ Add new layer to your design on Photoshop ✓ Choose type for the layer ✓ Apply formatting options for the layer
▪ Your trainer will provide guidance with this activity.
SELF-CHECK QUIZ 5.1.4
Fill in the blanks for the following statements:
1. The usual _________________ bleeds apply for wide format printing.
2. For close viewing distance (0.5-1 m) the minimum resolution should be ______ dpi.
3. For far viewing distance (>6m), the minimum resolution should be ______ dpi.
4. For Illustrator, maximum dimensions are ____________ in either width or height.
5. In pdf both ____________ quality and image __________________ can be managed more efficiently.
LEARNING ACTIVITY 5.1.5
Learning Activity Resources/Special Instructions/References
Check and adjust file size where necessary
▪ Information Sheet: 5.1.5 ▪ Self-Check Quiz: 5.1.5 ▪ Answer Key: 5.1.5
INFORMATION SHEET 5.1.5
Learning Objective: to check and adjust file size where necessary.
Check and adjust file size: ▪ When you are working with high resolution design works, the size of the output file maybe too
large to forward to the press for printing. Adjustments are required to reduce the file size. ▪ Applying symbols or stamp is one of the solutions for images used.
Reducing File Size for Large-format Printing ▪ When file size is an issue, the following steps may help reduce the size of your large-format files.
Before performing any of these steps, remember to back up your original file and any linked graphics.
▪ Use graphics of the correct size and resolution for your file. 150 pixels per inch (ppi) at full size (dimensions) is sufficient resolution for most posters, banners and displays. If the graphics in your project are set to a resolution above 150 ppi (at full size) either (1) resample each graphic to 150 ppi, or (2) export the whole file to .pdf with a compression setting of 150 ppi.
▪ Document setup. Build your project in full dimensions at 150 ppi whenever possible. This requires that you establish a custom document or paper size, depending on the software program you are using.
▪ File format makes a difference. You may be able to reduce the file size by exporting or saving your file as a .pdf. For printing at Design Services, export your file for compatibility with Acrobat 9 and above. This will result in the smallest possible file size.

CBLM – Graphic Design (Student Guide) v.1 Dec 2018 154
Skills for Employment Investment Programme (SEIP)
▪ Some cases are discussed here are building your project in...
PowerPoint:
1. Set the document dimensions to full size before laying out the project. 2. If possible, resize your images to full-size dimensions at a resolution of 150 ppi before you import
them into PowerPoint (as opposed to resizing them within PowerPoint). 3. Try saving the file with a different name. This removes saved document history and can reduce the
file size. 4. Export the completed project as a .pdf. NOTE: Carefully review the .pdf version of the file to ensure
all the content exported successfully.
Photoshop:
1. Set the document dimensions to full size and the resolution to 150 ppi before laying out the project. 2. Save the file with a different name than your original file (to preserve the source file), then flatten the
file (using the “Flatten Image” option under the “Layers” menu). 3. Save the file as a .psd, .eps or .pdf if possible. These formats will not rasterize vector art (including
fonts). Saving in other formats will rasterize the entire file, which may result in larger file size and reduced image quality.
Illustrator:
1. Set the document dimensions to full size and the raster-effects resolution to medium (150 ppi) before laying out the project.
2. If possible, resize your images to full-size dimensions at a resolution of 150 ppi before you import them into Illustrator (as opposed to resizing them within Illustrator).
3. Save the file with a different name than your original file (to preserve the source file), then flatten the artwork (from the Layers palette). Select all unused colours and then delete unused colours (from the Swatches palette).
4. Save the file as an .ai, .eps or .pdf. 5. Using raster files (such as photos) in Illustrator may result in very large file sizes.
Individual Activity:
▪ Practice with smart object and normal layers.
▪ Your trainer will provide guidance with this activity.
SELF-CHECK QUIZ 5.1.5
Mark true or false for the following statements:
1. 150 pixels per inch (ppi) at full size (dimensions) is sufficient resolution for most posters, banners and
displays.
2. In general, build your project in full dimensions at 200 ppi whenever possible.
3. Using raster files (such as photos) in Illustrator may result in very large file sizes.
LEARNING ACTIVITY 5.1.6
Learning Activity Resources/Special Instructions/References
Automate tasks and where necessary use scripts for automation
▪ Information Sheet: 5.1.6 ▪ Self-Check Quiz: 5.1.6 ▪ Answer Key: 5.1.6
https://helpx.adobe.com/illustrator/using/automation-scripts.html

CBLM – Graphic Design (Student Guide) v.1 Dec 2018 155
Skills for Employment Investment Programme (SEIP)
INFORMATION SHEET 5.1.6
Learning Objective: to automate tasks and where necessary use scripts for automation.
Automation with scripting:
▪ When you run a script, your computer performs a sequence of operations. These operations may involve only Illustrator, or they may involve other applications, such as word-processing, spreadsheet, and database-management programs.
▪ Illustrator supports multiple scripting environments (including Microsoft Visual Basic, AppleScript, JavaScript, and ExtendScript). You can use the standard scripts that come with Illustrator, and you can create your own scripts and add them to the Scripts submenu.
Run a script
▪ Choose File > Scripts and choose a script. Alternatively, choose File > Scripts > Other Script, and navigate to a script.
▪ If you edit a script while Illustrator is running, you must save your changes for them to take effect.
Install a script
▪ Copy the script to your computer’s hard disk. ▪ If you place the script in the Adobe Illustrator Scripts folder, the script will appear in
the File > Scripts submenu. ▪ If you place the script in another location on the hard disk, you can run the script in Illustrator by
choosing File > Scripts > Other Script. ▪ If you place a script in the Adobe Illustrator Scripts folder while Illustrator is running, you must
restart Illustrator for the script to appear in the Scripts submenu.
Individual Activity:
▪ Practice applying scripts to automate tasks.
▪ Share your experience in class.
▪ Your trainer will provide guidance for this activity.
SELF-CHECK QUIZ 5.1.6
Mark true or false for the following statements:
1. When you run a script, your computer performs a sequence of operations.
2. Scripts may involve applications other than illustrator.
3. If you place the script in the Adobe Illustrator Scripts folder, the script will appear in the File > Scripts submenu.
4. To run a script, choose File > Scripts, and choose a script.

CBLM – Graphic Design (Student Guide) v.1 Dec 2018 156
Skills for Employment Investment Programme (SEIP)
Learning Outcome 5.2 - Manipulate Objects and Text
Contents:
▪ Make manipulation and editing of objects and text according to design brief ▪ Identify and use repetition tools to create duplicates and manipulated as a group ▪ Create and edit complex shapes
Assessment criteria:
1. Manipulation and editing of objects and text are made according to design brief. 2. Repetition tools are identified and used to create duplicates and manipulated as a group. 3. Complex shapes are created and edited.
Resources required:
Students/trainees must be provided with the following resources:
▪ Workplace (simulated or actual) ▪ Personal computer/laptop ▪ Pens ▪ paper ▪ Instruction sheet/manual
LEARNING ACTIVITY 5.2.1
Learning Activity Resources/Special Instructions/References
Make manipulation and editing of objects and text according to design brief
▪ Information Sheet: 5.2.1
INFORMATION SHEET 5.2.1
Learning Objective: to make manipulation and editing of objects and text according to design brief.
Manipulation and editing of objects and text
While checking your design work you may find some of your objects are not matching the design
brief. You may need to manipulate and edit objects at this stage.
Your trainer will show the ways to manipulate different Distort effects. Here you will learn to apply
them.

CBLM – Graphic Design (Student Guide) v.1 Dec 2018 157
Skills for Employment Investment Programme (SEIP)
JOB SHEET 8
Job Title: Manipulate and edit of objects and text
Instructions: ▪ Find the objects and texts that are not meeting the design brief requirement.
▪ Select them on the design file.
▪ Make necessary manipulations and edit to meet the requirements.
▪ Finalize the design.
Outcome: Objects and texts on design are manipulated.
LEARNING ACTIVITY 5.2.2
Learning Activity Resources/Special Instructions/References
Identify and use repetition tools to create duplicates and manipulated as a group
▪ Information Sheet: 5.2.2 ▪ Self-Check Quiz: 5.2.2 ▪ Answer Key: 5.2.2
INFORMATION SHEET 5.2.2
Learning Objective: to identify and use repetition tools to create duplicates and manipulated as a group.
Identify and use repetition Tools ▪ Trainees will identify duplication tools in the design software. You will select objects and texts that
require duplication.
▪ Use duplication tools to duplicate identified object and texts.
▪ Your trainer will help you to perform the task.
Individual Activity:
▪ Identify repetition tools ▪ Identify objects and Texts those need duplication ▪ Apply repetition work to the selected objects and texts
SELF-CHECK QUIZ 5.2.2
Write correct answer for the following question:
1. Name tow duplication tools.

CBLM – Graphic Design (Student Guide) v.1 Dec 2018 158
Skills for Employment Investment Programme (SEIP)
LEARNING ACTIVITY 5.2.3
Learning Activity Resources/Special Instructions/References
Create and edit complex shapes ▪ Information Sheet: 5.2.3 ▪ Self-Check Quiz: 5.2.3 ▪ Answer Key: 5.2.3
https://www.chegg.com/homework-help/definitions/complex-shapes-63
INFORMATION SHEET 5.2.3
Learning Objective: to create and edit complex shapes.
Complex shapes ▪ Most shapes occurring in the physical world are complex. ▪ Complex shapes combine parts or all of simple shapes. ▪ These complex shapes include polygons and other shapes that may include parts of circles,
squares, triangles, ellipses, and rectangles.
Create and edit complex shapes: ▪ Your Trainer will explain the use of complex shapes. ▪ He will demonstrate use of tools to create complex objects.
Individual Activity:
▪ Create complex shapes for your design. ▪ Share your work in class.
▪ Your trainer will guide you to carry on this activity.
SELF-CHECK QUIZ 5.2.3
Write correct answer for the following question:
1. Write in brief about complex object.

CBLM – Graphic Design (Student Guide) v.1 Dec 2018 159
Skills for Employment Investment Programme (SEIP)
Learning Outcome 5.3 - Import Images
Contents:
▪ Embed and/or link bitmap images in the file ▪ Modify and/or duplicate placed bitmaps according to design requirements ▪ Mask bitmaps and/or add an opacity mask ▪ Export layered file to image editing program and edit
Assessment criteria:
1. The correct format for the colour separation is determined by the requirements of the pre-press
workflow system.
2. Command is set to correct preferences for print quality and process.
3. Based on printer feedback, the colour separation options are set according to print requirements of the
design brief.
4. Process and spot colours are combined as require.
Resources required:
Students/trainees must be provided with the following resources:
▪ Workplace (simulated or actual) ▪ Personal computer and peripherals ▪ Software (system and applications) ▪ Photoshop CC ▪ HTML Editor/software/tools ▪ Internet ▪ Stationery ▪ Instruction sheet/manual
LEARNING ACTIVITY 5.3.1
Learning Activity Resources/Special Instructions/References
Embed and/or link bitmap images in the file
▪ Information Sheet: 5.3.1 ▪ Self-Check Quiz: 5.3.1 ▪ Answer Key: 5.3.1
https://www.youtube.com/watch?v=UZZygHOVq78

CBLM – Graphic Design (Student Guide) v.1 Dec 2018 160
Skills for Employment Investment Programme (SEIP)
INFORMATION SHEET 5.3.1
Learning Objective: to embed and/or link bitmap images in the file.
Embed and/or link bitmap images:
▪ When you place a graphic, you will see a screen-resolution version of the file in the layout, so that you can view and position it, but the actual graphic file may be either linked or embedded.
✓ Linked artwork is connected to, but remains independent of, the document, resulting in a smaller document. You can modify linked artwork using transformation tools and effects; however, you cannot select and edit individual components in the artwork. You can use the linked graphic many times without significantly increasing the size of the document; you can also update all links at once. When you export or print, the original graphic is retrieved, creating the final output from the full resolution of the originals.
✓ Embedded artwork is copied into the document at full resolution, resulting in a larger document. You can update the document whenever you like; as long as the artwork is embedded, your document is self-sufficient.
▪ To determine if artwork is linked or embedded or change the status, use the Links panel.
▪ If the embedded artwork contains multiple components, you can edit them discretely. For example, if the artwork contains vector data, Illustrator converts it to paths, which you can then modify using Illustrator tools and commands. Illustrator also preserves the object hierarchy (such as groups and layers) in artwork embedded from certain file formats.
Individual Activity:
▪ Watch a video presentation on embed and links of images.
▪ Video link: https://www.youtube.com/watch?v=UZZygHOVq78.
▪ select bitmap images to work with design.
▪ Embed bitmap image to design. ▪ Use Place option. ▪ Share your work with class.
▪ Your trainer will guide to complete this activity.
SELF-CHECK QUIZ 5.3.1
Mark true or false for the following statements:
1. Linked artwork results a smaller document.
2. Embedded results in a larger document.
3. Links panel is used to determine if artwork is linked or embedded or change the status.
LEARNING ACTIVITY 5.3.2
Learning Activity Resources/Special Instructions/References
Modify and/or duplicate placed bitmaps according to design requirements
▪ Information Sheet: 5.3.2

CBLM – Graphic Design (Student Guide) v.1 Dec 2018 161
Skills for Employment Investment Programme (SEIP)
INFORMATION SHEET 5.3.2
Learning Objective: to modify and/or duplicate placed bitmaps according to design requirements.
Practice Work: ▪ Identify embedded or placed bitmaps on design work.
▪ Make necessary modification on the images to meet the design requirements.
▪ Your Trainer will guide you to complete the task.
Individual Activity:
▪ Modify placed image. ▪ Duplicate image. ▪ Apply effects on placed image. ▪ Share your work with class. ▪ Your trainer will guide to complete this activity.
LEARNING ACTIVITY 5.3.3
Learning Activity Resources/Special Instructions/References
Mask bitmaps and/or add an opacity mask ▪ Information Sheet: 5.3.3
INFORMATION SHEET 5.3.3
Learning Objective: to mask bitmaps and/or add an opacity mask.
Mask and opacity mask with bitmaps: ▪ You will work with the added/placed image on your design.
✓ Apply mask effect to the placed bitmap image
✓ Apply opacity mask to bitmap image
▪ Your trainer will guide to work on right track with bitmap image.:
Individual Activity:
▪ Apply mask to placed image ▪ Apply opacity mask to images ▪ Share your work with class. ▪ Your trainer will guide to complete this activity.

CBLM – Graphic Design (Student Guide) v.1 Dec 2018 162
Skills for Employment Investment Programme (SEIP)
LEARNING ACTIVITY 5.3.4
Learning Activity Resources/Special Instructions/References
Export layered file to image editing program and edit
▪ Information Sheet: 5.3.4 ▪ Self-Check Quiz: 5.3.4 ▪ Answer Key: 5.3.4
https://helpx.adobe.com/illustrator/using/exporting-artwork.html
INFORMATION SHEET 5.3.4
Learning Objective: to export layered file to image editing program and edit.
Export layered files:
▪ Open the main design file in Illustrator. ▪ Choose File > Export. ▪ Select a location for the file and enter a filename. ▪ Select a format from the Save As Type (Windows) or Format (Mac OS) pop-up menu (i.e. psd to
send to photoshop). ▪ Click Save (Windows) or Export (Mac OS). ▪ Now edit the image where necessary in Photoshop and save. ▪ Check the effect of the edit on main design file in Illustrator.
Individual Activity:
▪ Save layered file. ▪ Export layered file to image editing application. ▪ Edit image and save. ▪ Check effect on main design file. ▪ Share your experience in class. ▪ Your trainer will provide necessary guide.
SELF-CHECK QUIZ 5.3.4
Fill in the blank on the following statement:
1. In Illustrator, to export a file choose ____________________.

CBLM – Graphic Design (Student Guide) v.1 Dec 2018 163
Skills for Employment Investment Programme (SEIP)
Learning Outcome 5.4 - Set Colour Separation
Contents:
▪ Determine the correct format for the colour separation by the requirements of the pre-press workflow system
▪ Set command to correct preferences for print quality and process ▪ Based on printer feedback, set the colour separation options according to print requirements of the
design brief ▪ Combine process and spot colours as required
Assessment criteria:
1. The correct format for the colour separation is determined by the requirements of the pre-press workflow system.
2. Command is set to correct preferences for print quality and process. 3. Based on printer feedback, the colour separation options are set according to print requirements of the
design brief. 4. Process and spot colours are combined as require.
Resources required:
Students/trainees must be provided with the following resources:
▪ Workplace (simulated or actual) ▪ Personal computer and peripherals ▪ Software (system and applications) ▪ Photoshop CC ▪ HTML Editor/software/tools ▪ Internet ▪ Stationery ▪ Instruction sheet/manual
LEARNING ACTIVITY 5.4.1
Learning Activity Resources/Special Instructions/References
Determine the correct format for the colour separation by the requirements of the pre-press workflow system
▪ Information Sheet: 5.4.1

CBLM – Graphic Design (Student Guide) v.1 Dec 2018 164
Skills for Employment Investment Programme (SEIP)
INFORMATION SHEET 5.4.1
Learning Objective: to determine the correct format for the colour separation by the requirements of the
pre-press workflow system.
Select colour separation format: ▪ Trainer will guide you to define prepress workflow system and determine correct format for the
colour separation for your design work.
Individual Activity:
▪ Define pre-press workflow system. ▪ Define colour separation. ▪ Set correct format for colour separation. ▪ Share your work with class. ▪ Your trainer will guide to complete this activity.
LEARNING ACTIVITY 5.4.2
Learning Activity Resources/Special Instructions/References
Set command to correct preferences for print quality and process
▪ Information Sheet: 5.4.2
INFORMATION SHEET 5.4.2
Learning Objective: to set command to correct preferences for print quality and process.
Set command to correct preferences ▪ Trainer will guide trainees to recognize preferences for print quality and process and show them
how to set command to correct preferences for the print quality and process.
▪ You need to demonstrate the print of the colour separation outputs. This print will be used for print check in the next section.
Individual Activity:
▪ Recognize preferences for print quality and process. ▪ Set command to correct preferences. ▪ Print out the colour separations of the design work. ▪ Share your work with class. ▪ Your trainer will guide to complete this activity.

CBLM – Graphic Design (Student Guide) v.1 Dec 2018 165
Skills for Employment Investment Programme (SEIP)
LEARNING ACTIVITY 5.4.3
Learning Activity Resources/Special Instructions/References
Based on printer feedback, set the colour separation options according to print requirements of the design brief
▪ Information Sheet: 5.4.3
INFORMATION SHEET 5.4.3
Learning Objective: to set the colour separation options according to print requirements of the design brief
and based on printer feedback.
Colour separation options: ▪ Trainer will guide you to take printer feedback. Compare the feedback with design brief
requirements.
▪ From the comparison, set the colour separation options according to design brief requirement.
Individual Activity:
▪ Take printer feedback. ▪ Compare the feedback with design brief requirements. ▪ Set the colour separation options according to design brief requirement. ▪ Share your work with class. ▪ Your trainer will guide to complete this activity.
LEARNING ACTIVITY 5.4.4
Learning Activity Resources/Special Instructions/References
Combine process and spot colours as required ▪ Information Sheet: 5.4.4
INFORMATION SHEET 5.4.4
Learning Objective: to combine process and spot colours as required.
Combine process and spot colours: ▪ Trainer will explain to the trainees about process colours and spot colours.
▪ He will show them how to work with both colours.
Individual Activity:
▪ Work with process colours. ▪ Work with spot colours. ▪ Combine both colours according to the requirement. ▪ Share your work with class. ▪ Your trainer will guide to complete this activity.

CBLM – Graphic Design (Student Guide) v.1 Dec 2018 166
Skills for Employment Investment Programme (SEIP)
Learning Outcome 5.5 - Finalize Media and Print
Contents:
▪ Select a screen frequency value appropriate for the print quality and save colour separation preferences
▪ Create spreads and chokes traps to avoid mis-registration ▪ Define the overlapping and overprint of objects ▪ Create a proof and check the separations ▪ Complete any required editing and save the file ▪ Embed metadata tags to catalogue, organized and retrieved artwork ▪ Select web-safe colours for cross-media publishing purposes ▪ Choose file formats to best represent artwork ▪ Link objects to create an image map that meets design requirements ▪ Layer objects to create animation frames and exported for animation set up ▪ Select compression options that keep the image quality high and the file size low ▪ Set export options to the best settings for the final media and save and export the file ▪ Print final media
Assessment criteria:
1. A screen frequency value appropriate for the print quality is selected and colour separation preferences are saved.
2. Spreads and chokes traps are created to avoid mis-registration. 3. The overlapping and overprint of objects are defined. 4. A proof is created, and the separations checked. 5. Any required editing is completed, and the file is saved, 6. Metadata tags are embedded to catalogue, organized and retrieved artwork. 7. For cross-media publishing purposes, web-safe colours are selected. 8. File formats are chosen to best represent artwork. 9. Objects are linked to create an image map that meets design requirements. 10. Objects are layered to create animation frames and exported for animation set up. 11. Compression options are selected that keep the image quality high and the file size low. 12. Export options are set to the best settings for the final media and the file is saved and exported. 13. Final media is printed.
Resources required:
Students/trainees must be provided with the following resources:
▪ Workplace (simulated or actual) ▪ Personal computer/laptop ▪ Pens ▪ Paper ▪ Instruction sheet/manual

CBLM – Graphic Design (Student Guide) v.1 Dec 2018 167
Skills for Employment Investment Programme (SEIP)
LEARNING ACTIVITY 5.5.1
Learning Activity Resources/Special Instructions/References
Select a screen frequency value appropriate for the print quality and save colour separation preferences
▪ Information Sheet: 5.5.1 ▪ Self-Check Quiz: 5.5.1 ▪ Answer Key: 5.5.1
https://helpx.adobe.com/indesign/using/inks-separations-screen-frequency.html
INFORMATION SHEET 5.5.1
Learning Objective: to select a screen frequency value appropriate for the print quality and save colour
separation preferences.
Halftone screen frequency:
▪ In commercial printing, continuous tone is simulated by dots (called halftone dots) printed in rows (called lines or line screens). Lines are printed at different angles to make the rows less noticeable.
▪ The Screening menu in the Output section of the Print dialog box displays the recommended sets of line screens in lines per inch (lpi), and resolution in dots per inch (dpi), based on the currently selected PPD.
▪ As you select inks in the ink list, the values in the Frequency and Angle boxes change, showing you the halftone screen frequency and angle for that ink.
▪ A high line-screen ruling (for example, 150 lpi) spaces the dots closely together to create a finely rendered image on the press; a low line-screen ruling (60 lpi to 85 lpi) spaces the dots farther apart to create a coarser image. The size of the dots is also determined by the line screen. A high line-screen ruling uses small dots; a low line-screen ruling uses large dots.
▪ The most important factor in choosing a line-screen ruling is the type of printing press your job will use.
▪ Ask your service provider how fine a line screen its press can hold and make your choices accordingly.
Specify a halftone screen frequency and resolution:
▪ In the Output section of the Print dialog box, choose one of the following options:
▪ To select one of the pre-set screen frequencies and printer resolution combinations, choose an option in the Screening menu.
Line screens
A. 65 lpi: Coarse screen for printing newsletters and grocery coupons B. 85 lpi: Average screen for printing newspapers C. 133 lpi: High-quality screen for printing four-color magazines D. 177 lpi: Very fine screen for printing annual reports and images in art books

CBLM – Graphic Design (Student Guide) v.1 Dec 2018 168
Skills for Employment Investment Programme (SEIP)
▪ To specify a custom halftone screen frequency, select the plate to be customized, and then enter the lpi value in the Frequency text box and a screen angle value in the Angle text box.
Note:
▪ Before creating your own halftone screens, check with your service provider for the preferred frequencies and angles. Also, be aware that some output devices override the default frequencies and angles.
Colour Separation:
▪ Trainer will guide trainees to understand colour separation options.
▪ You will recognize colour separation options, set options for your work and save options.
Individual Activity:
▪ Identify halftone screen frequency options.
▪ Apply options to improve output quality.
▪ Share your work with class.
▪ Your trainer will guide to complete this activity.
SELF-CHECK QUIZ 5.5.1
Mark true or false for the following statements:
1. Lines are printed at different angles to make the rows less noticeable.
2. DPI means doodle per inch.
3. Low line-screen image contains 60 lpi to 85 lpi.
4. The most important factor in choosing a line-screen ruling is the type of printing press your job will use.
LEARNING ACTIVITY 5.5.2
Learning Activity Resources/Special Instructions/References
Create spreads and chokes traps to avoid mis-registration
▪ Information Sheet: 5.5.2 ▪ Self-Check Quiz: 5.5.2 ▪ Answer Key: 5.5.2
http://profesorazii.blogspot.com/2009/09/illustrator-what-is-trapping-how-to-do.html
INFORMATION SHEET 5.5.2
Learning Objective: to create spreads and chokes traps to avoid mis-registration.
Traps:
▪ When overlapping painted objects share a common colour, trapping may be unnecessary if the
colour that is common to both objects creates an automatic trap.

CBLM – Graphic Design (Student Guide) v.1 Dec 2018 169
Skills for Employment Investment Programme (SEIP)
▪ For example, if two overlapping objects contain cyan as part of their CMYK values, any gap
between them is covered by the cyan content of the object underneath.
▪ When artwork does contain common ink colours, overprinting does not occur on the shared plate.
There are two types of trap:
▪ A spread, in which a lighter object overlaps a darker background and seems to expand into the
background.
A choke, in which a lighter background overlaps a darker object that falls within the background
and seems to squeeze or reduce the object.
▪ You can create both spreads and chokes in the Adobe Illustrator program. It is generally best to
scale your graphic to its final size before adding a trap. Once you create a trap for an object, the
amount of trapping increases or decreases if you scale the object. For example, if you create a
graphic that has a 0.5-point trap and scale it to five times its original size, the result is a 2.5-point
trap for the enlarged graphic.
Trapping with tints:
▪ When trapping two light-coloured objects, the trap line may show through the darker of the two
colours, resulting in an unsightly dark border. For example, if you trap a light-yellow object into a
light blue object, a bright green border is visible where the trap is created.
▪ To prevent the trap line from showing through, you can specify a tint of the trapping colour (here,
the yellow colour) to create a more pleasing effect.
▪ Check with your print shop to find out what percentage of tint is most appropriate given the type
of press, inks, paper stock, and so on being used.
Trapping type:
▪ Trapping type can present special problems. Avoid applying mixed process colours or tints of
process colours to type at small point sizes, because any misregistration can make the text difficult
to read.
▪ Likewise, trapping type at small point sizes can result in hard-to-read type.
▪ As with tint reduction, check with your print shop before trapping such type.
Using the Trap command:
▪ The Trap command creates traps for simple objects by identifying the lighter artwork— whether
it’s the object or the background—and overprinting (trapping) it into the darker artwork.
▪ The Trap command is only available when you are working on CMYK documents.
Individual Activity:
▪ Save your artworks in .jpg and .png format.
▪ Apply them in a suitable web page and add the page to your portfolio.
▪ Share your work with class.
▪ Your trainer will guide to complete this activity.
SELF-CHECK QUIZ 5.5.2
Write correct answer for the following questions:
1. What is a trap?
2. What is a spread?
3. What is a choke?

CBLM – Graphic Design (Student Guide) v.1 Dec 2018 170
Skills for Employment Investment Programme (SEIP)
LEARNING ACTIVITY 5.5.3
Learning Activity Resources/Special Instructions/References
Define the overlapping and overprint of objects
▪ Information Sheet: 5.5.3 ▪ Self-Check Quiz: 5.5.3 ▪ Answer Key: 5.5.3
INFORMATION SHEET 5.5.3
Learning Objective: to define the overlapping and overprint of objects.
Overlapping and overprint of objects:
Here is how you can create overlapping of objects:
1. Select all of the shapes that are interacting.
2. Select the Shape Builder Tool (Shift-M).
3. Click and drag on the areas you wish to overlap. You will notice a mesh area like the one in the picture.
4. The end result will appear like this:
Overlapping and overprint of objects:
▪ Overprinting refers to the process of printing one colour on top of another in reprographics.
▪ This is closely linked to the reprographic technique of 'trapping'.
▪ Another use of overprinting is to create a rich black (often regarded as a colour that is "blacker
than black") by printing black over another dark colour.

CBLM – Graphic Design (Student Guide) v.1 Dec 2018 171
Skills for Employment Investment Programme (SEIP)
Individual Activity:
▪ Identify overlapping of object in design work. ▪ Check for overprinting possibilities. ▪ Share your work with class. ▪ Your trainer will guide to complete this activity.
SELF-CHECK QUIZ 5.5.3
Fill in the blanks on the following statements.
1. Overprinting refers to the __________ of printing one colour on top of another in reprographics.
2. Overprinting is closely linked to the reprographic technique of ____________.
LEARNING ACTIVITY 5.5.4
Learning Activity Resources/Special Instructions/References
Create a proof and check the separations ▪ Information Sheet: 5.5.4
INFORMATION SHEET 5.5.4
Learning Objective: to create a proof and check the separations.
Proof and check separation: ▪ Trainer will explain you the need of creating proof and check the separations before printing.
Individual Activity:
▪ Create proof. ▪ Check separations. ▪ Share your work with class. ▪ Your trainer will guide to complete this activity.
LEARNING ACTIVITY 5.5.5
Learning Activity Resources/Special Instructions/References
Complete any required editing and save the file
▪ Information Sheet: 5.5.5

CBLM – Graphic Design (Student Guide) v.1 Dec 2018 172
Skills for Employment Investment Programme (SEIP)
INFORMATION SHEET 5.5.5
Learning Objective: to complete any required editing and save the file.
Edit and save: ▪ Trainer will guide the you to edit the change requirement came out from proof reading and saving
the final updated file for print.
Individual Activity:
▪ Collect the changes required from proof reading. ▪ Make necessary changes. ▪ Save the final updated file. ▪ Share your work with class. ▪ Your trainer will guide to complete this activity.
LEARNING ACTIVITY 5.5.6
Learning Activity Resources/Special Instructions/References
Embed metadata tags to catalogue, organized and retrieved artwork
▪ Information Sheet: 5.5.6 ▪ Self-Check Quiz: 5.5.6 ▪ Answer Key: 5.5.6
https://www.youtube.com/watch?v=HoeB1O4o4sE
INFORMATION SHEET 5.5.6
Learning Objective: to Embed metadata tags to catalogue, organized and retrieved artwork.
Metadata tag:
▪ Metadata is a set of standardized information about a file, such as author name, resolution, colour space, copyright, and keywords applied to it.
▪ File information found in the Document Info panel provides general file information and object characteristics, as well as the number and names of graphic styles, custom colours, gradients, fonts, and placed art.
Document Info panel overview:
▪ Use the Document Info panel to see listings of general file information and object characteristics,
as well as the number and names of graphic styles, custom colours, patterns, gradients, fonts, and placed art.
✓ To display the panel, choose Window > Document Info.
✓ To view a different type of information, select an option from the panel menu: Document,
Objects, Graphic Styles, Brushes, Spot Colour Objects, Pattern Objects, Gradient Objects, Fonts, Linked Images, Embedded Images, and Font Details.

CBLM – Graphic Design (Student Guide) v.1 Dec 2018 173
Skills for Employment Investment Programme (SEIP)
✓ To view information on only the selected object, choose Selection Only from the panel menu. Leaving this option deselected lists information about the entire document.
✓ To save a copy of the file information as a text file, choose Save from the panel menu. Specify a name and location, and then click Save.
✓ To view artboard dimensions, click the Artboard tool, choose Document from the panel menu, and then click to select the artboard you want to view.
Individual Activity:
▪ Understand metadata. ▪ Watch a video clip and note key information from it. ▪ Video link: https://www.youtube.com/watch?v=HoeB1O4o4sE. ▪ Add metadata to own design file. ▪ Share your work with class. ▪ Your trainer will guide to complete this activity.
SELF-CHECK QUIZ 5.5.6
Write correct answer for the following question:
1. What is a metadata?
LEARNING ACTIVITY 5.5.7
Learning Activity Resources/Special Instructions/References
Select web-safe colours for cross-media publishing purposes
▪ Information Sheet: 5.5.7 ▪ Self-Check Quiz: 5.5.7 ▪ Answer Key: 5.5.7
https://www.w3schools.com/colors/colors_names.asp
INFORMATION SHEET 5.5.7
Learning Objective: to select web-safe colours for cross-media publishing purposes.
Web-safe colours for cross media publication:
Graphics created for web sites and interactive design will always be viewed on a computer screen. So, this means you will always be working with RGB colours for such requirements.
However, it's important to realize that every device has its own capabilities. Some devices and some computer monitors have the ability to display more RGB colours than others. Because of this, we have a concept in web design called Web-safe colours.
Web colours are colours used in displaying web pages, and the methods for describing and
specifying those colours. Colours may be specified as an RGB triplet or in hexadecimal format
(a hex triplet) or according to their common English names in some cases. A colour tool or
other graphics software is often used to generate colour values.
The HTML 4.01 specification, ratified in 1999, defines 16 named colours, as follows (names are
defined in this context to be case-insensitive):

CBLM – Graphic Design (Student Guide) v.1 Dec 2018 174
Skills for Employment Investment Programme (SEIP)
These 16 were labelled as sRGB and included in the HTML 3.0 specification, which noted they were "the standard 16 colours supported with the Windows VGA palette.
Individual Activity:
▪ Determine if cross media output requires. ▪ If yes select Web safe colours for output. ▪ Share your work with class. ▪ Your trainer will guide to complete this activity.
SELF-CHECK QUIZ 5.5.4
Mark true or false for the following statements:
1. For web related design always consider design with RGB colors.
2. Web colors are colors used in displaying web pages.
3. Web colors are the standard 16 colors supported with the Windows VGA palette.

CBLM – Graphic Design (Student Guide) v.1 Dec 2018 175
Skills for Employment Investment Programme (SEIP)
LEARNING ACTIVITY 5.5.8
Learning Activity Resources/Special Instructions/References
Choose file formats to best represent artwork
▪ Information Sheet: 5.5.8
INFORMATION SHEET 5.5.8
Learning Objective: to choose file formats to best represent artwork.
Appropriate file format:
▪ Trainer will explain choosing the format of design work. ▪ Judge your design work with client requirement and select appropriate file format for your work. ▪ Save your work with the chosen file format.
Individual Activity:
▪ Judge your design work with client requirement. ▪ Choose appropriate file format for your work. ▪ Save your work with the chosen file format. ▪ Share your work with class. ▪ Your trainer will guide to complete this activity.
LEARNING ACTIVITY 5.5.9
Learning Activity Resources/Special Instructions/References
Link objects to create an image map that meets design requirements
▪ Information Sheet: 5.5.9 ▪ Self-Check Quiz: 5.5.9 ▪ Answer Key: 5.5.9
https://www.image-map.net/
https://helpx.adobe.com/illustrator/using/slices-image-maps.html
INFORMATION SHEET 5.5.9
Learning Objective: to link objects to create an image map that meets design requirements.
Image map:
▪ An imagemap is a graphic image where a user can click on different parts of the image and be directed to different destinations. imagemaps are made by defining each of the hot areas in terms of their x and y coordinates (relative to the top left-hand corner). With each set of coordinates, you specify a link that users will be directed to when they click within the area.

CBLM – Graphic Design (Student Guide) v.1 Dec 2018 176
Skills for Employment Investment Programme (SEIP)
▪ Image maps enable you to link one or more areas of an image — called hotspots — to a URL. When a user clicks on the hotspot, the web browser loads the linked file.
Steps to create Image Map:
▪ Select the object that you want to link to a URL. ▪ In the Attributes panel, select a shape for the image map from the Image Map menu. ▪ Enter a relative or full URL in the URL text box or select from the list of available URLs’. ▪ You can verify the URL location by clicking the Browser button.
Individual Activity:
▪ Identify objects those are used in design work. ▪ Link the objects. ▪ Create image map of your design work. ▪ Share your work with class. ▪ Your trainer will guide to complete this activity.
SELF-CHECK QUIZ 5.5.9
Write correct answer for the following question:
1. Write short note on Image Map.
LEARNING ACTIVITY 5.5.10
Learning Activity Resources/Special Instructions/References
Layer objects to create animation frames and exported for animation set up
▪ Information Sheet: 5.5.10 ▪ Self-Check Quiz: 5.5.10 ▪ Answer Key: 5.5.10
https://blog.hubspot.com/marketing/how-to-create-animated-gif-quick-tip-ht
INFORMATION SHEET 5.5.10
Learning Objective: to layer objects to create animation frames and exported for animation set up.
Animation frame: ▪ Photoshop CC gives you option to create GIF animation of layers. Just follow the following steps:
i. Upload your images to Photoshop.
ii. Open up the Timeline window.
iii. In the Timeline window, click "Create Frame Animation".
iv. Create a new layer for each new frame.
v. Open the same menu icon on the right and choose "Make Frames from Layers".
vi. Under each frame, select how long it should appear for before switching to the next frame.
vii. At the bottom of the toolbar, select how many times you'd like it to loop.

CBLM – Graphic Design (Student Guide) v.1 Dec 2018 177
Skills for Employment Investment Programme (SEIP)
viii. Preview your GIF by pressing the play icon.
ix. Save and Export Your GIF.
For more details instructions and examples you may visit the reference link.
Individual Activity:
▪ Create animation.
▪ Export it and create animated graphics.
▪ Share your work with class.
▪ Your trainer will guide to complete this activity.
SELF-CHECK QUIZ 5.5.10
Fill in the blanks on the following statement.
1. Photoshop CC gives you option to create ____________________ graphics.
LEARNING ACTIVITY 5.5.11
Learning Activity Resources/Special Instructions/References
Select compression options that keep the image quality high and the file size low
▪ Information Sheet: 5.5.11 ▪ Self-Check Quiz: 5.5.11 ▪ Answer Key: 5.5.11
INFORMATION SHEET 5.5.11
Learning Objective: to select compression options that keep the image quality high and the file size low.
Compression Options: ▪ When you save an Illustrator file as a PDF file, you can compress text and line art, and compress
and downsample bitmap images. Depending on the settings you choose, compression and downsampling can significantly reduce the size of a PDF file with little or no loss of detail and precision.
▪ The Compression area of the Adobe PDF Options dialog box contains three sections. Each section provides the following options for compressing and resampling colour, grayscale, or monochrome images.
✓ Compression (Downsampling): If you plan to use the PDF file on the web, then use downsampling to allow for higher compression. If you plan to print the PDF file at high resolution, then don't use downsampling. Deselect the option to disable all downsampling options.
✓ Compression (Compression): Determines the type of compression used. The Automatic option automatically sets the best possible compression and quality for the artwork contained in the file. For most files, this option produces satisfactory results. Use Automatic (JPEG) if you need the greatest compatibility. Use Automatic (JPEG2000) for superior compression.
✓ Compression (Image Quality): Determines the amount of compression that is applied. The available options depend on the compression method. For JPEG compression, Illustrator

CBLM – Graphic Design (Student Guide) v.1 Dec 2018 178
Skills for Employment Investment Programme (SEIP)
provides Minimum, Low, Medium, High, and Maximum Quality options. For ZIP compression, Illustrator provides 4-bit and 8-bit Quality options. If you use 4-bit ZIP compression with 4-bit images, or 8-bit ZIP compression with 4-bit or 8-bit images, the ZIP method is lossless. That is, data is not removed to reduce file size, so image quality is not affected. Using 4-bit ZIP compression with 8-bit data can affect the quality, however, because data is lost.
▪ Tile Size option: The Title Size option is only enabled when the compression setting is JPEG2000. This option determines the size of the tiles for progressive display.
▪ Compress Text and Line Art option: The Compress Text and Line Art option applies ZIP compression to all text and line art in the file. This option results in no loss of detail or quality.
▪ Fonts option: The Subset Embedded Fonts When Percent of Characters Used Is Less Than [x]option specifies when to embed the entire font (as opposed to just the characters used in the document) based on how many of the font's characters are used in the document. For example, if a font contains 1,000 characters but the document only uses 10 of those characters, you could decide that embedding the font isn't worth the extra file size.
Individual Activity:
▪ Apply compression options. ▪ Check image quality and file size. ▪ Share your work with class. ▪ Your trainer will guide to complete this activity.
SELF-CHECK QUIZ 5.5.11
Fill in the blanks on the following statements:
1. When you save an Illustrator file as a PDF file, you can ___________ text and line art and compress and ________________ bitmap images.
2. If you plan to use the PDF file on the web, then use __________________ to allow for higher compression.
3. The _____________ option automatically sets the best possible compression and __________ for the artwork contained in the file.
4. ________ ___________ option determines the amount of compression that is applied.
5. _______ _______option determines the size of the tiles for progressive display.
LEARNING ACTIVITY 5.5.12
Learning Activity Resources/Special Instructions/References
Set export options to the best settings for the final media and save and export the file
▪ Information Sheet: 5.5. 12 ▪ Self-Check Quiz: 5.5. 12 ▪ Answer Key: 5.5. 12
photoshop/?doing_wp_cron=1535349890.3634090423583984375000

CBLM – Graphic Design (Student Guide) v.1 Dec 2018 179
Skills for Employment Investment Programme (SEIP)
INFORMATION SHEET 5.5.12
Learning Objective: to export layered file to image editing program and edit.
Export options:
▪ Go File > Export and choose Photoshop (psd) for the Format option, to bring up the Photoshop Export Option dialog.
▪ Here you can change the Resolution, Colour Profile, Layer Options, Text Edibility, and so on. ▪ One thing to note is that your Document Colour Mode has to match the Colour Model in the
export options for the ability to Write Layers.
▪ Trainer will guide you to apply export options to the best settings for the final media and the process to save the file and export it
Individual Activity:
▪ Check export options. ▪ Select final media. ▪ Select file type to save. ▪ Export the media. ▪ Make your design’s image quality high with low file size. ▪ Share your work with class. ▪ Your trainer will guide to complete this activity.
SELF-CHECK QUIZ 5.5.12
Write correct answer for the following question:
1. How will you access to export options?

CBLM – Graphic Design (Student Guide) v.1 Dec 2018 180
Skills for Employment Investment Programme (SEIP)
LEARNING ACTIVITY 5.5.13
Learning Activity Resources/Special Instructions/References
Print final media ▪ Information Sheet: 5.5.13 ▪ Self-Check Quiz: 5.5.13 ▪ Answer Key: 5.5.13
http://vectips.com/tips/export-illustrator-files-to-photoshop/
INFORMATION SHEET 5.5.13
Learning Objective: to print final media.
The Printing Process
▪ There is a lot to learn when it comes to designing for print. A print designer deals with a whole different set of questions and issues than a web designer. It is important to understand the various terms that relate to the printing process and to choose the appropriate printing method and printer for a job.
Designing for Print Vs. The Web
▪ Designing for print media versus designing for the web can be a completely different experience. To better understand these differences, the two can be compared in major topic areas: types of media, audience, layout, colour, technology and careers. Remember we’re looking at the graphic design side of web design, not the technical side. More »
Printing Process - Digital Printing
(Bob Peterson/Getty Images)

CBLM – Graphic Design (Student Guide) v.1 Dec 2018 181
Skills for Employment Investment Programme (SEIP)
▪ Modern printing methods such as laser and ink-jet printing are known as digital printing. In digital printing, an image is sent directly to the printer using digital files such as PDFs and those from graphics software such as Illustrator and InDesign. More »
Printing Process - Offset Lithography
(Justin Sullivan/Staff/Getty Images)
▪ Offset lithography is a printing process used for printing on a flat surface using printing plates. An image is transferred to a printing plate, which can be made of a variety of materials such as metal or paper. The plate is then chemically treated so that only image areas (such as type, colours, shapes and other elements) will accept ink.More »
Preparing Your Document Layout for Printing
(Arno Masse/Getty Images)
▪ When preparing a document to send to a printer, there are several specifications and elements to include in your layout. These specs help to ensure that the printer will provide your final project as intended. Information on trim marks, trimmed page size, bleed, and margin or safety are included in this article on preparing your document for the printing process.

CBLM – Graphic Design (Student Guide) v.1 Dec 2018 182
Skills for Employment Investment Programme (SEIP)
Using Swatches to Insure Desired Colour Results in Printing
▪ When designing for print, a common issue that has to be dealt with is the difference between the
colour on your computer display and on paper. Even if your monitor is calibrated correctly and you
match them as best as possible, your client’s will not be, and so a third “version” of the colour
comes into play.
▪ If you then print proofs for your client on any printer other than the one that will be used for the
final job (which is often the case), more colours join the mix that won’t match the final piece.
About the CMYK Colour Model
(Quark67/Wikimedia Commons/CC BY-SA 2.5)
The CMYK colour model is used in the printing process. To understand it, it is best to start with RGB
colour. The RGB colour model (made up of red, green and blue) is used in your computer monitor and is
what you will view your projects in while still on screen. These colours, however, can only be viewed with
natural or produced light, such as in the computer monitor, and not on a printed page. This is where CMYK
comes in.

CBLM – Graphic Design (Student Guide) v.1 Dec 2018 183
Skills for Employment Investment Programme (SEIP)
Colour Separation
Colour separation is the process by which original artwork is separated into individual colour
components for printing. The components are cyan, magenta, yellow and black, known as CMYK. By
combining these colours, a wide spectrum of colours can be produced on the printed page. In this
four-color printing process, each colour is applied to a printing plate. More »
Online Printer - 4over4.Com
(4OVER4.com)
Over 4, named for their 4-color two-sided printing, provides quality, low-price print services including business cards and die-cutting. They accept PDF, EPS, JPEG and TIFF formats as well as Quark, InDesign, Photoshop and Illustrator files. Your jobs are made a little bit easier with their collection of templates.

CBLM – Graphic Design (Student Guide) v.1 Dec 2018 184
Skills for Employment Investment Programme (SEIP)
▪ Online Printer - PsPrint.Com
(PsPrint.com)
▪ PsPrint.com is an online print shop that offers a long list of products at affordable prices, along with several paper options, same day service, and a large collection of design templates. More »
Sending Files to Your Service Bureau
(picjumbo.com/pexels.com/CC0)
▪ When you send a digital file out for film or printing more goes along than just your PageMaker or QuarkXPress document. You may need to send fonts and graphics too.
▪ Requirements differ from one printer to another but if you know the basics for sending files to your printer it will eliminate most common problems that might prevent from processing your job correctly.
Individual Activity:
▪ Send the media to printing press. ▪ Get the final product printed. ▪ Share your work with class. ▪ Your trainer will guide to complete this activity.
SELF-CHECK QUIZ 5.5.13
Fill in the blanks on the following statements:
1. A _______ ________deals with a whole different set of questions and issues than a web designer.

CBLM – Graphic Design (Student Guide) v.1 Dec 2018 185
Skills for Employment Investment Programme (SEIP)
2. In digital printing, an image is sent directly to the printer using _________ files such as PDFs
3. When designing for print, a common issue that has to be dealt with is the ________________ between the color on your computer display and on ________.
4. The __________ color model is used in the printing process.
5. Color separation components are ________, _________, ________ and ________.

CBLM – Graphic Design (Student Guide) v.1 Dec 2018 186
Skills for Employment Investment Programme (SEIP)
REVIEW OF COMPETENCY
Final Checklist
(for the performance criteria of the module Performing Distempering)
Performance Criteria Yes No
1. Graphics application and files are opened, and design brief requirements are confirmed.
2. Graphics are repeated efficiently using a symbol or stamp to reduce file size.
3. Slices are created from objects, layers or groups and updated as required.
4. Image quality is checked and adjusted where necessary.
5. File size is checked and adjusted where necessary.
6. Tasks are automated and where necessary scripts are used for automation.
7. Manipulation and editing of objects and text are made according to design brief.
8. Repetition tools are identified and used to create duplicates and manipulated as a group.
9. Complex shapes are created and edited.
10. Bitmap images are embedded and/or linked in the file.
11. Placed Bitmaps are modified and/or duplicated according to design requirements.
12. Bitmaps are masked and/or an opacity mask is added.
13. Layered file is exported to image editing program and edited.
14. The correct format for the color separation is determined by the requirements of the pre-press workflow system.
15. Command is set to correct preferences for print quality and process.
16. Based on printer feedback, the color separation options are set according to print requirements of the design brief.
17. Process and spot colors are combined as require.
18. A screen frequency value appropriate for the print quality is selected and color separation preferences are saved.
19. Spreads and chokes traps are created to avoid mis-registration.
20. The overlapping and overprint of objects are defined.
21. A proof is created, and the separations checked.
22. Any required editing is completed, and the file is saved,
23. Metadata tags are embedded to catalogue, organized and retrieved artwork.
24. For cross-media publishing purposes, web-safe colors are selected.
25. File formats are chosen to best represent artwork.
26. Objects are linked to create an image map that meets design requirements.
27. Objects are layered to create animation frames and exported for animation set up.

CBLM – Graphic Design (Student Guide) v.1 Dec 2018 187
Skills for Employment Investment Programme (SEIP)
28. Compression options are selected that keep the image quality high and the file size low.
29. Export options are set to the best settings for the final media and the file is saved and exported.
30. Final media is printed.
Now I feel ready to undertake my formal competency assessment.
Signed: _________________________
Date: _________________________

CBLM – Graphic Design (Student Guide) v.1 Dec 2018 188
Skills for Employment Investment Programme (SEIP)
ANSWER KEYS
ANSWER KEY 5.1.1
1. True
ANSWER KEY 5.1.2
1. A symbol is an art object that you can reuse in a document. Each symbol instance is linked to the symbol in the Symbols panel or to a symbols library. Using symbols can save you time and greatly reduce file size.
2. Stump tool is one of the duplication tool in Photoshop. This is applied to reduce file size keeping the quality of the design works.
ANSWER KEY 5.1.3
1. Illustrator, web 2. Regenerates
ANSWER KEY 5.1.4
1. 0.125 in 2. 200 3. 75 4. 227.5 inches 5. Vector, compressions
ANSWER KEY 5.1.5
1. True 2. False 3. True
ANSWER KEY 5.1.6
1. True 2. True 3. True 4. True
ANSWER KEY 5.2.2
1. Symbol, stamp tool
ANSWER KEY 5.2.3
1. Most shapes occurring in the physical world are complex. Complex shapes combine parts or all of simple shapes.
ANSWER KEY 5.3.1
1. True 2. True 3. True
CBLM – Graphic Design (Student Guide) v.1 Dec 2018 189
Skills for Employment Investment Programme (SEIP)
ANSWER KEY 5.3.4
1. File > Export
ANSWER KEY 5.3.3
1. Good, clean, functional 2. Mock-ups 3. Ctrl+Alt+Shift+N
ANSWER KEY 5.5.1
1. True 2. False 3. True 4. True
ANSWER KEY 5.5.2
1. When overlapping painted objects share a common colour, trapping may be unnecessary if the colour that is common to both objects creates an automatic trap.
2. A spread, in which a lighter object overlaps a darker background and seems to expand into the background.
3. A choke, in which a lighter background overlaps a darker object that falls within the background and seems to squeeze or reduce the object
ANSWER KEY 5.5.3
1. Process 2. Trapping
ANSWER KEY 5.5.6
1. Metadata is a set of standardized information about a file, such as author name, resolution, colour space, copyright, and keywords applied to it.
ANSWER KEY 5.5.7
1. True 2. True 3. True
ANSWER KEY 5.5.9
1. An imagemap is a graphic image where a user can click on different parts of the image and be directed to different destinations. imagemaps are made by defining each of the hot areas in terms of their x and y coordinates (relative to the top left-hand corner).
ANSWER KEY 5.5.10
1. GIF animation
ANSWER KEY 5.5.11
1. Compress, downsample 2. Downsampling 3. Automatic, quality 4. Image quality 5. Tile size

CBLM – Graphic Design (Student Guide) v.1 Dec 2018 190
Skills for Employment Investment Programme (SEIP)
ANSWER KEY 5.5.12
1. File > Export
ANSWER KEY 5.5.13
1. Print designer 2. Digital 3. Difference, paper 4. Cmyk 5. Cyan, magenta, yellow, black