Ventilation, passive cooling, ventilation strategies, wind tower, venturi effect, stack effect
Upload
khangminh22Category
view
1download
0
1 of 10 Revision: 031016
Skill Sheet 15.3.3
Ventilation
Instructor Reference Materials
The Connecticut Fire Academy
Recruit Firefighter Program
Practical Skill Training
Roof Sector Operations Common FD procedures state:
“Adequate-size ventilation holes must be cut and opened if ventilation is to be successful. Ventilation
hole(s) of at least 10% of roof surface of the involved area is a rule of thumb to consider.”
“When you cut a hole in a roof, cut a big one.”
“Vertical ventilation, as close to directly over the fire as possible, is the most effective form of
ventilation in working interior fire situations.”
Initial and ongoing size-up The size-up of the structur0e should take into account the following critical fireground factors:
The Building:
o Consider the size and the layout of the structure (small, medium or large; one story or two, etc.).
o Estimate the age of the building in order to predict basic construction features.
o Is the structure lightweight or conventional construction?
o What are the interior arrangements?
o Where is the garage?
o Does the structure have open vaulted ceilings?
o Does it have a middle hallway?
o What type of roof does the building have and how will the construction of this roof affect
ventilation.
o Finally, does the building exhibit features that will prevent vertical ventilation?
The Fire:
o What’s burning?
Is it a contents fire or is it structural?
o For command size-up, all fires should be assumed structural until confirmed by crews that the fire
has not extended.
o Estimate what percentage of the structure is involved in fire—5%, 15%, 25%?
o Where is the fire traveling and how will ventilation assist in slowing the extension?
o What is the stage of the fire and where are the initial engine company’s handlines positioned?
o Ventilation should not be attempted for first-floor fires in a multi-story structure, fires that have
extended well beyond the room of origin and/or advanced “structure” fires.
Life Hazards:
o What is rescue profile and survivability of any occupants?
o Where are they located, how many people and what is their condition, if known?
Type of Occupancy:
o What is the fire load of the occupancy?
o Are there any special hazards (e.g., hazardous and/or flammable/combustible contents) that crews
need to be aware of?
Exterior Arrangements:
o Are all four sides of the exterior accessible?
o Are there any exposures or barriers for apparatus positioning?
Will we need to work from Ground Ladders?
Fireground Actions:
o What is the status of the operation when the ventilation is assigned?
o Where has the initial engine companies been deployed?
o To coordinate ventilation, the interior crew should use a UCAN (unit/assignment-conditions-
actions-needs) report to advise command of their location, their actions and what they need.
Once the ceiling is punched through, the heat and gases begin to rise and the engine crew can
begin to put water on the fire.

2 of 10 Revision: 031016
Skill Sheet 15.3.3
Ventilation
Instructor Reference Materials
The Connecticut Fire Academy
Recruit Firefighter Program
Practical Skill Training
Venting Operations
Once the initial size-up has been completed, the company will determine a safe working surface on
the roof by sounding it with a flat-head axe or a pike pole. Factors to consider include the location and
movement of the fire, whether the fire has extended to the attic, the effect the fire has had on the roof, and
whether there are any dead loads affecting the roof structure.
The next steps happen in quick succession.
Complete an adequately sized ventilation opening to achieve effective ventilation. Note: crews should
attempt to cut at least a 4 x 4 or 4 x 8 hole
o Consider:
Ventilation opening size (currently, we aim for 10% of the involved space)
The smoke volume, speed and pressure
Wind direction, speed and effects on ventilation
Ventilation completed toward the top of pitched roofs
Coordinate roof ventilation with interior crews
o Roof and interior crews should communicate about the fire’s location.
o Interior crews should communicate the effect ventilation has on interior conditions.
o Interior and roof crews should then assess the need for additional ventilation.
Coordinate roof and fire control operations as directed by command.
o Handlines may be used for exposure protection.
o During offensive attack, handlines should not be operated into a ventilation hole.
Maintain rooftop monitoring of the structure and fire conditions. (Note: In some cases, this can be
done from the ground. If it’s not necessary for you to be on the roof, get down.)
o Monitor the ventilation opening.
You will likely see fire as the smoke vents (rich, heated smoke mixes with O2 upon exiting,
and immediately ignites), but this doesn’t necessarily mean conditions are deteriorating.
If fire continues to exit through the hole, command must immediately check on the status of
interior crews to determine if they’ve been able to put water on the fire.
o Watch for deteriorating structural conditions of the roof.
Communicate progress reports to command, including information on:
o Roof conditions
o Ventilation status (smoke vs. fire)
o Improving vs. deteriorating conditions
Saw Operating Team
The firefighter who operates the saw (Operator) will be assisted and/or guided by another member.
A physical communication system between the Guide Man and the Operator will be as follows:
One slap on the back of Operator ........................Stop Cut.
Two slaps on the back of Operator ......................Cut.
Three slaps on the back of Operator ....................Shut Down Saw.

3 of 10 Revision: 031016
Skill Sheet 15.3.3
Ventilation
Instructor Reference Materials
The Connecticut Fire Academy
Recruit Firefighter Program
Practical Skill Training
FLAT ROOF VENTIALTION OPERATIONS DANIEL M. TROXELL, FIRE ENGINEERING 8/2010
Roof operations are among the most important yet sometimes overlooked fireground functions. The
actions of the members operating on the roof can make or break the success of a working fire incident at a
flat-roof structure
Flat roofs are common on commercial structures in most areas. However, in older urban areas, flat roofs
are also often found on private and multifamily dwellings of ordinary construction, because flat roofs
were easier and cheaper to construct on these structures. In some urban areas, residential & multifamily
dwellings are ordinary construction row structures, built between 1900 and World War II. Its important
for firefighter to be familiar with the various types and features of the roofs found in their communities.
VENTILATION
Flat-roof ventilation can be divided into primary and secondary operations. Primary flat-roof operations
(tasks that can be quickly performed) involve the venting (opening) of existing roof structures such as
scuttle hatches, stairway bulkhead doors, skylights, ventilators, top-floor windows, elevator penthouses,
and other openings. Secondary flat-roof operations involve cutting holes and trench cuts in the roof to
prevent or halt the spread of fire in the cockloft.
Primary ventilation operations are conducted during the initial stages of a fireground operation. These
operations are designed to immediately relieve interior crews from smoke and heat and to obtain valuable
information for the fireground commander and the other operating units.
Secondary Flat-Roof ventilation operations is time consuming to complete and should be initiated
immediately after or simultaneously to the Primary Ventilation Operations.
Bring the proper equipment, including at a minimum a roof hook, a halligan bar, an ax, rope and a roof
saw.
ROOF ACCESS
For roof access, most departments primarily use the aerial ladder if it
is not needed for any obvious rescues. Proper aerial ladder placement
is key to safe roof access. If possible, place the aerial ladder to the
roof of an attached exposure. Placement should limit the ladder’s
exposure to fire or heat from any fire building windows venting and
will give the members on the roof a safe means of egress from the
roof.
If it is not possible to place the ladder on an exposure building, try to
place it in a position that is not directly over a window or line of
windows to prevent exposing the ladder if flames erupt from the
windows below. In addition, be sure to extend the ladder at least four
or five rungs above the roof or parapet level. This will make it much
easier for members to get on and off the ladder and will also make it
easier to find the ladder in low-visibility conditions.
Other methods are available to access a roof, depending on the
structure’s type and location. For row-type structures, you may
access the roof using the interior stairway of one of the attached
exposures or that of one of the adjacent exposures if you suspect that
fire has already spread to the cockloft. If accessible, these stairs can
provide a safe and rapid means of accessing the fire building roof if
the exposure roof is the same or almost the same height.

4 of 10 Revision: 031016
Skill Sheet 15.3.3
Ventilation
Instructor Reference Materials
The Connecticut Fire Academy
Recruit Firefighter Program
Practical Skill Training
It is not usually a good idea to access the roof by the interior stairs of
the fire building. If the stairway is not enclosed or if the fire floor
door is open, the stairway conditions may be untenable or become so
as the fire progresses, thus preventing the use of the stairs as a means
of egress from the roof. You may use fire escapes on the fire
building or an attached exposure if present. Fire escapes can often be
found on older multifamily occupancies of Type III ordinary
construction.
ROOF SIZE-UP
Once you have accessed the roof, you must consider several issues. Before dismounting the aerial ladder,
conduct a quick roof size-up. Note the location of any hazards such as open shafts or holes; trip hazards
such as antenna guy wires, electrical, and cable wires; and security devices such as barbed or razor wire.
If the aerial is placed to a parapet, always check for the location of the actual roof level, especially when
operating under low-visibility conditions. There could be a significant drop of five feet or more to the
actual roof deck. Use a hook to probe for the actual location of the roof deck under low-visibility
conditions.
After confirming the location of the roof deck, be sure to sound the roof for sturdiness before placing your
full weight on it. When traversing a roof, avoid walking in the middle of it; walk near the edges—they are
stronger. Note any patched or tarred-over areas on the roof deck; these may be covered-over skylights or
other shaft openings and may not be strong enough to support a firefighter’s weight.
Once the roof firefighter gets on the roof, he must confirm his secondary way off and get his bearings. If
you stand with your back to the front wall, you are usually looking at the building the same way the
incident commander is, so you know your exposures will be the same. If you become briefly disoriented
you know the front wall is behind you and where your exit is. Use caution, because the front walls usually
line up and the rear walls vary in depth due to the building construction. So if you have to go to the
adjoining building, cross over in the front where they are aligned to avoiding falling into a shaft, which is
generally located toward the rear.
In addition, when operating on a row structure roof under low-
visibility conditions, always cross over from an exposure roof at
the front of the building. Row building fronts are usually inline,
but the roof lengths may be uneven in the rear because of
different building lengths or open air and light shafts. An
unsuspecting firefighter may walk off the roof and fall.
As a rule of thumb, if you can’t see while operating on a roof,
CRAWL!
The roof firefighter should then do a perimeter search of the building looking for any victims or signs of
fire and observe conditions on the roof. Roof conditions include, visible fire, heavy smoke, melting tar,
melting snow or steaming water, roof sagging, smoldering, or a hoseline hitting the roof boards below.

5 of 10 Revision: 031016
Skill Sheet 15.3.3
Ventilation
Instructor Reference Materials
The Connecticut Fire Academy
Recruit Firefighter Program
Practical Skill Training
PRIMARY VENTILATION
Once you have accessed and sized up the roof, initiate primary roof operations immediately. The
following suggested sequence of operation will allow rapid vertical ventilation and a simultaneous check
of the conditions in the rear of the structure.
Open the Skylights
After sizing up and assessing the conditions, open any skylights
that may exist on the roof. Opening the skylights will often
provide immediate ventilation to the floors below, especially in
row dwellings, also known as row houses or row frames, as well
as brownstone-type dwellings. Open the larger skylights first,
since they are usually over a stairway or hallway. Do this by
breaking the glass, removing the individual glass panes from the
frames, or removing the entire unit from its frame. If breaking
out the glass, first notify the companies operating below by
portable radio or by first breaking out a small amount of glass. In
some situations, the skylights may be tarred or covered over. If
so, use the saw to quickly remove the material to provide an
opening.
After breaking out or removing the glass, probe the opening with
a hook to remove draft stops or other obstructions. Draft stops
are screens or additional panes of glass at the ceiling level on
some skylights. You must remove or break these out to provide
adequate ventilation through a skylight opening. Also open
smaller skylights, which are often above bathrooms in private
dwellings, if present. If there are no skylights, open the stairway
bulkhead door if present, or open the scuttle hatch to provide
initial ventilation.
Check the rear, the sides, the light wells, and shafts
It is extremely important that a member of the roof team check
the rear and sides of the building as soon as possible to locate
trapped occupants and determine the fire’s location and
conditions. One roof team member can do this as the other team
member is conducting initial ventilation. In addition, check vent
shafts and light wells, which often are present in older
multifamily occupancies. Immediately report any conditions
observed during these checks to the fireground commander; this
information is extremely important to the other members
operating on the fireground. Often, the conditions in the rear and
the exact location of the fire are not obvious from the front of the
building.
Occupants may be trapped at windows in the rear or at windows that open into light wells and shafts.
The roof team can quickly transmit this information to all members on the fireground using their
portable radios, thus allowing companies to quickly advance to the location of the fire or the trapped
occupants. Roof team members should also note any heavy mechanical equipment the roof is
supporting, which may pose a collapse hazard at a top-floor fire. Report these observations and any
other findings to the truck company officer and the fireground commander.

6 of 10 Revision: 031016
Skill Sheet 15.3.3
Ventilation
Instructor Reference Materials
The Connecticut Fire Academy
Recruit Firefighter Program
Practical Skill Training
Open the stairway bulkhead door. After checking the sides and rear, open and vent the stairway
bulkhead door, if present. The stairway bulkhead is a small
structure on the roof located at the point where an interior
stairway terminates at the roof level (photo 18). These are often
found on older multifamily dwellings and provide an excellent
ventilation point for the entire building, especially if the
stairways are unenclosed. The bulkhead doors usually open
outward and are often locked from the interior. Usually, you
must force these doors using conventional forcible entry
operations (halligan bar and ax) or the chisel end of a roof hook.
After forcing the doors, chock them open or break off the door hinges to prevent the door from
closing. Many bulkheads also feature skylights or windows; if so, open them also to provide
additional ventilation. After completing the venting of the bulkhead, members should also search just
inside the doorway for any victims who may have been overcome after attempting to escape the fire
by the roof.
Open the scuttle hatches/covers. Scuttle hatches or covers can be found on many flat roof
buildings. On row houses, they may only provide access to the
cockloft area. On garden apartment buildings and some other
multifamily dwellings, they are usually locked from the interior
and may provide access to the top floor by a scuttle ladder. In
any case, they can provide an excellent means of ventilating the
public hallway/stairway on garden apartment buildings and the
top-floor public hallway on older multifamily dwellings. They
are usually not the best means for ventilating row house roofs,
since the opening at the top-floor ceiling may be offset from the
hatch opening and located in a closet, thus providing little
ventilation. It may be possible to reach down through the
cockloft and knock the door open with a hook. Exercise caution
in doing this, however, since fire may be behind the door.
Remember that if the fire is in the cockloft of a large building and the scuttle cover is not directly
above the fire location, it usually should not be opened; opening may spread the fire by drawing it to
the scuttle location.
You can force or remove scuttle hatches/covers using the halligan bar or either end of the roof hook.
Once removed, turn over scuttle hatch covers and leave them on the roof deck next to the opening to
alert others to the presence of the opening (photo 20).
Vent the top-floor windows If the fire is on the top floor, if there are heavy smoke conditions
on the upper floors, and autoexposure to soffits and other
overhangs above the windows is not an issue, you can often vent
the top-floor windows from the roof. There are several methods
for accomplishing this. Because there are usually no parapets, a
six-foot roof hook is often long enough to reach the windows in
the rear. When performing this operation on a roof that has no
parapet, members should lie prone on the roof surface and then
lean over the roof edge to reach the windows. This will reduce
the likelihood of the member’s falling. To exert force over a

7 of 10 Revision: 031016
Skill Sheet 15.3.3
Ventilation
Instructor Reference Materials
The Connecticut Fire Academy
Recruit Firefighter Program
Practical Skill Training
wide surface area, the flat side of the hook should be parallel to
the window surface when it makes contact with the glass.
In the front of the structure, the parapet may make it impossible
to reach the top-floor windows with a six-foot hook. An alternate
method is to use a halligan bar attached to a rope or webbing.
The rope or webbing can be attached to the fork end of the
halligan with a clove hitch and safety, or with metal clips if the
halligan has a loop welded at the fork end.
Venting the top-floor windows from the roof in this manner is
extremely important if the fire is on the top floor and is not yet
showing out of the windows. Venting the windows in the proper
location will allow the engine company to push the fire out of the
vented windows as it advances into the fire area and will reduce
the likelihood of heat and smoke banking back and down on the
members while they operate. Keep in mind that the early or
indiscriminate venting of windows may cause flashover,
backdraft, or wind-driven fire conditions on the interior, thus
endangering the attack crews. Therefore, when the engine
company is in position to begin attack, vent the windows closest
to the fire (i.e., the fire room) first, and then, working away from
the fire, vent additional windows as needed. As with all
horizontal ventilation operations, coordination and
communication with the fire attack crews is imperative. This
communication does not necessarily need to be verbal, however.
The sound or sight of water flowing from an attack line is
usually a good indication that it is OK to begin venting.
Check the cockloft After all venting operations have been completed, check the cockloft (i.e., the area between the top-
floor ceiling and the roof decking on a flat-roof building) for smoke conditions and fire extension.
You can do this through the scuttle hatch opening or by breaking out the “returns” in the skylight
opening, which are gypsum or plaster-and-lath walls that separate the skylight opening and the
cockloft .If the fire is on a lower floor and may be traveling in void spaces, you can also check the
cockloft by making inspection holes in the ceiling on the top floor near common pipe shafts or other
vertical chases.
If you find no fire in the cockloft, primary roof operations are complete, and members can move on to
other fireground operations. If you discover fire in the cockloft, members should prepare to
commence secondary roof operations.
SECONDARY VENTILATION
Once the fire area is determined, decide where to cut. This is usually about six feet in from the front wall
or over the fire area. It is better and safer to cut one hole and enlarge it then cut several smaller ones.
Avoid cutting the vent hole between your primary and secondary exits off the roof.
Cutting
When cutting a roof, observe the following guidelines:
Ensure the stability of the area before entering.
Establish two means of escape from the roof.
Determine the location for making the cut.
Determine the thicknesses of the roof deck and rafter run.
Plan your cut, and inform other members of its layout.

8 of 10 Revision: 031016
Skill Sheet 15.3.3
Ventilation
Instructor Reference Materials
The Connecticut Fire Academy
Recruit Firefighter Program
Practical Skill Training
Keep the wind at your back.
Establish a guide man with the saw man.
Do not step on your cuts or projected opening.
Pull the hole; push down the ceiling.
Enlarge the hole as needed.
Report observations to IC.
Determine the Type of Roof The first step in any roof operation: Determine the type of roof system that you’re going to operate on. Is
it an ordinary construction roof? Is it a lightweight steel roof with a membrane covering, or a roof with a
gypsum deck? It might be a rain roof, also called a built-up roof system.
These questions are best answered before you get to the fire, either because you’re familiar with the
building or because the department conducted an inspection and recorded building construction
information in the dispatch system. If no information is available prior to arrival at the scene, you can
determine the type of roof system through a size-up, and confirm your initial assessment with a roof-level
inspection.
The type of roof support system should dictate the type and duration of roof operations.
Gypsum: If you encounter a gypsum roof, discontinue all roof operations. A gypsum roof covering can
disguise damage to the support system from the fire below. This damage might not be evident or visible
from roof level. If you discover a gypsum roof decking system, advise the IC and all operating forces of
its presence. The IC should order firefighters to abandon their roof position and to cease all interior
operations.
So how do you determine whether you’re dealing with a gypsum roof? If you place a saw into the roofing
material and a white dust comes from the area of the cut, that indicates the presence of gypsum. If the
gypsum is denigrated by moisture, then the dust will be absent and a mud-like substance will appear in
the shroud of the saw. The saw will also cut through the roof system with little or no resistance. If this
happens (the saw experiences no resistance when cutting), inspect the area around the roof where the saw
blade made the cut, looking for wet, mud-like gypsum. If either dust or mud appears, indicating a gypsum
roof decking system, then evacuate the roof and notify command.
Lightweight Steel Bar Joist: If you discover a lightweight steel bar joist roofing system, first determine if
roof ventilation is possible. If ventilation is needed, open and vent skylights, scuttle covers and other
openings on the roof. If after doing this the fire conditions inside the building require the roof to be cut,
the building is most likely in the decay stages and members should not be committed to the roof; the IC
might have to reevaluate the offensive strategy. Note: Lightweight steel roofs have little to no fire-
resistive rating, so you must limit your time on the roof.
Membrane: A membrane roof can and will burn and, if exposed to fire, can become a big problem for
roof firefighters. Plus, a membrane roof system is very difficult to cut. The roof membrane will get into
the saw shroud and around the blade shaft, slowing down the saw and making it ineffective. One way to
address this issue: Carry a utility knife with the saw or in your turnout coat pocket. Determine where the
cut is to be made and, using the utility knife, cut a large square in the area to be cut. Using a tool, remove
the membrane before the roof is cut.
Rain: A rain roof or built-up roof is a roof structure that’s placed over an existing roof to control drainage.
The issue with this type of roof: You might cut the deck of the roof and see no indications of fire, heat or
smoke coming from the blade’s kerf. But the fire can still be impacting the original roof without showing
through the hole cut in the built-up roof structure. Once the fire does enough damage to the original
support system, a collapse might occur and could be catastrophic, especially if members are on the rain
roof.
9 of 10 Revision: 031016
Skill Sheet 15.3.3
Ventilation
Instructor Reference Materials
The Connecticut Fire Academy
Recruit Firefighter Program
Practical Skill Training
This happened in Sacramento, Calif., recently; fortunately, all three members operating on the roof made
it to the parapet wall before a full collapse occurred. Tip: If the radio reports from the roof or the interior
vary in their reported fire conditions, suspect a built-up roof. The structure might be hiding the fire’s
location. This is when a thermal imaging camera (TIC) can be extremely helpful; if possible, position one
camera on the roof and one under it.
The following “Diagnostic Methods” can be used to determine the type of roof construction and fire
conditions that exist below:
Inspection Hole – Triangle Hole
Kerf Cut – Smoke Indicator Hole
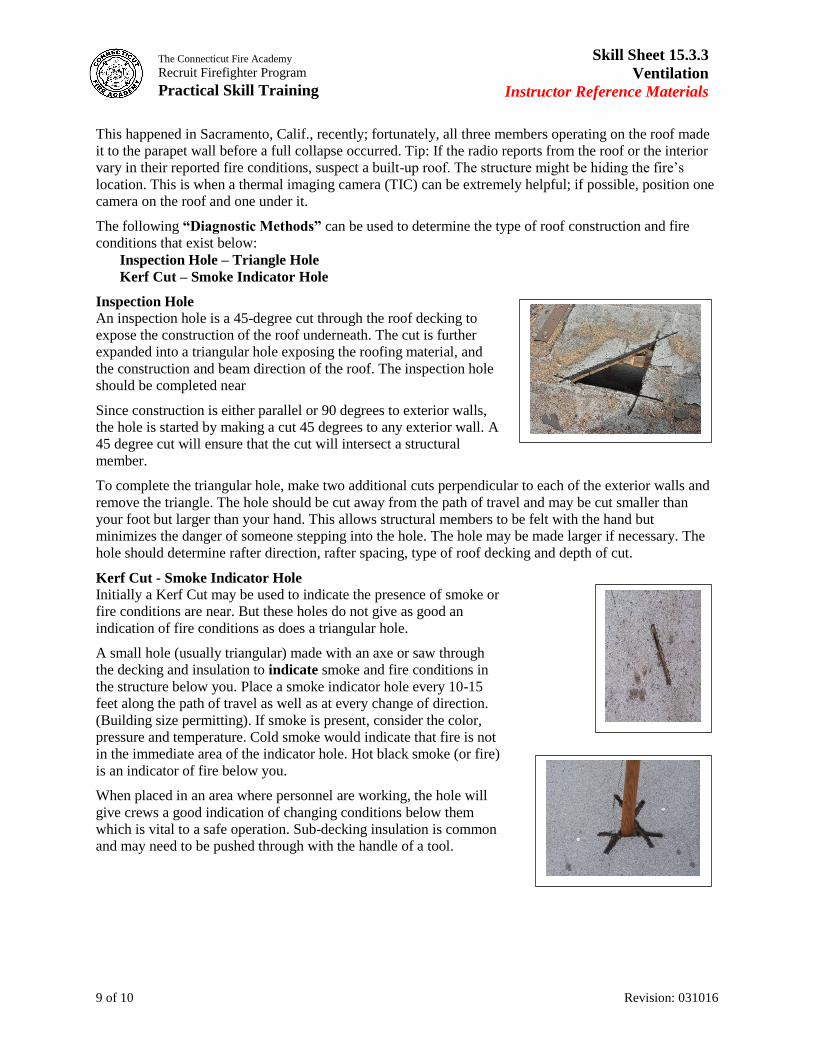
Inspection Hole
An inspection hole is a 45-degree cut through the roof decking to
expose the construction of the roof underneath. The cut is further
expanded into a triangular hole exposing the roofing material, and
the construction and beam direction of the roof. The inspection hole
should be completed near
Since construction is either parallel or 90 degrees to exterior walls,
the hole is started by making a cut 45 degrees to any exterior wall. A
45 degree cut will ensure that the cut will intersect a structural
member.
To complete the triangular hole, make two additional cuts perpendicular to each of the exterior walls and
remove the triangle. The hole should be cut away from the path of travel and may be cut smaller than
your foot but larger than your hand. This allows structural members to be felt with the hand but
minimizes the danger of someone stepping into the hole. The hole may be made larger if necessary. The
hole should determine rafter direction, rafter spacing, type of roof decking and depth of cut.
Kerf Cut - Smoke Indicator Hole
Initially a Kerf Cut may be used to indicate the presence of smoke or
fire conditions are near. But these holes do not give as good an
indication of fire conditions as does a triangular hole.
A small hole (usually triangular) made with an axe or saw through
the decking and insulation to indicate smoke and fire conditions in
the structure below you. Place a smoke indicator hole every 10-15
feet along the path of travel as well as at every change of direction.
(Building size permitting). If smoke is present, consider the color,
pressure and temperature. Cold smoke would indicate that fire is not
in the immediate area of the indicator hole. Hot black smoke (or fire)
is an indicator of fire below you.
When placed in an area where personnel are working, the hole will
give crews a good indication of changing conditions below them
which is vital to a safe operation. Sub-decking insulation is common
and may need to be pushed through with the handle of a tool.

10 of 10 Revision: 031016
Skill Sheet 15.3.3
Ventilation
Instructor Reference Materials
The Connecticut Fire Academy
Recruit Firefighter Program
Practical Skill Training
7-9-8 Vent Hole or Expandable Cut
When cutting your ventilation hole, a good technique to use is the
"798" cut. This is a 3-by-3-foot hole that can be quickly pulled and
extended to a 3-by-6-foot or 6-by-6-foot hole depending on fire
conditions. (see diagram) If fire condition is minor, the 3-by-3-foot
or 3-by-6-foot is all you will need, but for larger fires the 6-by-6 foot
is preferred.
This hole is considered an “Offensive” hose, meaning it is the
primary hole that is made on the roof and it is designed to remove
the heat and smoke so the engine companies below can make entry.
Depending on the size of the occupancy and the amount of fire
evolvement, it may be necessary to make several of these holes to
assist with the rapid removal of heat and smoke. Once this hole is
completed, the ventilation team should prepare to put in a
“Defensive” hole, strip or trench, to stop the horizontal movement of
the fire.
If fire vents while cutting or pulling the hole, you can use the roofing
material as a shield to protect members. You must always remember
to push the ceiling down below using a hook, roof board or even a
ladder if tin ceilings are encountered. And if fire is in the cockloft
prior to pushing down the ceiling, the incident commander must be
notified.
Trench Cut
If there is fire in the cockloft and a defensive operation is
needed, we can cut a trench. This is a time and manpower
consuming operation and most times fires are extinguished
by members pulling ceilings below and exposing fire for the
hoseline. But when we are going to go to a trench operation
we are giving up the building on the opposite side of the
trench and withdrawing all operating members. This tactic is
usually cut in larger H-type apartment buildings or
taxpayers. A trench is cut after the main ventilation hole is
cut and extended and inspection holes are made to monitor
extension in the cockloft. A trench is cut at least 20 feet from
the main vent hole and is cut from building wall to building
wall.
To start the trench cut, begin by cutting two
lines, three feet apart with cross cuts and
knockouts every three feet. It is important to
have inspection holes on both sides of the trench
to monitor fire conditions in the cockloft. The
trench should be cut in a narrow part of the
building like using the throat section in the H-
type, or incorporating a bulkhead structure or
firewall for less cutting.
Copyright © 2022 FDOKUMEN